Working with Recipes
Recipes are custom build steps based on one or multiple standard TeamCity steps. If TeamCity's built-in steps lack a needed option, and you frequently emulate it (for example, use a CLI step to upload artifacts via a cloud provider API), you can save this custom step as a reusable recipe.
Creating a recipe is a simpler alternative to developing a TeamCity plugin that implements a custom build step.
Key Takeaways
What are recipes?
Recipes are custom build steps made from default TeamCity build steps pre-set in the specific manner. Complex recipes can include other recipes as building blocks.
What's the point of a recipe?
Recipes allow you to wrap pre-customized TeamCity build steps into a new step that can be easily shared across build configurations.
What's the difference between recipes and meta-runners?
In version 2025.03, "meta-runners" were renamed to "recipes". While based on the same concept, recipes offer added benefits like YAML support and easy sharing on JetBrains Marketplace.
Can I continue use my existing meta-runners and TeamCity Meta-Runner Pack?
Yes, meta-runners are still functional under the new name and require no manual updates.
What are public recipes?
Public recipes are those shared at JetBrains Marketplace. These include both recipes hand-crafted by JetBrains and those shared by other TeamCity users.
Are public recipes safe?
All recipes published on JetBrains Marketplace are subjected to a manual verification by our employees. We recommend reviewing the recipe’s source code before installing it on your server. To access the source code, click the Source Code link on the recipe’s Marketplace page.
I want to create a recipe, what should I do?
Find an existing or create a new build configuration that performs an action you want to save as a custom build step, and extract a recipe using the configuration Actions menu in TeamCity UI. Doing so allows you to save an XML recipe. To create a YAML recipe, you need to write its definition from scratch. Inspect the source code for public Marketplace recipes and check out the Recipe YAML Syntax article to learn more.
How to use a recipe?
In the same way you utilize regular build steps: add them to the configuration's "Build steps" list.
Are recipes editable?
Yes, you do not need to re-configure a source configuration and re-extract a recipe every time you need to make a change. Private recipes can be edited on the Recipes page of project settings. Public recipes are authored by external parties and cannot be edited directly.
Extract a Recipe From a Build Configuration
The most straightforward way to create a new recipe is to extract it from an existing configuration that uses a required step or sequence of steps. For example, the Kotlin DSL example below shows a build configuration with two CLI build steps: one uses cURL to download a file, and the other runs ls to list the working directory contents.
To extract a recipe from an existing configuration:
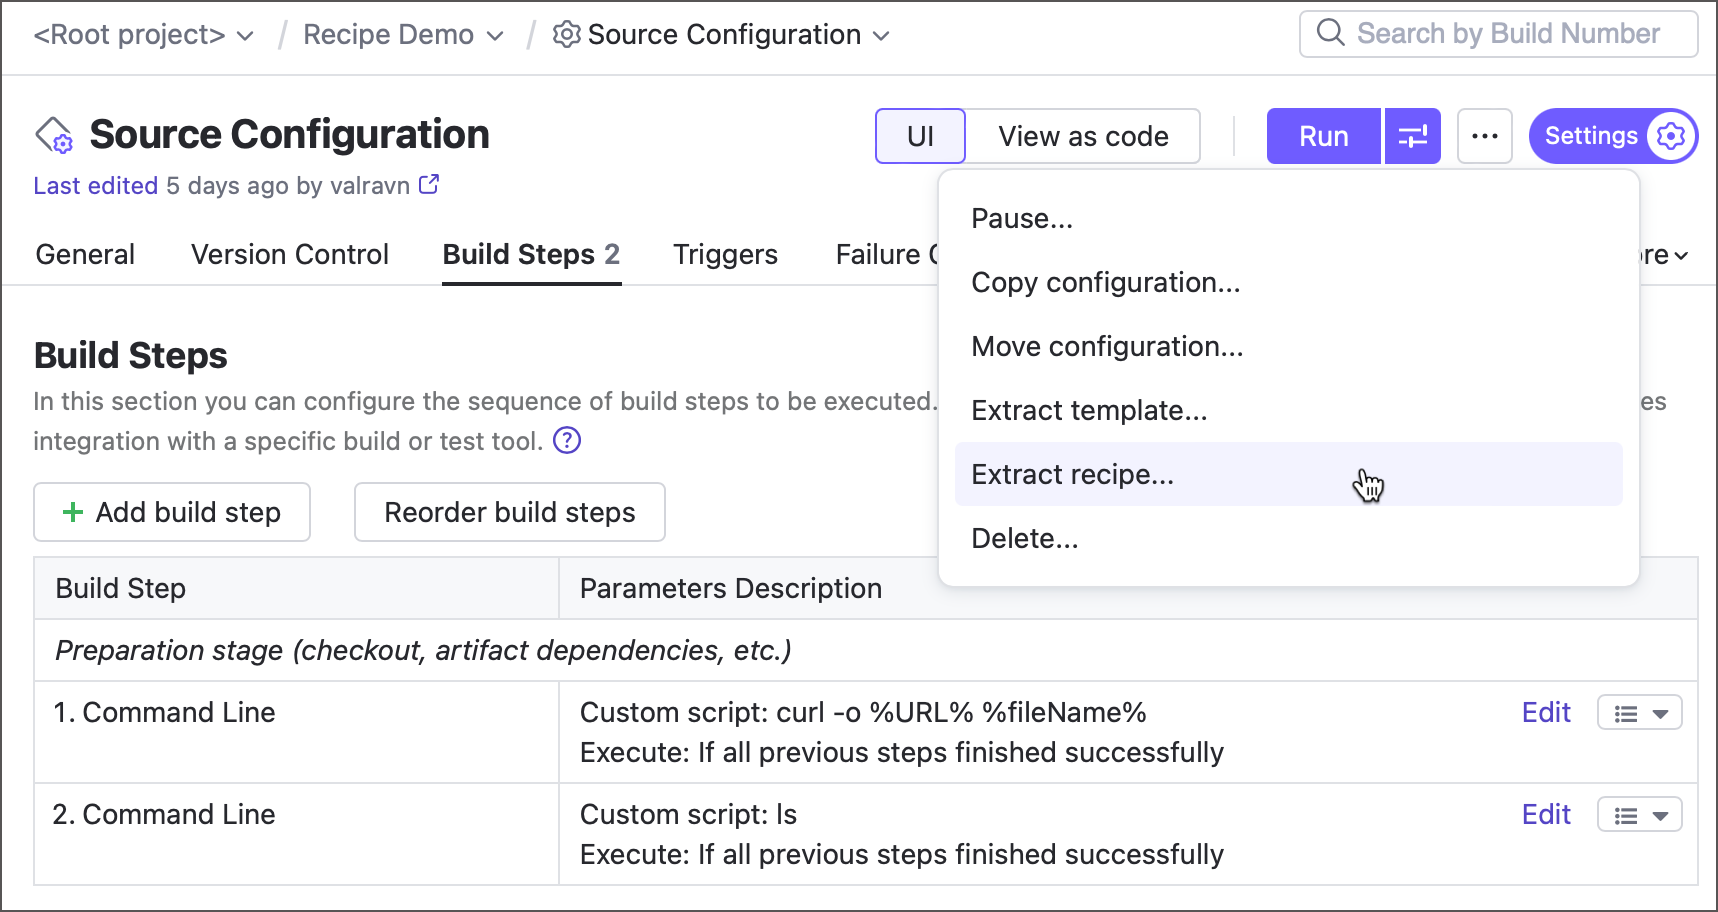
In configuration settings, invoke the Actions menu and click Extract recipe.

In the popup dialog, enter the recipe's internal ID, public name, and description. Recipes show these strings on the Add build step page.
Click Extract to create your new recipe. You recipe should look like the following:
<meta-runner name="cURL: File Download"> <description>A two-step recipe that utilizes the "curl -o %URL% %fileName%" command to download a file, and calls "ls" command to print the contents of a working directory afterwards</description> <settings> <parameters> <param name="URL" value="" spec="text description='The URL of a file to be downloaded' display='normal' label='Download URL:'"/> <param name="fileName" value="" spec="text description='Enter the saved file name or leave blank to keep the origin name' label='File name:'" /> <!--other parameters--> </parameters> <build-runners> <runner name="" type="simpleRunner"> <parameters> <param name="script.content" value="curl -o %URL% %fileName%" /> <param name="teamcity.step.mode" value="default" /> <param name="use.custom.script" value="true" /> </parameters> </runner> <runner name="" type="simpleRunner"> <parameters> <param name="script.content" value="ls" /> <param name="teamcity.step.mode" value="default" /> <param name="use.custom.script" value="true" /> </parameters> </runner> </build-runners> <requirements /> </settings> </meta-runner>
Recipes are saved to the <TeamCity Data Directory>\config\projects\<project_ID>\pluginData\metaRunners directory. They are owned by a project whose configuration was used as a source. As such, recipes are by default available only for their origin project and its subprojects.
Use a Recipe
Recipes are custom build steps, and as such, are added to build configurations in the same manner.
Open configuration settings and navigate to the Build steps settings tab.
Click the Add build step button.
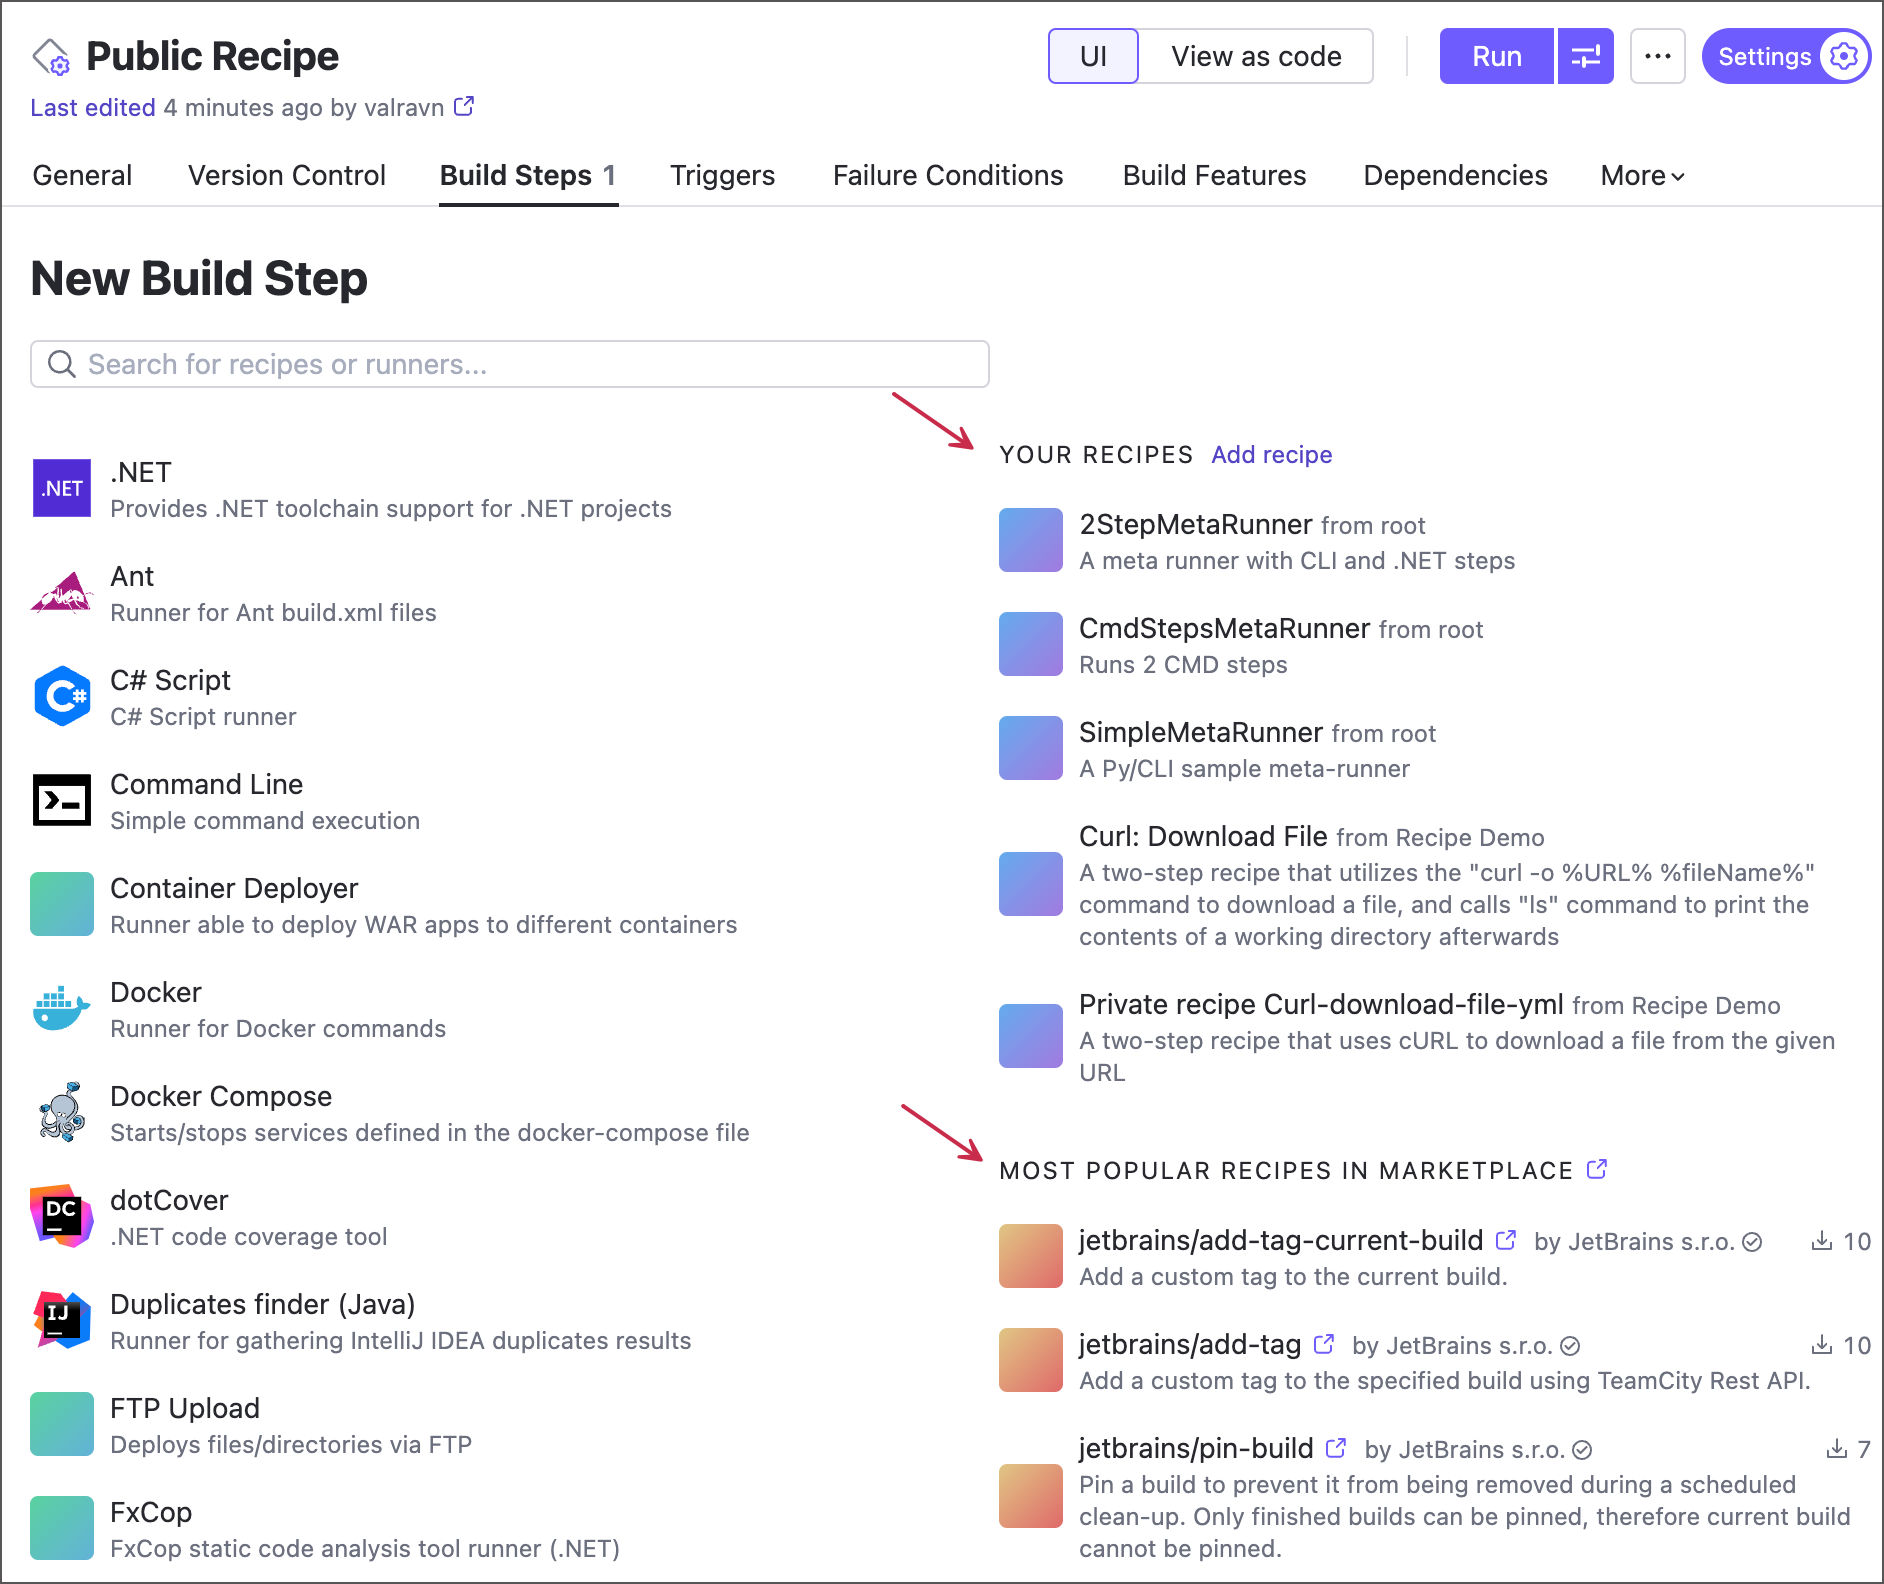
Choose a recipe from the right column that shows:
private recipes owned by this project or its parent project;
public recipes from JetBrains Marketplace.

Set up required recipe settings in the same manner you do this for regular TeamCity steps.
You can explore public recipes authored by the TeamCity developers and other TeamCity users at https://plugins.jetbrains.com/teamcity_recipe. We hope to expand our collection in future release cycles and welcome your ideas and feedback.
If you do not see any Marketplace recipe options, verify they are enabled for your project:
Open project settings and navigate to the Recipes settings tab.
Switch the Public JetBrains Marketplace recipes setting to "Enabled". If this setting is "Disabled" and grayed-out, edit the settings of a parent project that enforces this behavior or talk to a person who administers this project.
Upload a Recipe From a File
If you have a recipe .xml definition file, you can upload this file to a required project manually. For example, you may want to move a recipe from one project to another or downloaded a recipe manually from JetBrains Marketplace.
To install a recipe from a file, do the following:
Open project settings and navigate to the Recipes settings tab.
Click the Upload Recipe button.
Choose a configuration file and enter a unique recipe name.
Click Save. Your uploaded recipe is now available for all configuration of this project and its subprojects.
Manage Existing Recipes
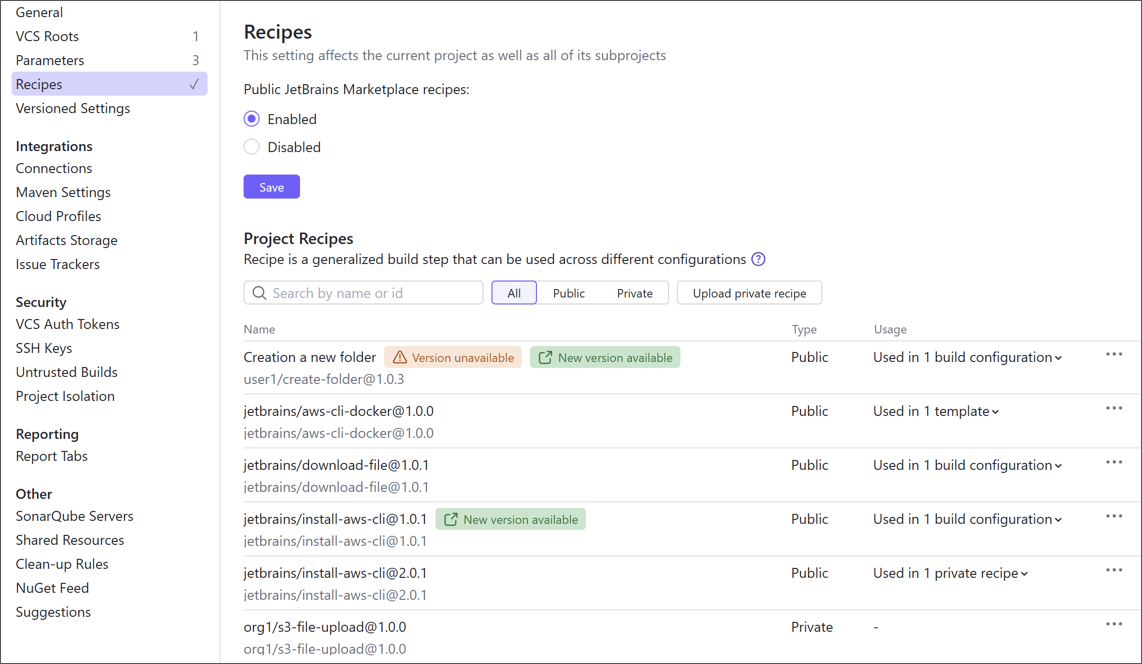
The Recipes page of project settings allows you to:
enable or disable public (Marketplace-based) recipes for this project and all of its subprojects;
inspect all public and private recipes used in this project: view their usages and spot any issues.

You can open this page for the Root project to view a server-wide usage report. Recipe tags notify you when a newer recipe version is available, the current version or the entire recipe is no longer available on Marketplace, or TeamCity cannot contact JetBrains Marketplace and retrieve recipe data.
Share Recipes on Marketplace
You can share your YAML-based recipes with TeamCity community on JetBrains Marketplace. See this article for more information: Uploading TeamCity Recipes.
Edit a Private Recipe
Recipes extracted from a build configuration or uploaded from a file are stored locally on your server machine and can be edited in TeamCity UI.
Open project settings and navigate to the Recipes settings tab.
A private recipe to view and edit its configuration file.
For example, a recipe extracted from an existing configuration copies all parameters from this configuration. You can remove parameters unrelated to actual build steps performed by a recipe.
XML Parameter Specification
XML recipe parameter specification has the spec="type attribute='value' format. You can edit this specifications to modify parameter/editor appearance and behavior settings.
For example:
Recipe Autonomy
Recipes are designed to be reused throughout build configurations and as such, should be configuration-agnostic. This means your recipes should ideally perform actions that can be executed regardless of other configuration settings.
In addition, recipes have the same project requirements as their origin build steps. You may opt for cross-platform build steps (like Command Line or Kotlin Script) as a basis for your recipes to make them compatible with as many build agents as possible.
Example 1: VCS Roots
VCS Roots are not baked into a recipe configuration file. As such, if you create a recipe that performs operations on repository files and folders, configurations without suitable VCS Roots will fail. If you need such recipe, do the following:
Go the settings of a build configuration that imports a recipe.
Switch to the Version Control Settings tab.
Click the Attach VCS root button.
In the Attach existing VCS root choose the same root your origin configuration uses.
Click Save at the bottom of the page and run your build configuration. Since it now has a connection to a VCS repository, build steps can access required files and are able to finish successfully.
Example 2: Build Files
Gradle, Maven, Ant, and other build steps process build files like build.xml or pom.xml. If your custom recipe includes such a step, ensure the importing build configuration can locate the required file to avoid failures.
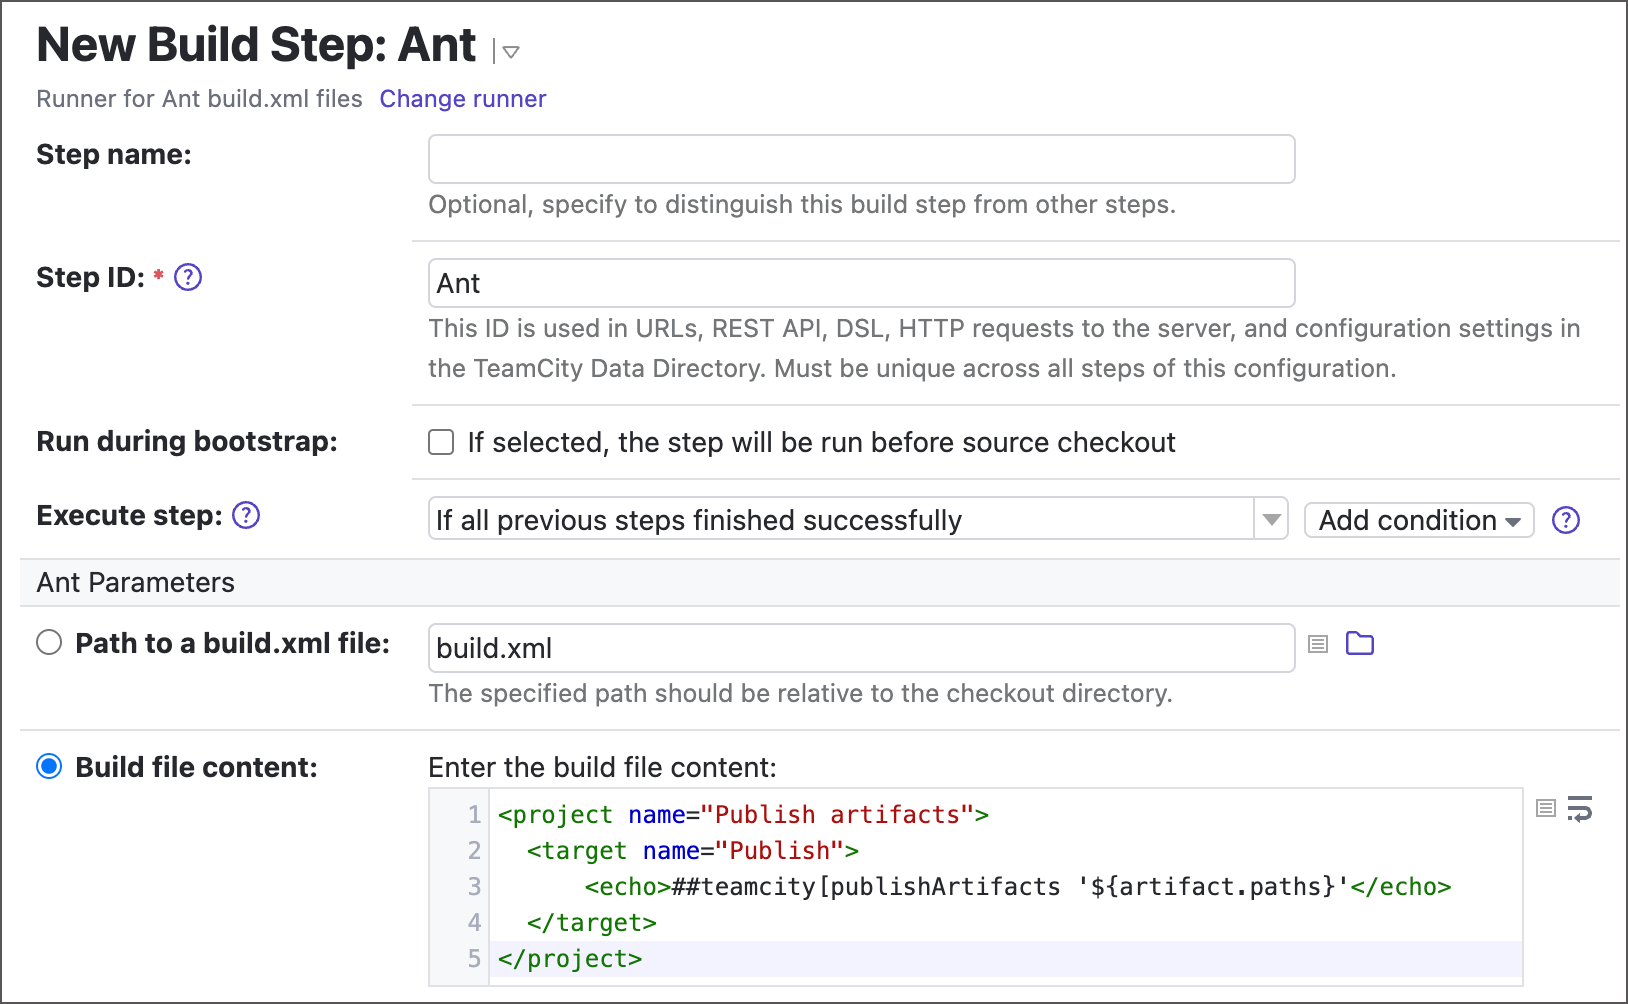
Build steps that allow defining a build file directly rather than just specifying a path are particularly well-suited for use in recipes. For example, the Ant build step.

Launch Recipes in Containers
Build steps that can run inside Docker/Podman containers also retain this feature when used inside recipes. The following sample recipe markup defines two steps: the Kotlin script step running inside the zenika/kotlin image, and the Command Line step without any container-related settings.
When you add a recipe to a build configuration, you can define a recipe-wide image in the Container Settings section. This image applies to all steps unless a step specifies its own container settings, which take priority.
For example, the following versioned settings show the same sample recipe within a build configuration. The configuration runs the recipe in the ubuntu:rolling image. The command-line step uses this image, while the Kotlin step overrides this global setting and runs in zenika/kotlin.
The same priority rules apply to the Run in Docker build feature, which sets a global Docker/Podman image for the entire build configuration. This image is used only if neither the recipe nor its steps define their own container settings.