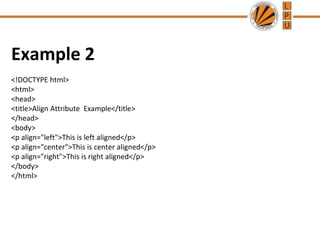
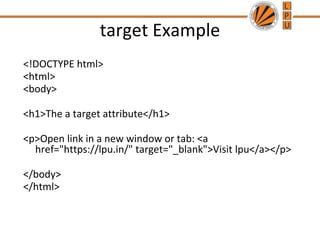
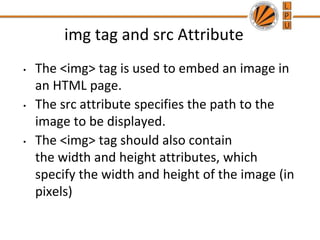
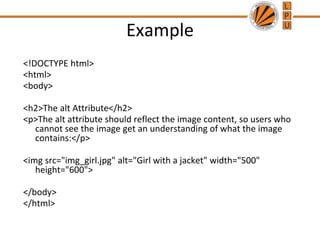
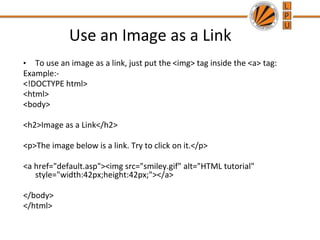
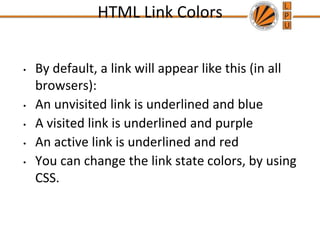
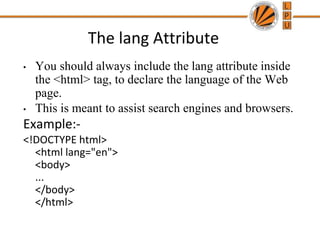
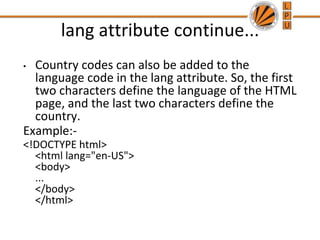
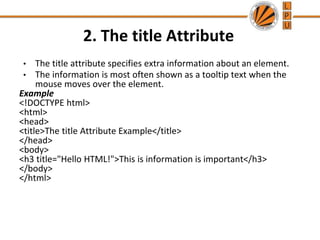
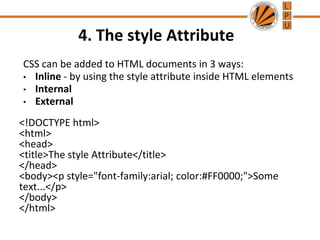
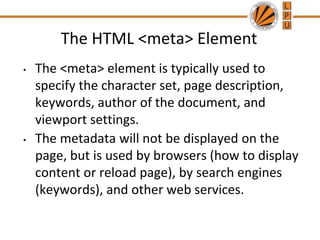
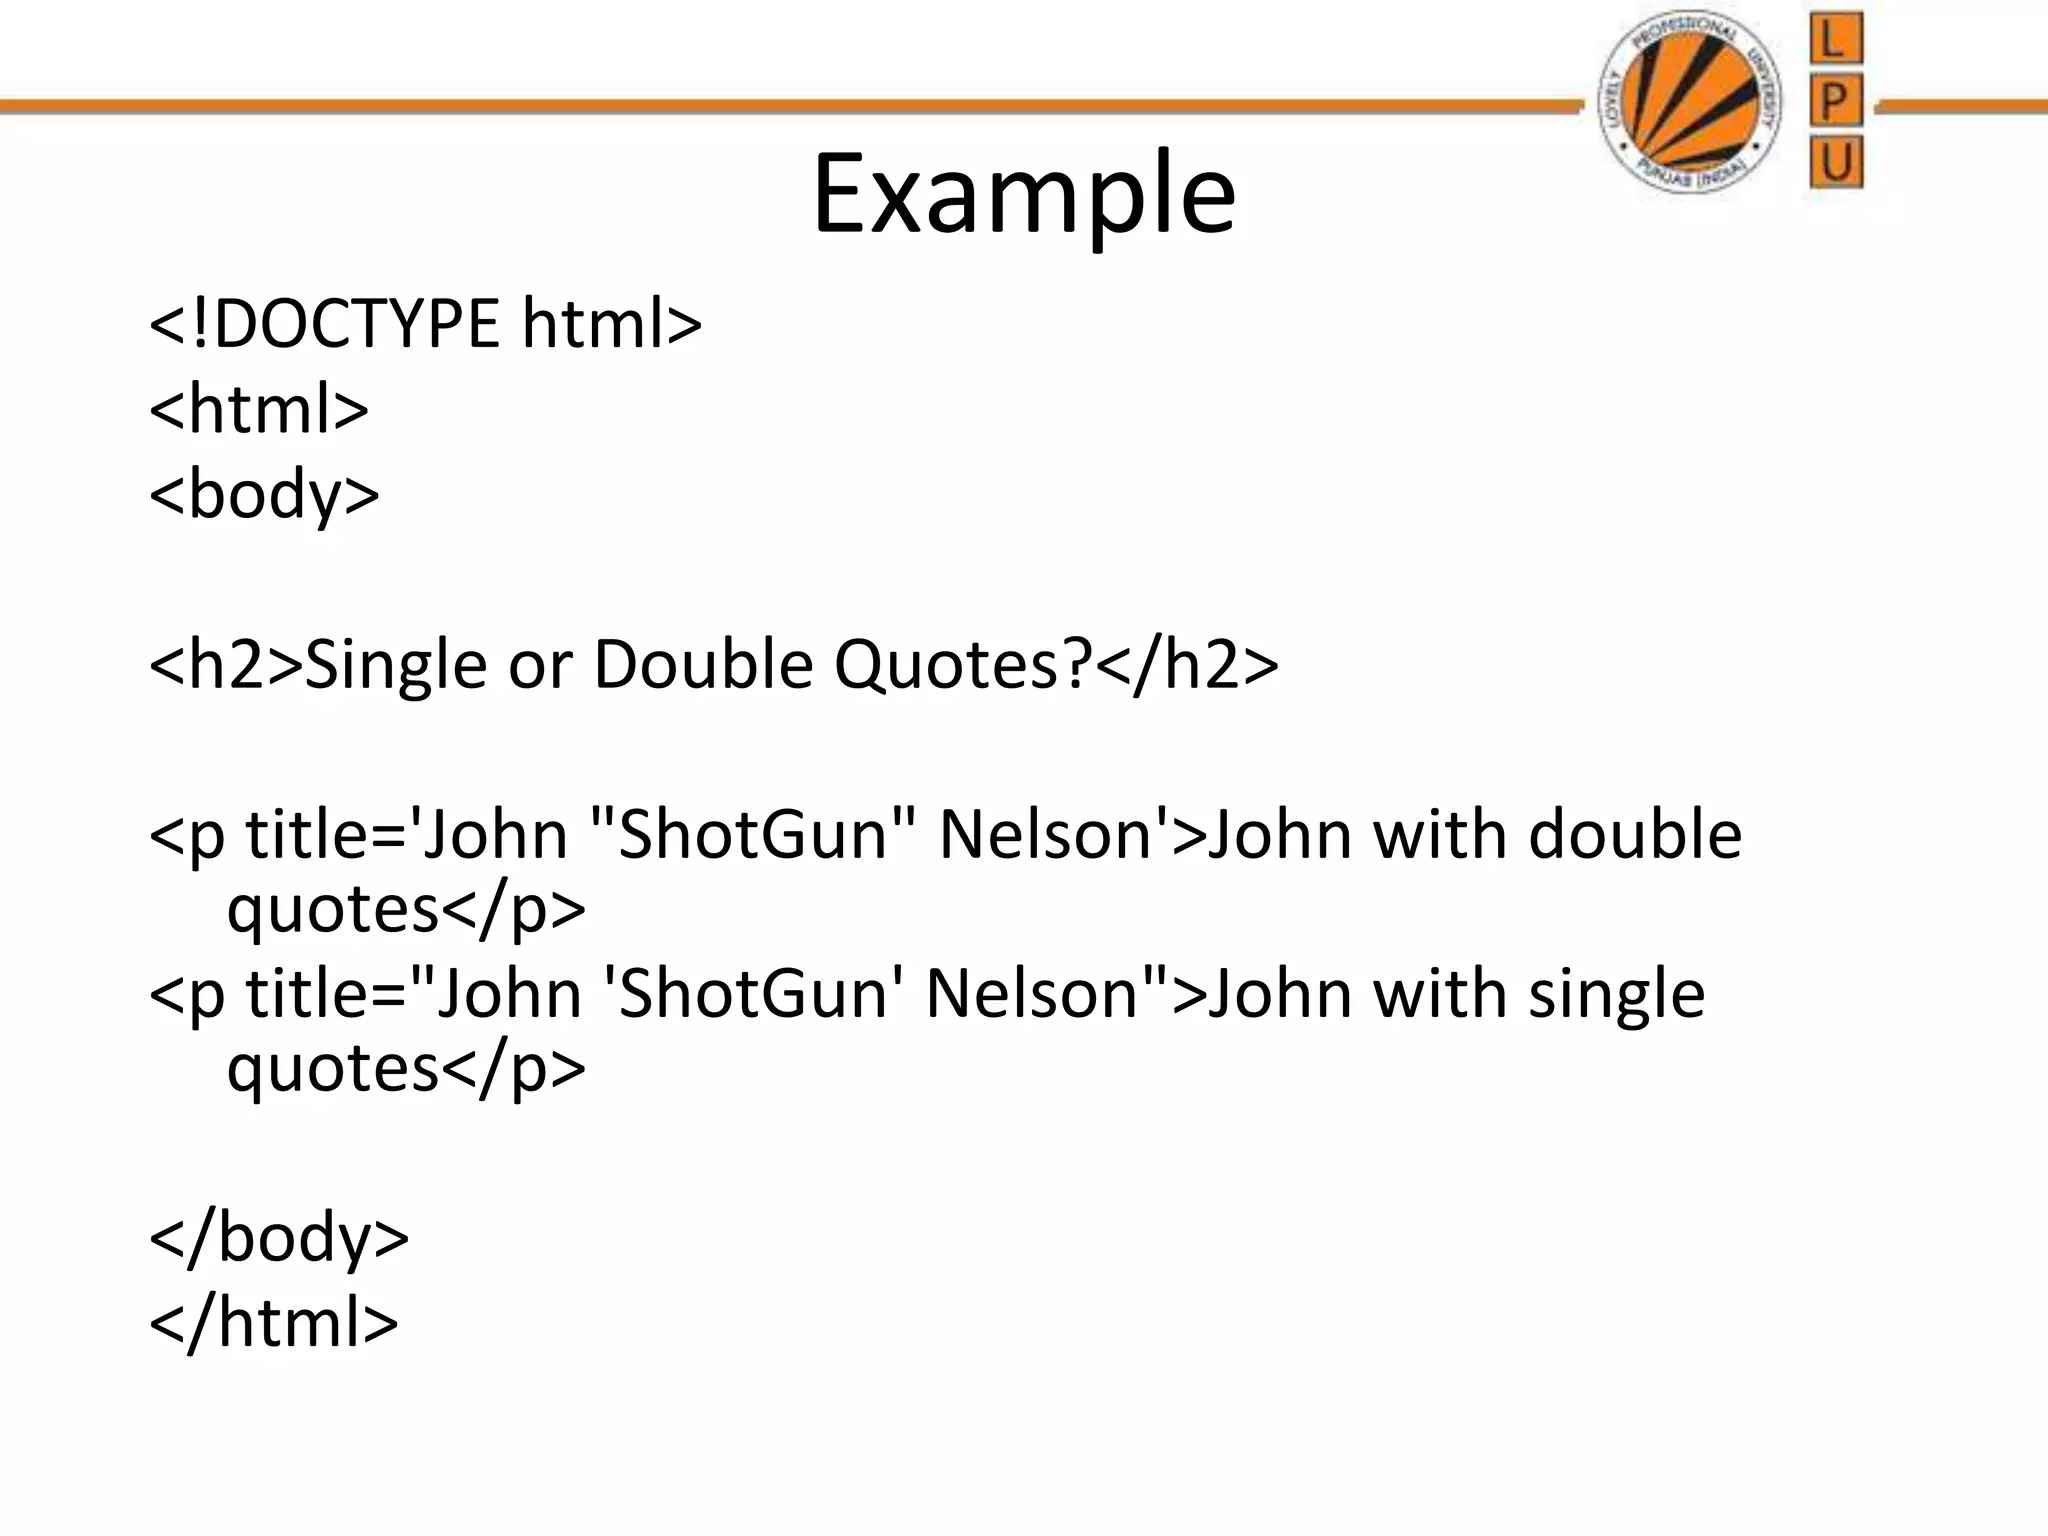
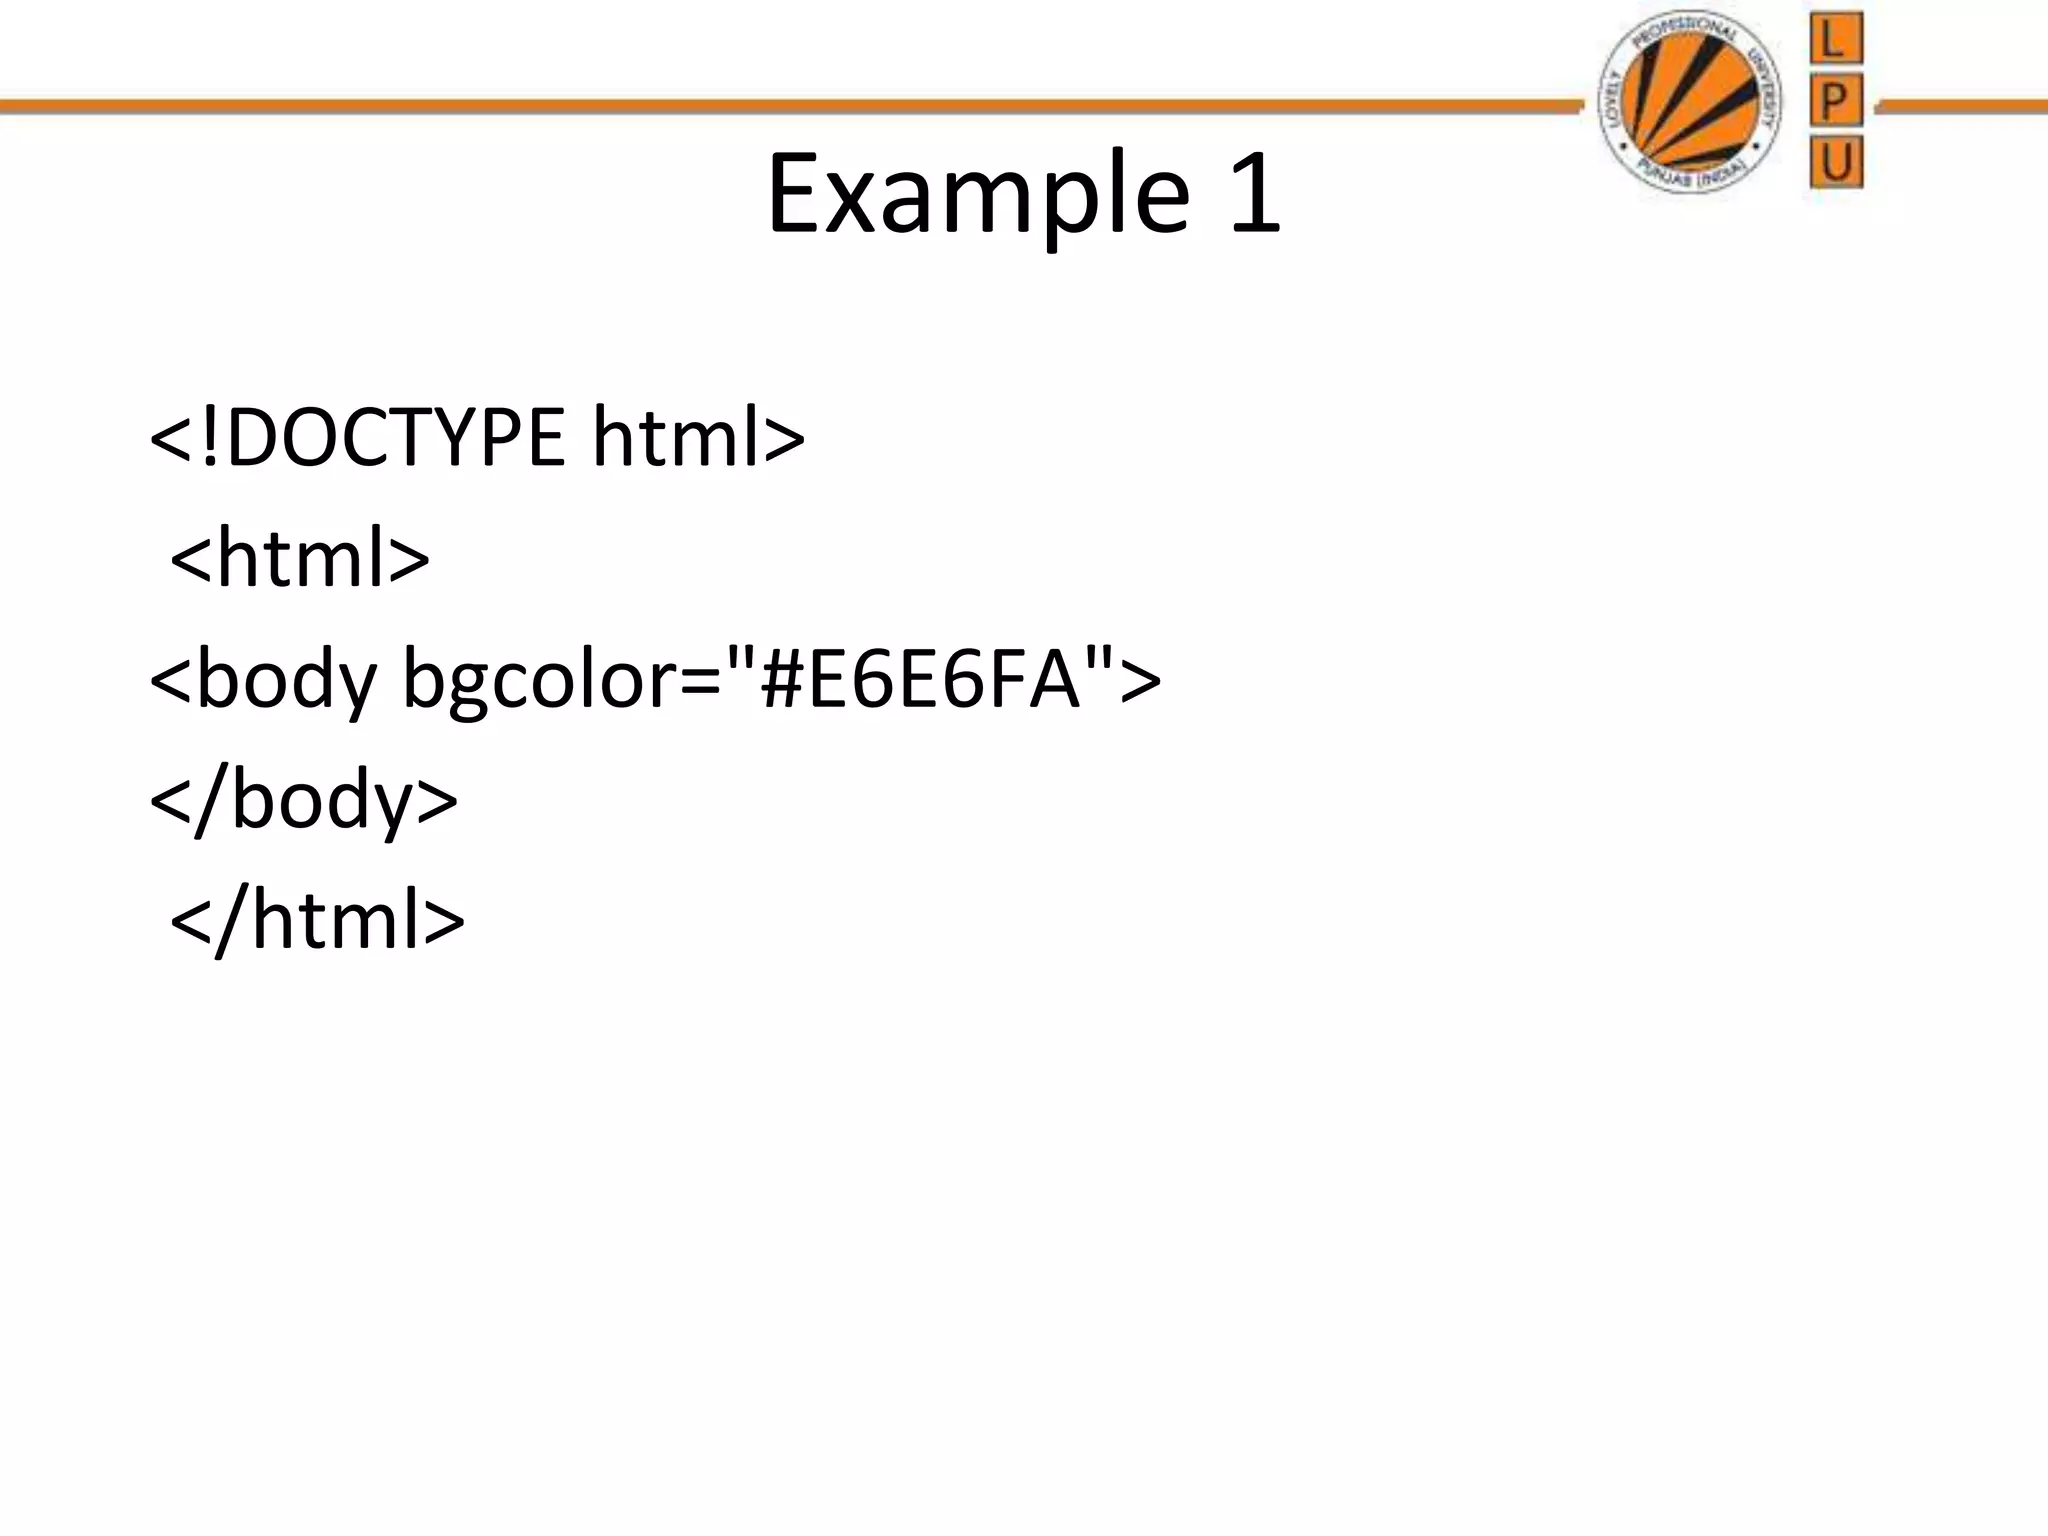
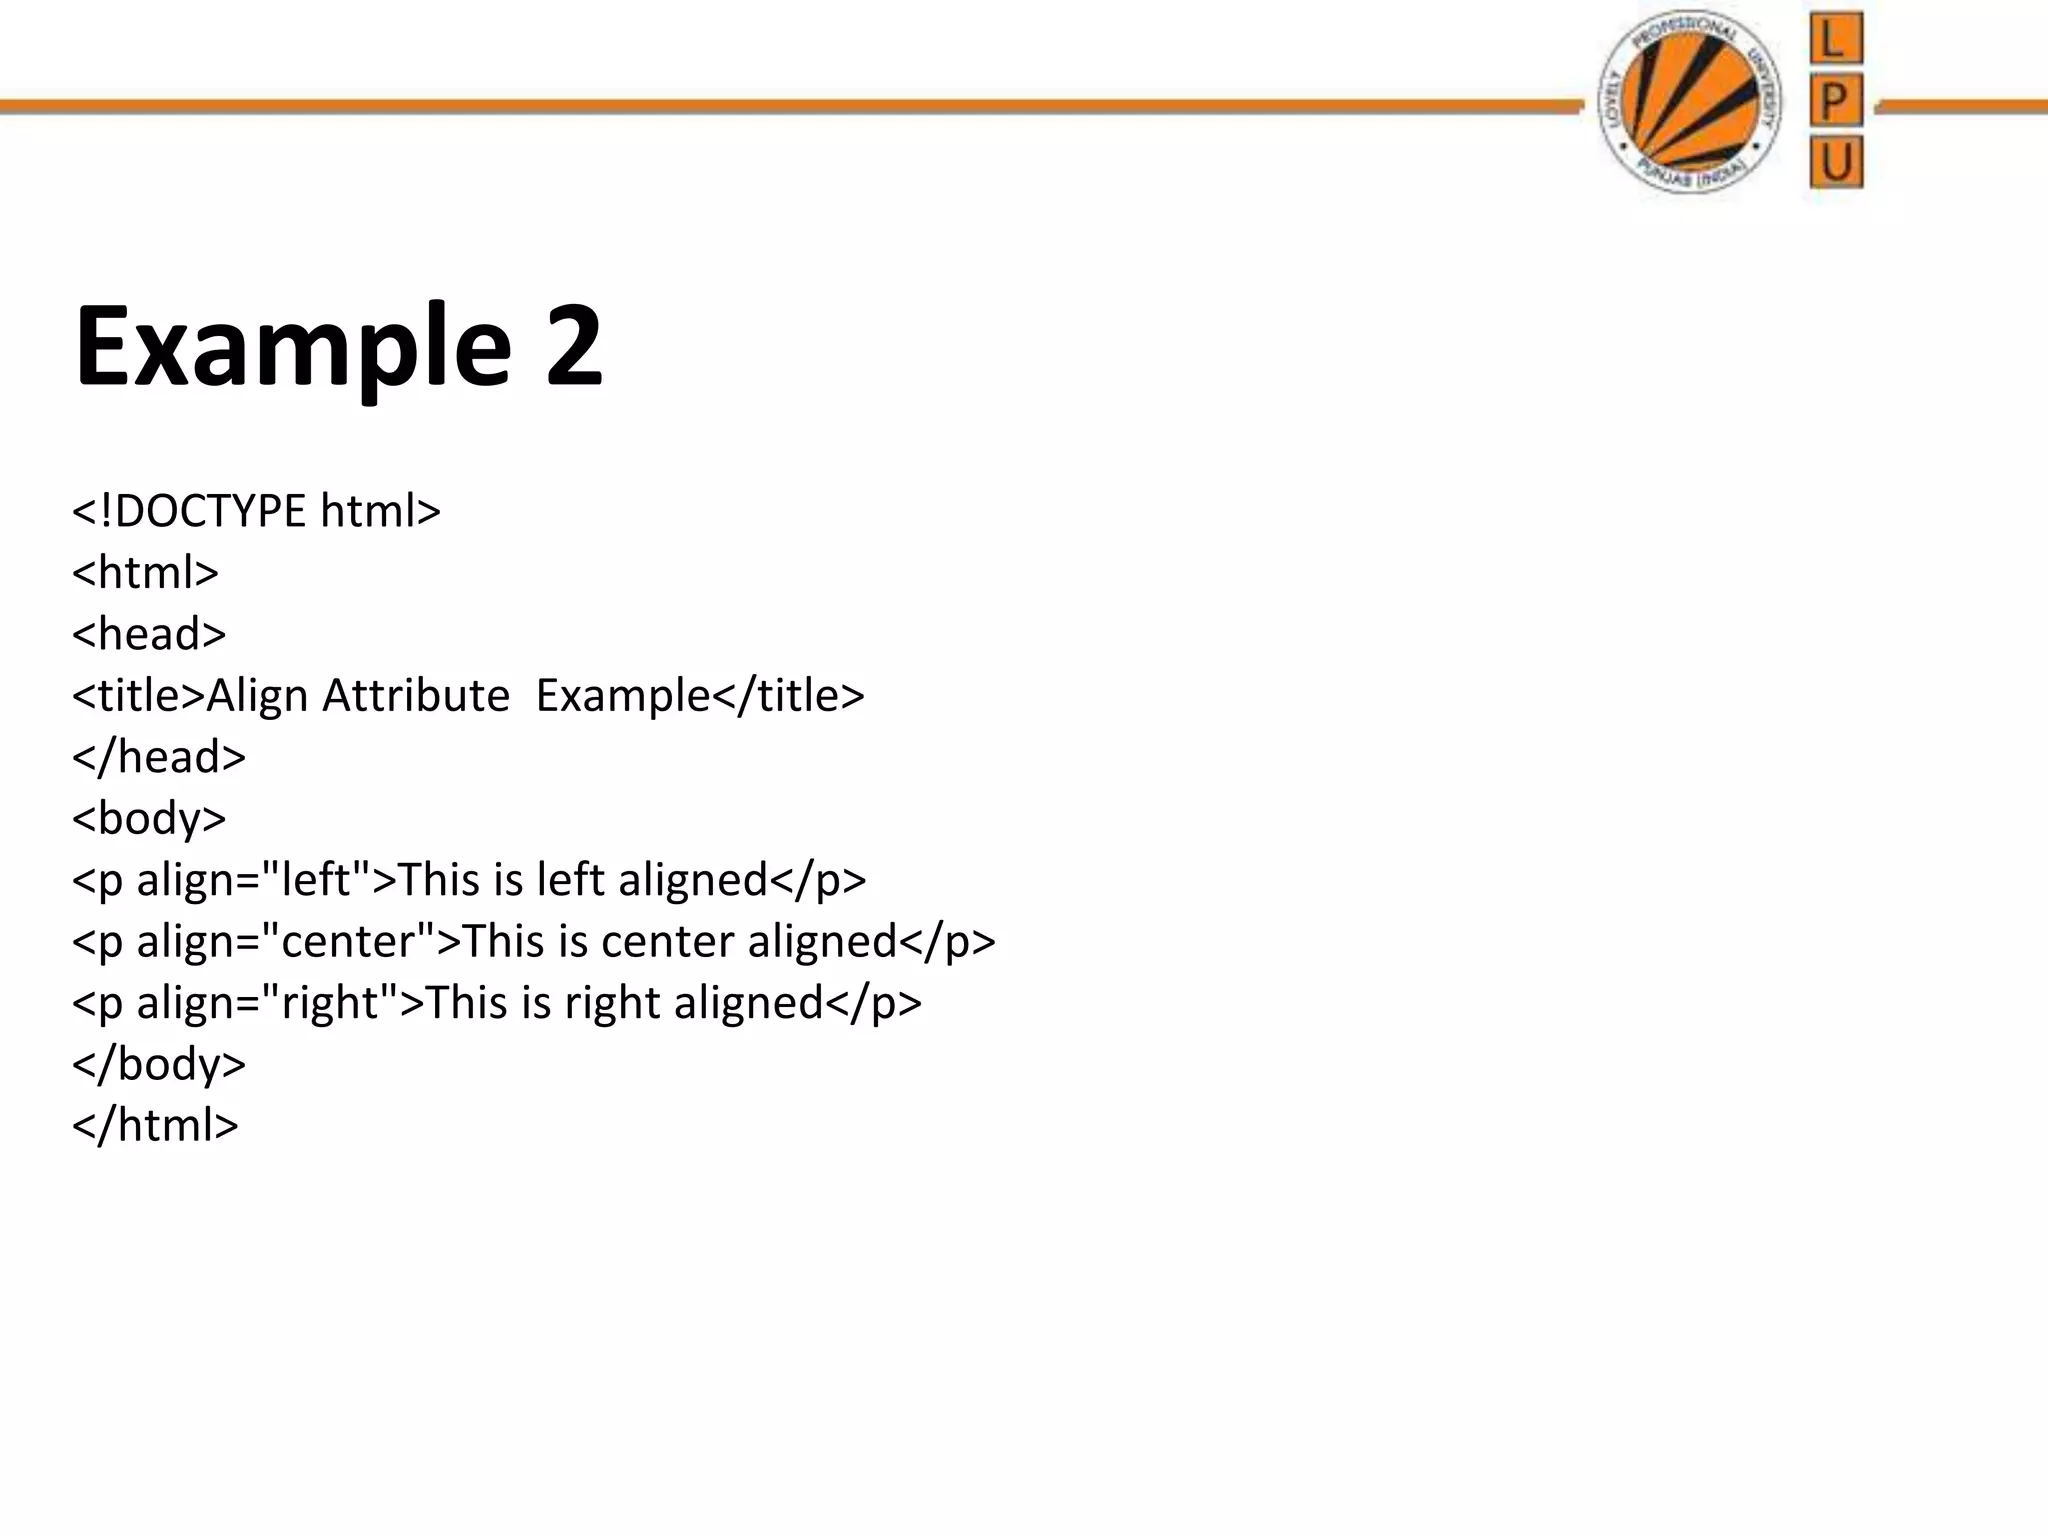
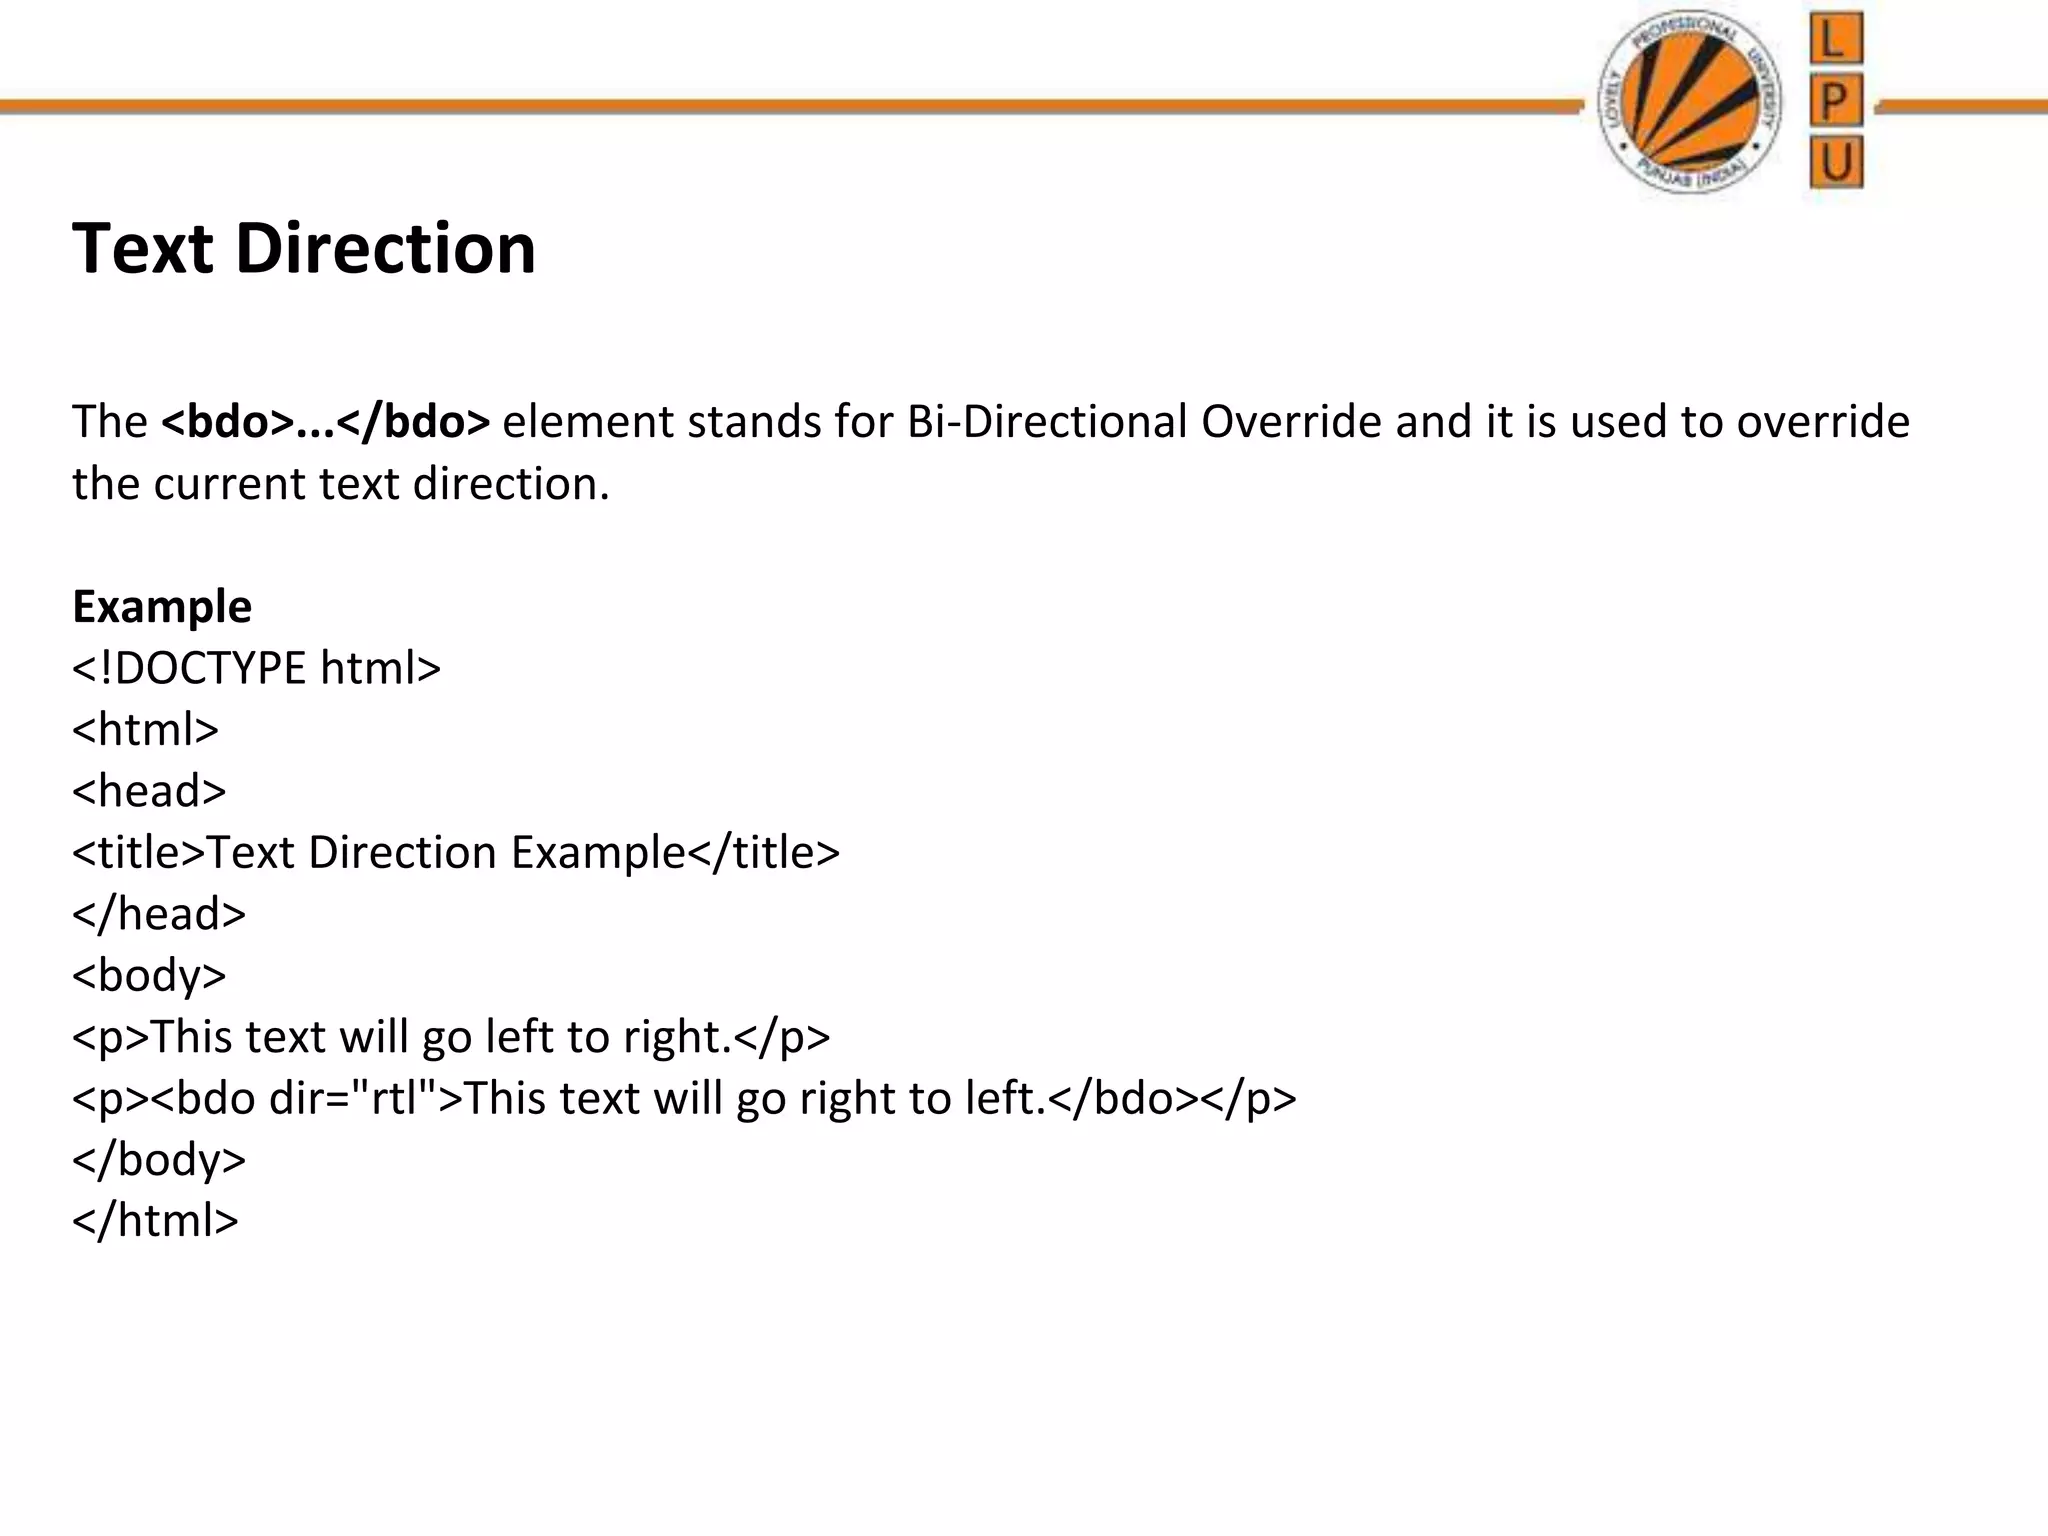
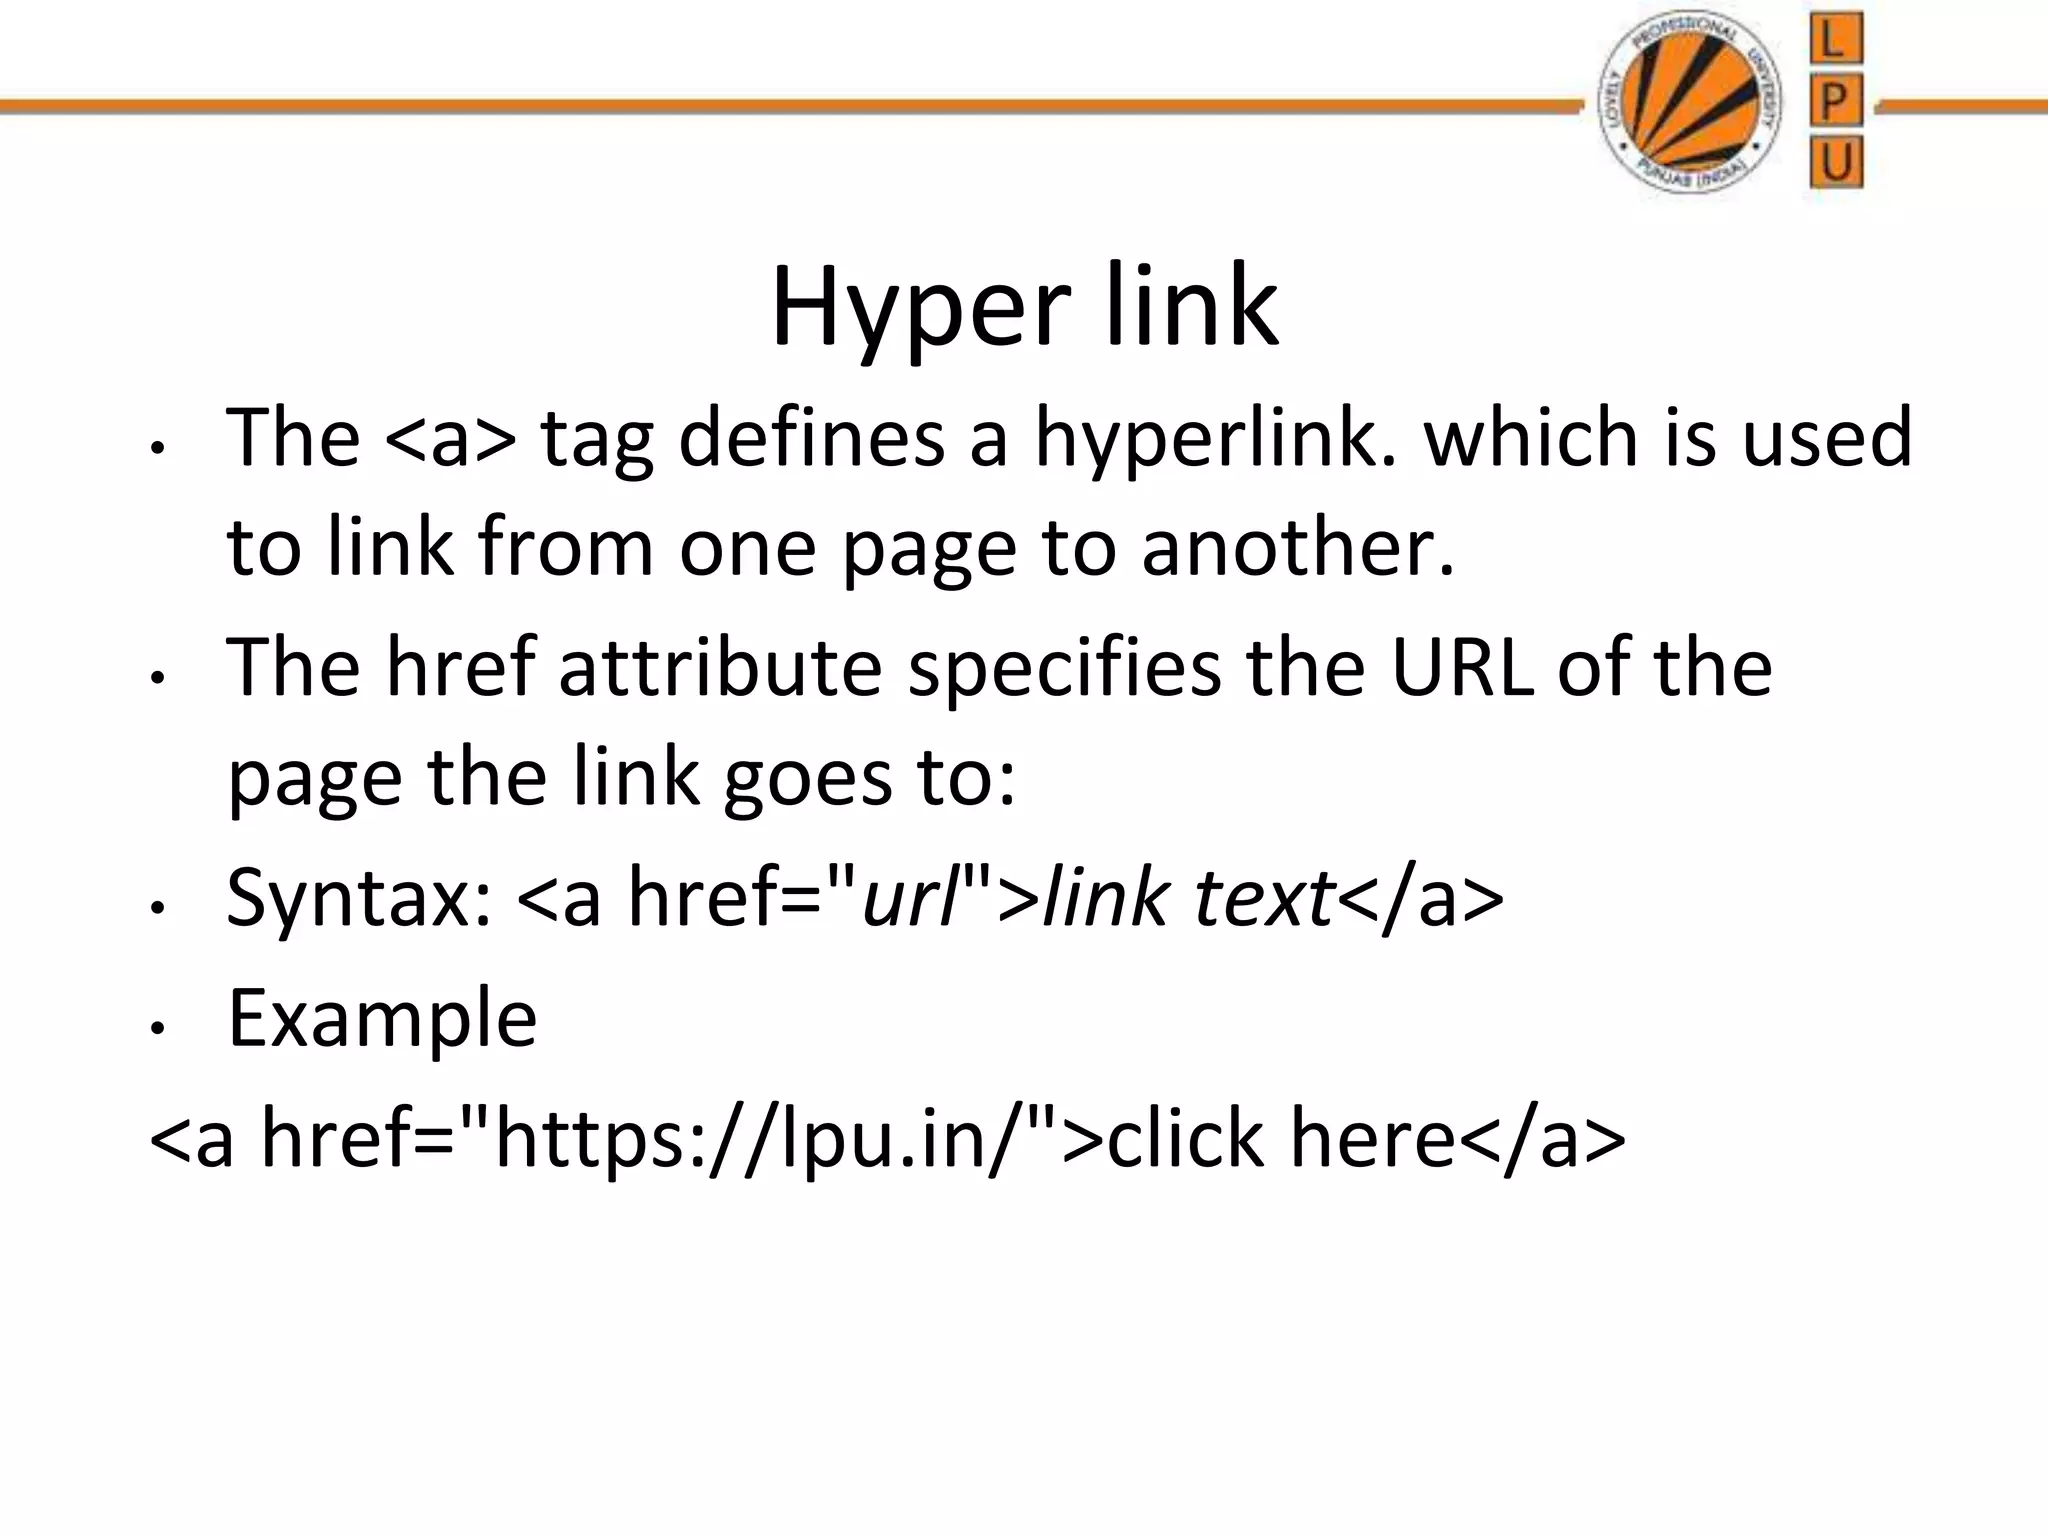
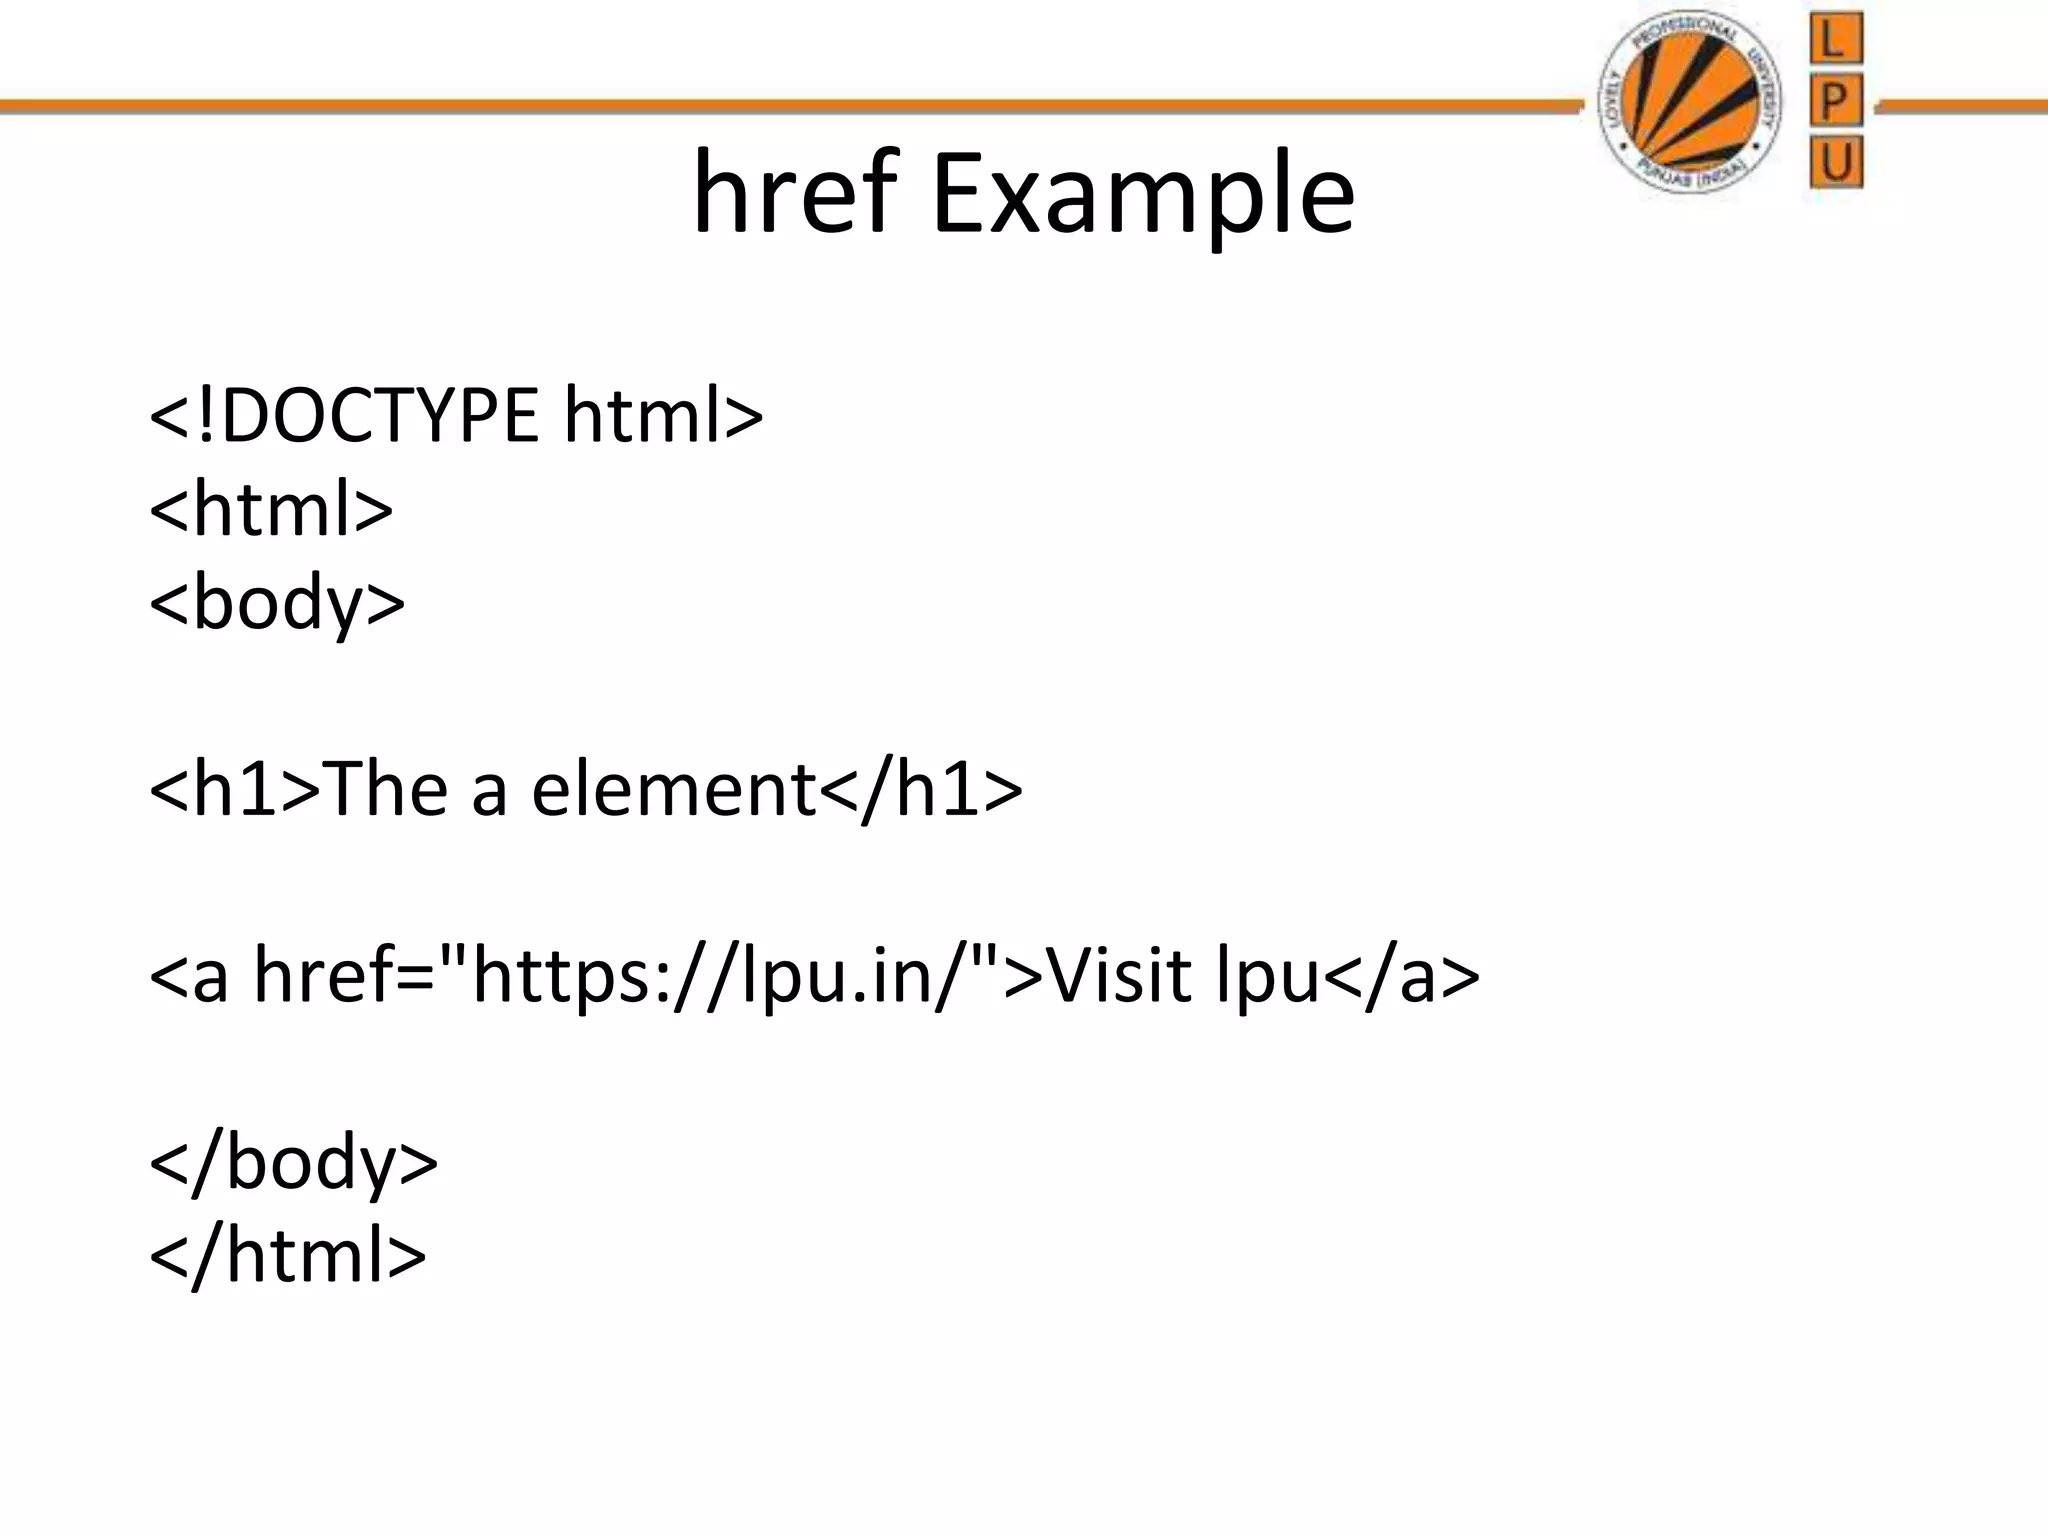
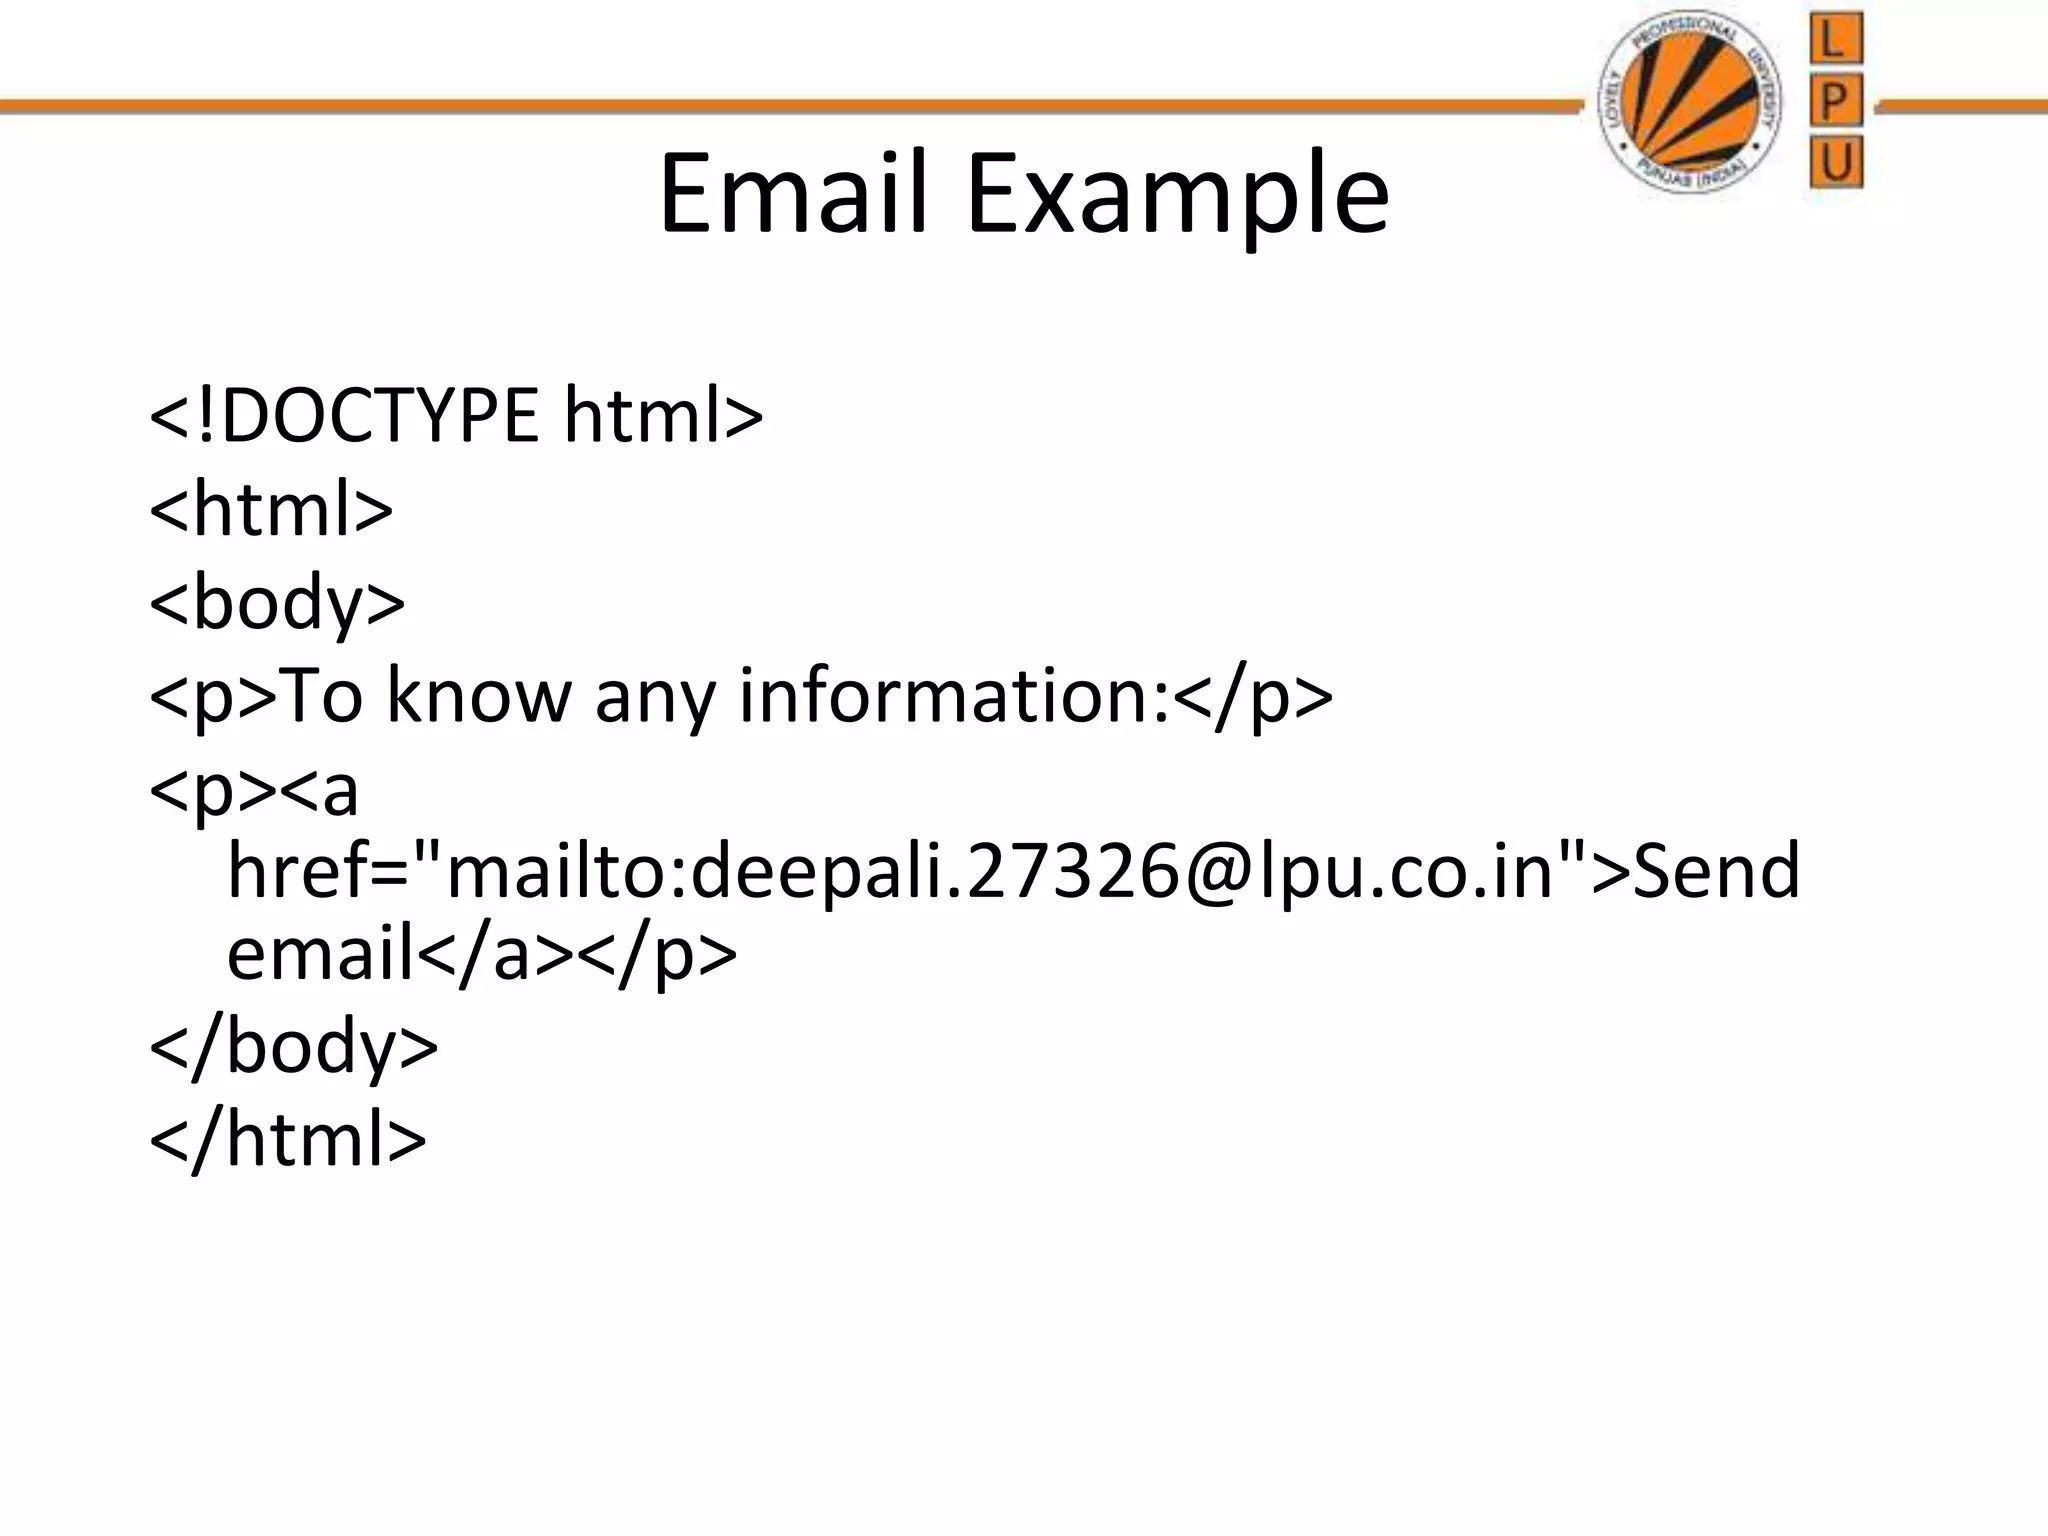
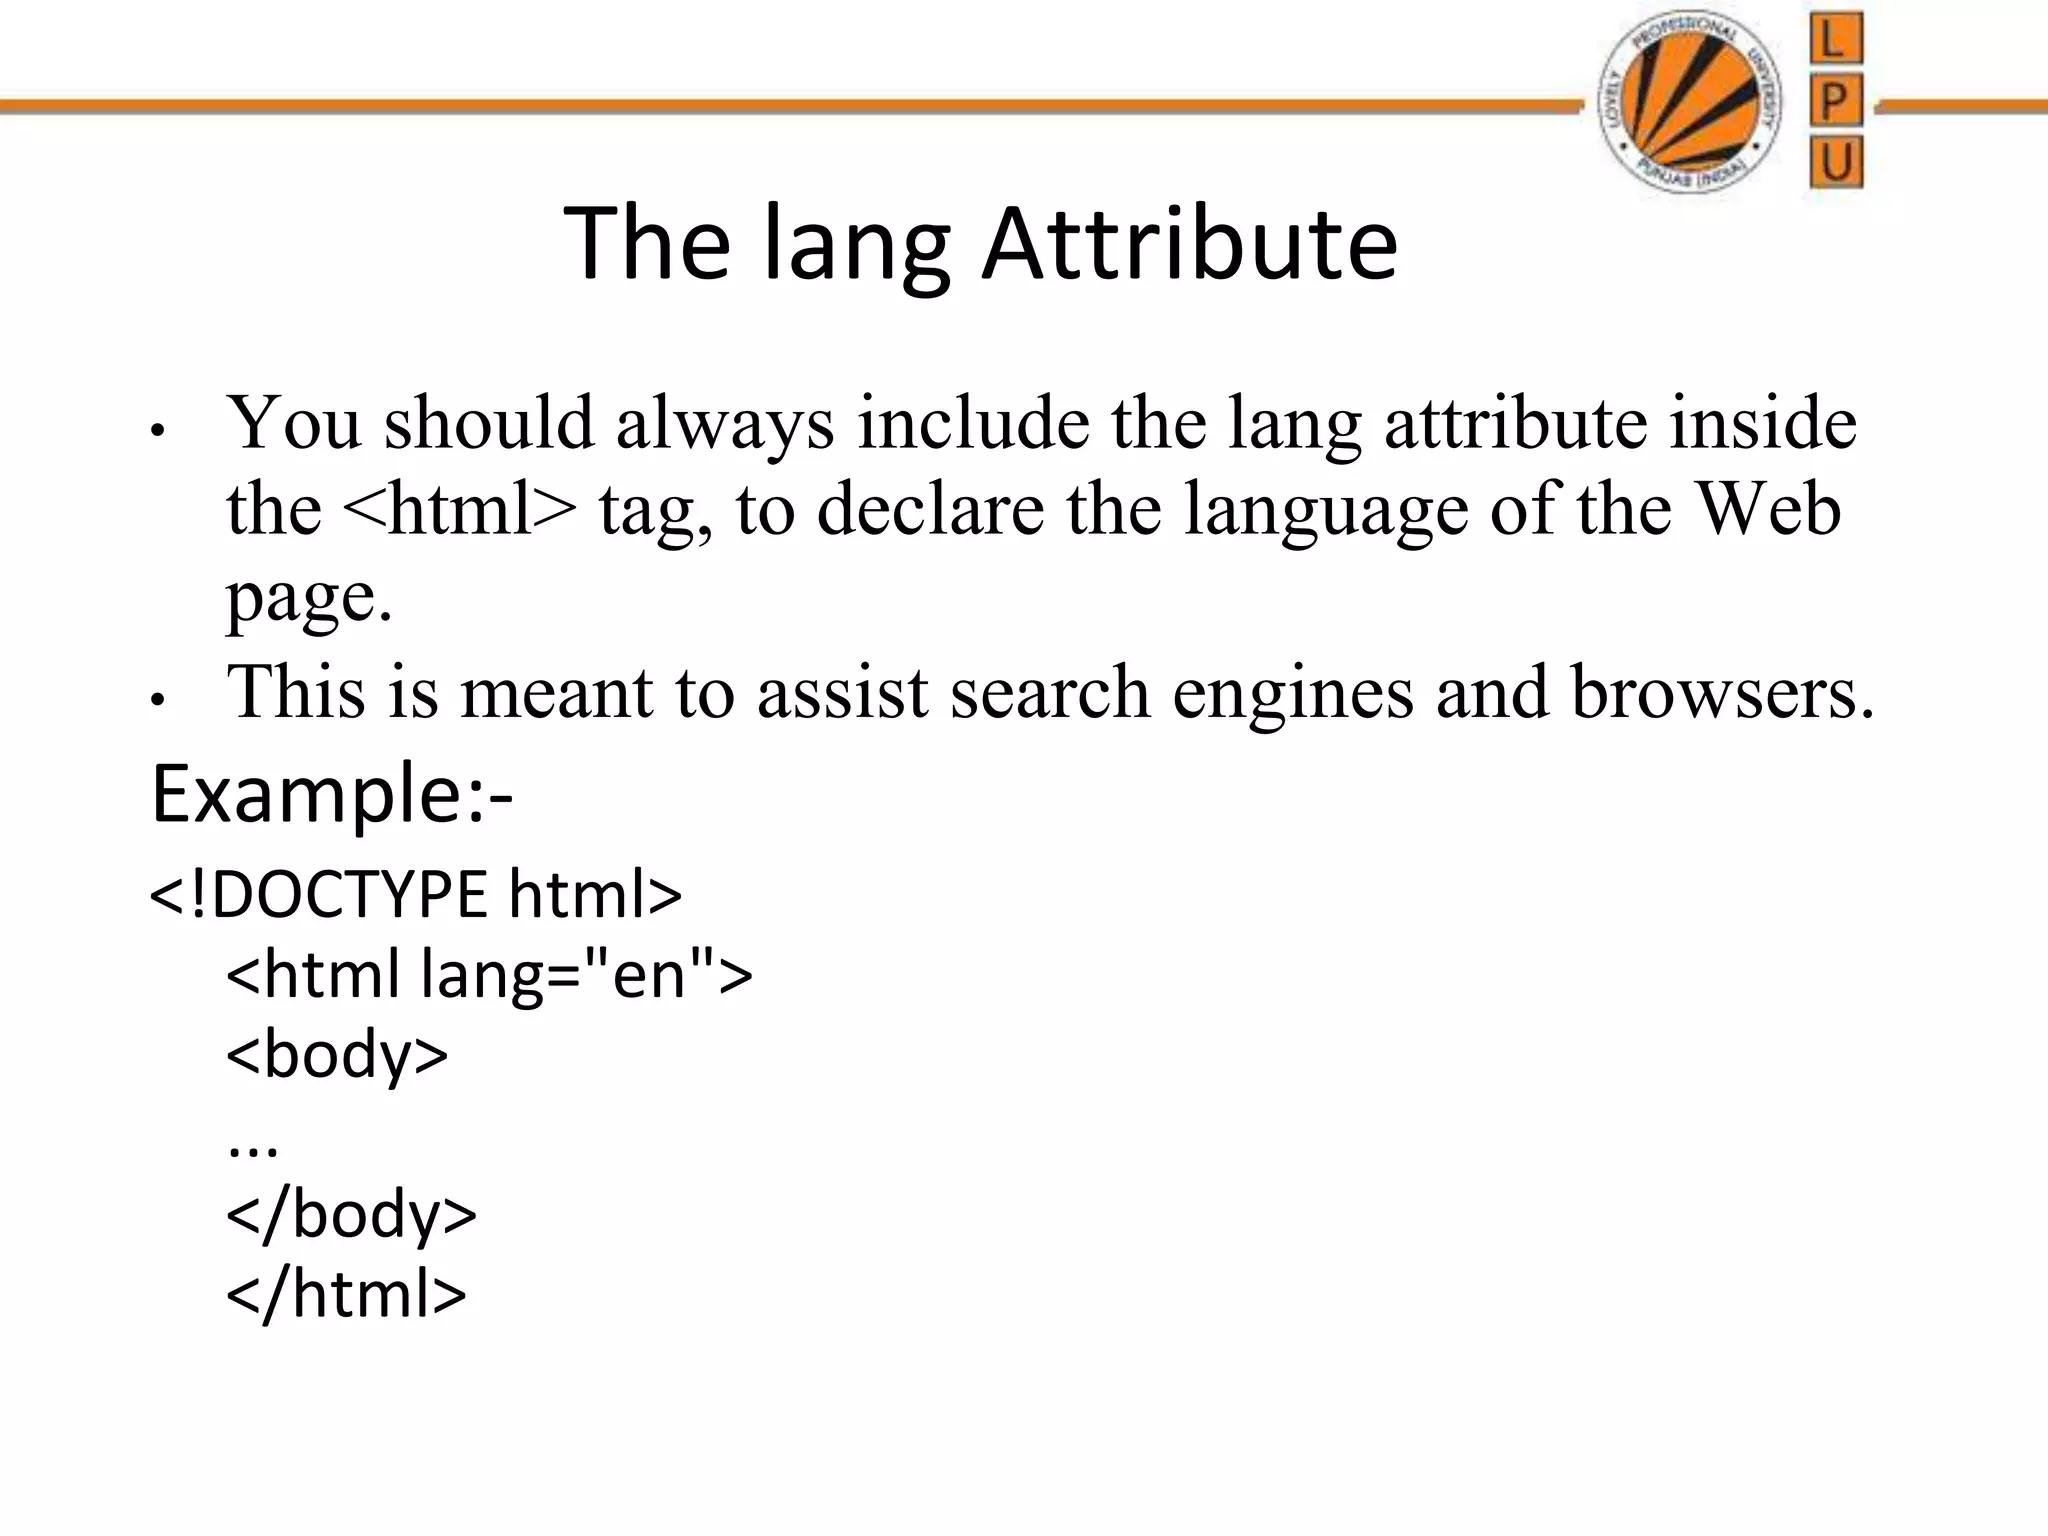
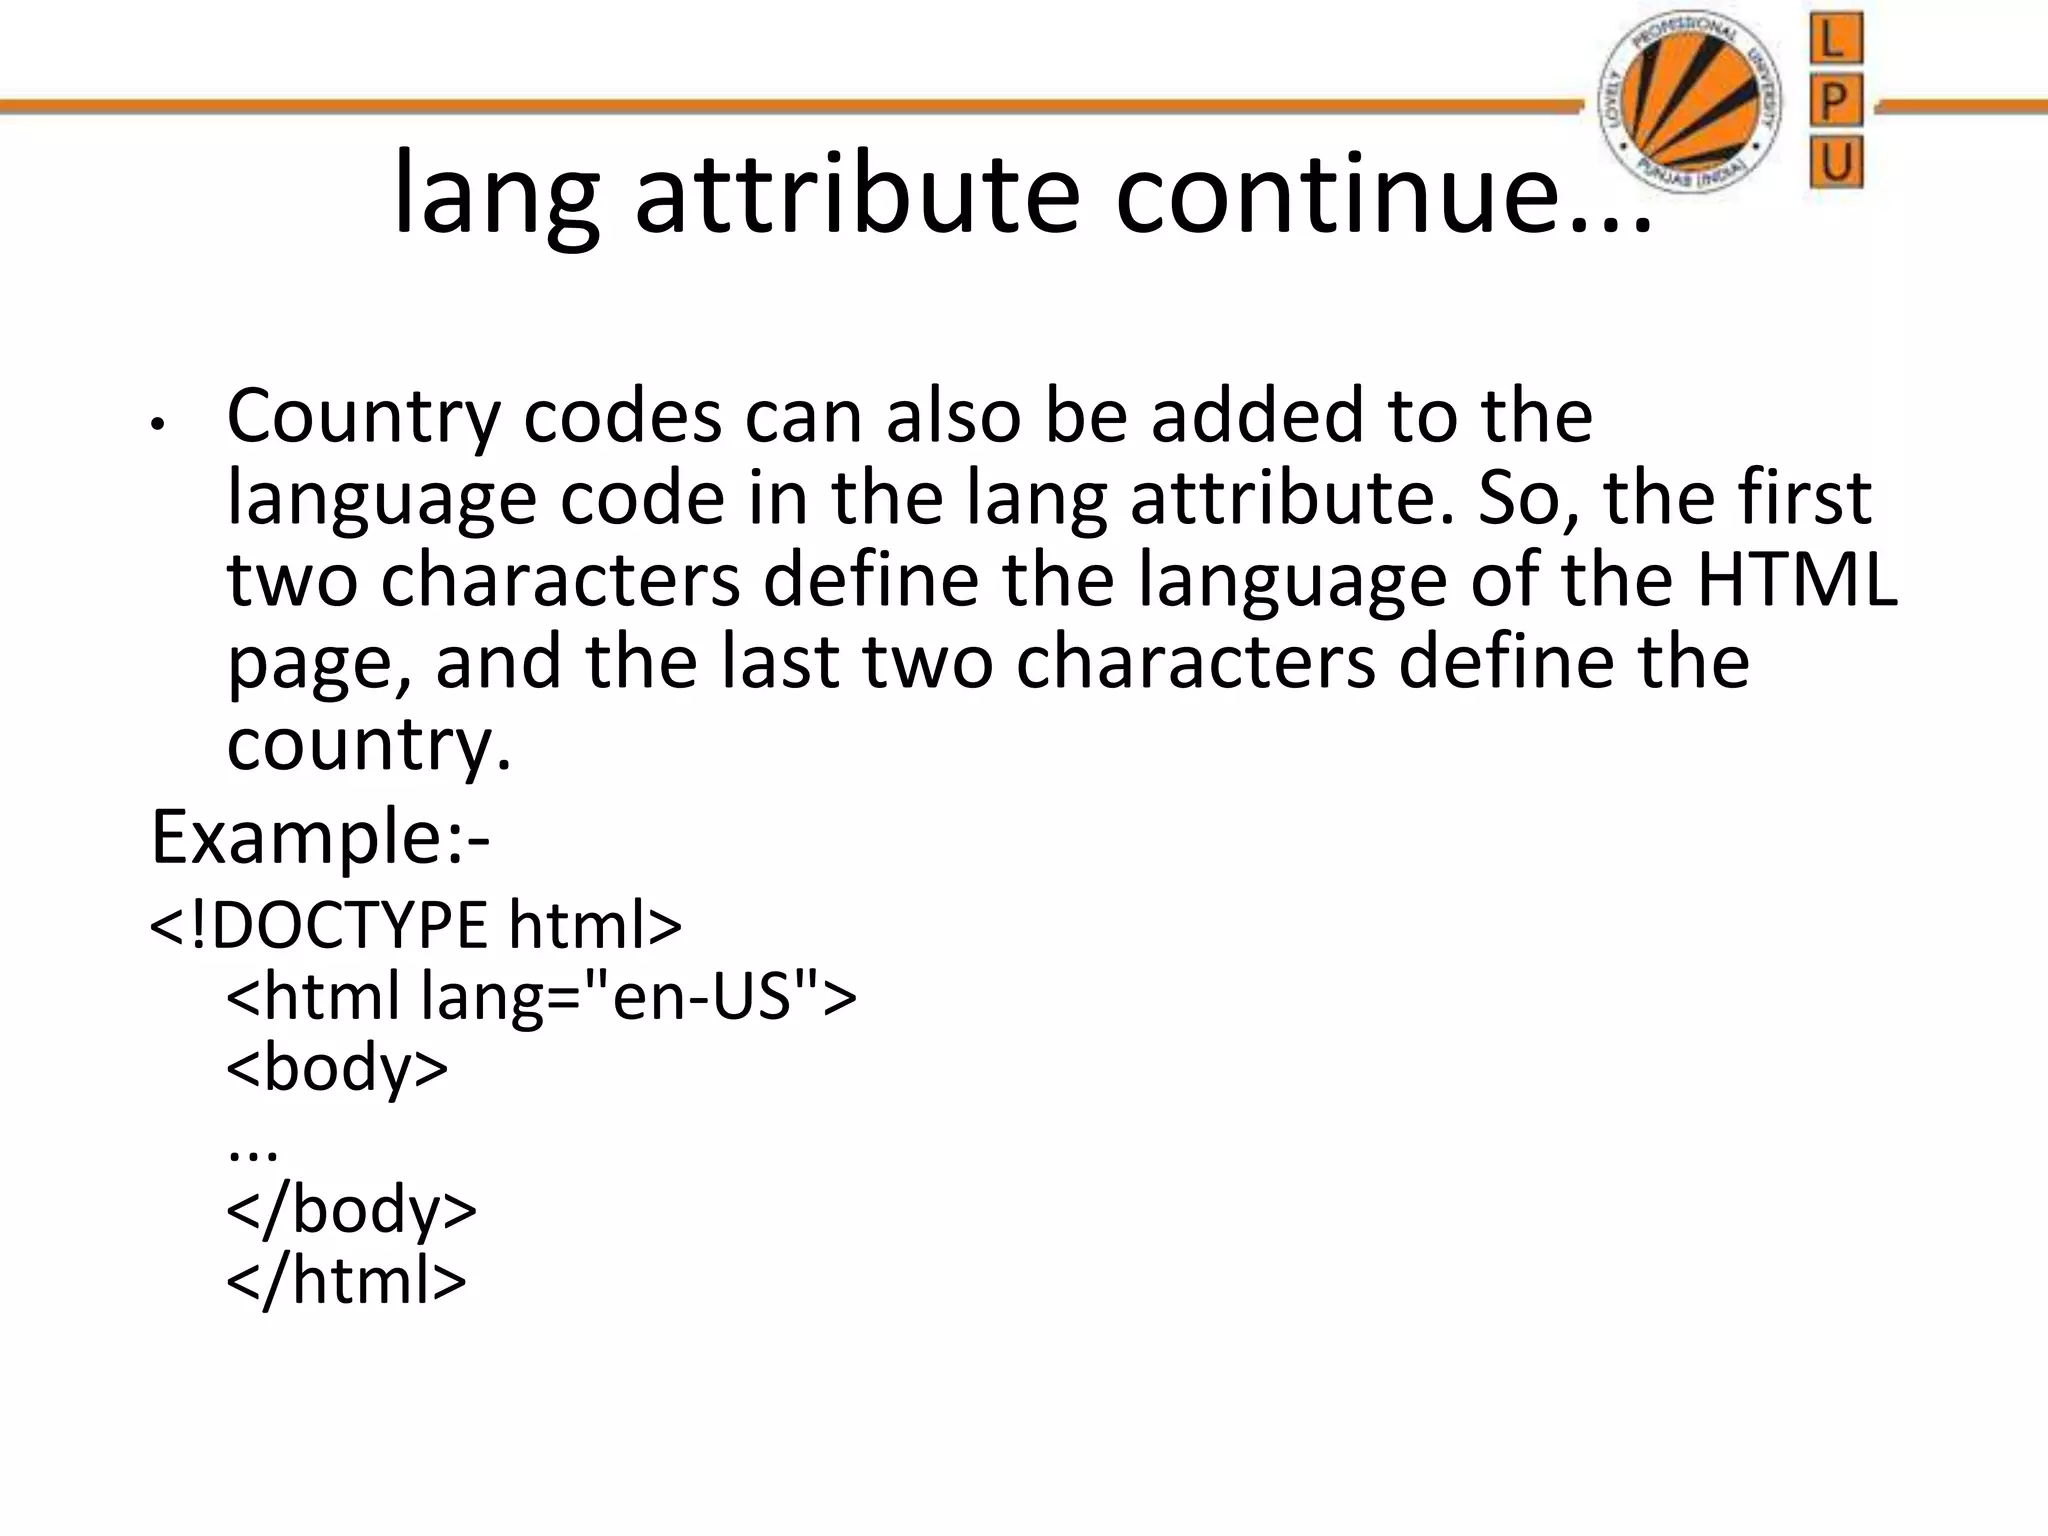
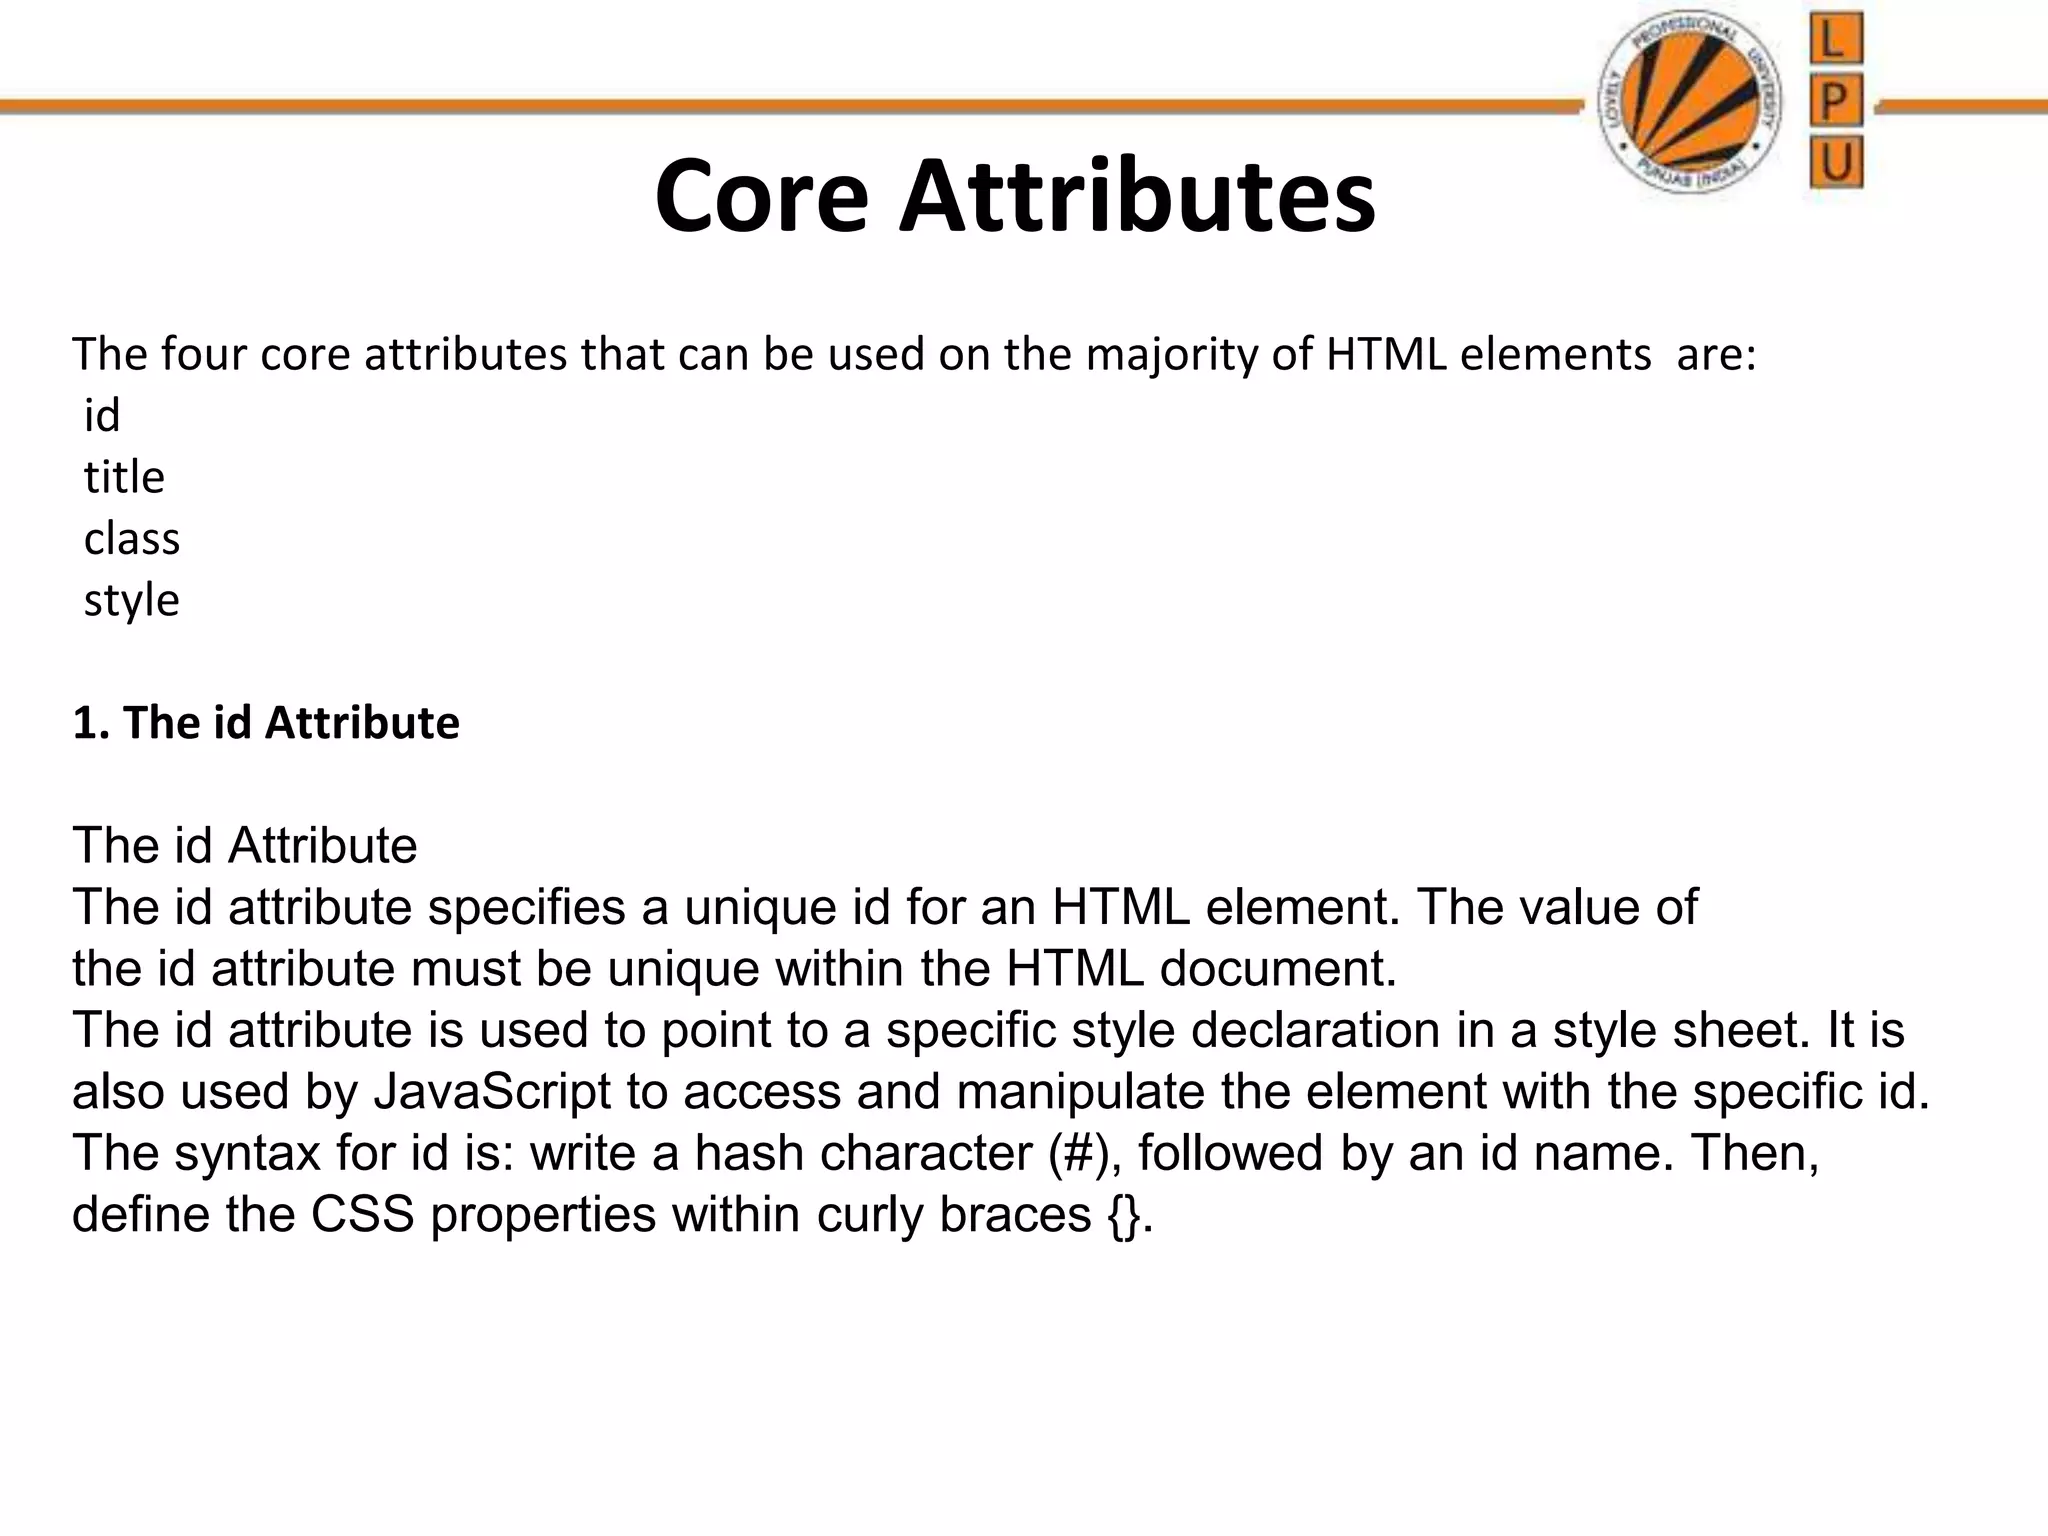
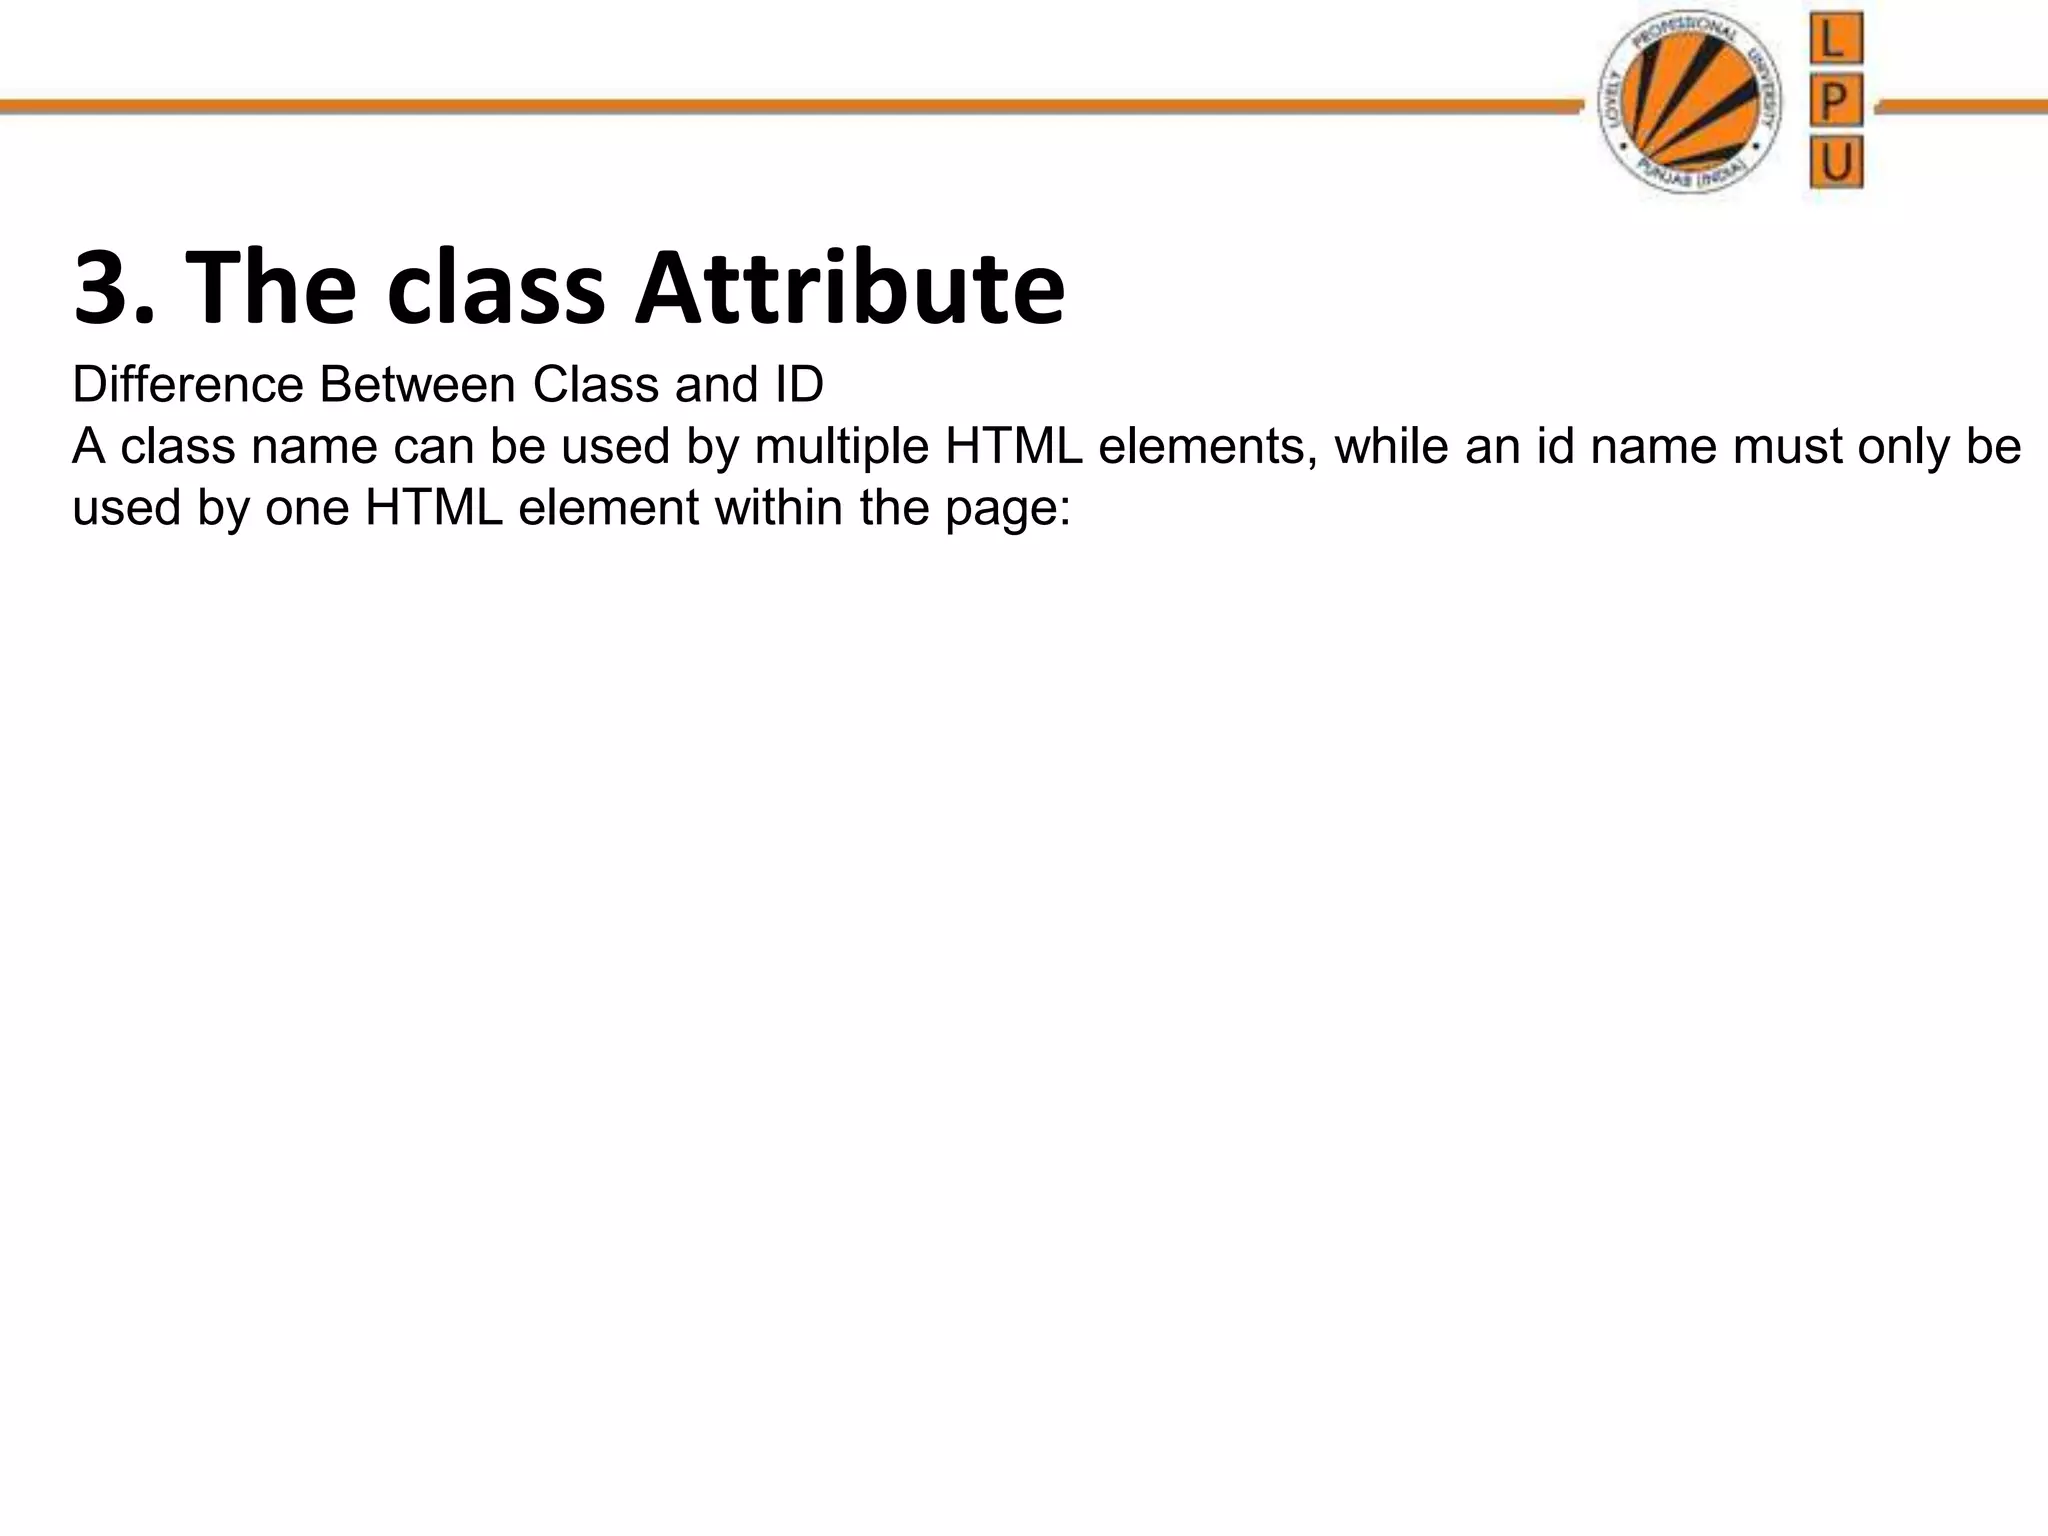
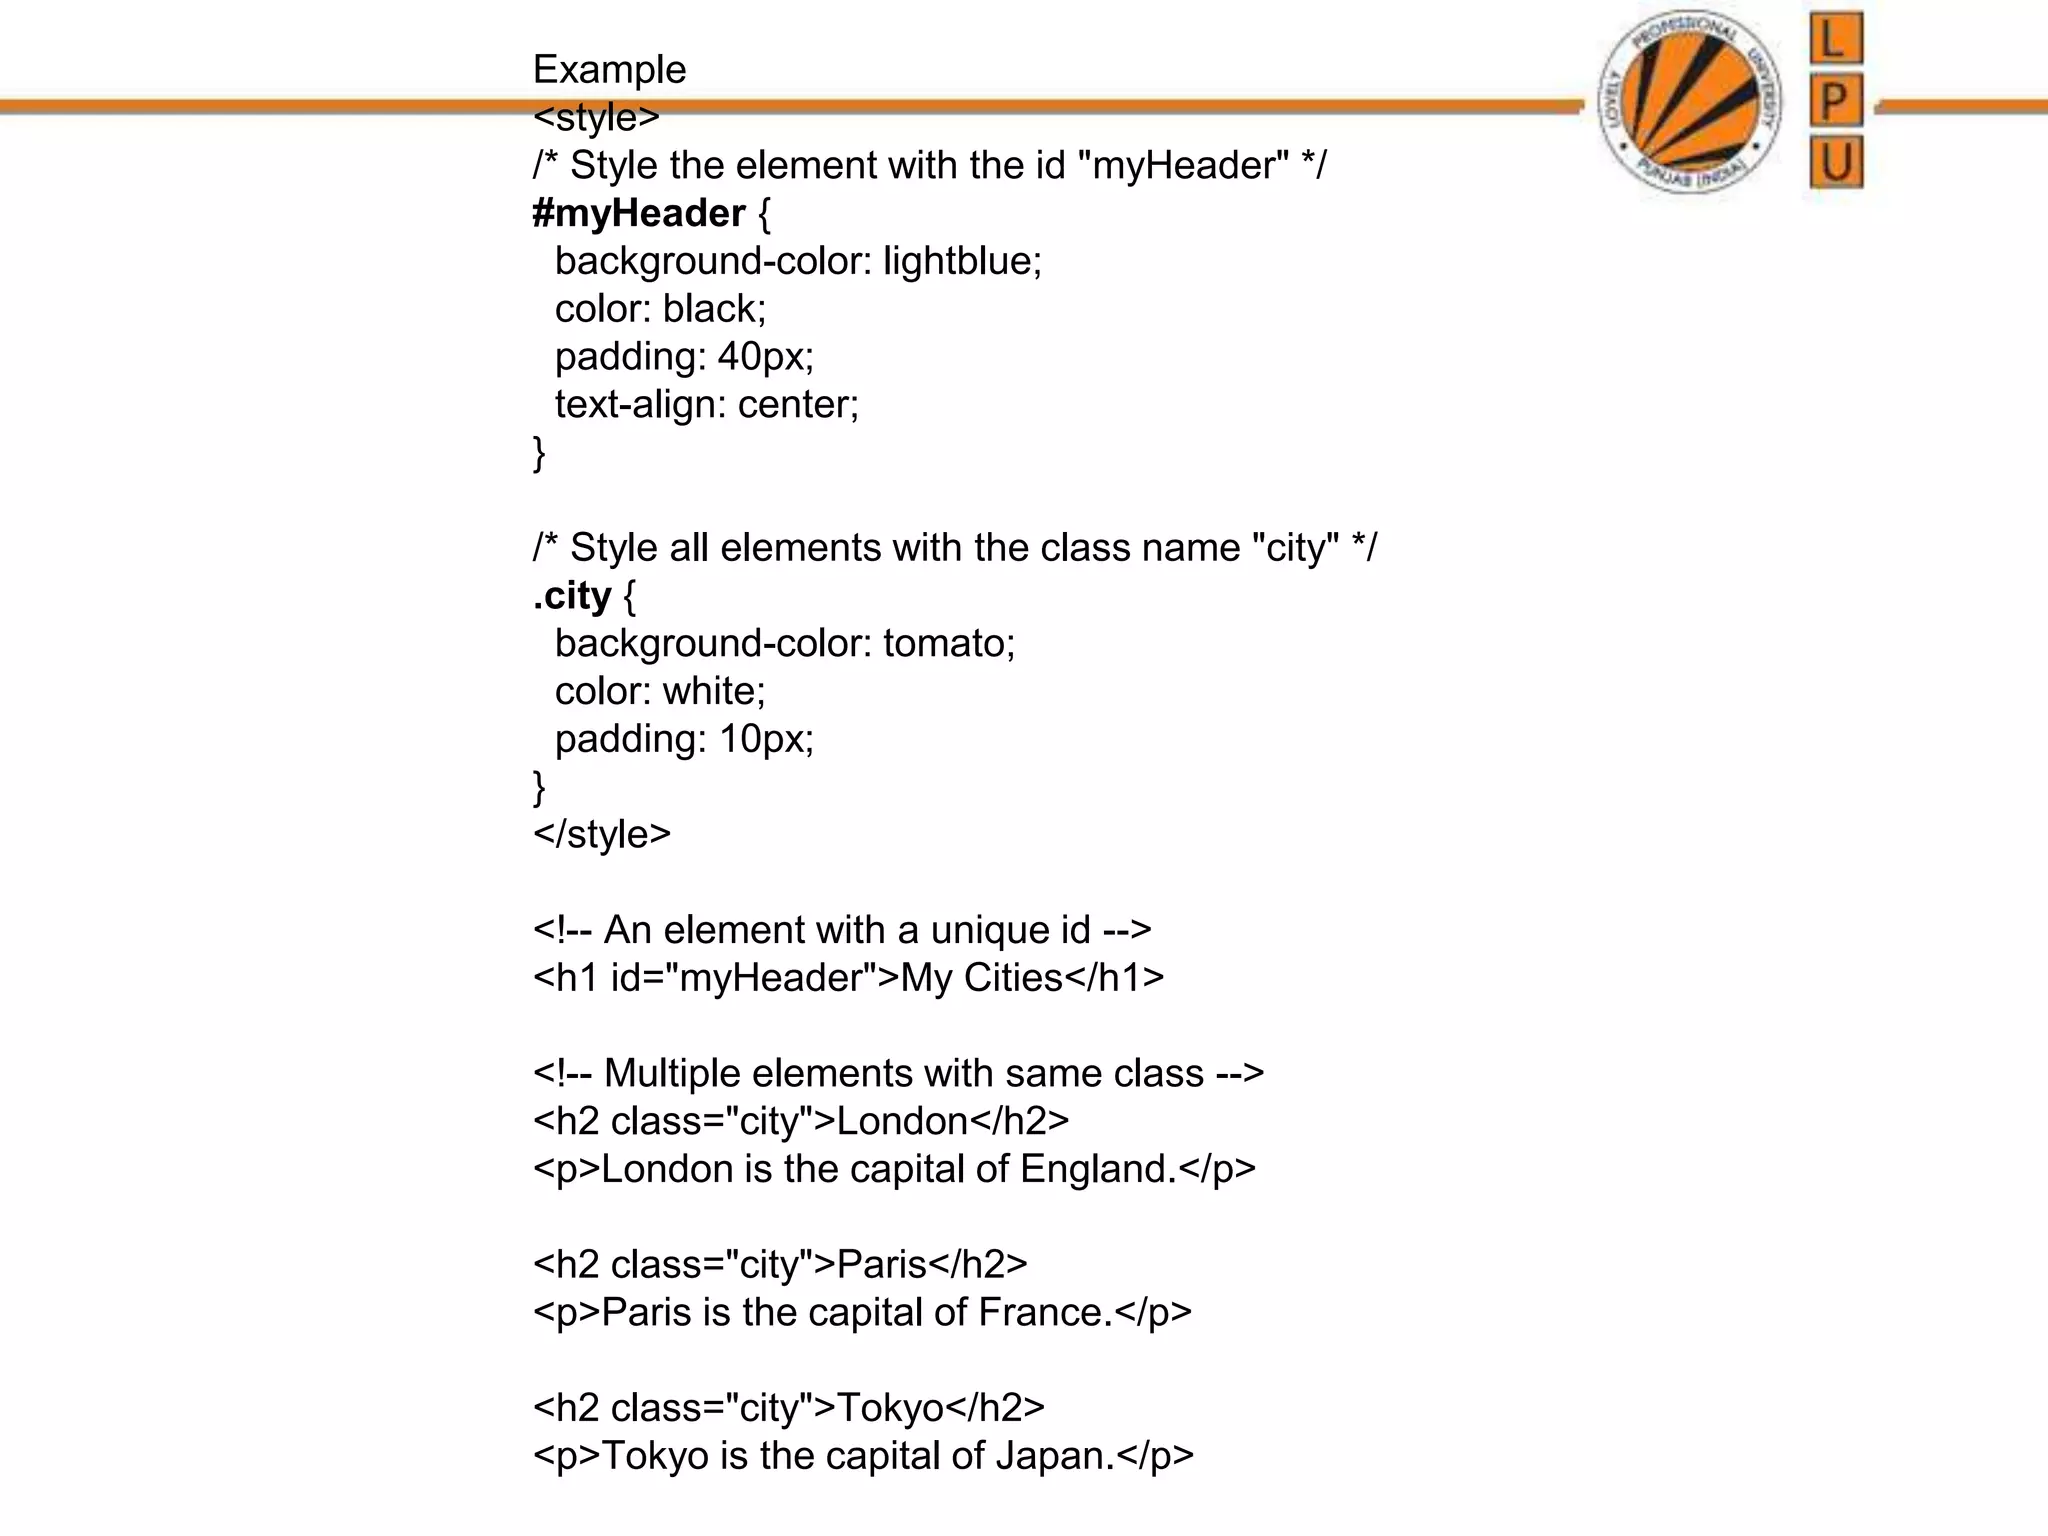
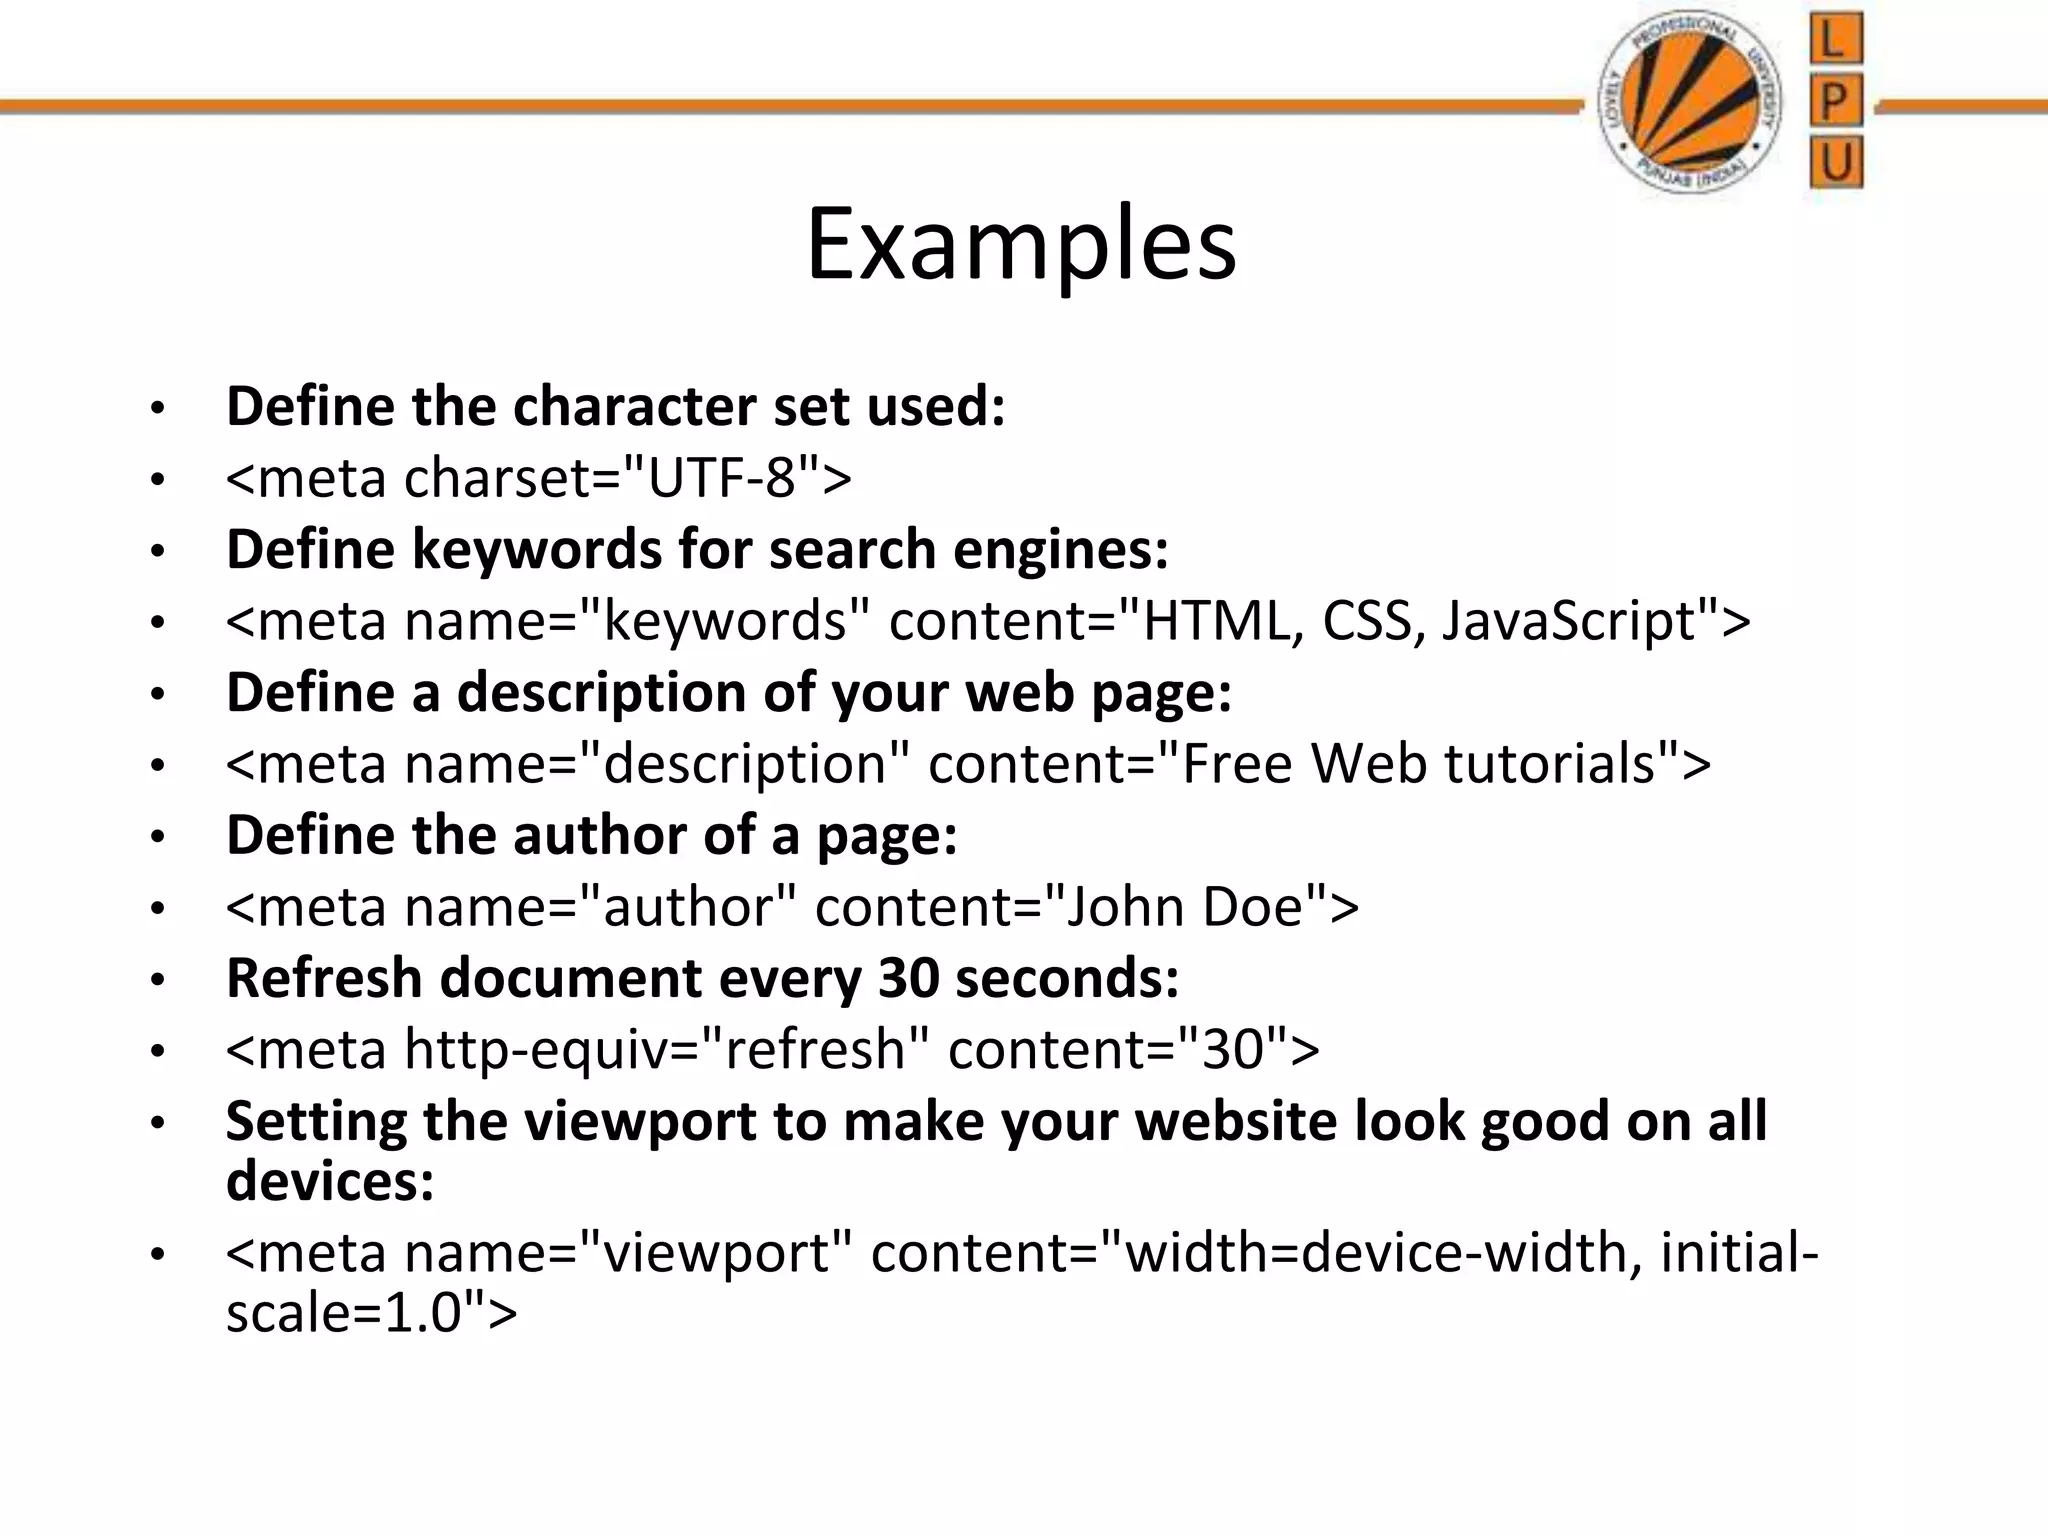
KEMBAR78
AttributesL3.pptx
HTML Attributes
An attribute is used to define the characteristics of an HTML element and is placed inside
the element's opening tag. All attributes are made up of two parts: a name and a value:
The name is the property you want to set. For example, the paragraph <p> element in the
example carries an attribute whose name is align, which you can use to indicate the
alignment of paragraph on the page.
The value is what you want the value of the property to be set and always put within
quotations. The below example shows three possible values of align attribute: left, center
and right.
Names of attributes and their values are not case-sensitive.
For example, BODY Tag, <body> carries many attributes such as bgcolor,
background that you can implement for indicating the back color of your webpage,
or give a specific image or background texture to your page, respectively.
Single or Double Quotes?
• Double quotes around attribute values are
the most common in HTML, but single quotes
can also be used.
• In some situations, when the attribute value
itself contains double quotes, it is necessary
to use single quotes:
Example
<!DOCTYPE html>
<html>
<body>
<h2>Single or Double Quotes?</h2>
<p title='John "ShotGun" Nelson'>John with double
quotes</p>
<p title="John 'ShotGun' Nelson">John with single
quotes</p>
</body>
</html>
Example 1
<!DOCTYPE html>
<html>
<body bgcolor="#E6E6FA">
</body>
</html>
Example 2
<!DOCTYPE html>
<html>
<head>
<title>Align Attribute Example</title>
</head>
<body>
<p align="left">This is left aligned</p>
<p align="center">This is center aligned</p>
<p align="right">This is right aligned</p>
</body>
</html>
Text Direction
The <bdo>...</bdo> element stands for Bi-Directional Override and it is used to override
the current text direction.
Example
<!DOCTYPE html>
<html>
<head>
<title>Text Direction Example</title>
</head>
<body>
<p>This text will go left to right.</p>
<p><bdo dir="rtl">This text will go right to left.</bdo></p>
</body>
</html>
Hyper link
• The <a> tag defines a hyperlink. which is used
to link from one page to another.
• The href attribute specifies the URL of the
page the link goes to:
• Syntax: <a href="url">link text</a>
• Example
<a href="https://lpu.in/">click here</a>
href Example
<!DOCTYPE html>
<html>
<body>
<h1>The a element</h1>
<a href="https://lpu.in/">Visit lpu</a>
</body>
</html>
Link to an Email Address
• Use mailto: inside the href attribute to create
a link that opens the user's email program (to
let them send a new email):
• Example
• <a href="mailto:someone@example.com">Se
nd email</a>
Email Example
<!DOCTYPE html>
<html>
<body>
<p>To know any information:</p>
<p><a
href="mailto:deepali.27326@lpu.co.in">Send
email</a></p>
</body>
</html>
The target Attribute
• By default, the linked page will be displayed in
the current browser window. To change this,
you must specify another target for the link.
• The target attribute specifies where to open the
linked document.
• _self - Default. Opens the document in the same
window/tab as it was clicked
• _blank - Opens the document in a new window
or tab
target Example
<!DOCTYPE html>
<html>
<body>
<h1>The a target attribute</h1>
<p>Open link in a new window or tab: <a
href="https://lpu.in/" target="_blank">Visit lpu</a></p>
</body>
</html>
img tag and src Attribute
• The <img> tag is used to embed an image in
an HTML page.
• The src attribute specifies the path to the
image to be displayed.
• The <img> tag should also contain
the width and height attributes, which
specify the width and height of the image (in
pixels)
Example
• <!DOCTYPE html>
• <html>
• <body>
•
<h2>The src Attribute</h2>
• <p>HTML images are defined with the img tag, and the filename
of the image source is specified in the src attribute:</p>
•
<img src="C:UsersADMINDesktopCSE326image1.jpg"
width="500" height="600">
•
</body>
• </html>
The alt Attribute
• The required alt attribute for the <img> tag specifies
an alternate text for an image, if the image for some
reason cannot be displayed. This can be due to a
slow connection, or an error in the src attribute, or if
the user uses a screen reader.
Example
<!DOCTYPE html>
<html>
<body>
<h2>The alt Attribute</h2>
<p>The alt attribute should reflect the image content, so users who
cannot see the image get an understanding of what the image
contains:</p>
<img src="img_girl.jpg" alt="Girl with a jacket" width="500"
height="600">
</body>
</html>
Use an Image as a Link
• To use an image as a link, just put the <img> tag inside the <a> tag:
Example:-
<!DOCTYPE html>
<html>
<body>
<h2>Image as a Link</h2>
<p>The image below is a link. Try to click on it.</p>
<a href="default.asp"><img src="smiley.gif" alt="HTML tutorial"
style="width:42px;height:42px;"></a>
</body>
</html>
HTML Link Colors
• By default, a link will appear like this (in all
browsers):
• An unvisited link is underlined and blue
• A visited link is underlined and purple
• An active link is underlined and red
• You can change the link state colors, by using
CSS.
<!DOCTYPE html>
<html>
<head>
<style>
a:link {
color: green;
background-color: transparent;
text-decoration: none;
}
a:visited {
color: pink;
background-color: transparent;
text-decoration: none;
}
a:hover {
color: red;
background-color: transparent;
text-decoration: underline;
}
a:active {
color: yellow;
background-color: transparent;
text-decoration: underline;
}
</style>
</head>
<body>
<h2>Link Colors</h2>
<p>You can change the default colors of links</p>
<a href="html_images.asp" target="_blank">HTML Images</a>
</body>
</html>
The lang Attribute
• You should always include the lang attribute inside
the <html> tag, to declare the language of the Web
page.
• This is meant to assist search engines and browsers.
Example:-
<!DOCTYPE html>
<html lang="en">
<body>
...
</body>
</html>
lang attribute continue...
• Country codes can also be added to the
language code in the lang attribute. So, the first
two characters define the language of the HTML
page, and the last two characters define the
country.
Example:-
<!DOCTYPE html>
<html lang="en-US">
<body>
...
</body>
</html>
Core Attributes
The four core attributes that can be used on the majority of HTML elements are:
id
title
class
style
1. The id Attribute
The id Attribute
The id attribute specifies a unique id for an HTML element. The value of
the id attribute must be unique within the HTML document.
The id attribute is used to point to a specific style declaration in a style sheet. It is
also used by JavaScript to access and manipulate the element with the specific id.
The syntax for id is: write a hash character (#), followed by an id name. Then,
define the CSS properties within curly braces {}.
Example
<!DOCTYPE html>
<html>
<head>
<style>
#myHeader {
background-color: lightblue;
color: black;
padding: 40px;
text-align: center;
}
</style>
</head>
<body>
<h1 id="myHeader">My Header</h1>
</body>
</html>
2. The title Attribute
• The title attribute specifies extra information about an element.
• The information is most often shown as a tooltip text when the
mouse moves over the element.
Example
<!DOCTYPE html>
<html>
<head>
<title>The title Attribute Example</title>
</head>
<body>
<h3 title="Hello HTML!">This is information is important</h3>
</body>
</html>
3. The class Attribute
Difference Between Class and ID
A class name can be used by multiple HTML elements, while an id name must only be
used by one HTML element within the page:
Example
<style>
/* Style the element with the id "myHeader" */
#myHeader {
background-color: lightblue;
color: black;
padding: 40px;
text-align: center;
}
/* Style all elements with the class name "city" */
.city {
background-color: tomato;
color: white;
padding: 10px;
}
</style>
<!-- An element with a unique id -->
<h1 id="myHeader">My Cities</h1>
<!-- Multiple elements with same class -->
<h2 class="city">London</h2>
<p>London is the capital of England.</p>
<h2 class="city">Paris</h2>
<p>Paris is the capital of France.</p>
<h2 class="city">Tokyo</h2>
<p>Tokyo is the capital of Japan.</p>
4. The style Attribute
CSS can be added to HTML documents in 3 ways:
• Inline - by using the style attribute inside HTML elements
• Internal
• External
<!DOCTYPE html>
<html>
<head>
<title>The style Attribute</title>
</head>
<body><p style="font-family:arial; color:#FF0000;">Some
text...</p>
</body>
</html>
The HTML <meta> Element
• The <meta> element is typically used to
specify the character set, page description,
keywords, author of the document, and
viewport settings.
• The metadata will not be displayed on the
page, but is used by browsers (how to display
content or reload page), by search engines
(keywords), and other web services.
Examples
• Define the character set used:
• <meta charset="UTF-8">
• Define keywords for search engines:
• <meta name="keywords" content="HTML, CSS, JavaScript">
• Define a description of your web page:
• <meta name="description" content="Free Web tutorials">
• Define the author of a page:
• <meta name="author" content="John Doe">
• Refresh document every 30 seconds:
• <meta http-equiv="refresh" content="30">
• Setting the viewport to make your website look good on all
devices:
• <meta name="viewport" content="width=device-width, initial-
scale=1.0">
Setting the viewport to make your website look good on all
devices:
• <meta name="viewport" content="width=device
-width, initial-scale=1.0">
• This gives the browser instructions on how to
control the page's dimensions and scaling.
• The width=device-width part sets the width of
the page to follow the screen-width of the
device (which will vary depending on the
device).
• The initial-scale=1.0 part sets the initial zoom
level when the page is first loaded by the
browser.

AttributesL3.pptx

  • 1.
    HTML Attributes An attributeis used to define the characteristics of an HTML element and is placed inside the element's opening tag. All attributes are made up of two parts: a name and a value: The name is the property you want to set. For example, the paragraph <p> element in the example carries an attribute whose name is align, which you can use to indicate the alignment of paragraph on the page. The value is what you want the value of the property to be set and always put within quotations. The below example shows three possible values of align attribute: left, center and right. Names of attributes and their values are not case-sensitive. For example, BODY Tag, <body> carries many attributes such as bgcolor, background that you can implement for indicating the back color of your webpage, or give a specific image or background texture to your page, respectively.
  • 2.
    Single or DoubleQuotes? • Double quotes around attribute values are the most common in HTML, but single quotes can also be used. • In some situations, when the attribute value itself contains double quotes, it is necessary to use single quotes:
  • 3.
    Example <!DOCTYPE html> <html> <body> <h2>Single orDouble Quotes?</h2> <p title='John "ShotGun" Nelson'>John with double quotes</p> <p title="John 'ShotGun' Nelson">John with single quotes</p> </body> </html>
  • 4.
    Example 1 <!DOCTYPE html> <html> <bodybgcolor="#E6E6FA"> </body> </html>
  • 5.
    Example 2 <!DOCTYPE html> <html> <head> <title>AlignAttribute Example</title> </head> <body> <p align="left">This is left aligned</p> <p align="center">This is center aligned</p> <p align="right">This is right aligned</p> </body> </html>
  • 6.
    Text Direction The <bdo>...</bdo>element stands for Bi-Directional Override and it is used to override the current text direction. Example <!DOCTYPE html> <html> <head> <title>Text Direction Example</title> </head> <body> <p>This text will go left to right.</p> <p><bdo dir="rtl">This text will go right to left.</bdo></p> </body> </html>
  • 7.
    Hyper link • The<a> tag defines a hyperlink. which is used to link from one page to another. • The href attribute specifies the URL of the page the link goes to: • Syntax: <a href="url">link text</a> • Example <a href="https://lpu.in/">click here</a>
  • 8.
    href Example <!DOCTYPE html> <html> <body> <h1>Thea element</h1> <a href="https://lpu.in/">Visit lpu</a> </body> </html>
  • 9.
    Link to anEmail Address • Use mailto: inside the href attribute to create a link that opens the user's email program (to let them send a new email): • Example • <a href="mailto:someone@example.com">Se nd email</a>
  • 10.
    Email Example <!DOCTYPE html> <html> <body> <p>Toknow any information:</p> <p><a href="mailto:deepali.27326@lpu.co.in">Send email</a></p> </body> </html>
  • 11.
    The target Attribute •By default, the linked page will be displayed in the current browser window. To change this, you must specify another target for the link. • The target attribute specifies where to open the linked document. • _self - Default. Opens the document in the same window/tab as it was clicked • _blank - Opens the document in a new window or tab
  • 12.
    target Example <!DOCTYPE html> <html> <body> <h1>Thea target attribute</h1> <p>Open link in a new window or tab: <a href="https://lpu.in/" target="_blank">Visit lpu</a></p> </body> </html>
  • 13.
    img tag andsrc Attribute • The <img> tag is used to embed an image in an HTML page. • The src attribute specifies the path to the image to be displayed. • The <img> tag should also contain the width and height attributes, which specify the width and height of the image (in pixels)
  • 14.
    Example • <!DOCTYPE html> •<html> • <body> • <h2>The src Attribute</h2> • <p>HTML images are defined with the img tag, and the filename of the image source is specified in the src attribute:</p> • <img src="C:UsersADMINDesktopCSE326image1.jpg" width="500" height="600"> • </body> • </html>
  • 15.
    The alt Attribute •The required alt attribute for the <img> tag specifies an alternate text for an image, if the image for some reason cannot be displayed. This can be due to a slow connection, or an error in the src attribute, or if the user uses a screen reader.
  • 16.
    Example <!DOCTYPE html> <html> <body> <h2>The altAttribute</h2> <p>The alt attribute should reflect the image content, so users who cannot see the image get an understanding of what the image contains:</p> <img src="img_girl.jpg" alt="Girl with a jacket" width="500" height="600"> </body> </html>
  • 17.
    Use an Imageas a Link • To use an image as a link, just put the <img> tag inside the <a> tag: Example:- <!DOCTYPE html> <html> <body> <h2>Image as a Link</h2> <p>The image below is a link. Try to click on it.</p> <a href="default.asp"><img src="smiley.gif" alt="HTML tutorial" style="width:42px;height:42px;"></a> </body> </html>
  • 18.
    HTML Link Colors •By default, a link will appear like this (in all browsers): • An unvisited link is underlined and blue • A visited link is underlined and purple • An active link is underlined and red • You can change the link state colors, by using CSS.
  • 19.
    <!DOCTYPE html> <html> <head> <style> a:link { color:green; background-color: transparent; text-decoration: none; } a:visited { color: pink; background-color: transparent; text-decoration: none; } a:hover { color: red; background-color: transparent; text-decoration: underline; } a:active { color: yellow; background-color: transparent; text-decoration: underline; } </style> </head> <body> <h2>Link Colors</h2> <p>You can change the default colors of links</p> <a href="html_images.asp" target="_blank">HTML Images</a> </body> </html>
  • 20.
    The lang Attribute •You should always include the lang attribute inside the <html> tag, to declare the language of the Web page. • This is meant to assist search engines and browsers. Example:- <!DOCTYPE html> <html lang="en"> <body> ... </body> </html>
  • 21.
    lang attribute continue... •Country codes can also be added to the language code in the lang attribute. So, the first two characters define the language of the HTML page, and the last two characters define the country. Example:- <!DOCTYPE html> <html lang="en-US"> <body> ... </body> </html>
  • 22.
    Core Attributes The fourcore attributes that can be used on the majority of HTML elements are: id title class style 1. The id Attribute The id Attribute The id attribute specifies a unique id for an HTML element. The value of the id attribute must be unique within the HTML document. The id attribute is used to point to a specific style declaration in a style sheet. It is also used by JavaScript to access and manipulate the element with the specific id. The syntax for id is: write a hash character (#), followed by an id name. Then, define the CSS properties within curly braces {}.
  • 23.
    Example <!DOCTYPE html> <html> <head> <style> #myHeader { background-color:lightblue; color: black; padding: 40px; text-align: center; } </style> </head> <body> <h1 id="myHeader">My Header</h1> </body> </html>
  • 24.
    2. The titleAttribute • The title attribute specifies extra information about an element. • The information is most often shown as a tooltip text when the mouse moves over the element. Example <!DOCTYPE html> <html> <head> <title>The title Attribute Example</title> </head> <body> <h3 title="Hello HTML!">This is information is important</h3> </body> </html>
  • 25.
    3. The classAttribute Difference Between Class and ID A class name can be used by multiple HTML elements, while an id name must only be used by one HTML element within the page:
  • 26.
    Example <style> /* Style theelement with the id "myHeader" */ #myHeader { background-color: lightblue; color: black; padding: 40px; text-align: center; } /* Style all elements with the class name "city" */ .city { background-color: tomato; color: white; padding: 10px; } </style> <!-- An element with a unique id --> <h1 id="myHeader">My Cities</h1> <!-- Multiple elements with same class --> <h2 class="city">London</h2> <p>London is the capital of England.</p> <h2 class="city">Paris</h2> <p>Paris is the capital of France.</p> <h2 class="city">Tokyo</h2> <p>Tokyo is the capital of Japan.</p>
  • 27.
    4. The styleAttribute CSS can be added to HTML documents in 3 ways: • Inline - by using the style attribute inside HTML elements • Internal • External <!DOCTYPE html> <html> <head> <title>The style Attribute</title> </head> <body><p style="font-family:arial; color:#FF0000;">Some text...</p> </body> </html>
  • 28.
    The HTML <meta>Element • The <meta> element is typically used to specify the character set, page description, keywords, author of the document, and viewport settings. • The metadata will not be displayed on the page, but is used by browsers (how to display content or reload page), by search engines (keywords), and other web services.
  • 29.
    Examples • Define thecharacter set used: • <meta charset="UTF-8"> • Define keywords for search engines: • <meta name="keywords" content="HTML, CSS, JavaScript"> • Define a description of your web page: • <meta name="description" content="Free Web tutorials"> • Define the author of a page: • <meta name="author" content="John Doe"> • Refresh document every 30 seconds: • <meta http-equiv="refresh" content="30"> • Setting the viewport to make your website look good on all devices: • <meta name="viewport" content="width=device-width, initial- scale=1.0">
  • 30.
    Setting the viewportto make your website look good on all devices: • <meta name="viewport" content="width=device -width, initial-scale=1.0"> • This gives the browser instructions on how to control the page's dimensions and scaling. • The width=device-width part sets the width of the page to follow the screen-width of the device (which will vary depending on the device). • The initial-scale=1.0 part sets the initial zoom level when the page is first loaded by the browser.