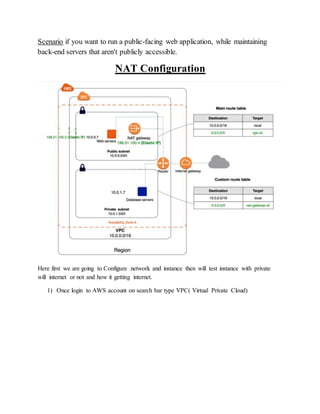
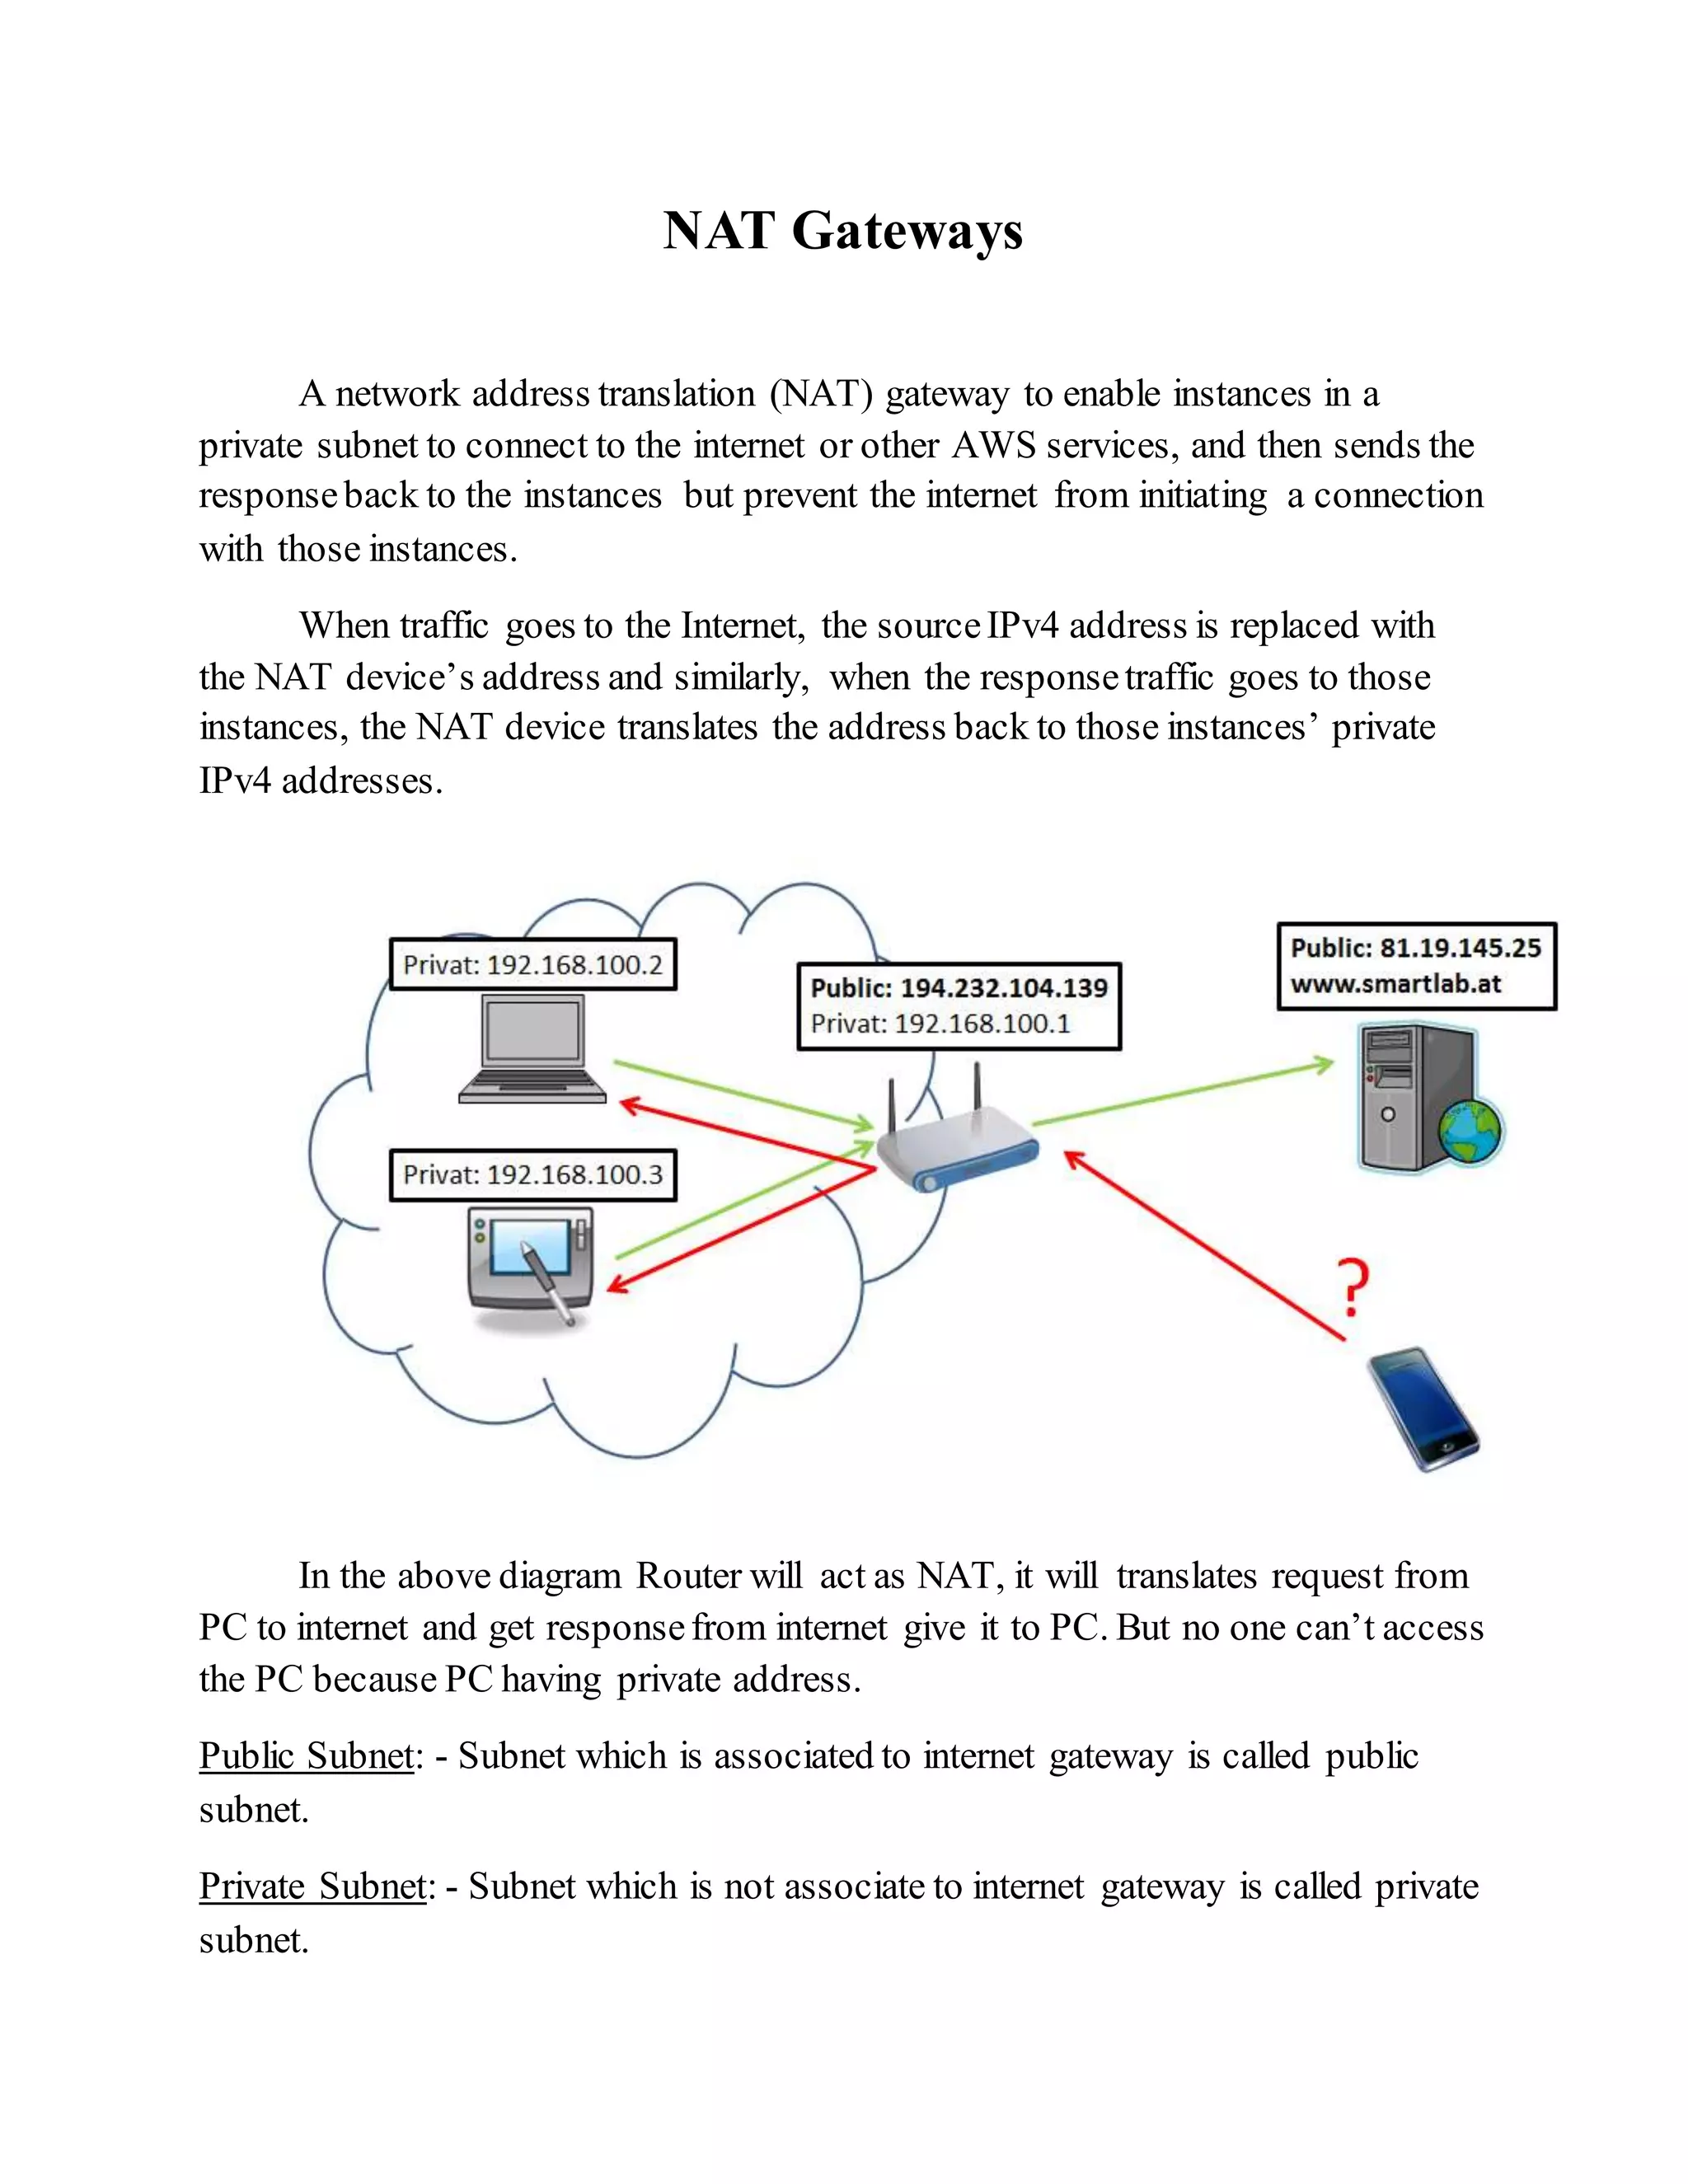
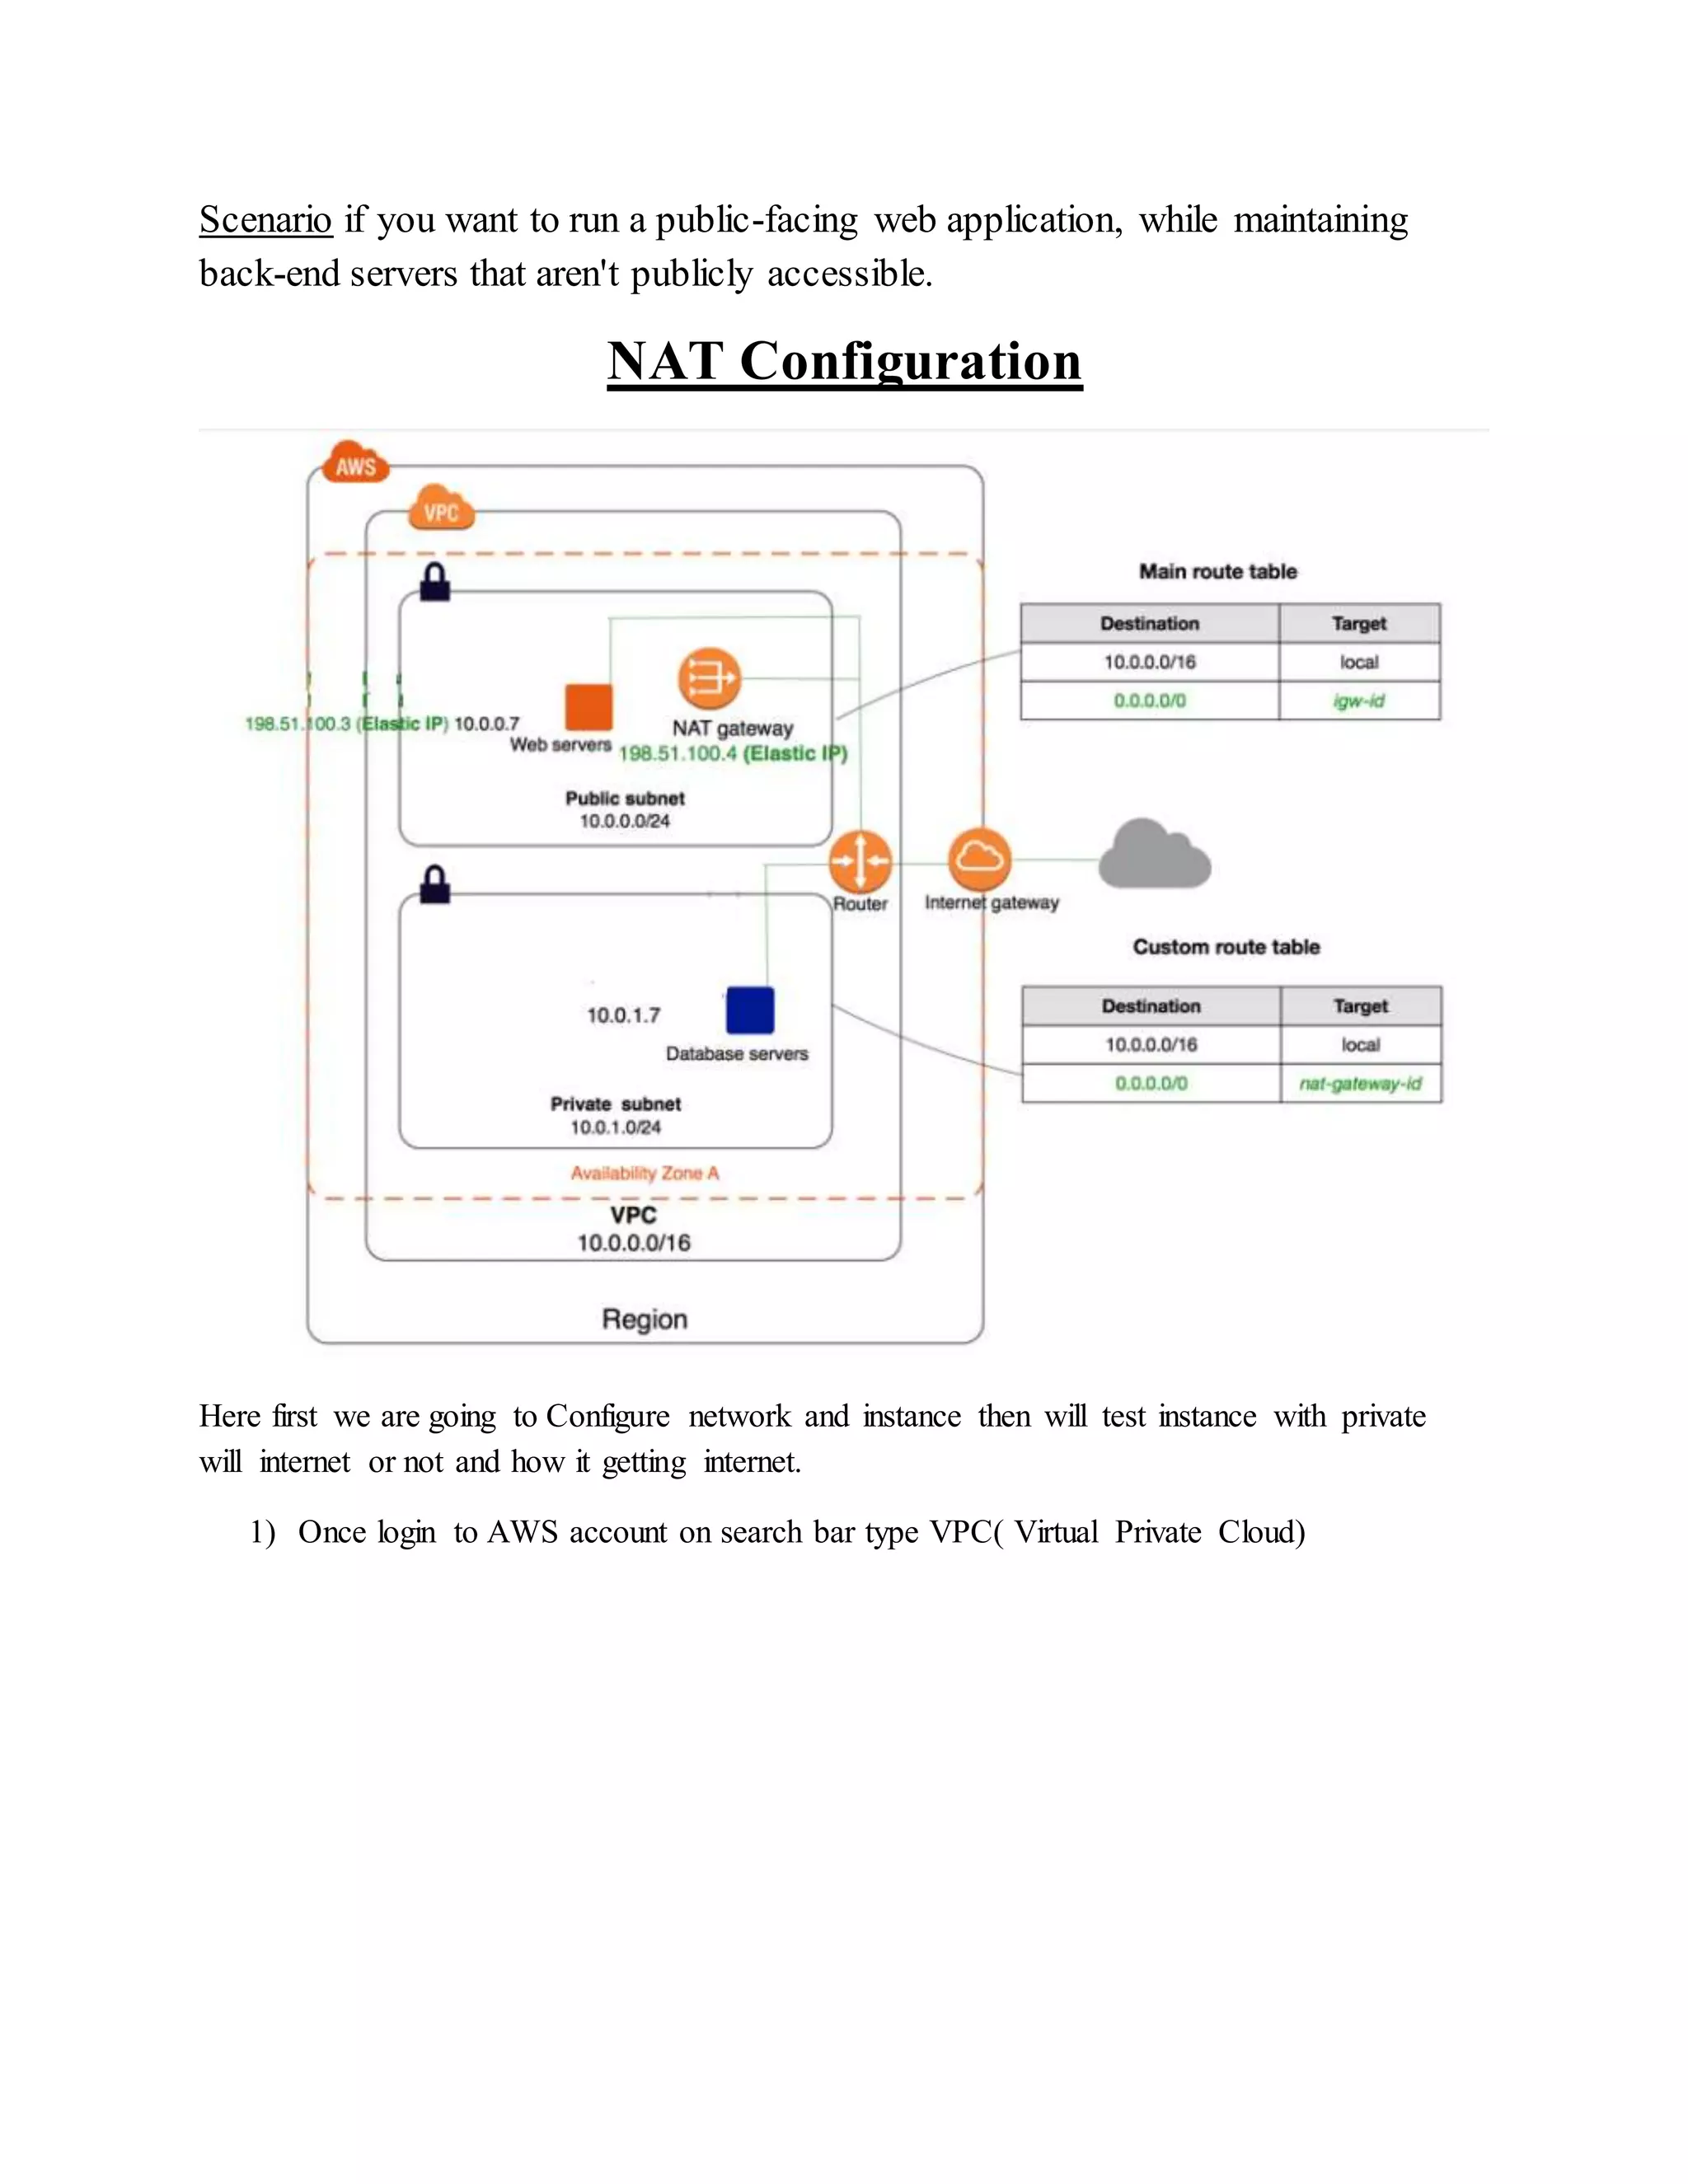
KEMBAR78
AWS | NAT Gateway Configuration | DOCX
NAT Gateways
A network address translation (NAT) gateway to enable instances in a
private subnet to connect to the internet or other AWS services, and then sends the
responseback to the instances but prevent the internet from initiating a connection
with those instances.
When traffic goes to the Internet, the sourceIPv4 address is replaced with
the NAT device’s address and similarly, when the responsetraffic goes to those
instances, the NAT device translates the address back to those instances’ private
IPv4 addresses.
In the above diagram Router will act as NAT, it will translates request from
PC to internet and get responsefrom internet give it to PC. But no one can’t access
the PC because PC having private address.
Public Subnet: - Subnet which is associated to internet gateway is called public
subnet.
Private Subnet: - Subnet which is not associate to internet gateway is called private
subnet.
Scenario if you want to run a public-facing web application, while maintaining
back-end servers that aren't publicly accessible.
NAT Configuration
Here first we are going to Configure network and instance then will test instance with private
will internet or not and how it getting internet.
1) Once login to AWS account on search bar type VPC( Virtual Private Cloud)
2) Chose ‘your VPCS’ then click on Create VPC, it will ask you name and ipv4 CIDR,
then click on ‘Create’.
3) We created VPC, under VPC we are creating 2 Subnets by giving name called public and
private with CIDR.
Chose subnets  Create Subnet  give a name(Public-Subnet)  select your VPC  give
IPV4, then click on Create
 Here I created 2 subnets with the name pubic and private.
 Availability Zone, if you want you can select or system will select one by default.
4) We need to create Internet Gateway and need to add to VPC
 Internet Gateway allows communication between instances in your VPC and the
Internet.
(Internet Gateway  Create Internet Gateway  give name  Create)
(Internet Gateway  Select Internet Gateway  Action  Attach to VPC  Select
Respective VPC  Attach.)
5) Attach Internet Gateway to Main Route Table
(Route Table  Select Route table  go to Routes  Edit  Add another route
table[0.0.0.0/0----IGW-XXXX] save.)
6) Go to NAT Gateway
(NAT Gateway Create NAT Gateway  Select Public subnet  Give Elastic IP
Create a NAT Gateway.)
7) Create Custom Route Table
(Route table  Create Route table Select your VPC  click on Create)
8) Attach NAT Gateway to Custom Route Table
(Route Table  Select Route table  go to Routes  Edit  Add another route
table[0.0.0.0/0----NAT-XXXX] save.)
Then Associate Private Subnet To this route Table
Configure network setup done
9) Create EC2 instance on both the subnets under your network.
Go to services select EC2 service
10) Chose instance, click on create instance
Under public subnet enable public IP in your VPC
Under Private Subnet Disable Public IP in your VPC
With Default setting Launch instance
Public IP Instance we can able to connect from your machine and system will get
internet.
Private IP Instance we can’t connect from your machine, Take remote from public IP
instance and Test Internet connectivity.
For test, how instance getting internet use CMD, [ tracert 8.8.8.8 ] the first IP is the NAT
Private IP.
This instance getting internet from NAT Gateway.

AWS | NAT Gateway Configuration

  • 1.
    NAT Gateways A networkaddress translation (NAT) gateway to enable instances in a private subnet to connect to the internet or other AWS services, and then sends the responseback to the instances but prevent the internet from initiating a connection with those instances. When traffic goes to the Internet, the sourceIPv4 address is replaced with the NAT device’s address and similarly, when the responsetraffic goes to those instances, the NAT device translates the address back to those instances’ private IPv4 addresses. In the above diagram Router will act as NAT, it will translates request from PC to internet and get responsefrom internet give it to PC. But no one can’t access the PC because PC having private address. Public Subnet: - Subnet which is associated to internet gateway is called public subnet. Private Subnet: - Subnet which is not associate to internet gateway is called private subnet.
  • 2.
    Scenario if youwant to run a public-facing web application, while maintaining back-end servers that aren't publicly accessible. NAT Configuration Here first we are going to Configure network and instance then will test instance with private will internet or not and how it getting internet. 1) Once login to AWS account on search bar type VPC( Virtual Private Cloud)
  • 3.
    2) Chose ‘yourVPCS’ then click on Create VPC, it will ask you name and ipv4 CIDR, then click on ‘Create’. 3) We created VPC, under VPC we are creating 2 Subnets by giving name called public and private with CIDR. Chose subnets  Create Subnet  give a name(Public-Subnet)  select your VPC  give IPV4, then click on Create  Here I created 2 subnets with the name pubic and private.
  • 4.
     Availability Zone,if you want you can select or system will select one by default. 4) We need to create Internet Gateway and need to add to VPC  Internet Gateway allows communication between instances in your VPC and the Internet. (Internet Gateway  Create Internet Gateway  give name  Create) (Internet Gateway  Select Internet Gateway  Action  Attach to VPC  Select Respective VPC  Attach.)
  • 5.
    5) Attach InternetGateway to Main Route Table (Route Table  Select Route table  go to Routes  Edit  Add another route table[0.0.0.0/0----IGW-XXXX] save.)
  • 6.
    6) Go toNAT Gateway (NAT Gateway Create NAT Gateway  Select Public subnet  Give Elastic IP Create a NAT Gateway.) 7) Create Custom Route Table (Route table  Create Route table Select your VPC  click on Create) 8) Attach NAT Gateway to Custom Route Table
  • 7.
    (Route Table Select Route table  go to Routes  Edit  Add another route table[0.0.0.0/0----NAT-XXXX] save.) Then Associate Private Subnet To this route Table Configure network setup done 9) Create EC2 instance on both the subnets under your network. Go to services select EC2 service 10) Chose instance, click on create instance
  • 8.
    Under public subnetenable public IP in your VPC Under Private Subnet Disable Public IP in your VPC With Default setting Launch instance
  • 9.
    Public IP Instancewe can able to connect from your machine and system will get internet. Private IP Instance we can’t connect from your machine, Take remote from public IP instance and Test Internet connectivity. For test, how instance getting internet use CMD, [ tracert 8.8.8.8 ] the first IP is the NAT Private IP. This instance getting internet from NAT Gateway.