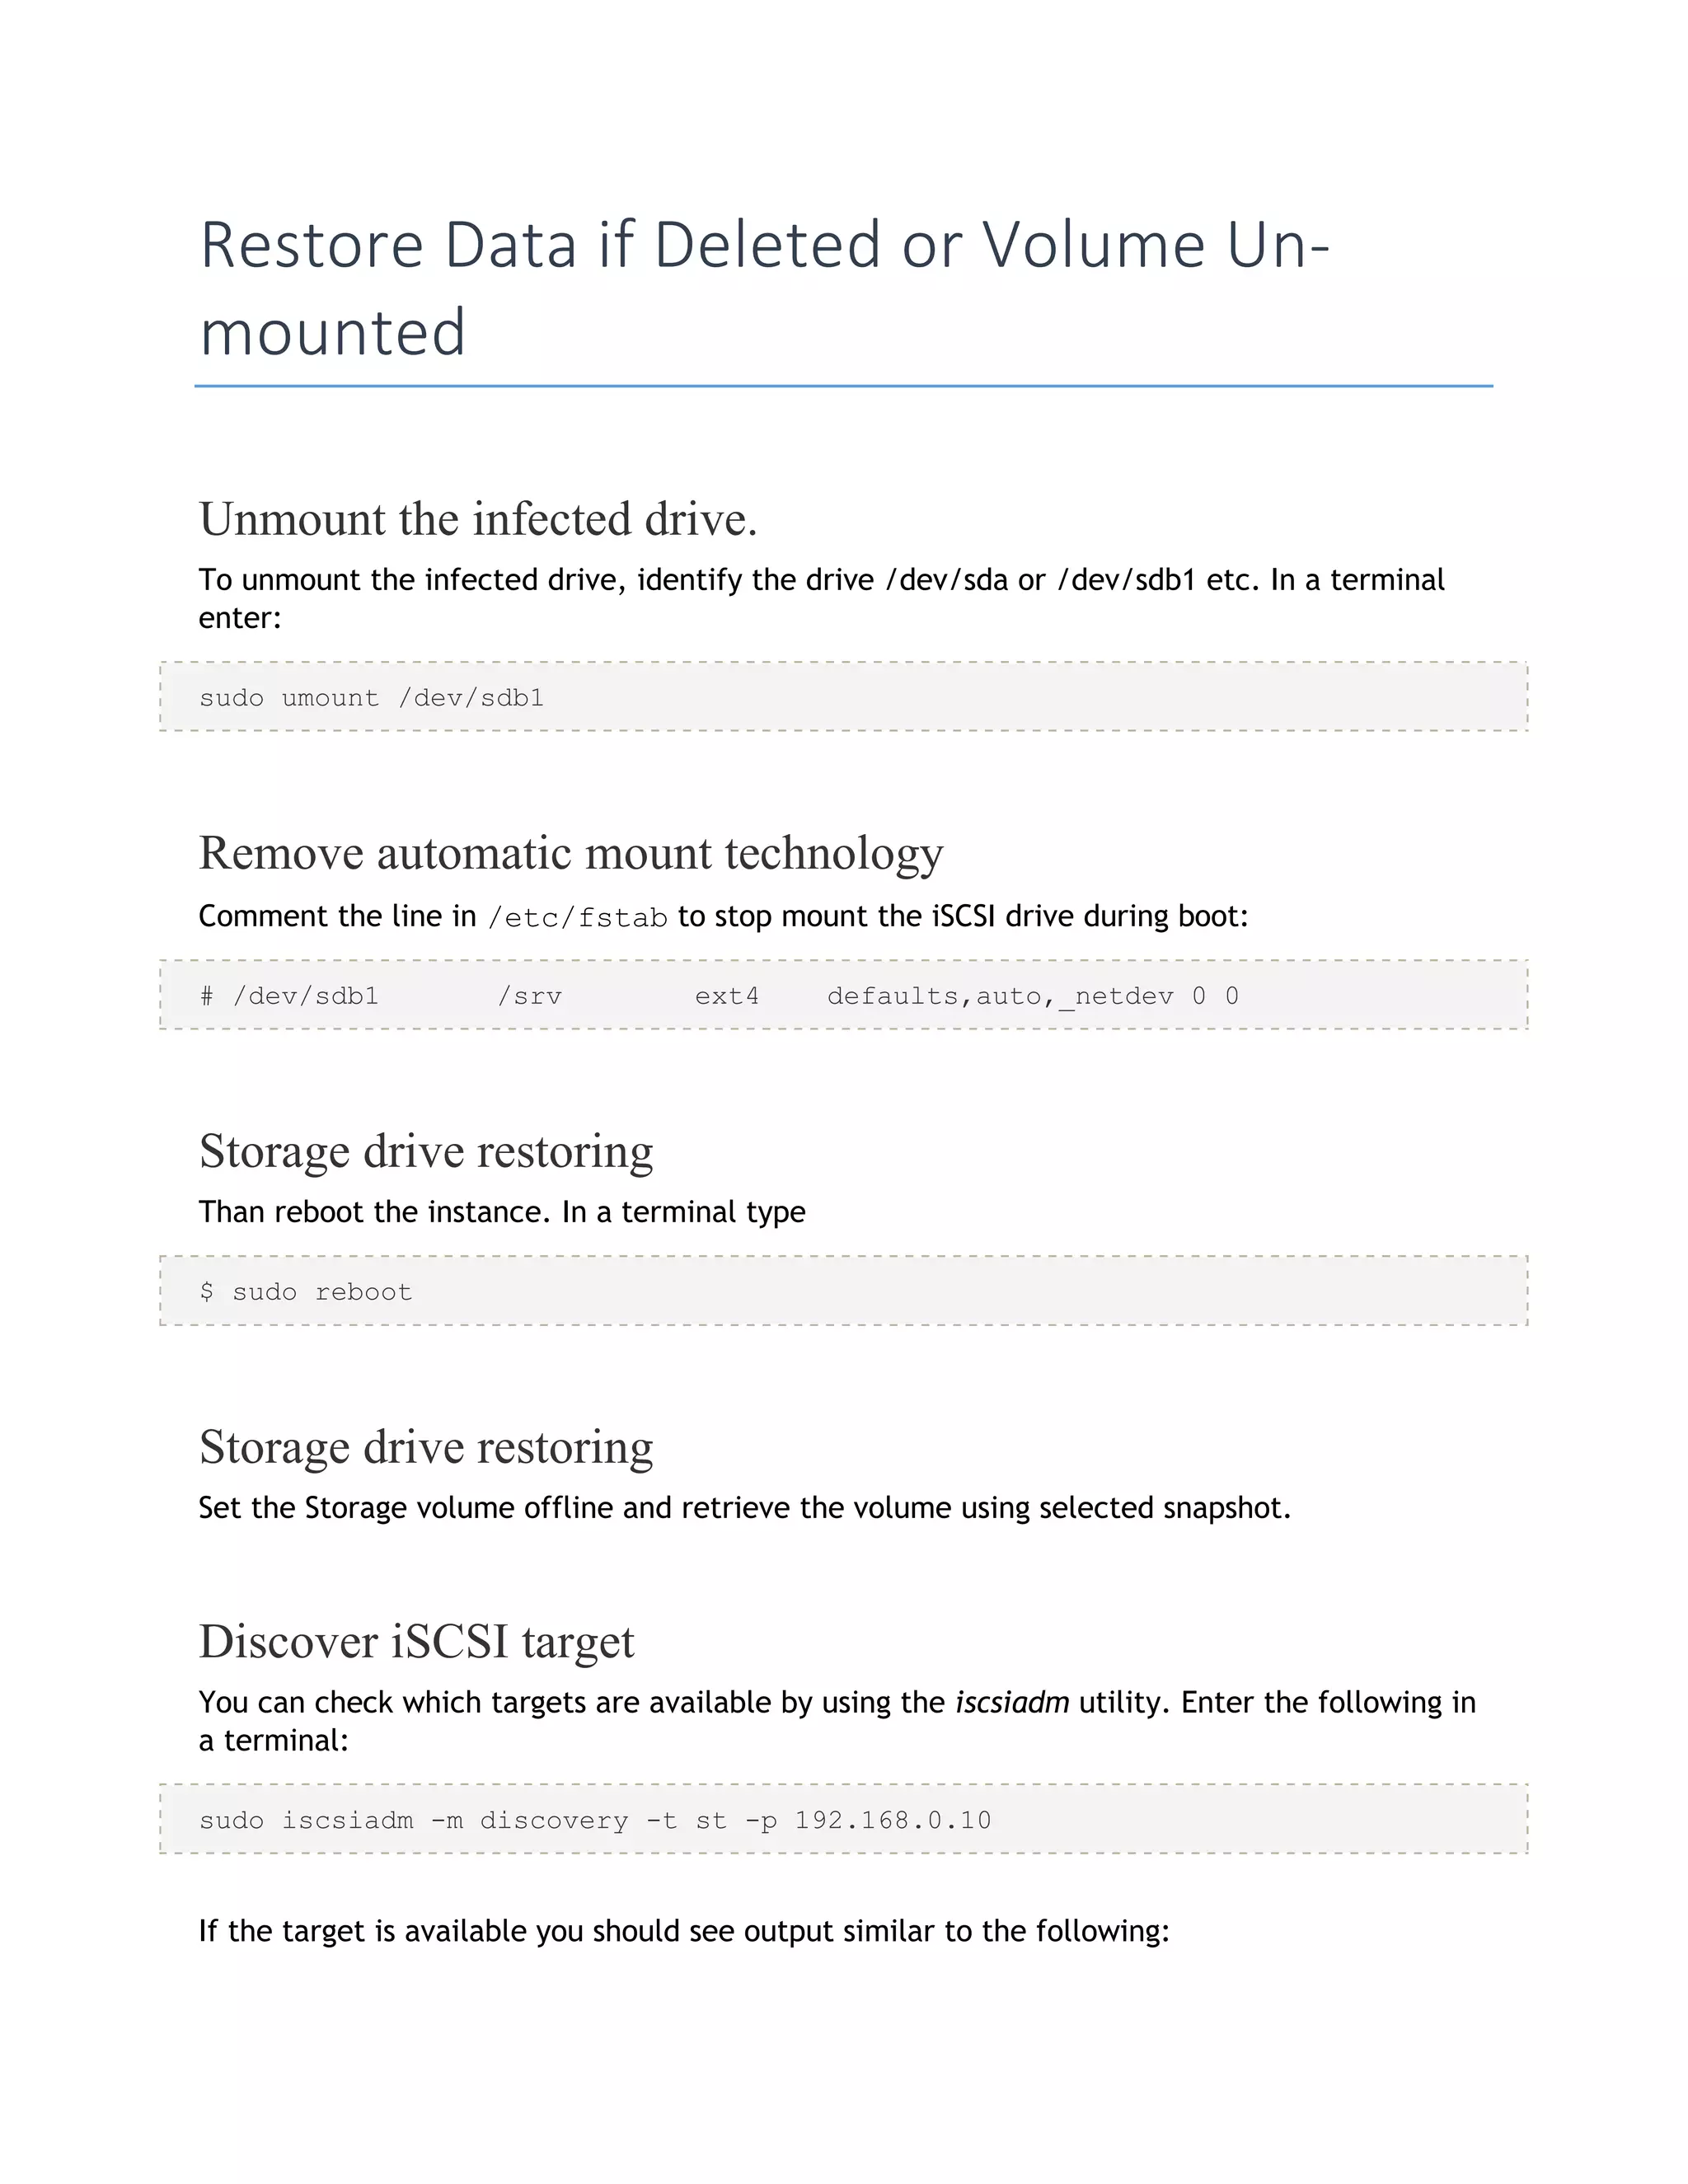
KEMBAR78
Connect dell equallogic storage to linux instance | PDF
Connect Dell Equallogic Storage
to Linux Instance
iSCSI initiator configure, iSCSI reinitiate when link break and data
recovery for Linux instance in Openstack
8/21/2013
A.S.M. Shamsuzzaman
Md. Saeed Siddik
Dhaka, Bangladesh
Connect Dell Equallogic Storage to Linux
Instance: iSCSI Initiator
iSCSI Initiator Install
To configure Ubuntu Server as an iSCSI initiator install the open-iscsi package. In a terminal
enter:
sudo apt-get install open-iscsi
iSCSI Initiator Configuration
Once the open-iscsi package is installed, edit /etc/iscsi/iscsid.conf changing the
following:
node.startup = automatic
You can check which targets are available by using the iscsiadm utility. Enter the following in
a terminal:
sudo iscsiadm -m discovery -t st -p 192.168.0.10
-m: determines the mode that iscsiadm executes in.
-t: specifies the type of discovery.
-p: option indicates the target IP address.
Change example 192.168.0.10 to the target IP address on your network.
If the target is available you should see output similar to the following:
192.168.0.10:3260,1 iqn.1992-05.com.emc:sl7b92030000520000-2
The iqn number and IP address above will vary depending on your hardware.
You should now be able to connect to the iSCSI target, and depending on your target setup
you may have to enter user credentials. Login to the iSCSI node:
sudo iscsiadm -m node --login
Check to make sure that the new disk has been detected using dmesg:
dmesg | grep sd
[ 4.322384] sd 2:0:0:0: Attached scsi generic sg1 type 0
[ 4.322797] sd 2:0:0:0: [sda] 41943040 512-byte logical blocks: (21.4
GB/20.0 GiB)
[ 4.322843] sd 2:0:0:0: [sda] Write Protect is off
[ 4.322846] sd 2:0:0:0: [sda] Mode Sense: 03 00 00 00
[ 4.322896] sd 2:0:0:0: [sda] Cache data unavailable
[ 4.322899] sd 2:0:0:0: [sda] Assuming drive cache: write through
[ 4.323230] sd 2:0:0:0: [sda] Cache data unavailable
[ 4.323233] sd 2:0:0:0: [sda] Assuming drive cache: write through
[ 4.325312] sda: sda1 sda2 < sda5 >
[ 4.325729] sd 2:0:0:0: [sda] Cache data unavailable
[ 4.325732] sd 2:0:0:0: [sda] Assuming drive cache: write through
[ 4.325735] sd 2:0:0:0: [sda] Attached SCSI disk
[ 2486.941805] sd 4:0:0:3: Attached scsi generic sg3 type 0
[ 2486.952093] sd 4:0:0:3: [sdb] 1126400000 512-byte logical blocks: (576
GB/537 GiB)
[ 2486.954195] sd 4:0:0:3: [sdb] Write Protect is off
[ 2486.954200] sd 4:0:0:3: [sdb] Mode Sense: 8f 00 00 08
[ 2486.954692] sd 4:0:0:3: [sdb] Write cache: disabled, read cache: enabled,
doesn't
support DPO or FUA
[ 2486.960577] sdb: sdb1
[ 2486.964862] sd 4:0:0:3: [sdb] Attached SCSI disk
In the output above sdb is the new iSCSI disk. Remember this is just an example; the output
you see on your screen will vary.
Next, create a partition, format the file system, and mount the new iSCSI disk. In a terminal
enter:
sudo fdisk /dev/sdb
n
p
enter
w
The above commands are from inside the fdisk utility; see man fdisk for more detailed
instructions. Also, the cfdisk utility is sometimes more user friendly.
Now format the file system and mount it to /srv as an example:
sudo mkfs.ext4 /dev/sdb1
sudo mount /dev/sdb1 /srv
Finally, add an entry to /etc/fstab to mount the iSCSI drive during boot:
/dev/sdb1 /srv ext4 defaults,auto,_netdev 0 0
It is a good idea to make sure everything is working as expected by rebooting the server.
Restore Data if Deleted or Volume Un-
mounted
Unmount the infected drive.
To unmount the infected drive, identify the drive /dev/sda or /dev/sdb1 etc. In a terminal
enter:
sudo umount /dev/sdb1
Remove automatic mount technology
Comment the line in /etc/fstab to stop mount the iSCSI drive during boot:
# /dev/sdb1 /srv ext4 defaults,auto,_netdev 0 0
Storage drive restoring
Than reboot the instance. In a terminal type
$ sudo reboot
Storage drive restoring
Set the Storage volume offline and retrieve the volume using selected snapshot.
Discover iSCSI target
You can check which targets are available by using the iscsiadm utility. Enter the following in
a terminal:
sudo iscsiadm -m discovery -t st -p 192.168.0.10
If the target is available you should see output similar to the following:
192.168.0.10:3260,1 iqn.1992-05.com.emc:sl7b92030000520000-2
The iqn number and IP address above will vary depending on your hardware.
Login to target
You should now be able to connect to the iSCSI target, and depending on your target setup
you may have to enter user credentials. Login to the iSCSI node:
sudo iscsiadm -m node --login
this command should connect to the new drive which is already well partitioned. So you don’t
need to moderate it’s partition.
Mount the volume
Finally mount the volume. In a terminal enter:
sudo mount /dev/sdb1
Permanent mount the iSCSI drive during boot
Finally, add an entry to /etc/fstab to mount the iSCSI drive during boot:
/dev/sdb1 /srv ext4 defaults,auto,_netdev 0 0
It is a good idea to make sure everything is working as expected by rebooting the server.
Help: https://help.ubuntu.com/lts/serverguide/iscsi-initiator.html

Connect dell equallogic storage to linux instance

  • 1.
    Connect Dell EquallogicStorage to Linux Instance iSCSI initiator configure, iSCSI reinitiate when link break and data recovery for Linux instance in Openstack 8/21/2013 A.S.M. Shamsuzzaman Md. Saeed Siddik Dhaka, Bangladesh
  • 2.
    Connect Dell EquallogicStorage to Linux Instance: iSCSI Initiator iSCSI Initiator Install To configure Ubuntu Server as an iSCSI initiator install the open-iscsi package. In a terminal enter: sudo apt-get install open-iscsi iSCSI Initiator Configuration Once the open-iscsi package is installed, edit /etc/iscsi/iscsid.conf changing the following: node.startup = automatic You can check which targets are available by using the iscsiadm utility. Enter the following in a terminal: sudo iscsiadm -m discovery -t st -p 192.168.0.10 -m: determines the mode that iscsiadm executes in. -t: specifies the type of discovery. -p: option indicates the target IP address. Change example 192.168.0.10 to the target IP address on your network. If the target is available you should see output similar to the following: 192.168.0.10:3260,1 iqn.1992-05.com.emc:sl7b92030000520000-2 The iqn number and IP address above will vary depending on your hardware. You should now be able to connect to the iSCSI target, and depending on your target setup you may have to enter user credentials. Login to the iSCSI node: sudo iscsiadm -m node --login Check to make sure that the new disk has been detected using dmesg: dmesg | grep sd
  • 3.
    [ 4.322384] sd2:0:0:0: Attached scsi generic sg1 type 0 [ 4.322797] sd 2:0:0:0: [sda] 41943040 512-byte logical blocks: (21.4 GB/20.0 GiB) [ 4.322843] sd 2:0:0:0: [sda] Write Protect is off [ 4.322846] sd 2:0:0:0: [sda] Mode Sense: 03 00 00 00 [ 4.322896] sd 2:0:0:0: [sda] Cache data unavailable [ 4.322899] sd 2:0:0:0: [sda] Assuming drive cache: write through [ 4.323230] sd 2:0:0:0: [sda] Cache data unavailable [ 4.323233] sd 2:0:0:0: [sda] Assuming drive cache: write through [ 4.325312] sda: sda1 sda2 < sda5 > [ 4.325729] sd 2:0:0:0: [sda] Cache data unavailable [ 4.325732] sd 2:0:0:0: [sda] Assuming drive cache: write through [ 4.325735] sd 2:0:0:0: [sda] Attached SCSI disk [ 2486.941805] sd 4:0:0:3: Attached scsi generic sg3 type 0 [ 2486.952093] sd 4:0:0:3: [sdb] 1126400000 512-byte logical blocks: (576 GB/537 GiB) [ 2486.954195] sd 4:0:0:3: [sdb] Write Protect is off [ 2486.954200] sd 4:0:0:3: [sdb] Mode Sense: 8f 00 00 08 [ 2486.954692] sd 4:0:0:3: [sdb] Write cache: disabled, read cache: enabled, doesn't support DPO or FUA [ 2486.960577] sdb: sdb1 [ 2486.964862] sd 4:0:0:3: [sdb] Attached SCSI disk In the output above sdb is the new iSCSI disk. Remember this is just an example; the output you see on your screen will vary. Next, create a partition, format the file system, and mount the new iSCSI disk. In a terminal enter: sudo fdisk /dev/sdb n p enter w The above commands are from inside the fdisk utility; see man fdisk for more detailed instructions. Also, the cfdisk utility is sometimes more user friendly. Now format the file system and mount it to /srv as an example: sudo mkfs.ext4 /dev/sdb1 sudo mount /dev/sdb1 /srv Finally, add an entry to /etc/fstab to mount the iSCSI drive during boot: /dev/sdb1 /srv ext4 defaults,auto,_netdev 0 0 It is a good idea to make sure everything is working as expected by rebooting the server.
  • 4.
    Restore Data ifDeleted or Volume Un- mounted Unmount the infected drive. To unmount the infected drive, identify the drive /dev/sda or /dev/sdb1 etc. In a terminal enter: sudo umount /dev/sdb1 Remove automatic mount technology Comment the line in /etc/fstab to stop mount the iSCSI drive during boot: # /dev/sdb1 /srv ext4 defaults,auto,_netdev 0 0 Storage drive restoring Than reboot the instance. In a terminal type $ sudo reboot Storage drive restoring Set the Storage volume offline and retrieve the volume using selected snapshot. Discover iSCSI target You can check which targets are available by using the iscsiadm utility. Enter the following in a terminal: sudo iscsiadm -m discovery -t st -p 192.168.0.10 If the target is available you should see output similar to the following:
  • 5.
    192.168.0.10:3260,1 iqn.1992-05.com.emc:sl7b92030000520000-2 The iqnnumber and IP address above will vary depending on your hardware. Login to target You should now be able to connect to the iSCSI target, and depending on your target setup you may have to enter user credentials. Login to the iSCSI node: sudo iscsiadm -m node --login this command should connect to the new drive which is already well partitioned. So you don’t need to moderate it’s partition. Mount the volume Finally mount the volume. In a terminal enter: sudo mount /dev/sdb1 Permanent mount the iSCSI drive during boot Finally, add an entry to /etc/fstab to mount the iSCSI drive during boot: /dev/sdb1 /srv ext4 defaults,auto,_netdev 0 0 It is a good idea to make sure everything is working as expected by rebooting the server. Help: https://help.ubuntu.com/lts/serverguide/iscsi-initiator.html