The document discusses installing and configuring various Linux applications including Apache, PHP, MySQL, and Postgres. It covers basic Ubuntu installation, system configuration, installing packages, configuring Apache, PHP, and MySQL. Specific instructions are provided for installing Apache, configuring virtual hosts and SSL, installing PHP, and installing and configuring MySQL and phpMyAdmin.
Install and configureapplications with Linux IES “Jaume II el just” Tavernes de la Valldigna Vicent Selfa Curs 2010/20 1 1
2.
Install and configureapplications with Linux Ubuntu Apache PHP MySQL Postgres Others
3.
Ubuntu: Basic installationSystem configuration Installing packages Configuring applications Apache PHP MySQL The relationship between Apache - PHP - MySQL Install and configure: Ubuntu 10.04 Install and configure applications with Linux
4.
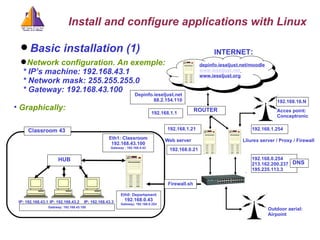
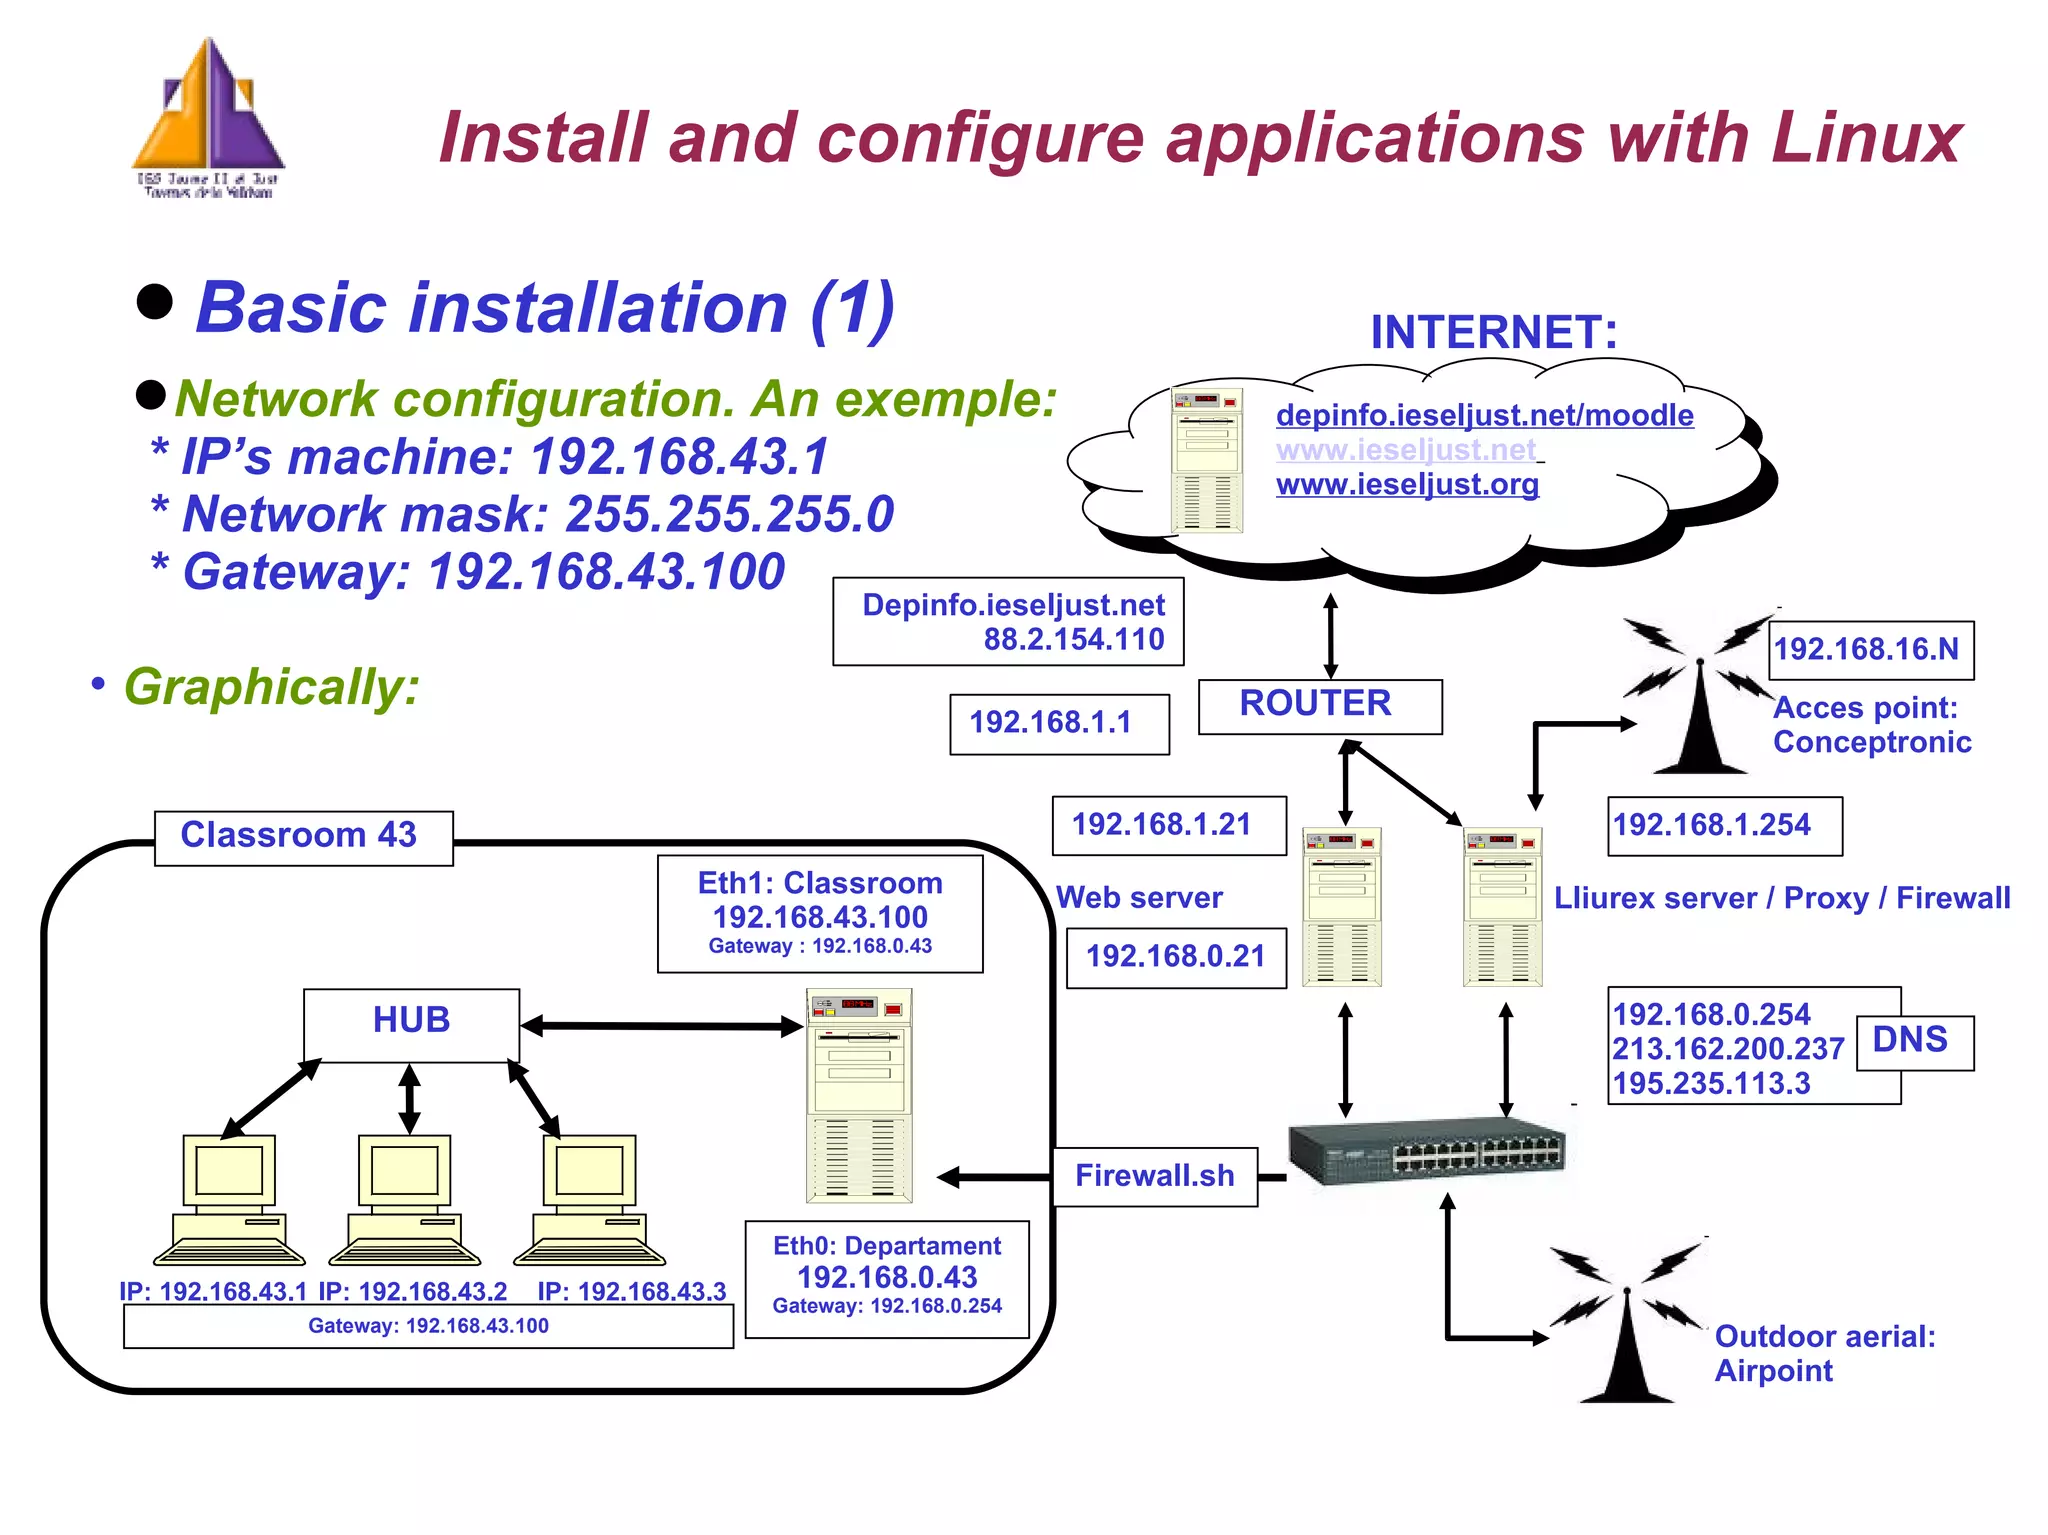
Basic installation (1) Network configuration. An exemple: * IP’s machine: 192.168.43.1 * Network mask: 255.255.255.0 * Gateway: 192.168.43.100 Graphically: INTERNET : depinfo.ieseljust.net/moodle www.ieseljust.net www.ieseljust.org HUB IP: 192.168.43.3 IP: 192.168.43.1 IP: 192.168.43.2 Eth0: Departament 192.168.0.43 Gateway: 192.168.0.254 Classroom 43 192.168.0.254 213.162.200.237 195.235.113.3 192.168.1.254 Lliurex server / Proxy / Firewall 192.168.16.N Acces point: Conceptronic Outdoor aerial: Airpoint DNS Eth1: Classroom 192.168.43.100 Gateway : 192.168.0.43 Firewall.sh Gateway: 192.168.43.100 Install and configure applications with Linux ROUTER 192.168.1.1 Depinfo.ieseljust.net 88.2.154.110 192.168.0.21 192.168.1.21 Web server
5.
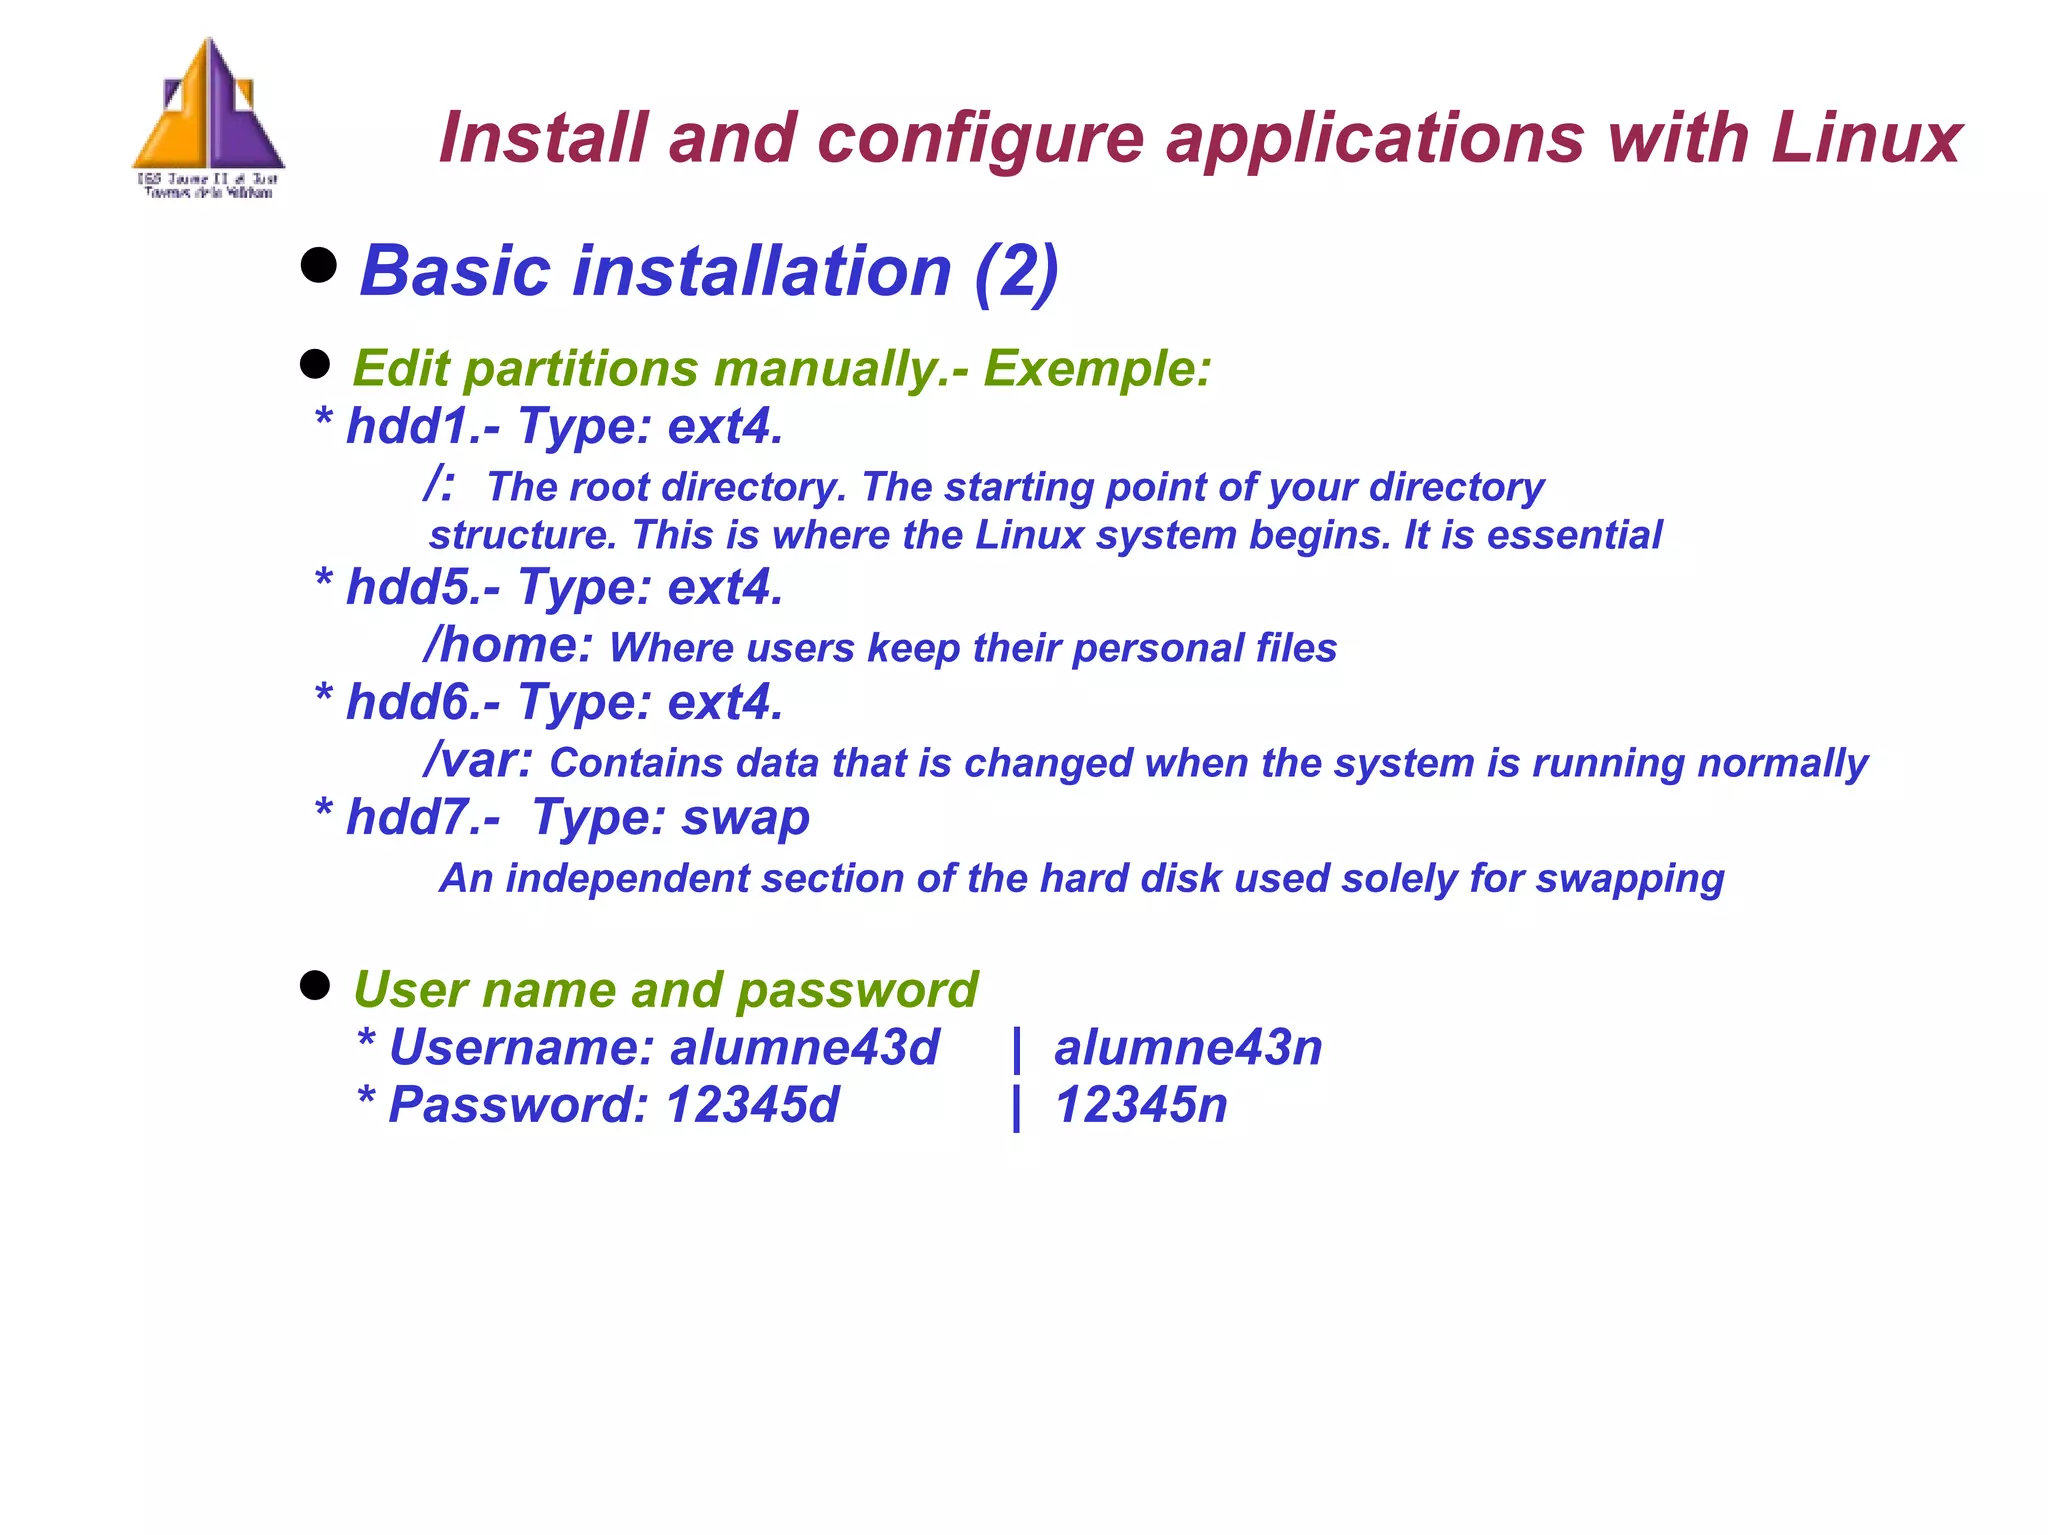
Basic installation (2)Edit partitions manually.- Exemple: * hdd1.- Type: ext4. /: The root directory. The starting point of your directory structure. This is where the Linux system begins. It is essential * hdd5.- Type: ext4. /home: W here users keep their personal files * hdd6.- Type: ext4. /var: C ontains data that is changed when the system is running normally * hdd7.- Type: swap An independent section of the hard disk used solely for swapping User name and password * Username: alumne43d | alumne43n * Password: 12345d | 12345n Install and configure applications with Linux
6.
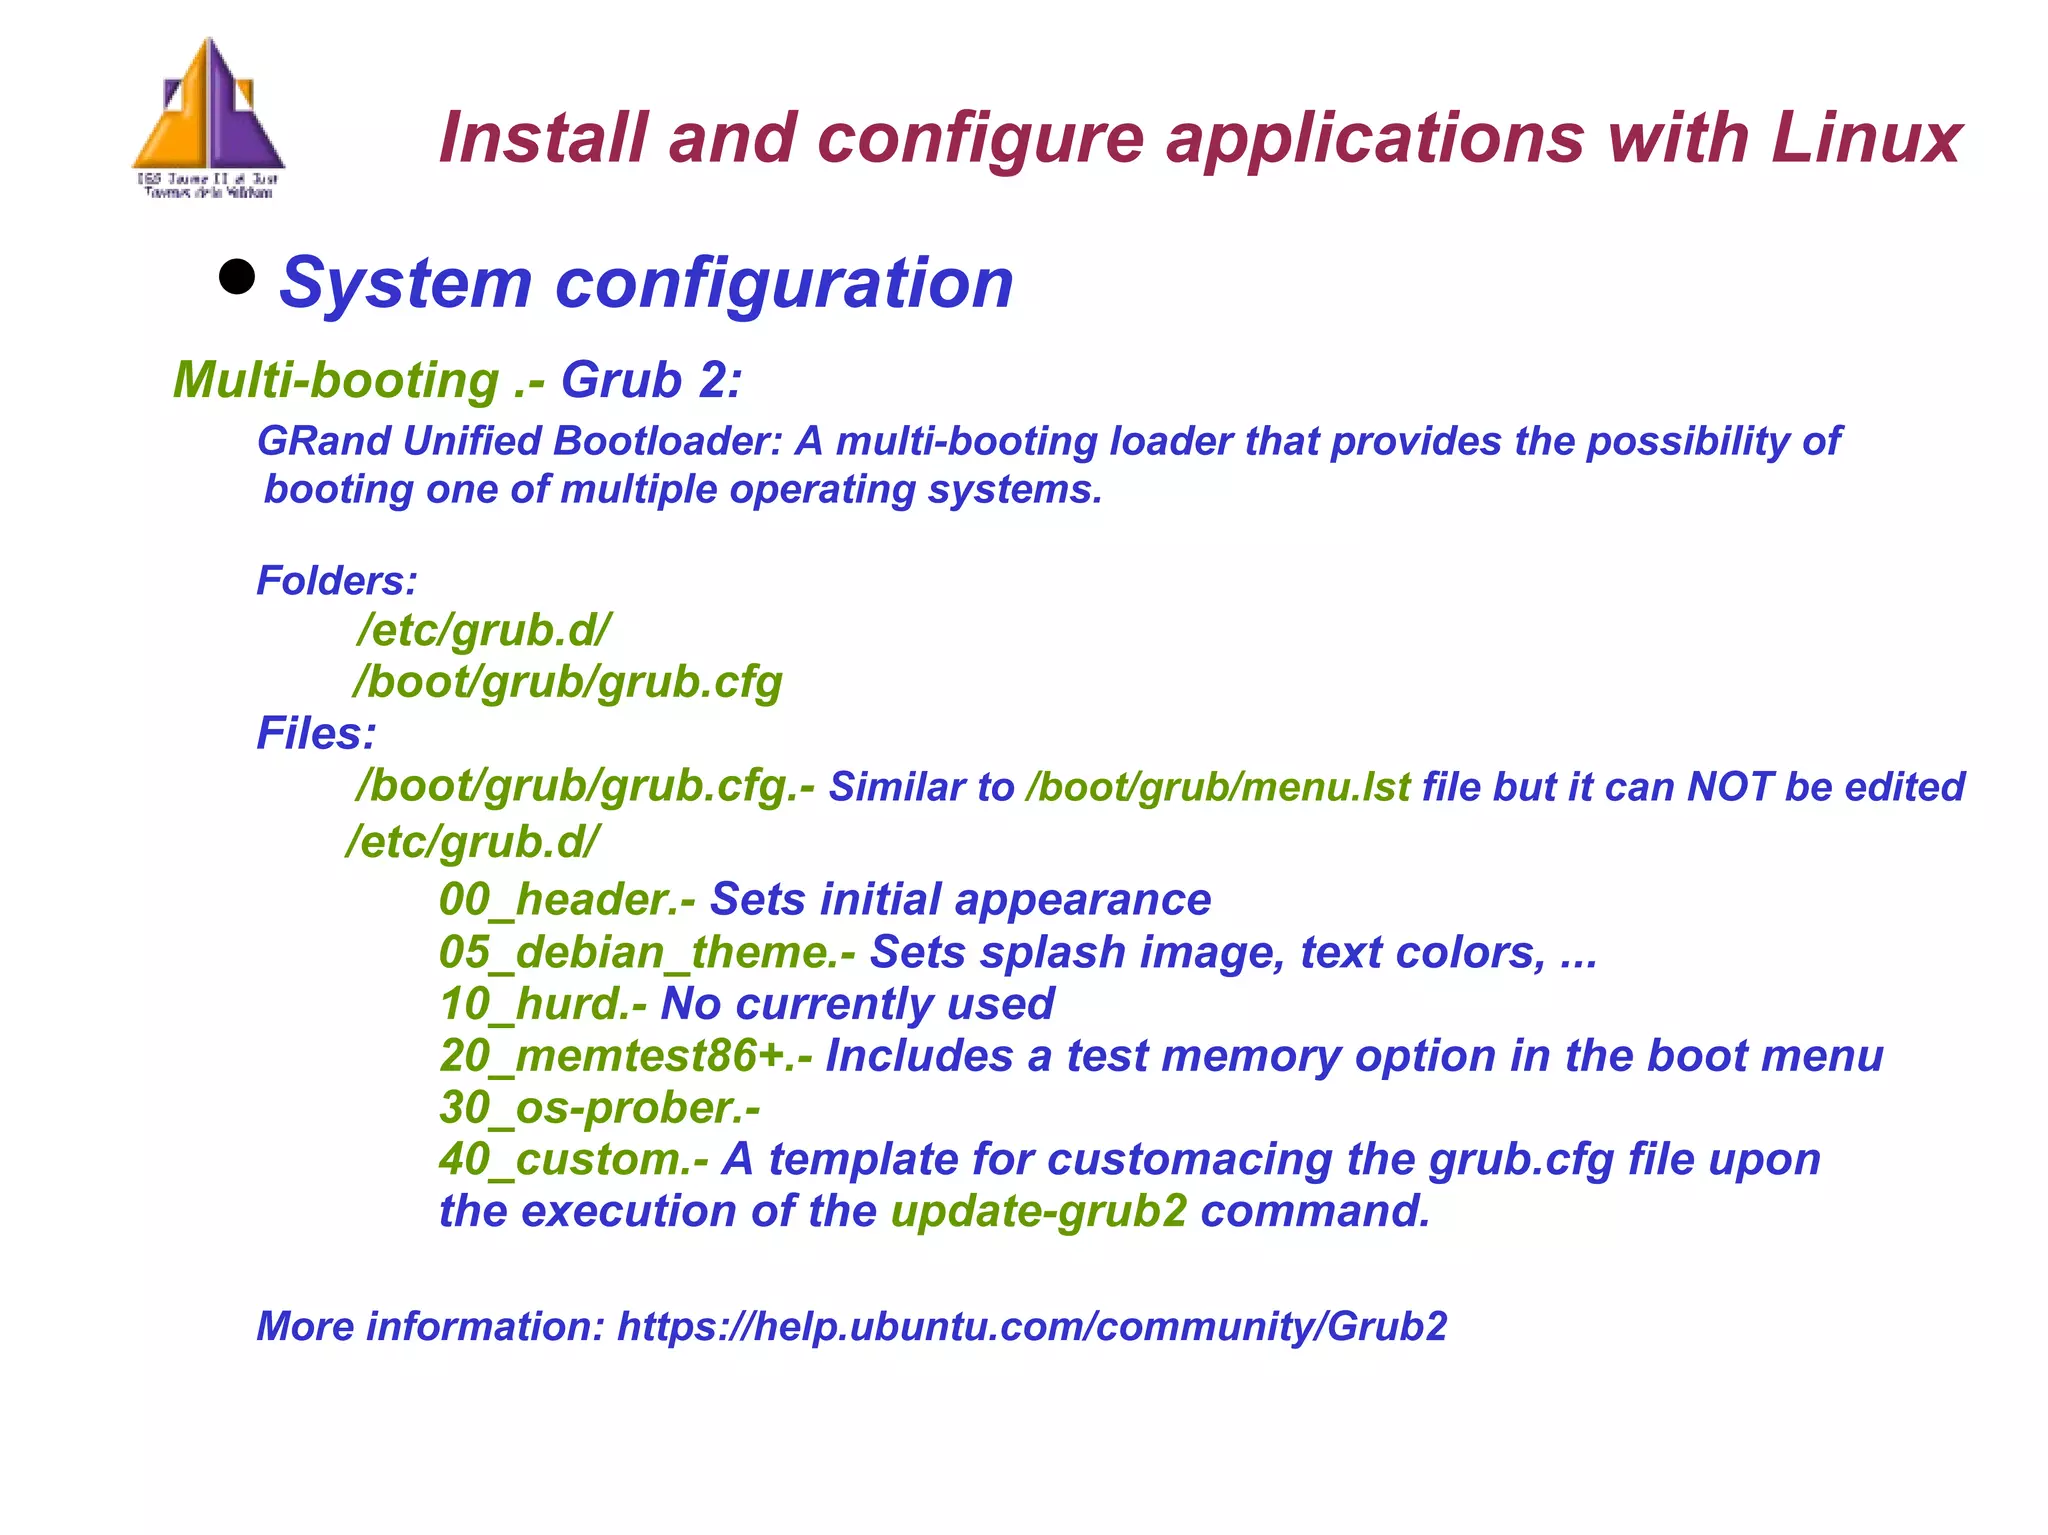
System configuration Multi-booting .- Grub 2: GRand Unified Bootloader: A multi-booting loader that provides the possibility of booting one of multiple operating systems. Folders: /etc/grub.d/ /boot/grub/grub.cfg Files: /boot/grub/grub.cfg.- Similar to /boot/grub/menu.lst file but it can NOT be edited /etc/grub.d/ 00_header.- Sets initial appearance 05_debian_theme.- Sets splash image, text colors, ... 10_hurd.- No currently used 20_memtest86+.- Includes a test memory option in the boot menu 30_os-prober.- 40_custom.- A template for customacing the grub.cfg file upon the execution of the update-grub2 command. More information: https://help.ubuntu.com/community/Grub2 Install and configure applications with Linux
7.
System configuration Multi-booting .- Grub 2 configuration: Steps Execute sudo update-grub2 to generate the file grub.cfg Copy its content to /etc/grub.d/40_custom file Edit and modify its content Modify attributes of the different files in /etc/grub.d in order to permit/deny their execution sudo chmod [+x | -x] /etc/grub.d/filename At the end execute sudo update-grub2 to make the new grub.cfg file Exercise: Configure your boot system with the next options: Only two entries (windows / linux) Starting from the second option by default Waiting for 15 second before automatic start Stablish a background image More information: https://wiki.ubuntu.com/Grub2 Install and configure applications with Linux
8.
System configuration Multi-booting .- Reinstall grub2 AFTER installing Windows Start the computer using a LiveCD version: Use the option: Test Ubuntu From a terminal execute the next commands Partition list: X -> System Linux sudo fdisk – l ; Mount the sdaX partition sudo mount /dev/sdaX /mnt ; Mount the other devices (Already visible directories mounted elsewhere) sudo –bind /dev /mnt/dev sudo –bind /proc /mnt/proc We acces as root to our file system sudo chroot /mnt Load the grub into the MBR grub-install -- recheck /dev/sda ; sda WITHOUT number! Actualize grub 2 sudo update-grub2 And restart the system as usual Install and configure applications with Linux
9.
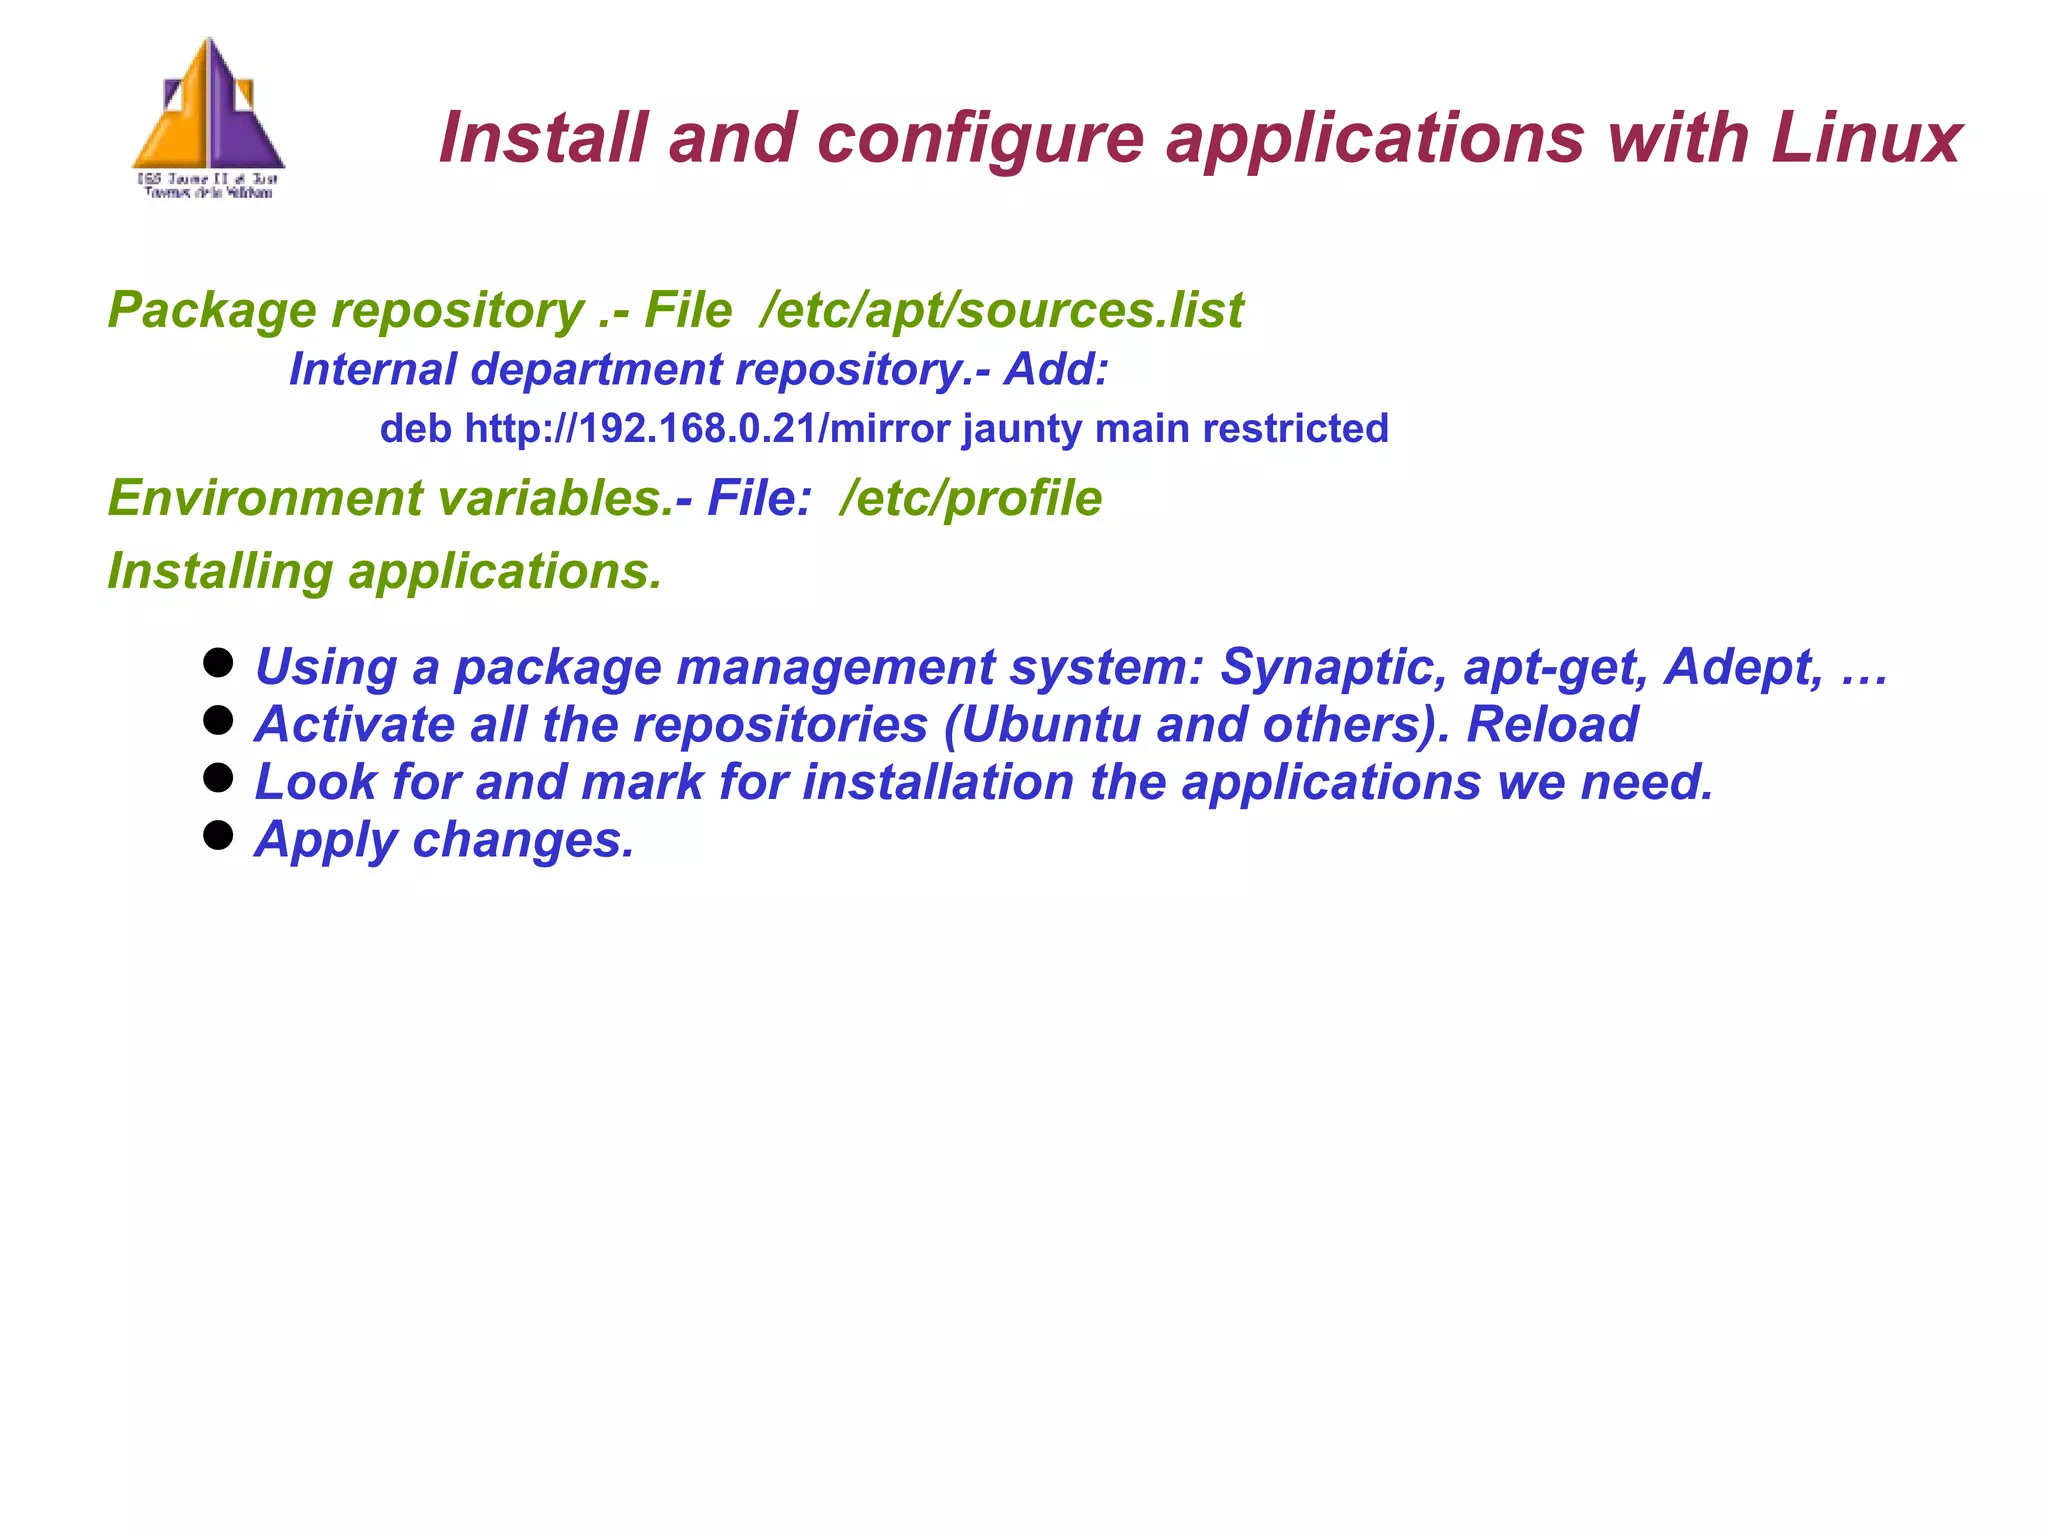
Package repository .-File /etc/apt/sources.list Internal department repository.- Add: deb http://192.168.0.21/mirror jaunty main restricted Environment variables. - File: /etc/profile Installing applications. Using a package management system: Synaptic, apt-get, Adept, … Activate all the repositories (Ubuntu and others). Reload Look for and mark for installation the applications we need. Apply changes. Install and configure applications with Linux
10.
Installing applications: Apache2 Packages to install apache2 // The web server libapache2-mod-php5 // The module to work with PHP5 Test from the web browser: http://localhost => It works! Apache version: /usr/sbin/apache2ctl -v Start / stop the web server: sudo /etc/init.d/apache2 [start | stop | restart | ...] sudo /usr/sbin/apache2ctl –k [start | stop | restart] Configuration files /etc/apache2/apache2.conf => Main Apache server configuration file /etc/apache2/httpd.conf => Administrator configuration /etc/apache2/sites-availabe/000-default => Virtual host configuration Log files: /var/log/apache2 Other folders Mods-available / mods-enable : Available / installed modules Sites-available / enable : C onfiguration details of the sites you aim to host More information: http://httpd.apache.org/ Install and configure applications with Linux
11.
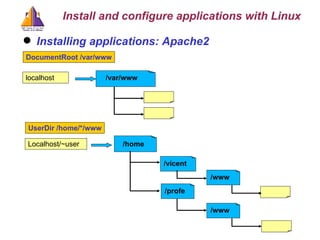
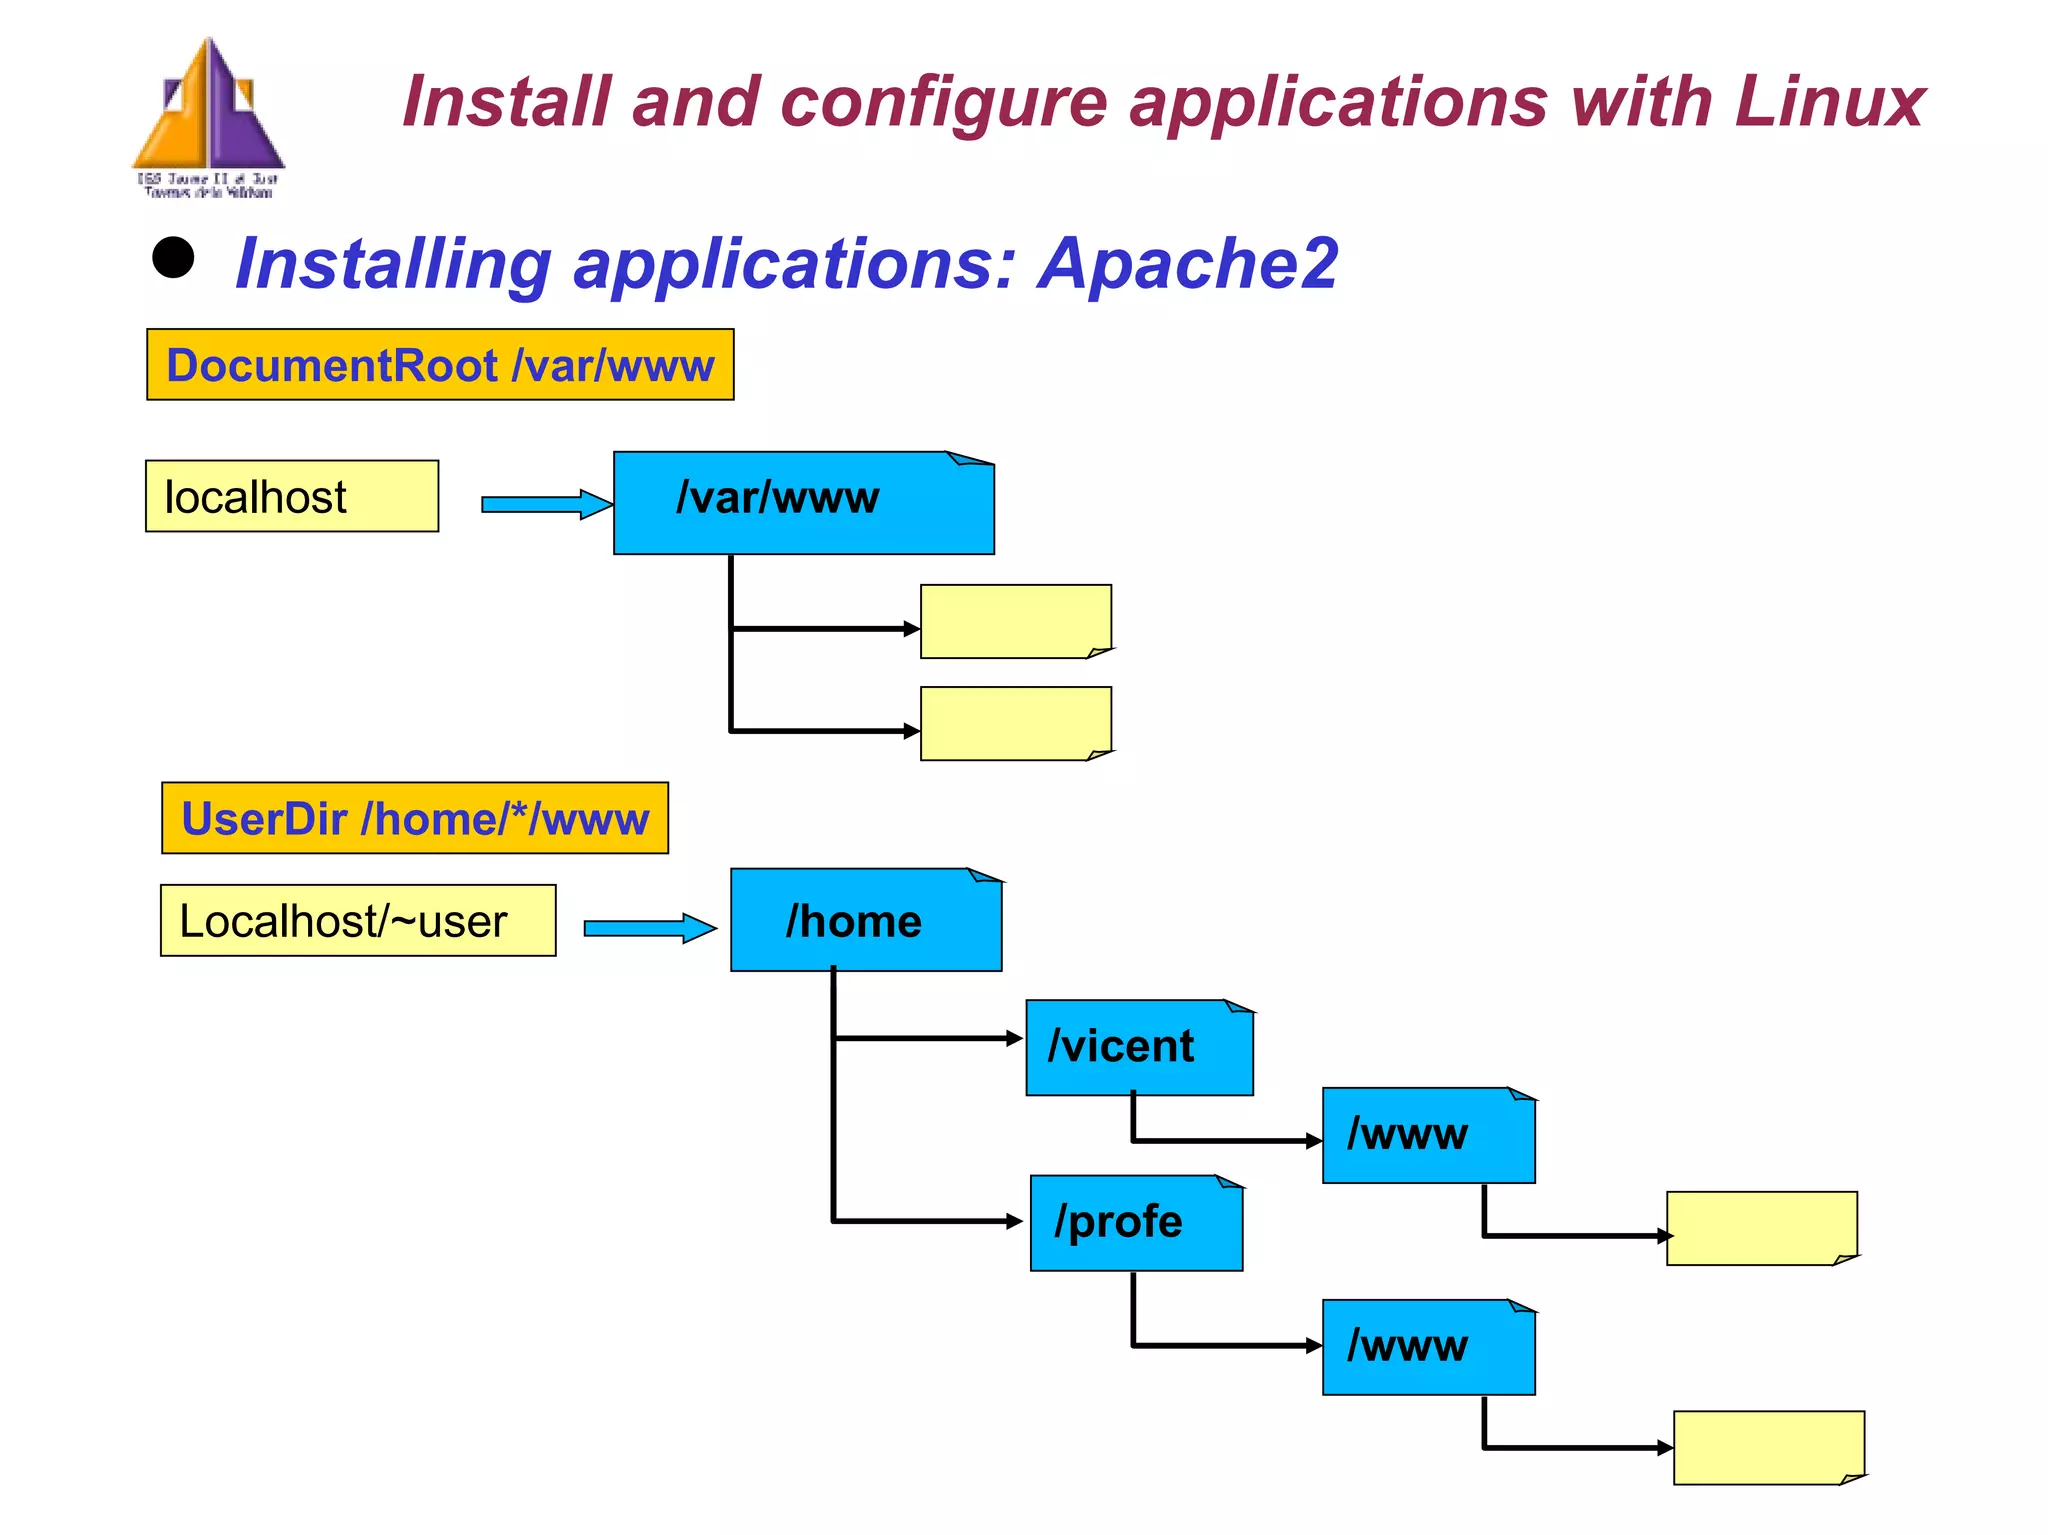
Installing applications: Apache2/etc/apache2/apache2.conf: ServerRoot: Base directory for the server installation ServerName: Hostname and port that the server uses to identify itself Timeout: Number of seconds before timing out KeepAlive [On | Off]: Whether or not to allow persistent connections AccessFileName: The name of the file to look for in each directory for additional configuration directives /etc/apache2/sites-enabled/default: DocumentRoot: Base d irectory that forms the main document tree visible from the web DocumentRoot /var/www localhost /var/www Install and configure applications with Linux
12.
Installing applications: Apache2/etc/apache2/httpd.conf: UserDir: To permit that different users have different web sites in their own home directory. Steps: 1.- From mods-enable make a symbolic link to user-dir modules sudo ln -s /etc/apache2/mods-available/userdir.conf sudo ln -s /etc/apache2/mods-available/userdir.load 2.- In the file /etc/apache2/httpd.conf UserDIr www <Directory /home/*/www> ... Options Indexes FollowSymLinks MultiViews # Other directives </Directory> 3.- Restart the web server: sudo /etc/init.d/apache2 [start | stop | restart ] 4.- How to access to the web page? localhost/~usuari Install and configure applications with Linux
13.
Installing applications: Apache2localhost DocumentRoot /var/www Localhost/~user /home UserDir /home/*/www Install and configure applications with Linux /var/www /vicent /profe /www /www
14.
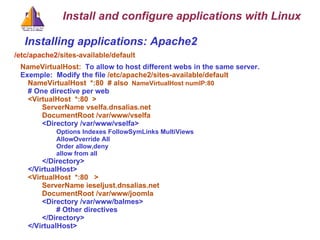
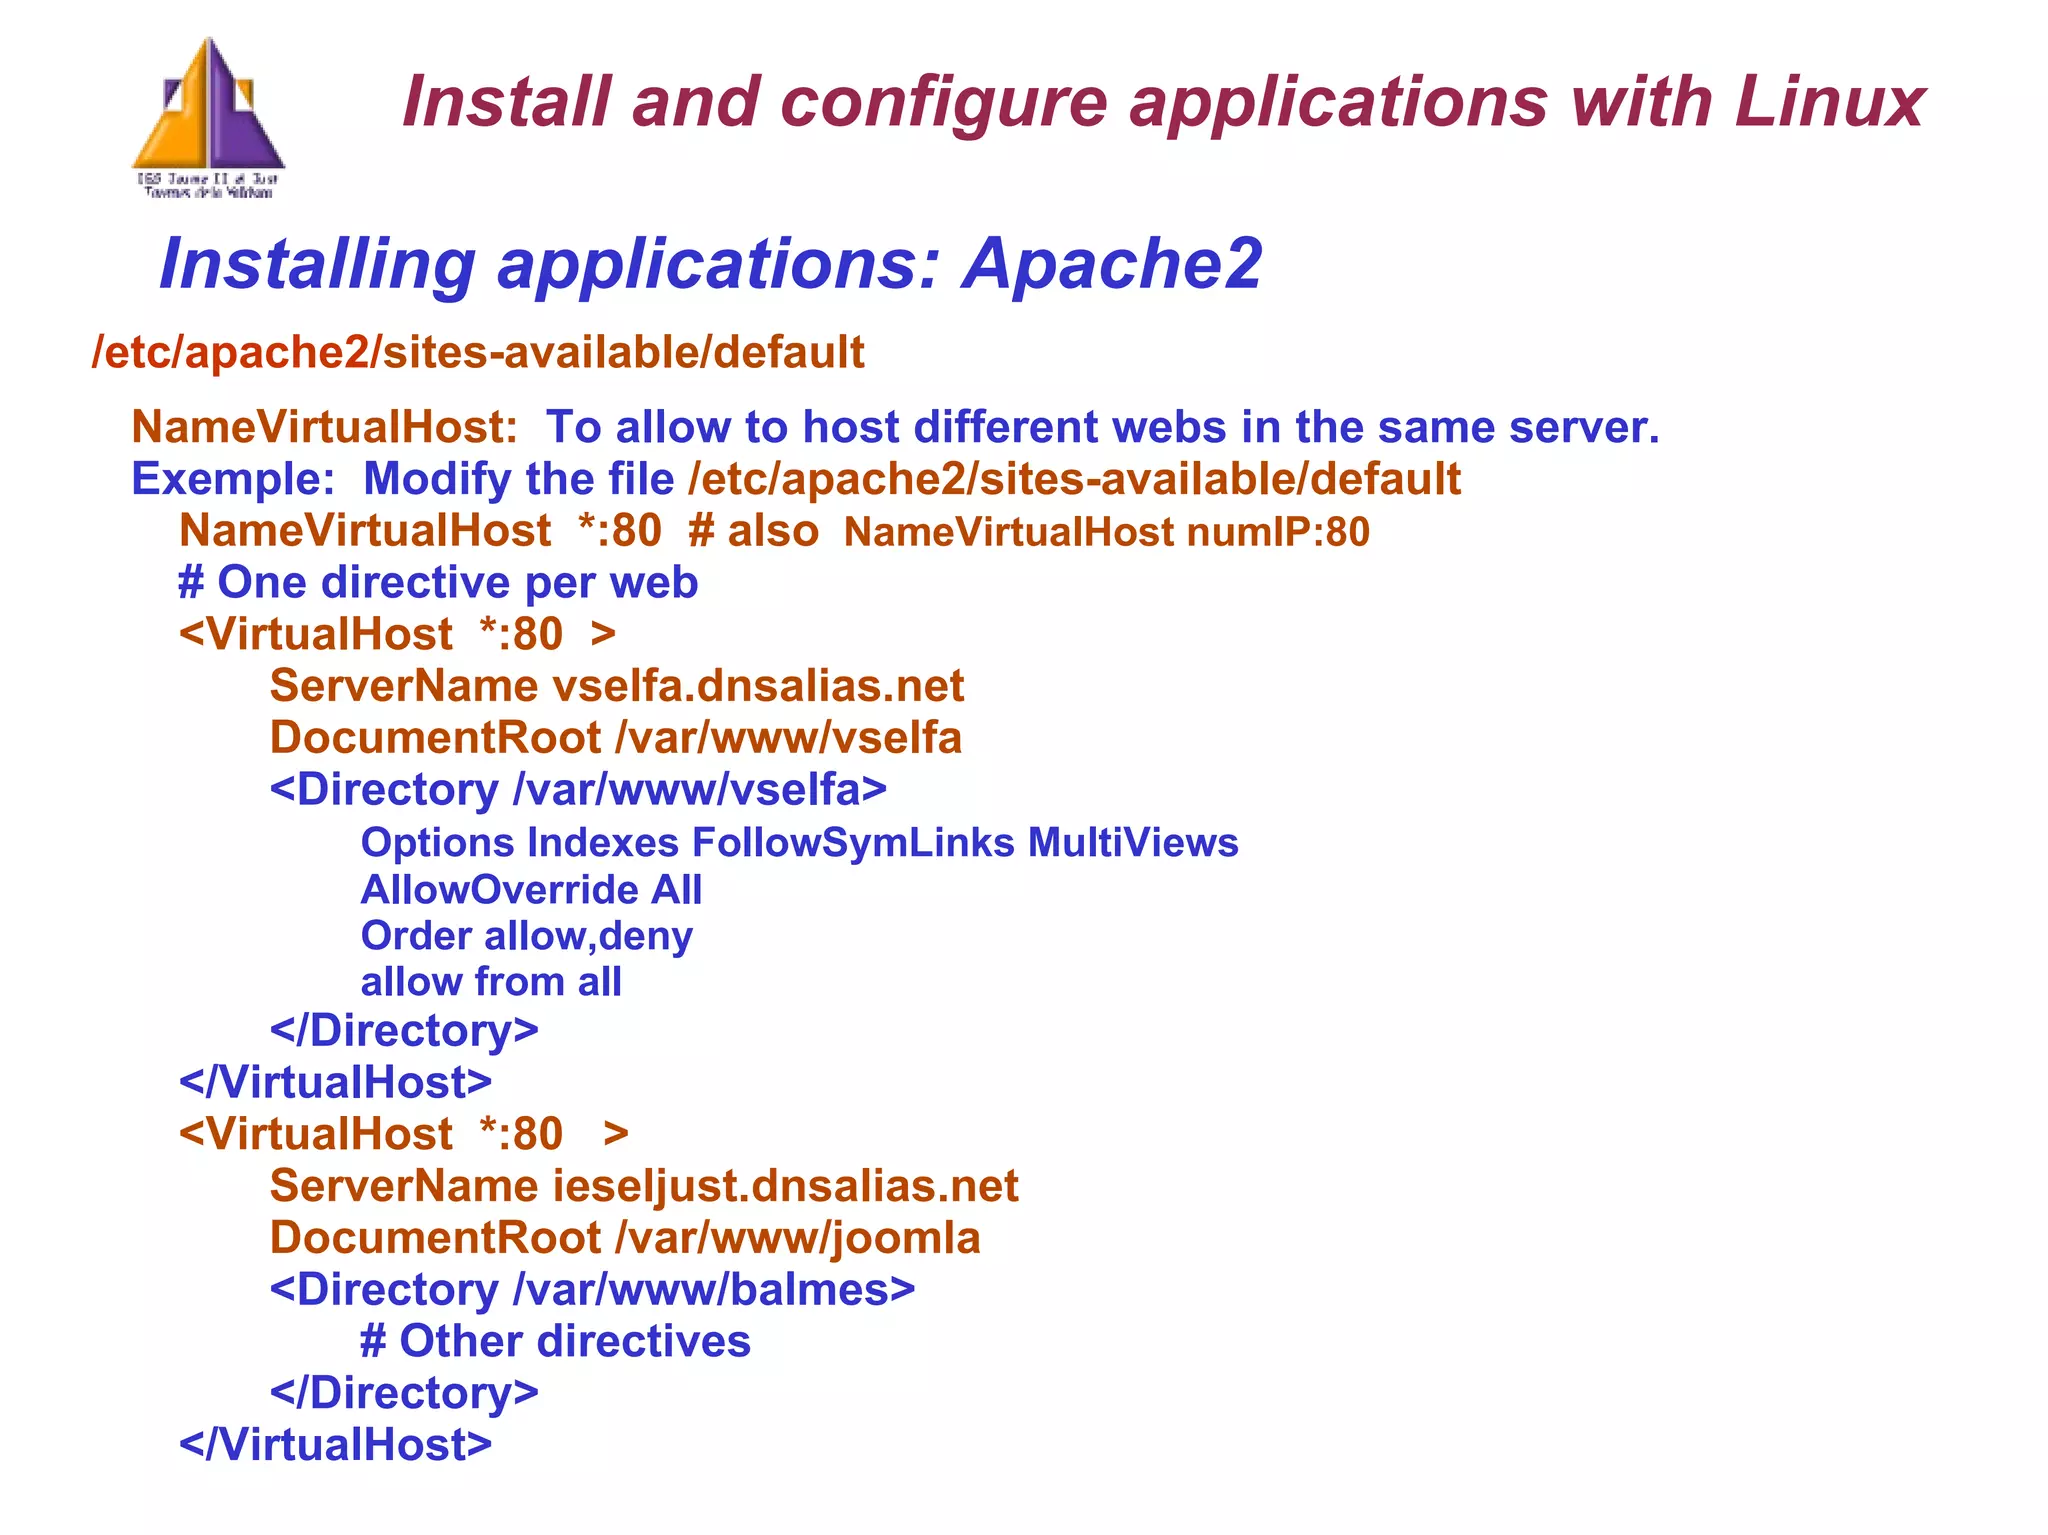
Installing applications: Apache2/etc/apache2/ sites-available/default NameVirtualHost: To allow to host different webs in the same server. Exemple: Modify the file /etc/apache2/sites-available/default NameVirtualHost *:80 # also NameVirtualHost numIP:80 # One directive per web <VirtualHost *:80 > ServerName vselfa.dnsalias.net DocumentRoot /var/www/vselfa <Directory /var/www/vselfa> Options Indexes FollowSymLinks MultiViews AllowOverride All Order allow,deny allow from all </Directory> </VirtualHost> <VirtualHost *:80 > ServerName ieseljust.dnsalias.net DocumentRoot /var/www/joomla <Directory /var/www/balmes> # Other directives </Directory> </VirtualHost> Install and configure applications with Linux
15.
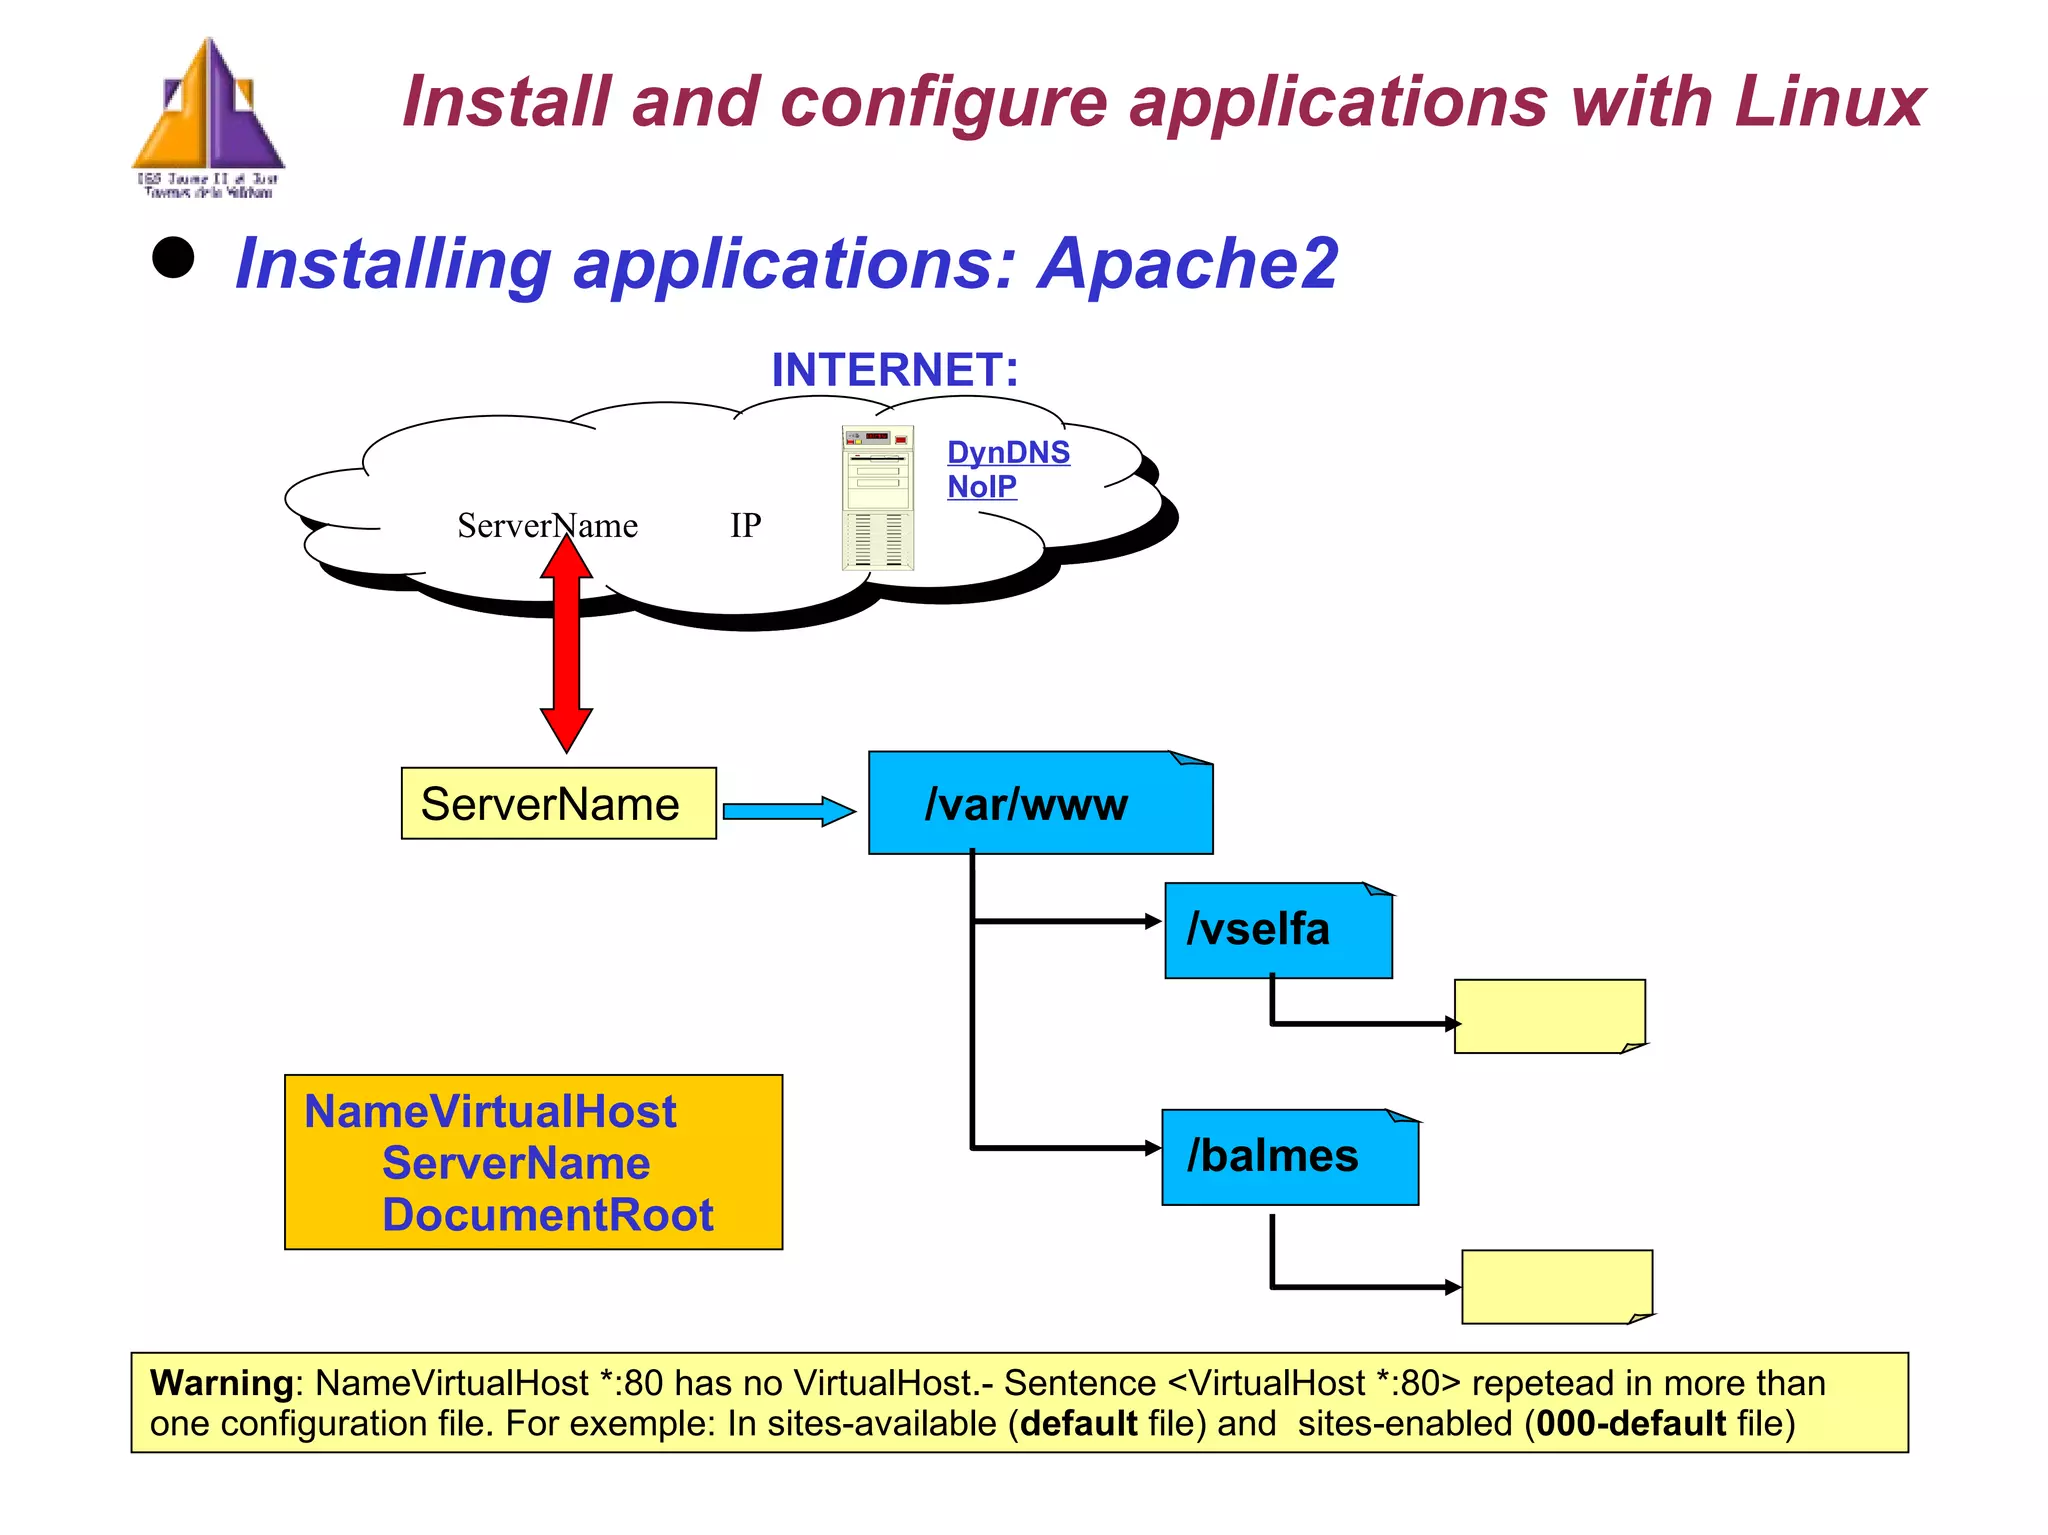
Installing applications: Apache2ServerName /var/www NameVirtualHost ServerName DocumentRoot INTERNET : DynDNS NoIP Install and configure applications with Linux Warning : NameVirtualHost *:80 has no VirtualHost.- Sentence <VirtualHost *:80> repetead in more than one configuration file. For exemple: In sites-available ( default file) and sites-enabled ( 000-default file) /vselfa /balmes ServerName IP
16.
Installing applications: Apache2Other directives.- [Module rewrite ] RewriteEngine RewriteRule To allow redirect web traffic Exemple: File .htaccess: To redirect all traffic to test.php web page 1.- From mods-enable make a symbolic link to rewrite module sudo ln -s /etc/apache2/mods-available/rewrite.load 2.- Modify the default configuration file: <VirtualHost *:80 > <Directory /var/www/vselfa> # Other opcions AllowOverride All </Directory> </VirtualHost> 3.- Create a .htaccess file and copy to /var/www/vselfa RewriteEngine on RewriteRule ^(.*)$ test.php ?command=$1 [L,QSA] 4.- To cancel the redirection RewriteEngine off Install and configure applications with Linux
17.
Installing applications: Apache2 To let acces to some users and specific groups: [Module auth_digest] 1.- From mods-enable symbolic link to required modules ln -s /etc/apache2/mods-available/auth_digest.load 2.- File .htaccess inside the folder we want to restrict AuthName " ZonaPrivada " AuthType Digest # Encripted method (Digest; NO basic) AuthDigestFile /var/.htpasswd Require valid-user 3.- We make a file with the passwords htdigest -c /var/.htpasswd ZonaPrivada vicent # It ask us the password for the administrator user Install and configure applications with Linux
18.
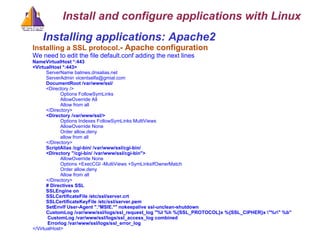
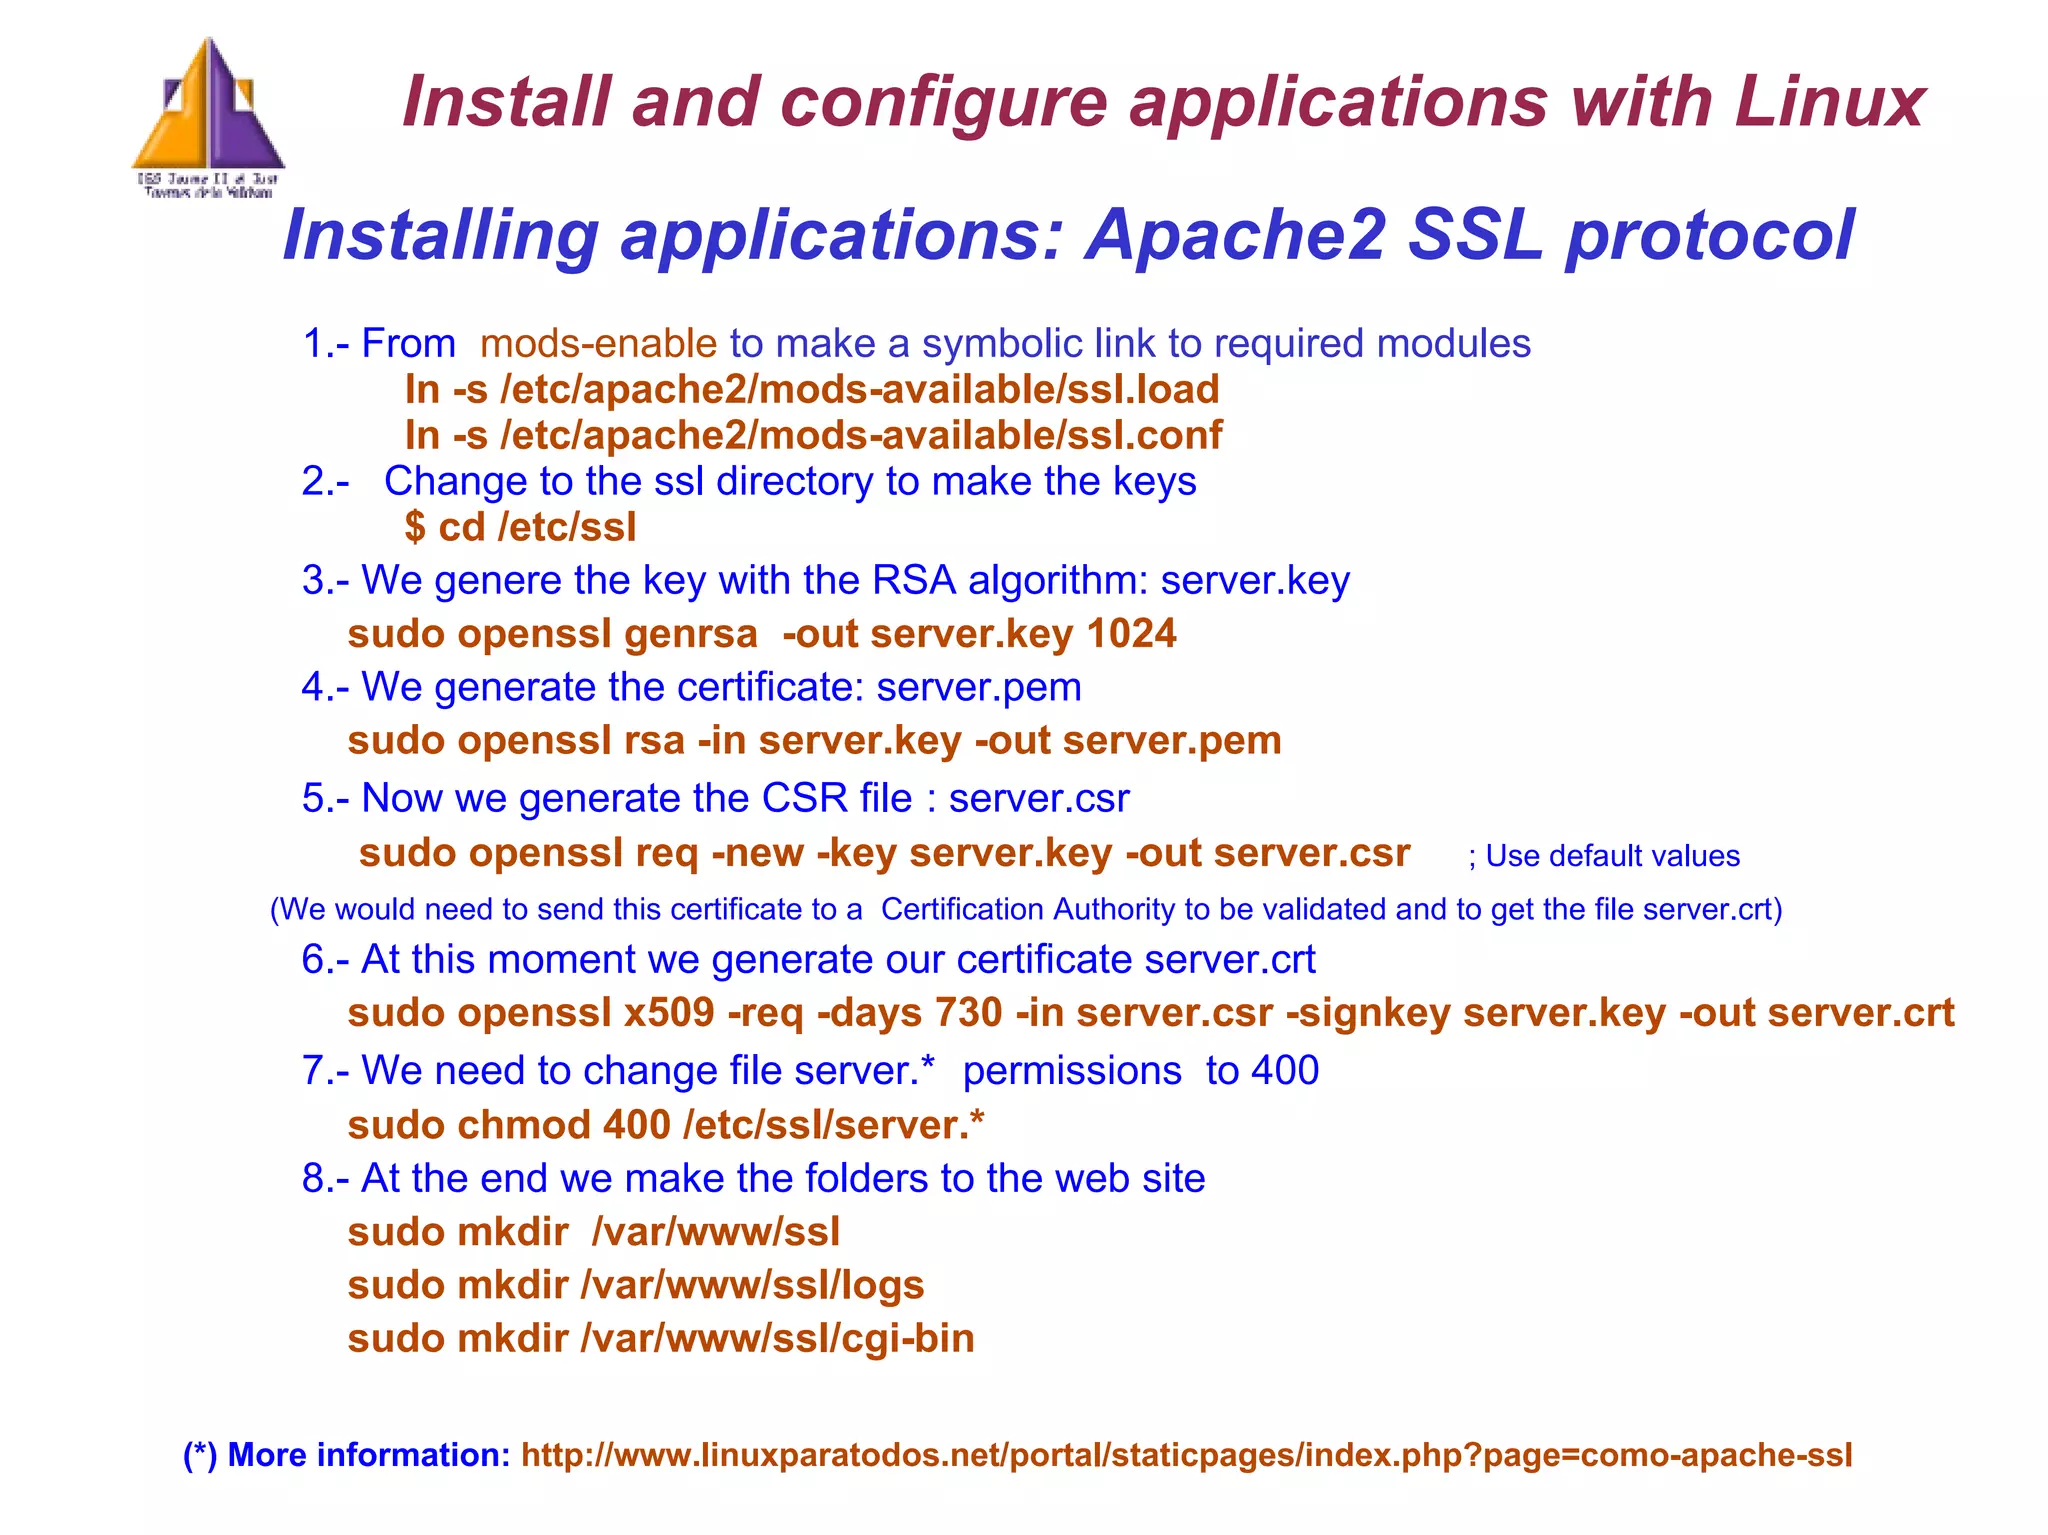
Installing applications: Apache2SSL protocol 1.- From mods-enable to make a symbolic link to required modules ln -s /etc/apache2/mods-available/ssl.load ln -s /etc/apache2/mods-available/ssl.conf 2.- Change to the ssl directory to make the keys $ cd /etc/ssl 3.- We genere the key with the RSA algorithm: server.key sudo openssl genrsa -out server.key 1024 4.- We generate the certificate: server.pem sudo openssl rsa -in server.key -out server.pem 5.- Now we generate the CSR file : server.csr sudo openssl req -new -key server.key -out server.csr ; Use default values (We would need to send this certificate to a Certification Authority to be validated and to get the file server.crt) 6.- At this moment we generate our certificate server.crt sudo openssl x509 -req -days 730 -in server.csr -signkey server.key -out server.crt 7.- We need to change file server.* permissions to 400 sudo chmod 400 /etc/ssl/server.* 8.- At the end we make the folders to the web site sudo mkdir /var/www/ssl sudo mkdir /var/www/ssl/logs sudo mkdir /var/www/ssl/cgi-bin (*) More information: http://www.linuxparatodos.net/portal/staticpages/index.php?page=como-apache-ssl Install and configure applications with Linux
19.
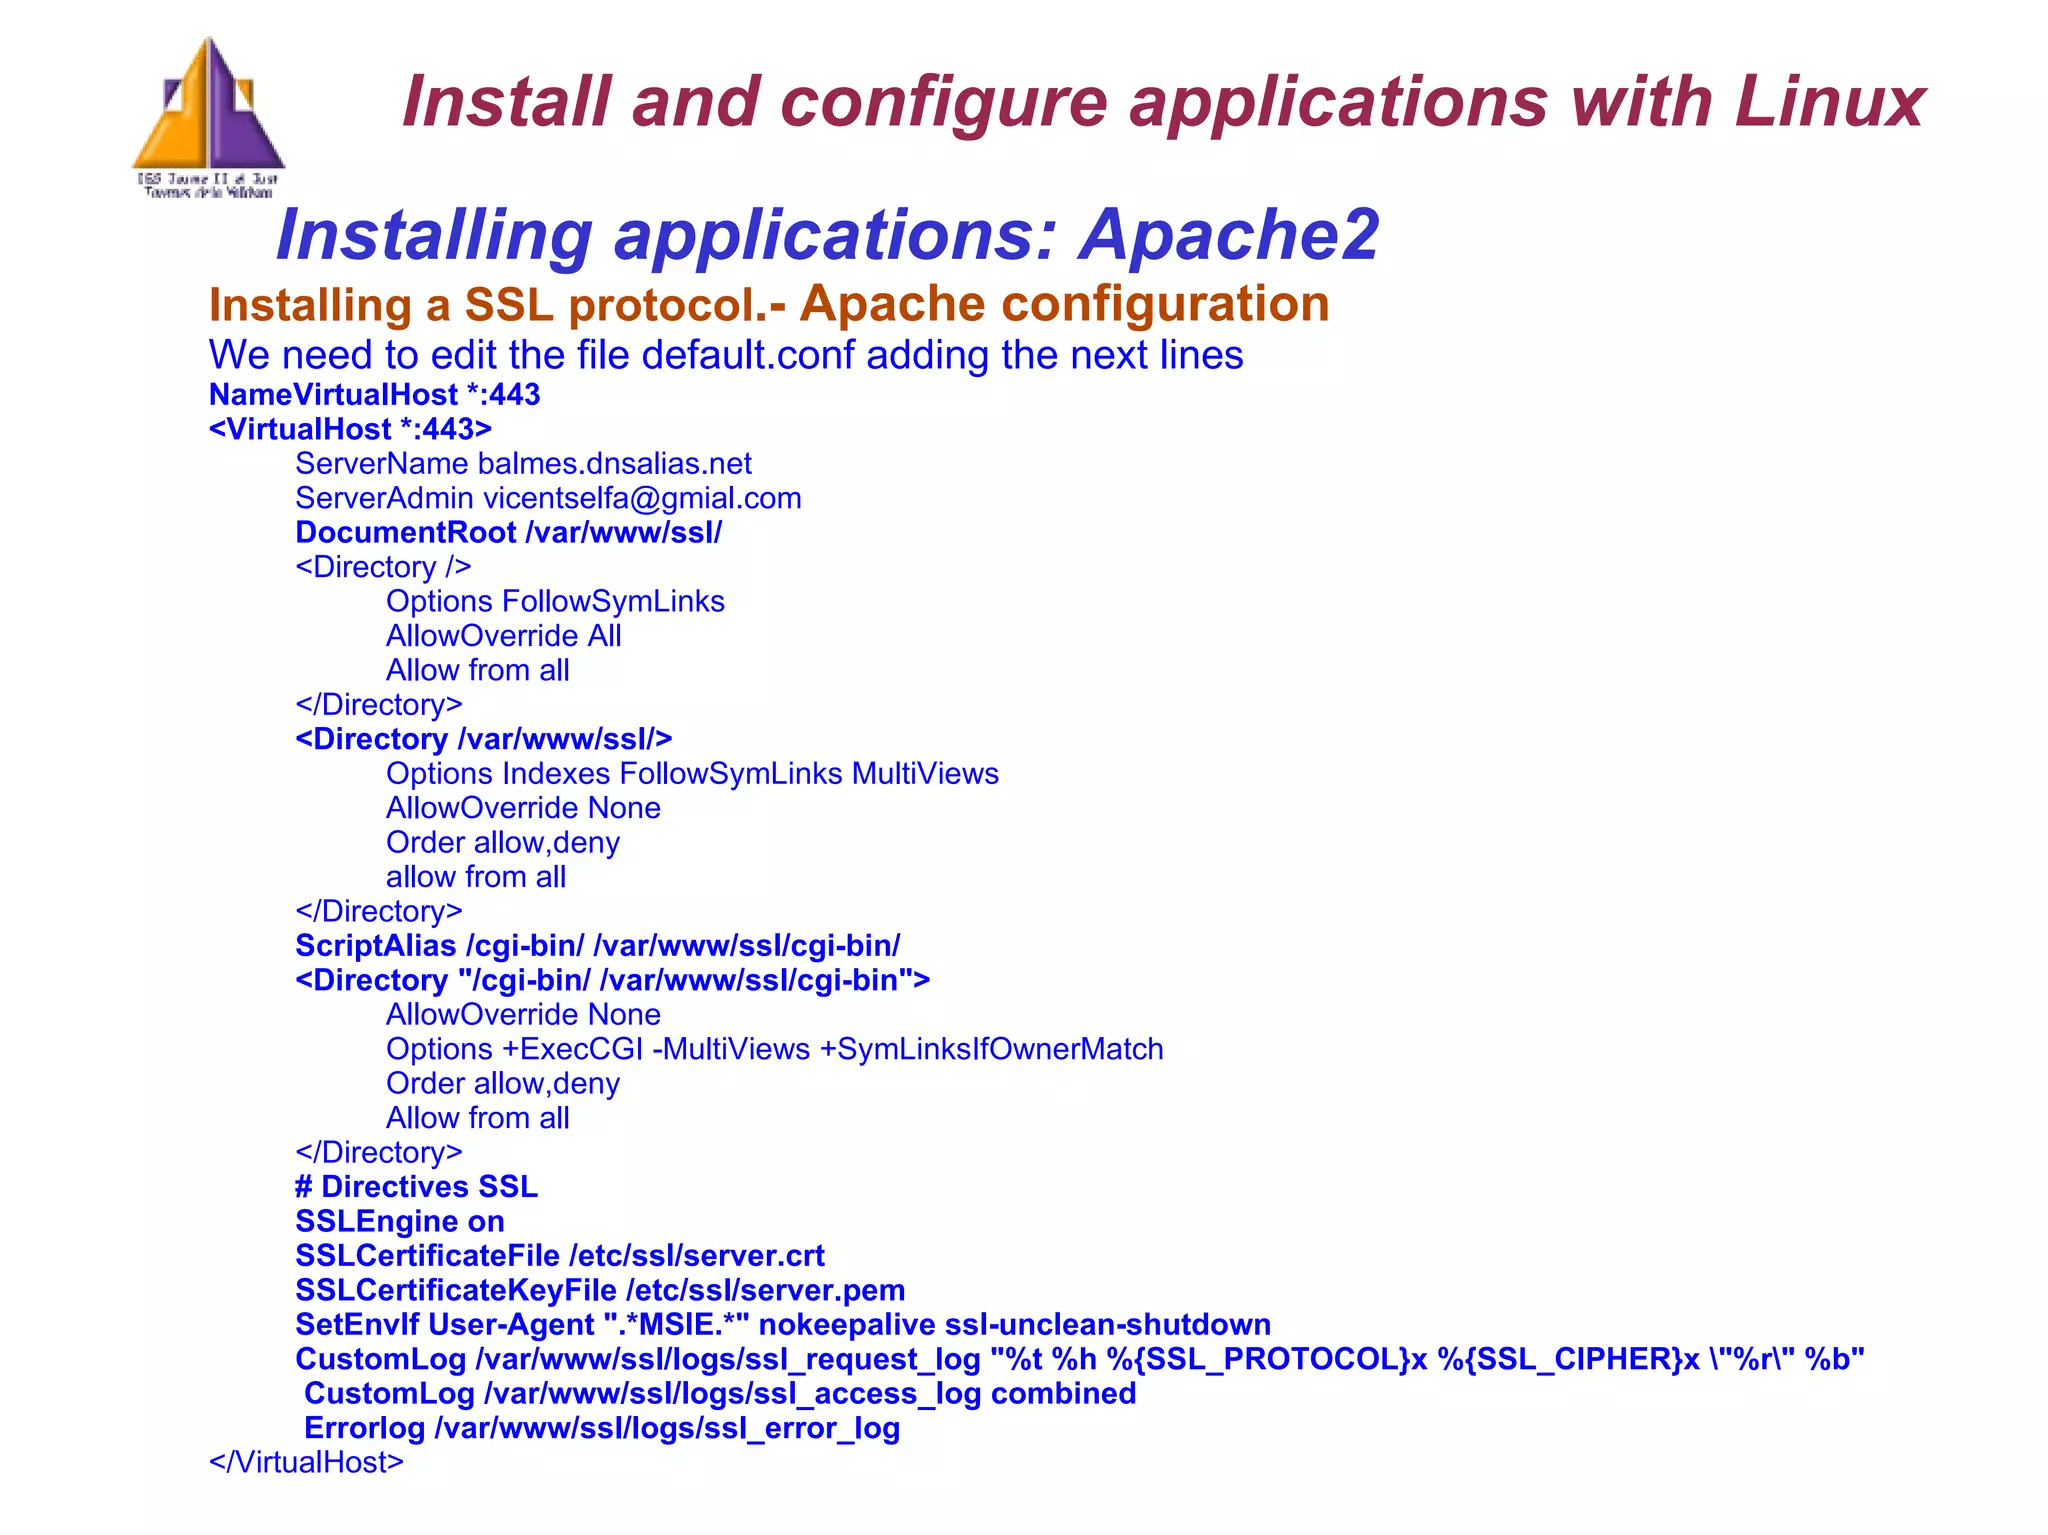
Installing applications: Apache2 Installing a SSL protocol .- Apache configuration We need to edit the file default.conf adding the next lines NameVirtualHost *:443 <VirtualHost *:443> ServerName balmes.dnsalias.net ServerAdmin vicentselfa@gmial.com DocumentRoot /var/www/ssl/ <Directory /> Options FollowSymLinks AllowOverride All Allow from all </Directory> <Directory /var/www/ssl/> Options Indexes FollowSymLinks MultiViews AllowOverride None Order allow,deny allow from all </Directory> ScriptAlias /cgi-bin/ /var/www/ssl/cgi-bin/ <Directory "/cgi-bin/ /var/www/ssl/cgi-bin"> AllowOverride None Options +ExecCGI -MultiViews +SymLinksIfOwnerMatch Order allow,deny Allow from all </Directory> # Directives SSL SSLEngine on SSLCertificateFile /etc/ssl/server.crt SSLCertificateKeyFile /etc/ssl/server.pem SetEnvIf User-Agent ".*MSIE.*" nokeepalive ssl-unclean-shutdown CustomLog /var/www/ssl/logs/ssl_request_log "%t %h %{SSL_PROTOCOL}x %{SSL_CIPHER}x \"%r\" %b" CustomLog /var/www/ssl/logs/ssl_access_log combined Errorlog /var/www/ssl/logs/ssl_error_log </VirtualHost> Install and configure applications with Linux
20.
Installing applications: Apache2Installing a SSL protocol.- Browsing the site We need to open the port number 443 for the PC We restart the Apache server: /etc/apache2/apache2ctl restart And our secure web site is OK Our address: https://balmes.dnsalias.net Install and configure applications with Linux Tcpdump packet analyze : sudo tcpdump –nnXvs 1514 –i wlan0 port [80 | 443] Check differences between information analysed using port 80 and port 443.
21.
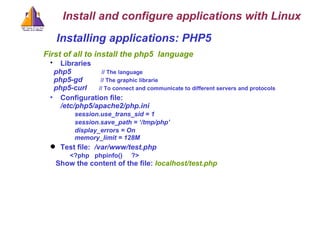
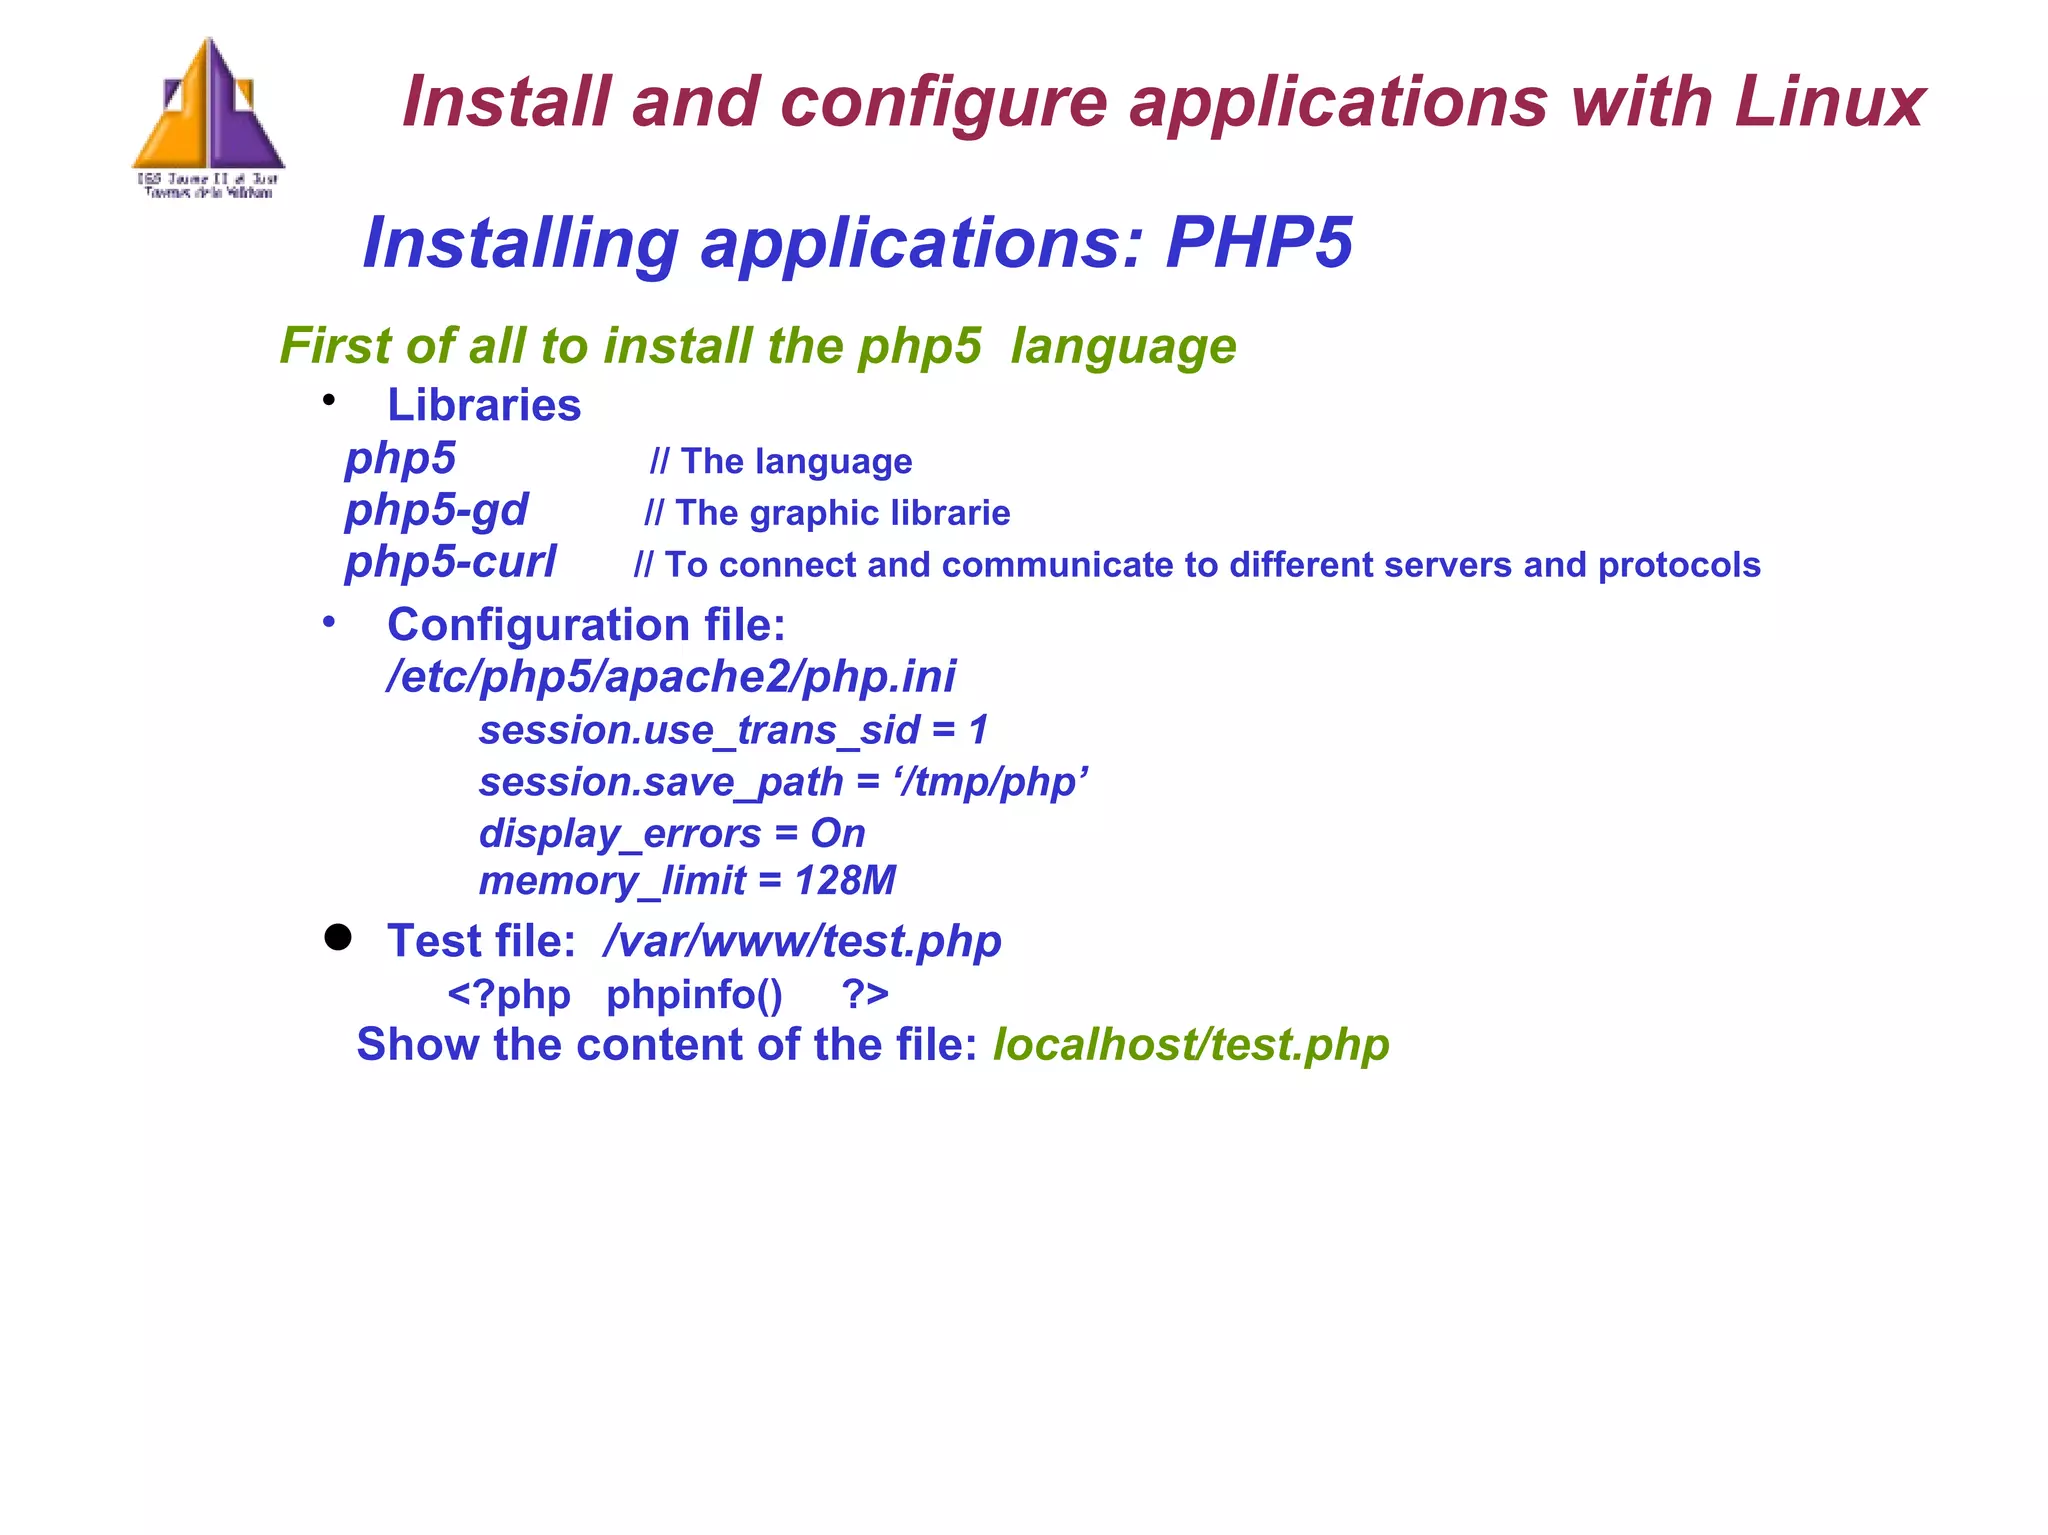
Installing applications: PHP5 First of all to install the php5 language Libraries php5 // The language php5-gd // The graphic librarie php5-curl // To connect and communicate to different servers and protocols Configuration file: /etc/php5/apache2/php.ini session.use_trans_sid = 1 session.save_path = ‘/tmp/php’ display_errors = On memory_limit = 128M Test file: /var/www/test.php <?php phpinfo() ?> Show the content of the file: localhost/test.php Install and configure applications with Linux
22.
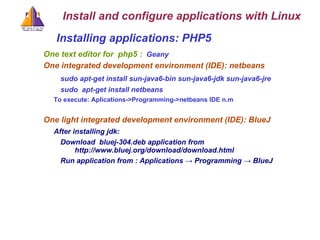
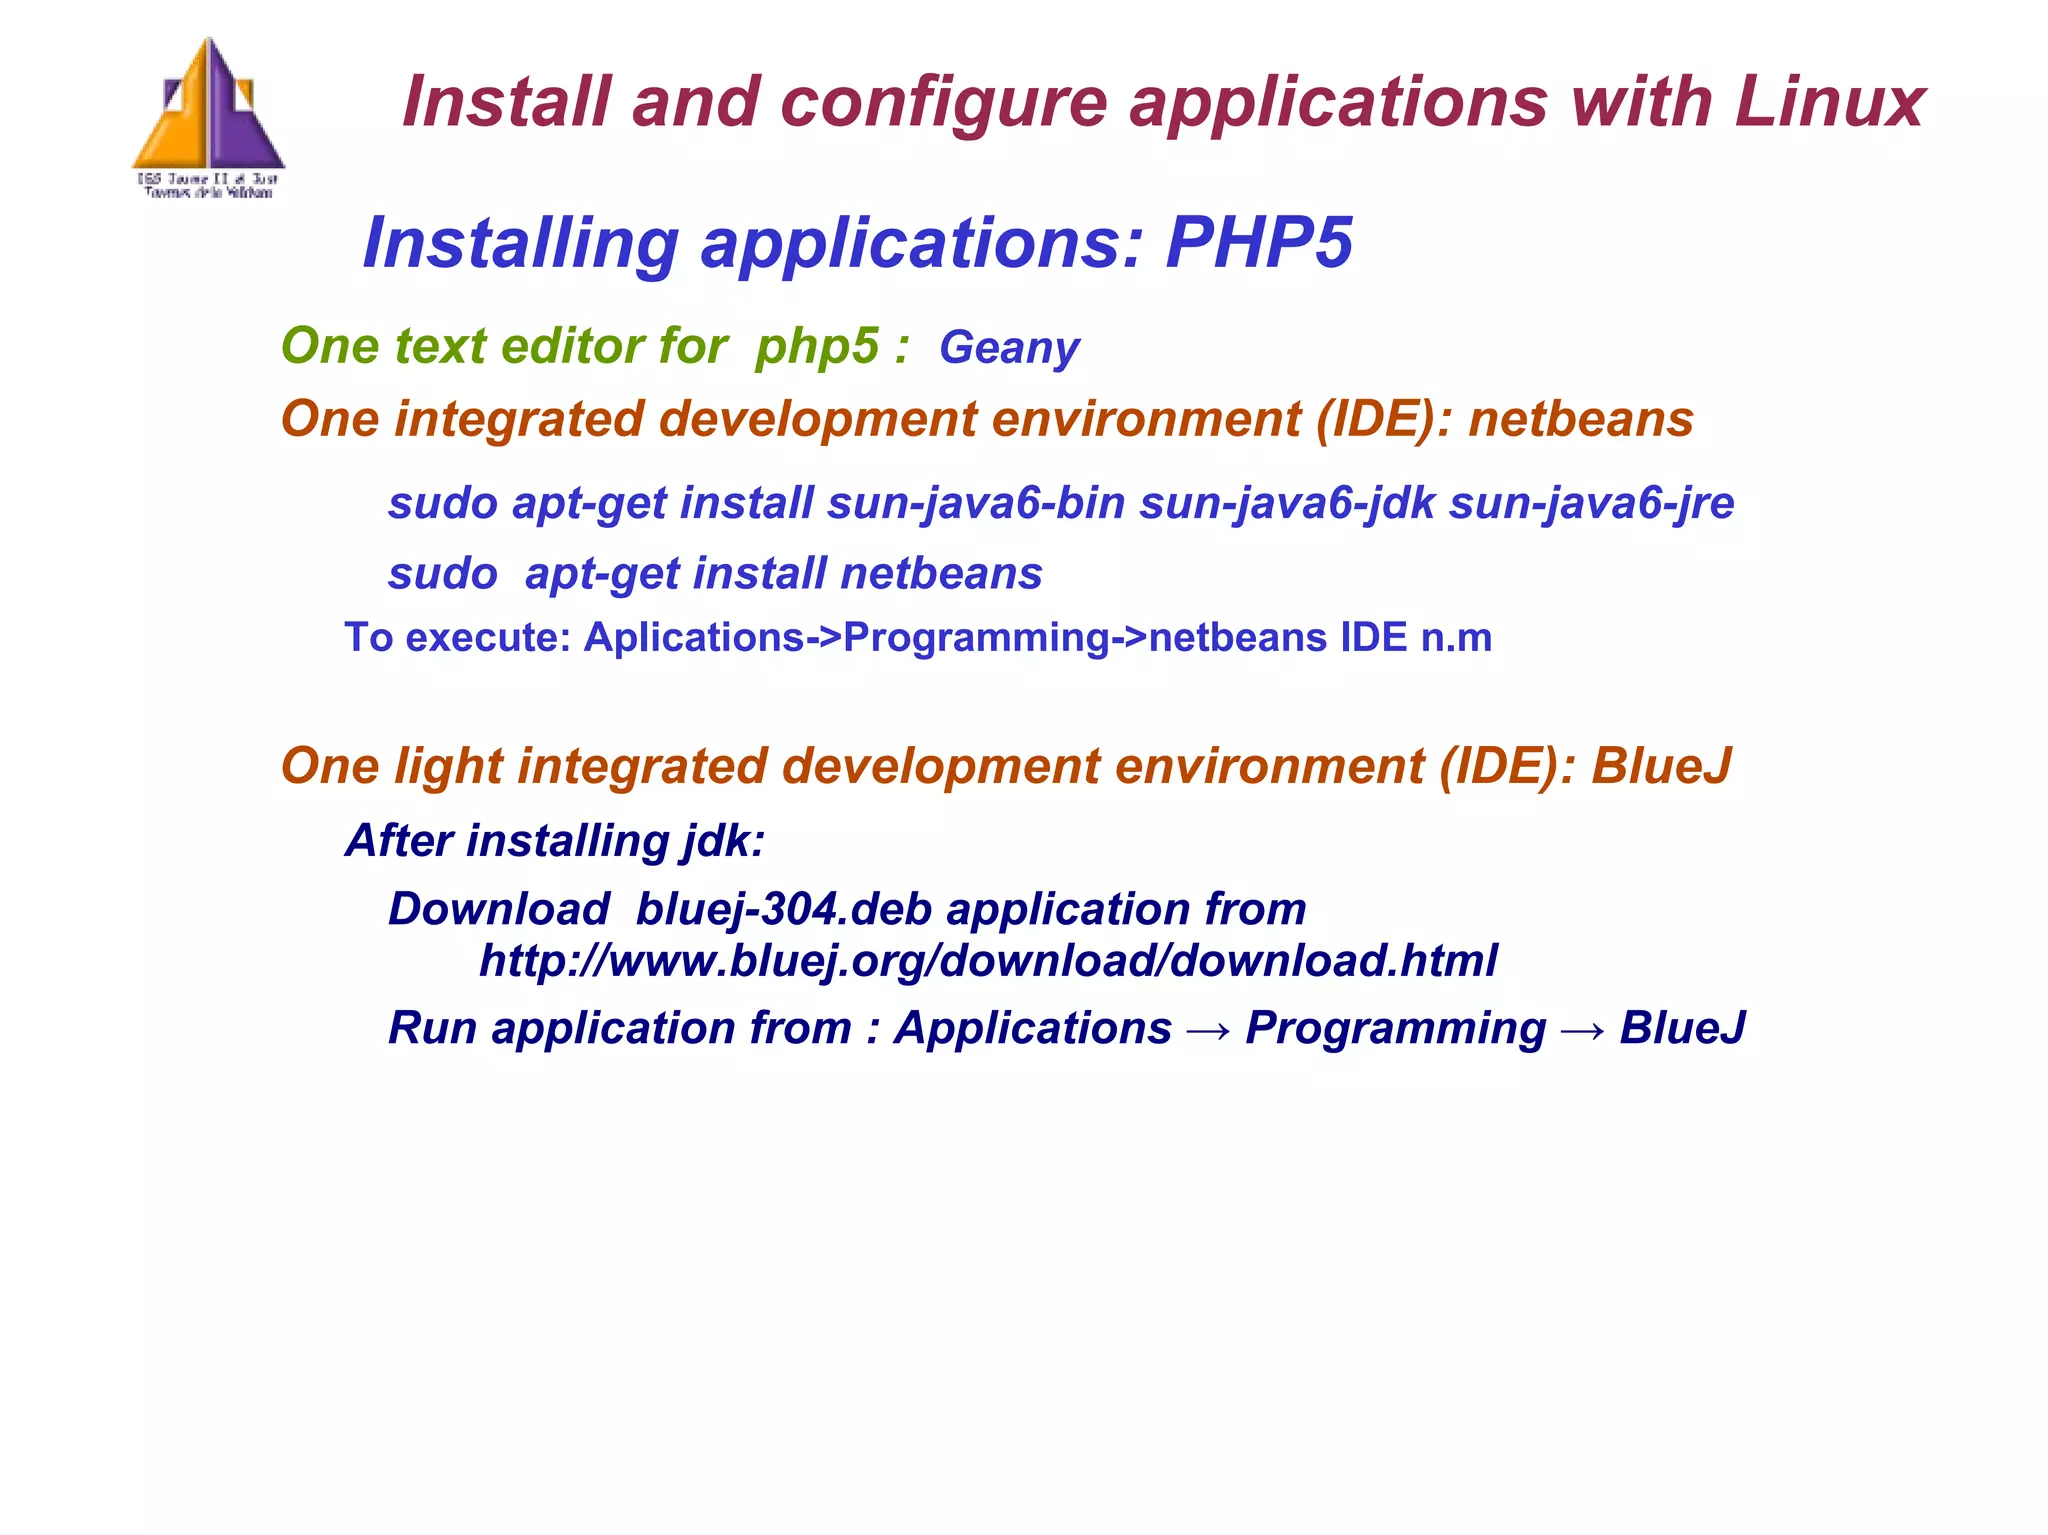
Installing applications: PHP5 One text editor for php5 : Geany One integrated development environment (IDE) : netbeans sudo apt-get install sun-java6-bin sun-java6-jdk sun-java6-jre sudo apt-get install netbeans To execute: Aplications->Programming->netbeans IDE n.m One light integrated development environment (IDE) : BlueJ After installing jdk: Download bluej-304.deb application from http://www.bluej.org/download/download.html Run application from : Applications -> Programming -> BlueJ Install and configure applications with Linux
23.
Installing applications: mySQL- Install a RDBMS: mySQL Libraies mysql-server-5 // The RDBMS phpmyadmin // The client myAdmin php5 - mysql // The mySQL module for PHP5 Configuration files: /etc/mysql/my.cnf /etc/phpmyadmin/config.inc.php Start the server mySQL sudo /etc/init.d/mysql [start | stop | ...] Install and configure applications with Linux
24.
Installing applications: mySQLphpmyadmin configuration Symbolic link between phpmyadmin and the document root ln -s /usr/share/phpmyadmin /var/www/ To start phpmyadmin from the web browser /localhost/phpmyadmin/ Some parameters from the configuration file $cfg['Servers'][$i]['auth_type'] = 'config'; $cfg['Servers'][$i]['user'] = 'root'; $cfg['Servers'][$i]['password'] = 'root'; $cfg['Servers'][$i]['AllowNoPasswordRoot'] = true; InnoDB engine: A transaction-safe (ACID compliant) storage engine for MySQL that has commit, rollback, and crash-recovery capabilities to protect user data Install and configure applications with Linux
25.
Installing applications: mySQLRoot password recovery Access to the system as root user : user@localhost:~$ su - Stop the server: /etc/init.d/mysql stop Restart the server mySQL in a safe mode From [email_address] # mysqld_safe --skip-grant-tables –skip- networking --user=mysql & Entry to the mysql BD as a root user [email_address] :/home/vicent# mysql -u root mysql Update the password mysql> UPDATE user SET Password = PASSWORD('newpassword') WHERE User='root'; Then also update the privileges mysql> FLUSH PRIVILEGES; Exit mysql mysql> exit Restart the server mySQL /etc/init.d/mysql restart Install and configure applications with Linux
26.
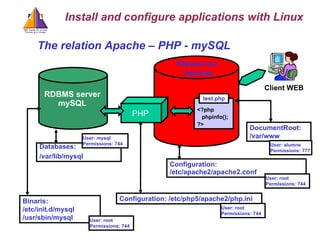
The relation Apache– PHP - mySQL Webserver Apache <?php phpinfo(); ?> Binaris: /etc/init.d/mysql /usr/sbin/mysql Databases: /var/lib/mysql Configuration: /etc/php5/apache2/php.ini DocumentRoot: /var/www Configuration: /etc/apache2/apache2.conf test.php User: mysql Permissions: 744 User: root Permissions: 744 User: alumne Permissions: 777 User: root Permissions: 744 User: root Permissions: 744 Install and configure applications with Linux RDBMS server mySQL PHP Client WEB
27.
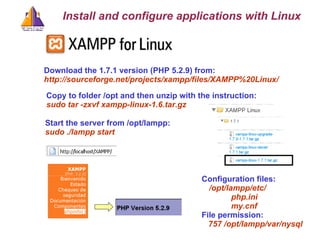
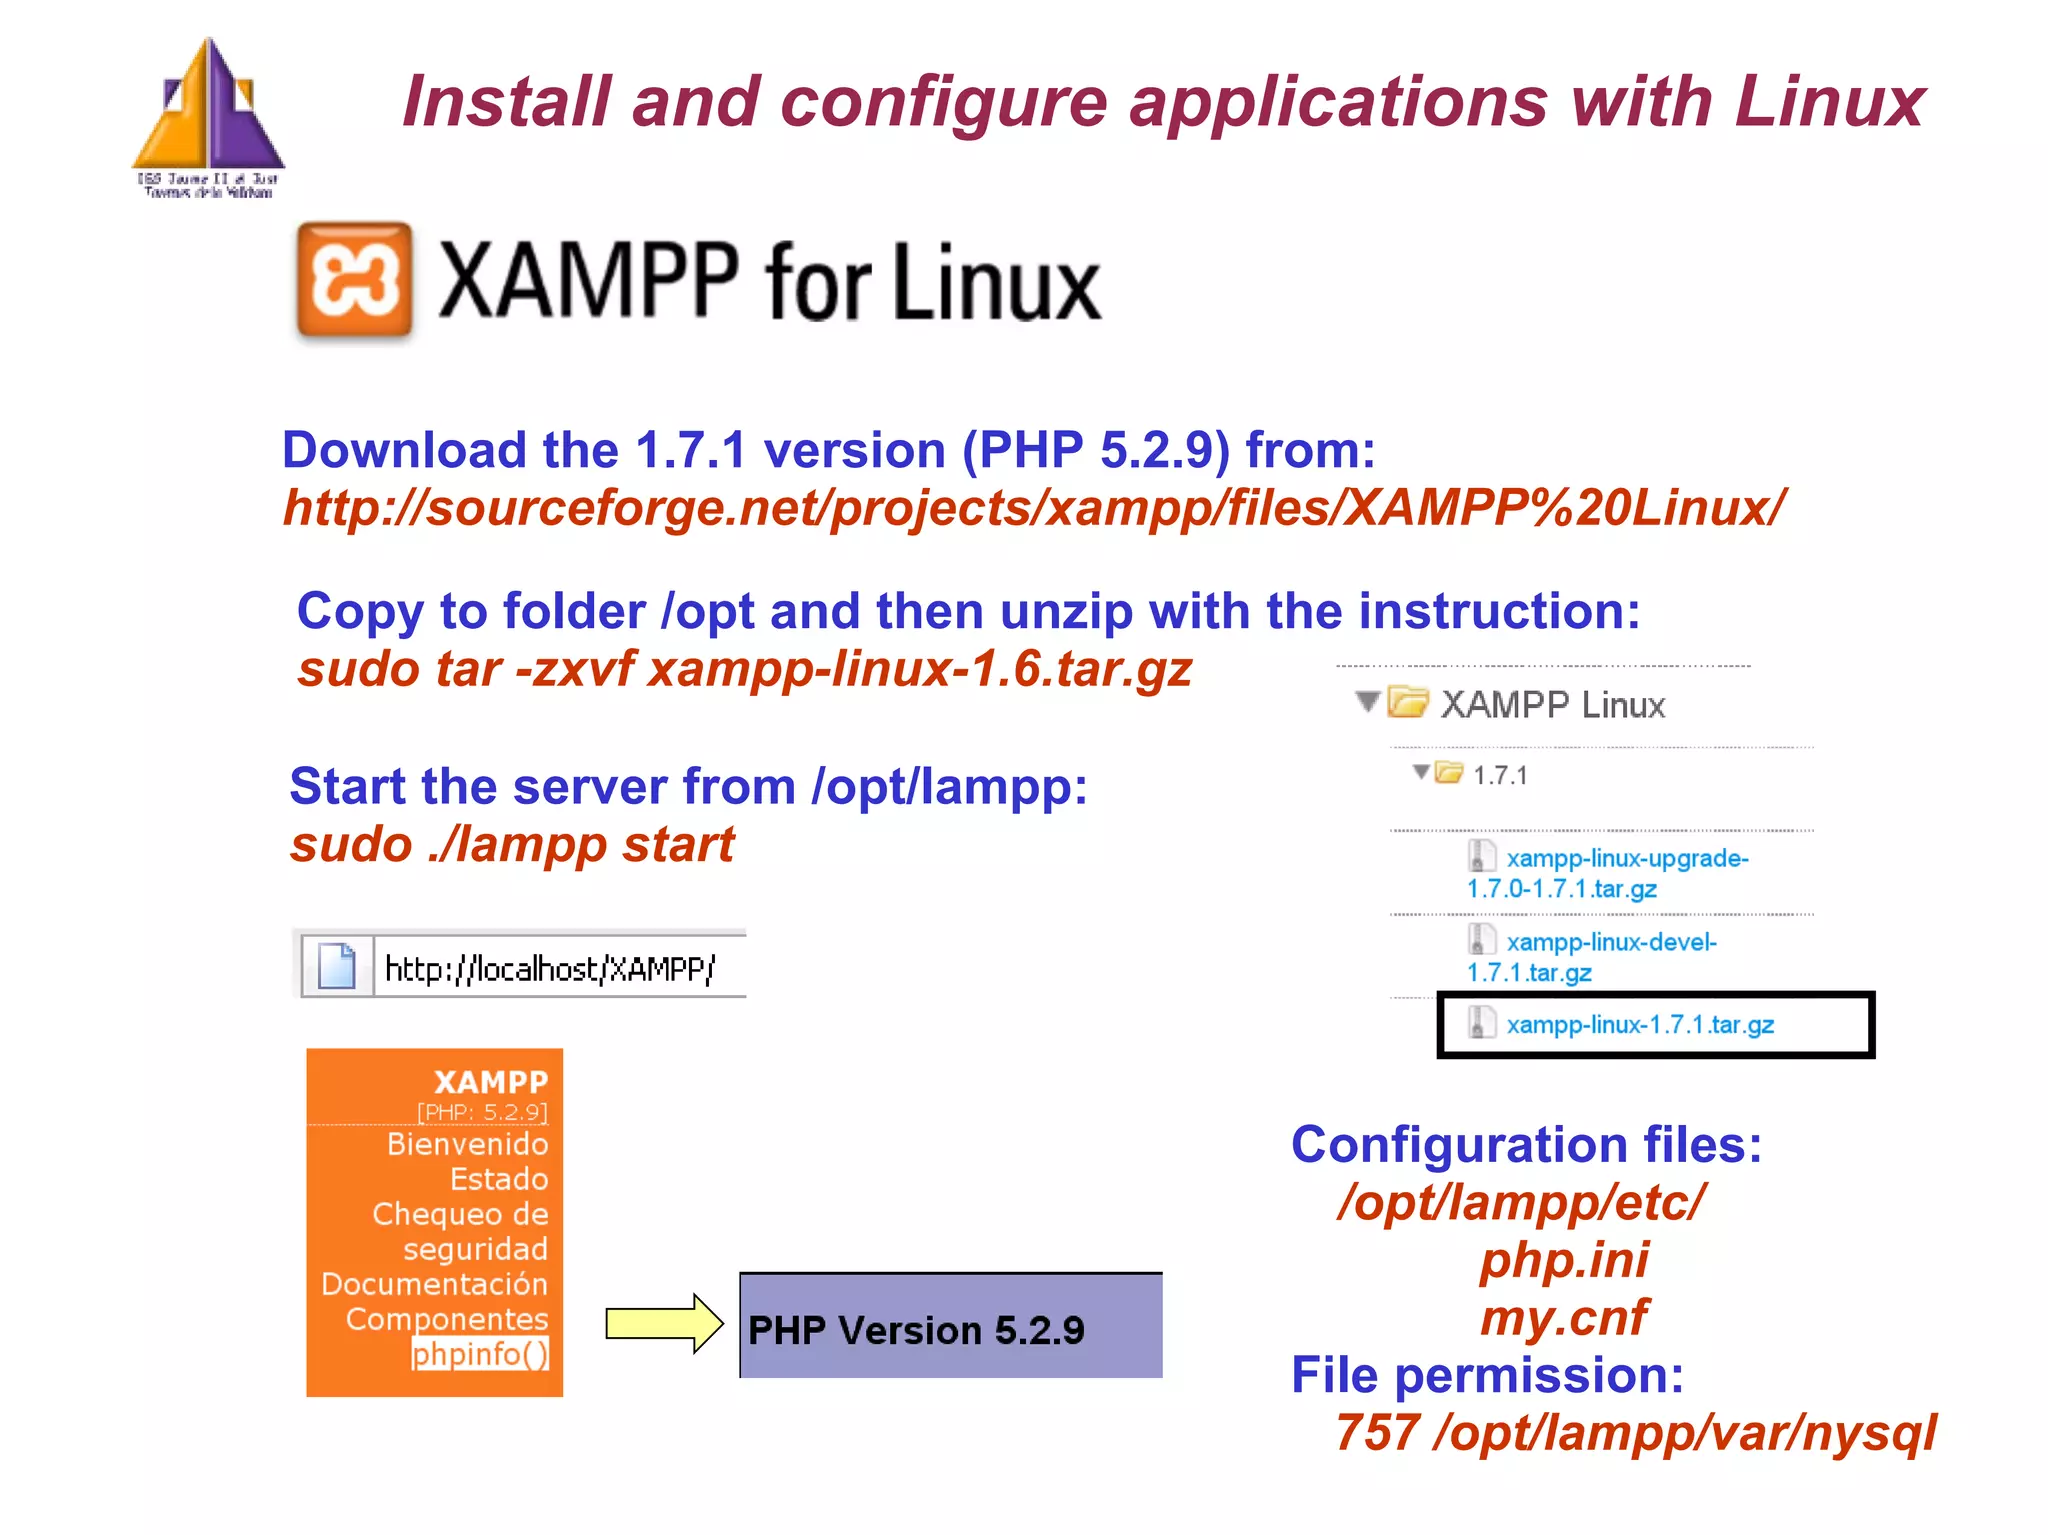
Download the 1.7.1version (PHP 5.2.9) from: http://sourceforge.net/projects/xampp/files/XAMPP%20Linux/ Install and configure applications with Linux Copy to folder /opt and then unzip with the instruction: sudo tar -zxvf xampp-linux-1.6.tar.gz Start the server from /opt/lampp: sudo ./lampp start Configuration files: /opt/lampp/etc/ php.ini my.cnf File permission: 757 /opt/lampp/var/nysql
28.
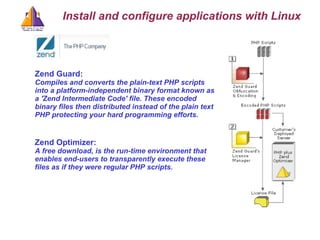
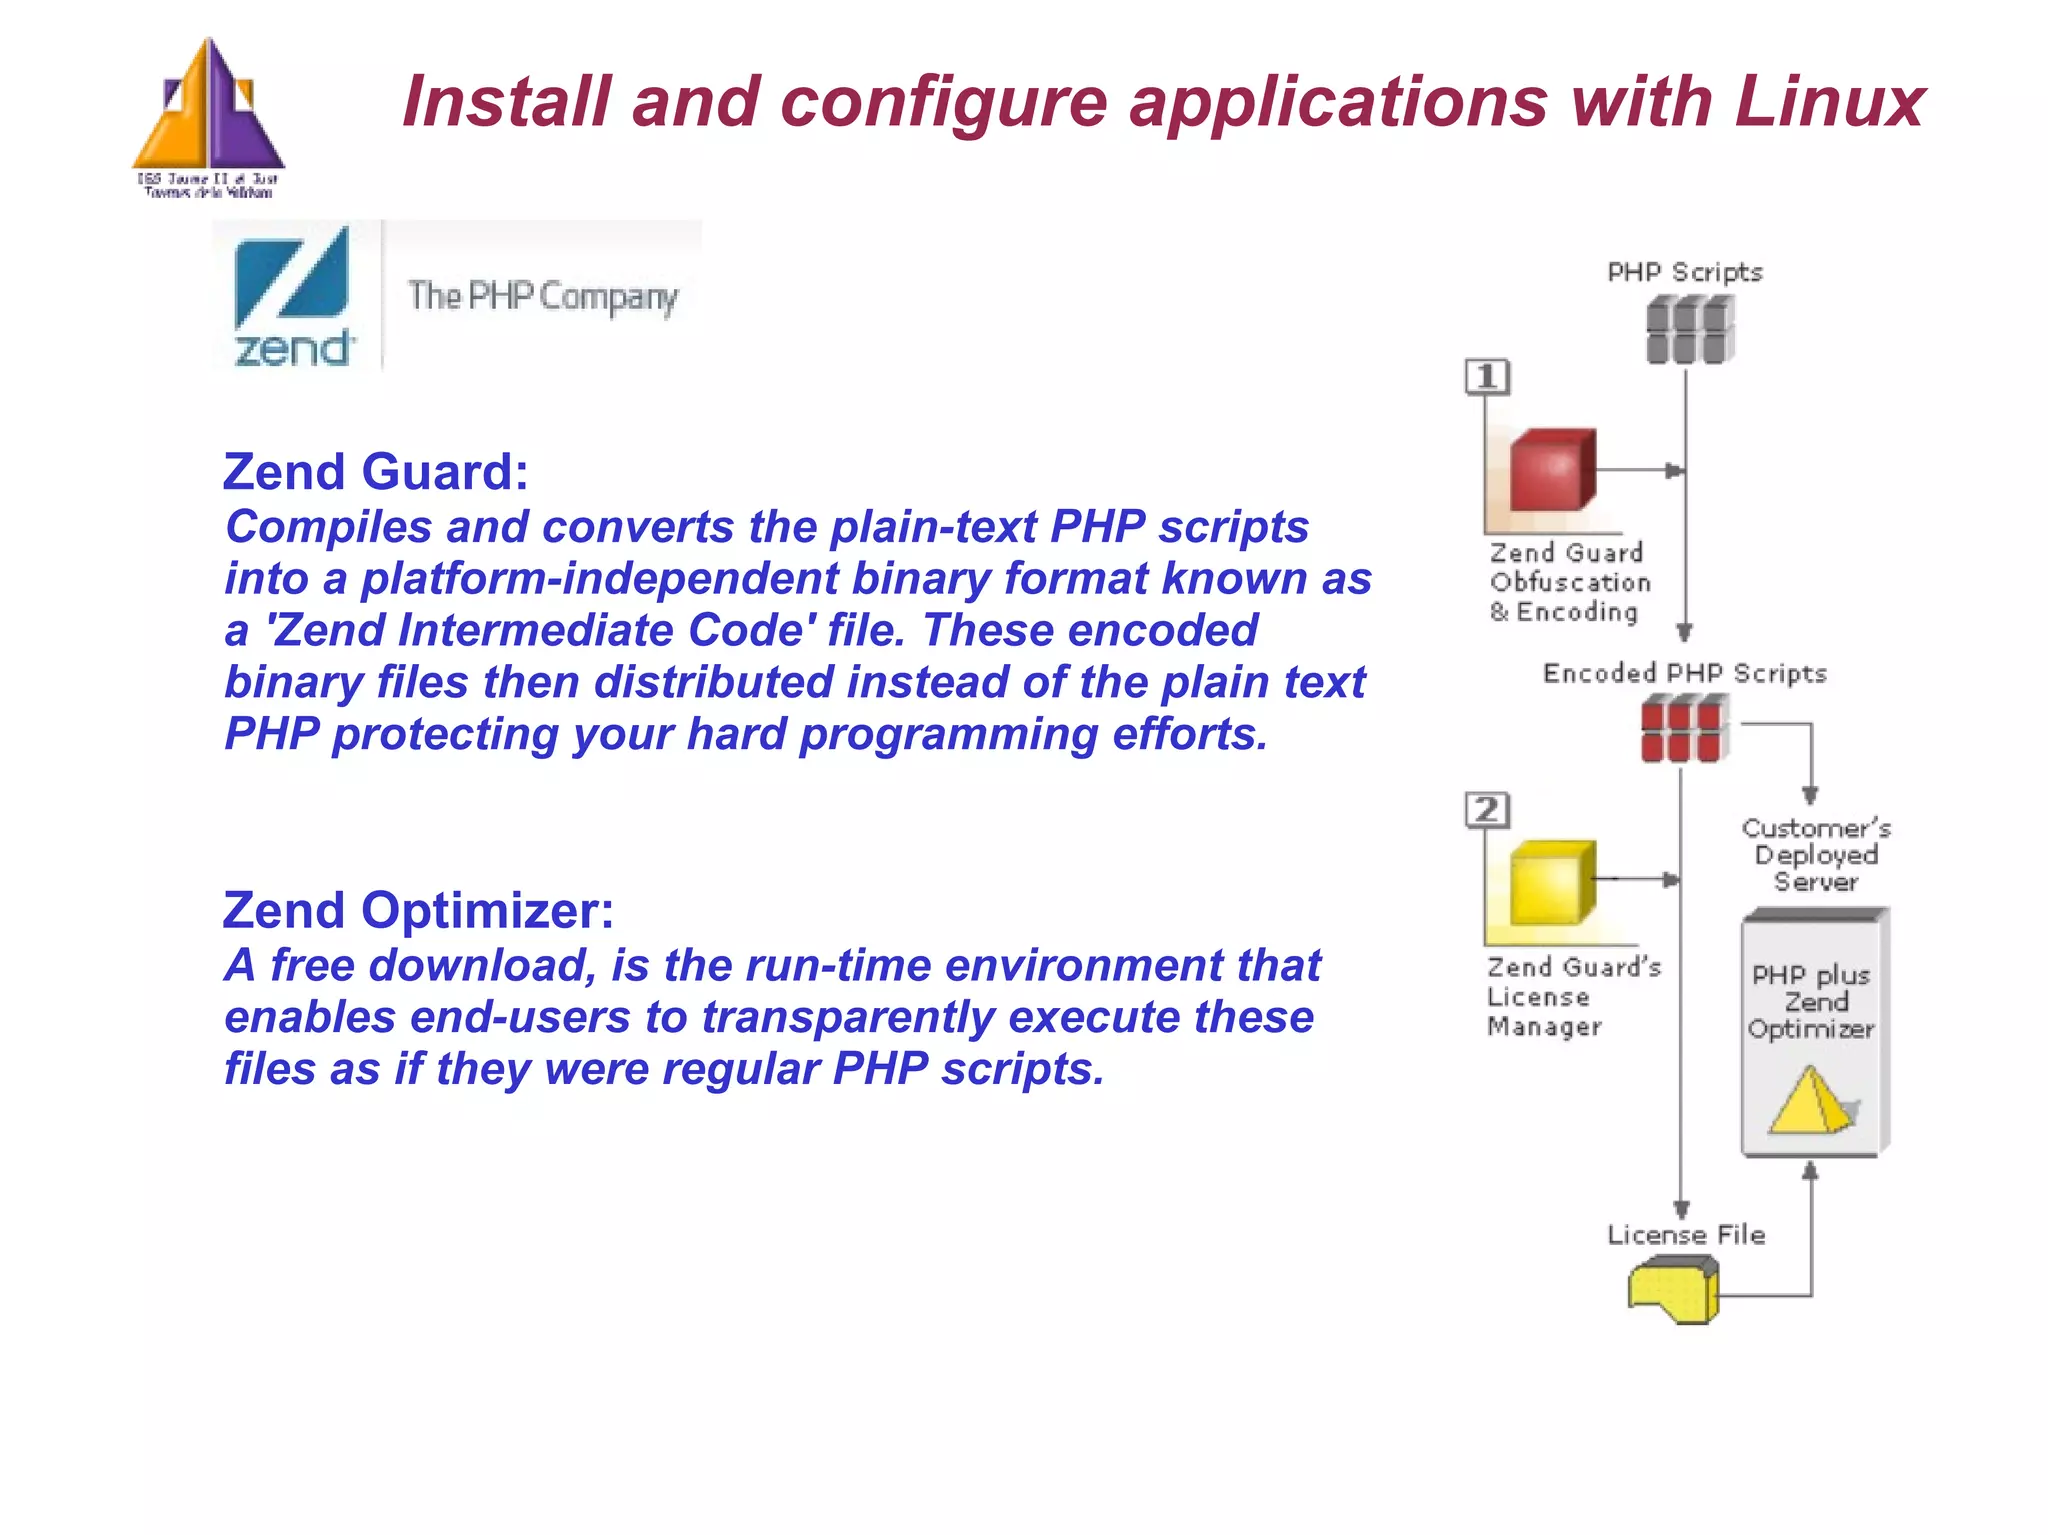
Install and configureapplications with Linux Zend Guard: Compiles and converts the plain-text PHP scripts into a platform-independent binary format known as a 'Zend Intermediate Code' file. These encoded binary files then distributed instead of the plain text PHP protecting your hard programming efforts. Zend Optimizer: A free download, is the run-time environment that enables end-users to transparently execute these files as if they were regular PHP scripts.
29.
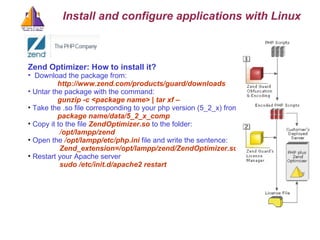
Install and configureapplications with Linux Zend Optimizer: How to install it? Download the package from: http://www.zend.com/products/guard/downloads Untar the package with the command: gunzip -c <package name> | tar xf – Take the .so file corresponding to your php version (5_2_x) from package name/data/5_2_x_comp Copy it to the file ZendOptimizer.so to the folder: / opt/lampp/zend Open the / opt/lampp/etc/php.ini file and write the sentence: Zend_extension=/opt/lampp/zend/ZendOptimizer.so Restart your Apache server sudo /etc/init.d/apache2 restart
30.
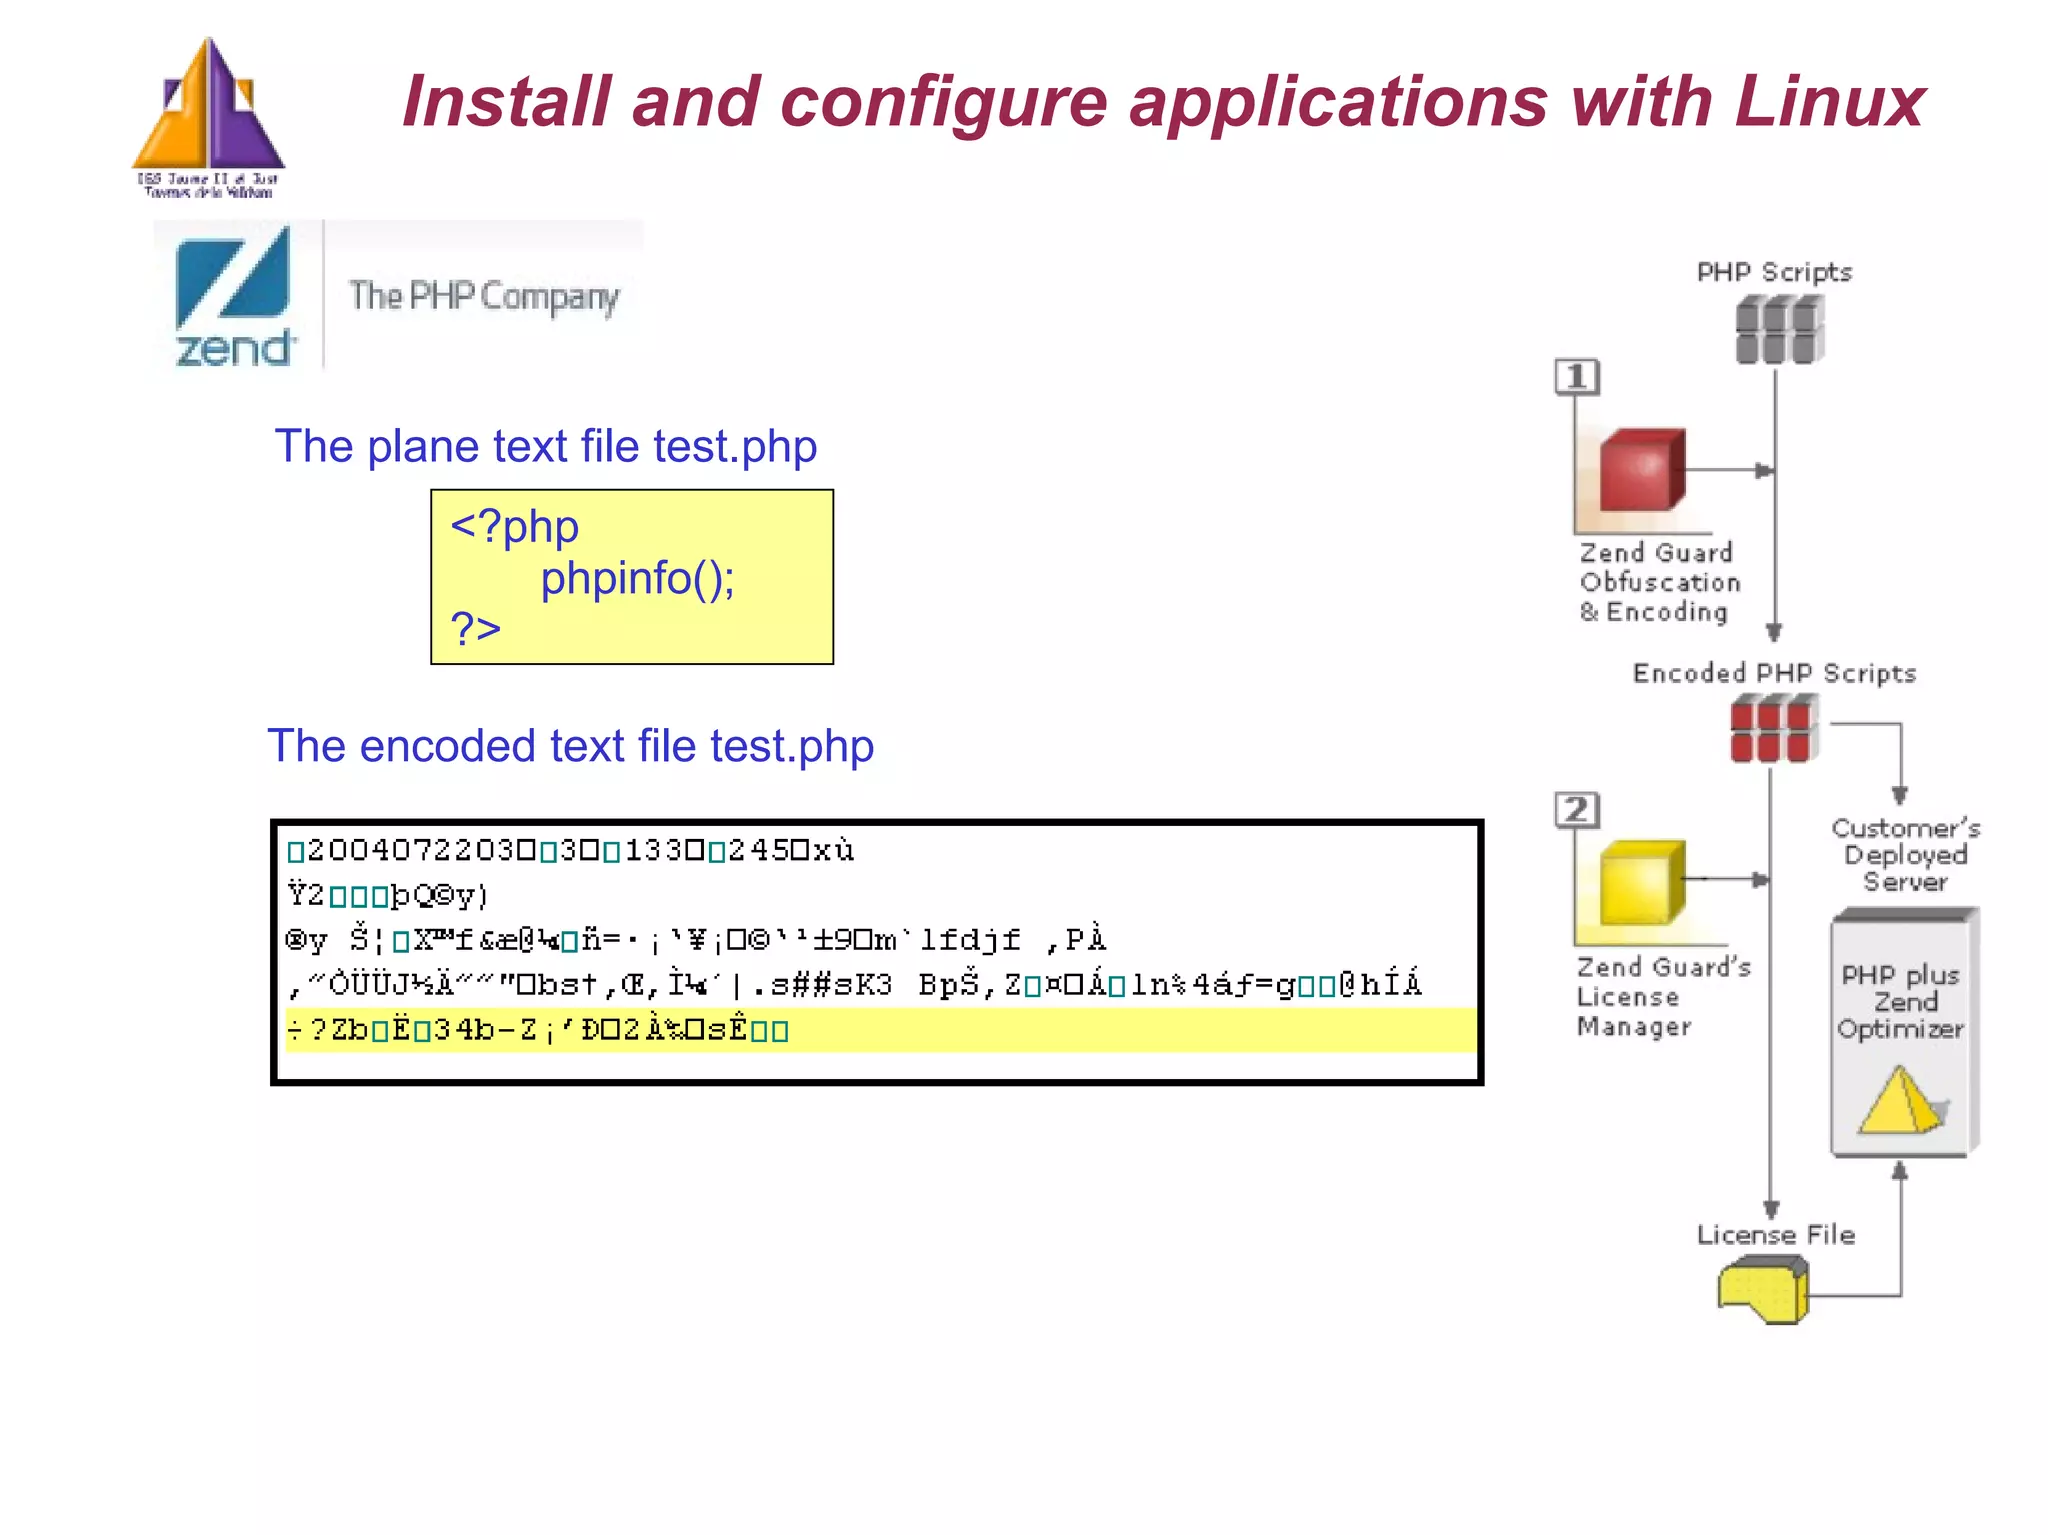
Install and configureapplications with Linux <?php phpinfo(); ?> The plane text file test.php The encoded text file test.php
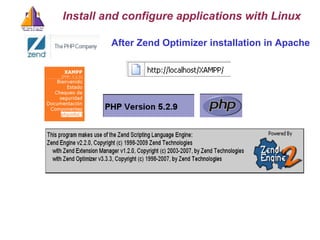
31.
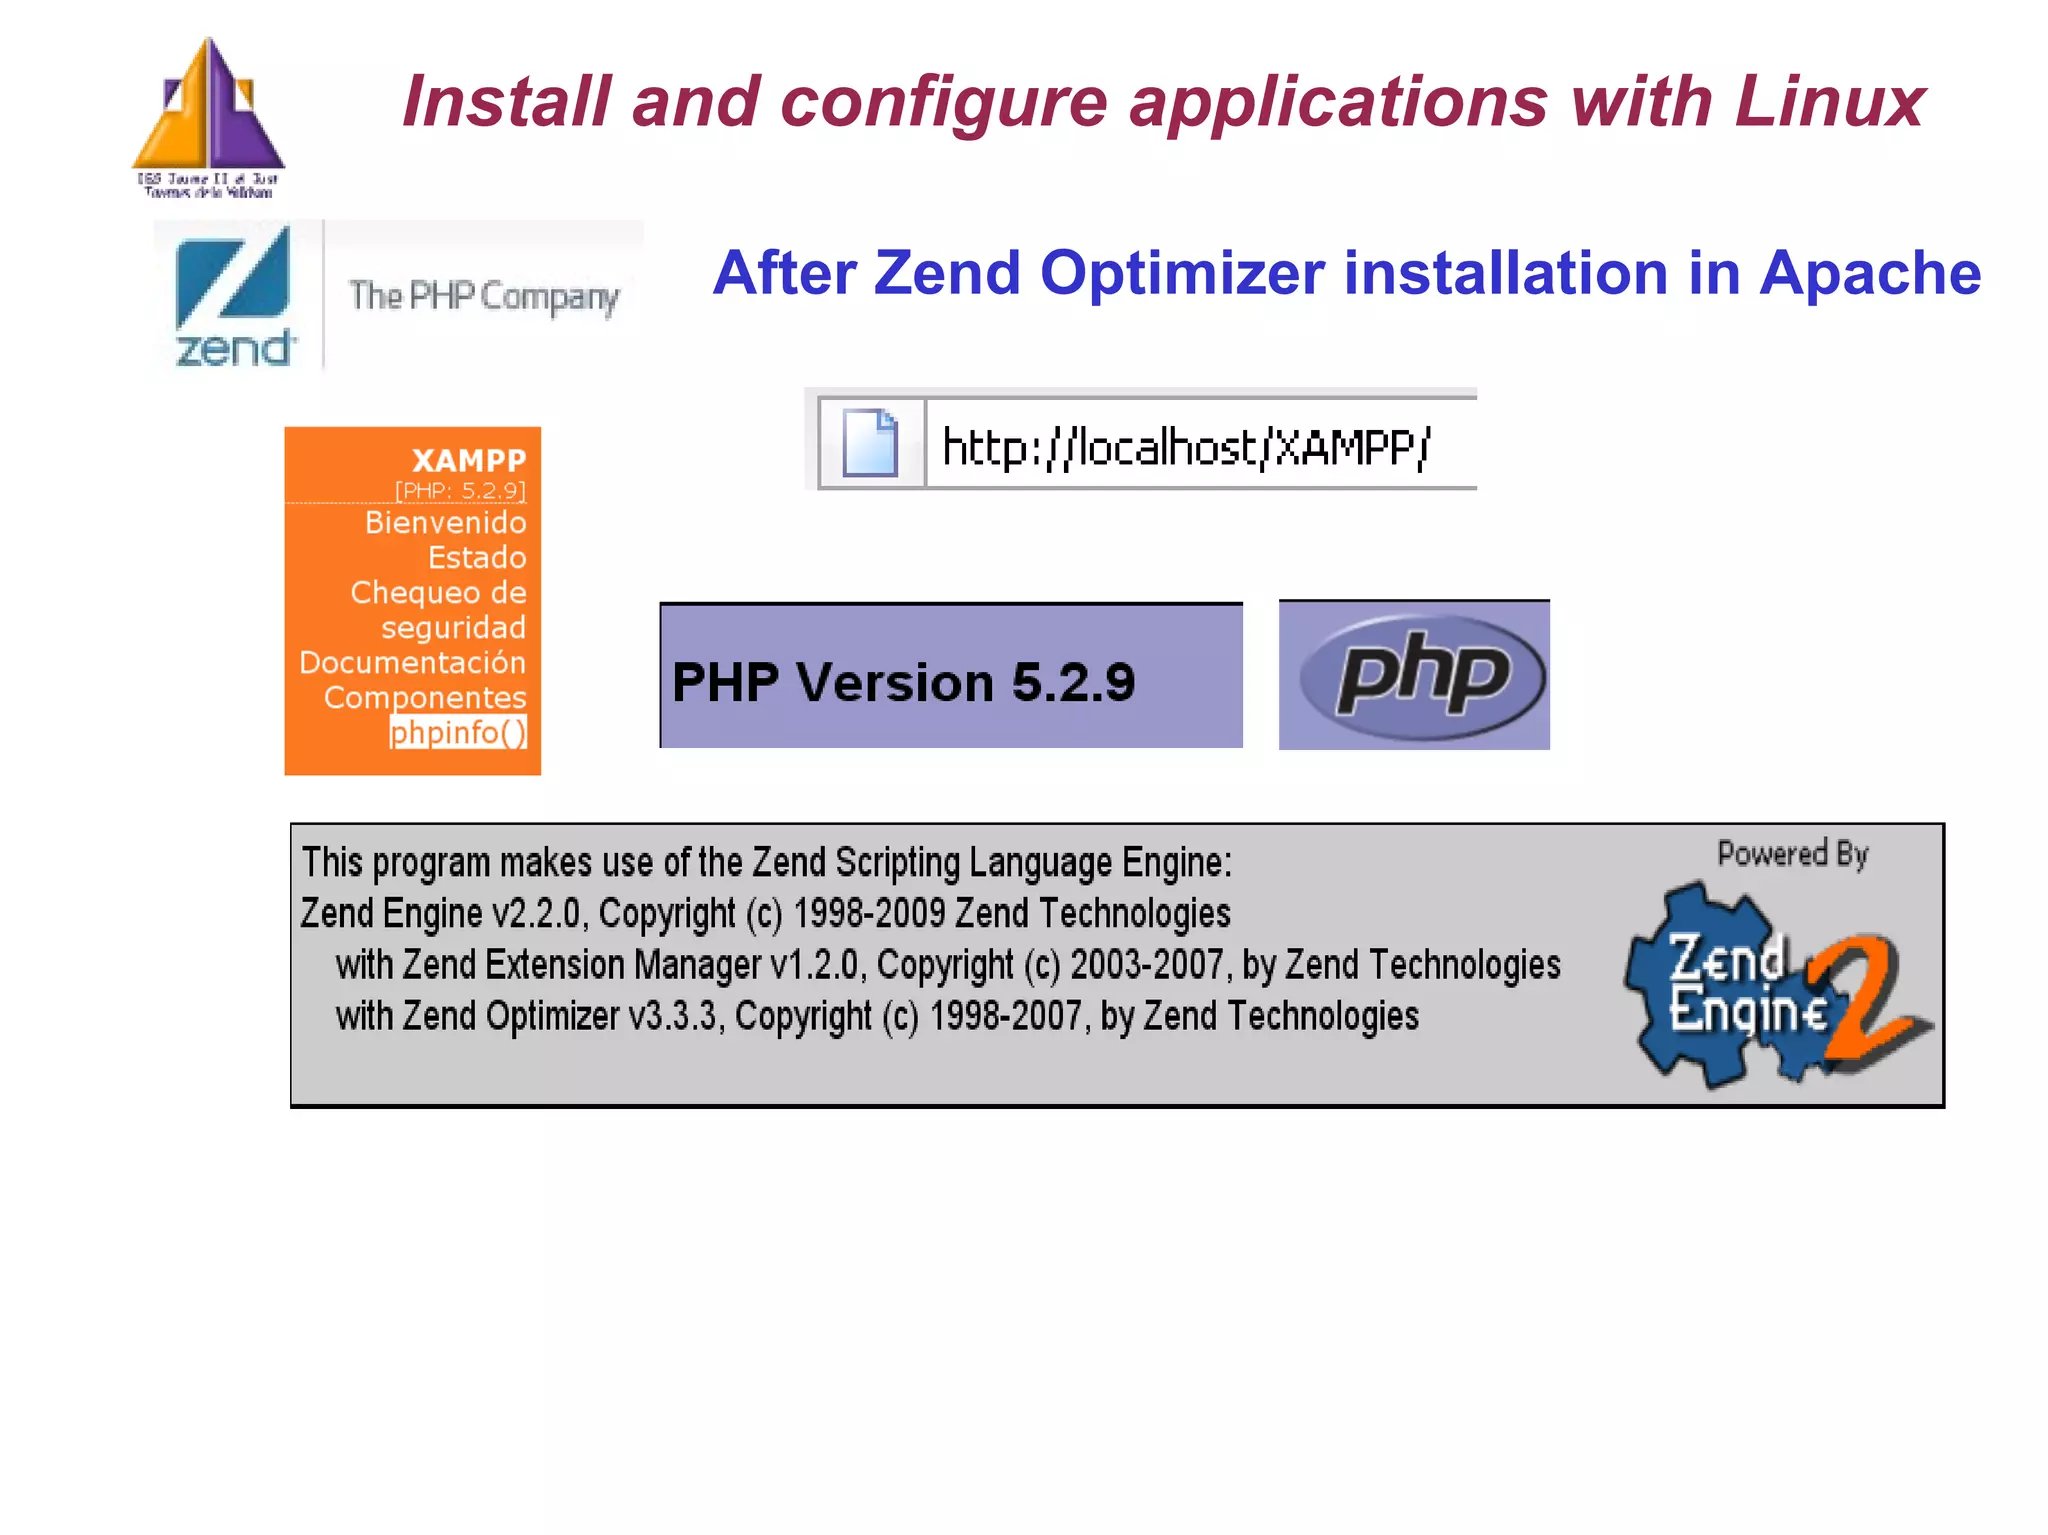
Install and configureapplications with Linux After Zend Optimizer installation in Apache
32.
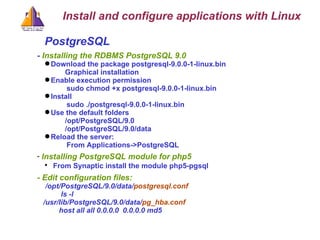
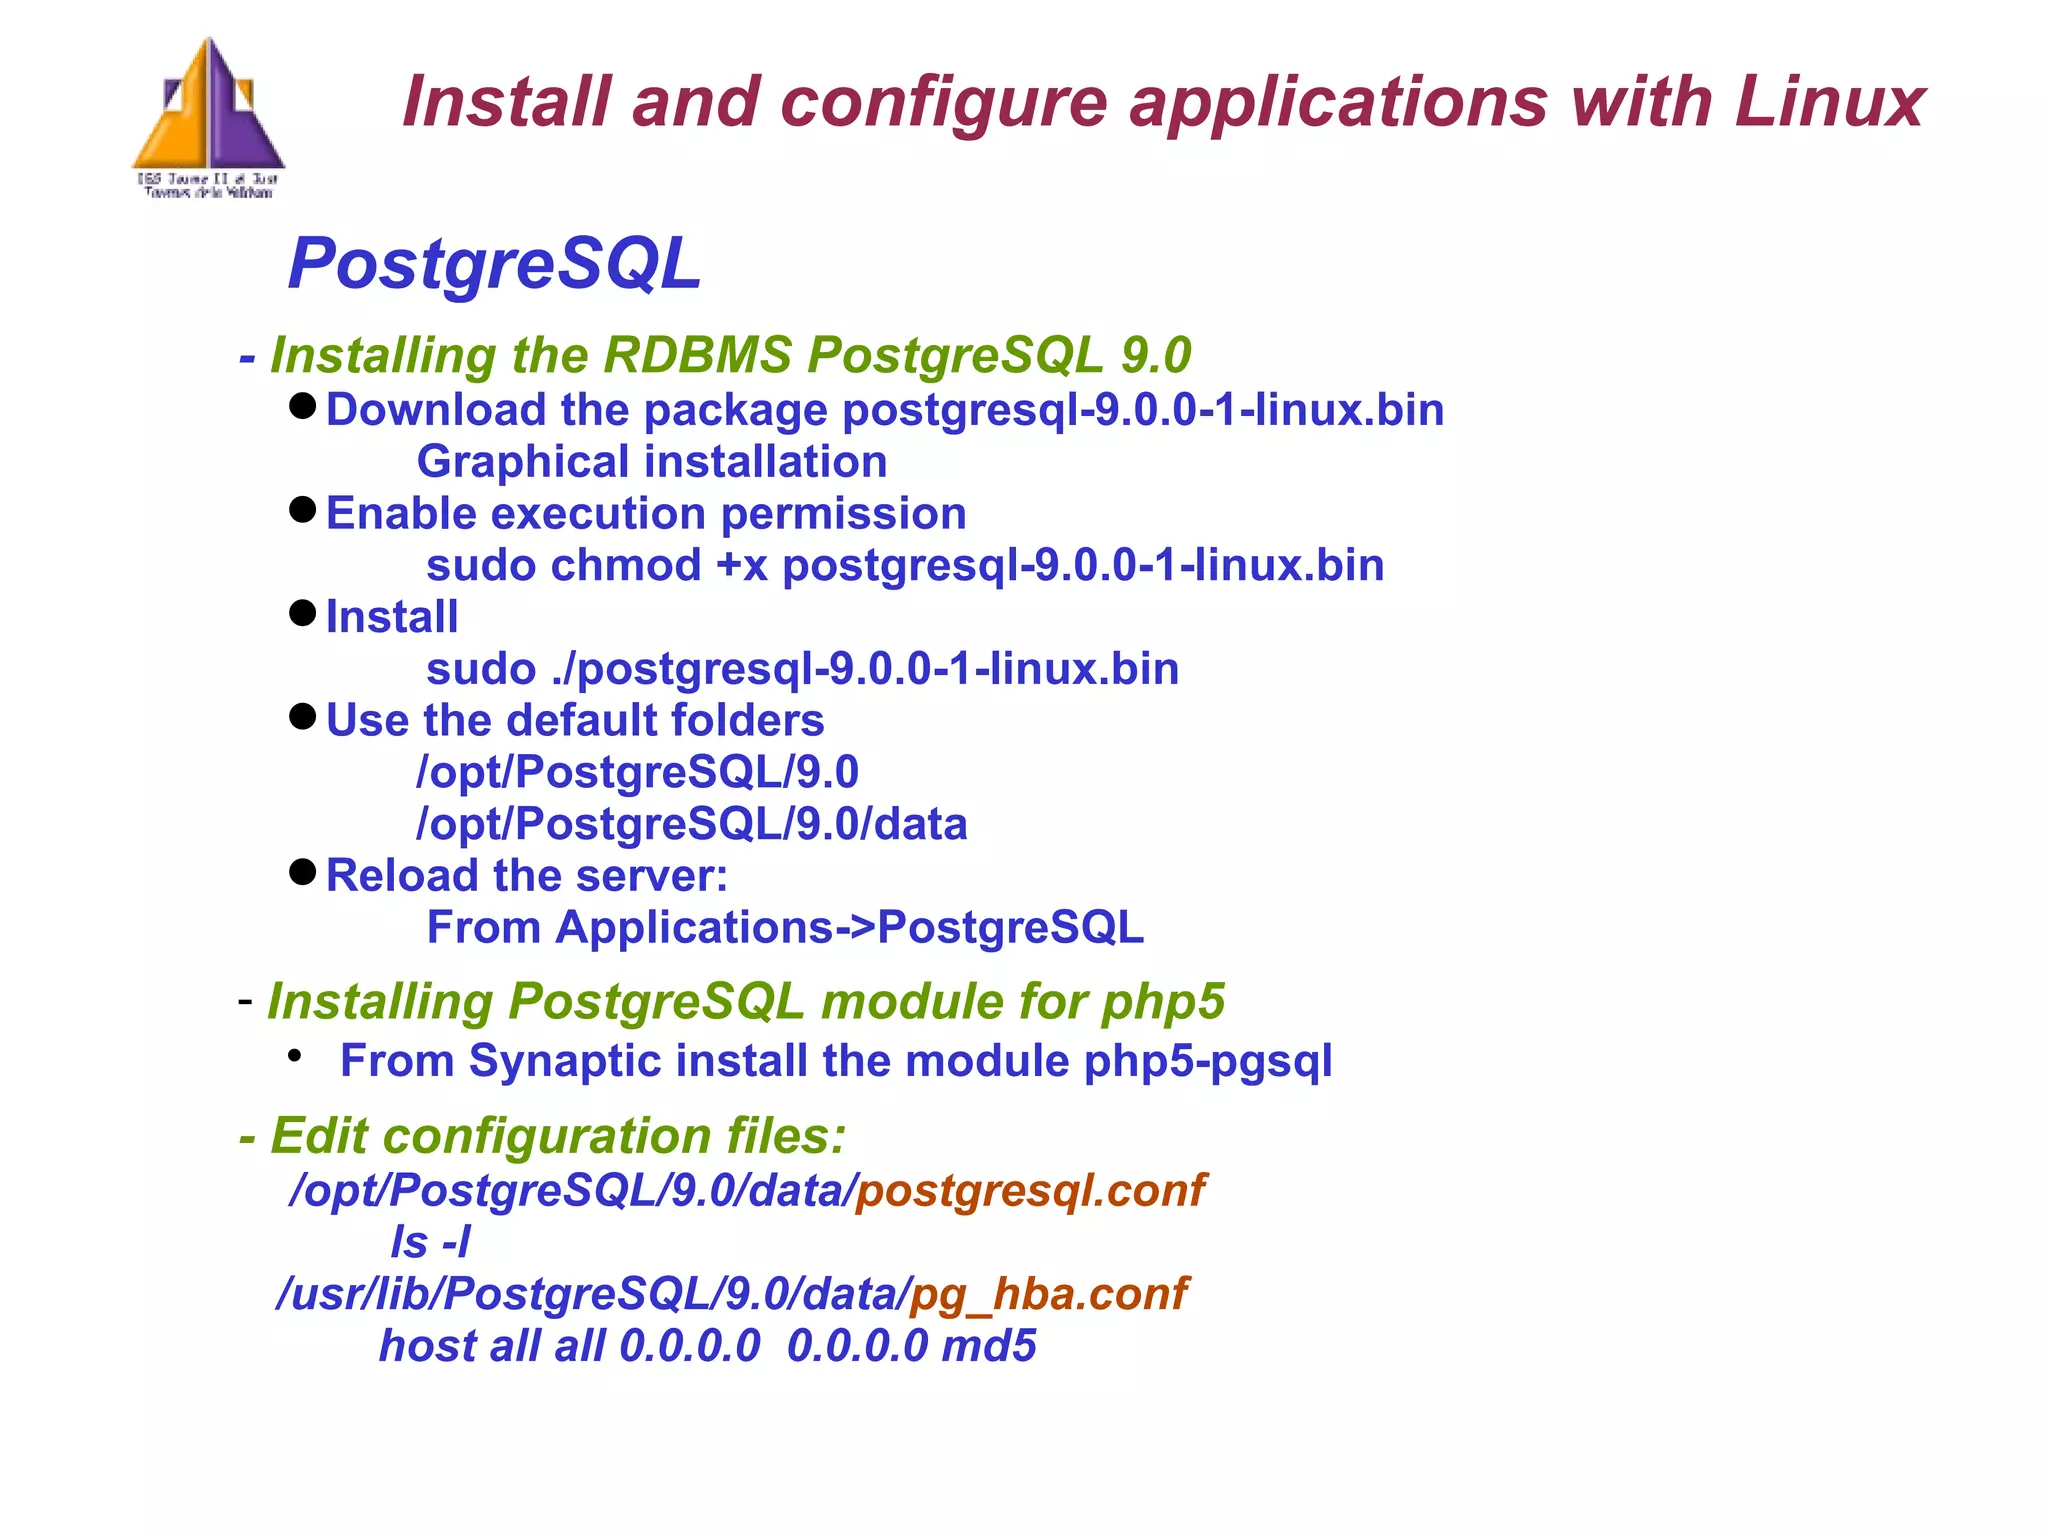
PostgreSQL - Installing the RDBMS PostgreSQL 9.0 Download the package postgresql-9.0.0-1-linux.bin Graphical installation Enable execution permission sudo chmod +x postgresql-9.0.0-1-linux.bin Install sudo ./postgresql-9.0.0-1-linux.bin Use the default folders /opt/PostgreSQL/9.0 /opt/PostgreSQL/9.0/data Reload the server: From Applications->PostgreSQL Installing PostgreSQL module for php5 From Synaptic install the module php5-pgsql - Edit configuration files: /opt/PostgreSQL/9.0/data/ postgresql.conf ls -l /usr/lib/PostgreSQL/9.0/data/ pg_hba.conf host all all 0.0.0.0 0.0.0.0 md5 Install and configure applications with Linux
33.
Installing applications: phppgadminInstall the phppgadmin client From the repositoris, install the package phppgadmin File configuration: /etc/phppgadmin/config.inc.php Some parameters: $conf['extra_login_security'] = true; $conf['owned_only'] = false; $conf['show_system'] = false; - Start phppgadmin Start phppgadmin from the web browser /localhost/phppgadmin/ /domini/phppgadmin Configuration file in Apache: /etc/apache2/conf.d/phppgadmin.conf Allow from all ; To allow Internet connexions Install and configure applications with Linux
34.
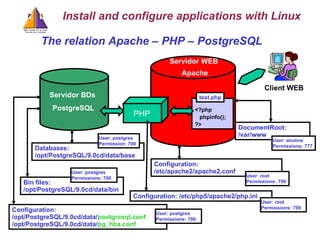
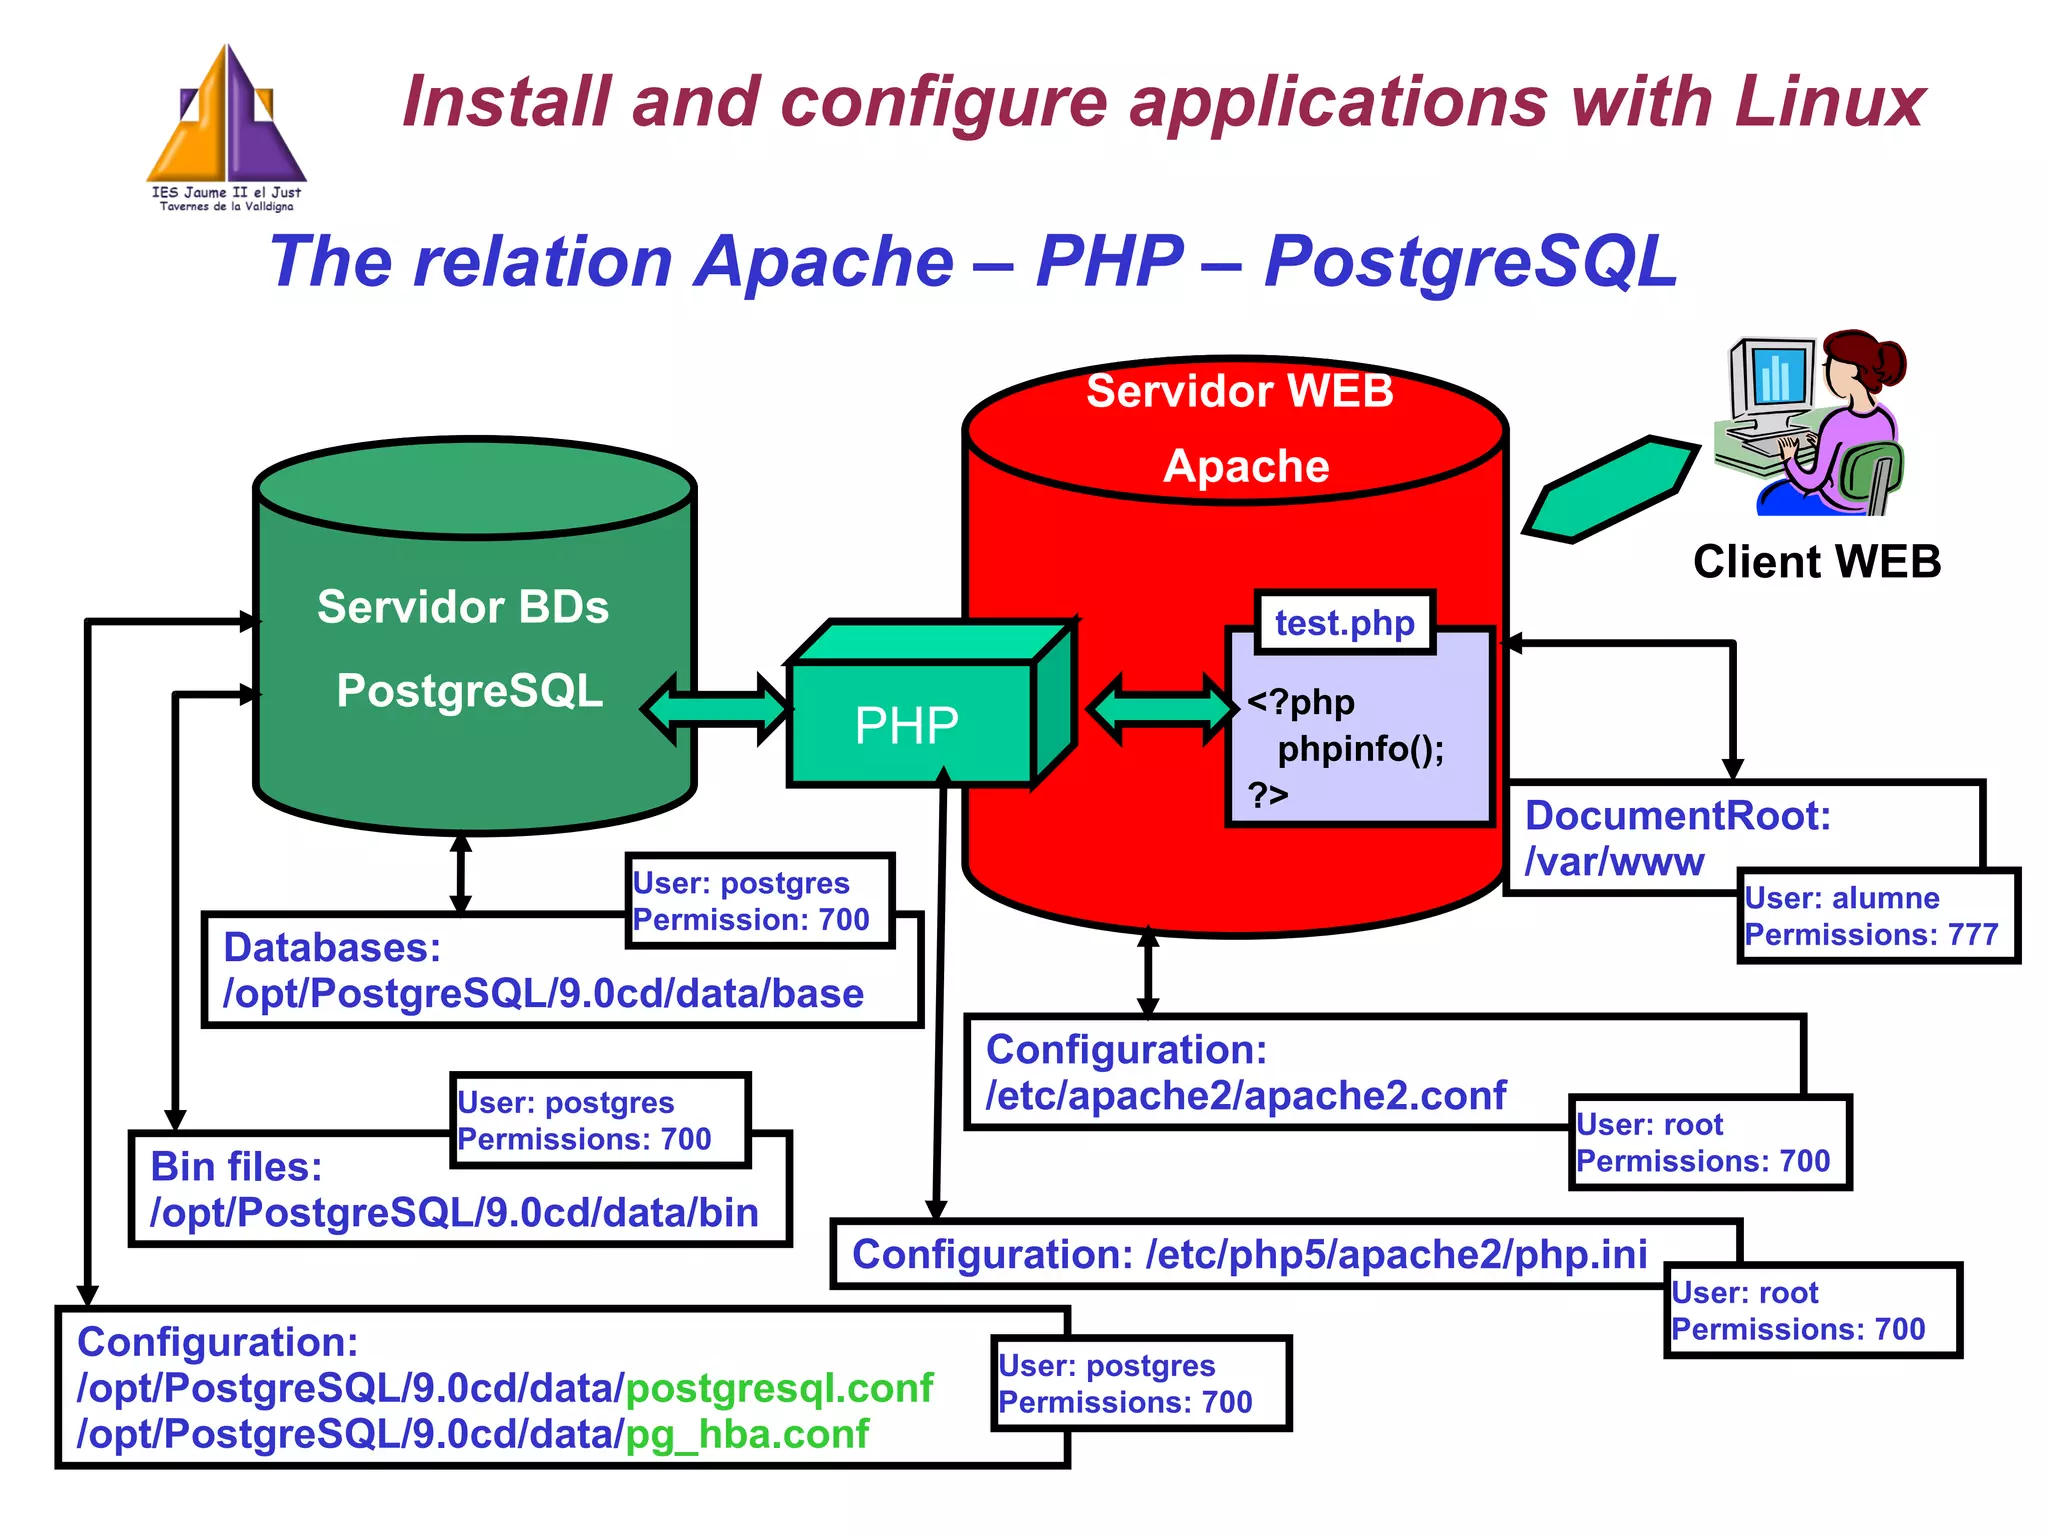
The relation Apache– PHP – PostgreSQL <?php phpinfo(); ?> Bin files: /opt/PostgreSQL/9.0cd/data/bin Databases: /opt/PostgreSQL/9.0cd/data/base Configuration: /etc/php5/apache2/php.ini DocumentRoot: /var/www Configuration: /etc/apache2/apache2.conf test.php User: postgres Permission: 700 User: postgres Permissions: 700 User: root Permissions: 700 User: root Permissions: 700 User: alumne Permissions: 777 Configuration: /opt/PostgreSQL/9.0cd/data/ postgresql.conf /opt/PostgreSQL/9.0cd/data/ pg_hba.conf User: postgres Permissions: 700 Install and configure applications with Linux Servidor WEB Apache Servidor BDs PostgreSQL PHP Client WEB
35.
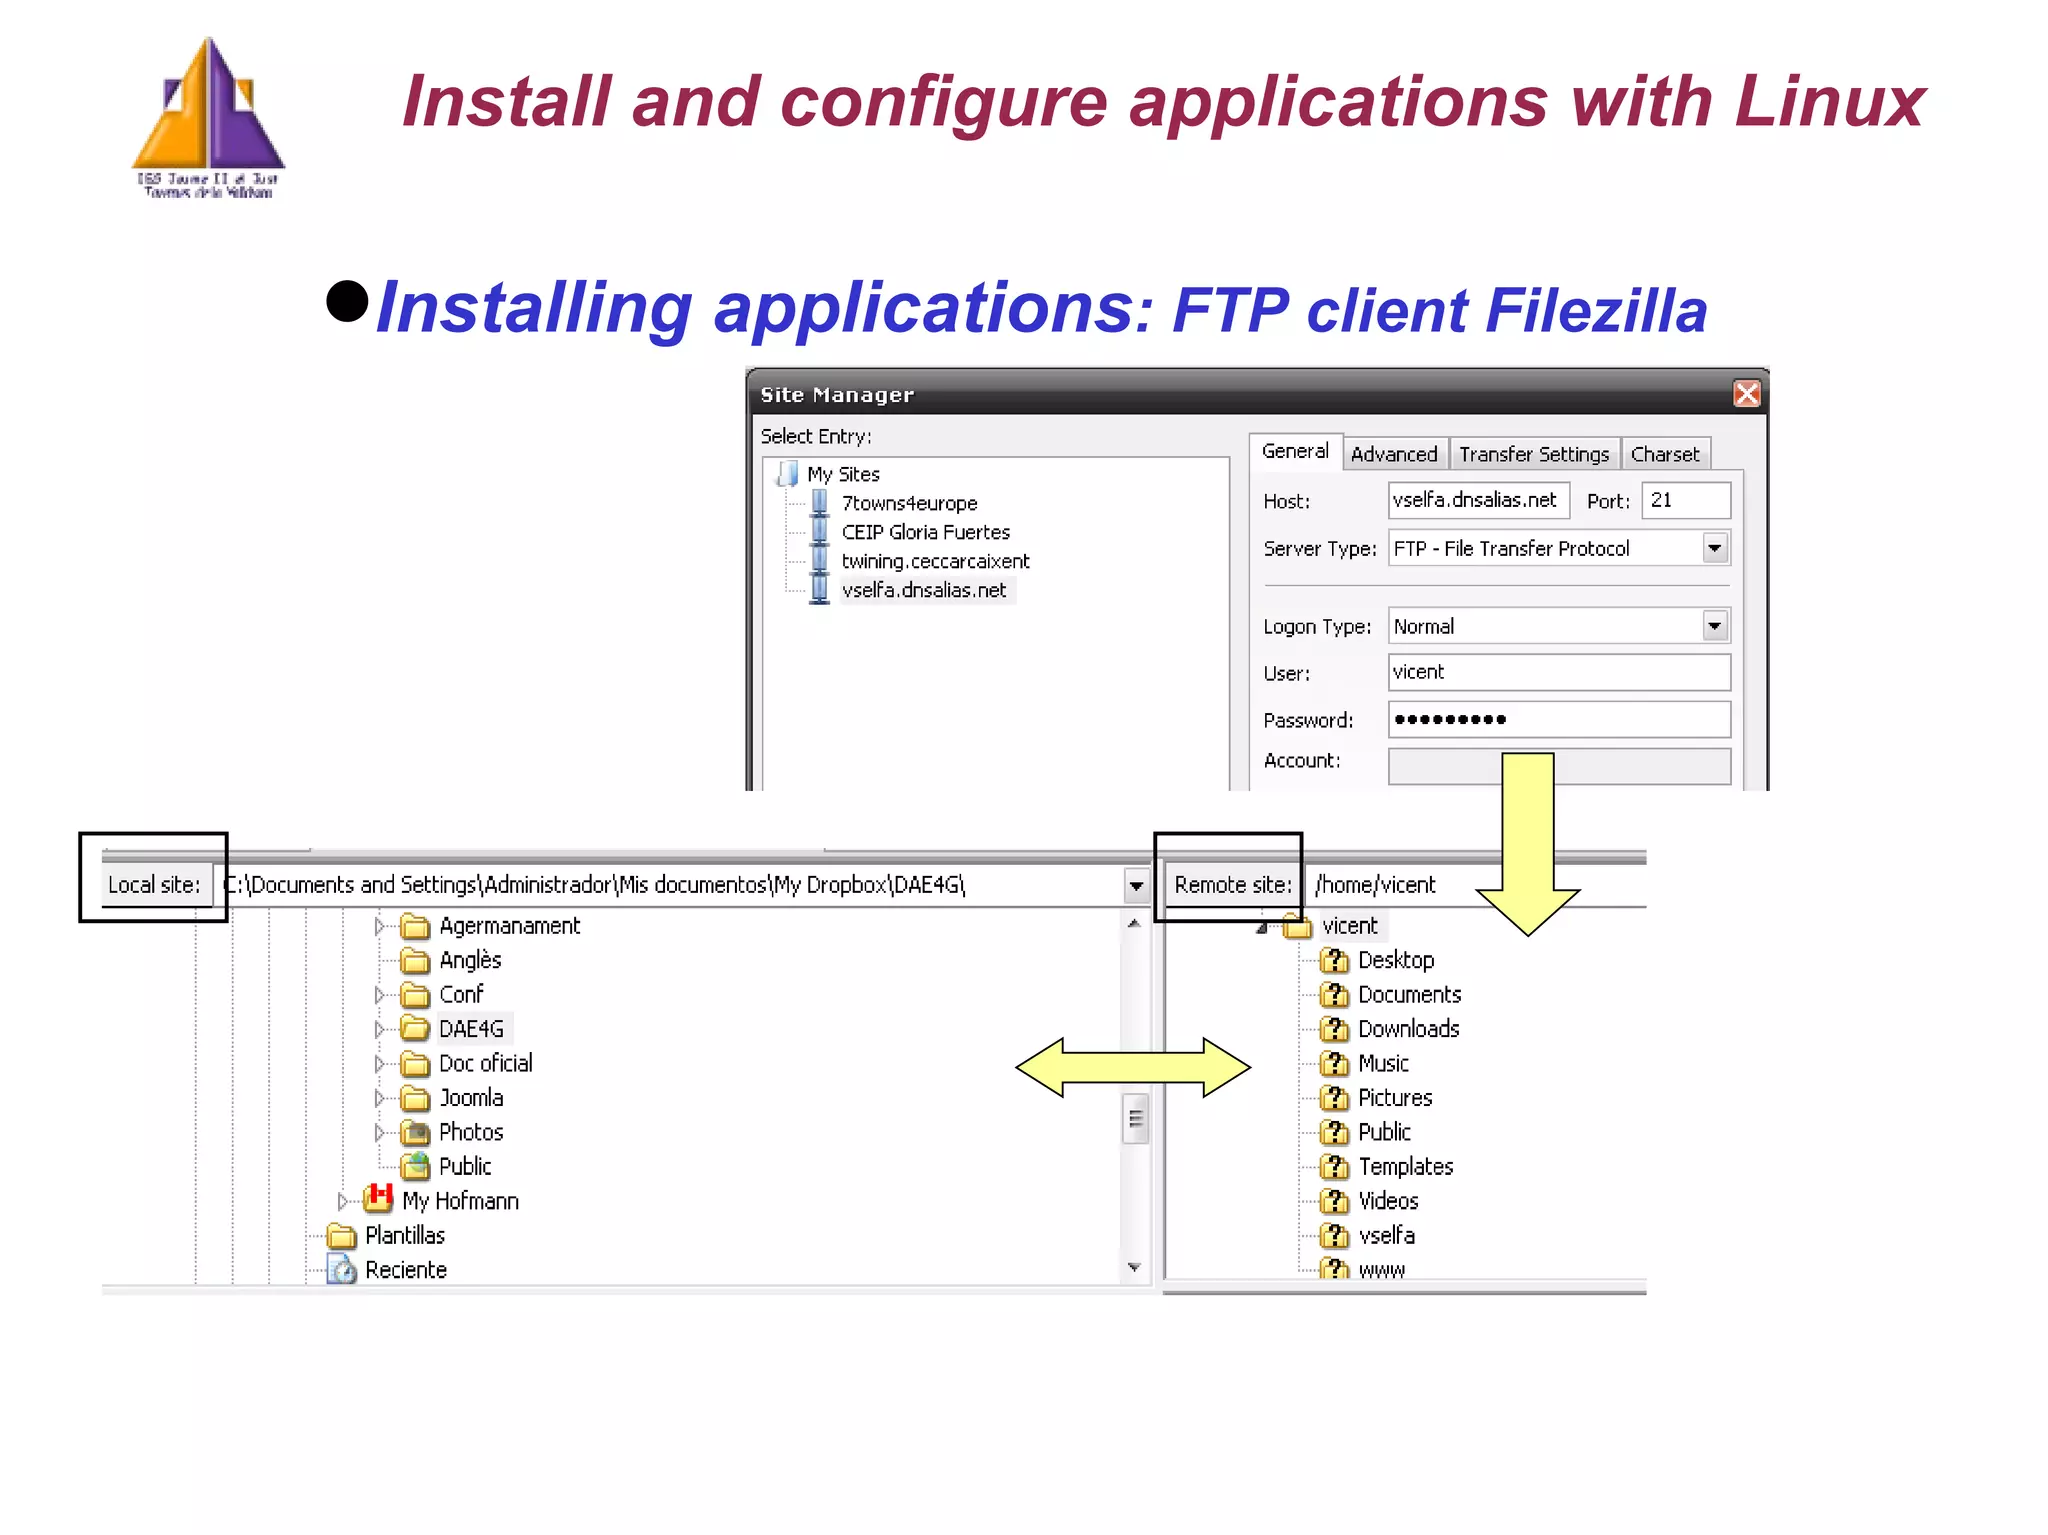
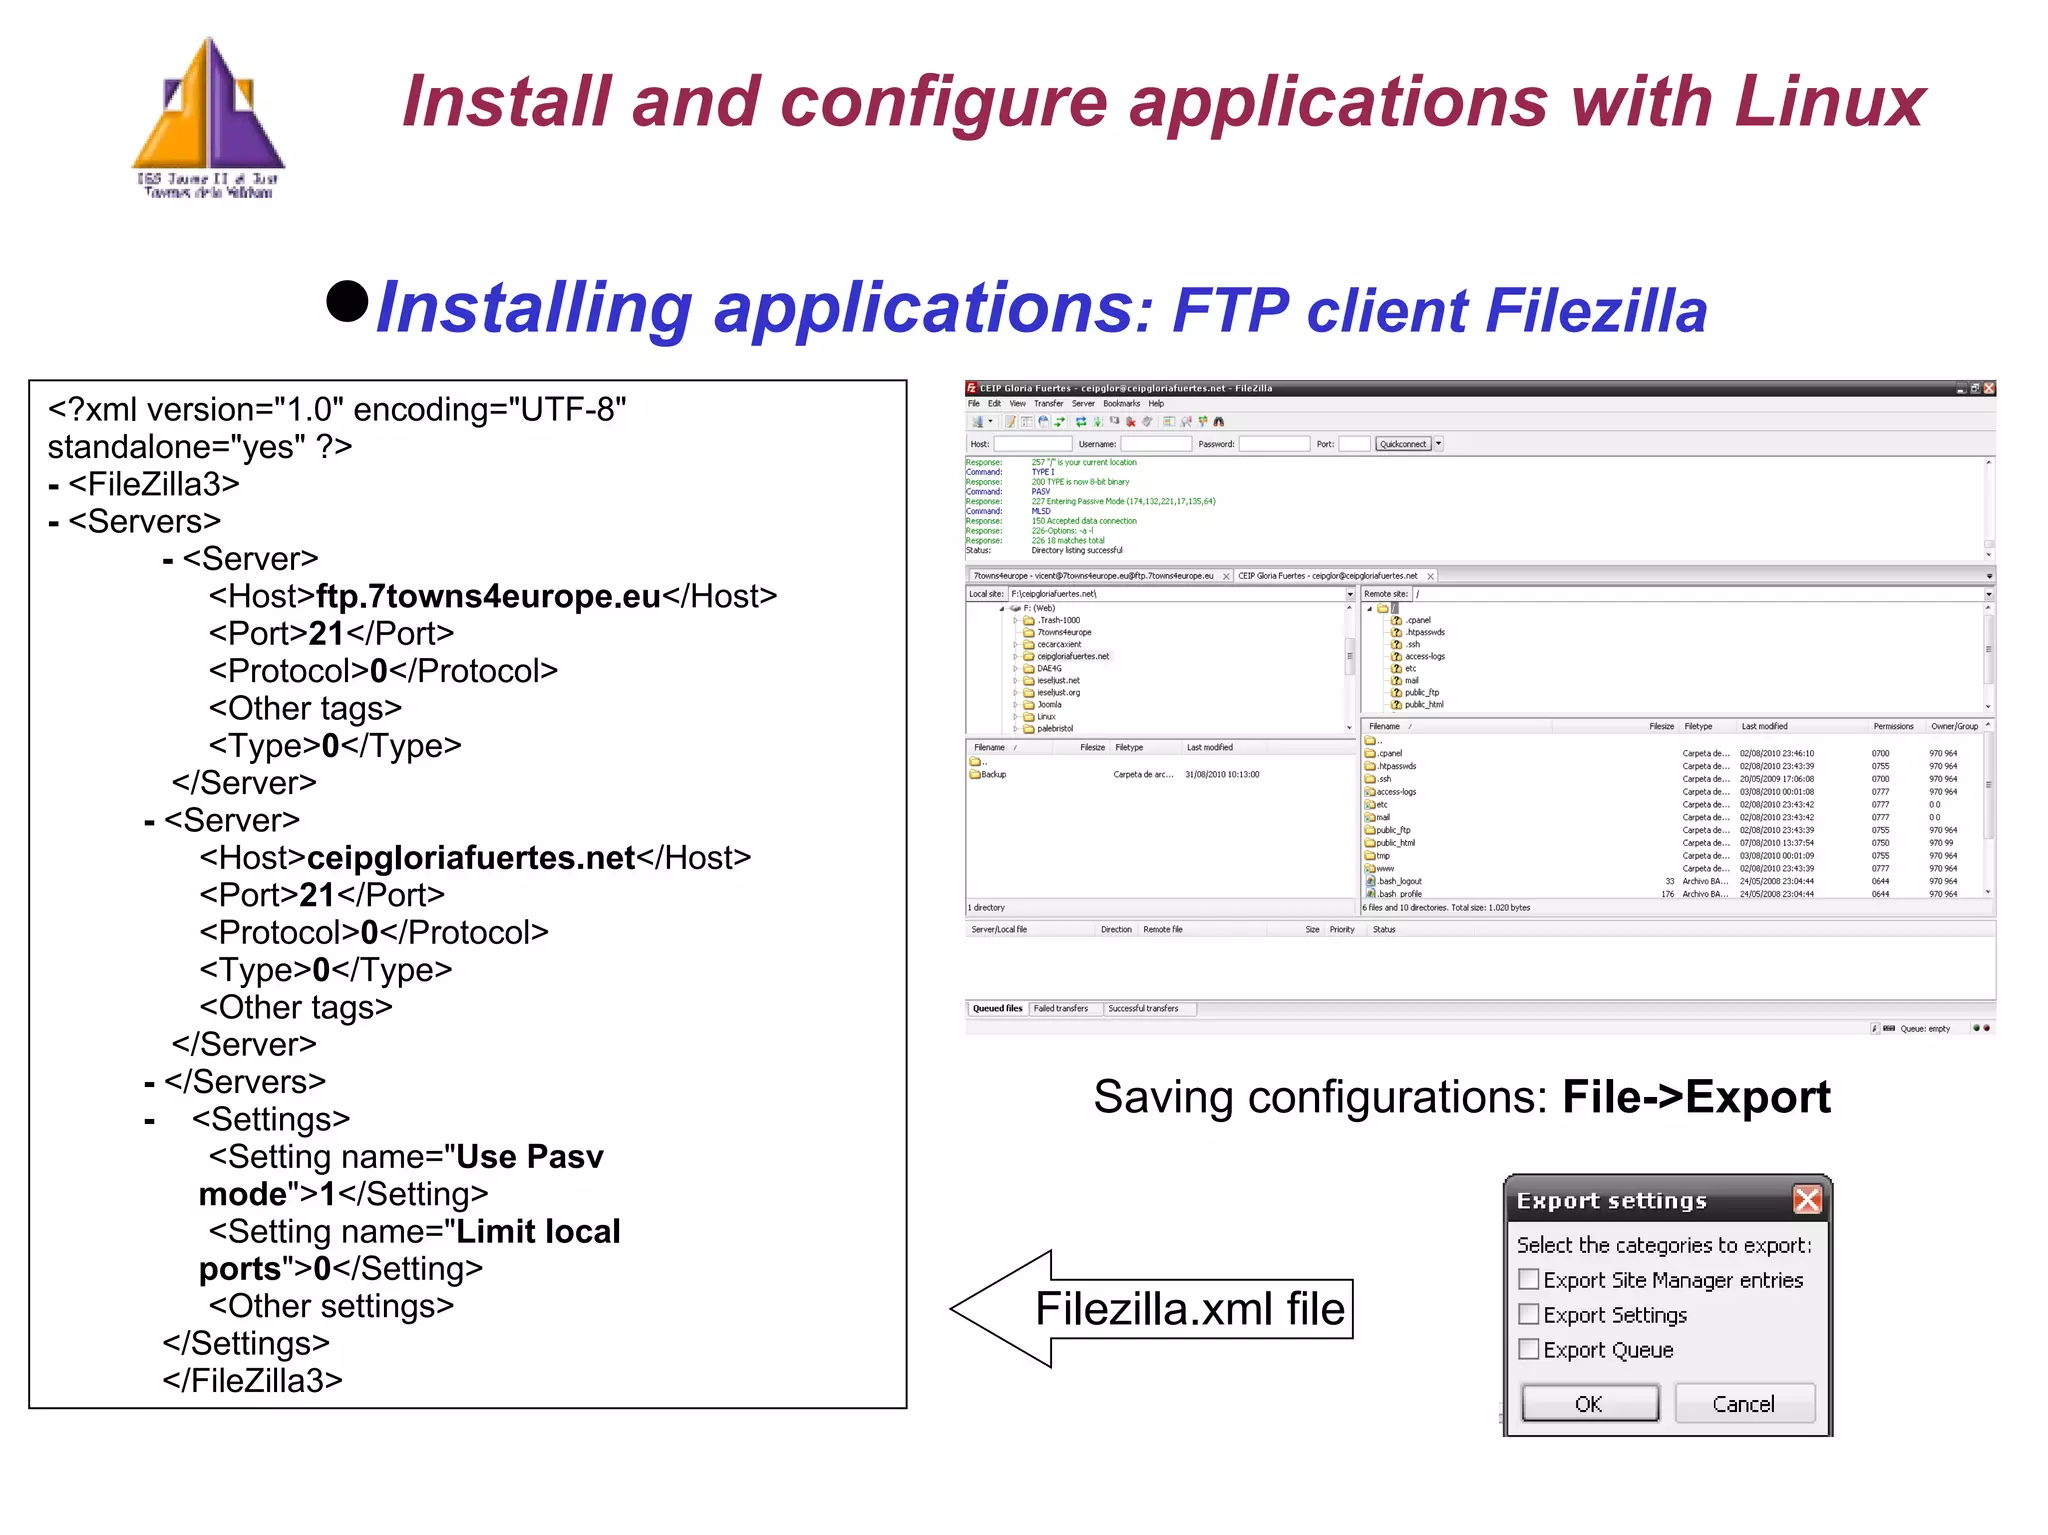
Installing applications :FTP Very Secure FTP Daemon server: From Synaptic: vsftpd Configuration: /etc/vsftpd.conf. To consider: Allow anonymous? anonymous_enable=NO Allow local connexions? local_enable=YES Restrict local users to its own directory? chroot_local_user=YES Enable writing: write_enable =YES Start server: /etc/init.d/vsftpd [start | stop | restart | reload] Service vsftpd [start | stop | restart | reload] sudo start vsftpd FTP clients: gFTP Run: From Applications->Internet->gFTP FileZilla Run: From Applications->Internet->FileZilla Install and configure applications with Linux
36.
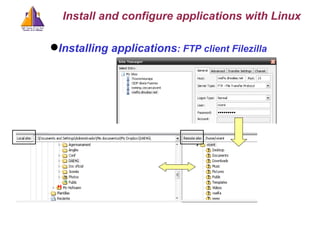
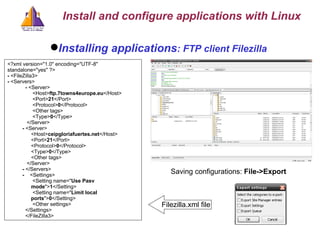
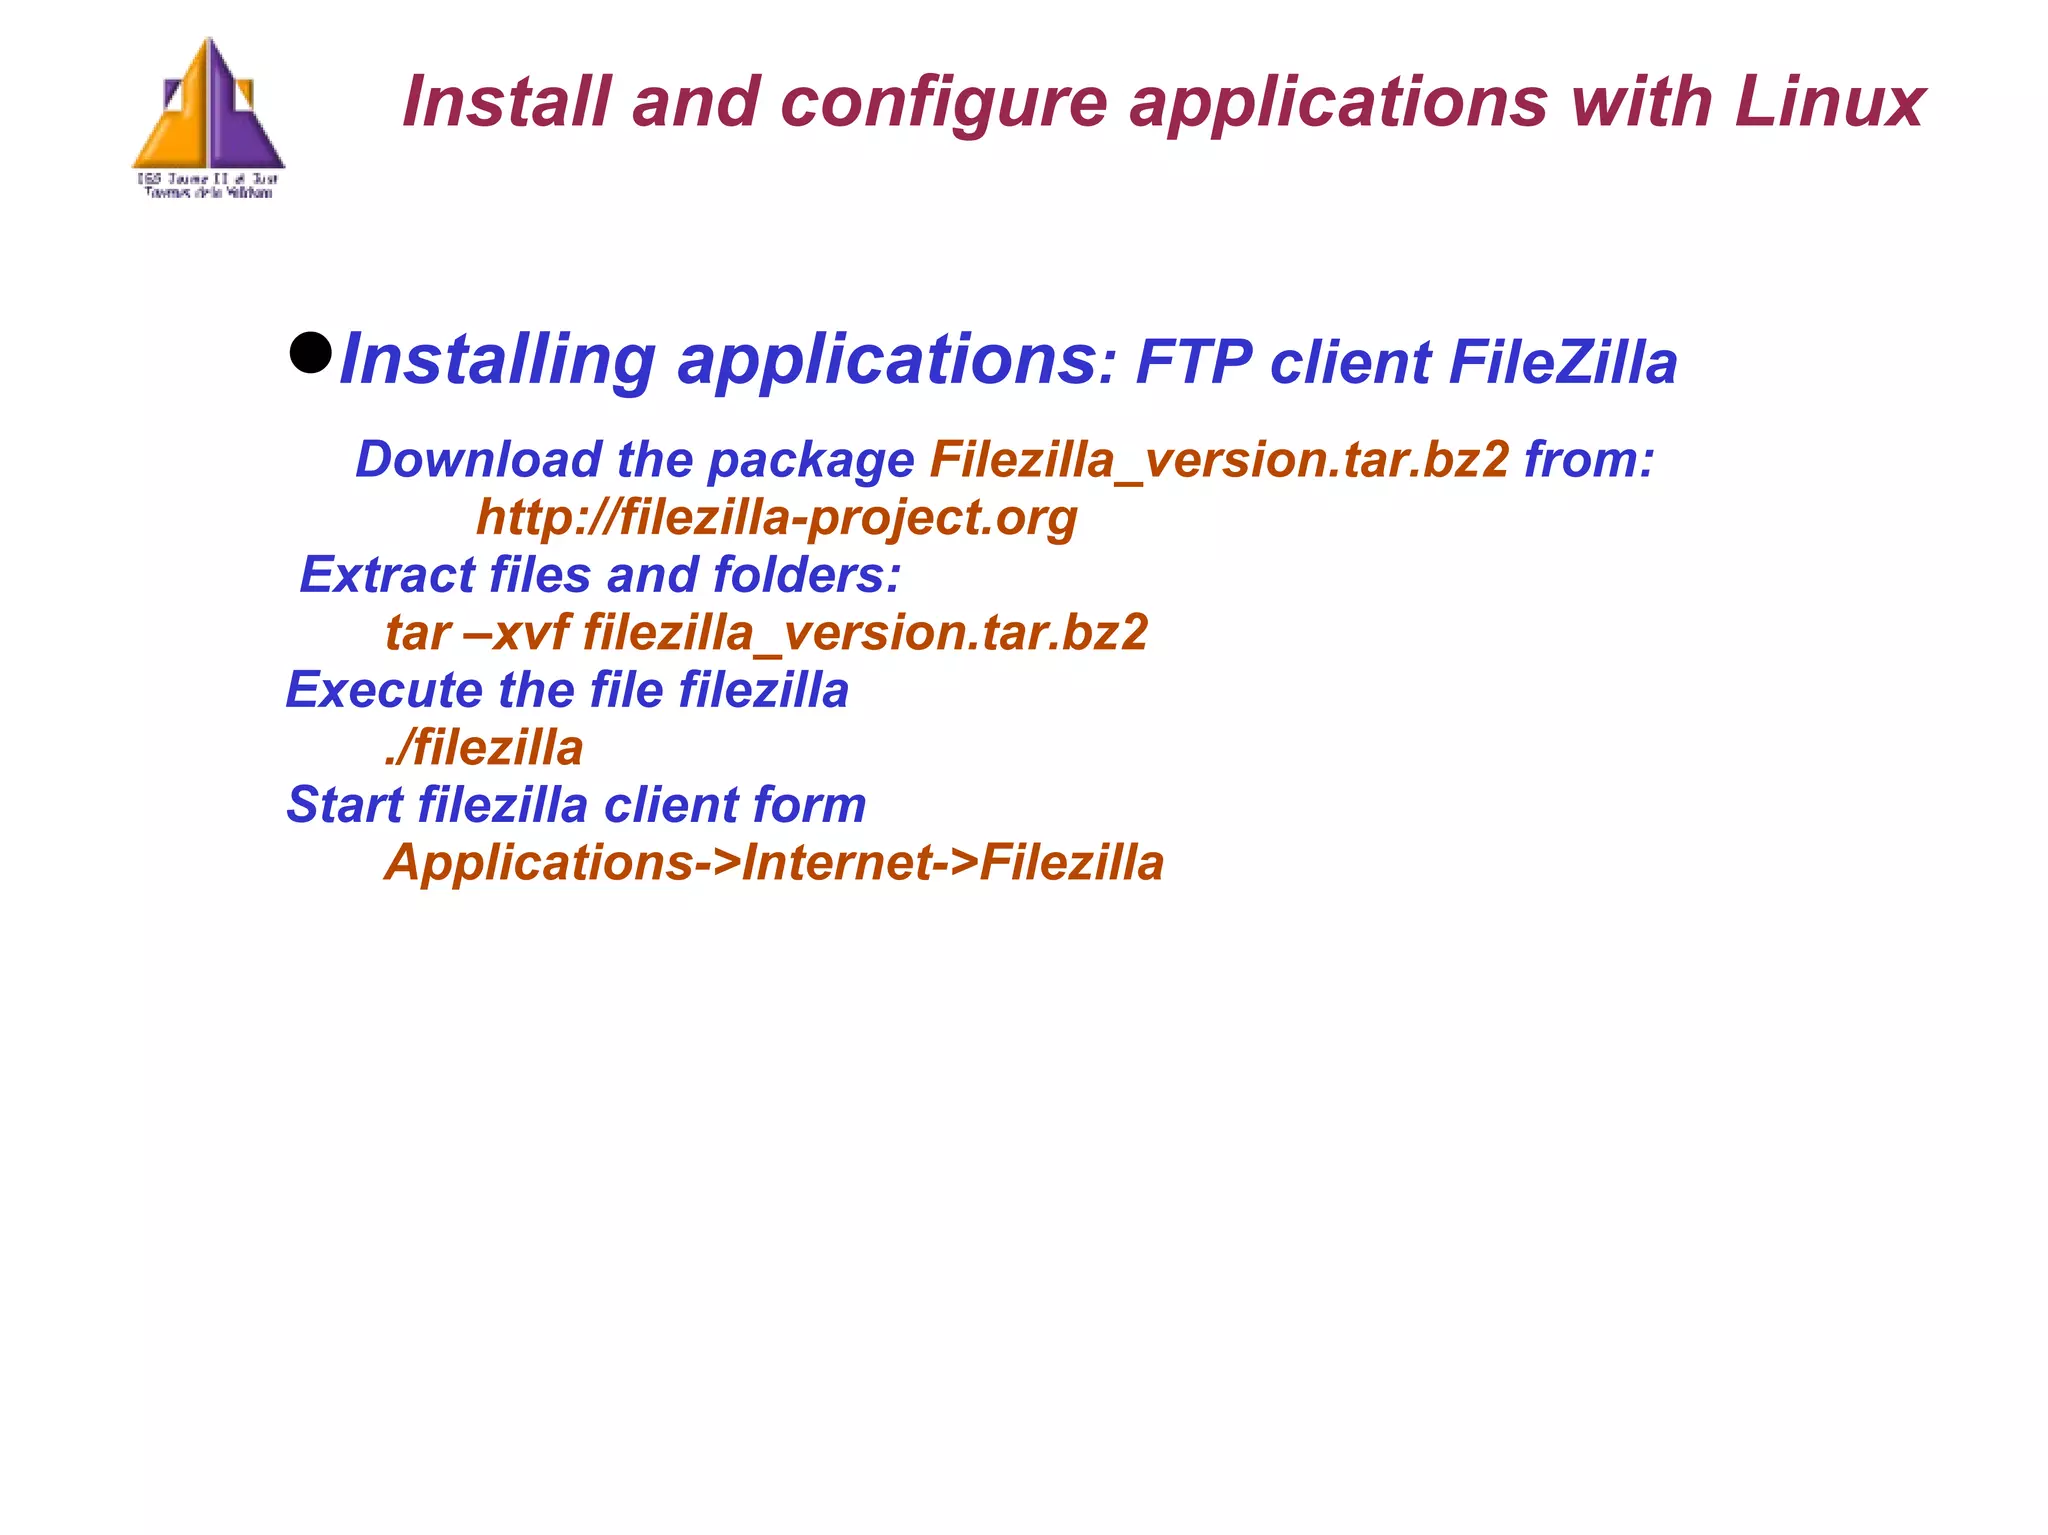
Installing applications :FTP client FileZilla Download the package Filezilla_version.tar.bz2 from: http://filezilla-project.org Extract files and folders: tar –xvf filezilla_version.tar.bz2 Execute the file filezilla ./filezilla Start filezilla client form Applications->Internet->Filezilla Install and configure applications with Linux
37.
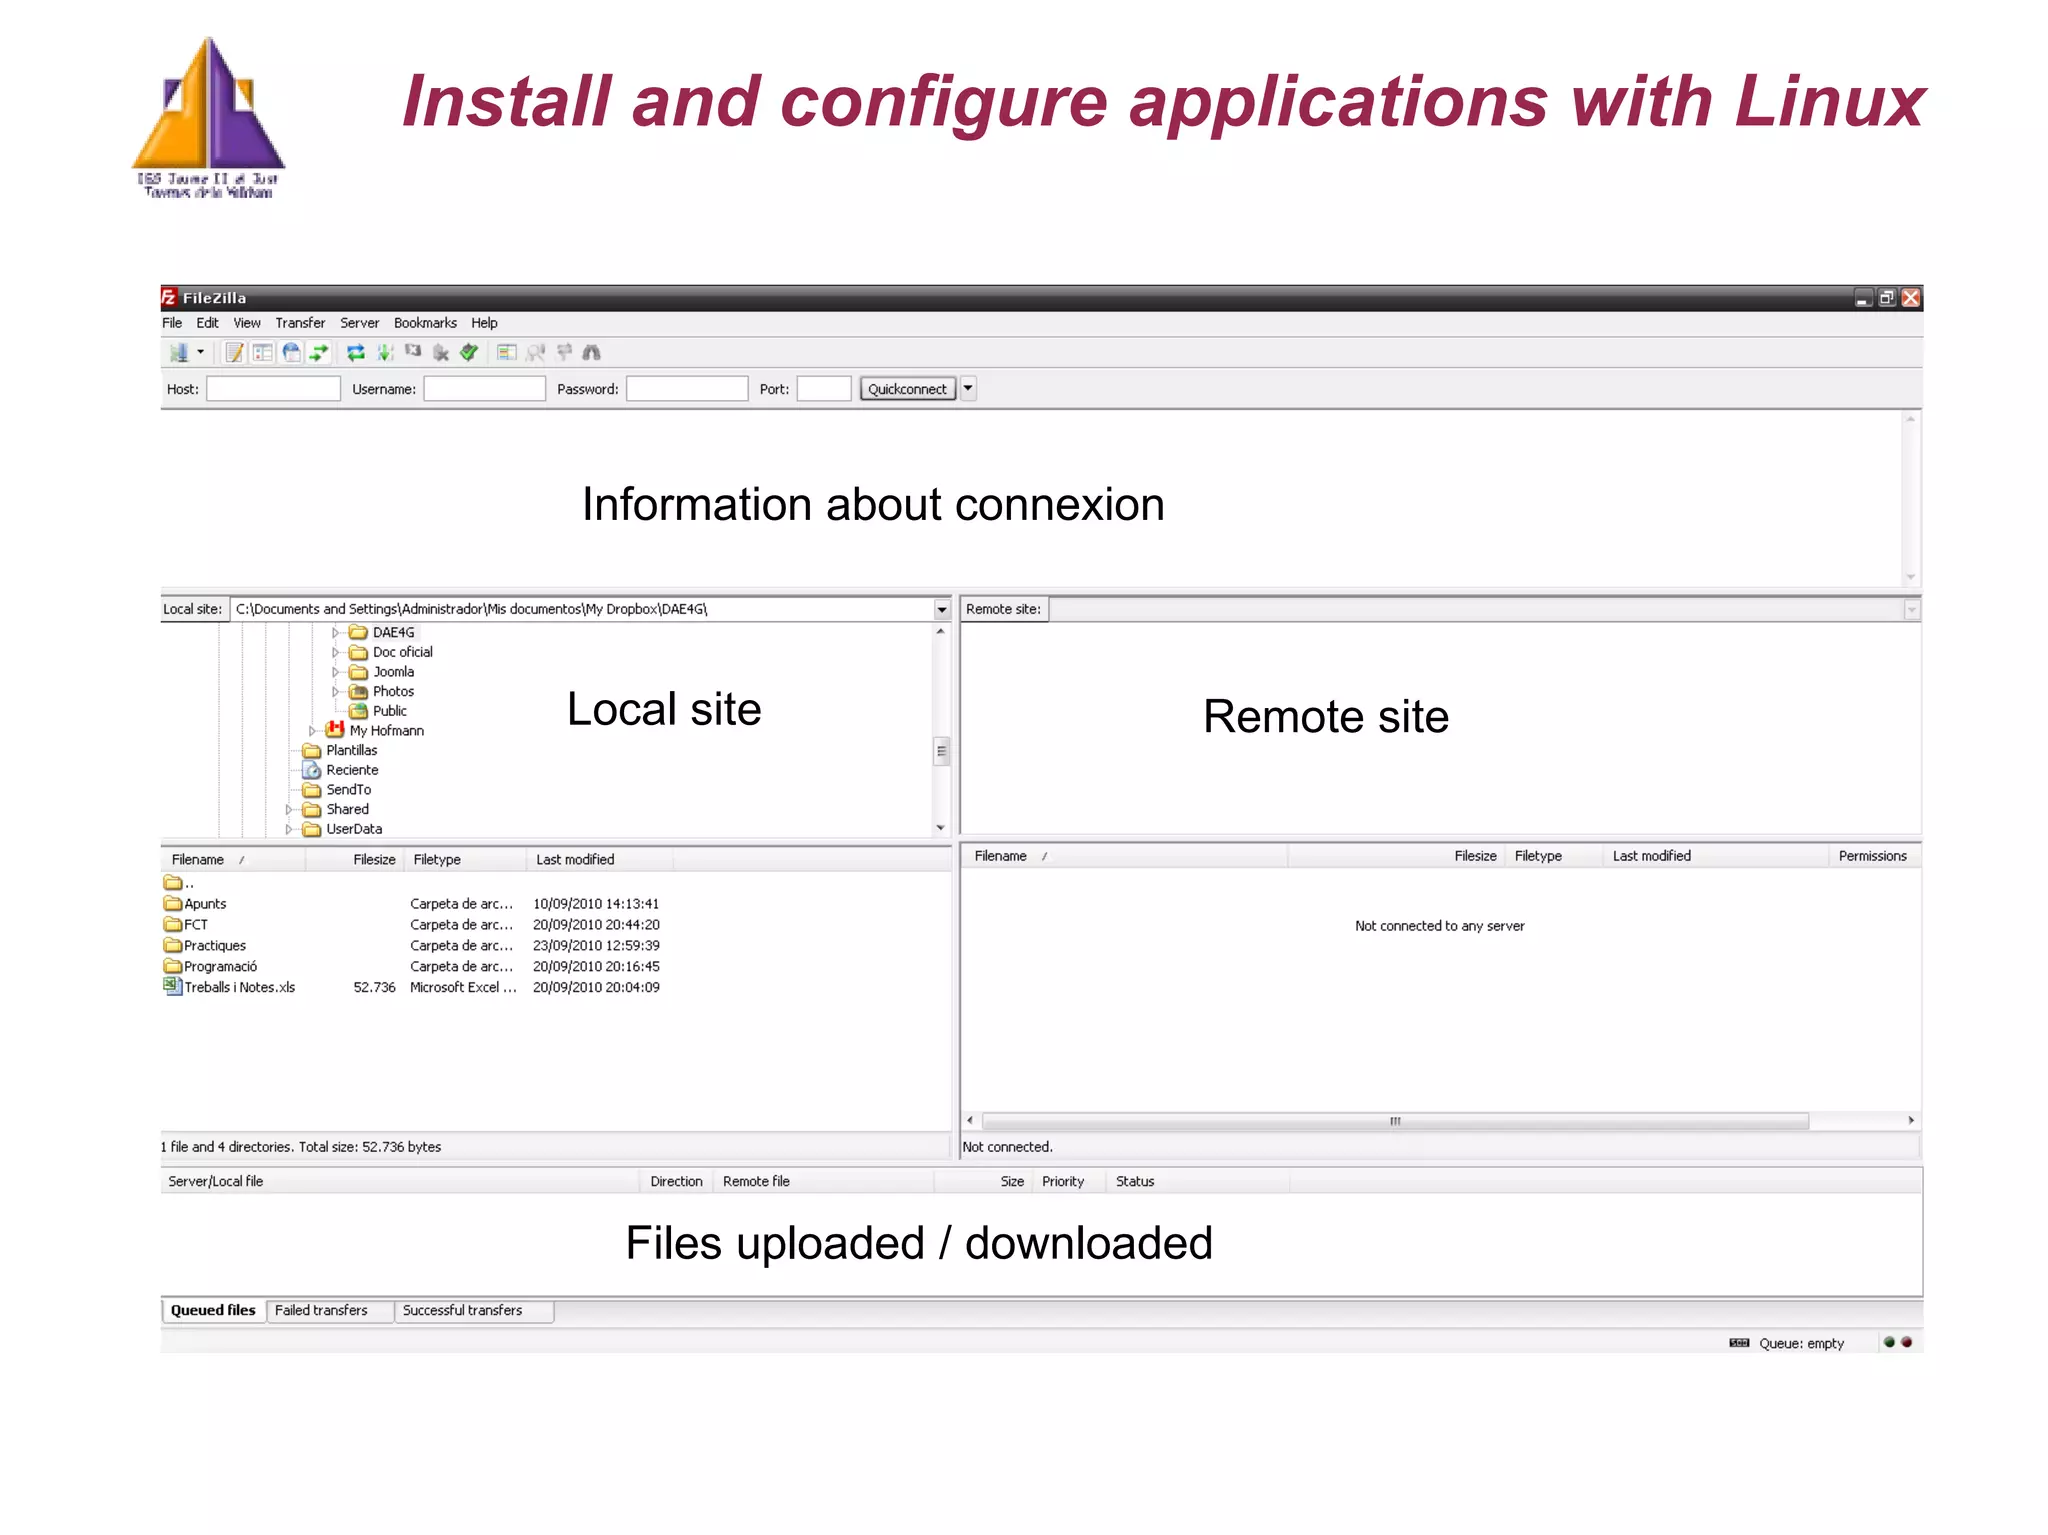
Local site Remotesite Information about connexion Files uploaded / downloaded Install and configure applications with Linux
Installing applications: SSHserver SSH server: Install from Synaptic: openssh-server Start: sudo /usr/sbin/sshd Start / Stop / restart server /etc/init.d/ssh [start | restart | stop ] ps -ef | grep ssh -> pid process /usr/sbin/sshd kill -9 pid Configuration file: /etc/ssh/sshd_config X11Forwarding yes ; graphic mode AllowUsers user1 user2 user3 Port N ; If we decide to change the port number (*) SSH client: Installed by default Run: ssh [email_address] [-p Port] ; text mode ssh -X usuari@domini [-p Port] ; graphic mode (*) For example, if we want to have 2 SSH servers in the same intranet. We need to modify the file /etc/services to access a specific port by default. Install and configure applications with Linux
41.
Installing applications.- SSHgraphic. NX Download package from : http://www.nomachine.com/download.php Install from package installer Execute: From Applications -> Internet -> NX Client Install and configure applications with Linux
42.
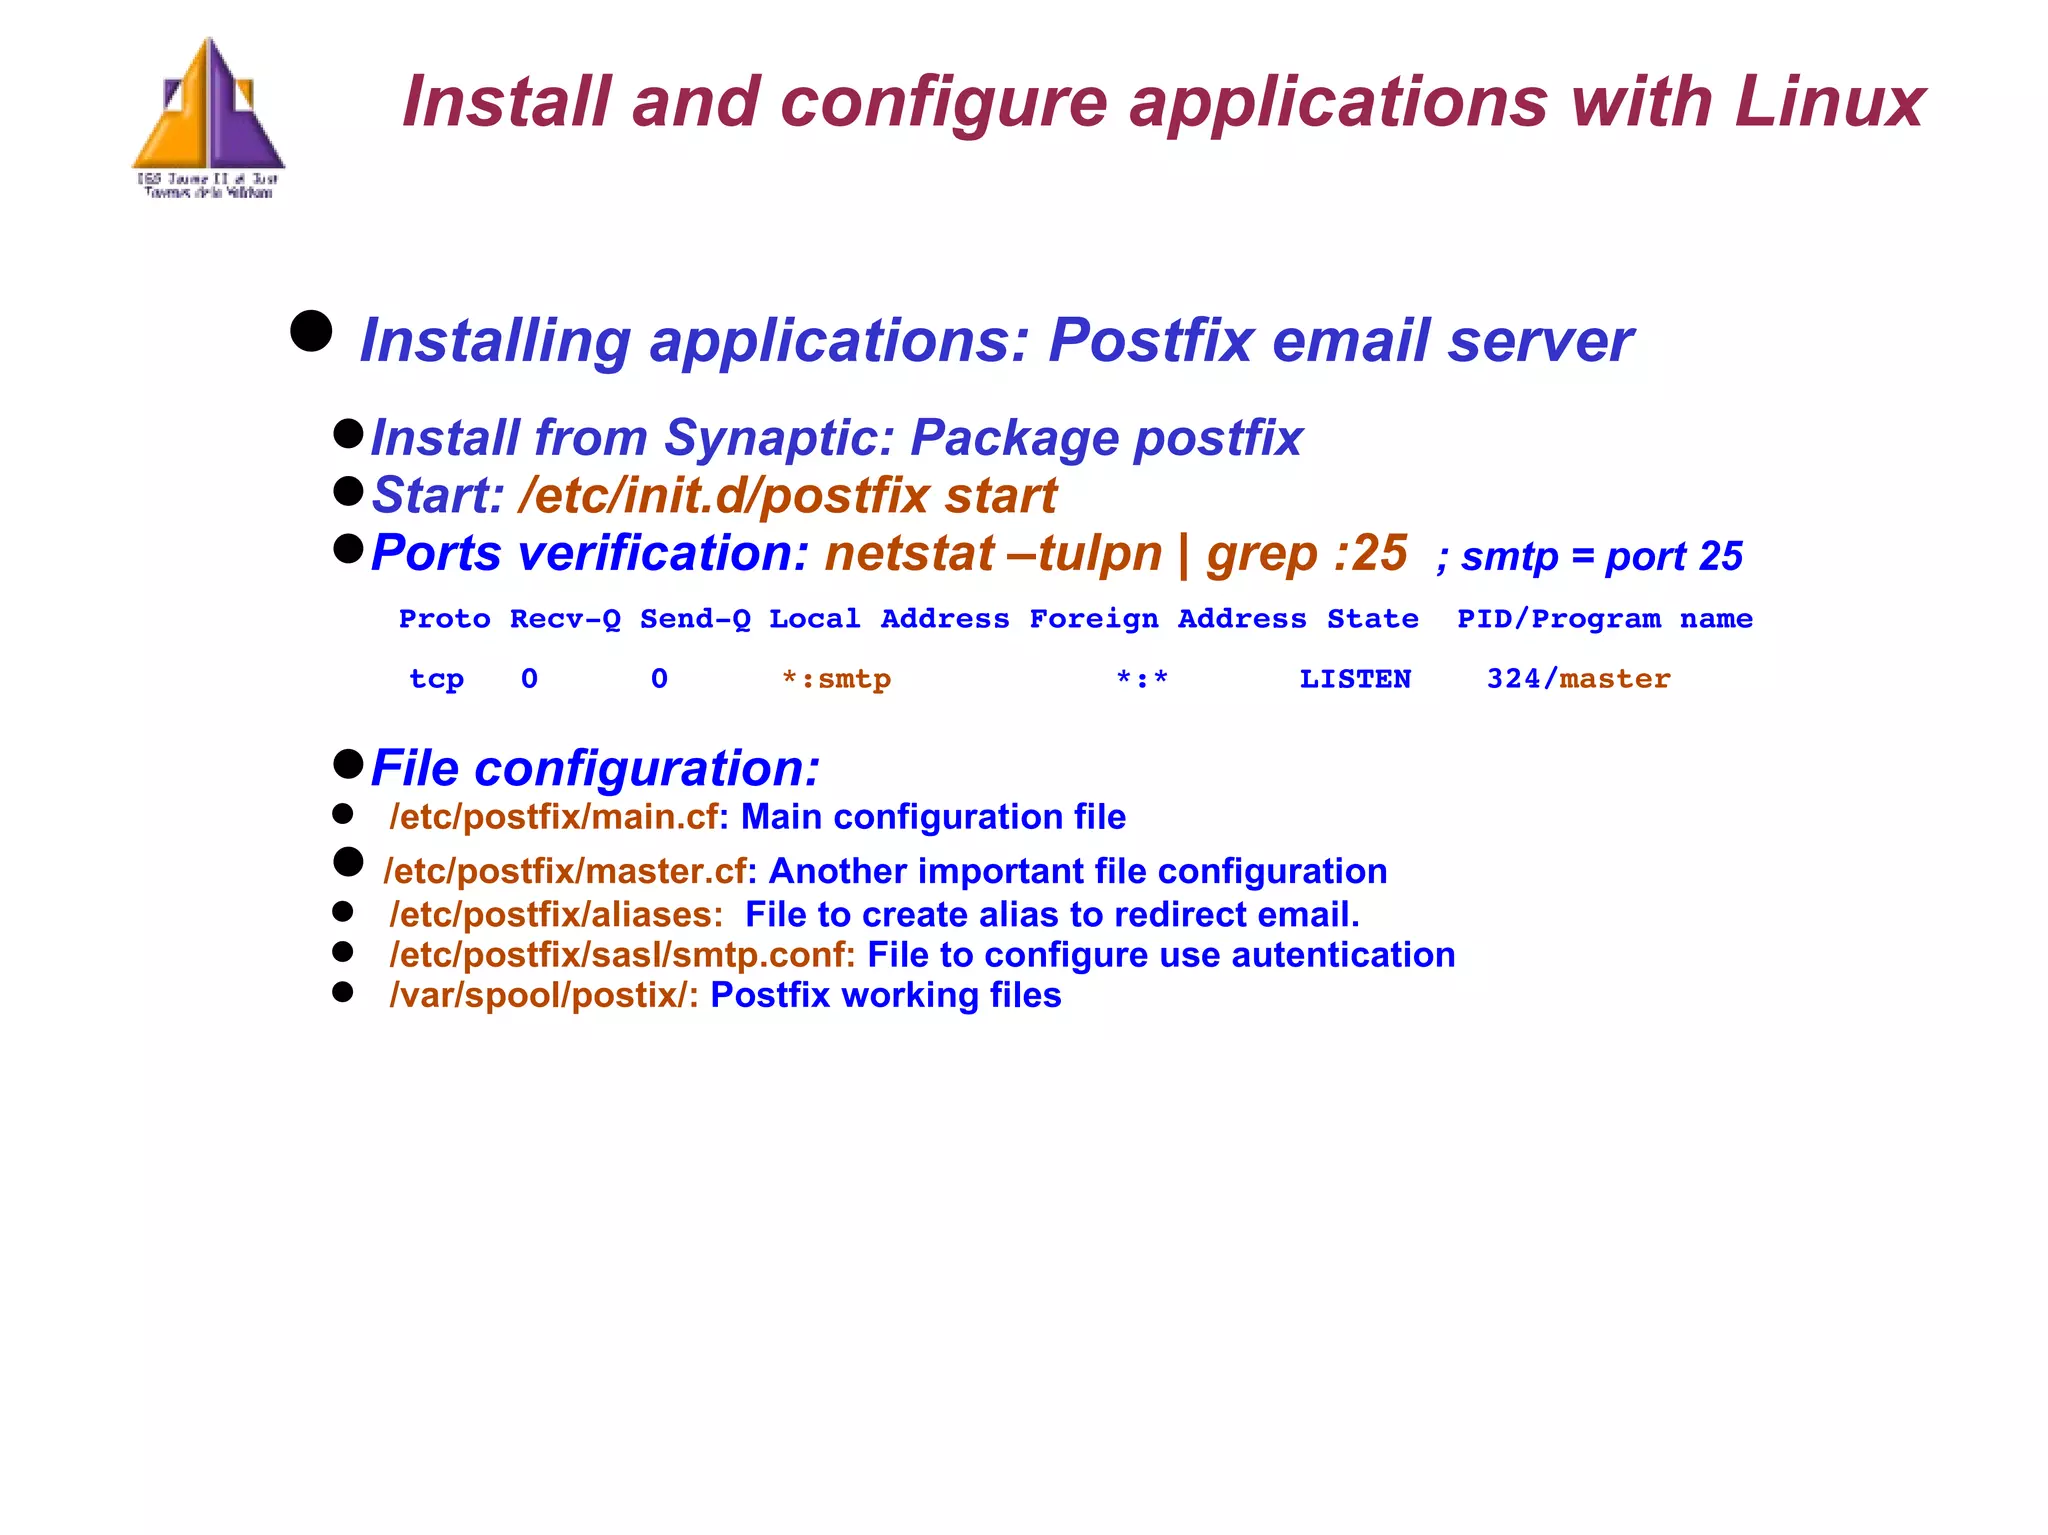
Installing applications: Postfixemail server Install from Synaptic: Package postfix Start: /etc/init.d/postfix start Ports verification: netstat –tulpn | grep :25 ; smtp = port 25 Proto Recv-Q Send-Q Local Address Foreign Address State PID/Program name tcp 0 0 *:smtp *:* LISTEN 324/ master File configuration: /etc/postfix/main.cf : Main configuration file /etc/postfix/master.cf : Another important file configuration /etc/postfix/aliases: File to create alias to redirect email. /etc/postfix/sasl/smtp.conf: File to configure use autentication /var/spool/postix/: Postfix working files Install and configure applications with Linux
43.
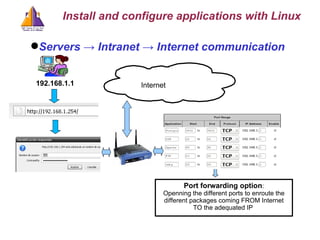
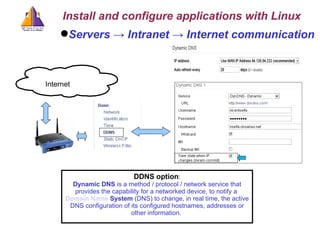
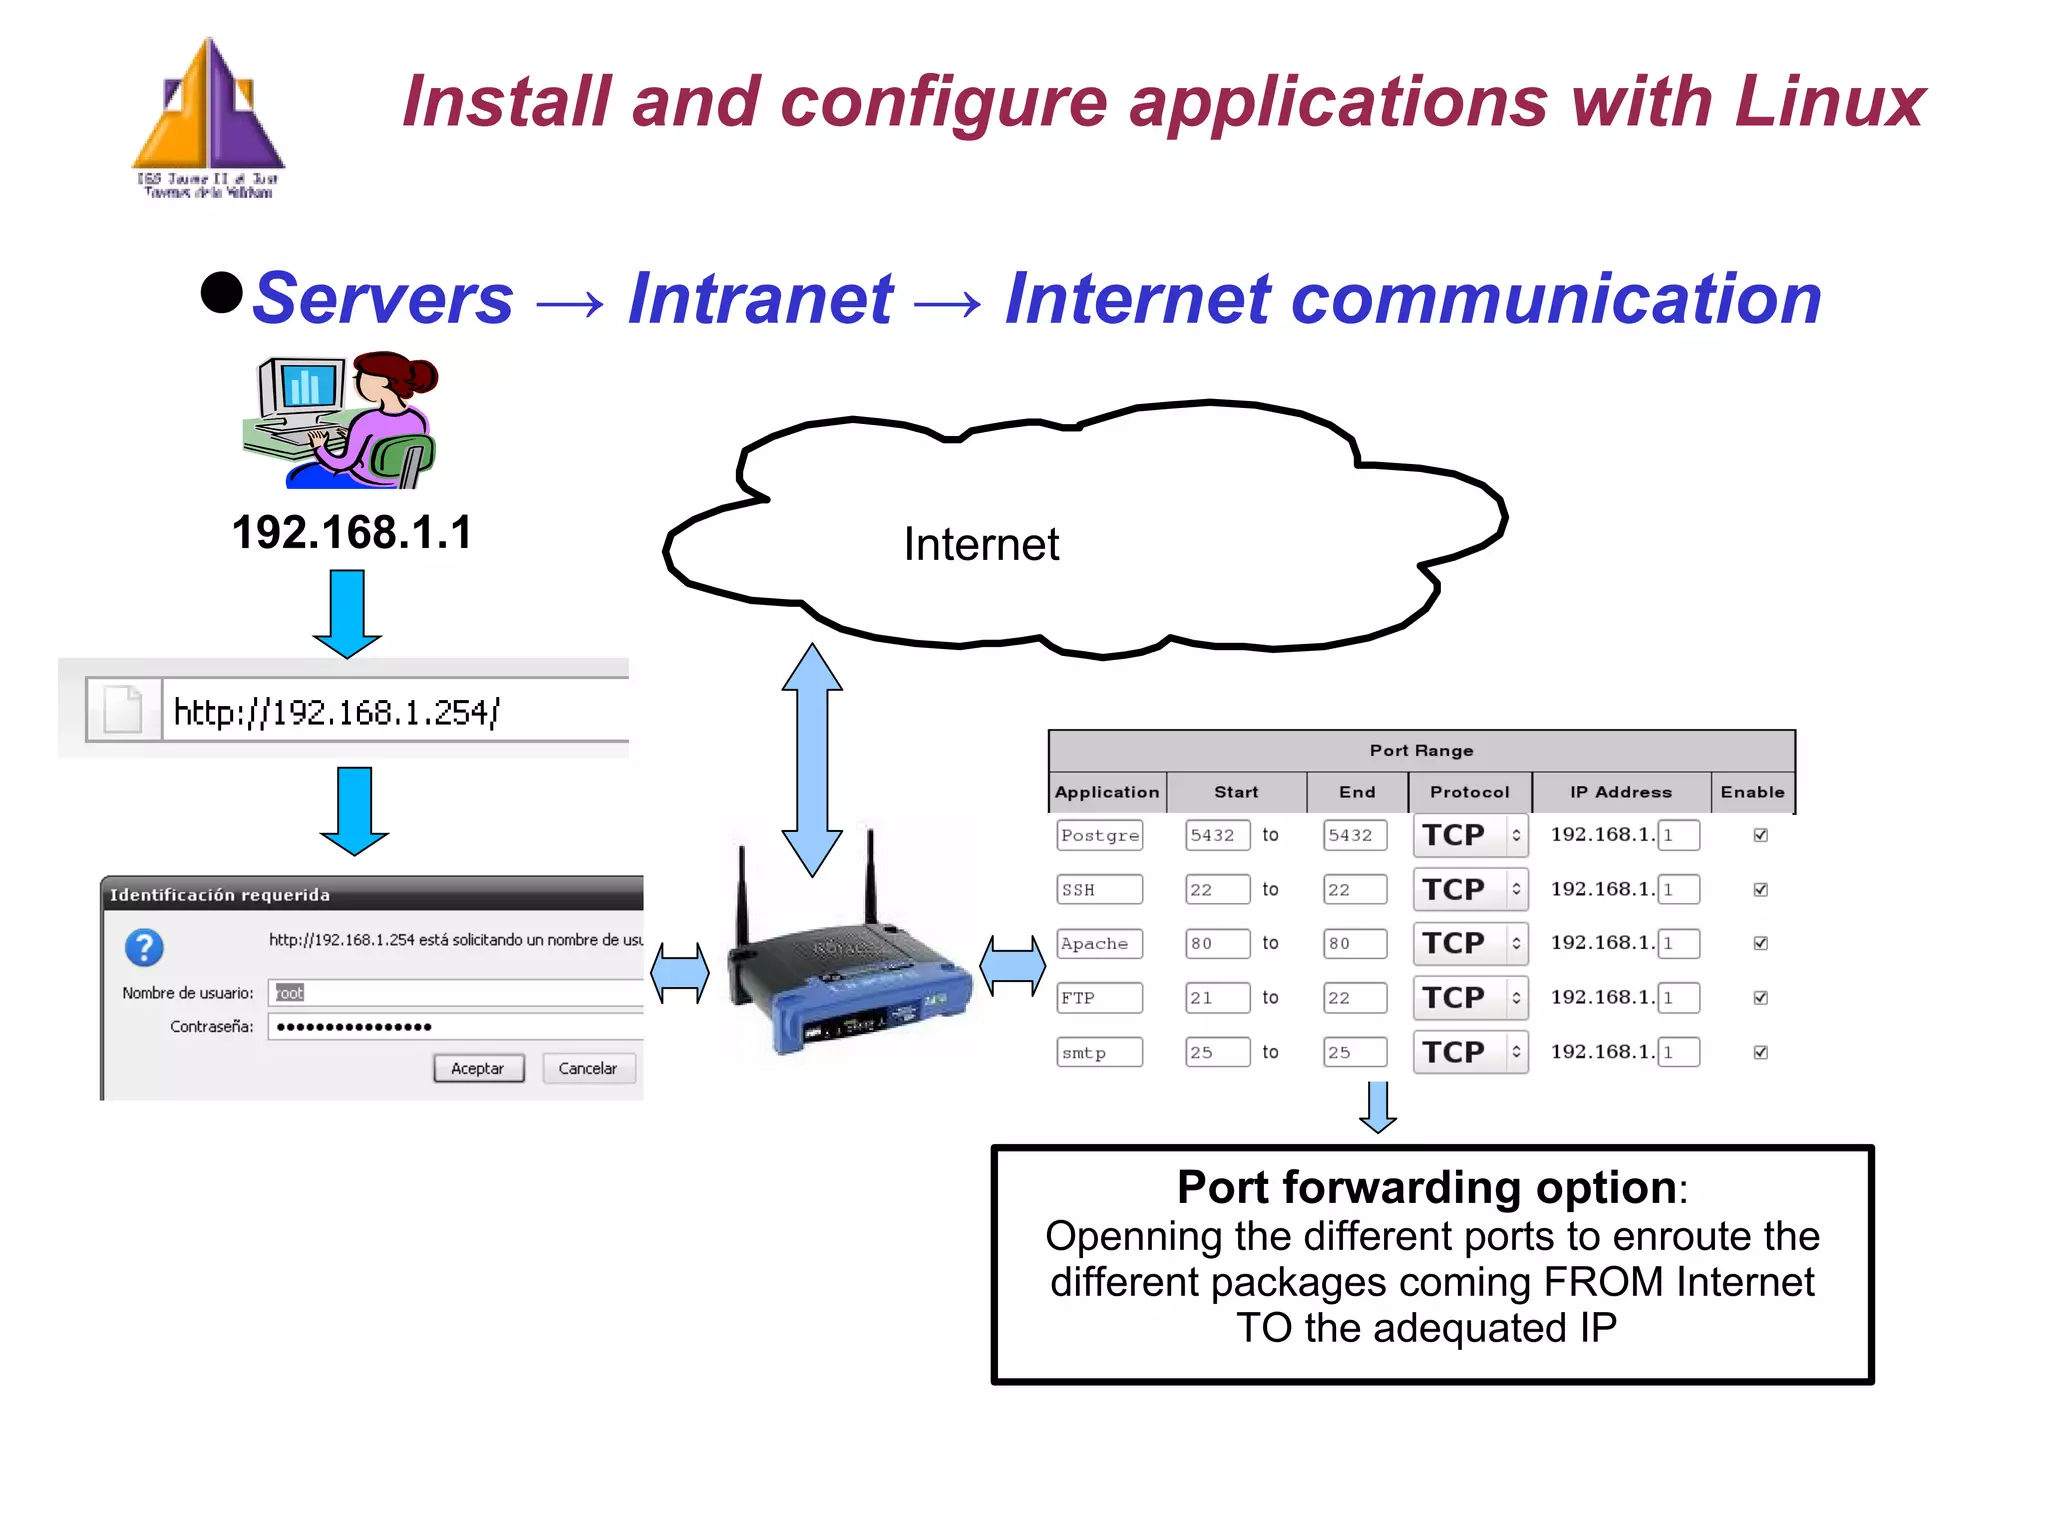
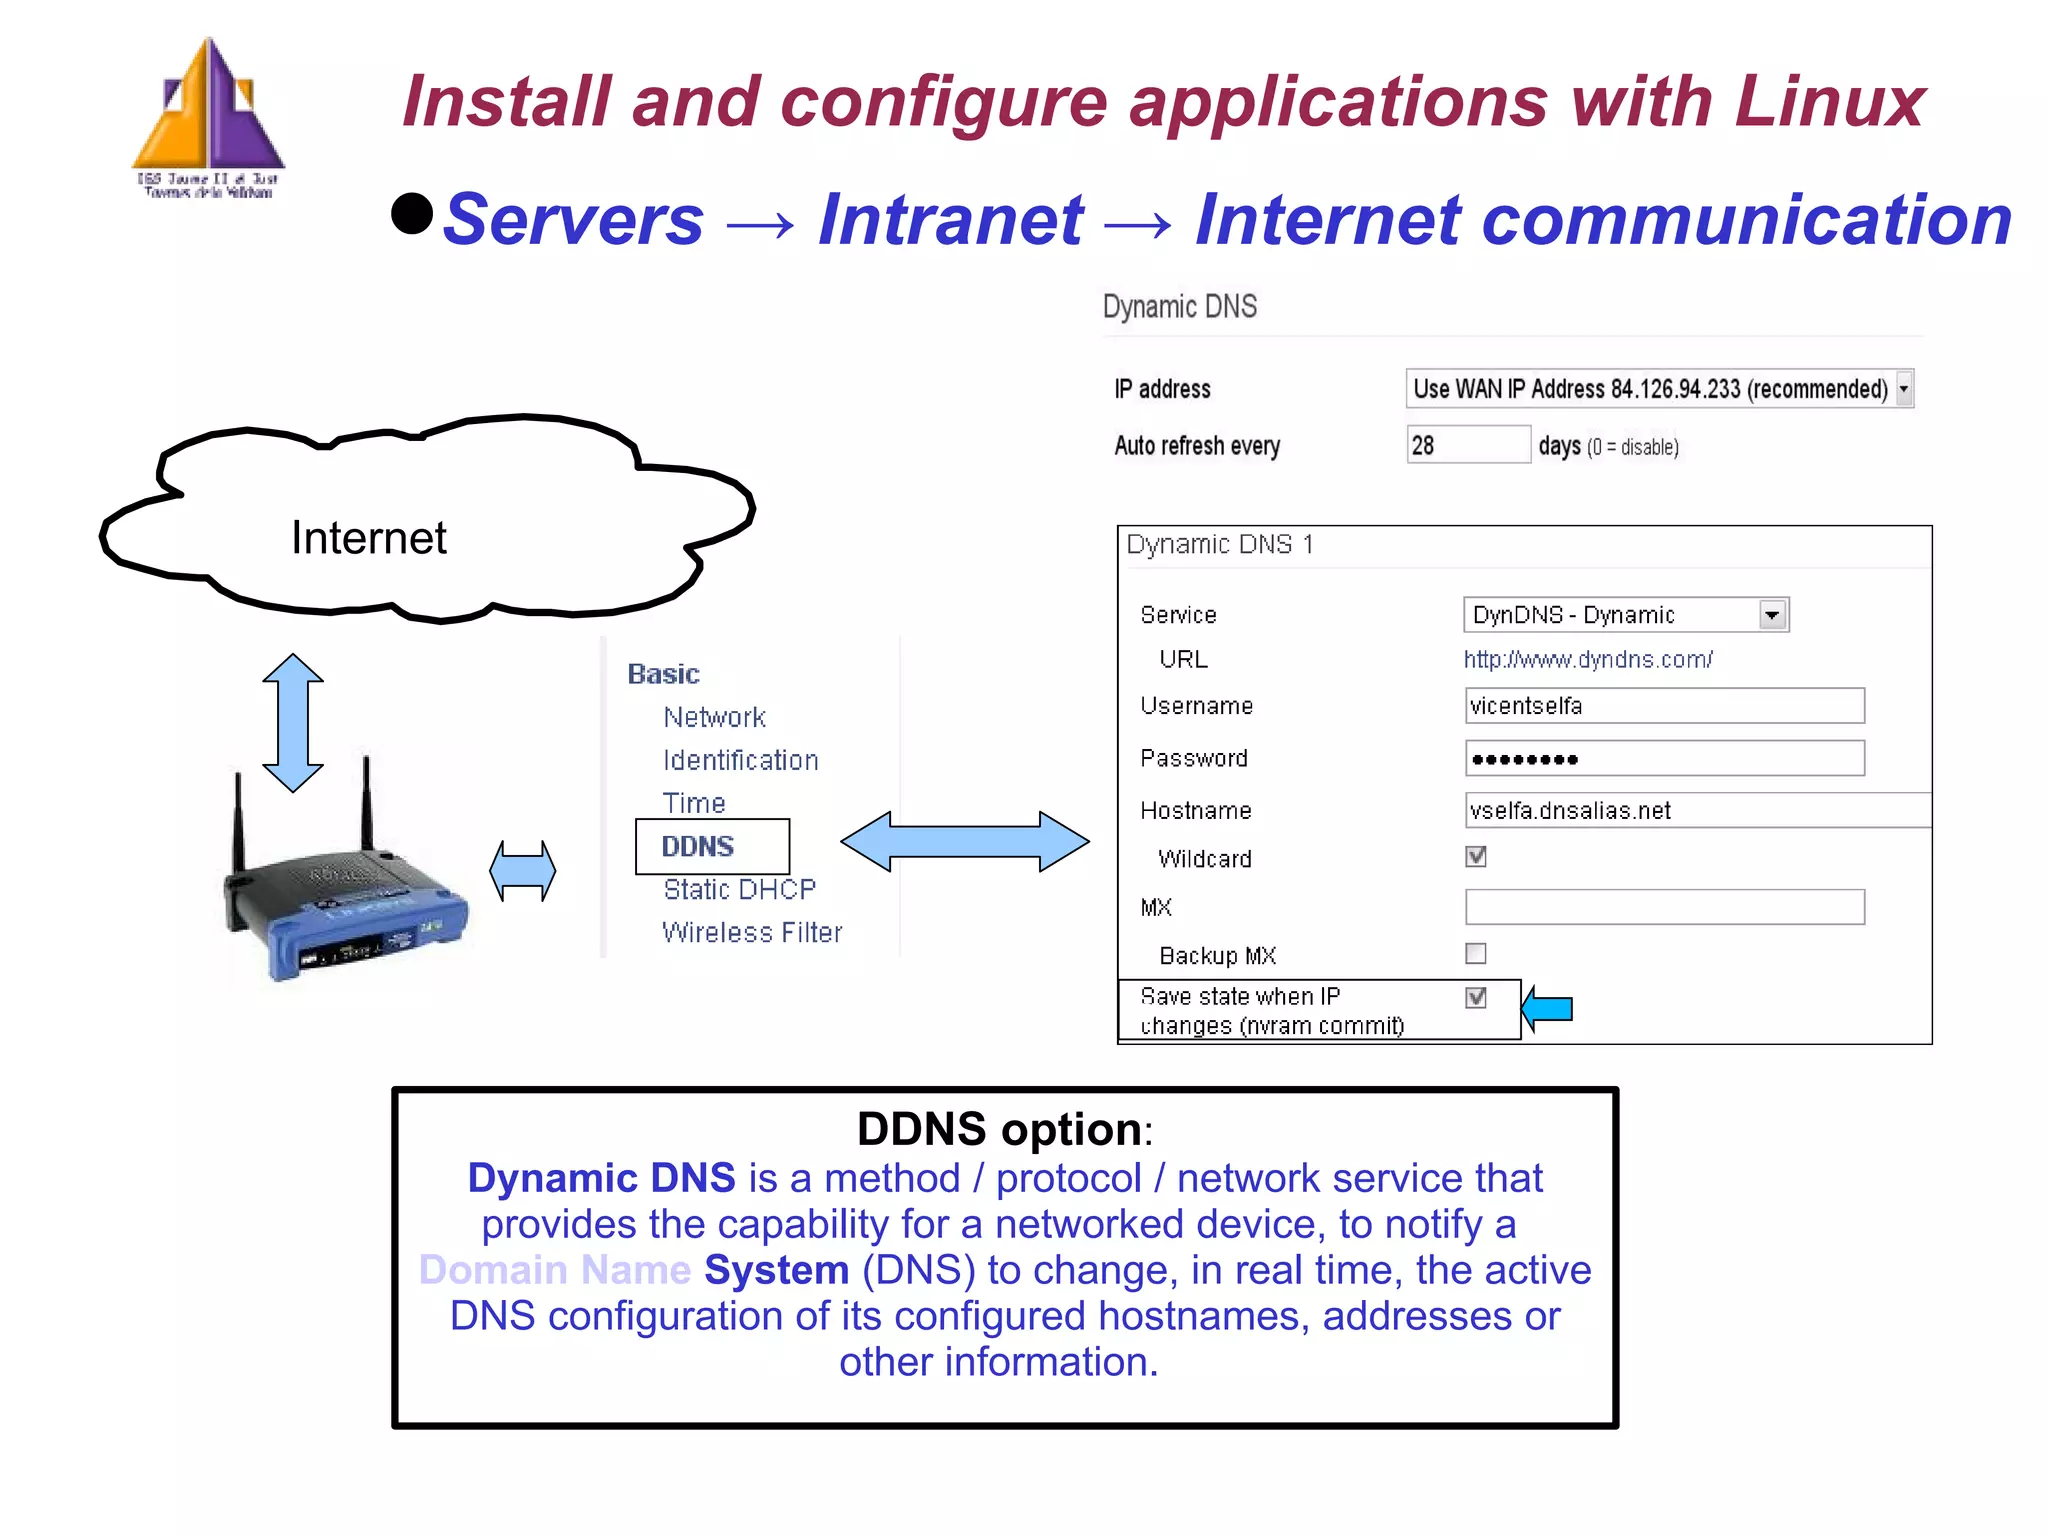
Servers -> Intranet-> Internet communication Port forwarding option : Openning the different ports to enroute the different packages coming FROM Internet TO the adequated IP Install and configure applications with Linux 192.168.1.1 Internet
44.
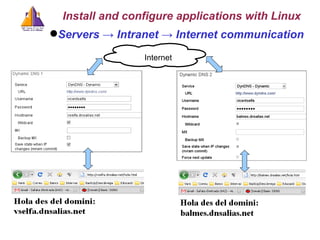
Servers -> Intranet-> Internet communication DDNS option : Dynamic DNS is a method / protocol / network service that provides the capability for a networked device, to notify a Domain Name System (DNS) to change, in real time, the active DNS configuration of its configured hostnames, addresses or other information. Install and configure applications with Linux c Internet
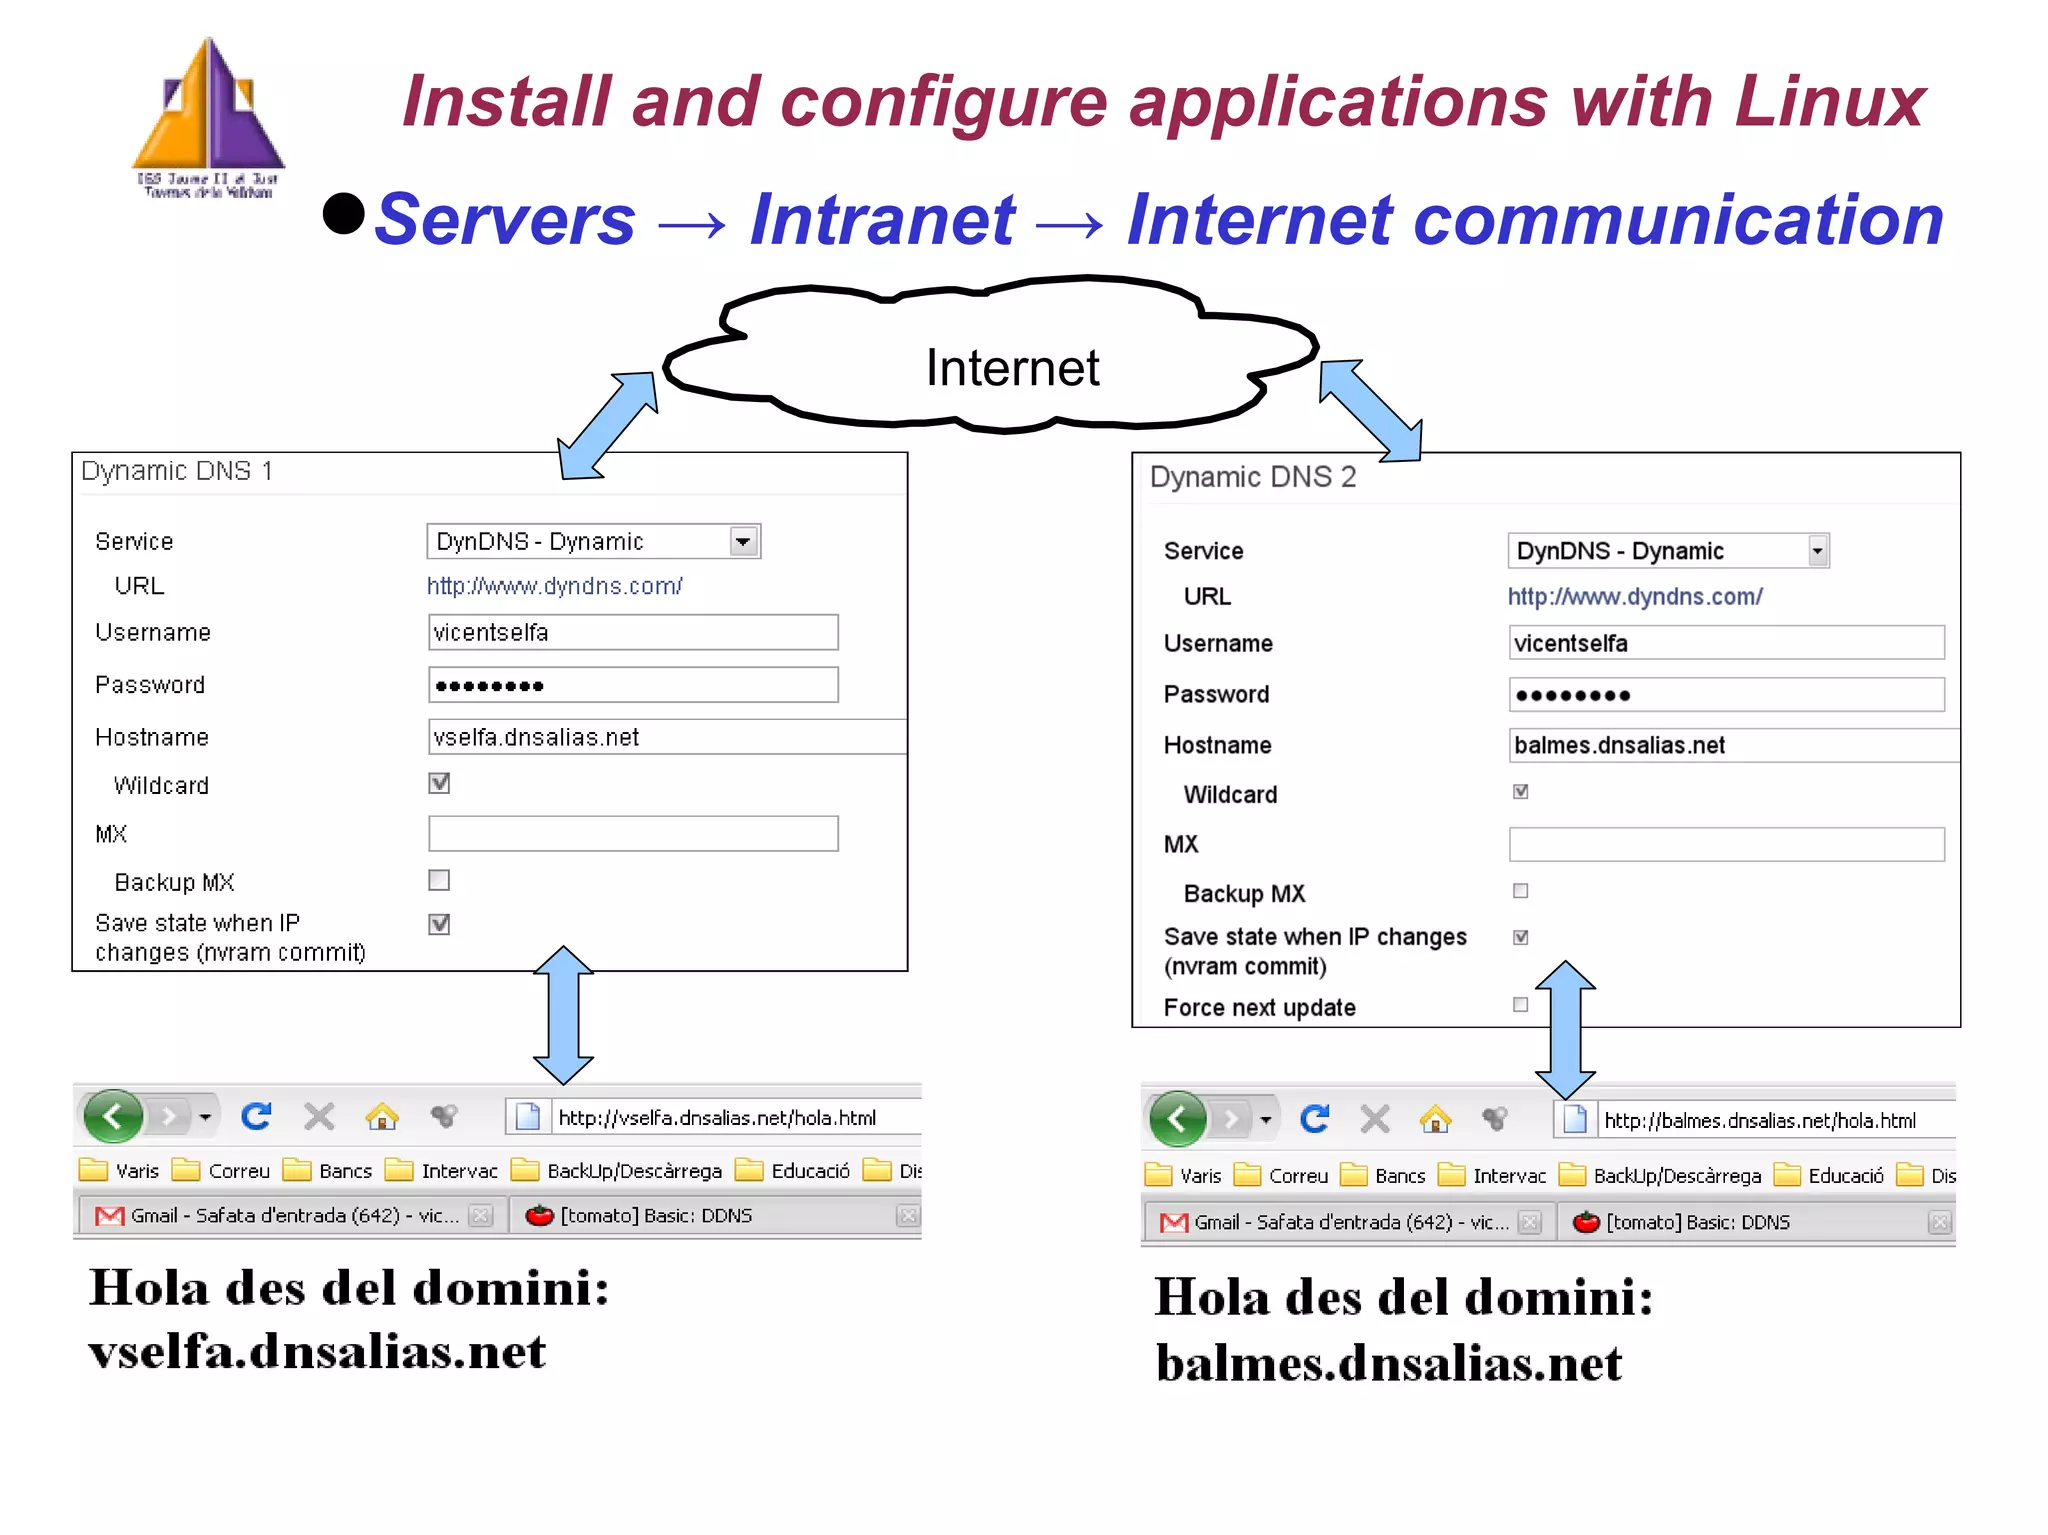
45.
Servers -> Intranet-> Internet communication Internet Install and configure applications with Linux
46.
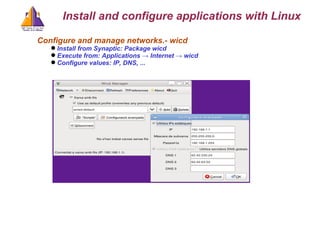
Configure and managenetworks.- wicd Install from Synaptic: Package wicd Execute from: Applications -> Internet -> wicd Configure values: IP, DNS, ... Install and configure applications with Linux
47.
Configuring the network.-Advanced aspects: Firewall+dansguardian+squid File /etc/init.d/firewall.sh #!/bin/sh ## SCRIPT de IPTABLES − www.pello.info − [email_address] echo -n Aplicando Reglas de Firewall... ## FLUSH de reglas iptables –F iptables –X iptables –Z iptables -t nat –F ## Establecemos politica por defecto iptables -P INPUT ACCEPT iptables -P OUTPUT ACCEPT iptables -P FORWARD ACCEPT iptables -t nat -P PREROUTING ACCEPT iptables -t nat -P POSTROUTING ACCEPT ## Empezamos a filtrar ## Nota: eth0 es el interfaz conectado al router y eth1 a la LAN # El localhost se deja (por ejemplo conexiones locales a mysql) /sbin/iptables -A INPUT -i lo -j ACCEPT # Al firewall tenemos acceso desde la red local iptables -A INPUT -s 192.168.43.0/24 -i eth1 -j ACCEPT # Ahora hacemos enmascaramiento de la red local # y activamos el BIT DE FORWARDING (imprescindible!!!!!) iptables -t nat -A POSTROUTING -s 192.168.43.0/255.255.255.0 -o eth0 -j MASQUERADE # Con esto permitimos hacer forward de paquetes en el firewall, o sea # que otras máquinas puedan salir a traves del firewall. echo 1 > /proc/sys/net/ipv4/ip_forward Install and configure applications with Linux
48.
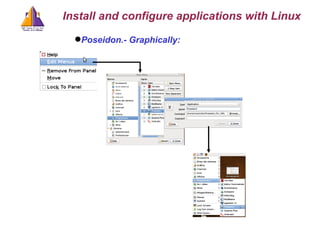
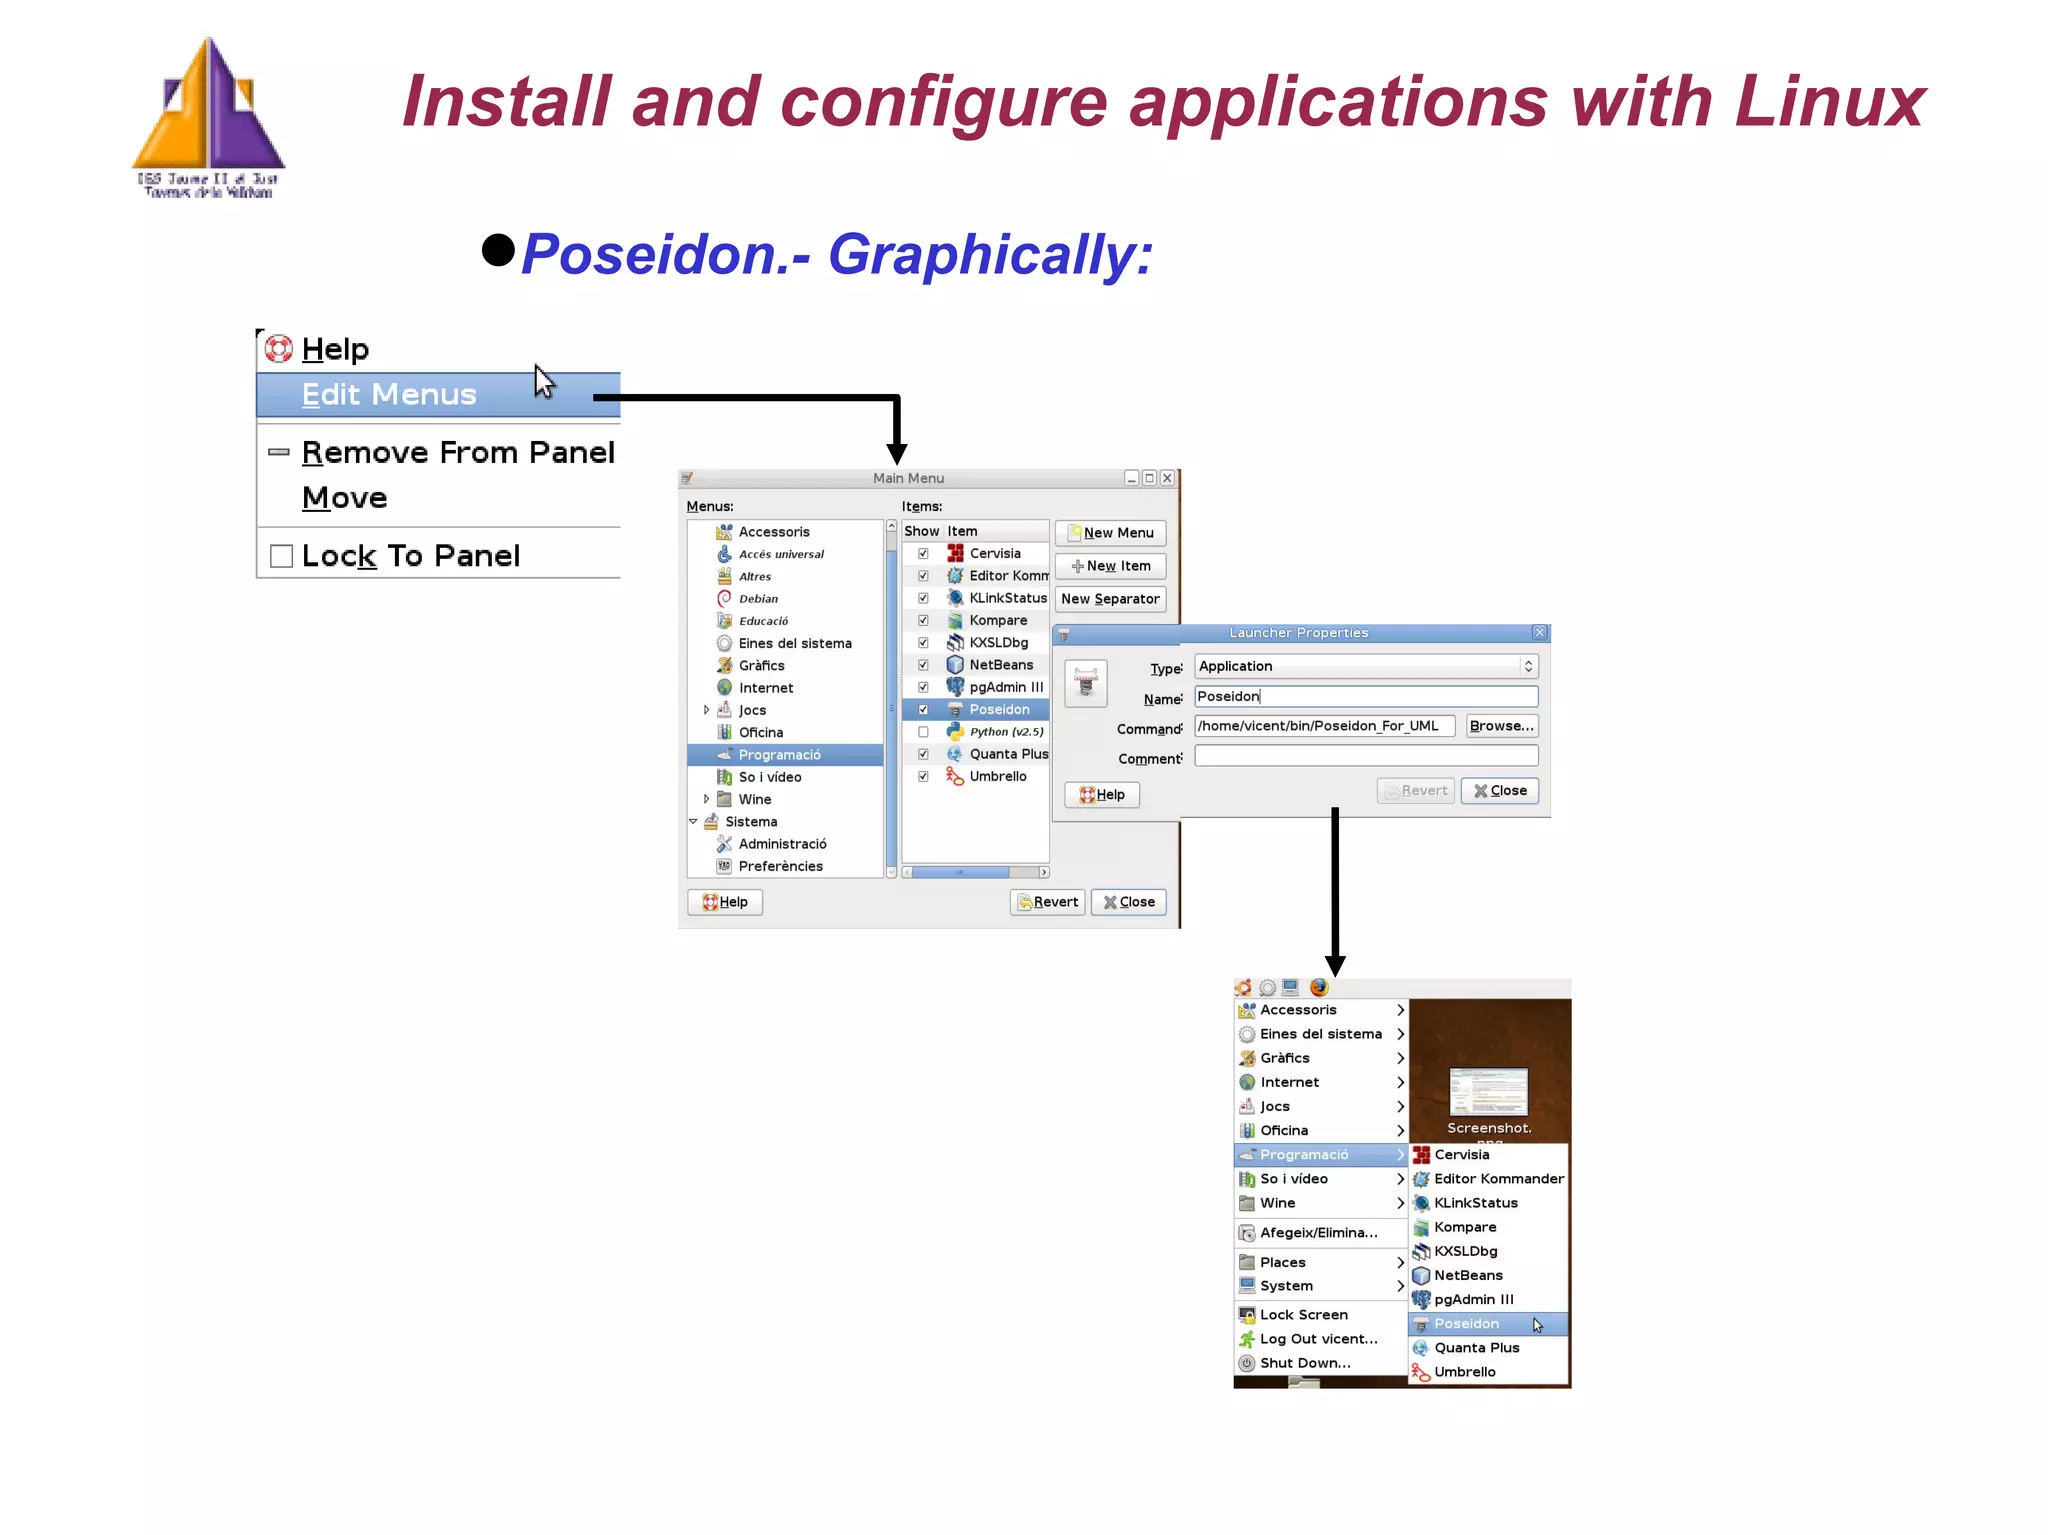
Other interesting packages:Unified Modelling Language diagram editors Umbrello: From Synaptic: package umbrello Start: : Aplicacions->Programs->Umbrello Poseidon Download the file: PoseidonCE_6_0_2_Installer.bin Give execution rights to the file and install: ./PoseidonCE_6_0_2_Installer.bin Edit the aplication menu and make an shortcut to: /home/vicent/bin/Poseidon_For_UML inside the submenu Programs Run the program from the shorcutDia Dia sudo apt-get install dia Install and configure applications with Linux
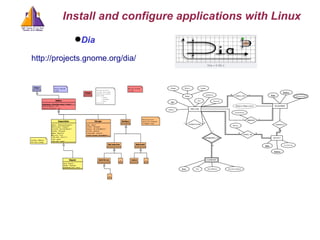
Dia Install andconfigure applications with Linux http://projects.gnome.org/dia/
51.
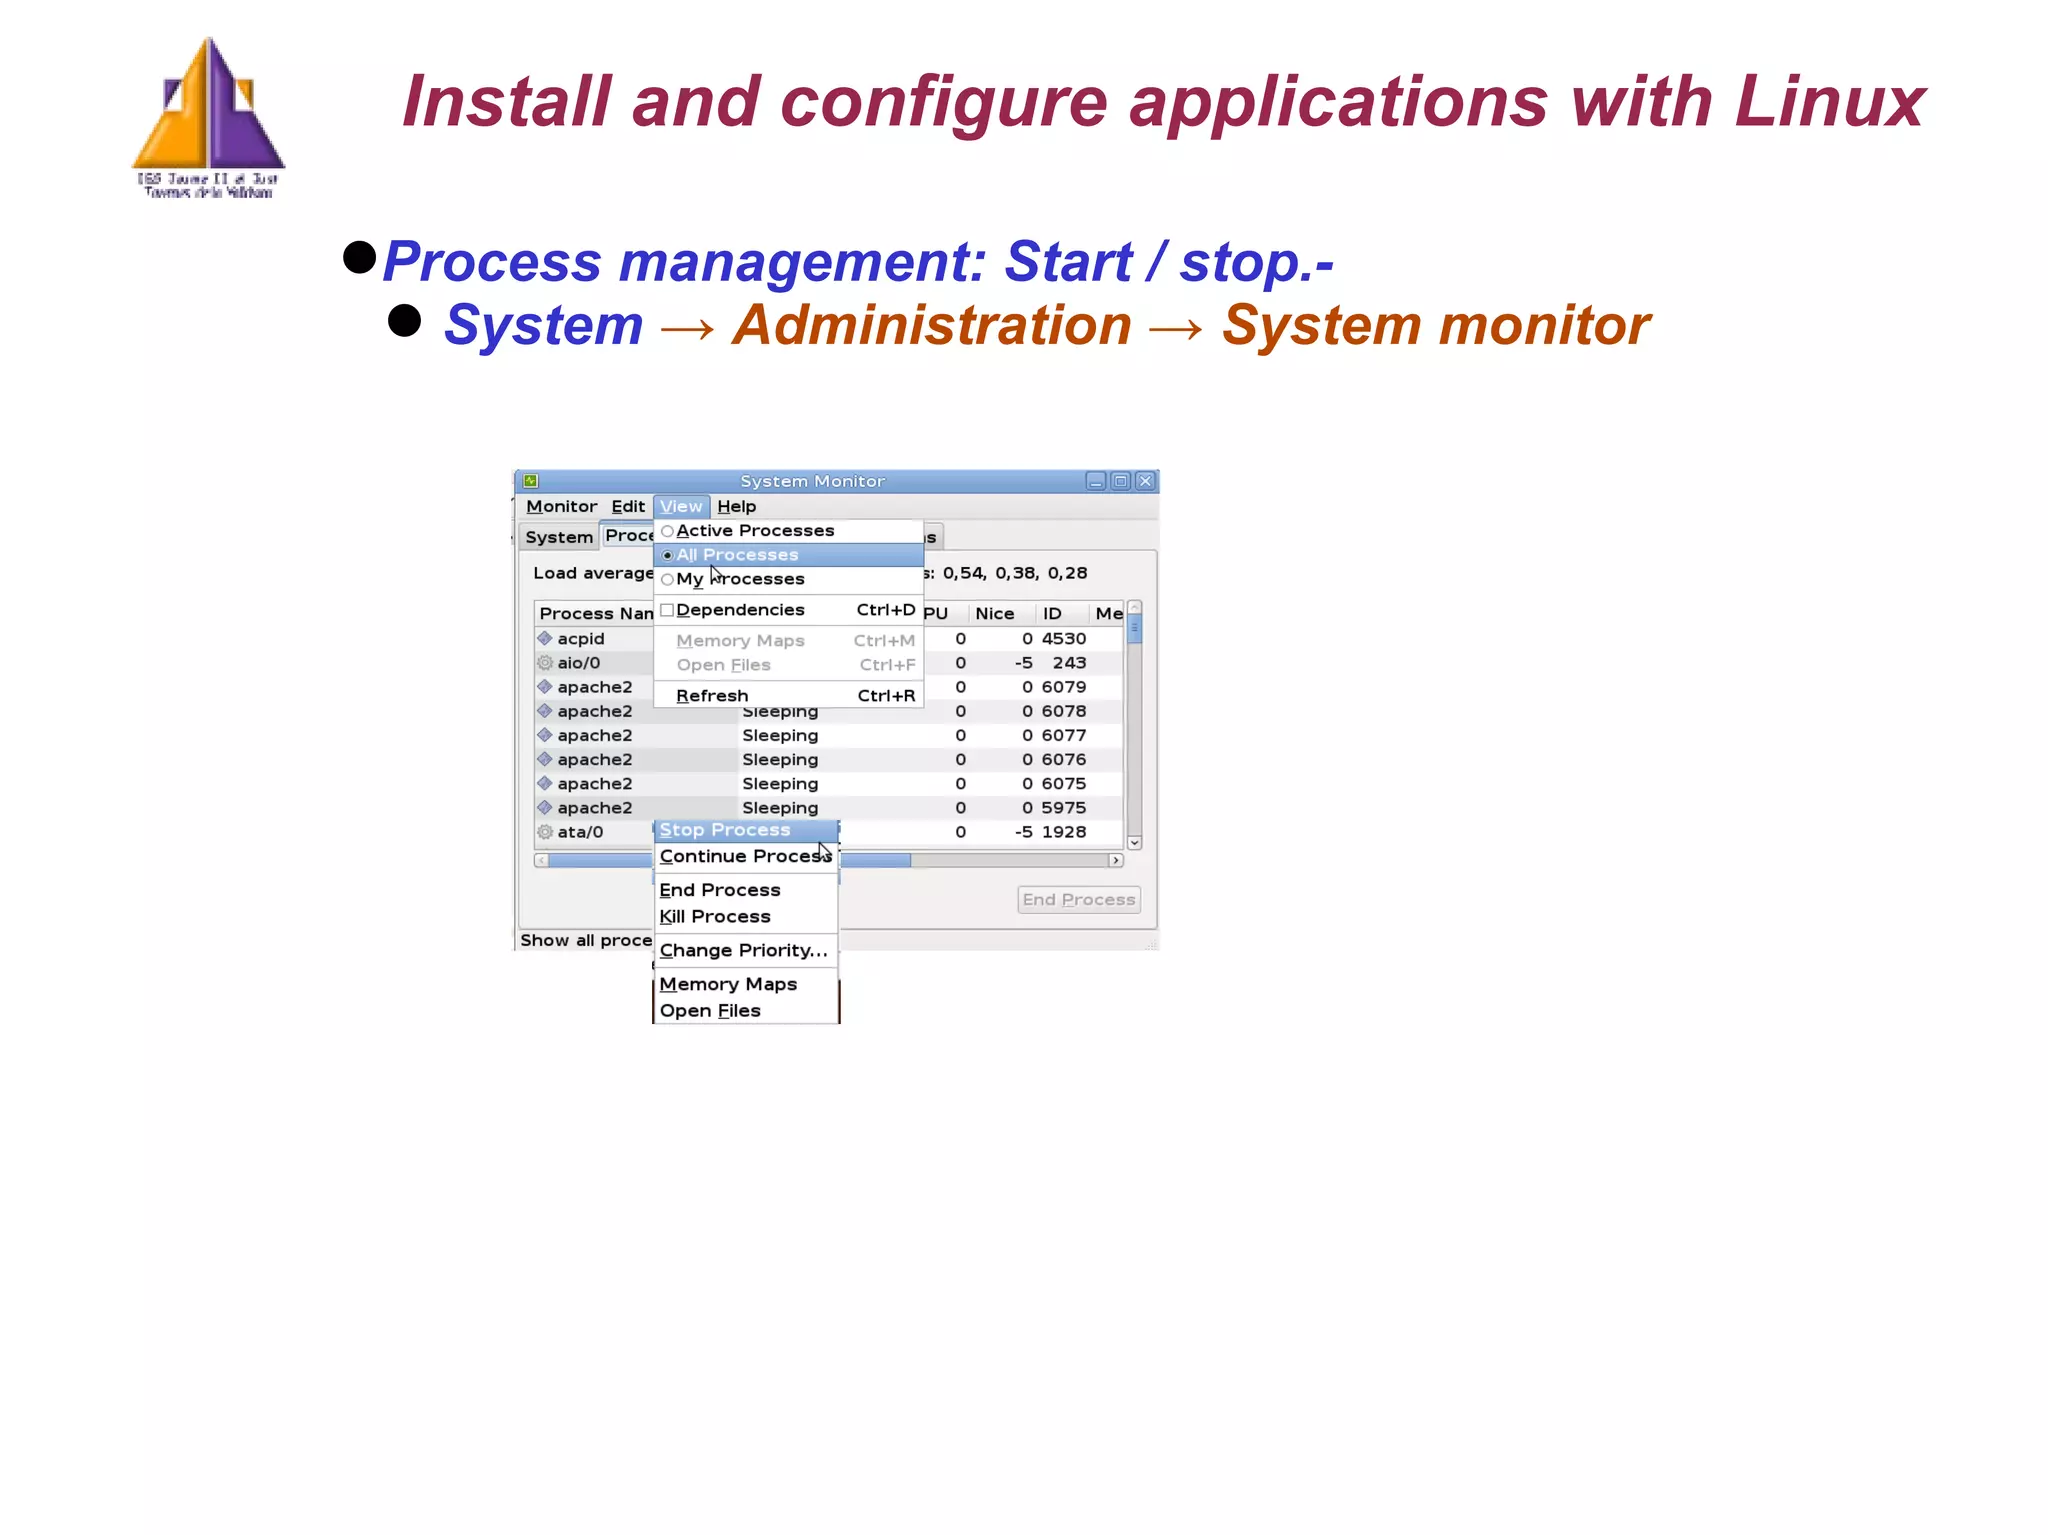
Process management: Start/ stop.- System -> Administration -> System monitor Install and configure applications with Linux
52.
Managing services getingstarted up at boot-time rcconf . - Install using Synaptic Executing from a terminal: sudo rcconf Actives services at boot-time [*] Inactive services at boot-time [ ] Another way: $ chkconfig -l | grep <proces> Managing start / stop of services using scripts from the folder: /etc/rc[0-6].d Install and configure applications with Linux
53.
Compartir carpetes: PaquetSamba. - Arranc: /etc/init.d/./samba [start | stop | ...] Arxiu de configuració: /etc/samba/smb.conf Paràmetres: workgroup = CASA Install and configure applications with Linux Rar / unrar: sudo apt-get install rar unrar Meld: Meld is a tool which allows the user to see the changes in, and merge between, either two files, two directories, or two files with a common ancestor. sudo apt-get install meld Adobe Acrobar Reader: Adobe Reader 9 is available from the Canonical Partner repository
54.
Wake On Line.- Conversió de videos: FLV <=> MPEG, AVI sudo apt-get install ffmpeg ffmpeg -i tu_archivo.flv tu_nuevo_archivo.mpeg ffmpeg -i tu_archivo.flv tu_nuevo_archivo.avi ; No acaba de funcionar Install and configure applications with Linux Resize / Rotate images sudo apt-get install nautilus-image-converter
55.
VPN . – Xarxa privada virtual Install and configure applications with Linux
56.
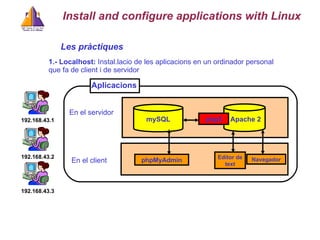
Les pr àctiques 1.- Localhost: Instal.lacio de les aplicacions en un ordinador personal que fa de client i de servidor mySQL Apache 2 En el servidor En el c lient php5 phpMyAdmin Navegador Editor de text Aplicacions Install and configure applications with Linux 192.168. 43 .1 192.168. 43 . 2 192.168. 43 . 3
57.
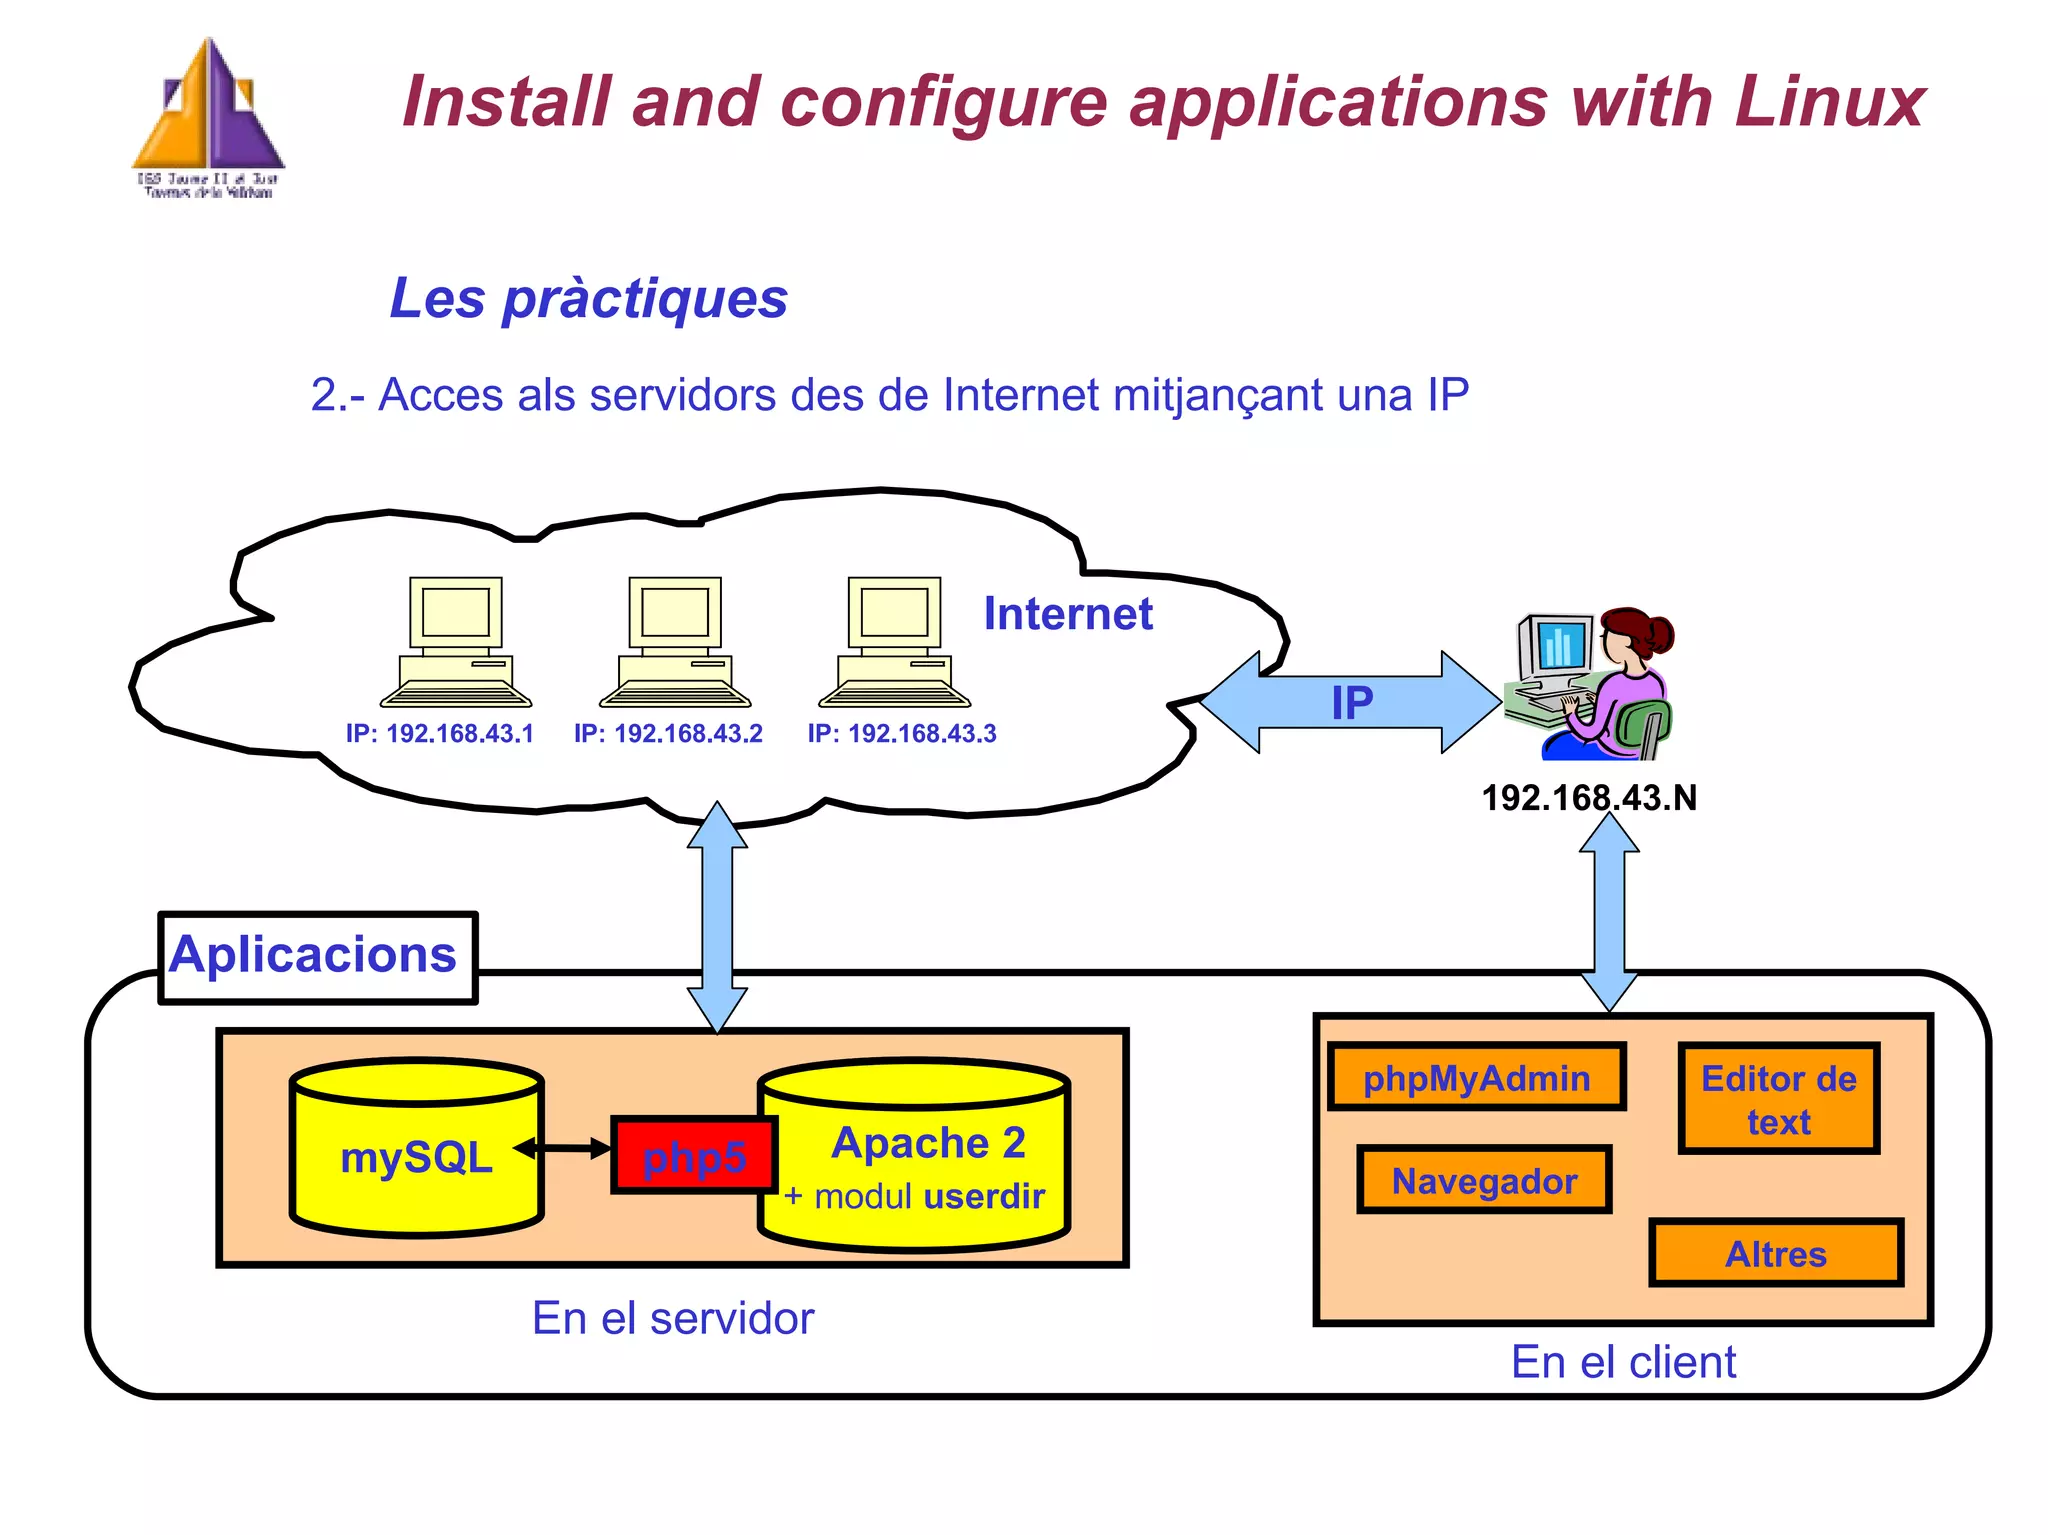
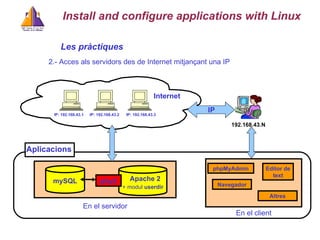
Les pr àctiques 2.- Acces als servidors des de Internet mitjan ç ant una IP Internet mySQL Apache 2 php5 Aplicacions IP: 192.168.43.3 IP: 192.168.43.1 IP: 192.168.43.2 En el servidor En el client IP + modul userdir phpMyAdmin Navegador Editor de text Altres Install and configure applications with Linux 192.168. 43 . N
58.
Les pr àctiques 3.- Acces als servidors des de Internet mitjanant un domini Internet mySQL Apache 2 php5 Aplicacions nomDomini nomDomini nomDomini En el servidor En el client Domini + userdir + ssl + VirtualHost NO_IP DNSALias Altres phpMyAdmin Navegador Editor de text Altres Opció router: DDNS Install and configure applications with Linux 192.168. 43 . N
59.
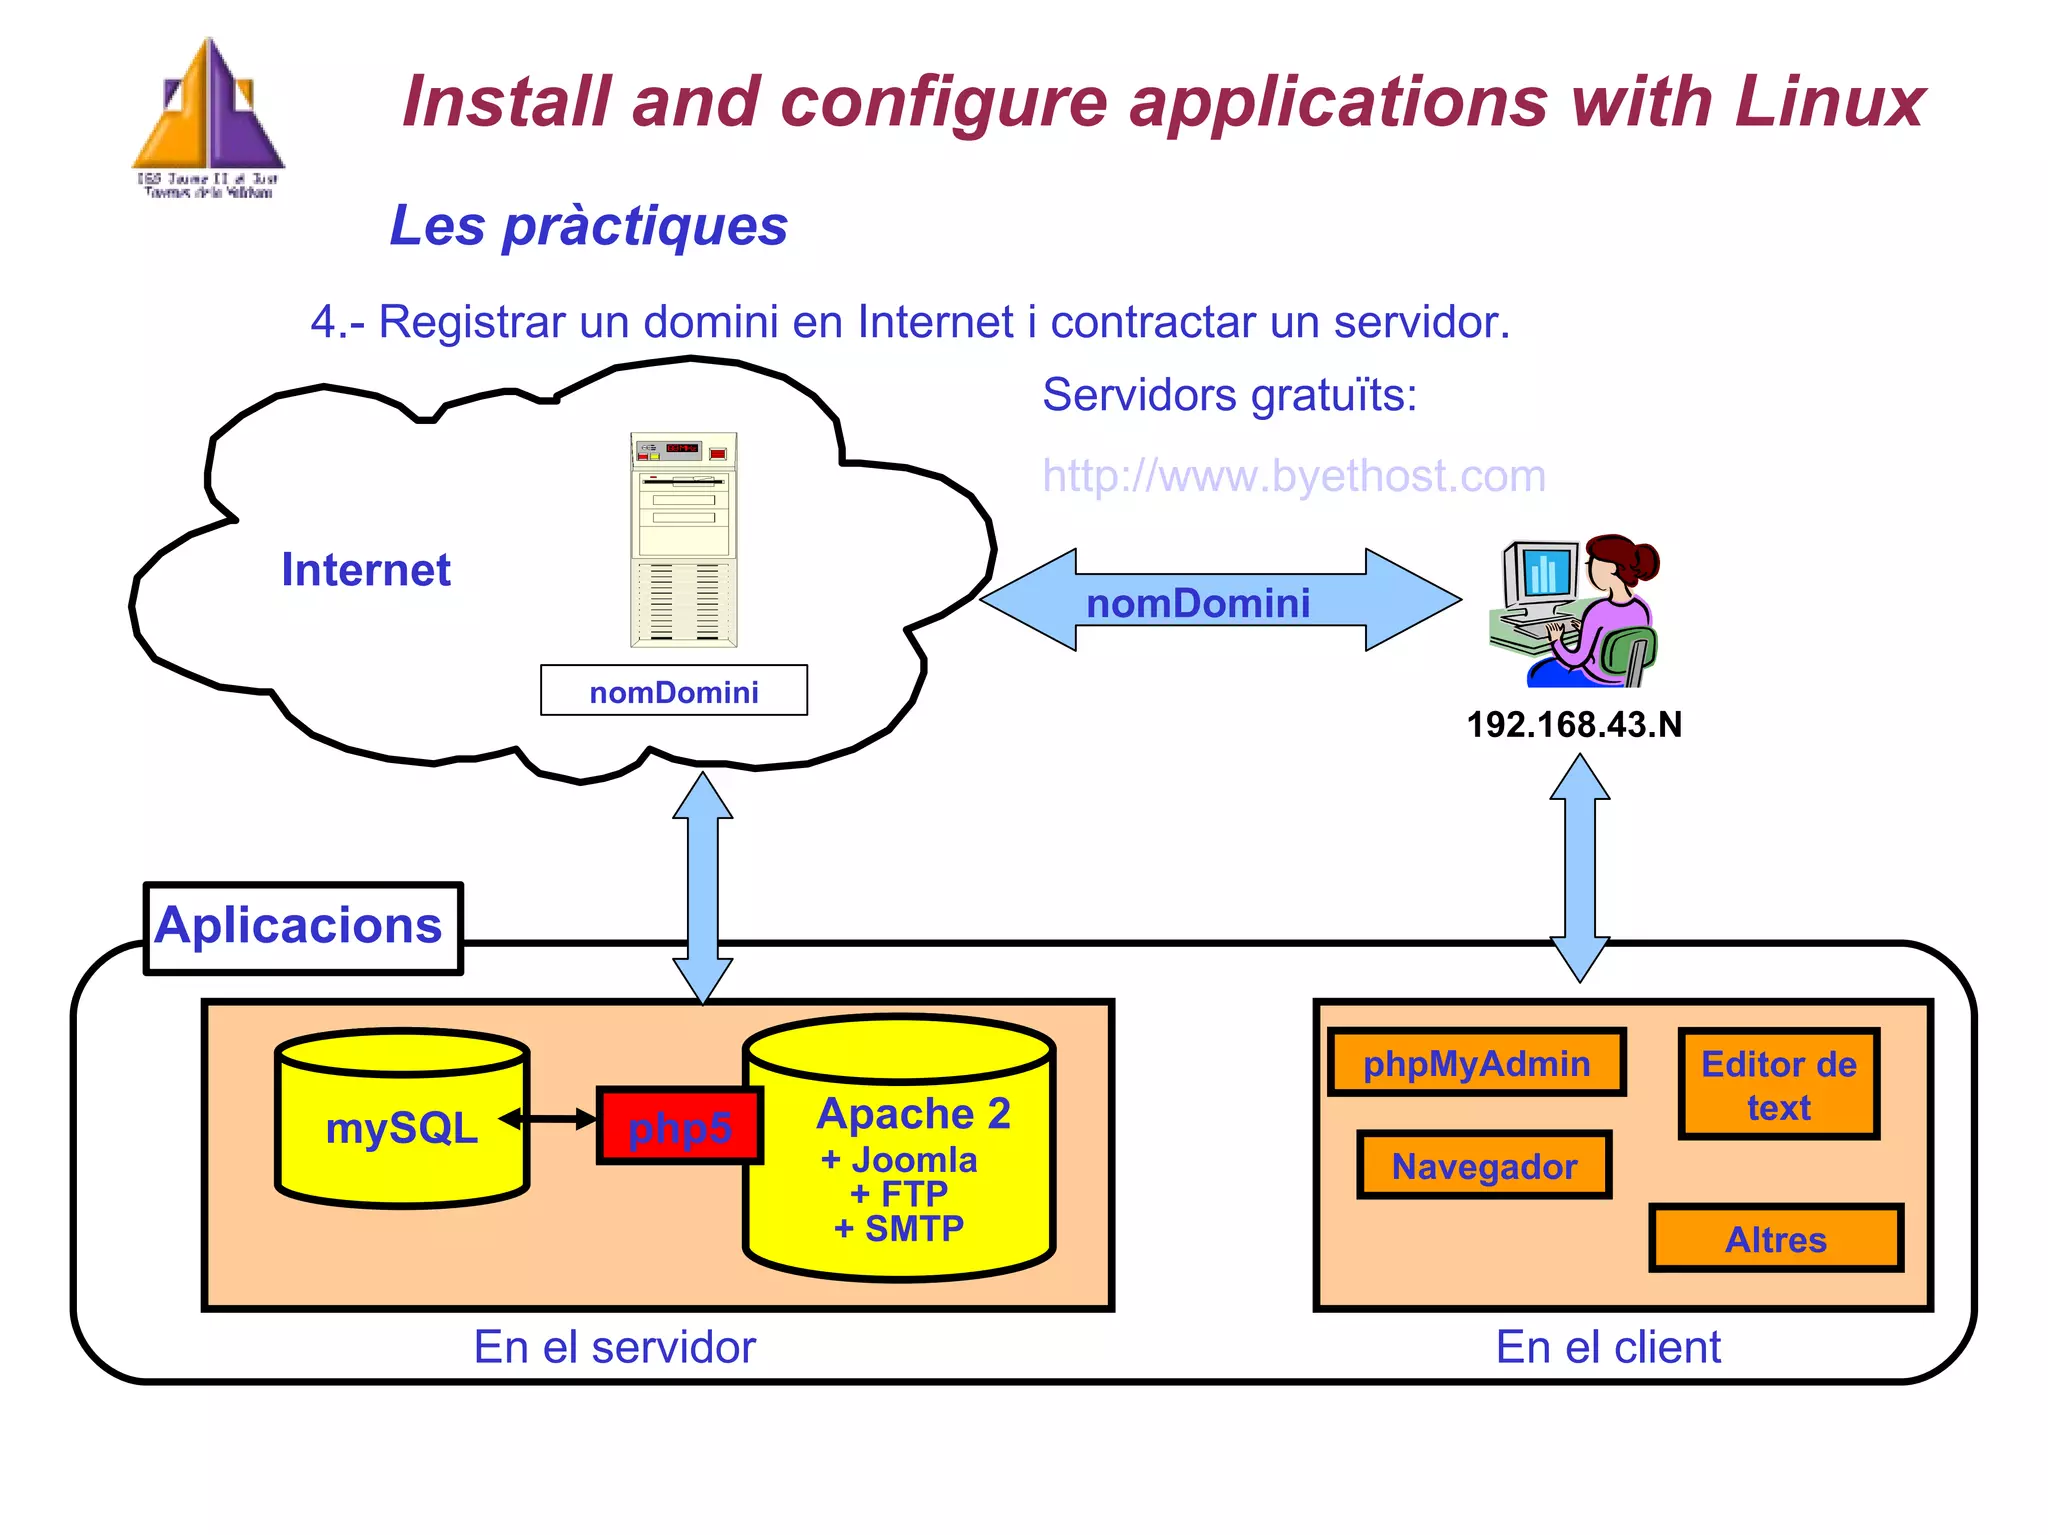
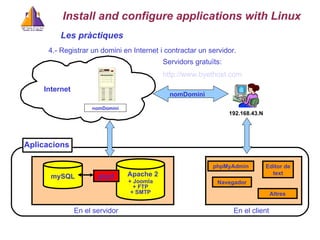
Les pr àctiques 4.- Registrar un domini en Internet i contra c tar un servidor. Internet mySQL Apache 2 php5 Aplicacions phpMyAdmin Navegador Editor de text En el servidor En el client + Joomla + FTP + SMTP nomDomini Altres Install and configure applications with Linux Servidors gratuïts: http :// www.byethost.com / 192.168. 43 . N nomDomini


![System configuration Multi-booting .- Grub 2 configuration: Steps Execute sudo update-grub2 to generate the file grub.cfg Copy its content to /etc/grub.d/40_custom file Edit and modify its content Modify attributes of the different files in /etc/grub.d in order to permit/deny their execution sudo chmod [+x | -x] /etc/grub.d/filename At the end execute sudo update-grub2 to make the new grub.cfg file Exercise: Configure your boot system with the next options: Only two entries (windows / linux) Starting from the second option by default Waiting for 15 second before automatic start Stablish a background image More information: https://wiki.ubuntu.com/Grub2 Install and configure applications with Linux](https://image.slidesharecdn.com/installandconfigurelinux-110502163448-phpapp01/85/Install-and-configure-linux-7-320.jpg)
![Installing applications: Apache2 Packages to install apache2 // The web server libapache2-mod-php5 // The module to work with PHP5 Test from the web browser: http://localhost => It works! Apache version: /usr/sbin/apache2ctl -v Start / stop the web server: sudo /etc/init.d/apache2 [start | stop | restart | ...] sudo /usr/sbin/apache2ctl –k [start | stop | restart] Configuration files /etc/apache2/apache2.conf => Main Apache server configuration file /etc/apache2/httpd.conf => Administrator configuration /etc/apache2/sites-availabe/000-default => Virtual host configuration Log files: /var/log/apache2 Other folders Mods-available / mods-enable : Available / installed modules Sites-available / enable : C onfiguration details of the sites you aim to host More information: http://httpd.apache.org/ Install and configure applications with Linux](https://image.slidesharecdn.com/installandconfigurelinux-110502163448-phpapp01/85/Install-and-configure-linux-10-320.jpg)
![Installing applications: Apache2 /etc/apache2/apache2.conf: ServerRoot: Base directory for the server installation ServerName: Hostname and port that the server uses to identify itself Timeout: Number of seconds before timing out KeepAlive [On | Off]: Whether or not to allow persistent connections AccessFileName: The name of the file to look for in each directory for additional configuration directives /etc/apache2/sites-enabled/default: DocumentRoot: Base d irectory that forms the main document tree visible from the web DocumentRoot /var/www localhost /var/www Install and configure applications with Linux](https://image.slidesharecdn.com/installandconfigurelinux-110502163448-phpapp01/85/Install-and-configure-linux-11-320.jpg)
![Installing applications: Apache2 /etc/apache2/httpd.conf: UserDir: To permit that different users have different web sites in their own home directory. Steps: 1.- From mods-enable make a symbolic link to user-dir modules sudo ln -s /etc/apache2/mods-available/userdir.conf sudo ln -s /etc/apache2/mods-available/userdir.load 2.- In the file /etc/apache2/httpd.conf UserDIr www <Directory /home/*/www> ... Options Indexes FollowSymLinks MultiViews # Other directives </Directory> 3.- Restart the web server: sudo /etc/init.d/apache2 [start | stop | restart ] 4.- How to access to the web page? localhost/~usuari Install and configure applications with Linux](https://image.slidesharecdn.com/installandconfigurelinux-110502163448-phpapp01/85/Install-and-configure-linux-12-320.jpg)

![Installing applications: Apache2 Other directives.- [Module rewrite ] RewriteEngine RewriteRule To allow redirect web traffic Exemple: File .htaccess: To redirect all traffic to test.php web page 1.- From mods-enable make a symbolic link to rewrite module sudo ln -s /etc/apache2/mods-available/rewrite.load 2.- Modify the default configuration file: <VirtualHost *:80 > <Directory /var/www/vselfa> # Other opcions AllowOverride All </Directory> </VirtualHost> 3.- Create a .htaccess file and copy to /var/www/vselfa RewriteEngine on RewriteRule ^(.*)$ test.php ?command=$1 [L,QSA] 4.- To cancel the redirection RewriteEngine off Install and configure applications with Linux](https://image.slidesharecdn.com/installandconfigurelinux-110502163448-phpapp01/85/Install-and-configure-linux-16-320.jpg)
![Installing applications: Apache2 To let acces to some users and specific groups: [Module auth_digest] 1.- From mods-enable symbolic link to required modules ln -s /etc/apache2/mods-available/auth_digest.load 2.- File .htaccess inside the folder we want to restrict AuthName " ZonaPrivada " AuthType Digest # Encripted method (Digest; NO basic) AuthDigestFile /var/.htpasswd Require valid-user 3.- We make a file with the passwords htdigest -c /var/.htpasswd ZonaPrivada vicent # It ask us the password for the administrator user Install and configure applications with Linux](https://image.slidesharecdn.com/installandconfigurelinux-110502163448-phpapp01/85/Install-and-configure-linux-17-320.jpg)

![Installing applications: Apache2 Installing a SSL protocol.- Browsing the site We need to open the port number 443 for the PC We restart the Apache server: /etc/apache2/apache2ctl restart And our secure web site is OK Our address: https://balmes.dnsalias.net Install and configure applications with Linux Tcpdump packet analyze : sudo tcpdump –nnXvs 1514 –i wlan0 port [80 | 443] Check differences between information analysed using port 80 and port 443.](https://image.slidesharecdn.com/installandconfigurelinux-110502163448-phpapp01/85/Install-and-configure-linux-20-320.jpg)
![Installing applications: mySQL - Install a RDBMS: mySQL Libraies mysql-server-5 // The RDBMS phpmyadmin // The client myAdmin php5 - mysql // The mySQL module for PHP5 Configuration files: /etc/mysql/my.cnf /etc/phpmyadmin/config.inc.php Start the server mySQL sudo /etc/init.d/mysql [start | stop | ...] Install and configure applications with Linux](https://image.slidesharecdn.com/installandconfigurelinux-110502163448-phpapp01/85/Install-and-configure-linux-23-320.jpg)
![Installing applications: mySQL phpmyadmin configuration Symbolic link between phpmyadmin and the document root ln -s /usr/share/phpmyadmin /var/www/ To start phpmyadmin from the web browser /localhost/phpmyadmin/ Some parameters from the configuration file $cfg['Servers'][$i]['auth_type'] = 'config'; $cfg['Servers'][$i]['user'] = 'root'; $cfg['Servers'][$i]['password'] = 'root'; $cfg['Servers'][$i]['AllowNoPasswordRoot'] = true; InnoDB engine: A transaction-safe (ACID compliant) storage engine for MySQL that has commit, rollback, and crash-recovery capabilities to protect user data Install and configure applications with Linux](https://image.slidesharecdn.com/installandconfigurelinux-110502163448-phpapp01/85/Install-and-configure-linux-24-320.jpg)
![Installing applications: mySQL Root password recovery Access to the system as root user : user@localhost:~$ su - Stop the server: /etc/init.d/mysql stop Restart the server mySQL in a safe mode From [email_address] # mysqld_safe --skip-grant-tables –skip- networking --user=mysql & Entry to the mysql BD as a root user [email_address] :/home/vicent# mysql -u root mysql Update the password mysql> UPDATE user SET Password = PASSWORD('newpassword') WHERE User='root'; Then also update the privileges mysql> FLUSH PRIVILEGES; Exit mysql mysql> exit Restart the server mySQL /etc/init.d/mysql restart Install and configure applications with Linux](https://image.slidesharecdn.com/installandconfigurelinux-110502163448-phpapp01/85/Install-and-configure-linux-25-320.jpg)

![Installing applications: phppgadmin Install the phppgadmin client From the repositoris, install the package phppgadmin File configuration: /etc/phppgadmin/config.inc.php Some parameters: $conf['extra_login_security'] = true; $conf['owned_only'] = false; $conf['show_system'] = false; - Start phppgadmin Start phppgadmin from the web browser /localhost/phppgadmin/ /domini/phppgadmin Configuration file in Apache: /etc/apache2/conf.d/phppgadmin.conf Allow from all ; To allow Internet connexions Install and configure applications with Linux](https://image.slidesharecdn.com/installandconfigurelinux-110502163448-phpapp01/85/Install-and-configure-linux-33-320.jpg)
![Installing applications : FTP Very Secure FTP Daemon server: From Synaptic: vsftpd Configuration: /etc/vsftpd.conf. To consider: Allow anonymous? anonymous_enable=NO Allow local connexions? local_enable=YES Restrict local users to its own directory? chroot_local_user=YES Enable writing: write_enable =YES Start server: /etc/init.d/vsftpd [start | stop | restart | reload] Service vsftpd [start | stop | restart | reload] sudo start vsftpd FTP clients: gFTP Run: From Applications->Internet->gFTP FileZilla Run: From Applications->Internet->FileZilla Install and configure applications with Linux](https://image.slidesharecdn.com/installandconfigurelinux-110502163448-phpapp01/85/Install-and-configure-linux-35-320.jpg)

![Installing applications: SSH server SSH server: Install from Synaptic: openssh-server Start: sudo /usr/sbin/sshd Start / Stop / restart server /etc/init.d/ssh [start | restart | stop ] ps -ef | grep ssh -> pid process /usr/sbin/sshd kill -9 pid Configuration file: /etc/ssh/sshd_config X11Forwarding yes ; graphic mode AllowUsers user1 user2 user3 Port N ; If we decide to change the port number (*) SSH client: Installed by default Run: ssh [email_address] [-p Port] ; text mode ssh -X usuari@domini [-p Port] ; graphic mode (*) For example, if we want to have 2 SSH servers in the same intranet. We need to modify the file /etc/services to access a specific port by default. Install and configure applications with Linux](https://image.slidesharecdn.com/installandconfigurelinux-110502163448-phpapp01/85/Install-and-configure-linux-40-320.jpg)

![Configuring the network.- Advanced aspects: Firewall+dansguardian+squid File /etc/init.d/firewall.sh #!/bin/sh ## SCRIPT de IPTABLES − www.pello.info − [email_address] echo -n Aplicando Reglas de Firewall... ## FLUSH de reglas iptables –F iptables –X iptables –Z iptables -t nat –F ## Establecemos politica por defecto iptables -P INPUT ACCEPT iptables -P OUTPUT ACCEPT iptables -P FORWARD ACCEPT iptables -t nat -P PREROUTING ACCEPT iptables -t nat -P POSTROUTING ACCEPT ## Empezamos a filtrar ## Nota: eth0 es el interfaz conectado al router y eth1 a la LAN # El localhost se deja (por ejemplo conexiones locales a mysql) /sbin/iptables -A INPUT -i lo -j ACCEPT # Al firewall tenemos acceso desde la red local iptables -A INPUT -s 192.168.43.0/24 -i eth1 -j ACCEPT # Ahora hacemos enmascaramiento de la red local # y activamos el BIT DE FORWARDING (imprescindible!!!!!) iptables -t nat -A POSTROUTING -s 192.168.43.0/255.255.255.0 -o eth0 -j MASQUERADE # Con esto permitimos hacer forward de paquetes en el firewall, o sea # que otras máquinas puedan salir a traves del firewall. echo 1 > /proc/sys/net/ipv4/ip_forward Install and configure applications with Linux](https://image.slidesharecdn.com/installandconfigurelinux-110502163448-phpapp01/85/Install-and-configure-linux-47-320.jpg)

![Managing services geting started up at boot-time rcconf . - Install using Synaptic Executing from a terminal: sudo rcconf Actives services at boot-time [*] Inactive services at boot-time [ ] Another way: $ chkconfig -l | grep <proces> Managing start / stop of services using scripts from the folder: /etc/rc[0-6].d Install and configure applications with Linux](https://image.slidesharecdn.com/installandconfigurelinux-110502163448-phpapp01/85/Install-and-configure-linux-52-320.jpg)
![Compartir carpetes: Paquet Samba. - Arranc: /etc/init.d/./samba [start | stop | ...] Arxiu de configuració: /etc/samba/smb.conf Paràmetres: workgroup = CASA Install and configure applications with Linux Rar / unrar: sudo apt-get install rar unrar Meld: Meld is a tool which allows the user to see the changes in, and merge between, either two files, two directories, or two files with a common ancestor. sudo apt-get install meld Adobe Acrobar Reader: Adobe Reader 9 is available from the Canonical Partner repository](https://image.slidesharecdn.com/installandconfigurelinux-110502163448-phpapp01/85/Install-and-configure-linux-53-320.jpg)


![System configuration Multi-booting .- Grub 2 configuration: Steps Execute sudo update-grub2 to generate the file grub.cfg Copy its content to /etc/grub.d/40_custom file Edit and modify its content Modify attributes of the different files in /etc/grub.d in order to permit/deny their execution sudo chmod [+x | -x] /etc/grub.d/filename At the end execute sudo update-grub2 to make the new grub.cfg file Exercise: Configure your boot system with the next options: Only two entries (windows / linux) Starting from the second option by default Waiting for 15 second before automatic start Stablish a background image More information: https://wiki.ubuntu.com/Grub2 Install and configure applications with Linux](https://image.slidesharecdn.com/installandconfigurelinux-110502163448-phpapp01/75/Install-and-configure-linux-7-2048.jpg)

![Installing applications: Apache2 Packages to install apache2 // The web server libapache2-mod-php5 // The module to work with PHP5 Test from the web browser: http://localhost => It works! Apache version: /usr/sbin/apache2ctl -v Start / stop the web server: sudo /etc/init.d/apache2 [start | stop | restart | ...] sudo /usr/sbin/apache2ctl –k [start | stop | restart] Configuration files /etc/apache2/apache2.conf => Main Apache server configuration file /etc/apache2/httpd.conf => Administrator configuration /etc/apache2/sites-availabe/000-default => Virtual host configuration Log files: /var/log/apache2 Other folders Mods-available / mods-enable : Available / installed modules Sites-available / enable : C onfiguration details of the sites you aim to host More information: http://httpd.apache.org/ Install and configure applications with Linux](https://image.slidesharecdn.com/installandconfigurelinux-110502163448-phpapp01/75/Install-and-configure-linux-10-2048.jpg)
![Installing applications: Apache2 /etc/apache2/apache2.conf: ServerRoot: Base directory for the server installation ServerName: Hostname and port that the server uses to identify itself Timeout: Number of seconds before timing out KeepAlive [On | Off]: Whether or not to allow persistent connections AccessFileName: The name of the file to look for in each directory for additional configuration directives /etc/apache2/sites-enabled/default: DocumentRoot: Base d irectory that forms the main document tree visible from the web DocumentRoot /var/www localhost /var/www Install and configure applications with Linux](https://image.slidesharecdn.com/installandconfigurelinux-110502163448-phpapp01/75/Install-and-configure-linux-11-2048.jpg)
![Installing applications: Apache2 /etc/apache2/httpd.conf: UserDir: To permit that different users have different web sites in their own home directory. Steps: 1.- From mods-enable make a symbolic link to user-dir modules sudo ln -s /etc/apache2/mods-available/userdir.conf sudo ln -s /etc/apache2/mods-available/userdir.load 2.- In the file /etc/apache2/httpd.conf UserDIr www <Directory /home/*/www> ... Options Indexes FollowSymLinks MultiViews # Other directives </Directory> 3.- Restart the web server: sudo /etc/init.d/apache2 [start | stop | restart ] 4.- How to access to the web page? localhost/~usuari Install and configure applications with Linux](https://image.slidesharecdn.com/installandconfigurelinux-110502163448-phpapp01/75/Install-and-configure-linux-12-2048.jpg)
![Installing applications: Apache2 Other directives.- [Module rewrite ] RewriteEngine RewriteRule To allow redirect web traffic Exemple: File .htaccess: To redirect all traffic to test.php web page 1.- From mods-enable make a symbolic link to rewrite module sudo ln -s /etc/apache2/mods-available/rewrite.load 2.- Modify the default configuration file: <VirtualHost *:80 > <Directory /var/www/vselfa> # Other opcions AllowOverride All </Directory> </VirtualHost> 3.- Create a .htaccess file and copy to /var/www/vselfa RewriteEngine on RewriteRule ^(.*)$ test.php ?command=$1 [L,QSA] 4.- To cancel the redirection RewriteEngine off Install and configure applications with Linux](https://image.slidesharecdn.com/installandconfigurelinux-110502163448-phpapp01/75/Install-and-configure-linux-16-2048.jpg)
![Installing applications: Apache2 To let acces to some users and specific groups: [Module auth_digest] 1.- From mods-enable symbolic link to required modules ln -s /etc/apache2/mods-available/auth_digest.load 2.- File .htaccess inside the folder we want to restrict AuthName " ZonaPrivada " AuthType Digest # Encripted method (Digest; NO basic) AuthDigestFile /var/.htpasswd Require valid-user 3.- We make a file with the passwords htdigest -c /var/.htpasswd ZonaPrivada vicent # It ask us the password for the administrator user Install and configure applications with Linux](https://image.slidesharecdn.com/installandconfigurelinux-110502163448-phpapp01/75/Install-and-configure-linux-17-2048.jpg)
![Installing applications: Apache2 Installing a SSL protocol.- Browsing the site We need to open the port number 443 for the PC We restart the Apache server: /etc/apache2/apache2ctl restart And our secure web site is OK Our address: https://balmes.dnsalias.net Install and configure applications with Linux Tcpdump packet analyze : sudo tcpdump –nnXvs 1514 –i wlan0 port [80 | 443] Check differences between information analysed using port 80 and port 443.](https://image.slidesharecdn.com/installandconfigurelinux-110502163448-phpapp01/75/Install-and-configure-linux-20-2048.jpg)
![Installing applications: mySQL - Install a RDBMS: mySQL Libraies mysql-server-5 // The RDBMS phpmyadmin // The client myAdmin php5 - mysql // The mySQL module for PHP5 Configuration files: /etc/mysql/my.cnf /etc/phpmyadmin/config.inc.php Start the server mySQL sudo /etc/init.d/mysql [start | stop | ...] Install and configure applications with Linux](https://image.slidesharecdn.com/installandconfigurelinux-110502163448-phpapp01/75/Install-and-configure-linux-23-2048.jpg)
![Installing applications: mySQL phpmyadmin configuration Symbolic link between phpmyadmin and the document root ln -s /usr/share/phpmyadmin /var/www/ To start phpmyadmin from the web browser /localhost/phpmyadmin/ Some parameters from the configuration file $cfg['Servers'][$i]['auth_type'] = 'config'; $cfg['Servers'][$i]['user'] = 'root'; $cfg['Servers'][$i]['password'] = 'root'; $cfg['Servers'][$i]['AllowNoPasswordRoot'] = true; InnoDB engine: A transaction-safe (ACID compliant) storage engine for MySQL that has commit, rollback, and crash-recovery capabilities to protect user data Install and configure applications with Linux](https://image.slidesharecdn.com/installandconfigurelinux-110502163448-phpapp01/75/Install-and-configure-linux-24-2048.jpg)
![Installing applications: mySQL Root password recovery Access to the system as root user : user@localhost:~$ su - Stop the server: /etc/init.d/mysql stop Restart the server mySQL in a safe mode From [email_address] # mysqld_safe --skip-grant-tables –skip- networking --user=mysql & Entry to the mysql BD as a root user [email_address] :/home/vicent# mysql -u root mysql Update the password mysql> UPDATE user SET Password = PASSWORD('newpassword') WHERE User='root'; Then also update the privileges mysql> FLUSH PRIVILEGES; Exit mysql mysql> exit Restart the server mySQL /etc/init.d/mysql restart Install and configure applications with Linux](https://image.slidesharecdn.com/installandconfigurelinux-110502163448-phpapp01/75/Install-and-configure-linux-25-2048.jpg)


![Installing applications: phppgadmin Install the phppgadmin client From the repositoris, install the package phppgadmin File configuration: /etc/phppgadmin/config.inc.php Some parameters: $conf['extra_login_security'] = true; $conf['owned_only'] = false; $conf['show_system'] = false; - Start phppgadmin Start phppgadmin from the web browser /localhost/phppgadmin/ /domini/phppgadmin Configuration file in Apache: /etc/apache2/conf.d/phppgadmin.conf Allow from all ; To allow Internet connexions Install and configure applications with Linux](https://image.slidesharecdn.com/installandconfigurelinux-110502163448-phpapp01/75/Install-and-configure-linux-33-2048.jpg)
![Installing applications : FTP Very Secure FTP Daemon server: From Synaptic: vsftpd Configuration: /etc/vsftpd.conf. To consider: Allow anonymous? anonymous_enable=NO Allow local connexions? local_enable=YES Restrict local users to its own directory? chroot_local_user=YES Enable writing: write_enable =YES Start server: /etc/init.d/vsftpd [start | stop | restart | reload] Service vsftpd [start | stop | restart | reload] sudo start vsftpd FTP clients: gFTP Run: From Applications->Internet->gFTP FileZilla Run: From Applications->Internet->FileZilla Install and configure applications with Linux](https://image.slidesharecdn.com/installandconfigurelinux-110502163448-phpapp01/75/Install-and-configure-linux-35-2048.jpg)
![Installing applications: SSH server SSH server: Install from Synaptic: openssh-server Start: sudo /usr/sbin/sshd Start / Stop / restart server /etc/init.d/ssh [start | restart | stop ] ps -ef | grep ssh -> pid process /usr/sbin/sshd kill -9 pid Configuration file: /etc/ssh/sshd_config X11Forwarding yes ; graphic mode AllowUsers user1 user2 user3 Port N ; If we decide to change the port number (*) SSH client: Installed by default Run: ssh [email_address] [-p Port] ; text mode ssh -X usuari@domini [-p Port] ; graphic mode (*) For example, if we want to have 2 SSH servers in the same intranet. We need to modify the file /etc/services to access a specific port by default. Install and configure applications with Linux](https://image.slidesharecdn.com/installandconfigurelinux-110502163448-phpapp01/75/Install-and-configure-linux-40-2048.jpg)


![Configuring the network.- Advanced aspects: Firewall+dansguardian+squid File /etc/init.d/firewall.sh #!/bin/sh ## SCRIPT de IPTABLES − www.pello.info − [email_address] echo -n Aplicando Reglas de Firewall... ## FLUSH de reglas iptables –F iptables –X iptables –Z iptables -t nat –F ## Establecemos politica por defecto iptables -P INPUT ACCEPT iptables -P OUTPUT ACCEPT iptables -P FORWARD ACCEPT iptables -t nat -P PREROUTING ACCEPT iptables -t nat -P POSTROUTING ACCEPT ## Empezamos a filtrar ## Nota: eth0 es el interfaz conectado al router y eth1 a la LAN # El localhost se deja (por ejemplo conexiones locales a mysql) /sbin/iptables -A INPUT -i lo -j ACCEPT # Al firewall tenemos acceso desde la red local iptables -A INPUT -s 192.168.43.0/24 -i eth1 -j ACCEPT # Ahora hacemos enmascaramiento de la red local # y activamos el BIT DE FORWARDING (imprescindible!!!!!) iptables -t nat -A POSTROUTING -s 192.168.43.0/255.255.255.0 -o eth0 -j MASQUERADE # Con esto permitimos hacer forward de paquetes en el firewall, o sea # que otras máquinas puedan salir a traves del firewall. echo 1 > /proc/sys/net/ipv4/ip_forward Install and configure applications with Linux](https://image.slidesharecdn.com/installandconfigurelinux-110502163448-phpapp01/75/Install-and-configure-linux-47-2048.jpg)


![Managing services geting started up at boot-time rcconf . - Install using Synaptic Executing from a terminal: sudo rcconf Actives services at boot-time [*] Inactive services at boot-time [ ] Another way: $ chkconfig -l | grep <proces> Managing start / stop of services using scripts from the folder: /etc/rc[0-6].d Install and configure applications with Linux](https://image.slidesharecdn.com/installandconfigurelinux-110502163448-phpapp01/75/Install-and-configure-linux-52-2048.jpg)
![Compartir carpetes: Paquet Samba. - Arranc: /etc/init.d/./samba [start | stop | ...] Arxiu de configuració: /etc/samba/smb.conf Paràmetres: workgroup = CASA Install and configure applications with Linux Rar / unrar: sudo apt-get install rar unrar Meld: Meld is a tool which allows the user to see the changes in, and merge between, either two files, two directories, or two files with a common ancestor. sudo apt-get install meld Adobe Acrobar Reader: Adobe Reader 9 is available from the Canonical Partner repository](https://image.slidesharecdn.com/installandconfigurelinux-110502163448-phpapp01/75/Install-and-configure-linux-53-2048.jpg)