Downloaded 57 times


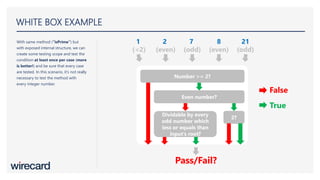

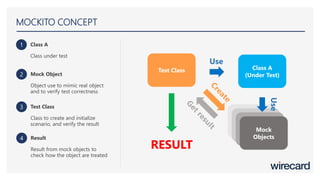
![RUNNING JUNIT
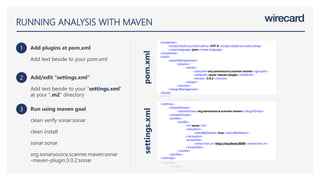
1 Using runnable method
We can create runnable method to run the test
class and using assert from test class to check the
result.
2 Right click on test class (Eclipse)
There is eclipse feature which we can right click
on JUnit test class and run it with Junit.
Run with maven (Maven)
We can run JUnit using maven goal “test”, or
even run it automatically every time we use
“package” goal
3
public class TestRunner {
public static void main(String[] args) {
Result result = JUnitCore.runClasses(TestClass.class);
for (Failure failure : result.getFailures()) {
System.out.println(failure.toString());
}
System.out.println(result.wasSuccessful());
}
}](https://image.slidesharecdn.com/newunittesting-160909080217/85/Java-Unit-Testing-18-320.jpg)
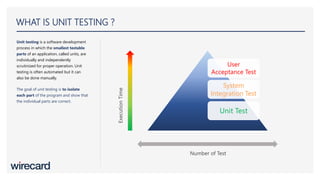
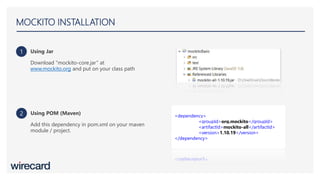
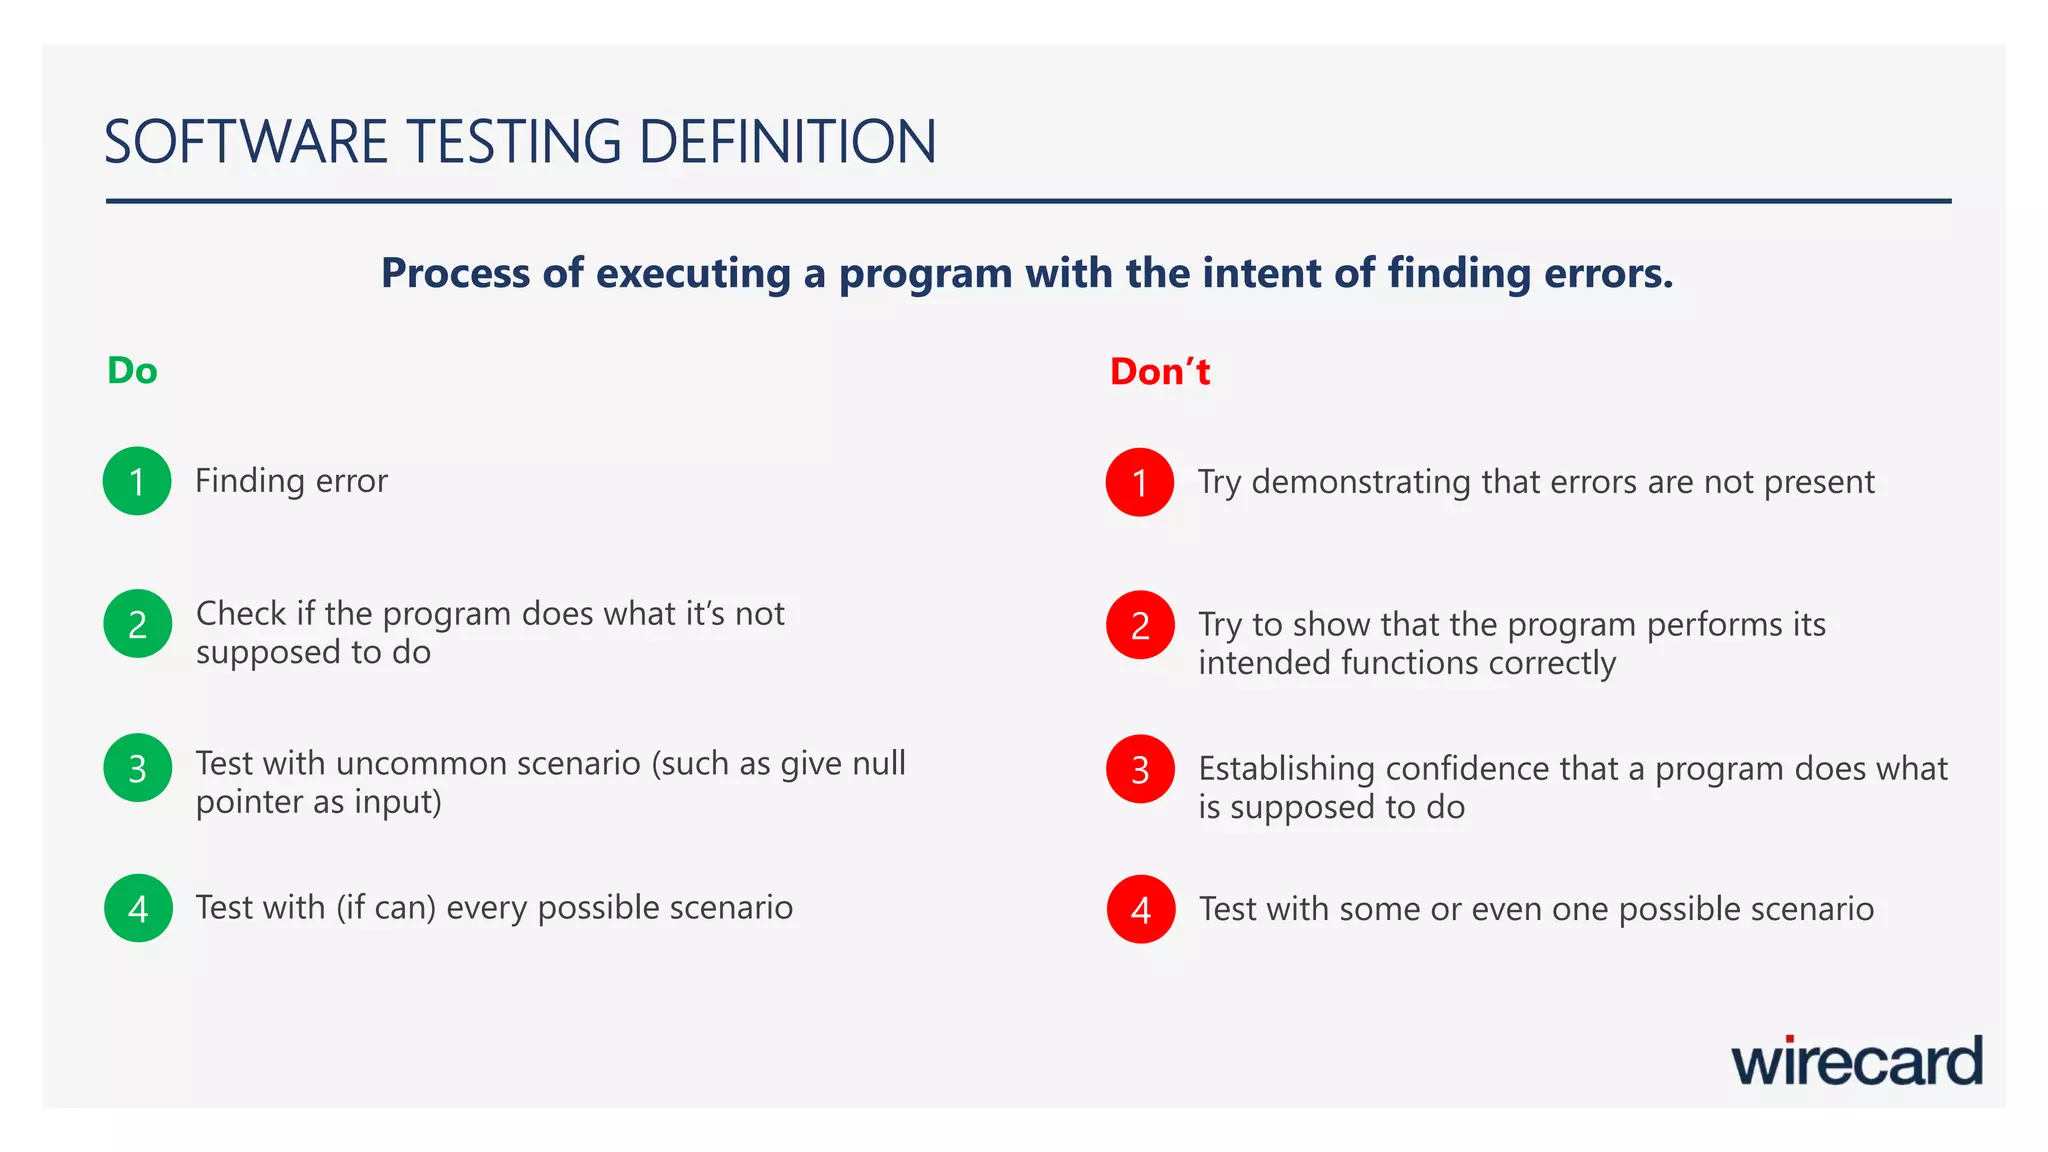
![SOME OF JUNIT API (JUnit 4.12)
1 org.junit.Assert.*
It will fail the test if not true
- assertTrue(boolean)
Assert that boolean is true
- assertEquals(type, type)
Assert that two variables are equals
- assertArrayEquals(type[], type[])
Assert that two arrays are equals
- assertNotNull(object)
Assert that object reference is not null
2 org.junit.Assume.*
It will ignore the test if not true
- assumeNoException(Throwable)
Assume there is no exception
- assumeTrue(boolean)
Assume boolean is true
- asumeNotNull(object)
Assume object reference is not null
- assumeThat(type, Matcher)
Assume that type is match with Matcher](https://image.slidesharecdn.com/newunittesting-160909080217/85/Java-Unit-Testing-19-320.jpg)
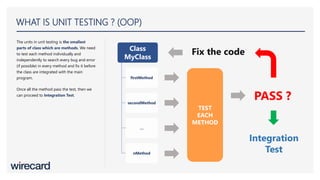
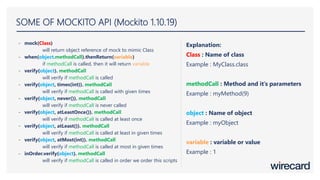
![To achieve everything we conclude
from previous slide by using “JUnit”,
we can use Parameterized API from
“JUnit” and create every input value
and expected result as parameters. By
using that method, we can create just
one test method for isPrime method
and test it with every parameters.
JUnit will run method with “@Test”
annotation for every object from
List in method with
“@Parameterized.Parameter”
annotation.
JUNIT EXAMPLE (3)
@RunWith(Parameterized.class)
public class MyMathTest {
private int number;
private boolean prime;
public MyMathTest(Integer number, Boolean prime) {
this.number = number.intValue();
this.prime = prime.booleanValue();
}
@Parameterized.Parameters
public static List<Object[]> testParam() {
return Arrays.asList(new Object[][] {
{ -65536, false }, { -21, false },{ -2, false }, { -1, false }, { 0, false },
{ 1, false }, { 2, true }, { 3, true },{ 4, false }, { 17, true },
{ 21, false },{ 40, false }, { 289, false }, { 65536, false },
{ 65538, false }
});
}
@Test
public void testPrime() {
assertEquals("The input number is " + number +
" and isPrime method should return " + prime + "but it return “ +
MyMath.isPrime(number), prime, MyMath.isPrime(number));
}
}](https://image.slidesharecdn.com/newunittesting-160909080217/85/Java-Unit-Testing-23-320.jpg)


![RUNNING JUNIT
1 Using runnable method
We can create runnable method to run the test
class and using assert from test class to check the
result.
2 Right click on test class (Eclipse)
There is eclipse feature which we can right click
on JUnit test class and run it with Junit.
Run with maven (Maven)
We can run JUnit using maven goal “test”, or
even run it automatically every time we use
“package” goal
3
public class TestRunner {
public static void main(String[] args) {
Result result = JUnitCore.runClasses(TestClass.class);
for (Failure failure : result.getFailures()) {
System.out.println(failure.toString());
}
System.out.println(result.wasSuccessful());
}
}](https://image.slidesharecdn.com/newunittesting-160909080217/75/Java-Unit-Testing-18-2048.jpg)
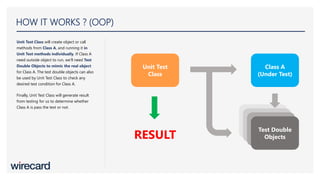
![SOME OF JUNIT API (JUnit 4.12)
1 org.junit.Assert.*
It will fail the test if not true
- assertTrue(boolean)
Assert that boolean is true
- assertEquals(type, type)
Assert that two variables are equals
- assertArrayEquals(type[], type[])
Assert that two arrays are equals
- assertNotNull(object)
Assert that object reference is not null
2 org.junit.Assume.*
It will ignore the test if not true
- assumeNoException(Throwable)
Assume there is no exception
- assumeTrue(boolean)
Assume boolean is true
- asumeNotNull(object)
Assume object reference is not null
- assumeThat(type, Matcher)
Assume that type is match with Matcher](https://image.slidesharecdn.com/newunittesting-160909080217/75/Java-Unit-Testing-19-2048.jpg)
![To achieve everything we conclude
from previous slide by using “JUnit”,
we can use Parameterized API from
“JUnit” and create every input value
and expected result as parameters. By
using that method, we can create just
one test method for isPrime method
and test it with every parameters.
JUnit will run method with “@Test”
annotation for every object from
List in method with
“@Parameterized.Parameter”
annotation.
JUNIT EXAMPLE (3)
@RunWith(Parameterized.class)
public class MyMathTest {
private int number;
private boolean prime;
public MyMathTest(Integer number, Boolean prime) {
this.number = number.intValue();
this.prime = prime.booleanValue();
}
@Parameterized.Parameters
public static List<Object[]> testParam() {
return Arrays.asList(new Object[][] {
{ -65536, false }, { -21, false },{ -2, false }, { -1, false }, { 0, false },
{ 1, false }, { 2, true }, { 3, true },{ 4, false }, { 17, true },
{ 21, false },{ 40, false }, { 289, false }, { 65536, false },
{ 65538, false }
});
}
@Test
public void testPrime() {
assertEquals("The input number is " + number +
" and isPrime method should return " + prime + "but it return “ +
MyMath.isPrime(number), prime, MyMath.isPrime(number));
}
}](https://image.slidesharecdn.com/newunittesting-160909080217/75/Java-Unit-Testing-23-2048.jpg)


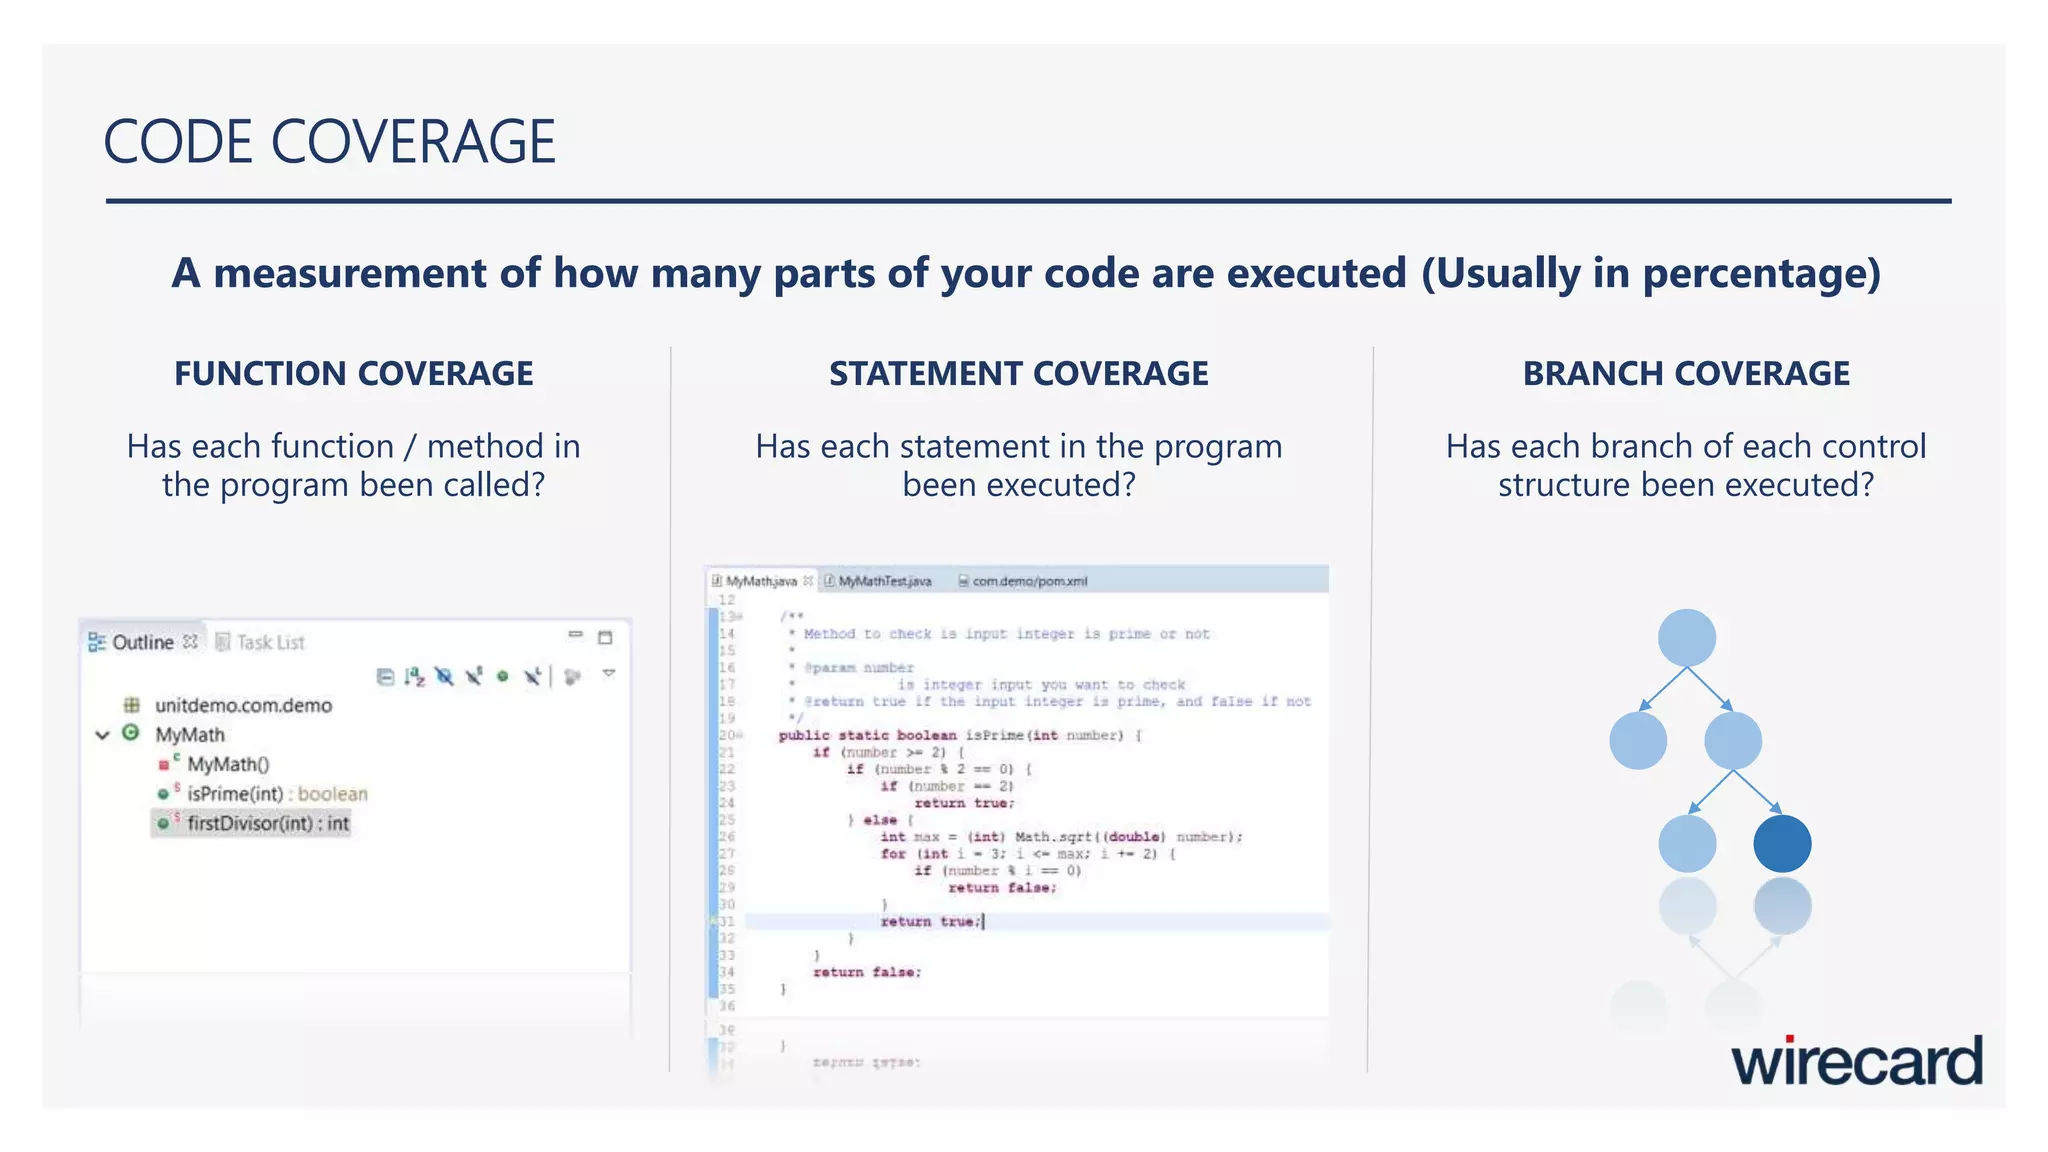
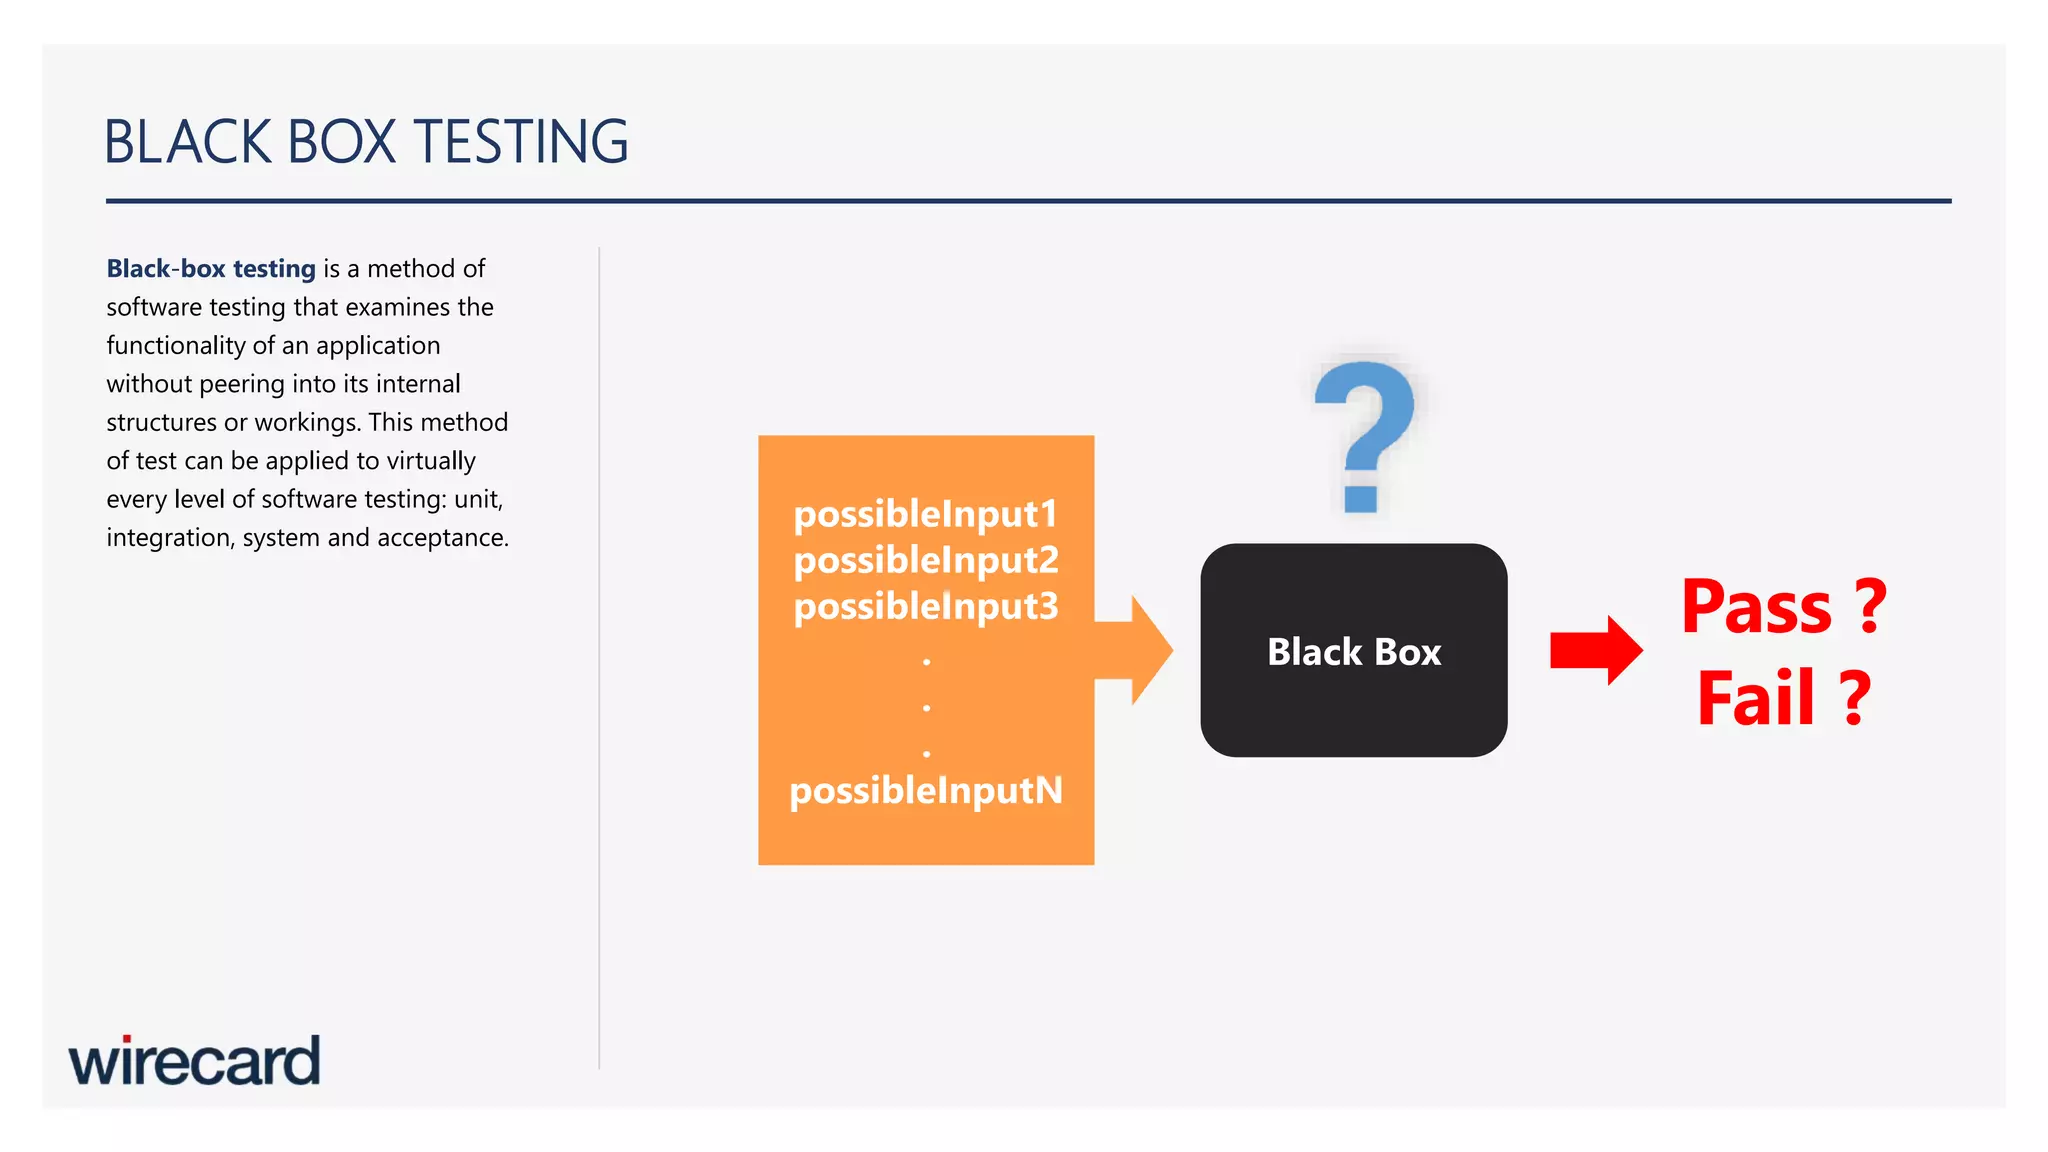
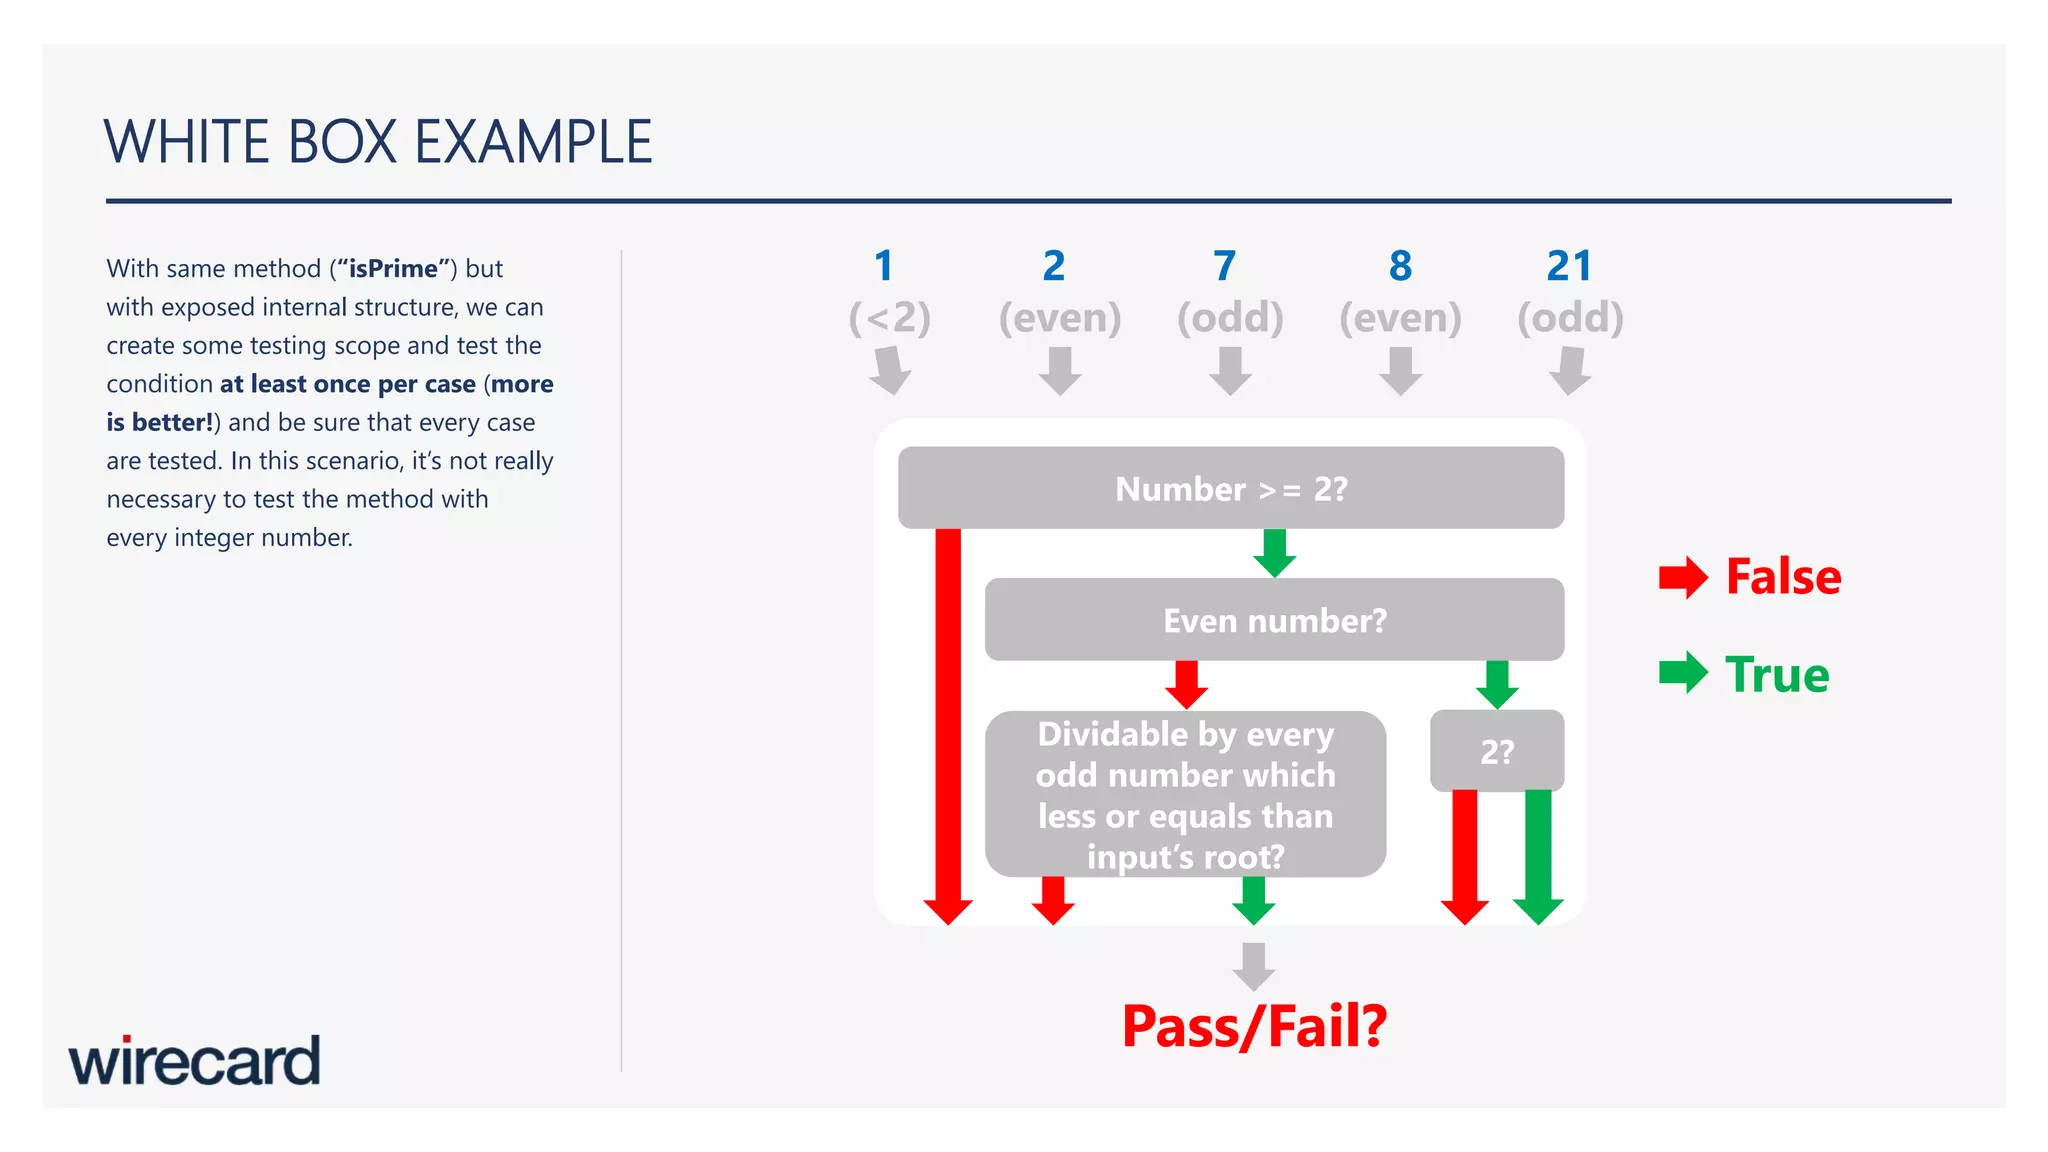
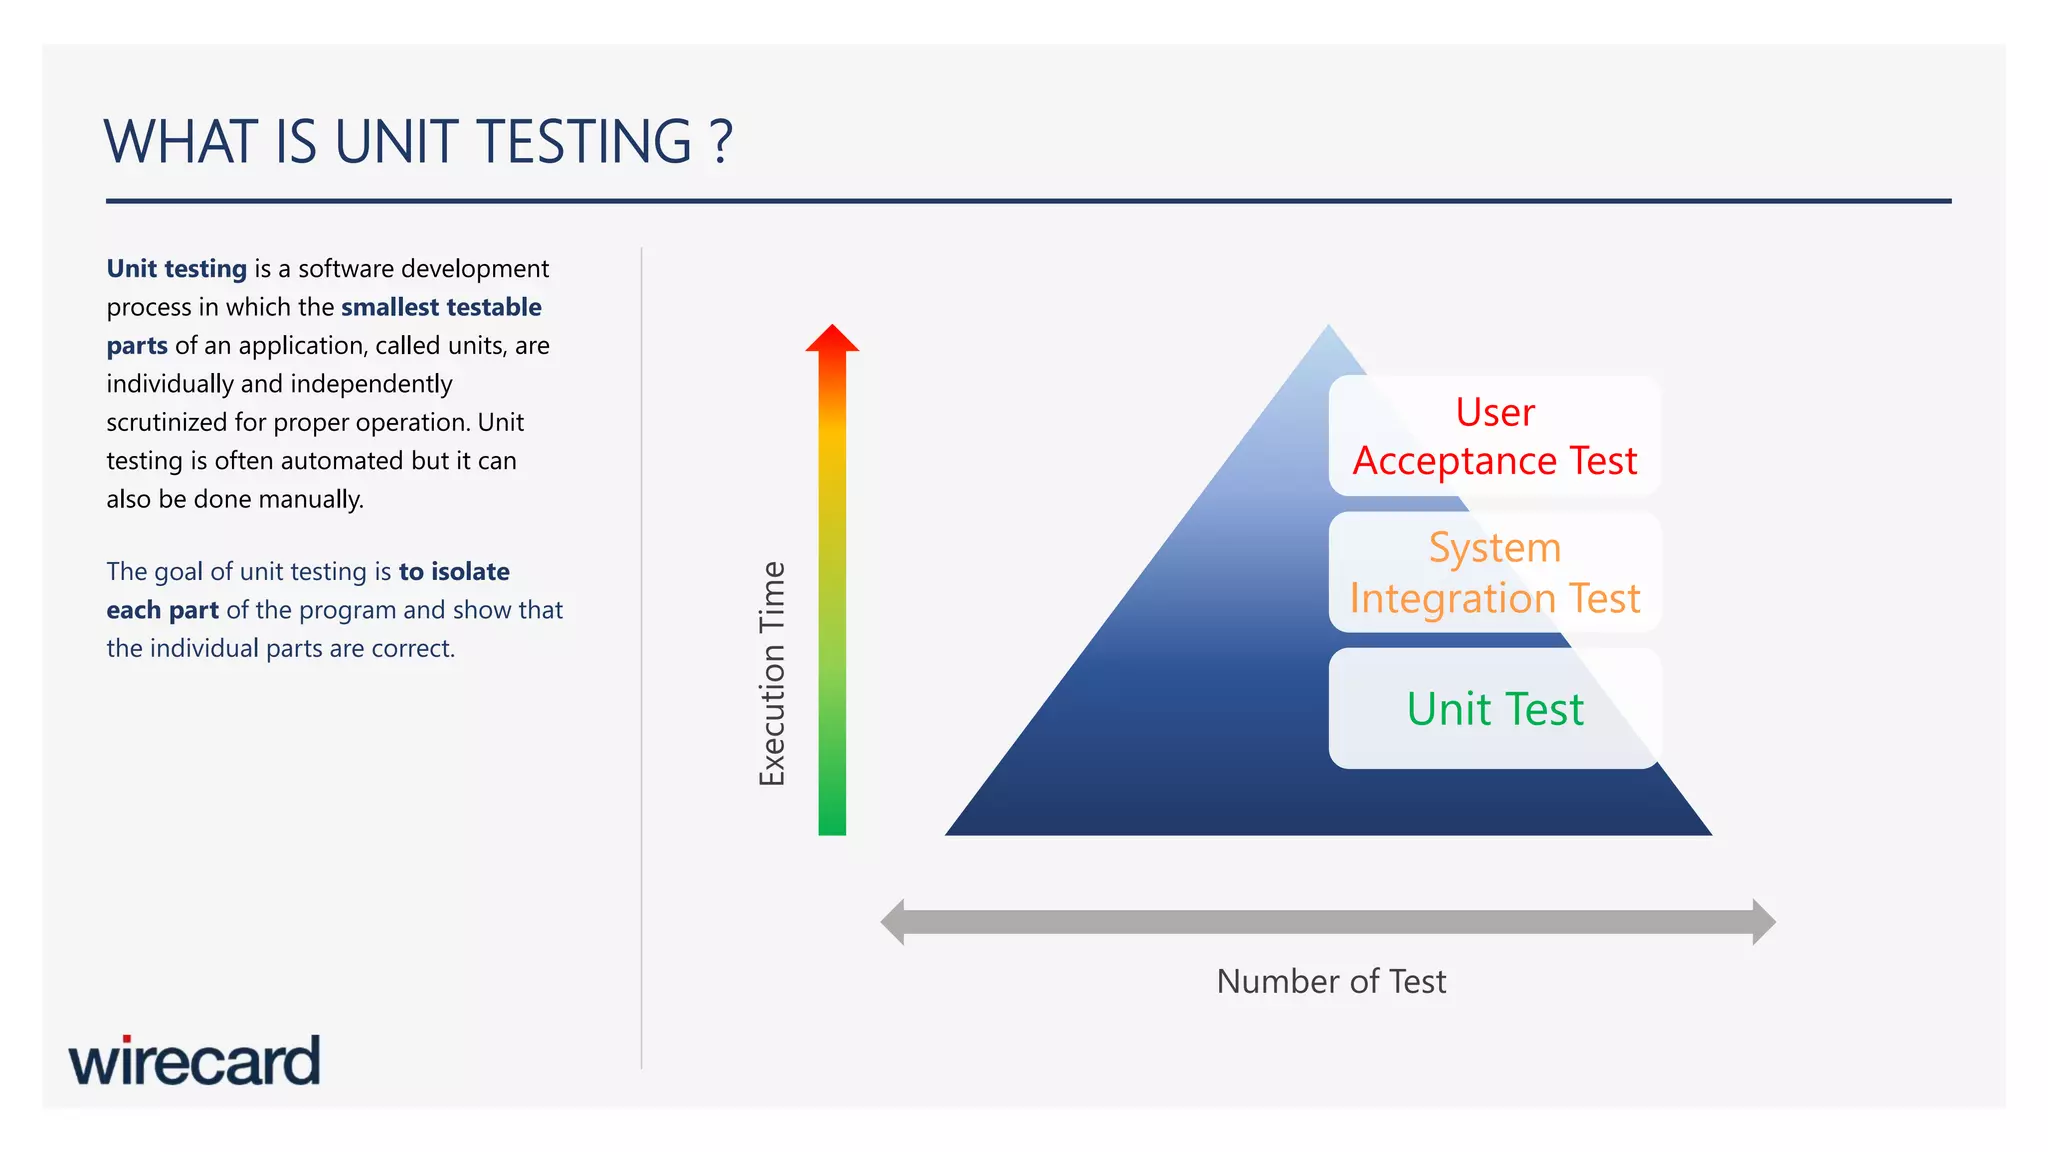
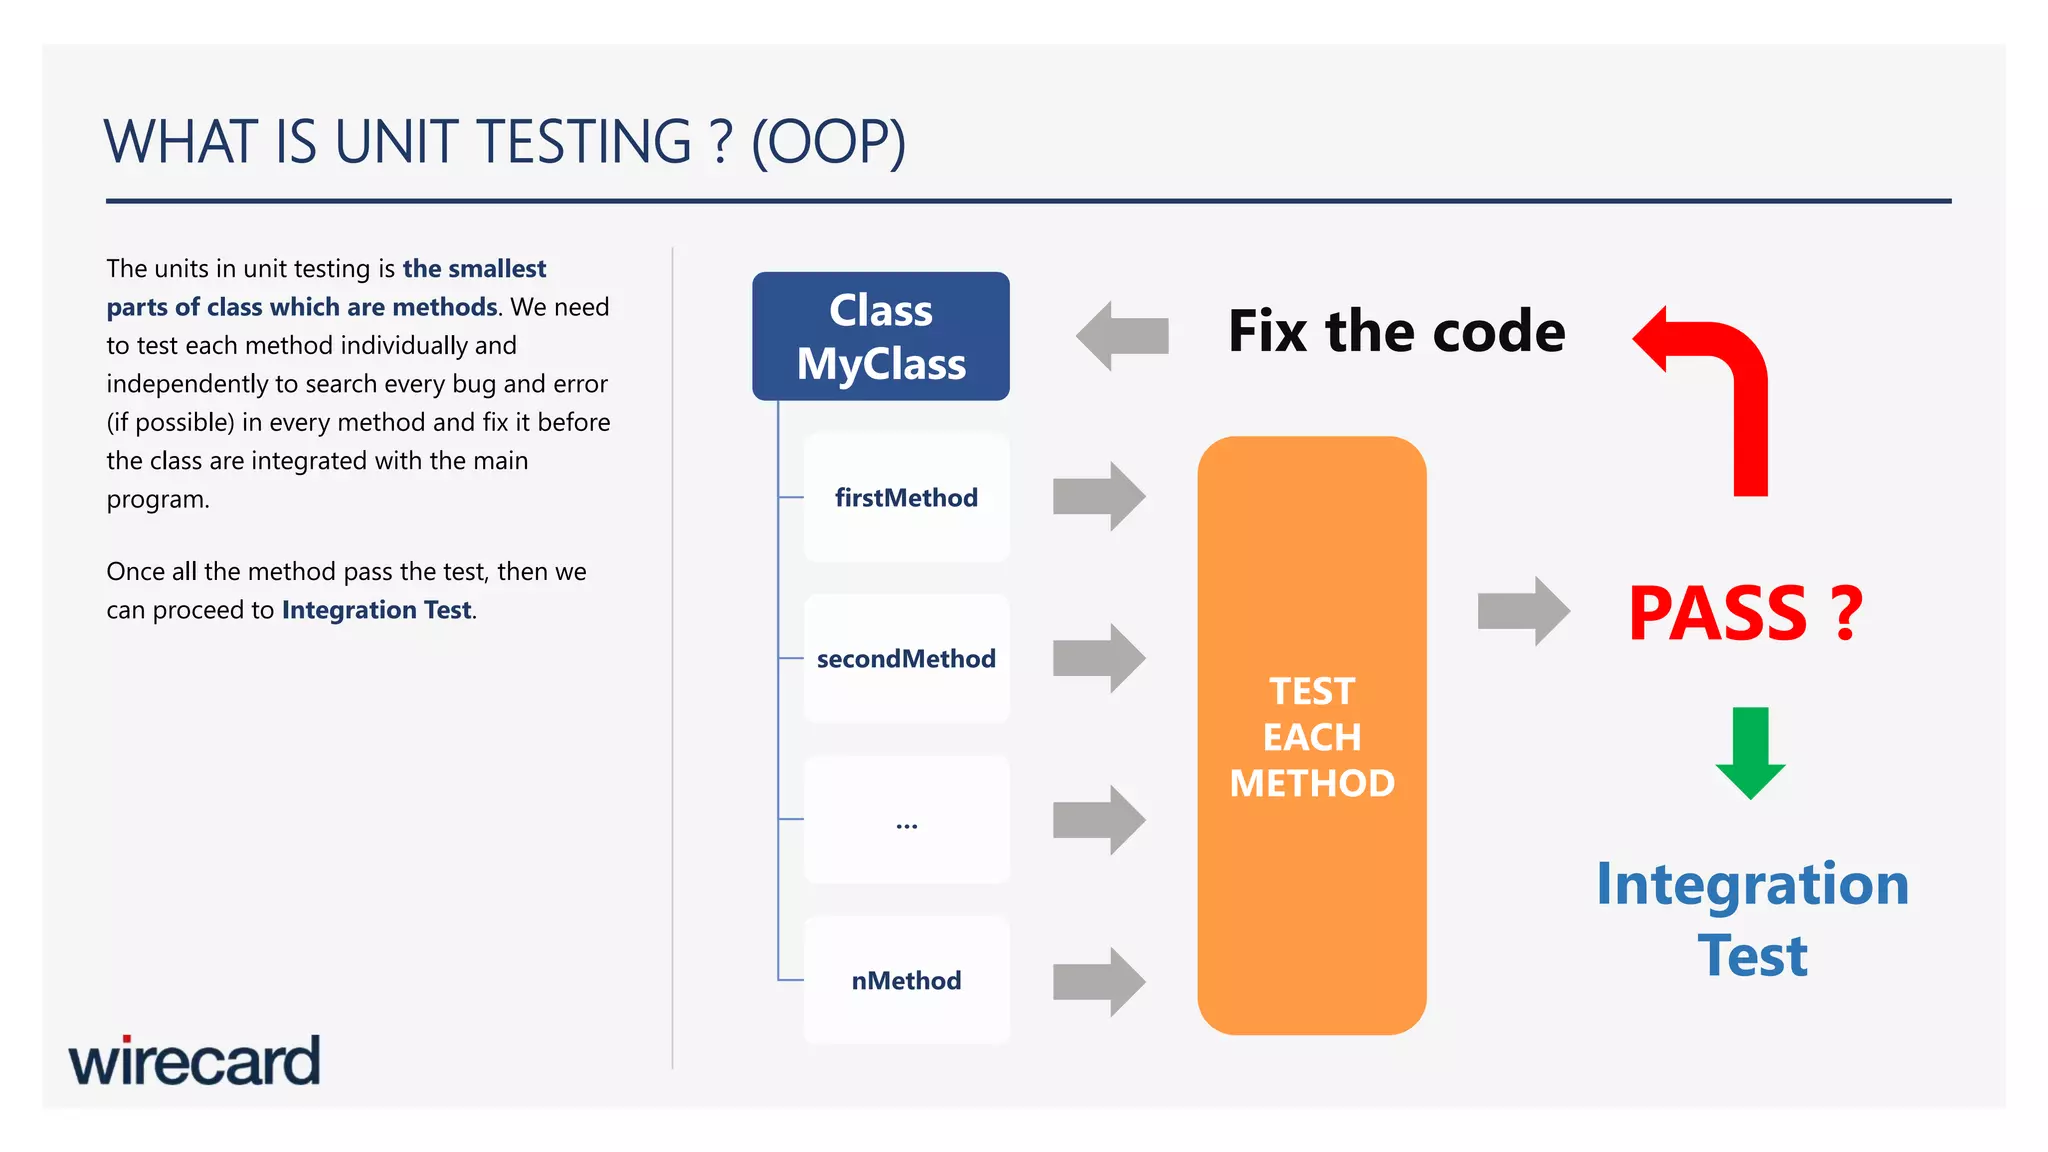
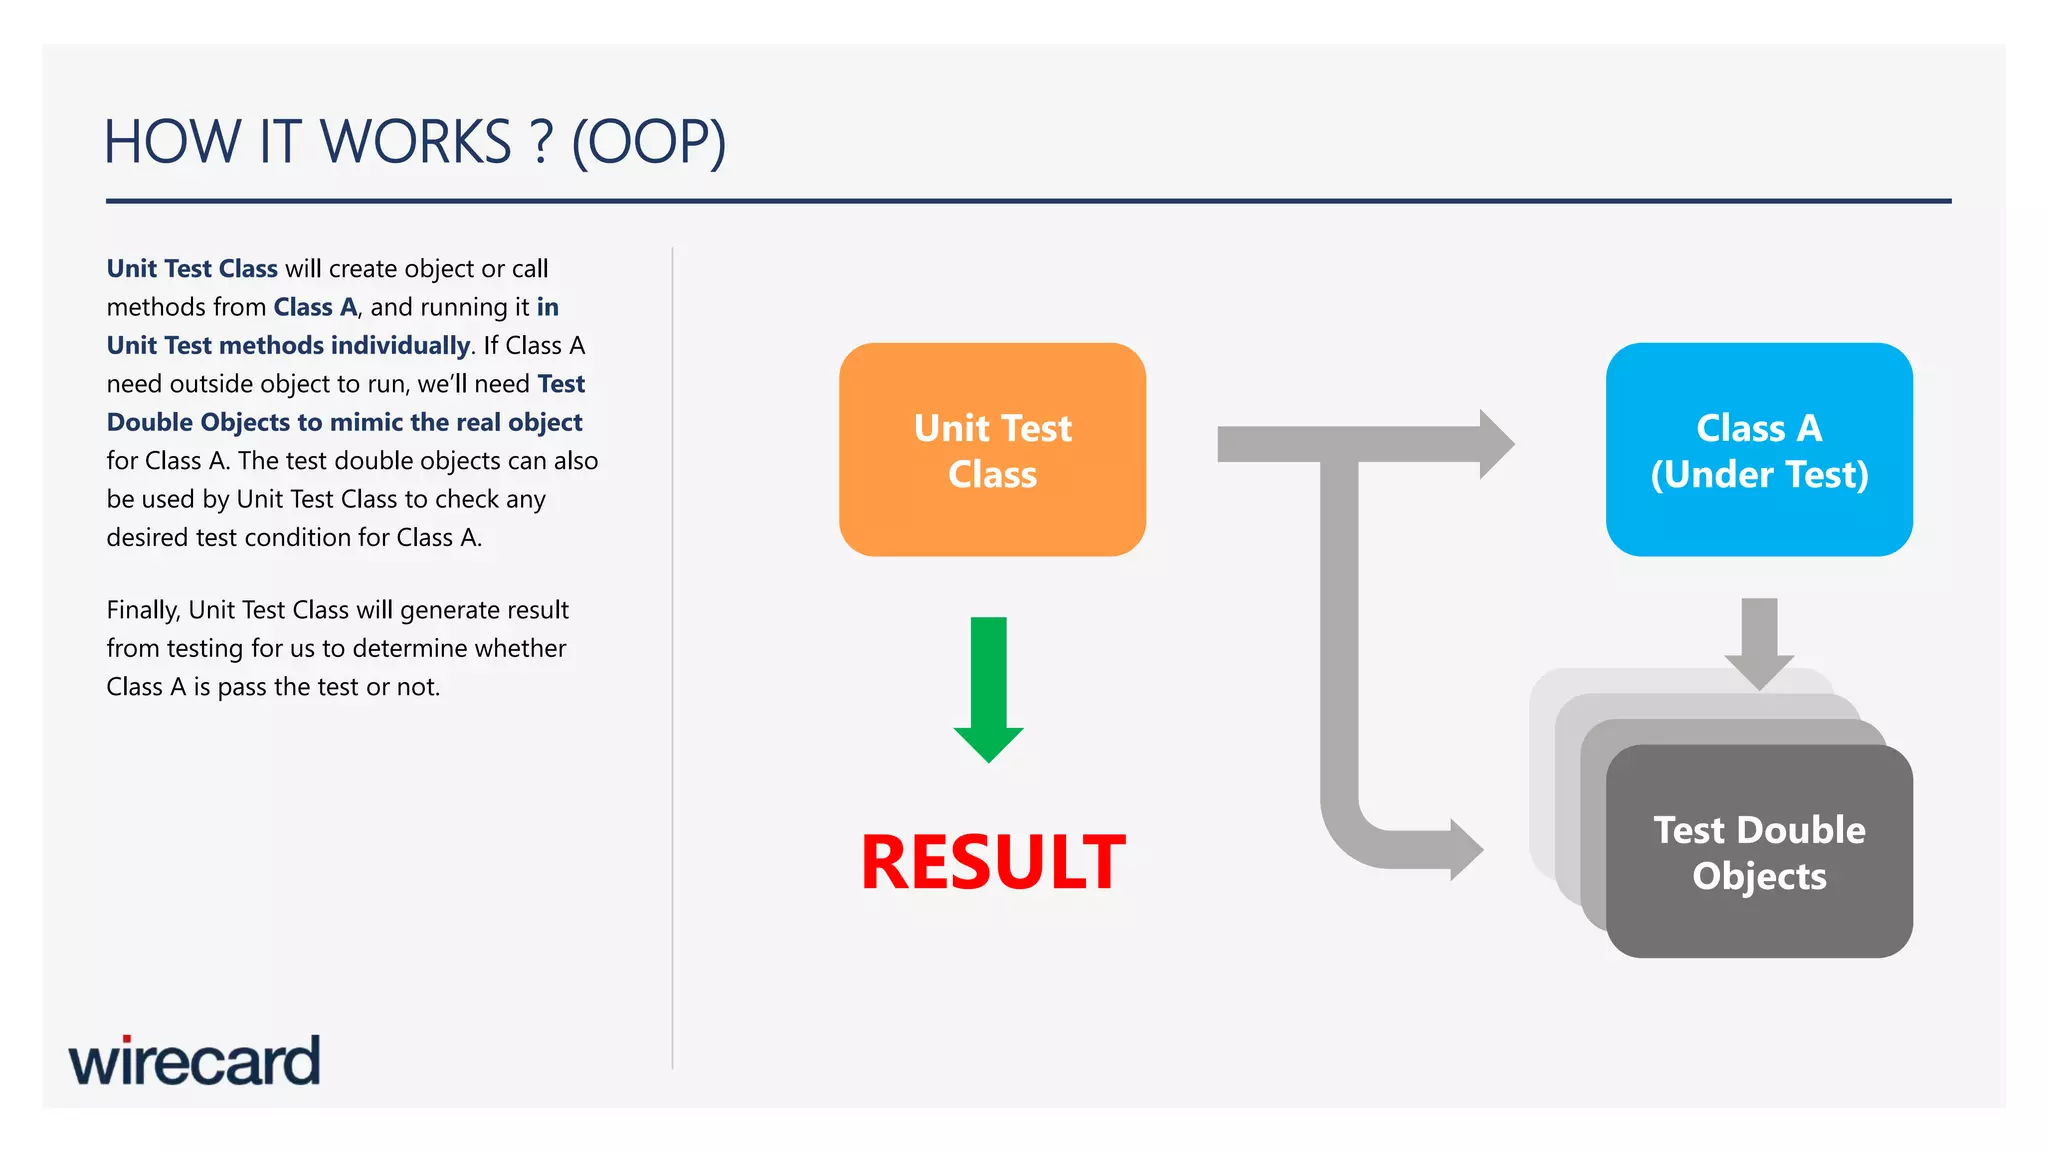
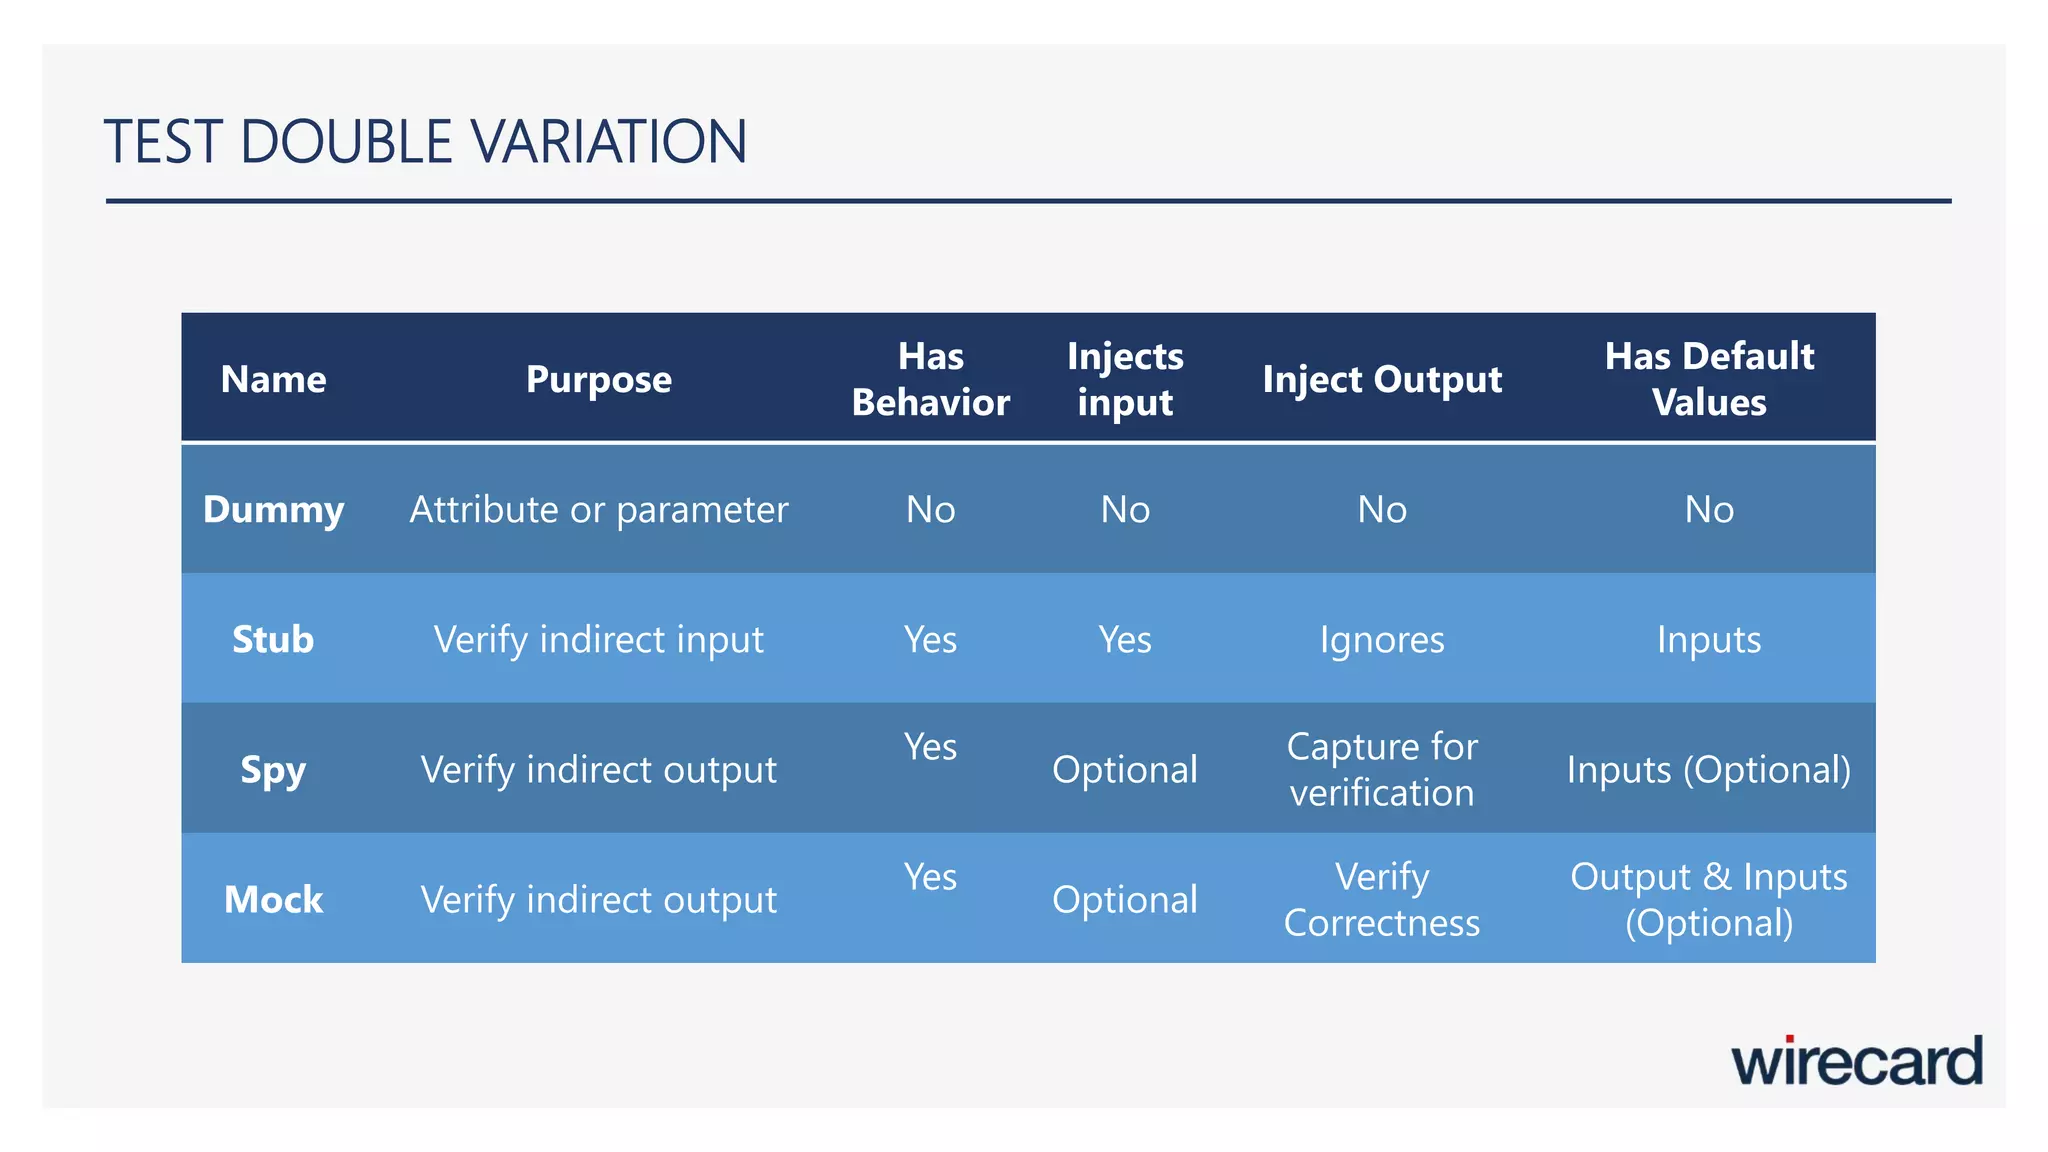
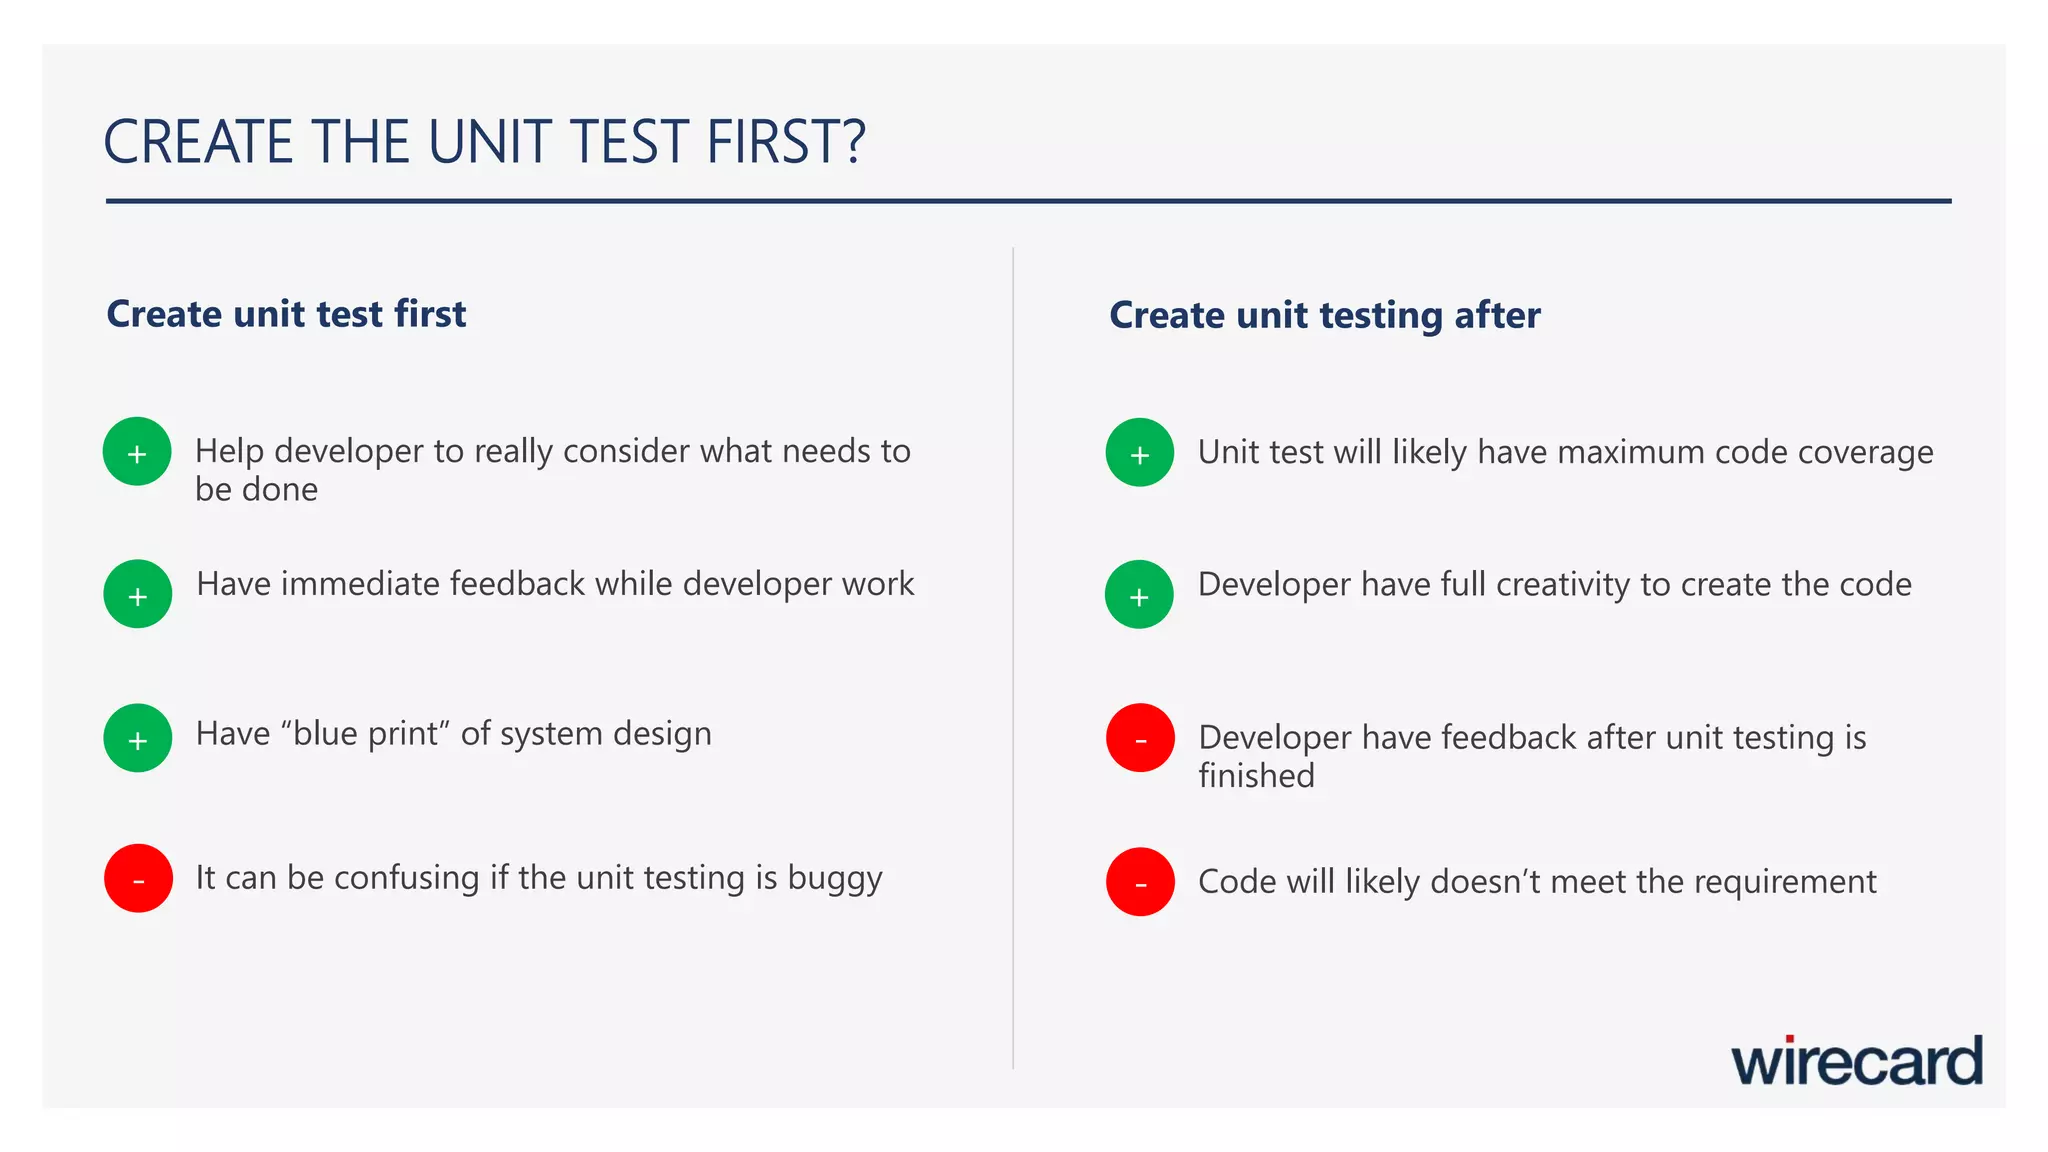
The document outlines a presentation on unit testing, specifically focusing on JUnit, Mockito, and SonarQube. It covers concepts like software testing, black-box and white-box testing methods, and emphasizes the importance of unit testing in ensuring program functionality and isolating issues. Additionally, it provides examples and installation instructions for JUnit and Mockito, as well as the use of SonarQube for code quality management.


