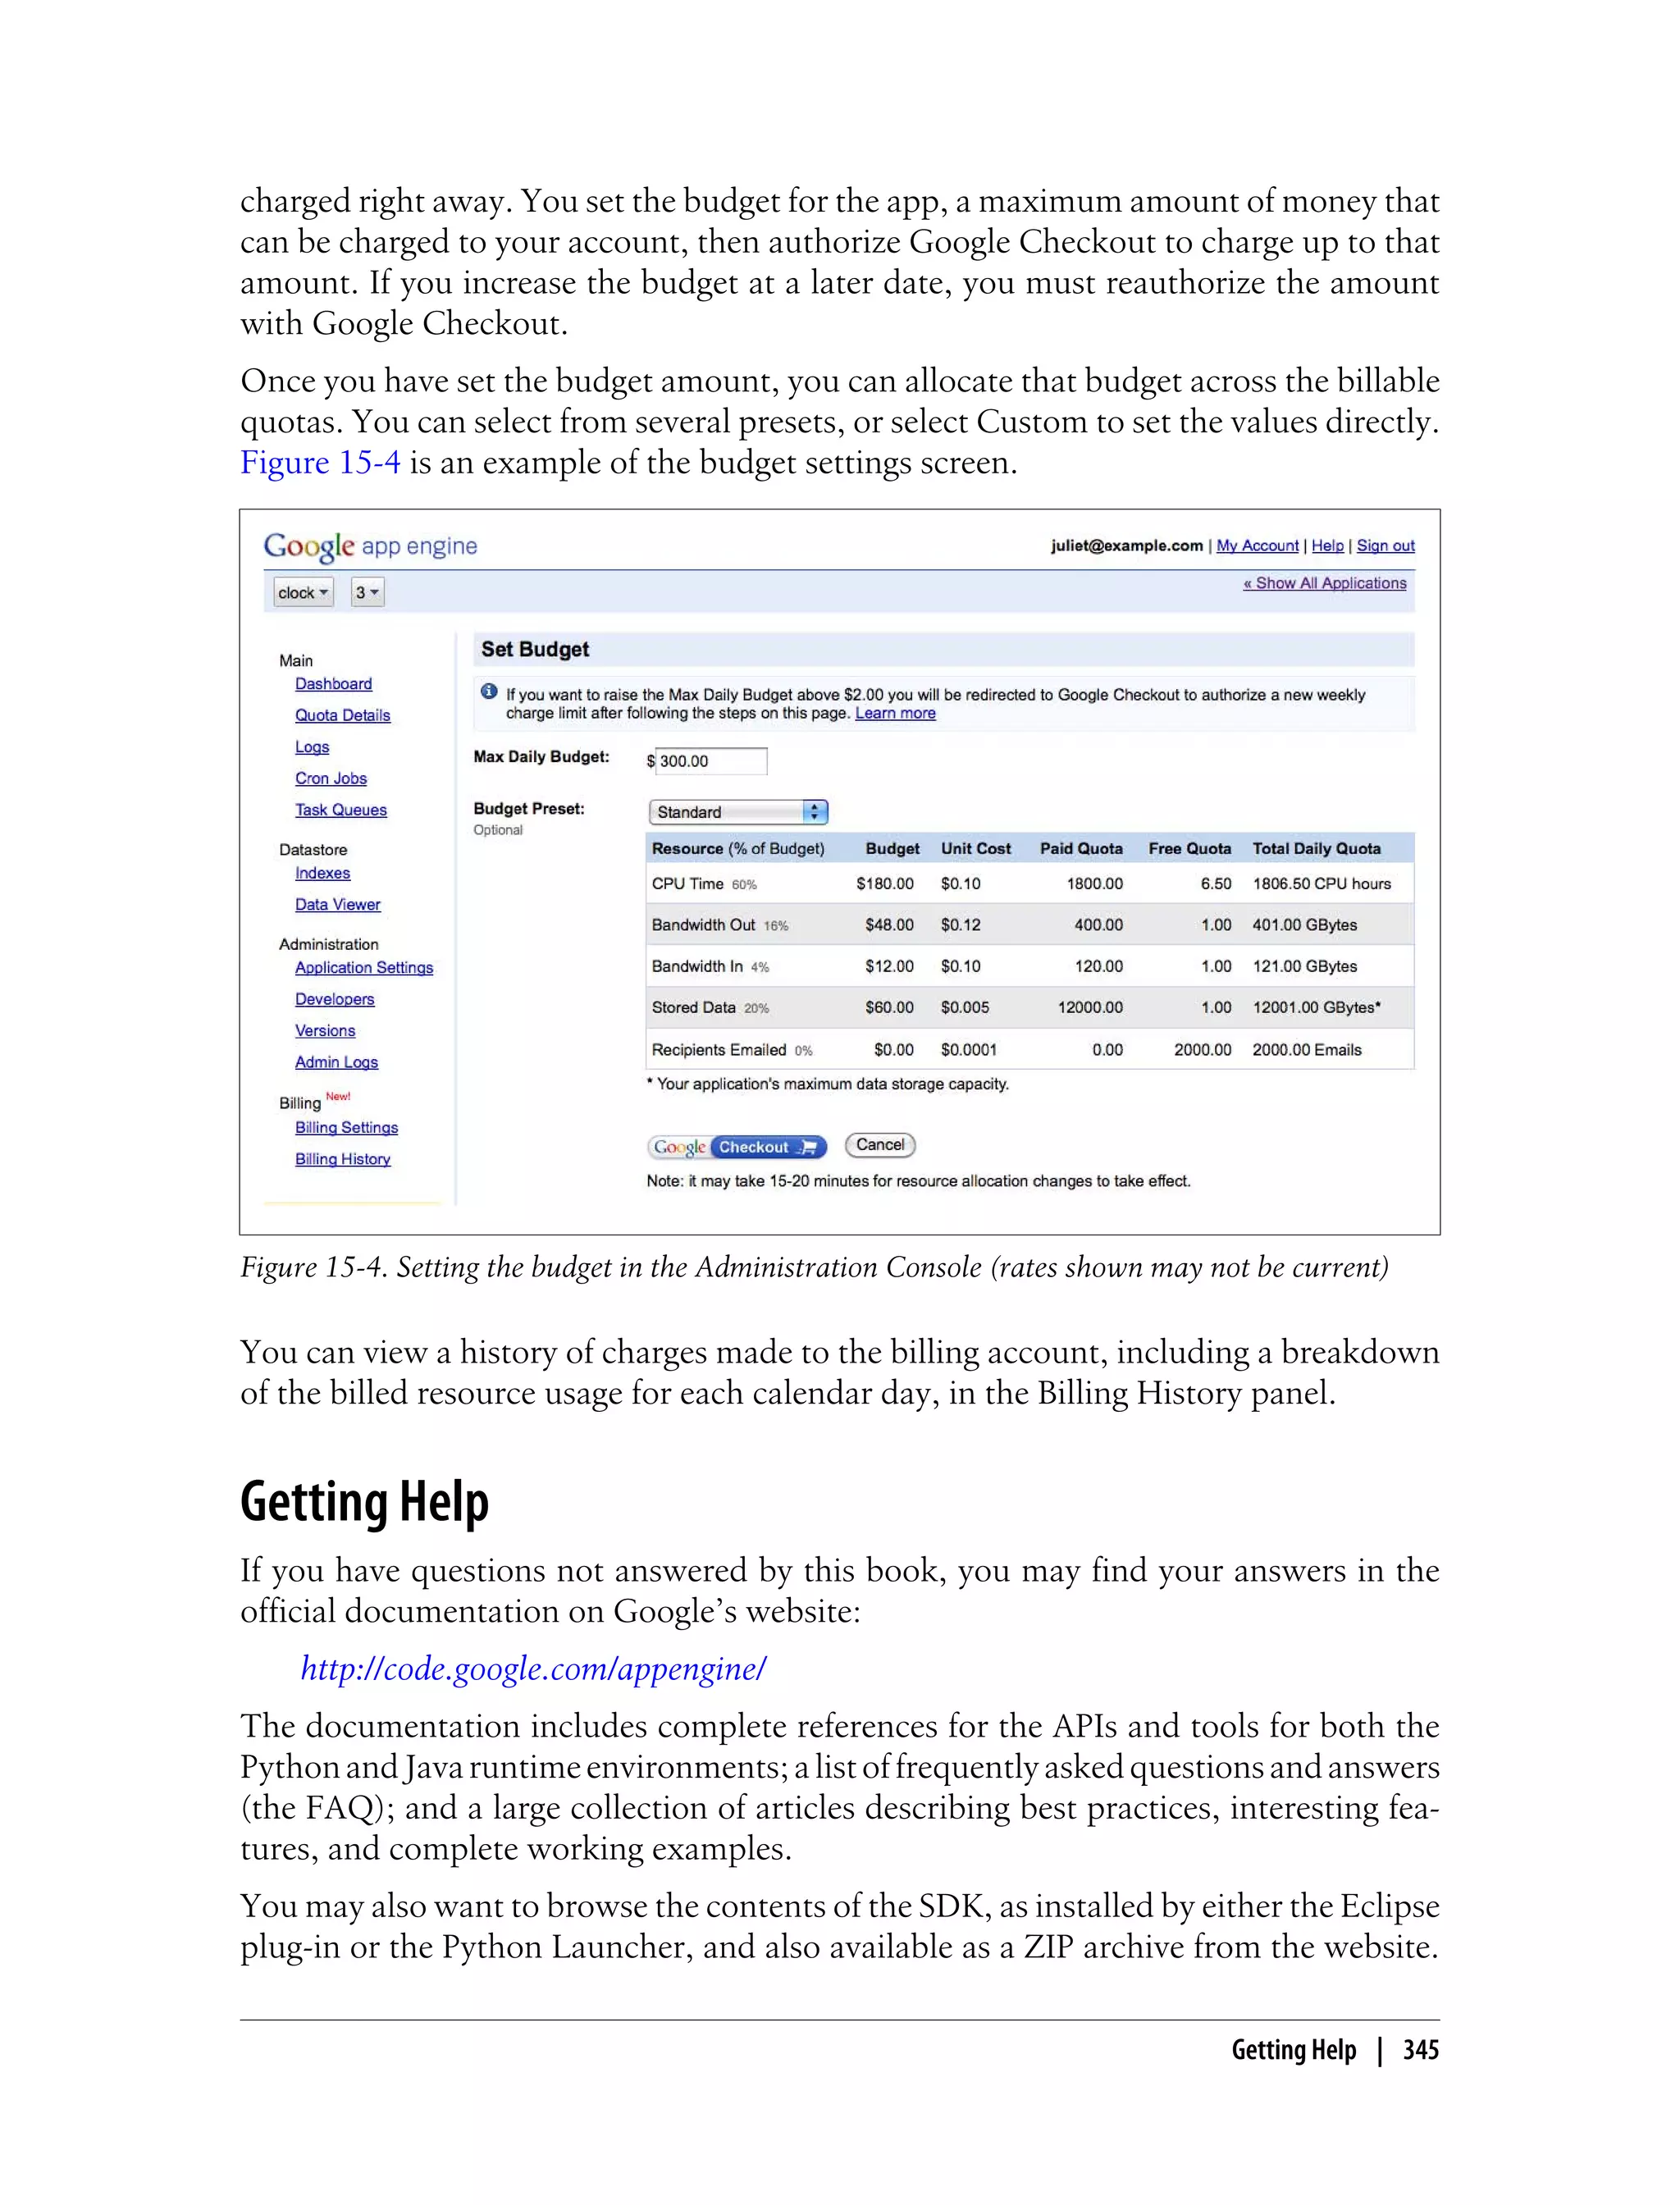
This document provides an overview and introduction to programming Google App Engine. It discusses the runtime environment, data storage via the datastore, available services, task queues, and developer tools. It is intended to help developers get started with building applications on App Engine and includes information about setting up development environments, developing apps, and registering applications.

![Programming Google App Engine
by Dan Sanderson
Copyright © 2010 Dan Sanderson. All rights reserved.
Printed in the United States of America.
Published by O’Reilly Media, Inc., 1005 Gravenstein Highway North, Sebastopol, CA 95472.
O’Reilly books may be purchased for educational, business, or sales promotional use. Online editions
are also available for most titles (http://my.safaribooksonline.com). For more information, contact our
corporate/institutional sales department: (800) 998-9938 or corporate@oreilly.com.
Editor: Mike Loukides Indexer: Ellen Troutman Zaig
Production Editor: Sumita Mukherji Cover Designer: Karen Montgomery
Proofreader: Sada Preisch Interior Designer: David Futato
Illustrator: Robert Romano
Printing History:
November 2009: First Edition.
Nutshell Handbook, the Nutshell Handbook logo, and the O’Reilly logo are registered trademarks of
O’Reilly Media, Inc. Programming Google App Engine, the image of a waterbuck, and related trade dress
are trademarks of O’Reilly Media, Inc.
Many of the designations used by manufacturers and sellers to distinguish their products are claimed as
trademarks. Where those designations appear in this book, and O’Reilly Media, Inc., was aware of a
trademark claim, the designations have been printed in caps or initial caps.
While every precaution has been taken in the preparation of this book, the publisher and author assume
no responsibility for errors or omissions, or for damages resulting from the use of the information con-
tained herein.
TM
This book uses RepKover™, a durable and flexible lay-flat binding.
ISBN: 978-0-596-52272-8
[M]
1257864694](https://image.slidesharecdn.com/programminggoogleappengine-100608200404-phpapp01/85/Programming-google-app-engine-5-320.jpg)


![Let’s upgrade the clock app to use the webapp framework. Replace the contents of
main.py with the version shown in Example 2-3. Reload the page in your browser to
see the new version in action. (You won’t notice a difference other than an updated
time. This example is equivalent to the previous version.)
Example 2-3. A simple request handler using the webapp framework
from google.appengine.ext import webapp
from google.appengine.ext.webapp.util import run_wsgi_app
import datetime
class MainPage(webapp.RequestHandler):
def get(self):
time = datetime.datetime.now()
self.response.headers['Content-Type'] = 'text/html'
self.response.out.write('<p>The time is: %s</p>' % str(time))
application = webapp.WSGIApplication([('/', MainPage)],
debug=True)
def main():
run_wsgi_app(application)
if __name__ == '__main__':
main()
Example 2-3 imports the module google.appengine.ext.webapp, then defines a request
handler class called MainPage, a subclass of webapp.RequestHandler. The class defines
methods for each HTTP method supported by the handler, in this case one method for
HTTP GET called get(). When the application handles a request, it instantiates the
handler class, sets self.request and self.response to values the handler method can
access and modify, then calls the appropriate handler method, in this case get(). When
the handler method exits, the application uses the value of self.response as the HTTP
response.
The application itself is represented by an instance of the class
webapp.WSGIApplication. The instance is initialized with a list of mappings of URLs to
handler classes. The debug parameter tells the application to print error messages to the
browser window when a handler returns an exception if the application is running
under the development web server. webapp detects whether it is running under the
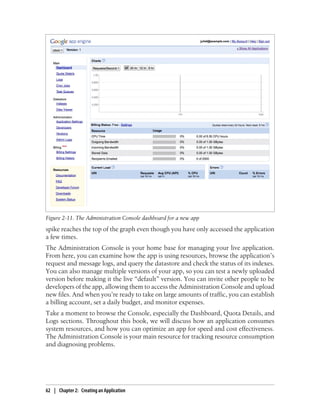
development server or running as a live App Engine application, and will not print
errors to the browser when running live even if debug is True. You can set it to False to
have the development server emulate the live server when errors occur.
The script defines a main() function that runs the application using a utility method.
Lastly, the script calls main() using the Python idiom of if __name__ ==
'__main__': ..., a condition that is always true when the script is run by the web server.
This idiom allows you to import the script as a module for other code, including the
classes and functions defined in the script, without running the main() routine.
Developing the Application | 29](https://image.slidesharecdn.com/programminggoogleappengine-100608200404-phpapp01/85/Programming-google-app-engine-50-320.jpg)
![Defining a main() function this way allows App Engine to cache the
compiled handler script, making subsequent requests faster to execute.
For more information on app caching, see Chapter 3.
A single WSGIApplication instance can handle multiple URLs, routing the request to
different RequestHandler classes based on the URL pattern. But we’ve already seen that
the app.yaml file maps URL patterns to handler scripts. So which URL patterns should
appear in app.yaml, and which should appear in the WSGIApplication? Many web
frameworks include their own URL dispatcher logic, and it’s common to route all dy-
namic URLs to the framework’s dispatcher in app.yaml. With webapp, the answer
mostly depends on how you’d like to organize your code. For the clock application, we
will create a second request handler as a separate script to take advantage of a feature
of app.yaml for user authentication, but we could also put this logic in main.py and
route the URL with the WSGIApplication object.
Users and Google Accounts
So far, our clock shows the same display for every user. To allow each user to customize
the display and save her preferences for future sessions, we need a way to identify the
user making a request. An easy way to do this is with Google Accounts.
Let’s add something to the page that indicates whether the user is signed in, and pro-
vides links for signing in and signing out of the application. Edit main.py to resemble
Example 2-4.
Example 2-4. A version of main.py that displays Google Accounts information and links
from google.appengine.api import users
from google.appengine.ext import webapp
from google.appengine.ext.webapp.util import run_wsgi_app
import datetime
class MainPage(webapp.RequestHandler):
def get(self):
time = datetime.datetime.now()
user = users.get_current_user()
if not user:
navbar = ('<p>Welcome! <a href="%s">Sign in or register</a> to customize.</p>'
% (users.create_login_url(self.request.path)))
else:
navbar = ('<p>Welcome, %s! You can <a href="%s">sign out</a>.</p>'
% (user.email(), users.create_logout_url(self.request.path)))
self.response.headers['Content-Type'] = 'text/html'
self.response.out.write('''
<html>
<head>
<title>The Time Is...</title>
</head>
30 | Chapter 2: Creating an Application](https://image.slidesharecdn.com/programminggoogleappengine-100608200404-phpapp01/85/Programming-google-app-engine-51-320.jpg)
![<body>
%s
<p>The time is: %s</p>
</body>
</html>
''' % (navbar, str(time)))
application = webapp.WSGIApplication([('/', MainPage)],
debug=True)
def main():
run_wsgi_app(application)
if __name__ == '__main__':
main()
In a real application, you would use a templating system for the output, separating the
HTML and display logic from the application code. While many web application
frameworks include a templating system, webapp does not. Since the clock app only
has one page, we’ll put the HTML in the handler code, using Python string formatting
to keep things organized.
The Python runtime environment includes a version of Django, whose
templating system can be used with webapp. When Google released
version 1 of the Python runtime environment, the latest version of
Django was 0.96, so this is what the runtime includes. For more infor-
mation on using Django templates with webapp, see the App Engine
documentation.
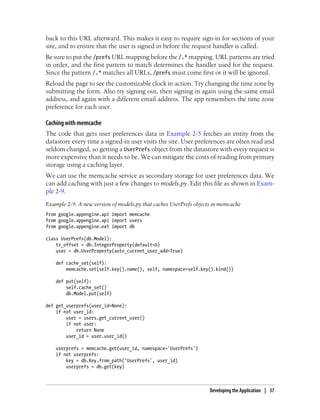
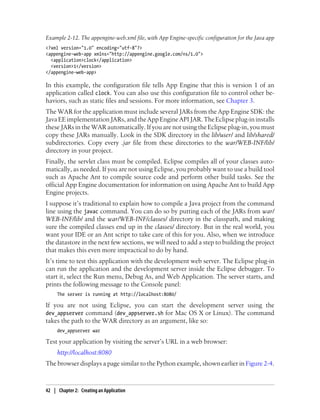
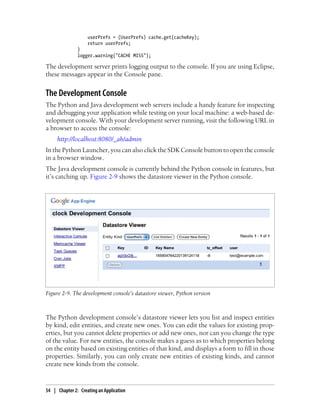
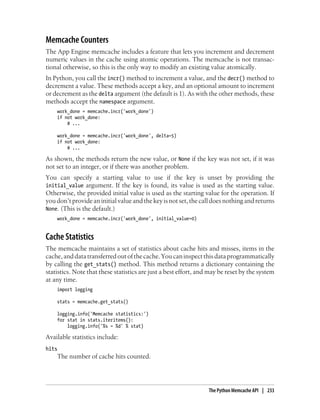
Reload the page in your browser. The new page resembles Figure 2-5.
Figure 2-5. The clock app with a link to Google Accounts when the user is not signed in
Developing the Application | 31](https://image.slidesharecdn.com/programminggoogleappengine-100608200404-phpapp01/85/Programming-google-app-engine-52-320.jpg)
![if not user:
navbar = ('<p>Welcome! <a href="%s">Sign in or register</a> to customize.</p>'
% (users.create_login_url(self.request.path)))
tz_form = ''
else:
userprefs = models.get_userprefs()
navbar = ('<p>Welcome, %s! You can <a href="%s">sign out</a>.</p>'
% (user.nickname(), users.create_logout_url(self.request.path)))
tz_form = '''
<form action="/prefs" method="post">
<label for="tz_offset">
Timezone offset from UTC (can be negative):
</label>
<input name="tz_offset" id="tz_offset" type="text"
size="4" value="%d" />
<input type="submit" value="Set" />
</form>
''' % userprefs.tz_offset
time += datetime.timedelta(0, 0, 0, 0, 0, userprefs.tz_offset)
self.response.headers['Content-Type'] = 'text/html'
self.response.out.write('''
<html>
<head>
<title>The Time Is...</title>
</head>
<body>
%s
<p>The time is: %s</p>
%s
</body>
</html>
''' % (navbar, str(time), tz_form))
application = webapp.WSGIApplication([('/', MainPage)],
debug=True)
def main():
run_wsgi_app(application)
if __name__ == '__main__':
main()
To enable the preferences form, we need a request handler to parse the form data and
update the datastore. Let’s implement this as a new request handler script. Create a file
named prefs.py with the contents shown in Example 2-7.
Example 2-7. A new handler script, prefs.py, for the preferences form
from google.appengine.ext import webapp
from google.appengine.ext.webapp.util import run_wsgi_app
import models
class PrefsPage(webapp.RequestHandler):
def post(self):
Developing the Application | 35](https://image.slidesharecdn.com/programminggoogleappengine-100608200404-phpapp01/85/Programming-google-app-engine-56-320.jpg)
![userprefs = models.get_userprefs()
try:
tz_offset = int(self.request.get('tz_offset'))
userprefs.tz_offset = tz_offset
userprefs.put()
except ValueError:
# User entered a value that wasn't an integer. Ignore for now.
pass
self.redirect('/')
application = webapp.WSGIApplication([('/prefs', PrefsPage)],
debug=True)
def main():
run_wsgi_app(application)
if __name__ == '__main__':
main()
This request handler handles HTTP POST requests to the URL /prefs, which is the
URL (“action”) and HTTP method used by the form. The handler calls the
get_userprefs() function from models.py to get the UserPrefs object for the current
user, which is either a new unsaved object with default values, or the object for an
existing entity. The handler parses the tz_offset parameter from the form data as an
integer, sets the property of the UserPrefs object, then saves the object to the datastore
by calling its put() method. The put() method creates the object if it doesn’t exist, or
updates the existing object.
If the user enters a noninteger in the form field, we don’t do anything. It’d be appro-
priate to return an error message, but we’ll leave this as is to keep the example simple.
Finally, edit app.yaml to map the handler script to the URL /prefs in the handlers:
section, as shown in Example 2-8.
Example 2-8. A new version of app.yaml mapping the URL /prefs, with login required
application: clock
version: 1
runtime: python
api_version: 1
handlers:
- url: /prefs
script: prefs.py
login: required
- url: /.*
script: main.py
The login: required line says that the user must be signed in to Google Accounts to
access the /prefs URL. If the user accesses the URL while not signed in, App Engine
automatically directs the user to the Google Accounts sign-in page, then redirects her
36 | Chapter 2: Creating an Application](https://image.slidesharecdn.com/programminggoogleappengine-100608200404-phpapp01/85/Programming-google-app-engine-57-320.jpg)


![class MainHandler(webapp.RequestHandler):
def get(self):
host = self.request.headers['Host']
self.response.out.write('Host: %s' % host)
App IDs and Versions
Every App Engine application has an application ID that uniquely distinguishes the
app from all other applications. As described in Chapter 2, you can register an ID for
a new application using the Administration Console. Once you have an ID, you add it
to the app’s configuration so the developer tools know that the files in the app root
directory belong to the app with that ID.
The app’s configuration also includes a version identifier. Like the app ID, the version
identifier is associated with the app’s files when the app is uploaded. App Engine retains
one set of files and frontend configuration for each distinct version identifier used dur-
ing an upload. If you do not change the app version in the configuration when you
upload, the existing files for that version of the app are replaced.
Each distinct version of the app is accessible at its own domain name, of the following
form:
version-id.latest.app-id.appspot.com
When you have multiple versions of an app uploaded to App Engine, you can use the
Administration Console to select which version is the one you want the public to access.
The Console calls this the “default” version. When a user visits your Google Apps
domain (and configured subdomain), or the appspot.com domain without the version
ID, he sees the default version.
The appspot.com domain containing the version ID supports an additional domain part,
just like the default appspot.com domain:
anything.version-id.latest.app-id.appspot.com
Unless you explicitly prevent it, anyone who knows your application ID
and version identifiers can access any uploaded version of your appli-
cation using the appspot.com URLs. You can restrict access to nondefault
versions of the application using code that checks the domain of the
request and only allows authorized users to access the versioned do-
mains. You can’t restrict access to static files this way.
Another way to restrict access to nondefault versions is to use Google
Accounts authorization, described later in this chapter. You can restrict
access to app administrators while a version is in development, then
replace the configuration to remove the restriction just before making
that version the default version.
70 | Chapter 3: Handling Web Requests](https://image.slidesharecdn.com/programminggoogleappengine-100608200404-phpapp01/85/Programming-google-app-engine-91-320.jpg)


![If you’d like browsers to reload a static file resource automatically every
time you launch a new major version of the app, you can use the mul-
tiversion URL handler just discussed, then use the CURRENT_VERSION_ID
environment variable as the “version” in the static file URLs:
self.response.out('<script src="/js/' +
os.environ['CURRENT_VERSION_ID'] +
'/code.js" />')
Static files in Java
As we saw earlier, the WAR directory structure for a Java web application keeps all
application code, JARs, and configuration in a subdirectory named WEB-INF/. Typi-
cally, files outside of WEB-INF/ represent resources that the user can access directly,
including static files and JSPs. The URL paths to these resources are equivalent to the
paths to these files within the WAR.
Say an app’s WAR has the following files:
main.jsp
forum/home.jsp
images/logo.png
images/cancelbutton.png
images/okbutton.png
terms.html
WEB-INF/classes/com/example/Forum.class
WEB-INF/classes/com/example/MainServlet.class
WEB-INF/classes/com/example/Message.class
WEB-INF/classes/com/example/UserPrefs.class
WEB-INF/lib/appengine-api.jar
This app has four static files: three PNG images and an HTML file named terms.html.
When the app is uploaded, these four files are pushed to the static file servers. The
frontends know to route requests for URL paths equivalent to these file paths (such
as /images/logo.png) to the static file servers.
The two .jsp files are assumed to be JSPs, and are compiled to servlet classes and
mapped to the URL paths equivalent to their file paths. Since these are application
code, they are handled by the application servers. The JSP source files themselves are
not pushed to the static file servers.
By default, all files in the WAR are pushed to the application servers, and are accessible
by the application code via the filesystem. This includes the files that are identified as
static files and pushed to the static file servers. In other words, all files are considered
resource files, and all files except for JSPs and the WEB-INF/ directory are considered
static files.
Configuring the Frontend | 79](https://image.slidesharecdn.com/programminggoogleappengine-100608200404-phpapp01/85/Programming-google-app-engine-100-320.jpg)


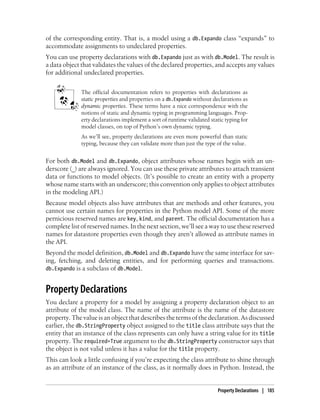
![In practice, neither method of importing offers much advantage. Late importing may
actually be slower if the import is inside a loop or frequent code path, since importing
an already-imported module takes some time, even if it doesn’t load files or evaluate
module code. It’s best to import modules in the way that makes the most sense for code
clarity, typically at the top of each module (source file) that uses the module. Once
you’ve developed your app, if you notice you have a significant slowdown during im-
ports of the first request, you could consider importing selected modules in their code
paths if you can demonstrate that doing so would skip a lot of unneeded code in a
significant number of cases.
App Engine includes a feature similar to import caching to achieve similar savings for
the handler scripts themselves. In general, when the app server invokes a handler script,
it evaluates all of the script’s code, regardless of whether the script has been invoked
by the app instance in the past. But if the script defines a function named main() that
takes no arguments (or arguments with default values), App Engine treats the handler
script like a module. The first invocation evaluates the complete script as usual, but for
all subsequent invocations, App Engine just calls the main() function.
Consider an early version of the clock application we built in Chapter 2, repeated here
as Example 3-4. This handler script imports three modules, defines three global ele-
ments (a class, a global variable, and the main() function), then calls the main() function.
Example 3-4. A simple request handler illustrating the use of app caching
from google.appengine.ext import webapp
from google.appengine.ext.webapp.util import run_wsgi_app
import datetime
class MainPage(webapp.RequestHandler):
def get(self):
time = datetime.datetime.now()
self.response.headers['Content-Type'] = 'text/html'
self.response.out.write('<p>The time is: %s</p>' % str(time))
application = webapp.WSGIApplication([('/', MainPage)],
debug=True)
def main():
run_wsgi_app(application)
if __name__ == '__main__':
main()
The first time an app instance invokes this script, the full script is evaluated, thereby
importing the modules and defining the global elements in the script’s namespace
within the app instance. Evaluating the script also calls the main() function.
How the App Is Run | 91](https://image.slidesharecdn.com/programminggoogleappengine-100608200404-phpapp01/85/Programming-google-app-engine-112-320.jpg)


![A property with the null value is not the same as an unset property. Consider the fol-
lowing Python code:
class Entity(db.Expando):
pass
a = Entity()
a.prop1 = 'abc'
a.prop2 = None
a.put()
b = Entity()
b.prop1 = 'def'
b.put()
This creates two entities of the kind Entity. Both entities have a property named
prop1. The first entity has a property named prop2; the second does not.
Of course, an unset property can be set later:
b.prop2 = 123
b.put()
# b now has a property named "prop2."
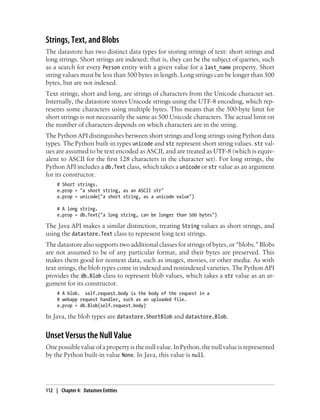
Similarly, a set property can be made unset. In the Python API, you delete the property
by deleting the attribute from the object, using the del keyword:
del b.prop2
b.put()
# b no longer has a property named "prop2."
In Java, the low-level datastore API’s Entity class has methods to set properties
(setProperty()) and unset properties (removeProperty()).
Multivalued Properties
As we mentioned earlier, a property can have multiple values. We’ll discuss the more
substantial aspects of multivalued properties when we talk about queries and data
modeling. But for now, it’s worth a brief mention.
A property can have one or more values. A property cannot have zero values; a property
without a value is simply unset. Each value for a property can be of a different type,
and can be the null value.
The datastore preserves the order of values as they are assigned. The Python API returns
the values in the same order as they were set.
In Python, a property with multiple values is represented as a single Python list value:
e.prop = [1, 2, 'a', None, 'b']
Property Values | 113](https://image.slidesharecdn.com/programminggoogleappengine-100608200404-phpapp01/85/Programming-google-app-engine-134-320.jpg)
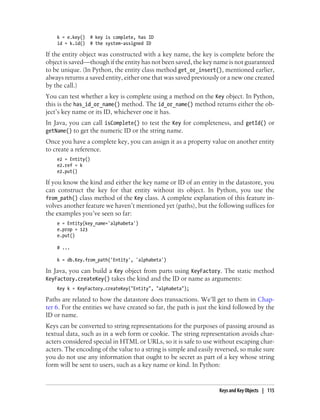
![Because a property must have at least one value, it is an error to assign
an empty list ([] in Python) to a property on an entity whose Python
class is based on the Expando class.
class Entity(db.Expando):
pass
e = Entity()
e.prop = [] # ERROR
In contrast, the Model base class includes a feature that automatically
translates between the empty list value and “no property set.” You’ll see
this feature in Chapter 7.
In the Java low-level datastore API, you can store multiple values for a property using
a Collection type. The low-level API returns the values as a java.util.List. The items
are stored in the order provided by the Collection type’s iterator. For many types, such
as SortedSet or TreeSet, this order is deterministic. For others, such as HashSet, it is
not. If the app needs the original data structure, it must convert the List returned by
the datastore to the appropriate type.
Keys and Key Objects
The key for an entity is a value that can be retrieved, passed around, and stored like
any other value. If you have the key for an entity, you can retrieve the entity from the
datastore quickly, much more quickly than with a datastore query. Keys can be stored
as property values, as an easy way for one entity to refer to another.
The Python API represents an entity key value as an instance of the Key class, in
the db package. To get the key for an entity, you call the entity object’s key() method.
The Key instance provides access to its several parts using accessor methods, including
the kind, key name (if any), and system-assigned ID (if the entity does not have a key
name).
The Java low-level API is similar: the getKey() method of the Entity class returns an
instance of the Key class.
When you construct a new entity object and do not provide a key name, the entity
object has a key, but the key does not yet have an ID. The ID is populated when the
entity object is saved to the datastore for the first time. You can get the key object prior
to saving the object, but it will be incomplete.
e = Entity()
e.prop = 123
k = e.key() # key is incomplete, has neither key name nor ID
kind = k.kind() # 'Entity'
e.put() # ID is assigned
114 | Chapter 4: Datastore Entities](https://image.slidesharecdn.com/programminggoogleappengine-100608200404-phpapp01/85/Programming-google-app-engine-135-320.jpg)
![k_str = str(k)
# ...
k = db.Key(k_str)
And in Java:
String k_str = KeyFactory.keyToString(k);
// ...
Key k = KeyFactory.stringToKey(k_str);
The Java Key class’s toString() method does not return the key’s string encoding. You
must use KeyFactory.keyToString() to get the string encoding of a key.
Using Entities
Let’s look briefly at how to retrieve entities from the datastore using keys, how to inspect
the contents of entities, and how to update and delete entities. The API methods for
these features are straightforward.
Getting Entities Using Keys
Given a complete key for an entity, you can retrieve the entity from the datastore.
In the Python API, you can call the get() function in the db package with the Key object
as an argument:
from google.appengine.ext import db
k = db.Key('Entity', 'alphabeta')
e = db.get(k)
If you know the kind of the entity you are fetching, you can also use the get() class
method on the appropriate entity class. This does a bit of type checking, ensuring that
the key you provide is of the appropriate kind:
class Entity(db.Expando):
pass
e = Entity.get(k)
To fetch multiple entities in a batch, you can pass the keys to get() as a list. Given a
list, the method returns a list containing entity objects, with None values for keys that
do not have a corresponding entity in the datastore.
entities = db.get([k1, k2, k3])
116 | Chapter 4: Datastore Entities](https://image.slidesharecdn.com/programminggoogleappengine-100608200404-phpapp01/85/Programming-google-app-engine-137-320.jpg)

![complete key (such as a key with a kind and a key name) and an entity already exists
with that key, the datastore replaces the existing entity with the new one.
If you want to test that an entity with a given key does not exist before
you create it, you can do so using the transaction API. You must use a
transaction to ensure that another process doesn’t create an entity with
that key after you test for it and before you create it. For more informa-
tion on transactions, see Chapter 6.
If you have several entity objects to save, you can save them all in one call using the
put() function in the db package. The put() function can also take a single entity object.
db.put(e)
db.put([e1, e2, e3])
As with a batch get, a batch put performs a single call to the service. The total size of
the call is subject to the API call limits for the datastore. The entity count is also subject
to a limit.
In Java, you can save entities using the put() method of a DatastoreService
instance. As with get(), the method takes a single Entity for a single put, or an
Iterable<Entity> for a batch put.
When the call to put() returns, the datastore is up to date, and all future queries in the
current request handler and other handlers will see the new data. The specifics of how
the datastore gets updated are discussed in detail in Chapter 6.
Deleting Entities
Deleting entities works similarly to putting entities. In Python, you can call the
delete() method on the entity object, or you can pass entity objects or Key objects to
the delete() function.
e = db.get('Entity', 'alphabeta')
e.delete()
db.delete(e)
db.delete([e1, e2, e3])
# Deleting without first fetching the entity:
k = db.Key('Entity', 'alphabeta')
db.delete(k)
In Java, you call the delete() method of the DatastoreService with either a single Key
or an Iterable<Key>.
As with gets and puts, a delete of multiple entities occurs in a single batch call to the
service, and is faster than making multiple service calls.
Using Entities | 119](https://image.slidesharecdn.com/programminggoogleappengine-100608200404-phpapp01/85/Programming-google-app-engine-140-320.jpg)


![impossible to get the list of players for a particular trophy. (A query filter can’t match
patterns within string values.)
Another option is to record each trophy win in a separate property named after the
trophy. To get the list of players with a trophy, you just query for the existence of the
corresponding property. However, getting the list of trophies for a given player would
require either coding the names of all of the trophies in the display logic, or iterating
over all of the Player entity’s properties looking for trophy names.
With multivalued properties, we can store each trophy name as a separate value for the
trophies property. To access a list of all trophies for a player, we simply access the
property of the entity. To get a list of all players with a trophy, we use a query with an
equality filter on the property.
Here’s what this example looks like in Python:
p = Player.get_by_key_name(user_id)
p.trophies = ['Lava Polo Champion',
'World Building 2008, Bronze',
'Glarcon Fighter, 2nd class']
p.put()
# List all trophies for a player.
for trophy in p.trophies:
# ...
# Query all players that have a trophy.
q = Player.gql("WHERE trophies = 'Lava Polo Champion'")
for p in q:
# ...
MVPs in Python
The Python API represents the values of a multivalued property as a Python list. Each
member of the list must be of one of the supported datastore types.
class Entity(db.Expando):
pass
e = Entity()
e.prop = [ 'value1', 123, users.get_current_user() ]
Remember that list is not a datastore type; it is only the mechanism for manipulating
multivalued properties. A list cannot contain another list.
A property must have at least one value, otherwise the property does not exist. To
enforce this, the Python API does not allow you to assign an empty list to a property.
Notice that the API can’t do otherwise: if a property doesn’t exist, then the API cannot
know to represent the missing property as an empty list when the entity is retrieved
from the datastore. (This being Python, the API could return the empty list whenever
a nonexistent property is accessed, but that might be more trouble than it’s worth.)
154 | Chapter 5: Datastore Queries](https://image.slidesharecdn.com/programminggoogleappengine-100608200404-phpapp01/85/Programming-google-app-engine-175-320.jpg)
![Because it is often useful for lists to behave like lists, including the ability to contain
zero items, the Python data modeling API provides a mechanism that supports assign-
ing the empty list to a property. We’ll look at this mechanism in Chapter 7.
MVPs and Equality Filters
As you’ve seen, when a multivalued property is the subject of an equality filter in a
query, the entity matches if any of the property’s values are equal to the filter value.
e1 = Entity()
e1.prop = [ 3.14, 'a', 'b' ]
e1.put()
e2 = Entity()
e2.prop = [ 'a', 1, 6 ]
e2.put()
# Returns e1 but not e2:
q = Entity.gql('WHERE prop = 3.14')
# Returns e2 but not e1:
q = Entity.gql('WHERE prop = 6')
# Returns both e1 and e2:
q = Entity.gql("WHERE prop = 'a'")
Recall that a query with a single equality filter uses an index that contains the keys of
every entity of the given kind with the given property and the property values. If an
entity has a single value for the property, the index contains one row that represents
the entity and the value. If an entity has multiple values for the property, the index
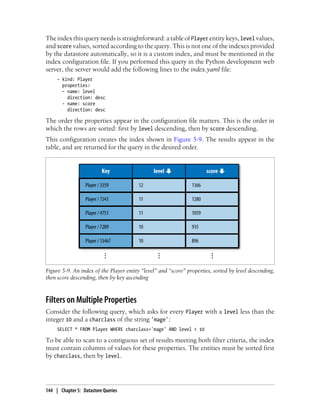
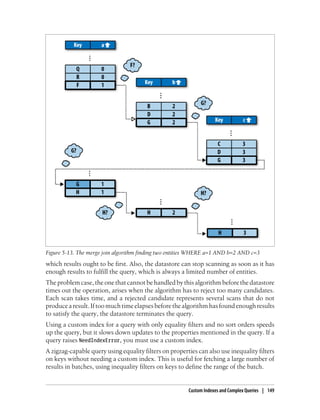
contains one row for each value. The index for this example is shown in Figure 5-14.
This brings us to the first of several odd-looking queries that nonetheless make sense
for multivalued properties. Since an equality filter is a membership test, it is possible
for multiple equality filters to use the same property with different values and still return
a result. An example in GQL:
SELECT * FROM Entity WHERE prop = 'a' AND prop = 'b'
App Engine uses the “merge join” algorithm described earlier for multiple equality
filters to satisfy this query using the prop single-property index. This query returns the
e1 entity because the entity key appears in two places in the index, once for each value
requested by the filters.
The way multivalued properties appear in an index gives us another way of thinking
about multivalued properties: an entity has one or more properties, each with a name
and a single value, and an entity can have multiple properties with the same name. The
API represents the values of multiple properties with the same name as a list of values
associated with that name.
Queries and Multivalued Properties | 155](https://image.slidesharecdn.com/programminggoogleappengine-100608200404-phpapp01/85/Programming-google-app-engine-176-320.jpg)
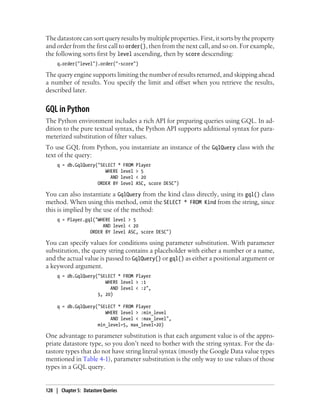
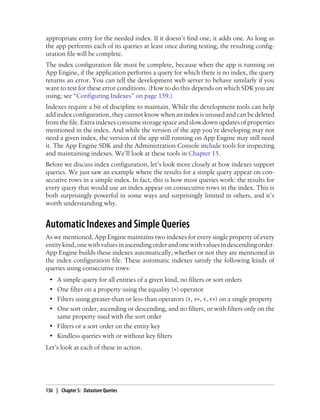
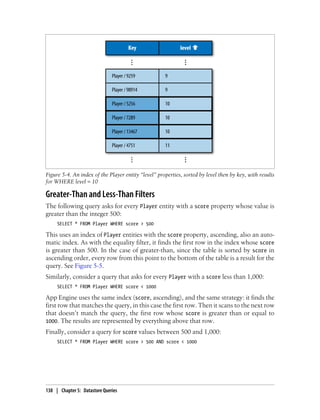
![Figure 5-14. An index of two entities with multiple values for the “prop” property, with results for
WHERE prop=‘a’
The datastore does not have a way to query for the exact set of values in a multivalued
property. You can use multiple equality filters to test that each of several values belongs
to the list, but there is no filter that ensures that those are the only values that belong
to the list, or that each value appears only once.
MVPs and Inequality Filters
Just as an equality filter tests that any value of the property is equal to the filter value,
an inequality filter tests that any value of the property meets the filter criterion.
e1 = Entity()
e1.prop = [ 1, 3, 5 ]
e1.put()
e2 = Entity()
e2.prop = [ 4, 6, 8 ]
e2.put()
# Returns e1 but not e2:
q = Entity.gql("WHERE prop < 2")
# Returns e2 but not e1:
q = Entity.gql("WHERE prop > 7")
# Returns both e1 and e2:
q = Entity.gql("WHERE prop > 3")
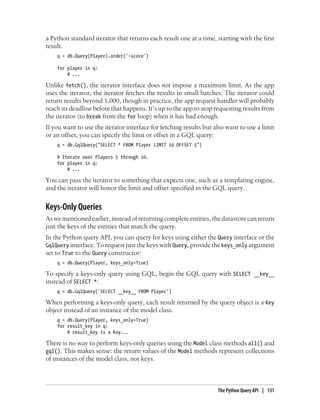
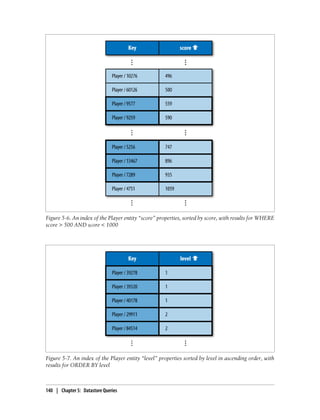
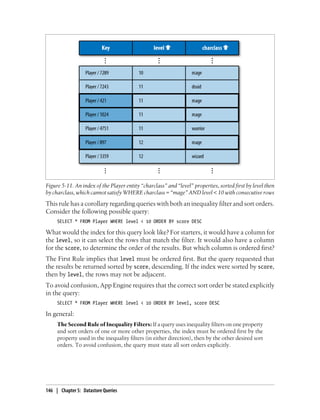
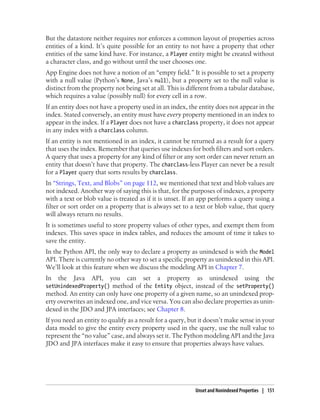
Figure 5-15 shows the index for this example, with the results of prop > 3 highlighted.
In the case of an inequality filter, it’s possible for the index scan to match rows for a
single entity multiple times. When this happens, the first occurrence of each key in the
156 | Chapter 5: Datastore Queries](https://image.slidesharecdn.com/programminggoogleappengine-100608200404-phpapp01/85/Programming-google-app-engine-177-320.jpg)
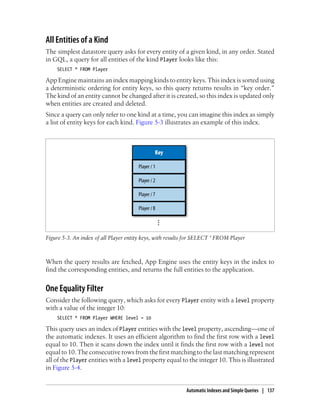
![Figure 5-15. An index of two entities with multiple values for the “prop” property, with results for
WHERE prop > 3
index determines the order of the results. If the index used for the query sorts the
property in ascending order, the first occurrence is the smallest matching value. For
descending, it’s the largest. In the example above, prop > 3 returns e2 before e1 because
4 appears before 5 in the index.
MVPs and Sort Orders
To summarize things we know about how multivalued properties are indexed:
• A multivalued property appears in an index with one row per value.
• All rows in an index are sorted by the values, possibly distributing property values
for a single entity across the index.
• The first occurrence of an entity in an index scan determines its place in the result
set for a query.
Together, these facts explain what happens when a query orders its results by a mul-
tivalued property. When results are sorted by a multivalued property in ascending or-
der, the smallest value for the property determines its location in the results. When
results are sorted in descending order, the largest value for the property determines its
location.
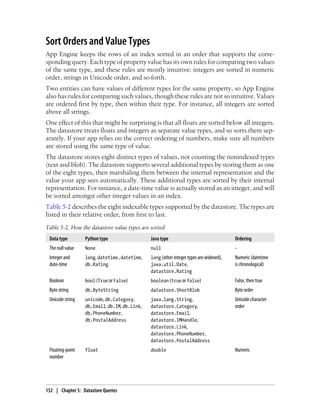
This has a counterintuitive—but consistent—consequence:
e1 = Entity()
e1.prop = [ 1, 3, 5 ]
e1.put()
e2 = Entity()
Queries and Multivalued Properties | 157](https://image.slidesharecdn.com/programminggoogleappengine-100608200404-phpapp01/85/Programming-google-app-engine-178-320.jpg)
![e2.prop = [ 2, 3, 4 ]
e2.put()
# Returns e1, e2:
q = Entity.gql("ORDER BY prop ASC")
# Also returns e1, e2:
q = Entity.gql("ORDER BY prop DESC")
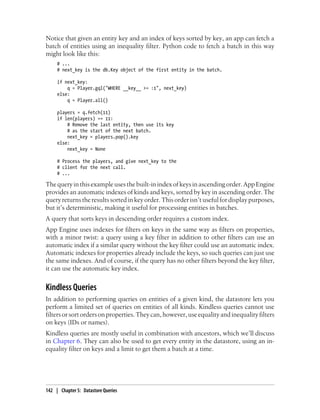
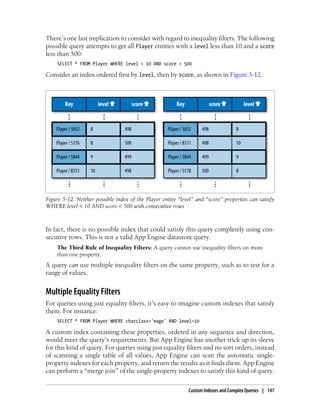
Because e1 has both the smallest value and the largest value, it appears first in the result
set in ascending order and in descending order. See Figure 5-16.
Figure 5-16. Indexes of two entities with multiple values for the “prop” property, one ascending and
one descending
MVPs and the Query Planner
The query planner tries to be smart by ignoring aspects of the query that are redundant
or contradictory. For instance, a = 3 AND a = 4 would normally return no results, so
the query planner catches those cases and doesn’t bother doing work it doesn’t need
to do. However, most of these normalization techniques don’t apply to multivalued
properties. In this case, the query could be asking, “Does this MVP have a value that
is equal to 3 and another value equal to 4?” The datastore remembers which properties
are MVPs (even those that end up with one or zero values), and never takes a shortcut
that would produce incorrect results.
But there is one exception. A query that has both an equality filter and a sort order will
drop the sort order. If a query asks for a = 3 ORDER BY a DESC and a is a single-value
property, the sort order has no effect because all of the values in the result are identical.
For an MVP, however, a = 3 tests for membership, and two MVPs that meet that
condition are not necessarily identical.
158 | Chapter 5: Datastore Queries](https://image.slidesharecdn.com/programminggoogleappengine-100608200404-phpapp01/85/Programming-google-app-engine-179-320.jpg)


![SELECT * FROM Message
WHERE ANCESTOR IS KEY(MessageBoard, 'The_Archonville_Times')
ORDER BY post_date DESC
LIMIT 10
Most queries that use an ancestor filter need custom indexes. There is one unusual
exception: a query does not need a custom index if the query also contains equality
filters on properties (and no inequality filters or sort orders). In this exceptional case,
the “merge join” algorithm can use a built-in index of keys along with the built-in
property indexes. In cases where the query would need a custom index anyway, the
query can match the ancestor to the keys in the custom index.
As we mentioned in Chapter 5, the datastore supports queries over entities of all kinds.
Kindless queries are limited to key filters and ancestor filters. Since ancestors can have
children of disparate kinds, kindless queries are useful for getting every child of a given
ancestor, regardless of kind:
SELECT * WHERE ANCESTOR IS KEY('MessageBoard', 'The_Archonville_Times')
While ancestor queries can be useful, don’t get carried away building
large ancestor trees. Remember that every entity with the same root
belongs to the same entity group, and more simultaneous users that
need to write to a group mean a greater likelihood of concurrency
failures.
If you want to model hierarchical relationships between entities without
the consequences of entity groups, consider using multivalued proper-
ties to store paths. For example, if there’s an entity whose path in your
hierarchy can be represented as /A/B/C/D, you can store this path as:
e.parents = ['/A', '/A/B', '/A/B/C'] Then you can perform a query
similar to an ancestor query on this property: ... WHERE parents = '/
A/B'.
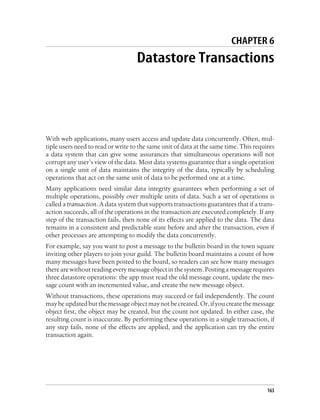
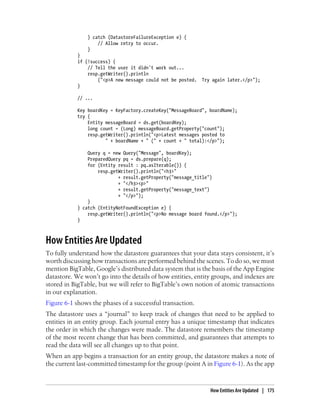
What Can Happen in a Transaction
Entity groups ensure that the operations performed within a transaction see a consistent
view of the entities in a group. For this to work, a single transaction must limit its
operations to entities in a single group. The entity group determines the scope of the
transaction.
Within a transaction, you can fetch, update, or delete an entity using the entity’s key.
You can also create a new entity that either is a root entity of a new group that becomes
the subject of the transaction, or that has a member of the transaction’s entity group
as its parent.
You can perform queries over the entities of a single entity group in a transaction. A
query in a transaction must have an ancestor filter that matches the transaction’s entity
group. The results of the query, including both the indexes that provide the results as
168 | Chapter 6: Datastore Transactions](https://image.slidesharecdn.com/programminggoogleappengine-100608200404-phpapp01/85/Programming-google-app-engine-189-320.jpg)

![p = Entity()
e = Entity(parent=p)
The parent key does not have to represent an entity that exists. You can construct a
fake key using db.Key.from_path() and use it as the parent:
p_key = db.Key.from_path('Entity', 'fake_parent')
e = Entity(parent=p_key)
You can use methods on the model object to get the key for the entity’s parent, or fetch
the entity’s parent from the datastore. These methods return None if the entity is a root
entity for its entity group.
p = e.parent()
p_key = e.parent_key()
Similarly, the Key object can return the Key of its parent, or None:
e_key = e.key()
p_key = e_key.parent()
The Python API uses function objects to handle transactions. To perform multiple
operations in a transaction, you define a function that executes the operations, then
you pass it to the run_in_transaction() function (in the ...ext.db module).
import datetime
from google.appengine.ext import db
class MessageBoard(db.Expando):
pass
class Message(db.Expando):
pass
def create_message_txn(board_name, message_name, message_title, message_text):
board = db.get(db.Key.from_path('MessageBoard', board_name))
if not board:
board = MessageBoard(key_name=board_name)
board.count = 0
message = Message(key_name=message_name, parent=board)
message.title = message_title
message.text = message_text
message.post_date = datetime.datetime.now()
board.count += 1
db.put([board, message])
# ...
try:
db.run_in_transaction(create_message_txn,
170 | Chapter 6: Datastore Transactions](https://image.slidesharecdn.com/programminggoogleappengine-100608200404-phpapp01/85/Programming-google-app-engine-191-320.jpg)

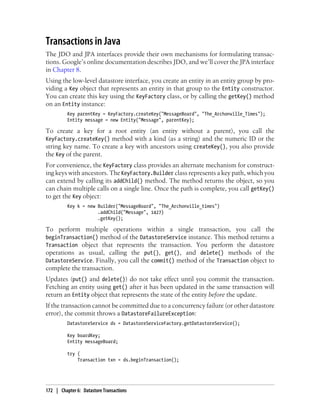

![Batch Updates
When you read, create, update, or delete an entity, the runtime environment makes a
service call to the datastore. Each service call has some overhead, including serializing
and deserializing parameters and transmitting them between machines in the data cen-
ter. If you need to update multiple entities, you can save time by performing the updates
together as a batch in one service call.
We introduced batch calls in Chapter 4. Here’s a quick example of the Python batch
API:
# Creating multiple entities:
e1 = Message(key_name='m1', text='...')
e2 = Message(key_name='m2', text='...')
e3 = Message(key_name='m3', text='...')
message_keys = db.put([e1, e2, e3])
# Getting multiple entities using keys:
message_keys = [db.Key('Message', 'm1'),
db.Key('Message', 'm2'),
db.Key('Message', 'm2')]
messages = db.get(message_keys)
for message in messages:
# ...
# Deleting multiple entities:
db.delete(message_keys)
When the datastore receives a batch call, it bundles the keys or entities by their entity
groups, which it can determine from the keys. Then it dispatches calls to the datastore
machines responsible for each entity group. The datastore returns results to the app
when it has received all results from all machines.
If the call includes changes for multiple entities in a single entity group, those changes
are performed in a single transaction. There is no way to control this behavior, but
there’s no reason to do it any other way. It’s faster to commit multiple changes to a
group at once than to commit them individually, and no less likely to result in concur-
rency failures.
Each entity group involved in a batch update may fail to commit due to a concurrency
failure. If a concurrency failure occurs for any update, the API raises the concurrency
failure exception—even if updates to other groups were committed successfully.
Batch updates in disparate entity groups are performed in separate threads, possibly
by separate datastore machines, executed in parallel to one another. This can make
batch updates especially fast compared to performing each update one at a time.
Remember that if you use the batch API during a transaction, every entity or key in the
batch must use the same entity group as the rest of the transaction. Also, be aware that
App Engine puts a maximum size on service calls and responses, and the total size of
the call or its responses must not exceed these limits. The number of items in a batch
Batch Updates | 179](https://image.slidesharecdn.com/programminggoogleappengine-100608200404-phpapp01/85/Programming-google-app-engine-200-320.jpg)


![s.song_key = 'C# min'
# The song_key attribute is stored as the
# datastore property named 'key'.
s.put()
You can declare that a property should contain only one of a fixed set of values by
providing a list of possible values as the choices argument. If None is not one of the
choices, this acts as a more restrictive form of required: the property must be set to one
of the valid choices using a keyword argument to the constructor.
_KEYS = ['C', 'C min', 'C 7',
'C#', 'C# min', 'C# 7',
# ...
]
class Song(db.Model):
song_key = db.StringProperty(choices=_KEYS)
s = Song(song_key='H min') # db.BadValueError
s = Song() # db.BadValueError, None is not an option
s = Song(song_key='C# min') # OK
All of these features validate the value assigned to a property, and raise a
db.BadValueError if the value does not meet the appropriate conditions. For even
greater control over value validation, you can define your own validation function and
assign it to a property declaration as the validator argument. The function should take
the value as an argument, and raise a db.BadValueError (or an exception of your choos-
ing) if the value should not be allowed.
def is_recent_year(val):
if val < 1923:
raise db.BadValueError
class Book(db.Model):
copyright_year = db.IntegerProperty(validator=is_recent_year)
b = Book(copyright_year=1922) # db.BadValueError
b = Book(copyright_year=1924) # OK
Nonindexed Properties
In Chapter 5, we mentioned that you can set properties of an entity in such a way that
they are available on the entity, but are considered unset for the purposes of indexes.
In the Python API, you establish a property as nonindexed using a property declaration.
If the property declaration is given an indexed argument of False, entities created with
that model class will set that property as nonindexed.
188 | Chapter 7: Data Modeling with Python](https://image.slidesharecdn.com/programminggoogleappengine-100608200404-phpapp01/85/Programming-google-app-engine-209-320.jpg)
![is saved for the first time, and left untouched thereafter. If the current user is not signed
in, the value is set to None.
class BookReview(db.Model):
created_by_user = db.UserProperty(auto_current_user_add=True)
last_edited_by_user = db.UserProperty(auto_current_user=True)
br = BookReview()
br.put() # created_by_user and last_edited_by_user set
# ...
br.put() # last_edited_by_user set again
At first glance, it might seem reasonable to set a default for a
db.UserProperty this way:
from google.appengine.api import users
class BookReview(db.Model):
created_by_user = db.UserProperty(
default=users.get_current_user())
# WRONG
This would set the default value to be the user who is signed in when
the class is imported. Requests that use a cached instance of the appli-
cation may end up using a previous user instead of the current user as
the default.
To guard against this mistake, db.UserProperty does not accept
the default argument. You can use only auto_current_user or
auto_current_user_add to set an automatic value.
List Properties
The data modeling API provides a property declaration class for multivalued properties,
called db.ListProperty. This class ensures that every value for the property is of the
same type. You pass this type to the property declaration, like so:
class Book(db.Model):
tags = db.ListProperty(basestring)
b = Book()
b.tags = ['python', 'app engine', 'data']
The type argument to the db.ListProperty constructor must be the Python represen-
tation of one of the native datastore types. Refer back to Table 4-1 for a complete list.
The datastore does not distinguish between a multivalued property with no elements
and no property at all. As such, an undeclared property on a db.Expando object can’t
store the empty list. If it did, when the entity is loaded back into an object, the property
simply wouldn’t be there, potentially confusing code that’s expecting to find an empty
190 | Chapter 7: Data Modeling with Python](https://image.slidesharecdn.com/programminggoogleappengine-100608200404-phpapp01/85/Programming-google-app-engine-211-320.jpg)
![list. To avoid confusion, db.Expando disallows assigning an empty list to an undeclared
property.
The db.ListProperty declaration makes it possible to keep an empty list value on a
multivalued property. The declaration interprets the state of an entity that doesn’t have
the declared property as the property being set to the empty list, and maintains that
distinction on the object. This also means that you cannot assign None to a declared list
property—but this isn’t of the expected type for the property anyway.
The datastore does distinguish between a property with a single value and a multivalued
property with a single value. An undeclared property on a db.Expando object can store
a list with one element, and represent it as a list value the next time the entity is loaded.
The example above declares a list of string values. (basestring is the Python base
type for str and unicode.) This case is so common that the API also provides
db.StringListProperty.
You can provide a default value to db.ListProperty using the default argument. If you
specify a nonempty list as the default, a shallow copy of the list value is made for each
new object that doesn’t have an initial value for the property.
db.ListProperty does not support the required validator, since every list property tech-
nically has a list value (possibly empty). If you wish to disallow the empty list, you can
provide your own validator function that does so:
def is_not_empty(lst):
if len(lst) == 0:
raise db.BadValueError
class Book(db.Model):
tags = db.ListProperty(basestring, validator=is_not_empty)
b = Book(tags=[]) # db.BadValueError
b = Book() # db.BadValueError, default "tags" is empty
b = Book(tags=['awesome']) # OK
db.ListProperty does not allow None as an element in the list because it doesn’t match
the required value type. It is possible to store None as an element in a list for an unde-
clared property.
Models and Schema Migration
Property declarations prevent the application from creating an invalid data object, or
assigning an invalid value to a property. If the application always uses the same model
classes to create and manipulate entities, then all entities in the datastore will be con-
sistent with the rules you establish using property declarations.
Property Declarations | 191](https://image.slidesharecdn.com/programminggoogleappengine-100608200404-phpapp01/85/Programming-google-app-engine-212-320.jpg)
![b.put()
br = BookReview()
br.book = b # sets br's 'book' property to b's key
br.book = b.key() # same thing
We’ll explain what collection_name does in a moment.
The referenced object must have a “complete” key before it can be assigned to a refer-
ence property. A key is complete when it has all of its parts, including the string name
or the system-assigned numeric ID. If you create a new object without a key name, the
key is not complete until you save the object. When you save the object, the system
completes the key with a numeric ID. If you create the object (or a db.Key) with a key
name, the key is already complete, and you can use it for a reference without saving it
first.
b = Book()
br = BookReview()
br.book = b # db.BadValueError, b's key is not complete
b.put()
br.book = b # OK, b's key has system ID
b = Book(key_name='The_Grapes_of_Wrath')
br = BookReview()
br.book = b # OK, b's key has a name
db.put([b, br])
A model class must be defined before it can be the subject of a db.ReferenceProperty.
To declare a reference property that can refer to another instance of the same class, you
use a different declaration, db.SelfReferenceProperty.
class Book(db.Model):
previous_edition = db.SelfReferenceProperty()
b1 = Book()
b2 = Book()
b2.previous_edition = b1
Reference properties have a powerful and intuitive syntax for accessing referenced ob-
jects. When you access the value of a reference property, the property fetches the entity
from the datastore using the stored key, then returns it as an instance of its model class.
A referenced entity is loaded “lazily”: it is not fetched from the datastore until the
property is dereferenced.
br = db.get(book_review_key)
# br is a BookReview instance
title = br.book.title # fetches book, gets its title property
Modeling Relationships | 193](https://image.slidesharecdn.com/programminggoogleappengine-100608200404-phpapp01/85/Programming-google-app-engine-214-320.jpg)


![The key list method is best suited for situations where there are fewer objects on one
side of the relationship than on the other, and the short list is small enough to store
directly on an entity. In this example, many players each belong to a few guilds; each
player has a short list of guilds, while each guild may have a long list of players. We
put the list property on the Player side of the relationship to keep the entity small, and
use queries to produce the long list when it is needed.
The link model method
The link model method represents each relationship as an entity. The relationship entity
has reference properties pointing to the related classes. You traverse the relationship
by going through the relationship entity via the back-references.
class Player(db.Model):
name = db.StringProperty()
class Guild(db.Model):
name = db.StringProperty()
class GuildMembership(db.Model):
player = db.ReferenceProperty(Player, collection_name='guild_memberships')
guild = db.ReferenceProperty(Guild, collection_name='player_memberships')
p = Player()
g = Guild()
db.put([p, g])
gm = GuildMembership(player=p, guild=g)
db.put(gm)
# Guilds to which a player belongs:
for gm in p.guild_memberships:
guild_name = gm.guild.name
# ...
# Players that belong to a guild:
for gm in g.player_memberships:
player_name = gm.player.name
# ...
This technique is similar to how you’d use “join tables” in a SQL database. It’s a good
choice if either side of the relationship may get too large to store on the entity itself.
You can also use the relationship entity to store metadata about the relationship (such
as when the player joined the guild), or model more complex relationships between
multiple classes.
The link model method is more expensive than the key list method. It requires fetching
the relationship entity to access the related object.
Modeling Relationships | 197](https://image.slidesharecdn.com/programminggoogleappengine-100608200404-phpapp01/85/Programming-google-app-engine-218-320.jpg)


![self.first_name = first_name
self.surname = surname
def is_valid(self):
return (isinstance(self.first_name, unicode)
and isinstance(self.surname, unicode)
and len(self.surname) >= 6)
class PlayerNameProperty(db.Property):
data_type = basestring
def validate(self, value):
value = super(PlayerNameProperty, self).validate(value)
if value is not None:
if not isinstance(value, PlayerName):
raise db.BadValueError('Property %s must be a PlayerName.' %
(self.name))
# Let the data class have a say in validity.
if not value.is_valid():
raise db.BadValueError('Property %s must be a valid PlayerName.' %
self.name)
# Disallow the serialization delimiter in the first field.
if value.surname.find('|') != -1:
raise db.BadValueError(('PlayerName surname in property %s cannot ' +
'contain a "|".') % self.name)
return value
def get_value_for_datastore(self, model_instance):
# Convert the data object's PlayerName to a unicode.
return (getattr(model_instance, self.name).surname + u'|'
+ getattr(model_instance, self.name).first_name)
def make_value_for_datastore(self, value):
# Convert a unicode to a PlayerName.
i = value.find(u'|')
return PlayerName(first_name=value[i+1:],
surname=value[:i])
And here’s how you’d use it:
p = Player()
p.player_name = PlayerName('Ned', 'Nederlander')
p.player_name = PlayerName('Ned', 'Neder|lander')
# db.BadValueError, surname contains serialization delimiter
p.player_name = PlayerName('Ned', 'Neder')
# db.BadValueError, PlayerName.is_valid() == False
Here, the application value type is a PlayerName instance, and the datastore value type
is that value encoded as a Unicode string. The encoding format is the surname field,
followed by a delimiter, followed by the first_name field. We disallow the delimiter
character in the surname using the validate() method. (Instead of disallowing
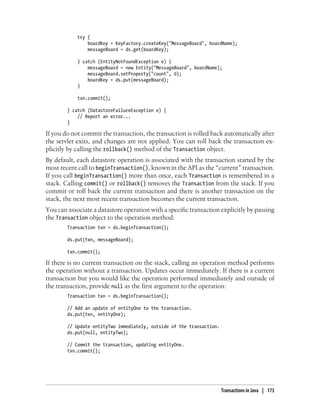
Creating Your Own Property Classes | 203](https://image.slidesharecdn.com/programminggoogleappengine-100608200404-phpapp01/85/Programming-google-app-engine-224-320.jpg)


![selects the requested fields and assembles the results. This is only true if one of the
requested fields is a datastore property, and is not true if the only field is a key field (@Id).
If the query is for one field, each result is a value of the type of that field. If the query
is for multiple fields, each result is an Object[] whose elements are the field values in
the order specified in the query.
Query query = em.createQuery("SELECT isbn, title, author FROM Book");
// Fetch complete Book objects, then
// produce result objects from 3 fields
// of each result
@SuppressWarnings("unchecked")
List<Object[]> results = (List<Object[]>) query.getResultList();
for (Object[] result : results) {
String isbn = result[0];
String title = result[1];
String author = result[2];
// ...
}
You specify filters on fields using a WHERE clause and one or more conditions:
SELECT b FROM Book b WHERE author = "John Steinbeck"
AND copyrightYear >= 1940
To filter on the entity key, refer to the field that represents the key in the data class (the
@Id field):
SELECT b FROM Book b WHERE author = "John Steinbeck"
AND isbn > :firstKeyToFetch
You can perform an ancestor filter by establishing a parent key field (as we did in the
previous section) and referring to that field in the query:
SELECT br FROM BookReview br WHERE bookKey = :pk
As with find(), you can use any of the four key types with parameterized queries, but
the most portable way is to use the type used in the class.
You specify sort orders using an ORDER BY clause. Multiple sort orders are comma-
delimited. Each sort order can have a direction of ASC (the default) or DESC.
SELECT b FROM Book b ORDER BY rating DESC title
The App Engine implementation of JPQL includes a couple of additional tricks that
the datastore can support natively. One such trick is the string prefix trick:
SELECT b FROM Book b WHERE title LIKE 'The Grape%'
The implementation translates this to WHERE title >= 'The Grape', which does the
same thing: it returns all books with a title that begins with the string The Grape, in-
cluding "The Grape", "The Grapefruit", and "The Grapes of Wrath".
Queries and JPQL | 219](https://image.slidesharecdn.com/programminggoogleappengine-100608200404-phpapp01/85/Programming-google-app-engine-240-320.jpg)


![Keys are strings. The API also accepts a memcached-style tuple of a hash code and a string
as a key for compatibility, but it ignores the hash code. The string can be any size;
strings larger than 250 bytes are hashed to 250 bytes.
Values can be any Python value that can be serialized using the pickle module. This
includes most simple values, and data structures and objects whose members are
pickleable values. Pretty much any db.Model instance falls into this category. You can
check the documentation for the pickle module for a more complete description.
Setting and Getting Values in Python
To store a value in memcache, you call the set() function (or method, if you’re using
the Client class) with the key and the value:
from google.appengine.api import memcache
# headlines is a pickle-able object
headlines = ['...', '...', '...']
success = memcache.set("headlines", headlines)
if not success:
# Problem accessing memcache...
set() returns True on success, or False if the value could not be stored.
If there already exists a value with the given key, set() overwrites it. If there is no value
for the key, set() sets it.
To set a value only if there is no value for the key, you call the add() function with
similar arguments:
success = memcache.add("headlines", headlines)
if not success:
# Key already set, or another problem setting...
add() works like set(), but does not update the value and returns False if a value is
currently set for the given key.
To update a value only if it’s already set, you call the replace() function, also with
similar arguments:
success = memcache.replace("headlines", headlines)
if not success:
# Key not set, or another problem setting...
To get a value, you call the get() method with the key:
headlines = memcache.get("headlines")
if headlines is None:
# Key not set, or another problem getting...
get() returns the value, or None if there is no value set for the given key.
The Python Memcache API | 229](https://image.slidesharecdn.com/programminggoogleappengine-100608200404-phpapp01/85/Programming-google-app-engine-250-320.jpg)
![Setting and Getting Multiple Values
You can set and get multiple values at a time using the batch interface. A batch call to
memcache is performed as a single call to the service, which is faster than multiple
individual calls for many items. Like the datastore batch operations, the total amount
of data sent to or received from memcache in a single call must not exceed one
megabyte.
set_multi(), add_multi(), and replace_multi() are similar to their singular counter-
parts, except instead of taking a key and a value as arguments, they take a Python
mapping (such as a dict) of keys to values.
article_summaries = {'article00174': '...',
'article05234': '...',
'article15820': '...',
}
failed_keys = memcache.set_multi(article_summaries)
if failed_keys:
# One or more keys failed to update...
These methods return a list of keys that failed to be set. A completely successful batch
update returns the empty list.
To get multiple values in a single batch, you call the get_multi() method with a list of
keys:
article_summary_keys = ['article00174',
'article05234',
'article15820',
]
article_summaries = memcache.get_multi(article_summary_keys)
get_multi() returns a dict of keys and values that were present and retrieved
successfully.
All of the batch operations accept a key_prefix keyword argument that prepends every
key with the given prefix string. When used with get_multi(), the keys on the returned
values do not include the prefix.
article_summaries = {'00174': '...',
'05234': '...',
'15820': '...',
}
failed_keys = memcache.set_multi(article_summaries,
key_prefix='article')
if failed_keys:
# ...
# ...
article_summary_keys = ['00174',
230 | Chapter 9: The Memory Cache](https://image.slidesharecdn.com/programminggoogleappengine-100608200404-phpapp01/85/Programming-google-app-engine-251-320.jpg)
!['05234',
'15820',
]
article_summaries = memcache.get_multi(article_summary_keys,
key_prefix='article')
Batch calls to the memcache service are not atomic actions.
set_multi() may be successful for some items and not others.
get_multi() will return the data seen at the time of each individual get,
and does not guarantee that all retrieved data is read at the same time.
Memcache Namespaces
You can specify an optional namespace for a memcache key with any setter or getter
call. Namespaces let you segment the key space by the kind of thing you are storing,
so you don’t have to worry about key collisions between disparate uses of the cache.
All of the setter and getter functions accept a namespace argument, a string that declares
the namespace for all keys involved in the call. The batch functions use one namespace
for all keys in the batch.
article_summaries = {'article00174': '...',
'article05234': '...',
'article15820': '...',
}
failed_keys = memcache.set_multi(article_summaries,
namespace='News')
if failed_keys:
# ...
# ...
summary = memcache.get('article05234',
namespace='News')
Namespaces are different from key prefixes in batch calls. Key prefixes merely prepend
keys in a batch with a common string, as a convenience for batch processing. The
namespace is a separate part of the key, and must be specified with an explicit
namespace argument in all calls.
Cache Expiration
You can tell the memcache to delete (or evict) a value automatically after a period of
time when you set or update the value.
All of the setter methods accept a time argument. Its value is either a number of seconds
from the current time up to one month (up to 2,678,400 seconds), or it is a Unix epoch
time (seconds since January 1, 1970, such as returned by time.time()) in the future.
The Python Memcache API | 231](https://image.slidesharecdn.com/programminggoogleappengine-100608200404-phpapp01/85/Programming-google-app-engine-252-320.jpg)


![The callback function is called without arguments. But a common use for a callback
function is to process the results of the fetch, so the function needs access to the RPC
object. There are several ways to give the callback function access to the object.
One way is to use a bound method, a feature of Python that lets you refer to a method
of an instance of a class as a callable object. Define a class with a method that processes
the results of the fetch, using an RPC object stored as a member of the class. Create an
instance of the class, then create the RPC object, assigning the bound method as the
callback by passing it as the callback argument to the create_rpc() function. Exam-
ple 10-6 demonstrates this technique.
Example 10-6. Using an object method as a callback to access the RPC object
from google.appengine.api import urlfetch
# ...
class CatalogUpdater(object):
def prepare_urlfetch_rpc(self):
self.rpc = urlfetch.create_rpc(callback=self.process_results)
urlfetch.make_fetch_call(self.rpc, 'http://api.example.com/catalog_feed')
return self.rpc
def process_results(self):
try:
results = self.rpc.get_result()
# Process results.content...
except urlfetch.Error, e:
# Handle urlfetch errors...
class MainHandler(webapp.RequestHandler):
def get(self):
rpcs = []
catalog_updater = CatalogUpdater(self.response)
rpcs.append(catalog_updater.prepare_urlfetch_rpc())
# ...
for rpc in rpcs:
rpc.wait()
Another way to give the callback access to the RPC object is to use a nested function
(sometimes called a closure). If the callback function is defined in the same scope as a
variable whose value is the RPC object, the function can access the variable when it is
called. To allow for this style of calling, the URL Fetch API lets you assign the callback
function to the RPC object’s callback property after the object has been created.
Example 10-7 demonstrates the use of a nested function as a callback. The
create_callback() function creates a function object, a lambda expression, that calls
another function with the RPC object as an argument. This function object is assigned
to the callback property of the RPC object.
248 | Chapter 10: Fetching URLs and Web Resources](https://image.slidesharecdn.com/programminggoogleappengine-100608200404-phpapp01/85/Programming-google-app-engine-269-320.jpg)

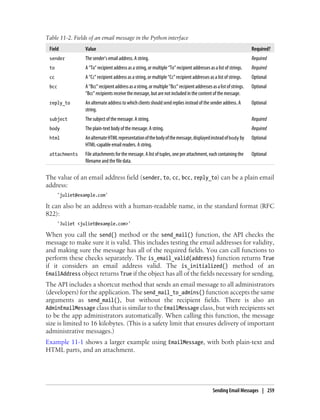
![Example 11-1. An example of sending an email message in Python, using several features
from google.appengine.api import mail
def send_registration_key(user_addr, software_key_data):
message_body = '''
Thank you for purchasing The Example App, the best
example on the market! Your registration key is attached
to this email.
To install your key, download the attachment, then select
"Register..." from the Help menu. Select the key file, then
click "Register".
You can download the app at any time from:
http://www.example.com/downloads/
Thanks again!
The Example Team
'''
html_message_body = '''
<p>Thank you for purchasing The Example App, the best
example on the market! Your registration key is attached
to this email.</p>
<p>To install your key, download the attachment, then select
<b>Register...</b> from the <b>Help</b> menu. Select the key file, then
click <b>Register</b>.</p>
<p>You can download the app at any time from:</p>
<p>
<a href="http://www.example.com/downloads/">
http://www.example.com/downloads/
</a>
</p>
<p>Thanks again!</p>
<p>The Example Team<br />
<img src="http://www.example.com/images/logo_email.gif" /></p>
'''
message = mail.EmailMessage(
sender='The Example Team <admin@example.com>',
to=user_addr,
subject='Your Example Registration Key',
body=message_body,
html=html_message_body,
attachments=[('example_key.txt', software_key_data)])
message.send()
260 | Chapter 11: Sending and Receiving Mail and Instant Messages](https://image.slidesharecdn.com/programminggoogleappengine-100608200404-phpapp01/85/Programming-google-app-engine-281-320.jpg)

![// There was an error contacting the Mail service.
// ...
}
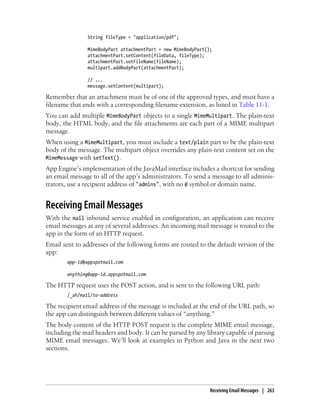
As shown here, you call methods on the MimeMessage to set fields and to add recipients
and content. The simplest message has a sender (setFrom()), one “To” recipient
(addRecipient()), a subject (setSubject()), and a plain-text message body (setText()).
The setFrom() method takes an InternetAddress. You can create an InternetAddress
with just the email address (a String) or the address and a human-readable name as
arguments to the constructor. The email address of the sender must meet the require-
ments described earlier. You can use any string for the human-readable name.
The addRecipient() method takes a recipient type and an InternetAddress. The
allowed recipient types are Message.RecipientType.TO (“To,” a primary recipient),
Message.RecipientType.CC (“Cc” or “carbon-copy,” a secondary recipient), and
Message.RecipientType.BCC (“Bcc” or “blind carbon-copy,” where the recipient is sent
the message but the address does not appear in the message content). You can call
addRecipient() multiple times to add multiple recipients of any type.
The setText() method sets the plain-text body for the message. To include an
HTML version of the message body for mail readers that support HTML, you create a
MimeMultipart object, then create a MimeBodyPart for the plain-text body and another
for the HTML body and add them to the MimeMultipart. You then make the
MimeMultipart the content of the MimeMessage:
import javax.mail.Multipart;
import javax.mail.internet.MimeBodyPart;
import javax.mail.internet.MimeMultipart;
// ...
String textBody = "...text...";
String htmlBody = "...HTML...";
Multipart multipart = new MimeMultipart();
MimeBodyPart textPart = new MimeBodyPart();
textPart.setContent(textBody, "text/plain");
multipart.addBodyPart(htmlPart);
MimeBodyPart htmlPart = new MimeBodyPart();
htmlPart.setContent(htmlBody, "text/html");
multipart.addBodyPart(htmlPart);
message.setContent(multipart);
You attach files to the email message in a similar way:
Multipart multipart = new MimeMultipart();
// ...
byte[] fileData = getBrochureData();
String fileName = "brochure.pdf";
262 | Chapter 11: Sending and Receiving Mail and Instant Messages](https://image.slidesharecdn.com/programminggoogleappengine-100608200404-phpapp01/85/Programming-google-app-engine-283-320.jpg)
![The development server console (http://localhost:8080/_ah/admin/) includes a fea-
ture for simulating incoming email by submitting a web form. The development server
cannot receive actual email messages.
If the app has the incoming mail service enabled but does not have a
request handler for the appropriate URL, or if the request handler re-
turns an HTTP response code other than 200 for the request, the mes-
sage gets “bounced” and the sender receives an error email message.
Receiving Email in Python
To receive email in Python, you map the incoming email URL path to a script handler
in app.yaml file:
handlers:
- url: /_ah/mail/.+
script: handle_email.py
The app address used for the message is included in the URL path, so you can set up
separate handlers for different addresses directly in the configuration:
handlers:
- url: /_ah/mail/support%40.*app-id.appspotmail.com
script: support_contact.py
- url: /_ah/mail/.+
script: handle_email.py
Email addresses are URL-encoded in the final URL, so this pattern uses %40 to represent
an @ symbol. Also notice you must include a .* before the application ID when using
this technique, so the pattern works for messages sent to version-specific addresses
(such as support@dev.latest.app-id.appspotmail.com).
The Python SDK includes a class for parsing the POST content into a convenient object,
called InboundEmailMessage (in the google.appengine.api.mail package). It takes the
multipart MIME data (the POST body) as an argument to its constructor. Here’s an
example using the webapp framework:
from google.appengine.api import mail
from google.appengine.ext import webapp
from google.appengine.ext.webapp.util import run_wsgi_app
class IncomingMailHandler(webapp.RequestHandler):
def post(self):
message = mail.InboundEmailMessage(self.request.body)
# sender = message.sender
# recipients = message.to
# body = list(message.bodies(content_type='text/plain'))[0]
# ...
application = webapp.WSGIApplication([('/_ah/mail/.+', IncomingMailHandler)],
debug=True)
264 | Chapter 11: Sending and Receiving Mail and Instant Messages](https://image.slidesharecdn.com/programminggoogleappengine-100608200404-phpapp01/85/Programming-google-app-engine-285-320.jpg)
![def main():
run_wsgi_app(application)
if __name__ == '__main__':
main()
The InboundEmailMessage object includes attributes for the fields of the message, similar
to EmailMessage. sender is the sender’s email address, possibly with a displayable name
in the standard format (Mr. Sender <sender@example.com>). to is a list of primary
recipient addresses, and cc is a list of secondary recipients. (There is no bcc on an
incoming message, because blind-carbon-copied recipients are not included in the
message content.) subject is the message’s subject.
The InboundEmailMessage object may have more than one message body: an HTML
body and a plain-text body. You can iterate over the MIME multipart parts of the types
text/html and text/plain using the bodies() method. Without arguments, this method
returns an iterator that returns the HTML parts first, then the plain-text parts. You can
limit the parts returned to just the HTML or plain-text parts by setting the
content_type parameter. For example, to get just the plain-text bodies:
for text_body in message.bodies(content_type='text/plain'):
# ...
In the example earlier, we extracted the first plain-text body by passing the iterator to
the list() type, then indexing its first argument (which assumes one exists):
text = list(message.bodies(content_type='text/plain'))[0]
If the incoming message has file attachments, then these are accessible on the
attachments attribute. As with using EmailMessage for sending, this attribute is a list of
tuples whose first element is the filename and whose second element is the data byte
string. InboundEmailMessage allows all file types for incoming attachments, and does
not require that the filename accurately represent the file type. Be careful when using
files sent to the app by users, since they may not be what they say they are, and have
not been scanned for viruses.
The Python SDK includes a convenient webapp handler base class
for processing incoming email, called InboundMailHandler in the
google.appengine.ext.webapp.mail_handlers package. You use the handler by creating
a subclass that overrides the receive() method, then installing it like any other handler.
When the handler receives an email message, the receive() method is called with an
InboundEmailMessage object as its argument.
from google.appengine.ext.webapp import mail_handlers
class MyMailHandler(mail_handlers.InboundMailHandler):
def receive(self, message):
# ...
application = webapp.WSGIApplication([('/_ah/mail/.+', MyMailHandler)],
Receiving Email Messages | 265](https://image.slidesharecdn.com/programminggoogleappengine-100608200404-phpapp01/85/Programming-google-app-engine-286-320.jpg)
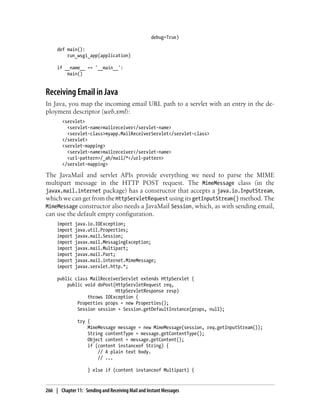


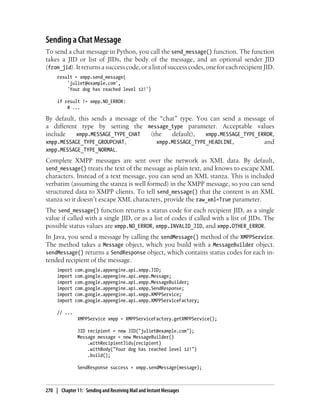
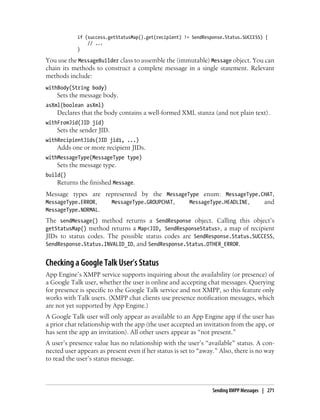

![The body content of the HTTP POST request is a MIME multipart message, with a
part for each field of the message:
from
The sender’s JID.
to
The app JID to which this message was sent.
body
The message body content (with characters as they were originally typed).
stanza
The full XML stanza of the message, including the previous fields (with XML spe-
cial characters escaped); useful for communicating with a custom client using
XML.
The Python and Java SDKs include classes for parsing the request data into objects.
When the service is enabled, all incoming messages are accepted and routed to the app.
All incoming chat invitations are accepted automatically. The app always appears as
connected and available when someone inquires for the app’s presence.
The development server console (http://localhost:8080/_ah/admin/) includes a fea-
ture for simulating incoming XMPP messages by submitting a web form. The devel-
opment server cannot receive actual XMPP messages.
Receiving XMPP Messages in Python
In Python, you map the URL path to a script handler in app.yaml file, as usual:
handlers:
- url: /_ah/xmpp/message/chat/
script: handle_xmpp.py
You can parse the incoming message into a Message object by passing a mapping of the
POST parameters to its constructor. With the webapp framework, this is a simple
matter of passing the parsed POST data (a mapping of the POST parameter names to
values) in directly:
from google.appengine.api import xmpp
from google.appengine.ext import webapp
from google.appengine.ext.webapp.util import run_wsgi_app
class IncomingXMPPHandler(webapp.RequestHandler):
def post(self):
message = xmpp.Message(self.request.POST)
message.reply('I got your message!')
application = webapp.WSGIApplication([('/_ah/xmpp/message/chat/',
IncomingXMPPHandler)],
debug=True)
Receiving XMPP Messages | 273](https://image.slidesharecdn.com/programminggoogleappengine-100608200404-phpapp01/85/Programming-google-app-engine-294-320.jpg)
![def main():
run_wsgi_app(application)
if __name__ == '__main__':
main()
The Message object has attributes for each message field: from, to, and body. It also
includes a convenience method for replying to the message: reply(), which takes the
body of the reply as its first argument.
The Python SDK includes an extension for webapp that makes it easy to implement
chat interfaces that perform user-issued commands. Here’s an example that responds
to the commands /stats and /score username, and ignores all other messages:
from google.appengine.api import xmpp
from google.appengine.ext import webapp
from google.appengine.ext.webapp import xmpp_handlers
from google.appengine.ext.webapp.util import run_wsgi_app
def get_stats():
# ...
def get_score_for_user(username):
# ...
class UnknownUserError(Exception):
pass
class ScoreBotHandler(xmpp_handlers.CommandHandler):
def stats_command(self, message):
stats = get_stats()
if stats:
message.reply('The latest stats: %s' % stats)
else:
message.reply('Stats are not available right now.')
def score_command(self, message):
try:
score = get_score_for_user(message.arg)
message.reply('Score for user %s: %d' % (message.arg, score))
except UnknownUserError, e:
message.reply('Unknown user %s' % message.arg)
application = webapp.WSGIApplication([('/_ah/xmpp/message/chat/', ScoreBotHandler)],
debug=True)
def main():
run_wsgi_app(application)
if __name__ == '__main__':
main()
274 | Chapter 11: Sending and Receiving Mail and Instant Messages](https://image.slidesharecdn.com/programminggoogleappengine-100608200404-phpapp01/85/Programming-google-app-engine-295-320.jpg)
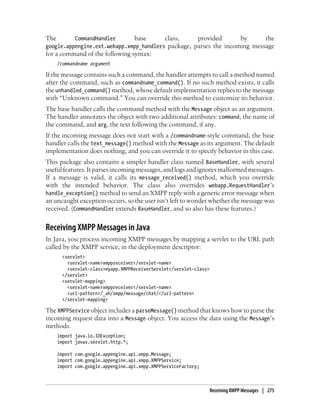
![public class XMPPReceiverServlet extends HttpServlet {
public void doPost(HttpServletRequest req,
HttpServletResponse resp)
throws IOException {
XMPPService xmpp = XMPPServiceFactory.getXMPPService();
Message message = xmpp.parseMessage(req);
// ...
}
}
You access the fields of a Message using methods:
getFromJid()
The sender JID.
getMessageType()
The MessageType of the message (MessageType.CHAT or MessageType.NORMAL).
getRecipientJids()
The app JID used, as a single-element JID[].
getBody()
The String content of the message.
getStanza()
The String raw XML of the message.
276 | Chapter 11: Sending and Receiving Mail and Instant Messages](https://image.slidesharecdn.com/programminggoogleappengine-100608200404-phpapp01/85/Programming-google-app-engine-297-320.jpg)
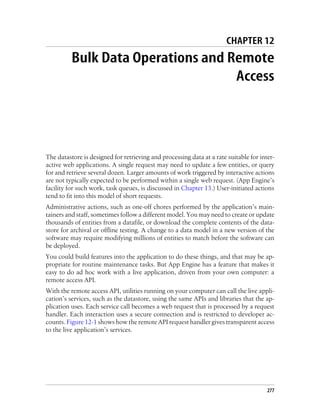
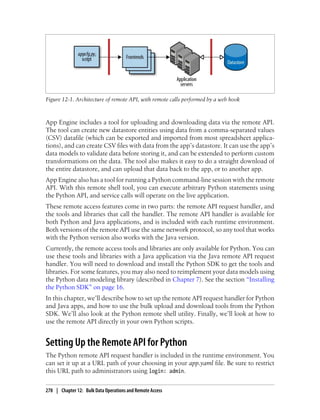


![the sqlite3 module installed by starting a Python shell and importing it. If nothing
happens, the module is installed:
% python
Python 2.6.1 (r261:67515, Jul 7 2009, 23:51:51)
[GCC 4.2.1 (Apple Inc. build 5646)] on darwin
Type "help", "copyright", "credits" or "license" for more information.
>>> import sqlite3
>>>
If you do not have the module, you can get it from the SQLite website. Note that if you
compiled your Python installation from source, you will need to recompile it with
SQLite support.
http://www.sqlite.org/download.html
If you’d prefer not to install SQLite, you can disable the use of the progress datafile in
the bulk loader tool by providing this command-line argument when running the tool:
--db_filename=skip.
Backup and Restore
One of the easiest features of the bulk loader to use is the backup and restore feature.
The bulk loader can download every entity of a given kind to a datafile, and can upload
that datafile back to the app to restore those entities. It can also upload the datafile to
another app, effectively moving all of the entities of a kind from one app to another.
You can also use these features to download data from the live app, and “upload” it to
the development server for testing (using the --url=... argument mentioned earlier).
These features require no additional configuration or code beyond the installation of
the remote API handler.
To download every entity of a given kind, run the bulkloader.py tool with the --dump,
--kind=..., and --filename=... arguments:
bulkloader.py --dump
--app_id=app-id
--url=http://app-id.appspot.com/remote_api
--kind=kind
--filename=backup.dat
(This is a single command line. The characters are line continuation markers, sup-
ported by some command shells. You can remove these characters and type all of the
arguments on one line.)
To upload a datafile created by --dump, thereby re-creating every entity in the file, use
the --restore argument instead of --dump:
bulkloader.py --restore
--app_id=app-id
--url=http://app-id.appspot.com/remote_api
--kind=kind
--filename=backup.dat
Using the Bulk Loader Tool | 281](https://image.slidesharecdn.com/programminggoogleappengine-100608200404-phpapp01/85/Programming-google-app-engine-302-320.jpg)
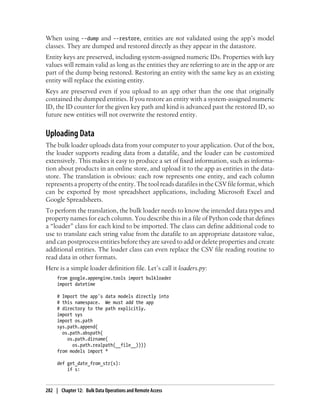
![return datetime.datetime.strptime(s, '%m/%d/%Y').date()
else:
return None
class BookLoader(bulkloader.Loader):
def __init__(self):
bulkloader.Loader.__init__(self, 'Book',
[('title', str),
('author', str),
('copyright_year', int),
('author_birthdate', get_date_from_str),
])
loaders = [BookLoader]
The loader definition file must do several things:
1. It must import or define a data model class for each kind to import, using the
Python data modeling API. The loader file does not have the app directory in the
module load path, so the loader file must add it. The modules should be imported
directly into the local namespace.
2. It must define (or import) a loader class for each kind to import, a subclass of the
Loader class in the package google.appengine.tools.bulkloader. This class must
have a constructor (an __init__() method) that calls the parent class’s constructor
with arguments that describe the CSV file’s columns.
3. It must define a module-global variable named loaders, whose value is a list of
loader classes.
The loader class’s __init__() method calls its parent class’s __init__() method with
three arguments: self (the object being initialized), the kind of the entity to create as
a string, and a list of tuples. Each tuple represents a column from the CSV file, in order
from left to right. The first element of each tuple is the property name to use. The second
element is a Python function that takes the CSV file value as a string and returns the
desired datastore value in the appropriate Python value type. (Refer to Table 4-1 for a
list of the Python value types for the datastore.)
For simple data types, you can use the constructor for the type as the type conversion
function. In the example above, we use str to leave the value from the CSV file as a
string, and int to parse the CSV string value as an integer. Depending on the output of
your spreadsheet program, you can use this technique for long, float, db.Text, and
other types whose constructors accept strings as initial arguments. For instance,
users.User takes an email address as a string argument.
The bool type constructor returns False for the empty string, and True in all other cases.
If your CSV file contains Boolean values in other forms, you’ll need to write a converter
function, like this:
def bool_from_string(s):
return s == 'TRUE'
Using the Bulk Loader Tool | 283](https://image.slidesharecdn.com/programminggoogleappengine-100608200404-phpapp01/85/Programming-google-app-engine-304-320.jpg)
![Dates, times, and date-times usually require a custom converter function to make an
appropriate datetime.datetime value from the string. As shown previously, you can use
the datetime.datetime.strptime() function to parse the string in a particular format.
Tailor this to the output of your spreadsheet program.
To create a multivalued property, you can use a type conversion function that returns
a list value. However, the function must get all of its data from a single cell (though you
can work around this by tweaking the file reader routine, described below). It cannot
reference other cells in the row, or other rows in the table.
Storing a key value (a reference to another entity) is usually a straightforward matter
of defining a type conversion function that uses db.Key.from_path() with the desired
kind and a key name derived from a CSV file value.
By default, the bulk loader creates each entity using a key with no ancestors, the given
kind, and a system-assigned numeric ID. You can tell the bulk loader to use a custom
key name instead of a numeric ID by defining a method of your loader class named
generate_key(). This method takes as arguments a loop counter (i) and the row’s col-
umn values as a list of strings (values), and returns either a string key name or a
db.Key object. The db.Key object can include an entity group parent key. If the function
returns None, a system-assigned numeric ID will be used.
class BookLoader(bulkloader.Loader):
# ...
def generate_key(self, i, values):
# Use the first column as the key name.
return values[0]
If an entity is uploaded with the same key as an entity that already exists
in the datastore, the new entity will replace the existing entity. You can
use this effect to download, modify, then reupload data to update ex-
isting entities instead of creating new ones.
You can “skip” an unused column in the CSV file by giving it a property name that
begins with an underscore. The Python data modeling API does not save attributes
beginning with an underscore as properties, so the final entity will not have a property
with this name. You can reuse the same dummy property name for all columns you
wish to skip:
class BookLoader(bulkloader.Loader):
def __init__(self):
bulkloader.Loader.__init__(self, 'Book',
[('_UNUSED', lambda x: None),
('title', str),
('author', str),
('_UNUSED', lambda x: None),
('_UNUSED', lambda x: None),
('copyright_year', int),
284 | Chapter 12: Bulk Data Operations and Remote Access](https://image.slidesharecdn.com/programminggoogleappengine-100608200404-phpapp01/85/Programming-google-app-engine-305-320.jpg)
![# ...
])
If you have a column that is to be the entity key name (via generate_key()) and you do
not want this value to also become a property, you must “skip” the column in the
column list using this technique. The bulk loader will complain if it finds more columns
than are declared in the list.
The bulk loader uses the Python data modeling API to construct, validate, and save
entities. If your app is written in Python, you just use the model classes of your app for
this purpose, and get the validation for free.
If your app is written in Java, you have a choice to make. You can either implement
Python data model classes that resemble your application’s data model, or you can
define Python data models that allow arbitrary properties to be set by the loader without
validation. For information on defining data models in Python, see Chapter 7. To define
a model class that allows all properties and does no validation, simply define a class
like the following for each kind in the loader file, above the definition of the loader
classes:
from google.appengine.ext import db
class Book(db.Expando):
pass
The loader class can do postprocessing on an entity after it is created but before it is
saved to the datastore. This gives you the opportunity to inspect the entity, add or
remove properties, and even create additional entities based on each row of the datafile.
To perform postprocessing, implement a method named handle_entity() on the loader
class. This takes an instance of the model class as its only argument (entity). It should
return the instance to create, a list of model instances if more than one entity should
be created, or None if no entity should be created.
You can extend the loader class to read file formats other than CSV files. To do
this, you override the generate_records() method. This method takes a filename
(filename), and returns a Python generator. Each iteration of the generator should yield
a list of strings for each entity to create, where each string corresponds to a property
defined in the loader’s constructor. You can use a generate_records() routine to mas-
sage the columns processed by the loader so that all the information needed for a single
property appears in the column’s value, such as to assemble what will eventually be-
come a multivalued property from multiple columns in the datafile.
You can override the initialize() method of the loader to perform actions at the be-
ginning of an upload. This method takes the input file’s name (filename) and a string
given on the command line as the --loader_opts=... argument (loader_opts), which
you can use to pass options to this method. Similarly, you can override the
finalize() method to do something after the upload is complete.
Using the Bulk Loader Tool | 285](https://image.slidesharecdn.com/programminggoogleappengine-100608200404-phpapp01/85/Programming-google-app-engine-306-320.jpg)

![specifies which property goes in which column of the resulting CSV file, and can include
value transformation functions to get the entity data into a format accepted by your
spreadsheet program.
Here is a simple exporter definition file that is symmetric with the loader definition
example in the previous section. Data downloaded with this exporter can be loaded
back in with the loader. Let’s call this file exporters.py:
from google.appengine.tools import bulkloader
import datetime
# Import the app's data models directly into
# this namespace. We must add the app
# directory to the path explicitly.
import sys
import os.path
sys.path.append(
os.path.abspath(
os.path.dirname(
os.path.realpath(__file__))))
from models import *
def make_str_for_date(d):
if d:
return d.strftime('%m/%d/%Y')
else:
return ''
class BookExporter(bulkloader.Exporter):
def __init__(self):
bulkloader.Exporter.__init__(self, 'Book',
[('title', str, None),
('author', str, ''),
('copyright_year', int, ''),
('author_birthdate', make_str_for_date, ''),
])
exporters = [BookExporter]
The exporter definition file must do several things:
1. It must import or define a data model class for each kind to export, using the Python
data modeling API. The exporter file does not have the app directory in the module
load path, so the exporter file must add it. The modules should be imported directly
into the local namespace.
2. It must define (or import) an exporter class for each kind to export, a subclass of
the Exporter class in the package google.appengine.tools.bulkloader. This class
must have a constructor (an __init__() method) that calls the parent class’s con-
structor with arguments that describe the CSV file’s columns.
3. It must define a module-global variable named exporters, whose value is a list of
exporter classes.
Using the Bulk Loader Tool | 287](https://image.slidesharecdn.com/programminggoogleappengine-100608200404-phpapp01/85/Programming-google-app-engine-308-320.jpg)
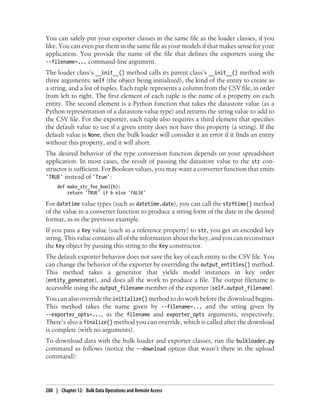
![Python 2.5.1 (r251:54863, Feb 6 2009, 19:02:12)
[GCC 4.0.1 (Apple Inc. build 5465)]
The db, users, urlfetch, and memcache modules are imported.
clock> import os.path
clock> import sys
clock> sys.path.append(os.path.realpath('.'))
clock> import models
clock> books = models.Book.all().fetch(6)
clock> books
[<models.Book object at 0x7a2c30>, <models.Book object at 0x7a2bf0>,
<models.Book object at 0x7a2cd0>, <models.Book object at 0x7a2cb0>,
<models.Book object at 0x7a2d30>, <models.Book object at 0x7a2c90>]
clock> books[0].title
u'The Grapes of Wrath'
clock> from google.appengine.api import mail
clock> mail.send_mail('juliet@example.com', 'test@example.com',
'Test email', 'This is a test message.')
clock>
To exit the shell, press Ctrl-D.
Using the Remote API from a Script
You can call the remote API directly from your own Python scripts using a library from
the Python SDK. This configures the Python API to use the remote API handler for your
application for all service calls, so you can use the service APIs as you would from a
request handler directly in your scripts.
Here’s a simple example script that prompts for a developer account email address and
password, then accesses the datastore of a live application:
#!/usr/bin/python
import getpass
import sys
# Add the Python SDK to the package path.
# Adjust these paths accordingly.
sys.path.append('~/google_appengine')
sys.path.append('~/google_appengine/lib/yaml/lib')
from google.appengine.ext.remote_api import remote_api_stub
from google.appengine.ext import db
import models
# Your app ID and remote API URL path go here.
APP-ID = 'app-id'
REMOTE_API_PATH = '/remote_api'
def auth_func():
email_address = raw_input('Email address: ')
password = getpass.getpass('Password: ')
Using the Remote API from a Script | 291](https://image.slidesharecdn.com/programminggoogleappengine-100608200404-phpapp01/85/Programming-google-app-engine-312-320.jpg)
![return email_address, password
def initialize_remote_api(app-id=APP-ID,
path=REMOTE_API_PATH):
remote_api_stub.ConfigureRemoteApi(
app-id,
path,
auth_func)
remote_api_stub.MaybeInvokeAuthentication()
def main(args):
initialize_remote_api()
books = models.Book.all().fetch(10)
for book in books:
print book.title
return 0
if __name__ == '__main__':
sys.exit(main(sys.argv[1:]))
The ConfigureRemoteApi() function (yes, it has a TitleCase name) sets up the remote
API access. It takes as arguments the application ID, the remote API handler URL path,
and a callable that returns a tuple containing the email address and password to use
when connecting. In this example, we define a function that prompts for the email
address and password, and pass the function to ConfigureRemoteApi().
The function also accepts an optional fourth argument specifying an alternate domain
name for the connection. By default, it uses app-id.appspot.com, where app-id is the
application ID in the first argument.
The MaybeInvokeAuthentication() function sends an empty request to verify that the
email address and password are correct, and raises an exception if they are not. (With-
out this, the script would wait until the first remote call to verify the authentication.)
Remember that every call to an App Engine library that performs a service call does so
over the network via an HTTP request to the application. This is inevitably slower than
running within the live application. It also consumes application resources like web
requests do, including bandwidth and request counts, which are not normally con-
sumed by service calls in the live app.
On the plus side, since your code runs on your local computer, it is not constrained by
the App Engine runtime sandbox or the 30-second request deadline. You can run long
jobs and interactive applications on your computer without restriction, using any Py-
thon modules you like—at the expense of consuming app resources to marshal service
calls over HTTP.
292 | Chapter 12: Bulk Data Operations and Remote Access](https://image.slidesharecdn.com/programminggoogleappengine-100608200404-phpapp01/85/Programming-google-app-engine-313-320.jpg)


![And here’s the request handler script:
from google.appengine.ext import webapp
from google.appengine.ext.webapp.util import run_wsgi_app
from google.appengine.ext import deferred
import invitation
class SendInvitationHandler(webapp.RequestHandler):
def get(self):
# recipient = ...
deferred.defer(invitation.send_invitation, recipient)
# ...
application = webapp.WSGIApplication([
('/sendinvite', SendInvitationHandler),
], debug=True)
def main():
run_wsgi_app(application)
if __name__ == '__main__':
main()
You set up the request handler for deferred work using the following configuration in
your app.yaml file:
handlers:
- url: /_ah/queue/deferred
script: $PYTHON_LIB/google/appengine/ext/deferred/
login: admin
This maps the URL path /_ah/queue/deferred to the deferred module in the API.
($PYTHON_LIB is replaced with the path to the Python directory containing the SDK on
App Engine.) Tasks created with defer() use this URL path by default. login: admin
restricts this handler to task queues and application developers.
The defer() function enqueues a task on the default queue that calls the given callable
object with the given arguments. (Despite its use of the URL /_ah/queue/deferred for
deferred tasks, this utility uses the default queue, not a queue named deferred.) The
arguments are serialized and deserialized using Python’s pickle module; all argument
values must be pickle-able.
Most Python callable objects can be used with defer(), including functions and classes
defined at the top level of a module, methods of objects, class methods, instances of
classes that implement __call__(), and built-in functions and methods. defer() does
not work with lambda functions, nested functions, nested classes, or instances of nested
classes. The task handler must be able to access the callable object by name, possibly
via a serializable object, since it does not preserve the scope of the call to defer().
You also can’t use a function or class in the same module as the request handler class
from which you call defer(). This is because pickle believes the module of the request
handler class to be __main__ while it is running, and so it doesn’t save the correct
Task Queues | 303](https://image.slidesharecdn.com/programminggoogleappengine-100608200404-phpapp01/85/Programming-google-app-engine-324-320.jpg)


![The url() method sets a custom URL for the task. If no custom URL is set, the task
calls the default URL for the queue.
The param() method adds a request parameter to be included with the task’s HTTP
request. The method takes the name of the parameter, and either a String or a
byte[] as the value of the parameter. Parameters are added to the HTTP request body
URL-encoded, similar to a web form. The removeParam() method removes a parameter
from the TaskOptions object; it takes the parameter name as its argument.
You can also set the HTTP request body with the payload() method. This method takes
the request body as a String. You can also include a character set specification (such
as "utf-8") as the second argument. You can’t set both a payload and parameters for
the same task.
You can control other aspects of the HTTP request as well. The method() method sets
the HTTP method; the default is "POST". You can also add arbitrary HTTP headers by
calling the header() method (which takes a String key and String value as arguments)
for each header, or by calling the headers() method with a Map<String, String>.
You can set a delay for the task. The countdownMillis() method sets the delay as a
number of milliseconds (a long) from the time the task is enqueued. The etaMillis()
method sets the delay to be an absolute date and time, as a number of milliseconds
from midnight, January 1, 1970, UTC.
To set the name for a task, you call the name() method. As described earlier, the name
ensures that only one task with that name can be enqueued for a period of time, at least
seven days with the current implementation. If you do not specify a name, the system
assigns a unique name that has not been used in the past seven days.
An app can have up to 10 named queues, each with its own task execution rate (token
replenishment rate and bucket size). In a Java app, you configure queues using a con-
figuration file named queue.xml, in the WEB-INF/ directory, which looks like this:
<queue-entries>
<queue>
<name>fastest</name>
<rate>10/s</rate>
<bucket-size>10</bucket-size>
</queue>
<queue>
<name>limitedemail</name>
<rate>1000/d</rate>
<bucket-size>5</bucket-size>
</queue>
</queue-entries>
The file includes one <queue> element per queue to be configured. Each queue has a
<name>, a token replenishment <rate>, and a <bucket-size>.
306 | Chapter 13: Task Queues and Scheduled Tasks](https://image.slidesharecdn.com/programminggoogleappengine-100608200404-phpapp01/85/Programming-google-app-engine-327-320.jpg)


![Because App Engine promises not to make backward-incompatible changes to the
runtime environment, the default version of Django on App Engine (in version 1 of the
Python runtime) is still 0.96. However, App Engine includes a mechanism for explicitly
selecting a newer version, such that all subsequent attempts to import Django modules
will use the new version. You can use this mechanism in your main request handler
script to use Django 1.1 for your app.
Before you do that, you must download and install Django 1.1 on your local computer.
You won’t need to add it to your application directory (it’s available when running on
App Engine), but you will need it locally while building and testing your application.
Go to the Django project website and download Django 1.1:
http://www.djangoproject.com/download/1.1/tarball/
Follow the instructions to install the Python modules in your local Python environment
by running the following commands. (The sudo command will require your computer’s
administrator password.)
tar xzvf Django-1.1.tar.gz
cd Django-1.1
sudo python setup.py install
Django 1.1 was the latest release when this book was published. If you
see a newer version available on the Django website, be sure to check
the App Engine documentation to confirm that the new version has been
added to the Python runtime environment before using it locally.
If you’d prefer to use your own copy of Django instead of the one pro-
vided by the Python runtime environment (such as a newer version not
yet in the environment), you can add it directly to your application di-
rectory. Doing so requires an additional step to remove the version of
Django that’s part of the runtime environment from the Python module
search path. To do this, put this in your main request handler script
prior to importing django modules:
for k in [k for k in sys.modules if k.startswith('django')]:
del sys.modules[k]
Creating a Django Project
In Django, the complete set of code, configuration, and static files for a website is called
a project. You create a new project by running a command that was installed with
Django, called django-admin.py, like so:
django-admin.py startproject myproject
This command creates in your current working directory a new directory named after
the project, in this case myproject/, with several starter files:
Creating a Django Project | 315](https://image.slidesharecdn.com/programminggoogleappengine-100608200404-phpapp01/85/Programming-google-app-engine-336-320.jpg)
![__init__.py
A file that tells Python that code files in this directory can be imported as modules
(this directory is a Python package).
manage.py
A command-line utility you will use to build and manage this project, with many
features.
settings.py
Configuration for this project, in the form of a Python source file.
urls.py
Mappings of URL paths to Python code, as a Python source file.
If you’re following along with a Django tutorial or book, the next step is usually to start
the Django development server using the manage.py command. If you did so now, you
would be running the Django server, but it would know nothing of App Engine. To
run the project in the App Engine development server, we must connect the Django
project to the App Engine runtime environment using a request handler script and
configuration in the app.yaml file.
The Request Handler Script
All that’s left to do is to invoke the Django project from a handler script. Exam-
ple 14-1 is a minimal script that hands the request off to Django 1.1 using the WSGI
runner function from the webapp library. Create a file named main.py in the Django
project directory you created in the previous step (e.g., myproject/).
Example 14-1. A simple request handler for invoking the Django framework
from google.appengine.dist import use_library
use_library('django', '1.1')
import os
os.environ['DJANGO_SETTINGS_MODULE'] = 'settings'
import django.core.handlers.wsgi
from google.appengine.ext.webapp import util
def main():
# Run Django via WSGI.
application = django.core.handlers.wsgi.WSGIHandler()
util.run_wsgi_app(application)
if __name__ == '__main__':
main()
The use_library() function is an App Engine utility that tells the runtime environment
that version 1.1 of Django should be used when importing libraries from the django
package. Without this call, importing from django would use Django 0.96.
316 | Chapter 14: The Django Web Application Framework](https://image.slidesharecdn.com/programminggoogleappengine-100608200404-phpapp01/85/Programming-google-app-engine-337-320.jpg)

![InstallAppengineHelperForDjango(), and adding the version identifier as an argument
to that function call. For instance, to select Django 1.0:
InstallAppengineHelperForDjango('1.0')
Now that the Helper is installed, you can start the App Engine development server
using manage.py as you would with any other Django project:
python manage.py runserver
Thanks to the Helper, this is no different than running the dev_appserver.py command
or using the Launcher to start the server. If you’d prefer to use those methods, you may,
without losing any functionality of the Helper.
Test that the default project is working locally by visiting the server’s URL in a web
browser. By default, Django uses port 8000, not 8080, so this URL is:
http://localhost:8000/
The Helper adds several features to manage.py that work with the App Engine devel-
opment server. One especially useful feature is the shell command, which starts a
Python shell in the context of the Django project—and the development server. You
can use this shell to import App Engine modules and interact with the development
server, the simulated sandbox, and the simulated services.
python manage.py shell
Here is a simple shell session that demonstrates calling the development server’s
simulated Mail service (several harmless warning messages have been elided):
% python manage.py shell
Python 2.6.1 (r261:67515, Jul 7 2009, 23:51:51)
[GCC 4.2.1 (Apple Inc. build 5646)] on darwin
Type "help", "copyright", "credits" or "license" for more information.
(InteractiveConsole)
>>> from google.appengine.api import mail
>>> mail.send_mail('sender@example.com', 'to@example.com', 'my subject',
'message body')
INFO:root:MailService.Send
INFO:root: From: sender@example.com
INFO:root: To: to@example.com
INFO:root: Subject: my subject
INFO:root: Body:
INFO:root: Content-type: text/plain
INFO:root: Data length: 12
INFO:root:You are not currently sending out real email. If you have sendmail
installed you can use it by using the server with --enable_sendmail
>>>
You can open a Python shell that connects to the live application via remote_api using
the console command. This requires that you set up remote_api as described in Chap-
ter 12 using a URL path of /remote_api.
python manage.py console
The Django App Engine Helper | 319](https://image.slidesharecdn.com/programminggoogleappengine-100608200404-phpapp01/85/Programming-google-app-engine-340-320.jpg)
![from appengine_django.models import BaseModel
from google.appengine.ext import db
class Book(BaseModel):
title = db.StringProperty()
author = db.StringProperty()
copyright_year = db.IntegerProperty()
author_birthdate = db.DateProperty()
class BookReview(BaseModel):
book = db.ReferenceProperty(Book, collection_name='reviews')
review_author = db.UserProperty()
review_text = db.TextProperty()
rating = db.StringProperty(choices=['Poor', 'OK', 'Good', 'Very Good', 'Great'],
default='Great')
create_date = db.DateTimeProperty(auto_now_add=True)
Edit views.py to query the database for books and pass the query object to the template,
like this:
from django.shortcuts import render_to_response
from google.appengine.ext import db
from bookstore import models
def home(request):
q = models.Book.all().order('title')
return render_to_response('bookstore/index.html',
{ 'books': q })
Finally, edit templates/bookstore/index.html to display the list of books:
<html>
<body>
<p>Welcome to The Book Store!</p>
<p>Books in our catalog:</p>
<ul>
{% for book in books %}
<li>{{ book.title }}, by {{ book.author }} ({{ book.copyright_year }})</li>
{% endfor %}
</ul>
</body>
</html>
Notice that we’re passing the db.Query object directly to the template. The template
uses the query object’s iterator interface to fetch the Book entities from the datastore.
If you load the page right now (and feel free to do so to test the code), you’ll see an
empty list of books. Let’s create some books from the Python shell. Stop the server (hit
Ctrl-C), then start the shell:
python manage.py shell
You can create objects in the development server’s datastore by typing Python code
directly into the shell. Here is a complete shell session, including output, that creates
several Book entities:
Using App Engine Models With Django | 323](https://image.slidesharecdn.com/programminggoogleappengine-100608200404-phpapp01/85/Programming-google-app-engine-344-320.jpg)
![% python manage.py shell
Python 2.6.1 (r261:67515, Jul 7 2009, 23:51:51)
[GCC 4.2.1 (Apple Inc. build 5646)] on darwin
Type "help", "copyright", "credits" or "license" for more information.
(InteractiveConsole)
>>> from bookstore import models
>>> import datetime
>>> b = models.Book(title='Grapes of Wrath, The', author='Steinbeck, John',
copyright_year=1939, author_birthdate=datetime.date(1902, 2, 27))
>>> b.put()
datastore_types.Key.from_path(u'Book', 1,
_app_id_namespace=u'google-app-engine-django')
>>> b = models.Book(title='Cat in the Hat, The', author='Dr. Seuss',
copyright_year=1957, author_birthdate=datetime.date(1904, 3, 2))
>>> b.put()
datastore_types.Key.from_path(u'Book', 2,
_app_id_namespace=u'google-app-engine-django')
>>>
Exit the shell (press Ctrl-D), then restart the server and load the page.
Using Django Unit Tests and Fixtures
The Django App Engine Helper includes support for unit tests using Django’s unit test
runner and the App Engine development server. The unit test runner runs tests inside
the development server’s environment, so tests can access the simulated services, in-
cluding the simulated datastore. The test runner supports tests defined with the
standard Python libraries unittest or doctest, or other test frameworks with test runner
customizations. Django provides its own class for defining unittest test cases, called
django.test.TestCase, which adds several Django-specific features.
For unittest tests, the runner looks in files in the Django application directory (e.g.,
bookstore/) named models.py and tests.py for classes that inherit from
unittest.TestCase or django.test.TestCase. Each method of a test case class whose
name begins with test is a separate test. For each test, the runner initializes the test
environment, instantiates the TestCase class, and calls the method for the test. If the
class defines a setUp() method, it calls it before each test. If the class defines a tear
Down() method, it calls it after each test. You can use setUp() and tearDown() to create
and clean up test data and preparation for every test in a test case.
The TestCase class provides methods that cause the test to report failure if the condi-
tions tested are not met. self.assertEqual() takes two arguments, and causes the test
to fail if the arguments are not equal. self.assert_() takes one argument, and fails the
test if the argument is a false value (False, None, 0, the empty string, and so forth).
self.assertRaises() takes an exception class, a callable object, and arguments for the
callable object, calls the callable, then fails the test if the callable does not raise the given
exception. There are several other test methods, as well. Each of these methods takes
an optional message argument that is printed in the test report if the test fails.
324 | Chapter 14: The Django Web Application Framework](https://image.slidesharecdn.com/programminggoogleappengine-100608200404-phpapp01/85/Programming-google-app-engine-345-320.jpg)
![Enter Python statements to create test data in the datastore. Here is a shell session that
creates a few Book and BookReview entities:
% python manage.py shell
Python 2.6.1 (r261:67515, Jul 7 2009, 23:51:51)
[GCC 4.2.1 (Apple Inc. build 5646)] on darwin
Type "help", "copyright", "credits" or "license" for more information.
(InteractiveConsole)
>>> from google.appengine.ext import db
>>> from bookstore import models
>>> b1 = models.Book(title="one", author="")
>>> b1.put()
datastore_types.Key.from_path(u'Book', 1,
_app_id_namespace=u'google-app-engine-django')
>>> br1 = models.BookReview(book=b1, review_text="review1")
>>> br2 = models.BookReview(book=b1, review_text="review2")
>>> br3 = models.BookReview(book=b1, review_text="review3")
>>> db.put(br1)
datastore_types.Key.from_path(u'BookReview', 2,
_app_id_namespace=u'google-app-engine-django')
>>> db.put(br2)
datastore_types.Key.from_path(u'BookReview', 3,
_app_id_namespace=u'google-app-engine-django')
>>> db.put(br3)
datastore_types.Key.from_path(u'BookReview', 4,
_app_id_namespace=u'google-app-engine-django')
>>> b2 = models.Book(title="two", author="")
>>> b2.put()
datastore_types.Key.from_path(u'Book', 5,
_app_id_namespace=u'google-app-engine-django')
>>> b2br1 = models.BookReview(book=b2, review_text="review1")
>>> b2br2 = models.BookReview(book=b2, review_text="review2")
>>> db.put(b2br1)
datastore_types.Key.from_path(u'BookReview', 6,
_app_id_namespace=u'google-app-engine-django')
>>> db.put(b2br2)
datastore_types.Key.from_path(u'BookReview', 7,
_app_id_namespace=u'google-app-engine-django')
>>>
Exit the shell (Ctrl-D).
Create a directory named fixtures/ in the bookstore/ app directory. Now run the
dumpdata command, and redirect its output to a file in this new directory:
python manage.py dumpdata bookstore >bookstore/fixtures/bookstore.json
The resulting file contains representations of all of the datastore entities for the kinds
whose models are defined in the bookstore app, in the JSON format.
To load this fixture for every test in a test case, you create a class attribute for the
django.test.TestCase named fixtures, whose value is a list of the names of the fixture
files to load from the fixtures/ directory. Here’s another (trivial) test case that uses
fixtures, which you can put in models.py:
326 | Chapter 14: The Django Web Application Framework](https://image.slidesharecdn.com/programminggoogleappengine-100608200404-phpapp01/85/Programming-google-app-engine-347-320.jpg)
![# ...
class TestBooksAndReviews(test.TestCase):
fixtures = ['bookstore.json']
def testBookReviewOrder(self):
d = Book.all().filter('title =', 'one').get()
self.assert_(d, 'Book "one" must be in test fixture')
q = BookReview.all().filter('book =', d)
q.order('-create_date')
reviews = q.fetch(3)
self.assertEqual('review3', reviews[0].review_text)
self.assertEqual('review2', reviews[1].review_text)
self.assertEqual('review1', reviews[2].review_text)
Run the new test using the test command, as before:
python manage.py test bookstore
For each test in the TestBooksAndReviews test case, Django flushes the simulated data-
store, loads the fixtures, calls the test case’s setUp() method (if any), then calls the test
method, and finally calls the tearDown() method (if any).
You can also load fixtures into the project’s development datastore manually using the
python manage.py loaddata command:
python manage.py loaddata bookstore/fixtures/bookstore.json
See the Django documentation for more information about unit testing and fixtures.
Using Django Forms
Django includes a powerful feature for building web forms based on data model defi-
nitions. The Django forms library can generate HTML for forms, validate that submit-
ted data meets the requirements of the model, and redisplay the form to the user with
error messages. The default appearance is useful, and you can customize the appearance
extensively.
Django’s version of the form library only works with the Django data modeling API,
and does not work directly with App Engine models. Thankfully, the App Engine Py-
thon runtime environment includes an App Engine–compatible implementation of
Django forms, in the package google.appengine.ext.db.djangoforms.
We won’t go into the details of how Django forms work—see the Django documen-
tation for a complete explanation—but let’s walk through a quick example to see how
the pieces fit together. Our example will use the following behavior for creating and
editing Book entities:
• An HTTP GET request to /books/book/ displays an empty form for creating a new
Book.
Using Django Forms | 327](https://image.slidesharecdn.com/programminggoogleappengine-100608200404-phpapp01/85/Programming-google-app-engine-348-320.jpg)
![To display the form, we simply pass the BookForm object to a template. There are several
methods on the object for rendering it in different ways; we’ll use the as_p() method
to display the form fields in <p> elements.
Create that template now, named templates/bookstore/bookform.html:
<html>
<body>
{% if book_id %}
<p>Edit book {{ book_id }}:</p>
<form action="/books/book/{{ book_id }}" method="POST">
{% else %}
<p>Create book:</p>
<form action="/books/book/" method="POST">
{% endif %}
{{ form.as_p }}
<input type="submit" />
</form>
</body>
</html>
The template is responsible for outputting the <form> tag and the Submit button. The
BookForm does the rest.
Before we test this, let’s make one more change to the book-listing template to add
some “create” and “edit” links. Edit templates/bookstore/index.html:
<html>
<body>
<p>Welcome to The Book Store!</p>
<p>Books in our catalog:</p>
<ul>
{% for book in books %}
<li>{{ book.title }}, by {{ book.author }} ({{ book.copyright_year }})
[<a href="/books/book/{{ book.key.id }}">edit</a>]</li>
{% endfor %}
</ul>
<p>[<a href="/books/book/">add a book</a>]</p>
</body>
</html>
Restart the development server, then load the book list URL (/books/) in the browser.
Click “add a book” to show the book creation form. Enter some data for the book, then
submit it to create it.
The default form widget for a date field is just a text field, and it’s finicky
about the format. In this case, the “author birthdate” field expects input
in the form YYYY-MM-DD, such as 1902-02-27.
330 | Chapter 14: The Django Web Application Framework](https://image.slidesharecdn.com/programminggoogleappengine-100608200404-phpapp01/85/Programming-google-app-engine-351-320.jpg)

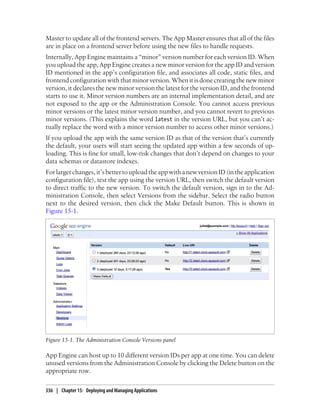

![Figure 15-3. The Administration Console log browser
The following command downloads request logs for the app in the development di-
rectory clock, and saves them to a file named logs.txt:
appcfg.py request_logs clock logs.txt
Request data appears in the file in a common format known as the Apache Combined
(or “NCSA Combined”) logfile format, one request per line (shown here as two lines
to fit on the page):
127.0.0.1 - - [05/Jul/2009:06:46:30 -0700] "GET /blog/ HTTP/1.1" 200 14598 -
"Mozilla/5.0 (Macintosh; U; Intel Mac OS X 10_5_8; en-us)...,gzip(gfe)"
From left to right, the fields are:
• The IP address of the client
• A - (an unused field retained for backward compatibility)
• The email address of the user who made the request, if the user is signed in using
Google Accounts; - otherwise
• The date and time of the request
• The HTTP command string in double quotes, including the method and URL path
• The HTTP response code returned by the server
• The size of the response, as a number of bytes
• The “Referrer” header provided by the client, usually the URL of the page that
linked to this URL
• The “User-Agent” header provided by the client, usually identifying the browser
and its capabilities
340 | Chapter 15: Deploying and Managing Applications](https://image.slidesharecdn.com/programminggoogleappengine-100608200404-phpapp01/85/Programming-google-app-engine-361-320.jpg)

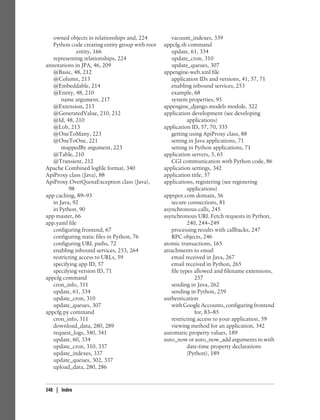
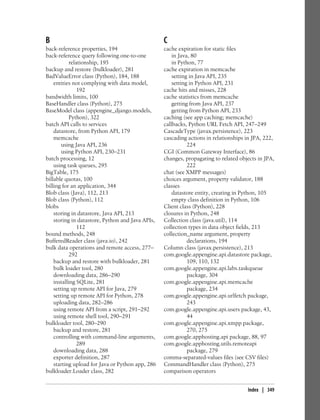
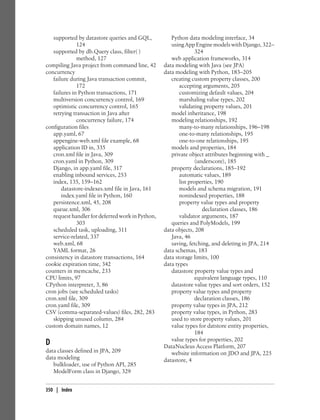


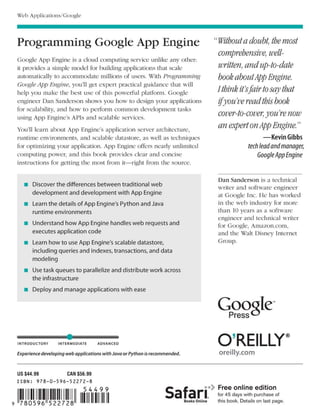


![Programming Google App Engine
by Dan Sanderson
Copyright © 2010 Dan Sanderson. All rights reserved.
Printed in the United States of America.
Published by O’Reilly Media, Inc., 1005 Gravenstein Highway North, Sebastopol, CA 95472.
O’Reilly books may be purchased for educational, business, or sales promotional use. Online editions
are also available for most titles (http://my.safaribooksonline.com). For more information, contact our
corporate/institutional sales department: (800) 998-9938 or corporate@oreilly.com.
Editor: Mike Loukides Indexer: Ellen Troutman Zaig
Production Editor: Sumita Mukherji Cover Designer: Karen Montgomery
Proofreader: Sada Preisch Interior Designer: David Futato
Illustrator: Robert Romano
Printing History:
November 2009: First Edition.
Nutshell Handbook, the Nutshell Handbook logo, and the O’Reilly logo are registered trademarks of
O’Reilly Media, Inc. Programming Google App Engine, the image of a waterbuck, and related trade dress
are trademarks of O’Reilly Media, Inc.
Many of the designations used by manufacturers and sellers to distinguish their products are claimed as
trademarks. Where those designations appear in this book, and O’Reilly Media, Inc., was aware of a
trademark claim, the designations have been printed in caps or initial caps.
While every precaution has been taken in the preparation of this book, the publisher and author assume
no responsibility for errors or omissions, or for damages resulting from the use of the information con-
tained herein.
TM
This book uses RepKover™, a durable and flexible lay-flat binding.
ISBN: 978-0-596-52272-8
[M]
1257864694](https://image.slidesharecdn.com/programminggoogleappengine-100608200404-phpapp01/75/Programming-google-app-engine-5-2048.jpg)


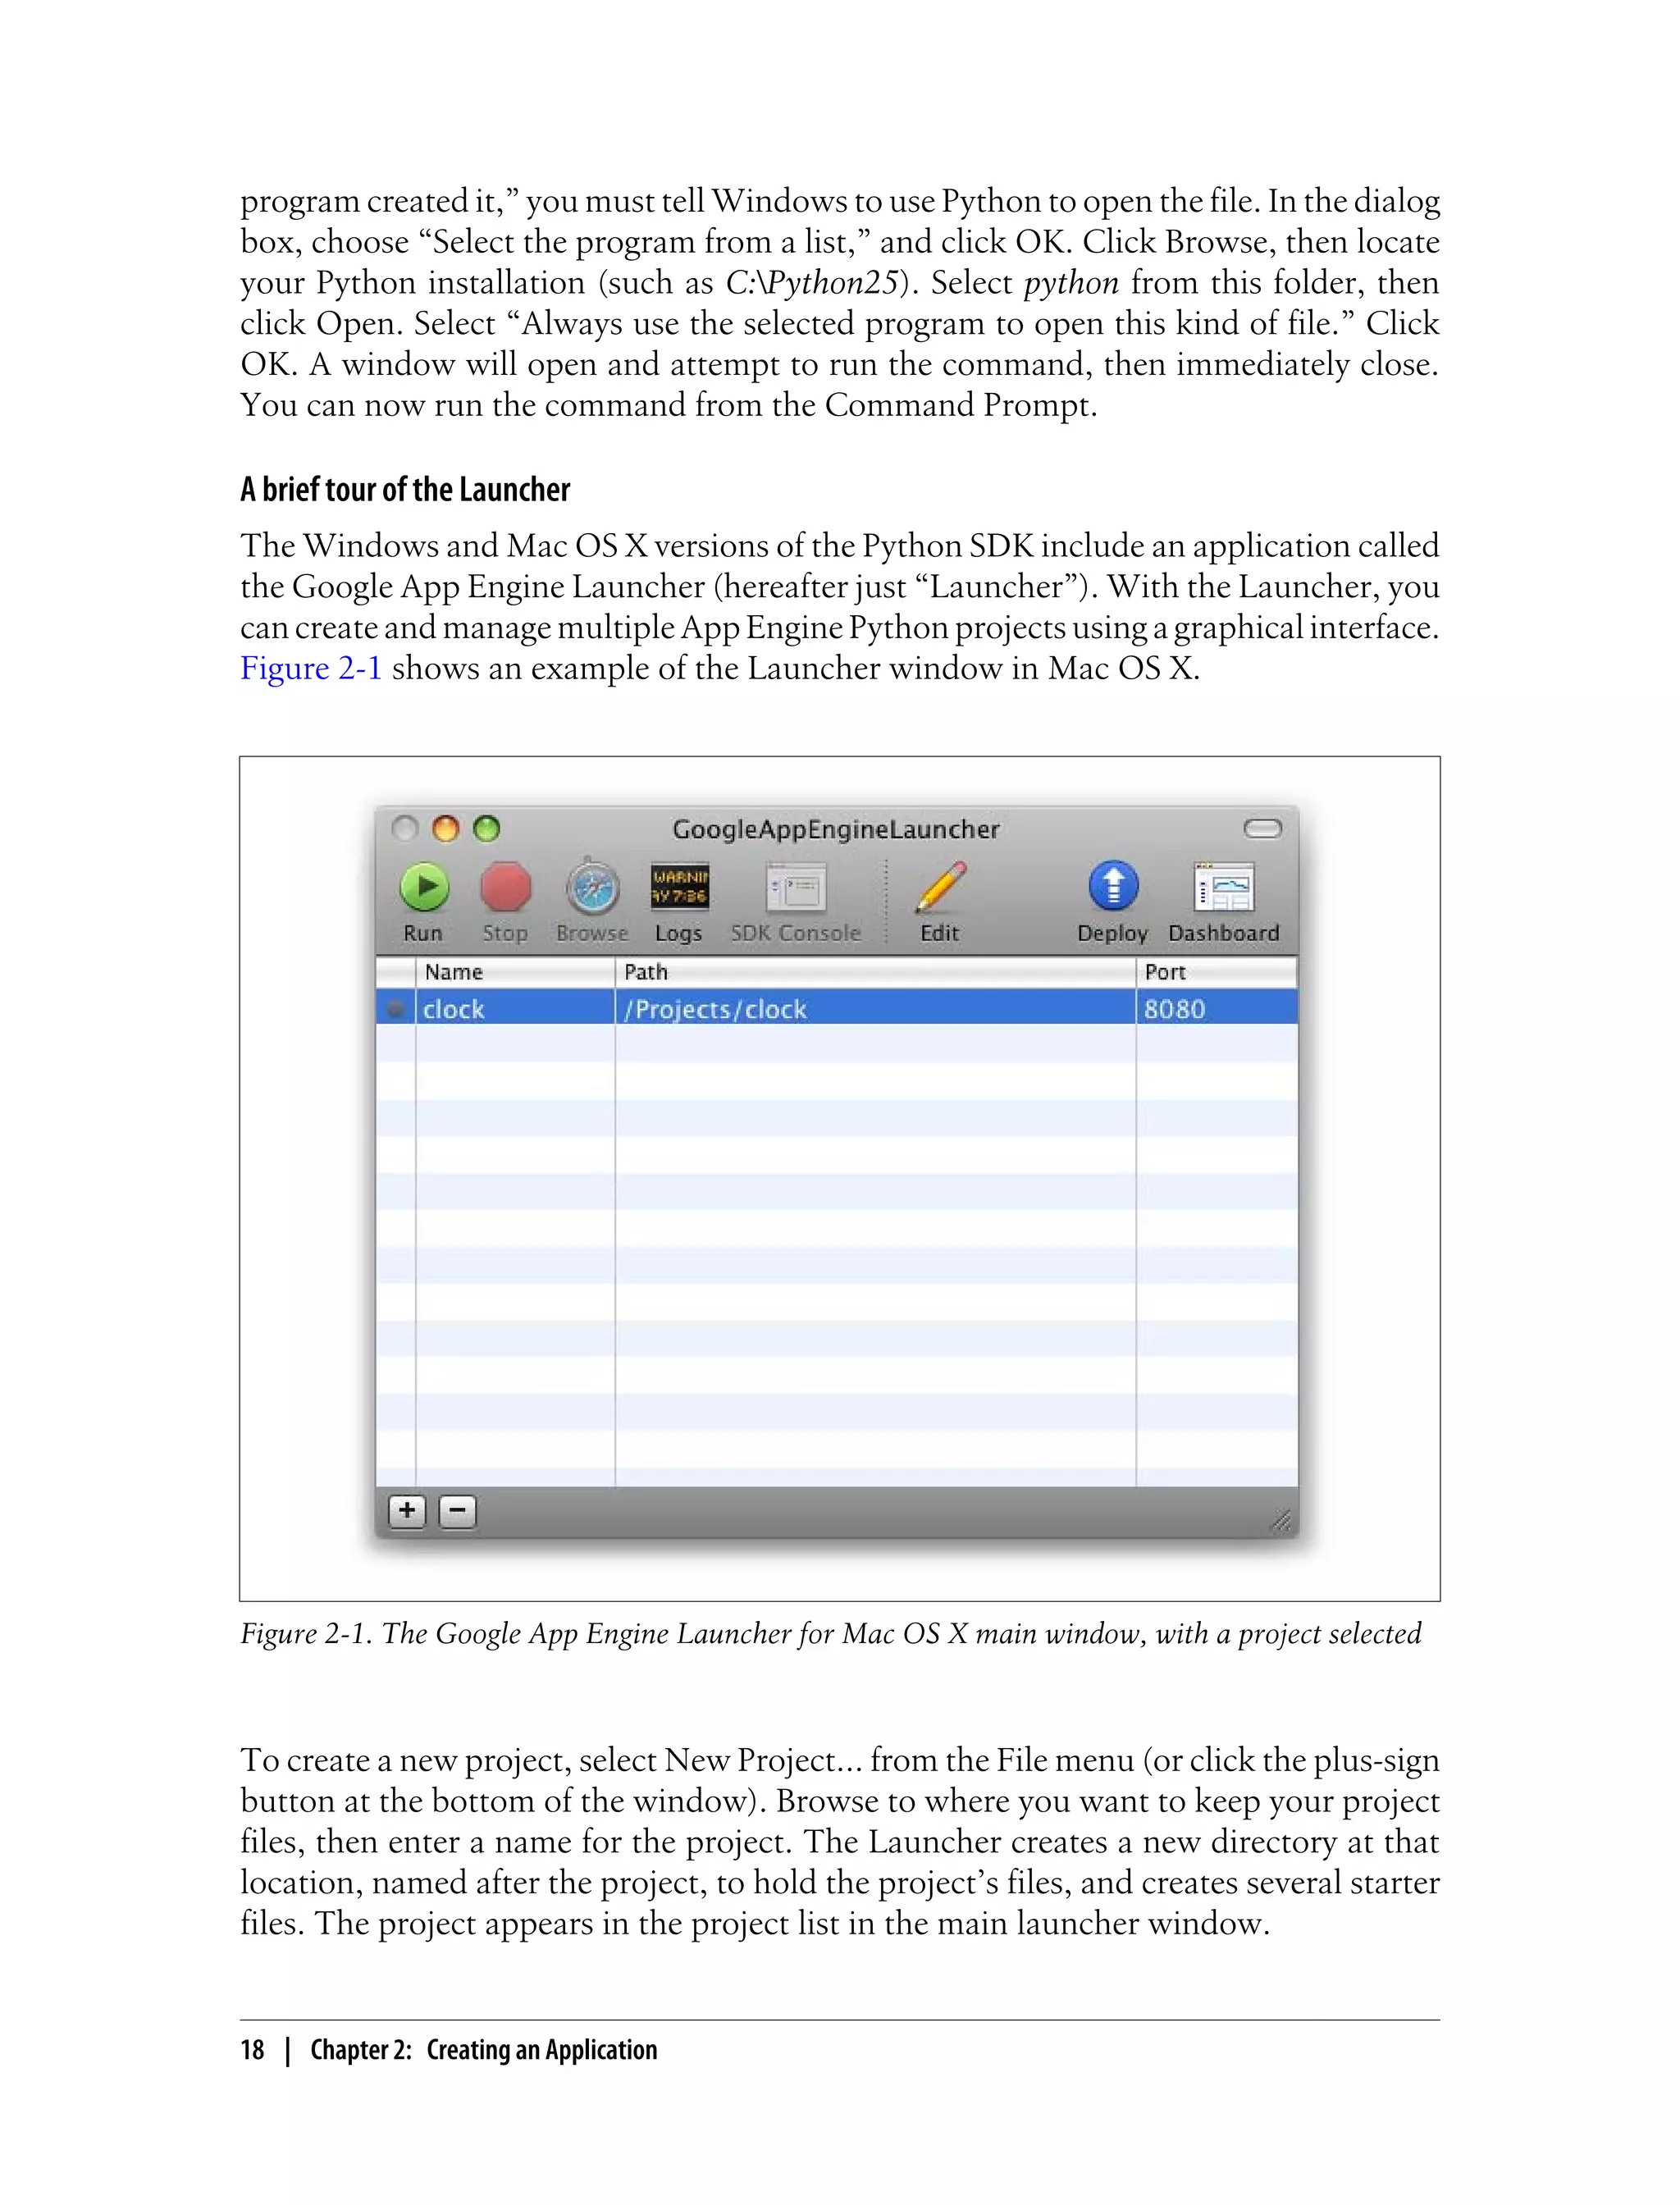
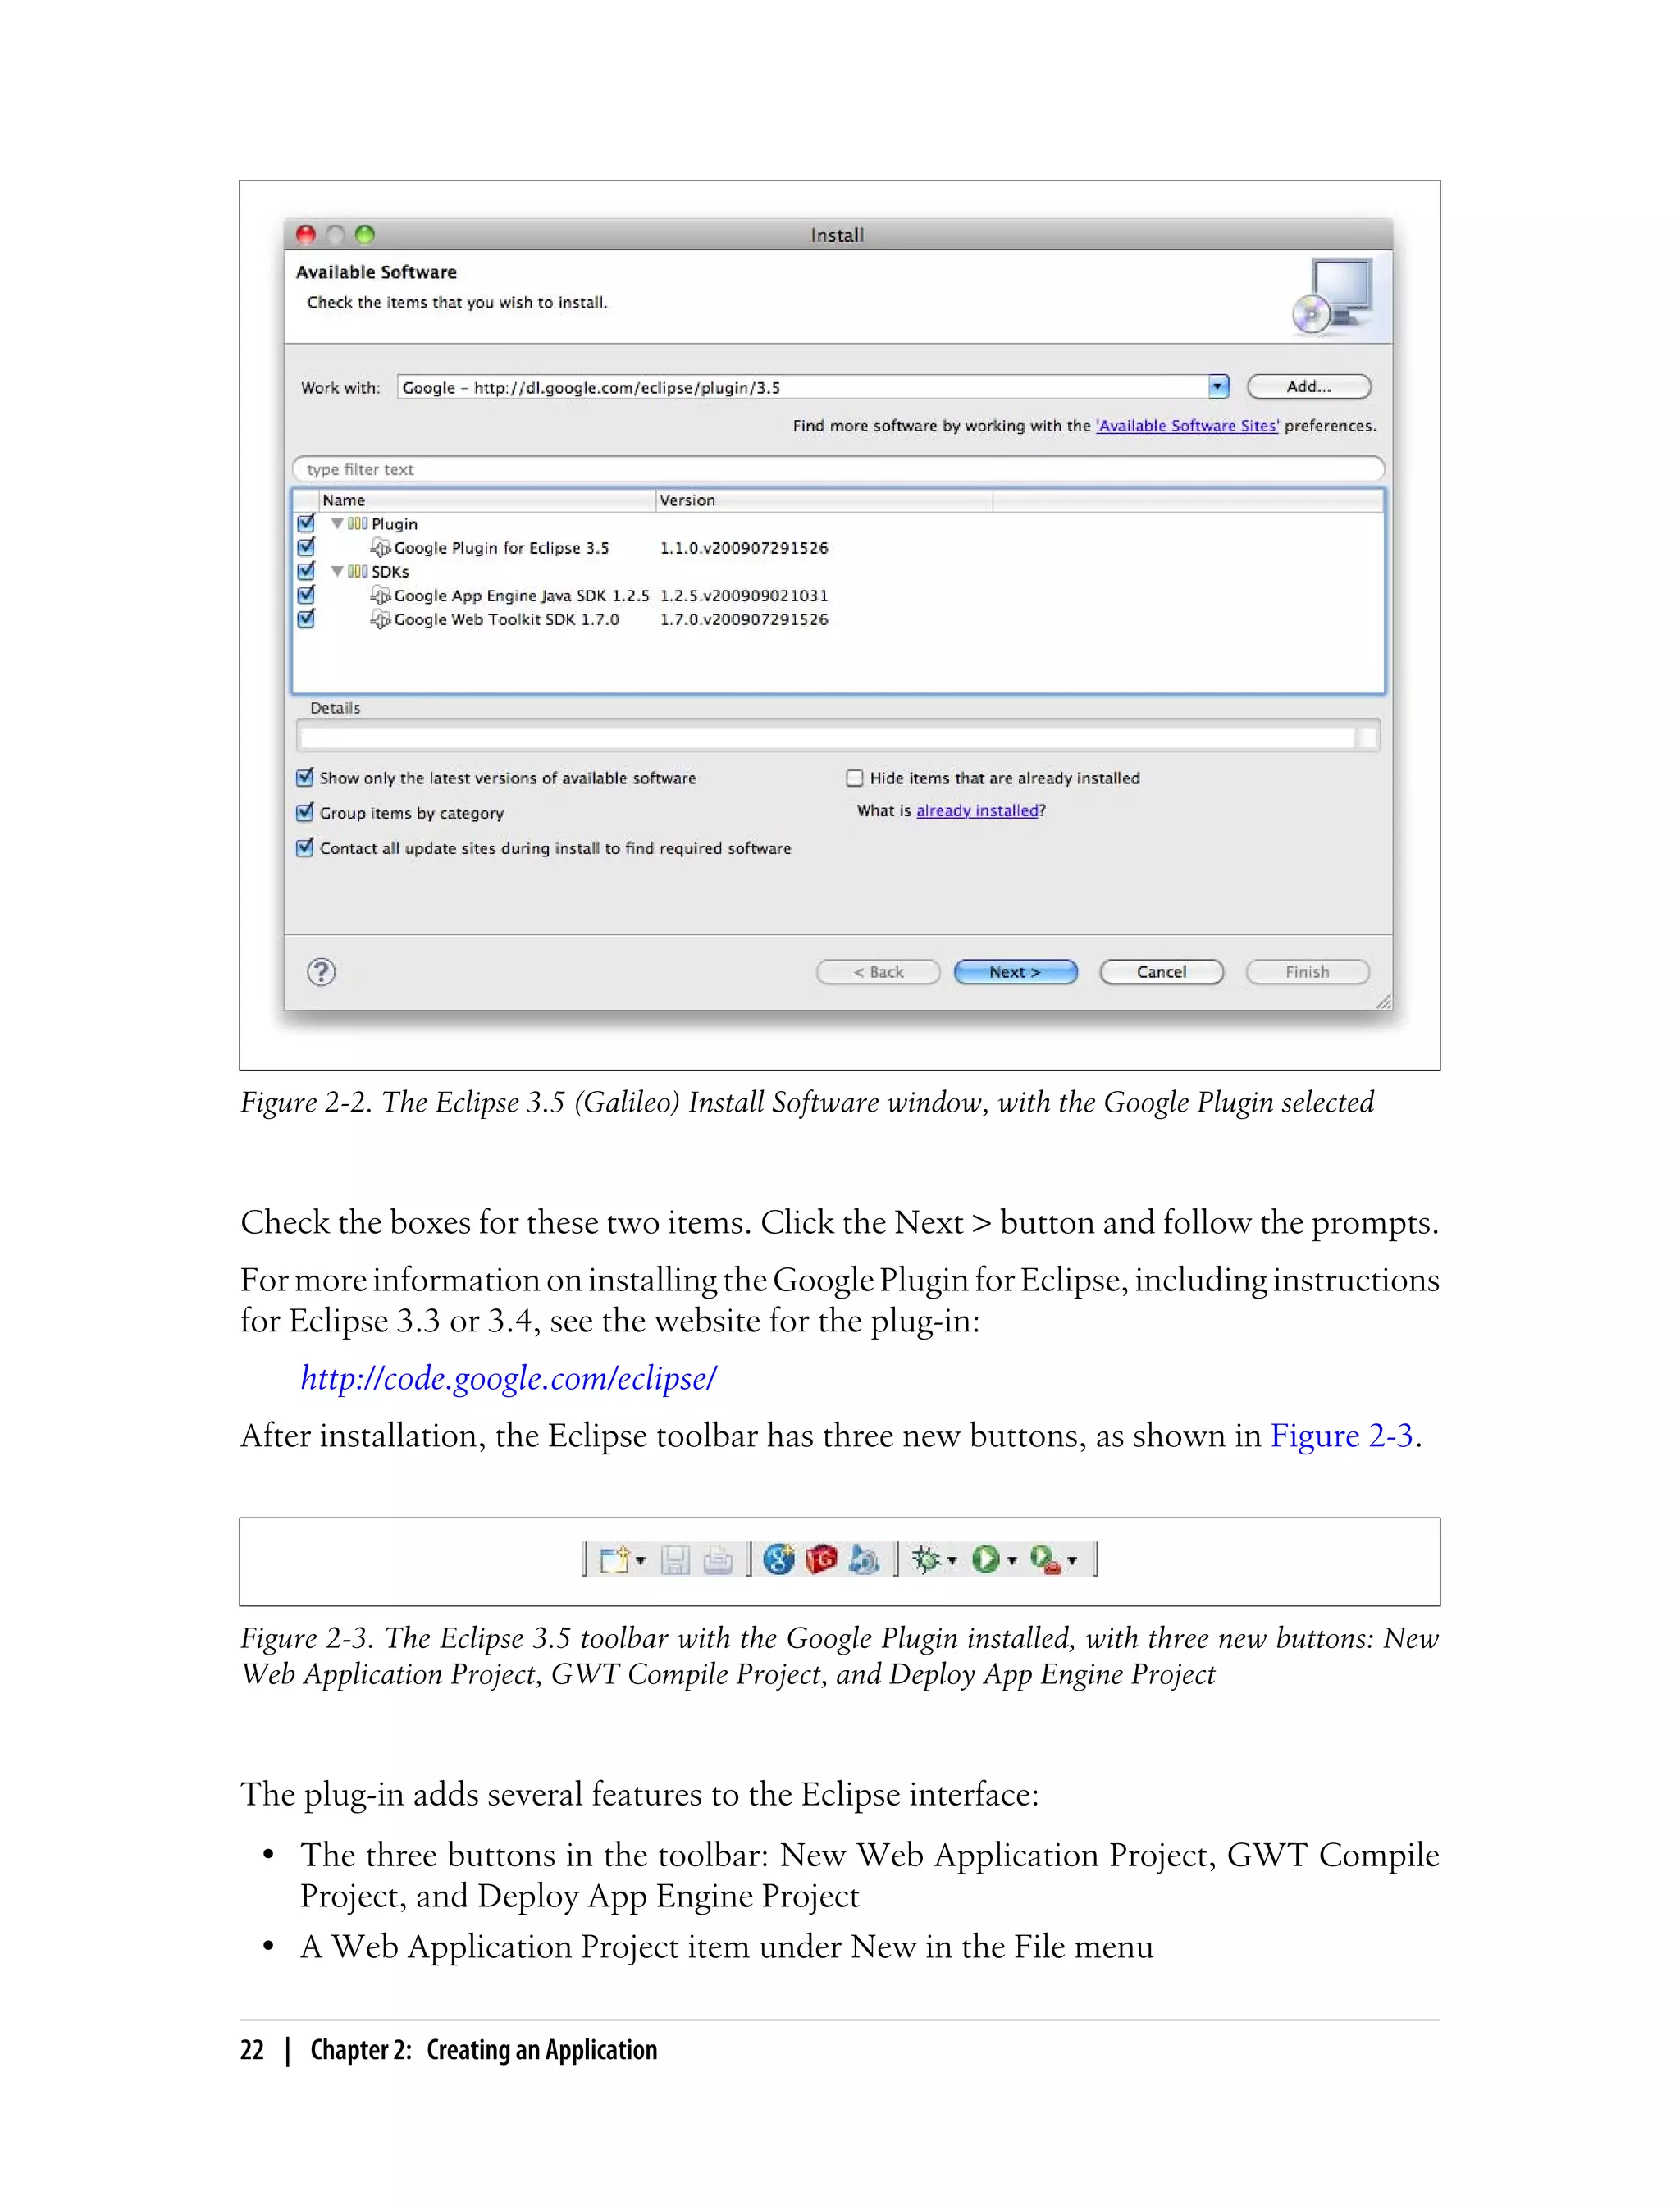


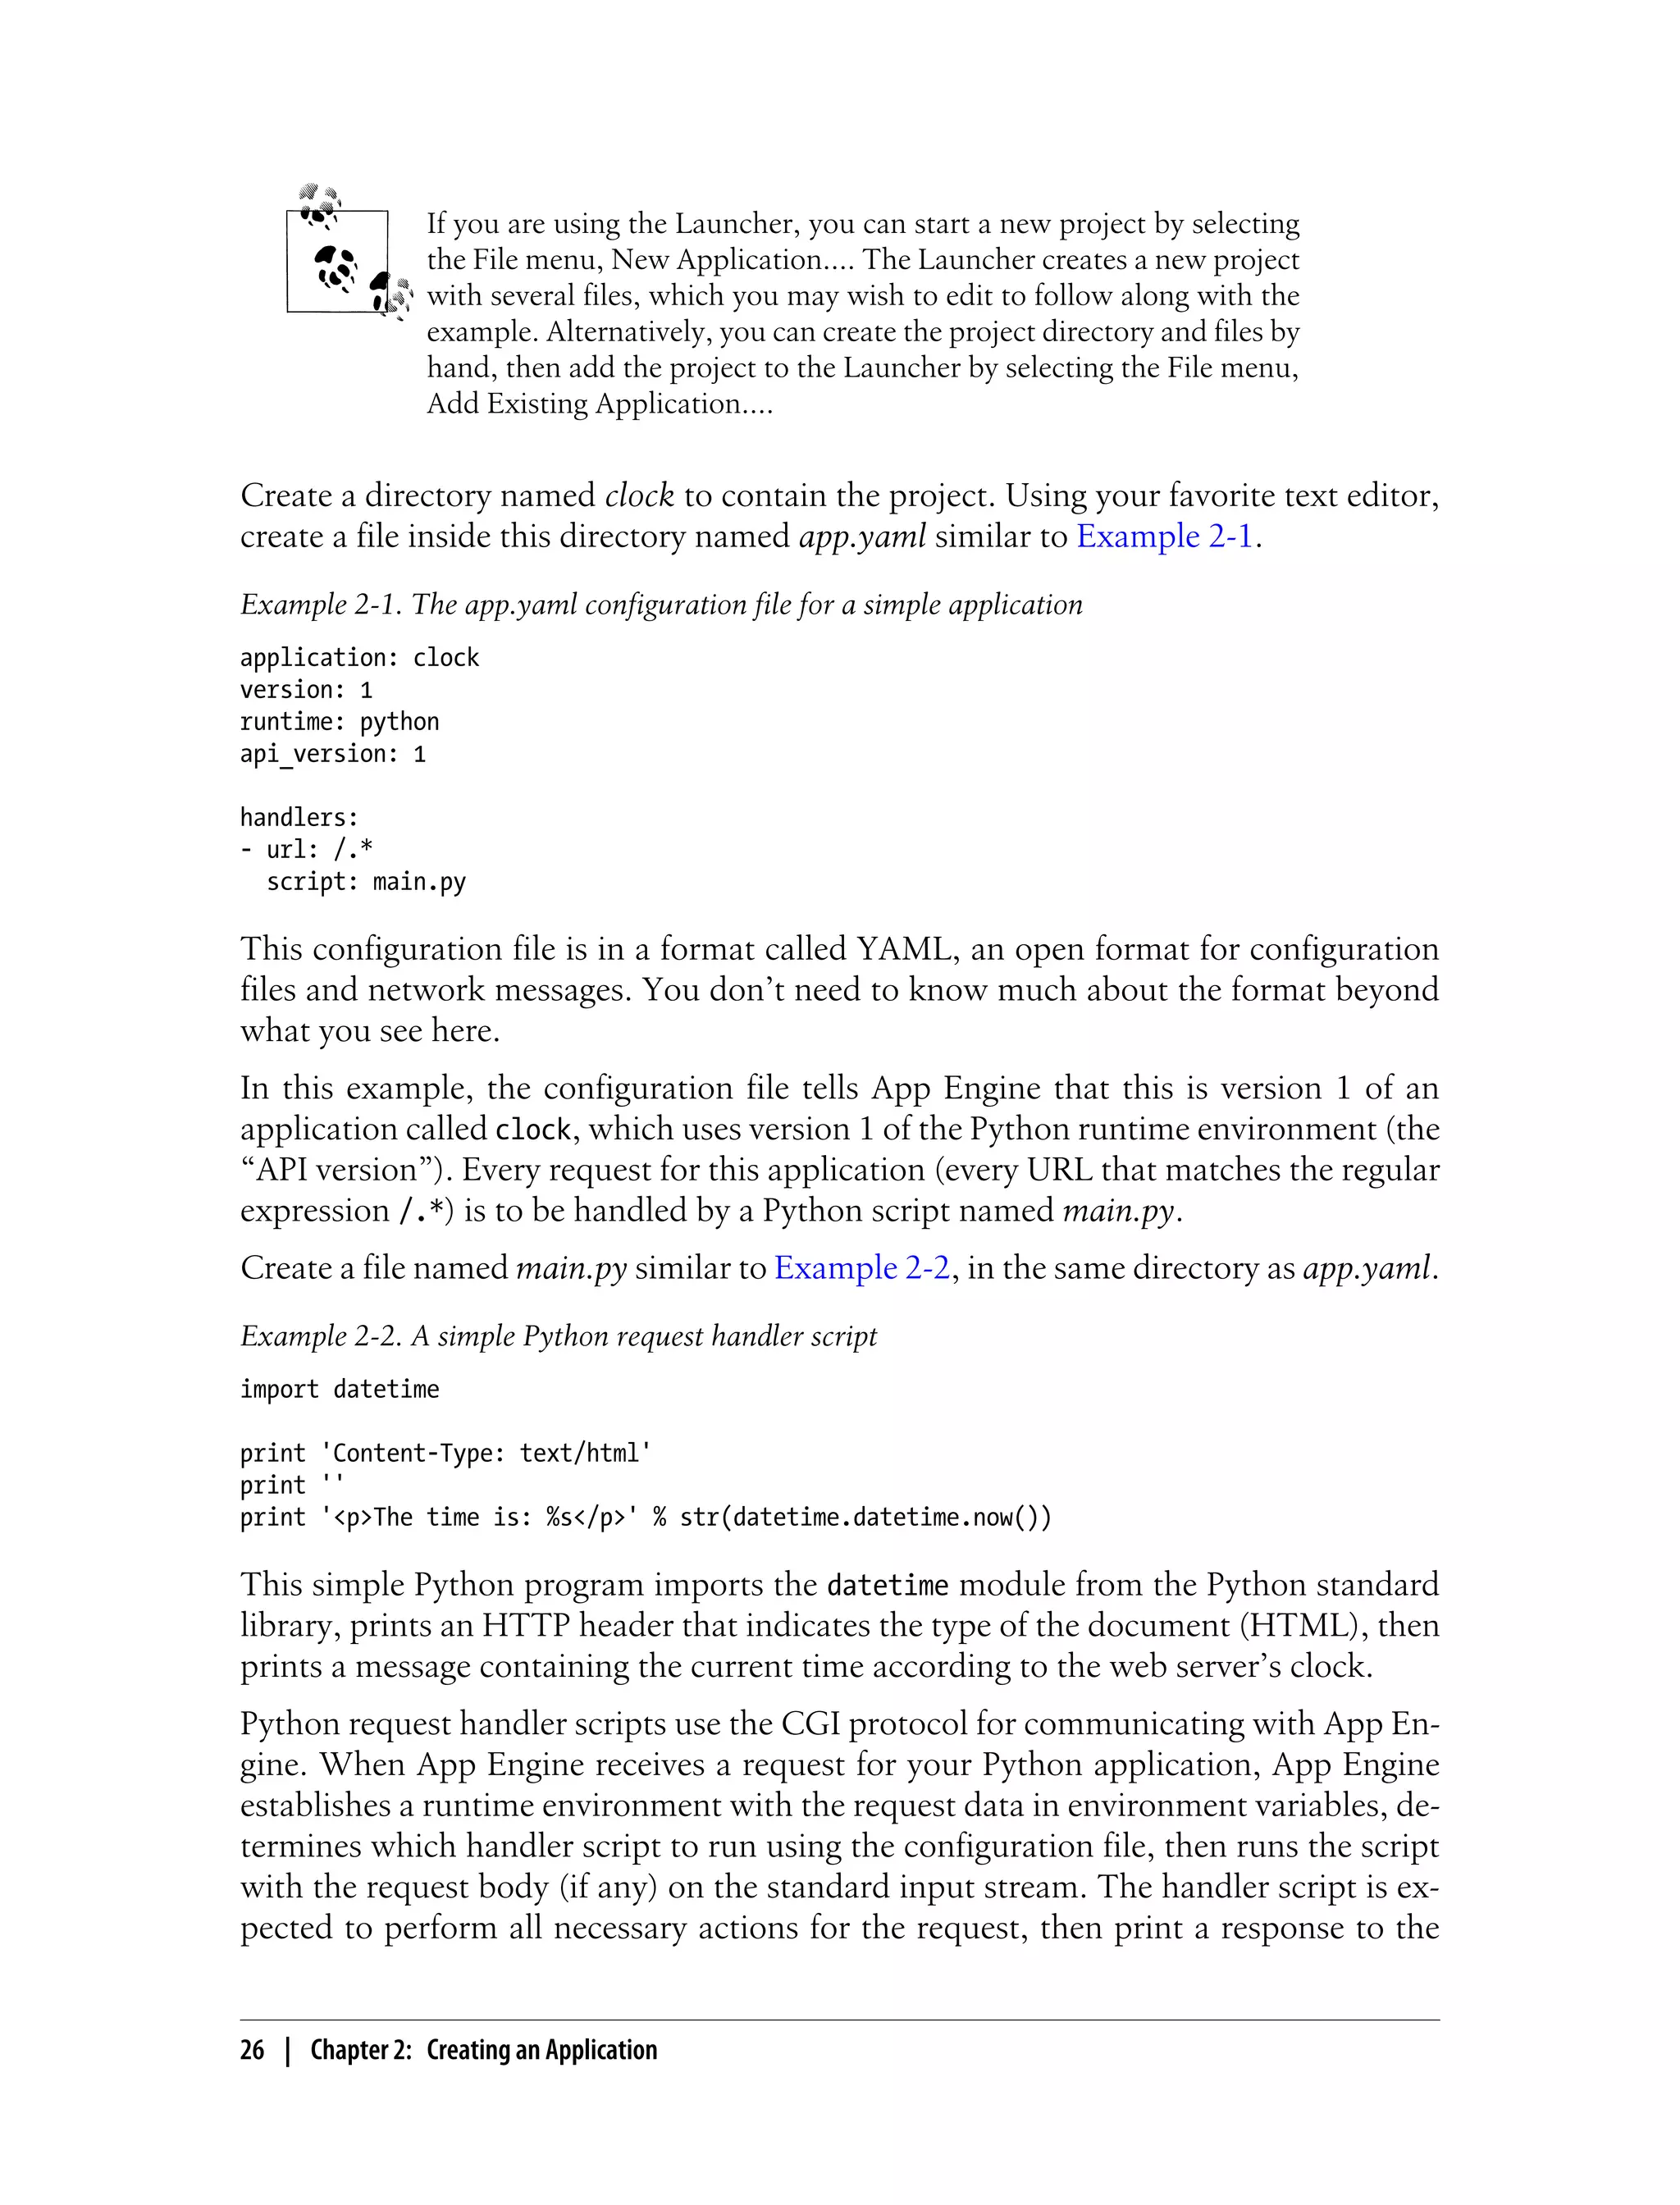
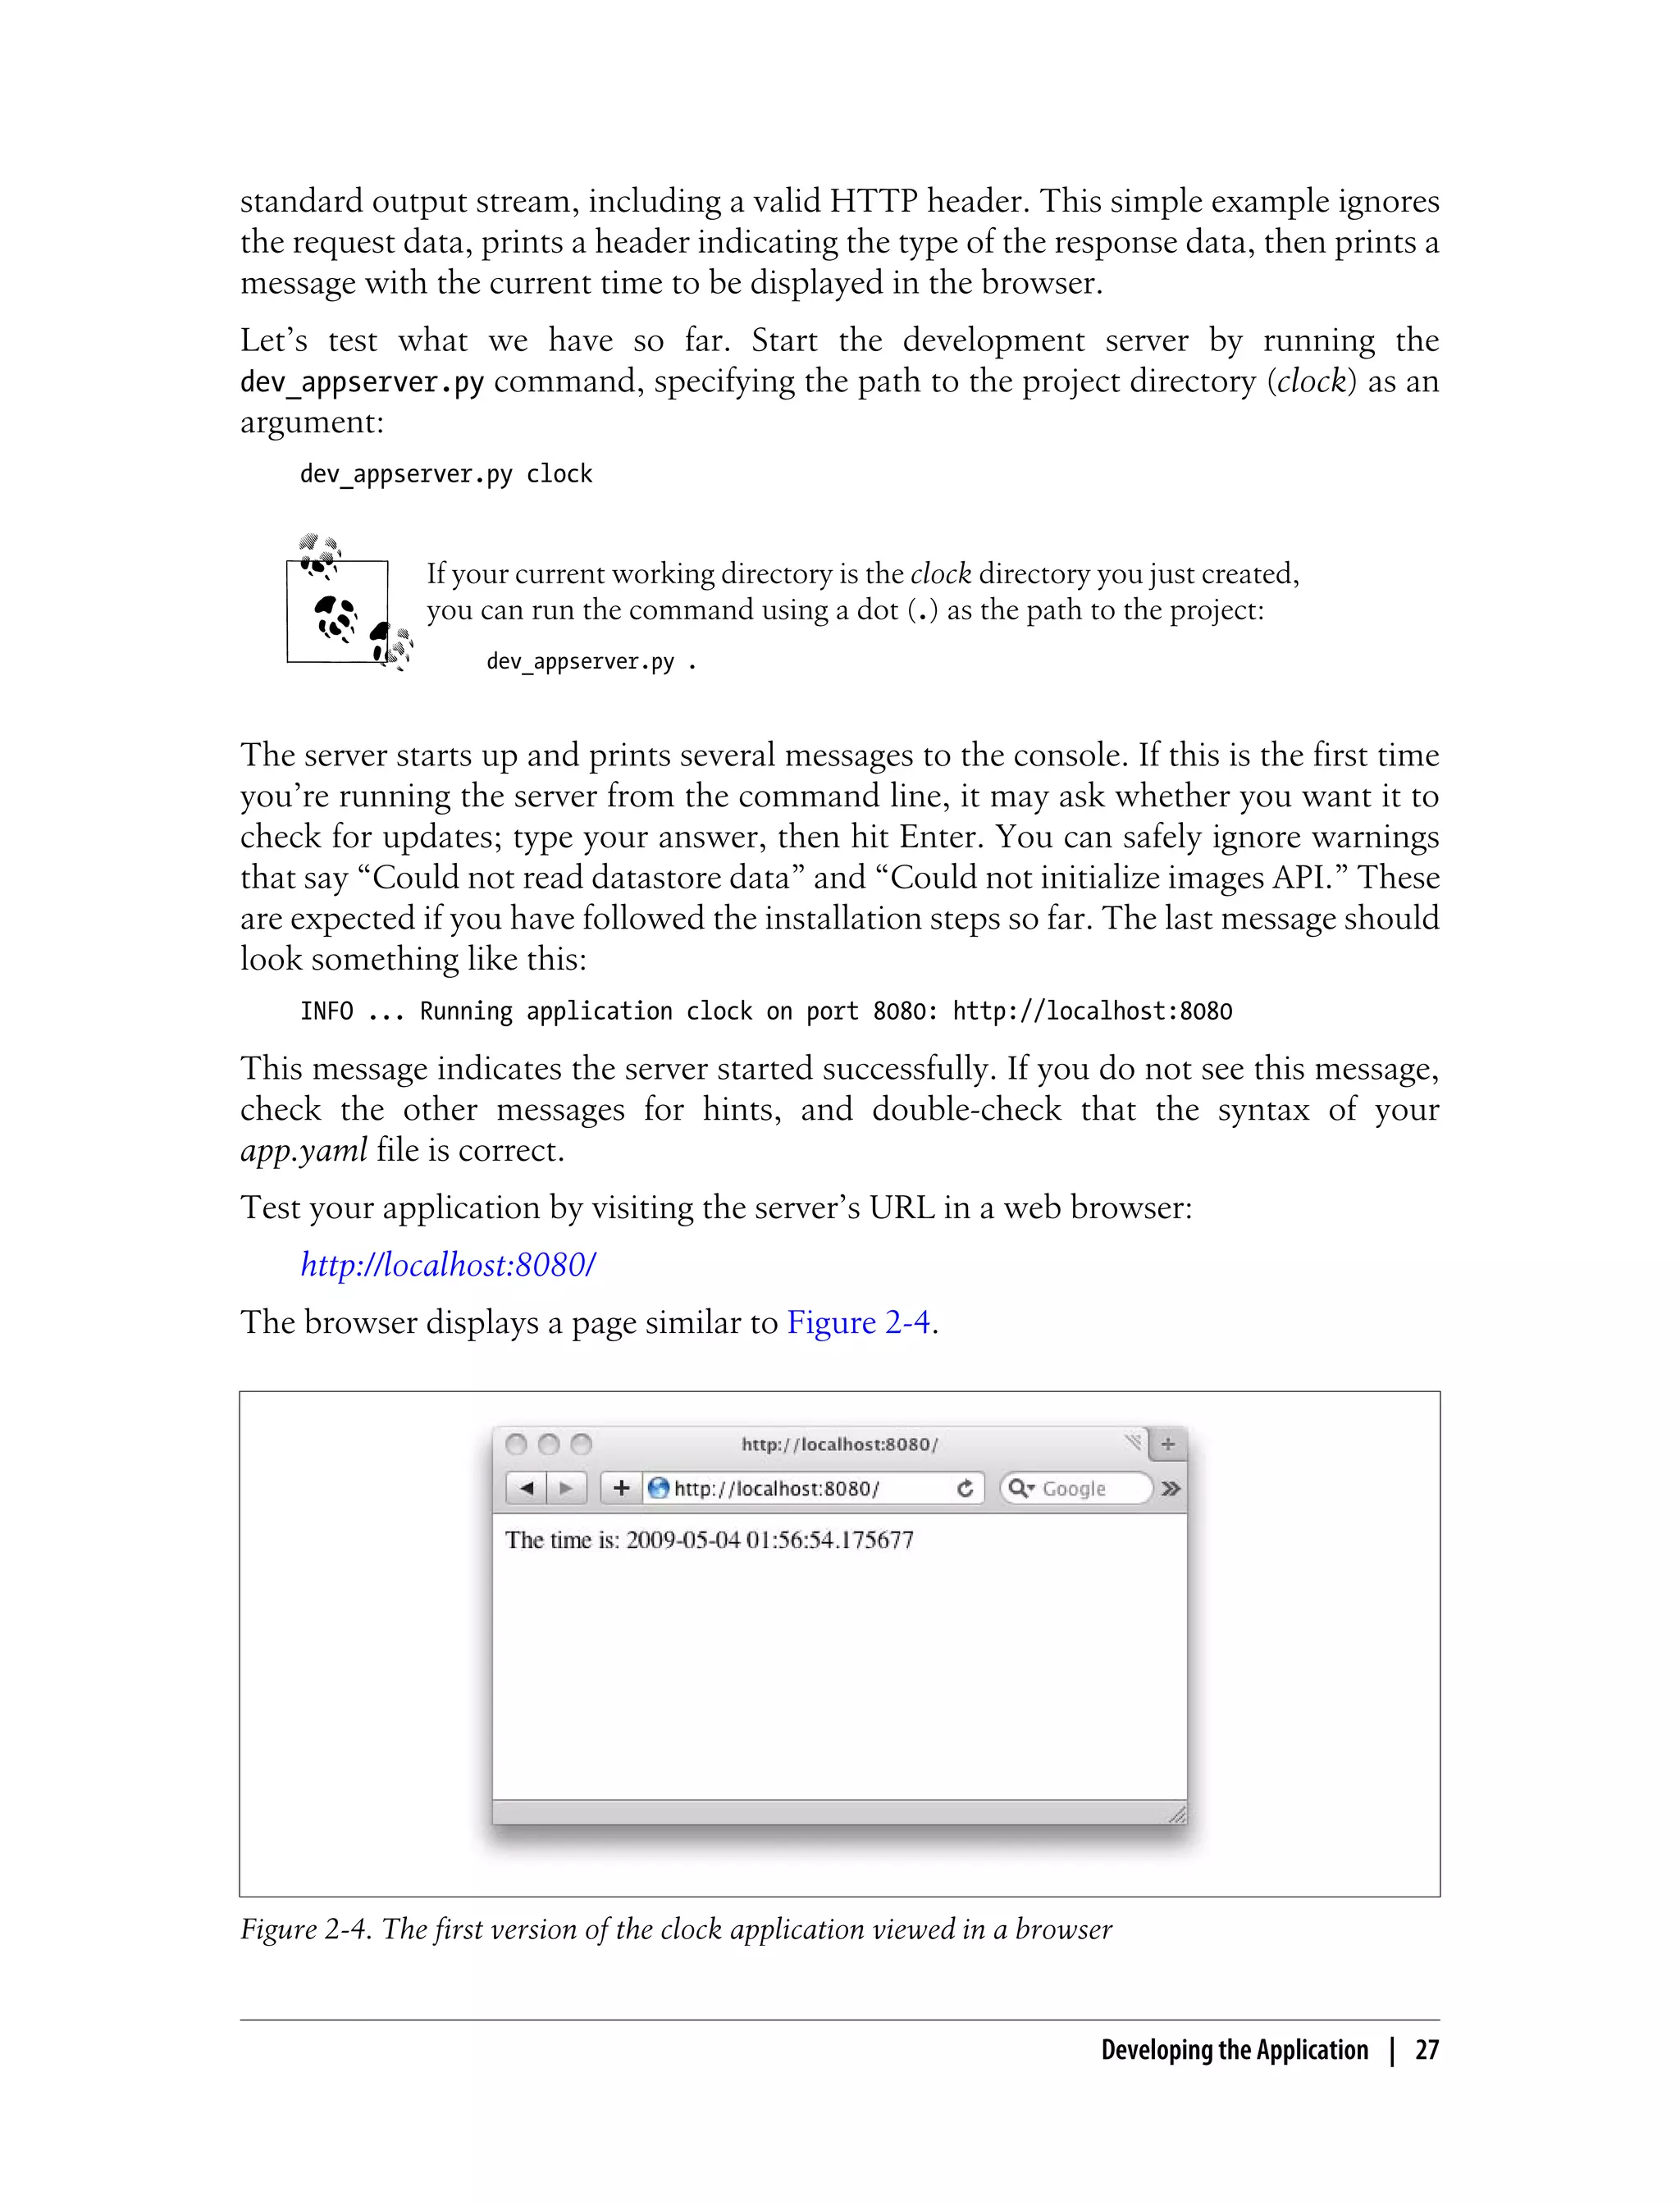
![Let’s upgrade the clock app to use the webapp framework. Replace the contents of
main.py with the version shown in Example 2-3. Reload the page in your browser to
see the new version in action. (You won’t notice a difference other than an updated
time. This example is equivalent to the previous version.)
Example 2-3. A simple request handler using the webapp framework
from google.appengine.ext import webapp
from google.appengine.ext.webapp.util import run_wsgi_app
import datetime
class MainPage(webapp.RequestHandler):
def get(self):
time = datetime.datetime.now()
self.response.headers['Content-Type'] = 'text/html'
self.response.out.write('<p>The time is: %s</p>' % str(time))
application = webapp.WSGIApplication([('/', MainPage)],
debug=True)
def main():
run_wsgi_app(application)
if __name__ == '__main__':
main()
Example 2-3 imports the module google.appengine.ext.webapp, then defines a request
handler class called MainPage, a subclass of webapp.RequestHandler. The class defines
methods for each HTTP method supported by the handler, in this case one method for
HTTP GET called get(). When the application handles a request, it instantiates the
handler class, sets self.request and self.response to values the handler method can
access and modify, then calls the appropriate handler method, in this case get(). When
the handler method exits, the application uses the value of self.response as the HTTP
response.
The application itself is represented by an instance of the class
webapp.WSGIApplication. The instance is initialized with a list of mappings of URLs to
handler classes. The debug parameter tells the application to print error messages to the
browser window when a handler returns an exception if the application is running
under the development web server. webapp detects whether it is running under the
development server or running as a live App Engine application, and will not print
errors to the browser when running live even if debug is True. You can set it to False to
have the development server emulate the live server when errors occur.
The script defines a main() function that runs the application using a utility method.
Lastly, the script calls main() using the Python idiom of if __name__ ==
'__main__': ..., a condition that is always true when the script is run by the web server.
This idiom allows you to import the script as a module for other code, including the
classes and functions defined in the script, without running the main() routine.
Developing the Application | 29](https://image.slidesharecdn.com/programminggoogleappengine-100608200404-phpapp01/75/Programming-google-app-engine-50-2048.jpg)
![Defining a main() function this way allows App Engine to cache the
compiled handler script, making subsequent requests faster to execute.
For more information on app caching, see Chapter 3.
A single WSGIApplication instance can handle multiple URLs, routing the request to
different RequestHandler classes based on the URL pattern. But we’ve already seen that
the app.yaml file maps URL patterns to handler scripts. So which URL patterns should
appear in app.yaml, and which should appear in the WSGIApplication? Many web
frameworks include their own URL dispatcher logic, and it’s common to route all dy-
namic URLs to the framework’s dispatcher in app.yaml. With webapp, the answer
mostly depends on how you’d like to organize your code. For the clock application, we
will create a second request handler as a separate script to take advantage of a feature
of app.yaml for user authentication, but we could also put this logic in main.py and
route the URL with the WSGIApplication object.
Users and Google Accounts
So far, our clock shows the same display for every user. To allow each user to customize
the display and save her preferences for future sessions, we need a way to identify the
user making a request. An easy way to do this is with Google Accounts.
Let’s add something to the page that indicates whether the user is signed in, and pro-
vides links for signing in and signing out of the application. Edit main.py to resemble
Example 2-4.
Example 2-4. A version of main.py that displays Google Accounts information and links
from google.appengine.api import users
from google.appengine.ext import webapp
from google.appengine.ext.webapp.util import run_wsgi_app
import datetime
class MainPage(webapp.RequestHandler):
def get(self):
time = datetime.datetime.now()
user = users.get_current_user()
if not user:
navbar = ('<p>Welcome! <a href="%s">Sign in or register</a> to customize.</p>'
% (users.create_login_url(self.request.path)))
else:
navbar = ('<p>Welcome, %s! You can <a href="%s">sign out</a>.</p>'
% (user.email(), users.create_logout_url(self.request.path)))
self.response.headers['Content-Type'] = 'text/html'
self.response.out.write('''
<html>
<head>
<title>The Time Is...</title>
</head>
30 | Chapter 2: Creating an Application](https://image.slidesharecdn.com/programminggoogleappengine-100608200404-phpapp01/75/Programming-google-app-engine-51-2048.jpg)
![<body>
%s
<p>The time is: %s</p>
</body>
</html>
''' % (navbar, str(time)))
application = webapp.WSGIApplication([('/', MainPage)],
debug=True)
def main():
run_wsgi_app(application)
if __name__ == '__main__':
main()
In a real application, you would use a templating system for the output, separating the
HTML and display logic from the application code. While many web application
frameworks include a templating system, webapp does not. Since the clock app only
has one page, we’ll put the HTML in the handler code, using Python string formatting
to keep things organized.
The Python runtime environment includes a version of Django, whose
templating system can be used with webapp. When Google released
version 1 of the Python runtime environment, the latest version of
Django was 0.96, so this is what the runtime includes. For more infor-
mation on using Django templates with webapp, see the App Engine
documentation.
Reload the page in your browser. The new page resembles Figure 2-5.
Figure 2-5. The clock app with a link to Google Accounts when the user is not signed in
Developing the Application | 31](https://image.slidesharecdn.com/programminggoogleappengine-100608200404-phpapp01/75/Programming-google-app-engine-52-2048.jpg)
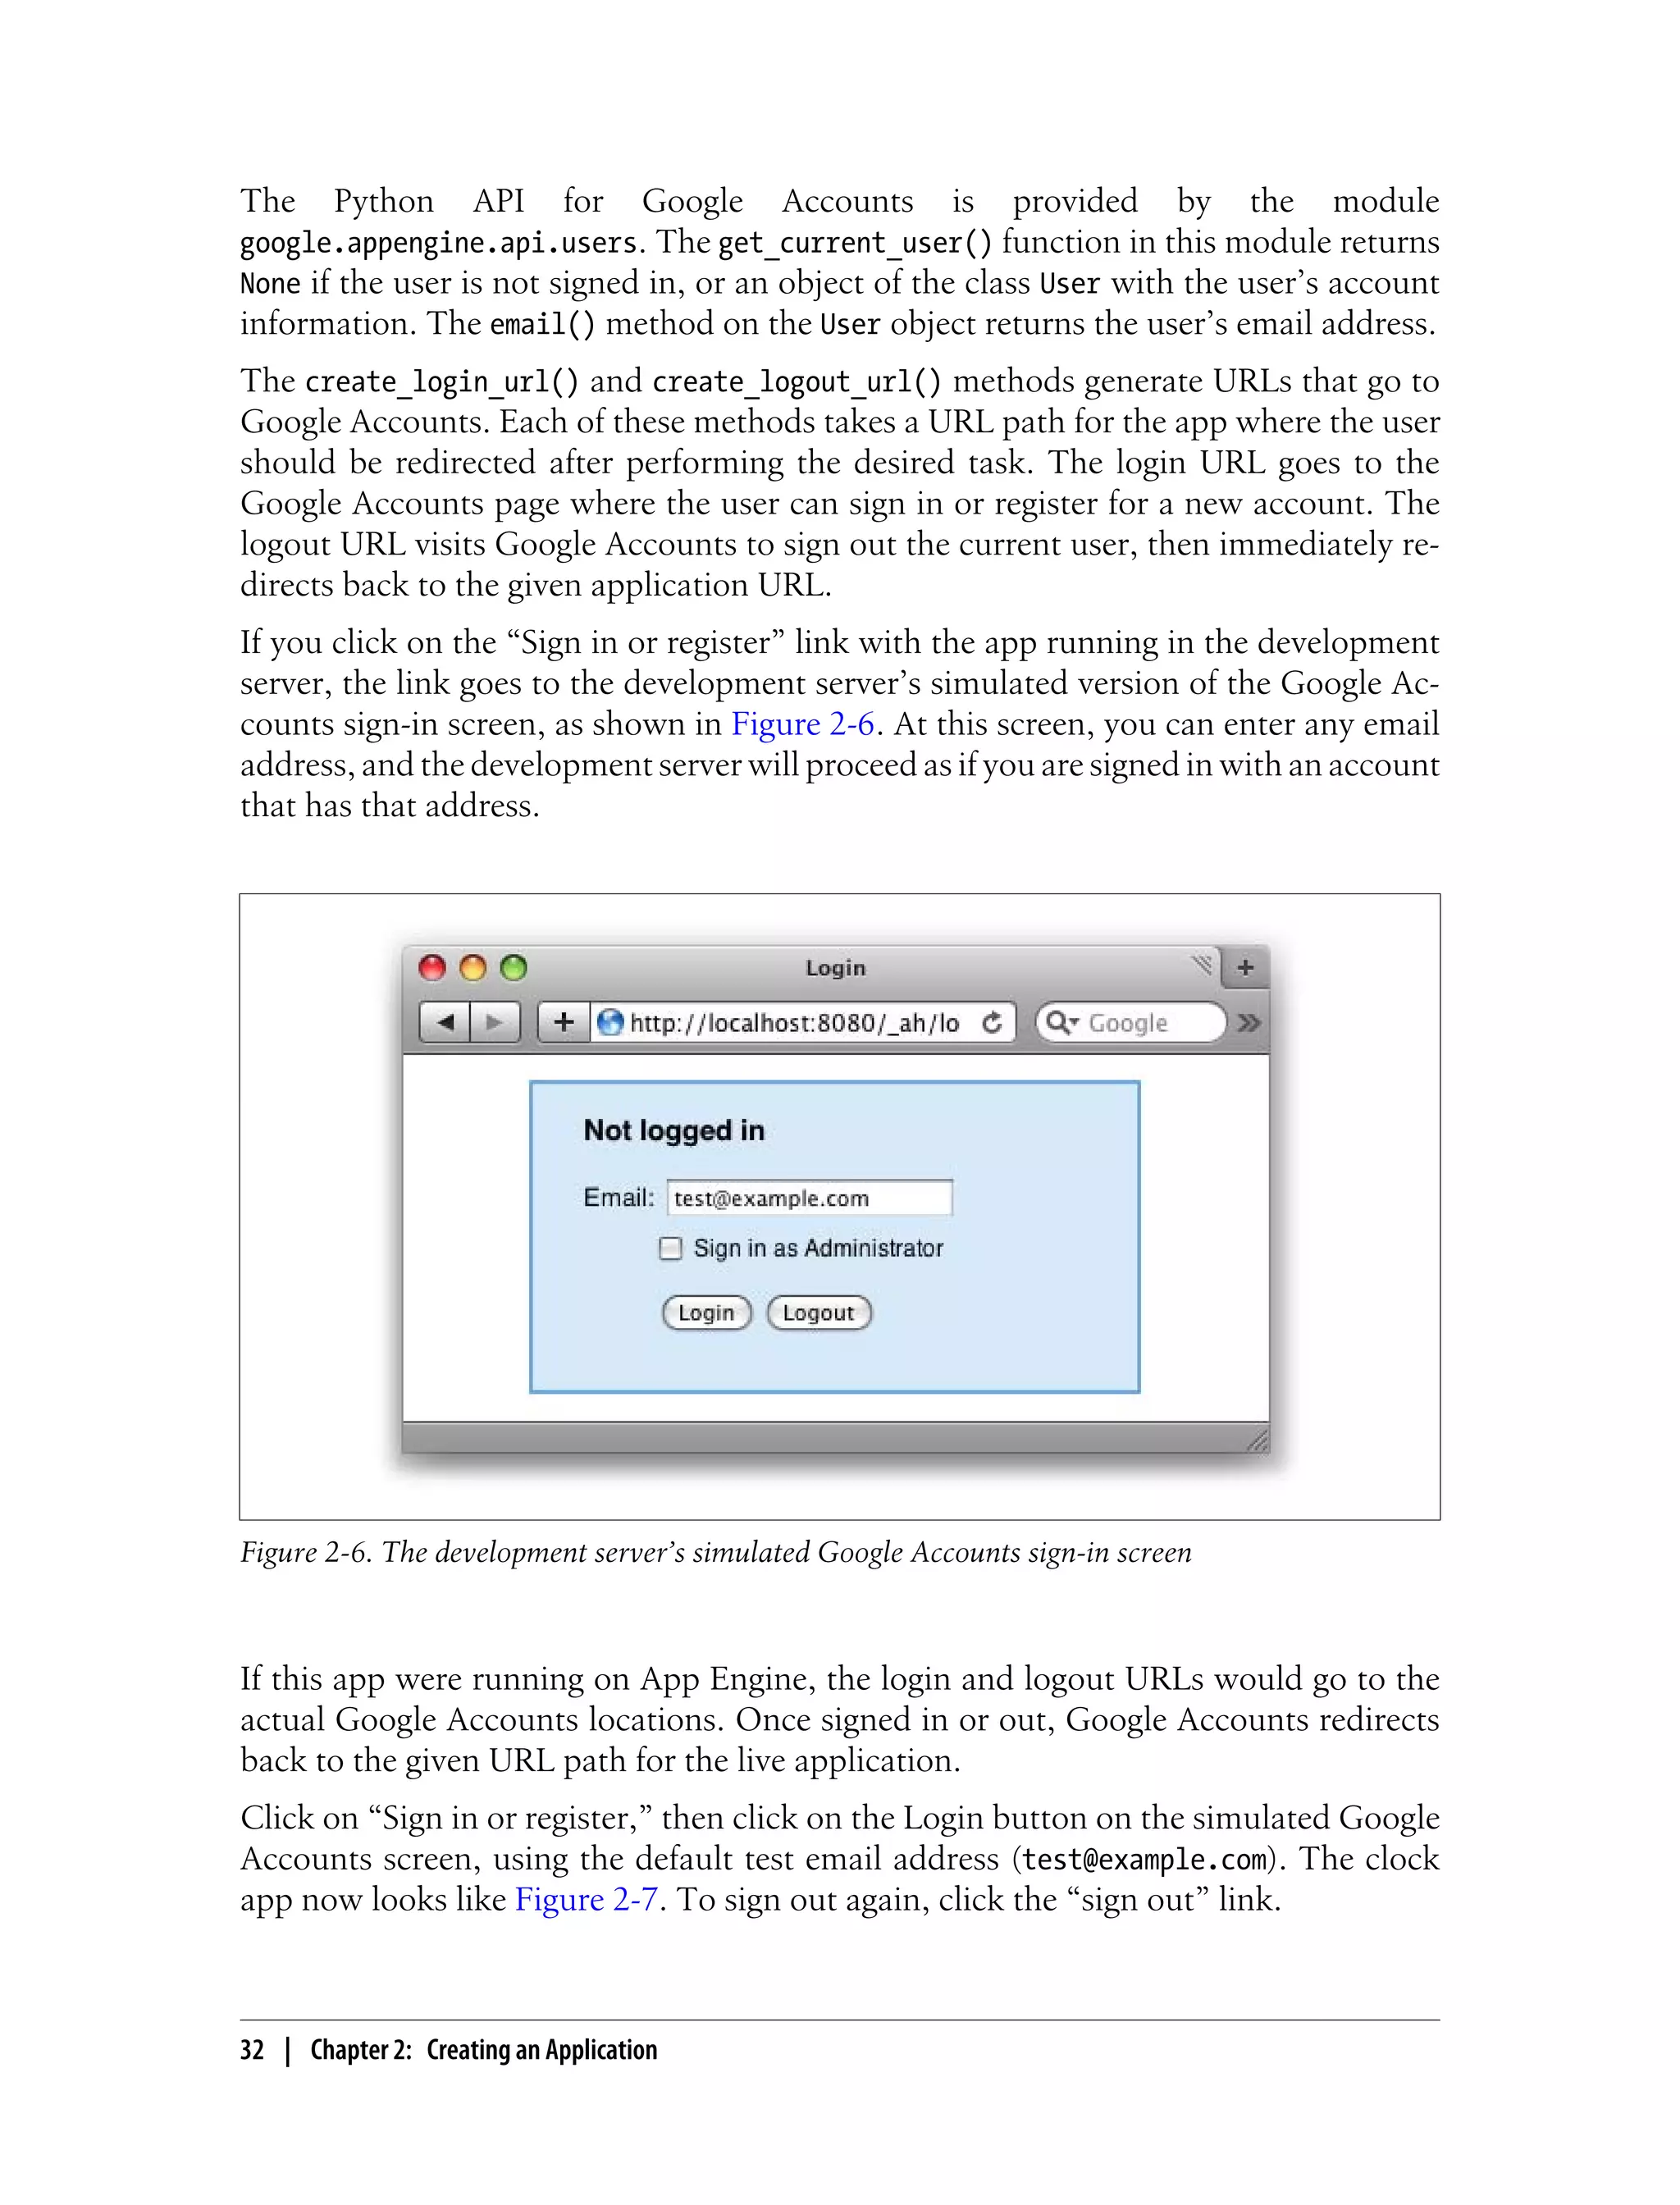
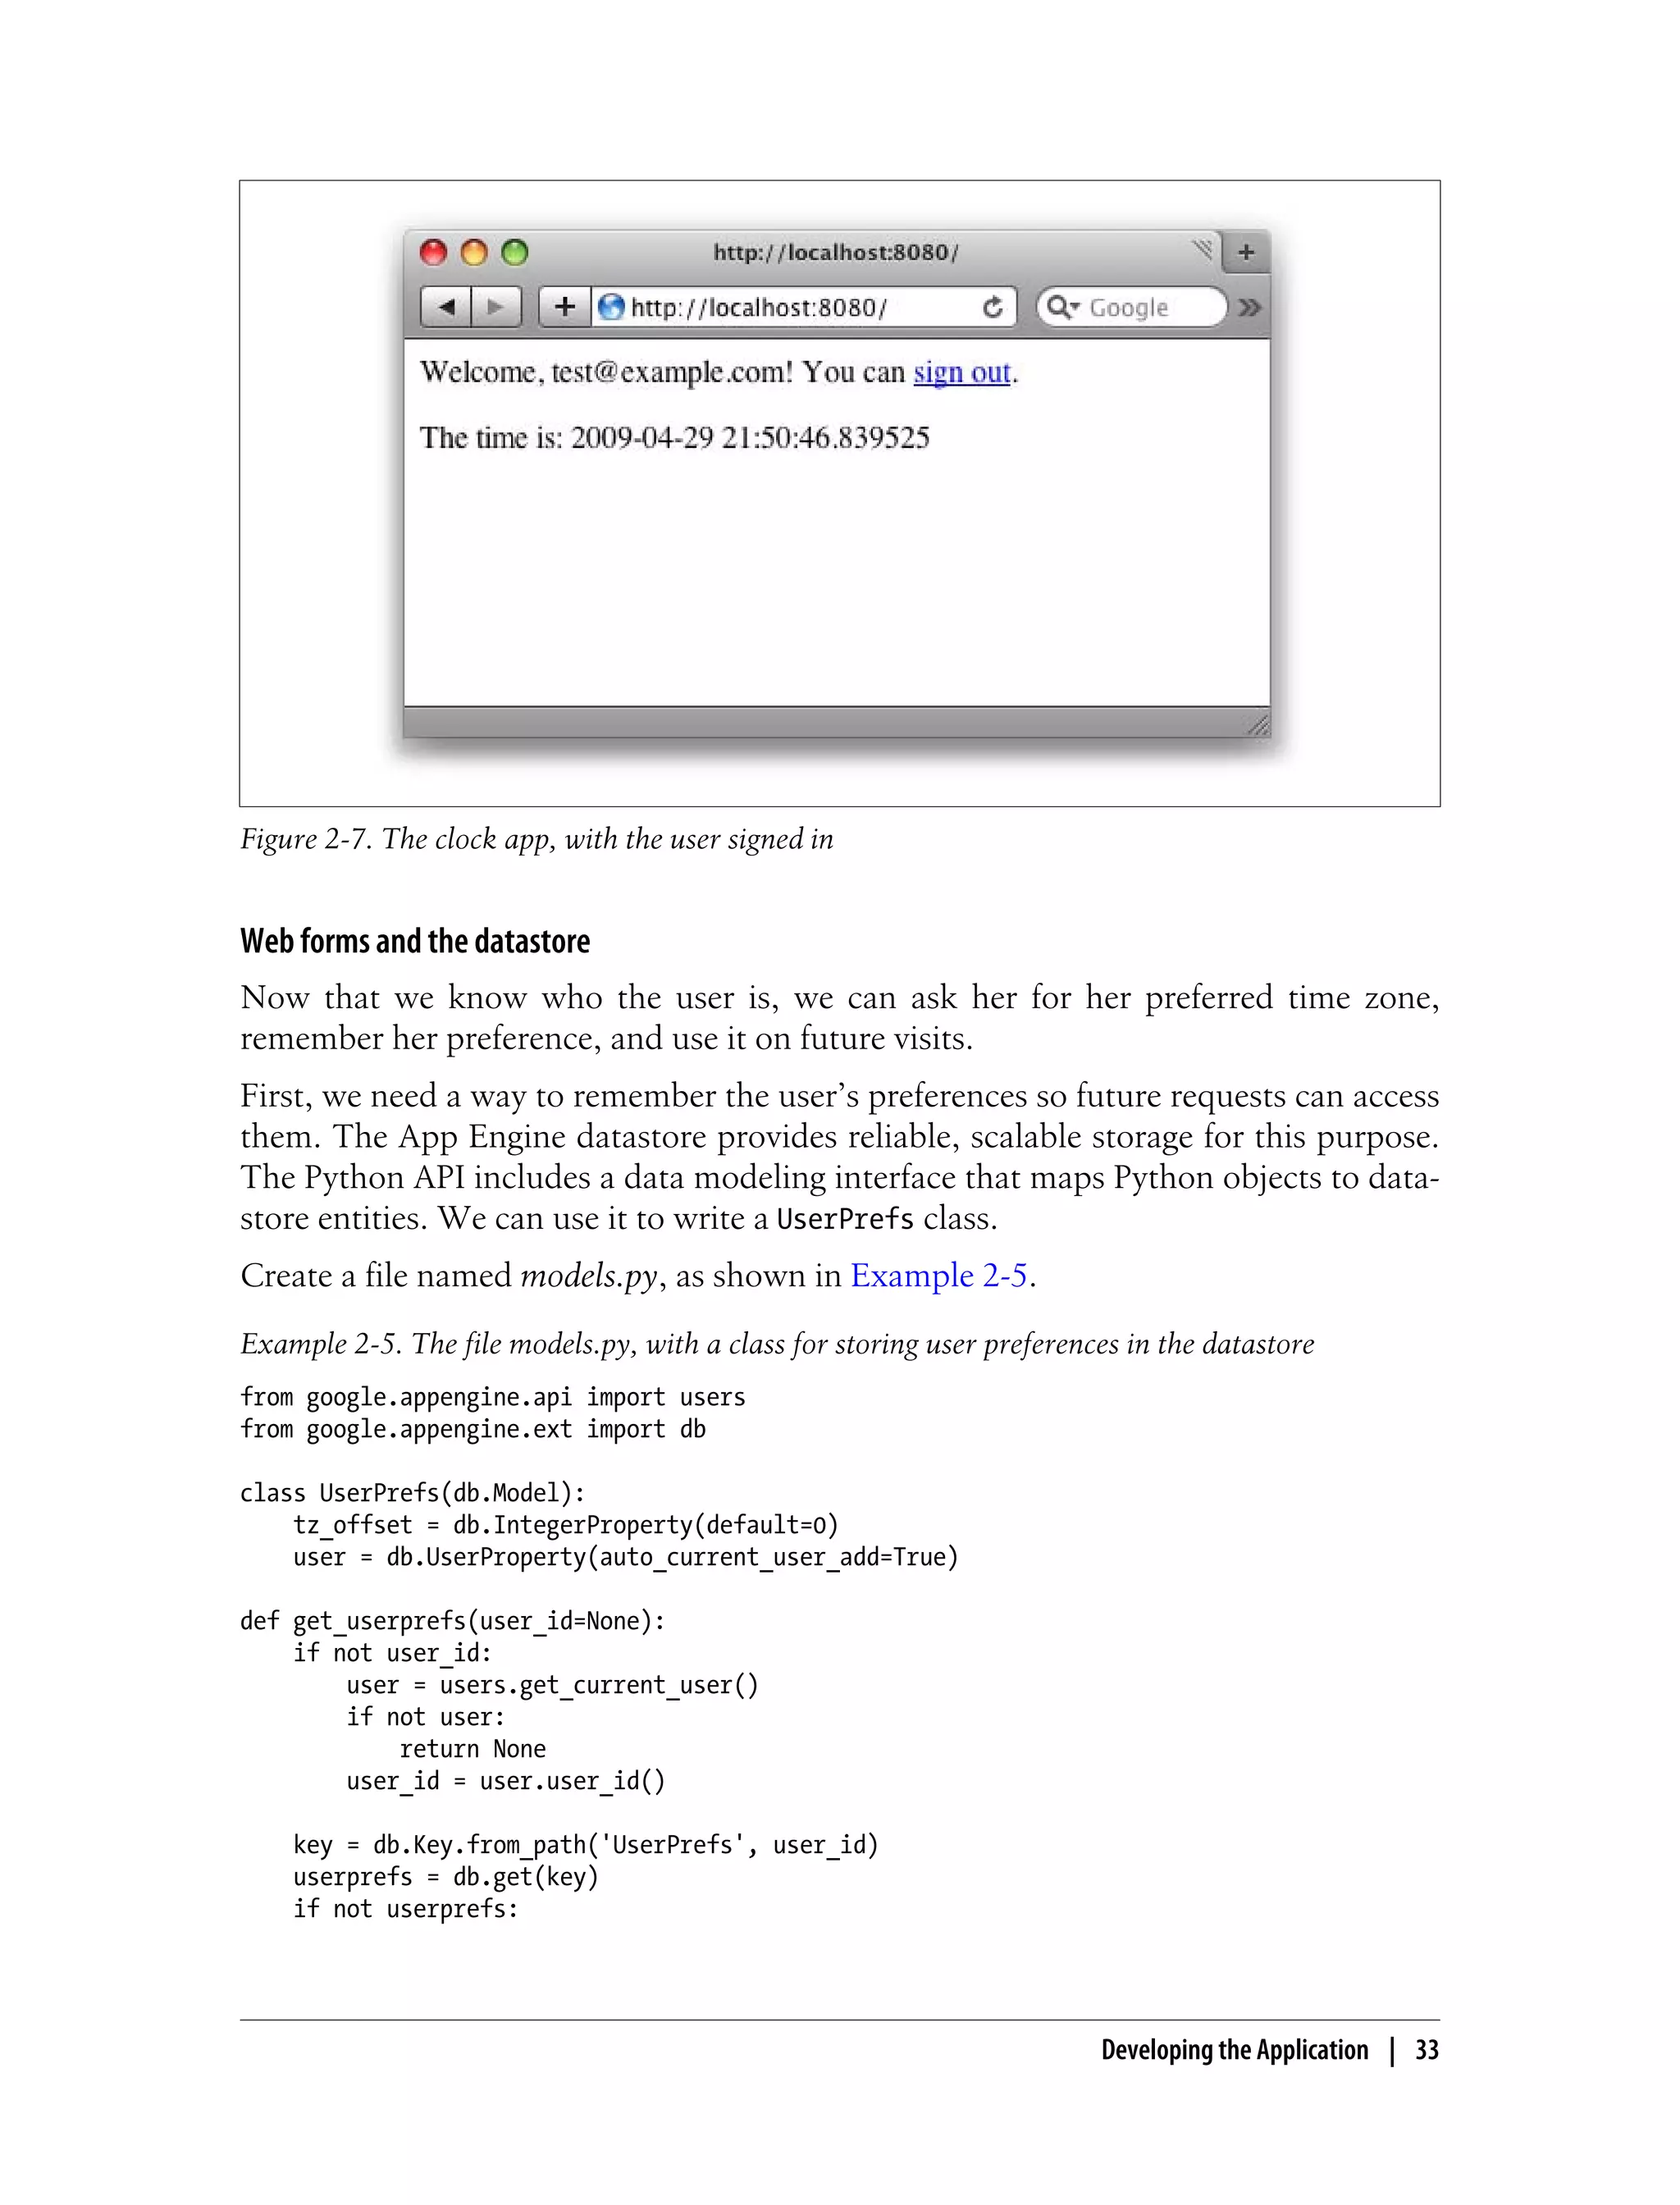
![if not user:
navbar = ('<p>Welcome! <a href="%s">Sign in or register</a> to customize.</p>'
% (users.create_login_url(self.request.path)))
tz_form = ''
else:
userprefs = models.get_userprefs()
navbar = ('<p>Welcome, %s! You can <a href="%s">sign out</a>.</p>'
% (user.nickname(), users.create_logout_url(self.request.path)))
tz_form = '''
<form action="/prefs" method="post">
<label for="tz_offset">
Timezone offset from UTC (can be negative):
</label>
<input name="tz_offset" id="tz_offset" type="text"
size="4" value="%d" />
<input type="submit" value="Set" />
</form>
''' % userprefs.tz_offset
time += datetime.timedelta(0, 0, 0, 0, 0, userprefs.tz_offset)
self.response.headers['Content-Type'] = 'text/html'
self.response.out.write('''
<html>
<head>
<title>The Time Is...</title>
</head>
<body>
%s
<p>The time is: %s</p>
%s
</body>
</html>
''' % (navbar, str(time), tz_form))
application = webapp.WSGIApplication([('/', MainPage)],
debug=True)
def main():
run_wsgi_app(application)
if __name__ == '__main__':
main()
To enable the preferences form, we need a request handler to parse the form data and
update the datastore. Let’s implement this as a new request handler script. Create a file
named prefs.py with the contents shown in Example 2-7.
Example 2-7. A new handler script, prefs.py, for the preferences form
from google.appengine.ext import webapp
from google.appengine.ext.webapp.util import run_wsgi_app
import models
class PrefsPage(webapp.RequestHandler):
def post(self):
Developing the Application | 35](https://image.slidesharecdn.com/programminggoogleappengine-100608200404-phpapp01/75/Programming-google-app-engine-56-2048.jpg)
![userprefs = models.get_userprefs()
try:
tz_offset = int(self.request.get('tz_offset'))
userprefs.tz_offset = tz_offset
userprefs.put()
except ValueError:
# User entered a value that wasn't an integer. Ignore for now.
pass
self.redirect('/')
application = webapp.WSGIApplication([('/prefs', PrefsPage)],
debug=True)
def main():
run_wsgi_app(application)
if __name__ == '__main__':
main()
This request handler handles HTTP POST requests to the URL /prefs, which is the
URL (“action”) and HTTP method used by the form. The handler calls the
get_userprefs() function from models.py to get the UserPrefs object for the current
user, which is either a new unsaved object with default values, or the object for an
existing entity. The handler parses the tz_offset parameter from the form data as an
integer, sets the property of the UserPrefs object, then saves the object to the datastore
by calling its put() method. The put() method creates the object if it doesn’t exist, or
updates the existing object.
If the user enters a noninteger in the form field, we don’t do anything. It’d be appro-
priate to return an error message, but we’ll leave this as is to keep the example simple.
Finally, edit app.yaml to map the handler script to the URL /prefs in the handlers:
section, as shown in Example 2-8.
Example 2-8. A new version of app.yaml mapping the URL /prefs, with login required
application: clock
version: 1
runtime: python
api_version: 1
handlers:
- url: /prefs
script: prefs.py
login: required
- url: /.*
script: main.py
The login: required line says that the user must be signed in to Google Accounts to
access the /prefs URL. If the user accesses the URL while not signed in, App Engine
automatically directs the user to the Google Accounts sign-in page, then redirects her
36 | Chapter 2: Creating an Application](https://image.slidesharecdn.com/programminggoogleappengine-100608200404-phpapp01/75/Programming-google-app-engine-57-2048.jpg)
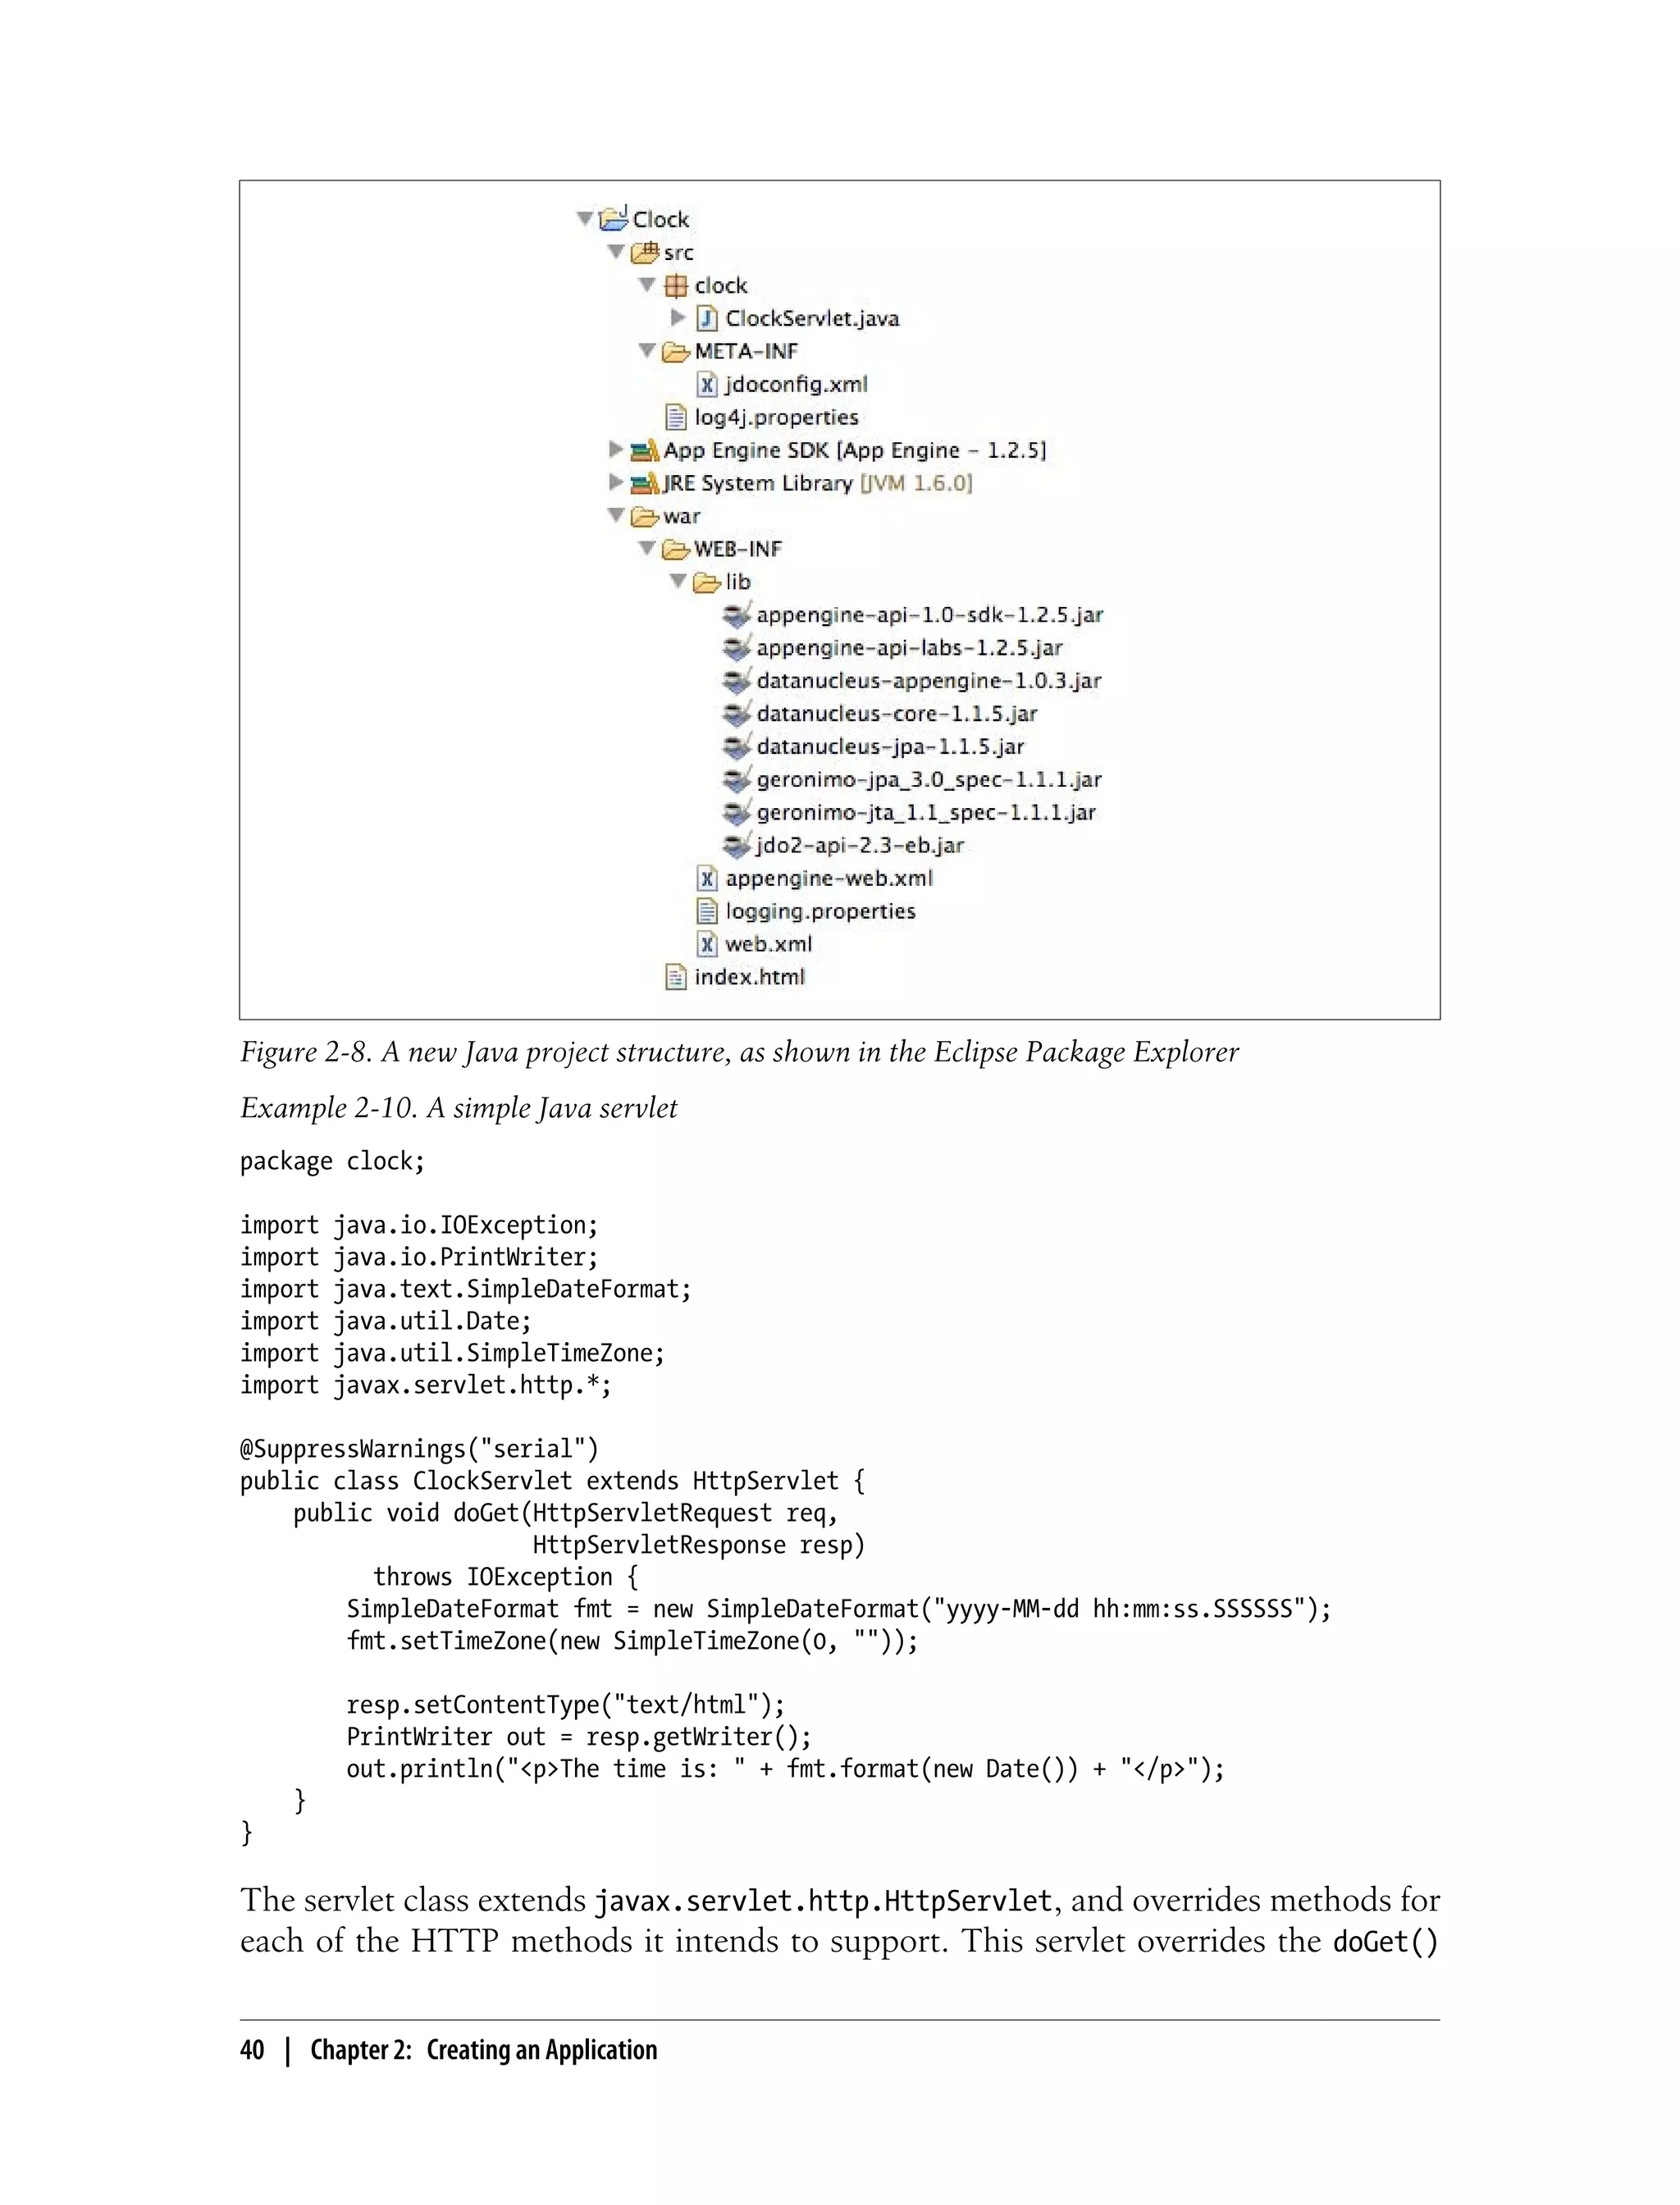


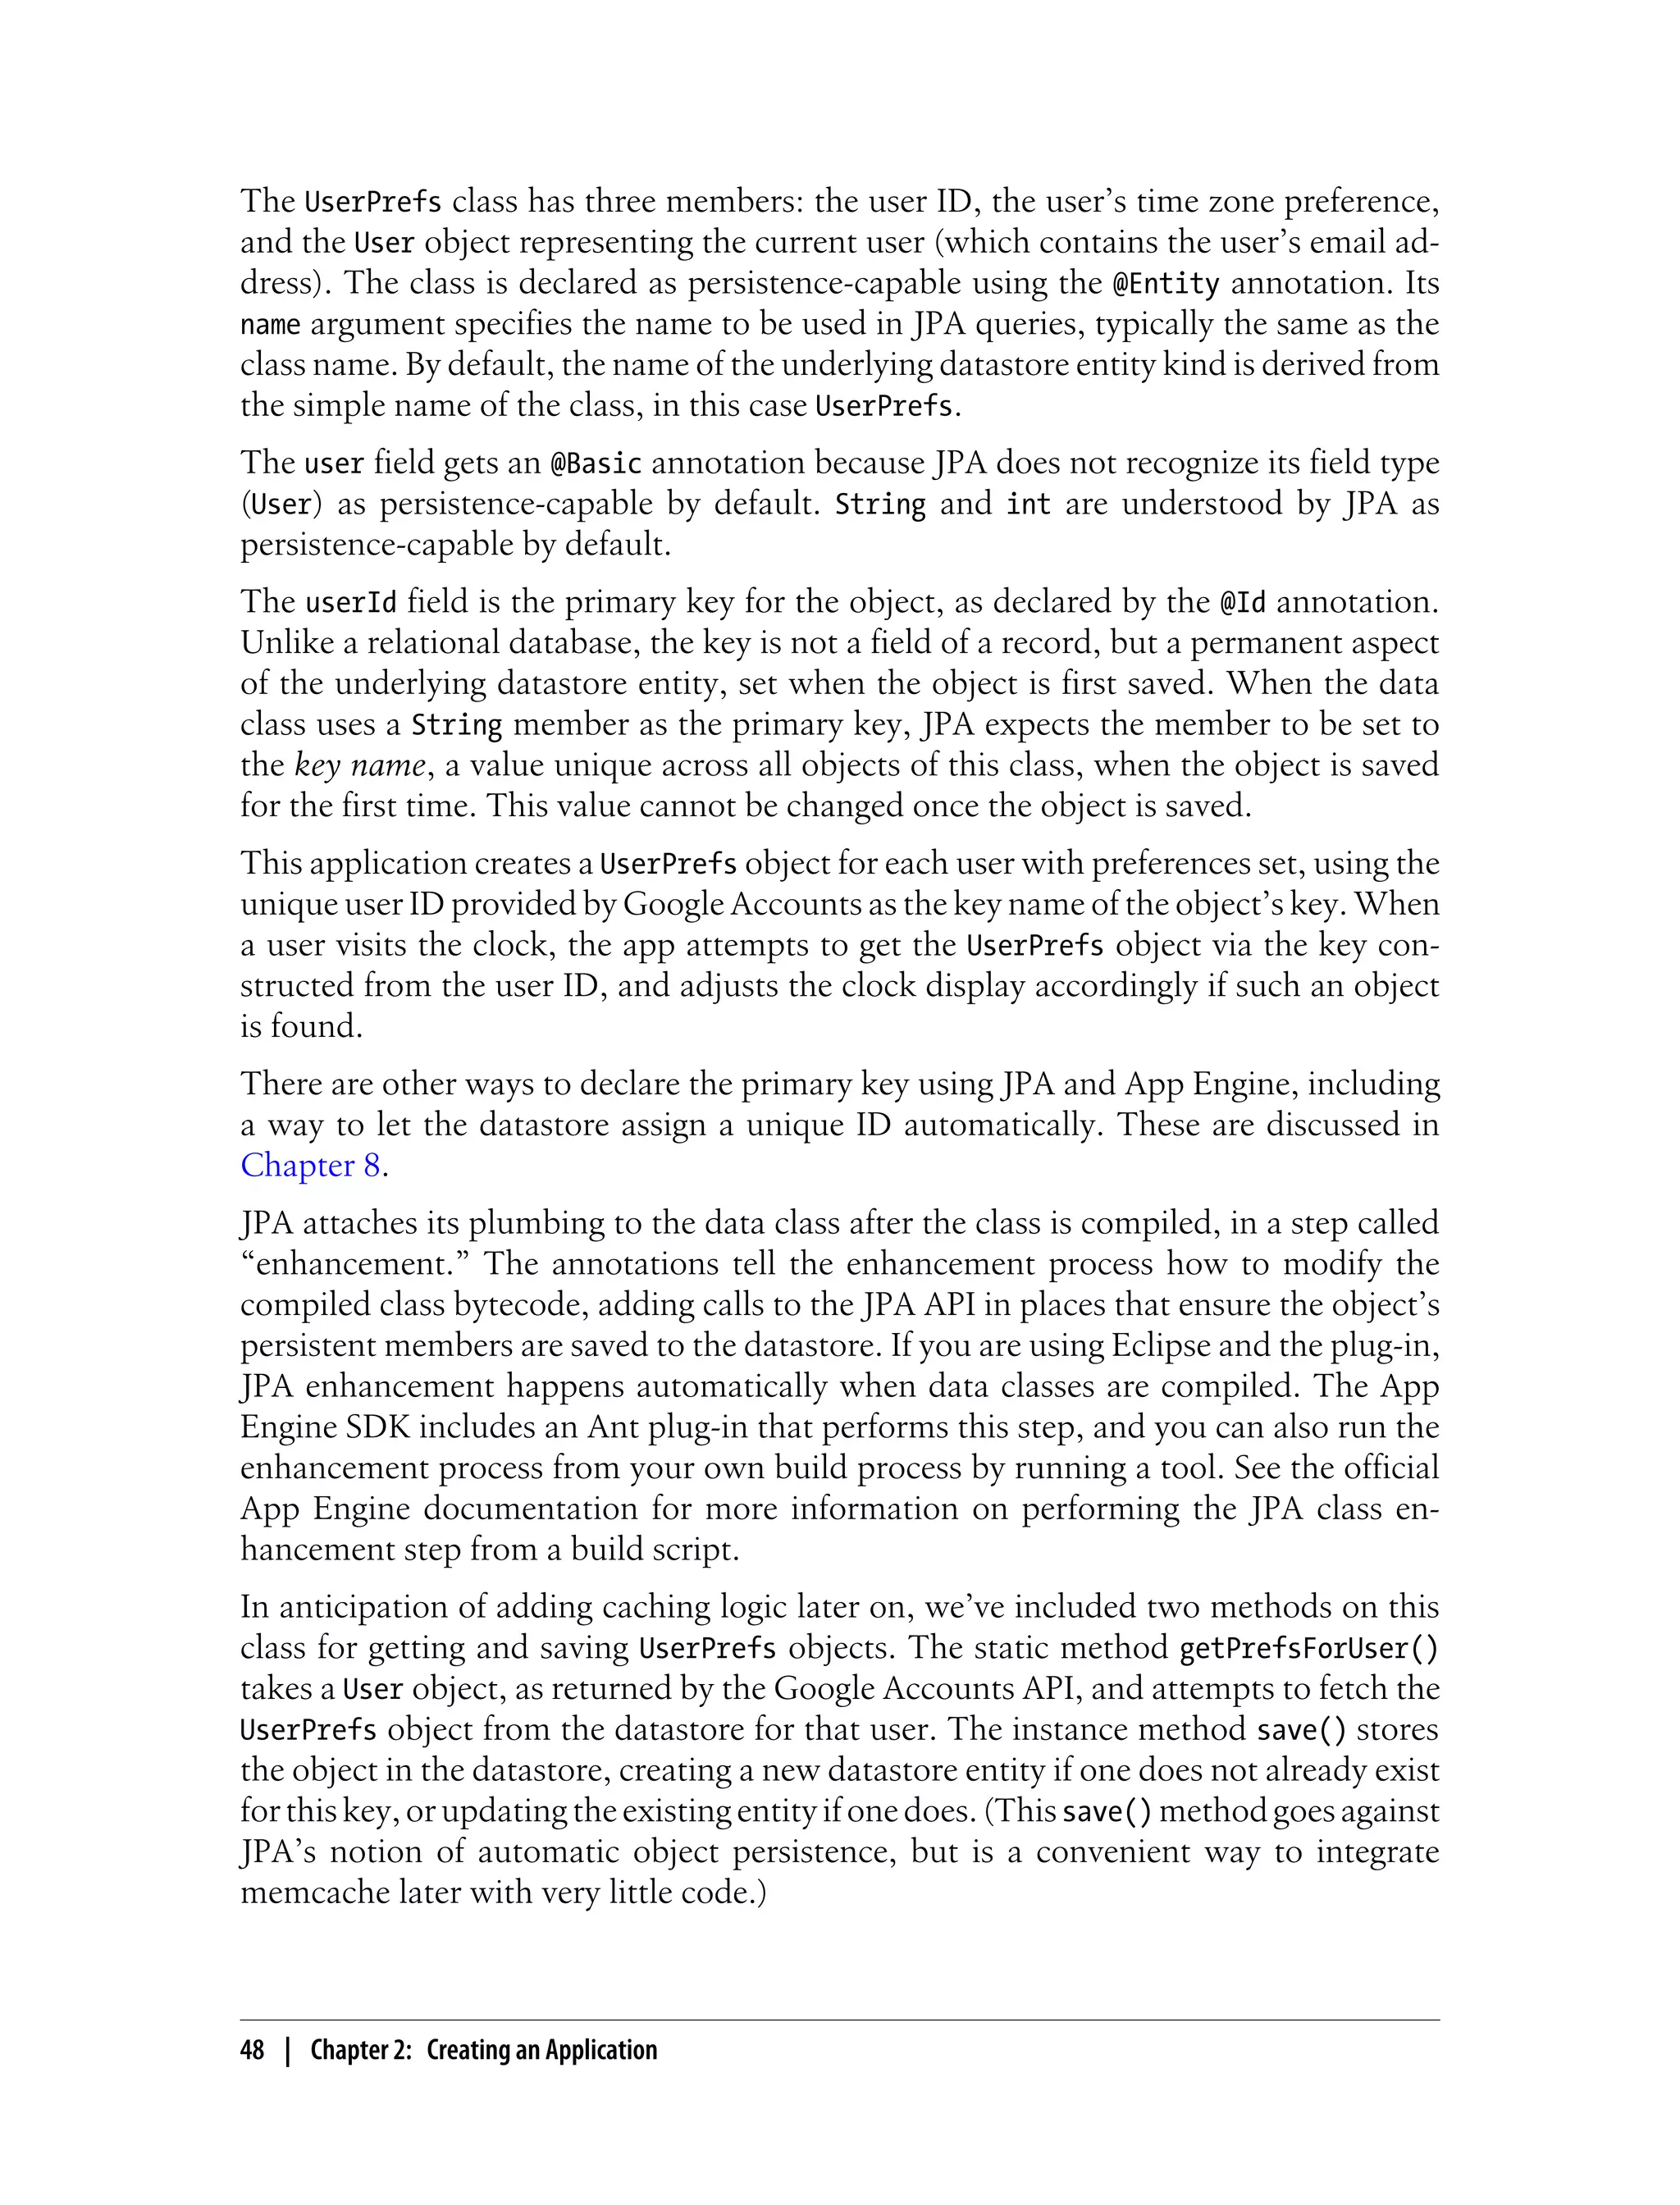
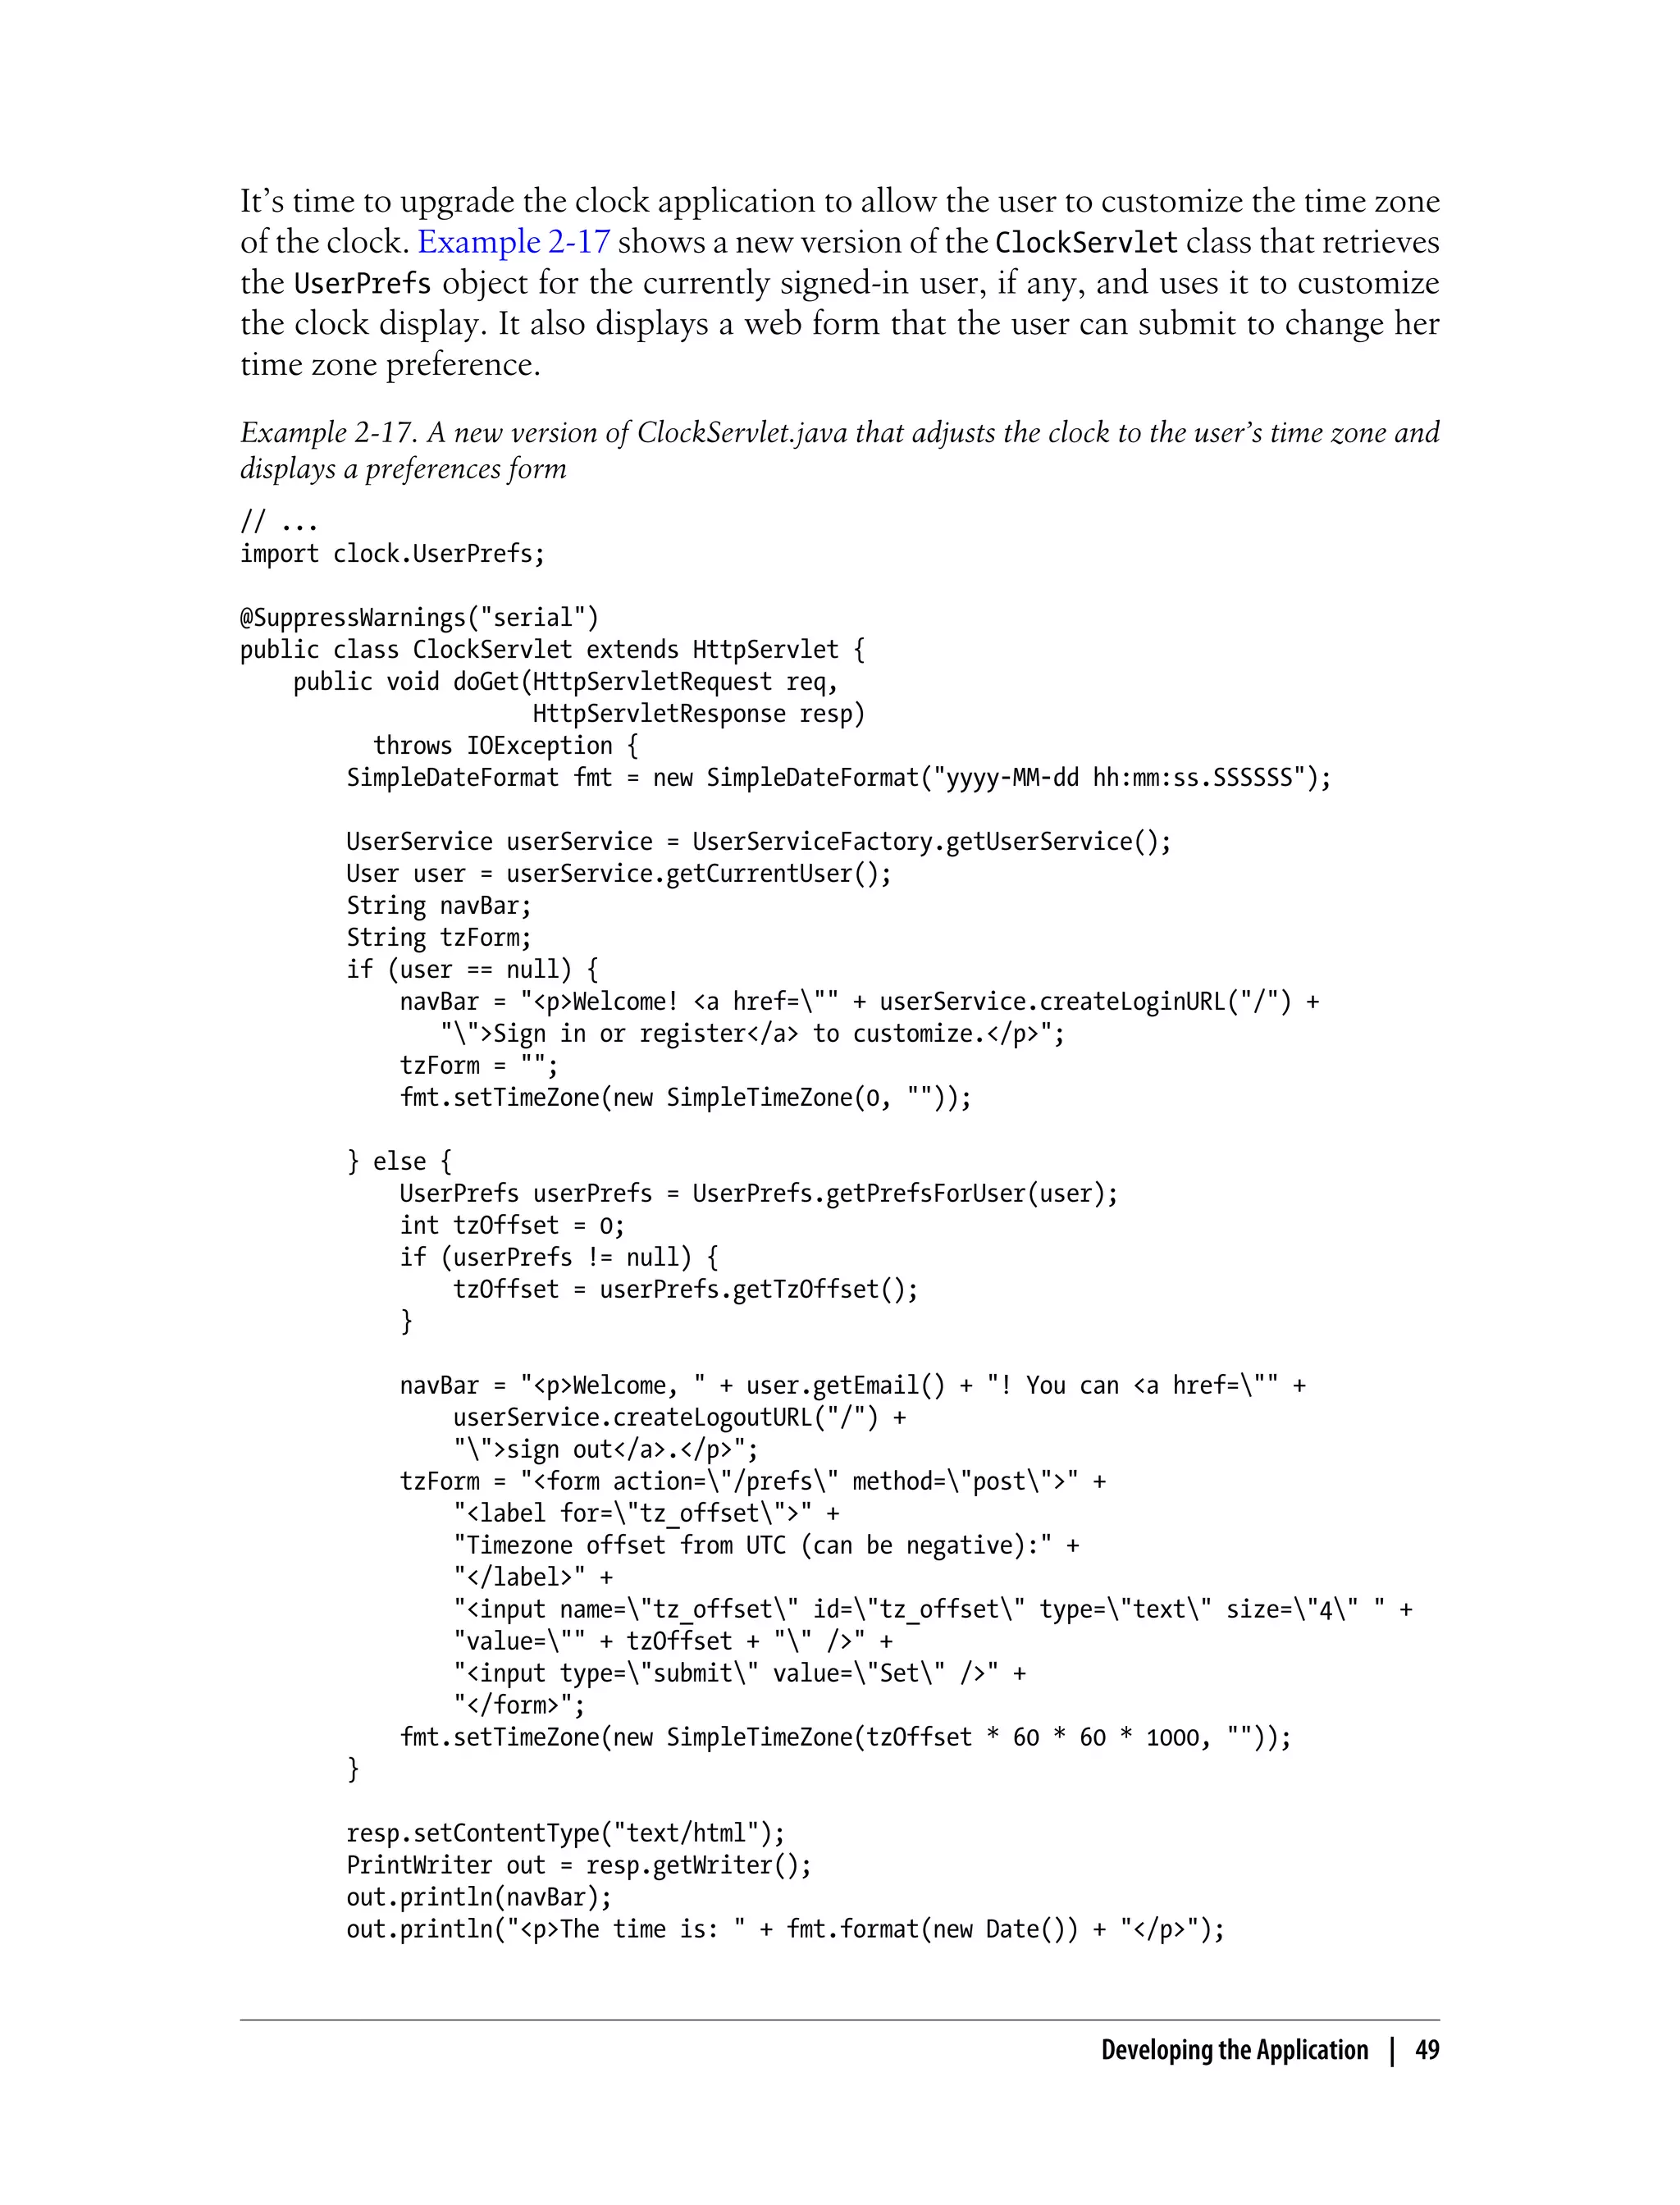
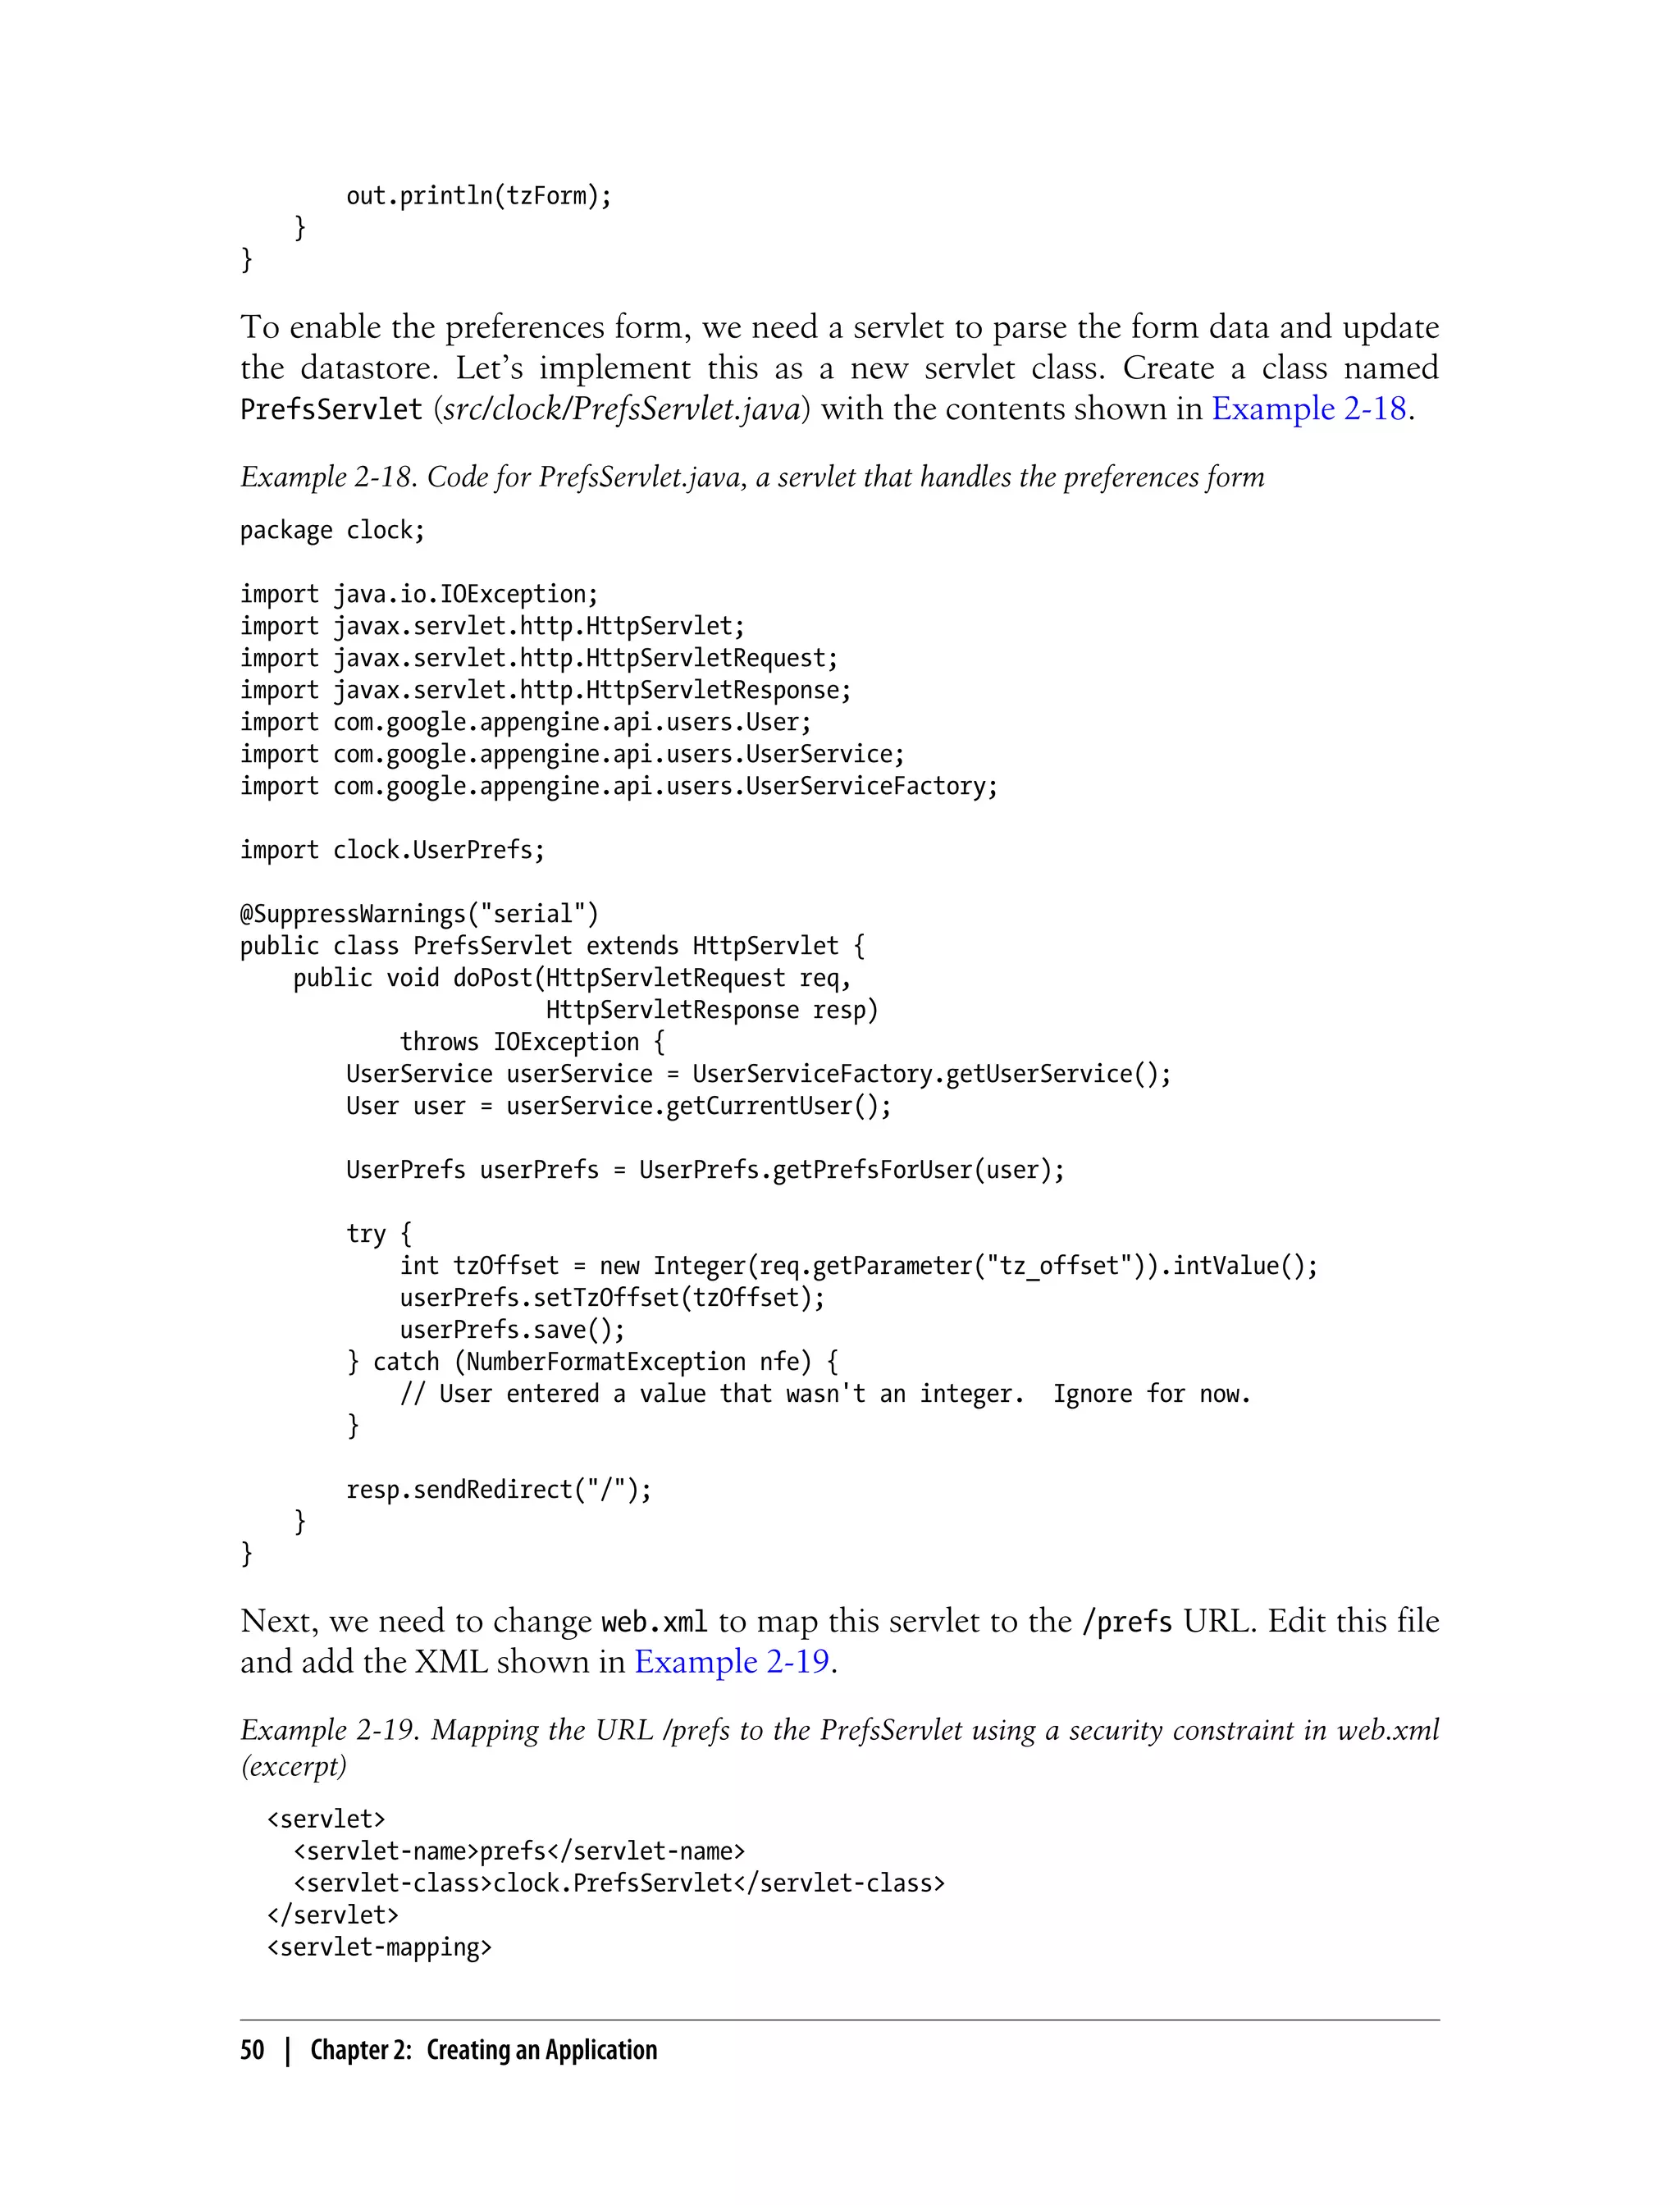
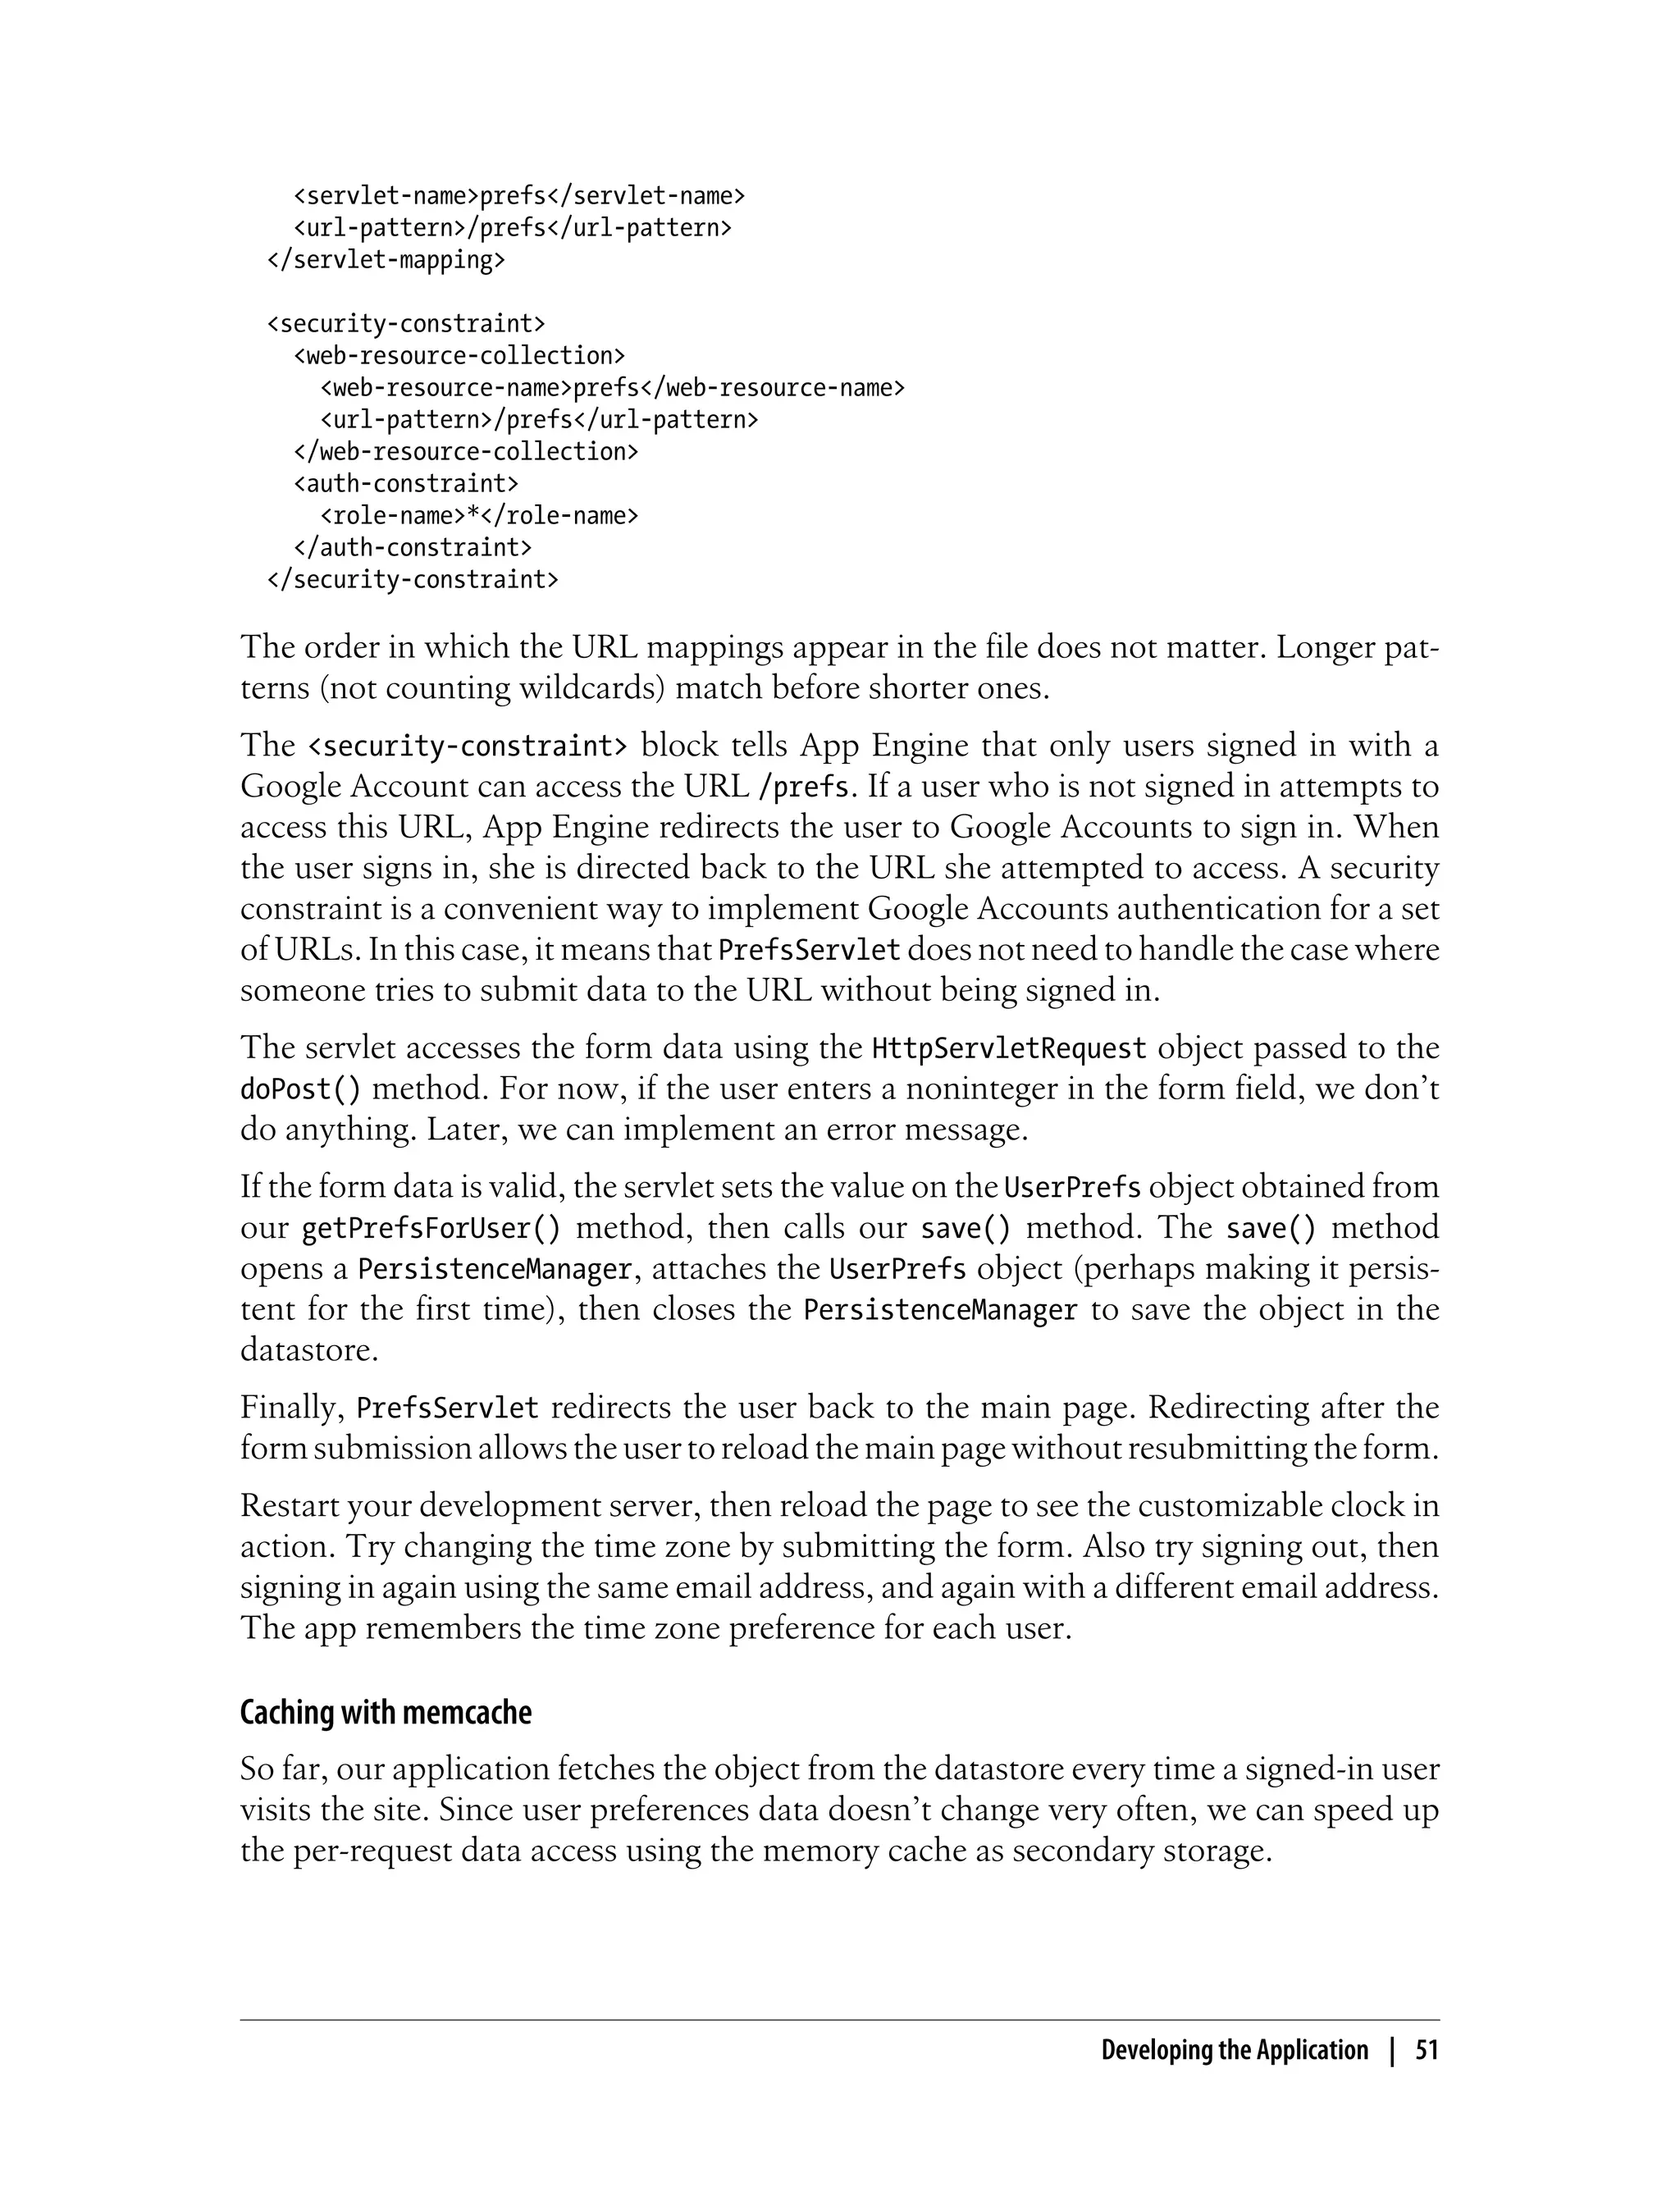

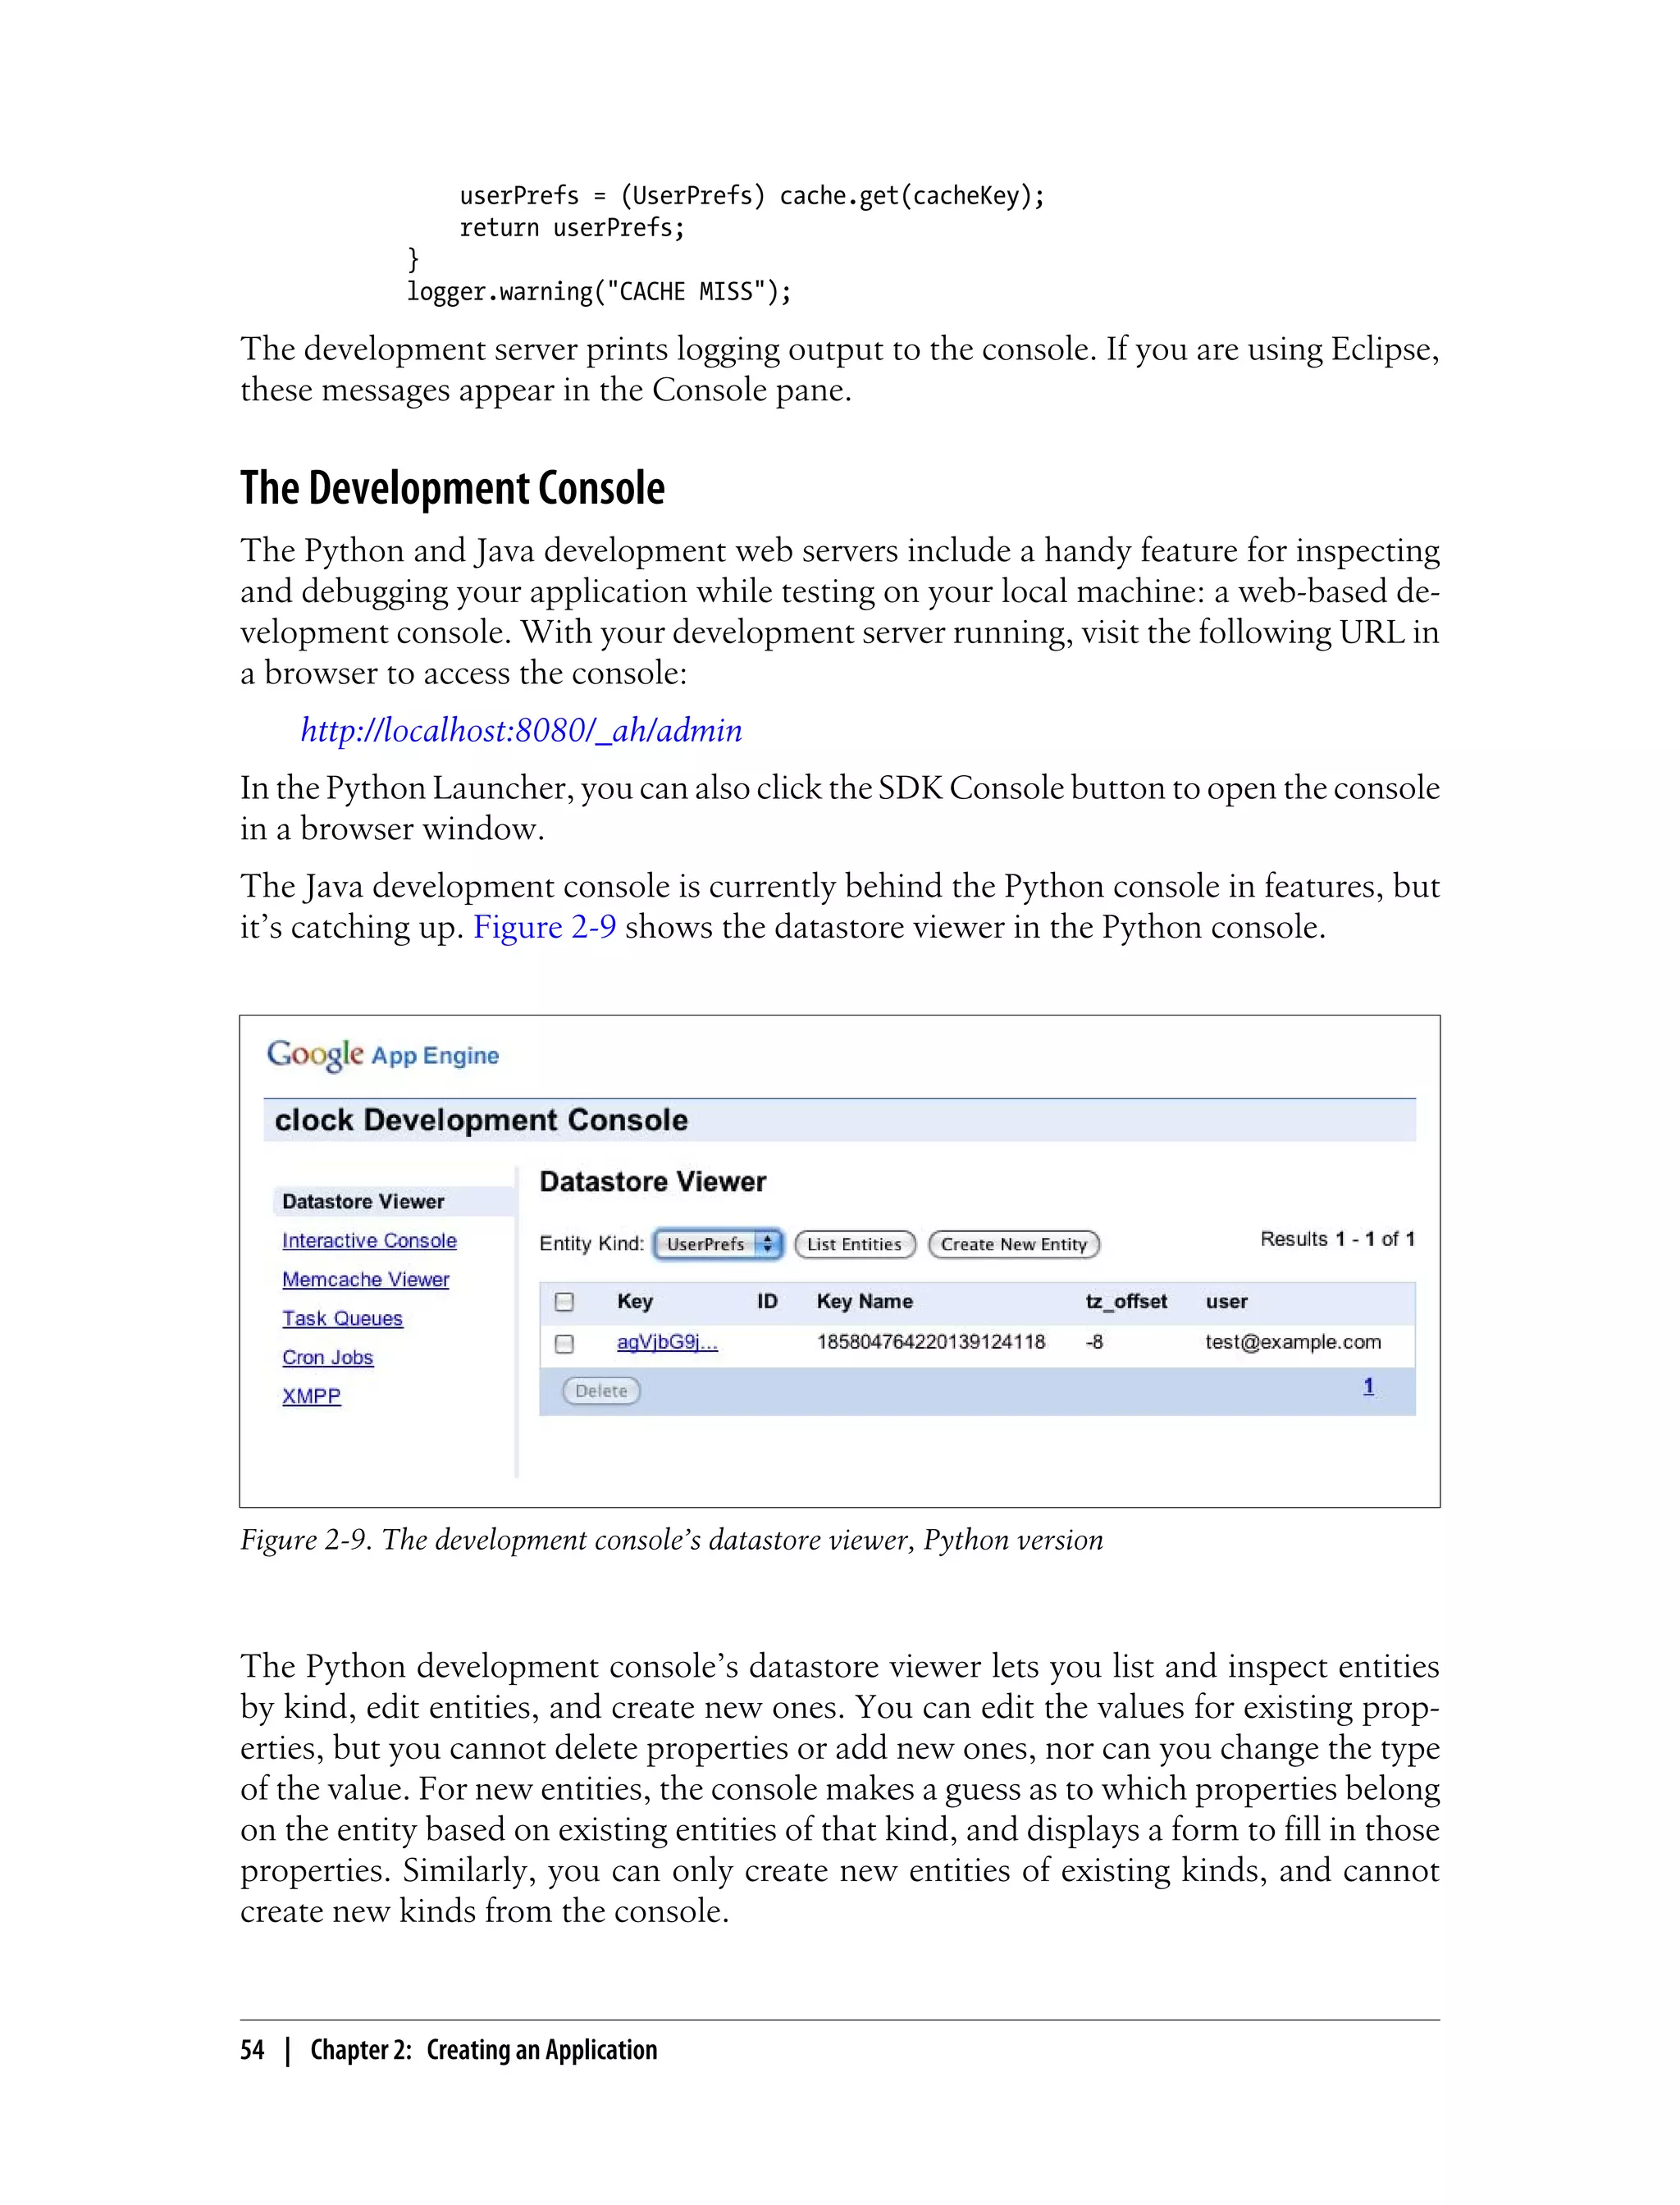
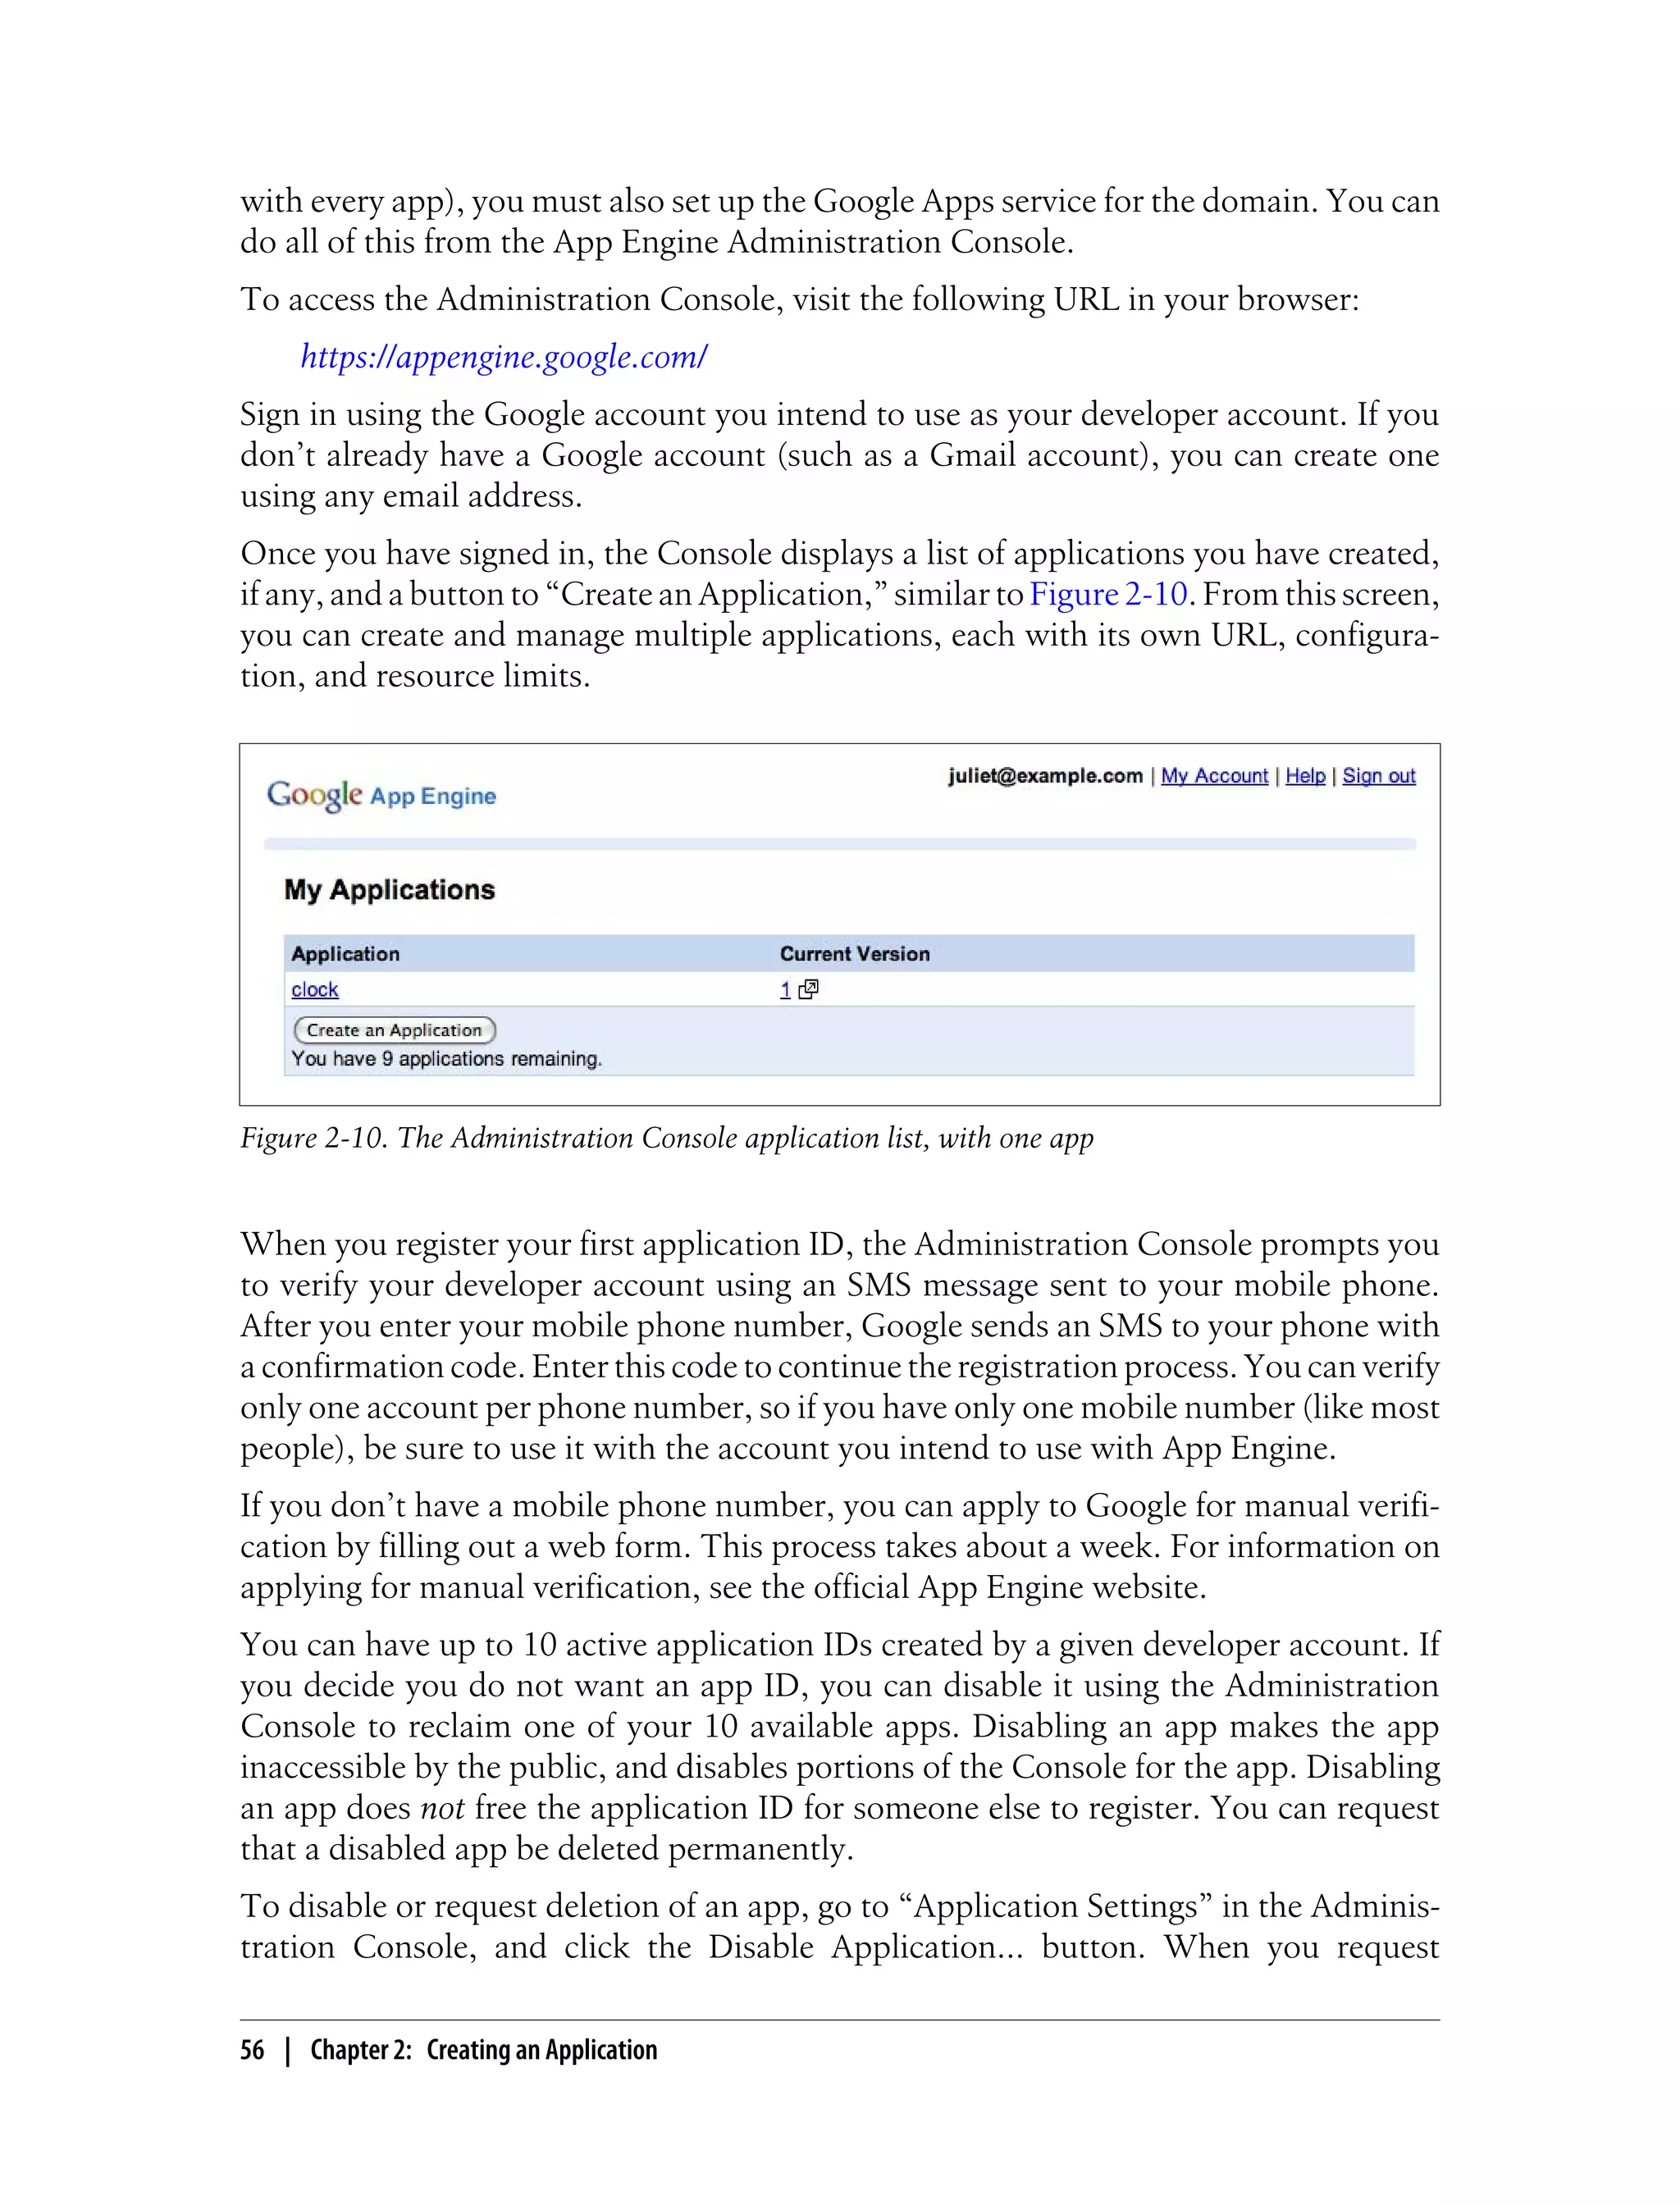

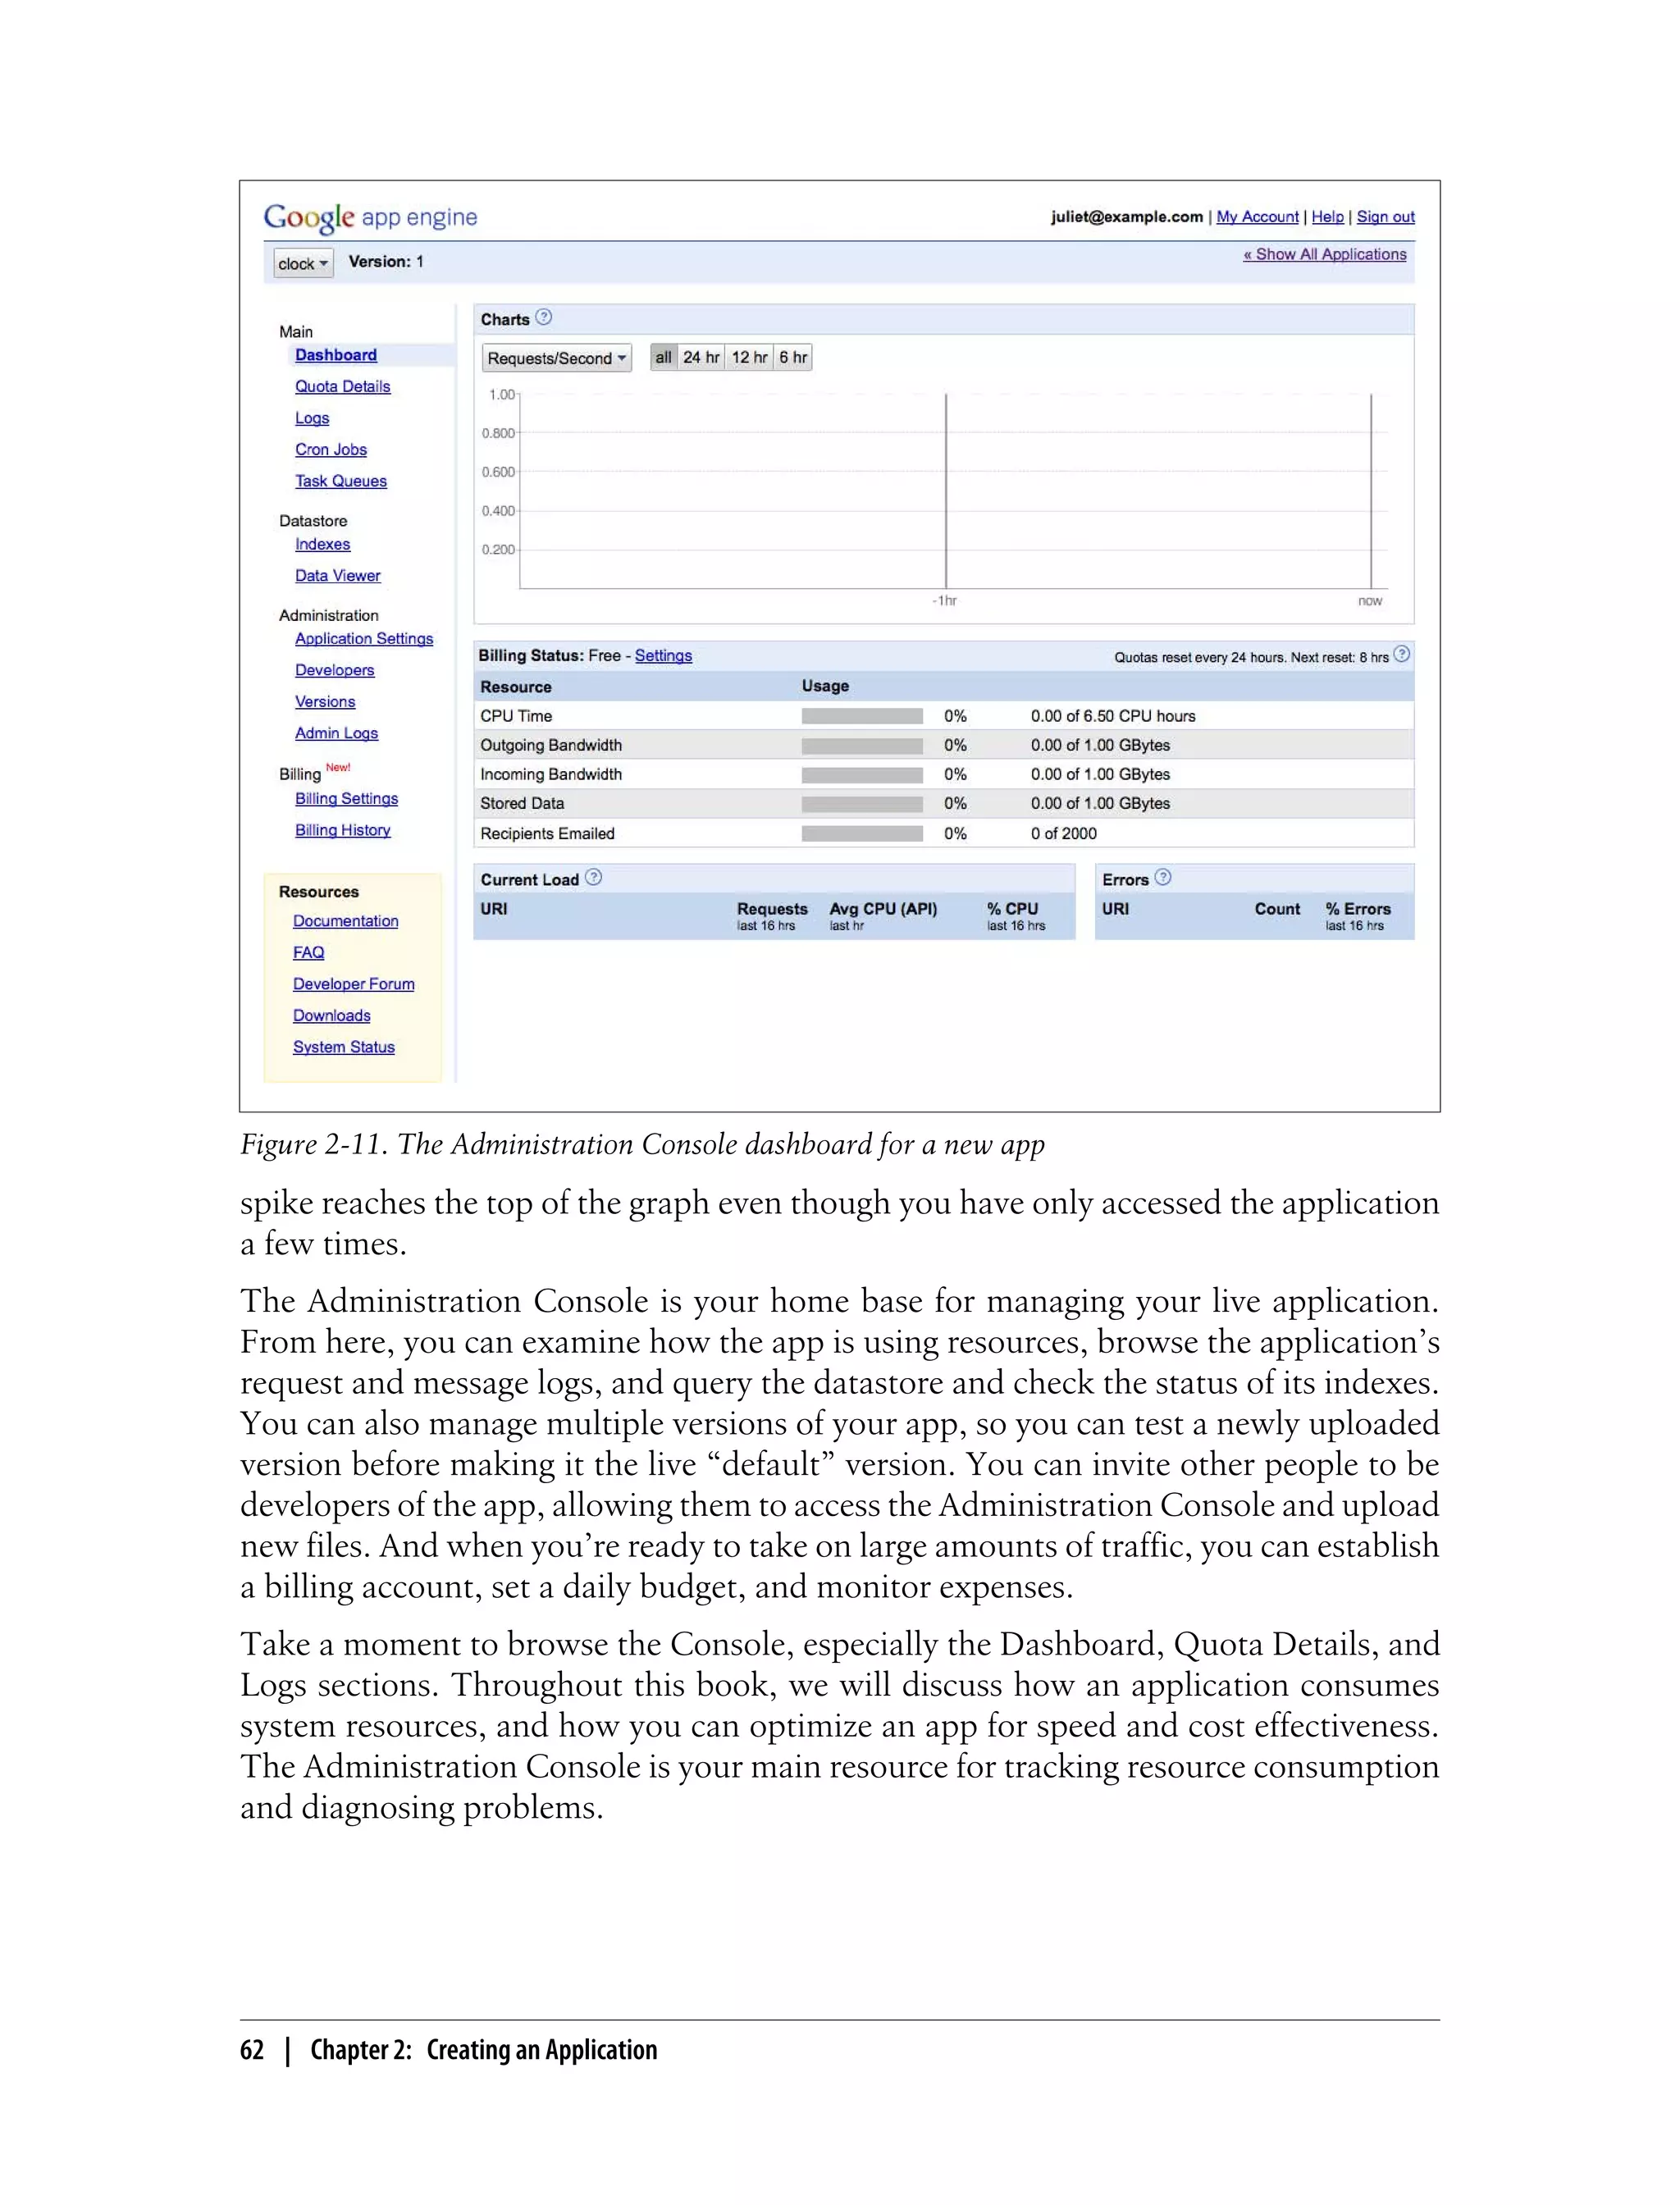
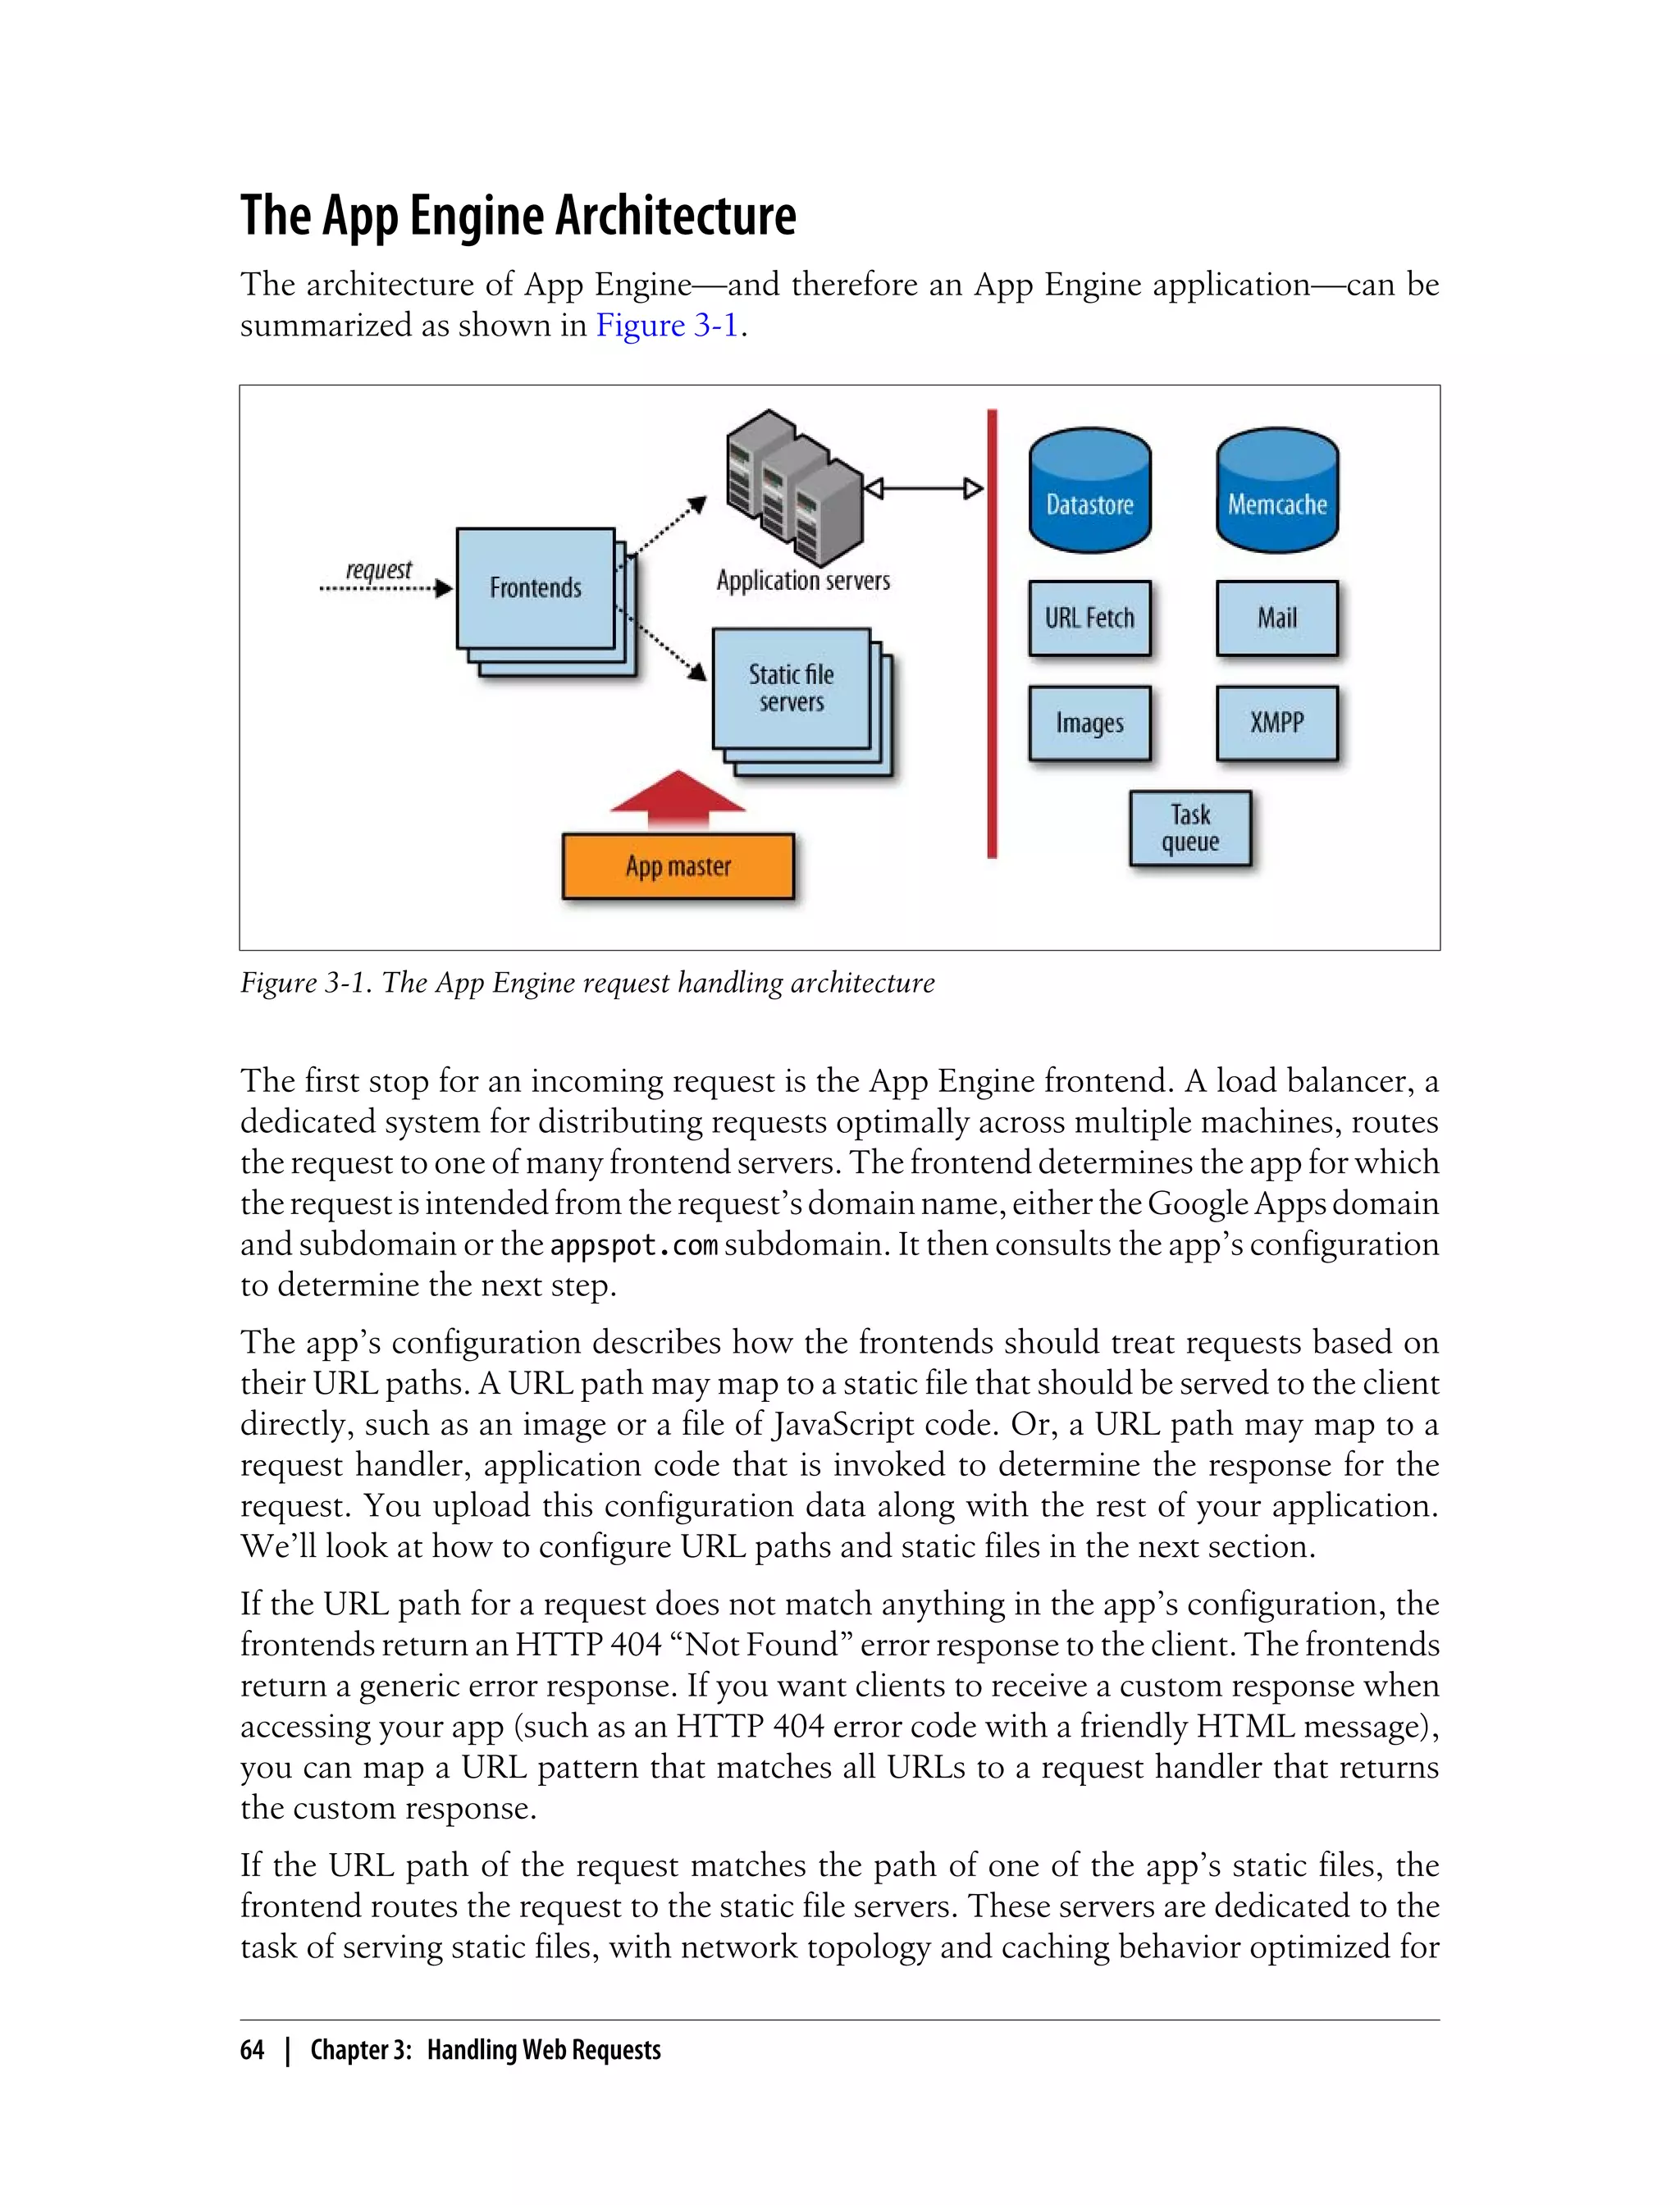

![class MainHandler(webapp.RequestHandler):
def get(self):
host = self.request.headers['Host']
self.response.out.write('Host: %s' % host)
App IDs and Versions
Every App Engine application has an application ID that uniquely distinguishes the
app from all other applications. As described in Chapter 2, you can register an ID for
a new application using the Administration Console. Once you have an ID, you add it
to the app’s configuration so the developer tools know that the files in the app root
directory belong to the app with that ID.
The app’s configuration also includes a version identifier. Like the app ID, the version
identifier is associated with the app’s files when the app is uploaded. App Engine retains
one set of files and frontend configuration for each distinct version identifier used dur-
ing an upload. If you do not change the app version in the configuration when you
upload, the existing files for that version of the app are replaced.
Each distinct version of the app is accessible at its own domain name, of the following
form:
version-id.latest.app-id.appspot.com
When you have multiple versions of an app uploaded to App Engine, you can use the
Administration Console to select which version is the one you want the public to access.
The Console calls this the “default” version. When a user visits your Google Apps
domain (and configured subdomain), or the appspot.com domain without the version
ID, he sees the default version.
The appspot.com domain containing the version ID supports an additional domain part,
just like the default appspot.com domain:
anything.version-id.latest.app-id.appspot.com
Unless you explicitly prevent it, anyone who knows your application ID
and version identifiers can access any uploaded version of your appli-
cation using the appspot.com URLs. You can restrict access to nondefault
versions of the application using code that checks the domain of the
request and only allows authorized users to access the versioned do-
mains. You can’t restrict access to static files this way.
Another way to restrict access to nondefault versions is to use Google
Accounts authorization, described later in this chapter. You can restrict
access to app administrators while a version is in development, then
replace the configuration to remove the restriction just before making
that version the default version.
70 | Chapter 3: Handling Web Requests](https://image.slidesharecdn.com/programminggoogleappengine-100608200404-phpapp01/75/Programming-google-app-engine-91-2048.jpg)


![If you’d like browsers to reload a static file resource automatically every
time you launch a new major version of the app, you can use the mul-
tiversion URL handler just discussed, then use the CURRENT_VERSION_ID
environment variable as the “version” in the static file URLs:
self.response.out('<script src="/js/' +
os.environ['CURRENT_VERSION_ID'] +
'/code.js" />')
Static files in Java
As we saw earlier, the WAR directory structure for a Java web application keeps all
application code, JARs, and configuration in a subdirectory named WEB-INF/. Typi-
cally, files outside of WEB-INF/ represent resources that the user can access directly,
including static files and JSPs. The URL paths to these resources are equivalent to the
paths to these files within the WAR.
Say an app’s WAR has the following files:
main.jsp
forum/home.jsp
images/logo.png
images/cancelbutton.png
images/okbutton.png
terms.html
WEB-INF/classes/com/example/Forum.class
WEB-INF/classes/com/example/MainServlet.class
WEB-INF/classes/com/example/Message.class
WEB-INF/classes/com/example/UserPrefs.class
WEB-INF/lib/appengine-api.jar
This app has four static files: three PNG images and an HTML file named terms.html.
When the app is uploaded, these four files are pushed to the static file servers. The
frontends know to route requests for URL paths equivalent to these file paths (such
as /images/logo.png) to the static file servers.
The two .jsp files are assumed to be JSPs, and are compiled to servlet classes and
mapped to the URL paths equivalent to their file paths. Since these are application
code, they are handled by the application servers. The JSP source files themselves are
not pushed to the static file servers.
By default, all files in the WAR are pushed to the application servers, and are accessible
by the application code via the filesystem. This includes the files that are identified as
static files and pushed to the static file servers. In other words, all files are considered
resource files, and all files except for JSPs and the WEB-INF/ directory are considered
static files.
Configuring the Frontend | 79](https://image.slidesharecdn.com/programminggoogleappengine-100608200404-phpapp01/75/Programming-google-app-engine-100-2048.jpg)


![In practice, neither method of importing offers much advantage. Late importing may
actually be slower if the import is inside a loop or frequent code path, since importing
an already-imported module takes some time, even if it doesn’t load files or evaluate
module code. It’s best to import modules in the way that makes the most sense for code
clarity, typically at the top of each module (source file) that uses the module. Once
you’ve developed your app, if you notice you have a significant slowdown during im-
ports of the first request, you could consider importing selected modules in their code
paths if you can demonstrate that doing so would skip a lot of unneeded code in a
significant number of cases.
App Engine includes a feature similar to import caching to achieve similar savings for
the handler scripts themselves. In general, when the app server invokes a handler script,
it evaluates all of the script’s code, regardless of whether the script has been invoked
by the app instance in the past. But if the script defines a function named main() that
takes no arguments (or arguments with default values), App Engine treats the handler
script like a module. The first invocation evaluates the complete script as usual, but for
all subsequent invocations, App Engine just calls the main() function.
Consider an early version of the clock application we built in Chapter 2, repeated here
as Example 3-4. This handler script imports three modules, defines three global ele-
ments (a class, a global variable, and the main() function), then calls the main() function.
Example 3-4. A simple request handler illustrating the use of app caching
from google.appengine.ext import webapp
from google.appengine.ext.webapp.util import run_wsgi_app
import datetime
class MainPage(webapp.RequestHandler):
def get(self):
time = datetime.datetime.now()
self.response.headers['Content-Type'] = 'text/html'
self.response.out.write('<p>The time is: %s</p>' % str(time))
application = webapp.WSGIApplication([('/', MainPage)],
debug=True)
def main():
run_wsgi_app(application)
if __name__ == '__main__':
main()
The first time an app instance invokes this script, the full script is evaluated, thereby
importing the modules and defining the global elements in the script’s namespace
within the app instance. Evaluating the script also calls the main() function.
How the App Is Run | 91](https://image.slidesharecdn.com/programminggoogleappengine-100608200404-phpapp01/75/Programming-google-app-engine-112-2048.jpg)


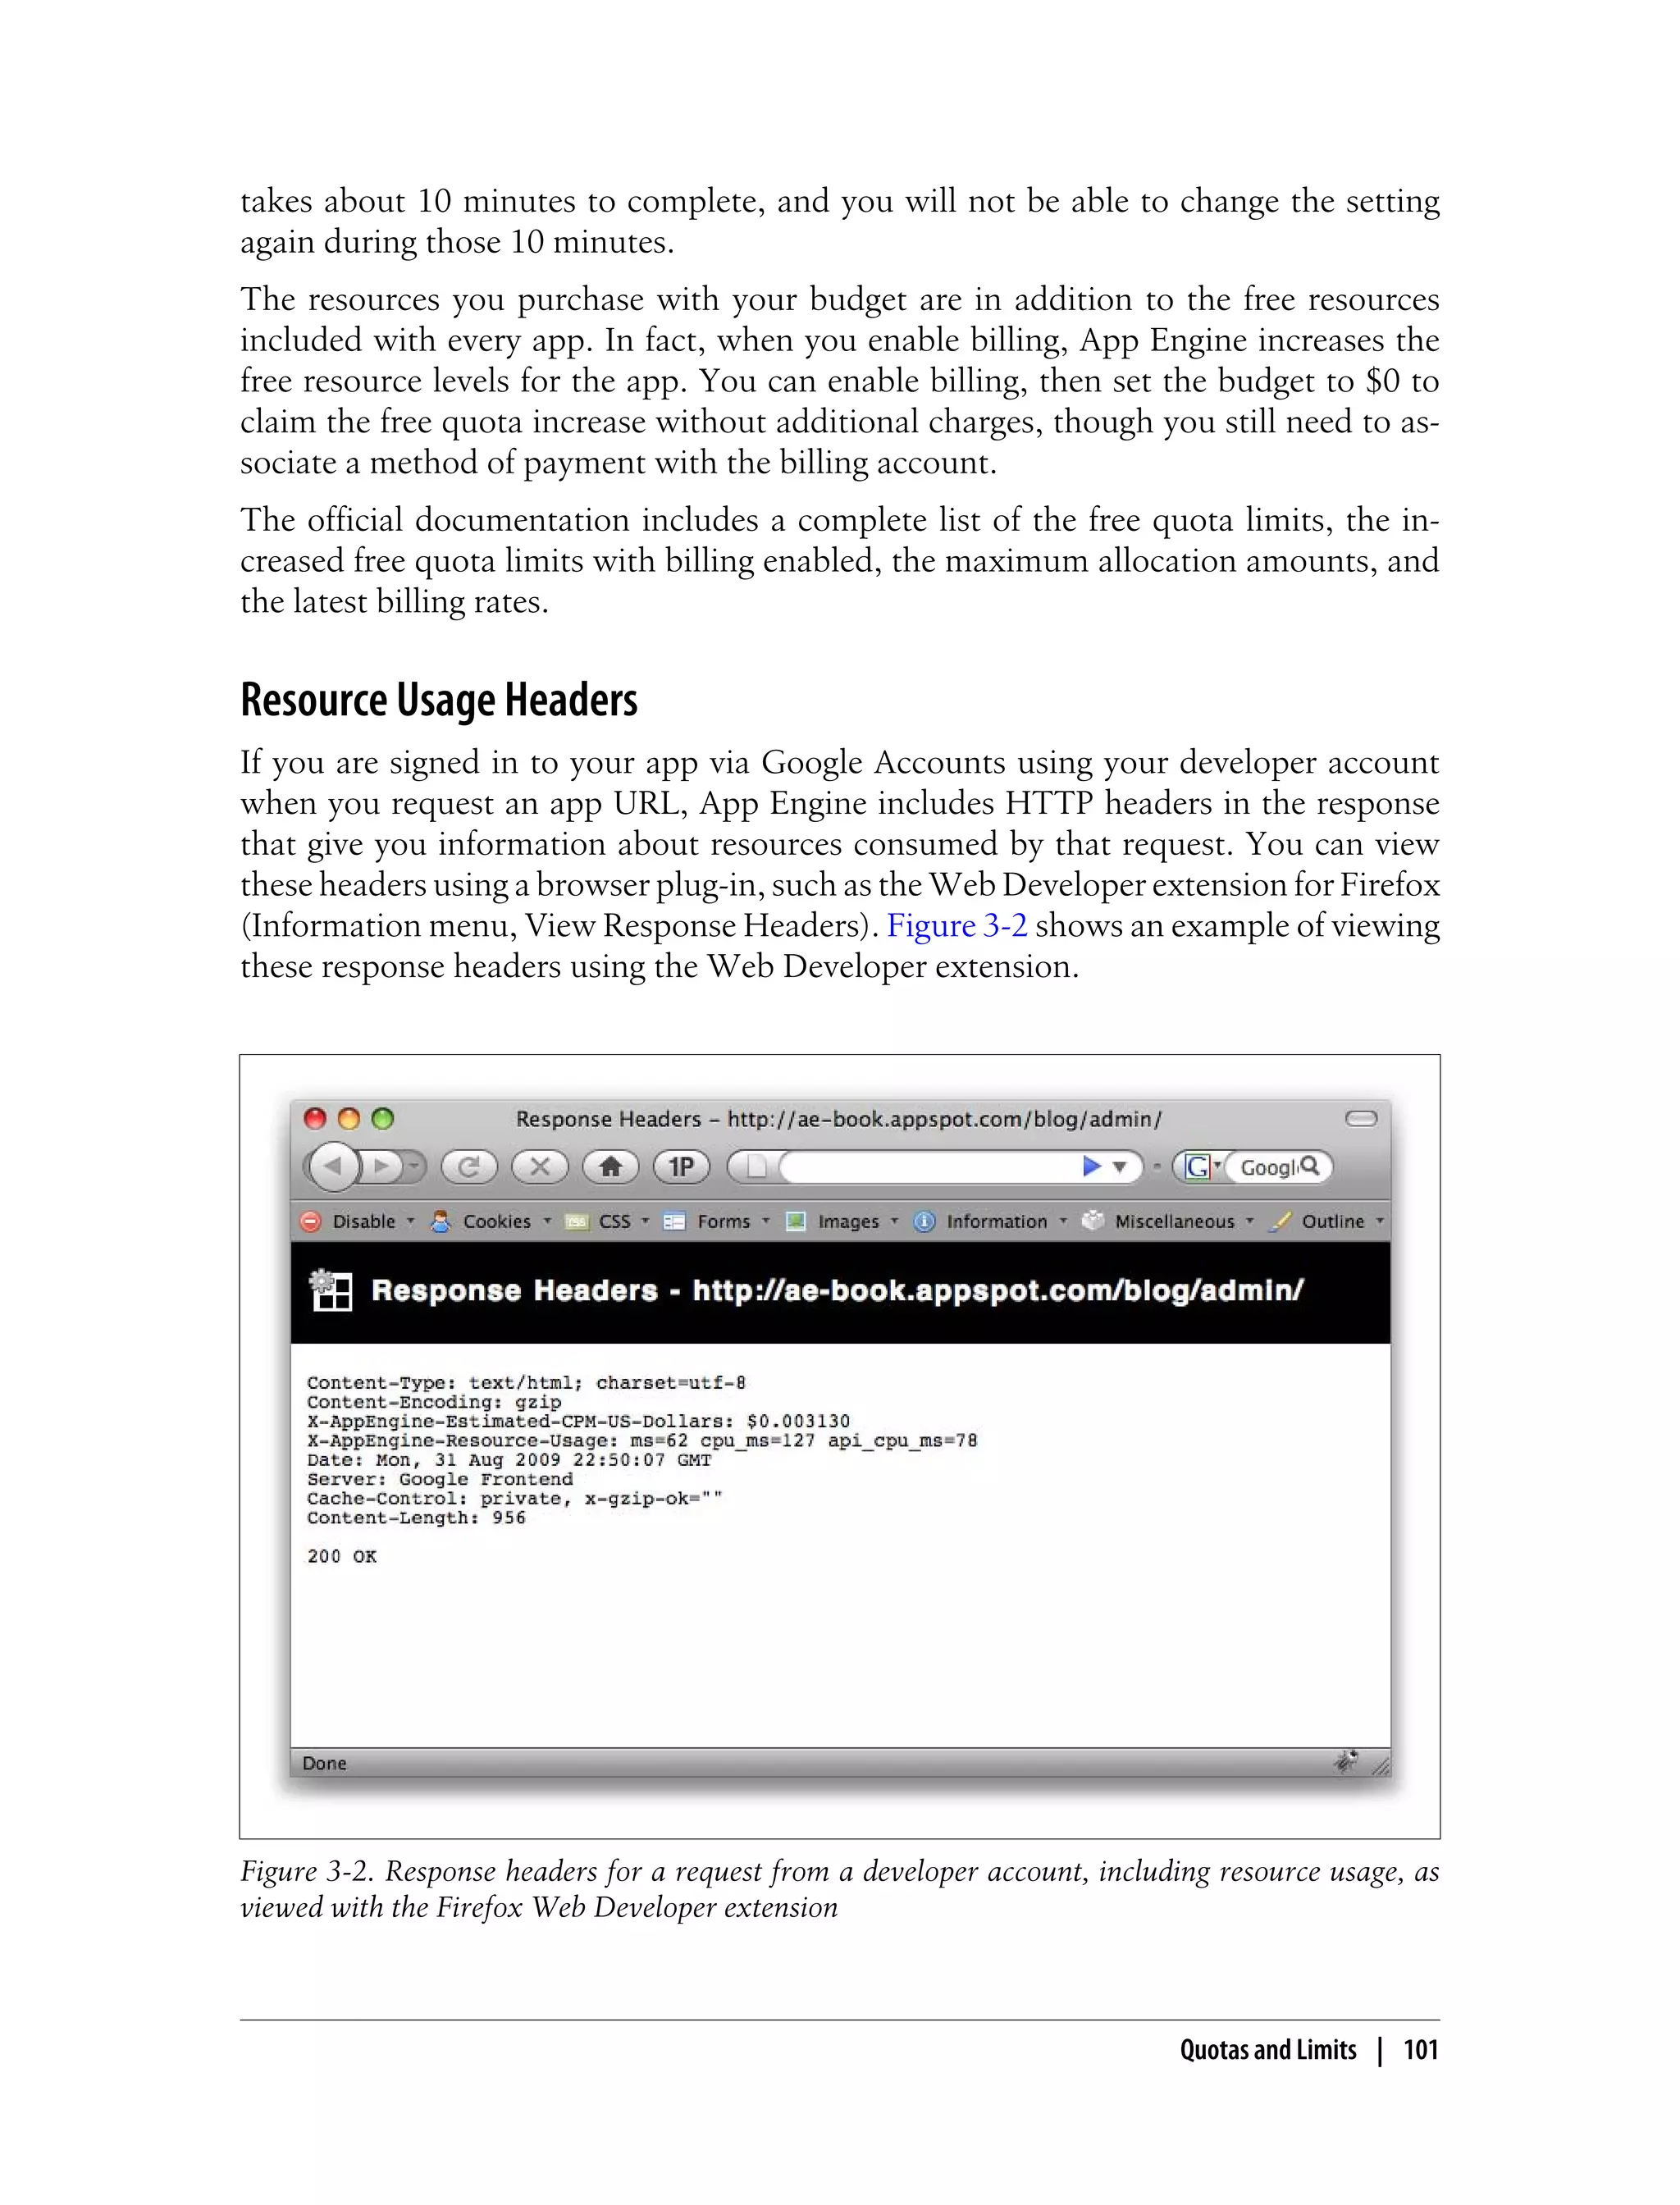
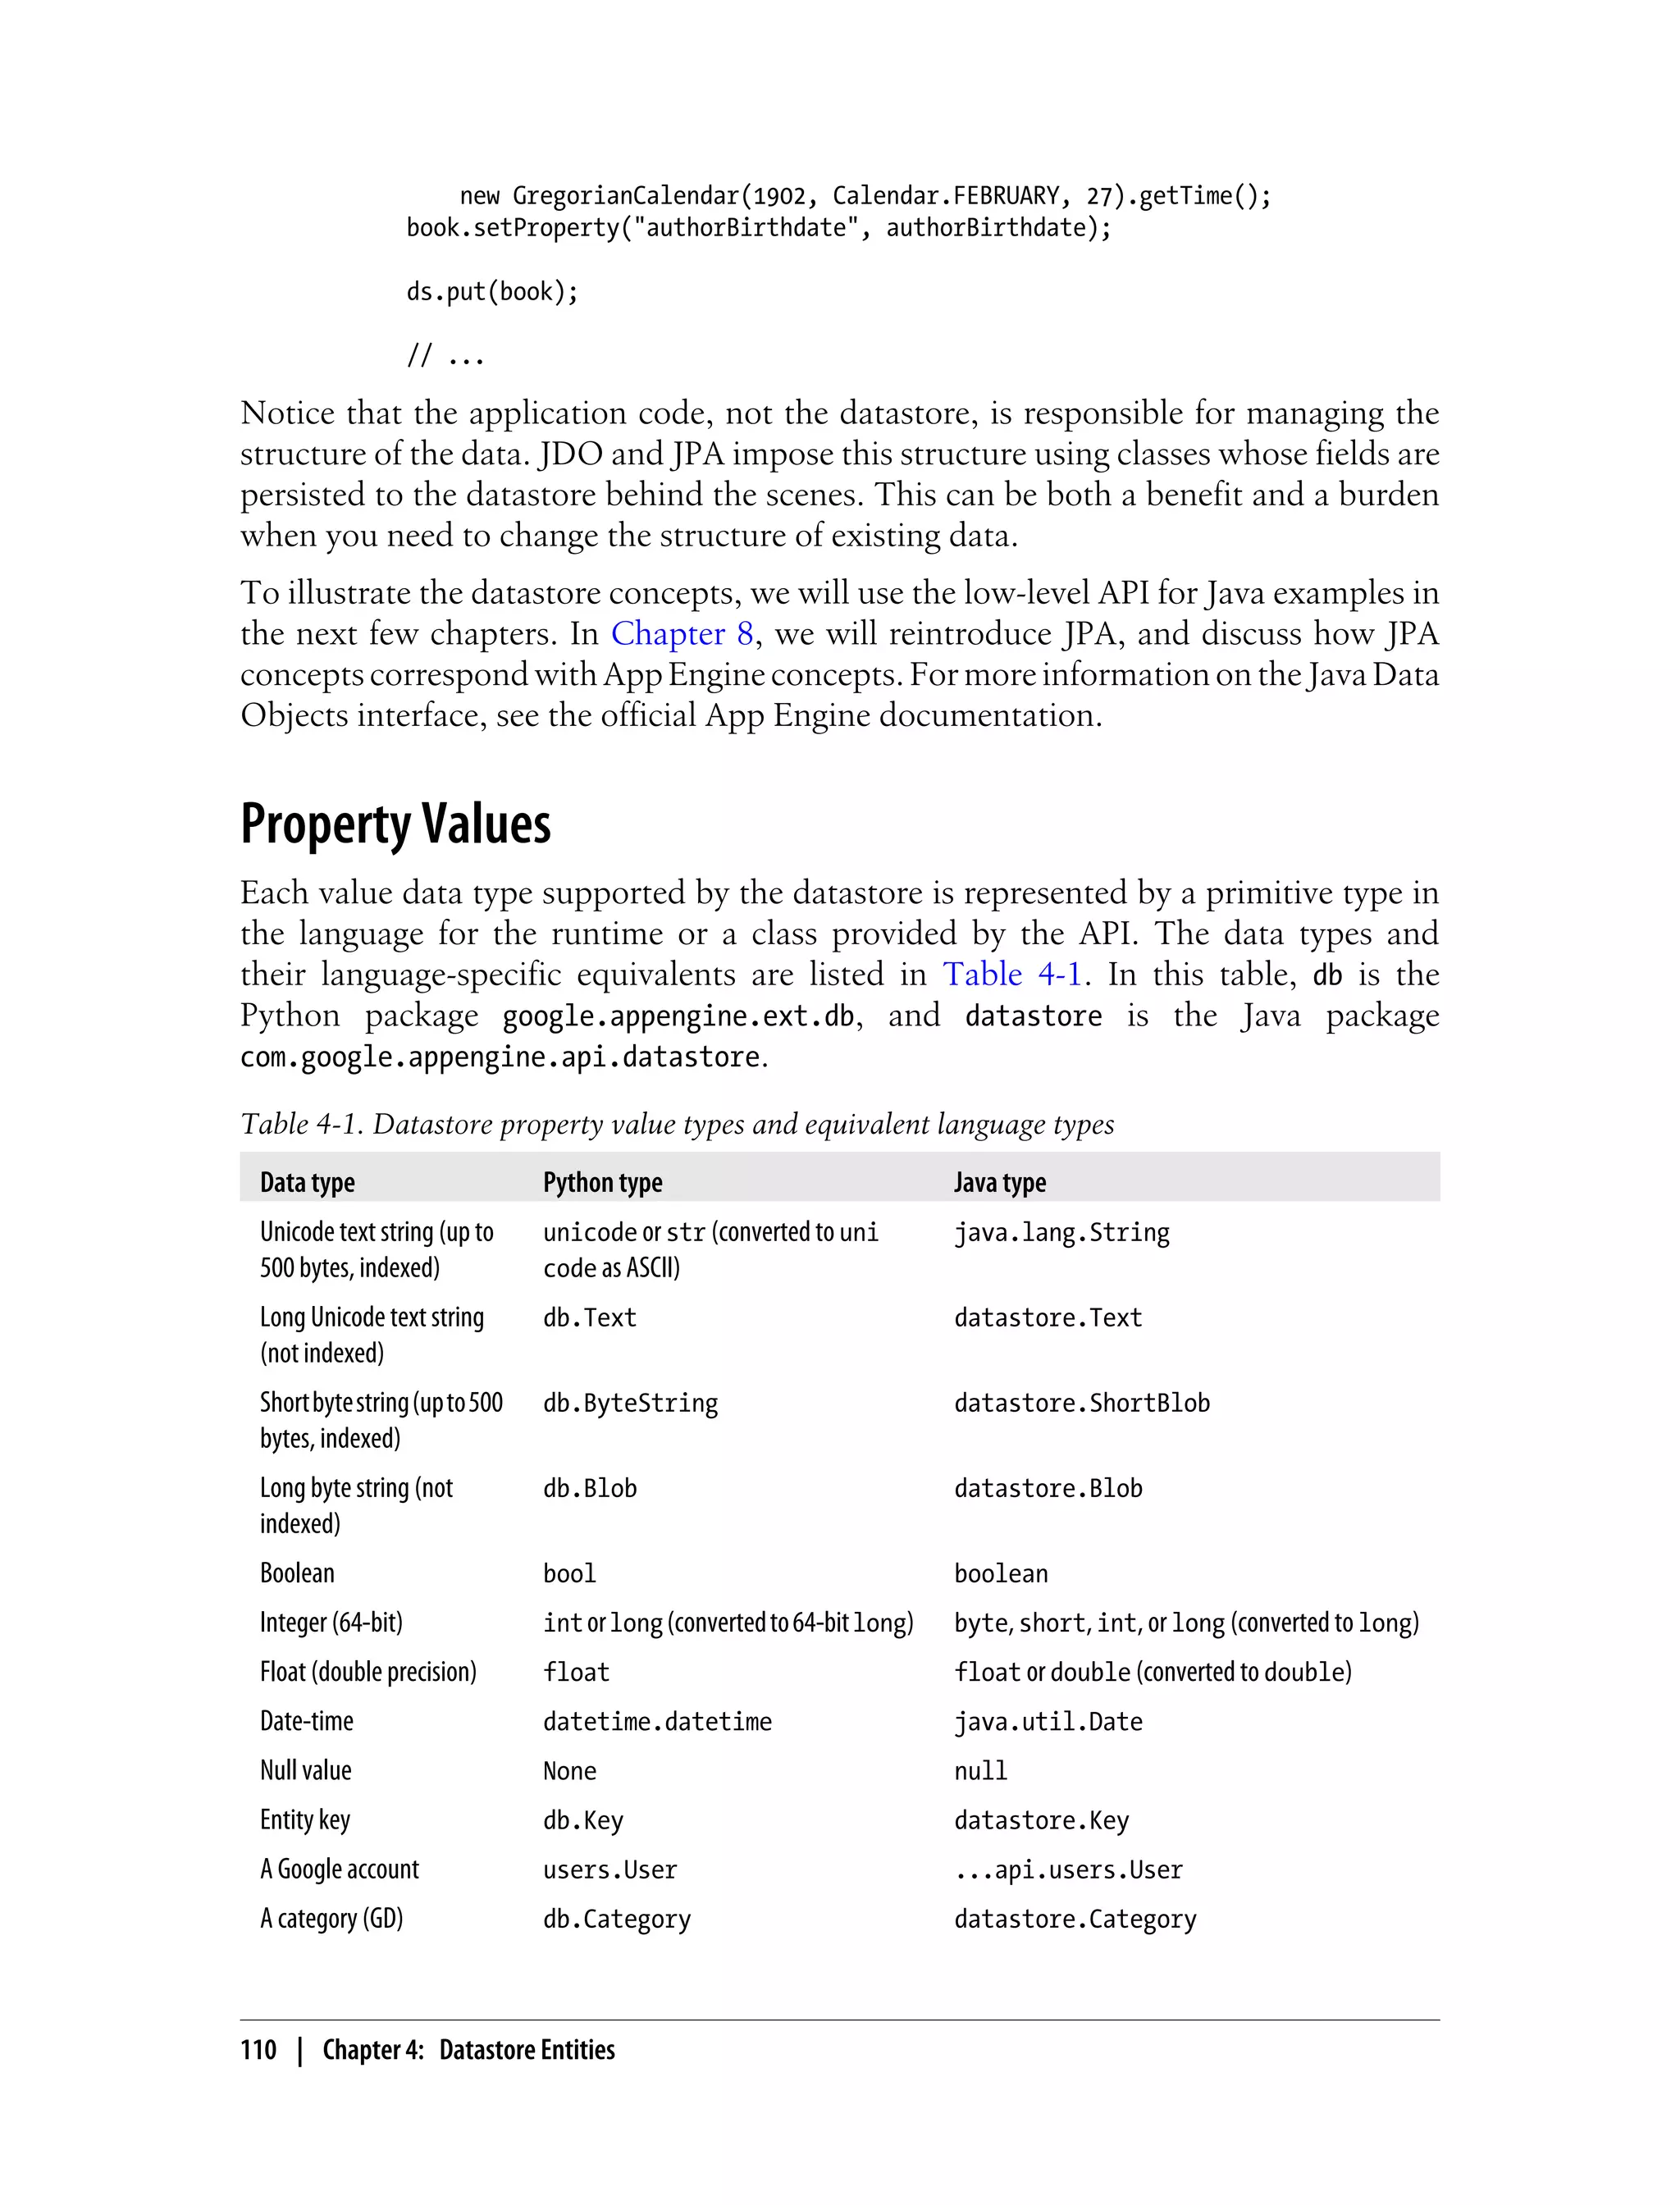
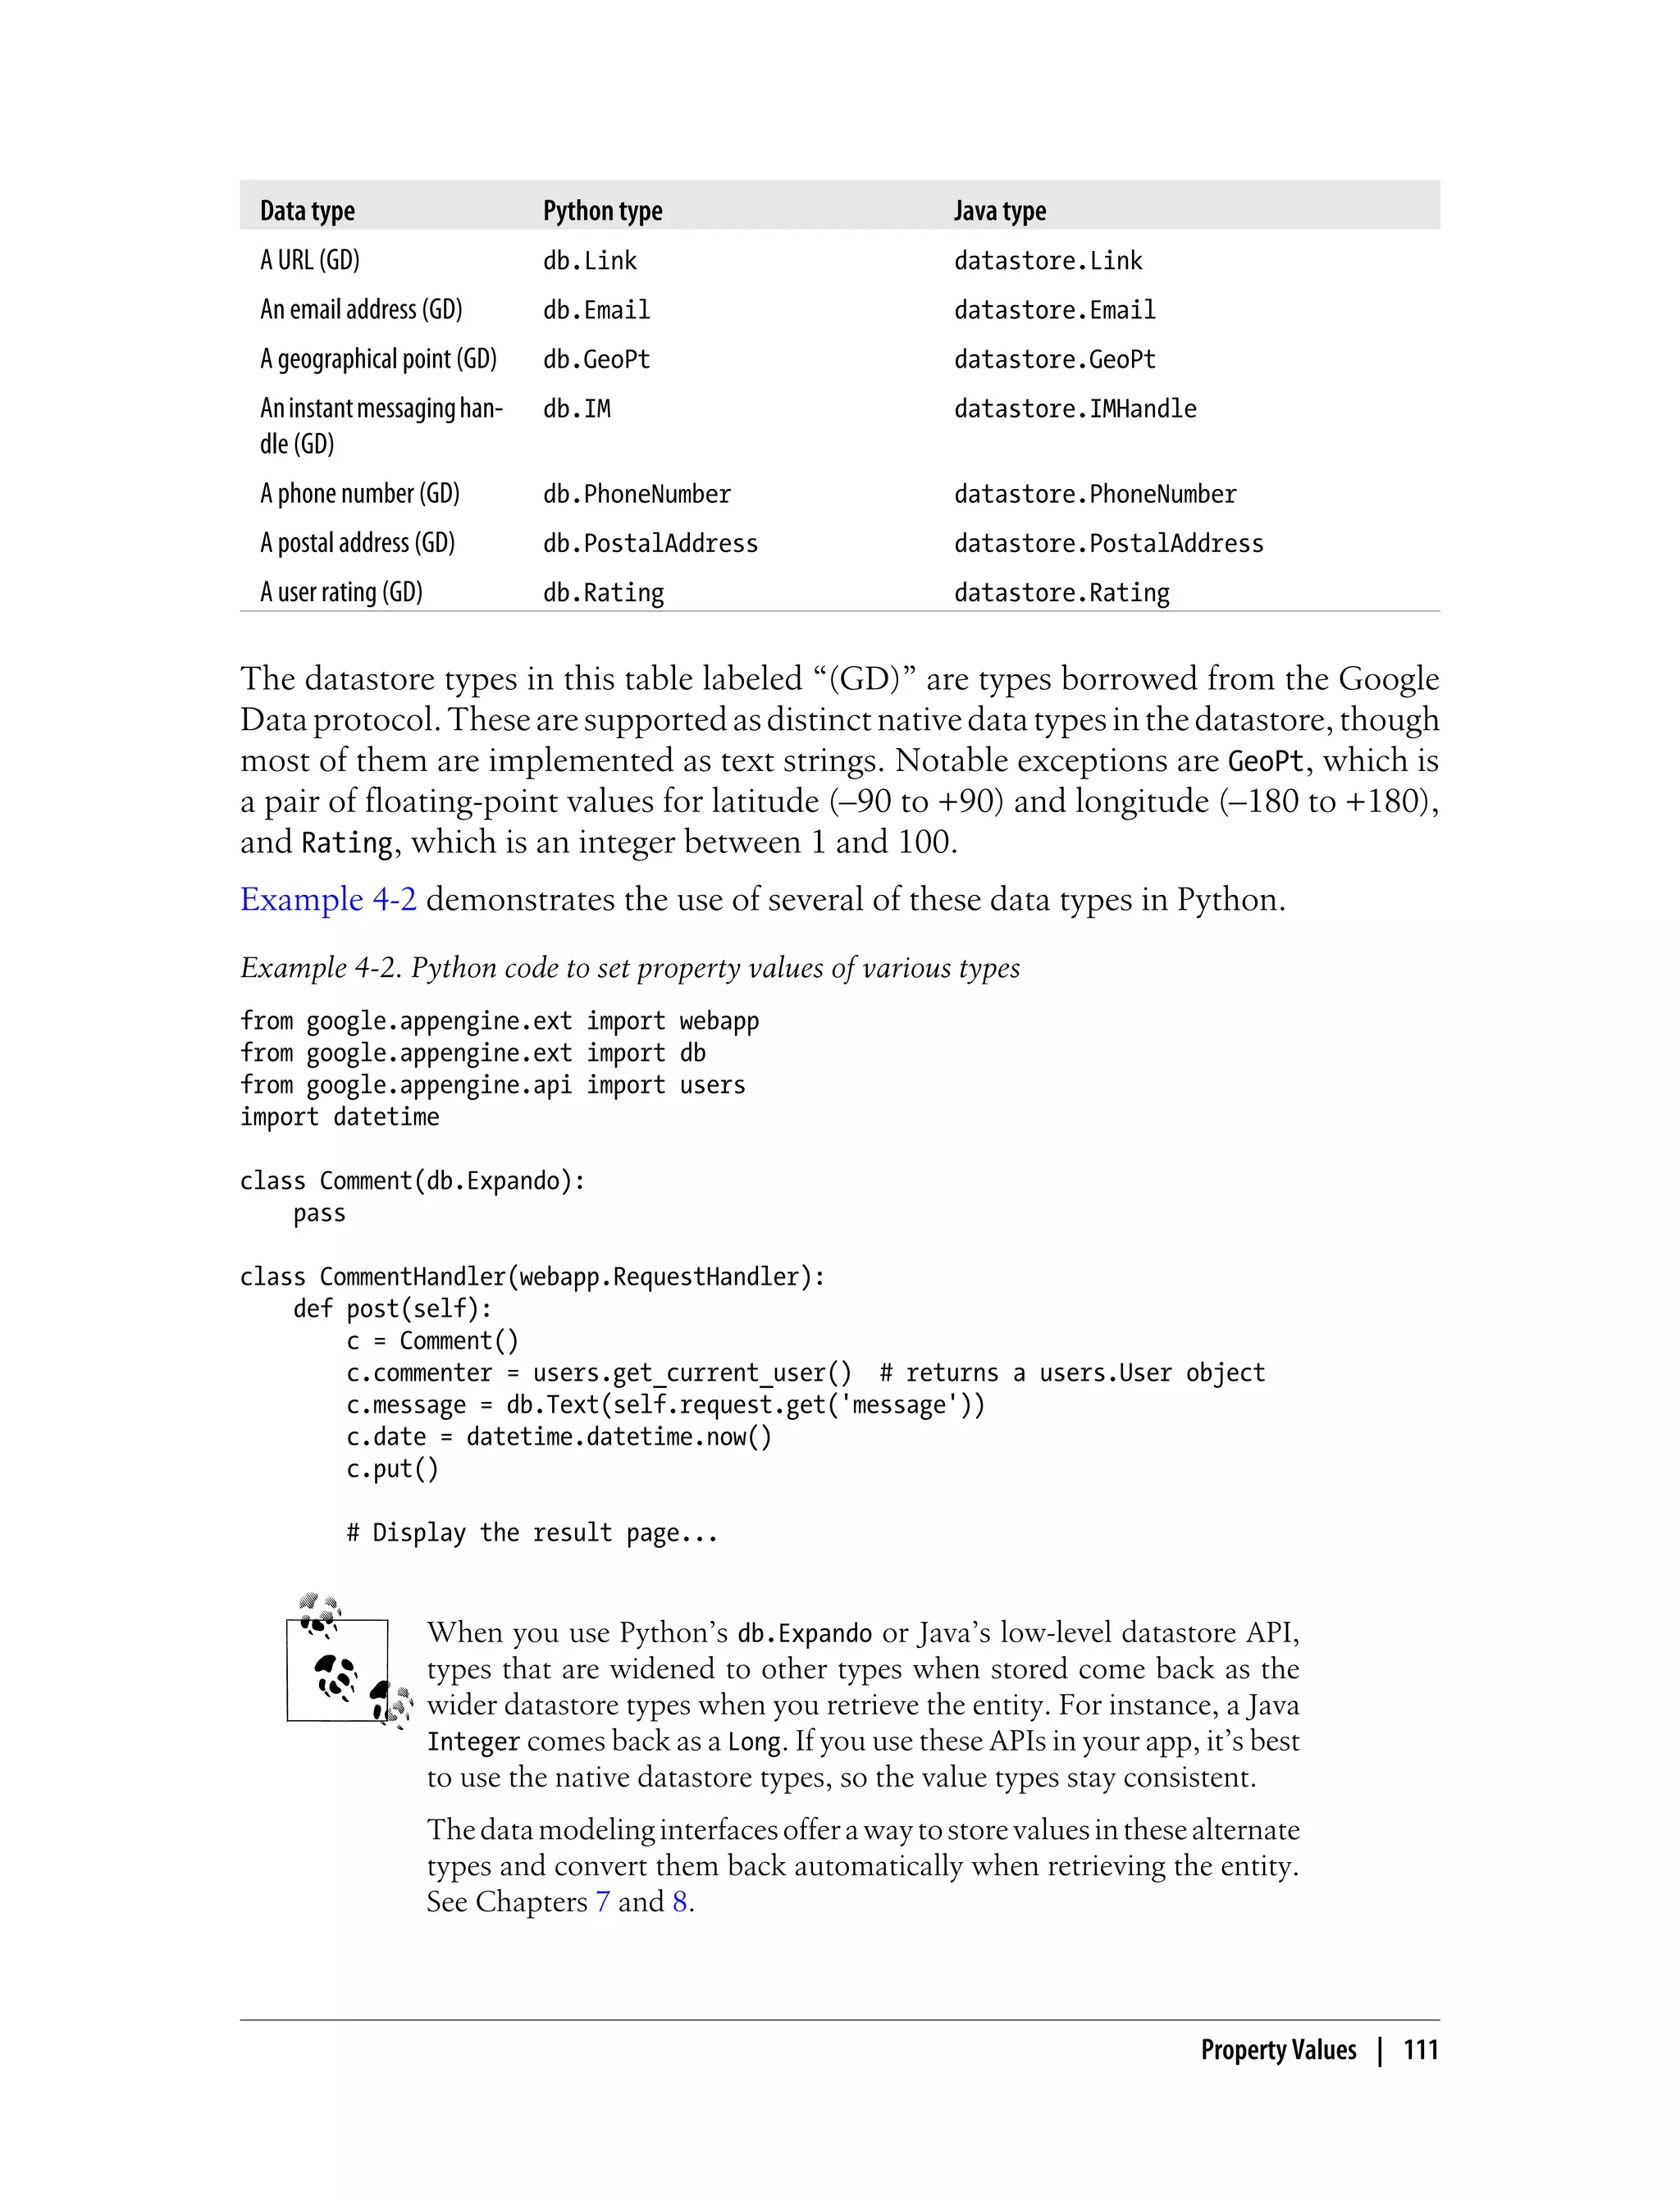

![A property with the null value is not the same as an unset property. Consider the fol-
lowing Python code:
class Entity(db.Expando):
pass
a = Entity()
a.prop1 = 'abc'
a.prop2 = None
a.put()
b = Entity()
b.prop1 = 'def'
b.put()
This creates two entities of the kind Entity. Both entities have a property named
prop1. The first entity has a property named prop2; the second does not.
Of course, an unset property can be set later:
b.prop2 = 123
b.put()
# b now has a property named "prop2."
Similarly, a set property can be made unset. In the Python API, you delete the property
by deleting the attribute from the object, using the del keyword:
del b.prop2
b.put()
# b no longer has a property named "prop2."
In Java, the low-level datastore API’s Entity class has methods to set properties
(setProperty()) and unset properties (removeProperty()).
Multivalued Properties
As we mentioned earlier, a property can have multiple values. We’ll discuss the more
substantial aspects of multivalued properties when we talk about queries and data
modeling. But for now, it’s worth a brief mention.
A property can have one or more values. A property cannot have zero values; a property
without a value is simply unset. Each value for a property can be of a different type,
and can be the null value.
The datastore preserves the order of values as they are assigned. The Python API returns
the values in the same order as they were set.
In Python, a property with multiple values is represented as a single Python list value:
e.prop = [1, 2, 'a', None, 'b']
Property Values | 113](https://image.slidesharecdn.com/programminggoogleappengine-100608200404-phpapp01/75/Programming-google-app-engine-134-2048.jpg)
![Because a property must have at least one value, it is an error to assign
an empty list ([] in Python) to a property on an entity whose Python
class is based on the Expando class.
class Entity(db.Expando):
pass
e = Entity()
e.prop = [] # ERROR
In contrast, the Model base class includes a feature that automatically
translates between the empty list value and “no property set.” You’ll see
this feature in Chapter 7.
In the Java low-level datastore API, you can store multiple values for a property using
a Collection type. The low-level API returns the values as a java.util.List. The items
are stored in the order provided by the Collection type’s iterator. For many types, such
as SortedSet or TreeSet, this order is deterministic. For others, such as HashSet, it is
not. If the app needs the original data structure, it must convert the List returned by
the datastore to the appropriate type.
Keys and Key Objects
The key for an entity is a value that can be retrieved, passed around, and stored like
any other value. If you have the key for an entity, you can retrieve the entity from the
datastore quickly, much more quickly than with a datastore query. Keys can be stored
as property values, as an easy way for one entity to refer to another.
The Python API represents an entity key value as an instance of the Key class, in
the db package. To get the key for an entity, you call the entity object’s key() method.
The Key instance provides access to its several parts using accessor methods, including
the kind, key name (if any), and system-assigned ID (if the entity does not have a key
name).
The Java low-level API is similar: the getKey() method of the Entity class returns an
instance of the Key class.
When you construct a new entity object and do not provide a key name, the entity
object has a key, but the key does not yet have an ID. The ID is populated when the
entity object is saved to the datastore for the first time. You can get the key object prior
to saving the object, but it will be incomplete.
e = Entity()
e.prop = 123
k = e.key() # key is incomplete, has neither key name nor ID
kind = k.kind() # 'Entity'
e.put() # ID is assigned
114 | Chapter 4: Datastore Entities](https://image.slidesharecdn.com/programminggoogleappengine-100608200404-phpapp01/75/Programming-google-app-engine-135-2048.jpg)

![k_str = str(k)
# ...
k = db.Key(k_str)
And in Java:
String k_str = KeyFactory.keyToString(k);
// ...
Key k = KeyFactory.stringToKey(k_str);
The Java Key class’s toString() method does not return the key’s string encoding. You
must use KeyFactory.keyToString() to get the string encoding of a key.
Using Entities
Let’s look briefly at how to retrieve entities from the datastore using keys, how to inspect
the contents of entities, and how to update and delete entities. The API methods for
these features are straightforward.
Getting Entities Using Keys
Given a complete key for an entity, you can retrieve the entity from the datastore.
In the Python API, you can call the get() function in the db package with the Key object
as an argument:
from google.appengine.ext import db
k = db.Key('Entity', 'alphabeta')
e = db.get(k)
If you know the kind of the entity you are fetching, you can also use the get() class
method on the appropriate entity class. This does a bit of type checking, ensuring that
the key you provide is of the appropriate kind:
class Entity(db.Expando):
pass
e = Entity.get(k)
To fetch multiple entities in a batch, you can pass the keys to get() as a list. Given a
list, the method returns a list containing entity objects, with None values for keys that
do not have a corresponding entity in the datastore.
entities = db.get([k1, k2, k3])
116 | Chapter 4: Datastore Entities](https://image.slidesharecdn.com/programminggoogleappengine-100608200404-phpapp01/75/Programming-google-app-engine-137-2048.jpg)

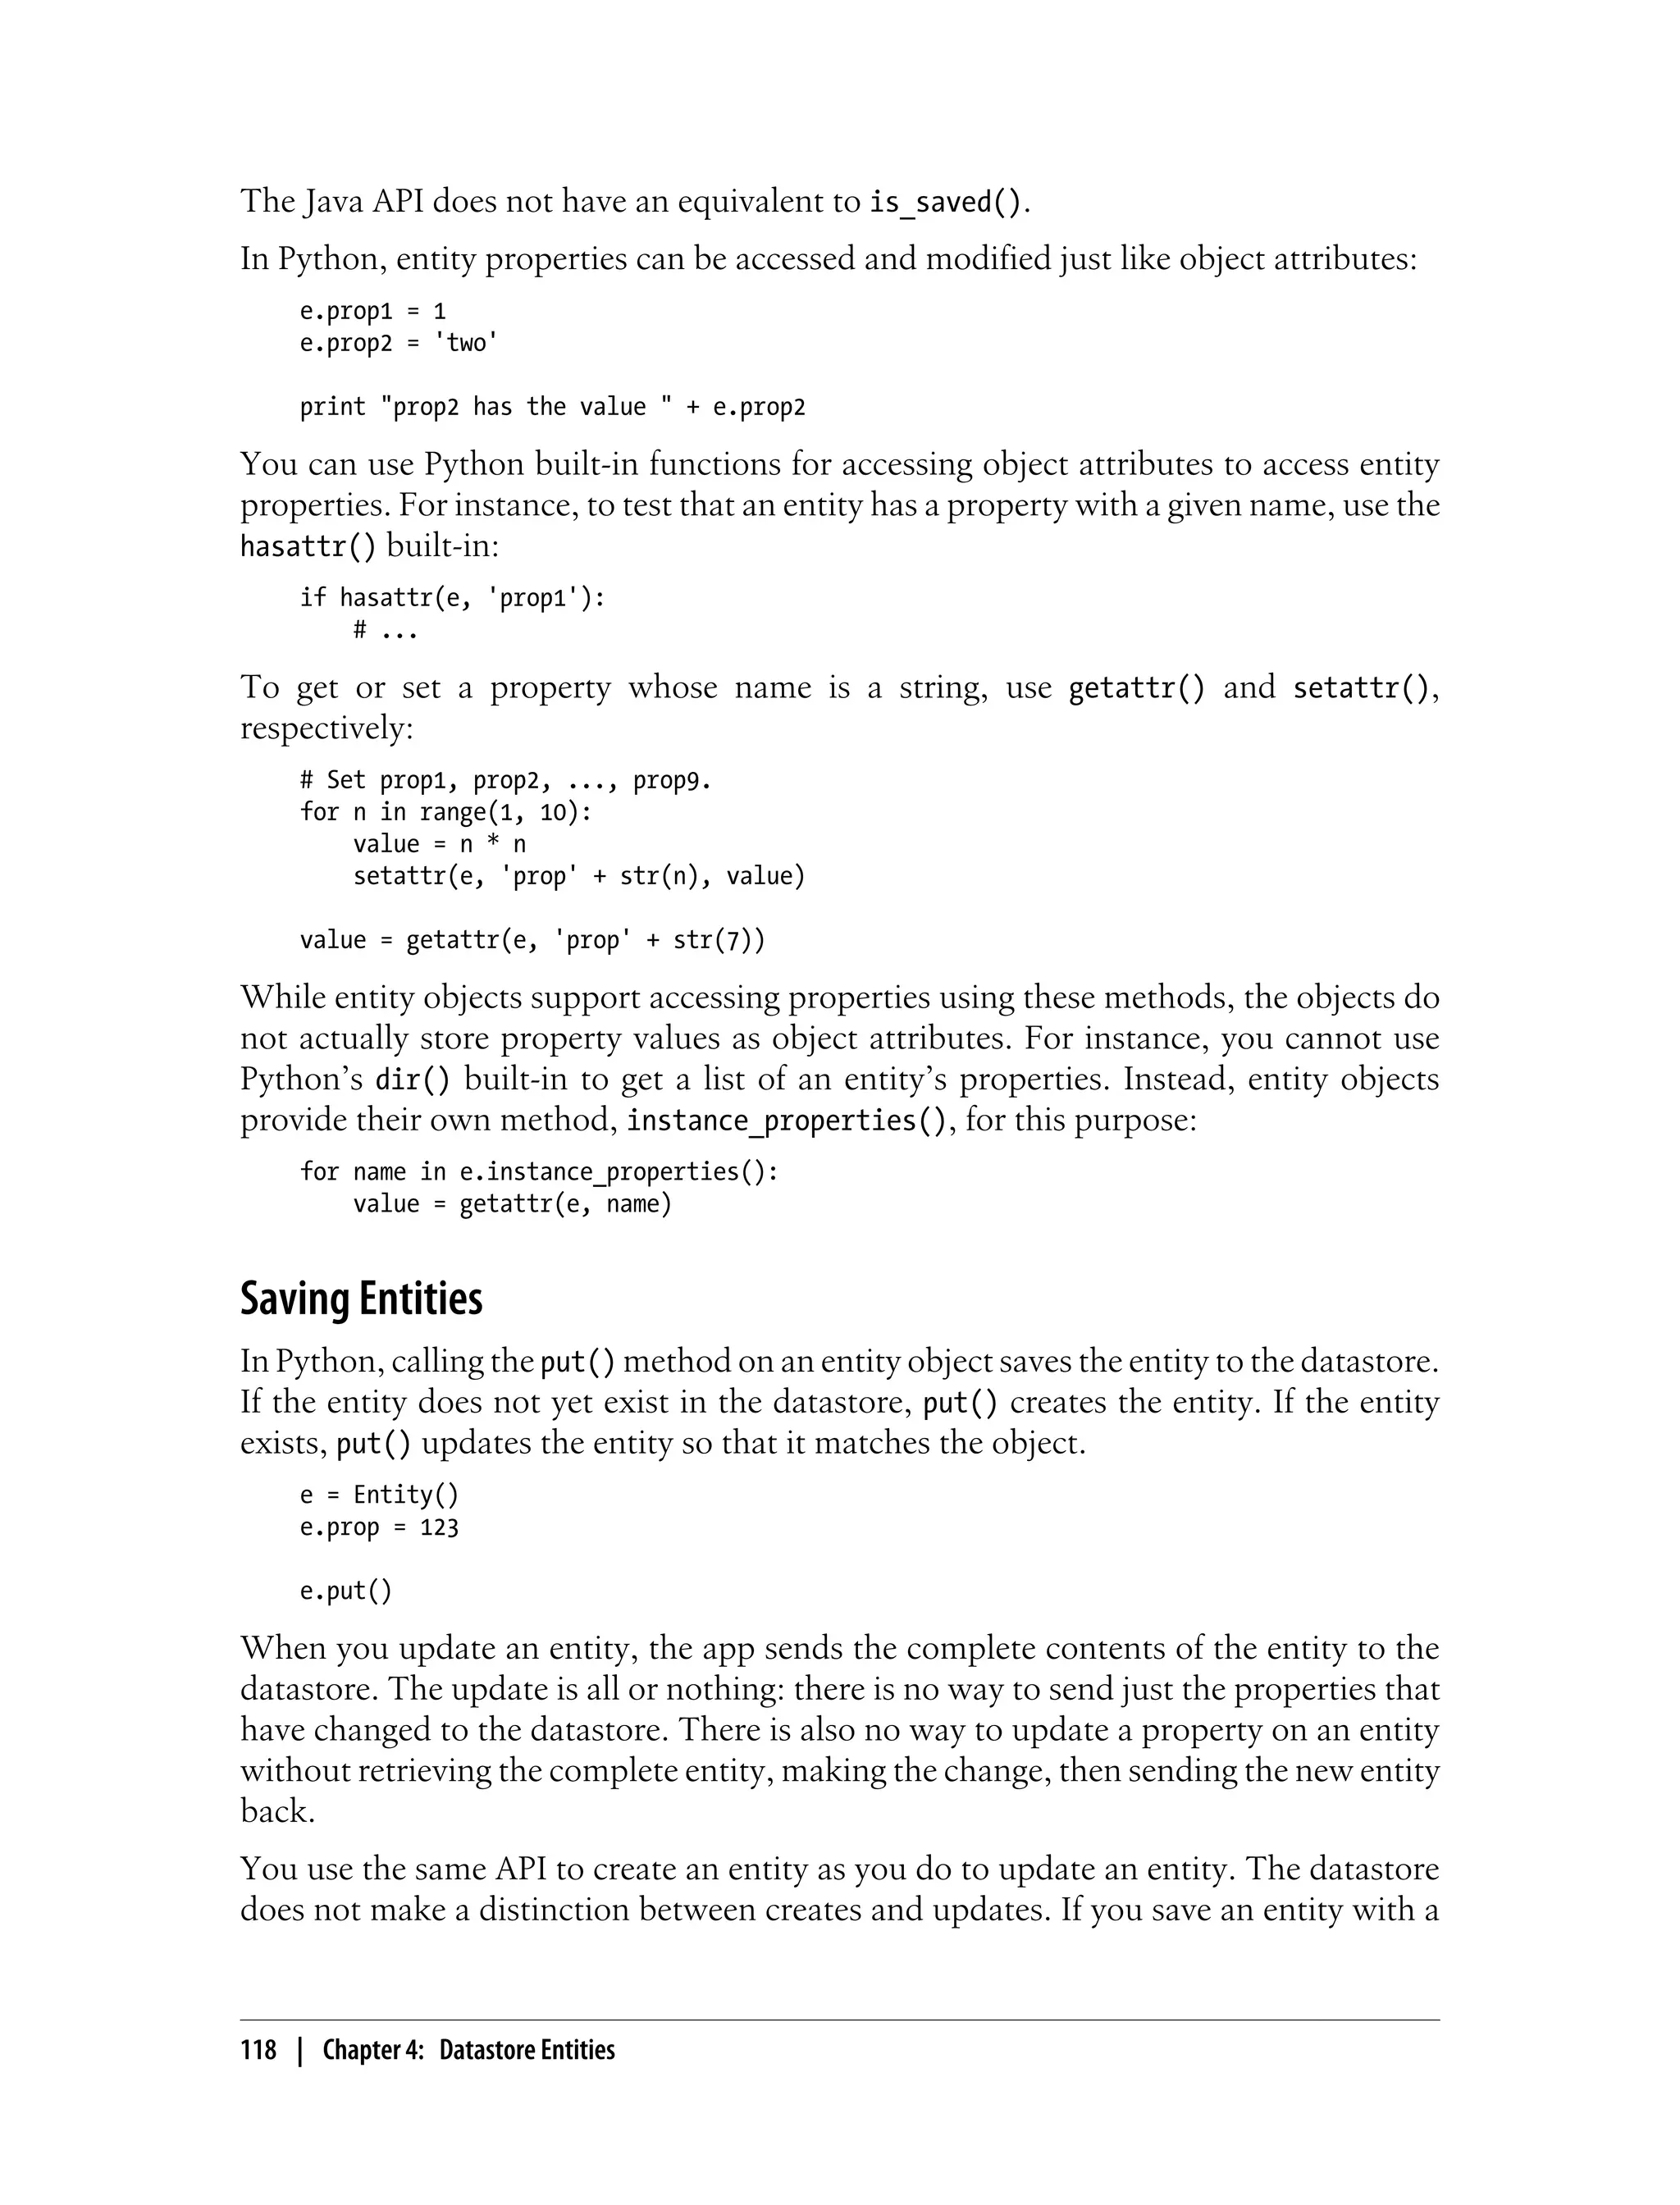
![complete key (such as a key with a kind and a key name) and an entity already exists
with that key, the datastore replaces the existing entity with the new one.
If you want to test that an entity with a given key does not exist before
you create it, you can do so using the transaction API. You must use a
transaction to ensure that another process doesn’t create an entity with
that key after you test for it and before you create it. For more informa-
tion on transactions, see Chapter 6.
If you have several entity objects to save, you can save them all in one call using the
put() function in the db package. The put() function can also take a single entity object.
db.put(e)
db.put([e1, e2, e3])
As with a batch get, a batch put performs a single call to the service. The total size of
the call is subject to the API call limits for the datastore. The entity count is also subject
to a limit.
In Java, you can save entities using the put() method of a DatastoreService
instance. As with get(), the method takes a single Entity for a single put, or an
Iterable<Entity> for a batch put.
When the call to put() returns, the datastore is up to date, and all future queries in the
current request handler and other handlers will see the new data. The specifics of how
the datastore gets updated are discussed in detail in Chapter 6.
Deleting Entities
Deleting entities works similarly to putting entities. In Python, you can call the
delete() method on the entity object, or you can pass entity objects or Key objects to
the delete() function.
e = db.get('Entity', 'alphabeta')
e.delete()
db.delete(e)
db.delete([e1, e2, e3])
# Deleting without first fetching the entity:
k = db.Key('Entity', 'alphabeta')
db.delete(k)
In Java, you call the delete() method of the DatastoreService with either a single Key
or an Iterable<Key>.
As with gets and puts, a delete of multiple entities occurs in a single batch call to the
service, and is faster than making multiple service calls.
Using Entities | 119](https://image.slidesharecdn.com/programminggoogleappengine-100608200404-phpapp01/75/Programming-google-app-engine-140-2048.jpg)


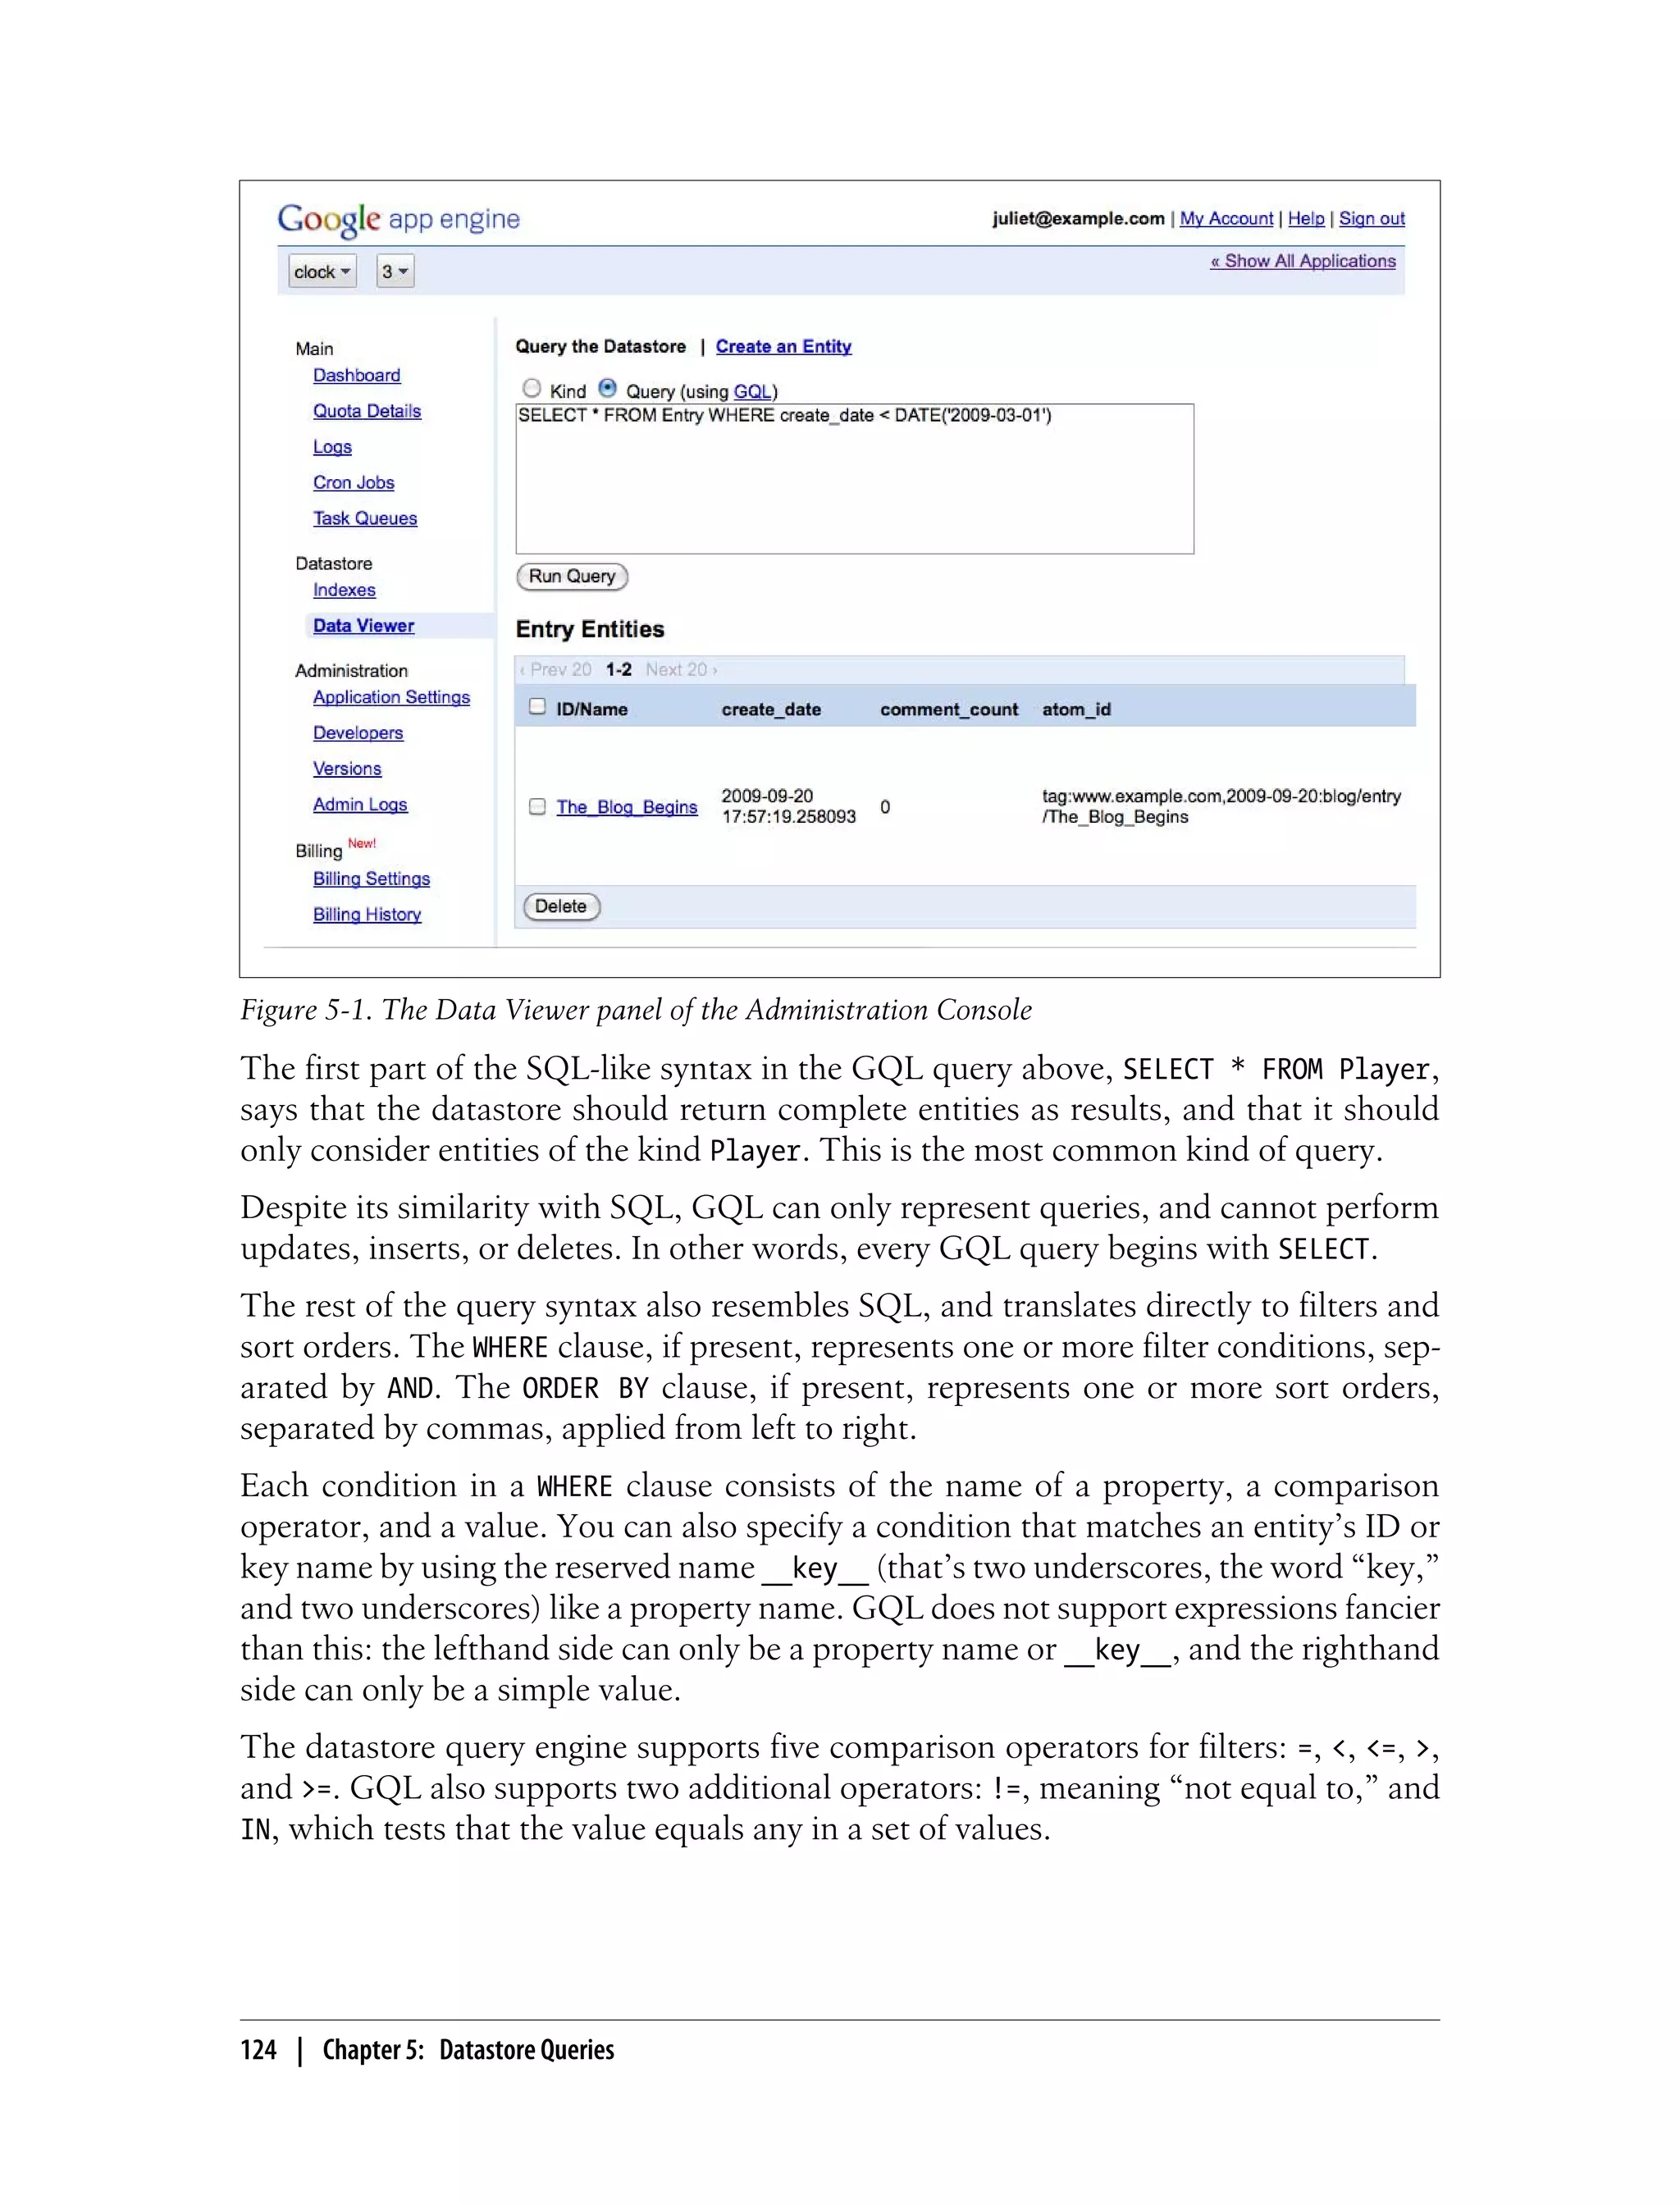
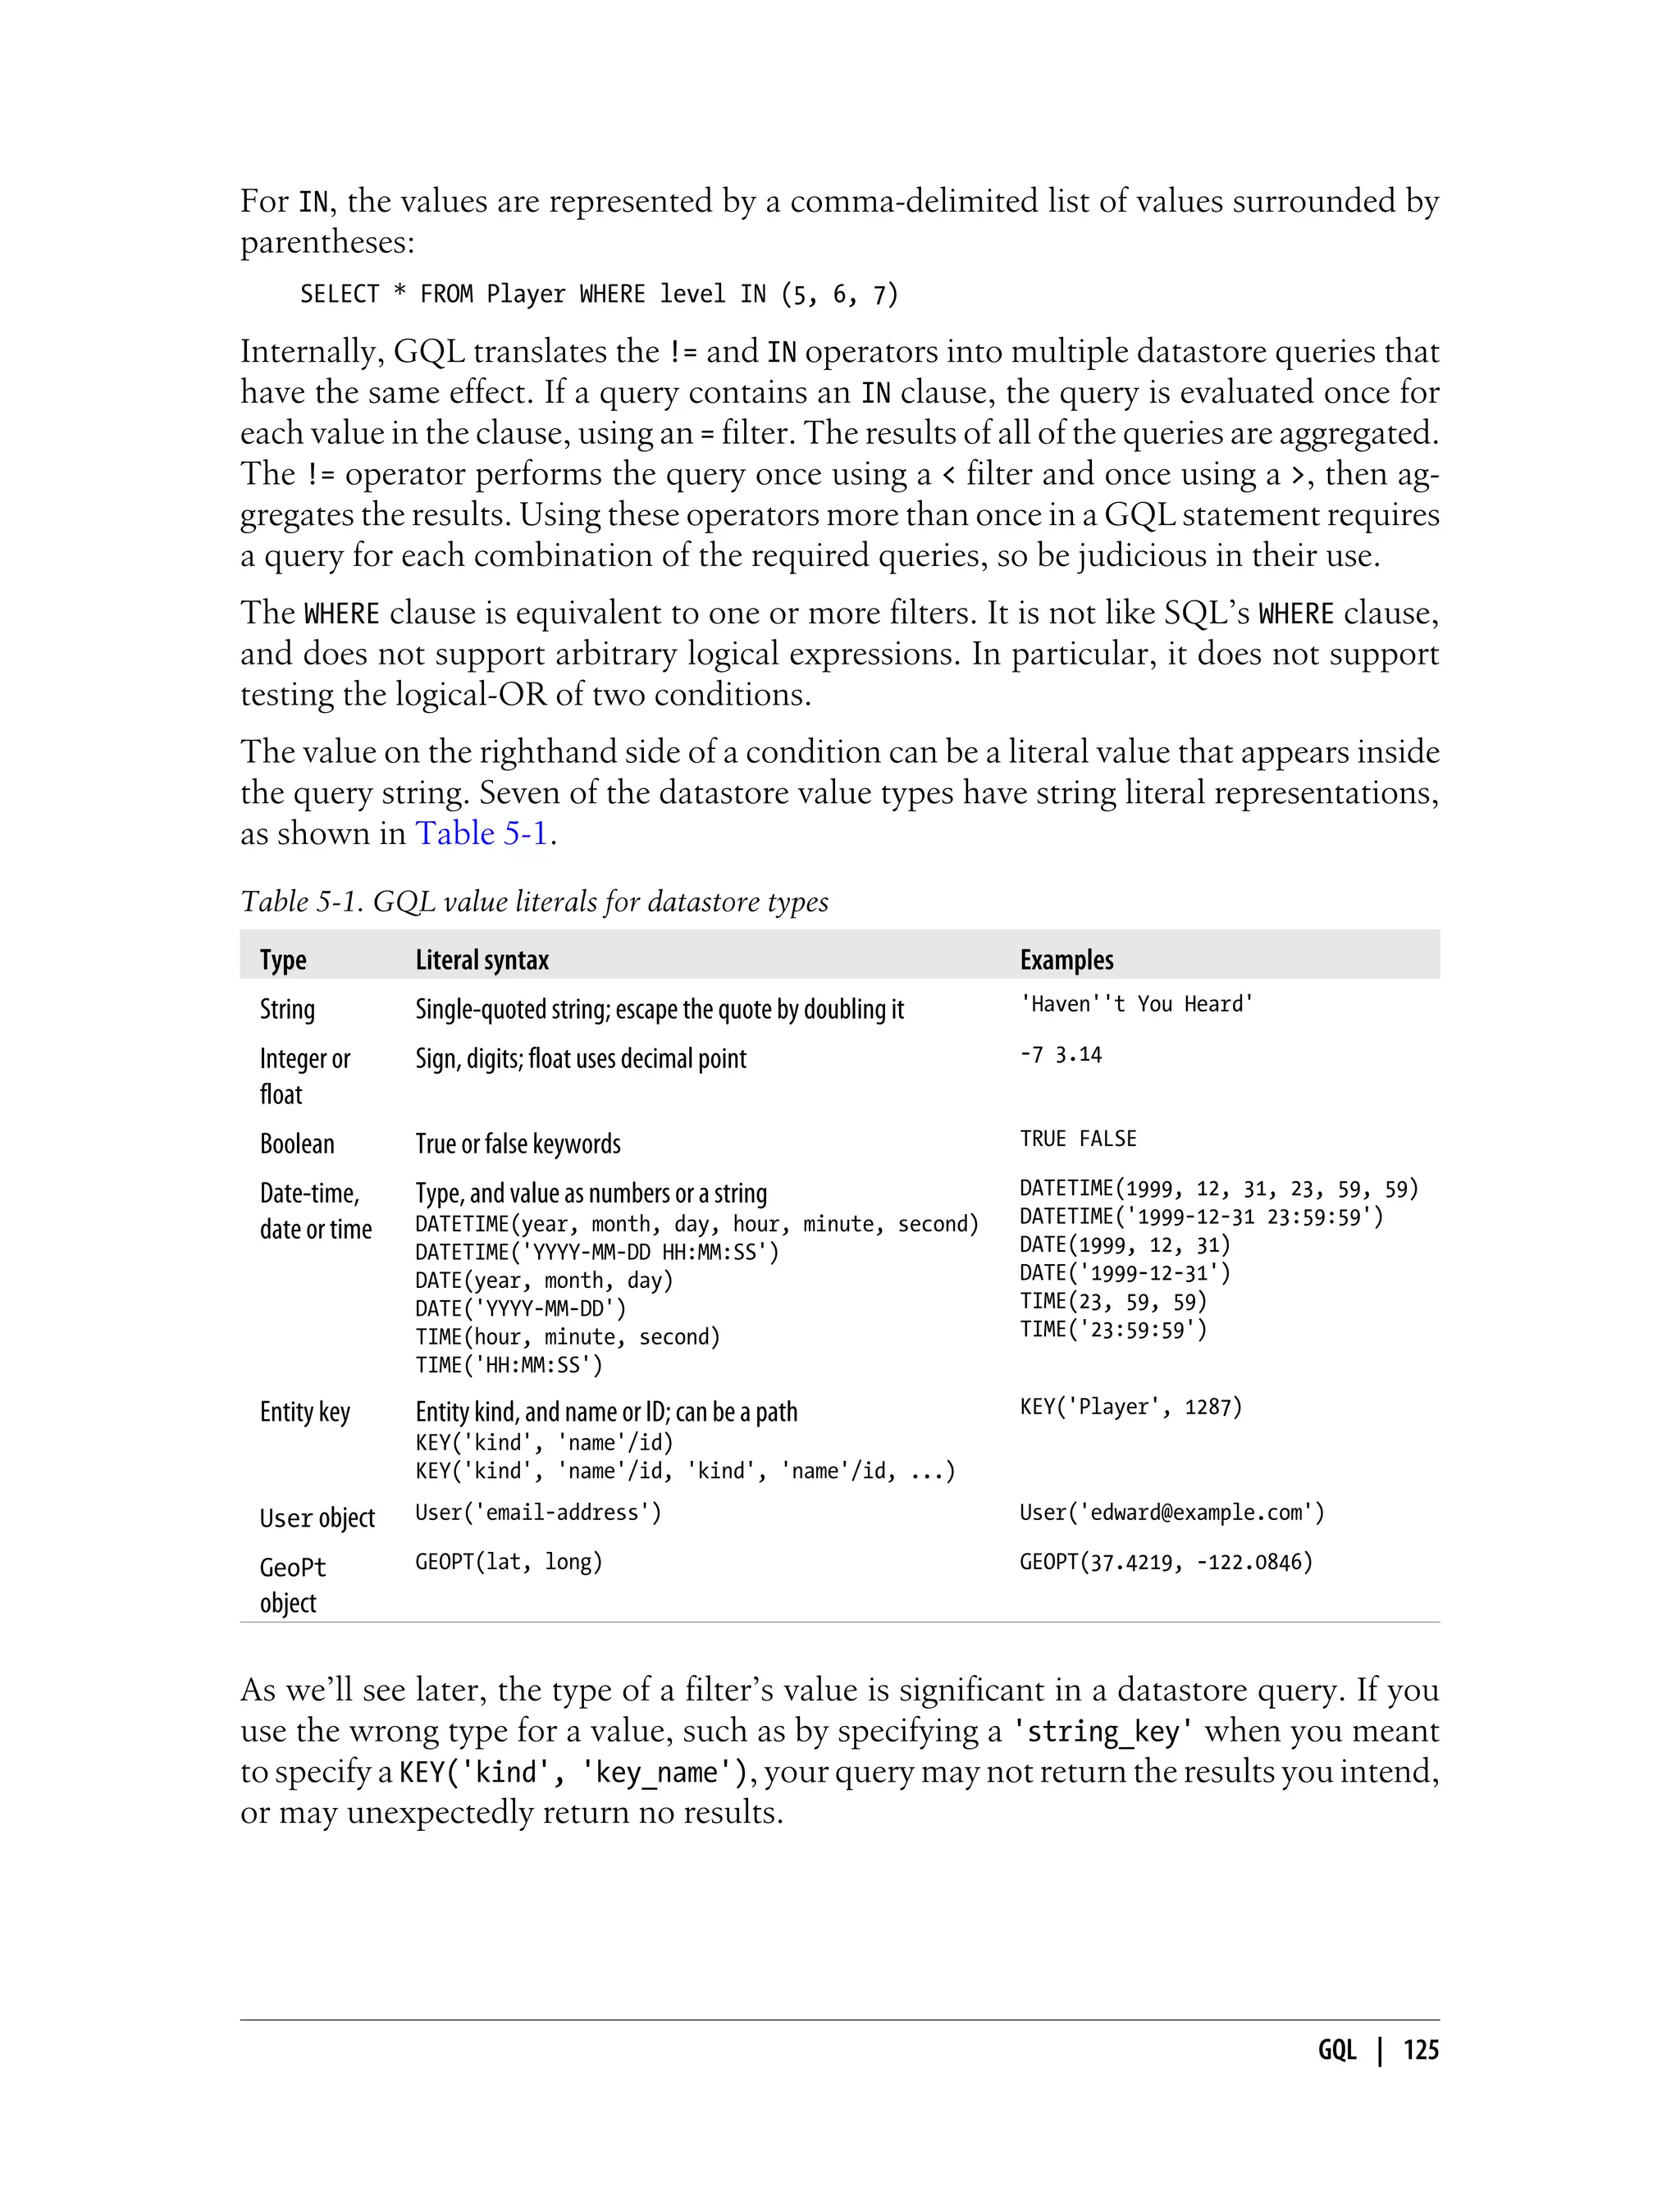


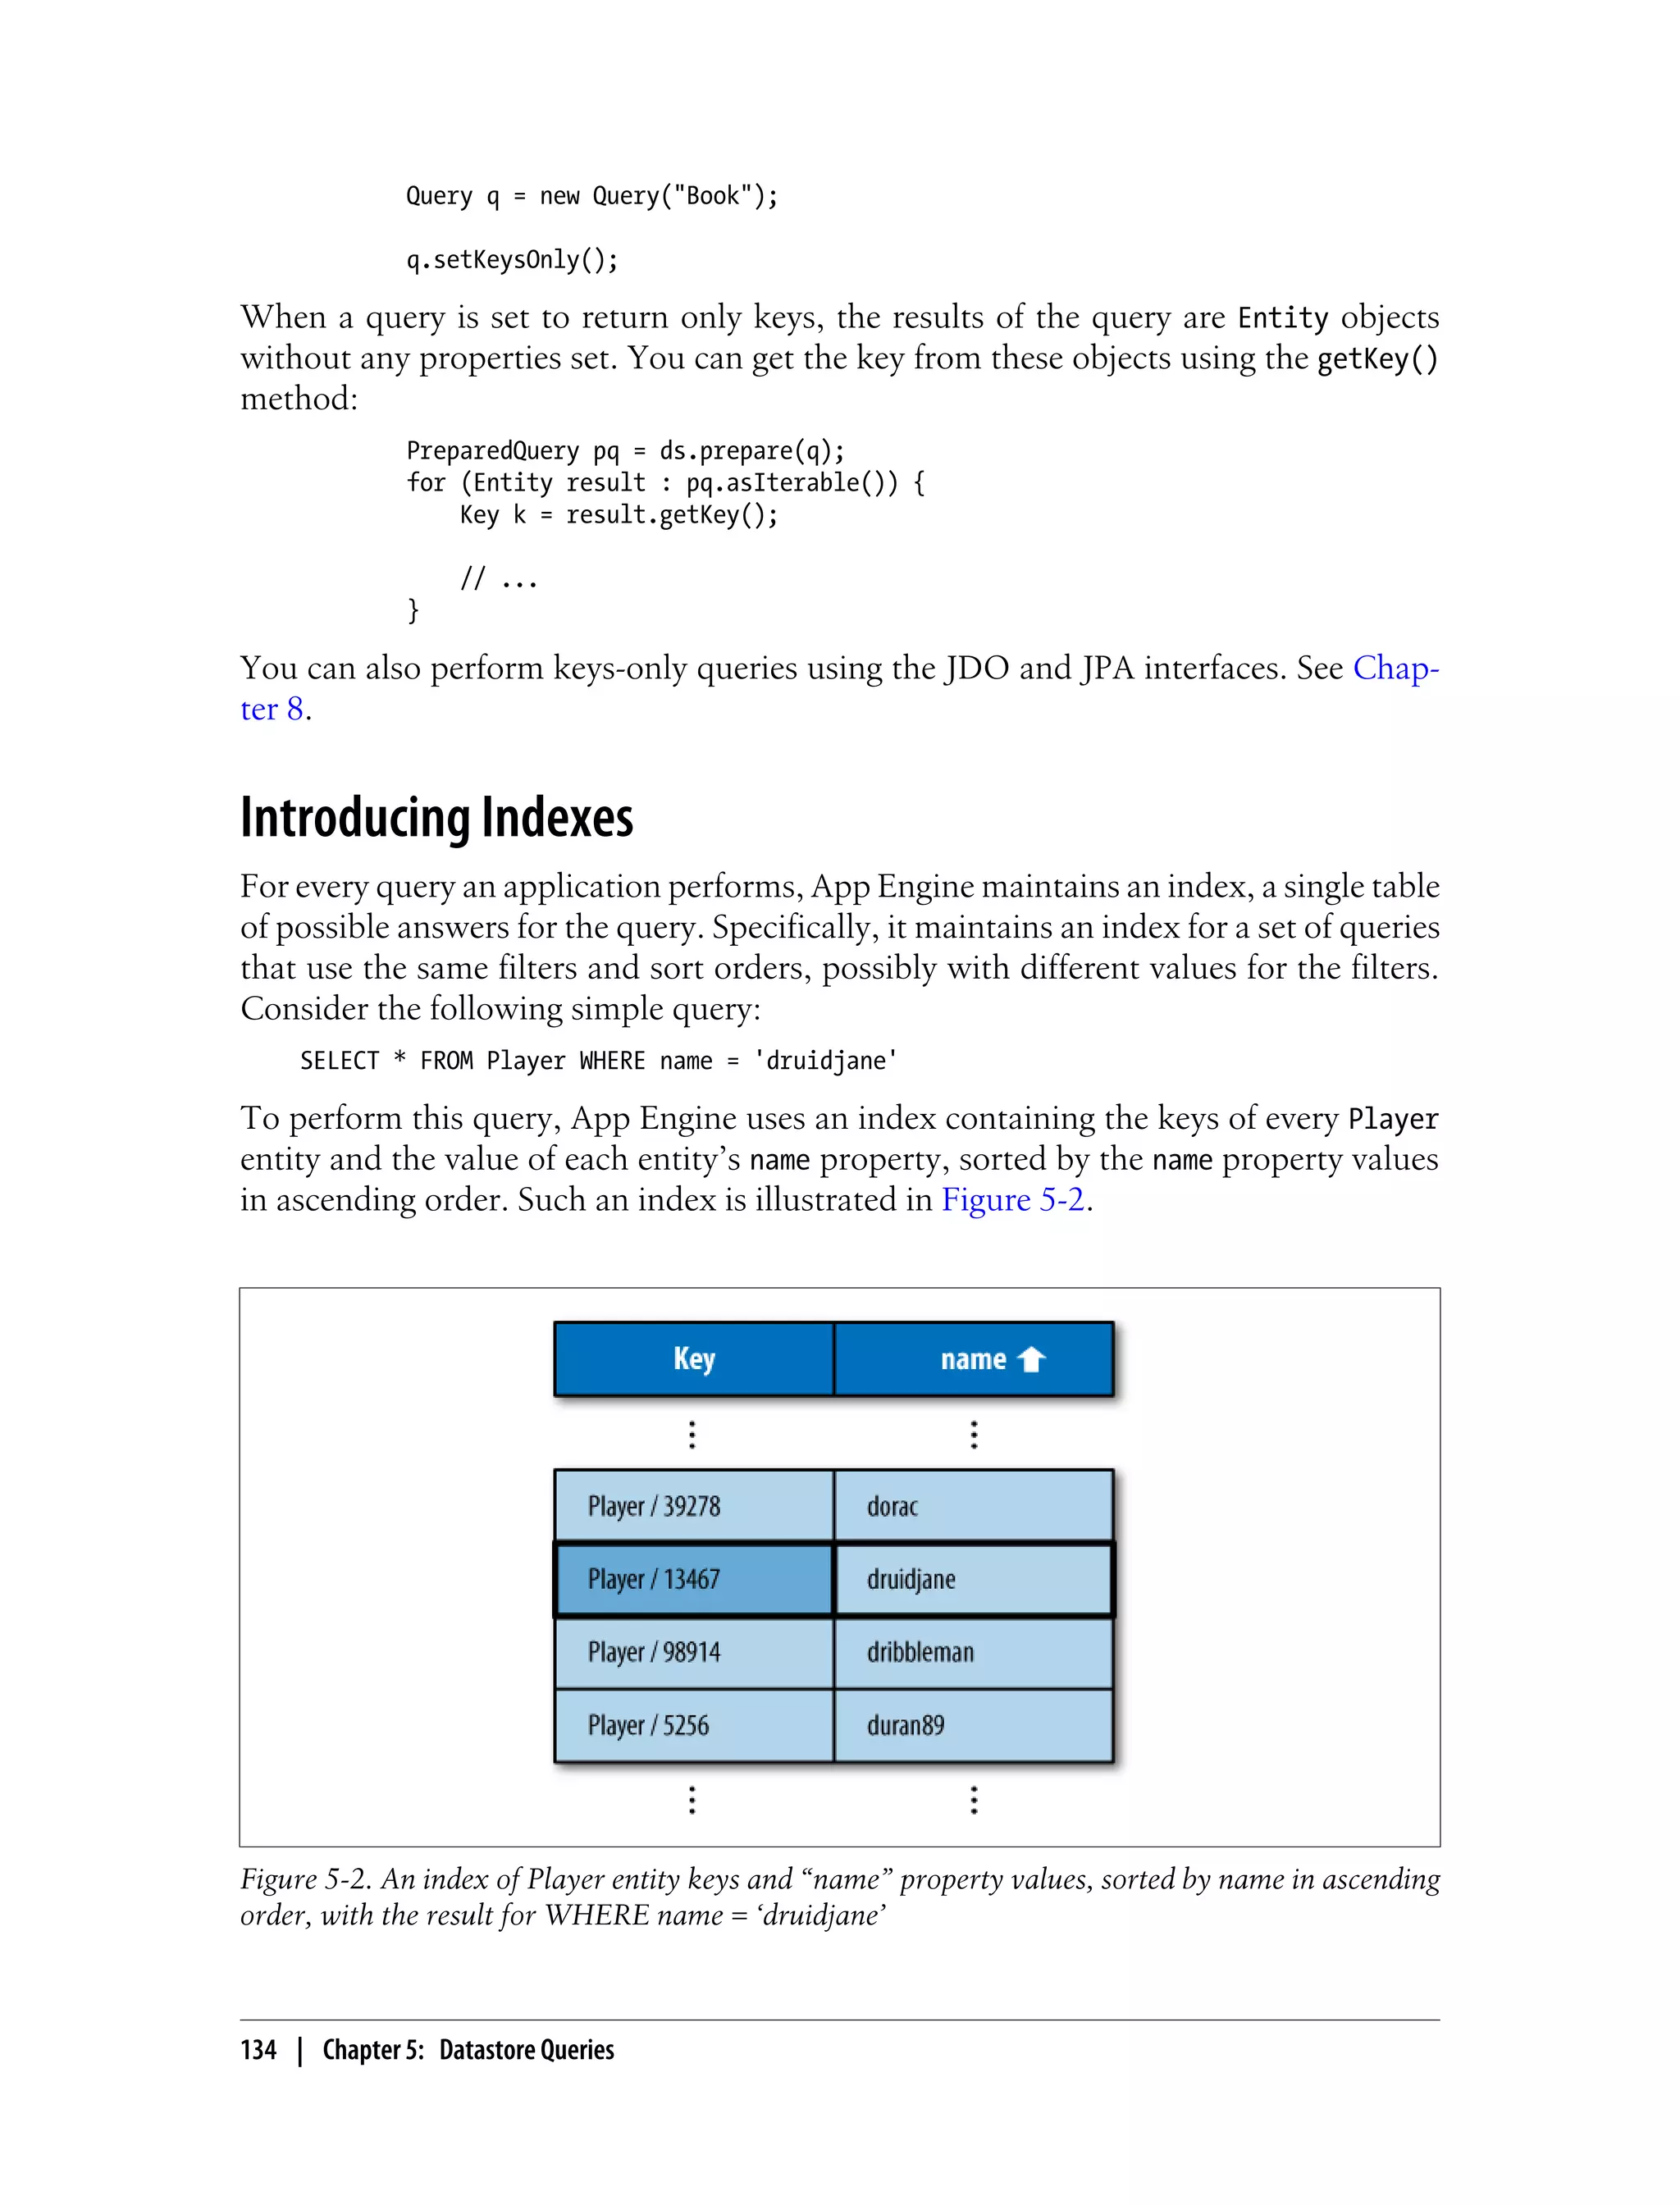


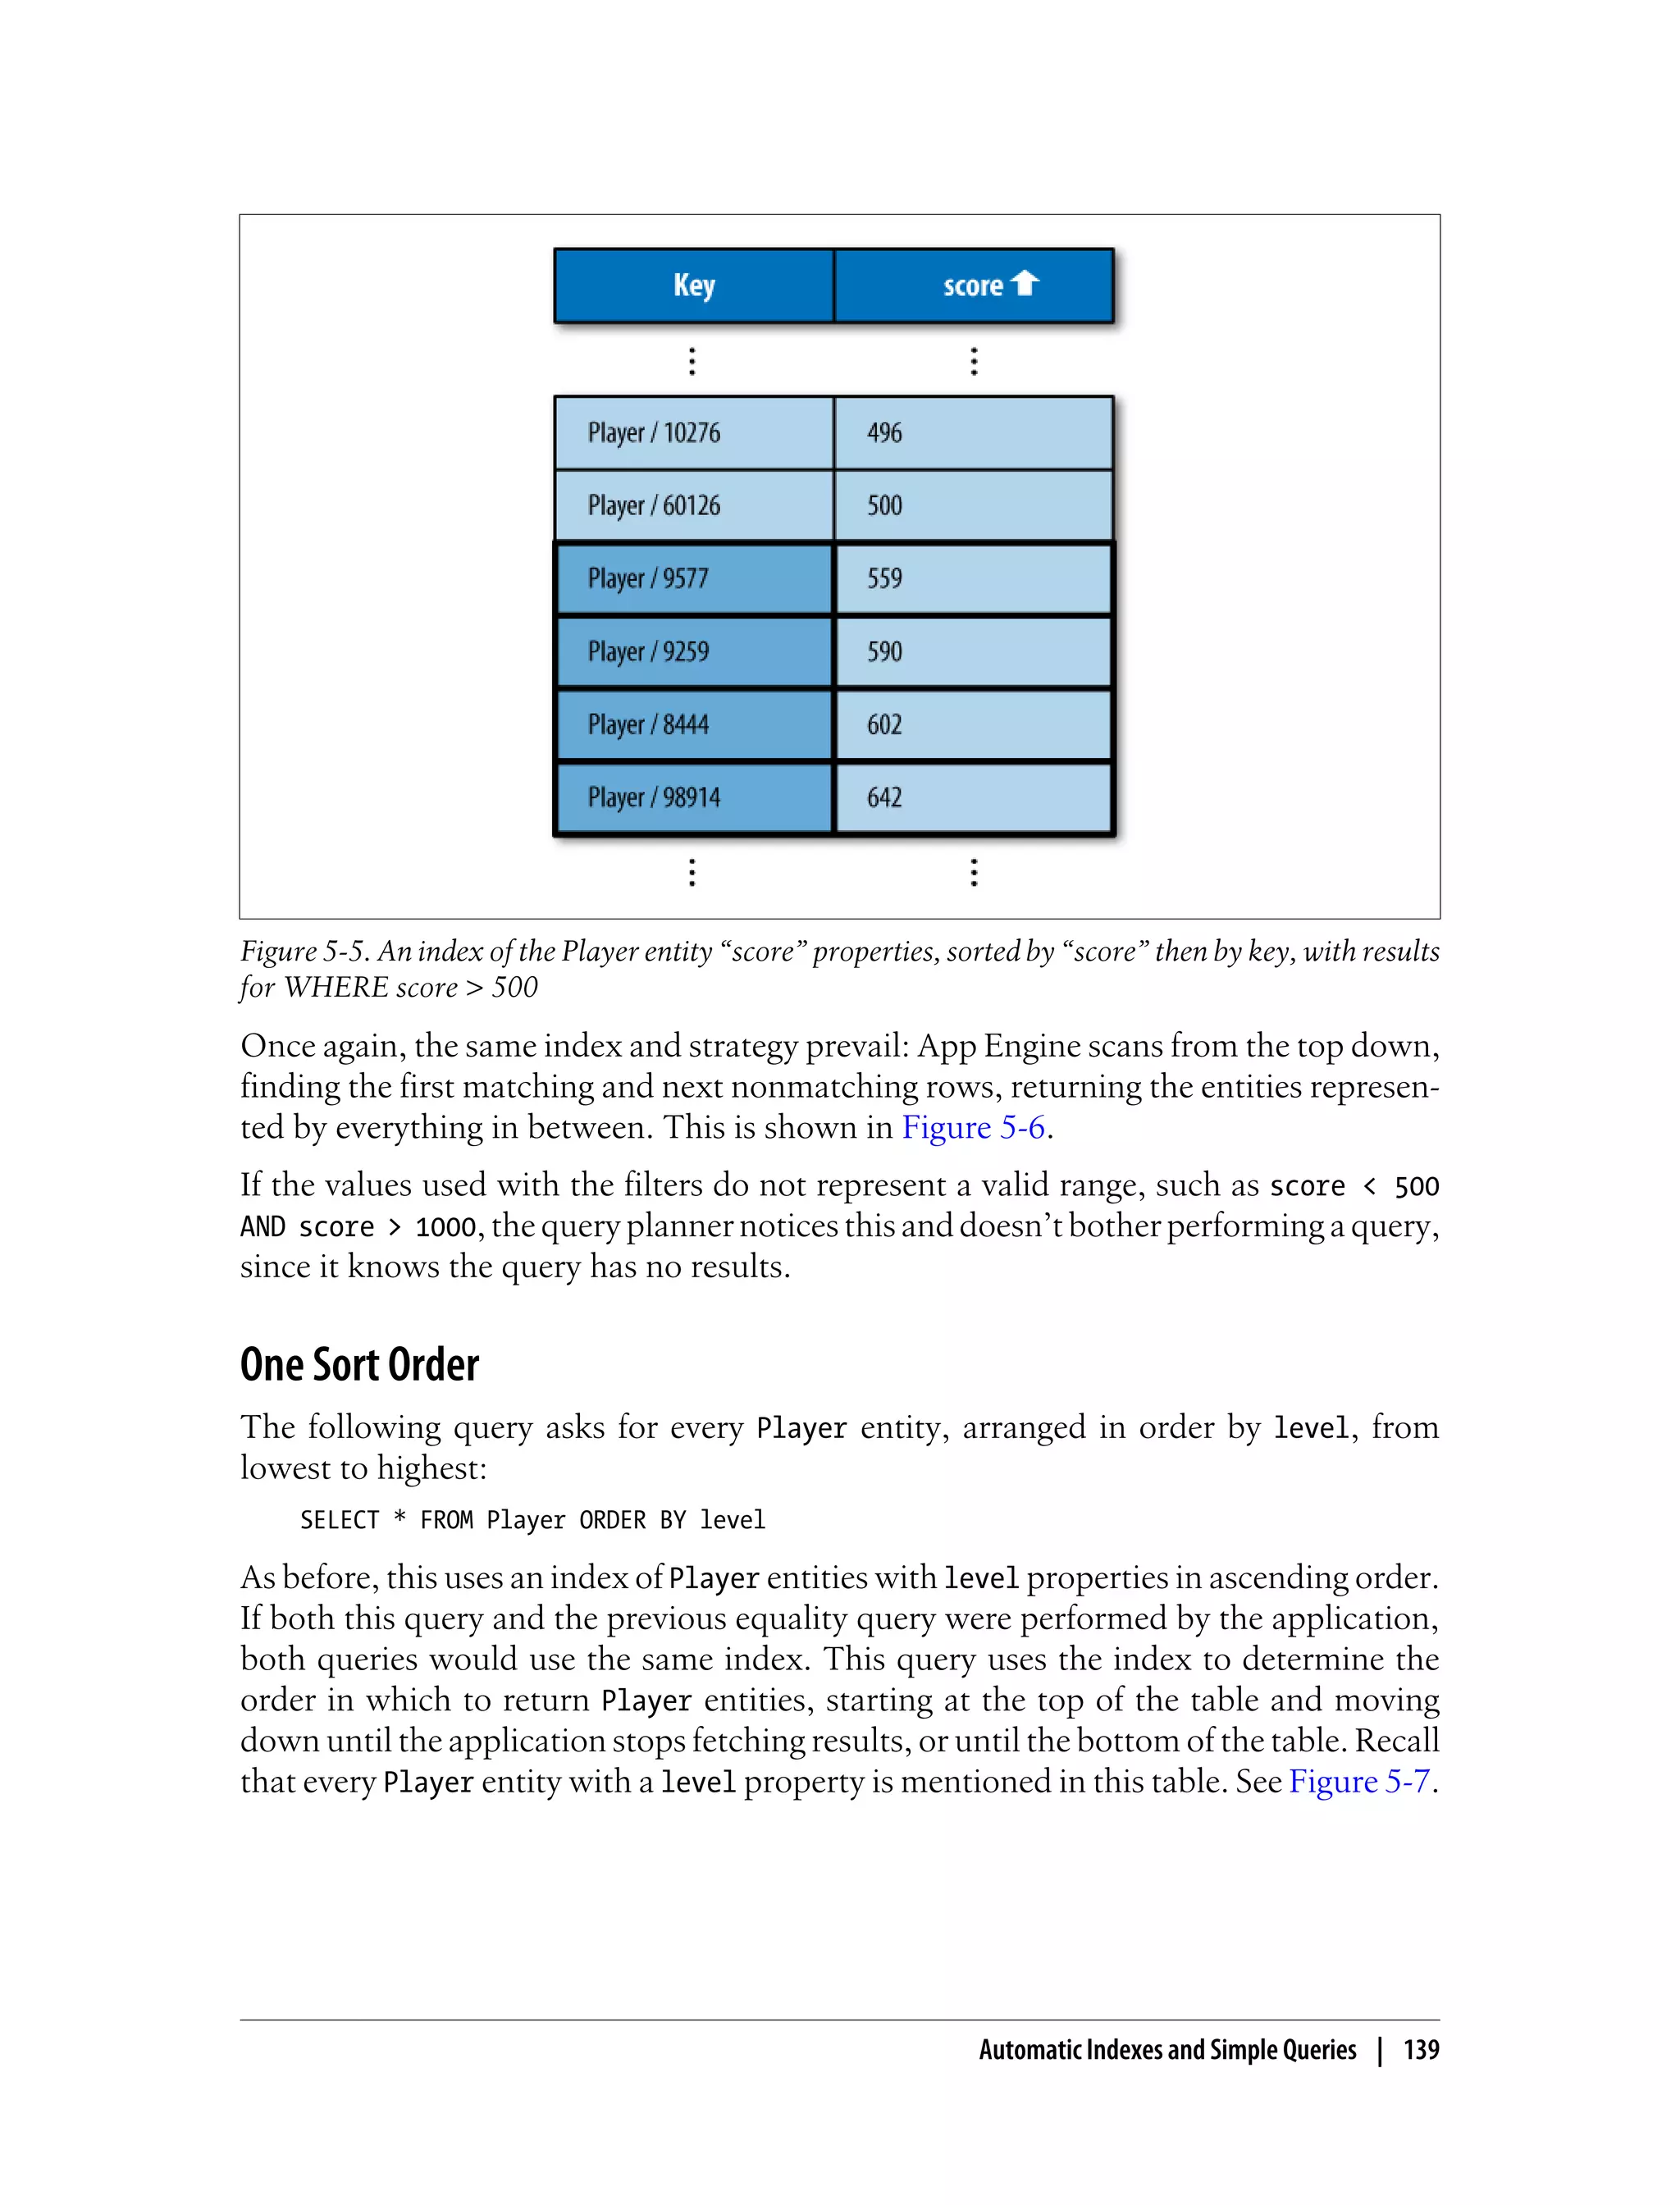

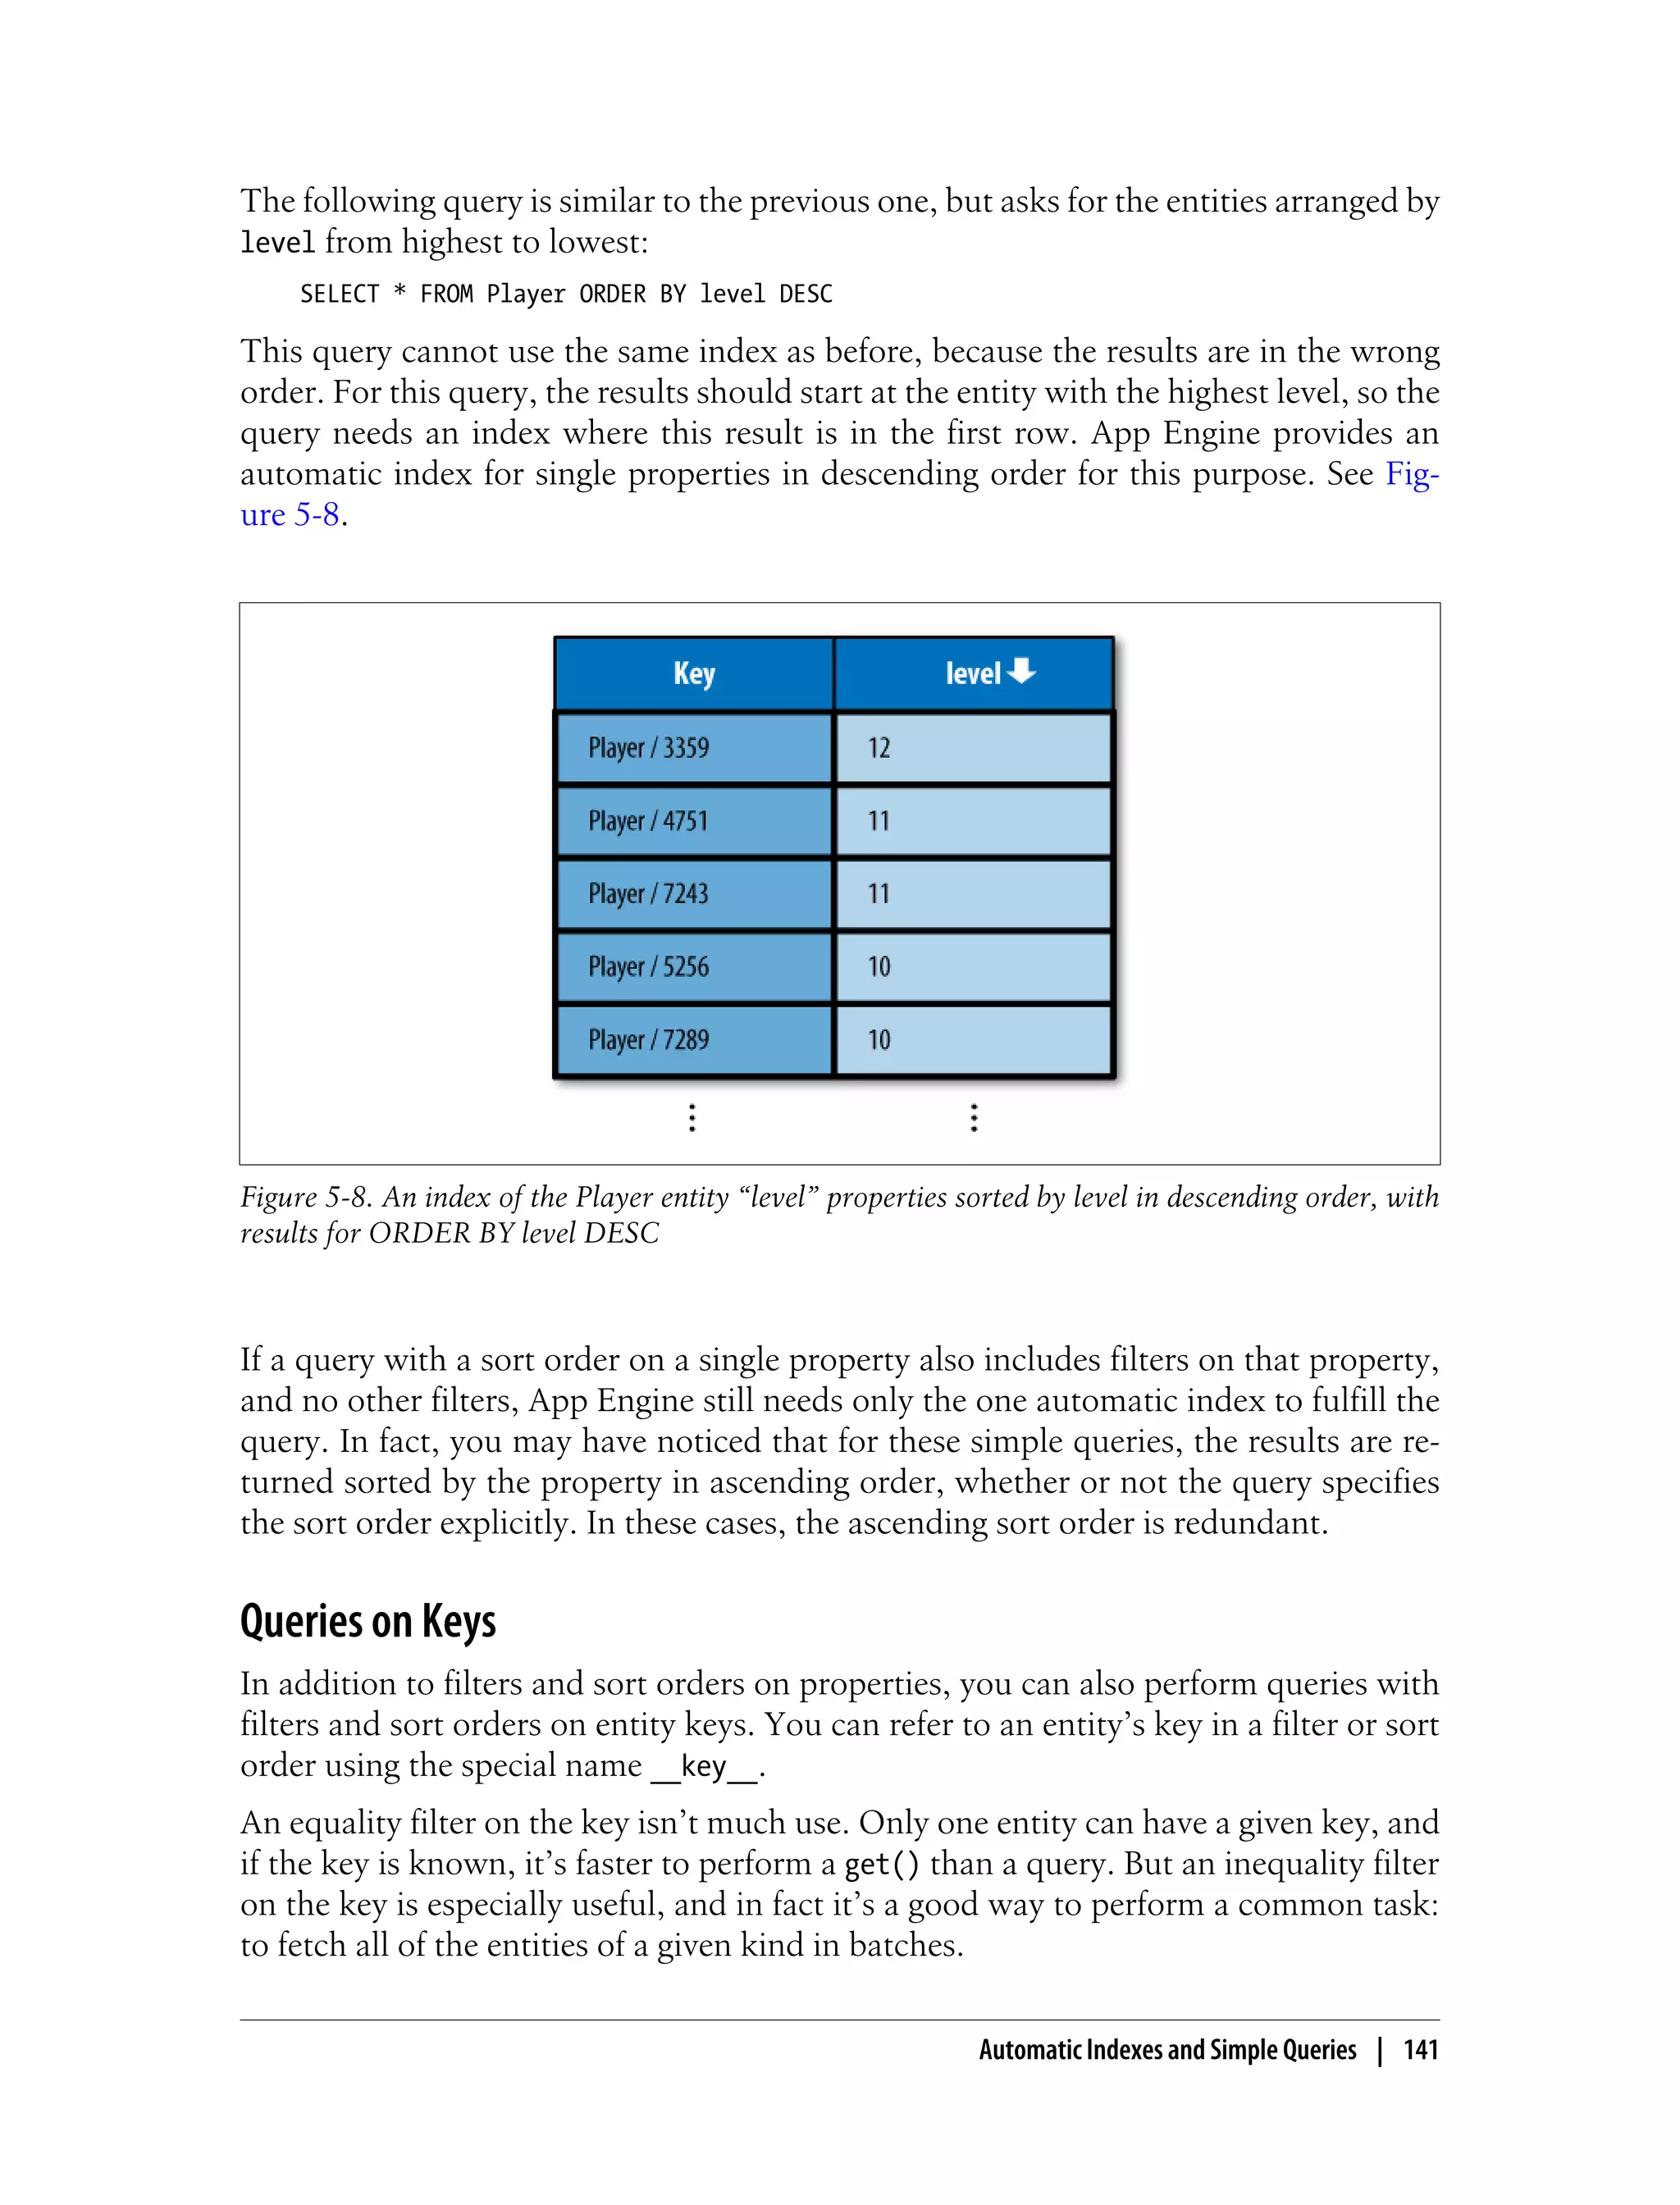

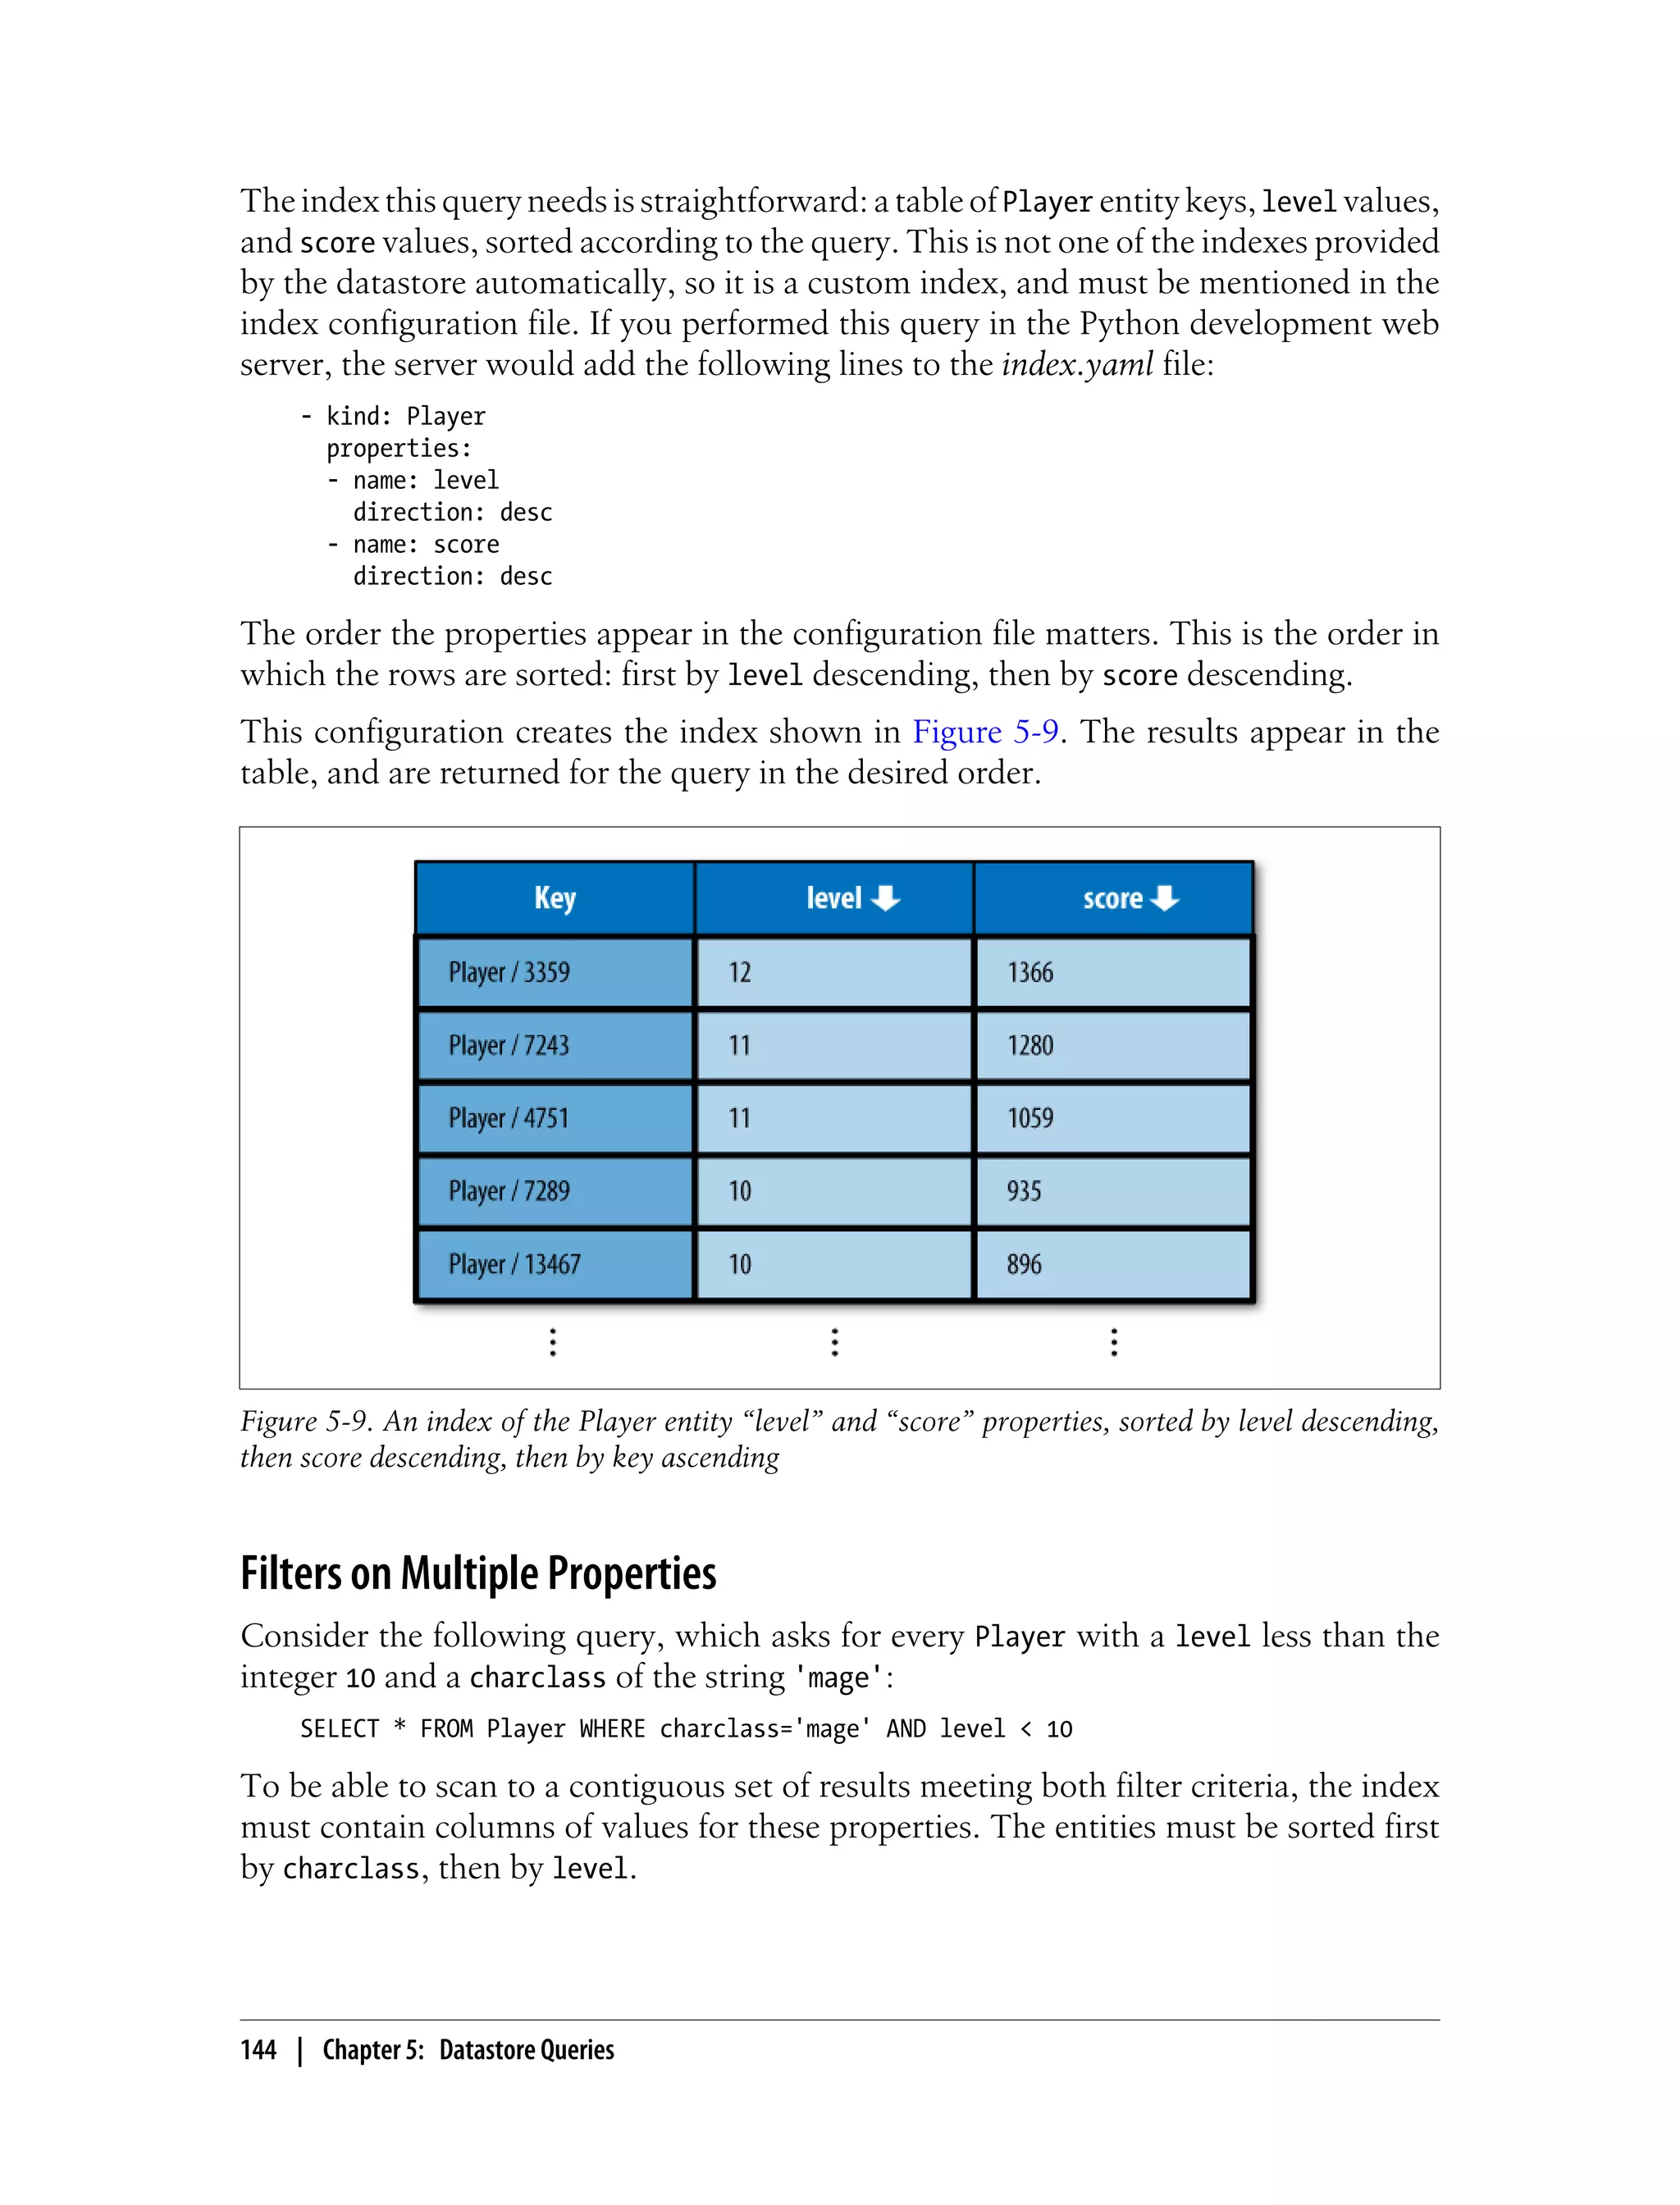
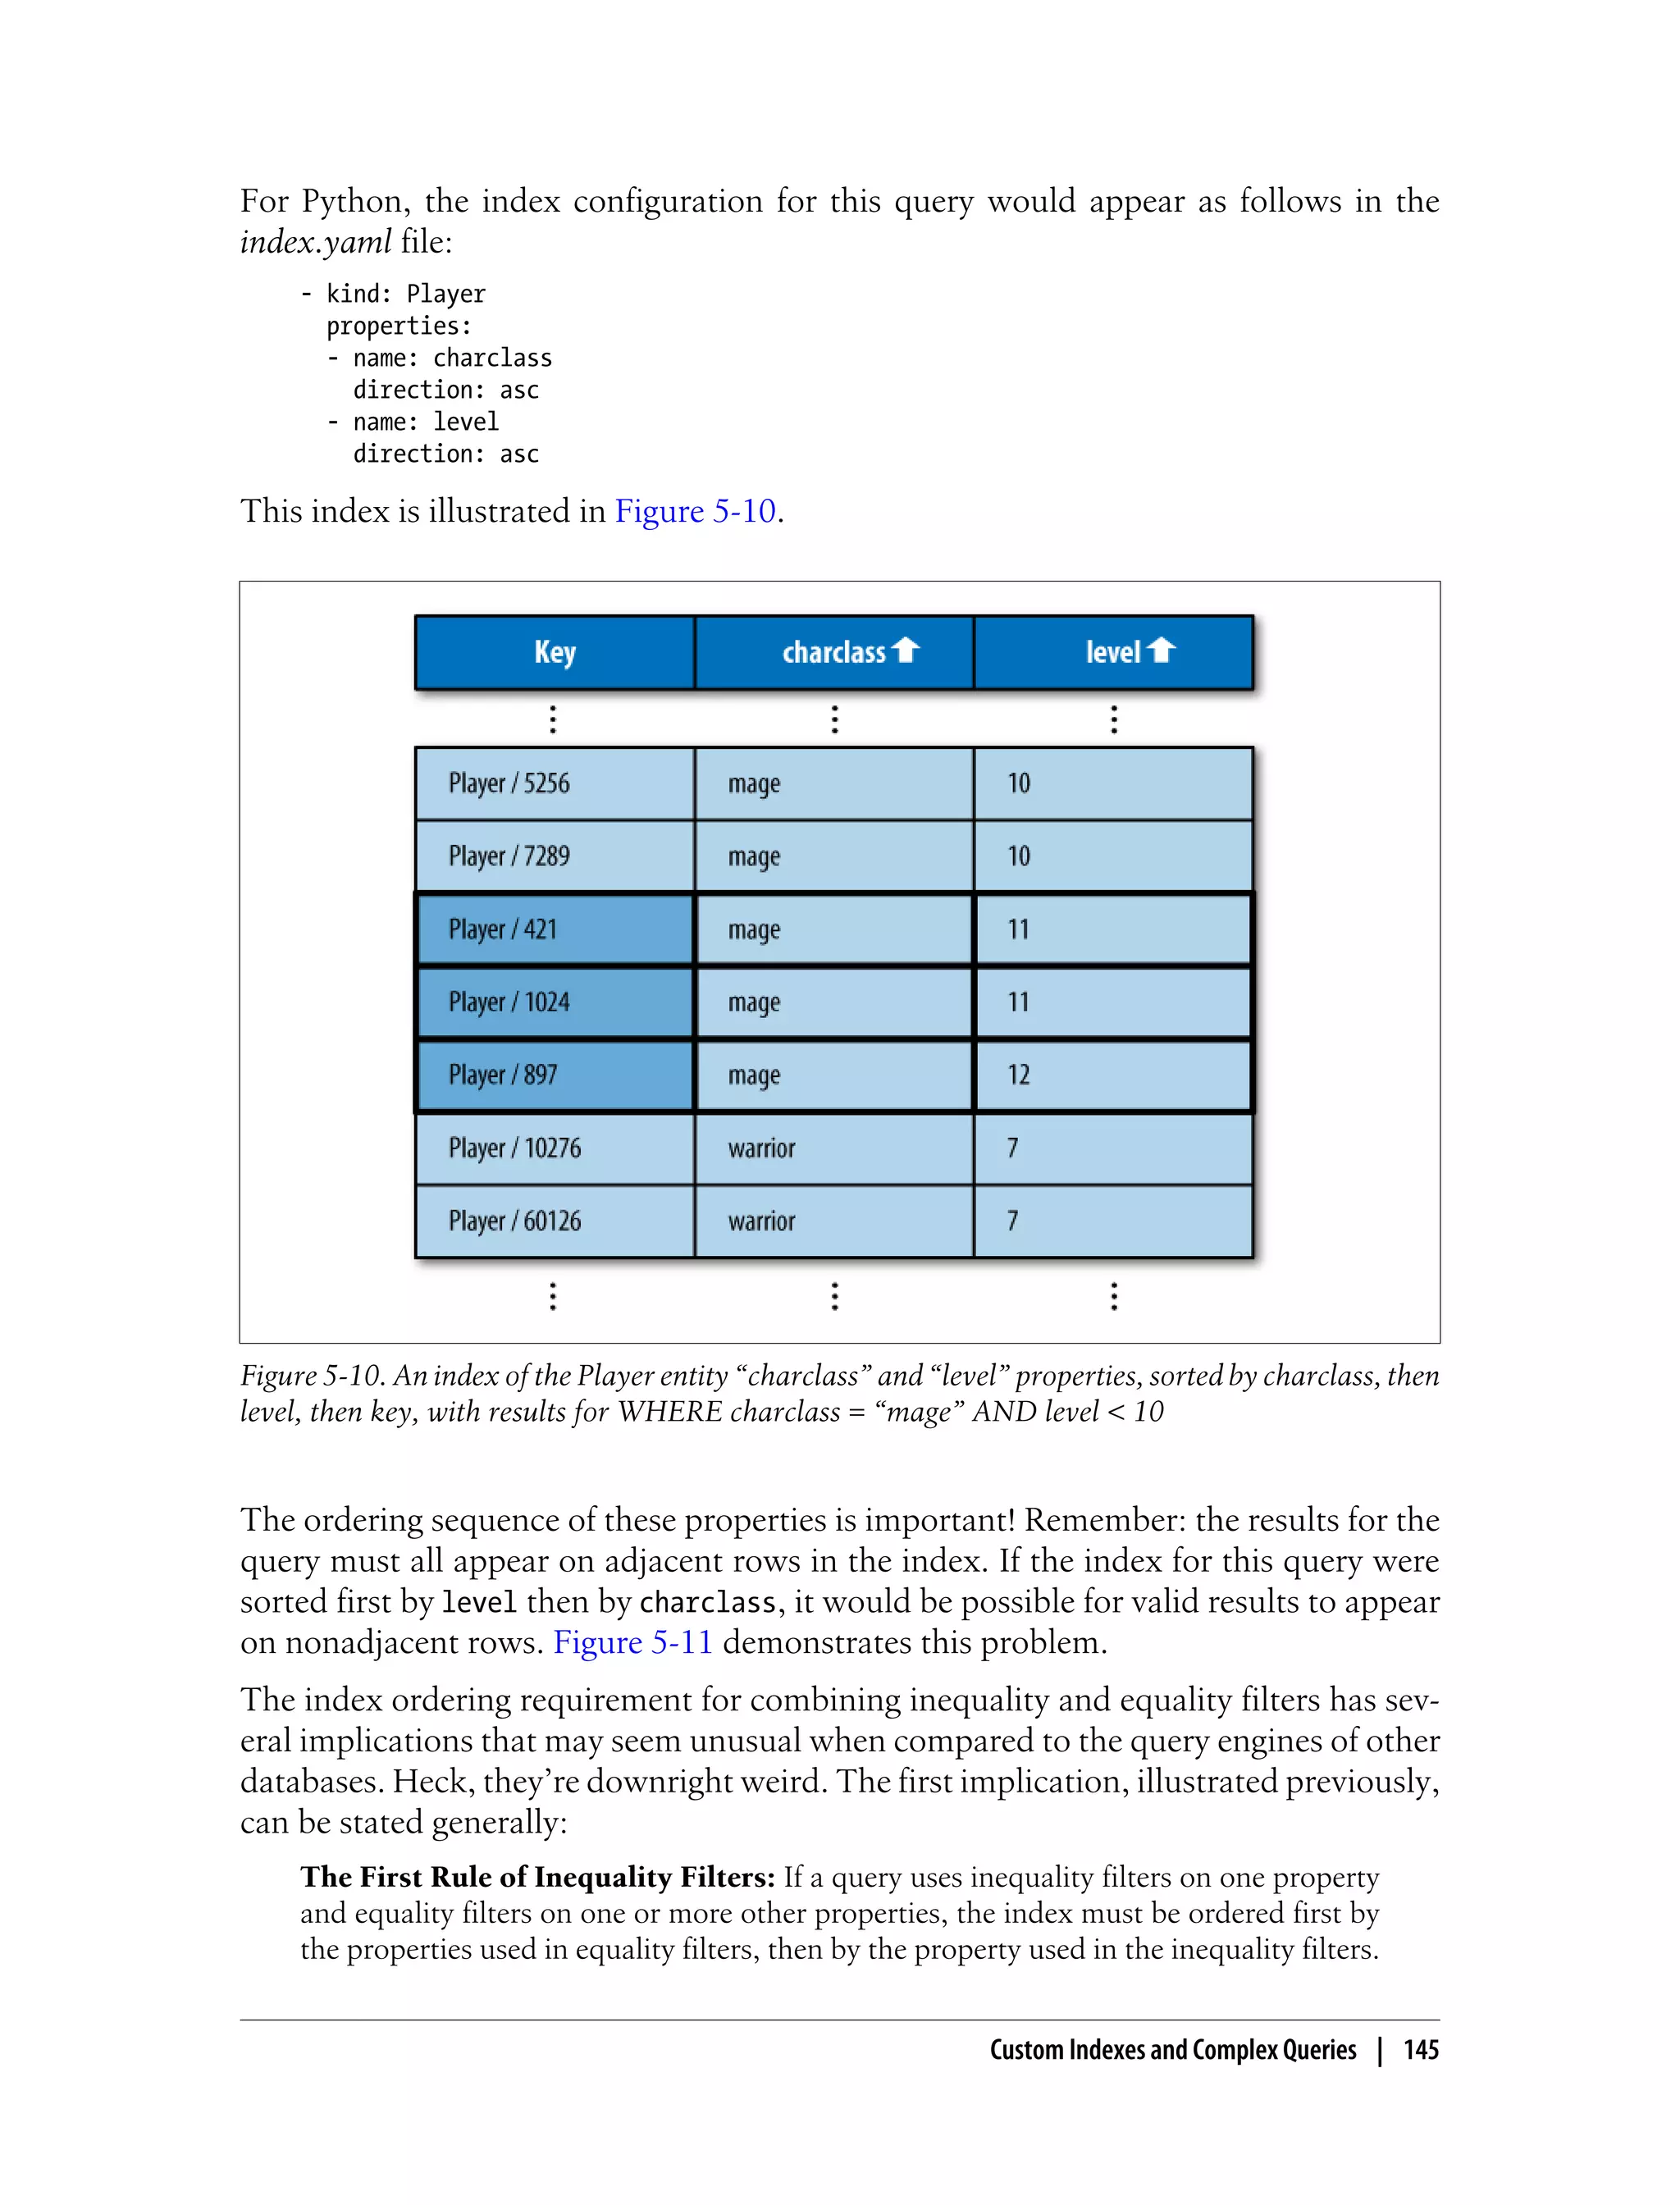
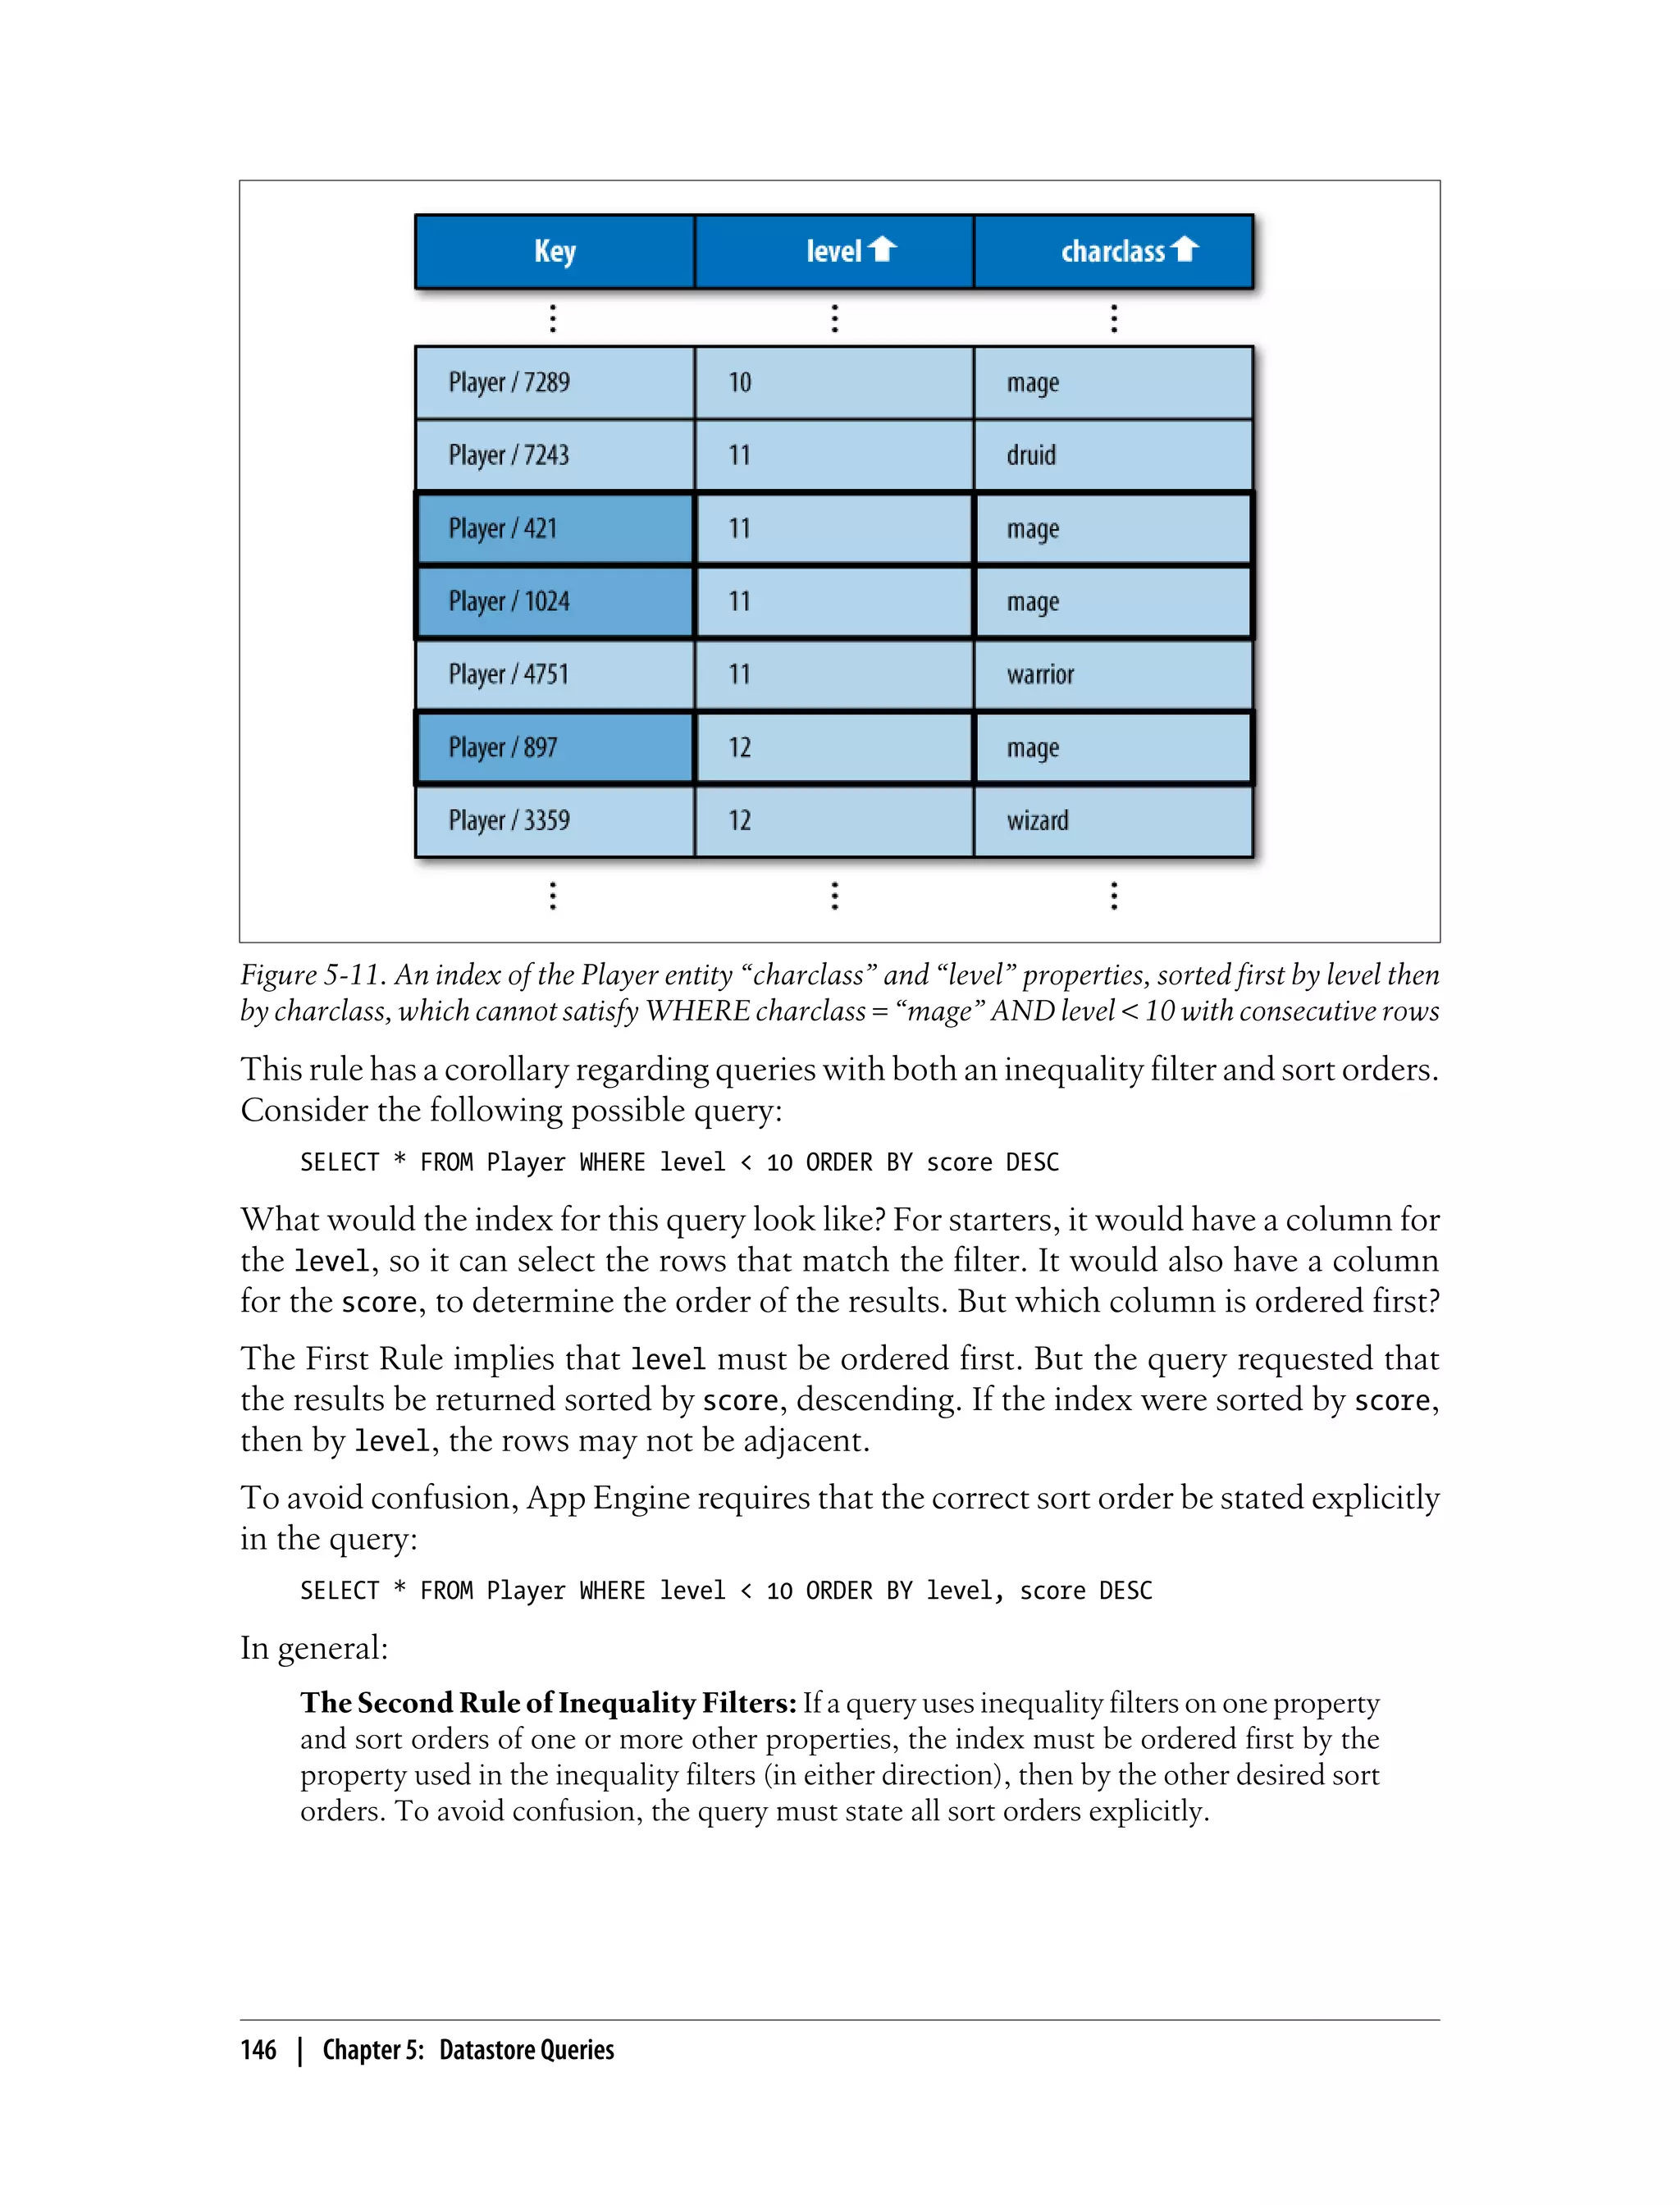

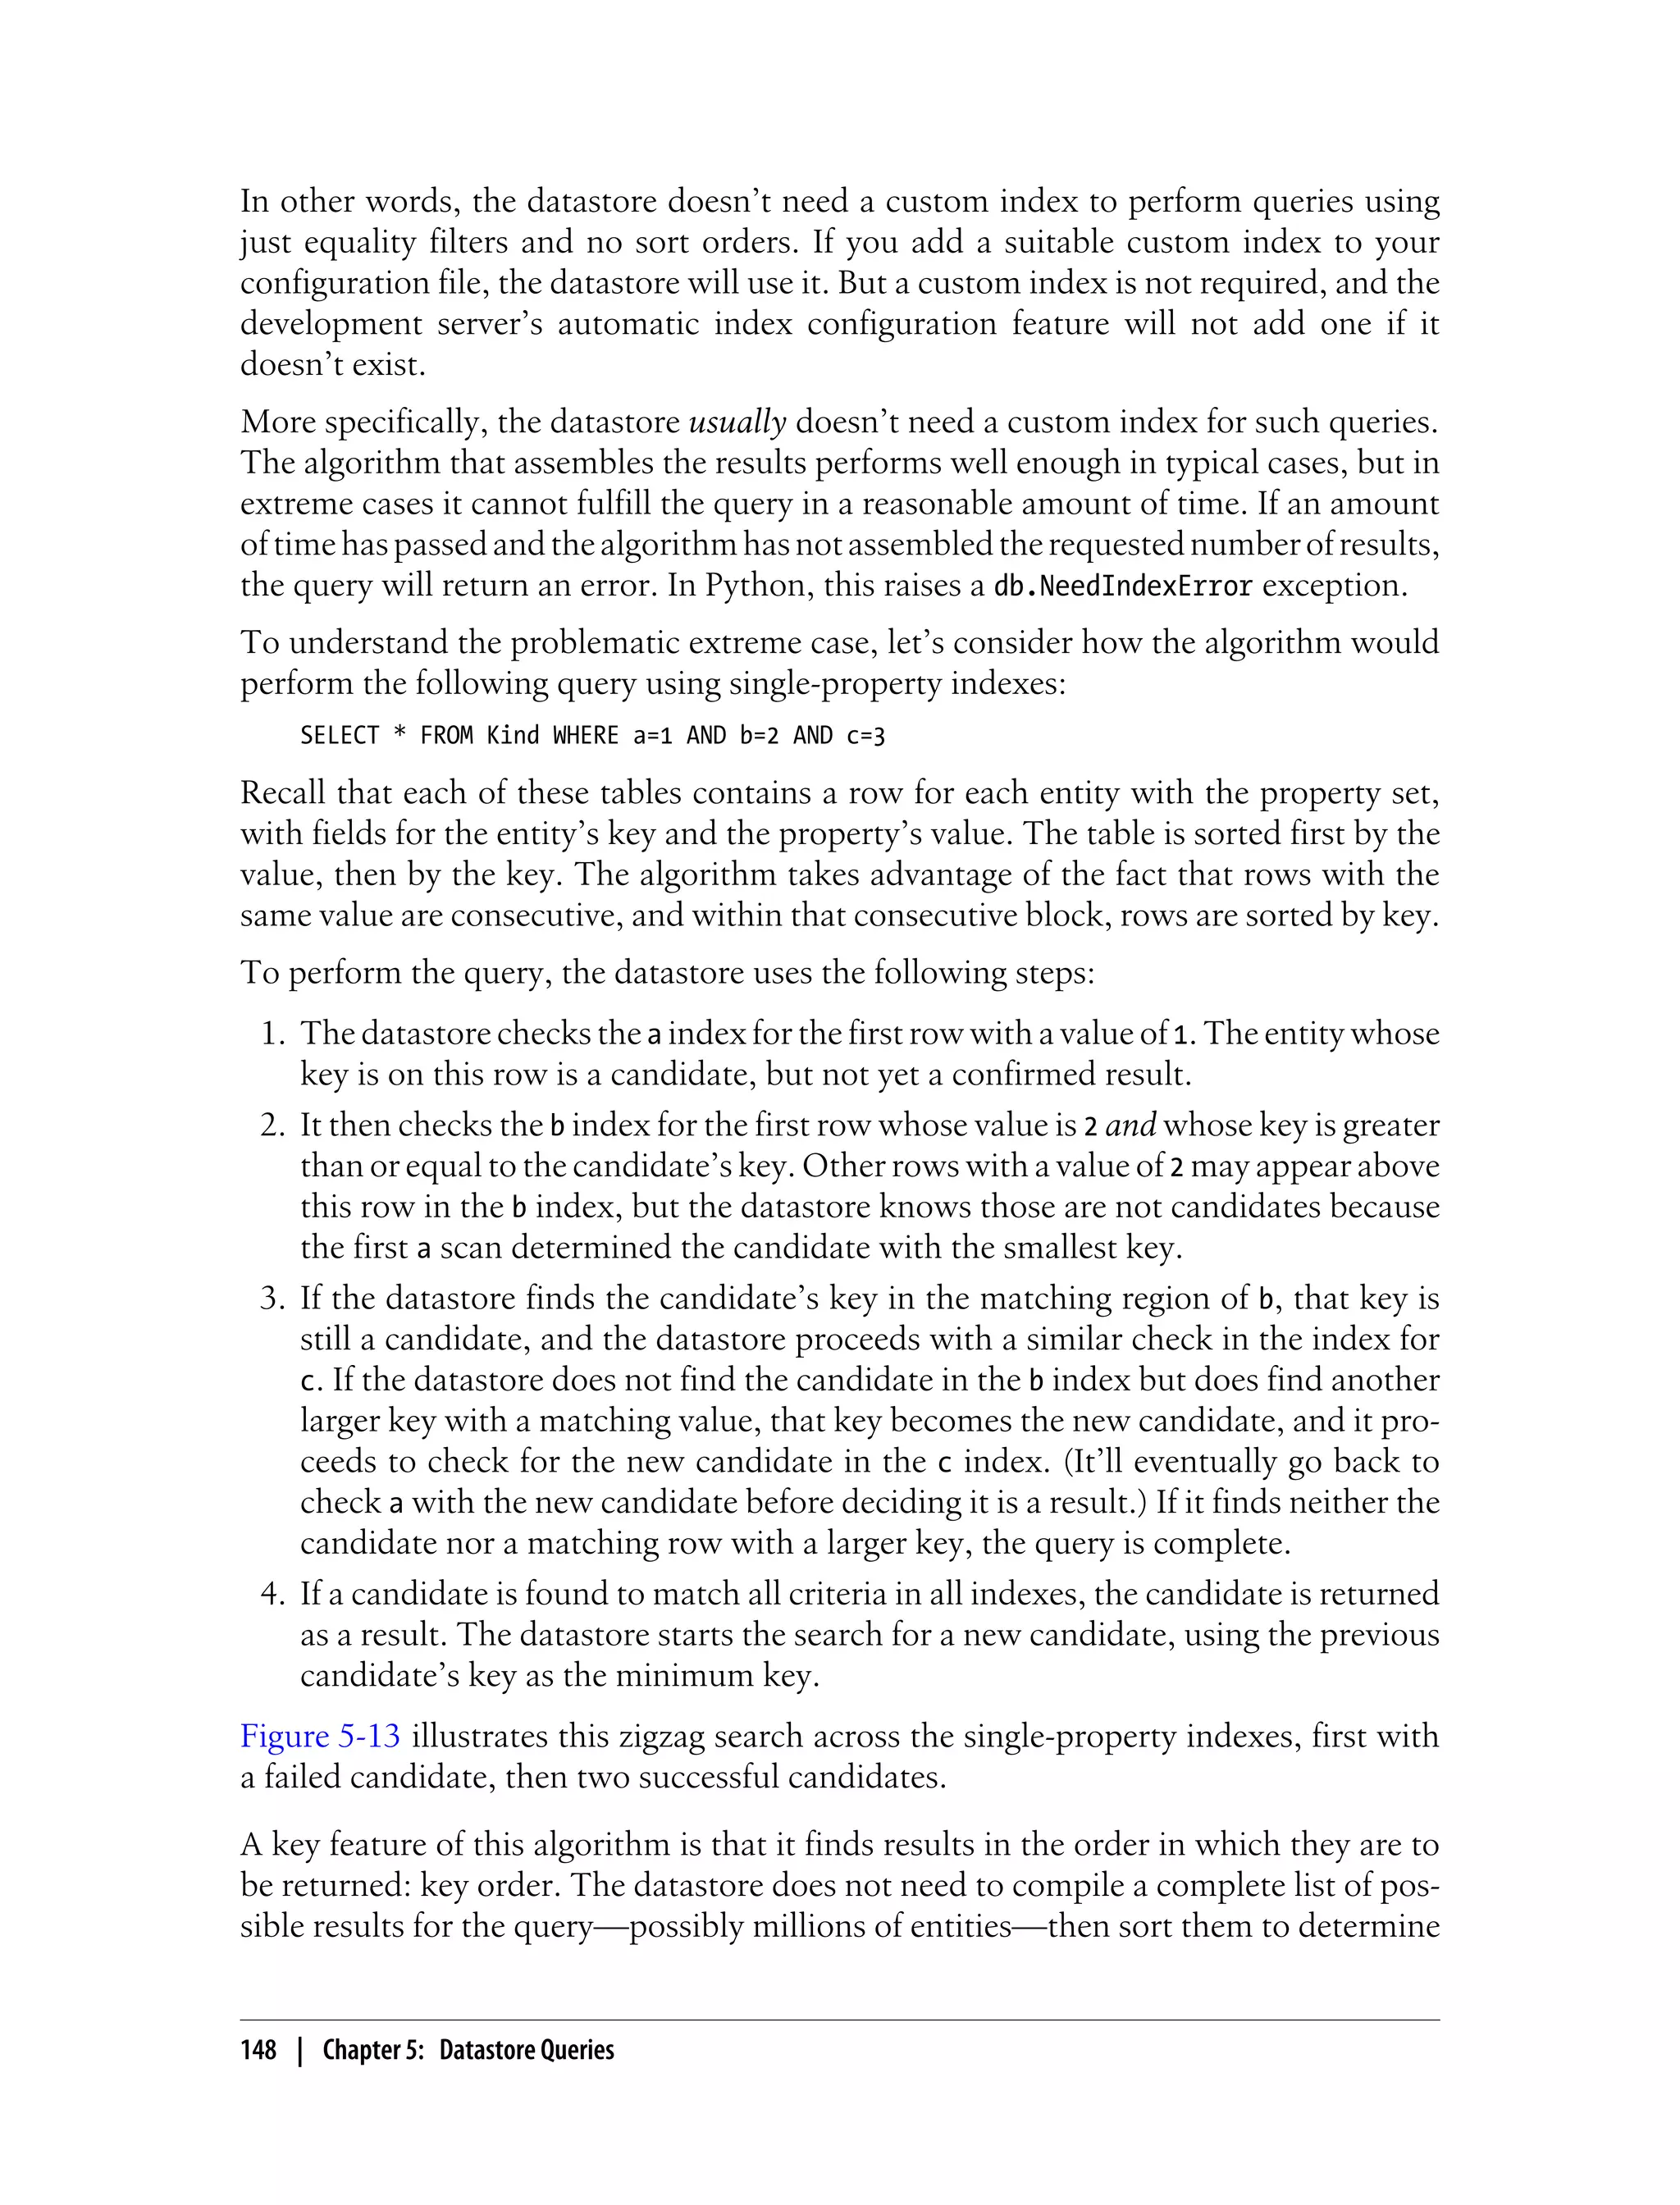

![impossible to get the list of players for a particular trophy. (A query filter can’t match
patterns within string values.)
Another option is to record each trophy win in a separate property named after the
trophy. To get the list of players with a trophy, you just query for the existence of the
corresponding property. However, getting the list of trophies for a given player would
require either coding the names of all of the trophies in the display logic, or iterating
over all of the Player entity’s properties looking for trophy names.
With multivalued properties, we can store each trophy name as a separate value for the
trophies property. To access a list of all trophies for a player, we simply access the
property of the entity. To get a list of all players with a trophy, we use a query with an
equality filter on the property.
Here’s what this example looks like in Python:
p = Player.get_by_key_name(user_id)
p.trophies = ['Lava Polo Champion',
'World Building 2008, Bronze',
'Glarcon Fighter, 2nd class']
p.put()
# List all trophies for a player.
for trophy in p.trophies:
# ...
# Query all players that have a trophy.
q = Player.gql("WHERE trophies = 'Lava Polo Champion'")
for p in q:
# ...
MVPs in Python
The Python API represents the values of a multivalued property as a Python list. Each
member of the list must be of one of the supported datastore types.
class Entity(db.Expando):
pass
e = Entity()
e.prop = [ 'value1', 123, users.get_current_user() ]
Remember that list is not a datastore type; it is only the mechanism for manipulating
multivalued properties. A list cannot contain another list.
A property must have at least one value, otherwise the property does not exist. To
enforce this, the Python API does not allow you to assign an empty list to a property.
Notice that the API can’t do otherwise: if a property doesn’t exist, then the API cannot
know to represent the missing property as an empty list when the entity is retrieved
from the datastore. (This being Python, the API could return the empty list whenever
a nonexistent property is accessed, but that might be more trouble than it’s worth.)
154 | Chapter 5: Datastore Queries](https://image.slidesharecdn.com/programminggoogleappengine-100608200404-phpapp01/75/Programming-google-app-engine-175-2048.jpg)
![Because it is often useful for lists to behave like lists, including the ability to contain
zero items, the Python data modeling API provides a mechanism that supports assign-
ing the empty list to a property. We’ll look at this mechanism in Chapter 7.
MVPs and Equality Filters
As you’ve seen, when a multivalued property is the subject of an equality filter in a
query, the entity matches if any of the property’s values are equal to the filter value.
e1 = Entity()
e1.prop = [ 3.14, 'a', 'b' ]
e1.put()
e2 = Entity()
e2.prop = [ 'a', 1, 6 ]
e2.put()
# Returns e1 but not e2:
q = Entity.gql('WHERE prop = 3.14')
# Returns e2 but not e1:
q = Entity.gql('WHERE prop = 6')
# Returns both e1 and e2:
q = Entity.gql("WHERE prop = 'a'")
Recall that a query with a single equality filter uses an index that contains the keys of
every entity of the given kind with the given property and the property values. If an
entity has a single value for the property, the index contains one row that represents
the entity and the value. If an entity has multiple values for the property, the index
contains one row for each value. The index for this example is shown in Figure 5-14.
This brings us to the first of several odd-looking queries that nonetheless make sense
for multivalued properties. Since an equality filter is a membership test, it is possible
for multiple equality filters to use the same property with different values and still return
a result. An example in GQL:
SELECT * FROM Entity WHERE prop = 'a' AND prop = 'b'
App Engine uses the “merge join” algorithm described earlier for multiple equality
filters to satisfy this query using the prop single-property index. This query returns the
e1 entity because the entity key appears in two places in the index, once for each value
requested by the filters.
The way multivalued properties appear in an index gives us another way of thinking
about multivalued properties: an entity has one or more properties, each with a name
and a single value, and an entity can have multiple properties with the same name. The
API represents the values of multiple properties with the same name as a list of values
associated with that name.
Queries and Multivalued Properties | 155](https://image.slidesharecdn.com/programminggoogleappengine-100608200404-phpapp01/75/Programming-google-app-engine-176-2048.jpg)
![Figure 5-14. An index of two entities with multiple values for the “prop” property, with results for
WHERE prop=‘a’
The datastore does not have a way to query for the exact set of values in a multivalued
property. You can use multiple equality filters to test that each of several values belongs
to the list, but there is no filter that ensures that those are the only values that belong
to the list, or that each value appears only once.
MVPs and Inequality Filters
Just as an equality filter tests that any value of the property is equal to the filter value,
an inequality filter tests that any value of the property meets the filter criterion.
e1 = Entity()
e1.prop = [ 1, 3, 5 ]
e1.put()
e2 = Entity()
e2.prop = [ 4, 6, 8 ]
e2.put()
# Returns e1 but not e2:
q = Entity.gql("WHERE prop < 2")
# Returns e2 but not e1:
q = Entity.gql("WHERE prop > 7")
# Returns both e1 and e2:
q = Entity.gql("WHERE prop > 3")
Figure 5-15 shows the index for this example, with the results of prop > 3 highlighted.
In the case of an inequality filter, it’s possible for the index scan to match rows for a
single entity multiple times. When this happens, the first occurrence of each key in the
156 | Chapter 5: Datastore Queries](https://image.slidesharecdn.com/programminggoogleappengine-100608200404-phpapp01/75/Programming-google-app-engine-177-2048.jpg)
![Figure 5-15. An index of two entities with multiple values for the “prop” property, with results for
WHERE prop > 3
index determines the order of the results. If the index used for the query sorts the
property in ascending order, the first occurrence is the smallest matching value. For
descending, it’s the largest. In the example above, prop > 3 returns e2 before e1 because
4 appears before 5 in the index.
MVPs and Sort Orders
To summarize things we know about how multivalued properties are indexed:
• A multivalued property appears in an index with one row per value.
• All rows in an index are sorted by the values, possibly distributing property values
for a single entity across the index.
• The first occurrence of an entity in an index scan determines its place in the result
set for a query.
Together, these facts explain what happens when a query orders its results by a mul-
tivalued property. When results are sorted by a multivalued property in ascending or-
der, the smallest value for the property determines its location in the results. When
results are sorted in descending order, the largest value for the property determines its
location.
This has a counterintuitive—but consistent—consequence:
e1 = Entity()
e1.prop = [ 1, 3, 5 ]
e1.put()
e2 = Entity()
Queries and Multivalued Properties | 157](https://image.slidesharecdn.com/programminggoogleappengine-100608200404-phpapp01/75/Programming-google-app-engine-178-2048.jpg)
![e2.prop = [ 2, 3, 4 ]
e2.put()
# Returns e1, e2:
q = Entity.gql("ORDER BY prop ASC")
# Also returns e1, e2:
q = Entity.gql("ORDER BY prop DESC")
Because e1 has both the smallest value and the largest value, it appears first in the result
set in ascending order and in descending order. See Figure 5-16.
Figure 5-16. Indexes of two entities with multiple values for the “prop” property, one ascending and
one descending
MVPs and the Query Planner
The query planner tries to be smart by ignoring aspects of the query that are redundant
or contradictory. For instance, a = 3 AND a = 4 would normally return no results, so
the query planner catches those cases and doesn’t bother doing work it doesn’t need
to do. However, most of these normalization techniques don’t apply to multivalued
properties. In this case, the query could be asking, “Does this MVP have a value that
is equal to 3 and another value equal to 4?” The datastore remembers which properties
are MVPs (even those that end up with one or zero values), and never takes a shortcut
that would produce incorrect results.
But there is one exception. A query that has both an equality filter and a sort order will
drop the sort order. If a query asks for a = 3 ORDER BY a DESC and a is a single-value
property, the sort order has no effect because all of the values in the result are identical.
For an MVP, however, a = 3 tests for membership, and two MVPs that meet that
condition are not necessarily identical.
158 | Chapter 5: Datastore Queries](https://image.slidesharecdn.com/programminggoogleappengine-100608200404-phpapp01/75/Programming-google-app-engine-179-2048.jpg)


![SELECT * FROM Message
WHERE ANCESTOR IS KEY(MessageBoard, 'The_Archonville_Times')
ORDER BY post_date DESC
LIMIT 10
Most queries that use an ancestor filter need custom indexes. There is one unusual
exception: a query does not need a custom index if the query also contains equality
filters on properties (and no inequality filters or sort orders). In this exceptional case,
the “merge join” algorithm can use a built-in index of keys along with the built-in
property indexes. In cases where the query would need a custom index anyway, the
query can match the ancestor to the keys in the custom index.
As we mentioned in Chapter 5, the datastore supports queries over entities of all kinds.
Kindless queries are limited to key filters and ancestor filters. Since ancestors can have
children of disparate kinds, kindless queries are useful for getting every child of a given
ancestor, regardless of kind:
SELECT * WHERE ANCESTOR IS KEY('MessageBoard', 'The_Archonville_Times')
While ancestor queries can be useful, don’t get carried away building
large ancestor trees. Remember that every entity with the same root
belongs to the same entity group, and more simultaneous users that
need to write to a group mean a greater likelihood of concurrency
failures.
If you want to model hierarchical relationships between entities without
the consequences of entity groups, consider using multivalued proper-
ties to store paths. For example, if there’s an entity whose path in your
hierarchy can be represented as /A/B/C/D, you can store this path as:
e.parents = ['/A', '/A/B', '/A/B/C'] Then you can perform a query
similar to an ancestor query on this property: ... WHERE parents = '/
A/B'.
What Can Happen in a Transaction
Entity groups ensure that the operations performed within a transaction see a consistent
view of the entities in a group. For this to work, a single transaction must limit its
operations to entities in a single group. The entity group determines the scope of the
transaction.
Within a transaction, you can fetch, update, or delete an entity using the entity’s key.
You can also create a new entity that either is a root entity of a new group that becomes
the subject of the transaction, or that has a member of the transaction’s entity group
as its parent.
You can perform queries over the entities of a single entity group in a transaction. A
query in a transaction must have an ancestor filter that matches the transaction’s entity
group. The results of the query, including both the indexes that provide the results as
168 | Chapter 6: Datastore Transactions](https://image.slidesharecdn.com/programminggoogleappengine-100608200404-phpapp01/75/Programming-google-app-engine-189-2048.jpg)
![p = Entity()
e = Entity(parent=p)
The parent key does not have to represent an entity that exists. You can construct a
fake key using db.Key.from_path() and use it as the parent:
p_key = db.Key.from_path('Entity', 'fake_parent')
e = Entity(parent=p_key)
You can use methods on the model object to get the key for the entity’s parent, or fetch
the entity’s parent from the datastore. These methods return None if the entity is a root
entity for its entity group.
p = e.parent()
p_key = e.parent_key()
Similarly, the Key object can return the Key of its parent, or None:
e_key = e.key()
p_key = e_key.parent()
The Python API uses function objects to handle transactions. To perform multiple
operations in a transaction, you define a function that executes the operations, then
you pass it to the run_in_transaction() function (in the ...ext.db module).
import datetime
from google.appengine.ext import db
class MessageBoard(db.Expando):
pass
class Message(db.Expando):
pass
def create_message_txn(board_name, message_name, message_title, message_text):
board = db.get(db.Key.from_path('MessageBoard', board_name))
if not board:
board = MessageBoard(key_name=board_name)
board.count = 0
message = Message(key_name=message_name, parent=board)
message.title = message_title
message.text = message_text
message.post_date = datetime.datetime.now()
board.count += 1
db.put([board, message])
# ...
try:
db.run_in_transaction(create_message_txn,
170 | Chapter 6: Datastore Transactions](https://image.slidesharecdn.com/programminggoogleappengine-100608200404-phpapp01/75/Programming-google-app-engine-191-2048.jpg)
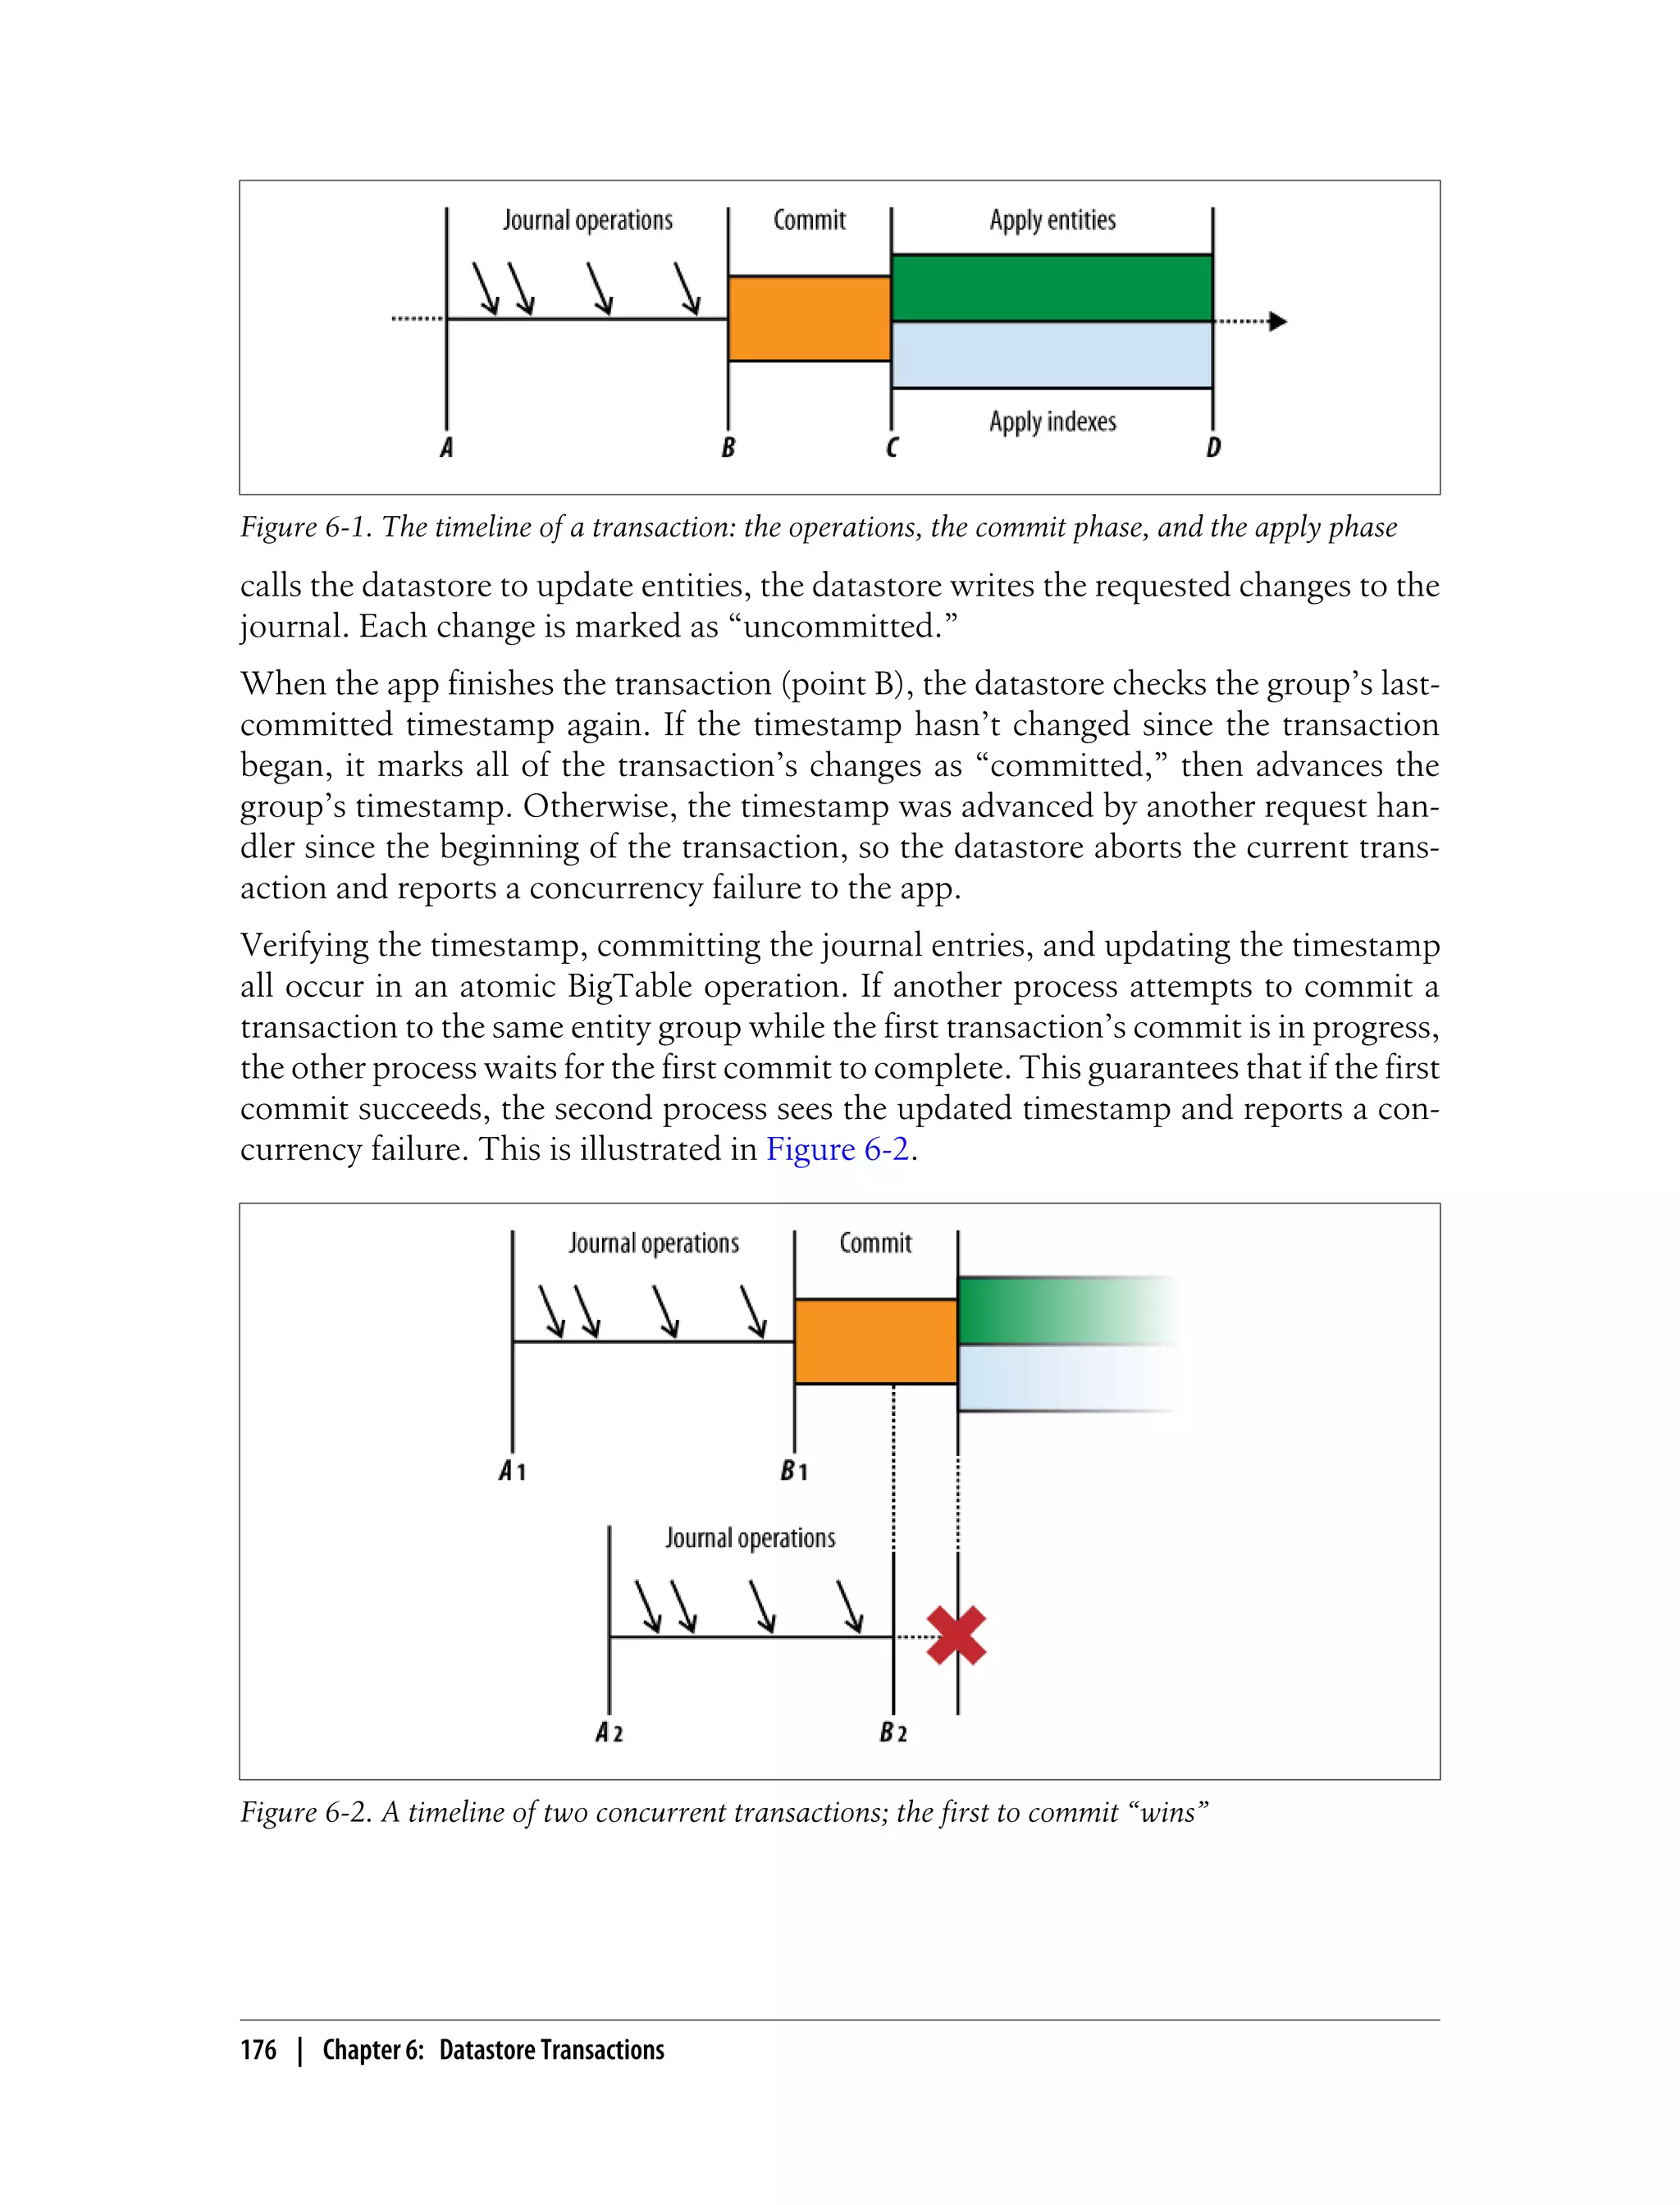
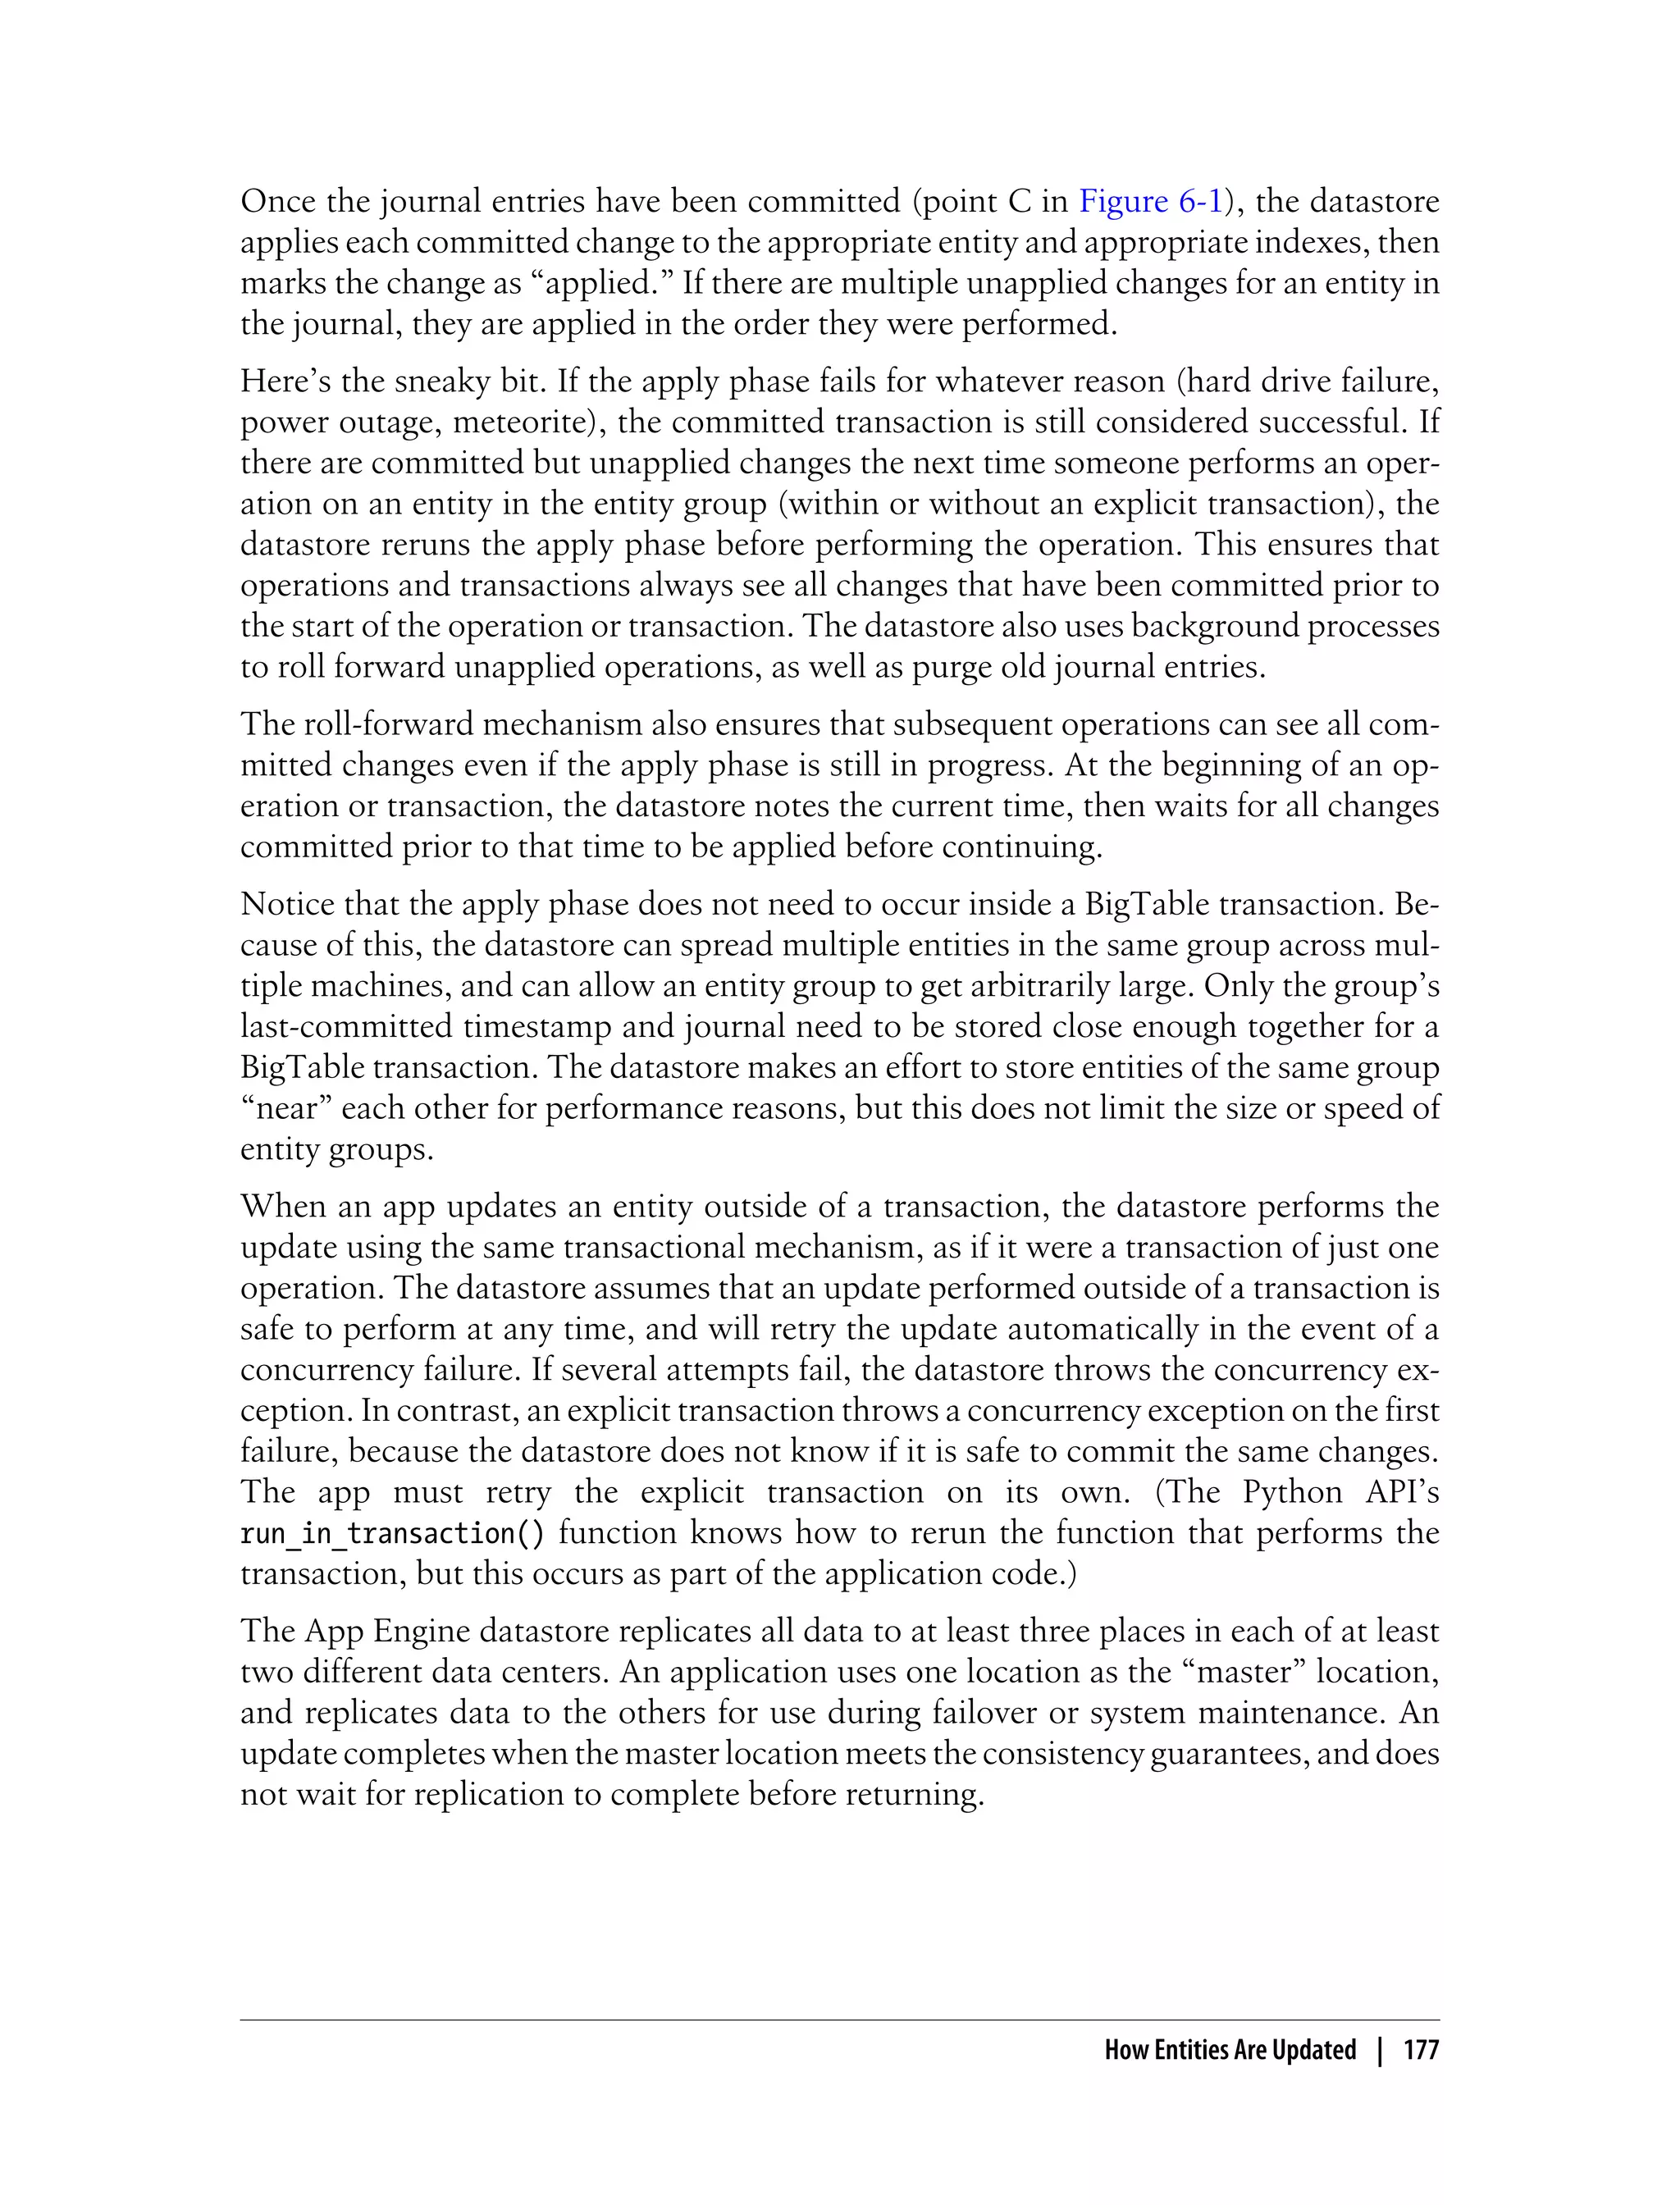

![Batch Updates
When you read, create, update, or delete an entity, the runtime environment makes a
service call to the datastore. Each service call has some overhead, including serializing
and deserializing parameters and transmitting them between machines in the data cen-
ter. If you need to update multiple entities, you can save time by performing the updates
together as a batch in one service call.
We introduced batch calls in Chapter 4. Here’s a quick example of the Python batch
API:
# Creating multiple entities:
e1 = Message(key_name='m1', text='...')
e2 = Message(key_name='m2', text='...')
e3 = Message(key_name='m3', text='...')
message_keys = db.put([e1, e2, e3])
# Getting multiple entities using keys:
message_keys = [db.Key('Message', 'm1'),
db.Key('Message', 'm2'),
db.Key('Message', 'm2')]
messages = db.get(message_keys)
for message in messages:
# ...
# Deleting multiple entities:
db.delete(message_keys)
When the datastore receives a batch call, it bundles the keys or entities by their entity
groups, which it can determine from the keys. Then it dispatches calls to the datastore
machines responsible for each entity group. The datastore returns results to the app
when it has received all results from all machines.
If the call includes changes for multiple entities in a single entity group, those changes
are performed in a single transaction. There is no way to control this behavior, but
there’s no reason to do it any other way. It’s faster to commit multiple changes to a
group at once than to commit them individually, and no less likely to result in concur-
rency failures.
Each entity group involved in a batch update may fail to commit due to a concurrency
failure. If a concurrency failure occurs for any update, the API raises the concurrency
failure exception—even if updates to other groups were committed successfully.
Batch updates in disparate entity groups are performed in separate threads, possibly
by separate datastore machines, executed in parallel to one another. This can make
batch updates especially fast compared to performing each update one at a time.
Remember that if you use the batch API during a transaction, every entity or key in the
batch must use the same entity group as the rest of the transaction. Also, be aware that
App Engine puts a maximum size on service calls and responses, and the total size of
the call or its responses must not exceed these limits. The number of items in a batch
Batch Updates | 179](https://image.slidesharecdn.com/programminggoogleappengine-100608200404-phpapp01/75/Programming-google-app-engine-200-2048.jpg)
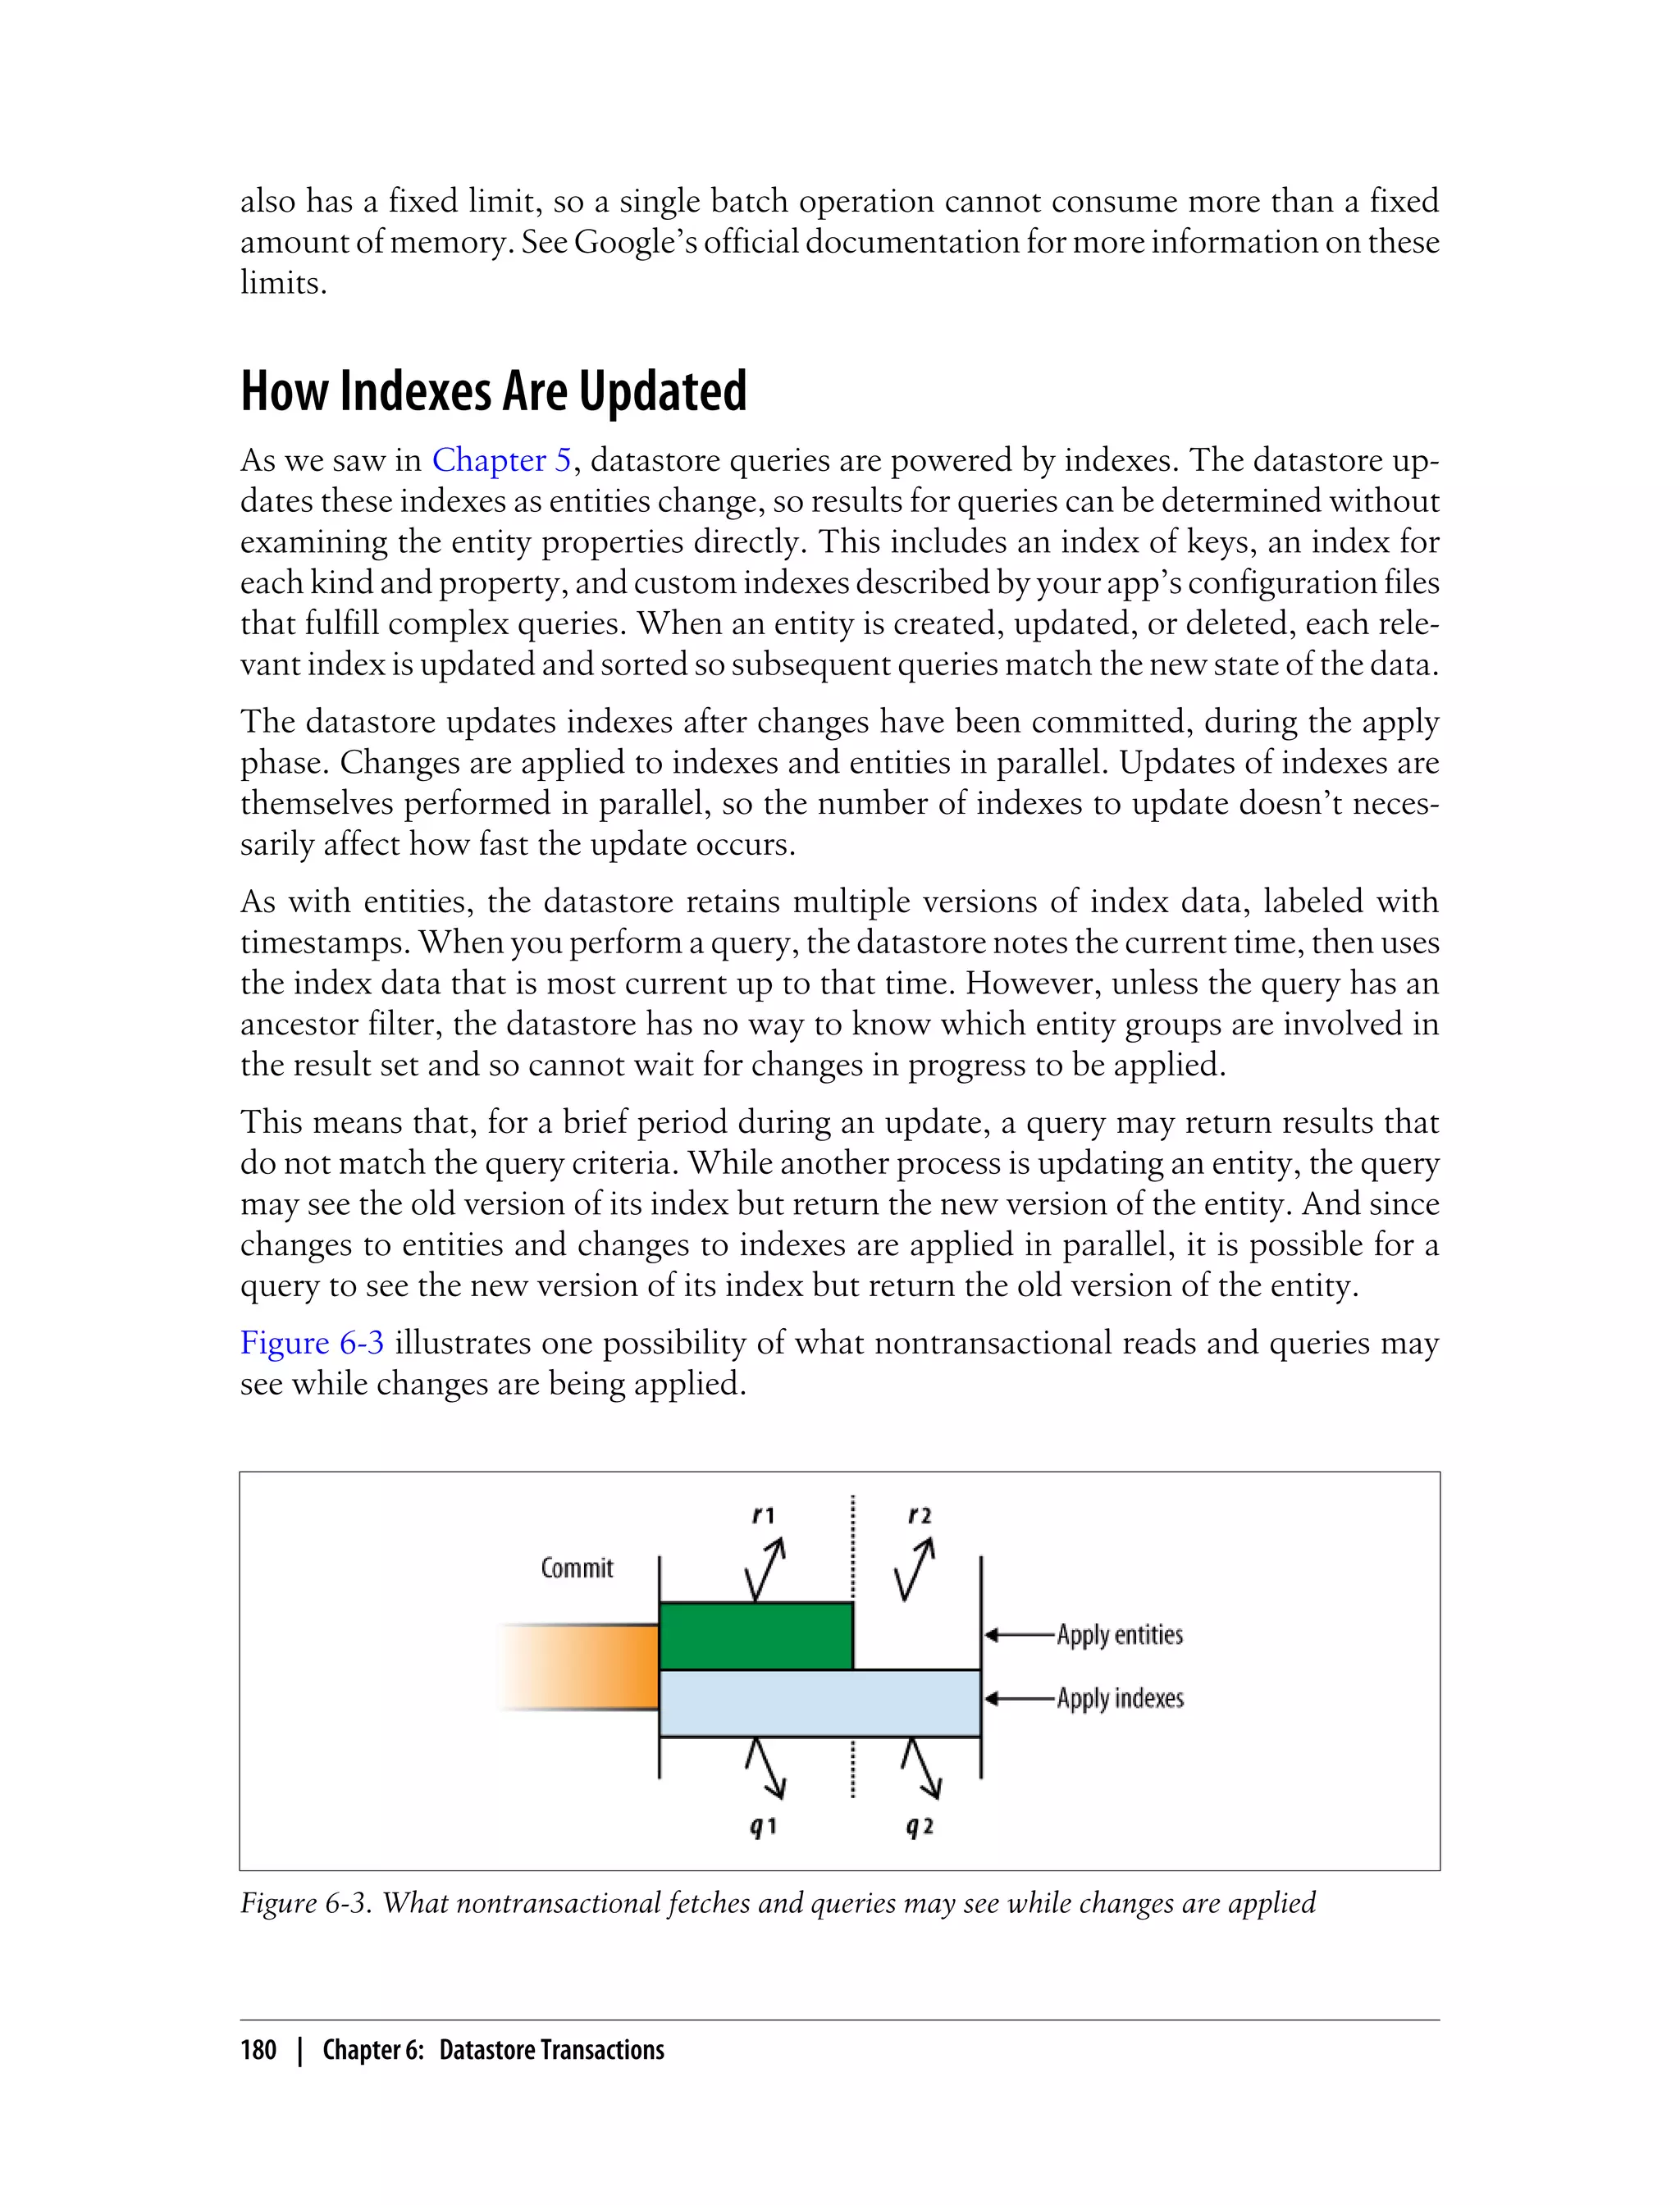


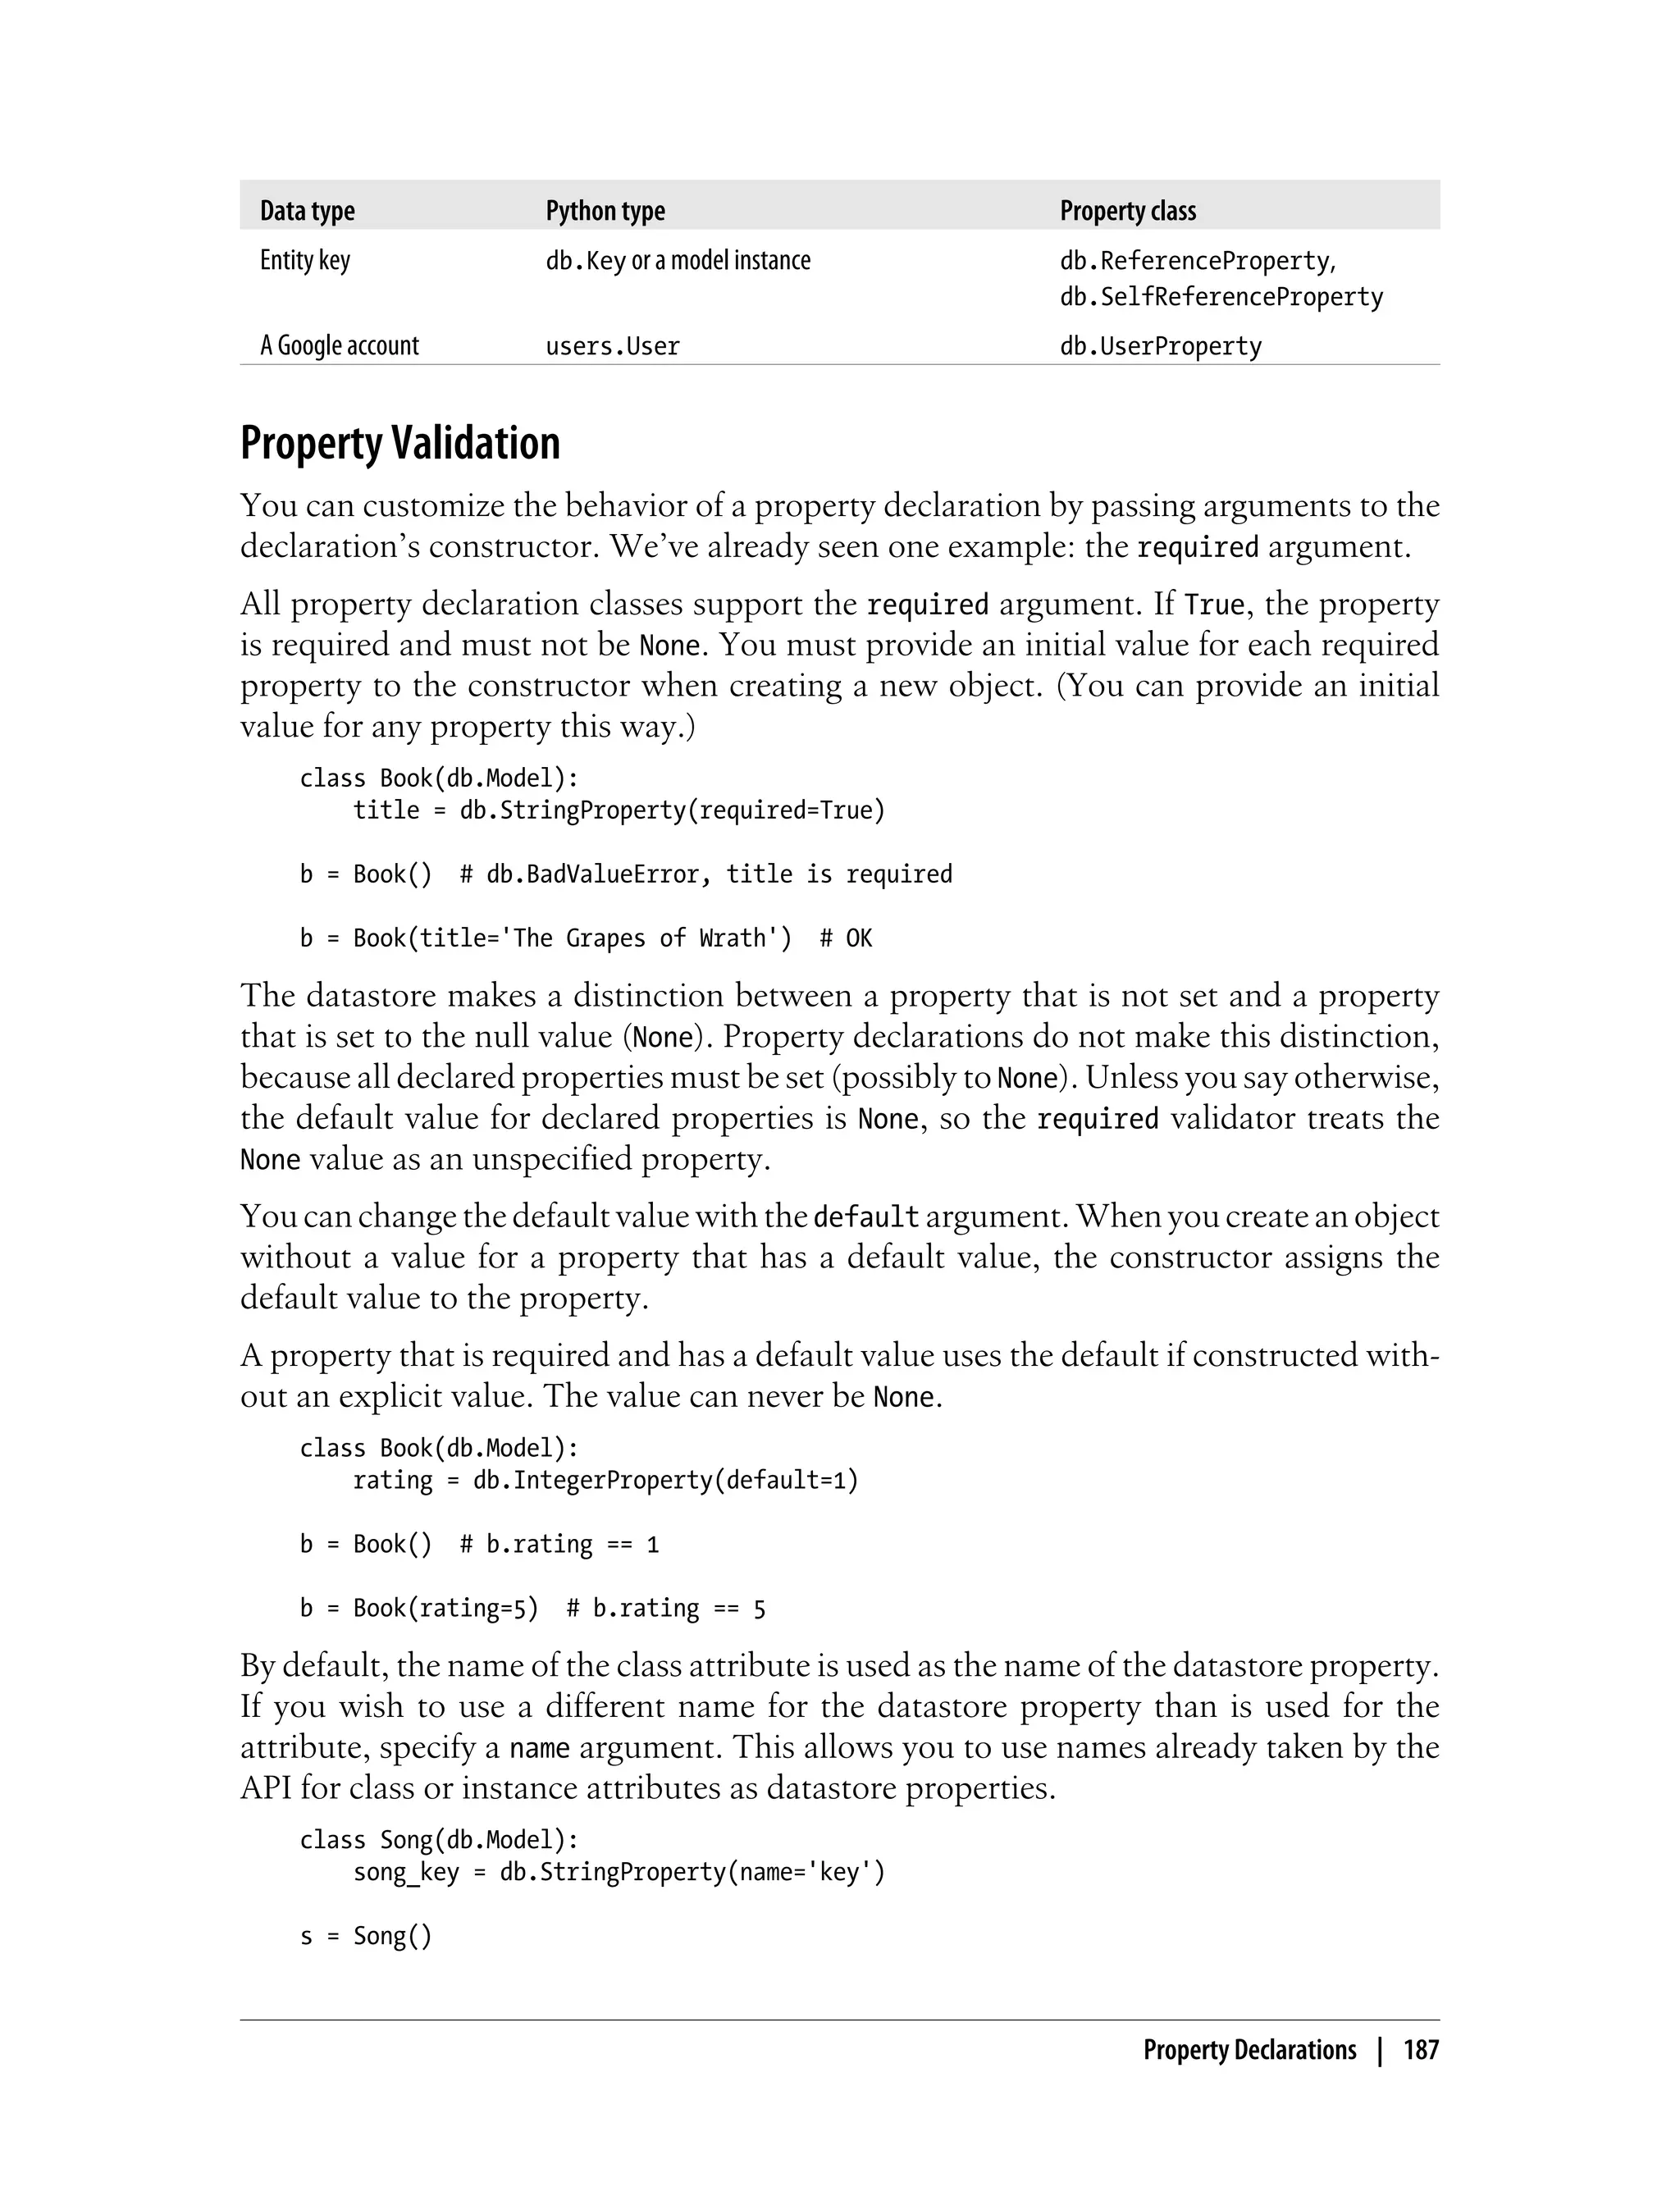
![s.song_key = 'C# min'
# The song_key attribute is stored as the
# datastore property named 'key'.
s.put()
You can declare that a property should contain only one of a fixed set of values by
providing a list of possible values as the choices argument. If None is not one of the
choices, this acts as a more restrictive form of required: the property must be set to one
of the valid choices using a keyword argument to the constructor.
_KEYS = ['C', 'C min', 'C 7',
'C#', 'C# min', 'C# 7',
# ...
]
class Song(db.Model):
song_key = db.StringProperty(choices=_KEYS)
s = Song(song_key='H min') # db.BadValueError
s = Song() # db.BadValueError, None is not an option
s = Song(song_key='C# min') # OK
All of these features validate the value assigned to a property, and raise a
db.BadValueError if the value does not meet the appropriate conditions. For even
greater control over value validation, you can define your own validation function and
assign it to a property declaration as the validator argument. The function should take
the value as an argument, and raise a db.BadValueError (or an exception of your choos-
ing) if the value should not be allowed.
def is_recent_year(val):
if val < 1923:
raise db.BadValueError
class Book(db.Model):
copyright_year = db.IntegerProperty(validator=is_recent_year)
b = Book(copyright_year=1922) # db.BadValueError
b = Book(copyright_year=1924) # OK
Nonindexed Properties
In Chapter 5, we mentioned that you can set properties of an entity in such a way that
they are available on the entity, but are considered unset for the purposes of indexes.
In the Python API, you establish a property as nonindexed using a property declaration.
If the property declaration is given an indexed argument of False, entities created with
that model class will set that property as nonindexed.
188 | Chapter 7: Data Modeling with Python](https://image.slidesharecdn.com/programminggoogleappengine-100608200404-phpapp01/75/Programming-google-app-engine-209-2048.jpg)

![is saved for the first time, and left untouched thereafter. If the current user is not signed
in, the value is set to None.
class BookReview(db.Model):
created_by_user = db.UserProperty(auto_current_user_add=True)
last_edited_by_user = db.UserProperty(auto_current_user=True)
br = BookReview()
br.put() # created_by_user and last_edited_by_user set
# ...
br.put() # last_edited_by_user set again
At first glance, it might seem reasonable to set a default for a
db.UserProperty this way:
from google.appengine.api import users
class BookReview(db.Model):
created_by_user = db.UserProperty(
default=users.get_current_user())
# WRONG
This would set the default value to be the user who is signed in when
the class is imported. Requests that use a cached instance of the appli-
cation may end up using a previous user instead of the current user as
the default.
To guard against this mistake, db.UserProperty does not accept
the default argument. You can use only auto_current_user or
auto_current_user_add to set an automatic value.
List Properties
The data modeling API provides a property declaration class for multivalued properties,
called db.ListProperty. This class ensures that every value for the property is of the
same type. You pass this type to the property declaration, like so:
class Book(db.Model):
tags = db.ListProperty(basestring)
b = Book()
b.tags = ['python', 'app engine', 'data']
The type argument to the db.ListProperty constructor must be the Python represen-
tation of one of the native datastore types. Refer back to Table 4-1 for a complete list.
The datastore does not distinguish between a multivalued property with no elements
and no property at all. As such, an undeclared property on a db.Expando object can’t
store the empty list. If it did, when the entity is loaded back into an object, the property
simply wouldn’t be there, potentially confusing code that’s expecting to find an empty
190 | Chapter 7: Data Modeling with Python](https://image.slidesharecdn.com/programminggoogleappengine-100608200404-phpapp01/75/Programming-google-app-engine-211-2048.jpg)
![list. To avoid confusion, db.Expando disallows assigning an empty list to an undeclared
property.
The db.ListProperty declaration makes it possible to keep an empty list value on a
multivalued property. The declaration interprets the state of an entity that doesn’t have
the declared property as the property being set to the empty list, and maintains that
distinction on the object. This also means that you cannot assign None to a declared list
property—but this isn’t of the expected type for the property anyway.
The datastore does distinguish between a property with a single value and a multivalued
property with a single value. An undeclared property on a db.Expando object can store
a list with one element, and represent it as a list value the next time the entity is loaded.
The example above declares a list of string values. (basestring is the Python base
type for str and unicode.) This case is so common that the API also provides
db.StringListProperty.
You can provide a default value to db.ListProperty using the default argument. If you
specify a nonempty list as the default, a shallow copy of the list value is made for each
new object that doesn’t have an initial value for the property.
db.ListProperty does not support the required validator, since every list property tech-
nically has a list value (possibly empty). If you wish to disallow the empty list, you can
provide your own validator function that does so:
def is_not_empty(lst):
if len(lst) == 0:
raise db.BadValueError
class Book(db.Model):
tags = db.ListProperty(basestring, validator=is_not_empty)
b = Book(tags=[]) # db.BadValueError
b = Book() # db.BadValueError, default "tags" is empty
b = Book(tags=['awesome']) # OK
db.ListProperty does not allow None as an element in the list because it doesn’t match
the required value type. It is possible to store None as an element in a list for an unde-
clared property.
Models and Schema Migration
Property declarations prevent the application from creating an invalid data object, or
assigning an invalid value to a property. If the application always uses the same model
classes to create and manipulate entities, then all entities in the datastore will be con-
sistent with the rules you establish using property declarations.
Property Declarations | 191](https://image.slidesharecdn.com/programminggoogleappengine-100608200404-phpapp01/75/Programming-google-app-engine-212-2048.jpg)
![b.put()
br = BookReview()
br.book = b # sets br's 'book' property to b's key
br.book = b.key() # same thing
We’ll explain what collection_name does in a moment.
The referenced object must have a “complete” key before it can be assigned to a refer-
ence property. A key is complete when it has all of its parts, including the string name
or the system-assigned numeric ID. If you create a new object without a key name, the
key is not complete until you save the object. When you save the object, the system
completes the key with a numeric ID. If you create the object (or a db.Key) with a key
name, the key is already complete, and you can use it for a reference without saving it
first.
b = Book()
br = BookReview()
br.book = b # db.BadValueError, b's key is not complete
b.put()
br.book = b # OK, b's key has system ID
b = Book(key_name='The_Grapes_of_Wrath')
br = BookReview()
br.book = b # OK, b's key has a name
db.put([b, br])
A model class must be defined before it can be the subject of a db.ReferenceProperty.
To declare a reference property that can refer to another instance of the same class, you
use a different declaration, db.SelfReferenceProperty.
class Book(db.Model):
previous_edition = db.SelfReferenceProperty()
b1 = Book()
b2 = Book()
b2.previous_edition = b1
Reference properties have a powerful and intuitive syntax for accessing referenced ob-
jects. When you access the value of a reference property, the property fetches the entity
from the datastore using the stored key, then returns it as an instance of its model class.
A referenced entity is loaded “lazily”: it is not fetched from the datastore until the
property is dereferenced.
br = db.get(book_review_key)
# br is a BookReview instance
title = br.book.title # fetches book, gets its title property
Modeling Relationships | 193](https://image.slidesharecdn.com/programminggoogleappengine-100608200404-phpapp01/75/Programming-google-app-engine-214-2048.jpg)
![The key list method is best suited for situations where there are fewer objects on one
side of the relationship than on the other, and the short list is small enough to store
directly on an entity. In this example, many players each belong to a few guilds; each
player has a short list of guilds, while each guild may have a long list of players. We
put the list property on the Player side of the relationship to keep the entity small, and
use queries to produce the long list when it is needed.
The link model method
The link model method represents each relationship as an entity. The relationship entity
has reference properties pointing to the related classes. You traverse the relationship
by going through the relationship entity via the back-references.
class Player(db.Model):
name = db.StringProperty()
class Guild(db.Model):
name = db.StringProperty()
class GuildMembership(db.Model):
player = db.ReferenceProperty(Player, collection_name='guild_memberships')
guild = db.ReferenceProperty(Guild, collection_name='player_memberships')
p = Player()
g = Guild()
db.put([p, g])
gm = GuildMembership(player=p, guild=g)
db.put(gm)
# Guilds to which a player belongs:
for gm in p.guild_memberships:
guild_name = gm.guild.name
# ...
# Players that belong to a guild:
for gm in g.player_memberships:
player_name = gm.player.name
# ...
This technique is similar to how you’d use “join tables” in a SQL database. It’s a good
choice if either side of the relationship may get too large to store on the entity itself.
You can also use the relationship entity to store metadata about the relationship (such
as when the player joined the guild), or model more complex relationships between
multiple classes.
The link model method is more expensive than the key list method. It requires fetching
the relationship entity to access the related object.
Modeling Relationships | 197](https://image.slidesharecdn.com/programminggoogleappengine-100608200404-phpapp01/75/Programming-google-app-engine-218-2048.jpg)
![self.first_name = first_name
self.surname = surname
def is_valid(self):
return (isinstance(self.first_name, unicode)
and isinstance(self.surname, unicode)
and len(self.surname) >= 6)
class PlayerNameProperty(db.Property):
data_type = basestring
def validate(self, value):
value = super(PlayerNameProperty, self).validate(value)
if value is not None:
if not isinstance(value, PlayerName):
raise db.BadValueError('Property %s must be a PlayerName.' %
(self.name))
# Let the data class have a say in validity.
if not value.is_valid():
raise db.BadValueError('Property %s must be a valid PlayerName.' %
self.name)
# Disallow the serialization delimiter in the first field.
if value.surname.find('|') != -1:
raise db.BadValueError(('PlayerName surname in property %s cannot ' +
'contain a "|".') % self.name)
return value
def get_value_for_datastore(self, model_instance):
# Convert the data object's PlayerName to a unicode.
return (getattr(model_instance, self.name).surname + u'|'
+ getattr(model_instance, self.name).first_name)
def make_value_for_datastore(self, value):
# Convert a unicode to a PlayerName.
i = value.find(u'|')
return PlayerName(first_name=value[i+1:],
surname=value[:i])
And here’s how you’d use it:
p = Player()
p.player_name = PlayerName('Ned', 'Nederlander')
p.player_name = PlayerName('Ned', 'Neder|lander')
# db.BadValueError, surname contains serialization delimiter
p.player_name = PlayerName('Ned', 'Neder')
# db.BadValueError, PlayerName.is_valid() == False
Here, the application value type is a PlayerName instance, and the datastore value type
is that value encoded as a Unicode string. The encoding format is the surname field,
followed by a delimiter, followed by the first_name field. We disallow the delimiter
character in the surname using the validate() method. (Instead of disallowing
Creating Your Own Property Classes | 203](https://image.slidesharecdn.com/programminggoogleappengine-100608200404-phpapp01/75/Programming-google-app-engine-224-2048.jpg)


![selects the requested fields and assembles the results. This is only true if one of the
requested fields is a datastore property, and is not true if the only field is a key field (@Id).
If the query is for one field, each result is a value of the type of that field. If the query
is for multiple fields, each result is an Object[] whose elements are the field values in
the order specified in the query.
Query query = em.createQuery("SELECT isbn, title, author FROM Book");
// Fetch complete Book objects, then
// produce result objects from 3 fields
// of each result
@SuppressWarnings("unchecked")
List<Object[]> results = (List<Object[]>) query.getResultList();
for (Object[] result : results) {
String isbn = result[0];
String title = result[1];
String author = result[2];
// ...
}
You specify filters on fields using a WHERE clause and one or more conditions:
SELECT b FROM Book b WHERE author = "John Steinbeck"
AND copyrightYear >= 1940
To filter on the entity key, refer to the field that represents the key in the data class (the
@Id field):
SELECT b FROM Book b WHERE author = "John Steinbeck"
AND isbn > :firstKeyToFetch
You can perform an ancestor filter by establishing a parent key field (as we did in the
previous section) and referring to that field in the query:
SELECT br FROM BookReview br WHERE bookKey = :pk
As with find(), you can use any of the four key types with parameterized queries, but
the most portable way is to use the type used in the class.
You specify sort orders using an ORDER BY clause. Multiple sort orders are comma-
delimited. Each sort order can have a direction of ASC (the default) or DESC.
SELECT b FROM Book b ORDER BY rating DESC title
The App Engine implementation of JPQL includes a couple of additional tricks that
the datastore can support natively. One such trick is the string prefix trick:
SELECT b FROM Book b WHERE title LIKE 'The Grape%'
The implementation translates this to WHERE title >= 'The Grape', which does the
same thing: it returns all books with a title that begins with the string The Grape, in-
cluding "The Grape", "The Grapefruit", and "The Grapes of Wrath".
Queries and JPQL | 219](https://image.slidesharecdn.com/programminggoogleappengine-100608200404-phpapp01/75/Programming-google-app-engine-240-2048.jpg)


![Keys are strings. The API also accepts a memcached-style tuple of a hash code and a string
as a key for compatibility, but it ignores the hash code. The string can be any size;
strings larger than 250 bytes are hashed to 250 bytes.
Values can be any Python value that can be serialized using the pickle module. This
includes most simple values, and data structures and objects whose members are
pickleable values. Pretty much any db.Model instance falls into this category. You can
check the documentation for the pickle module for a more complete description.
Setting and Getting Values in Python
To store a value in memcache, you call the set() function (or method, if you’re using
the Client class) with the key and the value:
from google.appengine.api import memcache
# headlines is a pickle-able object
headlines = ['...', '...', '...']
success = memcache.set("headlines", headlines)
if not success:
# Problem accessing memcache...
set() returns True on success, or False if the value could not be stored.
If there already exists a value with the given key, set() overwrites it. If there is no value
for the key, set() sets it.
To set a value only if there is no value for the key, you call the add() function with
similar arguments:
success = memcache.add("headlines", headlines)
if not success:
# Key already set, or another problem setting...
add() works like set(), but does not update the value and returns False if a value is
currently set for the given key.
To update a value only if it’s already set, you call the replace() function, also with
similar arguments:
success = memcache.replace("headlines", headlines)
if not success:
# Key not set, or another problem setting...
To get a value, you call the get() method with the key:
headlines = memcache.get("headlines")
if headlines is None:
# Key not set, or another problem getting...
get() returns the value, or None if there is no value set for the given key.
The Python Memcache API | 229](https://image.slidesharecdn.com/programminggoogleappengine-100608200404-phpapp01/75/Programming-google-app-engine-250-2048.jpg)
![Setting and Getting Multiple Values
You can set and get multiple values at a time using the batch interface. A batch call to
memcache is performed as a single call to the service, which is faster than multiple
individual calls for many items. Like the datastore batch operations, the total amount
of data sent to or received from memcache in a single call must not exceed one
megabyte.
set_multi(), add_multi(), and replace_multi() are similar to their singular counter-
parts, except instead of taking a key and a value as arguments, they take a Python
mapping (such as a dict) of keys to values.
article_summaries = {'article00174': '...',
'article05234': '...',
'article15820': '...',
}
failed_keys = memcache.set_multi(article_summaries)
if failed_keys:
# One or more keys failed to update...
These methods return a list of keys that failed to be set. A completely successful batch
update returns the empty list.
To get multiple values in a single batch, you call the get_multi() method with a list of
keys:
article_summary_keys = ['article00174',
'article05234',
'article15820',
]
article_summaries = memcache.get_multi(article_summary_keys)
get_multi() returns a dict of keys and values that were present and retrieved
successfully.
All of the batch operations accept a key_prefix keyword argument that prepends every
key with the given prefix string. When used with get_multi(), the keys on the returned
values do not include the prefix.
article_summaries = {'00174': '...',
'05234': '...',
'15820': '...',
}
failed_keys = memcache.set_multi(article_summaries,
key_prefix='article')
if failed_keys:
# ...
# ...
article_summary_keys = ['00174',
230 | Chapter 9: The Memory Cache](https://image.slidesharecdn.com/programminggoogleappengine-100608200404-phpapp01/75/Programming-google-app-engine-251-2048.jpg)
!['05234',
'15820',
]
article_summaries = memcache.get_multi(article_summary_keys,
key_prefix='article')
Batch calls to the memcache service are not atomic actions.
set_multi() may be successful for some items and not others.
get_multi() will return the data seen at the time of each individual get,
and does not guarantee that all retrieved data is read at the same time.
Memcache Namespaces
You can specify an optional namespace for a memcache key with any setter or getter
call. Namespaces let you segment the key space by the kind of thing you are storing,
so you don’t have to worry about key collisions between disparate uses of the cache.
All of the setter and getter functions accept a namespace argument, a string that declares
the namespace for all keys involved in the call. The batch functions use one namespace
for all keys in the batch.
article_summaries = {'article00174': '...',
'article05234': '...',
'article15820': '...',
}
failed_keys = memcache.set_multi(article_summaries,
namespace='News')
if failed_keys:
# ...
# ...
summary = memcache.get('article05234',
namespace='News')
Namespaces are different from key prefixes in batch calls. Key prefixes merely prepend
keys in a batch with a common string, as a convenience for batch processing. The
namespace is a separate part of the key, and must be specified with an explicit
namespace argument in all calls.
Cache Expiration
You can tell the memcache to delete (or evict) a value automatically after a period of
time when you set or update the value.
All of the setter methods accept a time argument. Its value is either a number of seconds
from the current time up to one month (up to 2,678,400 seconds), or it is a Unix epoch
time (seconds since January 1, 1970, such as returned by time.time()) in the future.
The Python Memcache API | 231](https://image.slidesharecdn.com/programminggoogleappengine-100608200404-phpapp01/75/Programming-google-app-engine-252-2048.jpg)


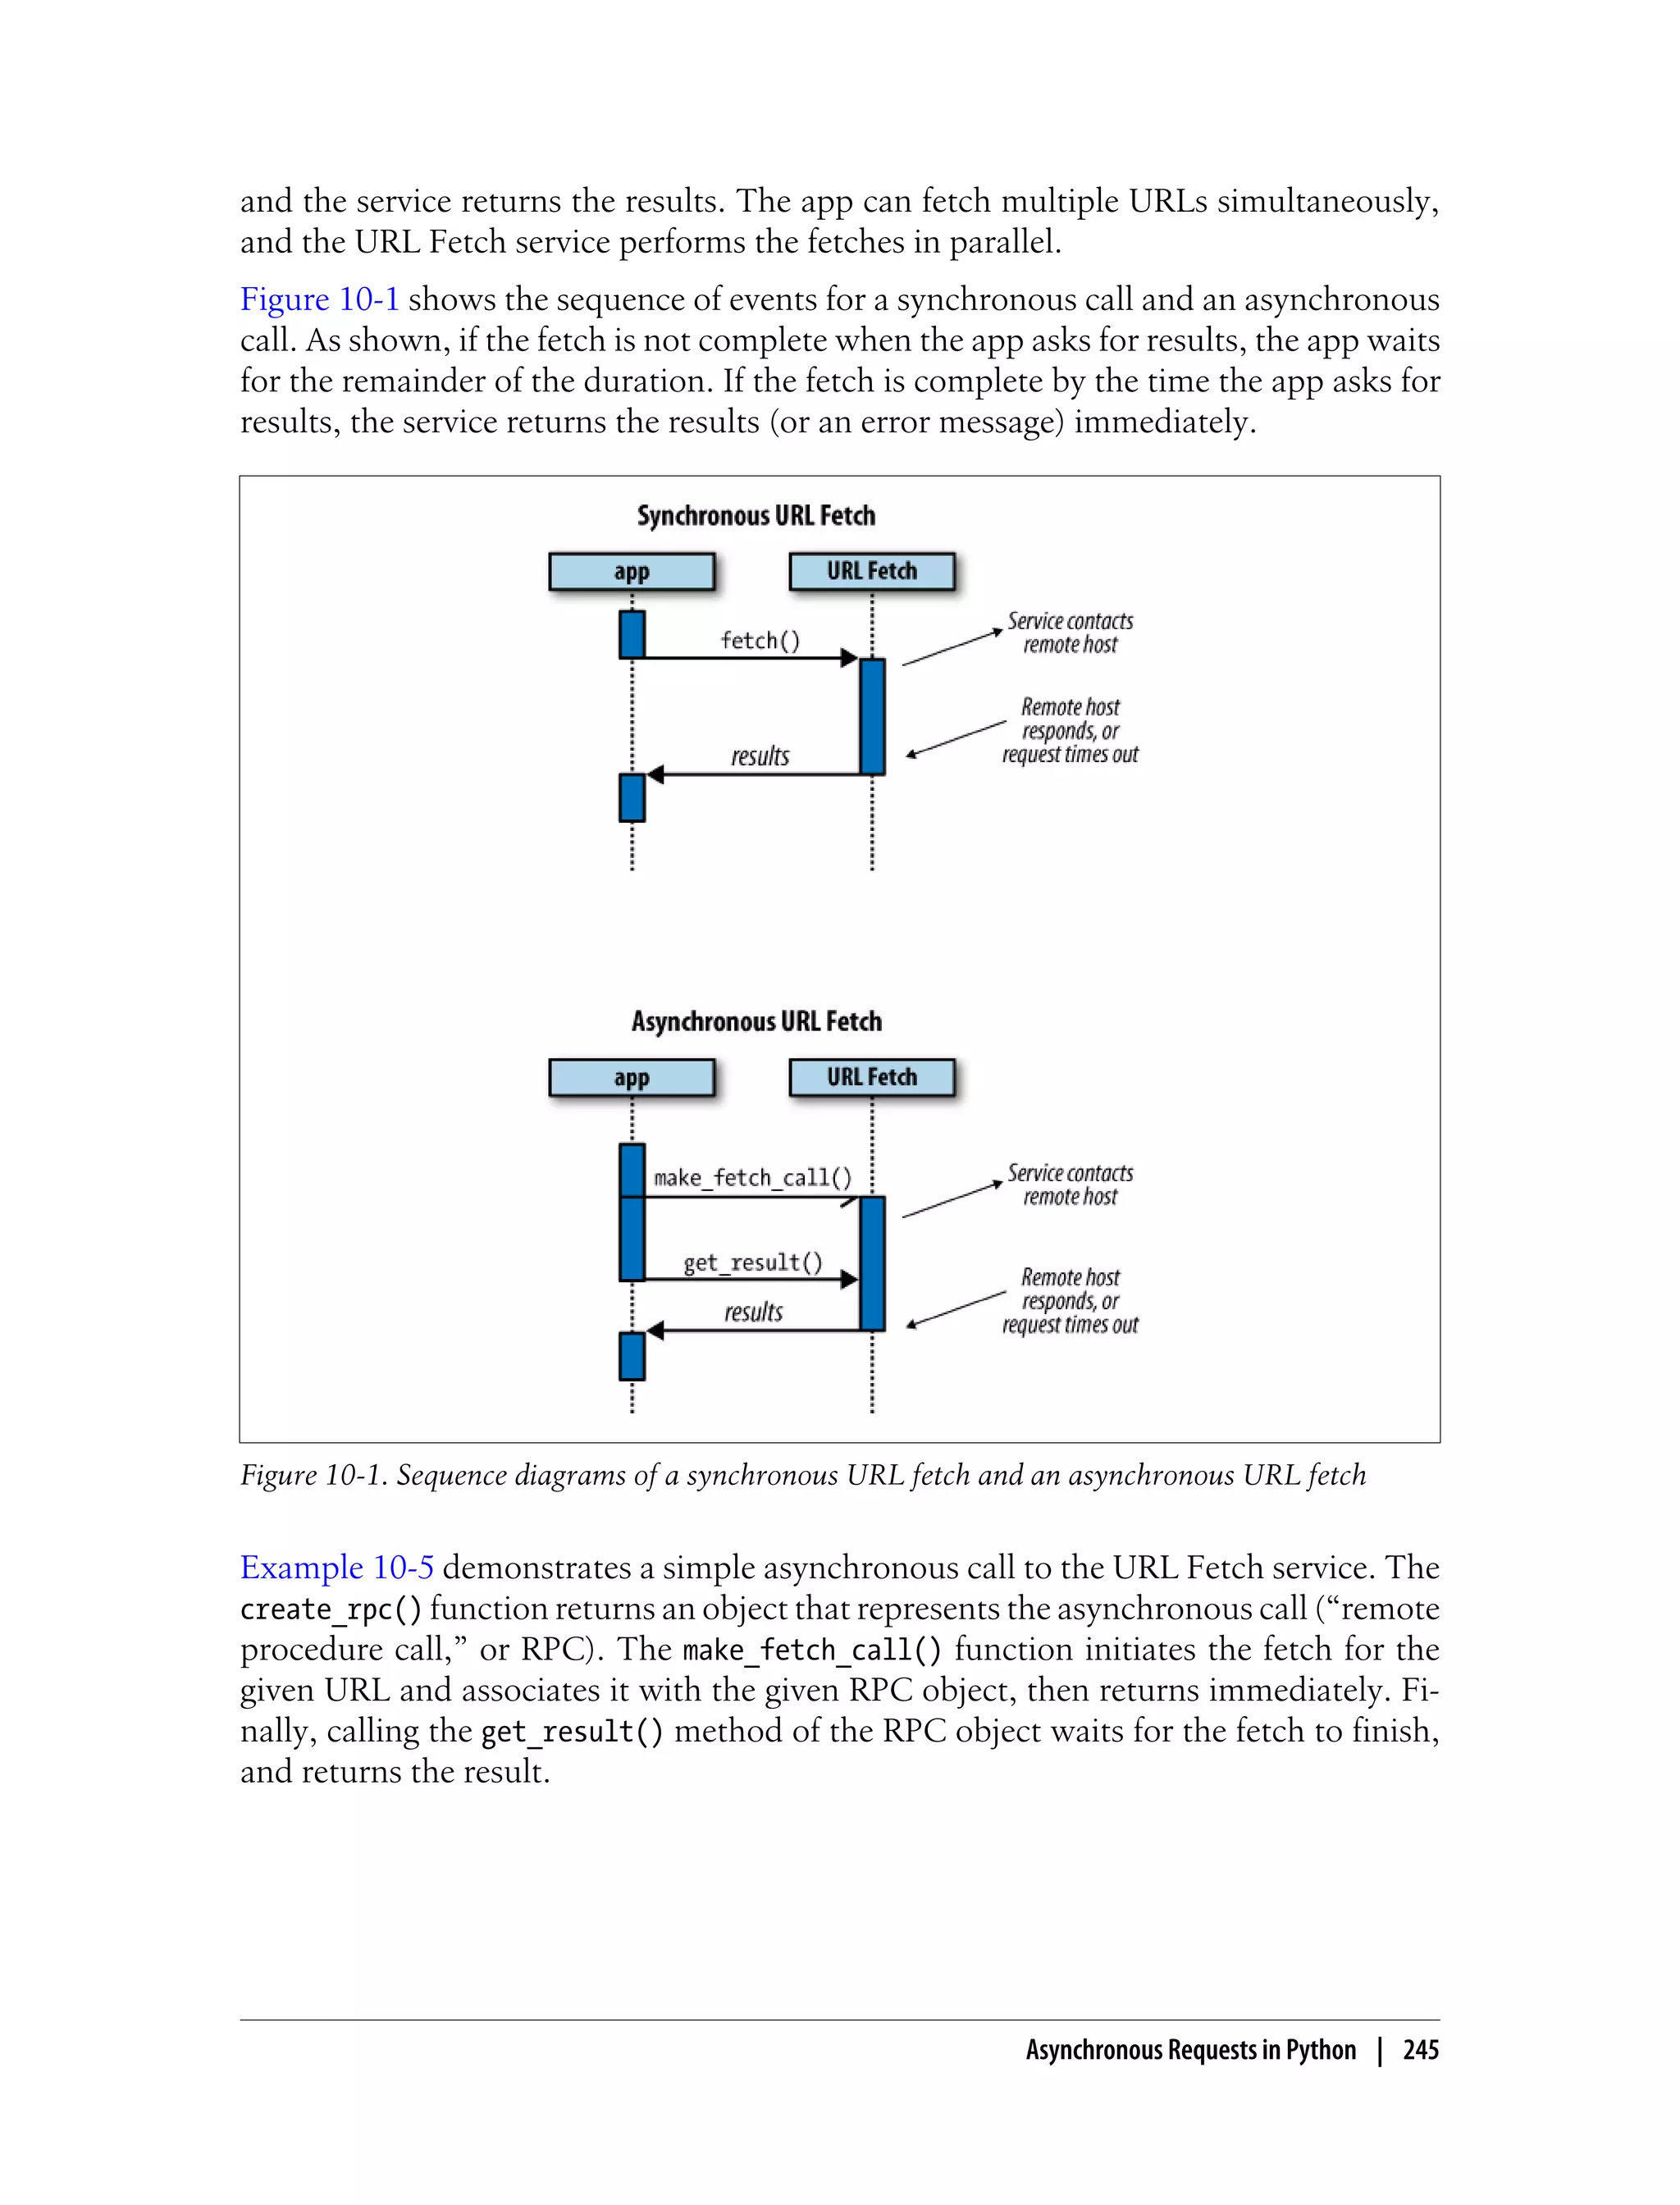

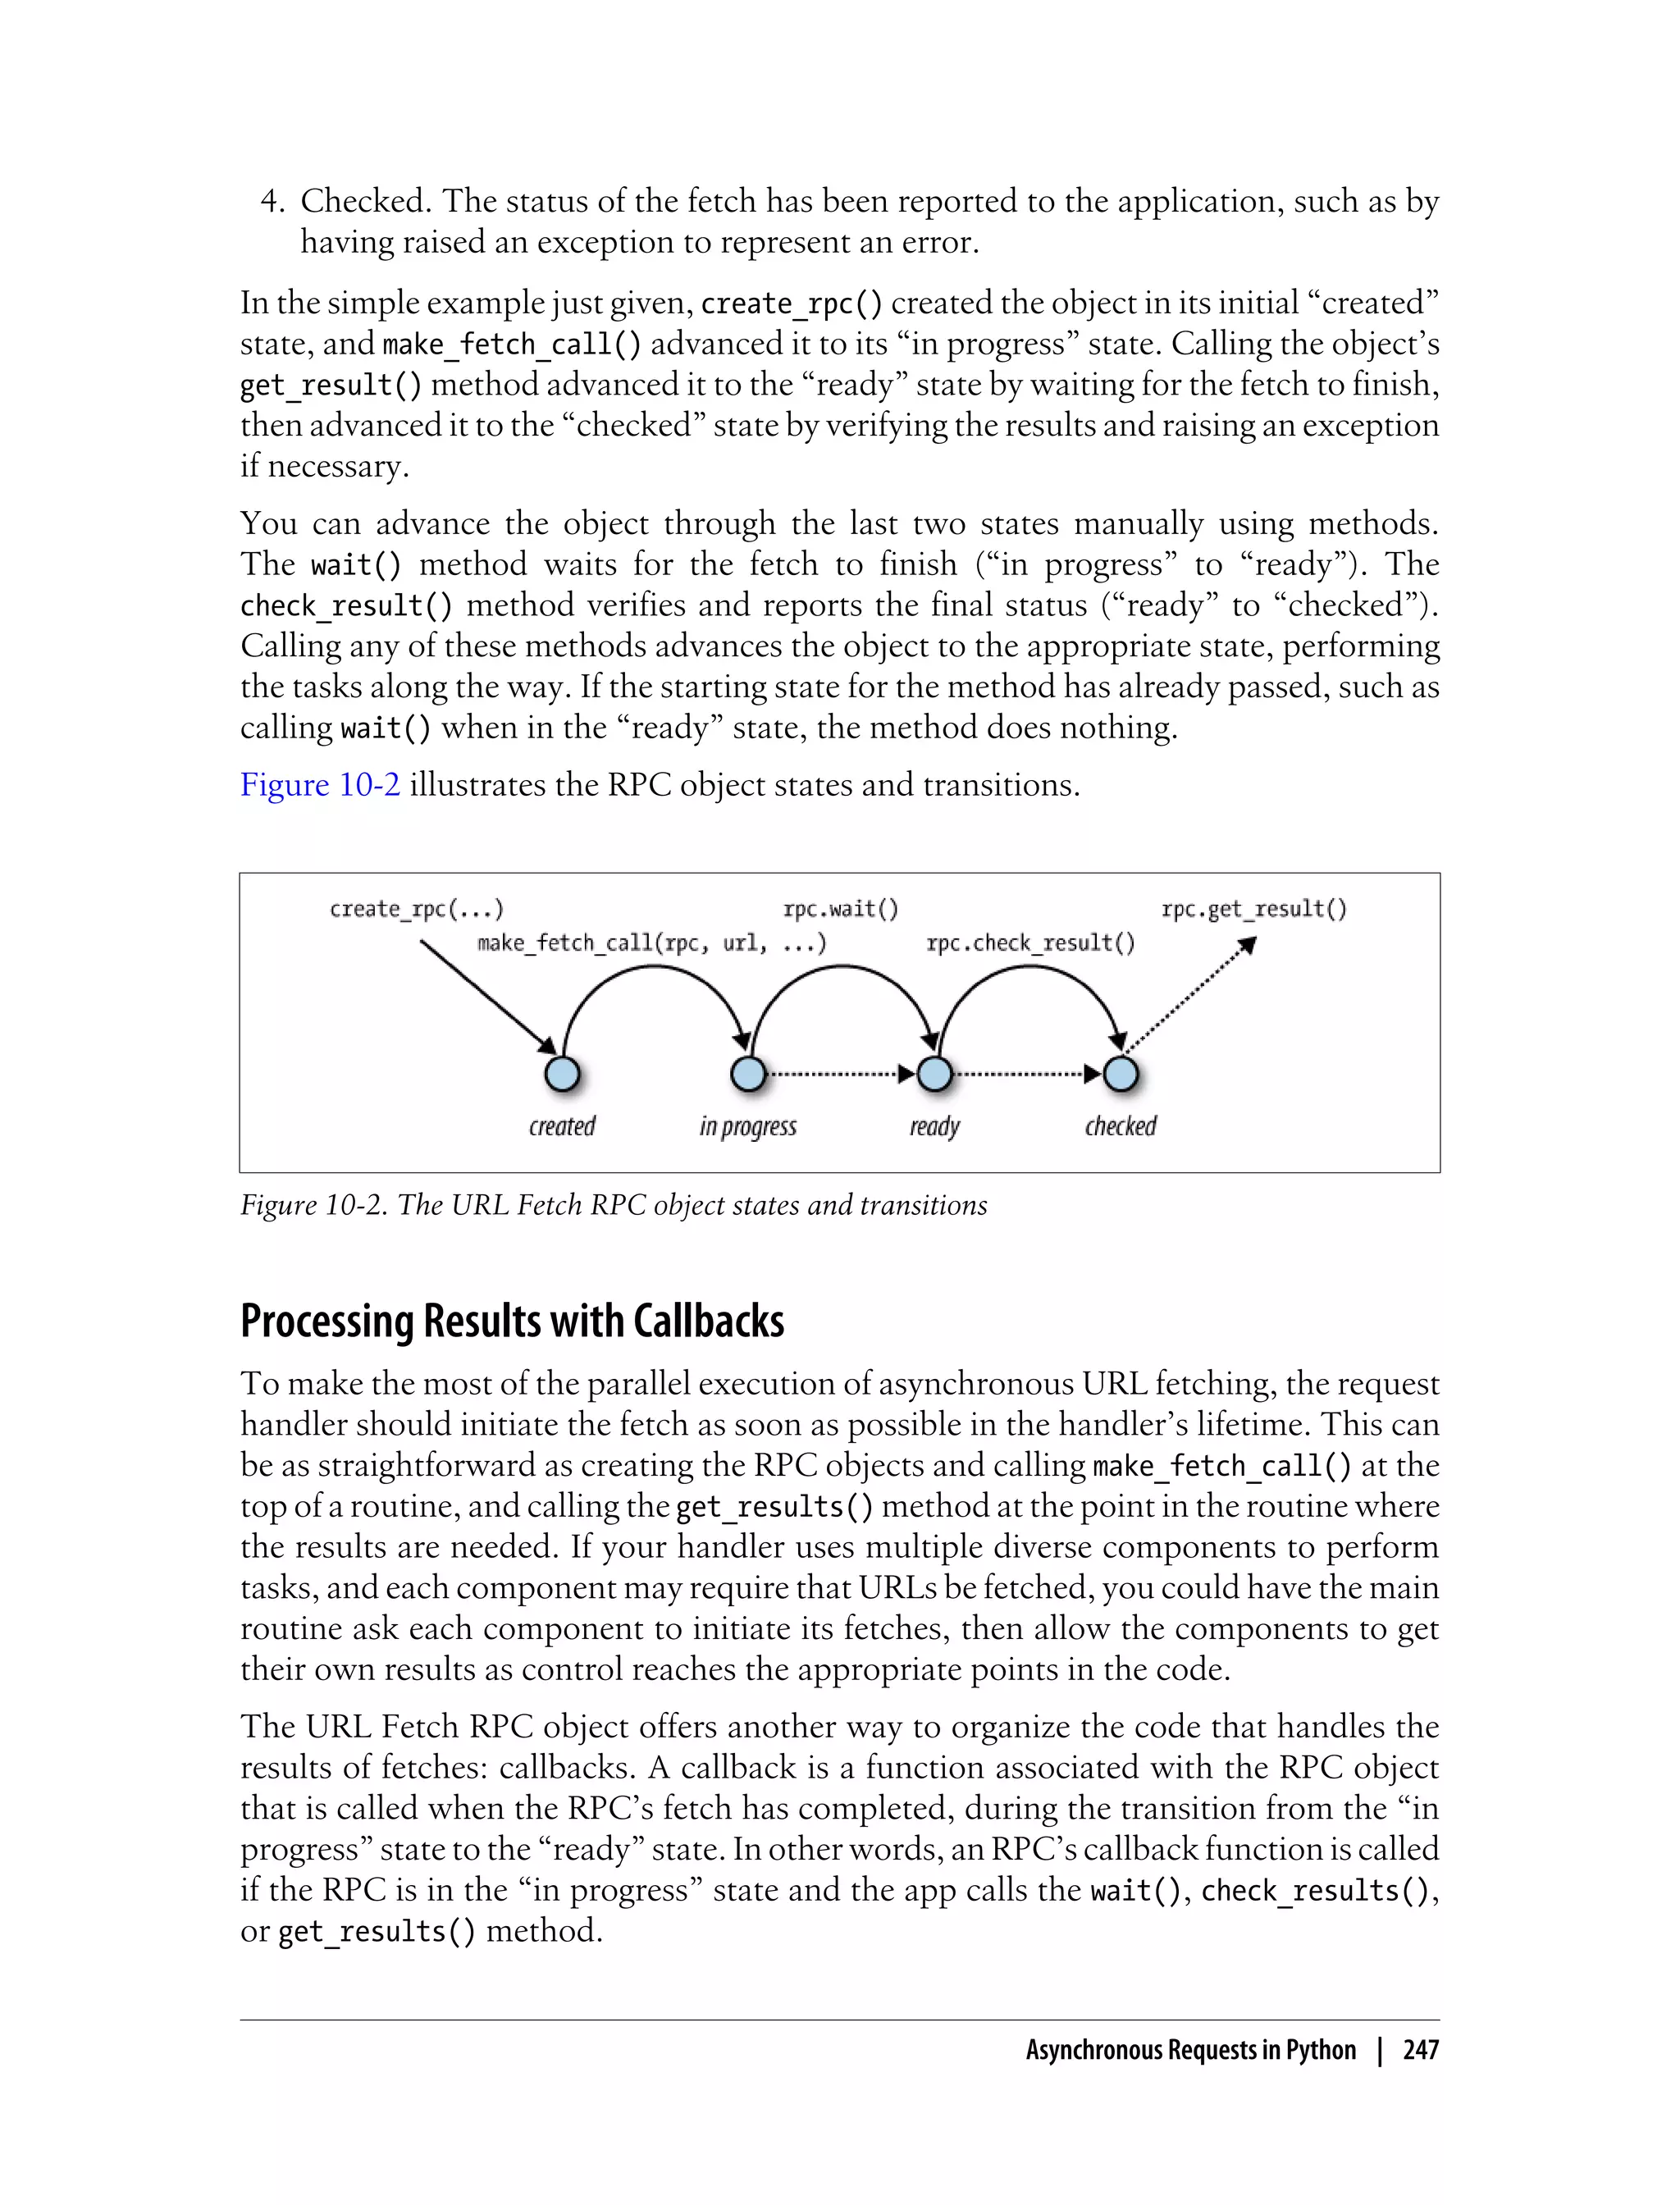
![The callback function is called without arguments. But a common use for a callback
function is to process the results of the fetch, so the function needs access to the RPC
object. There are several ways to give the callback function access to the object.
One way is to use a bound method, a feature of Python that lets you refer to a method
of an instance of a class as a callable object. Define a class with a method that processes
the results of the fetch, using an RPC object stored as a member of the class. Create an
instance of the class, then create the RPC object, assigning the bound method as the
callback by passing it as the callback argument to the create_rpc() function. Exam-
ple 10-6 demonstrates this technique.
Example 10-6. Using an object method as a callback to access the RPC object
from google.appengine.api import urlfetch
# ...
class CatalogUpdater(object):
def prepare_urlfetch_rpc(self):
self.rpc = urlfetch.create_rpc(callback=self.process_results)
urlfetch.make_fetch_call(self.rpc, 'http://api.example.com/catalog_feed')
return self.rpc
def process_results(self):
try:
results = self.rpc.get_result()
# Process results.content...
except urlfetch.Error, e:
# Handle urlfetch errors...
class MainHandler(webapp.RequestHandler):
def get(self):
rpcs = []
catalog_updater = CatalogUpdater(self.response)
rpcs.append(catalog_updater.prepare_urlfetch_rpc())
# ...
for rpc in rpcs:
rpc.wait()
Another way to give the callback access to the RPC object is to use a nested function
(sometimes called a closure). If the callback function is defined in the same scope as a
variable whose value is the RPC object, the function can access the variable when it is
called. To allow for this style of calling, the URL Fetch API lets you assign the callback
function to the RPC object’s callback property after the object has been created.
Example 10-7 demonstrates the use of a nested function as a callback. The
create_callback() function creates a function object, a lambda expression, that calls
another function with the RPC object as an argument. This function object is assigned
to the callback property of the RPC object.
248 | Chapter 10: Fetching URLs and Web Resources](https://image.slidesharecdn.com/programminggoogleappengine-100608200404-phpapp01/75/Programming-google-app-engine-269-2048.jpg)


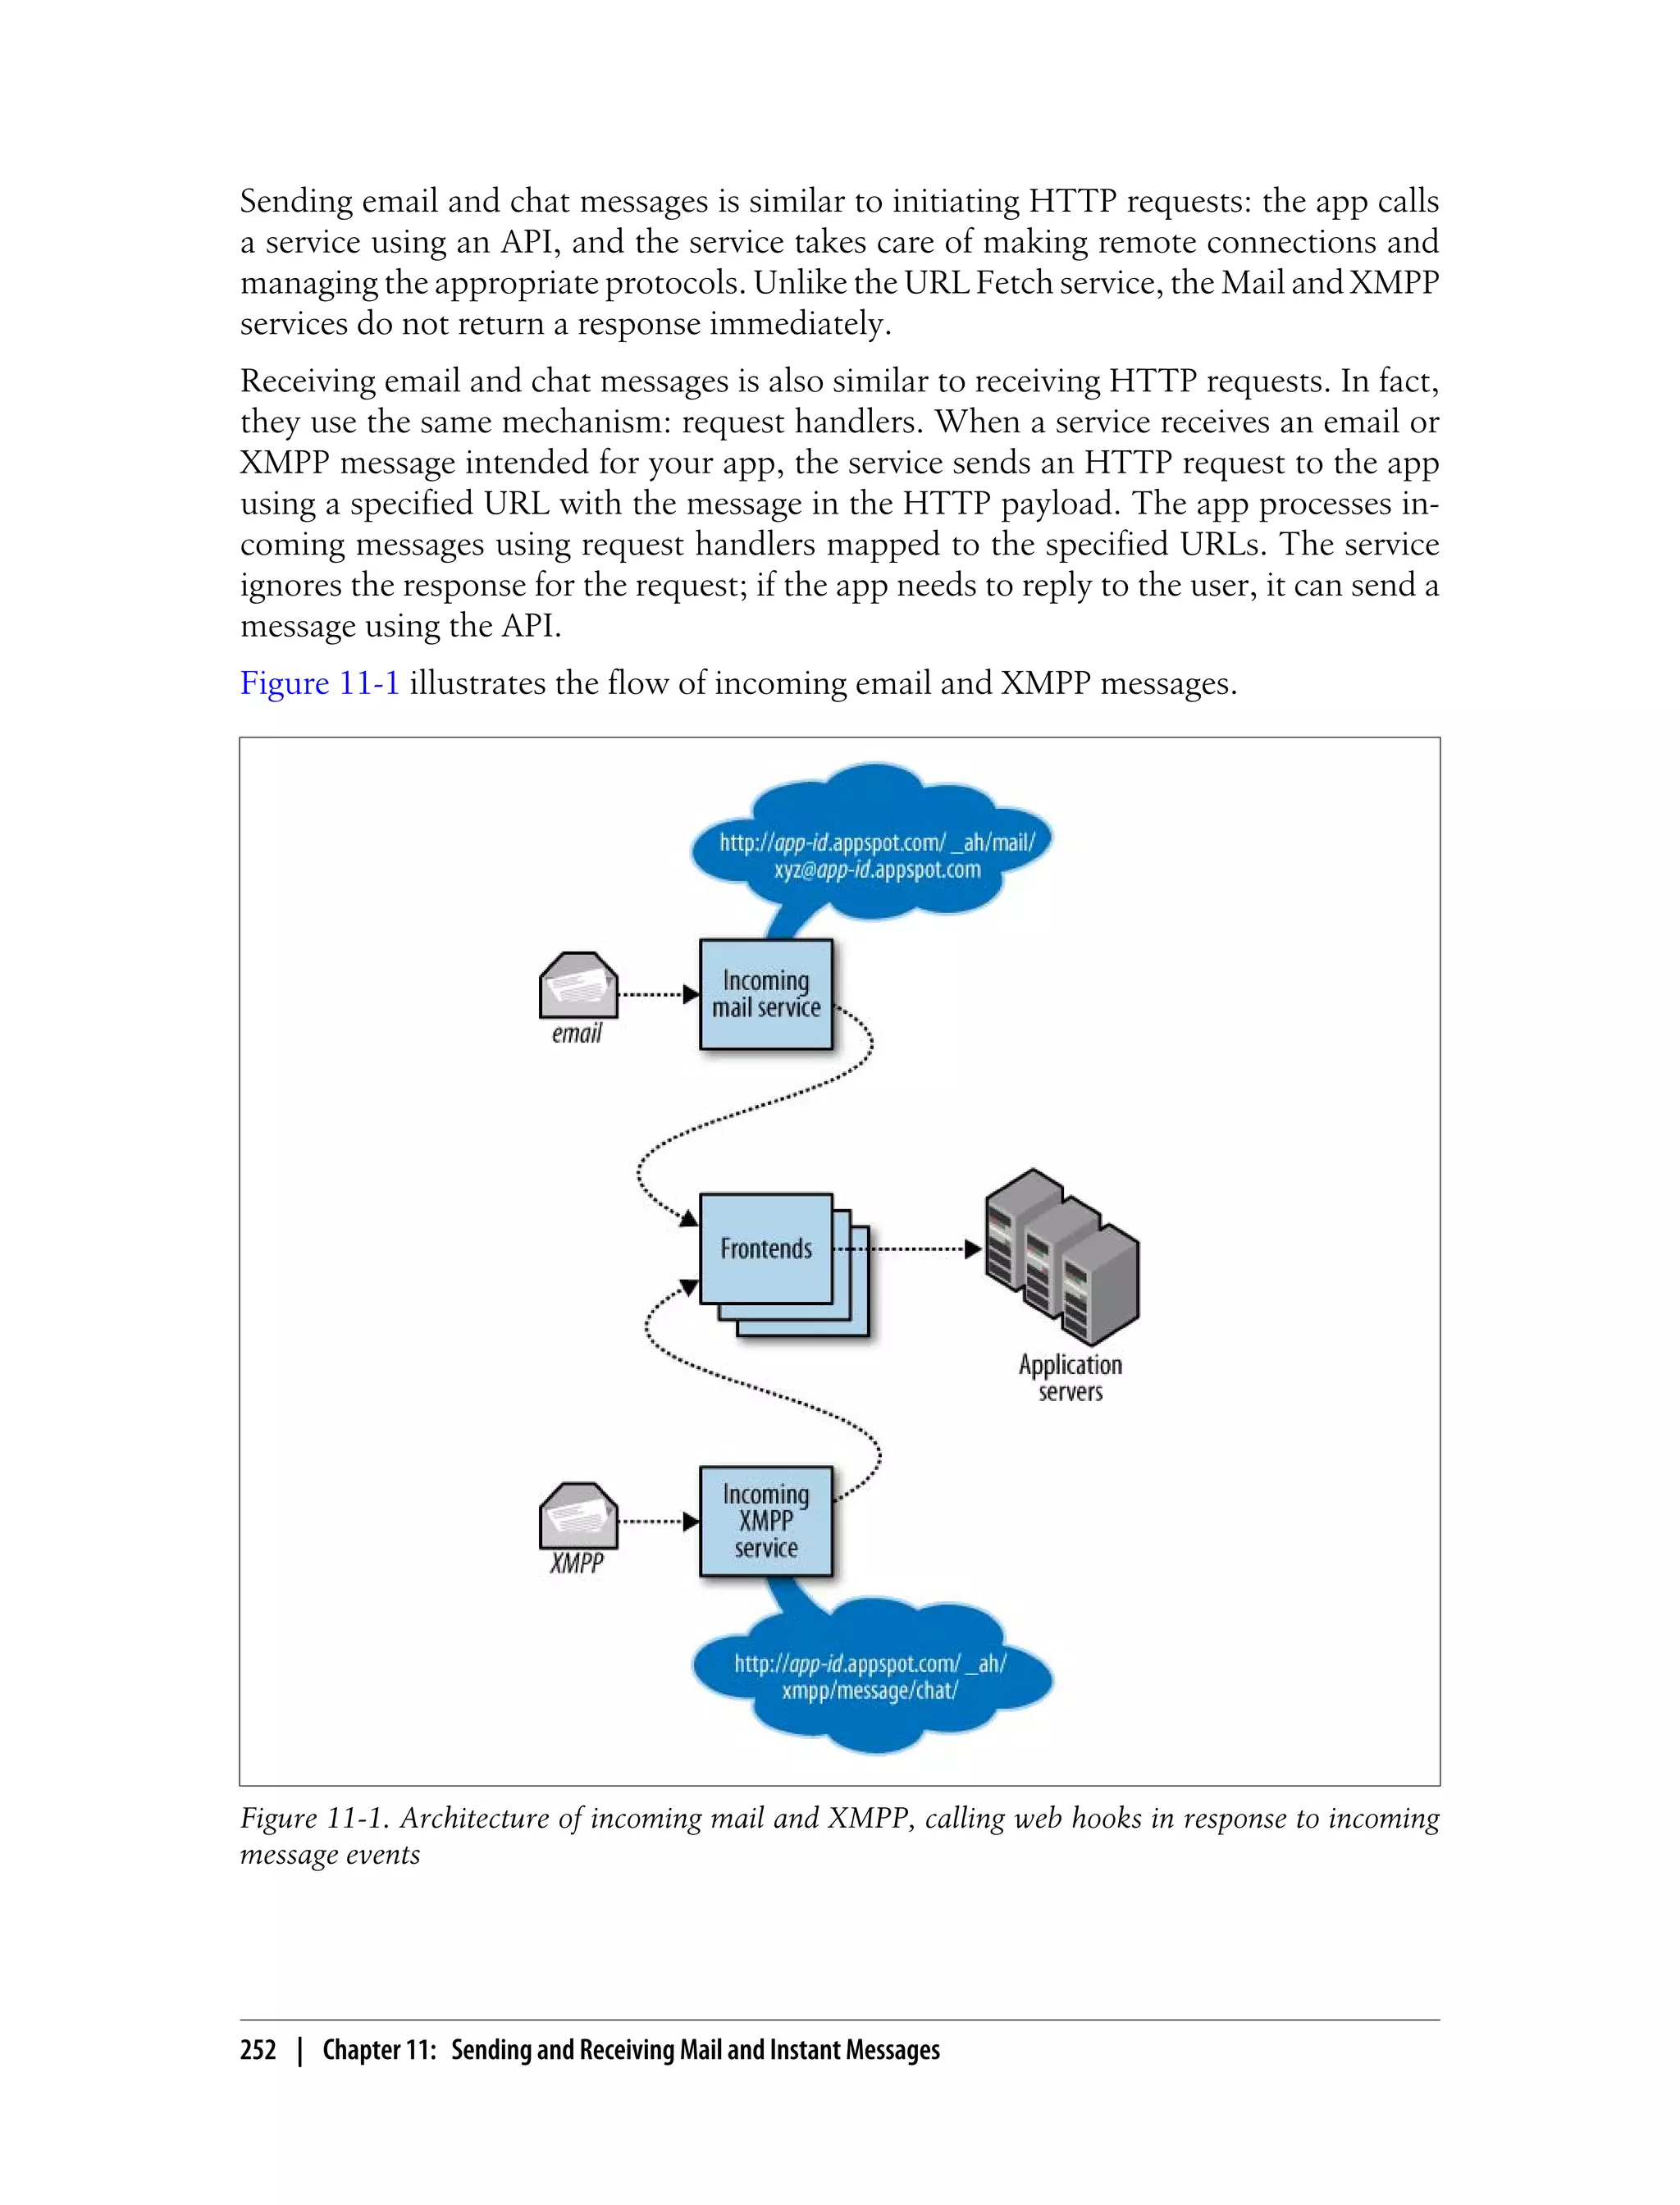


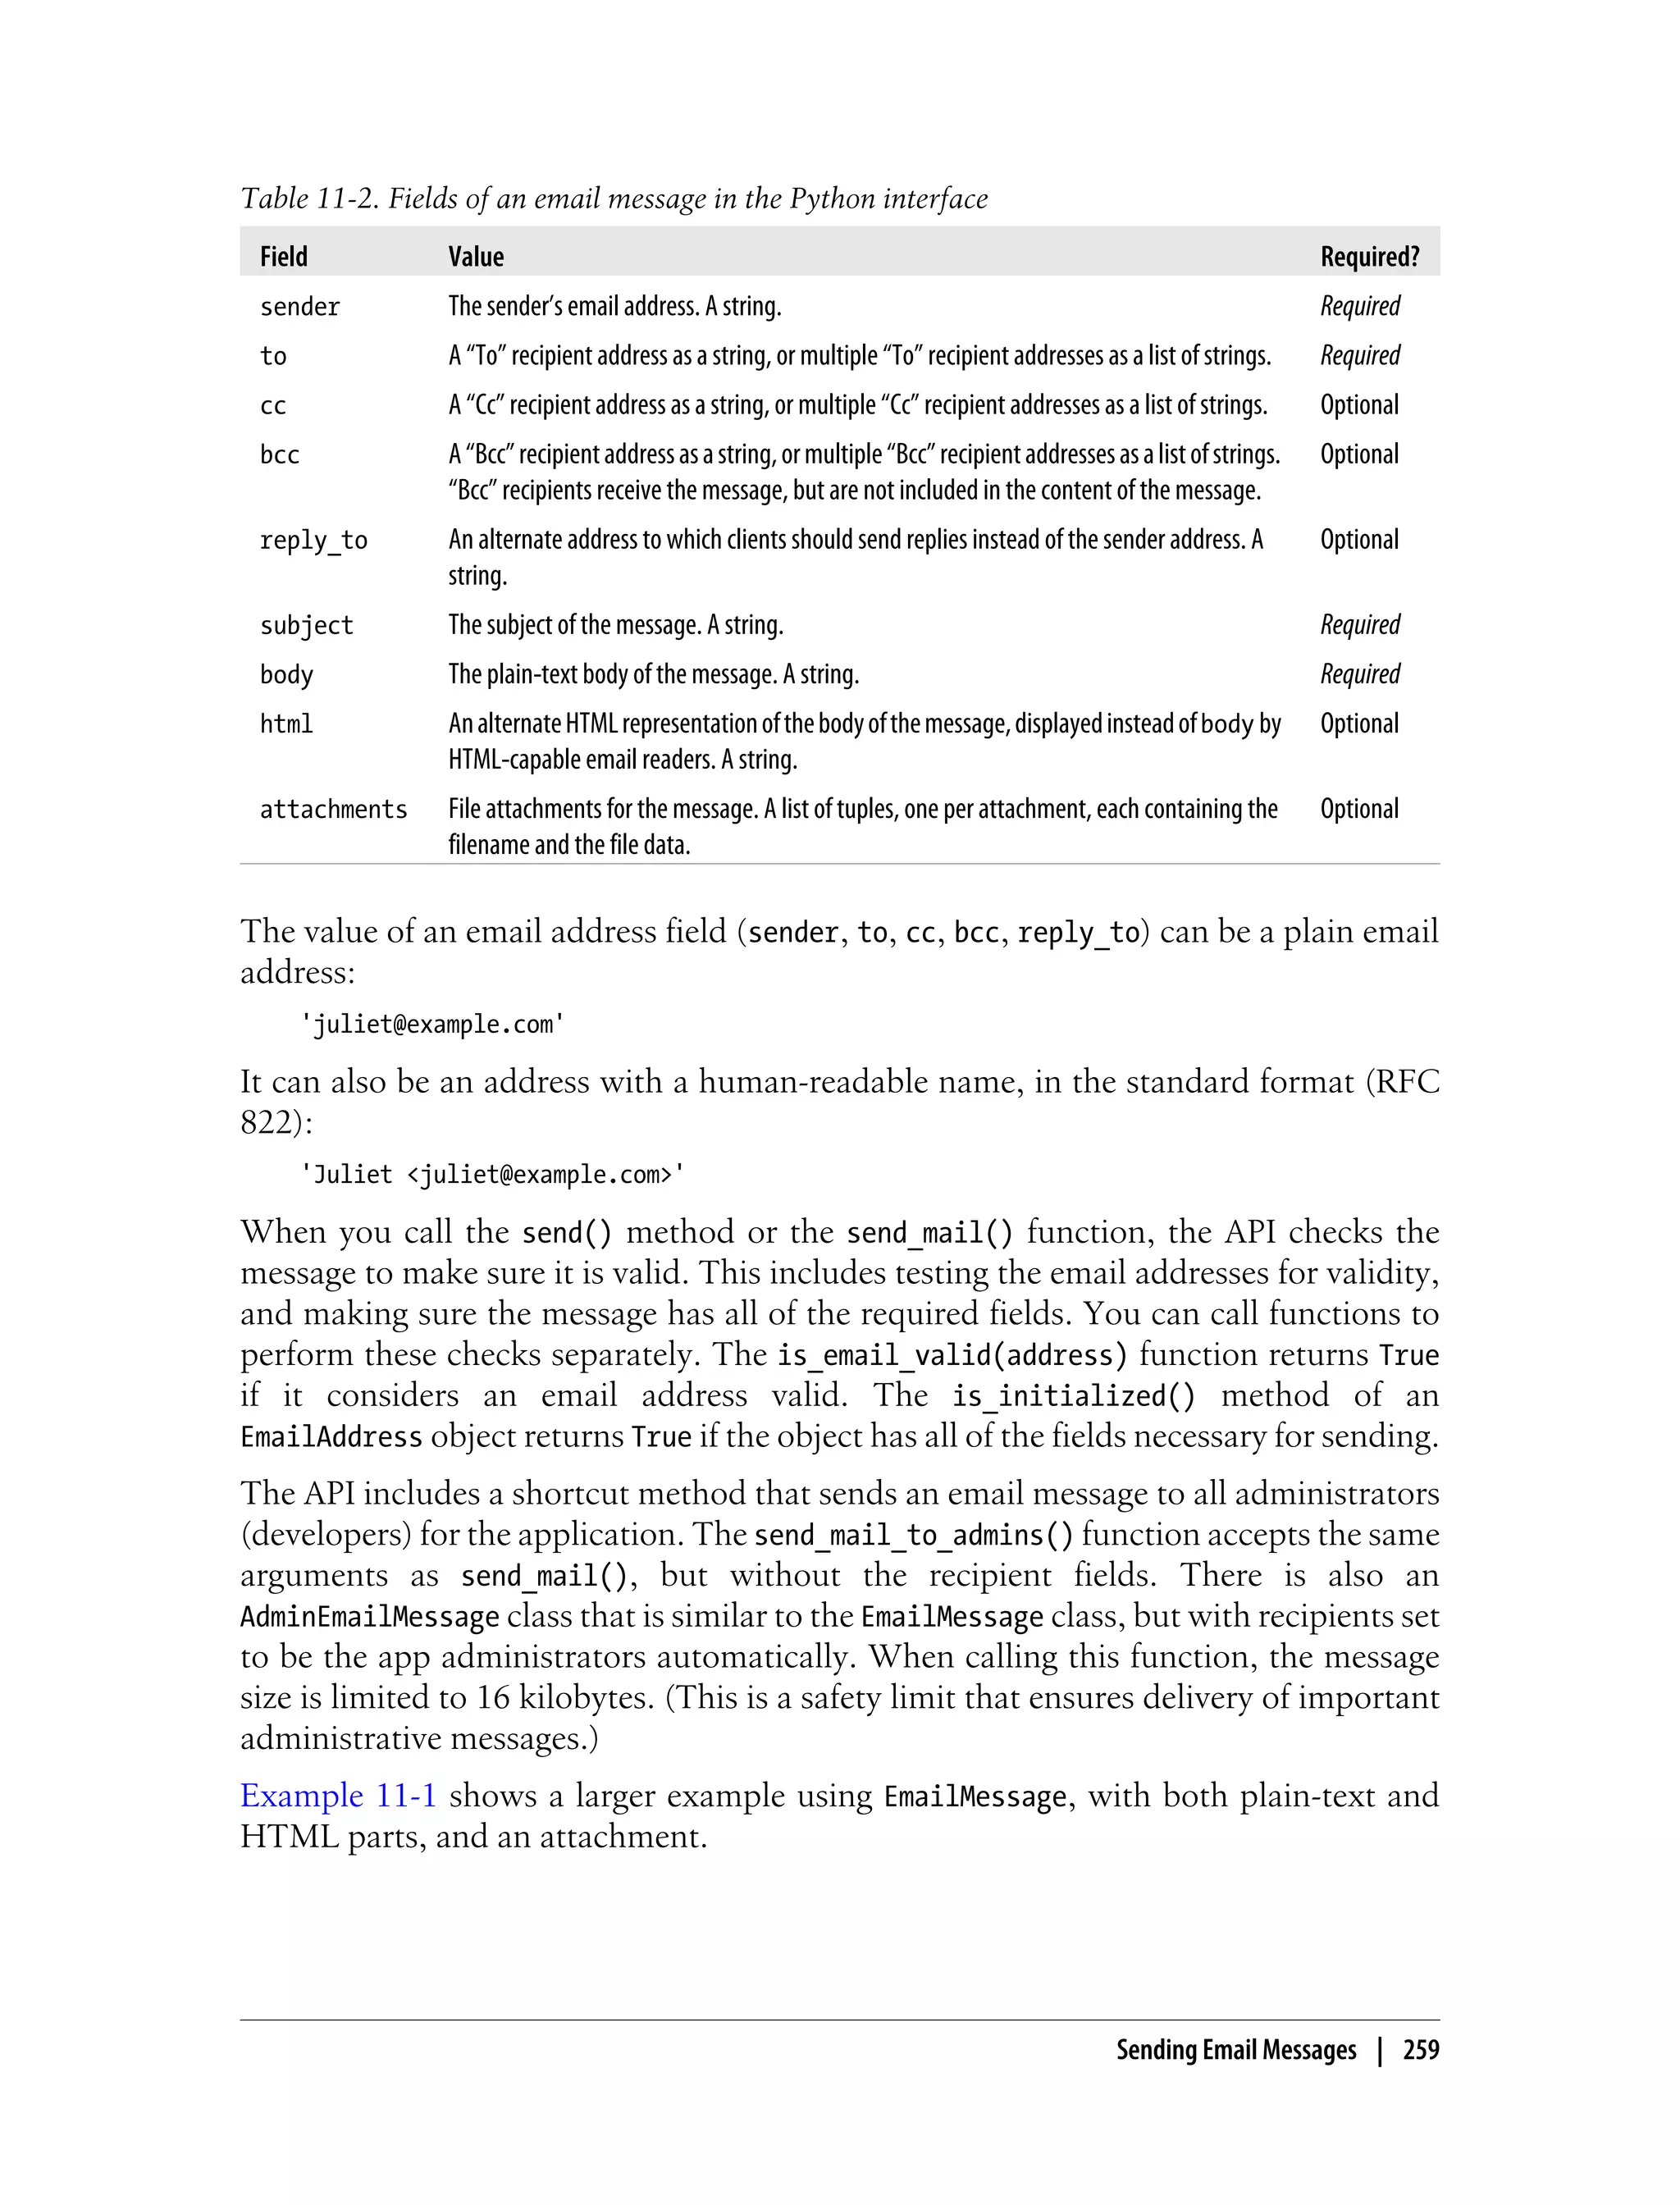
![Example 11-1. An example of sending an email message in Python, using several features
from google.appengine.api import mail
def send_registration_key(user_addr, software_key_data):
message_body = '''
Thank you for purchasing The Example App, the best
example on the market! Your registration key is attached
to this email.
To install your key, download the attachment, then select
"Register..." from the Help menu. Select the key file, then
click "Register".
You can download the app at any time from:
http://www.example.com/downloads/
Thanks again!
The Example Team
'''
html_message_body = '''
<p>Thank you for purchasing The Example App, the best
example on the market! Your registration key is attached
to this email.</p>
<p>To install your key, download the attachment, then select
<b>Register...</b> from the <b>Help</b> menu. Select the key file, then
click <b>Register</b>.</p>
<p>You can download the app at any time from:</p>
<p>
<a href="http://www.example.com/downloads/">
http://www.example.com/downloads/
</a>
</p>
<p>Thanks again!</p>
<p>The Example Team<br />
<img src="http://www.example.com/images/logo_email.gif" /></p>
'''
message = mail.EmailMessage(
sender='The Example Team <admin@example.com>',
to=user_addr,
subject='Your Example Registration Key',
body=message_body,
html=html_message_body,
attachments=[('example_key.txt', software_key_data)])
message.send()
260 | Chapter 11: Sending and Receiving Mail and Instant Messages](https://image.slidesharecdn.com/programminggoogleappengine-100608200404-phpapp01/75/Programming-google-app-engine-281-2048.jpg)

![// There was an error contacting the Mail service.
// ...
}
As shown here, you call methods on the MimeMessage to set fields and to add recipients
and content. The simplest message has a sender (setFrom()), one “To” recipient
(addRecipient()), a subject (setSubject()), and a plain-text message body (setText()).
The setFrom() method takes an InternetAddress. You can create an InternetAddress
with just the email address (a String) or the address and a human-readable name as
arguments to the constructor. The email address of the sender must meet the require-
ments described earlier. You can use any string for the human-readable name.
The addRecipient() method takes a recipient type and an InternetAddress. The
allowed recipient types are Message.RecipientType.TO (“To,” a primary recipient),
Message.RecipientType.CC (“Cc” or “carbon-copy,” a secondary recipient), and
Message.RecipientType.BCC (“Bcc” or “blind carbon-copy,” where the recipient is sent
the message but the address does not appear in the message content). You can call
addRecipient() multiple times to add multiple recipients of any type.
The setText() method sets the plain-text body for the message. To include an
HTML version of the message body for mail readers that support HTML, you create a
MimeMultipart object, then create a MimeBodyPart for the plain-text body and another
for the HTML body and add them to the MimeMultipart. You then make the
MimeMultipart the content of the MimeMessage:
import javax.mail.Multipart;
import javax.mail.internet.MimeBodyPart;
import javax.mail.internet.MimeMultipart;
// ...
String textBody = "...text...";
String htmlBody = "...HTML...";
Multipart multipart = new MimeMultipart();
MimeBodyPart textPart = new MimeBodyPart();
textPart.setContent(textBody, "text/plain");
multipart.addBodyPart(htmlPart);
MimeBodyPart htmlPart = new MimeBodyPart();
htmlPart.setContent(htmlBody, "text/html");
multipart.addBodyPart(htmlPart);
message.setContent(multipart);
You attach files to the email message in a similar way:
Multipart multipart = new MimeMultipart();
// ...
byte[] fileData = getBrochureData();
String fileName = "brochure.pdf";
262 | Chapter 11: Sending and Receiving Mail and Instant Messages](https://image.slidesharecdn.com/programminggoogleappengine-100608200404-phpapp01/75/Programming-google-app-engine-283-2048.jpg)
![The development server console (http://localhost:8080/_ah/admin/) includes a fea-
ture for simulating incoming email by submitting a web form. The development server
cannot receive actual email messages.
If the app has the incoming mail service enabled but does not have a
request handler for the appropriate URL, or if the request handler re-
turns an HTTP response code other than 200 for the request, the mes-
sage gets “bounced” and the sender receives an error email message.
Receiving Email in Python
To receive email in Python, you map the incoming email URL path to a script handler
in app.yaml file:
handlers:
- url: /_ah/mail/.+
script: handle_email.py
The app address used for the message is included in the URL path, so you can set up
separate handlers for different addresses directly in the configuration:
handlers:
- url: /_ah/mail/support%40.*app-id.appspotmail.com
script: support_contact.py
- url: /_ah/mail/.+
script: handle_email.py
Email addresses are URL-encoded in the final URL, so this pattern uses %40 to represent
an @ symbol. Also notice you must include a .* before the application ID when using
this technique, so the pattern works for messages sent to version-specific addresses
(such as support@dev.latest.app-id.appspotmail.com).
The Python SDK includes a class for parsing the POST content into a convenient object,
called InboundEmailMessage (in the google.appengine.api.mail package). It takes the
multipart MIME data (the POST body) as an argument to its constructor. Here’s an
example using the webapp framework:
from google.appengine.api import mail
from google.appengine.ext import webapp
from google.appengine.ext.webapp.util import run_wsgi_app
class IncomingMailHandler(webapp.RequestHandler):
def post(self):
message = mail.InboundEmailMessage(self.request.body)
# sender = message.sender
# recipients = message.to
# body = list(message.bodies(content_type='text/plain'))[0]
# ...
application = webapp.WSGIApplication([('/_ah/mail/.+', IncomingMailHandler)],
debug=True)
264 | Chapter 11: Sending and Receiving Mail and Instant Messages](https://image.slidesharecdn.com/programminggoogleappengine-100608200404-phpapp01/75/Programming-google-app-engine-285-2048.jpg)
![def main():
run_wsgi_app(application)
if __name__ == '__main__':
main()
The InboundEmailMessage object includes attributes for the fields of the message, similar
to EmailMessage. sender is the sender’s email address, possibly with a displayable name
in the standard format (Mr. Sender <sender@example.com>). to is a list of primary
recipient addresses, and cc is a list of secondary recipients. (There is no bcc on an
incoming message, because blind-carbon-copied recipients are not included in the
message content.) subject is the message’s subject.
The InboundEmailMessage object may have more than one message body: an HTML
body and a plain-text body. You can iterate over the MIME multipart parts of the types
text/html and text/plain using the bodies() method. Without arguments, this method
returns an iterator that returns the HTML parts first, then the plain-text parts. You can
limit the parts returned to just the HTML or plain-text parts by setting the
content_type parameter. For example, to get just the plain-text bodies:
for text_body in message.bodies(content_type='text/plain'):
# ...
In the example earlier, we extracted the first plain-text body by passing the iterator to
the list() type, then indexing its first argument (which assumes one exists):
text = list(message.bodies(content_type='text/plain'))[0]
If the incoming message has file attachments, then these are accessible on the
attachments attribute. As with using EmailMessage for sending, this attribute is a list of
tuples whose first element is the filename and whose second element is the data byte
string. InboundEmailMessage allows all file types for incoming attachments, and does
not require that the filename accurately represent the file type. Be careful when using
files sent to the app by users, since they may not be what they say they are, and have
not been scanned for viruses.
The Python SDK includes a convenient webapp handler base class
for processing incoming email, called InboundMailHandler in the
google.appengine.ext.webapp.mail_handlers package. You use the handler by creating
a subclass that overrides the receive() method, then installing it like any other handler.
When the handler receives an email message, the receive() method is called with an
InboundEmailMessage object as its argument.
from google.appengine.ext.webapp import mail_handlers
class MyMailHandler(mail_handlers.InboundMailHandler):
def receive(self, message):
# ...
application = webapp.WSGIApplication([('/_ah/mail/.+', MyMailHandler)],
Receiving Email Messages | 265](https://image.slidesharecdn.com/programminggoogleappengine-100608200404-phpapp01/75/Programming-google-app-engine-286-2048.jpg)


![The body content of the HTTP POST request is a MIME multipart message, with a
part for each field of the message:
from
The sender’s JID.
to
The app JID to which this message was sent.
body
The message body content (with characters as they were originally typed).
stanza
The full XML stanza of the message, including the previous fields (with XML spe-
cial characters escaped); useful for communicating with a custom client using
XML.
The Python and Java SDKs include classes for parsing the request data into objects.
When the service is enabled, all incoming messages are accepted and routed to the app.
All incoming chat invitations are accepted automatically. The app always appears as
connected and available when someone inquires for the app’s presence.
The development server console (http://localhost:8080/_ah/admin/) includes a fea-
ture for simulating incoming XMPP messages by submitting a web form. The devel-
opment server cannot receive actual XMPP messages.
Receiving XMPP Messages in Python
In Python, you map the URL path to a script handler in app.yaml file, as usual:
handlers:
- url: /_ah/xmpp/message/chat/
script: handle_xmpp.py
You can parse the incoming message into a Message object by passing a mapping of the
POST parameters to its constructor. With the webapp framework, this is a simple
matter of passing the parsed POST data (a mapping of the POST parameter names to
values) in directly:
from google.appengine.api import xmpp
from google.appengine.ext import webapp
from google.appengine.ext.webapp.util import run_wsgi_app
class IncomingXMPPHandler(webapp.RequestHandler):
def post(self):
message = xmpp.Message(self.request.POST)
message.reply('I got your message!')
application = webapp.WSGIApplication([('/_ah/xmpp/message/chat/',
IncomingXMPPHandler)],
debug=True)
Receiving XMPP Messages | 273](https://image.slidesharecdn.com/programminggoogleappengine-100608200404-phpapp01/75/Programming-google-app-engine-294-2048.jpg)
![def main():
run_wsgi_app(application)
if __name__ == '__main__':
main()
The Message object has attributes for each message field: from, to, and body. It also
includes a convenience method for replying to the message: reply(), which takes the
body of the reply as its first argument.
The Python SDK includes an extension for webapp that makes it easy to implement
chat interfaces that perform user-issued commands. Here’s an example that responds
to the commands /stats and /score username, and ignores all other messages:
from google.appengine.api import xmpp
from google.appengine.ext import webapp
from google.appengine.ext.webapp import xmpp_handlers
from google.appengine.ext.webapp.util import run_wsgi_app
def get_stats():
# ...
def get_score_for_user(username):
# ...
class UnknownUserError(Exception):
pass
class ScoreBotHandler(xmpp_handlers.CommandHandler):
def stats_command(self, message):
stats = get_stats()
if stats:
message.reply('The latest stats: %s' % stats)
else:
message.reply('Stats are not available right now.')
def score_command(self, message):
try:
score = get_score_for_user(message.arg)
message.reply('Score for user %s: %d' % (message.arg, score))
except UnknownUserError, e:
message.reply('Unknown user %s' % message.arg)
application = webapp.WSGIApplication([('/_ah/xmpp/message/chat/', ScoreBotHandler)],
debug=True)
def main():
run_wsgi_app(application)
if __name__ == '__main__':
main()
274 | Chapter 11: Sending and Receiving Mail and Instant Messages](https://image.slidesharecdn.com/programminggoogleappengine-100608200404-phpapp01/75/Programming-google-app-engine-295-2048.jpg)

![public class XMPPReceiverServlet extends HttpServlet {
public void doPost(HttpServletRequest req,
HttpServletResponse resp)
throws IOException {
XMPPService xmpp = XMPPServiceFactory.getXMPPService();
Message message = xmpp.parseMessage(req);
// ...
}
}
You access the fields of a Message using methods:
getFromJid()
The sender JID.
getMessageType()
The MessageType of the message (MessageType.CHAT or MessageType.NORMAL).
getRecipientJids()
The app JID used, as a single-element JID[].
getBody()
The String content of the message.
getStanza()
The String raw XML of the message.
276 | Chapter 11: Sending and Receiving Mail and Instant Messages](https://image.slidesharecdn.com/programminggoogleappengine-100608200404-phpapp01/75/Programming-google-app-engine-297-2048.jpg)
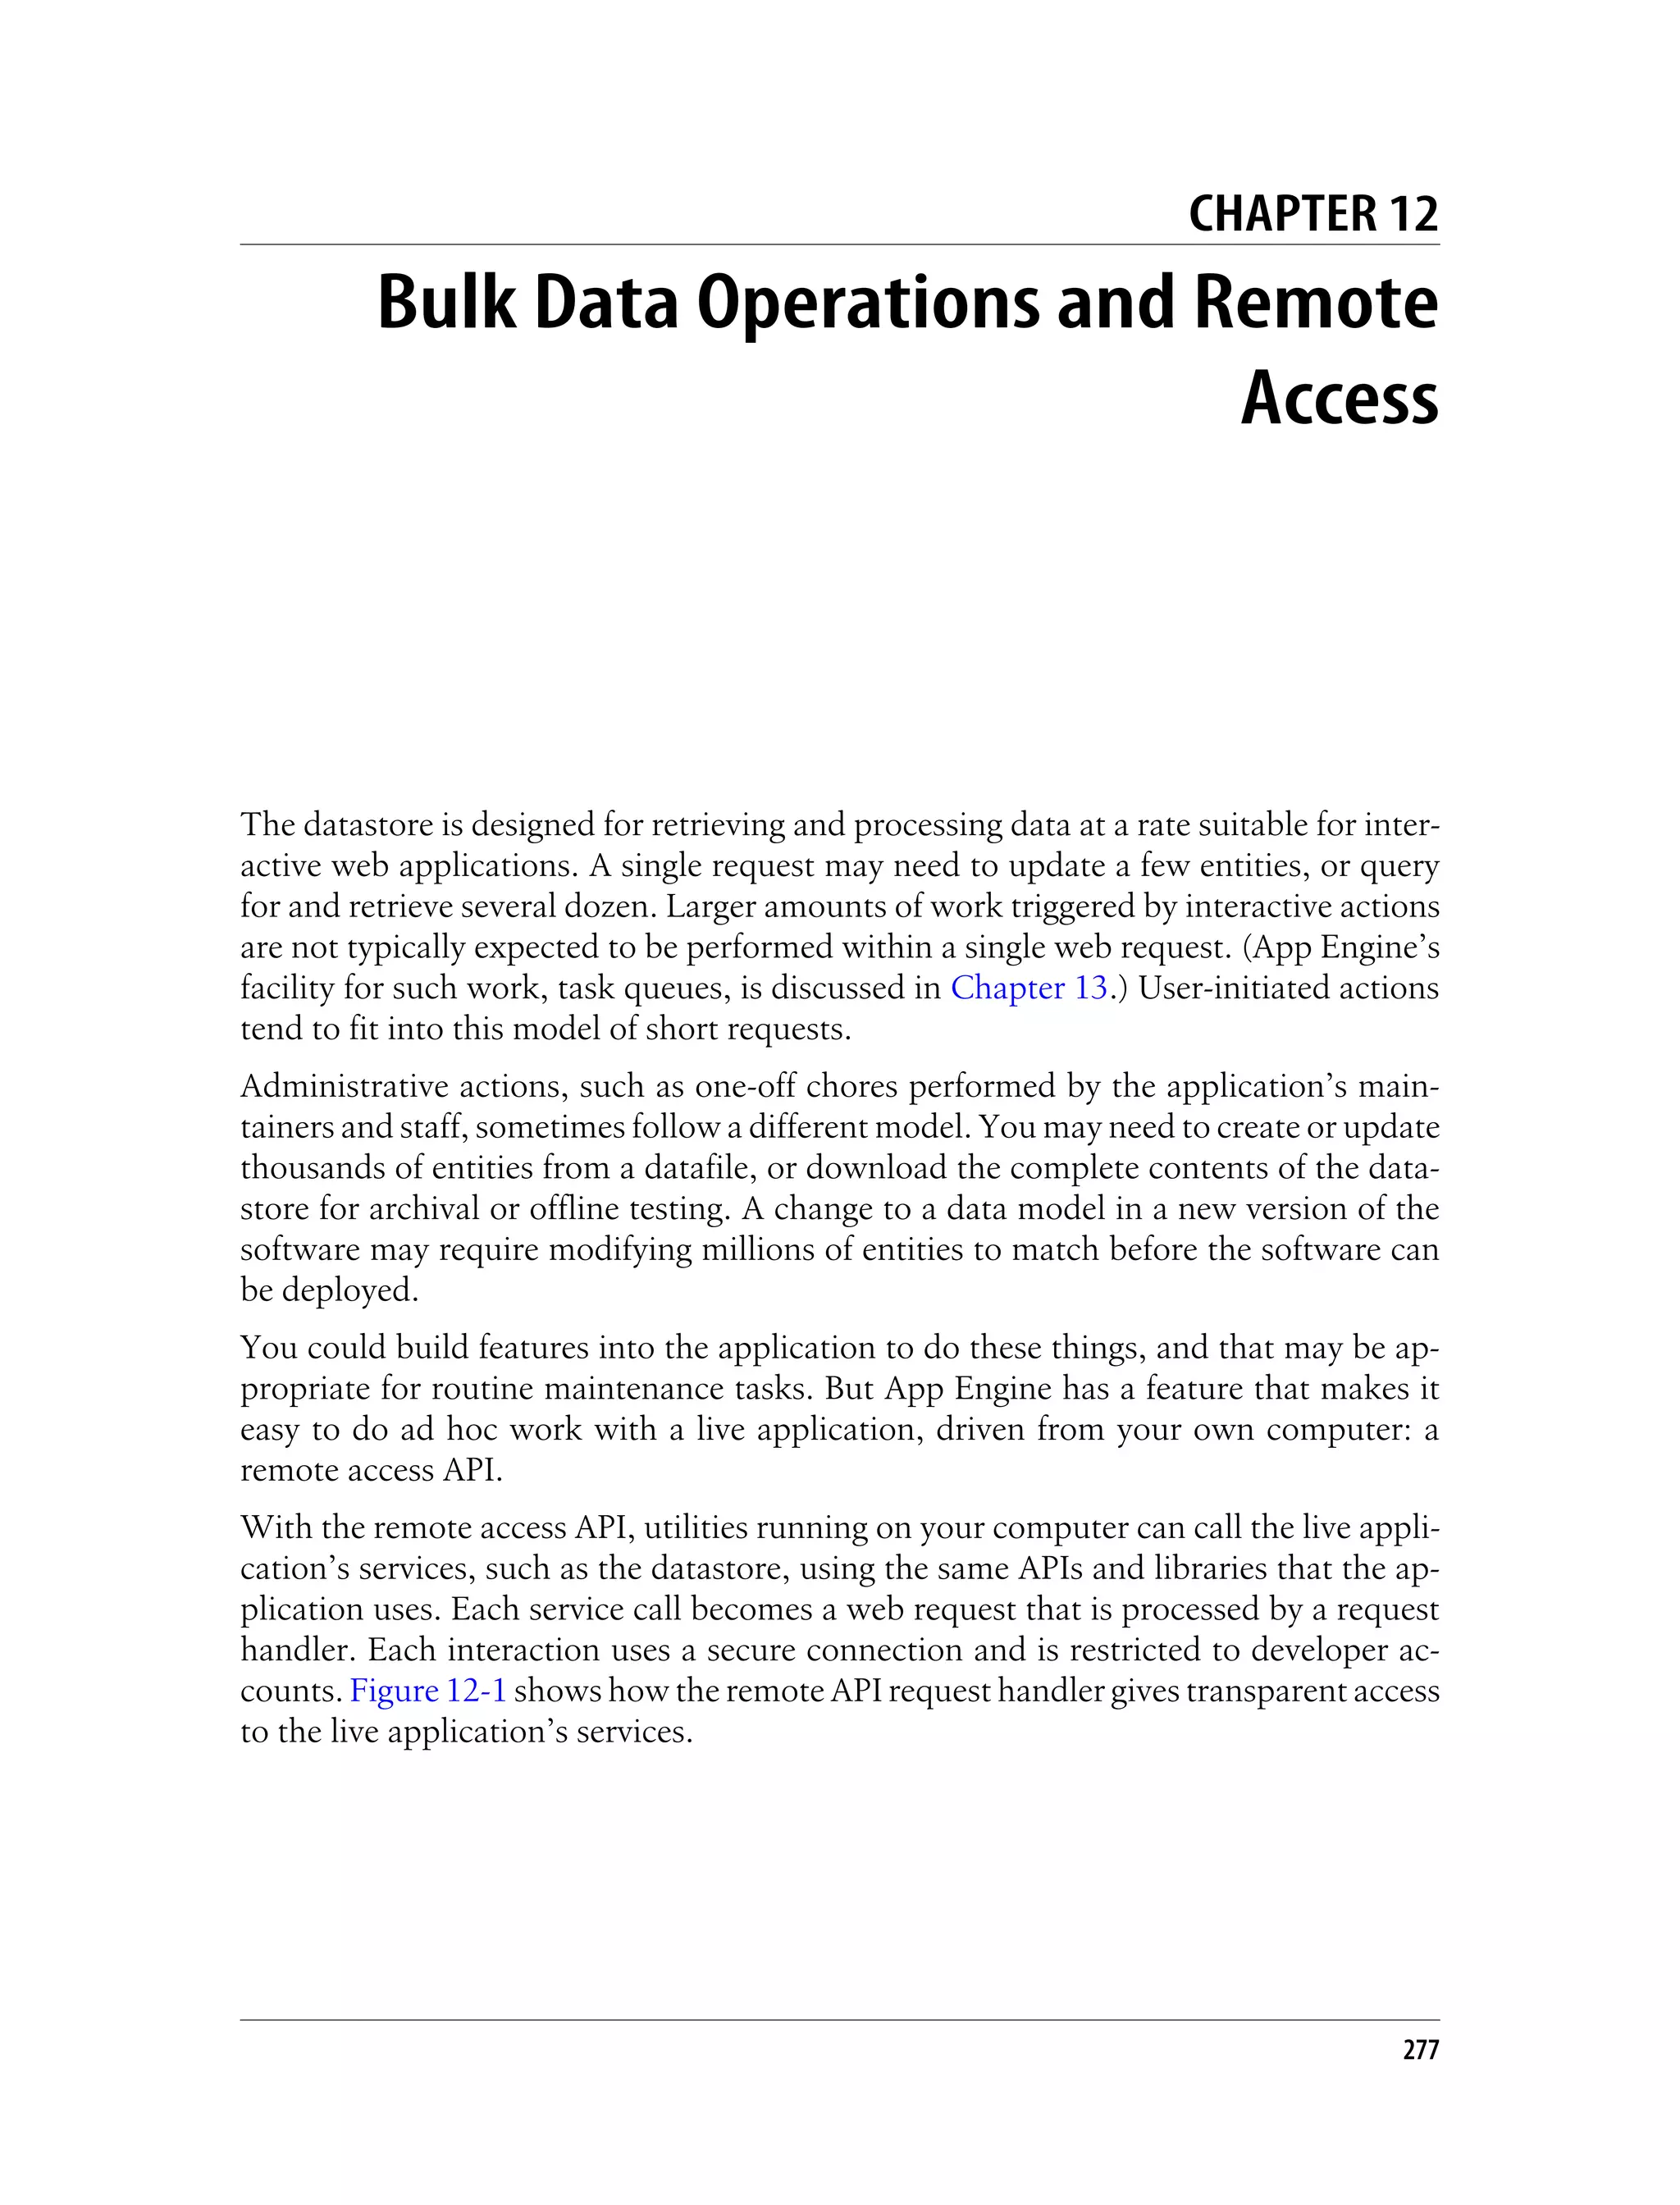
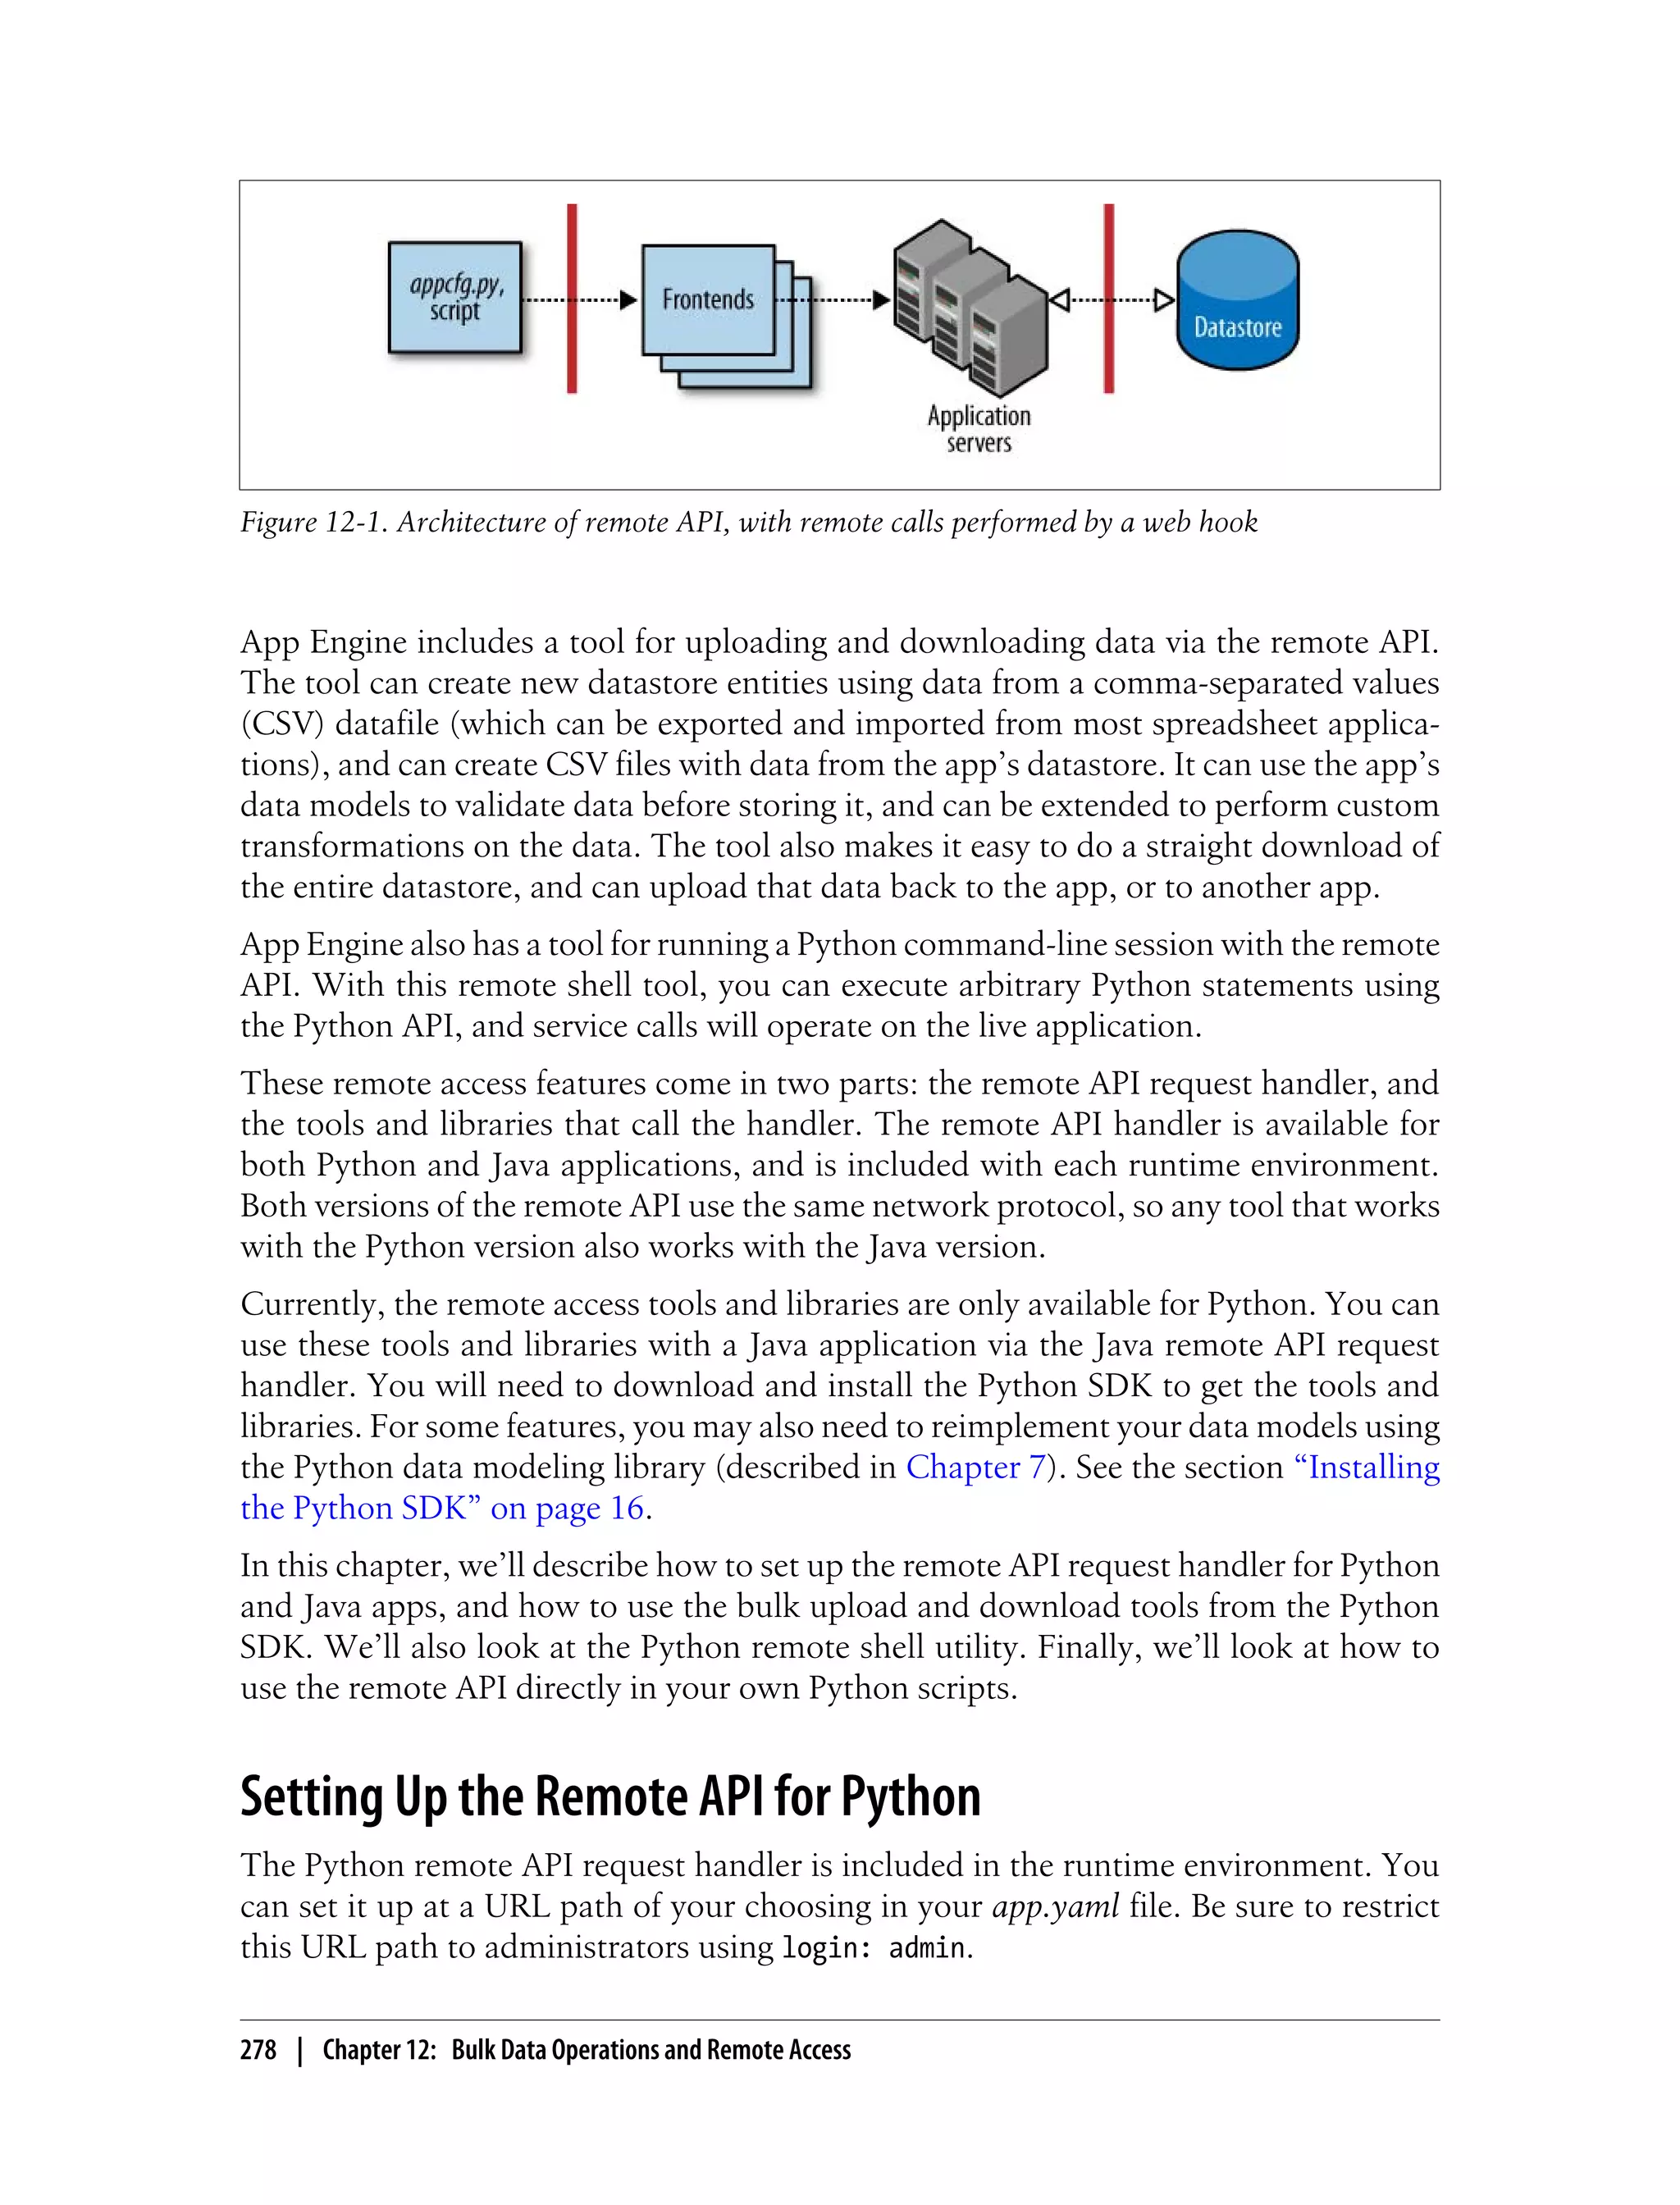

![the sqlite3 module installed by starting a Python shell and importing it. If nothing
happens, the module is installed:
% python
Python 2.6.1 (r261:67515, Jul 7 2009, 23:51:51)
[GCC 4.2.1 (Apple Inc. build 5646)] on darwin
Type "help", "copyright", "credits" or "license" for more information.
>>> import sqlite3
>>>
If you do not have the module, you can get it from the SQLite website. Note that if you
compiled your Python installation from source, you will need to recompile it with
SQLite support.
http://www.sqlite.org/download.html
If you’d prefer not to install SQLite, you can disable the use of the progress datafile in
the bulk loader tool by providing this command-line argument when running the tool:
--db_filename=skip.
Backup and Restore
One of the easiest features of the bulk loader to use is the backup and restore feature.
The bulk loader can download every entity of a given kind to a datafile, and can upload
that datafile back to the app to restore those entities. It can also upload the datafile to
another app, effectively moving all of the entities of a kind from one app to another.
You can also use these features to download data from the live app, and “upload” it to
the development server for testing (using the --url=... argument mentioned earlier).
These features require no additional configuration or code beyond the installation of
the remote API handler.
To download every entity of a given kind, run the bulkloader.py tool with the --dump,
--kind=..., and --filename=... arguments:
bulkloader.py --dump
--app_id=app-id
--url=http://app-id.appspot.com/remote_api
--kind=kind
--filename=backup.dat
(This is a single command line. The characters are line continuation markers, sup-
ported by some command shells. You can remove these characters and type all of the
arguments on one line.)
To upload a datafile created by --dump, thereby re-creating every entity in the file, use
the --restore argument instead of --dump:
bulkloader.py --restore
--app_id=app-id
--url=http://app-id.appspot.com/remote_api
--kind=kind
--filename=backup.dat
Using the Bulk Loader Tool | 281](https://image.slidesharecdn.com/programminggoogleappengine-100608200404-phpapp01/75/Programming-google-app-engine-302-2048.jpg)

![return datetime.datetime.strptime(s, '%m/%d/%Y').date()
else:
return None
class BookLoader(bulkloader.Loader):
def __init__(self):
bulkloader.Loader.__init__(self, 'Book',
[('title', str),
('author', str),
('copyright_year', int),
('author_birthdate', get_date_from_str),
])
loaders = [BookLoader]
The loader definition file must do several things:
1. It must import or define a data model class for each kind to import, using the
Python data modeling API. The loader file does not have the app directory in the
module load path, so the loader file must add it. The modules should be imported
directly into the local namespace.
2. It must define (or import) a loader class for each kind to import, a subclass of the
Loader class in the package google.appengine.tools.bulkloader. This class must
have a constructor (an __init__() method) that calls the parent class’s constructor
with arguments that describe the CSV file’s columns.
3. It must define a module-global variable named loaders, whose value is a list of
loader classes.
The loader class’s __init__() method calls its parent class’s __init__() method with
three arguments: self (the object being initialized), the kind of the entity to create as
a string, and a list of tuples. Each tuple represents a column from the CSV file, in order
from left to right. The first element of each tuple is the property name to use. The second
element is a Python function that takes the CSV file value as a string and returns the
desired datastore value in the appropriate Python value type. (Refer to Table 4-1 for a
list of the Python value types for the datastore.)
For simple data types, you can use the constructor for the type as the type conversion
function. In the example above, we use str to leave the value from the CSV file as a
string, and int to parse the CSV string value as an integer. Depending on the output of
your spreadsheet program, you can use this technique for long, float, db.Text, and
other types whose constructors accept strings as initial arguments. For instance,
users.User takes an email address as a string argument.
The bool type constructor returns False for the empty string, and True in all other cases.
If your CSV file contains Boolean values in other forms, you’ll need to write a converter
function, like this:
def bool_from_string(s):
return s == 'TRUE'
Using the Bulk Loader Tool | 283](https://image.slidesharecdn.com/programminggoogleappengine-100608200404-phpapp01/75/Programming-google-app-engine-304-2048.jpg)
![Dates, times, and date-times usually require a custom converter function to make an
appropriate datetime.datetime value from the string. As shown previously, you can use
the datetime.datetime.strptime() function to parse the string in a particular format.
Tailor this to the output of your spreadsheet program.
To create a multivalued property, you can use a type conversion function that returns
a list value. However, the function must get all of its data from a single cell (though you
can work around this by tweaking the file reader routine, described below). It cannot
reference other cells in the row, or other rows in the table.
Storing a key value (a reference to another entity) is usually a straightforward matter
of defining a type conversion function that uses db.Key.from_path() with the desired
kind and a key name derived from a CSV file value.
By default, the bulk loader creates each entity using a key with no ancestors, the given
kind, and a system-assigned numeric ID. You can tell the bulk loader to use a custom
key name instead of a numeric ID by defining a method of your loader class named
generate_key(). This method takes as arguments a loop counter (i) and the row’s col-
umn values as a list of strings (values), and returns either a string key name or a
db.Key object. The db.Key object can include an entity group parent key. If the function
returns None, a system-assigned numeric ID will be used.
class BookLoader(bulkloader.Loader):
# ...
def generate_key(self, i, values):
# Use the first column as the key name.
return values[0]
If an entity is uploaded with the same key as an entity that already exists
in the datastore, the new entity will replace the existing entity. You can
use this effect to download, modify, then reupload data to update ex-
isting entities instead of creating new ones.
You can “skip” an unused column in the CSV file by giving it a property name that
begins with an underscore. The Python data modeling API does not save attributes
beginning with an underscore as properties, so the final entity will not have a property
with this name. You can reuse the same dummy property name for all columns you
wish to skip:
class BookLoader(bulkloader.Loader):
def __init__(self):
bulkloader.Loader.__init__(self, 'Book',
[('_UNUSED', lambda x: None),
('title', str),
('author', str),
('_UNUSED', lambda x: None),
('_UNUSED', lambda x: None),
('copyright_year', int),
284 | Chapter 12: Bulk Data Operations and Remote Access](https://image.slidesharecdn.com/programminggoogleappengine-100608200404-phpapp01/75/Programming-google-app-engine-305-2048.jpg)
![# ...
])
If you have a column that is to be the entity key name (via generate_key()) and you do
not want this value to also become a property, you must “skip” the column in the
column list using this technique. The bulk loader will complain if it finds more columns
than are declared in the list.
The bulk loader uses the Python data modeling API to construct, validate, and save
entities. If your app is written in Python, you just use the model classes of your app for
this purpose, and get the validation for free.
If your app is written in Java, you have a choice to make. You can either implement
Python data model classes that resemble your application’s data model, or you can
define Python data models that allow arbitrary properties to be set by the loader without
validation. For information on defining data models in Python, see Chapter 7. To define
a model class that allows all properties and does no validation, simply define a class
like the following for each kind in the loader file, above the definition of the loader
classes:
from google.appengine.ext import db
class Book(db.Expando):
pass
The loader class can do postprocessing on an entity after it is created but before it is
saved to the datastore. This gives you the opportunity to inspect the entity, add or
remove properties, and even create additional entities based on each row of the datafile.
To perform postprocessing, implement a method named handle_entity() on the loader
class. This takes an instance of the model class as its only argument (entity). It should
return the instance to create, a list of model instances if more than one entity should
be created, or None if no entity should be created.
You can extend the loader class to read file formats other than CSV files. To do
this, you override the generate_records() method. This method takes a filename
(filename), and returns a Python generator. Each iteration of the generator should yield
a list of strings for each entity to create, where each string corresponds to a property
defined in the loader’s constructor. You can use a generate_records() routine to mas-
sage the columns processed by the loader so that all the information needed for a single
property appears in the column’s value, such as to assemble what will eventually be-
come a multivalued property from multiple columns in the datafile.
You can override the initialize() method of the loader to perform actions at the be-
ginning of an upload. This method takes the input file’s name (filename) and a string
given on the command line as the --loader_opts=... argument (loader_opts), which
you can use to pass options to this method. Similarly, you can override the
finalize() method to do something after the upload is complete.
Using the Bulk Loader Tool | 285](https://image.slidesharecdn.com/programminggoogleappengine-100608200404-phpapp01/75/Programming-google-app-engine-306-2048.jpg)
![specifies which property goes in which column of the resulting CSV file, and can include
value transformation functions to get the entity data into a format accepted by your
spreadsheet program.
Here is a simple exporter definition file that is symmetric with the loader definition
example in the previous section. Data downloaded with this exporter can be loaded
back in with the loader. Let’s call this file exporters.py:
from google.appengine.tools import bulkloader
import datetime
# Import the app's data models directly into
# this namespace. We must add the app
# directory to the path explicitly.
import sys
import os.path
sys.path.append(
os.path.abspath(
os.path.dirname(
os.path.realpath(__file__))))
from models import *
def make_str_for_date(d):
if d:
return d.strftime('%m/%d/%Y')
else:
return ''
class BookExporter(bulkloader.Exporter):
def __init__(self):
bulkloader.Exporter.__init__(self, 'Book',
[('title', str, None),
('author', str, ''),
('copyright_year', int, ''),
('author_birthdate', make_str_for_date, ''),
])
exporters = [BookExporter]
The exporter definition file must do several things:
1. It must import or define a data model class for each kind to export, using the Python
data modeling API. The exporter file does not have the app directory in the module
load path, so the exporter file must add it. The modules should be imported directly
into the local namespace.
2. It must define (or import) an exporter class for each kind to export, a subclass of
the Exporter class in the package google.appengine.tools.bulkloader. This class
must have a constructor (an __init__() method) that calls the parent class’s con-
structor with arguments that describe the CSV file’s columns.
3. It must define a module-global variable named exporters, whose value is a list of
exporter classes.
Using the Bulk Loader Tool | 287](https://image.slidesharecdn.com/programminggoogleappengine-100608200404-phpapp01/75/Programming-google-app-engine-308-2048.jpg)


![Python 2.5.1 (r251:54863, Feb 6 2009, 19:02:12)
[GCC 4.0.1 (Apple Inc. build 5465)]
The db, users, urlfetch, and memcache modules are imported.
clock> import os.path
clock> import sys
clock> sys.path.append(os.path.realpath('.'))
clock> import models
clock> books = models.Book.all().fetch(6)
clock> books
[<models.Book object at 0x7a2c30>, <models.Book object at 0x7a2bf0>,
<models.Book object at 0x7a2cd0>, <models.Book object at 0x7a2cb0>,
<models.Book object at 0x7a2d30>, <models.Book object at 0x7a2c90>]
clock> books[0].title
u'The Grapes of Wrath'
clock> from google.appengine.api import mail
clock> mail.send_mail('juliet@example.com', 'test@example.com',
'Test email', 'This is a test message.')
clock>
To exit the shell, press Ctrl-D.
Using the Remote API from a Script
You can call the remote API directly from your own Python scripts using a library from
the Python SDK. This configures the Python API to use the remote API handler for your
application for all service calls, so you can use the service APIs as you would from a
request handler directly in your scripts.
Here’s a simple example script that prompts for a developer account email address and
password, then accesses the datastore of a live application:
#!/usr/bin/python
import getpass
import sys
# Add the Python SDK to the package path.
# Adjust these paths accordingly.
sys.path.append('~/google_appengine')
sys.path.append('~/google_appengine/lib/yaml/lib')
from google.appengine.ext.remote_api import remote_api_stub
from google.appengine.ext import db
import models
# Your app ID and remote API URL path go here.
APP-ID = 'app-id'
REMOTE_API_PATH = '/remote_api'
def auth_func():
email_address = raw_input('Email address: ')
password = getpass.getpass('Password: ')
Using the Remote API from a Script | 291](https://image.slidesharecdn.com/programminggoogleappengine-100608200404-phpapp01/75/Programming-google-app-engine-312-2048.jpg)
![return email_address, password
def initialize_remote_api(app-id=APP-ID,
path=REMOTE_API_PATH):
remote_api_stub.ConfigureRemoteApi(
app-id,
path,
auth_func)
remote_api_stub.MaybeInvokeAuthentication()
def main(args):
initialize_remote_api()
books = models.Book.all().fetch(10)
for book in books:
print book.title
return 0
if __name__ == '__main__':
sys.exit(main(sys.argv[1:]))
The ConfigureRemoteApi() function (yes, it has a TitleCase name) sets up the remote
API access. It takes as arguments the application ID, the remote API handler URL path,
and a callable that returns a tuple containing the email address and password to use
when connecting. In this example, we define a function that prompts for the email
address and password, and pass the function to ConfigureRemoteApi().
The function also accepts an optional fourth argument specifying an alternate domain
name for the connection. By default, it uses app-id.appspot.com, where app-id is the
application ID in the first argument.
The MaybeInvokeAuthentication() function sends an empty request to verify that the
email address and password are correct, and raises an exception if they are not. (With-
out this, the script would wait until the first remote call to verify the authentication.)
Remember that every call to an App Engine library that performs a service call does so
over the network via an HTTP request to the application. This is inevitably slower than
running within the live application. It also consumes application resources like web
requests do, including bandwidth and request counts, which are not normally con-
sumed by service calls in the live app.
On the plus side, since your code runs on your local computer, it is not constrained by
the App Engine runtime sandbox or the 30-second request deadline. You can run long
jobs and interactive applications on your computer without restriction, using any Py-
thon modules you like—at the expense of consuming app resources to marshal service
calls over HTTP.
292 | Chapter 12: Bulk Data Operations and Remote Access](https://image.slidesharecdn.com/programminggoogleappengine-100608200404-phpapp01/75/Programming-google-app-engine-313-2048.jpg)
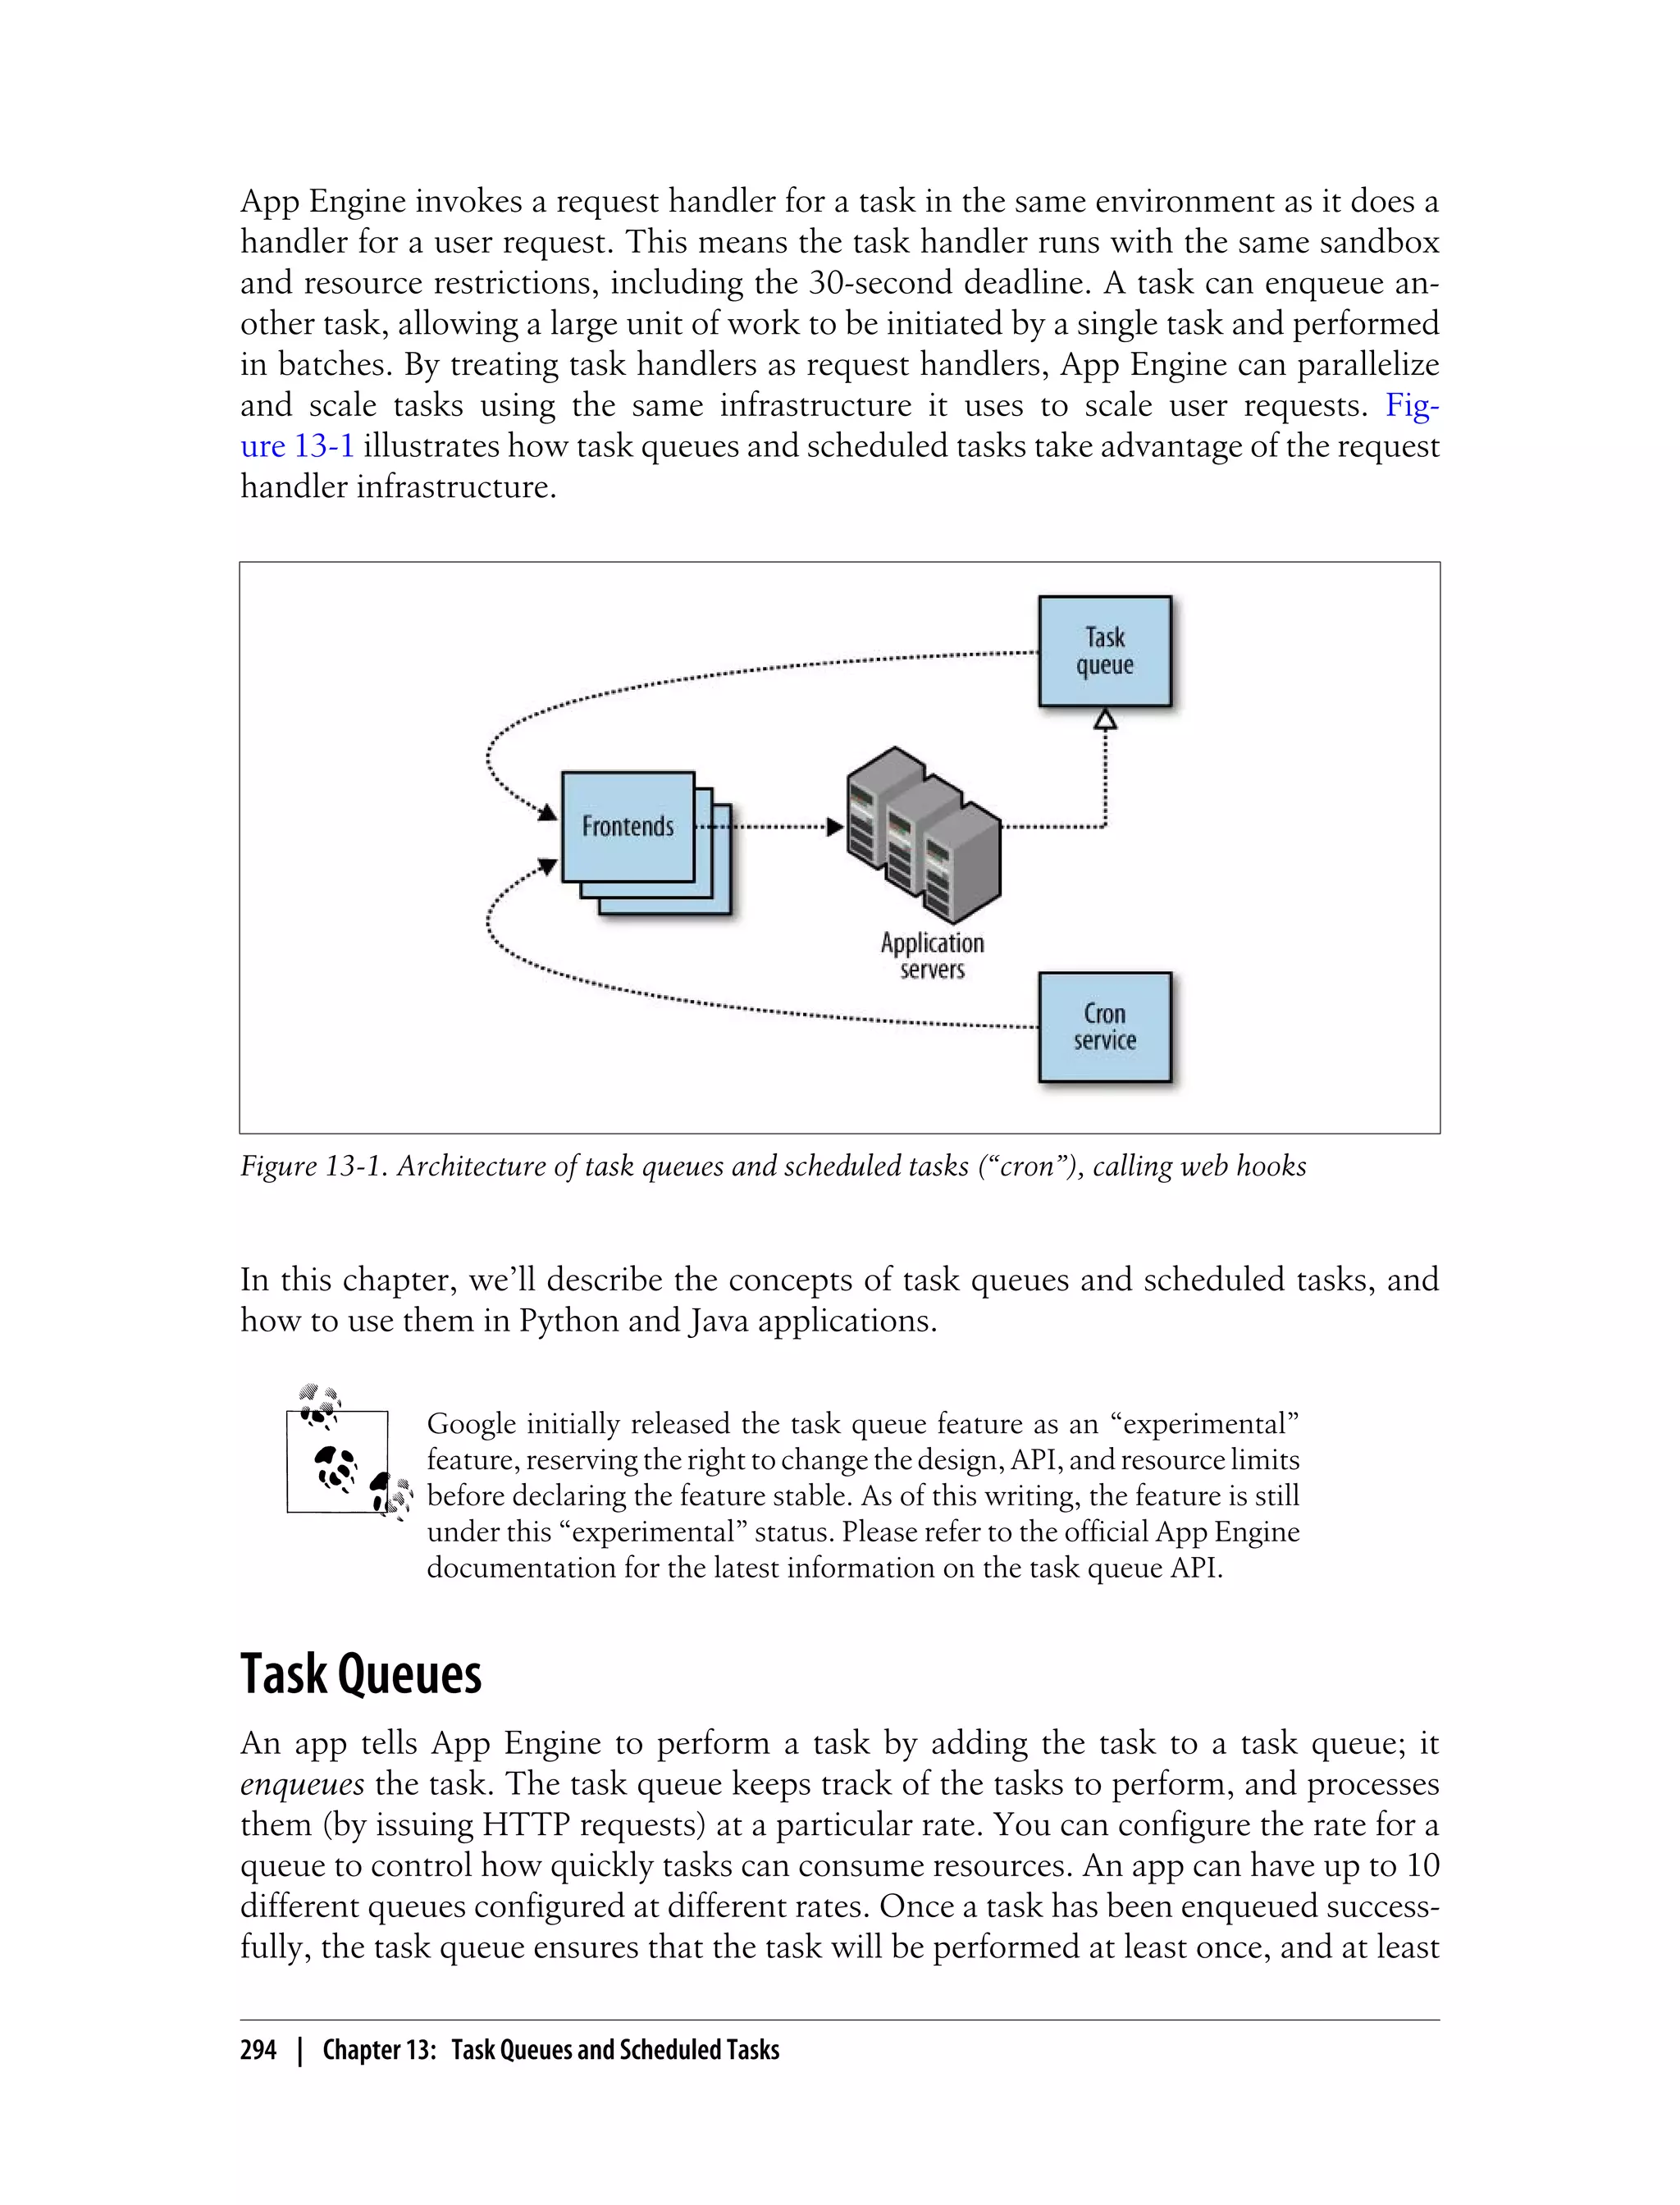

![And here’s the request handler script:
from google.appengine.ext import webapp
from google.appengine.ext.webapp.util import run_wsgi_app
from google.appengine.ext import deferred
import invitation
class SendInvitationHandler(webapp.RequestHandler):
def get(self):
# recipient = ...
deferred.defer(invitation.send_invitation, recipient)
# ...
application = webapp.WSGIApplication([
('/sendinvite', SendInvitationHandler),
], debug=True)
def main():
run_wsgi_app(application)
if __name__ == '__main__':
main()
You set up the request handler for deferred work using the following configuration in
your app.yaml file:
handlers:
- url: /_ah/queue/deferred
script: $PYTHON_LIB/google/appengine/ext/deferred/
login: admin
This maps the URL path /_ah/queue/deferred to the deferred module in the API.
($PYTHON_LIB is replaced with the path to the Python directory containing the SDK on
App Engine.) Tasks created with defer() use this URL path by default. login: admin
restricts this handler to task queues and application developers.
The defer() function enqueues a task on the default queue that calls the given callable
object with the given arguments. (Despite its use of the URL /_ah/queue/deferred for
deferred tasks, this utility uses the default queue, not a queue named deferred.) The
arguments are serialized and deserialized using Python’s pickle module; all argument
values must be pickle-able.
Most Python callable objects can be used with defer(), including functions and classes
defined at the top level of a module, methods of objects, class methods, instances of
classes that implement __call__(), and built-in functions and methods. defer() does
not work with lambda functions, nested functions, nested classes, or instances of nested
classes. The task handler must be able to access the callable object by name, possibly
via a serializable object, since it does not preserve the scope of the call to defer().
You also can’t use a function or class in the same module as the request handler class
from which you call defer(). This is because pickle believes the module of the request
handler class to be __main__ while it is running, and so it doesn’t save the correct
Task Queues | 303](https://image.slidesharecdn.com/programminggoogleappengine-100608200404-phpapp01/75/Programming-google-app-engine-324-2048.jpg)
![The url() method sets a custom URL for the task. If no custom URL is set, the task
calls the default URL for the queue.
The param() method adds a request parameter to be included with the task’s HTTP
request. The method takes the name of the parameter, and either a String or a
byte[] as the value of the parameter. Parameters are added to the HTTP request body
URL-encoded, similar to a web form. The removeParam() method removes a parameter
from the TaskOptions object; it takes the parameter name as its argument.
You can also set the HTTP request body with the payload() method. This method takes
the request body as a String. You can also include a character set specification (such
as "utf-8") as the second argument. You can’t set both a payload and parameters for
the same task.
You can control other aspects of the HTTP request as well. The method() method sets
the HTTP method; the default is "POST". You can also add arbitrary HTTP headers by
calling the header() method (which takes a String key and String value as arguments)
for each header, or by calling the headers() method with a Map<String, String>.
You can set a delay for the task. The countdownMillis() method sets the delay as a
number of milliseconds (a long) from the time the task is enqueued. The etaMillis()
method sets the delay to be an absolute date and time, as a number of milliseconds
from midnight, January 1, 1970, UTC.
To set the name for a task, you call the name() method. As described earlier, the name
ensures that only one task with that name can be enqueued for a period of time, at least
seven days with the current implementation. If you do not specify a name, the system
assigns a unique name that has not been used in the past seven days.
An app can have up to 10 named queues, each with its own task execution rate (token
replenishment rate and bucket size). In a Java app, you configure queues using a con-
figuration file named queue.xml, in the WEB-INF/ directory, which looks like this:
<queue-entries>
<queue>
<name>fastest</name>
<rate>10/s</rate>
<bucket-size>10</bucket-size>
</queue>
<queue>
<name>limitedemail</name>
<rate>1000/d</rate>
<bucket-size>5</bucket-size>
</queue>
</queue-entries>
The file includes one <queue> element per queue to be configured. Each queue has a
<name>, a token replenishment <rate>, and a <bucket-size>.
306 | Chapter 13: Task Queues and Scheduled Tasks](https://image.slidesharecdn.com/programminggoogleappengine-100608200404-phpapp01/75/Programming-google-app-engine-327-2048.jpg)

![Because App Engine promises not to make backward-incompatible changes to the
runtime environment, the default version of Django on App Engine (in version 1 of the
Python runtime) is still 0.96. However, App Engine includes a mechanism for explicitly
selecting a newer version, such that all subsequent attempts to import Django modules
will use the new version. You can use this mechanism in your main request handler
script to use Django 1.1 for your app.
Before you do that, you must download and install Django 1.1 on your local computer.
You won’t need to add it to your application directory (it’s available when running on
App Engine), but you will need it locally while building and testing your application.
Go to the Django project website and download Django 1.1:
http://www.djangoproject.com/download/1.1/tarball/
Follow the instructions to install the Python modules in your local Python environment
by running the following commands. (The sudo command will require your computer’s
administrator password.)
tar xzvf Django-1.1.tar.gz
cd Django-1.1
sudo python setup.py install
Django 1.1 was the latest release when this book was published. If you
see a newer version available on the Django website, be sure to check
the App Engine documentation to confirm that the new version has been
added to the Python runtime environment before using it locally.
If you’d prefer to use your own copy of Django instead of the one pro-
vided by the Python runtime environment (such as a newer version not
yet in the environment), you can add it directly to your application di-
rectory. Doing so requires an additional step to remove the version of
Django that’s part of the runtime environment from the Python module
search path. To do this, put this in your main request handler script
prior to importing django modules:
for k in [k for k in sys.modules if k.startswith('django')]:
del sys.modules[k]
Creating a Django Project
In Django, the complete set of code, configuration, and static files for a website is called
a project. You create a new project by running a command that was installed with
Django, called django-admin.py, like so:
django-admin.py startproject myproject
This command creates in your current working directory a new directory named after
the project, in this case myproject/, with several starter files:
Creating a Django Project | 315](https://image.slidesharecdn.com/programminggoogleappengine-100608200404-phpapp01/75/Programming-google-app-engine-336-2048.jpg)
![__init__.py
A file that tells Python that code files in this directory can be imported as modules
(this directory is a Python package).
manage.py
A command-line utility you will use to build and manage this project, with many
features.
settings.py
Configuration for this project, in the form of a Python source file.
urls.py
Mappings of URL paths to Python code, as a Python source file.
If you’re following along with a Django tutorial or book, the next step is usually to start
the Django development server using the manage.py command. If you did so now, you
would be running the Django server, but it would know nothing of App Engine. To
run the project in the App Engine development server, we must connect the Django
project to the App Engine runtime environment using a request handler script and
configuration in the app.yaml file.
The Request Handler Script
All that’s left to do is to invoke the Django project from a handler script. Exam-
ple 14-1 is a minimal script that hands the request off to Django 1.1 using the WSGI
runner function from the webapp library. Create a file named main.py in the Django
project directory you created in the previous step (e.g., myproject/).
Example 14-1. A simple request handler for invoking the Django framework
from google.appengine.dist import use_library
use_library('django', '1.1')
import os
os.environ['DJANGO_SETTINGS_MODULE'] = 'settings'
import django.core.handlers.wsgi
from google.appengine.ext.webapp import util
def main():
# Run Django via WSGI.
application = django.core.handlers.wsgi.WSGIHandler()
util.run_wsgi_app(application)
if __name__ == '__main__':
main()
The use_library() function is an App Engine utility that tells the runtime environment
that version 1.1 of Django should be used when importing libraries from the django
package. Without this call, importing from django would use Django 0.96.
316 | Chapter 14: The Django Web Application Framework](https://image.slidesharecdn.com/programminggoogleappengine-100608200404-phpapp01/75/Programming-google-app-engine-337-2048.jpg)
![InstallAppengineHelperForDjango(), and adding the version identifier as an argument
to that function call. For instance, to select Django 1.0:
InstallAppengineHelperForDjango('1.0')
Now that the Helper is installed, you can start the App Engine development server
using manage.py as you would with any other Django project:
python manage.py runserver
Thanks to the Helper, this is no different than running the dev_appserver.py command
or using the Launcher to start the server. If you’d prefer to use those methods, you may,
without losing any functionality of the Helper.
Test that the default project is working locally by visiting the server’s URL in a web
browser. By default, Django uses port 8000, not 8080, so this URL is:
http://localhost:8000/
The Helper adds several features to manage.py that work with the App Engine devel-
opment server. One especially useful feature is the shell command, which starts a
Python shell in the context of the Django project—and the development server. You
can use this shell to import App Engine modules and interact with the development
server, the simulated sandbox, and the simulated services.
python manage.py shell
Here is a simple shell session that demonstrates calling the development server’s
simulated Mail service (several harmless warning messages have been elided):
% python manage.py shell
Python 2.6.1 (r261:67515, Jul 7 2009, 23:51:51)
[GCC 4.2.1 (Apple Inc. build 5646)] on darwin
Type "help", "copyright", "credits" or "license" for more information.
(InteractiveConsole)
>>> from google.appengine.api import mail
>>> mail.send_mail('sender@example.com', 'to@example.com', 'my subject',
'message body')
INFO:root:MailService.Send
INFO:root: From: sender@example.com
INFO:root: To: to@example.com
INFO:root: Subject: my subject
INFO:root: Body:
INFO:root: Content-type: text/plain
INFO:root: Data length: 12
INFO:root:You are not currently sending out real email. If you have sendmail
installed you can use it by using the server with --enable_sendmail
>>>
You can open a Python shell that connects to the live application via remote_api using
the console command. This requires that you set up remote_api as described in Chap-
ter 12 using a URL path of /remote_api.
python manage.py console
The Django App Engine Helper | 319](https://image.slidesharecdn.com/programminggoogleappengine-100608200404-phpapp01/75/Programming-google-app-engine-340-2048.jpg)


![from appengine_django.models import BaseModel
from google.appengine.ext import db
class Book(BaseModel):
title = db.StringProperty()
author = db.StringProperty()
copyright_year = db.IntegerProperty()
author_birthdate = db.DateProperty()
class BookReview(BaseModel):
book = db.ReferenceProperty(Book, collection_name='reviews')
review_author = db.UserProperty()
review_text = db.TextProperty()
rating = db.StringProperty(choices=['Poor', 'OK', 'Good', 'Very Good', 'Great'],
default='Great')
create_date = db.DateTimeProperty(auto_now_add=True)
Edit views.py to query the database for books and pass the query object to the template,
like this:
from django.shortcuts import render_to_response
from google.appengine.ext import db
from bookstore import models
def home(request):
q = models.Book.all().order('title')
return render_to_response('bookstore/index.html',
{ 'books': q })
Finally, edit templates/bookstore/index.html to display the list of books:
<html>
<body>
<p>Welcome to The Book Store!</p>
<p>Books in our catalog:</p>
<ul>
{% for book in books %}
<li>{{ book.title }}, by {{ book.author }} ({{ book.copyright_year }})</li>
{% endfor %}
</ul>
</body>
</html>
Notice that we’re passing the db.Query object directly to the template. The template
uses the query object’s iterator interface to fetch the Book entities from the datastore.
If you load the page right now (and feel free to do so to test the code), you’ll see an
empty list of books. Let’s create some books from the Python shell. Stop the server (hit
Ctrl-C), then start the shell:
python manage.py shell
You can create objects in the development server’s datastore by typing Python code
directly into the shell. Here is a complete shell session, including output, that creates
several Book entities:
Using App Engine Models With Django | 323](https://image.slidesharecdn.com/programminggoogleappengine-100608200404-phpapp01/75/Programming-google-app-engine-344-2048.jpg)
![% python manage.py shell
Python 2.6.1 (r261:67515, Jul 7 2009, 23:51:51)
[GCC 4.2.1 (Apple Inc. build 5646)] on darwin
Type "help", "copyright", "credits" or "license" for more information.
(InteractiveConsole)
>>> from bookstore import models
>>> import datetime
>>> b = models.Book(title='Grapes of Wrath, The', author='Steinbeck, John',
copyright_year=1939, author_birthdate=datetime.date(1902, 2, 27))
>>> b.put()
datastore_types.Key.from_path(u'Book', 1,
_app_id_namespace=u'google-app-engine-django')
>>> b = models.Book(title='Cat in the Hat, The', author='Dr. Seuss',
copyright_year=1957, author_birthdate=datetime.date(1904, 3, 2))
>>> b.put()
datastore_types.Key.from_path(u'Book', 2,
_app_id_namespace=u'google-app-engine-django')
>>>
Exit the shell (press Ctrl-D), then restart the server and load the page.
Using Django Unit Tests and Fixtures
The Django App Engine Helper includes support for unit tests using Django’s unit test
runner and the App Engine development server. The unit test runner runs tests inside
the development server’s environment, so tests can access the simulated services, in-
cluding the simulated datastore. The test runner supports tests defined with the
standard Python libraries unittest or doctest, or other test frameworks with test runner
customizations. Django provides its own class for defining unittest test cases, called
django.test.TestCase, which adds several Django-specific features.
For unittest tests, the runner looks in files in the Django application directory (e.g.,
bookstore/) named models.py and tests.py for classes that inherit from
unittest.TestCase or django.test.TestCase. Each method of a test case class whose
name begins with test is a separate test. For each test, the runner initializes the test
environment, instantiates the TestCase class, and calls the method for the test. If the
class defines a setUp() method, it calls it before each test. If the class defines a tear
Down() method, it calls it after each test. You can use setUp() and tearDown() to create
and clean up test data and preparation for every test in a test case.
The TestCase class provides methods that cause the test to report failure if the condi-
tions tested are not met. self.assertEqual() takes two arguments, and causes the test
to fail if the arguments are not equal. self.assert_() takes one argument, and fails the
test if the argument is a false value (False, None, 0, the empty string, and so forth).
self.assertRaises() takes an exception class, a callable object, and arguments for the
callable object, calls the callable, then fails the test if the callable does not raise the given
exception. There are several other test methods, as well. Each of these methods takes
an optional message argument that is printed in the test report if the test fails.
324 | Chapter 14: The Django Web Application Framework](https://image.slidesharecdn.com/programminggoogleappengine-100608200404-phpapp01/75/Programming-google-app-engine-345-2048.jpg)
![Enter Python statements to create test data in the datastore. Here is a shell session that
creates a few Book and BookReview entities:
% python manage.py shell
Python 2.6.1 (r261:67515, Jul 7 2009, 23:51:51)
[GCC 4.2.1 (Apple Inc. build 5646)] on darwin
Type "help", "copyright", "credits" or "license" for more information.
(InteractiveConsole)
>>> from google.appengine.ext import db
>>> from bookstore import models
>>> b1 = models.Book(title="one", author="")
>>> b1.put()
datastore_types.Key.from_path(u'Book', 1,
_app_id_namespace=u'google-app-engine-django')
>>> br1 = models.BookReview(book=b1, review_text="review1")
>>> br2 = models.BookReview(book=b1, review_text="review2")
>>> br3 = models.BookReview(book=b1, review_text="review3")
>>> db.put(br1)
datastore_types.Key.from_path(u'BookReview', 2,
_app_id_namespace=u'google-app-engine-django')
>>> db.put(br2)
datastore_types.Key.from_path(u'BookReview', 3,
_app_id_namespace=u'google-app-engine-django')
>>> db.put(br3)
datastore_types.Key.from_path(u'BookReview', 4,
_app_id_namespace=u'google-app-engine-django')
>>> b2 = models.Book(title="two", author="")
>>> b2.put()
datastore_types.Key.from_path(u'Book', 5,
_app_id_namespace=u'google-app-engine-django')
>>> b2br1 = models.BookReview(book=b2, review_text="review1")
>>> b2br2 = models.BookReview(book=b2, review_text="review2")
>>> db.put(b2br1)
datastore_types.Key.from_path(u'BookReview', 6,
_app_id_namespace=u'google-app-engine-django')
>>> db.put(b2br2)
datastore_types.Key.from_path(u'BookReview', 7,
_app_id_namespace=u'google-app-engine-django')
>>>
Exit the shell (Ctrl-D).
Create a directory named fixtures/ in the bookstore/ app directory. Now run the
dumpdata command, and redirect its output to a file in this new directory:
python manage.py dumpdata bookstore >bookstore/fixtures/bookstore.json
The resulting file contains representations of all of the datastore entities for the kinds
whose models are defined in the bookstore app, in the JSON format.
To load this fixture for every test in a test case, you create a class attribute for the
django.test.TestCase named fixtures, whose value is a list of the names of the fixture
files to load from the fixtures/ directory. Here’s another (trivial) test case that uses
fixtures, which you can put in models.py:
326 | Chapter 14: The Django Web Application Framework](https://image.slidesharecdn.com/programminggoogleappengine-100608200404-phpapp01/75/Programming-google-app-engine-347-2048.jpg)
![# ...
class TestBooksAndReviews(test.TestCase):
fixtures = ['bookstore.json']
def testBookReviewOrder(self):
d = Book.all().filter('title =', 'one').get()
self.assert_(d, 'Book "one" must be in test fixture')
q = BookReview.all().filter('book =', d)
q.order('-create_date')
reviews = q.fetch(3)
self.assertEqual('review3', reviews[0].review_text)
self.assertEqual('review2', reviews[1].review_text)
self.assertEqual('review1', reviews[2].review_text)
Run the new test using the test command, as before:
python manage.py test bookstore
For each test in the TestBooksAndReviews test case, Django flushes the simulated data-
store, loads the fixtures, calls the test case’s setUp() method (if any), then calls the test
method, and finally calls the tearDown() method (if any).
You can also load fixtures into the project’s development datastore manually using the
python manage.py loaddata command:
python manage.py loaddata bookstore/fixtures/bookstore.json
See the Django documentation for more information about unit testing and fixtures.
Using Django Forms
Django includes a powerful feature for building web forms based on data model defi-
nitions. The Django forms library can generate HTML for forms, validate that submit-
ted data meets the requirements of the model, and redisplay the form to the user with
error messages. The default appearance is useful, and you can customize the appearance
extensively.
Django’s version of the form library only works with the Django data modeling API,
and does not work directly with App Engine models. Thankfully, the App Engine Py-
thon runtime environment includes an App Engine–compatible implementation of
Django forms, in the package google.appengine.ext.db.djangoforms.
We won’t go into the details of how Django forms work—see the Django documen-
tation for a complete explanation—but let’s walk through a quick example to see how
the pieces fit together. Our example will use the following behavior for creating and
editing Book entities:
• An HTTP GET request to /books/book/ displays an empty form for creating a new
Book.
Using Django Forms | 327](https://image.slidesharecdn.com/programminggoogleappengine-100608200404-phpapp01/75/Programming-google-app-engine-348-2048.jpg)

![To display the form, we simply pass the BookForm object to a template. There are several
methods on the object for rendering it in different ways; we’ll use the as_p() method
to display the form fields in <p> elements.
Create that template now, named templates/bookstore/bookform.html:
<html>
<body>
{% if book_id %}
<p>Edit book {{ book_id }}:</p>
<form action="/books/book/{{ book_id }}" method="POST">
{% else %}
<p>Create book:</p>
<form action="/books/book/" method="POST">
{% endif %}
{{ form.as_p }}
<input type="submit" />
</form>
</body>
</html>
The template is responsible for outputting the <form> tag and the Submit button. The
BookForm does the rest.
Before we test this, let’s make one more change to the book-listing template to add
some “create” and “edit” links. Edit templates/bookstore/index.html:
<html>
<body>
<p>Welcome to The Book Store!</p>
<p>Books in our catalog:</p>
<ul>
{% for book in books %}
<li>{{ book.title }}, by {{ book.author }} ({{ book.copyright_year }})
[<a href="/books/book/{{ book.key.id }}">edit</a>]</li>
{% endfor %}
</ul>
<p>[<a href="/books/book/">add a book</a>]</p>
</body>
</html>
Restart the development server, then load the book list URL (/books/) in the browser.
Click “add a book” to show the book creation form. Enter some data for the book, then
submit it to create it.
The default form widget for a date field is just a text field, and it’s finicky
about the format. In this case, the “author birthdate” field expects input
in the form YYYY-MM-DD, such as 1902-02-27.
330 | Chapter 14: The Django Web Application Framework](https://image.slidesharecdn.com/programminggoogleappengine-100608200404-phpapp01/75/Programming-google-app-engine-351-2048.jpg)


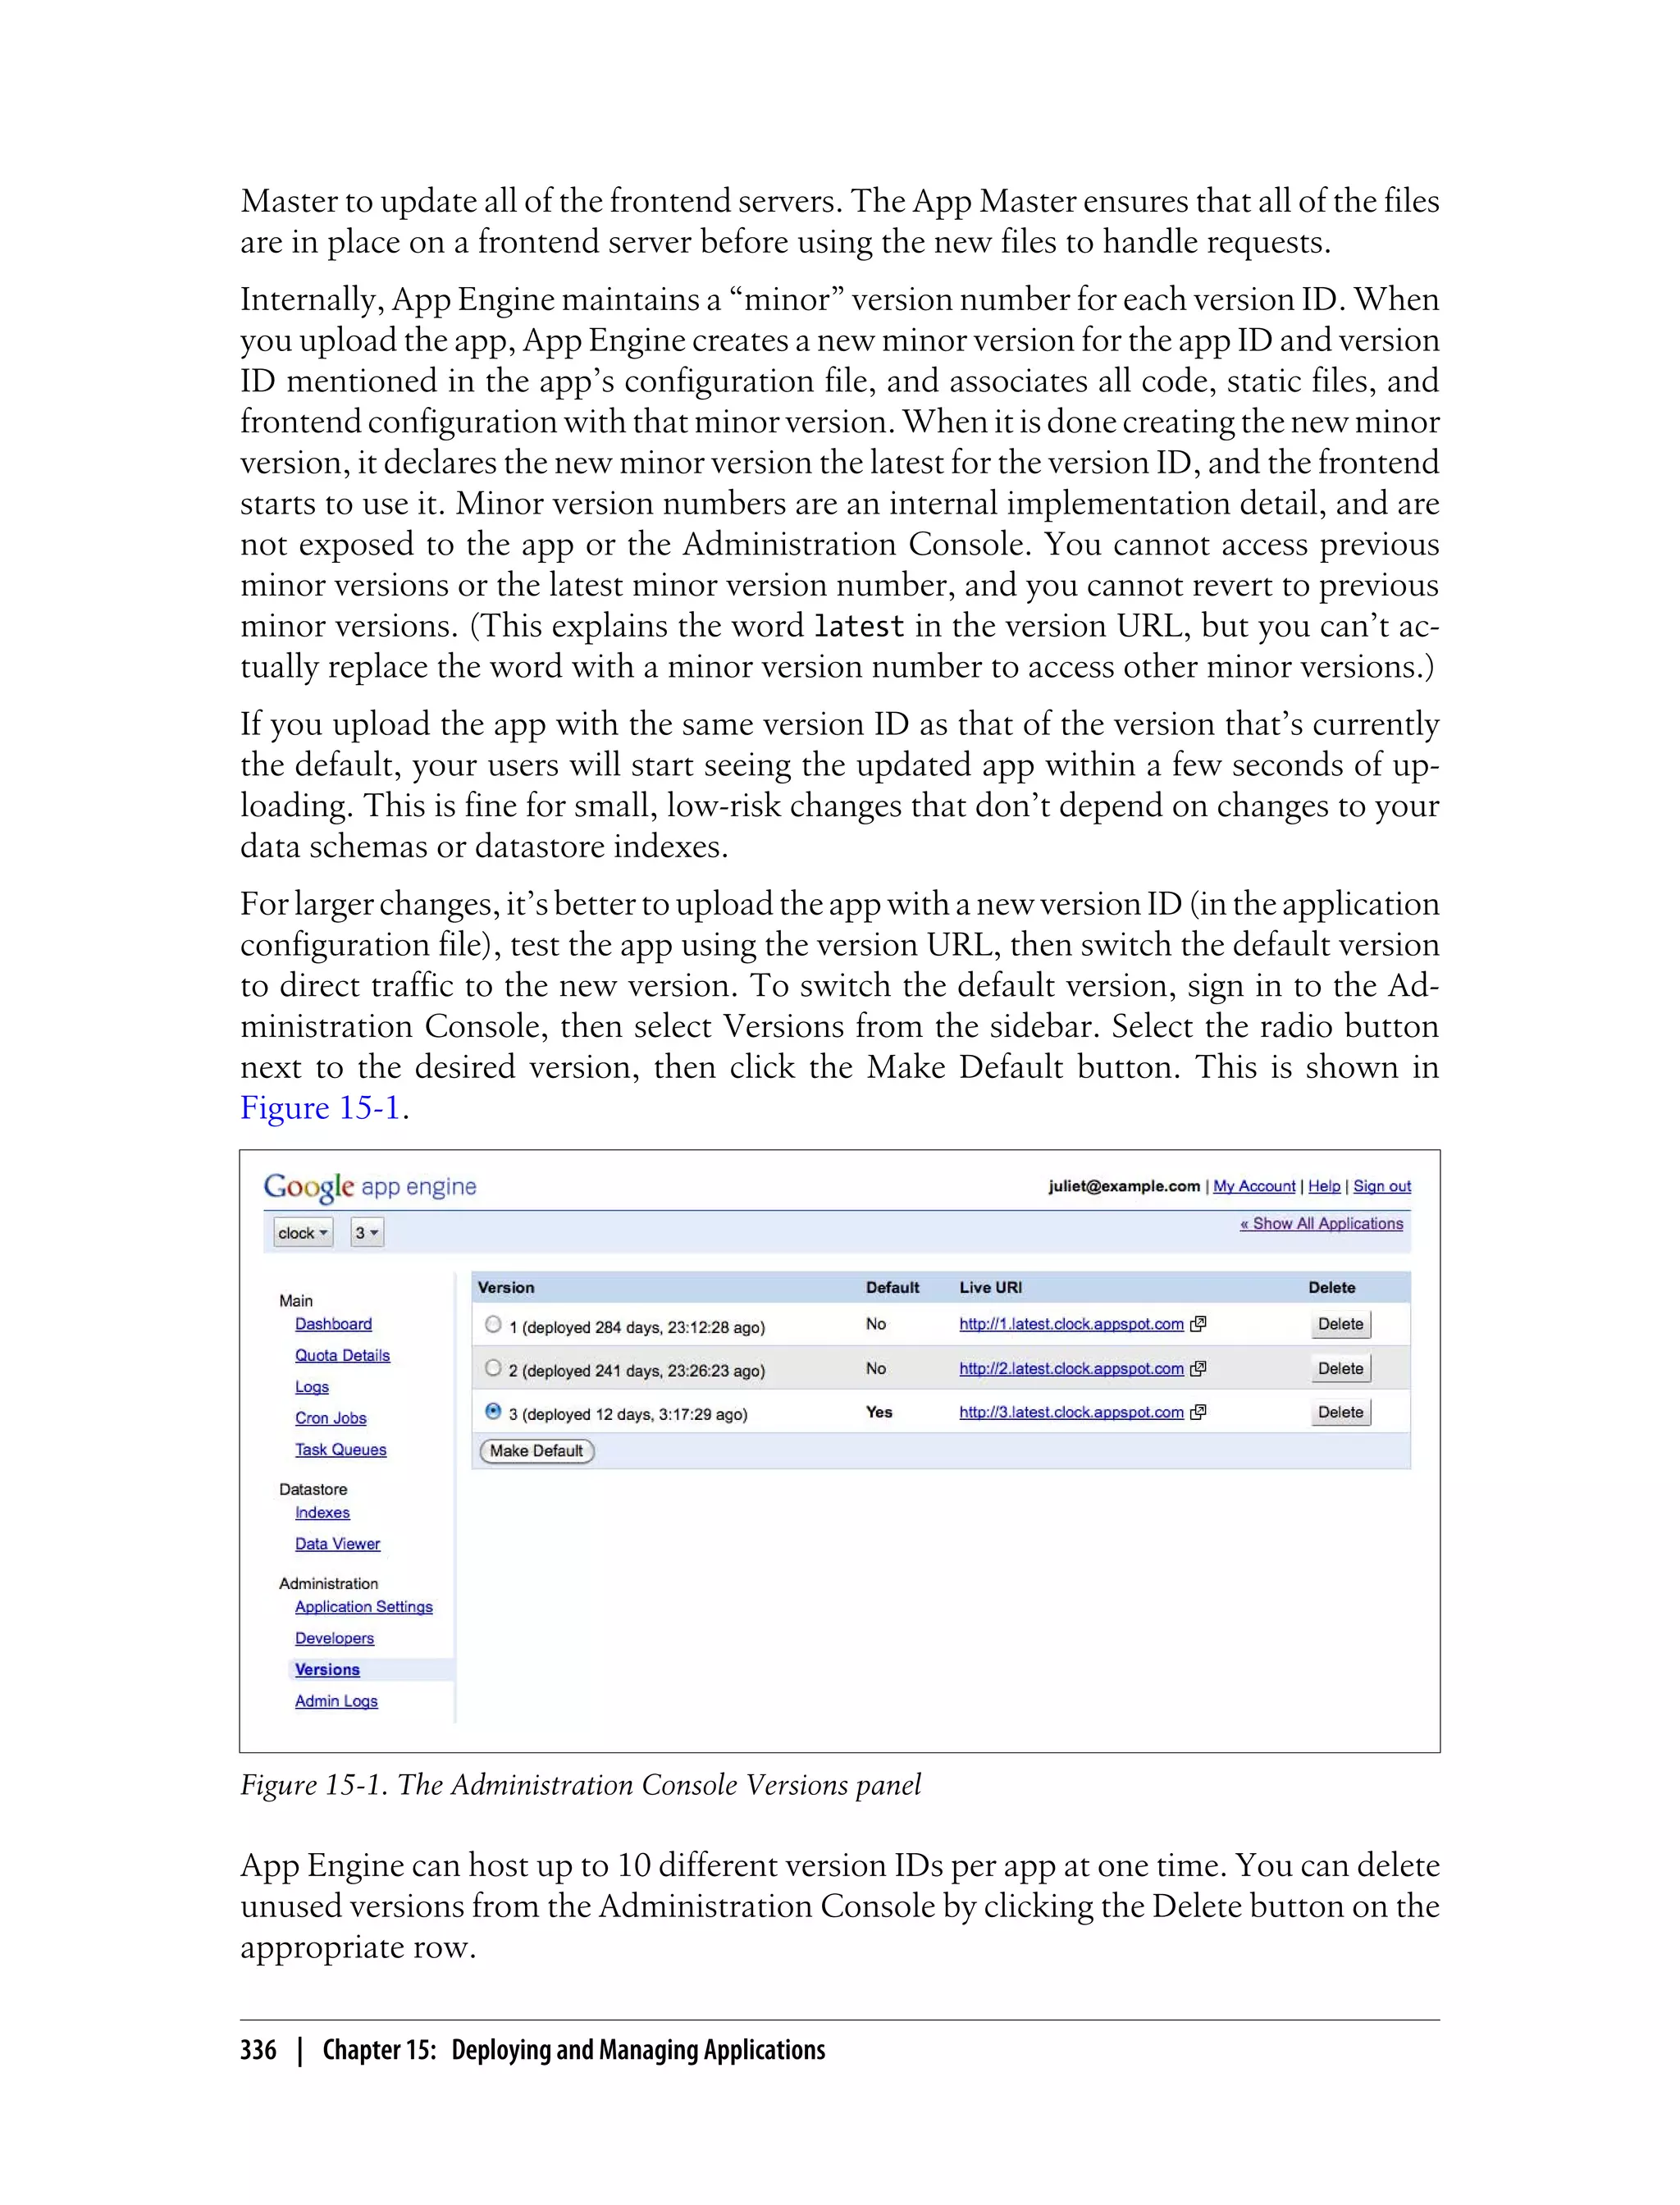

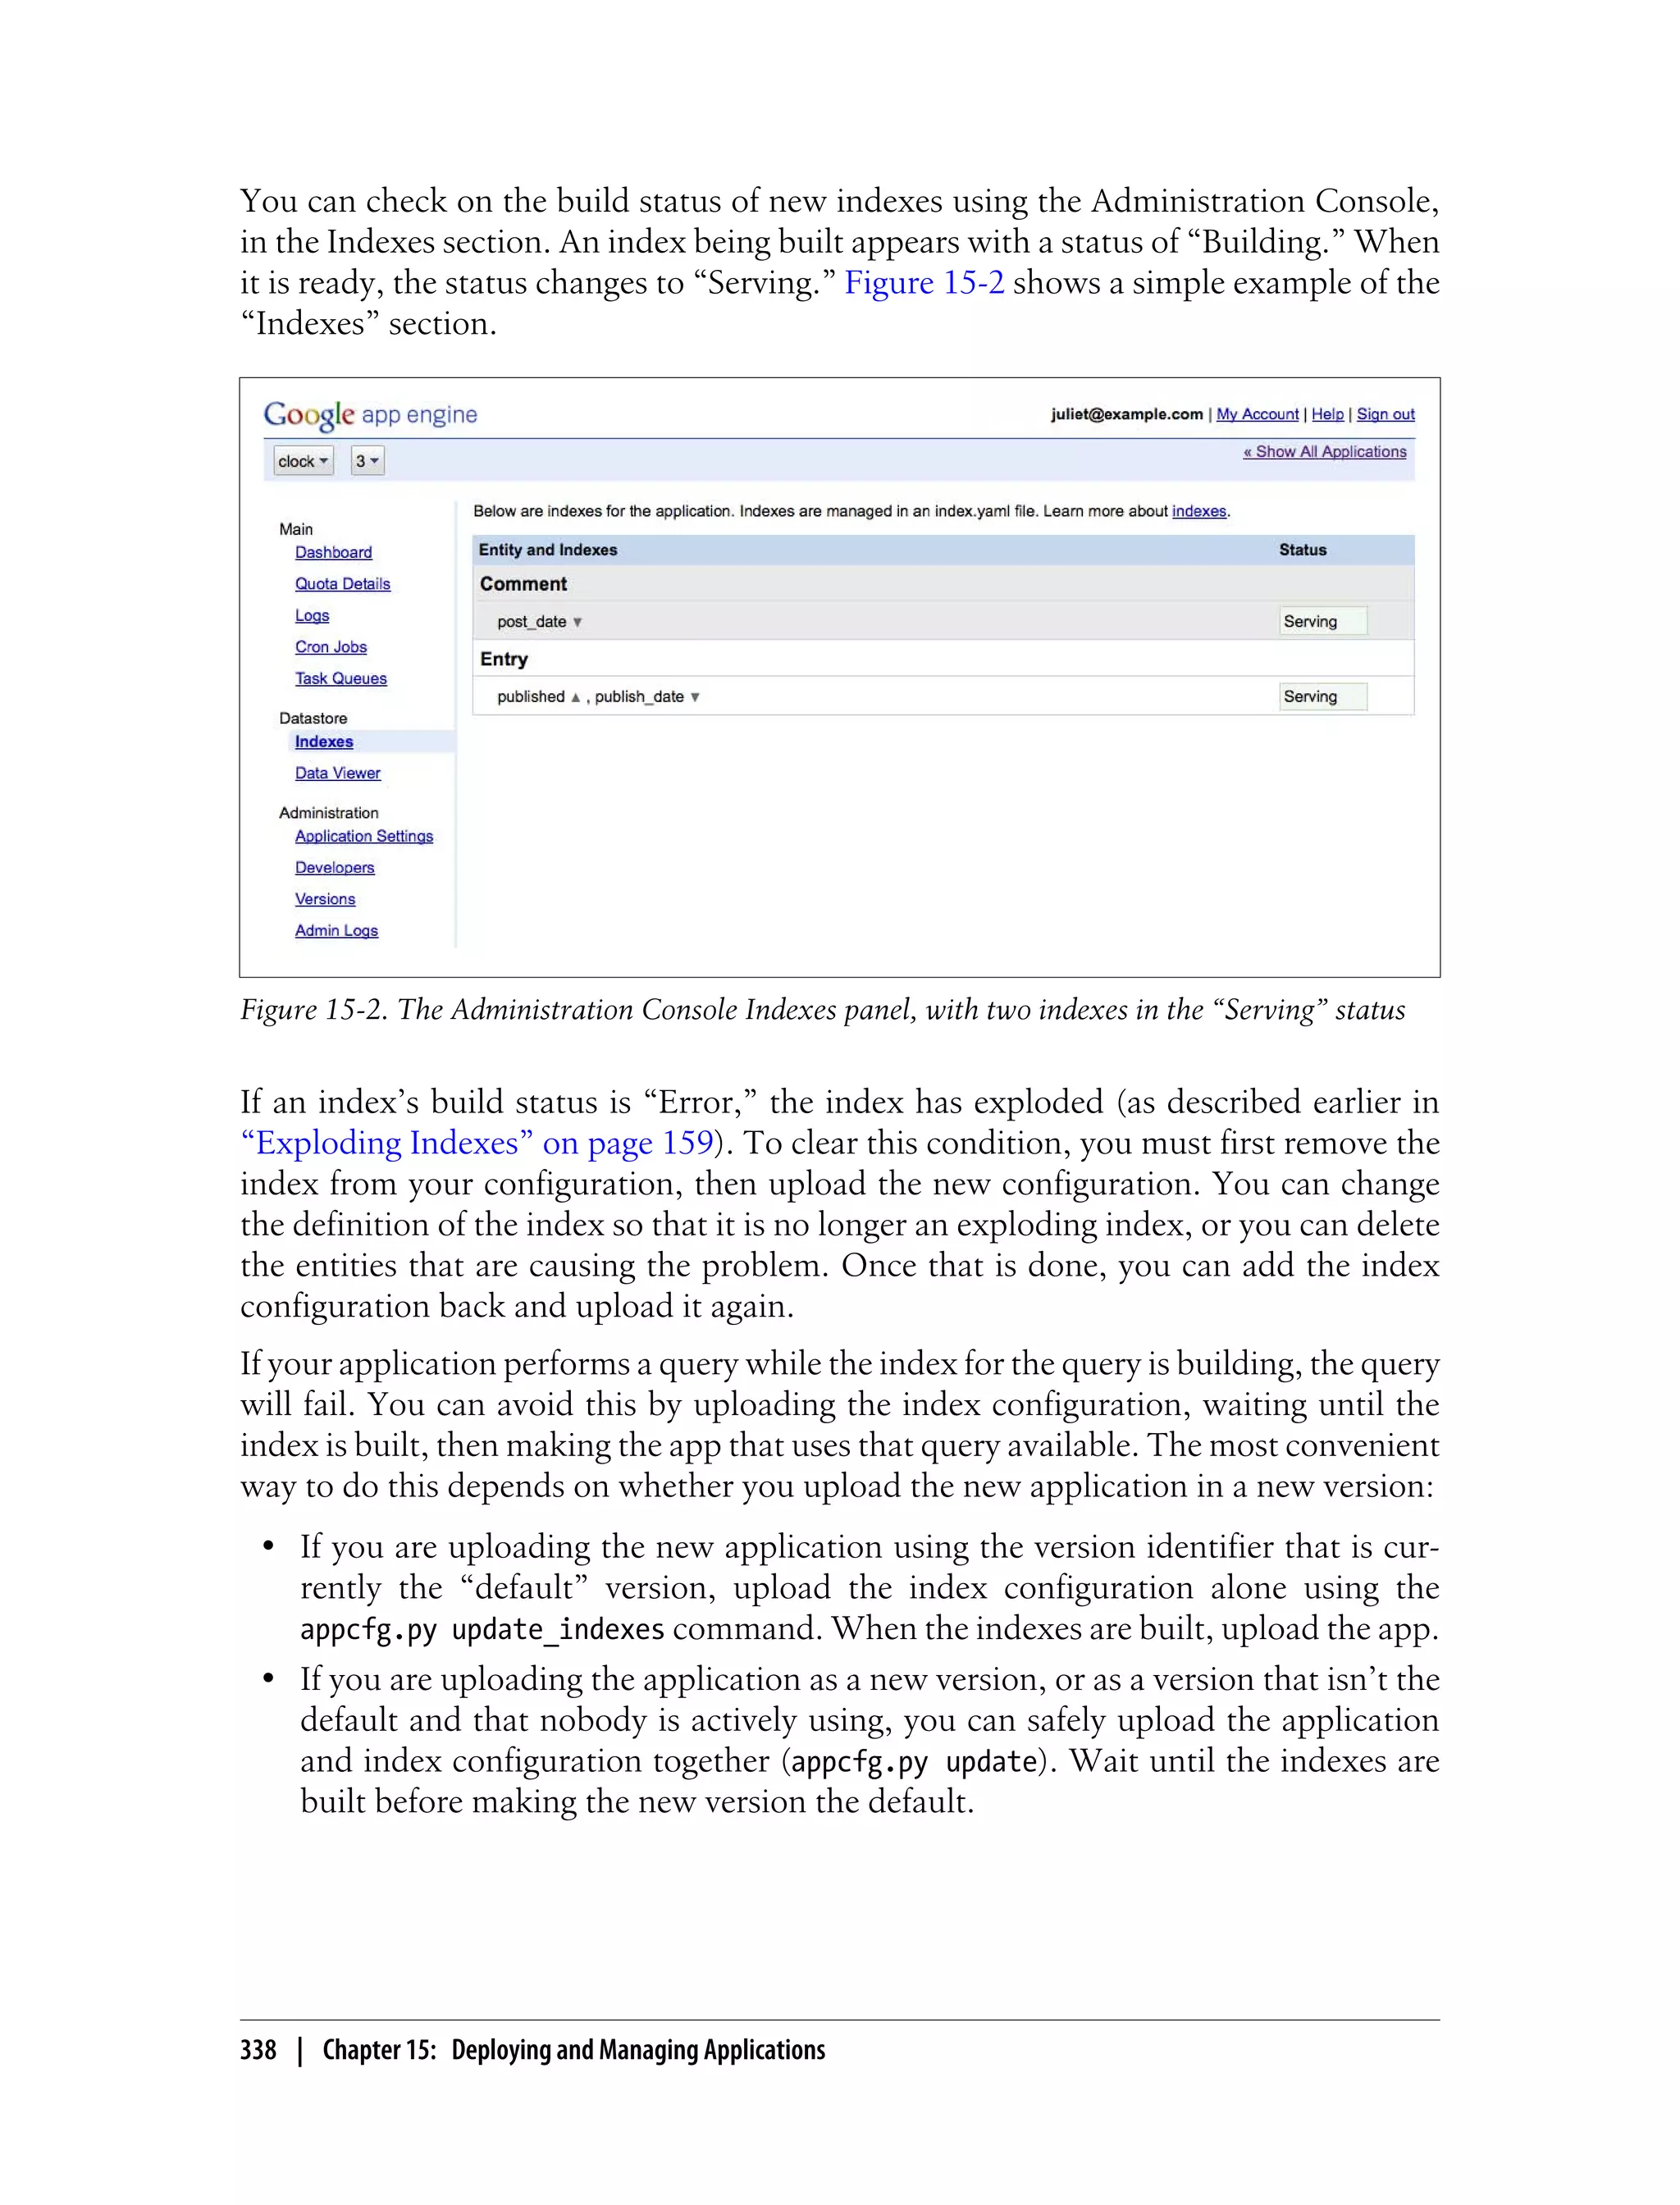
![Figure 15-3. The Administration Console log browser
The following command downloads request logs for the app in the development di-
rectory clock, and saves them to a file named logs.txt:
appcfg.py request_logs clock logs.txt
Request data appears in the file in a common format known as the Apache Combined
(or “NCSA Combined”) logfile format, one request per line (shown here as two lines
to fit on the page):
127.0.0.1 - - [05/Jul/2009:06:46:30 -0700] "GET /blog/ HTTP/1.1" 200 14598 -
"Mozilla/5.0 (Macintosh; U; Intel Mac OS X 10_5_8; en-us)...,gzip(gfe)"
From left to right, the fields are:
• The IP address of the client
• A - (an unused field retained for backward compatibility)
• The email address of the user who made the request, if the user is signed in using
Google Accounts; - otherwise
• The date and time of the request
• The HTTP command string in double quotes, including the method and URL path
• The HTTP response code returned by the server
• The size of the response, as a number of bytes
• The “Referrer” header provided by the client, usually the URL of the page that
linked to this URL
• The “User-Agent” header provided by the client, usually identifying the browser
and its capabilities
340 | Chapter 15: Deploying and Managing Applications](https://image.slidesharecdn.com/programminggoogleappengine-100608200404-phpapp01/75/Programming-google-app-engine-361-2048.jpg)