강의할 기회가 없어지는 아쉬움에 강의시 사용한 라즈베리파이 강의 자료를 업로드 합니다.
Raspberry Pi를 원격 개발 환경 구성이 완료된 후에 파이썬과 관련 라이브러리를 사용해서 GPIO의 Digital, Analog signal을 송신/수신하는 방법을 다루고 있습니다.
•Python GPIO
•DHT Humidity&Thermo
•VERSION 1.5.2
• Release Date : 2016.11
Raspberry Pi for IoT
고 강 태
james@thinkbee.kr
https://www.linkedin.com/in/thinkbeekr/
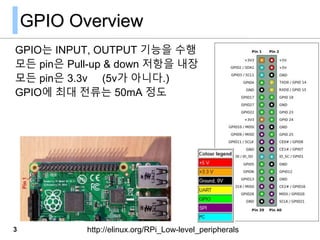
GPIO Overview
GPIO는 INPUT,OUTPUT 기능을 수행
모든 pin은 Pull-up & down 저항을 내장
모든 pin은 3.3v (5v가 아니다.)
GPIO에 최대 전류는 50mA 정도
3 http://elinux.org/RPi_Low-level_peripherals
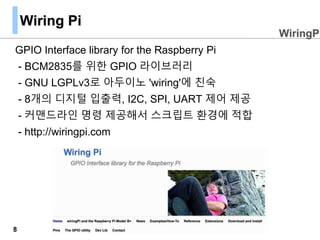
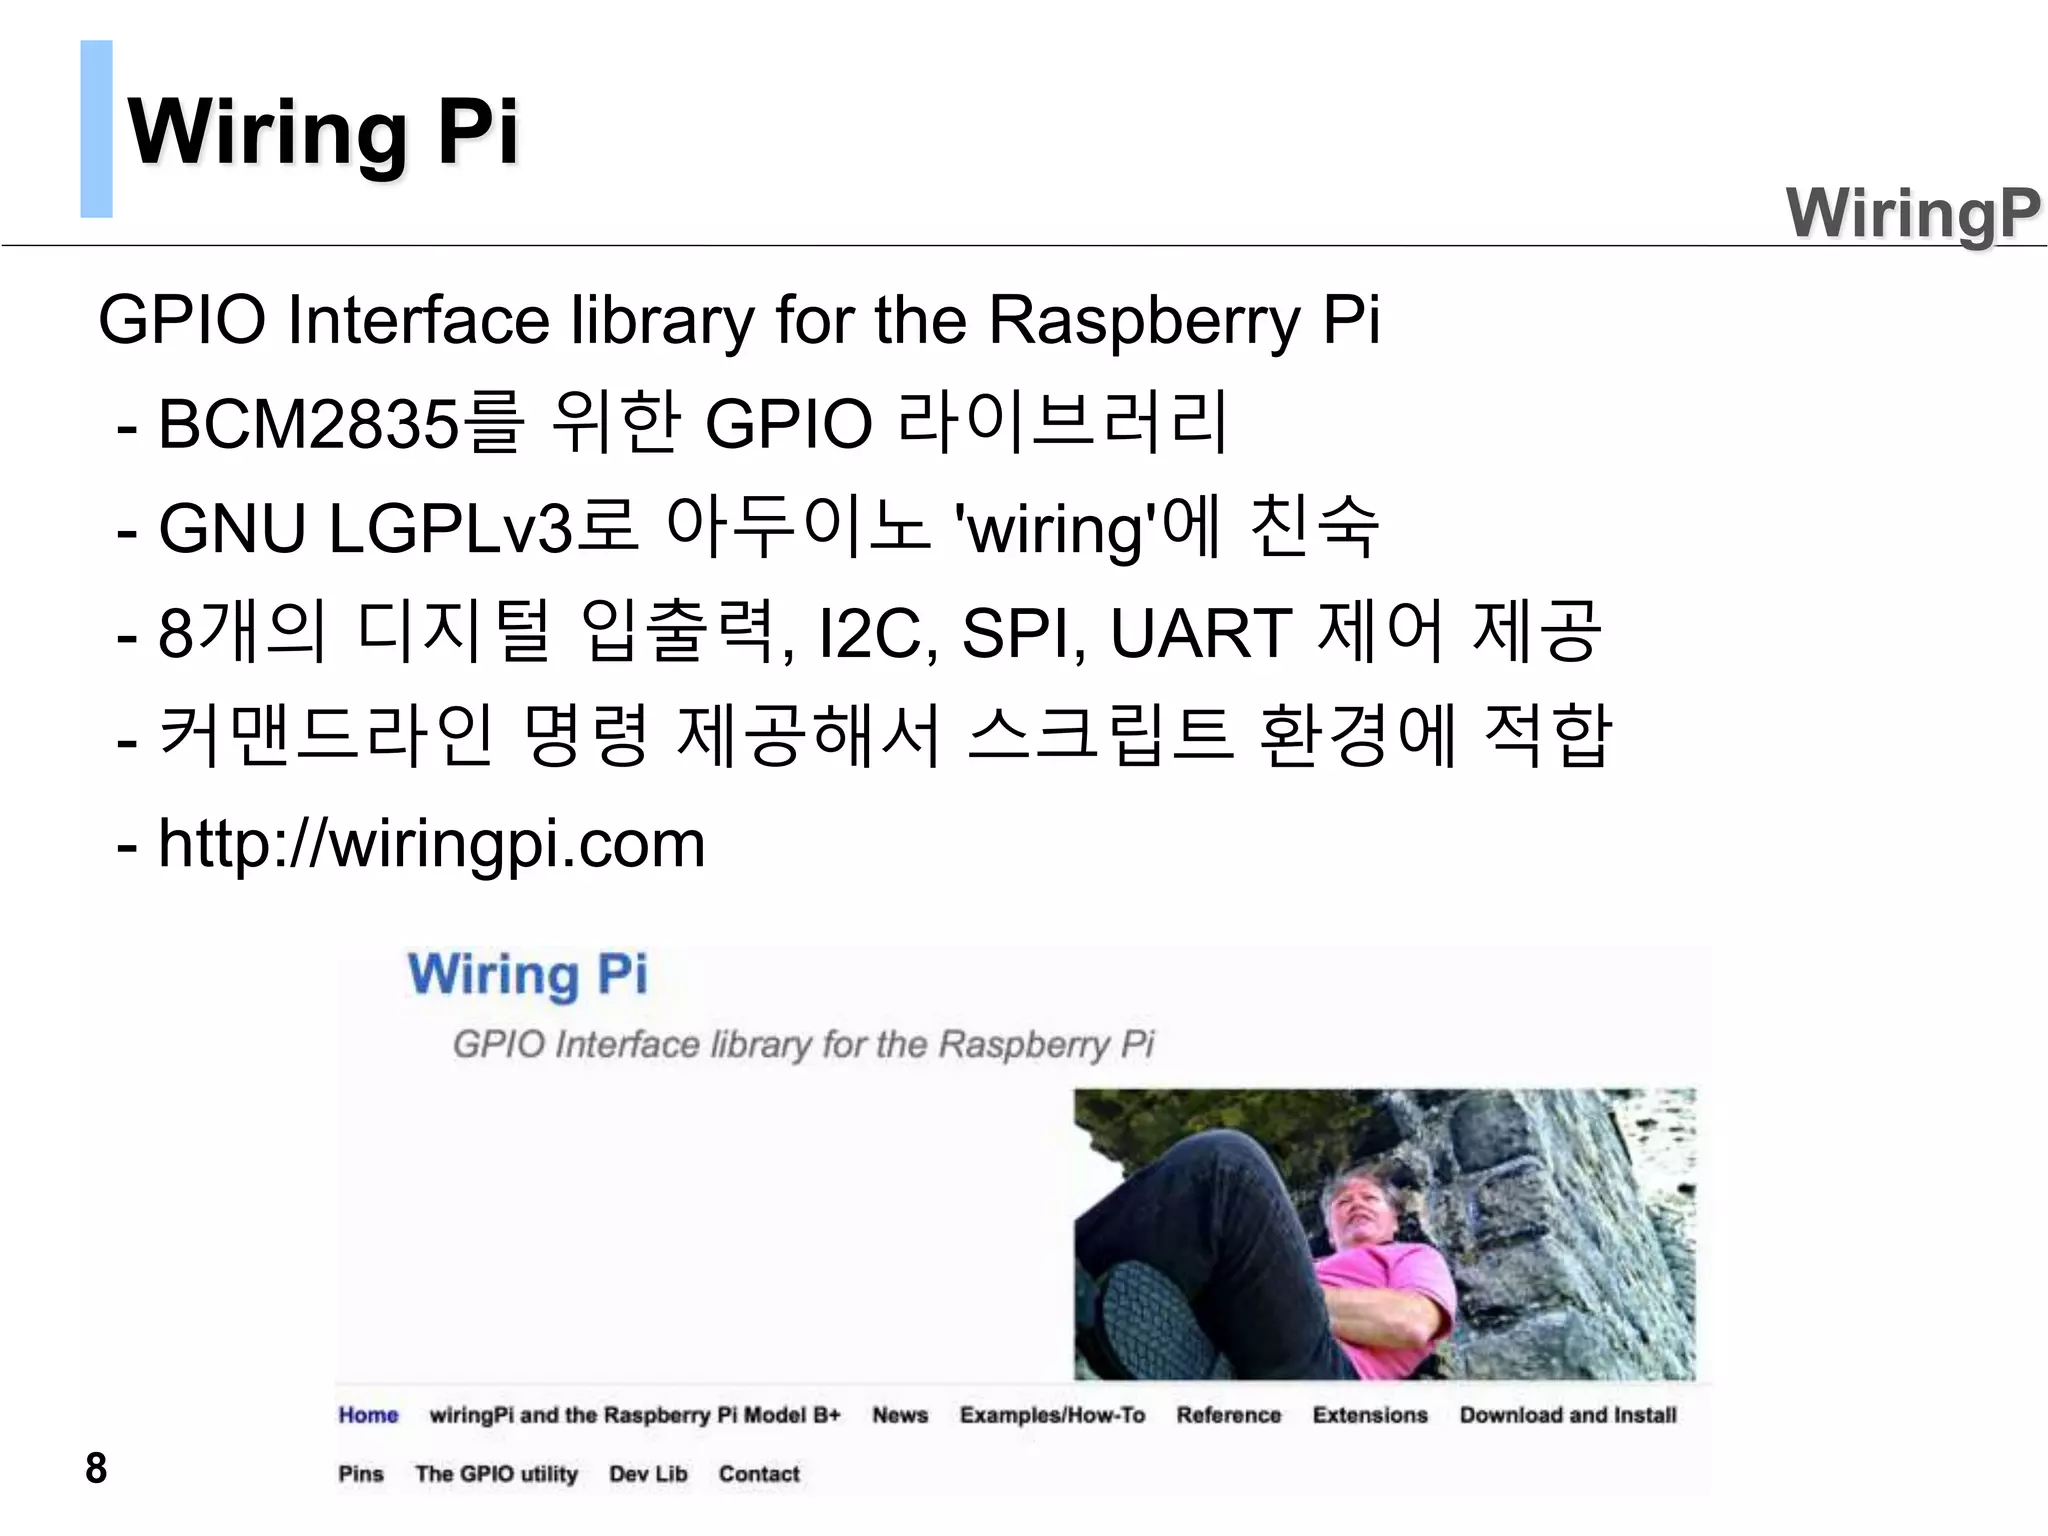
Wiring Pi
GPIO Interfacelibrary for the Raspberry Pi
- BCM2835를 위한 GPIO 라이브러리
- GNU LGPLv3로 아두이노 'wiring'에 친숙
- 8개의 디지털 입출력, I2C, SPI, UART 제어 제공
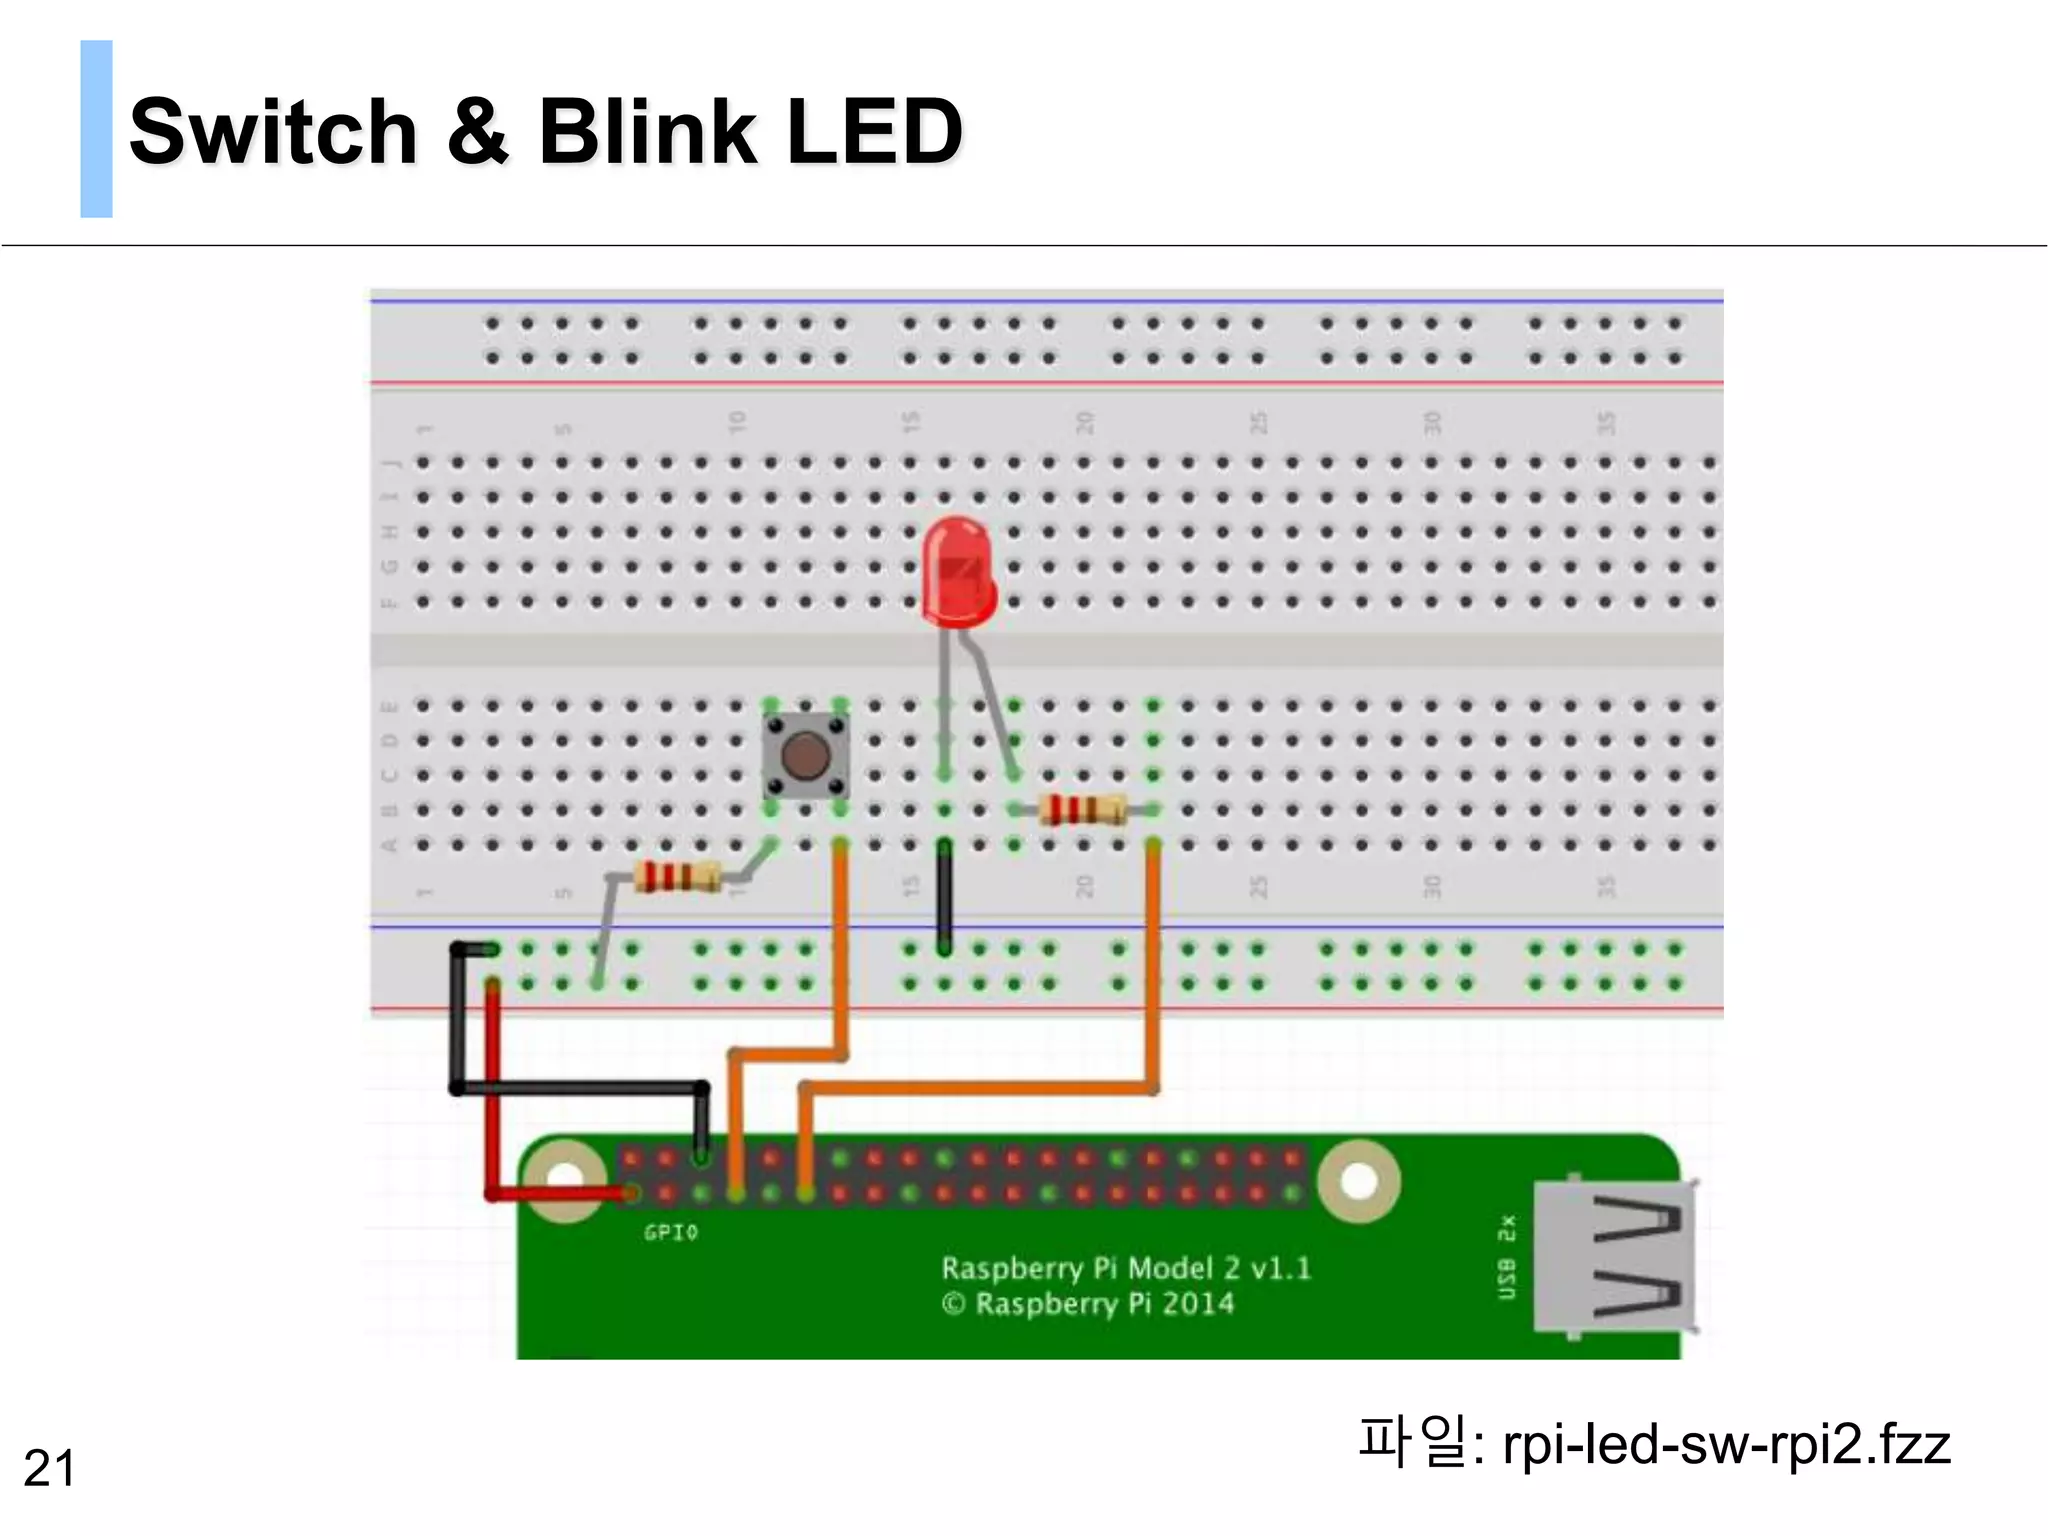
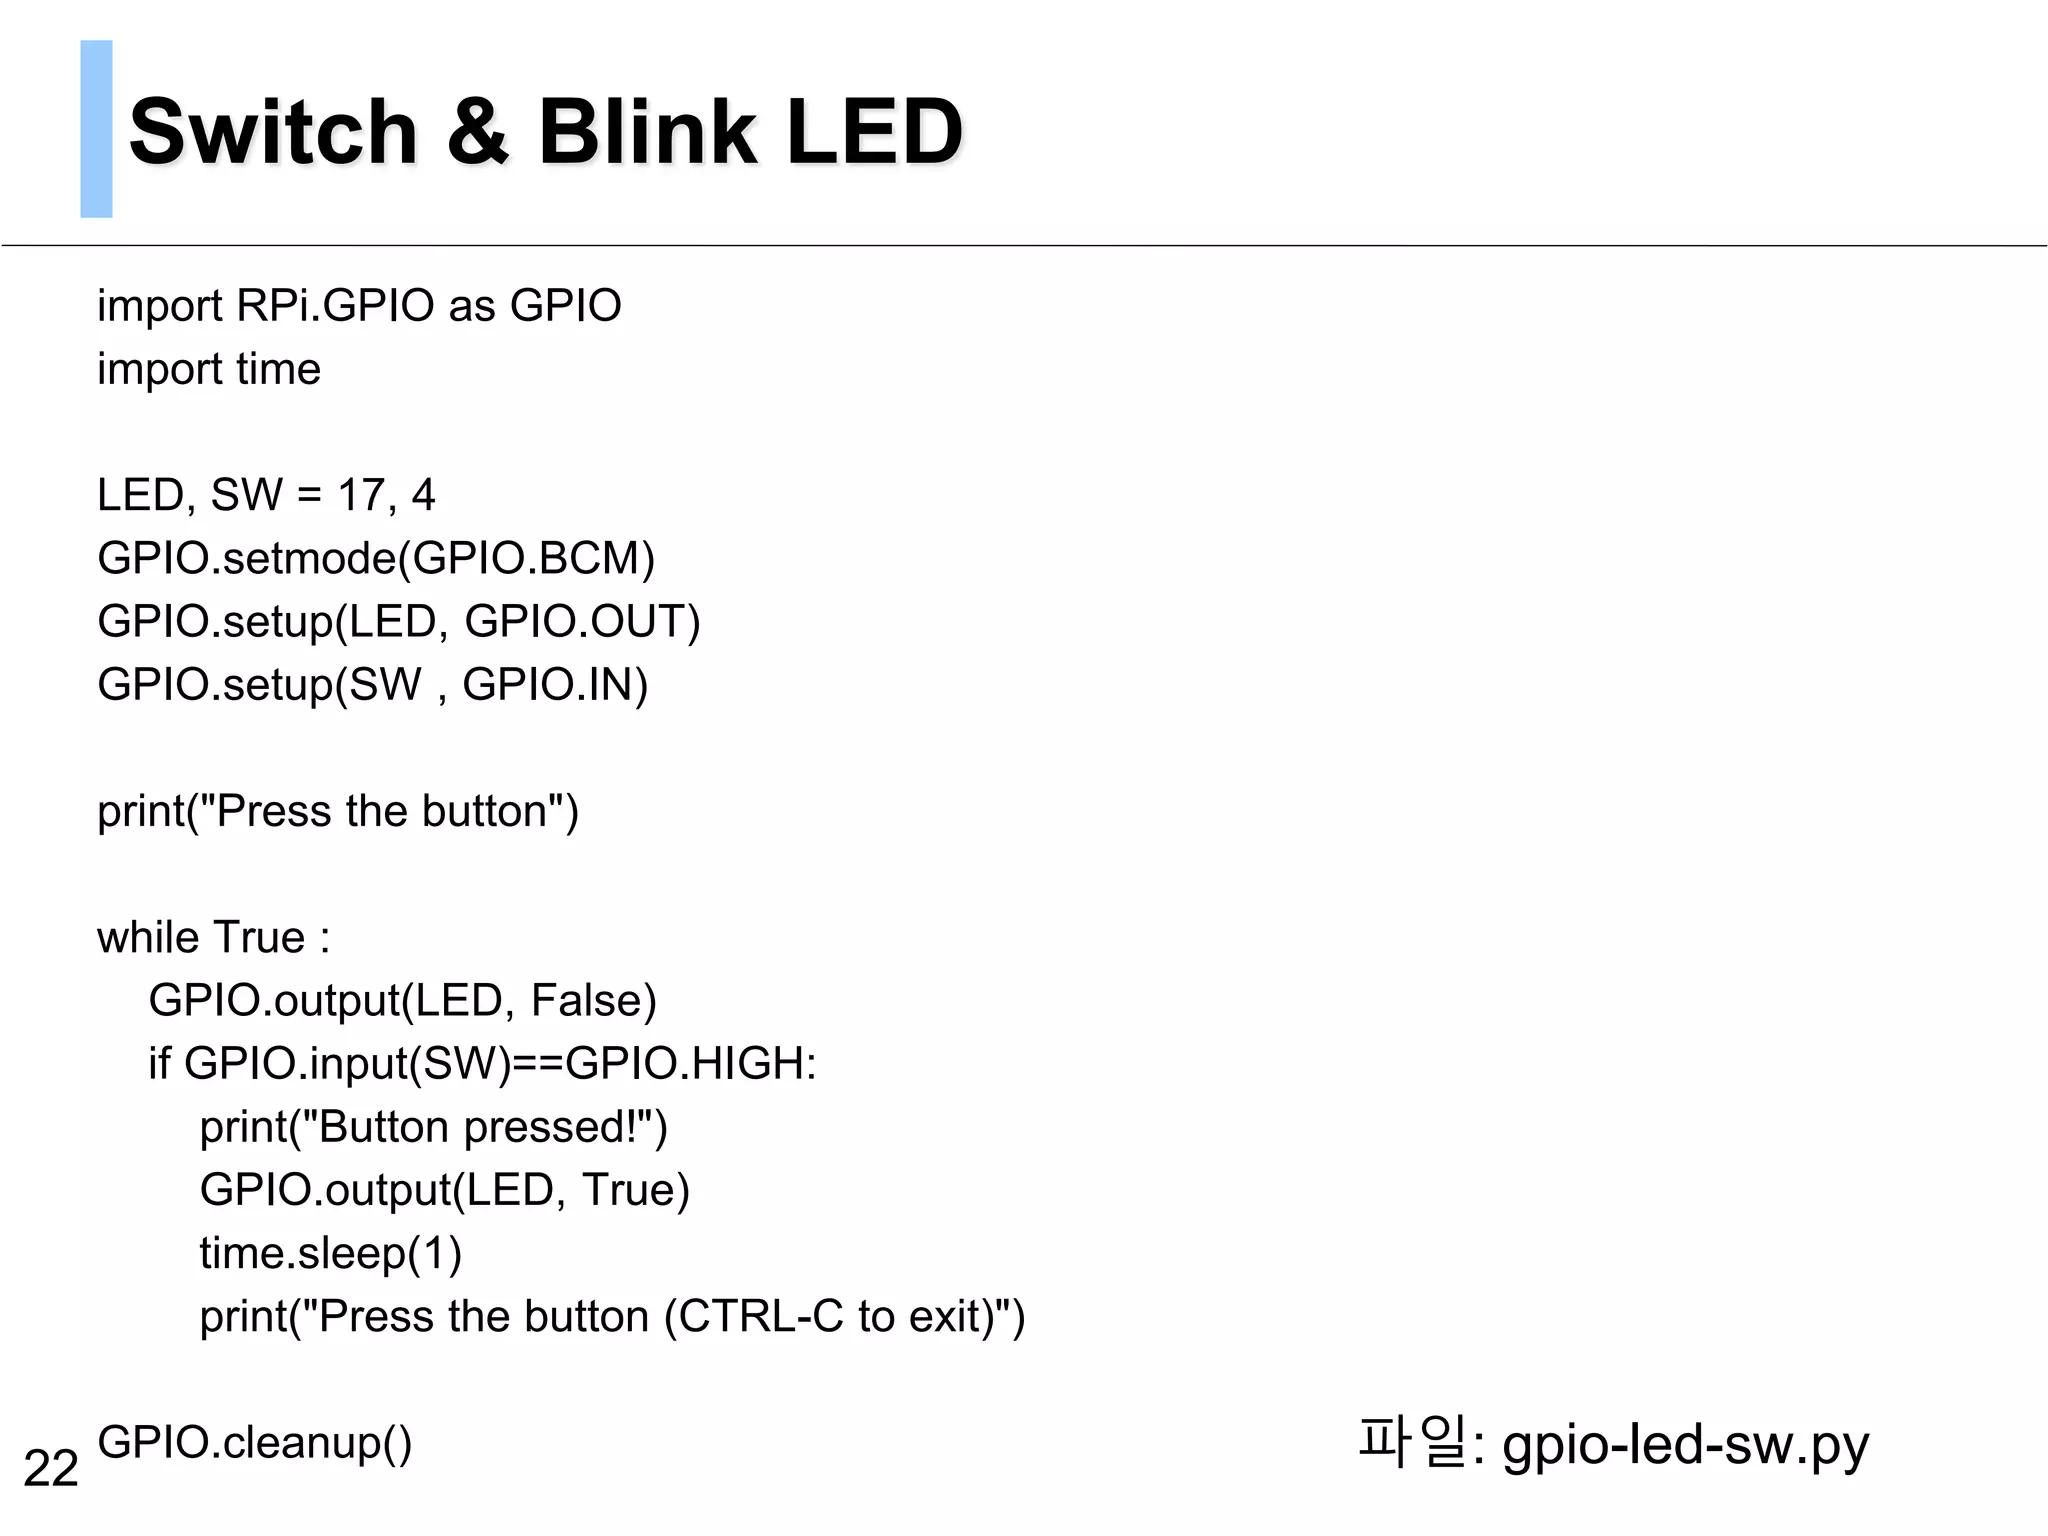
- 커맨드라인 명령 제공해서 스크립트 환경에 적합
- http://wiringpi.com
8
WiringPi
7.
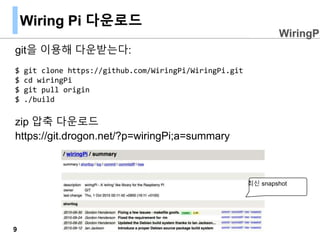
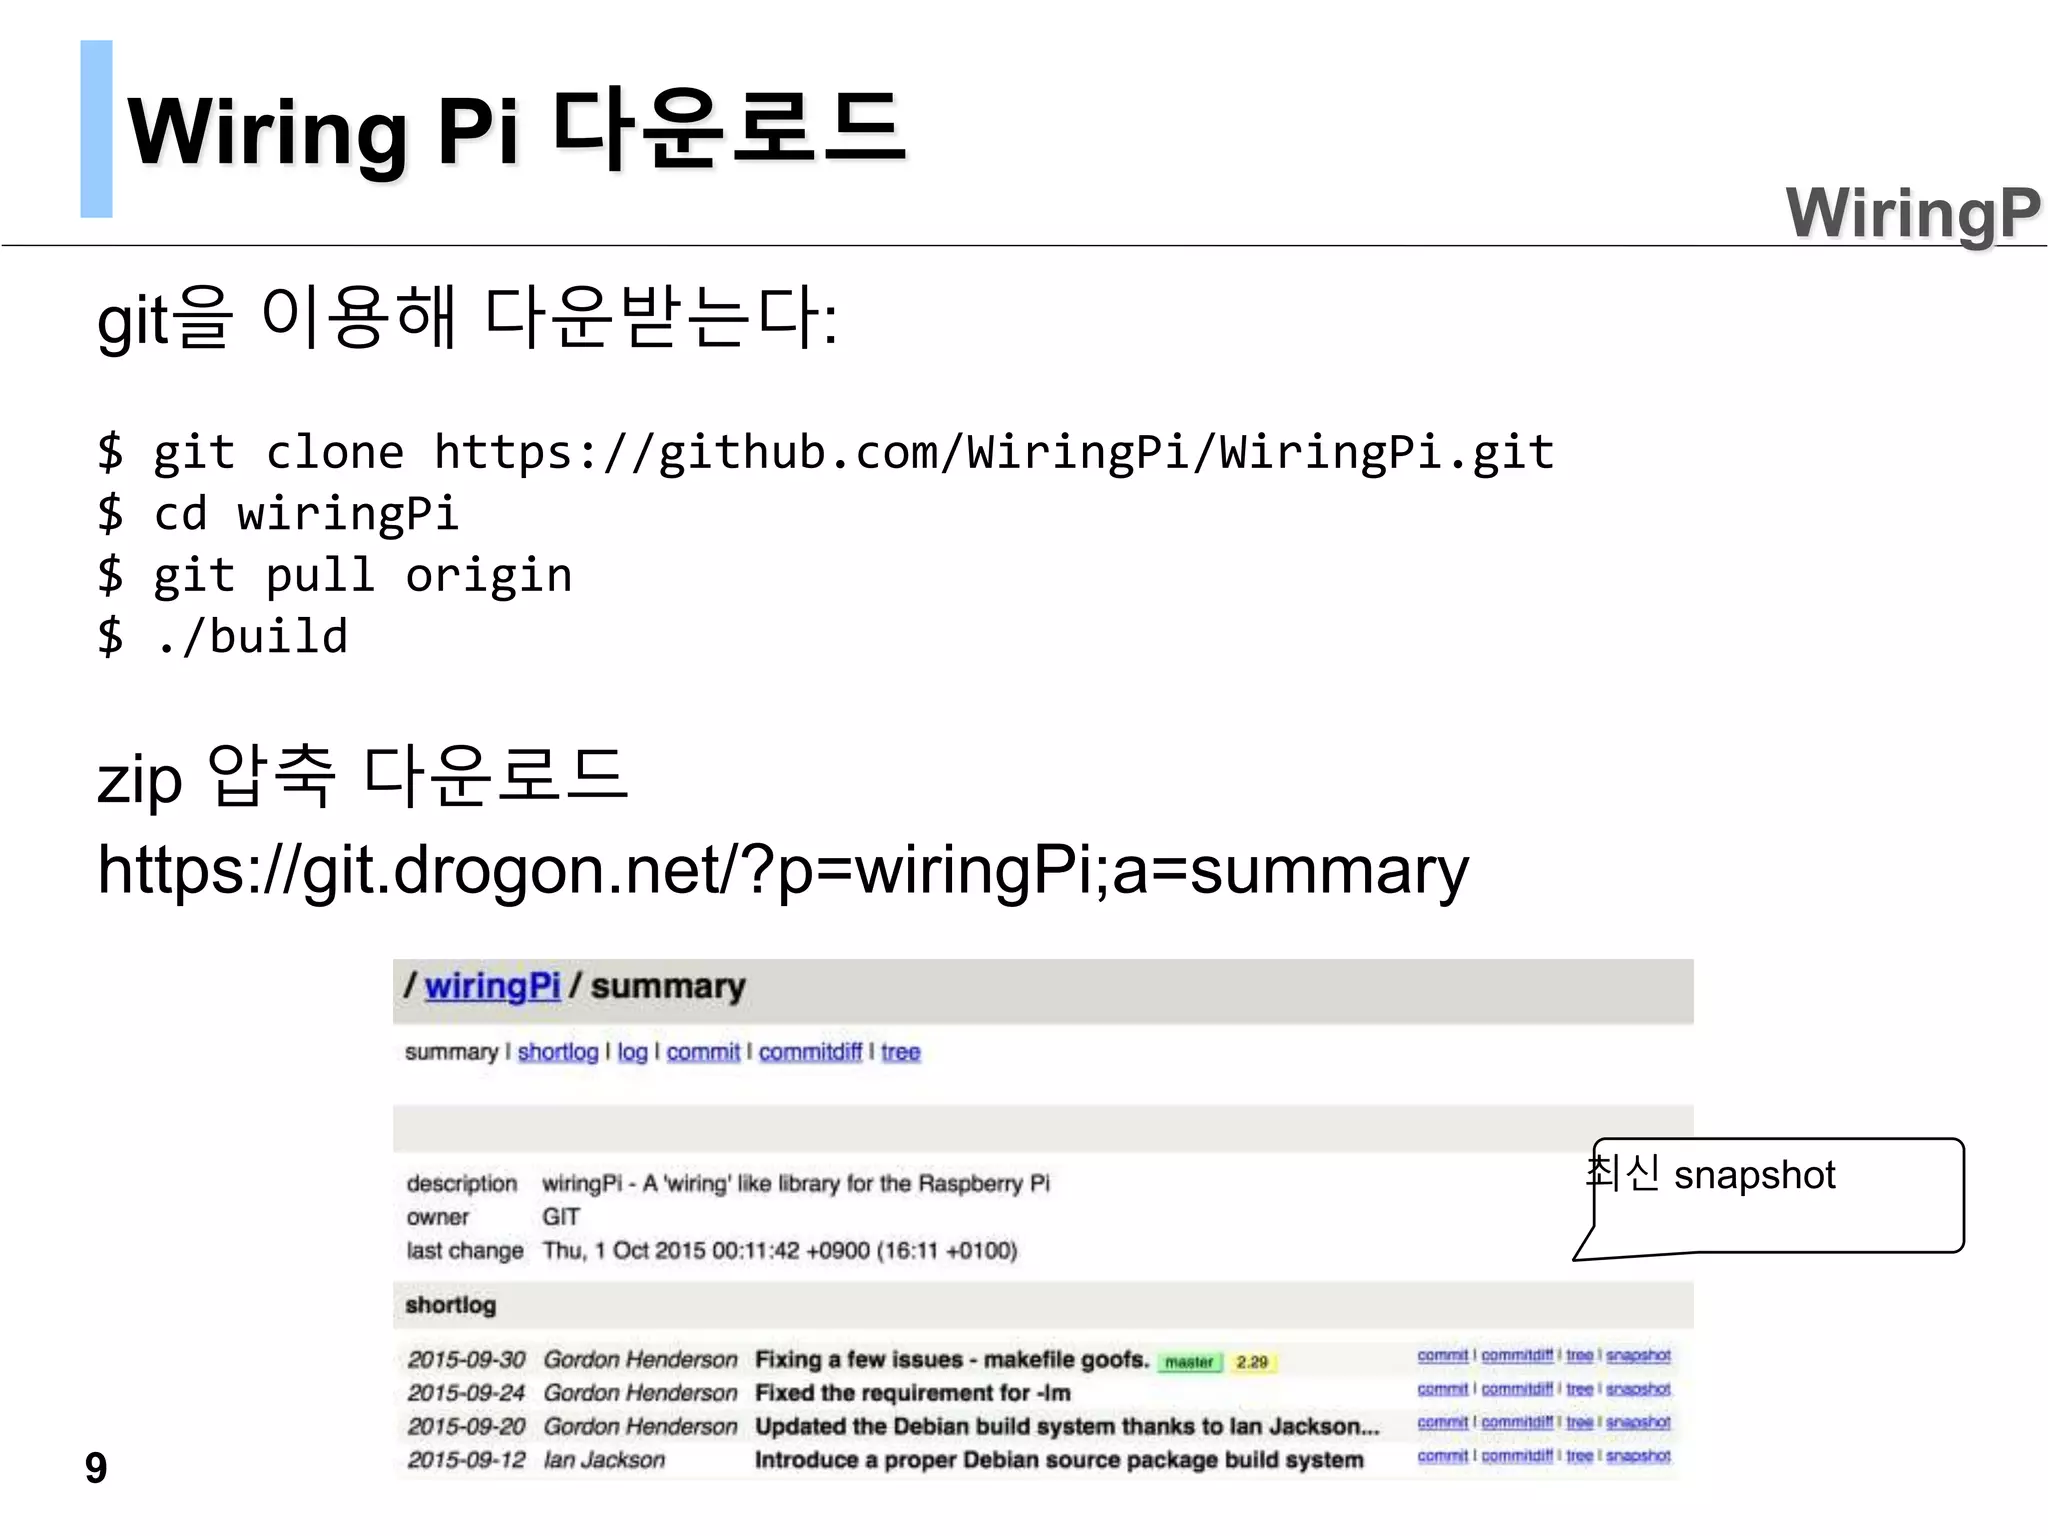
Wiring Pi 다운로드
git을이용해 다운받는다:
$ git clone https://github.com/WiringPi/WiringPi.git
$ cd wiringPi
$ git pull origin
$ ./build
zip 압축 다운로드
https://git.drogon.net/?p=wiringPi;a=summary
9
WiringPi
최신 snapshot
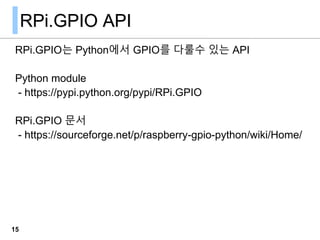
RPi.GPIO API
RPi.GPIO는 Python에서GPIO를 다룰수 있는 API
Python module
- https://pypi.python.org/pypi/RPi.GPIO
RPi.GPIO 문서
- https://sourceforge.net/p/raspberry-gpio-python/wiki/Home/
15
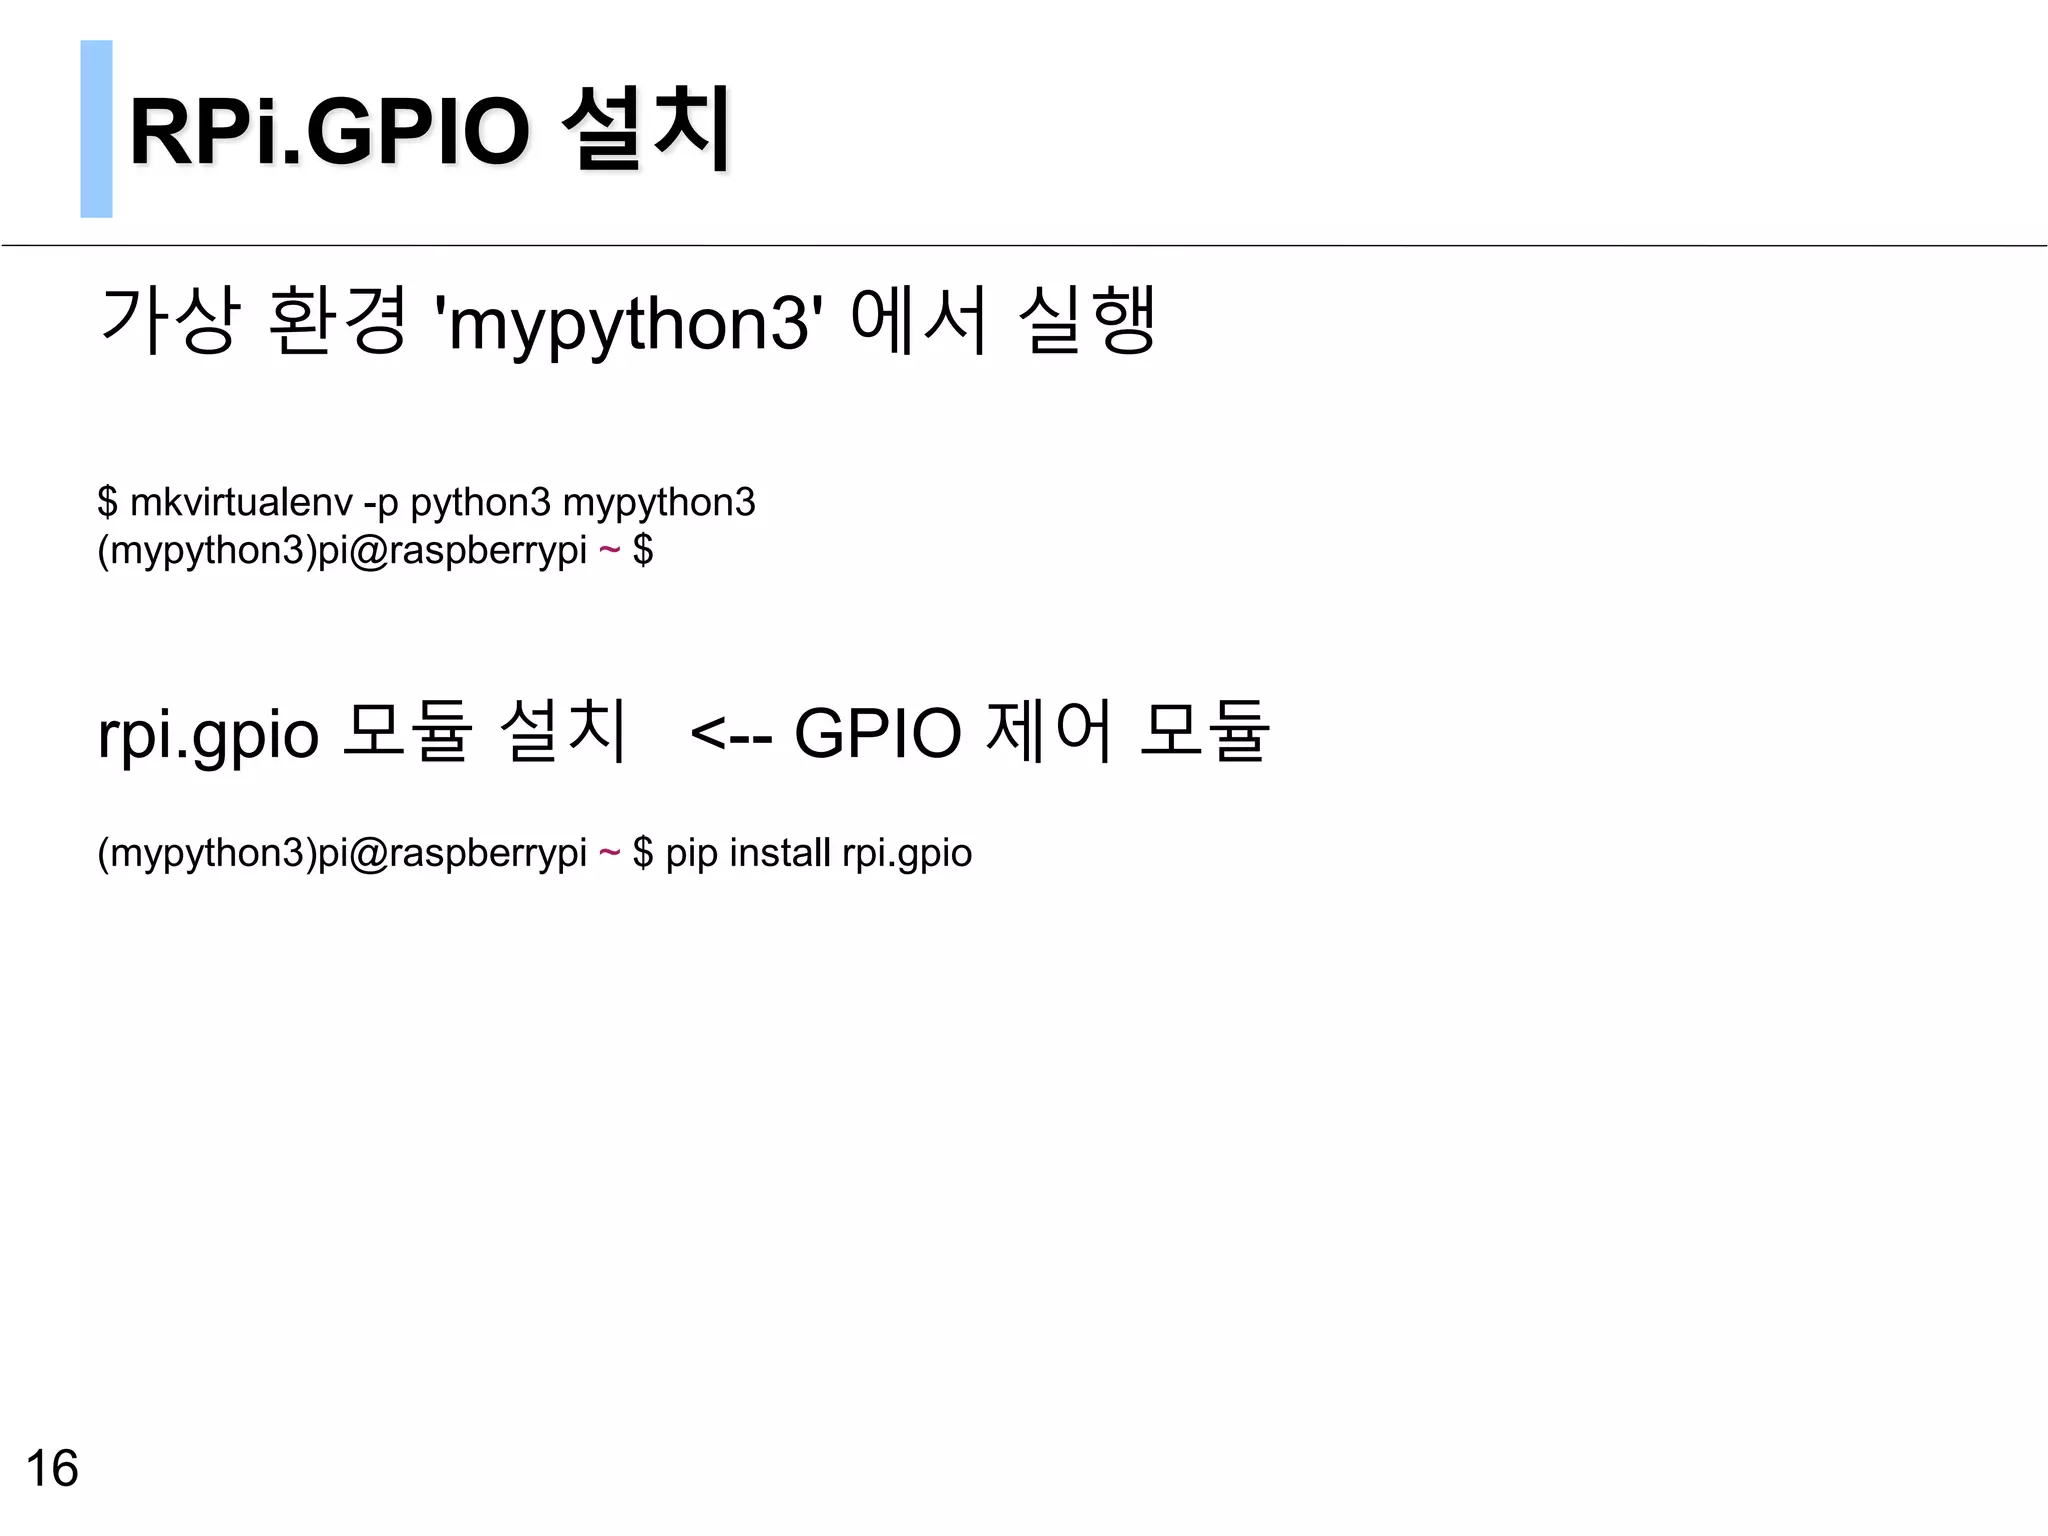
14.
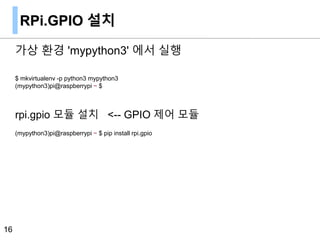
RPi.GPIO 설치
가상 환경'mypython3' 에서 실행
$ mkvirtualenv -p python3 mypython3
(mypython3)pi@raspberrypi ~ $
rpi.gpio 모듈 설치 <-- GPIO 제어 모듈
(mypython3)pi@raspberrypi ~ $ pip install rpi.gpio
16
15.
RPi.GPIO API 사용
모듈선언
import RPi.GPIO as GPIO
GPIO pin numbering
GPIO.setmode(GPIO.BOARD) # physical pin numbering
GPIO.setmode(GPIO.BCM) # BCM or GPIO pin numbering
GPIO channel : pin
GPIO.setup(channel, GPIO.IN) # 디지털 입력
GPIO.setup(channel, GPIO.OUT) # 디지털 출력
GPIO.setup(channel, GPIO.OUT, initial=GPIO.HIGH) # Pull up or down
GPIO multi channel
chan_list = [11,12]
GPIO.setup(chan_list, GPIO.OUT)
17 https://sourceforge.net/p/raspberry-gpio-python/wiki/BasicUsage/
16.
RPi.GPIO API 사용
GPIOread & write
GPIO.input(channel) # 디지털 값: 0 / GPIO.LOW / False or 1 / GPIO.HIGH / True.
GPIO.output(channel, state) # state 디지털 출력: GPIO.LOW, GPIO.HIGH, 0, False, True
GPIO multi channel output
chan_list = [11,12] # also works with tuples
GPIO.output(chan_list, GPIO.LOW) # sets all to GPIO.LOW
GPIO.output(chan_list, (GPIO.HIGH, GPIO.LOW))
GPIO cleanup
GPIO.cleanup()
GPIO.cleanup(channel) # 특정 채널
GPIO.cleanup( (channel1, channel2) )
GPIO.cleanup( [channel1, channel2] )
18 https://sourceforge.net/p/raspberry-gpio-python/wiki/BasicUsage/
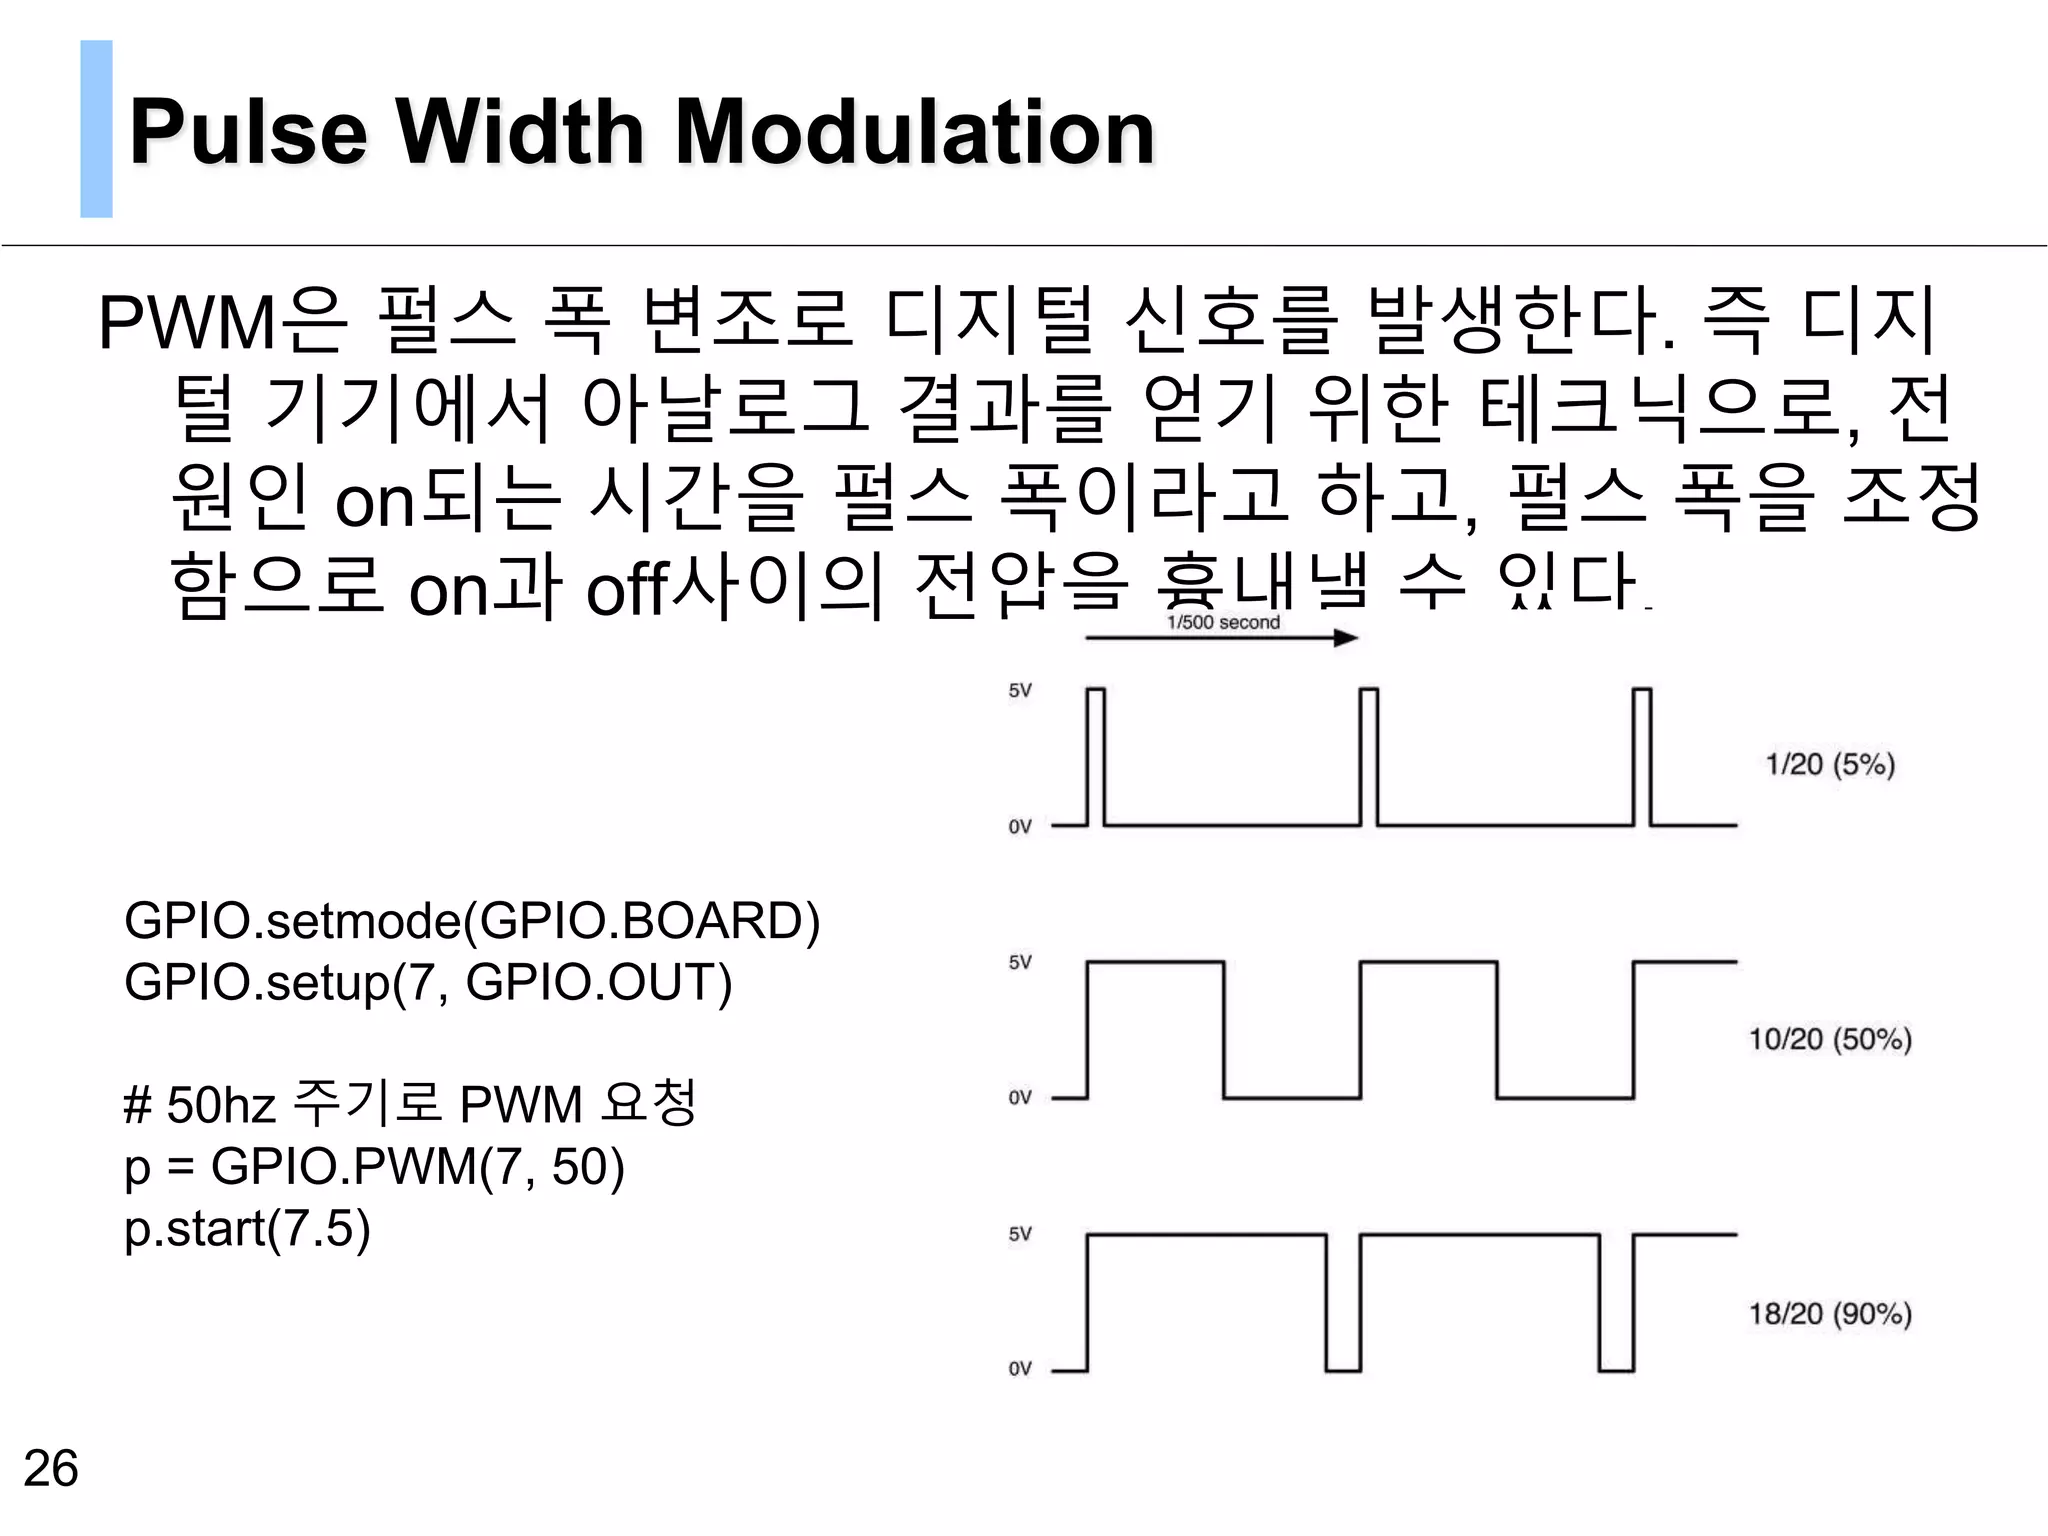
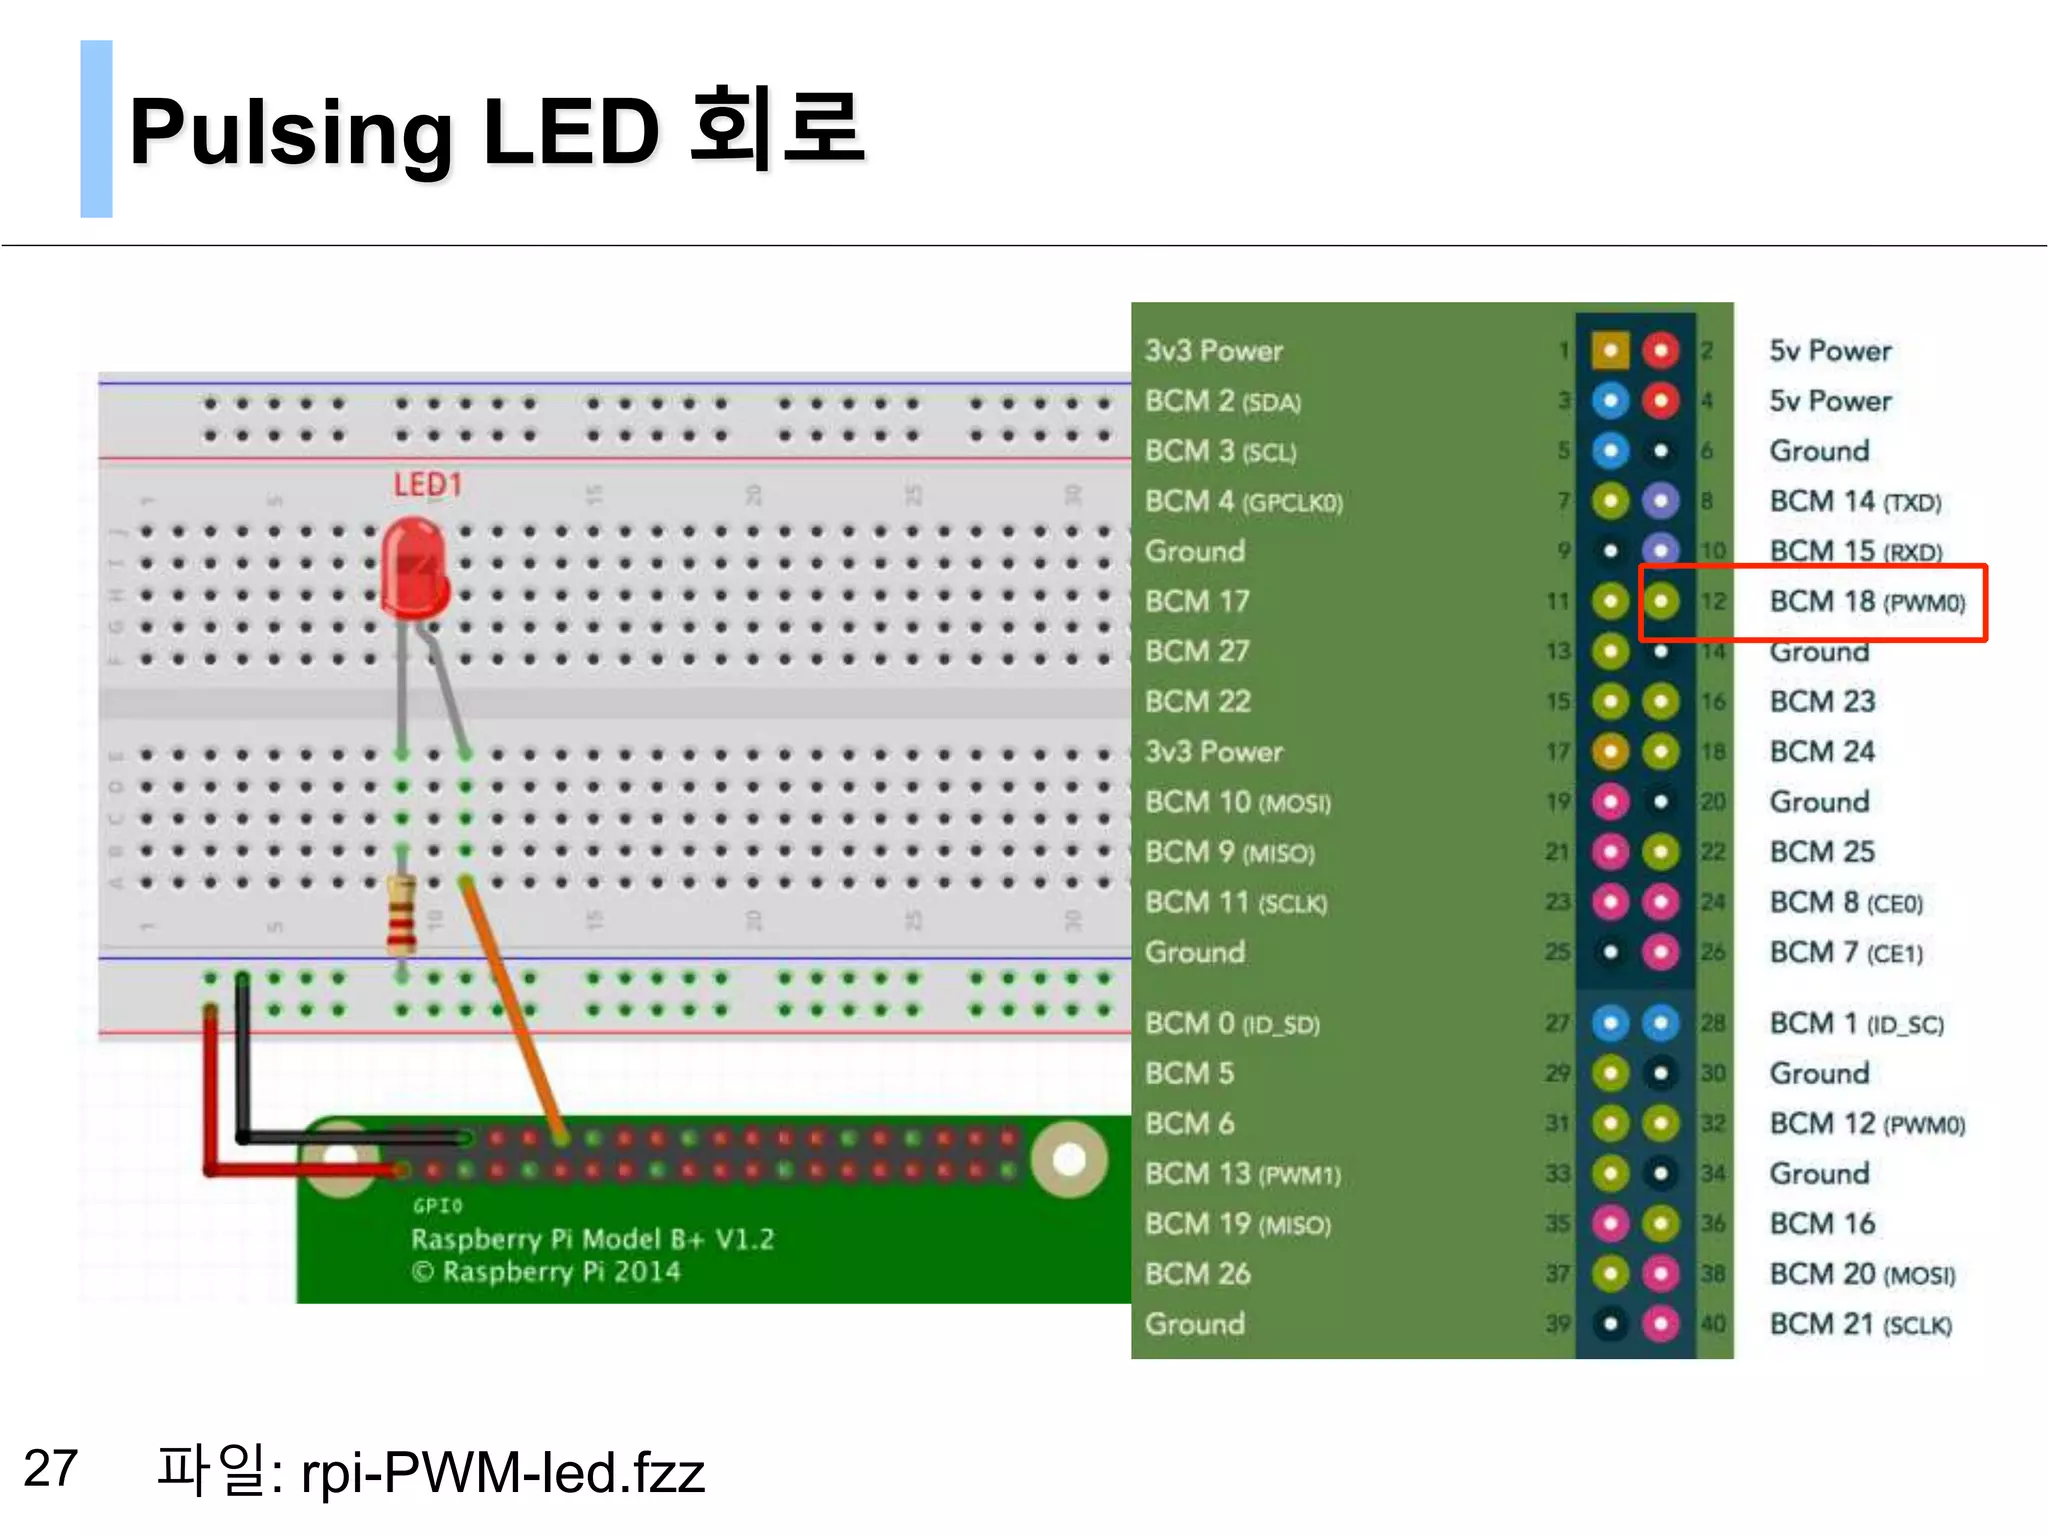
Pulse Width Modulation
PWM은펄스 폭 변조로 디지털 신호를 발생한다. 즉 디지
털 기기에서 아날로그 결과를 얻기 위한 테크닉으로, 전
원인 on되는 시간을 펄스 폭이라고 하고, 펄스 폭을 조정
함으로 on과 off사이의 전압을 흉내낼 수 있다.
26
GPIO.setmode(GPIO.BOARD)
GPIO.setup(7, GPIO.OUT)
# 50hz 주기로 PWM 요청
p = GPIO.PWM(7, 50)
p.start(7.5)
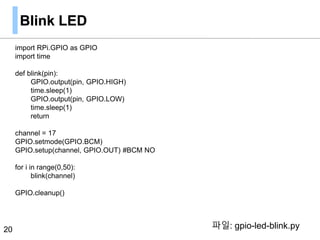
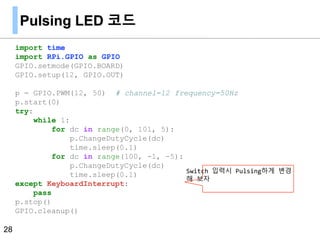
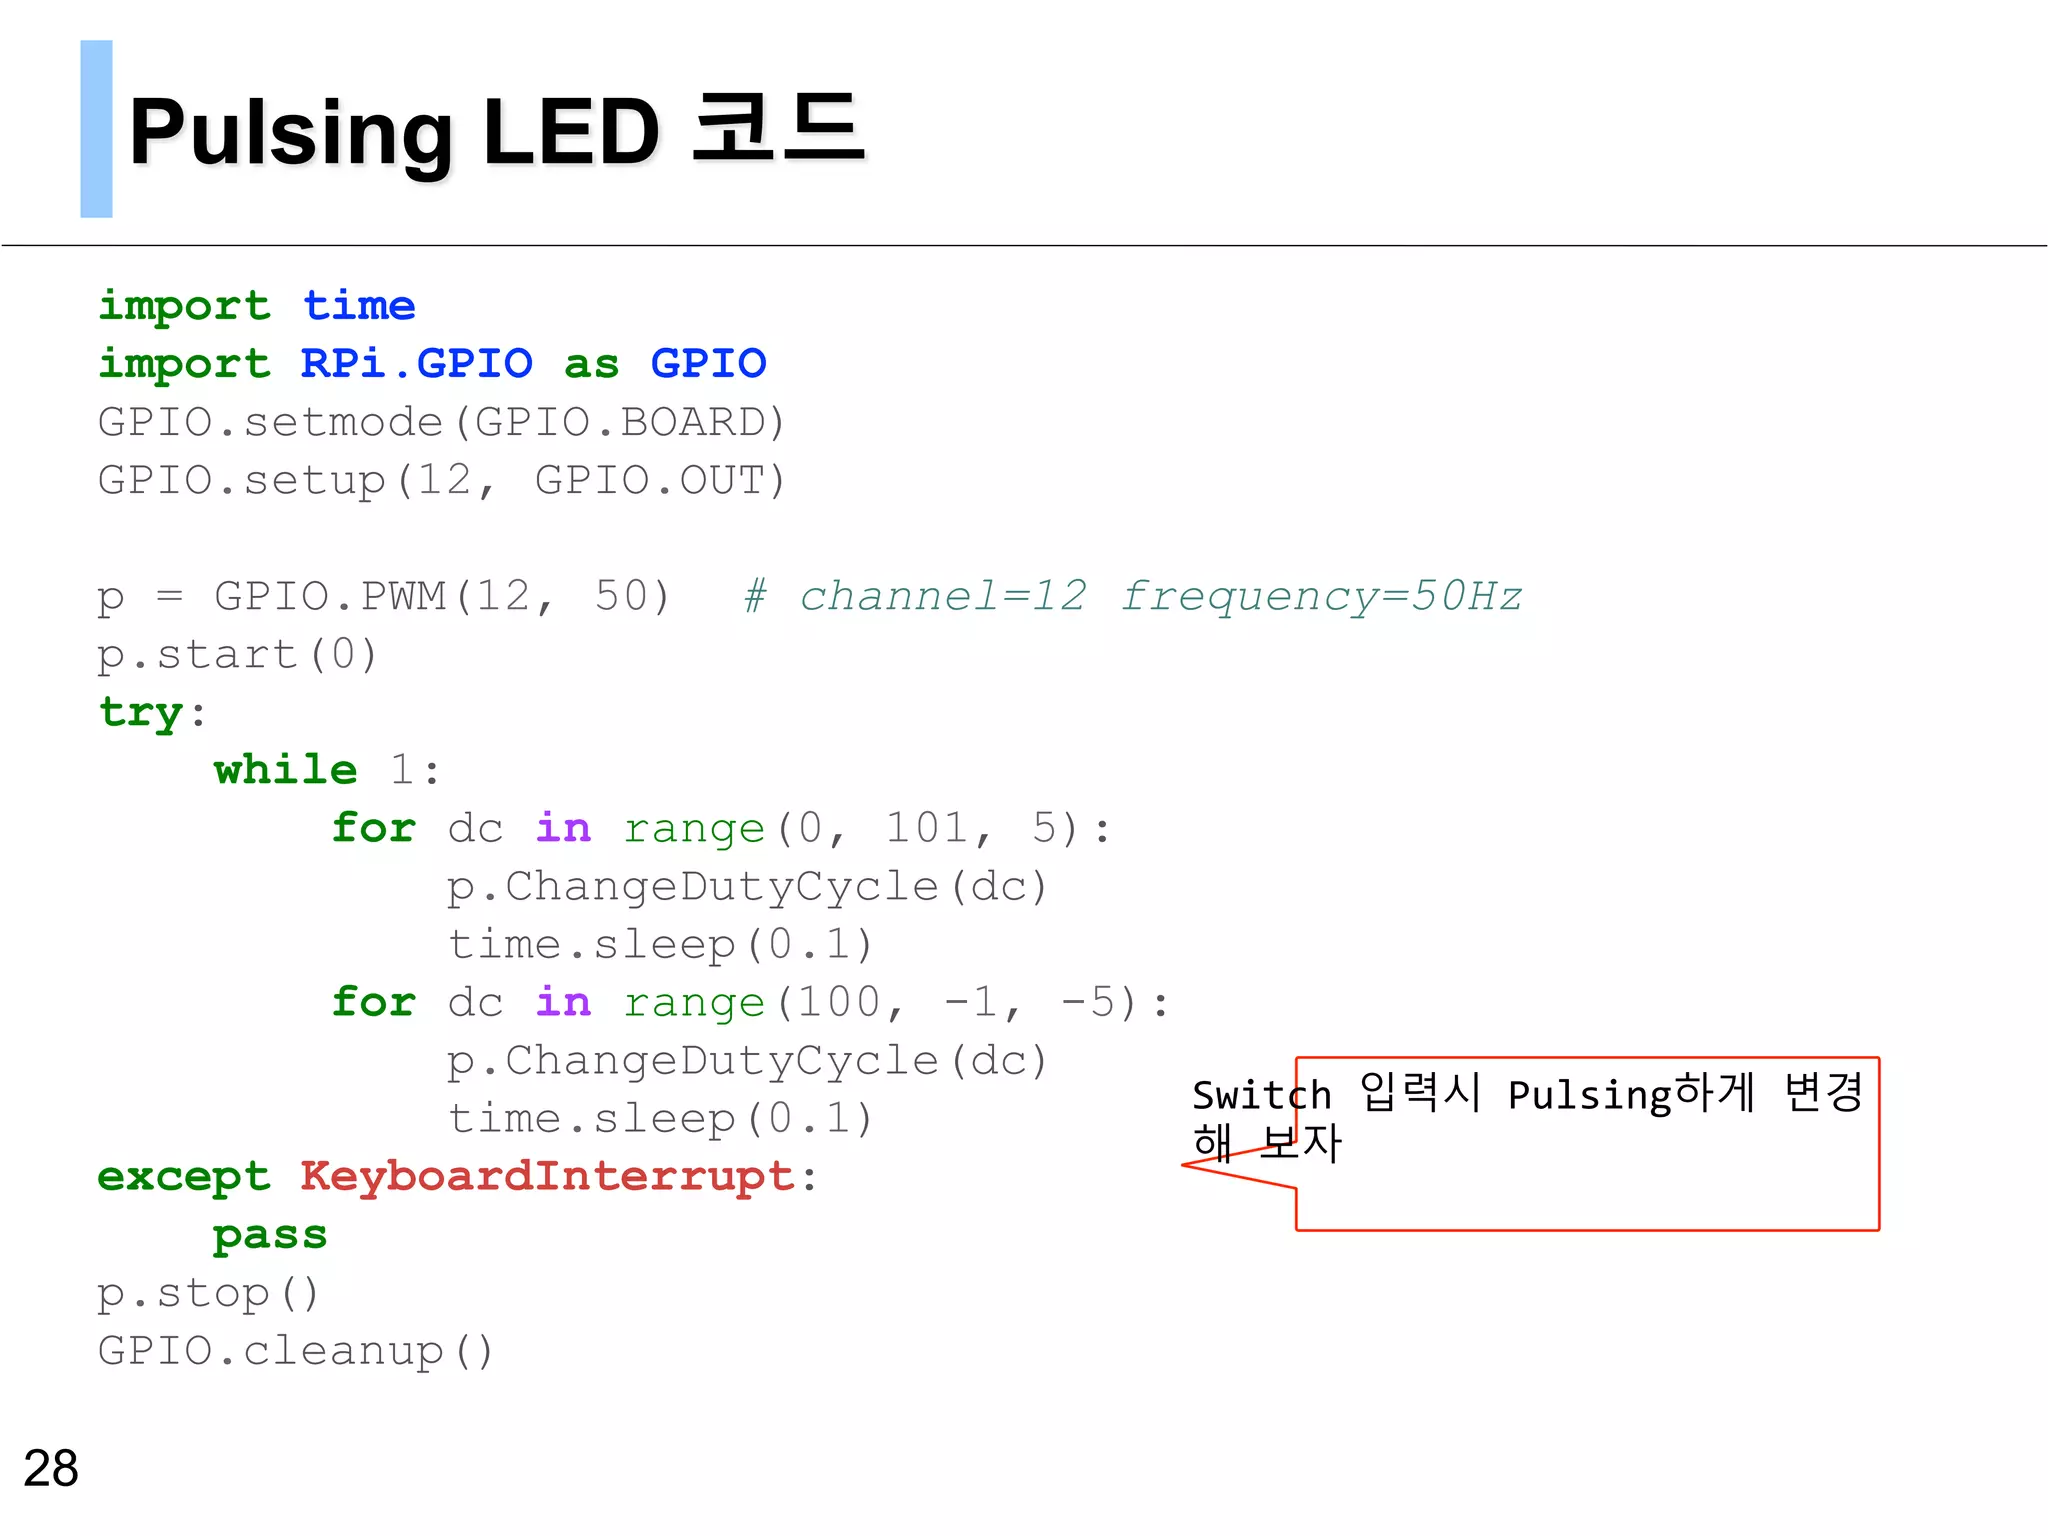
Pulsing LED 코드
importtime
import RPi.GPIO as GPIO
GPIO.setmode(GPIO.BOARD)
GPIO.setup(12, GPIO.OUT)
p = GPIO.PWM(12, 50) # channel=12 frequency=50Hz
p.start(0)
try:
while 1:
for dc in range(0, 101, 5):
p.ChangeDutyCycle(dc)
time.sleep(0.1)
for dc in range(100, -1, -5):
p.ChangeDutyCycle(dc)
time.sleep(0.1)
except KeyboardInterrupt:
pass
p.stop()
GPIO.cleanup()
28
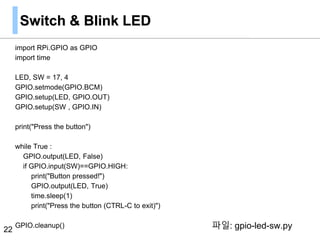
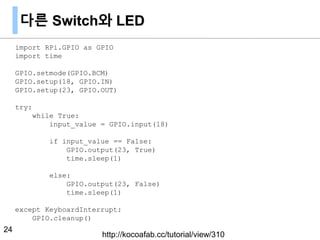
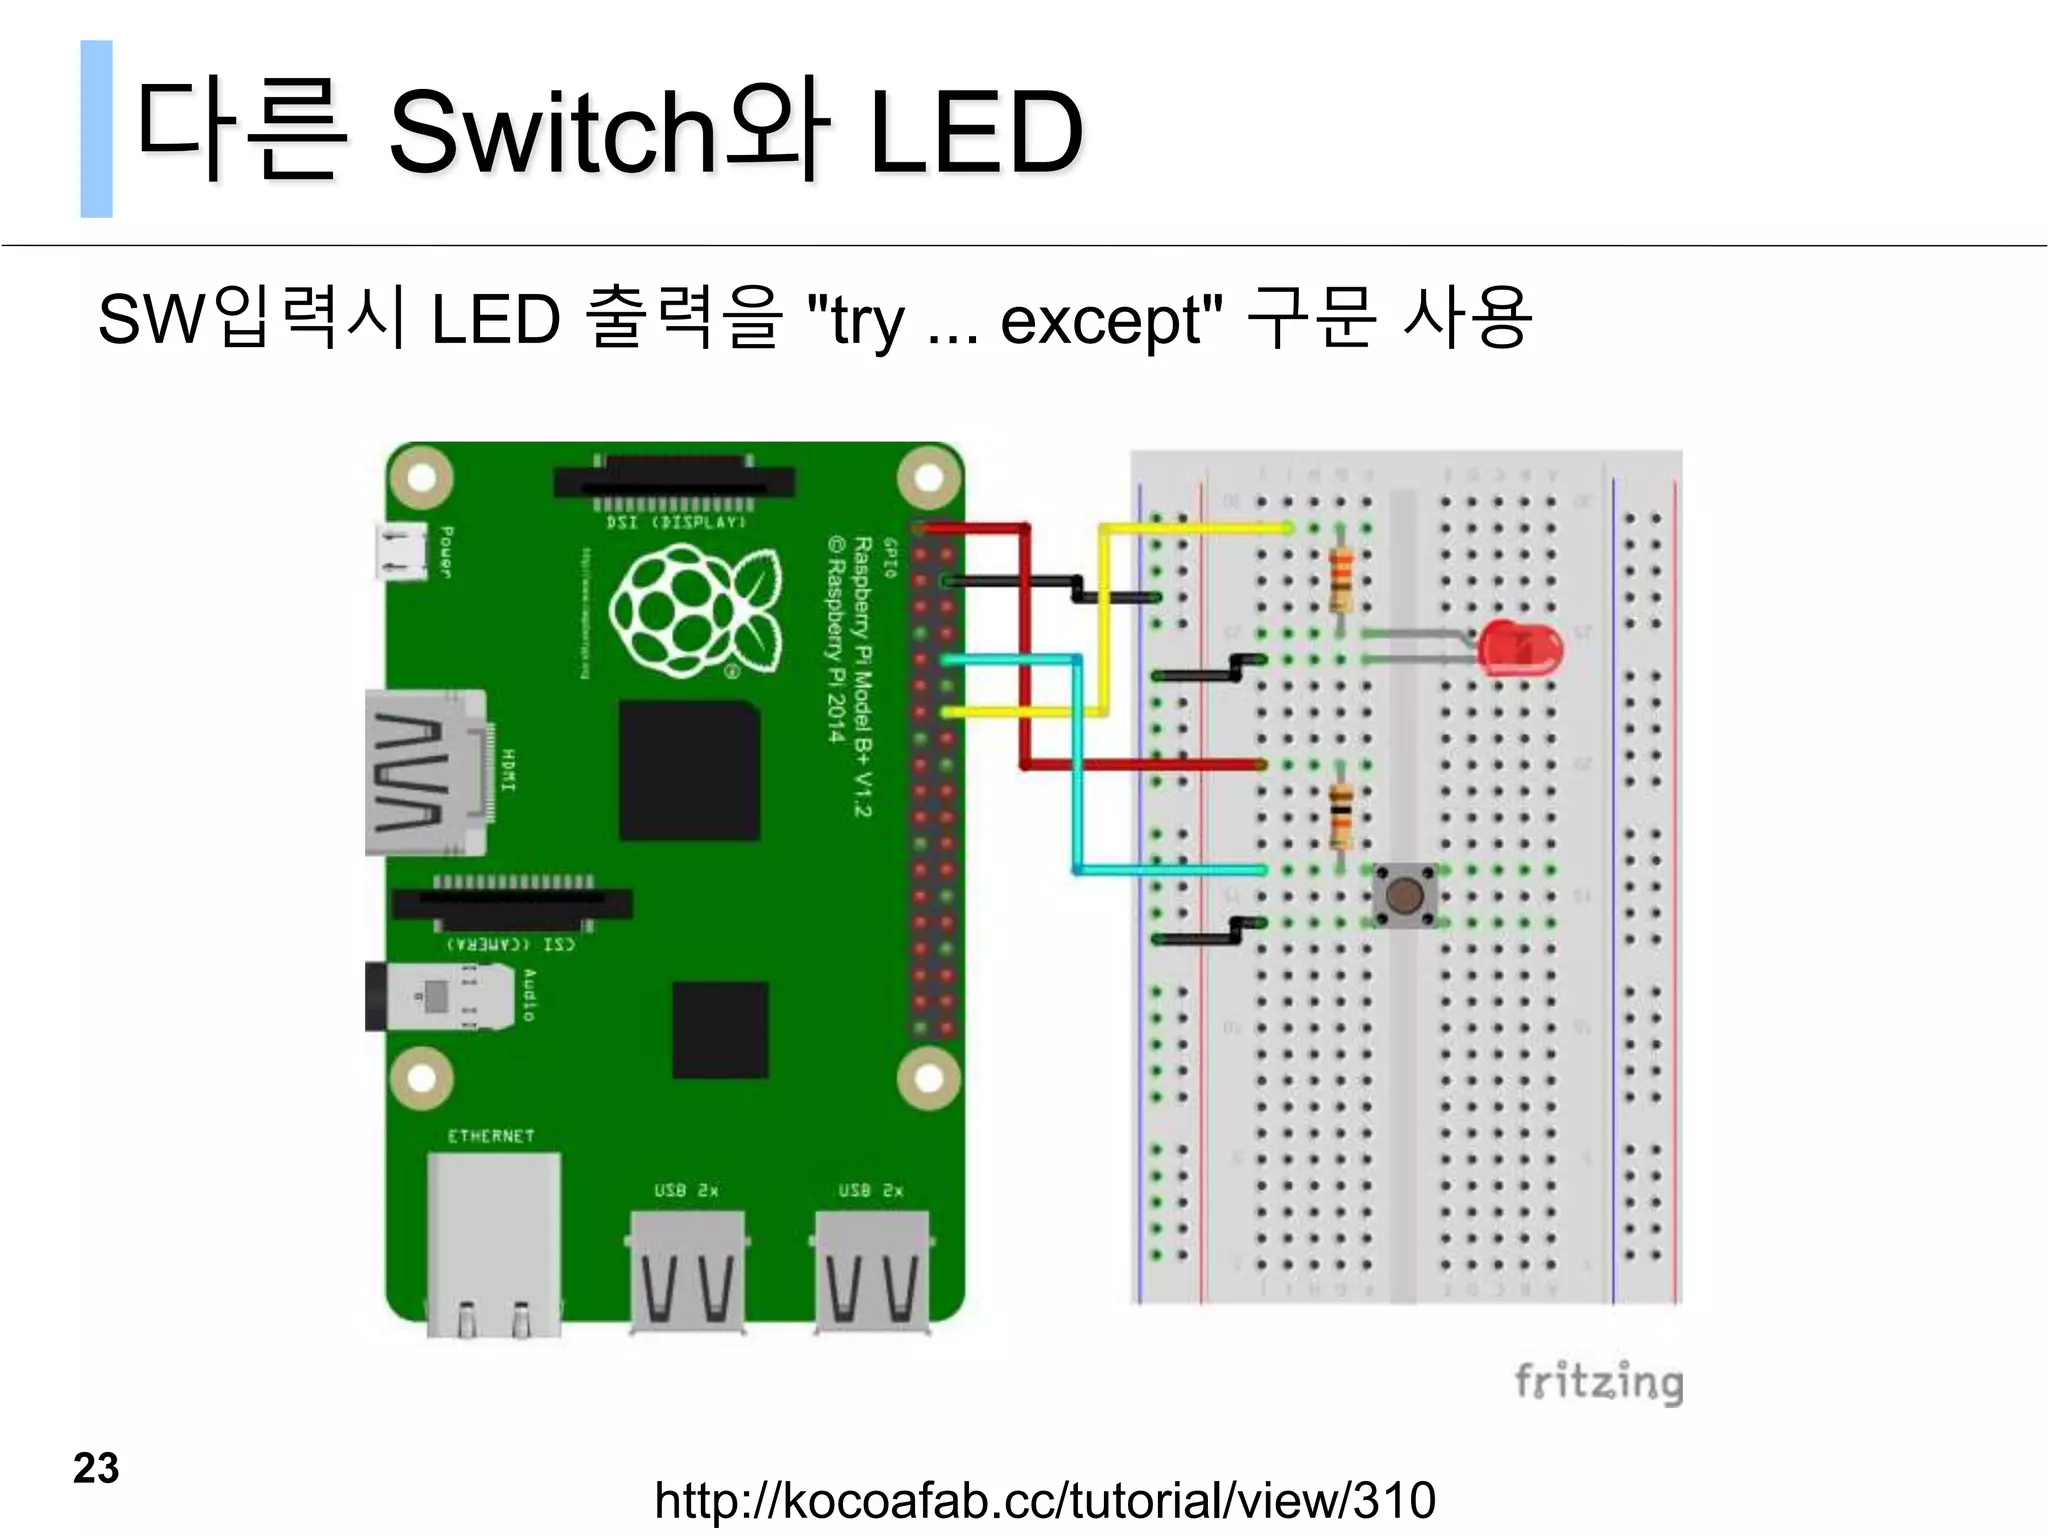
Switch 입력시 Pulsing하게 변경
해 보자
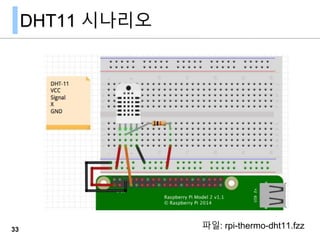
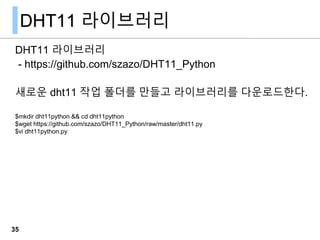
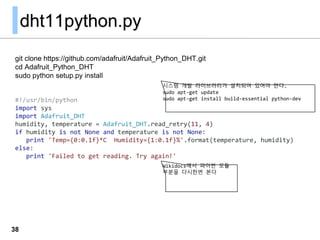
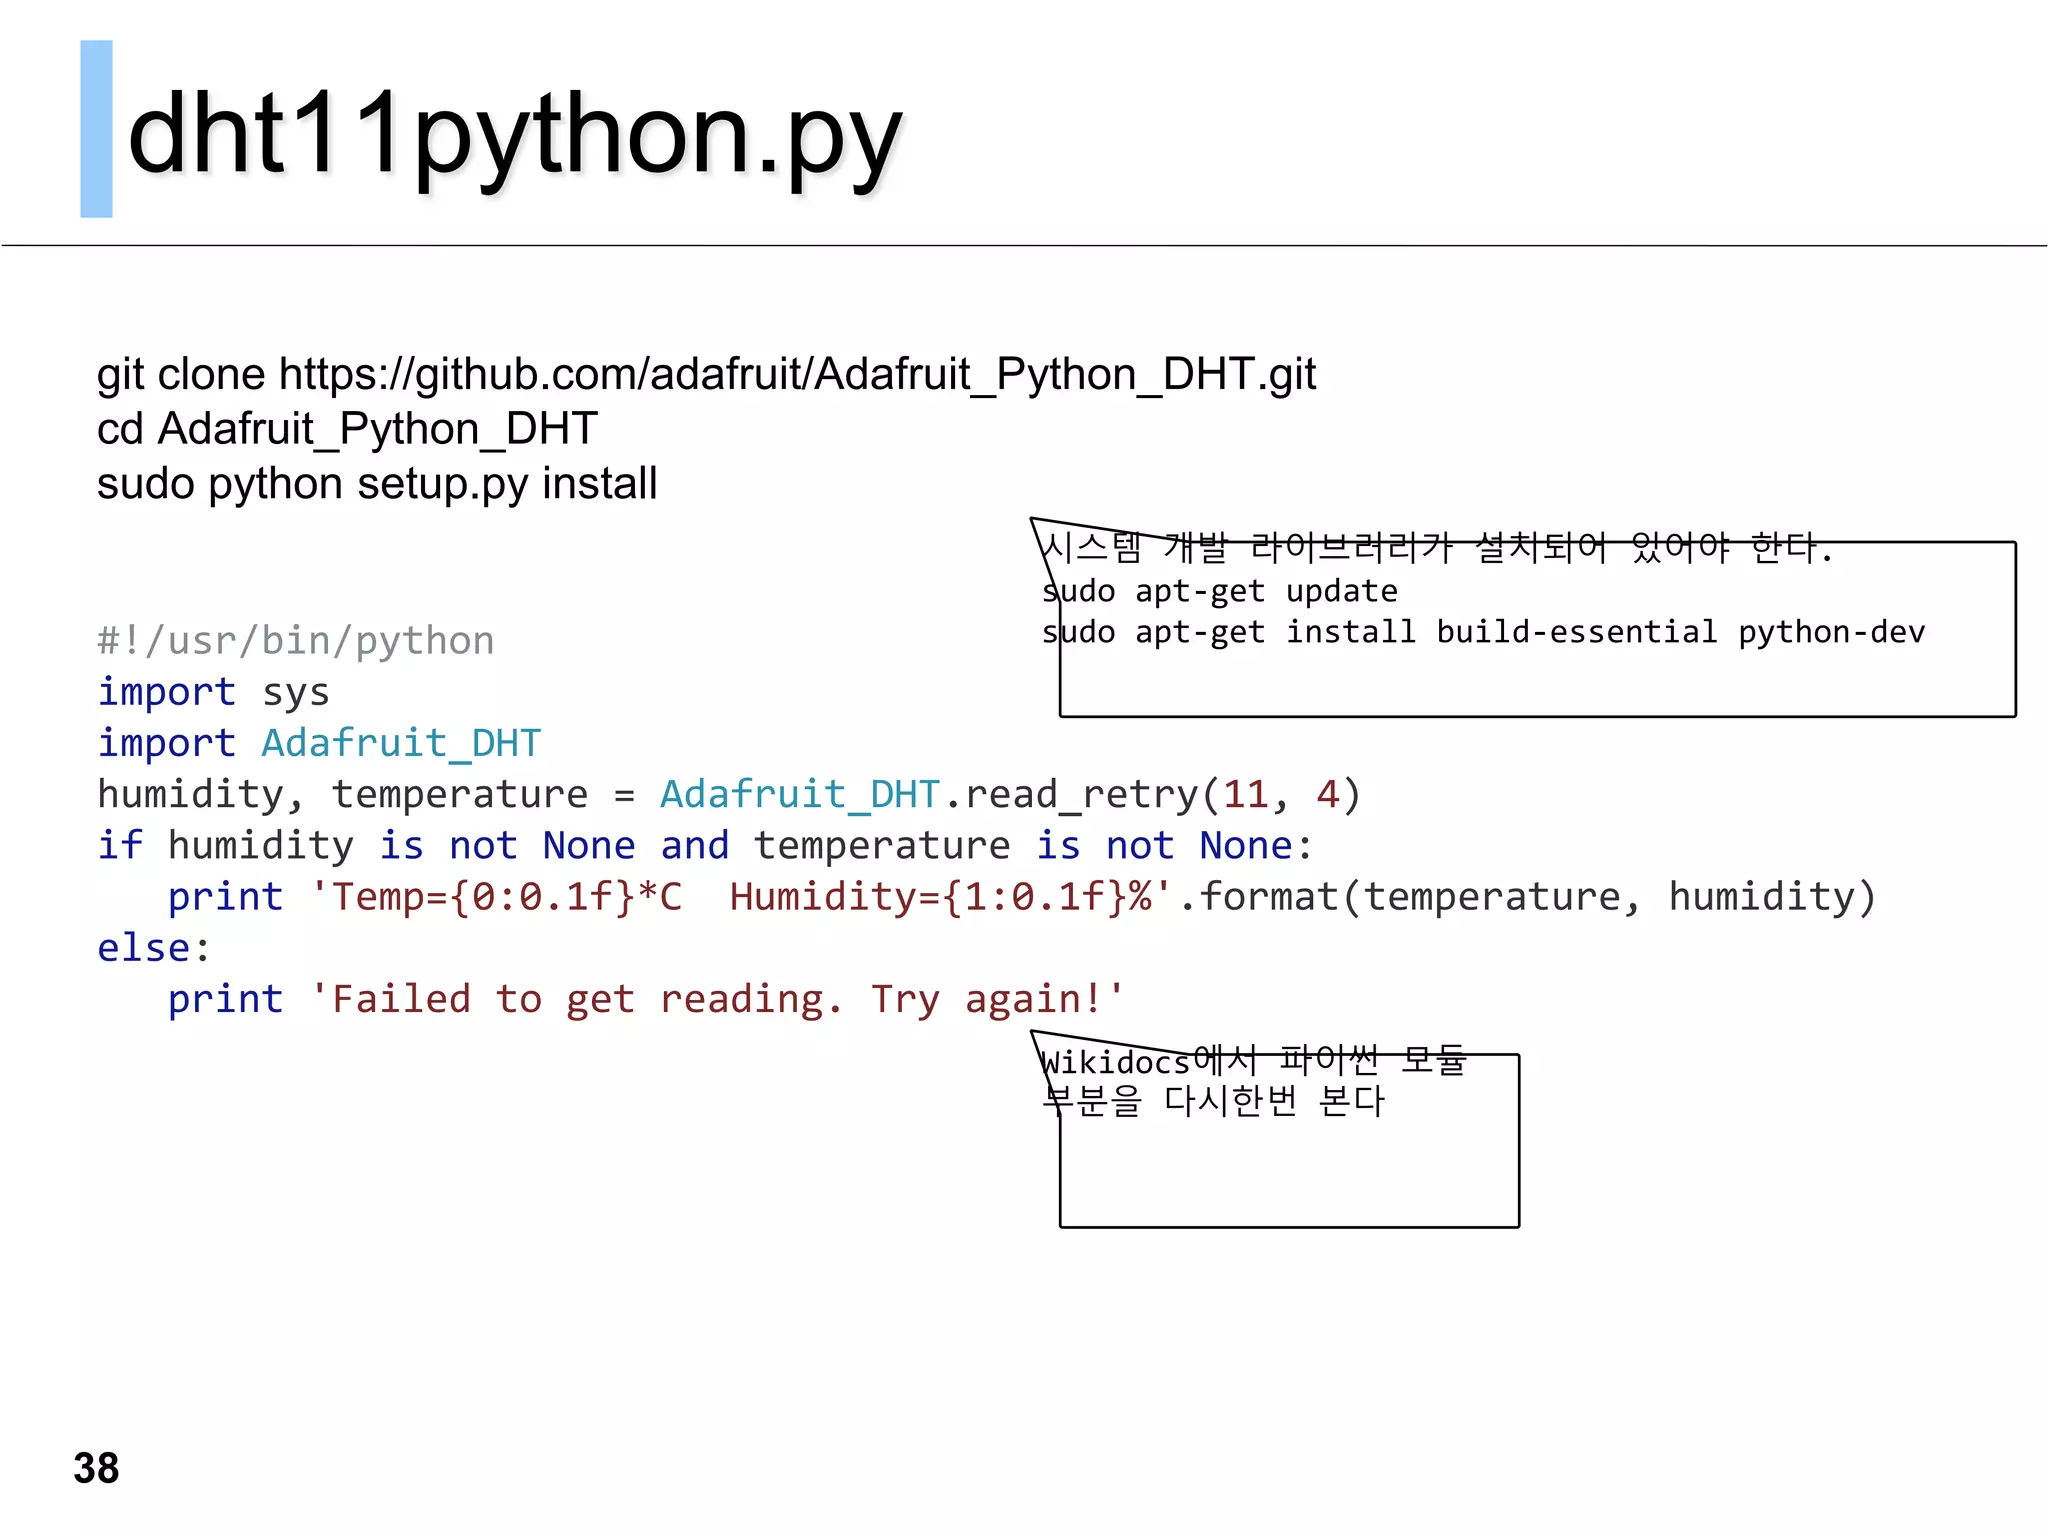
dht11python.py
git clone https://github.com/adafruit/Adafruit_Python_DHT.git
cdAdafruit_Python_DHT
sudo python setup.py install
#!/usr/bin/python
import sys
import Adafruit_DHT
humidity, temperature = Adafruit_DHT.read_retry(11, 4)
if humidity is not None and temperature is not None:
print 'Temp={0:0.1f}*C Humidity={1:0.1f}%'.format(temperature, humidity)
else:
print 'Failed to get reading. Try again!'
38
시스템 개발 라이브러리가 설치되어 있어야 한다.
sudo apt-get update
sudo apt-get install build-essential python-dev
Wikidocs에서 파이썬 모듈
부분을 다시한번 본다
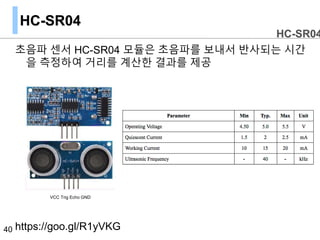
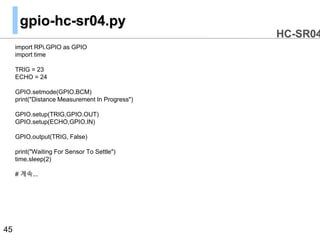
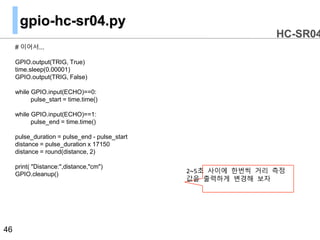
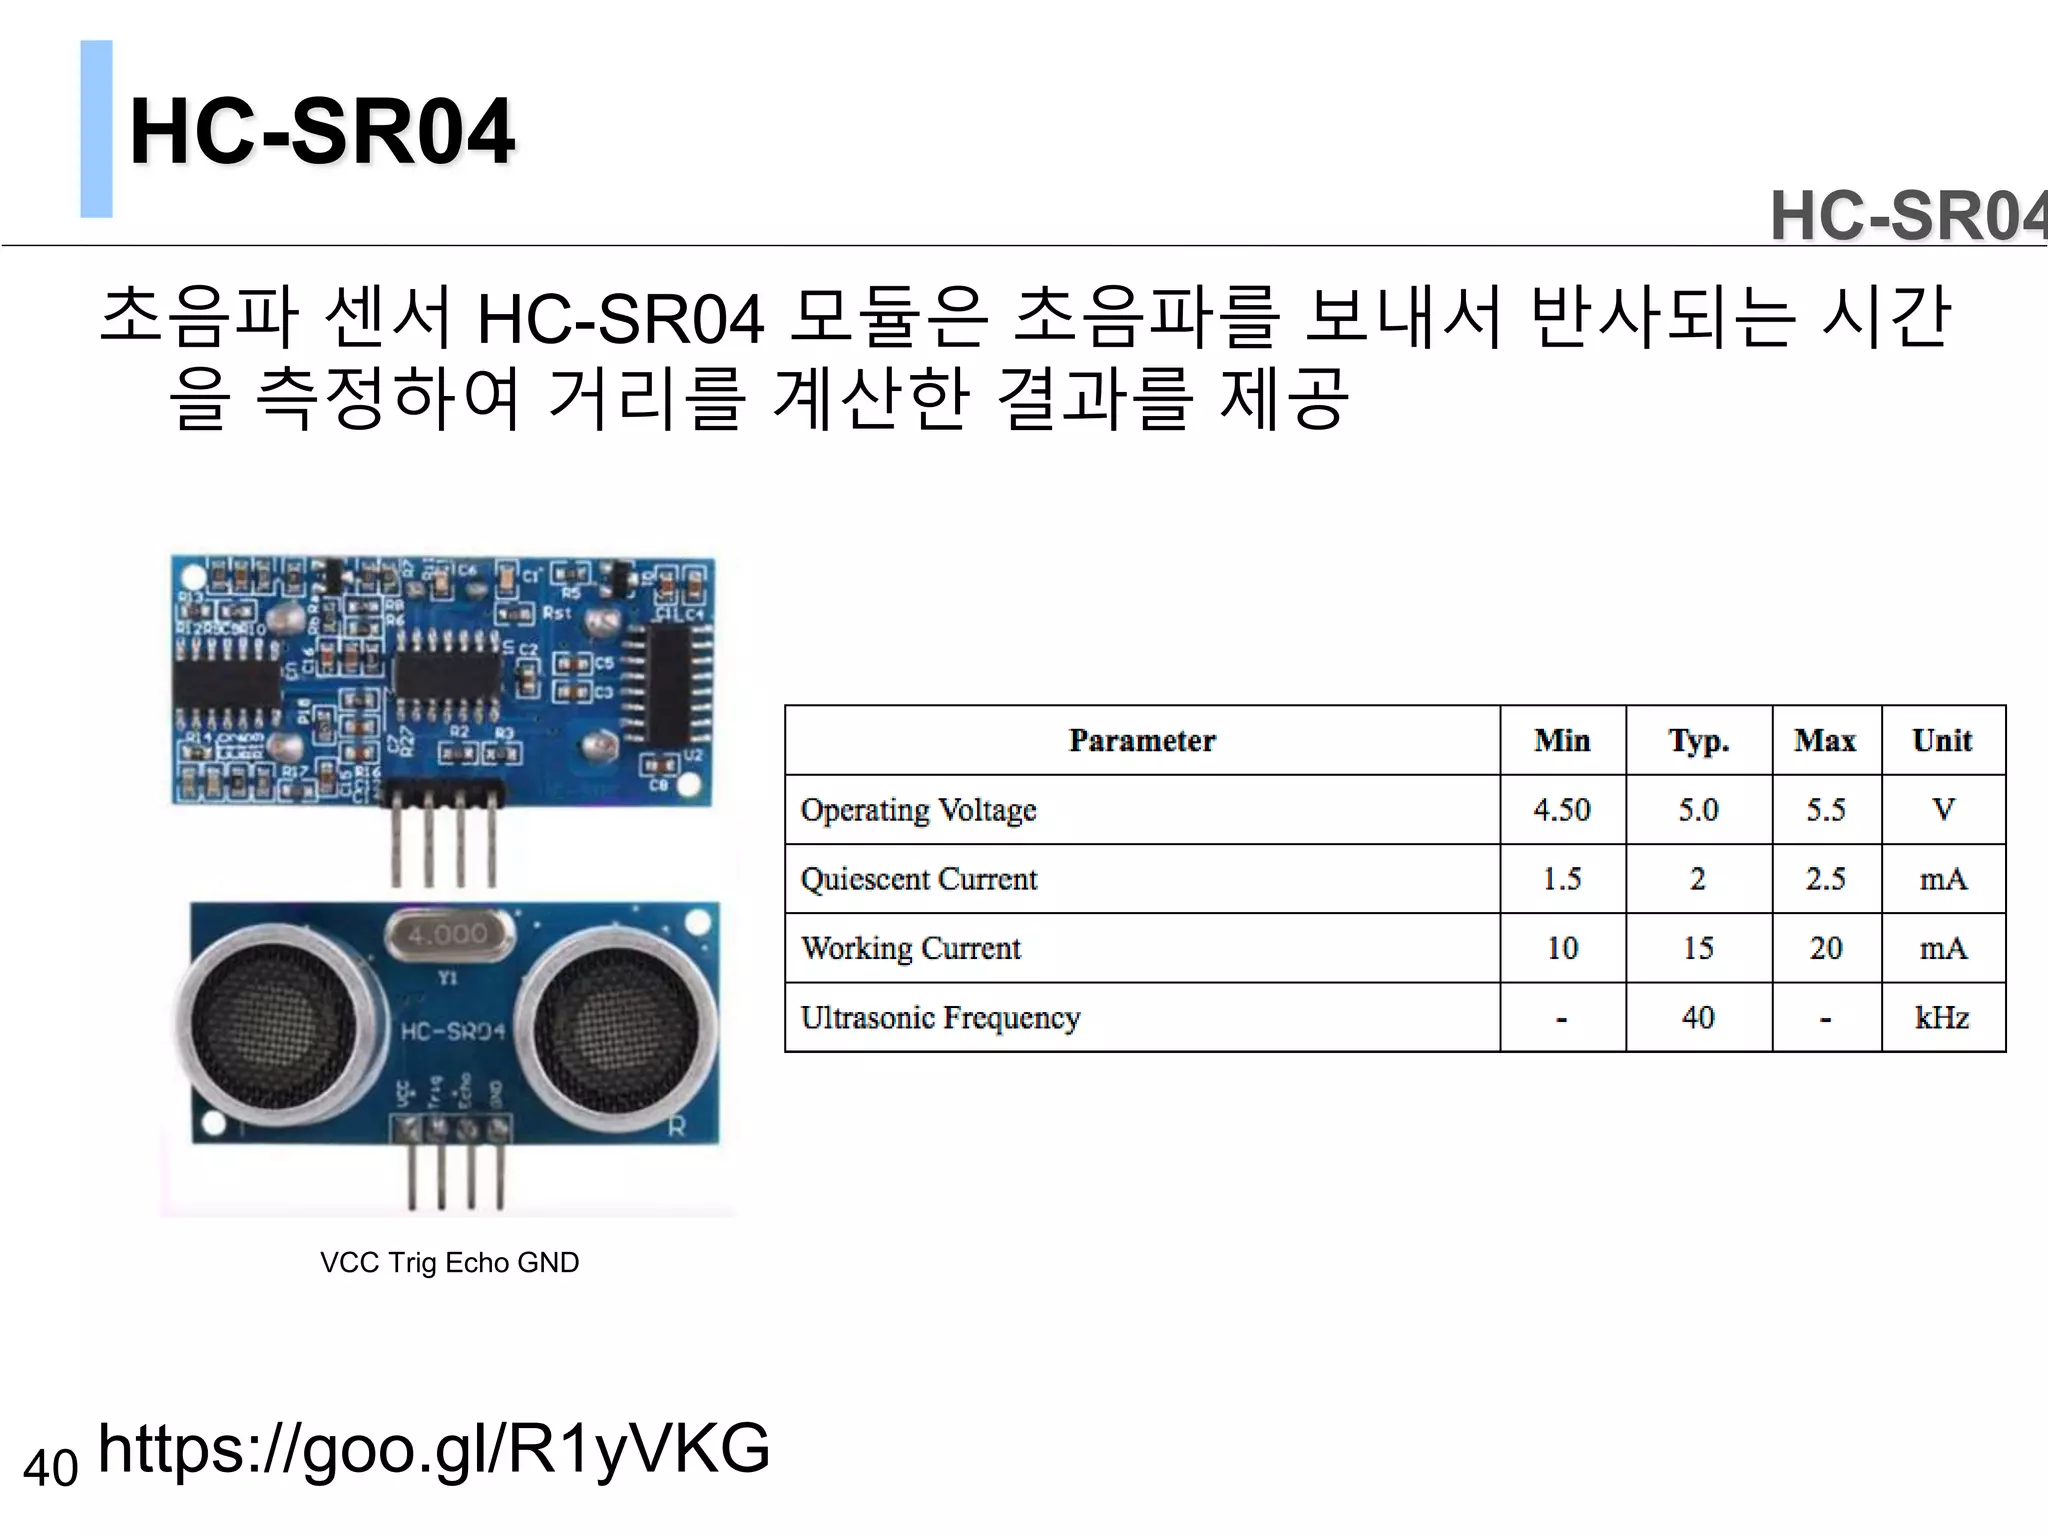
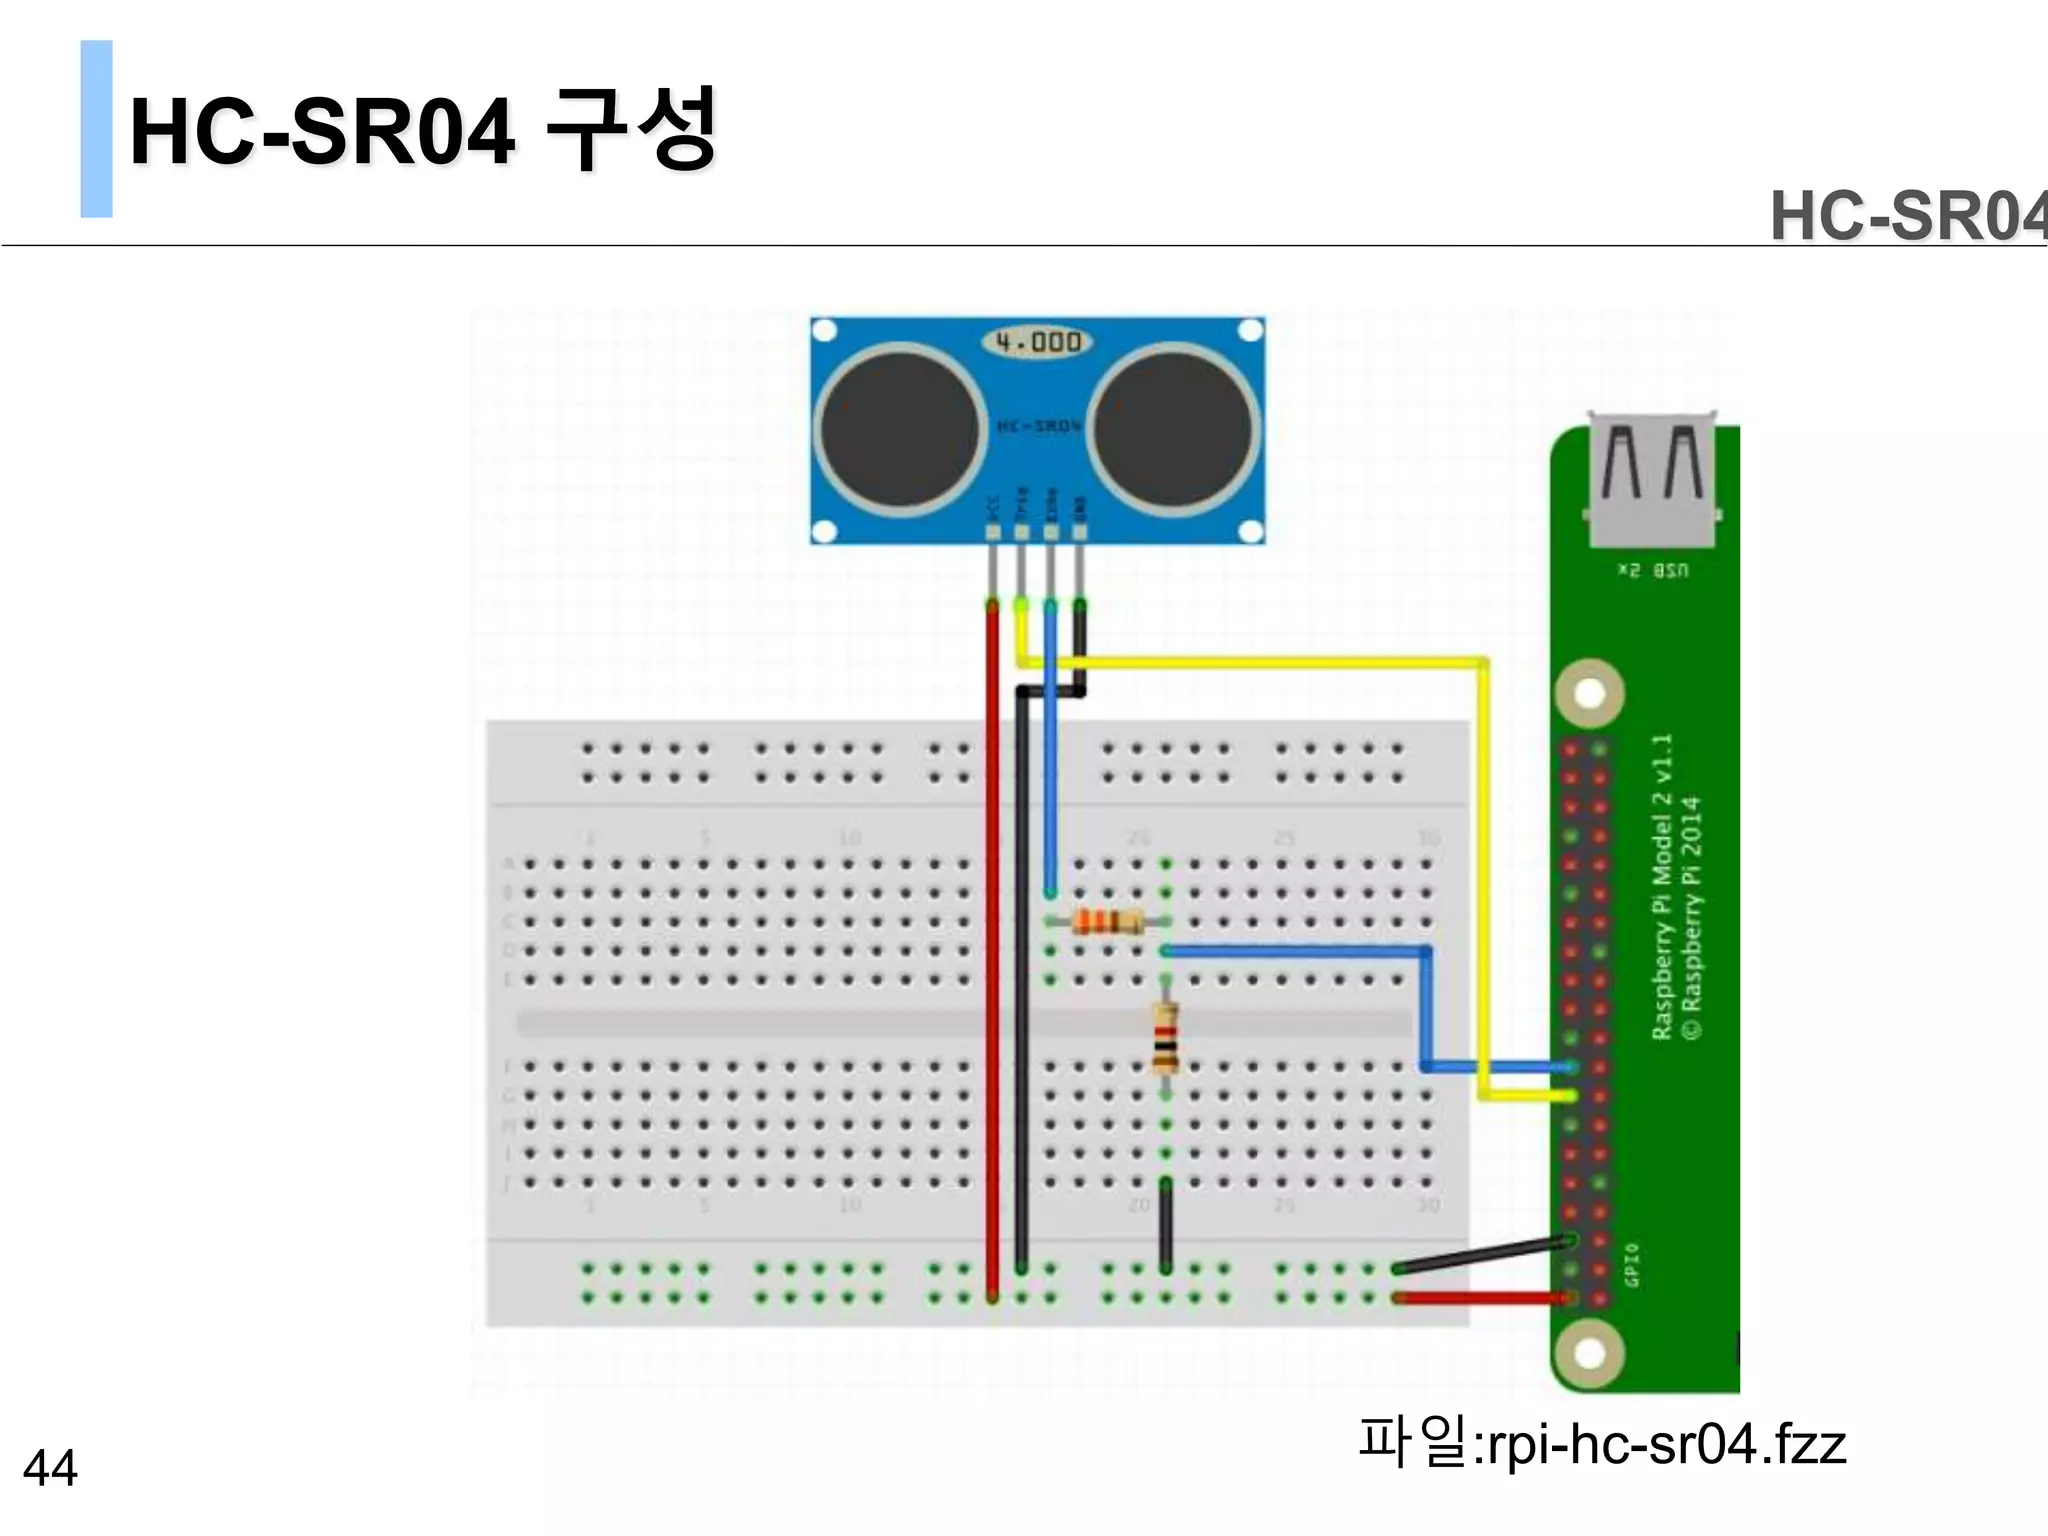
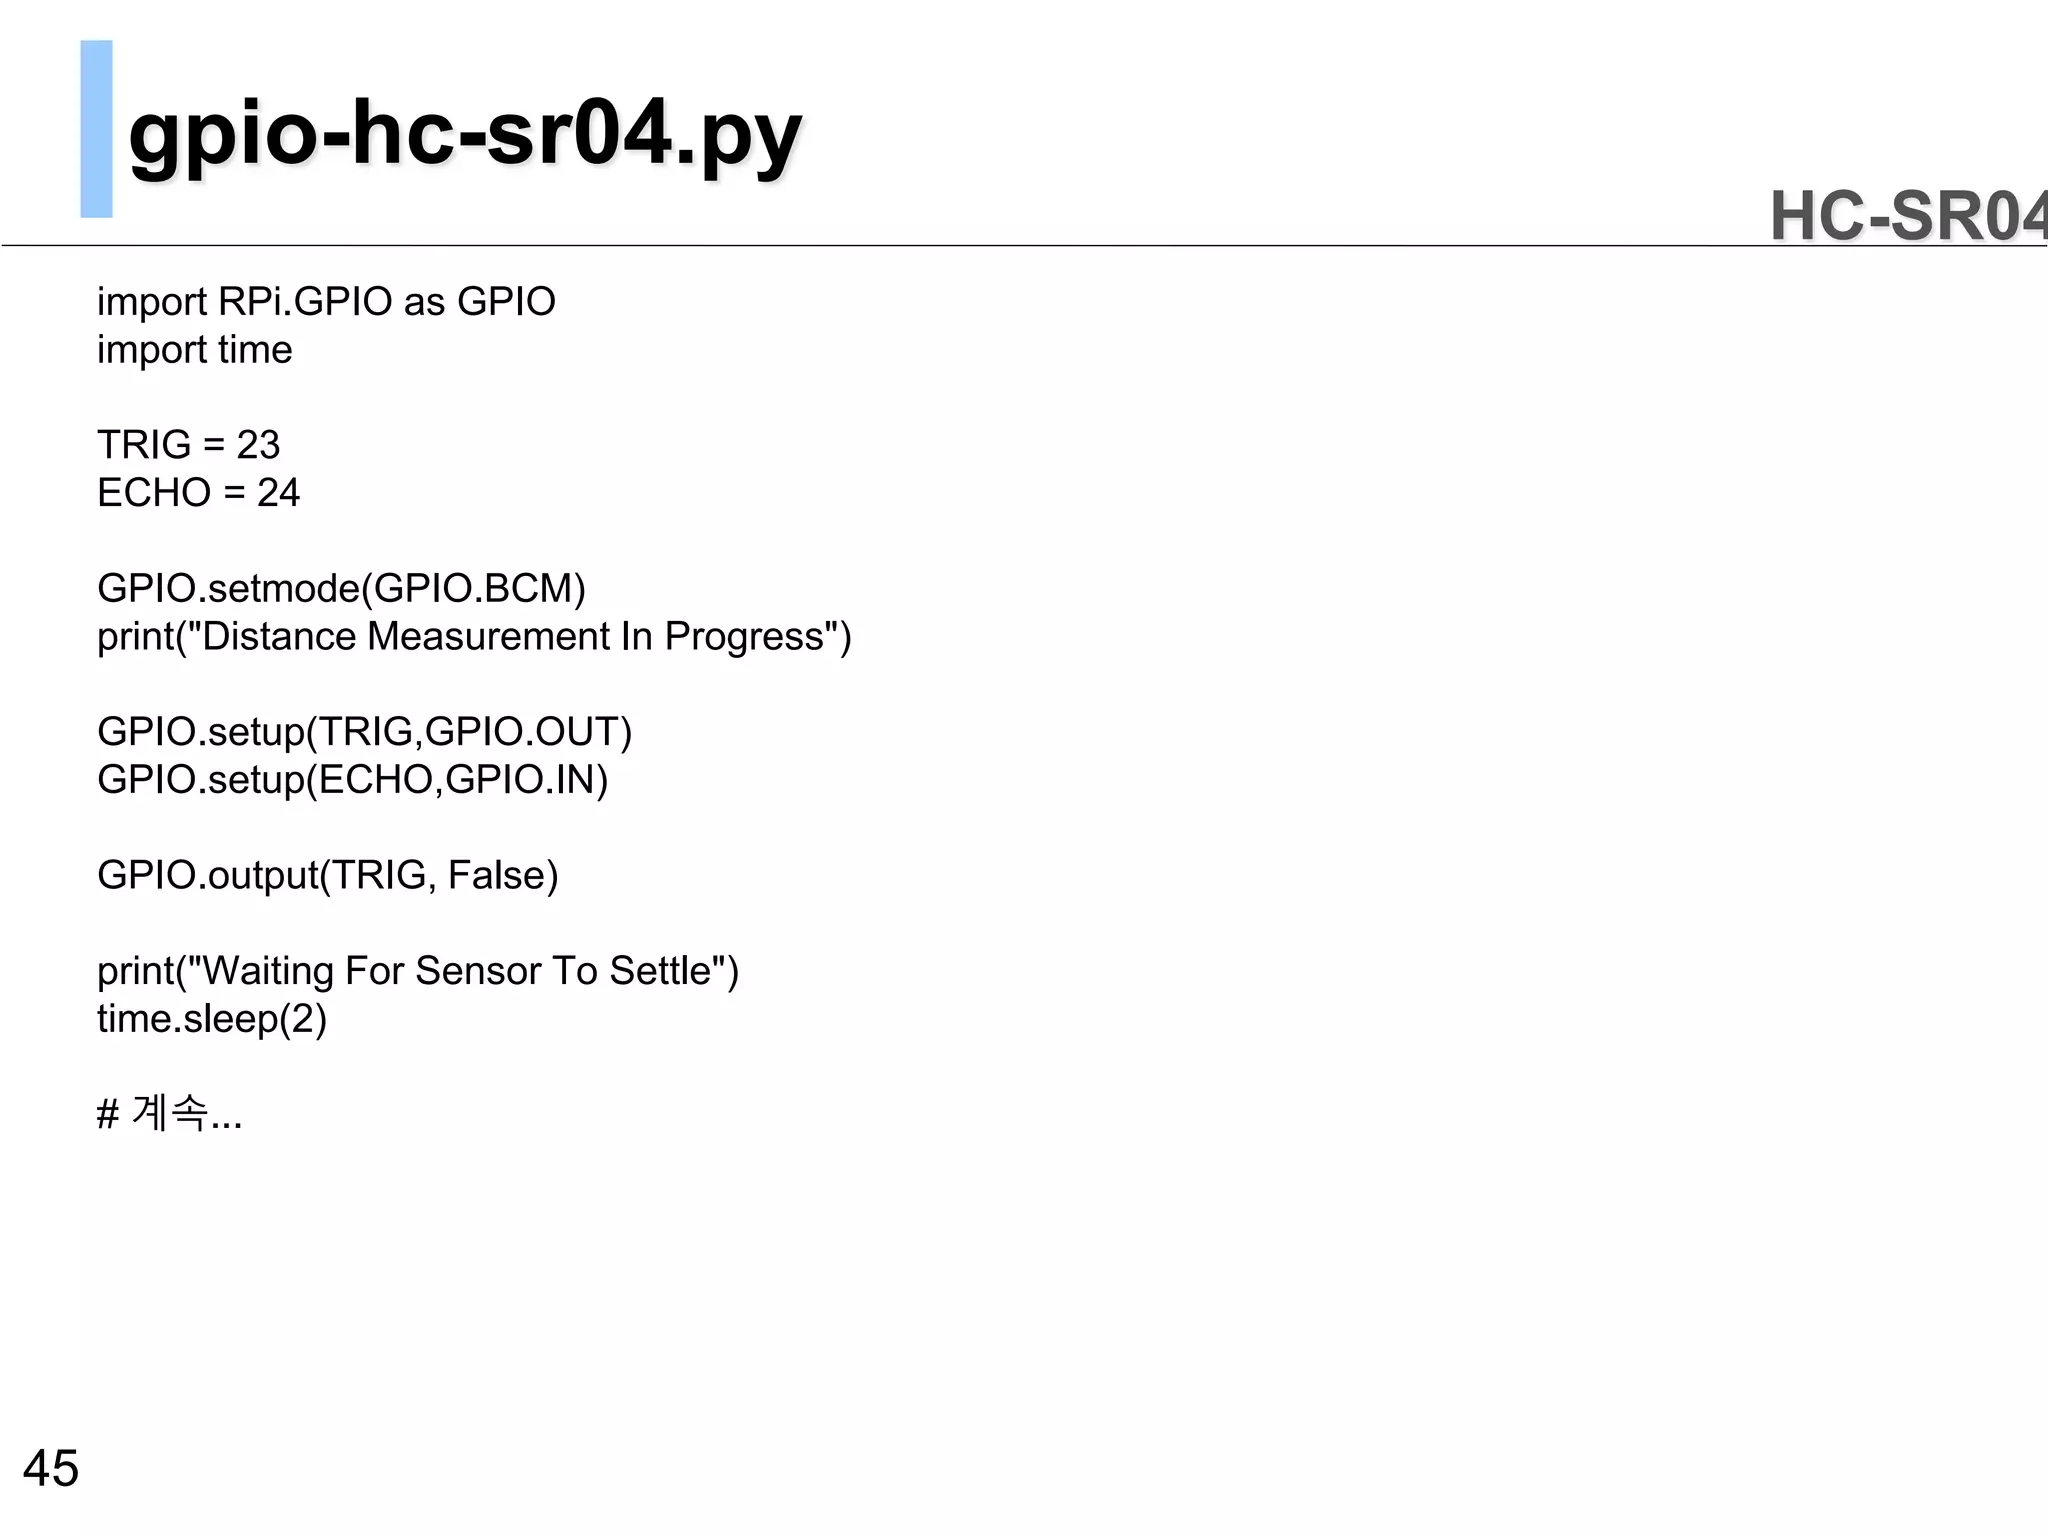
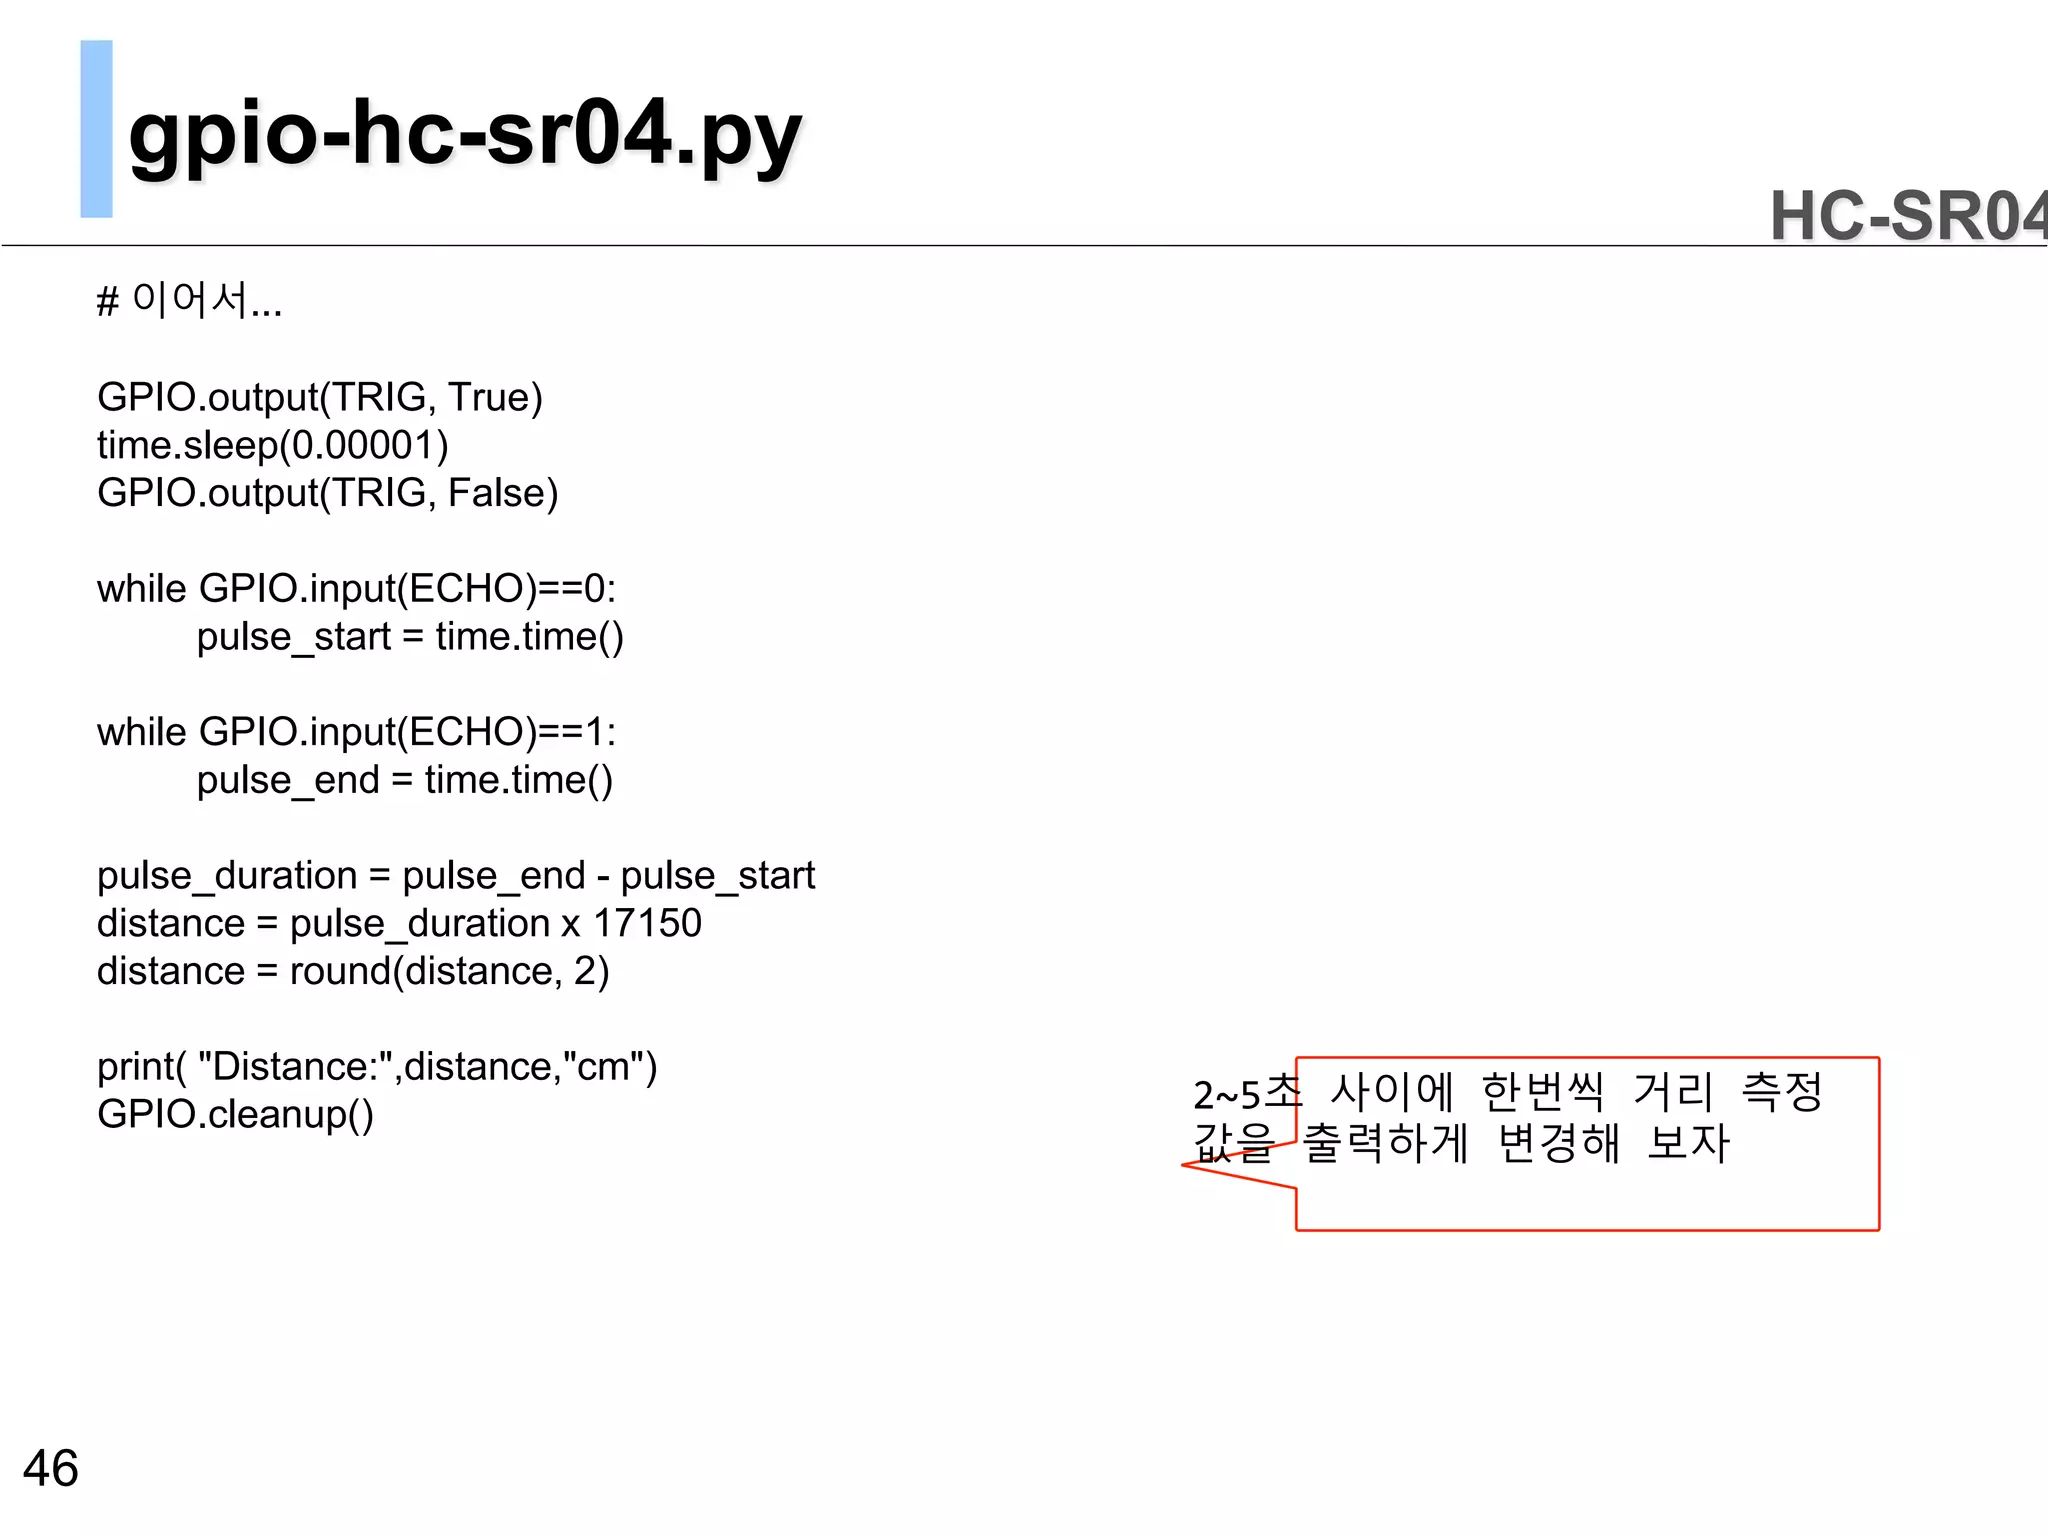
HC-SR04
초음파 센서 HC-SR04모듈은 초음파를 보내서 반사되는 시간
을 측정하여 거리를 계산한 결과를 제공
https://goo.gl/R1yVKG40
VCC Trig Echo GND
HC-SR04
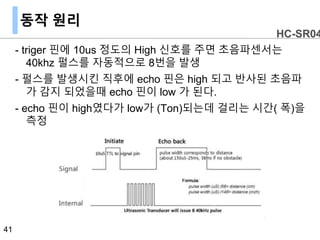
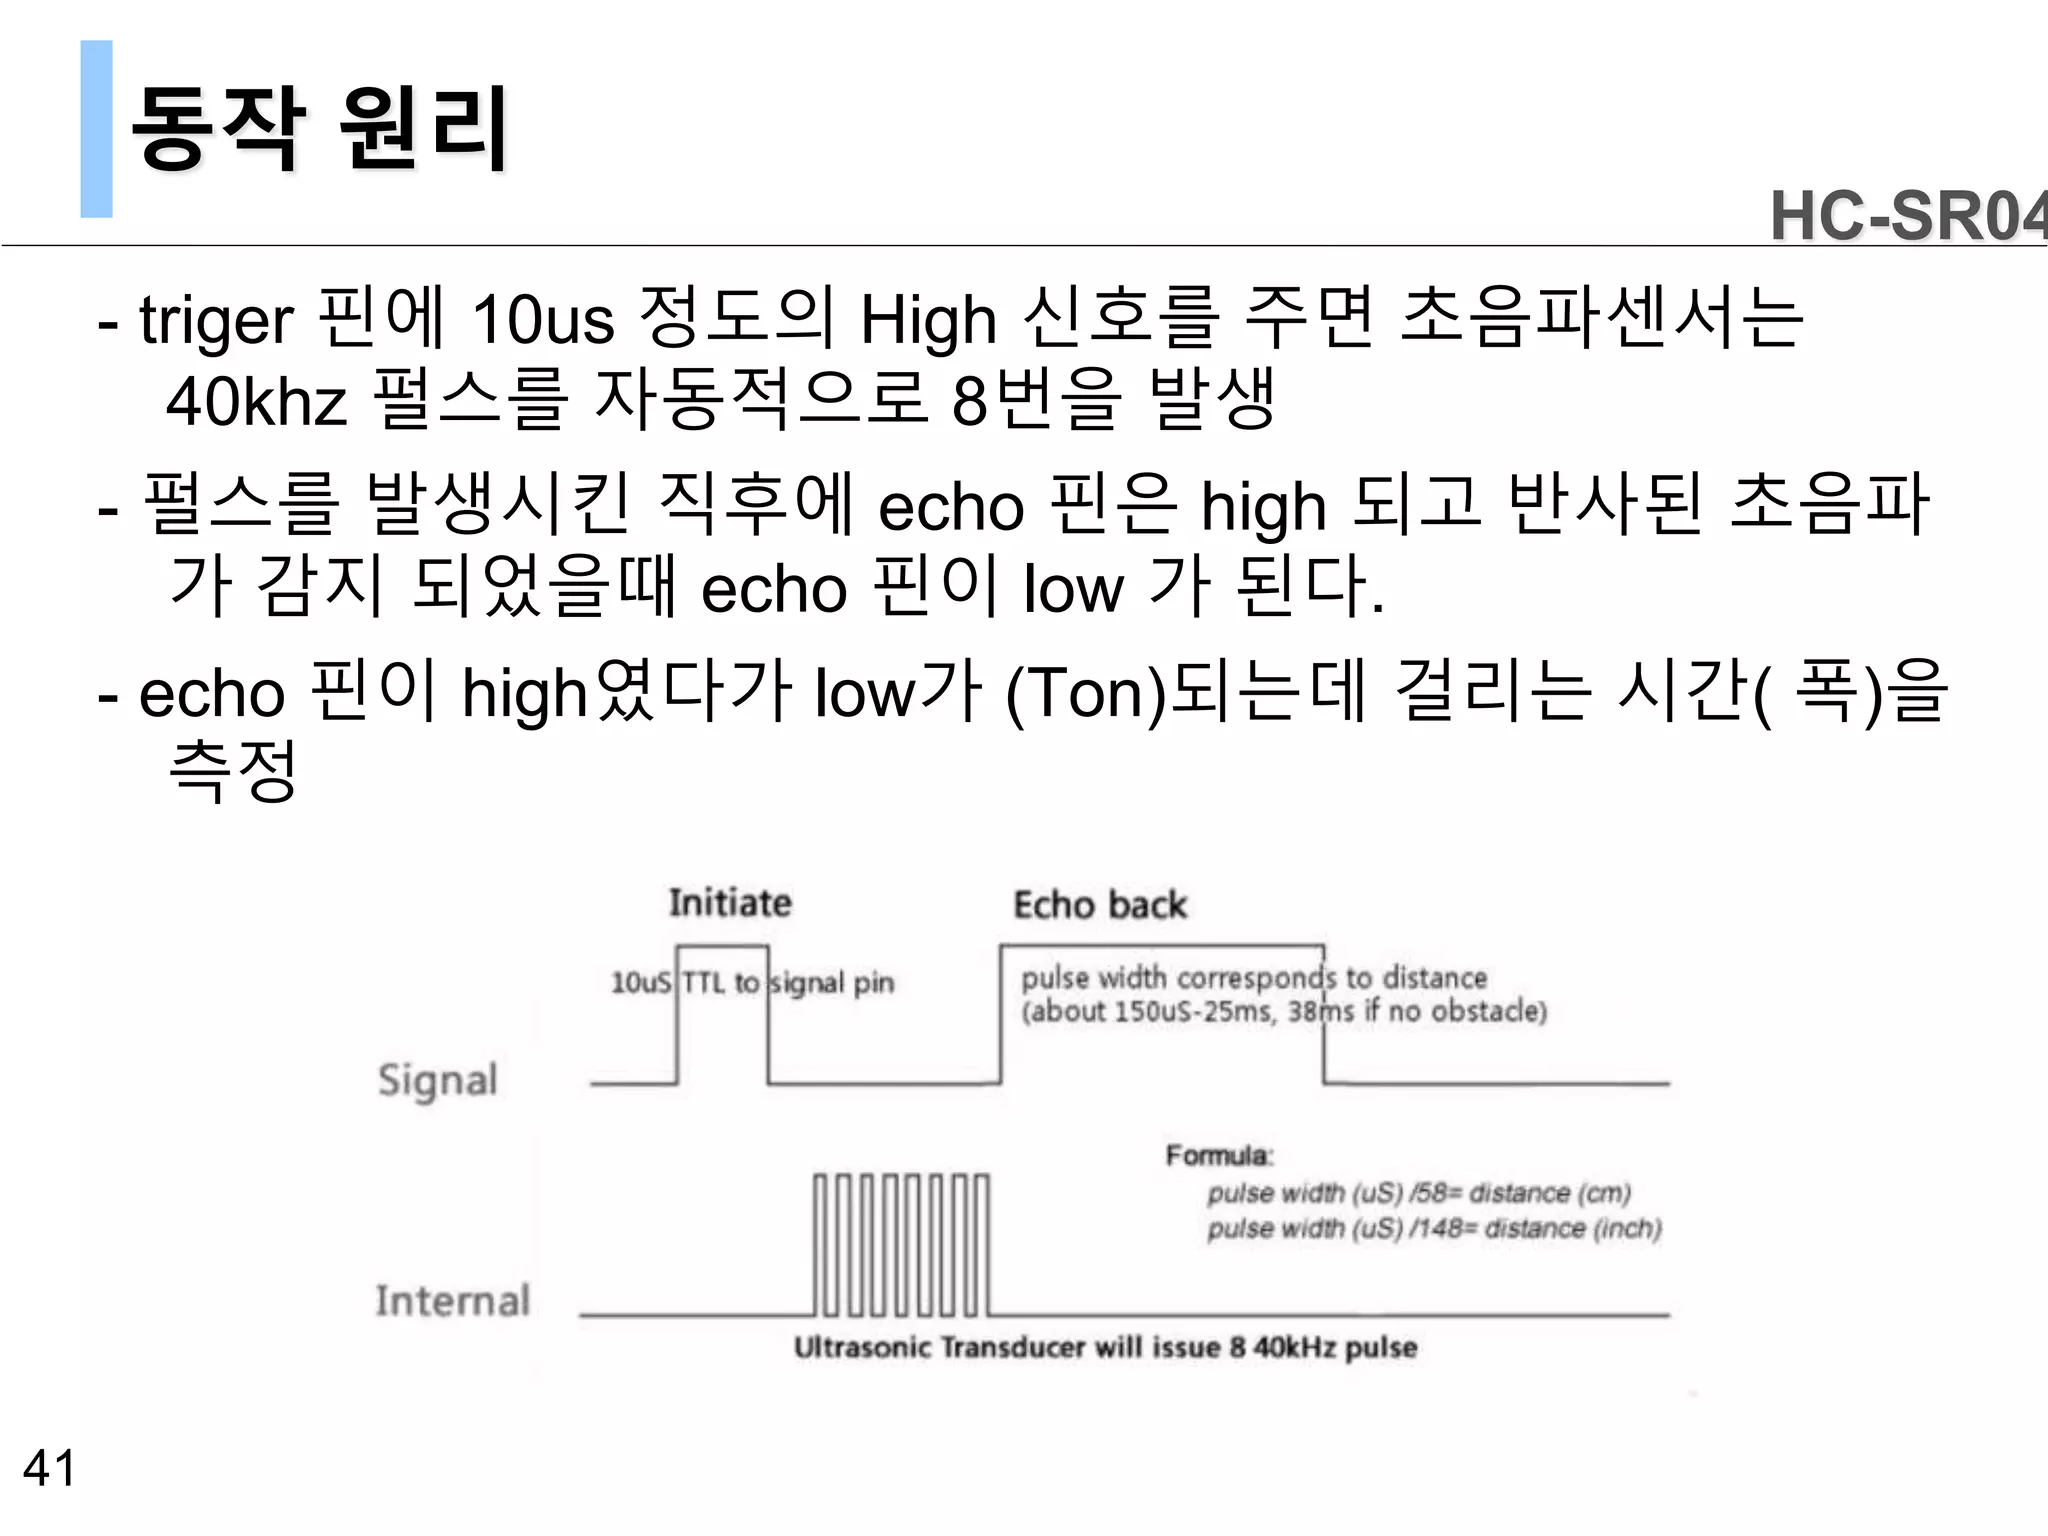
35.
동작 원리
- triger핀에 10us 정도의 High 신호를 주면 초음파센서는
40khz 펄스를 자동적으로 8번을 발생
- 펄스를 발생시킨 직후에 echo 핀은 high 되고 반사된 초음파
가 감지 되었을때 echo 핀이 low 가 된다.
- echo 핀이 high였다가 low가 (Ton)되는데 걸리는 시간( 폭)을
측정
41
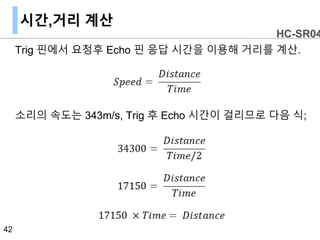
HC-SR04
36.
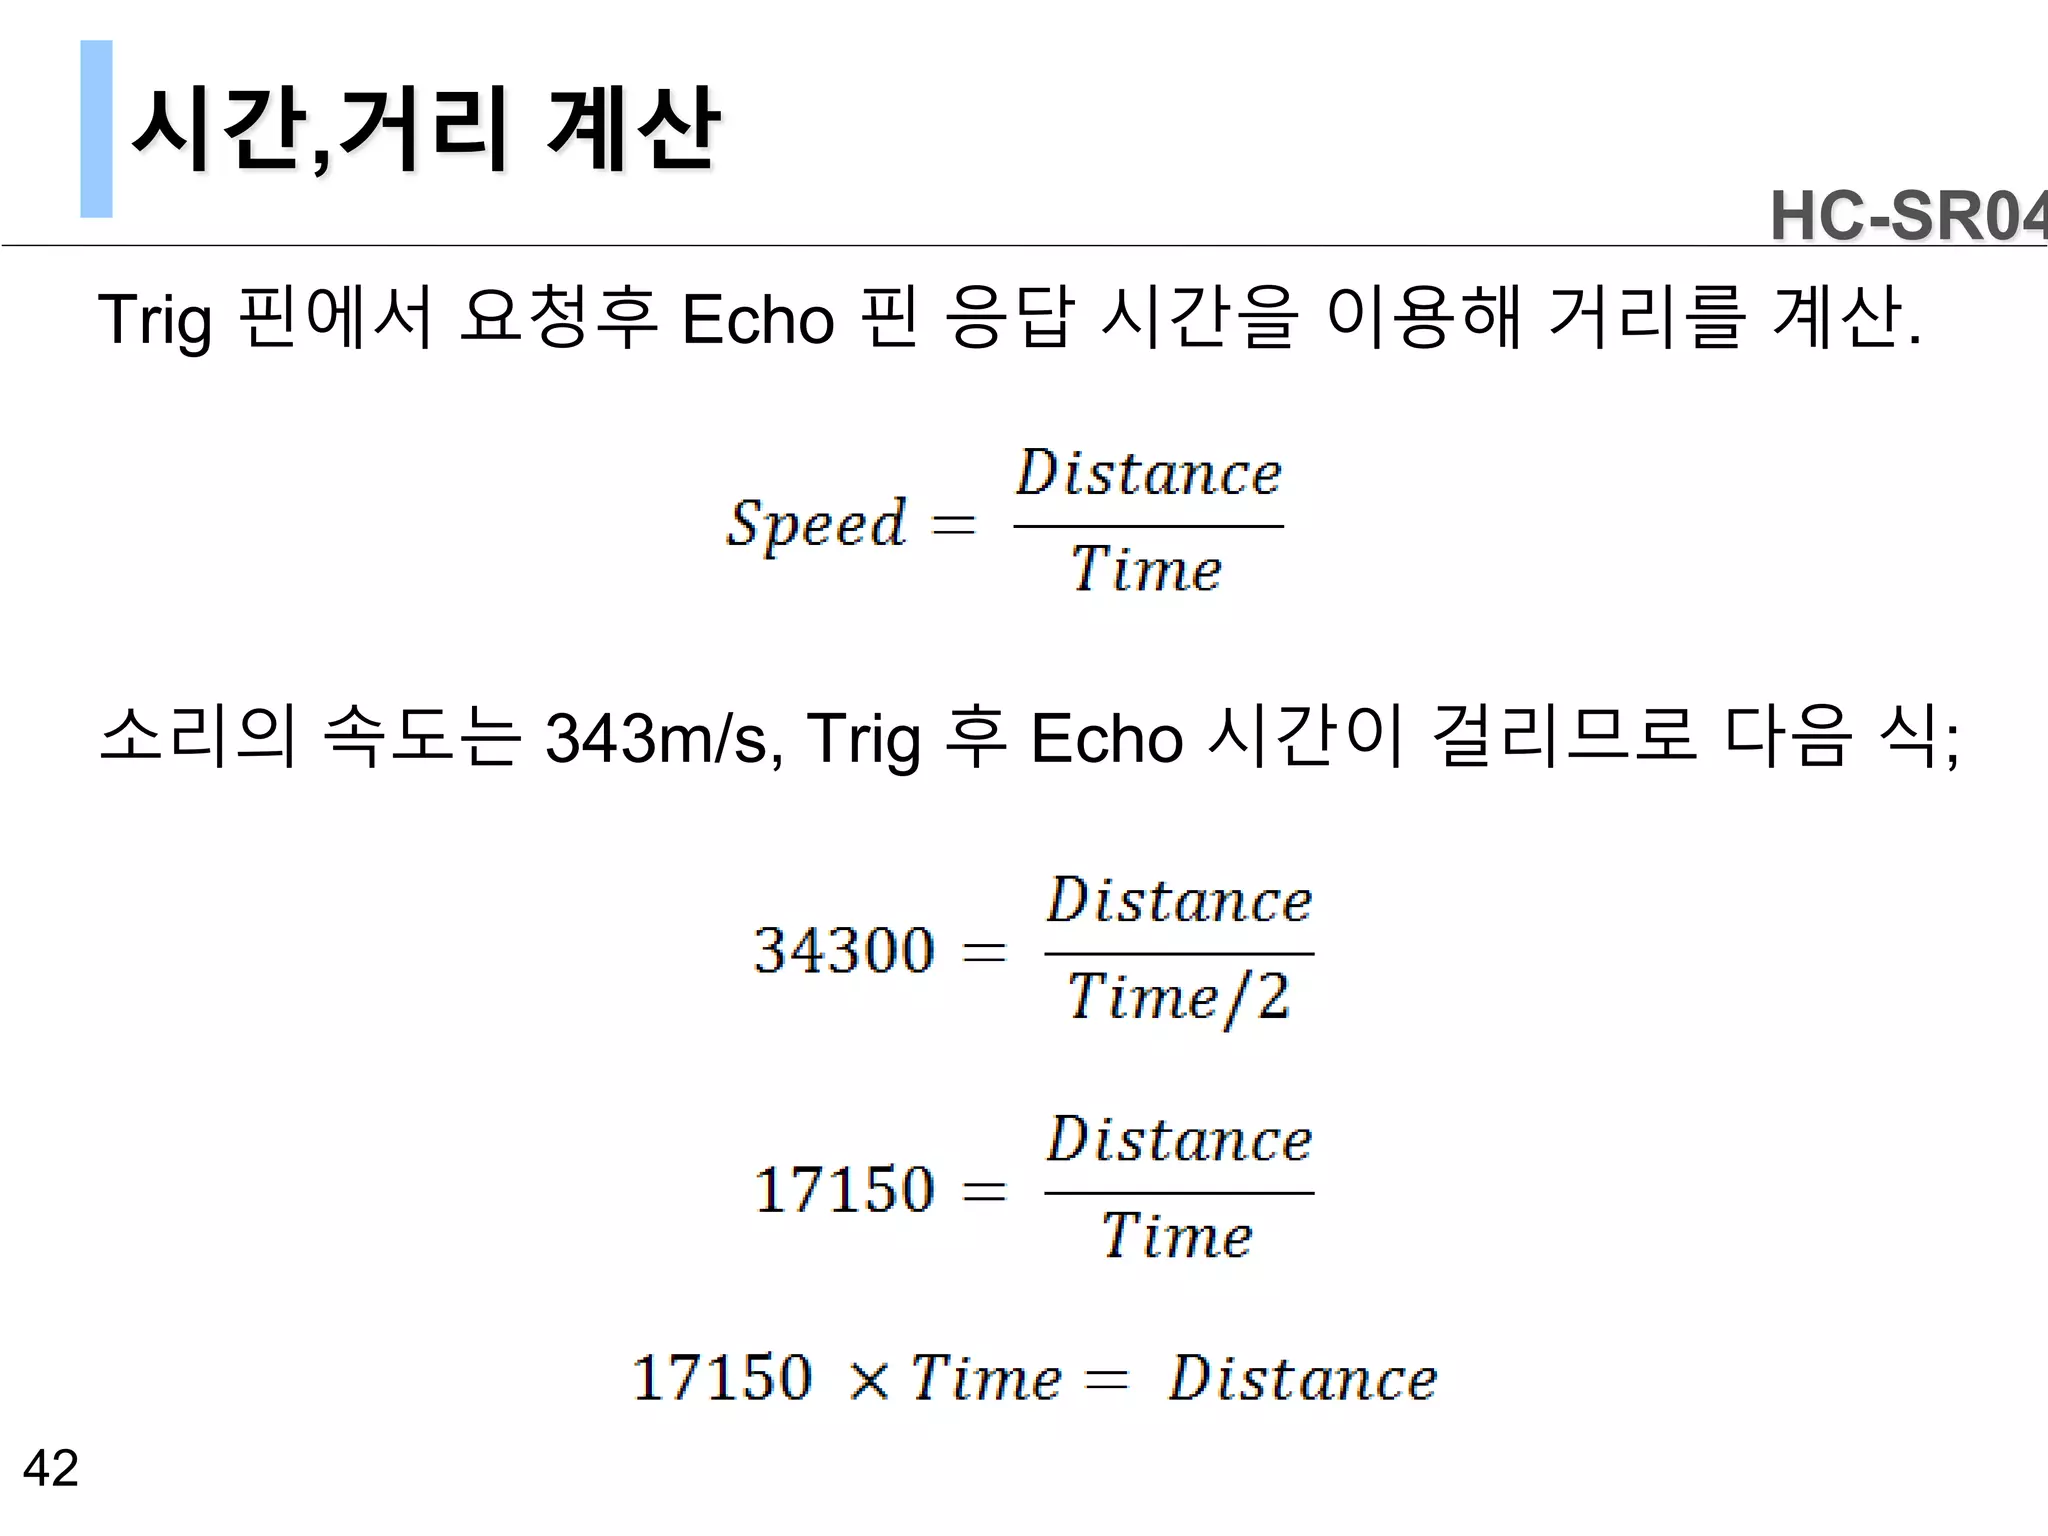
시간,거리 계산
Trig 핀에서요청후 Echo 핀 응답 시간을 이용해 거리를 계산.
소리의 속도는 343m/s, Trig 후 Echo 시간이 걸리므로 다음 식;
42
HC-SR04
37.
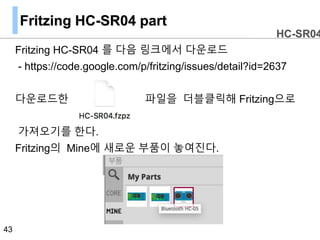
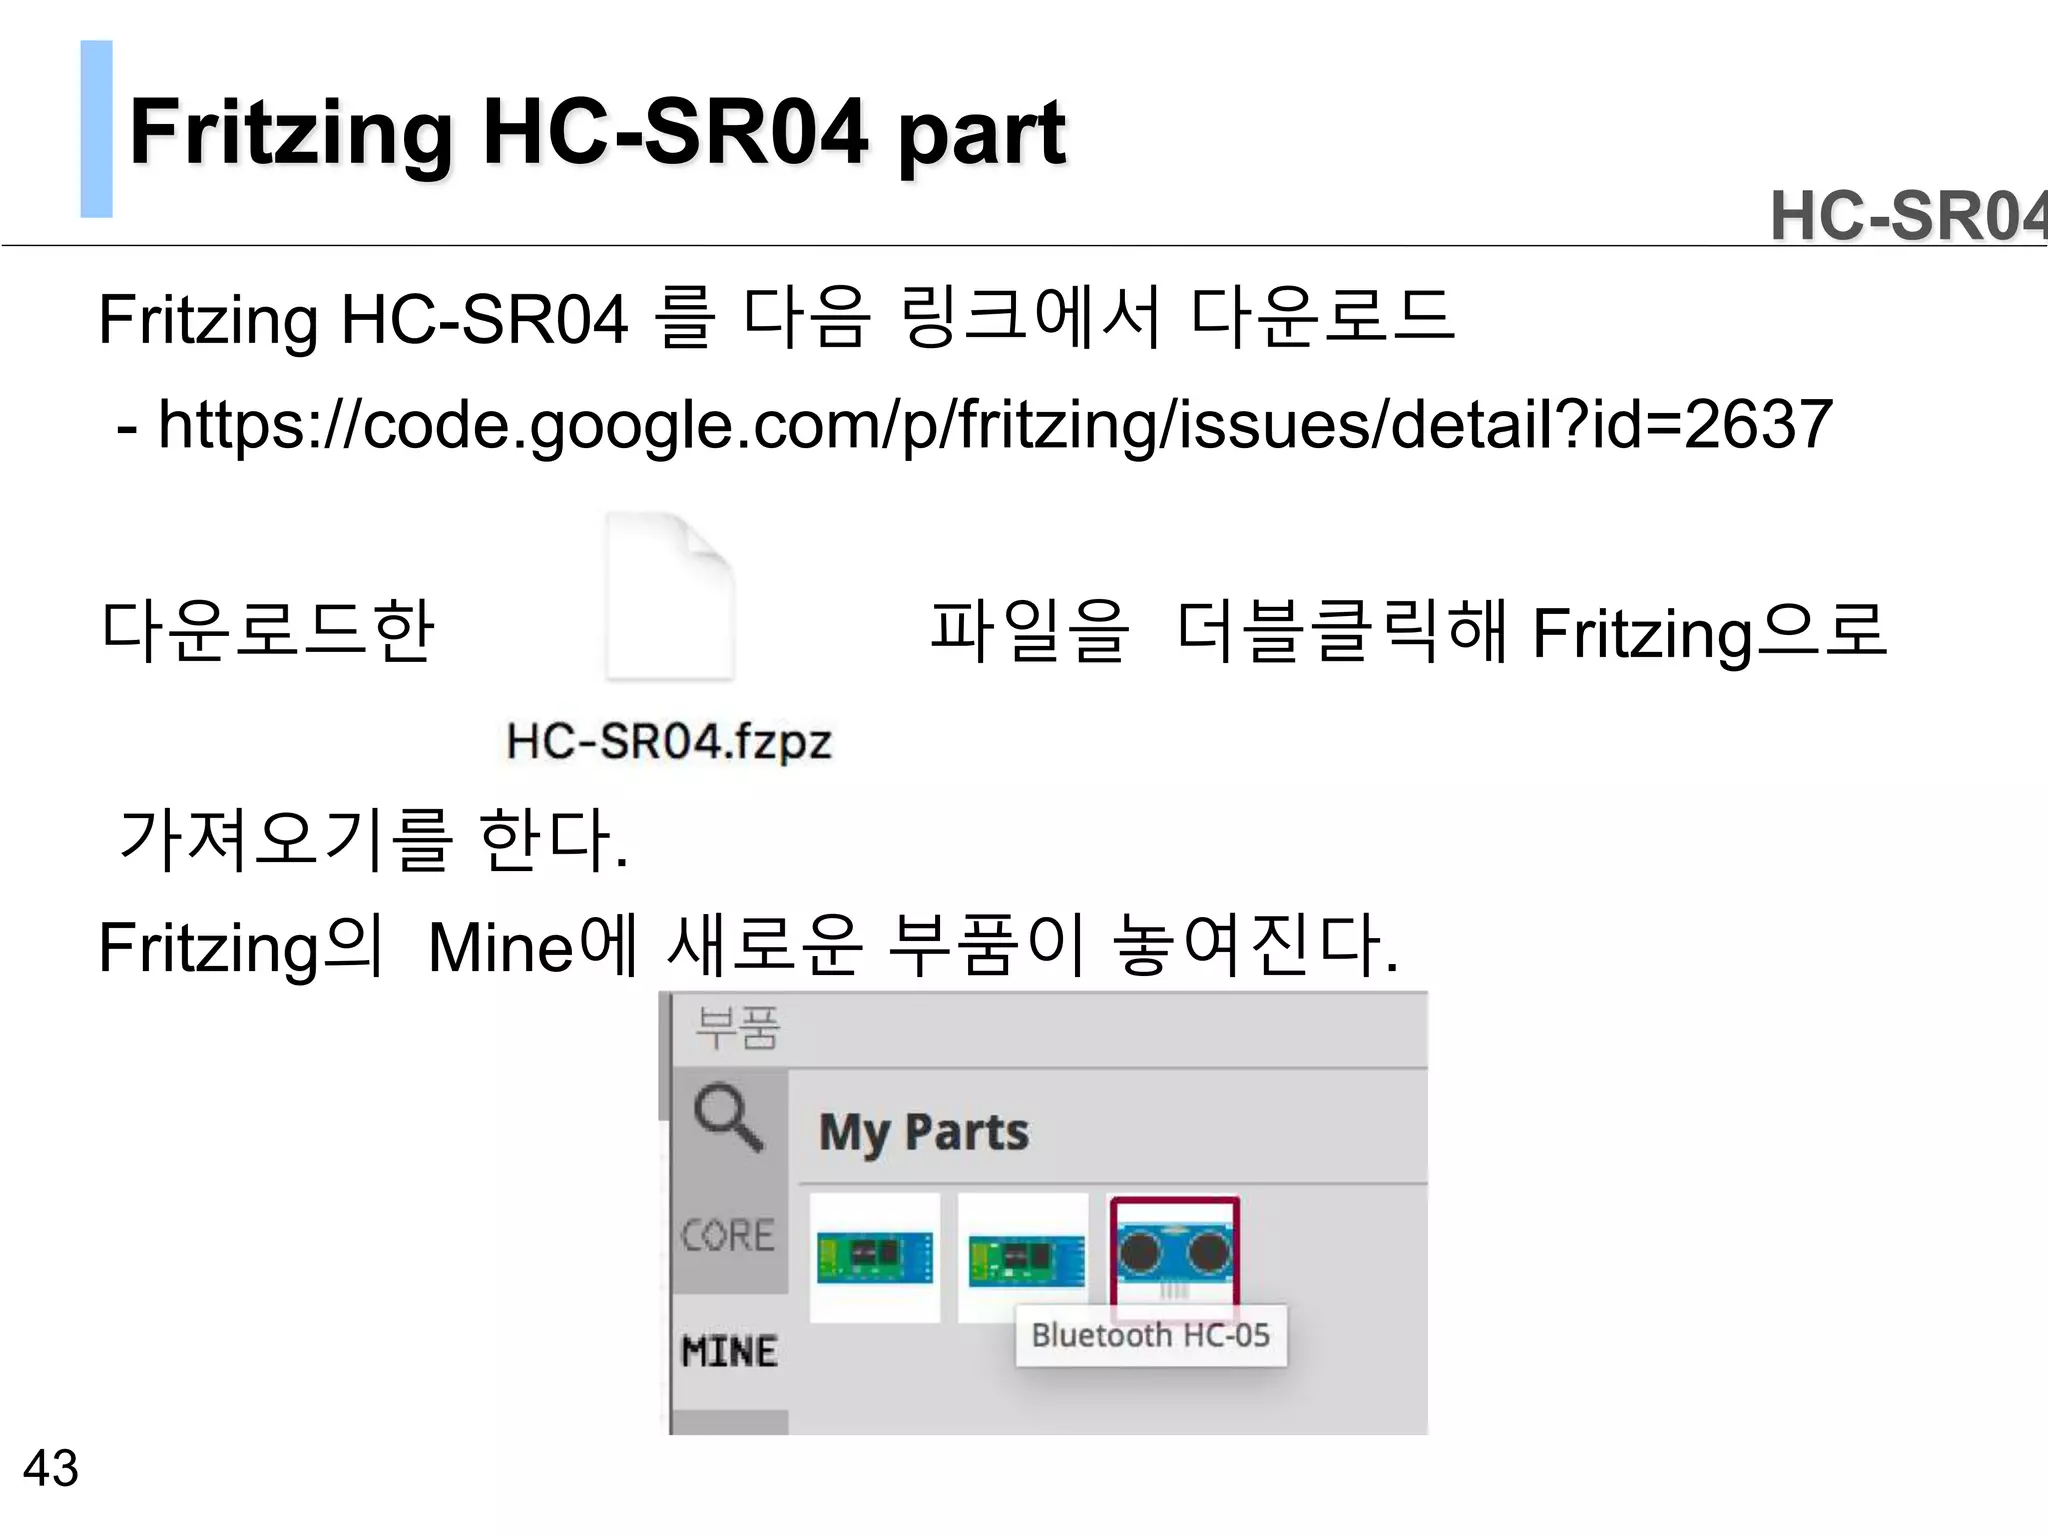
Fritzing HC-SR04 part
FritzingHC-SR04 를 다음 링크에서 다운로드
- https://code.google.com/p/fritzing/issues/detail?id=2637
다운로드한 파일을 더블클릭해 Fritzing으로
가져오기를 한다.
Fritzing의 Mine에 새로운 부품이 놓여진다.
43
HC-SR04


![RPi.GPIO API 사용
모듈 선언
import RPi.GPIO as GPIO
GPIO pin numbering
GPIO.setmode(GPIO.BOARD) # physical pin numbering
GPIO.setmode(GPIO.BCM) # BCM or GPIO pin numbering
GPIO channel : pin
GPIO.setup(channel, GPIO.IN) # 디지털 입력
GPIO.setup(channel, GPIO.OUT) # 디지털 출력
GPIO.setup(channel, GPIO.OUT, initial=GPIO.HIGH) # Pull up or down
GPIO multi channel
chan_list = [11,12]
GPIO.setup(chan_list, GPIO.OUT)
17 https://sourceforge.net/p/raspberry-gpio-python/wiki/BasicUsage/](https://image.slidesharecdn.com/rpi-gpiopython-v1-180910134920/85/Raspberry-Pi-GPIO-Programming-with-Python-15-320.jpg)
![RPi.GPIO API 사용
GPIO read & write
GPIO.input(channel) # 디지털 값: 0 / GPIO.LOW / False or 1 / GPIO.HIGH / True.
GPIO.output(channel, state) # state 디지털 출력: GPIO.LOW, GPIO.HIGH, 0, False, True
GPIO multi channel output
chan_list = [11,12] # also works with tuples
GPIO.output(chan_list, GPIO.LOW) # sets all to GPIO.LOW
GPIO.output(chan_list, (GPIO.HIGH, GPIO.LOW))
GPIO cleanup
GPIO.cleanup()
GPIO.cleanup(channel) # 특정 채널
GPIO.cleanup( (channel1, channel2) )
GPIO.cleanup( [channel1, channel2] )
18 https://sourceforge.net/p/raspberry-gpio-python/wiki/BasicUsage/](https://image.slidesharecdn.com/rpi-gpiopython-v1-180910134920/85/Raspberry-Pi-GPIO-Programming-with-Python-16-320.jpg)


![RPi.GPIO API 사용
모듈 선언
import RPi.GPIO as GPIO
GPIO pin numbering
GPIO.setmode(GPIO.BOARD) # physical pin numbering
GPIO.setmode(GPIO.BCM) # BCM or GPIO pin numbering
GPIO channel : pin
GPIO.setup(channel, GPIO.IN) # 디지털 입력
GPIO.setup(channel, GPIO.OUT) # 디지털 출력
GPIO.setup(channel, GPIO.OUT, initial=GPIO.HIGH) # Pull up or down
GPIO multi channel
chan_list = [11,12]
GPIO.setup(chan_list, GPIO.OUT)
17 https://sourceforge.net/p/raspberry-gpio-python/wiki/BasicUsage/](https://image.slidesharecdn.com/rpi-gpiopython-v1-180910134920/75/Raspberry-Pi-GPIO-Programming-with-Python-15-2048.jpg)
![RPi.GPIO API 사용
GPIO read & write
GPIO.input(channel) # 디지털 값: 0 / GPIO.LOW / False or 1 / GPIO.HIGH / True.
GPIO.output(channel, state) # state 디지털 출력: GPIO.LOW, GPIO.HIGH, 0, False, True
GPIO multi channel output
chan_list = [11,12] # also works with tuples
GPIO.output(chan_list, GPIO.LOW) # sets all to GPIO.LOW
GPIO.output(chan_list, (GPIO.HIGH, GPIO.LOW))
GPIO cleanup
GPIO.cleanup()
GPIO.cleanup(channel) # 특정 채널
GPIO.cleanup( (channel1, channel2) )
GPIO.cleanup( [channel1, channel2] )
18 https://sourceforge.net/p/raspberry-gpio-python/wiki/BasicUsage/](https://image.slidesharecdn.com/rpi-gpiopython-v1-180910134920/75/Raspberry-Pi-GPIO-Programming-with-Python-16-2048.jpg)


![[IoT] MAKE with Open H/W + Node.JS - 4th](https://cdn.slidesharecdn.com/ss_thumbnails/iotoshwnodejslesson4-150419161845-conversion-gate02-thumbnail.jpg?width=600ounds&width=560&fit=bounds)


![[142]편광을 활용한6 dof 전현기](https://cdn.slidesharecdn.com/ss_thumbnails/1426dof-161023161025-thumbnail.jpg?width=600ounds&width=560&fit=bounds)


