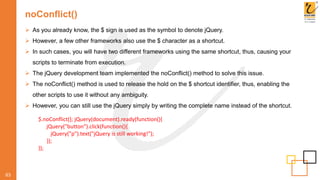
The document provides a comprehensive guide to jQuery, a lightweight JavaScript library that enhances the ease of web development through event handling, animations, DOM manipulation, and AJAX technology. It covers installation procedures, syntax for common operations, and various methods for selecting and manipulating HTML elements, as well as details about traversing the DOM tree. Additionally, the document includes examples that demonstrate how to use jQuery to achieve dynamic interactions on web pages.


![Binding events
25
Syntax selector.bind (eventType[,eventData],handler)
Description It lets you launch event handlers on DOM elements with the bind()
method.
eventType: string that indicates the event type, such as click or
submit.
eventData: An optional parameter that contains data to be passed
to the event handler.
handler: function to be executed each time the event is triggered.
Illustration $('div').bind('click', function( event ){
alert('Hi there!');
});](https://image.slidesharecdn.com/webdevelopmentcourse-jquery-200415111706/85/Web-Development-Course-JQuery-by-RSOLUTIONS-28-320.jpg)
![Unbinding events
26
Syntax selector.unbind(eventType[, handler])
selector.unbind(eventType)
Description By using the unbind() command, you can remove an existing event
handler. An event handler once established it remains in effect
throughout the life of that web page. However, at times you may want
to remove event handler.
eventType: string that indicates the event type, such as click or
submit.
handler: function to be executed each time the event is triggered.
Illustration $('div'). bind('click', function( event ){
alert('Hi there!');
});
$('div'). bind('click');](https://image.slidesharecdn.com/webdevelopmentcourse-jquery-200415111706/85/Web-Development-Course-JQuery-by-RSOLUTIONS-29-320.jpg)
![parent
30
Syntax selector.parent([selector])
Description This method is used to return the direct parent element of the
selected element. You can use this method only to traverse to a
single level up the DOM tree.
Illustration $(document).ready(function(){
$("span").parent().css(“color”,”red”);
});](https://image.slidesharecdn.com/webdevelopmentcourse-jquery-200415111706/85/Web-Development-Course-JQuery-by-RSOLUTIONS-33-320.jpg)
![parents
31
Syntax selector.parent([selector])
Description This method is used to return all the ancestor elements of the
selected element. This can even include the root element of the
document.
Illustration $(document).ready(function(){
$("#x", document.body).parents().each(function(){
$(this).prepend("-" + $(this).get(0).tagName + "-");
});
});](https://image.slidesharecdn.com/webdevelopmentcourse-jquery-200415111706/85/Web-Development-Course-JQuery-by-RSOLUTIONS-34-320.jpg)
![parentsUntil
32
Syntax selector.parentsUntil([selector][,filter])
Description Traverses through the ancestors until it reaches an element matched
by the selector passed within the method's argument.
Selector: A string containing a selector expression to indicate
where to stop matching ancestor elements.
Filter: A string containing a selector expression to match elements
against
Illustration $(document).ready(function(){ $("span").parentsUntil(“div”); });
Notes However, it does not include the one matched by the
parentsUntil()selector.
In case the selector is not matched or is not supplied, then, all
ancestors gets selected.](https://image.slidesharecdn.com/webdevelopmentcourse-jquery-200415111706/85/Web-Development-Course-JQuery-by-RSOLUTIONS-35-320.jpg)
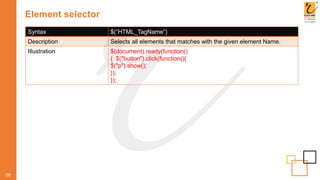
![children
33
Syntax selector.children([selector])
Description Used to return all direct children of the selected element. In addition
to this, you use optional parameter to filter the search for children.
Illustration $(document).ready(function(){ $("div").children().css(“color”,”red”); });
Notes You can use this method only to traverse to a single level down the
DOM tree.](https://image.slidesharecdn.com/webdevelopmentcourse-jquery-200415111706/85/Web-Development-Course-JQuery-by-RSOLUTIONS-36-320.jpg)
![find
34
Syntax selector.find([selector])
Description This method is used to return all the descendant elements of the
selected element, all the way down to the last descendant.
Illustration $(document).ready(function(){
$("div").find("*");
});](https://image.slidesharecdn.com/webdevelopmentcourse-jquery-200415111706/85/Web-Development-Course-JQuery-by-RSOLUTIONS-37-320.jpg)
![siblings
35
Syntax selector.siblings([selector])
Description This method is used to return all the sibling elements of the selected
element. Also, this method lets you to use an optional parameter to
filter the search for siblings.
Illustration $(document).ready(function(){
$(“h2").siblings();
});](https://image.slidesharecdn.com/webdevelopmentcourse-jquery-200415111706/85/Web-Development-Course-JQuery-by-RSOLUTIONS-38-320.jpg)
![next
36
Syntax selector.next([selector])
Description This method is used to return the next sibling of the selected element.
You must note that this method returns only one element.
Illustration $(document).ready(function(){
$(“h2").next();
});](https://image.slidesharecdn.com/webdevelopmentcourse-jquery-200415111706/85/Web-Development-Course-JQuery-by-RSOLUTIONS-39-320.jpg)
![nextAll
37
Syntax selector.nextAll([selector])
Description This method is used to return all the next siblings of the selected
element.
Illustration $(document).ready(function(){
$(“h2").nextAll();
});](https://image.slidesharecdn.com/webdevelopmentcourse-jquery-200415111706/85/Web-Development-Course-JQuery-by-RSOLUTIONS-40-320.jpg)
![nextUntil
38
Syntax selector.nextUntil([selector][,filter])
Description Traverses through the successors until it reaches an element
matched by the selector passed within the method's argument.
Selector: A string containing a selector expression to indicate
where to stop matching ancestor elements.
Filter: A string containing a selector expression to match elements
against
Illustration $(document).ready(function(){
$(“h2").nextUntill(“h6”);
});](https://image.slidesharecdn.com/webdevelopmentcourse-jquery-200415111706/85/Web-Development-Course-JQuery-by-RSOLUTIONS-41-320.jpg)
![prev
39
Syntax selector.prev([selector])
Description This method is used to return the previous siblings of the selected
element. You must note that this method returns only one element.
Illustration $(document).ready(function(){
$(“h2").prev();
});](https://image.slidesharecdn.com/webdevelopmentcourse-jquery-200415111706/85/Web-Development-Course-JQuery-by-RSOLUTIONS-42-320.jpg)
![prevAll
40
Syntax selector.prevAll([selector])
Description This method is used to return all the previous siblings of the selected
element.
Illustration $(document).ready(function(){
$(“h2").prevAll();
});](https://image.slidesharecdn.com/webdevelopmentcourse-jquery-200415111706/85/Web-Development-Course-JQuery-by-RSOLUTIONS-43-320.jpg)
![prevUntil
41
Syntax selector.prevUntil([selector][,filter])
Description This method is used to return all the previous siblings of an element
that is enclosed within two given arguments.
Selector: A string containing a selector expression to indicate
where to stop matching ancestor elements.
Filter: A string containing a selector expression to match elements
against
Illustration $(document).ready(function(){
$(“h2").prevUntil(“h6”);
});](https://image.slidesharecdn.com/webdevelopmentcourse-jquery-200415111706/85/Web-Development-Course-JQuery-by-RSOLUTIONS-44-320.jpg)


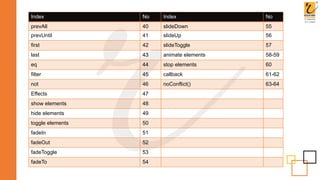
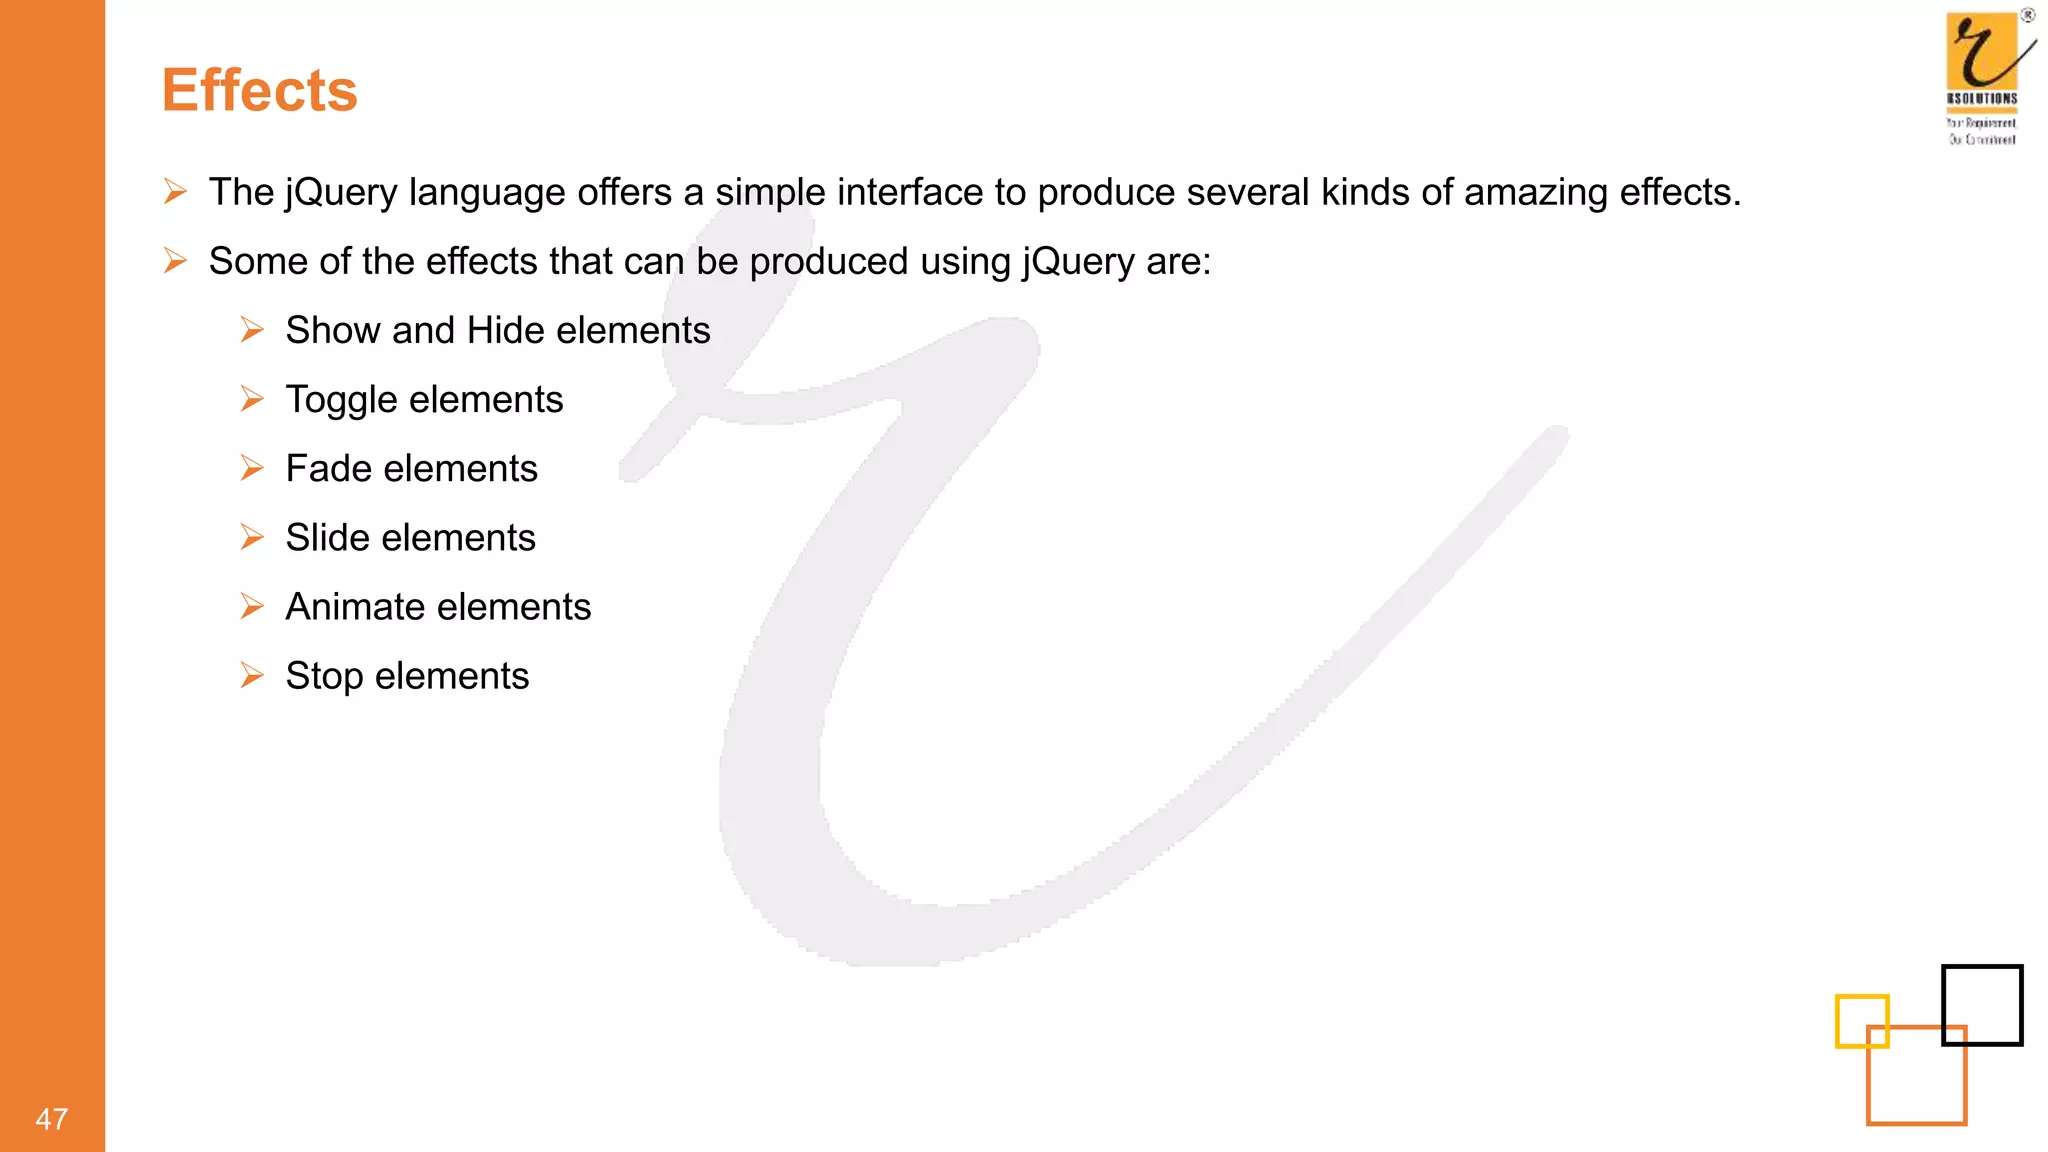
![show elements
48
Syntax selector.show ( [speed] [,callback] )
Description Used to show elements in a web application
Parameters:
speed: Is optional and indicates the speed to run the animation
value:
slow, normal, fast or the number of milliseconds
callback: Is optional and represents a function to be executed
either when the animation completes or executes once for each
animated element.
Illustration $(“show").click(function(){
$("#div1").show();
$("#div2").show("slow");
$("#div3").show(3000);
});](https://image.slidesharecdn.com/webdevelopmentcourse-jquery-200415111706/85/Web-Development-Course-JQuery-by-RSOLUTIONS-51-320.jpg)
![hide elements
49
Syntax selector.hide ( [speed] [,callback] )
Description Used to hide elements in a web application
Parameters:
speed: Is optional and indicates the speed to run the animation
value:
slow, normal, fast or the number of milliseconds
callback: Is optional and represents a function to be executed
either when the animation completes or executes once for each
animated element.
Illustration $(“hide").click(function(){
$("#div1").hide();
$("#div2").hide("slow");
$("#div3").hide);
});](https://image.slidesharecdn.com/webdevelopmentcourse-jquery-200415111706/85/Web-Development-Course-JQuery-by-RSOLUTIONS-52-320.jpg)
![toggle elements
50
Syntax selector.toggle ( [speed] [,callback] )
Description The jQuery offers methods to toggle the display state of elements
between the revealed or hidden.
When the element is initially displayed, it will be hidden, else if
hidden, it will be displayed.
Illustration $("button").click(function(){
$("p").toggle();
});](https://image.slidesharecdn.com/webdevelopmentcourse-jquery-200415111706/85/Web-Development-Course-JQuery-by-RSOLUTIONS-53-320.jpg)
![fadeIn
51
Syntax selector.fadeIn ( [speed] [,callback] )
Description This method is used to fade in a hidden HTML element.
Parameters:
speed: Is optional and indicates the speed to run the animation
value: slow, normal, fast or the number of milliseconds
callback: Is optional and represents a function to be executed
either when the animation completes or executes once for each
animated element.
Illustration $("button").click(function(){
$("#div1").fadeIn();
$("#div2").fadeIn("slow");
$("#div3").fadeIn(3000);
});](https://image.slidesharecdn.com/webdevelopmentcourse-jquery-200415111706/85/Web-Development-Course-JQuery-by-RSOLUTIONS-54-320.jpg)
![fadeOut
52
Syntax selector.fadeOut ( [speed] [,callback] )
Description This method is used to fade out a visible element.
Parameters:
speed: Is optional and indicates the speed to run the animation
value: slow, normal, fast or the number of milliseconds
callback: Is optional and represents a function to be executed
either when the animation completes or executes once for each
animated element.
Illustration $("button").click(function(){
$("#div1").fadeOut();
$("#div2").fadeOut("slow");
$("#div3").fadeOut);
});](https://image.slidesharecdn.com/webdevelopmentcourse-jquery-200415111706/85/Web-Development-Course-JQuery-by-RSOLUTIONS-55-320.jpg)
![fadeToggle
53
Syntax selector.fadeToggle ( [speed] [,callback] )
Description This method is used to toggle between the fadeIn() and fadeOut()
methods.
Illustration $("button").click(function(){
$("#div1").fadeToggle();
$("#div2").fadeToggle("slow");
$("#div3").fadeToggle(3000);
});](https://image.slidesharecdn.com/webdevelopmentcourse-jquery-200415111706/85/Web-Development-Course-JQuery-by-RSOLUTIONS-56-320.jpg)
![fadeTo
54
Syntax selector.fadeTo (speed, opacity, [callback]);
Description speed: Represents parameter that defines the duration of the
effect. It can take any of the three predefined speeds namely slow,
normal, or fast or the number of milliseconds to run the animation.
Opacity: Represents a parameter in the fadeTo() method that
defines the fading to a given opacity whose value lies between 0
and 1.
callback: Is an optional parameter that represents a function to be
executed after the function is completed.
Illustration $("button").click(function(){
$("#div1").fadeTo("slow",0.15);
$("#div2").fadeTo("slow",0.4);
});](https://image.slidesharecdn.com/webdevelopmentcourse-jquery-200415111706/85/Web-Development-Course-JQuery-by-RSOLUTIONS-57-320.jpg)
![slideDown
55
Syntax selector.slideDown (speed, [,callback]);
Description This method is used to slide down an element.
Illustration $("#flip").click(function(){
$("#panel").slideDown();
});](https://image.slidesharecdn.com/webdevelopmentcourse-jquery-200415111706/85/Web-Development-Course-JQuery-by-RSOLUTIONS-58-320.jpg)
![slideUp
56
Syntax selector.slideUp (speed, [,callback]);
Description This method is used to slide up an element.
Illustration $("#flip").click(function(){
$("#panel").slideUp();
});](https://image.slidesharecdn.com/webdevelopmentcourse-jquery-200415111706/85/Web-Development-Course-JQuery-by-RSOLUTIONS-59-320.jpg)
![slideToogle
57
Syntax selector.slideToggle (speed, [,callback]);
Description This method is used to slide up an element.
Illustration $("#flip").click(function(){
$("#panel").slideToggle();
});](https://image.slidesharecdn.com/webdevelopmentcourse-jquery-200415111706/85/Web-Development-Course-JQuery-by-RSOLUTIONS-60-320.jpg)
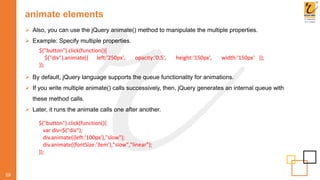
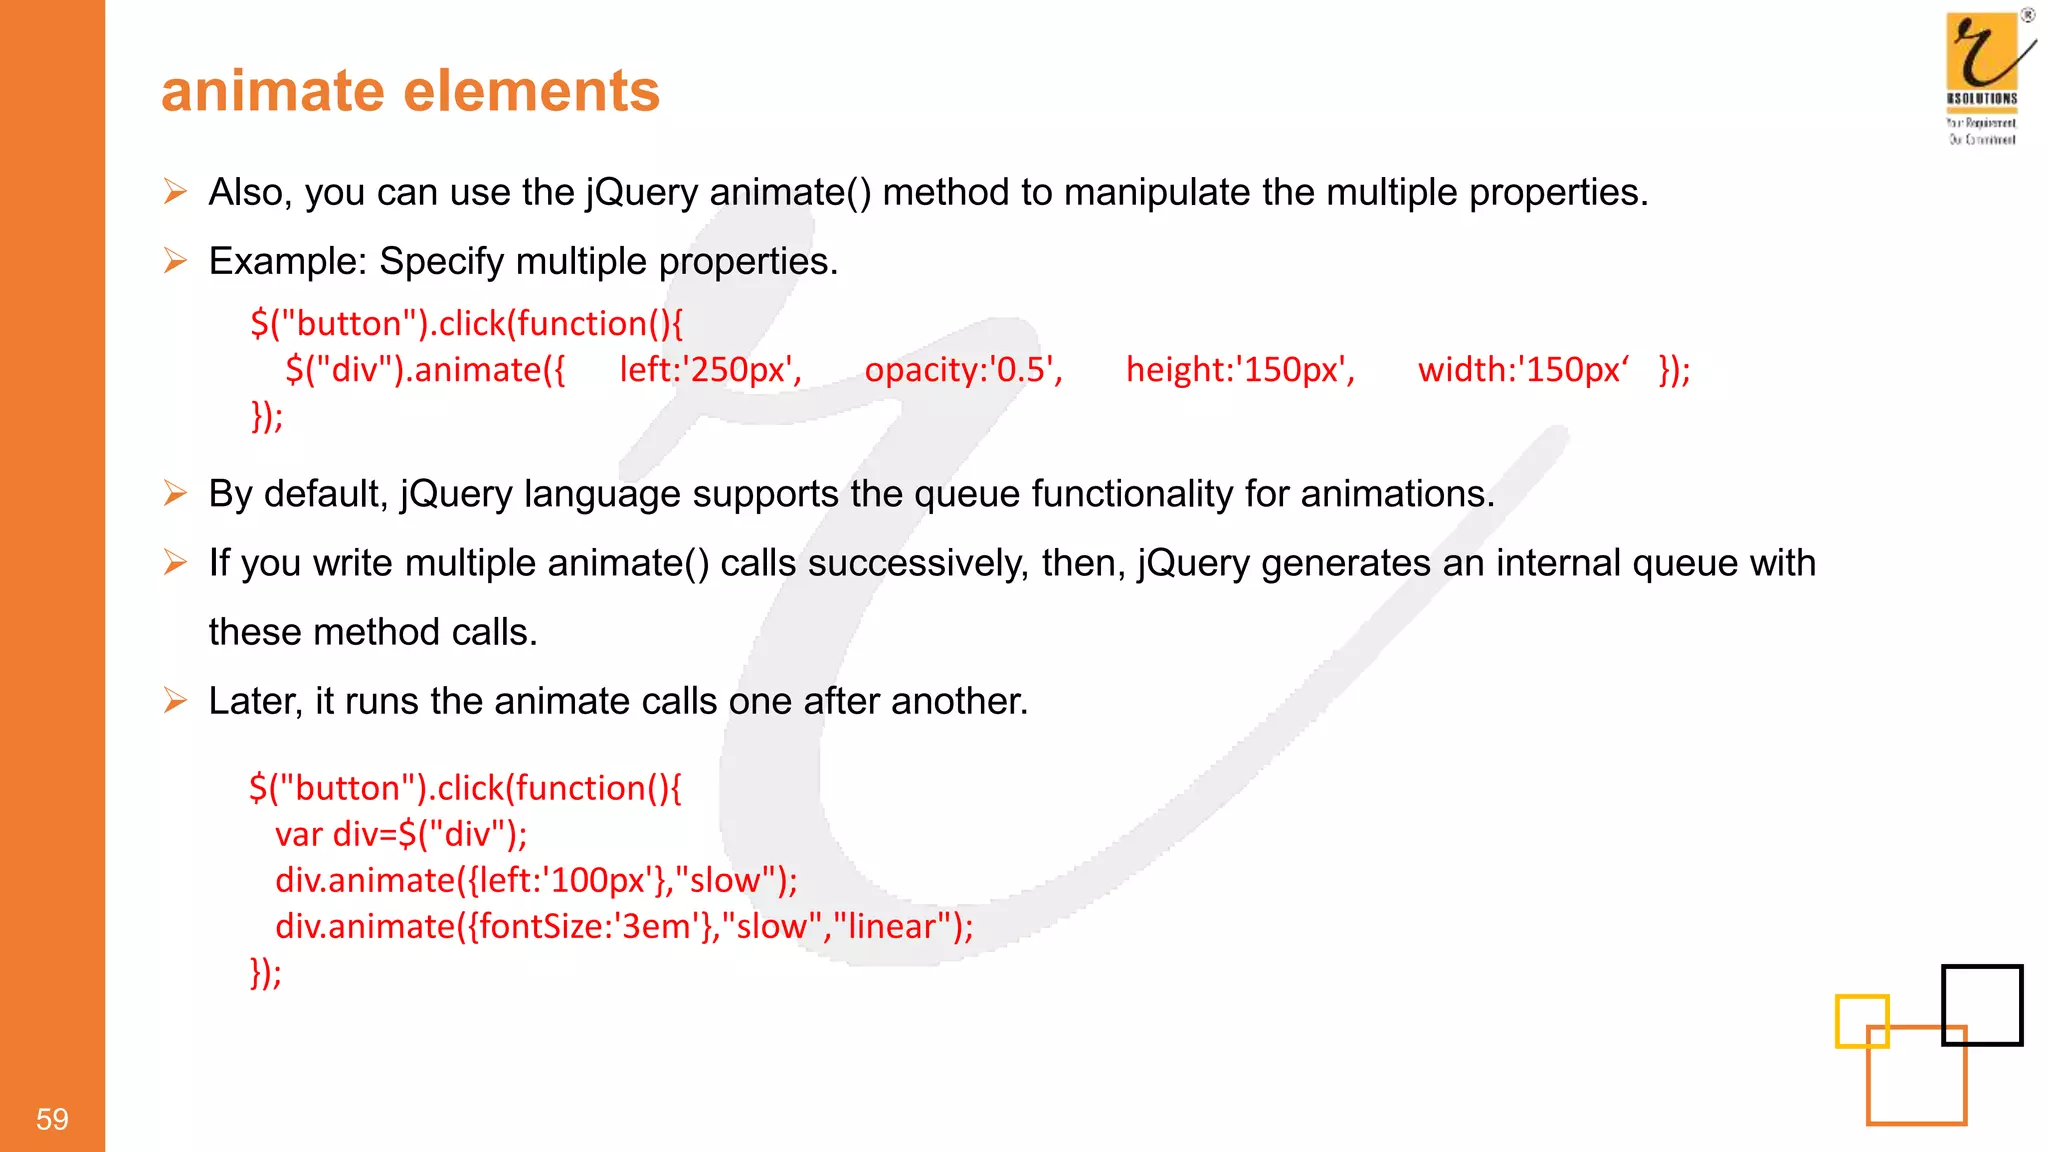
![animate elements
58
The jQuery lets you create customized animation on elements by using the animate() method.
By default, since all HTML elements are positioned static position, it does not let you move them.
Hence, if you need to manipulate the position, you must first set the CSS position property of the
element to relative, fixed, or absolute.
Syntax selector.animate ( {params} [,speed] [,easing] [,callback]);
Description jQuery lets you create customized animation on elements.
Parameters:
params: used to specify the CSS properties to be animated.
speed: defines the duration of the effect.
easing: specifies the easing function to use for the transition –
linear/swing
callback: function to be executed after the animation gets
completed.
Illustration $("button").animate(function(){
$("div").animate({left:'250px'}, 1000, “linear”);
});](https://image.slidesharecdn.com/webdevelopmentcourse-jquery-200415111706/85/Web-Development-Course-JQuery-by-RSOLUTIONS-61-320.jpg)
![stop elements
60
Syntax selector.stop ([stopAll], [,goToEnd]);
Description Used to terminate an animation or effect even before it is
completed.
All the jQuery effect functions such as sliding, fading and so on
supports the stop() method.
stopAll: A Boolean indicating whether to remove queued
animations as well.
goToEnd: A Boolean indicating whether to complete the current
animation immediately
Illustration $("#stop").click(function(){
$("#panel").stop();
});](https://image.slidesharecdn.com/webdevelopmentcourse-jquery-200415111706/85/Web-Development-Course-JQuery-by-RSOLUTIONS-63-320.jpg)
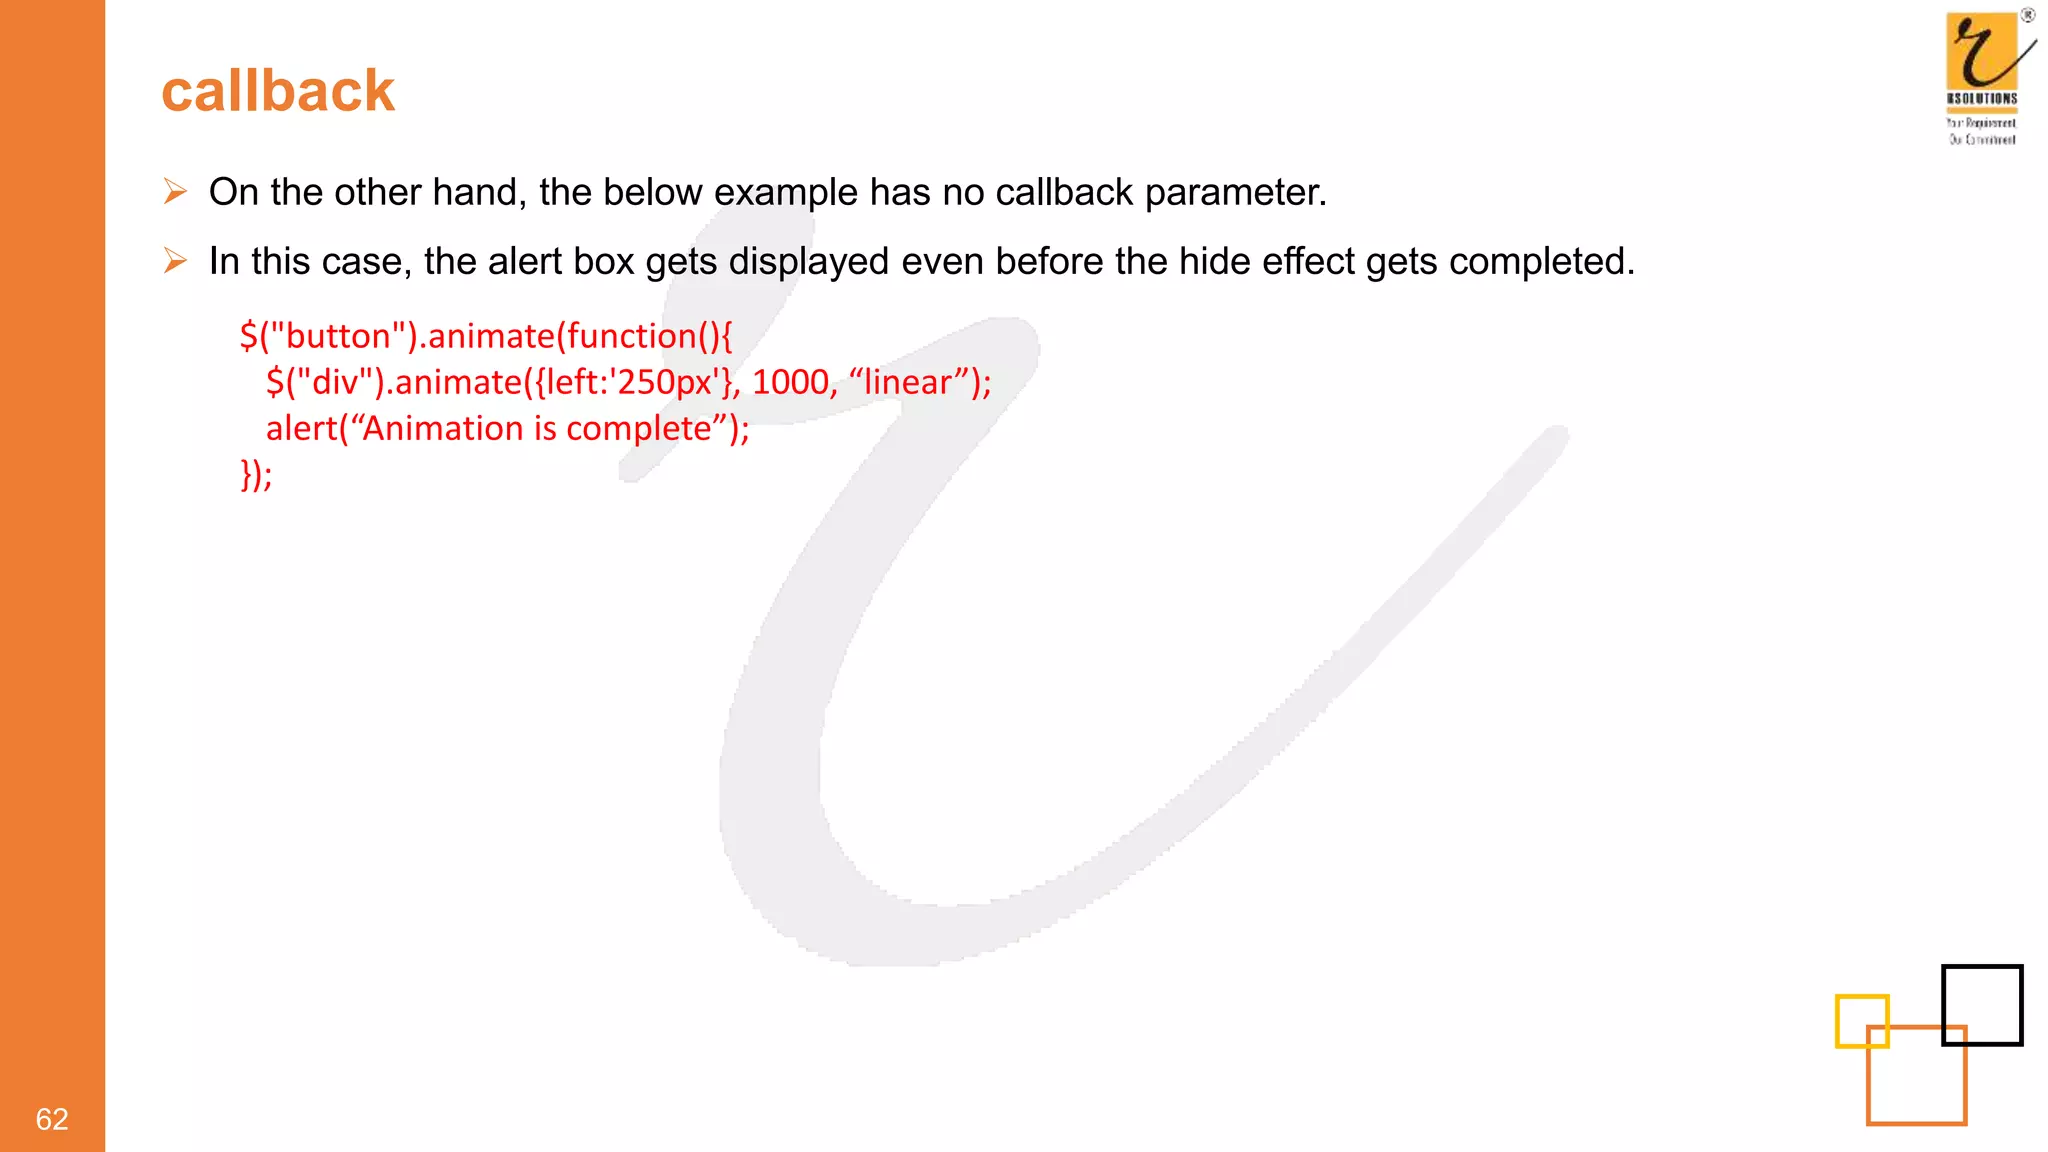
![callback
61
When using animations, while the animation is in progress the subsequent code will get executed.
It does not wait for the animation to complete before continuing with the execution.
The drawback of this process is that it can give rise to several errors.
By using the callback function you can prevent the creation of these errors.
Typically, a callback function is executed only after the current animation or the effect is completed.
Syntax: $(selector).animate({params}[,speed][,easing ][,callback]);
Example:
$("button").animate(function(){
$("div").animate({left:'250px'}, 1000, “linear”, function() {
alert(“Animation is complete”);
});
});](https://image.slidesharecdn.com/webdevelopmentcourse-jquery-200415111706/85/Web-Development-Course-JQuery-by-RSOLUTIONS-64-320.jpg)


![Binding events
25
Syntax selector.bind (eventType[,eventData],handler)
Description It lets you launch event handlers on DOM elements with the bind()
method.
eventType: string that indicates the event type, such as click or
submit.
eventData: An optional parameter that contains data to be passed
to the event handler.
handler: function to be executed each time the event is triggered.
Illustration $('div').bind('click', function( event ){
alert('Hi there!');
});](https://image.slidesharecdn.com/webdevelopmentcourse-jquery-200415111706/75/Web-Development-Course-JQuery-by-RSOLUTIONS-28-2048.jpg)
![Unbinding events
26
Syntax selector.unbind(eventType[, handler])
selector.unbind(eventType)
Description By using the unbind() command, you can remove an existing event
handler. An event handler once established it remains in effect
throughout the life of that web page. However, at times you may want
to remove event handler.
eventType: string that indicates the event type, such as click or
submit.
handler: function to be executed each time the event is triggered.
Illustration $('div'). bind('click', function( event ){
alert('Hi there!');
});
$('div'). bind('click');](https://image.slidesharecdn.com/webdevelopmentcourse-jquery-200415111706/75/Web-Development-Course-JQuery-by-RSOLUTIONS-29-2048.jpg)


![parent
30
Syntax selector.parent([selector])
Description This method is used to return the direct parent element of the
selected element. You can use this method only to traverse to a
single level up the DOM tree.
Illustration $(document).ready(function(){
$("span").parent().css(“color”,”red”);
});](https://image.slidesharecdn.com/webdevelopmentcourse-jquery-200415111706/75/Web-Development-Course-JQuery-by-RSOLUTIONS-33-2048.jpg)
![parents
31
Syntax selector.parent([selector])
Description This method is used to return all the ancestor elements of the
selected element. This can even include the root element of the
document.
Illustration $(document).ready(function(){
$("#x", document.body).parents().each(function(){
$(this).prepend("-" + $(this).get(0).tagName + "-");
});
});](https://image.slidesharecdn.com/webdevelopmentcourse-jquery-200415111706/75/Web-Development-Course-JQuery-by-RSOLUTIONS-34-2048.jpg)
![parentsUntil
32
Syntax selector.parentsUntil([selector][,filter])
Description Traverses through the ancestors until it reaches an element matched
by the selector passed within the method's argument.
Selector: A string containing a selector expression to indicate
where to stop matching ancestor elements.
Filter: A string containing a selector expression to match elements
against
Illustration $(document).ready(function(){ $("span").parentsUntil(“div”); });
Notes However, it does not include the one matched by the
parentsUntil()selector.
In case the selector is not matched or is not supplied, then, all
ancestors gets selected.](https://image.slidesharecdn.com/webdevelopmentcourse-jquery-200415111706/75/Web-Development-Course-JQuery-by-RSOLUTIONS-35-2048.jpg)
![children
33
Syntax selector.children([selector])
Description Used to return all direct children of the selected element. In addition
to this, you use optional parameter to filter the search for children.
Illustration $(document).ready(function(){ $("div").children().css(“color”,”red”); });
Notes You can use this method only to traverse to a single level down the
DOM tree.](https://image.slidesharecdn.com/webdevelopmentcourse-jquery-200415111706/75/Web-Development-Course-JQuery-by-RSOLUTIONS-36-2048.jpg)
![find
34
Syntax selector.find([selector])
Description This method is used to return all the descendant elements of the
selected element, all the way down to the last descendant.
Illustration $(document).ready(function(){
$("div").find("*");
});](https://image.slidesharecdn.com/webdevelopmentcourse-jquery-200415111706/75/Web-Development-Course-JQuery-by-RSOLUTIONS-37-2048.jpg)
![siblings
35
Syntax selector.siblings([selector])
Description This method is used to return all the sibling elements of the selected
element. Also, this method lets you to use an optional parameter to
filter the search for siblings.
Illustration $(document).ready(function(){
$(“h2").siblings();
});](https://image.slidesharecdn.com/webdevelopmentcourse-jquery-200415111706/75/Web-Development-Course-JQuery-by-RSOLUTIONS-38-2048.jpg)
![next
36
Syntax selector.next([selector])
Description This method is used to return the next sibling of the selected element.
You must note that this method returns only one element.
Illustration $(document).ready(function(){
$(“h2").next();
});](https://image.slidesharecdn.com/webdevelopmentcourse-jquery-200415111706/75/Web-Development-Course-JQuery-by-RSOLUTIONS-39-2048.jpg)
![nextAll
37
Syntax selector.nextAll([selector])
Description This method is used to return all the next siblings of the selected
element.
Illustration $(document).ready(function(){
$(“h2").nextAll();
});](https://image.slidesharecdn.com/webdevelopmentcourse-jquery-200415111706/75/Web-Development-Course-JQuery-by-RSOLUTIONS-40-2048.jpg)
![nextUntil
38
Syntax selector.nextUntil([selector][,filter])
Description Traverses through the successors until it reaches an element
matched by the selector passed within the method's argument.
Selector: A string containing a selector expression to indicate
where to stop matching ancestor elements.
Filter: A string containing a selector expression to match elements
against
Illustration $(document).ready(function(){
$(“h2").nextUntill(“h6”);
});](https://image.slidesharecdn.com/webdevelopmentcourse-jquery-200415111706/75/Web-Development-Course-JQuery-by-RSOLUTIONS-41-2048.jpg)
![prev
39
Syntax selector.prev([selector])
Description This method is used to return the previous siblings of the selected
element. You must note that this method returns only one element.
Illustration $(document).ready(function(){
$(“h2").prev();
});](https://image.slidesharecdn.com/webdevelopmentcourse-jquery-200415111706/75/Web-Development-Course-JQuery-by-RSOLUTIONS-42-2048.jpg)
![prevAll
40
Syntax selector.prevAll([selector])
Description This method is used to return all the previous siblings of the selected
element.
Illustration $(document).ready(function(){
$(“h2").prevAll();
});](https://image.slidesharecdn.com/webdevelopmentcourse-jquery-200415111706/75/Web-Development-Course-JQuery-by-RSOLUTIONS-43-2048.jpg)
![prevUntil
41
Syntax selector.prevUntil([selector][,filter])
Description This method is used to return all the previous siblings of an element
that is enclosed within two given arguments.
Selector: A string containing a selector expression to indicate
where to stop matching ancestor elements.
Filter: A string containing a selector expression to match elements
against
Illustration $(document).ready(function(){
$(“h2").prevUntil(“h6”);
});](https://image.slidesharecdn.com/webdevelopmentcourse-jquery-200415111706/75/Web-Development-Course-JQuery-by-RSOLUTIONS-44-2048.jpg)


![show elements
48
Syntax selector.show ( [speed] [,callback] )
Description Used to show elements in a web application
Parameters:
speed: Is optional and indicates the speed to run the animation
value:
slow, normal, fast or the number of milliseconds
callback: Is optional and represents a function to be executed
either when the animation completes or executes once for each
animated element.
Illustration $(“show").click(function(){
$("#div1").show();
$("#div2").show("slow");
$("#div3").show(3000);
});](https://image.slidesharecdn.com/webdevelopmentcourse-jquery-200415111706/75/Web-Development-Course-JQuery-by-RSOLUTIONS-51-2048.jpg)
![hide elements
49
Syntax selector.hide ( [speed] [,callback] )
Description Used to hide elements in a web application
Parameters:
speed: Is optional and indicates the speed to run the animation
value:
slow, normal, fast or the number of milliseconds
callback: Is optional and represents a function to be executed
either when the animation completes or executes once for each
animated element.
Illustration $(“hide").click(function(){
$("#div1").hide();
$("#div2").hide("slow");
$("#div3").hide);
});](https://image.slidesharecdn.com/webdevelopmentcourse-jquery-200415111706/75/Web-Development-Course-JQuery-by-RSOLUTIONS-52-2048.jpg)
![toggle elements
50
Syntax selector.toggle ( [speed] [,callback] )
Description The jQuery offers methods to toggle the display state of elements
between the revealed or hidden.
When the element is initially displayed, it will be hidden, else if
hidden, it will be displayed.
Illustration $("button").click(function(){
$("p").toggle();
});](https://image.slidesharecdn.com/webdevelopmentcourse-jquery-200415111706/75/Web-Development-Course-JQuery-by-RSOLUTIONS-53-2048.jpg)
![fadeIn
51
Syntax selector.fadeIn ( [speed] [,callback] )
Description This method is used to fade in a hidden HTML element.
Parameters:
speed: Is optional and indicates the speed to run the animation
value: slow, normal, fast or the number of milliseconds
callback: Is optional and represents a function to be executed
either when the animation completes or executes once for each
animated element.
Illustration $("button").click(function(){
$("#div1").fadeIn();
$("#div2").fadeIn("slow");
$("#div3").fadeIn(3000);
});](https://image.slidesharecdn.com/webdevelopmentcourse-jquery-200415111706/75/Web-Development-Course-JQuery-by-RSOLUTIONS-54-2048.jpg)
![fadeOut
52
Syntax selector.fadeOut ( [speed] [,callback] )
Description This method is used to fade out a visible element.
Parameters:
speed: Is optional and indicates the speed to run the animation
value: slow, normal, fast or the number of milliseconds
callback: Is optional and represents a function to be executed
either when the animation completes or executes once for each
animated element.
Illustration $("button").click(function(){
$("#div1").fadeOut();
$("#div2").fadeOut("slow");
$("#div3").fadeOut);
});](https://image.slidesharecdn.com/webdevelopmentcourse-jquery-200415111706/75/Web-Development-Course-JQuery-by-RSOLUTIONS-55-2048.jpg)
![fadeToggle
53
Syntax selector.fadeToggle ( [speed] [,callback] )
Description This method is used to toggle between the fadeIn() and fadeOut()
methods.
Illustration $("button").click(function(){
$("#div1").fadeToggle();
$("#div2").fadeToggle("slow");
$("#div3").fadeToggle(3000);
});](https://image.slidesharecdn.com/webdevelopmentcourse-jquery-200415111706/75/Web-Development-Course-JQuery-by-RSOLUTIONS-56-2048.jpg)
![fadeTo
54
Syntax selector.fadeTo (speed, opacity, [callback]);
Description speed: Represents parameter that defines the duration of the
effect. It can take any of the three predefined speeds namely slow,
normal, or fast or the number of milliseconds to run the animation.
Opacity: Represents a parameter in the fadeTo() method that
defines the fading to a given opacity whose value lies between 0
and 1.
callback: Is an optional parameter that represents a function to be
executed after the function is completed.
Illustration $("button").click(function(){
$("#div1").fadeTo("slow",0.15);
$("#div2").fadeTo("slow",0.4);
});](https://image.slidesharecdn.com/webdevelopmentcourse-jquery-200415111706/75/Web-Development-Course-JQuery-by-RSOLUTIONS-57-2048.jpg)
![slideDown
55
Syntax selector.slideDown (speed, [,callback]);
Description This method is used to slide down an element.
Illustration $("#flip").click(function(){
$("#panel").slideDown();
});](https://image.slidesharecdn.com/webdevelopmentcourse-jquery-200415111706/75/Web-Development-Course-JQuery-by-RSOLUTIONS-58-2048.jpg)
![slideUp
56
Syntax selector.slideUp (speed, [,callback]);
Description This method is used to slide up an element.
Illustration $("#flip").click(function(){
$("#panel").slideUp();
});](https://image.slidesharecdn.com/webdevelopmentcourse-jquery-200415111706/75/Web-Development-Course-JQuery-by-RSOLUTIONS-59-2048.jpg)
![slideToogle
57
Syntax selector.slideToggle (speed, [,callback]);
Description This method is used to slide up an element.
Illustration $("#flip").click(function(){
$("#panel").slideToggle();
});](https://image.slidesharecdn.com/webdevelopmentcourse-jquery-200415111706/75/Web-Development-Course-JQuery-by-RSOLUTIONS-60-2048.jpg)
![animate elements
58
The jQuery lets you create customized animation on elements by using the animate() method.
By default, since all HTML elements are positioned static position, it does not let you move them.
Hence, if you need to manipulate the position, you must first set the CSS position property of the
element to relative, fixed, or absolute.
Syntax selector.animate ( {params} [,speed] [,easing] [,callback]);
Description jQuery lets you create customized animation on elements.
Parameters:
params: used to specify the CSS properties to be animated.
speed: defines the duration of the effect.
easing: specifies the easing function to use for the transition –
linear/swing
callback: function to be executed after the animation gets
completed.
Illustration $("button").animate(function(){
$("div").animate({left:'250px'}, 1000, “linear”);
});](https://image.slidesharecdn.com/webdevelopmentcourse-jquery-200415111706/75/Web-Development-Course-JQuery-by-RSOLUTIONS-61-2048.jpg)
![stop elements
60
Syntax selector.stop ([stopAll], [,goToEnd]);
Description Used to terminate an animation or effect even before it is
completed.
All the jQuery effect functions such as sliding, fading and so on
supports the stop() method.
stopAll: A Boolean indicating whether to remove queued
animations as well.
goToEnd: A Boolean indicating whether to complete the current
animation immediately
Illustration $("#stop").click(function(){
$("#panel").stop();
});](https://image.slidesharecdn.com/webdevelopmentcourse-jquery-200415111706/75/Web-Development-Course-JQuery-by-RSOLUTIONS-63-2048.jpg)
![callback
61
When using animations, while the animation is in progress the subsequent code will get executed.
It does not wait for the animation to complete before continuing with the execution.
The drawback of this process is that it can give rise to several errors.
By using the callback function you can prevent the creation of these errors.
Typically, a callback function is executed only after the current animation or the effect is completed.
Syntax: $(selector).animate({params}[,speed][,easing ][,callback]);
Example:
$("button").animate(function(){
$("div").animate({left:'250px'}, 1000, “linear”, function() {
alert(“Animation is complete”);
});
});](https://image.slidesharecdn.com/webdevelopmentcourse-jquery-200415111706/75/Web-Development-Course-JQuery-by-RSOLUTIONS-64-2048.jpg)