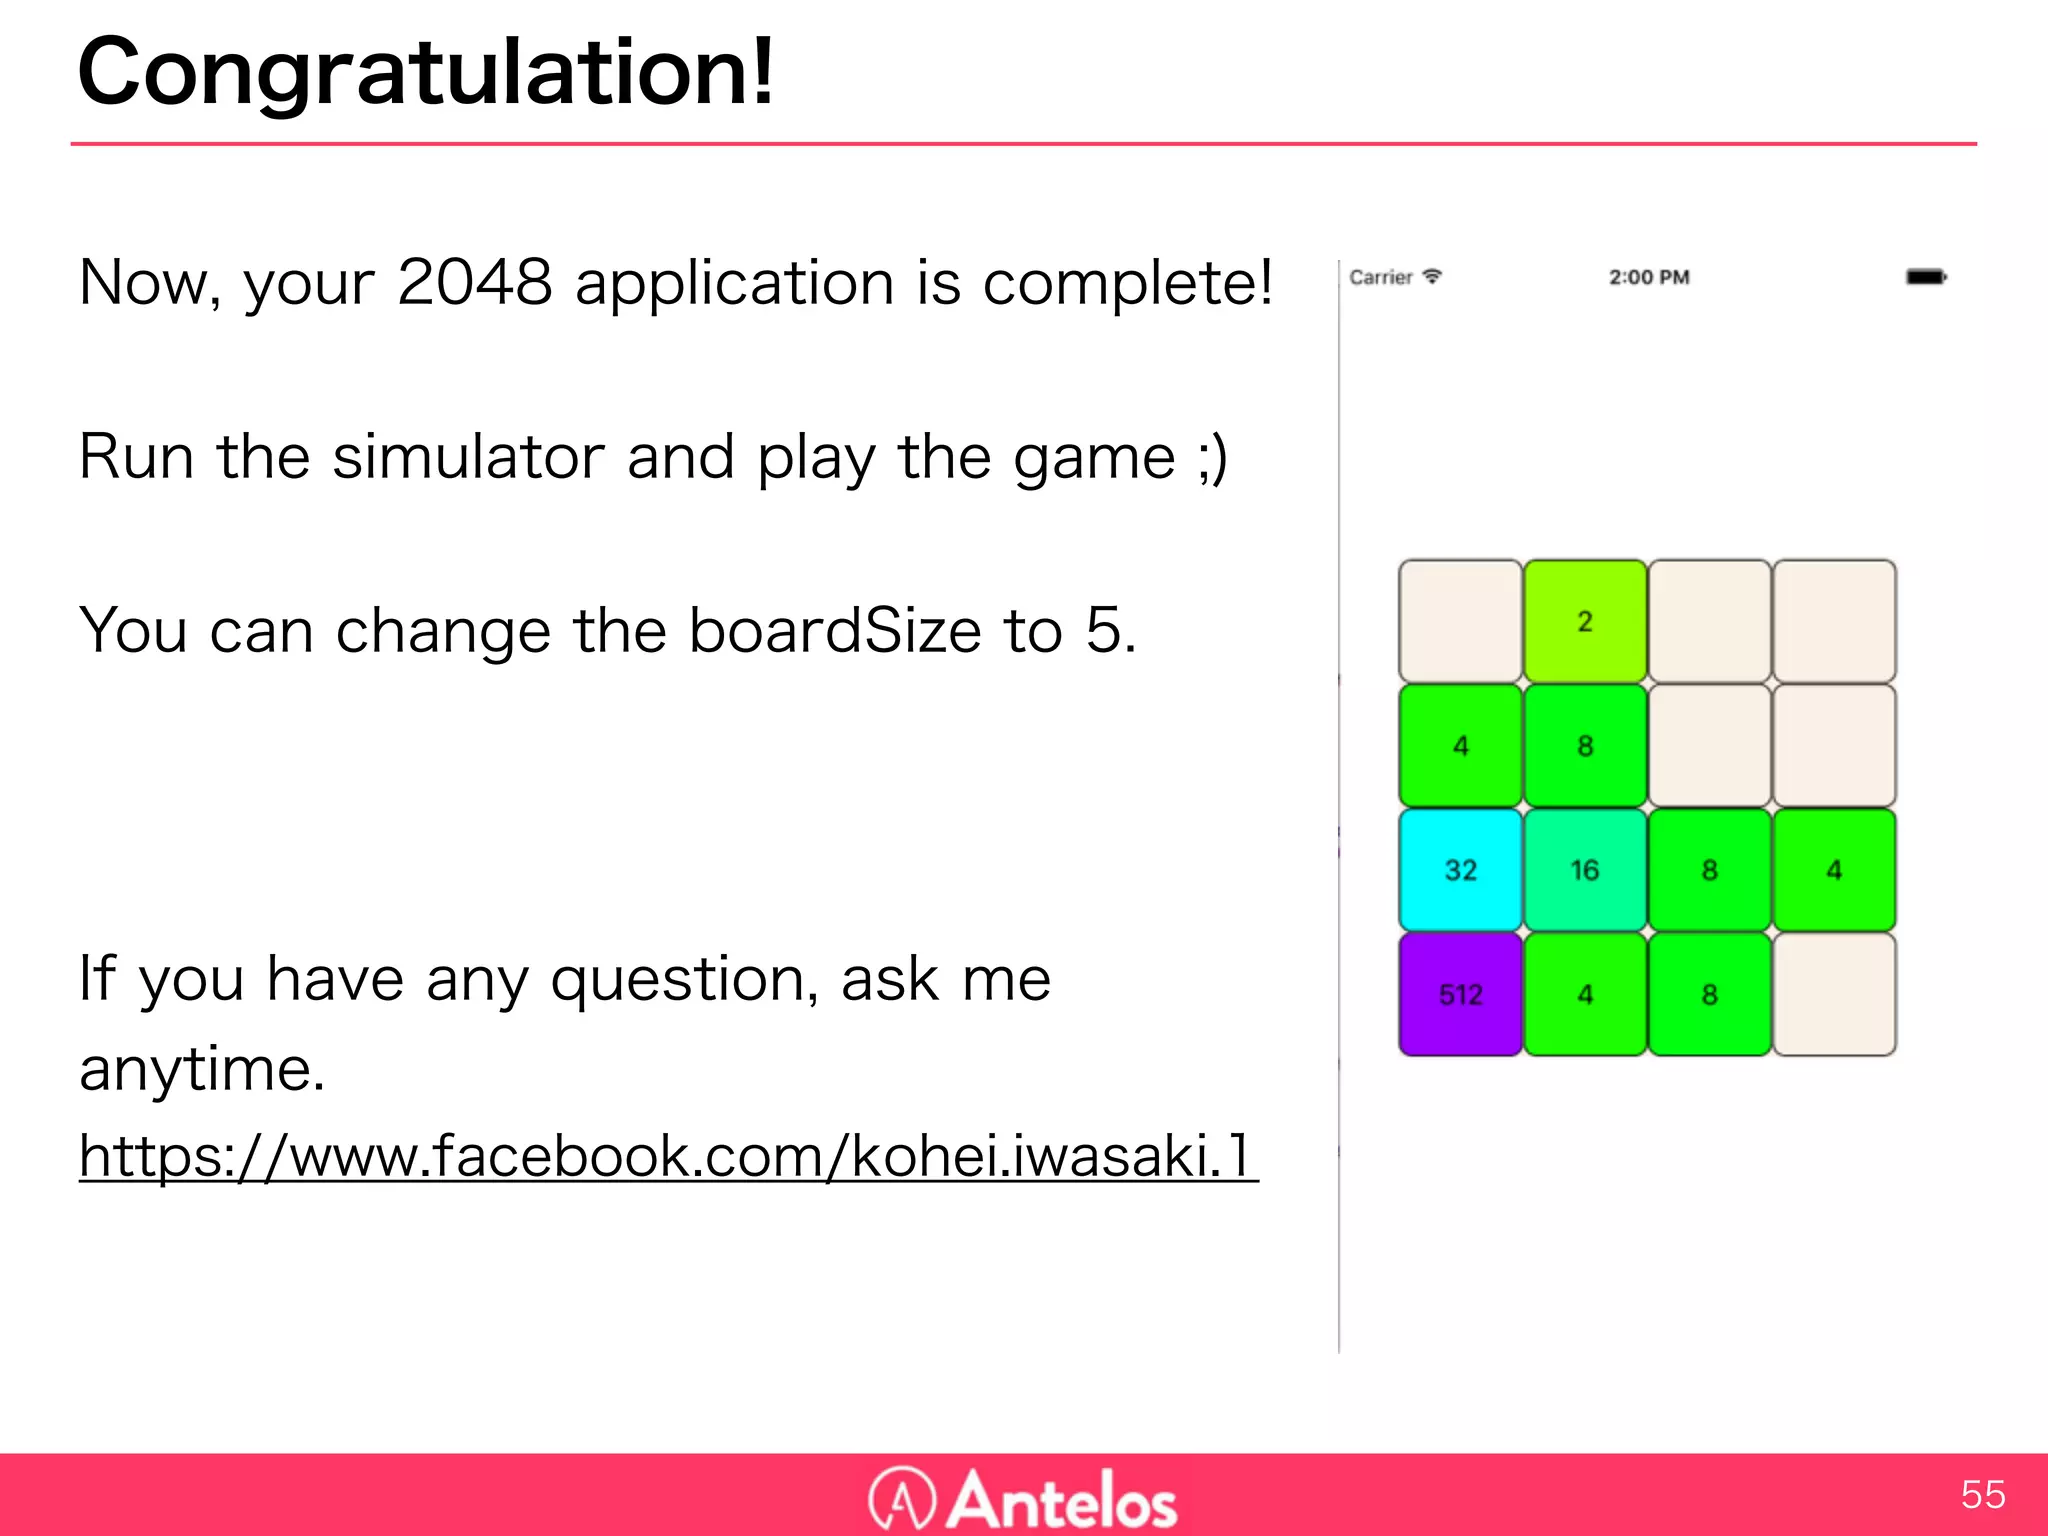
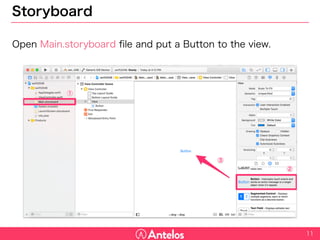
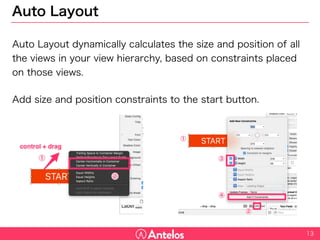
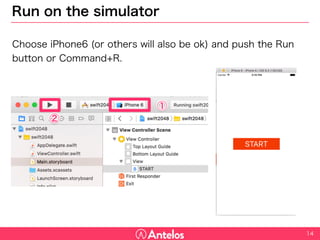
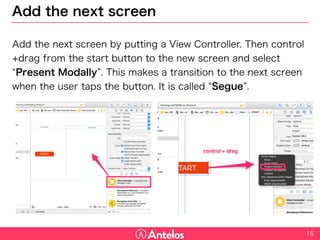
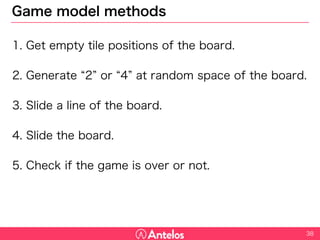
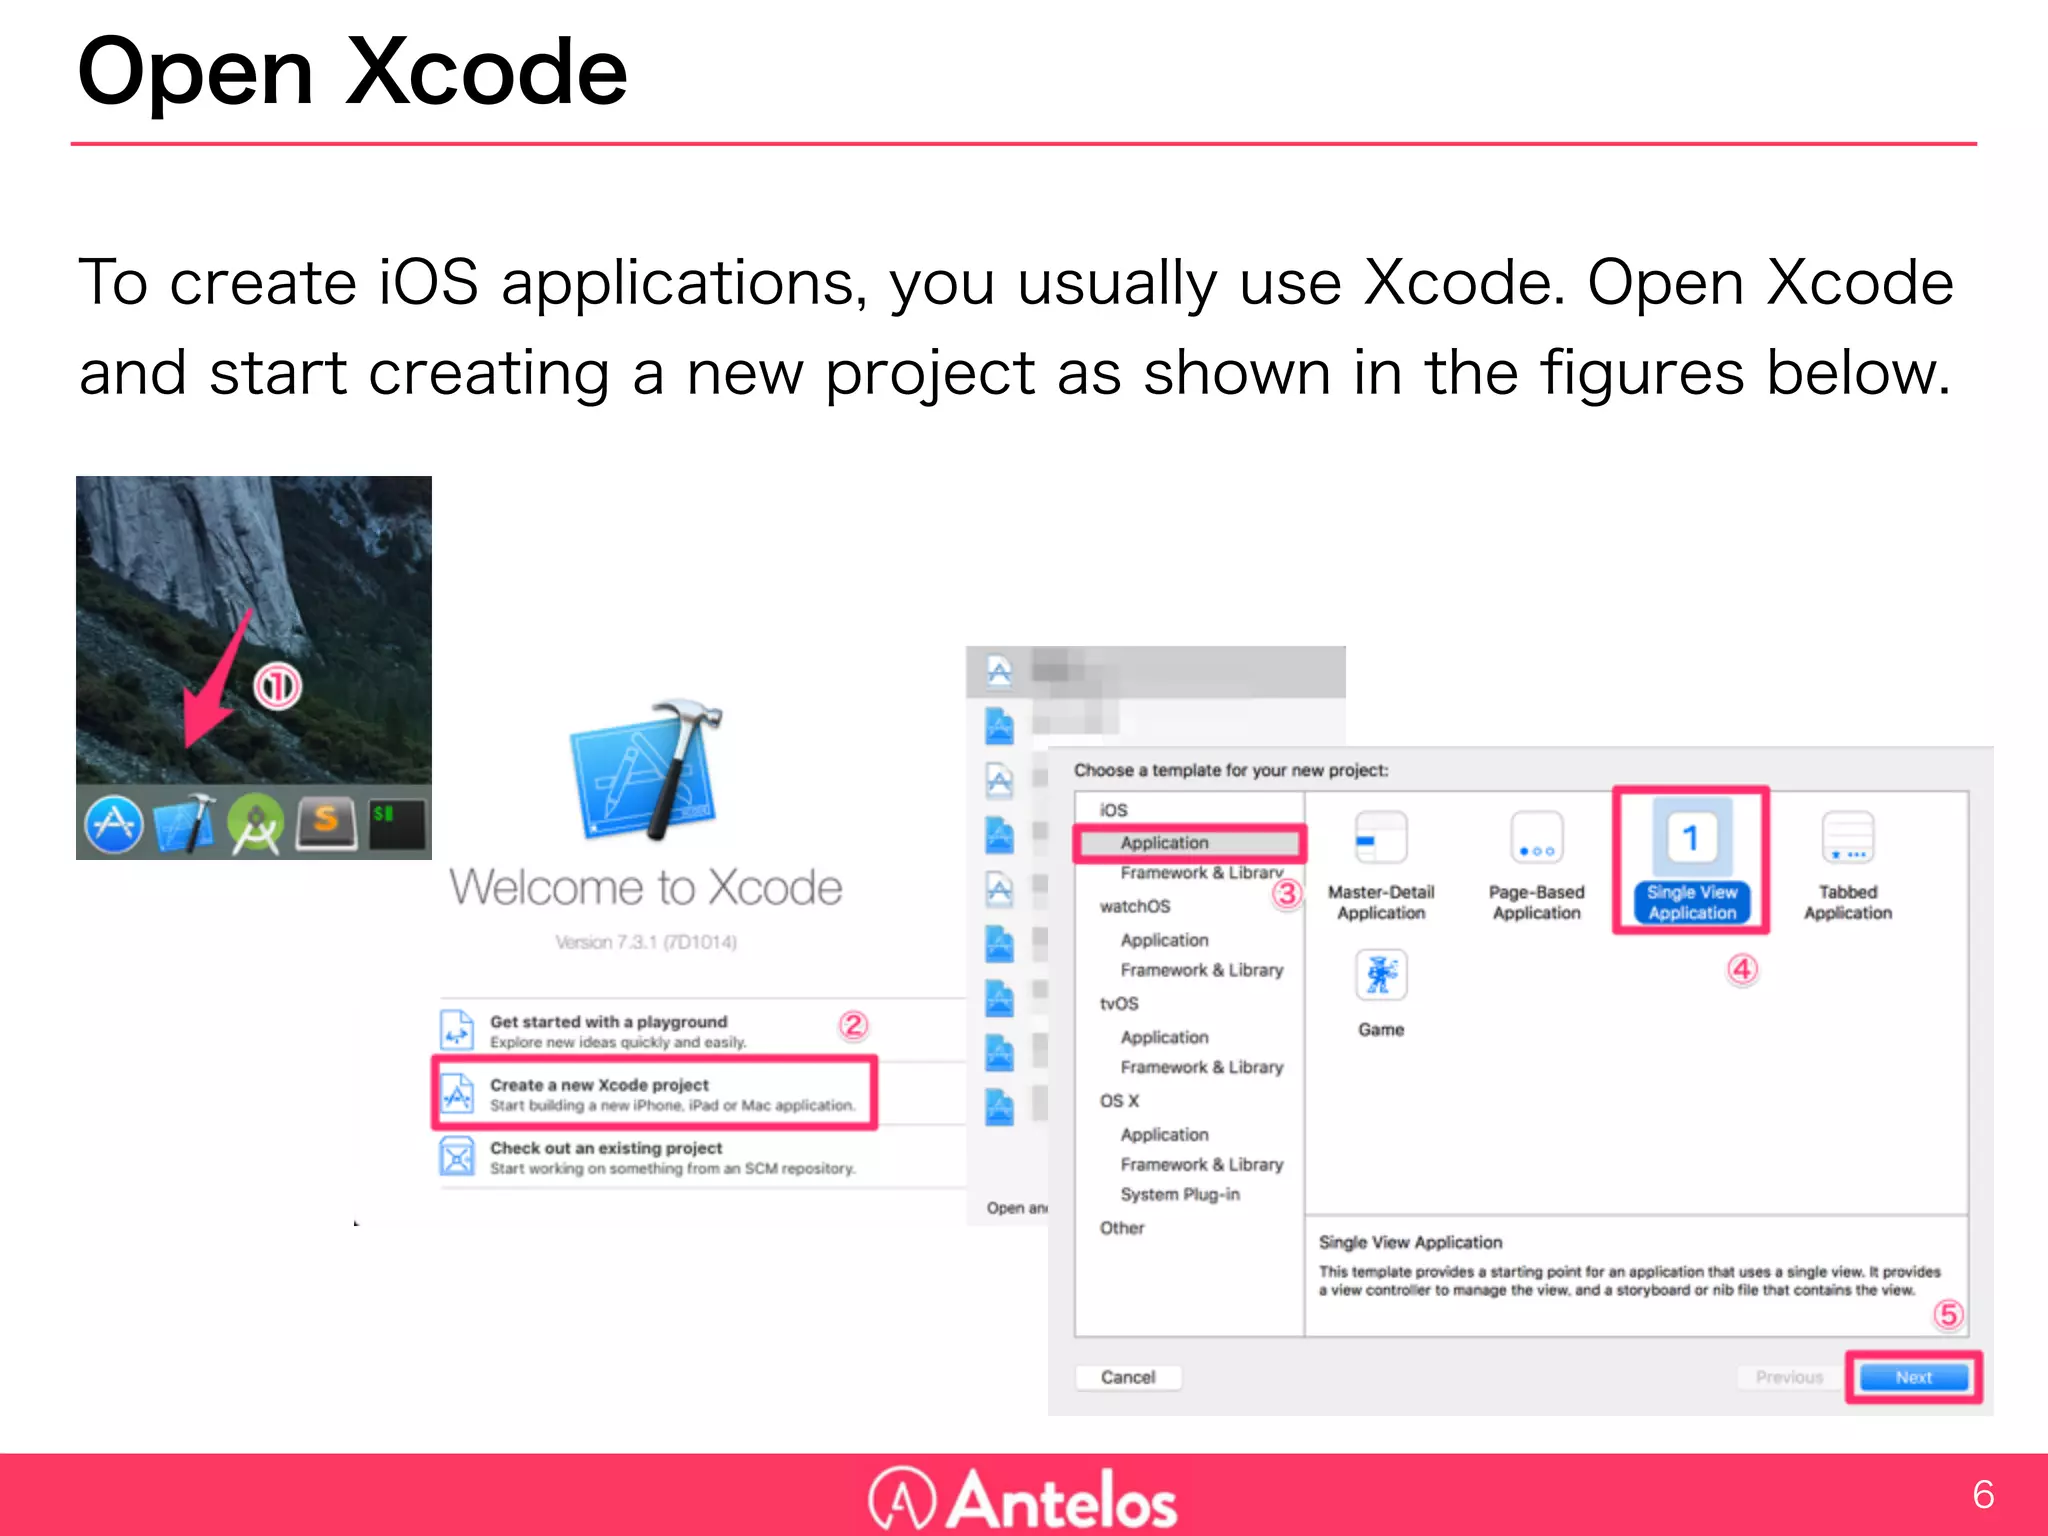
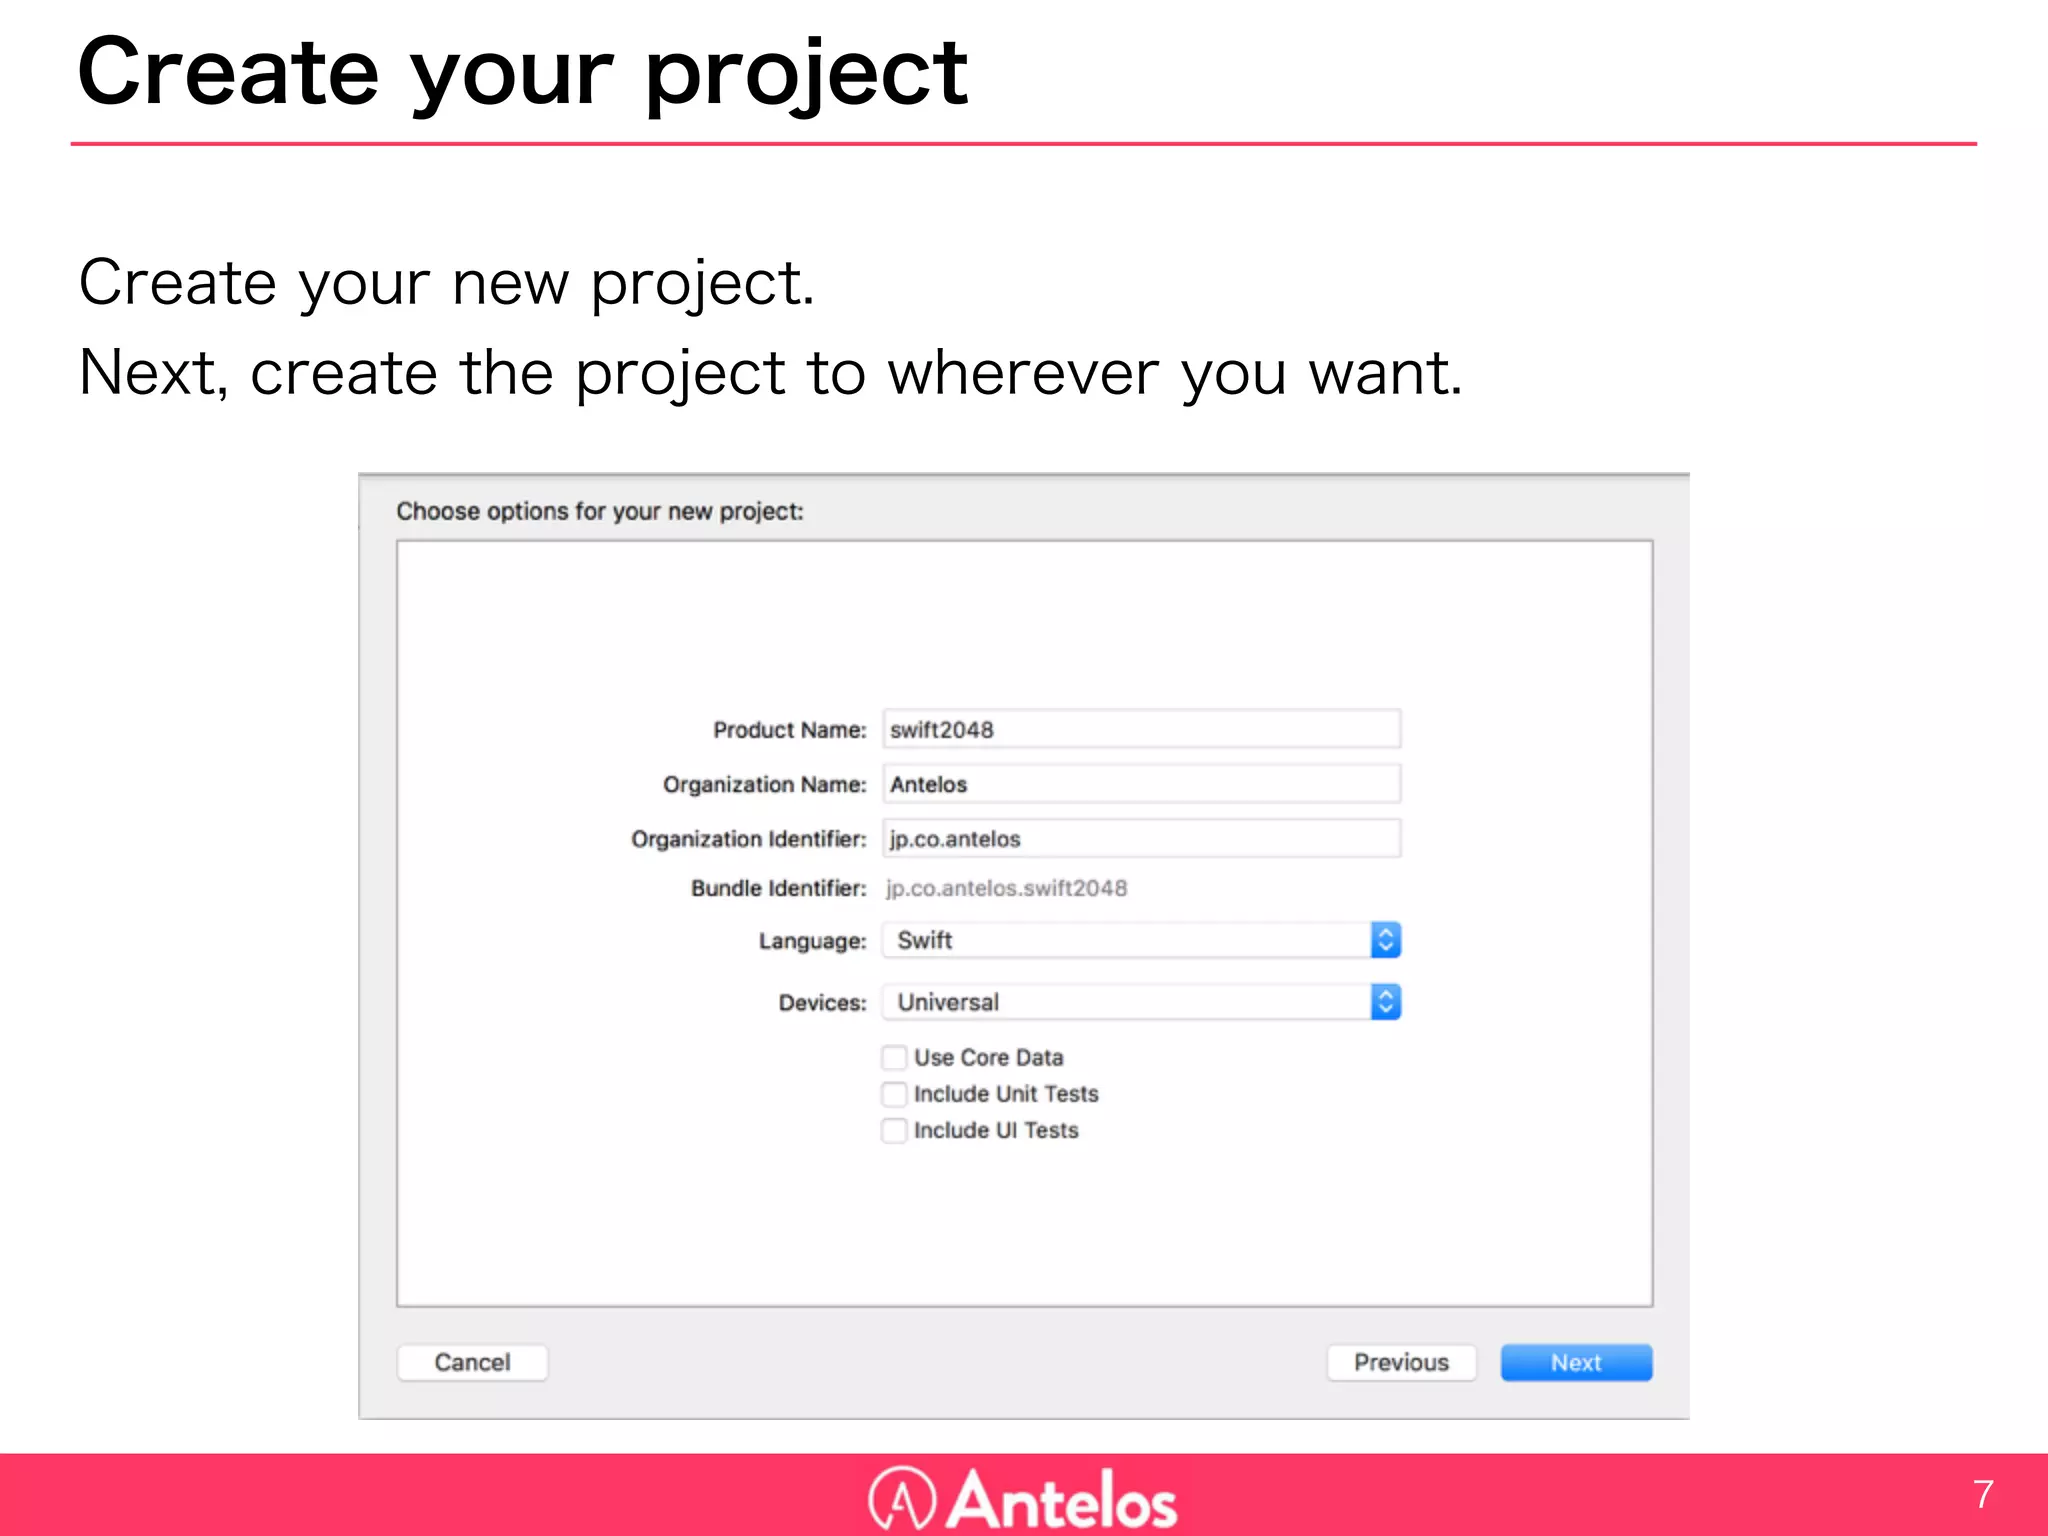
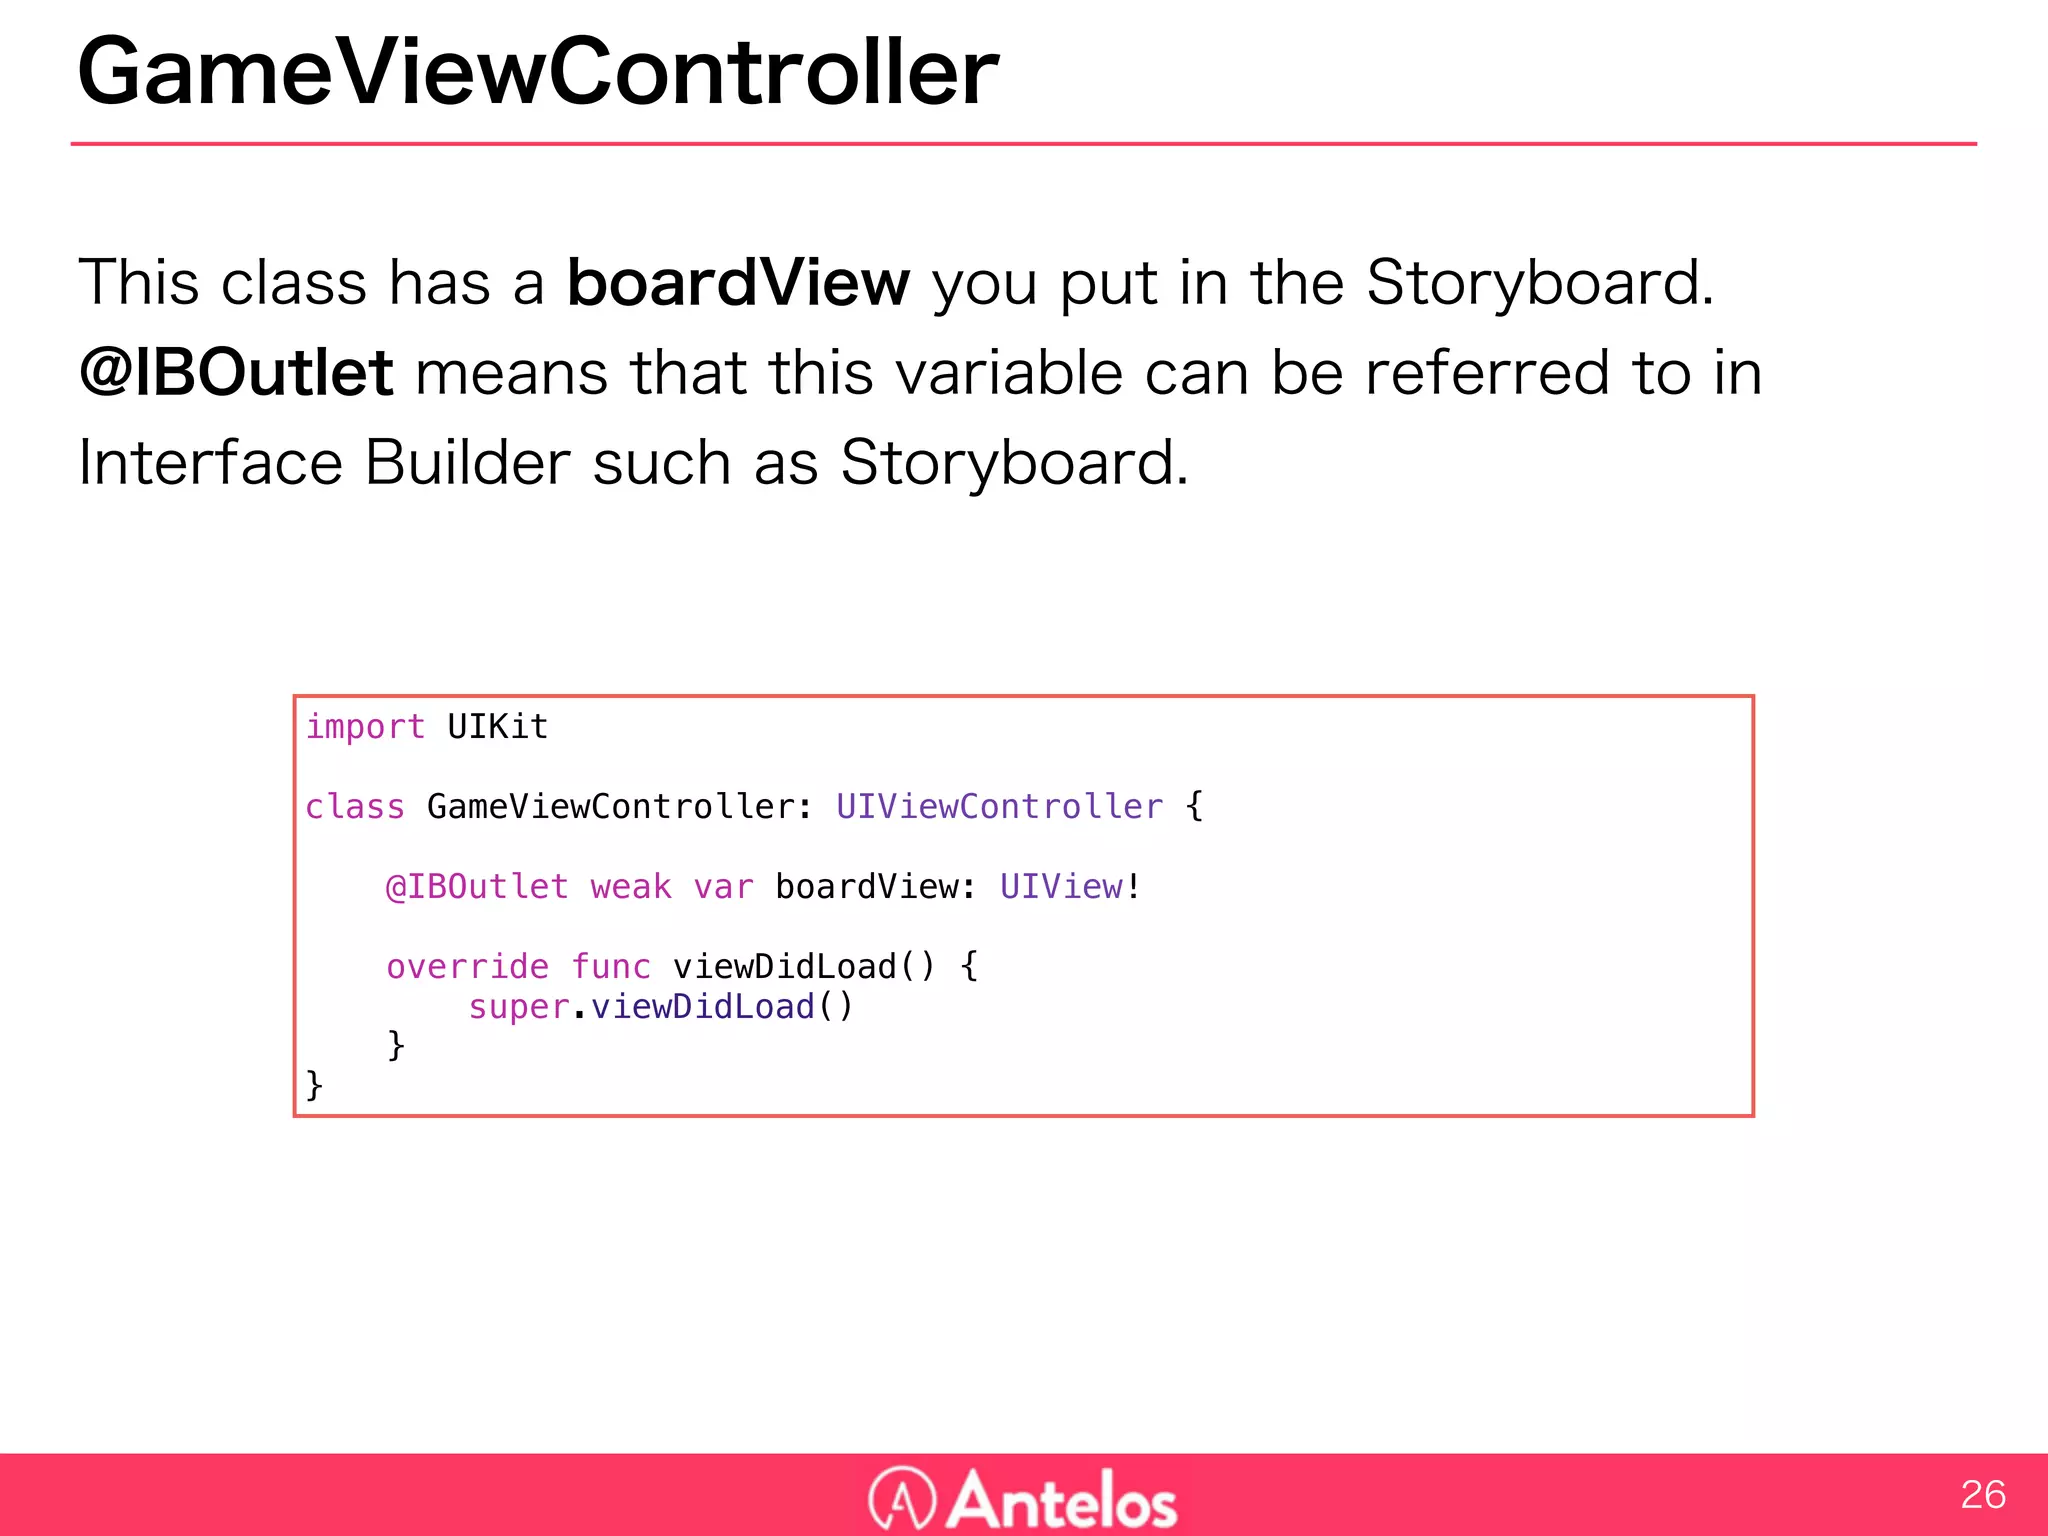
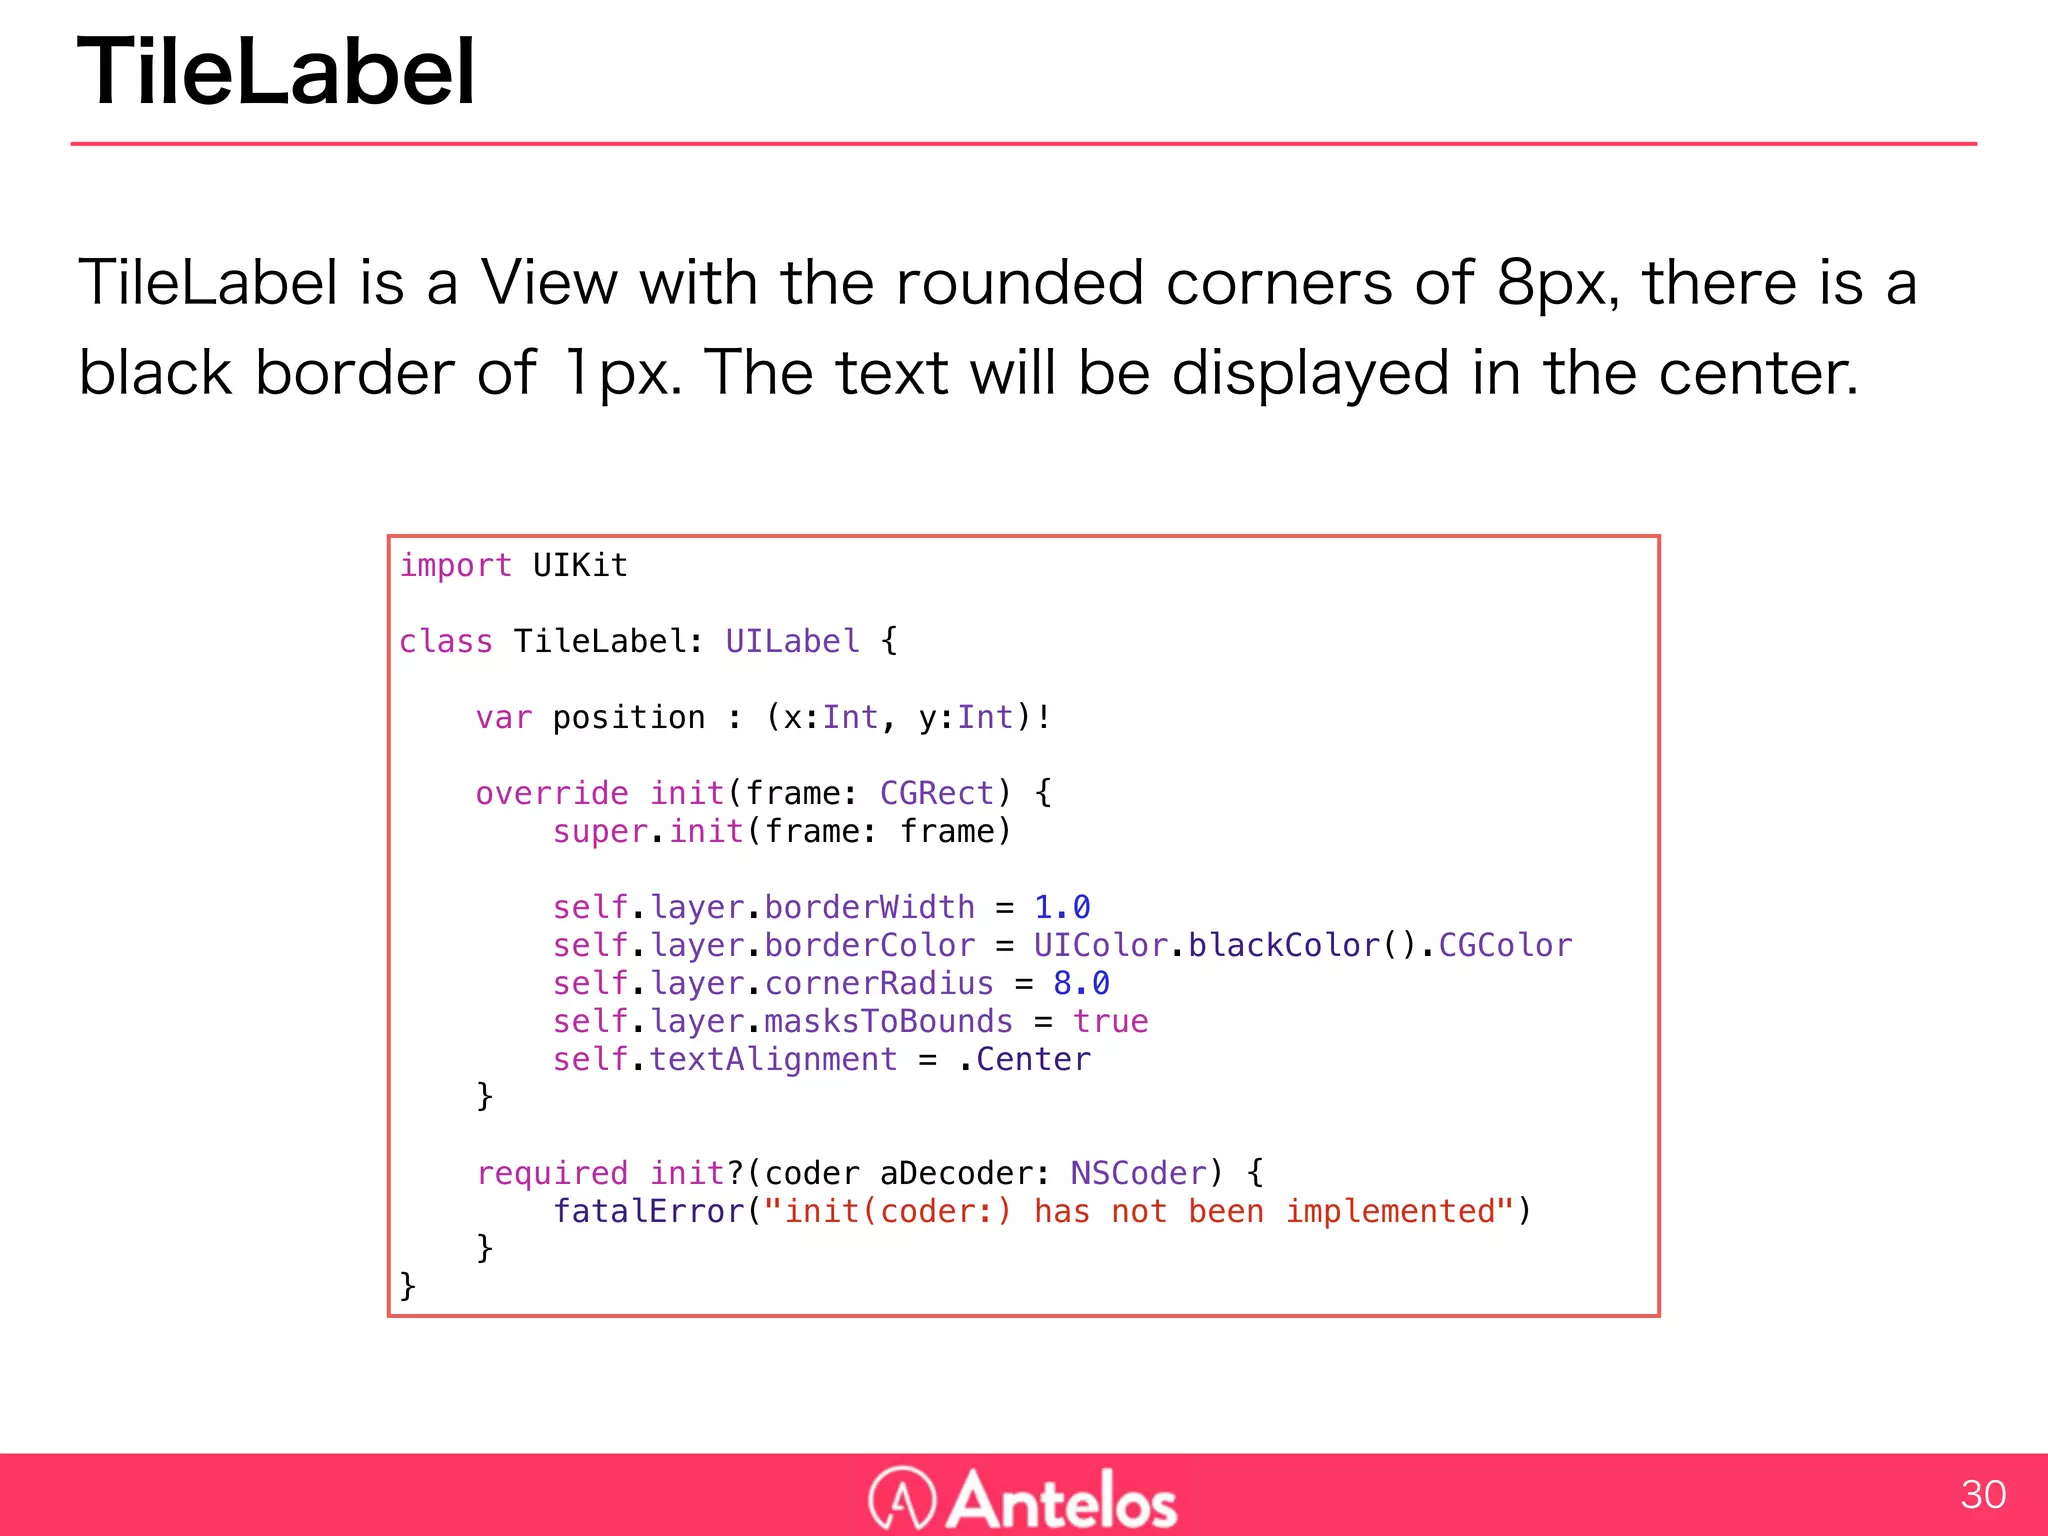
Game.sharedInstance manages the game logic and data as a singleton. It represents the game board as a 2D array and provides methods to generate tiles, slide the board in different directions, and check if the game is over. TileLabel views are used to display the tiles on the board. They observe the Game's "turn" property to update when it changes. User swipes are handled to call Game's slideBoard method and update the views if a move was possible. The game ends when no valid moves remain.


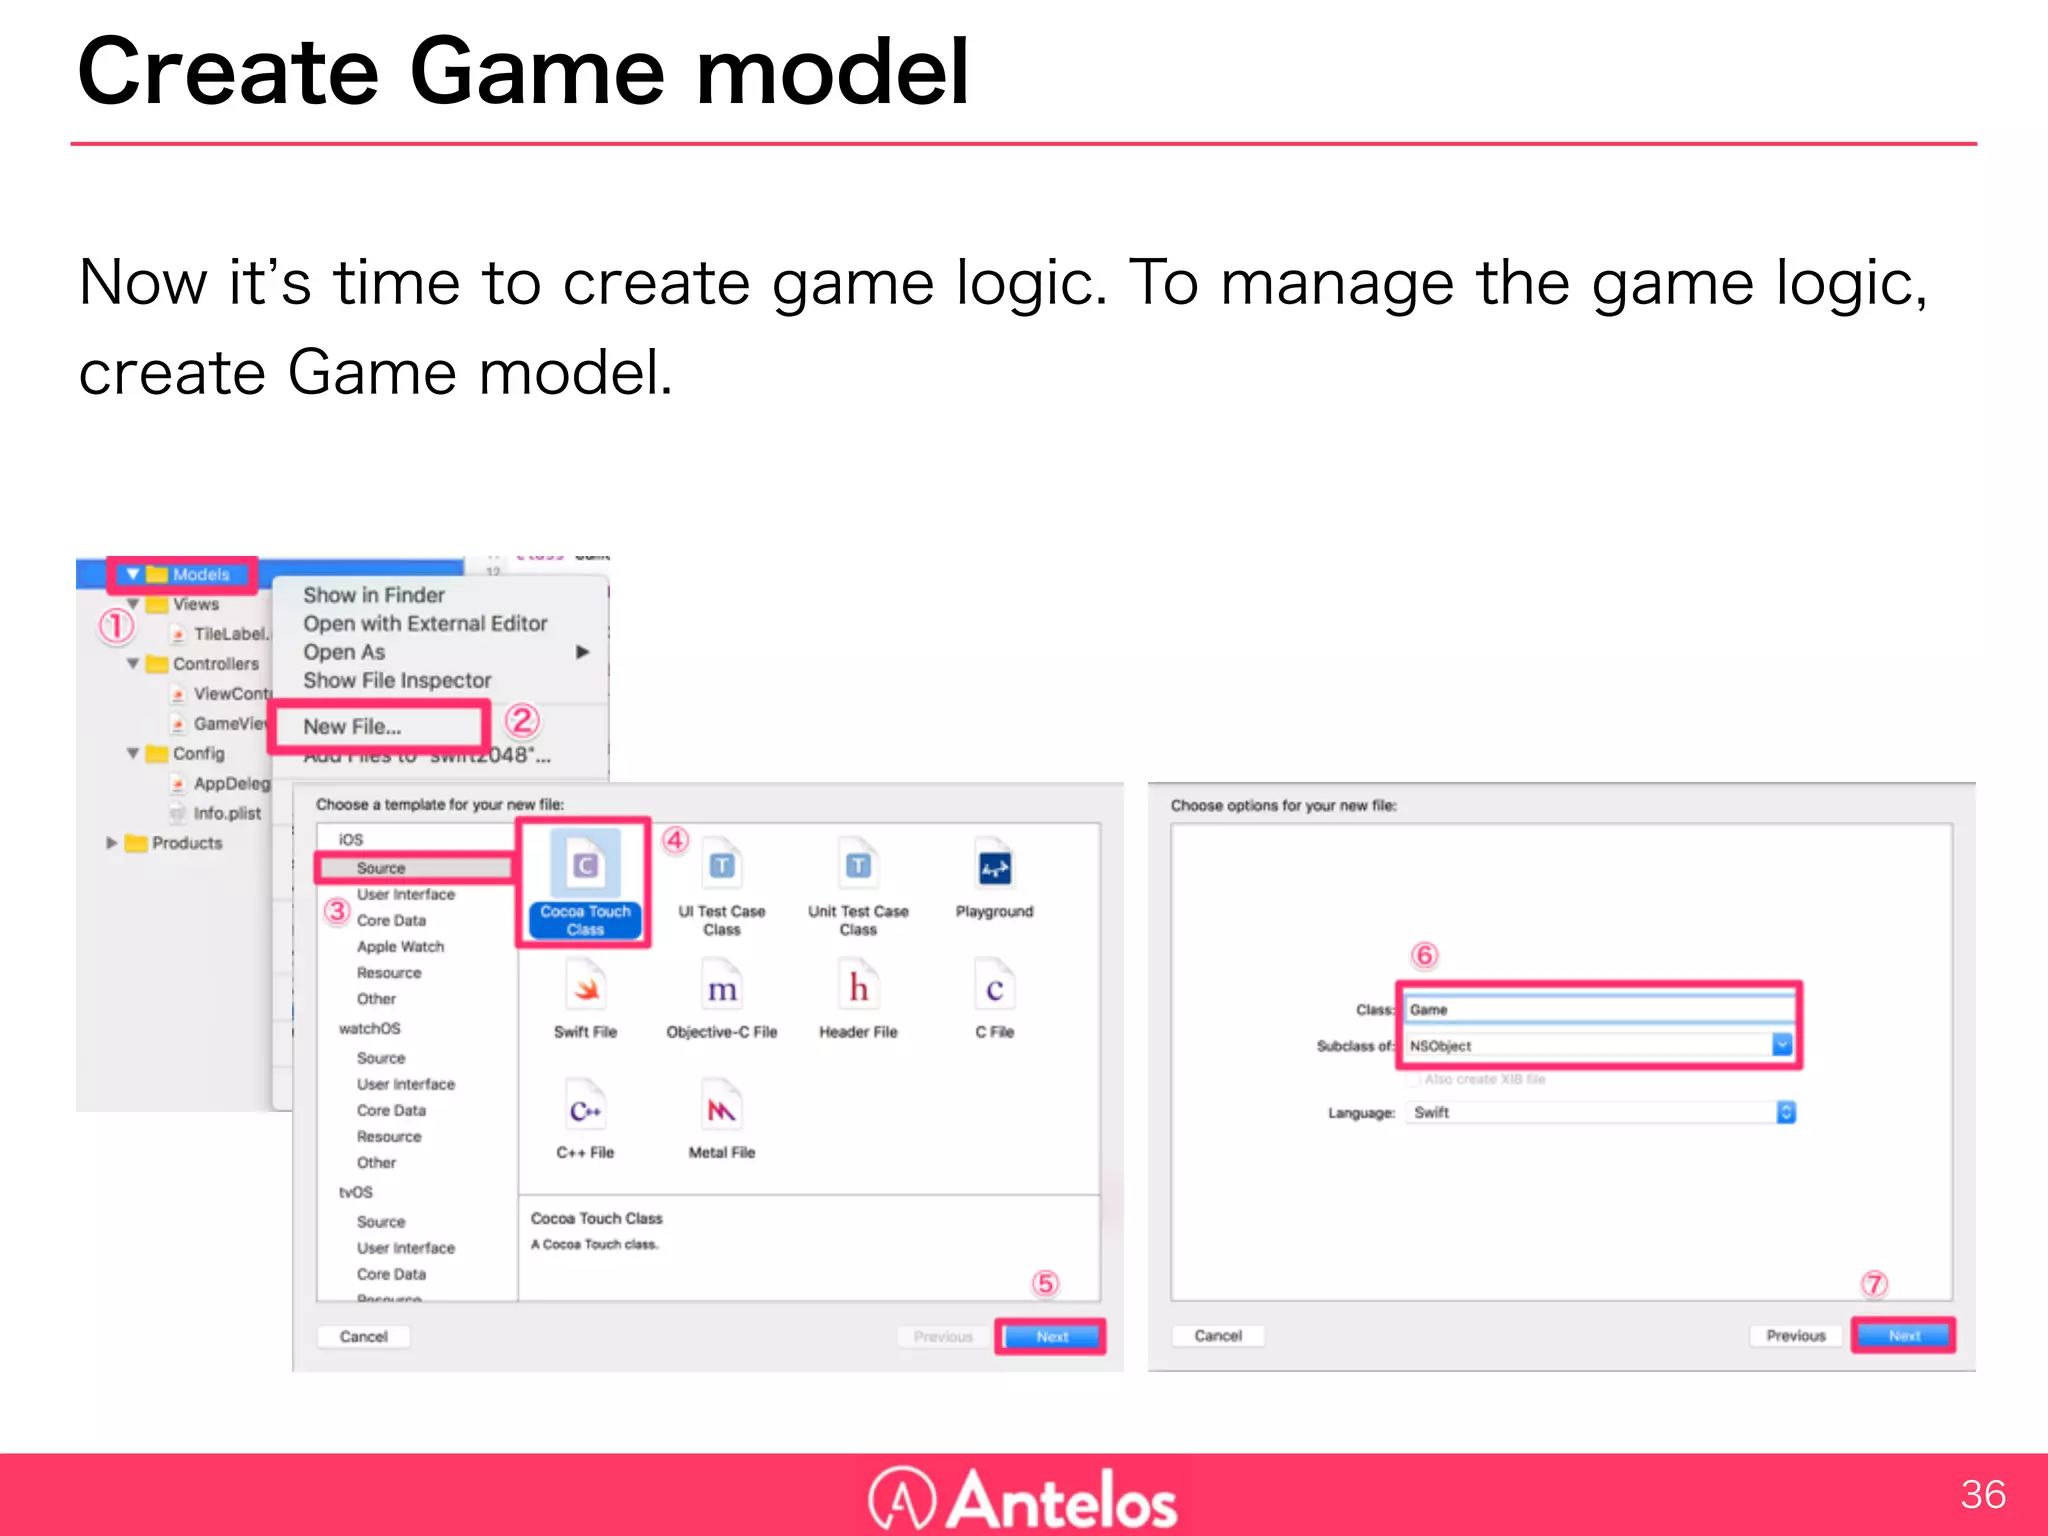
![Game model
In this application, Game model exists only one. You can use Singleton
Pattern to ensure that (sharedInstance).
Board status can be represented as a multidimensional array.
37
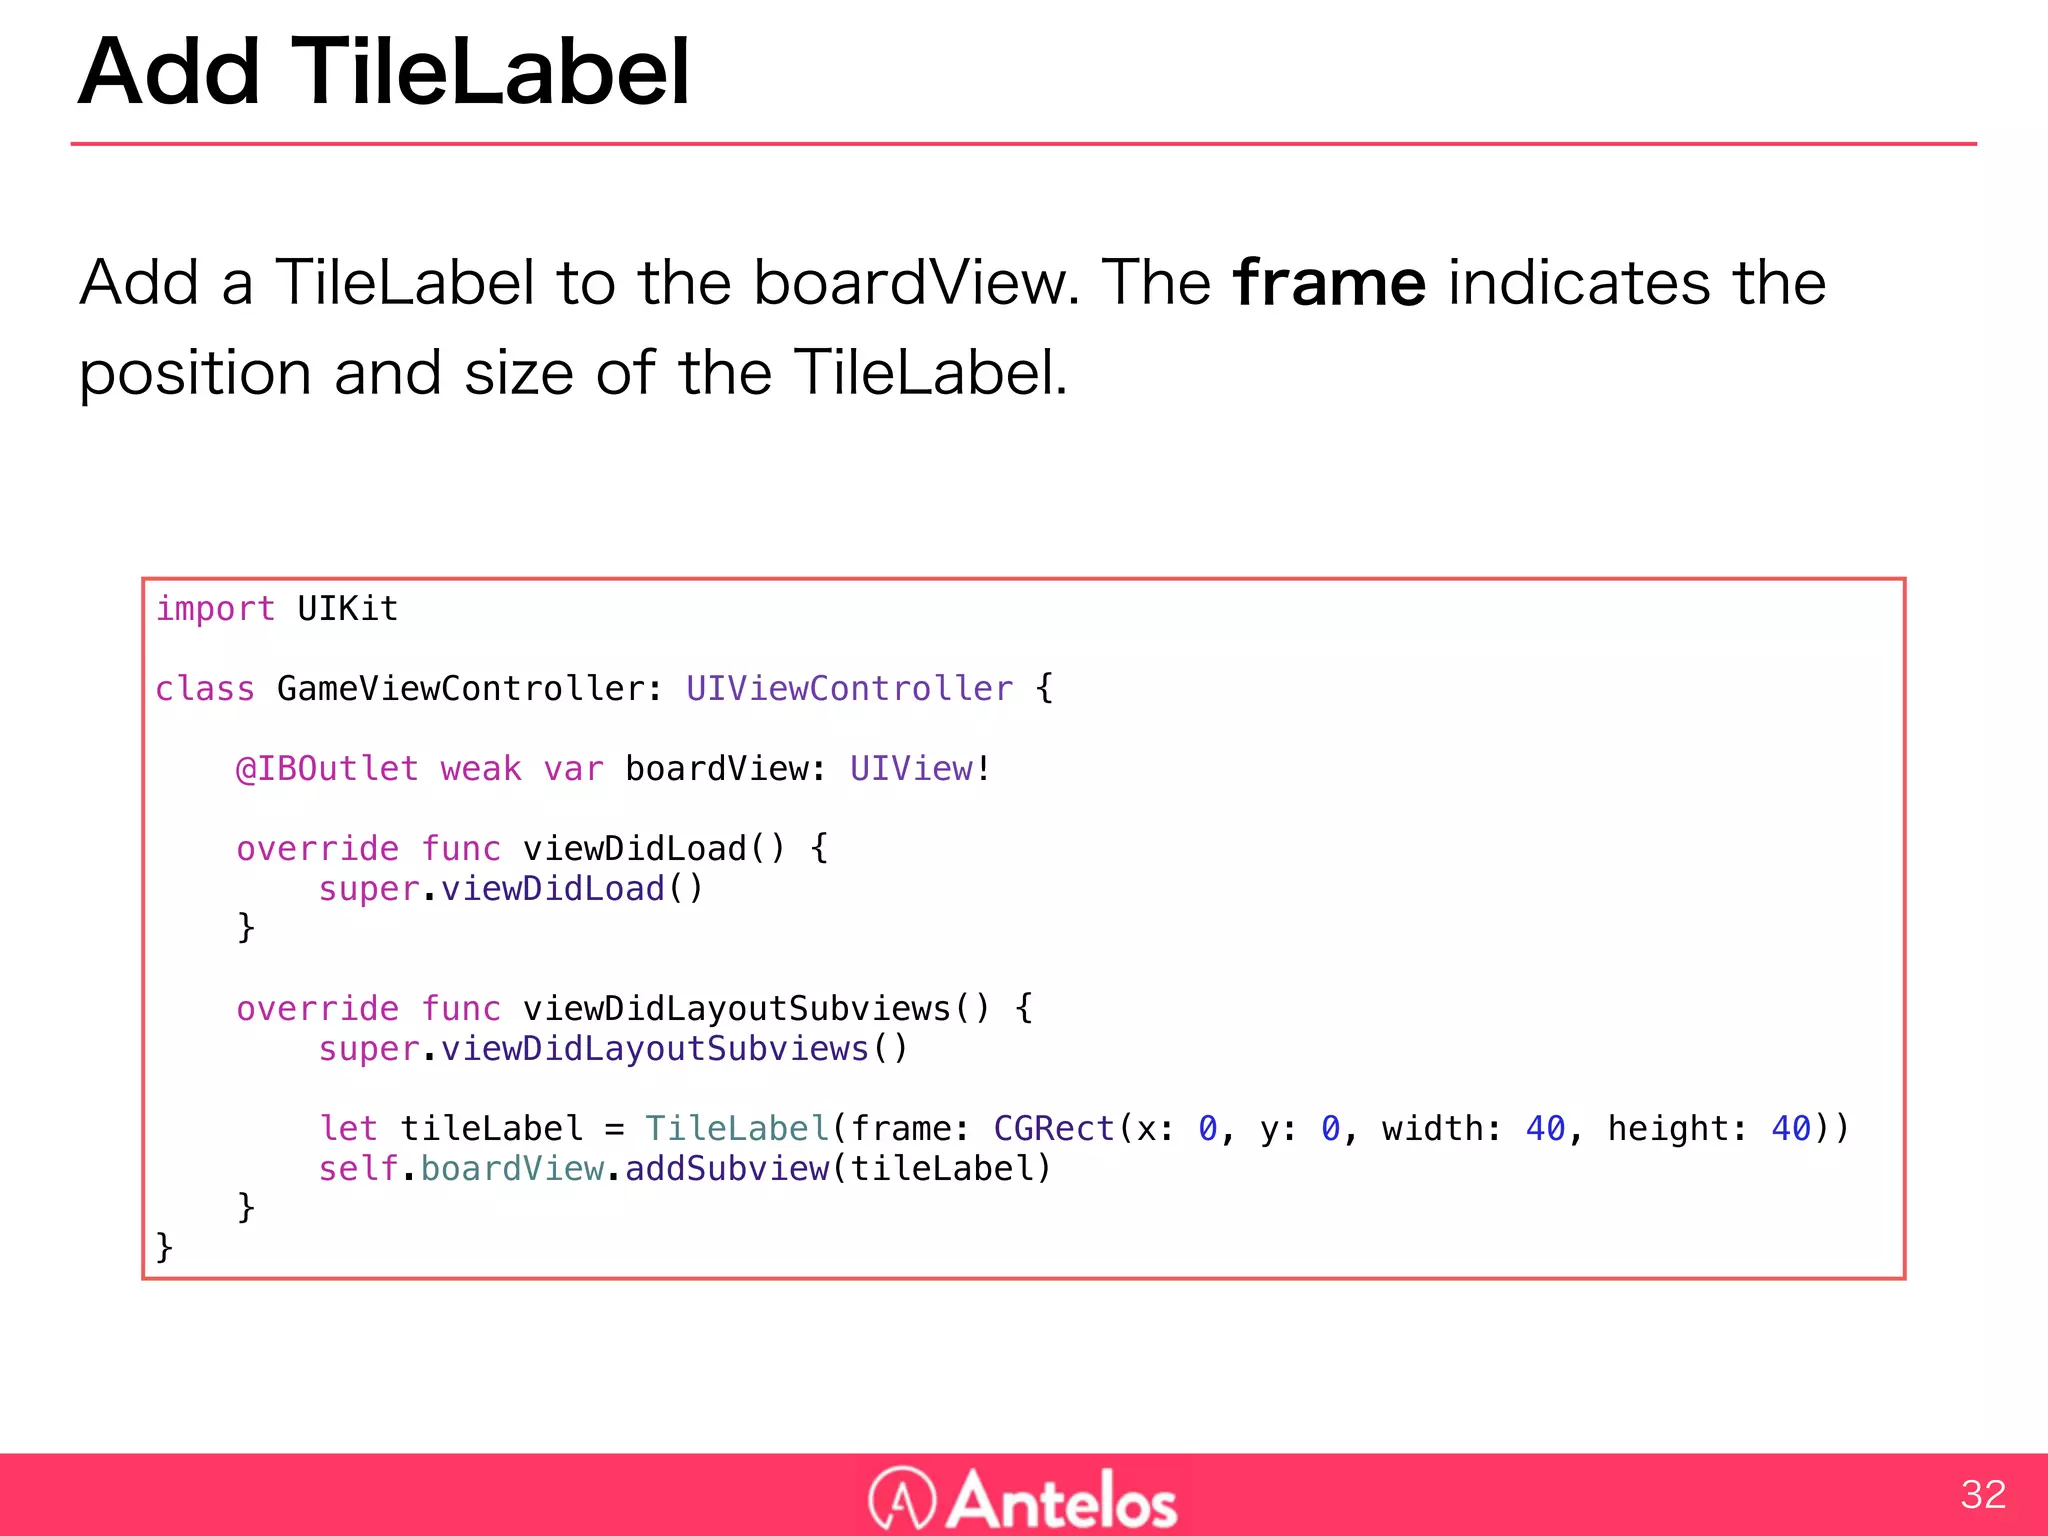
import UIKit
class Game: NSObject {
static var sharedInstance = Game()
let boardSize = 4
var board = [[Int]]()
dynamic var turn = 0
override init() {
super.init()
for _ in 0..<self.boardSize {
self.board.append([Int](count: self.boardSize, repeatedValue: 0))
}
}
}](https://image.slidesharecdn.com/2048onswift-160724025804/85/2048-on-swift-37-320.jpg)
![Get empty tile positions
To generate number on the board, first create a method to get empty
positions of the board. This returns an array of coordinates Tuple.
39
class Game: NSObject {
// ...
func getEmptyPositions() -> [(x:Int, y:Int)]{
var results = [(x:Int, y:Int)]()
for y in 0..<self.boardSize {
for x in 0..<self.boardSize {
if(self.board[y][x] == 0){
results.append((x, y))
}
}
}
return results
}
}](https://image.slidesharecdn.com/2048onswift-160724025804/85/2048-on-swift-39-320.jpg)
![Generate “2” or “4"
Then generate “2” or “4” at the random position of the board.
arc4random_uniform makes random number.
ex) arc4random_uniform(5) returns 0-4 randomly.
40
class Game: NSObject {
// ...
func generateNumber() {
let empties = self.getEmptyPositions()
let randomNum = arc4random_uniform(UInt32(empties.count))
let randomPos = empties[Int(randomNum)]
// Set 2 or 4
self.board[randomPos.y][randomPos.x] = Int(arc4random_uniform(2)+1) * 2
}
func nextTurn() {
self.generateNumber()
self.turn += 1
}
}](https://image.slidesharecdn.com/2048onswift-160724025804/85/2048-on-swift-40-320.jpg)
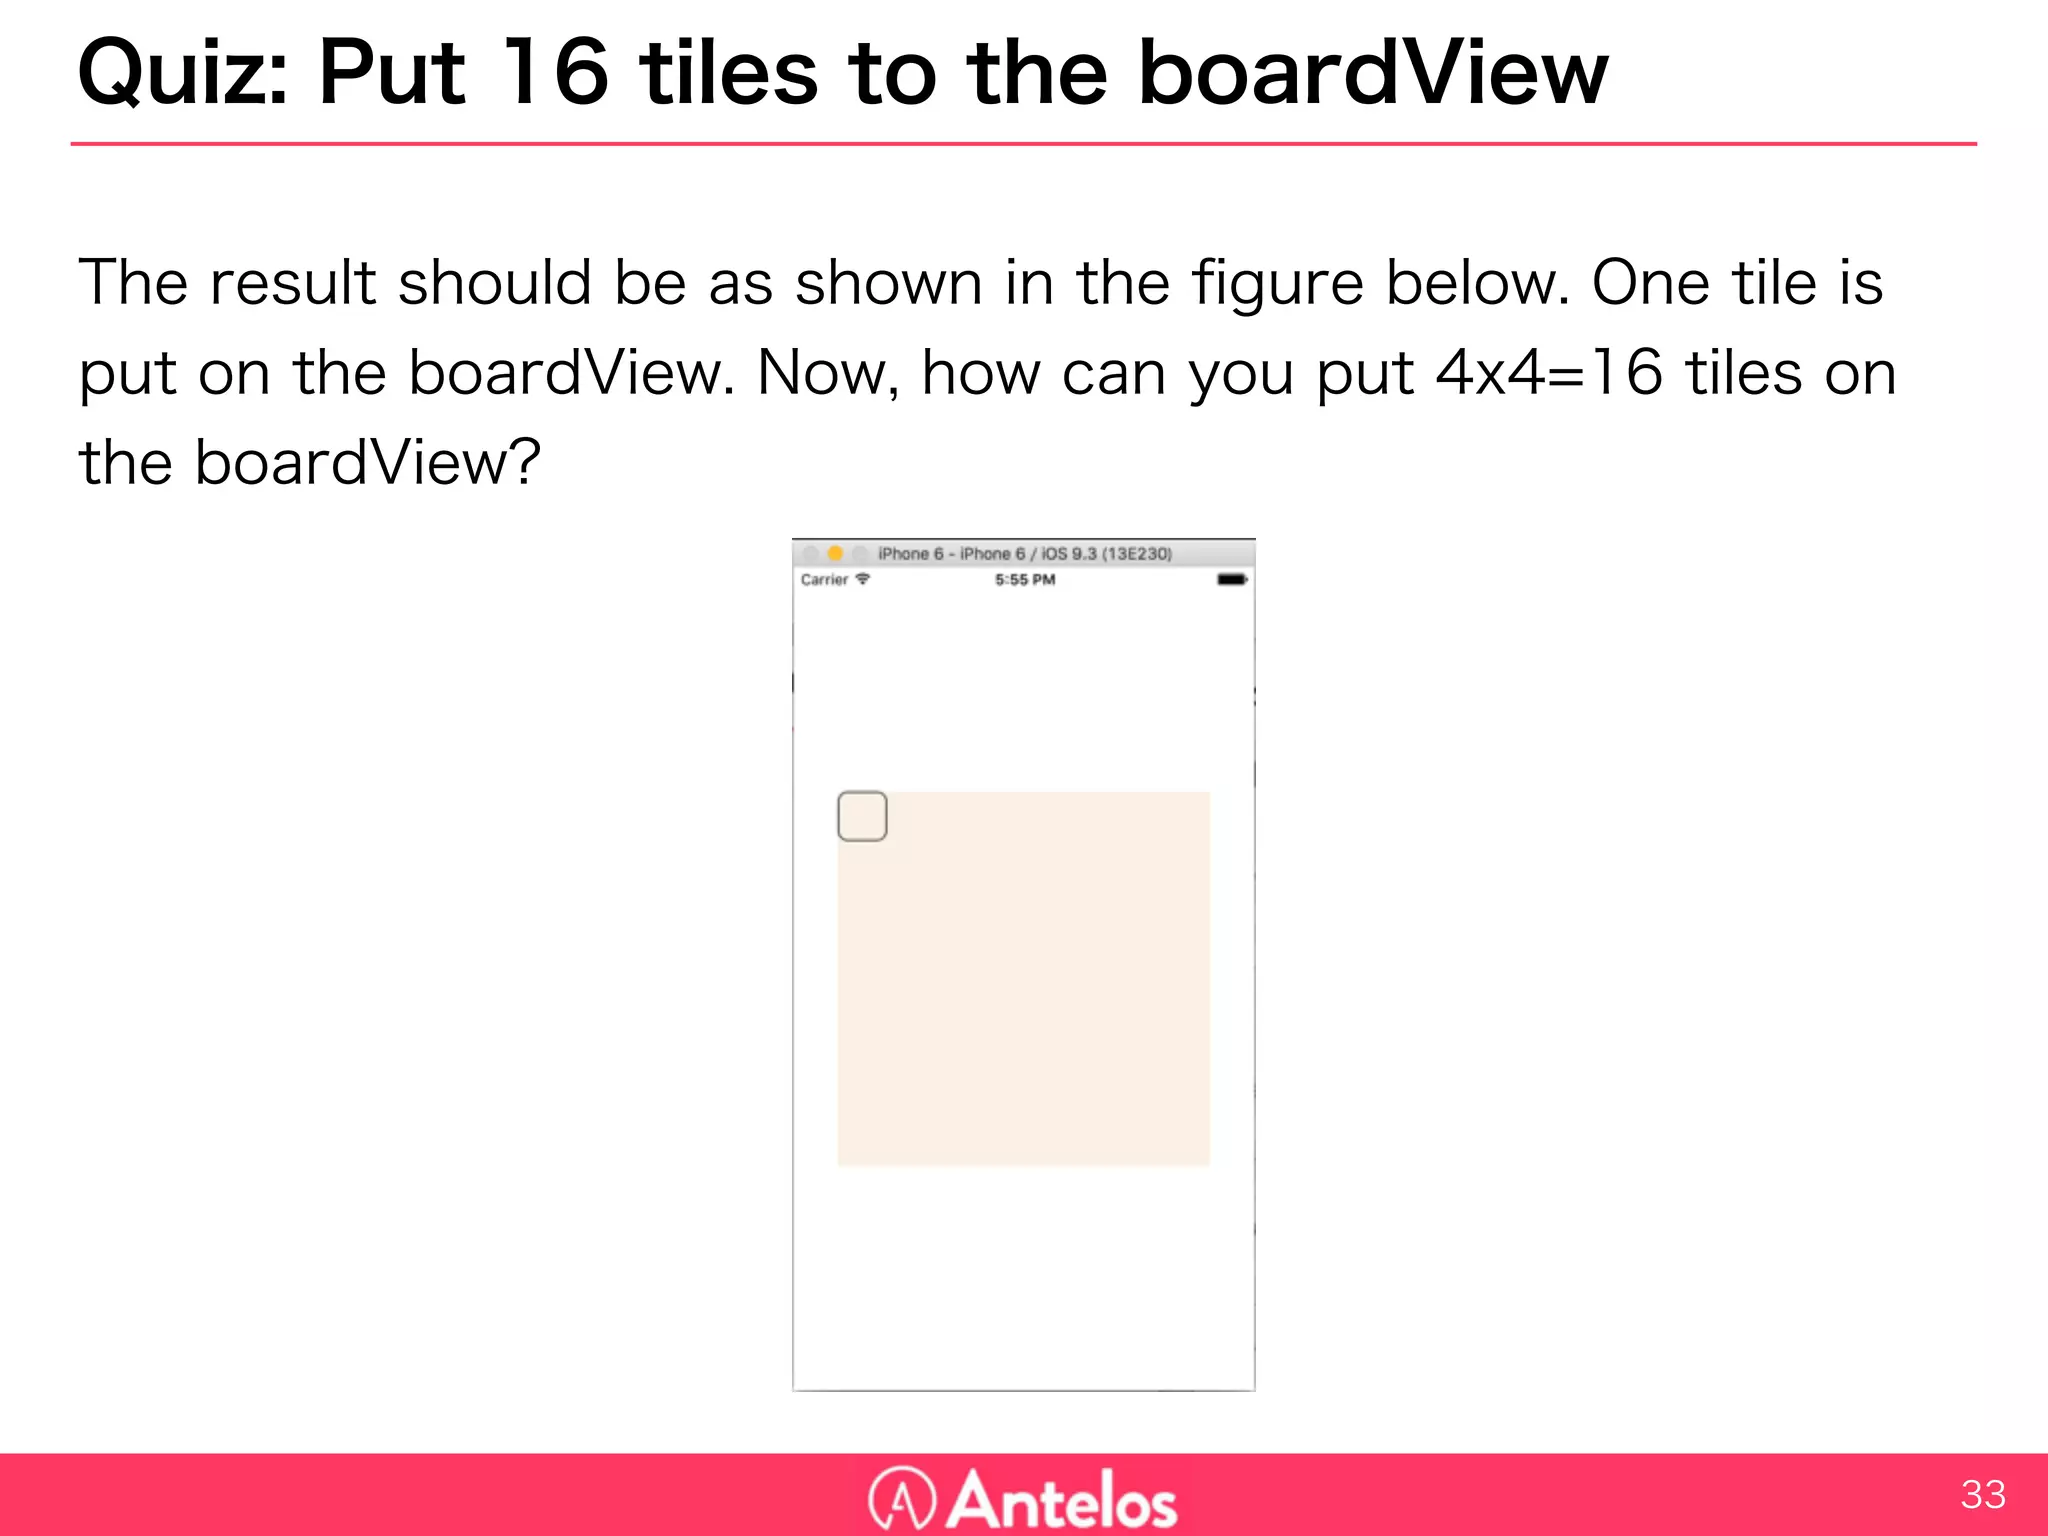
![Quiz: How to create slide function?
For example, [2, 0, 4, 4] must be [2, 8, 0, 0] when the board slides to
left.
41](https://image.slidesharecdn.com/2048onswift-160724025804/85/2048-on-swift-41-320.jpg)
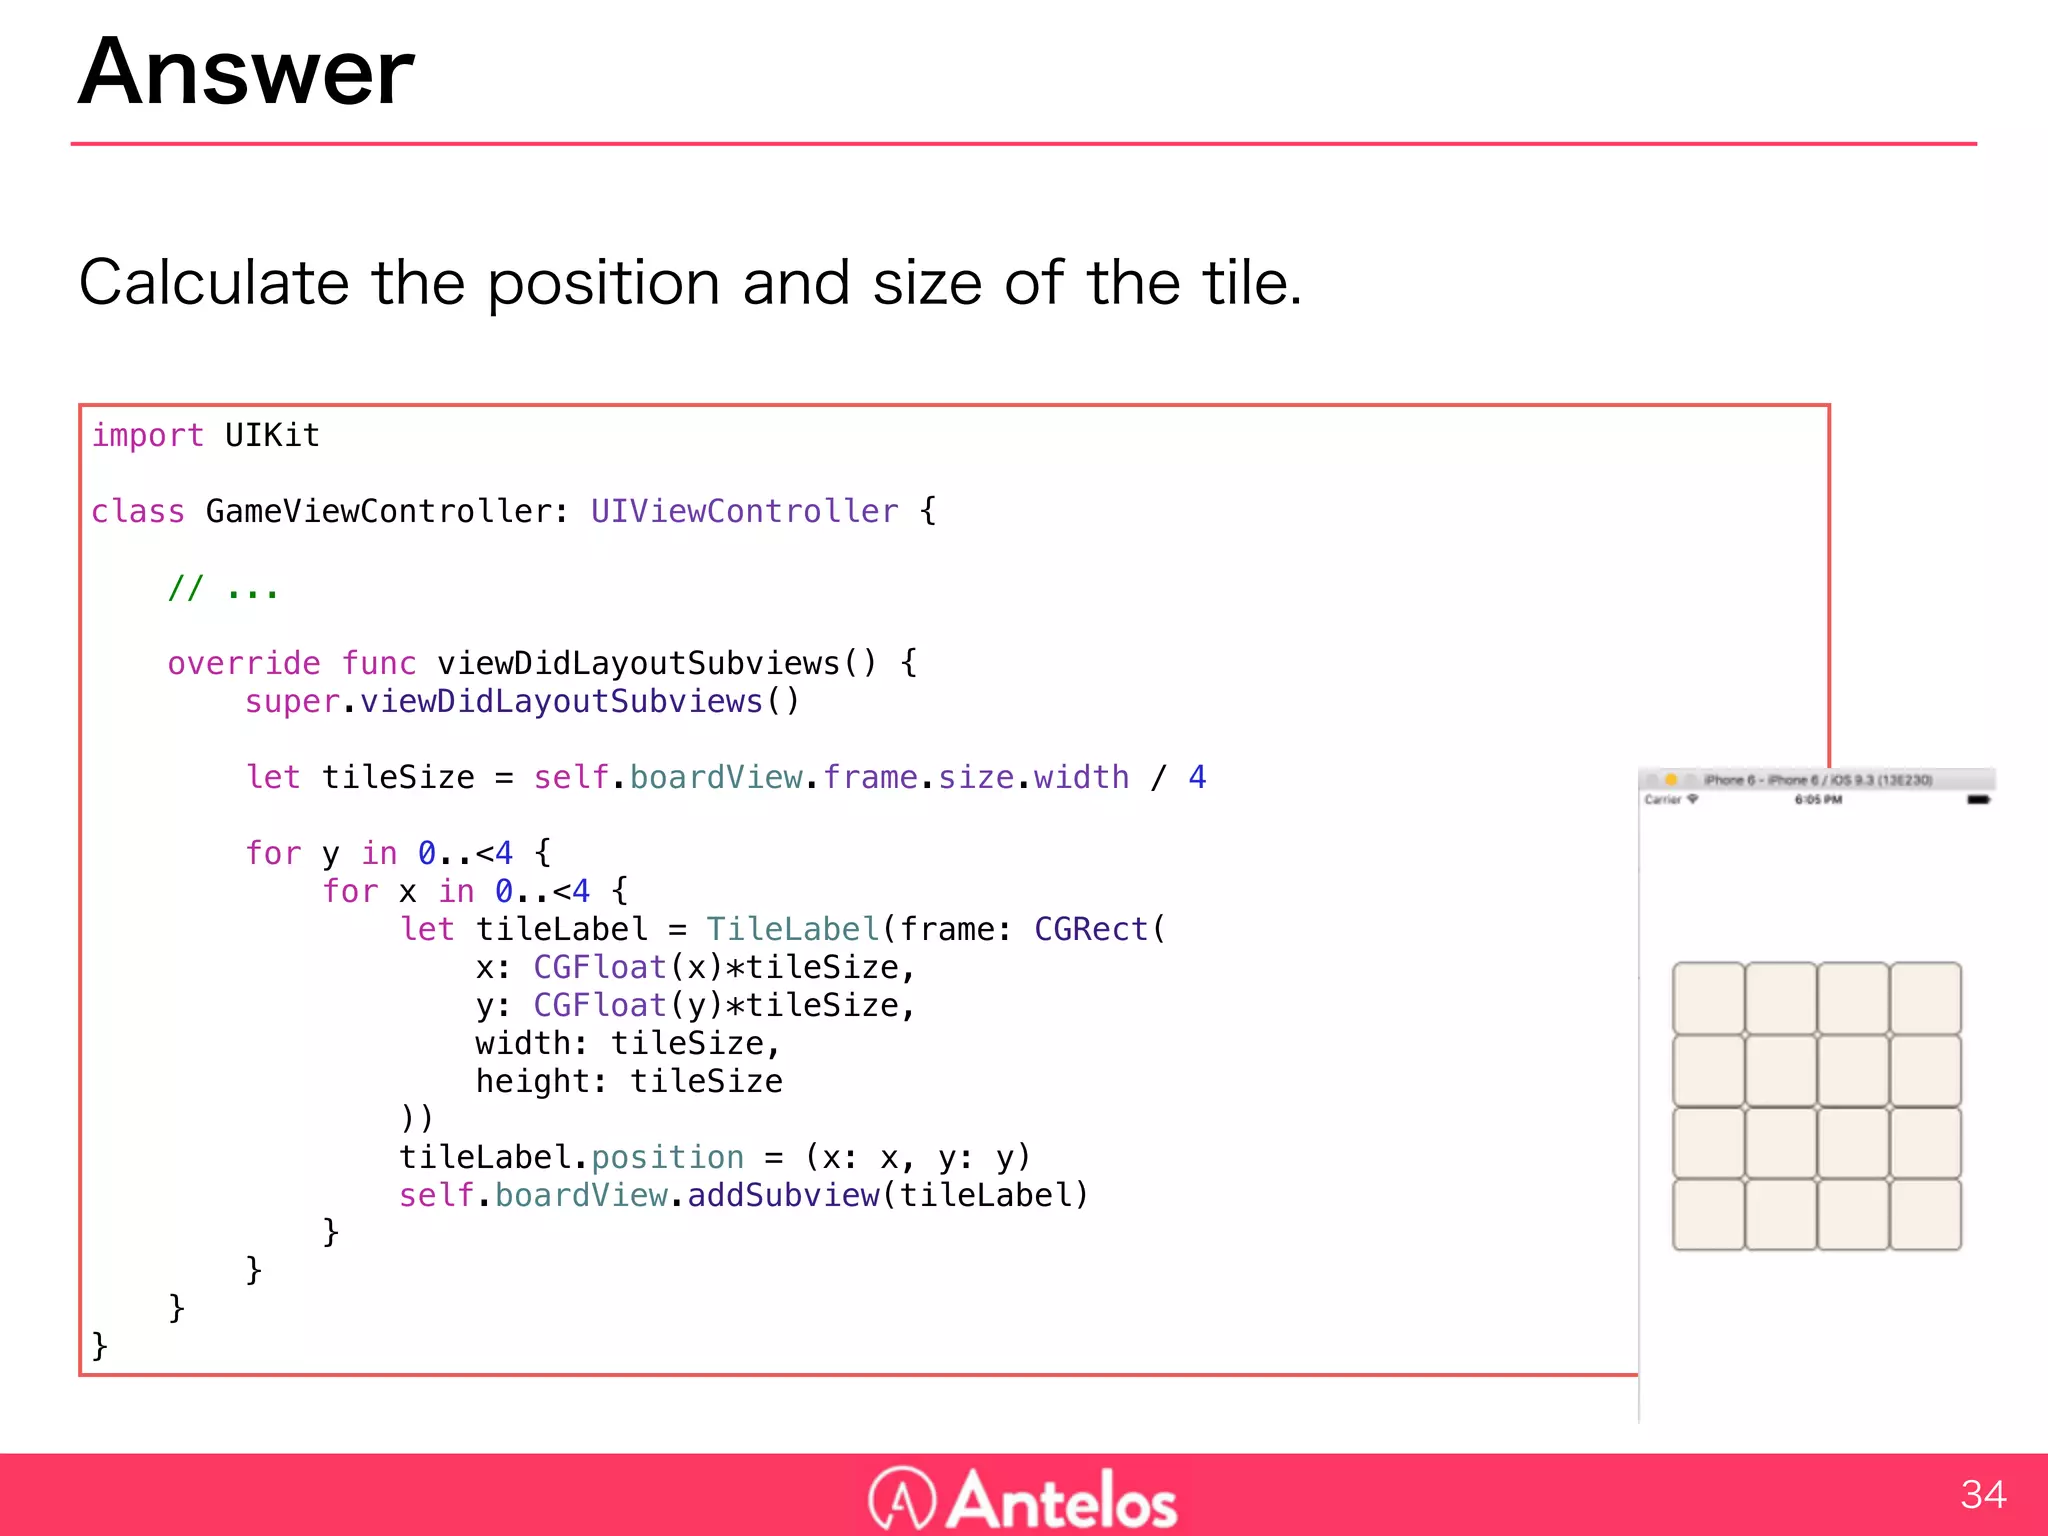
![Answer
Create these methods to create slide function.
1. Condense [2, 2, 0, 4] => [2, 2, 4]
2. Merge [2, 2, 4] => [4, 4]
3. Fill blanks [4, 4, 0, 0]
Then, create SlideNumbers method using these methods.
42](https://image.slidesharecdn.com/2048onswift-160724025804/85/2048-on-swift-42-320.jpg)
![Condense
Condense method uses filter method to exclude 0 from the received
numbers.
43
class Game: NSObject {
// ...
// [2, 2, 0, 4] => [2, 2, 4]
func condense(numbers: [Int]) -> [Int] {
return numbers.filter { (num) -> Bool in
return num != 0
}
}
}](https://image.slidesharecdn.com/2048onswift-160724025804/85/2048-on-swift-43-320.jpg)
![Merge
Merge method merges two adjacent numbers.
44
class Game: NSObject {
// ...
// [2, 2, 4] => [4, 4]
func merge(numbers: [Int]) -> [Int] {
var mergedNumbers = [Int]()
var i = 0
while i < numbers.count {
if i+1 == numbers.count {
mergedNumbers.append(numbers[i])
break
}
if numbers[i] == numbers[i+1] {
mergedNumbers.append(numbers[i] * 2)
i += 2
} else {
mergedNumbers.append(numbers[i])
i += 1
}
}
return mergedNumbers
}
}](https://image.slidesharecdn.com/2048onswift-160724025804/85/2048-on-swift-44-320.jpg)
![Fill Blanks
FillBlanks method fills the blanks with 0.
45
class Game: NSObject {
// ...
// [4, 4] => [4, 4, 0, 0]
func fillBlanks(numbers: [Int]) -> [Int] {
return numbers + [Int](count: self.boardSize-numbers.count, repeatedValue: 0)
}
}](https://image.slidesharecdn.com/2048onswift-160724025804/85/2048-on-swift-45-320.jpg)
![Slide Numbers
SlideNumbers method uses the three methods. If the direction is “up”
or “left”, the numbers should be reversed before and after the
processing.
[2, 2, 0, 4] => [4, 0, 2, 2] => [4, 4, 0, 0] => [0, 0, 4, 4]
46
class Game: NSObject {
// ...
// reverse=false(up, left) : [2, 2, 0, 4] => [4, 4, 0, 0]
// reverse=true(right, down) : [2, 2, 0, 4] => [0, 0, 4, 4]
func slideNumbers(numbers: [Int], reverse: Bool) -> [Int] {
if reverse {
return fillBlanks(merge(condense(numbers.reverse()))).reverse()
} else {
return fillBlanks(merge(condense(numbers)))
}
}
}
reverse processing reverse again](https://image.slidesharecdn.com/2048onswift-160724025804/85/2048-on-swift-46-320.jpg)
![Slide Board
SlideBoard method slides all lines of the board considering the
direction.
47
class Game: NSObject {
// ...
func slideBoard(dir: UISwipeGestureRecognizerDirection, virtual: Bool) -> [[Int]] {
var slidBoard = self.board
for i in 0..<self.boardSize {
switch dir {
case UISwipeGestureRecognizerDirection.Up:
let slid = slideNumbers(board.map({ (line) -> Int in return line[i] }), reverse: false)
for t in 0..<self.boardSize {
slidBoard[t][i] = slid[t]
}
case UISwipeGestureRecognizerDirection.Left:
slidBoard[i] = slideNumbers(board[i], reverse: false)
case UISwipeGestureRecognizerDirection.Right:
slidBoard[i] = slideNumbers(board[i], reverse: true)
case UISwipeGestureRecognizerDirection.Down:
let slid = slideNumbers(board.map({ (line) -> Int in return line[i] }), reverse: true)
for t in 0..<self.boardSize {
slidBoard[t][i] = slid[t]
}
default:
print("unexpected direction")
}
}
if !virtual{
self.board = slidBoard
self.nextTurn()
}
return slidBoard
}
}](https://image.slidesharecdn.com/2048onswift-160724025804/85/2048-on-swift-47-320.jpg)
![Check if the game is over
To check if the game is over or not, create a method to get swipable
directions.
48
class Game: NSObject {
// ...
func swipableDirections() -> [UISwipeGestureRecognizerDirection]{
var results = [UISwipeGestureRecognizerDirection]()
for dir:UISwipeGestureRecognizerDirection in [.Left, .Down, .Right, .Up]{
let slidBoard = slideBoard(dir, virtual:true)
for i in 0..<self.boardSize {
if !self.board[i].elementsEqual(slidBoard[i]) {
results.append(dir)
break
}
}
}
return results
}
func isGameOver() -> Bool {
return self.swipableDirections().count == 0
}
}](https://image.slidesharecdn.com/2048onswift-160724025804/85/2048-on-swift-48-320.jpg)
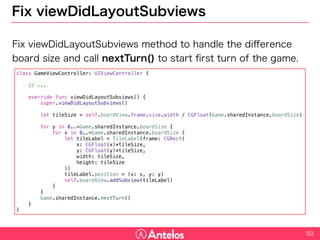
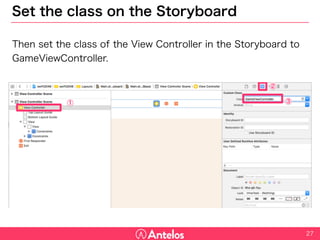
![Handle swipes
Use SwipeGestureRecognizer to handle swipes.
51
class GameViewController: UIViewController {
@IBOutlet weak var boardView: UIView!
override func viewDidLoad() {
super.viewDidLoad()
for dir:UISwipeGestureRecognizerDirection in [.Up, .Left, .Right, .Down] {
let sgr = UISwipeGestureRecognizer(target: self, action: #selector(GameViewController.swiped(_:)))
sgr.direction = dir
self.view.addGestureRecognizer(sgr)
}
}
func swiped(sender: UISwipeGestureRecognizer) {
if Game.sharedInstance.swipableDirections().contains(sender.direction) {
Game.sharedInstance.slideBoard(sender.direction, virtual: false)
}
if Game.sharedInstance.isGameOver() {
print("Game Over.")
}
}
// ...
}](https://image.slidesharecdn.com/2048onswift-160724025804/85/2048-on-swift-51-320.jpg)

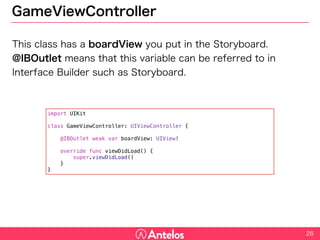
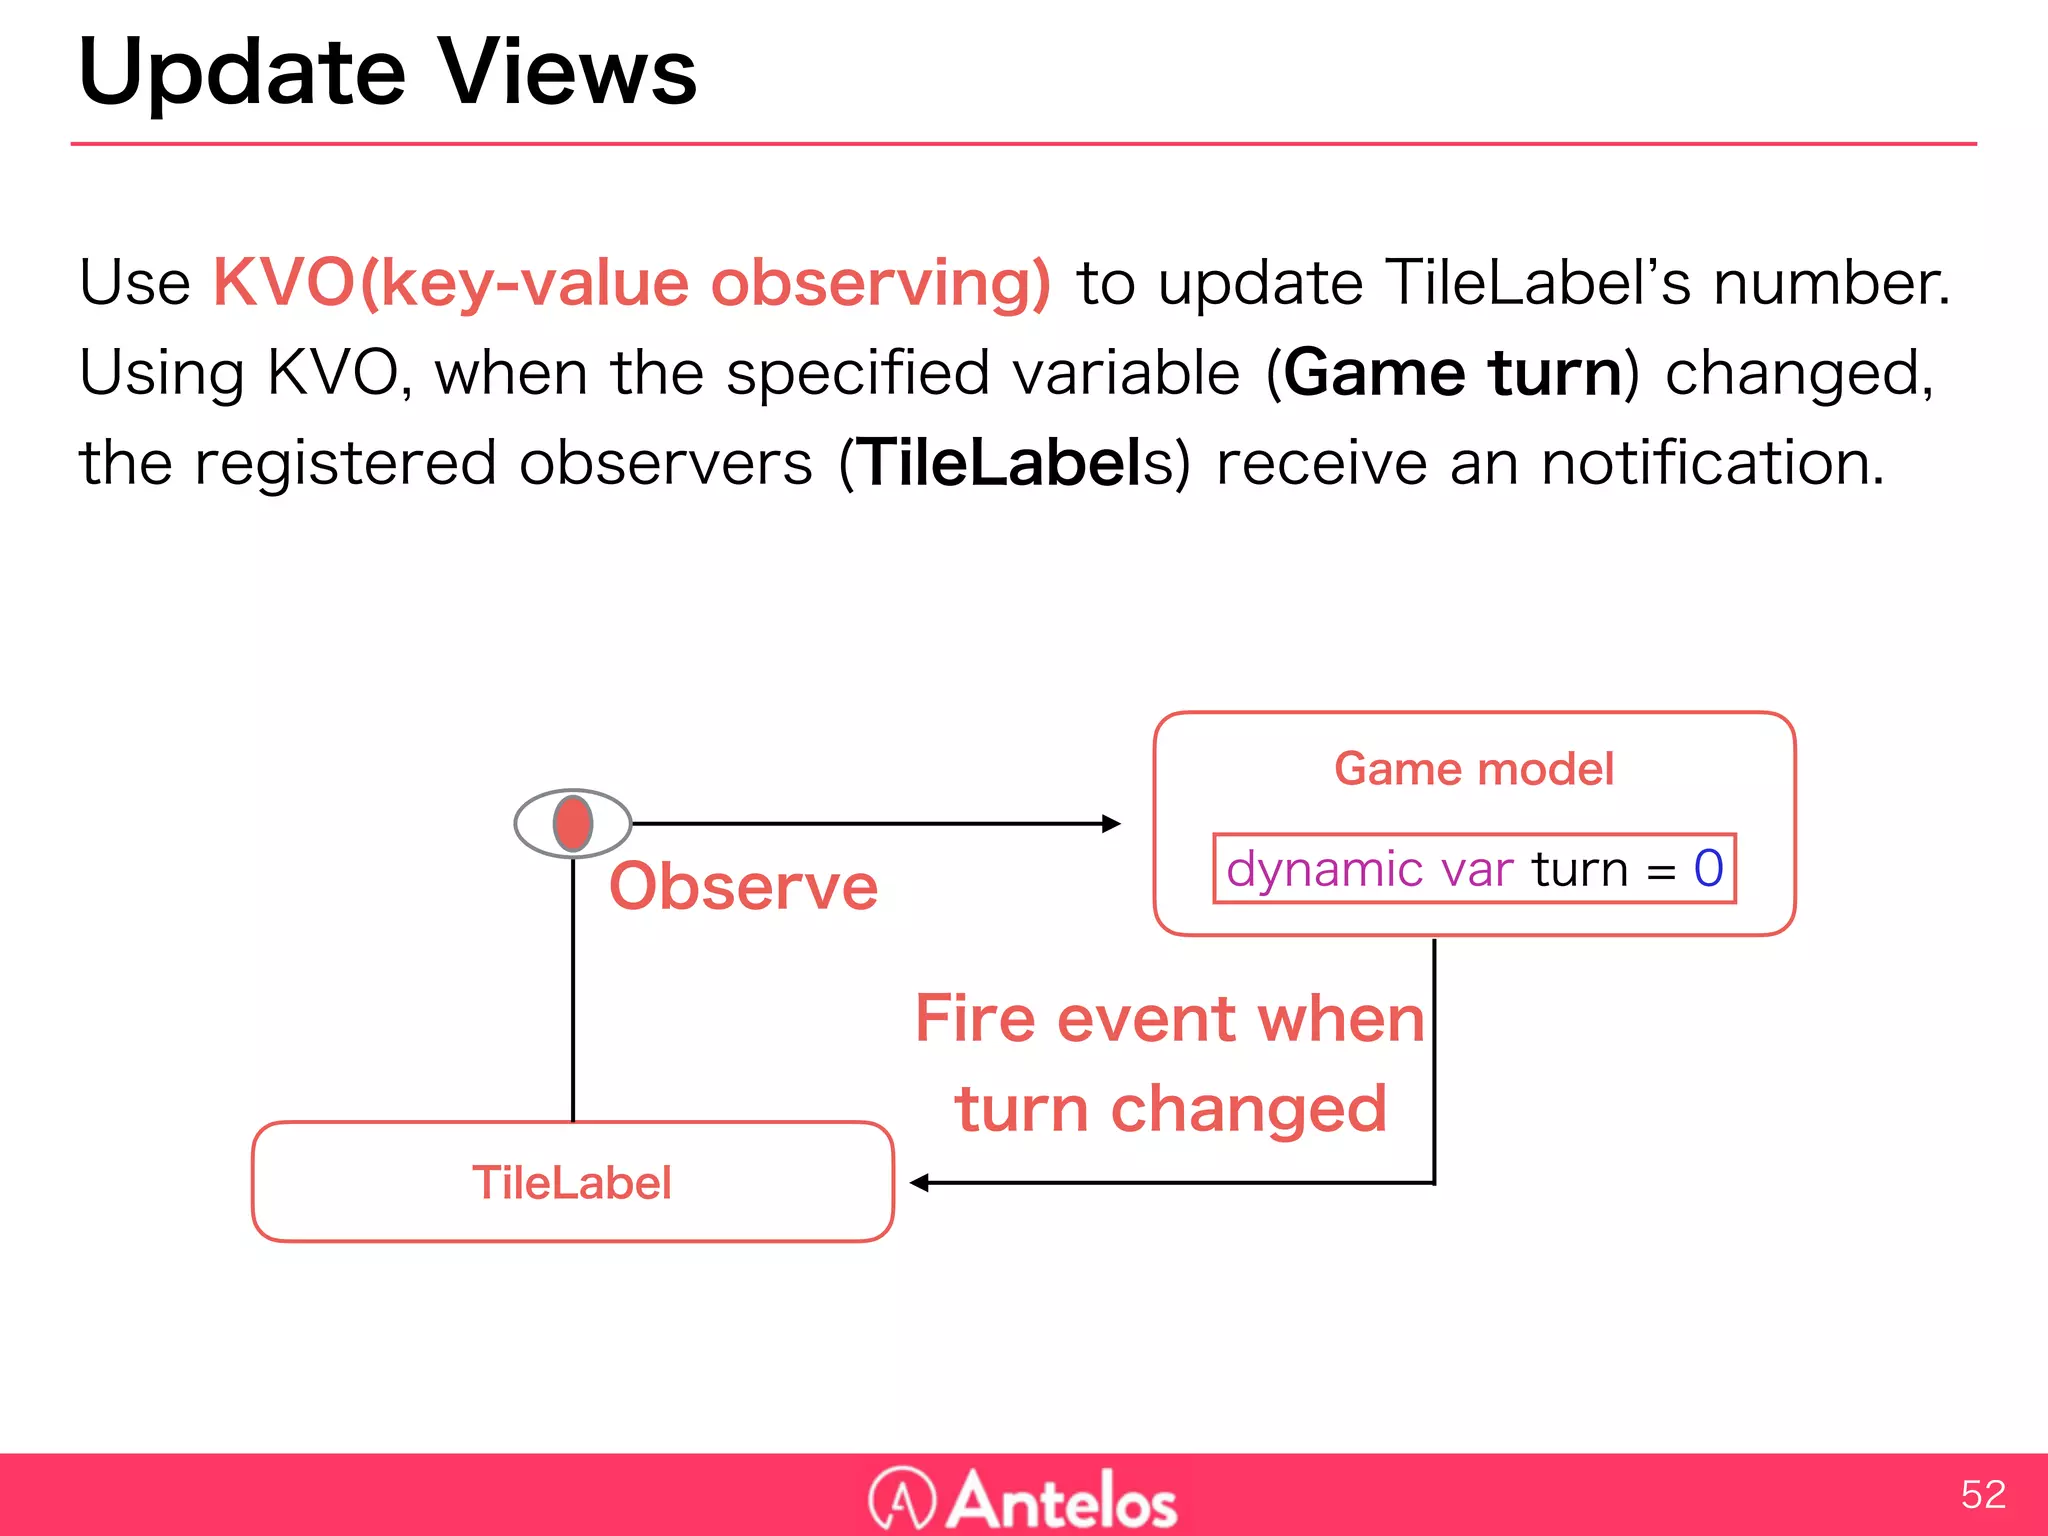
![KVO
Call addObserver and removeObserver method to use KVO.
Forgetting to remove observer causes a memory issue.
53
class TileLabel: UILabel {
var position : (x:Int, y:Int)!
override init(frame: CGRect) {
super.init(frame: frame)
// ...
Game.sharedInstance.addObserver(self, forKeyPath: "turn", options: NSKeyValueObservingOptions(), context: nil)
}
// When the turn of the Game changed, this method is called
override func observeValueForKeyPath(keyPath: String?, ofObject object: AnyObject?, change: [String : AnyObject]?, context:
UnsafeMutablePointer<Void>) {
// Update the text here.
}
// Do not forget to removeObserver here
deinit {
Game.sharedInstance.removeObserver(self, forKeyPath: "turn")
}
}](https://image.slidesharecdn.com/2048onswift-160724025804/85/2048-on-swift-53-320.jpg)
![Set text and background color
Decide the background color and set the text.
54
class TileLabel: UILabel {
// ...
// When the turn of the Game changed, this method is called
override func observeValueForKeyPath(keyPath: String?, ofObject object: AnyObject?, change: [String : AnyObject]?, context:
UnsafeMutablePointer<Void>) {
self.setNumber(Game.sharedInstance.board[self.position.y][self.position.x])
}
// Decide the color
func getHue(num:Int, hue:CGFloat = 60) -> CGFloat{
if(num < 2){ return hue }
if(hue == 360){ return getHue(num / 2, hue: 24 ) }
return getHue(num / 2, hue: hue + 24 )
}
func setNumber(num:Int){
if num == 0 {
self.text = ""
self.backgroundColor = UIColor.clearColor()
} else {
self.text = "(num)"
self.backgroundColor = UIColor(hue: getHue(num)/360, saturation: 1.0, brightness: 1.0, alpha: 1.0)
}
}
}](https://image.slidesharecdn.com/2048onswift-160724025804/85/2048-on-swift-54-320.jpg)


![Game model
In this application, Game model exists only one. You can use Singleton
Pattern to ensure that (sharedInstance).
Board status can be represented as a multidimensional array.
37
import UIKit
class Game: NSObject {
static var sharedInstance = Game()
let boardSize = 4
var board = [[Int]]()
dynamic var turn = 0
override init() {
super.init()
for _ in 0..<self.boardSize {
self.board.append([Int](count: self.boardSize, repeatedValue: 0))
}
}
}](https://image.slidesharecdn.com/2048onswift-160724025804/75/2048-on-swift-37-2048.jpg)
![Get empty tile positions
To generate number on the board, first create a method to get empty
positions of the board. This returns an array of coordinates Tuple.
39
class Game: NSObject {
// ...
func getEmptyPositions() -> [(x:Int, y:Int)]{
var results = [(x:Int, y:Int)]()
for y in 0..<self.boardSize {
for x in 0..<self.boardSize {
if(self.board[y][x] == 0){
results.append((x, y))
}
}
}
return results
}
}](https://image.slidesharecdn.com/2048onswift-160724025804/75/2048-on-swift-39-2048.jpg)
![Generate “2” or “4"
Then generate “2” or “4” at the random position of the board.
arc4random_uniform makes random number.
ex) arc4random_uniform(5) returns 0-4 randomly.
40
class Game: NSObject {
// ...
func generateNumber() {
let empties = self.getEmptyPositions()
let randomNum = arc4random_uniform(UInt32(empties.count))
let randomPos = empties[Int(randomNum)]
// Set 2 or 4
self.board[randomPos.y][randomPos.x] = Int(arc4random_uniform(2)+1) * 2
}
func nextTurn() {
self.generateNumber()
self.turn += 1
}
}](https://image.slidesharecdn.com/2048onswift-160724025804/75/2048-on-swift-40-2048.jpg)
![Quiz: How to create slide function?
For example, [2, 0, 4, 4] must be [2, 8, 0, 0] when the board slides to
left.
41](https://image.slidesharecdn.com/2048onswift-160724025804/75/2048-on-swift-41-2048.jpg)
![Answer
Create these methods to create slide function.
1. Condense [2, 2, 0, 4] => [2, 2, 4]
2. Merge [2, 2, 4] => [4, 4]
3. Fill blanks [4, 4, 0, 0]
Then, create SlideNumbers method using these methods.
42](https://image.slidesharecdn.com/2048onswift-160724025804/75/2048-on-swift-42-2048.jpg)
![Condense
Condense method uses filter method to exclude 0 from the received
numbers.
43
class Game: NSObject {
// ...
// [2, 2, 0, 4] => [2, 2, 4]
func condense(numbers: [Int]) -> [Int] {
return numbers.filter { (num) -> Bool in
return num != 0
}
}
}](https://image.slidesharecdn.com/2048onswift-160724025804/75/2048-on-swift-43-2048.jpg)
![Merge
Merge method merges two adjacent numbers.
44
class Game: NSObject {
// ...
// [2, 2, 4] => [4, 4]
func merge(numbers: [Int]) -> [Int] {
var mergedNumbers = [Int]()
var i = 0
while i < numbers.count {
if i+1 == numbers.count {
mergedNumbers.append(numbers[i])
break
}
if numbers[i] == numbers[i+1] {
mergedNumbers.append(numbers[i] * 2)
i += 2
} else {
mergedNumbers.append(numbers[i])
i += 1
}
}
return mergedNumbers
}
}](https://image.slidesharecdn.com/2048onswift-160724025804/75/2048-on-swift-44-2048.jpg)
![Fill Blanks
FillBlanks method fills the blanks with 0.
45
class Game: NSObject {
// ...
// [4, 4] => [4, 4, 0, 0]
func fillBlanks(numbers: [Int]) -> [Int] {
return numbers + [Int](count: self.boardSize-numbers.count, repeatedValue: 0)
}
}](https://image.slidesharecdn.com/2048onswift-160724025804/75/2048-on-swift-45-2048.jpg)
![Slide Numbers
SlideNumbers method uses the three methods. If the direction is “up”
or “left”, the numbers should be reversed before and after the
processing.
[2, 2, 0, 4] => [4, 0, 2, 2] => [4, 4, 0, 0] => [0, 0, 4, 4]
46
class Game: NSObject {
// ...
// reverse=false(up, left) : [2, 2, 0, 4] => [4, 4, 0, 0]
// reverse=true(right, down) : [2, 2, 0, 4] => [0, 0, 4, 4]
func slideNumbers(numbers: [Int], reverse: Bool) -> [Int] {
if reverse {
return fillBlanks(merge(condense(numbers.reverse()))).reverse()
} else {
return fillBlanks(merge(condense(numbers)))
}
}
}
reverse processing reverse again](https://image.slidesharecdn.com/2048onswift-160724025804/75/2048-on-swift-46-2048.jpg)
![Slide Board
SlideBoard method slides all lines of the board considering the
direction.
47
class Game: NSObject {
// ...
func slideBoard(dir: UISwipeGestureRecognizerDirection, virtual: Bool) -> [[Int]] {
var slidBoard = self.board
for i in 0..<self.boardSize {
switch dir {
case UISwipeGestureRecognizerDirection.Up:
let slid = slideNumbers(board.map({ (line) -> Int in return line[i] }), reverse: false)
for t in 0..<self.boardSize {
slidBoard[t][i] = slid[t]
}
case UISwipeGestureRecognizerDirection.Left:
slidBoard[i] = slideNumbers(board[i], reverse: false)
case UISwipeGestureRecognizerDirection.Right:
slidBoard[i] = slideNumbers(board[i], reverse: true)
case UISwipeGestureRecognizerDirection.Down:
let slid = slideNumbers(board.map({ (line) -> Int in return line[i] }), reverse: true)
for t in 0..<self.boardSize {
slidBoard[t][i] = slid[t]
}
default:
print("unexpected direction")
}
}
if !virtual{
self.board = slidBoard
self.nextTurn()
}
return slidBoard
}
}](https://image.slidesharecdn.com/2048onswift-160724025804/75/2048-on-swift-47-2048.jpg)
![Check if the game is over
To check if the game is over or not, create a method to get swipable
directions.
48
class Game: NSObject {
// ...
func swipableDirections() -> [UISwipeGestureRecognizerDirection]{
var results = [UISwipeGestureRecognizerDirection]()
for dir:UISwipeGestureRecognizerDirection in [.Left, .Down, .Right, .Up]{
let slidBoard = slideBoard(dir, virtual:true)
for i in 0..<self.boardSize {
if !self.board[i].elementsEqual(slidBoard[i]) {
results.append(dir)
break
}
}
}
return results
}
func isGameOver() -> Bool {
return self.swipableDirections().count == 0
}
}](https://image.slidesharecdn.com/2048onswift-160724025804/75/2048-on-swift-48-2048.jpg)
![Handle swipes
Use SwipeGestureRecognizer to handle swipes.
51
class GameViewController: UIViewController {
@IBOutlet weak var boardView: UIView!
override func viewDidLoad() {
super.viewDidLoad()
for dir:UISwipeGestureRecognizerDirection in [.Up, .Left, .Right, .Down] {
let sgr = UISwipeGestureRecognizer(target: self, action: #selector(GameViewController.swiped(_:)))
sgr.direction = dir
self.view.addGestureRecognizer(sgr)
}
}
func swiped(sender: UISwipeGestureRecognizer) {
if Game.sharedInstance.swipableDirections().contains(sender.direction) {
Game.sharedInstance.slideBoard(sender.direction, virtual: false)
}
if Game.sharedInstance.isGameOver() {
print("Game Over.")
}
}
// ...
}](https://image.slidesharecdn.com/2048onswift-160724025804/75/2048-on-swift-51-2048.jpg)
![KVO
Call addObserver and removeObserver method to use KVO.
Forgetting to remove observer causes a memory issue.
53
class TileLabel: UILabel {
var position : (x:Int, y:Int)!
override init(frame: CGRect) {
super.init(frame: frame)
// ...
Game.sharedInstance.addObserver(self, forKeyPath: "turn", options: NSKeyValueObservingOptions(), context: nil)
}
// When the turn of the Game changed, this method is called
override func observeValueForKeyPath(keyPath: String?, ofObject object: AnyObject?, change: [String : AnyObject]?, context:
UnsafeMutablePointer<Void>) {
// Update the text here.
}
// Do not forget to removeObserver here
deinit {
Game.sharedInstance.removeObserver(self, forKeyPath: "turn")
}
}](https://image.slidesharecdn.com/2048onswift-160724025804/75/2048-on-swift-53-2048.jpg)
![Set text and background color
Decide the background color and set the text.
54
class TileLabel: UILabel {
// ...
// When the turn of the Game changed, this method is called
override func observeValueForKeyPath(keyPath: String?, ofObject object: AnyObject?, change: [String : AnyObject]?, context:
UnsafeMutablePointer<Void>) {
self.setNumber(Game.sharedInstance.board[self.position.y][self.position.x])
}
// Decide the color
func getHue(num:Int, hue:CGFloat = 60) -> CGFloat{
if(num < 2){ return hue }
if(hue == 360){ return getHue(num / 2, hue: 24 ) }
return getHue(num / 2, hue: hue + 24 )
}
func setNumber(num:Int){
if num == 0 {
self.text = ""
self.backgroundColor = UIColor.clearColor()
} else {
self.text = "(num)"
self.backgroundColor = UIColor(hue: getHue(num)/360, saturation: 1.0, brightness: 1.0, alpha: 1.0)
}
}
}](https://image.slidesharecdn.com/2048onswift-160724025804/75/2048-on-swift-54-2048.jpg)