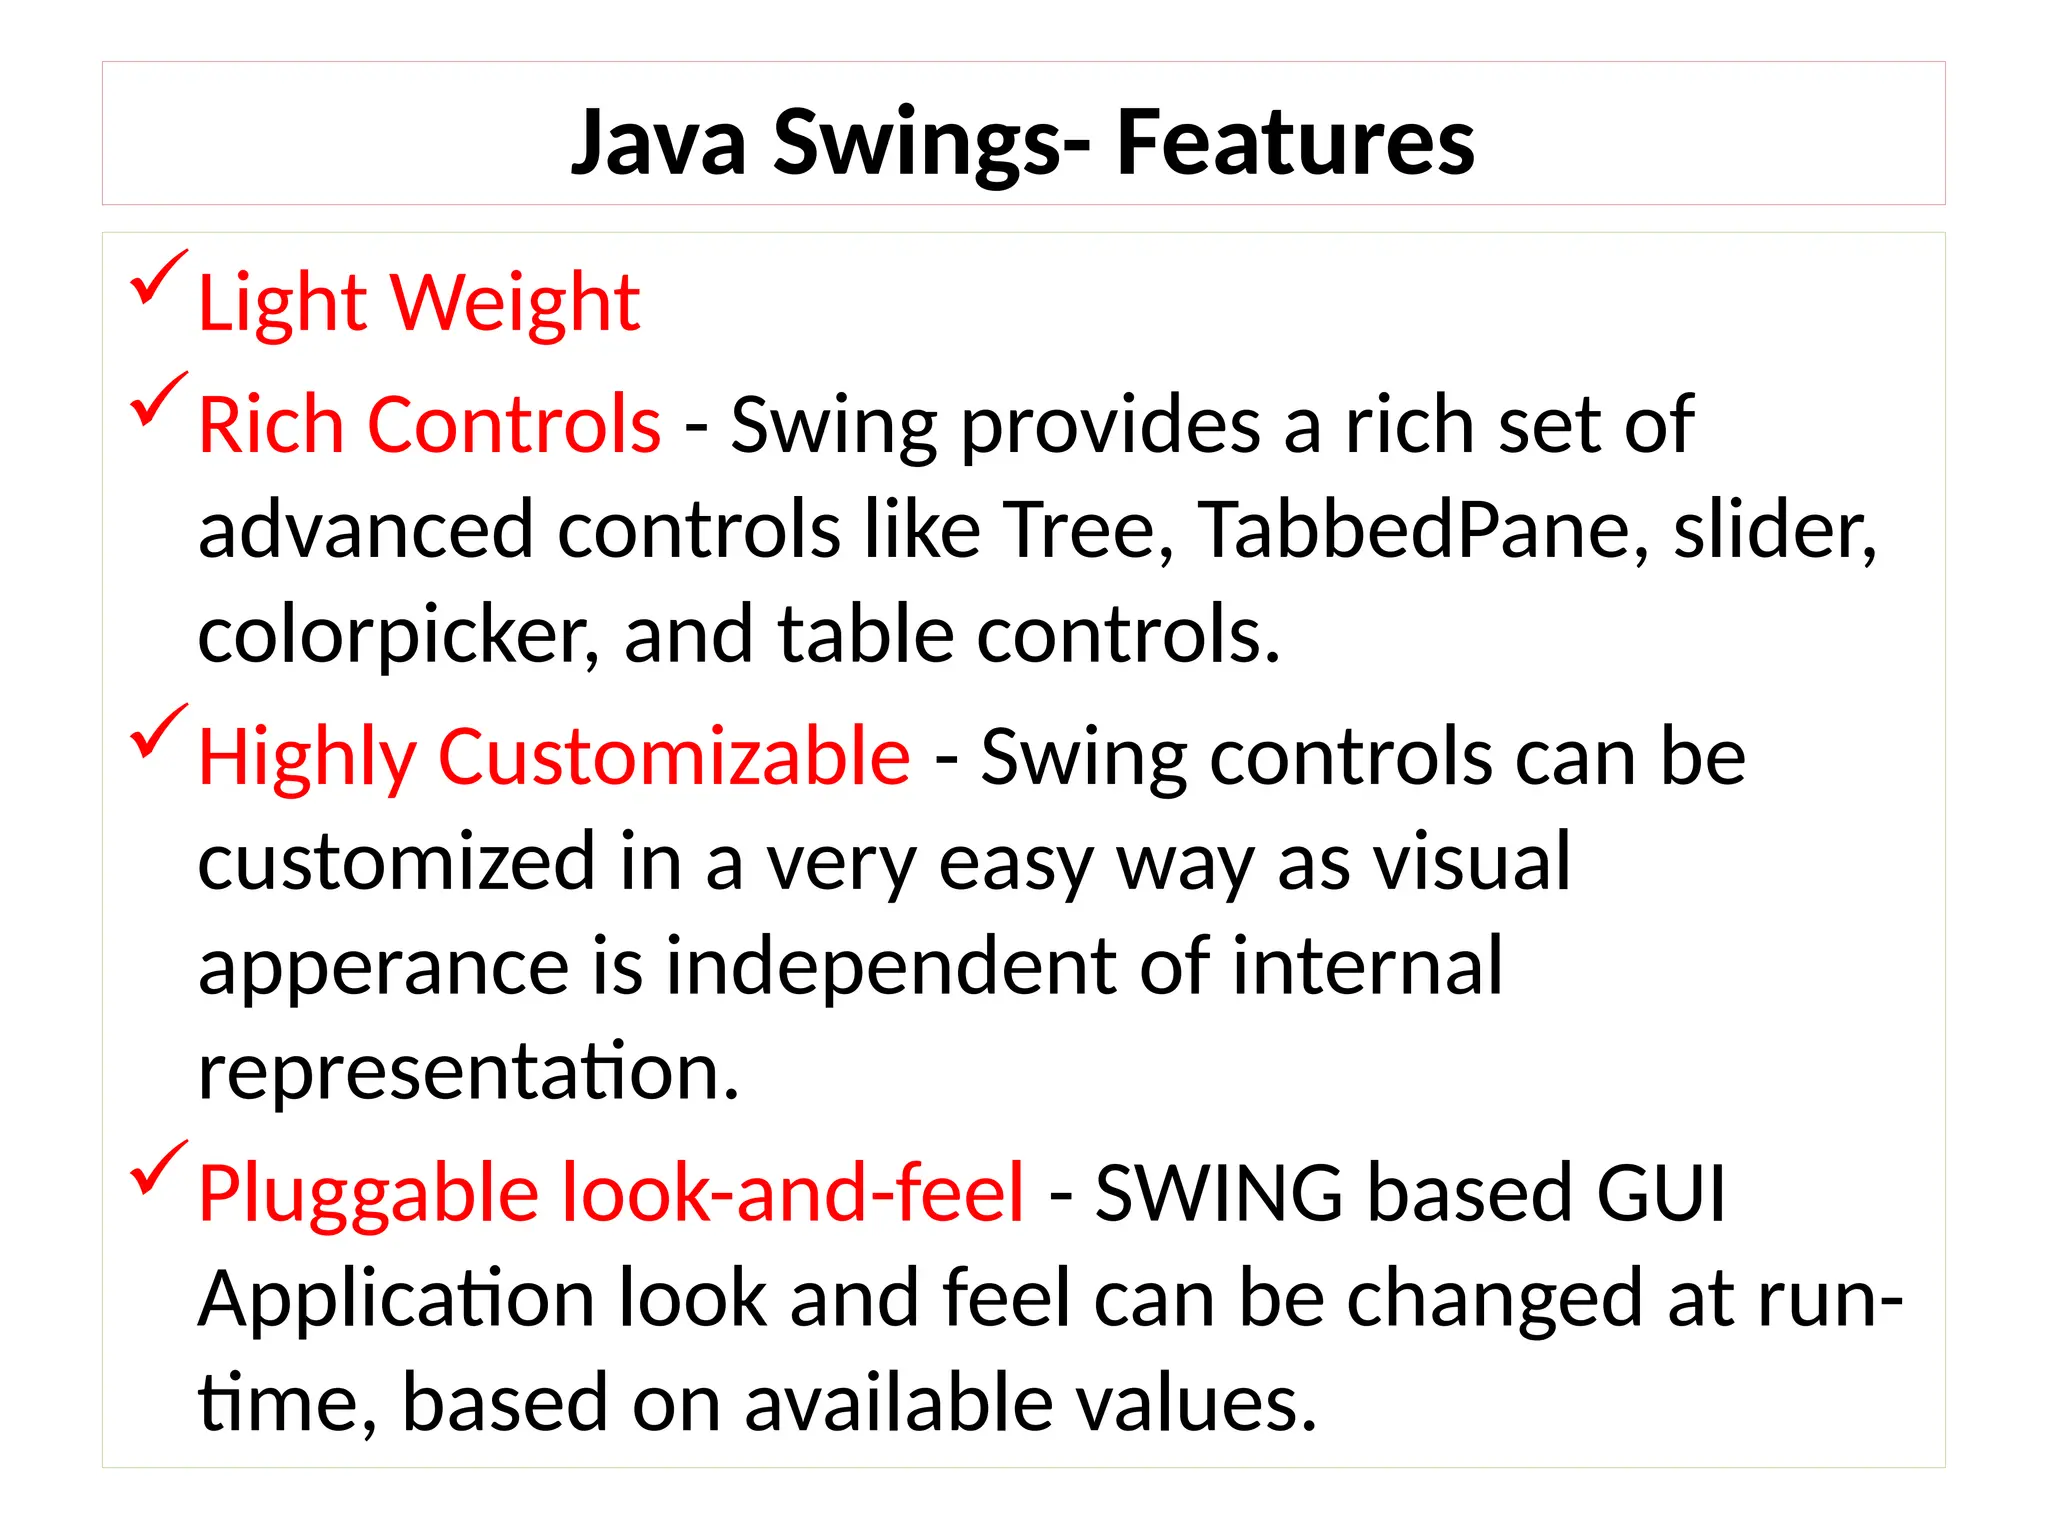
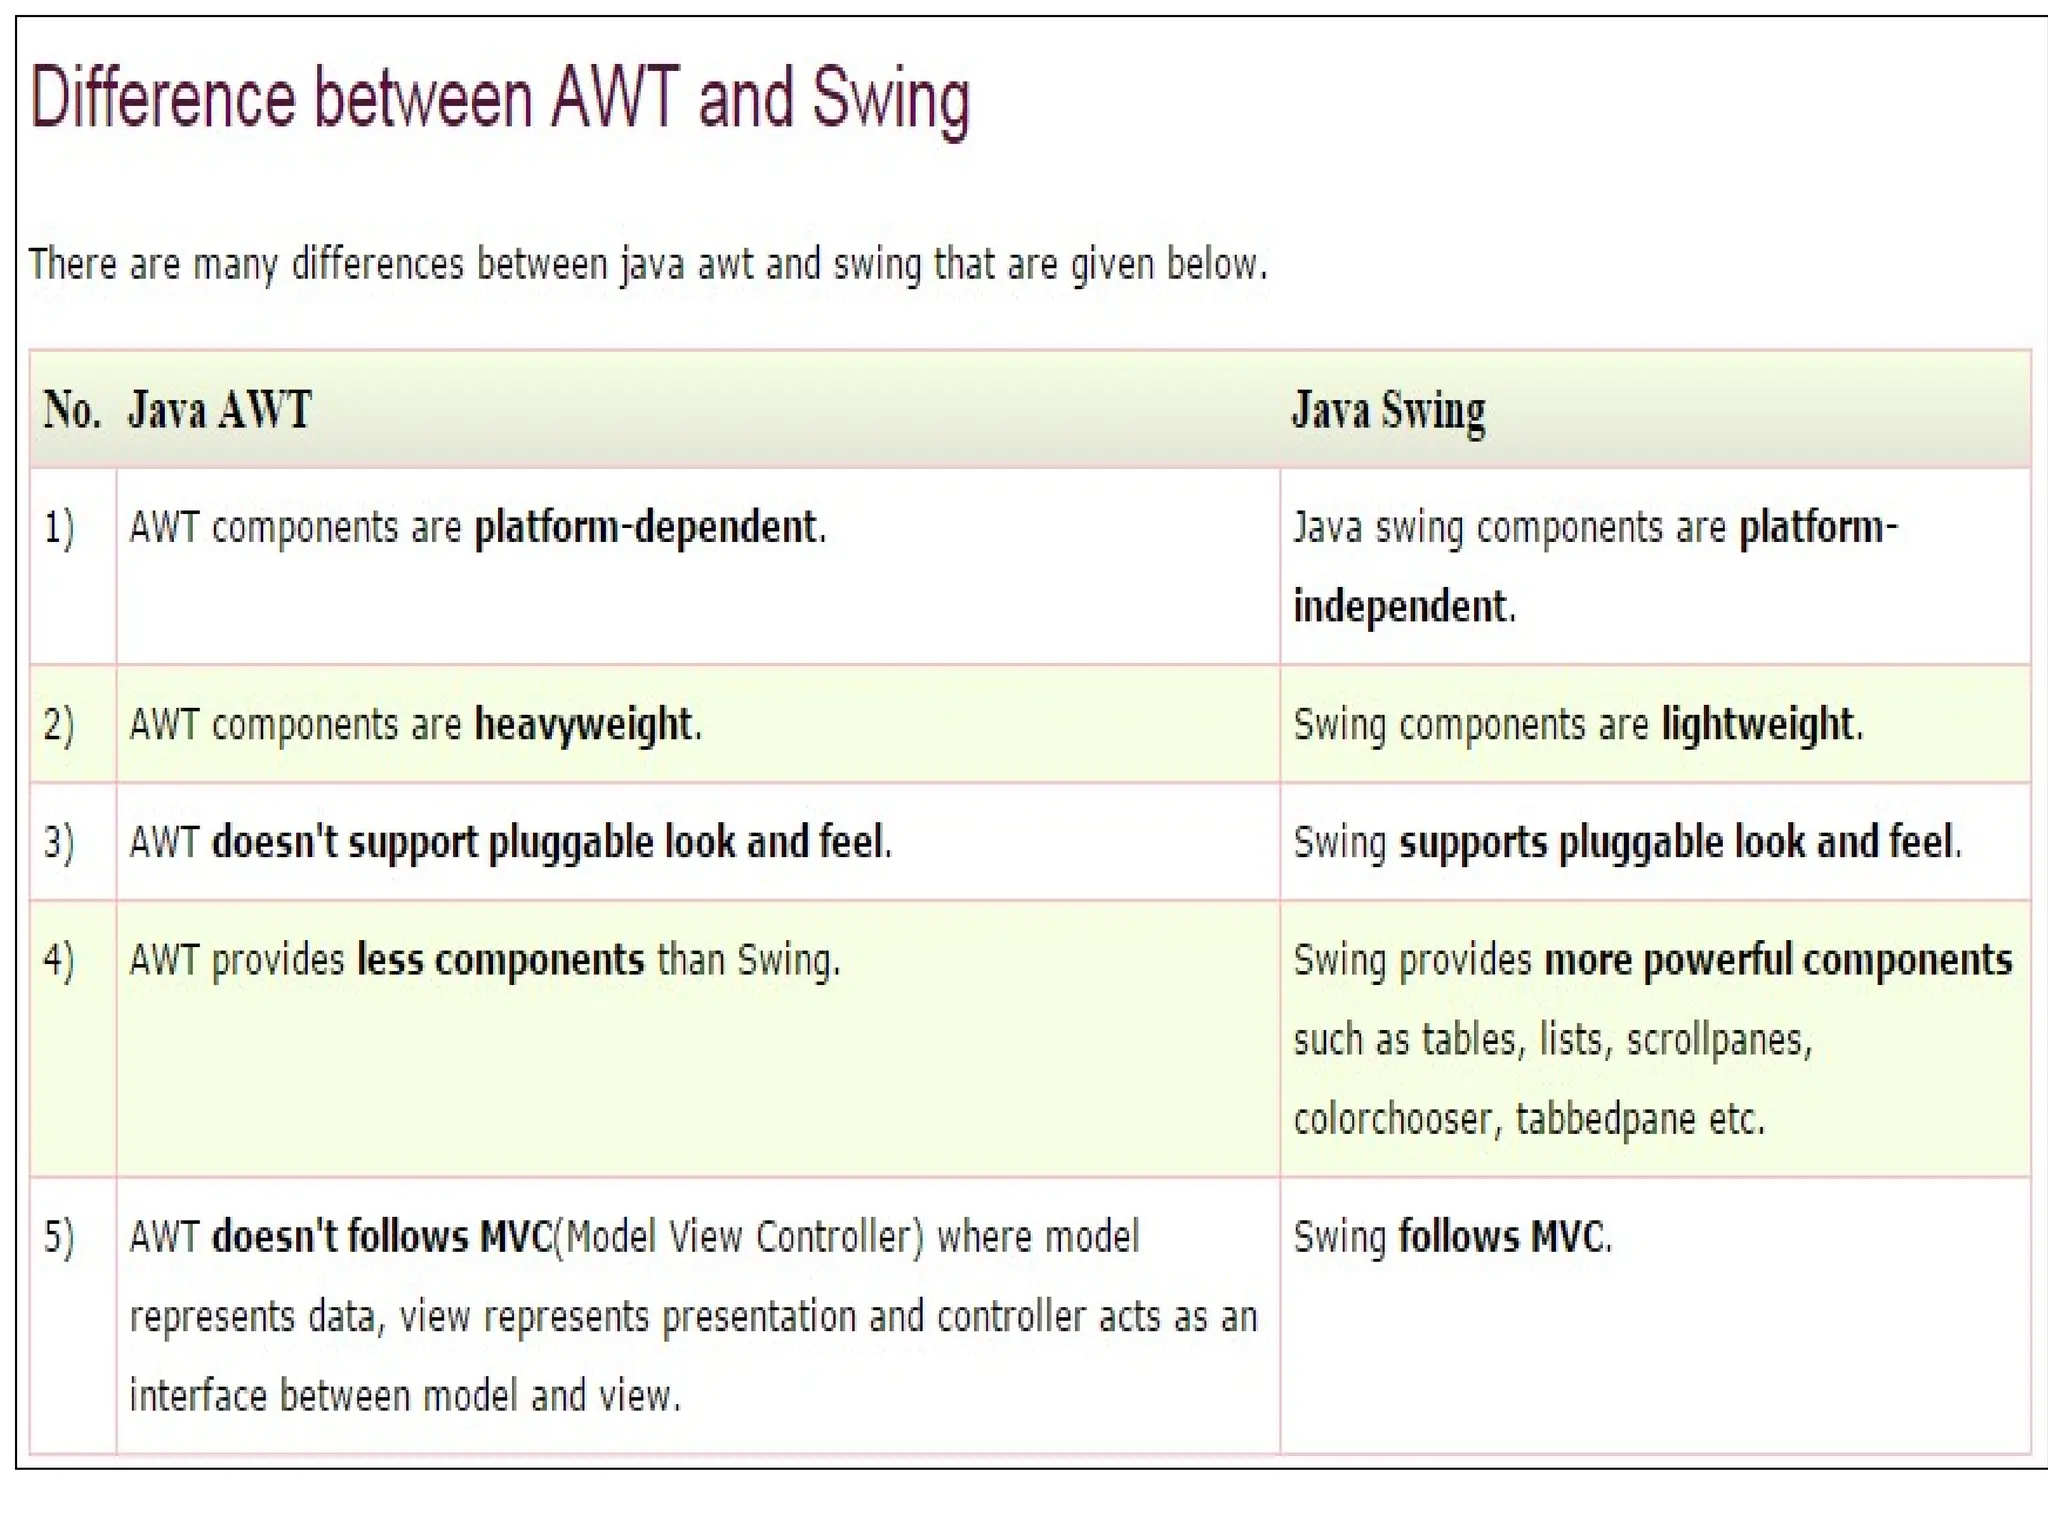
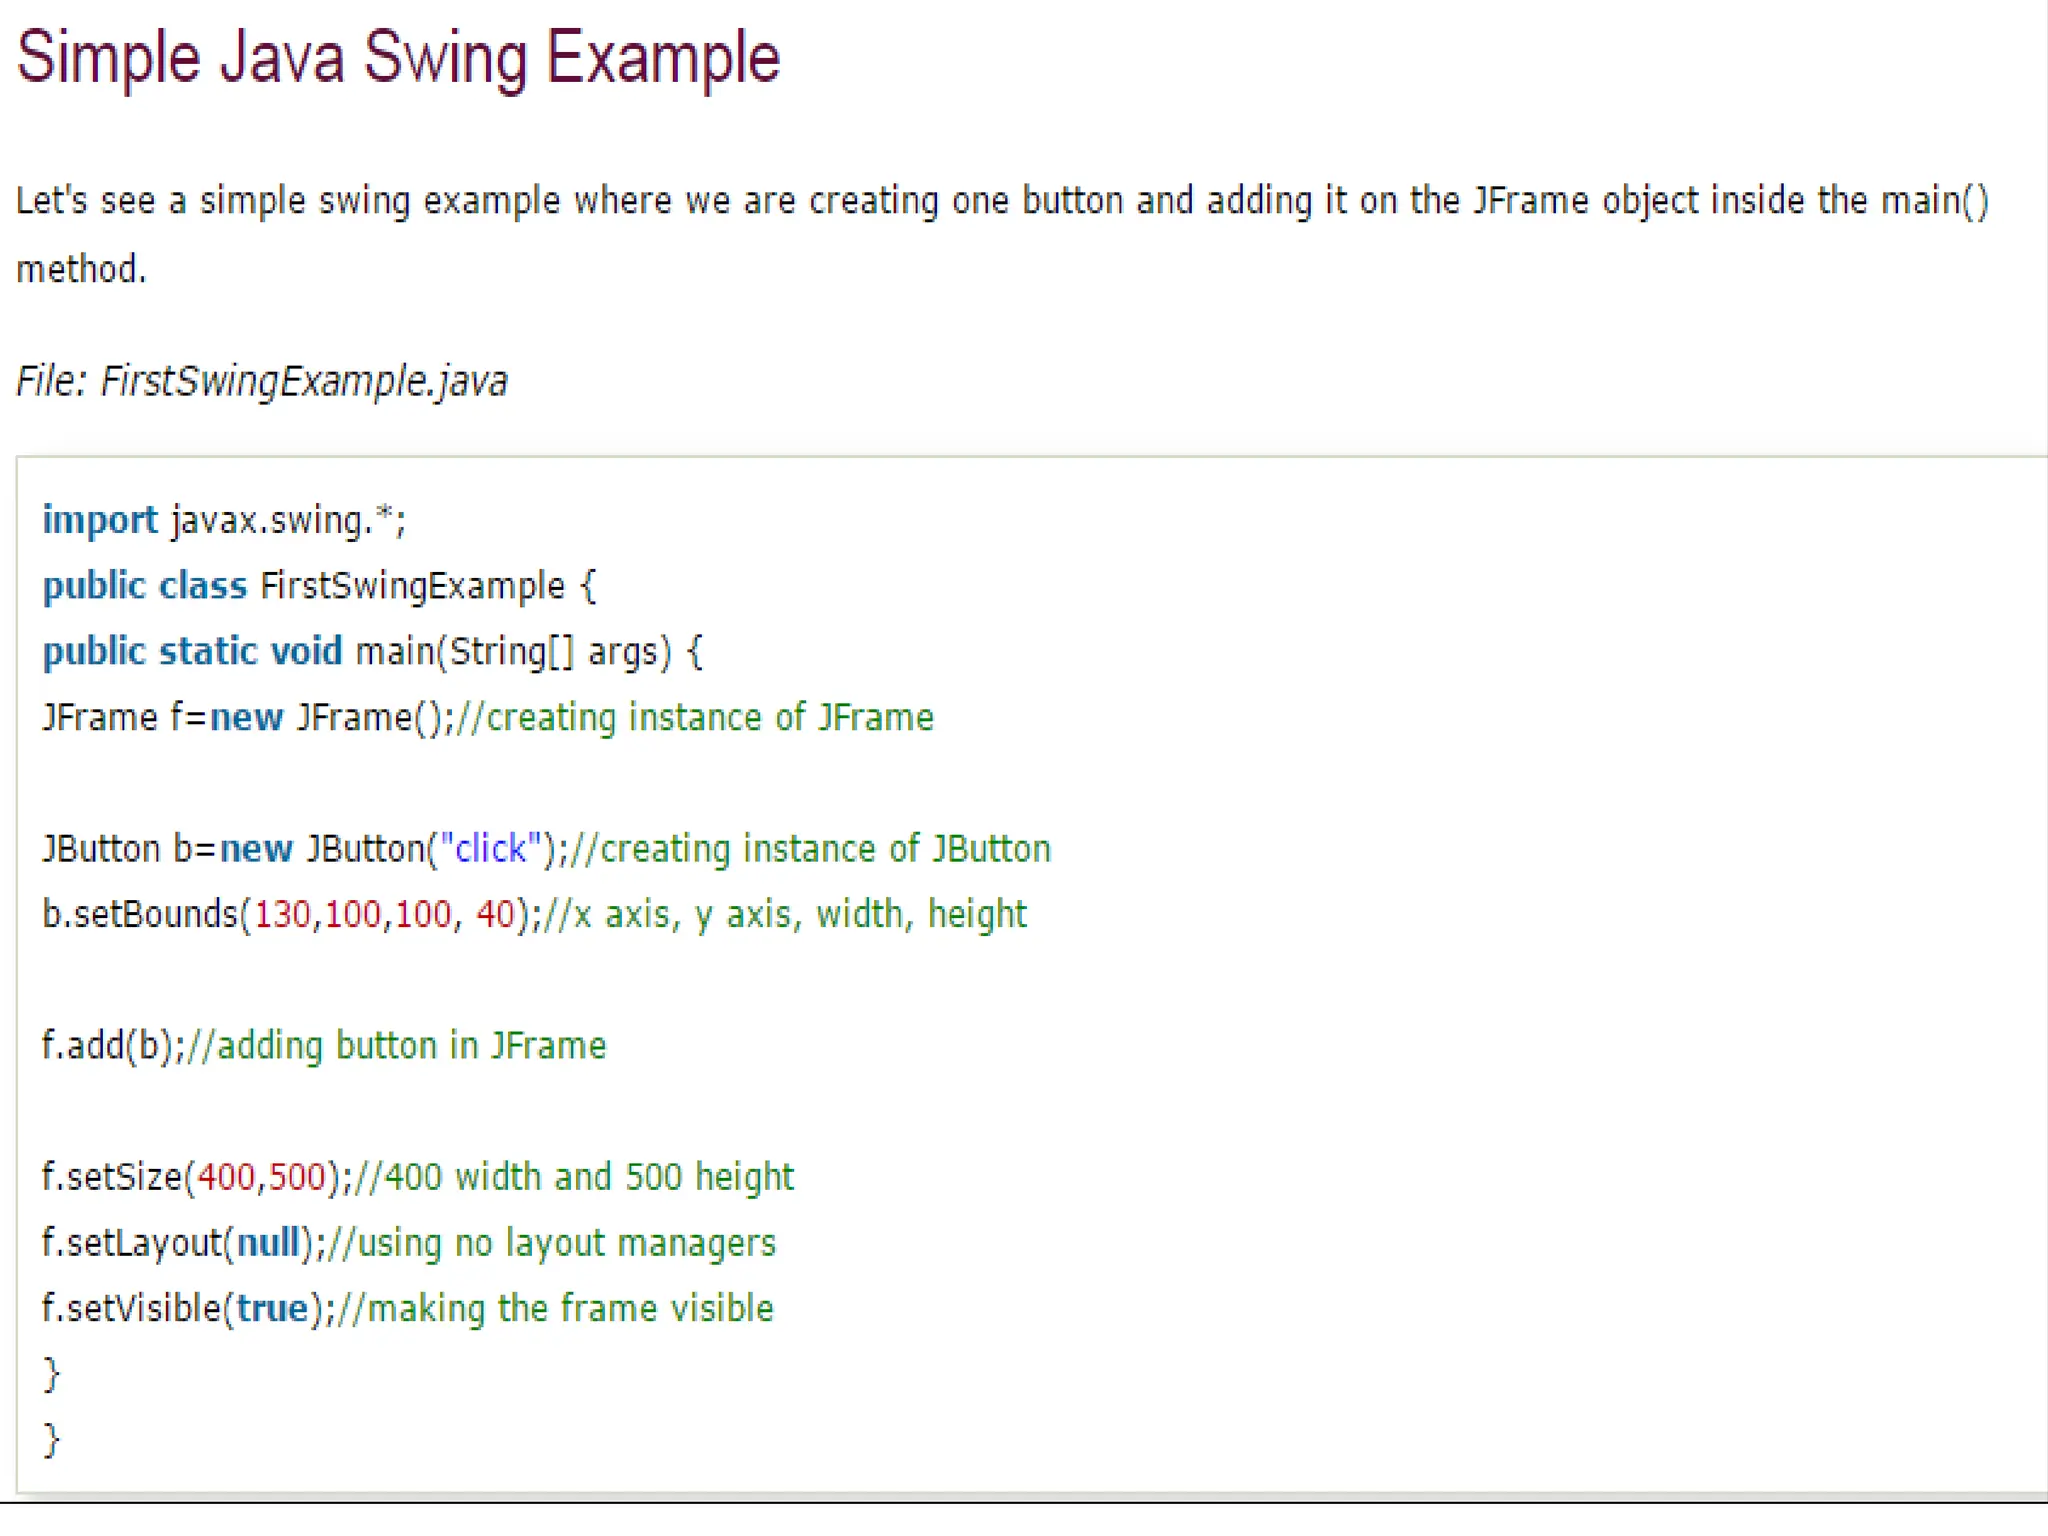
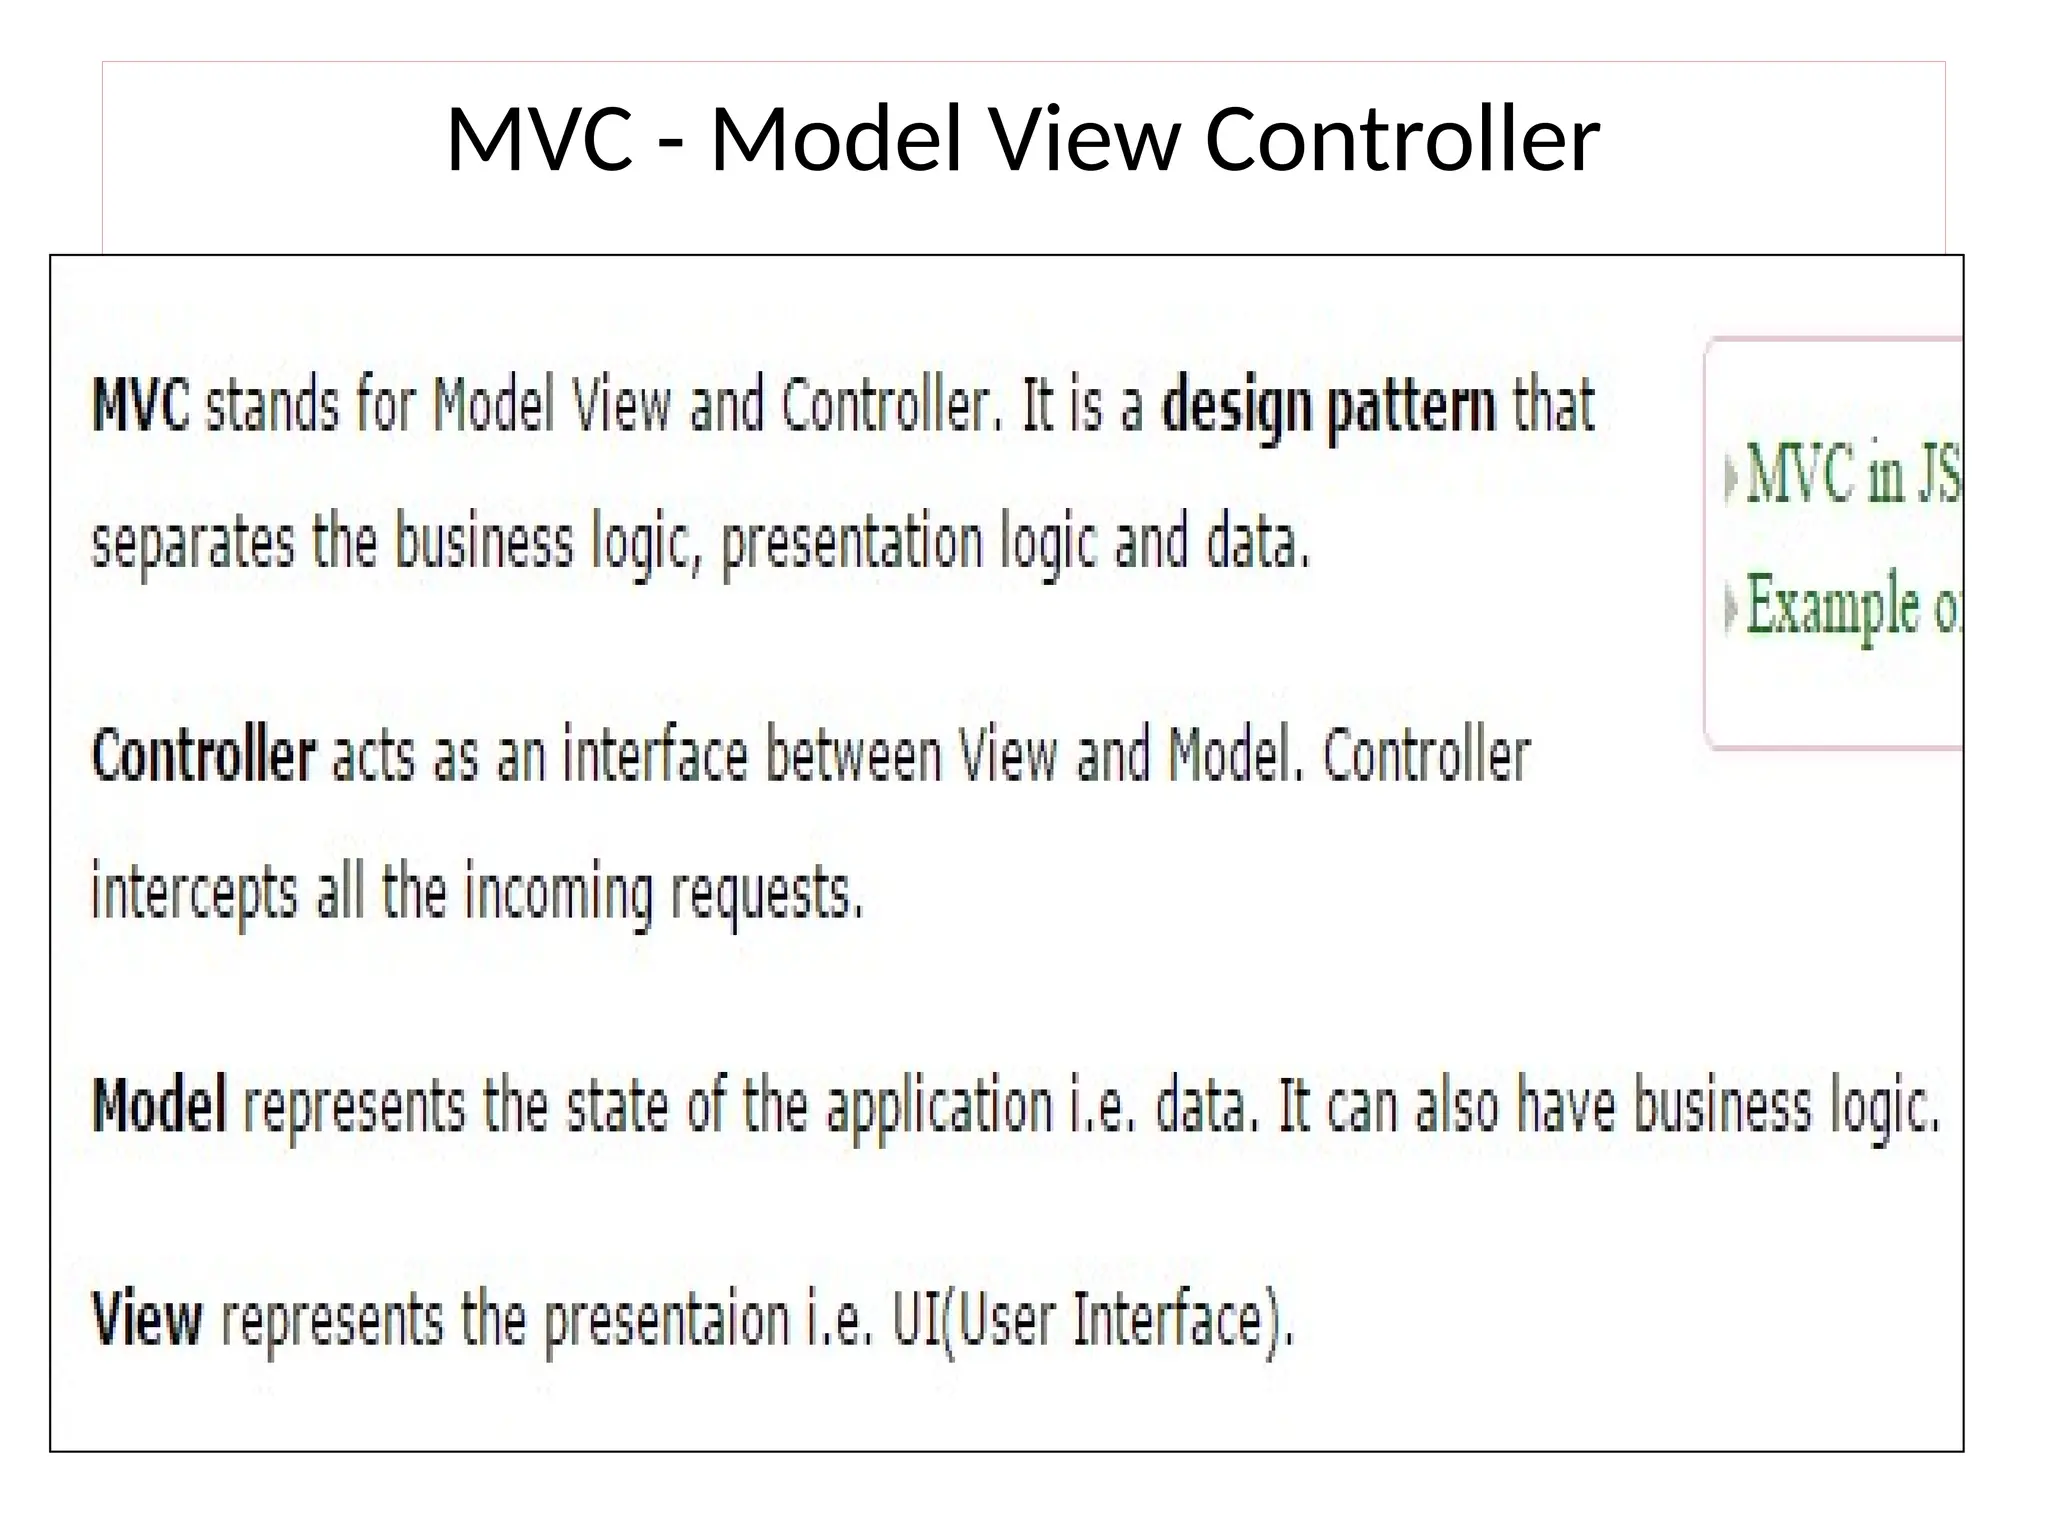
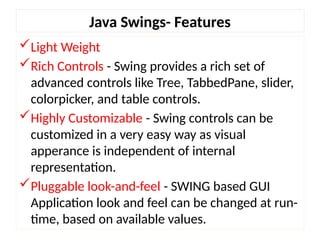
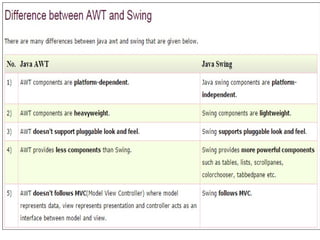
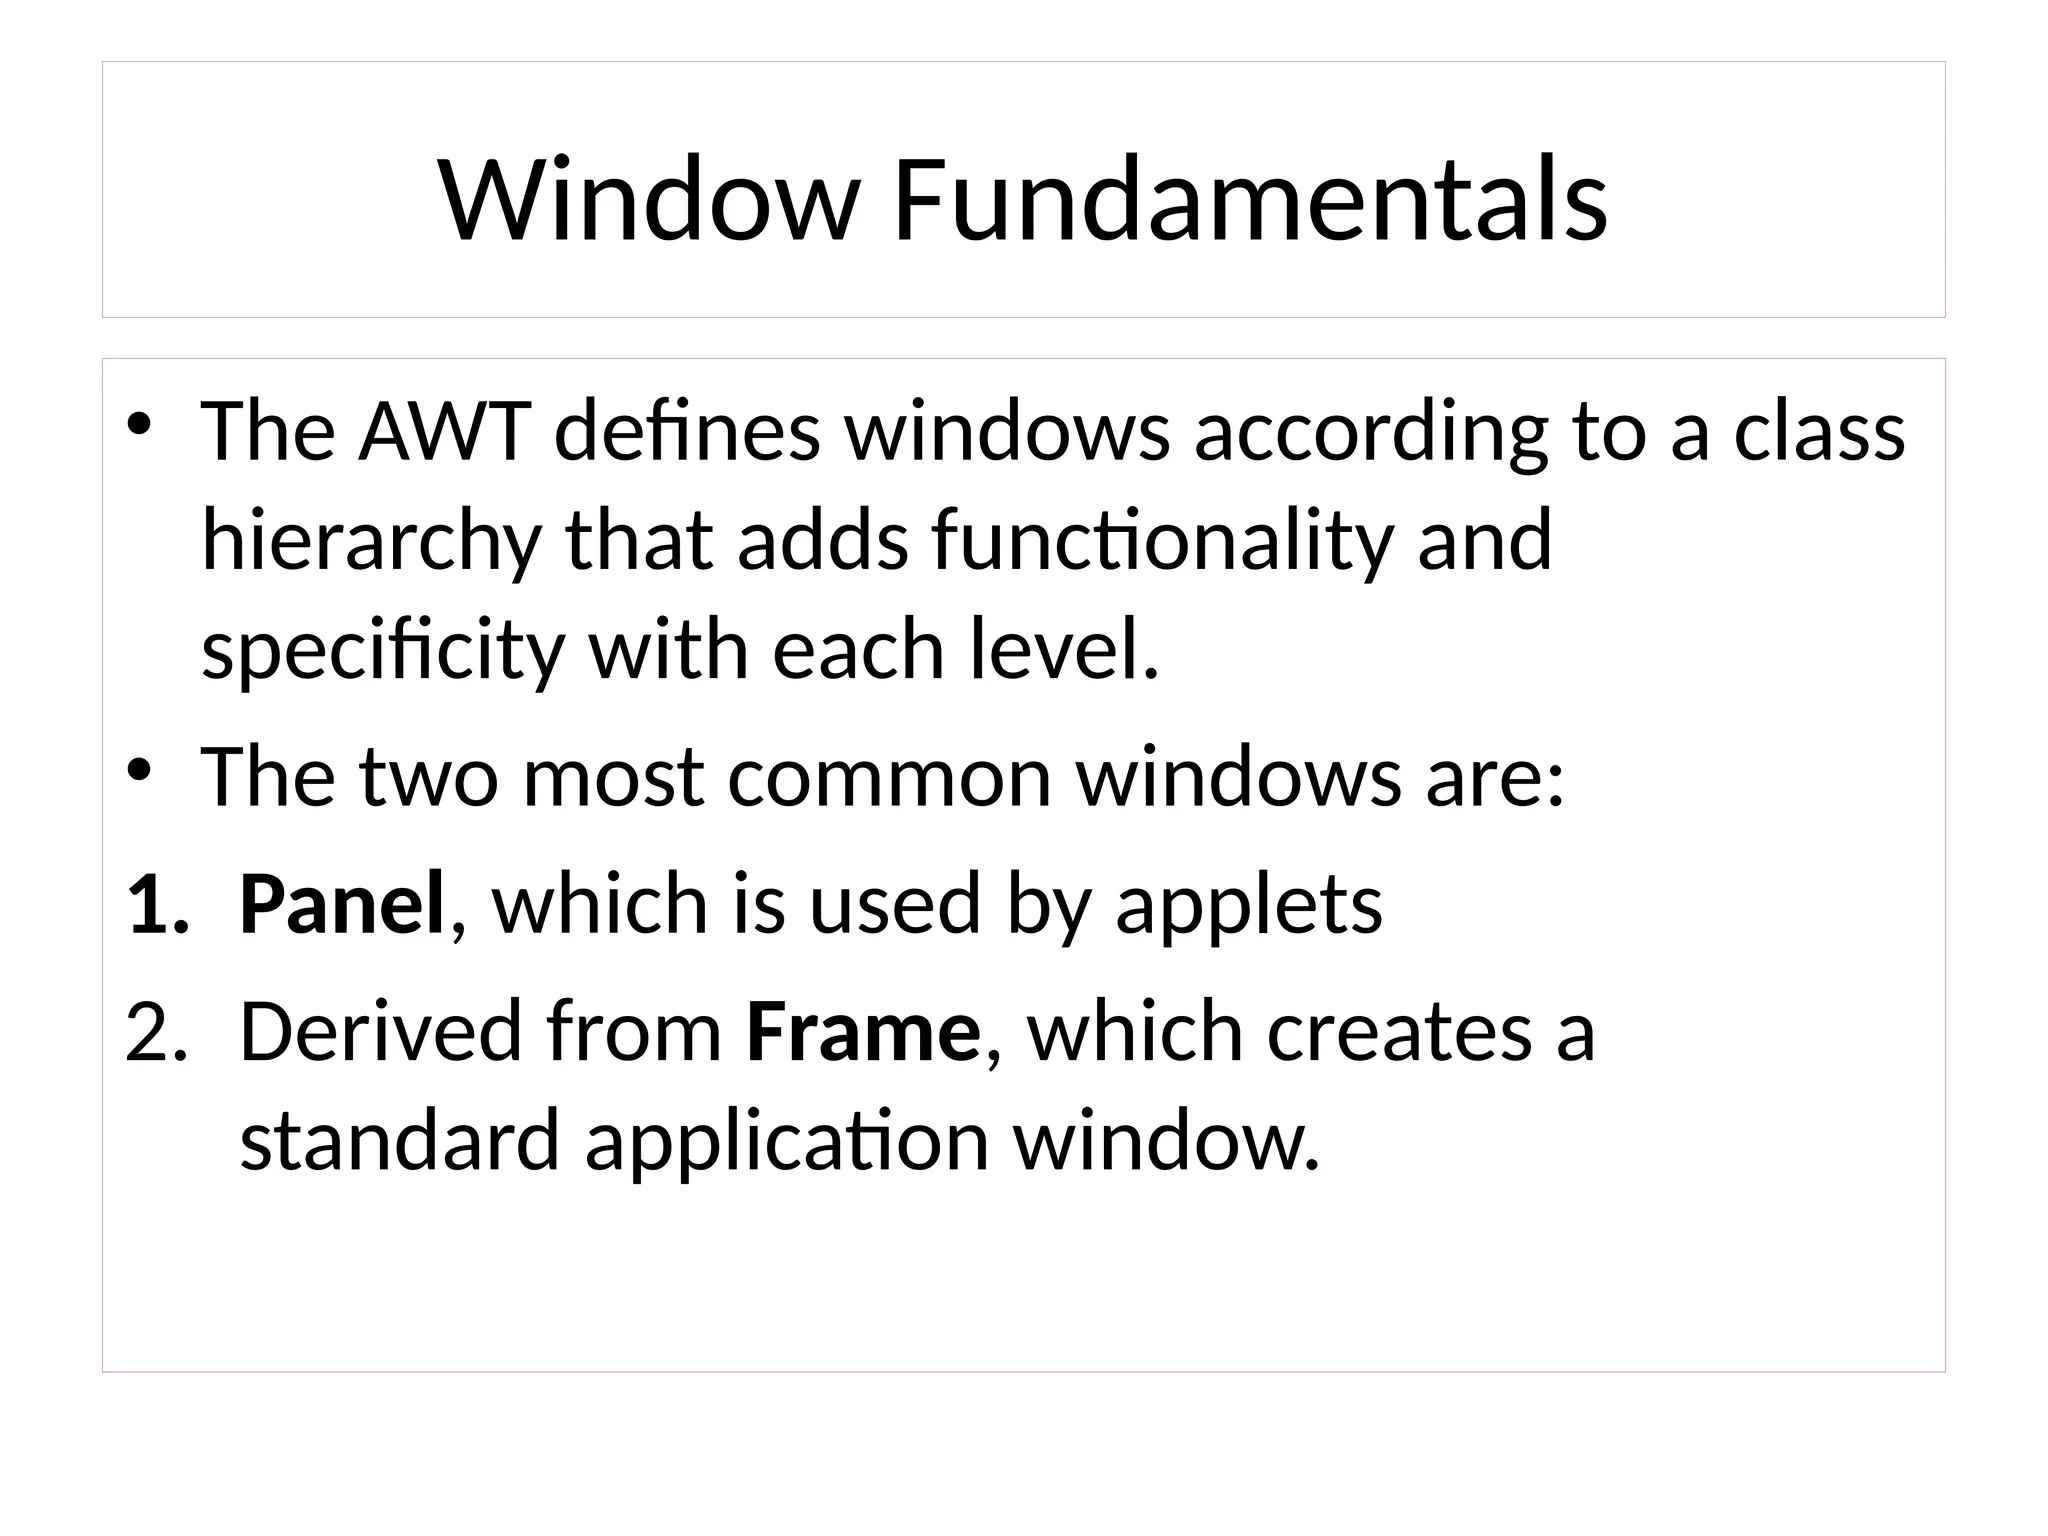
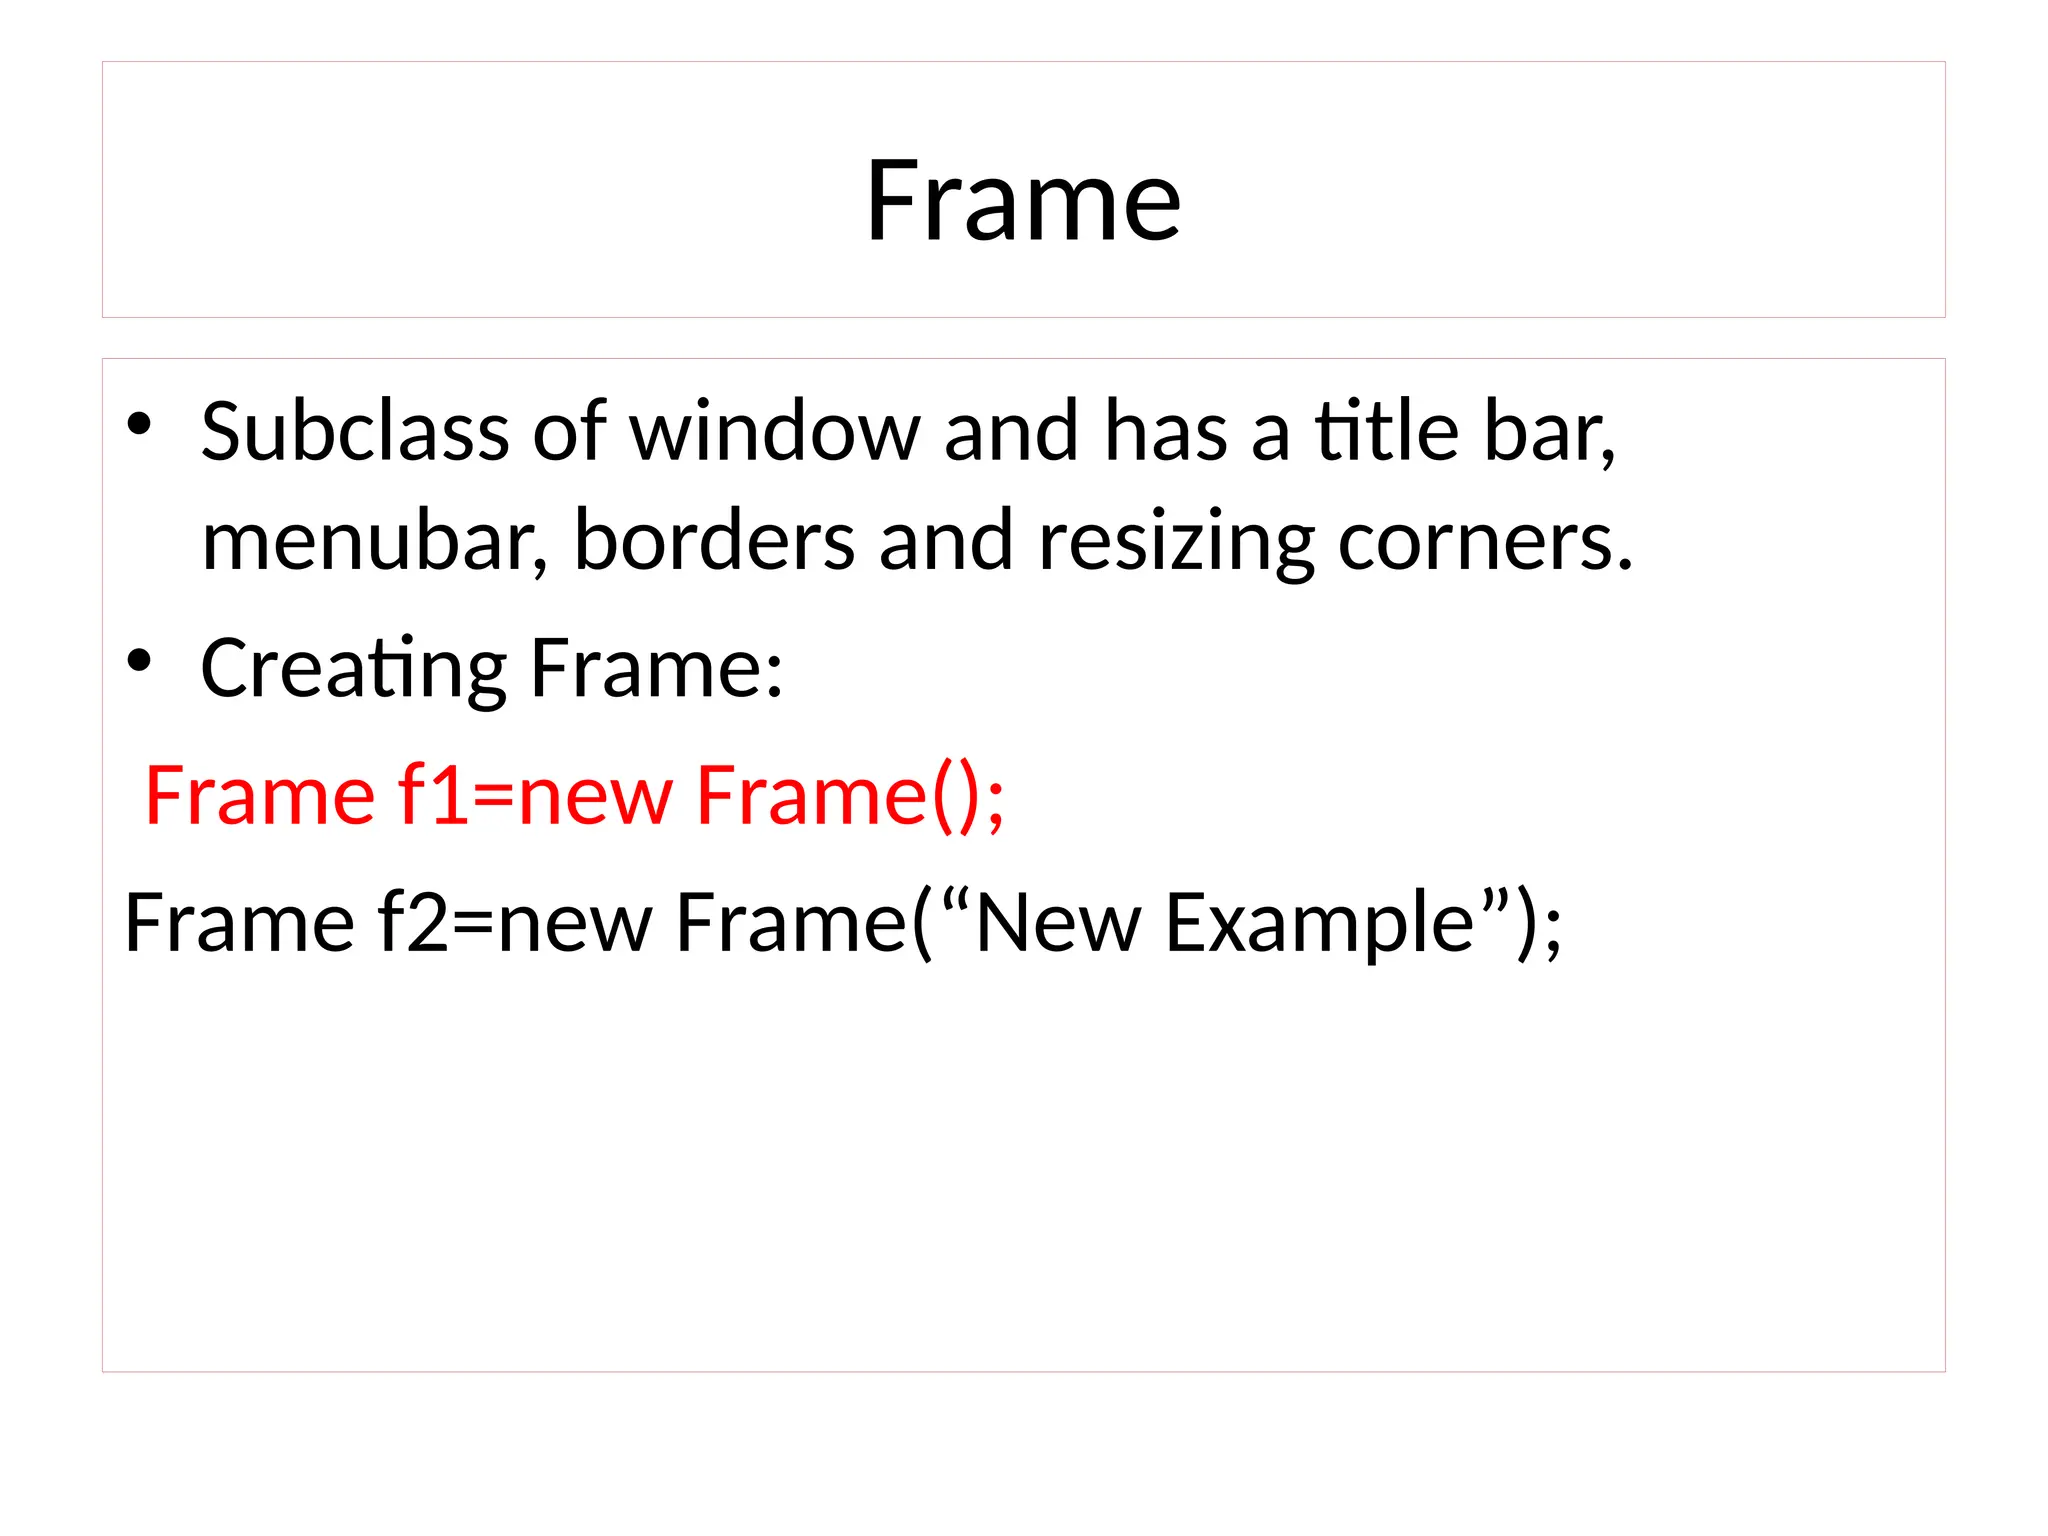
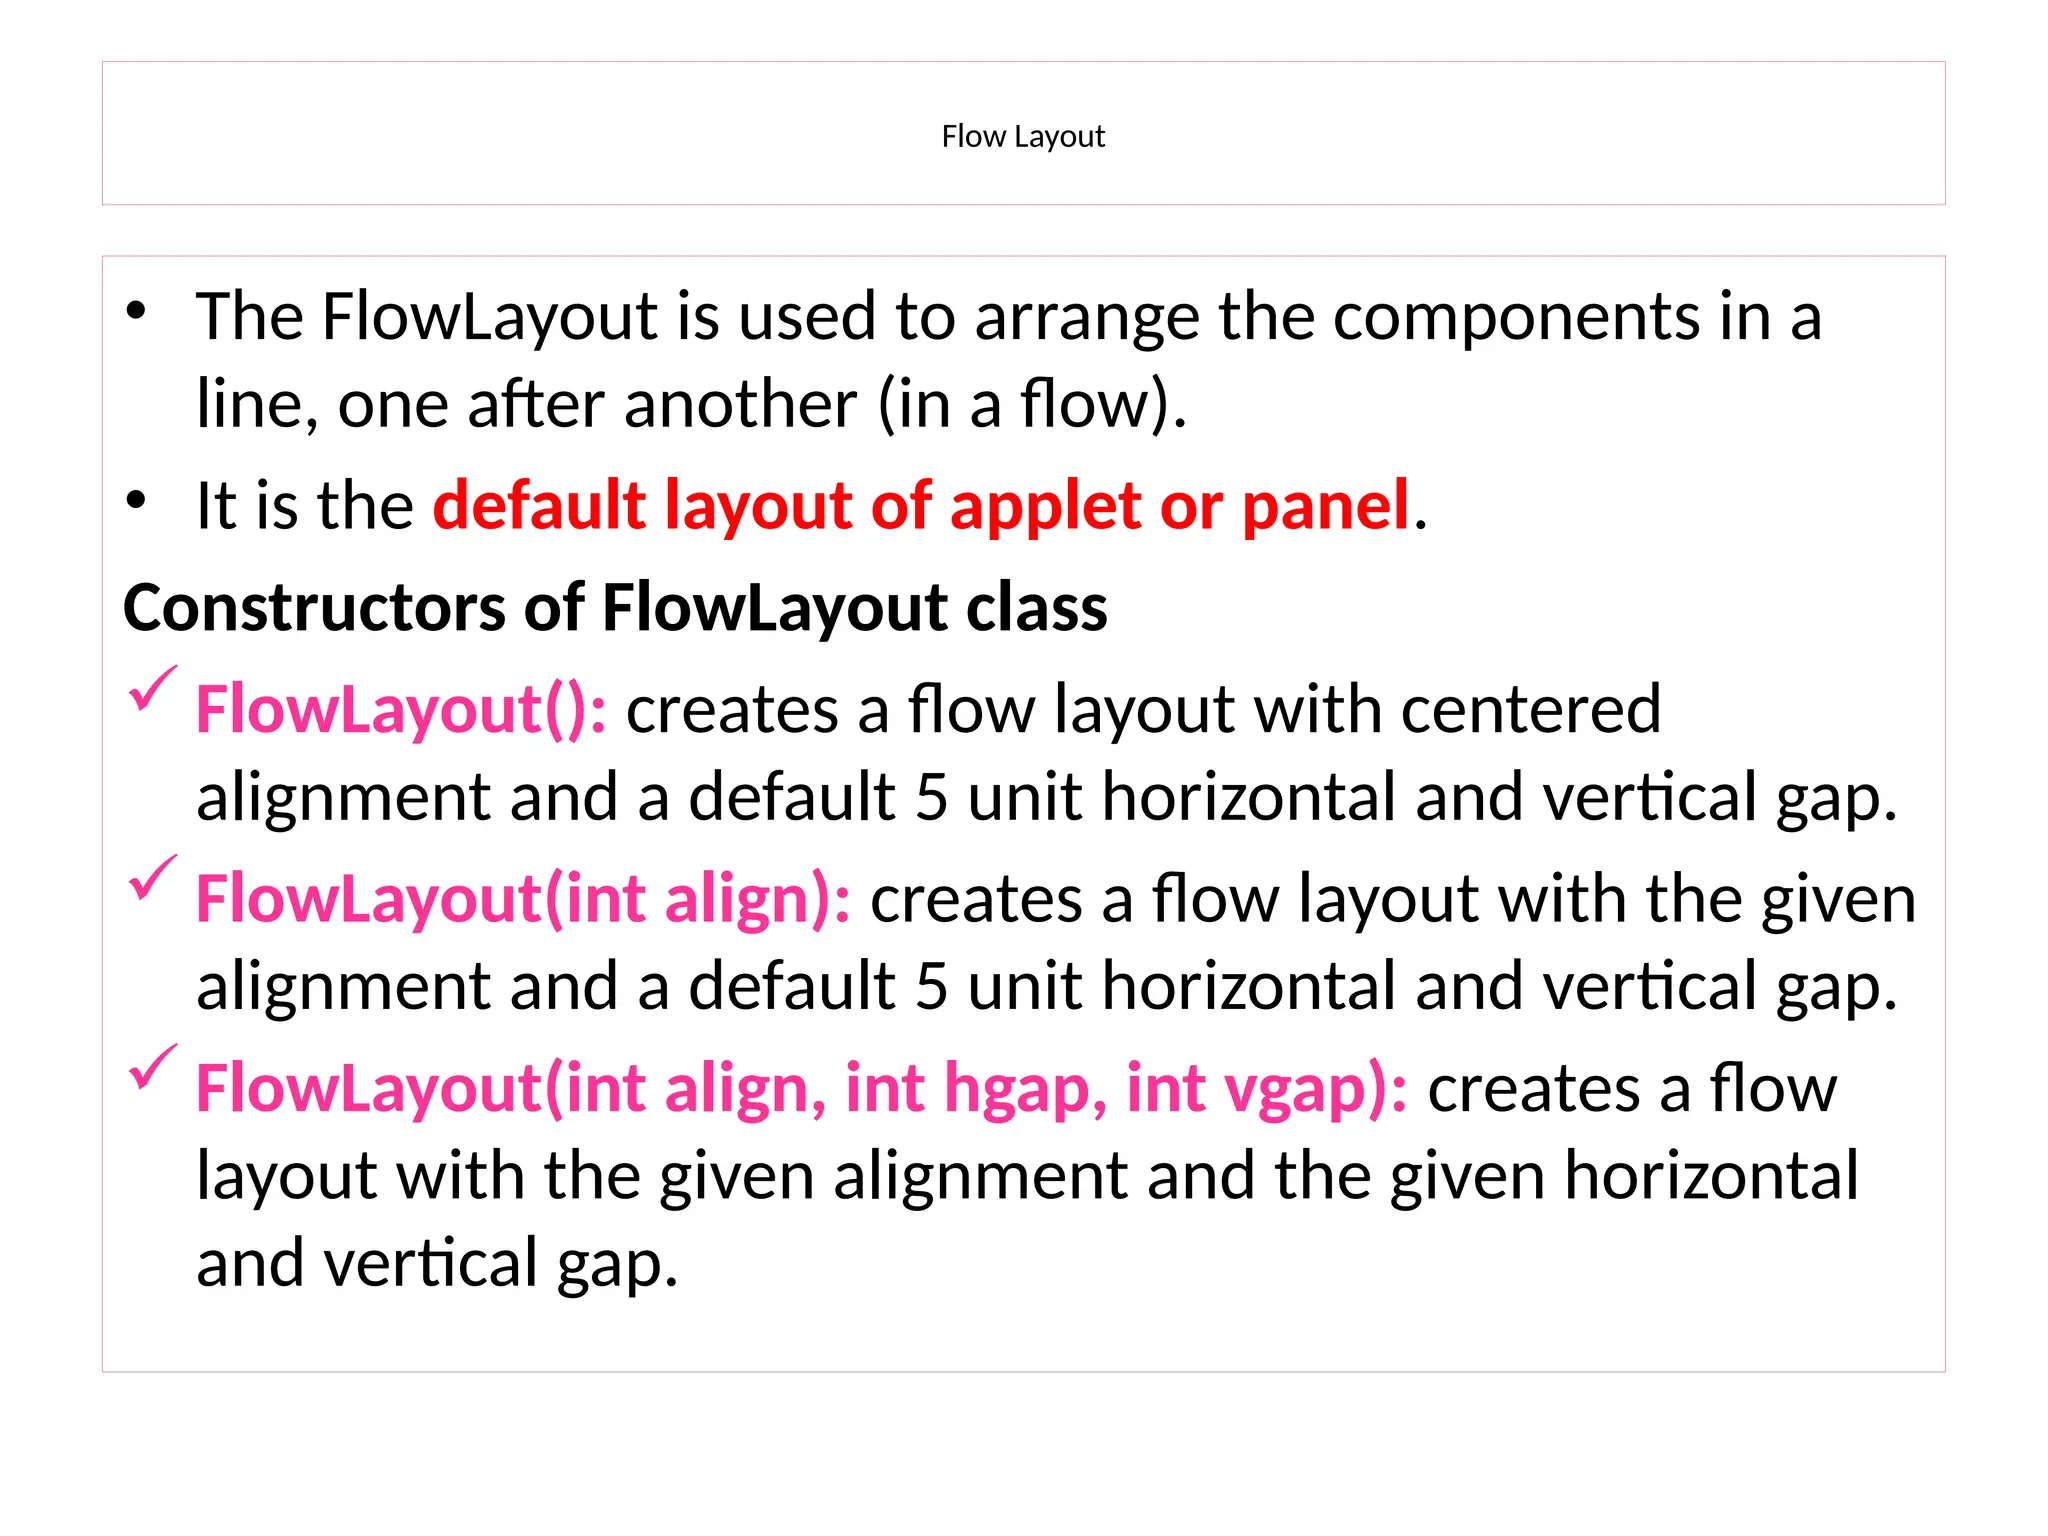
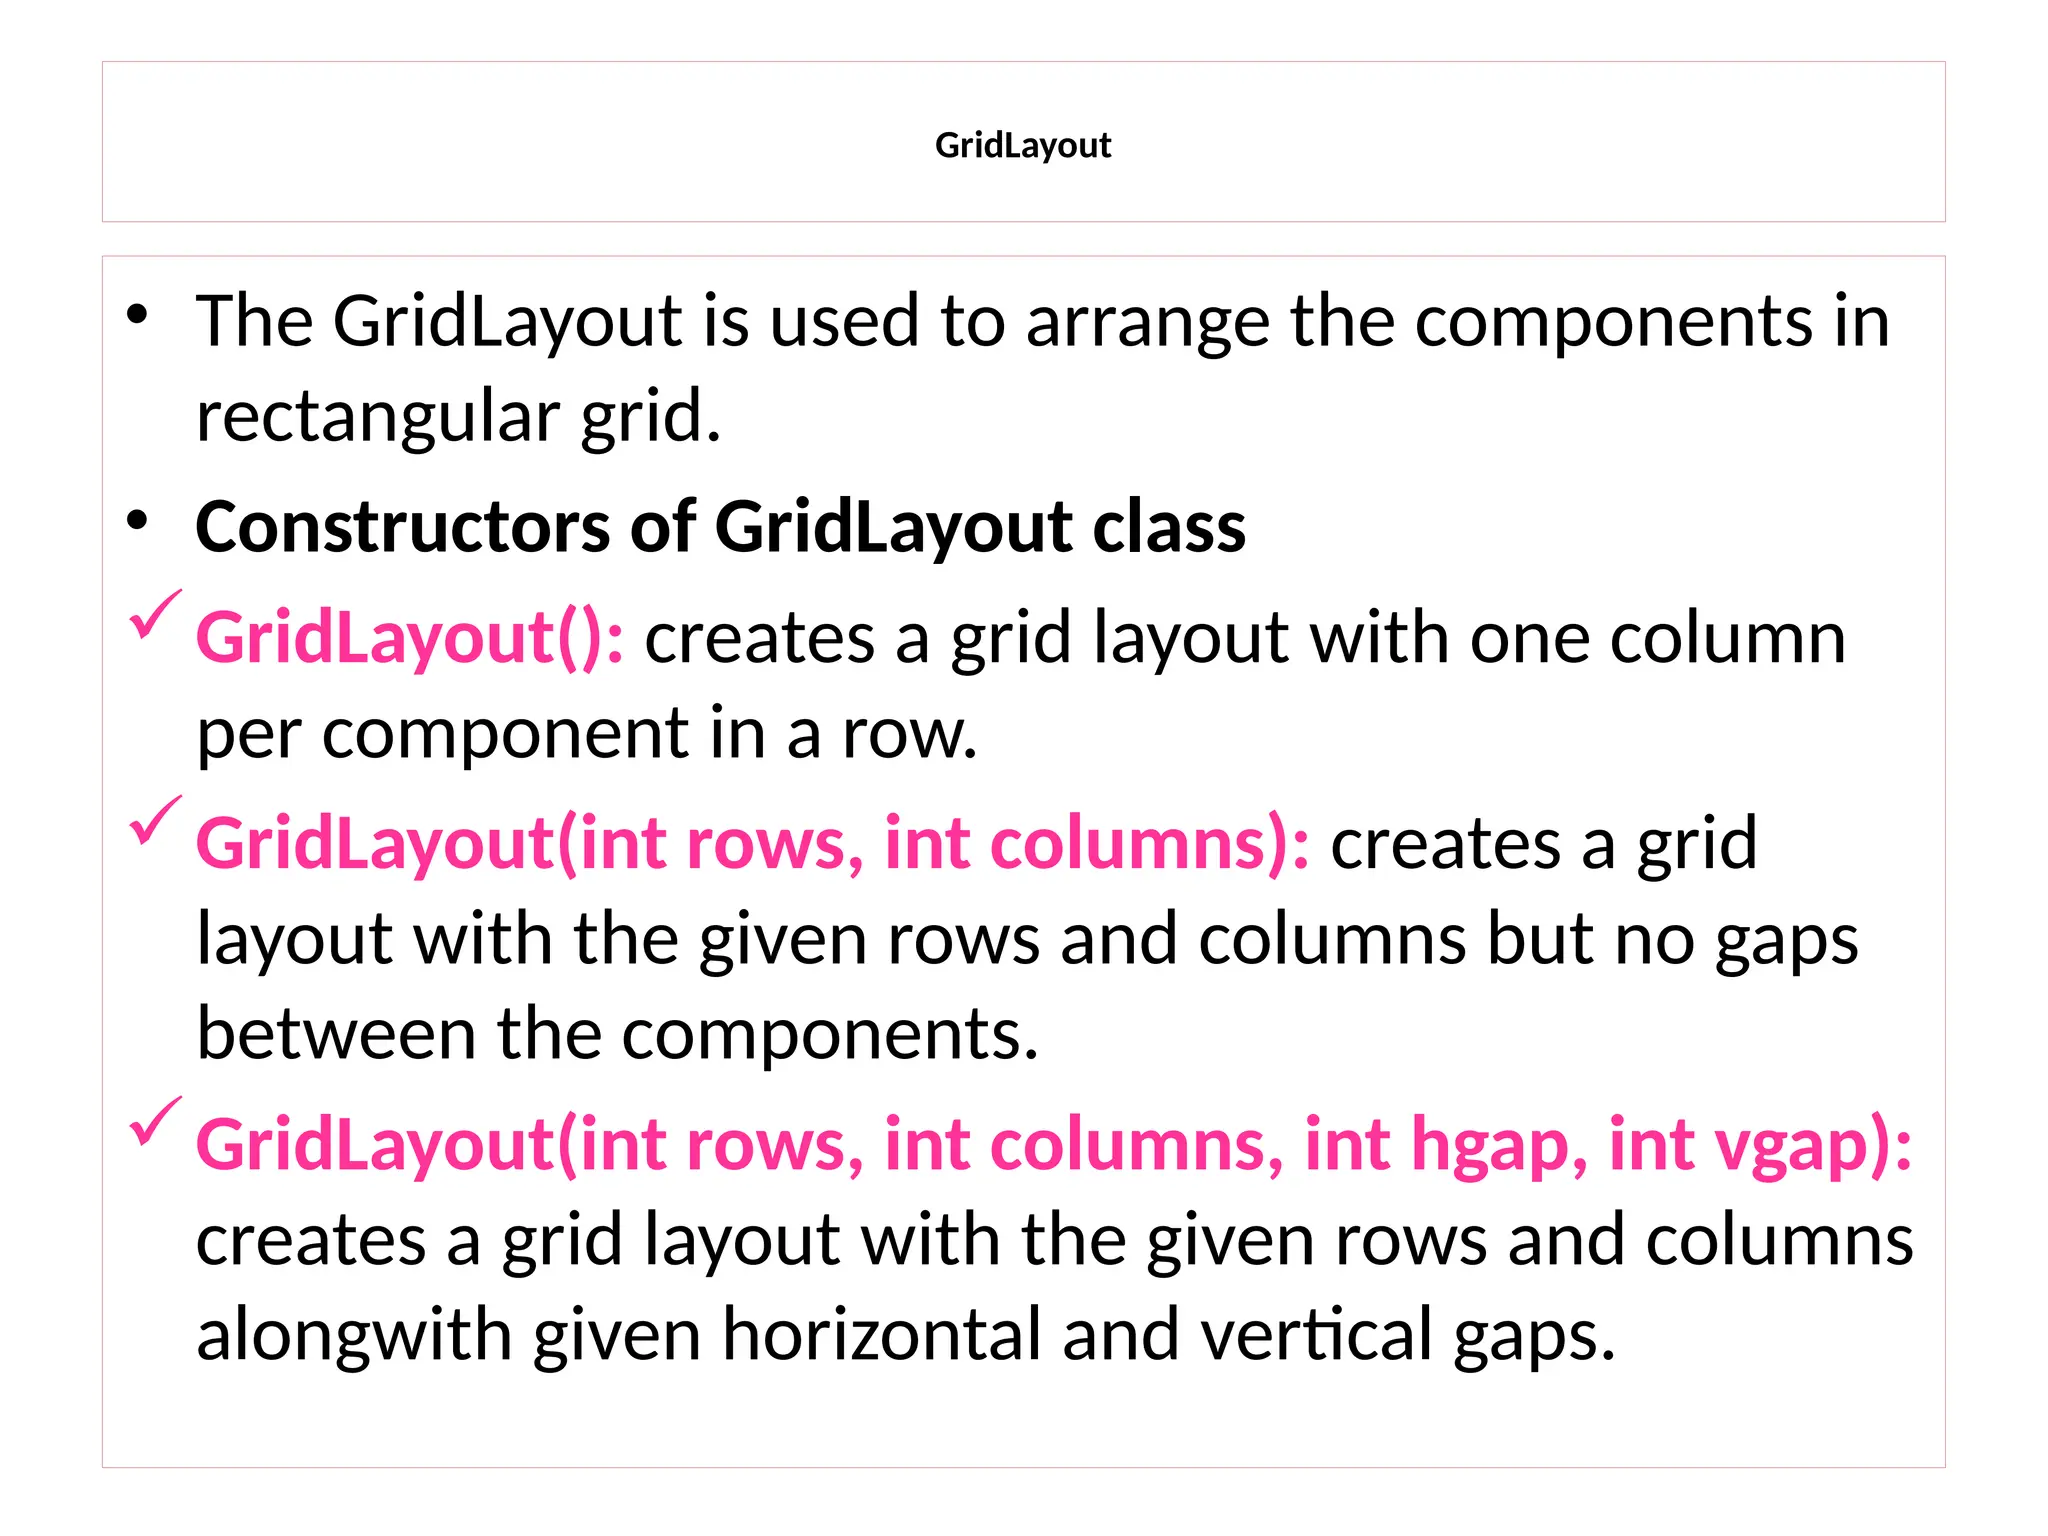
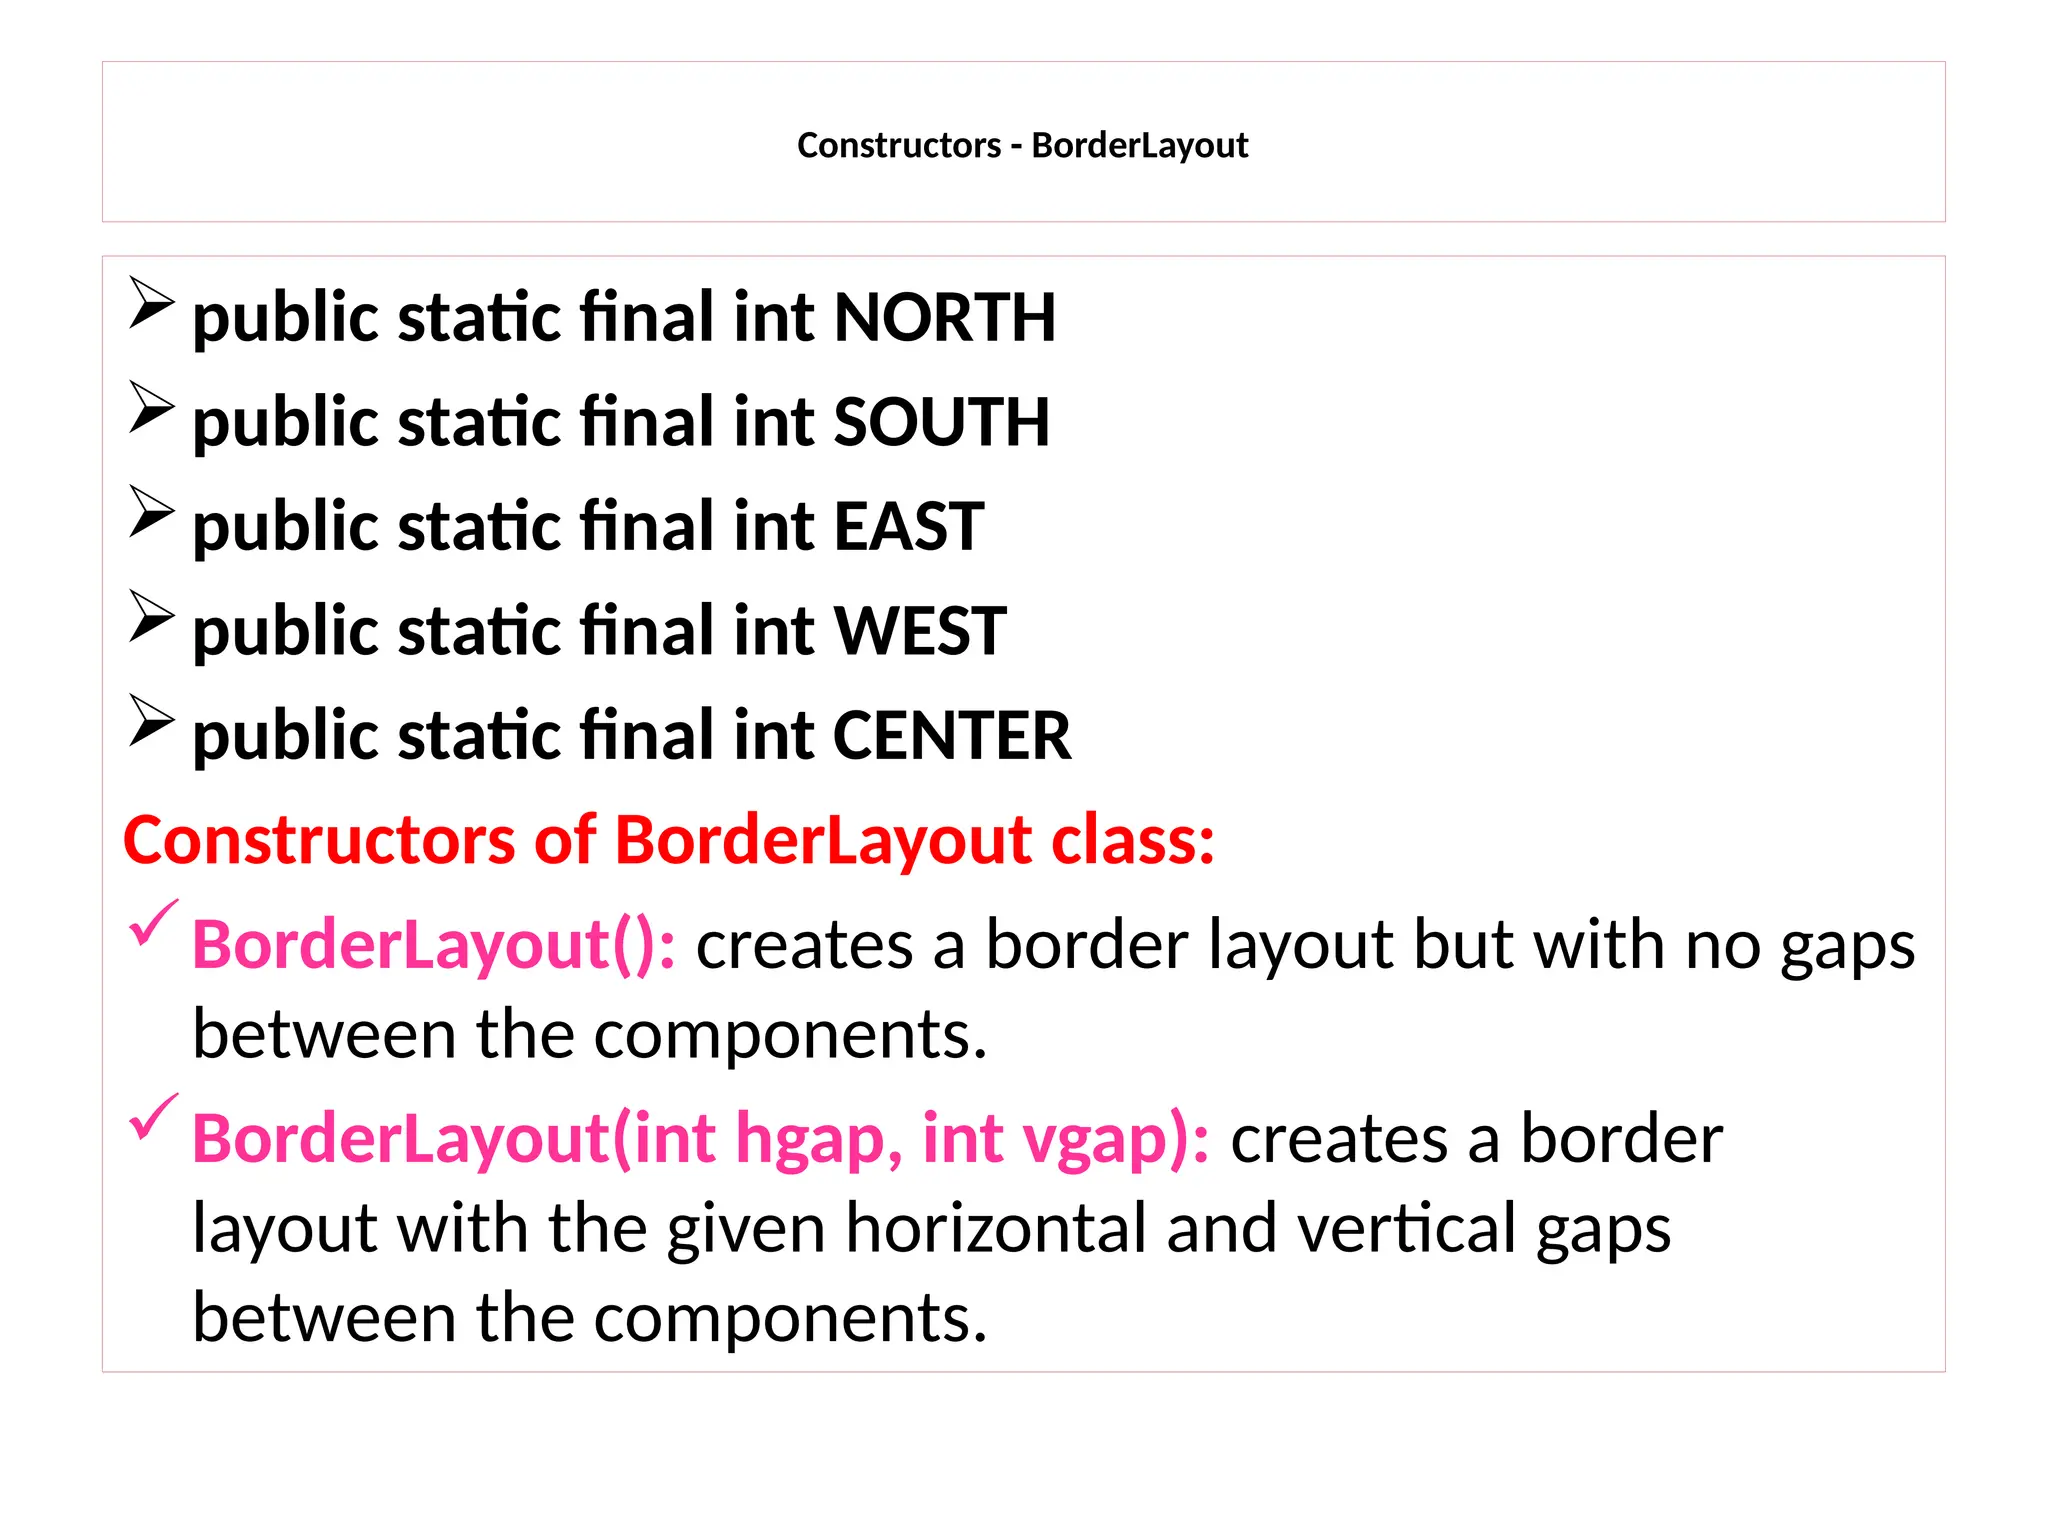
The document provides an overview of the Abstract Window Toolkit (AWT) and Swing in Java, detailing how to create graphical user interfaces (GUIs) using various layout managers, buttons, text fields, and other controls. It includes programming examples demonstrating the implementation of events and interactions within AWT components, as well as highlights the features of Swing, such as lightweight components and customizable interfaces. Additionally, the document describes the structure and function of several layout managers like FlowLayout, GridLayout, and BorderLayout.

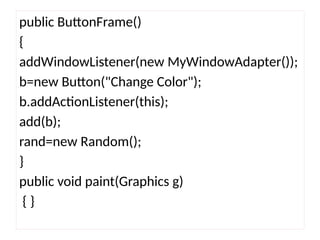
![public static void main(String args[])
{
ButtonFrame ob= new ButtonFrame();
ob.setSize(new Dimension(300, 200));
ob.setTitle("An AWT-Based Application--Buttons in
frame");
ob.setLayout(new FlowLayout());
ob.setVisible(true);
}](https://image.slidesharecdn.com/unit5awtclassesf-250115060442-d43a9a26/85/Abstract-Window-Toolkit_Event-Handling_python-10-320.jpg)

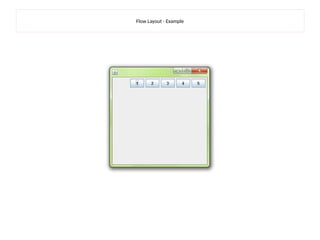
![Flow Layout - Example
import java.awt.*;
public class MyFlowLayout
{
Frame f=new Frame();
MyFlowLayout()
{
Button b1=new Button("1");
Button b2=new Button("2");
Button b3=new Button("3");
Button b4=new Button("4");
Button b5=new Button("5");
f.add(b1);f.add(b2);f.add(b3);f.add(b4);f.add(b5);
f.setLayout(new FlowLayout(FlowLayout.RIGHT));
//setting flow layout of right alignment
f.setSize(300,300);
f.setVisible(true);
}
public static void main(String[] args)
{
MyFlowLayout= new MyFlowLayout();
} }](https://image.slidesharecdn.com/unit5awtclassesf-250115060442-d43a9a26/85/Abstract-Window-Toolkit_Event-Handling_python-18-320.jpg)
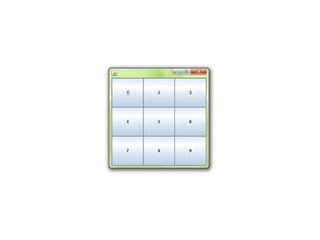
![GridLayout
import java.awt.*;
public class MyGridLayout
{
Frame ff=new Frame();;
MyGridLayout(){
Button b1=new Button("1");
Button b2=new Button("2");
Button b3=new Button("3");
Button b4=new Button("4");
Button b5=new Button("5");
Button b6=new Button("6");
Button b7=new Button("7");
Button b8=new Button("8");
Button b9=new Button("9");
f.add(b1);f.add(b2);f.add(b3);f.add(b4);f.add(b5);
f.add(b6);f.add(b7);f.add(b8);f.add(b9);
f.setLayout(new GridLayout(3,3));
//setting grid layout of 3 rows and 3 columns
f.setSize(300,300);
f.setVisible(true);
}
public static void main(String[] args)
{
MyGridLayout= new MyGridLayout();
} }](https://image.slidesharecdn.com/unit5awtclassesf-250115060442-d43a9a26/85/Abstract-Window-Toolkit_Event-Handling_python-21-320.jpg)

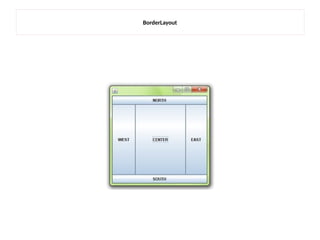
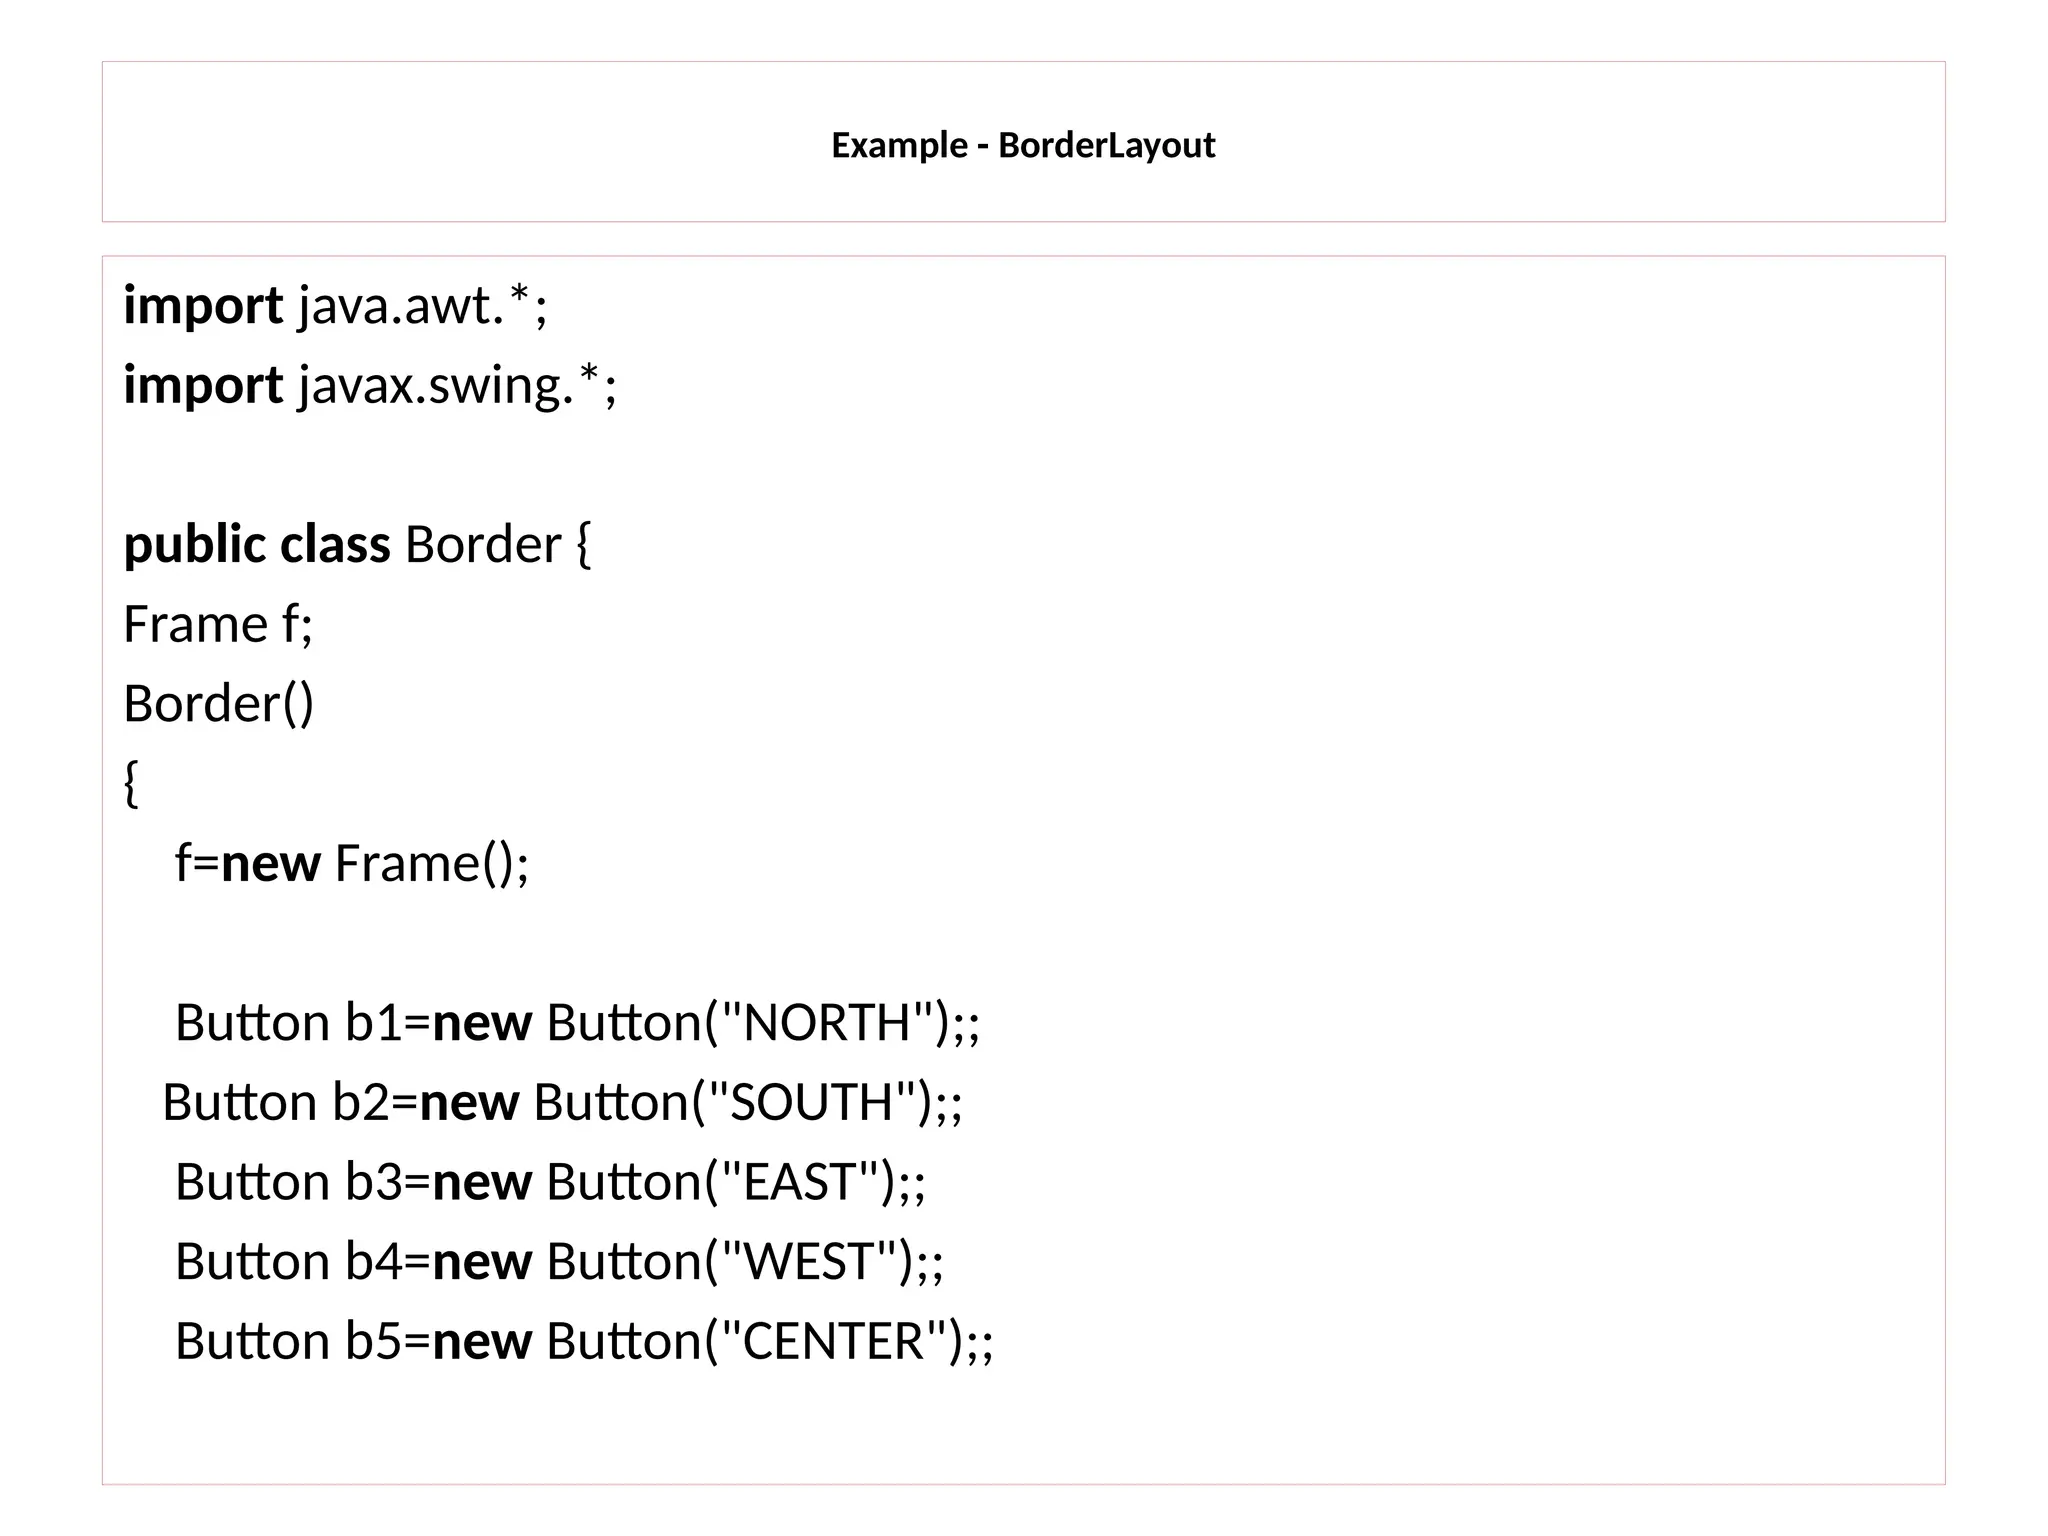
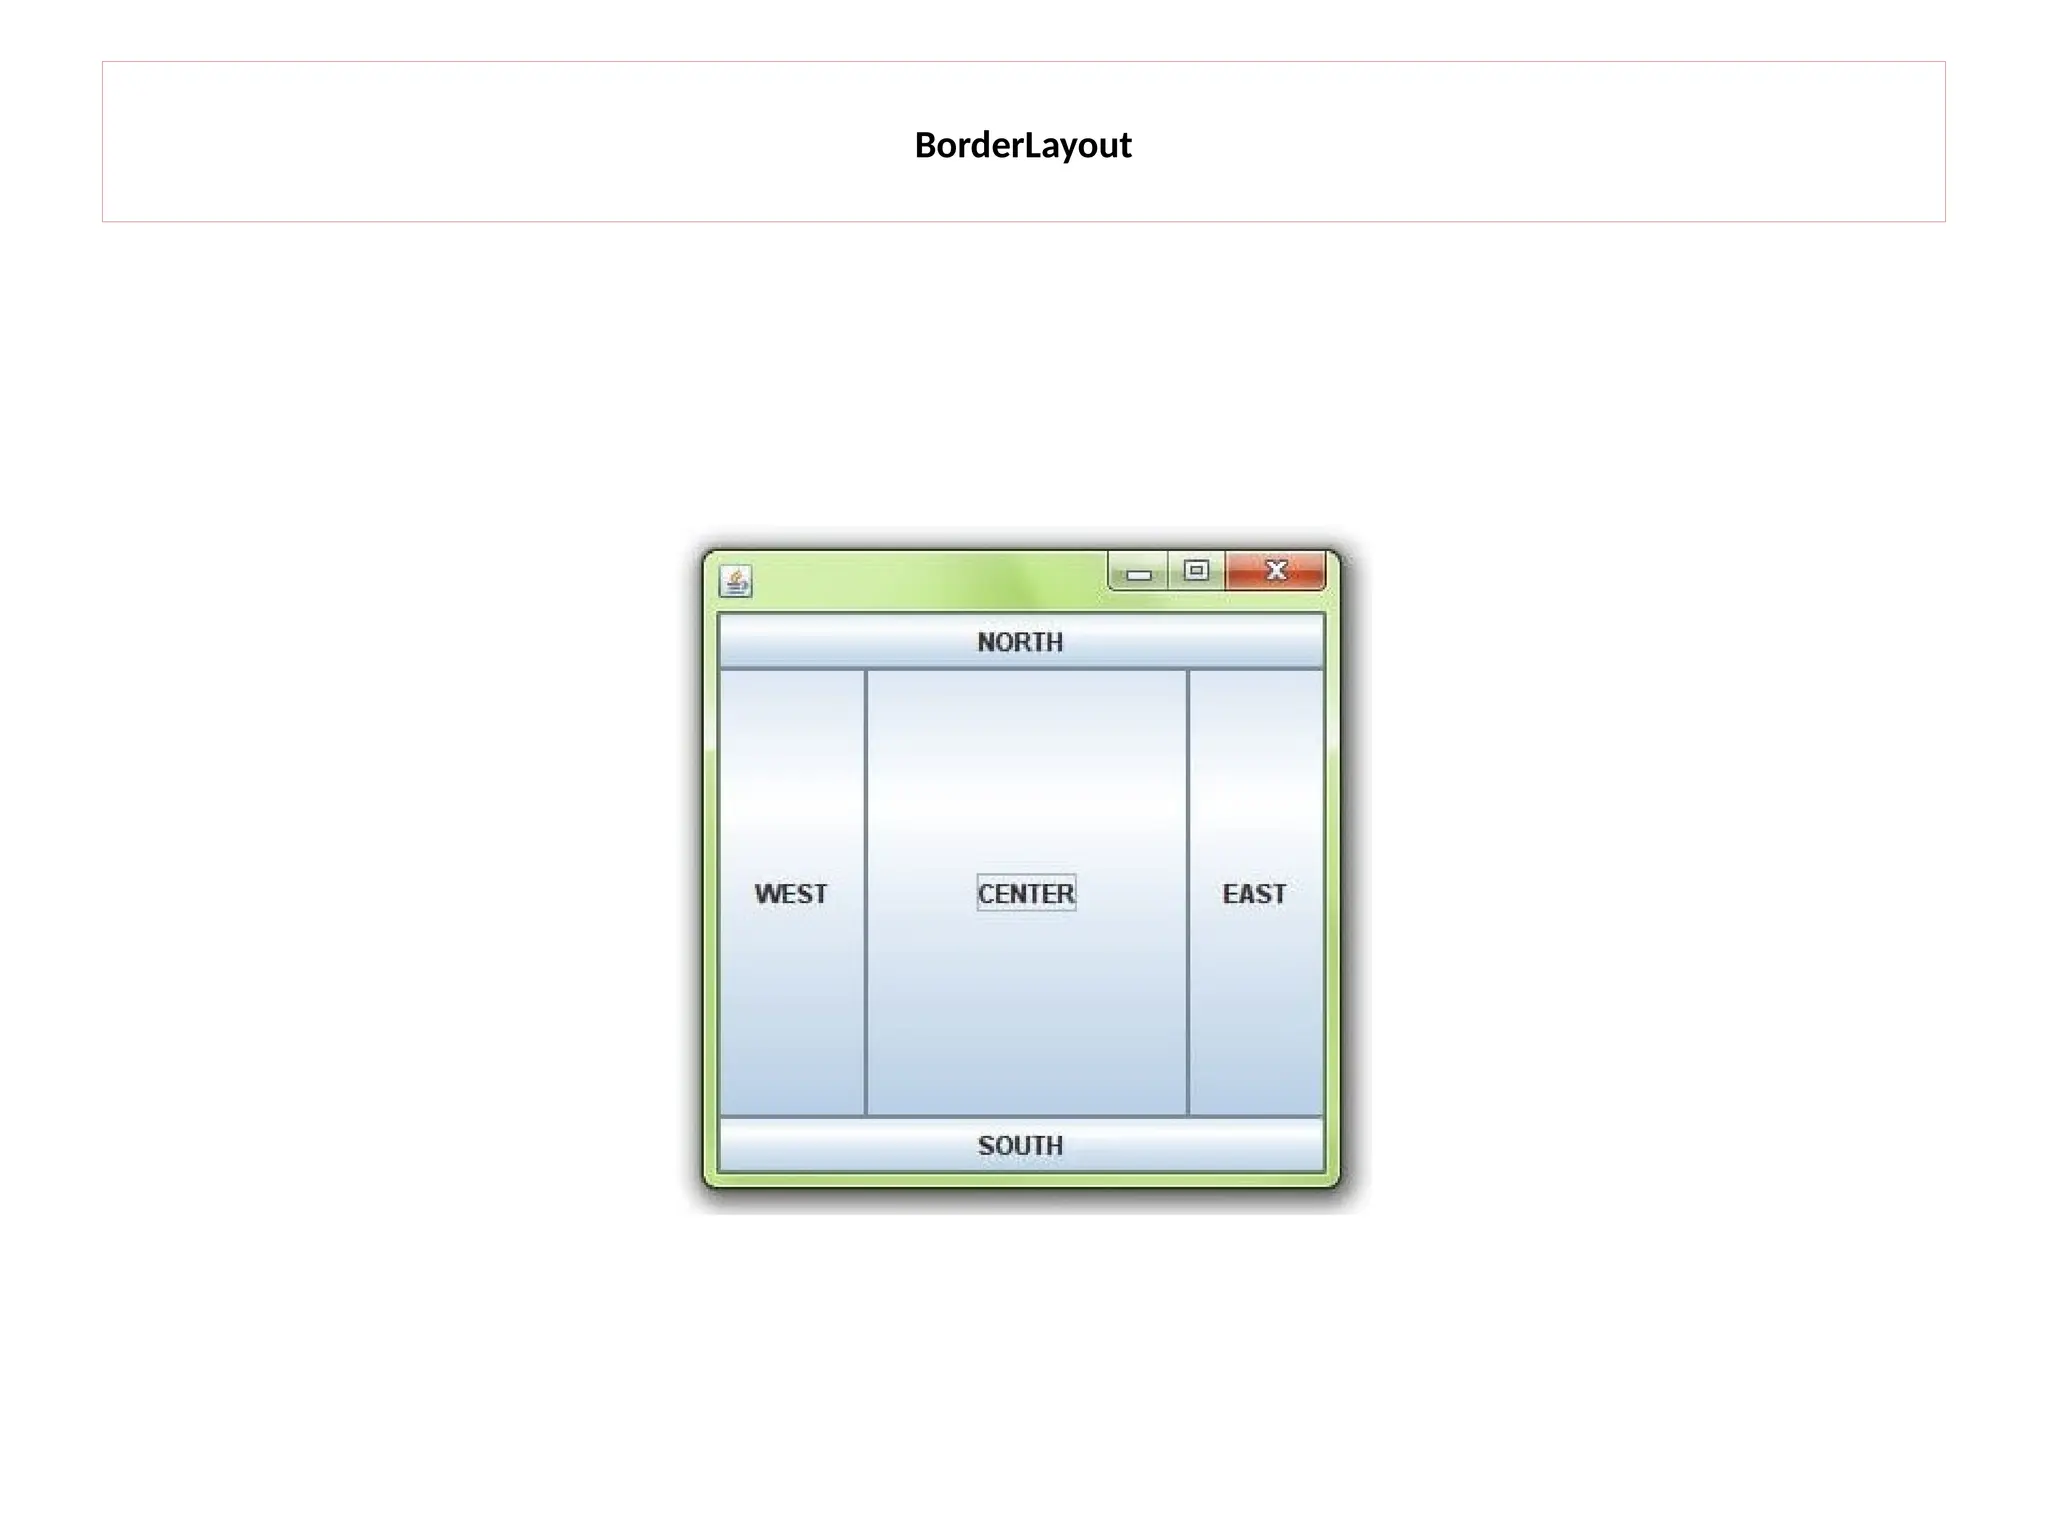
![BorderLayout
f.add(b1,BorderLayout.NORTH);
f.add(b2,BorderLayout.SOUTH);
f.add(b3,BorderLayout.EAST);
f.add(b4,BorderLayout.WEST);
f.add(b5,BorderLayout.CENTER);
f.setSize(300,300);
f.setVisible(true);
}
public static void main(String[] args)
{
new Border();
}
}](https://image.slidesharecdn.com/unit5awtclassesf-250115060442-d43a9a26/85/Abstract-Window-Toolkit_Event-Handling_python-26-320.jpg)
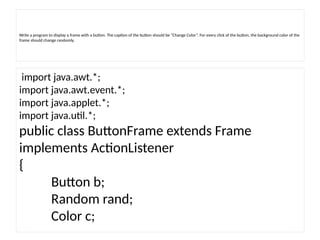
![AWT Button Example with ActionListener
import java.awt.*;
import java.awt.event.*;
public class ButtonExample {
public static void main(String[] args) {
Frame f=new Frame("Button Example");
TextField tf=new TextField();
tf.setBounds(50,50, 150,20);
Button b=new Button("Click Here");
b.setBounds(50,100,60,30);
b.addActionListener(new ActionListener(){
public void actionPerformed(ActionEvent e){
tf.setText("Welcome to Javatpoint.");
}
});
f.add(b);f.add(tf);
f.setSize(400,400); > javac ButtonExample.java
>java ButtonExample
f.setLayout(null);
f.setVisible(true);
}
}](https://image.slidesharecdn.com/unit5awtclassesf-250115060442-d43a9a26/85/Abstract-Window-Toolkit_Event-Handling_python-29-320.jpg)
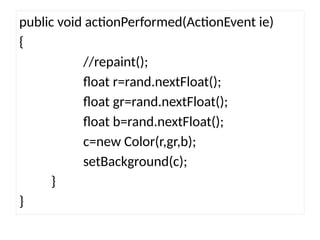
![add(tf1);add(tf2);add(tf3);add(b1);add(b2);
setSize(300,300);
setLayout(null);
setVisible(true);
}
public void actionPerformed(ActionEvent e) {
String s1=tf1.getText(); s1=“10” =10
String s2=tf2.getText(); s2=“5” =5
int a=Integer.parseInt(s1);
int b=Integer.parseInt(s2);
int c=0;
if(e.getSource()==b1){
c=a+b;
}else if(e.getSource()==b2){
c=a-b;
}
String result=String.valueOf(c);
tf3.setText(result);
}
public static void main(String[] args) {
new TextFieldExample();
}
}](https://image.slidesharecdn.com/unit5awtclassesf-250115060442-d43a9a26/85/Abstract-Window-Toolkit_Event-Handling_python-31-320.jpg)
![public void actionPerformed(ActionEvent e){
String text=area.getText();
String words[]=text.split("s");
l1.setText("Words: "+words.length);
l2.setText("Characters: "+text.length());
}
public static void main(String[] args) {
new TextAreaExample();
}
}](https://image.slidesharecdn.com/unit5awtclassesf-250115060442-d43a9a26/85/Abstract-Window-Toolkit_Event-Handling_python-33-320.jpg)
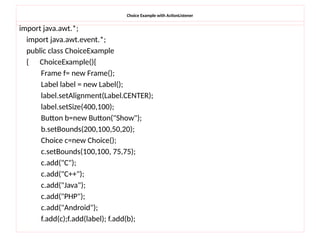
![Choice Example with ActionListener
f.setSize(400,400);
f.setLayout(null);
f.setVisible(true);
b.addActionListener(new ActionListener()
{public void actionPerformed(ActionEvent e)
{
String data = "Programming language Selected: "+
c.getItem(c.getSelectedIndex());
label.setText(data);
}
});
}
public static void main(String args[])
{
new ChoiceExample();
}
}](https://image.slidesharecdn.com/unit5awtclassesf-250115060442-d43a9a26/85/Abstract-Window-Toolkit_Event-Handling_python-35-320.jpg)
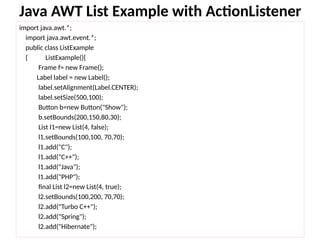
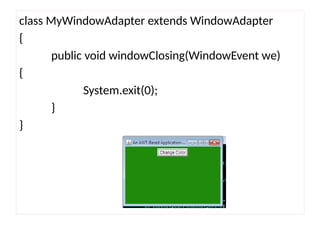
![Java AWT List Example with ActionListener
l2.add("CodeIgniter");
f.add(l1); f.add(l2); f.add(label); f.add(b);
f.setSize(450,450);
f.setLayout(null);
f.setVisible(true);
b.addActionListener(new ActionListener() {
public void actionPerformed(ActionEvent e) {
String data = "Programming language Selected: "+l1.getItem(l1.getSelectedIndex());
data += ", Framework Selected:";
for(String frame:l2.getSelectedItems()){
data += frame + " ";
}
label.setText(data);
}
});
}
public static void main(String args[])
{
new ListExample();
} }](https://image.slidesharecdn.com/unit5awtclassesf-250115060442-d43a9a26/85/Abstract-Window-Toolkit_Event-Handling_python-37-320.jpg)

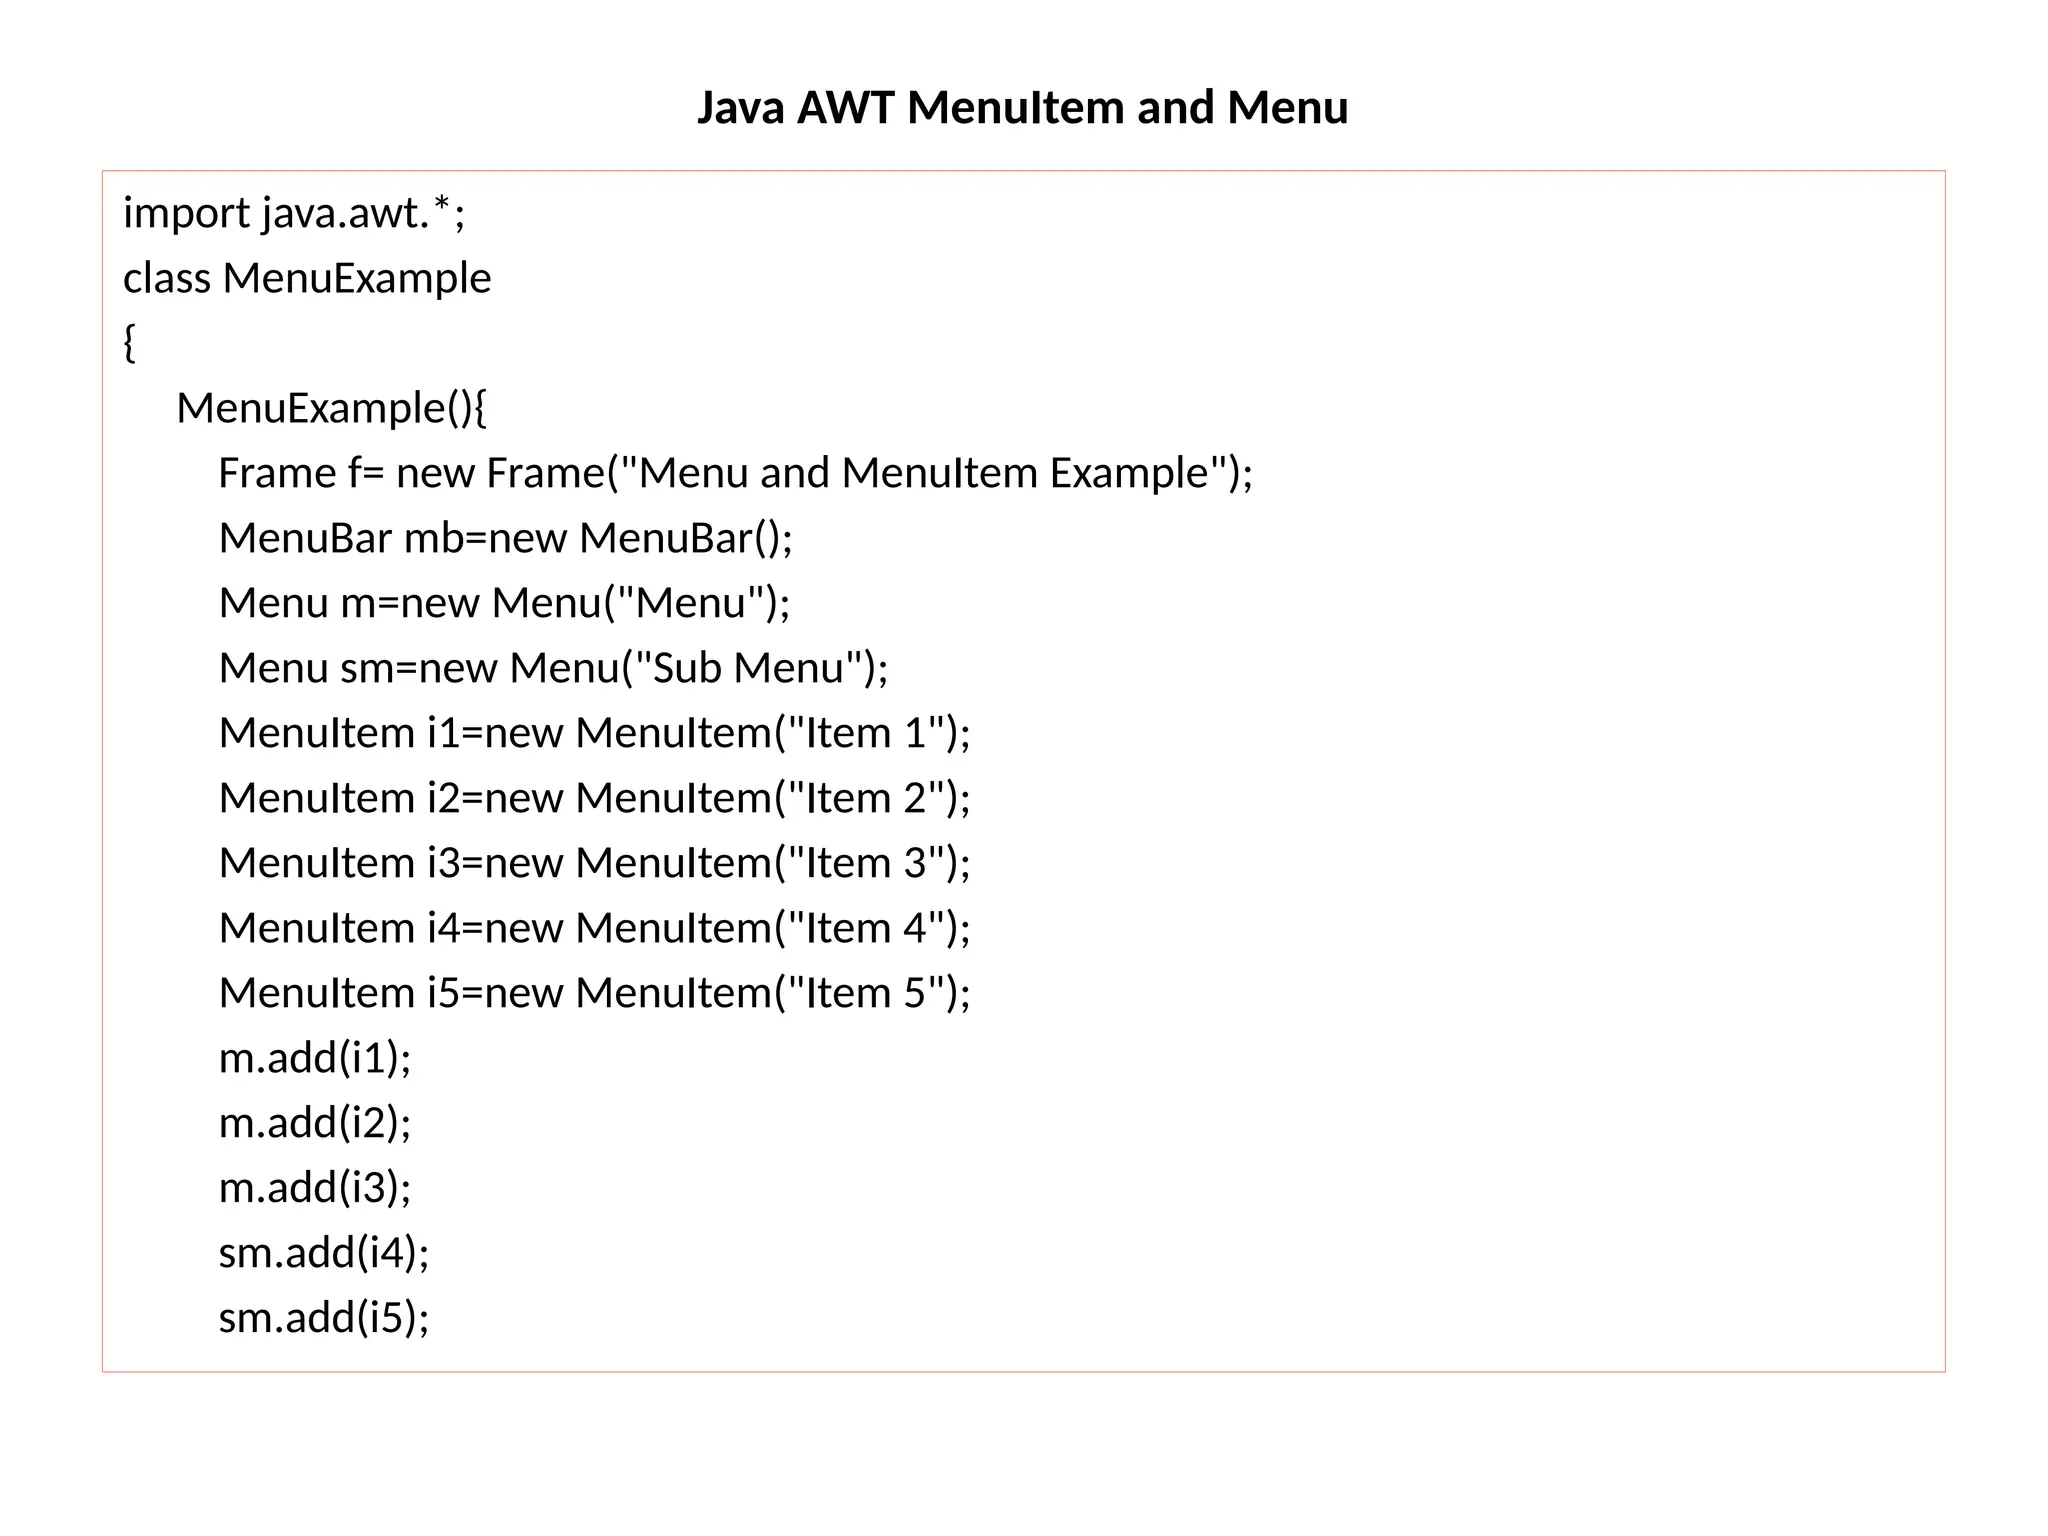
![Java AWT MenuItem and Menu
m.add(sm);
mb.add(m);
f.setMenuBar(mb);
f.setSize(400,400);
f.setLayout(null);
f.setVisible(true);
}
public static void main(String args[])
{
MenuExample me= new MenuExample();
}
}](https://image.slidesharecdn.com/unit5awtclassesf-250115060442-d43a9a26/85/Abstract-Window-Toolkit_Event-Handling_python-39-320.jpg)
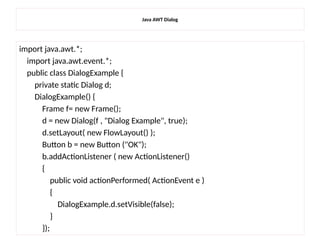
![Java AWT Dialog
d.add( new Label ("Click button to continue."));
d.add(b);
d.setSize(300,300);
d.setVisible(true);
}
public static void main(String args[])
{
new DialogExample();
}
}](https://image.slidesharecdn.com/unit5awtclassesf-250115060442-d43a9a26/85/Abstract-Window-Toolkit_Event-Handling_python-42-320.jpg)


![public static void main(String args[])
{
ButtonFrame ob= new ButtonFrame();
ob.setSize(new Dimension(300, 200));
ob.setTitle("An AWT-Based Application--Buttons in
frame");
ob.setLayout(new FlowLayout());
ob.setVisible(true);
}](https://image.slidesharecdn.com/unit5awtclassesf-250115060442-d43a9a26/75/Abstract-Window-Toolkit_Event-Handling_python-10-2048.jpg)

![Flow Layout - Example
import java.awt.*;
public class MyFlowLayout
{
Frame f=new Frame();
MyFlowLayout()
{
Button b1=new Button("1");
Button b2=new Button("2");
Button b3=new Button("3");
Button b4=new Button("4");
Button b5=new Button("5");
f.add(b1);f.add(b2);f.add(b3);f.add(b4);f.add(b5);
f.setLayout(new FlowLayout(FlowLayout.RIGHT));
//setting flow layout of right alignment
f.setSize(300,300);
f.setVisible(true);
}
public static void main(String[] args)
{
MyFlowLayout= new MyFlowLayout();
} }](https://image.slidesharecdn.com/unit5awtclassesf-250115060442-d43a9a26/75/Abstract-Window-Toolkit_Event-Handling_python-18-2048.jpg)

![GridLayout
import java.awt.*;
public class MyGridLayout
{
Frame ff=new Frame();;
MyGridLayout(){
Button b1=new Button("1");
Button b2=new Button("2");
Button b3=new Button("3");
Button b4=new Button("4");
Button b5=new Button("5");
Button b6=new Button("6");
Button b7=new Button("7");
Button b8=new Button("8");
Button b9=new Button("9");
f.add(b1);f.add(b2);f.add(b3);f.add(b4);f.add(b5);
f.add(b6);f.add(b7);f.add(b8);f.add(b9);
f.setLayout(new GridLayout(3,3));
//setting grid layout of 3 rows and 3 columns
f.setSize(300,300);
f.setVisible(true);
}
public static void main(String[] args)
{
MyGridLayout= new MyGridLayout();
} }](https://image.slidesharecdn.com/unit5awtclassesf-250115060442-d43a9a26/75/Abstract-Window-Toolkit_Event-Handling_python-21-2048.jpg)


![BorderLayout
f.add(b1,BorderLayout.NORTH);
f.add(b2,BorderLayout.SOUTH);
f.add(b3,BorderLayout.EAST);
f.add(b4,BorderLayout.WEST);
f.add(b5,BorderLayout.CENTER);
f.setSize(300,300);
f.setVisible(true);
}
public static void main(String[] args)
{
new Border();
}
}](https://image.slidesharecdn.com/unit5awtclassesf-250115060442-d43a9a26/75/Abstract-Window-Toolkit_Event-Handling_python-26-2048.jpg)

![AWT Button Example with ActionListener
import java.awt.*;
import java.awt.event.*;
public class ButtonExample {
public static void main(String[] args) {
Frame f=new Frame("Button Example");
TextField tf=new TextField();
tf.setBounds(50,50, 150,20);
Button b=new Button("Click Here");
b.setBounds(50,100,60,30);
b.addActionListener(new ActionListener(){
public void actionPerformed(ActionEvent e){
tf.setText("Welcome to Javatpoint.");
}
});
f.add(b);f.add(tf);
f.setSize(400,400); > javac ButtonExample.java
>java ButtonExample
f.setLayout(null);
f.setVisible(true);
}
}](https://image.slidesharecdn.com/unit5awtclassesf-250115060442-d43a9a26/75/Abstract-Window-Toolkit_Event-Handling_python-29-2048.jpg)

![add(tf1);add(tf2);add(tf3);add(b1);add(b2);
setSize(300,300);
setLayout(null);
setVisible(true);
}
public void actionPerformed(ActionEvent e) {
String s1=tf1.getText(); s1=“10” =10
String s2=tf2.getText(); s2=“5” =5
int a=Integer.parseInt(s1);
int b=Integer.parseInt(s2);
int c=0;
if(e.getSource()==b1){
c=a+b;
}else if(e.getSource()==b2){
c=a-b;
}
String result=String.valueOf(c);
tf3.setText(result);
}
public static void main(String[] args) {
new TextFieldExample();
}
}](https://image.slidesharecdn.com/unit5awtclassesf-250115060442-d43a9a26/75/Abstract-Window-Toolkit_Event-Handling_python-31-2048.jpg)

![public void actionPerformed(ActionEvent e){
String text=area.getText();
String words[]=text.split("s");
l1.setText("Words: "+words.length);
l2.setText("Characters: "+text.length());
}
public static void main(String[] args) {
new TextAreaExample();
}
}](https://image.slidesharecdn.com/unit5awtclassesf-250115060442-d43a9a26/75/Abstract-Window-Toolkit_Event-Handling_python-33-2048.jpg)

![Choice Example with ActionListener
f.setSize(400,400);
f.setLayout(null);
f.setVisible(true);
b.addActionListener(new ActionListener()
{public void actionPerformed(ActionEvent e)
{
String data = "Programming language Selected: "+
c.getItem(c.getSelectedIndex());
label.setText(data);
}
});
}
public static void main(String args[])
{
new ChoiceExample();
}
}](https://image.slidesharecdn.com/unit5awtclassesf-250115060442-d43a9a26/75/Abstract-Window-Toolkit_Event-Handling_python-35-2048.jpg)

![Java AWT List Example with ActionListener
l2.add("CodeIgniter");
f.add(l1); f.add(l2); f.add(label); f.add(b);
f.setSize(450,450);
f.setLayout(null);
f.setVisible(true);
b.addActionListener(new ActionListener() {
public void actionPerformed(ActionEvent e) {
String data = "Programming language Selected: "+l1.getItem(l1.getSelectedIndex());
data += ", Framework Selected:";
for(String frame:l2.getSelectedItems()){
data += frame + " ";
}
label.setText(data);
}
});
}
public static void main(String args[])
{
new ListExample();
} }](https://image.slidesharecdn.com/unit5awtclassesf-250115060442-d43a9a26/75/Abstract-Window-Toolkit_Event-Handling_python-37-2048.jpg)
![Java AWT MenuItem and Menu
m.add(sm);
mb.add(m);
f.setMenuBar(mb);
f.setSize(400,400);
f.setLayout(null);
f.setVisible(true);
}
public static void main(String args[])
{
MenuExample me= new MenuExample();
}
}](https://image.slidesharecdn.com/unit5awtclassesf-250115060442-d43a9a26/75/Abstract-Window-Toolkit_Event-Handling_python-39-2048.jpg)

![Java AWT Dialog
d.add( new Label ("Click button to continue."));
d.add(b);
d.setSize(300,300);
d.setVisible(true);
}
public static void main(String args[])
{
new DialogExample();
}
}](https://image.slidesharecdn.com/unit5awtclassesf-250115060442-d43a9a26/75/Abstract-Window-Toolkit_Event-Handling_python-42-2048.jpg)