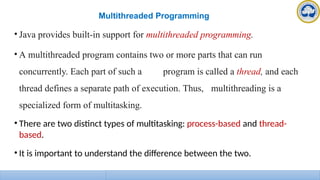
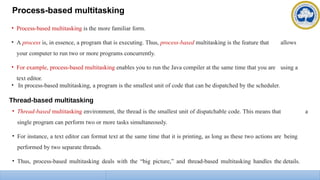
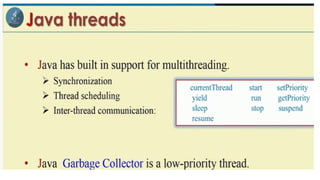
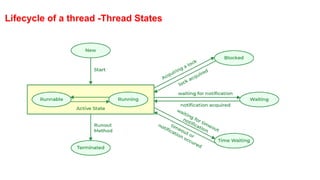
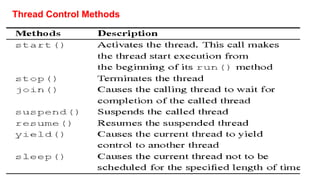
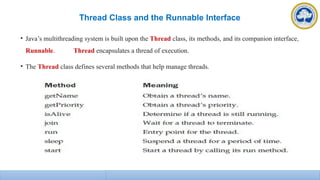
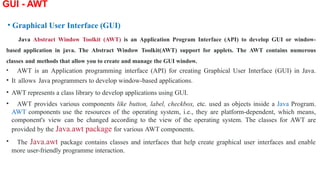
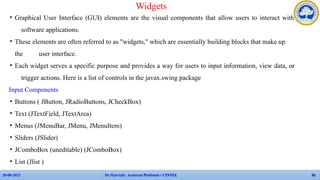
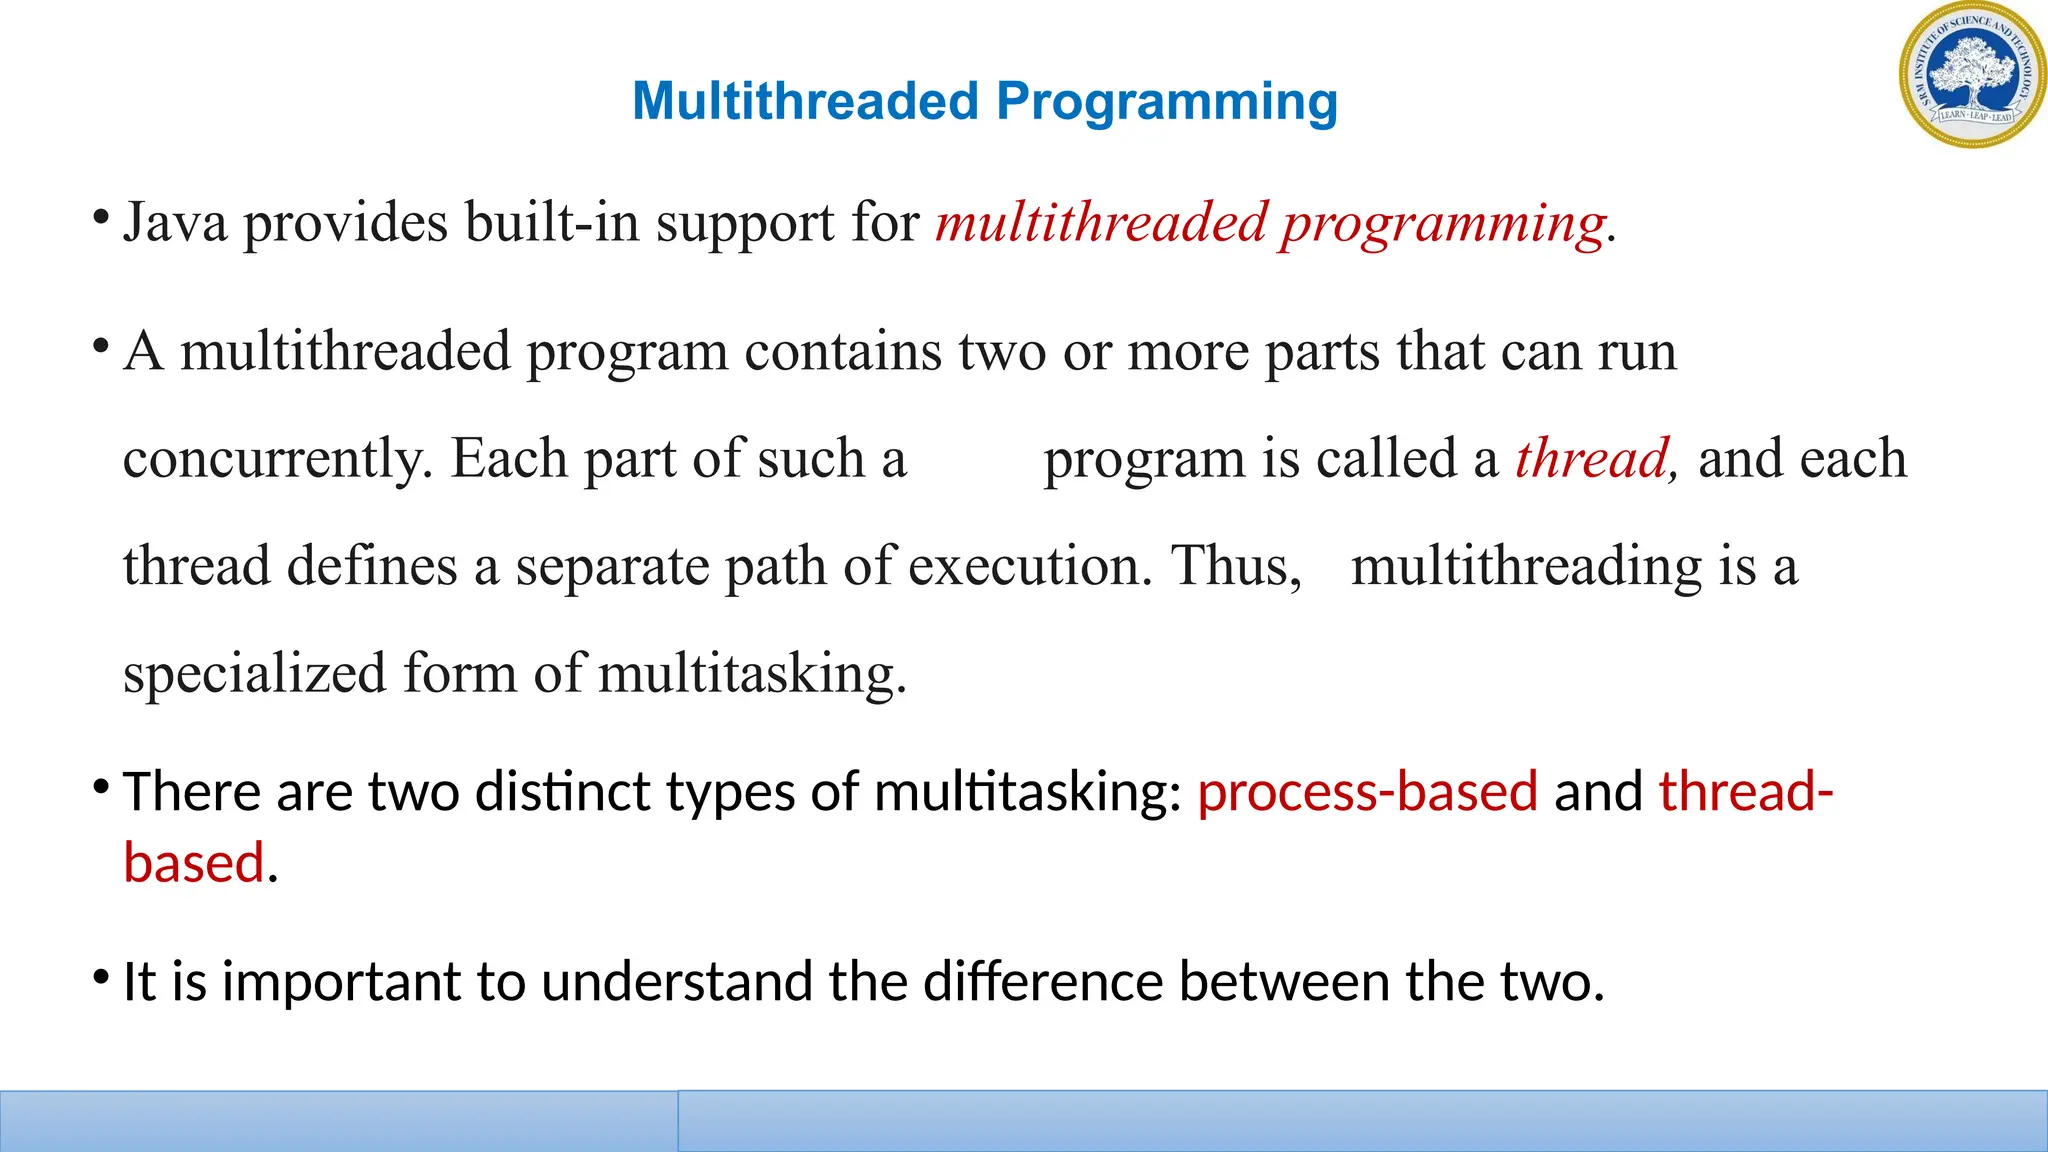
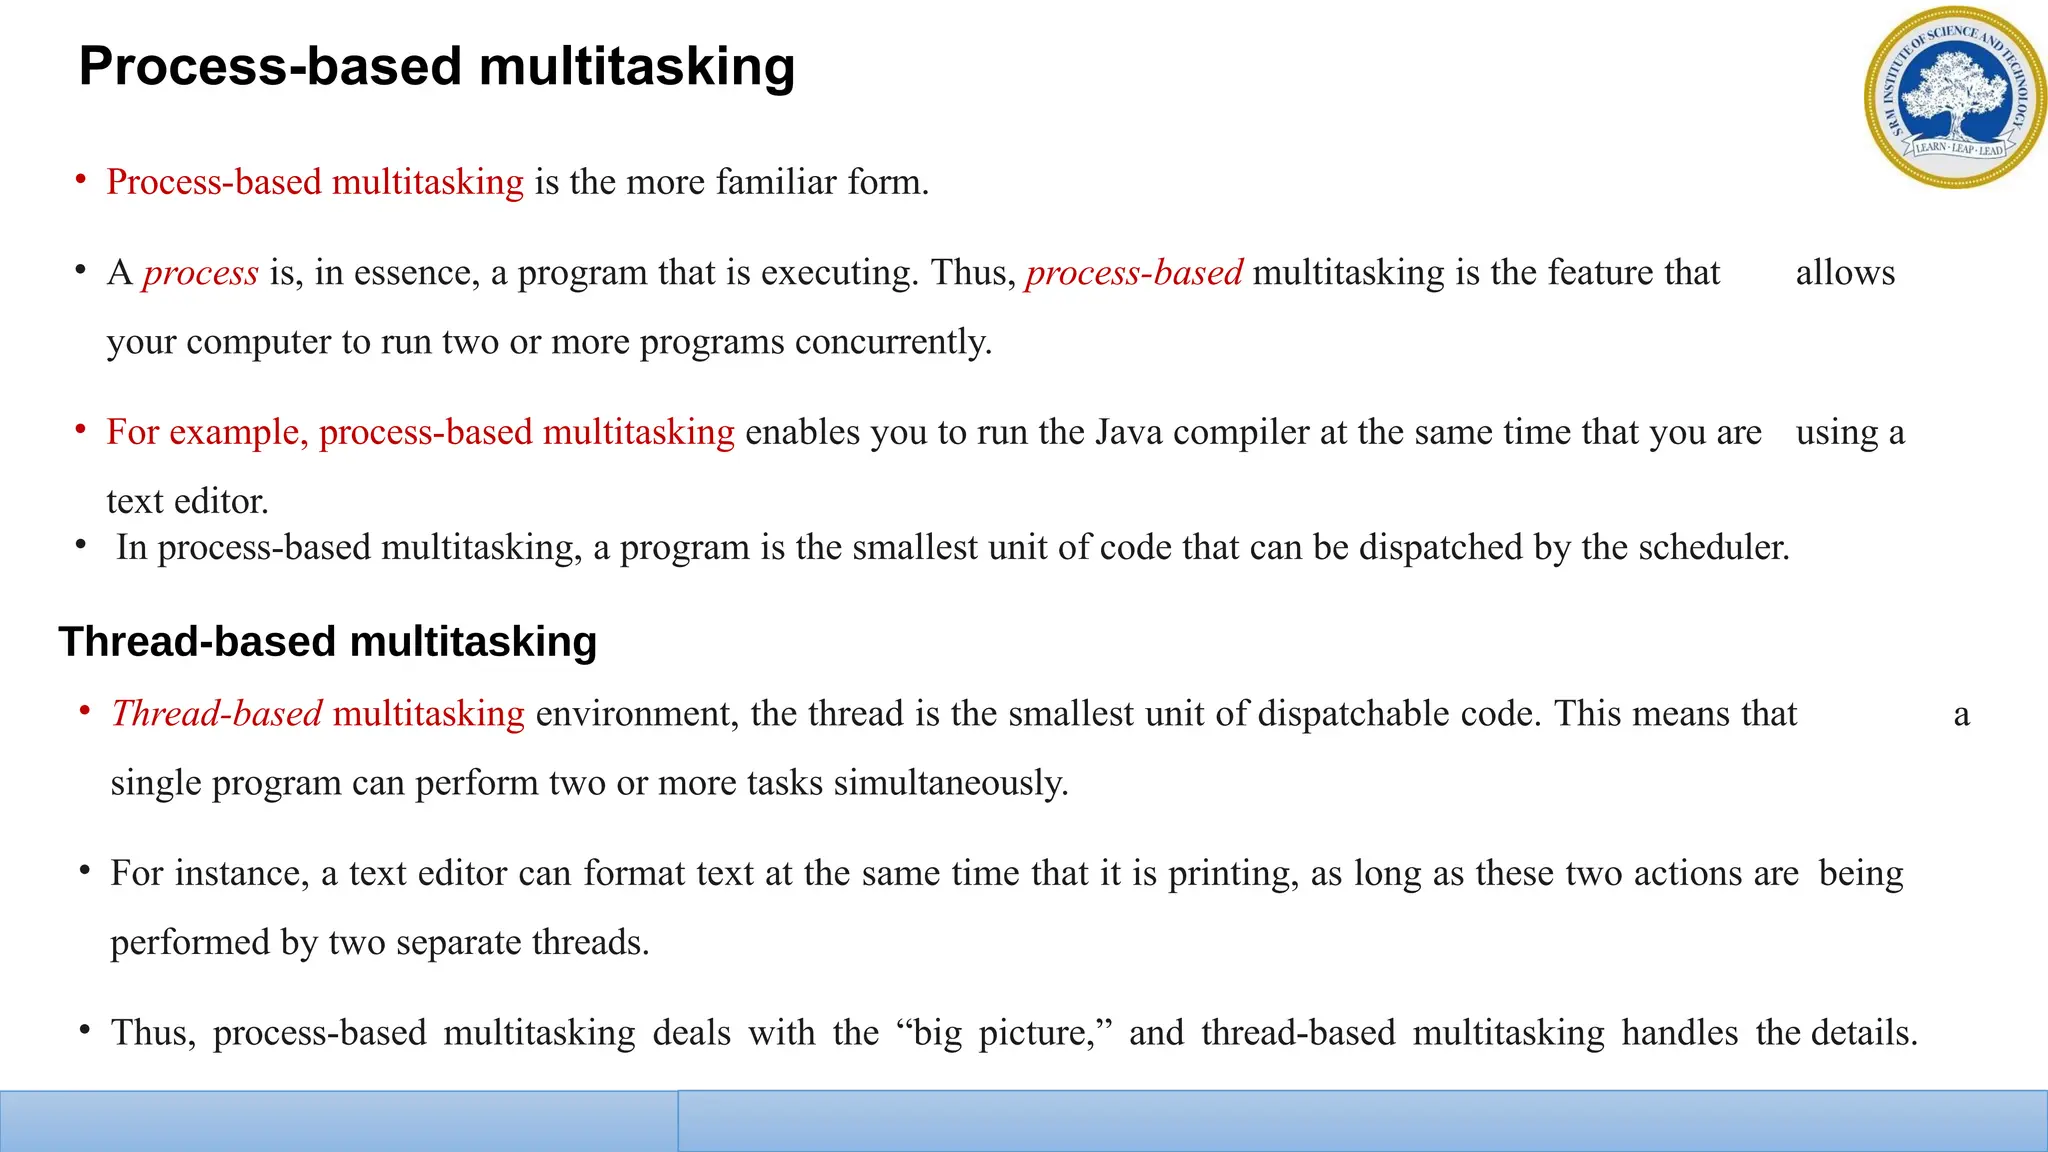
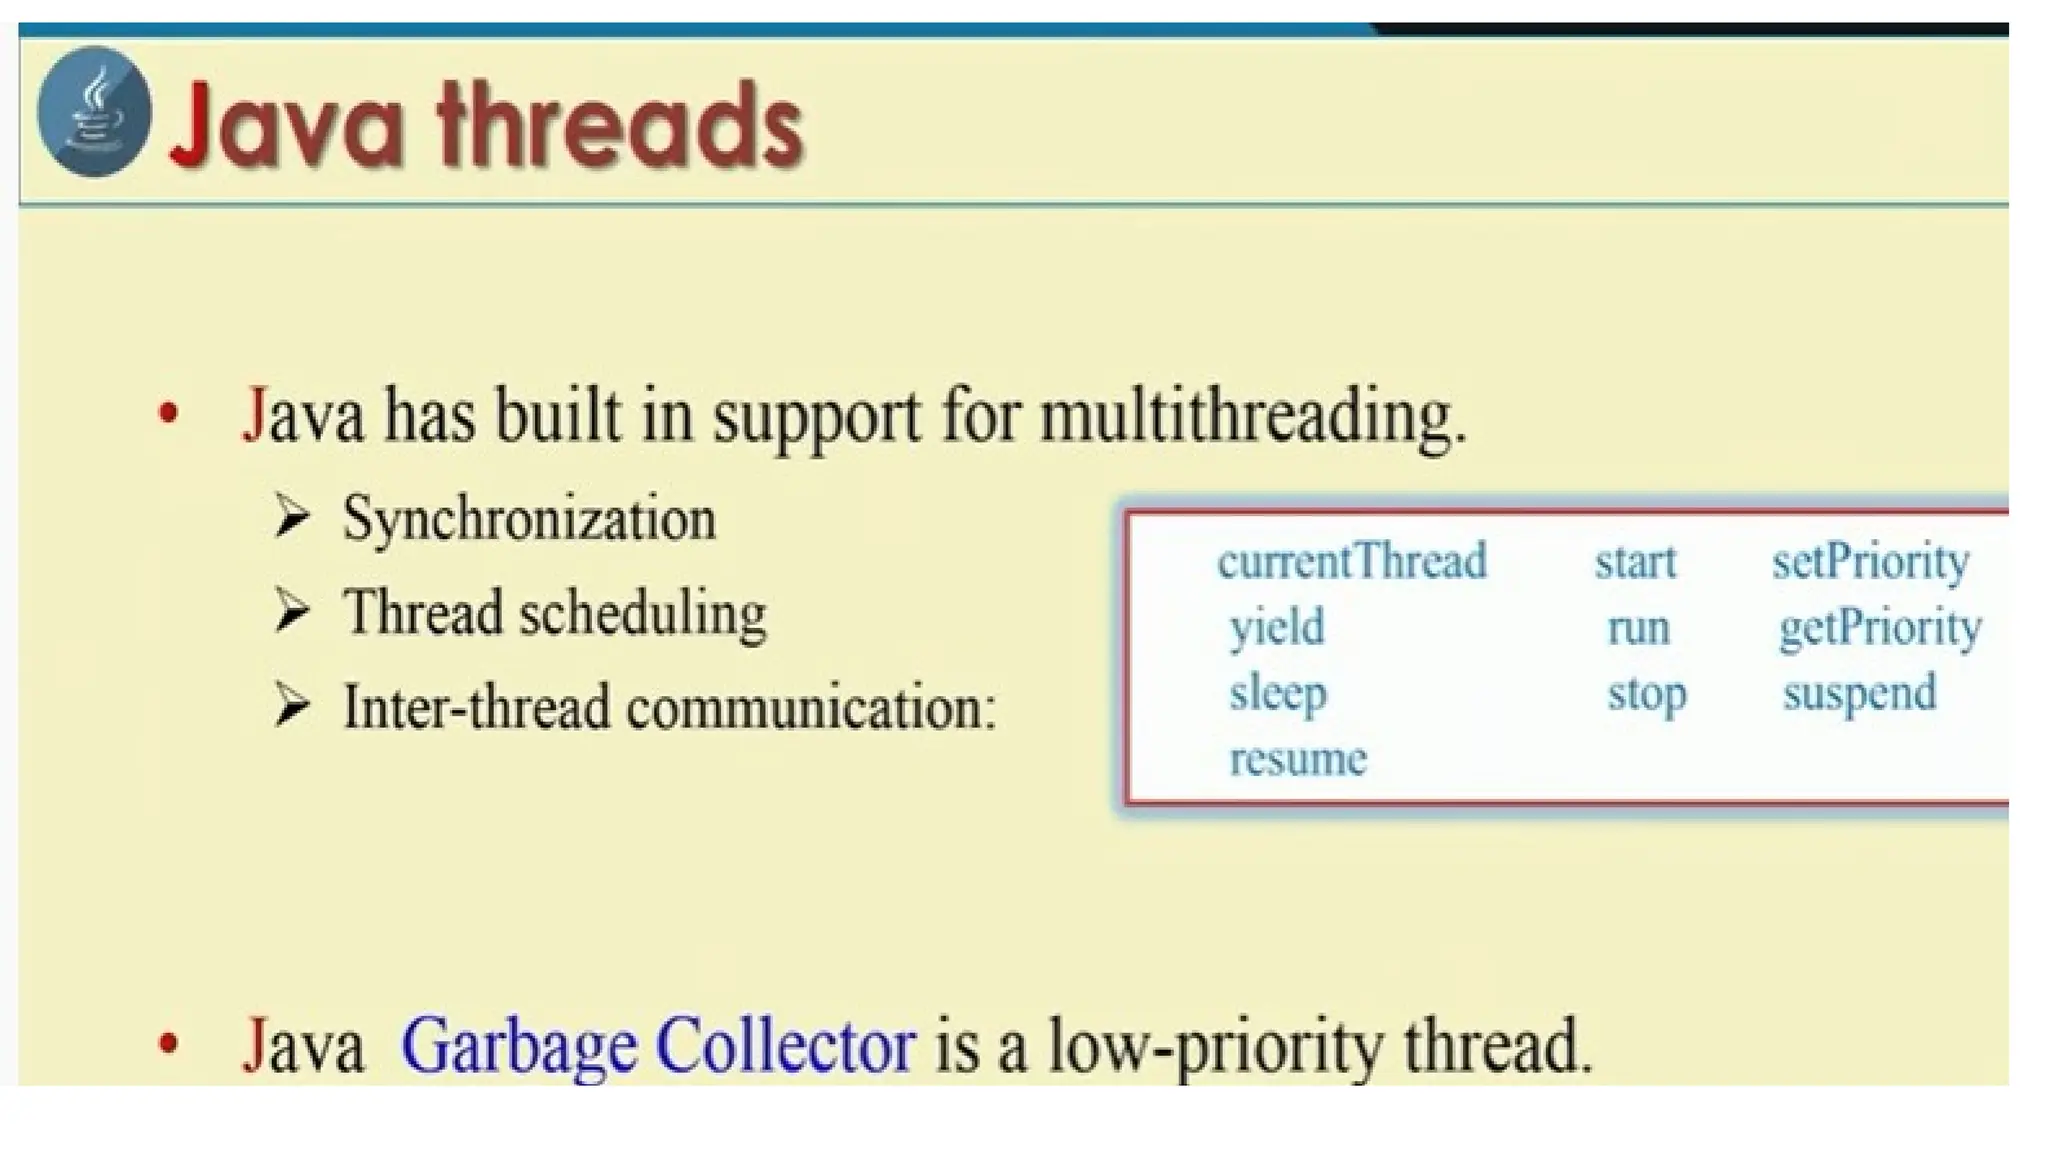
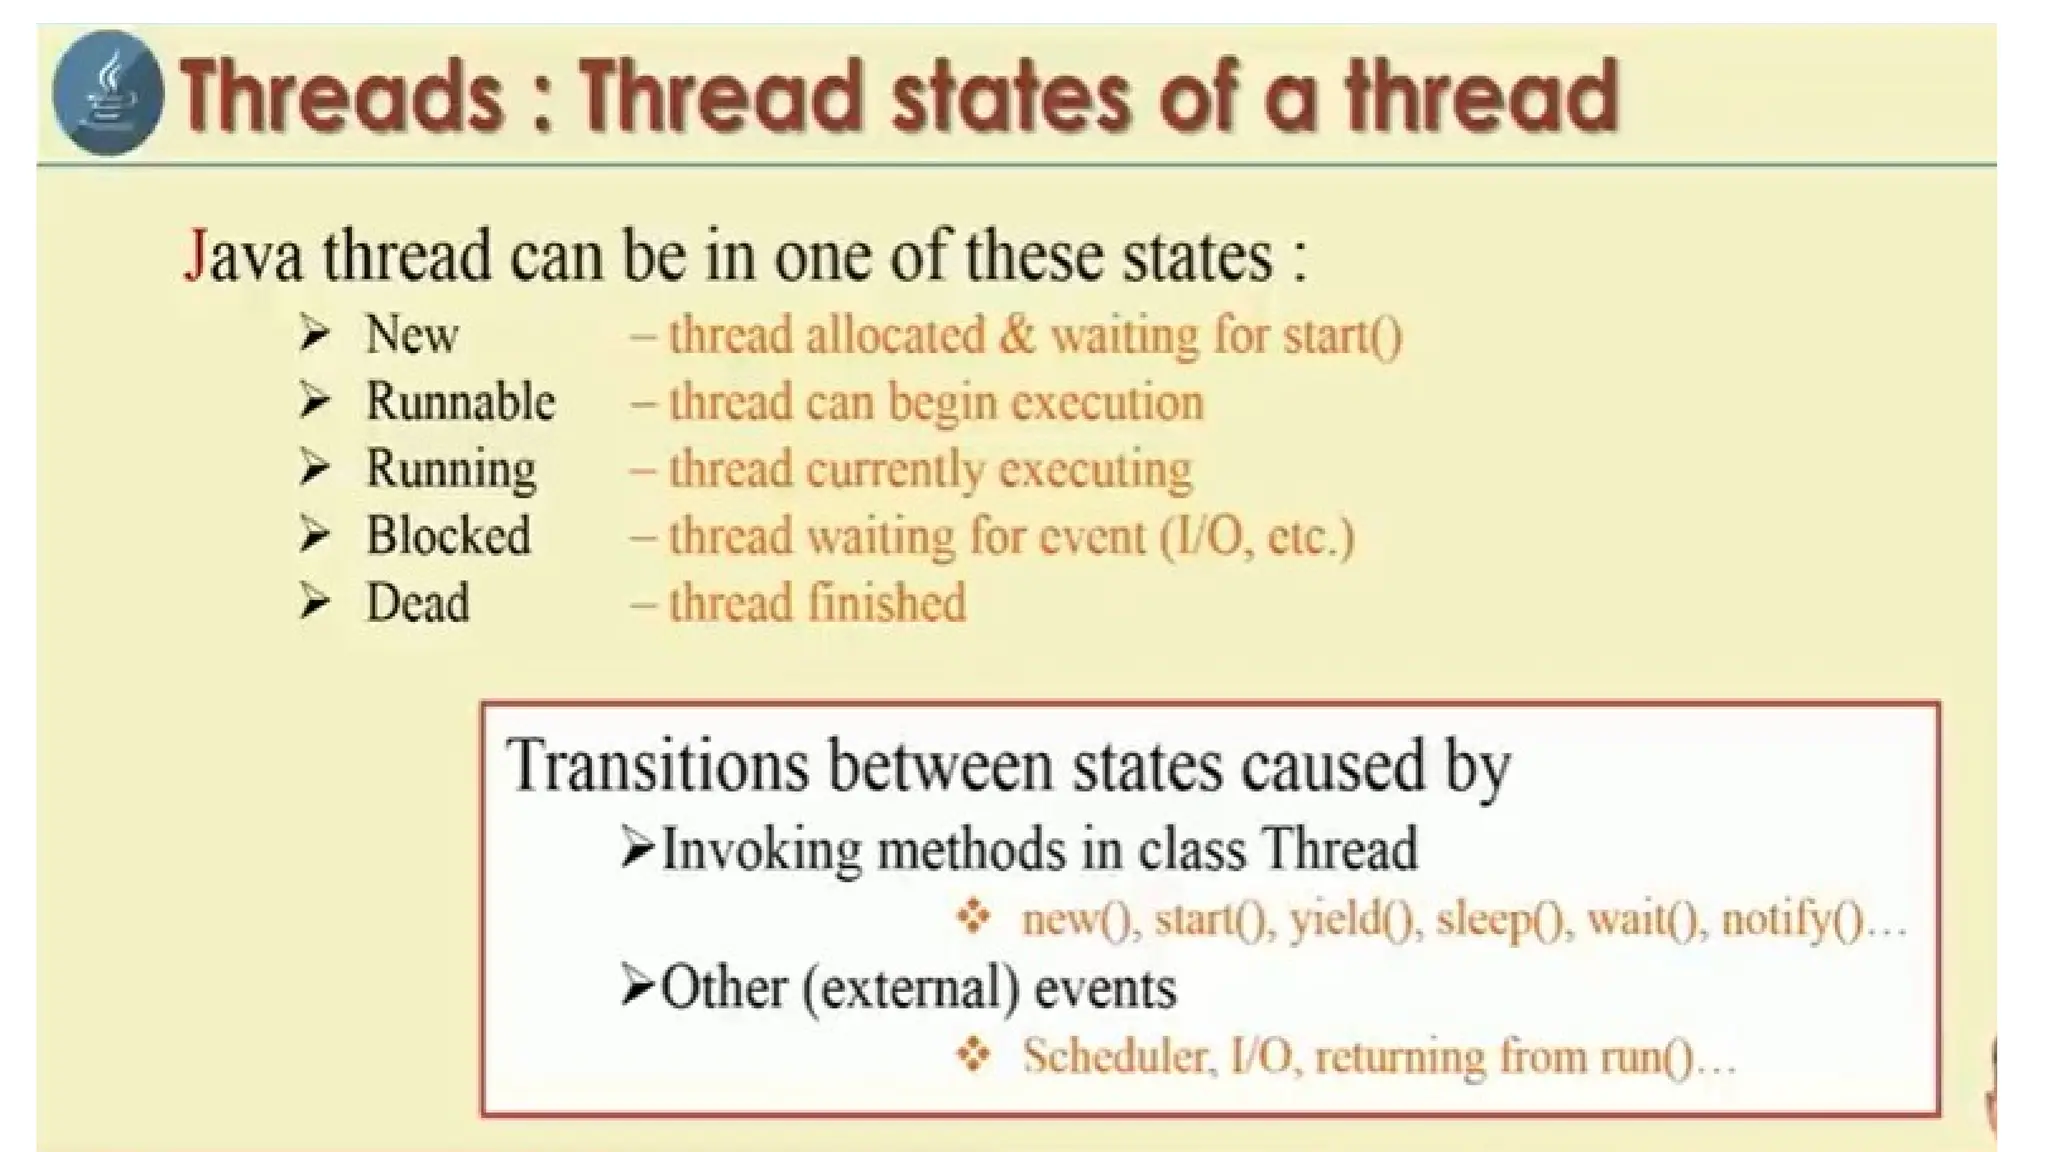
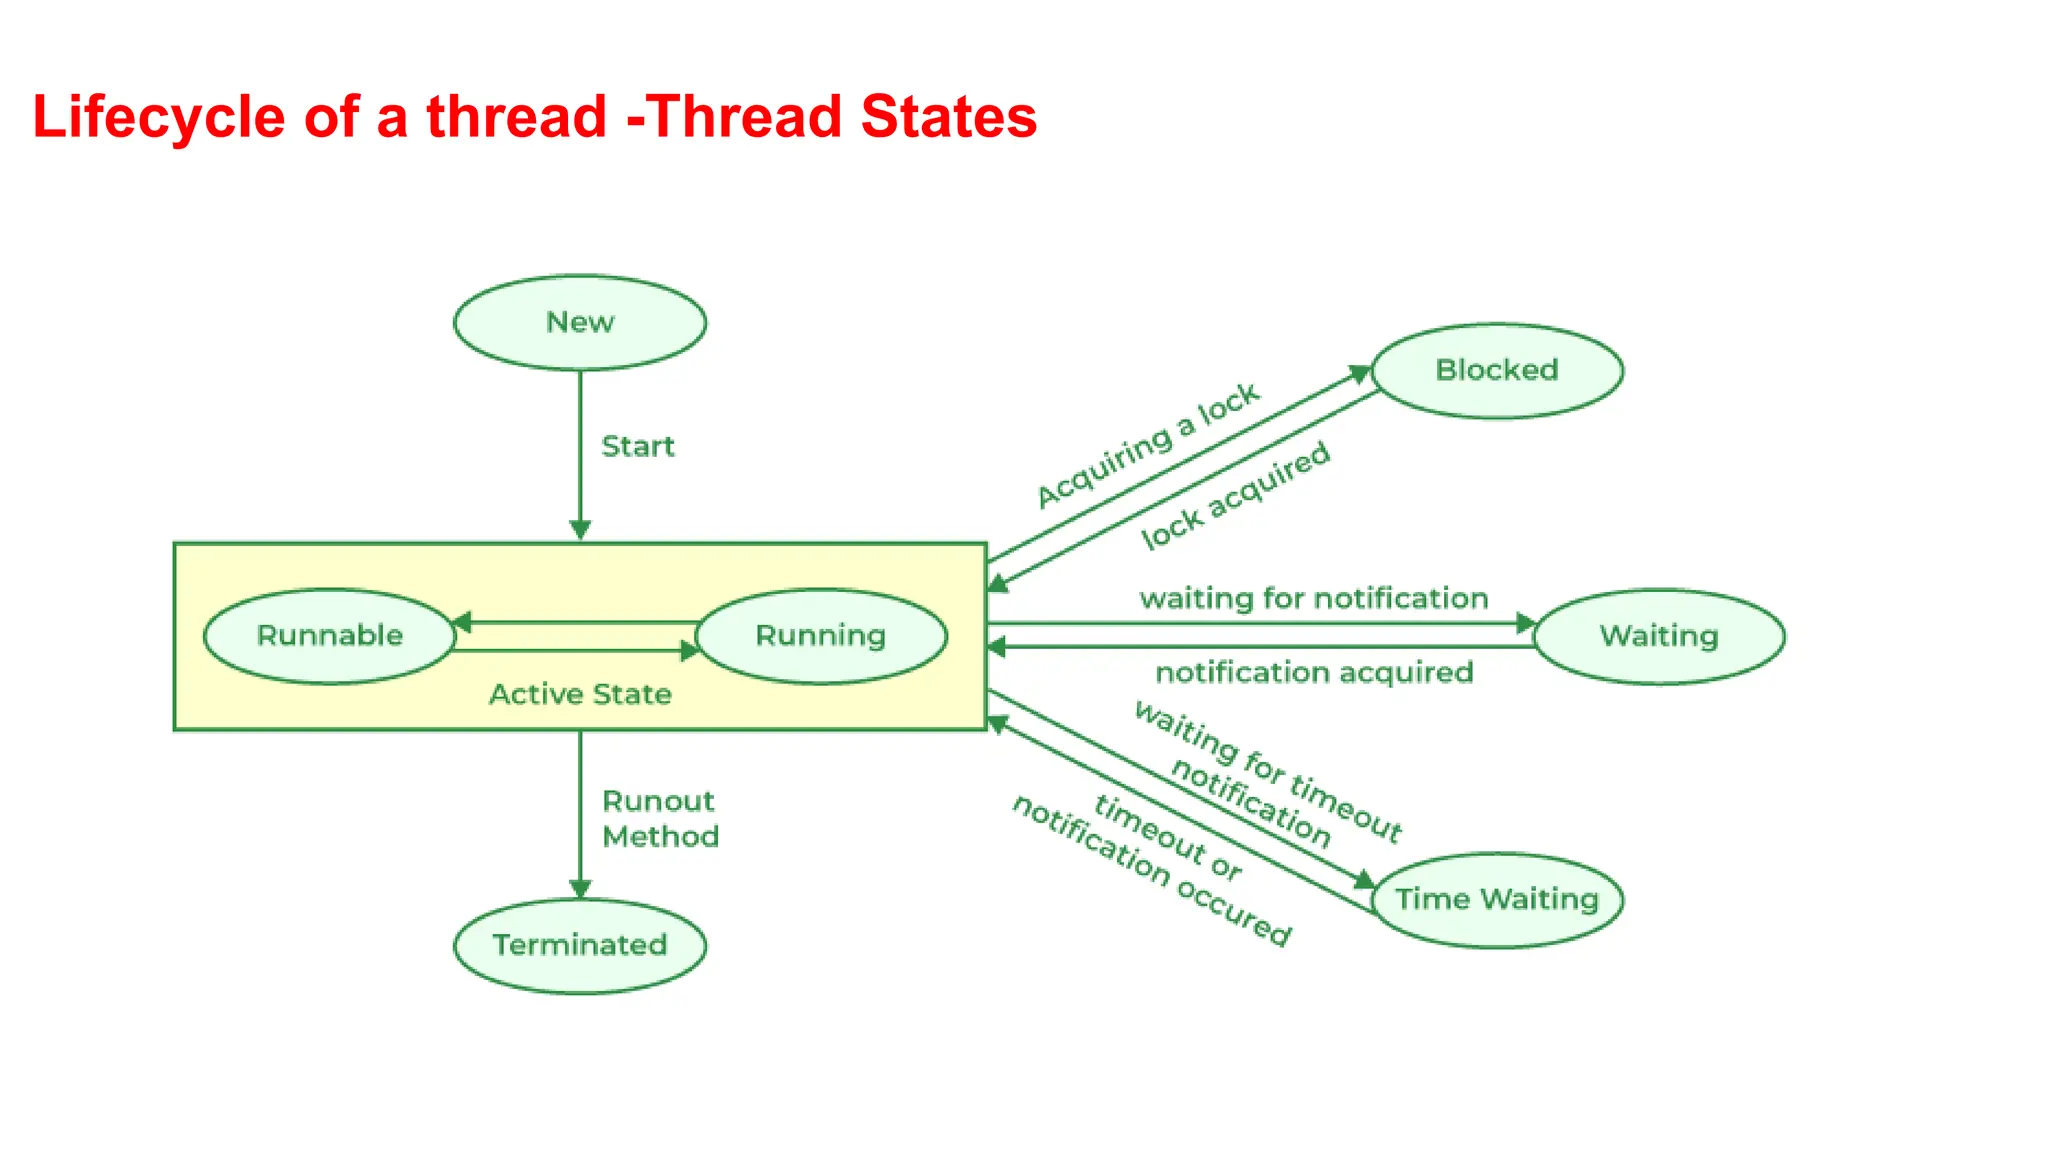
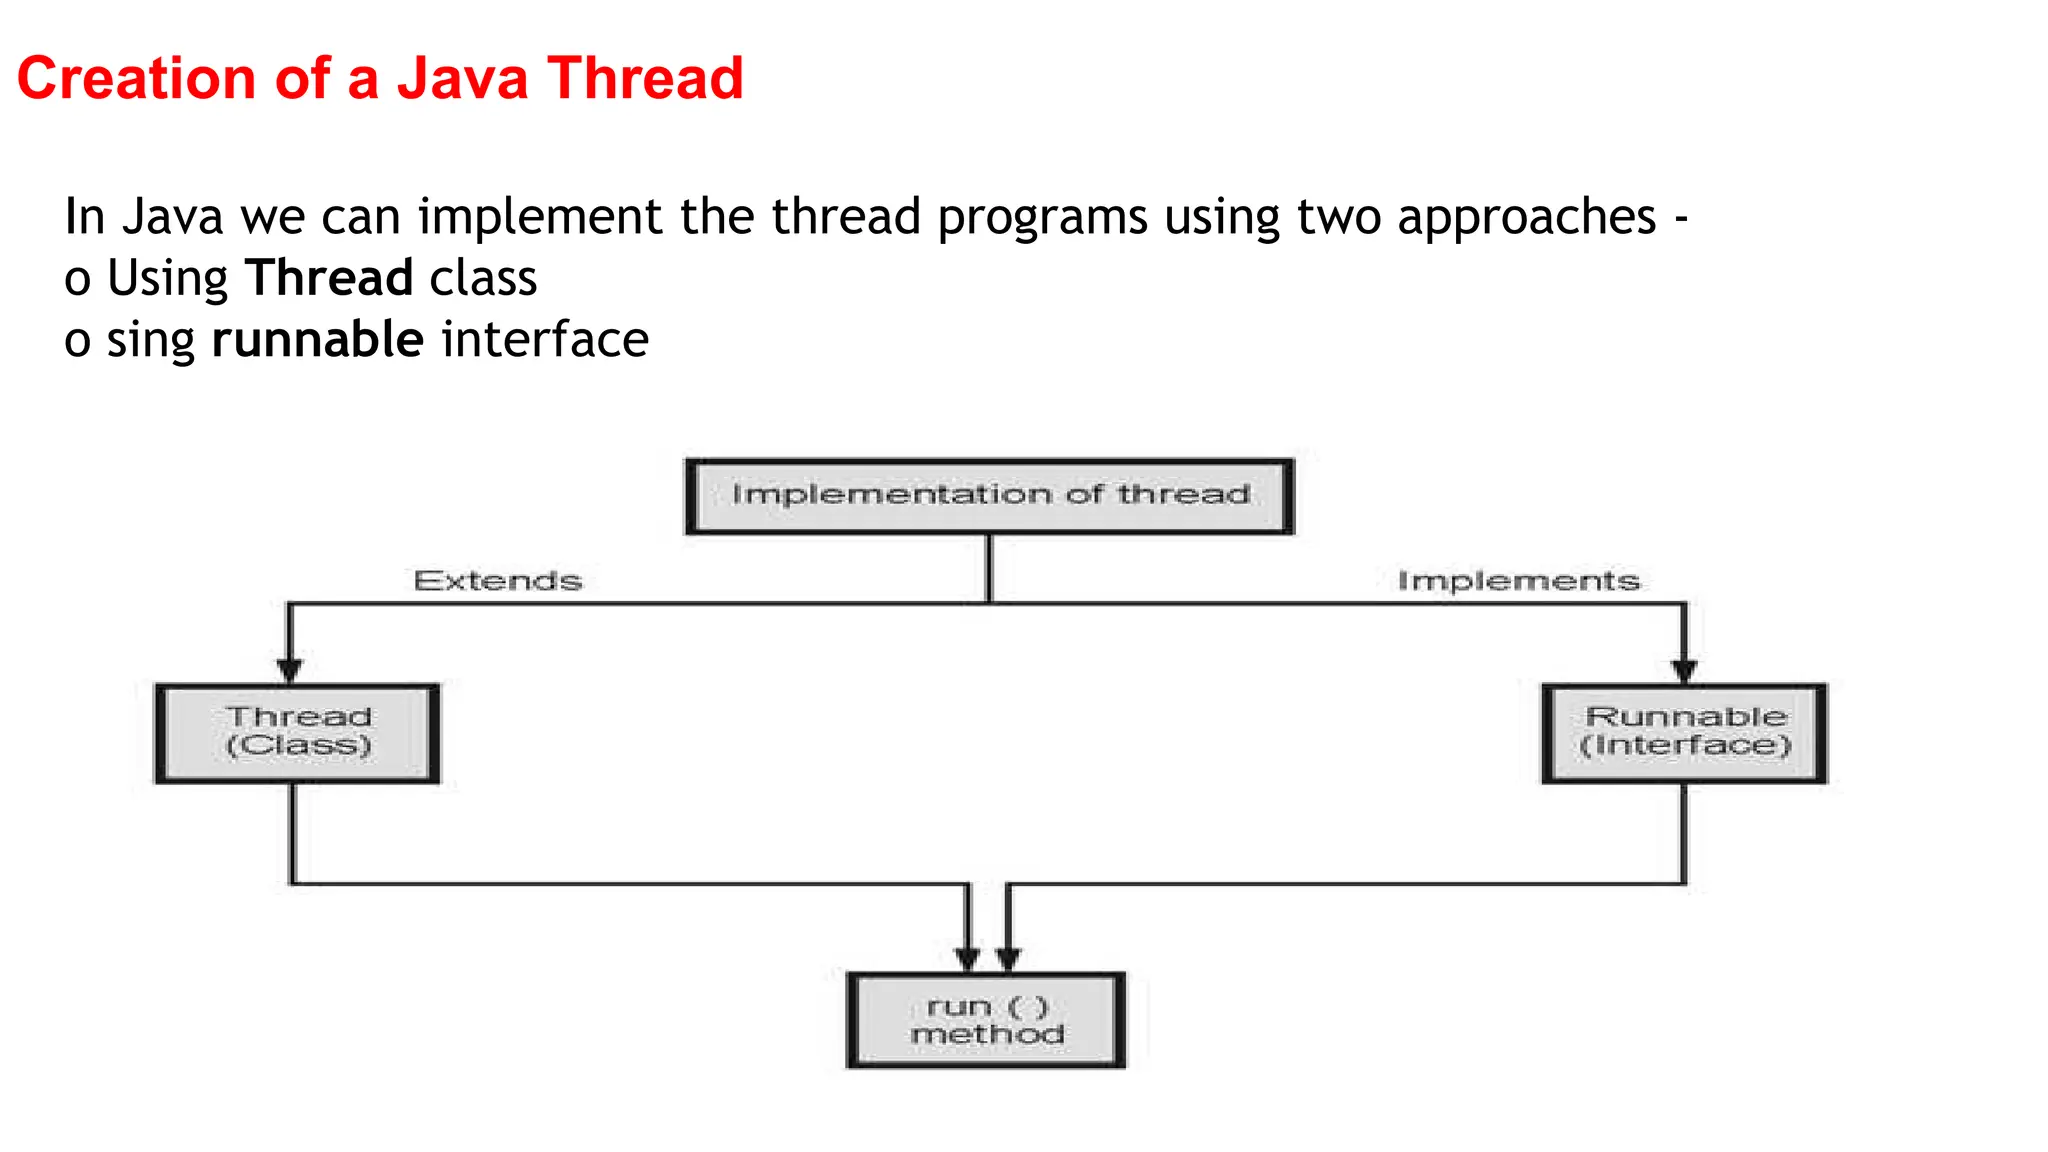
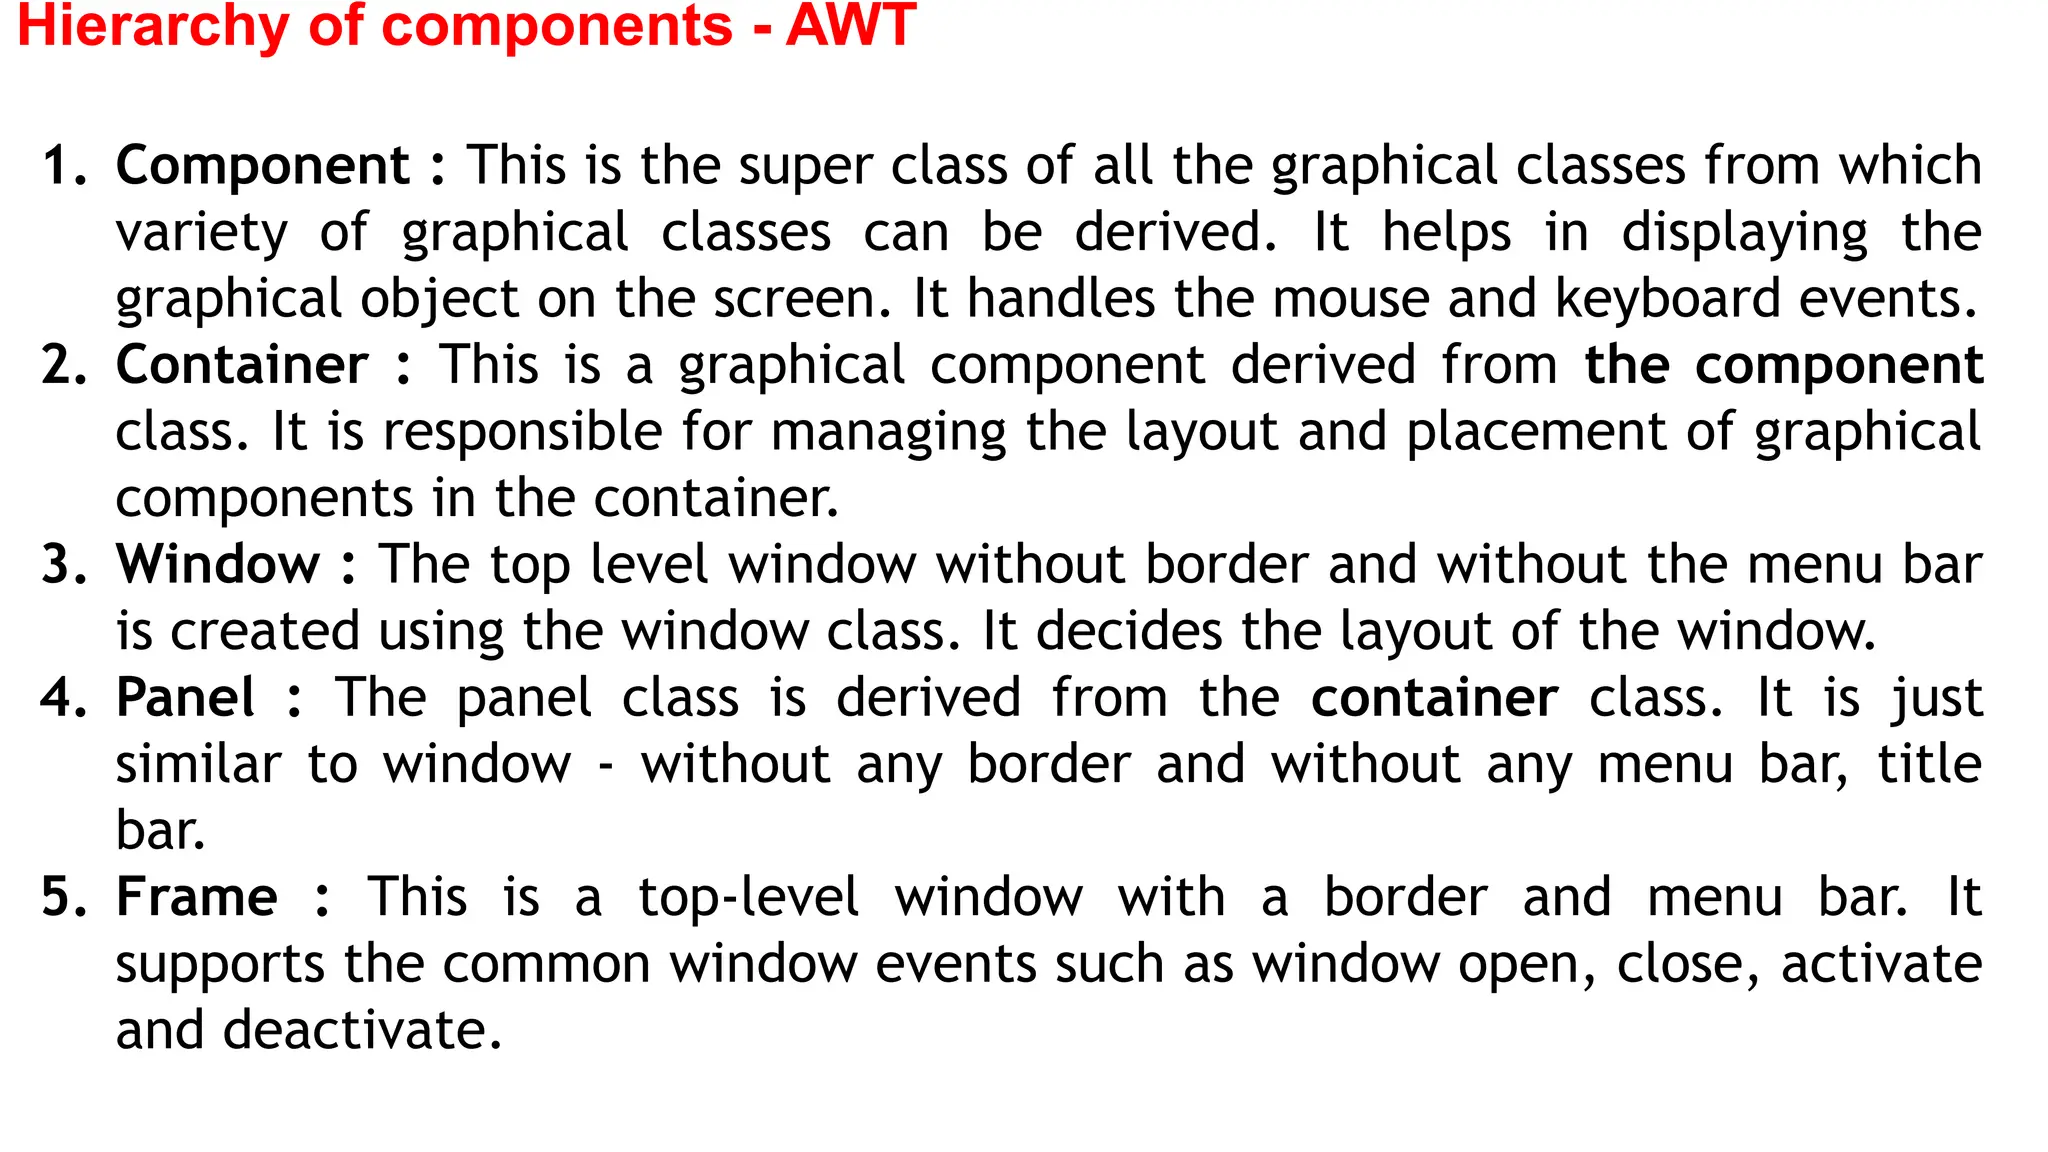
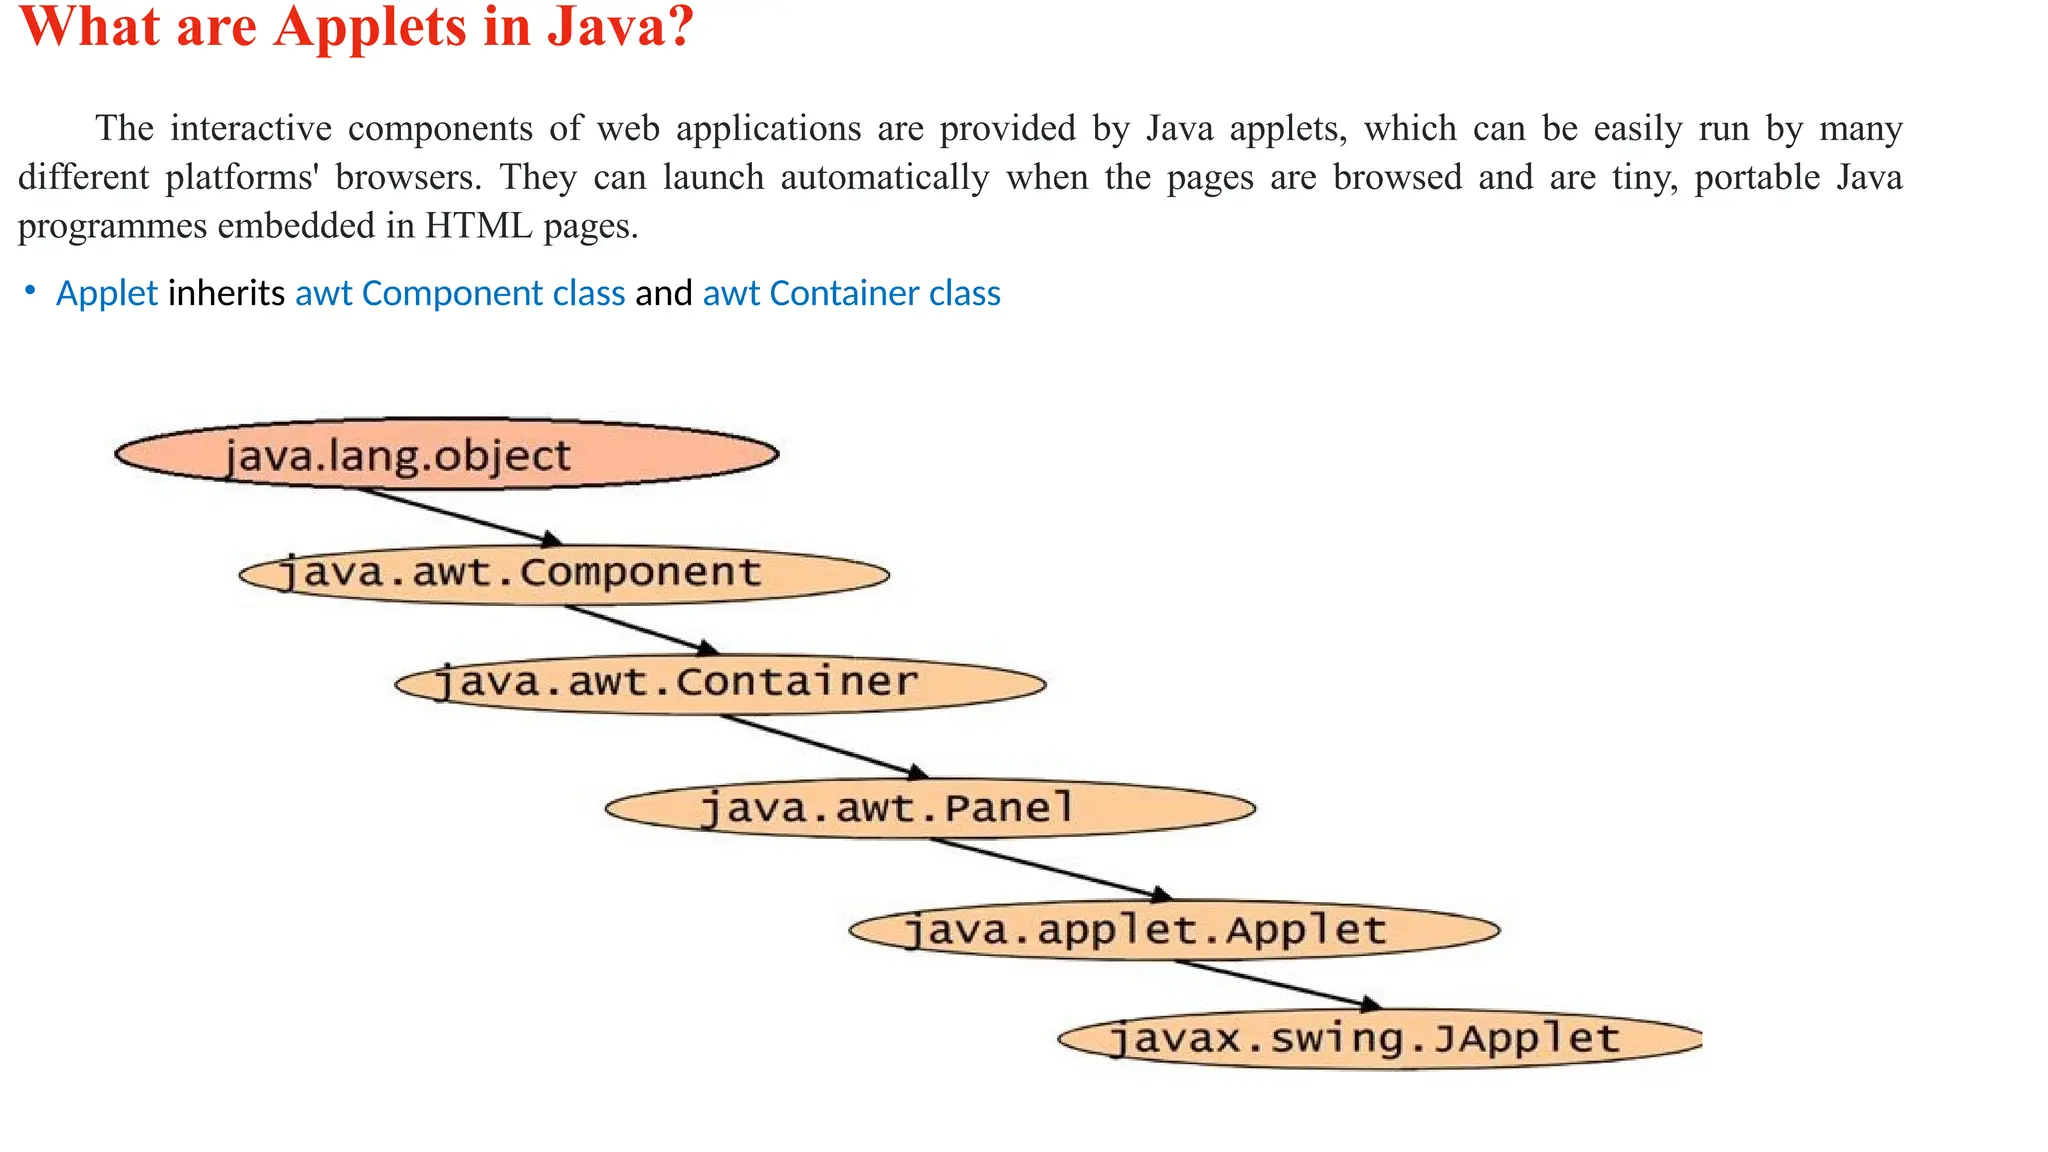
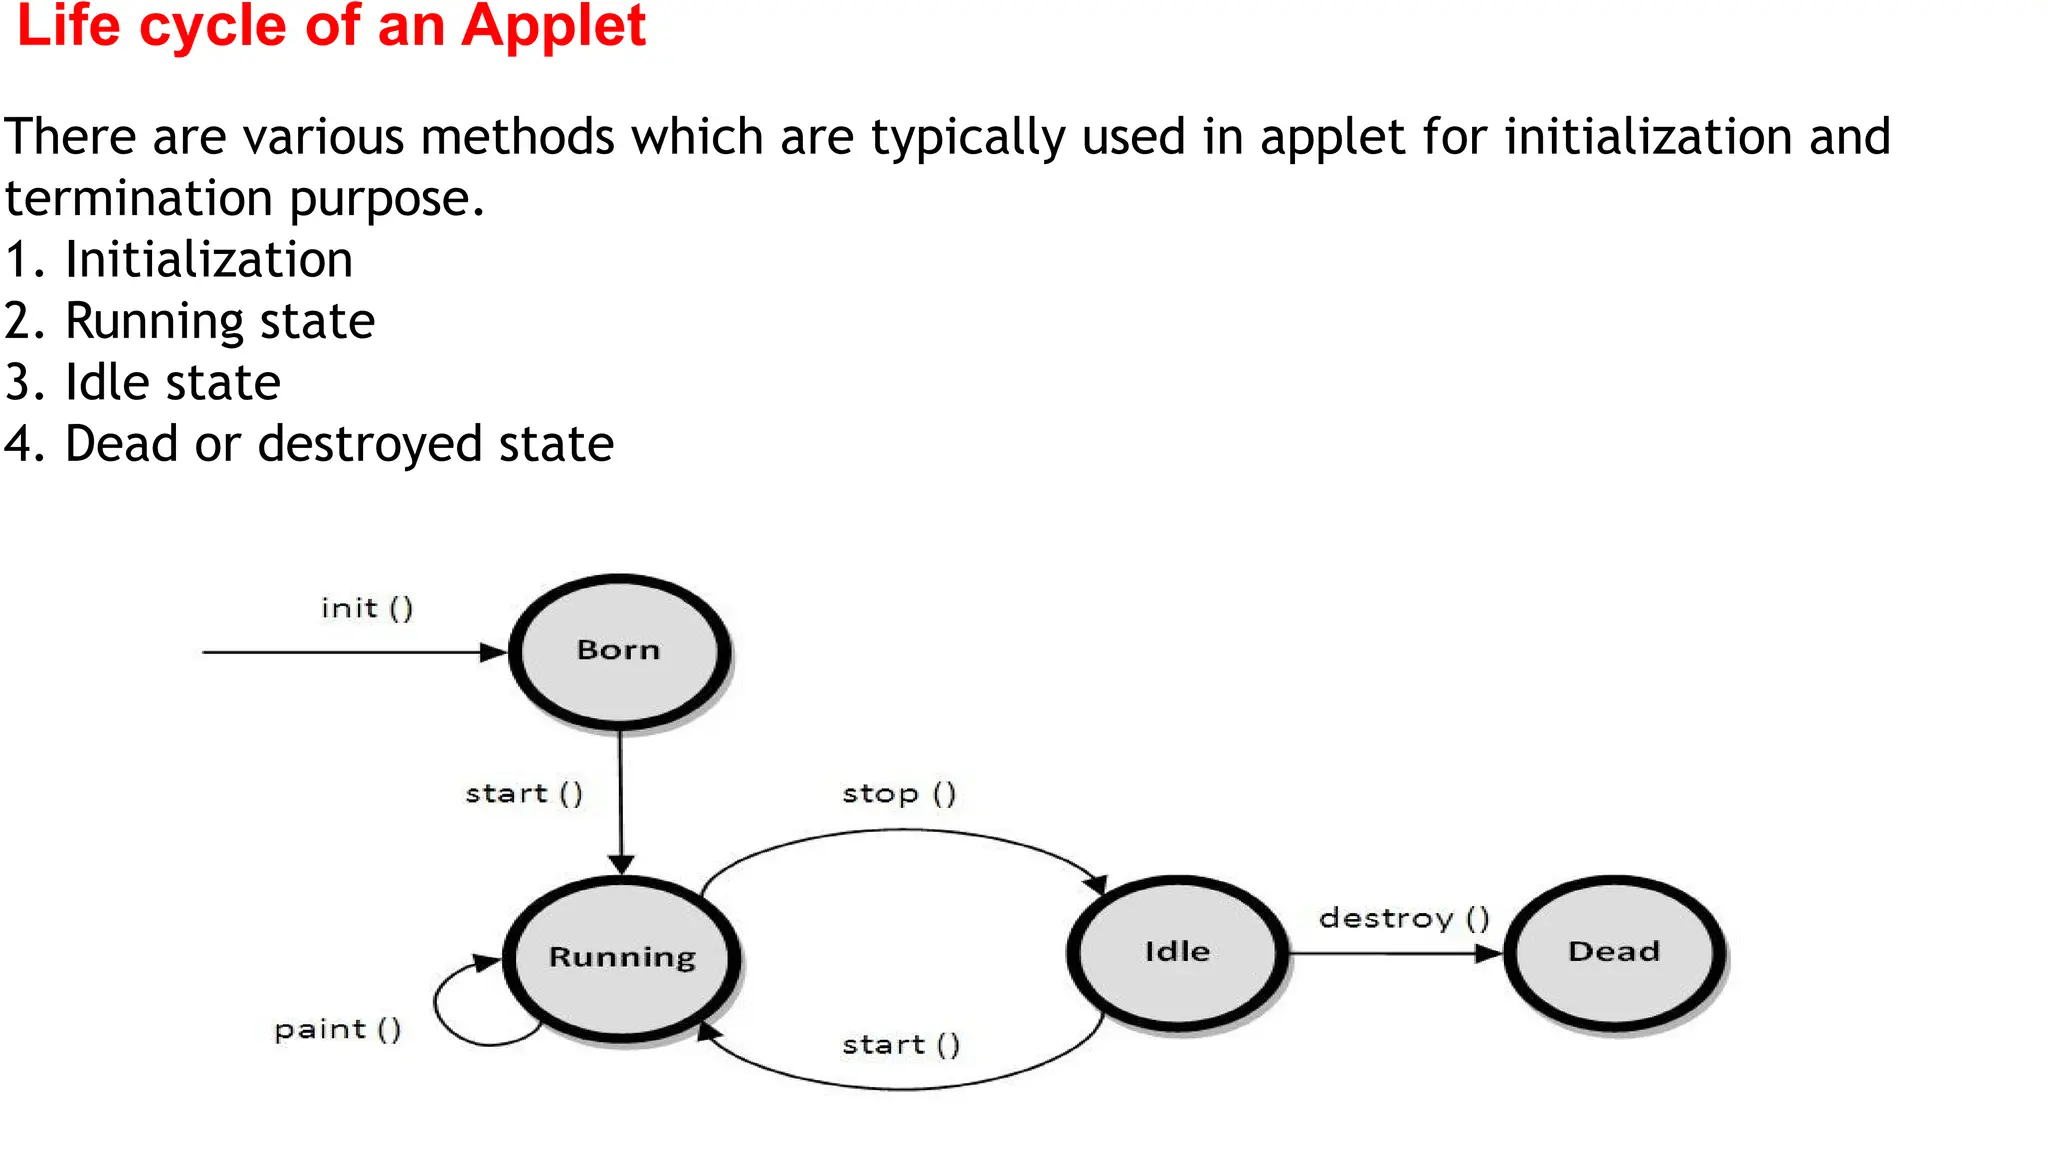
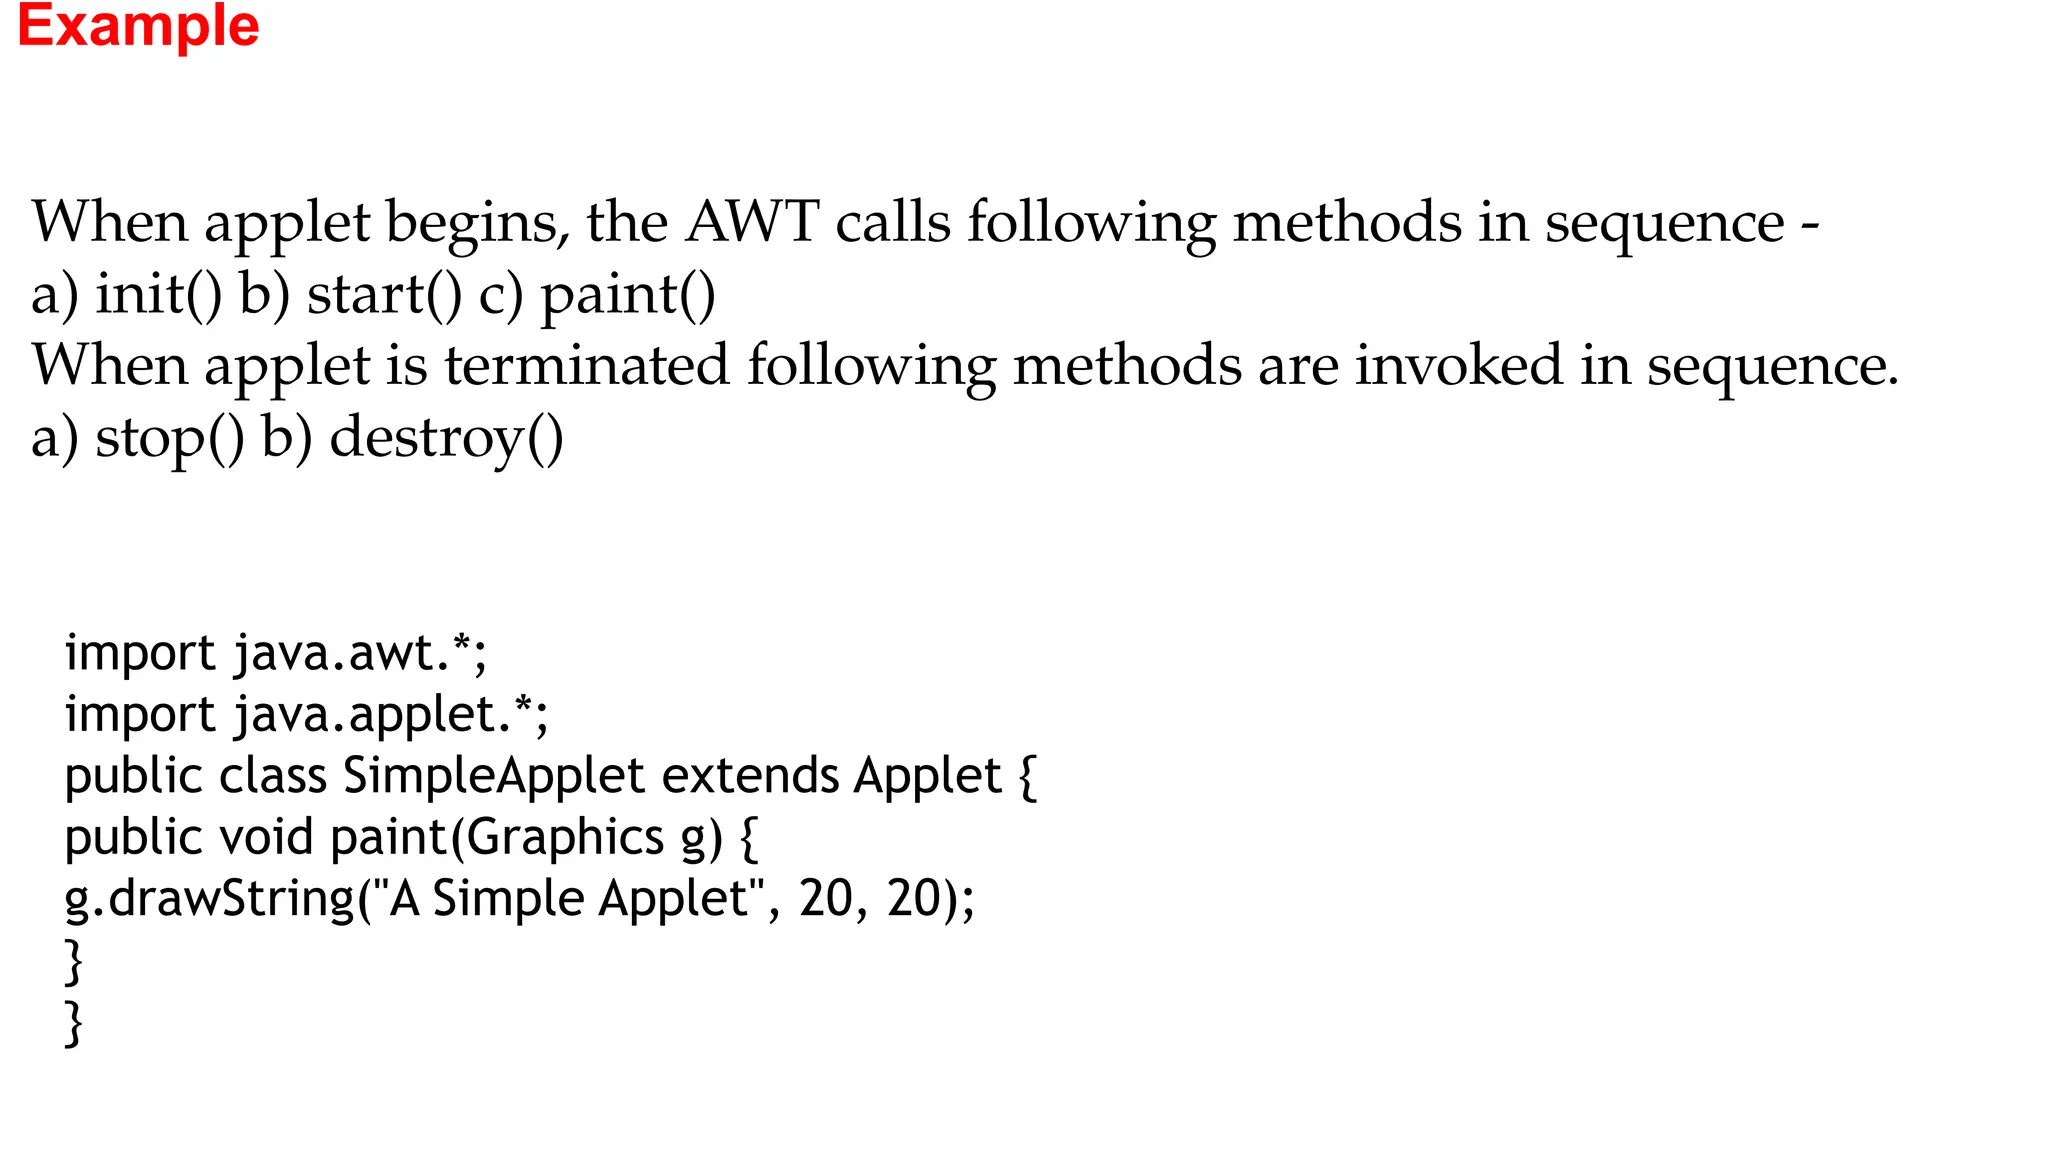
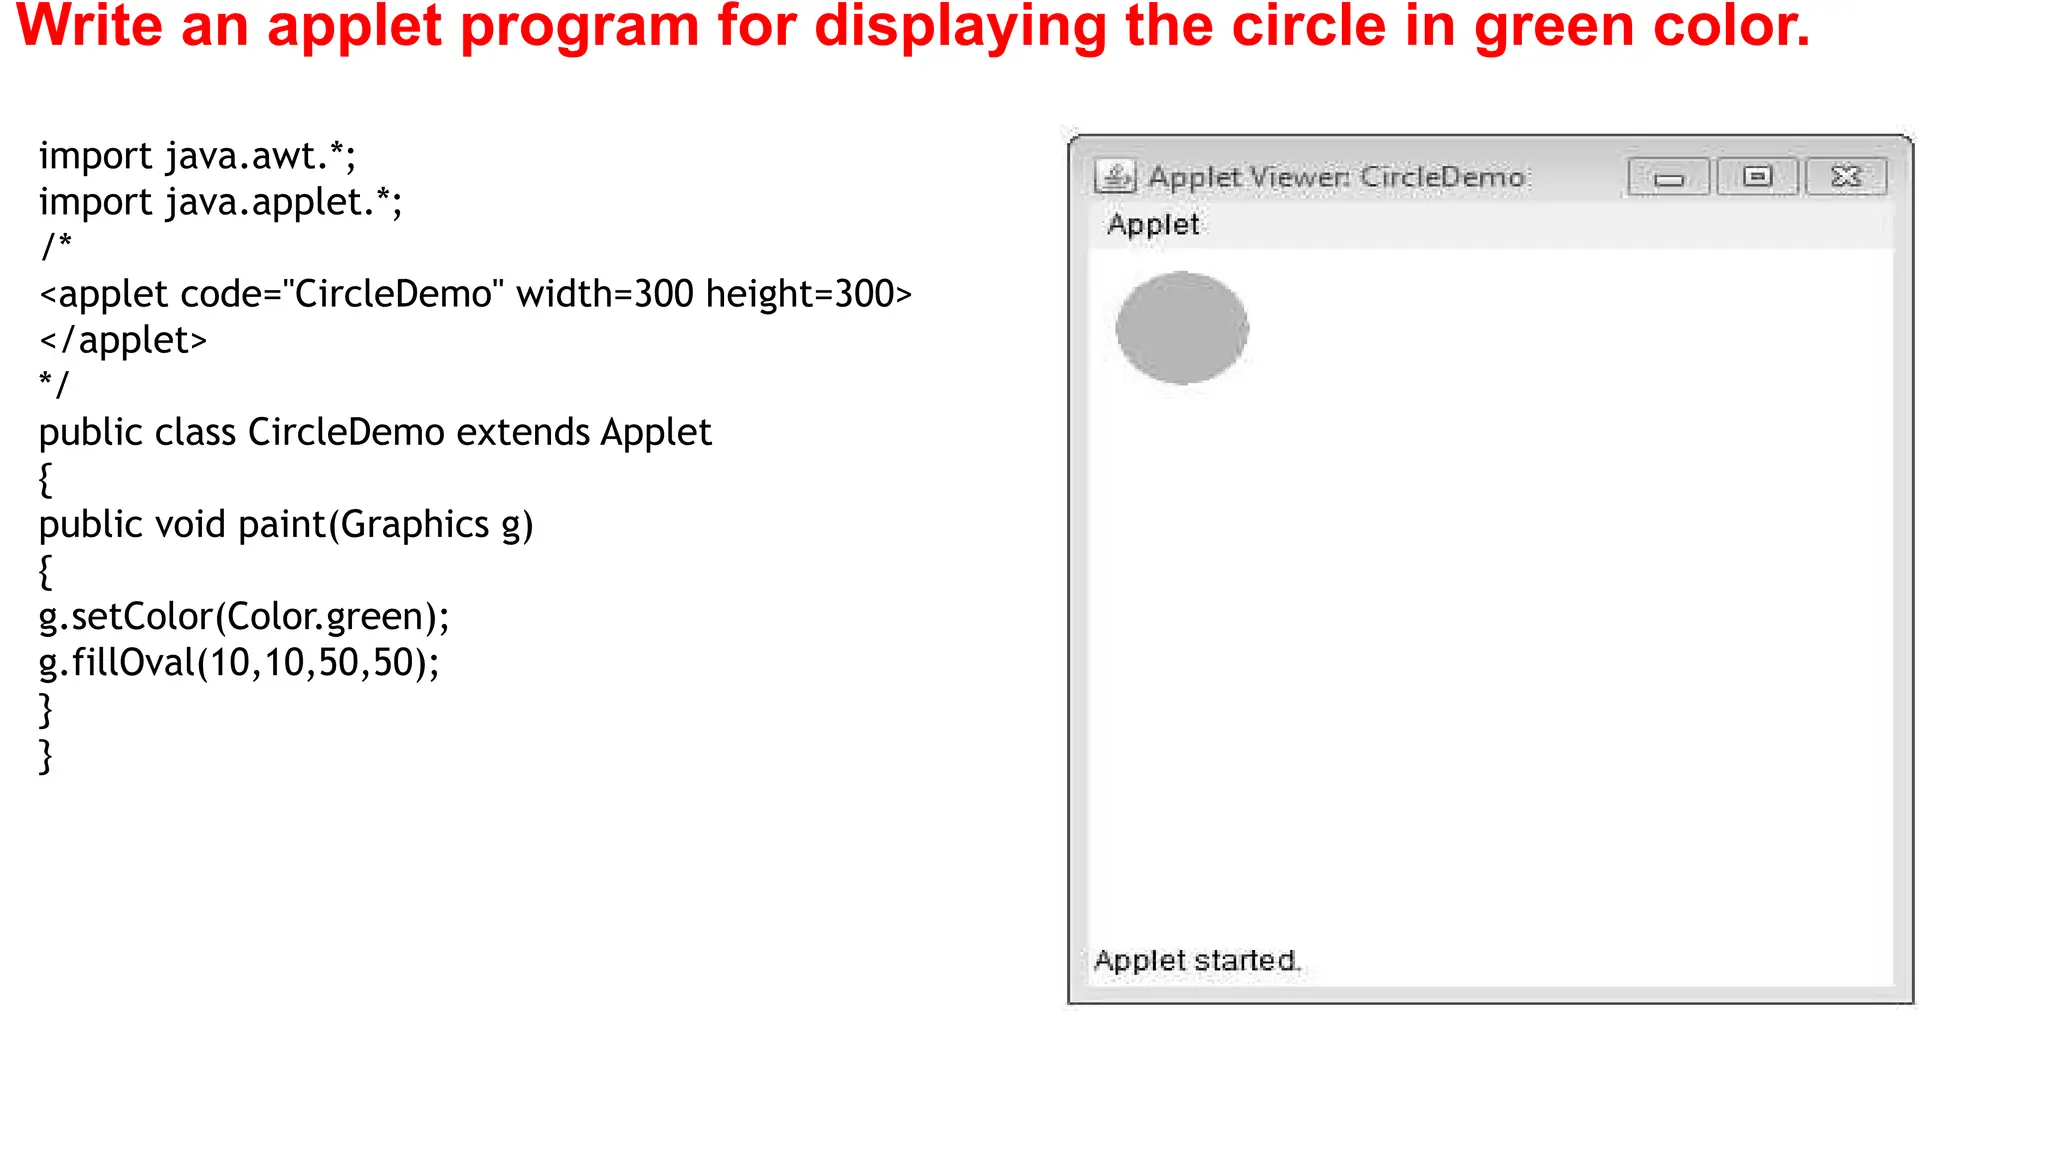
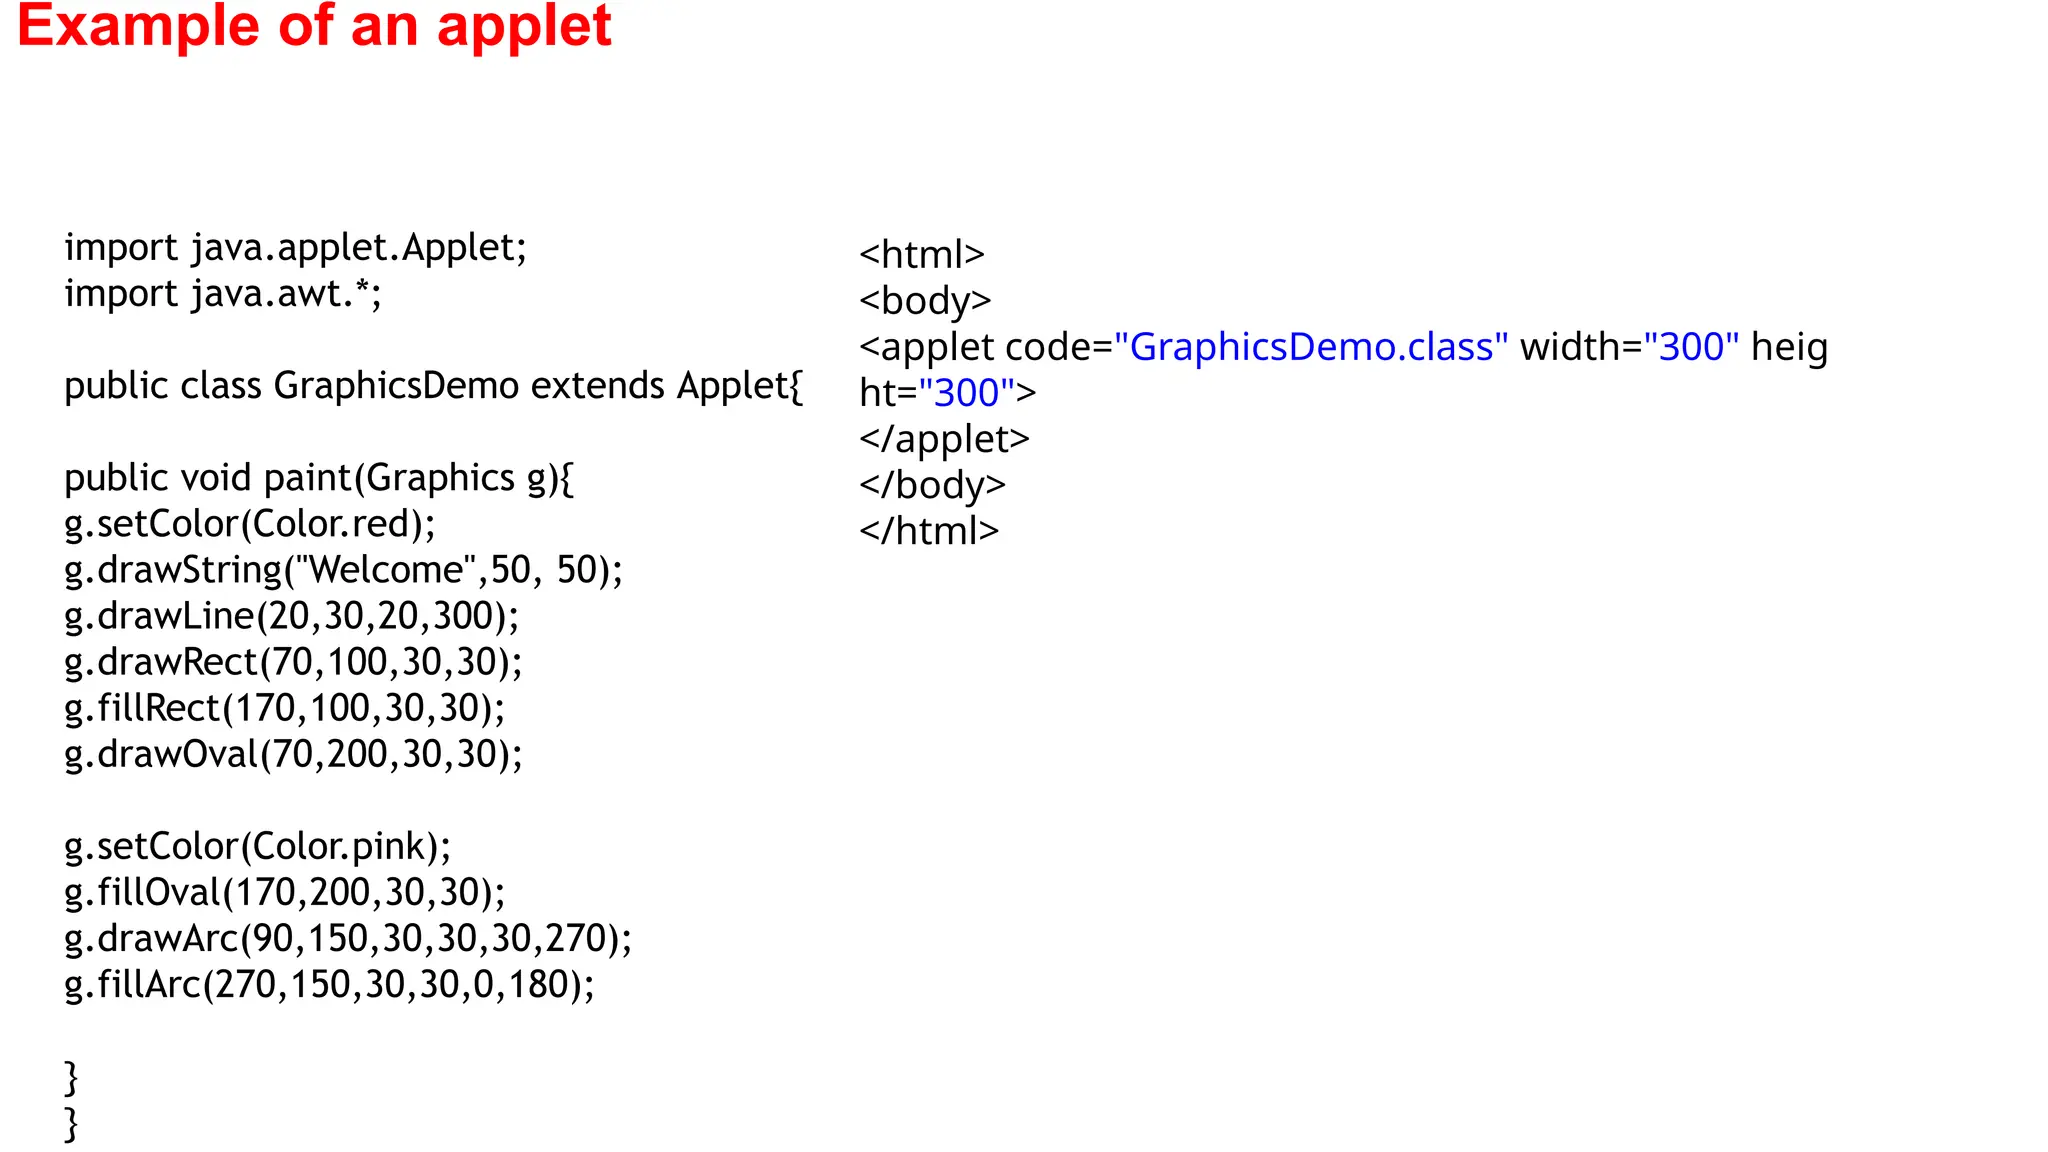
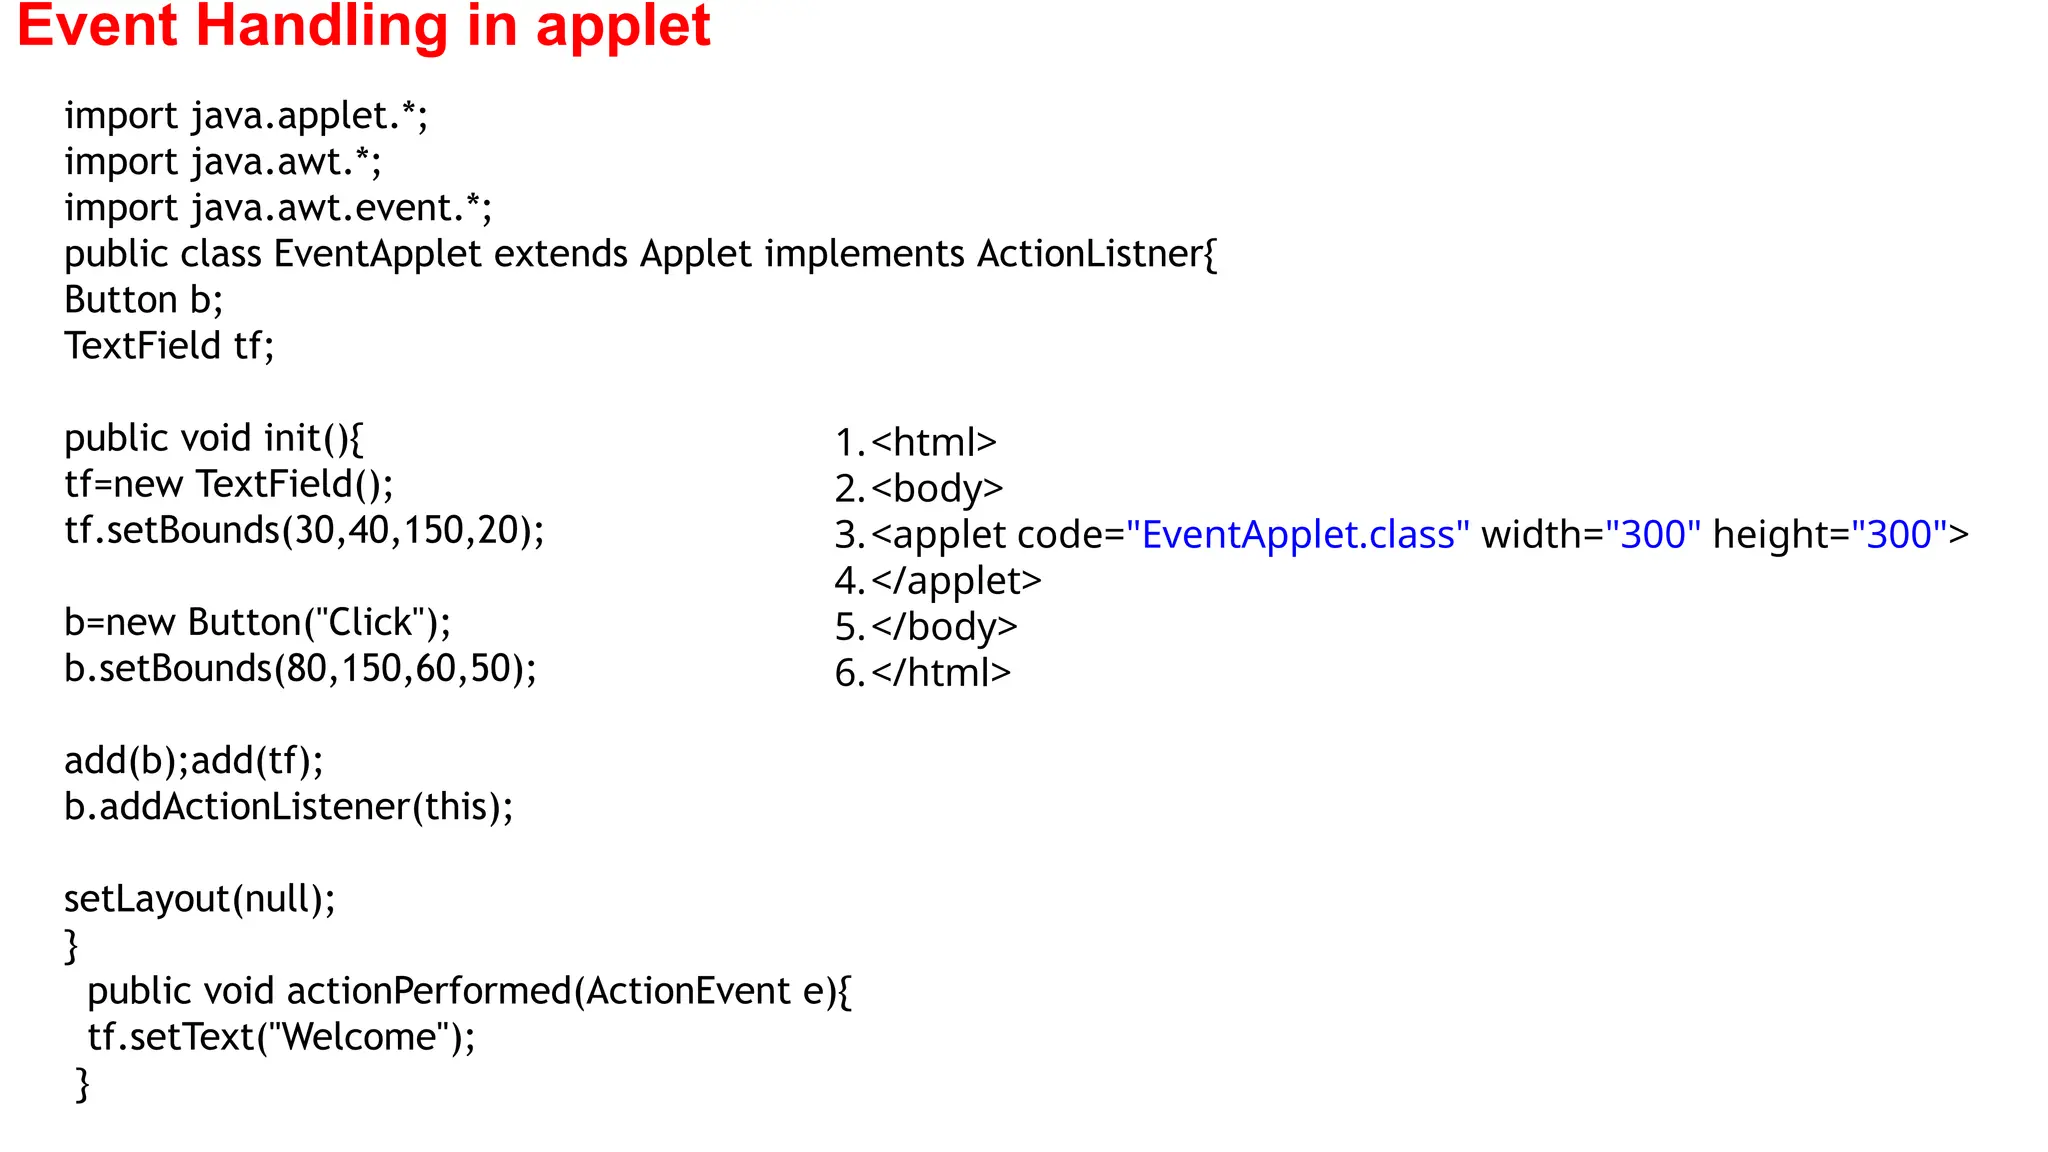
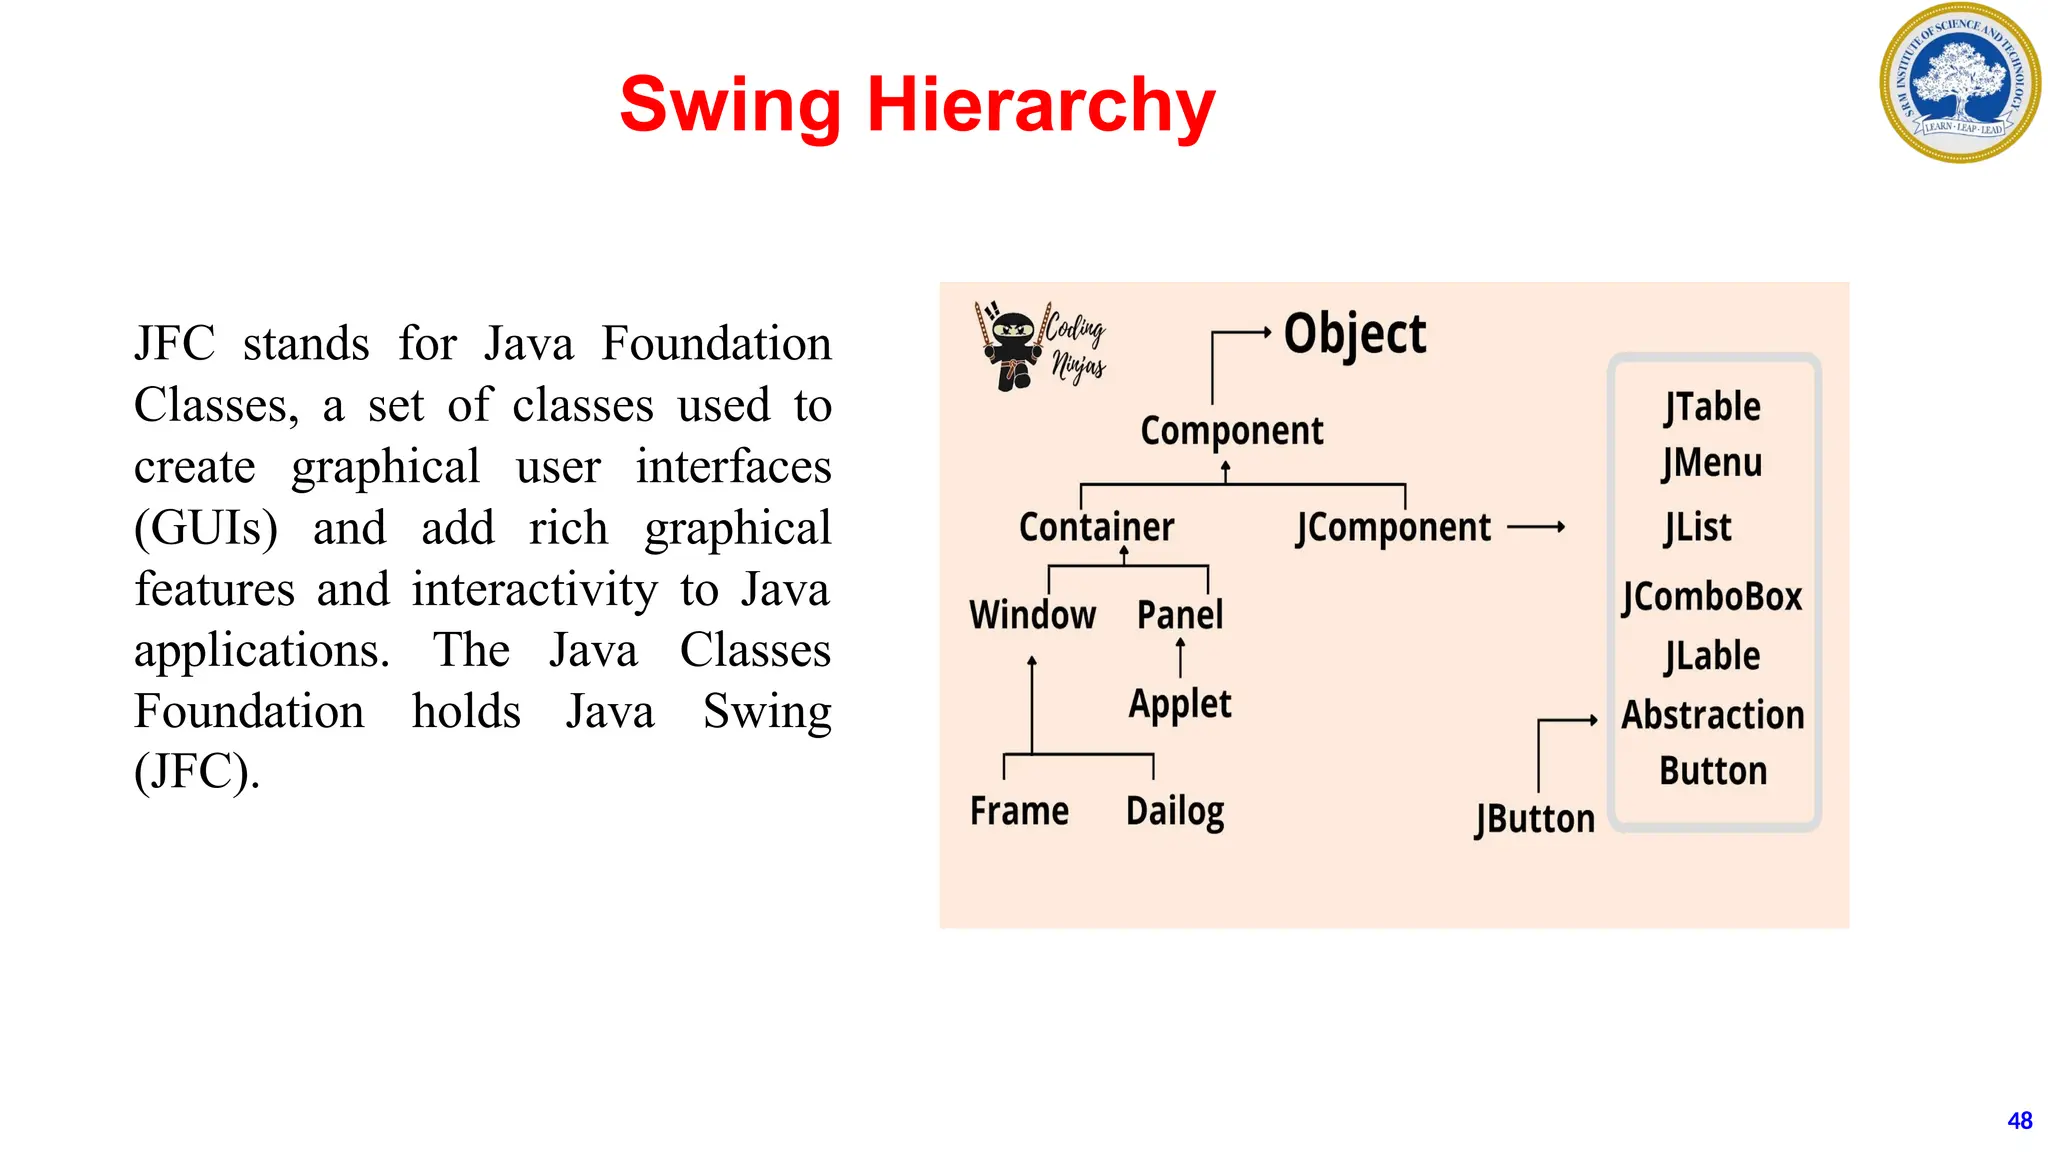
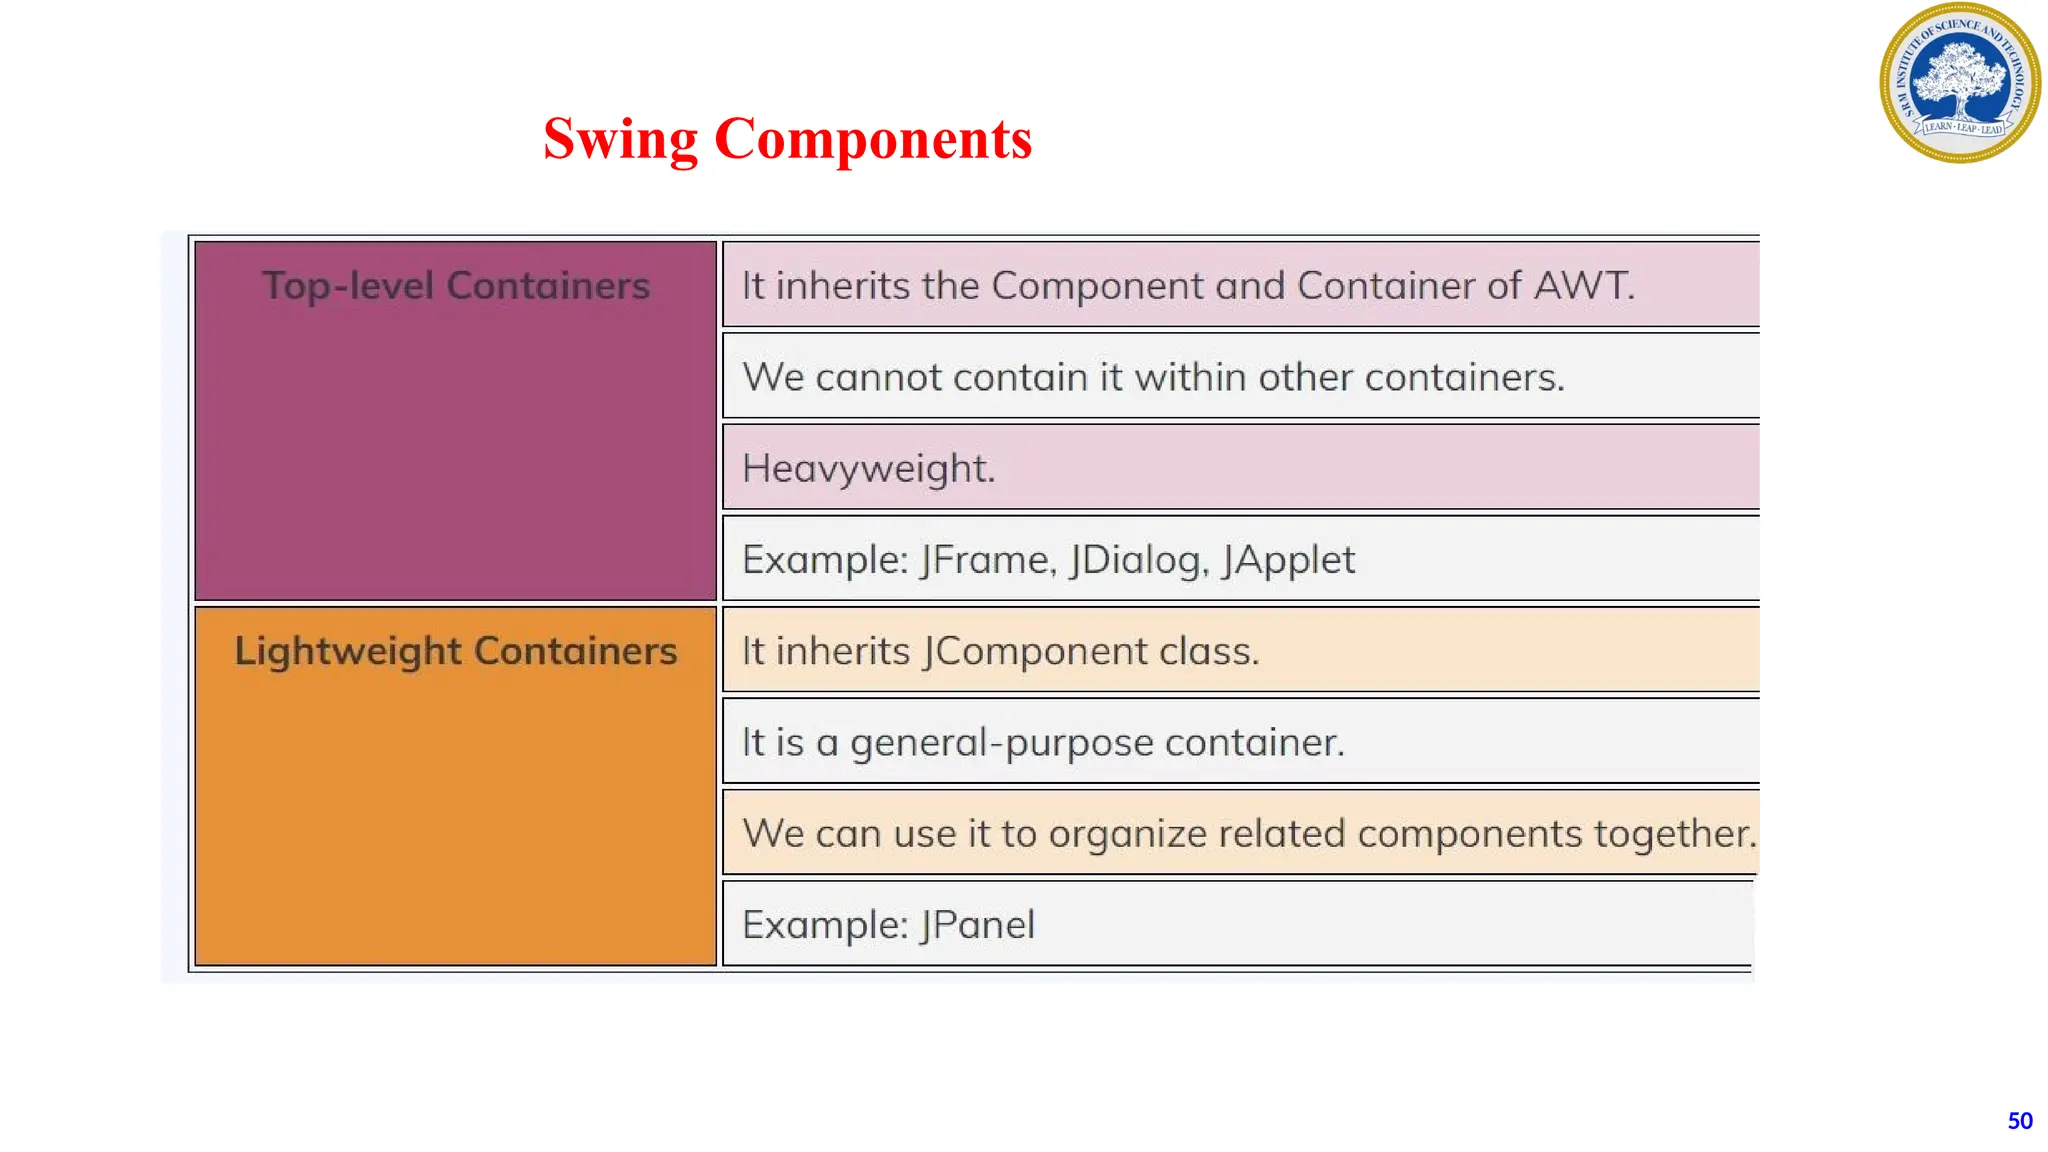
The document discusses advanced Java programming paradigms, emphasizing concurrent and multithreaded programming. It explains shared memory and message-passing models, thread lifecycle, and methods to create and start threads using the Thread class and Runnable interface. Additionally, it covers GUI programming with the AWT package, the lifecycle of applets, and event handling in applets.


![How to start a thread in Java
how to create a single thread by extending Thread Class.
class MyThread extends Thread
{
public void run()
{
System.out.println("Thread is created!!!");
}
}
class ThreadProg
{
public static void main(String args[])
{
MyThread t=new MyThread();
t.start();
}
}
class MyRunnable implements Runnable {
public void run() {
System.out.println("This is a runnable.");
}
}
1. Create the instance of class MyClass.
2. This instance is passed as a parameter to Thread class.
3. Using the instance of class Thread invoke the start
method.
4. The start method in-turn calls the run method written
in MyClass.](https://image.slidesharecdn.com/awt-240924100528-9e21f350/85/advanced-java-programming-paradigms-presentation-15-320.jpg)
![Create a thread by extending the Thread Class. Also make use of constructor and display message "You are
Welcome to Thread Programming".
class MyThread extends Thread
{
String str=""; //data member of class MyThread
MyThread(String s)//constructor
{
this.str=s;
}
public void run()
{
System.out.println(str);
}
}
class ThreadProg
{
public static void main(String args[])
{
MyThread t=new MyThread("You are Welcome to Thread Programming");
t.start();
}
}](https://image.slidesharecdn.com/awt-240924100528-9e21f350/85/advanced-java-programming-paradigms-presentation-16-320.jpg)
![class MyThread implements Runnable
{
public void run()
{
System.out.println("Thread is created!");
}
}
class ThreadProgRunn
{
public static void main(String args[])
{
MyThread obj=new MyThread();
Thread t=new Thread(obj);
t.start();
}
}](https://image.slidesharecdn.com/awt-240924100528-9e21f350/85/advanced-java-programming-paradigms-presentation-18-320.jpg)
![Write a Java program that prints the numbers from 1 to 10 line by line
after every 10 seconds.
class NumPrint extends Thread
{
int num;
NumPrint()
{
start();//directs to the run method
}
public void run()//thread execution starts
{
for(int i=1;i<=10;i++)
{
System.out.println(i);
Thread.sleep(10000);
}
}
}
public class MultiThNum
{
public static void main(String args[])
{
NumPrint t1;
t1=new NumPrint();
}
}](https://image.slidesharecdn.com/awt-240924100528-9e21f350/85/advanced-java-programming-paradigms-presentation-19-320.jpg)
![Creating Multiple Threads
class A extends Thread //class A implements Runnable
{
public void run()
{
for(int i=0;i<=5;i++)//printing 0 to 5
{
System.out.println(i);
} }}
class B extends Thread //class B implements Runnable
{
public void run()
{
for(int i=10;i>=5;i--)//printing 10 to 5
{
System.out.println(i);
} }}
The multiple threads can be created both by extending Thread class and by implementing the
Runnable interface.
class ThreadProg
{
public static void main(String args[])
{
A t1=new A();
B t2=new B();
t1.start();
t2.start();
}
}
// Runnable interface
Thread t1=new Thread(obj1);
Thread t2=new Thread(obj2);](https://image.slidesharecdn.com/awt-240924100528-9e21f350/85/advanced-java-programming-paradigms-presentation-20-320.jpg)

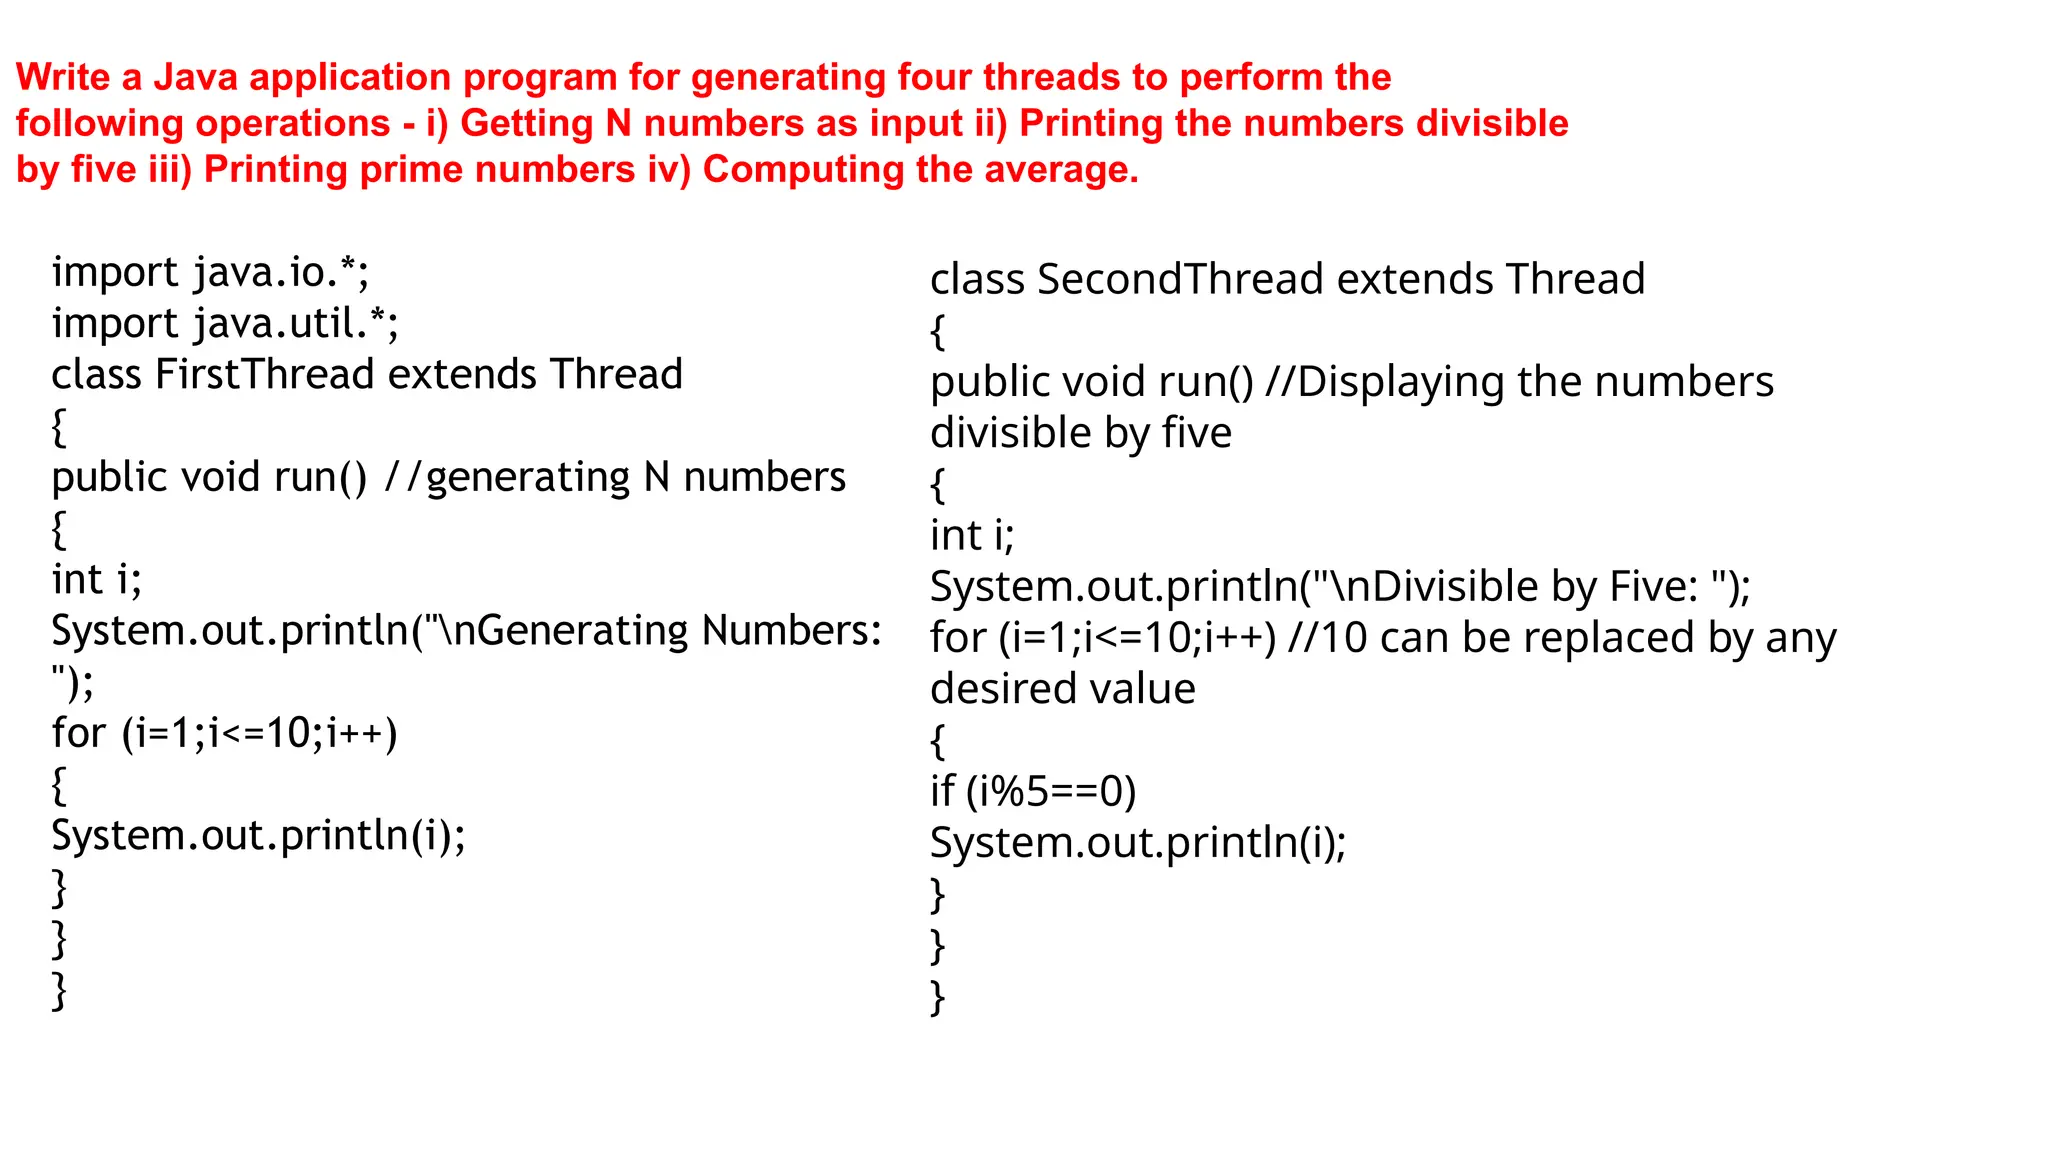
![class MainThread
{
public static void main(String[] args) throws IOException
{
FirstThread T1 = new FirstThread(); //creating first thread
SecondThread T2 = new SecondThread(); //creating second
thread
ThirdThread T3 = new ThirdThread(); //creating Third thread
FourthThread T4 = new FourthThread(); //creating Fourth
thread
T1.start(); //First Thread starts executing
T2.start();//Second Thread starts executing
T3.start();//Third Thread starts executing
T4.start();//Fourth Thread starts executing
}
}
Generating Numbers:
1
2
3
4
5
6
7
8
9
10
Divisible by Five:
5
10
Computing Average:
5.0
Prime Numbers:
2
3
5
7](https://image.slidesharecdn.com/awt-240924100528-9e21f350/85/advanced-java-programming-paradigms-presentation-23-320.jpg)


![Example
// importing Java AWT class
import java.awt.*;
public class AWTExample1 extends Frame {
AWTExample1() {
Button b = new Button("Click Me!!");
b.setBounds(30,100,80,30);
add(b);
setSize(300,300);
setTitle("This is our basic AWT example");
setLayout(null);
setVisible(true);
}
public static void main(String args[]) {
AWTExample1 f = new AWTExample1();
}
}](https://image.slidesharecdn.com/awt-240924100528-9e21f350/85/advanced-java-programming-paradigms-presentation-31-320.jpg)

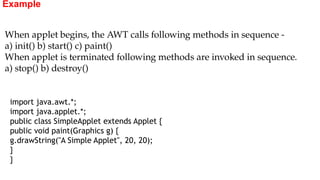
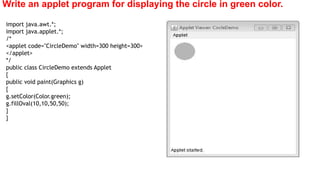
![Example of an Applet
Java Program[ColorDemo.java]
import java.awt.*;
import java.applet.*;
/*
<applet code="ColorDemo" width=300 height=100>
</applet>
*/
public class ColorDemo extends Applet
{
public void paint(Graphics g)
{
setBackground(Color.cyan);
setForeground(Color.red);
g.drawString("Its a colorful Applet",50,30);
Color newColor=new Color(255,255,0);
//creating red+green=yellow color
g.setColor(newColor);
g.drawString("Its a colorful Applet",50,70);
}](https://image.slidesharecdn.com/awt-240924100528-9e21f350/85/advanced-java-programming-paradigms-presentation-38-320.jpg)


![Java SWING FEATURES (Contd.)
Lightweight
• Lightweight Components: The JDK's AWT has supported lightweight component
development.
• A component must not rely on non-Java [O/s based] system classes to
be considered light.
• The look and feel classes in Java help Swing components have their view.
46
• Swing is another approach of graphical programming in Java.
• Swing creates highly interactive GUI applications.
• It is the most flexible and robust approach.](https://image.slidesharecdn.com/awt-240924100528-9e21f350/85/advanced-java-programming-paradigms-presentation-46-320.jpg)


![JTable
• In Java, the Swing toolkit contains a JTable Class.
• It is under package javax.swing.JTable class.
• It is used to draw a table to display data.
Syntax:
JTable table = new JTable(table_data, table_column);
The JTable contains two constructors. They are as follows:
1. JTable()
2. JTable(Object[][] rows, Object[] columns)
59](https://image.slidesharecdn.com/awt-240924100528-9e21f350/85/advanced-java-programming-paradigms-presentation-59-320.jpg)
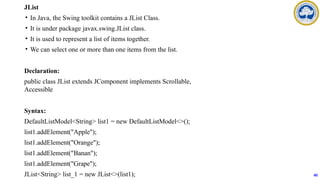
![The JListContains 3 constructors. They are as
follows: JList()
JList(ary[] listData)
JList(ListModel<ary> dataModel)
Display:
61](https://image.slidesharecdn.com/awt-240924100528-9e21f350/85/advanced-java-programming-paradigms-presentation-61-320.jpg)
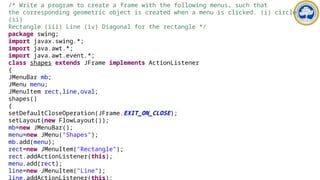
![oval=new JMenuItem("Circle");
oval.addActionListener(this);
menu.add(oval);
line=new JMenuItem("Rectangle_Diagonal");
line.addActionListener(this);
menu.add(line);
setJMenuBar(mb);
}
public void actionPerformed(ActionEvent ae)
{
String str=ae.getActionCommand();
Graphics g=getGraphics();
if(str=="Rectangle")
g.drawRect(200,200,50,50);
if(str=="Line")
g.drawLine(300,100,400,200);
if(str=="Circle")
g.drawOval(200,300,100,100);
if(str=="Rectangle_Diagonal")
g.drawLine(200,200,250,250);
}
public static void main(String args[])
{
shapes f=new shapes();
f.setTitle("SHAPES DEMO");
f.setSize(500,500);
f.setVisible(true);
}
}](https://image.slidesharecdn.com/awt-240924100528-9e21f350/85/advanced-java-programming-paradigms-presentation-70-320.jpg)
![package swing;
import java.awt.*;
import javax.swing.*;
import javax.swing.event.*;
import java.awt.event.*;
public class dialogbox
implements ActionListener
{
JFrame f;
public static void main(String[] args)
{
new dialogbox();
}
public dialogbox()
{
f=new JFrame("Dialox Box Demo");
JButton B=new JButton("Click Me!!");
Container container=f.getContentPane();
container.setLayout(new FlowLayout());
container.add(B);
B.addActionListener(this);
f.setDefaultCloseOperation(JFrame.EXIT_ON_CLOSE);
f.setSize(300,300);
f.setVisible(true);
}
public void actionPerformed(ActionEvent e)
{
JOptionPane.showMessageDialog(f,"Swing Programming is
a real
fun!!!","MyMessage",JOptionPane.INFORMATION_MESSAGE);
} }](https://image.slidesharecdn.com/awt-240924100528-9e21f350/85/advanced-java-programming-paradigms-presentation-71-320.jpg)
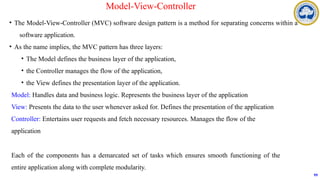

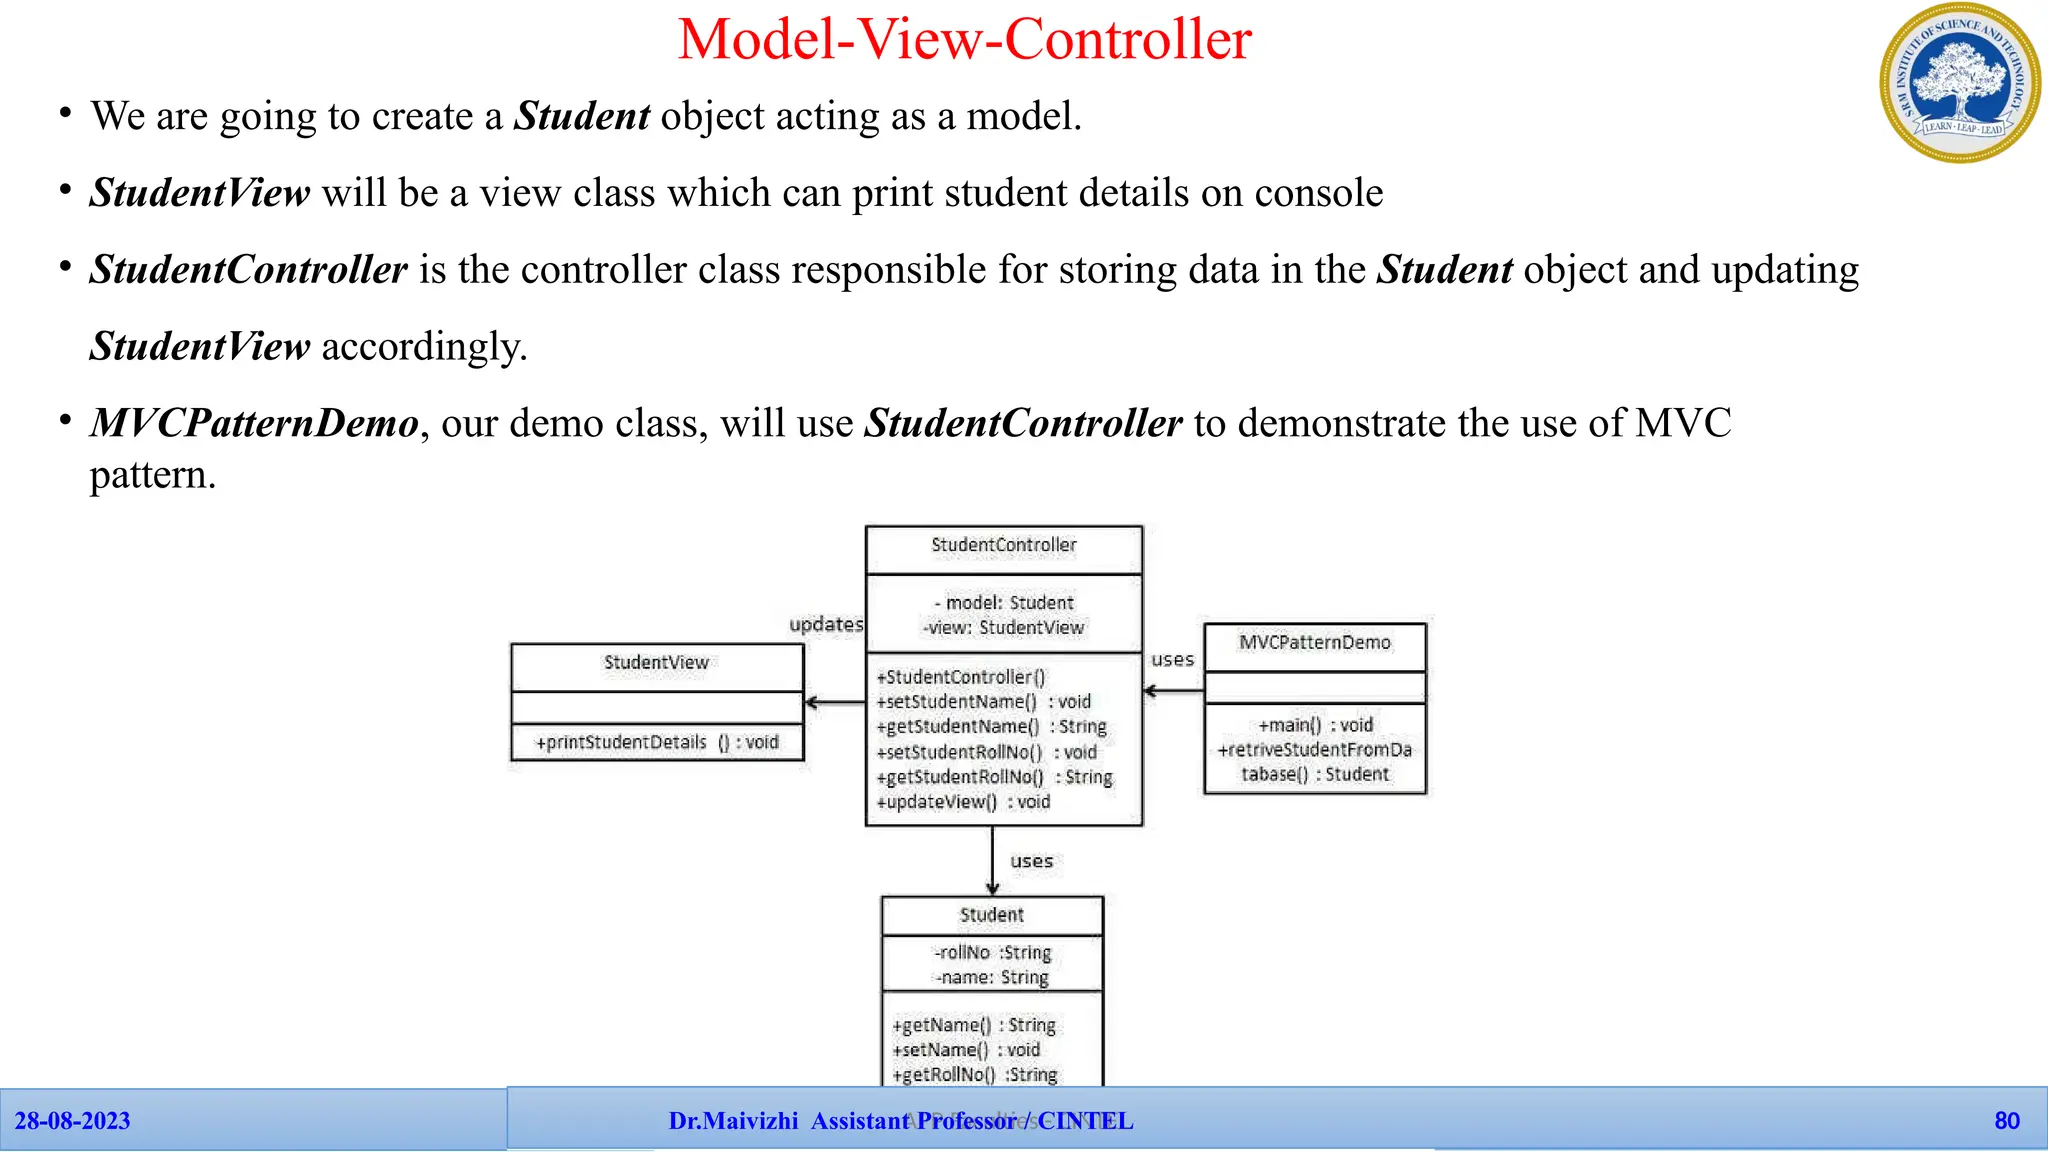
![28-08-2023
28-08-2023 109
Dr.Maivizhi AssistanAtPPProFafecsuslotires/
Model-View-Controller
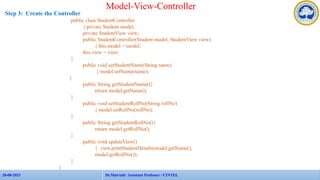
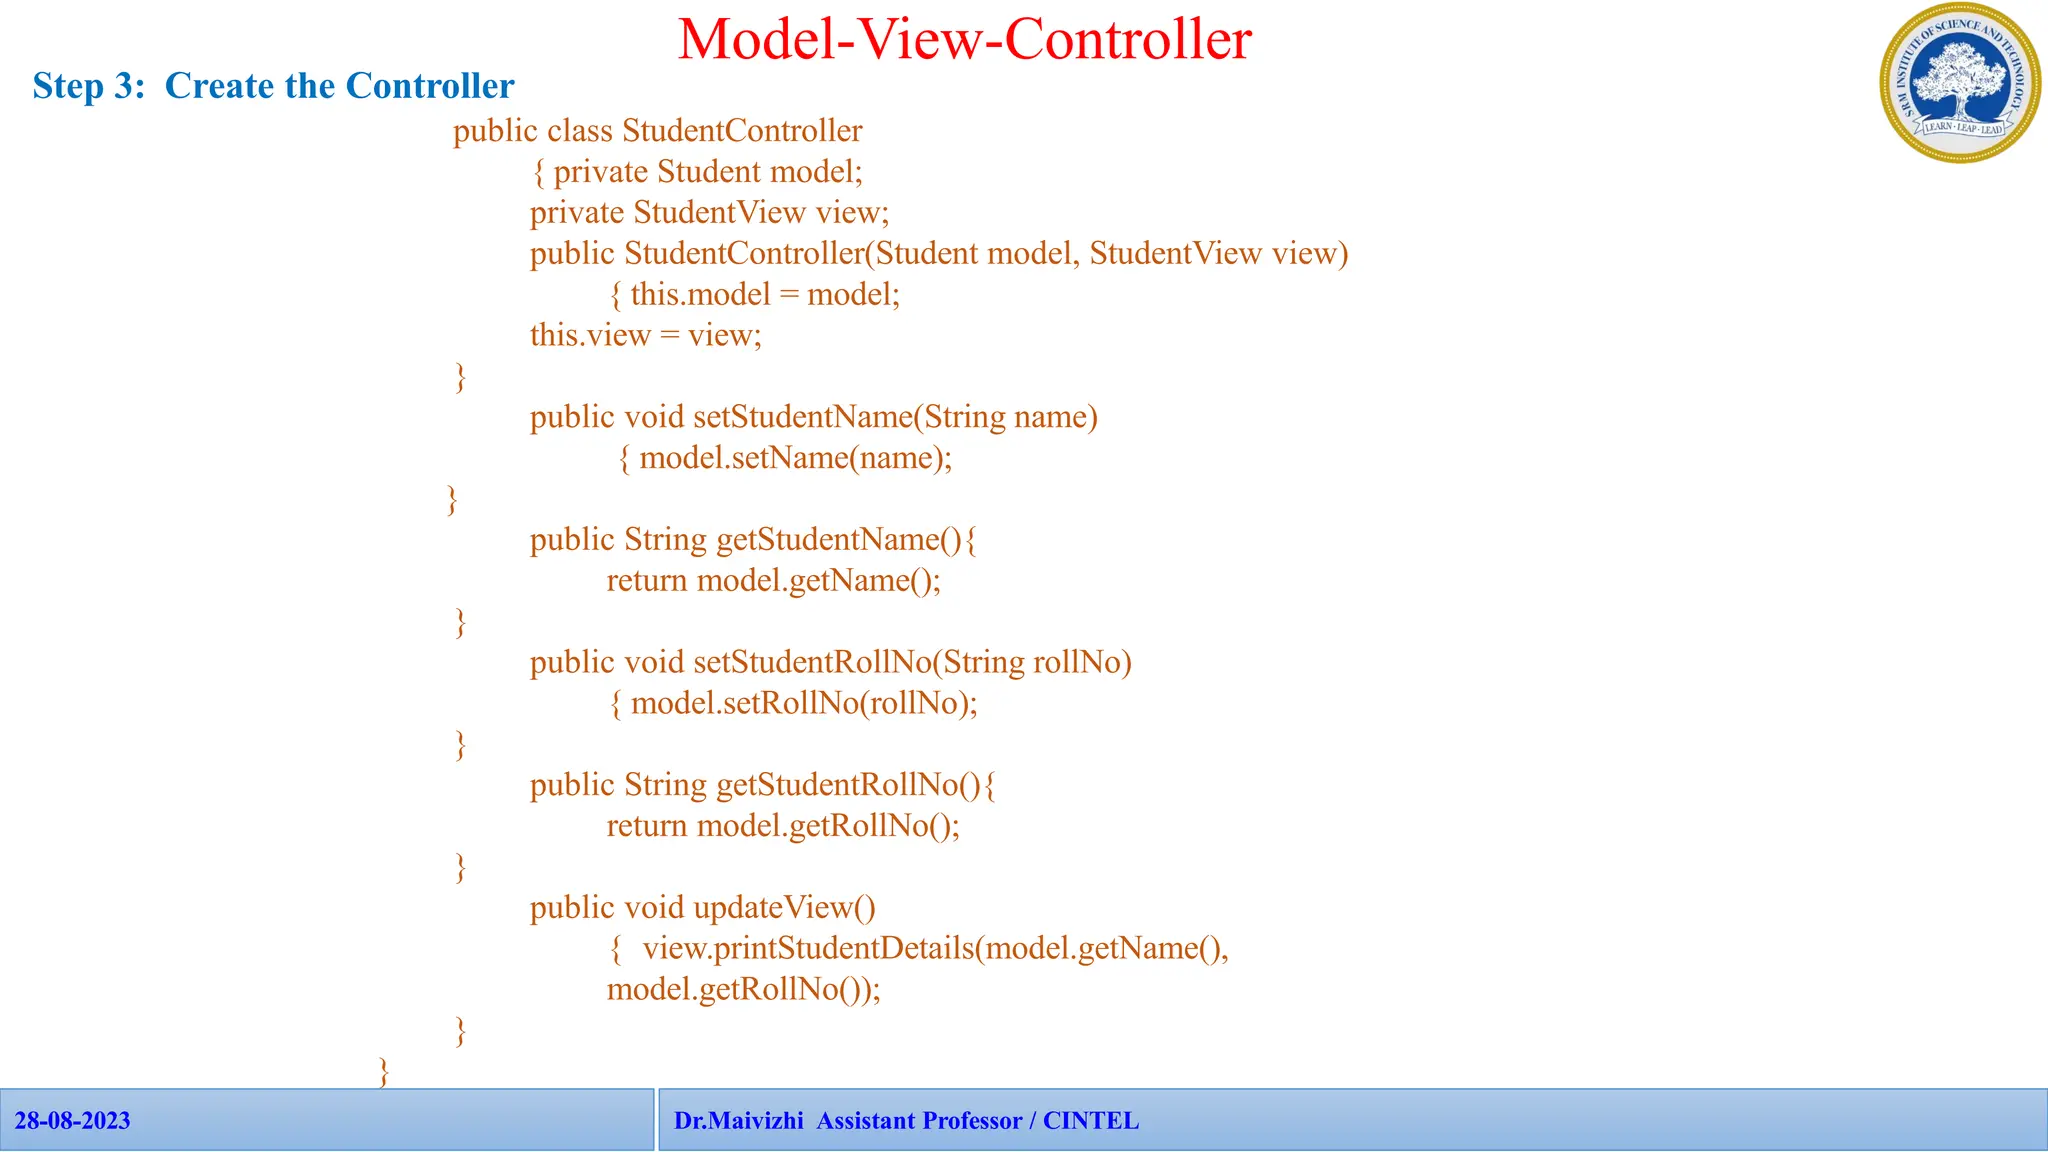
Step 4: Create the main Java file
public class MVCPatternDemo {
public static void main(String[] args) {
//fetch student record based on his roll no from the
database Student model = retriveStudentFromDatabase();
//Create a view : to write student details on
console StudentView view = new StudentView();
StudentController controller = new StudentController(model, view);
controller.updateView();
//update model data
controller.setStudentName("John");
controller.updateView();
}
private static Student retriveStudentFromDatabase(){
Student student = new Student();
student.setName("Robert");
student.setRollNo("10");
return student;
}
}
• “MVCPatternDemo.java” fetches
the
student data from the
database or a
function (in this case we’re
using a
function to set the values) and pushes it
on to the Student model.
• Then, it initializes the view we
had
created earlier.
• Further, it also initializes our controller
and binds it to the model and the view.
• The updateView() method is a part of the
controller which updates the
student details on the console.](https://image.slidesharecdn.com/awt-240924100528-9e21f350/85/advanced-java-programming-paradigms-presentation-84-320.jpg)

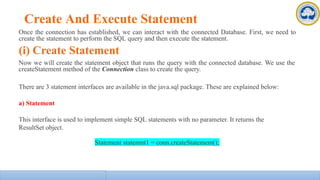

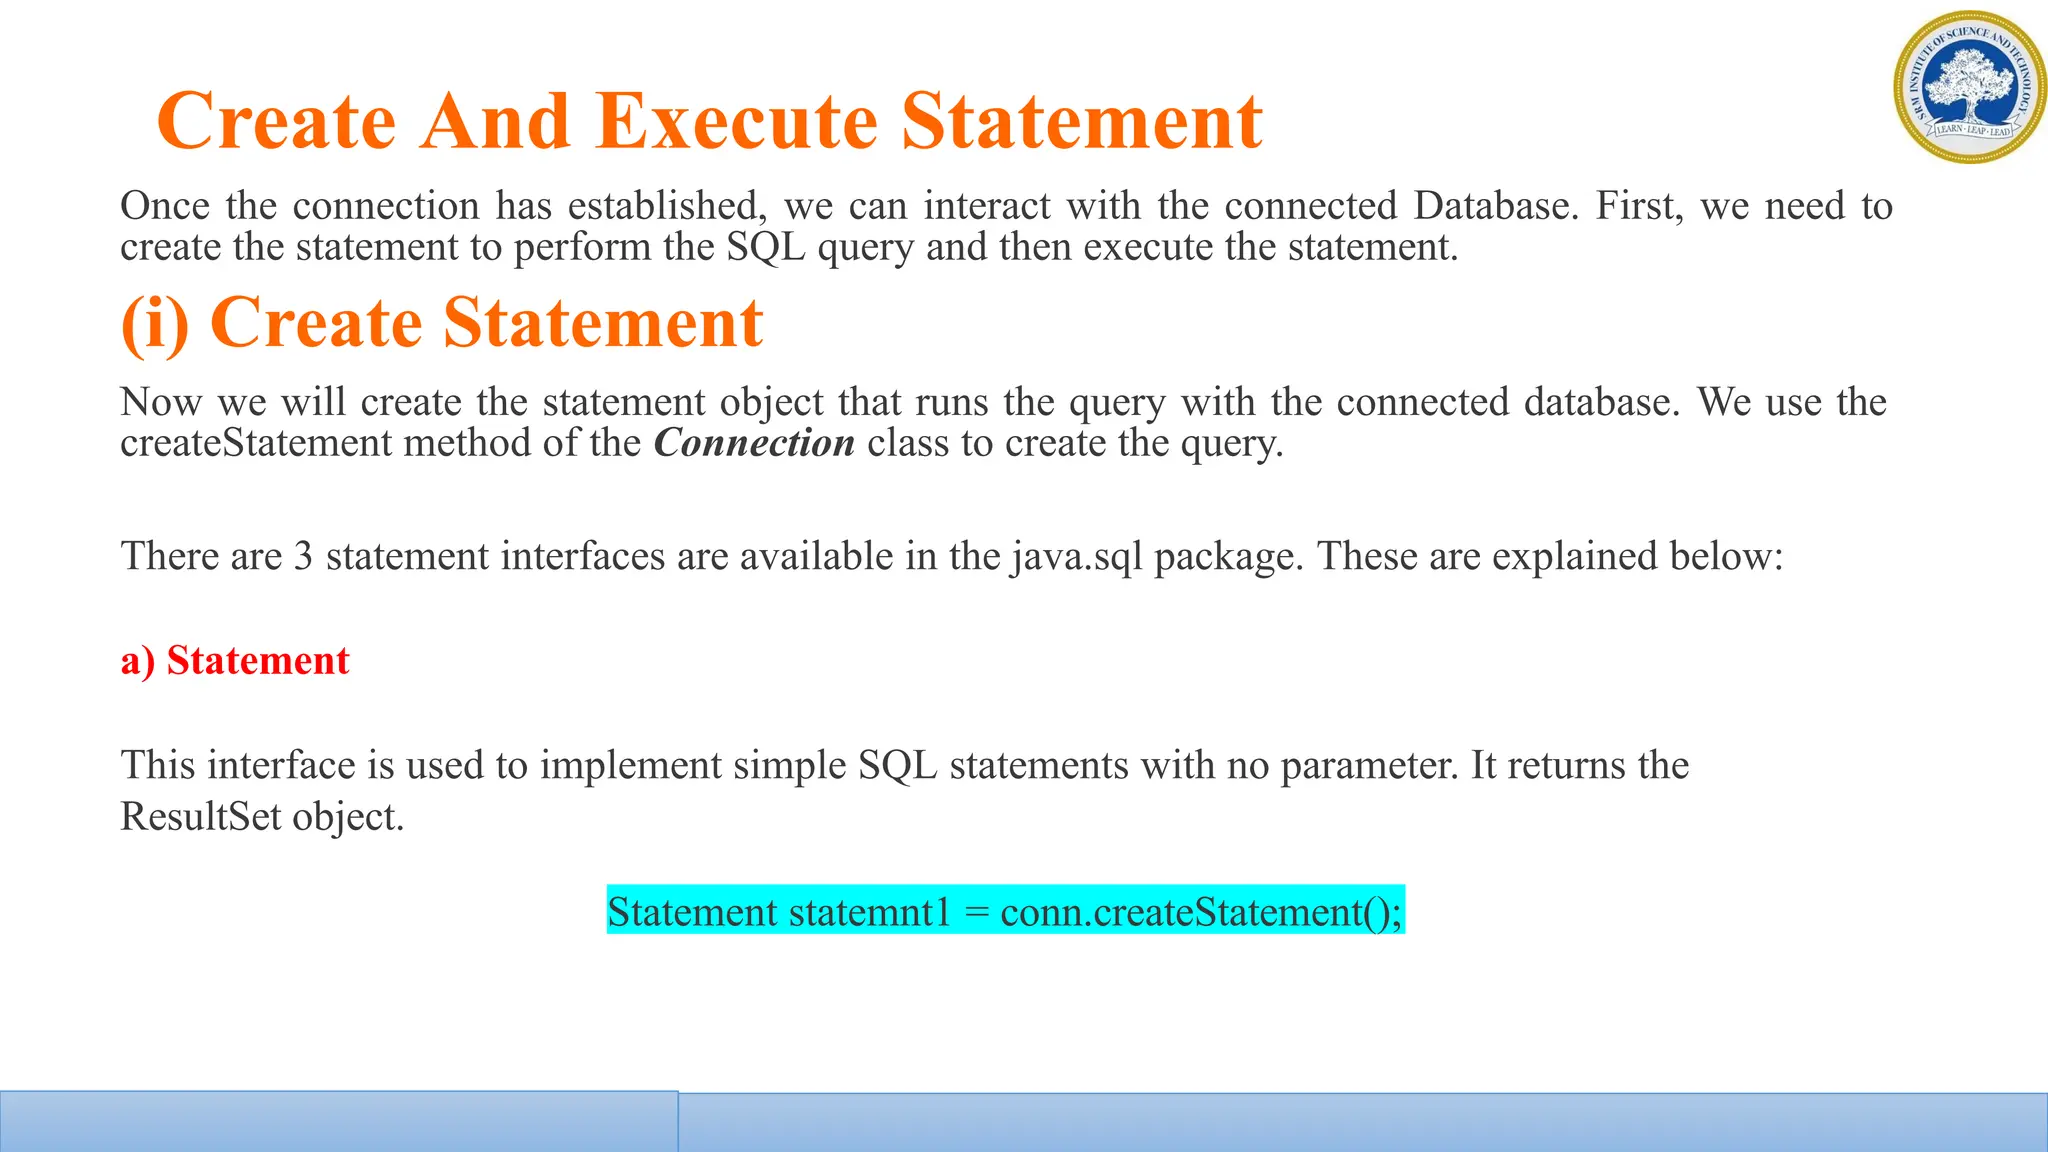
![Create And Execute Statement
(ii) Execute The Query
There are 4 important methods to execute the query in Statement interface. These are explained
below:
• ResultSet executeQuery(String sql)
• int executeUpdate(String sql)
• boolean execute(String sql)
• int []executeBatch()
a) ResultSet executeQuery(String sql)
The executeQuery() method in Statement interface is used to execute the
SQL query and retrieve the values from DB. It returns the ResultSet object.
Normally, we will use this method for the SELECT query.
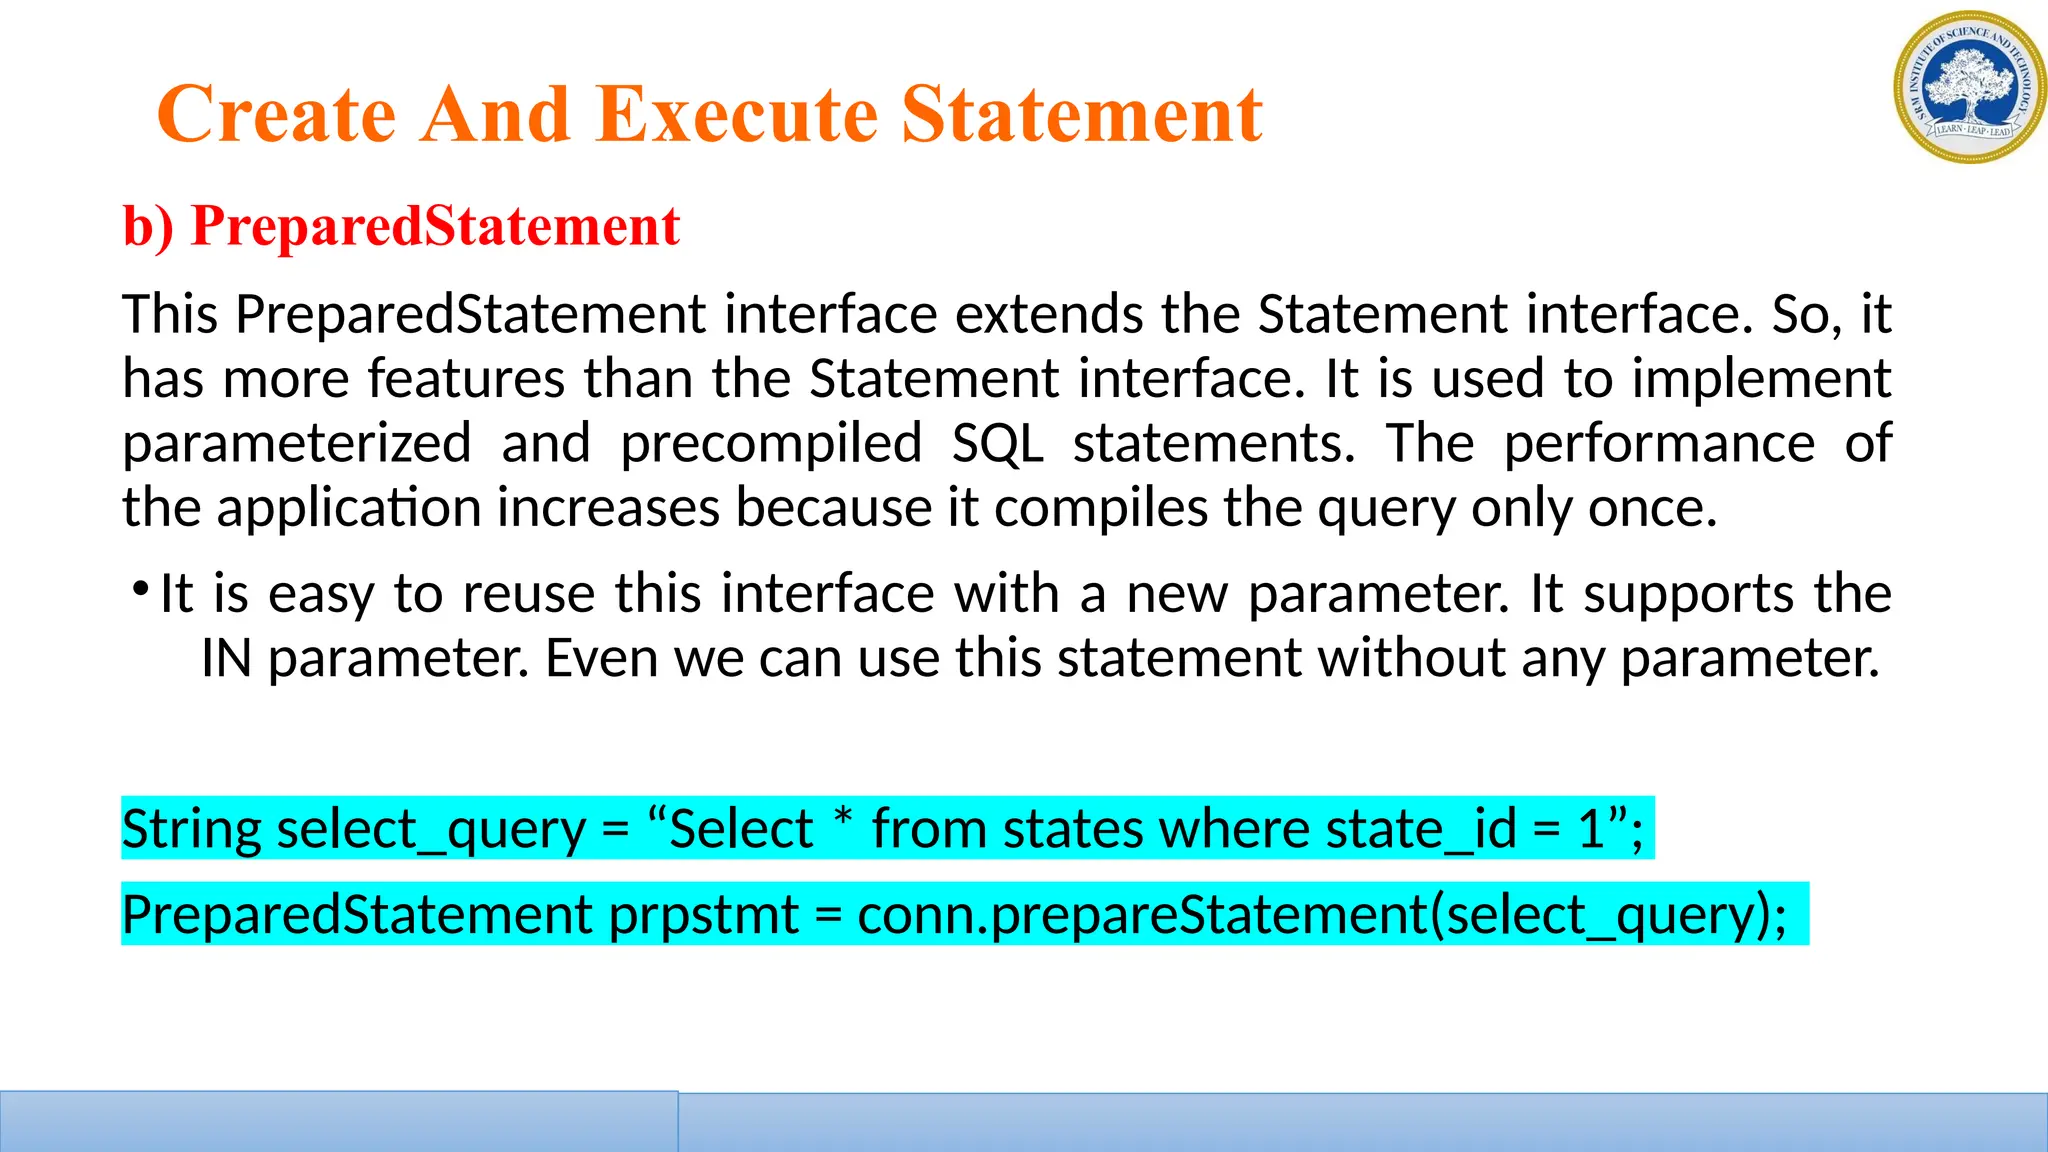
b) executeUpdate(String sql)
The executeUpdate() method is used to execute value specified queries like
INSERT, UPDATE, DELETE (DML statements), or DDL statements that return
nothing. Mostly, we will use this method for inserting and updating.
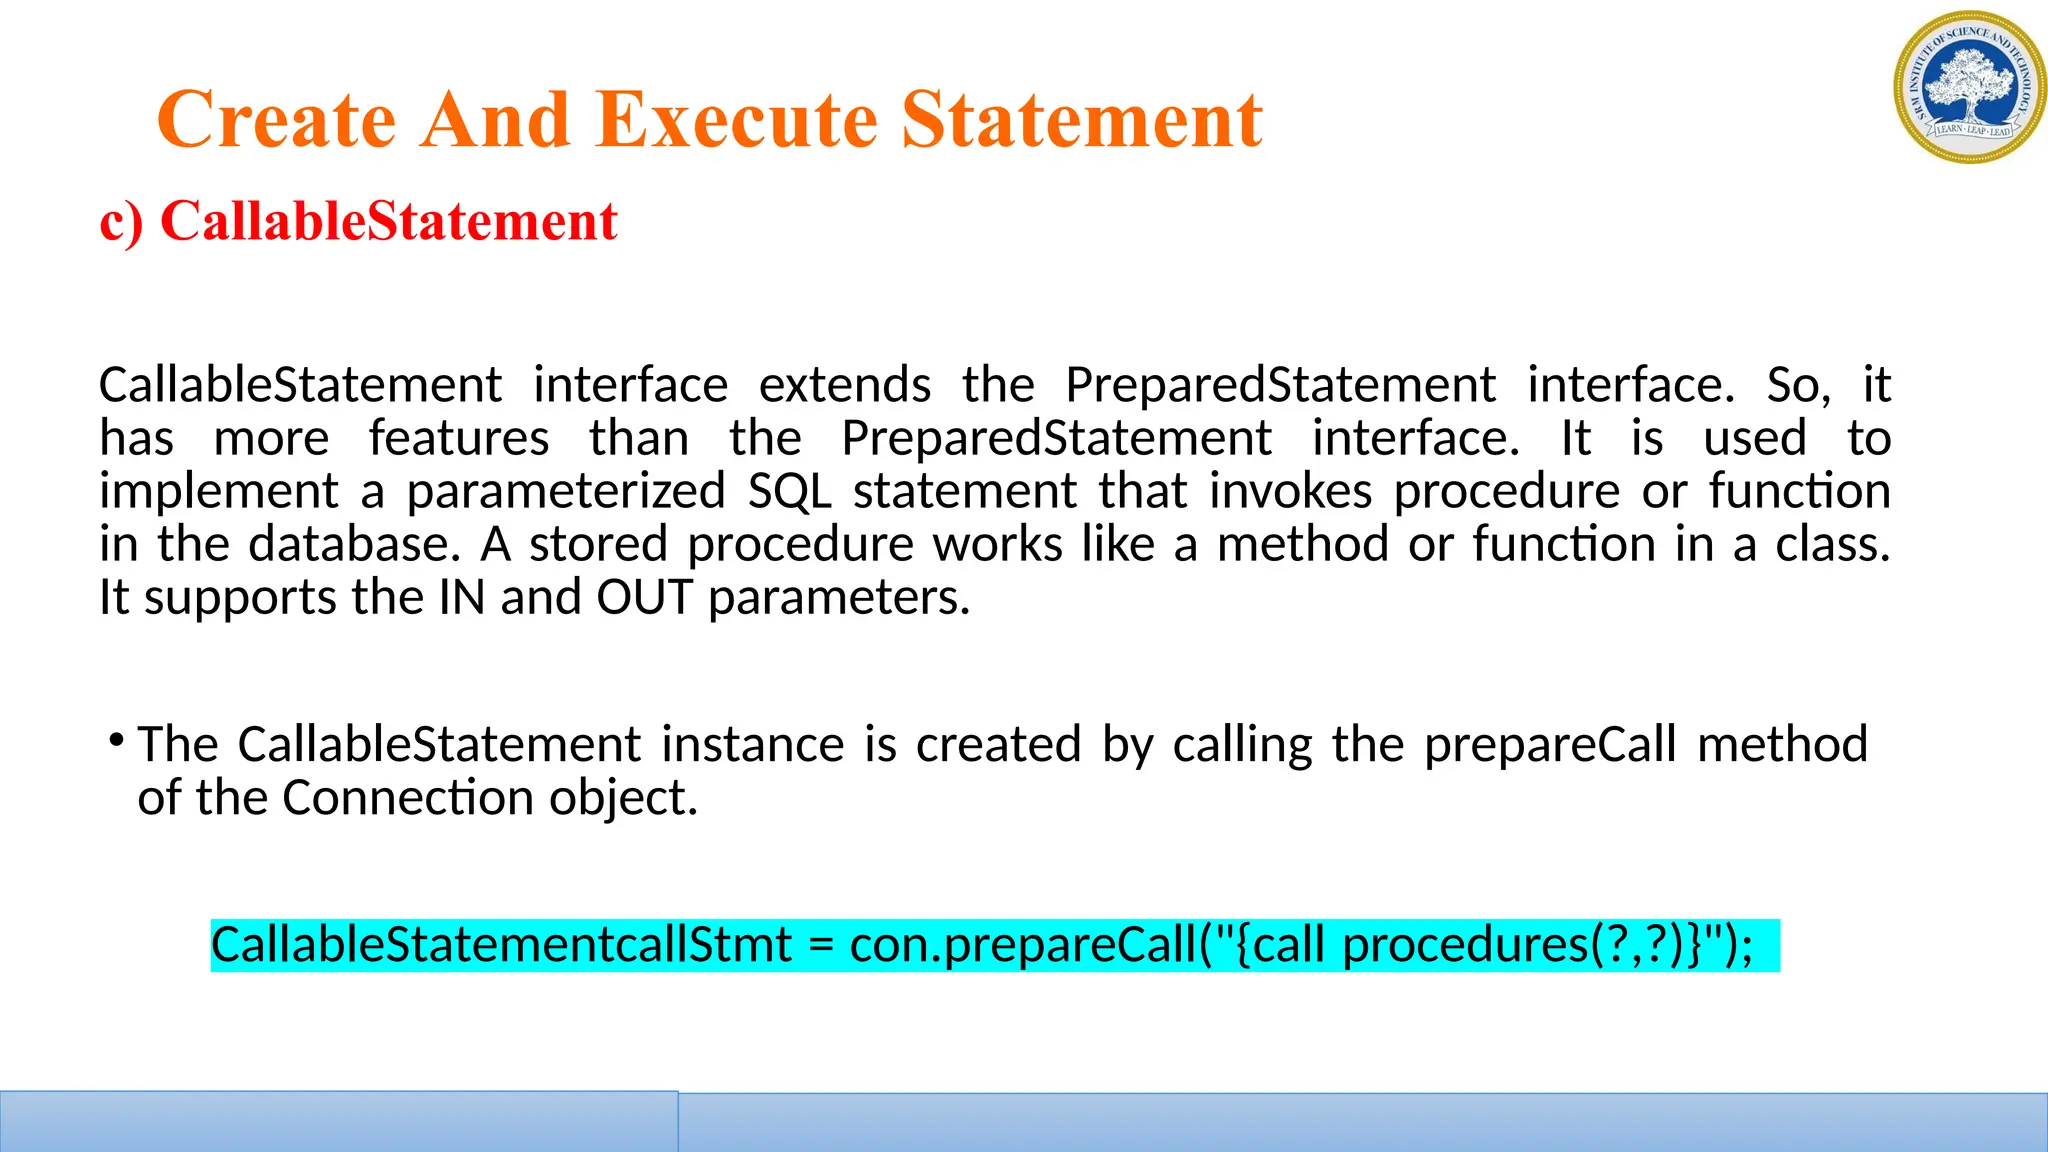
c) execute(String sql)
The execute() method is used to execute the SQL query. It returns true if it
executes the SELECT query. And, it returns false if it executes INSERT or
UPDATE query.
d) executeBatch()
This method is used to execute a batch of SQL queries to the Database and
if all the queries get executed successfully, it returns an array of update
cA
oP
uP
nFa
tc
su
.lt
Wies
e- C
wIN
iT
llEL
use this method to insert/update the bulk](https://image.slidesharecdn.com/awt-240924100528-9e21f350/85/advanced-java-programming-paradigms-presentation-101-320.jpg)


![Java Program - Oracle
import java.sql.*;
public class Sample_JDBC_Program {
public static void main(String[] args) throws
ClassNotFoundException, SQLException {
// store the SQL statement in a string
String QUERY = "select * from
employee_details“
//register the oracle driver with DriverManager
Class.forName("oracle.jdbc.driver.OracleDriver");
/*Here we have used Java 8 so opening the connection in try
statement*/
try(Connection conn =
DriverManager.getConnection("jdbc:oracle:thin:system/pass123@
localhost:1521:XE"))
{
Statement statemnt1 = conn.createStatement();
//Created statement and execute it
ResultSet rs1 = statemnt1.executeQuery(QUERY);
{
//Get the values of the record using while loop
while(rs1.next())
{
int empNum = rs1.getInt("empNum");
String lastName = rs1.getString("lastName"); String
firstName = rs1.getString("firstName"); String
email = rs1.getString("email");
String deptNum = rs1.getString("deptNum"); String
salary = rs1.getString("salary");
//store the values which are retrieved using ResultSet and print it
System.out.println(empNum + "," +lastName+ "," +firstName+ ","
+email +","+deptNum +"," +salary);
}
}
}
catch (SQLException e) {
//If exception occurs catch it and exit the program
e.printStackTrace();
}
}
}](https://image.slidesharecdn.com/awt-240924100528-9e21f350/85/advanced-java-programming-paradigms-presentation-105-320.jpg)
![Java Program - Mysql
import java.sql.*;
public class javamysql {
public static void main(String arg[])
{ Connection connection = null;
try {
// below two lines are used for connectivity.
Class.forName("com.mysql.cj.jdbc.Driver");
connection =
DriverManager.getConnection("jdbc:mysql://l
ocalhost:3306/mydb","mydbuser",
"mydbuser");
// mydb is database; mydbuser is name of database ;mydbuser is password of database
Statement statement;
statement = connection.createStatement();
ResultSet resultSet;
resultSet = statement.executeQuery("select * from designation"); int
code;
String title;
while (resultSet.next()) {
code = resultSet.getInt("code");
title = resultSet.getString("title").trim();
System.out.println("Code : " + code
+ " Title : " + title);
}
resultSet.close();
statement.close();
connection.close();
}
}
}](https://image.slidesharecdn.com/awt-240924100528-9e21f350/85/advanced-java-programming-paradigms-presentation-106-320.jpg)


![How to start a thread in Java
how to create a single thread by extending Thread Class.
class MyThread extends Thread
{
public void run()
{
System.out.println("Thread is created!!!");
}
}
class ThreadProg
{
public static void main(String args[])
{
MyThread t=new MyThread();
t.start();
}
}
class MyRunnable implements Runnable {
public void run() {
System.out.println("This is a runnable.");
}
}
1. Create the instance of class MyClass.
2. This instance is passed as a parameter to Thread class.
3. Using the instance of class Thread invoke the start
method.
4. The start method in-turn calls the run method written
in MyClass.](https://image.slidesharecdn.com/awt-240924100528-9e21f350/75/advanced-java-programming-paradigms-presentation-15-2048.jpg)
![Create a thread by extending the Thread Class. Also make use of constructor and display message "You are
Welcome to Thread Programming".
class MyThread extends Thread
{
String str=""; //data member of class MyThread
MyThread(String s)//constructor
{
this.str=s;
}
public void run()
{
System.out.println(str);
}
}
class ThreadProg
{
public static void main(String args[])
{
MyThread t=new MyThread("You are Welcome to Thread Programming");
t.start();
}
}](https://image.slidesharecdn.com/awt-240924100528-9e21f350/75/advanced-java-programming-paradigms-presentation-16-2048.jpg)
![class MyThread implements Runnable
{
public void run()
{
System.out.println("Thread is created!");
}
}
class ThreadProgRunn
{
public static void main(String args[])
{
MyThread obj=new MyThread();
Thread t=new Thread(obj);
t.start();
}
}](https://image.slidesharecdn.com/awt-240924100528-9e21f350/75/advanced-java-programming-paradigms-presentation-18-2048.jpg)
![Write a Java program that prints the numbers from 1 to 10 line by line
after every 10 seconds.
class NumPrint extends Thread
{
int num;
NumPrint()
{
start();//directs to the run method
}
public void run()//thread execution starts
{
for(int i=1;i<=10;i++)
{
System.out.println(i);
Thread.sleep(10000);
}
}
}
public class MultiThNum
{
public static void main(String args[])
{
NumPrint t1;
t1=new NumPrint();
}
}](https://image.slidesharecdn.com/awt-240924100528-9e21f350/75/advanced-java-programming-paradigms-presentation-19-2048.jpg)
![Creating Multiple Threads
class A extends Thread //class A implements Runnable
{
public void run()
{
for(int i=0;i<=5;i++)//printing 0 to 5
{
System.out.println(i);
} }}
class B extends Thread //class B implements Runnable
{
public void run()
{
for(int i=10;i>=5;i--)//printing 10 to 5
{
System.out.println(i);
} }}
The multiple threads can be created both by extending Thread class and by implementing the
Runnable interface.
class ThreadProg
{
public static void main(String args[])
{
A t1=new A();
B t2=new B();
t1.start();
t2.start();
}
}
// Runnable interface
Thread t1=new Thread(obj1);
Thread t2=new Thread(obj2);](https://image.slidesharecdn.com/awt-240924100528-9e21f350/75/advanced-java-programming-paradigms-presentation-20-2048.jpg)

![class MainThread
{
public static void main(String[] args) throws IOException
{
FirstThread T1 = new FirstThread(); //creating first thread
SecondThread T2 = new SecondThread(); //creating second
thread
ThirdThread T3 = new ThirdThread(); //creating Third thread
FourthThread T4 = new FourthThread(); //creating Fourth
thread
T1.start(); //First Thread starts executing
T2.start();//Second Thread starts executing
T3.start();//Third Thread starts executing
T4.start();//Fourth Thread starts executing
}
}
Generating Numbers:
1
2
3
4
5
6
7
8
9
10
Divisible by Five:
5
10
Computing Average:
5.0
Prime Numbers:
2
3
5
7](https://image.slidesharecdn.com/awt-240924100528-9e21f350/75/advanced-java-programming-paradigms-presentation-23-2048.jpg)


![Example
// importing Java AWT class
import java.awt.*;
public class AWTExample1 extends Frame {
AWTExample1() {
Button b = new Button("Click Me!!");
b.setBounds(30,100,80,30);
add(b);
setSize(300,300);
setTitle("This is our basic AWT example");
setLayout(null);
setVisible(true);
}
public static void main(String args[]) {
AWTExample1 f = new AWTExample1();
}
}](https://image.slidesharecdn.com/awt-240924100528-9e21f350/75/advanced-java-programming-paradigms-presentation-31-2048.jpg)


![Example of an Applet
Java Program[ColorDemo.java]
import java.awt.*;
import java.applet.*;
/*
<applet code="ColorDemo" width=300 height=100>
</applet>
*/
public class ColorDemo extends Applet
{
public void paint(Graphics g)
{
setBackground(Color.cyan);
setForeground(Color.red);
g.drawString("Its a colorful Applet",50,30);
Color newColor=new Color(255,255,0);
//creating red+green=yellow color
g.setColor(newColor);
g.drawString("Its a colorful Applet",50,70);
}](https://image.slidesharecdn.com/awt-240924100528-9e21f350/75/advanced-java-programming-paradigms-presentation-38-2048.jpg)

![Java SWING FEATURES (Contd.)
Lightweight
• Lightweight Components: The JDK's AWT has supported lightweight component
development.
• A component must not rely on non-Java [O/s based] system classes to
be considered light.
• The look and feel classes in Java help Swing components have their view.
46
• Swing is another approach of graphical programming in Java.
• Swing creates highly interactive GUI applications.
• It is the most flexible and robust approach.](https://image.slidesharecdn.com/awt-240924100528-9e21f350/75/advanced-java-programming-paradigms-presentation-46-2048.jpg)
![JTable
• In Java, the Swing toolkit contains a JTable Class.
• It is under package javax.swing.JTable class.
• It is used to draw a table to display data.
Syntax:
JTable table = new JTable(table_data, table_column);
The JTable contains two constructors. They are as follows:
1. JTable()
2. JTable(Object[][] rows, Object[] columns)
59](https://image.slidesharecdn.com/awt-240924100528-9e21f350/75/advanced-java-programming-paradigms-presentation-59-2048.jpg)

![The JListContains 3 constructors. They are as
follows: JList()
JList(ary[] listData)
JList(ListModel<ary> dataModel)
Display:
61](https://image.slidesharecdn.com/awt-240924100528-9e21f350/75/advanced-java-programming-paradigms-presentation-61-2048.jpg)


![oval=new JMenuItem("Circle");
oval.addActionListener(this);
menu.add(oval);
line=new JMenuItem("Rectangle_Diagonal");
line.addActionListener(this);
menu.add(line);
setJMenuBar(mb);
}
public void actionPerformed(ActionEvent ae)
{
String str=ae.getActionCommand();
Graphics g=getGraphics();
if(str=="Rectangle")
g.drawRect(200,200,50,50);
if(str=="Line")
g.drawLine(300,100,400,200);
if(str=="Circle")
g.drawOval(200,300,100,100);
if(str=="Rectangle_Diagonal")
g.drawLine(200,200,250,250);
}
public static void main(String args[])
{
shapes f=new shapes();
f.setTitle("SHAPES DEMO");
f.setSize(500,500);
f.setVisible(true);
}
}](https://image.slidesharecdn.com/awt-240924100528-9e21f350/75/advanced-java-programming-paradigms-presentation-70-2048.jpg)
![package swing;
import java.awt.*;
import javax.swing.*;
import javax.swing.event.*;
import java.awt.event.*;
public class dialogbox
implements ActionListener
{
JFrame f;
public static void main(String[] args)
{
new dialogbox();
}
public dialogbox()
{
f=new JFrame("Dialox Box Demo");
JButton B=new JButton("Click Me!!");
Container container=f.getContentPane();
container.setLayout(new FlowLayout());
container.add(B);
B.addActionListener(this);
f.setDefaultCloseOperation(JFrame.EXIT_ON_CLOSE);
f.setSize(300,300);
f.setVisible(true);
}
public void actionPerformed(ActionEvent e)
{
JOptionPane.showMessageDialog(f,"Swing Programming is
a real
fun!!!","MyMessage",JOptionPane.INFORMATION_MESSAGE);
} }](https://image.slidesharecdn.com/awt-240924100528-9e21f350/75/advanced-java-programming-paradigms-presentation-71-2048.jpg)


![28-08-2023
28-08-2023 109
Dr.Maivizhi AssistanAtPPProFafecsuslotires/
Model-View-Controller
Step 4: Create the main Java file
public class MVCPatternDemo {
public static void main(String[] args) {
//fetch student record based on his roll no from the
database Student model = retriveStudentFromDatabase();
//Create a view : to write student details on
console StudentView view = new StudentView();
StudentController controller = new StudentController(model, view);
controller.updateView();
//update model data
controller.setStudentName("John");
controller.updateView();
}
private static Student retriveStudentFromDatabase(){
Student student = new Student();
student.setName("Robert");
student.setRollNo("10");
return student;
}
}
• “MVCPatternDemo.java” fetches
the
student data from the
database or a
function (in this case we’re
using a
function to set the values) and pushes it
on to the Student model.
• Then, it initializes the view we
had
created earlier.
• Further, it also initializes our controller
and binds it to the model and the view.
• The updateView() method is a part of the
controller which updates the
student details on the console.](https://image.slidesharecdn.com/awt-240924100528-9e21f350/75/advanced-java-programming-paradigms-presentation-84-2048.jpg)


![Create And Execute Statement
(ii) Execute The Query
There are 4 important methods to execute the query in Statement interface. These are explained
below:
• ResultSet executeQuery(String sql)
• int executeUpdate(String sql)
• boolean execute(String sql)
• int []executeBatch()
a) ResultSet executeQuery(String sql)
The executeQuery() method in Statement interface is used to execute the
SQL query and retrieve the values from DB. It returns the ResultSet object.
Normally, we will use this method for the SELECT query.
b) executeUpdate(String sql)
The executeUpdate() method is used to execute value specified queries like
INSERT, UPDATE, DELETE (DML statements), or DDL statements that return
nothing. Mostly, we will use this method for inserting and updating.
c) execute(String sql)
The execute() method is used to execute the SQL query. It returns true if it
executes the SELECT query. And, it returns false if it executes INSERT or
UPDATE query.
d) executeBatch()
This method is used to execute a batch of SQL queries to the Database and
if all the queries get executed successfully, it returns an array of update
cA
oP
uP
nFa
tc
su
.lt
Wies
e- C
wIN
iT
llEL
use this method to insert/update the bulk](https://image.slidesharecdn.com/awt-240924100528-9e21f350/75/advanced-java-programming-paradigms-presentation-101-2048.jpg)
![Java Program - Oracle
import java.sql.*;
public class Sample_JDBC_Program {
public static void main(String[] args) throws
ClassNotFoundException, SQLException {
// store the SQL statement in a string
String QUERY = "select * from
employee_details“
//register the oracle driver with DriverManager
Class.forName("oracle.jdbc.driver.OracleDriver");
/*Here we have used Java 8 so opening the connection in try
statement*/
try(Connection conn =
DriverManager.getConnection("jdbc:oracle:thin:system/pass123@
localhost:1521:XE"))
{
Statement statemnt1 = conn.createStatement();
//Created statement and execute it
ResultSet rs1 = statemnt1.executeQuery(QUERY);
{
//Get the values of the record using while loop
while(rs1.next())
{
int empNum = rs1.getInt("empNum");
String lastName = rs1.getString("lastName"); String
firstName = rs1.getString("firstName"); String
email = rs1.getString("email");
String deptNum = rs1.getString("deptNum"); String
salary = rs1.getString("salary");
//store the values which are retrieved using ResultSet and print it
System.out.println(empNum + "," +lastName+ "," +firstName+ ","
+email +","+deptNum +"," +salary);
}
}
}
catch (SQLException e) {
//If exception occurs catch it and exit the program
e.printStackTrace();
}
}
}](https://image.slidesharecdn.com/awt-240924100528-9e21f350/75/advanced-java-programming-paradigms-presentation-105-2048.jpg)
![Java Program - Mysql
import java.sql.*;
public class javamysql {
public static void main(String arg[])
{ Connection connection = null;
try {
// below two lines are used for connectivity.
Class.forName("com.mysql.cj.jdbc.Driver");
connection =
DriverManager.getConnection("jdbc:mysql://l
ocalhost:3306/mydb","mydbuser",
"mydbuser");
// mydb is database; mydbuser is name of database ;mydbuser is password of database
Statement statement;
statement = connection.createStatement();
ResultSet resultSet;
resultSet = statement.executeQuery("select * from designation"); int
code;
String title;
while (resultSet.next()) {
code = resultSet.getInt("code");
title = resultSet.getString("title").trim();
System.out.println("Code : " + code
+ " Title : " + title);
}
resultSet.close();
statement.close();
connection.close();
}
}
}](https://image.slidesharecdn.com/awt-240924100528-9e21f350/75/advanced-java-programming-paradigms-presentation-106-2048.jpg)


