The document outlines the setup and integration of Docker within an OpenStack environment, detailing basic Docker installation and connection to OpenStack infrastructure. It discusses the advantages of using Docker for application deployment in terms of portability, resource efficiency, and ease of management. Additionally, it provides steps for configuring OpenStack nodes and monitoring logs for troubleshooting purposes.
![3
Contents
3. docker 구축 기초 [ 30분]
4. 오픈스택에 docker를 연결 [ 30분]
1. Openstack 인프라 구축 (4 node 구성) [ 30분]
2. Openstack 위에 VM 생성 [ 20분 ]
5. Docker로 WEB서비스 구축 [ 30분]
6.
7. Docker로 jenkins 구현 [15분]
Openstack 위에 Docker로 WEB서비스 구축 [ 15분]](https://image.slidesharecdn.com/dockeronopenstackoscv4-150309083842-conversion-gate01/85/Docker-on-openstack-by-OpenSource-Consulting-3-320.jpg)
![7
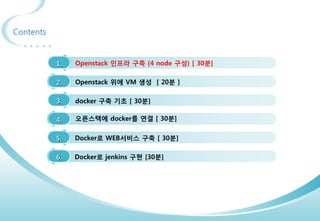
openstack 구축시 log 보는법
conf 파일에 verbose=true 옵션을 걸어 더 상세히 볼수 있음.
openstack의 대부분 내용은 /var/log/messages에 나옴.
verboase=ture option을 주면 /var/log/messages가 각자 원하는 /var/#service/#service.log가 나옴 .
그리고 /var/log/messages에 error뿐 아니라 동작 내용까지 모두 기록됨.
http://docs.openstack.org/juno http://behindtheracks.com/category/juno/
기존 log ( /var/log/cinder/scheduler.log)
2015-03-13 03:09:12.360 1148 INFO oslo.messaging._drivers.impl_rabbit [req-844f54aa-6201-4fc4-b321-c6ab2012c296 - -
- - -] Connecting to AMQP server on 192.168.32.181:5672
2015-03-13 03:09:12.433 1148 ERROR oslo.messaging._drivers.impl_rabbit [req-844f54aa-6201-4fc4-b321-c6ab2012c296 -
- - - -] AMQP server on 192.168.32.181:5672 is unreachable: [Errno 111] ECONNREFUSED. Trying again in 3 seconds.
verbose=true option 적용시 (/var/log/cinder/scheduler.log)
2015-03-13 06:20:18.812 18581 INFO cinder.service [-] Starting cinder-scheduler node (version 2014.2.1)
2015-03-13 06:20:18.816 18581 INFO oslo.messaging._drivers.impl_rabbit [req-1d1a9b9c-3658-4f76-8dc1-3d74b2028a36 -
- - - -] Connecting to AMQP server on 192.168.32.181:5672
2015-03-13 06:20:18.837 18581 INFO oslo.messaging._drivers.impl_rabbit [req-1d1a9b9c-3658-4f76-8dc1-3d74b2028a36 -
- - - -] Connected to AMQP server on 192.168.32.181:5672
2015-03-13 06:20:19.291 18581 INFO oslo.messaging._drivers.impl_rabbit [-] Connecting to AMQP server on
192.168.32.181:5672
2015-03-13 06:20:19.303 18581 INFO oslo.messaging._drivers.impl_rabbit [-] Connected to AMQP server on
192.168.32.181:5672
2015-03-13 06:20:50.814 18581 WARNING cinder.scheduler.host_manager [req-00223525-0c03-4c5d-ae9b-690ae0a10e72
d13d86ad609d4a9a8d9a84b36b954a69 3c40224ㅁ5243f443ebc2aa39605641be1 - - -] volume service is down. (host: juno-
compute)
2015-03-13 06:20:50.814 18581 WARNING cinder.scheduler.filter_scheduler [req-00223525-0c03-4c5d-ae9b-690ae0a10e72
d13d86ad609d4a9a8d9a84b36b954a69 3c402245243f443ebc2aa39605641be1 - - -] No weighed hosts found for volume with
properties: {}
2015-03-13 06:20:50.816 18581 ERROR cinder.scheduler.flows.create_volume [req-00223525-0c03-4c5d-ae9b-690ae0a10e72
d13d86ad609d4a9a8d9a84b36b954a69 3c402245243f443ebc2aa39605641be1 - - -] Failed to run task
cinder.scheduler.flows.create_volume.ScheduleCreateVolumeTask;volume:create: No valid host was found. No weighed
hosts available](https://image.slidesharecdn.com/dockeronopenstackoscv4-150309083842-conversion-gate01/85/Docker-on-openstack-by-OpenSource-Consulting-7-320.jpg)
![8
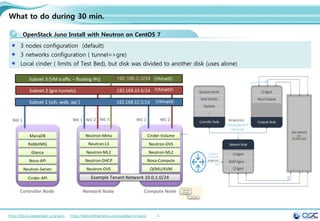
openstack 구축시 log 보는법
conf 파일에 verbose=true 옵션을 걸어 더 상세히 볼수 있음.
http://docs.openstack.org/juno http://behindtheracks.com/category/juno/
verbose=true option 적용시 (/var/log/messages)
Mar 13 06:20:50 juno-controller cinder-api: 2015-03-13 06:20:50.230 18615 INFO cinder.api.v1.volumes [req-
00223525-0c03-4c5d-ae9b-690ae0a10e72 d13d86ad609d4a9a8d9a84b36b954a69 3c402245243f443ebc2aa39605641be1 - - -]
Create volume of 2 GB
Mar 13 06:20:50 juno-controller cinder-api: 2015-03-13 06:20:50.620 18615 INFO
oslo.messaging._drivers.impl_rabbit [req-00223525-0c03-4c5d-ae9b-690ae0a10e72
d13d86ad609d4a9a8d9a84b36b954a69 3c402245243f443ebc2aa39605641be1 - - -] Connecting to AMQP server on
192.168.32.181:5672
Mar 13 06:20:50 juno-controller cinder-api: 2015-03-13 06:20:50.643 18615 INFO
oslo.messaging._drivers.impl_rabbit [req-00223525-0c03-4c5d-ae9b-690ae0a10e72
d13d86ad609d4a9a8d9a84b36b954a69 3c402245243f443ebc2aa39605641be1 - - -] Connected to AMQP server on
192.168.32.181:5672
Mar 13 06:20:50 juno-controller cinder-api: 2015-03-13 06:20:50.686 18615 INFO cinder.api.v1.volumes [req-
00223525-0c03-4c5d-ae9b-690ae0a10e72 d13d86ad609d4a9a8d9a84b36b954a69 3c402245243f443ebc2aa39605641be1 - - -]
vol={'migration_status': None, 'availability_zone': 'nova', 'terminated_at': None, 'reservations':
['01680237-32b1-4bcb-a3d4-c17b46837298', 'dd9280a1-7232-4aba-acf0-23aef02c34a9'], 'updated_at': None,
'provider_geometry': None, 'replication_extended_status': None, 'replication_status': 'disabled',
'snapshot_id': None, 'ec2_id': None, 'mountpoint': None, 'deleted_at': None, 'id': '37d5a43a-3f6c-4880-91c6-
7fba7c434211', 'size': 2, 'user_id': u'd13d86ad609d4a9a8d9a84b36b954a69', 'attach_time': None,
'source_replicaid': None, 'attached_host': None, 'display_description': None, 'volume_admin_metadata': [],
'project_id': u'3c402245243f443ebc2aa39605641be1', 'launched_at': None, 'scheduled_at': None, 'status':
'creating', 'volume_type_id': None, 'deleted': False, 'provider_location': None, 'host': None,
'consistencygroup_id': None, 'source_volid': None, 'provider_auth': None, 'display_name': u'test2',
'instance_uuid': None, 'bootable': False, 'created_at': datetime.datetime(2015, 3, 13, 10, 20, 50, 562087),
'attach_status': 'detached', 'volume_type': None, 'consistencygroup': None, 'volume_metadata': [], '_name_id':
None, 'encryption_key_id': None, 'replication_driver_data': None, 'metadata': {}}
Mar 13 06:20:50 juno-controller cinder-api: 2015-03-13 06:20:50.700 18615 INFO cinder.api.openstack.wsgi
[req-00223525-0c03-4c5d-ae9b-690ae0a10e72 d13d86ad609d4a9a8d9a84b36b954a69 3c402245243f443ebc2aa39605641be1 -
- -] http://192.168.32.181:8776/v1/3c402245243f443ebc2aa39605641be1/volumes returned with HTTP 200](https://image.slidesharecdn.com/dockeronopenstackoscv4-150309083842-conversion-gate01/85/Docker-on-openstack-by-OpenSource-Consulting-8-320.jpg)
![9
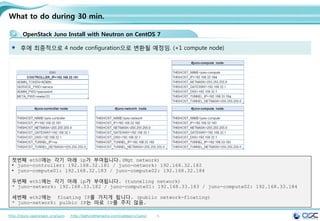
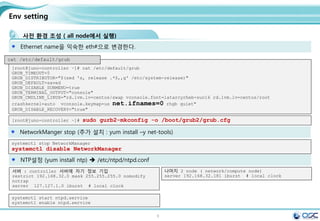
Env setting
사전 환경 조성 ( all node에서 실행)
[root@juno-controller ~]# cat /etc/default/grub
GRUB_TIMEOUT=5
GRUB_DISTRIBUTOR="$(sed 's, release .*$,,g' /etc/system-release)"
GRUB_DEFAULT=saved
GRUB_DISABLE_SUBMENU=true
GRUB_TERMINAL_OUTPUT="console"
GRUB_CMDLINE_LINUX="rd.lvm.lv=centos/swap vconsole.font=latarcyrheb-sun16 rd.lvm.lv=centos/root
crashkernel=auto vconsole.keymap=us net.ifnames=0 rhgb quiet"
GRUB_DISABLE_RECOVERY="true"
Ethernet name을 익숙한 eth#으로 변경한다.
cat /etc/default/grub
[root@juno-controller ~]# sudo gurb2-mkconfig -o /boot/grub2/grub.cfg
systemctl stop NetworkManager
systemctl disable NetworkManager
NetworkManger stop (추가 설치 : yum install –y net-tools)
서버 : controller 서버에 자기 정보 기입
restrict 192.168.32.0 mask 255.255.255.0 nomodify
notrap
server 127.127.1.0 iburst # local clock
NTP설정 (yum install ntp) /etc/ntp.conf
나머지 2 node ( network/compute node)
server 192.168.32.181 iburst # local clock
systemctl start ntpd.service
systemctl enable ntpd.service](https://image.slidesharecdn.com/dockeronopenstackoscv4-150309083842-conversion-gate01/85/Docker-on-openstack-by-OpenSource-Consulting-9-320.jpg)
![11
Env setting
IP setting
#!/bin/bash
#get primary NIC info
for i in $(ls /sys/class/net); do
NIC=$i
MY_MAC=$(cat /sys/class/net/$i/address)
if [ "$(cat /sys/class/net/$i/ifindex)" == '2' ]; then
#setup the IP configuration for management NIC
sed -i.bak "s/dhcp/none/g" /etc/sysconfig/network-scripts/ifcfg-$NIC
sed -i "s/HWADDR/#HWADDR/g" /etc/sysconfig/network-scripts/ifcfg-$NIC
sed -i "/#HWADDR/a HWADDR="$MY_MAC"" /etc/sysconfig/network-scripts/ifcfg-$NIC
sed -i "s/UUID/#UUID/g" /etc/sysconfig/network-scripts/ifcfg-$NIC
echo "IPADDR="$THISHOST_IP"" >> /etc/sysconfig/network-scripts/ifcfg-$NIC
echo "PREFIX="$THISHOST_NETMASK"" >> /etc/sysconfig/network-scripts/ifcfg-$NIC
echo "GATEWAY="$THISHOST_GATEWAY"" >> /etc/sysconfig/network-scripts/ifcfg-$NIC
echo "DNS1="$THISHOST_DNS"" >> /etc/sysconfig/network-scripts/ifcfg-$NIC
mv /etc/sysconfig/network-scripts/ifcfg-$NIC.bak .
fi
if [ "$(cat /sys/class/net/$i/ifindex)" == '3' ]; then
#create config file for Tunnel NIC
echo "HWADDR="$MY_MAC"" > /etc/sysconfig/network-scripts/ifcfg-$NIC
echo "TYPE="Ethernet"" >> /etc/sysconfig/network-scripts/ifcfg-$NIC
echo "BOOTPROTO="none"" >> /etc/sysconfig/network-scripts/ifcfg-$NIC
echo "IPV4_FAILURE_FATAL="no"" >> /etc/sysconfig/network-scripts/ifcfg-$NIC
echo "NAME="$NIC"" >> /etc/sysconfig/network-scripts/ifcfg-$NIC
echo "ONBOOT="yes"" >> /etc/sysconfig/network-scripts/ifcfg-$NIC
echo "IPADDR="$THISHOST_TUNNEL_IP"" >> /etc/sysconfig/network-scripts/ifcfg-$NIC
echo "PREFIX="$THISHOST_TUNNEL_NETMASK"" >> /etc/sysconfig/network-scripts/ifcfg-$NIC
fi
if [ "$(cat /sys/class/net/$i/ifindex)" == '4' ]; then
#create config file for External NIC
echo "HWADDR="$MY_MAC"" > /etc/sysconfig/network-scripts/ifcfg-$NIC
echo "TYPE="Ethernet"" >> /etc/sysconfig/network-scripts/ifcfg-$NIC
echo "BOOTPROTO="none"" >> /etc/sysconfig/network-scripts/ifcfg-$NIC
echo "IPV4_FAILURE_FATAL="no"" >> /etc/sysconfig/network-scripts/ifcfg-$NIC
echo "NAME="$NIC"" >> /etc/sysconfig/network-scripts/ifcfg-$NIC
echo "ONBOOT="yes"" >> /etc/sysconfig/network-scripts/ifcfg-$NIC
fi
done
먼저 각 node에서 env.sh를 실행한다. 그리고 아래대로 network-sciprt를 실행한다.
All node
#setup hostname
cp -f /dev/null /etc/hostname
echo " $THISHOST_NAME " >
/etc/hostname
echo "$THISHOST_IP
$THISHOST_NAME" >> /etc/hosts](https://image.slidesharecdn.com/dockeronopenstackoscv4-150309083842-conversion-gate01/85/Docker-on-openstack-by-OpenSource-Consulting-11-320.jpg)
![12
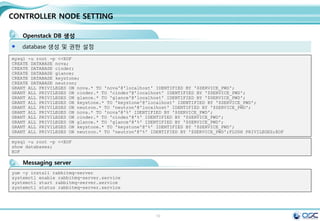
CONTROLLER NODE SETTING
Openstack DB setting
yum -y install mariadb mariadb-server MySQL-python
controller node = controller + MariaDB,RabbitMQ,Glance,NOVA api/scheduler,Neutron api, cinder api
egrep -v "^#|^$" /etc/my.cnf
[mysqld]
bind-address = 192.168.32.181
default-storage-engine = innodb
innodb_file_per_table
collation-server = utf8_general_ci
init-connect = 'SET NAMES utf8'
character-set-server = utf8
sed -i.bak "10i
bind-address = $CONTROLLER_IPn
default-storage-engine =
innodbn
innodb_file_per_tablen
collation-server =
utf8_general_cin
init-connect = 'SET NAMES
utf8'n
character-set-server = utf8n
" /etc/my.cnf
#edit /etc/my.cnf
systemctl enable mariadb.service
systemctl start mariadb.service
mysql_secure_installation # mariadb 암호 설정
Enter current password for root (enter for none): Enter
OK, successfully used password, moving on...
Setting the root password ensures that nobody can log into the MariaDB
root user without the proper authorisation.
Set root password? [Y/n] Y
New password: password ; Re-enter new password: password
Password updated successfully!
Reloading privilege tables..
... Success! # Enter *3](https://image.slidesharecdn.com/dockeronopenstackoscv4-150309083842-conversion-gate01/85/Docker-on-openstack-by-OpenSource-Consulting-12-320.jpg)

![14
CONTROLLER NODE SETTING
keystone 설치
keystone은 인증을 위한 서비스
yum -y install openstack-keystone python-keystoneclient
[DEFAULT]
# admin token 설정
admin_token=ADMIN
[database]
# database 접근 정보
connection =
mysql://keystone:service@192.168.32.181/keyston
e
[token]
#uuid token provider와 sql driver 정의
provider =
keystone.token.providers.uuid.Provider
driver =
keystone.token.persistence.backends.sql.Token
sed -i.bak
"s/#admin_token=ADMIN/admin_token=$ADMIN_TOKEN/g"
/etc/keystone/keystone.conf
sed -i "/[database]/a
connection =
mysql://keystone:$SERVICE_PWD@$CONTROLLER_IP/keyston
e" /etc/keystone/keystone.conf
sed -i "/[token]/a
provider = keystone.token.providers.uuid.Providern
driver =
keystone.token.persistence.backends.sql.Tokenn"
/etc/keystone/keystone.conf
sed -i "/[revoke]/a
driver =
keystone.contrib.revoke.backends.sql.Revoken"
/etc/keystone/keystone.conf
#edit /etc/keystone.conf
keystone-manage pki_setup --keystone-user keystone --keystone-group keystone # SSL PKI key 생성
chown -R keystone:keystone /var/log/keystone
chown -R keystone:keystone /etc/keystone/ssl
chmod -R o-rwx /etc/keystone/ssl
su -s /bin/sh -c "keystone-manage db_sync" keystone # 테이블 생성
#start keystone
systemctl enable openstack-keystone.service
systemctl start openstack-keystone.service
egrep -v "^#|^$" /etc/keystone/keystone.conf](https://image.slidesharecdn.com/dockeronopenstackoscv4-150309083842-conversion-gate01/85/Docker-on-openstack-by-OpenSource-Consulting-14-320.jpg)

![17
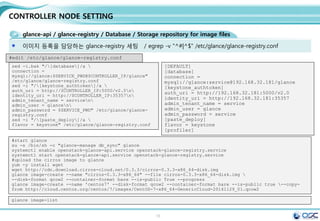
CONTROLLER NODE SETTING
glance-api / glance-registry / Database / Storage repository for image files
Glance는 인스턴스의 운영제제 이미지 파일을 관리한다.
yum -y install openstack-glance python-glanceclient
[DEFAULT]
[database]
connection =
mysql://glance:service@192.168.32.181/glance
[keystone_authtoken]
auth_uri = http://192.168.32.181:5000/v2.0
identity_uri = http://192.168.32.181:35357
admin_tenant_name = service
admin_user = glance
admin_password = service
[paste_deploy]
flavor = keystone
[glance_store]
default_store = file
filesystem_store_datadir=/var/lib/glance/im
ages/ # Cluster native mount point
sed -i.bak "/[database]/a
connection =
mysql://glance:$SERVICE_PWD@$CONTROLLER_IP/glance"
/etc/glance/glance-api.conf
sed -i "/[keystone_authtoken]/a
auth_uri = http://$CONTROLLER_IP:5000/v2.0n
identity_uri = http://$CONTROLLER_IP:35357n
admin_tenant_name = servicen
admin_user = glancen
admin_password = $SERVICE_PWD" /etc/glance/glance-
api.conf
sed -i "/[paste_deploy]/a
flavor = keystone" /etc/glance/glance-api.conf
sed -i "/[glance_store]/a
default_store = filen
filesystem_store_datadir = /var/lib/glance/images/"
/etc/glance/glance-api.conf
#edit /etc/glance/glance-api.conf
keystone user-create --name glance --pass $SERVICE_PWD
keystone user-role-add --user glance --tenant service --role admin
keystone service-create --name glance --type image
--description "OpenStack Image Service"
keystone endpoint-create
--service-id $(keystone service-list | awk '/ image / {print $2}')
--publicurl http://$CONTROLLER_IP:9292
--internalurl http://$CONTROLLER_IP:9292
--adminurl http://$CONTROLLER_IP:9292
--region regionOne
egrep -v "^#|^$" /etc/glance/glance-api.conf](https://image.slidesharecdn.com/dockeronopenstackoscv4-150309083842-conversion-gate01/85/Docker-on-openstack-by-OpenSource-Consulting-17-320.jpg)
![18
CONTROLLER NODE SETTING
glance-api / glance-registry / Database / Storage repository for image files
이미지 등록을 담당하는 glance-registry 세팅 /
[DEFAULT]
[database]
connection =
mysql://glance:service@192.168.32.181/glance
[keystone_authtoken]
auth_uri = http://192.168.32.181:5000/v2.0
identity_uri = http://192.168.32.181:35357
admin_tenant_name = service
admin_user = glance
admin_password = service
[paste_deploy]
flavor = keystone
[profiler]
sed -i.bak "/[database]/a
connection =
mysql://glance:$SERVICE_PWD@$CONTROLLER_IP/glance"
/etc/glance/glance-registry.conf
sed -i "/[keystone_authtoken]/a
auth_uri = http://$CONTROLLER_IP:5000/v2.0n
identity_uri = http://$CONTROLLER_IP:35357n
admin_tenant_name = servicen
admin_user = glancen
admin_password = $SERVICE_PWD" /etc/glance/glance-
registry.conf
sed -i "/[paste_deploy]/a
flavor = keystone" /etc/glance/glance-registry.conf
#edit /etc/glance/glance-registry.conf
#start glance
su -s /bin/sh -c "glance-manage db_sync" glance
systemctl enable openstack-glance-api.service openstack-glance-registry.service
systemctl start openstack-glance-api.service openstack-glance-registry.service
#upload the cirros image to glance
yum -y install wget
wget http://cdn.download.cirros-cloud.net/0.3.3/cirros-0.3.3-x86_64-disk.img
glance image-create --name "cirros-0.3.3-x86_64" --file cirros-0.3.3-x86_64-disk.img
--disk-format qcow2 --container-format bare --is-public True --progress
glance image-create --name 'centos7' --disk-format qcow2 --container-format bare --is-public true --copy-
from http://cloud.centos.org/centos/7/images/CentOS-7-x86_64-GenericCloud-20141129_01.qcow2
glance image-list
egrep -v "^#|^$" /etc/glance/glance-registry.conf](https://image.slidesharecdn.com/dockeronopenstackoscv4-150309083842-conversion-gate01/85/Docker-on-openstack-by-OpenSource-Consulting-18-320.jpg)
![20
CONTROLLER NODE SETTING
nova-api / nova-compute /nova-scheduler /nova-conductor module
Nova.conf 파일 구성 / egrep -v "^#|^$" /etc/nova/nova.conf
[DEFAULT]
rpc_backend = rabbit
rabbit_host = 192.168.32.181
auth_strategy = keystone
my_ip = 192.168.32.181
vncserver_listen = 192.168.32.181
vncserver_proxyclient_address = 192.168.32.181
network_api_class = nova.network.neutronv2.api.API
security_group_api = neutron
linuxnet_interface_driver =
nova.network.linux_net.LinuxOVSInterfaceDriver
firewall_driver = nova.virt.firewall.NoopFirewallDriver
[baremetal]
[glance]
host = 192.168.32.181
[hyperv]
[database]
connection = mysql://nova:service@192.168.32.181/nova
[keystone_authtoken]
auth_uri = http://192.168.32.181:5000/v2.0
identity_uri = http://192.168.32.181:35357
admin_tenant_name = service
admin_user = nova
admin_password = service
[neutron]
url = http://192.168.32.181:9696
auth_strategy = keystone
admin_auth_url = http://192.168.32.181:35357/v2.0
admin_tenant_name = service
admin_username = neutron
admin_password = service
service_metadata_proxy = True
metadata_proxy_shared_secret = meta123
sed -i.bak "/[database]/a
connection = mysql://nova:$SERVICE_PWD@$CONTROLLER_IP/nova"
/etc/nova/nova.conf
sed -i "/[DEFAULT]/a
rpc_backend = rabbitn
rabbit_host = $CONTROLLER_IPn
auth_strategy = keystonen
my_ip = $CONTROLLER_IPn
vncserver_listen = $CONTROLLER_IPn
vncserver_proxyclient_address = $CONTROLLER_IPn
network_api_class = nova.network.neutronv2.api.APIn
security_group_api = neutronn
linuxnet_interface_driver =
nova.network.linux_net.LinuxOVSInterfaceDrivern
firewall_driver = nova.virt.firewall.NoopFirewallDriver"
/etc/nova/nova.conf
sed -i "/[keystone_authtoken]/i
[database]nconnection = mysql://nova:$SERVICE_PWD@$CONTROLLER_IP/nova"
/etc/nova/nova.conf
sed -i "/[keystone_authtoken]/a
auth_uri = http://$CONTROLLER_IP:5000/v2.0n
identity_uri = http://$CONTROLLER_IP:35357n
admin_tenant_name = servicen
admin_user = novan
admin_password = $SERVICE_PWD" /etc/nova/nova.conf
sed -i "/[glance]/a host = $CONTROLLER_IP" /etc/nova/nova.conf
sed -i "/[neutron]/a
url = http://$CONTROLLER_IP:9696n
auth_strategy = keystonen
admin_auth_url = http://$CONTROLLER_IP:35357/v2.0n
admin_tenant_name = servicen
admin_username = neutronn
admin_password = $SERVICE_PWDn
service_metadata_proxy = Truen
metadata_proxy_shared_secret = $META_PWD" /etc/nova/nova.conf
#edit /etc/nova/nova.conf](https://image.slidesharecdn.com/dockeronopenstackoscv4-150309083842-conversion-gate01/85/Docker-on-openstack-by-OpenSource-Consulting-20-320.jpg)
![22
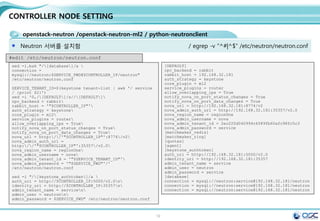
CONTROLLER NODE SETTING
openstack-neutron /openstack-neutron-ml2 / python-neutronclient
Neutron 서버를 설치함 / egrep -v "^#|^$" /etc/neutron/neutron.conf
[DEFAULT]
rpc_backend = rabbit
rabbit_host = 192.168.32.181
auth_strategy = keystone
core_plugin = ml2
service_plugins = router
allow_overlapping_ips = True
notify_nova_on_port_status_changes = True
notify_nova_on_port_data_changes = True
nova_url = http://192.168.32.181:8774/v2
nova_admin_auth_url = http://192.168.32.181:35357/v2.0
nova_region_name = regionOne
nova_admin_username = nova
nova_admin_tenant_id = 2ec220d040994c4589fb60afc98fc5c3
nova_admin_password = service
[matchmaker_redis]
[matchmaker_ring]
[quotas]
[agent]
[keystone_authtoken]
auth_uri = http://192.168.32.181:5000/v2.0
identity_uri = http://192.168.32.181:35357
admin_tenant_name = service
admin_user = neutron
admin_password = service
[database]
connection = mysql://neutron:service@192.168.32.181/neutron
connection = mysql://neutron:service@192.168.32.181/neutron
connection = mysql://neutron:service@192.168.32.181/neutron
sed -i.bak "/[database]/a
connection =
mysql://neutron:$SERVICE_PWD@$CONTROLLER_IP/neutron"
/etc/neutron/neutron.conf
SERVICE_TENANT_ID=$(keystone tenant-list | awk '/ service
/ {print $2}')
sed -i '0,/[DEFAULT]/s//[DEFAULT]
rpc_backend = rabbit
rabbit_host = '"$CONTROLLER_IP"'
auth_strategy = keystone
core_plugin = ml2
service_plugins = router
allow_overlapping_ips = True
notify_nova_on_port_status_changes = True
notify_nova_on_port_data_changes = True
nova_url = http://'"$CONTROLLER_IP"':8774/v2
nova_admin_auth_url =
http://'"$CONTROLLER_IP"':35357/v2.0
nova_region_name = regionOne
nova_admin_username = nova
nova_admin_tenant_id = '"$SERVICE_TENANT_ID"'
nova_admin_password = '"$SERVICE_PWD"'/'
/etc/neutron/neutron.conf
sed -i "/[keystone_authtoken]/a
auth_uri = http://$CONTROLLER_IP:5000/v2.0n
identity_uri = http://$CONTROLLER_IP:35357n
admin_tenant_name = servicen
admin_user = neutronn
admin_password = $SERVICE_PWD" /etc/neutron/neutron.conf
#edit /etc/neutron/neutron.conf](https://image.slidesharecdn.com/dockeronopenstackoscv4-150309083842-conversion-gate01/85/Docker-on-openstack-by-OpenSource-Consulting-22-320.jpg)
![23
CONTROLLER NODE SETTING
openstack-neutron /openstack-neutron-ml2 / python-neutronclient
Neutron 기본 plug-in인 ML2 사용 / GRE/Openvswitch 사용
/ egrep -v "^#|^$" /etc/neutron/plugins/ml2/ml2_conf.ini
[ml2]
type_drivers = flat,gre
tenant_network_types = gre
mechanism_drivers = openvswitch
[ml2_type_gre]
tunnel_id_ranges = 1:1000
[securitygroup]
enable_security_group = True
enable_ipset = True
firewall_driver =
neutron.agent.linux.iptables_firewall.OVSHybridIptablesFire
wallDriver
#edit /etc/neutron/plugins/ml2/ml2_conf.ini
sed -i "/[ml2]/a
type_drivers = flat,gren
tenant_network_types = gren
mechanism_drivers = openvswitch"
/etc/neutron/plugins/ml2/ml2_conf.ini
sed -i "/[ml2_type_gre]/a
tunnel_id_ranges = 1:1000"
/etc/neutron/plugins/ml2/ml2_conf.ini
sed -i "/[securitygroup]/a
enable_security_group = Truen
enable_ipset = Truen
firewall_driver =
neutron.agent.linux.iptables_firewall.OVSHybridIptablesFir
ewallDriver" /etc/neutron/plugins/ml2/ml2_conf.ini
#edit /etc/neutron/plugins/ml2/ml2_conf.ini
#start neutron
ln -s /etc/neutron/plugins/ml2/ml2_conf.ini /etc/neutron/plugin.ini
su -s /bin/sh -c "neutron-db-manage --config-file /etc/neutron/neutron.conf
--config-file /etc/neutron/plugins/ml2/ml2_conf.ini upgrade juno" neutron
systemctl restart openstack-nova-api.service openstack-nova-scheduler.service
openstack-nova-conductor.service
systemctl enable neutron-server.service
systemctl start neutron-server.service](https://image.slidesharecdn.com/dockeronopenstackoscv4-150309083842-conversion-gate01/85/Docker-on-openstack-by-OpenSource-Consulting-23-320.jpg)
![24
CONTROLLER NODE SETTING
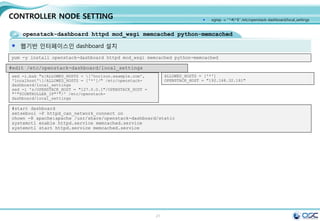
openstack-dashboard httpd mod_wsgi memcached python-memcached
웹기반 인터페이스인 dashboard 설치
ALLOWED_HOSTS = ['*']
OPENSTACK_HOST = "192.168.32.181"
sed -i.bak "s/ALLOWED_HOSTS = ['horizon.example.com',
'localhost']/ALLOWED_HOSTS = ['*']/" /etc/openstack-
dashboard/local_settings
sed -i 's/OPENSTACK_HOST = "127.0.0.1"/OPENSTACK_HOST =
"'"$CONTROLLER_IP"'"/' /etc/openstack-
dashboard/local_settings
#edit /etc/openstack-dashboard/local_settings
yum -y install openstack-dashboard httpd mod_wsgi memcached python-memcached
#start dashboard
setsebool -P httpd_can_network_connect on
chown -R apache:apache /usr/share/openstack-dashboard/static
systemctl enable httpd.service memcached.service
systemctl start httpd.service memcached.service
egrep -v "^#|^$" /etc/openstack-dashboard/local_settings](https://image.slidesharecdn.com/dockeronopenstackoscv4-150309083842-conversion-gate01/85/Docker-on-openstack-by-OpenSource-Consulting-24-320.jpg)
![26
CONTROLLER NODE SETTING
openstack-cinder/ python-cinderclient / python-oslo-db
cinder controller 설치 / egrep -v "^#|^$" /etc/cinder/cinder.conf
[DEFAULT]
rpc_backend = rabbit
rabbit_host = 192.168.32.181
auth_strategy = keystone
my_ip = 192.168.32.181
[database]
connection = mysql://cinder:service@192.168.32.181/cinder
[keystone_authtoken]
auth_uri = http://192.168.32.181:5000/v2.0
identity_uri = http://192.168.32.181:35357
admin_tenant_name = service
admin_user = cinder
admin_password = service
sed -i.bak "/[database]/a connection =
mysql://cinder:$SERVICE_PWD@$CONTROLLER_IP/cinde
r" /etc/cinder/cinder.conf
sed -i "0,/[DEFAULT]/a
rpc_backend = rabbitn
rabbit_host = $CONTROLLER_IPn
auth_strategy = keystonen
my_ip = $CONTROLLER_IP" /etc/cinder/cinder.conf
sed -i "/[keystone_authtoken]/a
auth_uri = http://$CONTROLLER_IP:5000/v2.0n
identity_uri = http://$CONTROLLER_IP:35357n
admin_tenant_name = servicen
admin_user = cindern
admin_password = $SERVICE_PWD"
/etc/cinder/cinder.conf
#edit /etc/cinder/cinder.conf
egrep -v "^#|^$" /etc/cinder/cinder.conf](https://image.slidesharecdn.com/dockeronopenstackoscv4-150309083842-conversion-gate01/85/Docker-on-openstack-by-OpenSource-Consulting-26-320.jpg)

![29
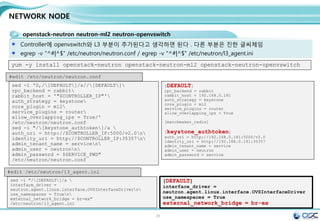
NETWORK NODE
openstack-neutron neutron-ml2 neutron-openvswitch
Controller에 openvswitch와 L3 부분이 추가된다고 생각하면 된다 . 다른 부분은 진한 글씨체임
egrep -v "^#|^$" /etc/neutron/neutron.conf / egrep -v "^#|^$" /etc/neutron/l3_agent.ini
yum -y install openstack-neutron openstack-neutron-ml2 openstack-neutron-openvswitch
[DEFAULT]
rpc_backend = rabbit
rabbit_host = 192.168.0.181
auth_strategy = keystone
core_plugin = ml2
service_plugins = router
allow_overlapping_ips = True
[matchmaker_redis]
[keystone_authtoken]
auth_uri = http://192.168.0.181:5000/v2.0
identity_uri = http://192.168.0.181:35357
admin_tenant_name = service
admin_user = neutron
admin_password = service
sed -i '0,/[DEFAULT]/s//[DEFAULT]
rpc_backend = rabbit
rabbit_host = '"$CONTROLLER_IP"'
auth_strategy = keystone
core_plugin = ml2
service_plugins = router
allow_overlapping_ips = True/'
/etc/neutron/neutron.conf
sed -i "/[keystone_authtoken]/a
auth_uri = http://$CONTROLLER_IP:5000/v2.0n
identity_uri = http://$CONTROLLER_IP:35357n
admin_tenant_name = servicen
admin_user = neutronn
admin_password = $SERVICE_PWD"
/etc/neutron/neutron.conf
#edit /etc/neutron/neutron.conf
[DEFAULT]
interface_driver =
neutron.agent.linux.interface.OVSInterfaceDriver
use_namespaces = True
external_network_bridge = br-ex
sed -i "/[DEFAULT]/a
interface_driver =
neutron.agent.linux.interface.OVSInterfaceDrivern
use_namespaces = Truen
external_network_bridge = br-ex"
/etc/neutron/l3_agent.ini
#edit /etc/neutron/l3_agent.ini](https://image.slidesharecdn.com/dockeronopenstackoscv4-150309083842-conversion-gate01/85/Docker-on-openstack-by-OpenSource-Consulting-29-320.jpg)
![30
NETWORK NODE
openstack-neutron neutron-ml2 neutron-openvswitch
Openvswitch setting / egrep -v "^#|^$" /etc/neutron/plugins/ml2/ml2_conf.ini
[ml2]
type_drivers = flat,gre
tenant_network_types = gre
mechanism_drivers = openvswitch
[ml2_type_flat]
flat_networks = external
[ml2_type_vlan]
[ml2_type_gre]
tunnel_id_ranges = 1:1000
[ml2_type_vxlan]
[securitygroup]
enable_security_group = True
enable_ipset = True
firewall_driver =
neutron.agent.linux.iptables_firewall.OVSHybridIp
tablesFirewallDriver
[ovs]
local_ip = 192.168.33.182
enable_tunneling = True
bridge_mappings = external:br-ex
[agent]
tunnel_types = gre
sed -i "/[ml2]/a
type_drivers = flat,gren
tenant_network_types = gren
mechanism_drivers = openvswitch"
/etc/neutron/plugins/ml2/ml2_conf.ini
sed -i "/[ml2_type_flat]/a
flat_networks = external"
/etc/neutron/plugins/ml2/ml2_conf.ini
sed -i "/[ml2_type_gre]/a
tunnel_id_ranges = 1:1000"
/etc/neutron/plugins/ml2/ml2_conf.ini
sed -i "/[securitygroup]/a
enable_security_group = Truen
enable_ipset = Truen
firewall_driver =
neutron.agent.linux.iptables_firewall.OVSHybridI
ptablesFirewallDrivern
[ovs]n
local_ip = $THISHOST_TUNNEL_IPn
enable_tunneling = Truen
bridge_mappings = external:br-exn
[agent]n
tunnel_types = gre"
/etc/neutron/plugins/ml2/ml2_conf.ini
#edit /etc/neutron/plugins/ml2/ml2_conf.ini](https://image.slidesharecdn.com/dockeronopenstackoscv4-150309083842-conversion-gate01/85/Docker-on-openstack-by-OpenSource-Consulting-30-320.jpg)
![31
NETWORK NODE
openstack-neutron neutron-ml2 neutron-openvswitch
Openvswitch setting egrep -v "^#|^$" / etc/neutron/dhcp_agent.ini
[root@juno-network neutron]# egrep -v
"^#|^$" /etc/neutron/l3_agent.ini
[DEFAULT]
interface_driver =
neutron.agent.linux.interface.OVSInterface
Driver
use_namespaces = True
external_network_bridge = br-ex
interface_driver =
neutron.agent.linux.interface.OVSInterface
Driver
use_namespaces = True
external_network_bridge = br-ex
sed -i "/[DEFAULT]/a
interface_driver =
neutron.agent.linux.interface.OVSInterfaceDriver
n
use_namespaces = Truen
external_network_bridge = br-ex"
/etc/neutron/l3_agent.ini
sed -i "/[DEFAULT]/a
interface_driver =
neutron.agent.linux.interface.OVSInterfaceDriver
n
dhcp_driver =
neutron.agent.linux.dhcp.Dnsmasqn
use_namespaces = True"
/etc/neutron/dhcp_agent.ini
#edit /etc/neutron/dhcp_agent.ini](https://image.slidesharecdn.com/dockeronopenstackoscv4-150309083842-conversion-gate01/85/Docker-on-openstack-by-OpenSource-Consulting-31-320.jpg)
![32
NETWORK NODE
openstack-neutron neutron-ml2 neutron-openvswitch
metadata_agent 정보 입력
[DEFAULT]
auth_url = http://192.168.32.181:5000/v2.0
auth_region = regionOne
admin_tenant_name = service
admin_user = neutron
admin_password = service
nova_metadata_ip = 192.168.32.181
metadata_proxy_shared_secret = meta123
sed -i "s/auth_url/#auth_url/g"
/etc/neutron/metadata_agent.ini
sed -i "s/auth_region/#auth_region/g"
/etc/neutron/metadata_agent.ini
sed -i
"s/admin_tenant_name/#admin_tenant_name/g"
/etc/neutron/metadata_agent.ini
sed -i "s/admin_user/#admin_user/g"
/etc/neutron/metadata_agent.ini
sed -i "s/admin_password/#admin_password/g"
/etc/neutron/metadata_agent.ini
sed -i "/[DEFAULT]/a
auth_url = http://$CONTROLLER_IP:5000/v2.0n
auth_region = regionOnen
admin_tenant_name = servicen
admin_user = neutronn
admin_password = $SERVICE_PWDn
nova_metadata_ip = $CONTROLLER_IPn
metadata_proxy_shared_secret = $META_PWD"
/etc/neutron/metadata_agent.ini
#edit /etc/neutron/metadata_agent.ini
egrep -v "^#|^$" /etc/neutron/metadata_agent.ini](https://image.slidesharecdn.com/dockeronopenstackoscv4-150309083842-conversion-gate01/85/Docker-on-openstack-by-OpenSource-Consulting-32-320.jpg)
![33
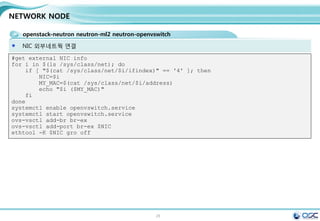
NETWORK NODE
openstack-neutron neutron-ml2 neutron-openvswitch
NIC 외부네트웍 연결
#get external NIC info
for i in $(ls /sys/class/net); do
if [ "$(cat /sys/class/net/$i/ifindex)" == '4' ]; then
NIC=$i
MY_MAC=$(cat /sys/class/net/$i/address)
echo "$i ($MY_MAC)"
fi
done
systemctl enable openvswitch.service
systemctl start openvswitch.service
ovs-vsctl add-br br-ex
ovs-vsctl add-port br-ex $NIC
ethtool -K $NIC gro off](https://image.slidesharecdn.com/dockeronopenstackoscv4-150309083842-conversion-gate01/85/Docker-on-openstack-by-OpenSource-Consulting-33-320.jpg)
![34
NETWORK NODE
openstack-neutron neutron-ml2 neutron-openvswitch
외부 nework setting
[root@net01 network-scripts]# cat ifcfg-eth2
#HWADDR=00:19:99:D5:AA:D0
TYPE=OVSPort
DEVICETYPE=ovs
OVS_BRIDGE=br-ex
BOOTPROTO=none
NAME=eth2
#UUID=33d13b63-9eba-4414-996a-75391a71fc6a
DEVICE=eth2
ONBOOT=yes
[root@net01 network-scripts]# cat ifcfg-br-ex
TYPE=OVSIntPort
OVS_BRIDGE=br-ex
DEVICETYPE=ovs
BOOTPROTO=none
IPADDR0=192.168.0.182
PREFIX0=24
DEFROUTE=yes
IPV4_FAILURE_FATAL=no
IPV6INIT=yes
IPV6_AUTOCONF=no
IPV6_DEFROUTE=yes
IPV6_FAILURE_FATAL=no
NAME=br-ex
#UUID=33d13b63-9eba-4414-996a-75391a71fc6a
DEVICE=br-ex
ONBOOT=yes
GATEWAY=192.168.0.1
DNS1=8.8.8.8
ln -s /etc/neutron/plugins/ml2/ml2_conf.ini /etc/neutron/plugin.ini
cp /usr/lib/systemd/system/neutron-openvswitch-agent.service
/usr/lib/systemd/system/neutron-openvswitch-agent.service.orig
sed -i 's,plugins/openvswitch/ovs_neutron_plugin.ini,plugin.ini,g'
/usr/lib/systemd/system/neutron-openvswitch-agent.service](https://image.slidesharecdn.com/dockeronopenstackoscv4-150309083842-conversion-gate01/85/Docker-on-openstack-by-OpenSource-Consulting-34-320.jpg)

![37
COMPUTE NODE
nova-compute sysfsutils libvirt-daemon-config-nwfilter
/etc/nova/nova.conf / egrep -v "^#|^$" /etc/nova/nova.conf
[DEFAULT]
rpc_backend = rabbit
rabbit_host = 192.168.32.181
auth_strategy = keystone
my_ip = 192.168.32.183
vnc_enabled = True
vncserver_listen = 0.0.0.0
vncserver_proxyclient_address = 192.168.32.183
novncproxy_base_url =
http://192.168.32.181:6080/vnc_auto.html
network_api_class = nova.network.neutronv2.api.API
security_group_api = neutron
linuxnet_interface_driver =
nova.network.linux_net.LinuxOVSInterfaceDriver
firewall_driver =
nova.virt.firewall.NoopFirewallDriver
[glance]
host = 192.168.32.181
[keystone_authtoken]
auth_uri = http://192.168.32.181:5000/v2.0
identity_uri = http://192.168.32.181:35357
admin_tenant_name = service
admin_user = nova
admin_password = service
[neutron]
url = http://192.168.32.181:9696
auth_strategy = keystone
admin_auth_url = http://192.168.32.181:35357/v2.0
admin_tenant_name = service
admin_username = neutron
admin_password = service
sed -i.bak "/[DEFAULT]/a
rpc_backend = rabbitn
rabbit_host = $CONTROLLER_IPn
auth_strategy = keystonen
my_ip = $THISHOST_IPn
vnc_enabled = Truen
vncserver_listen = 0.0.0.0n
vncserver_proxyclient_address = $THISHOST_IPn
novncproxy_base_url =
http://$CONTROLLER_IP:6080/vnc_auto.htmln
network_api_class =
nova.network.neutronv2.api.APIn
security_group_api = neutronn
linuxnet_interface_driver =
nova.network.linux_net.LinuxOVSInterfaceDrivern
firewall_driver =
nova.virt.firewall.NoopFirewallDriver"
/etc/nova/nova.conf
sed -i "/[keystone_authtoken]/a
auth_uri = http://$CONTROLLER_IP:5000/v2.0n
identity_uri = http://$CONTROLLER_IP:35357n
admin_tenant_name = servicen
admin_user = novan
admin_password = $SERVICE_PWD"
/etc/nova/nova.conf
sed -i "/[glance]/a host = $CONTROLLER_IP"
/etc/nova/nova.conf](https://image.slidesharecdn.com/dockeronopenstackoscv4-150309083842-conversion-gate01/85/Docker-on-openstack-by-OpenSource-Consulting-37-320.jpg)
![38
COMPUTE NODE
openstack-neutron-ml2 openstack-neutron-openvswitch
neutron seetting / egrep -v "^#|^$" /etc/neutron/neutron.conf
#install neutron
yum -y install openstack-neutron-ml2 openstack-neutron-openvswitch
[DEFAULT]
rpc_backend = rabbit
rabbit_host = 192.168.32.181
auth_strategy = keystone
core_plugin = ml2
service_plugins = router
allow_overlapping_ips = True
[keystone_authtoken]
auth_uri = http://192.168.32.181:5000/v2.0
identity_uri = http://192.168.32.181:35357
admin_tenant_name = service
admin_user = neutron
admin_password = service
sed -i '0,/[DEFAULT]/s//[DEFAULT]
rpc_backend = rabbitn
rabbit_host = '"$CONTROLLER_IP"'
auth_strategy = keystone
core_plugin = ml2
service_plugins = router
allow_overlapping_ips = True/'
/etc/neutron/neutron.conf
sed -i "/[keystone_authtoken]/a
auth_uri = http://$CONTROLLER_IP:5000/v2.0n
identity_uri = http://$CONTROLLER_IP:35357n
admin_tenant_name = servicen
admin_user = neutronn
admin_password = $SERVICE_PWD"
/etc/neutron/neutron.conf
#edit /etc/neutron/neutron.conf](https://image.slidesharecdn.com/dockeronopenstackoscv4-150309083842-conversion-gate01/85/Docker-on-openstack-by-OpenSource-Consulting-38-320.jpg)
![39
COMPUTE NODE
openstack-neutron-ml2 openstack-neutron-openvswitch
ml2_conf.ini 수정 / egrep -v "^#|^$" /etc/neutron/plugins/ml2/ml2_conf.ini
[ml2]
type_drivers = flat,gre
tenant_network_types = gre
mechanism_drivers = openvswitch
[ml2_type_gre]
tunnel_id_ranges = 1:1000
[securitygroup]
enable_security_group = True
enable_ipset = True
firewall_driver =
neutron.agent.linux.iptables_firewall.OVSHybridIp
tablesFirewallDriver
[ovs]
local_ip = 192.168.33.183
enable_tunneling = True
[agent]
tunnel_types = gre
sed -i "/[ml2]/a
type_drivers = flat,gren
tenant_network_types = gren
mechanism_drivers = openvswitch"
/etc/neutron/plugins/ml2/ml2_conf.ini
sed -i "/[ml2_type_gre]/a
tunnel_id_ranges = 1:1000"
/etc/neutron/plugins/ml2/ml2_conf.ini
sed -i "/[securitygroup]/a
enable_security_group = Truen
enable_ipset = Truen
firewall_driver =
neutron.agent.linux.iptables_firewall.OVSHybridI
ptablesFirewallDrivern
[ovs]n
local_ip = $THISHOST_TUNNEL_IPn
enable_tunneling = Truen
[agent]n
tunnel_types = gre"
/etc/neutron/plugins/ml2/ml2_conf.ini
#edit /etc/neutron/plugins/ml2/ml2_conf.ini
systemctl enable openvswitch.service
systemctl start openvswitch.service](https://image.slidesharecdn.com/dockeronopenstackoscv4-150309083842-conversion-gate01/85/Docker-on-openstack-by-OpenSource-Consulting-39-320.jpg)
![40
COMPUTE NODE
nova-compute node 구성
/etc/nova/nova.conf
[neutron]
url = http://192.168.32.181:9696
auth_strategy = keystone
admin_auth_url = http://192.168.32.181:35357/v2.0
admin_tenant_name = service
admin_username = neutron
admin_password = service
sed -i "/[neutron]/a
url = http://$CONTROLLER_IP:9696n
auth_strategy = keystonen
admin_auth_url =
http://$CONTROLLER_IP:35357/v2.0n
admin_tenant_name = servicen
admin_username = neutronn
admin_password = $SERVICE_PWD"
/etc/nova/nova.conf
#edit /etc/nova/nova.conf
ln -s /etc/neutron/plugins/ml2/ml2_conf.ini /etc/neutron/plugin.ini
cp /usr/lib/systemd/system/neutron-openvswitch-agent.service
/usr/lib/systemd/system/neutron-openvswitch-agent.service.orig
sed -i 's,plugins/openvswitch/ovs_neutron_plugin.ini,plugin.ini,g'
/usr/lib/systemd/system/neutron-openvswitch-agent.service
systemctl enable libvirtd.service openstack-nova-compute.service
systemctl start libvirtd.service
systemctl start openstack-nova-compute.service
systemctl enable neutron-openvswitch-agent.service
systemctl start neutron-openvswitch-agent.service
egrep -v "^#|^$" /etc/nova/nova.conf](https://image.slidesharecdn.com/dockeronopenstackoscv4-150309083842-conversion-gate01/85/Docker-on-openstack-by-OpenSource-Consulting-40-320.jpg)
![41
COMPUTE NODE
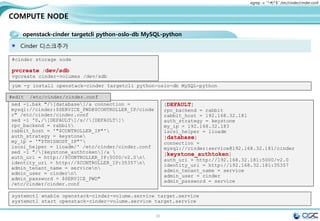
openstack-cinder targetcli python-oslo-db MySQL-python
Cinder 디스크추가
yum -y install openstack-cinder targetcli python-oslo-db MySQL-python
#cinder storage node
pvcreate /dev/sdb
vgcreate cinder-volumes /dev/sdb
[DEFAULT]
rpc_backend = rabbit
rabbit_host = 192.168.32.181
auth_strategy = keystone
my_ip = 192.168.32.183
iscsi_helper = lioadm
[database]
connection =
mysql://cinder:service@192.168.32.181/cinder
[keystone_authtoken]
auth_uri = http://192.168.32.181:5000/v2.0
identity_uri = http://192.168.32.181:35357
admin_tenant_name = service
admin_user = cinder
admin_password = service
sed -i.bak "/[database]/a connection =
mysql://cinder:$SERVICE_PWD@$CONTROLLER_IP/cinde
r" /etc/cinder/cinder.conf
sed -i '0,/[DEFAULT]/s//[DEFAULT]
rpc_backend = rabbit
rabbit_host = '"$CONTROLLER_IP"'
auth_strategy = keystone
my_ip = '"$THISHOST_IP"'
iscsi_helper = lioadm/' /etc/cinder/cinder.conf
sed -i "/[keystone_authtoken]/a
auth_uri = http://$CONTROLLER_IP:5000/v2.0n
identity_uri = http://$CONTROLLER_IP:35357n
admin_tenant_name = servicen
admin_user = cindern
admin_password = $SERVICE_PWD"
/etc/cinder/cinder.conf
#edit /etc/cinder/cinder.conf
egrep -v "^#|^$" /etc/cinder/cinder.conf](https://image.slidesharecdn.com/dockeronopenstackoscv4-150309083842-conversion-gate01/85/Docker-on-openstack-by-OpenSource-Consulting-41-320.jpg)
![42
COMPUTE NODE
openstack-cinder targetcli python-oslo-db MySQL-python
Cinder 디스크추가
sed -i 's/filter/#filter/g ' /etc/lvm/lvm.conf
sed -i "/devices {/a
filter = ["a/sd/","a/sdb/", "r/.*/"] "
/etc/lvm/lvm.conf
systemctl enable openstack-cinder-volume.service target.service
systemctl start openstack-cinder-volume.service target.service
egrep -v "^#|^$" /etc/cinder/cinder.conf
[root@juno-controller lvm]# grep filter
lvm.conf
filter = [ "a/sda/", "a/sdb/", "r/.*/"]
cinder create --display_name test3 2
[root@juno-compute cinder]# cinder list
+--------------------------------------+-----------+--------------+------+-------------+----------+-------------+
| ID | Status | Display Name | Size | Volume Type | Bootable | Attached to |
+--------------------------------------+-----------+--------------+------+-------------+----------+-------------+
| 35e69e09-015b-472e-a77c-a06f307beb92 | available | test3 | 2 | None | false
+--------------------------------------+-----------+--------------+------+-------------+----------+-------------+
[root@juno-compute cinder]# vgs
VG #PV #LV #SN Attr VSize VFree
centos 1 2 0 wz--n- 19.51g 0
cinder-volumes 1 1 0 wz--n- 50.00g 48.00g
[root@juno-compute cinder]# lvs
LV VG Attr LSize Pool Origin Data% Move Log Cpy%Sync
Convert
root centos -wi-ao---- 17.51g
swap centos -wi-ao---- 2.00g
volume-35e69e09-015b-472e-a77c-a06f307beb92 cinder-volumes -wi-a----- 2.00g](https://image.slidesharecdn.com/dockeronopenstackoscv4-150309083842-conversion-gate01/85/Docker-on-openstack-by-OpenSource-Consulting-42-320.jpg)
![43
Contents
3. docker 구축 기초 [ 30분]
4. 오픈스택에 docker를 연결 [ 30분]
1. Openstack 인프라 구축 (4 node 구성) [ 30분]
2. Openstack 위에 VM 생성 [ 20분 ]
5. Docker로 WEB서비스 구축 [ 15분]
6.
7. Docker로 jenkins 구현 [30분]
Openstack 위에 Docker로 WEB서비스 구축 [ 15분]](https://image.slidesharecdn.com/dockeronopenstackoscv4-150309083842-conversion-gate01/85/Docker-on-openstack-by-OpenSource-Consulting-43-320.jpg)

![45
Network만들기
Network 생성 / 외부 subnet 생성
[root@juno-controller ~]# Created a new network:
+---------------------------+--------------------------------------+
| Field | Value |
+---------------------------+--------------------------------------+
| admin_state_up | True |
| id | 74cea9a5-434c-4bff-89b7-a1e503b43d39 |
| name | ext-net |
| provider:network_type | gre |
| provider:physical_network | |
| provider:segmentation_id | 2 |
| router:external | True |
| shared | True |
| status | ACTIVE |
| subnets | |
| tenant_id | e7cb7856091d4d839031d79582c93a76 |
+---------------------------+--------------------------------------+
neutron net-create ext-net --shared --router:external True
neutron subnet-create ext-net --name ext-subnet --allocation-pool start=192.168.0.200,end=192.168.0.220
--disable-dhcp --gateway 192.168.0.1 192.168.0.0/24
Created a new subnet:
+-------------------+----------------------------------------------------+
| Field | Value |
+-------------------+----------------------------------------------------+
| allocation_pools | {"start": "192.168.0.200", "end": "192.168.0.220"} |
| cidr | 192.168.0.0/24 |
| dns_nameservers | |
| enable_dhcp | False |
| gateway_ip | 192.168.0.1 |
| host_routes | |
| id | d84f7826-ae27-420f-9f1d-da7261c76e0f |
| ip_version | 4 |
| ipv6_address_mode | |
| ipv6_ra_mode | |
| name | ext-subnet |
| network_id | 74cea9a5-434c-4bff-89b7-a1e503b43d39 |
| tenant_id | e7cb7856091d4d839031d79582c93a76 |
+-------------------+----------------------------------------------------+](https://image.slidesharecdn.com/dockeronopenstackoscv4-150309083842-conversion-gate01/85/Docker-on-openstack-by-OpenSource-Consulting-45-320.jpg)

![49
Contents
3. docker 구축 기초 [ 30분]
4. 오픈스택에 docker를 연결 [ 30분]
1. Openstack 인프라 구축 (4 node 구성) [ 30분]
2. Openstack 위에 VM 생성 [ 20분 ]
5. Docker로 WEB서비스 구축 [ 15분]
6.
7. Docker로 jenkins 구현 [30분]
Openstack 위에 Docker로 WEB서비스 구축 [ 15분]](https://image.slidesharecdn.com/dockeronopenstackoscv4-150309083842-conversion-gate01/85/Docker-on-openstack-by-OpenSource-Consulting-49-320.jpg)
![53
Getting Started with Docker Hub.
Docker Hub
먼저 docker site에 가입 (history 관리)
Hub.docker.com
[root@Tiger ~]# docker login
Username: oscinfra
Password:
Email: khoj@osci.kr
Login Succeeded](https://image.slidesharecdn.com/dockeronopenstackoscv4-150309083842-conversion-gate01/85/Docker-on-openstack-by-OpenSource-Consulting-53-320.jpg)
![55
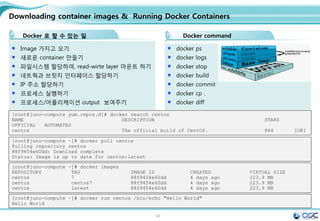
.
Docker 로 할 수 있는 일
Image 가지고 오기
새로운 container 만들기
파일시스템 할당하여, read-wirte layer 마운트 하기
네트웍과 브릿지 인터페이스 할당하기
IP 주소 할당하기
프로세스 실행하기
프로세스/어플리케이션 output 보여주기
[root@juno-compute yum.repos.d]# docker search centos
NAME DESCRIPTION STARS
OFFICIAL AUTOMATED
centos The official build of CentOS. 864 [OK]
docker ps
docker logs
docker stop
docker build
docker commit
docker cp .
docker diff
Docker command
Downloading container images & Running Docker Containers
[root@juno-compute ~]# docker images
REPOSITORY TAG IMAGE ID CREATED VIRTUAL SIZE
centos 7 88f9454e60dd 4 days ago 223.9 MB
centos centos7 88f9454e60dd 4 days ago 223.9 MB
centos latest 88f9454e60dd 4 days ago 223.9 MB
[root@juno-compute ~]# docker pull centos
Pulling repository centos
88f9454e60dd: Download complete
Status: Image is up to date for centos:latest
[root@juno-compute ~]# docker run centos /bin/echo "Hello World"
Hello World](https://image.slidesharecdn.com/dockeronopenstackoscv4-150309083842-conversion-gate01/85/Docker-on-openstack-by-OpenSource-Consulting-55-320.jpg)
![56
.
[root@docker /]# docker info
Containers: 6
Images: 18
Storage Driver: devicemapper
Pool Name: docker-253:1-67220484-pool
Pool Blocksize: 65.54 kB
Data file:
/var/lib/docker/devicemapper/devicemappe
r/data
Metadata file:
/var/lib/docker/devicemapper/devicemappe
r/metadata
Data Space Used: 831.9 MB
Data Space Total: 107.4 GB
Metadata Space Used: 1.696 MB
Metadata Space Total: 2.147 GB
Library Version: 1.02.84-RHEL7 (2014-
03-26)
Execution Driver: native-0.2
Kernel Version: 3.10.0-
123.20.1.el7.x86_64
Operating System: CentOS Linux 7 (Core)
Downloading container images & Running Docker Containers
[root@docker ~]# docker info
Containers: 15
Images: 43
Storage Driver: devicemapper
Pool Name: docker-253:1-67220484-pool
Pool Blocksize: 65.54 kB
Data file:
/var/lib/docker/devicemapper/devicemapper/
data
Metadata file:
/var/lib/docker/devicemapper/devicemapper/
metadata
Data Space Used: 2.682 GB
Data Space Total: 107.4 GB
Metadata Space Used: 4.174 MB
Metadata Space Total: 2.147 GB
Library Version: 1.02.84-RHEL7 (2014-03-
26)
Execution Driver: native-0.2
Kernel Version: 3.10.0-123.20.1.el7.x86_64
Operating System: CentOS Linux 7 (Core)
Username: oscinfra
Registry: [https://index.docker.io/v1/]
Docker info](https://image.slidesharecdn.com/dockeronopenstackoscv4-150309083842-conversion-gate01/85/Docker-on-openstack-by-OpenSource-Consulting-56-320.jpg)
![57
.
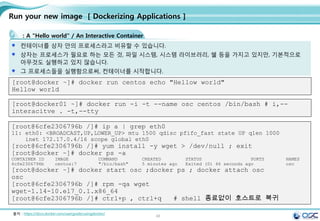
: A "Hello world“ / An Interactive Container
컨테이너를 상자 안의 프로세스라고 비유할 수 있습니다.
상자는 프로세스가 필요로 하는 모든 것, 파일 시스템, 시스템 라이브러리, 쉘 등을 가지고 있지만, 기본적으로
아무것도 실행하고 있지 않습니다.
그 프로세스들을 실행함으로써, 컨테이너를 시작합니다.
[root@docker ~]# docker run centos echo "Hellow world"
Hellow world
Run your new image [ Dockerizing Applications ]
[root@docker01 ~]# docker run -i -t --name osc centos /bin/bash # i,--
interacitve . -t,--tty
[root@6cfe2306796b /]# ip a | grep eth0
11: eth0: <BROADCAST,UP,LOWER_UP> mtu 1500 qdisc pfifo_fast state UP qlen 1000
inet 172.17.0.4/16 scope global eth0
[root@6cfe2306796b /]# yum install -y wget > /dev/null ; exit
[root@docker ~]# docker ps -a
CONTAINER ID IMAGE COMMAND CREATED STATUS PORTS NAMES
6cfe2306796b centos:7 "/bin/bash" 5 minutes ago Exited (0) 46 seconds ago osc
[root@docker ~]# docker start osc ;docker ps ; docker attach osc
osc
[root@6cfe2306796b /]# rpm -qa wget
wget-1.14-10.el7_0.1.x86_64
[root@6cfe2306796b /]# ctrl+p , ctrl+q # shell 종료없이 호스트로 복귀
출처 : https://docs.docker.com/userguide/usingdocker/](https://image.slidesharecdn.com/dockeronopenstackoscv4-150309083842-conversion-gate01/85/Docker-on-openstack-by-OpenSource-Consulting-57-320.jpg)
![58
.
A Daemonized Hello world
컨테이터를 데몬처럼 돌리기
[root@docker ~]# docker images
REPOSITORY TAG IMAGE ID CREATED VIRTUAL SIZE
centos 7 88f9454e60dd 2 days ago 223.9 MB
centos centos7 88f9454e60dd 2 days ago 223.9 MB
centos latest 88f9454e60dd 2 days ago 223.9 MB
[root@docker ~]# docker run --name osc -d centos /bin/bash
-c "while true;do echo Hello world;sleep 1;done"
61fe6bea107205c3ba9bfe998e506297797f0491d6bbe32664f5db261641c5ee
[root@docker01 ~]# ps -ef | grep –v grep | grep true
root 5338 3689 0 16:18 ? 00:00:00 /bin/bash -c while true;do echo Hello world;sleep 1;done
root 5357 3525 0 16:18 pts/0 00:00:00 grep --color=auto true
[root@docker ~]# docker logs --tail=10 -ft osc
2015-03-07T11:07:18.655548350Z Hello world
[root@docker ~]# docker top osc
UID PID PPID C STIME TTY TIME CMD
root 3408 983 0 06:02 ? 00:00:00 /bin/bash -c
while true;do echo Hello world;sleep 1;done
root 3827 3408 0 06:08 ? 00:00:00 sleep 1
[root@docker ~]# docker inspect osc / docker stop osc / docker kill osc
Run your new image [ Dockerizing Applications ]](https://image.slidesharecdn.com/dockeronopenstackoscv4-150309083842-conversion-gate01/85/Docker-on-openstack-by-OpenSource-Consulting-58-320.jpg)
![59
.
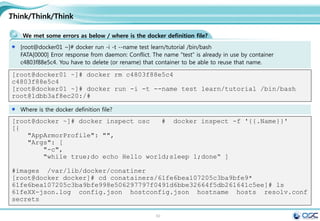
We met some errors as below / where is the docker definition file?
[root@docker01 ~]# docker run -i -t --name test learn/tutorial /bin/bash
FATA[0000] Error response from daemon: Conflict. The name "test" is already in use by container
c4803f88e5c4. You have to delete (or rename) that container to be able to reuse that name.
Think/Think/Think
[root@docker01 ~]# docker rm c4803f88e5c4
c4803f88e5c4
[root@docker01 ~]# docker run -i -t --name test learn/tutorial /bin/bash
root@1dbb3af8ec20:/#
Where is the docker definition file?
[root@docker ~]# docker inspect osc # docker inspect -f '{{.Name}}'
[{
"AppArmorProfile": "",
"Args": [
"-c",
"while true;do echo Hello world;sleep 1;done“ ]
#images /var/lib/docker/conatiner
[root@docker docker]# cd conatainers/61fe6bea107205c3ba9bfe9*
61fe6bea107205c3ba9bfe998e506297797f0491d6bbe32664f5db261641c5ee]# ls
61feXX-json.log config.json hostconfig.json hostname hosts resolv.conf
secrets](https://image.slidesharecdn.com/dockeronopenstackoscv4-150309083842-conversion-gate01/85/Docker-on-openstack-by-OpenSource-Consulting-59-320.jpg)
![60
.
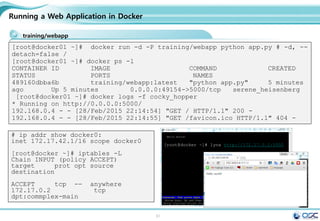
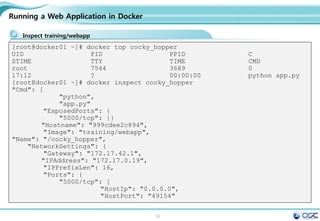
training/webapp
Running a Web Application in Docker
[root@docker01 ~]# docker run -d -P training/webapp python app.py # -d, --
detach=false /
[root@docker01 ~]# docker ps -l
CONTAINER ID IMAGE COMMAND CREATED
STATUS PORTS NAMES
489160dbba6b training/webapp:latest "python app.py" 5 minutes
ago Up 5 minutes 0.0.0.0:49154->5000/tcp serene_heisenberg
[root@docker01 ~]# docker logs -f cocky_hopper
* Running on http://0.0.0.0:5000/
192.168.0.4 - - [28/Feb/2015 22:14:54] "GET / HTTP/1.1" 200 -
192.168.0.4 - - [28/Feb/2015 22:14:55] "GET /favicon.ico HTTP/1.1" 404 -
# ip addr show docker0:
inet 172.17.42.1/16 scope docker0
[root@docker ~]# iptables -L
Chain INPUT (policy ACCEPT)
target prot opt source
destination
ACCEPT tcp -- anywhere
172.17.0.2 tcp
dpt:commplex-main
[root@docker ~]# lynx http://172.17.0.2:5000](https://image.slidesharecdn.com/dockeronopenstackoscv4-150309083842-conversion-gate01/85/Docker-on-openstack-by-OpenSource-Consulting-60-320.jpg)
![61
.
Inspect training/webapp
Running a Web Application in Docker
[root@docker01 ~]# docker top cocky_hopper
UID PID PPID C
STIME TTY TIME CMD
root 7544 3689 0
17:12 ? 00:00:00 python app.py
[root@docker01 ~]# docker inspect cocky_hopper
"Cmd": [
"python",
"app.py"
"ExposedPorts": {
"5000/tcp": {}
"Hostname": "999cdee2c894",
"Image": "training/webapp",
"Name": "/cocky_hopper",
"NetworkSettings": {
"Gateway": "172.17.42.1",
"IPAddress": "172.17.0.19",
"IPPrefixLen": 16,
"Ports": {
"5000/tcp": [
"HostIp": "0.0.0.0",
"HostPort": "49154"](https://image.slidesharecdn.com/dockeronopenstackoscv4-150309083842-conversion-gate01/85/Docker-on-openstack-by-OpenSource-Consulting-61-320.jpg)
![62
.Managing Data in Containers
Mount a Host Directory as a Data Volume
[root@docker01 ~]# docker run -d -P --name web -v /webapp training/webapp
python app.py
# -v, --volume=[] Bind mount a volume (e.g., from the host: -v
/host:/con-tainer, from Docker: -v /container)
191388a413d843a9e6ae020b9bf051698b8755e7081e2d9eeab77a2dbb72bdd1
===========================================================================
[root@docker ~]# docker run -d -P --name web -v /src/webapp:/opt/webapp
training/webapp python app.py
[root@docker ~]# cd /src;ls
webapp
Mount a Host File as a Data Volume
[root@docker]# docker run --rm -it -v ~/.bash_history:/.bash_history centos
/bin/bash
[root@5bf8bf23f10b /]# ls -al | more
ls: cannot access .bash_history: Permission denied
-?????????? ? ? ? ? ? .bash_history](https://image.slidesharecdn.com/dockeronopenstackoscv4-150309083842-conversion-gate01/85/Docker-on-openstack-by-OpenSource-Consulting-62-320.jpg)
![63
.
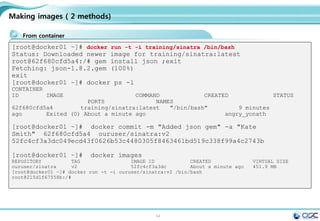
From container
Making images ( 2 methods)
[root@docker01 ~]# docker run -t -i training/sinatra /bin/bash
Status: Downloaded newer image for training/sinatra:latest
root@62f680cfd5a4:/# gem install json ;exit
Fetching: json-1.8.2.gem (100%)
exit
[root@docker01 ~]# docker ps -l
CONTAINER
ID IMAGE COMMAND CREATED STATUS
PORTS NAMES
62f680cfd5a4 training/sinatra:latest "/bin/bash" 9 minutes
ago Exited (0) About a minute ago angry_yonath
[root@docker01 ~]# docker commit -m "Added json gem" -a "Kate
Smith" 62f680cfd5a4 ouruser/sinatra:v2
52fc4cf3a3dc049ecd43f0626b53c4480305f8463461bd519c338f99a4c2743b
[root@docker01 ~]# docker images
REPOSITORY TAG IMAGE ID CREATED VIRTUAL SIZE
ouruser/sinatra v2 52fc4cf3a3dc About a minute ago 451.9 MB
[root@docker01 ~]# docker run -t -i ouruser/sinatra:v2 /bin/bash
root@215d1f67558b:/#](https://image.slidesharecdn.com/dockeronopenstackoscv4-150309083842-conversion-gate01/85/Docker-on-openstack-by-OpenSource-Consulting-63-320.jpg)
![64
.
From Dockerfile
Making images ( 2 methods)
[root@docker wget]# docker build -
t="oscinfra/centos:intall_wget" .
Sending build context to Docker daemon 2.56 kB
Sending build context to Docker daemon
Step 0 : FROM oscinfra/centos:latest
---> 403871a8320a
Step 1 : MAINTAINER hojin kim "khoj@osci.kr"
---> Running in 4c4bc393c67e
---> 8cc5127c853a
Removing intermediate container 4c4bc393c67e
Step 2 : RUN yum install -y wget
---> Running in 2ca7b10b283a
Loaded plugins: fastestmirror
Installed:
wget.x86_64 0:1.14-10.el7_0.1
Complete!
---> 3bbded5a9761
Removing intermediate container 2ca7b10b283a
Step 3 : RUN mkdir /root/wget
---> Running in 2de6060b4562
---> 6ba1987b89a7
Removing intermediate container 2de6060b4562
Step 4 : EXPOSE 22
---> Running in 59d051bb382d
---> c945ac8f8743
Removing intermediate container 59d051bb382d
Successfully built c945ac8f874
[root@docker wget]# cat Dockerfile
# for the technet seminar by hojin kim
FROM oscinfra/centos:tool
MAINTAINER hojin kim "khoj@osci.kr"
RUN yum install -y wget
RUN mkdir /root/wget
EXPOSE 22 # default port
[root@docker]# docker images
REPOSITORY TAG IMAGE ID
CREATED VIRTUAL SIZE
oscinfra/centos intall_wgeet
c945ac8f8743 19 seconds ago 379.9 MB
oscinfra/centos tool
1f06057f9152 24 minutes ago 366.5 MB
oscinfra/centos latest
403871a8320a 26 minutes ago 366.5 MB
[root@docker ~]# docker push
oscinfra/centos:tool
The push refers to a repository
[oscinfra/centos] (len: 1)
Sending image list
Pushing repository oscinfra/centos (1 tags)](https://image.slidesharecdn.com/dockeronopenstackoscv4-150309083842-conversion-gate01/85/Docker-on-openstack-by-OpenSource-Consulting-64-320.jpg)
![65
.
Uploading image file to Docker Hub
Push your image to the Docker Hub Registry
you@tutorial:~$ docker push learn/ping
The push refers to a repository [learn/ping] (len: 1)
Processing checksums
Sending image list
_
__ _____| | | __| | ___ _ __ ___ | |
/ / / _ | | / _` |/ _ | '_ / _ | |
V V / __/ | | | (_| | (_) | | | | __/ |_|
_/_/ ___|_|_| __,_|___/|_| |_|___| (_)
## .
## ## ## ==
## ## ## ## ===
/""""""""""""""""___/ ===
~~~ {~~ ~~~~ ~~~ ~~~~ ~~ ~ / ===- ~~~
______ o __/
__/
__________/
| |
__ | __ __ | _ __ _
/ | / / |/ / _ |
__/| __/ __ |_ __ |](https://image.slidesharecdn.com/dockeronopenstackoscv4-150309083842-conversion-gate01/85/Docker-on-openstack-by-OpenSource-Consulting-65-320.jpg)
![66
.
Docker compose 구성 예 (뒤에 자세히 나옴)
Docker Compose
you@tutorial:~$ cat docker-compose.yml
web:
build: .
links:
- db
ports:
- "8000:8000"
db:
image: postgres
you@tutorial:~$ cat Dockerfile
FROM python:2.7
WORKDIR /code
ADD requirements.txt /code/
RUN pip install -r requirements.txt
ADD . /code
CMD python app.py
[root@docker01 wordpress]# docker-compose up
[root@docker01 ~]# docker ps -a
CONTAINER ID IMAGE COMMAND CREATED
STATUS PORTS NAMES
7ddf0f0dec20 wordpress_web:latest "php -S 0.0.0.0:8000
4 minutes ago Up 4 minutes 0.0.0.0:8000->8000/tcp
wordpress_web_1
83ddc6ea784c orchardup/mysql:latest "/usr/local/bin/run"
4 minutes ago Up 4 minutes 3306/tcp
wordpress_db_1](https://image.slidesharecdn.com/dockeronopenstackoscv4-150309083842-conversion-gate01/85/Docker-on-openstack-by-OpenSource-Consulting-66-320.jpg)
![67
Contents
3. docker 구축 기초 [ 30분]
4. 오픈스택에 docker를 연결 [ 30분]
1. Openstack 인프라 구축 (4 node 구성) [ 30분]
2. Openstack 위에 VM 생성 [ 20분 ]
5. Docker로 WEB서비스 구축 [ 15분]
6.
7. Docker로 jenkins 구현 [30분]
Openstack 위에 Docker로 WEB서비스 구축 [ 15분]](https://image.slidesharecdn.com/dockeronopenstackoscv4-150309083842-conversion-gate01/85/Docker-on-openstack-by-OpenSource-Consulting-67-320.jpg)

![70
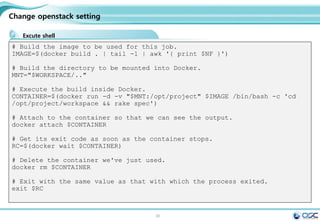
Change openstack setting
Setting env
chmod 666 /var/run/docker.sock
mkdir /etc/nova/rootwrap.d
cat /etc/nova/rootwrap.d/docker.filters
# nova-rootwrap command filters for setting up network in the docker driver
# This file should be owned by (and only-writeable by) the root user
[Filters]
# nova/virt/docker/driver.py: 'ln', '-sf', '/var/run/netns/.*'
ln: CommandFilter, /bin/ln, root
service docker start
chmod 660 /var/run/docker.sock
mkdir /etc/nova/rootwrap.d
cat /etc/nova/nova.conf # compute dirver 바꾸기
compute_driver = novadocker.virt.docker.DockerDriver
cat /etc/glance/glance-api.conf # container 형식으로 지원변경
container_formats=ami,ari,aki,bare,ovf,ova,docker
service openstack-glance-api restart
service openstack-nova-compute restart](https://image.slidesharecdn.com/dockeronopenstackoscv4-150309083842-conversion-gate01/85/Docker-on-openstack-by-OpenSource-Consulting-70-320.jpg)
![72
Check the status
Setting env
Docker 상태를 먼저 살펴본다.
$[root@juno-compute nova-docker]# docker run -i -t fedora /bin/bash
Pulling repository fedora
834629358fe2: Download complete
Status: Downloaded newer image for fedora:latest
bash-4.3#
간단한 이미지를 만들어본다.
[root@juno-compute nova-docker]# docker pull larsks/thttpd
Pulling repository larsks/thttpd
a32a10d723ab: Download complete
Status: Downloaded newer image for larsks/thttpd:latest
[root@juno-compute ~]# docker save larsks/thttpd | glance image-create -
-name larsks/thttpd --container-format docker --disk-format raw --is-
public true
+------------------+--------------------------------------+
| Property | Value |
+------------------+--------------------------------------+
| checksum | cc8b32dcc9d12fbfa1d59ce655457d31 |
| name | larsks/thttpd |
+------------------+--------------------------------------+](https://image.slidesharecdn.com/dockeronopenstackoscv4-150309083842-conversion-gate01/85/Docker-on-openstack-by-OpenSource-Consulting-72-320.jpg)
![73
Check the status
Gui 화면에서 만들어 보기
[root@juno-compute ~]# docker ps
CONTAINER ID IMAGE COMMAND CREATED
STATUS PORTS NAMES
148ef2905e65 larsks/thttpd:latest "/thttpd -D -l /dev/ About a minute ago
Up About a minute nova-f1aeb1e3-d395-4138-a92e-73c77e854709
b122f9046020 larsks/thttpd:latest "/thttpd -D -l /dev/ 2 minutes ago
Up 2 minutes nova-ac8d4a33-776b-4a13-be49-6b8bcfa87ec6
e8dc72cd6a65 larsks/thttpd:latest "/thttpd -D -l /dev/ 9 minutes ago
Up 9 minutes nova-d16b6bfe-4daa-48e5-a790-a9be088412ac](https://image.slidesharecdn.com/dockeronopenstackoscv4-150309083842-conversion-gate01/85/Docker-on-openstack-by-OpenSource-Consulting-73-320.jpg)
![74
Contents
3. docker 구축 기초 [ 30분]
4. 오픈스택에 docker를 연결 [ 30분]
1. Openstack 인프라 구축 (4 node 구성) [ 30분]
2. Openstack 위에 VM 생성 [ 20분 ]
5. Docker로 WEB서비스 구축 [ 15분]
6.
7. Docker로 jenkins 구현 [30분]
Openstack 위에 Docker로 WEB서비스 구축 [ 15분]](https://image.slidesharecdn.com/dockeronopenstackoscv4-150309083842-conversion-gate01/85/Docker-on-openstack-by-OpenSource-Consulting-74-320.jpg)
![76
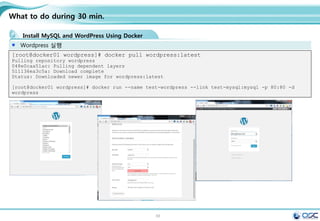
What to do during 30 min.
Install MySQL and WordPress Using Docker
Mysql / wordpress image 가지고 오기
[root@docker01 wordpress]# docker pull mysql:latest
Pulling repository mysql
0beee7f478c8: Download complete
Status: Downloaded newer image for mysql:latest
[root@docker01 wordpress]# docker images
REPOSITORY TAG IMAGE ID CREATED VIRTUAL SIZE
mysql latest 0beee7f478c8 3 weeks ago 283.1 MB
[root@docker01 wordpress]# docker run --name test-mysql -e MYSQL_ROOT_PASSWORD='test'
-d mysql
8f0c7c57b35a4177e8722d4868ff891a2821776dd3f075e02a126475f94f41db
[root@docker01 wordpress]#
[root@docker01 wordpress]# docker ps -l
CONTAINER ID IMAGE COMMAND CREATED
STATUS PORTS NAMES
8f0c7c57b35a mysql:5 "/entrypoint.sh mysq 28 seconds ago Up
27 seconds 3306/tcp test-mysql](https://image.slidesharecdn.com/dockeronopenstackoscv4-150309083842-conversion-gate01/85/Docker-on-openstack-by-OpenSource-Consulting-76-320.jpg)
![77
What to do during 30 min.
Install MySQL and WordPress Using Docker
Wordpress 실행
[root@docker01 wordpress]# docker pull wordpress:latest
Pulling repository wordpress
048e0caa51ac: Pulling dependent layers
511136ea3c5a: Download complete
Status: Downloaded newer image for wordpress:latest
[root@docker01 wordpress]# docker run --name test-wordpress --link test-mysql:mysql -p 80:80 -d
wordpress](https://image.slidesharecdn.com/dockeronopenstackoscv4-150309083842-conversion-gate01/85/Docker-on-openstack-by-OpenSource-Consulting-77-320.jpg)
![78
What to do during 30 min.
Install MySQL and WordPress Using Docker
수정 후 이미지 commit하기
[root@docker01 wordpress]# docker ps
CONTAINER ID IMAGE COMMAND CREATED S
TATUS PORTS NAMES
981485e03a06 wordpress:4 "/entrypoint.sh apac 25 minutes ago U
p 25 minutes 0.0.0.0:80->80/tcp test-wordpress
8f0c7c57b35a mysql:5 "/entrypoint.sh mysq 32 minutes ago U
p 32 minutes 3306/tcp test-mysql
[root@docker01 wordpress]# docker commit 9814 osc_wordpress
-bash: docker: command not found
[root@docker01 wordpress]# docker commit 9814 osc_wordpress
10a6ed19d49729deeacf5c9bb6c91a6f0ef17c08d04664c6294e64b49b2c09d6
[root@docker01 wordpress]# docker commit 8f0c osc_mysql
C6b9d3708309f98304c547ab2d39924dc39741b7b62d9252ed062c252041554a
//docker stop docker stop `docker ps -qa`
[root@docker01 ~]# docker run --name osc_mysql -e MYSQL_ROOT_PASSWORD='test' -d
osc_mysql
fb2e1ee783747dbf9c77f35648752a29735a982bf3bdb07cfdb7631b05a8bd28
docker run --name osc_wordpress2 --link test-mysql:mysql -p 80:80 -d osc_wordpress](https://image.slidesharecdn.com/dockeronopenstackoscv4-150309083842-conversion-gate01/85/Docker-on-openstack-by-OpenSource-Consulting-78-320.jpg)
![79
Getting started with Compose and Wordpress
Install MySQL and WordPress Using Docker
Docker-compose 구성
[root@docker01 dbdata]# curl -L
https://github.com/docker/compose/releases/download/1.1.0/docker-compose-`uname -s`-
`uname -m` > /usr/local/bin/docker-compose
% Total % Received % Xferd Average Speed Time Time Time Current
Dload Upload Total Spent Left Speed
100 407 0 407 0 0 376 0 --:--:-- 0:00:01 --:--:-- 376
100 5134k 100 5134k 0 0 1135k 0 0:00:04 0:00:04 --:--:-- 1760k
[root@docker01 dbdata]# chmod +x /usr/local/bin/docker-compose
[root@docker01 dbdata]# docker-compose --version
docker-compose 1.1.0
[root@docker01 ~]# curl https://wordpress.org/latest.tar.gz | tar -xvzf -
% Total % Received % Xferd Average Speed Time Time Time Current
Dload Upload Total Spent Left Speed
0 6041k 0 3726 0 0 4094 0 0:25:11 --:--:-- 0:25:11 4094wordpress/
wordpress/wp-settings.php](https://image.slidesharecdn.com/dockeronopenstackoscv4-150309083842-conversion-gate01/85/Docker-on-openstack-by-OpenSource-Consulting-79-320.jpg)
![80
Getting started with Compose and Wordpress
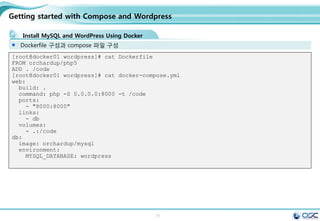
Install MySQL and WordPress Using Docker
Dockerfile 구성과 compose 파일 구성
[root@docker01 wordpress]# cat Dockerfile
FROM orchardup/php5
ADD . /code
[root@docker01 wordpress]# cat docker-compose.yml
web:
build: .
command: php -S 0.0.0.0:8000 -t /code
ports:
- "8000:8000"
links:
- db
volumes:
- .:/code
db:
image: orchardup/mysql
environment:
MYSQL_DATABASE: wordpress](https://image.slidesharecdn.com/dockeronopenstackoscv4-150309083842-conversion-gate01/85/Docker-on-openstack-by-OpenSource-Consulting-80-320.jpg)
![81
Getting started with Compose and Wordpress
Install MySQL and WordPress Using Docker
간단 program
[root@docker01 wordpress]# cat wp-config.php
<?php
define('DB_NAME', 'wordpress');
define('DB_USER', 'root');
define('DB_PASSWORD', '');
define('DB_HOST', "db:3306");
define('DB_CHARSET', 'utf8');
define('DB_COLLATE', '');
define('AUTH_KEY', 'test');
define('SECURE_AUTH_KEY', 'test');
define('LOGGED_IN_KEY', 'test');
define('NONCE_KEY', 'test');
define('AUTH_SALT', 'test');
define('SECURE_AUTH_SALT', 'test');
define('LOGGED_IN_SALT', 'test');
define('NONCE_SALT', 'test');
$table_prefix = 'wp_';
define('WPLANG', '');
define('WP_DEBUG', false);
if ( !defined('ABSPATH') )
define('ABSPATH', dirname(__FILE__) . '/');
require_once(ABSPATH . 'wp-settings.php');
[root@docker01 wordpress]# cat router.php
<?php
$root = $_SERVER['DOCUMENT_ROOT'];
chdir($root);
$path =
'/'.ltrim(parse_url($_SERVER['REQUEST_URI'])['p
ath'],'/');
set_include_path(get_include_path().':'.__DIR__
);
if(file_exists($root.$path))
{
if(is_dir($root.$path) &&
substr($path,strlen($path) - 1, 1) !== '/')
$path = rtrim($path,'/').'/index.php';
if(strpos($path,'.php') === false) return
false;
else {
chdir(dirname($root.$path));
require_once $root.$path;
}
}else include_once 'index.php';](https://image.slidesharecdn.com/dockeronopenstackoscv4-150309083842-conversion-gate01/85/Docker-on-openstack-by-OpenSource-Consulting-81-320.jpg)
![82
Getting started with Compose and Wordpress
Install MySQL and WordPress Using Docker
실행
[root@docker01 wordpress]# docker build -t
wordpress:v2 .
Sending build context to Docker daemon 19.26 MB
Sending build context to Docker daemon
Step 0 : FROM orchardup/php5
Pulling repository orchardup/php5
7113324d9d9e: Download complete
511136ea3c5a: Download complete
e2aa6665d371: Download complete
f0ee64c4df74: Download complete
2209cbf9dcd3: Download complete
5e019ab7bf6d: Download complete
Status: Downloaded newer image for
orchardup/php5:latest
---> 7113324d9d9e
Step 1 : ADD . /code
---> 3286cb3866e2
Removing intermediate container f43239d824e7
Successfully built 3286cb3866e2
[root@docker01 wordpress]# docker images
REPOSITORY TAG IMAGE
ID CREATED VIRTUAL SIZE
wordpress v2 3286cb3866e2
20 seconds ago 348.4 MB
orchardup/php5 latest 7113324d9d9e
9 months ago 330.1 MB
[root@docker01 wordpress]# docker-compose up
Creating wordpress_db_1...
Pulling image orchardup/mysql:latest...
Pulling repository orchardup/mysql
061b756f7e0d: Download complete
Status: Downloaded newer image for
orchardup/mysql:latest
Creating wordpress_web_1...
Building web...
Step 0 : FROM orchardup/php5
---> 7113324d9d9e
..
db_1 | 150301 14:54:42 InnoDB: highest
supported file format is Barracuda.
db_1 | 150301 14:54:42 InnoDB: Waiting for
the background threads to start
db_1 | 150301 14:54:43 InnoDB: 5.5.38 started;
log sequence number 1595675
db_1 | 150301 14:54:43 [Note] Server hostname
(bind-address): '0.0.0.0'; port: 3306
db_1 | 150301 14:54:43 [Note] - '0.0.0.0'
resolves to '0.0.0.0';
db_1 | 150301 14:54:43 [Note] Server socket
created on IP: '0.0.0.0'.](https://image.slidesharecdn.com/dockeronopenstackoscv4-150309083842-conversion-gate01/85/Docker-on-openstack-by-OpenSource-Consulting-82-320.jpg)
![83
Getting started with Compose and Wordpress
Install MySQL and WordPress Using Docker
Commit new image
[root@docker01 wordpress]# docker commit -m "0301_status" -a "khoj@osci.kr"
6ac193d6121f wordpress_web_1_0301
8c637330a125862362018c135139791e39d043babd3ae5aaaab358f99bbf60d1
[root@docker01 wordpress]# docker images
REPOSITORY TAG IMAGE ID CREATED VIRTUAL SIZE
wordpress_web_1_0301 latest 8c637330a125 9 seconds ago 348.4 MB
wordpress_web latest 0e8891e3f841 9 minutes ago 348.4 MB
wordpress v2 3286cb3866e2 12 minutes ago 348.4 MB
[root@docker01 wordpress]# docker ps
CONTAINER ID IMAGE COMMAND CREATED STATUS
PORTS NAMES
75303b0dd2ed wordpress_web:latest "php -S 0.0.0.0:8000 32 seconds ago Up 31
seconds 0.0.0.0:8000->8000/tcp wordpress_web_1
04f4f1e6b3a1 orchardup/mysql:latest "/usr/local/bin/run" 35 seconds ago Up 34
seconds 3306/tcp wordpress_db_1](https://image.slidesharecdn.com/dockeronopenstackoscv4-150309083842-conversion-gate01/85/Docker-on-openstack-by-OpenSource-Consulting-83-320.jpg)

![86
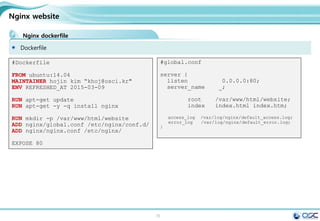
Nginx website
Nginx dockerfile
nginx.conf
Dockerfile
nginx:
global.conf nginx.conf
website:
index.html
[root@docker nginx]# docker build -t oscinfra/nginx .
[root@docker nginx]#
docker run -d -p 80 --name website -v $PWD/website:/var/www/html/website oscinfra/nginx nginx](https://image.slidesharecdn.com/dockeronopenstackoscv4-150309083842-conversion-gate01/85/Docker-on-openstack-by-OpenSource-Consulting-86-320.jpg)
![87
Contents
3. docker 구축 기초 [ 30분]
4. 오픈스택에 docker를 연결 [ 30분]
1. Openstack 인프라 구축 (4 node 구성) [ 30분]
2. Openstack 위에 VM 생성 [ 20분 ]
5. Docker로 WEB서비스 구축 [ 15분]
6.
7. Docker로 jenkins 구현 [30분]
Openstack 위에 Docker로 WEB서비스 구축 [ 15분]](https://image.slidesharecdn.com/dockeronopenstackoscv4-150309083842-conversion-gate01/85/Docker-on-openstack-by-OpenSource-Consulting-87-320.jpg)
![88
Openstack 위에 Docker로 WEB서비스 구축 [ 15분]
docker image 가지고 와서 이미지 만들기
docker pull tutum/wordpress
[root@juno-compute ~]# docker pull tutum/wordpress
[root@juno-compute ~]# docker save tutum/wordpress | glance image-create --is-
public=True --container-format=docker --disk-format=raw --name tutum/wordpress
출처 : Xen Virtualization on Linux and Solaris : Running Nova-Docker on OpenStack RDO Juno (CentOS 7)
+------------------+--------------------------------------+
| Property | Value |
+------------------+--------------------------------------+
| checksum | c343cc7afce50d264640f3238943c6de |
| container_format | docker |
| created_at | 2015-03-11T06:12:39 |
| deleted | False |
| deleted_at | None |
| disk_format | raw |
| id | 570f59ed-a227-43b7-9be1-3ad9b85f49a7 |
| is_public | True |
| min_disk | 0 |
| min_ram | 0 |
| name | tutum/wordpress |
| owner | 3c402245243f443ebc2aa39605641be1 |
| protected | False |
| size | 492773376 |
| status | active |
| updated_at | 2015-03-11T06:14:19 |
| virtual_size | None |
+------------------+--------------------------------------+](https://image.slidesharecdn.com/dockeronopenstackoscv4-150309083842-conversion-gate01/85/Docker-on-openstack-by-OpenSource-Consulting-88-320.jpg)
![89
Openstack 위에 Docker로 WEB서비스 구축 [ 15분]
docker image 가지고 와서 이미지 만들기
glance image
[root@juno-compute ~]# glance image-list
[root@juno-compute ~]# glance image-list
+--------------------------------------+---------------------+-------------+------------------+-----------+--------+
| ID | Name | Disk Format | Container Format | Size | Status |
+--------------------------------------+---------------------+-------------+------------------+-----------+--------+
| 707b9dfc-68e4-4a9c-b7bc-708127473a56 | centos7 | qcow2 | bare | 989069312 | active |
| 43d87a3d-e1da-4eac-86d3-33a8a4a0e62d | cirros-0.3.3-x86_64 | qcow2 | bare | 13200896 | active |
| 570f59ed-a227-43b7-9be1-3ad9b85f49a7 | tutum/wordpress | raw | docker | 492773376 | active |
+--------------------------------------+---------------------+-------------+------------------+-----------+--------+
출처 : Xen Virtualization on Linux and Solaris : Running Nova-Docker on OpenStack RDO Juno (CentOS 7)
[root@juno-compute ~]# nova boot --image "tutum/wordpress" --flavor m1.tiny --key-name
osc --nic net-id=00f8214c-fd7a-43f6-b469-6b78492adfff WordPress
[root@juno-compute ~]# neutron net-list
+--------------------------------------+-----------+-----------------------------------------------------+
| id | name | subnets |
+--------------------------------------+-----------+-----------------------------------------------------+
| 00f8214c-fd7a-43f6-b469-6b78492adfff | admin-net | a16ec435-0daa-4959-82c9-b6b6f50b9627 10.0.1.0/24 |
| 39e1abb0-d9bf-4f78-8cc6-88f0267e2b09 | ext-net | b74b68c0-84e7-4506-9169-1a1ff72ceb6f 192.168.0.0/24 |
| ddba5520-bc65-4762-a531-b1bfacd1b11e | test | b9bfb210-7c24-4c3c-809f-75cde2e5dd6f 10.0.2.0/24 |
+--------------------------------------+-----------+-----------------------------------------------------+](https://image.slidesharecdn.com/dockeronopenstackoscv4-150309083842-conversion-gate01/85/Docker-on-openstack-by-OpenSource-Consulting-89-320.jpg)
![90
Openstack 위에 Docker로 WEB서비스 구축 [ 15분]
인스턴스 floating IP 주고, 연결하기
출처 : Xen Virtualization on Linux and Solaris : Running Nova-Docker on OpenStack RDO Juno (CentOS 7)](https://image.slidesharecdn.com/dockeronopenstackoscv4-150309083842-conversion-gate01/85/Docker-on-openstack-by-OpenSource-Consulting-90-320.jpg)
![91
Openstack 위에 Docker로 WEB서비스 구축 [ 15분]
웹서비스 창
출처 : Xen Virtualization on Linux and Solaris : Running Nova-Docker on OpenStack RDO Juno (CentOS 7)](https://image.slidesharecdn.com/dockeronopenstackoscv4-150309083842-conversion-gate01/85/Docker-on-openstack-by-OpenSource-Consulting-91-320.jpg)
![92
Openstack 위에 Docker로 WEB서비스 구축 [ 15분]
웹 서비스 창
출처 : Xen Virtualization on Linux and Solaris : Running Nova-Docker on OpenStack RDO Juno (CentOS 7)](https://image.slidesharecdn.com/dockeronopenstackoscv4-150309083842-conversion-gate01/85/Docker-on-openstack-by-OpenSource-Consulting-92-320.jpg)
![93
Openstack 위에 Docker로 WEB서비스 구축 [ 15분]
docker image 가지고 와서 이미지 만들기
docker pull tutum/mysql
[root@juno-compute ~]# docker pull tutum/mysql
[root@juno-compute ~]# docker save tutum/mysql:latest | glance image-create --is-
public=True --container-format=docker --disk-format=raw --name tutum/mysql:latest
출처 : Xen Virtualization on Linux and Solaris : Running Nova-Docker on OpenStack RDO Juno (CentOS 7)
+------------------+--------------------------------------+
| Property | Value |
+------------------+--------------------------------------+
| checksum | fa22fdac9cfda75cb9ecf67ed6d974c1 |
| container_format | docker |
| created_at | 2015-03-11T08:59:20 |
| deleted | False |
| deleted_at | None |
| disk_format | raw |
| id | 54c5a2f8-e1ae-475d-9eb6-0be8c38315f4 |
| is_public | True |
| min_disk | 0 |
| min_ram | 0 |
| name | tutum/mysql:latest |
| owner | 3c402245243f443ebc2aa39605641be1 |
| protected | False |
| size | 332313600 |
| status | active |
| updated_at | 2015-03-11T09:00:18 |
| virtual_size | None |
+------------------+--------------------------------------+](https://image.slidesharecdn.com/dockeronopenstackoscv4-150309083842-conversion-gate01/85/Docker-on-openstack-by-OpenSource-Consulting-93-320.jpg)
![94
Openstack 위에 Docker로 WEB서비스 구축 [ 15분]
docker image 가지고 와서 이미지 만들기
glance image
[root@juno-compute ~]# glance image-list
+--------------------------------------+---------------------+-------------+------------------+-----------+--------+
| ID | Name | Disk Format | Container Format | Size | Status |
+--------------------------------------+---------------------+-------------+------------------+-----------+--------+
| 707b9dfc-68e4-4a9c-b7bc-708127473a56 | centos7 | qcow2 | bare | 989069312 | active |
| 43d87a3d-e1da-4eac-86d3-33a8a4a0e62d | cirros-0.3.3-x86_64 | qcow2 | bare | 13200896 | active |
| 54c5a2f8-e1ae-475d-9eb6-0be8c38315f4 | tutum/mysql:latest | raw | docker | 332313600 | active |
| 570f59ed-a227-43b7-9be1-3ad9b85f49a7 | tutum/wordpress | raw | docker | 492773376 | active |
+--------------------------------------+---------------------+-------------+------------------+-----------+--------+
출처 : Xen Virtualization on Linux and Solaris : Running Nova-Docker on OpenStack RDO Juno (CentOS 7)
[root@juno-compute ~]# nova boot --image "tutum/mysql:latest" --flavor m1.tiny --key-
name osc --nic net-id=00f8214c-fd7a-43f6-b469-6b78492adfff WordPress
[root@juno-compute ~]# neutron net-list
+--------------------------------------+-----------+-----------------------------------------------------+
| id | name | subnets |
+--------------------------------------+-----------+-----------------------------------------------------+
| 00f8214c-fd7a-43f6-b469-6b78492adfff | admin-net | a16ec435-0daa-4959-82c9-b6b6f50b9627 10.0.1.0/24 |
| 39e1abb0-d9bf-4f78-8cc6-88f0267e2b09 | ext-net | b74b68c0-84e7-4506-9169-1a1ff72ceb6f 192.168.0.0/24 |
| ddba5520-bc65-4762-a531-b1bfacd1b11e | test | b9bfb210-7c24-4c3c-809f-75cde2e5dd6f 10.0.2.0/24 |
+--------------------------------------+-----------+-----------------------------------------------------+](https://image.slidesharecdn.com/dockeronopenstackoscv4-150309083842-conversion-gate01/85/Docker-on-openstack-by-OpenSource-Consulting-94-320.jpg)
![95
Openstack 위에 Docker로 WEB서비스 구축 [ 15분]
docker image 가지고 와서 이미지 만들기
mysql contact
[root@juno-compute ~]# docker ps
CONTAINER ID IMAGE COMMAND CREATED STATUS
PORTS NAMES
5ba04d7d55c9 tutum/mysql:latest "/run.sh" 5 minutes ago Up 5 minutes
nova-9b9de363-820a-459c-964f-ef1de66a5634
001aa14aa877 tutum/wordpress:latest "/run.sh" 2 hours ago Up 2 hours
nova-f9a4d63d-9184-416b-aa6f-1691d1d19139
출처 : Xen Virtualization on Linux and Solaris : Running Nova-Docker on OpenStack RDO Juno (CentOS 7)
[root@juno-compute ~]# docker logs 5ba04d7d55c9
=> An empty or uninitialized MySQL volume is detected in /var/lib/mysql
=> Installing MySQL ...
=> Done!
=> Creating admin user ...
=> Waiting for confirmation of MySQL service startup, trying 0/13 ...
=> Creating MySQL user admin with random password
=> Done!
========================================================================
You can now connect to this MySQL Server using:
mysql -uadmin -pSXgwTukrk2fK -h<host> -P<port>](https://image.slidesharecdn.com/dockeronopenstackoscv4-150309083842-conversion-gate01/85/Docker-on-openstack-by-OpenSource-Consulting-95-320.jpg)
![96
Openstack 위에 Docker로 WEB서비스 구축 [ 15분]
docker image 가지고 와서 이미지 만들기
mysql connect
출처 : Xen Virtualization on Linux and Solaris : Running Nova-Docker on OpenStack RDO Juno (CentOS 7)
[root@juno-controller rootwrap.d]# mysql -uadmin -pSXgwTukrk2fK -h 192.168.0.213 -P
3306
Welcome to the MariaDB monitor. Commands end with ; or g.
Your MySQL connection id is 1
Server version: 5.5.41-0ubuntu0.14.04.1 (Ubuntu)
Copyright (c) 2000, 2014, Oracle, MariaDB Corporation Ab and others.
Type 'help;' or 'h' for help. Type 'c' to clear the current input statement.
MySQL [(none)]>
MySQL [(none)]> show databases;
+--------------------+
| Database |
+--------------------+
| information_schema |
| mysql |
| performance_schema |
+--------------------+
3 rows in set (0.00 sec)](https://image.slidesharecdn.com/dockeronopenstackoscv4-150309083842-conversion-gate01/85/Docker-on-openstack-by-OpenSource-Consulting-96-320.jpg)
![97
Contents
3. docker 구축 기초 [ 30분]
4. 오픈스택에 docker를 연결 [ 30분]
1. Openstack 인프라 구축 (4 node 구성) [ 30분]
2. Openstack 위에 VM 생성 [ 20분 ]
5. Docker로 WEB서비스 구축 [ 30분]
6.
7. Docker로 jenkins 구현 [30분]
Openstack 위에 Docker로 WEB서비스 구축 [ 15분]](https://image.slidesharecdn.com/dockeronopenstackoscv4-150309083842-conversion-gate01/85/Docker-on-openstack-by-OpenSource-Consulting-97-320.jpg)
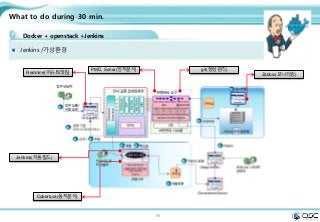
![99
Change openstack setting
Dockfile - ubnutu 환경에서 직접 해 봄.
[root@docker01 jenkins]# cat Dockerfile
FROM ubuntu:14.04
MAINTAINER james@example.com
ENV REFRESHED_AT 2014-06-01
RUN apt-get update -qq && apt-get install -qqy curl
RUN curl https://get.docker.io/gpg | apt-key add -
RUN echo deb http://get.docker.io/ubuntu docker main >
/etc/apt/sources.list.d/docker.list
RUN apt-get update -qq && apt-get install -qqy iptables ca-certificates lxc openjdk-6-
jdk git-core lxc-docker
ENV JENKINS_HOME /opt/jenkins/data
ENV JENKINS_MIRROR http://mirrors.jenkins-ci.org
RUN mkdir -p $JENKINS_HOME/plugins
RUN curl -sf -o /opt/jenkins/jenkins.war -L $JENKINS_MIRROR/war-
stable/latest/jenkins.war
RUN for plugin in chucknorris greenballs scm-api git-client git ws-cleanup ;
do curl -sf -o $JENKINS_HOME/plugins/${plugin}.hpi
-L $JENKINS_MIRROR/plugins/${plugin}/latest/${plugin}.hpi ; done
ADD ./dockerjenkins.sh /usr/local/bin/dockerjenkins.sh
RUN chmod +x /usr/local/bin/dockerjenkins.sh
VOLUME /var/lib/docker
EXPOSE 8080
ENTRYPOINT [ "/usr/local/bin/dockerjenkins.sh" ]](https://image.slidesharecdn.com/dockeronopenstackoscv4-150309083842-conversion-gate01/85/Docker-on-openstack-by-OpenSource-Consulting-99-320.jpg)
![100
Change openstack setting
dockerjenkins.sh
root@ubuntu:~/jenkins# cat dockerjenkins.sh
#!/bin/bash
# First, make sure that cgroups are mounted
correctly.
CGROUP=/sys/fs/cgroup
[ -d $CGROUP ] ||
mkdir $CGROUP
mountpoint -q $CGROUP ||
mount -n -t tmpfs -o uid=0,gid=0,mode=0755
cgroup $CGROUP || {
echo "Could not make a tmpfs mount. Did
you use -privileged?"
exit 1
}
# Mount the cgroup hierarchies exactly as they
are in the parent system.
for SUBSYS in $(cut -d: -f2 /proc/1/cgroup)
do
[ -d $CGROUP/$SUBSYS ] || mkdir
$CGROUP/$SUBSYS
mountpoint -q $CGROUP/$SUBSYS ||
mount -n -t cgroup -o $SUBSYS cgroup
$CGROUP/$SUBSYS
done
# Now, close extraneous file descriptors.
pushd /proc/self/fd
for FD in *
do
case "$FD" in
# Keep stdin/stdout/stderr
[012])
;;
# Nuke everything else
*)
eval exec "$FD>&-"
;;
esac
done
popd
docker -d &
exec java -jar /opt/jenkins/jenkins.war
name error가 발생하여.
DEBIAN_FRONTEND=noninteractive 후
apt-get install lxc-docker 수행](https://image.slidesharecdn.com/dockeronopenstackoscv4-150309083842-conversion-gate01/85/Docker-on-openstack-by-OpenSource-Consulting-100-320.jpg)
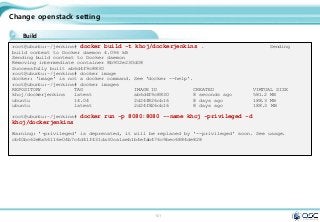
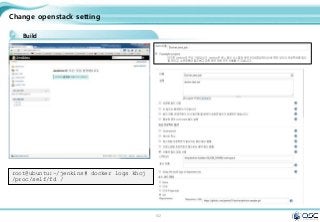
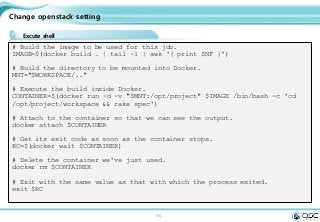
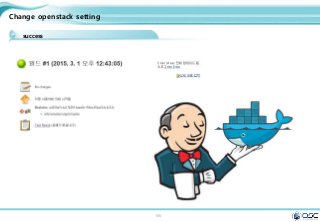


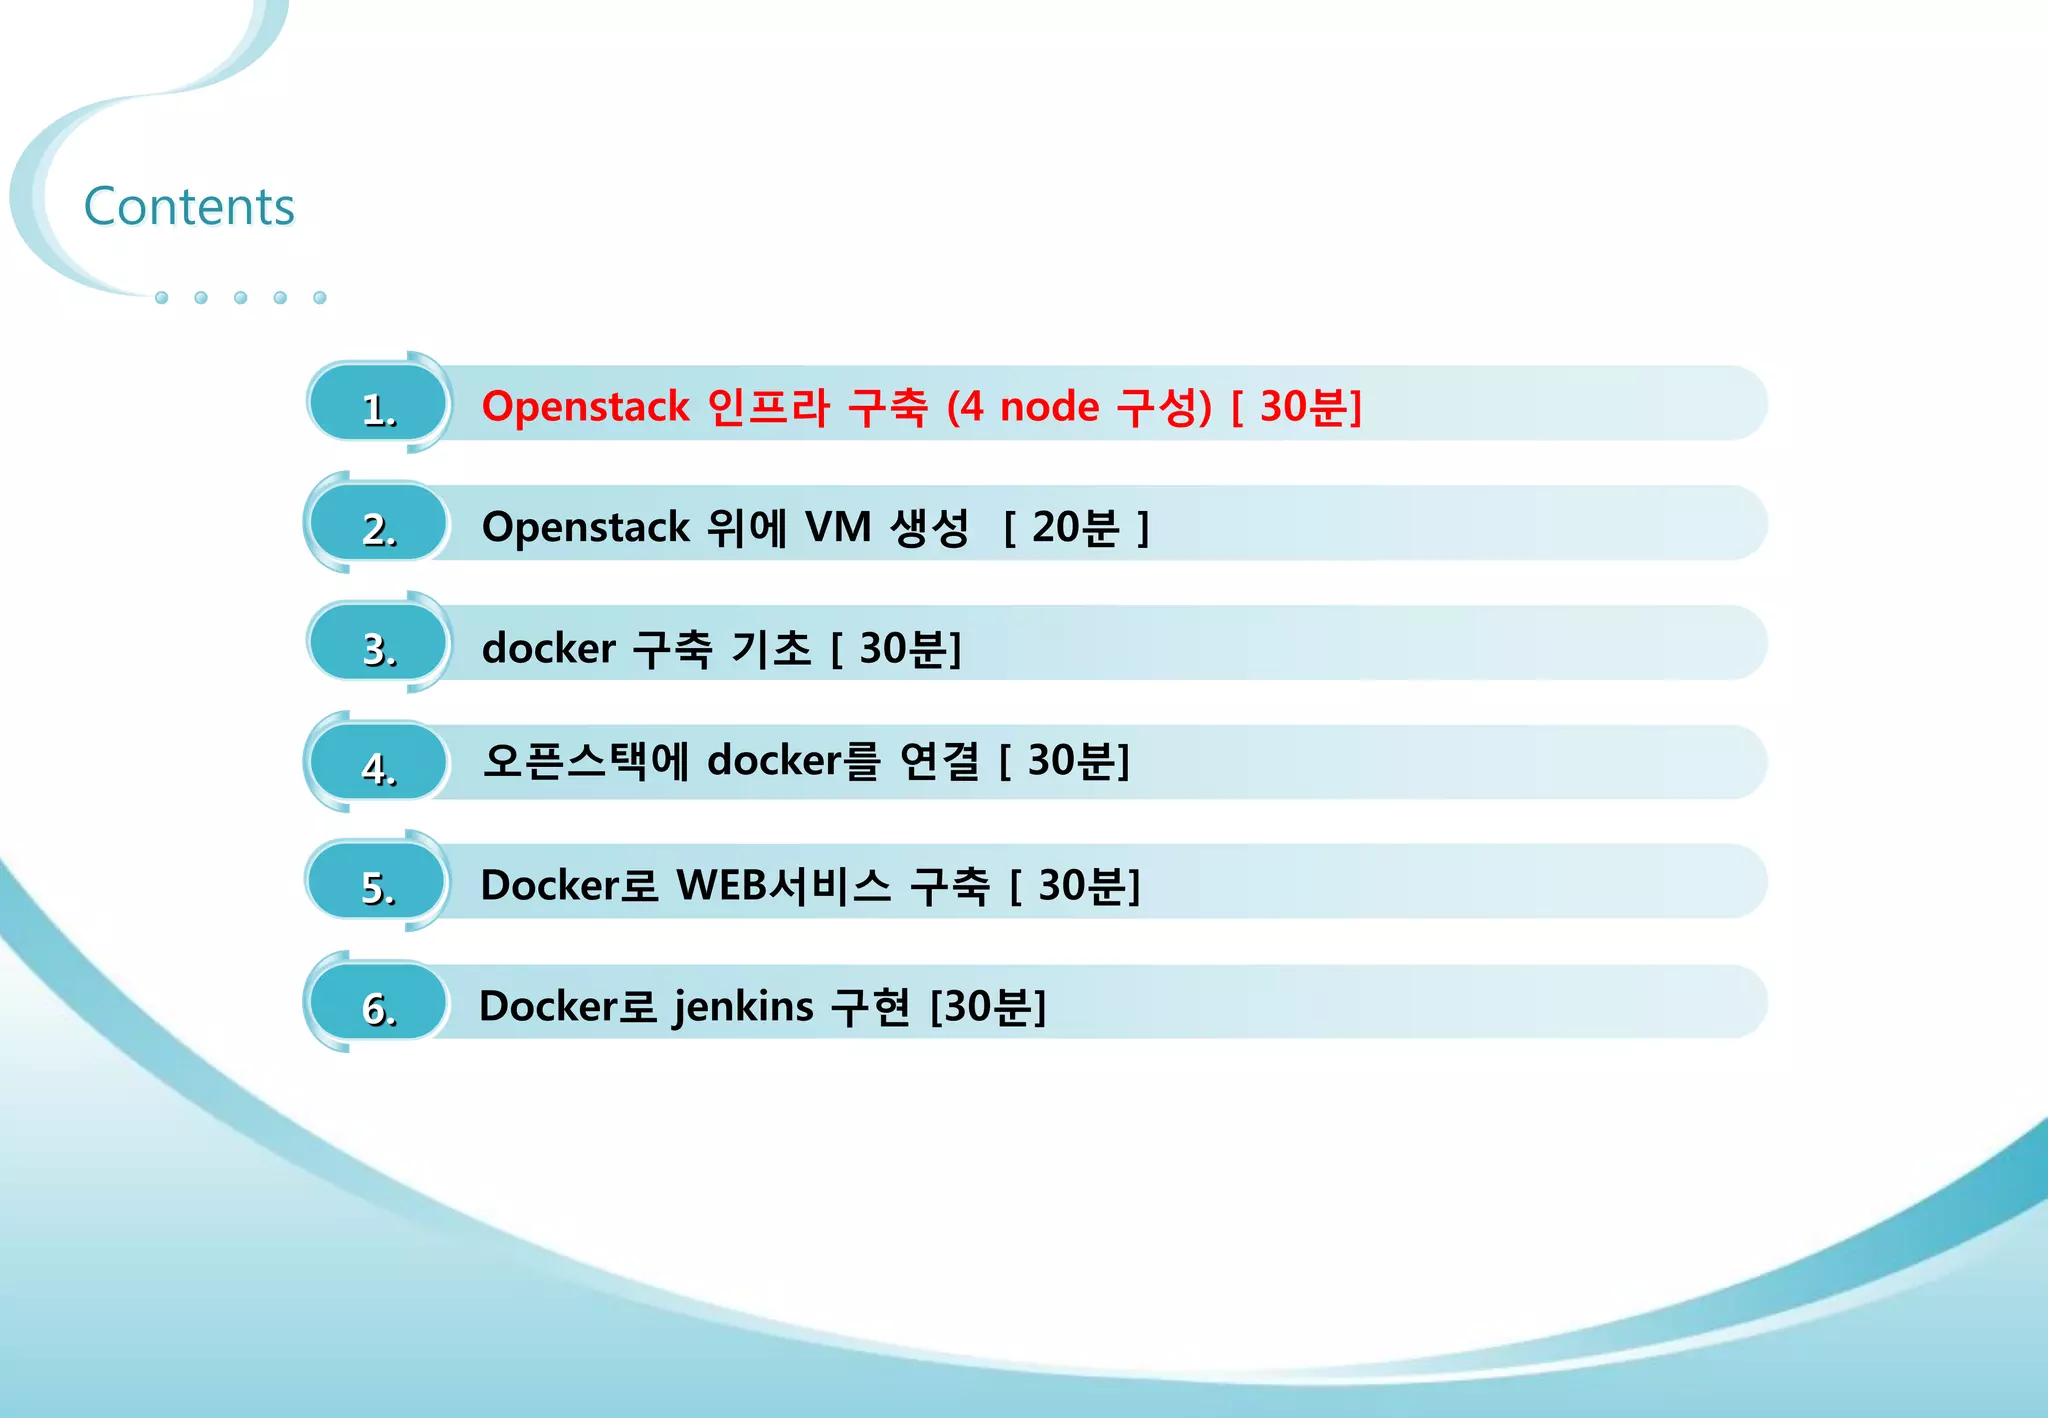
![3
Contents
3. docker 구축 기초 [ 30분]
4. 오픈스택에 docker를 연결 [ 30분]
1. Openstack 인프라 구축 (4 node 구성) [ 30분]
2. Openstack 위에 VM 생성 [ 20분 ]
5. Docker로 WEB서비스 구축 [ 30분]
6.
7. Docker로 jenkins 구현 [15분]
Openstack 위에 Docker로 WEB서비스 구축 [ 15분]](https://image.slidesharecdn.com/dockeronopenstackoscv4-150309083842-conversion-gate01/75/Docker-on-openstack-by-OpenSource-Consulting-3-2048.jpg)
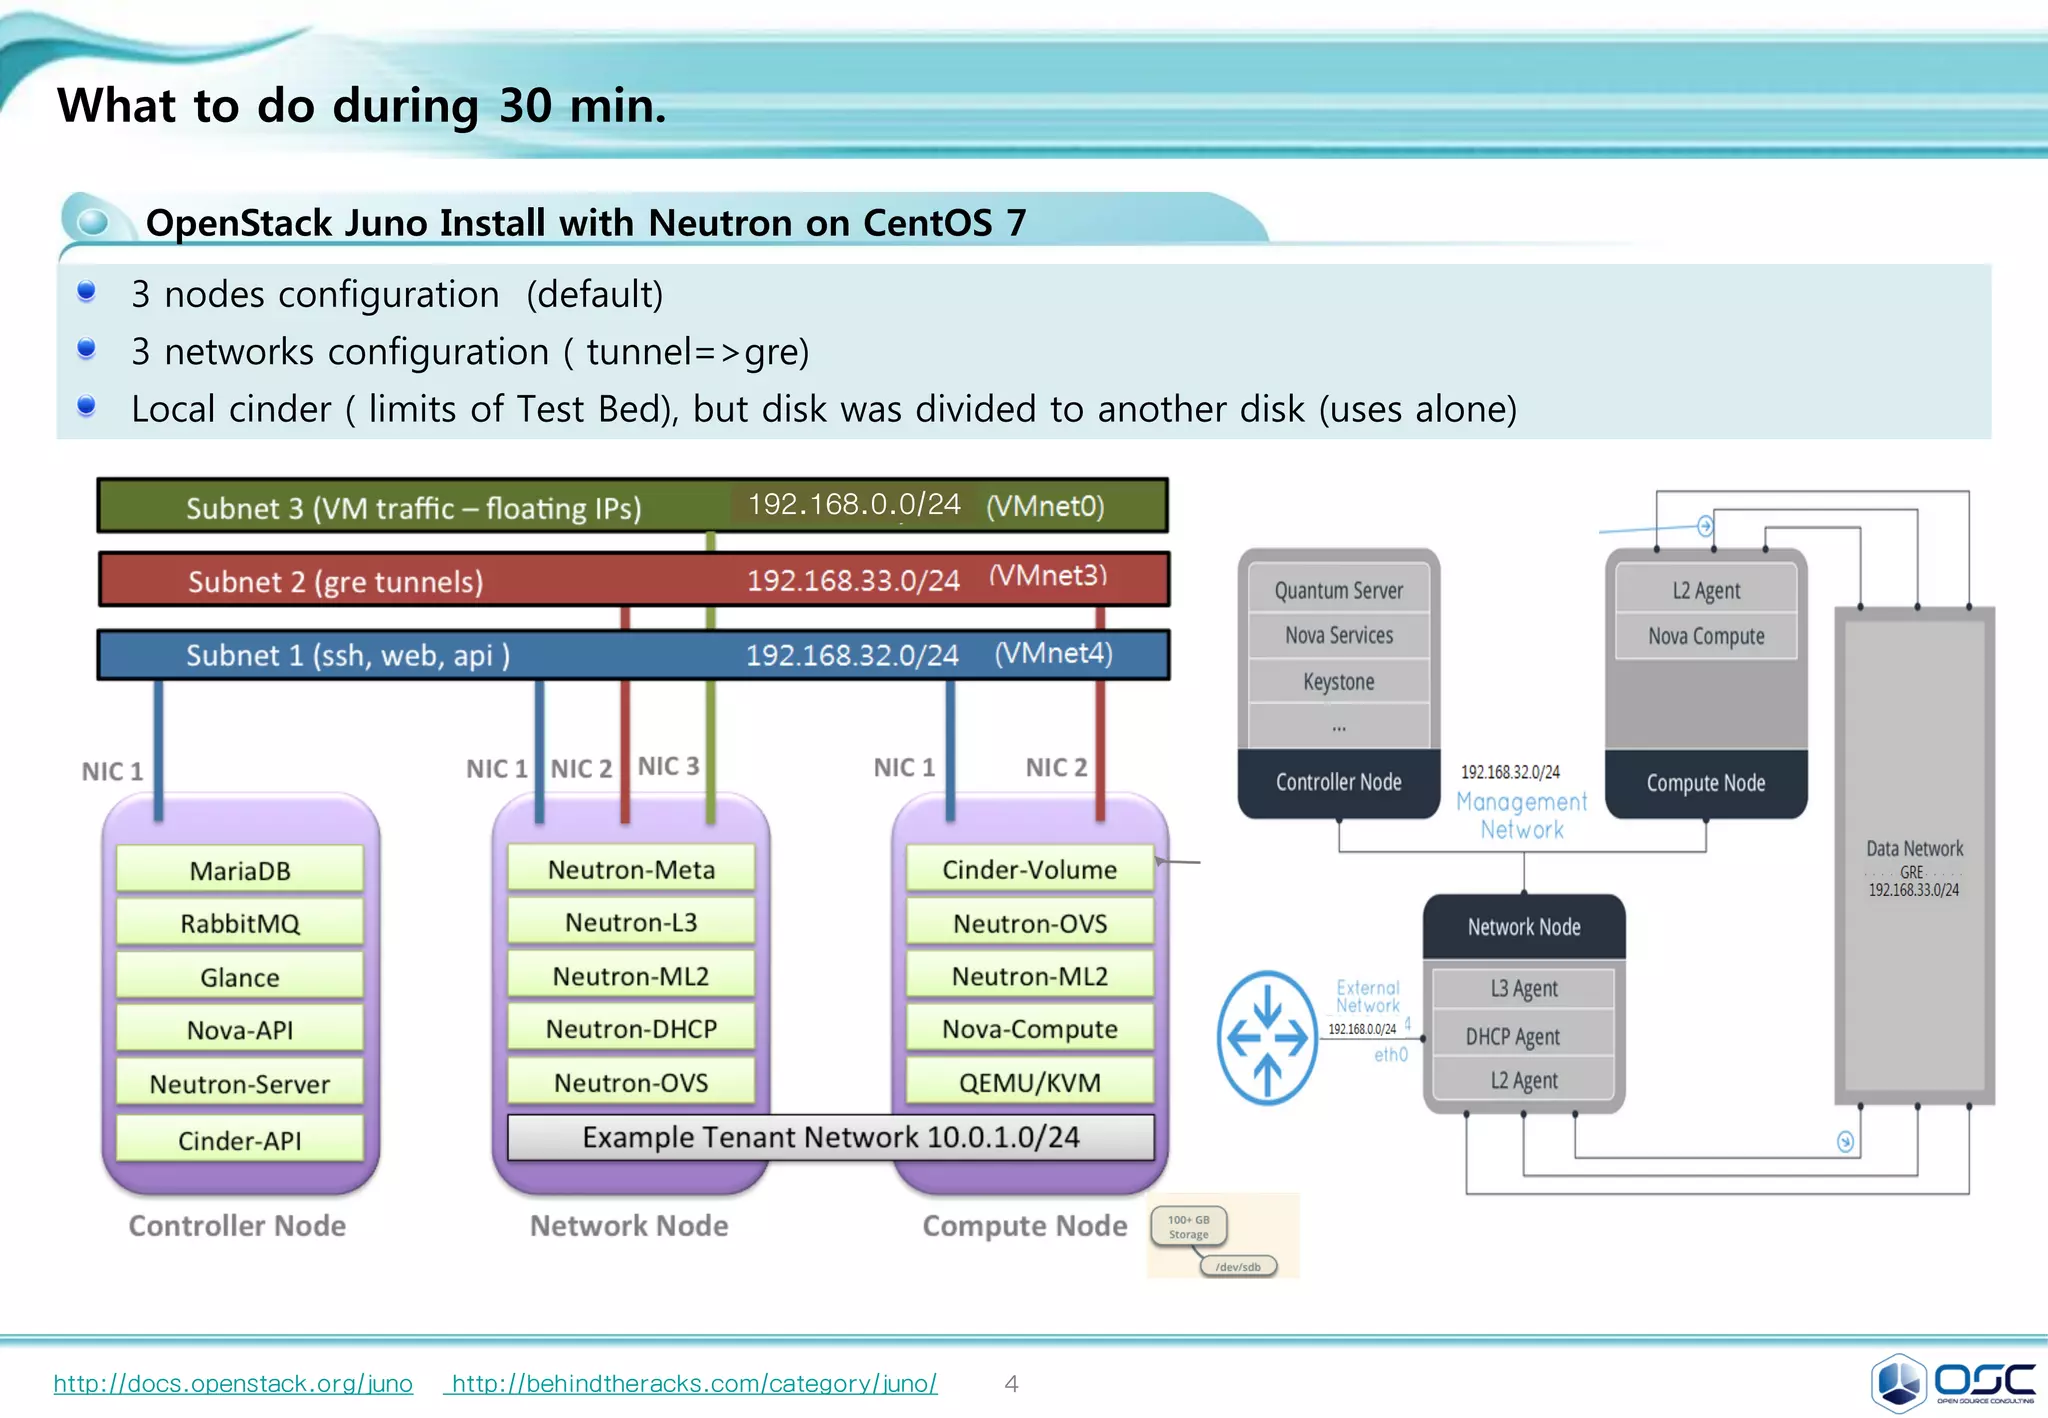
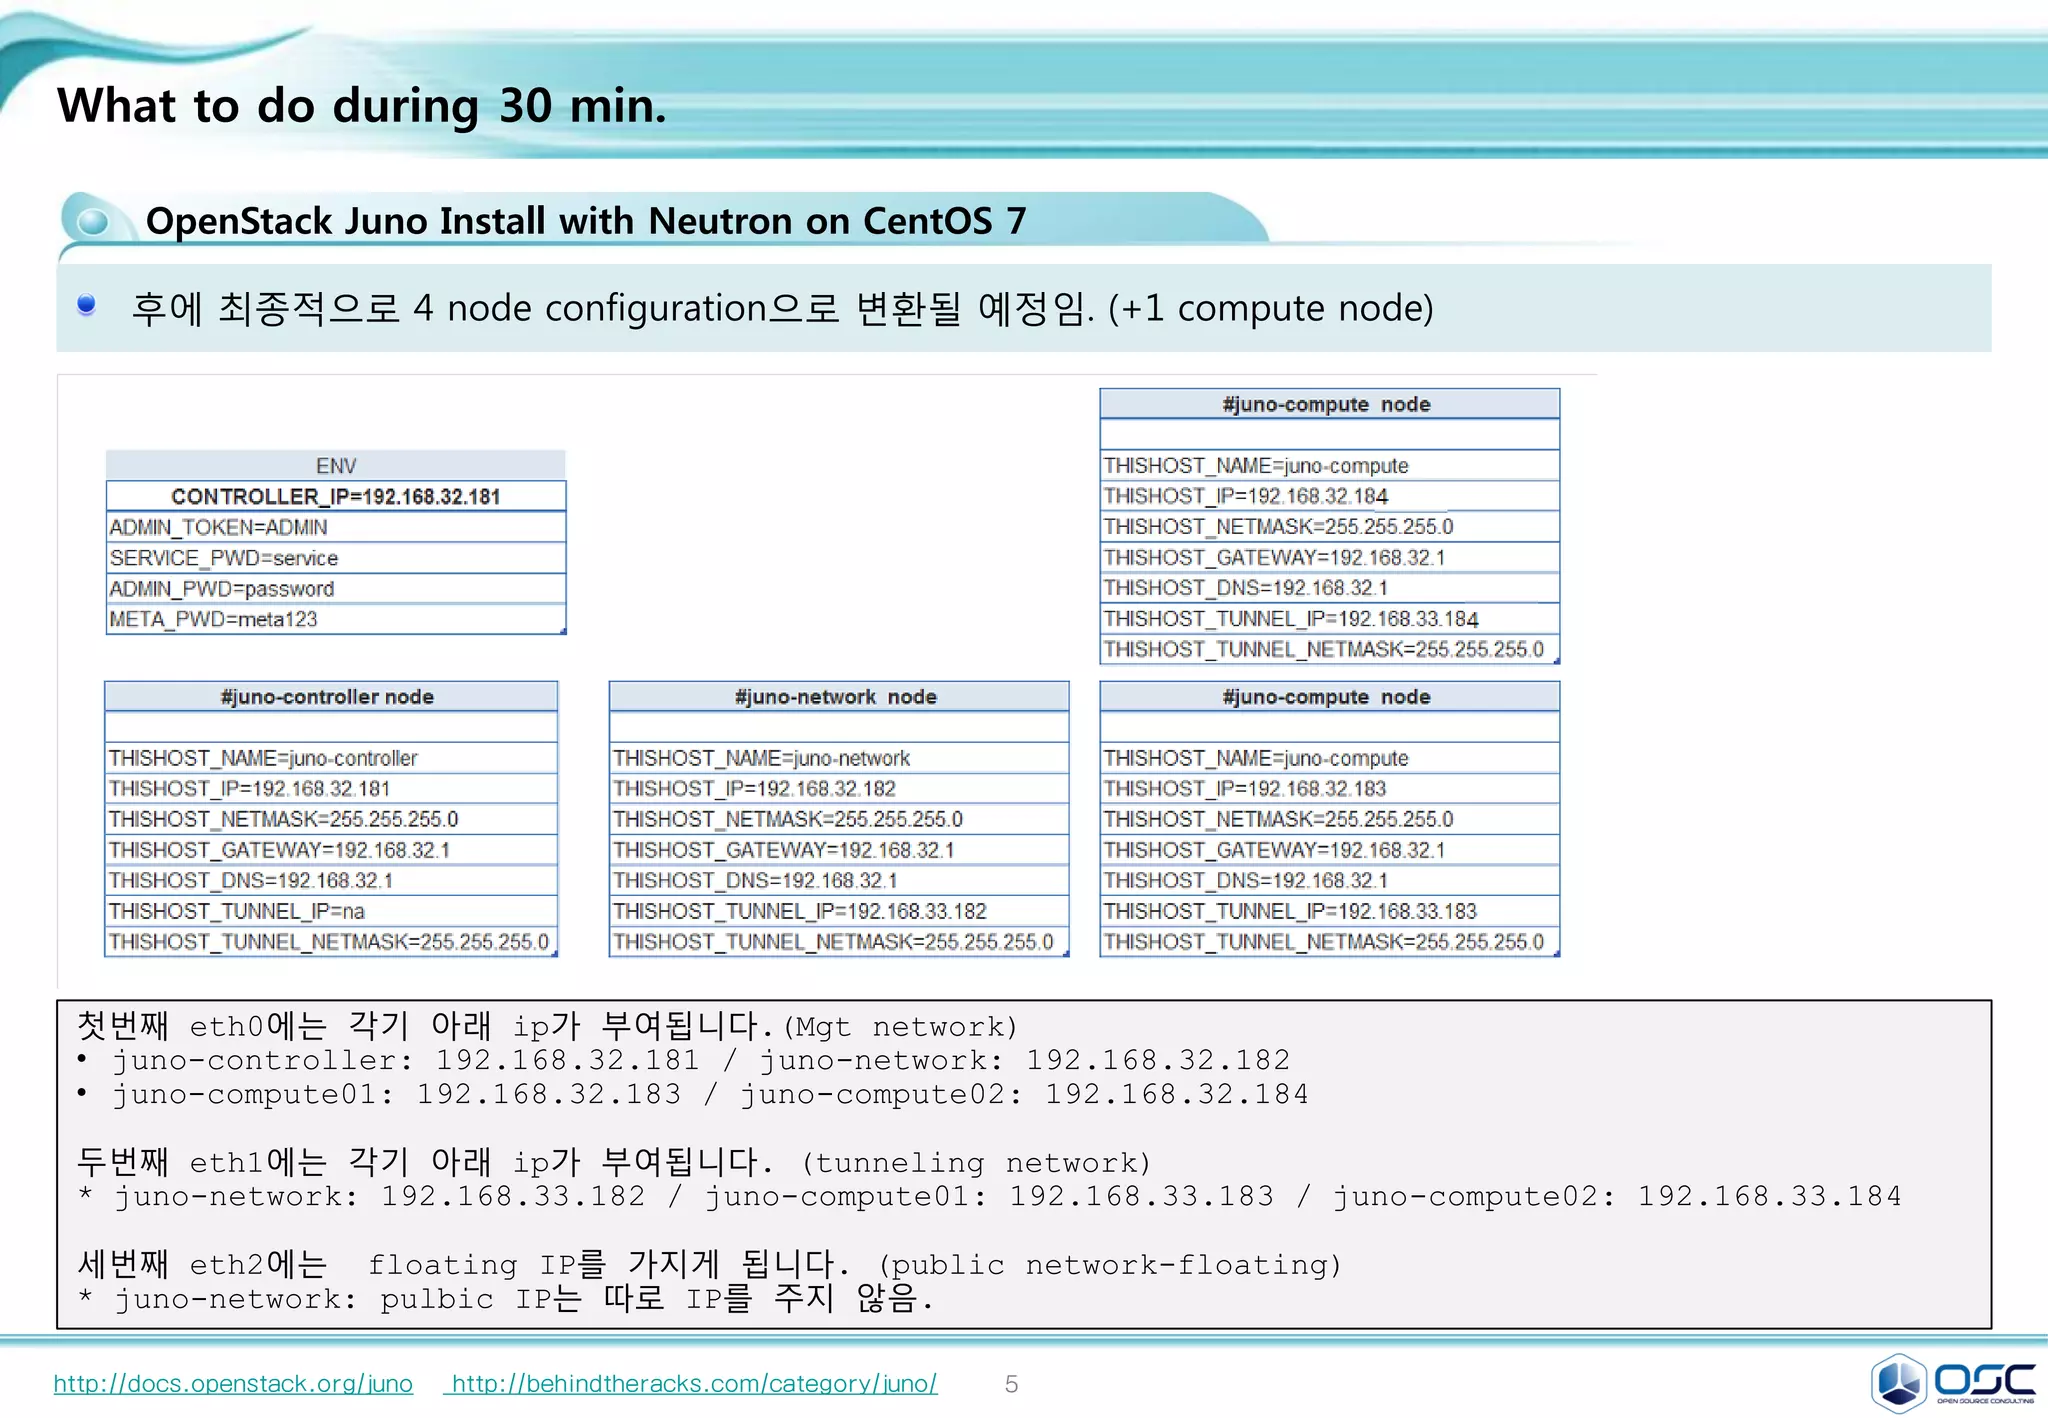
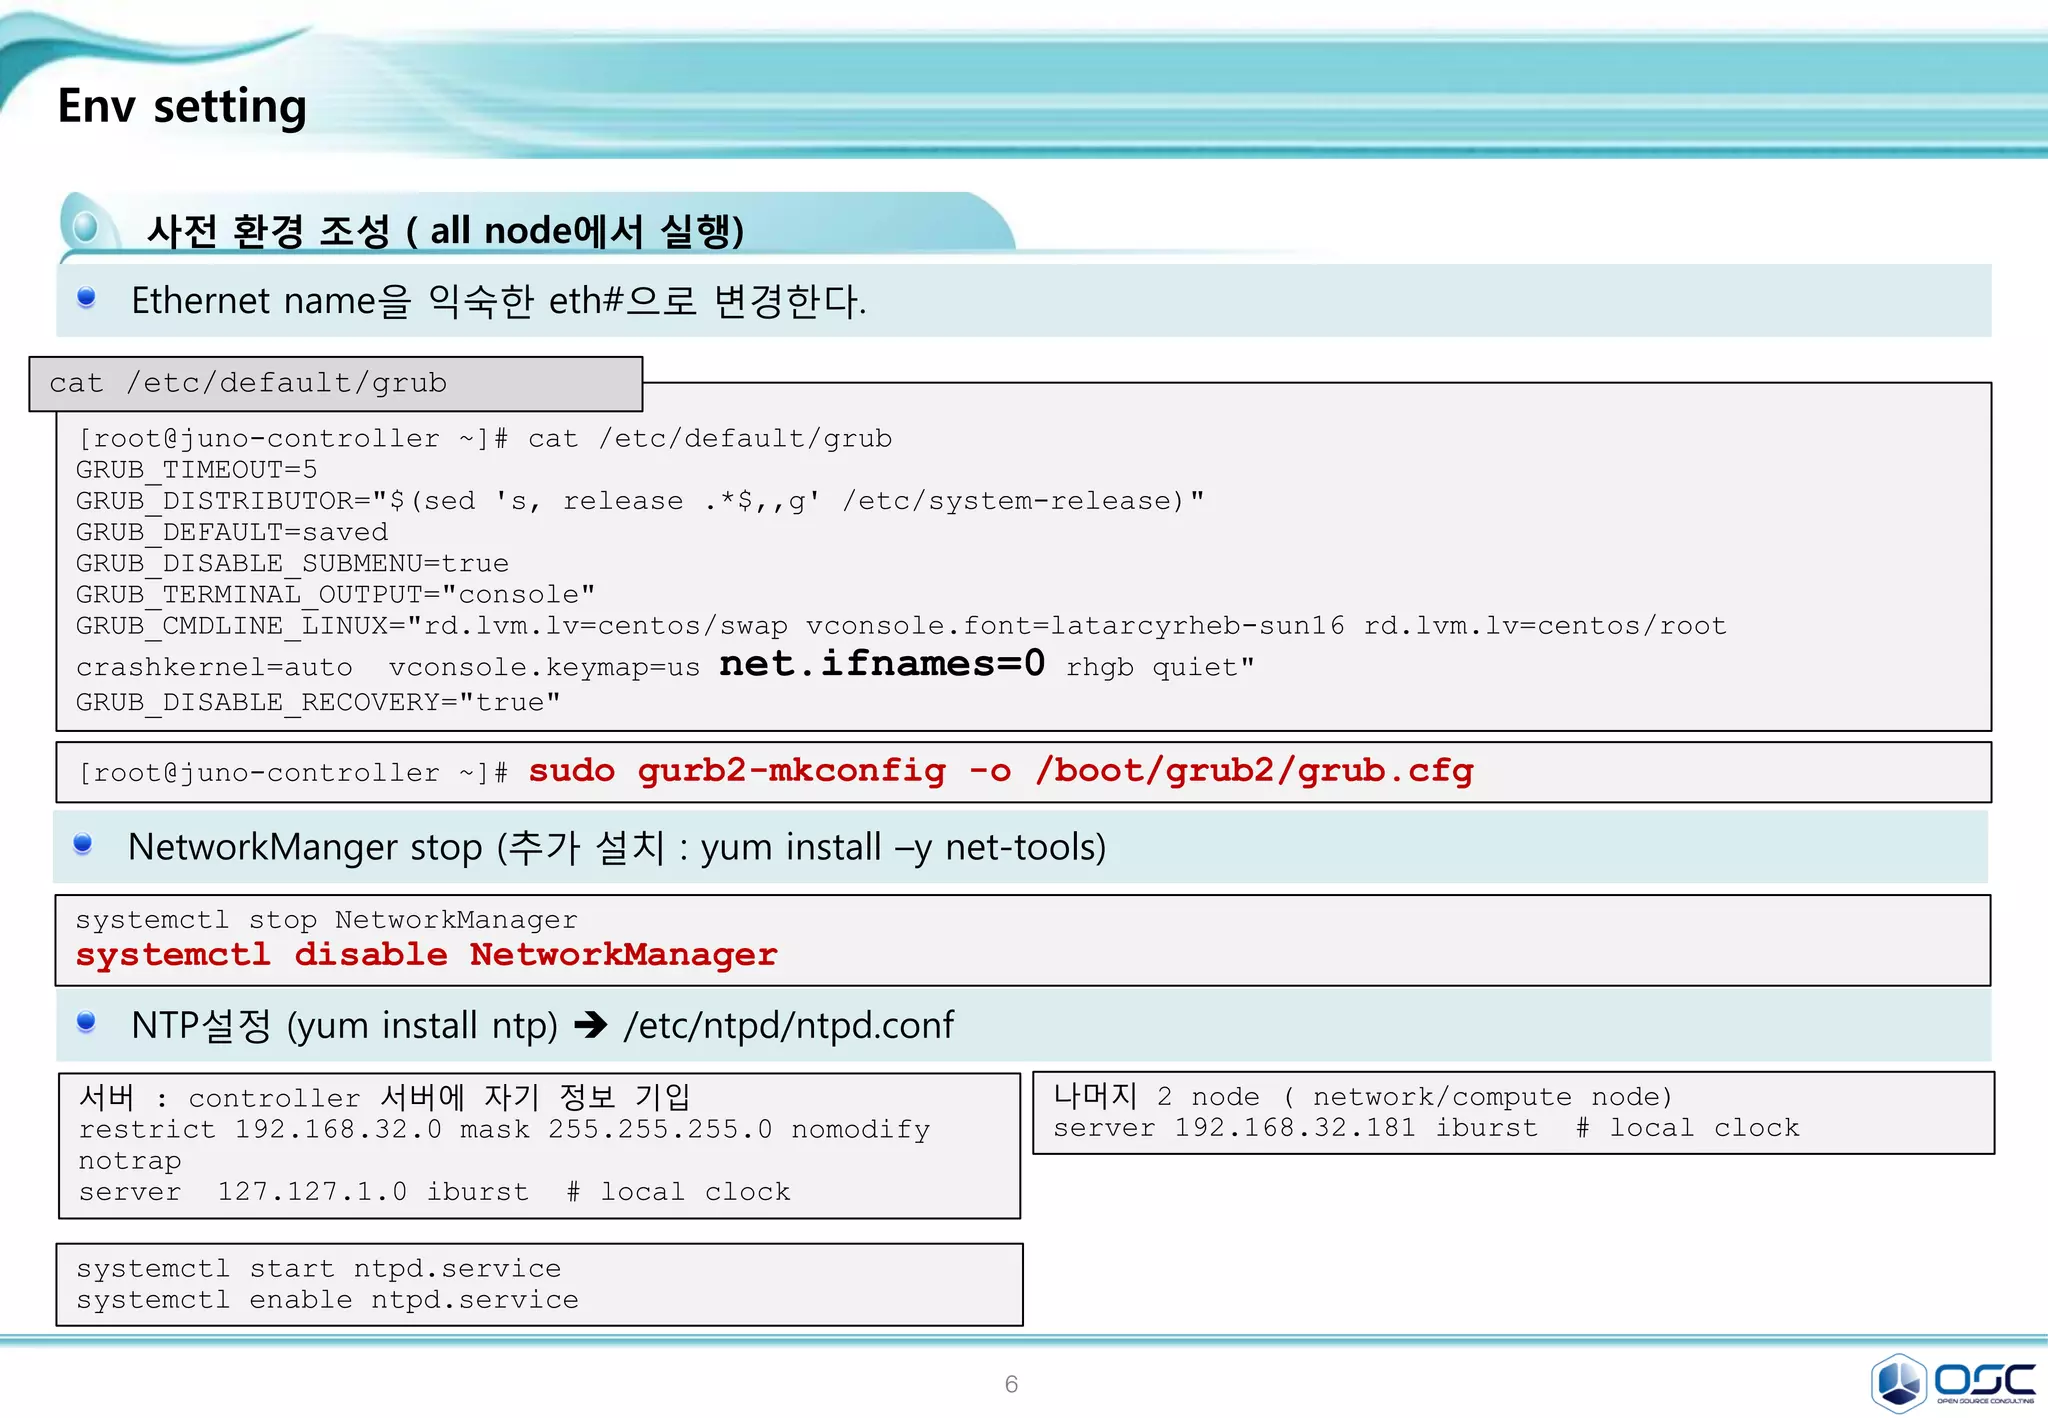
![7
openstack 구축시 log 보는법
conf 파일에 verbose=true 옵션을 걸어 더 상세히 볼수 있음.
openstack의 대부분 내용은 /var/log/messages에 나옴.
verboase=ture option을 주면 /var/log/messages가 각자 원하는 /var/#service/#service.log가 나옴 .
그리고 /var/log/messages에 error뿐 아니라 동작 내용까지 모두 기록됨.
http://docs.openstack.org/juno http://behindtheracks.com/category/juno/
기존 log ( /var/log/cinder/scheduler.log)
2015-03-13 03:09:12.360 1148 INFO oslo.messaging._drivers.impl_rabbit [req-844f54aa-6201-4fc4-b321-c6ab2012c296 - -
- - -] Connecting to AMQP server on 192.168.32.181:5672
2015-03-13 03:09:12.433 1148 ERROR oslo.messaging._drivers.impl_rabbit [req-844f54aa-6201-4fc4-b321-c6ab2012c296 -
- - - -] AMQP server on 192.168.32.181:5672 is unreachable: [Errno 111] ECONNREFUSED. Trying again in 3 seconds.
verbose=true option 적용시 (/var/log/cinder/scheduler.log)
2015-03-13 06:20:18.812 18581 INFO cinder.service [-] Starting cinder-scheduler node (version 2014.2.1)
2015-03-13 06:20:18.816 18581 INFO oslo.messaging._drivers.impl_rabbit [req-1d1a9b9c-3658-4f76-8dc1-3d74b2028a36 -
- - - -] Connecting to AMQP server on 192.168.32.181:5672
2015-03-13 06:20:18.837 18581 INFO oslo.messaging._drivers.impl_rabbit [req-1d1a9b9c-3658-4f76-8dc1-3d74b2028a36 -
- - - -] Connected to AMQP server on 192.168.32.181:5672
2015-03-13 06:20:19.291 18581 INFO oslo.messaging._drivers.impl_rabbit [-] Connecting to AMQP server on
192.168.32.181:5672
2015-03-13 06:20:19.303 18581 INFO oslo.messaging._drivers.impl_rabbit [-] Connected to AMQP server on
192.168.32.181:5672
2015-03-13 06:20:50.814 18581 WARNING cinder.scheduler.host_manager [req-00223525-0c03-4c5d-ae9b-690ae0a10e72
d13d86ad609d4a9a8d9a84b36b954a69 3c40224ㅁ5243f443ebc2aa39605641be1 - - -] volume service is down. (host: juno-
compute)
2015-03-13 06:20:50.814 18581 WARNING cinder.scheduler.filter_scheduler [req-00223525-0c03-4c5d-ae9b-690ae0a10e72
d13d86ad609d4a9a8d9a84b36b954a69 3c402245243f443ebc2aa39605641be1 - - -] No weighed hosts found for volume with
properties: {}
2015-03-13 06:20:50.816 18581 ERROR cinder.scheduler.flows.create_volume [req-00223525-0c03-4c5d-ae9b-690ae0a10e72
d13d86ad609d4a9a8d9a84b36b954a69 3c402245243f443ebc2aa39605641be1 - - -] Failed to run task
cinder.scheduler.flows.create_volume.ScheduleCreateVolumeTask;volume:create: No valid host was found. No weighed
hosts available](https://image.slidesharecdn.com/dockeronopenstackoscv4-150309083842-conversion-gate01/75/Docker-on-openstack-by-OpenSource-Consulting-7-2048.jpg)
![8
openstack 구축시 log 보는법
conf 파일에 verbose=true 옵션을 걸어 더 상세히 볼수 있음.
http://docs.openstack.org/juno http://behindtheracks.com/category/juno/
verbose=true option 적용시 (/var/log/messages)
Mar 13 06:20:50 juno-controller cinder-api: 2015-03-13 06:20:50.230 18615 INFO cinder.api.v1.volumes [req-
00223525-0c03-4c5d-ae9b-690ae0a10e72 d13d86ad609d4a9a8d9a84b36b954a69 3c402245243f443ebc2aa39605641be1 - - -]
Create volume of 2 GB
Mar 13 06:20:50 juno-controller cinder-api: 2015-03-13 06:20:50.620 18615 INFO
oslo.messaging._drivers.impl_rabbit [req-00223525-0c03-4c5d-ae9b-690ae0a10e72
d13d86ad609d4a9a8d9a84b36b954a69 3c402245243f443ebc2aa39605641be1 - - -] Connecting to AMQP server on
192.168.32.181:5672
Mar 13 06:20:50 juno-controller cinder-api: 2015-03-13 06:20:50.643 18615 INFO
oslo.messaging._drivers.impl_rabbit [req-00223525-0c03-4c5d-ae9b-690ae0a10e72
d13d86ad609d4a9a8d9a84b36b954a69 3c402245243f443ebc2aa39605641be1 - - -] Connected to AMQP server on
192.168.32.181:5672
Mar 13 06:20:50 juno-controller cinder-api: 2015-03-13 06:20:50.686 18615 INFO cinder.api.v1.volumes [req-
00223525-0c03-4c5d-ae9b-690ae0a10e72 d13d86ad609d4a9a8d9a84b36b954a69 3c402245243f443ebc2aa39605641be1 - - -]
vol={'migration_status': None, 'availability_zone': 'nova', 'terminated_at': None, 'reservations':
['01680237-32b1-4bcb-a3d4-c17b46837298', 'dd9280a1-7232-4aba-acf0-23aef02c34a9'], 'updated_at': None,
'provider_geometry': None, 'replication_extended_status': None, 'replication_status': 'disabled',
'snapshot_id': None, 'ec2_id': None, 'mountpoint': None, 'deleted_at': None, 'id': '37d5a43a-3f6c-4880-91c6-
7fba7c434211', 'size': 2, 'user_id': u'd13d86ad609d4a9a8d9a84b36b954a69', 'attach_time': None,
'source_replicaid': None, 'attached_host': None, 'display_description': None, 'volume_admin_metadata': [],
'project_id': u'3c402245243f443ebc2aa39605641be1', 'launched_at': None, 'scheduled_at': None, 'status':
'creating', 'volume_type_id': None, 'deleted': False, 'provider_location': None, 'host': None,
'consistencygroup_id': None, 'source_volid': None, 'provider_auth': None, 'display_name': u'test2',
'instance_uuid': None, 'bootable': False, 'created_at': datetime.datetime(2015, 3, 13, 10, 20, 50, 562087),
'attach_status': 'detached', 'volume_type': None, 'consistencygroup': None, 'volume_metadata': [], '_name_id':
None, 'encryption_key_id': None, 'replication_driver_data': None, 'metadata': {}}
Mar 13 06:20:50 juno-controller cinder-api: 2015-03-13 06:20:50.700 18615 INFO cinder.api.openstack.wsgi
[req-00223525-0c03-4c5d-ae9b-690ae0a10e72 d13d86ad609d4a9a8d9a84b36b954a69 3c402245243f443ebc2aa39605641be1 -
- -] http://192.168.32.181:8776/v1/3c402245243f443ebc2aa39605641be1/volumes returned with HTTP 200](https://image.slidesharecdn.com/dockeronopenstackoscv4-150309083842-conversion-gate01/75/Docker-on-openstack-by-OpenSource-Consulting-8-2048.jpg)
![9
Env setting
사전 환경 조성 ( all node에서 실행)
[root@juno-controller ~]# cat /etc/default/grub
GRUB_TIMEOUT=5
GRUB_DISTRIBUTOR="$(sed 's, release .*$,,g' /etc/system-release)"
GRUB_DEFAULT=saved
GRUB_DISABLE_SUBMENU=true
GRUB_TERMINAL_OUTPUT="console"
GRUB_CMDLINE_LINUX="rd.lvm.lv=centos/swap vconsole.font=latarcyrheb-sun16 rd.lvm.lv=centos/root
crashkernel=auto vconsole.keymap=us net.ifnames=0 rhgb quiet"
GRUB_DISABLE_RECOVERY="true"
Ethernet name을 익숙한 eth#으로 변경한다.
cat /etc/default/grub
[root@juno-controller ~]# sudo gurb2-mkconfig -o /boot/grub2/grub.cfg
systemctl stop NetworkManager
systemctl disable NetworkManager
NetworkManger stop (추가 설치 : yum install –y net-tools)
서버 : controller 서버에 자기 정보 기입
restrict 192.168.32.0 mask 255.255.255.0 nomodify
notrap
server 127.127.1.0 iburst # local clock
NTP설정 (yum install ntp) /etc/ntp.conf
나머지 2 node ( network/compute node)
server 192.168.32.181 iburst # local clock
systemctl start ntpd.service
systemctl enable ntpd.service](https://image.slidesharecdn.com/dockeronopenstackoscv4-150309083842-conversion-gate01/75/Docker-on-openstack-by-OpenSource-Consulting-9-2048.jpg)
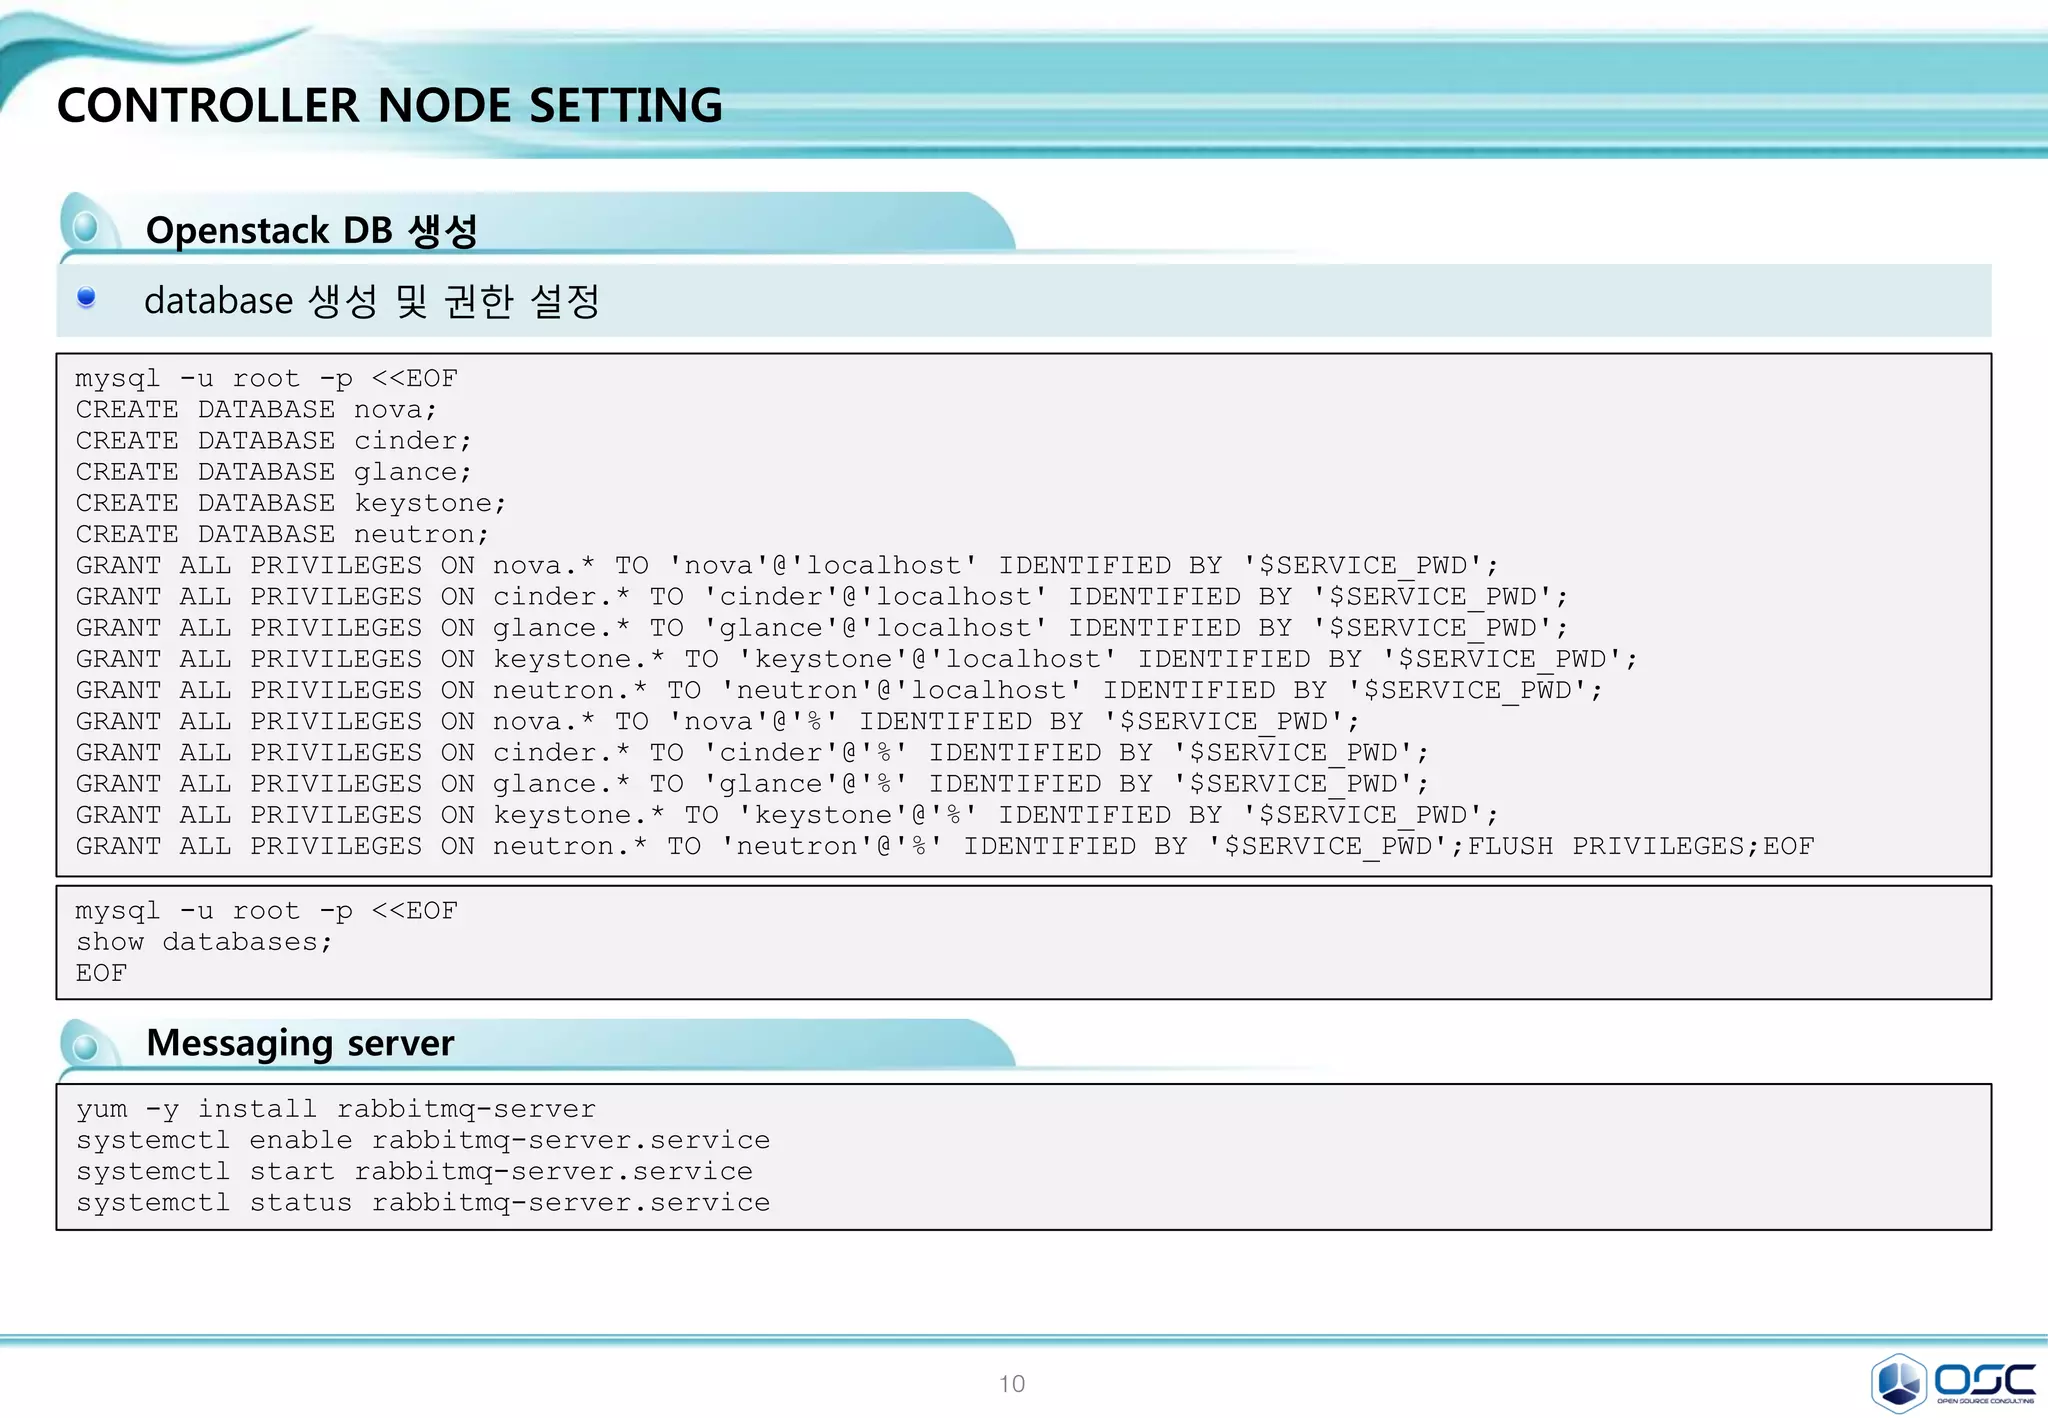
![11
Env setting
IP setting
#!/bin/bash
#get primary NIC info
for i in $(ls /sys/class/net); do
NIC=$i
MY_MAC=$(cat /sys/class/net/$i/address)
if [ "$(cat /sys/class/net/$i/ifindex)" == '2' ]; then
#setup the IP configuration for management NIC
sed -i.bak "s/dhcp/none/g" /etc/sysconfig/network-scripts/ifcfg-$NIC
sed -i "s/HWADDR/#HWADDR/g" /etc/sysconfig/network-scripts/ifcfg-$NIC
sed -i "/#HWADDR/a HWADDR="$MY_MAC"" /etc/sysconfig/network-scripts/ifcfg-$NIC
sed -i "s/UUID/#UUID/g" /etc/sysconfig/network-scripts/ifcfg-$NIC
echo "IPADDR="$THISHOST_IP"" >> /etc/sysconfig/network-scripts/ifcfg-$NIC
echo "PREFIX="$THISHOST_NETMASK"" >> /etc/sysconfig/network-scripts/ifcfg-$NIC
echo "GATEWAY="$THISHOST_GATEWAY"" >> /etc/sysconfig/network-scripts/ifcfg-$NIC
echo "DNS1="$THISHOST_DNS"" >> /etc/sysconfig/network-scripts/ifcfg-$NIC
mv /etc/sysconfig/network-scripts/ifcfg-$NIC.bak .
fi
if [ "$(cat /sys/class/net/$i/ifindex)" == '3' ]; then
#create config file for Tunnel NIC
echo "HWADDR="$MY_MAC"" > /etc/sysconfig/network-scripts/ifcfg-$NIC
echo "TYPE="Ethernet"" >> /etc/sysconfig/network-scripts/ifcfg-$NIC
echo "BOOTPROTO="none"" >> /etc/sysconfig/network-scripts/ifcfg-$NIC
echo "IPV4_FAILURE_FATAL="no"" >> /etc/sysconfig/network-scripts/ifcfg-$NIC
echo "NAME="$NIC"" >> /etc/sysconfig/network-scripts/ifcfg-$NIC
echo "ONBOOT="yes"" >> /etc/sysconfig/network-scripts/ifcfg-$NIC
echo "IPADDR="$THISHOST_TUNNEL_IP"" >> /etc/sysconfig/network-scripts/ifcfg-$NIC
echo "PREFIX="$THISHOST_TUNNEL_NETMASK"" >> /etc/sysconfig/network-scripts/ifcfg-$NIC
fi
if [ "$(cat /sys/class/net/$i/ifindex)" == '4' ]; then
#create config file for External NIC
echo "HWADDR="$MY_MAC"" > /etc/sysconfig/network-scripts/ifcfg-$NIC
echo "TYPE="Ethernet"" >> /etc/sysconfig/network-scripts/ifcfg-$NIC
echo "BOOTPROTO="none"" >> /etc/sysconfig/network-scripts/ifcfg-$NIC
echo "IPV4_FAILURE_FATAL="no"" >> /etc/sysconfig/network-scripts/ifcfg-$NIC
echo "NAME="$NIC"" >> /etc/sysconfig/network-scripts/ifcfg-$NIC
echo "ONBOOT="yes"" >> /etc/sysconfig/network-scripts/ifcfg-$NIC
fi
done
먼저 각 node에서 env.sh를 실행한다. 그리고 아래대로 network-sciprt를 실행한다.
All node
#setup hostname
cp -f /dev/null /etc/hostname
echo " $THISHOST_NAME " >
/etc/hostname
echo "$THISHOST_IP
$THISHOST_NAME" >> /etc/hosts](https://image.slidesharecdn.com/dockeronopenstackoscv4-150309083842-conversion-gate01/75/Docker-on-openstack-by-OpenSource-Consulting-11-2048.jpg)
![12
CONTROLLER NODE SETTING
Openstack DB setting
yum -y install mariadb mariadb-server MySQL-python
controller node = controller + MariaDB,RabbitMQ,Glance,NOVA api/scheduler,Neutron api, cinder api
egrep -v "^#|^$" /etc/my.cnf
[mysqld]
bind-address = 192.168.32.181
default-storage-engine = innodb
innodb_file_per_table
collation-server = utf8_general_ci
init-connect = 'SET NAMES utf8'
character-set-server = utf8
sed -i.bak "10i
bind-address = $CONTROLLER_IPn
default-storage-engine =
innodbn
innodb_file_per_tablen
collation-server =
utf8_general_cin
init-connect = 'SET NAMES
utf8'n
character-set-server = utf8n
" /etc/my.cnf
#edit /etc/my.cnf
systemctl enable mariadb.service
systemctl start mariadb.service
mysql_secure_installation # mariadb 암호 설정
Enter current password for root (enter for none): Enter
OK, successfully used password, moving on...
Setting the root password ensures that nobody can log into the MariaDB
root user without the proper authorisation.
Set root password? [Y/n] Y
New password: password ; Re-enter new password: password
Password updated successfully!
Reloading privilege tables..
... Success! # Enter *3](https://image.slidesharecdn.com/dockeronopenstackoscv4-150309083842-conversion-gate01/75/Docker-on-openstack-by-OpenSource-Consulting-12-2048.jpg)
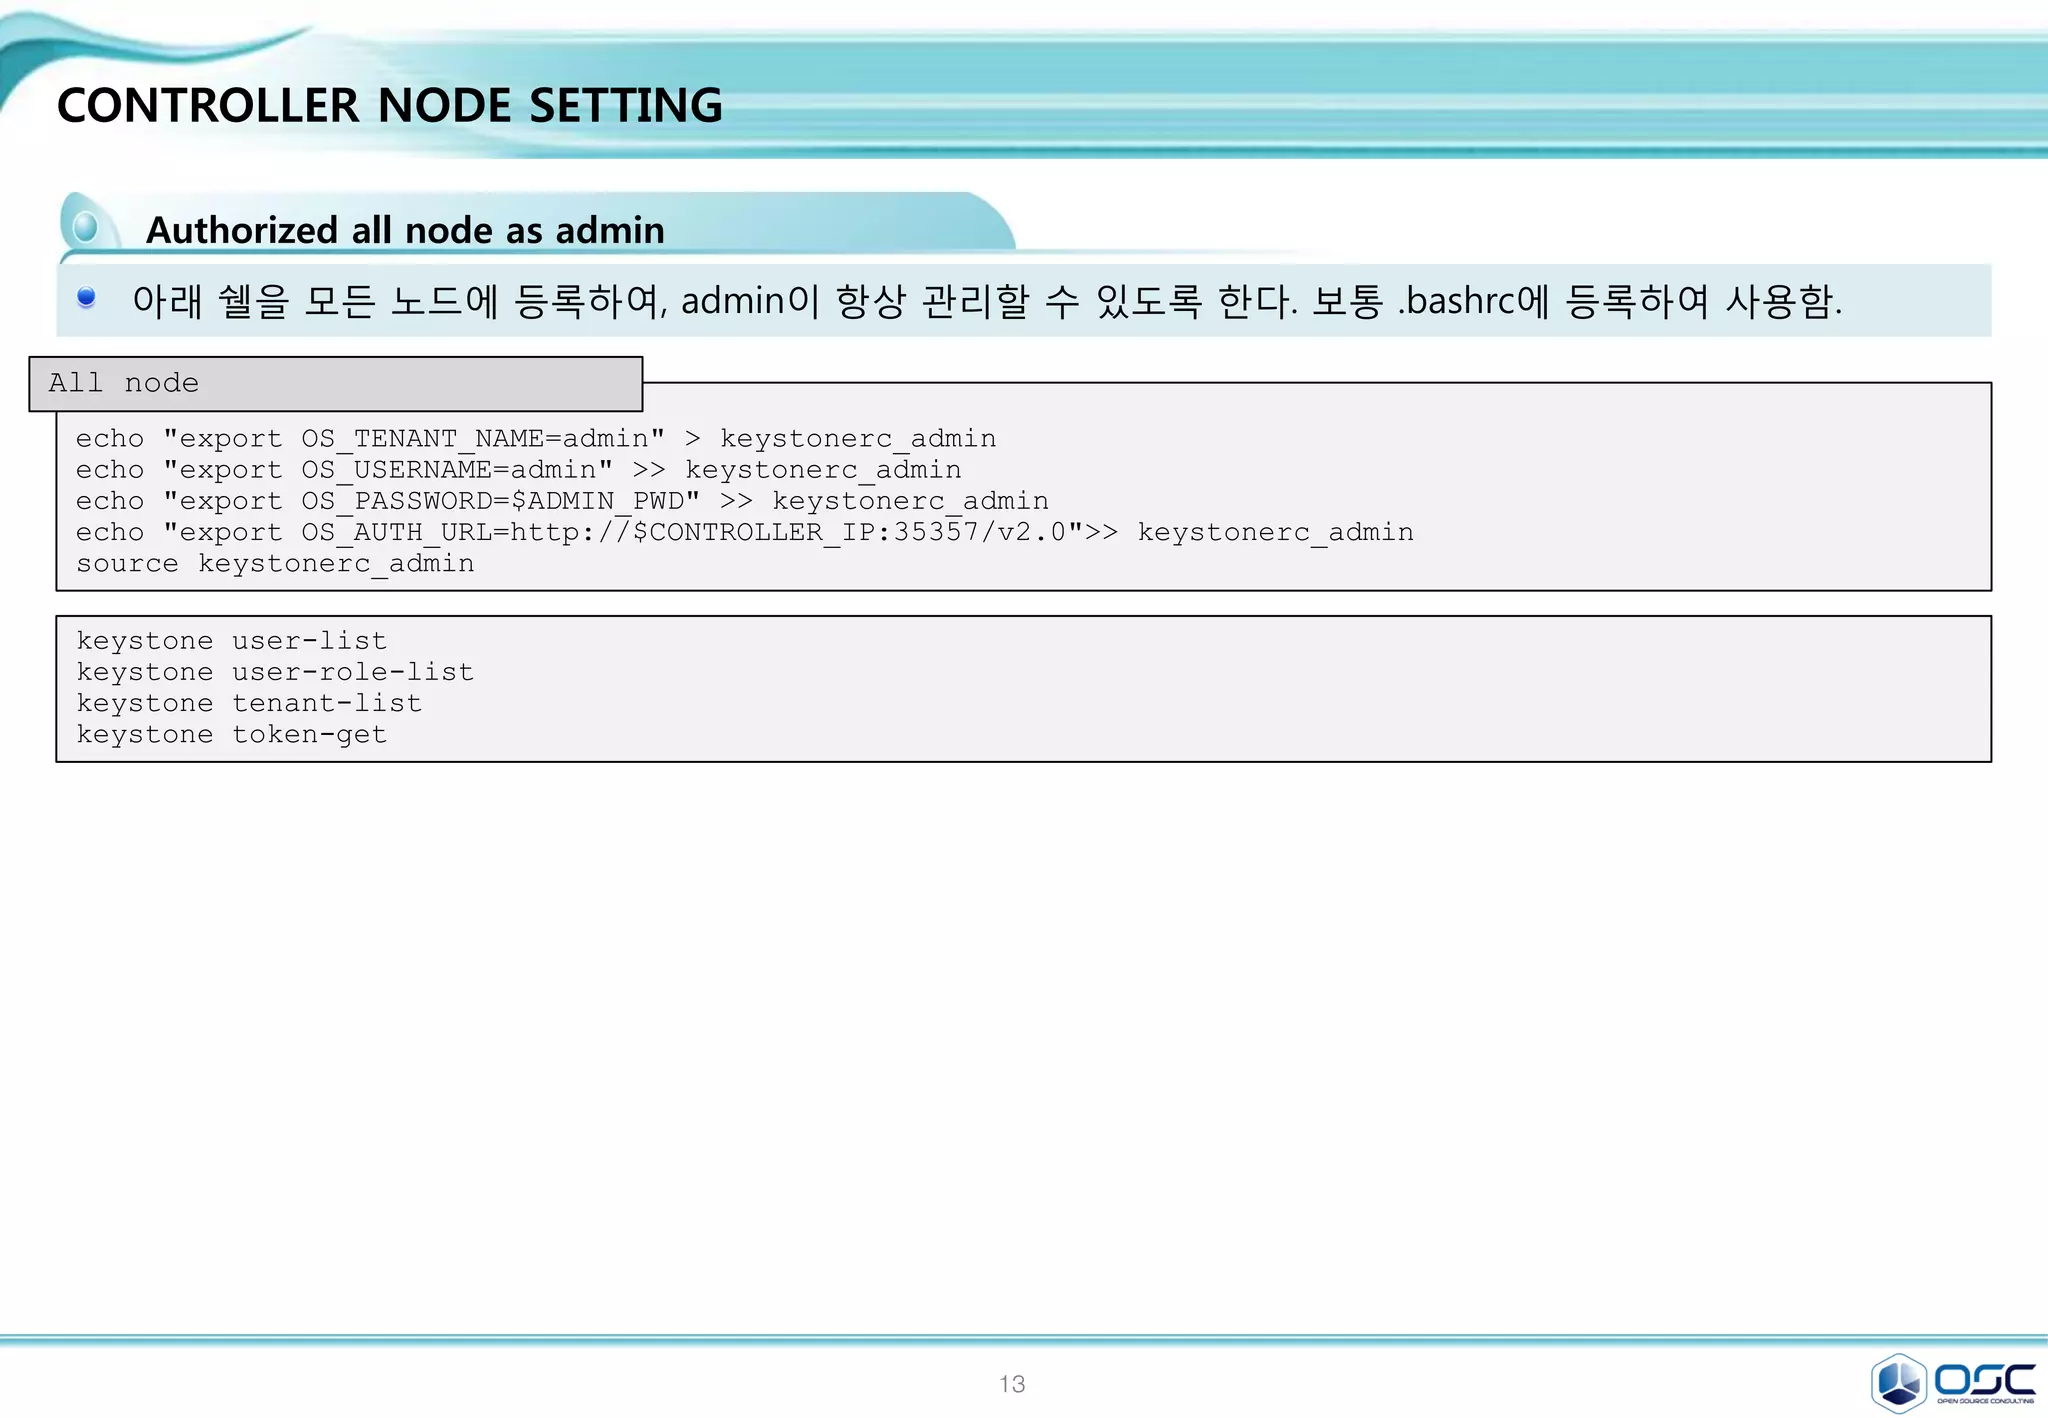
![14
CONTROLLER NODE SETTING
keystone 설치
keystone은 인증을 위한 서비스
yum -y install openstack-keystone python-keystoneclient
[DEFAULT]
# admin token 설정
admin_token=ADMIN
[database]
# database 접근 정보
connection =
mysql://keystone:service@192.168.32.181/keyston
e
[token]
#uuid token provider와 sql driver 정의
provider =
keystone.token.providers.uuid.Provider
driver =
keystone.token.persistence.backends.sql.Token
sed -i.bak
"s/#admin_token=ADMIN/admin_token=$ADMIN_TOKEN/g"
/etc/keystone/keystone.conf
sed -i "/[database]/a
connection =
mysql://keystone:$SERVICE_PWD@$CONTROLLER_IP/keyston
e" /etc/keystone/keystone.conf
sed -i "/[token]/a
provider = keystone.token.providers.uuid.Providern
driver =
keystone.token.persistence.backends.sql.Tokenn"
/etc/keystone/keystone.conf
sed -i "/[revoke]/a
driver =
keystone.contrib.revoke.backends.sql.Revoken"
/etc/keystone/keystone.conf
#edit /etc/keystone.conf
keystone-manage pki_setup --keystone-user keystone --keystone-group keystone # SSL PKI key 생성
chown -R keystone:keystone /var/log/keystone
chown -R keystone:keystone /etc/keystone/ssl
chmod -R o-rwx /etc/keystone/ssl
su -s /bin/sh -c "keystone-manage db_sync" keystone # 테이블 생성
#start keystone
systemctl enable openstack-keystone.service
systemctl start openstack-keystone.service
egrep -v "^#|^$" /etc/keystone/keystone.conf](https://image.slidesharecdn.com/dockeronopenstackoscv4-150309083842-conversion-gate01/75/Docker-on-openstack-by-OpenSource-Consulting-14-2048.jpg)
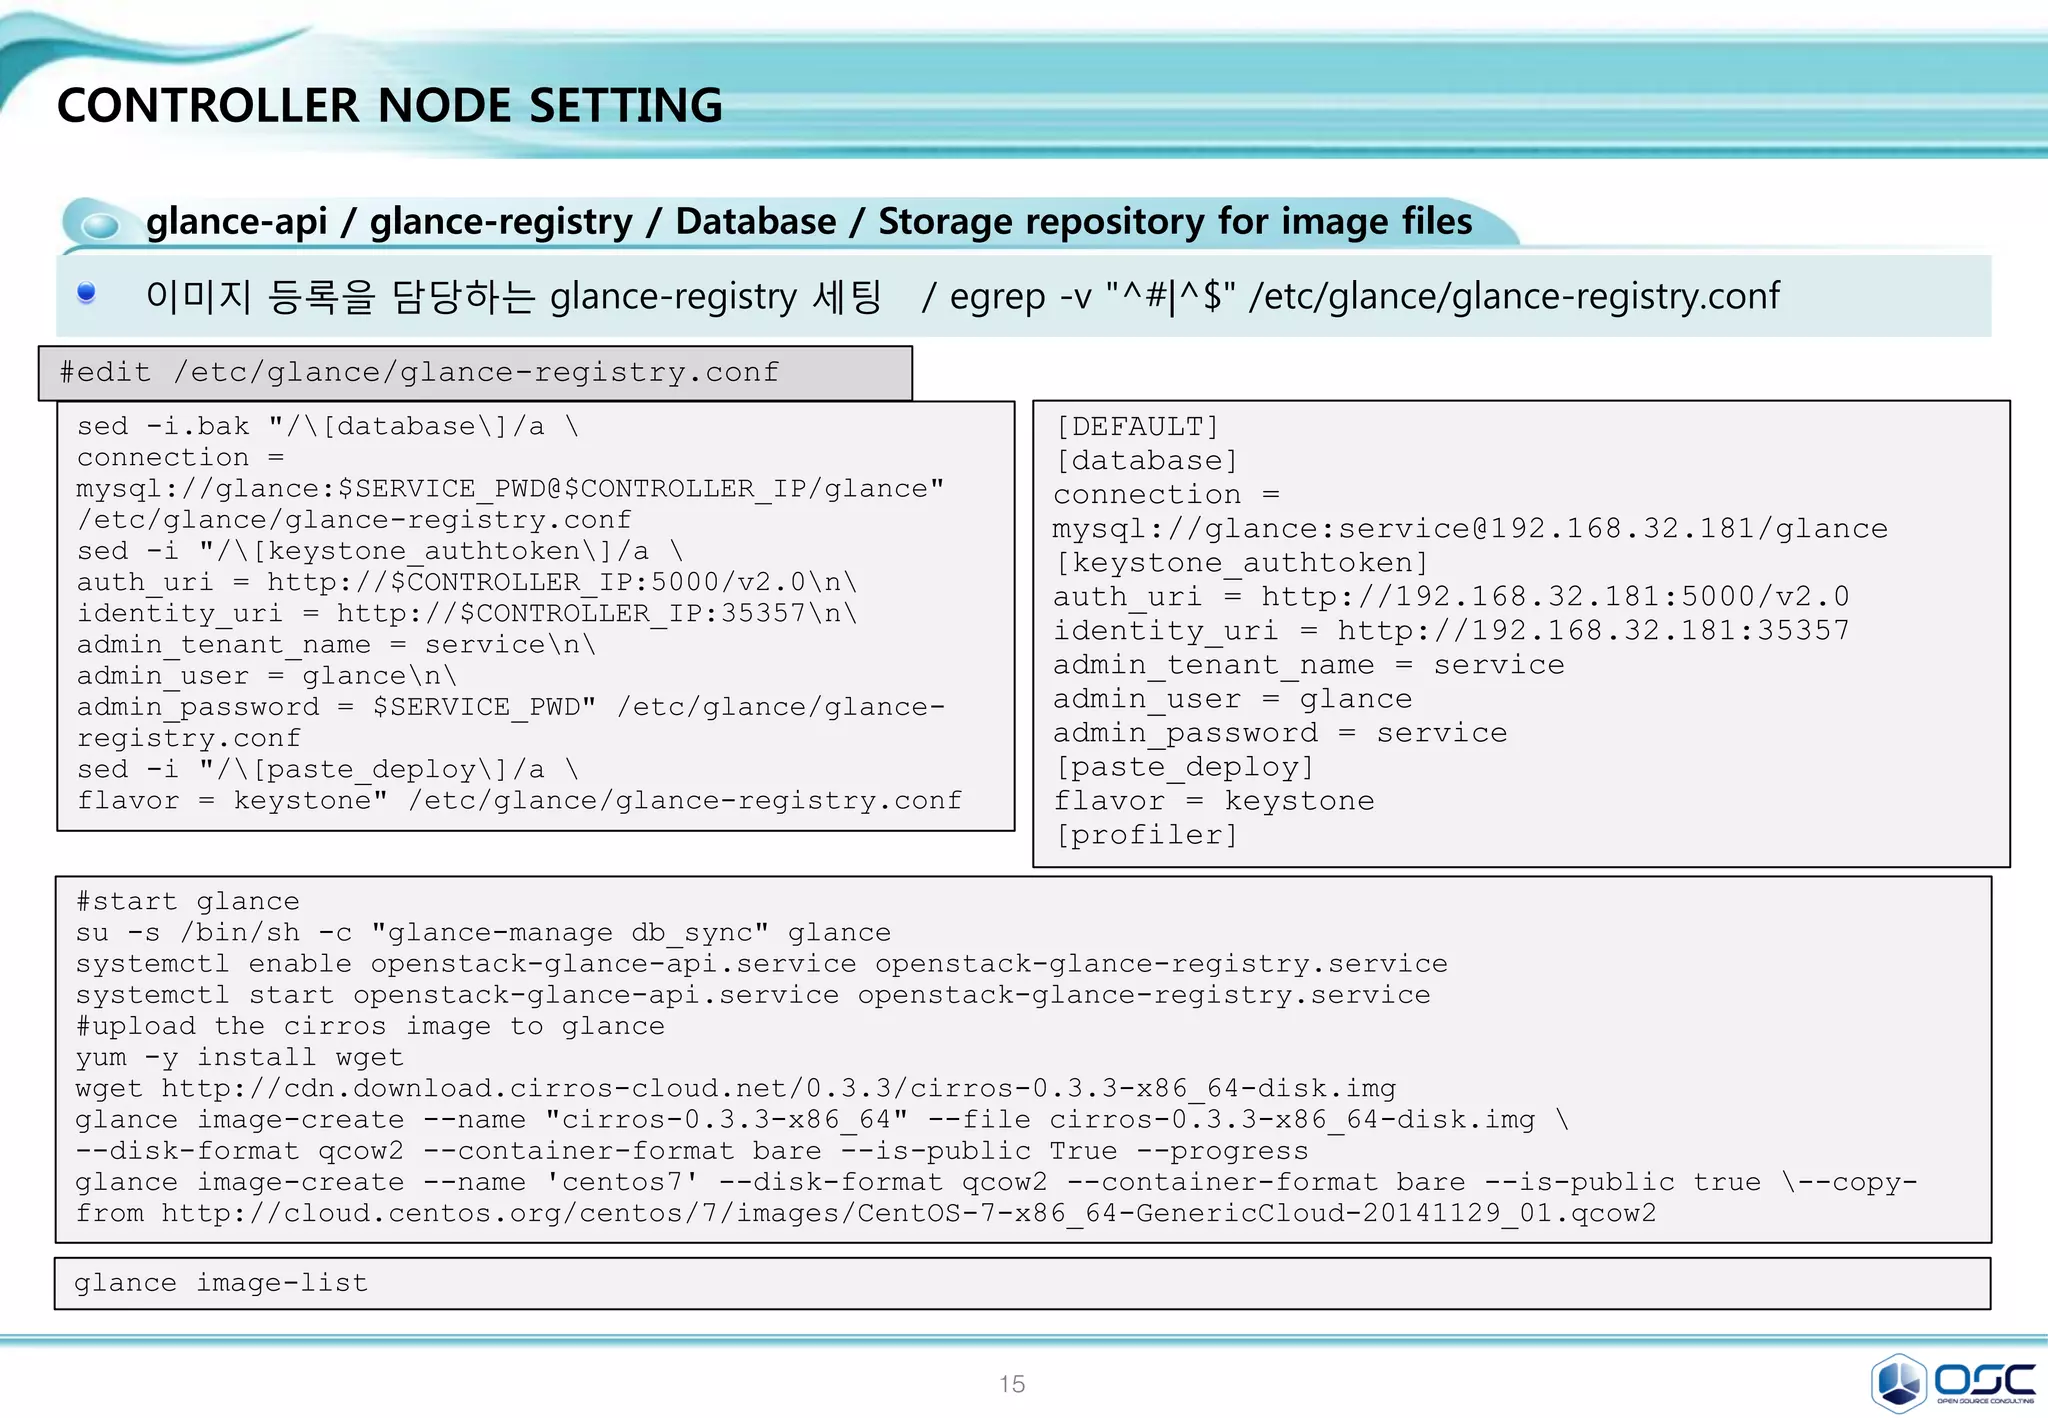
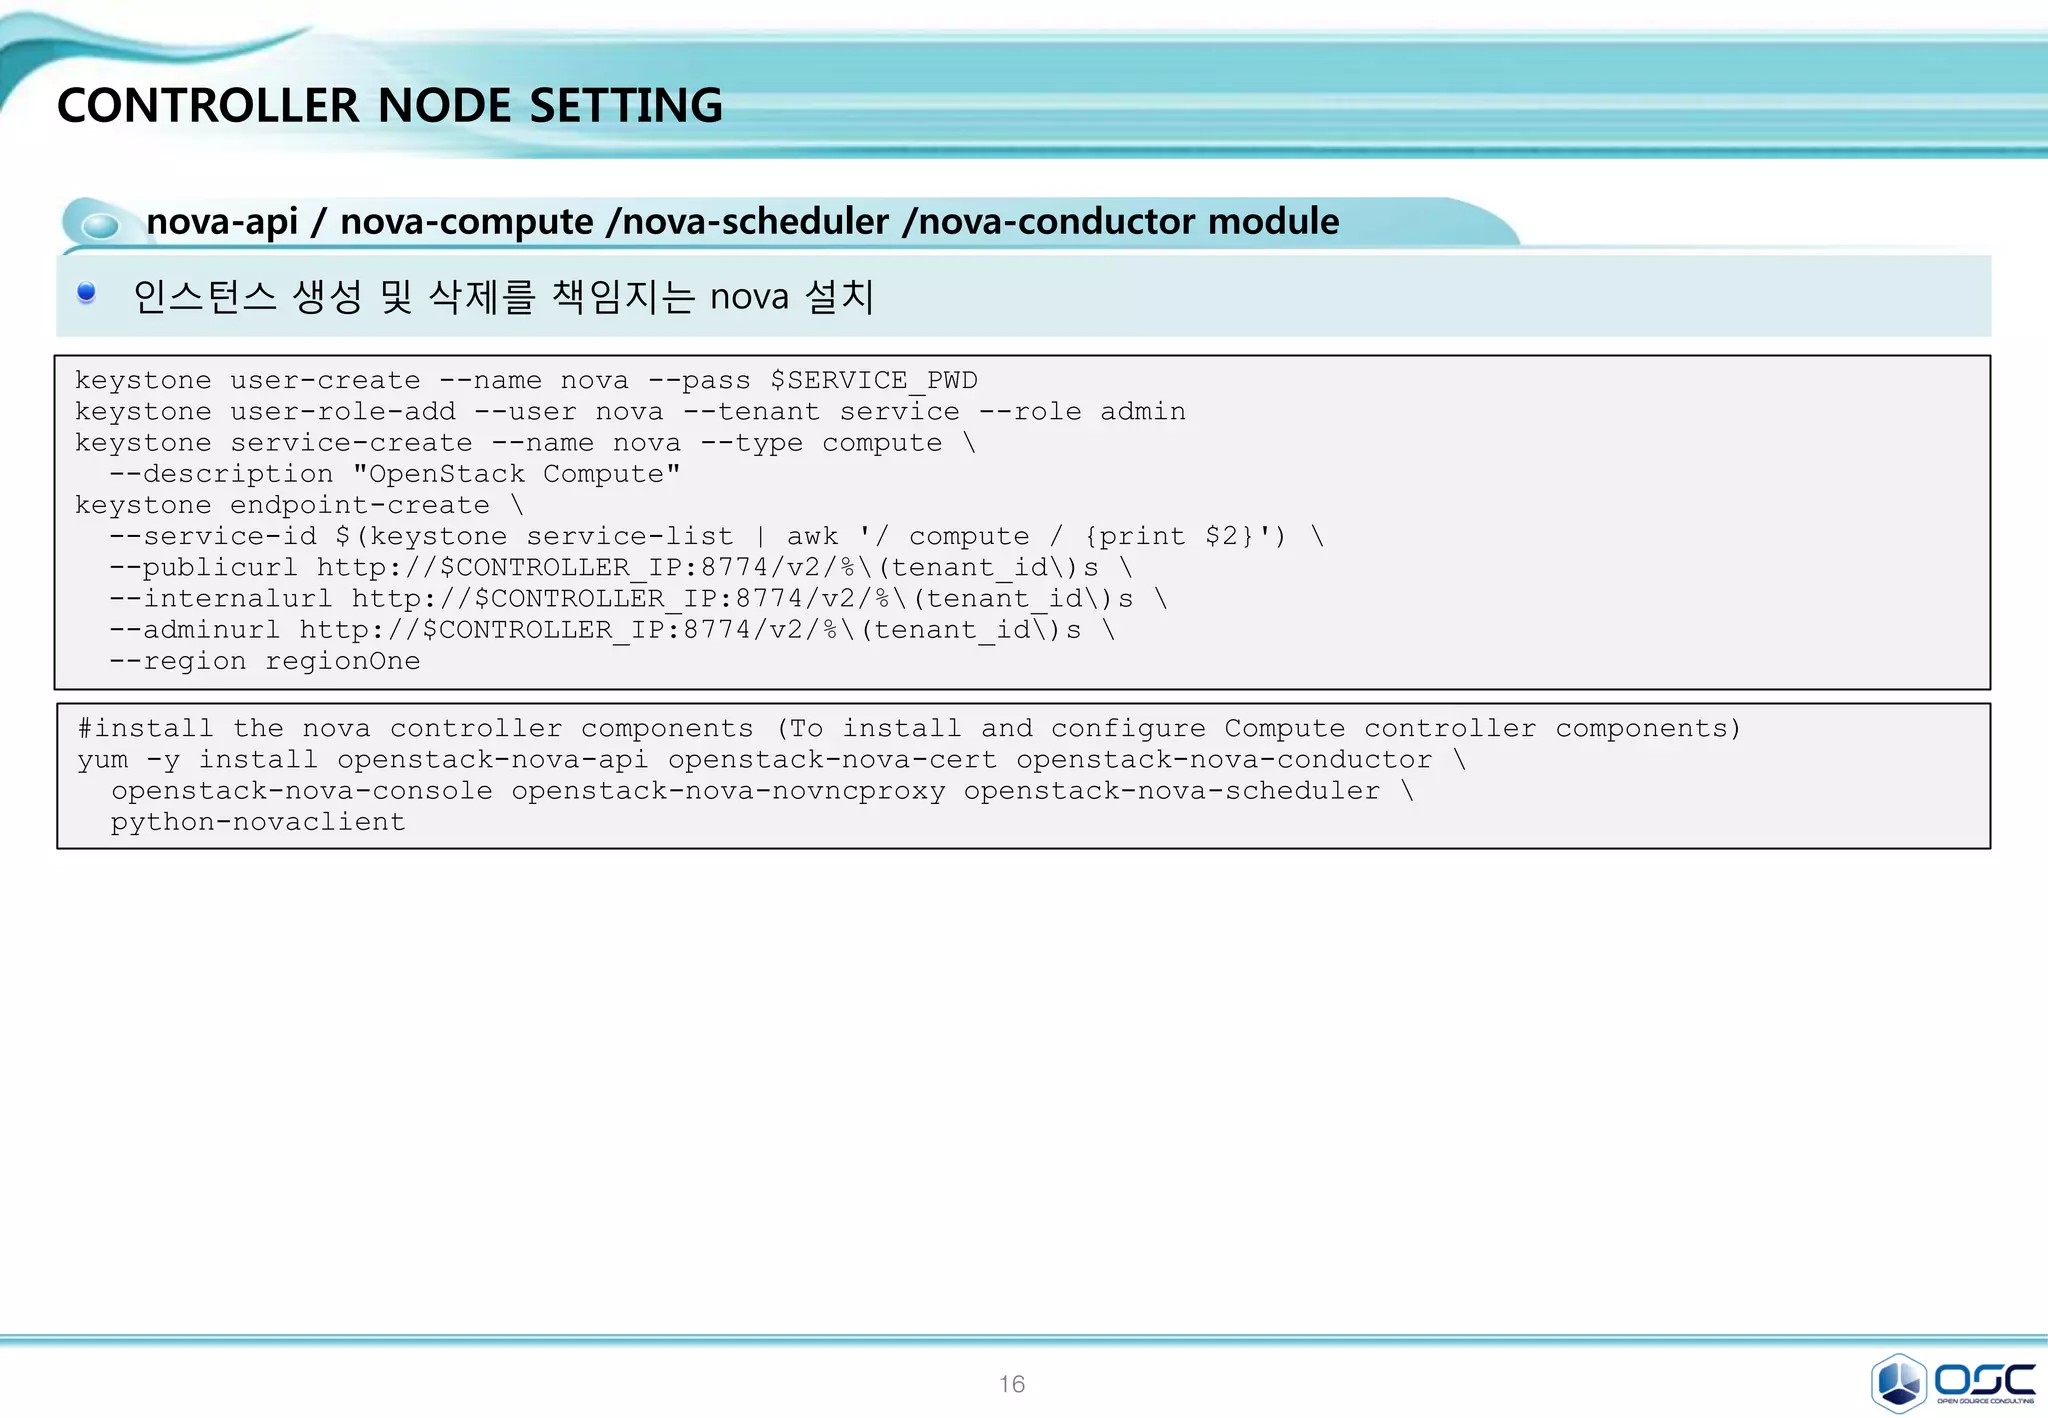
![17
CONTROLLER NODE SETTING
glance-api / glance-registry / Database / Storage repository for image files
Glance는 인스턴스의 운영제제 이미지 파일을 관리한다.
yum -y install openstack-glance python-glanceclient
[DEFAULT]
[database]
connection =
mysql://glance:service@192.168.32.181/glance
[keystone_authtoken]
auth_uri = http://192.168.32.181:5000/v2.0
identity_uri = http://192.168.32.181:35357
admin_tenant_name = service
admin_user = glance
admin_password = service
[paste_deploy]
flavor = keystone
[glance_store]
default_store = file
filesystem_store_datadir=/var/lib/glance/im
ages/ # Cluster native mount point
sed -i.bak "/[database]/a
connection =
mysql://glance:$SERVICE_PWD@$CONTROLLER_IP/glance"
/etc/glance/glance-api.conf
sed -i "/[keystone_authtoken]/a
auth_uri = http://$CONTROLLER_IP:5000/v2.0n
identity_uri = http://$CONTROLLER_IP:35357n
admin_tenant_name = servicen
admin_user = glancen
admin_password = $SERVICE_PWD" /etc/glance/glance-
api.conf
sed -i "/[paste_deploy]/a
flavor = keystone" /etc/glance/glance-api.conf
sed -i "/[glance_store]/a
default_store = filen
filesystem_store_datadir = /var/lib/glance/images/"
/etc/glance/glance-api.conf
#edit /etc/glance/glance-api.conf
keystone user-create --name glance --pass $SERVICE_PWD
keystone user-role-add --user glance --tenant service --role admin
keystone service-create --name glance --type image
--description "OpenStack Image Service"
keystone endpoint-create
--service-id $(keystone service-list | awk '/ image / {print $2}')
--publicurl http://$CONTROLLER_IP:9292
--internalurl http://$CONTROLLER_IP:9292
--adminurl http://$CONTROLLER_IP:9292
--region regionOne
egrep -v "^#|^$" /etc/glance/glance-api.conf](https://image.slidesharecdn.com/dockeronopenstackoscv4-150309083842-conversion-gate01/75/Docker-on-openstack-by-OpenSource-Consulting-17-2048.jpg)
![18
CONTROLLER NODE SETTING
glance-api / glance-registry / Database / Storage repository for image files
이미지 등록을 담당하는 glance-registry 세팅 /
[DEFAULT]
[database]
connection =
mysql://glance:service@192.168.32.181/glance
[keystone_authtoken]
auth_uri = http://192.168.32.181:5000/v2.0
identity_uri = http://192.168.32.181:35357
admin_tenant_name = service
admin_user = glance
admin_password = service
[paste_deploy]
flavor = keystone
[profiler]
sed -i.bak "/[database]/a
connection =
mysql://glance:$SERVICE_PWD@$CONTROLLER_IP/glance"
/etc/glance/glance-registry.conf
sed -i "/[keystone_authtoken]/a
auth_uri = http://$CONTROLLER_IP:5000/v2.0n
identity_uri = http://$CONTROLLER_IP:35357n
admin_tenant_name = servicen
admin_user = glancen
admin_password = $SERVICE_PWD" /etc/glance/glance-
registry.conf
sed -i "/[paste_deploy]/a
flavor = keystone" /etc/glance/glance-registry.conf
#edit /etc/glance/glance-registry.conf
#start glance
su -s /bin/sh -c "glance-manage db_sync" glance
systemctl enable openstack-glance-api.service openstack-glance-registry.service
systemctl start openstack-glance-api.service openstack-glance-registry.service
#upload the cirros image to glance
yum -y install wget
wget http://cdn.download.cirros-cloud.net/0.3.3/cirros-0.3.3-x86_64-disk.img
glance image-create --name "cirros-0.3.3-x86_64" --file cirros-0.3.3-x86_64-disk.img
--disk-format qcow2 --container-format bare --is-public True --progress
glance image-create --name 'centos7' --disk-format qcow2 --container-format bare --is-public true --copy-
from http://cloud.centos.org/centos/7/images/CentOS-7-x86_64-GenericCloud-20141129_01.qcow2
glance image-list
egrep -v "^#|^$" /etc/glance/glance-registry.conf](https://image.slidesharecdn.com/dockeronopenstackoscv4-150309083842-conversion-gate01/75/Docker-on-openstack-by-OpenSource-Consulting-18-2048.jpg)

![20
CONTROLLER NODE SETTING
nova-api / nova-compute /nova-scheduler /nova-conductor module
Nova.conf 파일 구성 / egrep -v "^#|^$" /etc/nova/nova.conf
[DEFAULT]
rpc_backend = rabbit
rabbit_host = 192.168.32.181
auth_strategy = keystone
my_ip = 192.168.32.181
vncserver_listen = 192.168.32.181
vncserver_proxyclient_address = 192.168.32.181
network_api_class = nova.network.neutronv2.api.API
security_group_api = neutron
linuxnet_interface_driver =
nova.network.linux_net.LinuxOVSInterfaceDriver
firewall_driver = nova.virt.firewall.NoopFirewallDriver
[baremetal]
[glance]
host = 192.168.32.181
[hyperv]
[database]
connection = mysql://nova:service@192.168.32.181/nova
[keystone_authtoken]
auth_uri = http://192.168.32.181:5000/v2.0
identity_uri = http://192.168.32.181:35357
admin_tenant_name = service
admin_user = nova
admin_password = service
[neutron]
url = http://192.168.32.181:9696
auth_strategy = keystone
admin_auth_url = http://192.168.32.181:35357/v2.0
admin_tenant_name = service
admin_username = neutron
admin_password = service
service_metadata_proxy = True
metadata_proxy_shared_secret = meta123
sed -i.bak "/[database]/a
connection = mysql://nova:$SERVICE_PWD@$CONTROLLER_IP/nova"
/etc/nova/nova.conf
sed -i "/[DEFAULT]/a
rpc_backend = rabbitn
rabbit_host = $CONTROLLER_IPn
auth_strategy = keystonen
my_ip = $CONTROLLER_IPn
vncserver_listen = $CONTROLLER_IPn
vncserver_proxyclient_address = $CONTROLLER_IPn
network_api_class = nova.network.neutronv2.api.APIn
security_group_api = neutronn
linuxnet_interface_driver =
nova.network.linux_net.LinuxOVSInterfaceDrivern
firewall_driver = nova.virt.firewall.NoopFirewallDriver"
/etc/nova/nova.conf
sed -i "/[keystone_authtoken]/i
[database]nconnection = mysql://nova:$SERVICE_PWD@$CONTROLLER_IP/nova"
/etc/nova/nova.conf
sed -i "/[keystone_authtoken]/a
auth_uri = http://$CONTROLLER_IP:5000/v2.0n
identity_uri = http://$CONTROLLER_IP:35357n
admin_tenant_name = servicen
admin_user = novan
admin_password = $SERVICE_PWD" /etc/nova/nova.conf
sed -i "/[glance]/a host = $CONTROLLER_IP" /etc/nova/nova.conf
sed -i "/[neutron]/a
url = http://$CONTROLLER_IP:9696n
auth_strategy = keystonen
admin_auth_url = http://$CONTROLLER_IP:35357/v2.0n
admin_tenant_name = servicen
admin_username = neutronn
admin_password = $SERVICE_PWDn
service_metadata_proxy = Truen
metadata_proxy_shared_secret = $META_PWD" /etc/nova/nova.conf
#edit /etc/nova/nova.conf](https://image.slidesharecdn.com/dockeronopenstackoscv4-150309083842-conversion-gate01/75/Docker-on-openstack-by-OpenSource-Consulting-20-2048.jpg)

![22
CONTROLLER NODE SETTING
openstack-neutron /openstack-neutron-ml2 / python-neutronclient
Neutron 서버를 설치함 / egrep -v "^#|^$" /etc/neutron/neutron.conf
[DEFAULT]
rpc_backend = rabbit
rabbit_host = 192.168.32.181
auth_strategy = keystone
core_plugin = ml2
service_plugins = router
allow_overlapping_ips = True
notify_nova_on_port_status_changes = True
notify_nova_on_port_data_changes = True
nova_url = http://192.168.32.181:8774/v2
nova_admin_auth_url = http://192.168.32.181:35357/v2.0
nova_region_name = regionOne
nova_admin_username = nova
nova_admin_tenant_id = 2ec220d040994c4589fb60afc98fc5c3
nova_admin_password = service
[matchmaker_redis]
[matchmaker_ring]
[quotas]
[agent]
[keystone_authtoken]
auth_uri = http://192.168.32.181:5000/v2.0
identity_uri = http://192.168.32.181:35357
admin_tenant_name = service
admin_user = neutron
admin_password = service
[database]
connection = mysql://neutron:service@192.168.32.181/neutron
connection = mysql://neutron:service@192.168.32.181/neutron
connection = mysql://neutron:service@192.168.32.181/neutron
sed -i.bak "/[database]/a
connection =
mysql://neutron:$SERVICE_PWD@$CONTROLLER_IP/neutron"
/etc/neutron/neutron.conf
SERVICE_TENANT_ID=$(keystone tenant-list | awk '/ service
/ {print $2}')
sed -i '0,/[DEFAULT]/s//[DEFAULT]
rpc_backend = rabbit
rabbit_host = '"$CONTROLLER_IP"'
auth_strategy = keystone
core_plugin = ml2
service_plugins = router
allow_overlapping_ips = True
notify_nova_on_port_status_changes = True
notify_nova_on_port_data_changes = True
nova_url = http://'"$CONTROLLER_IP"':8774/v2
nova_admin_auth_url =
http://'"$CONTROLLER_IP"':35357/v2.0
nova_region_name = regionOne
nova_admin_username = nova
nova_admin_tenant_id = '"$SERVICE_TENANT_ID"'
nova_admin_password = '"$SERVICE_PWD"'/'
/etc/neutron/neutron.conf
sed -i "/[keystone_authtoken]/a
auth_uri = http://$CONTROLLER_IP:5000/v2.0n
identity_uri = http://$CONTROLLER_IP:35357n
admin_tenant_name = servicen
admin_user = neutronn
admin_password = $SERVICE_PWD" /etc/neutron/neutron.conf
#edit /etc/neutron/neutron.conf](https://image.slidesharecdn.com/dockeronopenstackoscv4-150309083842-conversion-gate01/75/Docker-on-openstack-by-OpenSource-Consulting-22-2048.jpg)
![23
CONTROLLER NODE SETTING
openstack-neutron /openstack-neutron-ml2 / python-neutronclient
Neutron 기본 plug-in인 ML2 사용 / GRE/Openvswitch 사용
/ egrep -v "^#|^$" /etc/neutron/plugins/ml2/ml2_conf.ini
[ml2]
type_drivers = flat,gre
tenant_network_types = gre
mechanism_drivers = openvswitch
[ml2_type_gre]
tunnel_id_ranges = 1:1000
[securitygroup]
enable_security_group = True
enable_ipset = True
firewall_driver =
neutron.agent.linux.iptables_firewall.OVSHybridIptablesFire
wallDriver
#edit /etc/neutron/plugins/ml2/ml2_conf.ini
sed -i "/[ml2]/a
type_drivers = flat,gren
tenant_network_types = gren
mechanism_drivers = openvswitch"
/etc/neutron/plugins/ml2/ml2_conf.ini
sed -i "/[ml2_type_gre]/a
tunnel_id_ranges = 1:1000"
/etc/neutron/plugins/ml2/ml2_conf.ini
sed -i "/[securitygroup]/a
enable_security_group = Truen
enable_ipset = Truen
firewall_driver =
neutron.agent.linux.iptables_firewall.OVSHybridIptablesFir
ewallDriver" /etc/neutron/plugins/ml2/ml2_conf.ini
#edit /etc/neutron/plugins/ml2/ml2_conf.ini
#start neutron
ln -s /etc/neutron/plugins/ml2/ml2_conf.ini /etc/neutron/plugin.ini
su -s /bin/sh -c "neutron-db-manage --config-file /etc/neutron/neutron.conf
--config-file /etc/neutron/plugins/ml2/ml2_conf.ini upgrade juno" neutron
systemctl restart openstack-nova-api.service openstack-nova-scheduler.service
openstack-nova-conductor.service
systemctl enable neutron-server.service
systemctl start neutron-server.service](https://image.slidesharecdn.com/dockeronopenstackoscv4-150309083842-conversion-gate01/75/Docker-on-openstack-by-OpenSource-Consulting-23-2048.jpg)
![24
CONTROLLER NODE SETTING
openstack-dashboard httpd mod_wsgi memcached python-memcached
웹기반 인터페이스인 dashboard 설치
ALLOWED_HOSTS = ['*']
OPENSTACK_HOST = "192.168.32.181"
sed -i.bak "s/ALLOWED_HOSTS = ['horizon.example.com',
'localhost']/ALLOWED_HOSTS = ['*']/" /etc/openstack-
dashboard/local_settings
sed -i 's/OPENSTACK_HOST = "127.0.0.1"/OPENSTACK_HOST =
"'"$CONTROLLER_IP"'"/' /etc/openstack-
dashboard/local_settings
#edit /etc/openstack-dashboard/local_settings
yum -y install openstack-dashboard httpd mod_wsgi memcached python-memcached
#start dashboard
setsebool -P httpd_can_network_connect on
chown -R apache:apache /usr/share/openstack-dashboard/static
systemctl enable httpd.service memcached.service
systemctl start httpd.service memcached.service
egrep -v "^#|^$" /etc/openstack-dashboard/local_settings](https://image.slidesharecdn.com/dockeronopenstackoscv4-150309083842-conversion-gate01/75/Docker-on-openstack-by-OpenSource-Consulting-24-2048.jpg)
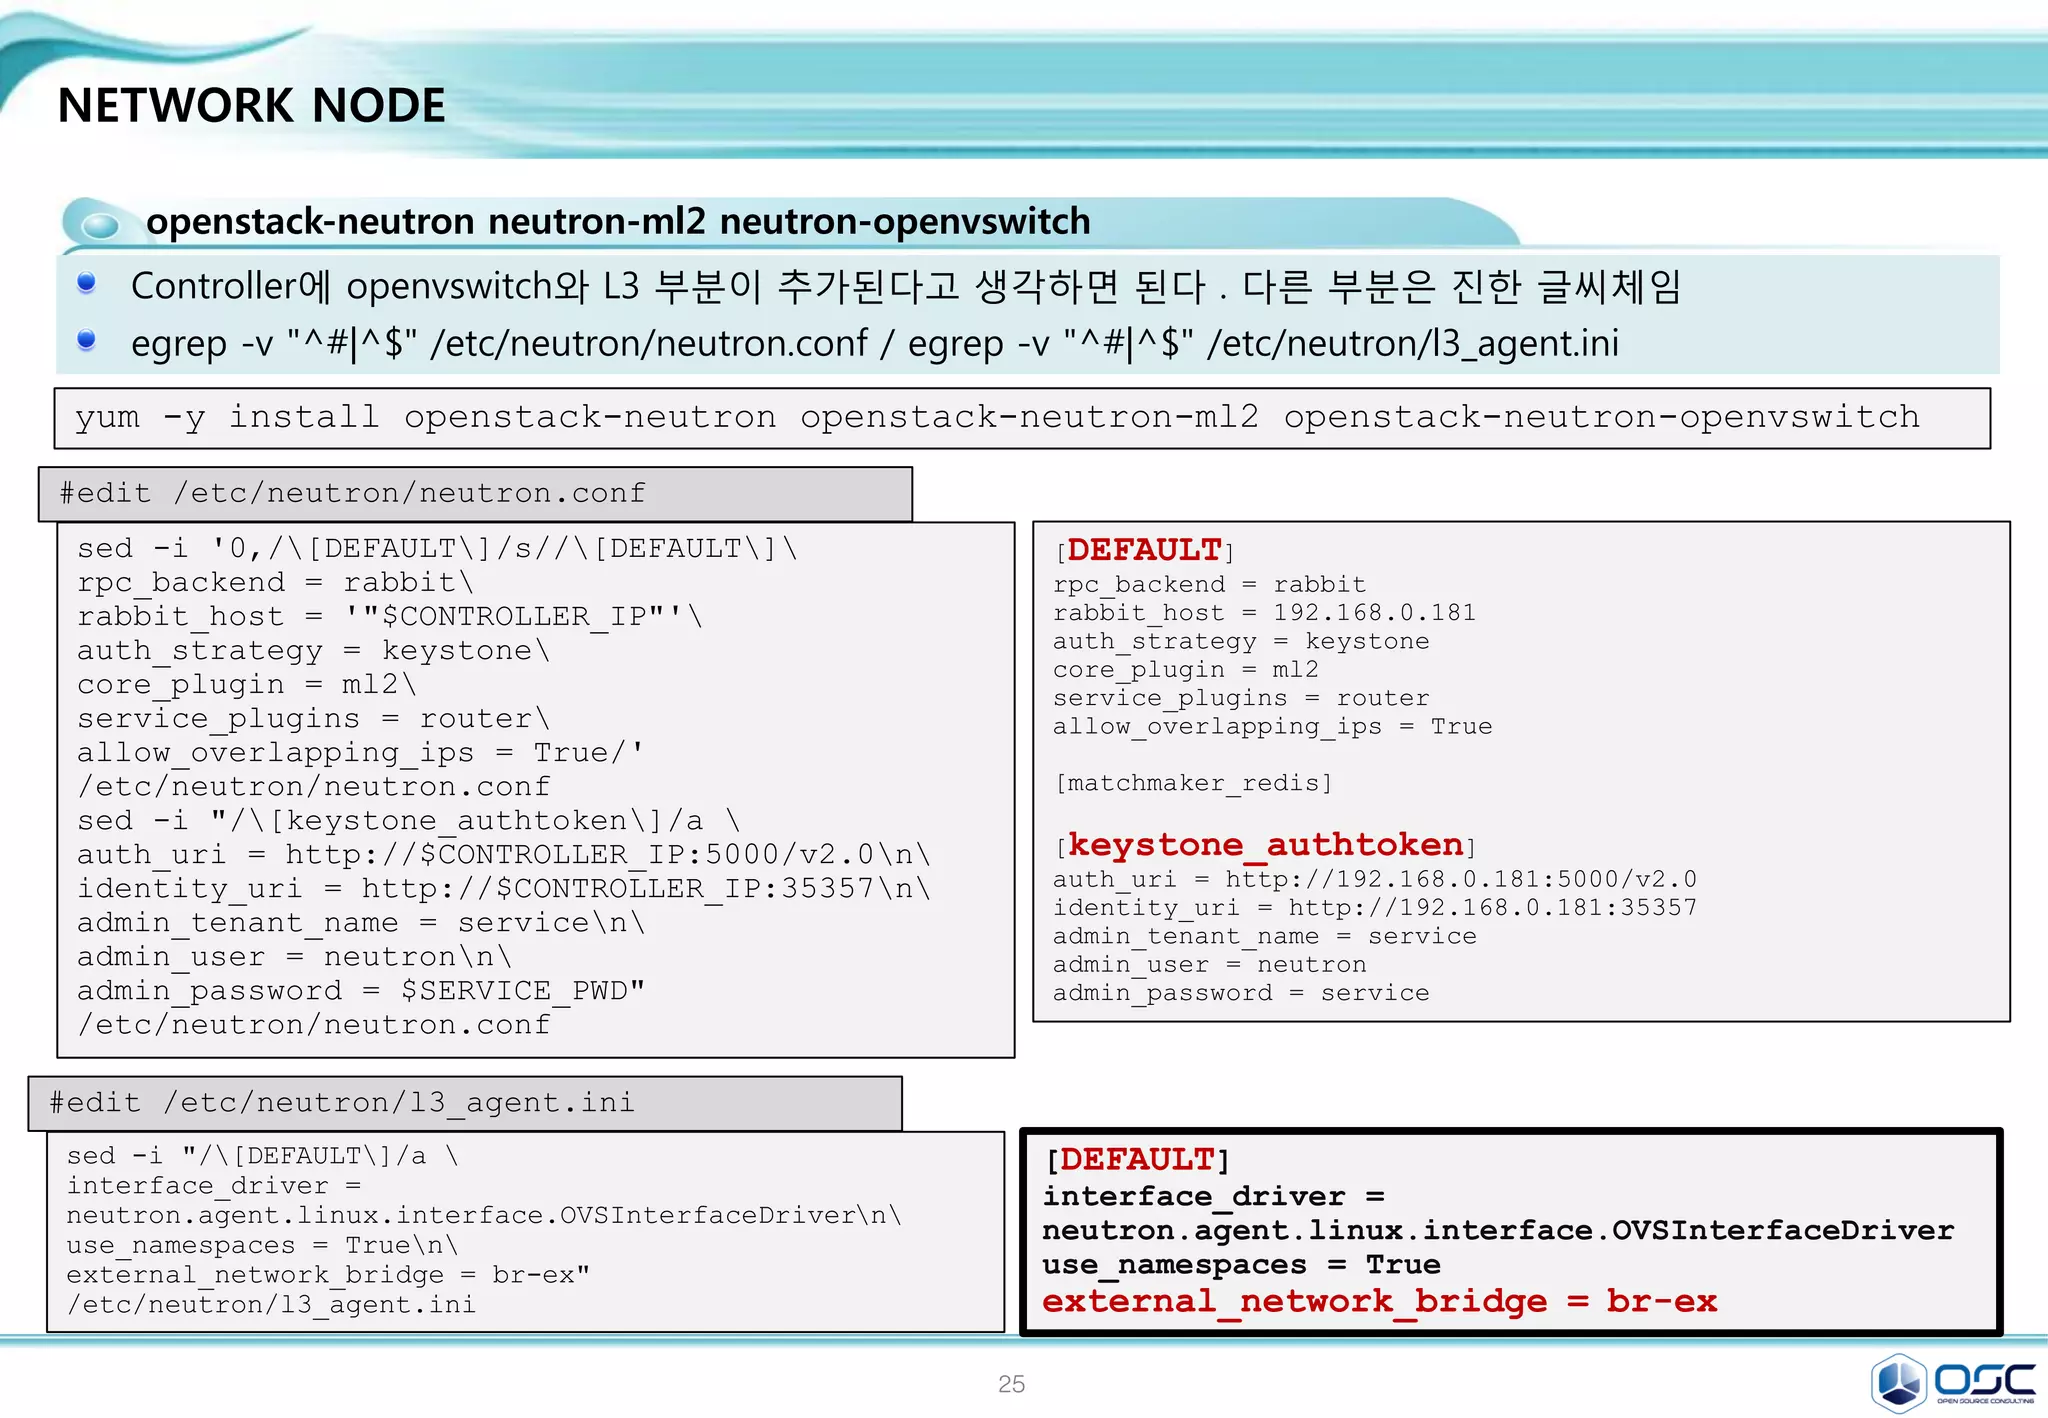
![26
CONTROLLER NODE SETTING
openstack-cinder/ python-cinderclient / python-oslo-db
cinder controller 설치 / egrep -v "^#|^$" /etc/cinder/cinder.conf
[DEFAULT]
rpc_backend = rabbit
rabbit_host = 192.168.32.181
auth_strategy = keystone
my_ip = 192.168.32.181
[database]
connection = mysql://cinder:service@192.168.32.181/cinder
[keystone_authtoken]
auth_uri = http://192.168.32.181:5000/v2.0
identity_uri = http://192.168.32.181:35357
admin_tenant_name = service
admin_user = cinder
admin_password = service
sed -i.bak "/[database]/a connection =
mysql://cinder:$SERVICE_PWD@$CONTROLLER_IP/cinde
r" /etc/cinder/cinder.conf
sed -i "0,/[DEFAULT]/a
rpc_backend = rabbitn
rabbit_host = $CONTROLLER_IPn
auth_strategy = keystonen
my_ip = $CONTROLLER_IP" /etc/cinder/cinder.conf
sed -i "/[keystone_authtoken]/a
auth_uri = http://$CONTROLLER_IP:5000/v2.0n
identity_uri = http://$CONTROLLER_IP:35357n
admin_tenant_name = servicen
admin_user = cindern
admin_password = $SERVICE_PWD"
/etc/cinder/cinder.conf
#edit /etc/cinder/cinder.conf
egrep -v "^#|^$" /etc/cinder/cinder.conf](https://image.slidesharecdn.com/dockeronopenstackoscv4-150309083842-conversion-gate01/75/Docker-on-openstack-by-OpenSource-Consulting-26-2048.jpg)
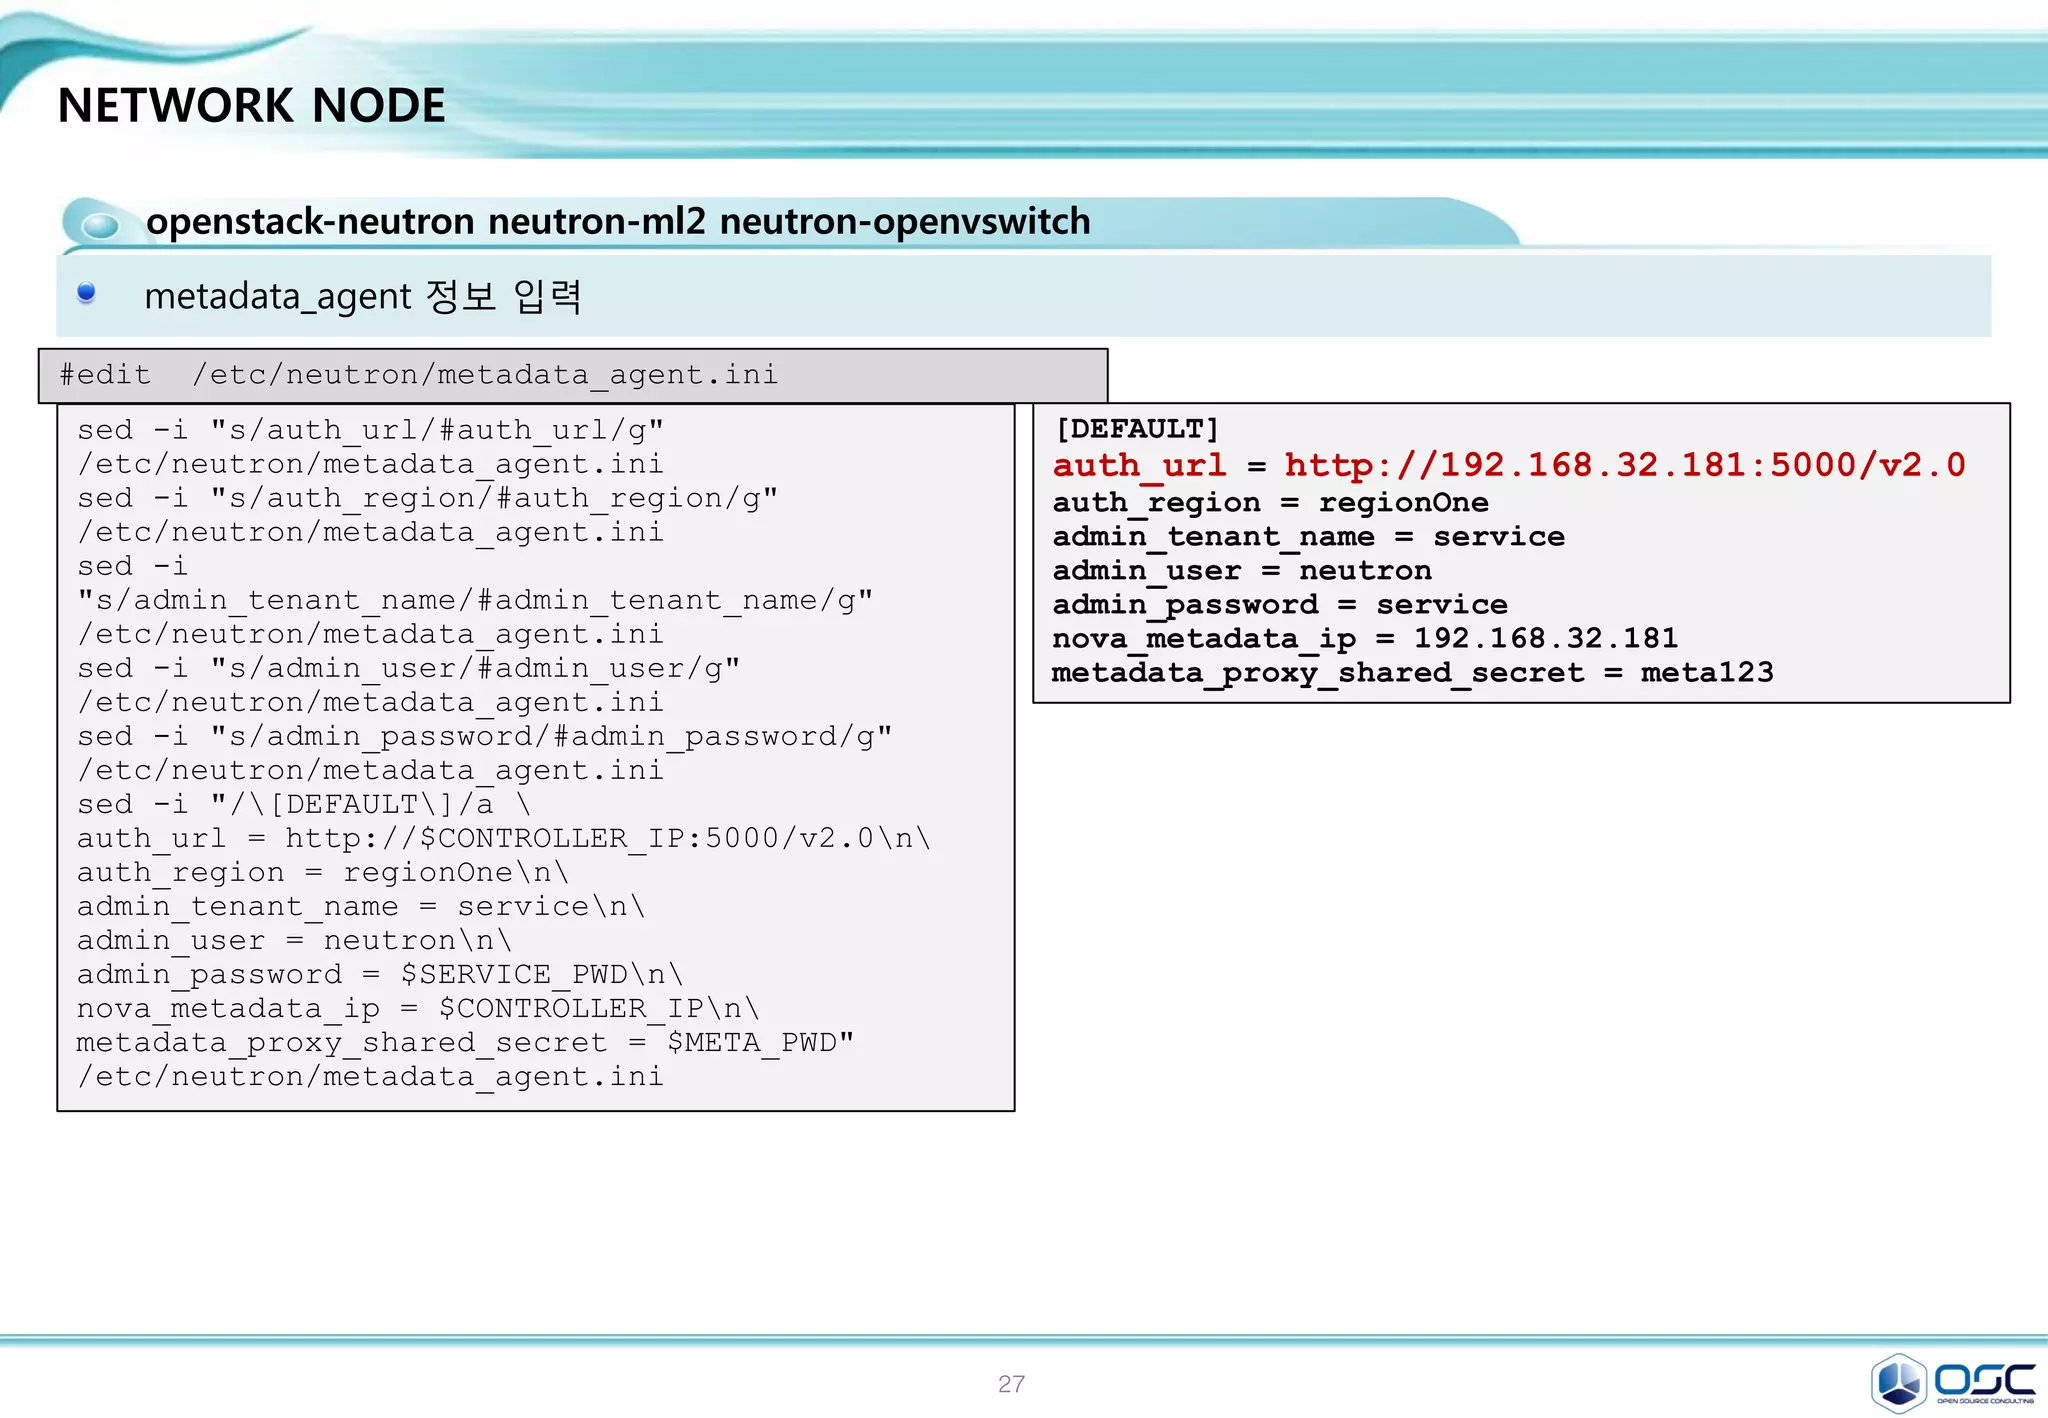

![29
NETWORK NODE
openstack-neutron neutron-ml2 neutron-openvswitch
Controller에 openvswitch와 L3 부분이 추가된다고 생각하면 된다 . 다른 부분은 진한 글씨체임
egrep -v "^#|^$" /etc/neutron/neutron.conf / egrep -v "^#|^$" /etc/neutron/l3_agent.ini
yum -y install openstack-neutron openstack-neutron-ml2 openstack-neutron-openvswitch
[DEFAULT]
rpc_backend = rabbit
rabbit_host = 192.168.0.181
auth_strategy = keystone
core_plugin = ml2
service_plugins = router
allow_overlapping_ips = True
[matchmaker_redis]
[keystone_authtoken]
auth_uri = http://192.168.0.181:5000/v2.0
identity_uri = http://192.168.0.181:35357
admin_tenant_name = service
admin_user = neutron
admin_password = service
sed -i '0,/[DEFAULT]/s//[DEFAULT]
rpc_backend = rabbit
rabbit_host = '"$CONTROLLER_IP"'
auth_strategy = keystone
core_plugin = ml2
service_plugins = router
allow_overlapping_ips = True/'
/etc/neutron/neutron.conf
sed -i "/[keystone_authtoken]/a
auth_uri = http://$CONTROLLER_IP:5000/v2.0n
identity_uri = http://$CONTROLLER_IP:35357n
admin_tenant_name = servicen
admin_user = neutronn
admin_password = $SERVICE_PWD"
/etc/neutron/neutron.conf
#edit /etc/neutron/neutron.conf
[DEFAULT]
interface_driver =
neutron.agent.linux.interface.OVSInterfaceDriver
use_namespaces = True
external_network_bridge = br-ex
sed -i "/[DEFAULT]/a
interface_driver =
neutron.agent.linux.interface.OVSInterfaceDrivern
use_namespaces = Truen
external_network_bridge = br-ex"
/etc/neutron/l3_agent.ini
#edit /etc/neutron/l3_agent.ini](https://image.slidesharecdn.com/dockeronopenstackoscv4-150309083842-conversion-gate01/75/Docker-on-openstack-by-OpenSource-Consulting-29-2048.jpg)
![30
NETWORK NODE
openstack-neutron neutron-ml2 neutron-openvswitch
Openvswitch setting / egrep -v "^#|^$" /etc/neutron/plugins/ml2/ml2_conf.ini
[ml2]
type_drivers = flat,gre
tenant_network_types = gre
mechanism_drivers = openvswitch
[ml2_type_flat]
flat_networks = external
[ml2_type_vlan]
[ml2_type_gre]
tunnel_id_ranges = 1:1000
[ml2_type_vxlan]
[securitygroup]
enable_security_group = True
enable_ipset = True
firewall_driver =
neutron.agent.linux.iptables_firewall.OVSHybridIp
tablesFirewallDriver
[ovs]
local_ip = 192.168.33.182
enable_tunneling = True
bridge_mappings = external:br-ex
[agent]
tunnel_types = gre
sed -i "/[ml2]/a
type_drivers = flat,gren
tenant_network_types = gren
mechanism_drivers = openvswitch"
/etc/neutron/plugins/ml2/ml2_conf.ini
sed -i "/[ml2_type_flat]/a
flat_networks = external"
/etc/neutron/plugins/ml2/ml2_conf.ini
sed -i "/[ml2_type_gre]/a
tunnel_id_ranges = 1:1000"
/etc/neutron/plugins/ml2/ml2_conf.ini
sed -i "/[securitygroup]/a
enable_security_group = Truen
enable_ipset = Truen
firewall_driver =
neutron.agent.linux.iptables_firewall.OVSHybridI
ptablesFirewallDrivern
[ovs]n
local_ip = $THISHOST_TUNNEL_IPn
enable_tunneling = Truen
bridge_mappings = external:br-exn
[agent]n
tunnel_types = gre"
/etc/neutron/plugins/ml2/ml2_conf.ini
#edit /etc/neutron/plugins/ml2/ml2_conf.ini](https://image.slidesharecdn.com/dockeronopenstackoscv4-150309083842-conversion-gate01/75/Docker-on-openstack-by-OpenSource-Consulting-30-2048.jpg)
![31
NETWORK NODE
openstack-neutron neutron-ml2 neutron-openvswitch
Openvswitch setting egrep -v "^#|^$" / etc/neutron/dhcp_agent.ini
[root@juno-network neutron]# egrep -v
"^#|^$" /etc/neutron/l3_agent.ini
[DEFAULT]
interface_driver =
neutron.agent.linux.interface.OVSInterface
Driver
use_namespaces = True
external_network_bridge = br-ex
interface_driver =
neutron.agent.linux.interface.OVSInterface
Driver
use_namespaces = True
external_network_bridge = br-ex
sed -i "/[DEFAULT]/a
interface_driver =
neutron.agent.linux.interface.OVSInterfaceDriver
n
use_namespaces = Truen
external_network_bridge = br-ex"
/etc/neutron/l3_agent.ini
sed -i "/[DEFAULT]/a
interface_driver =
neutron.agent.linux.interface.OVSInterfaceDriver
n
dhcp_driver =
neutron.agent.linux.dhcp.Dnsmasqn
use_namespaces = True"
/etc/neutron/dhcp_agent.ini
#edit /etc/neutron/dhcp_agent.ini](https://image.slidesharecdn.com/dockeronopenstackoscv4-150309083842-conversion-gate01/75/Docker-on-openstack-by-OpenSource-Consulting-31-2048.jpg)
![32
NETWORK NODE
openstack-neutron neutron-ml2 neutron-openvswitch
metadata_agent 정보 입력
[DEFAULT]
auth_url = http://192.168.32.181:5000/v2.0
auth_region = regionOne
admin_tenant_name = service
admin_user = neutron
admin_password = service
nova_metadata_ip = 192.168.32.181
metadata_proxy_shared_secret = meta123
sed -i "s/auth_url/#auth_url/g"
/etc/neutron/metadata_agent.ini
sed -i "s/auth_region/#auth_region/g"
/etc/neutron/metadata_agent.ini
sed -i
"s/admin_tenant_name/#admin_tenant_name/g"
/etc/neutron/metadata_agent.ini
sed -i "s/admin_user/#admin_user/g"
/etc/neutron/metadata_agent.ini
sed -i "s/admin_password/#admin_password/g"
/etc/neutron/metadata_agent.ini
sed -i "/[DEFAULT]/a
auth_url = http://$CONTROLLER_IP:5000/v2.0n
auth_region = regionOnen
admin_tenant_name = servicen
admin_user = neutronn
admin_password = $SERVICE_PWDn
nova_metadata_ip = $CONTROLLER_IPn
metadata_proxy_shared_secret = $META_PWD"
/etc/neutron/metadata_agent.ini
#edit /etc/neutron/metadata_agent.ini
egrep -v "^#|^$" /etc/neutron/metadata_agent.ini](https://image.slidesharecdn.com/dockeronopenstackoscv4-150309083842-conversion-gate01/75/Docker-on-openstack-by-OpenSource-Consulting-32-2048.jpg)
![33
NETWORK NODE
openstack-neutron neutron-ml2 neutron-openvswitch
NIC 외부네트웍 연결
#get external NIC info
for i in $(ls /sys/class/net); do
if [ "$(cat /sys/class/net/$i/ifindex)" == '4' ]; then
NIC=$i
MY_MAC=$(cat /sys/class/net/$i/address)
echo "$i ($MY_MAC)"
fi
done
systemctl enable openvswitch.service
systemctl start openvswitch.service
ovs-vsctl add-br br-ex
ovs-vsctl add-port br-ex $NIC
ethtool -K $NIC gro off](https://image.slidesharecdn.com/dockeronopenstackoscv4-150309083842-conversion-gate01/75/Docker-on-openstack-by-OpenSource-Consulting-33-2048.jpg)
![34
NETWORK NODE
openstack-neutron neutron-ml2 neutron-openvswitch
외부 nework setting
[root@net01 network-scripts]# cat ifcfg-eth2
#HWADDR=00:19:99:D5:AA:D0
TYPE=OVSPort
DEVICETYPE=ovs
OVS_BRIDGE=br-ex
BOOTPROTO=none
NAME=eth2
#UUID=33d13b63-9eba-4414-996a-75391a71fc6a
DEVICE=eth2
ONBOOT=yes
[root@net01 network-scripts]# cat ifcfg-br-ex
TYPE=OVSIntPort
OVS_BRIDGE=br-ex
DEVICETYPE=ovs
BOOTPROTO=none
IPADDR0=192.168.0.182
PREFIX0=24
DEFROUTE=yes
IPV4_FAILURE_FATAL=no
IPV6INIT=yes
IPV6_AUTOCONF=no
IPV6_DEFROUTE=yes
IPV6_FAILURE_FATAL=no
NAME=br-ex
#UUID=33d13b63-9eba-4414-996a-75391a71fc6a
DEVICE=br-ex
ONBOOT=yes
GATEWAY=192.168.0.1
DNS1=8.8.8.8
ln -s /etc/neutron/plugins/ml2/ml2_conf.ini /etc/neutron/plugin.ini
cp /usr/lib/systemd/system/neutron-openvswitch-agent.service
/usr/lib/systemd/system/neutron-openvswitch-agent.service.orig
sed -i 's,plugins/openvswitch/ovs_neutron_plugin.ini,plugin.ini,g'
/usr/lib/systemd/system/neutron-openvswitch-agent.service](https://image.slidesharecdn.com/dockeronopenstackoscv4-150309083842-conversion-gate01/75/Docker-on-openstack-by-OpenSource-Consulting-34-2048.jpg)
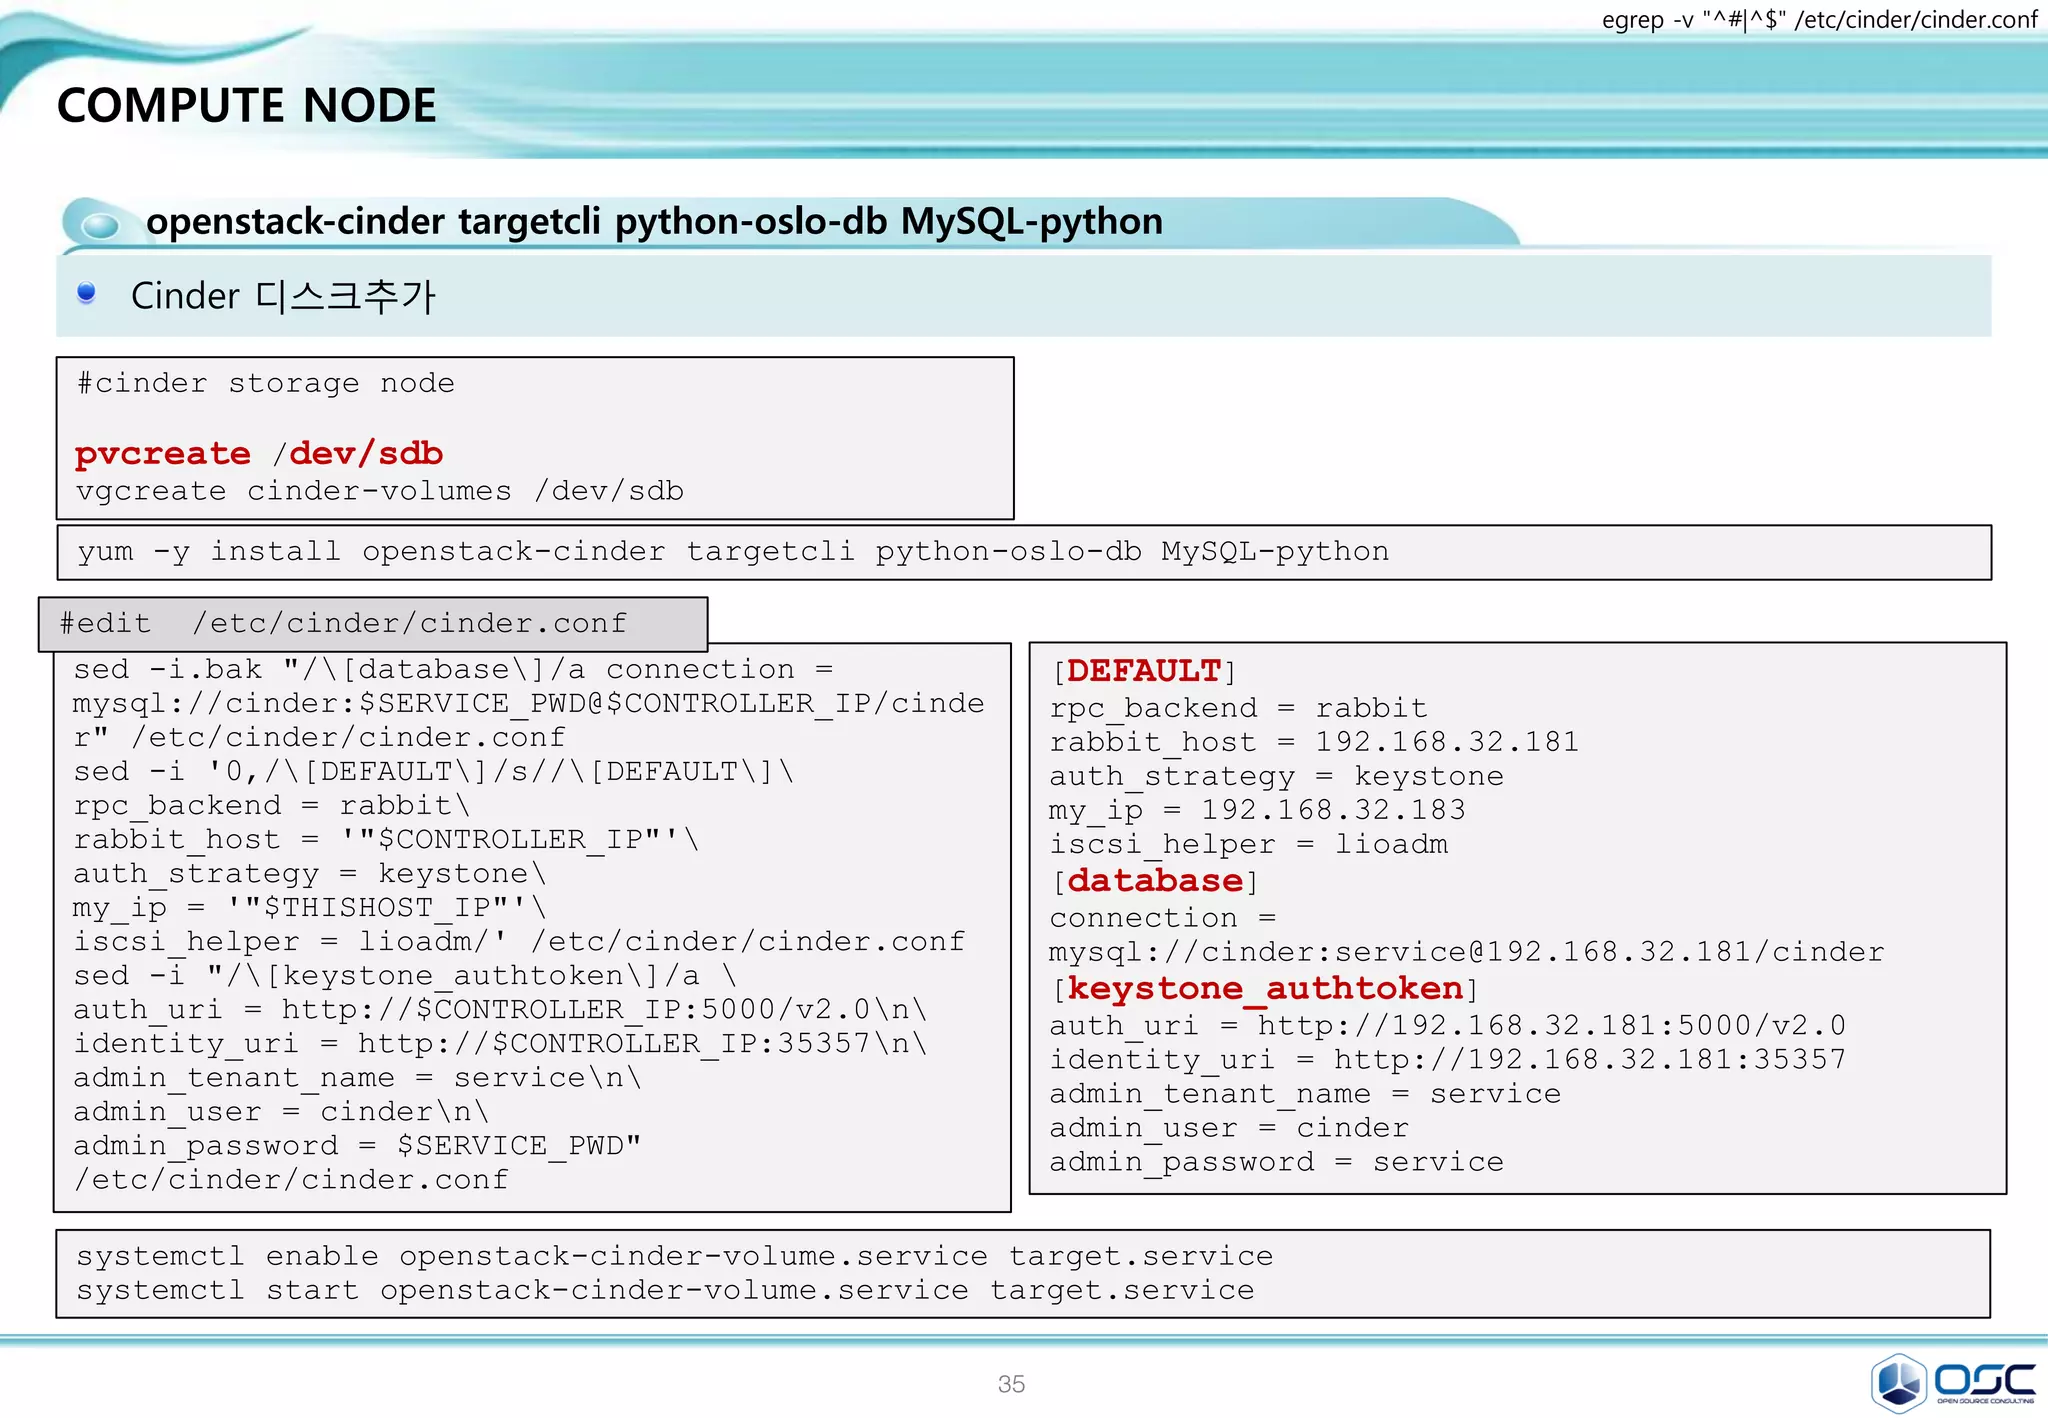

![37
COMPUTE NODE
nova-compute sysfsutils libvirt-daemon-config-nwfilter
/etc/nova/nova.conf / egrep -v "^#|^$" /etc/nova/nova.conf
[DEFAULT]
rpc_backend = rabbit
rabbit_host = 192.168.32.181
auth_strategy = keystone
my_ip = 192.168.32.183
vnc_enabled = True
vncserver_listen = 0.0.0.0
vncserver_proxyclient_address = 192.168.32.183
novncproxy_base_url =
http://192.168.32.181:6080/vnc_auto.html
network_api_class = nova.network.neutronv2.api.API
security_group_api = neutron
linuxnet_interface_driver =
nova.network.linux_net.LinuxOVSInterfaceDriver
firewall_driver =
nova.virt.firewall.NoopFirewallDriver
[glance]
host = 192.168.32.181
[keystone_authtoken]
auth_uri = http://192.168.32.181:5000/v2.0
identity_uri = http://192.168.32.181:35357
admin_tenant_name = service
admin_user = nova
admin_password = service
[neutron]
url = http://192.168.32.181:9696
auth_strategy = keystone
admin_auth_url = http://192.168.32.181:35357/v2.0
admin_tenant_name = service
admin_username = neutron
admin_password = service
sed -i.bak "/[DEFAULT]/a
rpc_backend = rabbitn
rabbit_host = $CONTROLLER_IPn
auth_strategy = keystonen
my_ip = $THISHOST_IPn
vnc_enabled = Truen
vncserver_listen = 0.0.0.0n
vncserver_proxyclient_address = $THISHOST_IPn
novncproxy_base_url =
http://$CONTROLLER_IP:6080/vnc_auto.htmln
network_api_class =
nova.network.neutronv2.api.APIn
security_group_api = neutronn
linuxnet_interface_driver =
nova.network.linux_net.LinuxOVSInterfaceDrivern
firewall_driver =
nova.virt.firewall.NoopFirewallDriver"
/etc/nova/nova.conf
sed -i "/[keystone_authtoken]/a
auth_uri = http://$CONTROLLER_IP:5000/v2.0n
identity_uri = http://$CONTROLLER_IP:35357n
admin_tenant_name = servicen
admin_user = novan
admin_password = $SERVICE_PWD"
/etc/nova/nova.conf
sed -i "/[glance]/a host = $CONTROLLER_IP"
/etc/nova/nova.conf](https://image.slidesharecdn.com/dockeronopenstackoscv4-150309083842-conversion-gate01/75/Docker-on-openstack-by-OpenSource-Consulting-37-2048.jpg)
![38
COMPUTE NODE
openstack-neutron-ml2 openstack-neutron-openvswitch
neutron seetting / egrep -v "^#|^$" /etc/neutron/neutron.conf
#install neutron
yum -y install openstack-neutron-ml2 openstack-neutron-openvswitch
[DEFAULT]
rpc_backend = rabbit
rabbit_host = 192.168.32.181
auth_strategy = keystone
core_plugin = ml2
service_plugins = router
allow_overlapping_ips = True
[keystone_authtoken]
auth_uri = http://192.168.32.181:5000/v2.0
identity_uri = http://192.168.32.181:35357
admin_tenant_name = service
admin_user = neutron
admin_password = service
sed -i '0,/[DEFAULT]/s//[DEFAULT]
rpc_backend = rabbitn
rabbit_host = '"$CONTROLLER_IP"'
auth_strategy = keystone
core_plugin = ml2
service_plugins = router
allow_overlapping_ips = True/'
/etc/neutron/neutron.conf
sed -i "/[keystone_authtoken]/a
auth_uri = http://$CONTROLLER_IP:5000/v2.0n
identity_uri = http://$CONTROLLER_IP:35357n
admin_tenant_name = servicen
admin_user = neutronn
admin_password = $SERVICE_PWD"
/etc/neutron/neutron.conf
#edit /etc/neutron/neutron.conf](https://image.slidesharecdn.com/dockeronopenstackoscv4-150309083842-conversion-gate01/75/Docker-on-openstack-by-OpenSource-Consulting-38-2048.jpg)
![39
COMPUTE NODE
openstack-neutron-ml2 openstack-neutron-openvswitch
ml2_conf.ini 수정 / egrep -v "^#|^$" /etc/neutron/plugins/ml2/ml2_conf.ini
[ml2]
type_drivers = flat,gre
tenant_network_types = gre
mechanism_drivers = openvswitch
[ml2_type_gre]
tunnel_id_ranges = 1:1000
[securitygroup]
enable_security_group = True
enable_ipset = True
firewall_driver =
neutron.agent.linux.iptables_firewall.OVSHybridIp
tablesFirewallDriver
[ovs]
local_ip = 192.168.33.183
enable_tunneling = True
[agent]
tunnel_types = gre
sed -i "/[ml2]/a
type_drivers = flat,gren
tenant_network_types = gren
mechanism_drivers = openvswitch"
/etc/neutron/plugins/ml2/ml2_conf.ini
sed -i "/[ml2_type_gre]/a
tunnel_id_ranges = 1:1000"
/etc/neutron/plugins/ml2/ml2_conf.ini
sed -i "/[securitygroup]/a
enable_security_group = Truen
enable_ipset = Truen
firewall_driver =
neutron.agent.linux.iptables_firewall.OVSHybridI
ptablesFirewallDrivern
[ovs]n
local_ip = $THISHOST_TUNNEL_IPn
enable_tunneling = Truen
[agent]n
tunnel_types = gre"
/etc/neutron/plugins/ml2/ml2_conf.ini
#edit /etc/neutron/plugins/ml2/ml2_conf.ini
systemctl enable openvswitch.service
systemctl start openvswitch.service](https://image.slidesharecdn.com/dockeronopenstackoscv4-150309083842-conversion-gate01/75/Docker-on-openstack-by-OpenSource-Consulting-39-2048.jpg)
![40
COMPUTE NODE
nova-compute node 구성
/etc/nova/nova.conf
[neutron]
url = http://192.168.32.181:9696
auth_strategy = keystone
admin_auth_url = http://192.168.32.181:35357/v2.0
admin_tenant_name = service
admin_username = neutron
admin_password = service
sed -i "/[neutron]/a
url = http://$CONTROLLER_IP:9696n
auth_strategy = keystonen
admin_auth_url =
http://$CONTROLLER_IP:35357/v2.0n
admin_tenant_name = servicen
admin_username = neutronn
admin_password = $SERVICE_PWD"
/etc/nova/nova.conf
#edit /etc/nova/nova.conf
ln -s /etc/neutron/plugins/ml2/ml2_conf.ini /etc/neutron/plugin.ini
cp /usr/lib/systemd/system/neutron-openvswitch-agent.service
/usr/lib/systemd/system/neutron-openvswitch-agent.service.orig
sed -i 's,plugins/openvswitch/ovs_neutron_plugin.ini,plugin.ini,g'
/usr/lib/systemd/system/neutron-openvswitch-agent.service
systemctl enable libvirtd.service openstack-nova-compute.service
systemctl start libvirtd.service
systemctl start openstack-nova-compute.service
systemctl enable neutron-openvswitch-agent.service
systemctl start neutron-openvswitch-agent.service
egrep -v "^#|^$" /etc/nova/nova.conf](https://image.slidesharecdn.com/dockeronopenstackoscv4-150309083842-conversion-gate01/75/Docker-on-openstack-by-OpenSource-Consulting-40-2048.jpg)
![41
COMPUTE NODE
openstack-cinder targetcli python-oslo-db MySQL-python
Cinder 디스크추가
yum -y install openstack-cinder targetcli python-oslo-db MySQL-python
#cinder storage node
pvcreate /dev/sdb
vgcreate cinder-volumes /dev/sdb
[DEFAULT]
rpc_backend = rabbit
rabbit_host = 192.168.32.181
auth_strategy = keystone
my_ip = 192.168.32.183
iscsi_helper = lioadm
[database]
connection =
mysql://cinder:service@192.168.32.181/cinder
[keystone_authtoken]
auth_uri = http://192.168.32.181:5000/v2.0
identity_uri = http://192.168.32.181:35357
admin_tenant_name = service
admin_user = cinder
admin_password = service
sed -i.bak "/[database]/a connection =
mysql://cinder:$SERVICE_PWD@$CONTROLLER_IP/cinde
r" /etc/cinder/cinder.conf
sed -i '0,/[DEFAULT]/s//[DEFAULT]
rpc_backend = rabbit
rabbit_host = '"$CONTROLLER_IP"'
auth_strategy = keystone
my_ip = '"$THISHOST_IP"'
iscsi_helper = lioadm/' /etc/cinder/cinder.conf
sed -i "/[keystone_authtoken]/a
auth_uri = http://$CONTROLLER_IP:5000/v2.0n
identity_uri = http://$CONTROLLER_IP:35357n
admin_tenant_name = servicen
admin_user = cindern
admin_password = $SERVICE_PWD"
/etc/cinder/cinder.conf
#edit /etc/cinder/cinder.conf
egrep -v "^#|^$" /etc/cinder/cinder.conf](https://image.slidesharecdn.com/dockeronopenstackoscv4-150309083842-conversion-gate01/75/Docker-on-openstack-by-OpenSource-Consulting-41-2048.jpg)
![42
COMPUTE NODE
openstack-cinder targetcli python-oslo-db MySQL-python
Cinder 디스크추가
sed -i 's/filter/#filter/g ' /etc/lvm/lvm.conf
sed -i "/devices {/a
filter = ["a/sd/","a/sdb/", "r/.*/"] "
/etc/lvm/lvm.conf
systemctl enable openstack-cinder-volume.service target.service
systemctl start openstack-cinder-volume.service target.service
egrep -v "^#|^$" /etc/cinder/cinder.conf
[root@juno-controller lvm]# grep filter
lvm.conf
filter = [ "a/sda/", "a/sdb/", "r/.*/"]
cinder create --display_name test3 2
[root@juno-compute cinder]# cinder list
+--------------------------------------+-----------+--------------+------+-------------+----------+-------------+
| ID | Status | Display Name | Size | Volume Type | Bootable | Attached to |
+--------------------------------------+-----------+--------------+------+-------------+----------+-------------+
| 35e69e09-015b-472e-a77c-a06f307beb92 | available | test3 | 2 | None | false
+--------------------------------------+-----------+--------------+------+-------------+----------+-------------+
[root@juno-compute cinder]# vgs
VG #PV #LV #SN Attr VSize VFree
centos 1 2 0 wz--n- 19.51g 0
cinder-volumes 1 1 0 wz--n- 50.00g 48.00g
[root@juno-compute cinder]# lvs
LV VG Attr LSize Pool Origin Data% Move Log Cpy%Sync
Convert
root centos -wi-ao---- 17.51g
swap centos -wi-ao---- 2.00g
volume-35e69e09-015b-472e-a77c-a06f307beb92 cinder-volumes -wi-a----- 2.00g](https://image.slidesharecdn.com/dockeronopenstackoscv4-150309083842-conversion-gate01/75/Docker-on-openstack-by-OpenSource-Consulting-42-2048.jpg)
![43
Contents
3. docker 구축 기초 [ 30분]
4. 오픈스택에 docker를 연결 [ 30분]
1. Openstack 인프라 구축 (4 node 구성) [ 30분]
2. Openstack 위에 VM 생성 [ 20분 ]
5. Docker로 WEB서비스 구축 [ 15분]
6.
7. Docker로 jenkins 구현 [30분]
Openstack 위에 Docker로 WEB서비스 구축 [ 15분]](https://image.slidesharecdn.com/dockeronopenstackoscv4-150309083842-conversion-gate01/75/Docker-on-openstack-by-OpenSource-Consulting-43-2048.jpg)
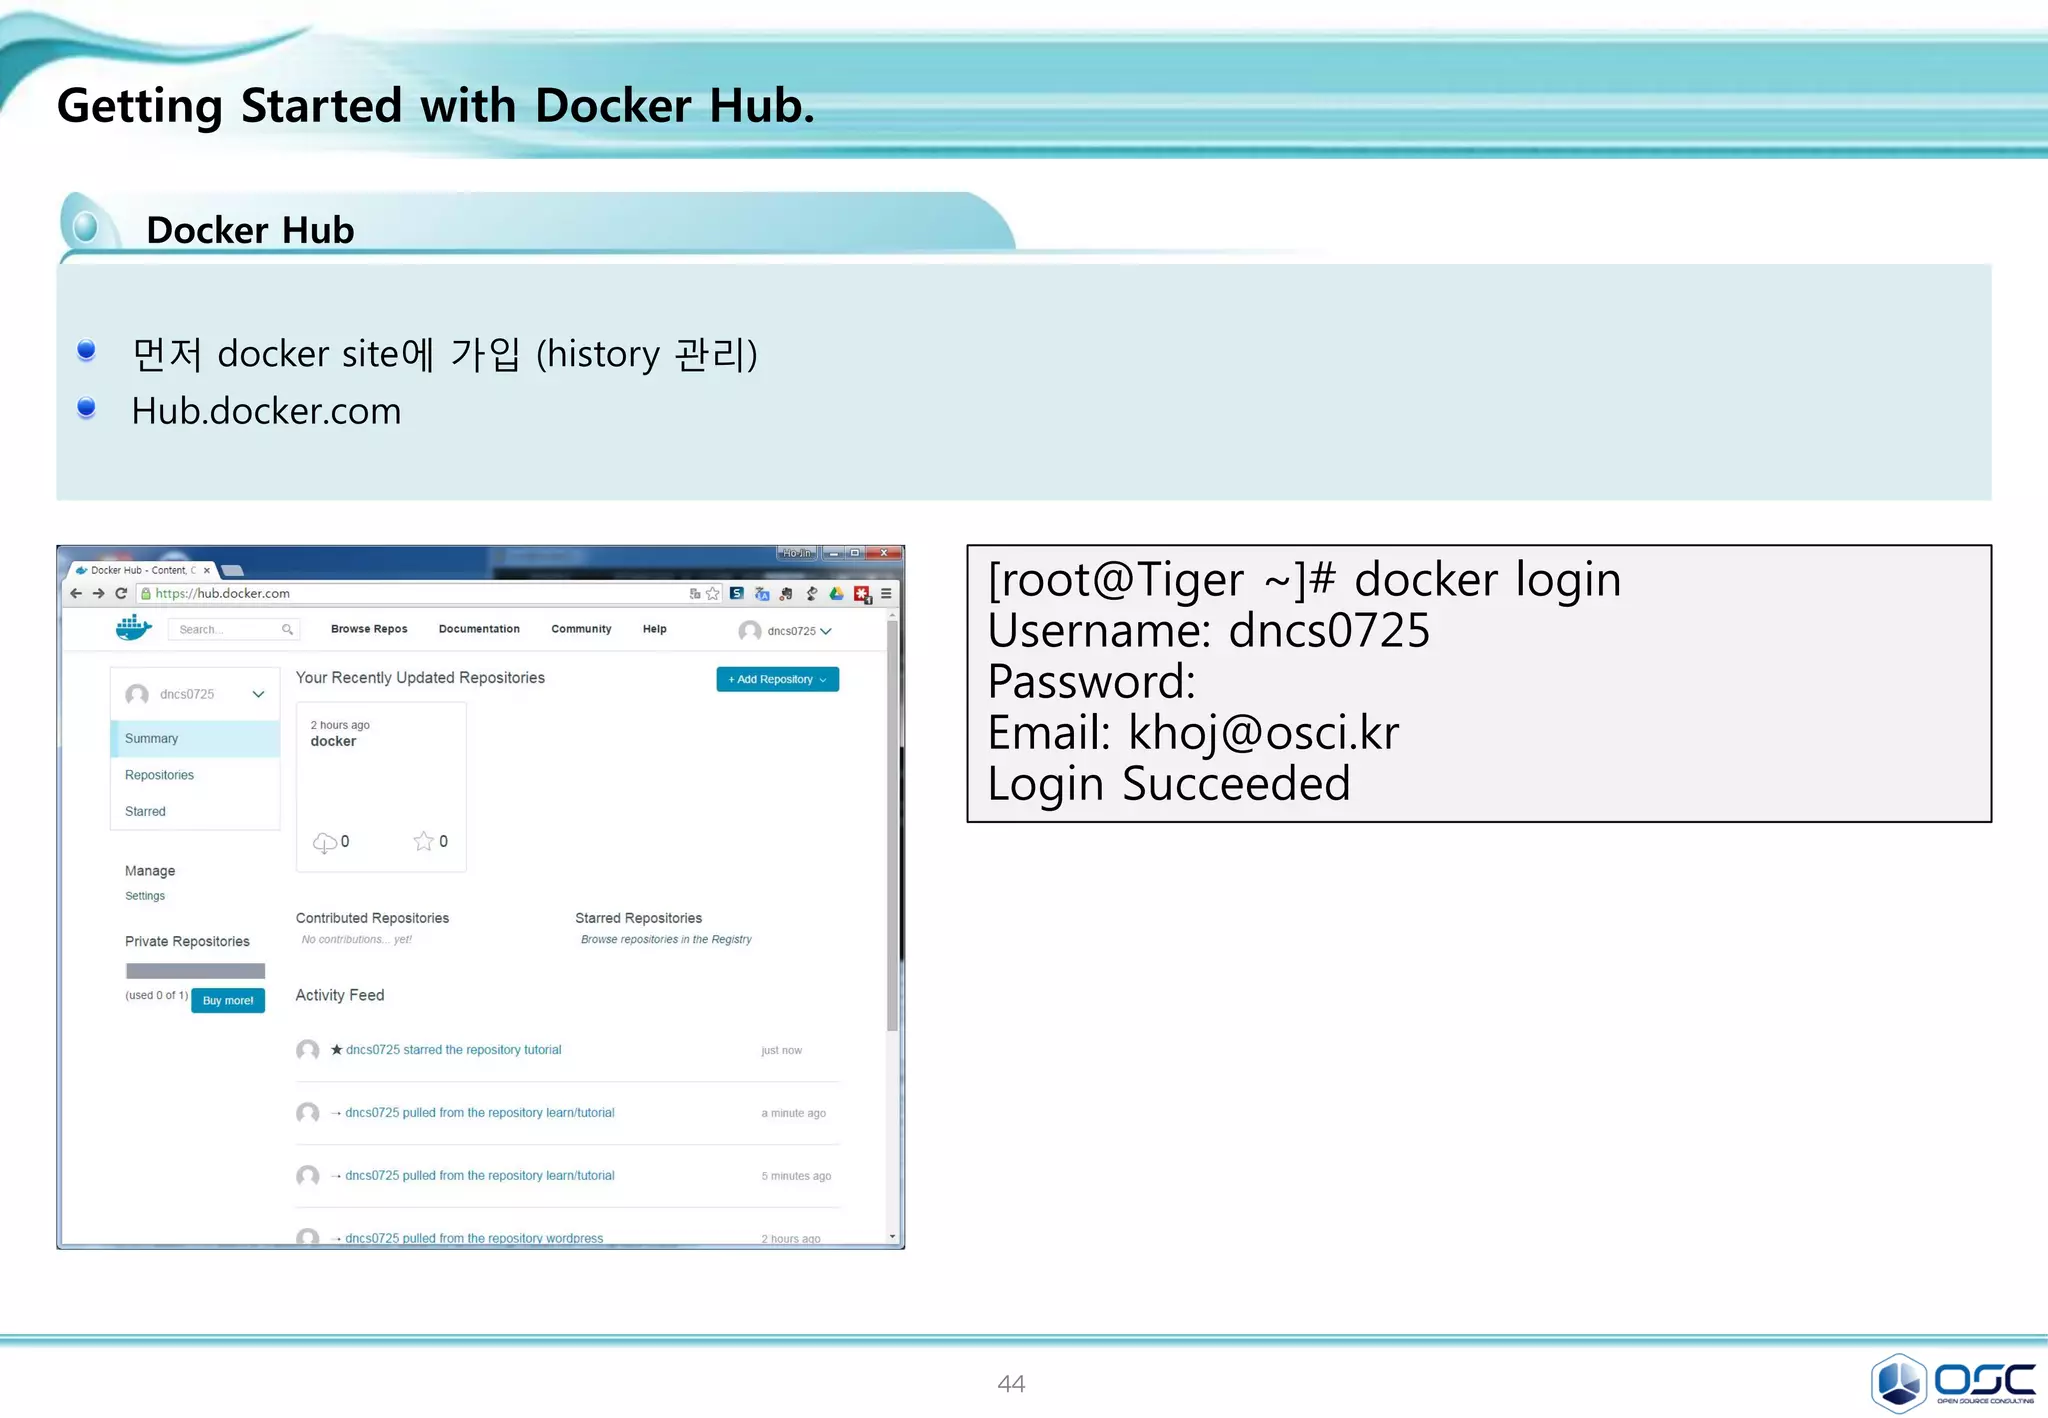
![45
Network만들기
Network 생성 / 외부 subnet 생성
[root@juno-controller ~]# Created a new network:
+---------------------------+--------------------------------------+
| Field | Value |
+---------------------------+--------------------------------------+
| admin_state_up | True |
| id | 74cea9a5-434c-4bff-89b7-a1e503b43d39 |
| name | ext-net |
| provider:network_type | gre |
| provider:physical_network | |
| provider:segmentation_id | 2 |
| router:external | True |
| shared | True |
| status | ACTIVE |
| subnets | |
| tenant_id | e7cb7856091d4d839031d79582c93a76 |
+---------------------------+--------------------------------------+
neutron net-create ext-net --shared --router:external True
neutron subnet-create ext-net --name ext-subnet --allocation-pool start=192.168.0.200,end=192.168.0.220
--disable-dhcp --gateway 192.168.0.1 192.168.0.0/24
Created a new subnet:
+-------------------+----------------------------------------------------+
| Field | Value |
+-------------------+----------------------------------------------------+
| allocation_pools | {"start": "192.168.0.200", "end": "192.168.0.220"} |
| cidr | 192.168.0.0/24 |
| dns_nameservers | |
| enable_dhcp | False |
| gateway_ip | 192.168.0.1 |
| host_routes | |
| id | d84f7826-ae27-420f-9f1d-da7261c76e0f |
| ip_version | 4 |
| ipv6_address_mode | |
| ipv6_ra_mode | |
| name | ext-subnet |
| network_id | 74cea9a5-434c-4bff-89b7-a1e503b43d39 |
| tenant_id | e7cb7856091d4d839031d79582c93a76 |
+-------------------+----------------------------------------------------+](https://image.slidesharecdn.com/dockeronopenstackoscv4-150309083842-conversion-gate01/75/Docker-on-openstack-by-OpenSource-Consulting-45-2048.jpg)
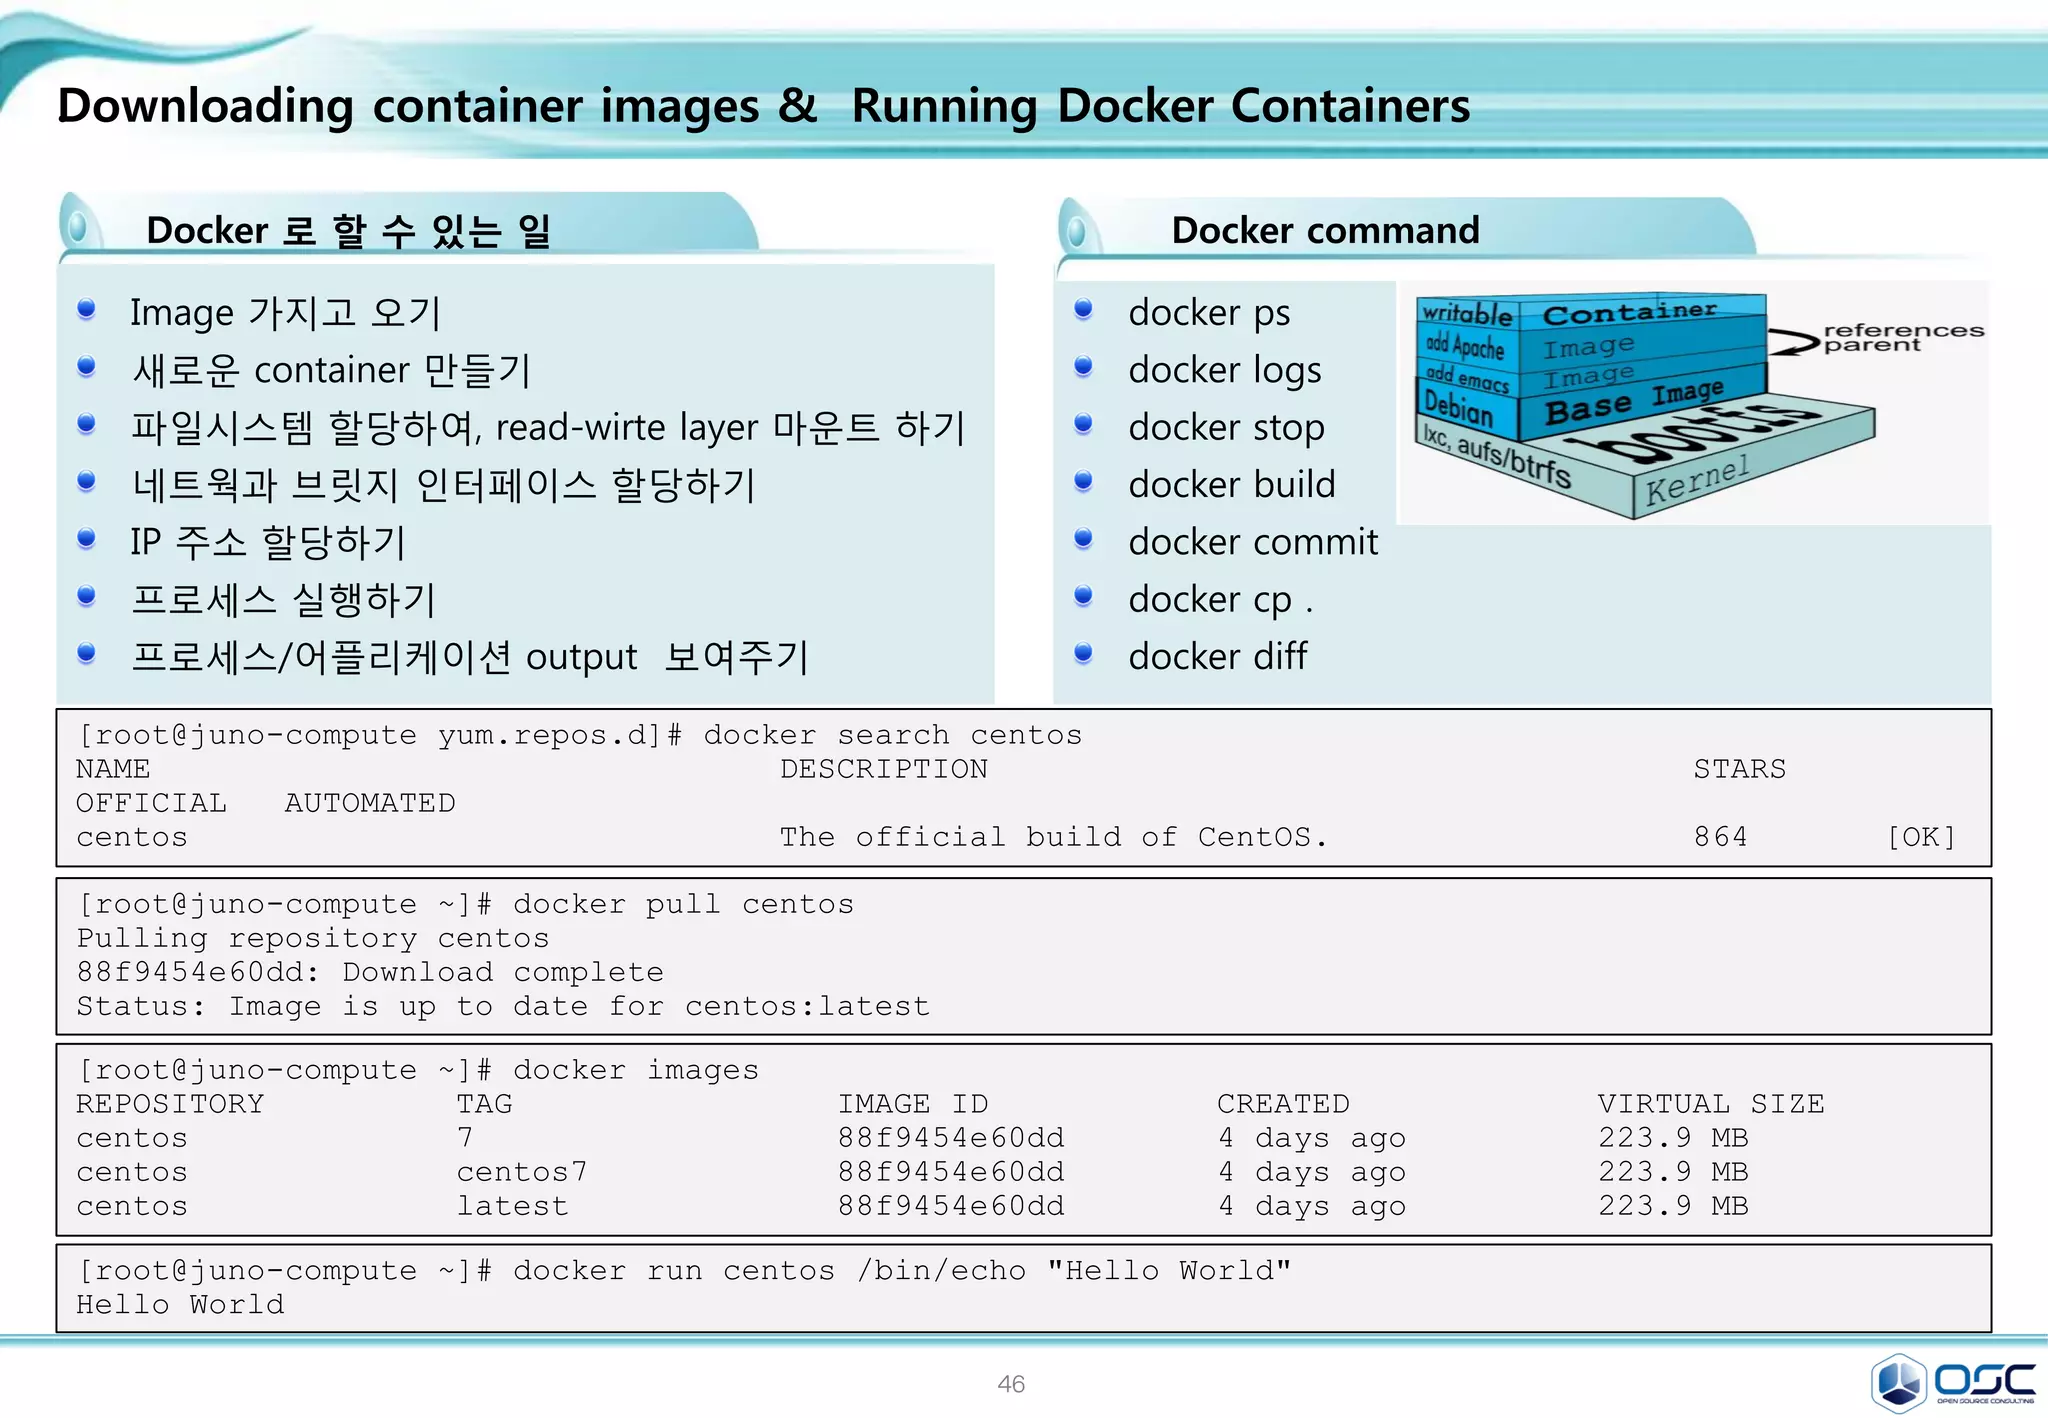
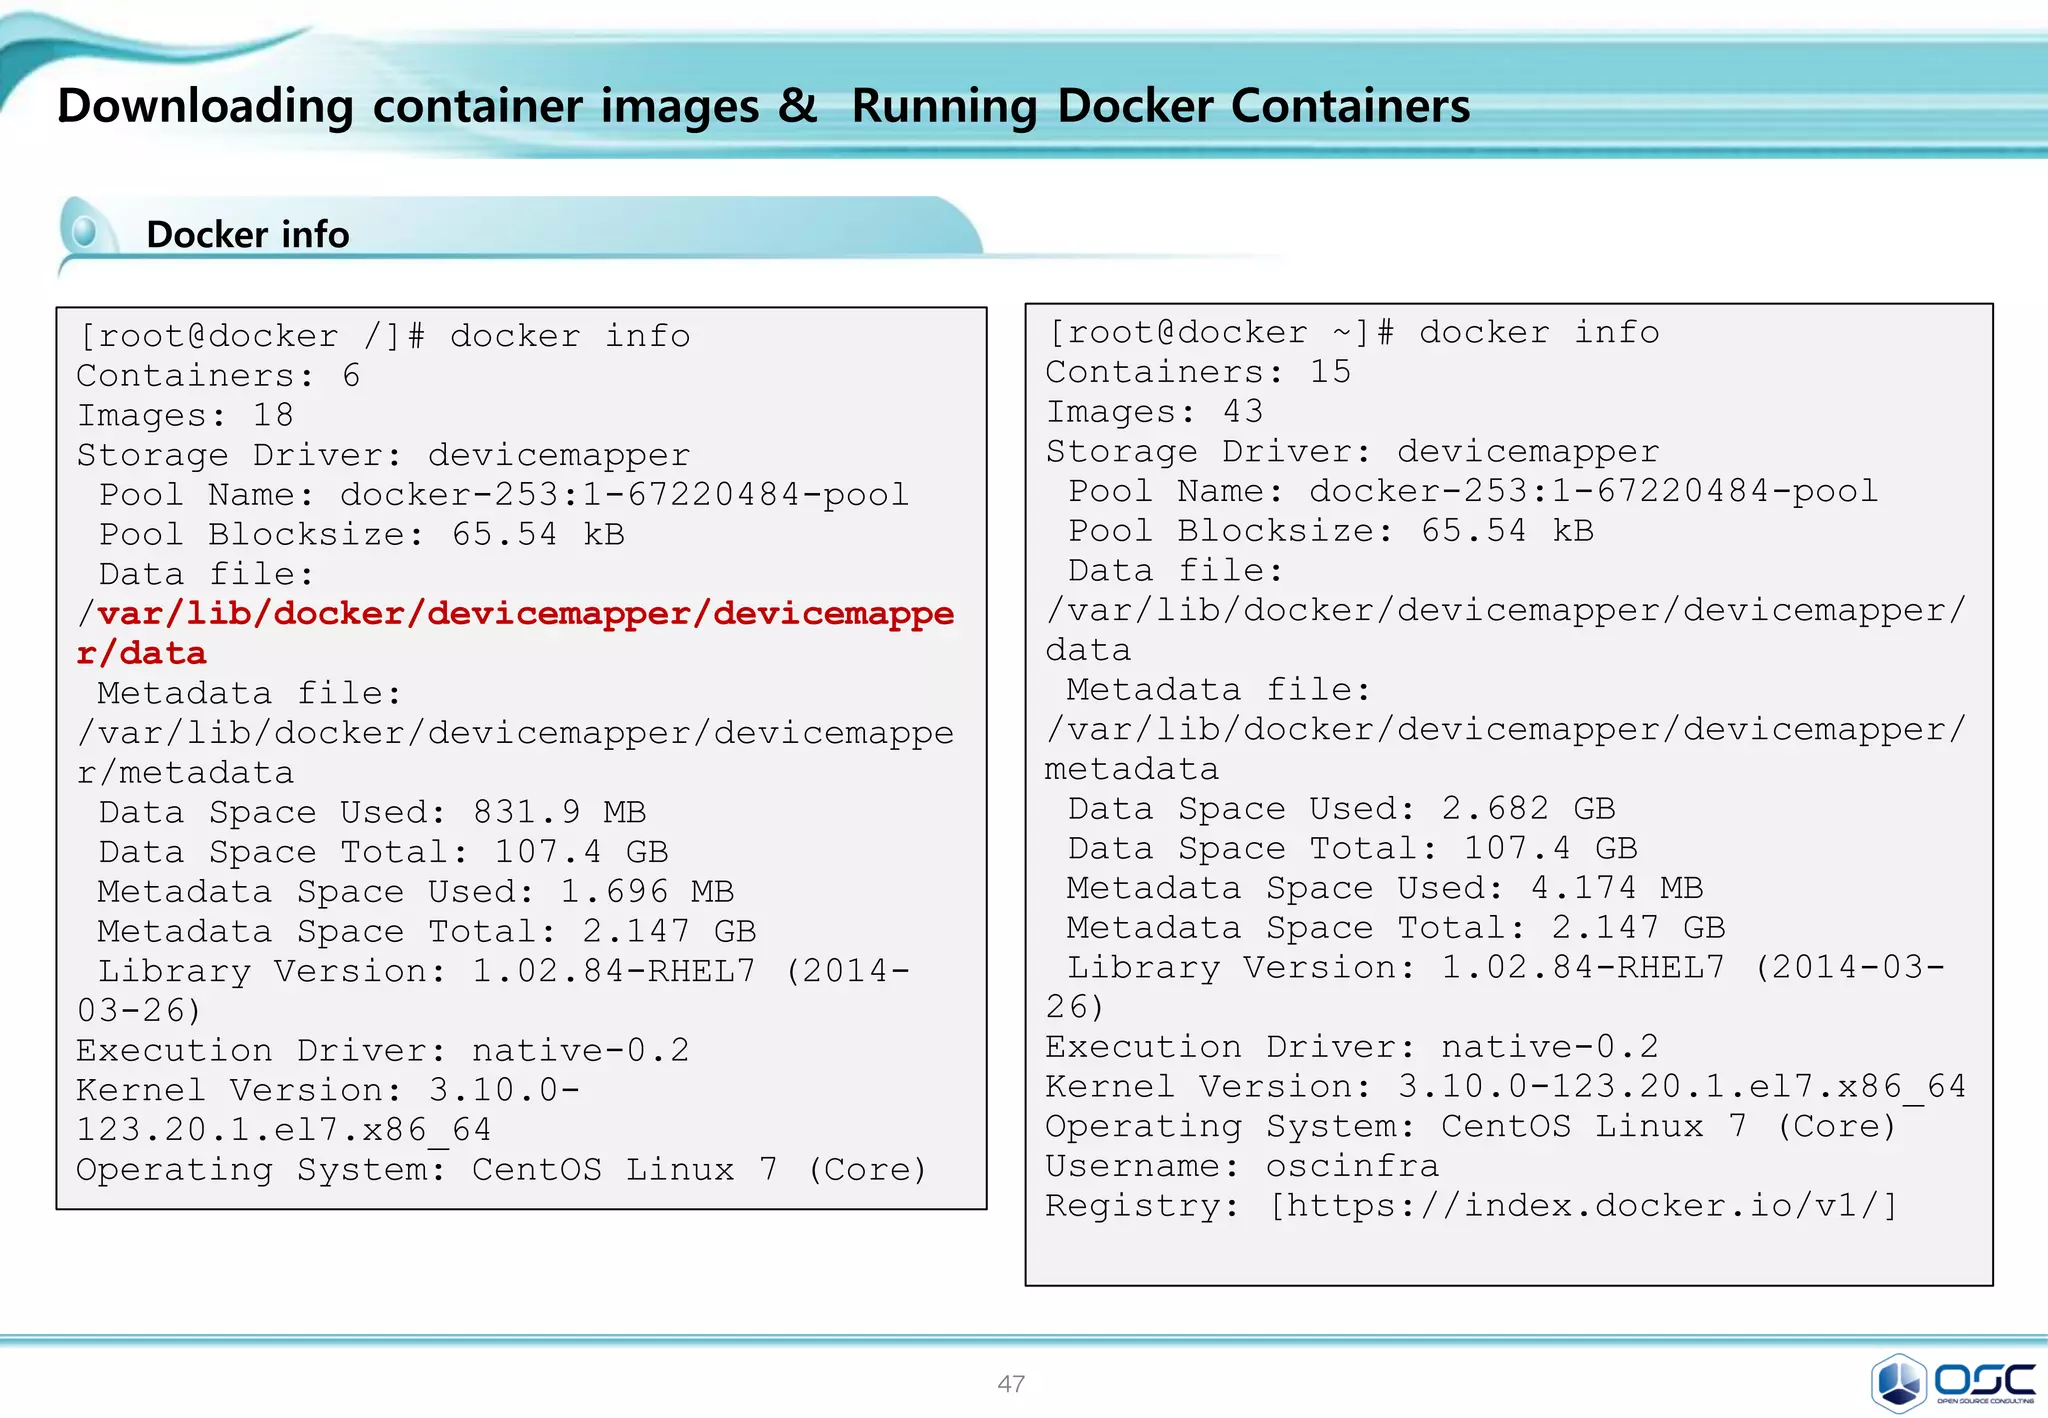
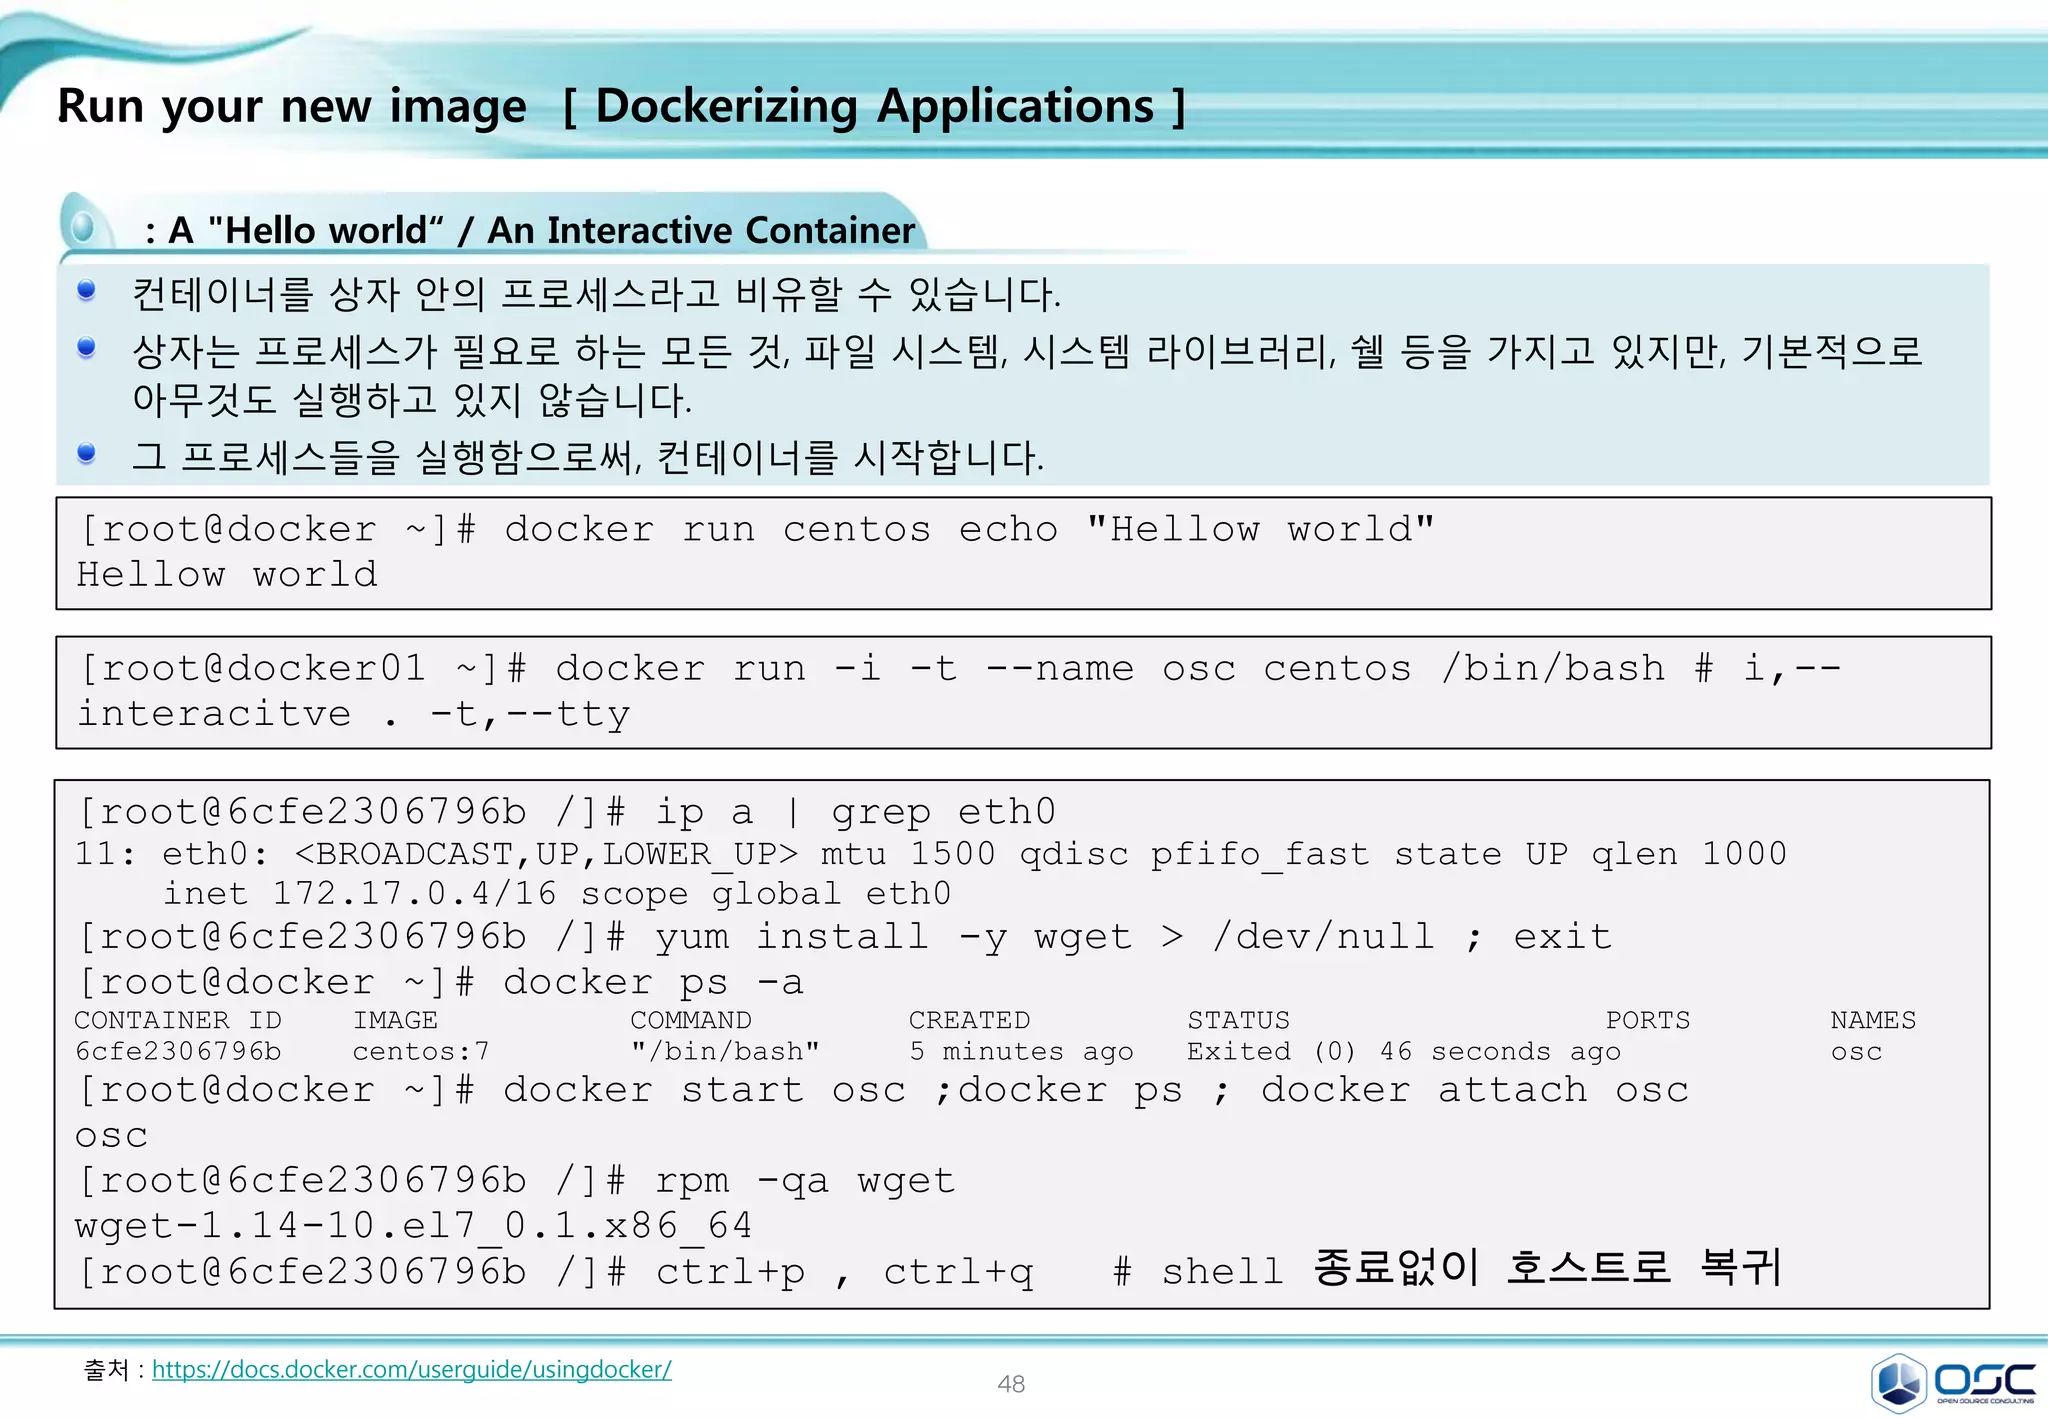
![49
Contents
3. docker 구축 기초 [ 30분]
4. 오픈스택에 docker를 연결 [ 30분]
1. Openstack 인프라 구축 (4 node 구성) [ 30분]
2. Openstack 위에 VM 생성 [ 20분 ]
5. Docker로 WEB서비스 구축 [ 15분]
6.
7. Docker로 jenkins 구현 [30분]
Openstack 위에 Docker로 WEB서비스 구축 [ 15분]](https://image.slidesharecdn.com/dockeronopenstackoscv4-150309083842-conversion-gate01/75/Docker-on-openstack-by-OpenSource-Consulting-49-2048.jpg)
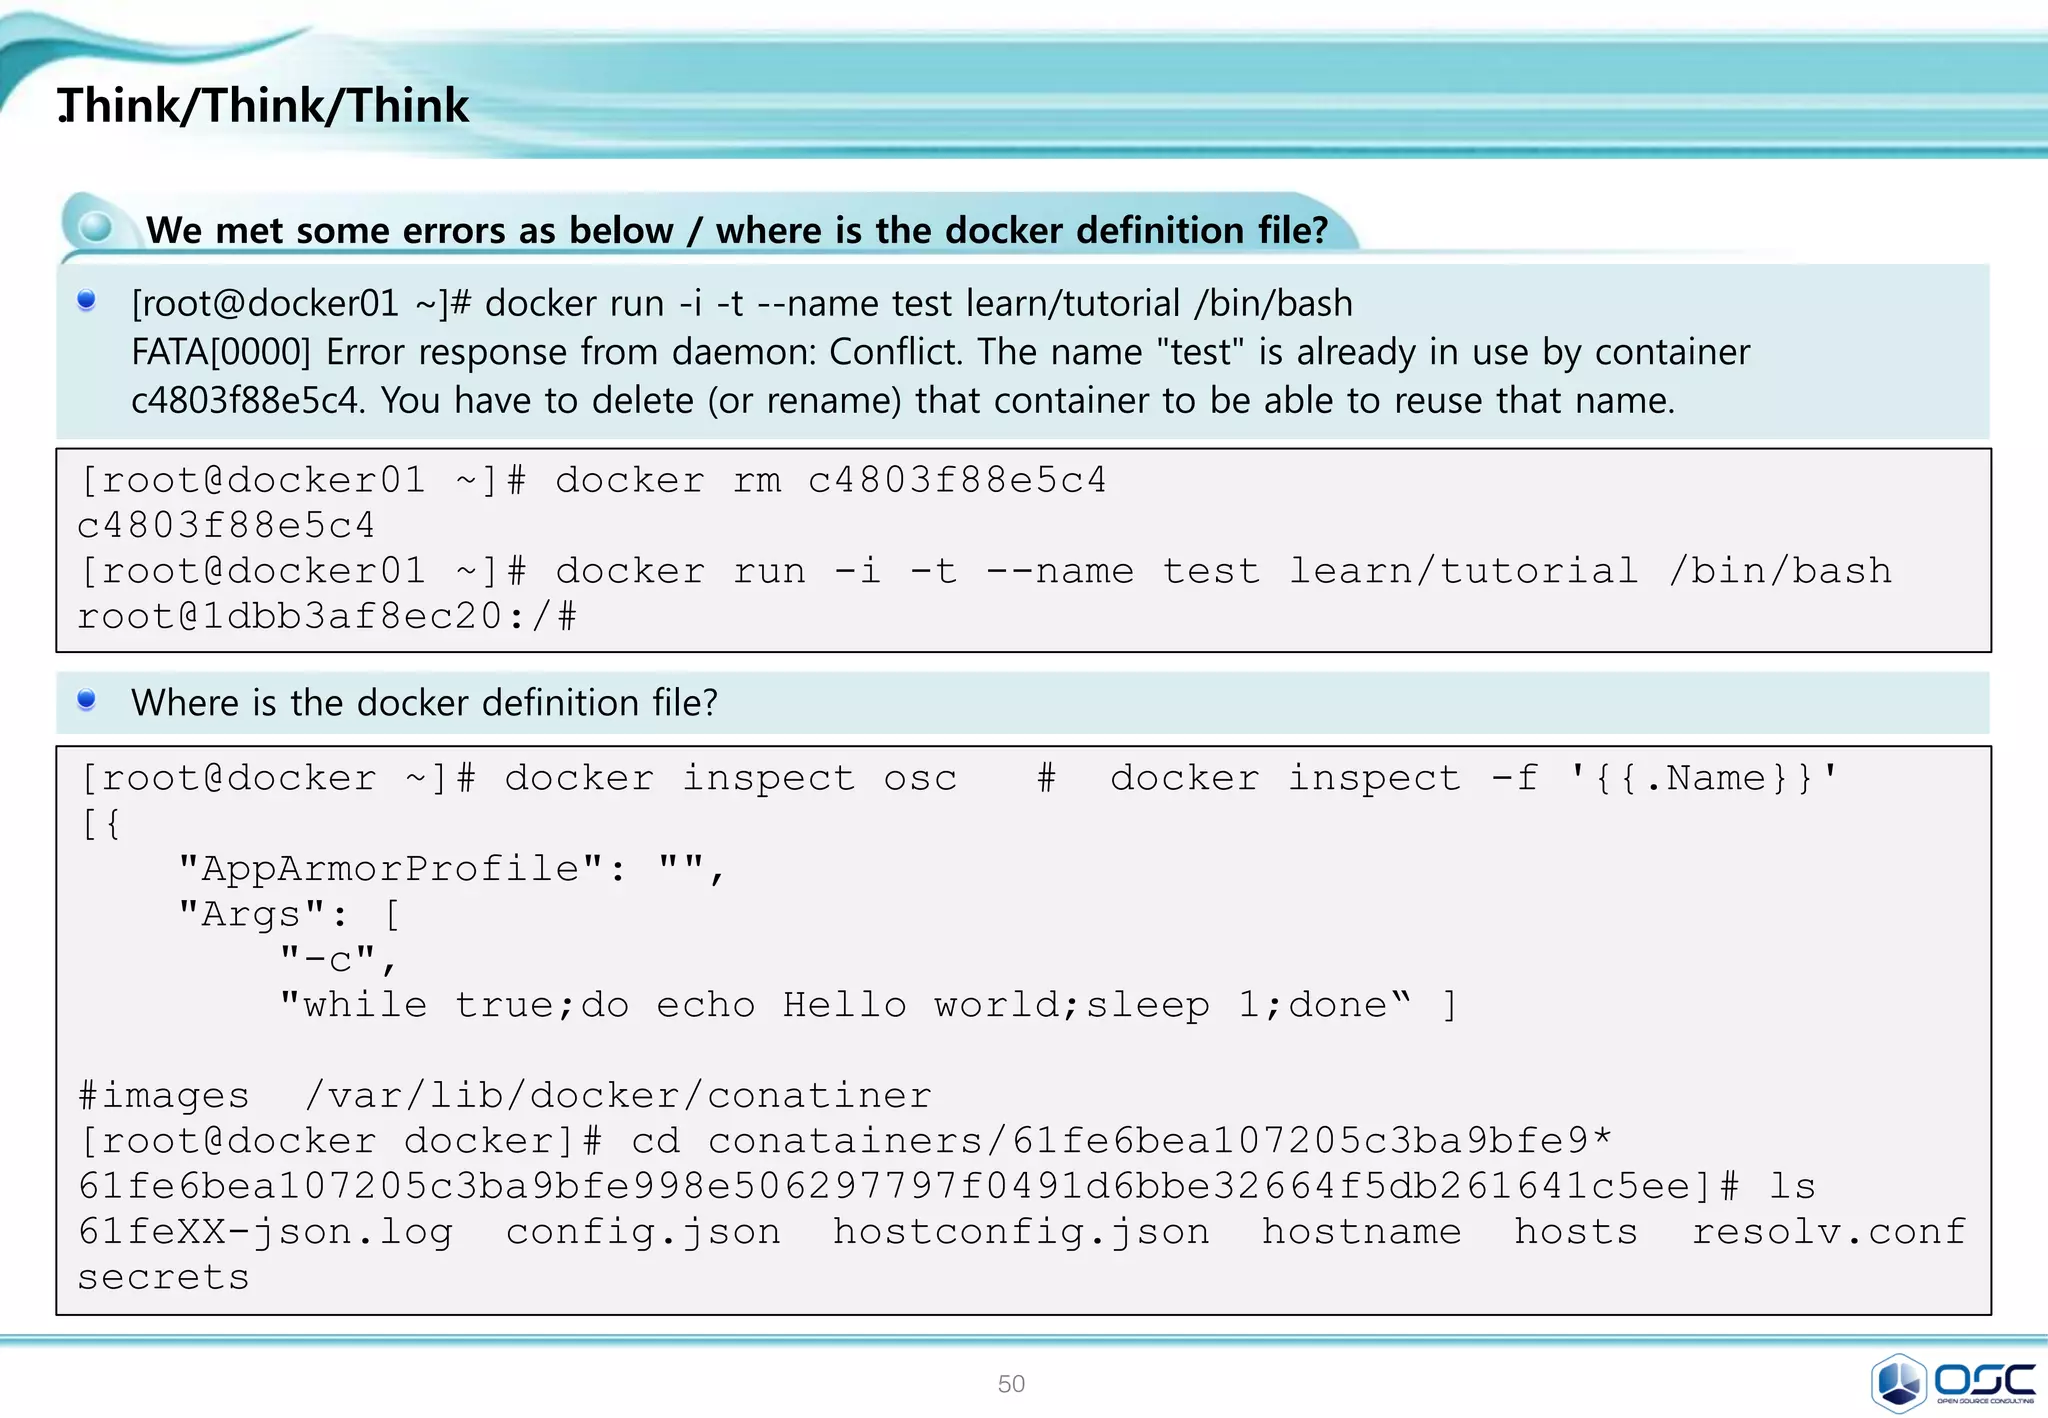

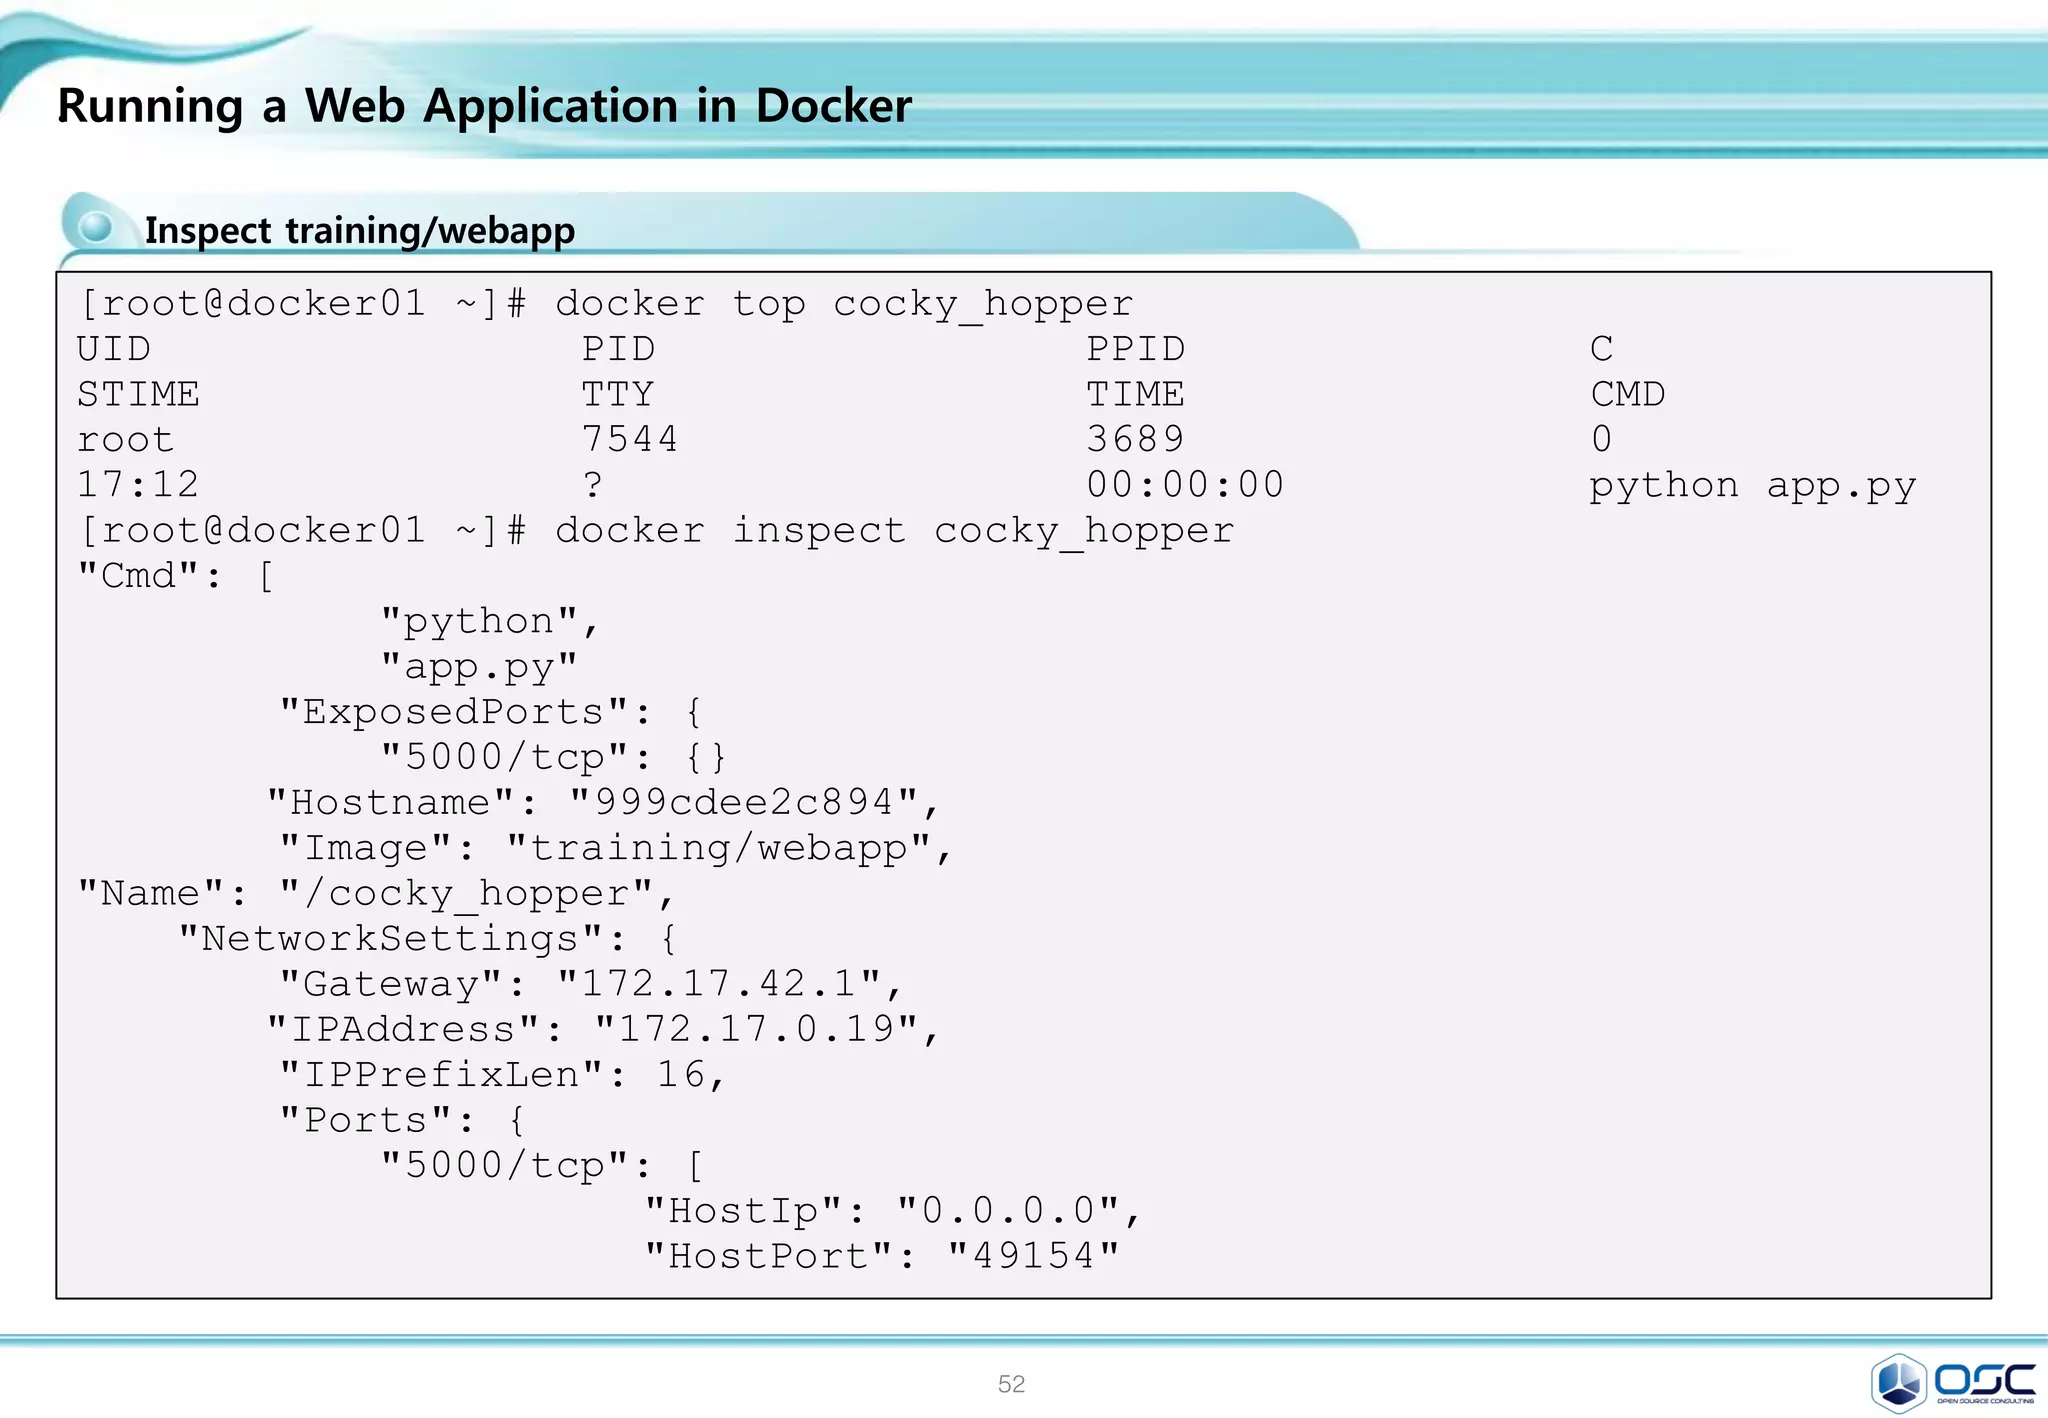
![53
Getting Started with Docker Hub.
Docker Hub
먼저 docker site에 가입 (history 관리)
Hub.docker.com
[root@Tiger ~]# docker login
Username: oscinfra
Password:
Email: khoj@osci.kr
Login Succeeded](https://image.slidesharecdn.com/dockeronopenstackoscv4-150309083842-conversion-gate01/75/Docker-on-openstack-by-OpenSource-Consulting-53-2048.jpg)
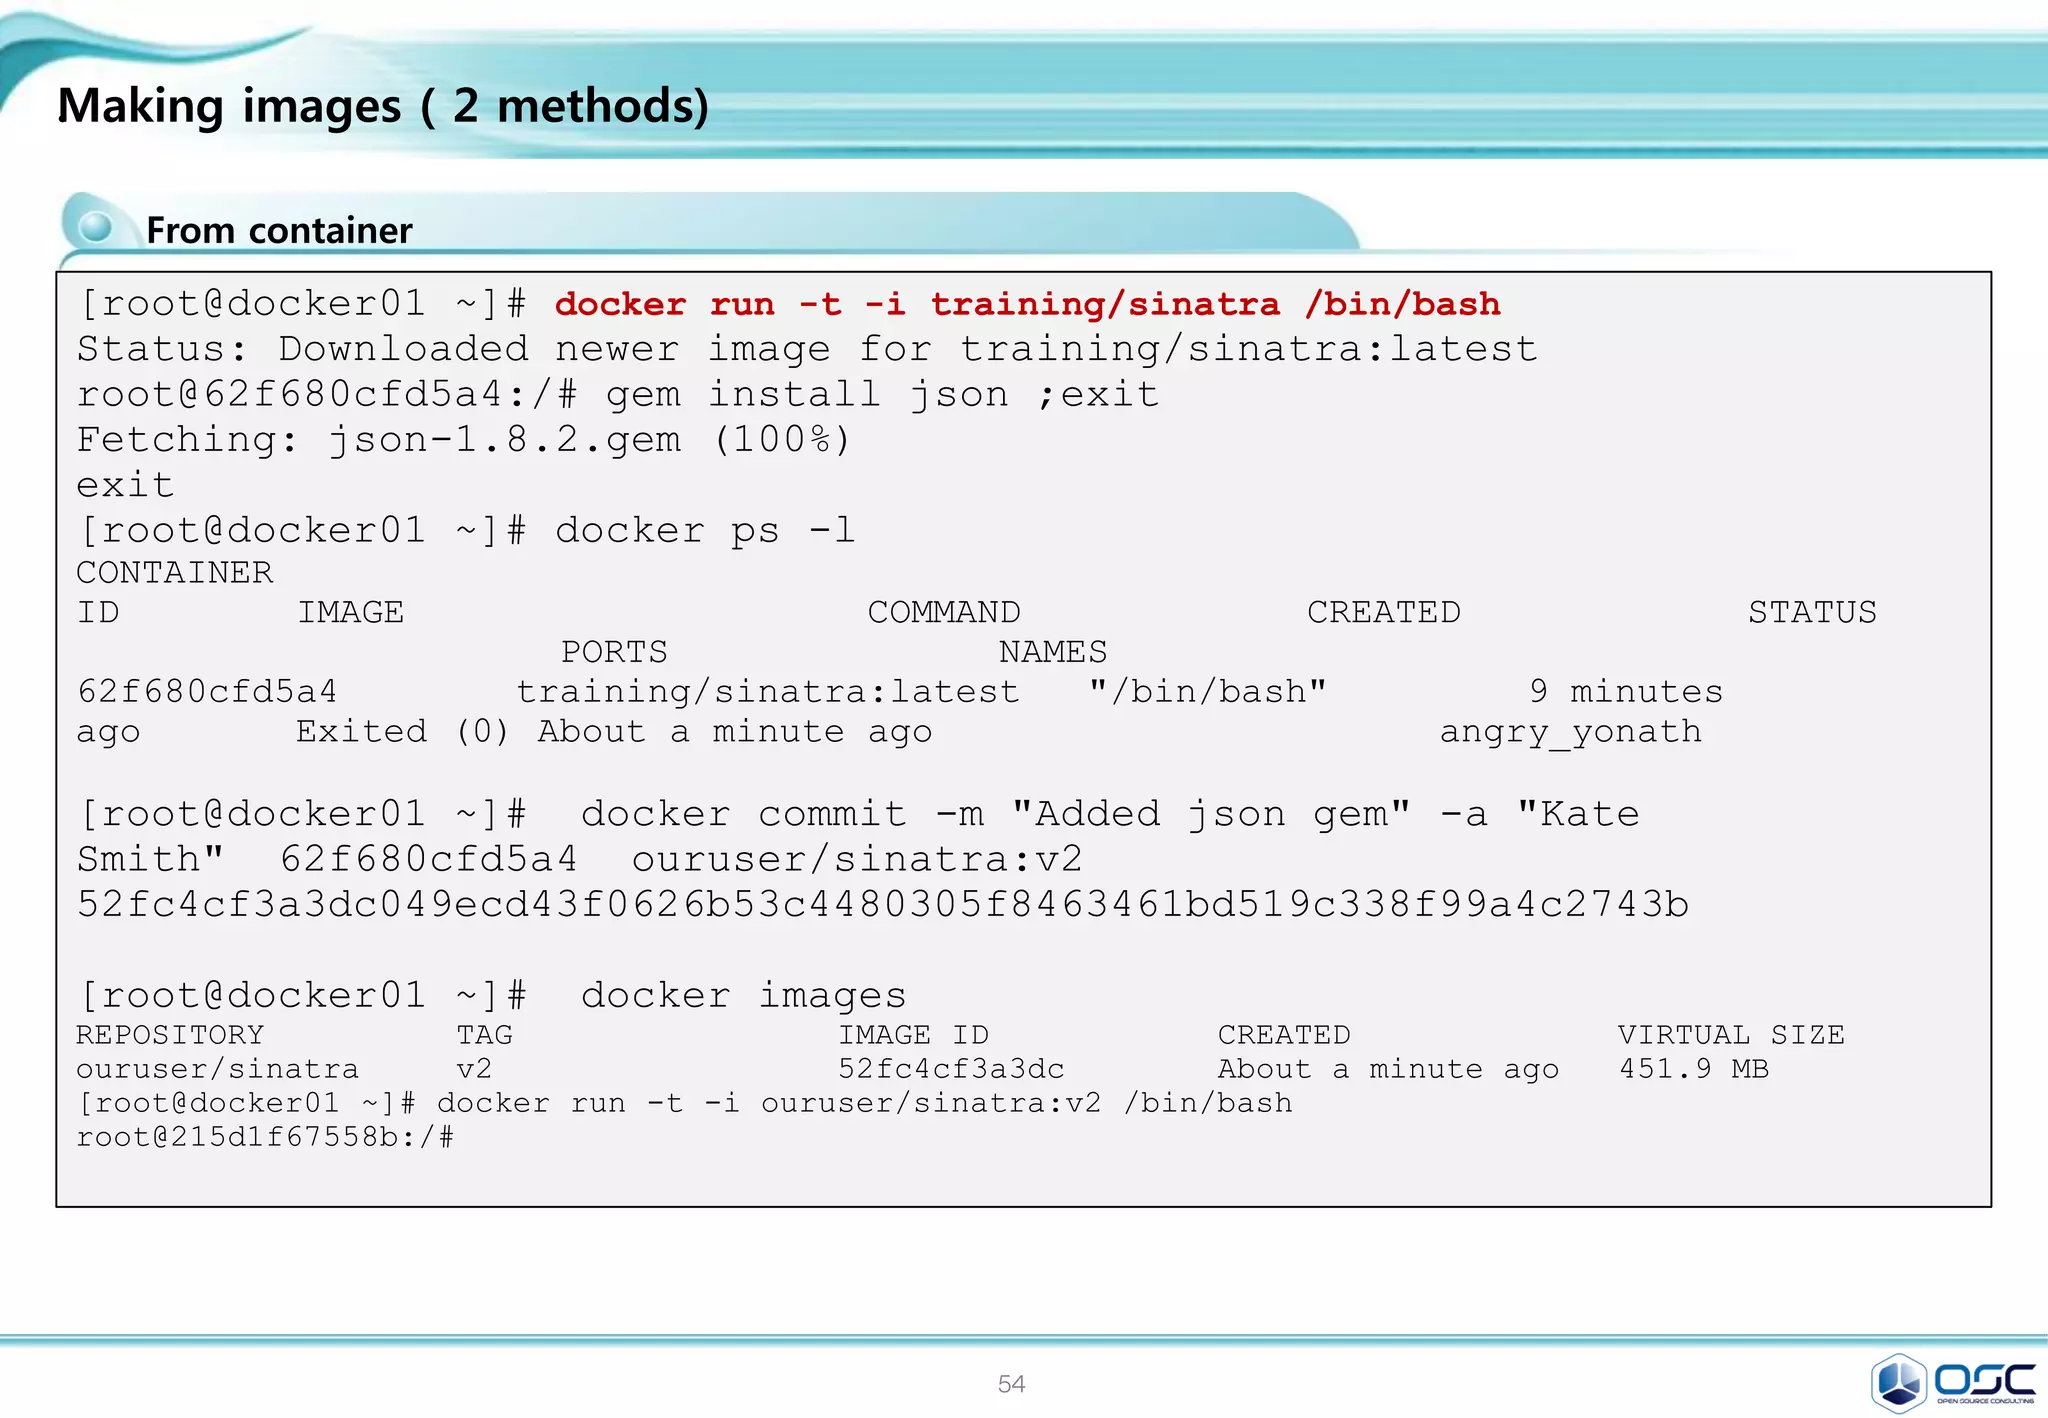
![55
.
Docker 로 할 수 있는 일
Image 가지고 오기
새로운 container 만들기
파일시스템 할당하여, read-wirte layer 마운트 하기
네트웍과 브릿지 인터페이스 할당하기
IP 주소 할당하기
프로세스 실행하기
프로세스/어플리케이션 output 보여주기
[root@juno-compute yum.repos.d]# docker search centos
NAME DESCRIPTION STARS
OFFICIAL AUTOMATED
centos The official build of CentOS. 864 [OK]
docker ps
docker logs
docker stop
docker build
docker commit
docker cp .
docker diff
Docker command
Downloading container images & Running Docker Containers
[root@juno-compute ~]# docker images
REPOSITORY TAG IMAGE ID CREATED VIRTUAL SIZE
centos 7 88f9454e60dd 4 days ago 223.9 MB
centos centos7 88f9454e60dd 4 days ago 223.9 MB
centos latest 88f9454e60dd 4 days ago 223.9 MB
[root@juno-compute ~]# docker pull centos
Pulling repository centos
88f9454e60dd: Download complete
Status: Image is up to date for centos:latest
[root@juno-compute ~]# docker run centos /bin/echo "Hello World"
Hello World](https://image.slidesharecdn.com/dockeronopenstackoscv4-150309083842-conversion-gate01/75/Docker-on-openstack-by-OpenSource-Consulting-55-2048.jpg)
![56
.
[root@docker /]# docker info
Containers: 6
Images: 18
Storage Driver: devicemapper
Pool Name: docker-253:1-67220484-pool
Pool Blocksize: 65.54 kB
Data file:
/var/lib/docker/devicemapper/devicemappe
r/data
Metadata file:
/var/lib/docker/devicemapper/devicemappe
r/metadata
Data Space Used: 831.9 MB
Data Space Total: 107.4 GB
Metadata Space Used: 1.696 MB
Metadata Space Total: 2.147 GB
Library Version: 1.02.84-RHEL7 (2014-
03-26)
Execution Driver: native-0.2
Kernel Version: 3.10.0-
123.20.1.el7.x86_64
Operating System: CentOS Linux 7 (Core)
Downloading container images & Running Docker Containers
[root@docker ~]# docker info
Containers: 15
Images: 43
Storage Driver: devicemapper
Pool Name: docker-253:1-67220484-pool
Pool Blocksize: 65.54 kB
Data file:
/var/lib/docker/devicemapper/devicemapper/
data
Metadata file:
/var/lib/docker/devicemapper/devicemapper/
metadata
Data Space Used: 2.682 GB
Data Space Total: 107.4 GB
Metadata Space Used: 4.174 MB
Metadata Space Total: 2.147 GB
Library Version: 1.02.84-RHEL7 (2014-03-
26)
Execution Driver: native-0.2
Kernel Version: 3.10.0-123.20.1.el7.x86_64
Operating System: CentOS Linux 7 (Core)
Username: oscinfra
Registry: [https://index.docker.io/v1/]
Docker info](https://image.slidesharecdn.com/dockeronopenstackoscv4-150309083842-conversion-gate01/75/Docker-on-openstack-by-OpenSource-Consulting-56-2048.jpg)
![57
.
: A "Hello world“ / An Interactive Container
컨테이너를 상자 안의 프로세스라고 비유할 수 있습니다.
상자는 프로세스가 필요로 하는 모든 것, 파일 시스템, 시스템 라이브러리, 쉘 등을 가지고 있지만, 기본적으로
아무것도 실행하고 있지 않습니다.
그 프로세스들을 실행함으로써, 컨테이너를 시작합니다.
[root@docker ~]# docker run centos echo "Hellow world"
Hellow world
Run your new image [ Dockerizing Applications ]
[root@docker01 ~]# docker run -i -t --name osc centos /bin/bash # i,--
interacitve . -t,--tty
[root@6cfe2306796b /]# ip a | grep eth0
11: eth0: <BROADCAST,UP,LOWER_UP> mtu 1500 qdisc pfifo_fast state UP qlen 1000
inet 172.17.0.4/16 scope global eth0
[root@6cfe2306796b /]# yum install -y wget > /dev/null ; exit
[root@docker ~]# docker ps -a
CONTAINER ID IMAGE COMMAND CREATED STATUS PORTS NAMES
6cfe2306796b centos:7 "/bin/bash" 5 minutes ago Exited (0) 46 seconds ago osc
[root@docker ~]# docker start osc ;docker ps ; docker attach osc
osc
[root@6cfe2306796b /]# rpm -qa wget
wget-1.14-10.el7_0.1.x86_64
[root@6cfe2306796b /]# ctrl+p , ctrl+q # shell 종료없이 호스트로 복귀
출처 : https://docs.docker.com/userguide/usingdocker/](https://image.slidesharecdn.com/dockeronopenstackoscv4-150309083842-conversion-gate01/75/Docker-on-openstack-by-OpenSource-Consulting-57-2048.jpg)
![58
.
A Daemonized Hello world
컨테이터를 데몬처럼 돌리기
[root@docker ~]# docker images
REPOSITORY TAG IMAGE ID CREATED VIRTUAL SIZE
centos 7 88f9454e60dd 2 days ago 223.9 MB
centos centos7 88f9454e60dd 2 days ago 223.9 MB
centos latest 88f9454e60dd 2 days ago 223.9 MB
[root@docker ~]# docker run --name osc -d centos /bin/bash
-c "while true;do echo Hello world;sleep 1;done"
61fe6bea107205c3ba9bfe998e506297797f0491d6bbe32664f5db261641c5ee
[root@docker01 ~]# ps -ef | grep –v grep | grep true
root 5338 3689 0 16:18 ? 00:00:00 /bin/bash -c while true;do echo Hello world;sleep 1;done
root 5357 3525 0 16:18 pts/0 00:00:00 grep --color=auto true
[root@docker ~]# docker logs --tail=10 -ft osc
2015-03-07T11:07:18.655548350Z Hello world
[root@docker ~]# docker top osc
UID PID PPID C STIME TTY TIME CMD
root 3408 983 0 06:02 ? 00:00:00 /bin/bash -c
while true;do echo Hello world;sleep 1;done
root 3827 3408 0 06:08 ? 00:00:00 sleep 1
[root@docker ~]# docker inspect osc / docker stop osc / docker kill osc
Run your new image [ Dockerizing Applications ]](https://image.slidesharecdn.com/dockeronopenstackoscv4-150309083842-conversion-gate01/75/Docker-on-openstack-by-OpenSource-Consulting-58-2048.jpg)
![59
.
We met some errors as below / where is the docker definition file?
[root@docker01 ~]# docker run -i -t --name test learn/tutorial /bin/bash
FATA[0000] Error response from daemon: Conflict. The name "test" is already in use by container
c4803f88e5c4. You have to delete (or rename) that container to be able to reuse that name.
Think/Think/Think
[root@docker01 ~]# docker rm c4803f88e5c4
c4803f88e5c4
[root@docker01 ~]# docker run -i -t --name test learn/tutorial /bin/bash
root@1dbb3af8ec20:/#
Where is the docker definition file?
[root@docker ~]# docker inspect osc # docker inspect -f '{{.Name}}'
[{
"AppArmorProfile": "",
"Args": [
"-c",
"while true;do echo Hello world;sleep 1;done“ ]
#images /var/lib/docker/conatiner
[root@docker docker]# cd conatainers/61fe6bea107205c3ba9bfe9*
61fe6bea107205c3ba9bfe998e506297797f0491d6bbe32664f5db261641c5ee]# ls
61feXX-json.log config.json hostconfig.json hostname hosts resolv.conf
secrets](https://image.slidesharecdn.com/dockeronopenstackoscv4-150309083842-conversion-gate01/75/Docker-on-openstack-by-OpenSource-Consulting-59-2048.jpg)
![60
.
training/webapp
Running a Web Application in Docker
[root@docker01 ~]# docker run -d -P training/webapp python app.py # -d, --
detach=false /
[root@docker01 ~]# docker ps -l
CONTAINER ID IMAGE COMMAND CREATED
STATUS PORTS NAMES
489160dbba6b training/webapp:latest "python app.py" 5 minutes
ago Up 5 minutes 0.0.0.0:49154->5000/tcp serene_heisenberg
[root@docker01 ~]# docker logs -f cocky_hopper
* Running on http://0.0.0.0:5000/
192.168.0.4 - - [28/Feb/2015 22:14:54] "GET / HTTP/1.1" 200 -
192.168.0.4 - - [28/Feb/2015 22:14:55] "GET /favicon.ico HTTP/1.1" 404 -
# ip addr show docker0:
inet 172.17.42.1/16 scope docker0
[root@docker ~]# iptables -L
Chain INPUT (policy ACCEPT)
target prot opt source
destination
ACCEPT tcp -- anywhere
172.17.0.2 tcp
dpt:commplex-main
[root@docker ~]# lynx http://172.17.0.2:5000](https://image.slidesharecdn.com/dockeronopenstackoscv4-150309083842-conversion-gate01/75/Docker-on-openstack-by-OpenSource-Consulting-60-2048.jpg)
![61
.
Inspect training/webapp
Running a Web Application in Docker
[root@docker01 ~]# docker top cocky_hopper
UID PID PPID C
STIME TTY TIME CMD
root 7544 3689 0
17:12 ? 00:00:00 python app.py
[root@docker01 ~]# docker inspect cocky_hopper
"Cmd": [
"python",
"app.py"
"ExposedPorts": {
"5000/tcp": {}
"Hostname": "999cdee2c894",
"Image": "training/webapp",
"Name": "/cocky_hopper",
"NetworkSettings": {
"Gateway": "172.17.42.1",
"IPAddress": "172.17.0.19",
"IPPrefixLen": 16,
"Ports": {
"5000/tcp": [
"HostIp": "0.0.0.0",
"HostPort": "49154"](https://image.slidesharecdn.com/dockeronopenstackoscv4-150309083842-conversion-gate01/75/Docker-on-openstack-by-OpenSource-Consulting-61-2048.jpg)
![62
.Managing Data in Containers
Mount a Host Directory as a Data Volume
[root@docker01 ~]# docker run -d -P --name web -v /webapp training/webapp
python app.py
# -v, --volume=[] Bind mount a volume (e.g., from the host: -v
/host:/con-tainer, from Docker: -v /container)
191388a413d843a9e6ae020b9bf051698b8755e7081e2d9eeab77a2dbb72bdd1
===========================================================================
[root@docker ~]# docker run -d -P --name web -v /src/webapp:/opt/webapp
training/webapp python app.py
[root@docker ~]# cd /src;ls
webapp
Mount a Host File as a Data Volume
[root@docker]# docker run --rm -it -v ~/.bash_history:/.bash_history centos
/bin/bash
[root@5bf8bf23f10b /]# ls -al | more
ls: cannot access .bash_history: Permission denied
-?????????? ? ? ? ? ? .bash_history](https://image.slidesharecdn.com/dockeronopenstackoscv4-150309083842-conversion-gate01/75/Docker-on-openstack-by-OpenSource-Consulting-62-2048.jpg)
![63
.
From container
Making images ( 2 methods)
[root@docker01 ~]# docker run -t -i training/sinatra /bin/bash
Status: Downloaded newer image for training/sinatra:latest
root@62f680cfd5a4:/# gem install json ;exit
Fetching: json-1.8.2.gem (100%)
exit
[root@docker01 ~]# docker ps -l
CONTAINER
ID IMAGE COMMAND CREATED STATUS
PORTS NAMES
62f680cfd5a4 training/sinatra:latest "/bin/bash" 9 minutes
ago Exited (0) About a minute ago angry_yonath
[root@docker01 ~]# docker commit -m "Added json gem" -a "Kate
Smith" 62f680cfd5a4 ouruser/sinatra:v2
52fc4cf3a3dc049ecd43f0626b53c4480305f8463461bd519c338f99a4c2743b
[root@docker01 ~]# docker images
REPOSITORY TAG IMAGE ID CREATED VIRTUAL SIZE
ouruser/sinatra v2 52fc4cf3a3dc About a minute ago 451.9 MB
[root@docker01 ~]# docker run -t -i ouruser/sinatra:v2 /bin/bash
root@215d1f67558b:/#](https://image.slidesharecdn.com/dockeronopenstackoscv4-150309083842-conversion-gate01/75/Docker-on-openstack-by-OpenSource-Consulting-63-2048.jpg)
![64
.
From Dockerfile
Making images ( 2 methods)
[root@docker wget]# docker build -
t="oscinfra/centos:intall_wget" .
Sending build context to Docker daemon 2.56 kB
Sending build context to Docker daemon
Step 0 : FROM oscinfra/centos:latest
---> 403871a8320a
Step 1 : MAINTAINER hojin kim "khoj@osci.kr"
---> Running in 4c4bc393c67e
---> 8cc5127c853a
Removing intermediate container 4c4bc393c67e
Step 2 : RUN yum install -y wget
---> Running in 2ca7b10b283a
Loaded plugins: fastestmirror
Installed:
wget.x86_64 0:1.14-10.el7_0.1
Complete!
---> 3bbded5a9761
Removing intermediate container 2ca7b10b283a
Step 3 : RUN mkdir /root/wget
---> Running in 2de6060b4562
---> 6ba1987b89a7
Removing intermediate container 2de6060b4562
Step 4 : EXPOSE 22
---> Running in 59d051bb382d
---> c945ac8f8743
Removing intermediate container 59d051bb382d
Successfully built c945ac8f874
[root@docker wget]# cat Dockerfile
# for the technet seminar by hojin kim
FROM oscinfra/centos:tool
MAINTAINER hojin kim "khoj@osci.kr"
RUN yum install -y wget
RUN mkdir /root/wget
EXPOSE 22 # default port
[root@docker]# docker images
REPOSITORY TAG IMAGE ID
CREATED VIRTUAL SIZE
oscinfra/centos intall_wgeet
c945ac8f8743 19 seconds ago 379.9 MB
oscinfra/centos tool
1f06057f9152 24 minutes ago 366.5 MB
oscinfra/centos latest
403871a8320a 26 minutes ago 366.5 MB
[root@docker ~]# docker push
oscinfra/centos:tool
The push refers to a repository
[oscinfra/centos] (len: 1)
Sending image list
Pushing repository oscinfra/centos (1 tags)](https://image.slidesharecdn.com/dockeronopenstackoscv4-150309083842-conversion-gate01/75/Docker-on-openstack-by-OpenSource-Consulting-64-2048.jpg)
![65
.
Uploading image file to Docker Hub
Push your image to the Docker Hub Registry
you@tutorial:~$ docker push learn/ping
The push refers to a repository [learn/ping] (len: 1)
Processing checksums
Sending image list
_
__ _____| | | __| | ___ _ __ ___ | |
/ / / _ | | / _` |/ _ | '_ / _ | |
V V / __/ | | | (_| | (_) | | | | __/ |_|
_/_/ ___|_|_| __,_|___/|_| |_|___| (_)
## .
## ## ## ==
## ## ## ## ===
/""""""""""""""""___/ ===
~~~ {~~ ~~~~ ~~~ ~~~~ ~~ ~ / ===- ~~~
______ o __/
__/
__________/
| |
__ | __ __ | _ __ _
/ | / / |/ / _ |
__/| __/ __ |_ __ |](https://image.slidesharecdn.com/dockeronopenstackoscv4-150309083842-conversion-gate01/75/Docker-on-openstack-by-OpenSource-Consulting-65-2048.jpg)
![66
.
Docker compose 구성 예 (뒤에 자세히 나옴)
Docker Compose
you@tutorial:~$ cat docker-compose.yml
web:
build: .
links:
- db
ports:
- "8000:8000"
db:
image: postgres
you@tutorial:~$ cat Dockerfile
FROM python:2.7
WORKDIR /code
ADD requirements.txt /code/
RUN pip install -r requirements.txt
ADD . /code
CMD python app.py
[root@docker01 wordpress]# docker-compose up
[root@docker01 ~]# docker ps -a
CONTAINER ID IMAGE COMMAND CREATED
STATUS PORTS NAMES
7ddf0f0dec20 wordpress_web:latest "php -S 0.0.0.0:8000
4 minutes ago Up 4 minutes 0.0.0.0:8000->8000/tcp
wordpress_web_1
83ddc6ea784c orchardup/mysql:latest "/usr/local/bin/run"
4 minutes ago Up 4 minutes 3306/tcp
wordpress_db_1](https://image.slidesharecdn.com/dockeronopenstackoscv4-150309083842-conversion-gate01/75/Docker-on-openstack-by-OpenSource-Consulting-66-2048.jpg)
![67
Contents
3. docker 구축 기초 [ 30분]
4. 오픈스택에 docker를 연결 [ 30분]
1. Openstack 인프라 구축 (4 node 구성) [ 30분]
2. Openstack 위에 VM 생성 [ 20분 ]
5. Docker로 WEB서비스 구축 [ 15분]
6.
7. Docker로 jenkins 구현 [30분]
Openstack 위에 Docker로 WEB서비스 구축 [ 15분]](https://image.slidesharecdn.com/dockeronopenstackoscv4-150309083842-conversion-gate01/75/Docker-on-openstack-by-OpenSource-Consulting-67-2048.jpg)
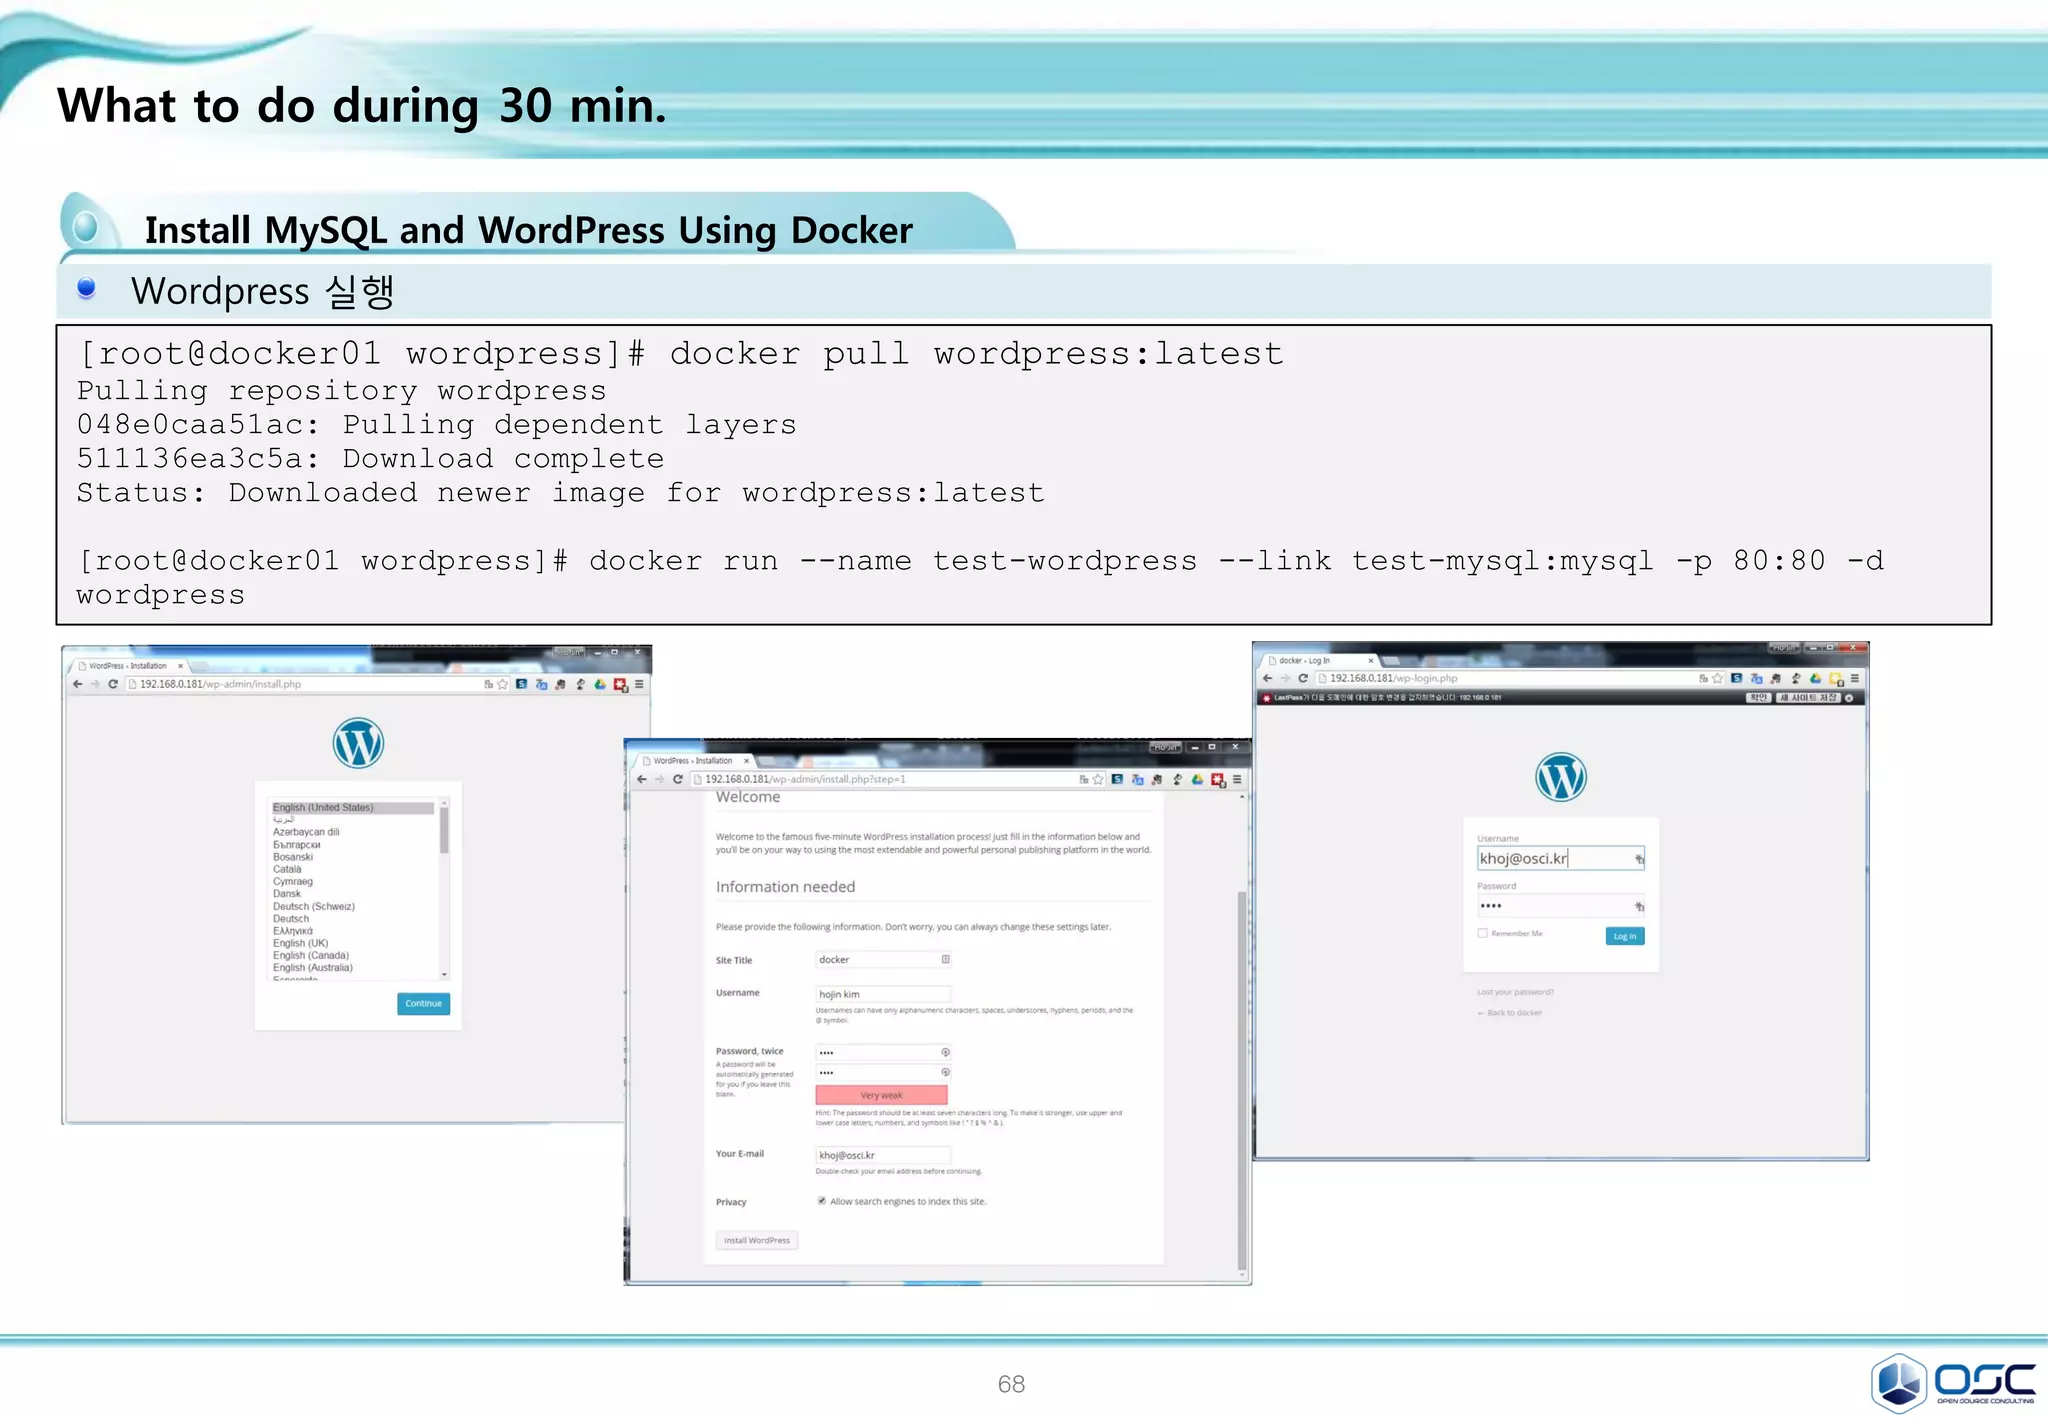
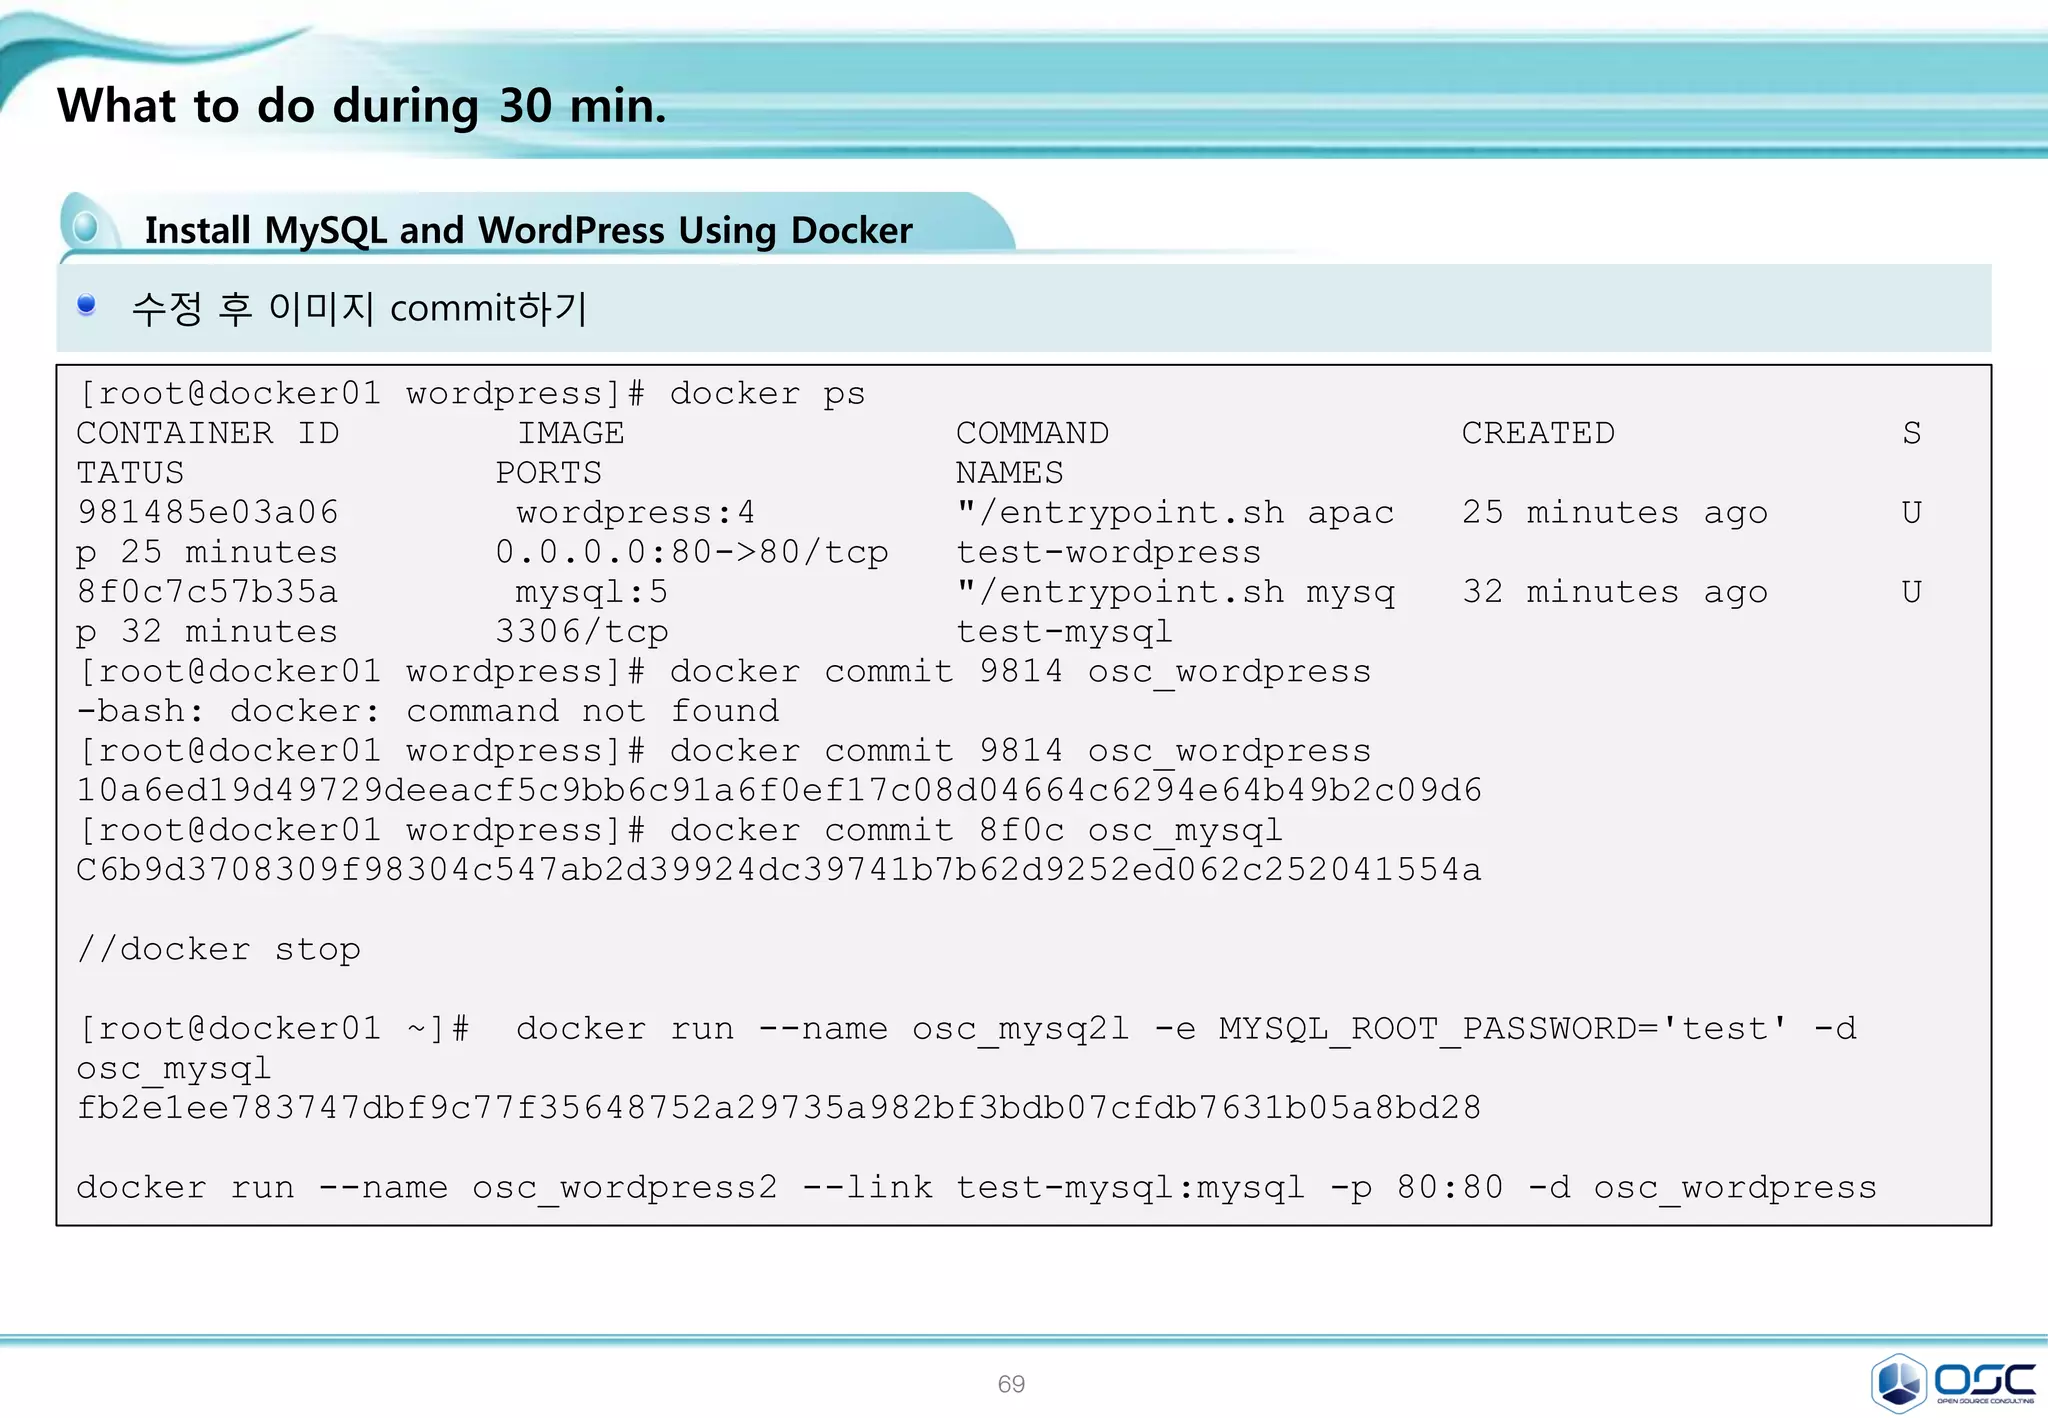
![70
Change openstack setting
Setting env
chmod 666 /var/run/docker.sock
mkdir /etc/nova/rootwrap.d
cat /etc/nova/rootwrap.d/docker.filters
# nova-rootwrap command filters for setting up network in the docker driver
# This file should be owned by (and only-writeable by) the root user
[Filters]
# nova/virt/docker/driver.py: 'ln', '-sf', '/var/run/netns/.*'
ln: CommandFilter, /bin/ln, root
service docker start
chmod 660 /var/run/docker.sock
mkdir /etc/nova/rootwrap.d
cat /etc/nova/nova.conf # compute dirver 바꾸기
compute_driver = novadocker.virt.docker.DockerDriver
cat /etc/glance/glance-api.conf # container 형식으로 지원변경
container_formats=ami,ari,aki,bare,ovf,ova,docker
service openstack-glance-api restart
service openstack-nova-compute restart](https://image.slidesharecdn.com/dockeronopenstackoscv4-150309083842-conversion-gate01/75/Docker-on-openstack-by-OpenSource-Consulting-70-2048.jpg)
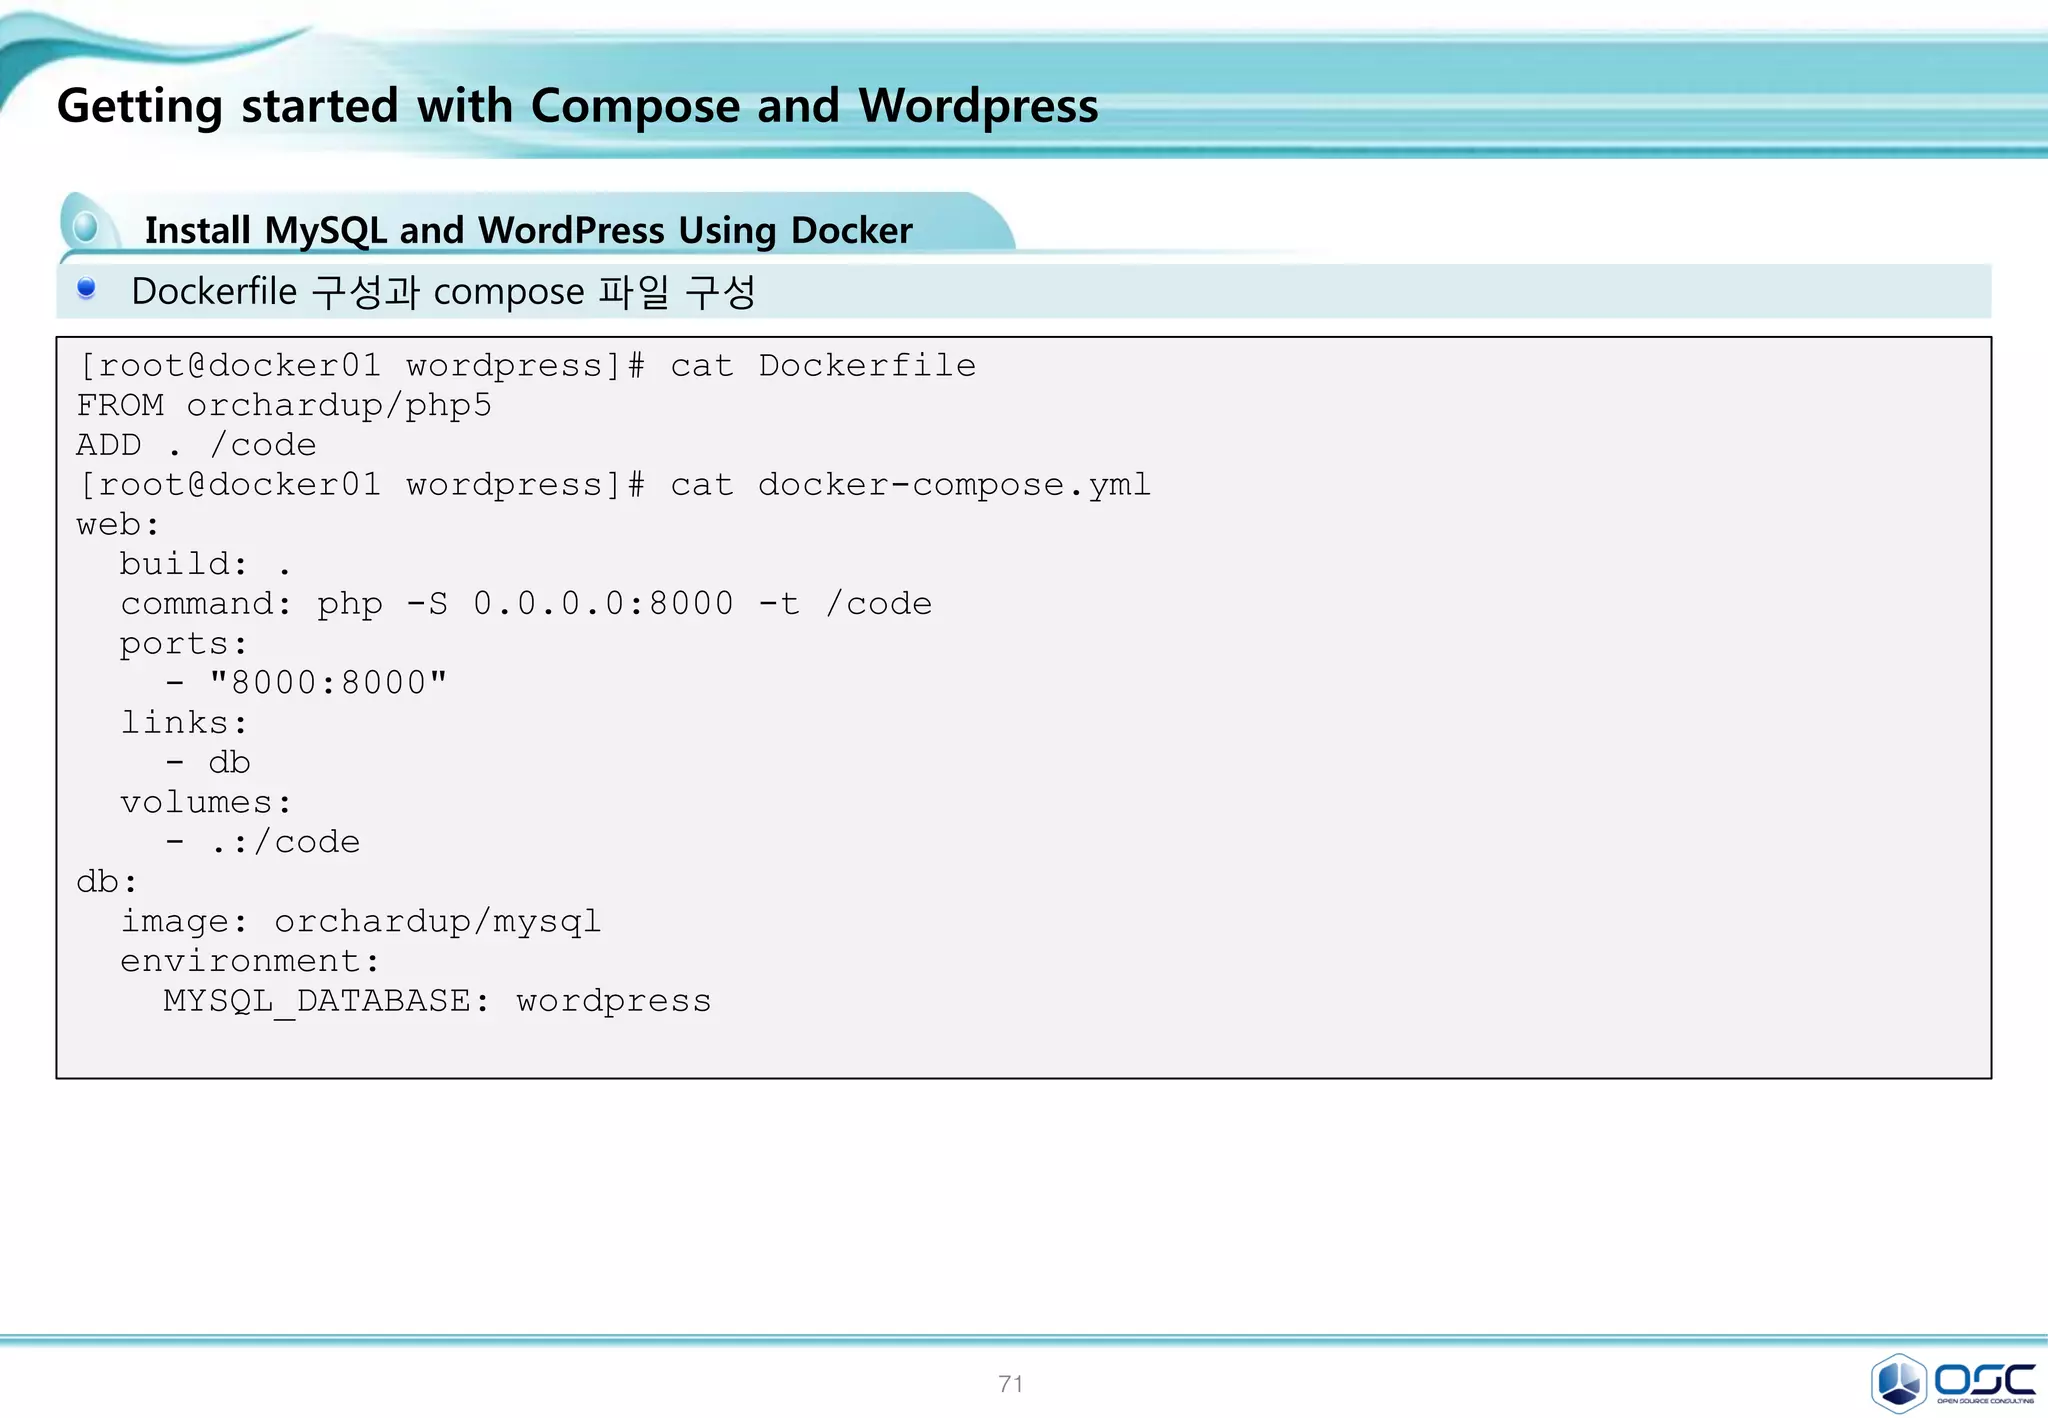
![72
Check the status
Setting env
Docker 상태를 먼저 살펴본다.
$[root@juno-compute nova-docker]# docker run -i -t fedora /bin/bash
Pulling repository fedora
834629358fe2: Download complete
Status: Downloaded newer image for fedora:latest
bash-4.3#
간단한 이미지를 만들어본다.
[root@juno-compute nova-docker]# docker pull larsks/thttpd
Pulling repository larsks/thttpd
a32a10d723ab: Download complete
Status: Downloaded newer image for larsks/thttpd:latest
[root@juno-compute ~]# docker save larsks/thttpd | glance image-create -
-name larsks/thttpd --container-format docker --disk-format raw --is-
public true
+------------------+--------------------------------------+
| Property | Value |
+------------------+--------------------------------------+
| checksum | cc8b32dcc9d12fbfa1d59ce655457d31 |
| name | larsks/thttpd |
+------------------+--------------------------------------+](https://image.slidesharecdn.com/dockeronopenstackoscv4-150309083842-conversion-gate01/75/Docker-on-openstack-by-OpenSource-Consulting-72-2048.jpg)
![73
Check the status
Gui 화면에서 만들어 보기
[root@juno-compute ~]# docker ps
CONTAINER ID IMAGE COMMAND CREATED
STATUS PORTS NAMES
148ef2905e65 larsks/thttpd:latest "/thttpd -D -l /dev/ About a minute ago
Up About a minute nova-f1aeb1e3-d395-4138-a92e-73c77e854709
b122f9046020 larsks/thttpd:latest "/thttpd -D -l /dev/ 2 minutes ago
Up 2 minutes nova-ac8d4a33-776b-4a13-be49-6b8bcfa87ec6
e8dc72cd6a65 larsks/thttpd:latest "/thttpd -D -l /dev/ 9 minutes ago
Up 9 minutes nova-d16b6bfe-4daa-48e5-a790-a9be088412ac](https://image.slidesharecdn.com/dockeronopenstackoscv4-150309083842-conversion-gate01/75/Docker-on-openstack-by-OpenSource-Consulting-73-2048.jpg)
![74
Contents
3. docker 구축 기초 [ 30분]
4. 오픈스택에 docker를 연결 [ 30분]
1. Openstack 인프라 구축 (4 node 구성) [ 30분]
2. Openstack 위에 VM 생성 [ 20분 ]
5. Docker로 WEB서비스 구축 [ 15분]
6.
7. Docker로 jenkins 구현 [30분]
Openstack 위에 Docker로 WEB서비스 구축 [ 15분]](https://image.slidesharecdn.com/dockeronopenstackoscv4-150309083842-conversion-gate01/75/Docker-on-openstack-by-OpenSource-Consulting-74-2048.jpg)
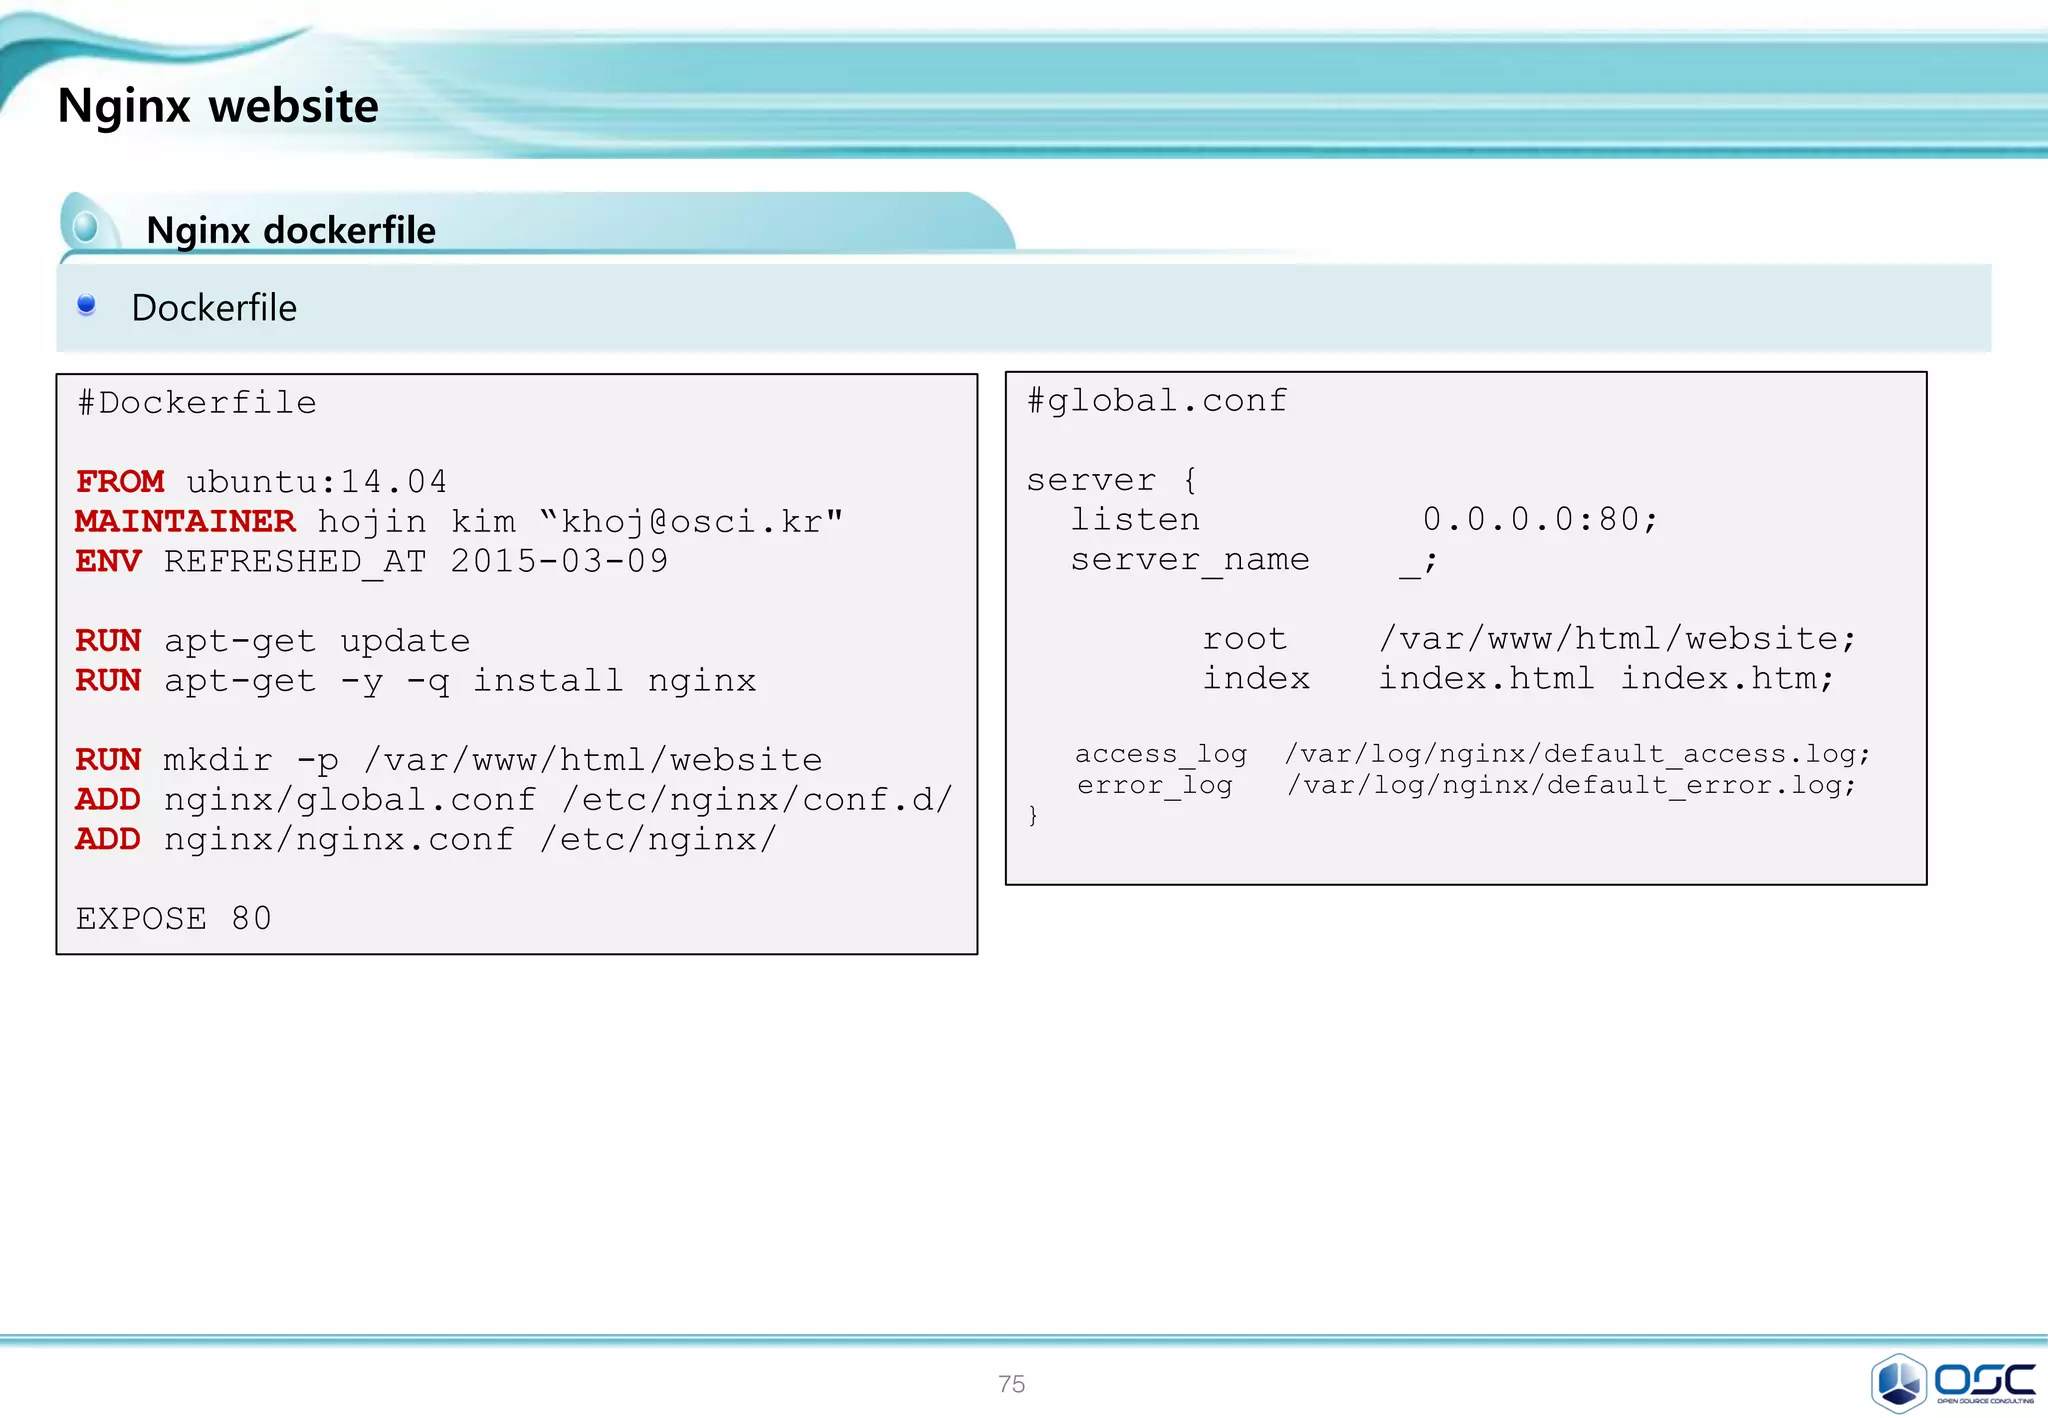
![76
What to do during 30 min.
Install MySQL and WordPress Using Docker
Mysql / wordpress image 가지고 오기
[root@docker01 wordpress]# docker pull mysql:latest
Pulling repository mysql
0beee7f478c8: Download complete
Status: Downloaded newer image for mysql:latest
[root@docker01 wordpress]# docker images
REPOSITORY TAG IMAGE ID CREATED VIRTUAL SIZE
mysql latest 0beee7f478c8 3 weeks ago 283.1 MB
[root@docker01 wordpress]# docker run --name test-mysql -e MYSQL_ROOT_PASSWORD='test'
-d mysql
8f0c7c57b35a4177e8722d4868ff891a2821776dd3f075e02a126475f94f41db
[root@docker01 wordpress]#
[root@docker01 wordpress]# docker ps -l
CONTAINER ID IMAGE COMMAND CREATED
STATUS PORTS NAMES
8f0c7c57b35a mysql:5 "/entrypoint.sh mysq 28 seconds ago Up
27 seconds 3306/tcp test-mysql](https://image.slidesharecdn.com/dockeronopenstackoscv4-150309083842-conversion-gate01/75/Docker-on-openstack-by-OpenSource-Consulting-76-2048.jpg)
![77
What to do during 30 min.
Install MySQL and WordPress Using Docker
Wordpress 실행
[root@docker01 wordpress]# docker pull wordpress:latest
Pulling repository wordpress
048e0caa51ac: Pulling dependent layers
511136ea3c5a: Download complete
Status: Downloaded newer image for wordpress:latest
[root@docker01 wordpress]# docker run --name test-wordpress --link test-mysql:mysql -p 80:80 -d
wordpress](https://image.slidesharecdn.com/dockeronopenstackoscv4-150309083842-conversion-gate01/75/Docker-on-openstack-by-OpenSource-Consulting-77-2048.jpg)
![78
What to do during 30 min.
Install MySQL and WordPress Using Docker
수정 후 이미지 commit하기
[root@docker01 wordpress]# docker ps
CONTAINER ID IMAGE COMMAND CREATED S
TATUS PORTS NAMES
981485e03a06 wordpress:4 "/entrypoint.sh apac 25 minutes ago U
p 25 minutes 0.0.0.0:80->80/tcp test-wordpress
8f0c7c57b35a mysql:5 "/entrypoint.sh mysq 32 minutes ago U
p 32 minutes 3306/tcp test-mysql
[root@docker01 wordpress]# docker commit 9814 osc_wordpress
-bash: docker: command not found
[root@docker01 wordpress]# docker commit 9814 osc_wordpress
10a6ed19d49729deeacf5c9bb6c91a6f0ef17c08d04664c6294e64b49b2c09d6
[root@docker01 wordpress]# docker commit 8f0c osc_mysql
C6b9d3708309f98304c547ab2d39924dc39741b7b62d9252ed062c252041554a
//docker stop docker stop `docker ps -qa`
[root@docker01 ~]# docker run --name osc_mysql -e MYSQL_ROOT_PASSWORD='test' -d
osc_mysql
fb2e1ee783747dbf9c77f35648752a29735a982bf3bdb07cfdb7631b05a8bd28
docker run --name osc_wordpress2 --link test-mysql:mysql -p 80:80 -d osc_wordpress](https://image.slidesharecdn.com/dockeronopenstackoscv4-150309083842-conversion-gate01/75/Docker-on-openstack-by-OpenSource-Consulting-78-2048.jpg)
![79
Getting started with Compose and Wordpress
Install MySQL and WordPress Using Docker
Docker-compose 구성
[root@docker01 dbdata]# curl -L
https://github.com/docker/compose/releases/download/1.1.0/docker-compose-`uname -s`-
`uname -m` > /usr/local/bin/docker-compose
% Total % Received % Xferd Average Speed Time Time Time Current
Dload Upload Total Spent Left Speed
100 407 0 407 0 0 376 0 --:--:-- 0:00:01 --:--:-- 376
100 5134k 100 5134k 0 0 1135k 0 0:00:04 0:00:04 --:--:-- 1760k
[root@docker01 dbdata]# chmod +x /usr/local/bin/docker-compose
[root@docker01 dbdata]# docker-compose --version
docker-compose 1.1.0
[root@docker01 ~]# curl https://wordpress.org/latest.tar.gz | tar -xvzf -
% Total % Received % Xferd Average Speed Time Time Time Current
Dload Upload Total Spent Left Speed
0 6041k 0 3726 0 0 4094 0 0:25:11 --:--:-- 0:25:11 4094wordpress/
wordpress/wp-settings.php](https://image.slidesharecdn.com/dockeronopenstackoscv4-150309083842-conversion-gate01/75/Docker-on-openstack-by-OpenSource-Consulting-79-2048.jpg)
![80
Getting started with Compose and Wordpress
Install MySQL and WordPress Using Docker
Dockerfile 구성과 compose 파일 구성
[root@docker01 wordpress]# cat Dockerfile
FROM orchardup/php5
ADD . /code
[root@docker01 wordpress]# cat docker-compose.yml
web:
build: .
command: php -S 0.0.0.0:8000 -t /code
ports:
- "8000:8000"
links:
- db
volumes:
- .:/code
db:
image: orchardup/mysql
environment:
MYSQL_DATABASE: wordpress](https://image.slidesharecdn.com/dockeronopenstackoscv4-150309083842-conversion-gate01/75/Docker-on-openstack-by-OpenSource-Consulting-80-2048.jpg)
![81
Getting started with Compose and Wordpress
Install MySQL and WordPress Using Docker
간단 program
[root@docker01 wordpress]# cat wp-config.php
<?php
define('DB_NAME', 'wordpress');
define('DB_USER', 'root');
define('DB_PASSWORD', '');
define('DB_HOST', "db:3306");
define('DB_CHARSET', 'utf8');
define('DB_COLLATE', '');
define('AUTH_KEY', 'test');
define('SECURE_AUTH_KEY', 'test');
define('LOGGED_IN_KEY', 'test');
define('NONCE_KEY', 'test');
define('AUTH_SALT', 'test');
define('SECURE_AUTH_SALT', 'test');
define('LOGGED_IN_SALT', 'test');
define('NONCE_SALT', 'test');
$table_prefix = 'wp_';
define('WPLANG', '');
define('WP_DEBUG', false);
if ( !defined('ABSPATH') )
define('ABSPATH', dirname(__FILE__) . '/');
require_once(ABSPATH . 'wp-settings.php');
[root@docker01 wordpress]# cat router.php
<?php
$root = $_SERVER['DOCUMENT_ROOT'];
chdir($root);
$path =
'/'.ltrim(parse_url($_SERVER['REQUEST_URI'])['p
ath'],'/');
set_include_path(get_include_path().':'.__DIR__
);
if(file_exists($root.$path))
{
if(is_dir($root.$path) &&
substr($path,strlen($path) - 1, 1) !== '/')
$path = rtrim($path,'/').'/index.php';
if(strpos($path,'.php') === false) return
false;
else {
chdir(dirname($root.$path));
require_once $root.$path;
}
}else include_once 'index.php';](https://image.slidesharecdn.com/dockeronopenstackoscv4-150309083842-conversion-gate01/75/Docker-on-openstack-by-OpenSource-Consulting-81-2048.jpg)
![82
Getting started with Compose and Wordpress
Install MySQL and WordPress Using Docker
실행
[root@docker01 wordpress]# docker build -t
wordpress:v2 .
Sending build context to Docker daemon 19.26 MB
Sending build context to Docker daemon
Step 0 : FROM orchardup/php5
Pulling repository orchardup/php5
7113324d9d9e: Download complete
511136ea3c5a: Download complete
e2aa6665d371: Download complete
f0ee64c4df74: Download complete
2209cbf9dcd3: Download complete
5e019ab7bf6d: Download complete
Status: Downloaded newer image for
orchardup/php5:latest
---> 7113324d9d9e
Step 1 : ADD . /code
---> 3286cb3866e2
Removing intermediate container f43239d824e7
Successfully built 3286cb3866e2
[root@docker01 wordpress]# docker images
REPOSITORY TAG IMAGE
ID CREATED VIRTUAL SIZE
wordpress v2 3286cb3866e2
20 seconds ago 348.4 MB
orchardup/php5 latest 7113324d9d9e
9 months ago 330.1 MB
[root@docker01 wordpress]# docker-compose up
Creating wordpress_db_1...
Pulling image orchardup/mysql:latest...
Pulling repository orchardup/mysql
061b756f7e0d: Download complete
Status: Downloaded newer image for
orchardup/mysql:latest
Creating wordpress_web_1...
Building web...
Step 0 : FROM orchardup/php5
---> 7113324d9d9e
..
db_1 | 150301 14:54:42 InnoDB: highest
supported file format is Barracuda.
db_1 | 150301 14:54:42 InnoDB: Waiting for
the background threads to start
db_1 | 150301 14:54:43 InnoDB: 5.5.38 started;
log sequence number 1595675
db_1 | 150301 14:54:43 [Note] Server hostname
(bind-address): '0.0.0.0'; port: 3306
db_1 | 150301 14:54:43 [Note] - '0.0.0.0'
resolves to '0.0.0.0';
db_1 | 150301 14:54:43 [Note] Server socket
created on IP: '0.0.0.0'.](https://image.slidesharecdn.com/dockeronopenstackoscv4-150309083842-conversion-gate01/75/Docker-on-openstack-by-OpenSource-Consulting-82-2048.jpg)
![83
Getting started with Compose and Wordpress
Install MySQL and WordPress Using Docker
Commit new image
[root@docker01 wordpress]# docker commit -m "0301_status" -a "khoj@osci.kr"
6ac193d6121f wordpress_web_1_0301
8c637330a125862362018c135139791e39d043babd3ae5aaaab358f99bbf60d1
[root@docker01 wordpress]# docker images
REPOSITORY TAG IMAGE ID CREATED VIRTUAL SIZE
wordpress_web_1_0301 latest 8c637330a125 9 seconds ago 348.4 MB
wordpress_web latest 0e8891e3f841 9 minutes ago 348.4 MB
wordpress v2 3286cb3866e2 12 minutes ago 348.4 MB
[root@docker01 wordpress]# docker ps
CONTAINER ID IMAGE COMMAND CREATED STATUS
PORTS NAMES
75303b0dd2ed wordpress_web:latest "php -S 0.0.0.0:8000 32 seconds ago Up 31
seconds 0.0.0.0:8000->8000/tcp wordpress_web_1
04f4f1e6b3a1 orchardup/mysql:latest "/usr/local/bin/run" 35 seconds ago Up 34
seconds 3306/tcp wordpress_db_1](https://image.slidesharecdn.com/dockeronopenstackoscv4-150309083842-conversion-gate01/75/Docker-on-openstack-by-OpenSource-Consulting-83-2048.jpg)
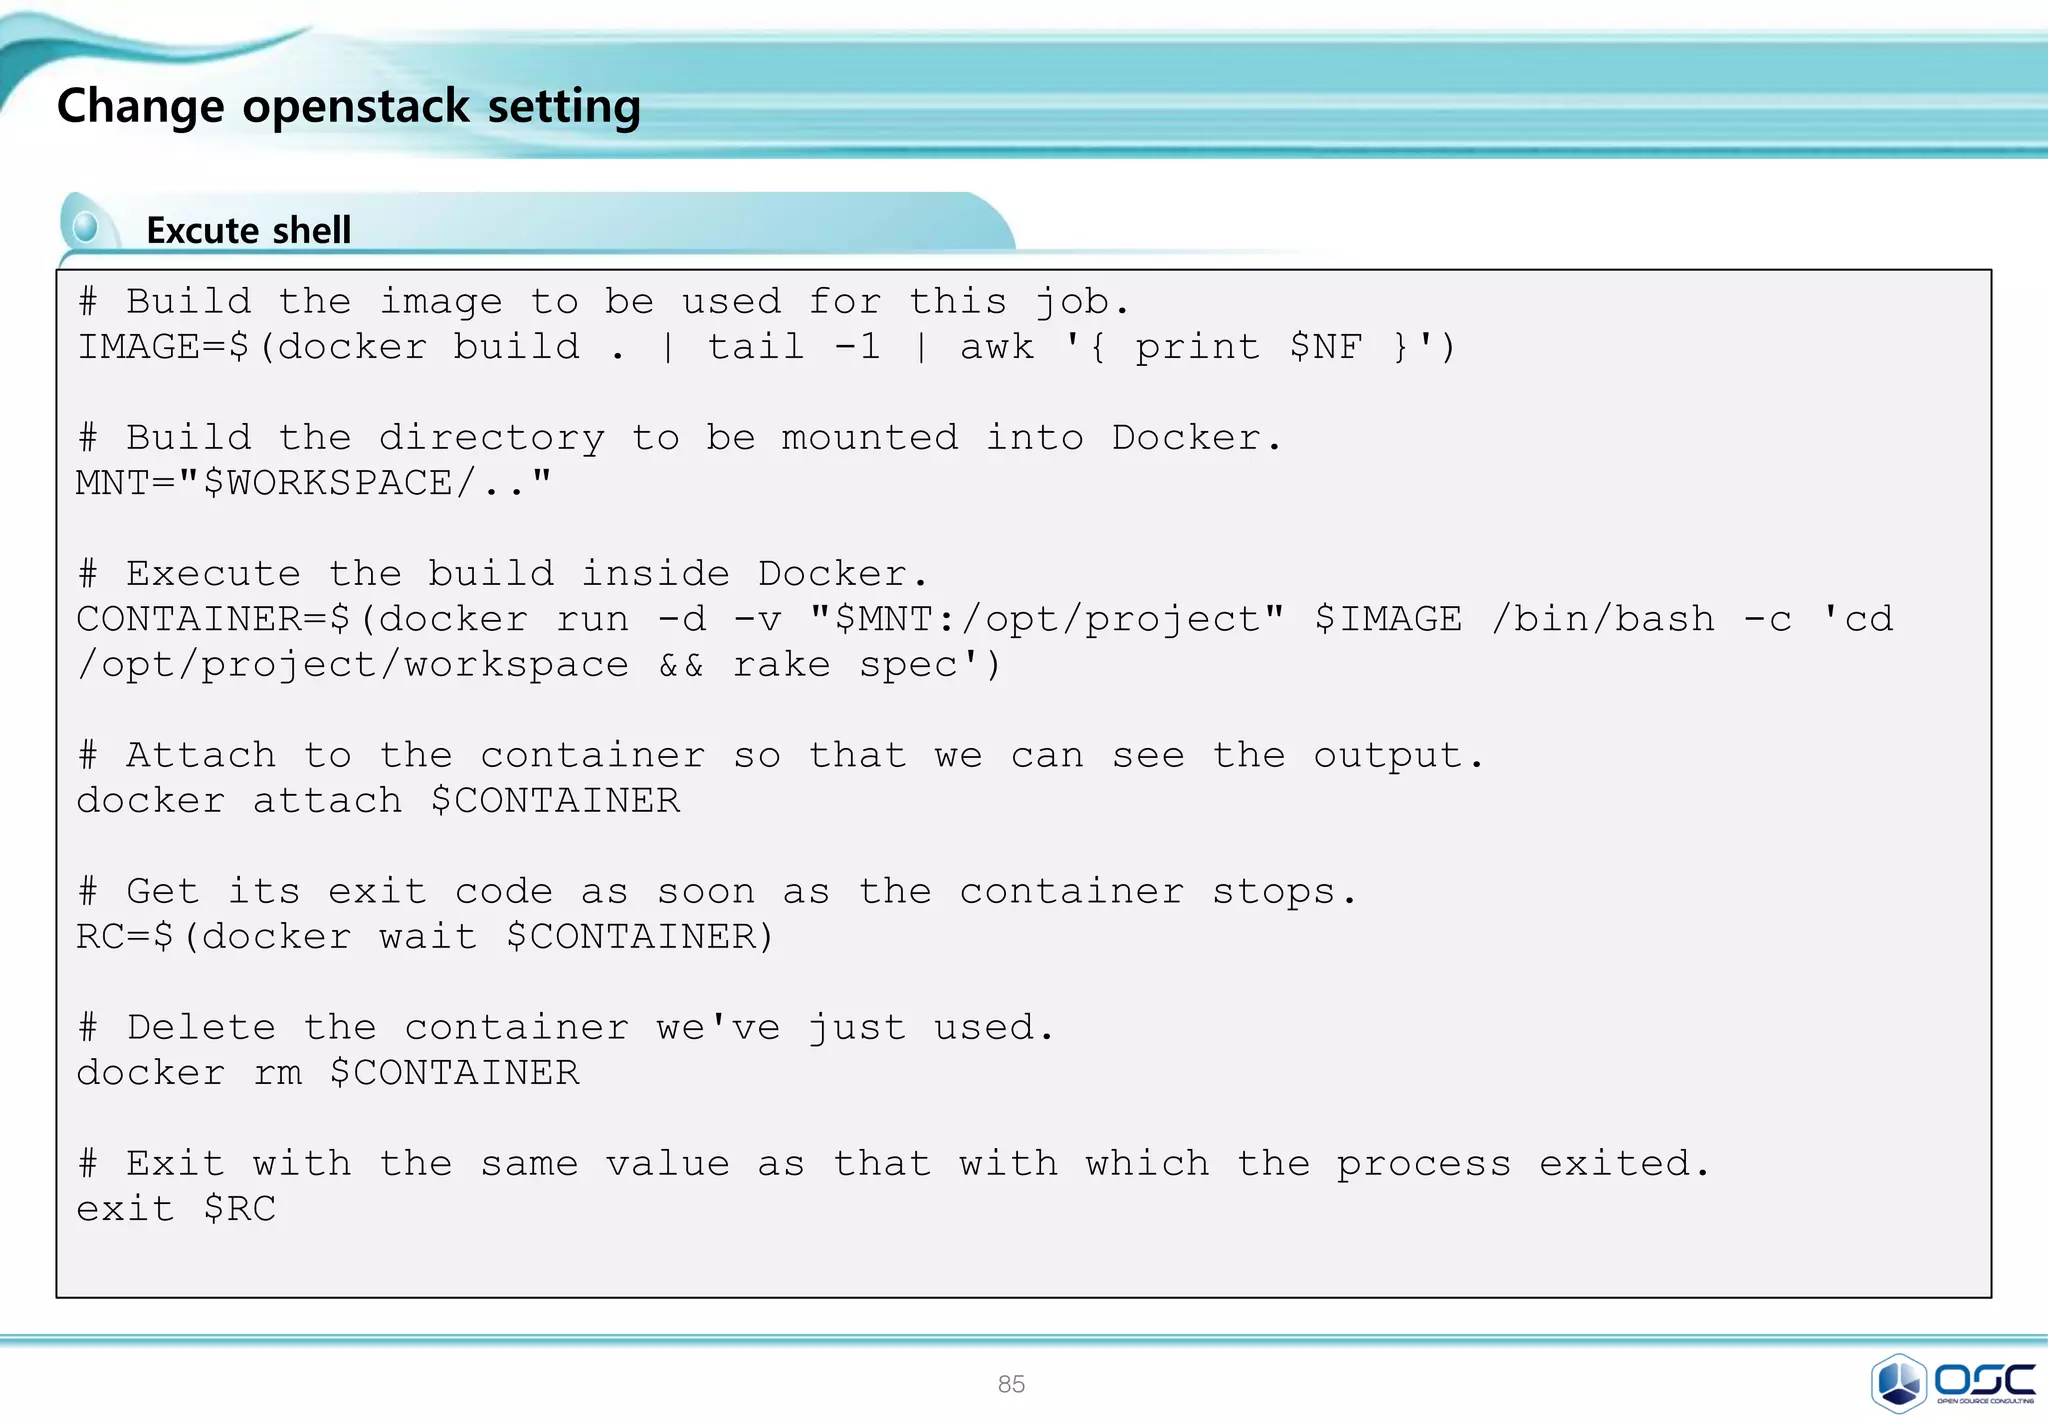
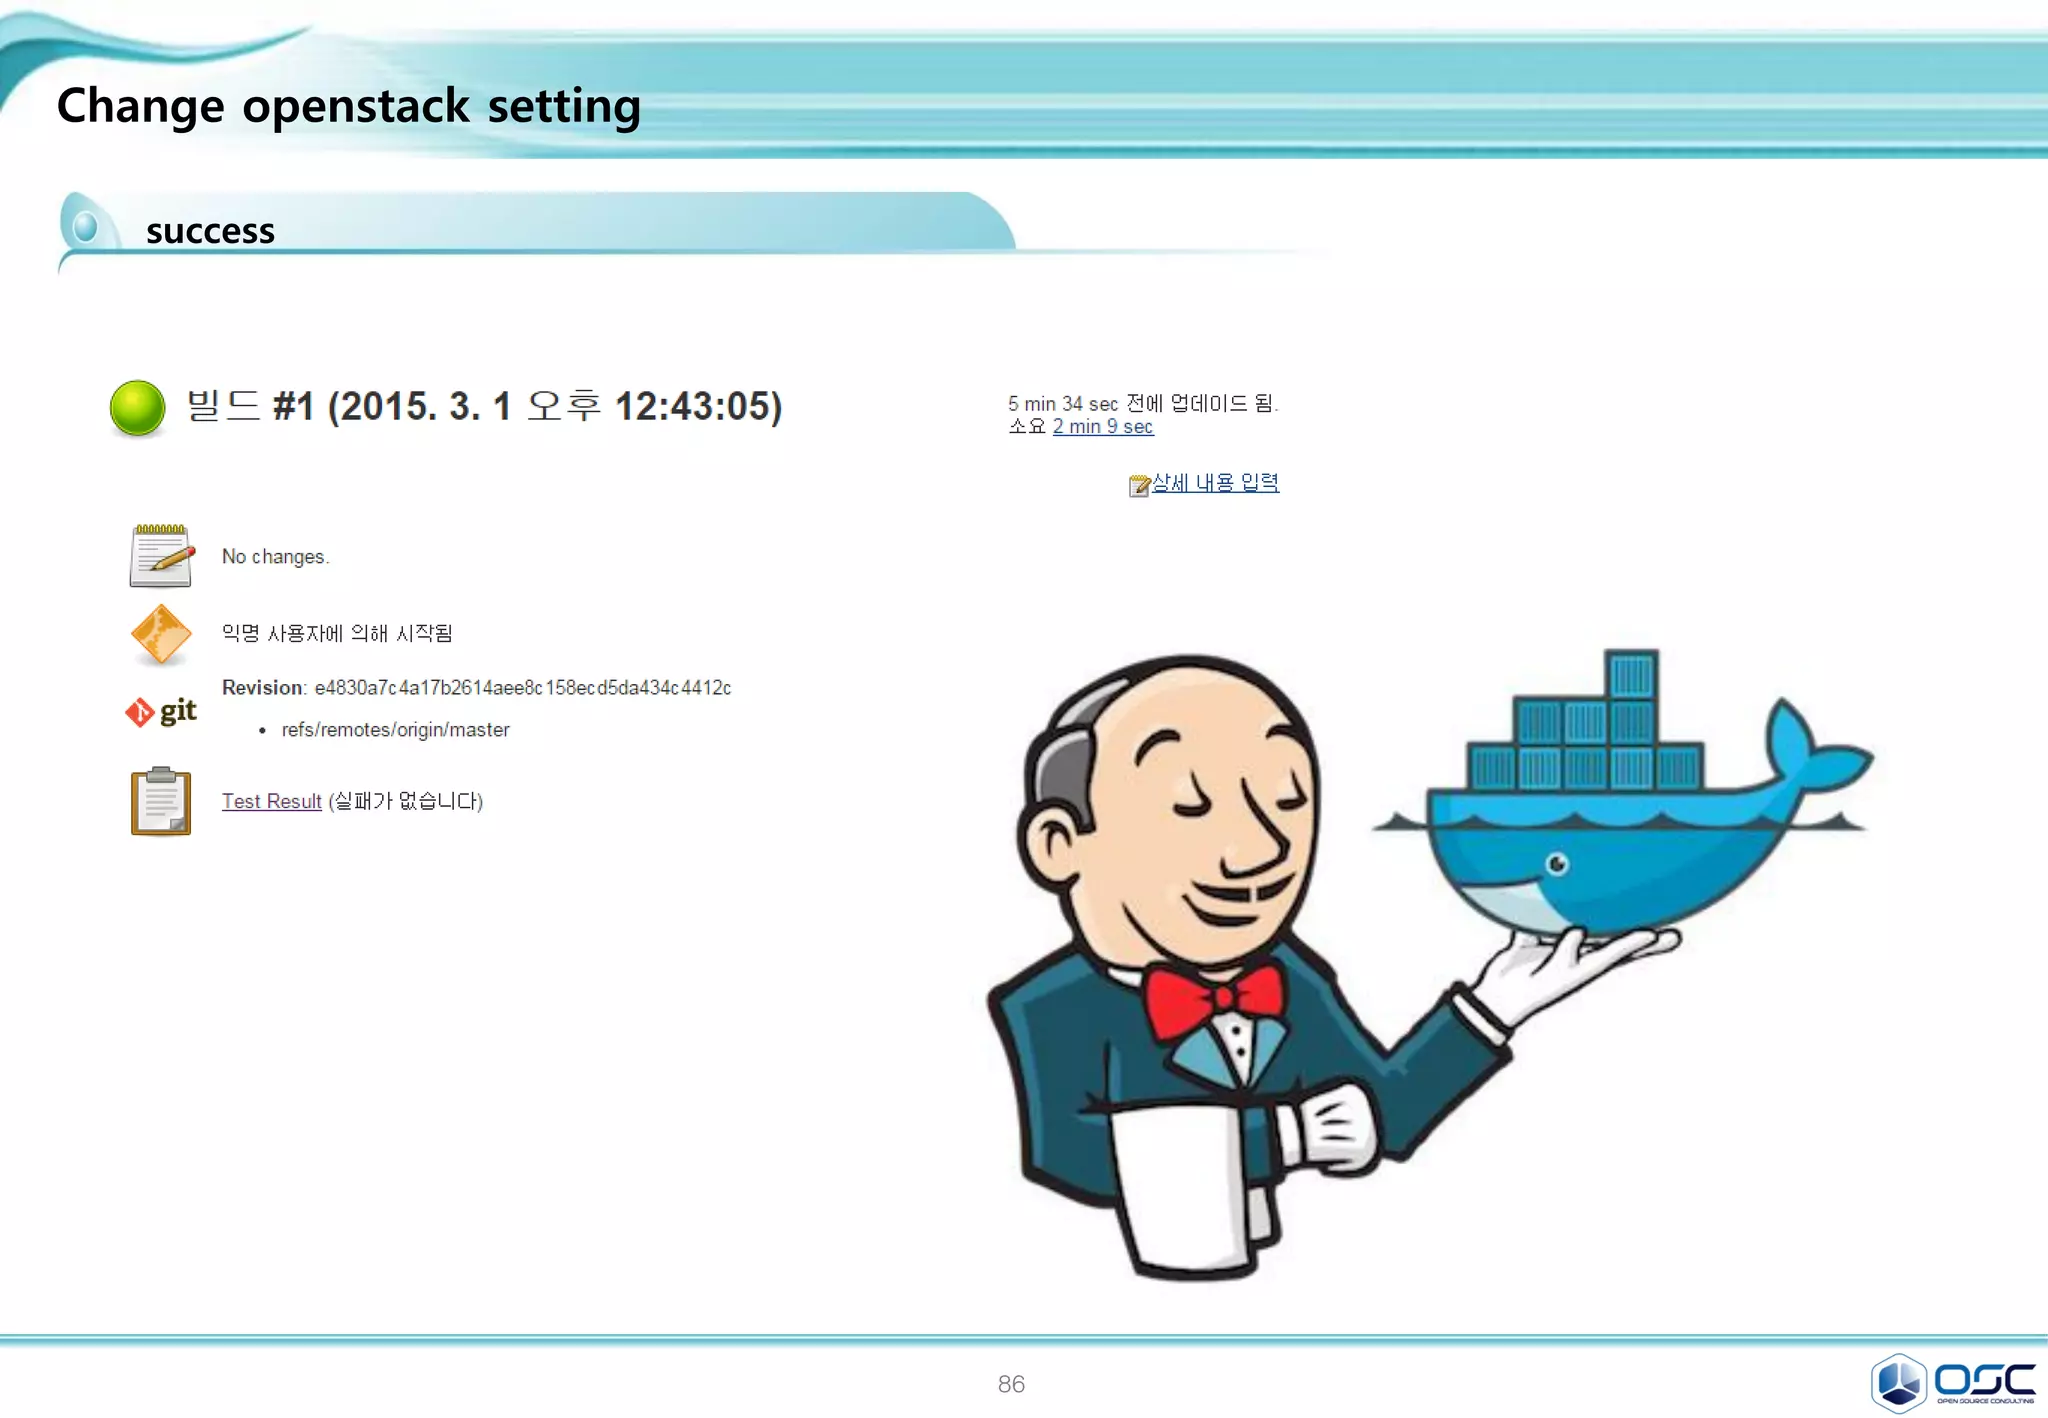
![86
Nginx website
Nginx dockerfile
nginx.conf
Dockerfile
nginx:
global.conf nginx.conf
website:
index.html
[root@docker nginx]# docker build -t oscinfra/nginx .
[root@docker nginx]#
docker run -d -p 80 --name website -v $PWD/website:/var/www/html/website oscinfra/nginx nginx](https://image.slidesharecdn.com/dockeronopenstackoscv4-150309083842-conversion-gate01/75/Docker-on-openstack-by-OpenSource-Consulting-86-2048.jpg)
![87
Contents
3. docker 구축 기초 [ 30분]
4. 오픈스택에 docker를 연결 [ 30분]
1. Openstack 인프라 구축 (4 node 구성) [ 30분]
2. Openstack 위에 VM 생성 [ 20분 ]
5. Docker로 WEB서비스 구축 [ 15분]
6.
7. Docker로 jenkins 구현 [30분]
Openstack 위에 Docker로 WEB서비스 구축 [ 15분]](https://image.slidesharecdn.com/dockeronopenstackoscv4-150309083842-conversion-gate01/75/Docker-on-openstack-by-OpenSource-Consulting-87-2048.jpg)
![88
Openstack 위에 Docker로 WEB서비스 구축 [ 15분]
docker image 가지고 와서 이미지 만들기
docker pull tutum/wordpress
[root@juno-compute ~]# docker pull tutum/wordpress
[root@juno-compute ~]# docker save tutum/wordpress | glance image-create --is-
public=True --container-format=docker --disk-format=raw --name tutum/wordpress
출처 : Xen Virtualization on Linux and Solaris : Running Nova-Docker on OpenStack RDO Juno (CentOS 7)
+------------------+--------------------------------------+
| Property | Value |
+------------------+--------------------------------------+
| checksum | c343cc7afce50d264640f3238943c6de |
| container_format | docker |
| created_at | 2015-03-11T06:12:39 |
| deleted | False |
| deleted_at | None |
| disk_format | raw |
| id | 570f59ed-a227-43b7-9be1-3ad9b85f49a7 |
| is_public | True |
| min_disk | 0 |
| min_ram | 0 |
| name | tutum/wordpress |
| owner | 3c402245243f443ebc2aa39605641be1 |
| protected | False |
| size | 492773376 |
| status | active |
| updated_at | 2015-03-11T06:14:19 |
| virtual_size | None |
+------------------+--------------------------------------+](https://image.slidesharecdn.com/dockeronopenstackoscv4-150309083842-conversion-gate01/75/Docker-on-openstack-by-OpenSource-Consulting-88-2048.jpg)
![89
Openstack 위에 Docker로 WEB서비스 구축 [ 15분]
docker image 가지고 와서 이미지 만들기
glance image
[root@juno-compute ~]# glance image-list
[root@juno-compute ~]# glance image-list
+--------------------------------------+---------------------+-------------+------------------+-----------+--------+
| ID | Name | Disk Format | Container Format | Size | Status |
+--------------------------------------+---------------------+-------------+------------------+-----------+--------+
| 707b9dfc-68e4-4a9c-b7bc-708127473a56 | centos7 | qcow2 | bare | 989069312 | active |
| 43d87a3d-e1da-4eac-86d3-33a8a4a0e62d | cirros-0.3.3-x86_64 | qcow2 | bare | 13200896 | active |
| 570f59ed-a227-43b7-9be1-3ad9b85f49a7 | tutum/wordpress | raw | docker | 492773376 | active |
+--------------------------------------+---------------------+-------------+------------------+-----------+--------+
출처 : Xen Virtualization on Linux and Solaris : Running Nova-Docker on OpenStack RDO Juno (CentOS 7)
[root@juno-compute ~]# nova boot --image "tutum/wordpress" --flavor m1.tiny --key-name
osc --nic net-id=00f8214c-fd7a-43f6-b469-6b78492adfff WordPress
[root@juno-compute ~]# neutron net-list
+--------------------------------------+-----------+-----------------------------------------------------+
| id | name | subnets |
+--------------------------------------+-----------+-----------------------------------------------------+
| 00f8214c-fd7a-43f6-b469-6b78492adfff | admin-net | a16ec435-0daa-4959-82c9-b6b6f50b9627 10.0.1.0/24 |
| 39e1abb0-d9bf-4f78-8cc6-88f0267e2b09 | ext-net | b74b68c0-84e7-4506-9169-1a1ff72ceb6f 192.168.0.0/24 |
| ddba5520-bc65-4762-a531-b1bfacd1b11e | test | b9bfb210-7c24-4c3c-809f-75cde2e5dd6f 10.0.2.0/24 |
+--------------------------------------+-----------+-----------------------------------------------------+](https://image.slidesharecdn.com/dockeronopenstackoscv4-150309083842-conversion-gate01/75/Docker-on-openstack-by-OpenSource-Consulting-89-2048.jpg)
![90
Openstack 위에 Docker로 WEB서비스 구축 [ 15분]
인스턴스 floating IP 주고, 연결하기
출처 : Xen Virtualization on Linux and Solaris : Running Nova-Docker on OpenStack RDO Juno (CentOS 7)](https://image.slidesharecdn.com/dockeronopenstackoscv4-150309083842-conversion-gate01/75/Docker-on-openstack-by-OpenSource-Consulting-90-2048.jpg)
![91
Openstack 위에 Docker로 WEB서비스 구축 [ 15분]
웹서비스 창
출처 : Xen Virtualization on Linux and Solaris : Running Nova-Docker on OpenStack RDO Juno (CentOS 7)](https://image.slidesharecdn.com/dockeronopenstackoscv4-150309083842-conversion-gate01/75/Docker-on-openstack-by-OpenSource-Consulting-91-2048.jpg)
![92
Openstack 위에 Docker로 WEB서비스 구축 [ 15분]
웹 서비스 창
출처 : Xen Virtualization on Linux and Solaris : Running Nova-Docker on OpenStack RDO Juno (CentOS 7)](https://image.slidesharecdn.com/dockeronopenstackoscv4-150309083842-conversion-gate01/75/Docker-on-openstack-by-OpenSource-Consulting-92-2048.jpg)
![93
Openstack 위에 Docker로 WEB서비스 구축 [ 15분]
docker image 가지고 와서 이미지 만들기
docker pull tutum/mysql
[root@juno-compute ~]# docker pull tutum/mysql
[root@juno-compute ~]# docker save tutum/mysql:latest | glance image-create --is-
public=True --container-format=docker --disk-format=raw --name tutum/mysql:latest
출처 : Xen Virtualization on Linux and Solaris : Running Nova-Docker on OpenStack RDO Juno (CentOS 7)
+------------------+--------------------------------------+
| Property | Value |
+------------------+--------------------------------------+
| checksum | fa22fdac9cfda75cb9ecf67ed6d974c1 |
| container_format | docker |
| created_at | 2015-03-11T08:59:20 |
| deleted | False |
| deleted_at | None |
| disk_format | raw |
| id | 54c5a2f8-e1ae-475d-9eb6-0be8c38315f4 |
| is_public | True |
| min_disk | 0 |
| min_ram | 0 |
| name | tutum/mysql:latest |
| owner | 3c402245243f443ebc2aa39605641be1 |
| protected | False |
| size | 332313600 |
| status | active |
| updated_at | 2015-03-11T09:00:18 |
| virtual_size | None |
+------------------+--------------------------------------+](https://image.slidesharecdn.com/dockeronopenstackoscv4-150309083842-conversion-gate01/75/Docker-on-openstack-by-OpenSource-Consulting-93-2048.jpg)
![94
Openstack 위에 Docker로 WEB서비스 구축 [ 15분]
docker image 가지고 와서 이미지 만들기
glance image
[root@juno-compute ~]# glance image-list
+--------------------------------------+---------------------+-------------+------------------+-----------+--------+
| ID | Name | Disk Format | Container Format | Size | Status |
+--------------------------------------+---------------------+-------------+------------------+-----------+--------+
| 707b9dfc-68e4-4a9c-b7bc-708127473a56 | centos7 | qcow2 | bare | 989069312 | active |
| 43d87a3d-e1da-4eac-86d3-33a8a4a0e62d | cirros-0.3.3-x86_64 | qcow2 | bare | 13200896 | active |
| 54c5a2f8-e1ae-475d-9eb6-0be8c38315f4 | tutum/mysql:latest | raw | docker | 332313600 | active |
| 570f59ed-a227-43b7-9be1-3ad9b85f49a7 | tutum/wordpress | raw | docker | 492773376 | active |
+--------------------------------------+---------------------+-------------+------------------+-----------+--------+
출처 : Xen Virtualization on Linux and Solaris : Running Nova-Docker on OpenStack RDO Juno (CentOS 7)
[root@juno-compute ~]# nova boot --image "tutum/mysql:latest" --flavor m1.tiny --key-
name osc --nic net-id=00f8214c-fd7a-43f6-b469-6b78492adfff WordPress
[root@juno-compute ~]# neutron net-list
+--------------------------------------+-----------+-----------------------------------------------------+
| id | name | subnets |
+--------------------------------------+-----------+-----------------------------------------------------+
| 00f8214c-fd7a-43f6-b469-6b78492adfff | admin-net | a16ec435-0daa-4959-82c9-b6b6f50b9627 10.0.1.0/24 |
| 39e1abb0-d9bf-4f78-8cc6-88f0267e2b09 | ext-net | b74b68c0-84e7-4506-9169-1a1ff72ceb6f 192.168.0.0/24 |
| ddba5520-bc65-4762-a531-b1bfacd1b11e | test | b9bfb210-7c24-4c3c-809f-75cde2e5dd6f 10.0.2.0/24 |
+--------------------------------------+-----------+-----------------------------------------------------+](https://image.slidesharecdn.com/dockeronopenstackoscv4-150309083842-conversion-gate01/75/Docker-on-openstack-by-OpenSource-Consulting-94-2048.jpg)
![95
Openstack 위에 Docker로 WEB서비스 구축 [ 15분]
docker image 가지고 와서 이미지 만들기
mysql contact
[root@juno-compute ~]# docker ps
CONTAINER ID IMAGE COMMAND CREATED STATUS
PORTS NAMES
5ba04d7d55c9 tutum/mysql:latest "/run.sh" 5 minutes ago Up 5 minutes
nova-9b9de363-820a-459c-964f-ef1de66a5634
001aa14aa877 tutum/wordpress:latest "/run.sh" 2 hours ago Up 2 hours
nova-f9a4d63d-9184-416b-aa6f-1691d1d19139
출처 : Xen Virtualization on Linux and Solaris : Running Nova-Docker on OpenStack RDO Juno (CentOS 7)
[root@juno-compute ~]# docker logs 5ba04d7d55c9
=> An empty or uninitialized MySQL volume is detected in /var/lib/mysql
=> Installing MySQL ...
=> Done!
=> Creating admin user ...
=> Waiting for confirmation of MySQL service startup, trying 0/13 ...
=> Creating MySQL user admin with random password
=> Done!
========================================================================
You can now connect to this MySQL Server using:
mysql -uadmin -pSXgwTukrk2fK -h<host> -P<port>](https://image.slidesharecdn.com/dockeronopenstackoscv4-150309083842-conversion-gate01/75/Docker-on-openstack-by-OpenSource-Consulting-95-2048.jpg)
![96
Openstack 위에 Docker로 WEB서비스 구축 [ 15분]
docker image 가지고 와서 이미지 만들기
mysql connect
출처 : Xen Virtualization on Linux and Solaris : Running Nova-Docker on OpenStack RDO Juno (CentOS 7)
[root@juno-controller rootwrap.d]# mysql -uadmin -pSXgwTukrk2fK -h 192.168.0.213 -P
3306
Welcome to the MariaDB monitor. Commands end with ; or g.
Your MySQL connection id is 1
Server version: 5.5.41-0ubuntu0.14.04.1 (Ubuntu)
Copyright (c) 2000, 2014, Oracle, MariaDB Corporation Ab and others.
Type 'help;' or 'h' for help. Type 'c' to clear the current input statement.
MySQL [(none)]>
MySQL [(none)]> show databases;
+--------------------+
| Database |
+--------------------+
| information_schema |
| mysql |
| performance_schema |
+--------------------+
3 rows in set (0.00 sec)](https://image.slidesharecdn.com/dockeronopenstackoscv4-150309083842-conversion-gate01/75/Docker-on-openstack-by-OpenSource-Consulting-96-2048.jpg)
![97
Contents
3. docker 구축 기초 [ 30분]
4. 오픈스택에 docker를 연결 [ 30분]
1. Openstack 인프라 구축 (4 node 구성) [ 30분]
2. Openstack 위에 VM 생성 [ 20분 ]
5. Docker로 WEB서비스 구축 [ 30분]
6.
7. Docker로 jenkins 구현 [30분]
Openstack 위에 Docker로 WEB서비스 구축 [ 15분]](https://image.slidesharecdn.com/dockeronopenstackoscv4-150309083842-conversion-gate01/75/Docker-on-openstack-by-OpenSource-Consulting-97-2048.jpg)

![99
Change openstack setting
Dockfile - ubnutu 환경에서 직접 해 봄.
[root@docker01 jenkins]# cat Dockerfile
FROM ubuntu:14.04
MAINTAINER james@example.com
ENV REFRESHED_AT 2014-06-01
RUN apt-get update -qq && apt-get install -qqy curl
RUN curl https://get.docker.io/gpg | apt-key add -
RUN echo deb http://get.docker.io/ubuntu docker main >
/etc/apt/sources.list.d/docker.list
RUN apt-get update -qq && apt-get install -qqy iptables ca-certificates lxc openjdk-6-
jdk git-core lxc-docker
ENV JENKINS_HOME /opt/jenkins/data
ENV JENKINS_MIRROR http://mirrors.jenkins-ci.org
RUN mkdir -p $JENKINS_HOME/plugins
RUN curl -sf -o /opt/jenkins/jenkins.war -L $JENKINS_MIRROR/war-
stable/latest/jenkins.war
RUN for plugin in chucknorris greenballs scm-api git-client git ws-cleanup ;
do curl -sf -o $JENKINS_HOME/plugins/${plugin}.hpi
-L $JENKINS_MIRROR/plugins/${plugin}/latest/${plugin}.hpi ; done
ADD ./dockerjenkins.sh /usr/local/bin/dockerjenkins.sh
RUN chmod +x /usr/local/bin/dockerjenkins.sh
VOLUME /var/lib/docker
EXPOSE 8080
ENTRYPOINT [ "/usr/local/bin/dockerjenkins.sh" ]](https://image.slidesharecdn.com/dockeronopenstackoscv4-150309083842-conversion-gate01/75/Docker-on-openstack-by-OpenSource-Consulting-99-2048.jpg)
![100
Change openstack setting
dockerjenkins.sh
root@ubuntu:~/jenkins# cat dockerjenkins.sh
#!/bin/bash
# First, make sure that cgroups are mounted
correctly.
CGROUP=/sys/fs/cgroup
[ -d $CGROUP ] ||
mkdir $CGROUP
mountpoint -q $CGROUP ||
mount -n -t tmpfs -o uid=0,gid=0,mode=0755
cgroup $CGROUP || {
echo "Could not make a tmpfs mount. Did
you use -privileged?"
exit 1
}
# Mount the cgroup hierarchies exactly as they
are in the parent system.
for SUBSYS in $(cut -d: -f2 /proc/1/cgroup)
do
[ -d $CGROUP/$SUBSYS ] || mkdir
$CGROUP/$SUBSYS
mountpoint -q $CGROUP/$SUBSYS ||
mount -n -t cgroup -o $SUBSYS cgroup
$CGROUP/$SUBSYS
done
# Now, close extraneous file descriptors.
pushd /proc/self/fd
for FD in *
do
case "$FD" in
# Keep stdin/stdout/stderr
[012])
;;
# Nuke everything else
*)
eval exec "$FD>&-"
;;
esac
done
popd
docker -d &
exec java -jar /opt/jenkins/jenkins.war
name error가 발생하여.
DEBIAN_FRONTEND=noninteractive 후
apt-get install lxc-docker 수행](https://image.slidesharecdn.com/dockeronopenstackoscv4-150309083842-conversion-gate01/75/Docker-on-openstack-by-OpenSource-Consulting-100-2048.jpg)


![[OpenStack Day in Korea 2015] Track 1 - Triple O를 이용한 빠르고 쉬운 OpenStack 설치](https://cdn.slidesharecdn.com/ss_thumbnails/11-150213041431-conversion-gate02-thumbnail.jpg?width=600ounds&width=560&fit=bounds)


![[Demo session] 관리형 Kafka 서비스 - Oracle Event Hub Service](https://cdn.slidesharecdn.com/ss_thumbnails/oraclouddevmeetupeventhubpublic-180521084803-thumbnail.jpg?width=600ounds&width=560&fit=bounds)

![[오픈소스컨설팅] 프로메테우스 모니터링 살펴보고 구성하기](https://cdn.slidesharecdn.com/ss_thumbnails/oscprometheus-190422050231-thumbnail.jpg?width=600ounds&width=560&fit=bounds)
![[오픈소스컨설팅] Open Stack Ceph, Neutron, HA, Multi-Region](https://cdn.slidesharecdn.com/ss_thumbnails/openstackoscv0-160718105826-thumbnail.jpg?width=600ounds&width=560&fit=bounds)


![UiPath Automation Suite Installation (Hands-On) [2/3]](https://cdn.slidesharecdn.com/ss_thumbnails/automationsuitecommunitysession2-251015095633-a6d862f1-thumbnail.jpg?width=600ounds&width=560&fit=bounds)


