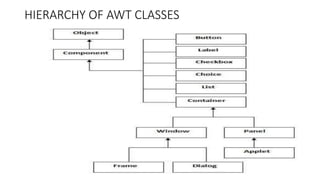
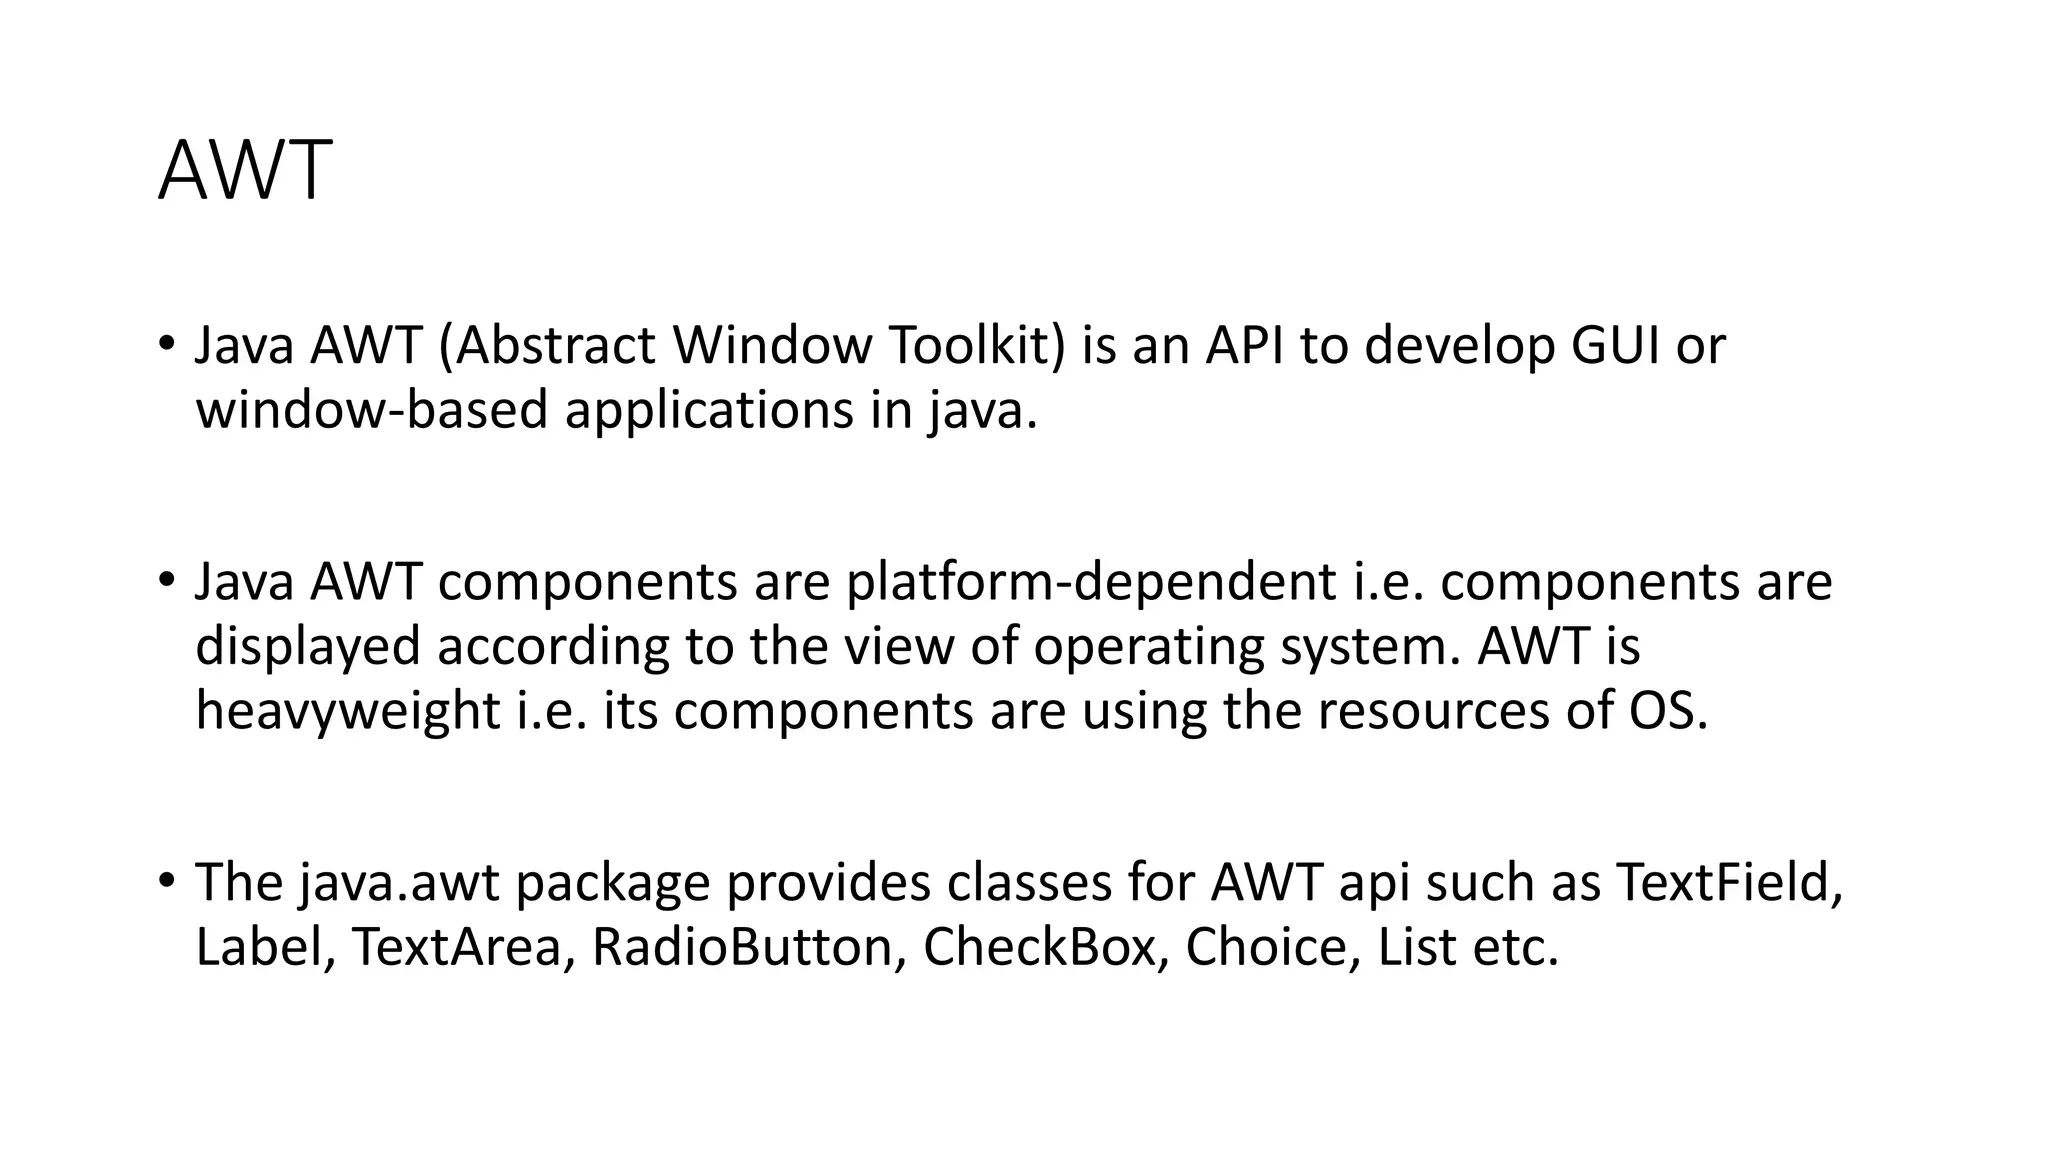
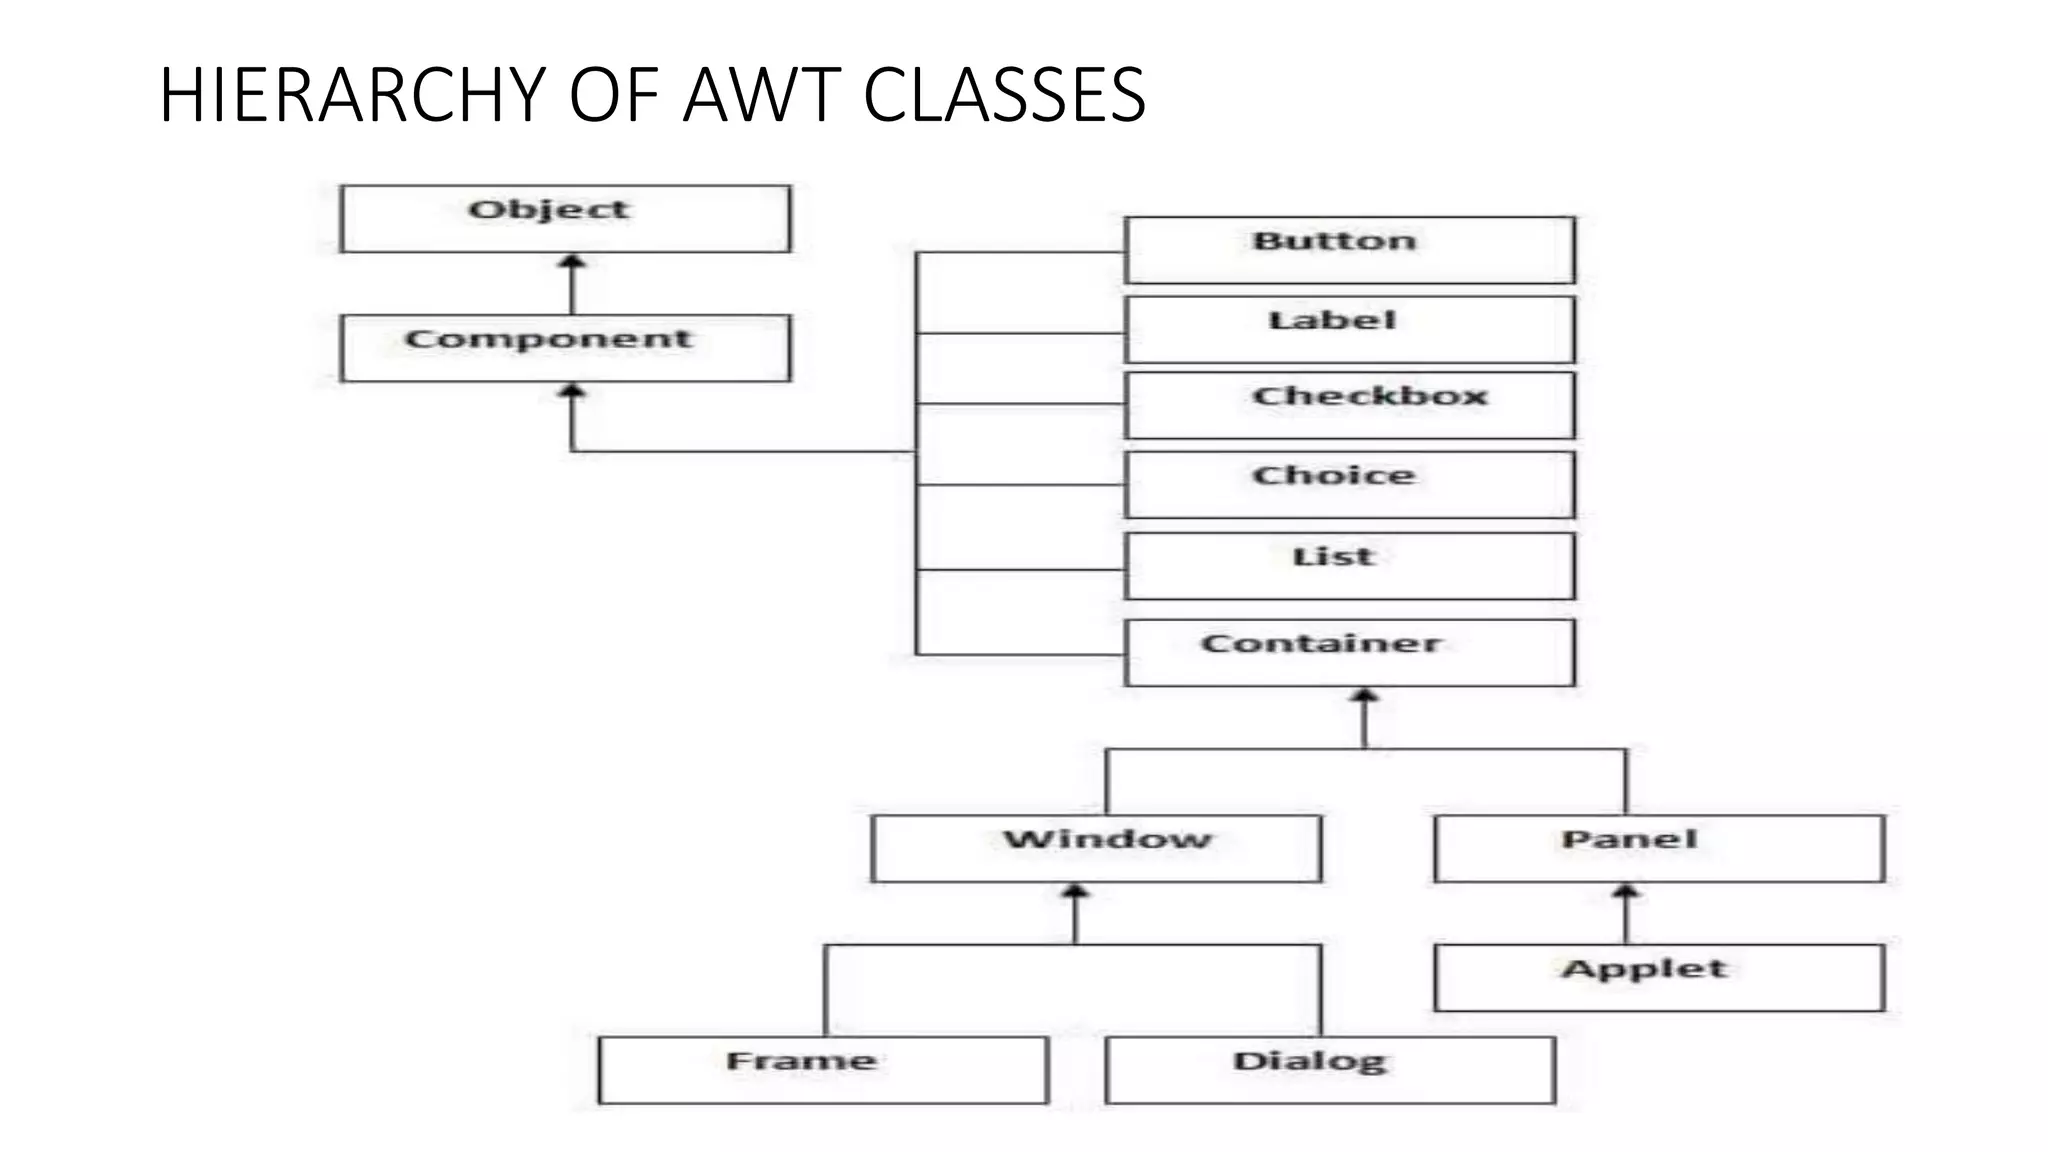
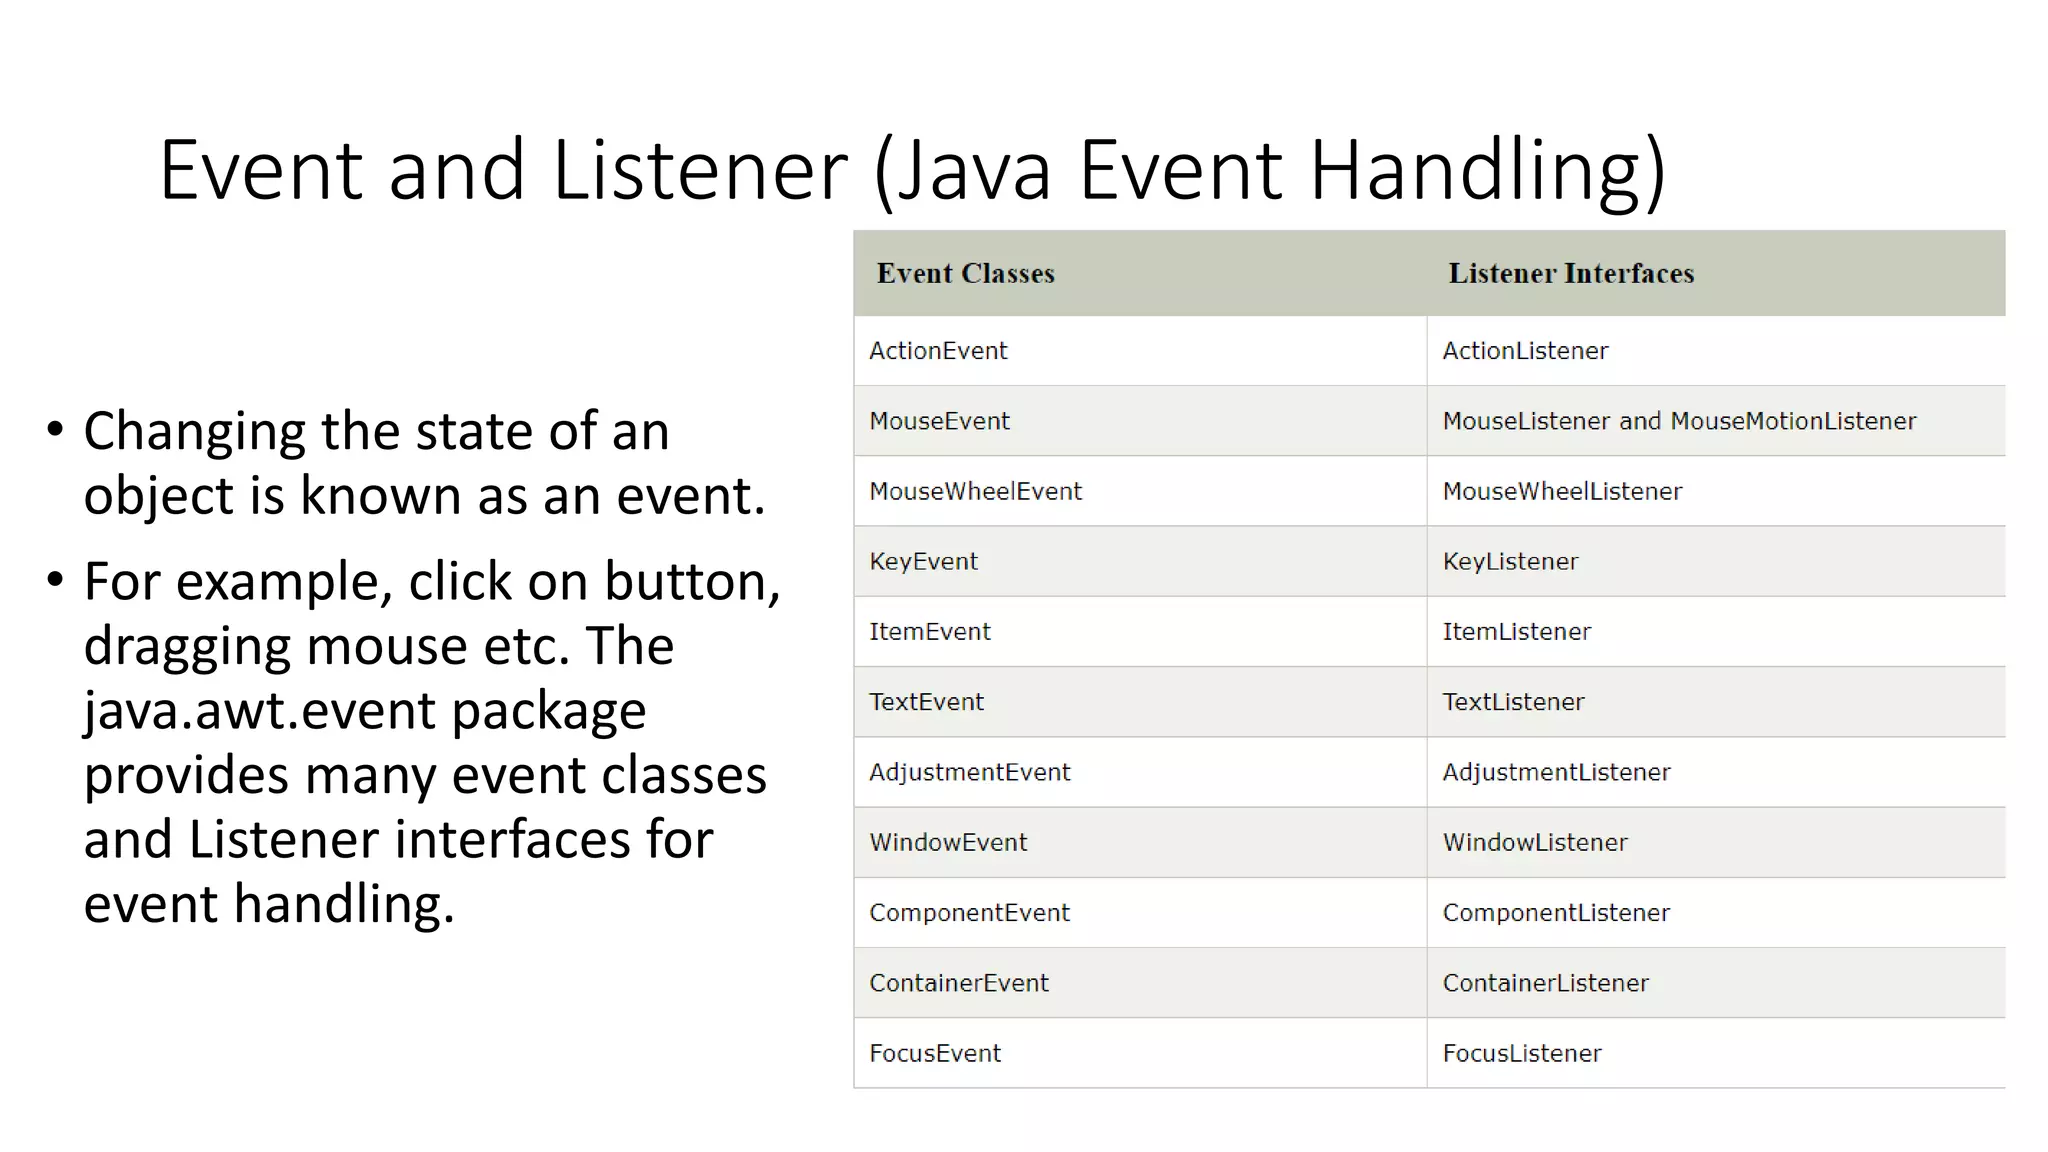
The document discusses the Abstract Window Toolkit (AWT) in Java. It describes AWT as an API that allows developing GUI or window-based applications in Java. It notes that AWT components are platform-dependent and heavyweight. The document then provides details on AWT classes like Container, Window, Panel, Frame and their hierarchy. It also gives examples of using common AWT components like Button, Label, TextField, TextArea, Checkbox, List and examples of event handling in AWT applications.


![AWT EXAMPLE
• To create simple awt example,
you need a frame.
• By extending Frame class
(inheritance)
import java.awt.*;
class First extends Frame{
First(){
Button b=new Button("click me");
b.setBounds(30,100,80,30);// setting button position
add(b);//adding button into frame
setSize(300,300);//frame size 300 width and 300 height
setLayout(null);//no layout manager
setVisible(true);//now frame will be visible, by default
not visible
}
public static void main(String args[]){
First f=new First();
}}](https://image.slidesharecdn.com/corejava-awt-200525095547/85/java-Abstract-Window-toolkit-7-320.jpg)
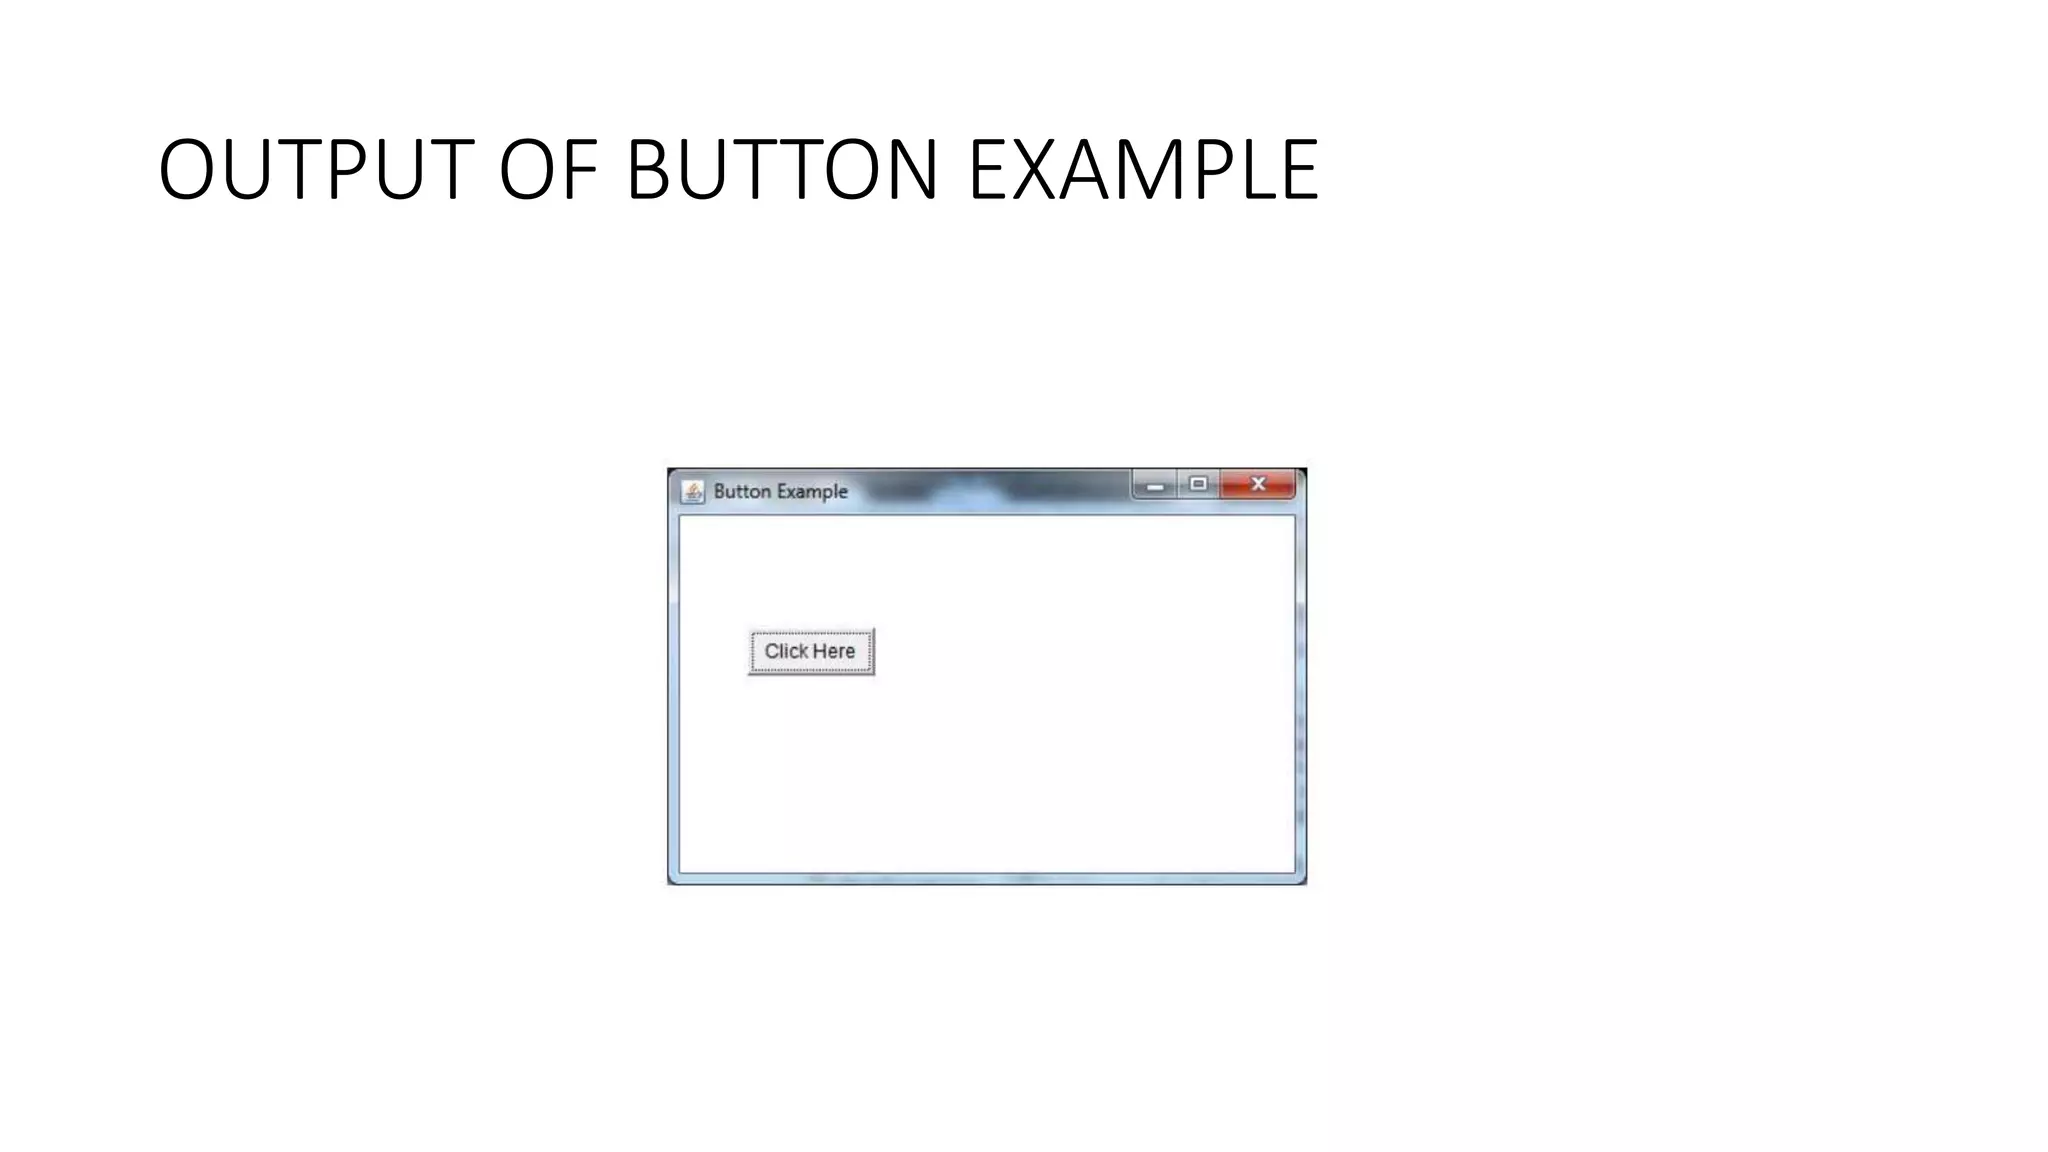
![Java AWT Button
• The button class is used to create a
labeled button that has platform
independent implementation. The
application result in some action
when the button is pushed.
• AWT Button Class declaration
• public class Button extends
Component implements Accessible
Java AWT Button Example
import java.awt.*;
public class ButtonExample {
public static void main(String[] args) {
Frame f=new Frame("Button Example");
Button b=new Button("Click Here");
b.setBounds(50,100,80,30);
f.add(b);
f.setSize(400,400);
f.setLayout(null);
f.setVisible(true);
}
}](https://image.slidesharecdn.com/corejava-awt-200525095547/85/java-Abstract-Window-toolkit-8-320.jpg)

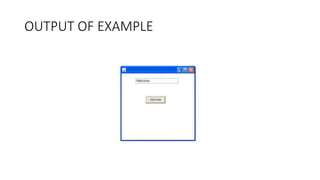
![EXAMPLE
import java.awt.*;
import java.awt.event.*;
class AEvent extends Frame implements ActionListener{
TextField tf;
AEvent(){
//create components
tf=new TextField();
tf.setBounds(60,50,170,20);
Button b=new Button("click me");
b.setBounds(100,120,80,30);
//register listener
b.addActionListener(this);
//add components and set size, layout and visibility
add(b);
add(tf);
setSize(300,300);
setLayout(null);
setVisible(true);
}
public void actionPerformed(ActionEvent e){
tf.setText("Welcome");
}
public static void main(String args[]){
new AEvent();
}
}](https://image.slidesharecdn.com/corejava-awt-200525095547/85/java-Abstract-Window-toolkit-12-320.jpg)
![import java.awt.*;
class LabelExample{
public static void main(String args[]){
Frame f= new Frame("Label Example");
Label l1,l2;
l1=new Label("First Label.");
l1.setBounds(50,100, 100,30);
l2=new Label("Second Label.");
l2.setBounds(50,150, 100,30);
f.add(l1); f.add(l2);
f.setSize(400,400);
f.setLayout(null);
f.setVisible(true);
}
}](https://image.slidesharecdn.com/corejava-awt-200525095547/85/java-Abstract-Window-toolkit-15-320.jpg)
![import java.awt.*;
class TextFieldExample{
public static void main(String args[]){
Frame f= new Frame("TextField Example");
TextField t1,t2;
t1=new TextField("Welcome to Javatpoint.");
t1.setBounds(50,100, 200,30);
t2=new TextField("AWT Tutorial");
t2.setBounds(50,150, 200,30);
f.add(t1); f.add(t2);
f.setSize(400,400);
f.setLayout(null);
f.setVisible(true);
}
}](https://image.slidesharecdn.com/corejava-awt-200525095547/85/java-Abstract-Window-toolkit-17-320.jpg)
![import java.awt.*;
import java.awt.event.*;
public class TextFieldExample extends Frame implements ActionListener{
TextField tf1,tf2,tf3;
Button b1,b2;
TextFieldExample(){
tf1=new TextField();
tf1.setBounds(50,50,150,20);
tf2=new TextField();
tf2.setBounds(50,100,150,20);
tf3=new TextField();
tf3.setBounds(50,150,150,20);
tf3.setEditable(false);
b1=new Button("+");
b1.setBounds(50,200,50,50);
b2=new Button("-");
b2.setBounds(120,200,50,50);
b1.addActionListener(this);
b2.addActionListener(this);
add(tf1);add(tf2);add(tf3);add(b1);add(b2);
setSize(300,300);
setLayout(null);
setVisible(true);
}
public void actionPerformed(ActionEvent e) {
String s1=tf1.getText();
String s2=tf2.getText();
int a=Integer.parseInt(s1);
int b=Integer.parseInt(s2);
int c=0;
if(e.getSource()==b1){
c=a+b;
}else if(e.getSource()==b2){
c=a-b;
}
String result=String.valueOf(c);
tf3.setText(result);
}
public static void main(String[] args) {
new TextFieldExample();
}
}](https://image.slidesharecdn.com/corejava-awt-200525095547/85/java-Abstract-Window-toolkit-18-320.jpg)
![Java AWT TextArea
• The object of a TextArea class is
a multi line region that displays
text. It allows the editing of
multiple line text. It inherits
TextComponent class.
import java.awt.*;
public class TextAreaExample
{
TextAreaExample(){
Frame f= new Frame();
TextArea area=new TextArea("Welcome to javatpoint");
area.setBounds(10,30, 300,300);
f.add(area);
f.setSize(400,400);
f.setLayout(null);
f.setVisible(true);
}
public static void main(String args[])
{
new TextAreaExample();
}
}](https://image.slidesharecdn.com/corejava-awt-200525095547/85/java-Abstract-Window-toolkit-19-320.jpg)
![import java.awt.*;
import java.awt.event.*;
public class TextAreaExample extends Frame implements
ActionListener{
Label l1,l2;
TextArea area;
Button b;
TextAreaExample(){
l1=new Label();
l1.setBounds(50,50,100,30);
l2=new Label();
l2.setBounds(160,50,100,30);
area=new TextArea();
area.setBounds(20,100,300,300);
b=new Button("Count Words");
b.setBounds(100,400,100,30);
b.addActionListener(this);
add(l1);add(l2);add(area);add(b);
setSize(400,450);
setLayout(null);
setVisible(true);
}
public void actionPerformed(ActionEvent e){
String text=area.getText();
String words[]=text.split("s");
l1.setText("Words: "+words.length);
l2.setText("Characters: "+text.length());
}
public static void main(String[] args) {
new TextAreaExample();
}
}](https://image.slidesharecdn.com/corejava-awt-200525095547/85/java-Abstract-Window-toolkit-20-320.jpg)
![Java AWT Checkbox
• The Checkbox class is used to
create a checkbox. It is used to
turn an option on (true) or off
(false). Clicking on a Checkbox
changes its state from "on" to
"off" or from "off" to "on"
import java.awt.*;
public class CheckboxExample
{
CheckboxExample(){
Frame f= new Frame("Checkbox Example");
Checkbox checkbox1 = new Checkbox("C++");
checkbox1.setBounds(100,100, 50,50);
Checkbox checkbox2 = new Checkbox("Java", true);
checkbox2.setBounds(100,150, 50,50);
f.add(checkbox1);
f.add(checkbox2);
f.setSize(400,400);
f.setLayout(null);
f.setVisible(true);
}
public static void main(String args[])
{
new CheckboxExample();
}
}](https://image.slidesharecdn.com/corejava-awt-200525095547/85/java-Abstract-Window-toolkit-21-320.jpg)
![import java.awt.*;
import java.awt.event.*;
public class CheckboxExample
{
CheckboxExample(){
Frame f= new Frame("CheckBox Example");
final Label label = new Label();
label.setAlignment(Label.CENTER);
label.setSize(400,100);
Checkbox checkbox1 = new Checkbox("C++");
checkbox1.setBounds(100,100, 50,50);
Checkbox checkbox2 = new Checkbox("Java");
checkbox2.setBounds(100,150, 50,50);
f.add(checkbox1); f.add(checkbox2); f.add(label);
checkbox1.addItemListener(new ItemListener() {
public void itemStateChanged(ItemEvent e) {
label.setText("C++ Checkbox: "
+ (e.getStateChange()==1?"checked":"unchecked"));
}
});
checkbox2.addItemListener(new ItemListener() {
public void itemStateChanged(ItemEvent e) {
label.setText("Java Checkbox: "
+ (e.getStateChange()==1?"checked":"unchecked"));
}
});
f.setSize(400,400);
f.setLayout(null);
f.setVisible(true);
}
public static void main(String args[])
{
new CheckboxExample();
}
}](https://image.slidesharecdn.com/corejava-awt-200525095547/85/java-Abstract-Window-toolkit-22-320.jpg)
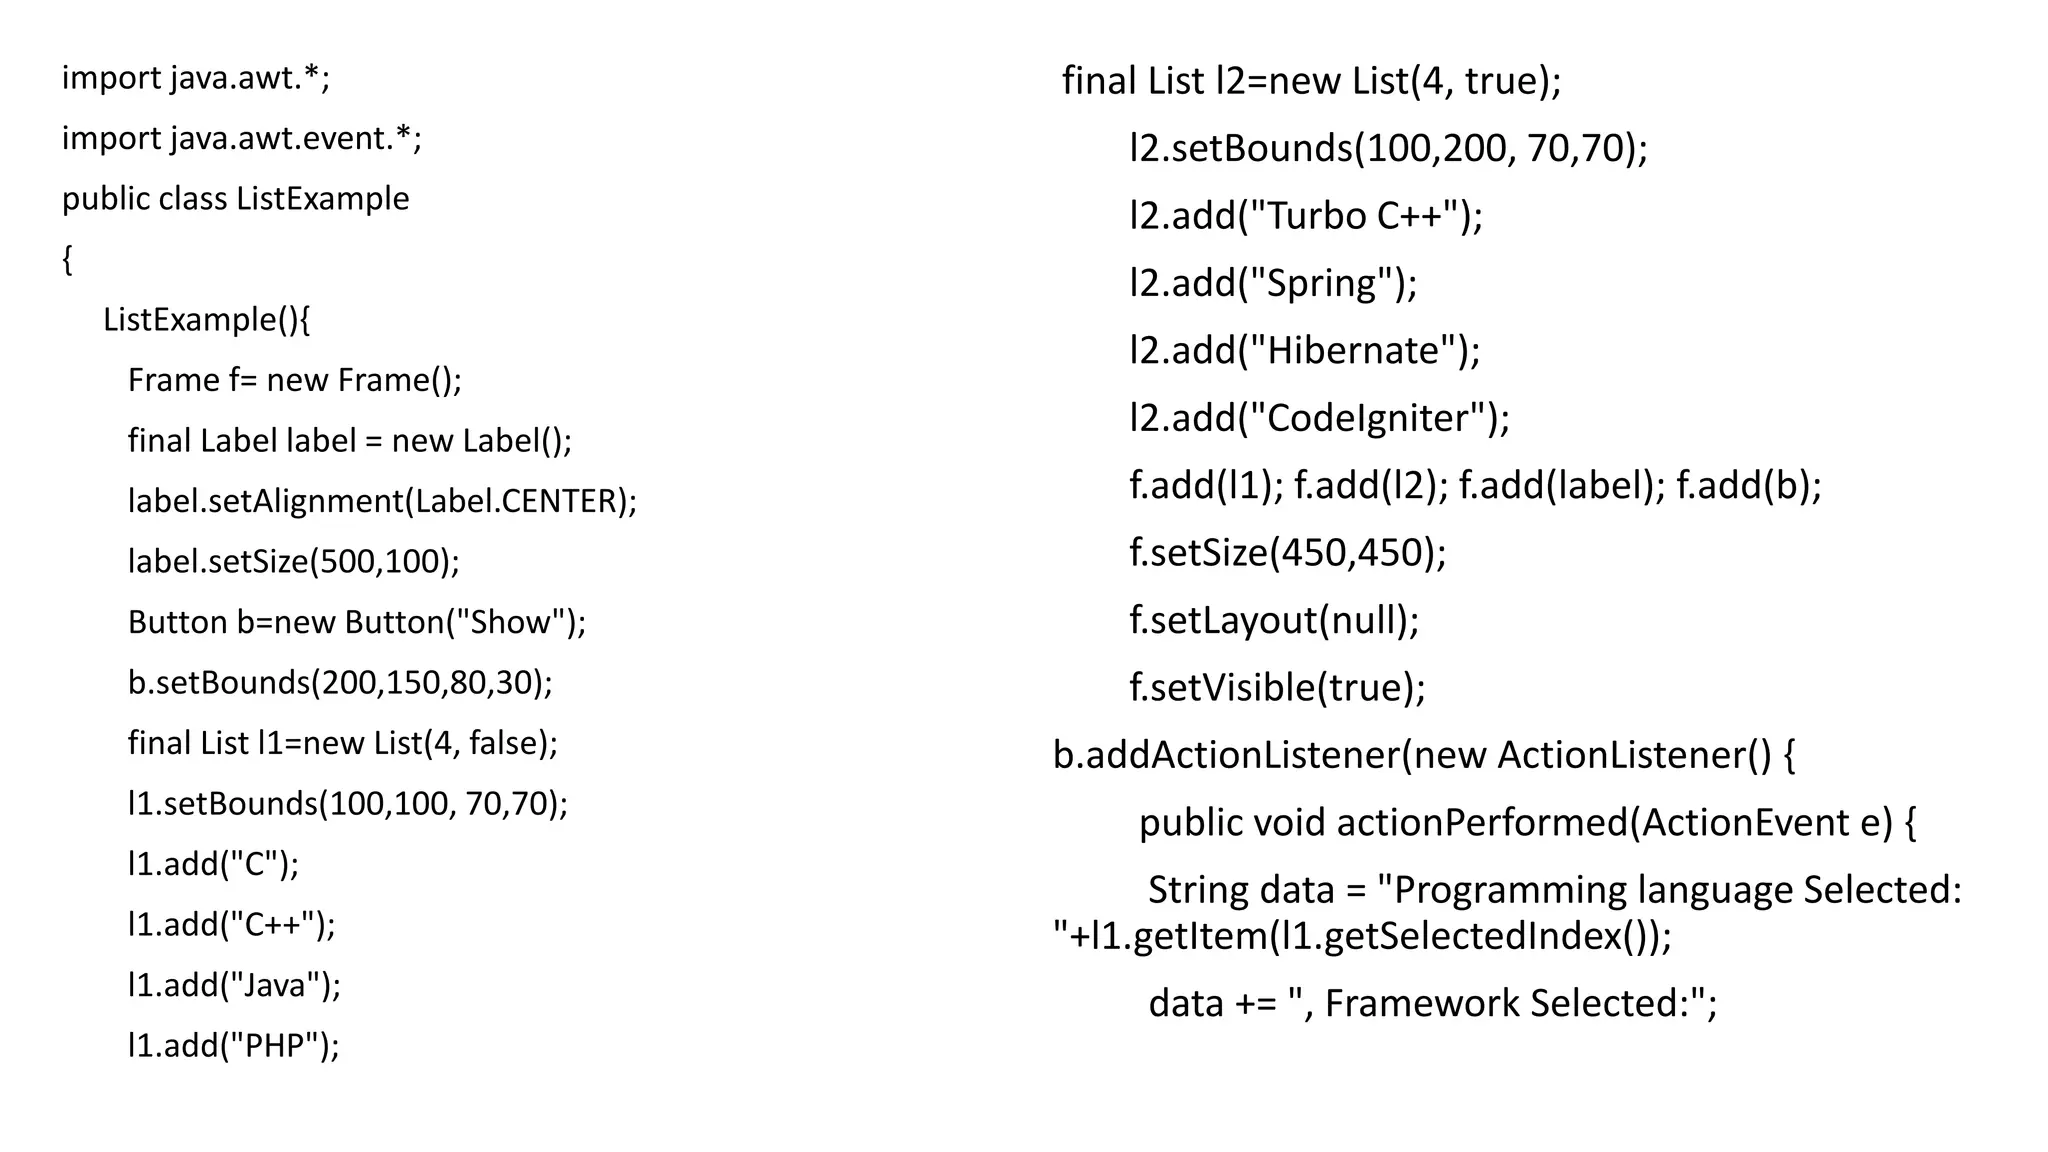
![Java AWT List
• The object of List class
represents a list of text items. By
the help of list, user can choose
either one item or multiple
items. It inherits Component
class.
import java.awt.*;
public class ListExample
{
ListExample(){
Frame f= new Frame();
List l1=new List(5);
l1.setBounds(100,100, 75,75);
l1.add("Item 1");
l1.add("Item 2");
l1.add("Item 3");
l1.add("Item 4");
l1.add("Item 5");
f.add(l1);
f.setSize(400,400);
f.setLayout(null);
f.setVisible(true);
}
public static void main(String args[])
{
new ListExample();
}
}](https://image.slidesharecdn.com/corejava-awt-200525095547/85/java-Abstract-Window-toolkit-23-320.jpg)
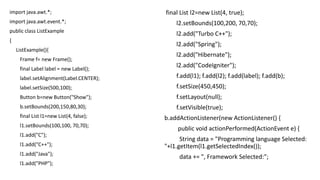
![for(String
frame:l2.getSelectedItems()){
data += frame + " ";
}
label.setText(data);
}
});
}
public static void main(String
args[])
{
new ListExample();
}
}](https://image.slidesharecdn.com/corejava-awt-200525095547/85/java-Abstract-Window-toolkit-25-320.jpg)
![Java AWT Scrollbar
• The object of Scrollbar class is
used to add horizontal and
vertical scrollbar. Scrollbar is a
GUI component allows us to see
invisible number of rows and
columns.
import java.awt.*;
class ScrollbarExample{
ScrollbarExample(){
Frame f= new Frame("Scrollbar Example");
Scrollbar s=new Scrollbar();
s.setBounds(100,100, 50,100);
f.add(s);
f.setSize(400,400);
f.setLayout(null);
f.setVisible(true);
}
public static void main(String args[]){
new ScrollbarExample();
}
}](https://image.slidesharecdn.com/corejava-awt-200525095547/85/java-Abstract-Window-toolkit-26-320.jpg)
![import java.awt.*;
class MenuExample
{
MenuExample(){
Frame f= new Frame("Menu and MenuItem Example");
MenuBar mb=new MenuBar();
Menu menu=new Menu("Menu");
Menu submenu=new Menu("Sub Menu");
MenuItem i1=new MenuItem("Item 1");
MenuItem i2=new MenuItem("Item 2");
MenuItem i3=new MenuItem("Item 3");
MenuItem i4=new MenuItem("Item 4");
MenuItem i5=new MenuItem("Item 5");
menu.add(i1);
menu.add(i2);
menu.add(i3);
submenu.add(i4);
submenu.add(i5);
menu.add(submenu);
mb.add(menu);
f.setMenuBar(mb);
f.setSize(400,400);
f.setLayout(null);
f.setVisible(true);
}
public static void main(String args[])
{
new MenuExample();
}
}](https://image.slidesharecdn.com/corejava-awt-200525095547/85/java-Abstract-Window-toolkit-28-320.jpg)
![radio buttons example
import java.awt.*;
import java.awt.event.*;
public class CheckboxGroupExample
{
CheckboxGroupExample(){
Frame f= new Frame("CheckboxGroup Example");
final Label label = new Label();
label.setAlignment(Label.CENTER);
label.setSize(400,100);
CheckboxGroup cbg = new CheckboxGroup();
Checkbox checkBox1 = new Checkbox("C++", cbg, false);
checkBox1.setBounds(100,100, 50,50);
Checkbox checkBox2 = new Checkbox("Java", cbg, false);
checkBox2.setBounds(100,150, 50,50);
f.add(checkBox1); f.add(checkBox2); f.add(label);
f.setSize(400,400);
f.setLayout(null);
f.setVisible(true);
checkBox1.addItemListener(new ItemListener() {
public void itemStateChanged(ItemEvent e) {
label.setText("C++ checkbox: Checked");
}
});
checkBox2.addItemListener(new ItemListener() {
public void itemStateChanged(ItemEvent e) {
label.setText("Java checkbox: Checked");
}
});
}
public static void main(String args[])
{
new CheckboxGroupExample();
}
}](https://image.slidesharecdn.com/corejava-awt-200525095547/85/java-Abstract-Window-toolkit-29-320.jpg)

![AWT EXAMPLE
• To create simple awt example,
you need a frame.
• By extending Frame class
(inheritance)
import java.awt.*;
class First extends Frame{
First(){
Button b=new Button("click me");
b.setBounds(30,100,80,30);// setting button position
add(b);//adding button into frame
setSize(300,300);//frame size 300 width and 300 height
setLayout(null);//no layout manager
setVisible(true);//now frame will be visible, by default
not visible
}
public static void main(String args[]){
First f=new First();
}}](https://image.slidesharecdn.com/corejava-awt-200525095547/75/java-Abstract-Window-toolkit-7-2048.jpg)
![Java AWT Button
• The button class is used to create a
labeled button that has platform
independent implementation. The
application result in some action
when the button is pushed.
• AWT Button Class declaration
• public class Button extends
Component implements Accessible
Java AWT Button Example
import java.awt.*;
public class ButtonExample {
public static void main(String[] args) {
Frame f=new Frame("Button Example");
Button b=new Button("Click Here");
b.setBounds(50,100,80,30);
f.add(b);
f.setSize(400,400);
f.setLayout(null);
f.setVisible(true);
}
}](https://image.slidesharecdn.com/corejava-awt-200525095547/75/java-Abstract-Window-toolkit-8-2048.jpg)

![EXAMPLE
import java.awt.*;
import java.awt.event.*;
class AEvent extends Frame implements ActionListener{
TextField tf;
AEvent(){
//create components
tf=new TextField();
tf.setBounds(60,50,170,20);
Button b=new Button("click me");
b.setBounds(100,120,80,30);
//register listener
b.addActionListener(this);
//add components and set size, layout and visibility
add(b);
add(tf);
setSize(300,300);
setLayout(null);
setVisible(true);
}
public void actionPerformed(ActionEvent e){
tf.setText("Welcome");
}
public static void main(String args[]){
new AEvent();
}
}](https://image.slidesharecdn.com/corejava-awt-200525095547/75/java-Abstract-Window-toolkit-12-2048.jpg)


![import java.awt.*;
class LabelExample{
public static void main(String args[]){
Frame f= new Frame("Label Example");
Label l1,l2;
l1=new Label("First Label.");
l1.setBounds(50,100, 100,30);
l2=new Label("Second Label.");
l2.setBounds(50,150, 100,30);
f.add(l1); f.add(l2);
f.setSize(400,400);
f.setLayout(null);
f.setVisible(true);
}
}](https://image.slidesharecdn.com/corejava-awt-200525095547/75/java-Abstract-Window-toolkit-15-2048.jpg)
![import java.awt.*;
class TextFieldExample{
public static void main(String args[]){
Frame f= new Frame("TextField Example");
TextField t1,t2;
t1=new TextField("Welcome to Javatpoint.");
t1.setBounds(50,100, 200,30);
t2=new TextField("AWT Tutorial");
t2.setBounds(50,150, 200,30);
f.add(t1); f.add(t2);
f.setSize(400,400);
f.setLayout(null);
f.setVisible(true);
}
}](https://image.slidesharecdn.com/corejava-awt-200525095547/75/java-Abstract-Window-toolkit-17-2048.jpg)
![import java.awt.*;
import java.awt.event.*;
public class TextFieldExample extends Frame implements ActionListener{
TextField tf1,tf2,tf3;
Button b1,b2;
TextFieldExample(){
tf1=new TextField();
tf1.setBounds(50,50,150,20);
tf2=new TextField();
tf2.setBounds(50,100,150,20);
tf3=new TextField();
tf3.setBounds(50,150,150,20);
tf3.setEditable(false);
b1=new Button("+");
b1.setBounds(50,200,50,50);
b2=new Button("-");
b2.setBounds(120,200,50,50);
b1.addActionListener(this);
b2.addActionListener(this);
add(tf1);add(tf2);add(tf3);add(b1);add(b2);
setSize(300,300);
setLayout(null);
setVisible(true);
}
public void actionPerformed(ActionEvent e) {
String s1=tf1.getText();
String s2=tf2.getText();
int a=Integer.parseInt(s1);
int b=Integer.parseInt(s2);
int c=0;
if(e.getSource()==b1){
c=a+b;
}else if(e.getSource()==b2){
c=a-b;
}
String result=String.valueOf(c);
tf3.setText(result);
}
public static void main(String[] args) {
new TextFieldExample();
}
}](https://image.slidesharecdn.com/corejava-awt-200525095547/75/java-Abstract-Window-toolkit-18-2048.jpg)
![Java AWT TextArea
• The object of a TextArea class is
a multi line region that displays
text. It allows the editing of
multiple line text. It inherits
TextComponent class.
import java.awt.*;
public class TextAreaExample
{
TextAreaExample(){
Frame f= new Frame();
TextArea area=new TextArea("Welcome to javatpoint");
area.setBounds(10,30, 300,300);
f.add(area);
f.setSize(400,400);
f.setLayout(null);
f.setVisible(true);
}
public static void main(String args[])
{
new TextAreaExample();
}
}](https://image.slidesharecdn.com/corejava-awt-200525095547/75/java-Abstract-Window-toolkit-19-2048.jpg)
![import java.awt.*;
import java.awt.event.*;
public class TextAreaExample extends Frame implements
ActionListener{
Label l1,l2;
TextArea area;
Button b;
TextAreaExample(){
l1=new Label();
l1.setBounds(50,50,100,30);
l2=new Label();
l2.setBounds(160,50,100,30);
area=new TextArea();
area.setBounds(20,100,300,300);
b=new Button("Count Words");
b.setBounds(100,400,100,30);
b.addActionListener(this);
add(l1);add(l2);add(area);add(b);
setSize(400,450);
setLayout(null);
setVisible(true);
}
public void actionPerformed(ActionEvent e){
String text=area.getText();
String words[]=text.split("s");
l1.setText("Words: "+words.length);
l2.setText("Characters: "+text.length());
}
public static void main(String[] args) {
new TextAreaExample();
}
}](https://image.slidesharecdn.com/corejava-awt-200525095547/75/java-Abstract-Window-toolkit-20-2048.jpg)
![Java AWT Checkbox
• The Checkbox class is used to
create a checkbox. It is used to
turn an option on (true) or off
(false). Clicking on a Checkbox
changes its state from "on" to
"off" or from "off" to "on"
import java.awt.*;
public class CheckboxExample
{
CheckboxExample(){
Frame f= new Frame("Checkbox Example");
Checkbox checkbox1 = new Checkbox("C++");
checkbox1.setBounds(100,100, 50,50);
Checkbox checkbox2 = new Checkbox("Java", true);
checkbox2.setBounds(100,150, 50,50);
f.add(checkbox1);
f.add(checkbox2);
f.setSize(400,400);
f.setLayout(null);
f.setVisible(true);
}
public static void main(String args[])
{
new CheckboxExample();
}
}](https://image.slidesharecdn.com/corejava-awt-200525095547/75/java-Abstract-Window-toolkit-21-2048.jpg)
![import java.awt.*;
import java.awt.event.*;
public class CheckboxExample
{
CheckboxExample(){
Frame f= new Frame("CheckBox Example");
final Label label = new Label();
label.setAlignment(Label.CENTER);
label.setSize(400,100);
Checkbox checkbox1 = new Checkbox("C++");
checkbox1.setBounds(100,100, 50,50);
Checkbox checkbox2 = new Checkbox("Java");
checkbox2.setBounds(100,150, 50,50);
f.add(checkbox1); f.add(checkbox2); f.add(label);
checkbox1.addItemListener(new ItemListener() {
public void itemStateChanged(ItemEvent e) {
label.setText("C++ Checkbox: "
+ (e.getStateChange()==1?"checked":"unchecked"));
}
});
checkbox2.addItemListener(new ItemListener() {
public void itemStateChanged(ItemEvent e) {
label.setText("Java Checkbox: "
+ (e.getStateChange()==1?"checked":"unchecked"));
}
});
f.setSize(400,400);
f.setLayout(null);
f.setVisible(true);
}
public static void main(String args[])
{
new CheckboxExample();
}
}](https://image.slidesharecdn.com/corejava-awt-200525095547/75/java-Abstract-Window-toolkit-22-2048.jpg)
![Java AWT List
• The object of List class
represents a list of text items. By
the help of list, user can choose
either one item or multiple
items. It inherits Component
class.
import java.awt.*;
public class ListExample
{
ListExample(){
Frame f= new Frame();
List l1=new List(5);
l1.setBounds(100,100, 75,75);
l1.add("Item 1");
l1.add("Item 2");
l1.add("Item 3");
l1.add("Item 4");
l1.add("Item 5");
f.add(l1);
f.setSize(400,400);
f.setLayout(null);
f.setVisible(true);
}
public static void main(String args[])
{
new ListExample();
}
}](https://image.slidesharecdn.com/corejava-awt-200525095547/75/java-Abstract-Window-toolkit-23-2048.jpg)
![for(String
frame:l2.getSelectedItems()){
data += frame + " ";
}
label.setText(data);
}
});
}
public static void main(String
args[])
{
new ListExample();
}
}](https://image.slidesharecdn.com/corejava-awt-200525095547/75/java-Abstract-Window-toolkit-25-2048.jpg)
![Java AWT Scrollbar
• The object of Scrollbar class is
used to add horizontal and
vertical scrollbar. Scrollbar is a
GUI component allows us to see
invisible number of rows and
columns.
import java.awt.*;
class ScrollbarExample{
ScrollbarExample(){
Frame f= new Frame("Scrollbar Example");
Scrollbar s=new Scrollbar();
s.setBounds(100,100, 50,100);
f.add(s);
f.setSize(400,400);
f.setLayout(null);
f.setVisible(true);
}
public static void main(String args[]){
new ScrollbarExample();
}
}](https://image.slidesharecdn.com/corejava-awt-200525095547/75/java-Abstract-Window-toolkit-26-2048.jpg)

![import java.awt.*;
class MenuExample
{
MenuExample(){
Frame f= new Frame("Menu and MenuItem Example");
MenuBar mb=new MenuBar();
Menu menu=new Menu("Menu");
Menu submenu=new Menu("Sub Menu");
MenuItem i1=new MenuItem("Item 1");
MenuItem i2=new MenuItem("Item 2");
MenuItem i3=new MenuItem("Item 3");
MenuItem i4=new MenuItem("Item 4");
MenuItem i5=new MenuItem("Item 5");
menu.add(i1);
menu.add(i2);
menu.add(i3);
submenu.add(i4);
submenu.add(i5);
menu.add(submenu);
mb.add(menu);
f.setMenuBar(mb);
f.setSize(400,400);
f.setLayout(null);
f.setVisible(true);
}
public static void main(String args[])
{
new MenuExample();
}
}](https://image.slidesharecdn.com/corejava-awt-200525095547/75/java-Abstract-Window-toolkit-28-2048.jpg)
![radio buttons example
import java.awt.*;
import java.awt.event.*;
public class CheckboxGroupExample
{
CheckboxGroupExample(){
Frame f= new Frame("CheckboxGroup Example");
final Label label = new Label();
label.setAlignment(Label.CENTER);
label.setSize(400,100);
CheckboxGroup cbg = new CheckboxGroup();
Checkbox checkBox1 = new Checkbox("C++", cbg, false);
checkBox1.setBounds(100,100, 50,50);
Checkbox checkBox2 = new Checkbox("Java", cbg, false);
checkBox2.setBounds(100,150, 50,50);
f.add(checkBox1); f.add(checkBox2); f.add(label);
f.setSize(400,400);
f.setLayout(null);
f.setVisible(true);
checkBox1.addItemListener(new ItemListener() {
public void itemStateChanged(ItemEvent e) {
label.setText("C++ checkbox: Checked");
}
});
checkBox2.addItemListener(new ItemListener() {
public void itemStateChanged(ItemEvent e) {
label.setText("Java checkbox: Checked");
}
});
}
public static void main(String args[])
{
new CheckboxGroupExample();
}
}](https://image.slidesharecdn.com/corejava-awt-200525095547/75/java-Abstract-Window-toolkit-29-2048.jpg)


