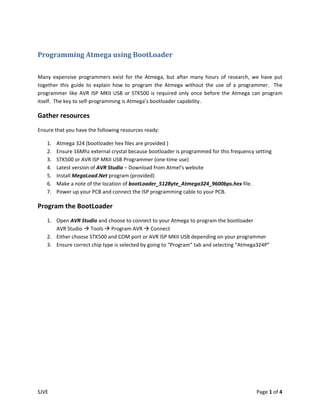
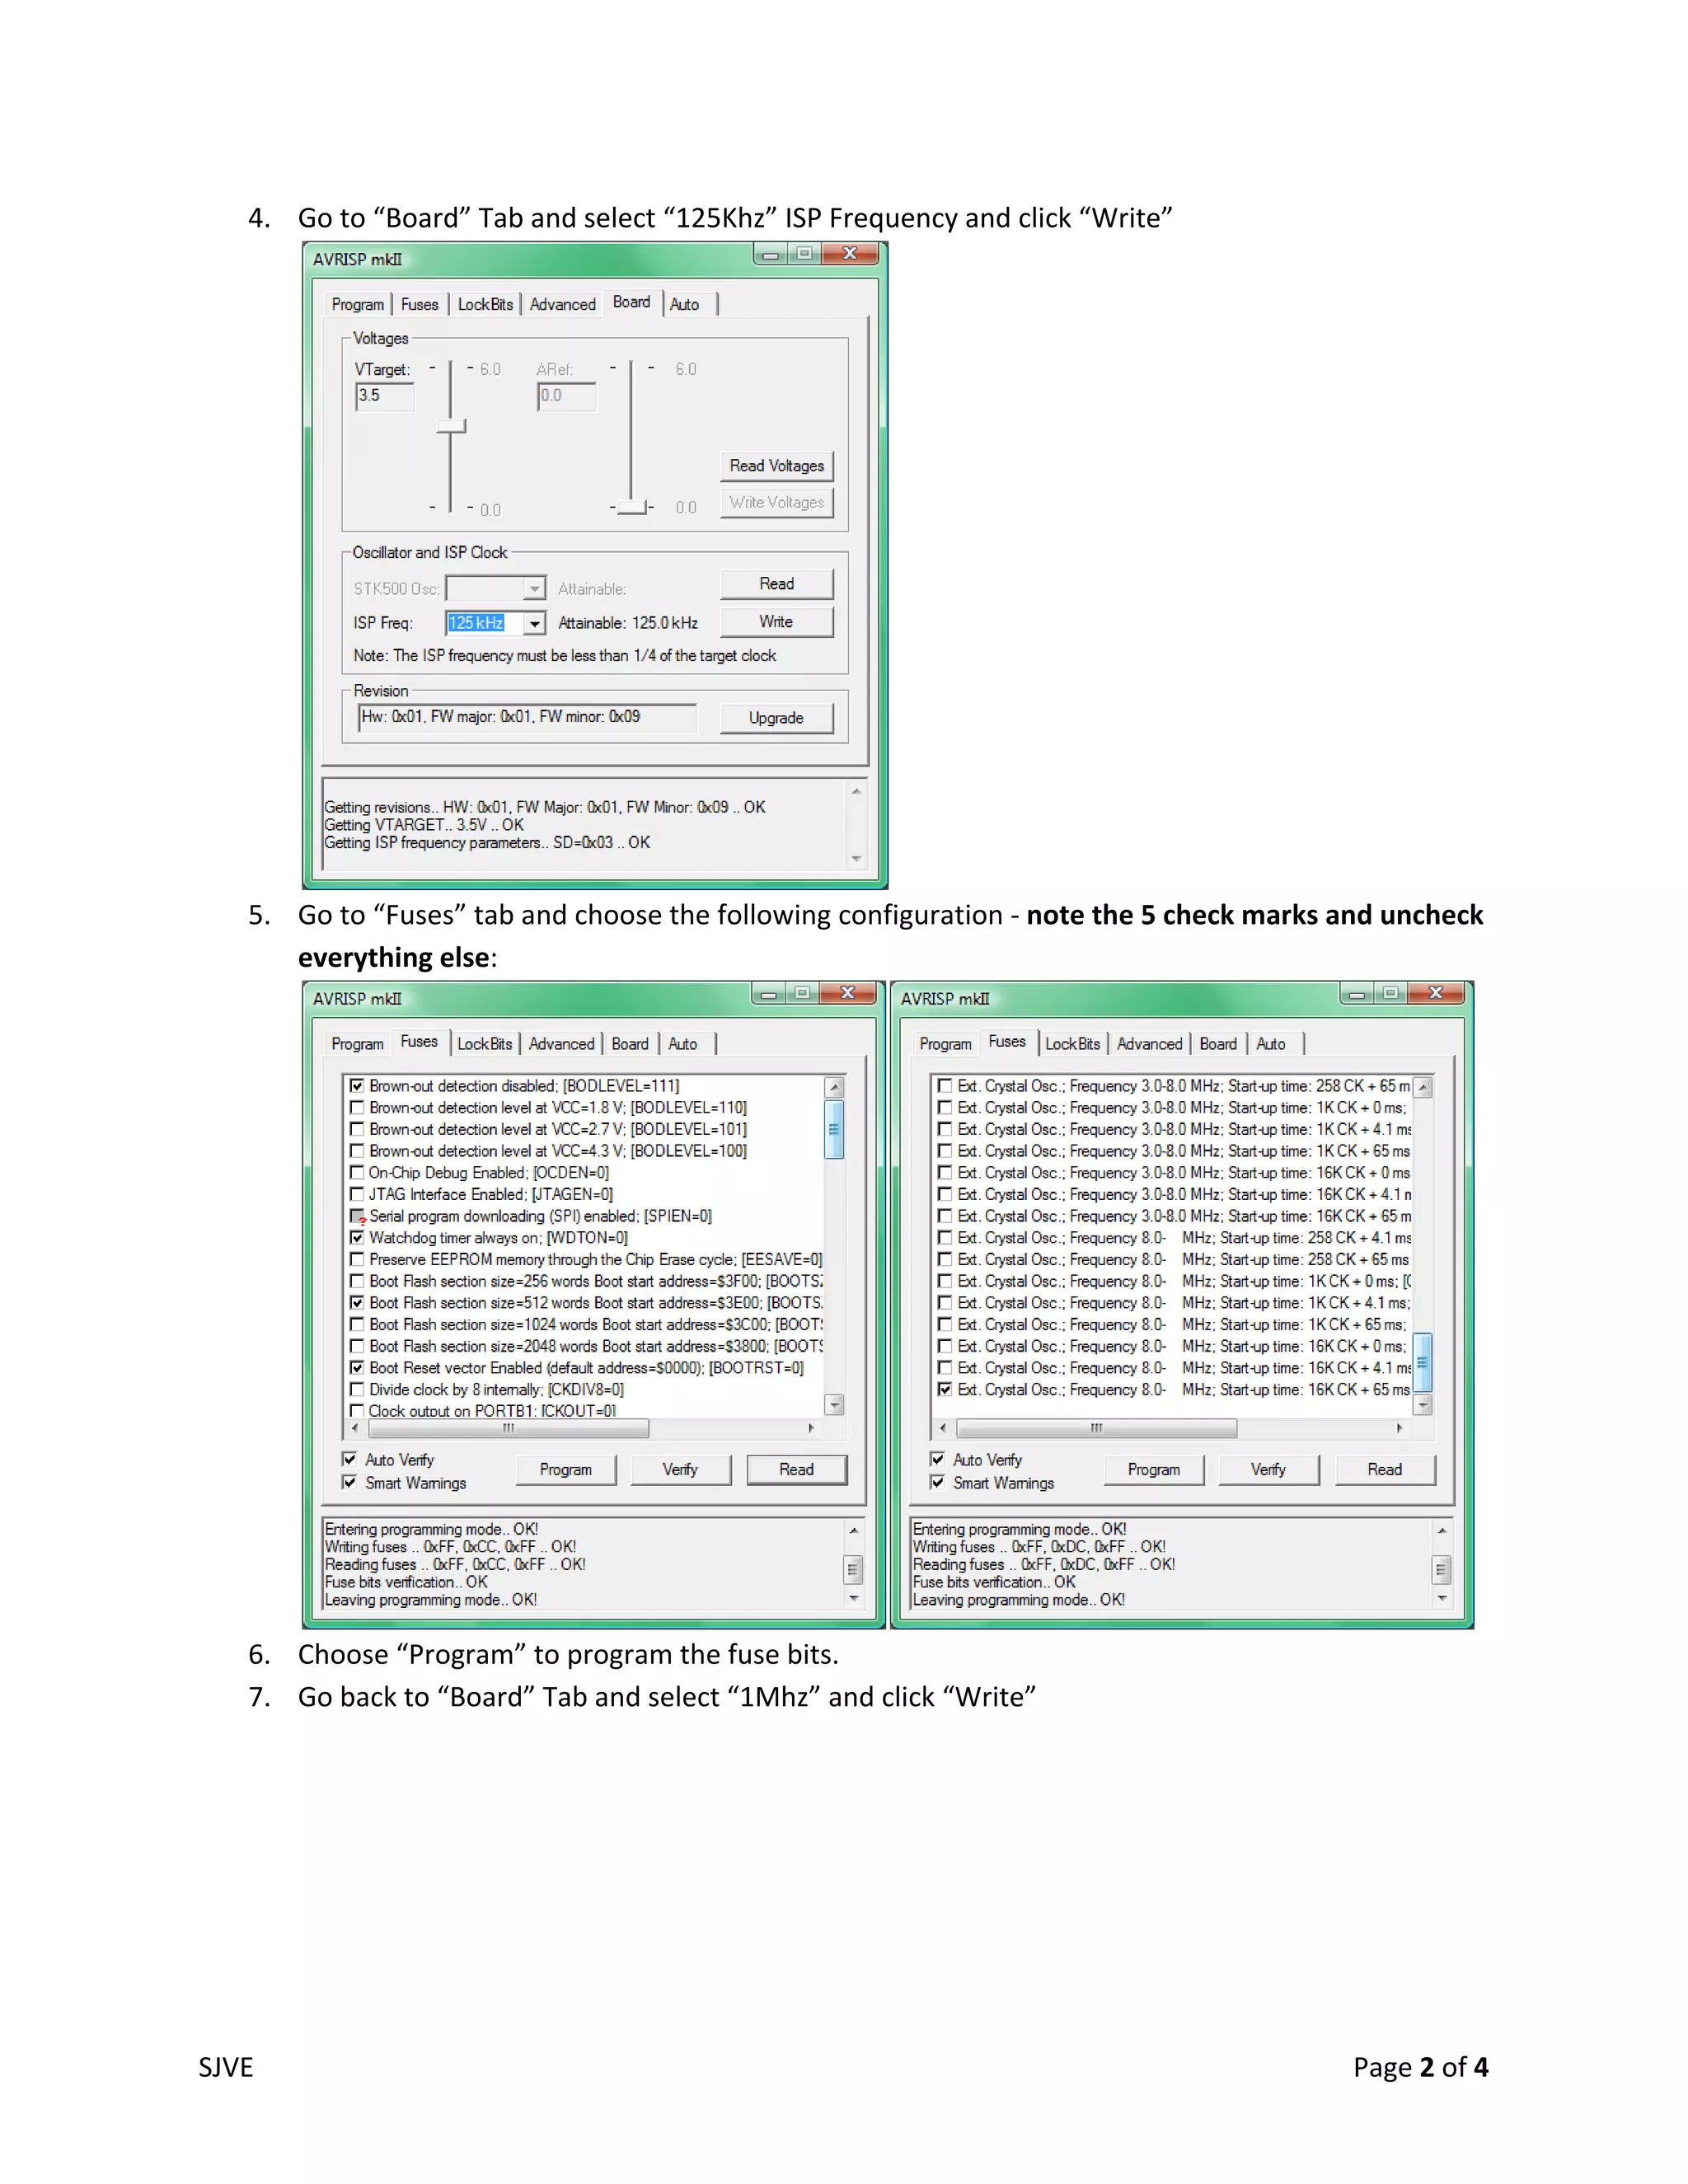
KEMBAR78
Programming atmega using boot loader | PDF
Programming Atmega using BootLoader 
 

Many  expensive  programmers  exist  for  the  Atmega,  but  after  many  hours  of  research,  we  have  put 
together  this  guide  to  explain  how  to  program  the  Atmega  without  the  use  of  a  programmer.    The 
programmer  like  AVR  ISP  MKII  USB  or  STK500  is  required  only  once  before  the  Atmega  can  program 
itself.  The key to self‐programming is Atmega’s bootloader capability. 

Gather resources 
Ensure that you have the following resources ready: 

    1.   Atmega 324 (bootloader hex files are provided ) 
    2.   Ensure 16Mhz external crystal because bootloader is programmed for this frequency setting 
    3.   STK500 or AVR ISP MKII USB Programmer (one‐time use) 
    4.   Latest version of AVR Studio – Download from Atmel’s website 
    5.   Install MegaLoad.Net program (provided) 
    6.   Make a note of the location of bootLoader_512Byte_Atmega324_9600bps.hex file. 
    7.   Power up your PCB and connect the ISP programming cable to your PCB. 

Program the BootLoader  
    1. Open AVR Studio and choose to connect to your Atmega to program the bootloader 
       AVR Studio   Tools   Program AVR   Connect 
    2. Either choose STK500 and COM port or AVR ISP MKII USB depending on your programmer 
    3. Ensure correct chip type is selected by going to “Program” tab and selecting “Atmega324P” 


SJVE                                                                                               Page 1 of 4 
4. Go to “Board” Tab and select “125Khz” ISP Frequency and click “Write” 


   5. Go to “Fuses” tab and choose the following configuration ‐ note the 5 check marks and uncheck 
      everything else: 


   6. Choose “Program” to program the fuse bits. 
   7. Go back to “Board” Tab and select “1Mhz” and click “Write” 


SJVE                                                                                     Page 2 of 4 
8. Go to the “Program” Tab and click on the “…” button next to “Input HEX File” under FLASH 
       section and browse to bootLoader_Atmega324_9600bps.hex  file and hit Program button: 


    9. You have successfully loaded the bootloader software. 


SJVE                                                                                      Page 3 of 4 
Program the chip using the self­programming bootloader software 
After loading the bootloader program, the actual programming hex file can be loaded easily using the 
MegaLoad.Net program. 

    1. Compile your project in CodeVision or similar compiler. 
    2. Locate your program’s HEX file in your CodeVision project directory 
    3. Connect your serial cable to microcontroller’s serial input which is PD0 and PD1.  Reference your 
       PCB manual for details on how to setup serial input and output. 
    4. Turn on your microcontroller. 
    5. Open MegaLoad.Net and click on “OPEN” for FLASH file and browse to the hex file from step 2. 
    6. Click on “Open Port” button until Port opens up. 
    7. Your Atmega should have programmed automatically after the COM PORT opened up, if not, 
       then hit the “reset” switch on the PCB. 
    8. To load new programming file, compile your project in CodeVision and hit Atmega’s reset switch 
       and MegaLoad.Net will automatically install the new file.  If you do not want to program the 
       chip, simply close MegaLoad.Net to avoid unintentional programming. 

 
Tips for advanced users 
    1. You  could  use  “bootLoader_Atmega324_38400bps.hex”  file  when  you  programmed  the  boot 
       loader.  This way, MegaLoad.net would program 4 times faster when you open the COM PORT 
       at  38400bps.    The  only  slight  problem  is  that  if  you  are  using  Xbee  wireless  transceivers  to 
       program, you would need to change the Xbee’s transmission rate to 38400bps as well.  You can 
       use  XCTU  to  easily  do  it.    In  theory,  wireless  transmission  errors  occur  more  at  higher  bps  so 
       consider it before you use 38400, although Xbee’s tend to be very reliable. 

References 
http://www.microsyl.com/ 
http://www.imagecraft.com/ 


SJVE                                                                                                     Page 4 of 4 

Programming atmega using boot loader

  • 1.
    Programming Atmega using BootLoader    Many  expensive  programmers exist  for  the  Atmega,  but  after  many  hours  of  research,  we  have  put  together  this  guide  to  explain  how  to  program  the  Atmega  without  the  use  of  a  programmer.    The  programmer  like  AVR  ISP  MKII  USB  or  STK500  is  required  only  once  before  the  Atmega  can  program  itself.  The key to self‐programming is Atmega’s bootloader capability.  Gather resources  Ensure that you have the following resources ready:  1. Atmega 324 (bootloader hex files are provided )  2. Ensure 16Mhz external crystal because bootloader is programmed for this frequency setting  3. STK500 or AVR ISP MKII USB Programmer (one‐time use)  4. Latest version of AVR Studio – Download from Atmel’s website  5. Install MegaLoad.Net program (provided)  6. Make a note of the location of bootLoader_512Byte_Atmega324_9600bps.hex file.  7. Power up your PCB and connect the ISP programming cable to your PCB.  Program the BootLoader   1. Open AVR Studio and choose to connect to your Atmega to program the bootloader  AVR Studio   Tools   Program AVR   Connect  2. Either choose STK500 and COM port or AVR ISP MKII USB depending on your programmer  3. Ensure correct chip type is selected by going to “Program” tab and selecting “Atmega324P”  SJVE    Page 1 of 4 
  • 2.
    4. Go to “Board” Tab and select “125Khz” ISP Frequency and click “Write”    5. Go to “Fuses” tab and choose the following configuration ‐ note the 5 check marks and uncheck  everything else:    6. Choose “Program” to program the fuse bits.  7. Go back to “Board” Tab and select “1Mhz” and click “Write”  SJVE    Page 2 of 4 
  • 3.
    8. Go to the “Program” Tab and click on the “…” button next to “Input HEX File” under FLASH  section and browse to bootLoader_Atmega324_9600bps.hex  file and hit Program button:    9. You have successfully loaded the bootloader software.      SJVE    Page 3 of 4 
  • 4.
    Program the chip using the self­programming bootloader software  After loading the bootloader program, the actual programming hex file can be loaded easily using the  MegaLoad.Net program.  1. Compile your project in CodeVision or similar compiler.  2. Locate your program’s HEX file in your CodeVision project directory  3. Connect your serial cable to microcontroller’s serial input which is PD0 and PD1.  Reference your  PCB manual for details on how to setup serial input and output.  4. Turn on your microcontroller.  5. Open MegaLoad.Net and click on “OPEN” for FLASH file and browse to the hex file from step 2.  6. Click on “Open Port” button until Port opens up.  7. Your Atmega should have programmed automatically after the COM PORT opened up, if not,  then hit the “reset” switch on the PCB.  8. To load new programming file, compile your project in CodeVision and hit Atmega’s reset switch  and MegaLoad.Net will automatically install the new file.  If you do not want to program the  chip, simply close MegaLoad.Net to avoid unintentional programming.    Tips for advanced users  1. You  could  use  “bootLoader_Atmega324_38400bps.hex”  file  when  you  programmed  the  boot  loader.  This way, MegaLoad.net would program 4 times faster when you open the COM PORT  at  38400bps.    The  only  slight  problem  is  that  if  you  are  using  Xbee  wireless  transceivers  to  program, you would need to change the Xbee’s transmission rate to 38400bps as well.  You can  use  XCTU  to  easily  do  it.    In  theory,  wireless  transmission  errors  occur  more  at  higher  bps  so  consider it before you use 38400, although Xbee’s tend to be very reliable.  References  http://www.microsyl.com/  http://www.imagecraft.com/    SJVE    Page 4 of 4