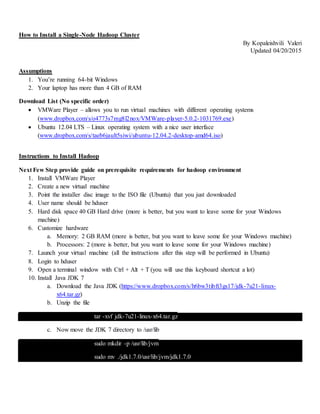
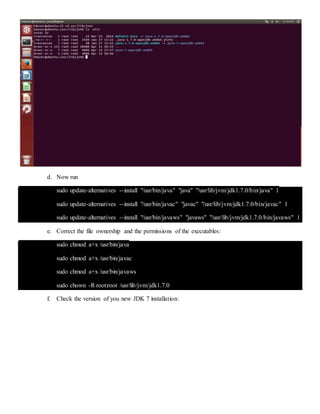
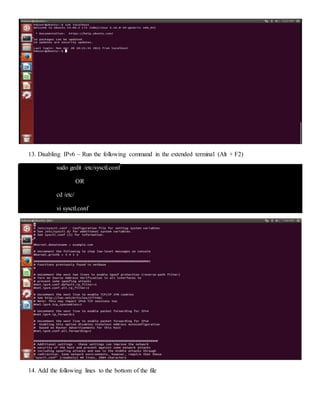
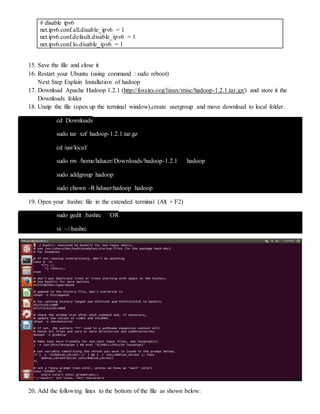
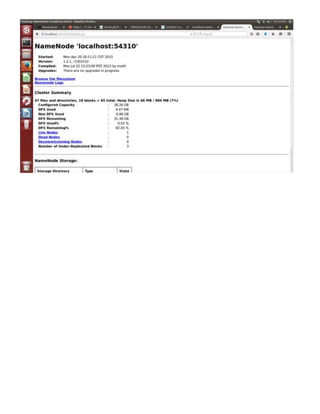
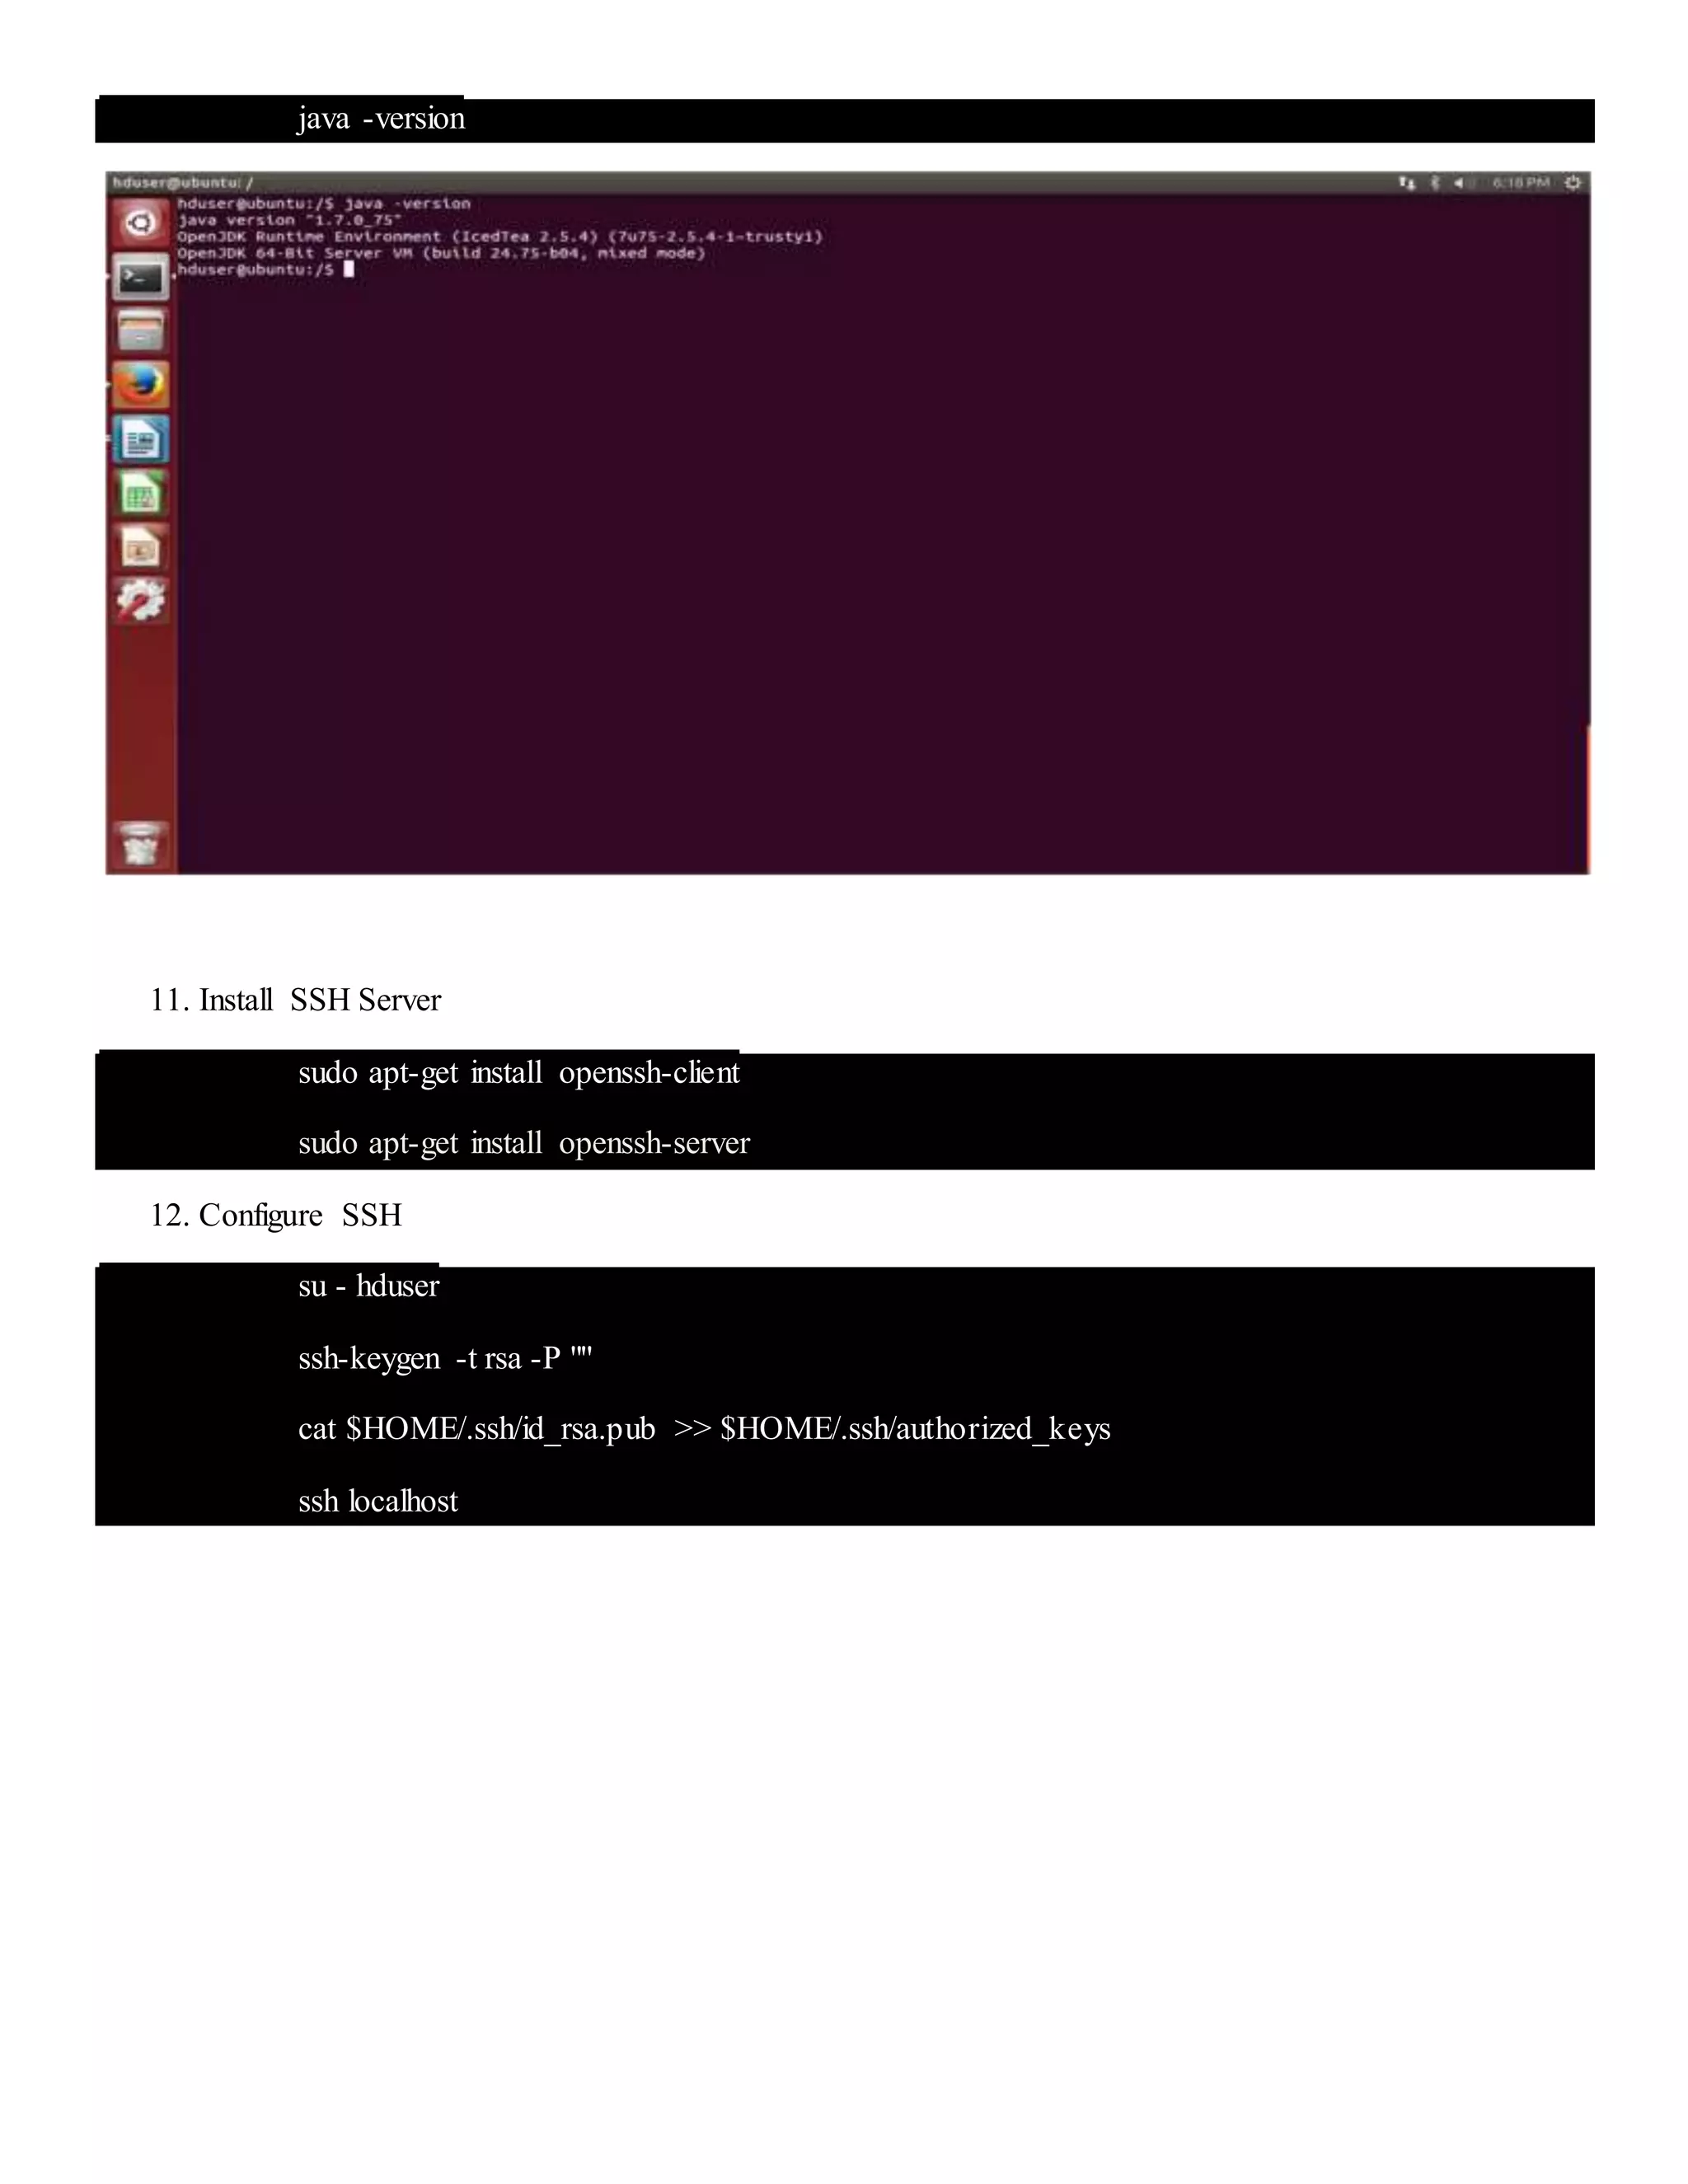
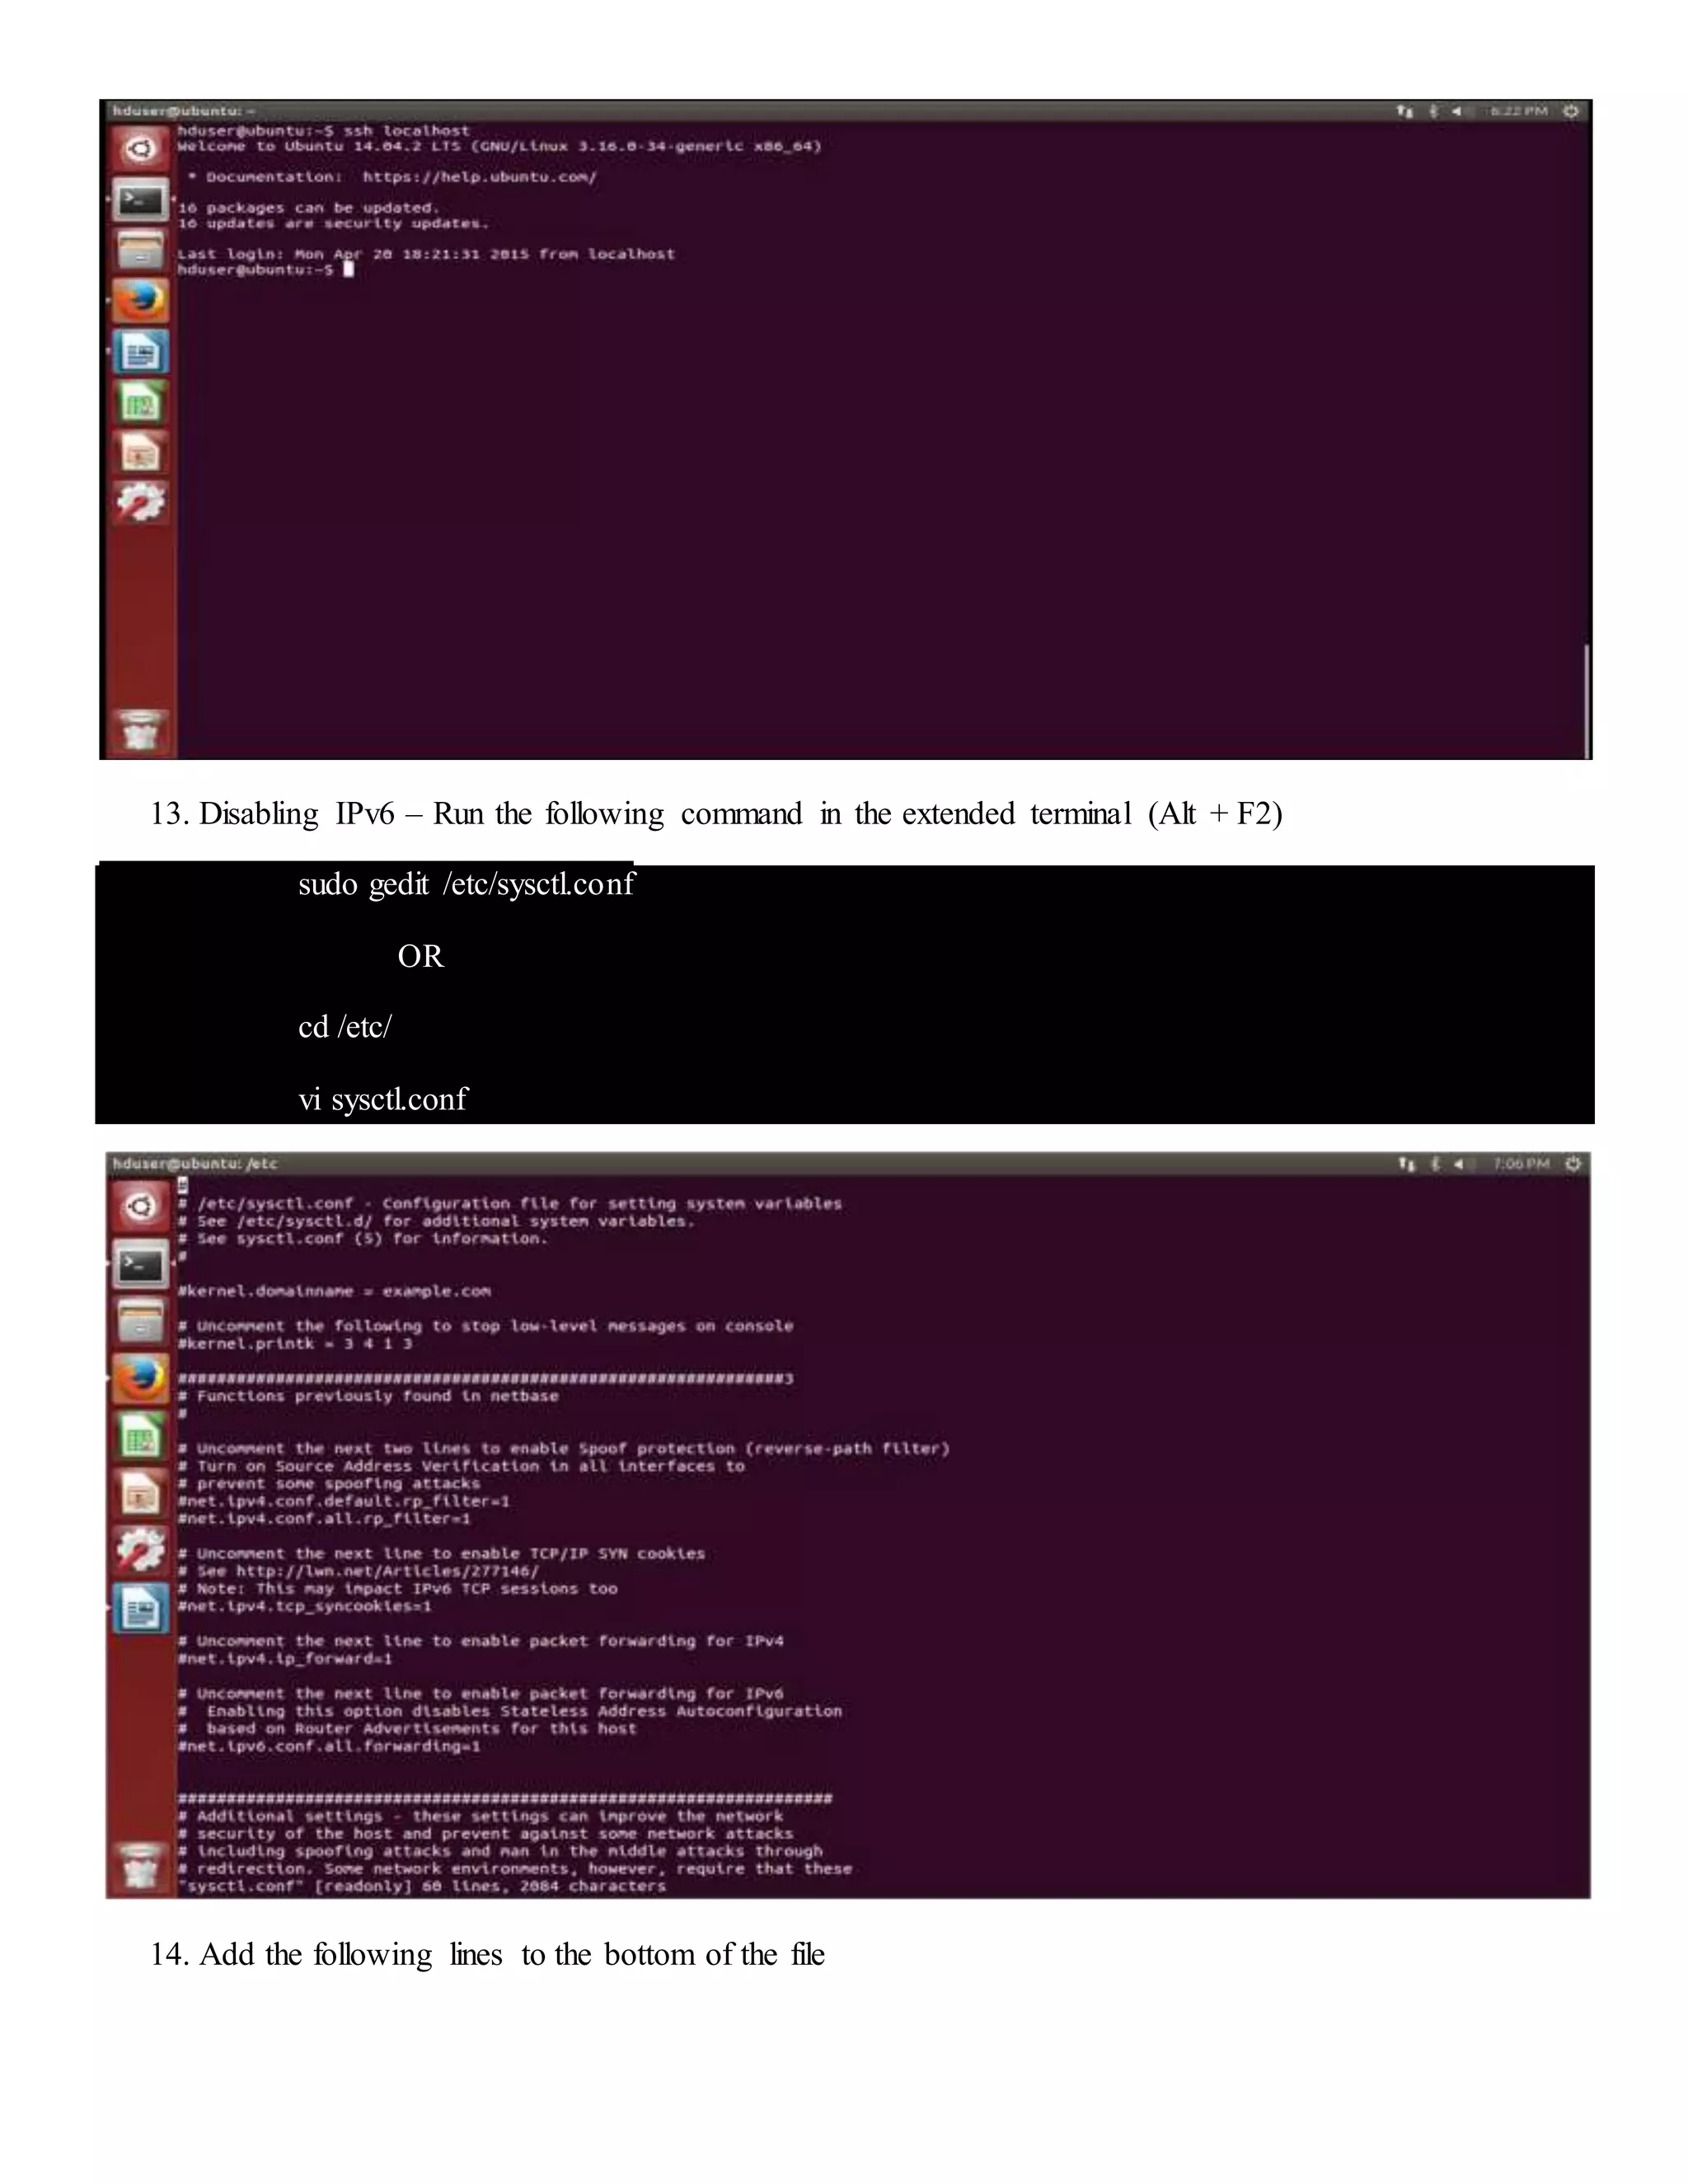
KEMBAR78
Run wordcount job (hadoop) | DOCX
How to Install a Single-Node Hadoop Cluster
By Kopaleishvili Valeri
Updated 04/20/2015
Assumptions
1. You’re running 64-bit Windows
2. Your laptop has more than 4 GB of RAM
Download List (No specific order)
 VMWare Player – allows you to run virtual machines with different operating systems
(www.dropbox.com/s/o4773s7mg8l2nox/VMWare-player-5.0.2-1031769.exe)
 Ubuntu 12.04 LTS – Linux operating system with a nice user interface
(www.dropbox.com/s/taeb6jault5siwi/ubuntu-12.04.2-desktop-amd64.iso)
Instructions to Install Hadoop
Next Few Step provide guide on prerequisite requirements for hadoop environment
1. Install VMWare Player
2. Create a new virtual machine
3. Point the installer disc image to the ISO file (Ubuntu) that you just downloaded
4. User name should be hduser
5. Hard disk space 40 GB Hard drive (more is better, but you want to leave some for your Windows
machine)
6. Customize hardware
a. Memory: 2 GB RAM (more is better, but you want to leave some for your Windows machine)
b. Processors: 2 (more is better, but you want to leave some for your Windows machine)
7. Launch your virtual machine (all the instructions after this step will be performed in Ubuntu)
8. Login to hduser
9. Open a terminal window with Ctrl + Alt + T (you will use this keyboard shortcut a lot)
10. Install Java JDK 7
a. Download the Java JDK (https://www.dropbox.com/s/h6bw3tibft3gs17/jdk-7u21-linux-
x64.tar.gz)
b. Unzip the file
tar -xvf jdk-7u21-linux-x64.tar.gz
c. Now move the JDK 7 directory to /usr/lib
sudo mkdir -p /usr/lib/jvm
sudo mv ./jdk1.7.0/usr/lib/jvm/jdk1.7.0
d. Now run
sudo update-alternatives --install "/usr/bin/java" "java" "/usr/lib/jvm/jdk1.7.0/bin/java" 1
sudo update-alternatives --install "/usr/bin/javac" "javac" "/usr/lib/jvm/jdk1.7.0/bin/javac" 1
sudo update-alternatives --install "/usr/bin/javaws" "javaws" "/usr/lib/jvm/jdk1.7.0/bin/javaws" 1
e. Correct the file ownership and the permissions of the executables:
sudo chmod a+x /usr/bin/java
sudo chmod a+x /usr/bin/javac
sudo chmod a+x /usr/bin/javaws
sudo chown -R root:root /usr/lib/jvm/jdk1.7.0
f. Check the version of you new JDK 7 installation:
java -version
11. Install SSH Server
sudo apt-get install openssh-client
sudo apt-get install openssh-server
12. Configure SSH
su - hduser
ssh-keygen -t rsa -P ""
cat $HOME/.ssh/id_rsa.pub >> $HOME/.ssh/authorized_keys
ssh localhost
13. Disabling IPv6 – Run the following command in the extended terminal (Alt + F2)
sudo gedit /etc/sysctl.conf
OR
cd /etc/
vi sysctl.conf
14. Add the following lines to the bottom of the file
# disable ipv6
net.ipv6.conf.all.disable_ipv6 = 1
net.ipv6.conf.default.disable_ipv6 = 1
net.ipv6.conf.lo.disable_ipv6 = 1
15. Save the file and close it
16. Restart your Ubuntu (using command : sudo reboot)
Next Step Explain Installation of hadoop
17. Download Apache Hadoop 1.2.1 (http://fossies.org/linux/misc/hadoop-1.2.1.tar.gz/) and store it the
Downloads folder
18. Unzip the file (open up the terminal window),create usergroup and move download to local folder.
cd Downloads
sudo tar xzf hadoop-1.2.1.tar.gz
cd /usr/local/
sudo mv /home/hduser/Downloads/hadoop-1.2.1 hadoop
sudo addgroup hadoop
sudo chown -R hduser:hadoop hadoop
19. Open your .bashrc file in the extended terminal (Alt + F2)
sudo gedit .bashrc OR
vi ~/.bashrc
20. Add the following lines to the bottom of the file as shown below:
# Set Hadoop-related environment variables
export HADOOP_HOME=/usr/local/hadoop/hadoop-1.2.1
export PIG_HOME=/usr/local/pig
export PIG_CLASSPATH=/usr/local/hadoop/hadoop-1.2.1/conf
# Set JAVA_HOME (we will also configure JAVA_HOME directly for Hadoop later on)
export JAVA_HOME=/usr/lib/jvm/java-7-openjdk-amd64
# Some convenient aliases and functions for running Hadoop-related commands
unalias fs &> /dev/null
alias fs="hadoop fs"
unalias hls &> /dev/null
alias hls="fs -ls"
# If you have LZO compression enabled in your Hadoop cluster and
# compress job outputs with LZOP (not covered in this tutorial):
# Conveniently inspect an LZOP compressed file from the command
# line; run via:
#
# $ lzohead /hdfs/path/to/lzop/compressed/file.lzo
#
# Requires installed 'lzop' command.
#
lzohead () {
hadoop fs -cat $1 | lzop -dc | head -1000 | less
}
# Add Hadoop bin/ directory to PATH
export PATH=$PATH:$HADOOP_HOME/bin
export PATH=$PATH:$PIG_HOME/bin
21. Save the .bashrc file and close it
22. Run
sudo gedit usr/local/hadoop/hadoop-1.2.1/conf/hadoop-env.sh
OR
vi usr/local/hadoop/hadoop-1.2.1/conf/hadoop-env.sh
23. Add the following lines
# The java implementation to use. Required.
export JAVA_HOME=/usr/lib/jvm/java-7-openjdk-amd64
24. Save and close file
25. In the terminal window, create a directory and set the required ownerships and permissions
sudo mkdir -p /app/hadoop/tmp
sudo chown hduser:hadoop /app/hadoop/tmp
sudo chmod 750 /app/hadoop/tmp
26. Run
sudo gedit /usr/local/hadoop/hadoop-1.2.1/conf/core-site.xml
OR
vi /usr/local/hadoop/hadoop-1.2.1/conf/core-site.xml
27. Add the following between the <configuration> … </configuration> tags
<property>
<name>hadoop.tmp.dir</name>
<value>/app/hadoop/tmp</value>
<description>A base for other temporary directories.</description>
</property>
<property>
<name>fs.default.name</name>
<value>hdfs://localhost:54310</value>
<description>The name of the default file system. A URI whose
scheme and authority determine the FileSystem implementation. The
uri's scheme determines the config property (fs.SCHEME.impl) naming
the FileSystem implementation class. The uri's authority is used to
determine the host, port, etc. for a filesystem.</description>
</property>
As shown below;
28. Save and close file
29. Run
sudo gedit /usr/local/hadoop/hadoop-1.2.1/conf/mapred-site.xml
OR
vi /usr/local/hadoop/hadoop-1.2.1/conf/mapred-site.xml
30. Add the following between the <configuration> … </configuration> tags
<property>
<name>mapred.job.tracker</name>
<value>localhost:54311</value>
<description>The host and port that the MapReduce job tracker runs
at. If "local", then jobs are run in-process as a single map
and reduce task.
</description>
</property>
31. Save and close file
32. Run
sudo gedit /usr/local/hadoop/hadoop-1.2.1/conf/hdfs-site.xml
OR
vi /usr/local/hadoop/hadoop-1.2.1/conf/hdfs-site.xml
33. Add the following between the <configuration> … </configuration> tags
<property>
<name>dfs.replication</name>
<value>1</value>
<description>Default block replication.
The actual number of replications can be specified when the file is created.
The default is used if replication is not specified in create time.
</description>
</property>
The Next Steps are a guide to preparing hdfs after installation and running word count job
34. Format the HDFS
/usr/local/hadoop/hadoop-1.2.1/bin/hadoop namenode -format
35. Start Hadoop services with the following command:
/usr/local/hadoop/bin/start-all.sh
37. A nifty tool for checking whether the expected Hadoop processes are running is jps
38.Restart Ubuntu and login (sudo reboot)
Run a Simple MapReduce Program
1. Download Datasets :
www.gutenberg.org/ebooks/20417
www.gutenberg.org/ebooks/5000
www.gutenberg.org/ebooks/4300
2. Download each ebook as text files in Plain Text UTF-8 encoding and store the files in a local temporary
directory of choice, for example /tmp/gutenberg
ls -l /tmp/gutenberg/
3. Copy the files from our local file system to Hadoop’s HDFS.
hduser@ubuntu:/usr/local/hadoop/hadoop-1.2.1$ bin/hadoop dfs -copyFromLocal /tmp/gutenberg
/user/hduser/gutenberg
hduser@ubuntu:/usr/local/hadoop/hadoop-1.2.1$ bin/hadoop dfs -ls /user/hduser
hduser@ubuntu:/usr/local/hadoop/hadoop-1.2.1$ bin/hadoop dfs -ls /user/hduser/gutenberg
4. Run the WordCount example job
hduser@ubuntu:/usr/local/hadoop/hadoop-1.2.1$ bin/hadoop jar hadoop*examples*.jar wordcount
/user/hduser/gutenberg /user/hduser/gutenberg-output
Below is the output of the running job. This information is useful as it gives map reduce job status as it
runs.
The figures below shows the Admin Web Interfaces for checking Job Status and HDFS files
The URL by default at http://localhost:50030/
Run wordcount job (hadoop)

Run wordcount job (hadoop)

  • 1.
    How to Installa Single-Node Hadoop Cluster By Kopaleishvili Valeri Updated 04/20/2015 Assumptions 1. You’re running 64-bit Windows 2. Your laptop has more than 4 GB of RAM Download List (No specific order)  VMWare Player – allows you to run virtual machines with different operating systems (www.dropbox.com/s/o4773s7mg8l2nox/VMWare-player-5.0.2-1031769.exe)  Ubuntu 12.04 LTS – Linux operating system with a nice user interface (www.dropbox.com/s/taeb6jault5siwi/ubuntu-12.04.2-desktop-amd64.iso) Instructions to Install Hadoop Next Few Step provide guide on prerequisite requirements for hadoop environment 1. Install VMWare Player 2. Create a new virtual machine 3. Point the installer disc image to the ISO file (Ubuntu) that you just downloaded 4. User name should be hduser 5. Hard disk space 40 GB Hard drive (more is better, but you want to leave some for your Windows machine) 6. Customize hardware a. Memory: 2 GB RAM (more is better, but you want to leave some for your Windows machine) b. Processors: 2 (more is better, but you want to leave some for your Windows machine) 7. Launch your virtual machine (all the instructions after this step will be performed in Ubuntu) 8. Login to hduser 9. Open a terminal window with Ctrl + Alt + T (you will use this keyboard shortcut a lot) 10. Install Java JDK 7 a. Download the Java JDK (https://www.dropbox.com/s/h6bw3tibft3gs17/jdk-7u21-linux- x64.tar.gz) b. Unzip the file tar -xvf jdk-7u21-linux-x64.tar.gz c. Now move the JDK 7 directory to /usr/lib sudo mkdir -p /usr/lib/jvm sudo mv ./jdk1.7.0/usr/lib/jvm/jdk1.7.0
  • 2.
    d. Now run sudoupdate-alternatives --install "/usr/bin/java" "java" "/usr/lib/jvm/jdk1.7.0/bin/java" 1 sudo update-alternatives --install "/usr/bin/javac" "javac" "/usr/lib/jvm/jdk1.7.0/bin/javac" 1 sudo update-alternatives --install "/usr/bin/javaws" "javaws" "/usr/lib/jvm/jdk1.7.0/bin/javaws" 1 e. Correct the file ownership and the permissions of the executables: sudo chmod a+x /usr/bin/java sudo chmod a+x /usr/bin/javac sudo chmod a+x /usr/bin/javaws sudo chown -R root:root /usr/lib/jvm/jdk1.7.0 f. Check the version of you new JDK 7 installation:
  • 3.
    java -version 11. InstallSSH Server sudo apt-get install openssh-client sudo apt-get install openssh-server 12. Configure SSH su - hduser ssh-keygen -t rsa -P "" cat $HOME/.ssh/id_rsa.pub >> $HOME/.ssh/authorized_keys ssh localhost
  • 4.
    13. Disabling IPv6– Run the following command in the extended terminal (Alt + F2) sudo gedit /etc/sysctl.conf OR cd /etc/ vi sysctl.conf 14. Add the following lines to the bottom of the file
  • 5.
    # disable ipv6 net.ipv6.conf.all.disable_ipv6= 1 net.ipv6.conf.default.disable_ipv6 = 1 net.ipv6.conf.lo.disable_ipv6 = 1 15. Save the file and close it 16. Restart your Ubuntu (using command : sudo reboot) Next Step Explain Installation of hadoop 17. Download Apache Hadoop 1.2.1 (http://fossies.org/linux/misc/hadoop-1.2.1.tar.gz/) and store it the Downloads folder 18. Unzip the file (open up the terminal window),create usergroup and move download to local folder. cd Downloads sudo tar xzf hadoop-1.2.1.tar.gz cd /usr/local/ sudo mv /home/hduser/Downloads/hadoop-1.2.1 hadoop sudo addgroup hadoop sudo chown -R hduser:hadoop hadoop 19. Open your .bashrc file in the extended terminal (Alt + F2) sudo gedit .bashrc OR vi ~/.bashrc 20. Add the following lines to the bottom of the file as shown below:
  • 6.
    # Set Hadoop-relatedenvironment variables export HADOOP_HOME=/usr/local/hadoop/hadoop-1.2.1 export PIG_HOME=/usr/local/pig export PIG_CLASSPATH=/usr/local/hadoop/hadoop-1.2.1/conf # Set JAVA_HOME (we will also configure JAVA_HOME directly for Hadoop later on) export JAVA_HOME=/usr/lib/jvm/java-7-openjdk-amd64 # Some convenient aliases and functions for running Hadoop-related commands unalias fs &> /dev/null alias fs="hadoop fs" unalias hls &> /dev/null alias hls="fs -ls" # If you have LZO compression enabled in your Hadoop cluster and # compress job outputs with LZOP (not covered in this tutorial): # Conveniently inspect an LZOP compressed file from the command # line; run via: # # $ lzohead /hdfs/path/to/lzop/compressed/file.lzo # # Requires installed 'lzop' command. # lzohead () { hadoop fs -cat $1 | lzop -dc | head -1000 | less } # Add Hadoop bin/ directory to PATH export PATH=$PATH:$HADOOP_HOME/bin export PATH=$PATH:$PIG_HOME/bin 21. Save the .bashrc file and close it 22. Run sudo gedit usr/local/hadoop/hadoop-1.2.1/conf/hadoop-env.sh OR vi usr/local/hadoop/hadoop-1.2.1/conf/hadoop-env.sh 23. Add the following lines # The java implementation to use. Required. export JAVA_HOME=/usr/lib/jvm/java-7-openjdk-amd64
  • 7.
    24. Save andclose file 25. In the terminal window, create a directory and set the required ownerships and permissions sudo mkdir -p /app/hadoop/tmp sudo chown hduser:hadoop /app/hadoop/tmp sudo chmod 750 /app/hadoop/tmp 26. Run sudo gedit /usr/local/hadoop/hadoop-1.2.1/conf/core-site.xml OR vi /usr/local/hadoop/hadoop-1.2.1/conf/core-site.xml 27. Add the following between the <configuration> … </configuration> tags
  • 8.
    <property> <name>hadoop.tmp.dir</name> <value>/app/hadoop/tmp</value> <description>A base forother temporary directories.</description> </property> <property> <name>fs.default.name</name> <value>hdfs://localhost:54310</value> <description>The name of the default file system. A URI whose scheme and authority determine the FileSystem implementation. The uri's scheme determines the config property (fs.SCHEME.impl) naming the FileSystem implementation class. The uri's authority is used to determine the host, port, etc. for a filesystem.</description> </property> As shown below; 28. Save and close file 29. Run sudo gedit /usr/local/hadoop/hadoop-1.2.1/conf/mapred-site.xml OR vi /usr/local/hadoop/hadoop-1.2.1/conf/mapred-site.xml 30. Add the following between the <configuration> … </configuration> tags
  • 9.
    <property> <name>mapred.job.tracker</name> <value>localhost:54311</value> <description>The host andport that the MapReduce job tracker runs at. If "local", then jobs are run in-process as a single map and reduce task. </description> </property> 31. Save and close file 32. Run sudo gedit /usr/local/hadoop/hadoop-1.2.1/conf/hdfs-site.xml OR vi /usr/local/hadoop/hadoop-1.2.1/conf/hdfs-site.xml 33. Add the following between the <configuration> … </configuration> tags <property> <name>dfs.replication</name> <value>1</value> <description>Default block replication. The actual number of replications can be specified when the file is created. The default is used if replication is not specified in create time. </description> </property>
  • 10.
    The Next Stepsare a guide to preparing hdfs after installation and running word count job 34. Format the HDFS /usr/local/hadoop/hadoop-1.2.1/bin/hadoop namenode -format 35. Start Hadoop services with the following command: /usr/local/hadoop/bin/start-all.sh
  • 11.
    37. A niftytool for checking whether the expected Hadoop processes are running is jps 38.Restart Ubuntu and login (sudo reboot) Run a Simple MapReduce Program 1. Download Datasets : www.gutenberg.org/ebooks/20417 www.gutenberg.org/ebooks/5000 www.gutenberg.org/ebooks/4300 2. Download each ebook as text files in Plain Text UTF-8 encoding and store the files in a local temporary directory of choice, for example /tmp/gutenberg ls -l /tmp/gutenberg/ 3. Copy the files from our local file system to Hadoop’s HDFS. hduser@ubuntu:/usr/local/hadoop/hadoop-1.2.1$ bin/hadoop dfs -copyFromLocal /tmp/gutenberg /user/hduser/gutenberg hduser@ubuntu:/usr/local/hadoop/hadoop-1.2.1$ bin/hadoop dfs -ls /user/hduser hduser@ubuntu:/usr/local/hadoop/hadoop-1.2.1$ bin/hadoop dfs -ls /user/hduser/gutenberg 4. Run the WordCount example job hduser@ubuntu:/usr/local/hadoop/hadoop-1.2.1$ bin/hadoop jar hadoop*examples*.jar wordcount /user/hduser/gutenberg /user/hduser/gutenberg-output
  • 12.
    Below is theoutput of the running job. This information is useful as it gives map reduce job status as it runs. The figures below shows the Admin Web Interfaces for checking Job Status and HDFS files The URL by default at http://localhost:50030/