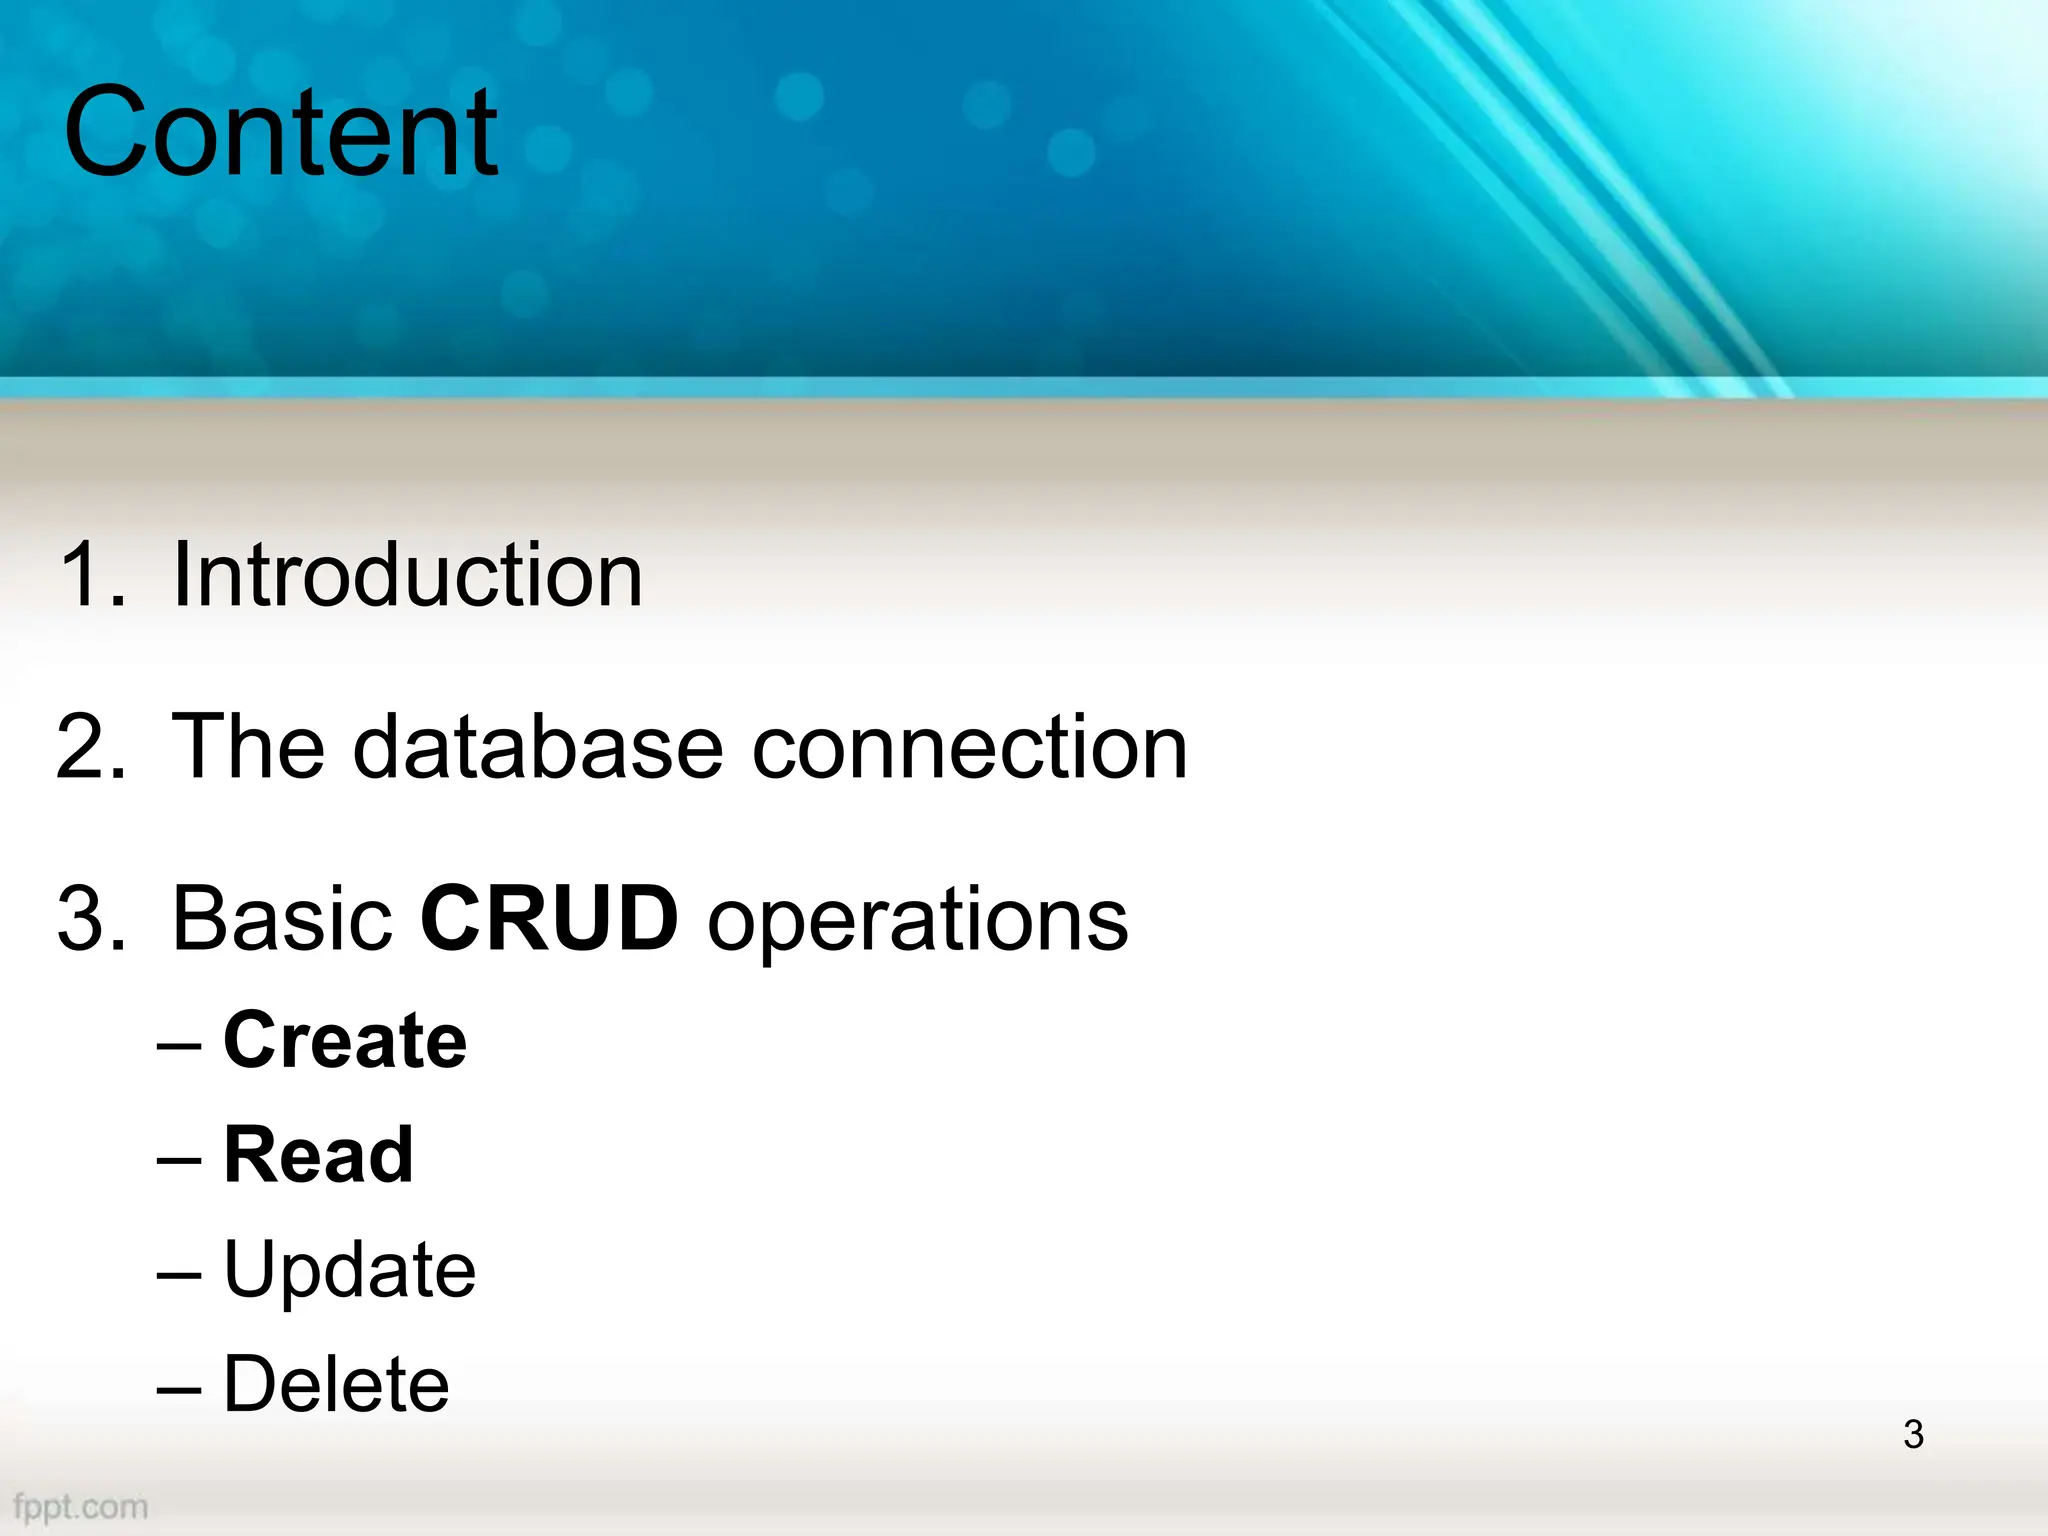
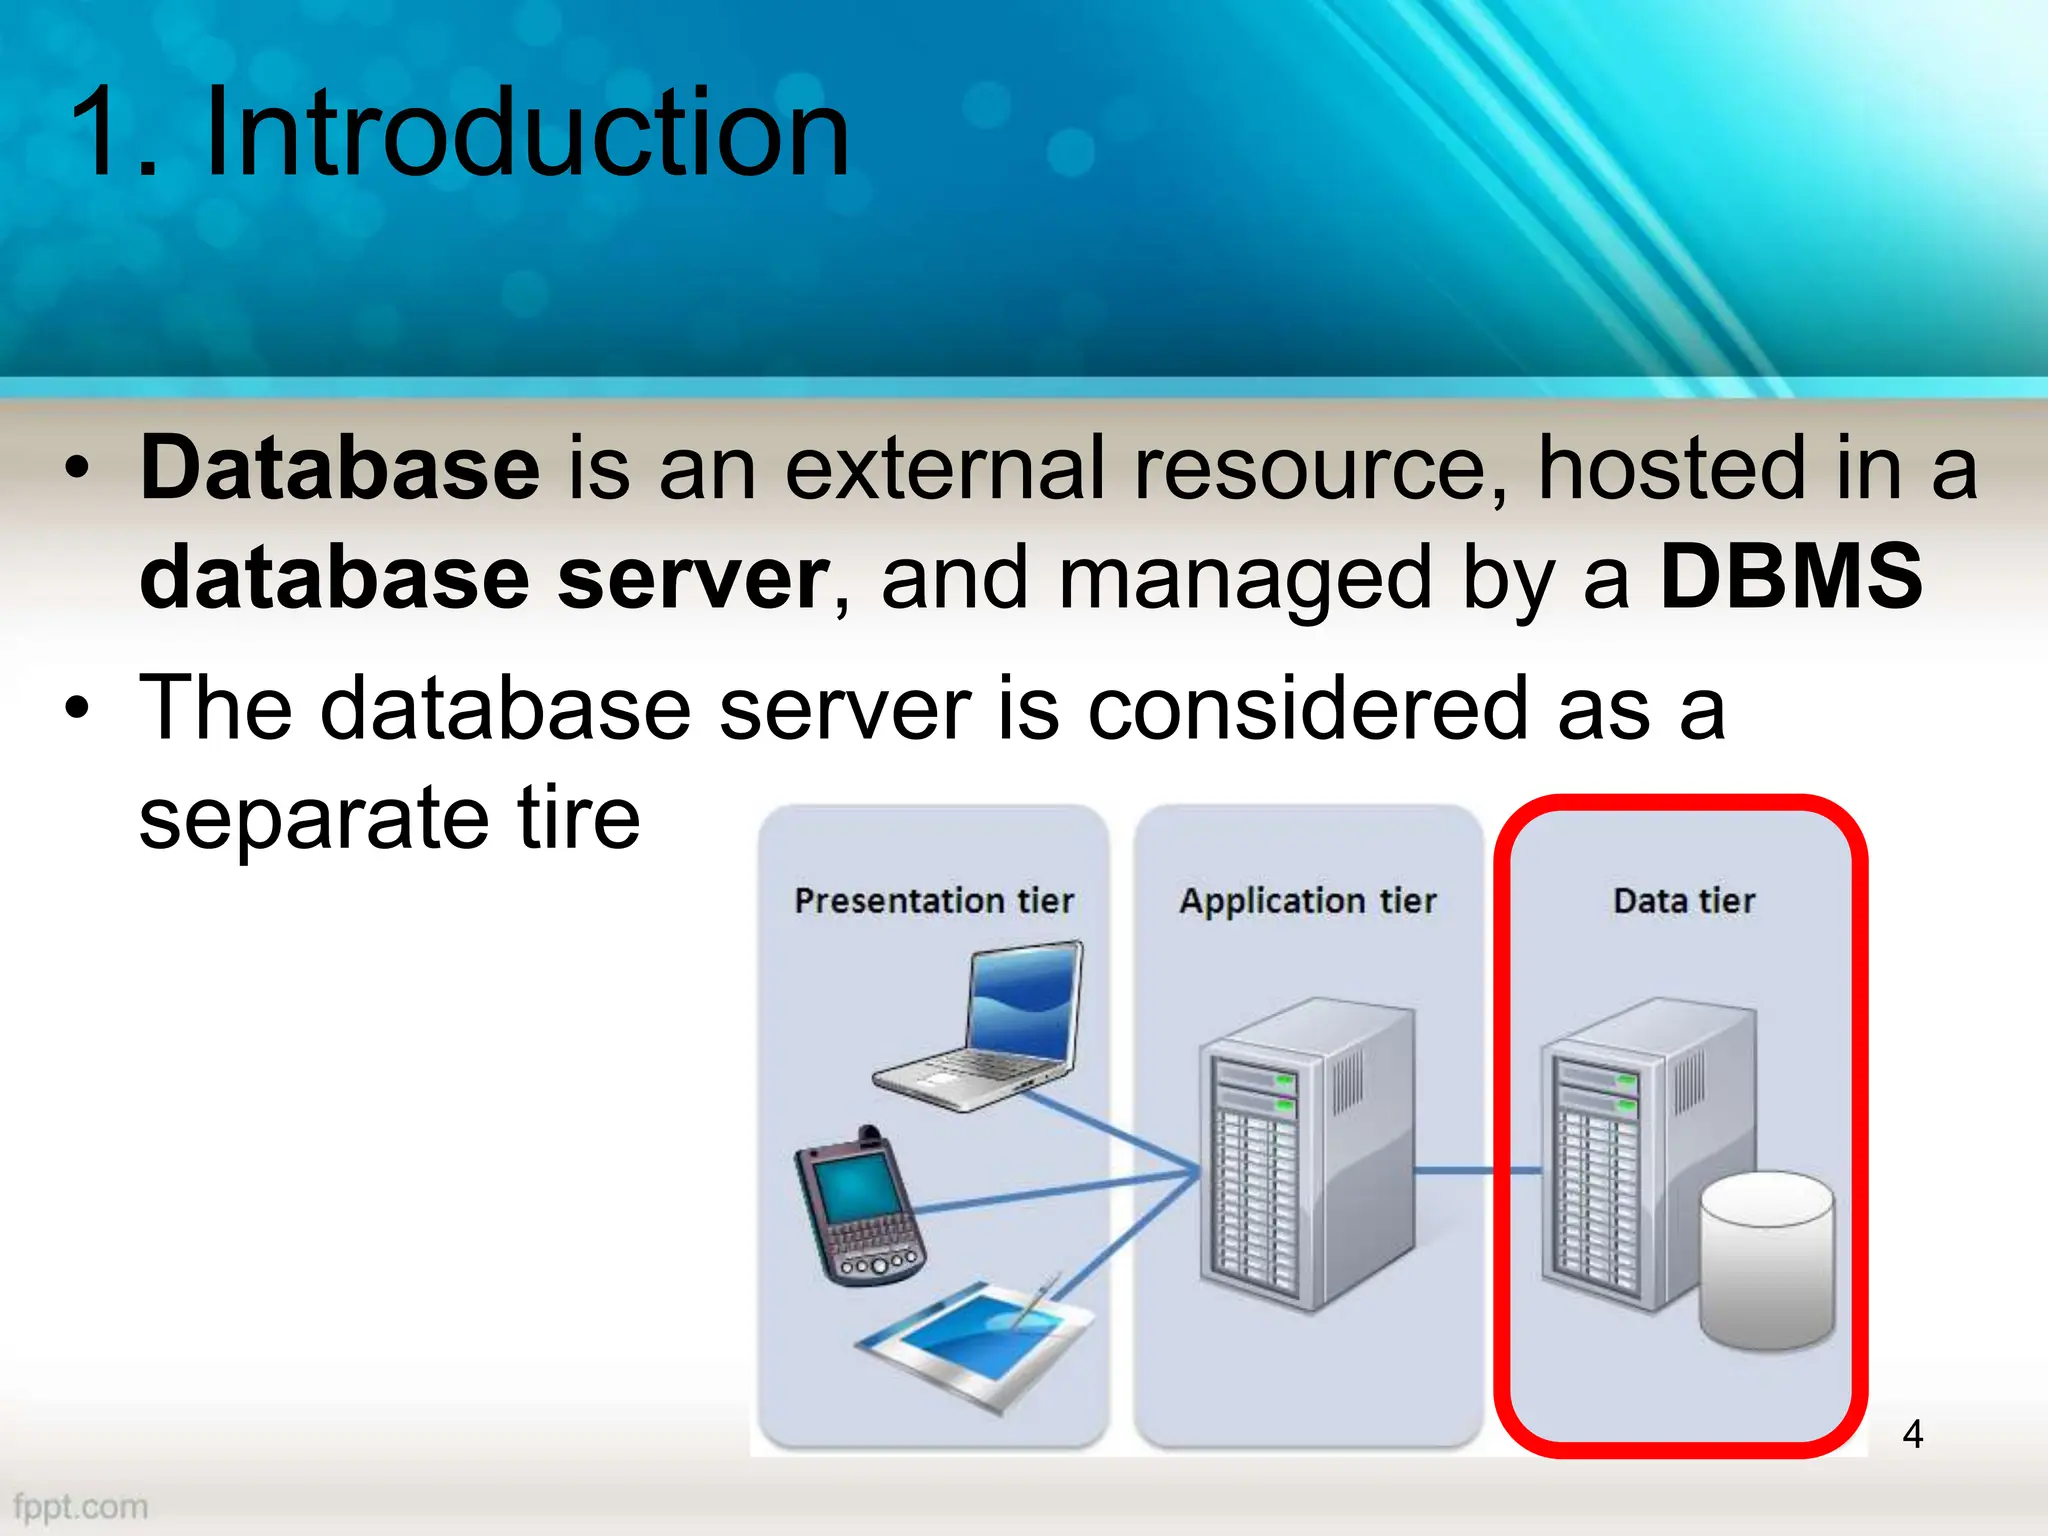
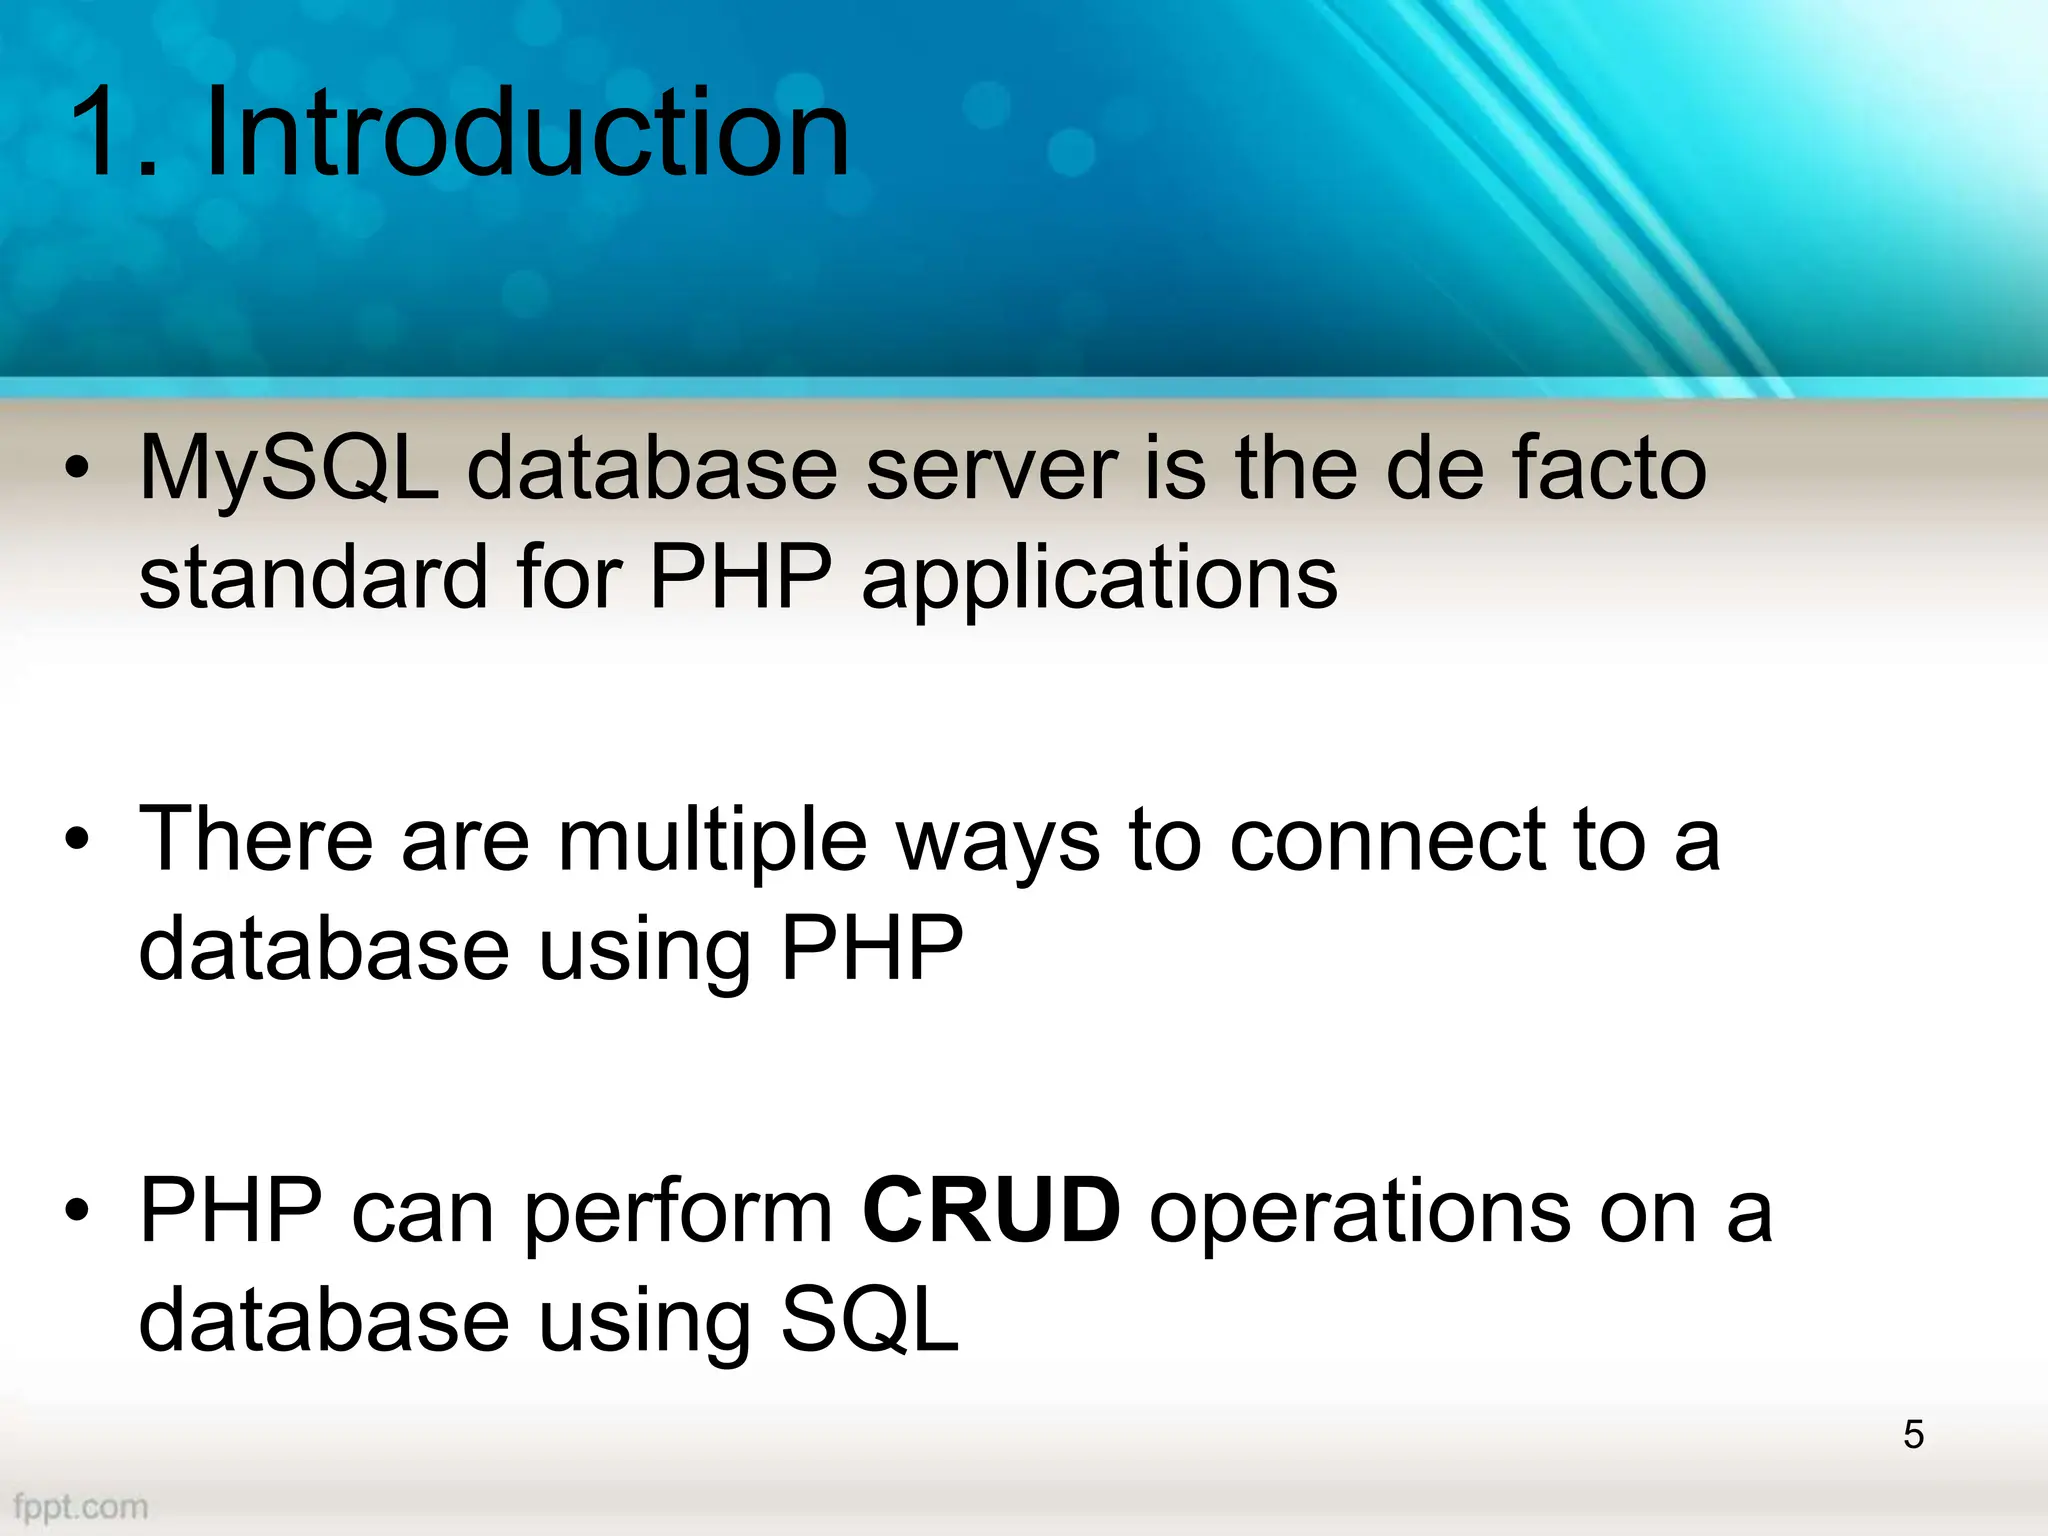
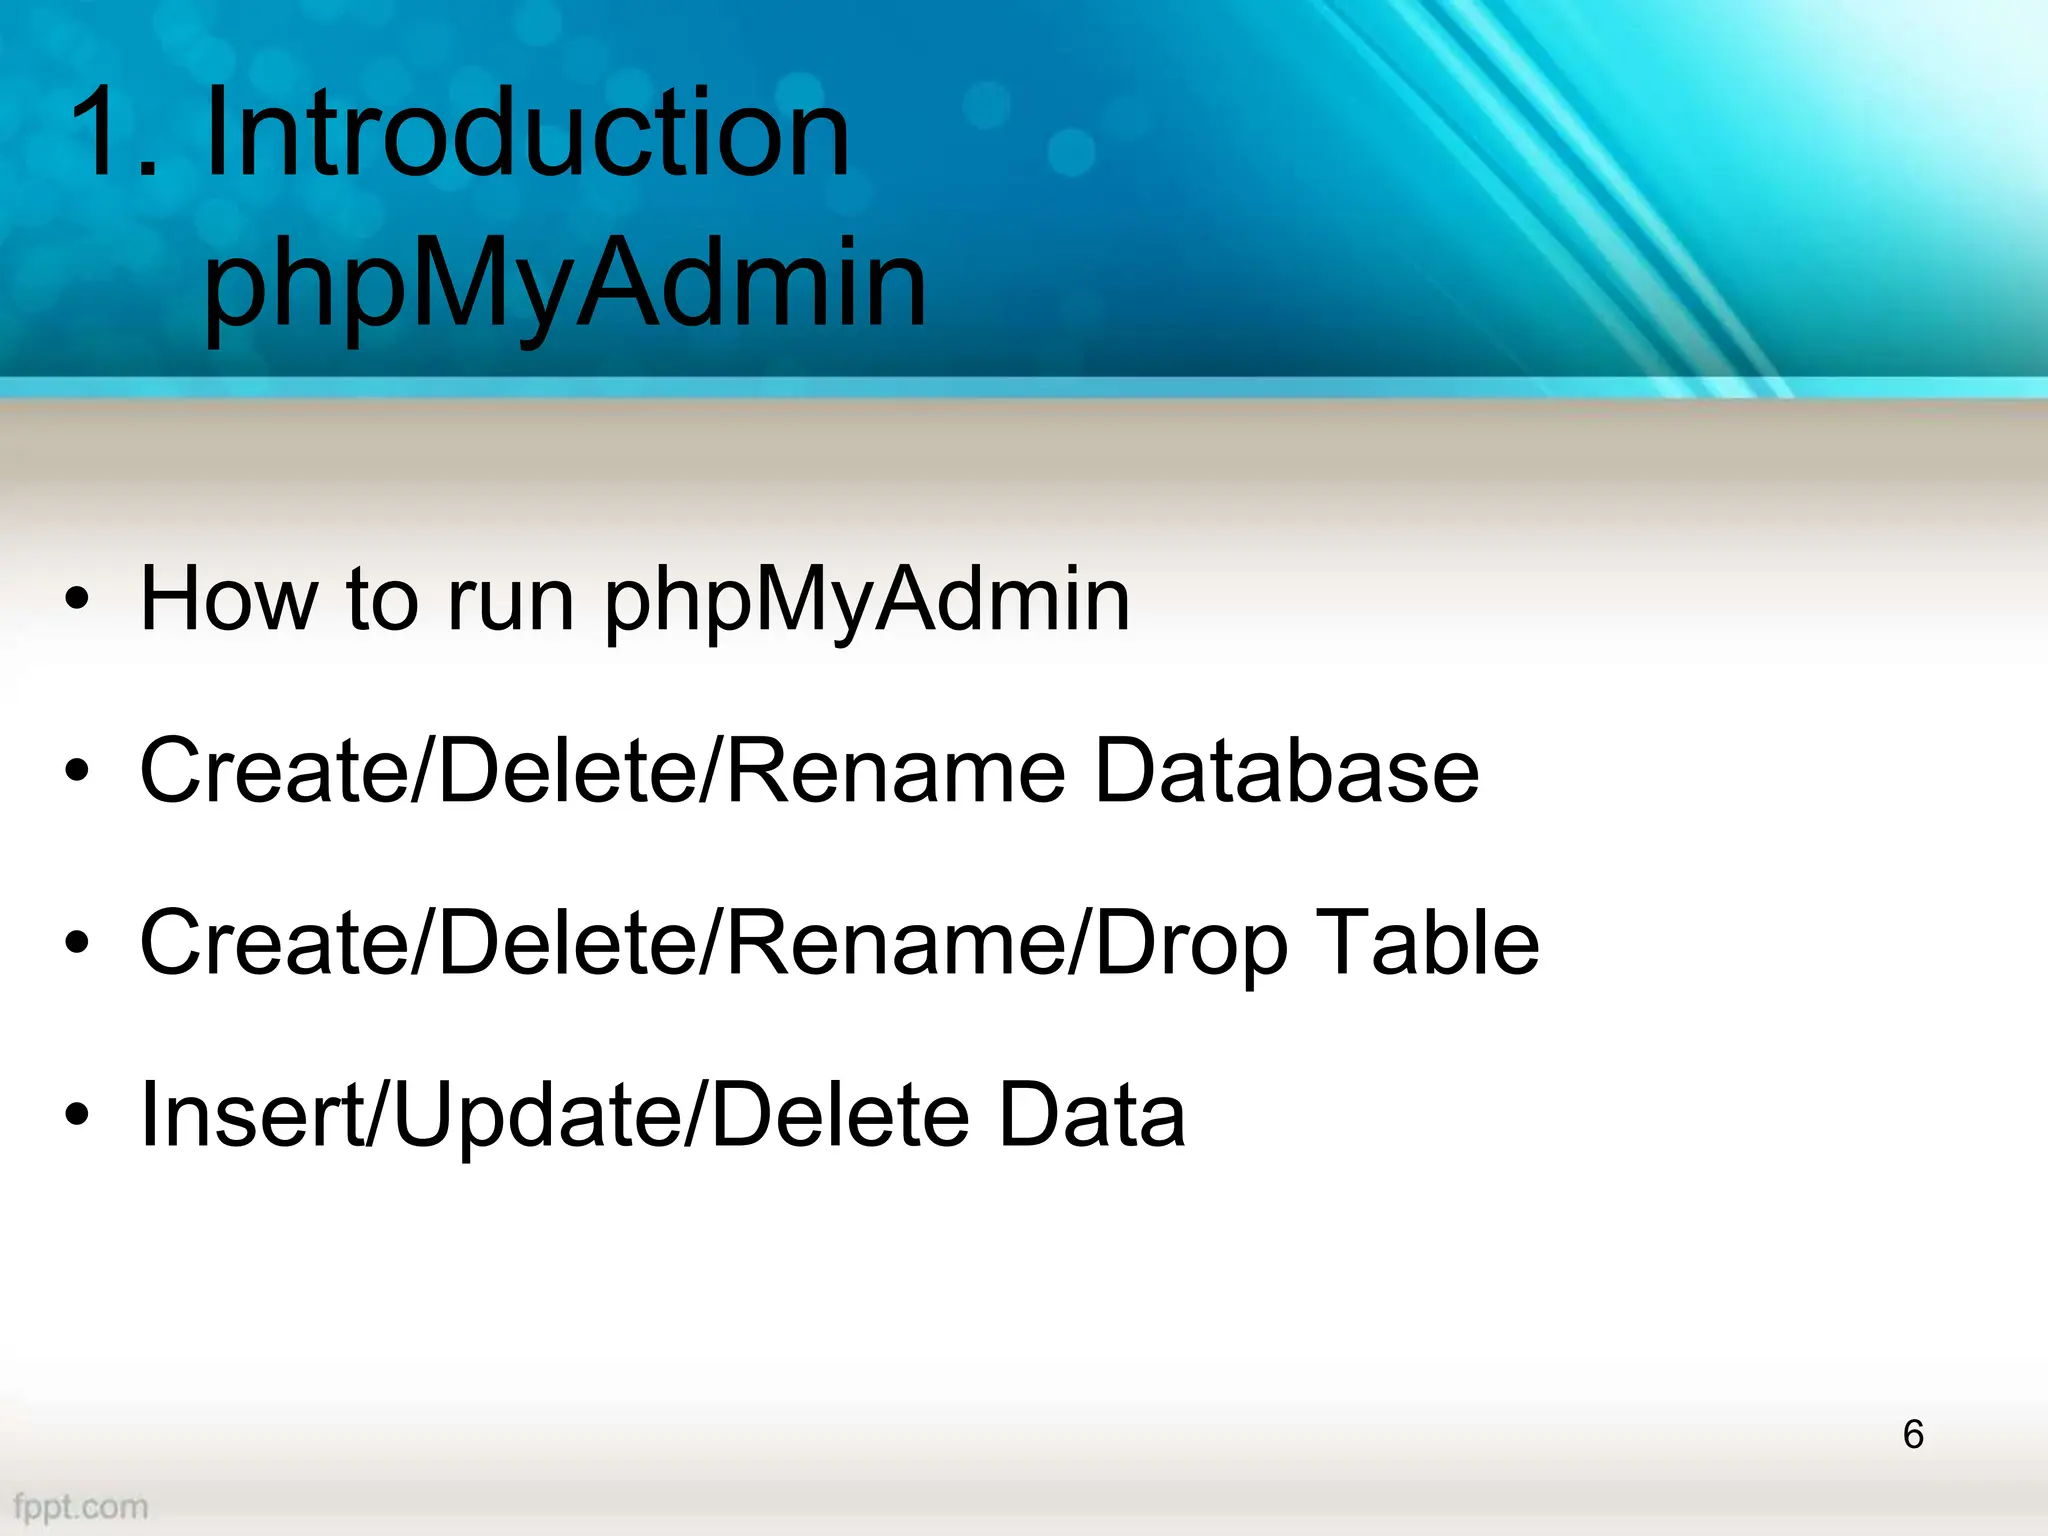
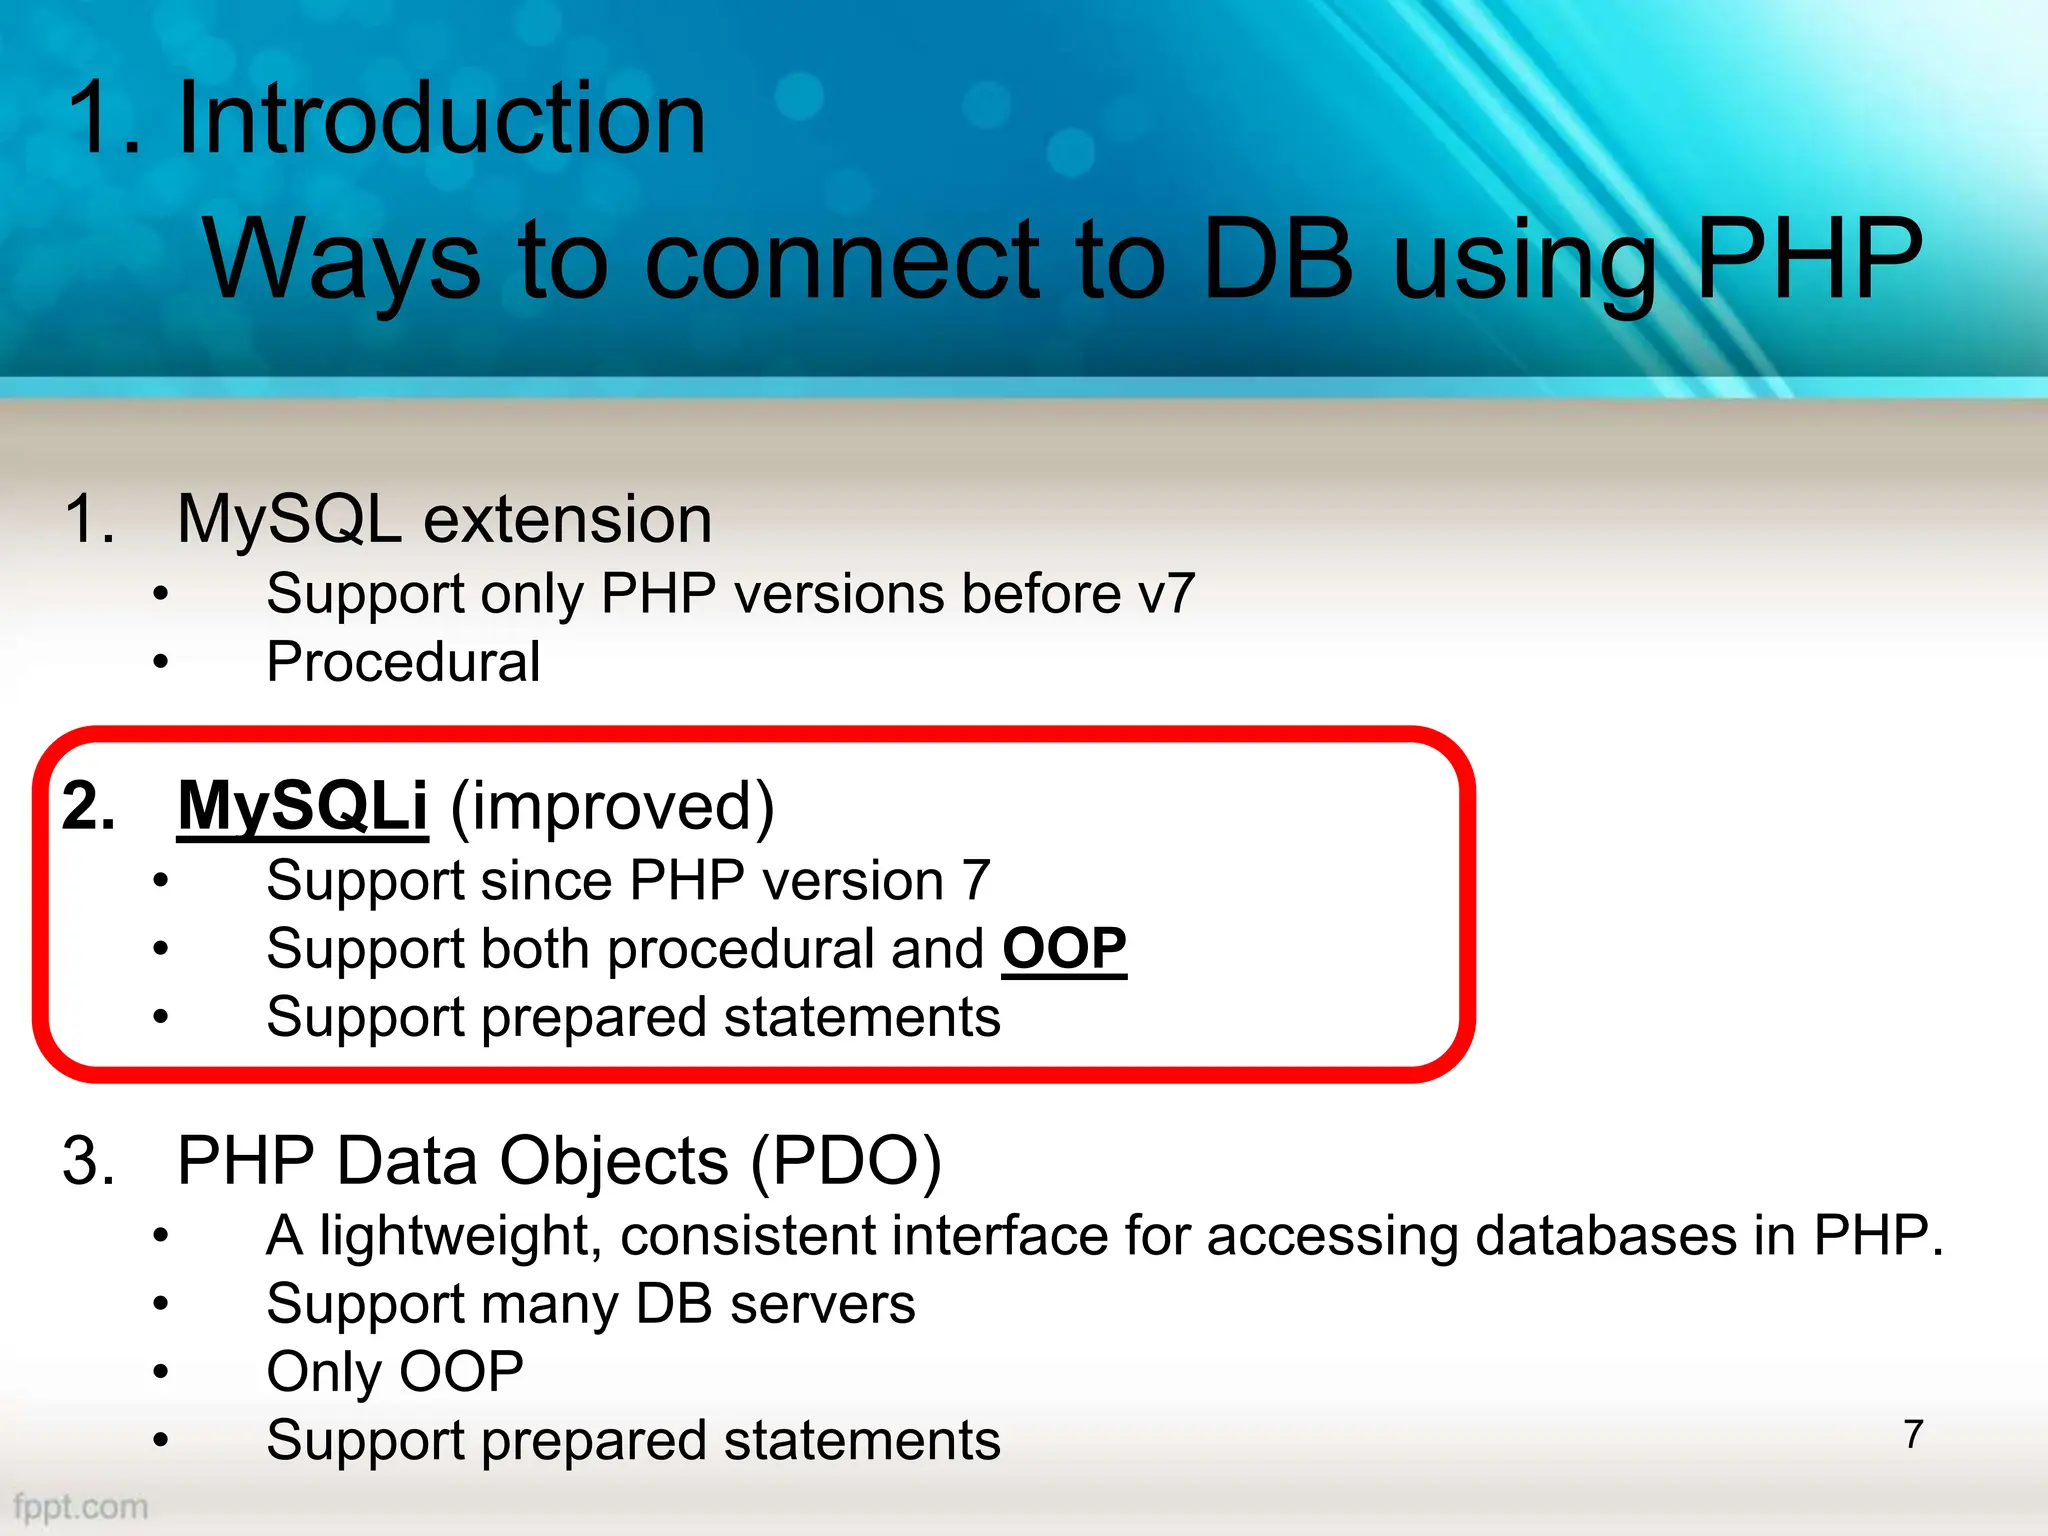
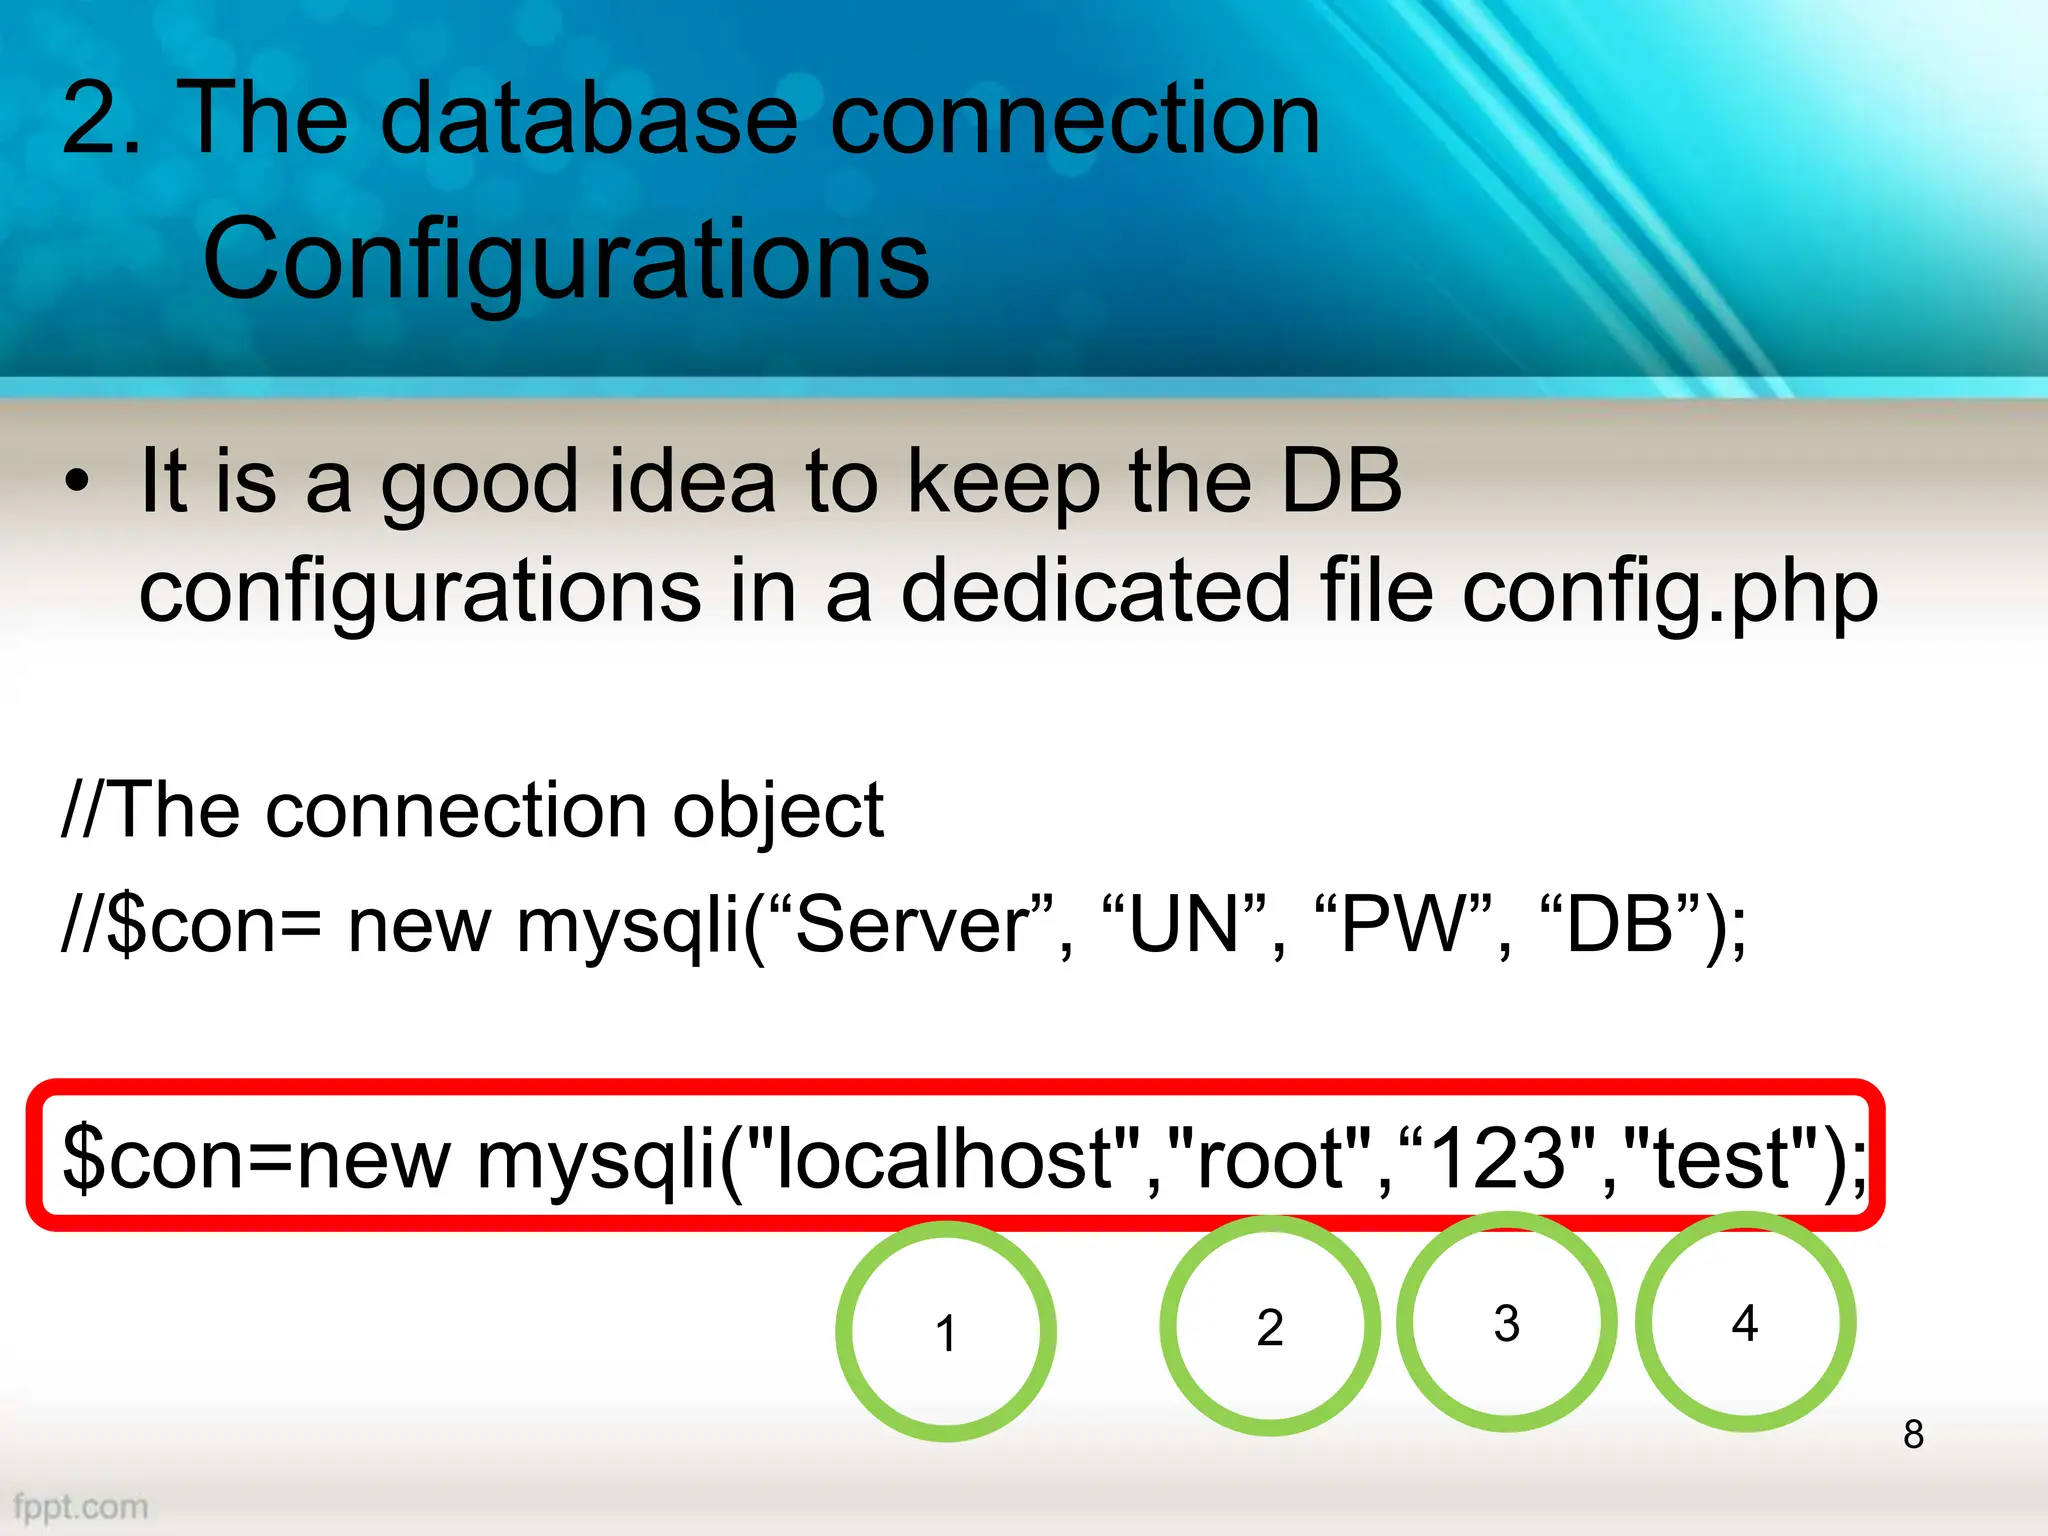
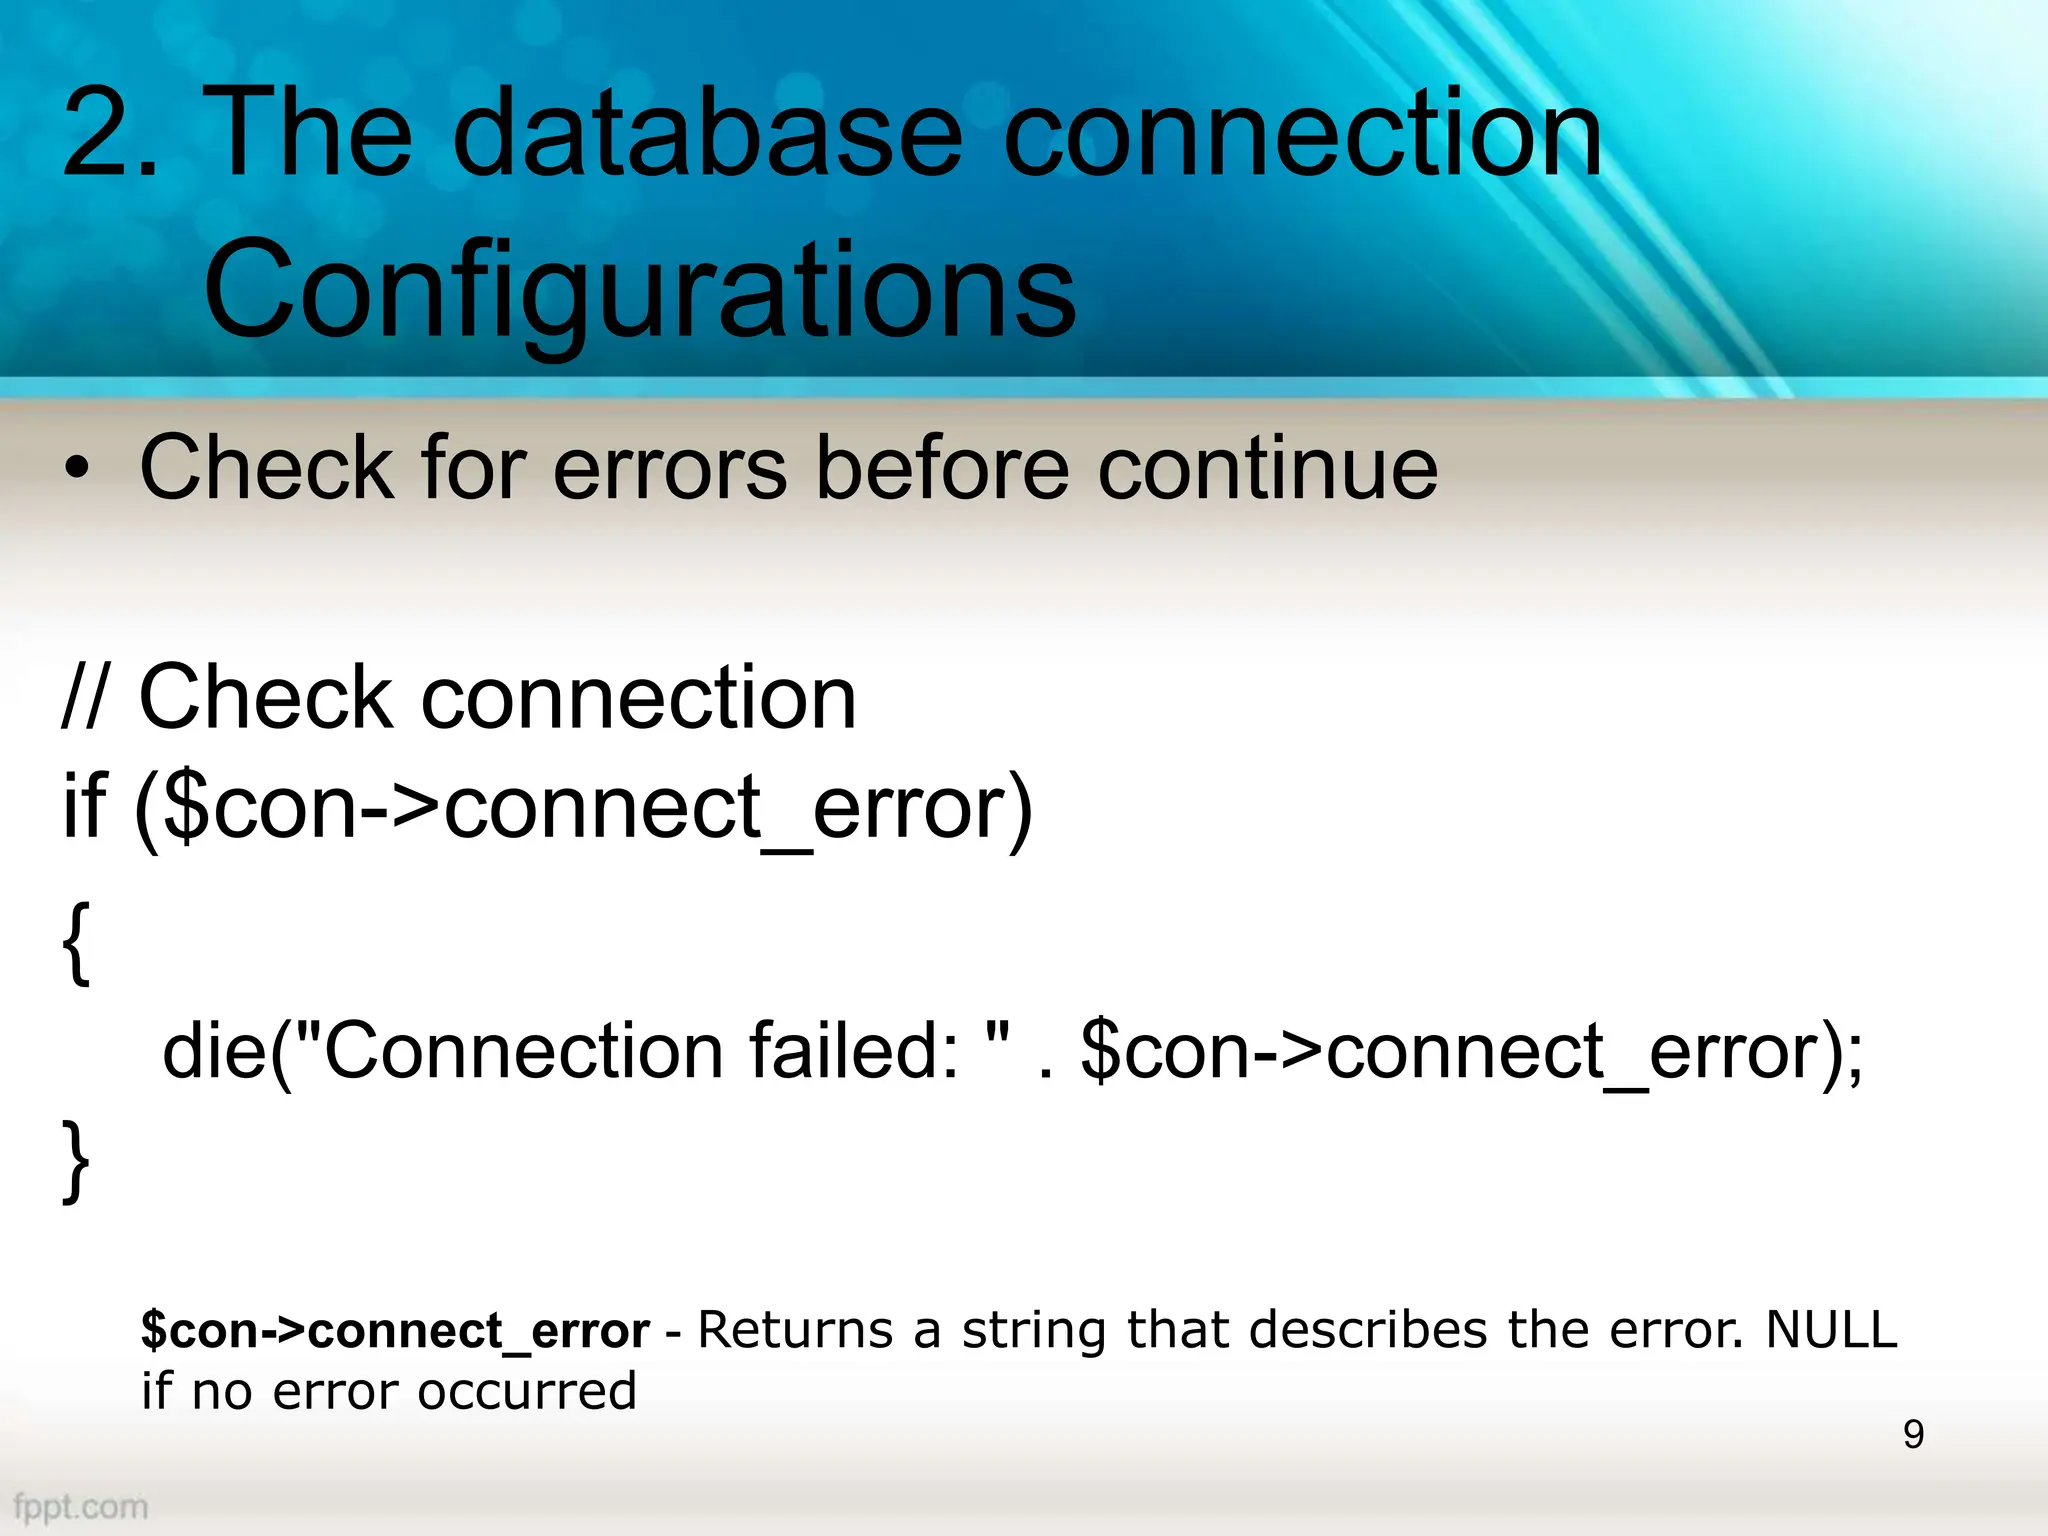
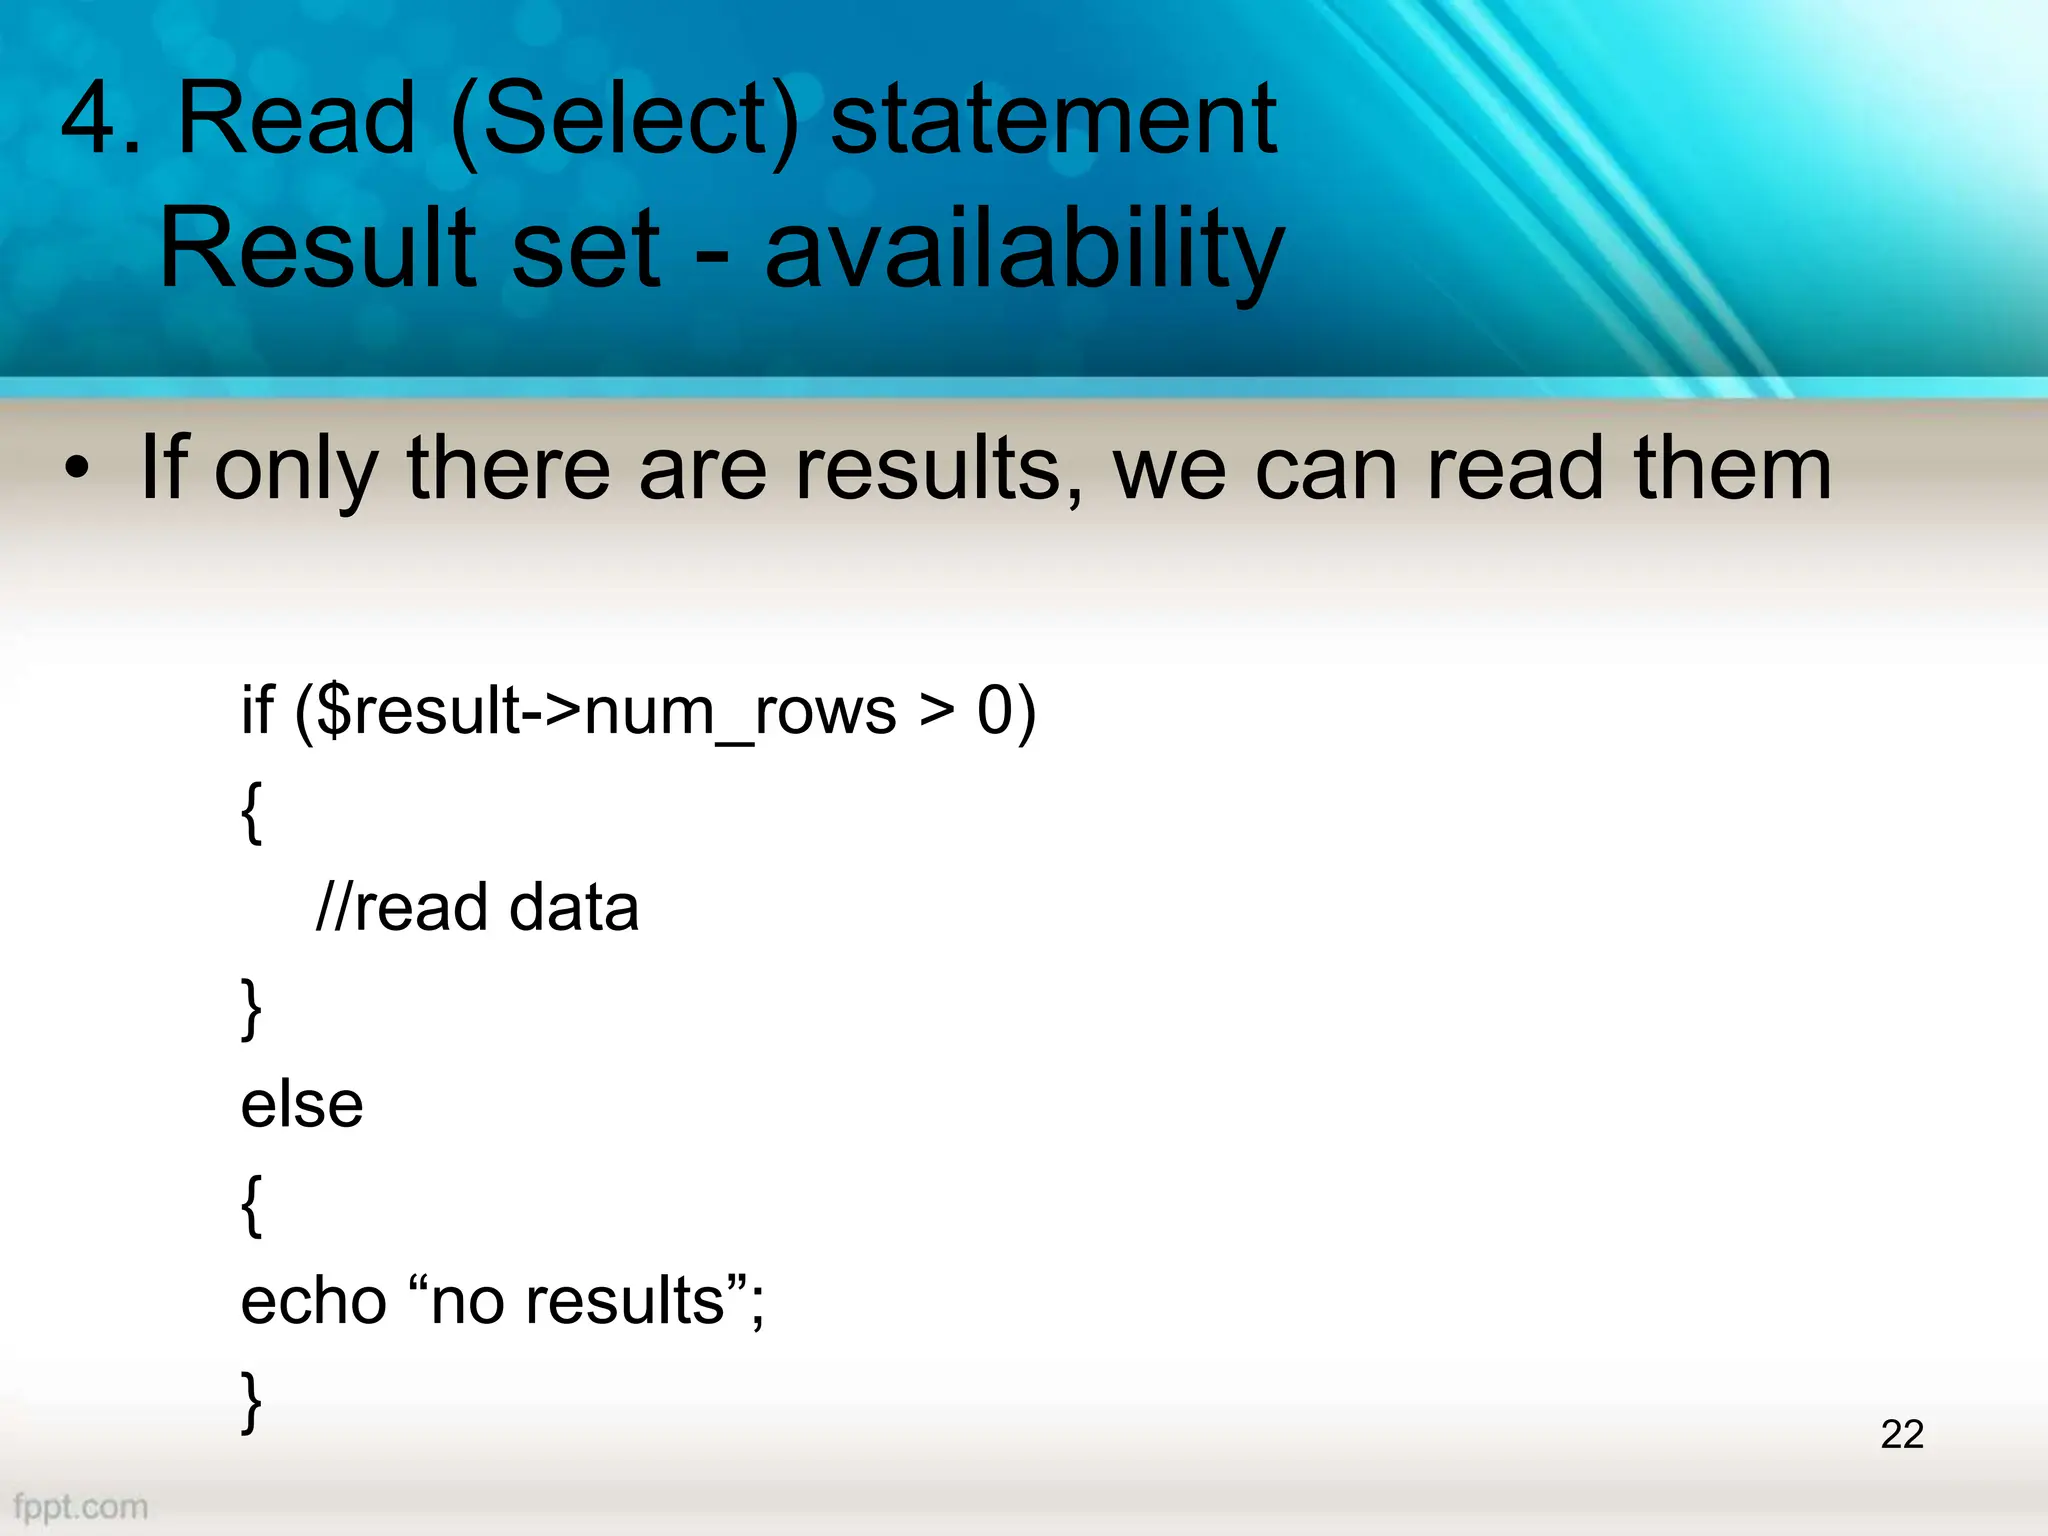
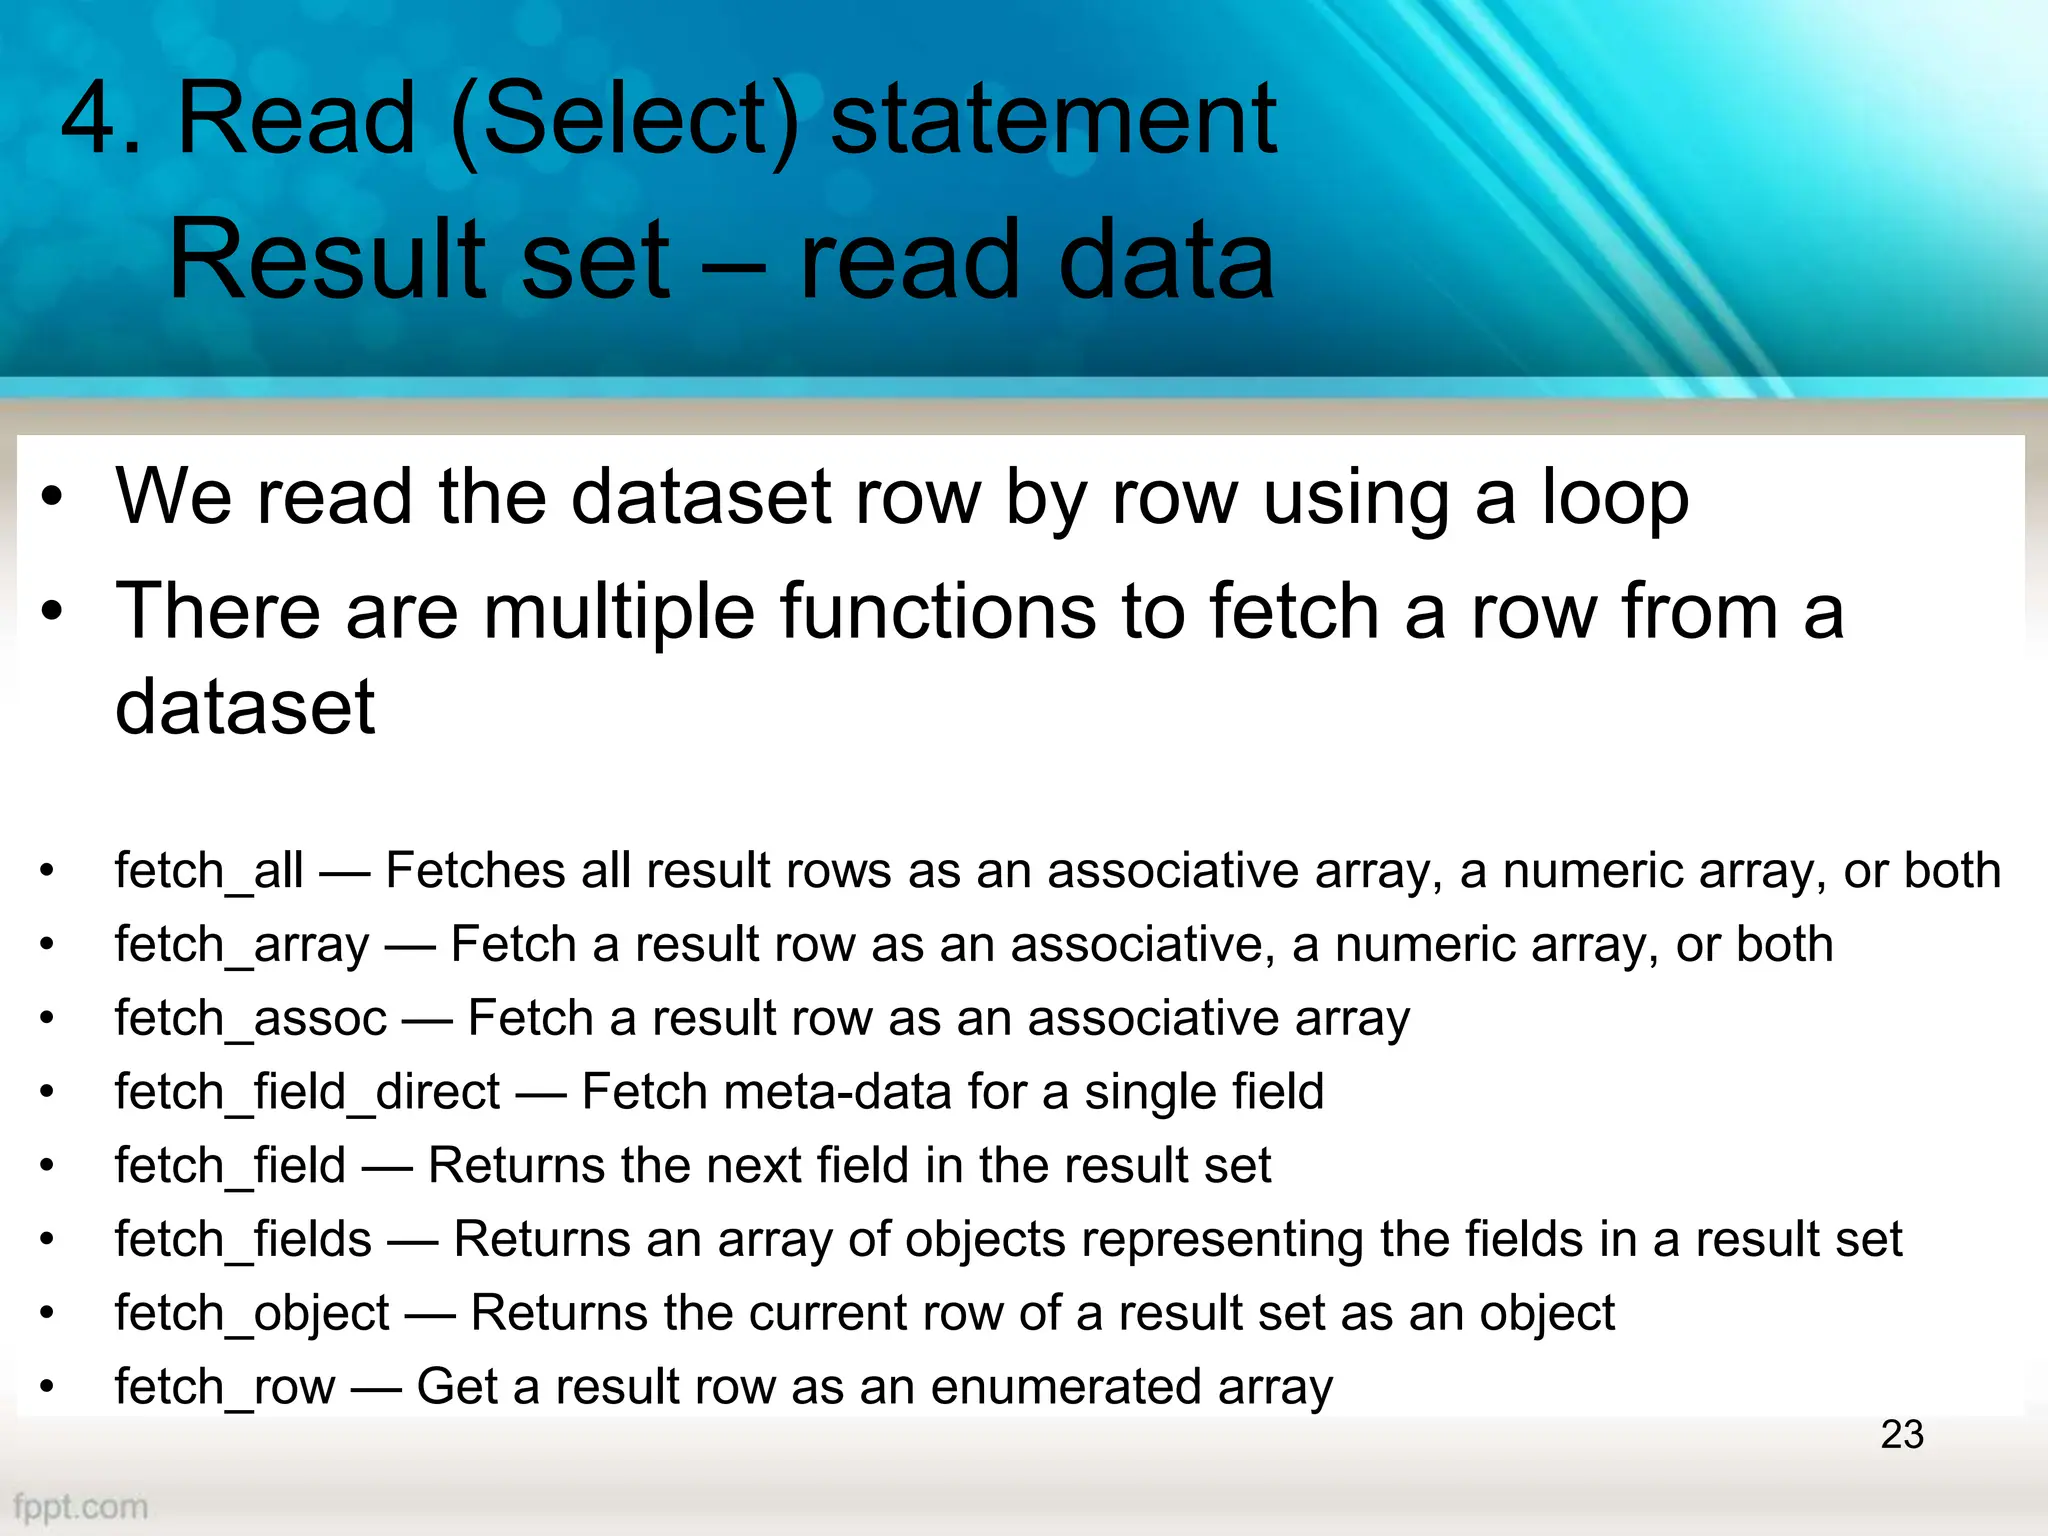
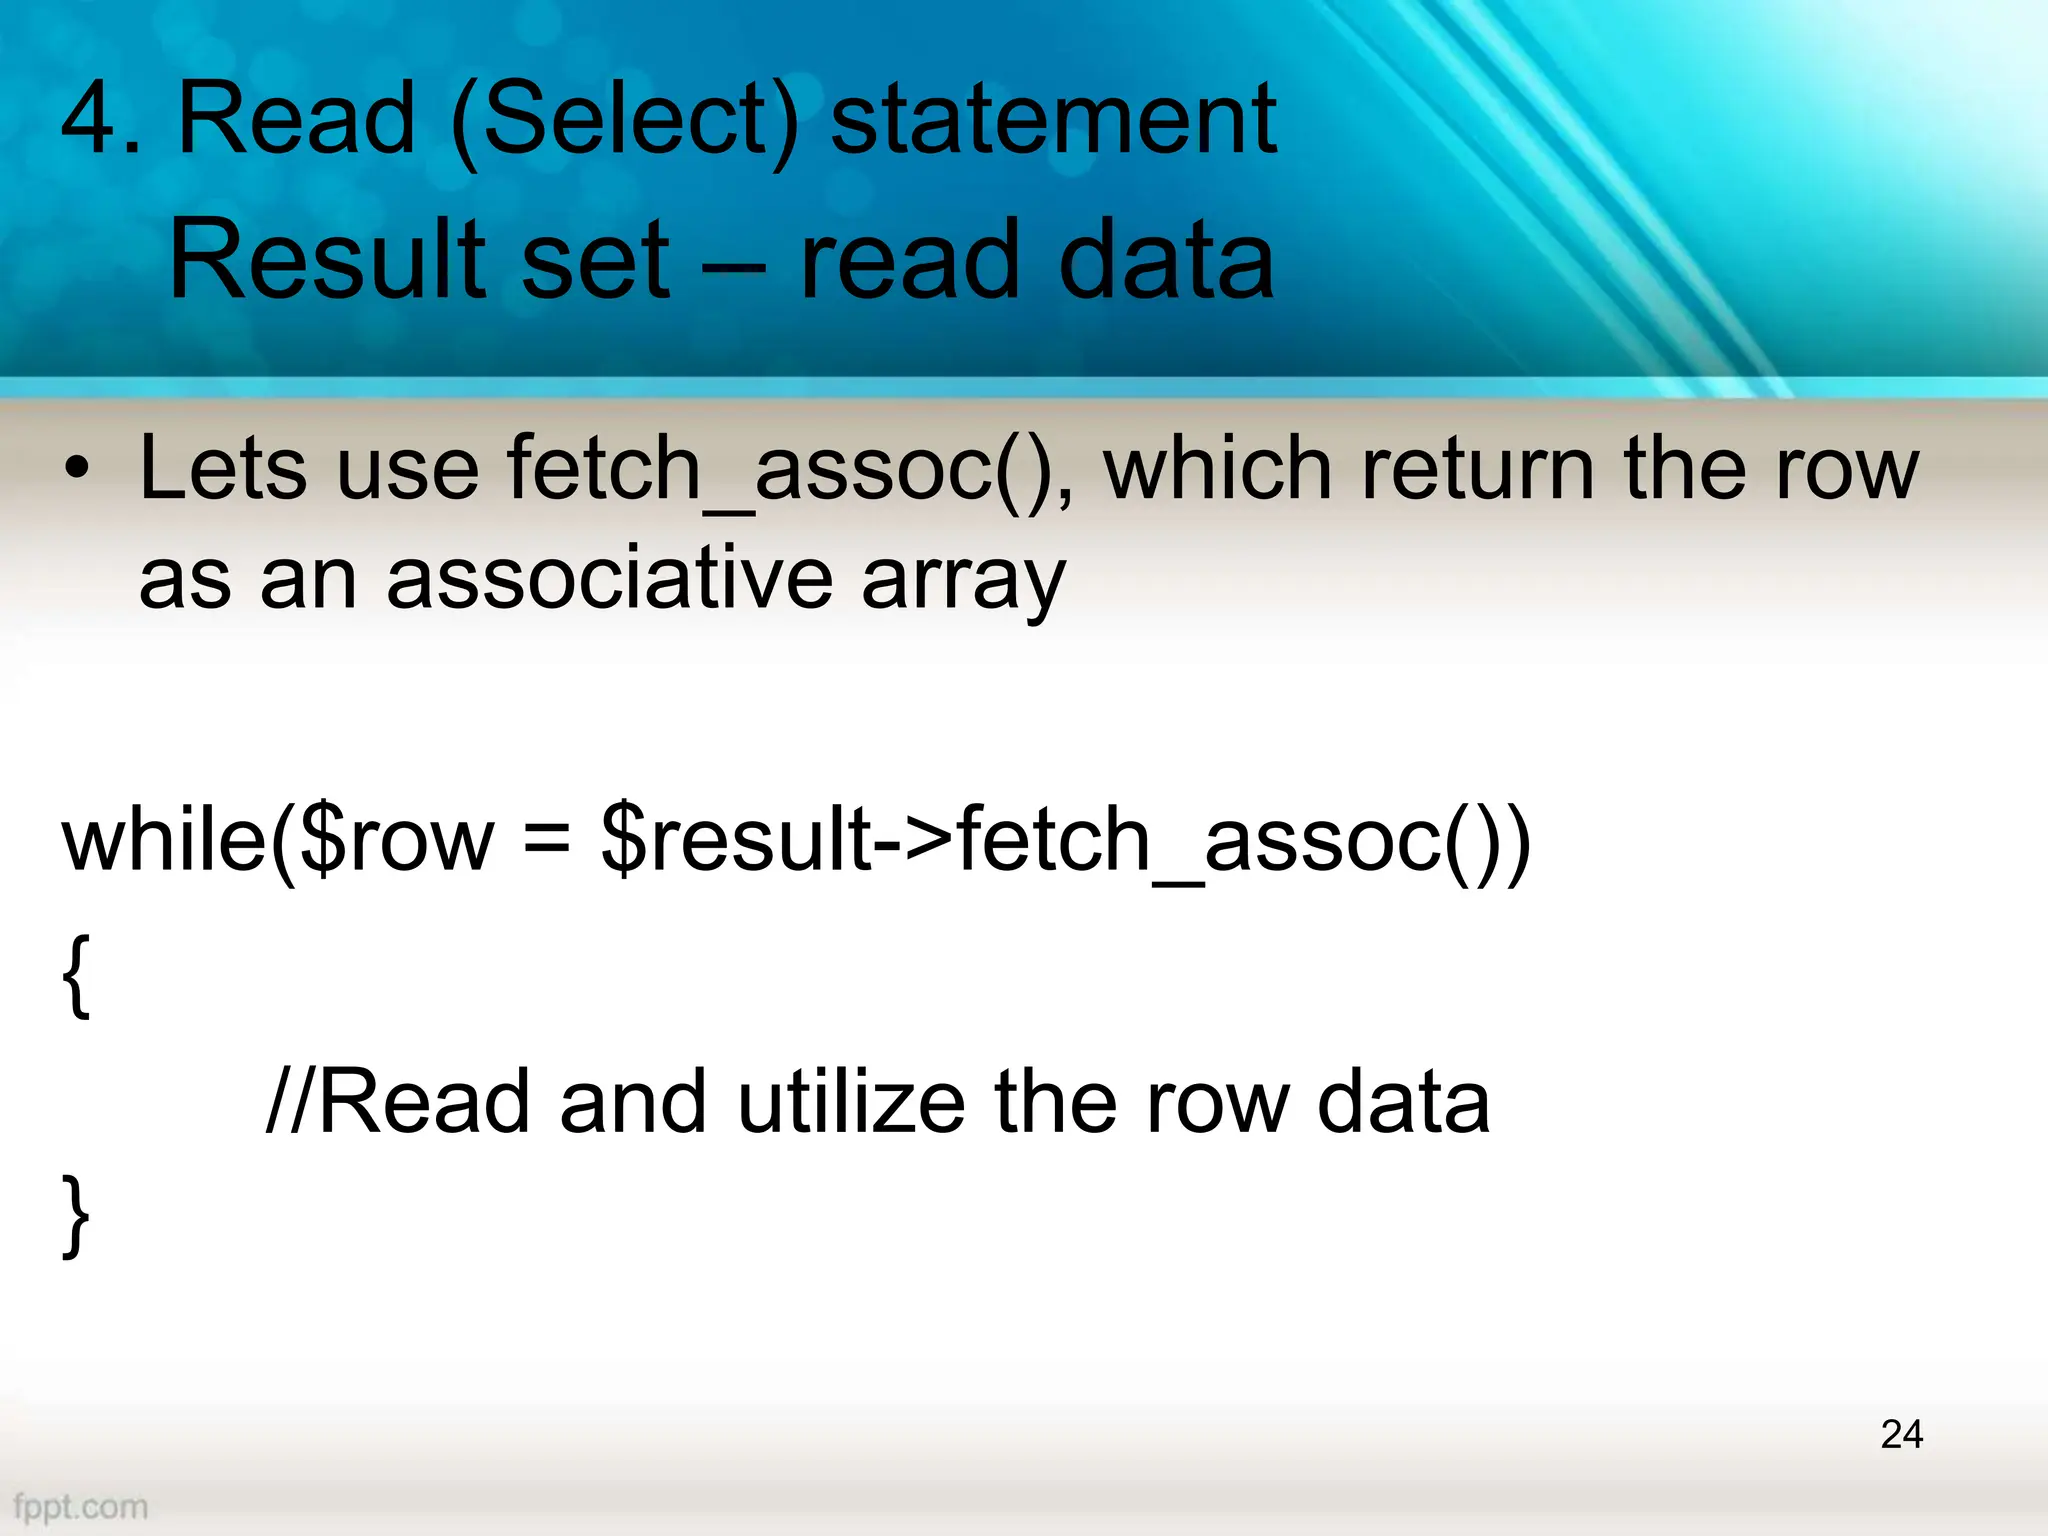
The document covers a lecture on database handling in PHP, including an introduction to databases, connection methods, and CRUD (Create, Read, Update, Delete) operations. It explains how to configure database connections in PHP, execute SQL statements for data manipulation, and handle errors while performing operations like inserting and selecting data. Additionally, it provides examples of using PHP forms for data entry and demonstrates reading data from a database using various fetching methods.
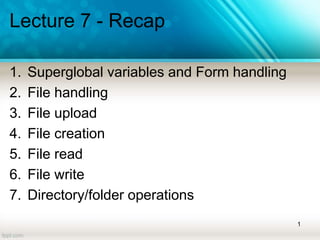

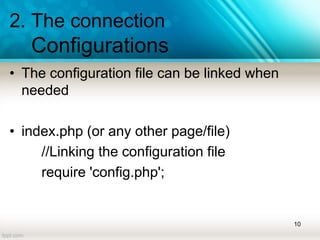


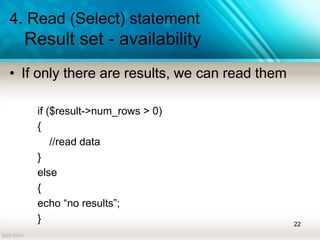
![Solution1
Use a HTML Form
<!doctype html>
<html>
<head> </head>
<body>
<form method="post" action="form_process.php">
<h3>Input Student Data </h3>
Student ID :<input type="text" name="stuID"><BR />
Student Name :<input type="text" name="stuName"><BR />
<input type="submit" value="Submit">
<input type="reset" value="Reset">
</form>
</body>
</html>
18
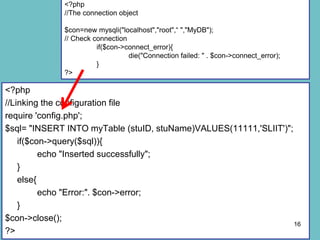
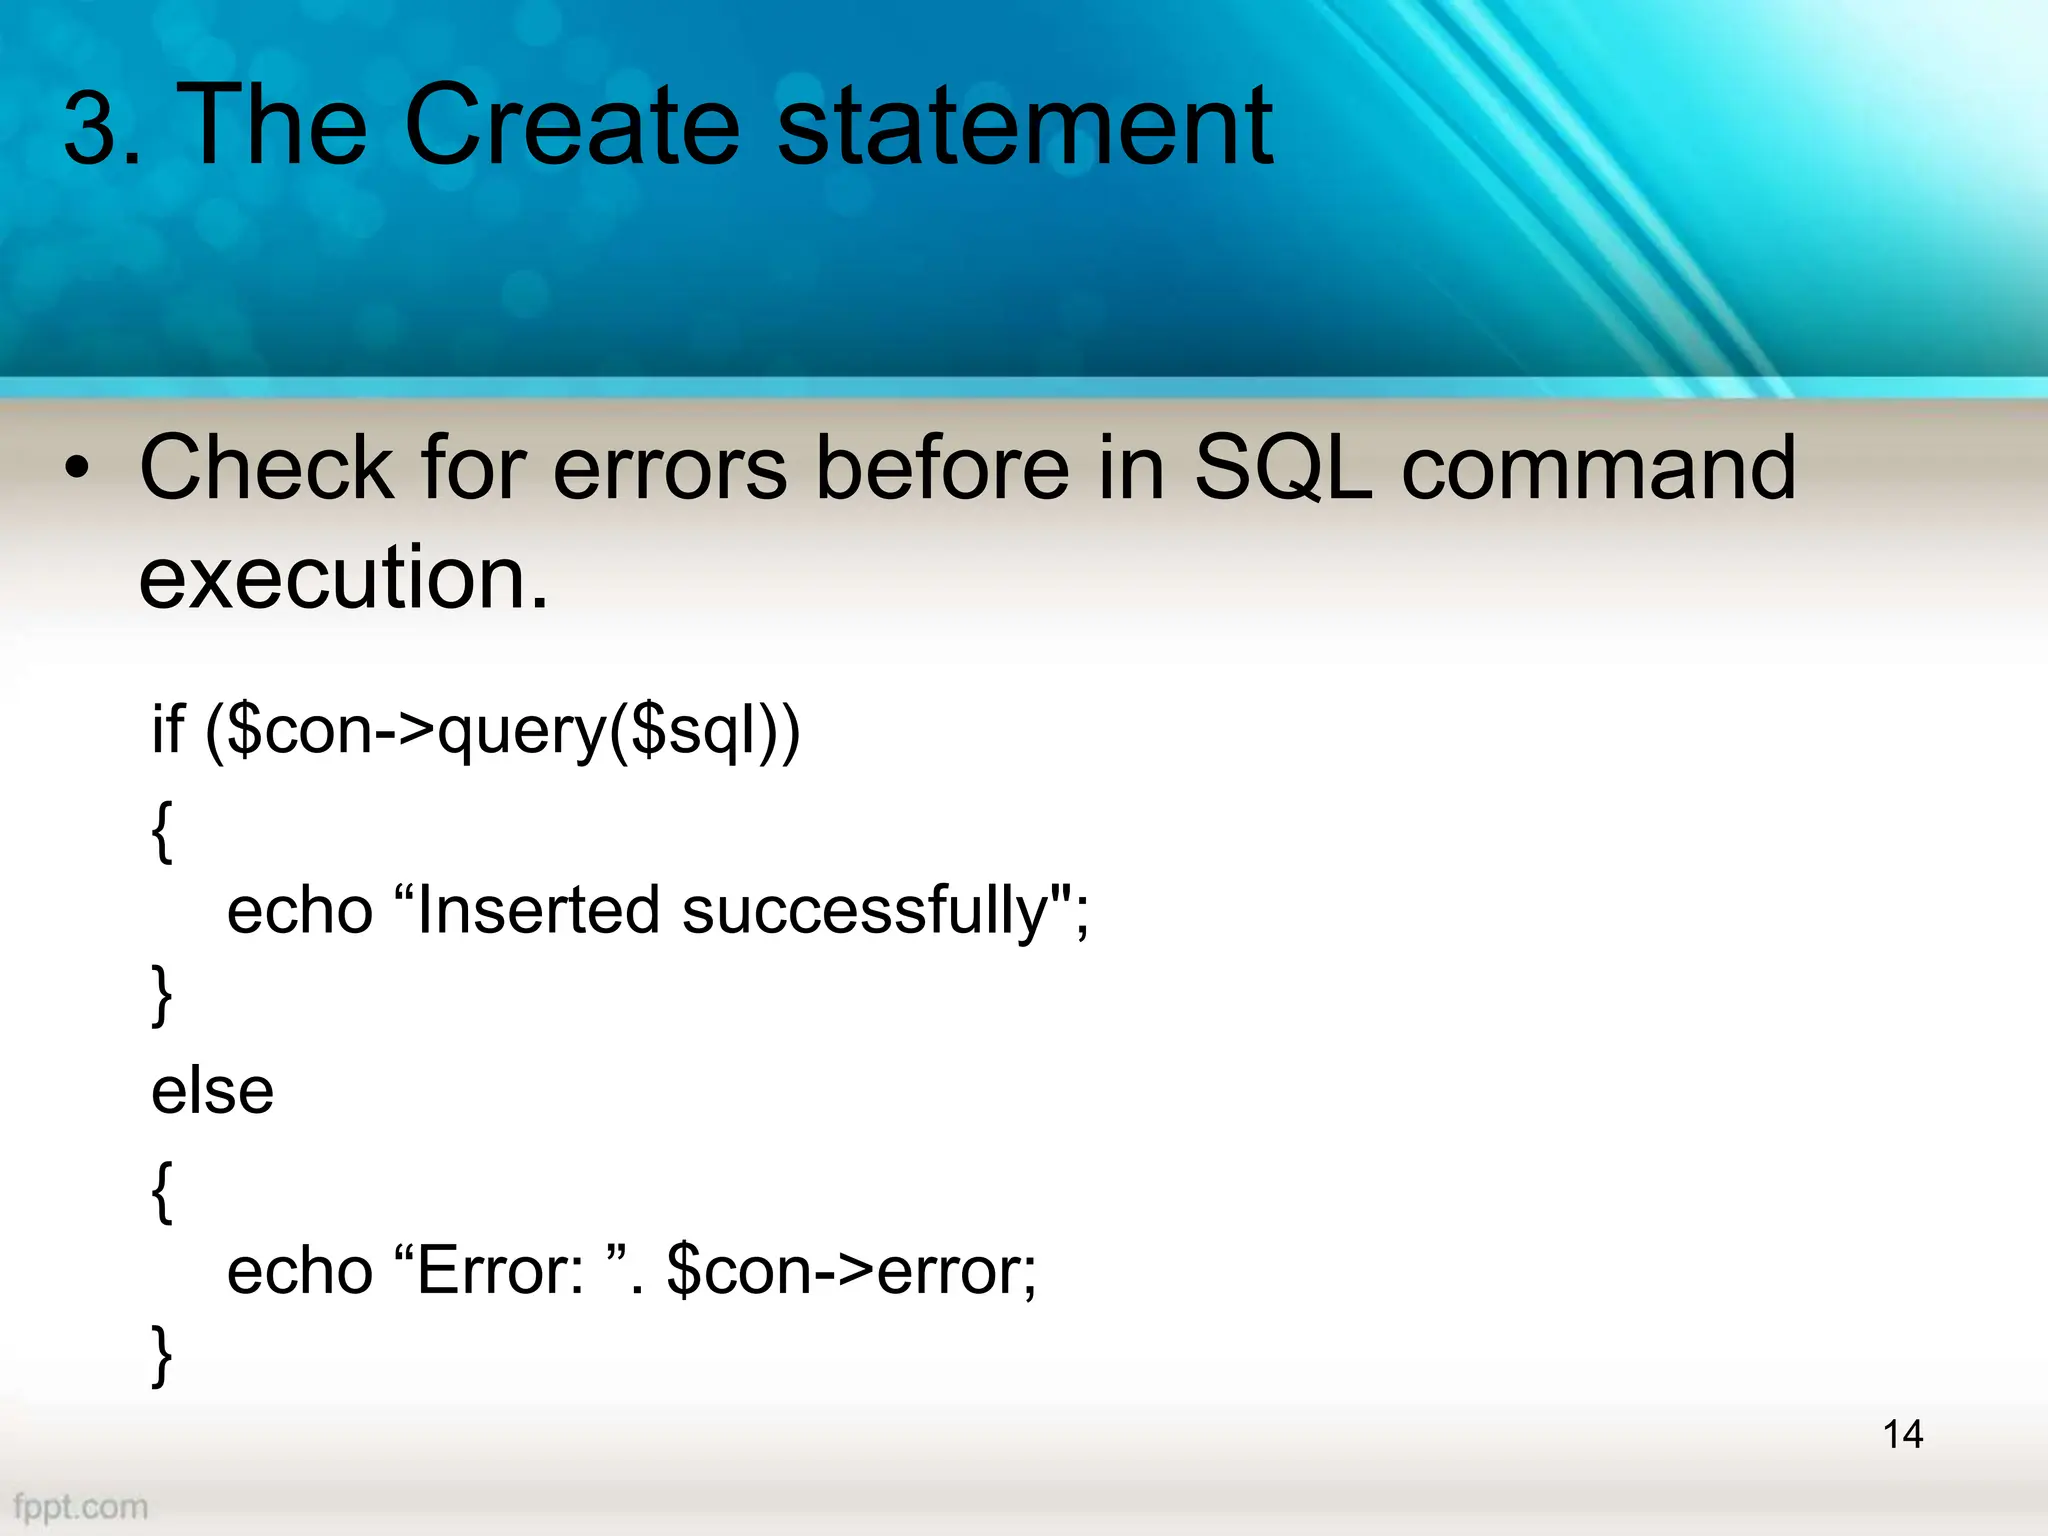
<?php
//Linking the configuration file
require 'config.php';
$ID = $_POST["stuID"];
$Name = $_POST["stuName"];
$sql= "INSERT INTO myTable(stuID, stuName)VALUES($ID,$Name)";
if($con->query($sql)){
echo "Inserted successfully";
}
else{
echo "Error:". $con->error;
}
$con->close();
?>
5
4
2
3
1
6
7](https://image.slidesharecdn.com/lecture08-databasehandling-240704050553-2019dffe/85/This-slide-show-will-brief-about-database-handling-18-320.jpg)
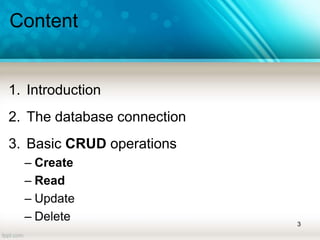
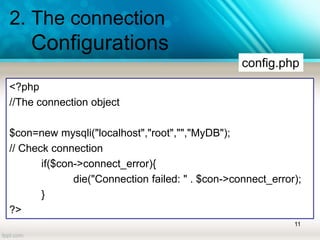
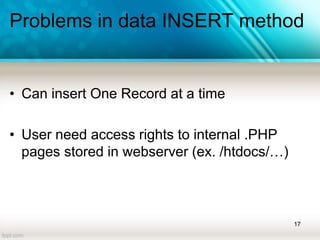
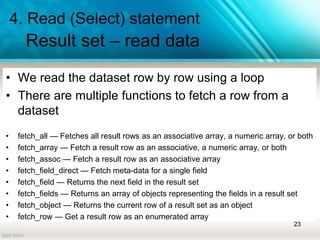
![Solution1
Use a PHP Form
<?php
//Linking the configuration file
require 'config.php';
?>
<form method="post" action="<?php echo htmlspecialchars($_SERVER["PHP_SELF"]);?>">
<h3>Input Student Data </h3>
Student ID :<input type="text" name="stuID"><BR />
Student Name :<input type="text" name="stuName"><BR />
<input type="submit" value="Submit" name="btnSubmit">
<input type="reset" value="Reset">
</form>
<?php
if(isset($_POST["btnSubmit"])){
$stuID = $_POST["stuID"];
$stuName = $_POST["stuName"];
$sql= "INSERT INTO myTable(stuID,stuName)VALUES($stuID,'$stuName')";
if($con->query($sql)){
echo "Inserted successfully";
}
else{
echo "Error:". $con->error;
}
}
$con->close();
?>
19
6
5
3
2
1
7
4](https://image.slidesharecdn.com/lecture08-databasehandling-240704050553-2019dffe/85/This-slide-show-will-brief-about-database-handling-19-320.jpg)

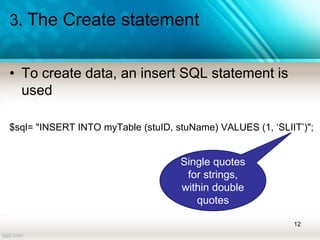
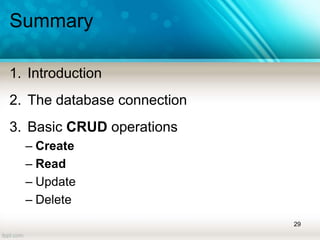
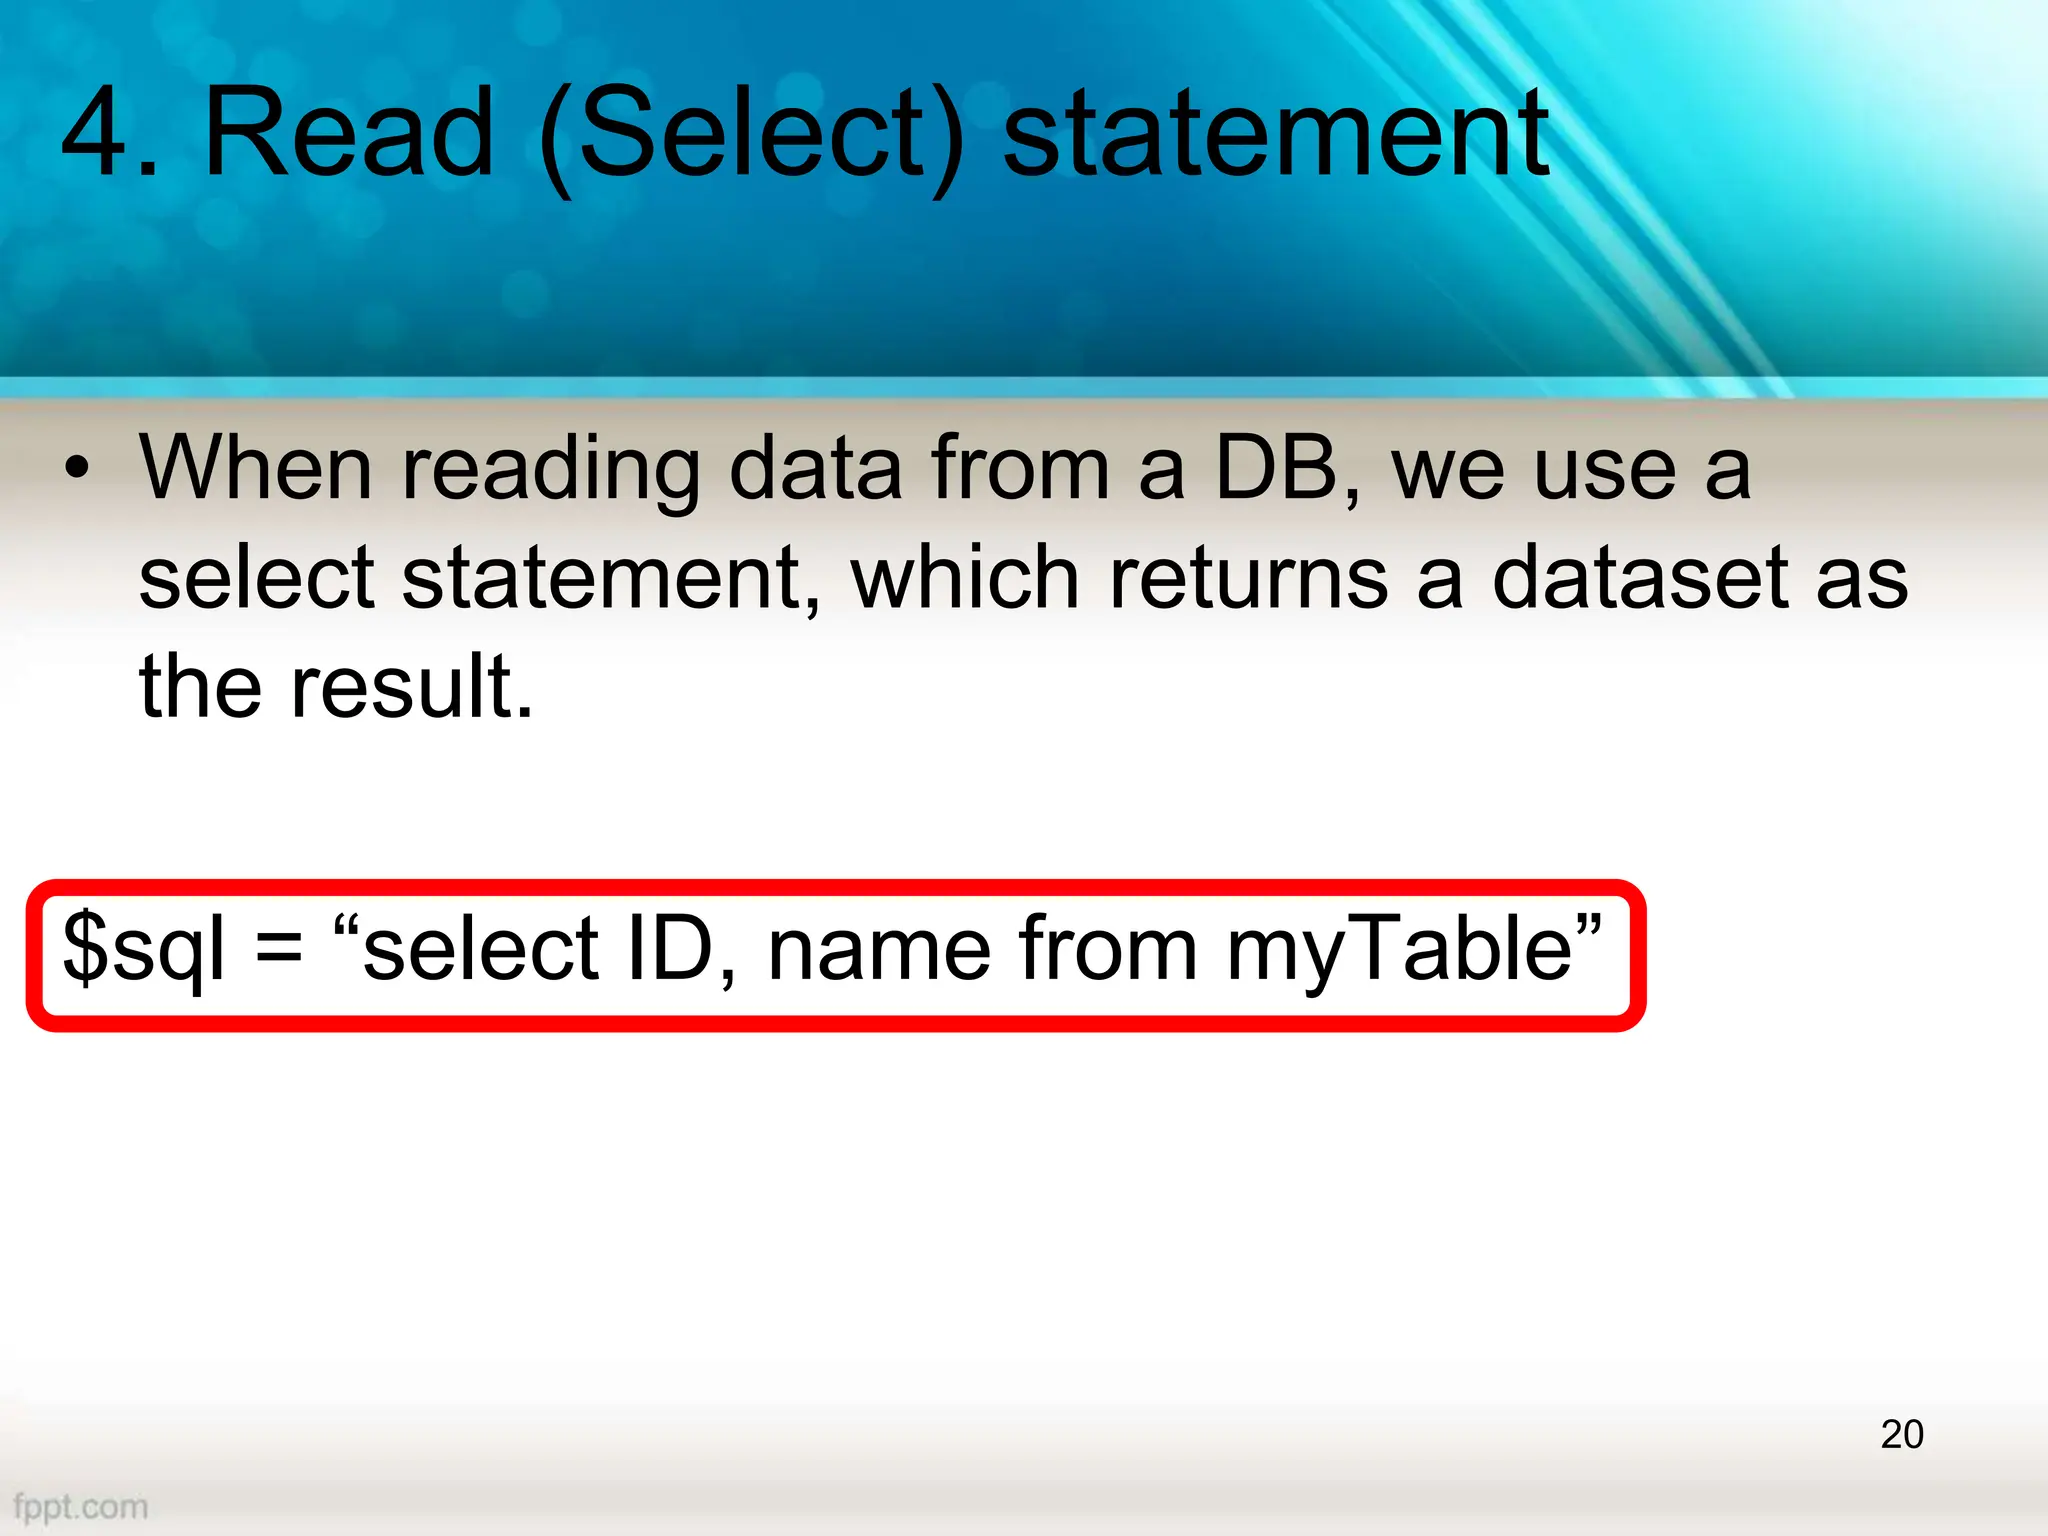
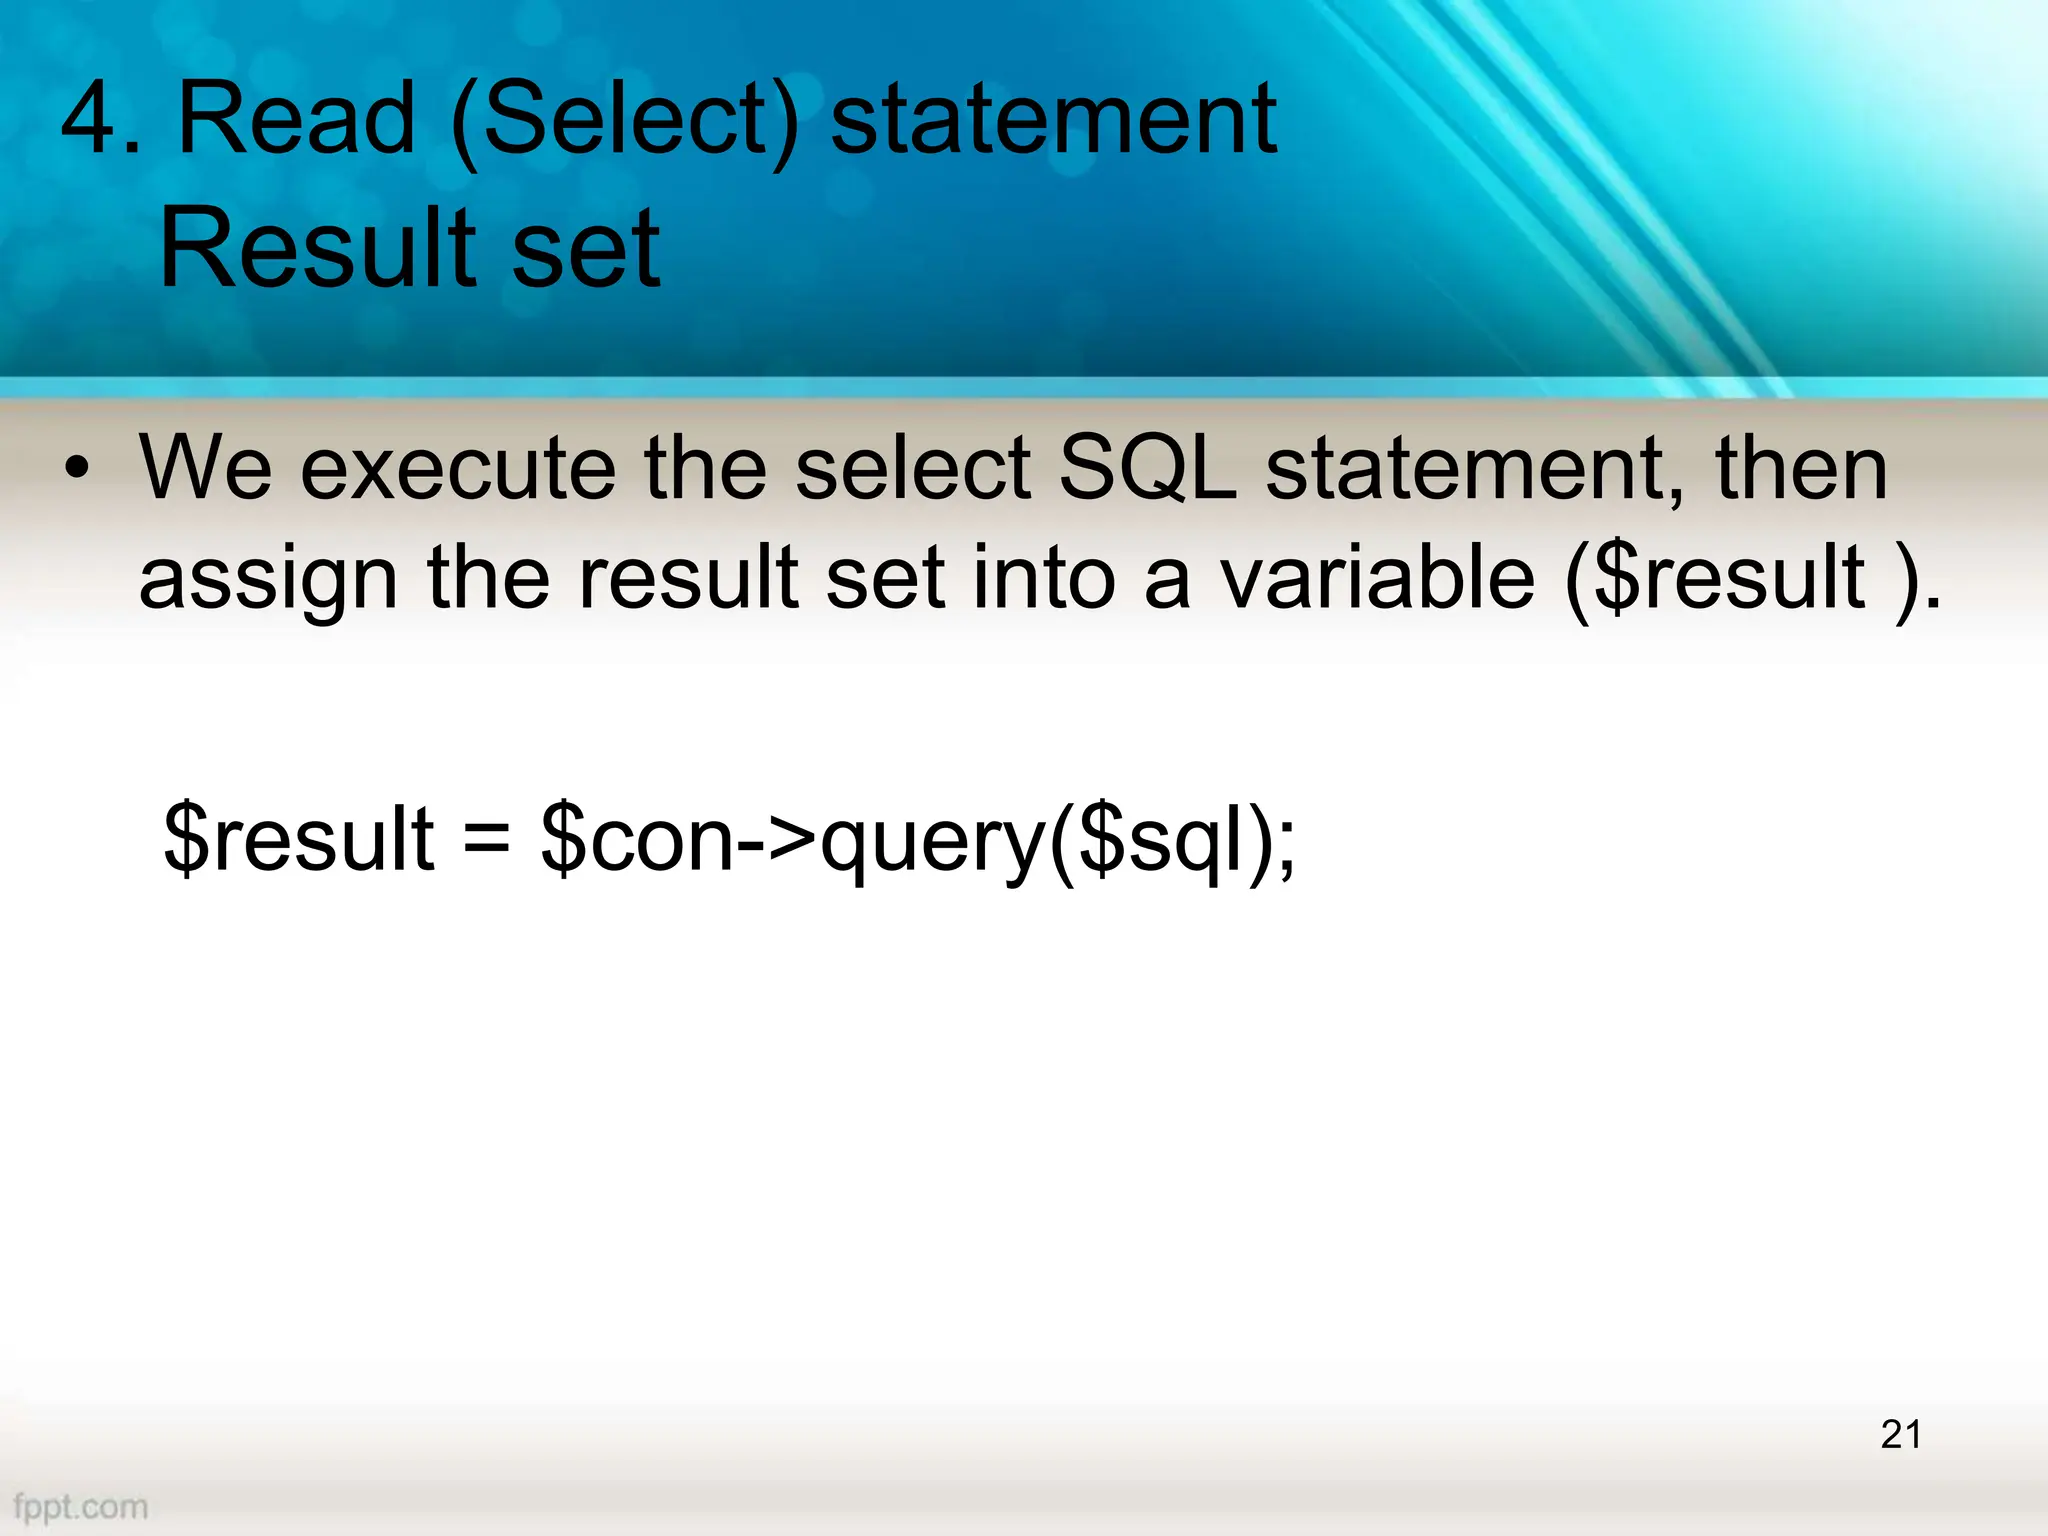
![4. Read (Select) statement
Result set – read data
• Column names can be used as the indexes to
read the cell data in the fetched row
echo $row["ID"]. " – " . $row["Name"] . "<BR />";
EX: show the data inside a table, on the page
25](https://image.slidesharecdn.com/lecture08-databasehandling-240704050553-2019dffe/85/This-slide-show-will-brief-about-database-handling-25-320.jpg)
![4. Read (Select) statement
Complete function
• Column names can be used as the indexes to
read the cell data in the fetched row
echo $row[“stuID"]. " – " . $row[“stuName"] . "<BR />";
EX: show the data inside a table, on the page
26](https://image.slidesharecdn.com/lecture08-databasehandling-240704050553-2019dffe/85/This-slide-show-will-brief-about-database-handling-26-320.jpg)
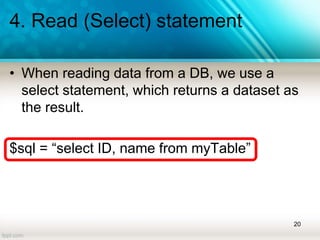
![Complete Code
<?php
//Linking the configuration file
require 'config.php';
$sql = "select stuID, stuName from myTable";
$result = $con->query($sql);
if($result->num_rows > 0){
//read data
while($row = $result->fetch_assoc()){
//Read and utilize the row data
echo $row["ID"]. " – " . $row["Name"] . "<BR />";
}
}
else
{
echo "no results";
}
$con->close();
?>
27
<?php
//The connection object
$con=new mysqli("localhost","root","","MyDB");
// Check connection
if($con->connect_error){
die("Connection failed: " . $con->connect_error);
}
?>](https://image.slidesharecdn.com/lecture08-databasehandling-240704050553-2019dffe/85/This-slide-show-will-brief-about-database-handling-27-320.jpg)
![4. Read
Complete function
<?php
require 'config.php';
function readData()
{
global $con;
$sql = "SELECT stuID, stuName FROM myTable";
$result = $con->query($sql);
if ($result->num_rows > 0)
{
while($row = $result->fetch_assoc())
{
echo "ID: " . $row["ID"]. " - Name: " . $row["Name"]. "<br>";
}
}
else
{
echo "No results";
}
$con->close();
}
readData();
?> 28
<?php
$con=new mysqli("localhost","root","","test");
if($con->connect_error)
{
die("Connection failed: ". $con->connect_error);
}
?>](https://image.slidesharecdn.com/lecture08-databasehandling-240704050553-2019dffe/85/This-slide-show-will-brief-about-database-handling-28-320.jpg)


![Solution1
Use a HTML Form
<!doctype html>
<html>
<head> </head>
<body>
<form method="post" action="form_process.php">
<h3>Input Student Data </h3>
Student ID :<input type="text" name="stuID"><BR />
Student Name :<input type="text" name="stuName"><BR />
<input type="submit" value="Submit">
<input type="reset" value="Reset">
</form>
</body>
</html>
18
<?php
//Linking the configuration file
require 'config.php';
$ID = $_POST["stuID"];
$Name = $_POST["stuName"];
$sql= "INSERT INTO myTable(stuID, stuName)VALUES($ID,$Name)";
if($con->query($sql)){
echo "Inserted successfully";
}
else{
echo "Error:". $con->error;
}
$con->close();
?>
5
4
2
3
1
6
7](https://image.slidesharecdn.com/lecture08-databasehandling-240704050553-2019dffe/75/This-slide-show-will-brief-about-database-handling-18-2048.jpg)
![Solution1
Use a PHP Form
<?php
//Linking the configuration file
require 'config.php';
?>
<form method="post" action="<?php echo htmlspecialchars($_SERVER["PHP_SELF"]);?>">
<h3>Input Student Data </h3>
Student ID :<input type="text" name="stuID"><BR />
Student Name :<input type="text" name="stuName"><BR />
<input type="submit" value="Submit" name="btnSubmit">
<input type="reset" value="Reset">
</form>
<?php
if(isset($_POST["btnSubmit"])){
$stuID = $_POST["stuID"];
$stuName = $_POST["stuName"];
$sql= "INSERT INTO myTable(stuID,stuName)VALUES($stuID,'$stuName')";
if($con->query($sql)){
echo "Inserted successfully";
}
else{
echo "Error:". $con->error;
}
}
$con->close();
?>
19
6
5
3
2
1
7
4](https://image.slidesharecdn.com/lecture08-databasehandling-240704050553-2019dffe/75/This-slide-show-will-brief-about-database-handling-19-2048.jpg)
![4. Read (Select) statement
Result set – read data
• Column names can be used as the indexes to
read the cell data in the fetched row
echo $row["ID"]. " – " . $row["Name"] . "<BR />";
EX: show the data inside a table, on the page
25](https://image.slidesharecdn.com/lecture08-databasehandling-240704050553-2019dffe/75/This-slide-show-will-brief-about-database-handling-25-2048.jpg)
![4. Read (Select) statement
Complete function
• Column names can be used as the indexes to
read the cell data in the fetched row
echo $row[“stuID"]. " – " . $row[“stuName"] . "<BR />";
EX: show the data inside a table, on the page
26](https://image.slidesharecdn.com/lecture08-databasehandling-240704050553-2019dffe/75/This-slide-show-will-brief-about-database-handling-26-2048.jpg)
![Complete Code
<?php
//Linking the configuration file
require 'config.php';
$sql = "select stuID, stuName from myTable";
$result = $con->query($sql);
if($result->num_rows > 0){
//read data
while($row = $result->fetch_assoc()){
//Read and utilize the row data
echo $row["ID"]. " – " . $row["Name"] . "<BR />";
}
}
else
{
echo "no results";
}
$con->close();
?>
27
<?php
//The connection object
$con=new mysqli("localhost","root","","MyDB");
// Check connection
if($con->connect_error){
die("Connection failed: " . $con->connect_error);
}
?>](https://image.slidesharecdn.com/lecture08-databasehandling-240704050553-2019dffe/75/This-slide-show-will-brief-about-database-handling-27-2048.jpg)
![4. Read
Complete function
<?php
require 'config.php';
function readData()
{
global $con;
$sql = "SELECT stuID, stuName FROM myTable";
$result = $con->query($sql);
if ($result->num_rows > 0)
{
while($row = $result->fetch_assoc())
{
echo "ID: " . $row["ID"]. " - Name: " . $row["Name"]. "<br>";
}
}
else
{
echo "No results";
}
$con->close();
}
readData();
?> 28
<?php
$con=new mysqli("localhost","root","","test");
if($con->connect_error)
{
die("Connection failed: ". $con->connect_error);
}
?>](https://image.slidesharecdn.com/lecture08-databasehandling-240704050553-2019dffe/75/This-slide-show-will-brief-about-database-handling-28-2048.jpg)
![Ex[1].3 php db connectivity](https://cdn.slidesharecdn.com/ss_thumbnails/ex1-3phpdbconnectivity-130227182839-phpapp02-thumbnail.jpg?width=600ounds&width=560&fit=bounds)


