Downloaded 16 times


![42 CHAPTER 2 Your first application
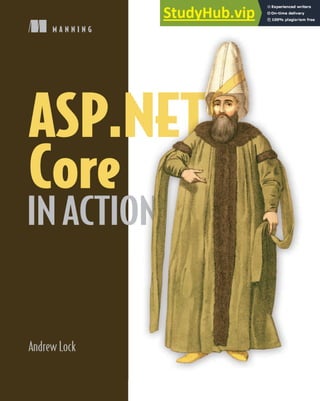
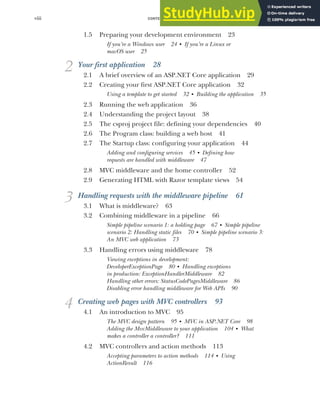
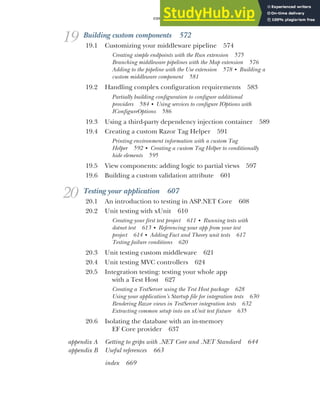
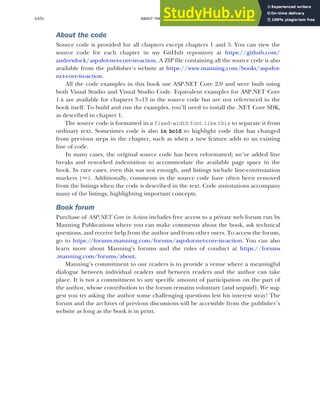
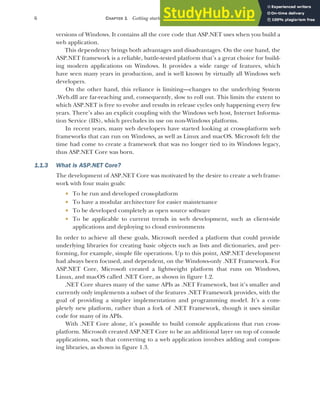
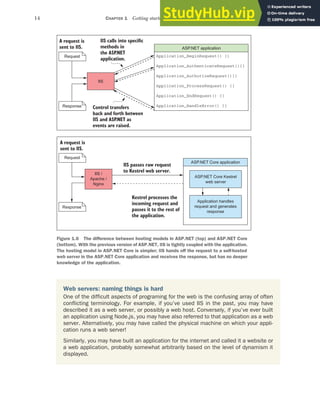
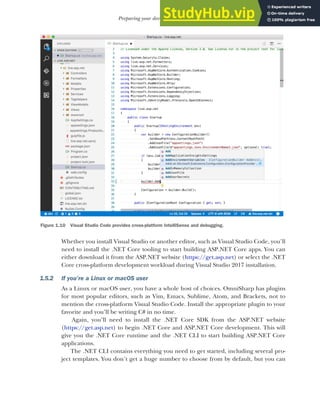
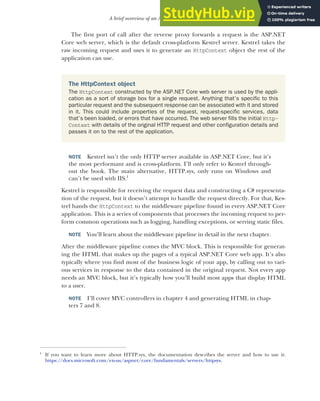
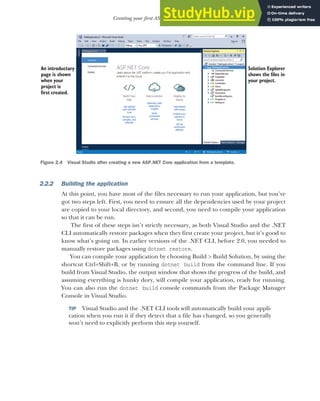
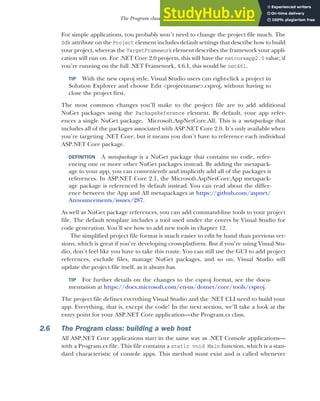
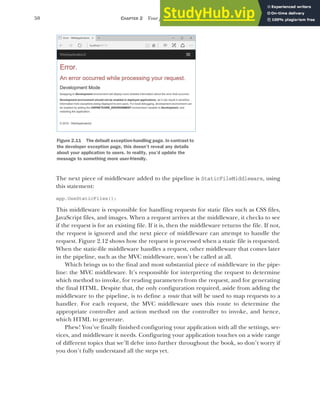
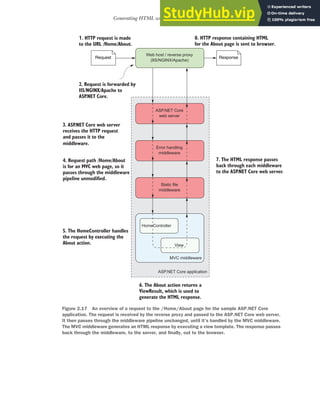
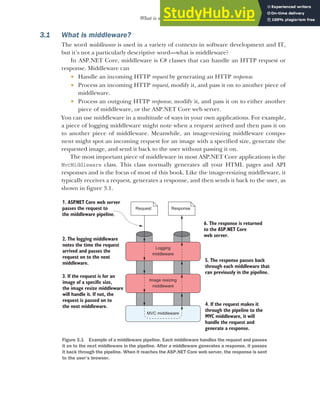
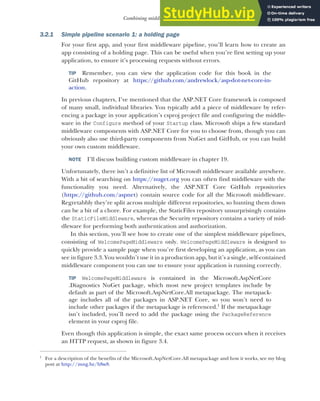
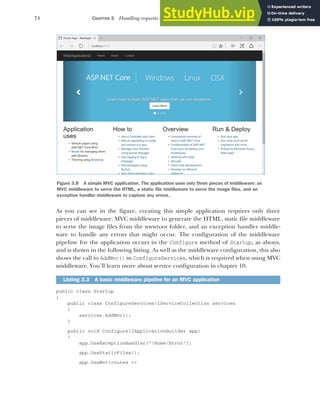
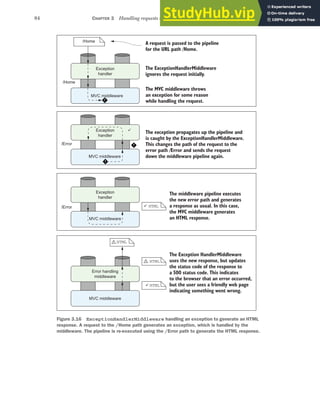
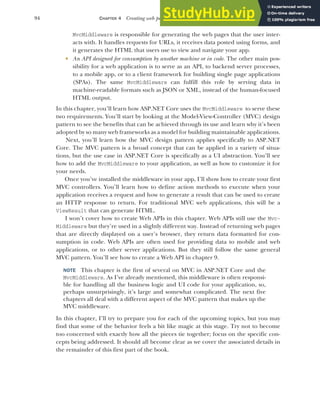
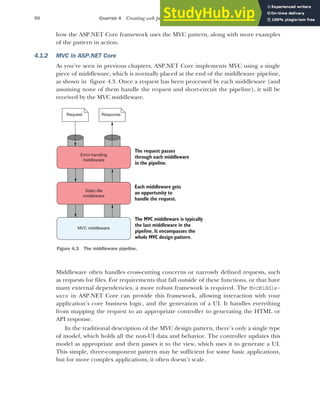
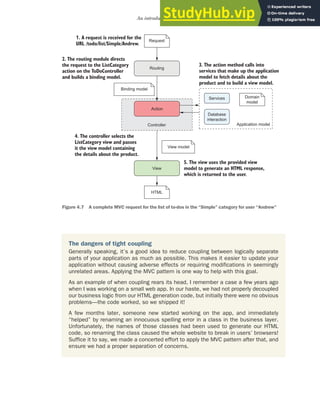
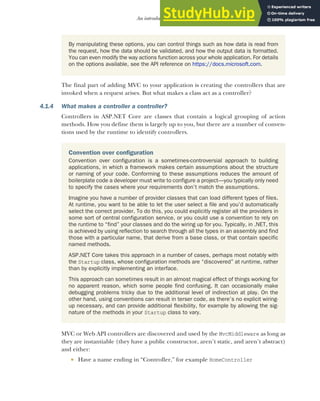
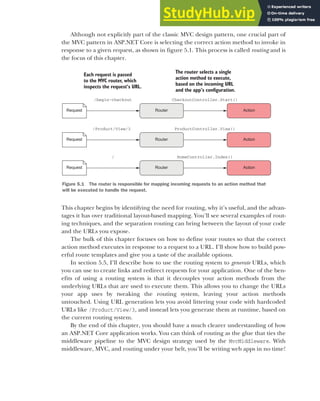
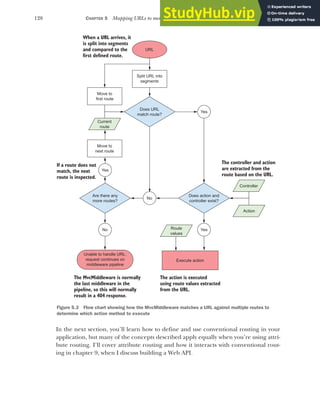
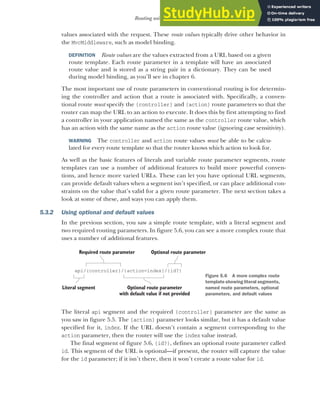
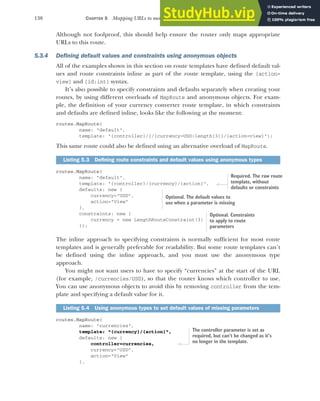
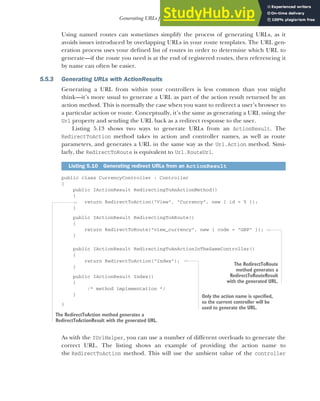
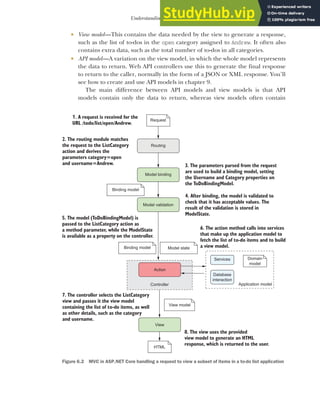
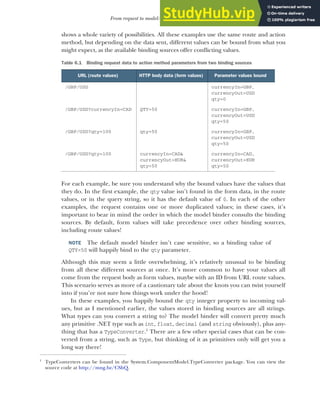
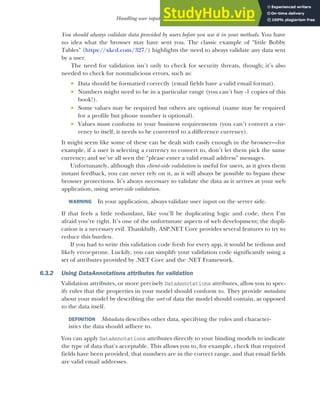
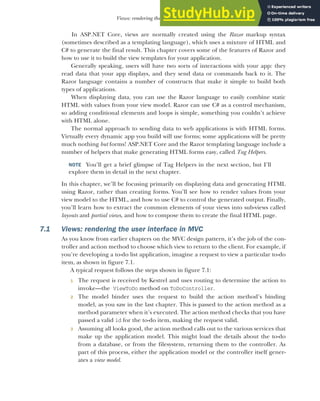
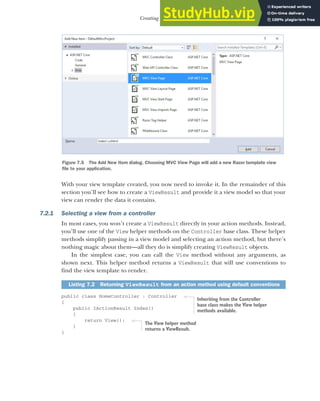
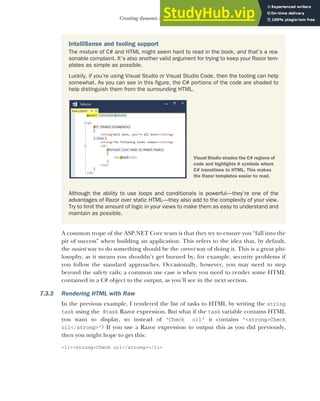
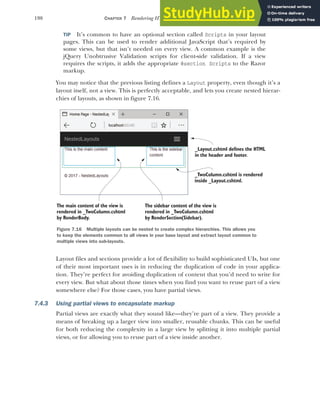
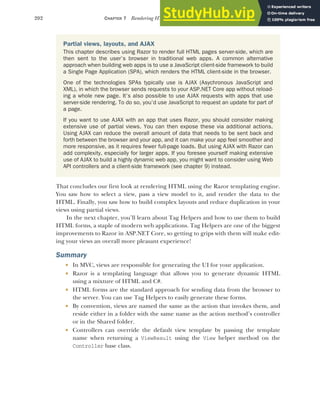
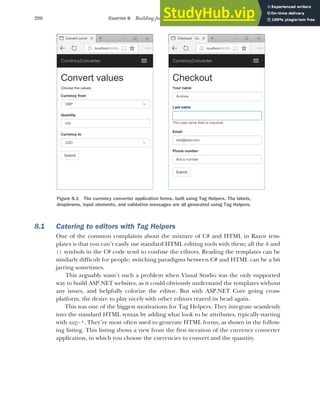
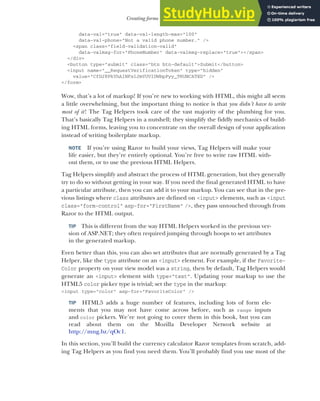
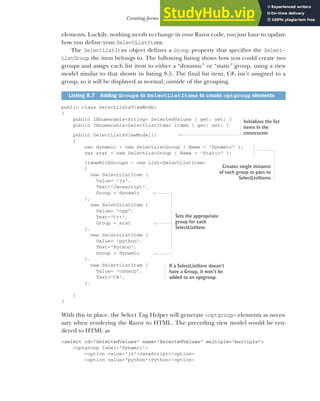
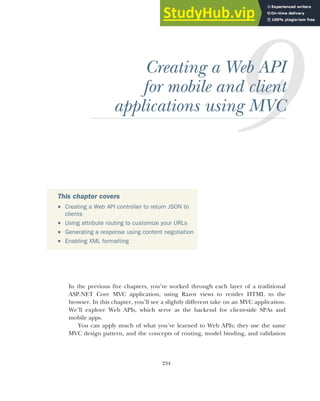
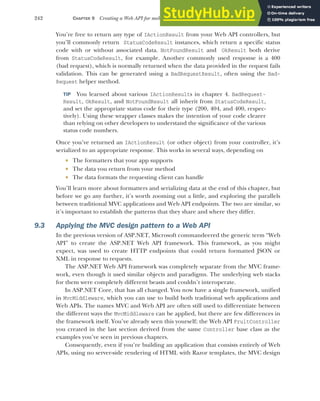
you start your web application. In ASP.NET Core applications, it’s used to build and
run an IWebHost instance, as shown in the following listing, which shows the default
Program.cs file. The IWebHost is the core of your ASP.NET Core application, contain-
ing the application configuration and the Kestrel server that listens for requests and
sends responses.
public class Program
{
public static void Main(string[] args)
{
BuildWebHost(args)
.Run();
}
public static IWebHost BuildWebHost(string[] args) =>
WebHost.CreateDefaultBuilder(args)
.UseStartup<Startup>()
.Build();
}
The Main function contains all the basic initialization code required to create a web
server and to start listening for requests. It uses a WebHostBuilder, created by the call
to CreateDefaultBuilder, to define how the IWebHost is configured, before instanti-
ating the IWebHost with a call to Build().
NOTE You’ll find this pattern of using a builder object to configure a com-
plex object repeated throughout the ASP.NET Core framework. It’s a useful
technique for allowing users to configure an object, delaying its creation until
all configuration has finished. It’s one of the patterns described in the “Gang
of Four” book, Design Patterns: Elements of Reusable Object-Oriented Software
(Addison Wesley, 1994).
Much of your app’s configuration takes place in the WebHostBuilder created by the
call to CreateDefaultBuilder, but it delegates some responsibility to a separate class,
Startup. The Startup class referenced in the generic UseStartup<> method is where
you configure your app’s services and define your middleware pipeline. In section 2.7,
we’ll spend a while delving into this crucial class.
At this point, you may be wondering why you need two classes for configuration:
Program and Startup. Why not include all of your app’s configuration in one class or
the other?
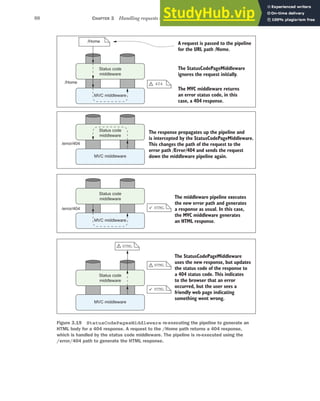
Figure 2.8 shows the typical split of configuration components between Program
and Startup. Generally speaking, Program is where you configure the infrastructure
Listing 2.2 The default Program.cs configures and runs an IWebHost
Create an IWebHost using
the BuildWebHost method.
Run the IWebHost,
start listening for
requests and
generating
responses.
Create a WebHostBuilder
using the default
configuration.
The Startup class defines
most of your application’s
configuration.
Build and return an
instance of IWebHost
from the WebHostBuilder.](https://image.slidesharecdn.com/asp-230807173723-31e70040/85/ASP-NET-Core-in-Action-2018-pdf-70-320.jpg)


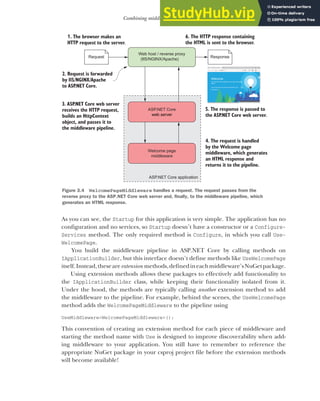
![52 CHAPTER 2 Your first application
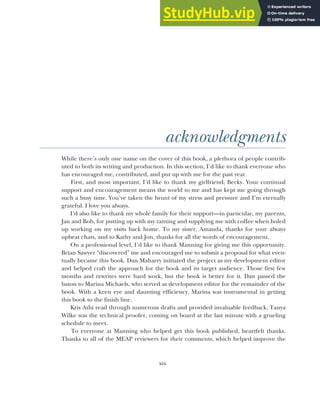
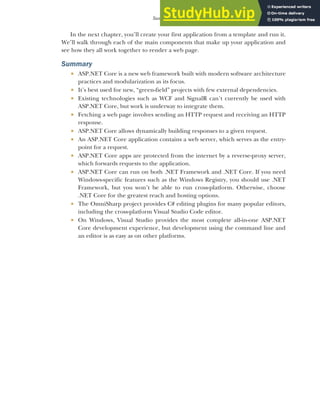
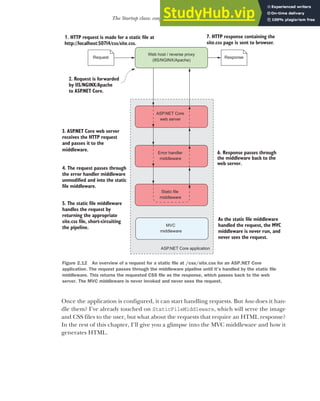
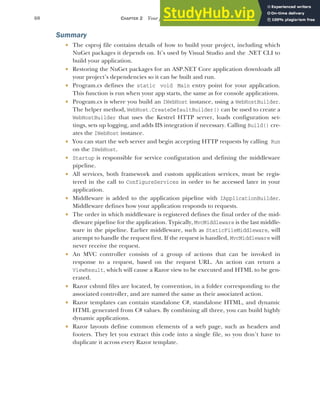
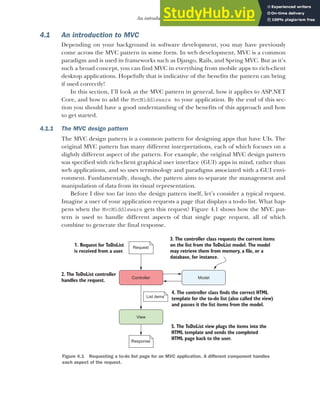
2.8 MVC middleware and the home controller
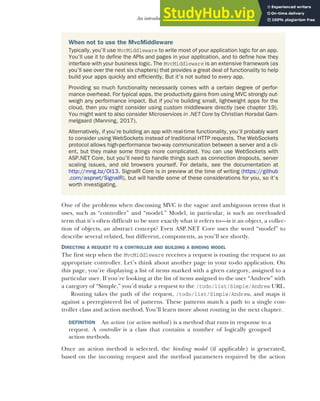
When an ASP.NET Core application receives a request, it progresses through the mid-
dleware pipeline until a middleware component can handle it, as you saw in figure
2.12. Normally, the final piece of middleware in a pipeline is the MVC middleware.
This middleware will attempt to match a request’s path to a configured route, which
defines which controller and action method to invoke. A path is the remainder of the
request URL, once the domain has been removed. For example, for a request to
www.microsoft.com/account/manage, the path is /account/manage.
DEFINITION An action is a method that runs in response to a request. A con-
troller is a class that contains a number of action methods that can be logi-
cally grouped.
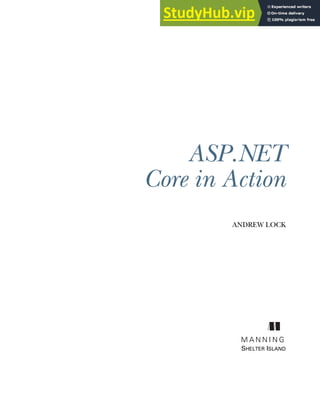
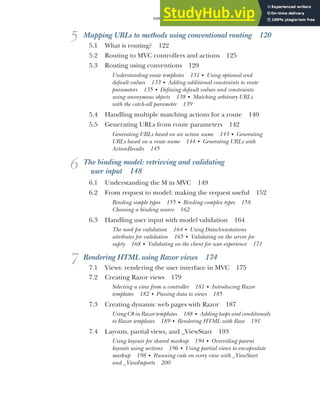
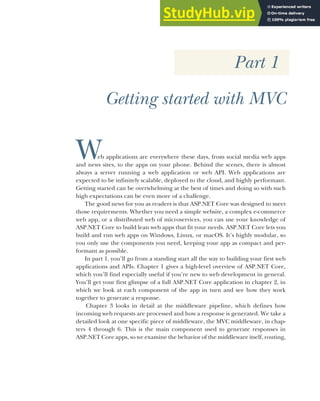
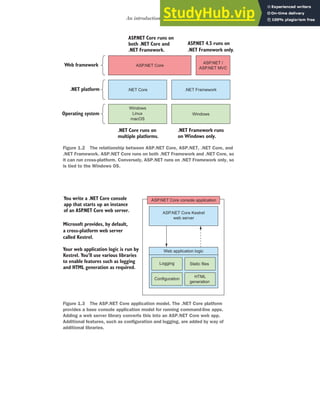
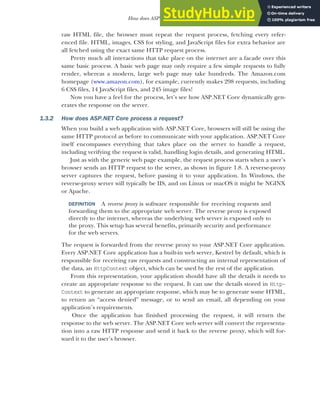
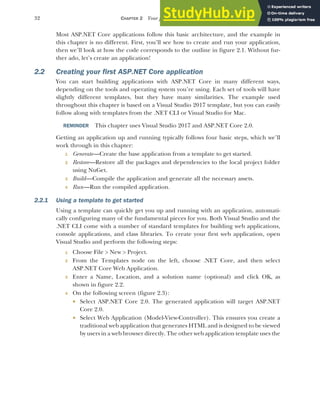
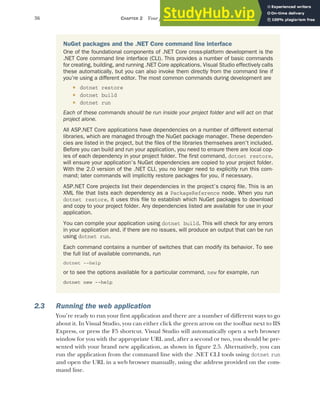
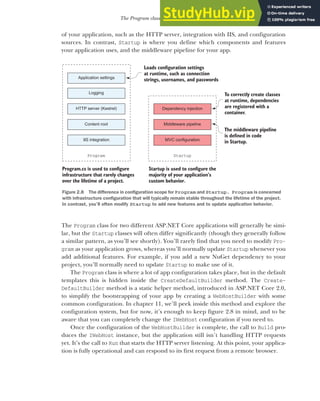
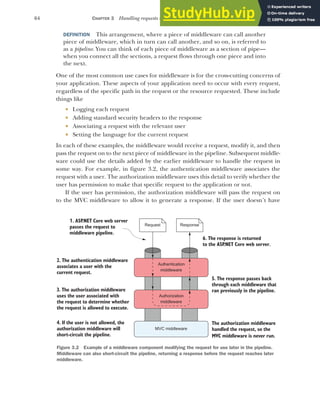
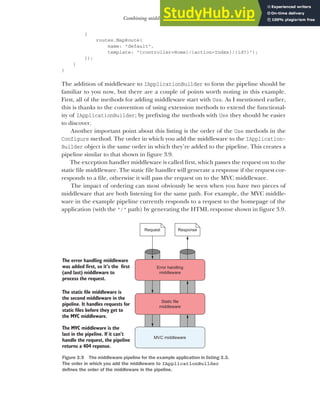
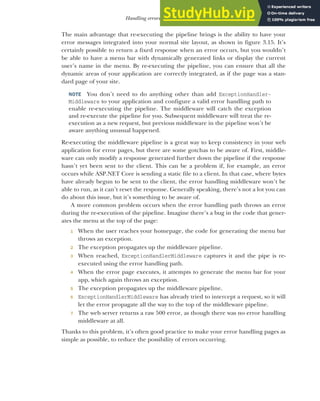
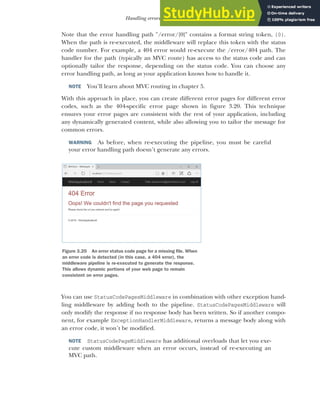
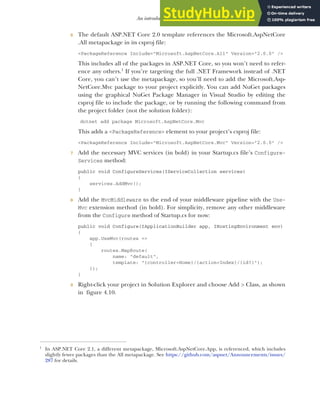
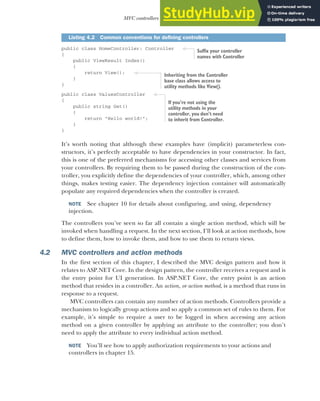
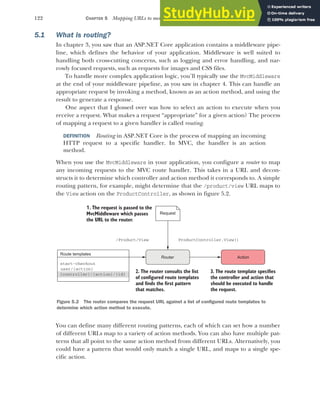
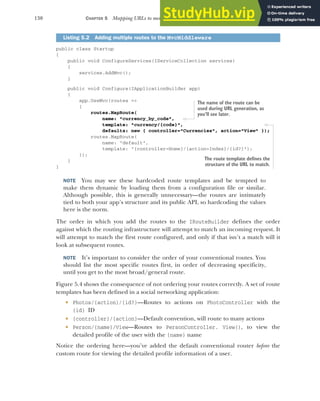
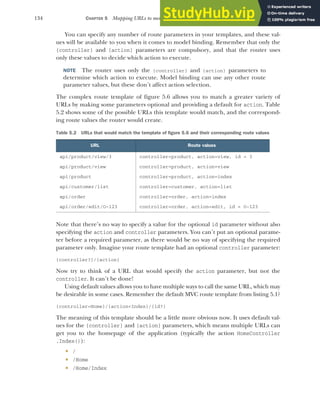
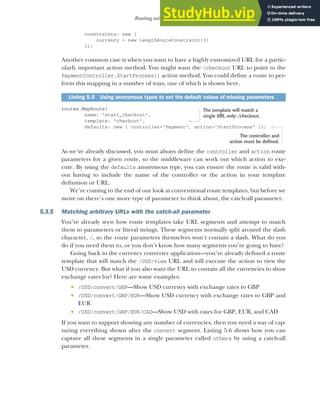
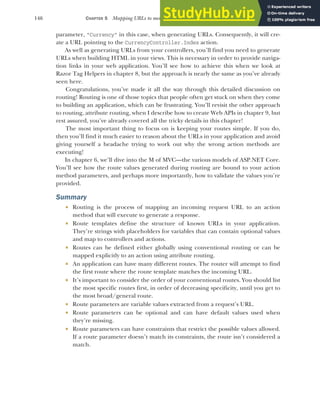
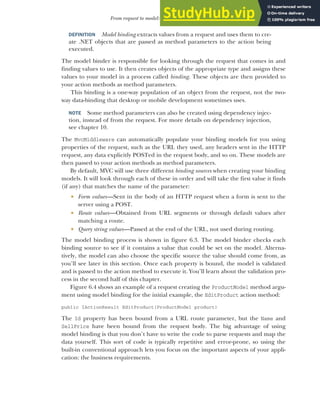
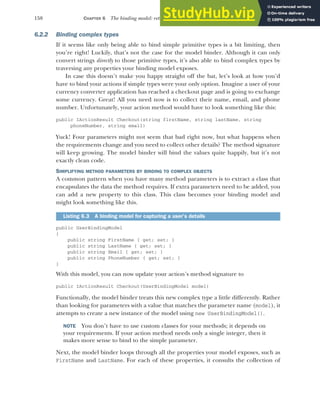
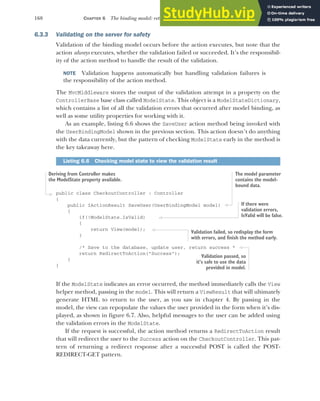
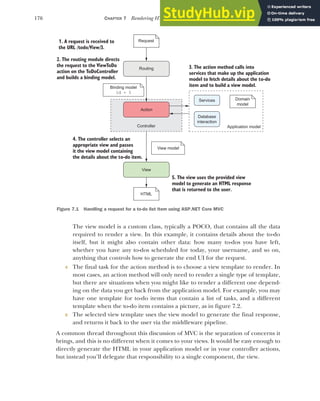
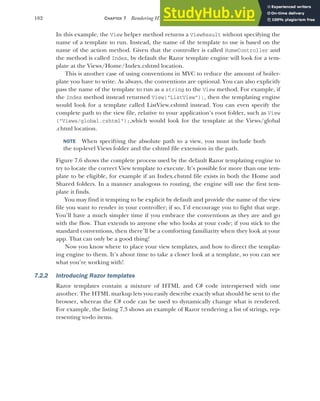
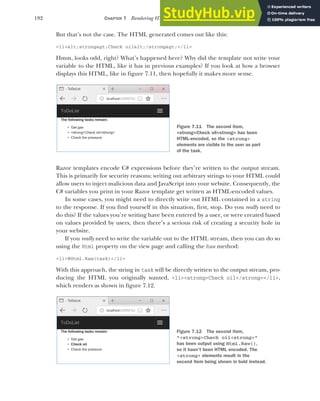
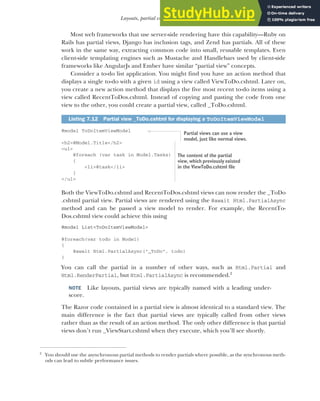
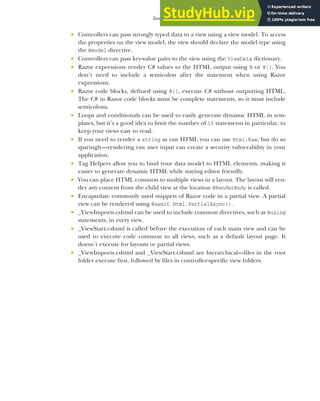
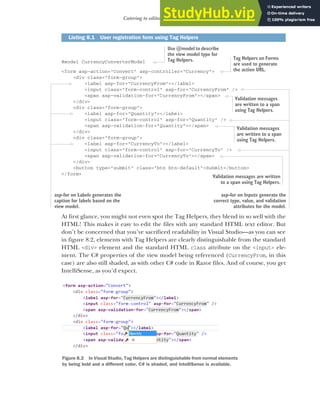
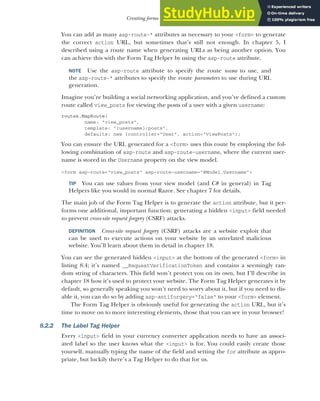
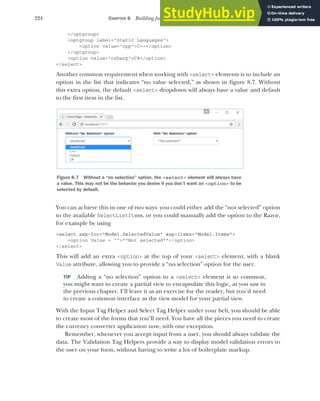
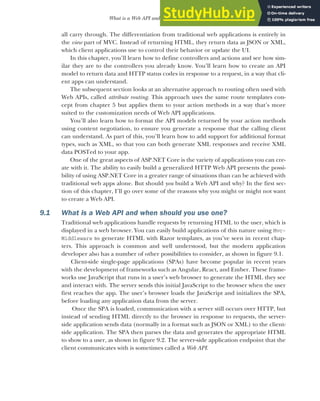
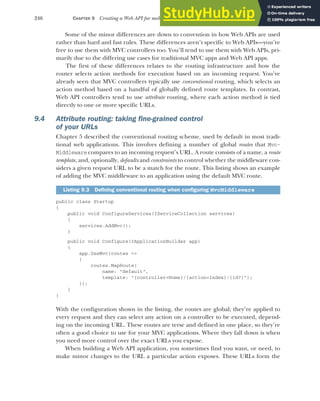
Once the middleware has selected a controller and action for a given request, the
appropriate class will be instantiated and the action method invoked. Controllers are
ordinary classes, though they often inherit from the Controller base class to provide
access to a number of helper methods, as shown in the following listing. Similarly,
there’s nothing special about action methods, other than that they typically return an
IActionResult, which contains instructions for handling the request.
public class HomeController : Controller
{
public IActionResult Index()
{
return View();
}
public IActionResult About()
{
ViewData["Message"] =
"Your application description page.";
return View();
}
public IActionResult Contact()
{
ViewData["Message"] = "Your contact page.";
return View();
}
public IActionResult Error()
{
Listing 2.6 The HomeController—an MVC controller
Action
methods
typically
return a
ViewResult
by calling
the View()
helper
method.
MVC controllers can inherit
from a helper base class but
don’t have to.
Data can be passed to
a view using the
ViewData dictionary.
Data can be passed to
a view using the
ViewData dictionary.
If not specified,
the name of the
view is taken
from the name
of the action
method.](https://image.slidesharecdn.com/asp-230807173723-31e70040/85/ASP-NET-Core-in-Action-2018-pdf-80-320.jpg)


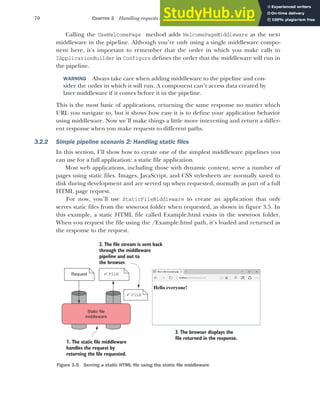
![57
Generating HTML with Razor template views
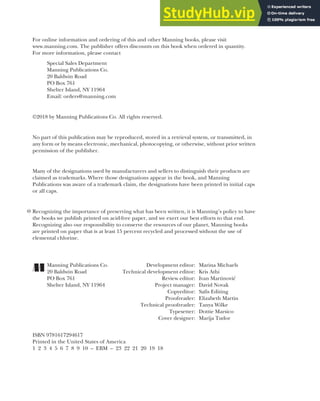
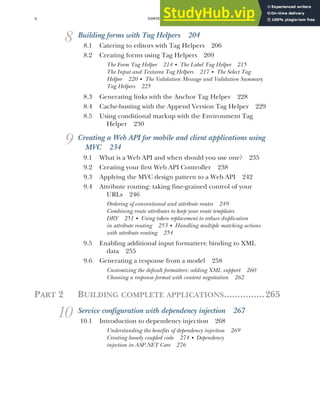
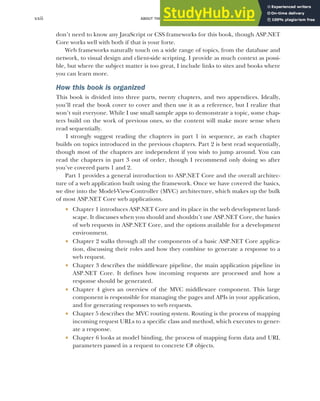
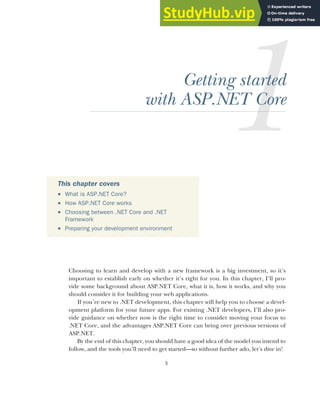
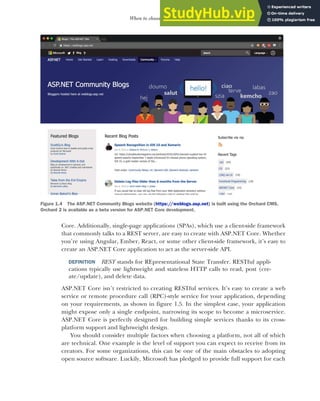
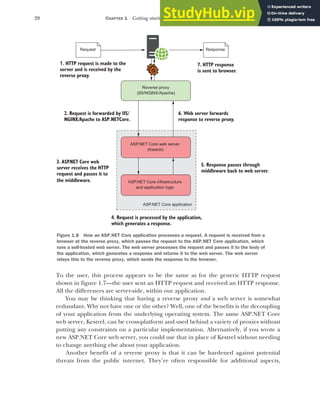
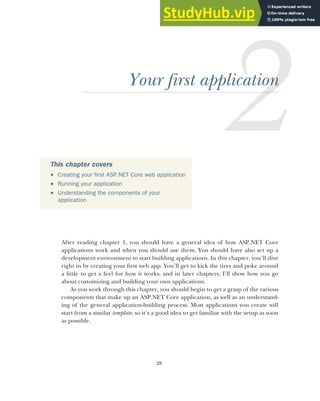
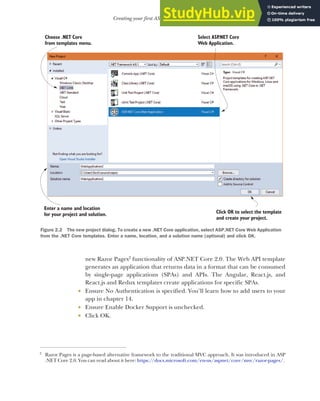
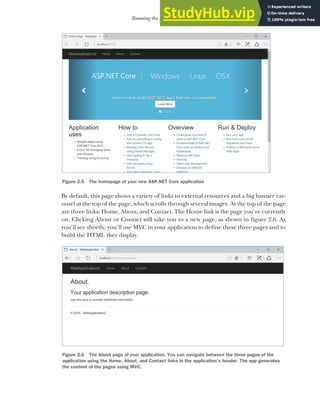
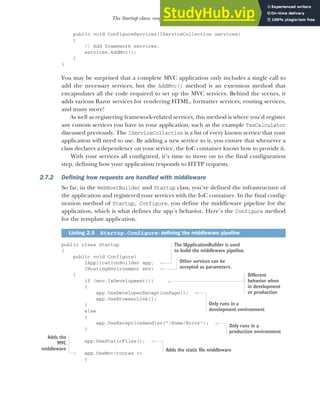
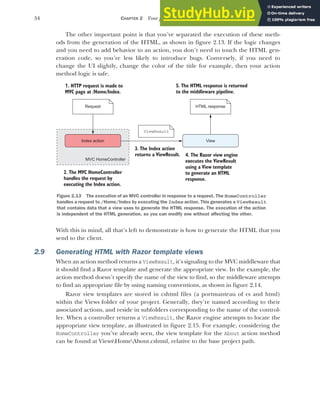
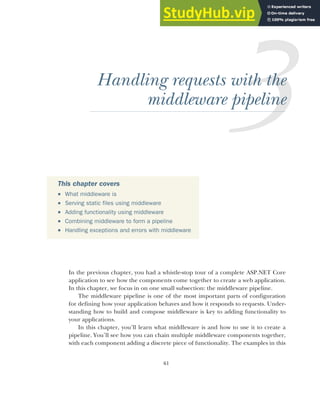
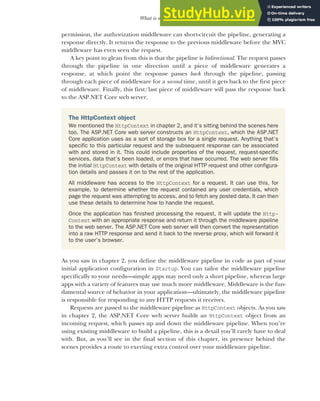
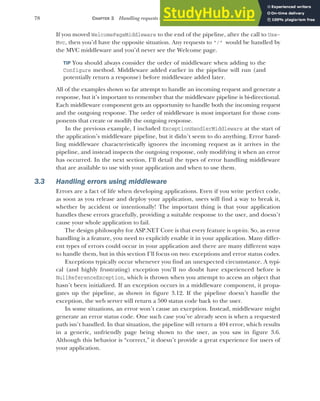
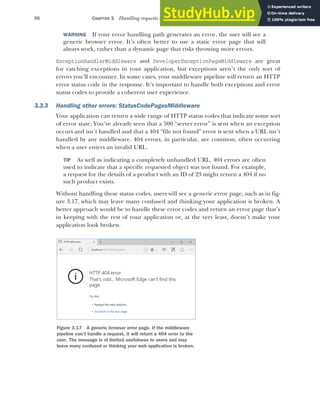
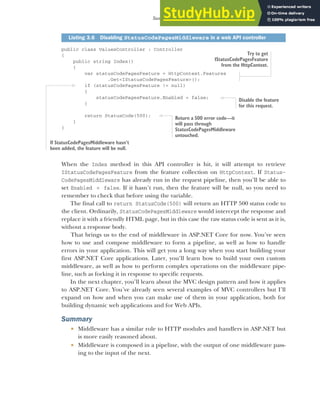
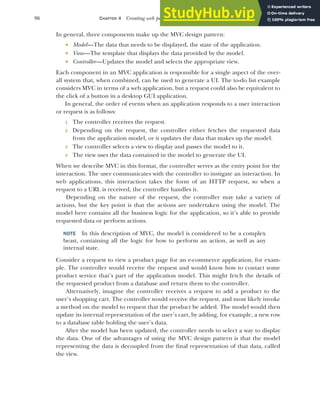
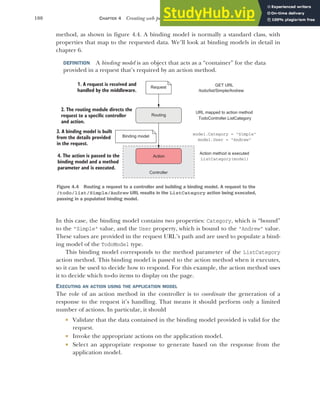
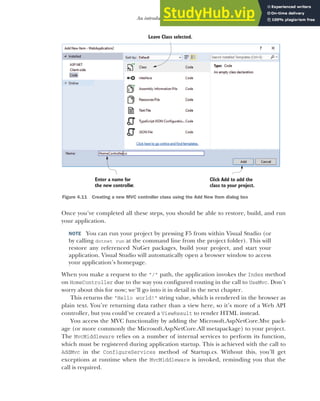
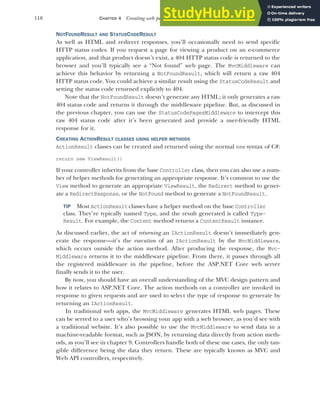
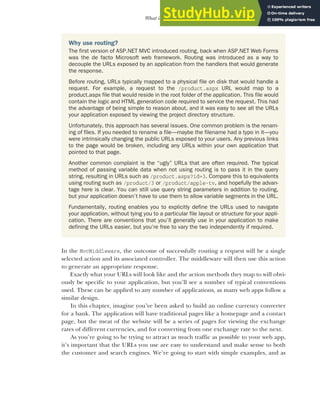
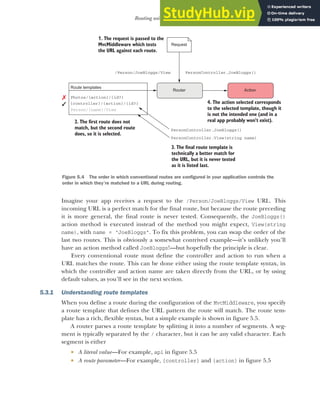
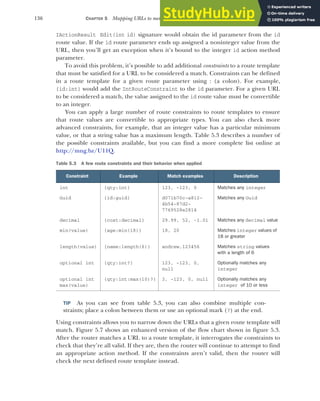
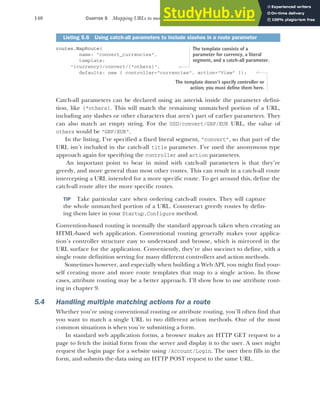
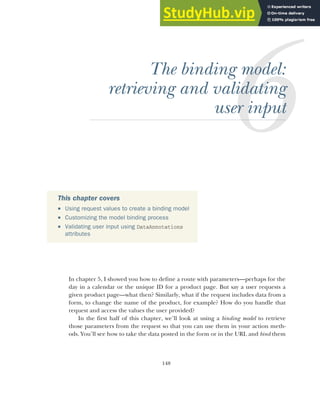
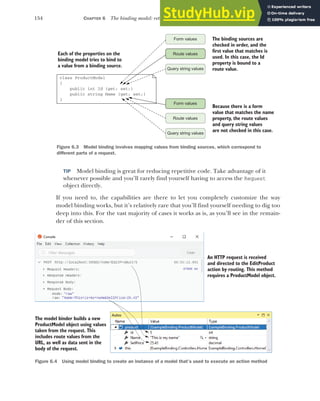
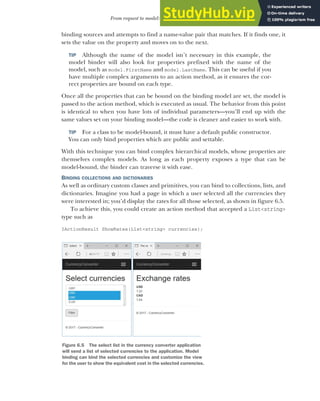
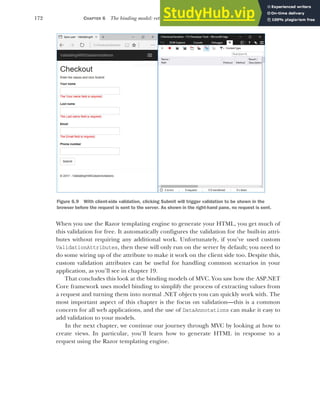
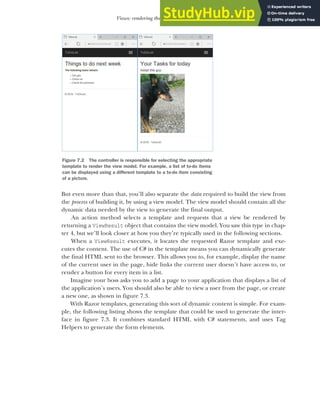
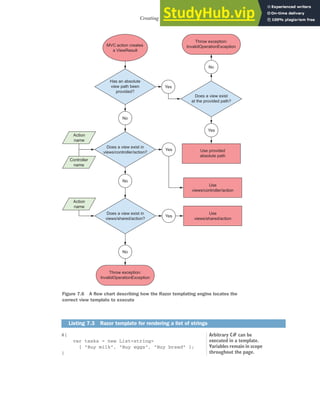
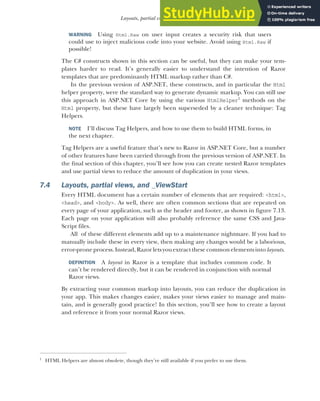
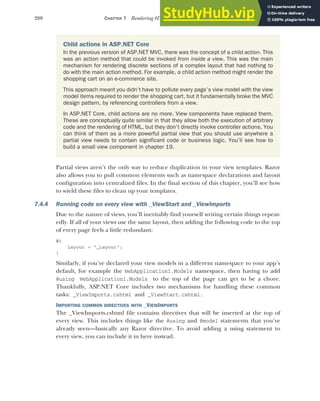
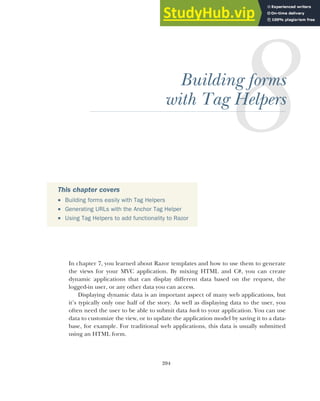
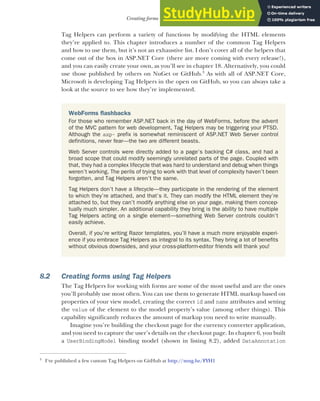
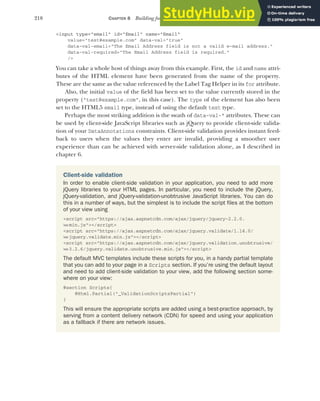
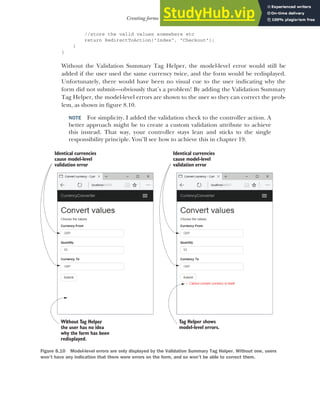
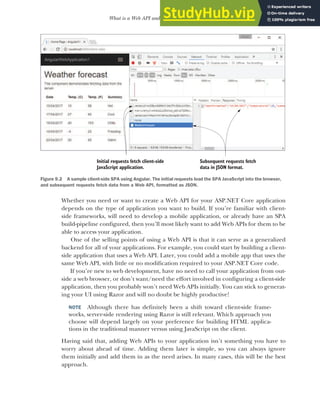
Once the template has been located, it can be executed. Figure 2.16 shows the result
of executing the About action method and rendering the associated Razor template.
The following listing shows the contents of the About.cshtml file. You can see that
the file consists of a combination of some standalone C# code, some standalone
HTML, and some points where you’re writing C# values in the HTML.
@{
ViewData["Title"] = "About";
}
<h2>@ViewData["Title"]</h2>
<h3>@ViewData["Message"]</h3>
<p>Use this area to provide additional information.</p>
This file, although small, demonstrates three features of Razor that you can use when
building your templates. The simplest and most obvious point is that standalone,
static HTML is always valid in a template and will be rendered as is in the response.
Second, you can write ordinary C# code in Razor templates by using this construct
@{ /* C# code here */ }
Any code between the curly braces will be executed but won’t be written to the
response. In the listing you’re setting the title of the page by writing a key to the View-
Data dictionary, but you aren’t writing anything to the response at this point:
@{
ViewData["Title"] = "About";
}
Listing 2.7 A simple Razor template—About.cshtml
Figure 2.16 Rendering a Razor template to HTML. The About
action is invoked and returns a ViewResult. The MVC
middleware searches for the appropriate Razor template and
executes it to generate the HTML displayed in the browser.
C# code that doesn’t write to
the response
HTML with dynamic C# values
written to the response
Standalone,
static HTML](https://image.slidesharecdn.com/asp-230807173723-31e70040/85/ASP-NET-Core-in-Action-2018-pdf-85-320.jpg)
![58 CHAPTER 2 Your first application
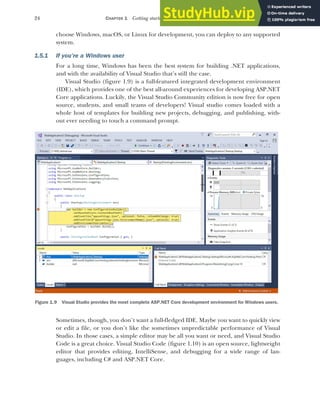
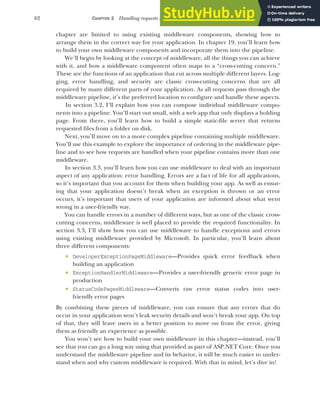
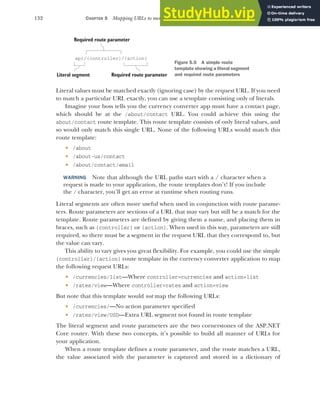
Another feature shown in this template is dynamically writing C# variables to the
HTML stream using the @ symbol. This ability to combine dynamic and static markup
is what gives Razor templates their power. In the example, you’re fetching the "Title"
and "Message" values from the ViewData dictionary and writing the values to the
response inside the <h2> and <h3> tags, respectively:
<h2>@ViewData["Title"]</h2>
<h3>@ViewData["Message"]</h3>
You may also remember that you previously set the value of the "Message" key in the
About action method, which you’re now retrieving and writing to the response. This is
one of the ways to pass data from an action method to a view—we’ll discuss others in
chapter 7.
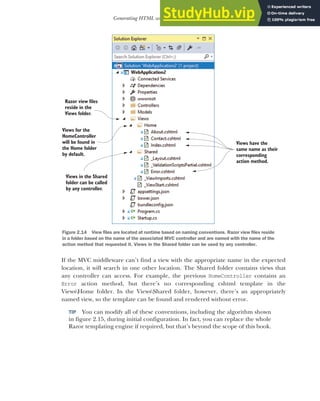
At this point, you might be a little confused by the template from the listing when
compared to the output shown in figure 2.16. The title and the message values appear
in both the listing and figure, but some parts of the final web page don’t appear in the
template. How can that be?
Razor has the concept of layouts, which are base templates that define the common
elements of your application, such as headers and footers. These layouts define a
writeable section in which they will render the action method template, such as the
code in listing 2.7. The HTML of the layout combines with the action method tem-
plate to produce the final HTML that’s sent to the browser. This prevents you having
to duplicate code for the header and footer in every page and means that, if you need
to tweak something, you’ll only need to do it in one place.
NOTE I’ll cover Razor templates, including layouts, in detail in chapter 7.
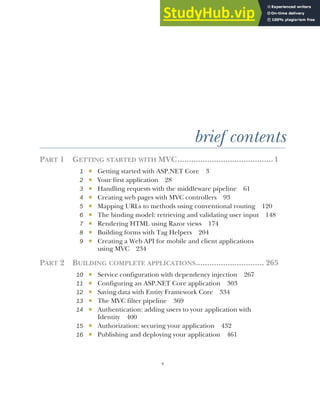
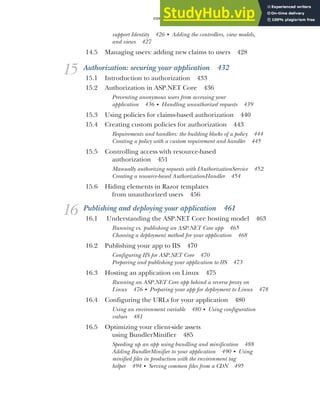
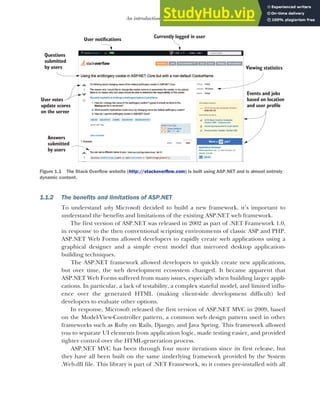
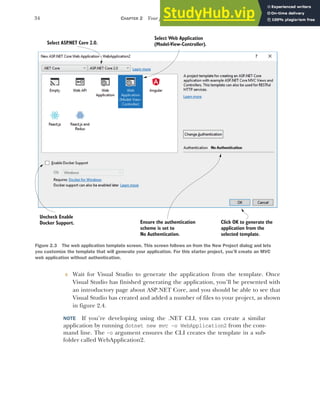
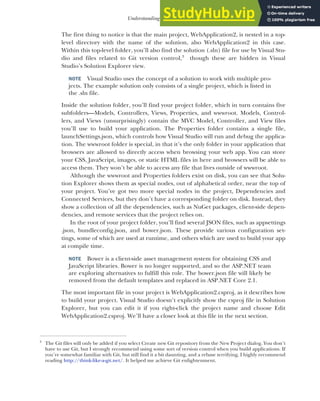
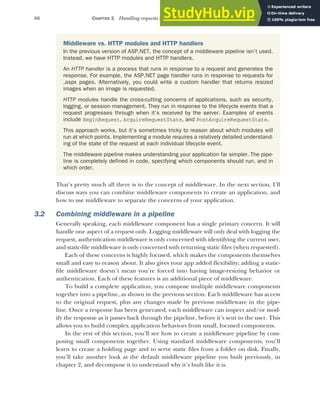
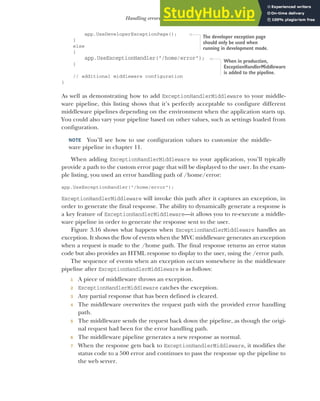
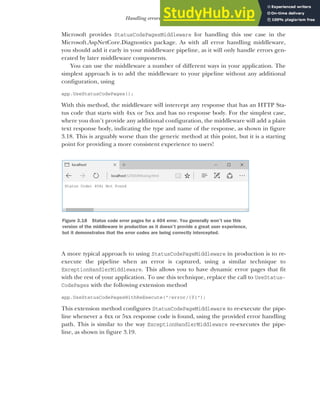
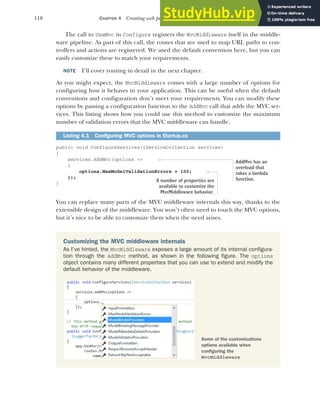
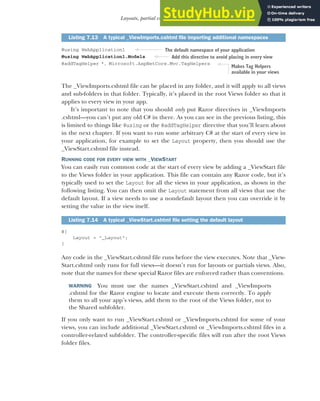
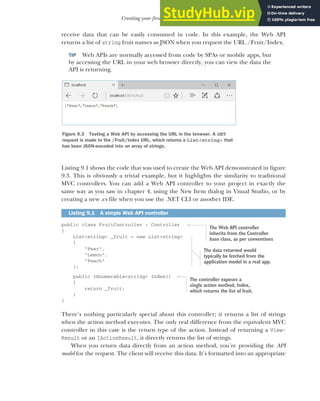
And there you have it, a complete ASP.NET Core MVC application! Before I move on,
we’ll take one last look at how our application handles a request. Figure 2.17 shows a
request to the /Home/About path being handled by the sample application. You’ve
seen everything here already, so the process of handling a request should be familiar.
It shows how the request passes through the middleware pipeline before being han-
dled by the MVC middleware. A view is used to generate the HTML response, which
passes back through the middleware to the ASP.NET Core web server, before being
sent to the user’s browser.
It’s been a pretty intense trip, but you now have a good overview of how an entire
application is configured and how it handles a request using MVC. In the next chap-
ter, you’ll take a closer look at the middleware pipeline that exists in all ASP.NET Core
applications. You’ll learn how it’s composed, how you can use it to add functionality to
your application, and how you can use it to create simple HTTP services.](https://image.slidesharecdn.com/asp-230807173723-31e70040/85/ASP-NET-Core-in-Action-2018-pdf-86-320.jpg)


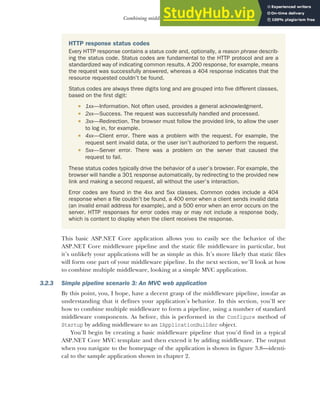


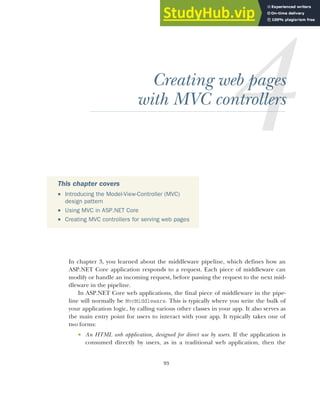
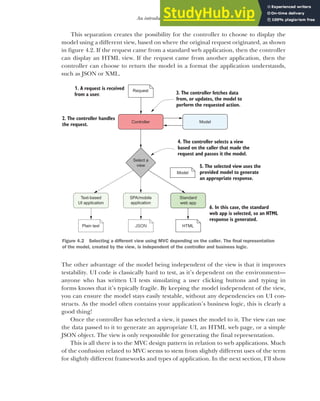
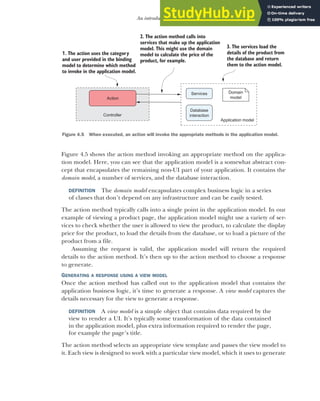


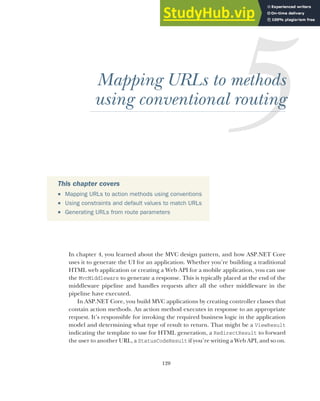
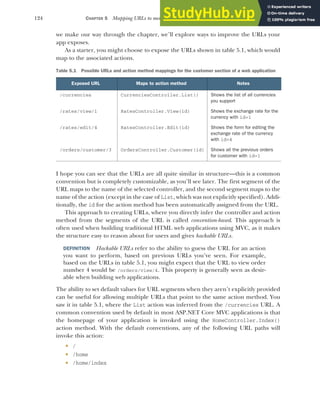

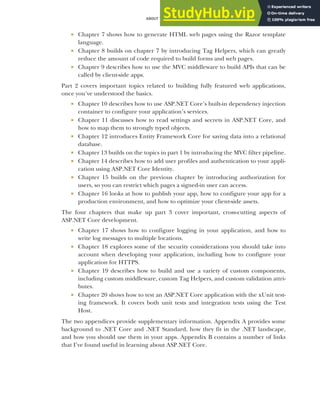
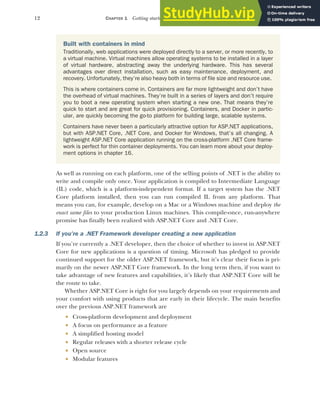
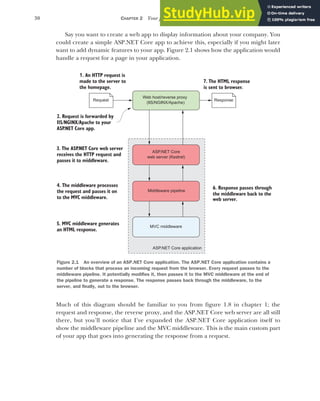
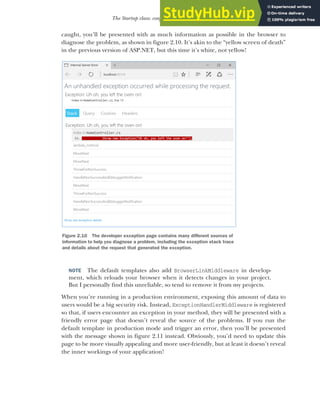
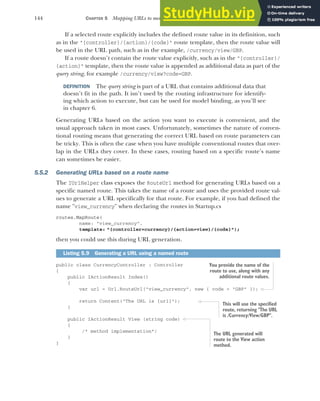
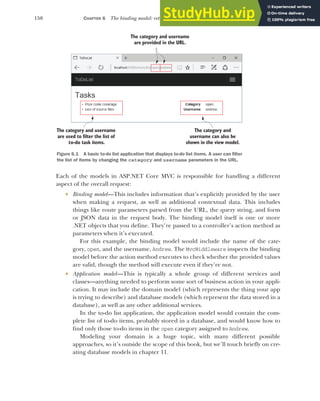
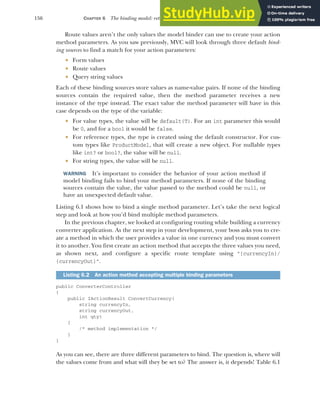
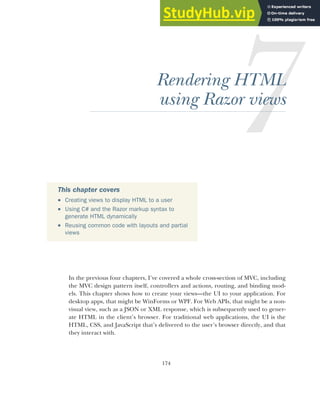
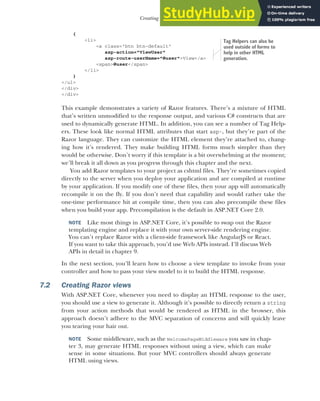
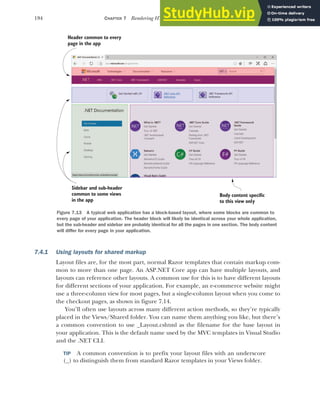
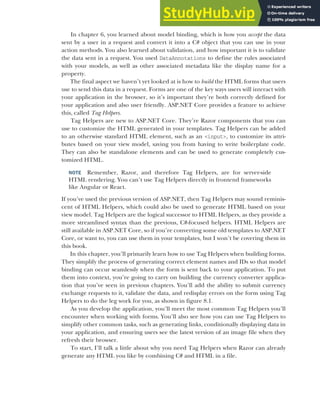
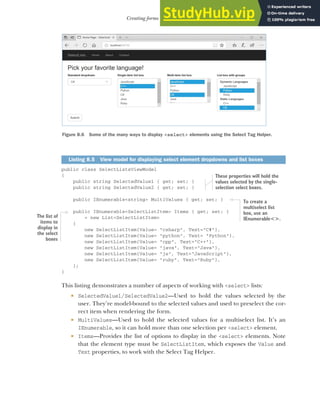
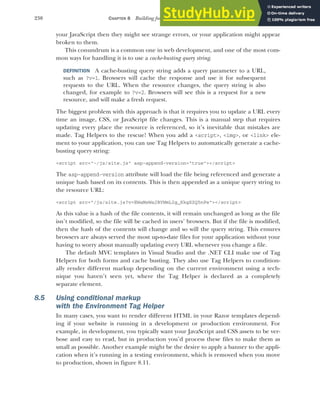
![126 CHAPTER 5 Mapping URLs to methods using conventional routing
for example) or a previous middleware generating an error. In these two cases, the Mvc-
Middleware won’t run, and so no routing will occur.
If the request does make it to the MvcMiddleware, then the first step is to route the
request to the required action method. You have two different ways to define these
mappings in your application:
Using global, conventional routing
Using attribute routing
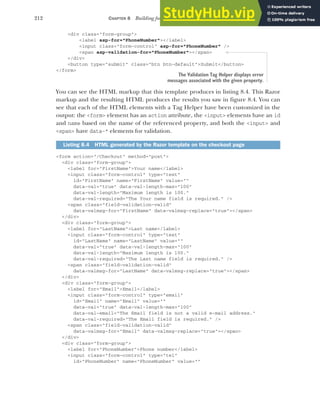
The convention-based routes are defined globally for your application. You can use
convention-based routes to map all of the controllers and actions in your application,
as long as your code conforms to the conventions you define. This provides a succinct
and terse way to expose your action methods at easily understood URLs. Traditional
HTML-based MVC web applications typically use this approach to routing.
You can also use attribute-based routes to tie a given URL to a specific action
method by placing [Route] attributes on the action methods themselves. This pro-
vides a lot more flexibility as you can explicitly define what a URL for a given action
method should be. This approach is more verbose than the convention-based
approach, as it requires applying attributes to every action method in your applica-
tion. Despite this, the additional flexibility it provides can often be useful, especially
when building Web APIs.
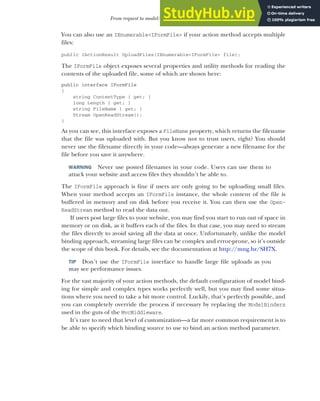
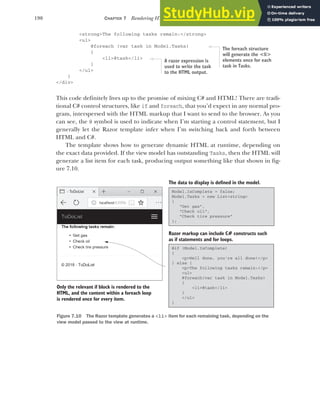
Whichever technique you use, you’ll define your expected URLs using route tem-
plates. These define the pattern of the URL you’re expecting, with placeholders for
parts that may vary.
DEFINITION Route templates define the structure of known URLs in your appli-
cation. They’re strings with placeholders for variables that can contain
optional values and map to controllers and actions.
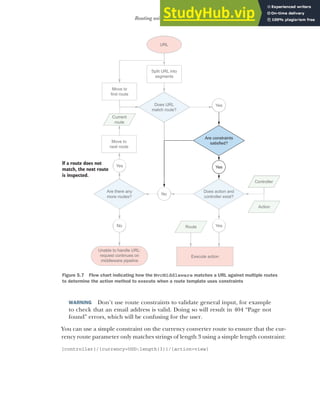
A single route template can match a number of different URLs. The /product/index
and /product URLs would both be matched by the product/{action=index} route
template, for example, and the /customer/1 and /customer/2 URLs would both be
matched by the customer/{id} route template. The route template syntax is power-
ful and contains many different features that are controlled by splitting a URL into
multiple segments.
DEFINITION A segment is a small contiguous section of a URL. It’s separated
from other URL segments by at least one character, often by the / character.
Routing involves matching the segments of a URL to a route template.
For a single-route template, you can define
Specific, expected strings
Variable segments of the URL
Optional segments of a URL
Default values when an optional segment isn’t provided
Constraints on segments of a URL, for example, ensuring that it’s numeric](https://image.slidesharecdn.com/asp-230807173723-31e70040/85/ASP-NET-Core-in-Action-2018-pdf-154-320.jpg)


![141
Handling multiple matching actions for a route
Up to this point, I’ve said that the router uses only the URL to determine the
selected controller and action, and that only a single action may be executed. If that’s
the case, how can this possibly work?! Well, without further work, it won’t. The Mvc-
Middleware would throw an exception when the URL is requested saying “Multiple
actions matched.”
Luckily, ASP.NET Core provides a number of attributes you can use to pick a win-
ning action method, when the router would normally end up selecting multiple
actions. Listing 5.7 shows an AccountController with the two action methods you
want to disambiguate. It’s typical for the two corresponding methods to have the same
name, where the POST action takes additional parameters corresponding to the form
values entered by the user.
public class AccountController : Controller
{
public IActionResult Login()
{
/* method implementation*/
}
[HttpPost]
public IActionResult Login(string username, string password)
{
/* method implementation*/
}
}
In order to select one action over the other for a given request, you’ve decorated the
second method with an HttpPostAttribute. This limits the type of requests an action
can match. In this case, the [HttpPost] attribute indicates that the second Login
method is a match for POST requests only, and not any other HTTP methods.
For the initial GET request, there’s now only one method that’s a match—the first
action in the controller—so this action executes to generate the response. The user
can then enter their details, press submit, and send a POST request.
Now, both methods can still handle POST requests—the first method can handle
any HTTP method and the second method can handle only POST requests. But an
action method with an IActionContraint attribute “trumps” an action method with-
out one. The second action method “wins” the contest and executes in response to
the POST request. All the common HTTP methods, such as GET, POST, PUT, and
DELETE, have IActionContraint HTTP methods.
NOTE Use types of IActionConstraint, such as [HttpPost] and [HttpGet],
to provide precedence to one action method over another where they would
match the same URL.
That brings us to the end of the discussion of mapping URLs to action methods when
the MvcMiddleware receives a request. One of the most important things to keep in mind
Listing 5.7 Selecting an action using the HttpPostAttribute
As the method has no Http attribute,
it can match GET or POST requests.
The method names are identical,
hence both methods match the
same /Account/Login URL.
Indicates the method is a match
for POST requests only.](https://image.slidesharecdn.com/asp-230807173723-31e70040/85/ASP-NET-Core-in-Action-2018-pdf-169-320.jpg)


![147
Summary
The controller and action route values must be able to be calculated for
every route template. They can either be matched from the URL or using
default values.
Don’t use route constraints as general input validators. Use them to disambigu-
ate between two similar routes.
Use a catch-all parameter to capture the remainder of a URL into a route value.
The [HttpPost] and [HttpGet] attributes allow choosing between actions
based on the request’s HTTP method when two actions correspond to the same
URL.
You can use the routing infrastructure to generate internal URLs for your
application.
The IUrlHelper can be used to generate URLs as a string based on an action
name or on the name of a specific route.
You can use the RedirectToAction and RedirectToRoute methods to generate
URLs while also generating a redirect response.](https://image.slidesharecdn.com/asp-230807173723-31e70040/85/ASP-NET-Core-in-Action-2018-pdf-175-320.jpg)


![160 CHAPTER 6 The binding model: retrieving and validating user input
You could then POST data to this method by providing values in a number of differ-
ent formats:
currencies[index]—Where currencies is the name of the parameter to bind
and index is the index of the item to bind, for example, currencies[0]=
GBR¤cies[1]=USD.
[index]—If there’s only a single list, you can omit the name of the parameter,
for example, [0]=GBR&[1]=USD.
currencies—Alternatively, you can omit the index and send currencies as the
key value for every value, for example, currencies=GBR¤cies=USD.
The key values can come from route values and query values, but it’s far more com-
mon to POST them in a form. Dictionaries can use similar binding, where the dictio-
nary key replaces the index both where the parameter is named and where it’s
omitted.
If this all seems a bit confusing, don’t feel too alarmed. If you’re building a tradi-
tional web application, and using Razor views to generate HTML, then it will take care
of most of the naming for you. As you’ll see in chapter 8, the view will ensure that any
form data you POST will be generated in the correct format.
BINDING FILE UPLOADS WITH IFORMFILE
A common feature of many websites is the ability to upload files. This could be a rela-
tively infrequent activity, for example if a user uploads a profile picture for their Stack
Overflow profile, or it may be integral to the application, like uploading photos to
Facebook.
ASP.NET Core supports uploading files by exposing the IFormFile interface. You can
use this interface as a method parameter to your action method and it will be popu-
lated with the details of the file upload:
public IActionResult UploadFile(IFormFile file);
Letting users upload files to your application
Uploading files to websites is a pretty common activity, but you should carefully con-
sider whether your application needs that ability. Whenever files can be uploaded by
users the road is fraught with danger.
You should be careful to treat the incoming files as potentially malicious, don’t trust
the filename provided, take care of large files being uploaded, and don’t allow the
files to be executed on your server.
Files also raise questions as to where the data should be stored—should they go in
a database, in the filesystem, or some other storage? None of these questions has
a straightforward answer and you should think hard about the implications of choos-
ing one over the other. Better yet, if you can avoid it, don’t let users upload files!](https://image.slidesharecdn.com/asp-230807173723-31e70040/85/ASP-NET-Core-in-Action-2018-pdf-188-320.jpg)
![162 CHAPTER 6 The binding model: retrieving and validating user input
6.2.3 Choosing a binding source
As you’ve already seen, by default the ASP.NET Core model binder will attempt to
bind all action method parameters from three different binding sources: form data,
route data, and the query string.
Occasionally, you may find it necessary to specifically declare which binding source
to bind to, but in other cases, these three sources won’t be sufficient. The most com-
mon scenarios are when you want to bind a method parameter to a request header
value, or when the body of a request contains JSON-formatted data that you want to
bind to a parameter. In these cases, you can decorate your action method parameters
(or binding model class properties) with attributes that say where to bind from, as
shown here.
public class PhotosController
{
public IActionResult TagPhotosWithUser(
[FromHeader] string userId,
[FromBody] List<Photo> photos)
{
/* method implementation */
}
}
In this example, an action method updates a collection of photos with a user. You’ve
got method parameters for the ID of the user to tag in the photos, userId, and a list of
Photo objects to tag, photos.
Rather than binding these action methods using the standard binding sources,
you’ve added attributes to each parameter, indicating the binding source to use. The
[FromHeader] attribute has been applied to the userId parameter. This tells the
model binder to bind the value to an HTTP request header value called userId.
You’re also binding a list of photos to the body of the HTTP request by using the
[FromBody] attribute. This will read JSON from the body of the request and will bind
it to the List<Photo> method parameter.
WARNING Developers familiar with the previous version of ASP.NET should
take note that the [FromBody] attribute is explicitly required when binding to
JSON requests. This differs from previous ASP.NET behavior, in which no
attribute was required.2
You aren’t limited to binding JSON data from the request body—you can use other
formats too, depending on which InputFormatters you configure the MvcMiddleware
Listing 6.4 Choosing a binding source for model binding
2
ASP.NET Core 2.1 introduces the [ApiController] attribute, which allows you to add model binding con-
ventions designed for Web API controllers. This means [FromBody] is automatically used for complex
parameters. For details see http://mng.bz/FYH1.
The userId will be bound from an
HTTP header in the request.
The list of photos will be bound to
the body of the request, typically
in JSON format.](https://image.slidesharecdn.com/asp-230807173723-31e70040/85/ASP-NET-Core-in-Action-2018-pdf-190-320.jpg)
![163
From request to model: making the request useful
to use. By default, only a JSON input formatter is configured. You’ll see how to add an
XML formatter in chapter 9, when I discuss Web APIs.
You can use a few different attributes to override the defaults and to specify a bind-
ing source for each method parameter:
[FromHeader]—Bind to a header value
[FromQuery]—Bind to a query string value
[FromRoute]—Bind to route parameters
[FromForm]—Bind to form data posted in the body of the request
[FromBody]—Bind to the request’s body content
You can apply each of these to any number of method parameters, as you saw in listing
6.4, with the exception of the [FromBody] attribute—only one parameter may be dec-
orated with the [FromBody] attribute. Also, as form data is sent in the body of a
request, the [FromBody] and [FromForm] attributes are effectively mutually exclusive.
TIP Only one parameter may use the [FromBody] attribute. This attribute
will consume the incoming request as HTTP request bodies can only be safely
read once.
As well as these attributes for specifying binding sources, there are a few other attri-
butes for customizing the binding process even further:
[BindNever]—The model binder will skip this parameter completely.3
[BindRequired]—If the parameter was not provided, or was empty, the binder
will add a validation error.
[FromServices]—Used to indicate the parameter should be provided using
dependency injection (see chapter 10 for details).
In addition, you’ve got the [ModelBinder] attribute, which puts you into “God mode”
with respect to model binding. With this attribute, you can specify the exact binding
source, override the name of the parameter to bind to, and specify the type of binding
to perform. It’ll be rare that you need this one, but when you do, at least it’s there!
By combining all these attributes, you should find you’re able to configure the
model binder to bind to pretty much any data your action method wants to receive. If
you’re building a traditional web app, then you’ll probably find you rarely need to use
them; the defaults should work well for you in most cases.
This brings us to the end of this section on model binding. If all has gone well, you
should have a populated binding model, and the middleware can execute the action
method. It’s time to handle the request, right? Nothing to worry about?
Not so fast! How do you know that the data you received was valid? That you
haven’t been sent malicious data attempting a SQL injection attack, or a phone num-
ber full of letters?
3
You can use the [BindNever] attribute to prevent mass assignment, as discussed in this post:
http://mng.bz/QvfG.](https://image.slidesharecdn.com/asp-230807173723-31e70040/85/ASP-NET-Core-in-Action-2018-pdf-191-320.jpg)

![166 CHAPTER 6 The binding model: retrieving and validating user input
As an example, let’s consider the checkout page for your currency converter appli-
cation. You need to collect details about the user before you can continue, so you ask
them to provide their name, email and, optionally, a phone number. The following list-
ing shows the UserBindingModel decorated with validation attributes that represent
the validation rules for the model. This expands on the example you saw in listing 6.3.
Public class UserBindingModel
{
[Required]
[StringLength(100)]
[Display(Name = "Your name")]
public string FirstName { get; set; }
[Required]
[StringLength(100)]
[Display(Name = "Last name")]
public string LastName { get; set; }
[Required]
[EmailAddress]
public string Email { get; set; }
[Phone]
[Display(Name = "Phone number")]
public string PhoneNumber { get; set; }
}
Suddenly your binding model contains a whole wealth of information where previ-
ously it was pretty sparse on details. For example, you’ve specified that the FirstName
property should always be provided, that it should have a maximum length of 100
characters, and that when it’s referred to (in error messages, for example) it should
be called "Your name" instead of "FirstName".
The great thing about these attributes is that they clearly declare the expected state
of the model. By looking at these attributes, you know what the properties will/should
contain. They also provide hooks for the ASP.NET Core framework to validate that the
data set on the model during model binding is valid, as you’ll see shortly.
You’ve got a plethora of attributes to choose from when applying DataAnnotations
to your models. I’ve listed some of the common ones here, but you can find more in
the System.ComponentModel.DataAnnotations namespace. For a more complete list,
I recommend using IntelliSense in Visual Studio/Visual Studio Code, or you can
always look at the source code directly on GitHub (http://mng.bz/7N7s).
[CreditCard]—Validates that a property has a valid credit card format
[EmailAddress]—Validates that a property has a valid email address format
Listing 6.5 Adding DataAnnotations to a binding model to provide metadata
Values marked Required
must be provided.
Customizes the
name used to
describe the
property
The StringLengthAttribute sets the
maximum length for the property.
The StringLengthAttribute sets the
maximum length for the property.
Validates the value of Email
is a valid email address](https://image.slidesharecdn.com/asp-230807173723-31e70040/85/ASP-NET-Core-in-Action-2018-pdf-194-320.jpg)
![167
Handling user input with model validation
[StringLength(max)]—Validates that a string has at most the max amount of
characters
[MinLength(min)]—Validates that a collection has at least the min amount of
items
[Phone]—Validates that a property has a valid phone number format
[Range(min, max)]—Validates that a property has a value between min and max
[RegularExpression(regex)]—Validates that a property conforms to the
regex regular expression pattern
[Url]—Validates that a property has a valid URL format
[Required]—Indicates the property that must be provided
[Compare]—Allows you to confirm that two properties have the same value (for
example, Email and ConfirmEmail)
WARNING The [EmailAddress] and other attributes only validate that the
format of the value is correct. They don’t validate that the email address exists.
The DataAnnotations attributes aren’t a new feature—they have been part of the
.NET Framework since version 3.5—and their usage in ASP.NET Core is almost the
same as in the previous version of ASP.NET.
They’re also used for other purposes, in addition to validation. Entity Framework
Core (among others) uses DataAnnotations to define the types of column and rule to
use when creating database tables from C# classes. You can read more about Entity
Framework Core in chapter 12, and in Jon P Smith’s Entity Framework Core in Action
(Manning, 2018).
If the DataAnnotation attributes provided out of the box don’t cover everything
you need, then it’s also possible to write custom attributes by deriving from the base
ValidationAttribute. You’ll see how to create a custom attribute for your currency
converter application in chapter 19.
Alternatively, if you’re not a fan of the attribute-based approach, the MvcMiddleware
is flexible enough that you can replace the validation infrastructure with your
preferred technique. For example, you could use the popular FluentValidation
library (https://github.com/JeremySkinner/FluentValidation) in place of the Data-
Annotations attributes if you prefer.
TIP DataAnnotations are good for input validation of properties in isola-
tion, but not so good for validating business rules. You’ll most likely need to
perform this validation outside the DataAnnotations framework.
Whichever validation approach you use, it’s important to remember that these tech-
niques don’t protect your application by themselves. The MvcMiddleware will ensure
the validation occurs, but it doesn’t automatically do anything if validation fails. In the
next section, we’ll look at how to check the validation result on the server and handle
the case where validation has failed.](https://image.slidesharecdn.com/asp-230807173723-31e70040/85/ASP-NET-Core-in-Action-2018-pdf-195-320.jpg)
![169
Handling user input with model validation
NOTE The error messages displayed on the form are the default values for
each validation attribute. You can customize the message by setting the
ErrorMessage property on any of the validation attributes. For example, you
could customize a [Required] attribute using [Required(ErrorMessage=
"Required")].
Figure 6.7 When validation fails, you can
redisplay the form to display ModelState
validation errors to the user. Note the “Your
name” field has no associated validation errors,
unlike the other fields.
POST-REDIRECT-GET
The POST-REDIRECT-GET design pattern is a web development pattern that prevents
users from accidently submitting the same form multiple times. Users typically sub-
mit a form using the standard browser POST mechanism, sending data to the server.
This is the normal way by which you might take a payment, for example.
If a server takes the naive approach and responds with a 200 OK response and some
HTML to display, then the user will still be on the same URL. If the user refreshes
their browser, they will be making an additional POST to the server, potentially making
another payment! Browsers have some mechanisms to avoid this, such as in the fol-
lowing figure, but the user experience isn’t desirable.](https://image.slidesharecdn.com/asp-230807173723-31e70040/85/ASP-NET-Core-in-Action-2018-pdf-197-320.jpg)


![173
Summary
Summary
ASP.NET Core MVC has three distinct models, each responsible for a different
aspect of a request. The binding model encapsulates data sent as part of a
request, the application model represents the state of the application, and the
view model contains data used by the view to generate a response.
Model binding extracts values from a request and uses them to create .NET
objects to pass as method parameters to the action being executed.
By default, there are three binding sources: POSTed form values, route values,
and the query string. The binder will interrogate these in order when trying to
bind an action method parameter.
When binding values to parameters, the names of the parameters aren’t case
sensitive.
You can bind to simple method parameter types or to the properties of complex
types.
To bind complex types, they must have a default constructor and public, setta-
ble properties.
Simple types must be convertible to strings to be bound automatically, for
example numbers, dates, and Boolean values.
Collections and dictionaries can be bound using the [index]=value and
[key]=value syntax, respectively.
You can customize the binding source for an action parameter using [From*]
attributes applied to the method, such as [FromHeader] and [FromBody]. These
can be used to bind to nondefault binding sources, such as headers or JSON
body content.
In contrast to the previous version of ASP.NET, the [FromBody] attribute is
required when binding JSON properties (previously it was not required).
Validation is necessary to check for security threats. Check that data is format-
ted correctly, confirm it conforms to expected values and that it meets your
business rules.
ASP.NET Core provides DataAnnotations attributes to allow you to declara-
tively define the expected values.
Validation occurs automatically after model binding, but you must manually
check the result of the validation and act accordingly in your action method by
interrogating the ModelState property.
Client-side validation provides a better user experience than server-side valida-
tion alone, but you should always use server-side validation.
Client-side validation uses JavaScript and attributes applied to your HTML ele-
ments to validate form values.](https://image.slidesharecdn.com/asp-230807173723-31e70040/85/ASP-NET-Core-in-Action-2018-pdf-201-320.jpg)
![178 CHAPTER 7 Rendering HTML using Razor views
@model IndexViewModel
<div class="row">
<div class="col-md-12">
<form asp-action="Index">
<div class="form-group">
<label asp-for="NewUser"></label>
<input class="form-control" asp-for="NewUser" />
<span asp-validation-for="NewUser"></span>
</div>
<div class="form-group">
<button type="submit"
class="btn btn-success">Add</button>
</div>
</form>
</div>
</div>
<h4>Number of users: @Model.ExistingUsers.Count</h4>
<div class="row">
<div class="col-md-12">
<ul>
@foreach (var user in Model.ExistingUsers)
Listing 7.1 A Razor template to list users and a form for adding a new user
Form elements can be used
to send values back to the
application.
The view model contains the data
you wish to display on the page.
Razor markup describes how to display this
data using a mixture of HTML and C#.
By combining the data in your view
model with the Razor markup, HTML
can be generated dynamically, instead
of being fixed at compile time.
@foreach(var user in Model.ExistingUsers)
{
<li>
<button>View</button>
<span>@user</span>
</li>
}
Model.ExistingUsers = new[]
{
'Andrew',
'Robbie',
'Jimmy',
'Bart'
};
Figure 7.3 The use of C# in Razor lets you easily generate dynamic HTML that varies at runtime.
Normal HTML is sent to
the browser unchanged.
Tag Helpers attach to
HTML elements to
create forms.
Values can be written
from C# objects to
the HTML.
C# constructs like for
loops can be used in Razor.](https://image.slidesharecdn.com/asp-230807173723-31e70040/85/ASP-NET-Core-in-Action-2018-pdf-206-320.jpg)

![184 CHAPTER 7 Rendering HTML using Razor views
<h1>Tasks to complete</h1>
<ul>
@for(var i=0; i< tasks.Count; i++)
{
var task = tasks[i];
<li>@i - @task</li>
}
</ul>
The pure HTML sections in this template are the angle brackets. The Razor engine
copies this HTML directly to the output, unchanged, as though you were writing a
normal HTML file.
As well as HTML, you can also see a number of C# statements in there. The advan-
tage of being able to, for example, use a for loop rather than having to explicitly write
out each <li> element should be self-evident. I’ll dive a little deeper into more of the
C# features of Razor in the next section. When rendered, this template would pro-
duce the HTML shown here.
<h1>Tasks to complete</h1>
<ul>
<li>0 - Buy milk</li>
<li>1 - Buy eggs</li>
<li>2 - Buy bread</li>
</ul>
As you can see, the final output of a Razor template after it’s been rendered is simple
HTML. There’s nothing complicated left, just straight markup that can be sent to the
browser and rendered. Figure 7.7 shows how a browser would render it.
Listing 7.4 HTML output produced by rendering a Razor template
Standard HTML markup will be
rendered to the output unchanged.
Mixing C# and HTML
allows you to dynamically
create HTML at runtime.
HTML from the Razor template is
written directly to the output.
The <li> elements are generated
dynamically based on the data.
HTML from the Razor template is
written directly to the output.
The data to display is defined in C# .
Razor markup describes how to display this
data using a mixture of HTML and C#.
By combining the C# object data
with the Razor markup, HTML can
be generated dynamically, instead
of being fixed at compile time.
<h1>Tasks to complete</h1>
<ul>
@for(var i=0; i<tasks.Count; i++)
{
var task = tasks[i];
<li>@i - @task</li>
}
</ul>
var tasks = new List<string>
{
'Buy milk',
'Buy eggs',
'Buy bread'
}
Figure 7.7 Razor templates can be used to generate the HTML dynamically at runtime from C# objects.](https://image.slidesharecdn.com/asp-230807173723-31e70040/85/ASP-NET-Core-in-Action-2018-pdf-212-320.jpg)

![186 CHAPTER 7 Rendering HTML using Razor views
var viewModel = new ToDoItemViewModel
{
Title = "Tasks for today",
Tasks = new List<string>{
{
"Get fuel",
"Check oil",
"Check tyre pressure"
}
};
return View(viewModel);
}
}
By passing it to the View method, the viewModel instance will be available in the tem-
plate, allowing you to access the values it contains from the view template. All that’s
required is to add an @model directive at the top of your template so that it knows the
Type of the view model it should expect:
@model ToDoItemViewModel
DEFINITION A directive is a statement in a Razor file that changes the way the
template is parsed or compiled. Another common directive is the @using
newNamespace directive, which would make objects in the newNamespace name-
space available.
Once you’ve added this directive, you can access any of the data on the todoModel you
provided, using the Model property. For example, to display the Title property from
the ToDoItemViewModel, you’d use <h1>@Model.Title</h1>. This would render the
string provided on the original viewModel object, producing the <h1>Tasks for
today</h1> HTML.
TIP Note that the @model directive should be at the top of your view, and has
a lowercase m. The Model property can be accessed anywhere in the view and
has an uppercase M.
In the vast majority of cases, using a view model is the way to go; it’s the standard mech-
anism for passing data between the controller and the view. But in some circumstances,
a view model may not be the best fit. This is often the case when you want to pass data
between view layouts (you’ll see how this works in the last section of this chapter).
A common example is the title of the page. You need to provide a title for every
page, so you could create a base class with a Title property and make all your view
models inherit from it. But that’s a little cumbersome, so a common approach for this
situation is to use the ViewData collection to pass data around.
In fact, the standard MVC templates use this approach by default rather than using
view models by setting values in the ViewData dictionary from within the action methods:
public IActionResult Contact()
{
ViewData["Message"] = "Your contact page.";
Building a view model: this would
normally call out to a database or
filesystem to load the data.
Creates a ViewResult that looks for a view
called ViewTodo, and passes it the viewModel](https://image.slidesharecdn.com/asp-230807173723-31e70040/85/ASP-NET-Core-in-Action-2018-pdf-214-320.jpg)
![187
Creating dynamic web pages with Razor
return View();
}
They’re then displayed in the template using
<h3>@ViewData["Message"]</h3>
NOTE Personally, I don’t agree with the default approach in the templates—
the message being presented is integral to the page, so it should probably be
part of a view model.
You can also set values on the ViewData dictionary from within the view itself:
@{
ViewData["Title"] = "About";
}
<h2>@ViewData["Title"].</h2>
This template sets the value of the "Title" key in the ViewData dictionary to "About"
and then fetches the key to render in the template. This might seem superfluous, but
as the ViewData dictionary is shared throughout the request, it makes the title of the
page available in layouts, as you’ll see later. When rendered, this would produce the
following output:
<h2>About.</h2>
TIP Create a set of global, static constants for any ViewData keys, and refer-
ence those instead of typing "Title" repeatedly. You’ll get IntelliSense for
the values, they’ll be refactor-safe, and you’ll avoid hard-to-spot typos.
As I mentioned previously, there are other mechanisms besides view models and
ViewData that you can use to pass data around, but these two are the only ones I use
personally, as you can do everything you need with them.
You’ve had a small taste of the power available to you in Razor templates, but in the
next section, I’d like to dive a little deeper into some of the available C# capabilities.
7.3 Creating dynamic web pages with Razor
You might be glad to know that pretty much anything you can do in C# is possible in
Razor syntax. Under the covers, the cshtml files are compiled into normal C# code
(with string for the raw HTML sections), so whatever weird and wonderful behavior
you need can be created.
Having said that, just because you can do something doesn’t mean you should.
You’ll find it much easier to work with, and maintain, your files if you keep them as
simple as possible. This is true of pretty much all programming, but I find especially
so with Razor templates.
This section covers some of the more common C# constructs you can use. If you
find you need to achieve something a more exotic, refer to the Razor syntax docu-
mentation at https://docs.microsoft.com/en-us/aspnet/core/mvc/views/razor.](https://image.slidesharecdn.com/asp-230807173723-31e70040/85/ASP-NET-Core-in-Action-2018-pdf-215-320.jpg)
![188 CHAPTER 7 Rendering HTML using Razor views
7.3.1 Using C# in Razor templates
One of the most common requirements when working with Razor templates is to ren-
der a value you’ve calculated in C# to the HTML. For example, you might want to
print the current year to use with a copyright statement in your HTML, to give
<p>Copyright 2018 ©</p>
or you might want to print the result of a calculation, for example
<p>The sum of 1 and 2 is <i>3</i><p>
You can do this in two ways, depending on the exact C# code you need to execute. If
the code is a single statement, then you can use the @ symbol to indicate you want to
write the result to the HTML output, as shown in figure 7.8. You’ve already seen this
used to write out values from the view model or from ViewData.
If the C# you want to execute is something that needs a space, then you need to use
parentheses to demarcate the C#, as shown in figure 7.9.
These two approaches, in which C# is evaluated and written directly to the HTML out-
put, are called Razor expressions. Sometimes you want to execute some C#, but you
don’t need to output the values. I used this technique when we were setting values in
ViewData:
@{
ViewData["Title"] = "About";
}
<p>Copyright @DateTime.Now.Year ©</p>
@ indicates start of
C# expression
Whitespace indicates
end of C# expression
HTML HTML
C# expression. The result
will be written to the
HTML output.
Figure 7.8 Writing the result of a C#
expression to HTML. The @ symbol
indicates where the C# code begins and
the expression ends at the end of the
statement, in this case at the space.
<p>The sum of 1 and 2 is <i>@(1 + 2)</i></p>
HTML
The whole C# expression within @() is
evaluated and written to the HTML output.
HTML
Figure 7.9 When a C# expression
contains whitespace, you must wrap
it in parentheses using @() so the
Razor engine knows where the C#
stops and HTML begins.](https://image.slidesharecdn.com/asp-230807173723-31e70040/85/ASP-NET-Core-in-Action-2018-pdf-216-320.jpg)

![195
Layouts, partial views, and _ViewStart
A layout file looks similar to a normal Razor template, with one exception: every lay-
out must call the @RenderBody() function. This tells the templating engine where to
insert the content from the child views. A simple layout is shown in the following list-
ing. Typically, your application will reference all your CSS and JavaScript files in the
layout, as well as include all the common elements such as headers and footers, but
this example includes pretty much the bare minimum HTML.
<!DOCTYPE html>
<html>
<head>
<meta charset="utf-8" />
<title>@ViewData["Title"]</title>
<link rel="stylesheet" href="~/css/site.css" />
</head>
<body>
@RenderBody()
</body>
</html>
As you can see, the layout file includes the required elements, such as <html> and
<head>, as well as elements you need on every page, such as <title> and <link>. This
example also shows the benefit of storing the page title in ViewData; the layout can
render it in the <title> element so that it shows in the browser’s tab, as shown in fig-
ure 7.15.
Listing 7.7 A basic Layout.cshtml file calling RenderBody
Three-column layout Single-column layout
Figure 7.14 The https://manning.com website uses different layouts for different parts of the web application.
The product pages use a three-column layout, but the cart page uses a single-column layout.
ViewData is the standard
mechanism for passing data
to a layout from a view.
Elements common to
every page, such as
your CSS, are typically
found in the layout.
Tells the templating engine where
to insert the child view’s content](https://image.slidesharecdn.com/asp-230807173723-31e70040/85/ASP-NET-Core-in-Action-2018-pdf-223-320.jpg)
![196 CHAPTER 7 Rendering HTML using Razor views
Views can specify a layout file to use by setting the Layout property inside a Razor
code block.
@{
Layout = "_Layout";
ViewData["Title"] = "Home Page";
}
<h1>@ViewData[“Title”]</h1>
<p>This is the home page</p>
Any contents in the view will be rendered inside the layout, where the call to @Render-
Body() occurs. Combining the two previous listings will result in the following HTML
being generated and sent to the user.
<!DOCTYPE html>
<html>
<head>
<meta charset="utf-8" />
<title>Home Page</title>
<link rel="stylesheet" href="/css/site.css" />
</head>
<body>
<h1>Home Page</h1>
<p>This is the home page</p>
</body>
<html>
Judicious use of layouts can be extremely useful in reducing the duplication on a
page. By default, layouts only provide a single location where you can render content
from the view, at the call to @RenderBody. In cases where this is too restrictive, you can
render content using sections.
7.4.2 Overriding parent layouts using sections
A common requirement when you start using multiple layouts in your application is to
be able to render content from child views in more than one place in your layout.
Consider the case of a layout that uses two columns. The view needs a mechanism for
Listing 7.8 Setting the Layout property from a view
Listing 7.9 Rendered output from combining a view with its layout
Figure 7.15 The contents of the <title>
element is used to name the tab in the
user’s browser, in this case Home Page.
Set the layout for the page
to _Layout.cshtml.
ViewData is a convenient way of passing
data from a view to the layout.
The content in the view to
render inside the layout
ViewData set in the
view is used to render
the layout.
The RenderBody call renders
the contents of the view.](https://image.slidesharecdn.com/asp-230807173723-31e70040/85/ASP-NET-Core-in-Action-2018-pdf-224-320.jpg)

![208 CHAPTER 8 Building forms with Tag Helpers
TIP Visual Studio 2017 currently doesn’t have native IntelliSense support for
the asp-* Tag Helpers themselves, though it will be enabled in an update. In
the meantime, install the Razor Language Services extension.1
Unfortunately,
IntelliSense for Tag Helpers isn’t available in Visual Studio Code.
Tag Helpers are extra attributes on standard HTML elements (or new elements
entirely) that work by modifying the HTML element they’re attached to. They let you
easily integrate your server-side values, such as those in your view model, with the gen-
erated HTML.
Notice that listing 8.1 didn’t specify the captions to display in the labels. Instead, you
declaratively used asp-for="CurrencyFrom" to say, “for this <label>, use the Currency-
From property to work out what caption to use.” Similarly, for the <input> elements, Tag
Helpers are used to
Automatically populate the values from the view model
Choose the correct input type to display (for example, a number input for the
Quantity property)
Display any validation errors, as shown in figure 8.32
1
You can install Visual Studio extensions by clicking Tools > Extensions and Updates, or by viewing on the
Visual Studio Marketplace at http://mng.bz/LcNX.
2
To learn more about the internals of Tag Helpers, read the documentation at http://mng.bz/Idb0.
Figure 8.3 Tag Helpers hook into the metadata provided by DataAnnotations,
as well as the property types themselves. The Validation Tag Helper can even
populate error messages based on the ModelState, as you saw in the last
chapter on validation.
Label caption calculated
from [Display] attribute
Validation error message
populated from ModelState
Input types determined
from DataAnnotations and
property type](https://image.slidesharecdn.com/asp-230807173723-31e70040/85/ASP-NET-Core-in-Action-2018-pdf-236-320.jpg)
![210 CHAPTER 8 Building forms with Tag Helpers
attributes for validation, and saw how to model bind it in your action method. In this
chapter, you’ll see how to create the view for it, using the UserBindingModel as a view
model.
WARNING For simplicity, I’m using the same object for both my binding
model and view model, but in practice you should use two separate objects to
avoid mass-assignment attacks on your app.4
public class UserBindingModel
{
[Required]
[StringLength(100, ErrorMessage = "Maximum length is {1}")]
[Display(Name = "Your name")]
public string FirstName { get; set; }
[Required]
[StringLength(100, ErrorMessage = "Maximum length is {1}")]
[Display(Name = "Last name")]
public string LastName { get; set; }
[Required]
[EmailAddress]
public string Email { get; set; }
[Phone(ErrorMessage = "Not a valid phone number.")]
[Display(Name = "Phone number")]
public string PhoneNumber { get; set; }
}
The UserBindingModel is decorated with a number of DataAnnotations attributes. In
the previous chapter, you saw that these attributes are used during model validation
when your binding model is bound, before the action method is executed. These
attributes are also used by the Razor templating language to provide the metadata
required to generate the correct HTML when you use Tag Helpers.
With the help of the UserBindingModel, Tag Helpers, and a little HTML, you can
create a Razor view that lets the user enter their details, as shown in figure 8.4.
The Razor template to generate this page is shown in listing 8.3. This code uses a
variety of tag helpers, including
A Form Tag Helper on the <form> element
Label Tag Helpers on the <label>
Input Tag Helpers on the <input>
Validation Message Tag Helpers on <span> validation elements for each prop-
erty in the UserBindingModel
Listing 8.2 UserBindingModel for creating a user on a checkout page
4
You can read about techniques for working with separate binding and view models at http://mng.bz/QvfG.](https://image.slidesharecdn.com/asp-230807173723-31e70040/85/ASP-NET-Core-in-Action-2018-pdf-238-320.jpg)
![211
Creating forms using Tag Helpers
@model UserBindingModel
@{
ViewData["Title"] = "Checkout";
}
<h1>@ViewData["Title"]</h1>
<form asp-action="Index" asp-controller="Checkout">
<div class="form-group">
<label asp-for="FirstName"></label>
<input class="form-control" asp-for="FirstName" />
<span asp-validation-for="FirstName"></span>
</div>
<div class="form-group">
<label asp-for="LastName"></label>
<input class="form-control" asp-for="LastName" />
<span asp-validation-for="LastName"></span>
</div>
<div class="form-group">
<label asp-for="Email"></label>
<input class="form-control" asp-for="Email" />
<span asp-validation-for="Email"></span>
</div>
Listing 8.3 Razor template for binding to UserBindingModel on the checkout page
Figure 8.4 The checkout page for an
application. The HTML is generated
based on a UserBindingModel,
using Tag Helpers to render the
required element values, input types,
and validation messages.
The @model directive describes
the view model for the page.
Form Tag Helpers use
routing to determine
the URL the form will
be posted to.
The Label Tag Helper
uses DataAnnotations
on a property to
determine the caption
to display.
The Input Tag Helper
uses DataAnnotations
to determine the type
of input to generate.](https://image.slidesharecdn.com/asp-230807173723-31e70040/85/ASP-NET-Core-in-Action-2018-pdf-239-320.jpg)

![216 CHAPTER 8 Building forms with Tag Helpers
The Label Tag Helper is used to generate the caption (the visible text) and the for
attribute for a <label> element, based on the properties in the view model. It’s used
by providing the name of the property in the asp-for attribute:
<label asp-for="FirstName"></label>
The Label Tag Helper uses the [Display] DataAnnotations attribute that you saw in
chapter 6 to determine the appropriate value to display. If the property you’re gener-
ating a label for doesn’t have a [Display] attribute, the Label Tag Helper will use the
name of the property instead. So, for the model
public class UserBindingModel
{
[Display(Name = "Your name")]
public string FirstName { get; set; }
public string Email { get; set; }
}
in which the FirstName property has an [Display] attribute, but the Email property
doesn’t; the following Razor
<label asp-for="FirstName"></label>
<label asp-for="Email"></label>
would generate the HTML
<label for="FirstName">Your Name</label>
<label for="Email">Email</label>
The caption text inside the <label> element uses the value set in the [Display] attri-
bute, or the property name in the case of the Email property. Also note that the for
attribute has been generated with the name of the property. This is a key bonus of
using Tag Helpers—it hooks in with the element IDs generated by other Tag Helpers,
as you’ll see shortly.
NOTE The for attribute is important for accessibility. It specifies the ID of
the element to which the label refers.
As is typical with Tag Helpers, the Label Tag Helper won’t override values you set your-
self. If, for example, you don’t want to use the caption generated by the helper, you
could insert your own manually. The following code
<label asp-for="Email">Please enter your Email</label>
would generate the HTML
<label for="Email">Please enter your Email</label>
As ever, you’ll generally have an easier time with maintenance if you stick to the stan-
dard conventions and don’t override values like this, but the option is there. Right,
next up is a biggie: the Input and Textarea Tag Helpers.](https://image.slidesharecdn.com/asp-230807173723-31e70040/85/ASP-NET-Core-in-Action-2018-pdf-244-320.jpg)
![217
Creating forms using Tag Helpers
8.2.3 The Input and Textarea Tag Helpers
Now you’re getting into the meat of your form—the <input> elements that handle
user input. Given that there’s such a wide array of possible input types, there’s a vari-
ety of different ways they can be displayed in the browser. For example, Boolean val-
ues are typically represented by a checkbox type <input> element, whereas integer
values would use a number type <input> element, and a date would use the date type,
shown in figure 8.5.
To handle this diversity, the Input Tag Helper is one of the most powerful Tag Help-
ers. It uses information based on both the type of the property (bool, string, int,
and so on) and any DataAnnotations attributes applied to it ([EmailAddress] and
[Phone], among others) to determine the type of the input element to generate. The
DataAnnotations are also used to add data-val-* client-side validation attributes to
the generated HTML.
Consider the Email property from listing 8.2 that was decorated with the [Email-
Address] attribute. Adding an <input> is as simple as using the asp-for attribute:
<input asp-for="Email" />
The property is a string, so ordinarily, the Input Tag Helper would generate an
<input> with type="text". But the addition of the [EmailAddress] attribute provides
additional metadata about the property. Consequently, the Tag Helper generates an
HTML5 <input> with type="email":
Figure 8.5 Various input element
types. The exact way in which each
type is displayed varies by browser.](https://image.slidesharecdn.com/asp-230807173723-31e70040/85/ASP-NET-Core-in-Action-2018-pdf-245-320.jpg)
![219
Creating forms using Tag Helpers
The Input Tag Helper tries to pick the most appropriate template for a given property
based on DataAnnotation attributes or the type of the property. Whether this gener-
ates the exact <input> type you need may depend, to an extent, on your application.
As always, you can override the generated type by adding your own type attribute to
the Razor. Table 8.1 shows how some of the common data types are mapped to
<input> types, and how the data types themselves can be specified.
The Input Tag Helper has one additional attribute that can be used to customize the
way data is displayed: asp-format. HTML forms are entirely string-based, so when the
value of an <input> is set, the Input Tag Helper must take the value stored in
the property and convert it to a string. Under the covers, this performs a string
.Format() on the property’s value, passing in a format string.
The Input Tag Helper uses a default format string for each different data type, but
with the asp-format attribute, you can set the specific format string to use. For exam-
ple, you could ensure a decimal property, Dec, is formatted to three decimal places
with the following code:
<input asp-for="Dec" asp-format="0.000" />
If the Dec property had a value of 1.2, this would generate HTML similar to
<input type="text" id="Dec" name="Dec" value="1.200">
Table 8.1 Common data types, how to specify them, and the input element type they map to
Data type How it’s specified Input element type
byte, int, short, long, uint Property type number
decimal, double, float Property type text
string Property type,
[DataType(DataType.Text)]
attribute
text
HiddenInput [HiddenInput] attribute hidden
Password [Password] attribute password
PhoneAttribute [Phone] attribute tel
EmailAddress [EmailAddress] attribute email
Url [Url] attribute url
Date DateTime property type,
[DataType(DataType.Date)]
attribute
date](https://image.slidesharecdn.com/asp-230807173723-31e70040/85/ASP-NET-Core-in-Action-2018-pdf-247-320.jpg)


![226 CHAPTER 8 Building forms with Tag Helpers
passed, but we provide additional model-level validation that we aren’t trying to convert
a currency to itself.
public class CurrencyController : Controller
{
[HttpPost]
public IActionResult Convert(
CurrencyConverterModel model)
{
if(model.CurrencyFrom == model.CurrencyTo)
{
ModelState.AddModelError(
string.Empty,
"Cannot convert currency to itself");
}
if (!ModelState.IsValid)
{
return View(model);
}
Listing 8.8 Adding model-level validation errors to the ModelState
Figure 8.9 Form showing validation errors. The Validation Message Tag Helper
is applied to <span>, close to the associated input. The Validation Summary
Tag Helper is applied to a <div>, normally at the top or bottom of the form.
Validation Message
Tag Helpers
Validation Summary
Tag Helper
Can’t convert
currency to itself
Adds model-level error
by using empty key
If there are any property-
level or model-level errors,
display them.](https://image.slidesharecdn.com/asp-230807173723-31e70040/85/ASP-NET-Core-in-Action-2018-pdf-254-320.jpg)


![232 CHAPTER 8 Building forms with Tag Helpers
you need to build complex Razor layouts—the custom components can help tidy up
your code down the line.
This chapter, along with the previous four, has been a whistle-stop tour of how to
build MVC applications with ASP.NET Core. You now have the basic building blocks to
start making simple ASP.NET Core applications. In the second part of this book, I’ll
show you some of the additional features you’ll need to understand to build complete
applications. But before we get to that, I’ll take a chapter to discuss building Web APIs.
I’ve mentioned the Web API approach previously, in which your application serves
data using the MVC framework, but instead of returning user-friendly HTML, it
returns machine-friendly JSON or XML. In the next chapter, you’ll see why and how
to build a Web API, take a look at an alternative routing system designed for APIs, and
learn how to generate JSON responses to requests.
Summary
Tag Helpers let you bind your data model to HTML elements, making it easier
to generate dynamic HTML while remaining editor friendly.
As with Razor in general, Tag Helpers are for server-side rendering of HTML
only. You can’t use them directly in frontend frameworks, such as Angular or
React.
Tag Helpers can be standalone elements or can attach to existing HTML using
attributes.
Tag Helpers can customize the elements they’re attached to, add additional
attributes, and customize how they’re rendered to HTML. This can greatly
reduce the amount of markup you need to write.
Tag Helpers can expose multiple attributes on a single element.
You can add the asp-action and asp-controller attributes to the <form> ele-
ment to set the action URL using the URL generation feature of the MVC
middleware’s router.
You specify route values to use during routing with the Form Tag Helper using
asp-route-* attributes.
The Form Tag Helper also generates a hidden field that you can use to prevent
CSRF attacks.
You can attach the Label Tag Helper to a <label> using asp-for. It generates an
appropriate for attribute and caption based on the [Display] DataAnnotations
attribute and the view model property name.
The Input Tag Helper sets the type attribute of an <input> element to the
appropriate value based on a bound property’s Type and any DataAnnotations
applied to it. It also generates the data-val-* attributes required for client-side
validation.
To enable client-side validation, you must add the necessary JavaScript files to
your view for jQuery validation and unobtrusive validation.](https://image.slidesharecdn.com/asp-230807173723-31e70040/85/ASP-NET-Core-in-Action-2018-pdf-260-320.jpg)


![240 CHAPTER 9 Creating a Web API for mobile and client applications using MVC
response, in this case a JSON representation of the list, and sent back to the browser
with a 200 (OK) status code.
TIP ASP.NET Core will format returned data as JSON by default. You’ll see
how to format the returned data in other ways later in this chapter.
The URL at which a Web API controller is exposed is handled in the same way as for
traditional MVC controllers—using routing. The routing module directs a request to
a particular controller and action, which is then invoked and returns a result. This
result is then used to generate an appropriate response.
Web API controllers don’t have to return data directly. You’re free to return an
IActionResult instead, and often this is required. Depending on the desired behav-
ior of your API, you may sometimes want to return data, and other times you may want
to return a raw HTTP status code, indicating whether the request was successful. If an
API call is made requesting details of a product that does not exist, you might want to
return a 404 (Not Found) status code, as you’ll see shortly.1
Although the primary goal of a Web API is to return data, typically only the most
trivial of cases will be able to return data directly from the action method in the man-
ner you’ve seen. For example, if the request represented a command, such as “Delete
the user with ID 9,” then there might not be any data to return, other than a success/
failure status code.
Listing 9.2 shows an example of a case where you’d want to return an IAction-
Result instead of returning the data directly. It shows another method on the same
FruitController as before. This method exposes a way for clients to fetch a specific
fruit by an id, which we’ll assume is its index in the list of _fruit you defined in the
previous listing. Model binding is used to set the value of the id parameter from the
request.
public IActionResult View(int id)
{
if (id >= 0 && id < _fruit.Count)
{
return Ok(_fruit[id]);
}
return NotFound();
}
1
ASP.NET Core 2.1 introduces IActionResult<T>, which can simplify generating OpenAPI specifications
for your Controllers. See http://mng.bz/FYH1 for details.
Listing 9.2 A Web API action returning IActionResult to handle error conditions
The action method returns an
IActionResult as it can no longer
always return List<string>.
An element can only be
returned if the id value is a
valid _fruit element index.
Using Ok to return data will
format the data passed to it
and send a 200 status code.
NotFound returns a
NotFoundResult, which will
send a 404 status code.](https://image.slidesharecdn.com/asp-230807173723-31e70040/85/ASP-NET-Core-in-Action-2018-pdf-268-320.jpg)
![241
Creating your first Web API Controller
In the successful path for the action method, the id parameter has a value greater
than zero and less than the number of elements in _fruit. When that’s true, the value
of the element can be returned to the caller. This is achieved by creating an OkResult,
using the Ok helper method1
on the Controller base class. This generates a 200 status
code and returns the element in the response body, as shown in figure 9.4, as if you
had returned the _fruit[id] object from the method directly.
If the id is outside the bounds of the _fruit list, then the method calls NotFound to
create a NotFoundResult. When executed, this method generates a raw 404 HTTP sta-
tus code response, which will show the default “not found” page for your browser, as
shown in figure 9.5. The fact that you’re returning two different types depending on
the code path taken means that you must mark the action method as returning an
IActionResult in order to make the code compile.
1
Some people get uneasy when they see the phrase “helper method,” but there’s nothing magic about the
Controller helpers—they’re shorthand for creating a new IActionResult of a given type. You don’t have
to take my word for it though, you can always view the source code for the base class on GitHub at
http://mng.bz/NZDt.
Figure 9.4 Returning data using the Ok helper method. The Ok method uses the
data passed to it to create the response body, then sets the status code to 200.
Figure 9.5 A request that generates a raw 404 response without any
content, as is typical for a Web API, will show the default “not found”
page in a browser.](https://image.slidesharecdn.com/asp-230807173723-31e70040/85/ASP-NET-Core-in-Action-2018-pdf-269-320.jpg)


![245
Applying the MVC design pattern to a Web API
In this example, routing directs the request to a controller described as a Web API
controller, but there’s nothing special about this class compared to the MVC control-
ler from figure 9.6. The only difference is that the Web API controller will return data
in a machine-readable format, rather than as HTML.
TIP In ASP.NET Core, there’s no difference between MVC controllers and
Web API controllers. The naming refers only to the difference in the data
returned by their methods and the purpose for which they’re used.1
After routing comes model binding, in which the binder creates a binding model and
populates it with values from the request, exactly as in the MVC request. Validation
occurs in the same way.
The action executes in the same way as for the MVC controller, by interacting with
the application model—the very same application model as is used by the MVC con-
troller. This is an important point; by separating the behavior of your app into an
application model, instead of incorporating it into the controllers themselves, you’re
able to reuse the business logic of your application.
After the application model has returned the data necessary to service the
request—the fruit objects in the apples category—you see the first difference to the
traditional HTML app. Instead of building a view model, the action method creates an
API model. This is analogous to the view model used previously, but rather than con-
taining data used to generate an HTML view, it contains the data that will be sent back
in the response.
DEFINITION View models contain both data required to build a response and
metadata about how to build the response. API Models only contain the data
to be returned in the response.
When we looked at the traditional MVC app, we used the view model in conjunction
with a Razor view template to build the final response. With the Web API app, we use
the API model in conjunction with a formatter. A formatter, as the name suggests, seri-
alizes the API model into a machine-readable response, such as JSON or XML. The
formatter forms the “V” in the Web API version of MVC, by choosing an appropriate
representation for the data to return.
Finally, as with the traditional web app, the generated response is then sent back
through the middleware pipeline, passing through each of the configured middle-
ware components, and back to the original caller.
Hopefully, the parallels between traditional web applications and Web APIs are
clear; the majority of behavior is identical, only the response varies. Everything from
when the request comes in to the interaction with the application model is similar
between the paradigms.
1
ASP.NET Core 2.1 introduces the [ApiController] attribute. You can use this attribute to opt-in to specific
Web API conventions. To learn more about this attribute, see http://mng.bz/FYH1.](https://image.slidesharecdn.com/asp-230807173723-31e70040/85/ASP-NET-Core-in-Action-2018-pdf-273-320.jpg)
![247
Attribute routing: taking fine-grained control of your URLs
public API of your application, so it’s important that they’re easy to consume. Imagine
you have a commonly called action on the CategoriesController that returns a list
of all the current categories on your e-commerce site that contain available products:
public IActionResult ListAllCurrentCategoriesWithProducts();
Using conventional routing, that would map to an excessively long URL,
/Categories/ListAllCurrentCategoriesWithProducts. The team decides to shorten
it to /CurrentCategories, so users can easily understand which section of your app
they’re in.
With conventional routing you’d need to add a new, highly specific, route in the
global configuration, to handle this outlier method. Over time, you might add other
similarly specific routes, giving the potential for clashes and breaking other routes in
your application. Conventional routing is not as useful when you need to have this
level of fine-grained control over your routes.
Instead, a more common approach is to use attribute routing for your Web APIs.
Attribute routing, as the name suggests, involves applying attributes to your action
methods to specify the URL that they should match.
public class HomeController: Controller
{
[Route("")]
public IActionResult Index()
{
/* method implementation*/
}
[Route("contact")]
public IActionResult Contact()
{
/* method implementation*/
}
}
By applying [Route] attributes to your controller, you bypass conventional routing for
that action method. Each [Route] attribute defines a specific URL that corresponds
to the associated action method. In the example provided, the "/" URL maps directly
to the Index method and the "/contact" URL maps to the Contact method.
TIP If you use [Route] attributes on all your action methods, then you don’t
need to set up any conventional routes when you call UseMvc() in
Startup.Configure().
Conceptually, attribute routing takes the opposite approach to conventional routing.
The MVC-style conventional routing looks at the incoming URL, checks it against
your route templates to fill in the blanks for the controller and action, and then
checks to see if the requested controller and action exist in your application.
Listing 9.4 Attribute routing example
The Index action will be
executed when the "/"
URL is requested.
The Contact action will be
executed when the
"/home/contact" URL is
requested.](https://image.slidesharecdn.com/asp-230807173723-31e70040/85/ASP-NET-Core-in-Action-2018-pdf-275-320.jpg)
![248 CHAPTER 9 Creating a Web API for mobile and client applications using MVC
Attribute routing, on the other hand, starts by looking for all the controllers and
action methods in your application that have [Route] attributes. It uses these to calcu-
late the URL that needs to be called to invoke a given action, building a dictionary
where the key is the URL and the value is the action method. When a request arrives,
the router can check if the key is in the dictionary—if it is, then it knows which action
to execute, if it isn’t, then the action isn’t attribute-routed.
Attribute routing maps URLs to a specific action method, but a single action
method can still have multiple URLs. Each URL must be declared with its own Route-
Attribute, as shown in this listing, which shows the skeleton of the Web API for a car-
racing game.
public class CarController
{
[Route("car/start")]
[Route("car/ignition")]
[Route("start-car")]
public IActionResult Start()
{
/* method implementation*/
}
[Route("car/speed/{speed}")]
[Route("set-speed/{speed}")]
public IActionResult SetCarSpeed(int speed)
{
/* method implementation*/
}
}
The listing shows two different action methods, both of which can be accessed from
multiple URLs. For example, the Start method will be executed when any of the fol-
lowing URLS are requested:
/car/start
/car/ignition
/start-car
These URLs are completely independent of the controller and action method names;
only the value in the RouteAttribute matters.
NOTE The controller and action name have no bearing on the URLs or
route templates when RouteAttributes are used.
The templates used by the route attributes are standard route templates, the same as
you used in chapter 5. You can use literal segments and you’re free to define route
parameters that will extract values from the URL, as shown by the SetCarSpeed
Listing 9.5 Attribute routing with multiple attributes
The Start method will be
executed when any of these
URLs are reached.
The name of the action
method has no effect on
the RouteAttribute or URL.
The RouteAttributes can
contain route parameters, in
this case speed.](https://image.slidesharecdn.com/asp-230807173723-31e70040/85/ASP-NET-Core-in-Action-2018-pdf-276-320.jpg)
![249
Attribute routing: taking fine-grained control of your URLs
method in the previous listing. That method defines two route templates, both of
which define a route parameter, {speed}.
TIP I’ve used multiple [Route] attributes on each action in this example, but
it’s best practice to expose your action at a single URL. This will make your
API easier to understand and consume by other applications.
Route parameters are handled in the very same way as for conventional routing—they
represent a segment of the URL that can vary. The only difference with attribute rout-
ing is that the controller and action name are already known, so you’re not allowed to
use the {controller} and {action} parameters—these are already set to the control-
ler and action that corresponds to the decorated action method.
As before, when defining conventional routes, the route parameters in your Route-
Attribute templates can
Be optional
Have default values
Use route constraints
For example, you could update the SetCarSpeed method in the previous listing to
constrain {speed} to an integer and to default to 20 like so:
[Route("car/speed/{speed=20:int}")]
[Route("set-speed/{speed=20:int}")]
public IActionResult SetCarSpeed(int speed)
It’s also possible to give your route attributes a name by providing one to Route-
Attribute, for example:
[Route("set-speed/{speed}", Name = "set_speed")]
public IActionResult SetCarSpeed(int speed)
Route names are optional, and aren’t used when matching URLs, but they can be use-
ful for URL generation. You saw in chapter 5 how to create URLs in your action meth-
ods using the Url helper and the RedirectToRoute method, and how to use them
with Tag Helpers in chapter 8. Although you may only have half a dozen conventional
routes, you effectively have a route for every attribute-routed action method that has
been given a name. Each route name must be unique in the application, so be sure to
keep track of them if you do use them!
If you managed to get your head around routing in chapter 5, then attribute rout-
ing shouldn’t hold any dangers for you. You’re writing a custom route template for
every action method in your application. When combining both conventional and
attribute routing in your application, you need to bear in mind how these two
approaches interact and what it means for your URLs.
9.4.1 Ordering of conventional and attribute routes
In chapter 5, you saw that the order in which you define conventional routes in
Startup.cs controls the order in which those routes are checked when MvcMiddleware](https://image.slidesharecdn.com/asp-230807173723-31e70040/85/ASP-NET-Core-in-Action-2018-pdf-277-320.jpg)
![250 CHAPTER 9 Creating a Web API for mobile and client applications using MVC
receives a request. A route template defined earlier will be tested first, so gets first dibs
on handling the request. Because of that, it’s important to define the most specific
routes first, and the most general routes at the end.
With attribute routing, ordering doesn’t happen in quite the same way. On startup,
MvcMiddleware scans your app using reflection and locates all the routes applied
using RouteAttributes. It then automatically orders the routes from most specific to
least specific, as though you had defined the routes in the most optimum way.
Having said that, RouteAttributes do have an Order property. You can use this to
explicitly ensure a particular route attribute match is attempted before other routes,
but I’d strongly advise against using it. Doing so adds another layer of complexity that
you need to manage and could be indicative of excessive complexity in the URLs your
application exposes.
WARNING If you find yourself relying on a route order, then your URLs are
probably confusing. This will make it difficult for clients to consume your
API. Instead of using the Order property, look at ways to reduce the overlap
between your routes.
What does ordering routes in the most optimum way look like? Well, it obviously
depends on your application, and if you’ve defined your [Route] attributes using a
confusing URL space, then there may not be a truly optimum order. In those cases,
falling back to route naming can sometimes be an easier solution than trying to
coerce the correct order.
An aspect I haven’t touched on yet is what happens when you have an application
with both conventional and attribute routing. For example, the standard conventional
routing for the Index action method
public class HomeController
{
[Route("view”)]
public IActionResult Index() { }
}
would suggest that the /home/index URL would invoke the action. On the other
hand, attribute routing suggests the /view URL would invoke the action. Who wins?
Either? Both?
Well, applying attribute routing to an action means that it can never be matched
using conventional routing. Even though the action theoretically matches the
/home/index route, the conventional router can’t even see it, so it will never match.
You’re free to use both conventional routing and attribute routing in a single
application, but you need to bear this conflict between the two approaches in mind.
Even if a convention seems like it should match a particular action, the presence of an
attribute route will mean the action won’t be matched by the convention.
TIP Attribute routing on an action (or a controller, as you’ll see) will make
the action unreachable by conventional routing.](https://image.slidesharecdn.com/asp-230807173723-31e70040/85/ASP-NET-Core-in-Action-2018-pdf-278-320.jpg)
![251
Attribute routing: taking fine-grained control of your URLs
This fact lends credence to the convention of sticking to conventional routing for tra-
ditional MVC controllers that return HTML using Razor templates and using attribute
routing for your Web API controllers. Doing so will make your life a lot simpler and
can help avoid conflicts if you’re consistent with your naming.1
TIP Use conventional routing for MVC controllers, and attribute routing for
Web API controllers. Adding a prefix such as "api" to your Web API route
templates helps to separate the Web API URL space from the MVC URL
space.
One thing you might begin noticing when you start using attribute routing is how
much more verbose it is than conventional routing. Where with conventional routing
you had only a handful of routes, you now have one for every single action method!
This is largely a symptom of the greater control attribute routing provides, but
there are a few features available to make your life a little easier. In particular, combin-
ing route attributes and token replacement can help reduce duplication in your code.
9.4.2 Combining route attributes to keep your route templates DRY
Adding route attributes to all of your API controllers can get a bit tedious, especially if
you’re mostly following conventions where your routes have a standard prefix such as
"api" or the controller name. Generally, you’ll want to ensure you don’t repeat your-
self (DRY) when it comes to these strings. The following listing shows two action meth-
ods with a number of [Route] attributes. (This is for demonstration purposes only.
Stick to one per action if you can!)
public class CarController
{
[Route("api/car/start")]
[Route("api/car/ignition")]
[Route("/start-car")]
public IActionResult Start()
{
/* method implementation*/
}
[Route("api/car/speed/{speed}")]
[Route("/set-speed/{speed}")]
public IActionResult SetCarSpeed(int speed)
{
/* method implementation*/
}
}
1
ASP.NET Core 2.1 introduces the [ApiController] attribute. Applying this attribute to your controller
means it must only use [Route] attributes; it will never match conventional routes.
Listing 9.6 Duplication in RouteAttribute templates](https://image.slidesharecdn.com/asp-230807173723-31e70040/85/ASP-NET-Core-in-Action-2018-pdf-279-320.jpg)
![252 CHAPTER 9 Creating a Web API for mobile and client applications using MVC
There’s quite a lot of duplication here—you’re adding "api/car" to most of your
routes. Presumably, if you decided to change this to "api/vehicles", you’d have to go
through each attribute and update it. Code like that is asking for a typo to creep in!
To alleviate this pain, it’s also possible to apply RouteAttributes to controllers, in
addition to action methods. When a controller and an action method both have a
route attribute, the overall route template for the method is calculated by combining
the two templates.
[Route("api/car")]
public class CarController
{
[Route("start")]
[Route("ignition")]
[Route("/start-car")]
public IActionResult Start()
{
/* method implementation*/
}
[Route("speed/{speed}")]
[Route("/set-speed/{speed}")]
public IActionResult SetCarSpeed(int speed)
{
/* method implementation*/
}
}
Combining attributes in this way can reduce some of the duplication in your route
templates and makes it easier to add or change the prefixes (such as switching "car"
to "vehicle") for multiple action methods. To ignore the RouteAttribute on the
controller and create an absolute route template, start your action method route tem-
plate with a slash (/).
You can combine multiple RouteAttribute on controllers too, if you use inheri-
tance. If all your controllers inherit from a base class, you can use this approach to
add a global prefix to all your attribute routes.
[Route("api")]
public class BaseController : Controller { }
[Route("car")]
public class CarController : BaseController
{
[Route("start")]
[Route("ignition")]
Listing 9.7 Combining RouteAttribute templates
Listing 9.8 Using a base class to add a global prefix to RouteAttribute templates
Combines to give
the"api/car/start"
template
Combines to give
the "api/car/ignition"
template
Does not combine as
starts with /, gives the
"start-car" template
Combines to give the
"api/car/speed/{speed}"
template
Does not combine as starts
with /, gives the "set-
speed/{speed}" template
The BaseController defines
the "api" global prefix
The CarController inherits the
RouteAttribute from the BaseController
and adds its own prefix
Combines all attributes
to give the
"api/car/start" template
Combines all attributes
to give the
"api/car/ignition" template](https://image.slidesharecdn.com/asp-230807173723-31e70040/85/ASP-NET-Core-in-Action-2018-pdf-280-320.jpg)
![253
Attribute routing: taking fine-grained control of your URLs
[Route("/start-car")]
public IActionResult Start()
{
/* method implementation*/
}
}
As you can see, the [Route] attribute from the “most-base” controller is used first, fol-
lowed by the action controller, and finally, the action method, combining to give a sin-
gle route for the action method. Once again, specifying a leading "/" to the route will
prevent route combination and will use only the final [Route] attribute to define the
route. This has reduced a lot of the duplication, but you can do one better by using
token replacement.
9.4.3 Using token replacement to reduce duplication
in attribute routing
The ability to combine attribute routes is handy, but you’re still left with some duplica-
tion if you’re prefixing your routes with the name of the controller, or your route tem-
plates use the action name. Luckily, you can simplify even further!
Attribute routes support the automatic replacement of the [action] and
[controller] tokens in your attribute routes. These will be replaced with the name of
the action and the controller (without the “Controller” suffix), respectively. The
tokens are replaced after all attributes have been combined, so this is useful when you
have controller inheritance hierarchies. This listing shows how you can simplify the
previous route attribute hierarchy.
[Route("api/[controller]")]
public abstract class BaseController { }
public class CarController : BaseController
{
[Route("[action]")]
[Route("ignition")]
[Route("/start-car")]
public IActionResult Start()
{
/* method implementation*/
}
}
The router will also replace tokens in the Name property of RouteAttributes, which
can make generating unique route names easier. If you use a RouteAttribute on a
base controller with a tokenized name
[Route("api/[controller]", Name = "[controller]_[action]")]
Listing 9.9 Token replacement in RouteAttributes
Does not combine with base
attributes as it starts with /, so
remains as "start-car"
Token replacement happens
last, so [controller] is replaced
with "car" not "base"
Combines and replaces
tokens to give the
"api/car/start" template
Combines and replaces
tokens to give the
"api/car/ignition" template
Does not combine with base attributes as
it starts with /, so remains as "start-car"](https://image.slidesharecdn.com/asp-230807173723-31e70040/85/ASP-NET-Core-in-Action-2018-pdf-281-320.jpg)
![254 CHAPTER 9 Creating a Web API for mobile and client applications using MVC
then a unique route name will be generated for each action. You need to be careful if
you have multiple RouteAttributes applied to a single action, as in the previous list-
ing, as then the route names will no longer be unique!
TIP Avoid using multiple [Route] attributes on your Web API action meth-
ods. Having multiple URLs invoke the same action can be confusing for con-
sumers of your app and complicates routing.
We’ve covered pretty much everything there is to know about attribute routing now,
with one exception: handling different HTTP request types like GET and POST.
9.4.4 Handling multiple matching actions with attribute routing
In chapter 5, you saw that you could discriminate between two action methods that
match the same URL by using HTTP verb attributes such as [HttpPost]. With Web
API controllers, the need to distinguish between identical URLs becomes more preva-
lent, due to their typical design.
Imagine you’re building an API to manage your calendar. You want to be able to
list and create appointments. Well, a traditional HTTP REST service might define the
following URLs and HTTP verbs to achieve this:
GET /appointments—List all your appointments
POST /appointments—Create a new appointment
Note that these two endpoints define the same URL, only the HTTP verb differs. This
is common when building Web APIs and, luckily, is easy to model in ASP.NET Core. As
with conventional routing, you use attributes such as [HttpPost] to define the HTTP
verb an action method corresponds to.
public class AppointmentController
{
[HttpGet("/appointments")]
public IActionResult ListAppointments()
{
/* method implementation */
}
[HttpPost("/appointments")]
public IActionResult CreateAppointment()
{
/* method implementation */
}
}
These HTTP verb attributes are the same ones you saw used in chapter 5 with conven-
tional routing, but in this case, they also contain the route template themselves.
[HttpGet("/appointments")] effectively combines [Route("/appointments")] and
Listing 9.10 Using HTTP verb attributes with attribute routing
Only executed in response
to GET /appointments
Only executed in response
to POST /appointments](https://image.slidesharecdn.com/asp-230807173723-31e70040/85/ASP-NET-Core-in-Action-2018-pdf-282-320.jpg)
![255
Enabling additional input formatters: binding to XML data
[HttpGet] into a more compact representation. For that reason, this is the preferred
approach for defining your attribute routes.
TIP Define routes using attributes such as [HttpGet], [HttpPost], and
[HttpDelete]. This makes the action methods more specific and easier to
reason about.
And with that, you’ll probably be glad to hear we’re finished with routing for Web
APIs and, in fact, for the whole book! With the route template details you have in
chapter 5 and in this section, you have everything you need to customize the URLs in
your application, whether you’re using conventional routes or attribute routing.
Conceptually, people often find attribute routing a bit easier to grok, as you’re nor-
mally mapping a URL one-to-one with an action method. Although having the free-
dom to define the exact URL for a particular action method is useful, try not to get
too power-crazed; always try to think about the users and clients consuming your API.
Having a simple and well-defined set of URLs for your application should be your
main goal.
With routing checked off the list, it’s time to consider the next step in an MVC
request—model binding—and how you can customize it for Web APIs. The process is
identical for both MVC and Web API, but Web APIs often run into an additional
requirement, especially when interoperating with legacy systems—the ability to post
XML to a Web API action method. By default, this isn’t possible but, luckily, enabling
it is easy.
9.5 Enabling additional input formatters:
binding to XML data
In chapter 6, I introduced model binding as a way of mapping an incoming request to
the method parameters of an action. After the router selects an action method, the
model binder is responsible for taking the data posted in a request and mapping it to
the method parameters of the action method.
In particular, you saw that by using the [FromBody] attribute on a method parame-
ter, you could bind a parameter to the body of a request.
These days, with mobile applications and SPAs becoming increasingly popular, the
vast majority of data posted to Web APIs is JSON. The default model binder supports
this out of the box, so all that’s required to have the JSON data bound to your method
parameter is to add the [FromBody] attribute.1
There was a time, however, when XML was king. It’s still used for configuration
(good old MSBuild and .csproj files) and many communication protocols (SOAP,
RSS). Consequently, it’s quite likely you’ll need to be able to accept XML data to a
Web API action at some point.
1
ASP.NET Core 2.1 introduces the [ApiController] attribute. If you decorate your Web API controller with
this attribute, you don’t need to decorate your binding models with [FromBody]. The MVC middleware will
infer that complex types should be bound using [FromBody] automatically.](https://image.slidesharecdn.com/asp-230807173723-31e70040/85/ASP-NET-Core-in-Action-2018-pdf-283-320.jpg)
![256 CHAPTER 9 Creating a Web API for mobile and client applications using MVC
By default, MvcMiddleware only accepts POST data in JSON format. In order to be
able to accept XML data and have it bind automatically to your models, you’ll need
additional services.
Before you dig into how to add the formatters, it’s worth considering what happens if
you try to send XML to an ASP.NET Core application that you haven’t yet configured
to accept it.
In this example, I’ve created a simple Web API Controller that parses an object
form the request body and returns a 200 OK response:
[HttpPost]
public IActionResult Add([FromBody] Car car)
{
return Ok();
}
Figure 9.8 shows a screenshot of Postman (www.getpostman.com), which you can use
to create requests for testing your application. I created a request with XML in the
body and POSTed it to the preceding action. As you can see, the application returns a
415 response code, which means “Unsupported Media Type”, indicating that Mvc-
Middleware was unable to parse the XML in the body of the request.
Clients include the content-type header as part of POST requests to tell the server
what sort of data it’s sending. In this case, the request is sent with a content-type of
text/xml. When the request arrives, it checks this header and looks for an input for-
matter that can deserialize the request.
TIP The input formatter is selected based on the content-type header of
the request.
Customizable by default
The ability to customize each aspect of ASP.NET Core is one of the features that sets
it apart from the previous version of ASP.NET. ASP.NET Core configures the vast
majority of its internal components using one of two mechanisms—dependency injec-
tion or by configuring an Options object when you add the service to your application,
as you’ll see in chapters 10 (dependency injection) and 11 (Options object).
As an adjunct to this, much of ASP.NET Core starts from the assumption that you
want nothing in your application, and lets you add in the things you need. This means
you can easily create small, stripped-back web applications, when compared to the
monolithic System.Web-based previous version of ASP.NET. Your application has only
the features you need.
In counterpoint to this, this philosophy means you’ll run into many more situations
where the default settings won’t fit your requirements. Luckily, the ability to easily
customize all the components of ASP.NET Core means you’ll normally be able to add
additional features without too much difficulty.](https://image.slidesharecdn.com/asp-230807173723-31e70040/85/ASP-NET-Core-in-Action-2018-pdf-284-320.jpg)
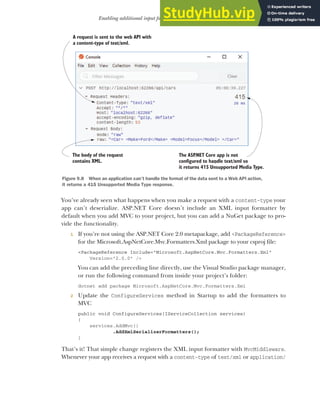
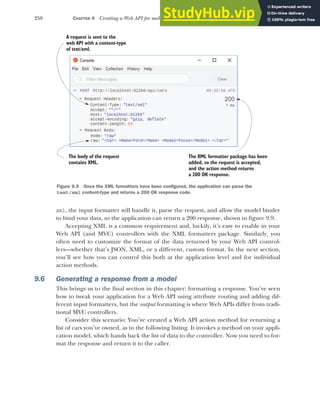
![259
Generating a response from a model
public class CarsController : Controller
{
[HttpGet("api/cars")]
public IEnumerable<string> ListCars()
{
return new string[]
{ "Nissan Micra", "FordFocus" };
}
}
You’ve already seen that it’s possible to return data directly from an action method, in
which case, the middleware formats it and returns the formatted data to the caller. But
how does the middleware know which format to use? After all, you could serialize it as
JSON, as XML, even with a simple ToString() call.
The process of determining the format of data to send to clients is known gener-
ally as content negotiation (conneg). At a high level, the client sends a header indicating
the types of content it can understand—the Accept header—and the server picks one
of these, formats the response, and sends a content-type header in the response,
indicating which it chose.
You’re not forced into only sending a content-type the client expects and, in some
cases, you may not even be able to handle the types it requests. What if a request stipu-
lates it can only accept Excel spreadsheets? It’s unlikely you’d support that, even if
that’s the only content-type the request contains!
When you return an API model from an action method, whether directly (as in the
previous listing) or via an OkResult or other StatusCodeResult, ASP.NET Core will
Listing 9.11 A Web API controller to return a list of cars
The action is executed with
a request to GET /api/cars.
The API Model containing
the data is an
IEnumerable<string>.
This data would normally be
fetched from the application model.
The accept and content-type headers
The accept header is sent by a client as part of a request to indicate the type of con-
tent that the client can handle. It consists of a number of MIME types,a
with optional
weightings (from 0 to 1) to indicate which type would be preferred. For example, the
application/json,text/xml;q=0.9,text/plain;q=0.6 header indicates that
the client can accept JSON, XML, and plain text, with weightings of 1.0, 0.9, and 0.6,
respectively. JSON has a weighting of 1.0, as no explicit weighting was provided. The
weightings can be used during content negotiation to choose an optimal representa-
tion for both parties.
The content-type header describes the data sent in a request or response. It con-
tains the MIME type of the data, with an optional character encoding. For example,
the application/json; charset=utf-8 header would indicate that the body of the
request or response is JSON, encoded using UTF-8.
a
For more on MIME types see http://mng.bz/D3UB.](https://image.slidesharecdn.com/asp-230807173723-31e70040/85/ASP-NET-Core-in-Action-2018-pdf-287-320.jpg)
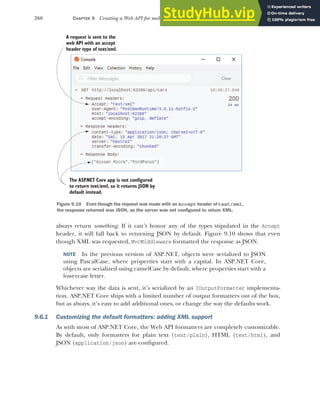
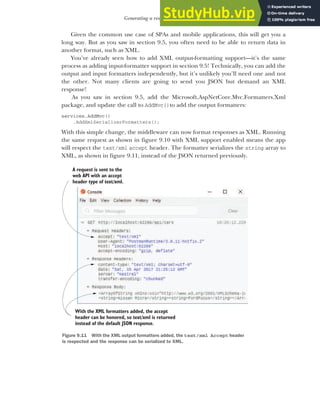


![264 CHAPTER 9 Creating a Web API for mobile and client applications using MVC
view models, as view models contain both data and metadata about how to gen-
erate the response.
Attribute routing is an alternative way of defining the routes in your application
by applying RouteAttributes to your action methods. Web API controllers
often use this approach, as it allows tighter control over the URL generated for
each action method.
The controller and action name have no bearing on the URLs or route tem-
plates when you use attribute routing.
Route attributes applied to a controller combine with attributes on action
methods to form the final template. These are also combined with attributes on
inherited base classes.
If an action or controller uses attribute routing, it can no longer be reached via
conventional routing.
Use the "[controller]" and "[action]" tokens in your route templates to
reduce repetition. They’ll be replaced with the current controller and action
name.
The [HttpPost] and [HttpGet] attributes allow choosing between actions
based on the request’s HTTP method when two actions correspond to the same
URL.
You can model bind requests sent in the XML format using the Microsoft
.AspNetCore.Mvc.Formatters.Xml package. Add the XML formatters by calling
services.AddMvc().AddXmlSerializerFormatters() in your Startup class.
This will also enable XML responses.
By default, ASP.NET Core will format the API model returned from a Web API
controller as JSON.
If you return more than one type of result from an action method, the method
signature must return IActionResult.
In contrast to the previous version of ASP.NET, JSON data is serialized using
camelCase rather than PascalCase.
Content negotiation occurs when the client specifies the type of data it can han-
dle and the server chooses a return format based on this.
By default, ASP.NET Core can return text/plain, text/html, and application/
json, but you can add additional formatters.
Content negotiation isn’t used when the accept header contains */*, such as in
most browsers. You can disable this option by modifying the RespectBrowser-
AcceptHeader option when adding MVC services in Startup.cs.](https://image.slidesharecdn.com/asp-230807173723-31e70040/85/ASP-NET-Core-in-Action-2018-pdf-292-320.jpg)
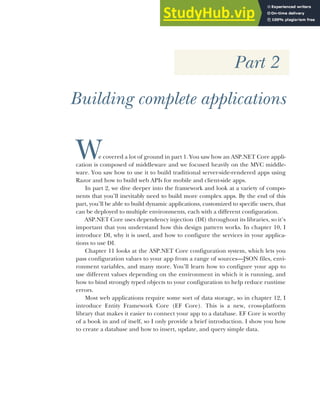
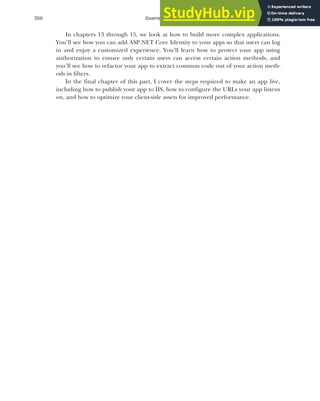


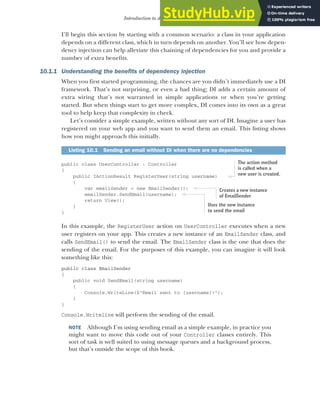
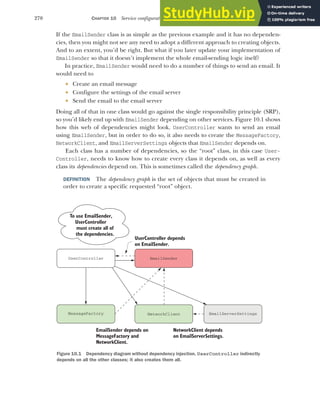


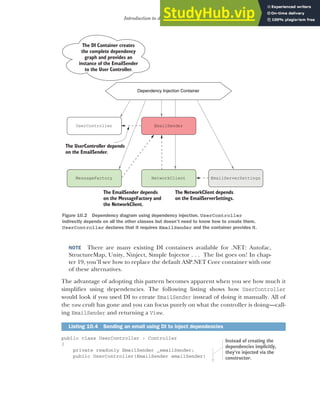
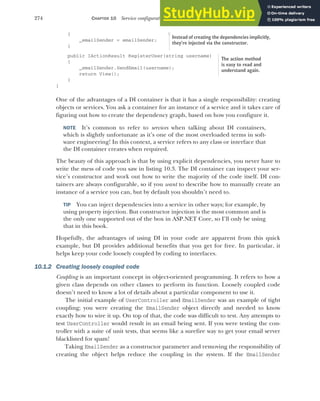
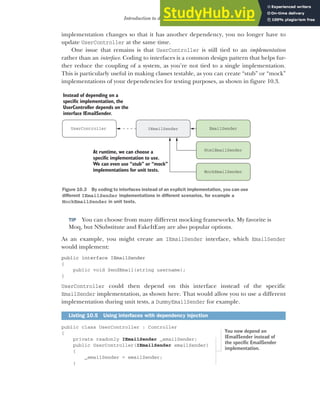

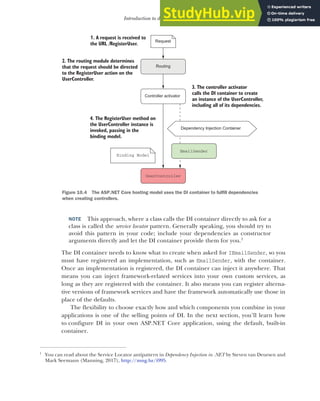
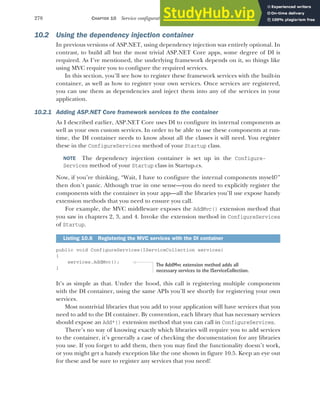
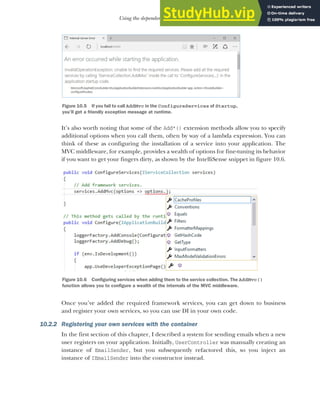
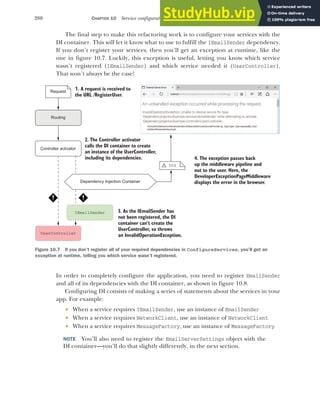

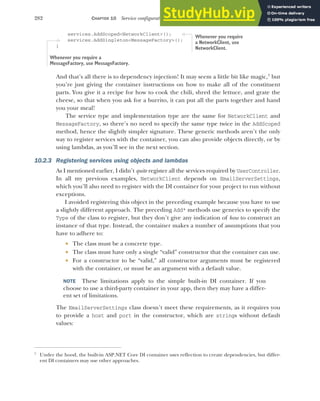
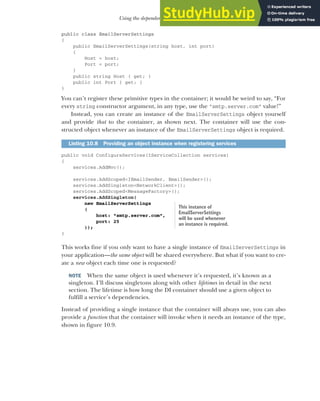
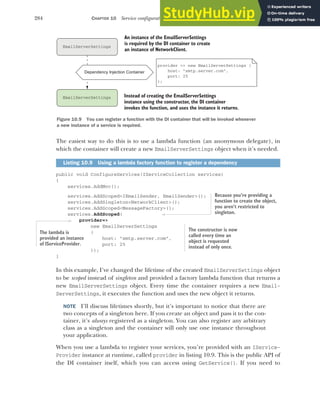
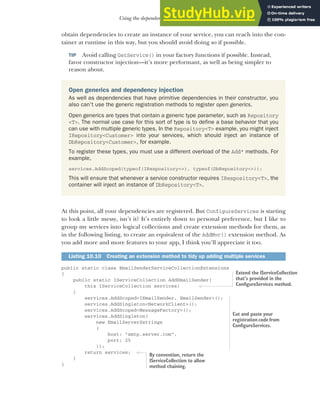
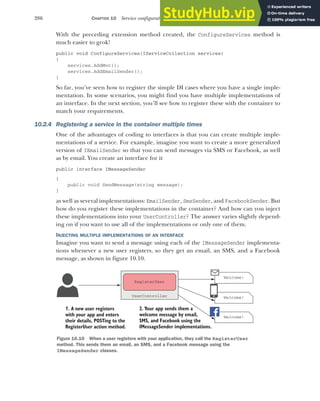
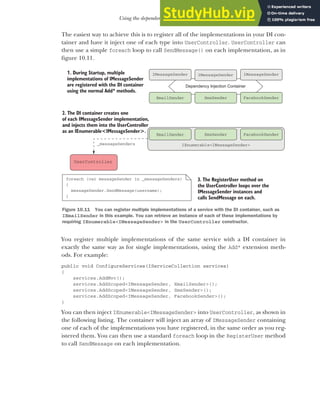
![288 CHAPTER 10 Service configuration with dependency injection
public class UserController : Controller
{
private readonly IEnumerable<IMessageSender> _messageSenders;
public UserController(
IEnumerable<IMessageSender> messageSenders)
{
_messageSenders = messageSenders;
}
public IActionResult RegisterUser(string username)
{
foreach (var messageSender in _messageSenders)
{
messageSender.SendMessage(username);
}
return View();
}
}
WARNING You must use IEnumerable<T> as the constructor argument to
inject all of the registered types of a service, T. Even though this will be
injected as a T[] array, you can’t use T[] or ICollection<T> as your construc-
tor argument. Doing so will cause an InvalidOperationException, as you
saw in figure 10.7.
It’s simple enough to inject all of the registered implementations of a service, but
what if you only need one? How does the container know which one to use?
INJECTING A SINGLE IMPLEMENTATION WHEN MULTIPLE SERVICES ARE REGISTERED
Imagine you’ve already registered all of the IMessageSender implementations, what
happens if you have a service that requires only one of them? For example
public class SingleMessageSender
{
private readonly IMessageSender _messageSender;
public SingleMessageSender(IMessageSender messageSender)
{
_messageSender = messageSender;
}
}
The container needs to pick a single IMessageSender to inject into this service, out of
the three implementations available. It does this by using the last registered imple-
mentation—the FacebookSender from the previous example.
NOTE The DI container will use the last registered implementation of a ser-
vice when resolving a single instance of the service.
Listing 10.11 Injecting multiple implementations of a service into a consumer
Requesting an
IEnumerable will
inject an array of
IMessageSender.
Each IMessageSender
in the IEnumerable is
a different
implementation.](https://image.slidesharecdn.com/asp-230807173723-31e70040/85/ASP-NET-Core-in-Action-2018-pdf-316-320.jpg)

![290 CHAPTER 10 Service configuration with dependency injection
1 Action methods
2 View templates
In this section, I’ll briefly discuss these two situations, how they work, and when you
might want to use them.
INJECTING SERVICES DIRECTLY INTO ACTION METHODS USING [FROMSERVICES]
MVC controllers typically contain multiple action methods that logically belong
together. You might group all the action methods related to managing user accounts
into the same controller, for example. This allows you to apply filters and authoriza-
tion to all of the action methods collectively, as you’ll see in chapter 13.
As you add additional action methods to a controller, you may find the controller
needs additional services to implement new action methods. With constructor injec-
tion, all of these dependencies are provided via the constructor. That means the DI
container must create all of the services for every action method in a controller, even
if none of them are required by the action method being called.
Consider listing 10.13 for example. This shows UserController with two stub
methods: RegisterUser and SignInUser. Each action method requires a different
dependency, so both dependencies will be created and injected, whichever action
method is called by the request. If ISignInManager or IMessageSender have lots of
dependencies themselves, the DI container may have to create lots of objects for a ser-
vice that is often not used.
public class UserController : Controller
{
private readonly IMessageSender _messageSender;
private readonly ISignInService _signInService;
public UserController(
IMessageSender messageSender, ISignInService signInService)
{
messageSenders = messageSender;
_signInService = signInService;
}
public IActionResult RegisterUser(string username)
{
_messageSender.SendMessage(username);
return View();
}
public IActionResult SignInUser(string username, string password)
{
_signInService.SignUserIn(username, password);
return View();
}
}
Listing 10.13 Injecting services into a controller via the constructor
Both IMessageSender
and ISignInService are
injected into the
constructor every time.
Only the RegisterUser
method uses
IMessageSender.
Only the SignInUser
method uses
ISignInService.](https://image.slidesharecdn.com/asp-230807173723-31e70040/85/ASP-NET-Core-in-Action-2018-pdf-318-320.jpg)
![291
Using the dependency injection container
If you know a service is particularly expensive to create, you can choose to inject it as a
dependency directly into the action method, instead of into the controller’s construc-
tor. This ensures the DI container only creates the dependency when the specific action
method is invoked, as opposed to when any action method on the controller is
invoked.
NOTE Generally speaking, your controllers should be sufficiently cohesive
that this approach isn’t necessary. If you find you have a controller that’s
dependent on many services, each of which is used by a single action method,
you might want to consider splitting up your controller.
You can directly inject a dependency into an action method by passing it as a parame-
ter to the method and using the [FromServices] attribute. During model binding,
MvcMiddleware will resolve the parameter from the DI container, instead of from the
request values, like you saw in chapter 6. This listing shows how you could rewrite list-
ing 10.13 to use [FromServices] instead of constructor injection.
public class UserController : Controller
{
public IActionResult RegisterUser(
[FromServices] IMessageSender messageSender,
string username)
{
messageSender.SendMessage(username);
return View();
}
public IActionResult SignInUser(
[FromServices] ISignInService signInService
string username, string password)
{
signInService.SignUserIn(username, password);
return View();
}
}
You might be tempted to use the [FromServices] attribute in all of your action meth-
ods, but I’d encourage you to use standard constructor injection most of the time.
Having the constructor as a single location that declares all the dependencies of a
class can be useful, so I only use [FromServices] where creating an instance of a
dependency is expensive and is only used in a single action method.
INJECTING SERVICES INTO VIEW TEMPLATES
Injecting dependencies into the constructor is recommended, but what if you don’t
have a constructor? In particular, how do you go about injecting services into a Razor
view template when you don’t have control over how the template is constructed?
Listing 10.14 Injecting services into a controller using the [FromServices] attribute
The [FromServices]
attribute ensures
IMessageSender is resolved
from the DI container.
IMessageSender is only
available in RegisterUser.
ISignInService is resolved
from the DI container and
injected as a parameter.
Only the SignInUser
method can use
ISignInService.](https://image.slidesharecdn.com/asp-230807173723-31e70040/85/ASP-NET-Core-in-Action-2018-pdf-319-320.jpg)
![292 CHAPTER 10 Service configuration with dependency injection
Imagine you have a simple service, HtmlGenerator, to help you generate HTML in
your view templates. The question is, how do you pass this service to your view tem-
plates, assuming you’ve already registered it with the DI container?
One option is to inject HtmlGenerator into your controller using constructor injec-
tion or the [FromServices] attribute. Then you can pass the service via ViewData or
the view model, as you saw in chapter 7. In some cases, that approach may make sense,
but other times, you might not want to have references to the HtmlGenerator service
in your controller or view model at all. In those cases, you can directly inject Html-
Generator into your view templates.
NOTE Some people take offense at injecting services into views in this way.
You definitely shouldn’t be injecting services related to business logic into
your views, but I think it makes sense for services that are related to HTML
generation.
You can inject a service into a Razor template with the @inject directive by providing
the type to inject and a name for the injected service in the template.
@inject HtmlGenerator helper
<h1>The page title</h1>
<footer>
@helper.Copyright()
</footer>
Injecting services directly into views can be a useful way of exposing UI-related ser-
vices to your view templates without having to closely couple your views to your con-
trollers and actions. You shouldn’t find you need to rely on it too much, but it’s a
useful tool to have.
That pretty much covers registering and using dependencies, but there’s one
important aspect I’ve only vaguely touched on: lifetimes, or, when does the container
create a new instance of a service? Understanding lifetimes is crucial to working with
DI containers, so it’s important to pay close attention to them when registering your
services with the container.
10.3 Understanding lifetimes: when are services created?
Whenever the DI container is asked for a particular registered service, for example an
instance of IMessageSender, it can do one of two things:
Create and return a new instance of the service
Return an existing instance of the service
The lifetime of a service controls the behavior of the DI container with respect to these
two options. You define the lifetime of a service during DI service registration. This
Listing 10.15 Injecting a service into a Razor view template with @inject
Injects an instance of HtmlGenerator
into the view, named helper
Uses the injected service by
calling the helper instance](https://image.slidesharecdn.com/asp-230807173723-31e70040/85/ASP-NET-Core-in-Action-2018-pdf-320-320.jpg)

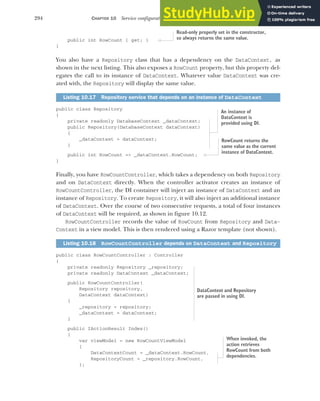

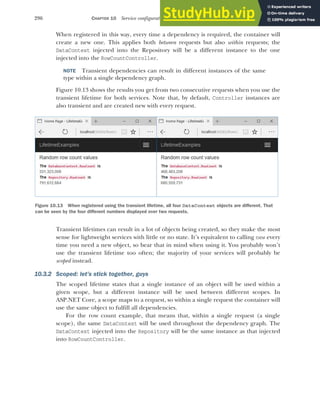
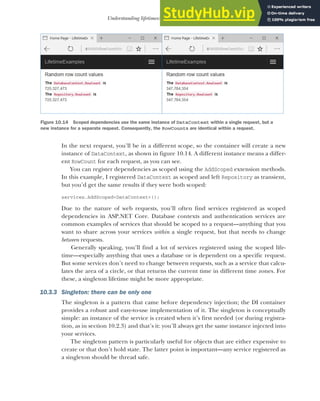
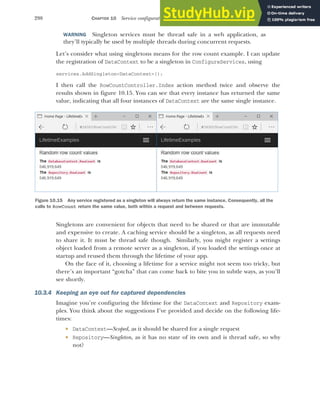
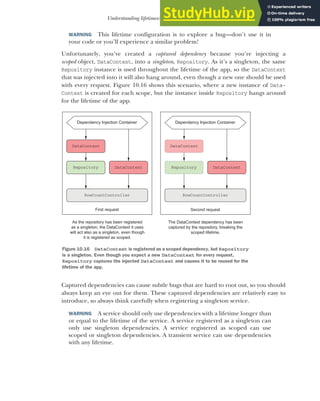
![300 CHAPTER 10 Service configuration with dependency injection
At this point, I should mention that there’s one glimmer of hope in this cautionary
tale. ASP.NET Core 2.0 includes a new option that lets you check for these kinds of
captured dependencies and will throw an exception on application startup if it detects
them, as shown in figure 10.17.
This scope validation check has a performance impact, so by default it’s only enabled
when your app is running in a development environment, but it should help you
catch most issues of this kind. You can enable or disable this check regardless of envi-
ronment by setting the ValidateScopes option when creating your WebHostBuilder
in Program.cs, as shown in the following listing.
public class Program
{
public static void Main(string[] args)
{
BuildWebHost(args).Run();
}
public static IWebHost BuildWebHost(string[] args) =>
WebHost.CreateDefaultBuilder(args)
.UseStartup<Startup>()
.UseDefaultServiceProvider(options =>
{
options.ValidateScopes = true;
})
.Build();
}
Listing 10.19 Setting the ValidateScopes property to always validate scopes
In ASP
.NET Core 2.0, you will get
an Exception when the DI container
detects a captured dependency.
The exception message
describes which service
was captured...
...and which
service captured
the dependency
.
Figure 10.17 In ASP.NET Core 2.0, the DI container will throw an exception when it creates a
service with a captured dependency. By default, this check is only enabled for development
environments.
The default builder
sets ValidateScopes
to validate only in
development
environments.
You can override the
validation check with
the UseDefaultService-
Provider extension.
Setting to true will
validate scopes in all
environments. This
has performance
implications.](https://image.slidesharecdn.com/asp-230807173723-31e70040/85/ASP-NET-Core-in-Action-2018-pdf-328-320.jpg)

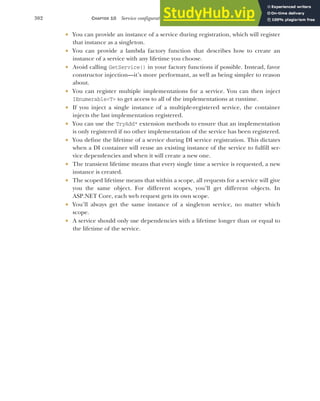
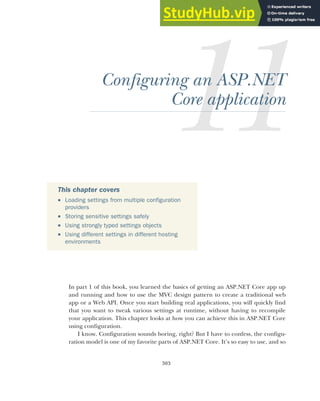
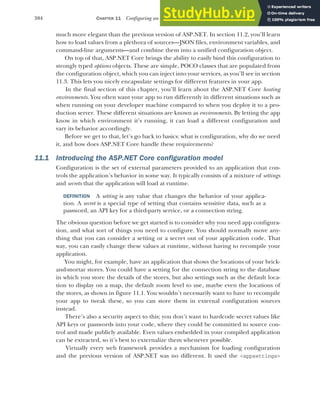
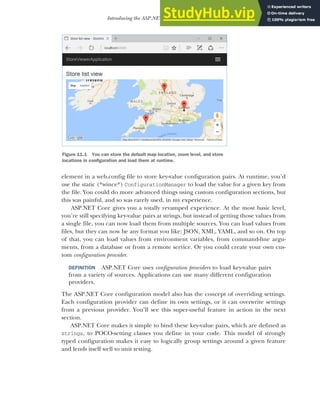
![306 CHAPTER 11 Configuring an ASP.NET Core application
Before we get into the details of loading configuration from providers, we’ll take a
step back and look at where this process happens—inside WebHostBuilder. For
ASP.NET Core 2.0 apps built using the default templates, that’s invariably inside the
WebHost.CreateDefaultBuilder() method.
11.2 Configuring your application with
CreateDefaultBuilder
As you saw in chapter 2, the default templates in ASP.NET Core 2.0 use the Create-
DefaultBuilder method. This is an opinionated helper method that sets up a num-
ber of defaults for your app.
public class Program
{
public static void Main(string[] args)
{
BuildWebHost(args).Run();
}
public static IWebHost BuildWebHost(string[] args) =>
WebHost.CreateDefaultBuilder(args)
.UseStartup<Startup>()
.Build();
}
In chapter 2, I glossed over this method, as you will only rarely need to change it for
simple apps. But as your application grows, and if you want to change how configura-
tion is loaded for your application, you may find you need to break it apart.
This listing shows an overview of the CreateDefaultBuilder method, so you can
see how WebHostBuilder is constructed.
public static IWebHostBuilder CreateDefaultBuilder(string[] args)
{
var builder = new WebHostBuilder()
.UseKestrel()
.UseContentRoot(Directory.GetCurrentDirectory())
.ConfigureAppConfiguration((hostingContext, config) =>
{
// Configuration provider setup
})
Listing 11.1 Using CreateDefaultBuilder to set up configuration
Listing 11.2 The WebHost.CreateDefaultBuilder method
The entry point for your
application creates
IWebHost and calls Run.
CreateDefaultBuilder sets up
a number of defaults,
including configuration.
Creating an instance of
WebHostBuilder
Kestrel is the default HTTP
server in ASP.NET Core.
The content root defines the
directory where configuration
files can be found.
Configures application settings,
the topic of this chapter](https://image.slidesharecdn.com/asp-230807173723-31e70040/85/ASP-NET-Core-in-Action-2018-pdf-334-320.jpg)

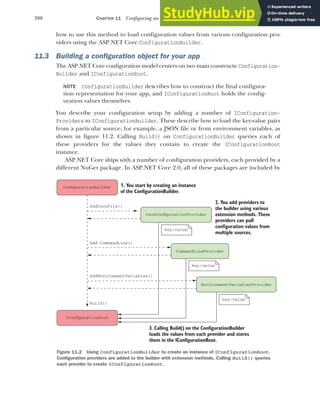
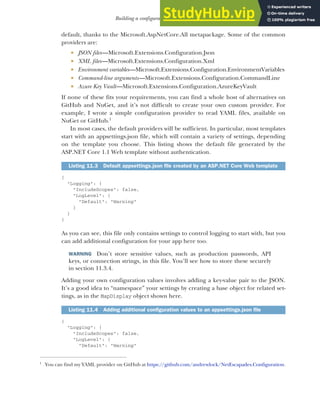
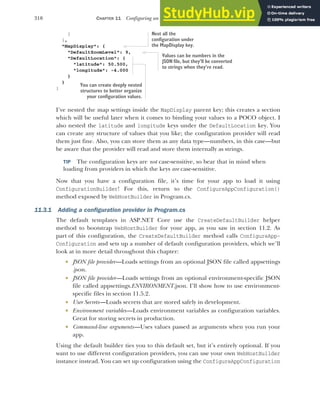
![311
Building a configuration object for your app
method, as shown in the following listing, in which you configure a JSON provider to
load the appsettings.json file. For brevity, I’ve omitted the logging and service provider
configuration that you saw in listing 11.2, but you’d need to include this in practice.
public class Program
{
public static void Main(string[] args)
{
BuildWebHost(args).Run();
}
public static IWebHost BuildWebHost(string[] args) =>
new WebHostBuilder()
.UseKestrel()
.UseContentRoot(Directory.GetCurrentDirectory())
.ConfigureAppConfiguration(AddAppConfiguration)
.ConfigureLogging(
(hostingContext, logging) => { /* Detail not shown */ })
.UseIISIntegration()
.UseDefaultServiceProvider(
(context, options) =>{ /* Detail not shown */ })
.UseStartup<Startup>()
.Build();
public static void AddAppConfiguration(
WebHostBuilderContext hostingContext,
IConfigurationBuilder config)
{
config.AddJsonFile("appsettings.json", optional: true);
}
}
TIP In listing 11.5, I extracted the configuration to a static helper method,
AddAppConfiguration, but you can also provide this inline as a lambda
method.
In ASP.NET Core 2.0, WebHostBuilder creates an IConfigurationBuilder instance
before invoking the ConfigureAppConfiguration method. All you need to do is add
the configuration providers for your application.
In this example, you’ve added a single JSON configuration provider by calling the
AddJsonFile extension method and providing a filename. You’ve also set the value of
optional to true. This tells the configuration provider to skip over files it can’t find at
runtime, instead of throwing FileNotFoundException. Note that the extension
method just registers the provider at this point, it doesn’t try to load the file yet.
And that’s it! The WebHostBuilder instance takes care of calling Build(), which
generates IConfigurationRoot, which represents your configuration object. This is
then registered as an IConfiguration instance with the DI container, so you can
Listing 11.5 Loading appsettings.json using a custom WebHostBuilder
Adds the
configuration
setup function to
WebHostBuilder
WebHostBuilder provides a
hosting context and an instance of
ConfigurationBuilder.
Adds a JSON configuration
provider, providing the filename
of the configuration file](https://image.slidesharecdn.com/asp-230807173723-31e70040/85/ASP-NET-Core-in-Action-2018-pdf-339-320.jpg)
![312 CHAPTER 11 Configuring an ASP.NET Core application
inject it into your classes. You’d commonly inject this into the constructor of your
Startup class, so you can use it in the Configure and ConfigureServices methods:
public class Startup
{
public Startup(IConfiguration config)
{
Configuration = config
}
public IConfiguration Configuration { get; }
}
NOTE The ASP.NET Core 2.0 WebHostBuilder registers the configuration
object as an IConfiguration in the DI container, not an IConfiguration-
Root. In ASP.NET Core 1, you have to manually register the configuration
with DI yourself.
At this point, at the end of the Startup constructor, you have a fully loaded configura-
tion object! But what can you do with it? The IConfigurationRoot stores configuration
as a set of key-value string pairs. You can access any value by its key, using standard dic-
tionary syntax. For example, you could use
var zoomLevel = Configuration["MapDisplay:DefaultZoomLevel"];
to retrieve the configured zoom level for your application. Note that I used a : to des-
ignate a separate section. Similarly, to retrieve the latitude key, you could use
Configuration["MapDisplay:DefaultLocation:Latitude"];
You can also grab a whole section of the configuration using the GetSection(section)
method. This grabs a chunk of the configuration and resets the namespace. Another
way of getting the latitude key would be
Configuration.GetSection("MapDisplay”)["DefaultLocation:Latitude"];
Accessing setting values like this is useful in the ConfigureServices and Configure
methods of Startup, when you’re defining your application. When setting up your
application to connect to a database, for example, you’ll often load a connection
string from the Configuration object (you’ll see a concrete example of this in the
next chapter, when we look at Entity Framework Core).
If you need to access the configuration object like this from classes other than
Startup, you can use DI to take it as a dependency in your service’s constructor. But
accessing configuration using string keys like this isn’t particularly convenient; you
should try to use strongly typed configuration instead, as you’ll see in section 11.4.
WARNING ASP.NET Core 1 doesn’t register the configuration object with the
DI container by default. If you need this functionality, you can register it your-
self as a singleton by calling services.AddSingleton(Configuration) in
Startup.ConfigureServices.](https://image.slidesharecdn.com/asp-230807173723-31e70040/85/ASP-NET-Core-in-Action-2018-pdf-340-320.jpg)
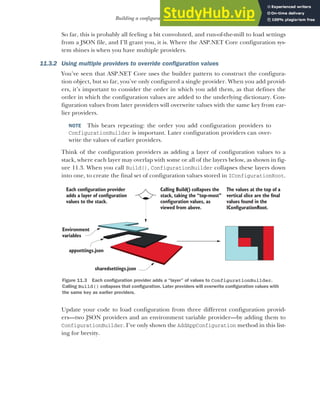

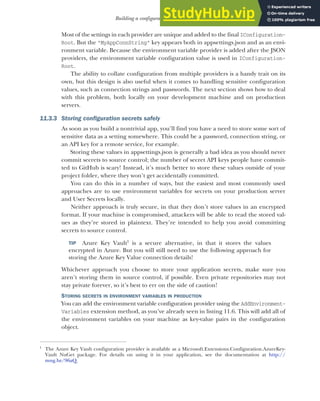
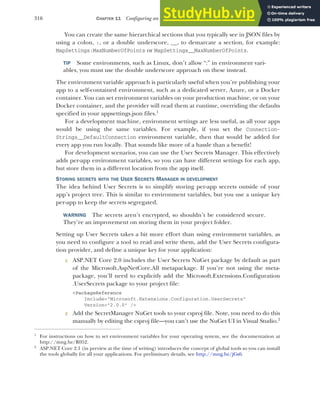
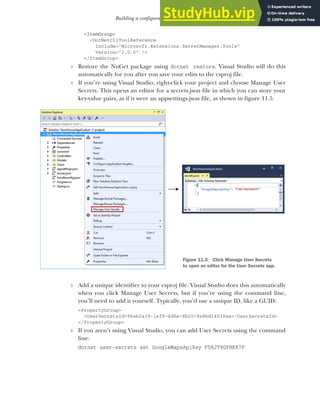
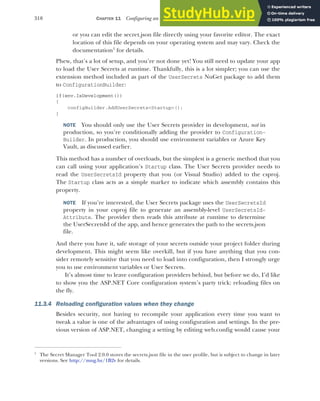

![320 CHAPTER 11 Configuring an ASP.NET Core application
With that in place, any changes you make to the file will be mirrored in IConfiguration-
Root. But as I said at the start of this chapter, IConfigurationRoot isn’t the preferred
way to pass settings around in your application. Instead, as you’ll see in the next sec-
tion, you should favor strongly typed POCO objects.
11.4 Using strongly typed settings with the options pattern
Most of the examples I’ve shown so far have been how to get values into IConfiguration-
Root, as opposed to how to use them. You’ve seen that you can access a key using the
Configuration["key"] dictionary syntax, but using string keys like this feels messy
and prone to typos.
Instead, ASP.NET Core promotes the use of strongly typed settings. These are
POCO objects that you define and create and represent a small collection of settings,
scoped to a single feature in your app.
The following listing shows both the settings for your store locator component and
display settings to customize the homepage of the app. They’re separated into two
separate objects with "MapDisplay" and "HomePageSettings" keys corresponding to
the different areas of the app they impact.
{
"MapDisplay": {
"DefaultZoomLevel": 6,
"DefaultLocation": {
"latitude": 50.500,
"longitude": -4.000
}
},
"HomePageSettings": {
"Title": "Acme Store Locator",
"ShowCopyright": true
}
}
The simplest approach to making the homepage settings available to HomeController
would be to inject IConfiguration and access the values using the dictionary syntax;
for example:
public class HomeController : Controller
{
public HomeController(IConfiguration config)
{
var title = config["HomePageSettings:Title"];
var showCopyright = bool.Parse(
config["HomePageSettings:ShowCopyright"]);
}
}
Listing 11.8 Separating settings into different objects in appsettings.json
Settings related to the store
locator section of the app
General settings related to
the app’s homepage](https://image.slidesharecdn.com/asp-230807173723-31e70040/85/ASP-NET-Core-in-Action-2018-pdf-348-320.jpg)

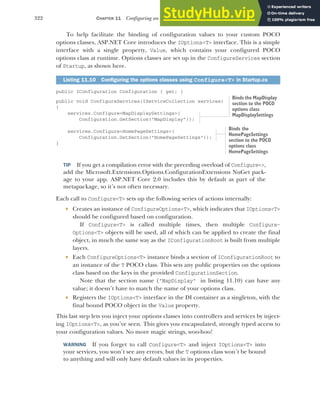
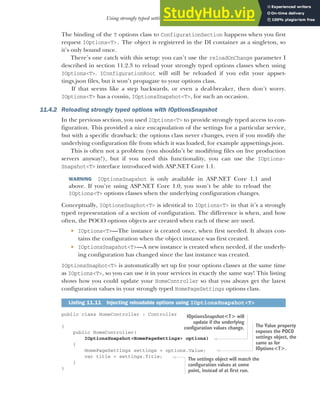
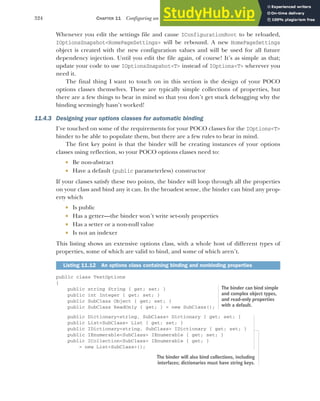
![325
Using strongly typed settings with the options pattern
internal string NotPublic { get; set; }
public SubClass SetOnly { set => _setOnly = value; }
public SubClass NullReadOnly { get; } = null;
public SubClass NullPrivateSetter { get; private set; } = null;
public SubClass this[int i] {
get => _indexerList[i];
set => _indexerList[i] = value;
}
public List<SubClass> NullList { get; }
public Dictionary<int, SubClass> IntegerKeys { get; set; }
public IEnumerable<SubClass> ReadOnlyEnumerable { get; }
= new List<SubClass>();
public SubClass _setOnly = null;
private readonly List<SubClass> _indexerList
= new List<SubClass>();
public class SubClass
{
public string Value { get; set; }
}
}
As shown in the listing, the binder generally supports collections too—both imple-
mentations and interfaces. If the collection property is already initialized, it will use
that, but the binder can also create backing fields for them. If your property imple-
ments any of the following classes, the binder will create a List<> of the appropriate
type as the backing object:
IReadOnlyList<>
IReadOnlyCollection<>
ICollection<>
IEnumerable<>
WARNING You can’t bind to an IEnumerable<> property that has already
been initialized, as the underlying type doesn’t expose an Add function! You
can bind to an IEnumerable<> if you leave its initial value as null.
Similarly, the binder will create a Dictionary<,> as the backing field for properties
with dictionary interfaces, as long as they use string keys:
IDictionary<,>
IReadOnlyDictionary<,>
WARNING You can’t bind dictionaries with nonstring values, such as int.
Clearly there are quite a few nuances here, but if you stick to the simple cases from the
preceding example, you’ll be fine. Be sure to check for typos in your JSON files!
That brings us to the end of this section on strongly typed settings. In the next sec-
tion, we’ll look at how you can dynamically change your settings at runtime, based on
the environment in which your app is running.
The binder can’t
bind nonpublic,
set-only, null-read-
only, or indexer
properties.
These
collection
properties
can’t be
bound.
The backing fields
for SetOnly and
Indexer properties](https://image.slidesharecdn.com/asp-230807173723-31e70040/85/ASP-NET-Core-in-Action-2018-pdf-353-320.jpg)

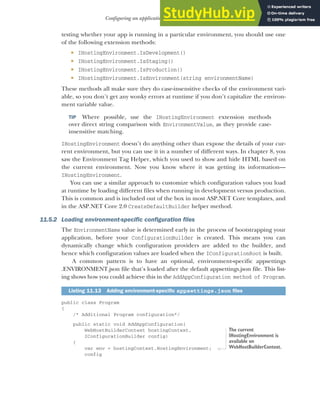
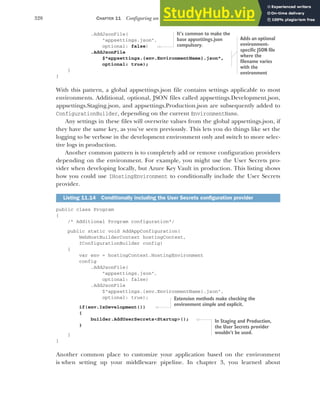
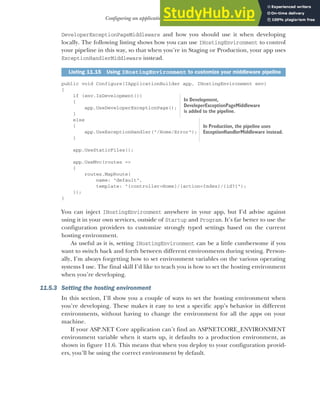
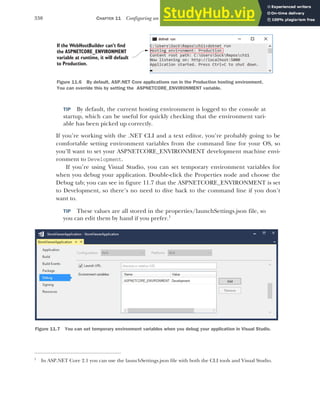
![331
Configuring an application for multiple environments
Visual Studio Code uses a similar approach with its own launch.json file. Add the
ASPNETCORE_ENVIRONMENT variable, as shown in figure 11.8.
These temporary environment variables are a great way to test your application in
different variables. In Visual Studio, you could even add a new debugging profile, IIS
Express (Production) perhaps, so you can quickly switch between testing different
environments.
There’s one final trick I’ve seen used. If you want to completely hardcode the envi-
ronment your app runs in to a single value, you can use the UseEnvironment exten-
sion method on WebHostBuilder, as shown next. This forces the app to use the
value you provide. I still suggest using one of the standard values though, preferably
EnvironmentName.Production.
public class Program
{
public static void Main(string[] args)
{
Listing 11.16 Hardcoding EnvironmentName with UseEnvironment
You can define temporary variables to
use when debugging your application
in the launch.json file.
Figure 11.8 Visual Studio code lets you define temporary environment variables to use when debugging. Your
application will treat them the same as any other environment variable but they won’t affect other applications,
only the ASP.NET Core app you’re debugging.](https://image.slidesharecdn.com/asp-230807173723-31e70040/85/ASP-NET-Core-in-Action-2018-pdf-359-320.jpg)
![332 CHAPTER 11 Configuring an ASP.NET Core application
BuildWebHost(args).Run();
}
public static IWebHost BuildWebHost(string[] args) =>
new WebHostBuilder()
.UseEnvironment(EnvironmentName.Production)
.UseKestrel()
.UseContentRoot(Directory.GetCurrentDirectory())
.ConfigureAppConfiguration( /* Not shown*/)
.UseIISIntegration()
.UseStartup<Startup>()
.Build();
}
TIP This approach only makes sense if you always want to run your app in a
single environment. That’s overly restrictive, so I recommend setting the host-
ing environment using an environment variable or your IDE instead.
That brings us to the end of this chapter on configuration. Configuration isn’t glam-
orous, but it’s an essential part of all apps. The ASP.NET Core configuration provider
model handles a wide range of scenarios, letting you store settings and secrets in a
variety of locations.
Simple settings can be stored in appsettings.json, where they’re easy to tweak and
modify during development, and can be overwritten by using environment-specific
JSON files. Meanwhile, your secrets and sensitive settings can be stored outside
the project file, in the User Secrets manager, or as environment variables. This gives
you both flexibility and safety—as long as you don’t go writing your secrets to
appsettings.json!
In the next chapter, we’ll take a brief look at the new object relational mapper that
fits well with ASP.NET Core: Entity Framework Core. We’ll only be getting a taste of it
in this book, but you’ll learn how to load and save data, build a database from your
code, and migrate the database as your code evolves.
Summary
Anything that could be considered a setting or a secret is normally stored as a
configuration value.
ASP.NET Core uses configuration providers to load key-value pairs from a vari-
ety of sources. Applications can use many different configuration providers.
ConfigurationBuilder describes how to construct the final configuration rep-
resentation for your app and IConfigurationRoot holds the configuration val-
ues themselves.
You create a configuration object by adding configuration providers to an
instance of ConfigurationBuilder using extension methods such as AddJson-
File(). WebHostBuilder creates the ConfigurationBuilder instance for you
and calls Build() to create an instance of IConfigurationRoot.
ASP.NET Core includes built-in providers for JSON files, XML files, environ-
ment files, command-line arguments, and Azure Key Vault, among others.
This ignores ASPNETCORE_ENVIRONMENT and
hardcodes the environment to Production.](https://image.slidesharecdn.com/asp-230807173723-31e70040/85/ASP-NET-Core-in-Action-2018-pdf-360-320.jpg)
![333
Summary
The order in which you add providers to ConfigurationBuilder is important;
subsequent providers replace the values of settings defined in earlier providers.
Configuration keys aren’t case-sensitive.
ASP.NET Core 1.x doesn’t register the IConfigurationRoot object with the DI
container by default. In ASP.NET Core 2.0, it’s registered as an IConfiguration
object.
You can retrieve settings from IConfiguration directly using the indexer syn-
tax, for example Configuration["MySettings:Value"].
In ASP.NET Core 2.0, the CreateDefaultBuilder method configures JSON,
environment variable, command-line argument, and User Secret providers for
you. You can customize the configuration providers used in your app by manu-
ally creating a WebHostBuilder and calling ConfigureAppConfiguration.
In production, store secrets in environment variables. These can be loaded
after your file-based settings in the configuration builder.
On development machines, the User Secrets Manager is a more convenient
tool than using environment variables. It stores secrets in your OS user’s profile,
outside the project folder.
Be aware that neither environment variables nor the User Secrets Manager tool
encrypt secrets, they merely store them in locations that are less likely to be
made public, as they’re outside your project folder.
File-based providers, such as the JSON provider, can automatically reload con-
figuration values when the file changes. This allows you to update configuration
values in real time, without having to restart your app.
Use strongly typed POCO options classes to access configuration in your app.
Use the Configure<T>() extension method in ConfigureServices to bind your
POCO options objects to ConfigurationSection.
You can inject the IOptions<T> interface into your services using DI. You can
access the strongly typed options object on the Value property.
If you want to reload your POCO options objects when your configuration
changes, use the IOptionsSnapshot<T> interface instead.
Applications running in different environments, Development versus Produc-
tion for example, often require different configuration values.
ASP.NET Core determines the current hosting environment using the
ASPNETCORE_ENVIRONMENT environment variable. If this variable isn’t set,
the environment is assumed to be Production.
The current hosting environment is exposed as an IHostingEnvironment
interface. You can check for specific environments using IsDevelopment(),
IsStaging(), and IsProduction().
You can use the IHostingEnvironment object to load files specific to the cur-
rent environment, such as appsettings.Production.json.](https://image.slidesharecdn.com/asp-230807173723-31e70040/85/ASP-NET-Core-in-Action-2018-pdf-361-320.jpg)

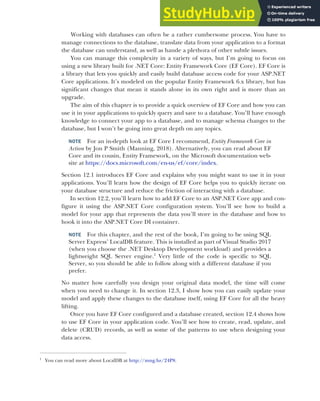


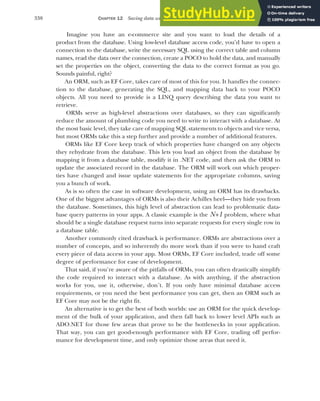

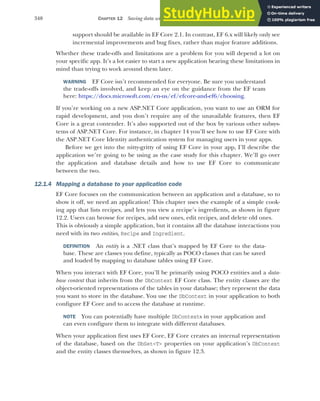
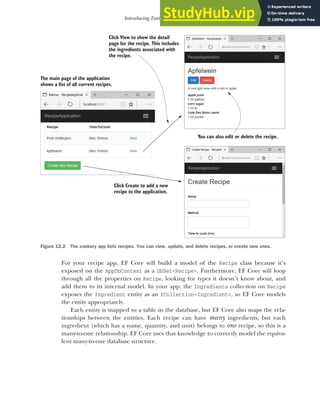


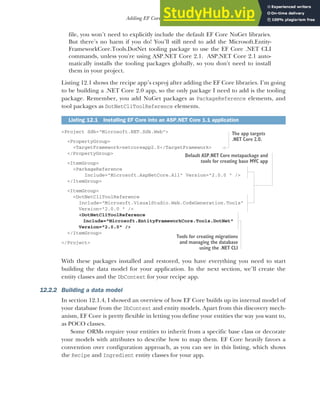
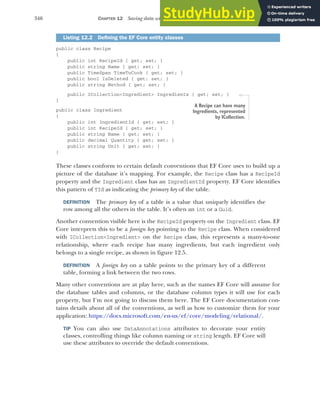
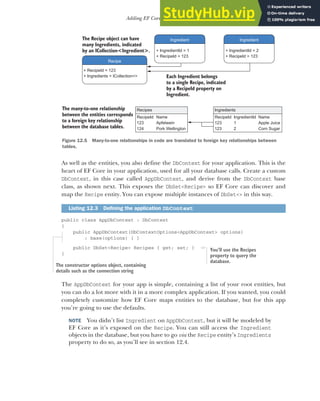


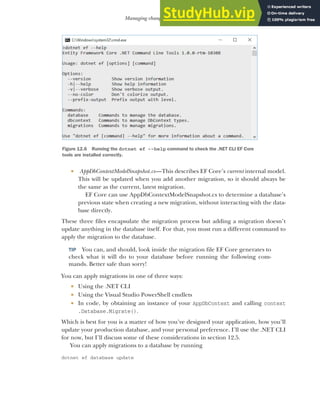
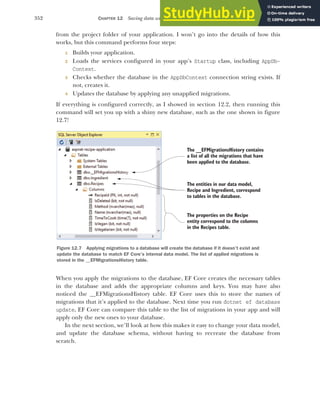
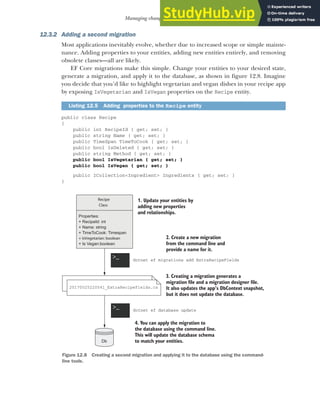

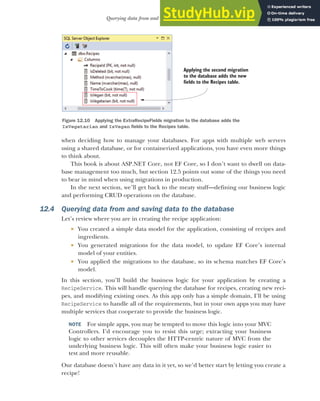
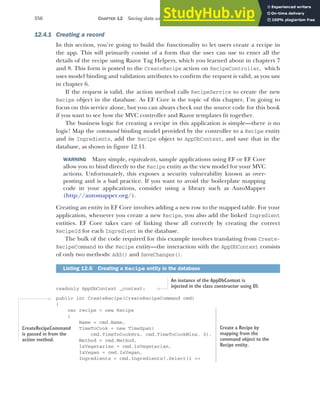
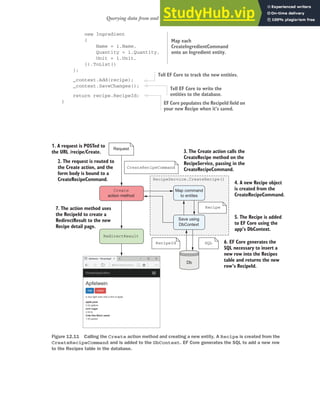
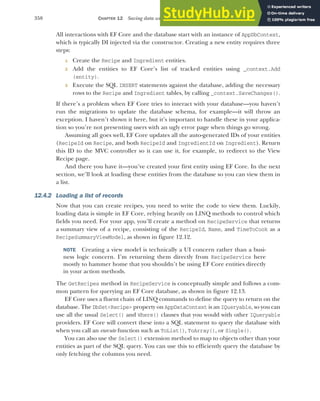


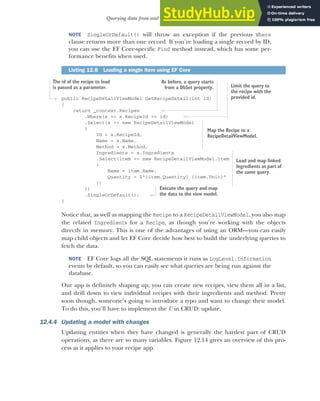
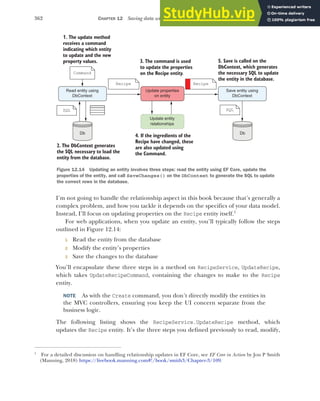

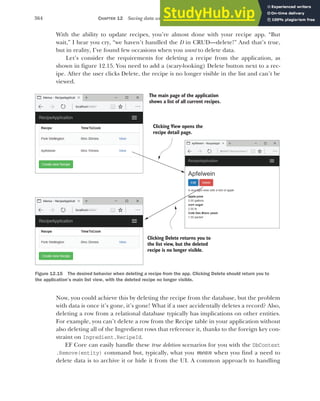
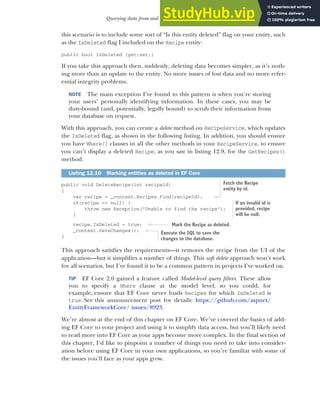

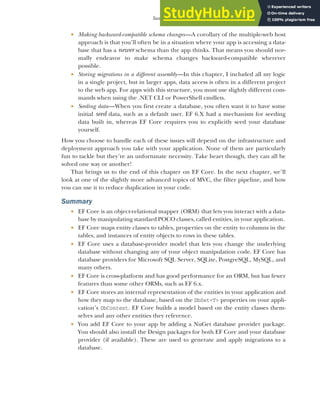
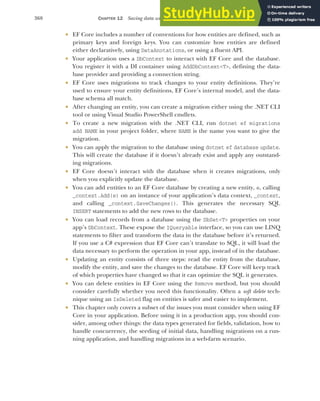


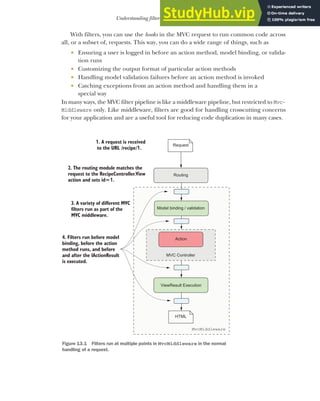

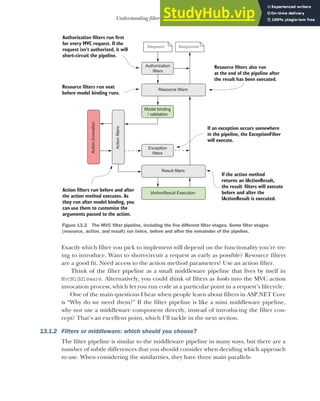

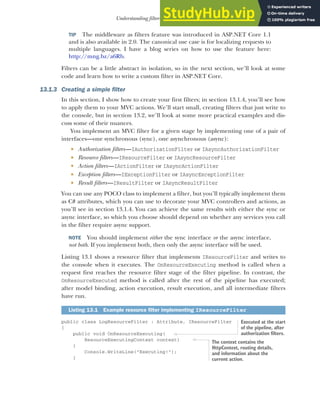

![377
Understanding filters and when to use them
The sync and async filter implementations have subtle differences, but for most pur-
poses they’re identical. I recommend implementing the sync version if possible, and
only falling back to the async version if you need to.
You’ve created a couple of filters now, so we should look at how to use them in the
application. In the next section, we’ll tackle two specific issues: how to control which
requests execute your new filters and how to control the order in which they execute.
13.1.4 Adding filters to your actions, your controllers, and globally
In section 13.1.2, I discussed the similarities and differences between middleware and
filters. One of those differences is that filters can be scoped to specific actions or con-
trollers, so that they only run for certain requests. Alternatively, you can apply a filter
globally, so that it runs for every MVC action.
By adding filters in different ways, you can achieve a number of different results.
Imagine you have a filter that forces you to log in to view an action. How you add the
filter to your app will significantly change your app’s behavior:
Apply the filter to a single action—Anonymous users could browse the app as normal,
but if they tried to access the protected action, they would be forced to log in.
Apply the filter to a controller—Anonymous users could access actions from other
controllers, but accessing any action on the protected controller would force
them to log in.
Apply the filter globally—Users couldn’t use the app without logging in. Any
attempt to access an action would redirect the user to the login page.
NOTE ASP.NET Core comes with just such a filter out of the box, Authorize-
Filter. I’ll discuss this filter in section 13.2.1, and you’ll be seeing a lot more
of it in chapter 15.
As I described in the previous section, you normally create filters as attributes, and for
good reason—it makes applying them to MVC controllers and actions easy. In this sec-
tion, you’ll see how to apply LogResourceFilter from listing 13.1 to an action, a con-
troller, and globally. The level at which the filter applies is called its scope.
DEFINITION The scope of a filter refers to how many different actions it applies
to. A filter can be scoped to the action method, to the controller, or globally.
You’ll start at the most specific scope—applying filters to a single action. The follow-
ing listing shows an example of an MVC controller that has two action methods: one
with LogResourceFilter and one without.
public class HomeController : Controller
{
[LogResourceFilter]
public IActionResult Index()
{
return View();
}
Listing 13.3 Applying filters to an action method
LogResourceFilter will
run as part of the
pipeline when executing
this action.](https://image.slidesharecdn.com/asp-230807173723-31e70040/85/ASP-NET-Core-in-Action-2018-pdf-405-320.jpg)
![378 CHAPTER 13 The MVC filter pipeline
public IActionResult About()
{
return View();
}
}
Alternatively, if you want to apply the same filter to every action method, you could
add the attribute at the controller scope, as in the next listing. Every action method in
the controller will use LogResourceFilter, without having to specifically decorate
each method:
[LogResourceFilter]
public class HomeController : Controller
{
public IActionResult Index ()
{
return View();
}
public IActionResult SendInvoice()
{
return View();
}
}
Filters you apply as attributes to controllers and actions are automatically discovered
by MvcMiddleware when your application starts up. For common attributes, you can
go one step further and apply filters globally, without having to decorate individual
controllers.
You add global filters in a different way to controller- or action-scoped filters—by
adding a filter directly to the MVC services, when configuring MVC in Startup. This
listing shows three equivalent ways to add a globally scoped filter.
public class Startup
{
public void ConfigureServices(IServiceCollection services)
{
services.AddMvc(options =>
{
options.Filters.Add(new LogResourceFilter());
options.Filters.Add(typeof(LogAsyncResourceFilter));
options.Filters.Add<LogAsyncResourceFilter>();
});
}
}
Listing 13.4 Applying filters to a controller
Listing 13.5 Applying filters globally to an application
This action method has no
filters at the action level.
The LogResourceFilter Is
added to every action on
the controller.
Every action in the
controller is decorated
with the filter.
Adds filters using
the MvcOptions
object
Alternatively, the
framework can
create a global
filter using a
generic type
parameter.
. . . or pass in the Type of the filter
and let the framework create it.
You can pass
an instance
of the filter
directly. . .](https://image.slidesharecdn.com/asp-230807173723-31e70040/85/ASP-NET-Core-in-Action-2018-pdf-406-320.jpg)


![381
Creating custom filters for your application
see some of the built-in filters provided by ASP.NET Core, as well as some practical
examples of filters you might want to use in your own applications.
13.2 Creating custom filters for your application
ASP.NET Core includes a number of filters that you can use, but often, the most use-
ful filters are the custom ones that are specific to your own apps. In this section, you’ll
work through each of the five types of filters. I’ll explain in more detail what they’re
for and when you should use them. I’ll point out examples of these filters that are part
of ASP.NET Core itself and you’ll see how to create custom filters for an example
application.
To give you something realistic to work with, you’ll start with a Web API controller
for accessing the recipe application from chapter 12. This controller contains two
actions: one for fetching a RecipeDetailViewModel and another for updating a
Recipe with new values. This listing shows your starting point for this chapter, includ-
ing both of the action methods.
[Route("api/recipe")]
public class RecipeApiController : Controller
{
private const bool IsEnabled = true;
public RecipeService _service;
public RecipeApiController(RecipeService service)
{
_service = service;
}
[HttpGet("{id}")]
public IActionResult Get(int id)
{
if (!IsEnabled) { return BadRequest(); }
try
{
if (!_service.DoesRecipeExist(id))
{
return NotFound();
}
var detail = _service.GetRecipeDetail(id);
Response.GetTypedHeaders().LastModified =
detail.LastModified;
return Ok(detail);
}
catch (Exception ex)
{
return GetErrorResponse(ex);
}
}
Listing 13.6 Recipe Web API controller before refactoring to use filters
These fields would be passed in as
configuration values and are used
to control access to actions.
If the API isn’t enabled,
block further execution.
If the requested Recipe
doesn’t exist, return a
404 response.
Fetch
RecipeDetailViewModel.
Sets the Last-Modified
response header to the
value in the model
Returns the
view model
with a 200
response
If an exception occurs, catch it,
and return the error in an
expected format, as a 500 error.](https://image.slidesharecdn.com/asp-230807173723-31e70040/85/ASP-NET-Core-in-Action-2018-pdf-409-320.jpg)
![382 CHAPTER 13 The MVC filter pipeline
[HttpPost("{id}")]
public IActionResult Edit(
int id, [FromBody] UpdateRecipeCommand command)
{
if (!IsEnabled) { return BadRequest(); }
try
{
if (!ModelState.IsValid)
{
return BadRequest(ModelState);
}
if (!_service.DoesRecipeExist(id))
{
return NotFound();
}
_service.UpdateRecipe(command);
return Ok();
}
catch (Exception ex)
{
return GetErrorResponse(ex);
}
}
private static IActionResult GetErrorResponse(Exception ex)
{
var error = new
{
Success = false,
Errors = new[]
{
ex.Message
}
};
return new ObjectResult(error)
{
StatusCode = 500
};
}
}
These action methods currently have a lot of code to them, which hides the intent of
each action. There’s also quite a lot of duplication between the methods, such as
checking that the Recipe entity exists, and formatting exceptions.
In this section, you’re going to refactor this controller to use filters for all the code
in the methods that’s unrelated to the intent of each action. By the end of the chapter,
you’ll have a much simpler controller that’s far easier to understand, as shown here.
If the API isn’t enabled,
block further execution.
Validates the binding model
and returns a 400 response
if there are errors
If the requested Recipe
doesn’t exist, return a
404 response.
Updates the Recipe from the command
and returns a 200 response
If an exception occurs, catch it,
and return the error in an
expected format, as a 500 error.](https://image.slidesharecdn.com/asp-230807173723-31e70040/85/ASP-NET-Core-in-Action-2018-pdf-410-320.jpg)
![383
Creating custom filters for your application
[Route("api/recipe")]
[ValidateModel, HandleException, FeatureEnabled(IsEnabled = true)]
public class RecipeApiController : Controller
{
public RecipeService _service;
public RecipeApiController(RecipeService service)
{
_service = service;
}
[HttpGet("{id}"), EnsureRecipeExists, AddLastModifedHeader]
public IActionResult Get(int id)
{
var detail = _service.GetRecipeDetail(id);
return Ok(detail);
}
[HttpPost("{id}"), EnsureRecipeExists]
public IActionResult Edit(
int id, [FromBody] UpdateRecipeCommand command)
{
_service.UpdateRecipe(command);
return Ok();
}
}
I think you'll have to agree, the controller in listing 13.7 is much easier to read! In this
section, you’ll refactor the controller bit by bit, removing crosscutting code to get to
something more manageable. All the filters I’ll create in this section will use the sync
filter interfaces—I’ll leave it as an exercise for the reader to create their async coun-
terparts. You’ll start by looking at authorization filters and how they relate to security
in ASP.NET Core.
13.2.1 Authorization filters: protecting your APIs
Authentication and authorization are related, fundamental concepts in security that we’ll
be looking at in detail in chapters 14 and 15.
DEFINITION Authentication is concerned with determining who made a
request. Authorization is concerned with what a user is allowed to access.
Authorization filters run first in the MVC filter pipeline, before any other filters. They
control access to the action method by immediately short-circuiting the pipeline when
a request doesn’t meet the necessary requirements.
ASP.NET Core has a built-in authorization framework that you should use when
you need to protect your MVC application or your Web APIs. You can configure this
framework with custom policies that let you finely control access to your actions.
Listing 13.7 Recipe Web API controller after refactoring to use filters
The filters encapsulate
the majority of logic
common to multiple
action methods.
Placing filters at the action level
limits them to a single action.
The intent of the action,
return a Recipe view model,
is much clearer.
Placing filters at the action level
can be used to control the order
in which they execute.
The intent of the action, update
a Recipe, is much clearer.](https://image.slidesharecdn.com/asp-230807173723-31e70040/85/ASP-NET-Core-in-Action-2018-pdf-411-320.jpg)
![384 CHAPTER 13 The MVC filter pipeline
TIP It’s possible to write your own authorization filters by implementing
IAuthorizationFilter or IAsyncAuthorizationFilter, but I strongly advise
against it. The ASP.NET Core authorization framework is highly configurable
and should meet all your needs.
At the heart of the ASP.NET Core authorization framework is an Authorization filter,
AuthorizeFilter, which you can add to the filter pipeline by decorating your actions
or controllers with the [Authorize] attribute. In its simplest form, adding the
[Authorize] attribute to an action, as in the following listing, means the request must
be made by an authenticated user to be allowed to continue. If you’re not logged in, it
will short-circuit the pipeline, returning a 401 Unauthorized response to the browser.
public class RecipeApiController : Controller
{
public IActionResult Get(int id)
{
// method body
}
[Authorize]
public IActionResult Edit(
int id, [FromBody] UpdateRecipeCommand command)
{
// method body
}
}
As with all filters, you can apply the [Authorize] attribute at the controller level to
protect all the actions on a controller, or even globally, to protect every method in
your app.
NOTE We’ll explore authorization in detail in chapter 15, including how to
add more detailed requirements, so that only specific sets of users can exe-
cute an action.
The next filters in the pipeline are resource filters. In the next section, you’ll extract
some of the common code from RecipeApiController and see how easy it is to create
a short-circuiting filter.
13.2.2 Resource filters: short-circuiting your action methods
Resource filters are the first general-purpose filters in the MVC filter pipeline. In sec-
tion 13.1.3, you saw minimal examples of both sync and async resource filters, which
logged to the console. In your own apps, you can use resource filters for a wide range
of purposes, thanks to the fact they execute so early (and late) in the filter pipeline.
Listing 13.8 Adding [Authorize] to an action method
The Get method has no
[Authorize] attribute, so can
be executed by anyone.
The Edit method can
only be executed if
you’re logged in.
Adds the AuthorizeFilter to the MVC
filter pipeline using [Authorize]](https://image.slidesharecdn.com/asp-230807173723-31e70040/85/ASP-NET-Core-in-Action-2018-pdf-412-320.jpg)
![385
Creating custom filters for your application
The ASP.NET Core framework includes a few different implementations of
resource filters you can use in your apps, for example:
ConsumesAttribute—Can be used to restrict the allowed formats an action
method can accept. If your action is decorated with [Consumes("application/
json")] but the client sends the request as XML, then the resource filter will
short-circuit the pipeline and return a 415 Unsupported Media Type response.
DisableFormValueModelBindingAttribute—This filter prevents model bind-
ing from binding to form data in the request body. This can be useful if you
know an action method will be handling large file uploads that you need to
manage manually yourself. The resource filters run before model binding, so
you can disable the model binding for a single action in this way.2
resource filters are useful when you want to ensure the filter runs early in the pipeline,
before model binding. They provide an early hook into the pipeline for your logic, so
you can quickly short-circuit the request if you need to.
Look back at listing 13.6 and see if you can refactor any of the code into a
Resource filter. One candidate line appears at the start of both the Get and Edit
methods:
if (!IsEnabled) { return BadRequest(); }
This line of code is a feature toggle that you can use to disable the availability of the
whole API, based on the IsEnabled field. In practice, you’d probably load the
IsEnabled field from a database or configuration file so you could control the avail-
ability dynamically at runtime but, for this example, I’m using a hardcoded value.
This piece of code is self-contained, crosscutting logic, which is somewhat tangen-
tial to the main action method intent—a perfect candidate for a filter. You want to
execute the feature toggle early in the pipeline, before any other logic, so a resource
filter makes sense.
TIP Technically, you could also use an Authorization filter for this example,
but I’m following my own advice of “Don’t write your own Authorization
filters!”
The next listing shows an implementation of FeatureEnabledAttribute, which
extracts the logic from the action methods and moves it into the filter. I’ve also
exposed the IsEnabled field as a property on the filter.
public class FeatureEnabledAttribute : Attribute, IResourceFilter
{
public bool IsEnabled { get; set; }
2
For details on handling file uploads, see http://mng.bz/2rrk.
Listing 13.9 The FeatureEnabledAttribute resource filter
Defines whether the feature is enabled](https://image.slidesharecdn.com/asp-230807173723-31e70040/85/ASP-NET-Core-in-Action-2018-pdf-413-320.jpg)
![386 CHAPTER 13 The MVC filter pipeline
public void OnResourceExecuting(
ResourceExecutingContext context)
{
if (!IsEnabled)
{
context.Result = new BadRequestResult();
}
}
public void OnResourceExecuted(
ResourceExecutedContext context) { }
}
This simple resource filter demonstrates a number of important concepts, which are
applicable to most filter types:
The filter is an attribute as well as a filter. This lets you decorate your controller
and action methods with it using [FeatureEnabled(IsEnabled = true)].
The filter interface consists of two methods—*Executing that runs before
model binding and *Executed that runs after the result has been executed. You
must implement both, even if you only need one for your use case.
The filter execution methods provide a context object. This provides access to,
among other things, the HttpContext for the request and metadata about the
action method the middleware will execute.
To short-circuit the pipeline, set the context.Result property to IAction-
Result. The MVC pipeline will execute this result to generate the response,
bypassing any remaining filters in the pipeline and the action method itself. In
this example, if the feature isn’t enabled, you bypass the pipeline by returning
BadRequestResult, which will return a 400 error to the client.
By moving this logic into the resource filter, you can remove it from your action meth-
ods, and instead decorate the whole API controller with a simple attribute:
[Route("api/recipe"), FeatureEnabled(IsEnabled = true)]
public class RecipeApiController : Controller
You’ve only extracted two lines of code from your action methods so far, but you’re on
the right track. In the next section, we’ll move on to Action filters and extract two
more filters from the action method code.
13.2.3 Action filters: customizing model binding and action results
Action filters run just after model binding, before the action method executes.
Thanks to this positioning, action filters can access all the arguments that will be used
to execute the action method, which makes them a powerful way of extracting com-
mon logic out of your actions.
On top of this, they also run just after the action method has executed and can
completely change or replace the IActionResult returned by the action if you want.
They can even handle exceptions thrown in the action.
Executes before model binding,
early in the filter pipeline
If the feature isn’t enabled,
short-circuits the pipeline
by setting the
context.Result property
Must be implemented to satisfy
IResourceFilter, but not needed
in this case.](https://image.slidesharecdn.com/asp-230807173723-31e70040/85/ASP-NET-Core-in-Action-2018-pdf-414-320.jpg)
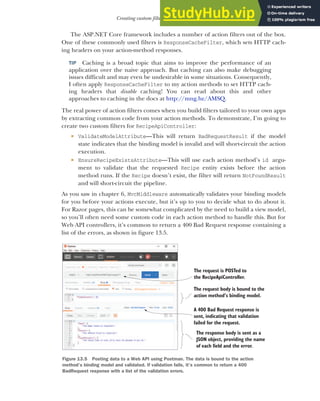
![388 CHAPTER 13 The MVC filter pipeline
It’s likely that all of your Web API controllers will use this approach, so an action filter
that automatically validates your binding models is a perfect fit. It’s normally the first
filter I create for any new project. Listing 13.10 shows a simple implementation that
you can use in your own apps.3
public class ValidateModelAttribute : ActionFilterAttribute
{
public override void OnActionExecuting(
ActionExecutingContext context)
{
if (!context.ModelState.IsValid)
{
context.Result =
new BadRequestObjectResult(context.ModelState);
}
}
}
This attribute is self-explanatory and follows a similar pattern to the resource filter in
section 13.2.2, but with a few interesting points:
I have derived from the abstract ActionFilterAttribute. This class imple-
ments IActionFilter and IResultFilter, as well as their async counterparts,
so you can override the methods you need as appropriate. This avoids needing
to add an unused OnActionExecuted() method, but is entirely optional and a
matter of preference.
Action filters run after model binding has taken place, so context.ModelState
contains the validation errors if validation failed.
Setting the Result property on context short-circuits the pipeline. But, due to
the position of the action filter stage, only the action method execution and
later action filters are bypassed; all the other stages of the pipeline run as
though the action had executed as normal.
If you apply this action filter to your RecipeApiController, you can remove
if (!ModelState.IsValid)
{
return BadRequest(ModelState);
}
Listing 13.10 The action filter for validating ModelState
3
ASP.NET Core 2.1 added this behavior by default for controllers decorated with the [ApiController] attri-
bute. For details, see https://blogs.msdn.microsoft.com/webdev/2018/02/27/asp-net-core-2-1-web-apis/.
For convenience, you derive from
the ActionFilterAttribute base class.
Overrides the Executing
method to run the filter
before the Action executes
Model binding and validation have already
run at this point, so you can check the state.
If the model isn’t valid, set the
Result property; this short-
circuits the action execution.](https://image.slidesharecdn.com/asp-230807173723-31e70040/85/ASP-NET-Core-in-Action-2018-pdf-416-320.jpg)
![389
Creating custom filters for your application
from the start of both the action methods, as it will run automatically in the filter pipe-
line. You’ll use a similar approach to remove the duplicate code checking whether the id
provided as an argument to the action methods corresponds to an existing Recipe entity.
This listing shows the EnsureRecipeExistsAttribute action filter. This uses an
instance of RecipeService to check whether the Recipe exists and returns a 404 Not
Found if it doesn’t.
public class EnsureRecipeExistsAtribute : ActionFilterAttribute
{
public override void OnActionExecuting(
ActionExecutingContext context)
{
var service = (RecipeService) context.HttpContext
.RequestServices.GetService(typeof(RecipeService));
var recipeId = (int) context.ActionArguments["id"];
if (!service.DoesRecipeExist(recipeId))
{
context.Result = new NotFoundResult();
}
}
}
As before, you’ve derived from ActionFilterAttribute for simplicity and overridden
the OnActionExecuting method. The main functionality of the filter relies on the
DoesRecipeExist() method of RecipeService, so the first step is to obtain an
instance of RecipeService. The context parameter provides access to the Http-
Context for the request, which in turn lets you access the DI container and use
RequestServices.GetService() to return an instance of RecipeService.
WARNING This technique for obtaining dependencies is known as service loca-
tion and is generally considered an antipattern.4
In section 13.4, I’ll show a
much better way to use the DI container to inject dependencies into your filters.
As well as RecipeService, the other piece of information you need is the id argument
of the Get and Edit action methods. In action filters, model binding has already
occurred, so the arguments that the MVC middleware will use to execute the action
method are already known and are exposed on context.ActionArguments.
The action arguments are exposed as Dictionary<string, object>, so you can
obtain the id parameter using the "id" string key. Remember to cast the object to
the correct type.
Listing 13.11 An action filter to check whether a Recipe exists
4
For a detailed discussion on DI patterns and antipatterns, see Dependency Injection in .NET by Mark Seemann
(Manning, 2012) https://livebook.manning.com/#!/book/dependency-injection-in-dot-net/chapter-5/.
Fetches an
instance of
RecipeService
from the DI
container
Retrieves the id
parameter that
will be passed to
action method
when it executes
Checks whether a Recipe entity
with the given RecipeId exists
If it doesn’t exist, returns a
404 Not Found result and
short-circuits the pipeline.](https://image.slidesharecdn.com/asp-230807173723-31e70040/85/ASP-NET-Core-in-Action-2018-pdf-417-320.jpg)
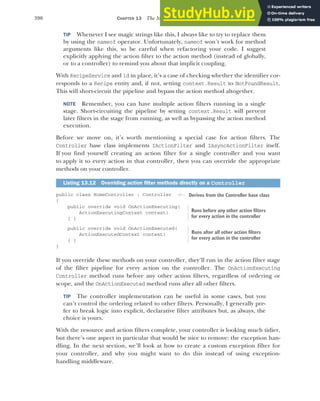
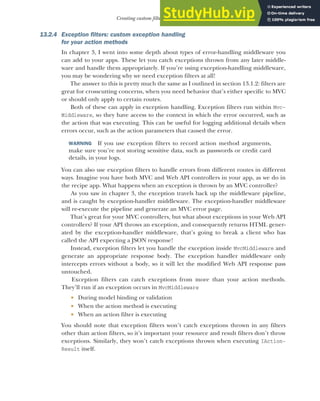
![392 CHAPTER 13 The MVC filter pipeline
Now that you know why you might want an exception filter, go ahead and imple-
ment one for RecipeApiController, as shown next. This lets you safely remove the
try-catch block from your action methods, knowing that your filter will catch any
errors.
public class HandleExceptionAttribute : ExceptionFilterAttribute
{
public override void OnException(ExceptionContext context)
{
var error = new
{
Success = false,
Errors = new [] { context.Exception.Message }
};
context.Result = new ObjectResult(error)
{
StatusCode = 500
};
context.ExceptionHandled = true;
}
}
It’s quite common to have one or two different exception filters in your application,
one for your MVC controllers and one for your Web API controllers, but they’re not
always necessary. If you can handle all the exceptions in your application with a single
piece of middleware, then ditch the exception filters and go with that instead.
You’re coming to the last type of filter now, result filters, and with it, you’re almost
done refactoring your RecipeApiController. Custom result filters tend to be rela-
tively rare in the apps I’ve written, but they have their uses, as you’ll see.
13.2.5 Result filters: customizing action results before they execute
If everything runs successfully in the pipeline, and there’s no short-circuiting, then
the next stage of the pipeline after action filters are result filters. These run just
before and after the IActionResult returned by the Action method (or action filters)
is executed.
WARNING If the pipeline is short-circuited by setting context.Result, the
result filter stage won’t be run, but IActionResult will still be executed to
generate the response. The one exception to this rule is action filters—these
only short-circuit the action execution, as you saw in figure 13.2, and so result
filters run as normal, as though the action itself generated the response.
Listing 13.13 The HandleExceptionAttribute exception filter
ExceptionFilterAttibute is an abstract base
class that implements IExceptionFilter.
There’s only a single method to
override for IExceptionFilter.
Building a custom
object to return in
the response
Creates an ObjectResult
to serialize the error
object and to set the
response status code
Marks the exception as handled to
prevent it propagating out of
MvcMiddleware](https://image.slidesharecdn.com/asp-230807173723-31e70040/85/ASP-NET-Core-in-Action-2018-pdf-420-320.jpg)
![393
Creating custom filters for your application
Result filters run immediately after action filters, so many of their use cases are similar,
but you typically use result filters to customize the way the IActionResult executes.
For example, ASP.NET Core has several result filters built into its framework:
ProducesAttribute—This forces the Web API result to be serialized to a
specific output format. For example, decorating your action method with
[Produces("application/xml")] forces the formatters to try to format the
response as XML, even if the client doesn’t list XML in its Accept header.
FormatFilterAttribute—Decorating an action method with this filter tells the
formatter to look for a route value or query string parameter called format, and
to use that to determine the output format. For example, you could call
/api/recipe/11?format=json and FormatFilter will format the response as
JSON, or call api/recipe/11?format=xml and get the response as XML.5
As well as controlling the output formatters, you can use result filters to make any last-
minute adjustments before IActionResult is executed and the response is generated.
As an example of the kind of flexibility available to you, in the following listing I
demonstrate setting the Last-Modified header, based on the object returned from
the action. This is a somewhat contrived example—it’s specific enough to a single
action that it doesn’t warrant being moved to a result filter—but, hopefully, you get
the idea!
public class AddLastModifedHeaderAttribute : ResultFilterAttribute
{
public override void OnResultExecuting(
ResultExecutingContext context)
{
if (context.Result is OkObjectResult result
&& result.Value is RecipeDetailViewModel detail)
{
var viewModelDate = detail.LastModified;
context.HttpContext.Response
.GetTypedHeaders().LastModified = viewModelDate;
}
}
}
I’ve used another helper base class here, ResultFilterAttribute, so you only need
to override a single method to implement the filter. Fetch the current IActionResult,
5
Remember, you need to explicitly configure the XML formatters if you want to serialize to XML. For details,
see http://mng.bz/0J2z.
Listing 13.14 Setting a response header in a result filter
ResultFilterAttribute provides a
useful base class you can override
You could also override the Executed
method, but the response would
already be sent by then.
Checks
whether the
action result
returned a 200
Ok result with
a view model
Checks whether
the view model
type is
RecipeDetailView
Model . . .
. . . if it is, fetches the LastModified field and
sets the Last-Modified header in the response](https://image.slidesharecdn.com/asp-230807173723-31e70040/85/ASP-NET-Core-in-Action-2018-pdf-421-320.jpg)

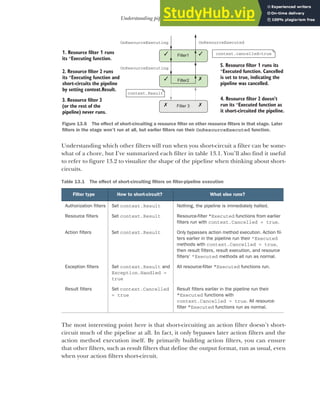
![396 CHAPTER 13 The MVC filter pipeline
The last thing I’d like to talk about in this chapter is how to use DI with your filters.
You saw in chapter 10 that DI is integral to ASP.NET Core, and in the next section,
you’ll see how to design your filters so that the framework can inject service depen-
dencies into them for you.
13.4 Using dependency injection with filter attributes
The previous version of ASP.NET used filters, but they suffered from one problem in
particular: it was hard to use services from them. This was a fundamental issue with
implementing them as attributes that you decorate your actions with. C# attributes
don’t let you pass dependencies into their constructors (other than constant values),
and they’re created as singletons, so there’s only a single instance for the lifetime of
your app.
In ASP.NET Core, this limitation is still there in general, in that filters are typically
created as attributes that you add to your controller classes and action methods. What
happens if you need to access a transient or scoped service from inside the singleton
attribute?
Listing 13.11 showed one way of doing this, using a pseudo service locator pattern
to reach into the DI container and pluck out RecipeService at runtime. This works
but is generally frowned upon as a pattern, in favor of proper DI. How can you add DI
to your filters?
The key is to split the filter into two. Instead of creating a class that’s both an attri-
bute and a filter, create a filter class that contains the functionality and an attribute
that tells MvcMiddleware when and where to use the filter.
Let’s apply this to the action filter from listing 13.11. Previously, I derived from
ActionFilterAttribute and obtained an instance of RecipeService from the context
passed to the method. In the following listing, I show two classes, EnsureRecipeExists-
Filter and EnsureRecipeExistsAttribute. The filter class is responsible for the func-
tionality and takes in RecipeService as a constructor dependency.
public class EnsureRecipeExistsFilter : IActionFilter
{
private readonly RecipeService _service;
public EnsureRecipeExistsFilter(RecipeService service)
{
_service = service;
}
public void OnActionExecuting(ActionExecutingContext context)
{
var recipeId = (int) context.ActionArguments["id"];
if (!_service.DoesRecipeExist(recipeId))
{
context.Result = new NotFoundResult();
}
}
Listing 13.15 Using DI in a filter by not deriving from Attribute
Doesn’t derive from
an Attribute class
RecipeService
is injected
into the
constructor.
The rest of
the method
remains the
same.](https://image.slidesharecdn.com/asp-230807173723-31e70040/85/ASP-NET-Core-in-Action-2018-pdf-424-320.jpg)
![397
Using dependency injection with filter attributes
public void OnActionExecuted(ActionExecutedContext context) { }
}
public class EnsureRecipeExistsAttribute : TypeFilterAttribute
{
public EnsureRecipeExistsAttribute()
: base(typeof(EnsureRecipeExistsFilter)) {}
}
EnsureRecipeExistsFilter is a valid filter; you could use it on its own by adding it as
a global filter (as global filters don’t need to be attributes). But you can’t use it directly
by decorating controller classes and action methods, as it’s not an attribute. That’s
where EnsureRecipeExistsAttribute comes in.
You can decorate your methods with EnsureRecipeExistsAttribute instead. This
attribute inherits from TypeFilterAttribute and passes the Type of filter to create as
an argument to the base constructor. This attribute acts as a factory for EnsureRecipe-
ExistsFilter by implementing IFilterFactory.
When MvcMiddleware initially loads your app, it scans your actions and controllers,
looking for filters and filter factories. It uses these to form a filter pipeline for every
action in your app, as shown in figure 13.7.
When an action decorated with EnsureRecipeExistsAttribute is called, Mvc-
Middleware calls CreateInstance() on the attribute. This creates a new instance of
EnsureRecipeExistsFilter and uses the DI container to populate its dependencies
(RecipeService).
You must implement
the Executed action to
satisfy the interface.
Passes the type EnsureRecipeExistsFilter
as an argument to the base TypeFilter
constructor
Derives from
TypeFilter, which
is used to fill
dependencies
using the DI
container.
public class HomeController
{
[ValidateModel]
[EnsureRecipeExistsFilter]
public IActionResult Index()
{
return View();
}
}
ValidateModelAttribute
EnsureRecipeExistsFilter
IFilterFactory
Attributes that implement
filter interfaces are added
directly to the pipeline.
The MvcMiddleware calls CreateInstance () on each
IFilterFactory when a request is received to create
a filter instance, which is added to the pipeline.
CreateInstance()
The MvcMiddleware scans your
app looking for filters or attributes
that implement IFilterFactory.
Figure 13.7 The MvcMiddleware scans your app on startup to find both filters and attributes that
implement IFilterFactory. At runtime, the middleware calls CreateInstance() to get an
instance of the filter.](https://image.slidesharecdn.com/asp-230807173723-31e70040/85/ASP-NET-Core-in-Action-2018-pdf-425-320.jpg)
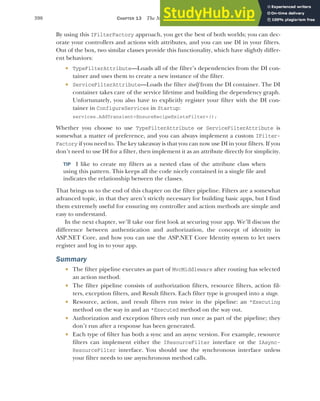
![399
Summary
You can add filters globally, at the controller level, or at the action level. This is
called the scope of the filter.
Within a given stage, global-scoped filters run first, then controller-scoped, and
finally, action-scoped.
You can override the default order by implementing the IOrderedFilter inter-
face. Filters will run from lowest to highest Order and use scope to break ties.
Authorization filters run first in the pipeline and control access to APIs.
ASP.NET Core includes an [Authorization] attribute that you can apply to
action methods so that only logged-in users can execute the action.
Resource filters run after authorization filters, and again after a result has been
executed. They can be used to short-circuit the pipeline, so that an action
method is never executed. They can also be used to customize the model bind-
ing process for an action method.
Action filters run after model binding has occurred, just before an action
method executes. They also run after the action method has executed. They can
be used to extract common code out of an action method to prevent duplication.
The Controller base class also implements IActionFilter and IAsyncAction-
Filter. They run at the start and end of the action filter pipeline, regardless of
the ordering or scope of other action filters.
Exception filters execute after action filters, when an action method has thrown
an exception. They can be used to provide custom error handling specific to
the action executed.
Generally, you should handle exceptions at the middleware level, but exception
filters let you customize how you handle exceptions for specific actions or
controllers.
Result filters run just before and after an IActionResult is executed. You can
use them to control how the action result is executed, or to completely change
the action result that will be executed.
You can use ServiceFilterAttribute and TypeFilterAttribute to allow
dependency injection in your custom filters. ServiceFilterAttribute requires
that you register your filter and all its dependencies with the DI container,
whereas TypeFilterAttribute only requires that the filter’s dependencies have
been registered.](https://image.slidesharecdn.com/asp-230807173723-31e70040/85/ASP-NET-Core-in-Action-2018-pdf-427-320.jpg)


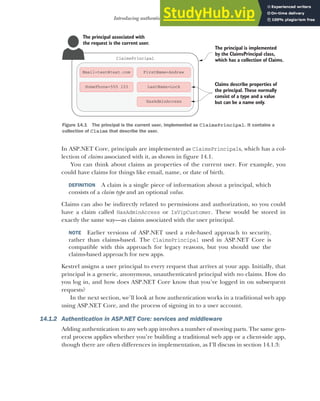
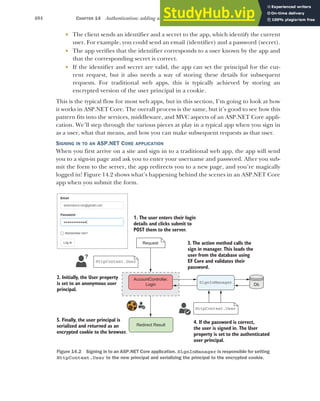
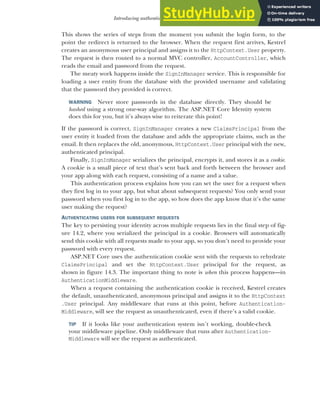
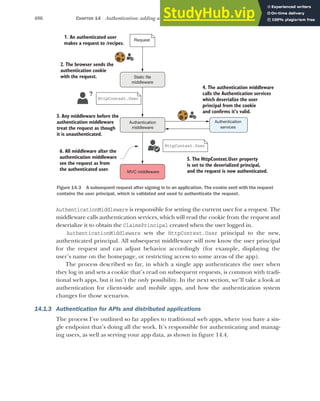
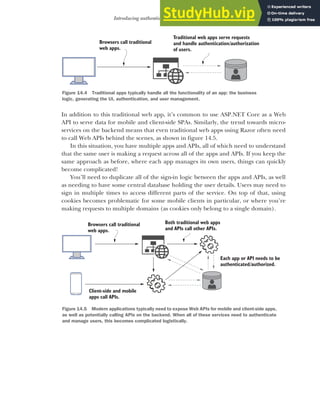


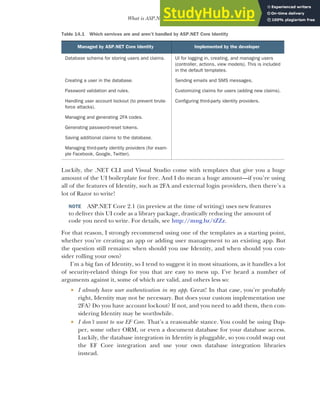

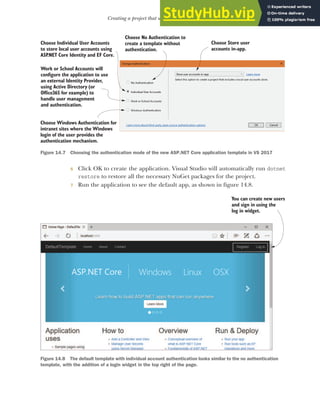

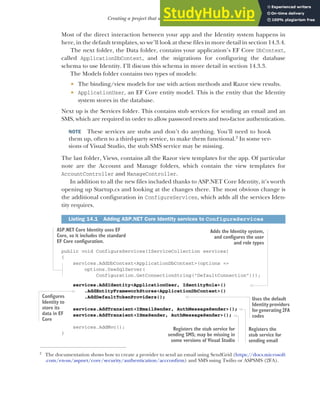

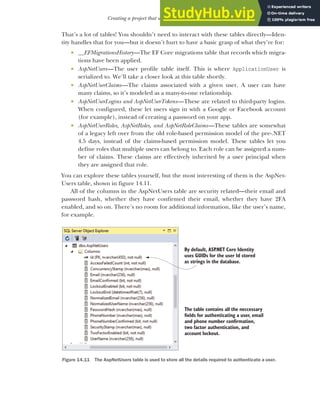

![419
Creating a project that uses ASP.NET Core Identity
public async Task<IActionResult> Register(
RegisterViewModel model, string returnUrl = null)
{
ViewData["ReturnUrl"] = returnUrl;
if (ModelState.IsValid)
{
var user = new ApplicationUser {
UserName = model.Email, Email = model.Email };
var result = await _userManager.CreateAsync(
user, model.Password);
if (result.Succeeded)
{
await _signInManager.SignInAsync(user);
return RedirectToLocal(returnUrl);
}
AddErrors(result);
}
return View(model);
}
Listing 14.2 AccountController.Register POST action for creating new users
Figure 14.12 The user registration
form in the default template
The form is bound to
RegisterViewModel.
If the binding mode
is valid, creates an
instance of the
user entity
Checks that the provided
password is valid and
creates the new user in
the database
If the user
was created
successfully,
sign them in.
Updates the
HttpContext.User principal
and sets a cookie containing
the serialized principal
Redirects to the previous
page using a helper
method to protect against
open redirect attacks
If something went
wrong, adds the errors
to the model state and
redisplays the form](https://image.slidesharecdn.com/asp-230807173723-31e70040/85/ASP-NET-Core-in-Action-2018-pdf-447-320.jpg)

![421
Creating a project that uses ASP.NET Core Identity
NOTE Adding external providers is a fully supported feature of Identity,
which requires relatively minimal configuration to your app. Unfortunately,
you also have to register your app with the external provider, Google or Face-
book, for example, which can be a convoluted process!3
As with the Register method, the Identity system does all the hard work associated
with loading a user from the database, validating the password, checking that the
account isn’t locked, and whether they have enabled 2FA on the account. The follow-
ing listing shows that the SignInManager handles all this; you only need to display a
view or redirect to an action, as appropriate.
public async Task<IActionResult> Login(
LoginViewModel model, string returnUrl = null)
{
ViewData["ReturnUrl"] = returnUrl;
if (ModelState.IsValid)
{
var result = await _signInManager.PasswordSignInAsync(
model.Email, model.Password, model.RememberMe);
if (result.Succeeded)
{
return RedirectToLocal(returnUrl);
}
3
For documentation on adding external providers see http://mng.bz/MR2m.
Listing 14.4 The AccountController.Login POST action for logging in
Figure 14.13 The login form in the default templates. The right-hand side of the screen can be used to
configure external identity providers, so users can log in to your app using their Google or Facebook accounts.
Attempts to sign
in with the email
and password
The sign-in succeeded, so the
HttpContext.User and authentication
cookie have been set.](https://image.slidesharecdn.com/asp-230807173723-31e70040/85/ASP-NET-Core-in-Action-2018-pdf-449-320.jpg)
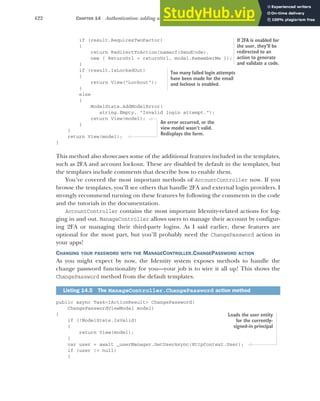
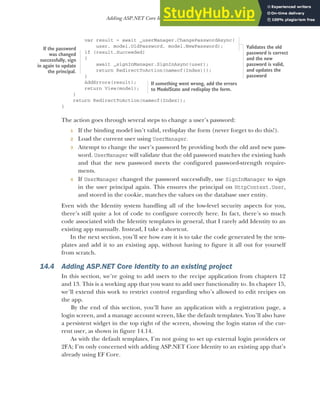
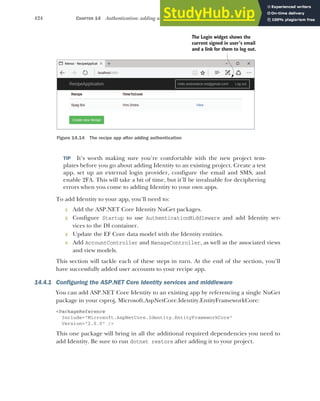


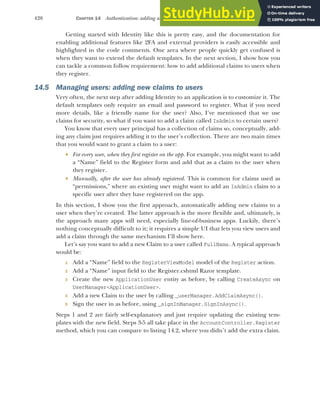
![429
Managing users: adding new claims to users
public async Task<IActionResult> Register(
RegisterViewModel model, string returnUrl = null)
{
ViewData["ReturnUrl"] = returnUrl;
if (ModelState.IsValid)
{
var user = new ApplicationUser {
UserName = model.Email, Email = model.Email };
var result = await _userManager.CreateAsync(
user, model.Password);
if (result.Succeeded)
{
var claim = new Claim("FullName", model.Name);
await _userManager.AddClaimAsync(user, nameClaim);
await _signInManager.SignInAsync(user);
return RedirectToLocal(returnUrl);
}
AddErrors(result);
}
return View(model);
}
This is all that’s required to add the new claim, but you’re not using it anywhere cur-
rently. What if you want to display it? Well, you’ve added a claim to the user principal,
which was assigned to the HttpContext.User property when you called SignInAsync.
That means you can access the claims anywhere you have access to HttpContext—in
your controllers or in view templates. For example, you could display the user’s Full-
Name claim anywhere in a Razor template with the following statement:
@User.Claims.FirstOrDefault(x=>x.Type == "FullName").Value
This finds the first claim on the current users with a Type of "FullName" and prints
the assigned value. The Identity system even includes a handy extension method that
tidies up this LINQ expression (found in the System.Security.Claims namespace):
@User.FindFirstValue("FullName")
And with that last titbit, we’ve reached the end of this chapter on ASP.NET Core Iden-
tity. I hope you’ve come to appreciate the amount of effort using Identity can save
you, especially when you make use of the templates that come with Visual Studio and
the .NET CLI.
ASP.NET Core Identity provides so many additional features, such as 2FA and
external login providers, that there isn’t space to cover them here. Although not
essential for adding user functionality to your app, I strongly recommend looking into
them. In particular, consider adding 2FA to give your users additional protection.
Listing 14.10 Adding a custom claim to a new user in the Register action
Creates an
instance of the
ApplicationUser
entity, as usual
Validates that the provided
password is valid and creates
the user in the database
Adds the new
claim to the
ApplicationUser’s
collection
Creates a claim,
with a string
name of
"FullName" and
the provided
value
Signs the user in by setting
the HttpContext.User, the
principal will include the
custom claim](https://image.slidesharecdn.com/asp-230807173723-31e70040/85/ASP-NET-Core-in-Action-2018-pdf-457-320.jpg)
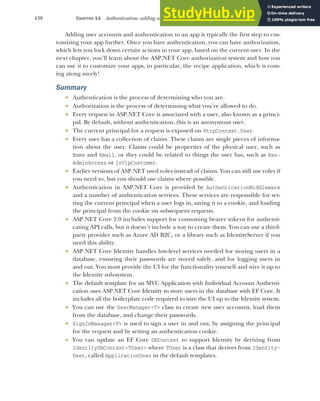

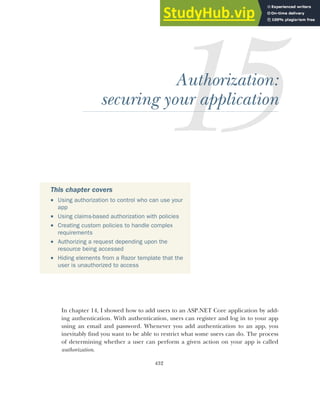

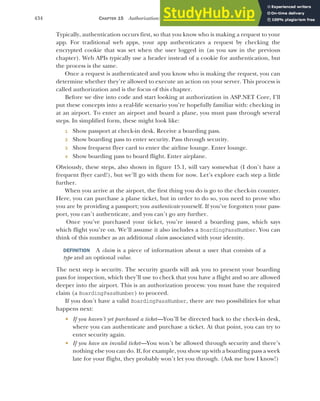
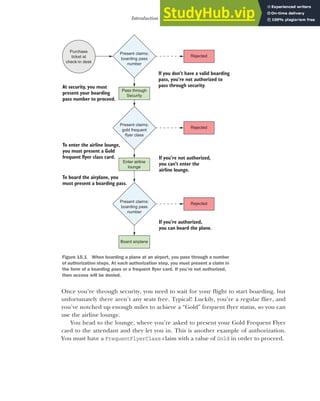
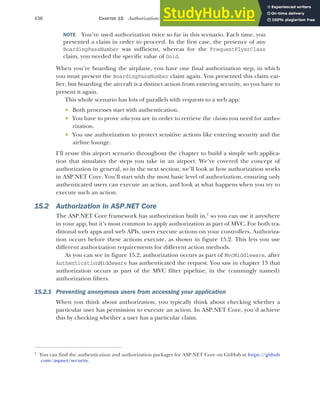
![437
Authorization in ASP.NET Core
There’s an even more basic level of authorization that you haven’t considered yet—
only allowing authenticated users to execute an action. This is even simpler than the
claims scenario (which we’ll come to later) as there are only two possibilities:
The user is authenticated—The action executes as normal.
The user is unauthenticated—The user can’t execute the action.
You can achieve this basic level of authorization by using the [Authorize] attribute, as
you saw in chapter 13, when we discussed authorization filters. You can apply this attri-
bute to your actions, as shown in the following listing, to restrict them to authenti-
cated (logged-in) users only. If an unauthenticated user tries to execute an action
protected with the [Authorize] attribute in this way, they’ll be redirected to the login
page.
public class HomeController : Controller
{
public IActionResult Index()
{
return View();
}
[Authorize]
Listing 15.1 Applying [Authorize] to an action
Static file
middleware
Authentication
middleware
Index
action method
Authorize filter
Index view
A request is made
to the URL /recipe/index.
MvcMiddleware
The authentication middleware
deserializes the ClaimsPrincipal
from the encrypted cookie.
The authorize filter runs
after routing but before
model binding or validation.
If authorization is successful,
the action method executes
and generates a response
as normal.
If authorization fails, the
authorize filter returns an
error to the user, and the
action is not executed.
Figure 15.2 Authorization occurs before an action method executes as part of the MVC filter
pipeline in MvcMiddleware.
This action can be
executed by anyone, even
when not logged in.
Applies [Authorize] to
individual actions or
whole controllers](https://image.slidesharecdn.com/asp-230807173723-31e70040/85/ASP-NET-Core-in-Action-2018-pdf-465-320.jpg)
![438 CHAPTER 15 Authorization: securing your application
public IActionResult AuthedUsersOnly()
{
return View();
}
}
You can apply the [Authorize] attribute at the action scope, controller scope, or glob-
ally, as you saw in chapter 13. Any action that has the [Authorize] attribute applied in
this way can be executed only by an authenticated user. Unauthenticated users will be
redirected to the login page.
Sometimes, especially when you apply the [Authorize] attribute globally, you
might need to “poke holes” in this authorization requirement. If you apply the
[Authorize] attribute globally, then any unauthenticated request will be redirected to
the login page for your app. But the [Authorize] attribute is global, so when the
login page tries to load, you’ll be unauthenticated and redirected to the login page
again. And now you’re stuck in an infinite redirect loop.
To get around this, you can designate specific actions to ignore the [Authorize]
attribute by applying the [AllowAnonymous] attribute to an action, as shown next.
This allows unauthenticated users to execute the action, so you can avoid the redirect
loop that would otherwise result.
[Authorize]
public class AccountController : Controller
{
public IActionResult ManageAccount()
{
return View();
}
[AllowAnonymous]
public IActionResult Login()
{
return View();
}
}
WARNING If you apply the [Authorize] attribute globally, be sure to add the
[AllowAnonymous] attribute to your login actions, error actions, password
reset actions, and any other actions that you need unauthenticated users to
execute.
If an unauthenticated user attempts to execute an action protected by the [Authorize]
attribute, traditional web apps will redirect them to the login page. But what about web
APIs? And what about more complex scenarios, where a user is logged in but doesn’t
have the necessary claims to execute an action? In the next section, we’ll look at how the
ASP.NET Core authentication services handle all of this for you.
Listing 15.2 Applying [AllowAnonymous] to allow unauthenticated access
This action can only be executed
by authenticated users.
Applied at the controller scope,
so user must be authenticated
for all actions on the controller.
Only authenticated users may
execute ManageAccount.
[AllowAnonymous] overrides
[Authorize] to allow
unauthenticated users.
Login can be executed
by anonymous users.](https://image.slidesharecdn.com/asp-230807173723-31e70040/85/ASP-NET-Core-in-Action-2018-pdf-466-320.jpg)
![439
Authorization in ASP.NET Core
15.2.2 Handling unauthorized requests
In the previous section, you saw how to apply the [Authorize] attribute to an action
to ensure only authenticated users can execute it. In section 15.3, we’ll look at more
complex examples that require you to also have a specific claim. In both cases, you
must meet one or more authorization requirements (for example, you must be
authenticated) to execute the action.
If the user meets the authorization requirements, then they can execute the action
as normal and the request continues down the MVC filter pipeline. If they don’t meet
the requirements, the authorization filter will short-circuit the request. Depending on
why they failed authorization, the authorization filter will return one of two different
types of IActionResult:
ChallengeResult—This indicates that the user was not authorized to execute
the action because they weren’t yet logged in.
ForbidResult—This indicates that the user was logged in but didn’t meet the
requirements to execute the action. They didn’t have a required claim, for
example.
NOTE If you apply the [Authorize] attribute in basic form, as you did in sec-
tion 15.2.1, then the filter will only create ChallengeResults. The filter will
return ChallengeResult for unauthenticated users, but authenticated users
will always be authorized.
When authorization fails, the authorization filter short-circuits the MVC filter pipe-
line, and the ChallengeResult or ForbidResult executes to generate a response.
This response passes back through the middleware pipeline as usual. The exact
response generated depends on the type of application you’re building, and so the
type of authentication your application uses.
For traditional web apps using cookie authentication, such as when you use
ASP.NET Core Identity, as in chapter 14, ChallengeResult and ForbidResult redi-
rect users to a different page in your application. ChallengeResult indicates the user
isn’t yet authenticated, so they’re redirected to the login page for the app. After log-
ging in, they can attempt to execute the protected resource again.
ForbidResult means the request was from a user that already logged in, but
they’re still not allowed to execute the action. Consequently, the user is redirected to a
Forbidden or Access Denied web page, as shown in figure 15.3, which informs them
they can’t execute the action.
The preceding behavior is typical for traditional web apps, but web APIs typically
use a different approach to authentication, as you saw in chapter 14. Instead of log-
ging in using the web API directly, you’d typically log in to a third-party application
that provides a token to the client-side SPA or mobile app. The client-side app sends
this token when it makes a request to your web API.
Authenticating a request for a web API using tokens is essentially identical to a tra-
ditional web app that uses cookies; AuthenticationMiddleware deserializes the](https://image.slidesharecdn.com/asp-230807173723-31e70040/85/ASP-NET-Core-in-Action-2018-pdf-467-320.jpg)
![440 CHAPTER 15 Authorization: securing your application
cookie or token to create the ClaimsPrincipal. The difference is in how a web API
handles ChallengeResult and ForbidResult.
When a web API app executes a ChallengeResult, it returns a 401 Unauthorized
error response to the caller. Similarly, when the app executes a ForbidResult, it
returns a 403 Forbidden response. The traditional web app essentially handled these
errors by automatically redirecting unauthorized users to the login or Access Denied
page, but the web API doesn’t do this. It’s up to the client-side SPA or mobile app to
detect these errors and handle them as appropriate.
The important takeaway from all this is that the framework largely handles these
intricacies for you. Whether you’re building a web API or a traditional MVC web app,
the authorization code looks the same in both cases. Apply your [Authorize] attri-
butes as normal and let the framework take care of the differences for you.
NOTE In chapter 14, you saw how to configure ASP.NET Core Identity as a
traditional web app. This chapter assumes you’re building a traditional web
app, but it’s equally applicable if you’re building a web API. Remember that a
web API will return 401 and 403 status codes directly, instead of redirecting
unauthorized users.
You’ve seen how to apply the most basic authorization requirement—restricting an
action to authenticated users only—but most apps need something more subtle than
this all-or-nothing approach.
Consider the airport scenario from section 15.1. Being authenticated (having a
passport) isn’t enough to get you through security. Instead, you also need a specific
claim: BoardingPassNumber. In the next section, we’ll look at how you can implement
a similar requirement in ASP.NET Core.
15.3 Using policies for claims-based authorization
In the previous chapter, you saw that authentication in ASP.NET Core centers around
a ClaimsPrincipal object, which represents the user. This object has a collection of
claims that contain pieces of information about the user, such as their name, email,
and date of birth.
Figure 15.3 In traditional web apps using cookie authentication, if you don’t
have permission to execute an action and you’re already logged in, you’ll be
redirected to an Access Denied page.](https://image.slidesharecdn.com/asp-230807173723-31e70040/85/ASP-NET-Core-in-Action-2018-pdf-468-320.jpg)
![441
Using policies for claims-based authorization
You can use these to customize the app for each user, by displaying a welcome mes-
sage addressing the user by name, but you can also use claims for authorization. For
example, you might only authorize a user if they have a specific claim (such as Boarding-
PassNumber) or if a claim has a specific value (FrequentFlyerClass claim with the
value Gold).
In ASP.NET Core, the rules that define whether a user is authorized are encapsu-
lated in a policy.
DEFINITION A policy defines the requirements you must meet in order for a
request to be authorized.
Policies can be applied to an action using the [Authorize] attribute, similar to the
way you saw in section 15.2.1. This listing shows a controller and action that represent
the first step in the airport scenario. The AirportSecurity action method is pro-
tected by an [Authorize] attribute, but you’ve also provided a policy name: "Can-
EnterSecurity".
public class AirportController : Controller
{
public IActionResult Index()
{
return View();
}
[Authorize("CanEnterSecurity")]
public IActionResult AirportSecurity()
{
return View();
}
}
If a user attempts to execute the AirportSecurity action, the authorize filter will ver-
ify whether the user satisfies the policy’s requirements (we’ll look at the policy itself
shortly). This gives one of three possible outcomes:
The user satisfies the policy.—The action will execute as normal.
The user is unauthenticated.—The user will be redirected to the login page.
The user is authenticated but doesn’t satisfy the policy.—The user will be redirected to
a “Forbidden” or “Access Denied” page.
These three outcomes correlate with the real-life outcomes you might expect when
trying to pass through security at the airport:
You have a boarding pass.—You can enter security as normal.
You’re unauthenticated.—You’re redirected to purchase a ticket.
Your boarding pass is invalid (you turned up a day late, for example).—You’re blocked
from entering.
Listing 15.3 Applying an authorization policy to an action
The Index method can be
executed by
unauthenticated users.
Applying the
"CanEnterSecurity" policy
using [Authorize]
Only users that satisfy the
"CanEnterSecurity" policy can
execute the AirportSecurity action.](https://image.slidesharecdn.com/asp-230807173723-31e70040/85/ASP-NET-Core-in-Action-2018-pdf-469-320.jpg)
![442 CHAPTER 15 Authorization: securing your application
Listing 15.3 shows how you can apply a policy to an action using the [Authorize]
attribute, but you still need to define the CanEnterSecurity policy.
You add policies to an ASP.NET Core application in the ConfigureServices
method of Startup.cs, as shown in listing 15.4. First, you add the authorization services
using AddAuthorization(), and then you can add policies by calling AddPolicy() on
the AuthorizationOptions object. You define the policy itself by calling methods on a
provided AuthorizationPolicyBuilder (called policyBuilder here).
public void ConfigureServices(IServiceCollection services)
{
services.AddAuthorization(options =>
{
options.AddPolicy(
"CanEnterSecurity",
policyBuilder => policyBuilder
.RequireClaim("BoardingPassNumber"));
});
// Additional service configuration
}
When you call AddPolicy you provide a name for the policy, which should match the
value you use in your [Authorize] attributes, and you define the requirements of the
policy. In this example, you have a single simple requirement: the user must have a
claim of type BoardingPassNumber. If a user has this claim, whatever its value, then the
policy will be satisfied and they’ll be authorized.
AuthorizationPolicyBuilder contains several methods for creating simple poli-
cies like this, as shown in table 15.1. For example, an overload of the RequireClaim()
method lets you specify a specific value that a claim must have. The following would let
you create a policy that the "BoardingPassNumber" claim must have a value of "A1234":
policyBuilder => policyBuilder.RequireClaim("BoardingPassNumber", "A1234");
Listing 15.4 Adding an authorization policy using AuthorizationPolicyBuilder
Table 15.1 Simple policy builder methods on AuthorizationPolicyBuilder
Method Policy behavior
RequireAuthenticatedUser() The required user must be authenticated. Creates a policy
similar to the default [Authorize] attribute, where you
don’t set a policy.
RequireClaim(claim, values) The user must have the specified claim. Optionally, with one
of the specified values.
RequireUsername(username) The user must have the specified username.
RequireAssertion(function) Executes the provided lambda function, which returns a
bool, indicating whether the policy was satisfied.
Calls AddAuthorization
to configure
AuthorizationOptions
Adds a new policy
Provides a name for the policy
Defines the policy
requirements using
AuthorizationPolicyBuilder](https://image.slidesharecdn.com/asp-230807173723-31e70040/85/ASP-NET-Core-in-Action-2018-pdf-470-320.jpg)
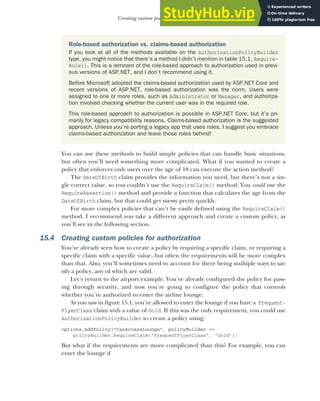
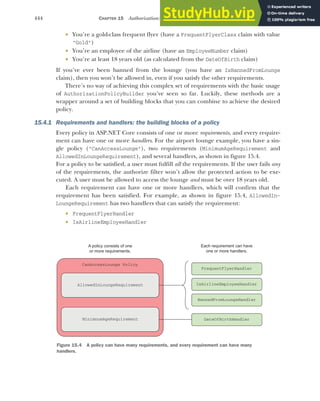
![445
Creating custom policies for authorization
If the user satisfies either of these handlers, then AllowedInLoungeRequirement is sat-
isfied. You don’t need all handlers for a requirement to be satisfied, you just need one.
NOTE Figure 15.4 showed a third handler, BannedFromLoungeHandler, which
I’ll cover in the next section. It’s slightly different, in that it can only fail a
requirement, not satisfy it.
You can use requirements and handlers to achieve most any combination of behavior
you need for a policy. By combining handlers for a requirement, you can validate con-
ditions using a logical OR: if any of the handlers are satisfied, the requirement is satis-
fied. By combining requirements, you create a logical AND: all of the requirements
must be satisfied for the policy to be satisfied, as shown in figure 15.5.
TIP You can also add multiple policies to an action method by applying the
[Authorize] attribute multiple times, for example [Authorize("Policy1"),
Authorize("Policy2")]. All policies must be satisfied for the request to be
authorized.
I’ve highlighted requirements and handlers that will make up your "CanAccess-
Lounge" policy, so in the next section, you’ll build each of the components and apply
them to the airport sample app.
15.4.2 Creating a policy with a custom requirement and handler
You’ve seen all the pieces that make up a custom authorization policy, so in this sec-
tion, we’ll explore the implementation of the "CanAccessLounge" policy.
CREATING AN IAUTHORIZATIONREQUIREMENT TO REPRESENT A REQUIREMENT
As you’ve seen, a custom policy can have multiple requirements, but what is a require-
ment in code terms? Authorization requirements in ASP.NET Core are any class that
implements the IAuthorizationRequirement interface. This is a blank, marker inter-
face, which you can apply to any class to indicate that it represents a requirement.
Requirement
1
Requirement
2
AND AND
Requirement
N
AND
...
Handler
2A
Handler
2B
Policy
Satisfied? =
OR
Handler
M
...
For the policy to be satisfied, every
requirement must be satisfied.
If any of the handlers are satisfied,
the requirement is satisfied.
OR
OR
Figure 15.5 For a policy to be satisfied, every requirement must be satisfied. A requirement is
satisfied if any of the handlers are satisfied.](https://image.slidesharecdn.com/asp-230807173723-31e70040/85/ASP-NET-Core-in-Action-2018-pdf-473-320.jpg)
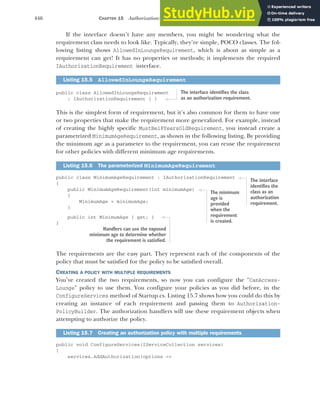
![447
Creating custom policies for authorization
{
options.AddPolicy(
"CanEnterSecurity",
policyBuilder => policyBuilder
.RequireClaim(Claims.BoardingPassNumber));
options.AddPolicy(
"CanAccessLounge",
policyBuilder => policyBuilder.AddRequirements(
new MinimumAgeRequirement(18),
new AllowedInLoungeRequirement()
));
});
// Additional service configuration
}
You now have a policy called "CanAccessLounge" with two requirements, so you can
apply it to an action method using the [Authorize] attribute, in exactly the same way
you did for the "CanEnterSecurity" policy:
[Authorize("CanAccessLounge")]
public IActionResult AirportLounge()
{
return View();
}
When a user attempts to execute the AirportLounge action, the authorize filter policy
will be executed and each of the requirements will be inspected. But you saw earlier
that the requirements are purely data; they indicate what needs to be fulfilled, they
don’t describe how that has to happen. For that, you need to write some handlers.
CREATING AUTHORIZATION HANDLERS TO SATISFY YOUR REQUIREMENTS
Authorization handlers contain the logic of how a specific IAuthorizationRequirement
can be satisfied. When executed, a handler can do one of three things:
Mark the requirement handling as a success
Not do anything
Explicitly fail the requirement
Handlers should implement AuthorizationHandler<T>, where T is the type of requirement
they handle. For example, the following listing shows a handler for AllowedInLounge-
Requirement that checks whether the user has a claim called FrequentFlyerClass with a
value of Gold.
public class FrequentFlyerHandler :
AuthorizationHandler<AllowedInLoungeRequirement>
{
protected override Task HandleRequirementAsync(
Listing 15.8 FrequentFlyerHandler for AllowedInLoungeRequirement
Adds the previous
simple policy for
passing through
security
Adds a new
policy for the
airport lounge,
called
CanAccessLounge
Adds an instance of each
IAuthorizationRequirement object
The handler implements
AuthorizationHandler<T>.
You must override the abstract
HandleRequirementAsync method.](https://image.slidesharecdn.com/asp-230807173723-31e70040/85/ASP-NET-Core-in-Action-2018-pdf-475-320.jpg)
![448 CHAPTER 15 Authorization: securing your application
AuthorizationHandlerContext context,
AllowedInLoungeRequirement requirement)
{
if(context.User.HasClaim("FrequentFlyerClass", "Gold"))
{
context.Succeed(requirement);
}
return Task.CompletedTask;
}
}
This handler is functionally equivalent to the simple RequireClaim()handler you saw
at the start of section 15.4, but using the requirement and handler approach instead.
When a user attempts to execute the AirportLounge action method, the authoriza-
tion filter added by the [Authorize] attribute validates the "CanAccessLounge" pol-
icy. It loops through all of the requirements in the policy, and all of the handlers for
each requirement, calling the HandleRequirementAsync method for each.
The filter passes in the current AuthorizationHandlerContext and the require-
ment to be checked. The current ClaimsPrincipal being authorized is exposed on the
context as the User property. In listing 15.8, FrequentFlyerHandler uses the context to
check for a claim called FrequentFlyerClass with the Gold value, and if it exists, con-
cludes that the user is allowed to enter the airline lounge, by calling Succeed().
NOTE Handlers mark a requirement as being successfully satisfied by calling
context.Succeed() and passing in the requirement.
It’s important to note the behavior when the user doesn’t have the claim. Frequent-
FlyerHandler doesn’t do anything if this is the case (it returns a completed Task to
satisfy the method signature).
NOTE Remember, if any of the handlers associated with a requirement pass,
then the requirement is a success. Only one of the handlers has to succeed for
the requirement to be satisfied.
This behavior, whereby you either call context.Succeed() or do nothing, is typical
for authorization handlers. This listing shows the implementation of IsAirline-
EmployeeHandler, which uses a similar claim check to determine whether the require-
ment is satisfied.
public class IsAirlineEmployeeHandler :
AuthorizationHandler<AllowedInLoungeRequirement>
{
Listing 15.9 IsAirlineEmployeeHandler handler
The context contains details
such as the ClaimsPrincipal
user object.
The
requirement
to handle
Checks whether the user
has the FrequentFlyerClass
claim with the Gold value
If the user had the necessary claim,
then mark the requirement as
satisfied by calling Succeed.
If the requirement wasn’t
satisfied, do nothing.
The handler implements
AuthorizationHandler<T>.](https://image.slidesharecdn.com/asp-230807173723-31e70040/85/ASP-NET-Core-in-Action-2018-pdf-476-320.jpg)
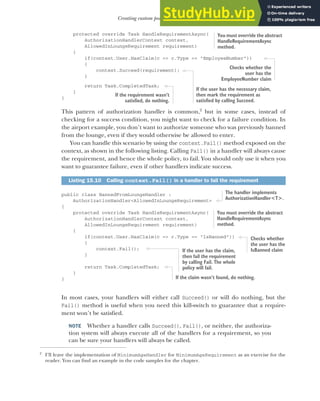
![450 CHAPTER 15 Authorization: securing your application
The final step to complete your authorization implementation for the app is to regis-
ter the authorization handlers with the DI container, as shown in listing 15.11.
public void ConfigureServices(IServiceCollection services)
{
services.AddAuthorization(options =>
{
options.AddPolicy(
"CanEnterSecurity",
policyBuilder => policyBuilder
.RequireClaim(Claims.BoardingPassNumber));
options.AddPolicy(
"CanAccessLounge",
policyBuilder => policyBuilder.AddRequirements(
new MinimumAgeRequirement(18),
new AllowedInLoungeRequirement()
));
});
services.AddSingleton<IAuthorizationHandler, MinimumAgeHandler>();
services.AddSingleton<IAuthorizationHandler, FrequentFlyerHandler>();
services
.AddSingleton<IAuthorizationHandler, BannedFromLoungeHandler>();
Services
.AddSingleton<IAuthorizationHandler, IsAirlineEmployeeHandler>();
// Additional service configuration
}
For this app, the handlers don’t have any constructor dependencies, so I’ve registered
them as singletons with the container. If your handlers have scoped or transient
dependencies (the EF Core DbContext, for example), then you might want to register
them as scoped instead, as appropriate.
You can combine the concepts of policies, requirements, and handlers in many
different ways to achieve your goals for authorization in your application. The exam-
ple in this section, although contrived, demonstrates each of the components you
need to apply authorization at the action method level, by creating policies and apply-
ing the [Authorize] attribute as appropriate.
There’s one area, however, where the [Authorize] attribute falls short: resource-
based authorization. The [Authorize] attribute uses an authorization filter to autho-
rize the user before the action method is executed, but what if you need to authorize
the action during the action method?
This is common when you’re applying authorization at the document or resource
level. If users are only allowed to edit documents they created, then you need to load
the document before you can tell whether you’re allowed to edit it! This isn’t possible
with the declarative [Authorize] attribute approach, so you must use an alternative,
Listing 15.11 Registering the authorization handlers with the DI container](https://image.slidesharecdn.com/asp-230807173723-31e70040/85/ASP-NET-Core-in-Action-2018-pdf-478-320.jpg)
![451
Controlling access with resource-based authorization
imperative approach. In the next section, you’ll see how to apply this resource-based
authorization to an action method.
15.5 Controlling access with resource-based authorization
Resource-based authorization is a common problem for applications, especially when
you have users that can create or edit some sort of document. Consider the recipe
application you built in the previous 3 chapters. This app lets users create, view, and
edit recipes.
Up to this point, everyone is able to create new recipes, and anyone can edit a rec-
ipe, even if they haven’t logged in. Now you want to add some additional behavior:
Only authenticated users should be able to create new recipes
You can only edit recipes you created
You’ve already seen how to achieve the first of these requirements; decorate the Create
action method with an [Authorize] attribute and don’t specify a policy, as shown in this
listing. This will force the user to authenticate before they can create a new recipe.
public class RecipeController : Controller
{
[Authorize]
public IActionResult Create()
{
return View(new CreateRecipeCommand());
}
[HttpPost, Authorize]
public async Task<IActionResult> Create(CreateRecipeCommand command)
{
// Method body not shown for brevity
}
}
TIP When applying the [Authorize] attribute to single actions, it’s import-
ant to protect both the GET method and the POST action method.
Adding the [Authorize] attribute fulfills your first requirement, but unfortunately,
with the techniques you’ve seen so far, you have no way to fulfill the second. You could
apply a policy that either permits or denies a user the ability to edit all recipes, but
there’s currently no way to restrict this so that a user can only edit their own recipes.
In order to find out who created the Recipe, you must first load it from the data-
base. Only then can you attempt to authorize the user, taking the specific recipe
(resource) into account. The following listing shows a partially implemented method
for how this might look, where authorization occurs part way through the method,
after the Recipe object has been loaded.
Listing 15.12 Adding AuthorizeAttribute to RecipeController.Create
Users must be authenticated
to execute the Create action.
It’s important to protect
the HttpPost actions, too.](https://image.slidesharecdn.com/asp-230807173723-31e70040/85/ASP-NET-Core-in-Action-2018-pdf-479-320.jpg)
![452 CHAPTER 15 Authorization: securing your application
public IActionResult Edit(int id)
{
var recipe = _service.GetRecipe(id);
var createdById = recipe.CreatedById;
// Authorize user based on createdById
if(isAuthorized)
{
return View(recipe);
}
}
The [Authorize] attribute can’t help you here; authorization filters run before model
binding and before the action method executes. In the next section, you’ll see the
approach you need to take to handle these situations and to apply authorization
inside the action.
WARNING Be careful when exposing the integer ID of your entities in the
URL, as in listing 15.13. Users will be able to edit every entity by modifying the
ID in the URL to access a different entity. Be sure to apply authorization
checks, otherwise you could expose a security vulnerability called Insecure
Direct Object Reference.3
15.5.1 Manually authorizing requests with IAuthorizationService
All of the approaches to authorization so far have been declarative. You apply the
[Authorize] attribute, with or without a policy name, and you let the framework take
care of performing the authorization itself.
For this recipe-editing example, you need to use imperative authorization, so you
can authorize the user after you’ve loaded the Recipe from the database. Instead of
applying a marker saying “Authorize this method,” you need to write some of the
authorization code yourself.
DEFINITION Declarative and imperative are two different styles of programming.
Declarative programming describes what you’re trying to achieve, and lets the
framework figure out how to achieve it. Imperative programming describes
how to achieve something by providing each of the steps needed.
ASP.NET Core exposes IAuthorizationService, which you can inject into your con-
trollers for imperative authorization. This listing shows how you can update the Edit
action shown in listing 15.13 to use the IAuthorizationService and verify whether
the action is allowed to continue execution.
Listing 15.13 The Edit action must load the Recipe before authorizing the request
3
You can read about this vulnerability and ways to counteract it on the Open Web Application Security Project
(OWASP): www.owasp.org/index.php/Top_10_2007-Insecure_Direct_Object_Reference.
The id of the recipe to edit is
provided by model binding.
You must load the Recipe from the
database before you know who created it.
You must authorize the
current user, to verify
they’re allowed to edit this
specific Recipe.
The action method
can only continue if
the user was
authorized.](https://image.slidesharecdn.com/asp-230807173723-31e70040/85/ASP-NET-Core-in-Action-2018-pdf-480-320.jpg)
![453
Controlling access with resource-based authorization
public class RecipeController : Controller
{
private IAuthorizationService _authService
public RecipeController(IAuthorizationService authService)
{
_authService = authService;
}
[Authorize]
public async Task<IActionResult> Edit(int id)
{
var recipe = _service.GetRecipe(id);
var authResult = await _authService
.AuthorizeAsync(User, recipe, "CanManageRecipe");
if (!authResult.Succeeded)
{
return new ForbidResult();
}
return View(recipe);
}
}
IAuthorizationService exposes an AuthorizeAsync method, which requires three
things to authorize the request:
The ClaimsPrincipal user object, exposed on the Controller as User
The resource being authorized: recipe
The policy to evaluate: "CanManageRecipe"
The authorization attempt returns an AuthorizationResult object, which indicates
whether the attempt was successful via the Succeeded property. If the attempt wasn’t
successful, then you should return a new ForbidResult, which will return a 403 For-
bidden response to the user.
WARNING In ASP.NET Core 1.x resource-based authorization, you’d return a
ChallengeResult instead of a ForbidResult and the framework would gener-
ate the appropriate 401 or 403 response, depending on whether you
were logged in or not. In the changes that came with ASP.NET Core 2.0,
this behavior was lost, so you have to work out whether to return a 401 or
403 yourself. The easiest approach is: mark your action methods with the
[Authorize] attribute and always return a ForbidResult.
You’ve configured the imperative authorization in the Edit method itself, but you still
need to define the "CanManageRecipe" policy that you use to authorize the user. This
is the same process as for declarative authorization, so you have to:
Create a policy in ConfigureServices by calling AddAuthorization()
Define one or more requirements for the policy
Listing 15.14 Using IAuthorizationService for resource-based authorization
IAuthorizationService
is injected into the
class constructor
using DI.
Only authenticated
users should be
allowed to edit recipes.
Load the recipe
from the database.
If authorization failed,
returns a 403
Forbidden result
Calls
IAuthorizationService,
providing
ClaimsPrinicipal,
resource, and the
policy name
If authorization was successful,
continues the action method](https://image.slidesharecdn.com/asp-230807173723-31e70040/85/ASP-NET-Core-in-Action-2018-pdf-481-320.jpg)
![454 CHAPTER 15 Authorization: securing your application
Define one or more handlers for each requirement
Register the handlers in the DI container
With the exception of the handler, these steps are all identical to the declarative
authorization approach with the [Authorize] attribute, so I’ll only run through them
briefly here.
First, you can create a simple IAuthorizationRequirement. As with all require-
ments, this contains no functionality and simply implements the marker interface.
public class IsRecipeOwnerRequirement : IAuthorizationRequirement { }
Defining the policy in ConfigureServices is similarly simple, as you have only this sin-
gle requirement. Note that there’s nothing resource-specific in any of this code so far:
public void ConfigureServices(IServiceCollection services)
{
services.AddAuthorization(options => {
options.AddPolicy("CanManageRecipe", policyBuilder =>
policyBuilder.AddRequirements(new IsRecipeOwnerRequirement()));
});
}
You’re halfway there; all you need to do now is create an authorization handler for
IsRecipeOwnerRequirement and register it with the DI container.
15.5.2 Creating a resource-based AuthorizationHandler
Resource-based authorization handlers are essentially the same as the authorization
handler implementations you saw in section 15.4.2. The only difference is that the
handler also has access to the resource being authorized.
To create a resource-based handler, you should derive from the Authorization-
Handler<TRequirement, TResource> base class, where TRequirement is the type of
requirement to handle, and TResource is the type of resource that you provide when
calling IAuthorizationService. Compare this to the AuthorizationHandler<T> class
you implemented previously, where you only specified the requirement.
This listing shows the handler implementation for your recipe application. You can
see that you’ve specified the requirement as IsRecipeOwnerRequirement, the
resource as Recipe, and have implemented the HandleRequirementAsync method.
public class IsRecipeOwnerHandler :
AuthorizationHandler<IsRecipeOwnerRequirement, Recipe>
{
private readonly UserManager<ApplicationUser> _userManager;
public IsRecipeOwnerHandler(
UserManager<ApplicationUser> userManager)
{
_userManager = userManager;
}
Listing 15.15 IsRecipeOwnerHandler for resource-based authorization
Injects an instance
of the
UserManager<T>
class using DI
Implements the
necessary base class,
specifying the
requirement and
resource type](https://image.slidesharecdn.com/asp-230807173723-31e70040/85/ASP-NET-Core-in-Action-2018-pdf-482-320.jpg)
![455
Controlling access with resource-based authorization
protected override async Task HandleRequirementAsync(
AuthorizationHandlerContext context,
IsRecipeOwnerRequirement requirement,
Recipe resource)
{
var appUser = await _userManager.GetUserAsync(context.User);
if(appUser == null)
{
return;
}
if(resource.CreatedById == appUser.Id)
{
context.Succeed(requirement);
}
}
}
This handler is slightly more complicated than the examples you’ve seen previously,
primarily because you’re using an additional service, UserManager<>, to load the
ApplicationUser entity based on ClaimsPrincipal from the request.
The other significant difference is that the HandleRequirementAsync method is
called with a Recipe resource. This is the same object that you provided when calling
AuthorizeAsync on IAuthorizationService. You can use this resource to verify
whether the current user created it. If so, you Succeed() the requirement, otherwise
you do nothing.
Our final task is to add IsRecipeOwnerHandler to the DI container. Your handler
uses an additional dependency, UserManager<>, which you know uses EF Core, so you
should register the handler as a scoped service:
services.AddScoped<IAuthorizationHandler, IsRecipeOwnerHandler>();
TIP If you’re wondering how to know whether you register a handler as
scoped or a singleton, think back to chapter 10. Essentially, if you have
scoped dependencies, then you must register the handler as scoped; other-
wise, singleton is fine.
With everything hooked up, you can take the application for a spin. If you try to edit a
recipe you didn’t create by clicking the Edit button on the recipe, you’ll either be
redirected to the login page (if you hadn’t yet authenticated) or you’ll be presented
with an Access Denied page, as shown in figure 15.6.
By using resource-based authorization, you’re able to enact more fine-grained
authorization requirements that you can apply at the level of an individual document
or resource. Instead of only being able to authorize that a user can edit any recipe, you
can authorize whether a user can edit this recipe.
All of the authorization techniques you’ve seen so far have focused on server-side
checks. Both the [Authorize] attribute and resource-based authorization approaches
focus on stopping users from executing a protected action on the server. This is
As well as the
context and
requirement,
you’re also
provided the
resource instance.
If you aren’t authenticated,
then appUser will be null.
Checks whether the
current user created
the Recipe by checking
the CreatedById
property
If the user created the document,
Succeed the requirement;
otherwise, do nothing.](https://image.slidesharecdn.com/asp-230807173723-31e70040/85/ASP-NET-Core-in-Action-2018-pdf-483-320.jpg)
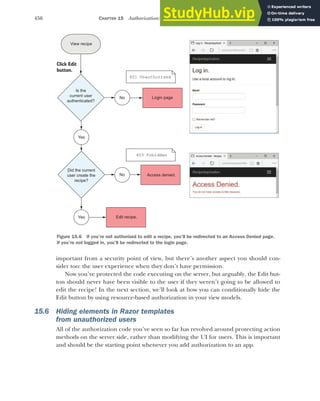
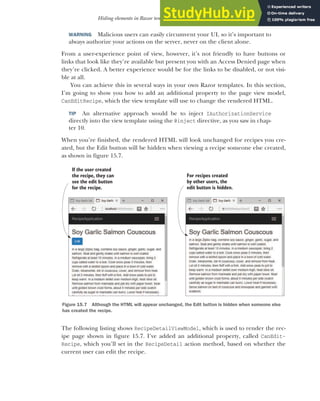
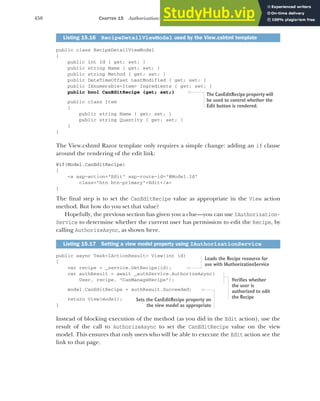
![459
Summary
WARNING Note that you didn’t remove the server-side authorization check
from the Edit action. This is important for preventing malicious users from
circumventing your UI.
With that final change, you’ve finished adding authorization to the recipe application.
Anonymous users can browse the recipes created by others, but they must log in to
create new recipes. Additionally, users can only edit the recipes that they created, and
won’t see an edit link for other people’s recipes.
Authorization is a key aspect of most apps, so it’s important to bear it in mind from
an early point. Although it’s possible to add authorization later, as you did with the
recipe app, it’s normally preferable to consider authorization sooner rather than later
in the app’s development.
In the next chapter, we’re going to be looking at your ASP.NET Core application
from a different point of view. Instead of focusing on the code and logic behind your
app, we’re going to look at how you prepare an app for production. You’ll see how to
specify the URLs your application uses, and how to publish an app so that it can be
hosted in IIS. Finally, you’ll learn about the bundling and minification of client-side
assets, why you should care, and how to use BundlerMinifier in ASP.NET Core.
Summary
Authorization is the process of determining what a user can do. It’s distinct
from authentication, the process of determining who a user is. Authentication
typically occurs before authorization.
You can use authorization in any part of your application, but it’s typically
applied to MVC controllers and actions, using the [Authorize] attribute to
control which actions a user can execute.
The simplest form of authorization requires that a user is authenticated before
executing an action. You can achieve this by applying the [Authorize] attribute
to an action, to a controller, or globally.
Claims-based authorization uses the current user’s claims to determine whether
they’re authorized to execute an action. You define the claims needed to exe-
cute an action in a policy.
Policies have a name and are configured in Startup.cs as part of the call to
AddAuthorization() in ConfigureServices. You define the policy using Add-
Policy(), passing in a name and a lambda that defines the claims needed.
You can apply a policy to an action or controller by specifying the policy in the
authorize attribute, for example [Authorize("CanAccessLounge")].
If an unauthenticated user attempts to execute a protected action, they’ll typi-
cally be redirected to the login page for your app. If they’re already authenti-
cated, but don’t have the required claims, they’ll be shown an Access Denied
page instead.](https://image.slidesharecdn.com/asp-230807173723-31e70040/85/ASP-NET-Core-in-Action-2018-pdf-487-320.jpg)
![460 CHAPTER 15 Authorization: securing your application
For complex authorization policies, you can build a custom policy. A custom
policy consists of one or more requirements, and a requirement can have one
or more handlers.
For a policy to be authorized, every requirement must be satisfied. For a
requirement to be satisfied, one or more of the associated handlers must indi-
cate success, and none must indicate explicit failure.
AuthorizationHandler<T> contains the logic that determines whether a
requirement is satisfied. If a requirement requires that users are over 18, the
handler could look for a DateOfBirth claim and calculate the user’s age.
Handlers can mark a requirement as satisfied by calling context.Succeed
(requirement). If a handler can’t satisfy the requirement, then it shouldn’t call
anything on the context, as a different handler could call Succeed() and satisfy
the requirement.
If a handler calls context.Fail(), then the requirement will fail, even if a dif-
ferent handler marked it as a success using Succeed().
Resource-based authorization uses details of the resource being protected to
determine whether the current user is authorized. For example, if a user is only
allowed to edit their own documents, then you need to know the author of the
document before you can determine whether they’re authorized.
Resource-based authorization uses the same policy, requirements, and handlers
system as before. Instead of applying authorization with the [Authorize] attri-
bute, you must manually call IAuthorizationService and provide the resource
you’re protecting.
You can modify the user interface to account for user authorization by adding
additional properties to your view models. If a user isn’t authorized to execute
an action, you can remove or disable the link to that action method in the UI.
You should always authorize on the server, even if you’ve removed links from
the UI.](https://image.slidesharecdn.com/asp-230807173723-31e70040/85/ASP-NET-Core-in-Action-2018-pdf-488-320.jpg)


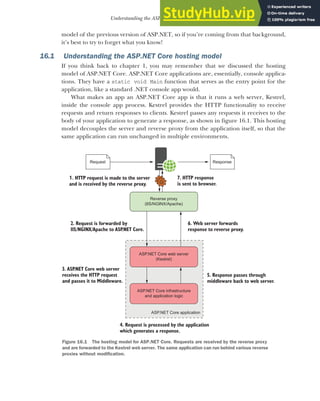

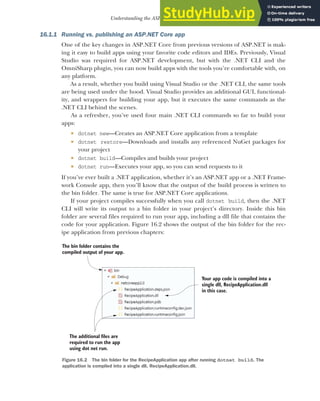
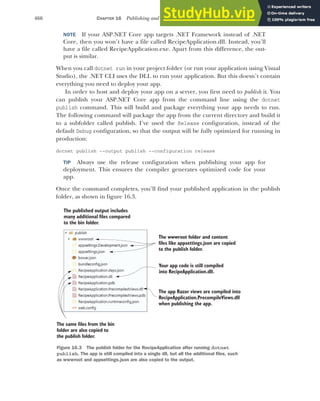
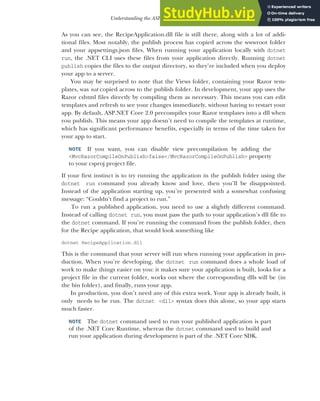
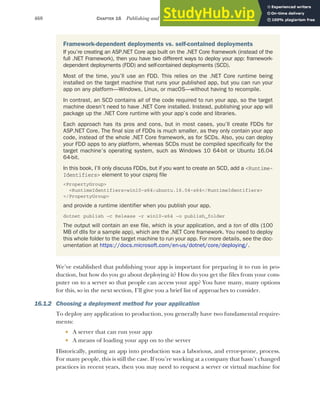
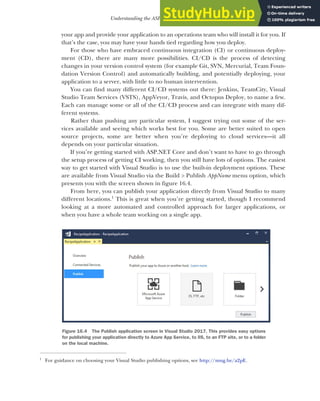


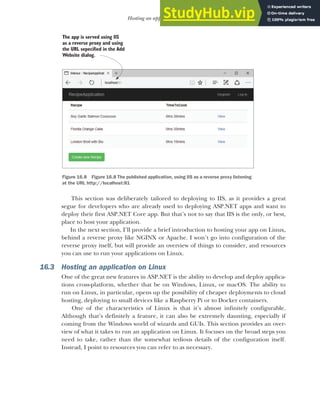
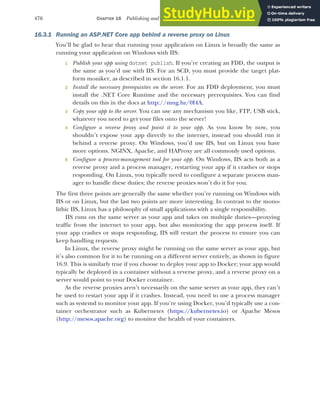
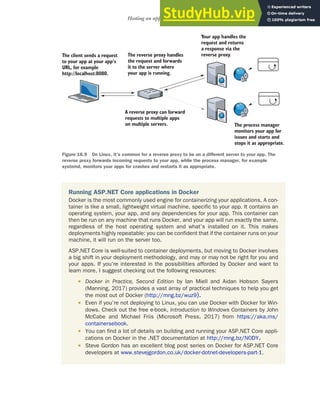

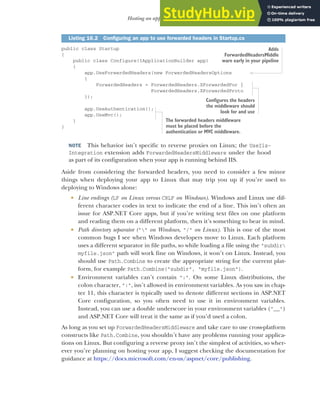
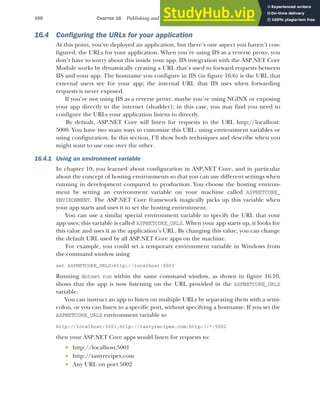
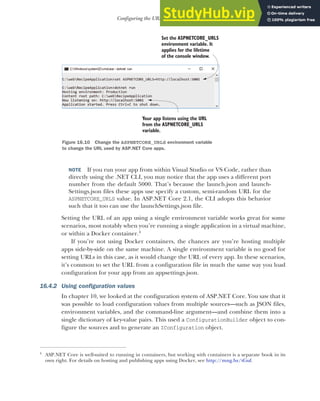

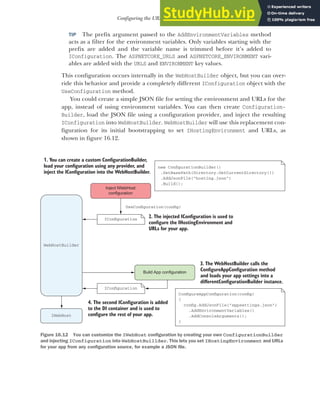
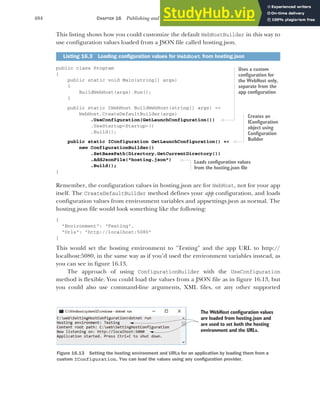

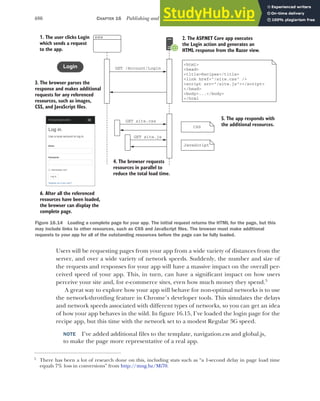
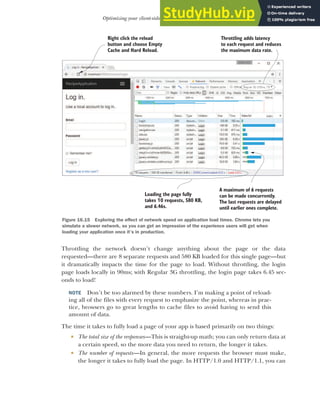

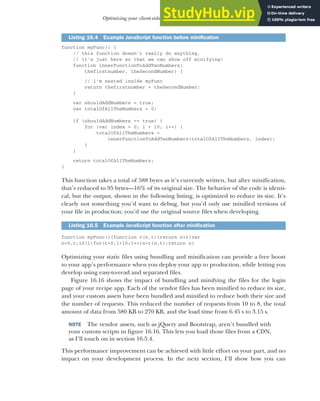
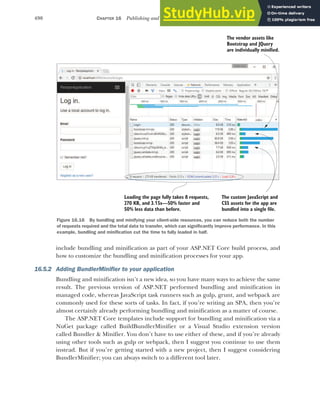
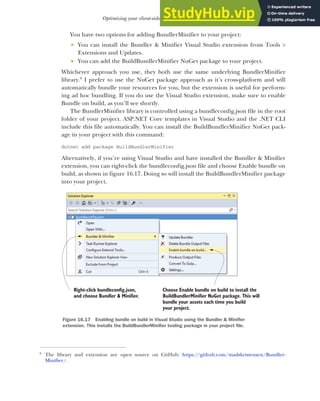
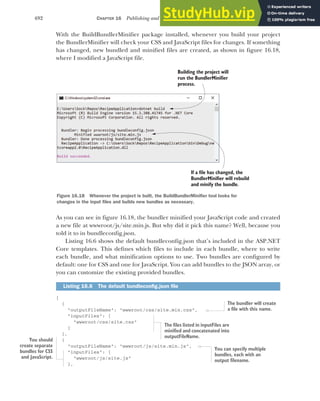


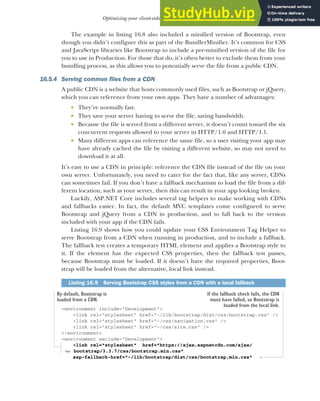
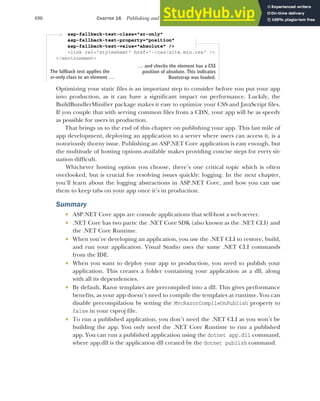
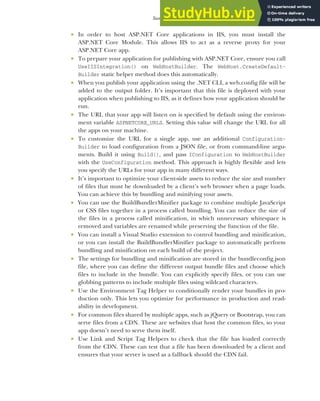


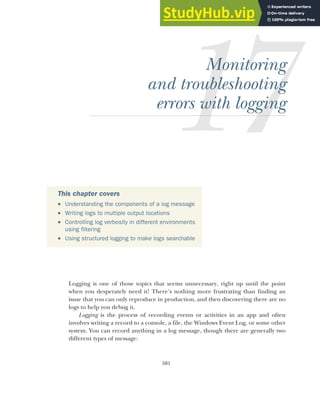
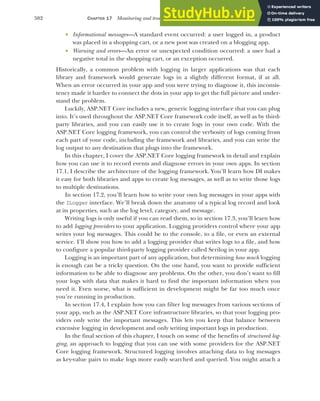

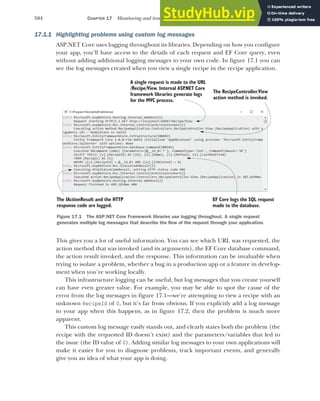


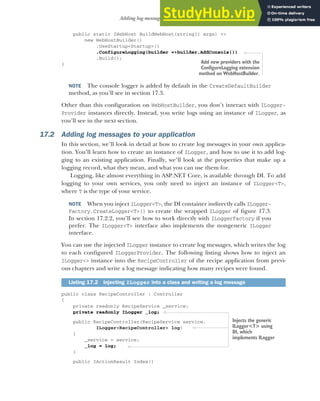
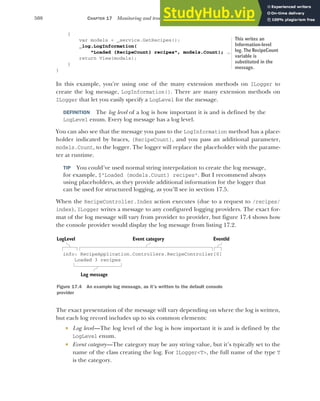
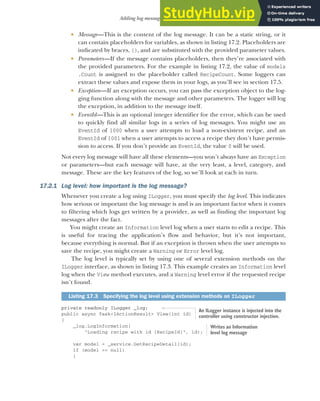
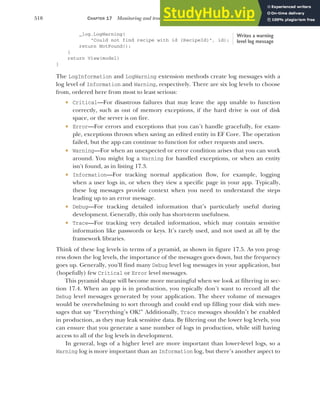
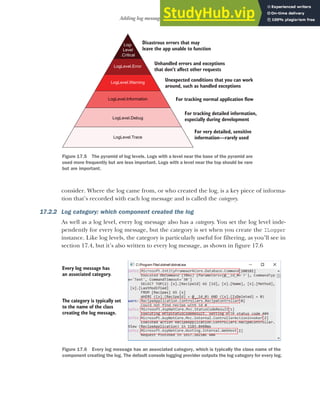

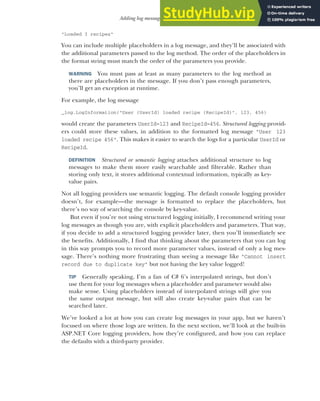

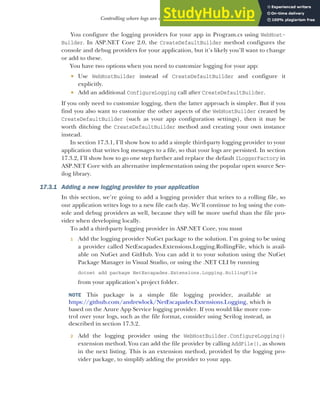
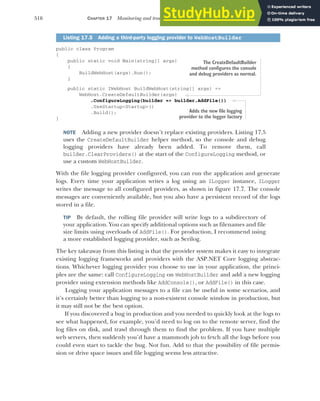

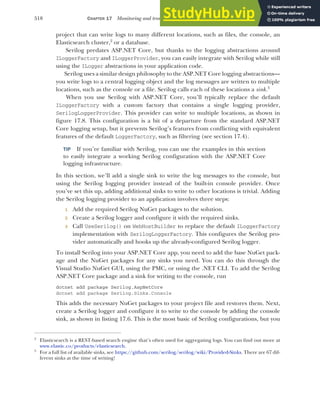
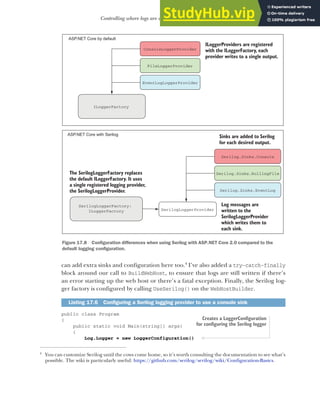

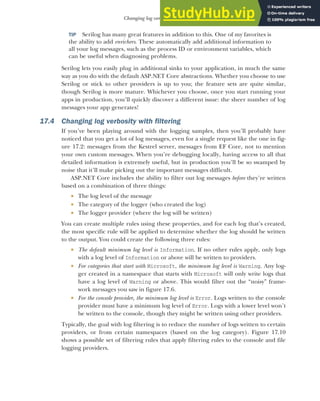
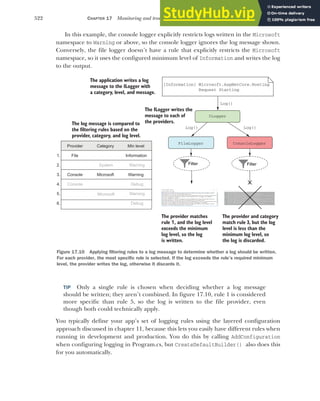
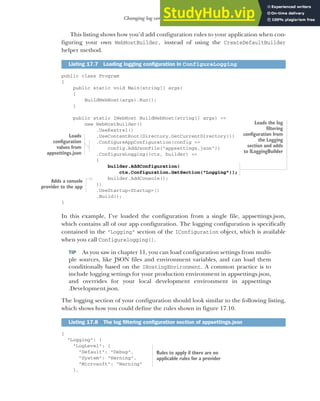
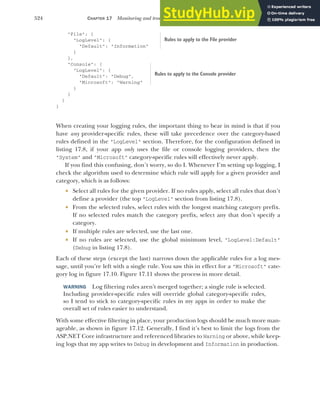

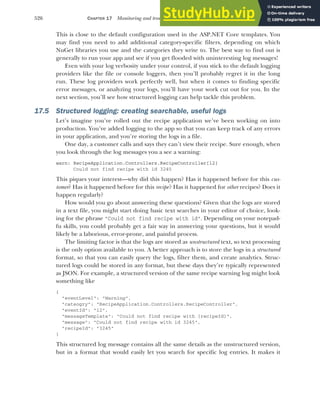

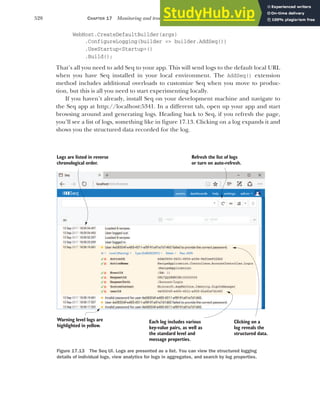

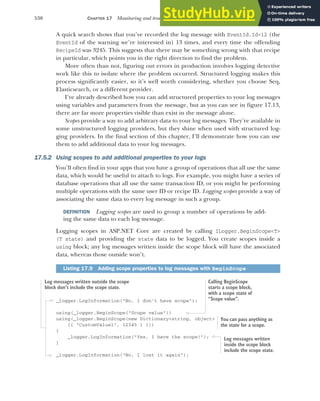

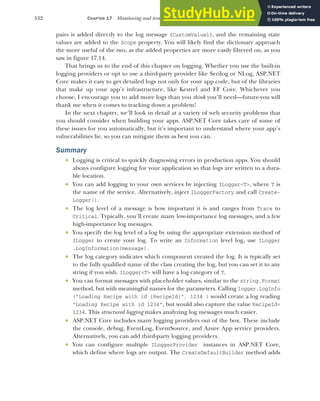


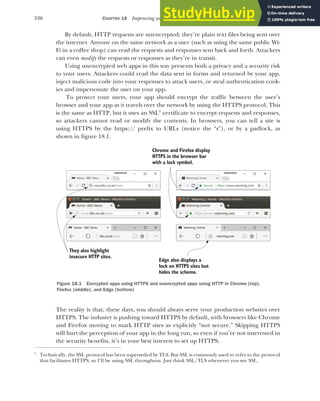
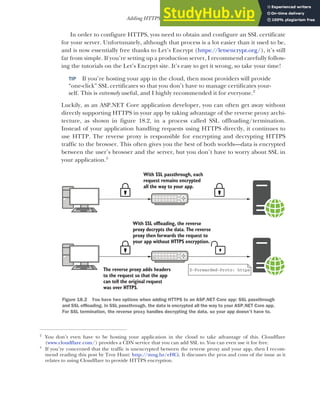
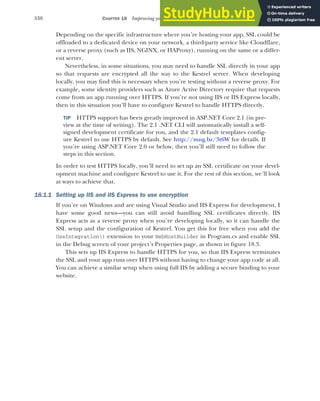

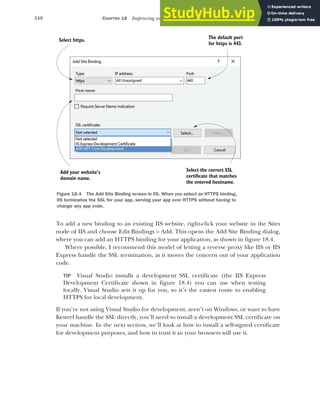
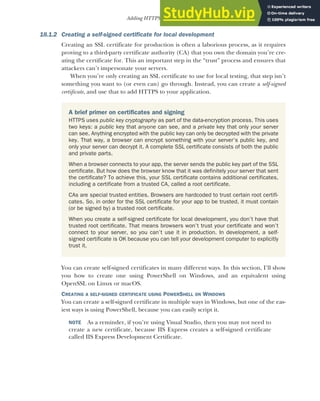
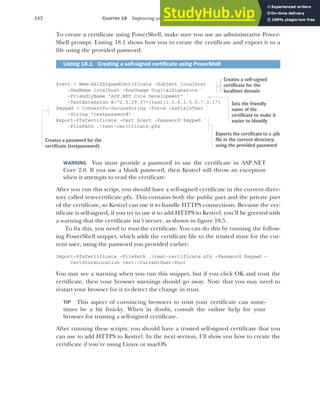

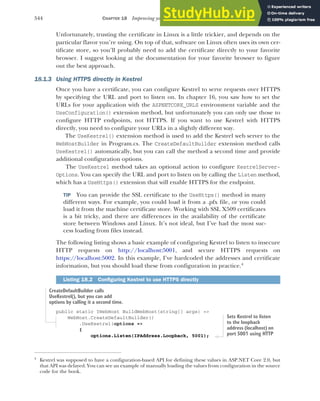


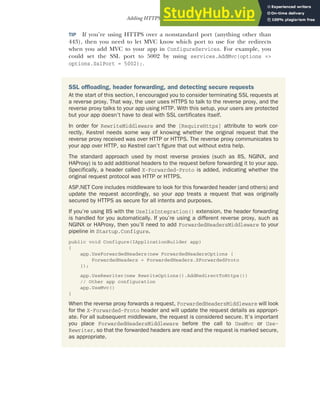

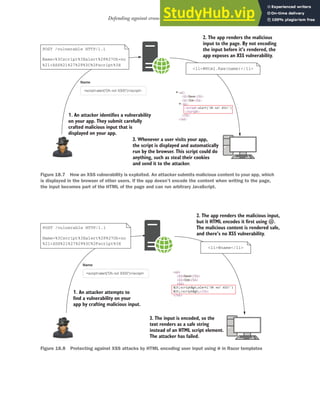


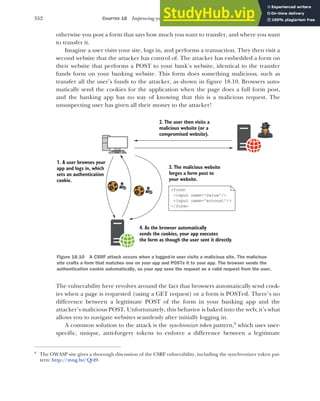
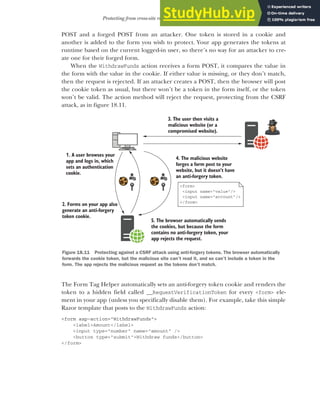
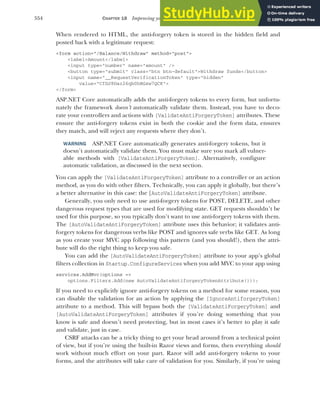
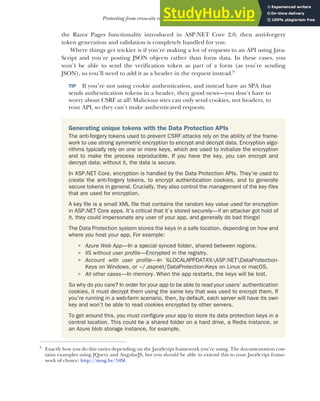
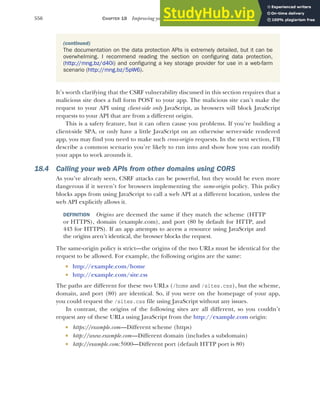


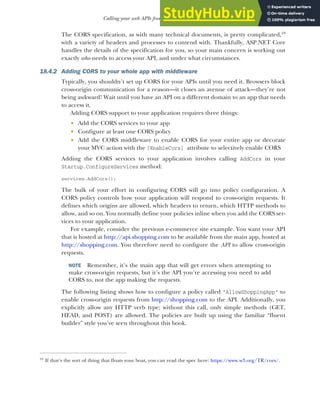
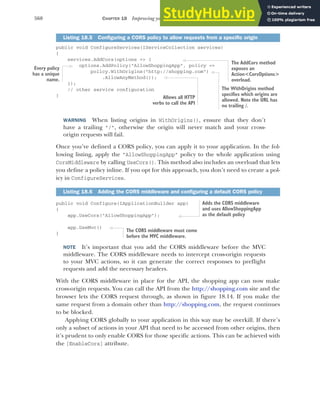

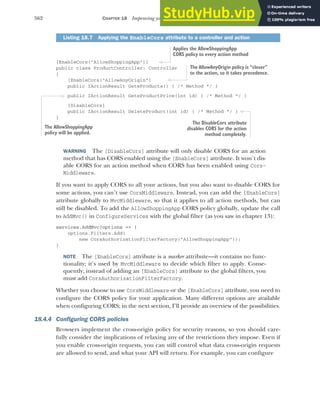


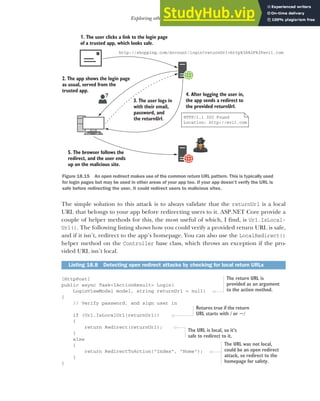


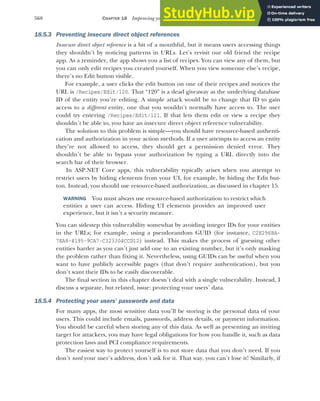
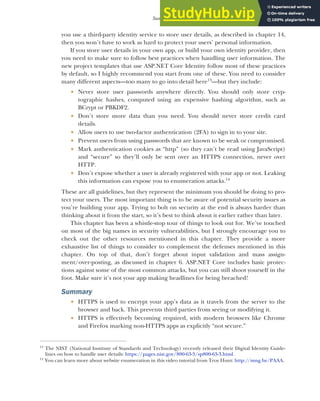
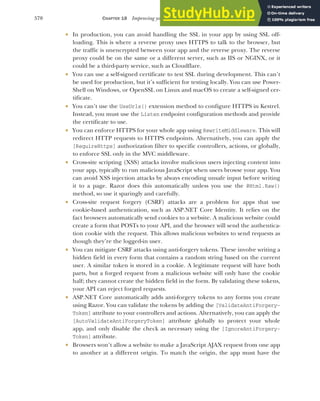
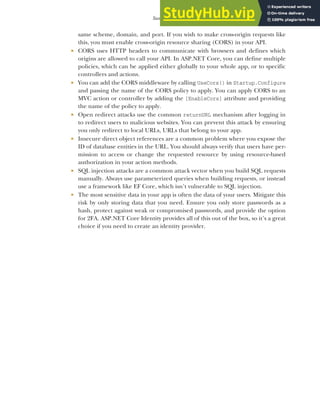
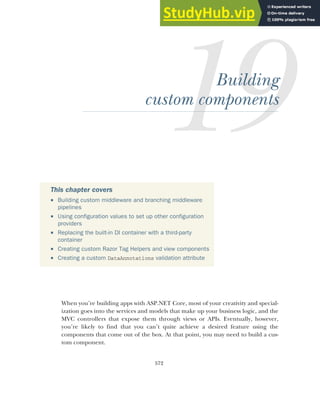
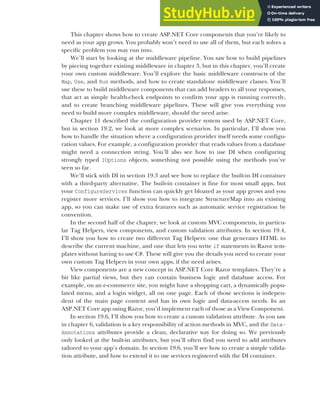

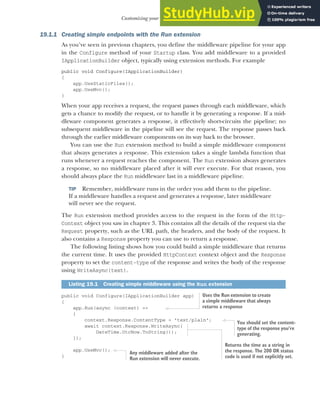

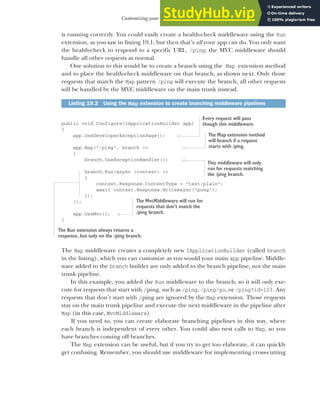
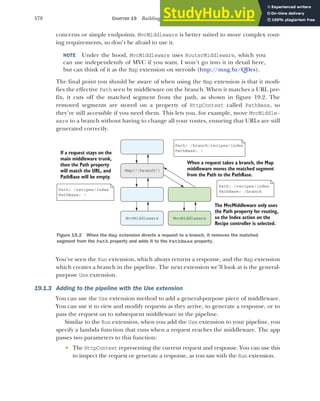
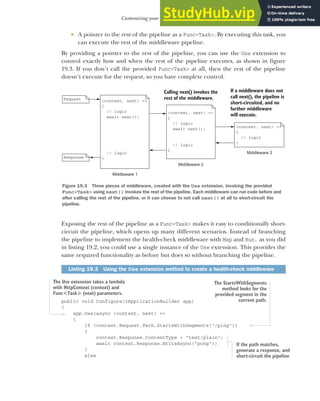
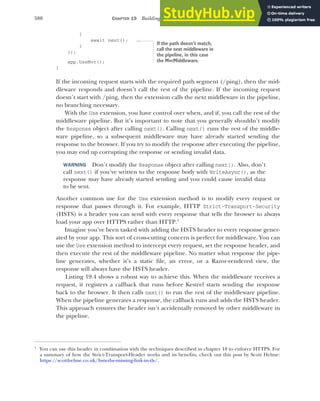

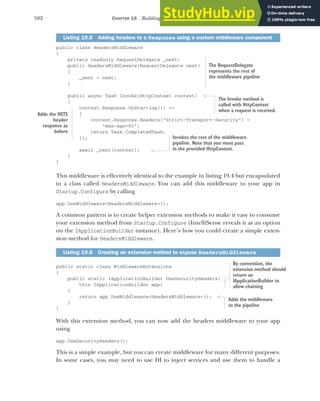
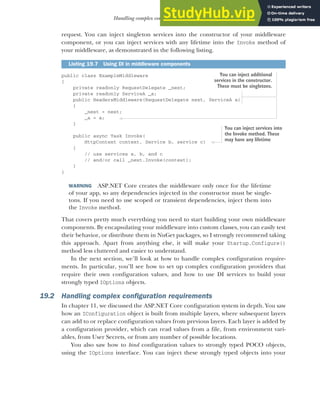

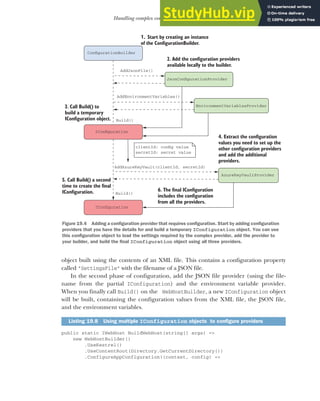
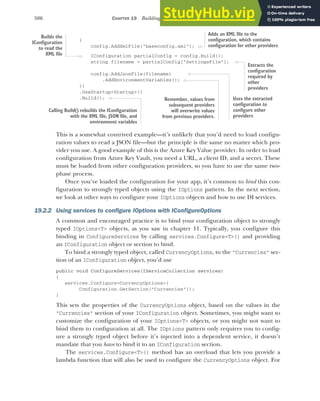
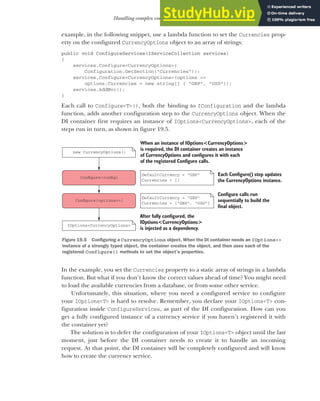
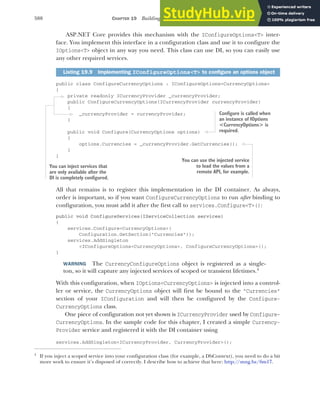


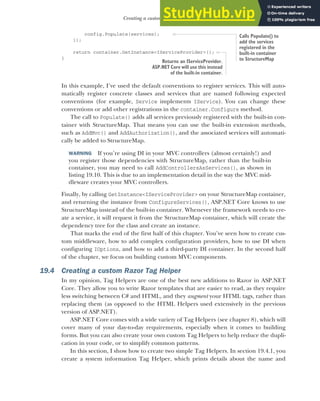

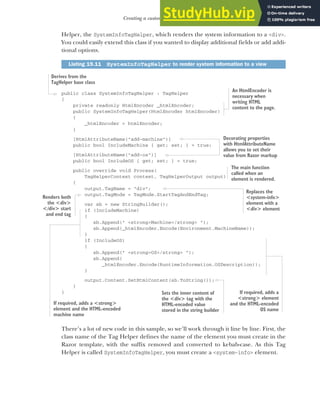

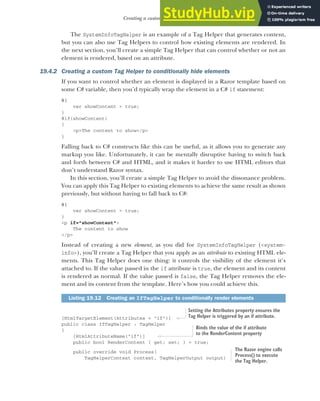
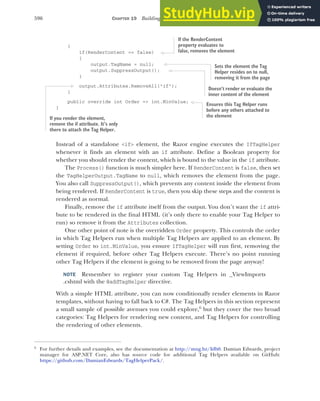
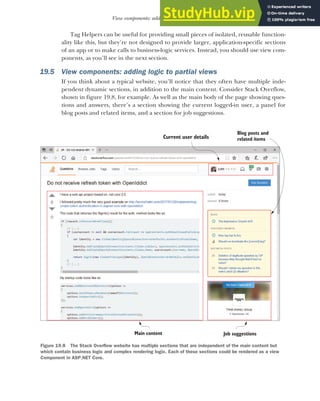

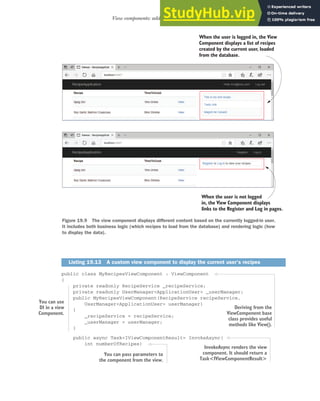

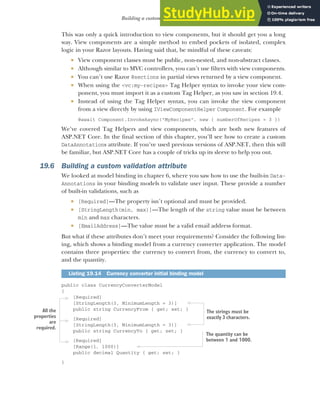
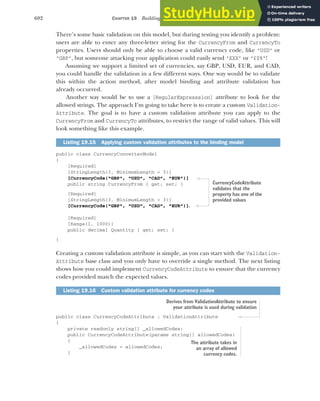


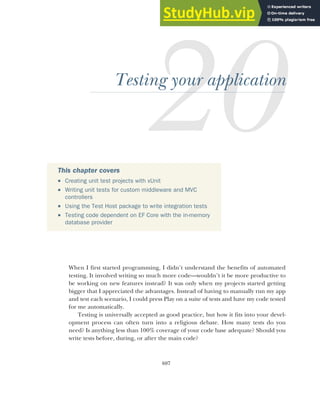

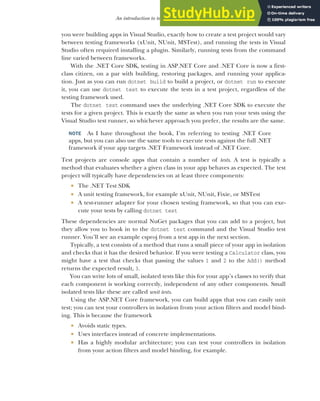
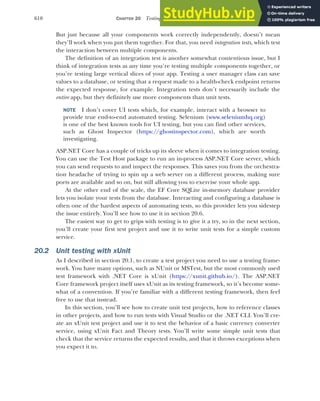
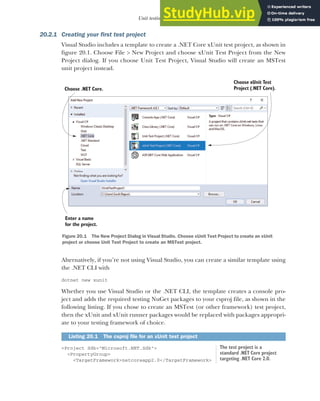
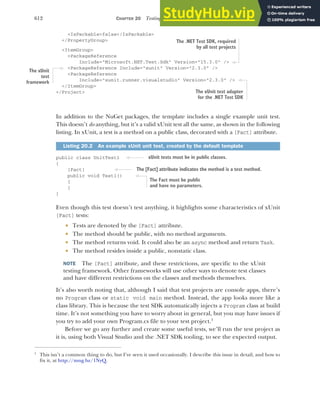
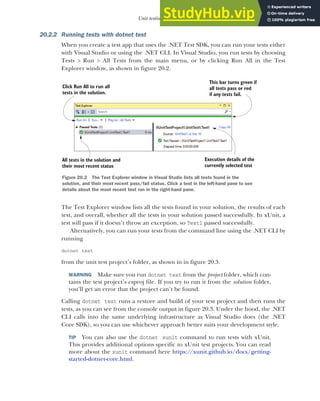
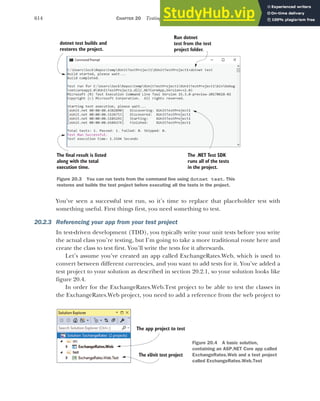
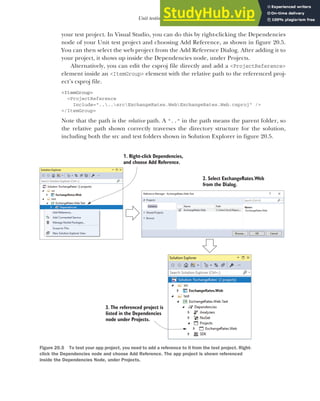

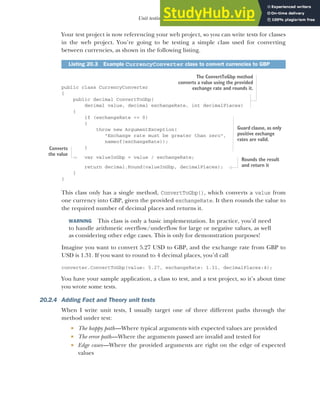
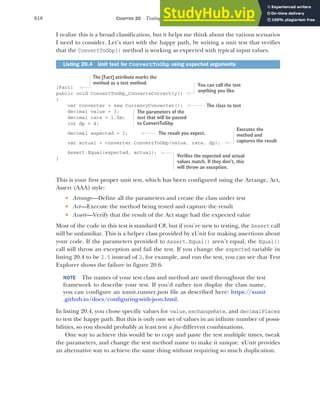
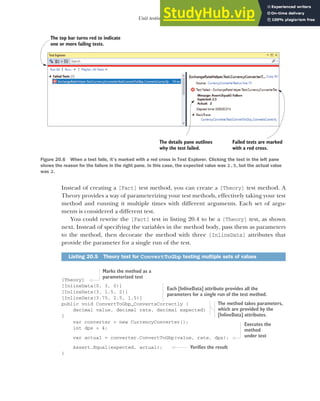
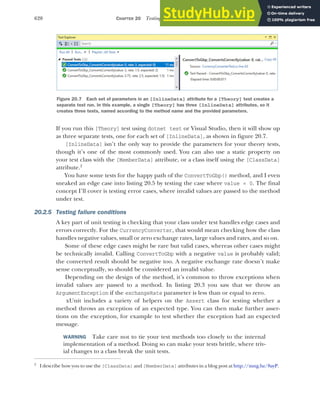
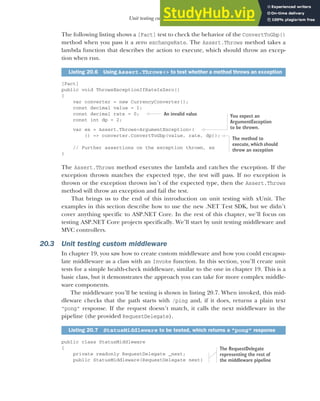
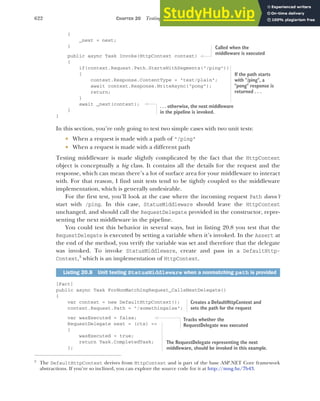
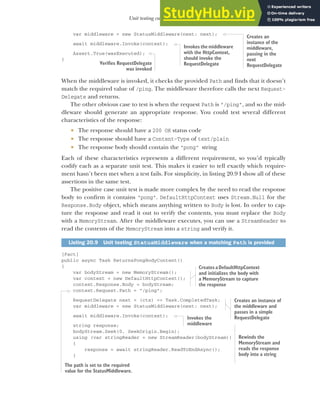
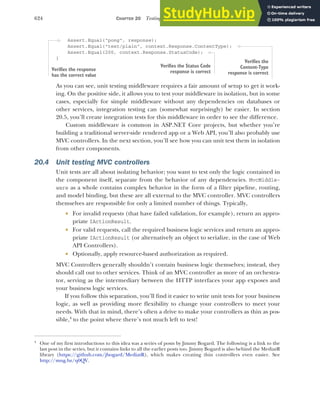
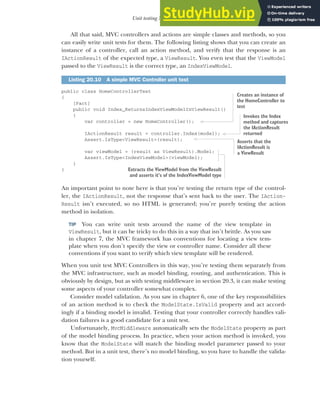

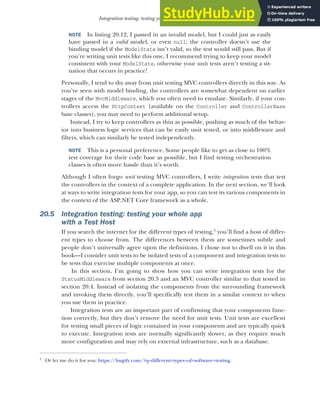


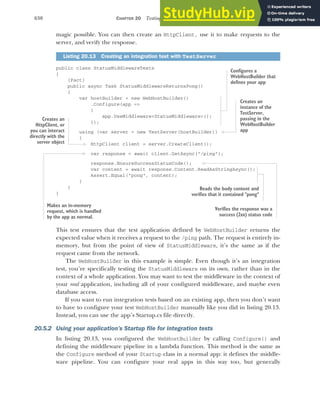
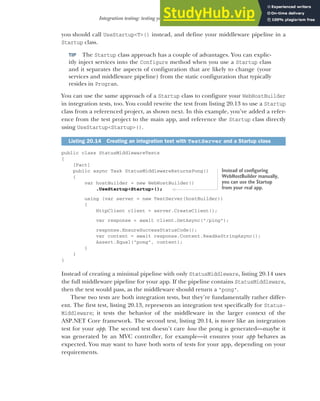


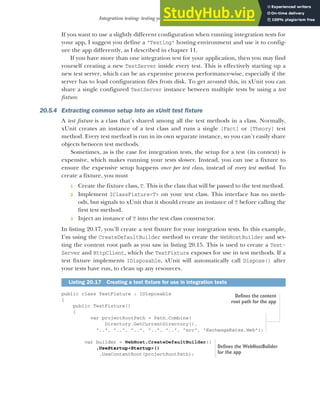

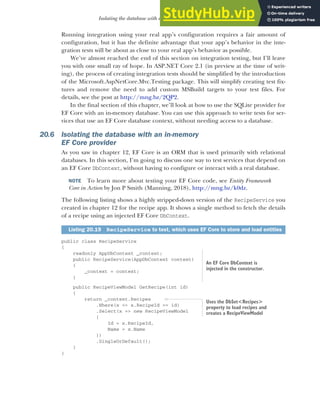

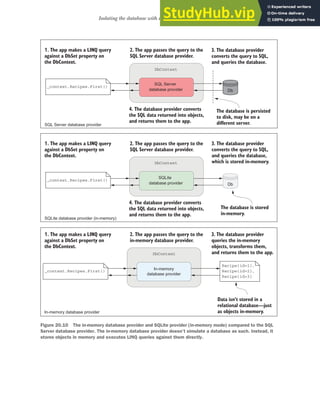
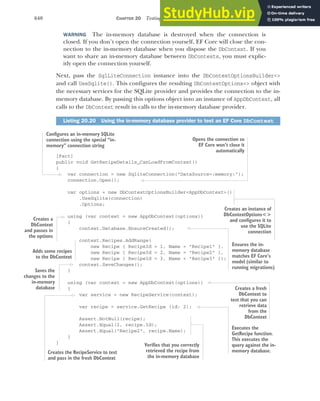
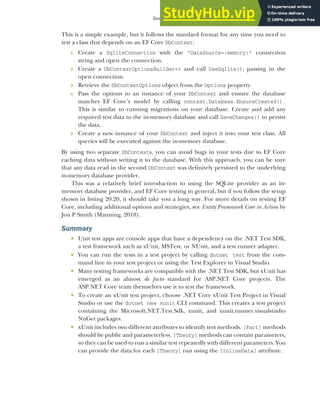
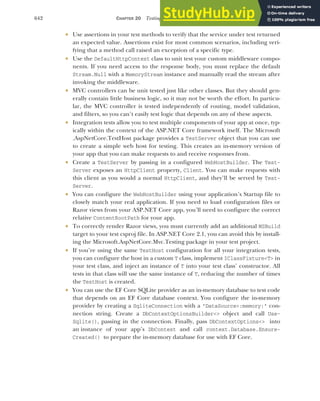

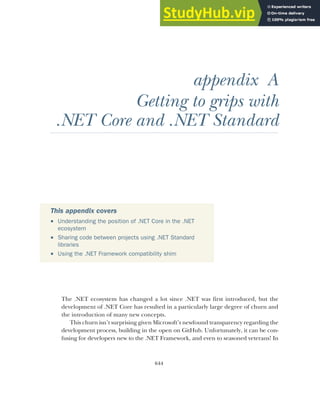
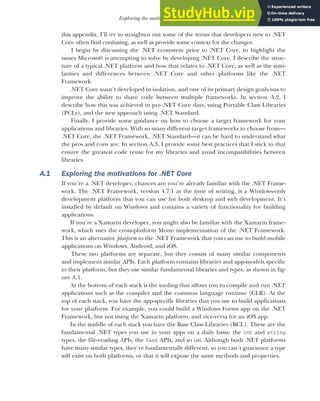
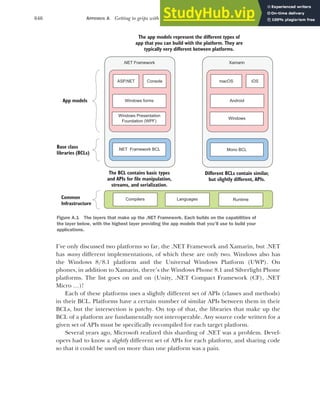

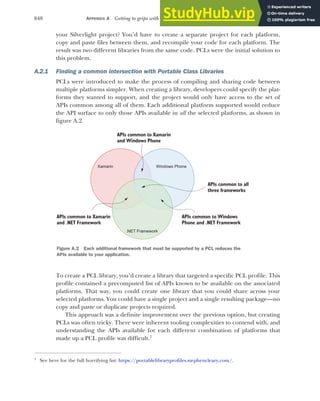


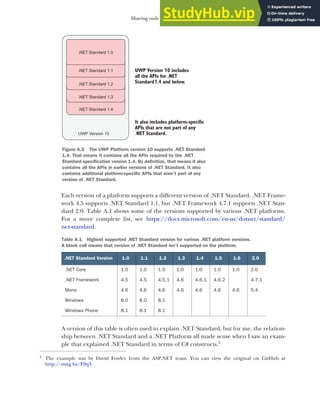
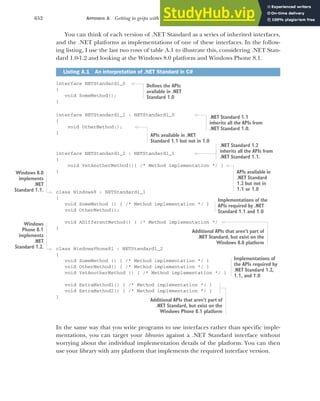

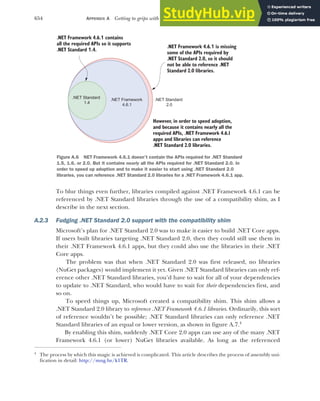
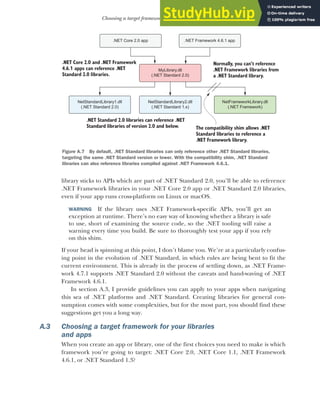

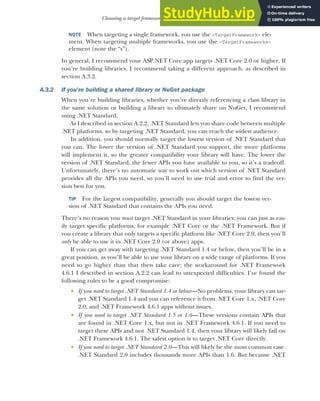

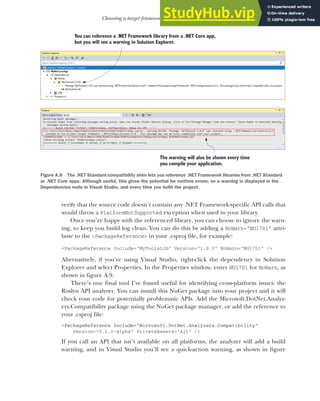
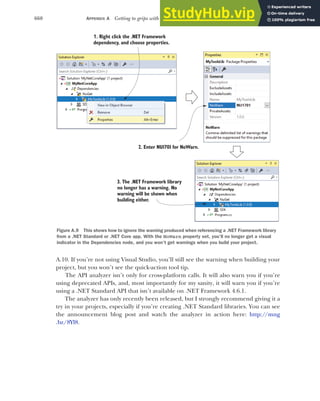
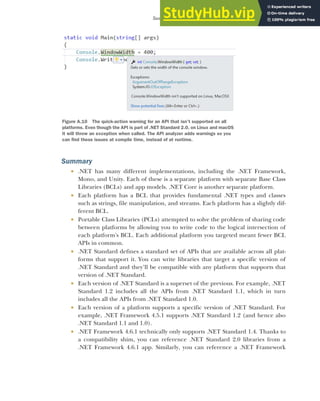
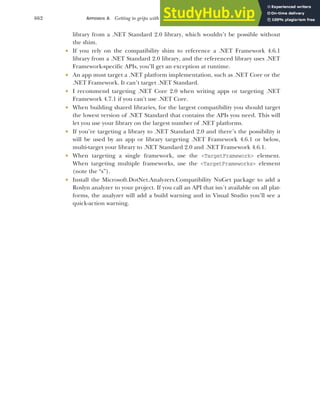
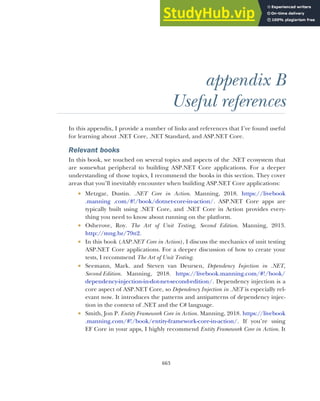
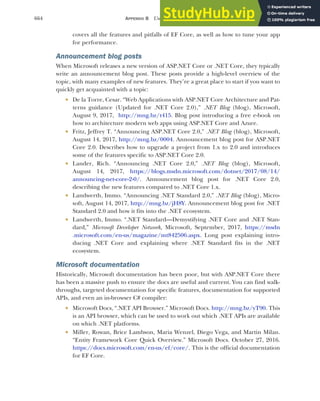
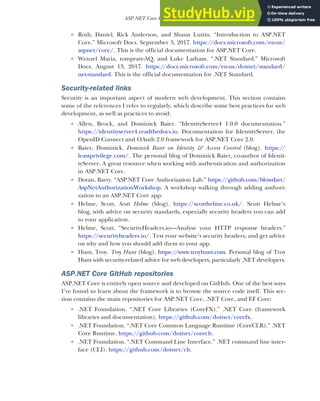


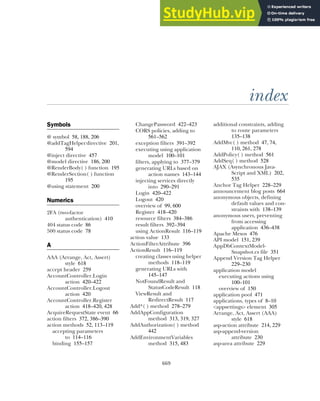

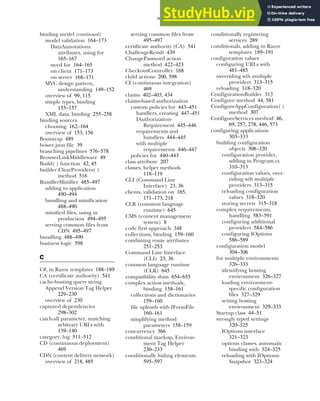

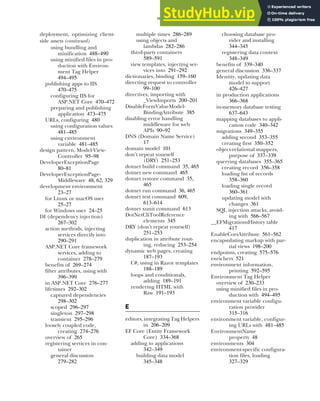
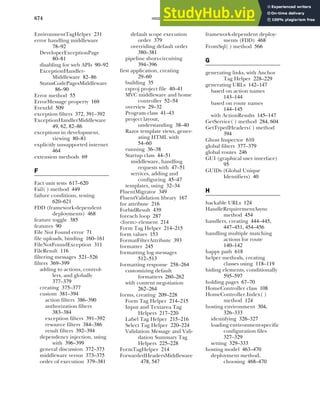

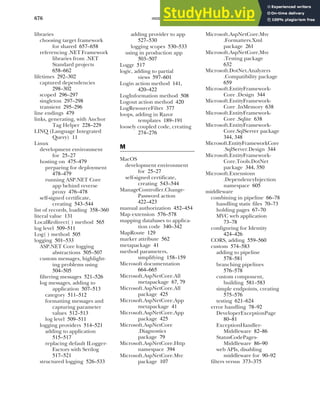
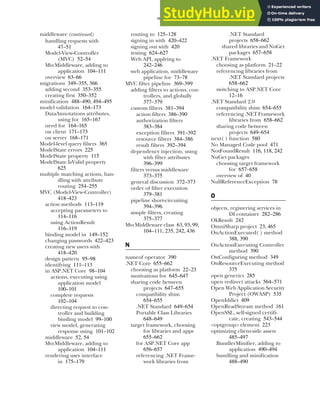

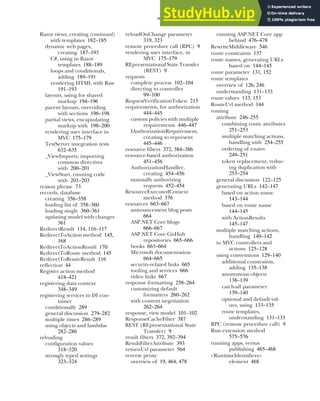
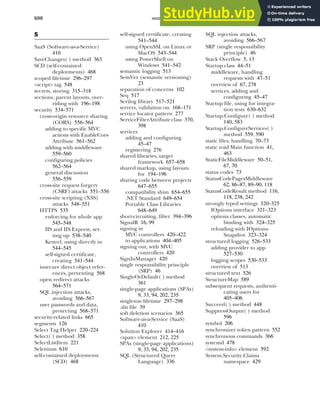


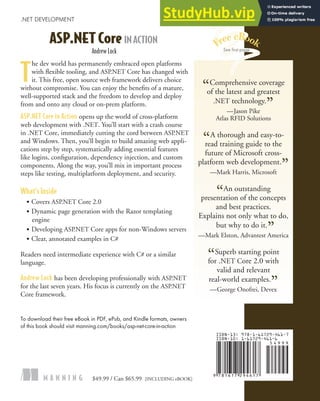

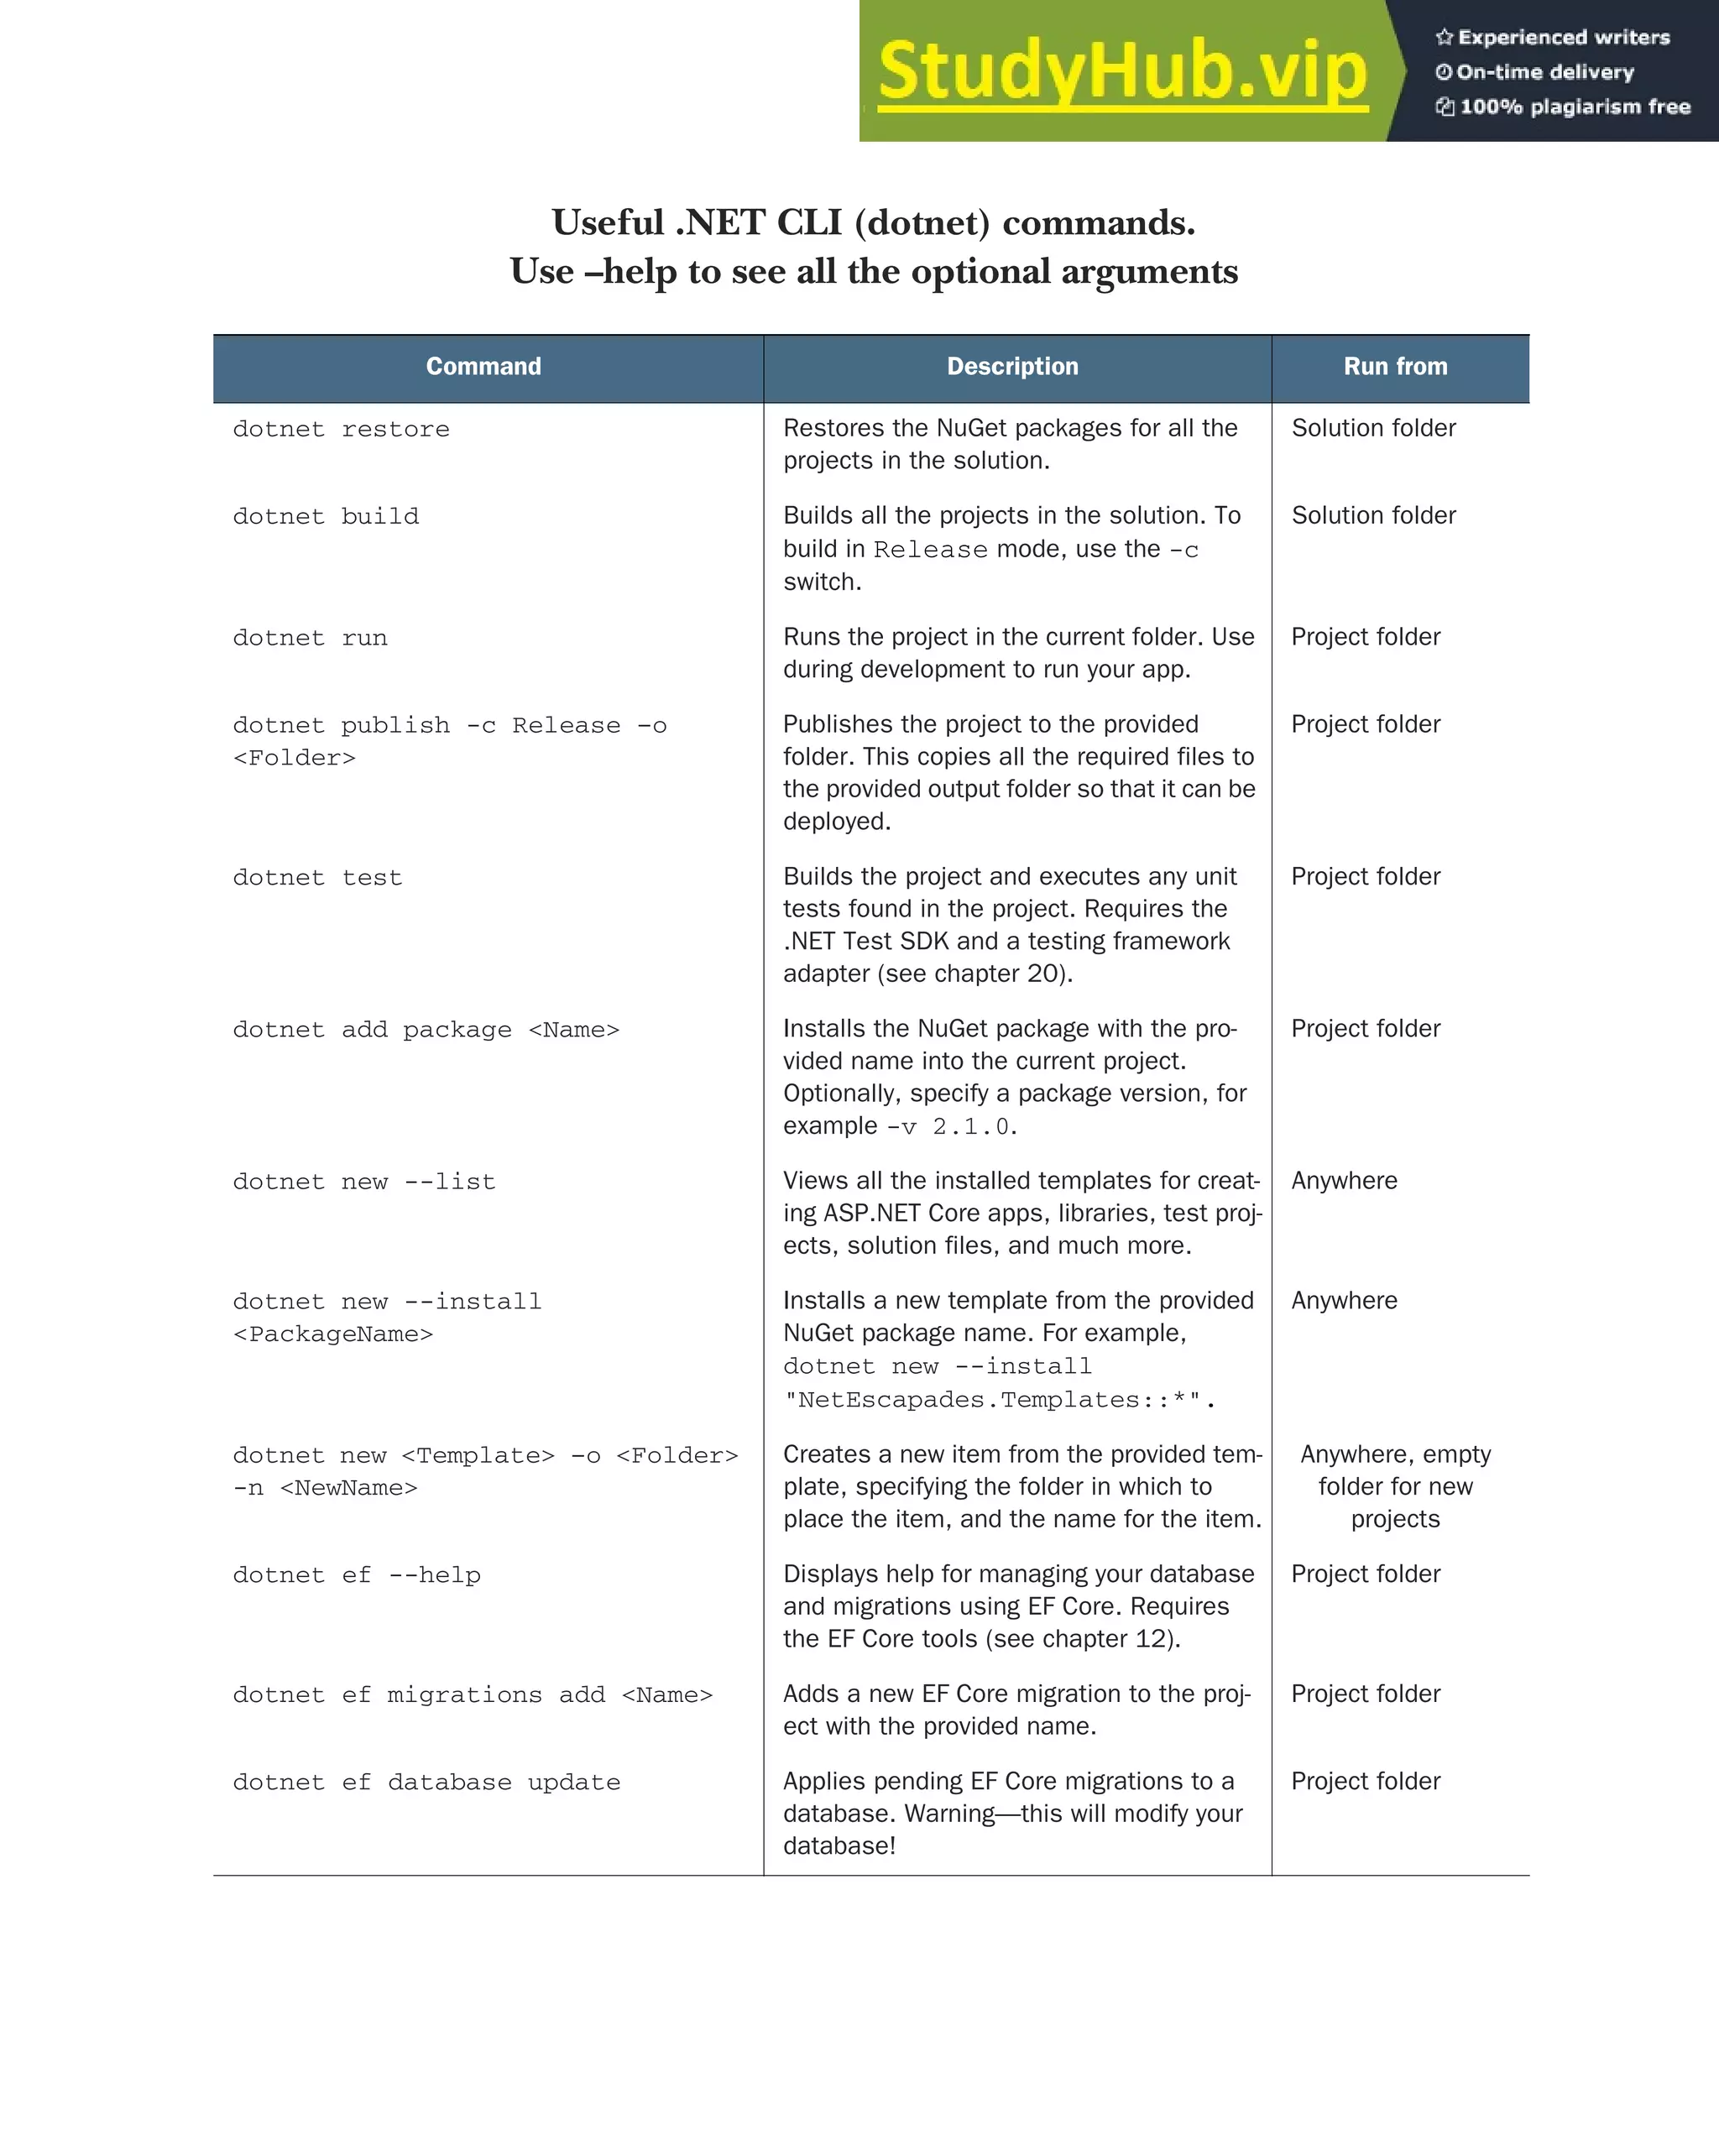


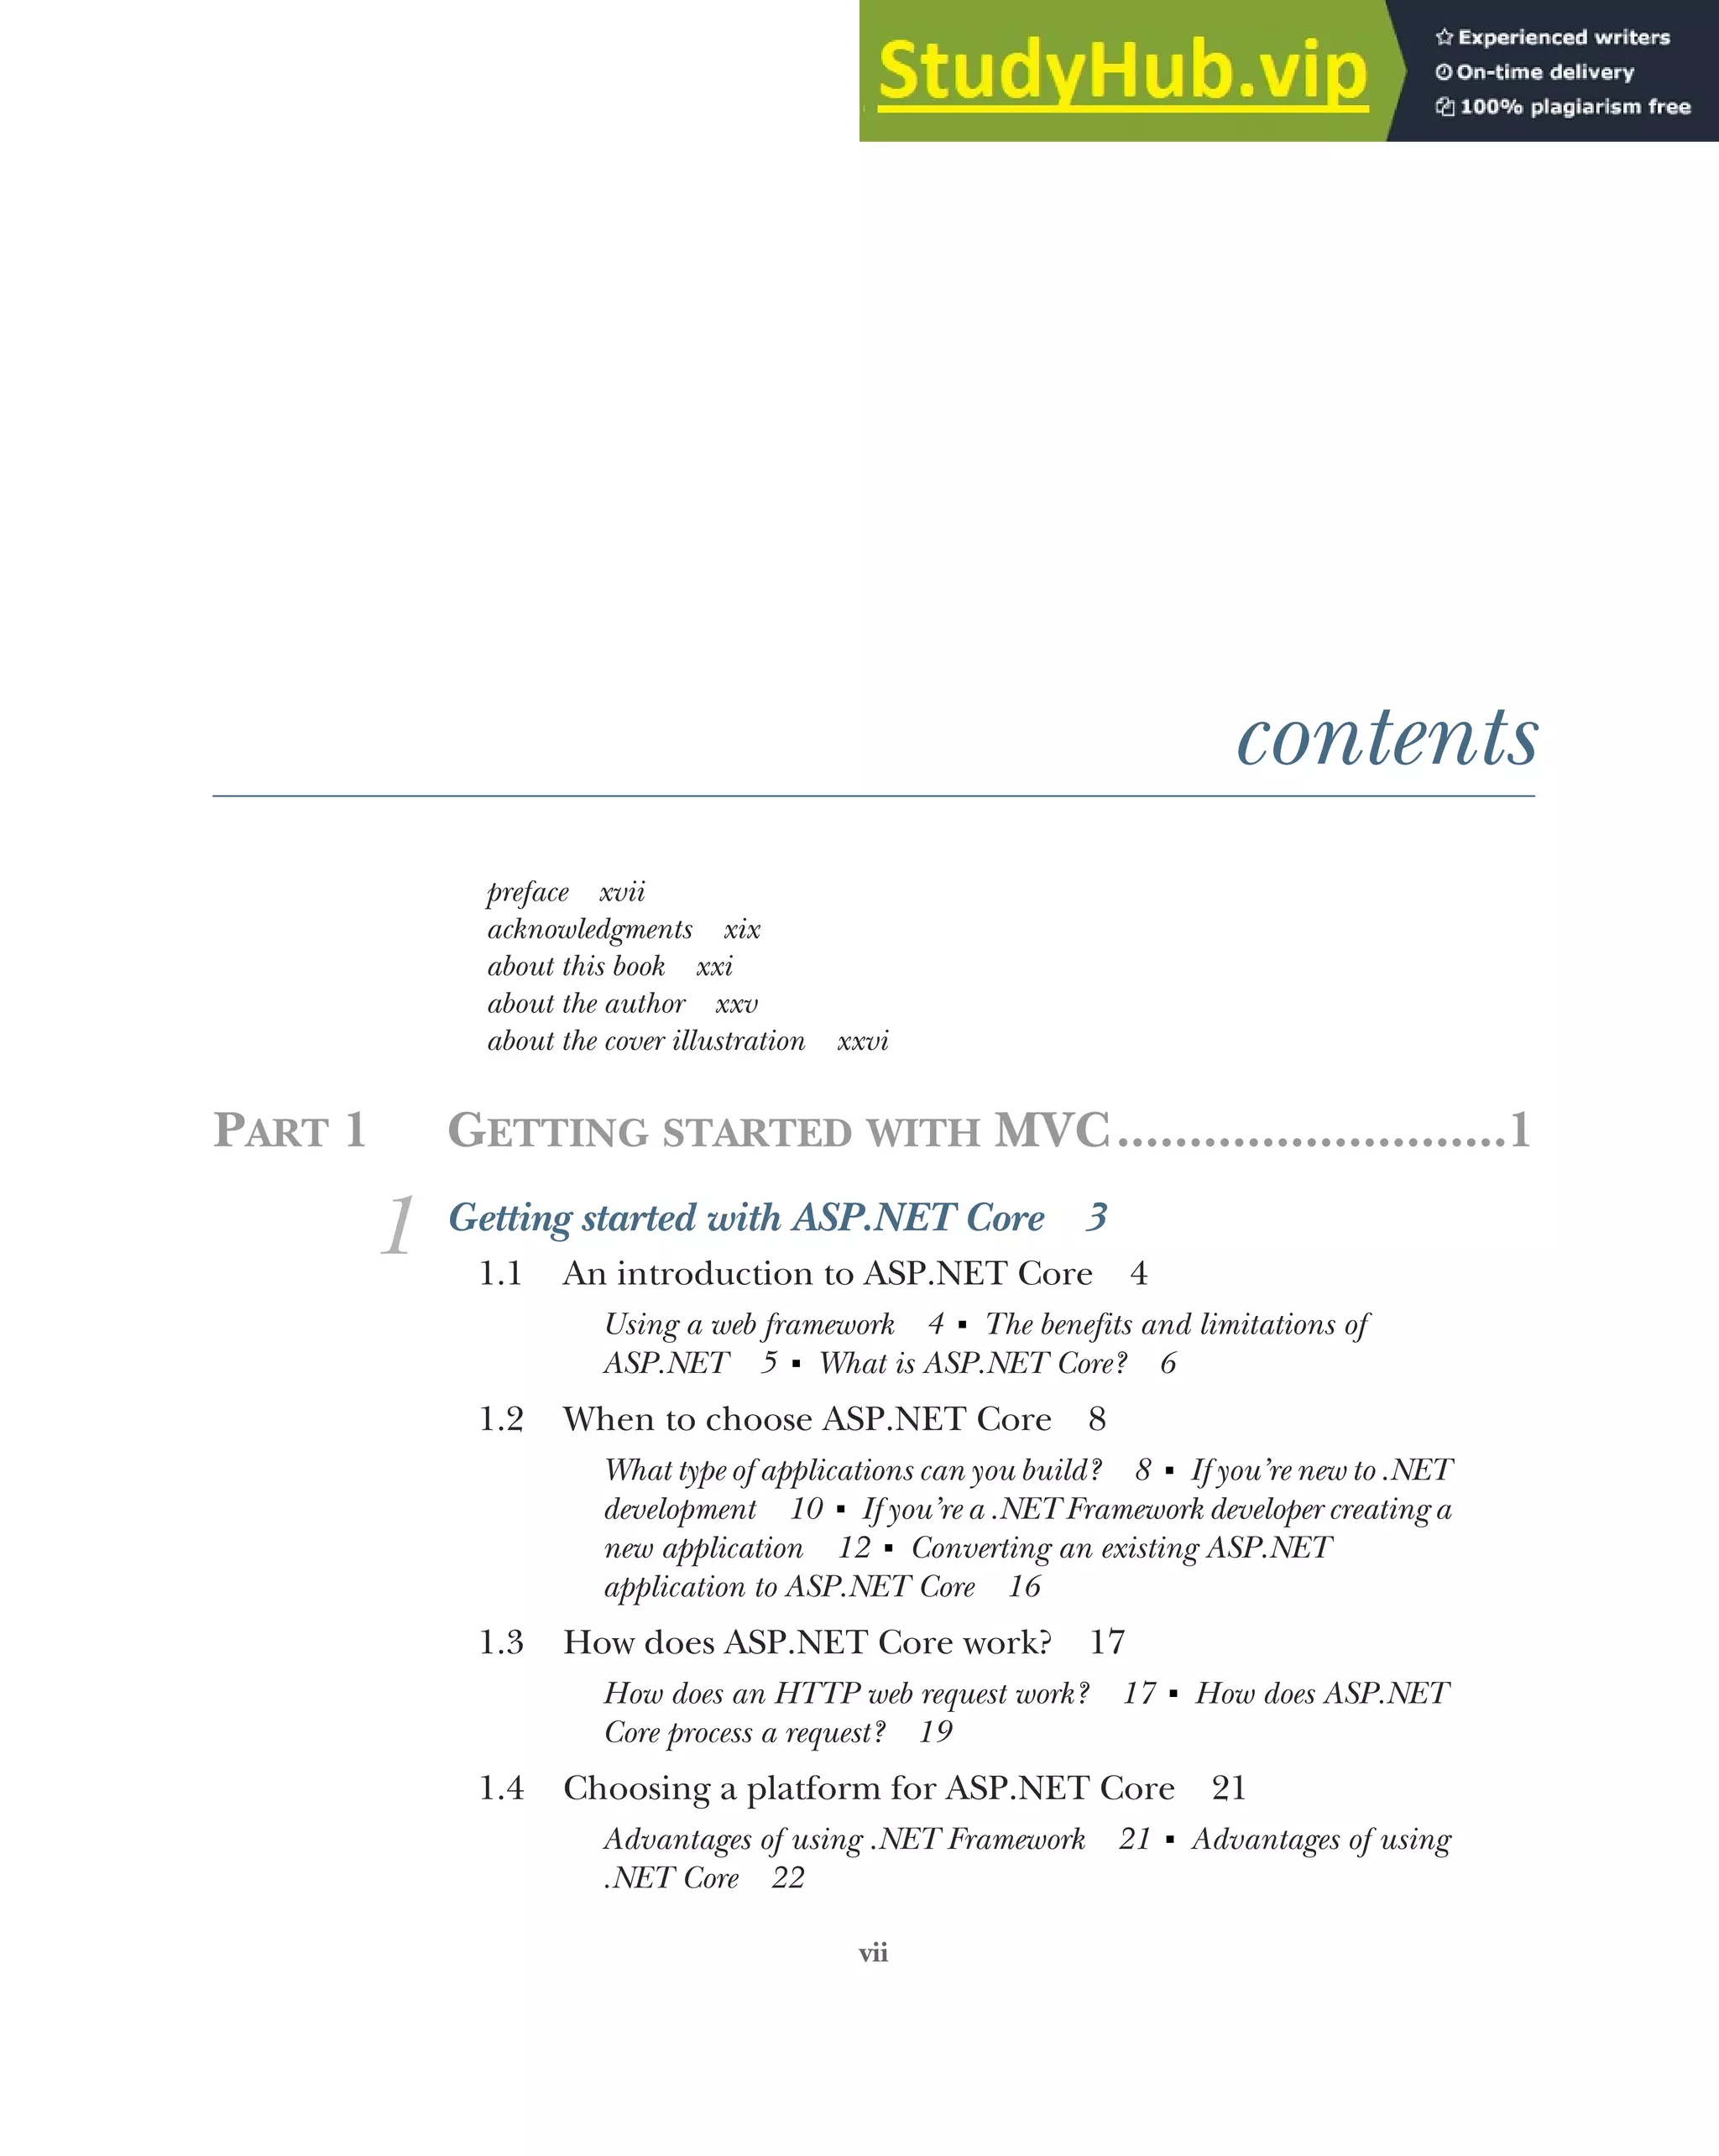
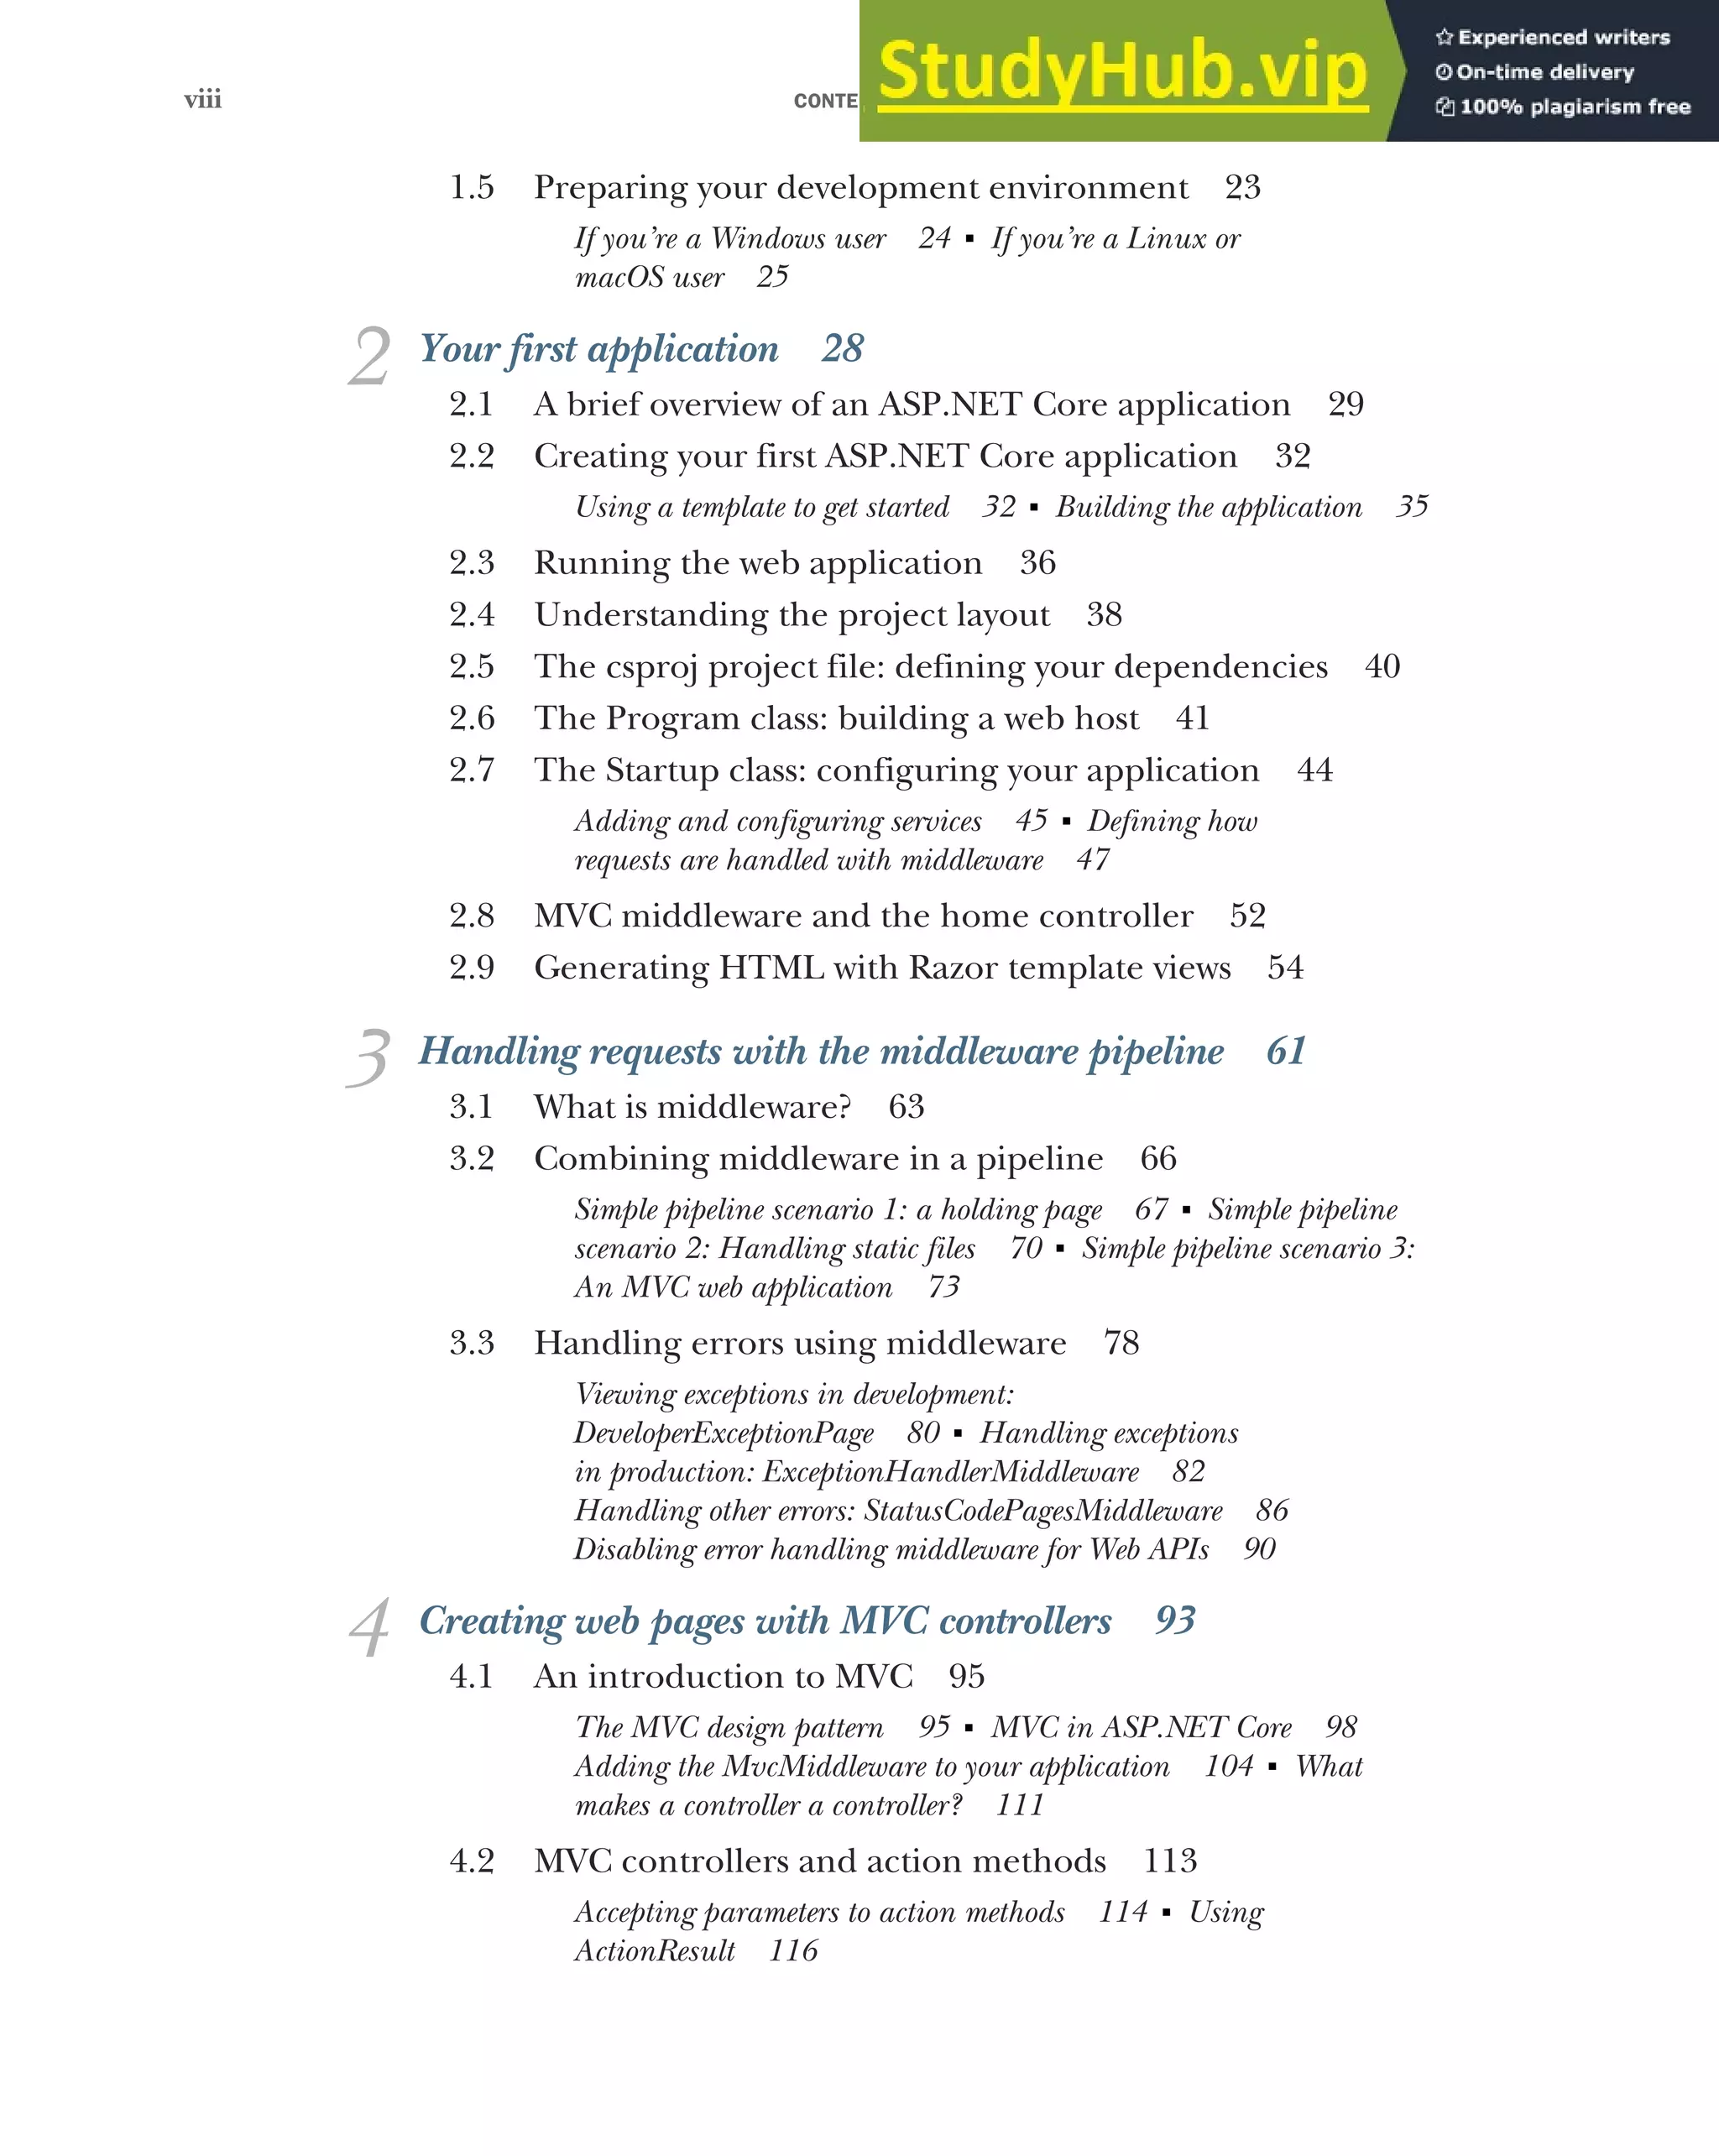
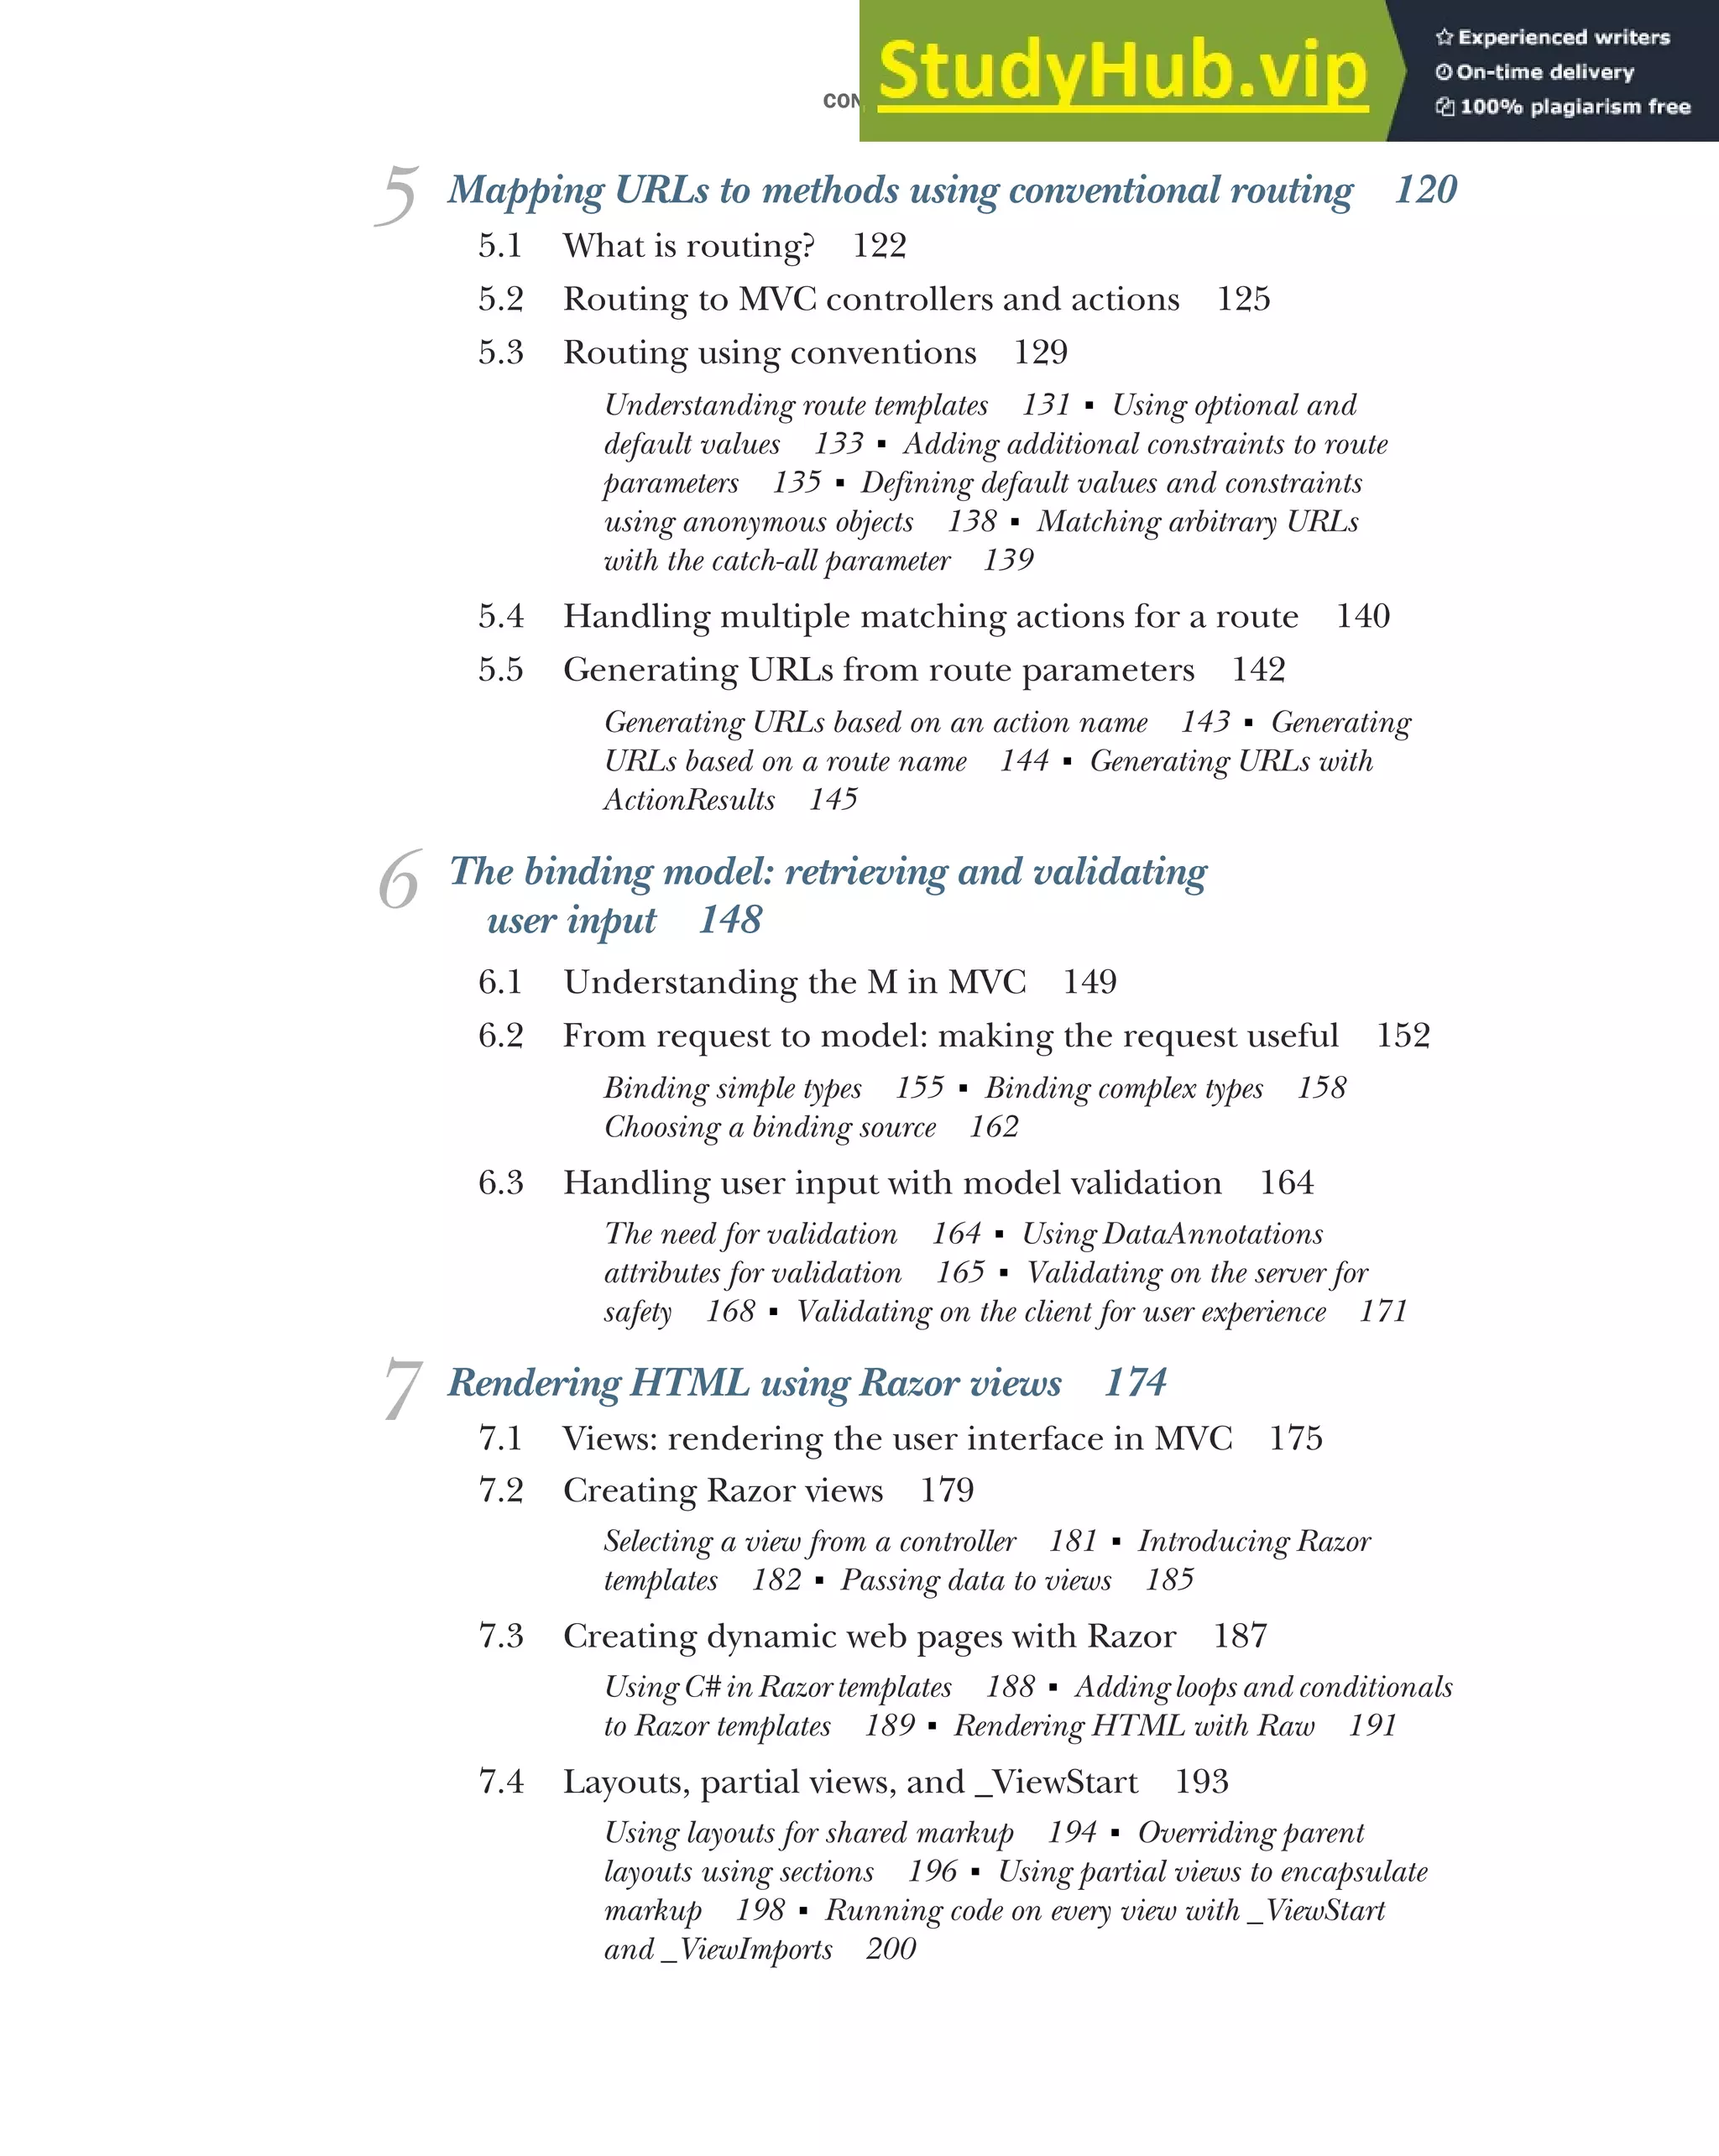
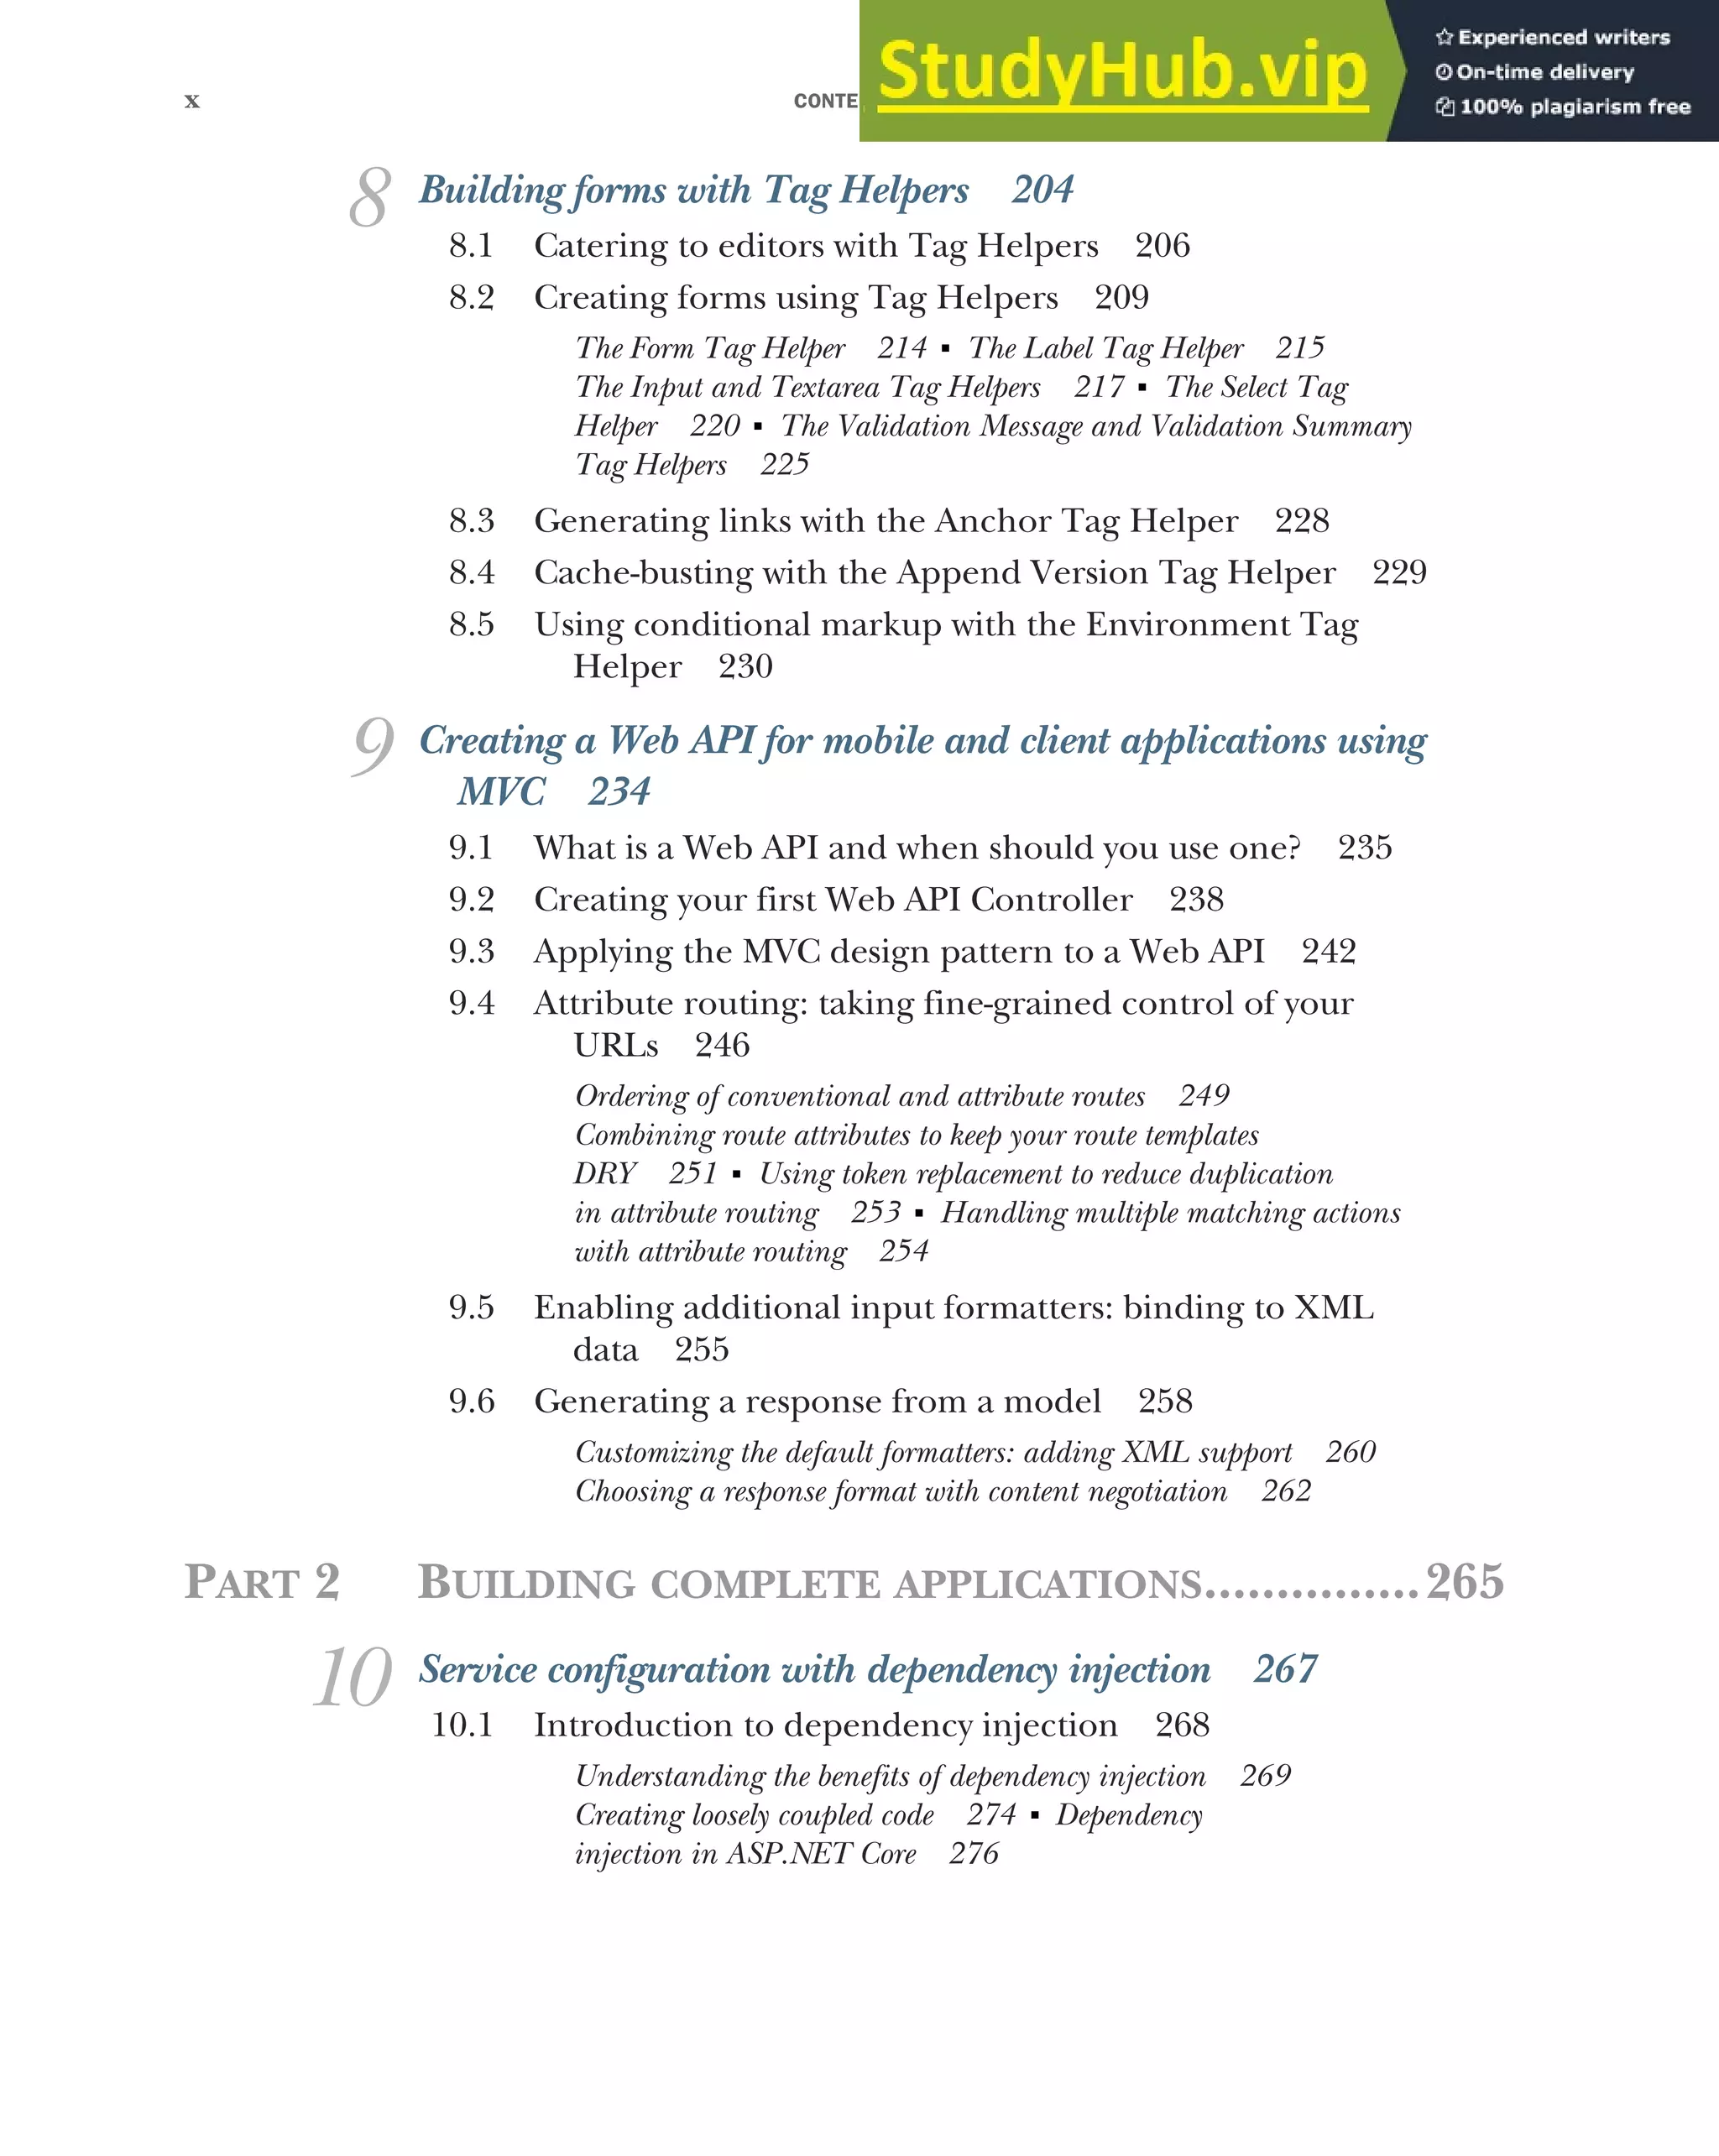


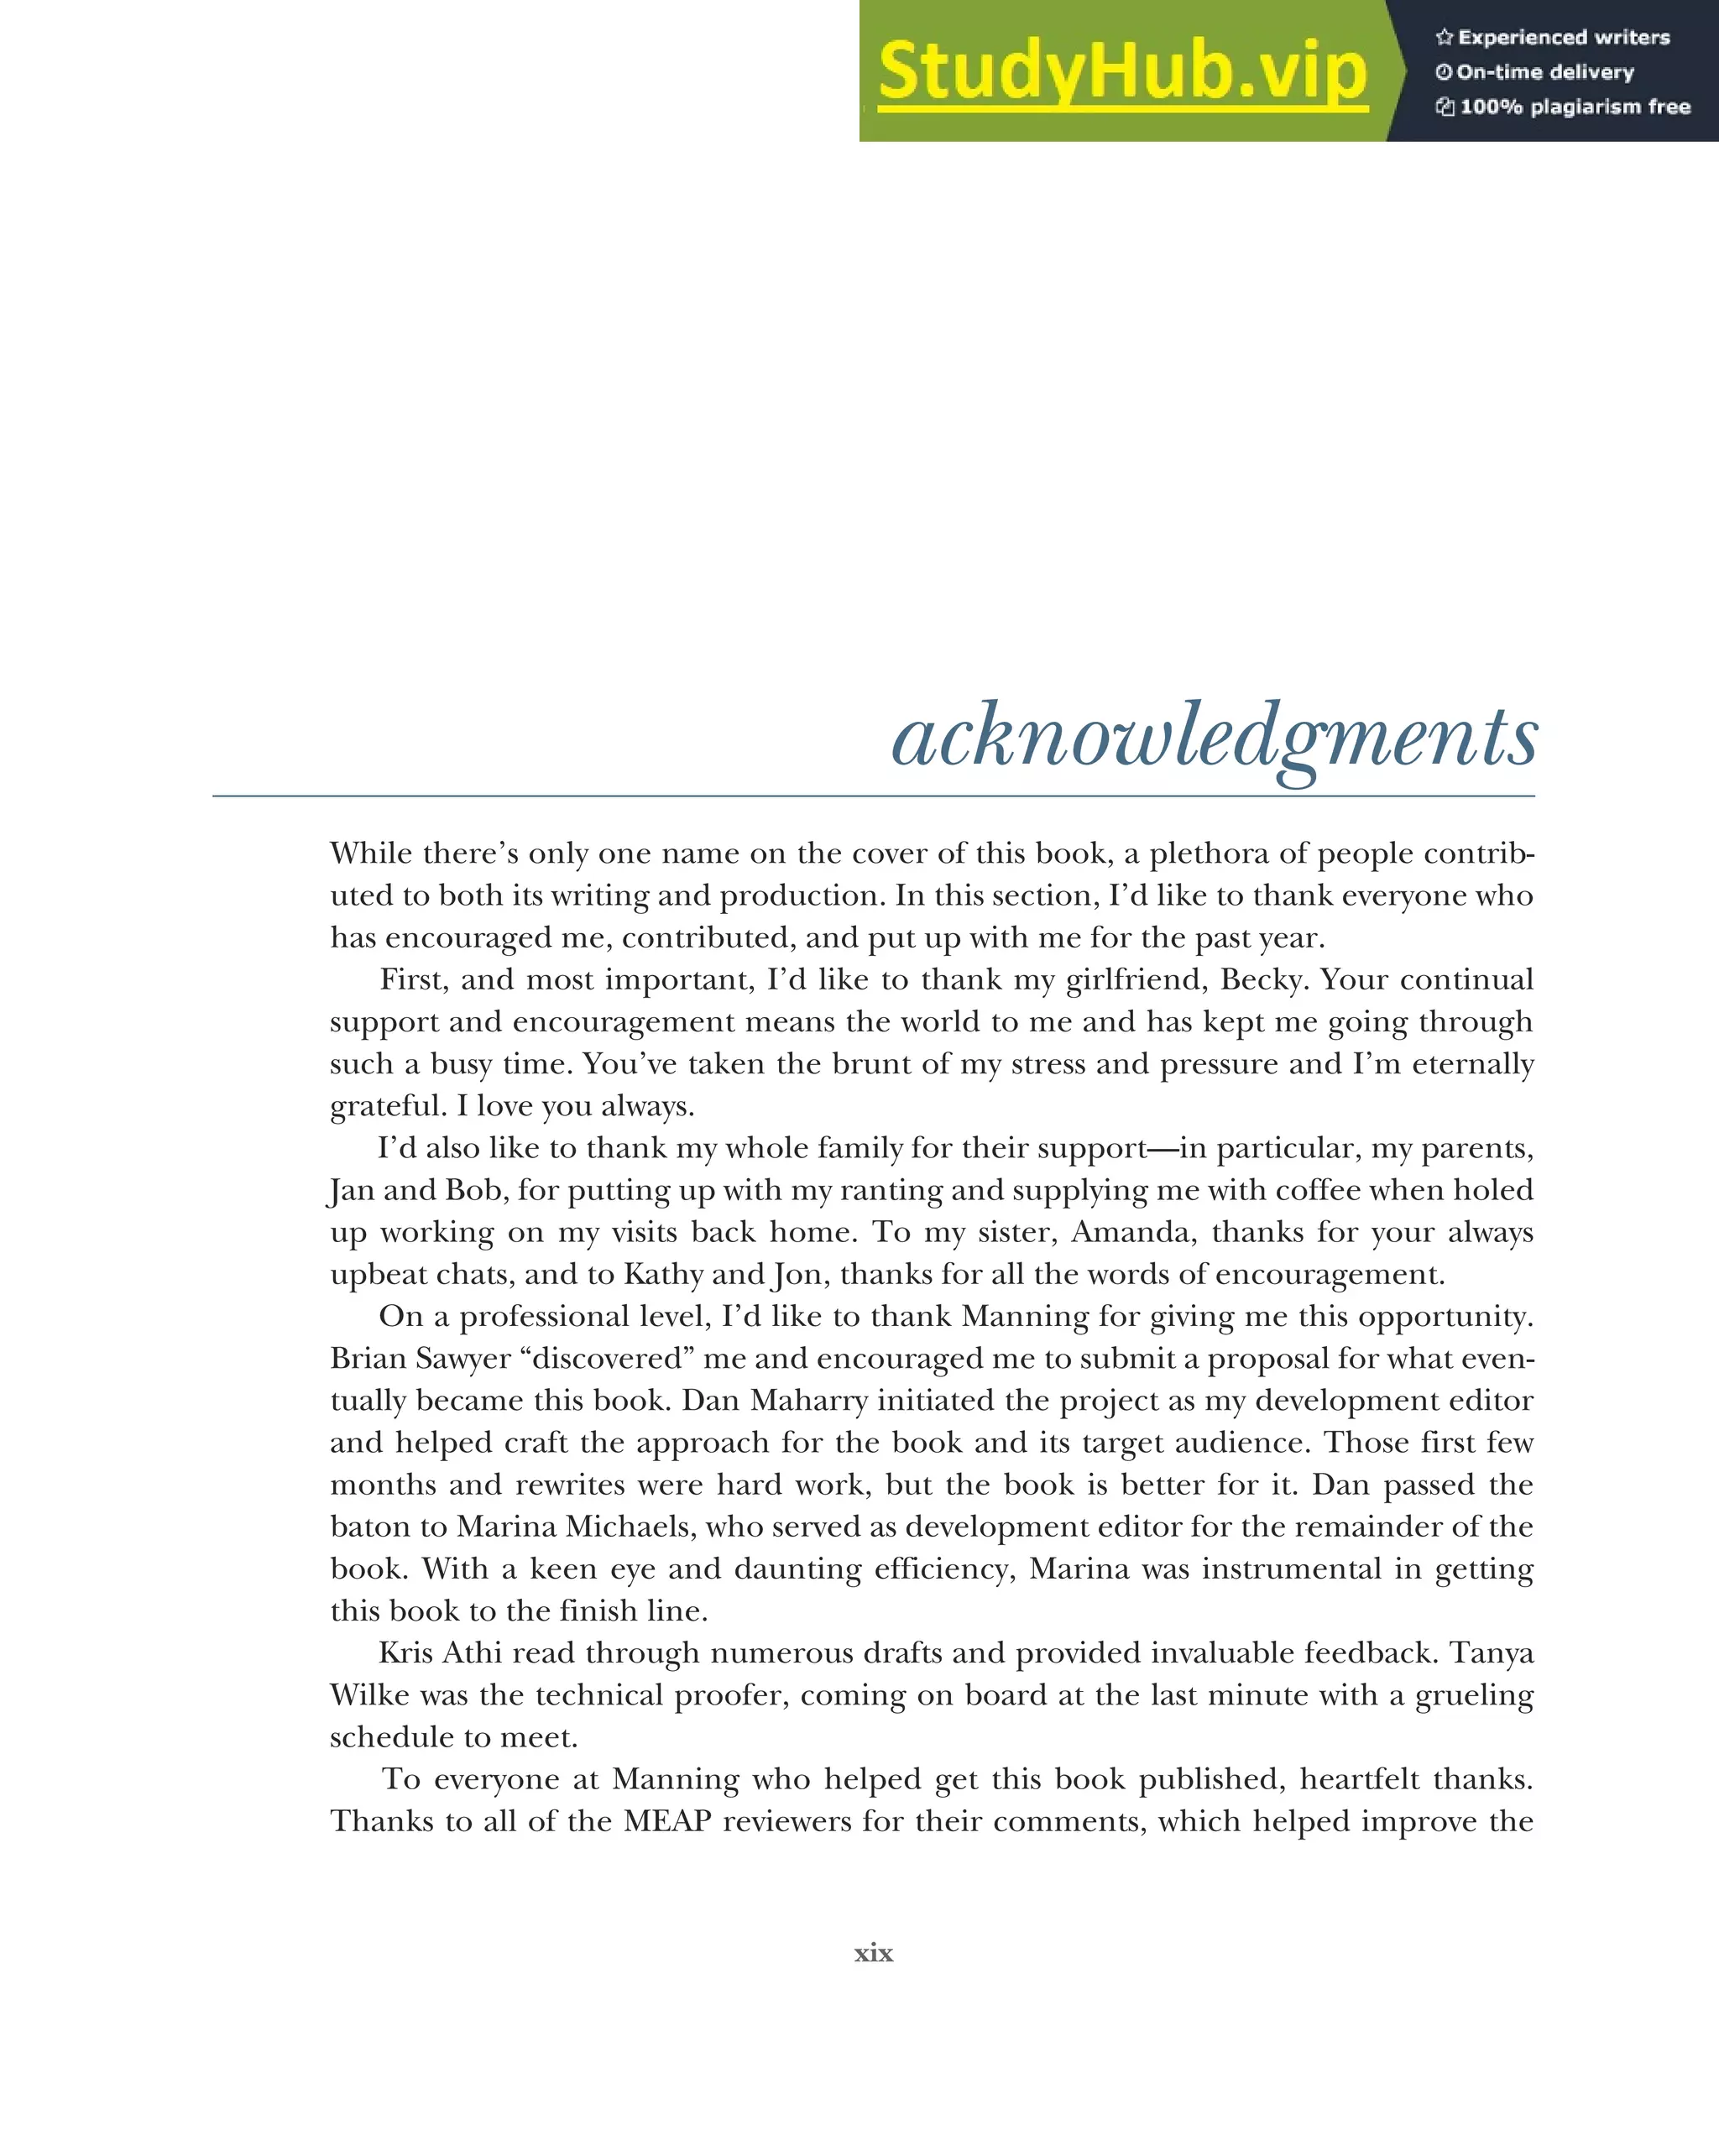
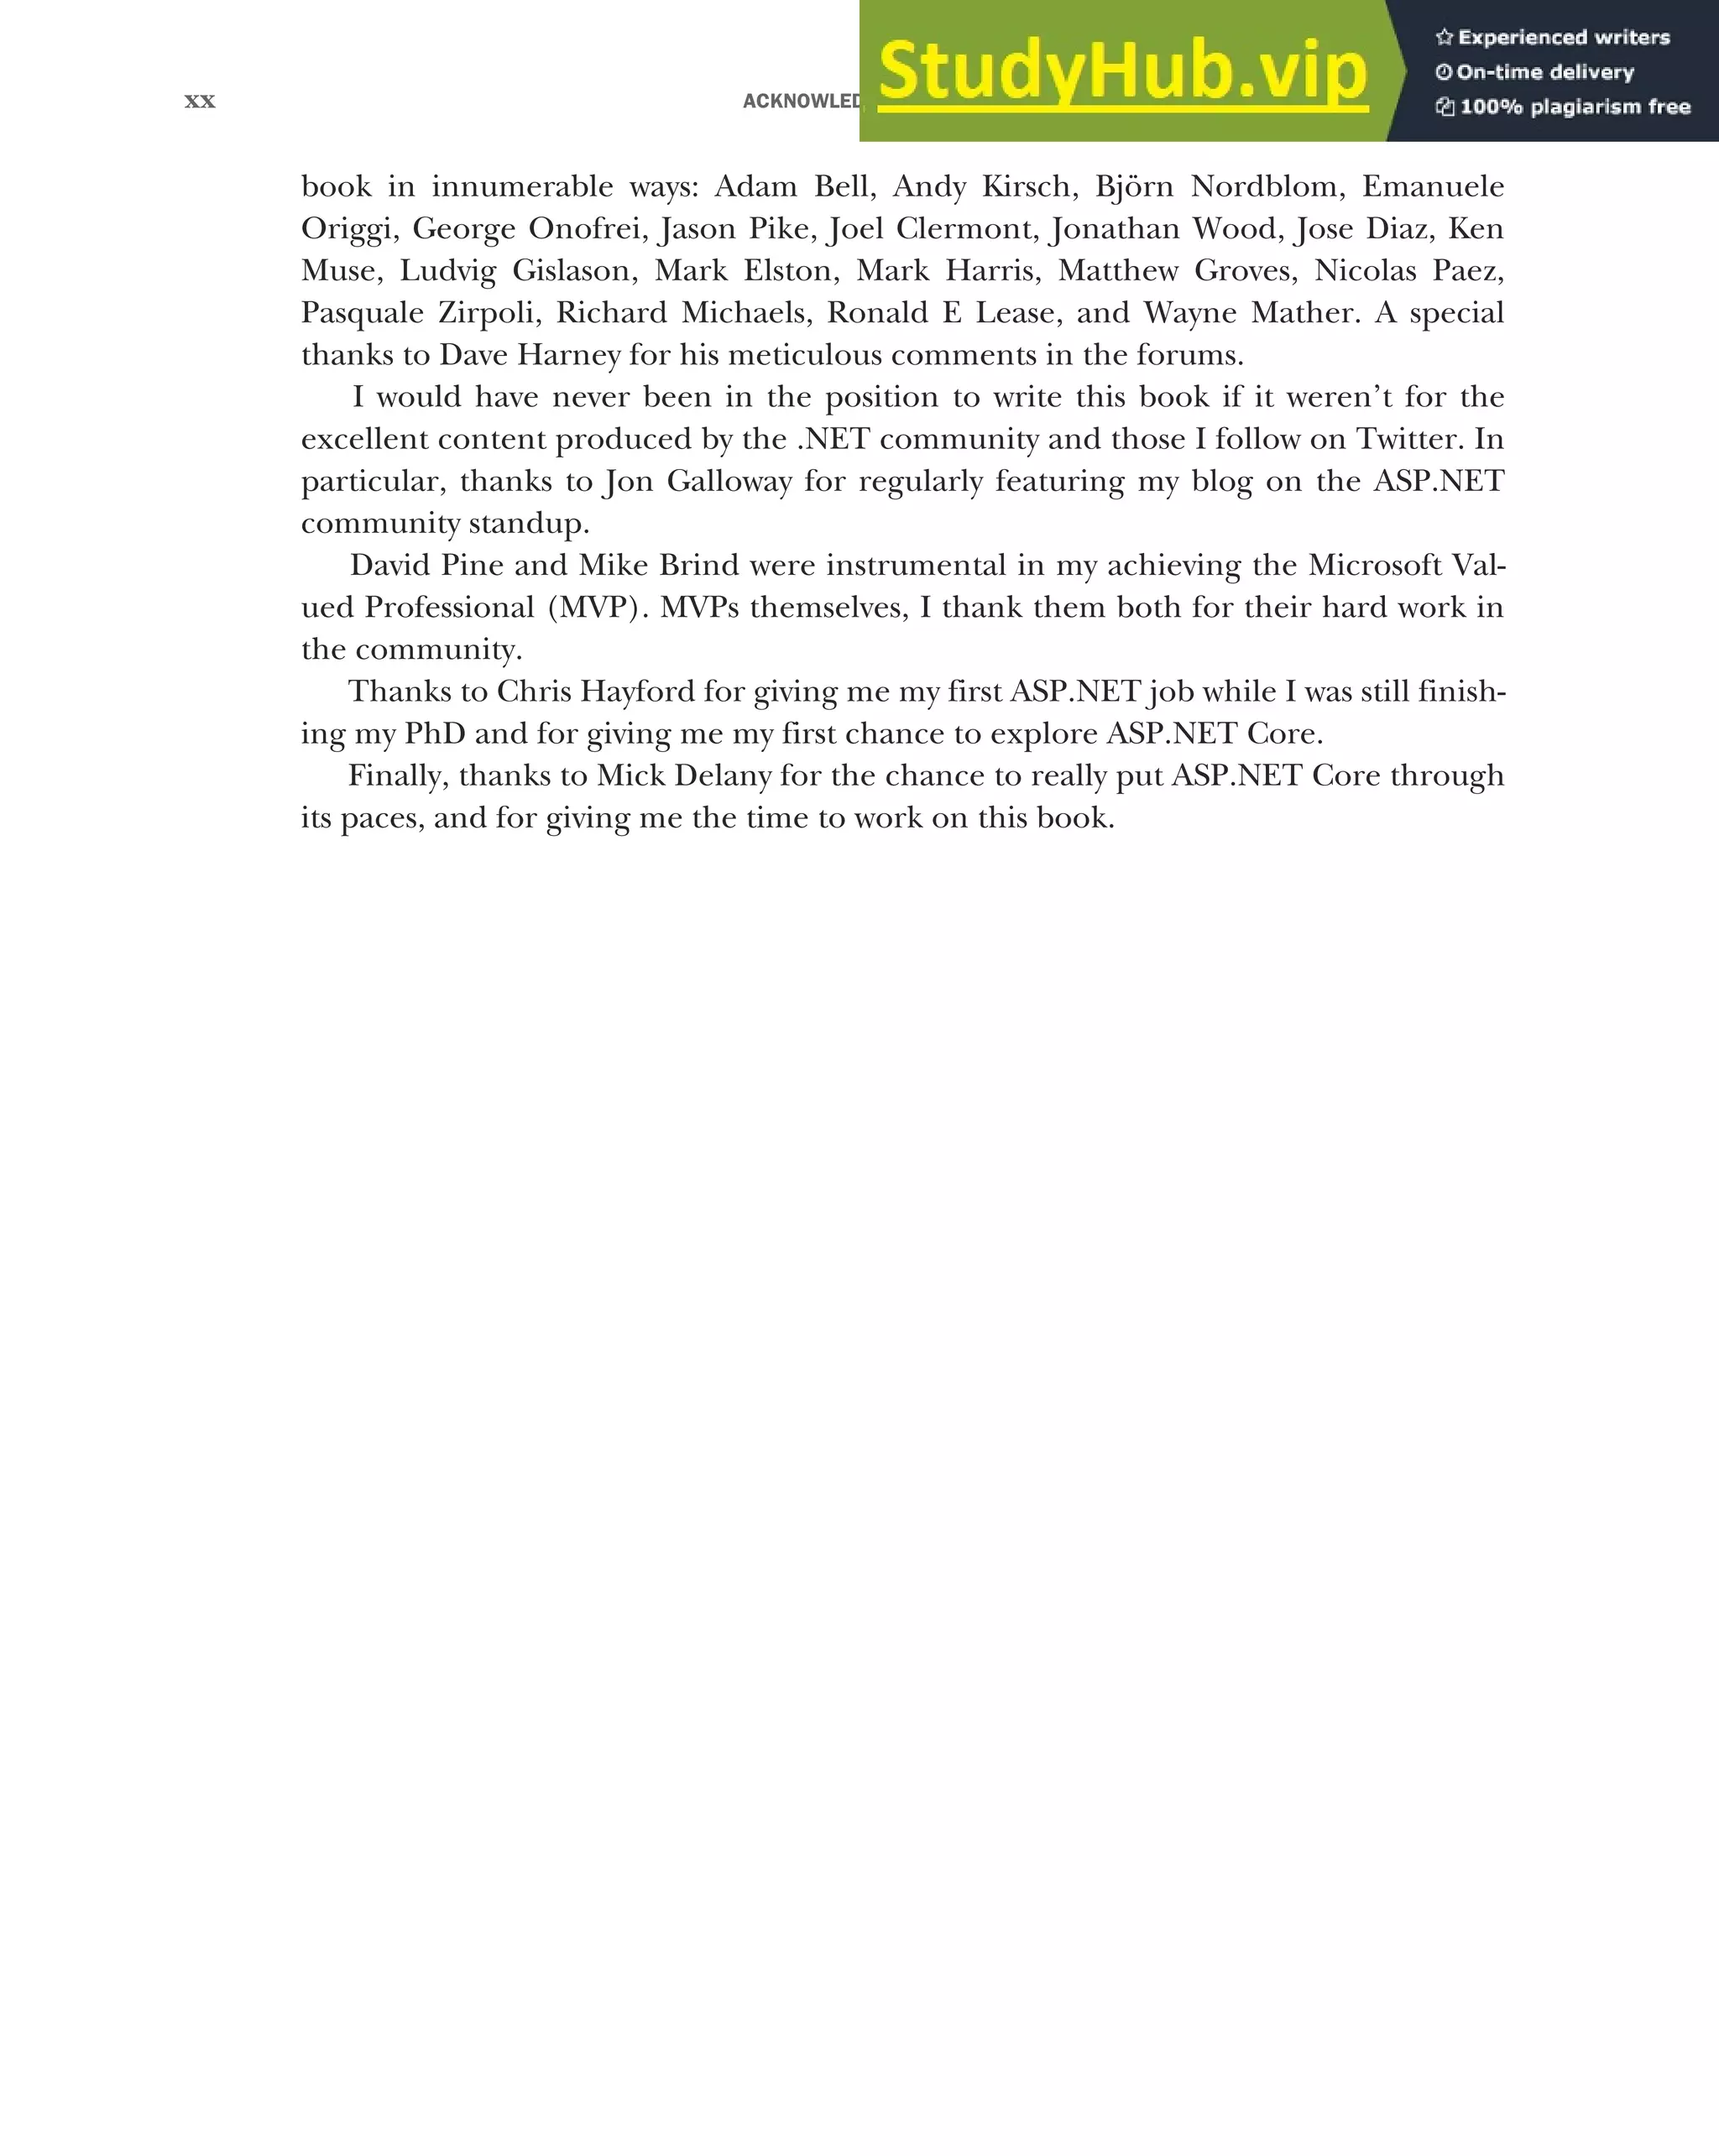
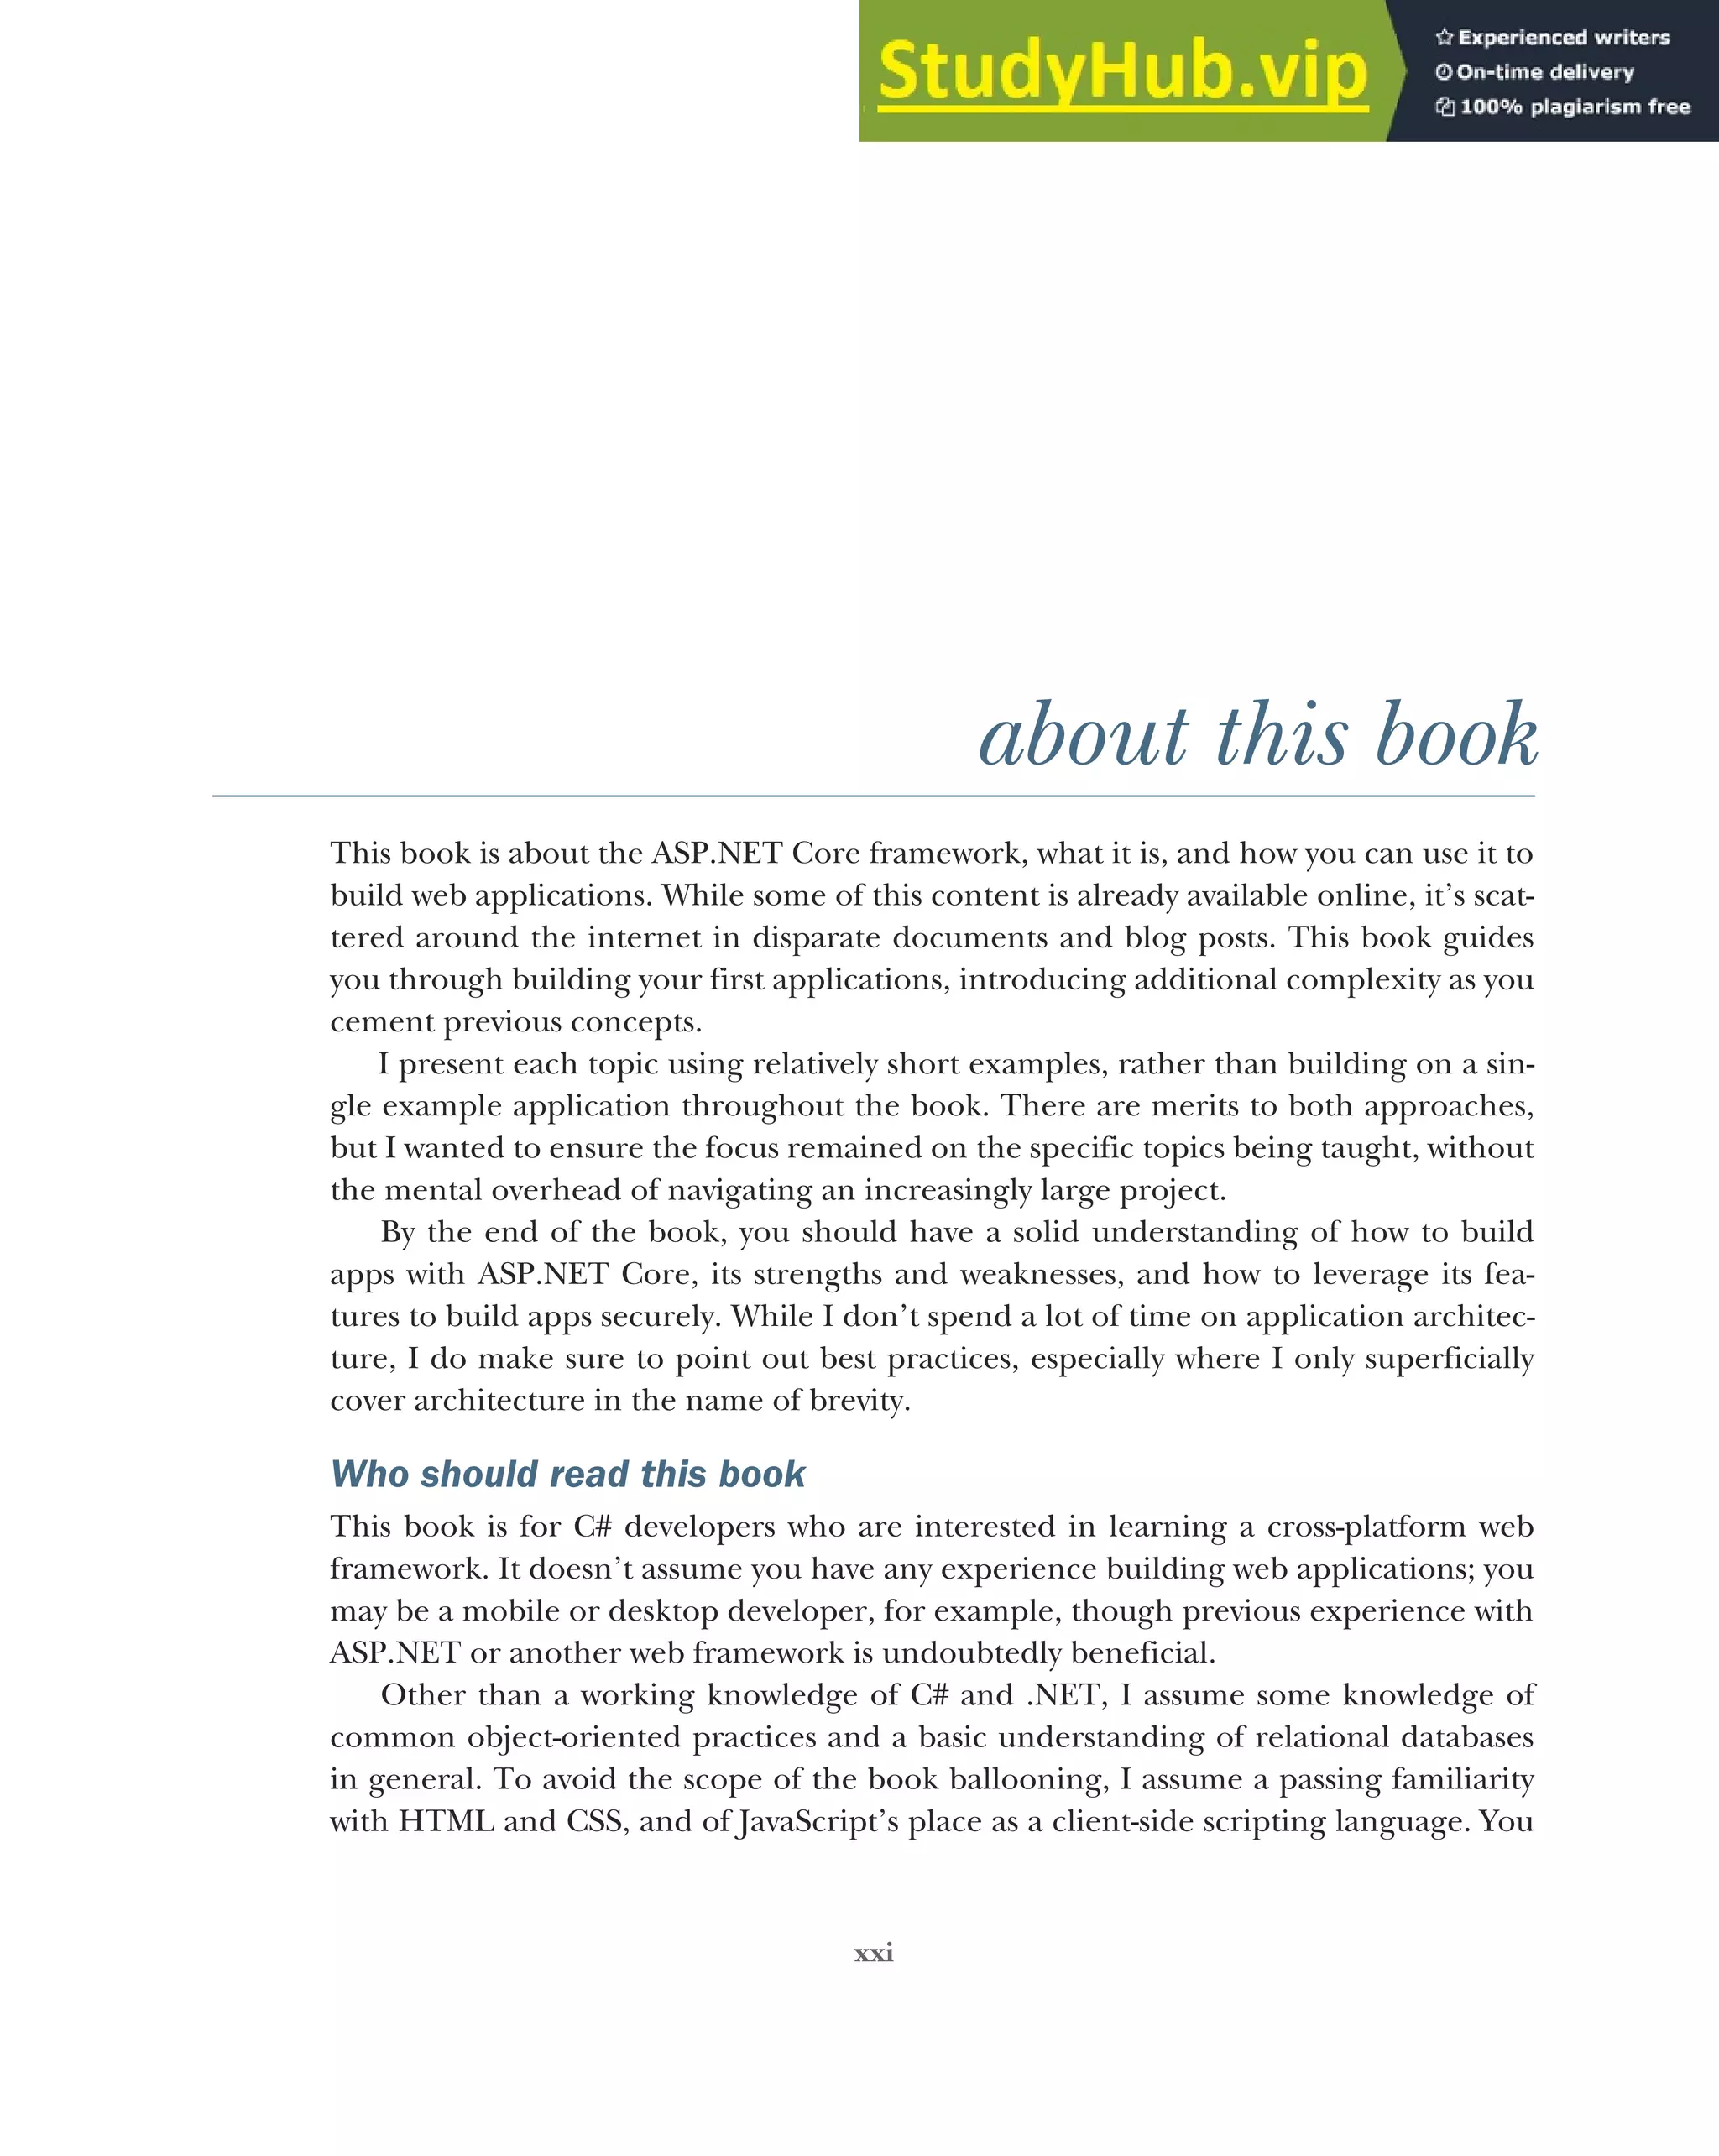

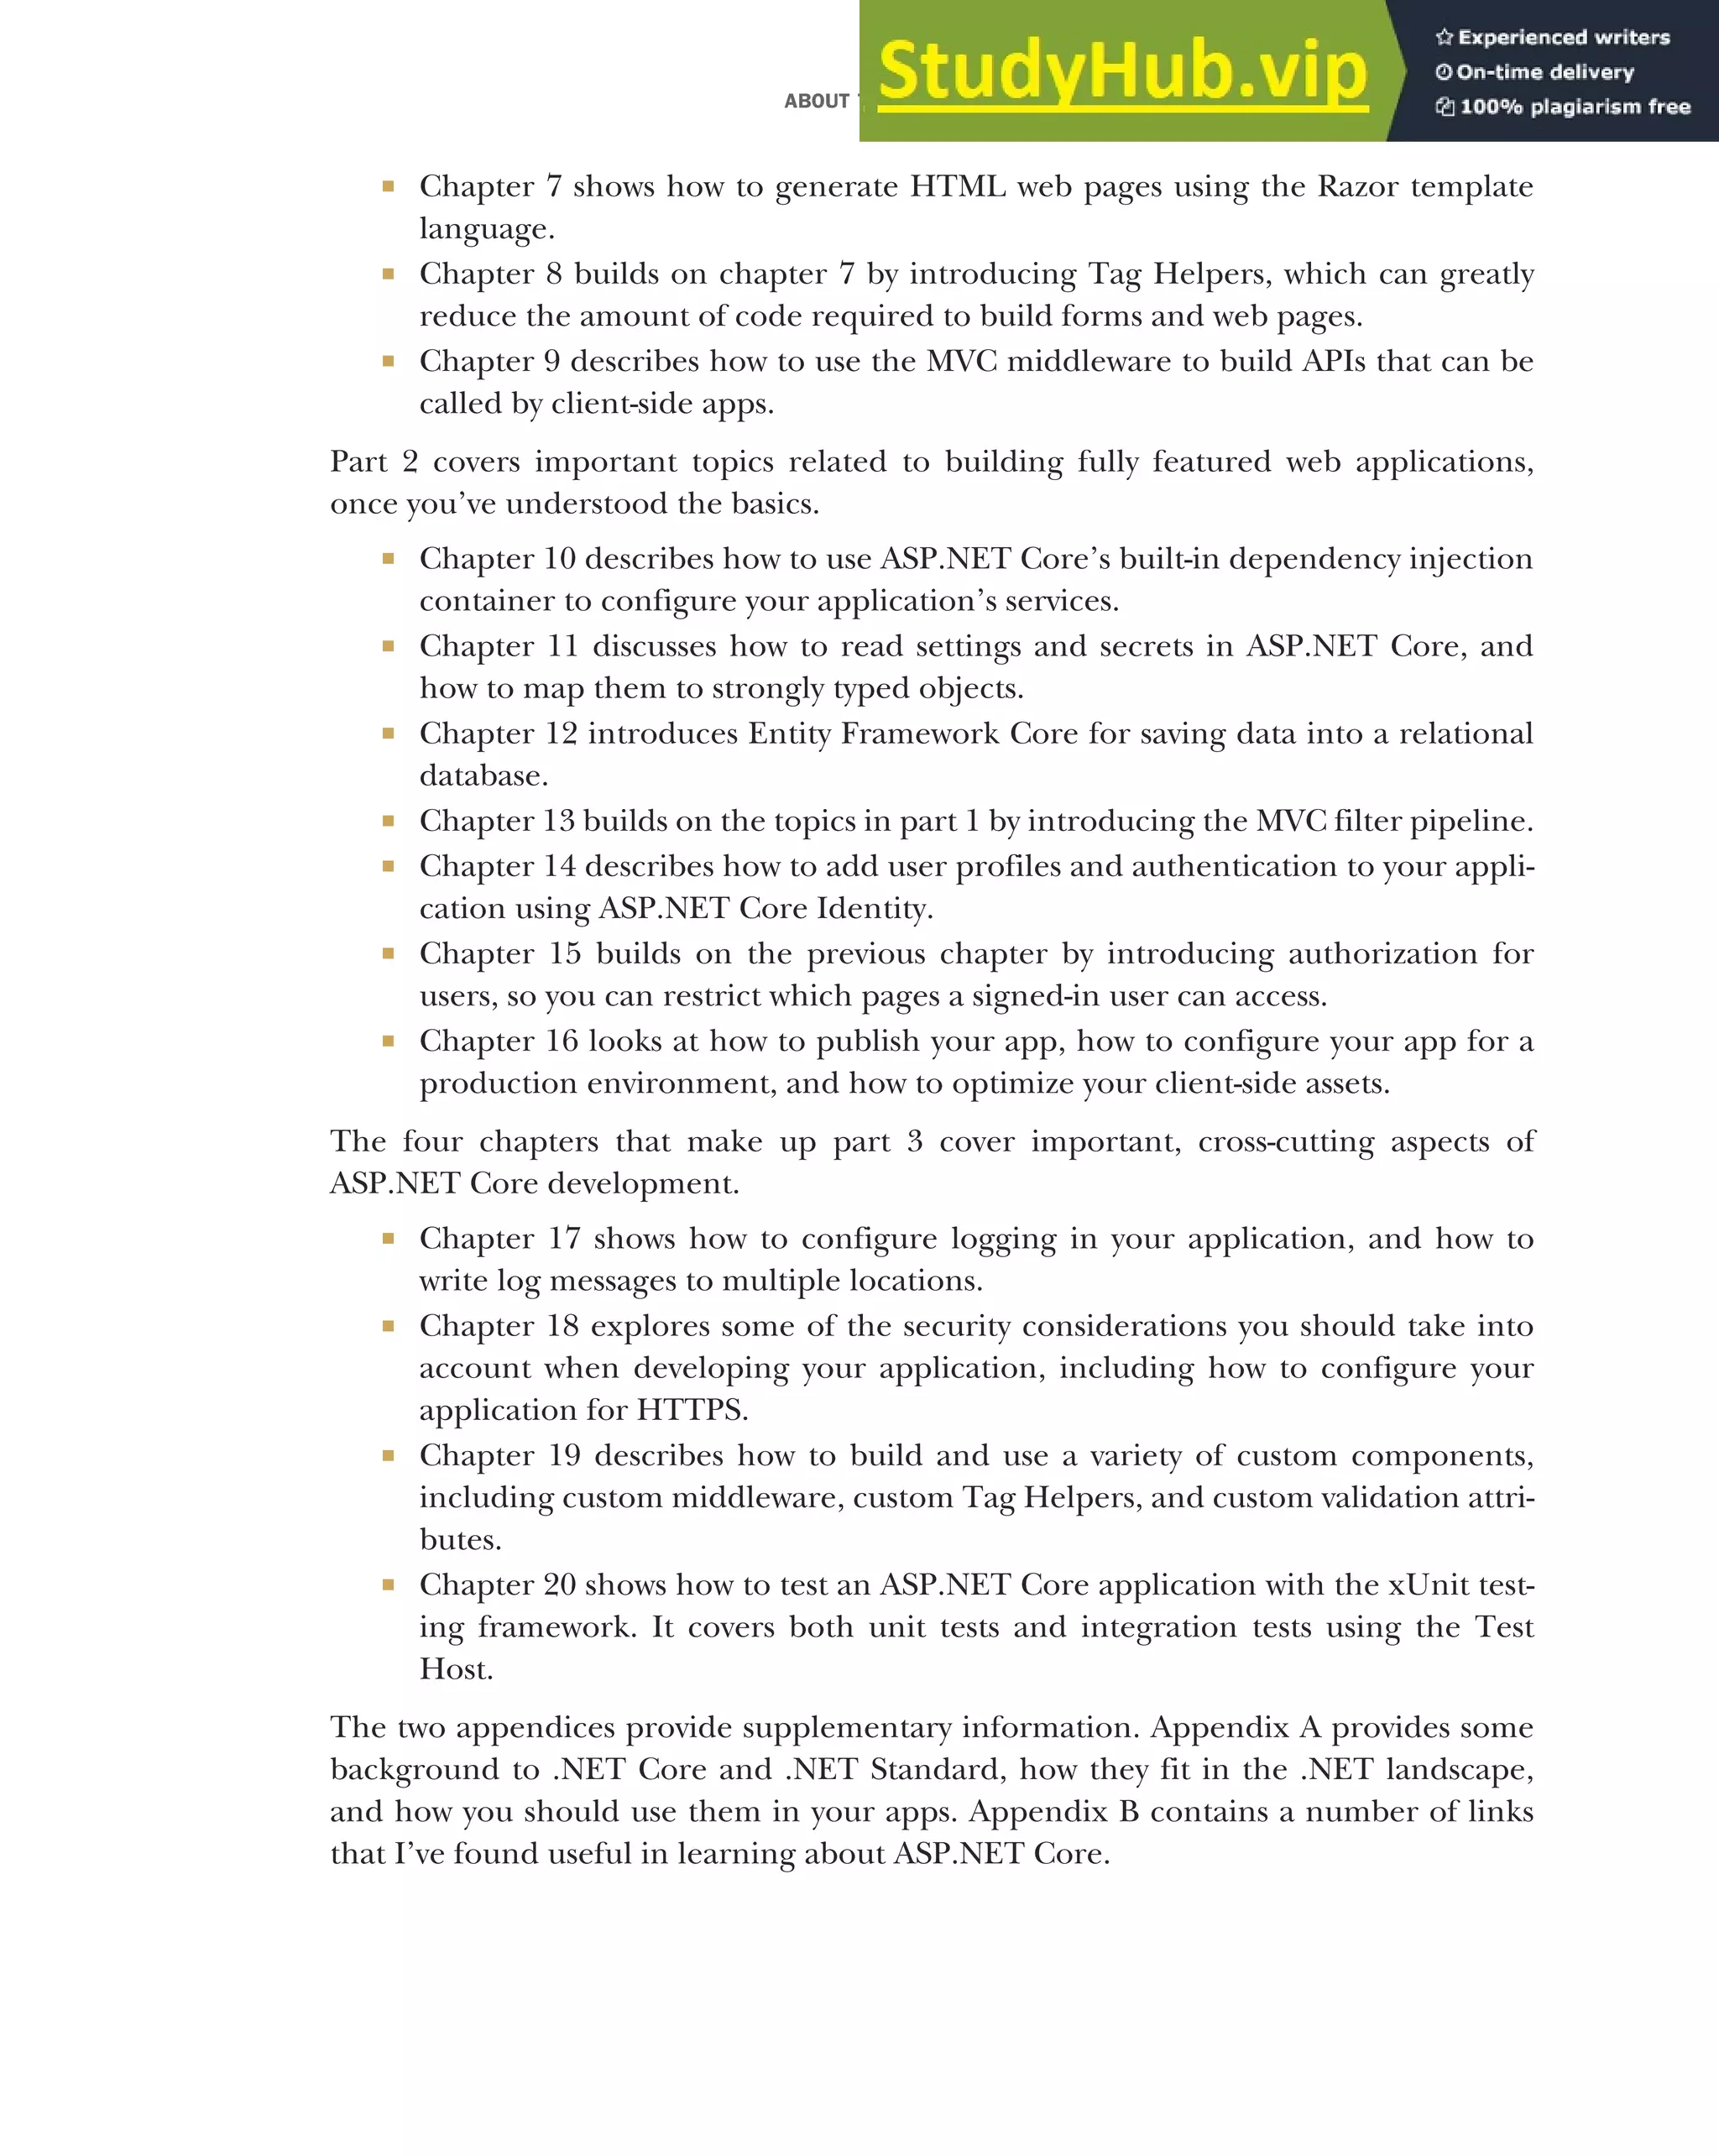


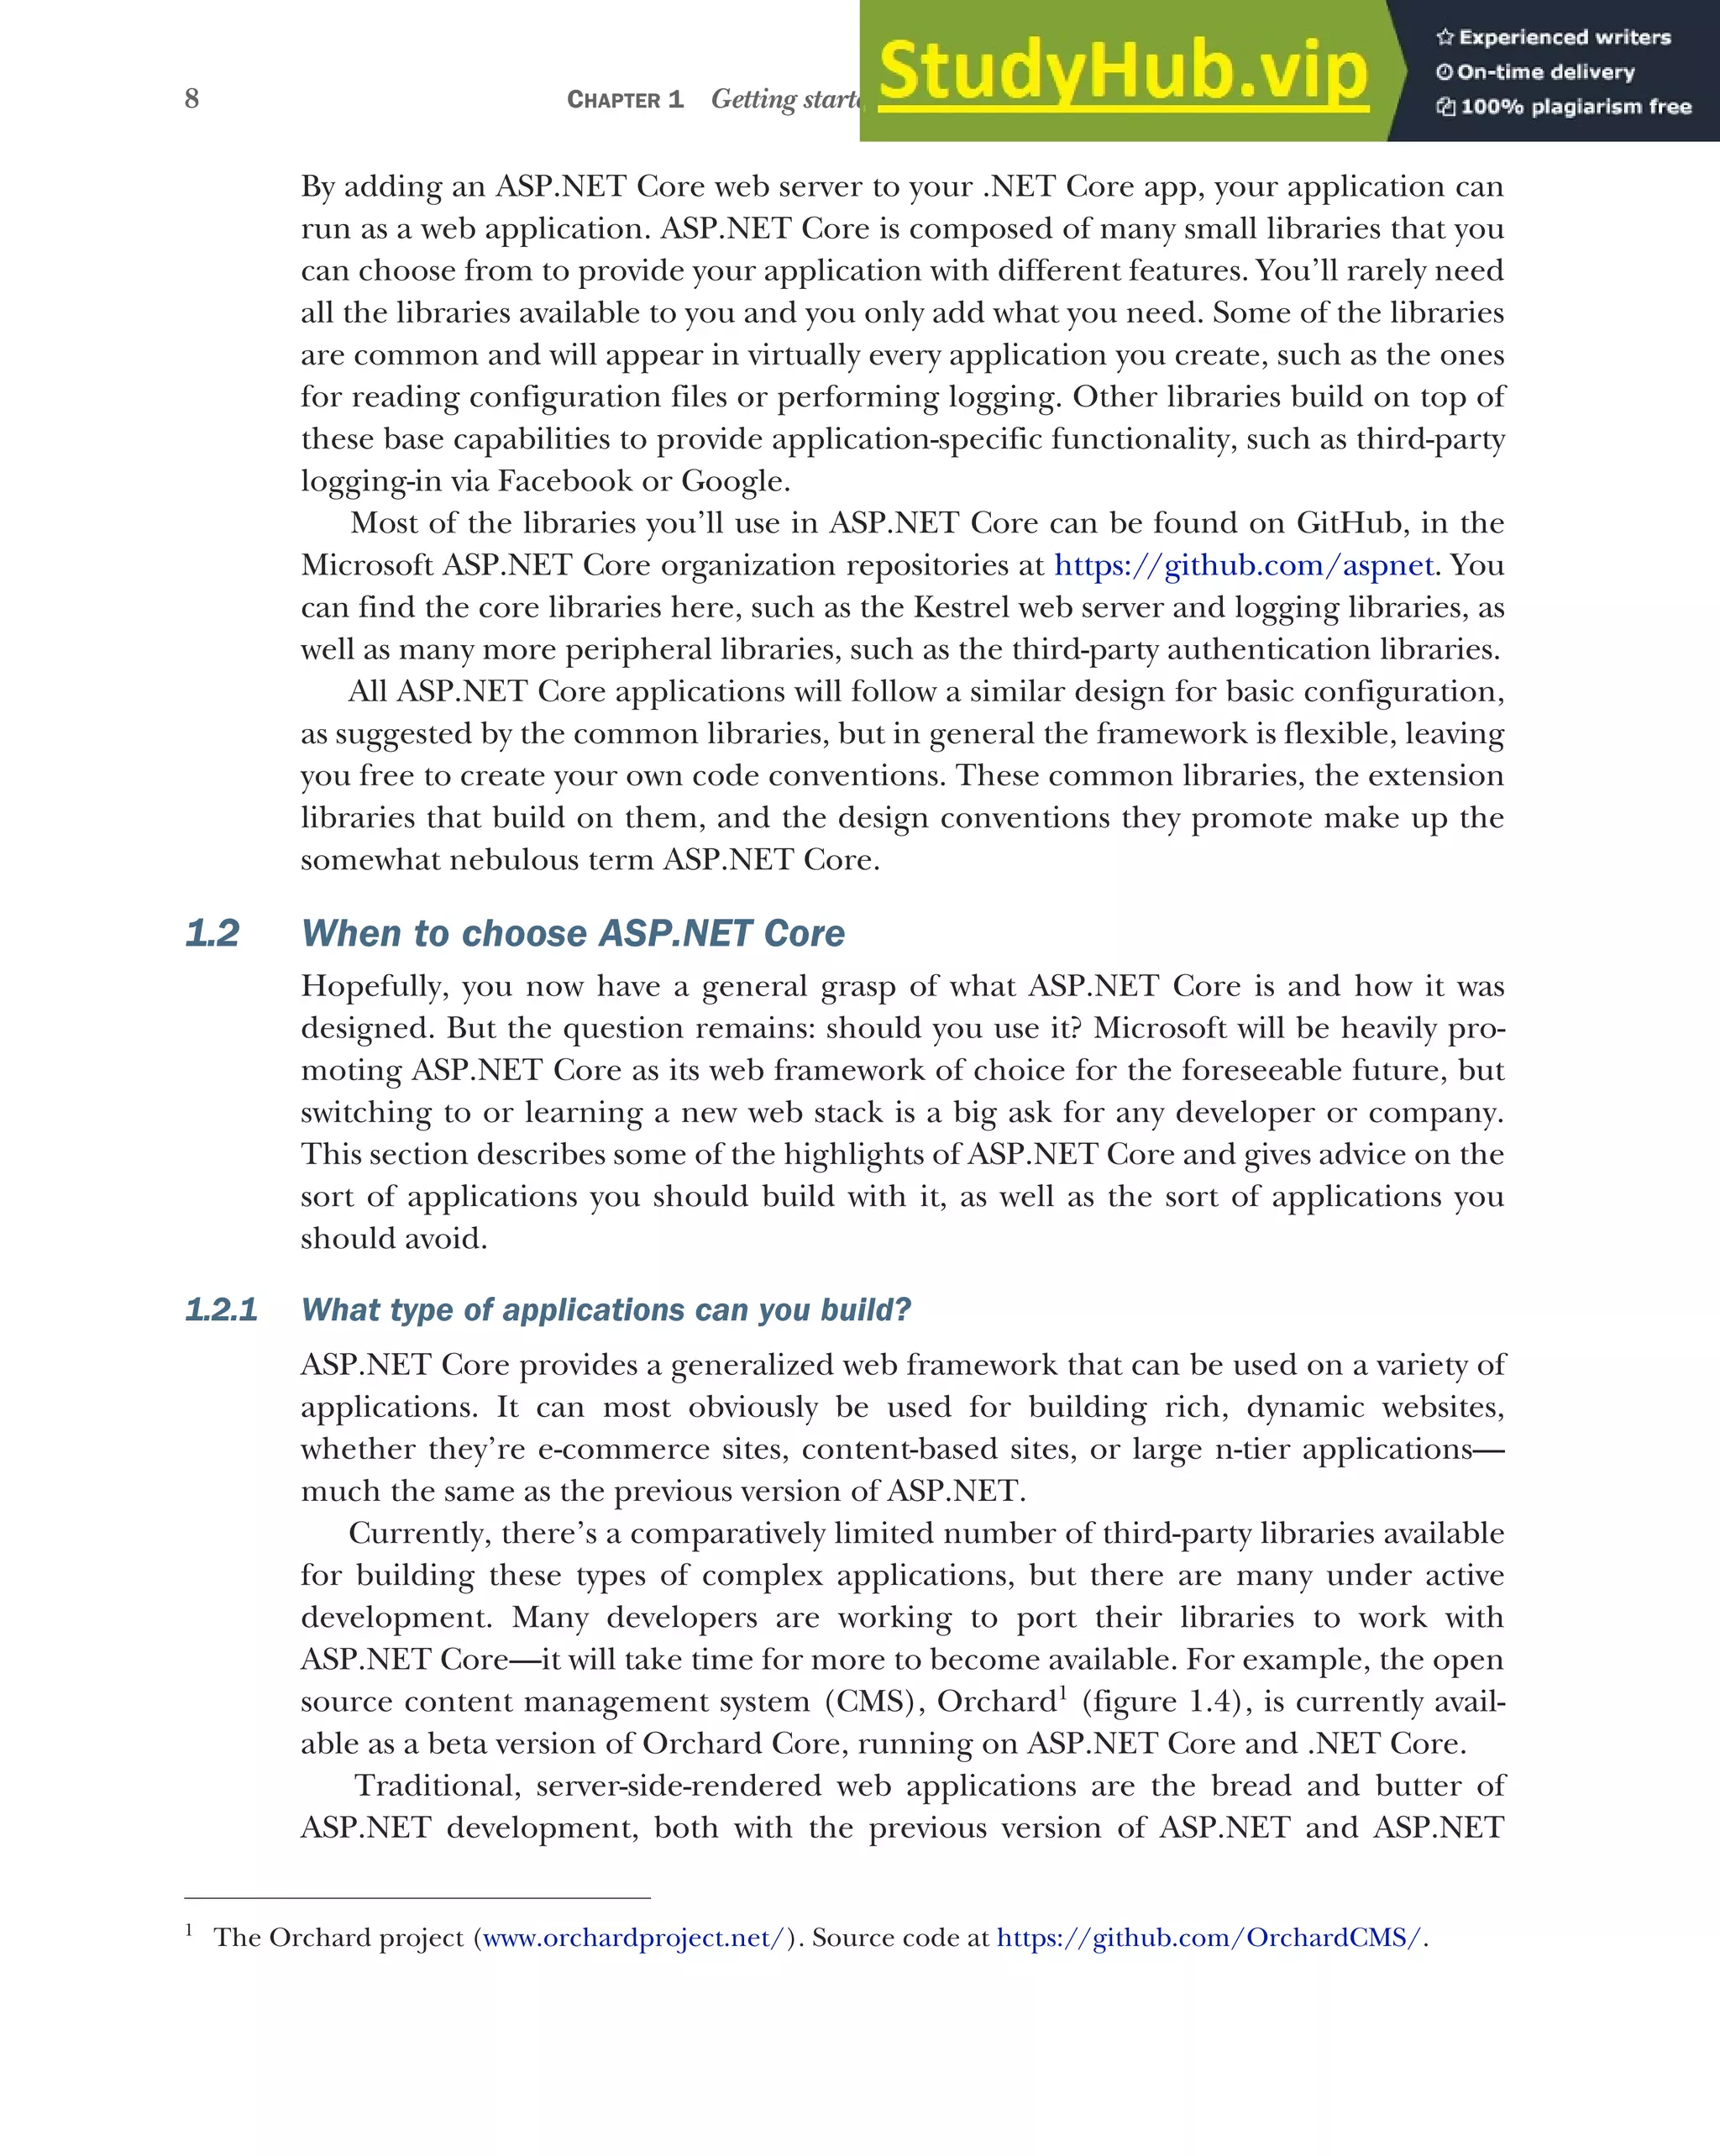
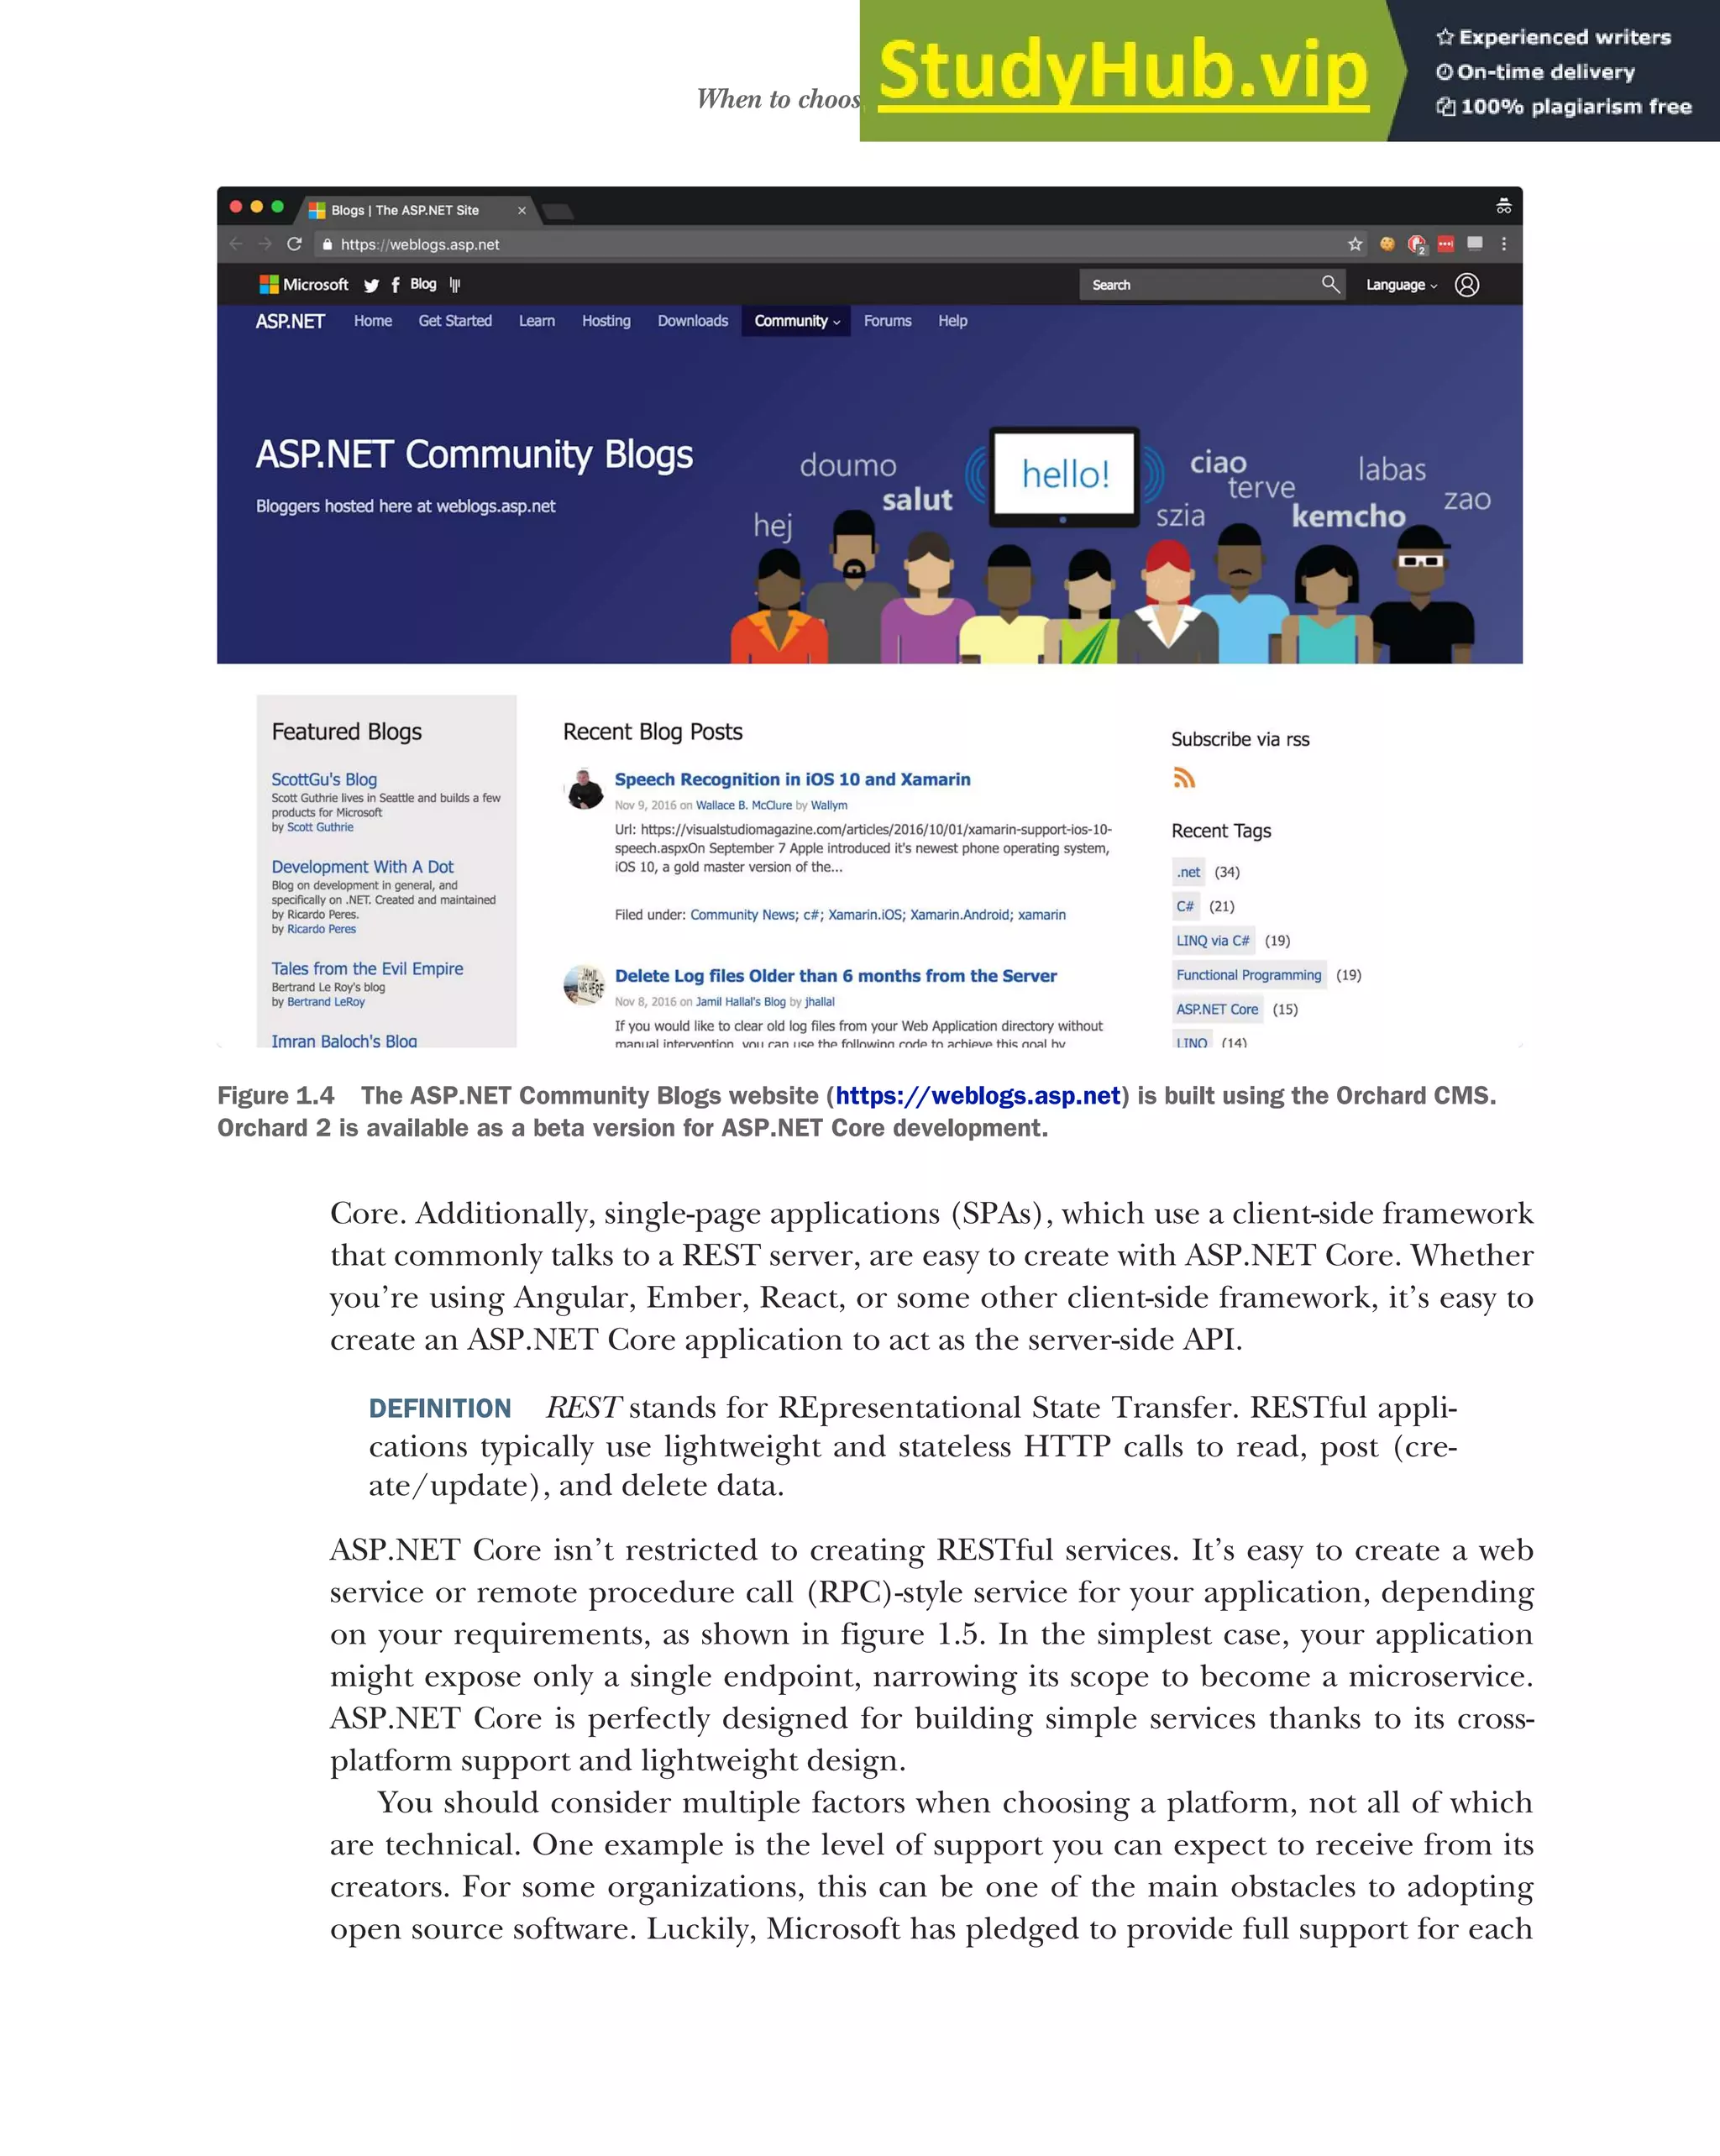
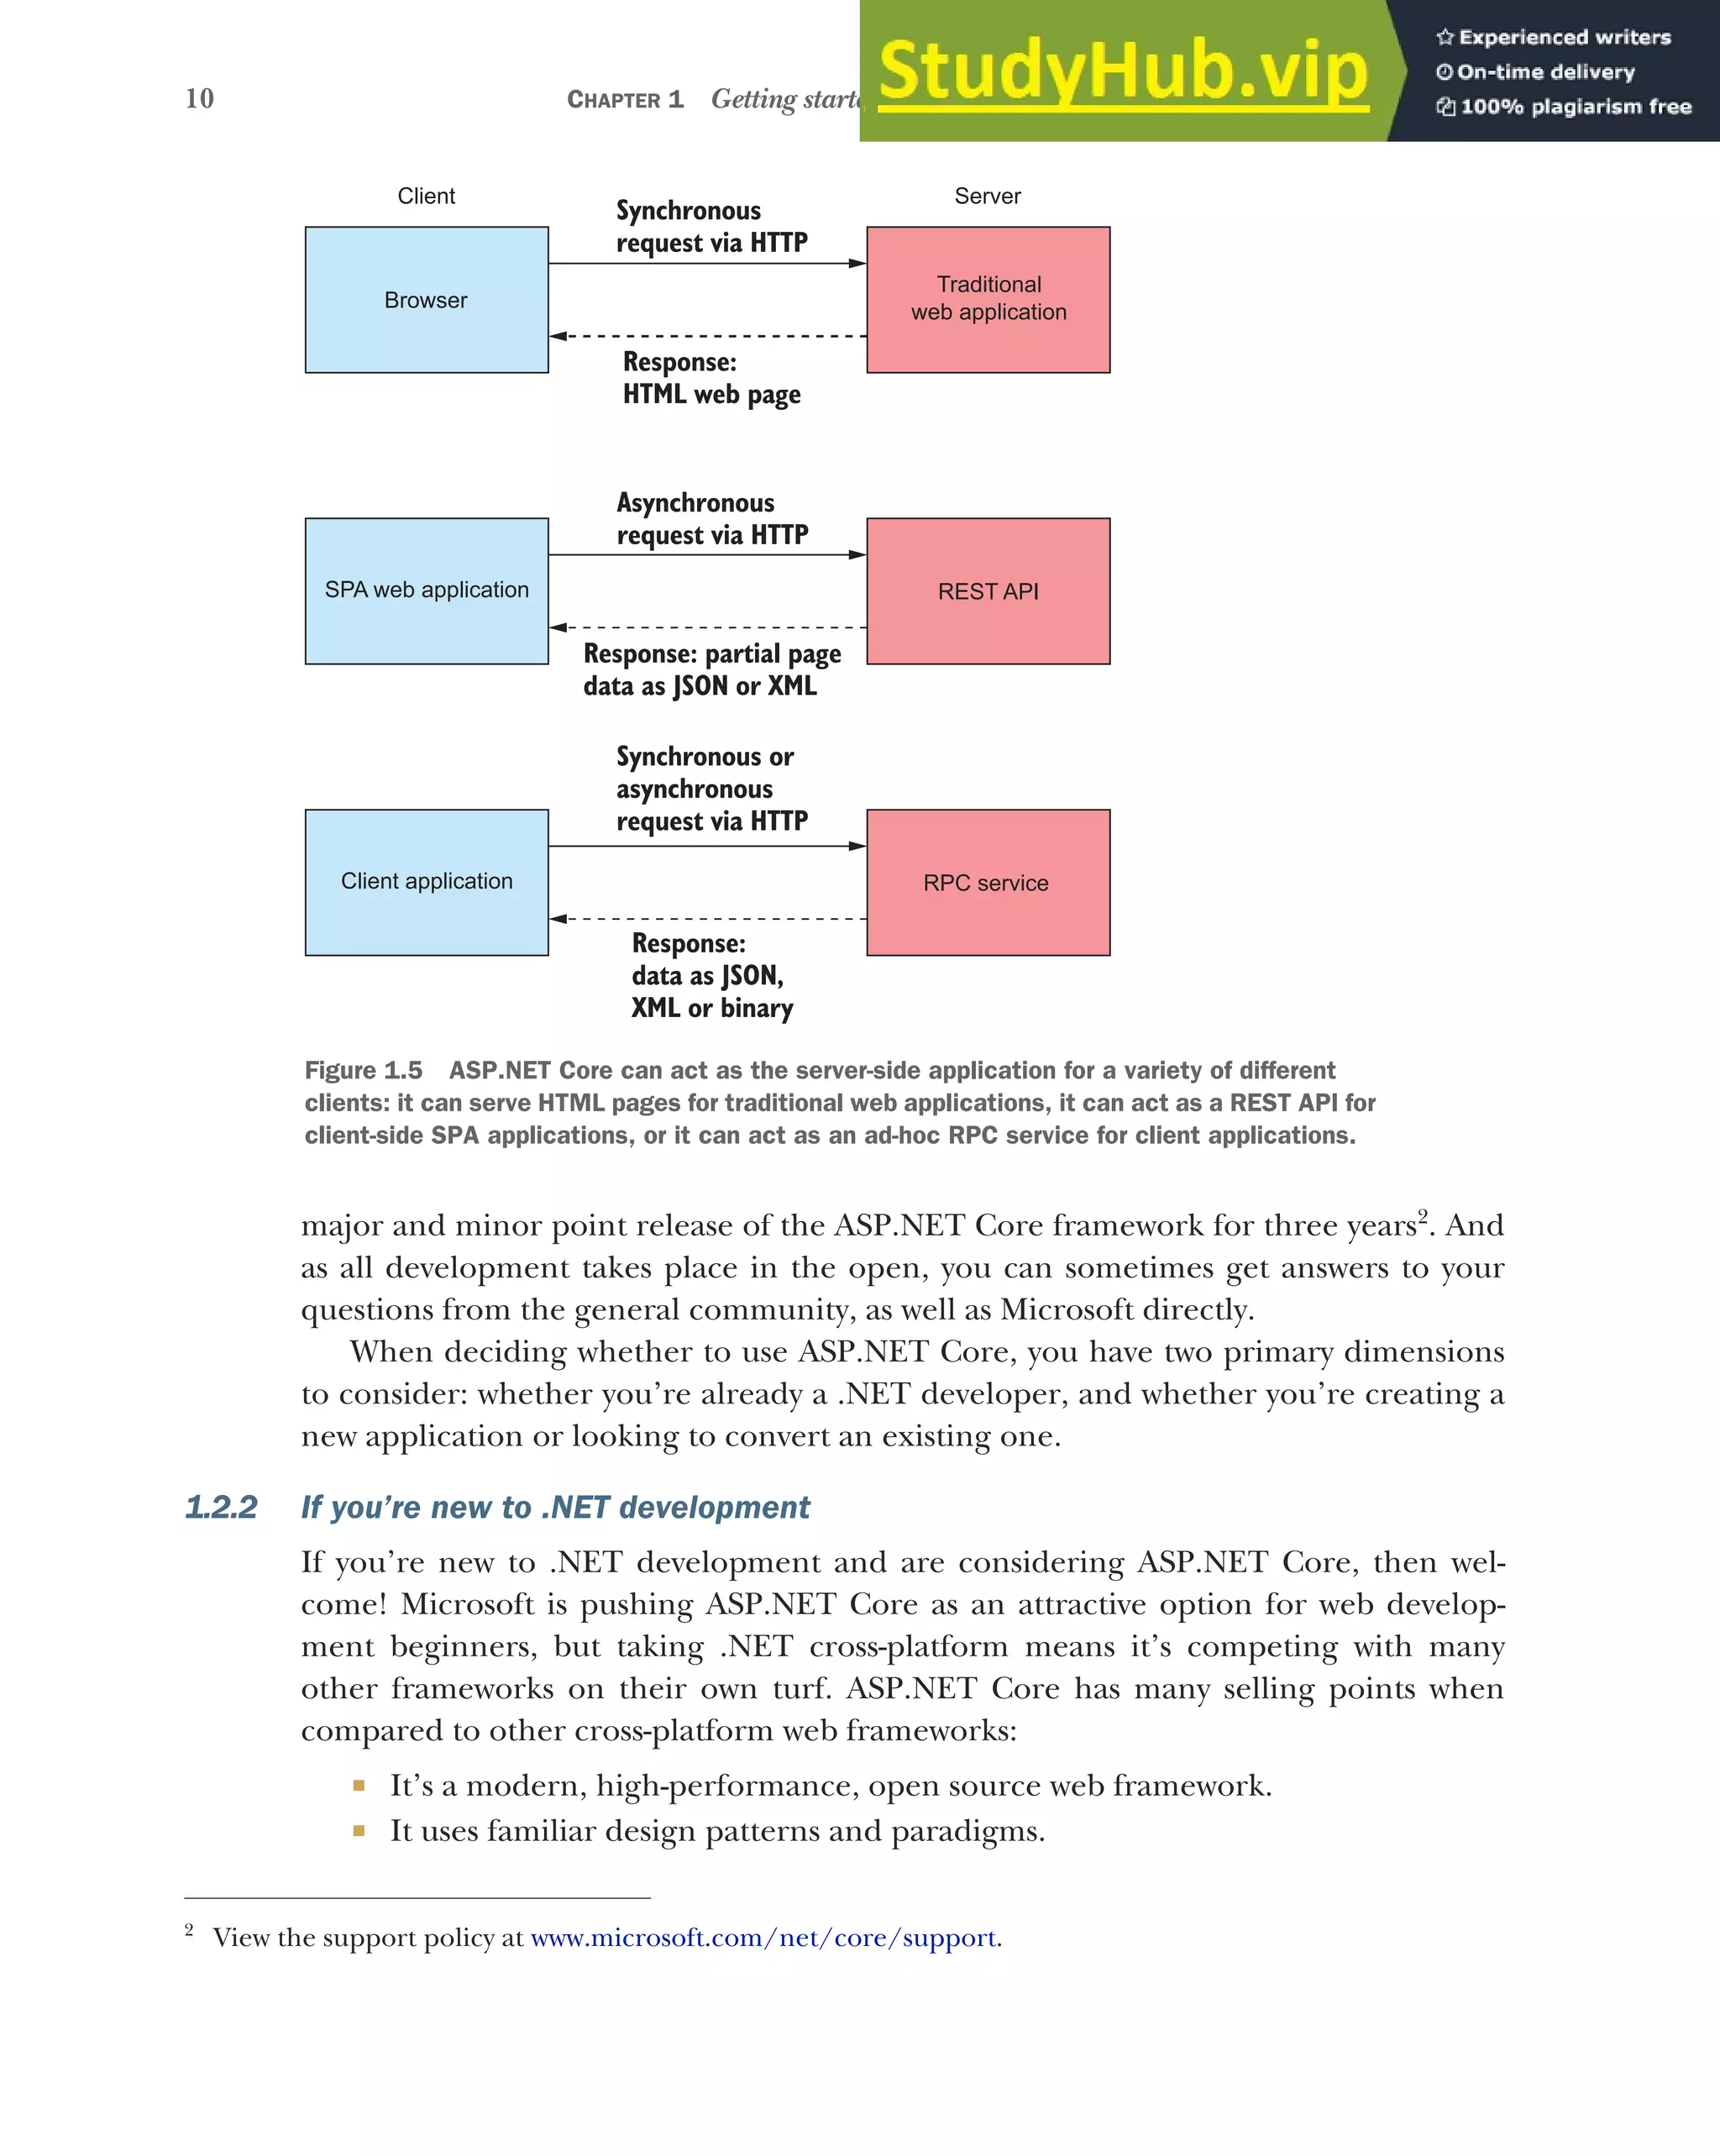


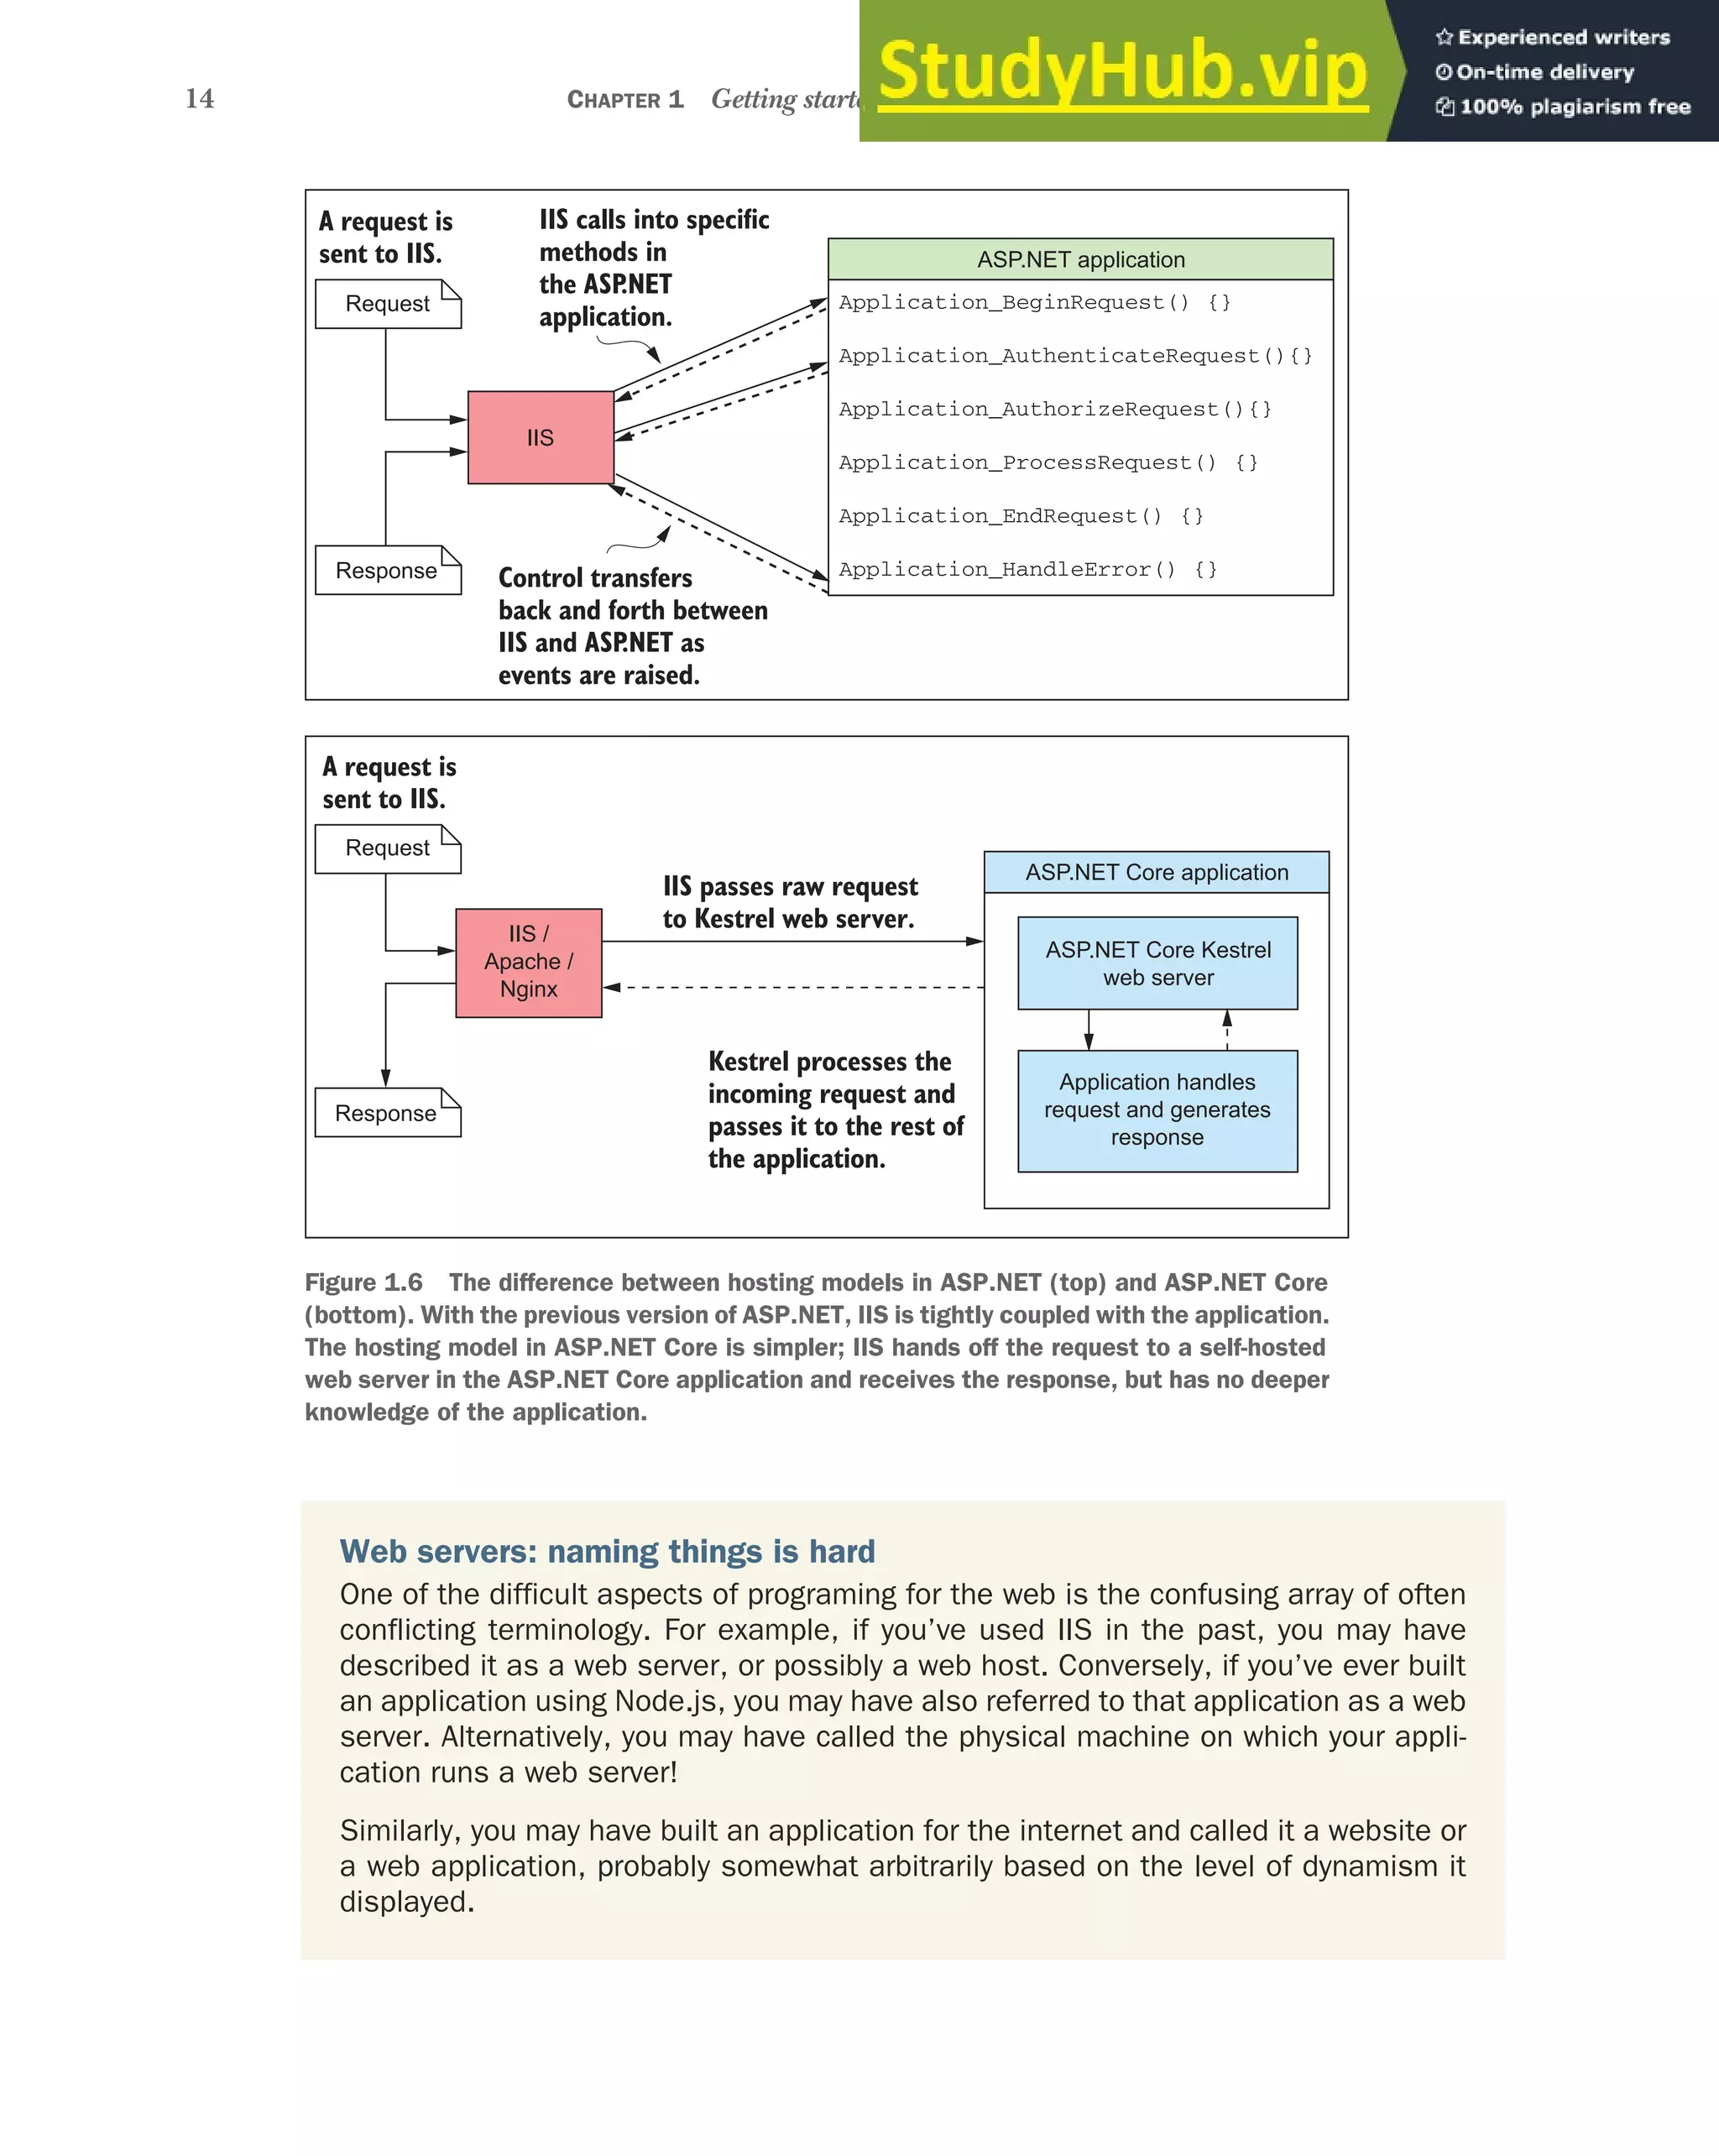
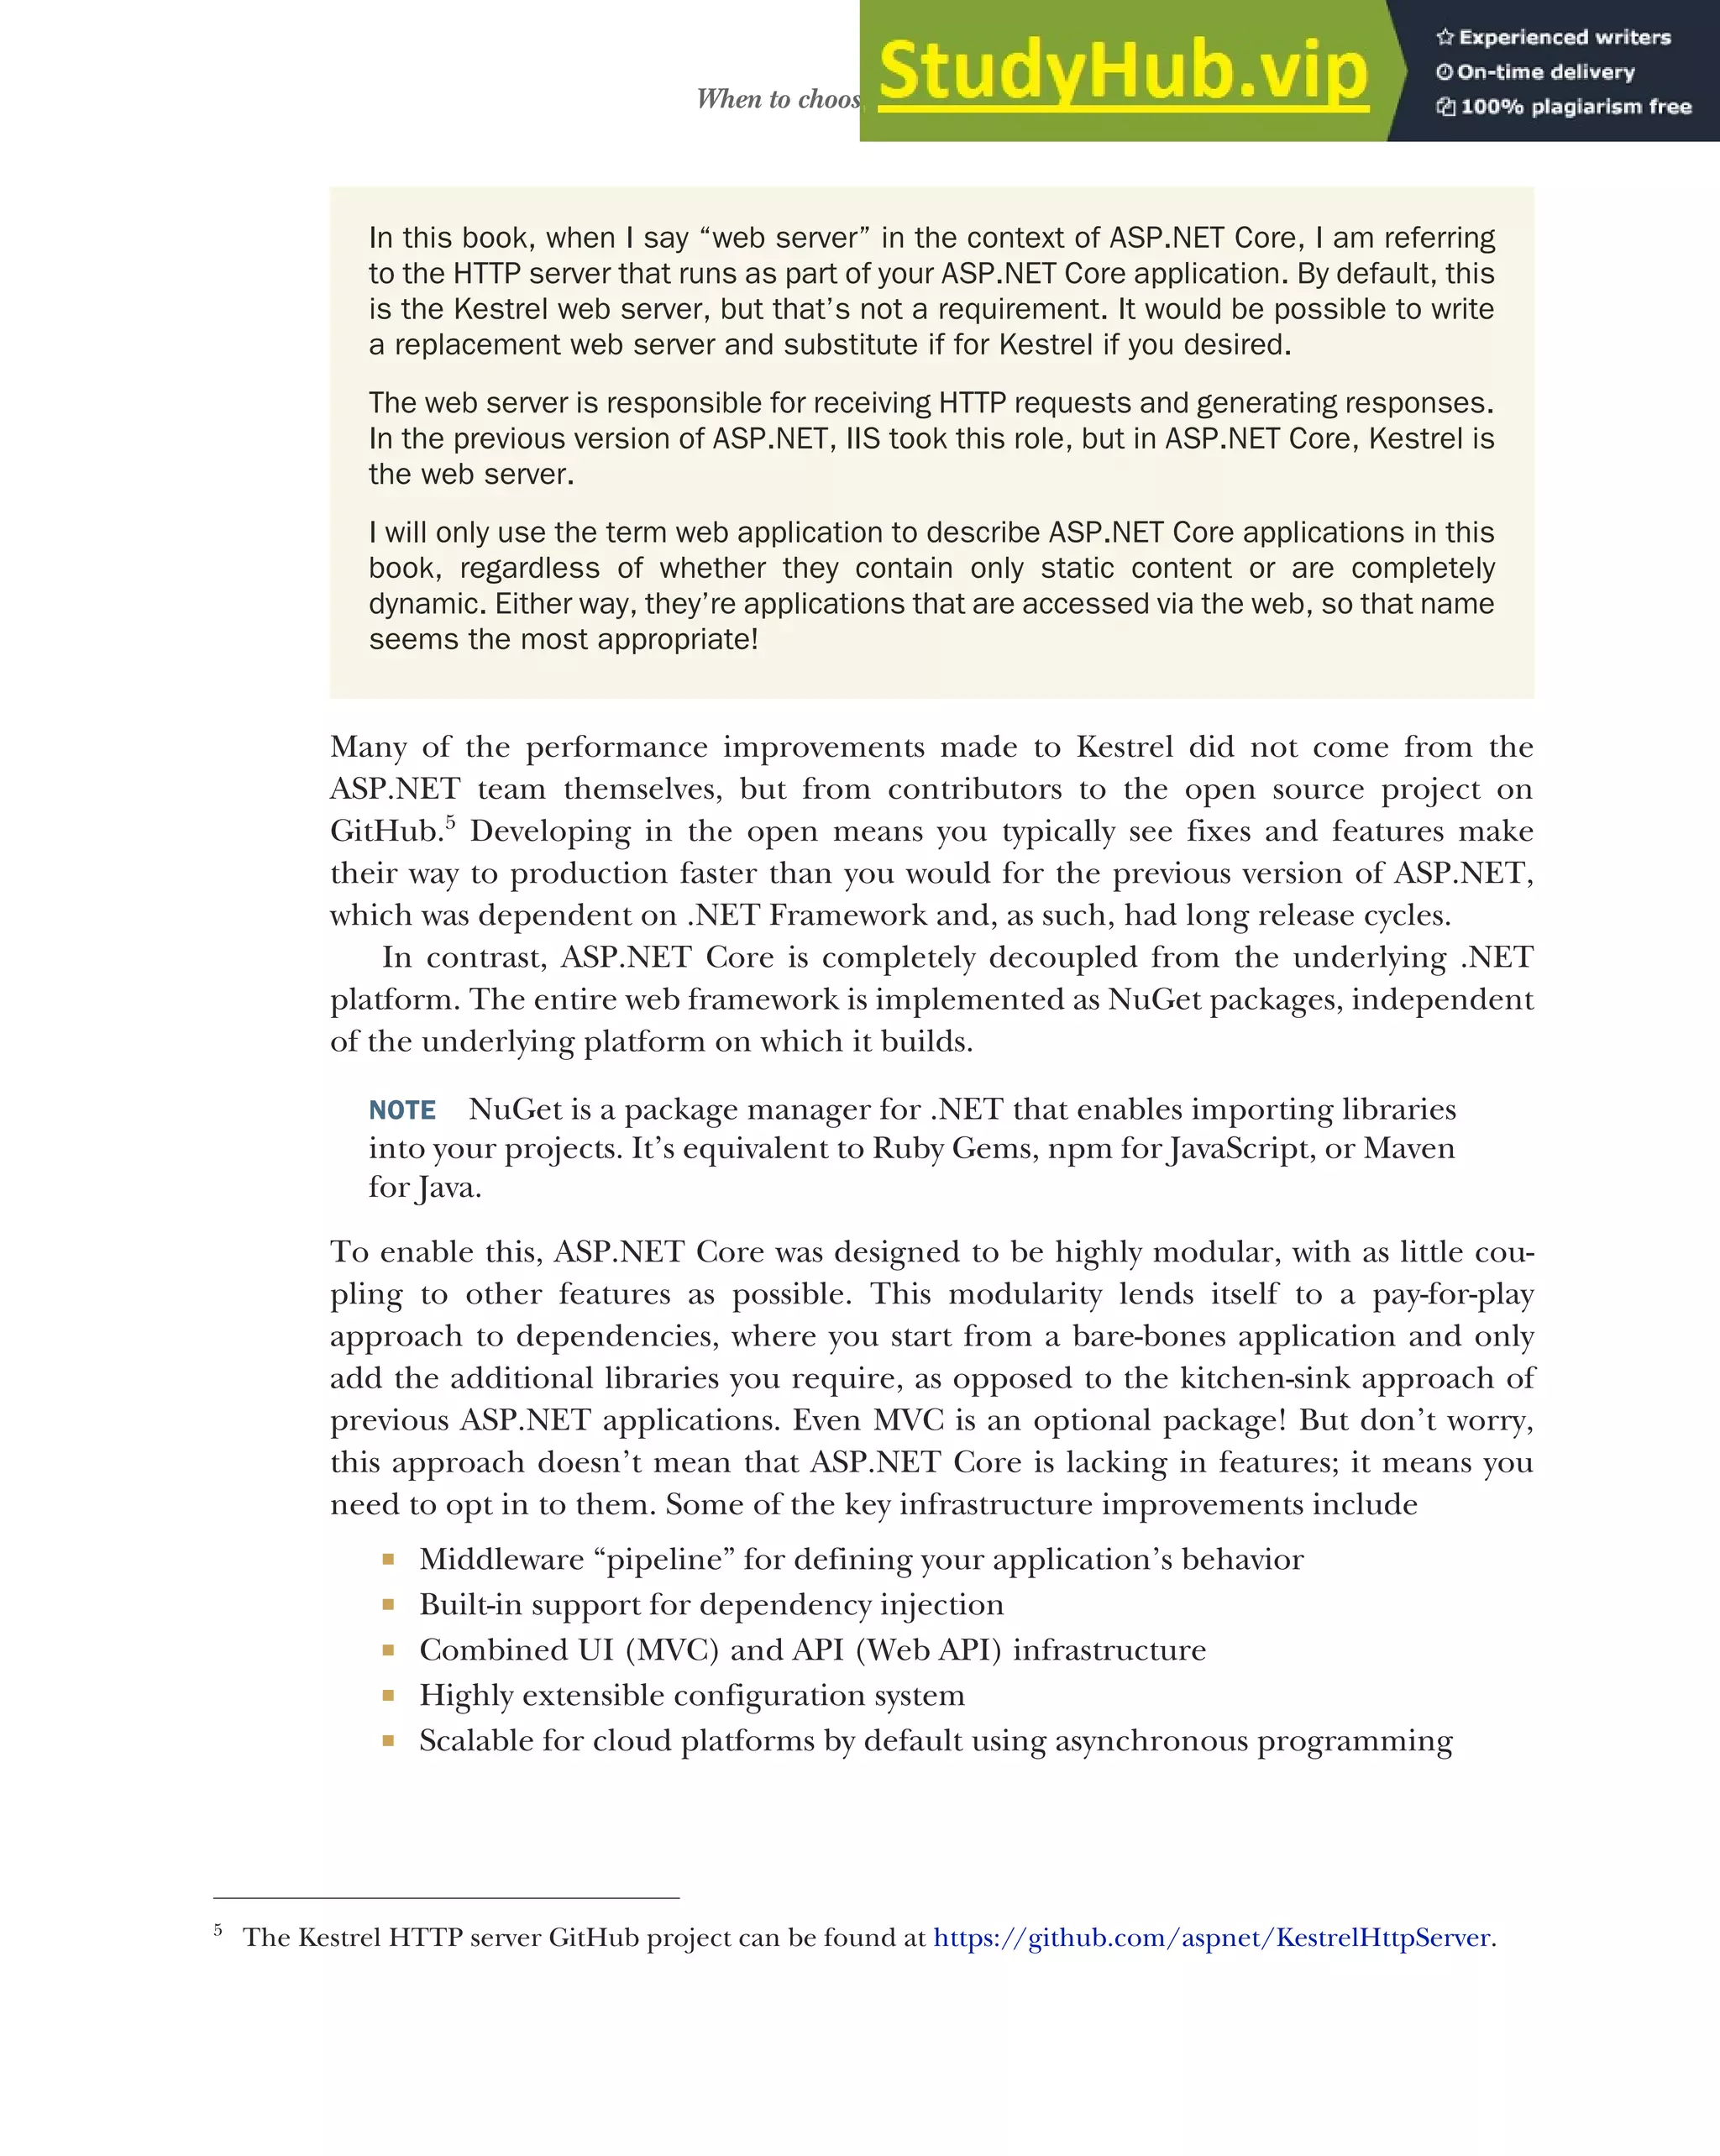
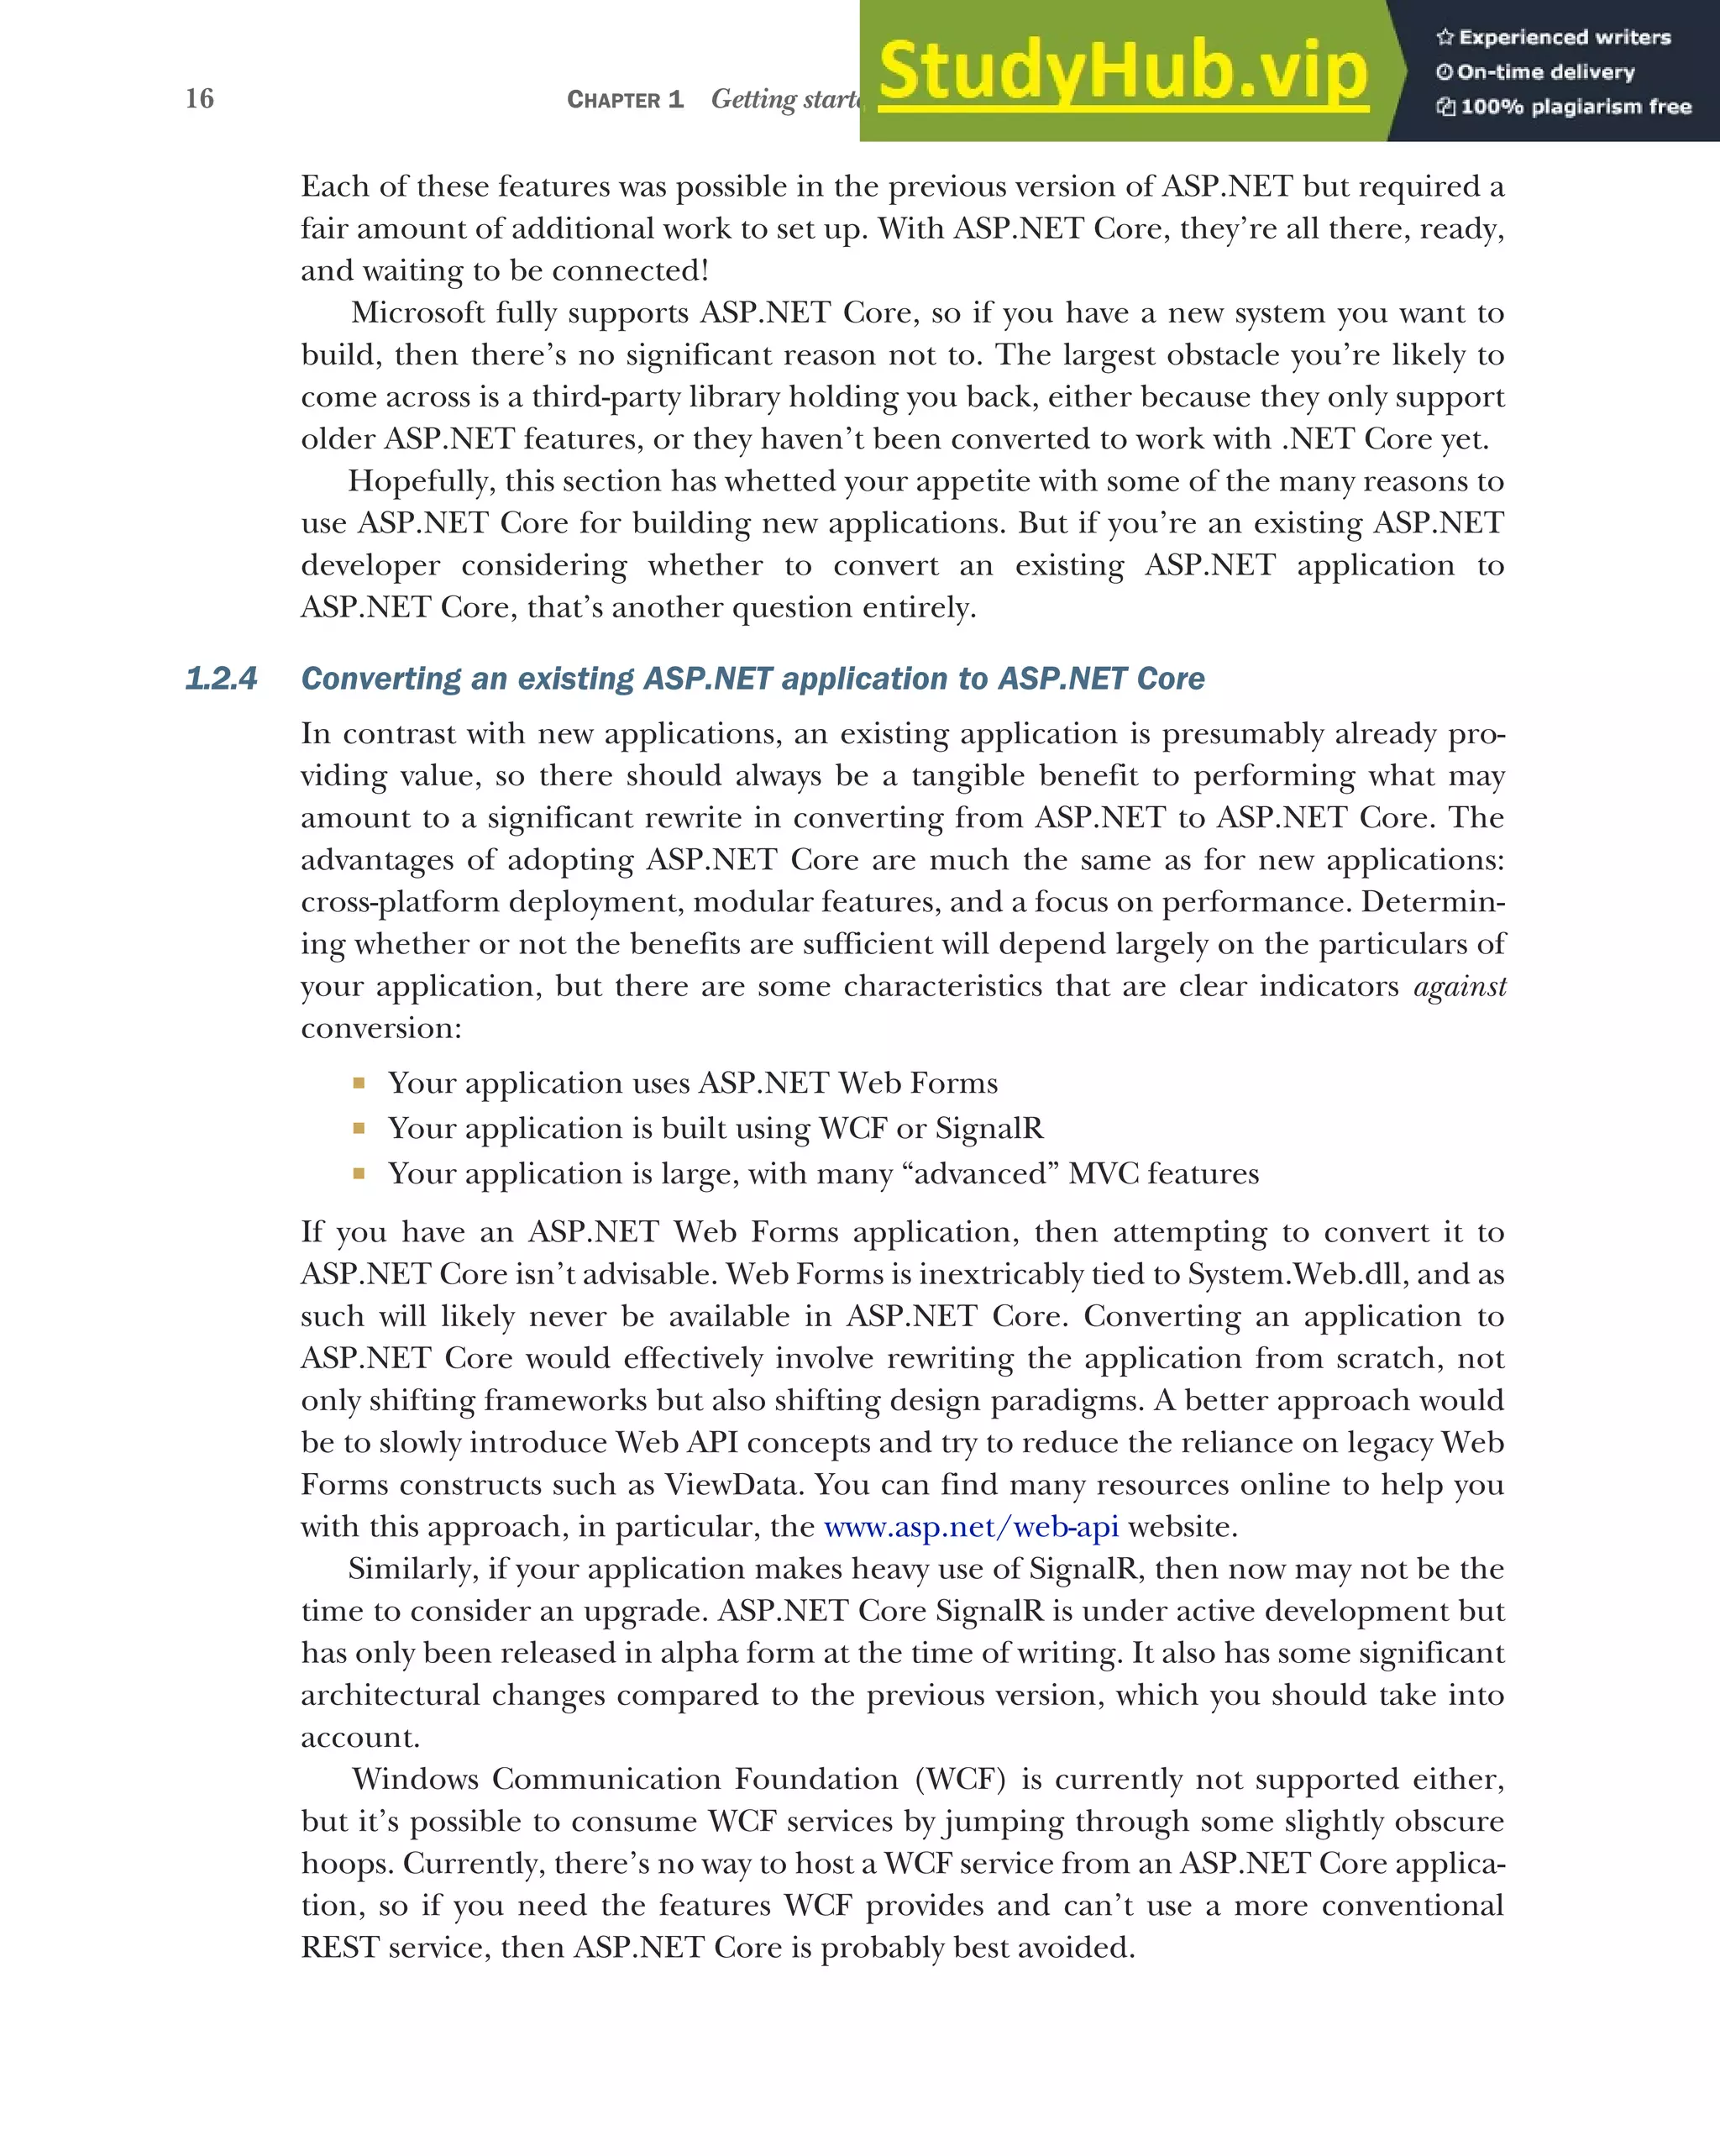
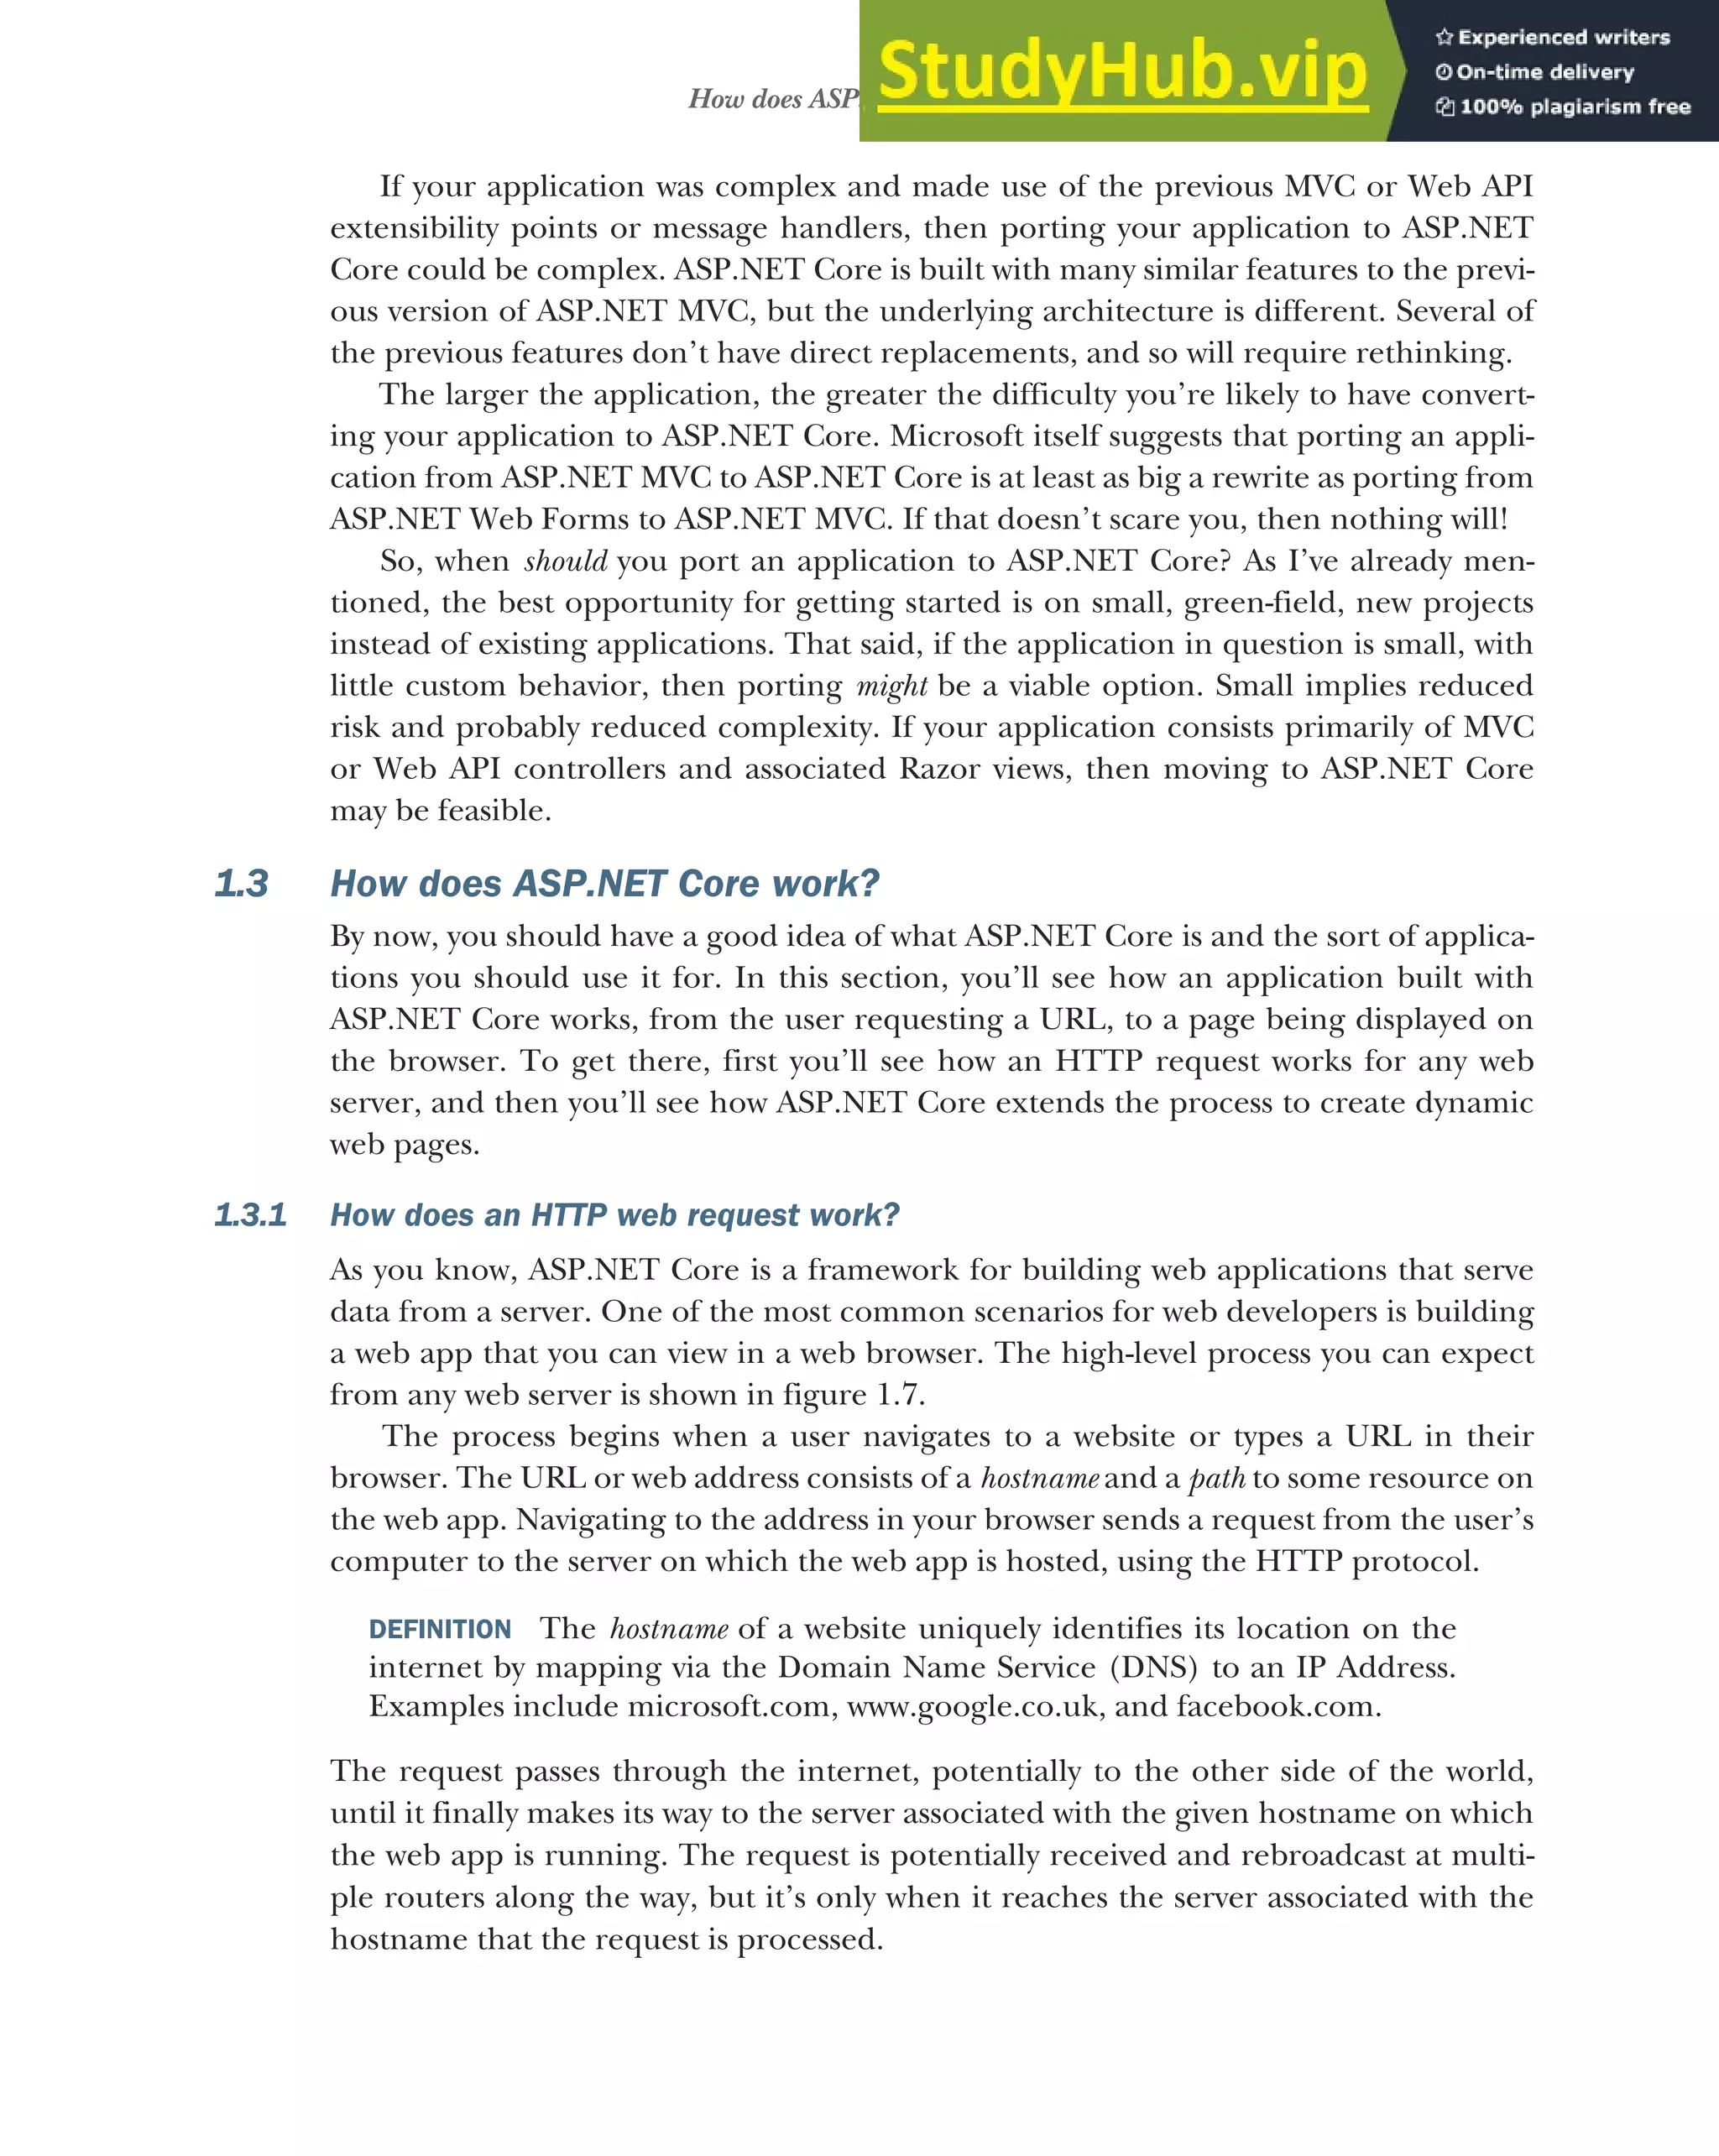
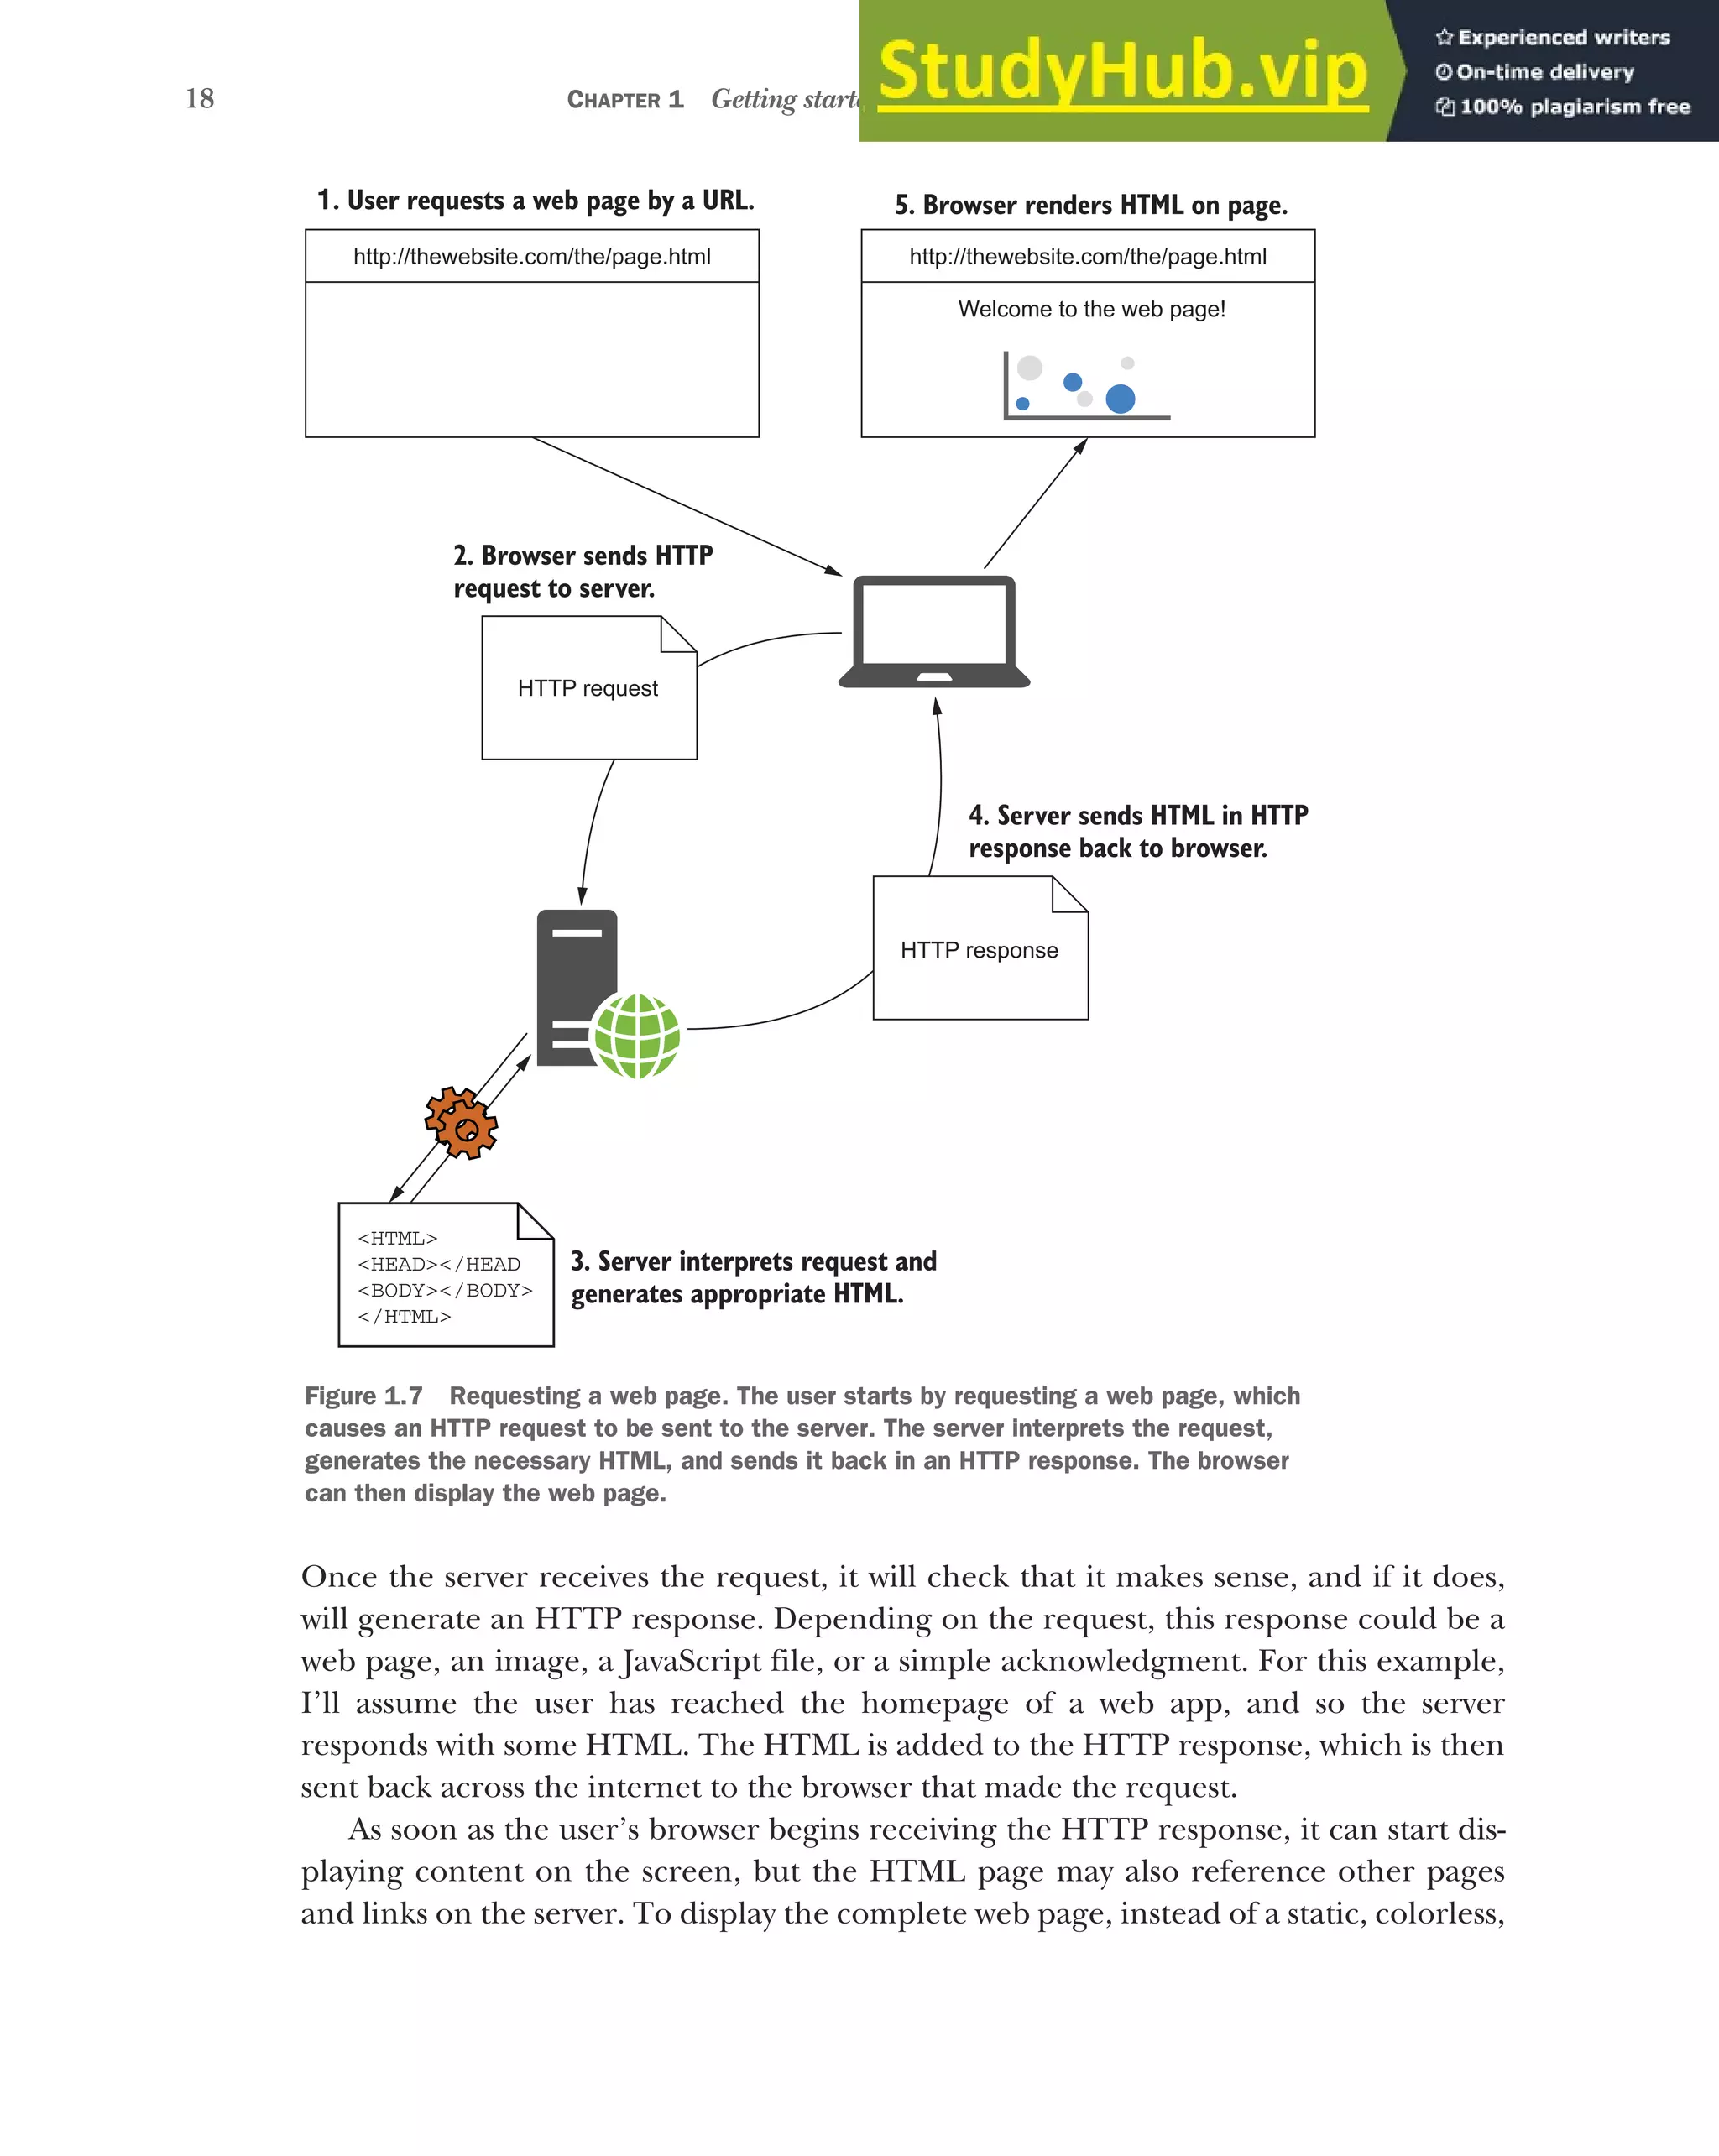


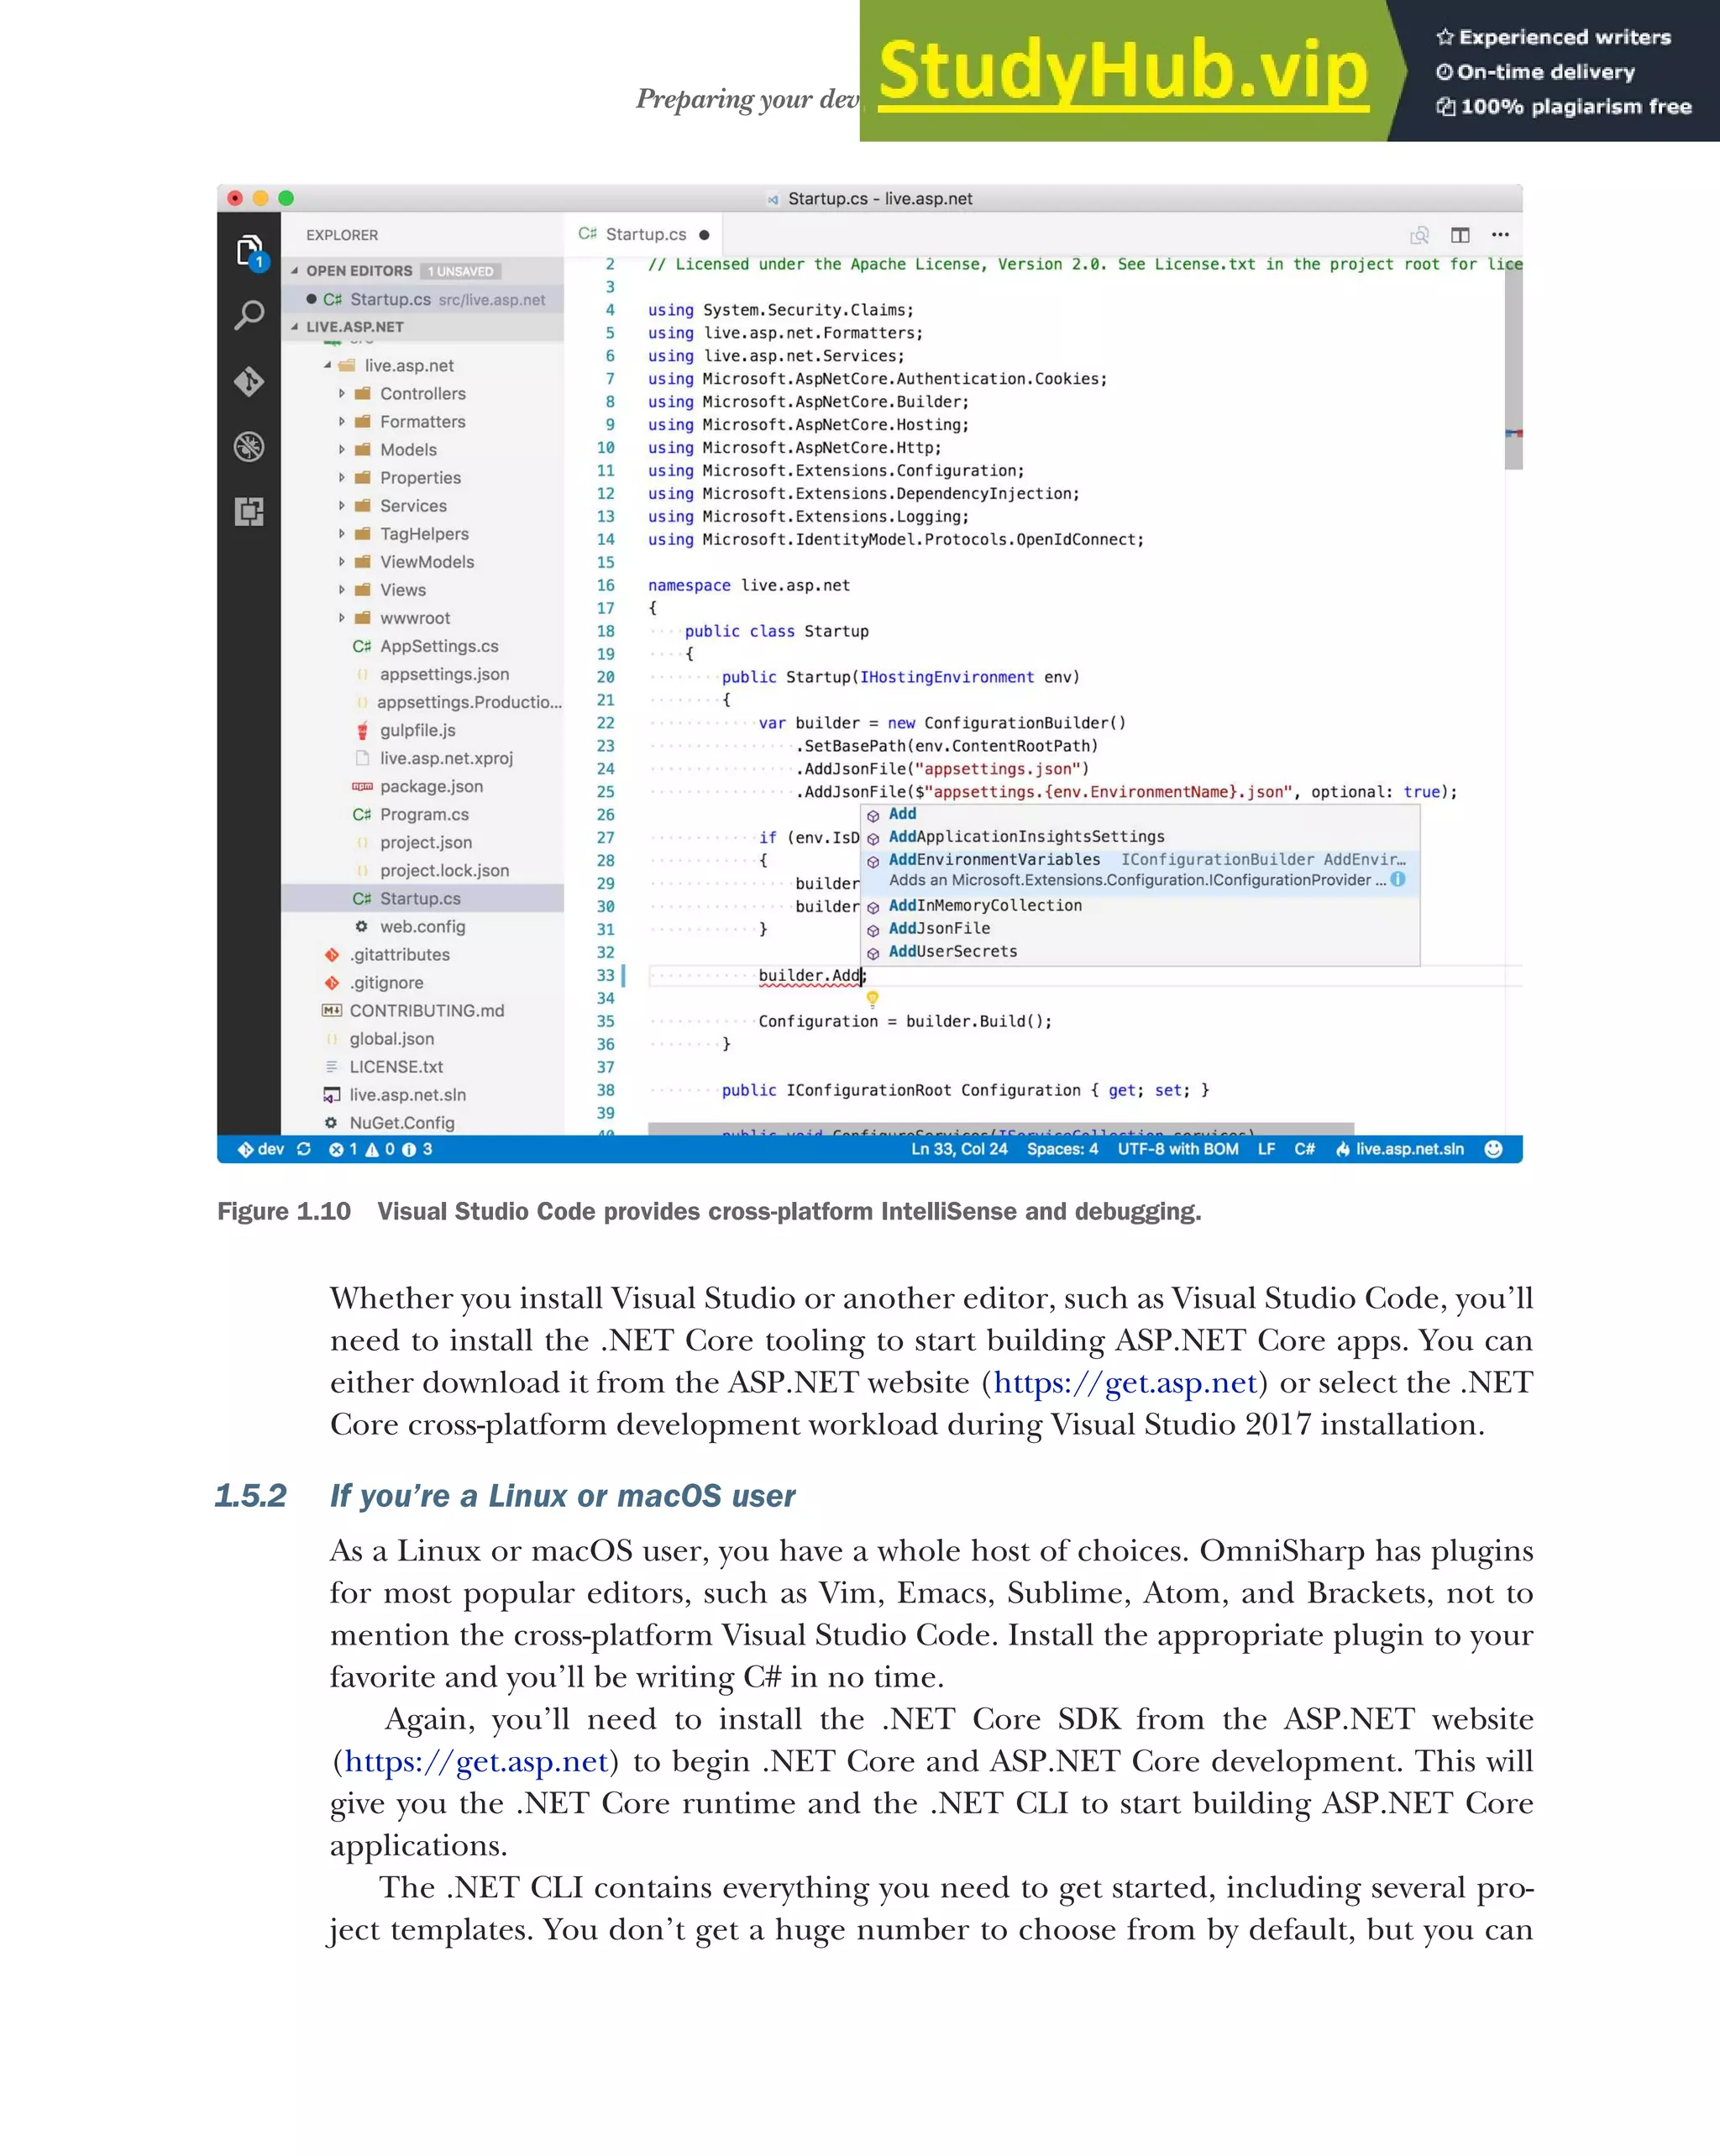

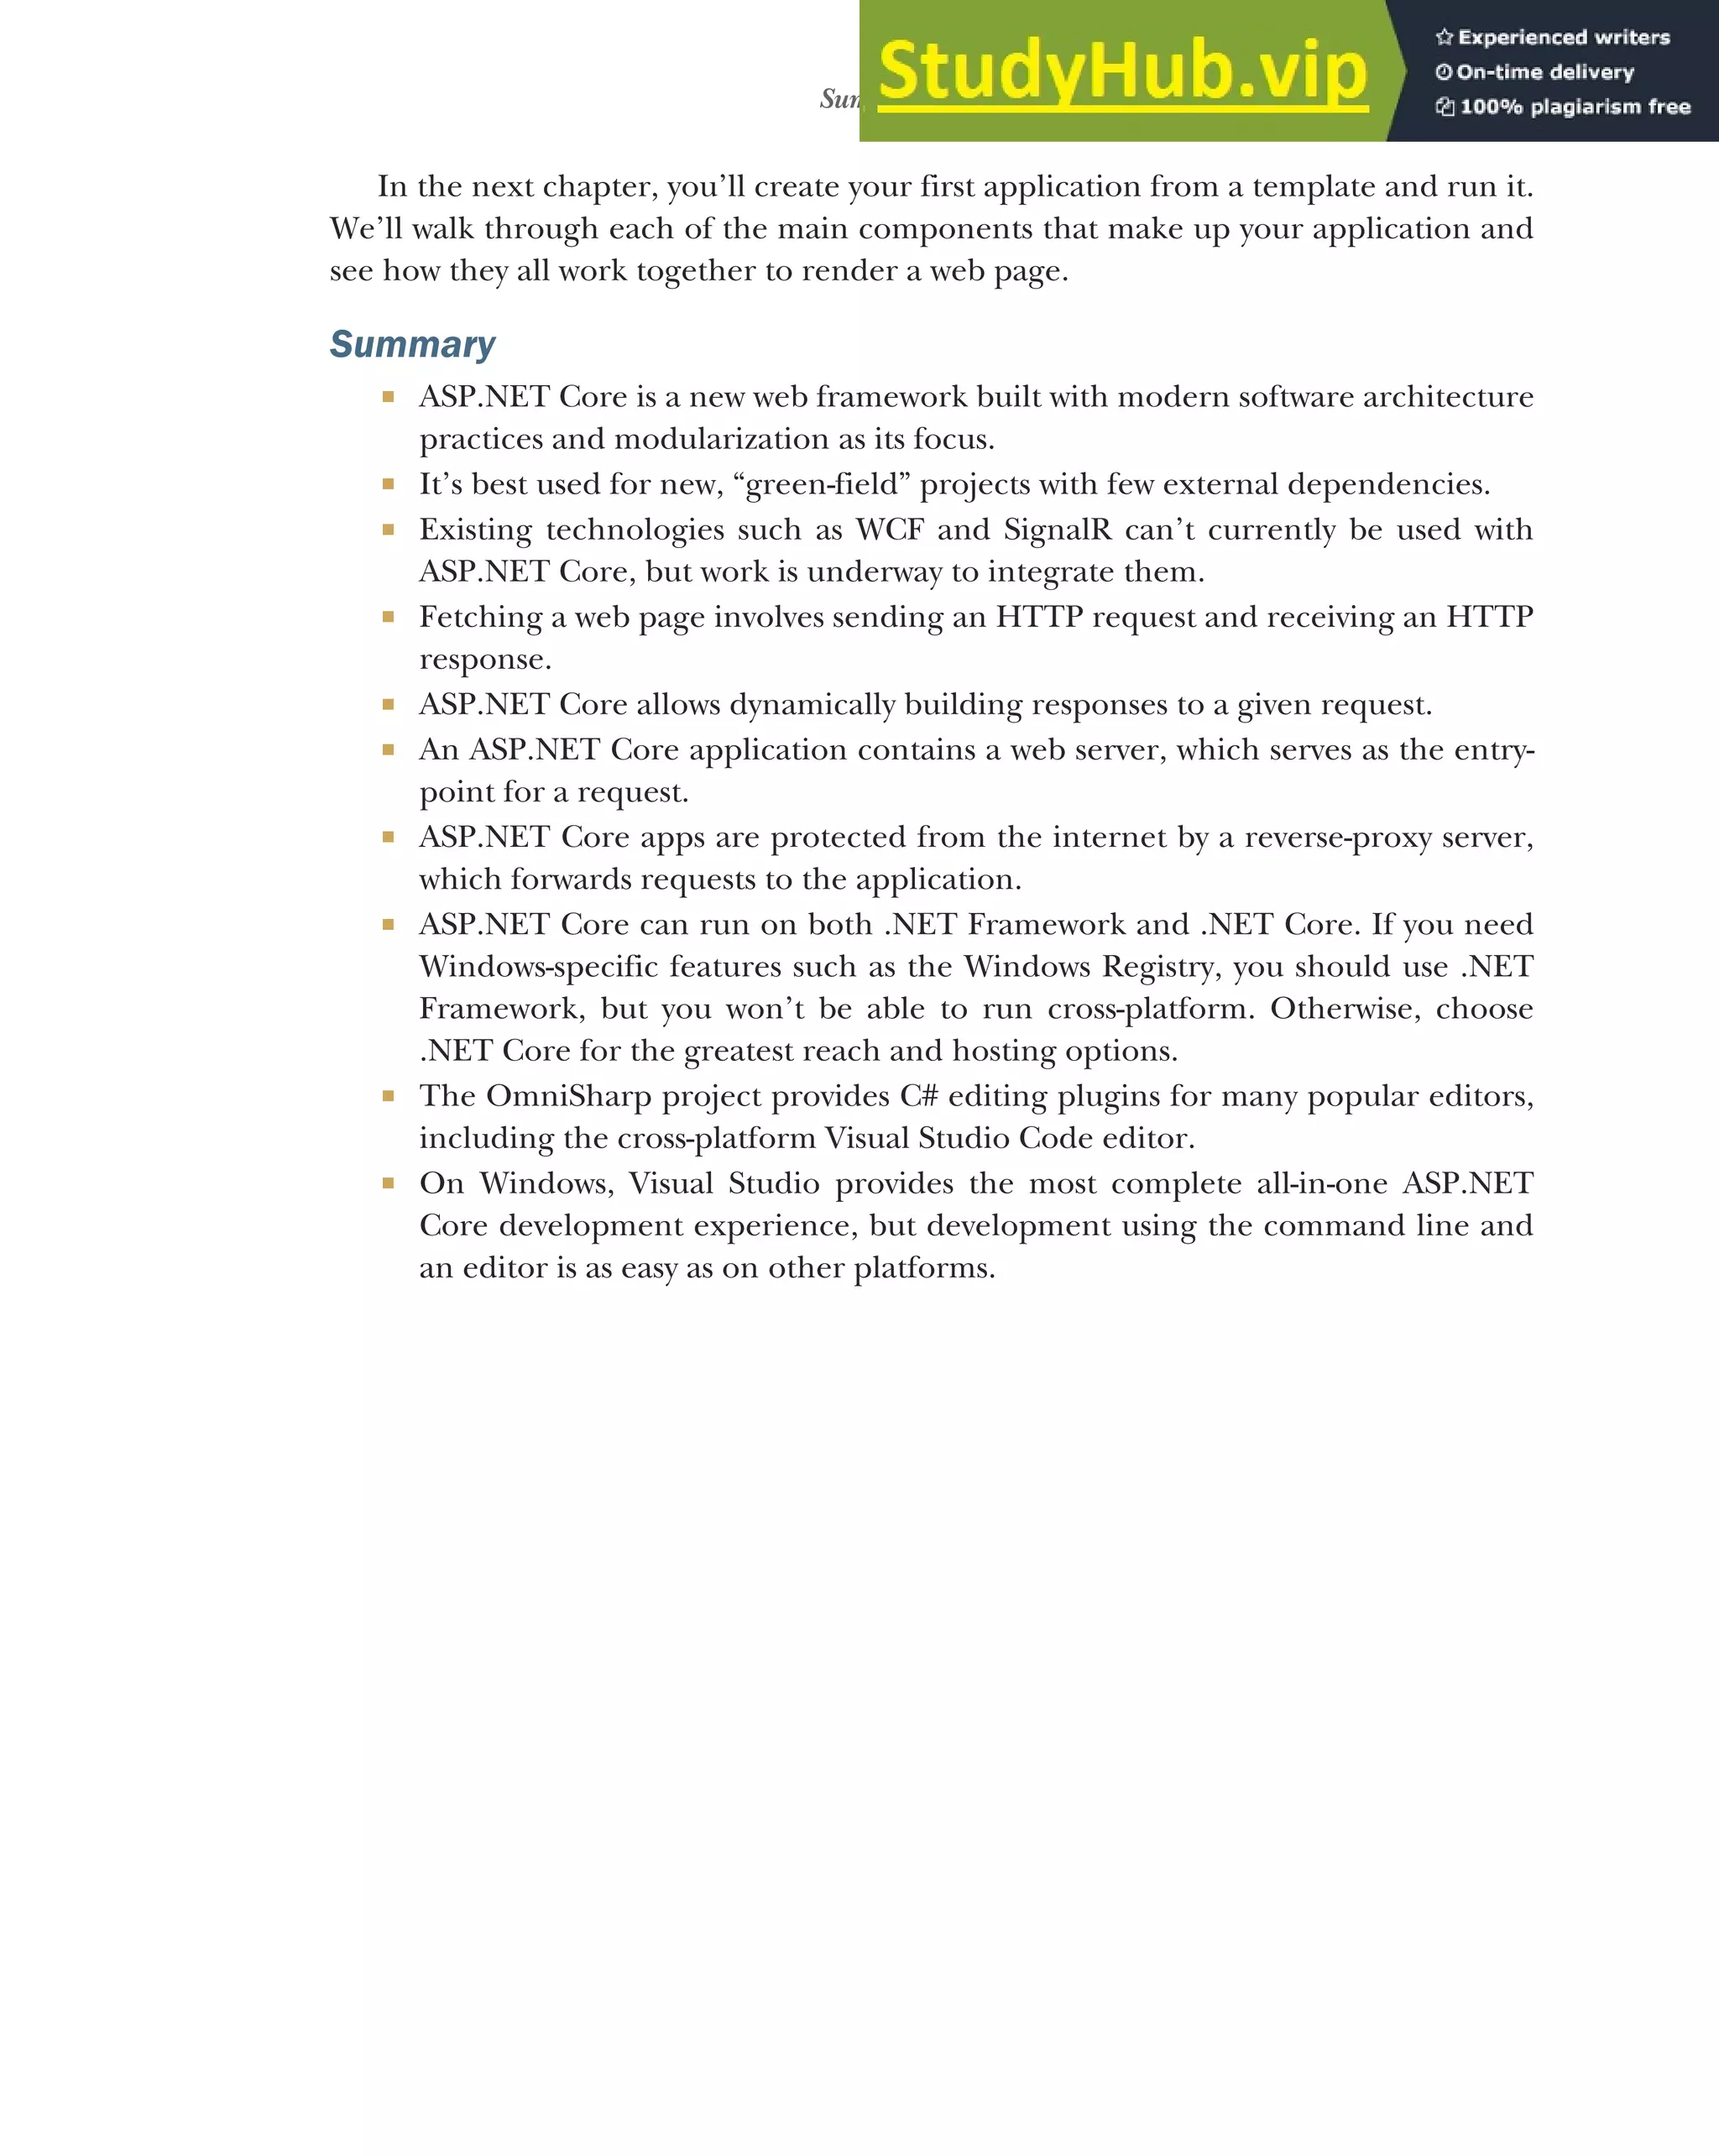


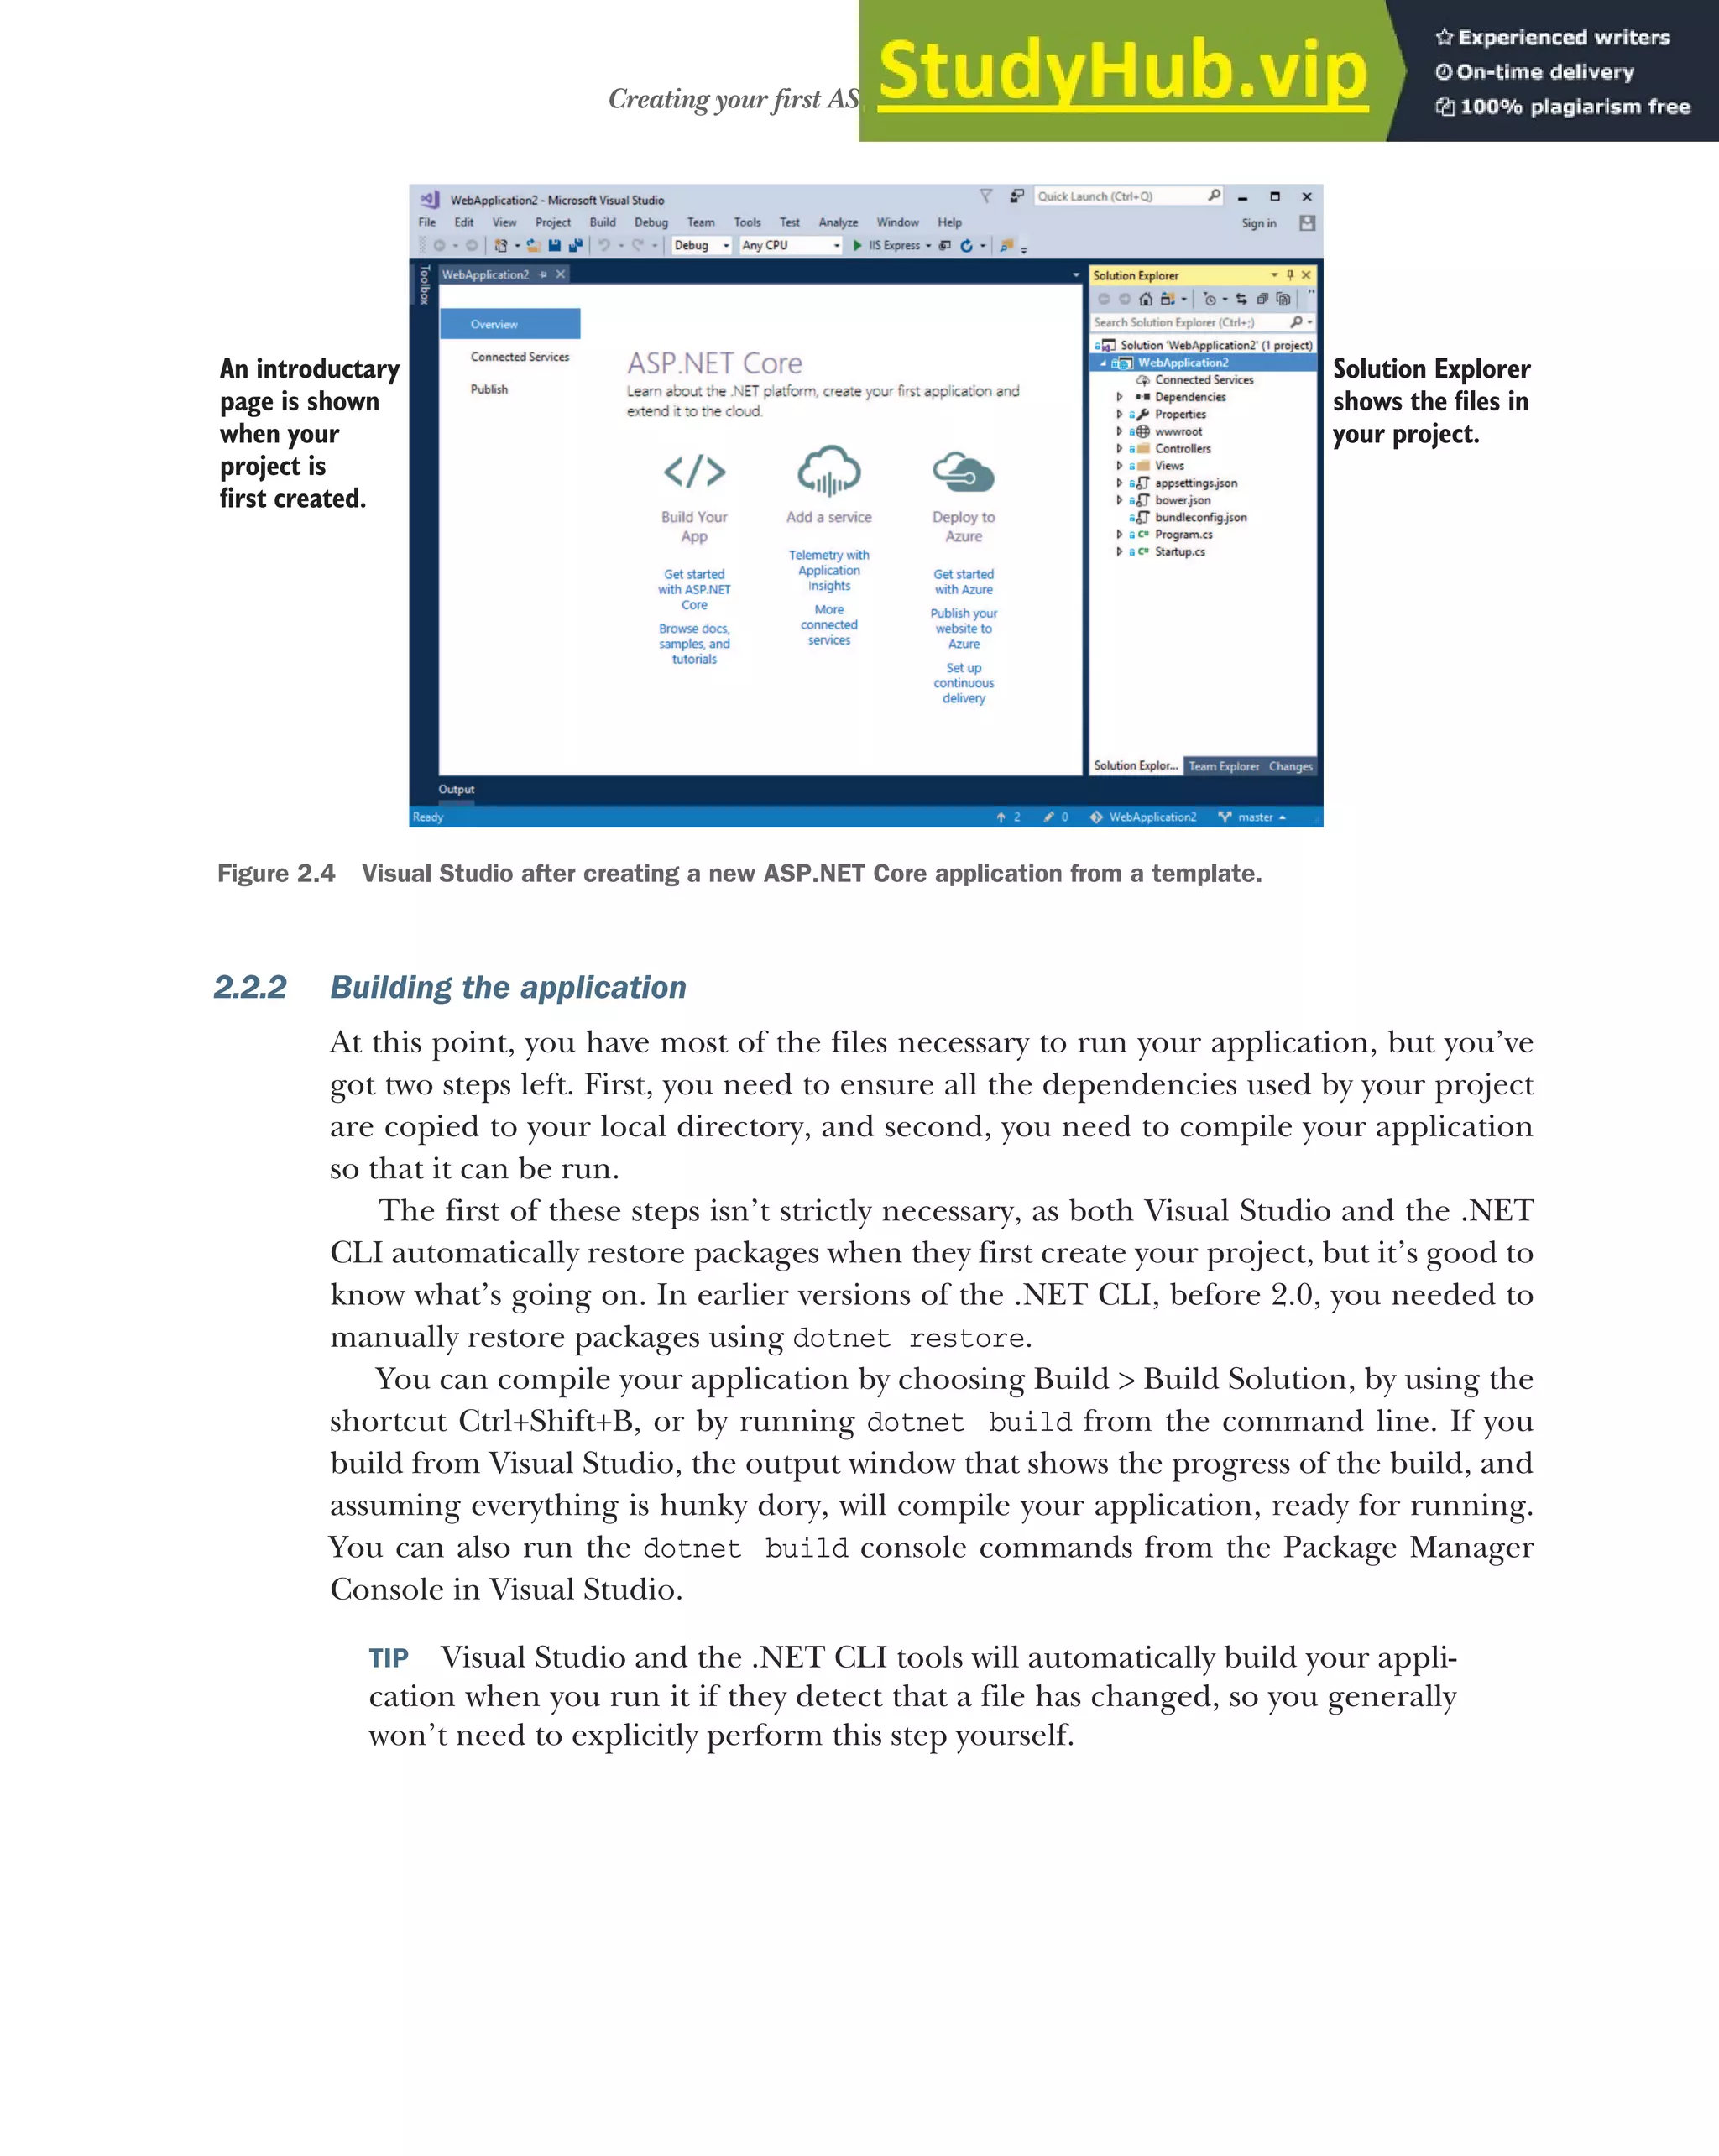
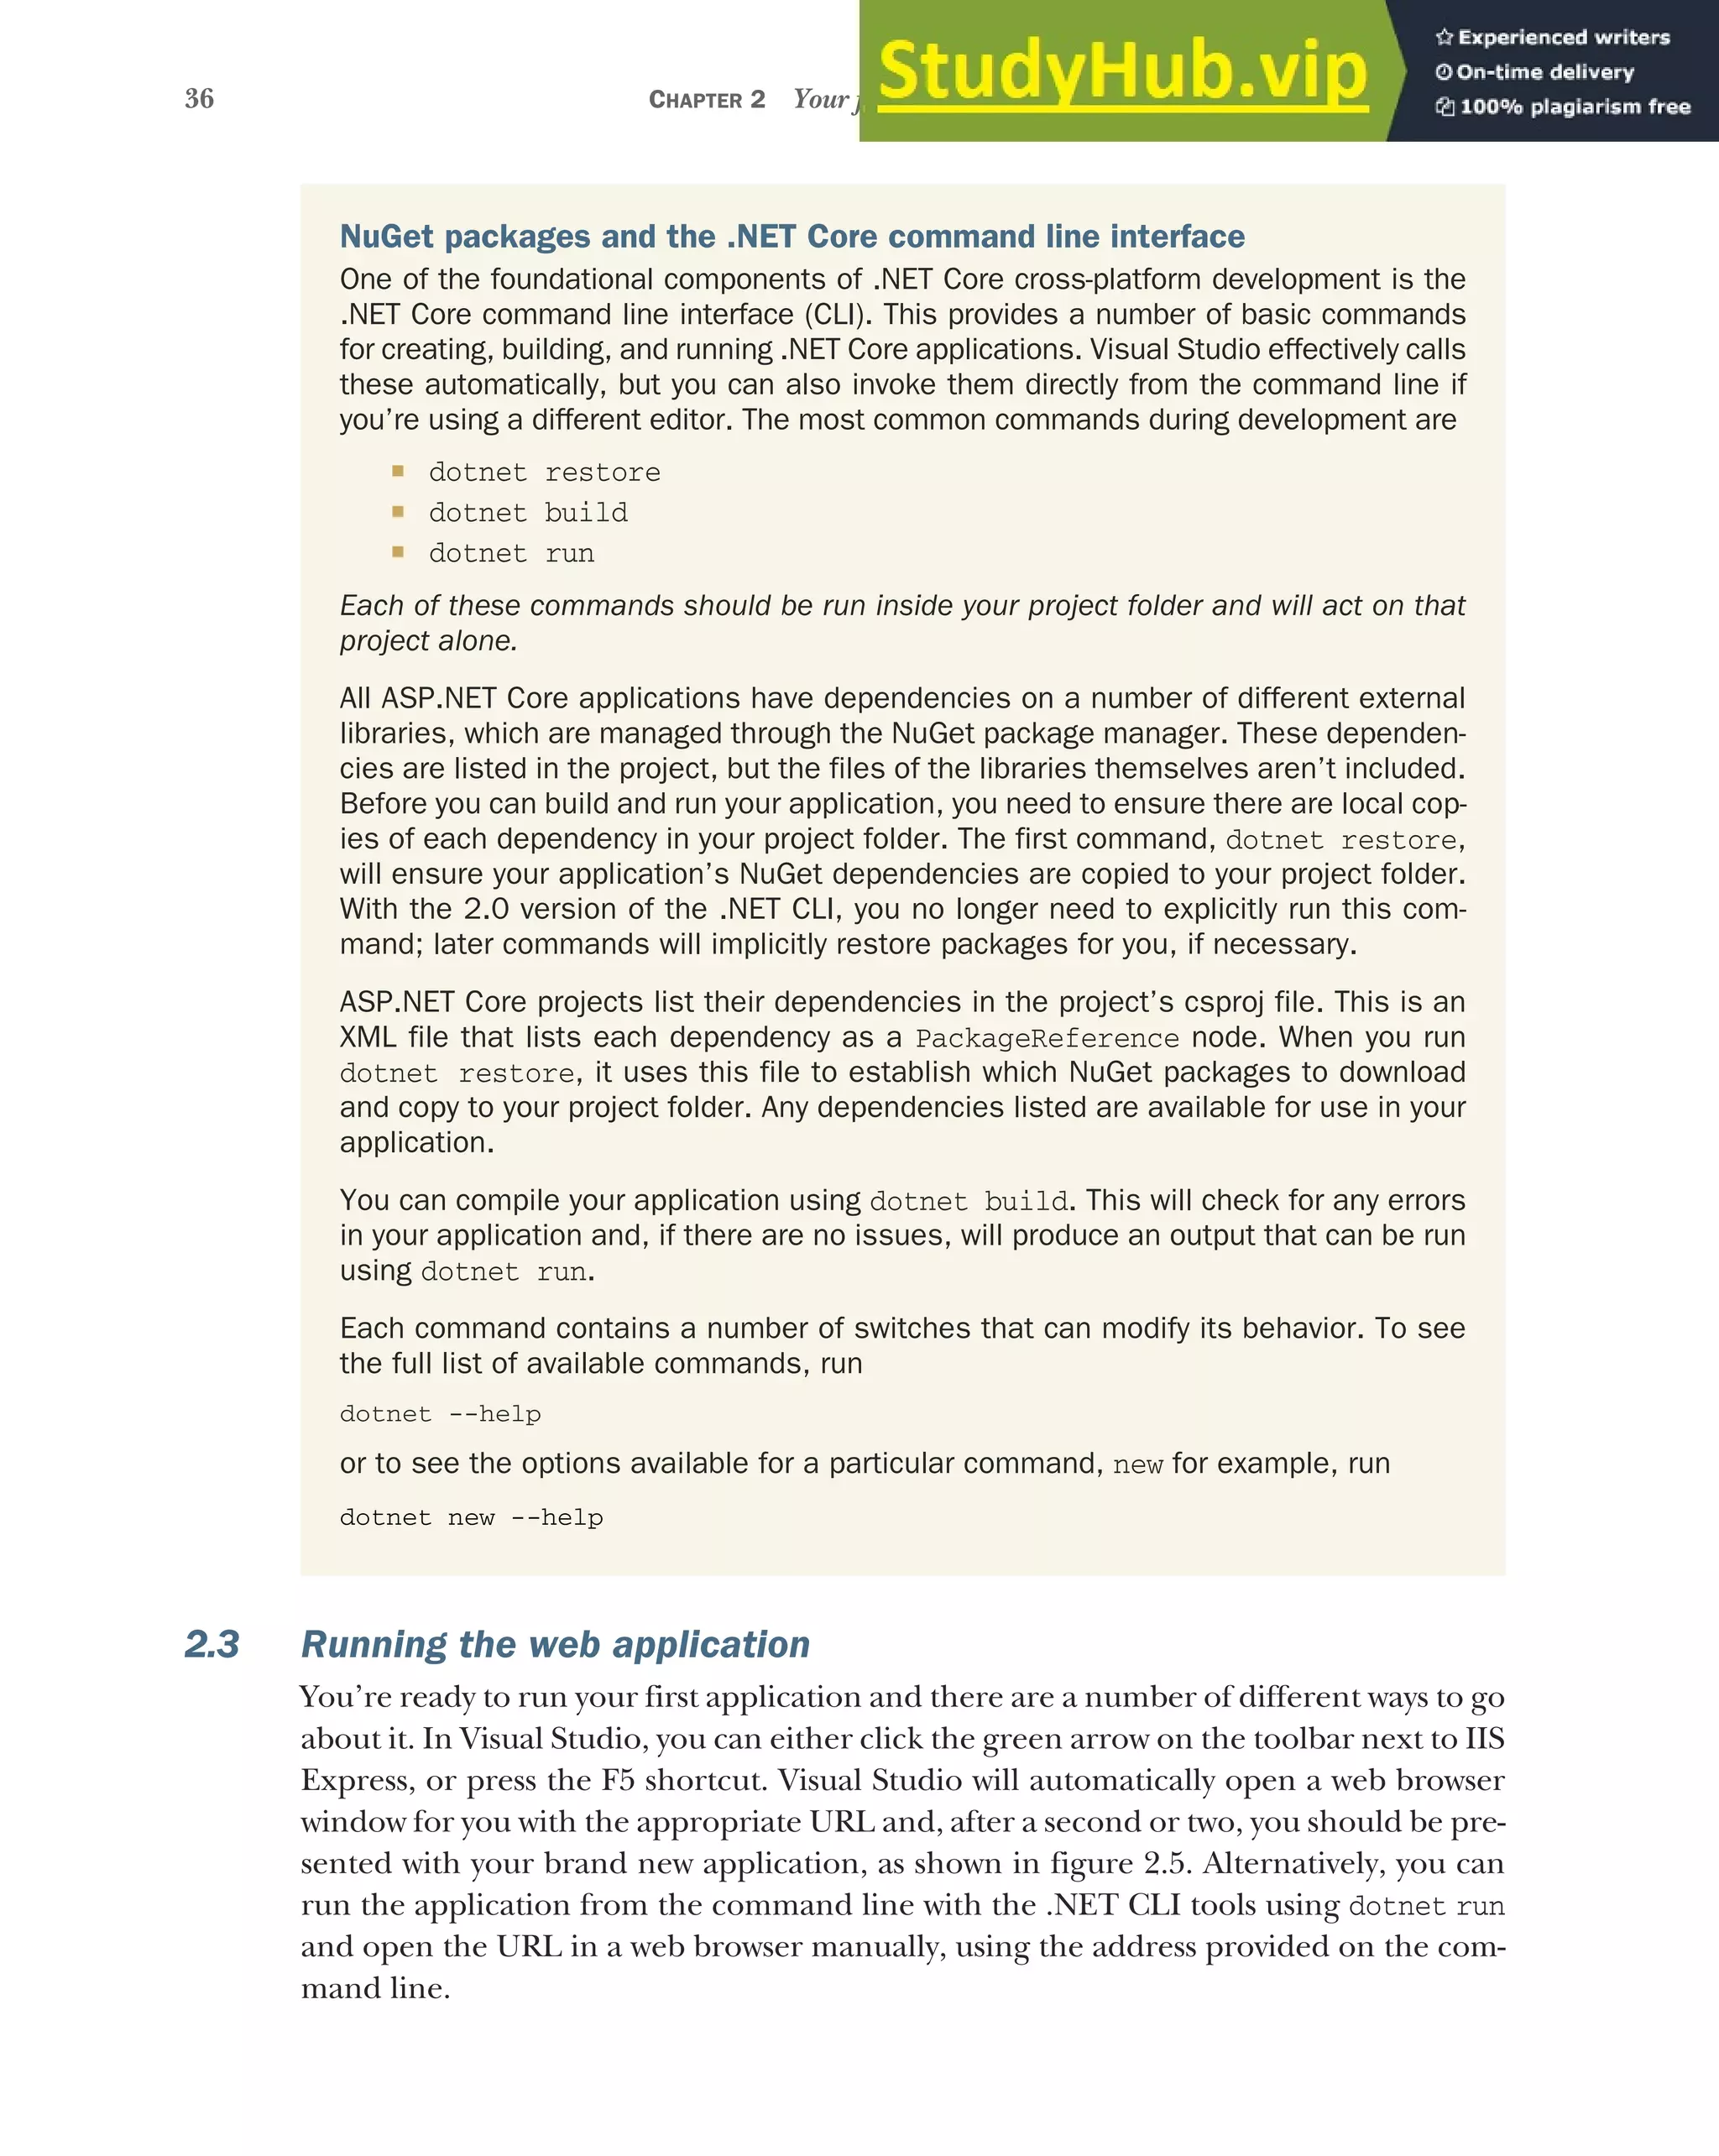
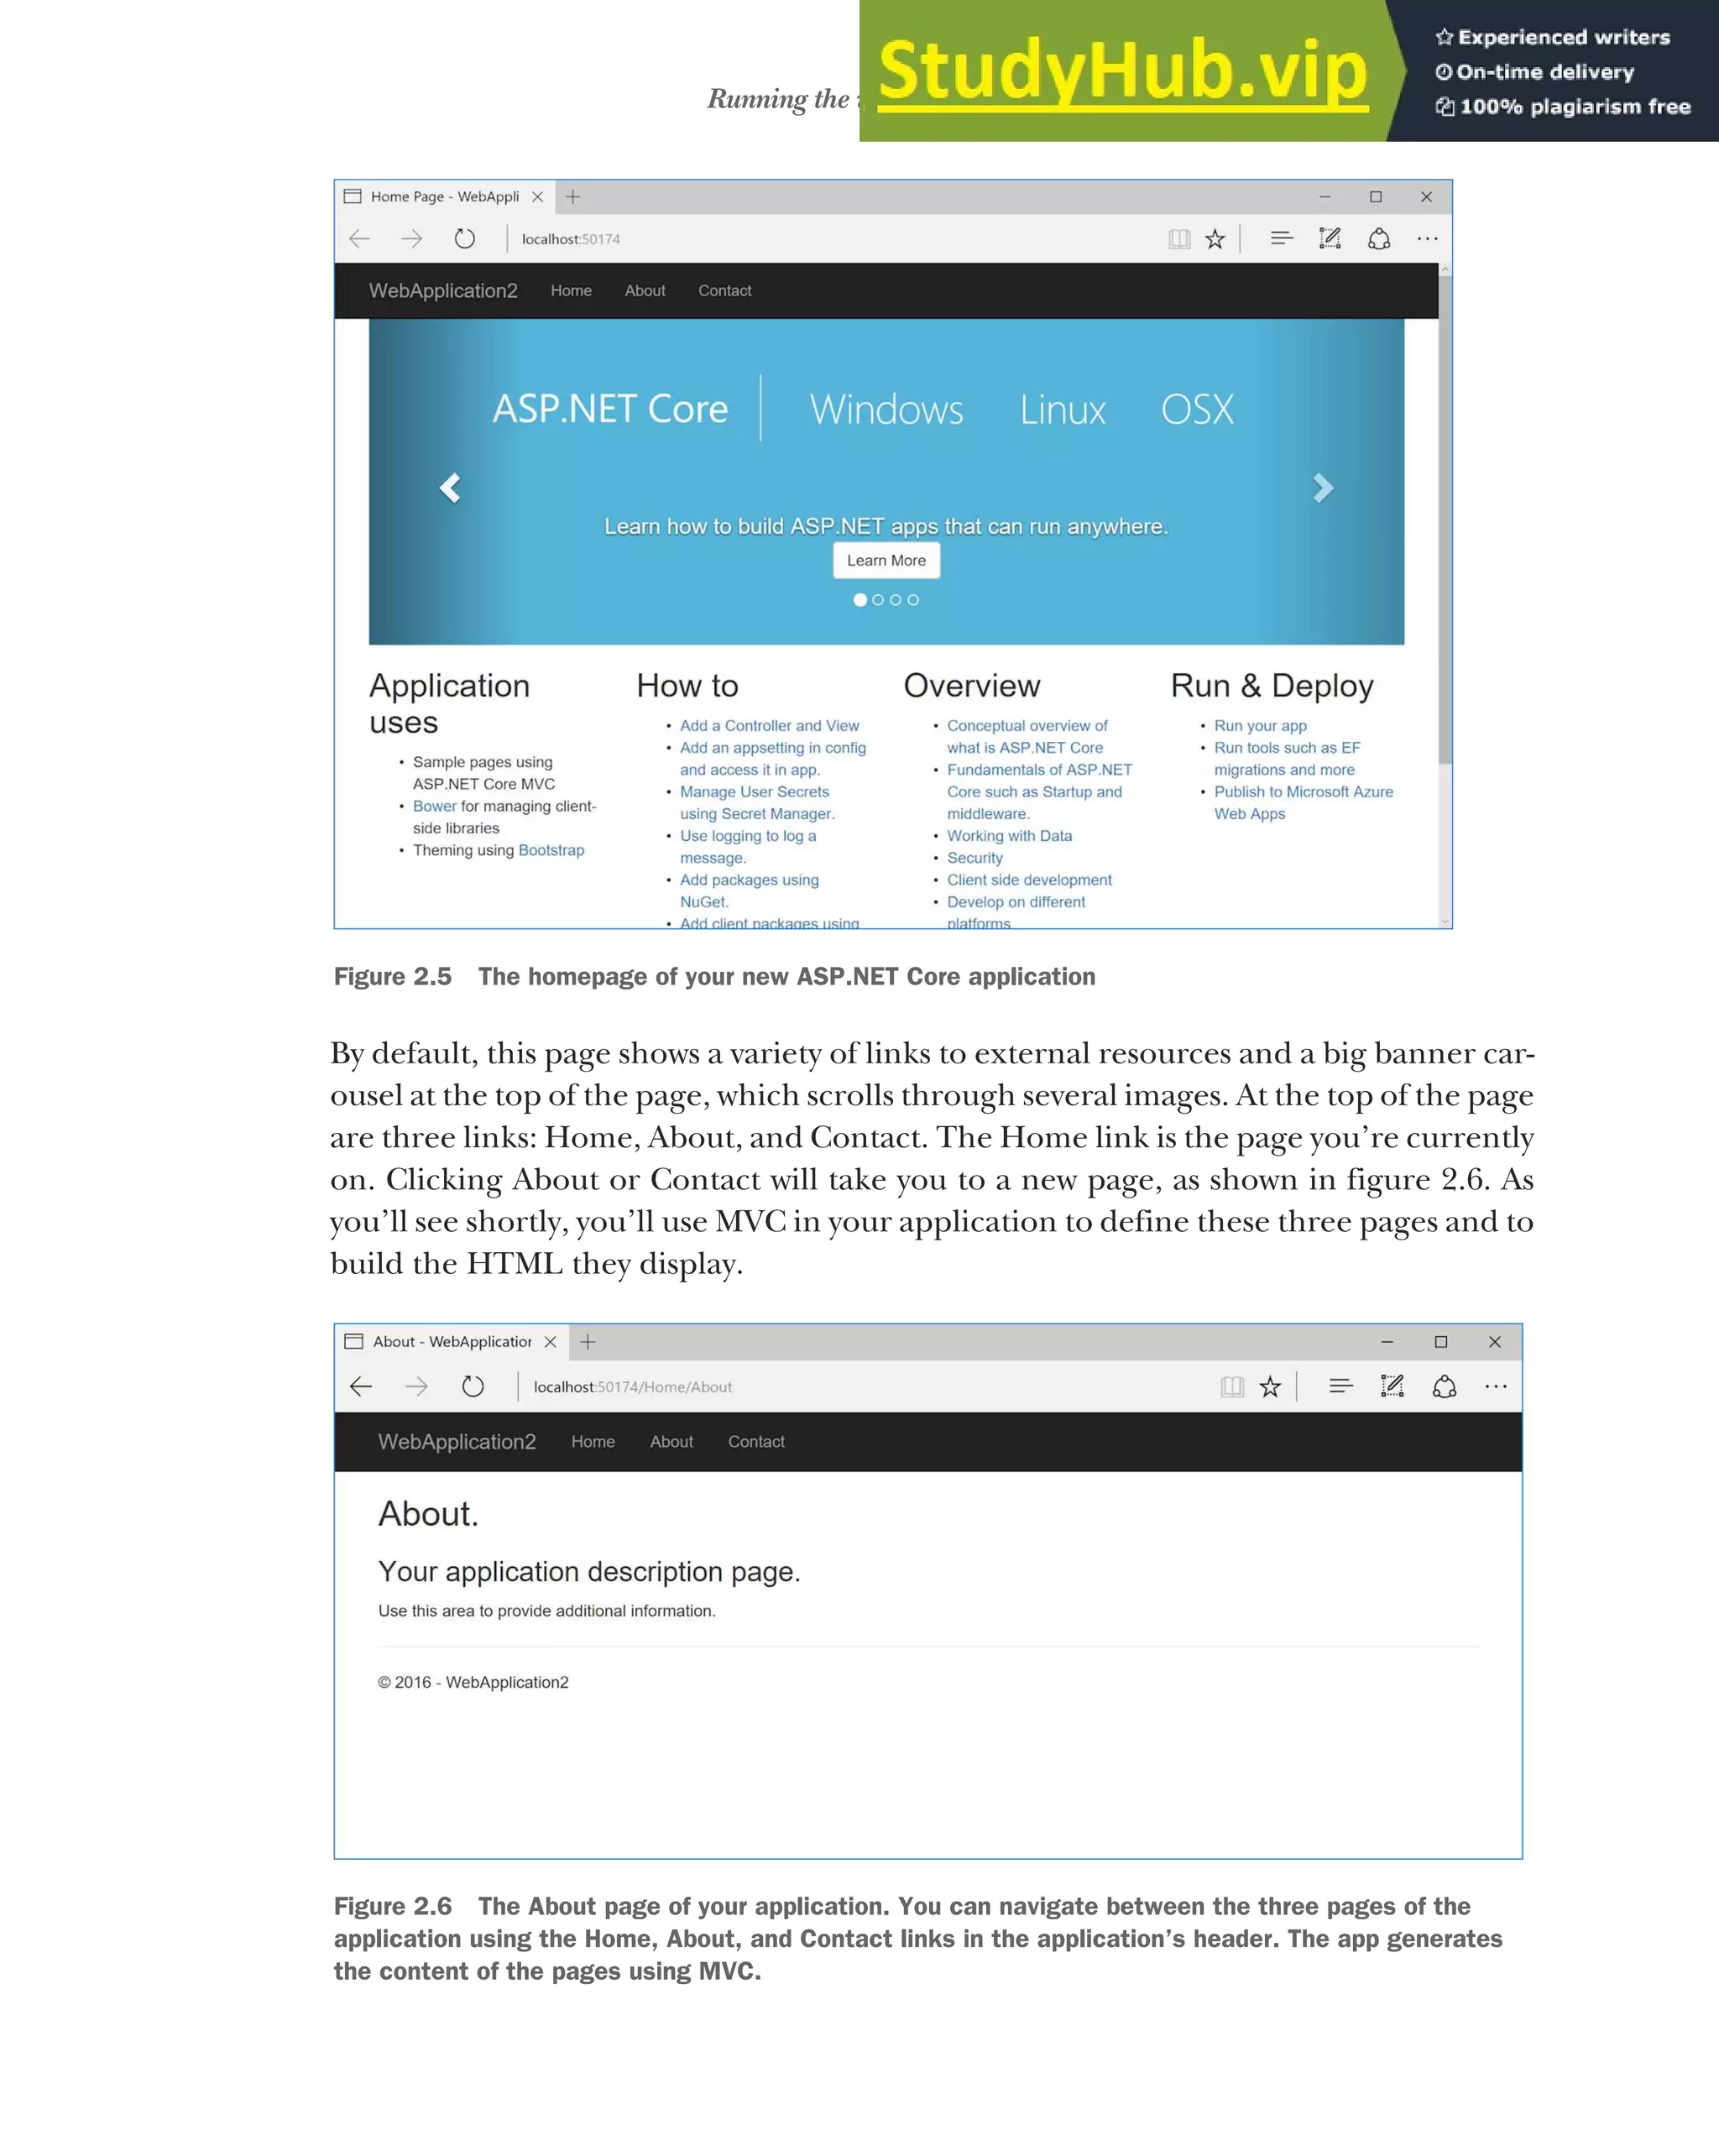

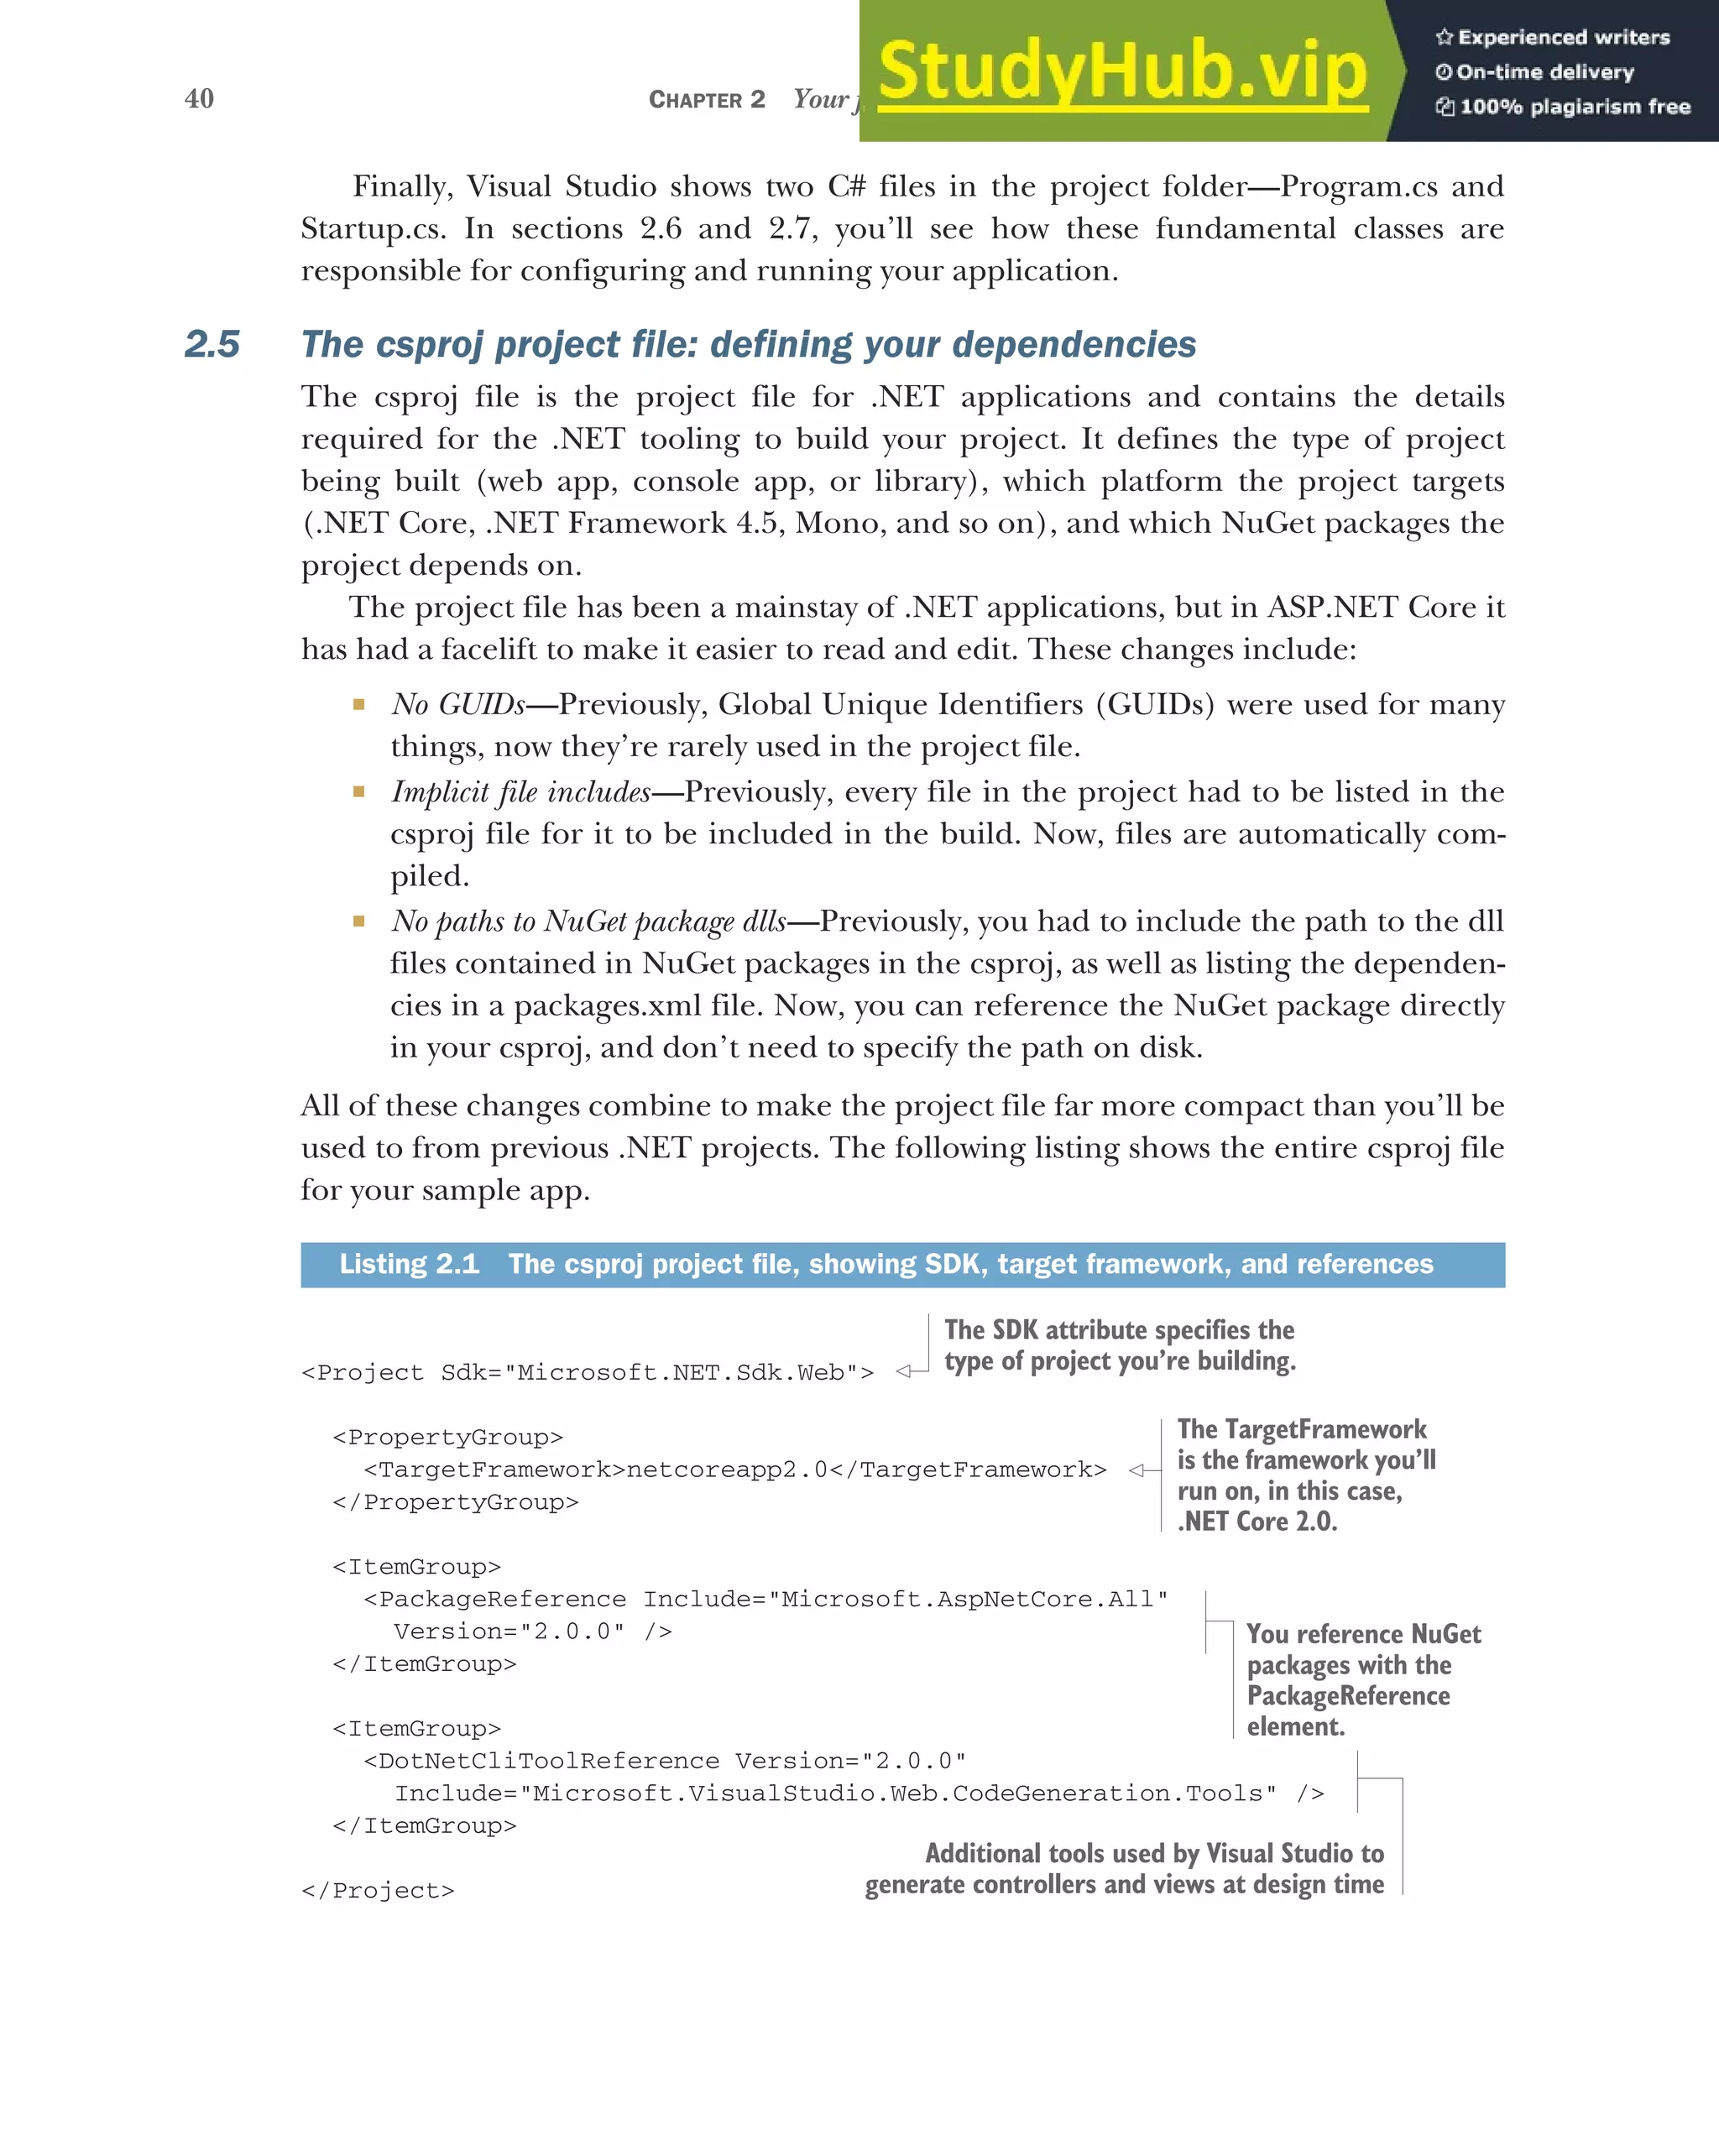

![42 CHAPTER 2 Your first application
you start your web application. In ASP.NET Core applications, it’s used to build and
run an IWebHost instance, as shown in the following listing, which shows the default
Program.cs file. The IWebHost is the core of your ASP.NET Core application, contain-
ing the application configuration and the Kestrel server that listens for requests and
sends responses.
public class Program
{
public static void Main(string[] args)
{
BuildWebHost(args)
.Run();
}
public static IWebHost BuildWebHost(string[] args) =>
WebHost.CreateDefaultBuilder(args)
.UseStartup<Startup>()
.Build();
}
The Main function contains all the basic initialization code required to create a web
server and to start listening for requests. It uses a WebHostBuilder, created by the call
to CreateDefaultBuilder, to define how the IWebHost is configured, before instanti-
ating the IWebHost with a call to Build().
NOTE You’ll find this pattern of using a builder object to configure a com-
plex object repeated throughout the ASP.NET Core framework. It’s a useful
technique for allowing users to configure an object, delaying its creation until
all configuration has finished. It’s one of the patterns described in the “Gang
of Four” book, Design Patterns: Elements of Reusable Object-Oriented Software
(Addison Wesley, 1994).
Much of your app’s configuration takes place in the WebHostBuilder created by the
call to CreateDefaultBuilder, but it delegates some responsibility to a separate class,
Startup. The Startup class referenced in the generic UseStartup<> method is where
you configure your app’s services and define your middleware pipeline. In section 2.7,
we’ll spend a while delving into this crucial class.
At this point, you may be wondering why you need two classes for configuration:
Program and Startup. Why not include all of your app’s configuration in one class or
the other?
Figure 2.8 shows the typical split of configuration components between Program
and Startup. Generally speaking, Program is where you configure the infrastructure
Listing 2.2 The default Program.cs configures and runs an IWebHost
Create an IWebHost using
the BuildWebHost method.
Run the IWebHost,
start listening for
requests and
generating
responses.
Create a WebHostBuilder
using the default
configuration.
The Startup class defines
most of your application’s
configuration.
Build and return an
instance of IWebHost
from the WebHostBuilder.](https://image.slidesharecdn.com/asp-230807173723-31e70040/75/ASP-NET-Core-in-Action-2018-pdf-70-2048.jpg)

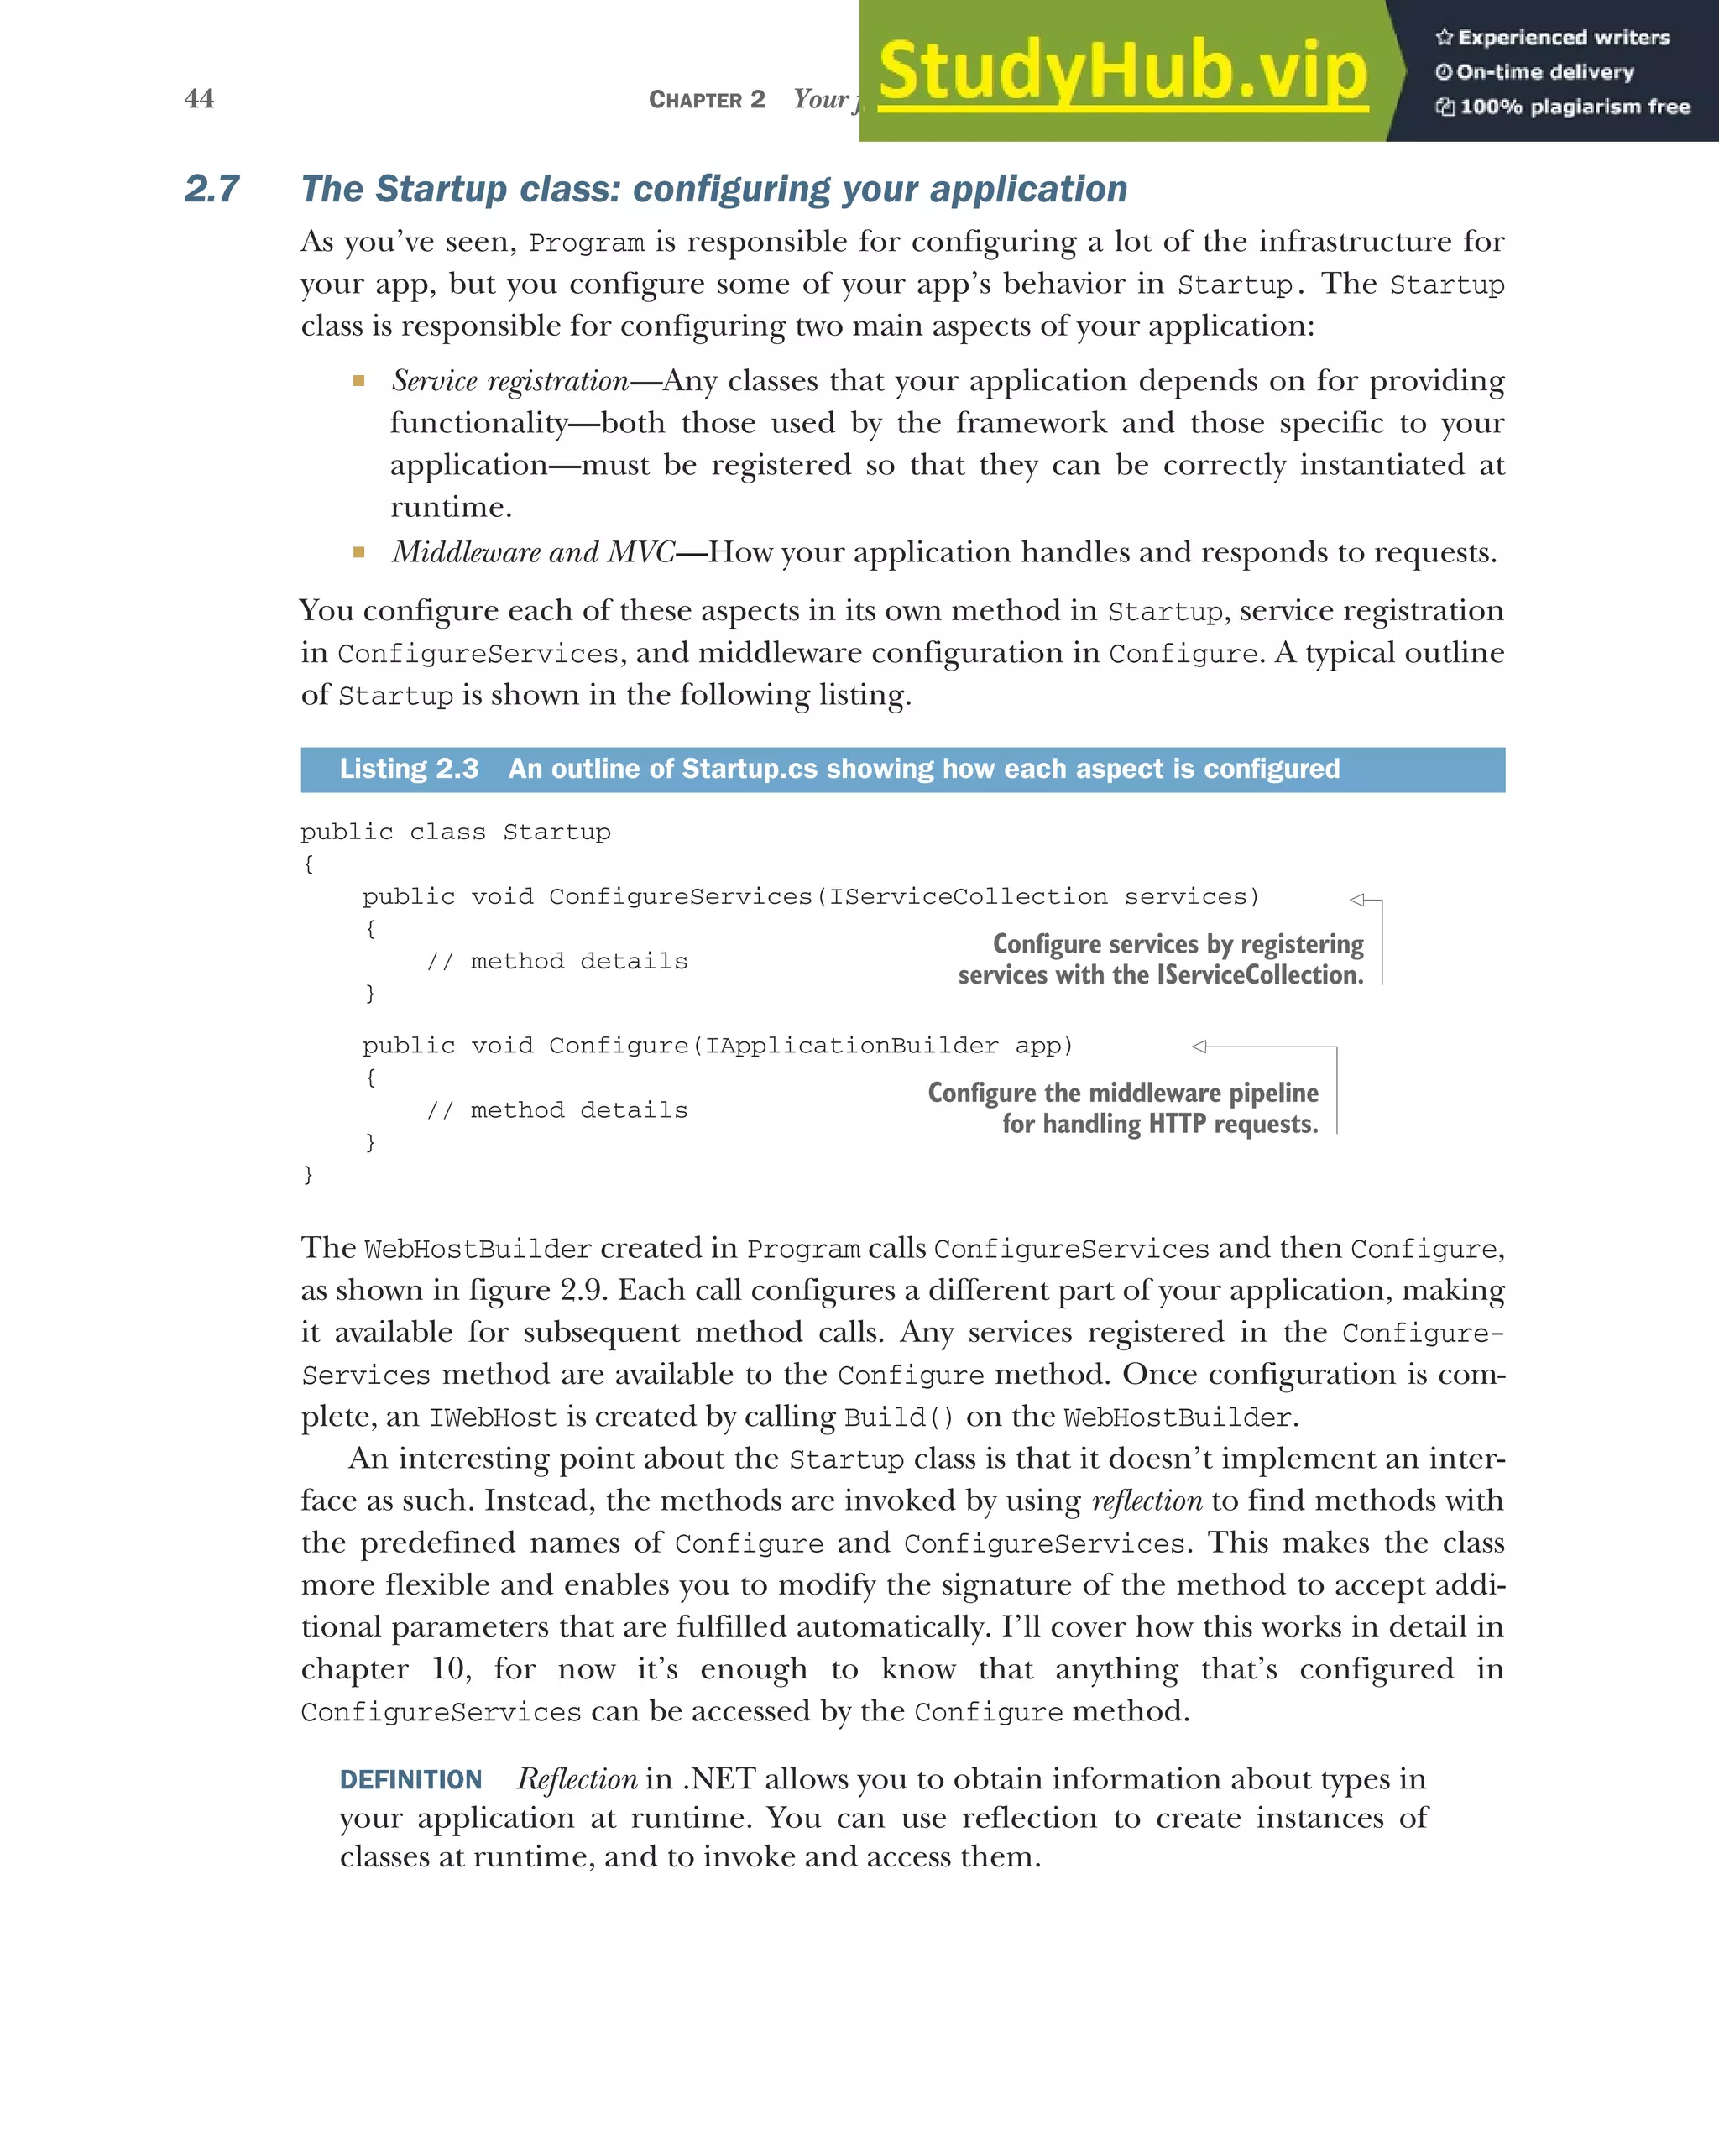
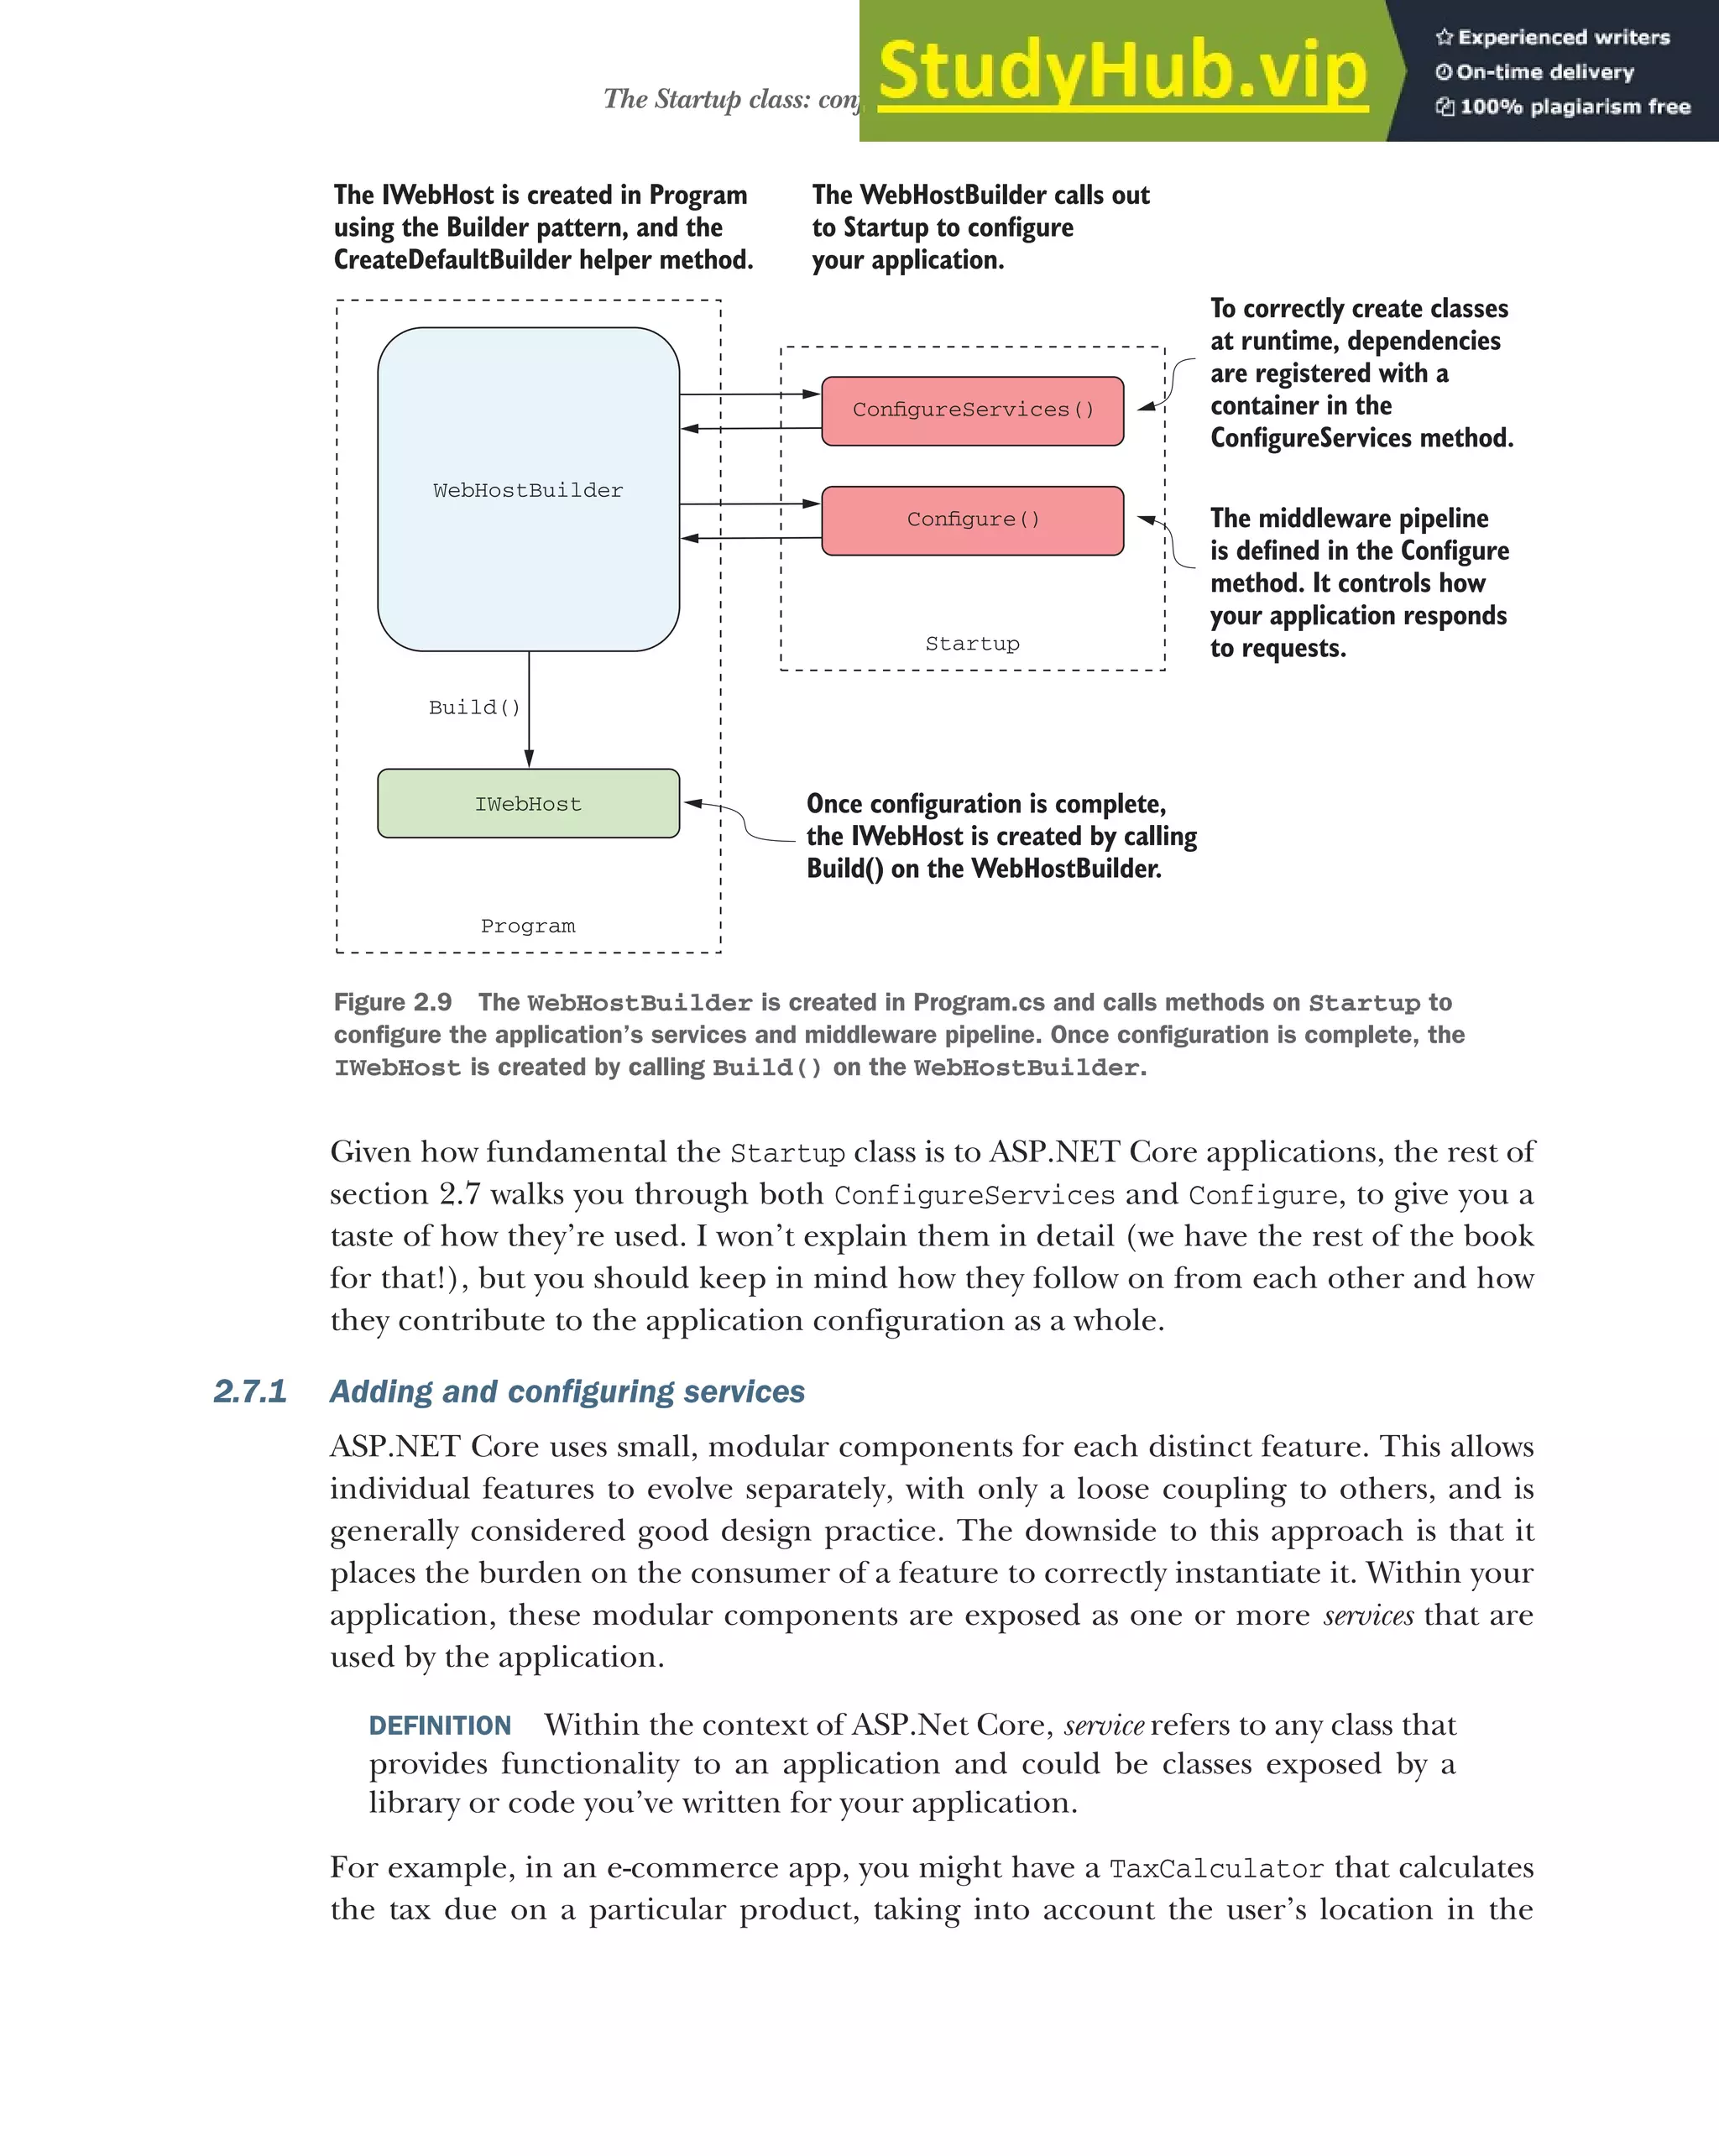

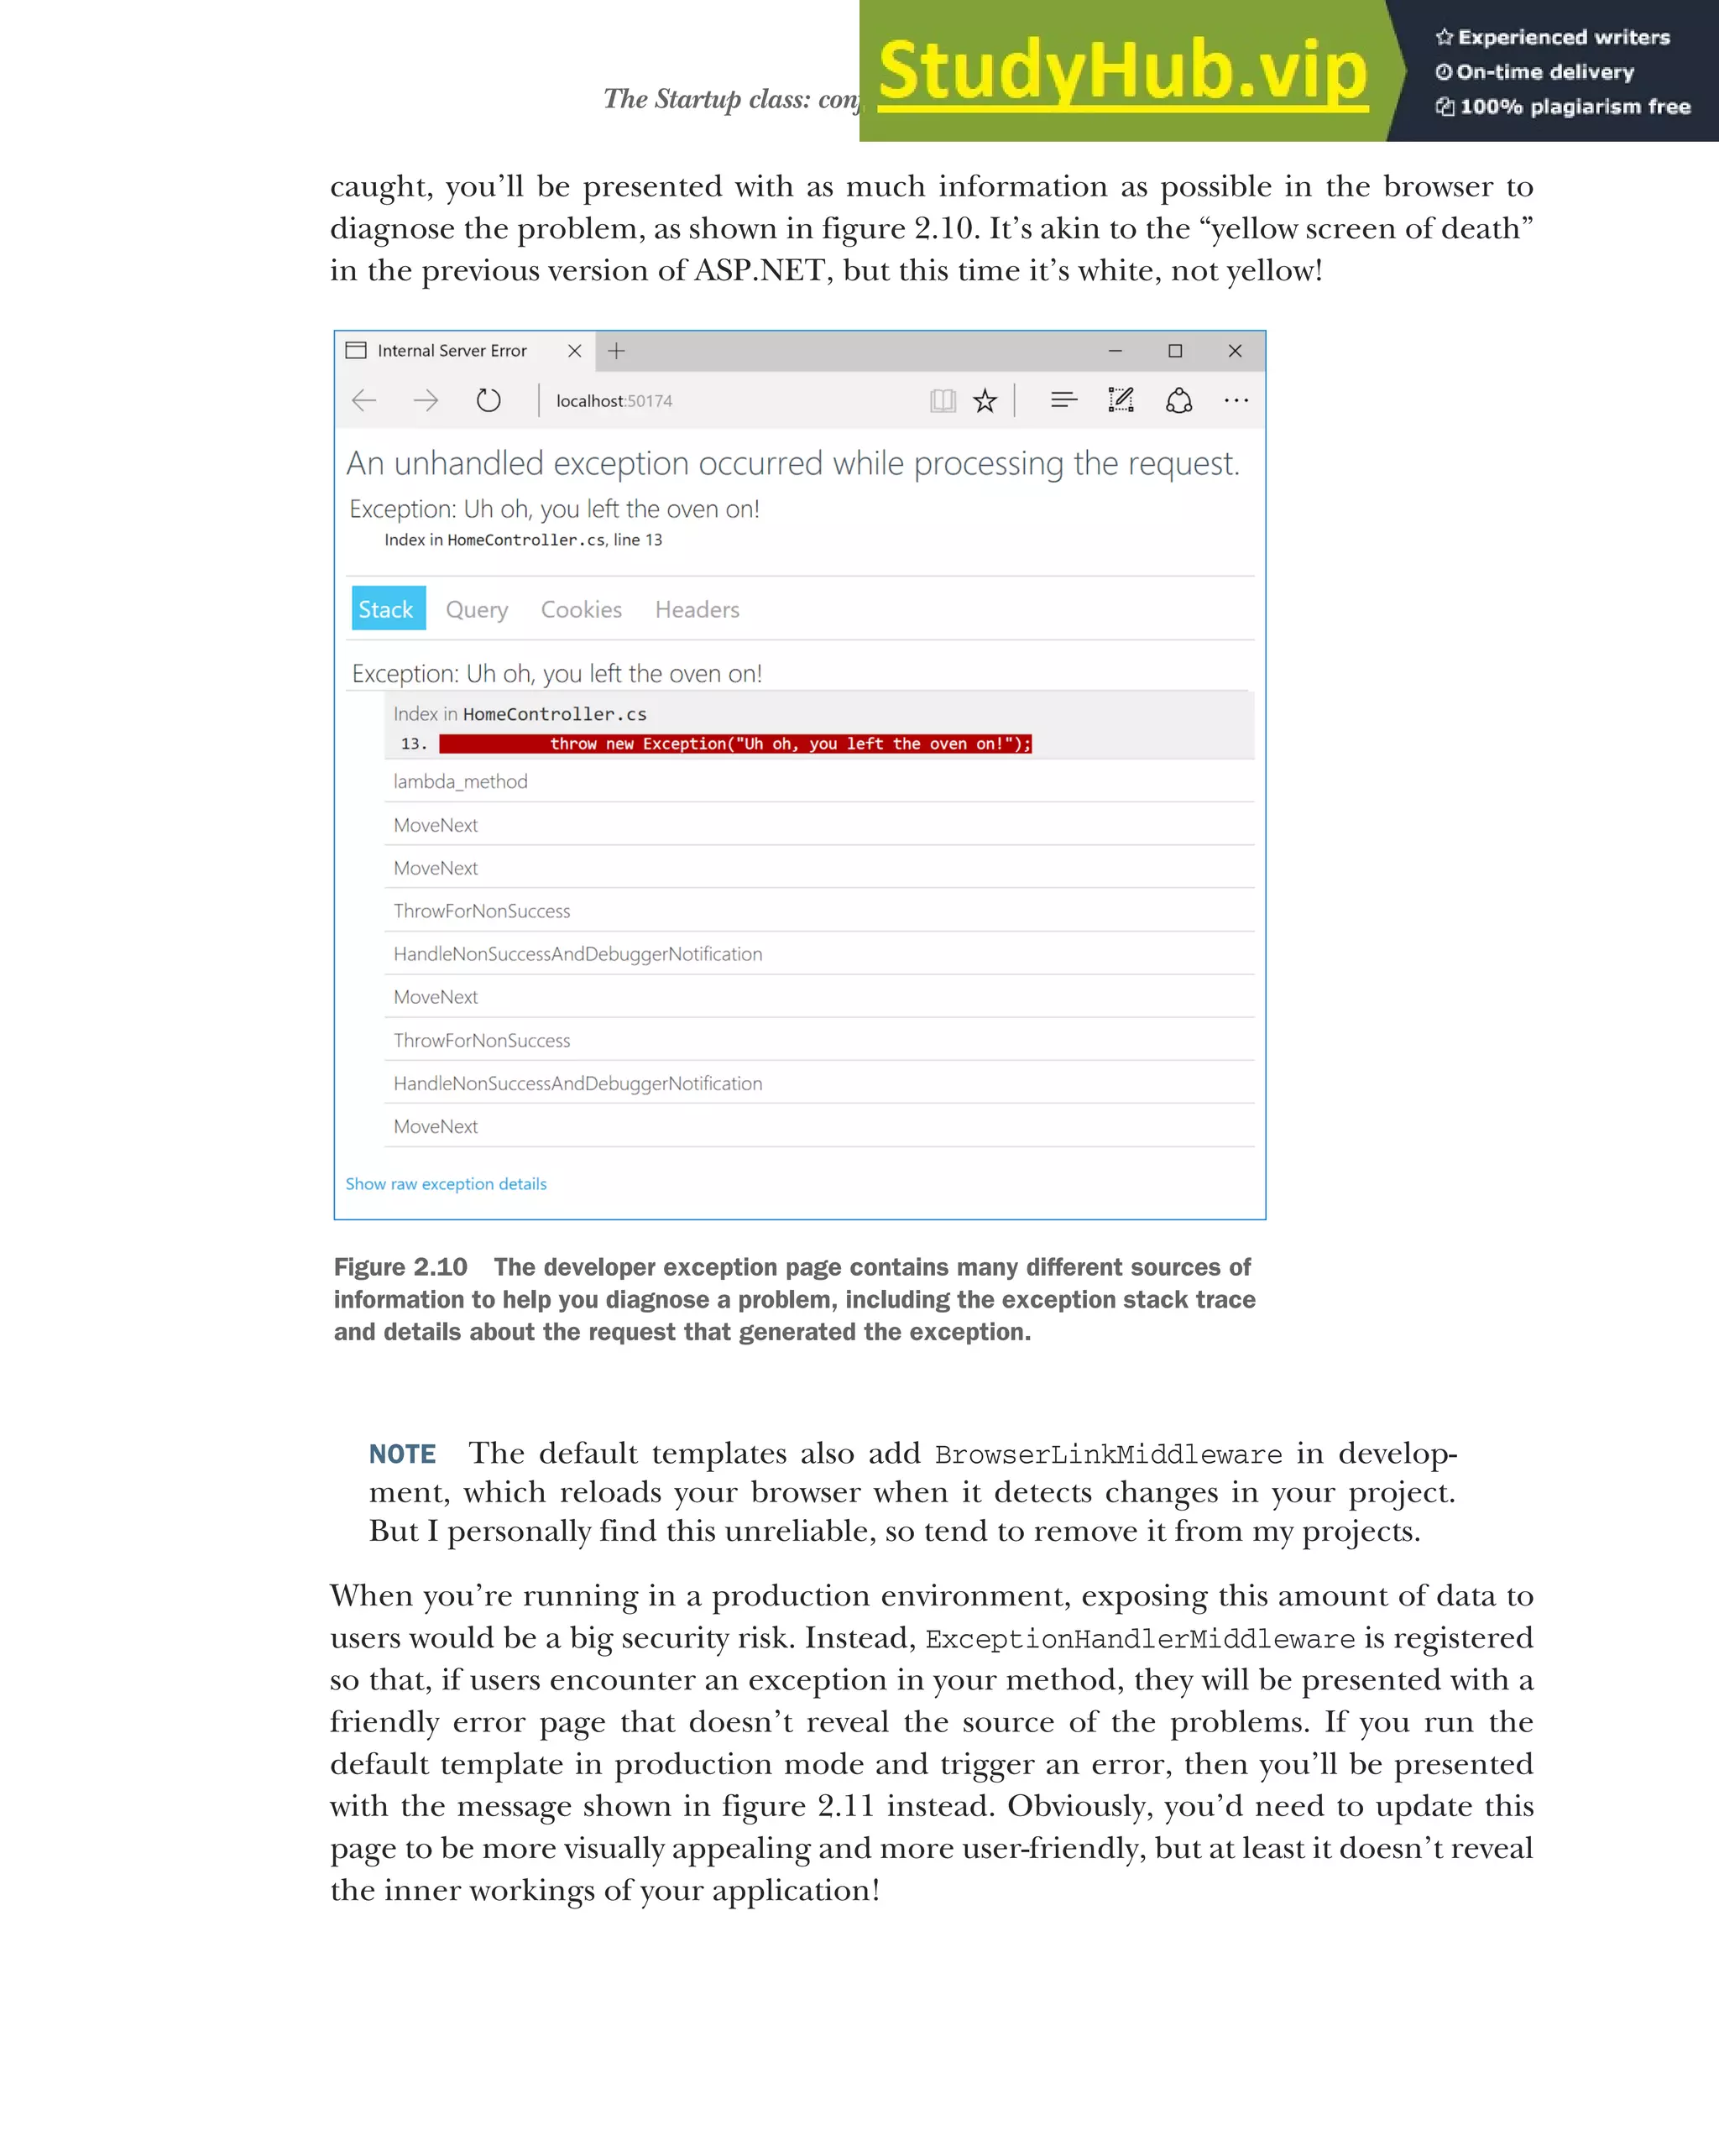


![52 CHAPTER 2 Your first application
2.8 MVC middleware and the home controller
When an ASP.NET Core application receives a request, it progresses through the mid-
dleware pipeline until a middleware component can handle it, as you saw in figure
2.12. Normally, the final piece of middleware in a pipeline is the MVC middleware.
This middleware will attempt to match a request’s path to a configured route, which
defines which controller and action method to invoke. A path is the remainder of the
request URL, once the domain has been removed. For example, for a request to
www.microsoft.com/account/manage, the path is /account/manage.
DEFINITION An action is a method that runs in response to a request. A con-
troller is a class that contains a number of action methods that can be logi-
cally grouped.
Once the middleware has selected a controller and action for a given request, the
appropriate class will be instantiated and the action method invoked. Controllers are
ordinary classes, though they often inherit from the Controller base class to provide
access to a number of helper methods, as shown in the following listing. Similarly,
there’s nothing special about action methods, other than that they typically return an
IActionResult, which contains instructions for handling the request.
public class HomeController : Controller
{
public IActionResult Index()
{
return View();
}
public IActionResult About()
{
ViewData["Message"] =
"Your application description page.";
return View();
}
public IActionResult Contact()
{
ViewData["Message"] = "Your contact page.";
return View();
}
public IActionResult Error()
{
Listing 2.6 The HomeController—an MVC controller
Action
methods
typically
return a
ViewResult
by calling
the View()
helper
method.
MVC controllers can inherit
from a helper base class but
don’t have to.
Data can be passed to
a view using the
ViewData dictionary.
Data can be passed to
a view using the
ViewData dictionary.
If not specified,
the name of the
view is taken
from the name
of the action
method.](https://image.slidesharecdn.com/asp-230807173723-31e70040/75/ASP-NET-Core-in-Action-2018-pdf-80-2048.jpg)
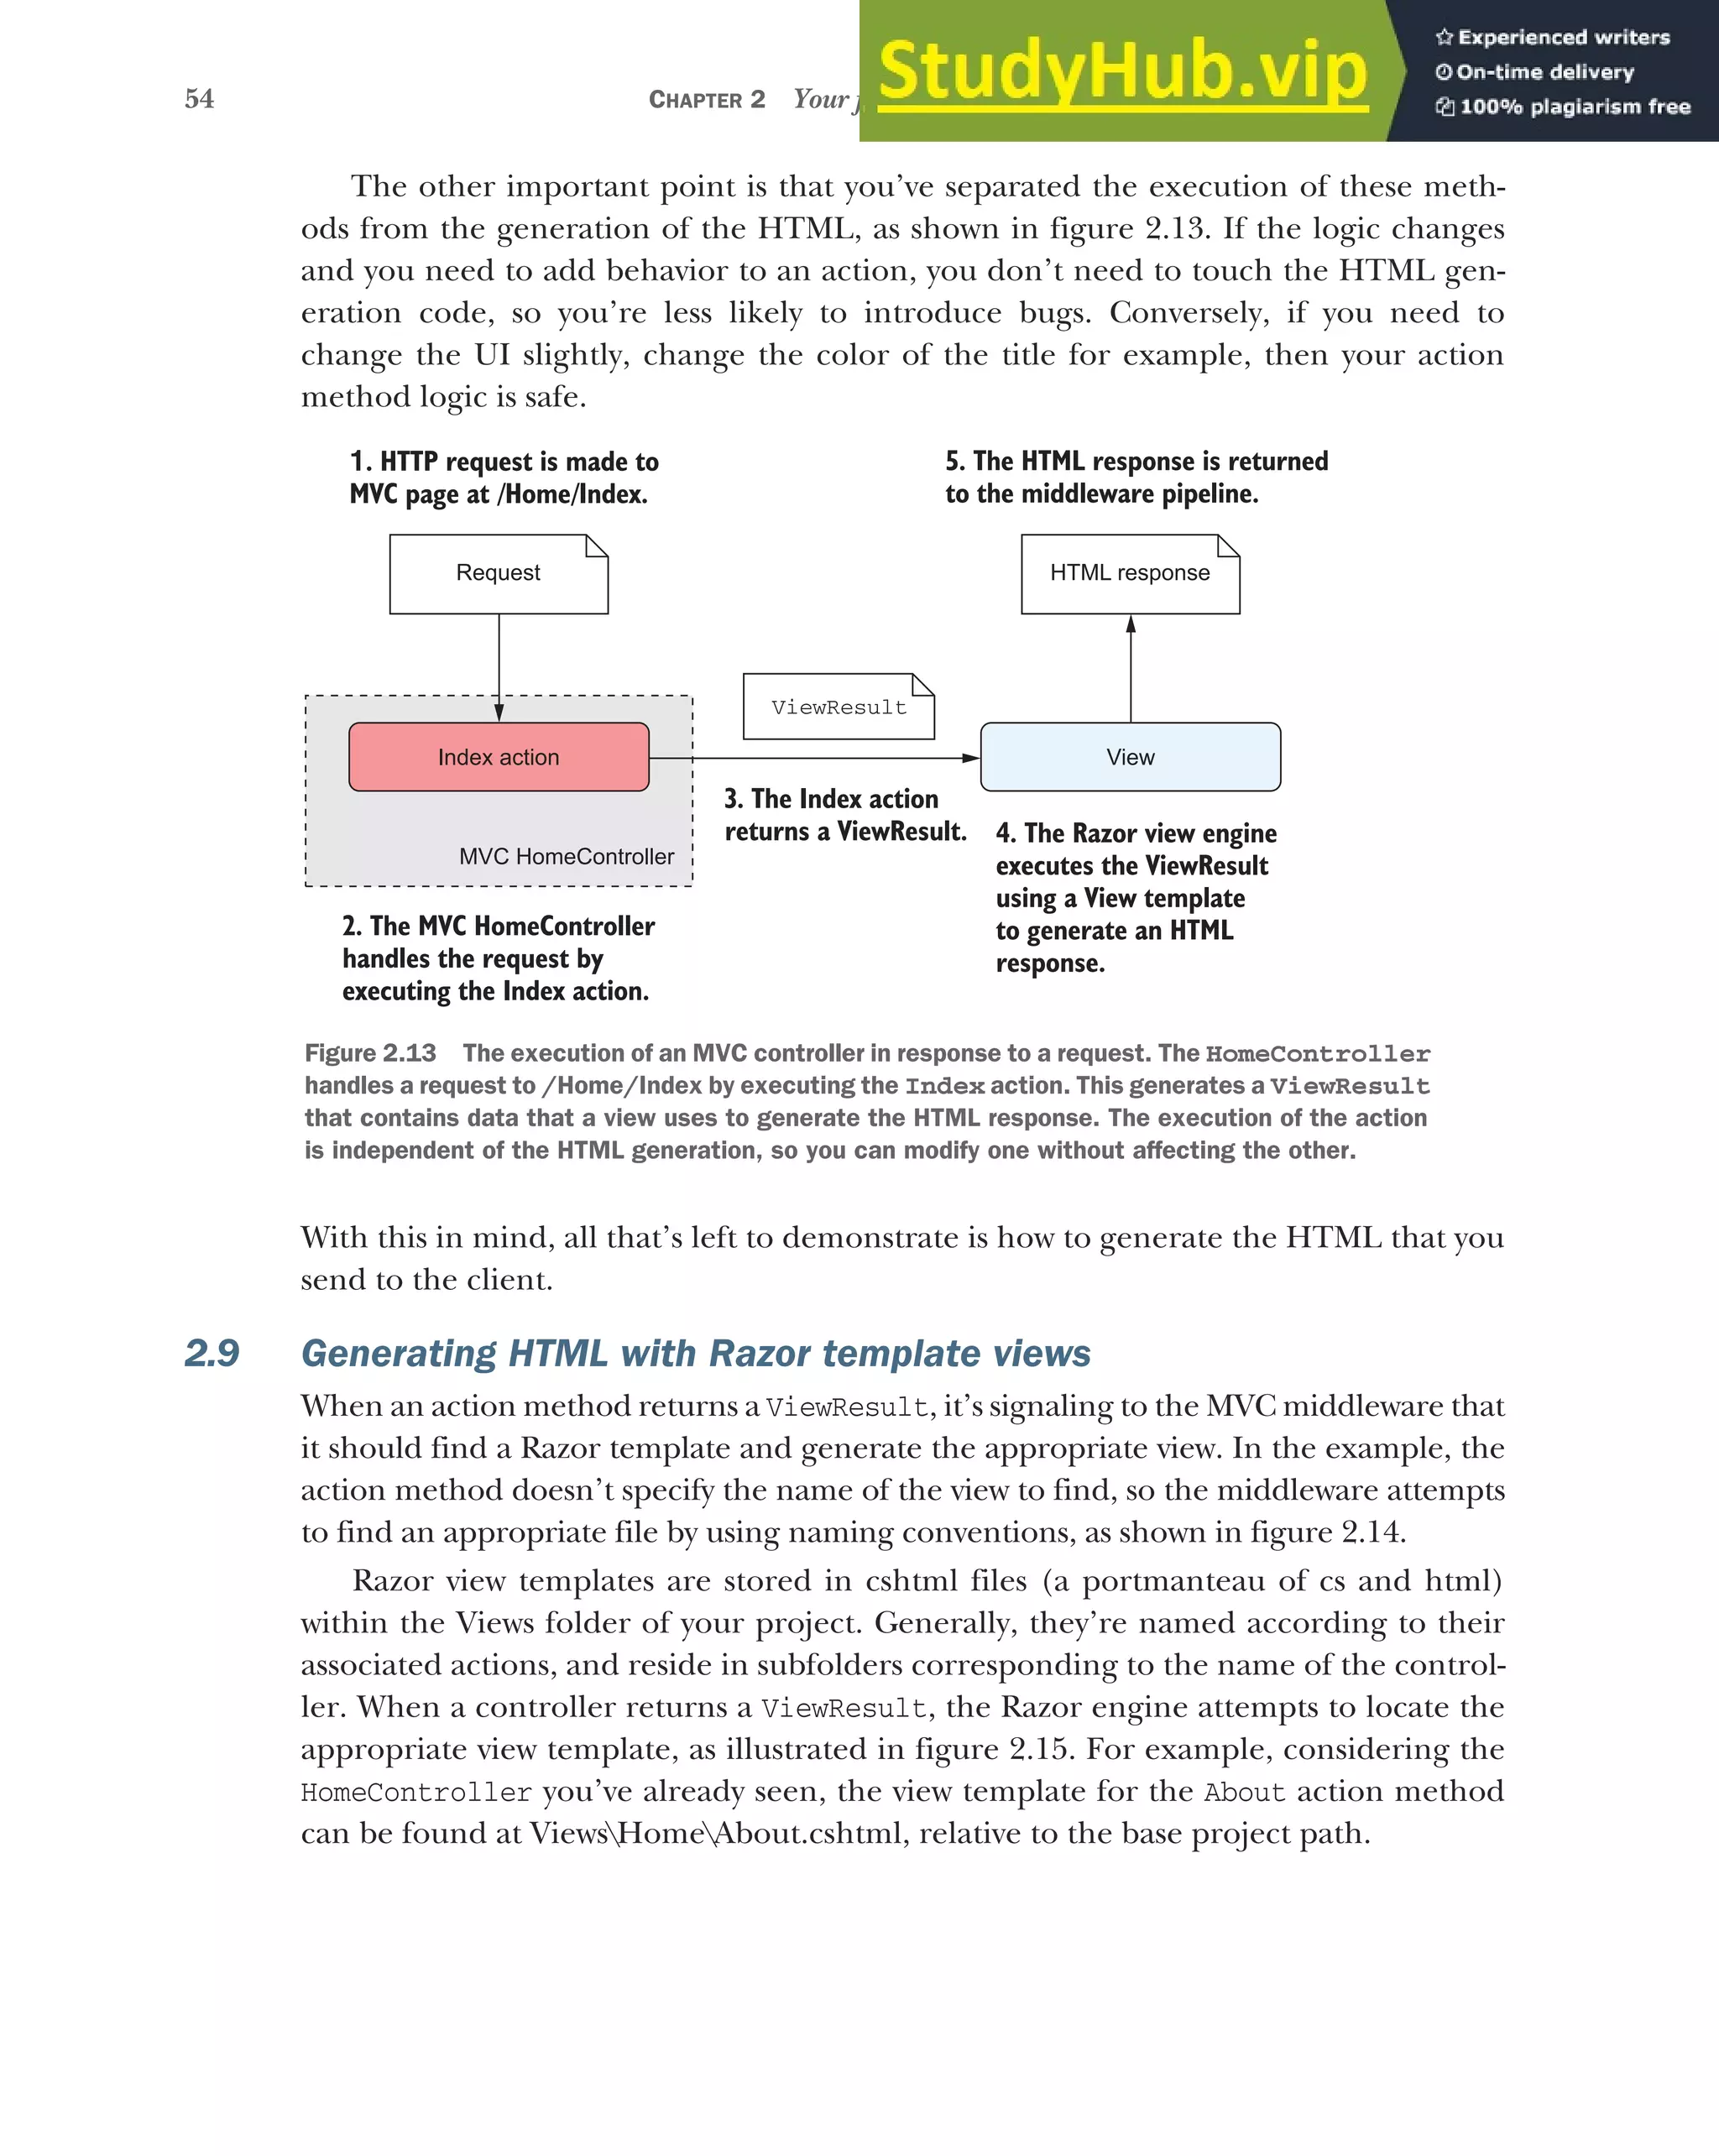
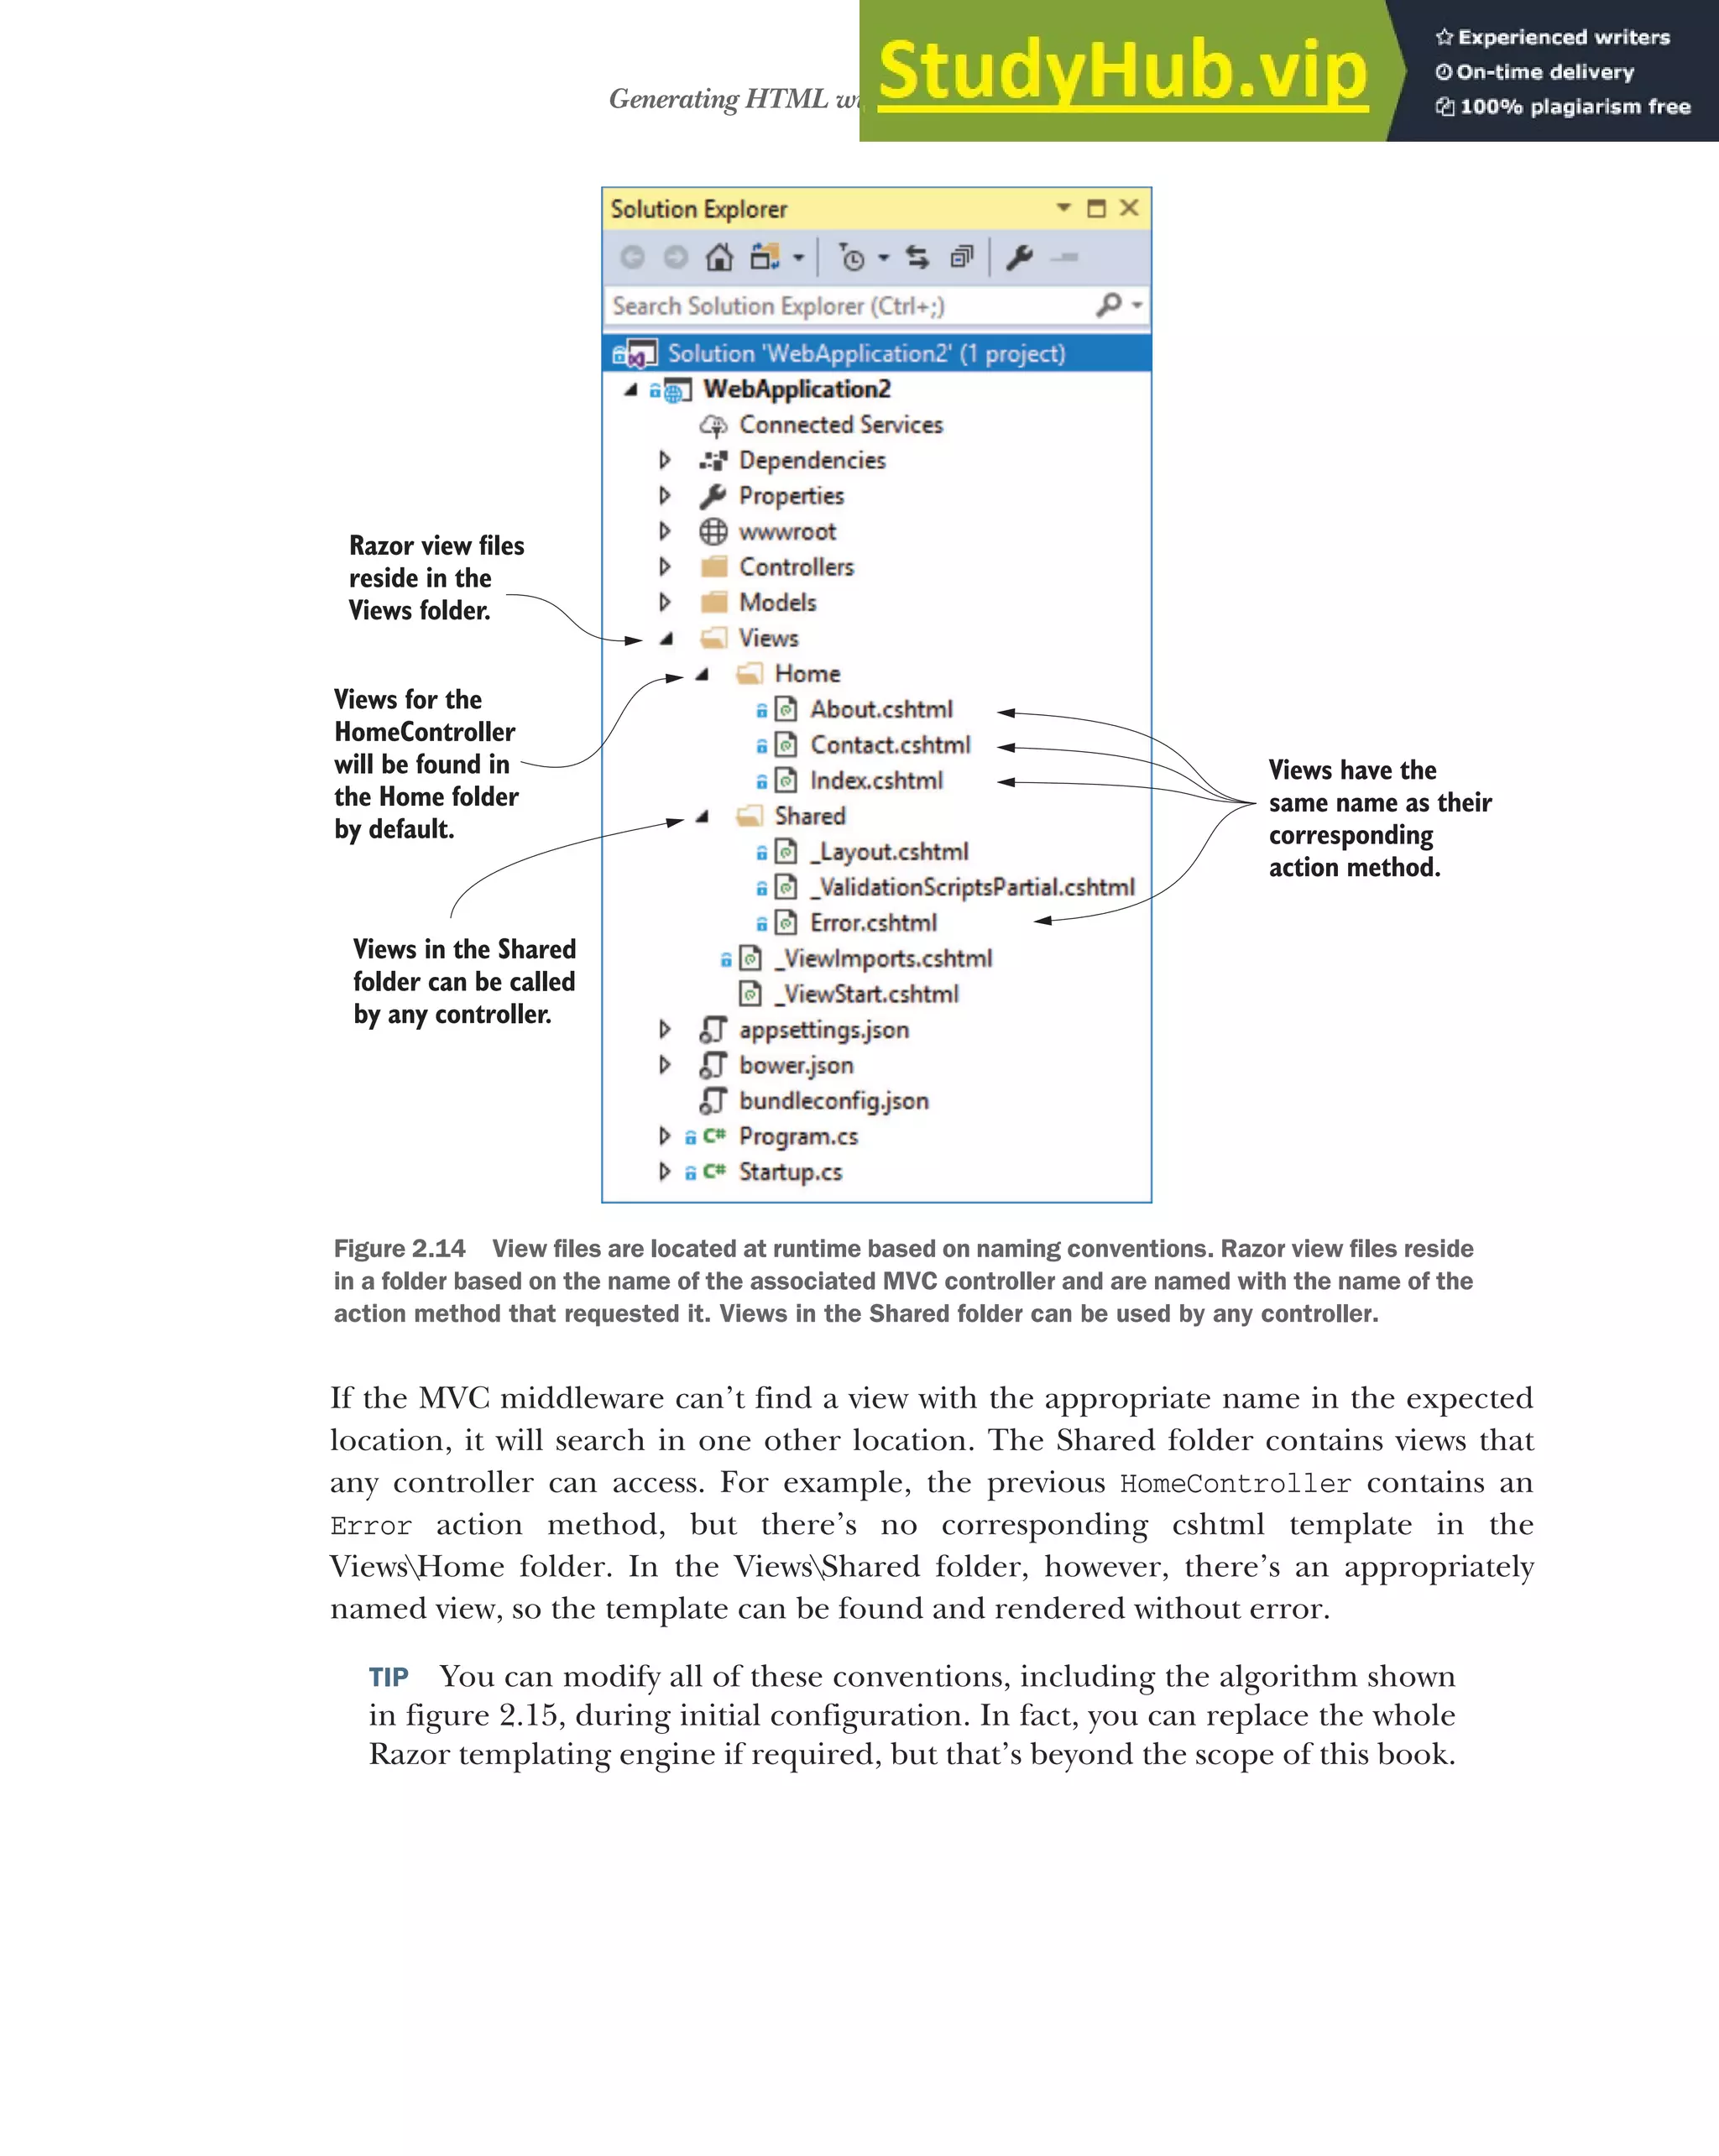
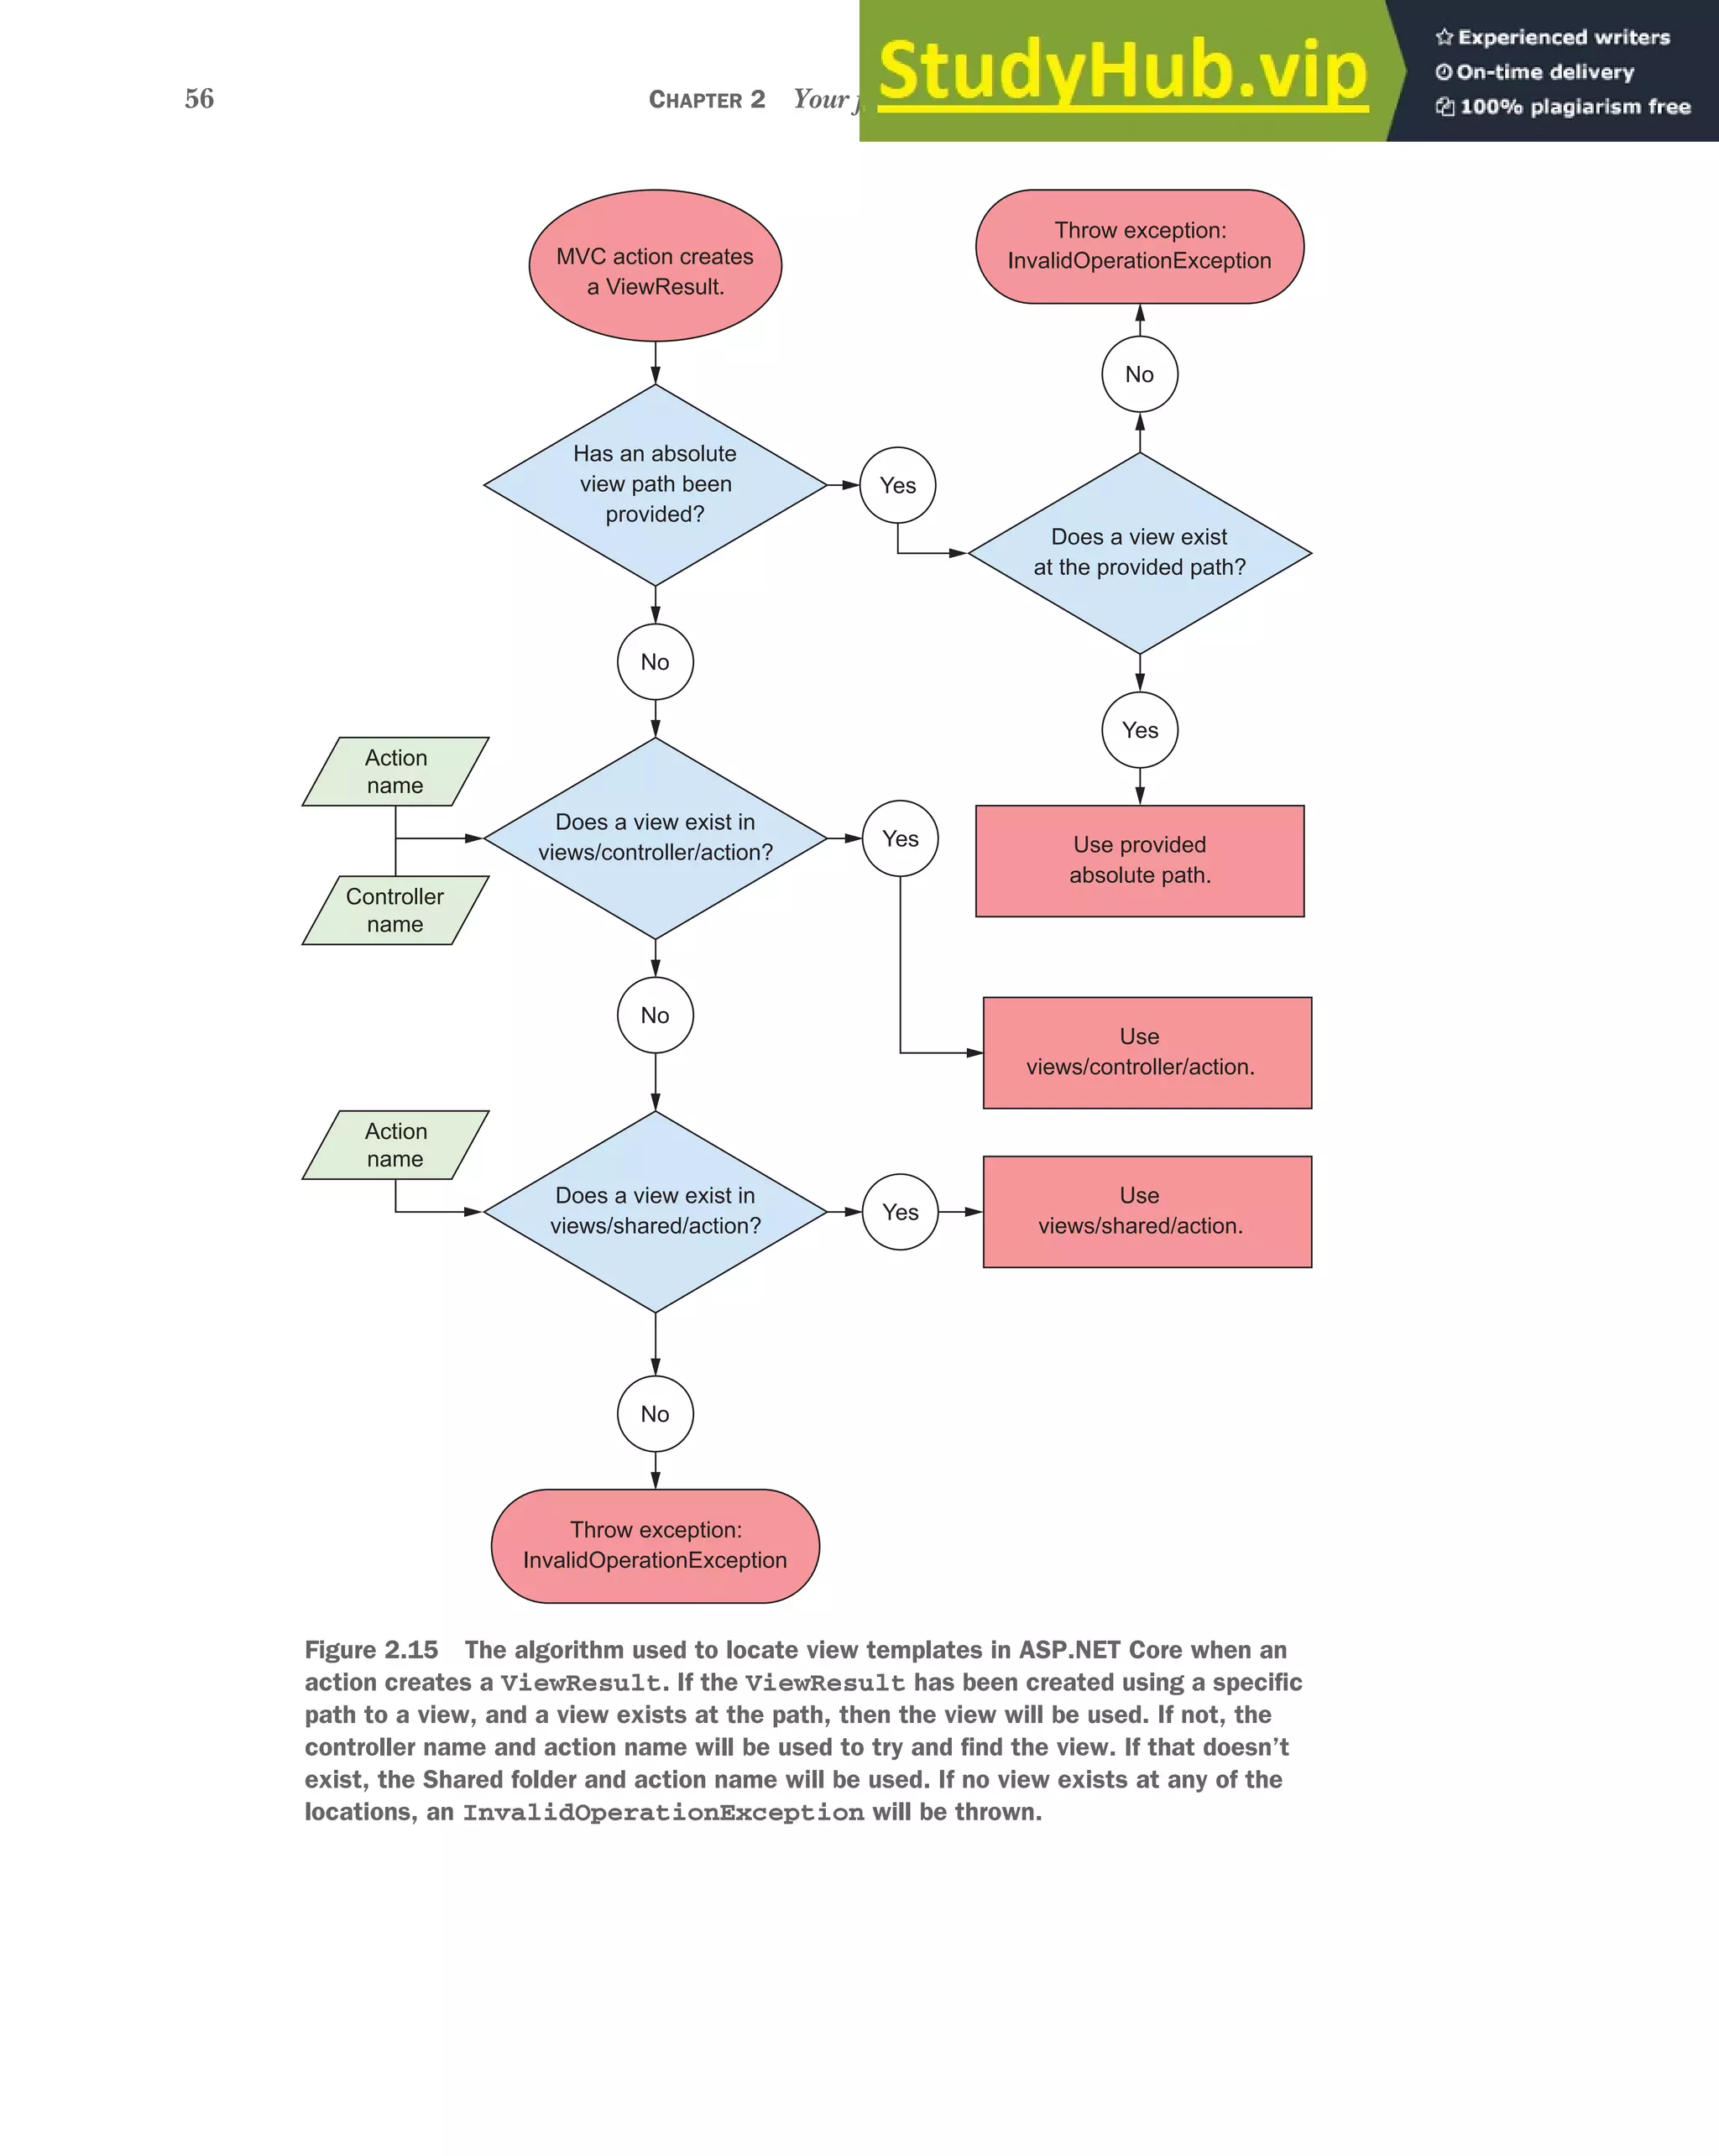
![57
Generating HTML with Razor template views
Once the template has been located, it can be executed. Figure 2.16 shows the result
of executing the About action method and rendering the associated Razor template.
The following listing shows the contents of the About.cshtml file. You can see that
the file consists of a combination of some standalone C# code, some standalone
HTML, and some points where you’re writing C# values in the HTML.
@{
ViewData["Title"] = "About";
}
<h2>@ViewData["Title"]</h2>
<h3>@ViewData["Message"]</h3>
<p>Use this area to provide additional information.</p>
This file, although small, demonstrates three features of Razor that you can use when
building your templates. The simplest and most obvious point is that standalone,
static HTML is always valid in a template and will be rendered as is in the response.
Second, you can write ordinary C# code in Razor templates by using this construct
@{ /* C# code here */ }
Any code between the curly braces will be executed but won’t be written to the
response. In the listing you’re setting the title of the page by writing a key to the View-
Data dictionary, but you aren’t writing anything to the response at this point:
@{
ViewData["Title"] = "About";
}
Listing 2.7 A simple Razor template—About.cshtml
Figure 2.16 Rendering a Razor template to HTML. The About
action is invoked and returns a ViewResult. The MVC
middleware searches for the appropriate Razor template and
executes it to generate the HTML displayed in the browser.
C# code that doesn’t write to
the response
HTML with dynamic C# values
written to the response
Standalone,
static HTML](https://image.slidesharecdn.com/asp-230807173723-31e70040/75/ASP-NET-Core-in-Action-2018-pdf-85-2048.jpg)
![58 CHAPTER 2 Your first application
Another feature shown in this template is dynamically writing C# variables to the
HTML stream using the @ symbol. This ability to combine dynamic and static markup
is what gives Razor templates their power. In the example, you’re fetching the "Title"
and "Message" values from the ViewData dictionary and writing the values to the
response inside the <h2> and <h3> tags, respectively:
<h2>@ViewData["Title"]</h2>
<h3>@ViewData["Message"]</h3>
You may also remember that you previously set the value of the "Message" key in the
About action method, which you’re now retrieving and writing to the response. This is
one of the ways to pass data from an action method to a view—we’ll discuss others in
chapter 7.
At this point, you might be a little confused by the template from the listing when
compared to the output shown in figure 2.16. The title and the message values appear
in both the listing and figure, but some parts of the final web page don’t appear in the
template. How can that be?
Razor has the concept of layouts, which are base templates that define the common
elements of your application, such as headers and footers. These layouts define a
writeable section in which they will render the action method template, such as the
code in listing 2.7. The HTML of the layout combines with the action method tem-
plate to produce the final HTML that’s sent to the browser. This prevents you having
to duplicate code for the header and footer in every page and means that, if you need
to tweak something, you’ll only need to do it in one place.
NOTE I’ll cover Razor templates, including layouts, in detail in chapter 7.
And there you have it, a complete ASP.NET Core MVC application! Before I move on,
we’ll take one last look at how our application handles a request. Figure 2.17 shows a
request to the /Home/About path being handled by the sample application. You’ve
seen everything here already, so the process of handling a request should be familiar.
It shows how the request passes through the middleware pipeline before being han-
dled by the MVC middleware. A view is used to generate the HTML response, which
passes back through the middleware to the ASP.NET Core web server, before being
sent to the user’s browser.
It’s been a pretty intense trip, but you now have a good overview of how an entire
application is configured and how it handles a request using MVC. In the next chap-
ter, you’ll take a closer look at the middleware pipeline that exists in all ASP.NET Core
applications. You’ll learn how it’s composed, how you can use it to add functionality to
your application, and how you can use it to create simple HTTP services.](https://image.slidesharecdn.com/asp-230807173723-31e70040/75/ASP-NET-Core-in-Action-2018-pdf-86-2048.jpg)
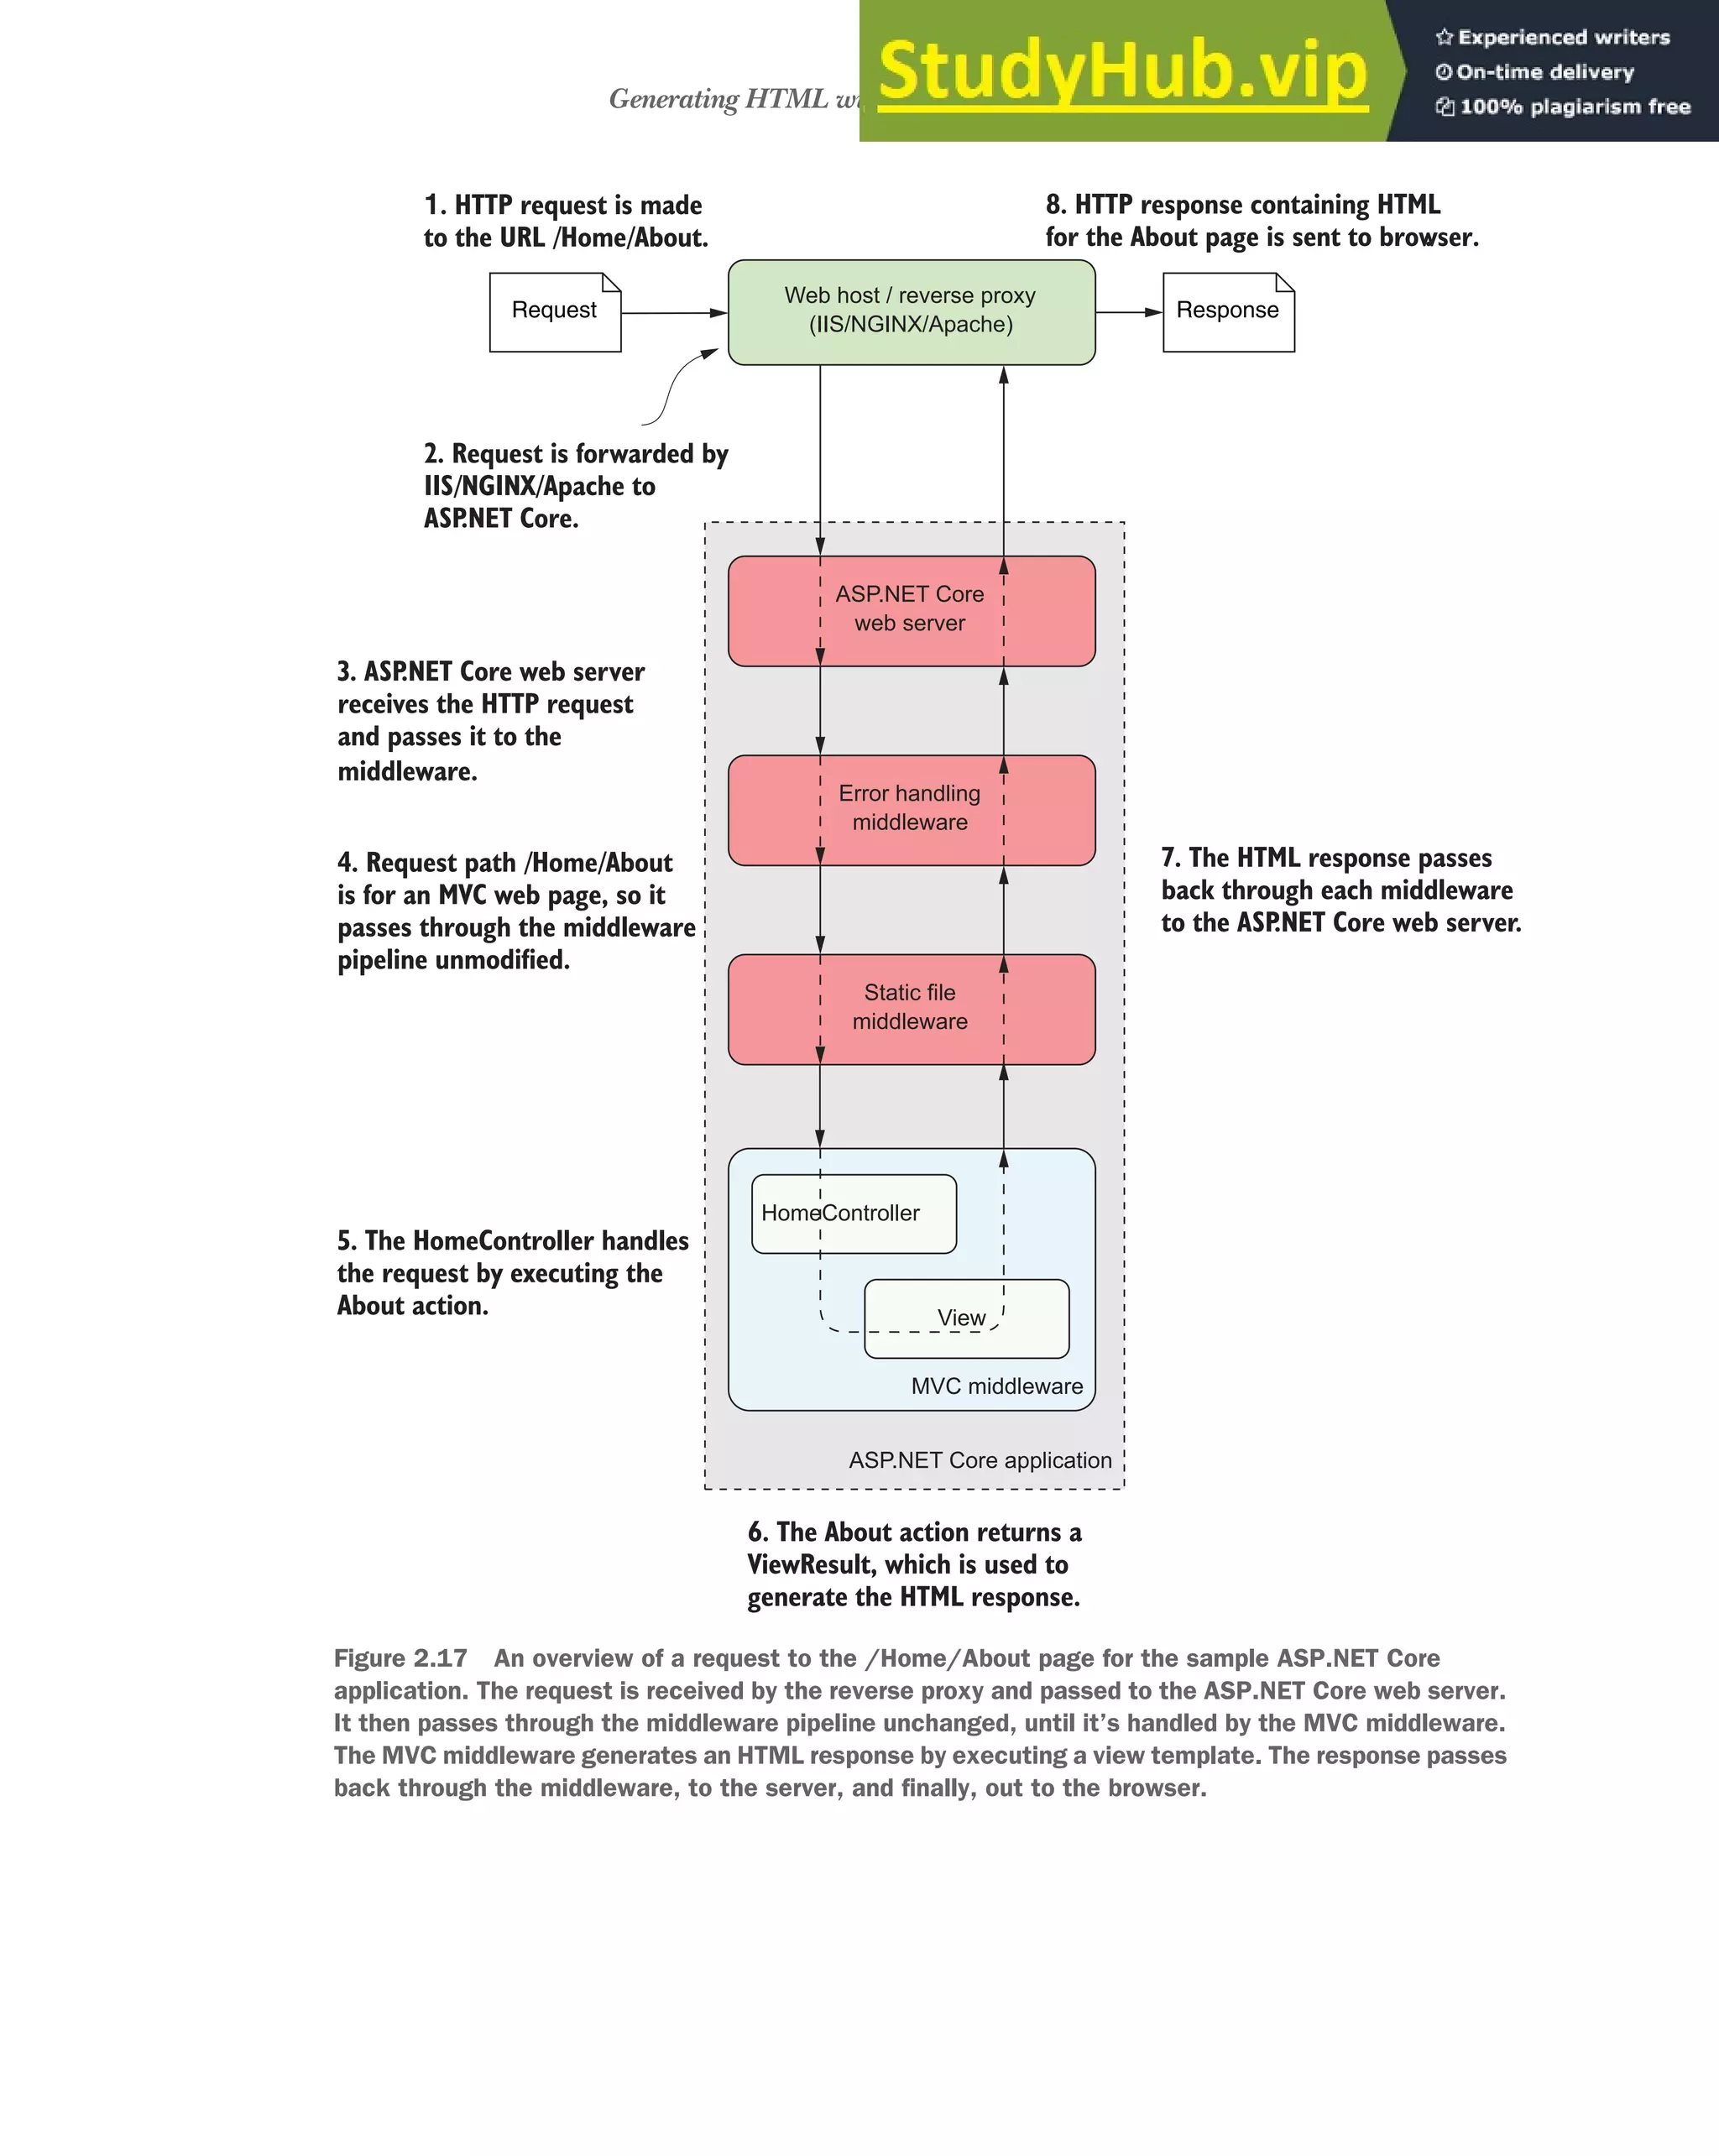


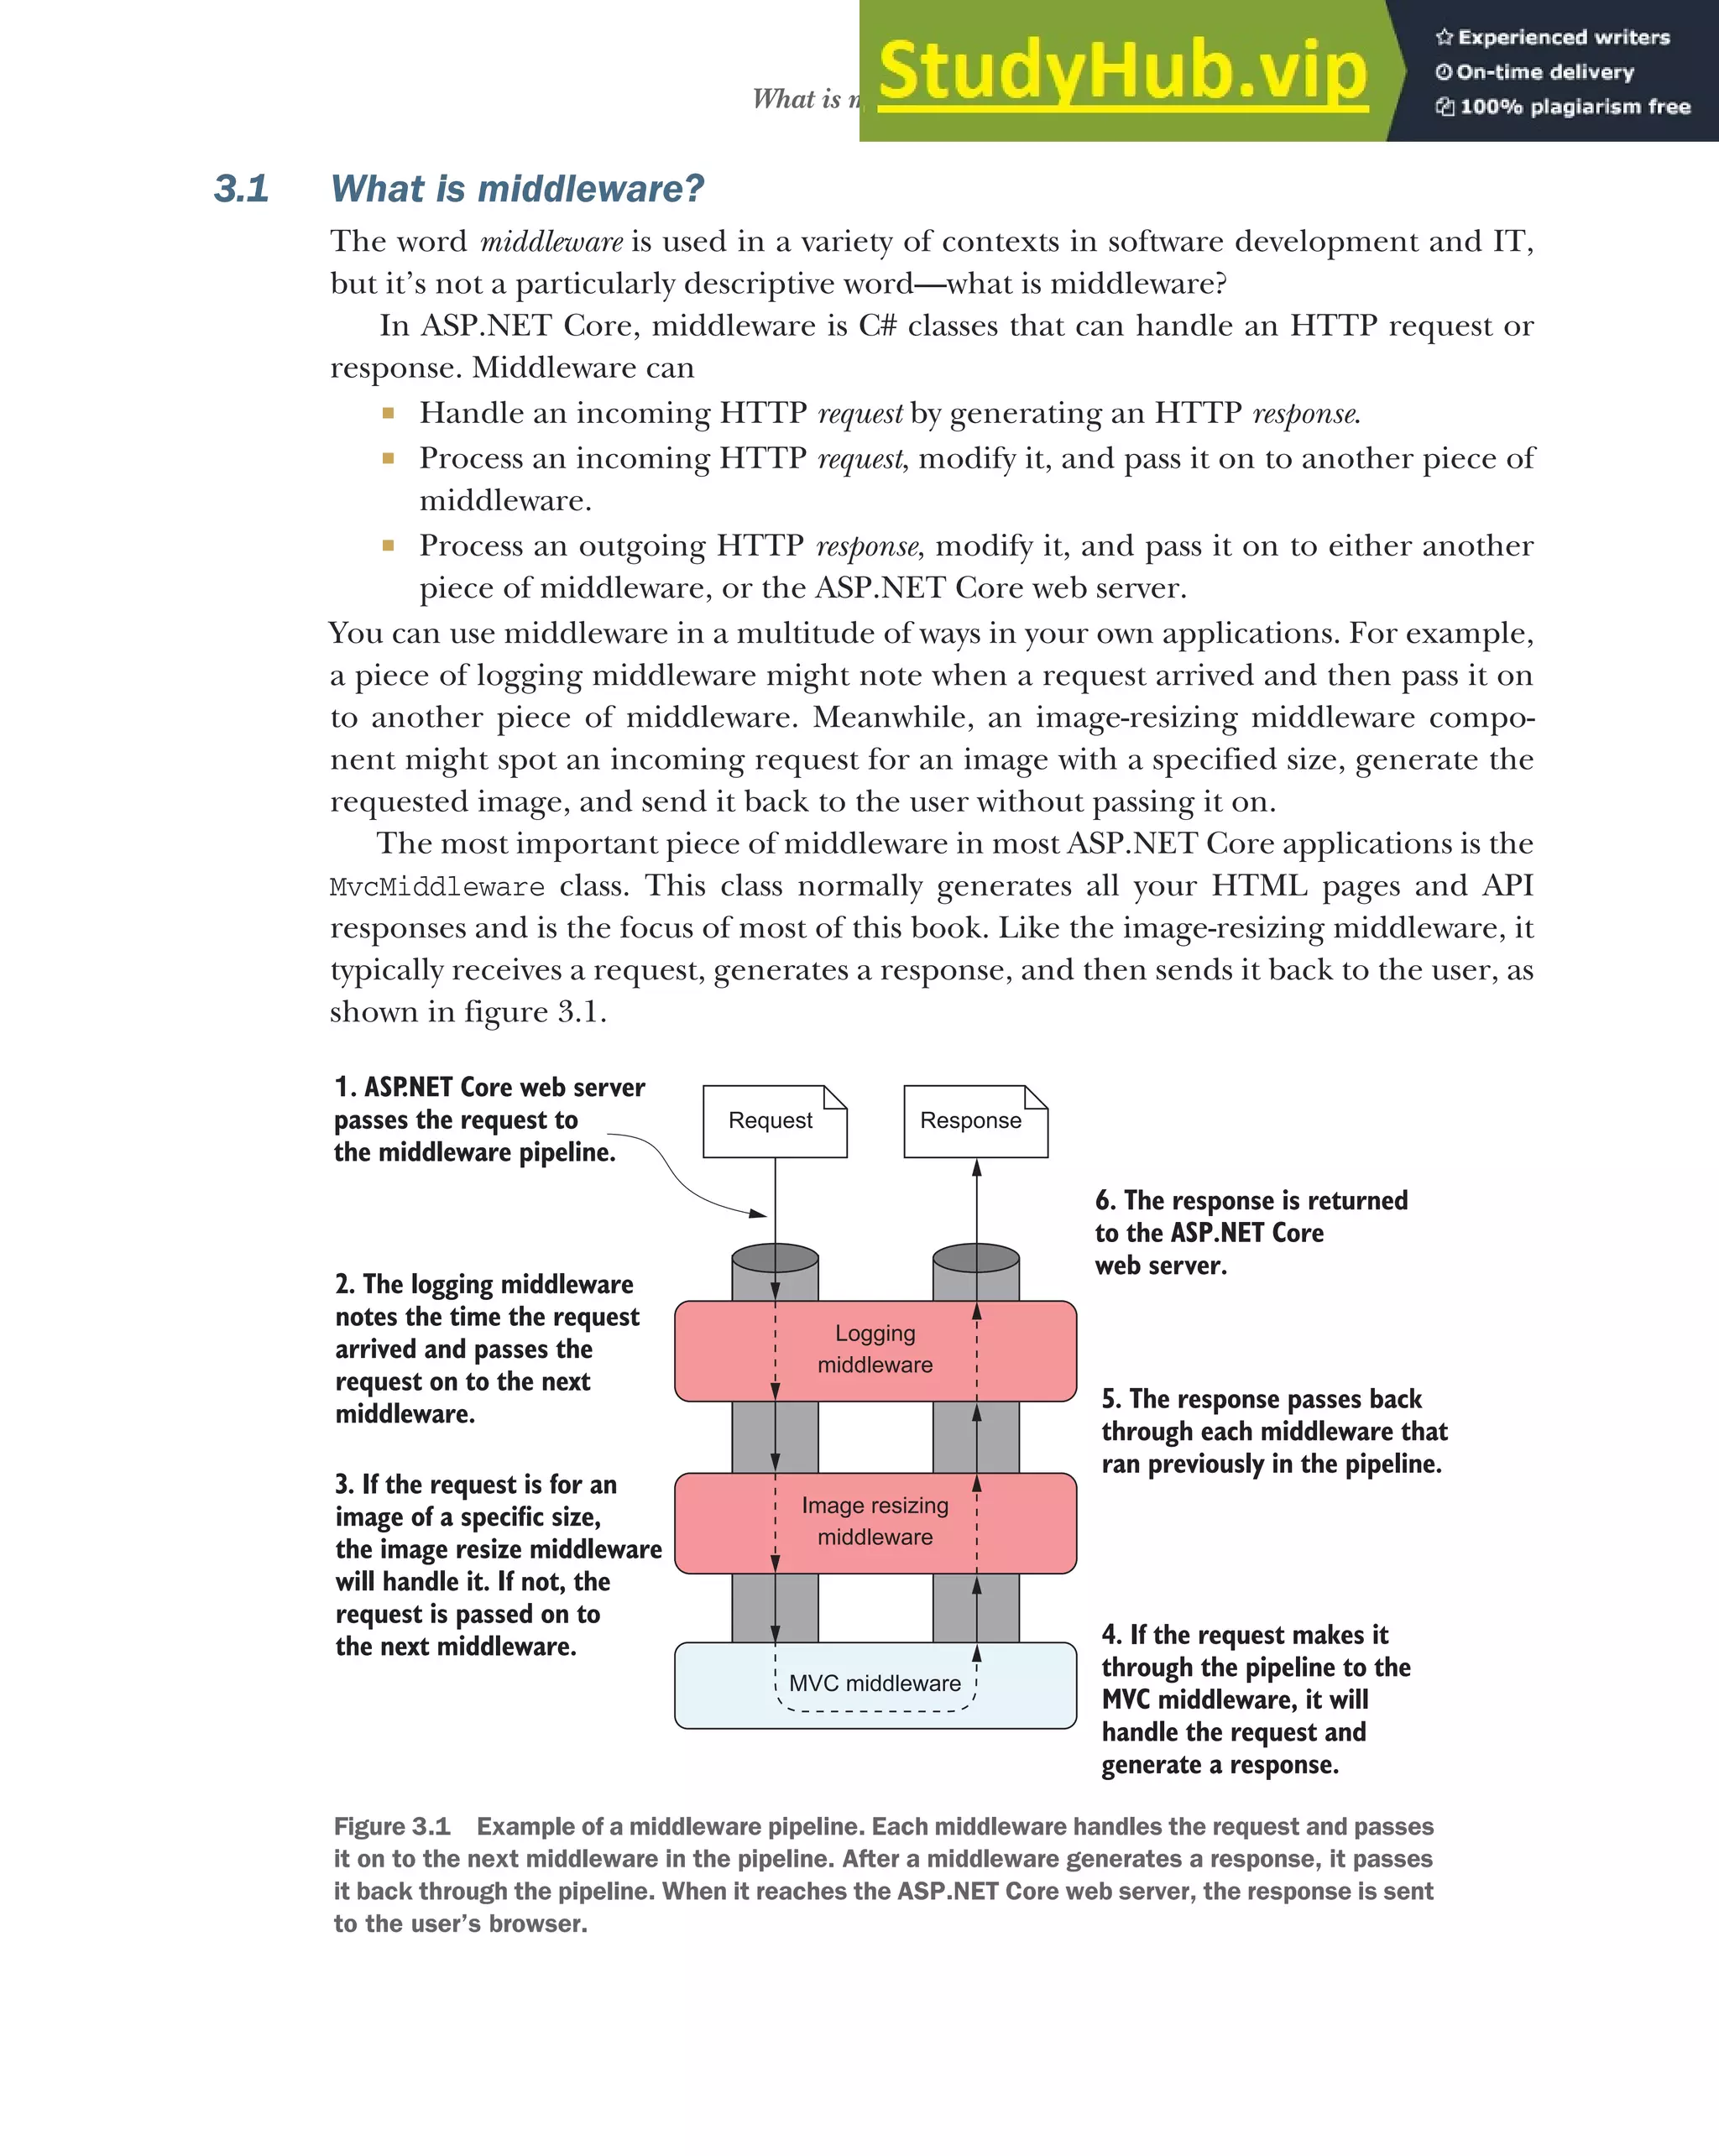


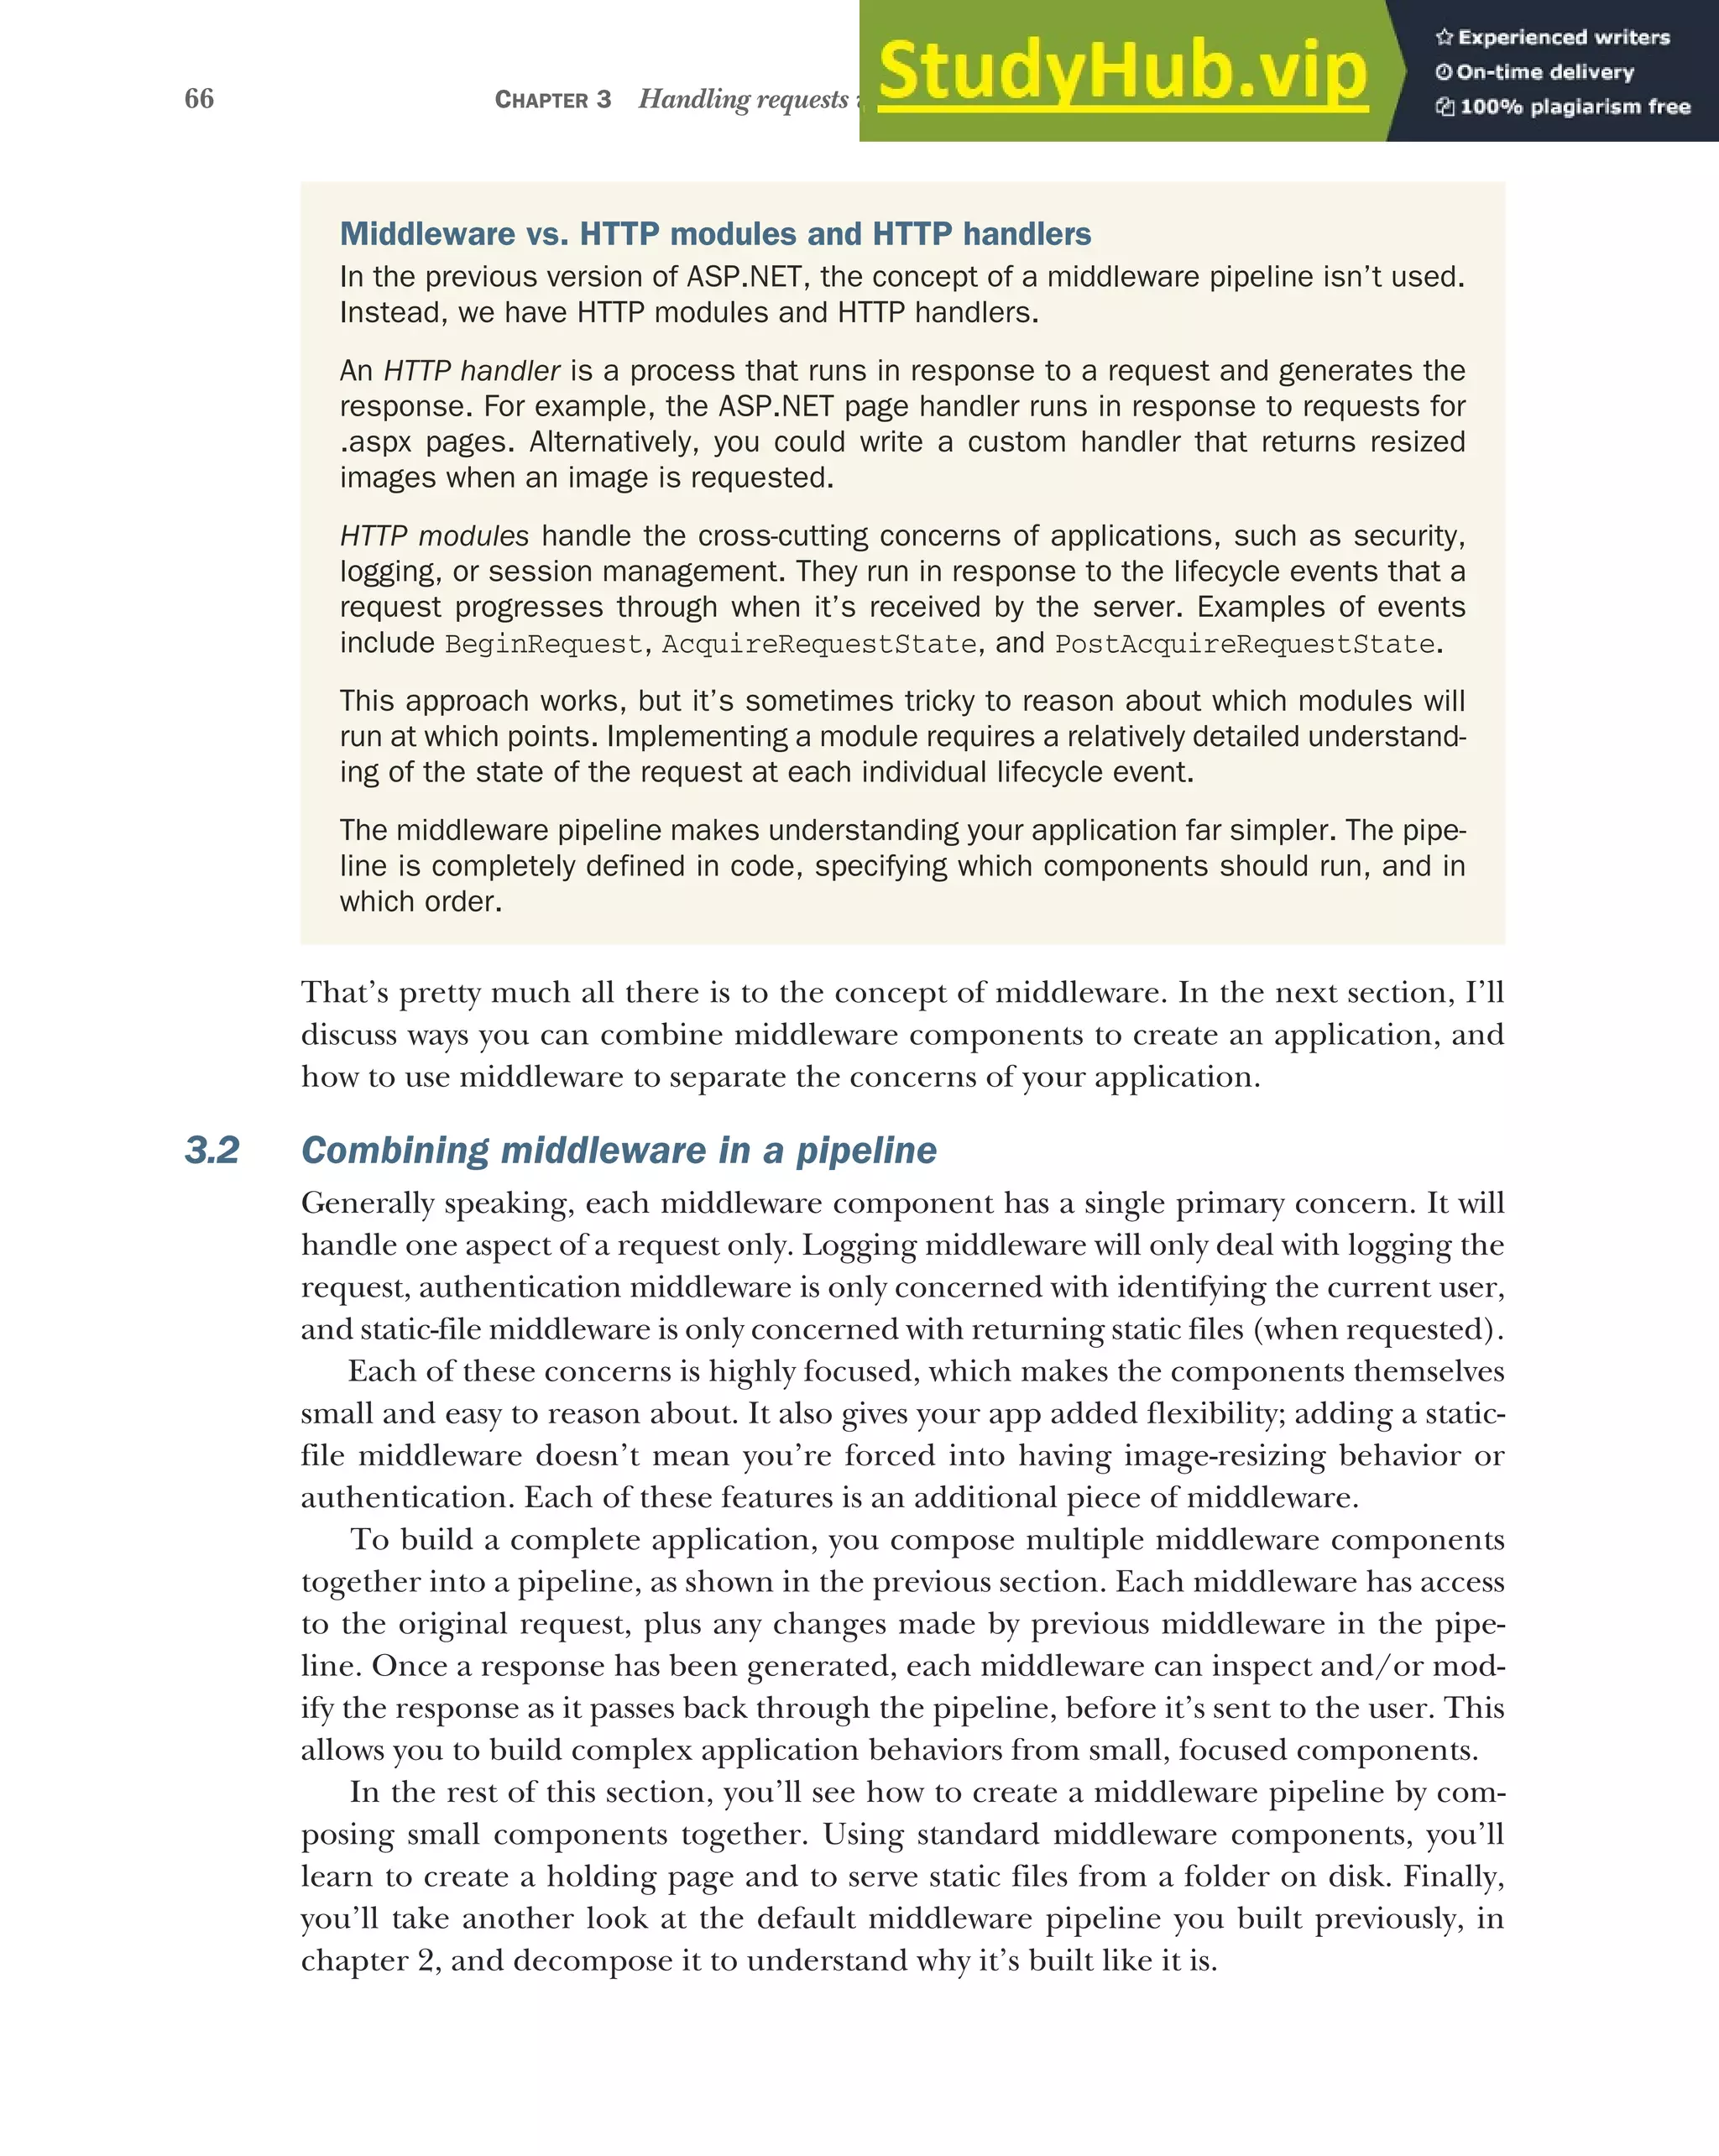
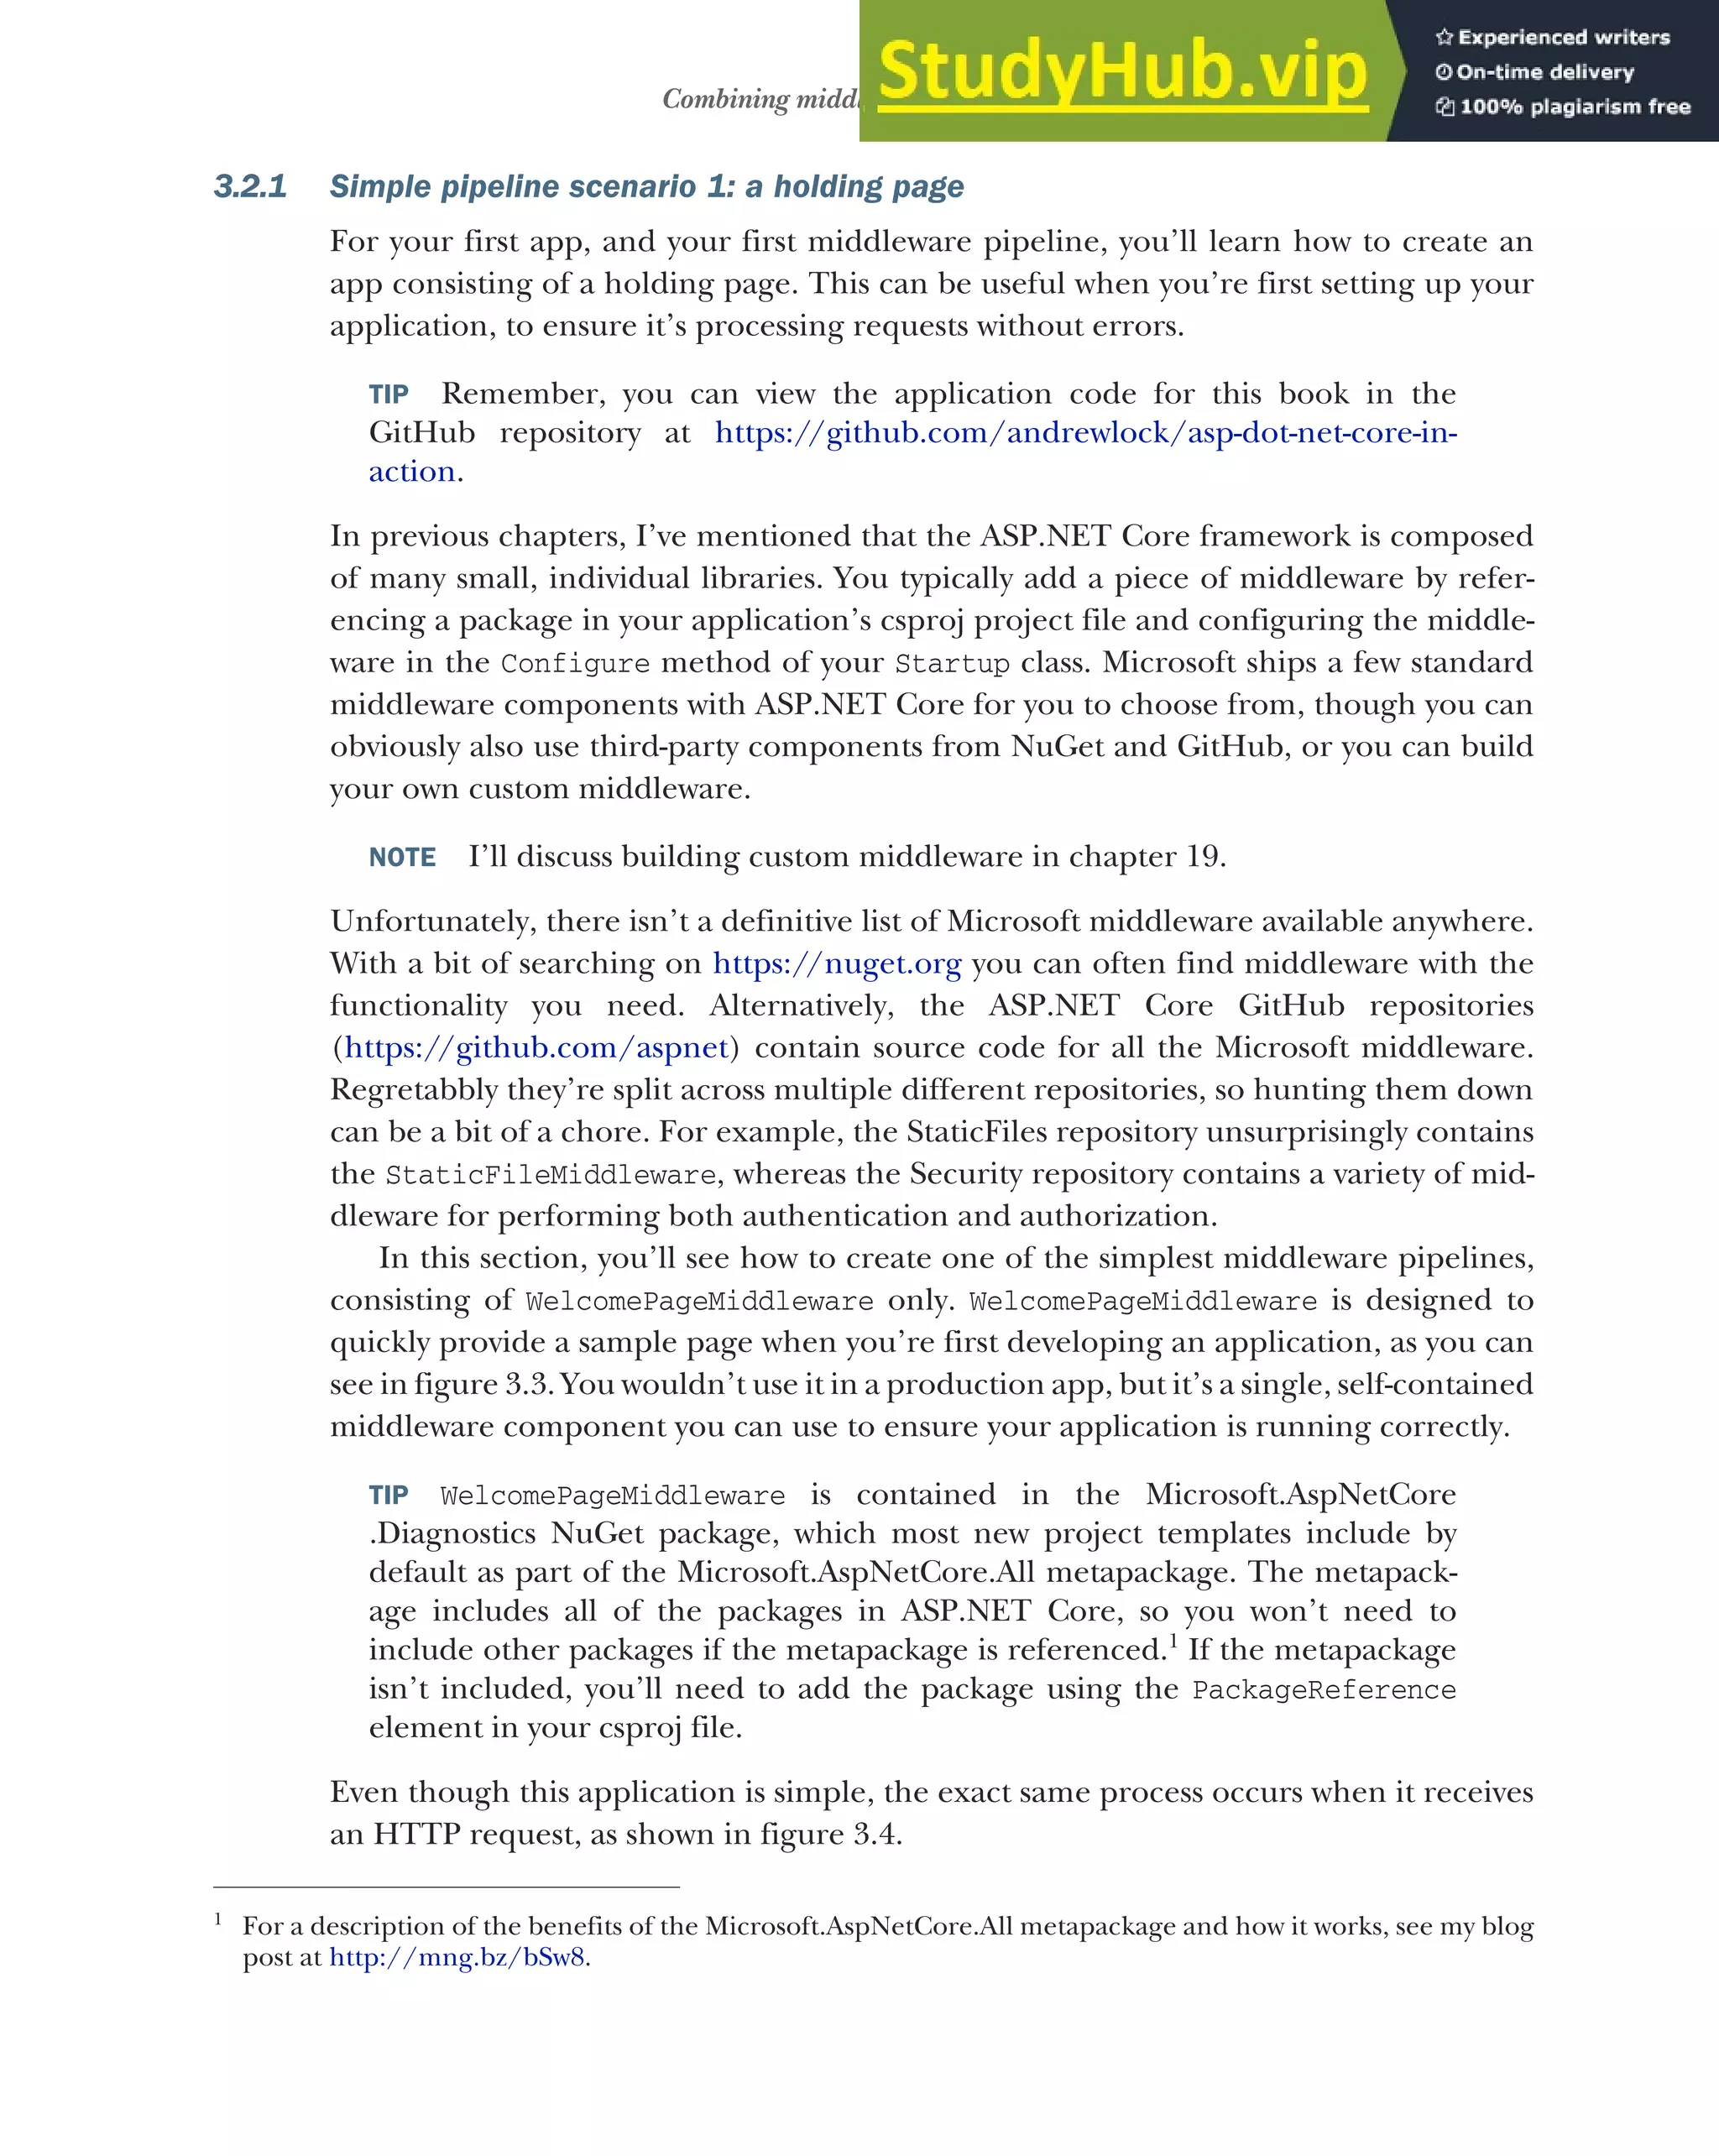

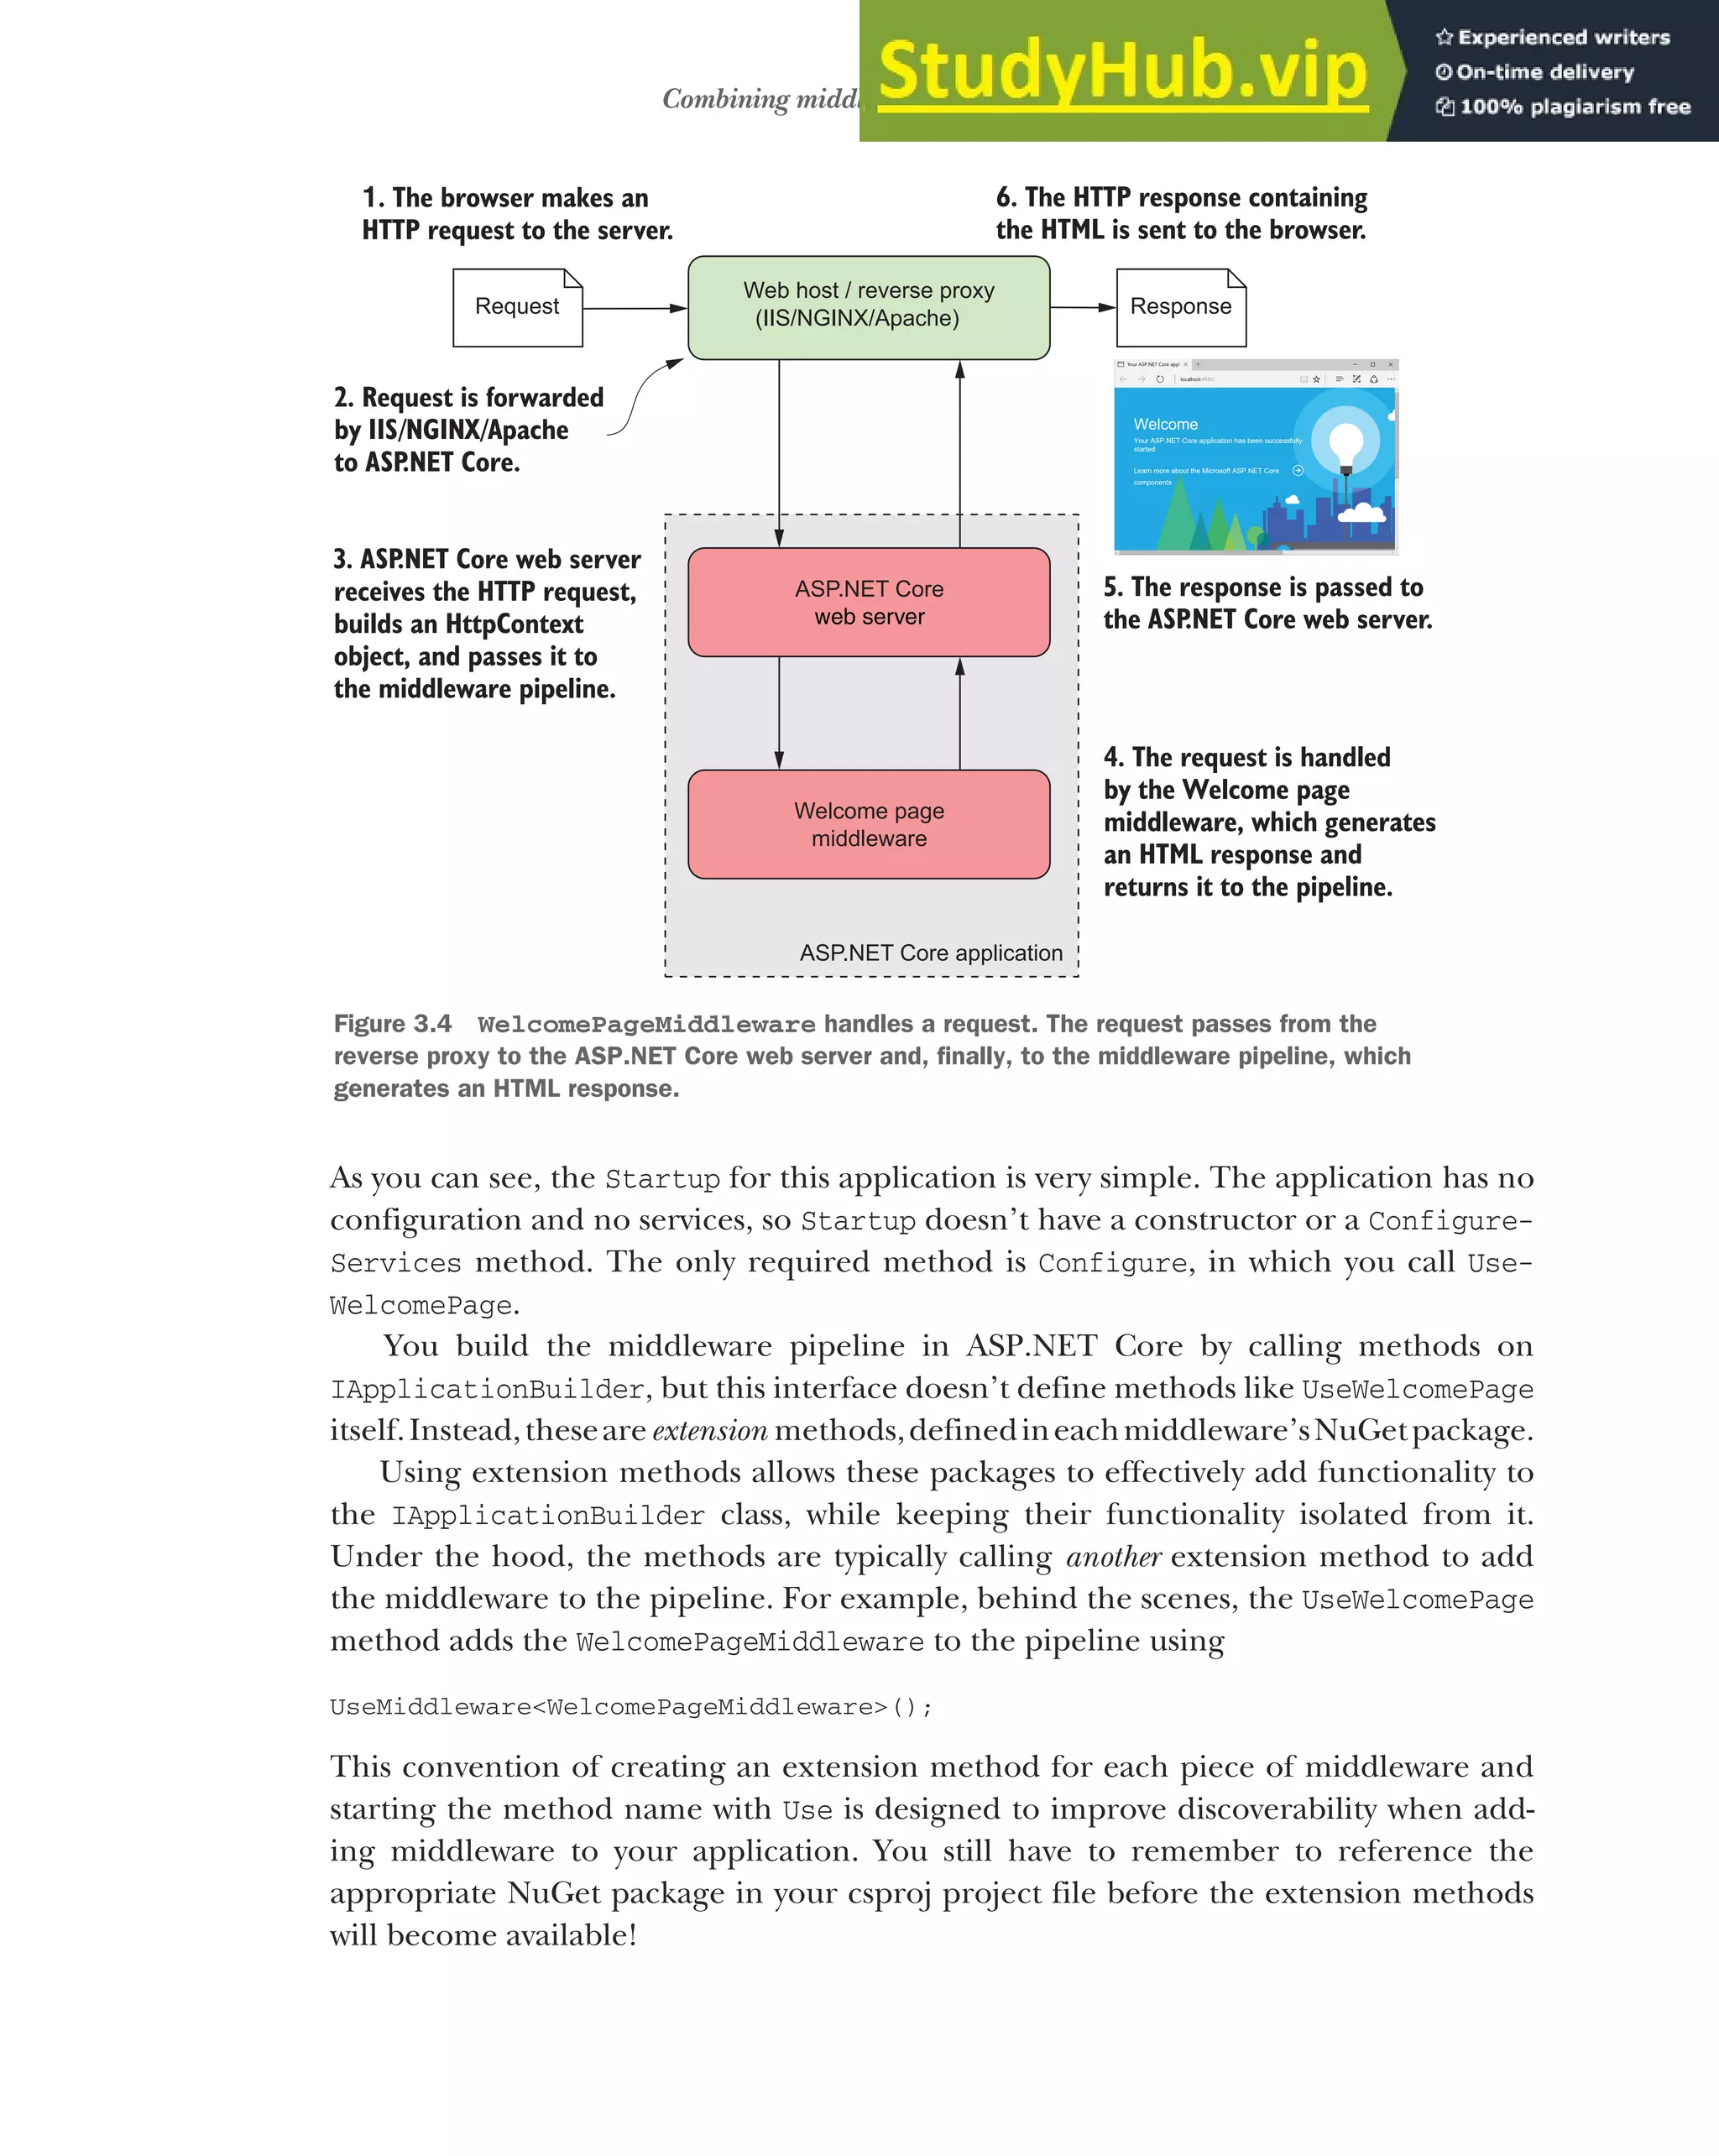

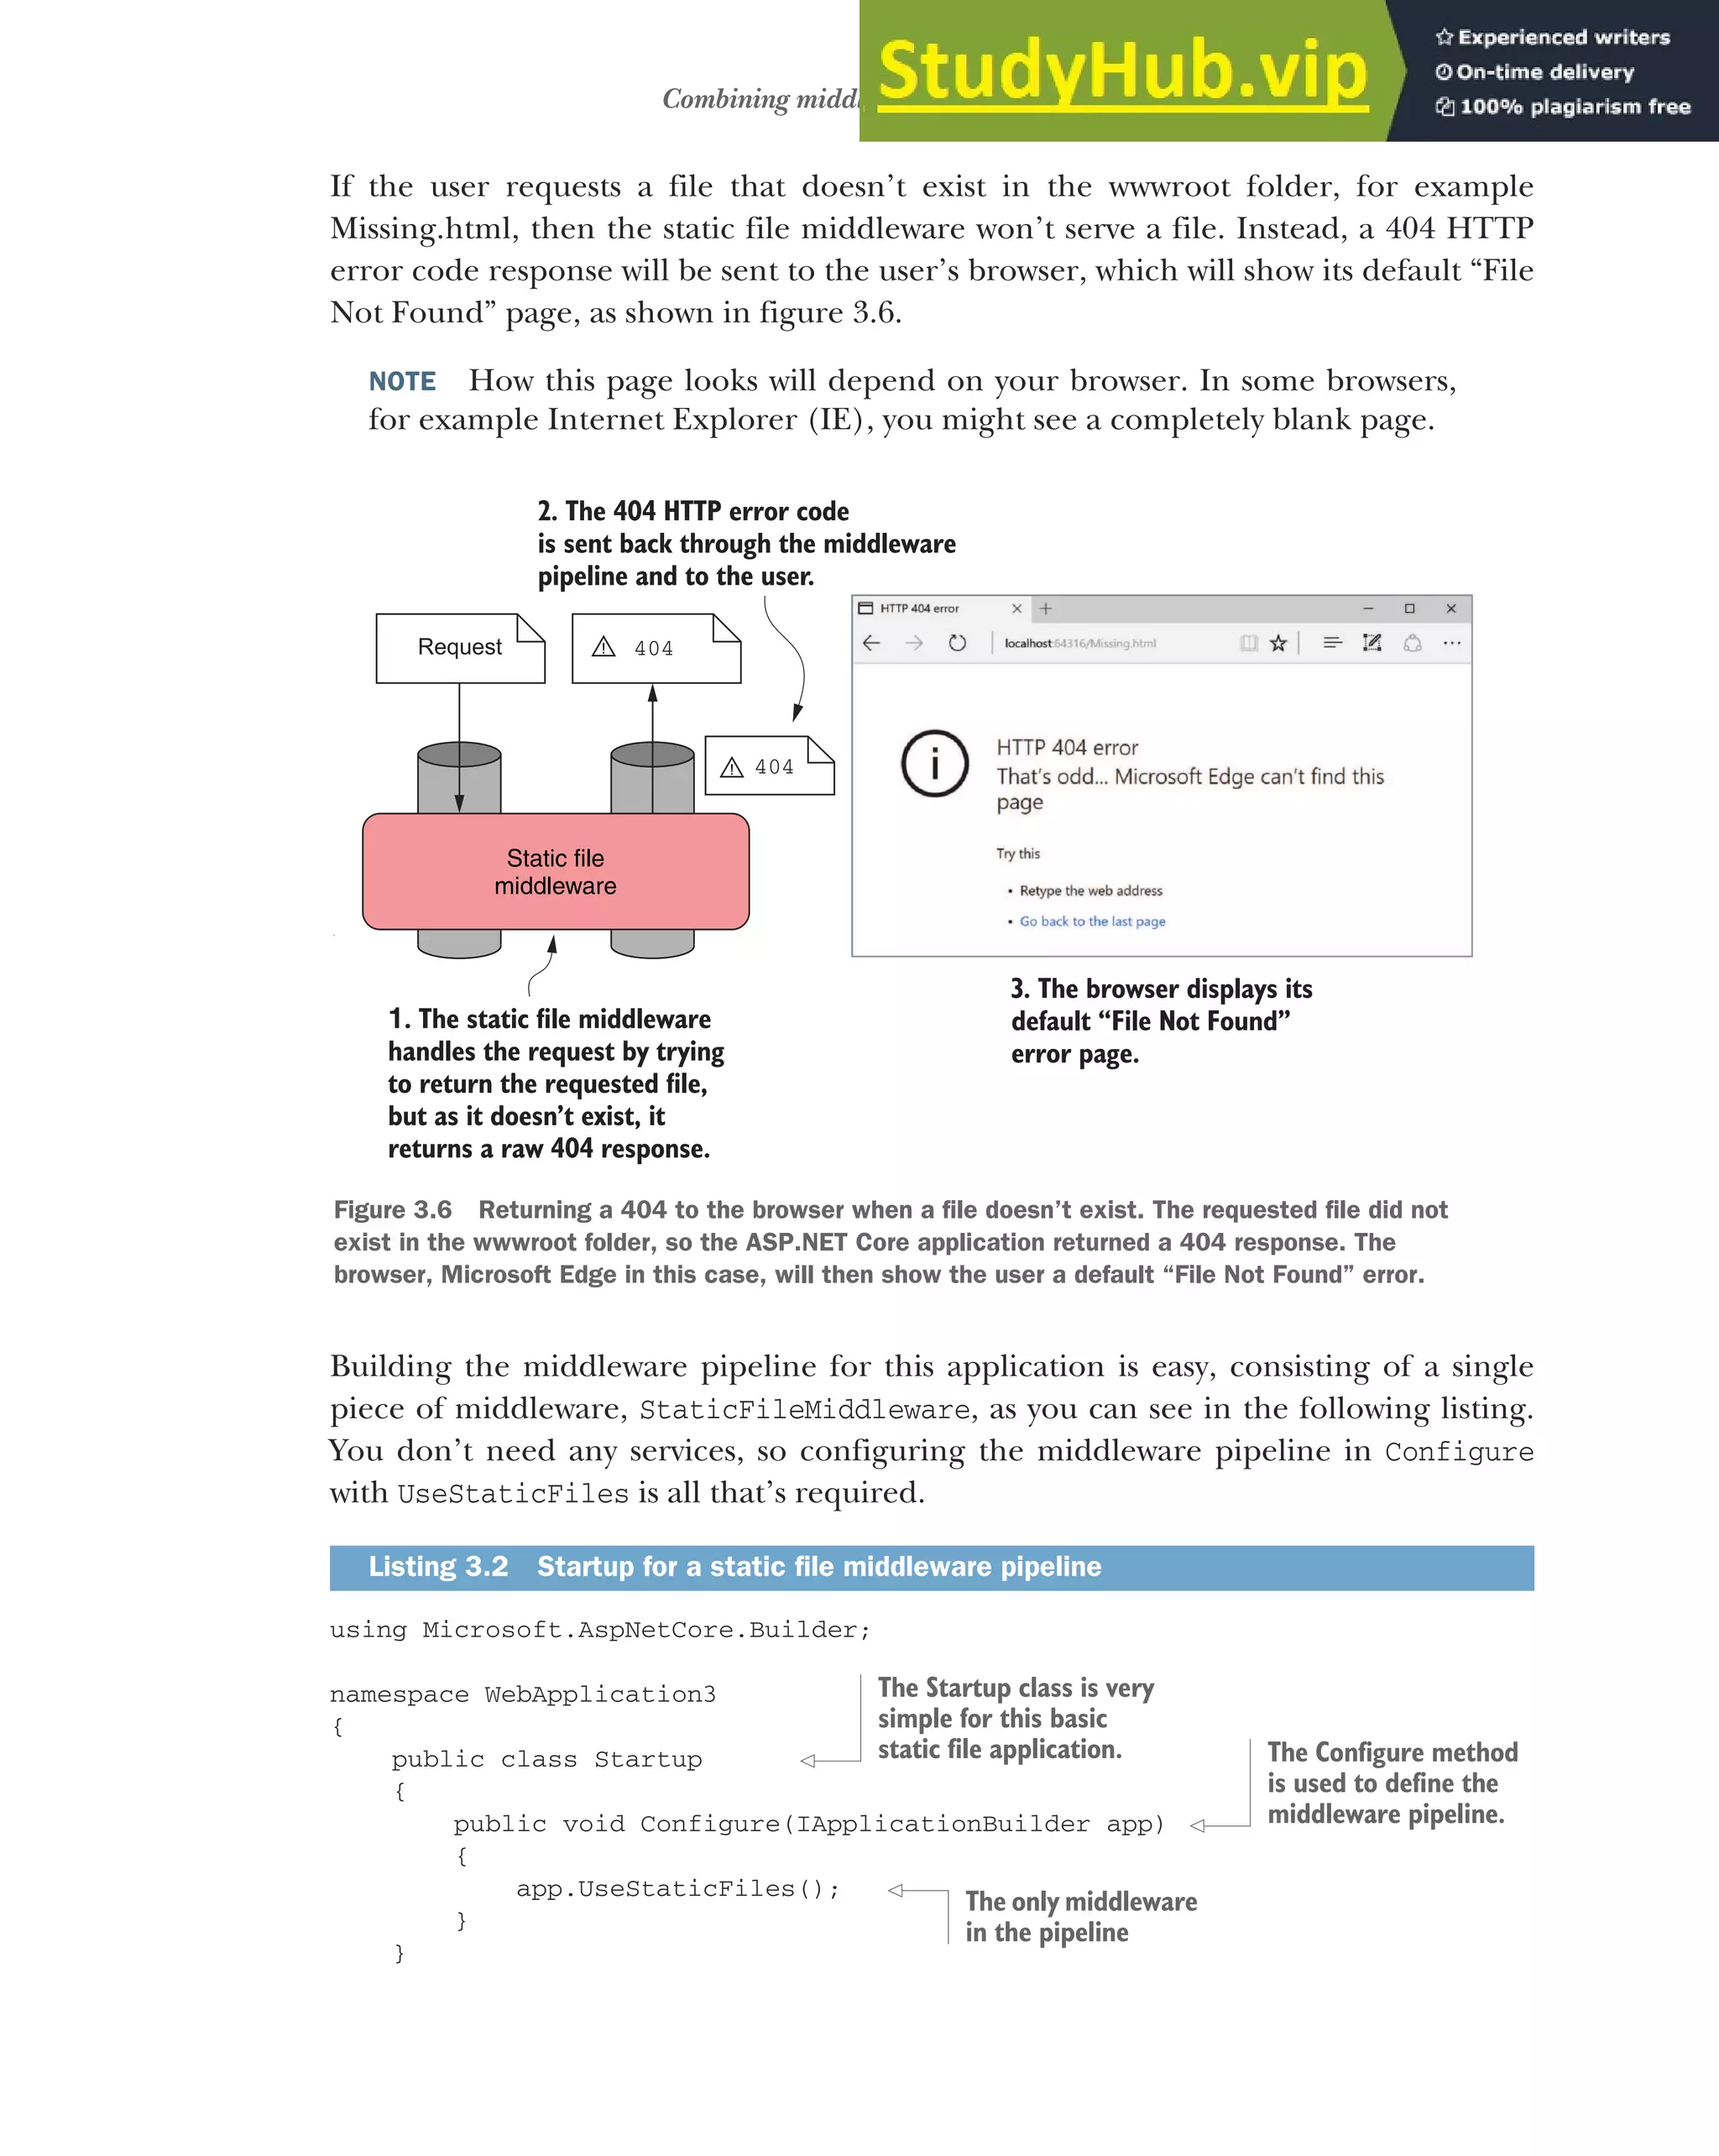
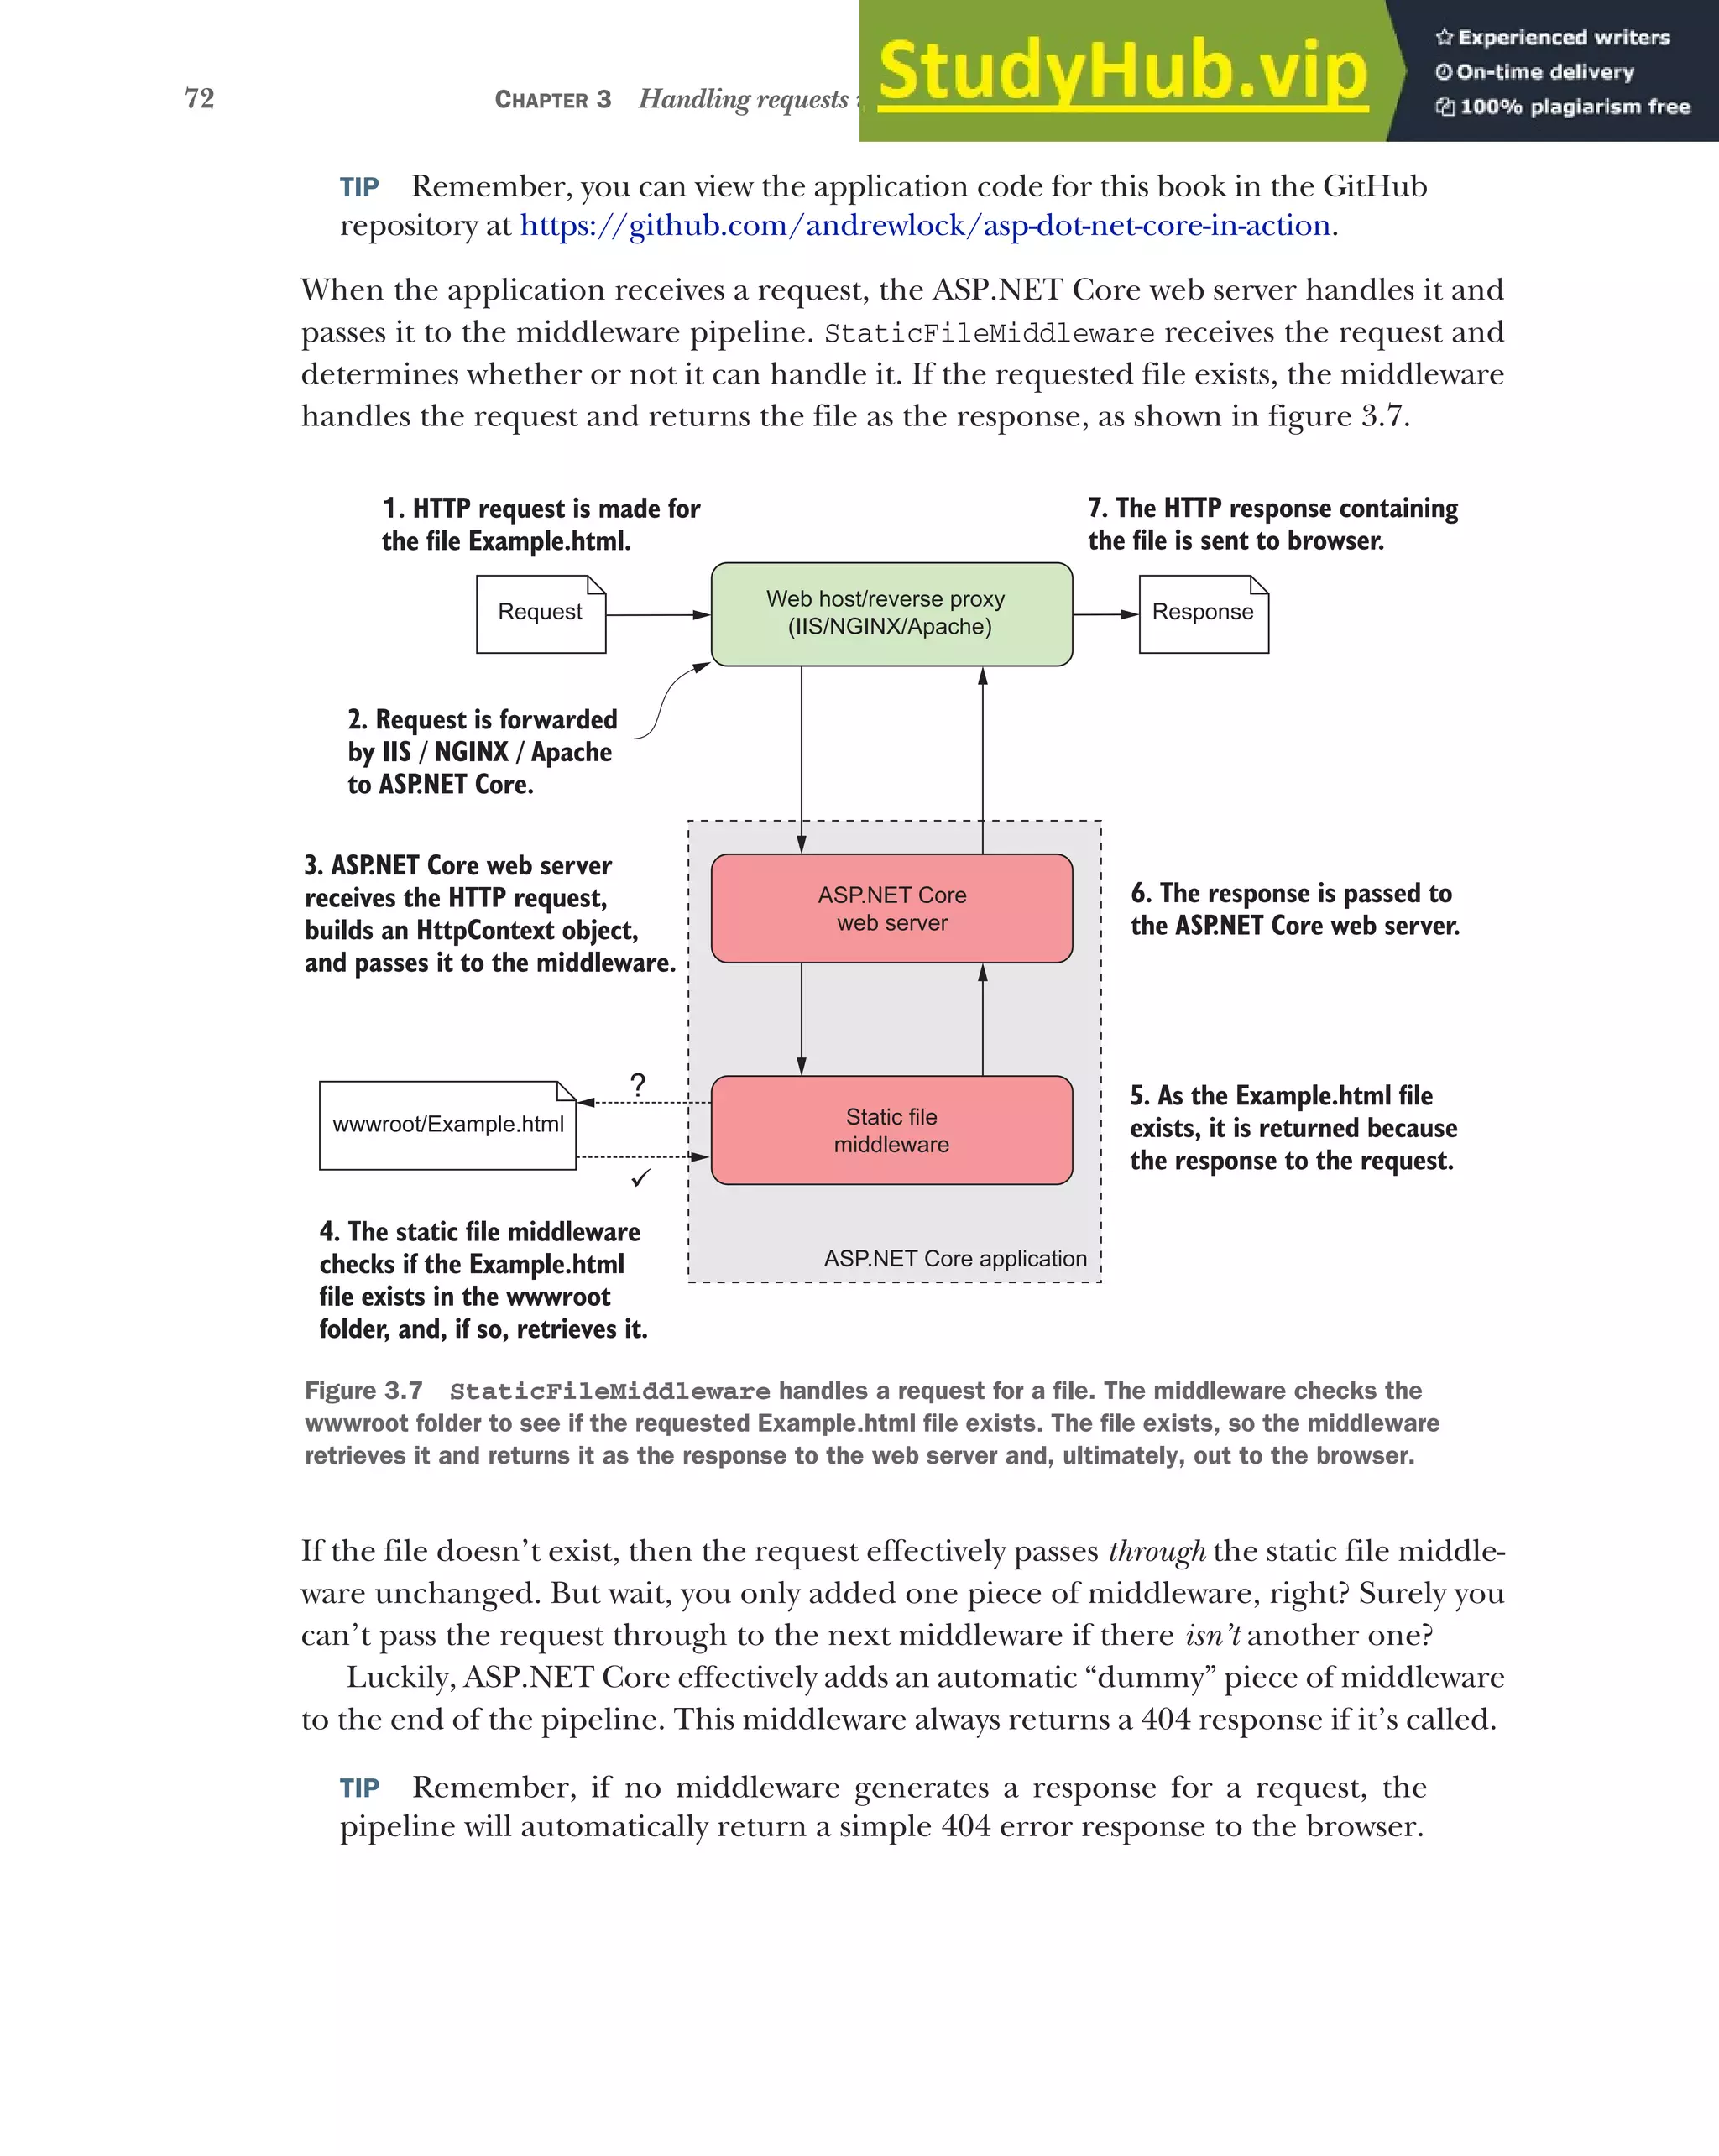
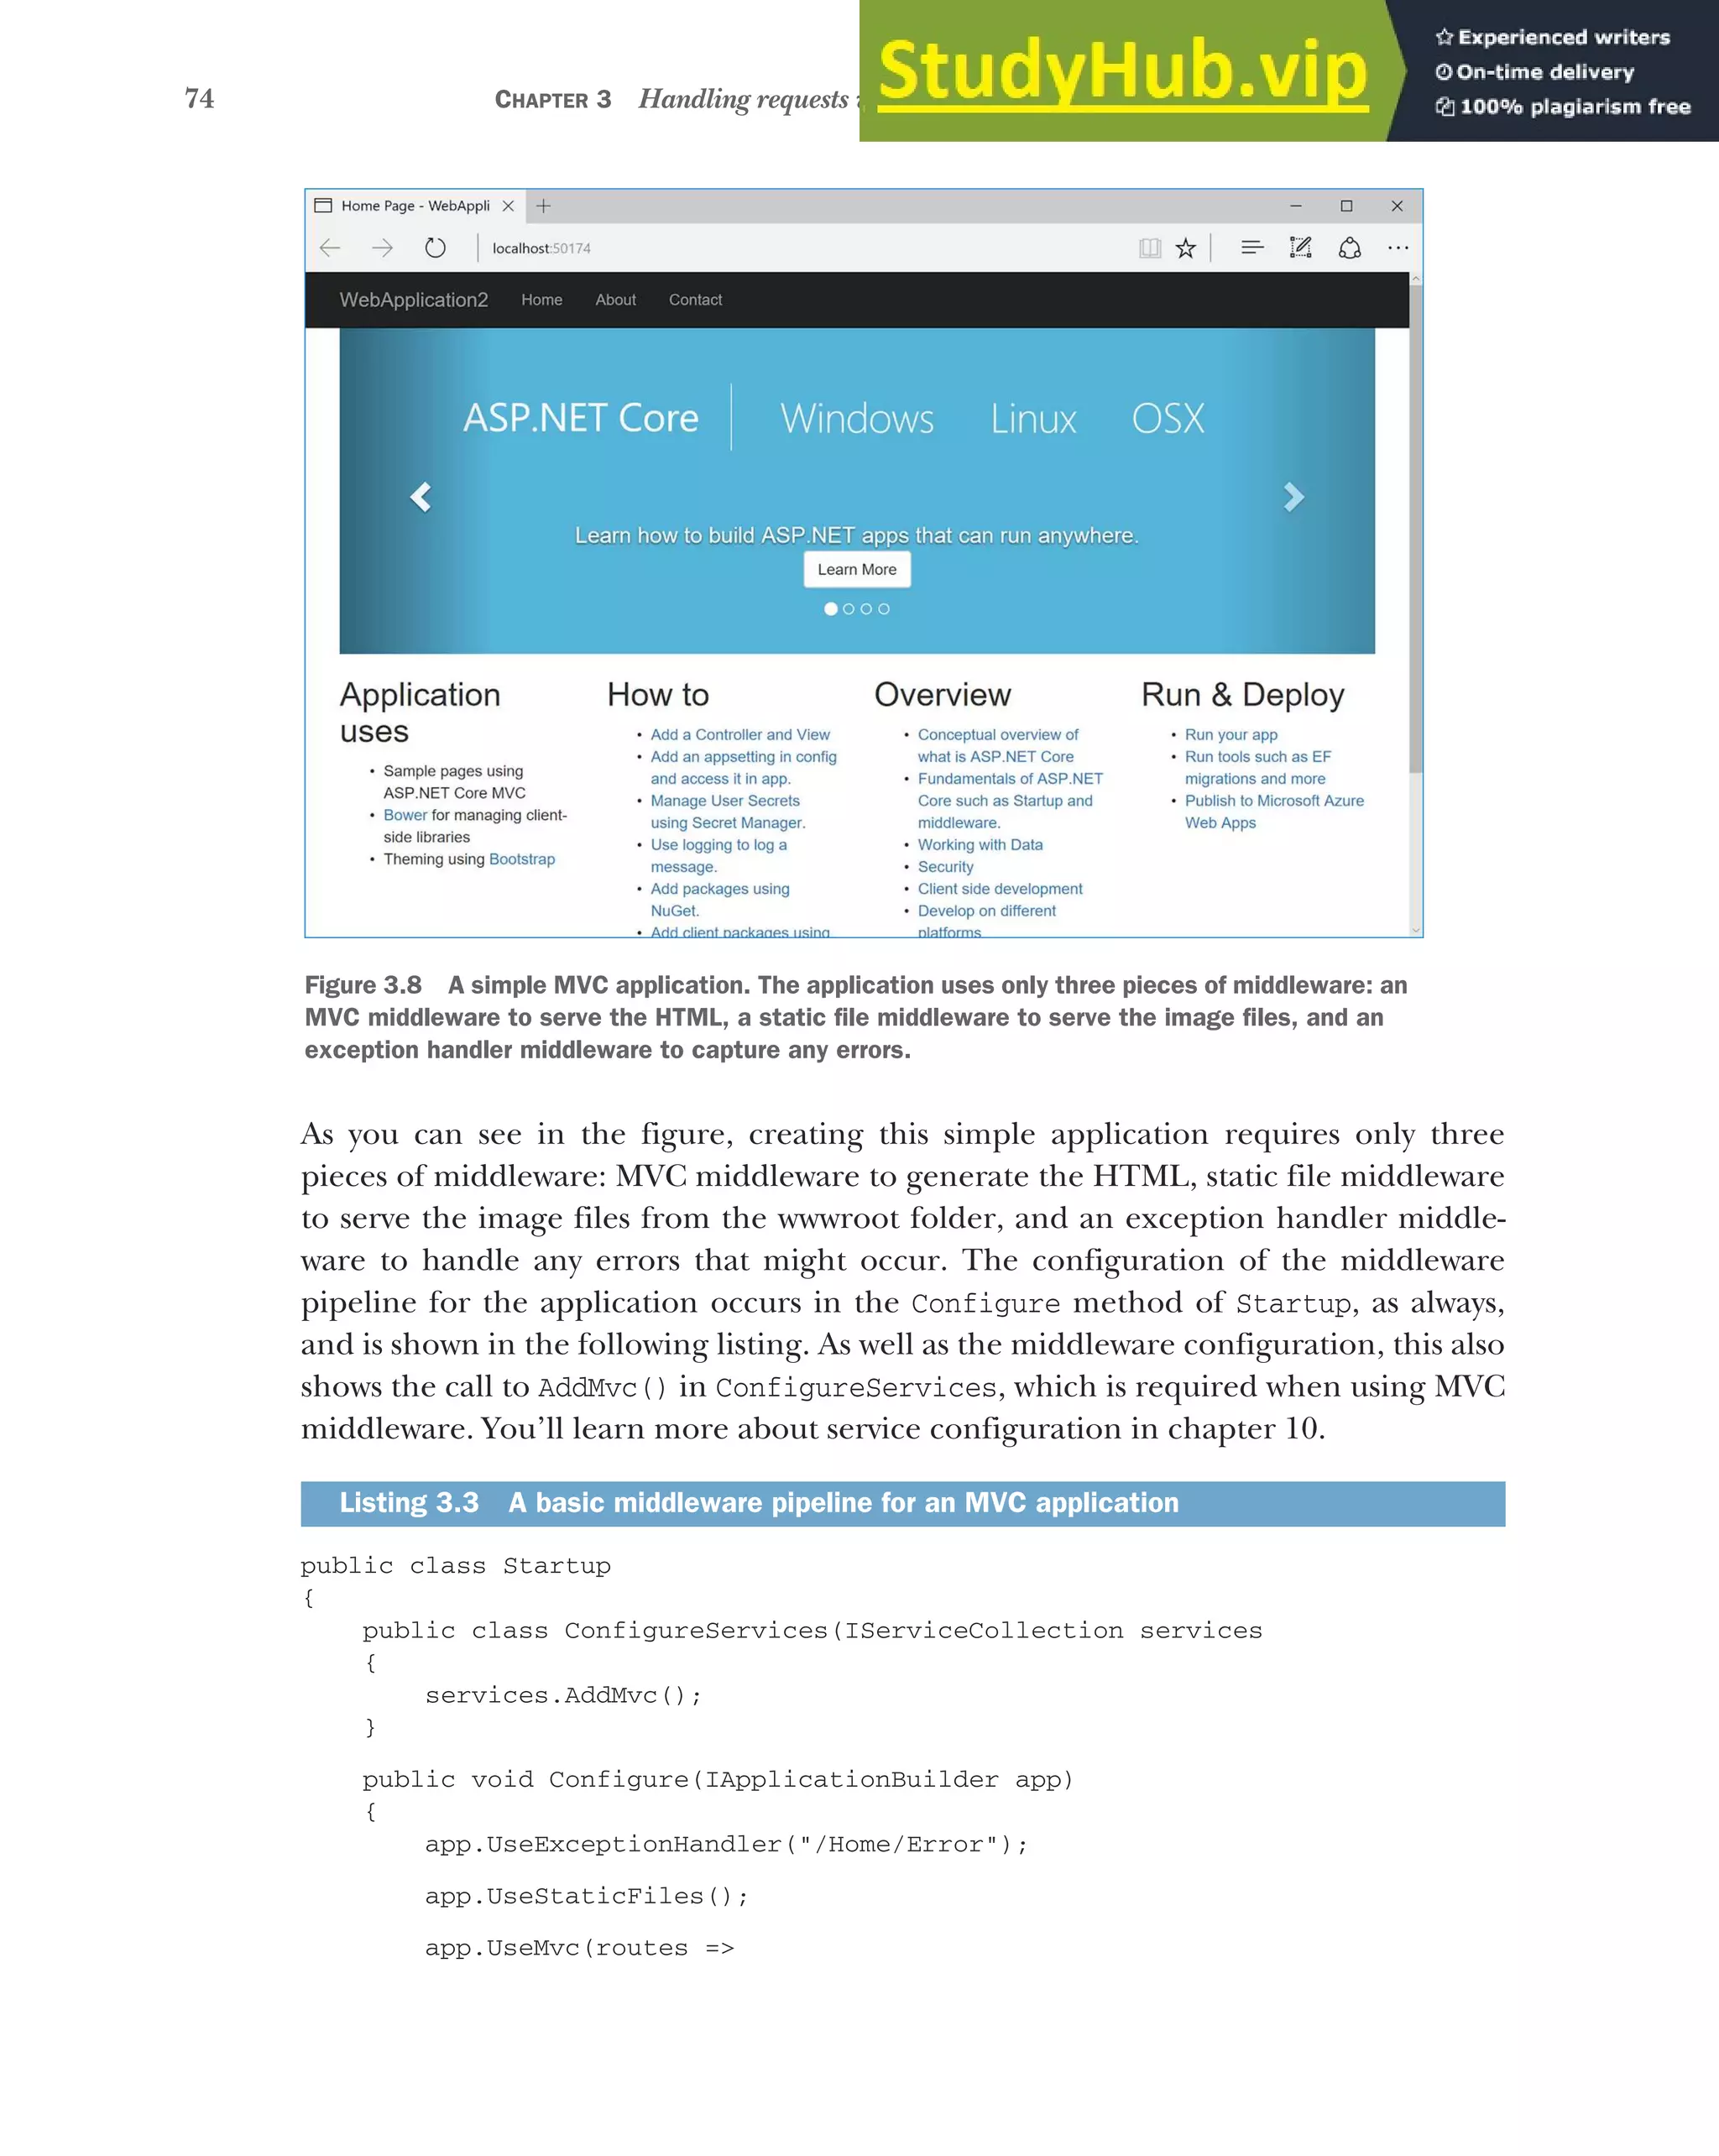
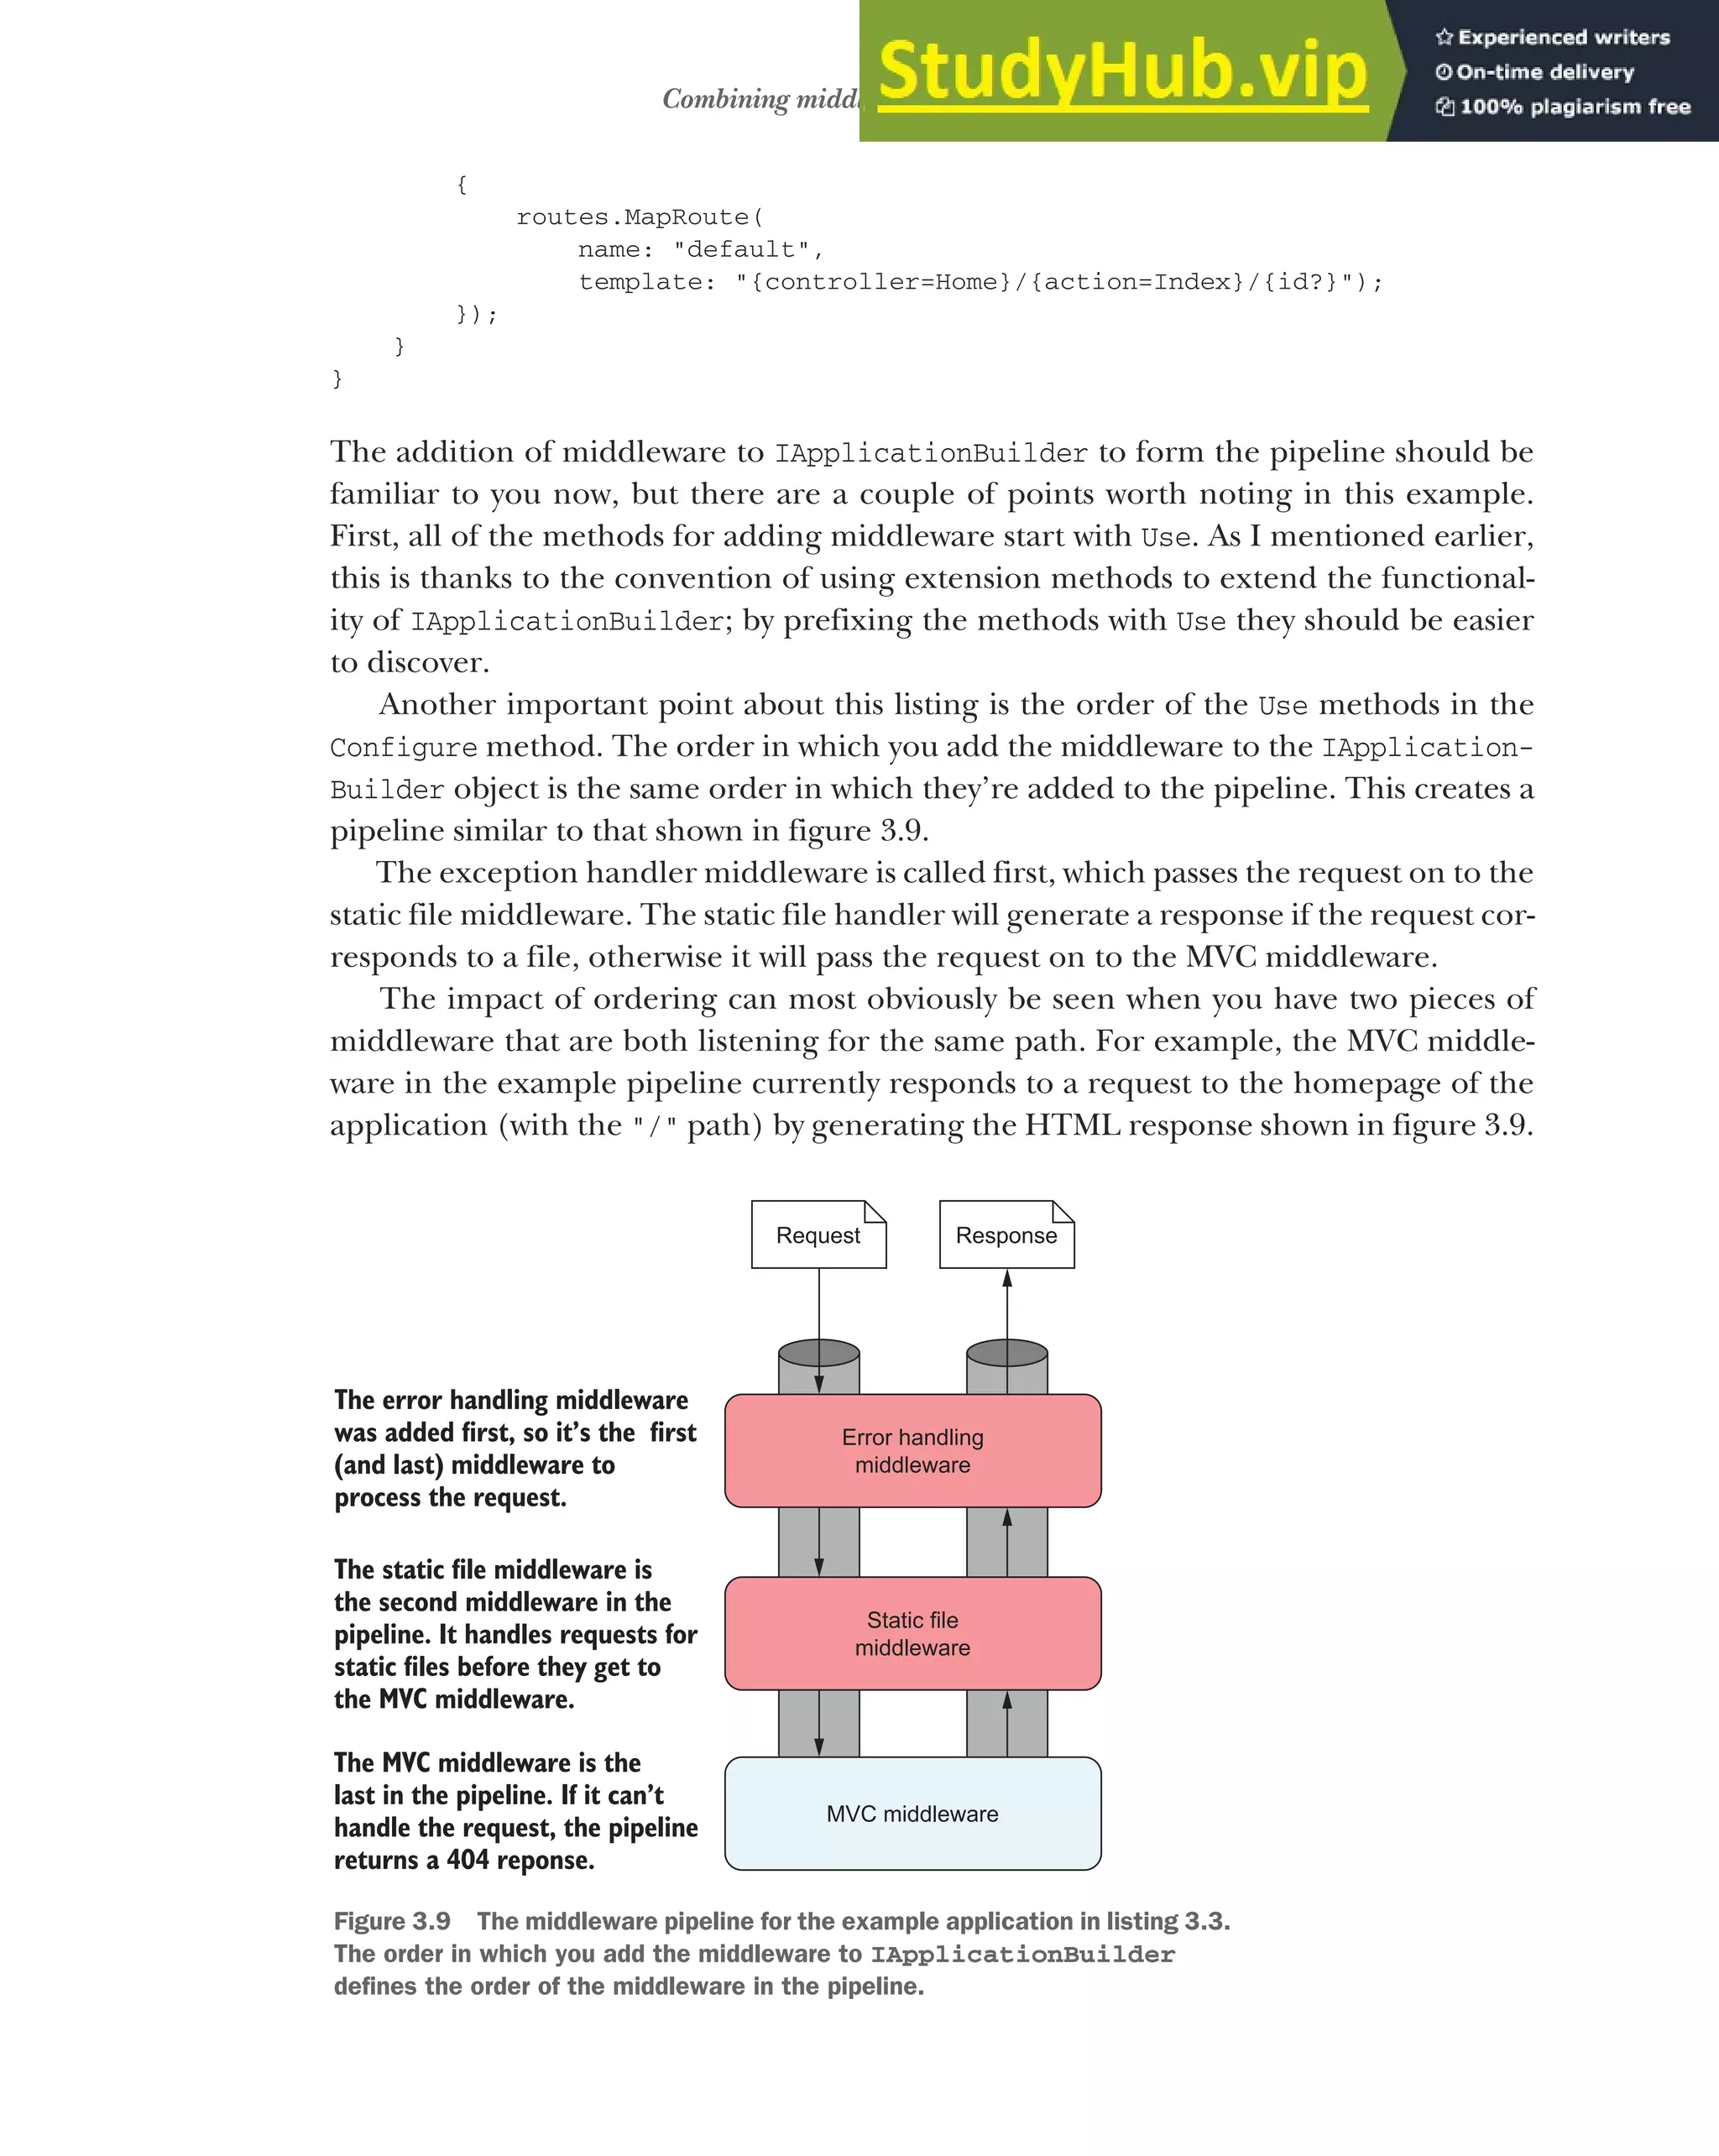
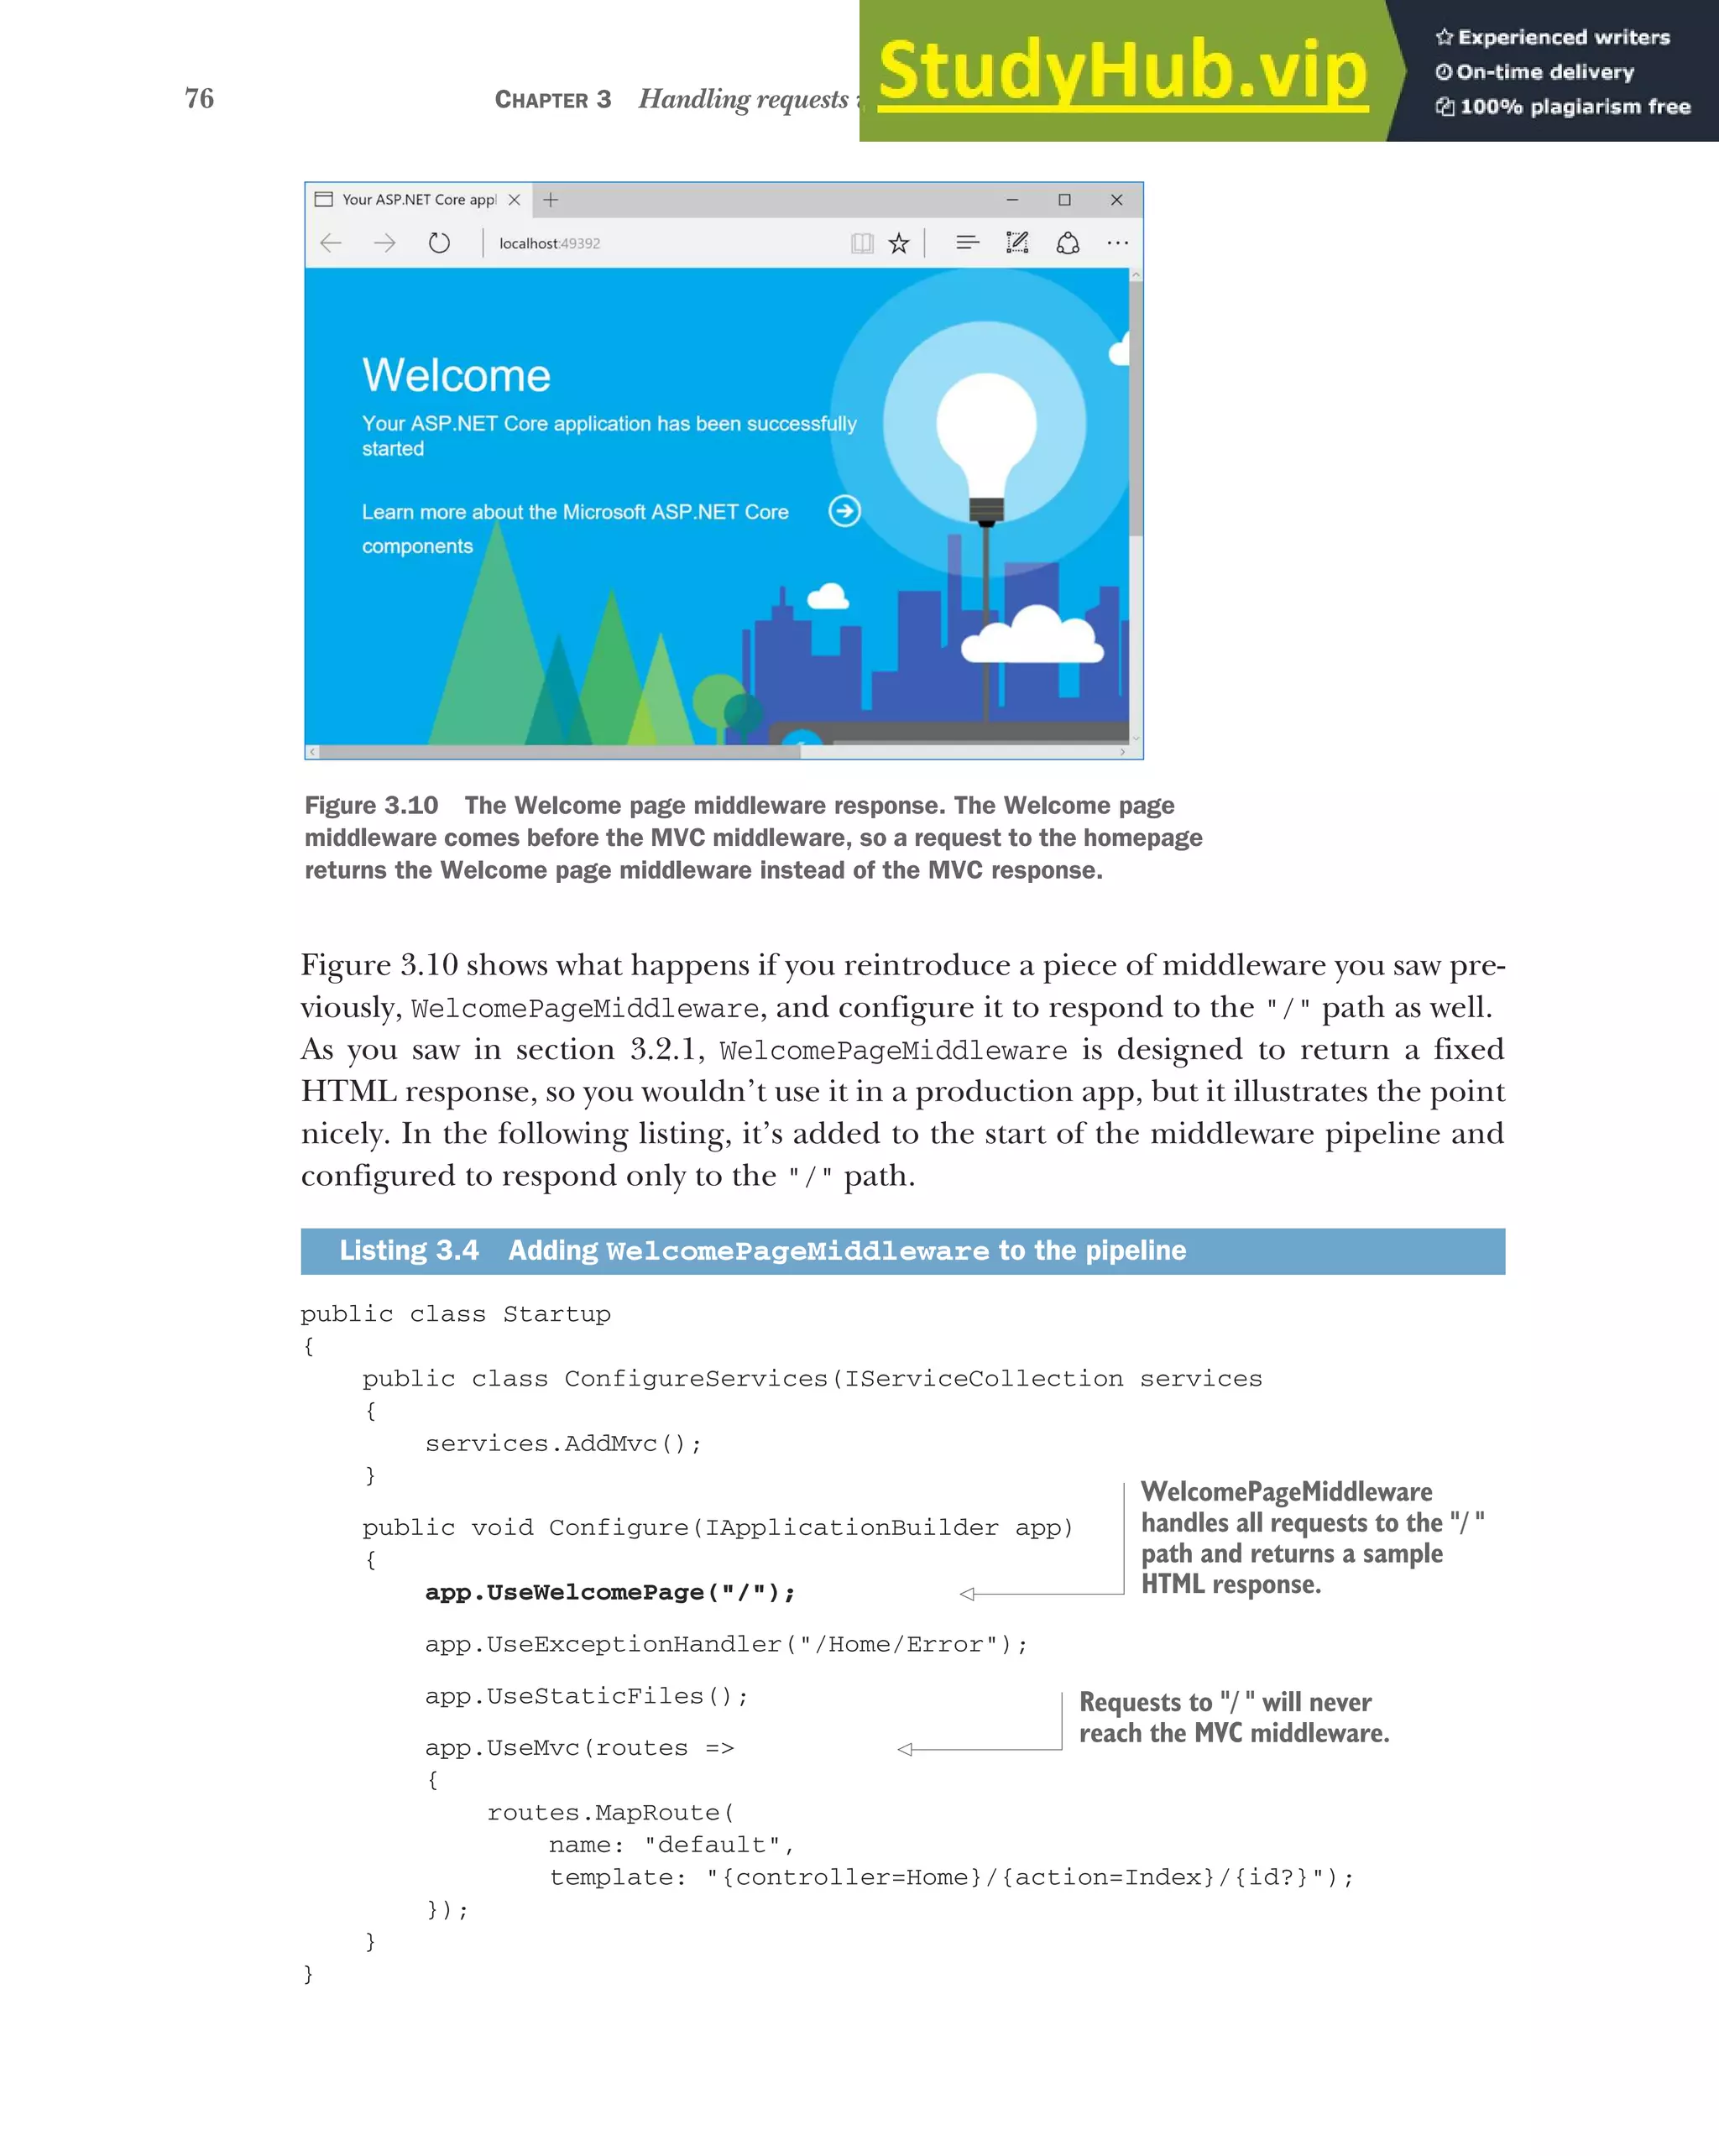
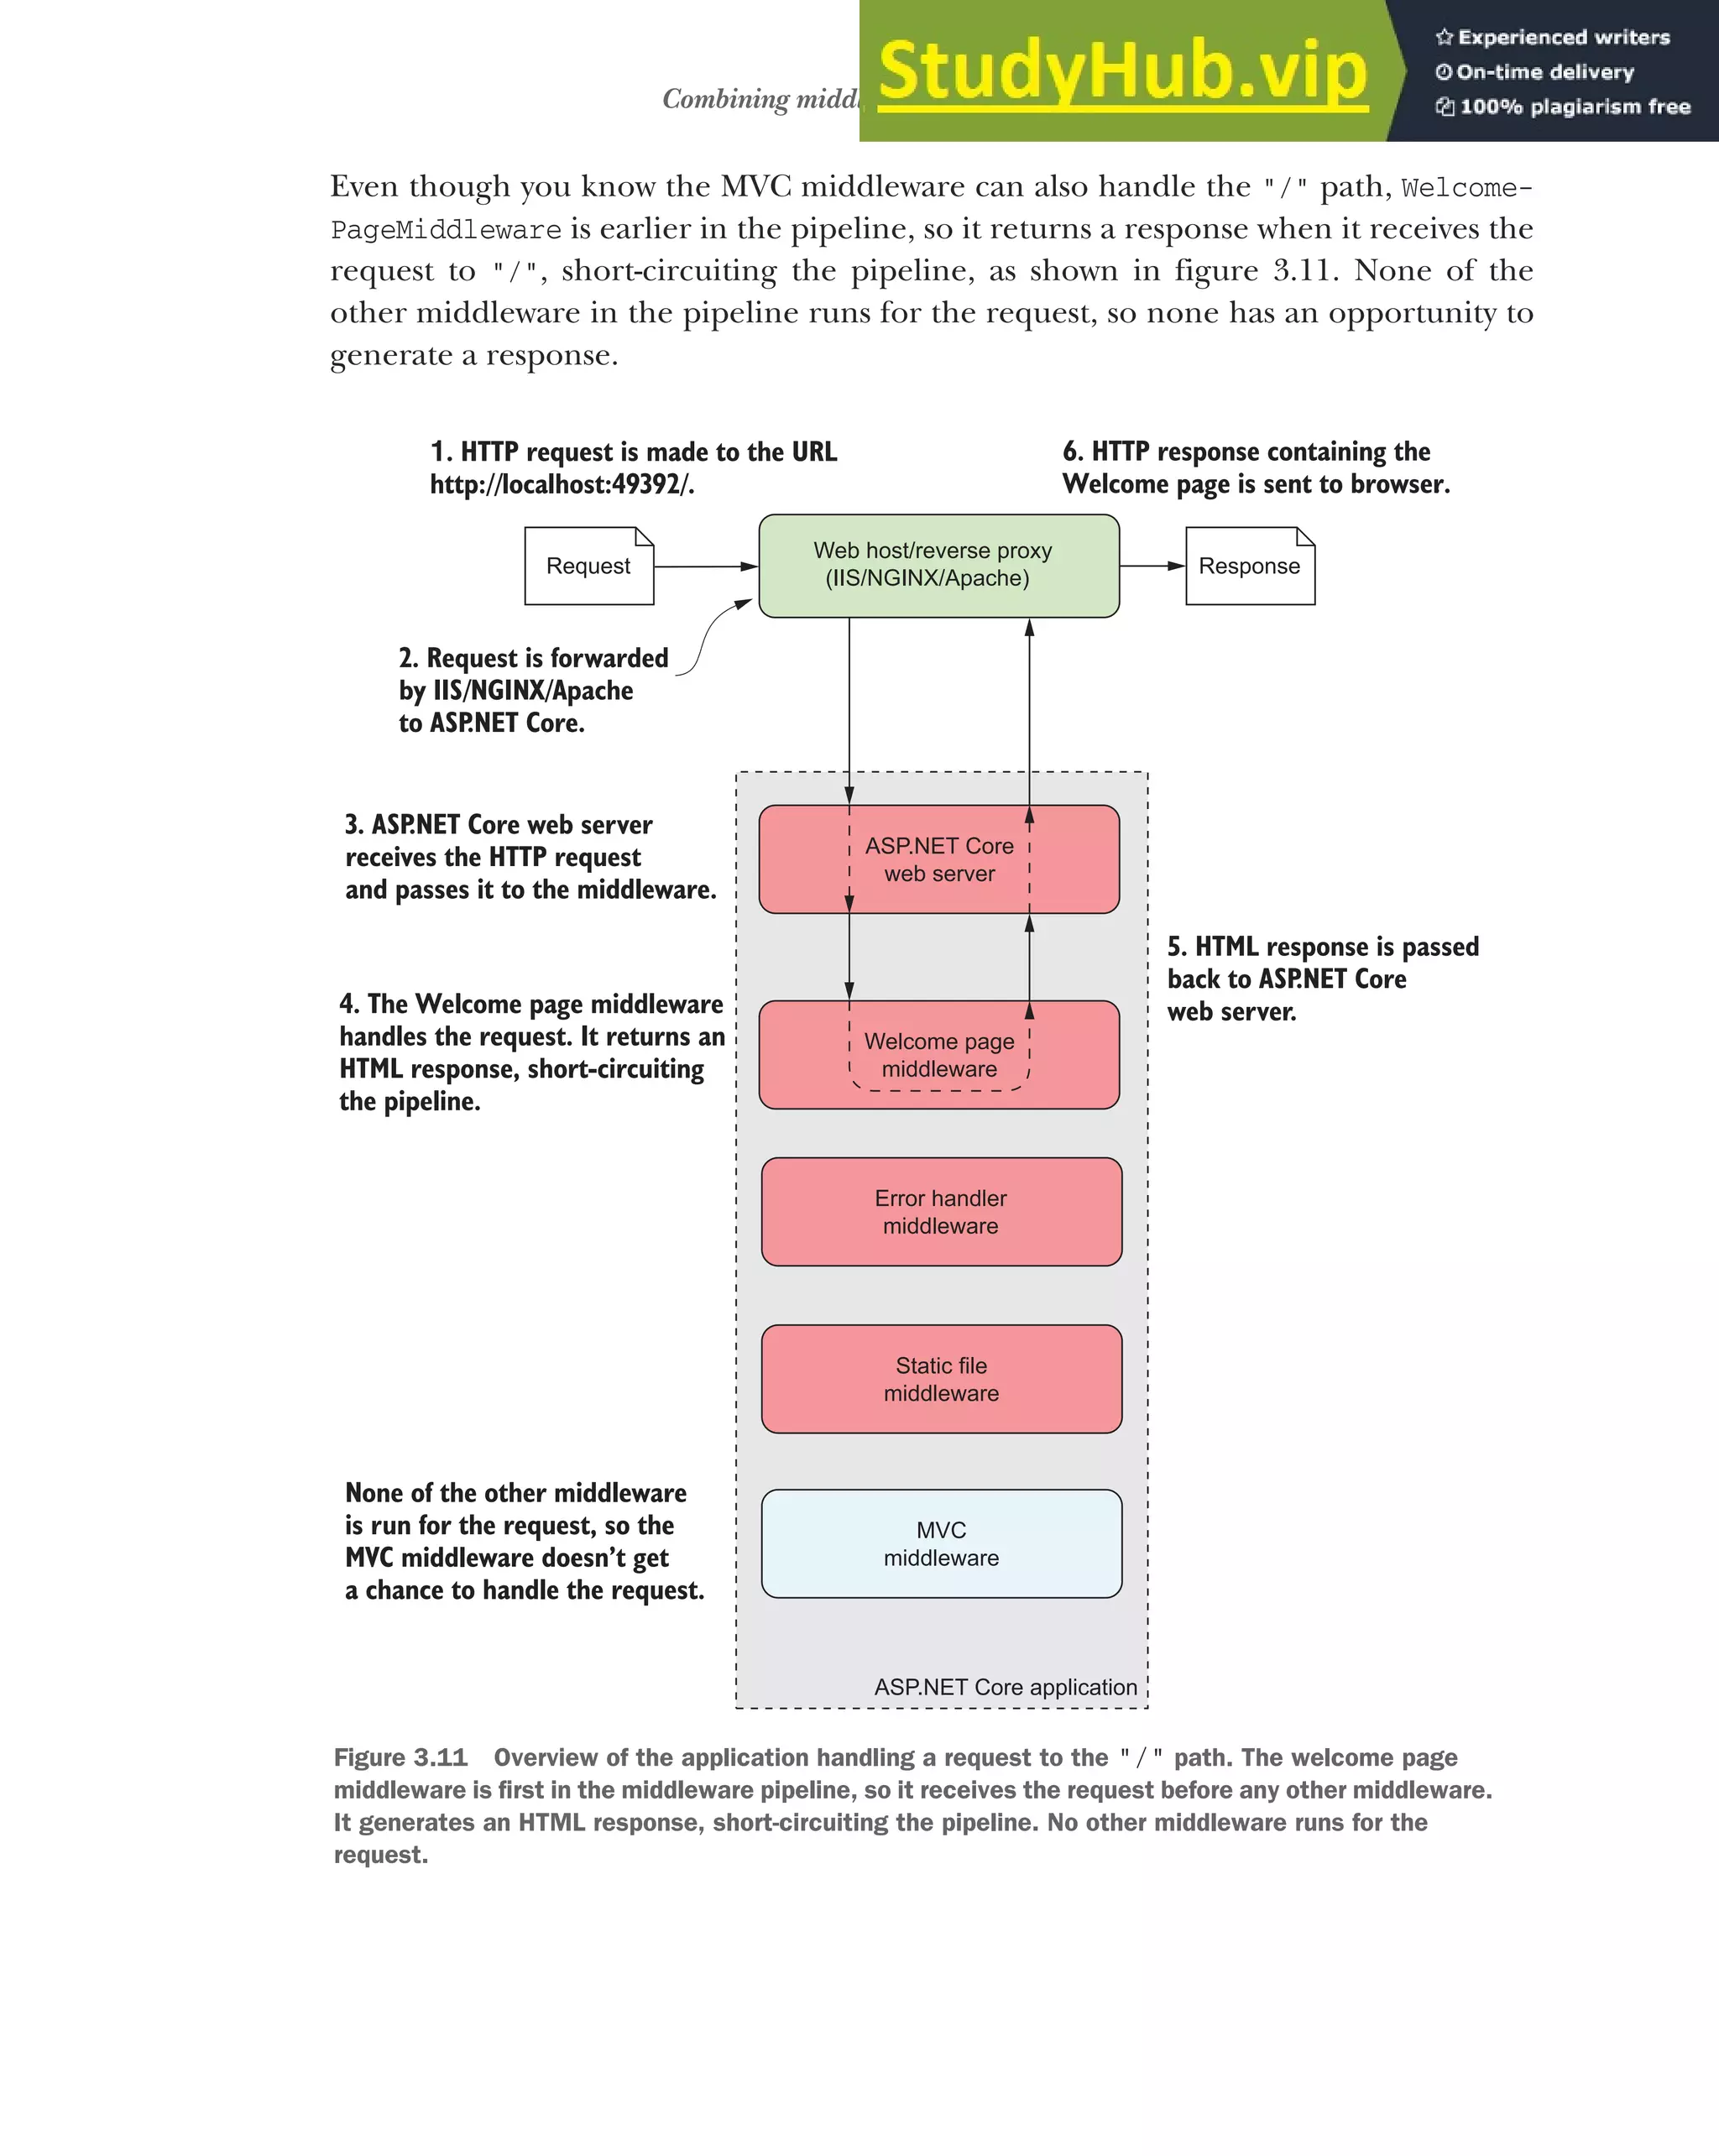

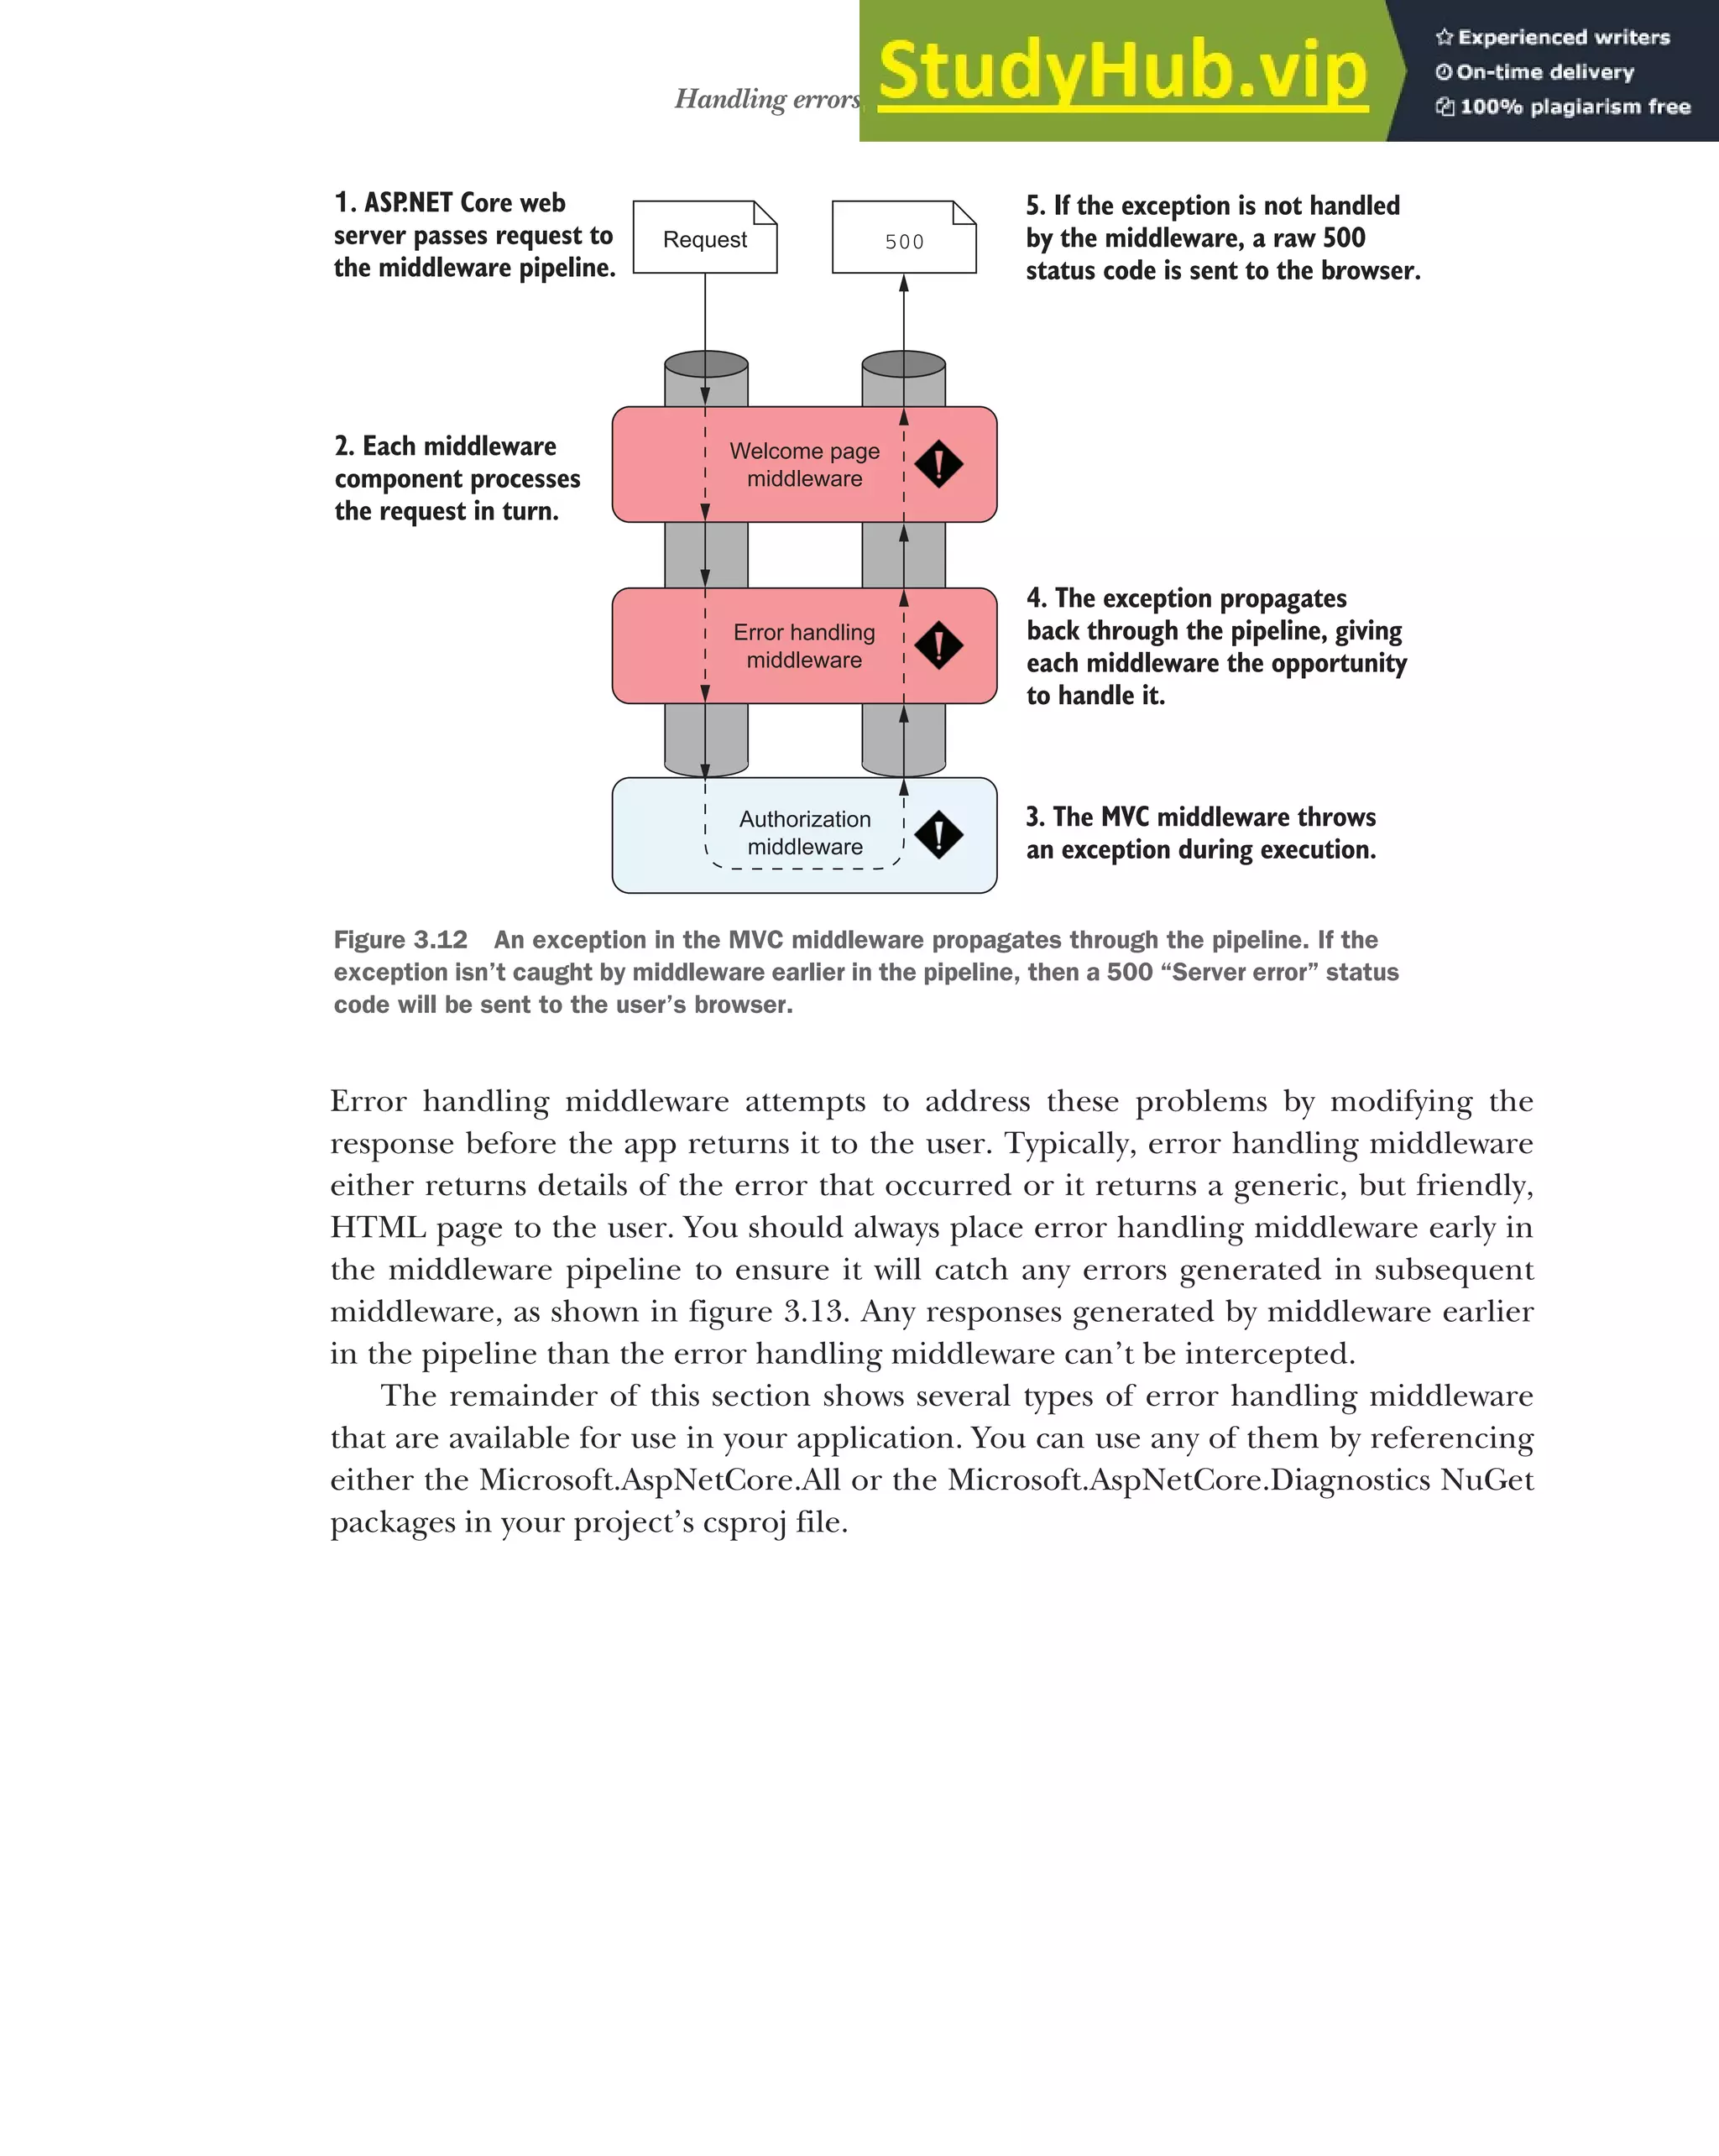
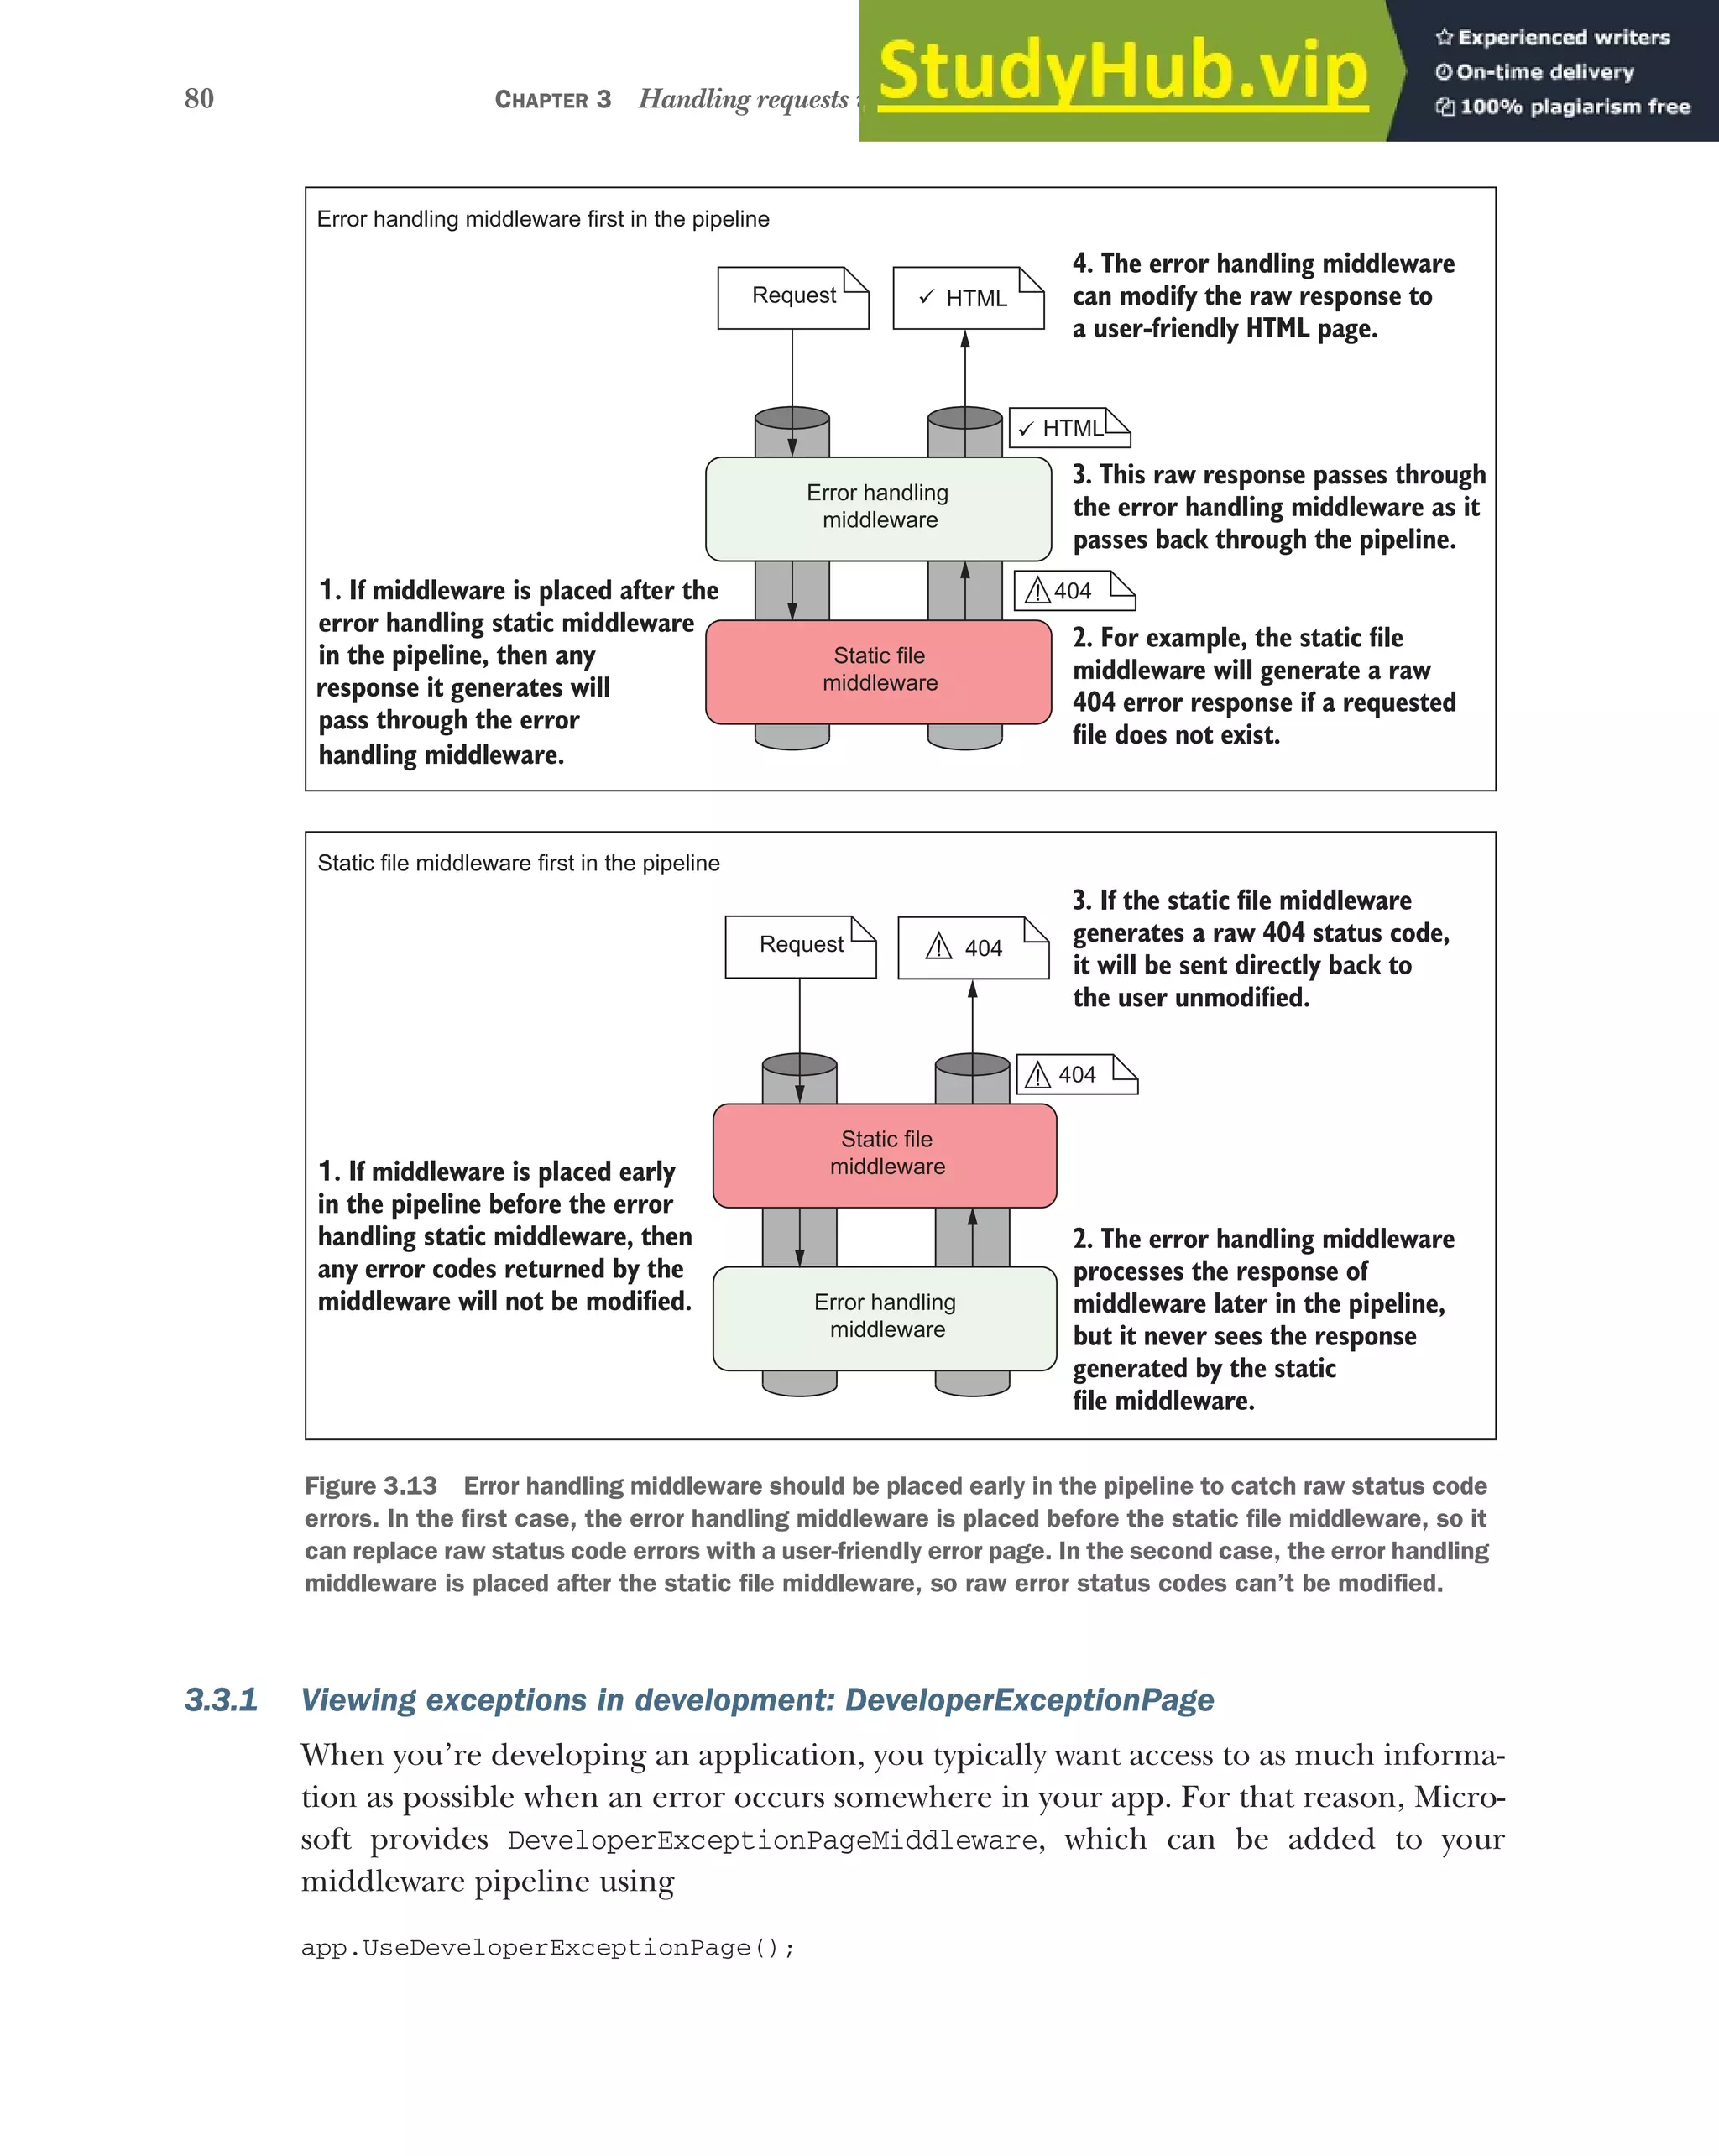
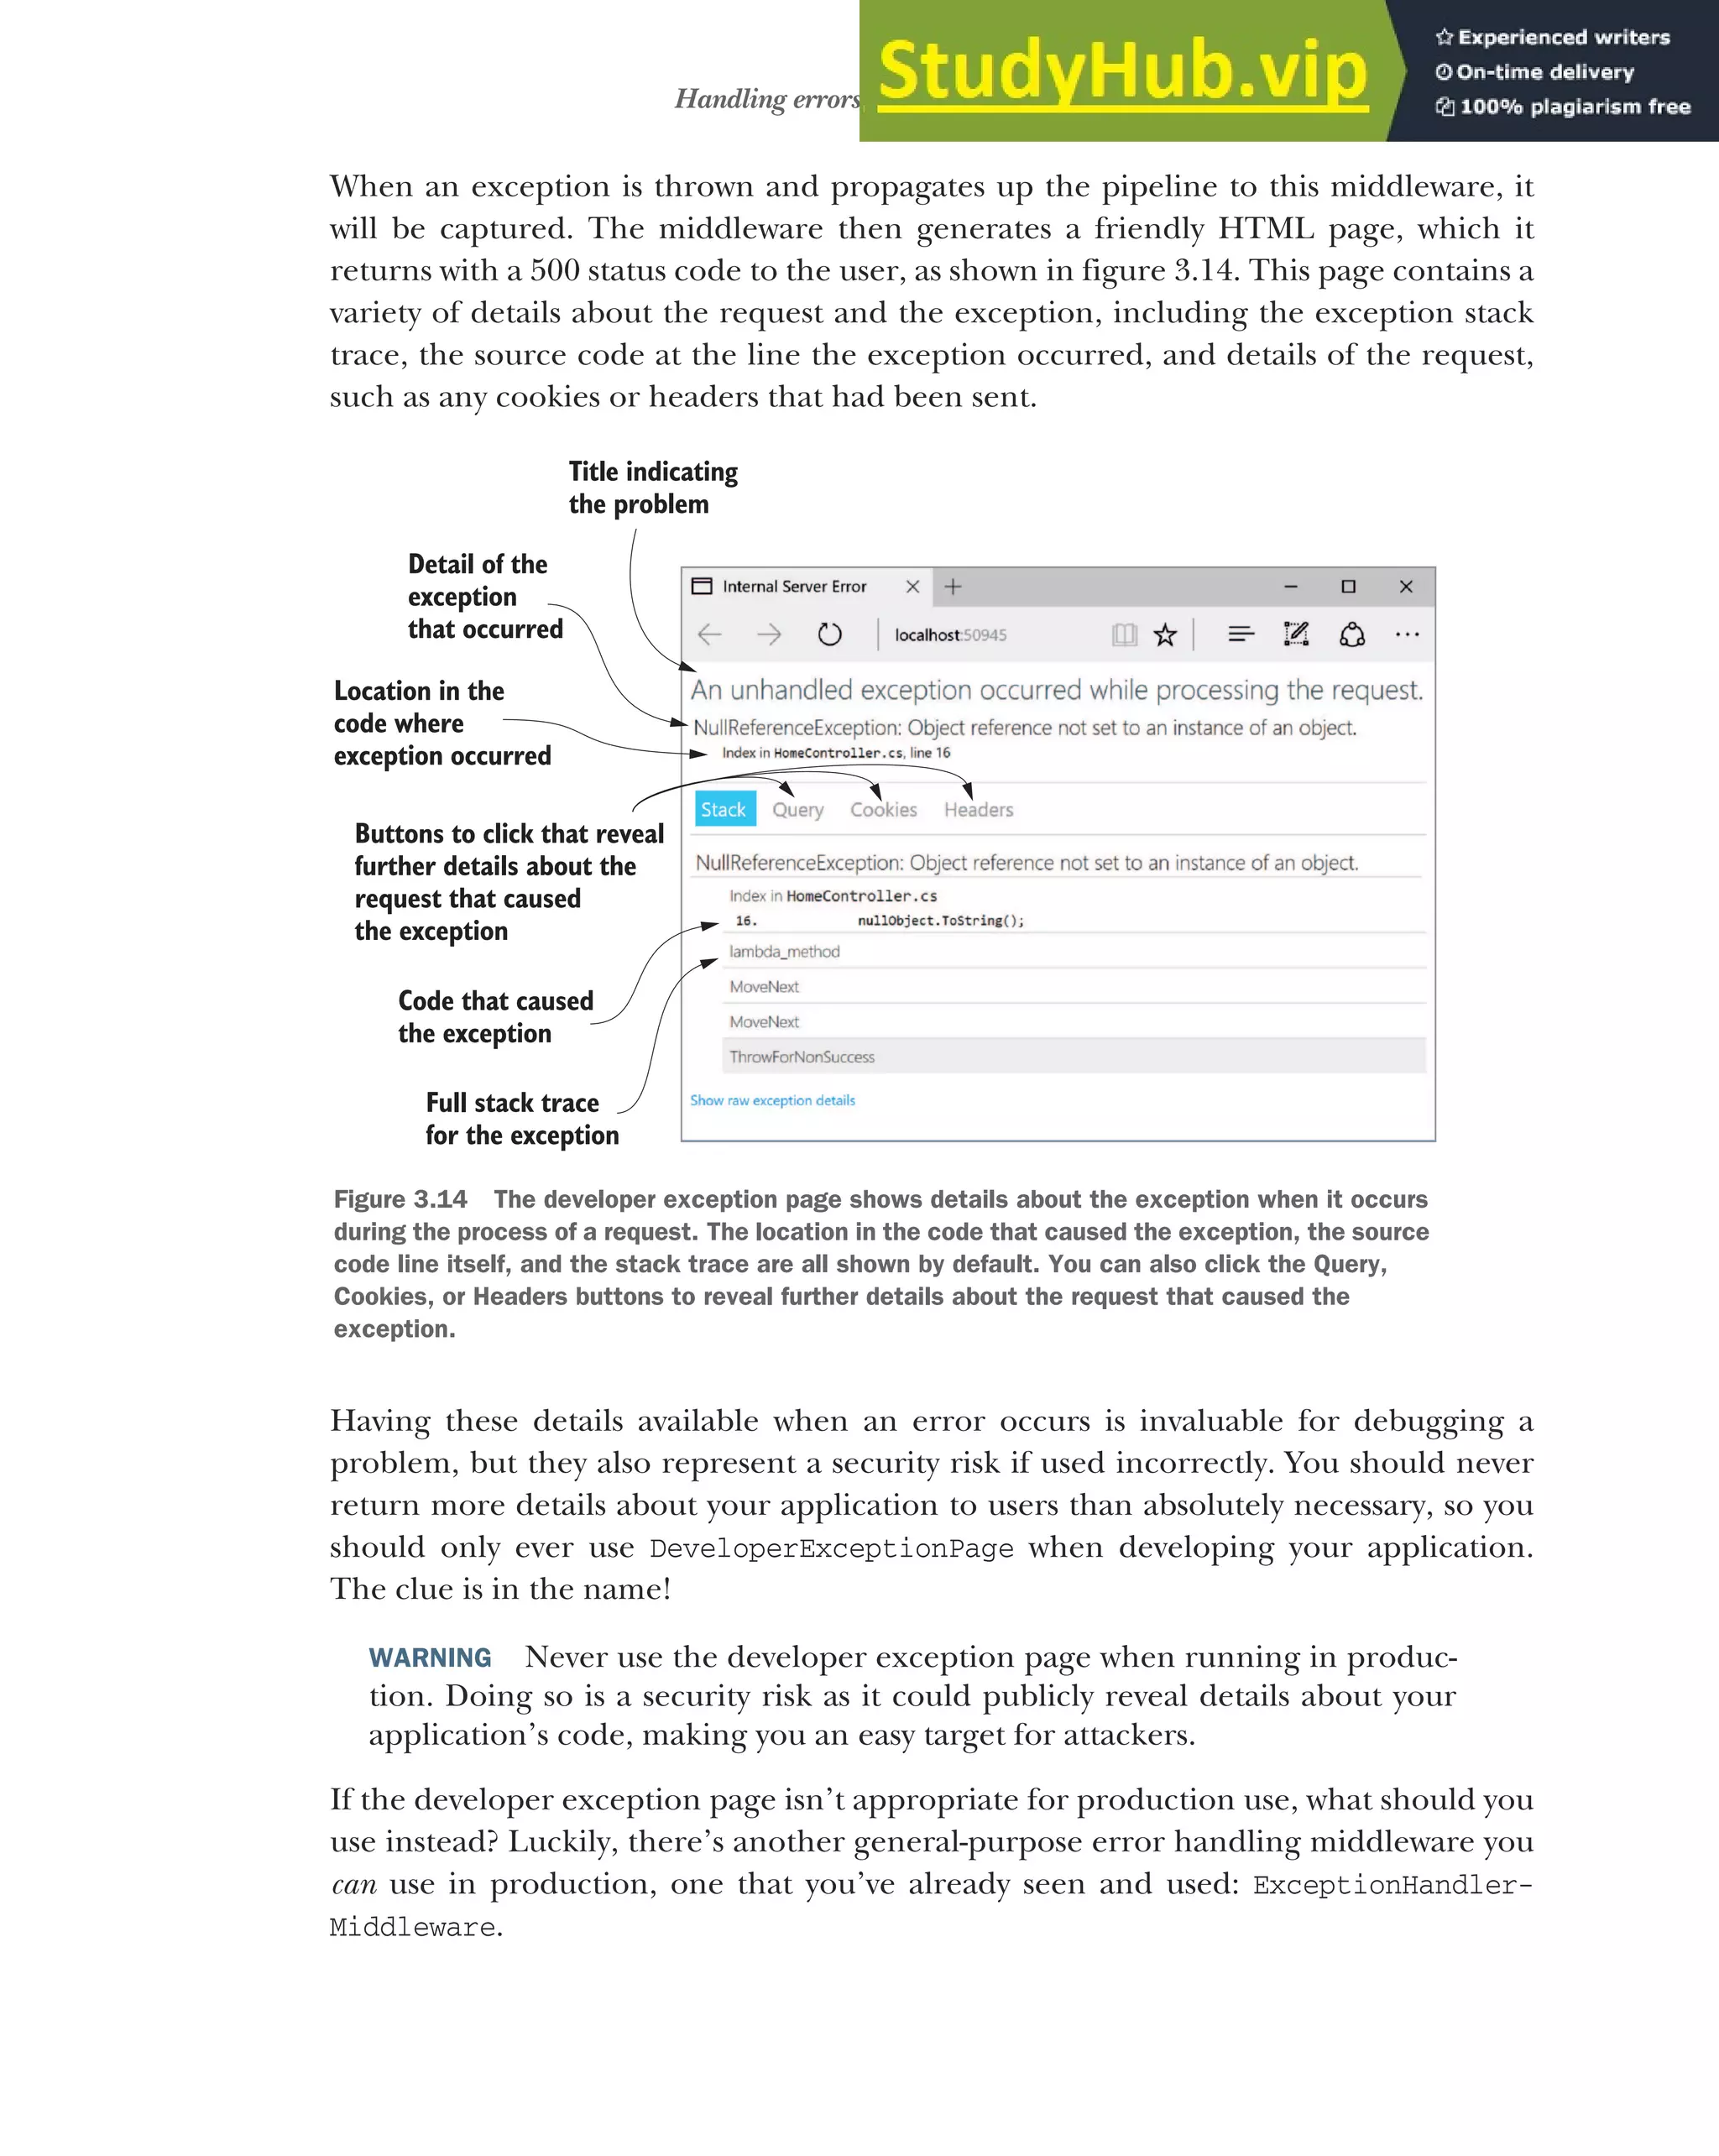


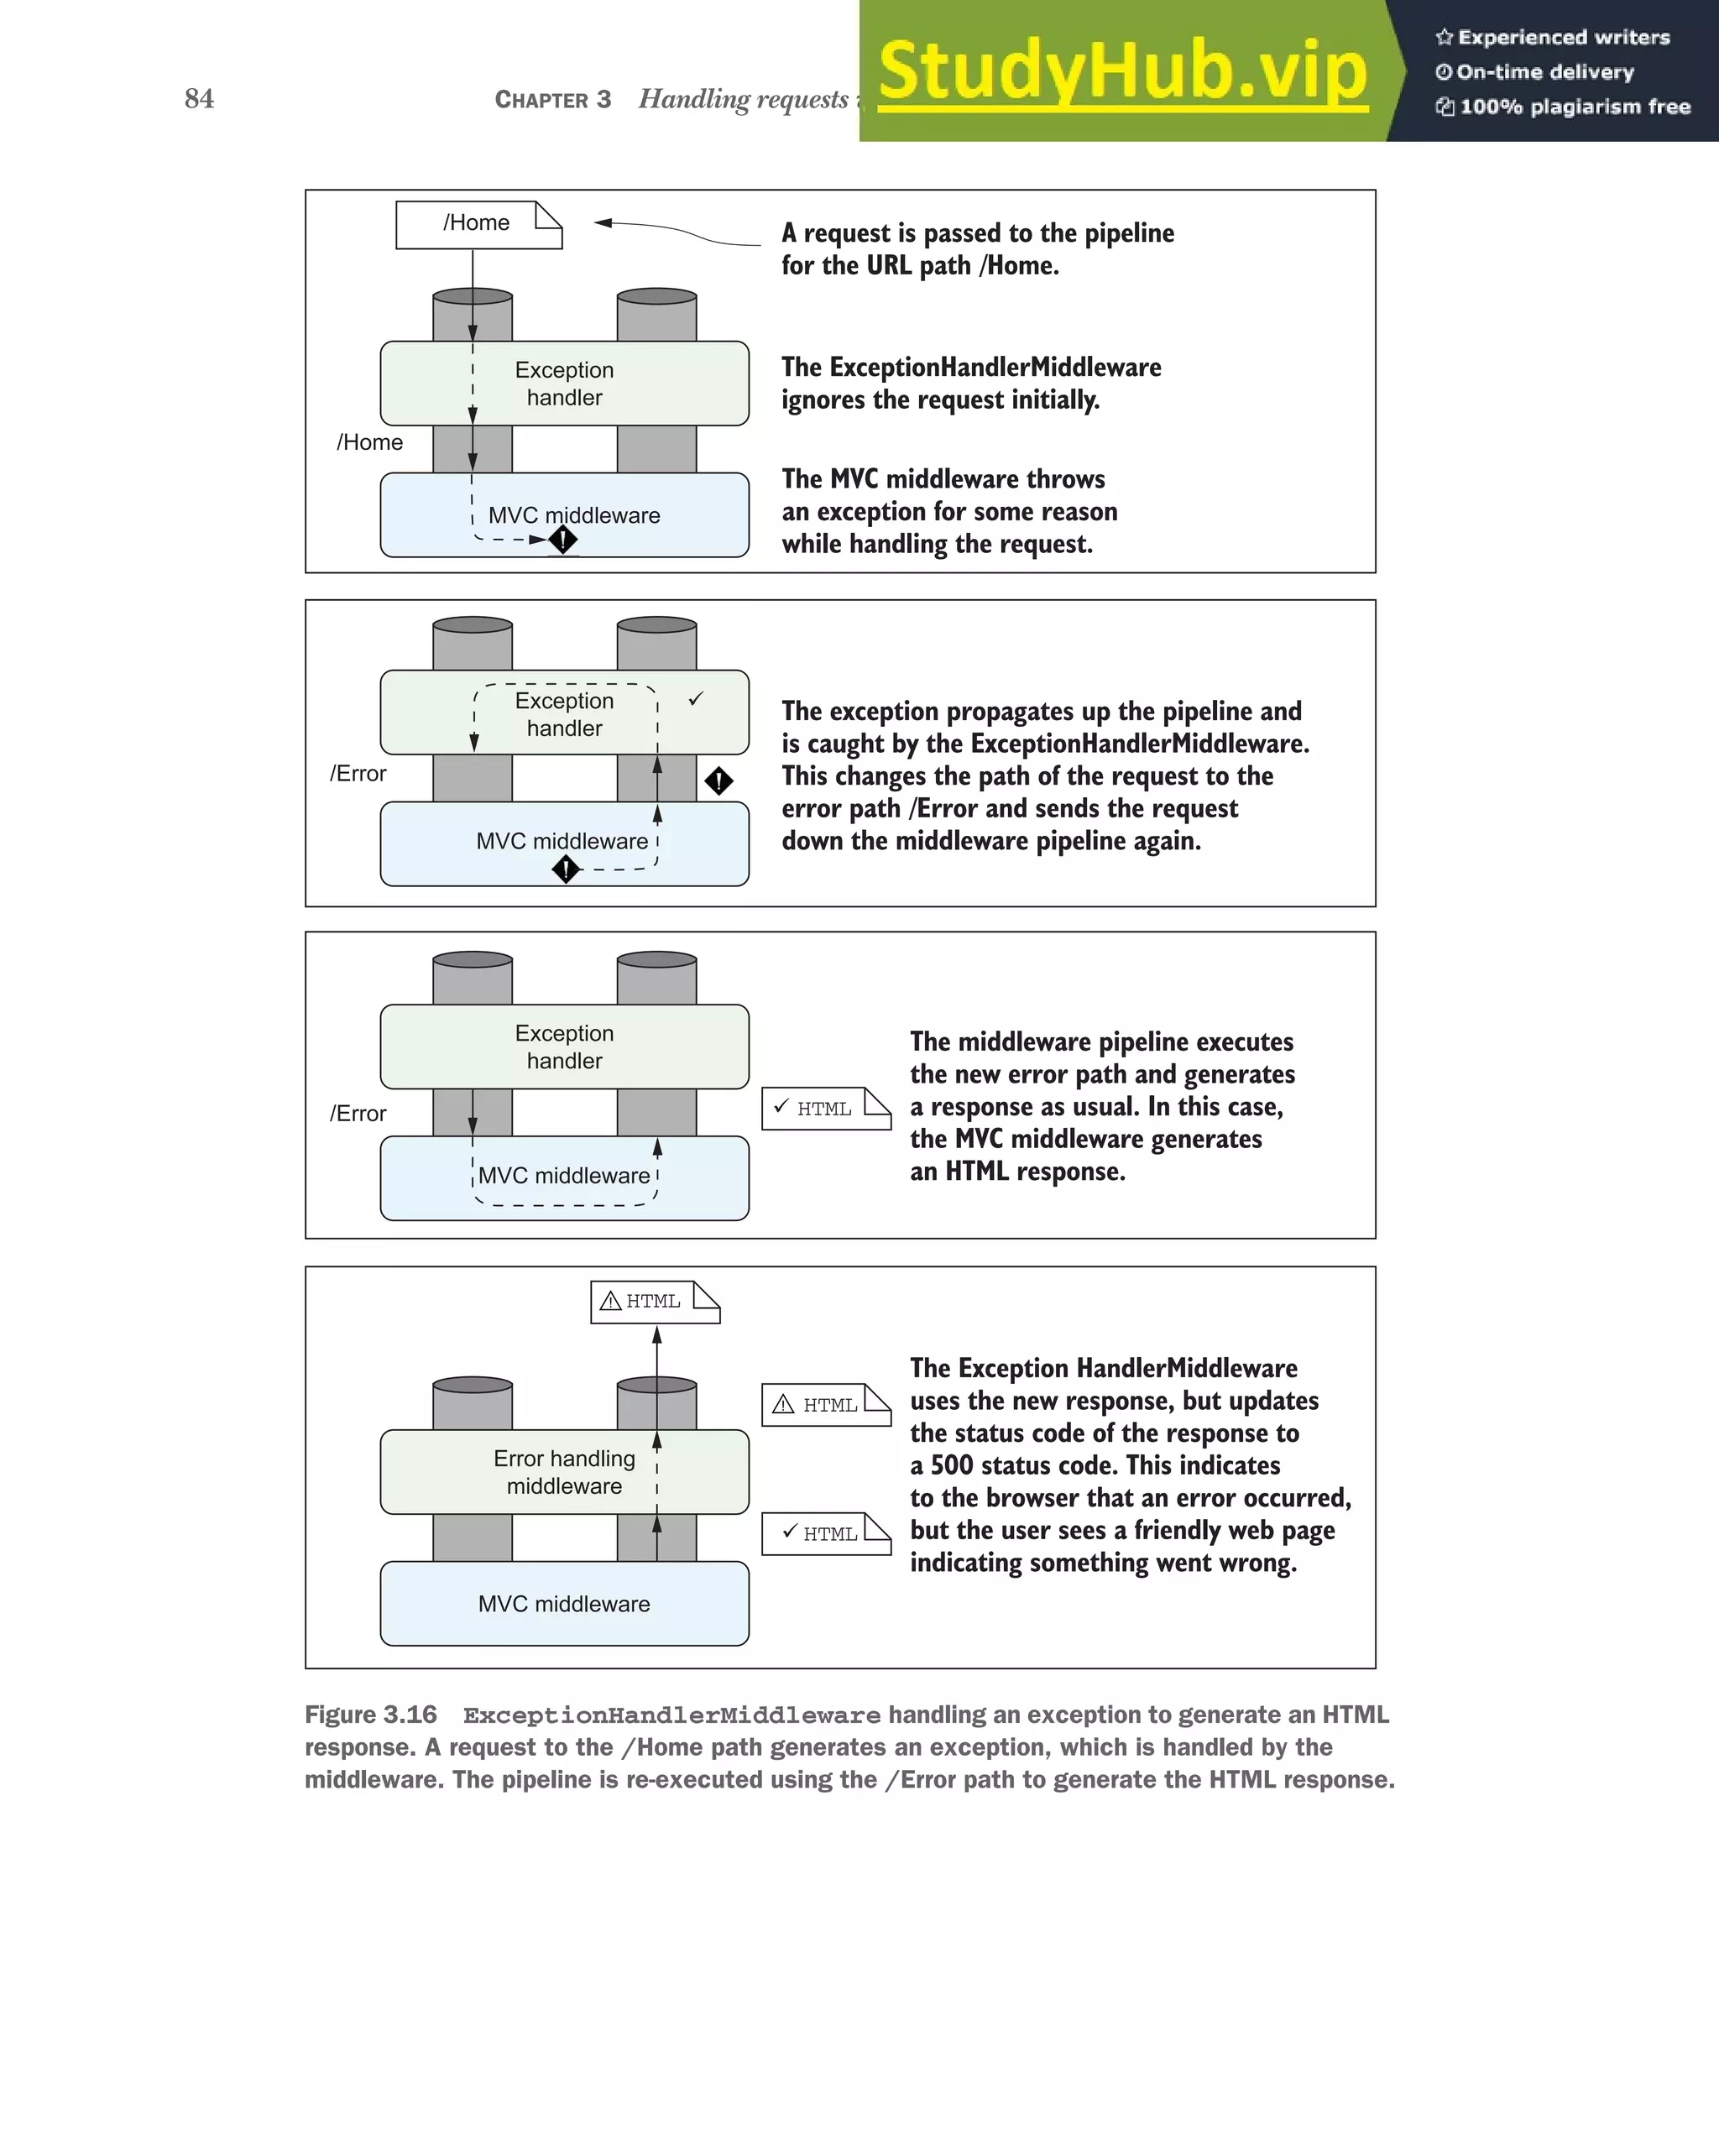
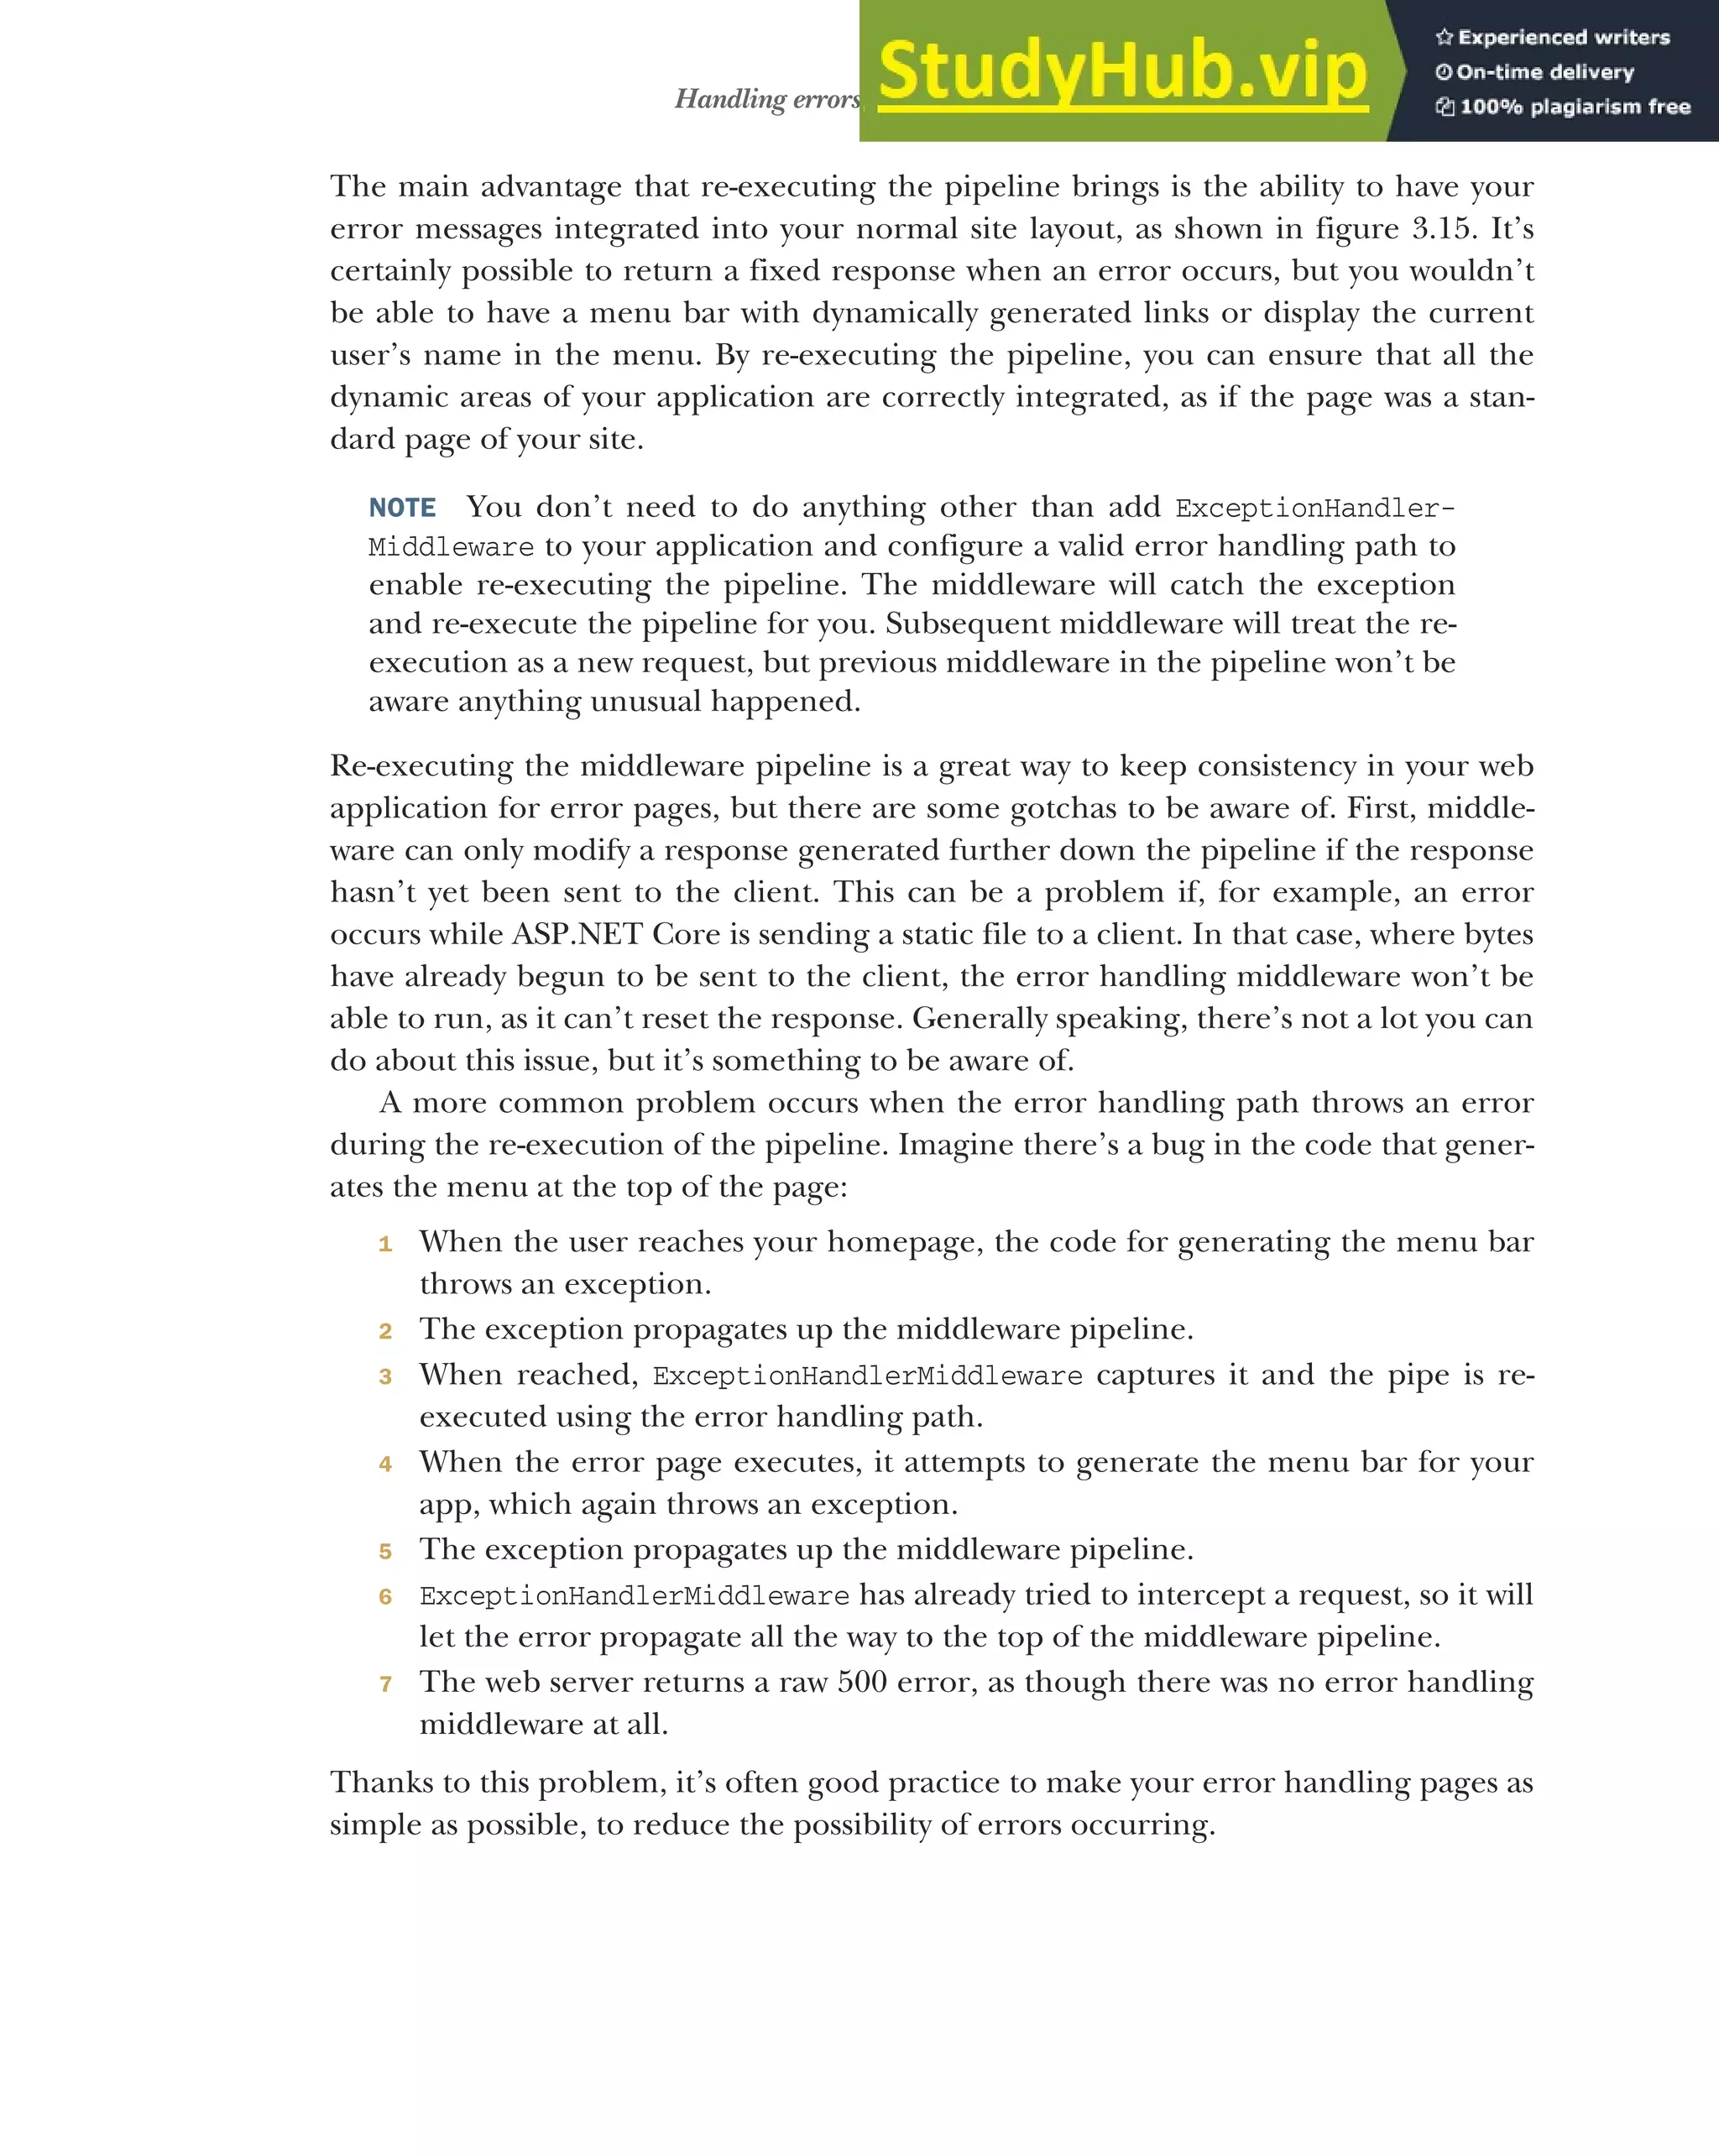
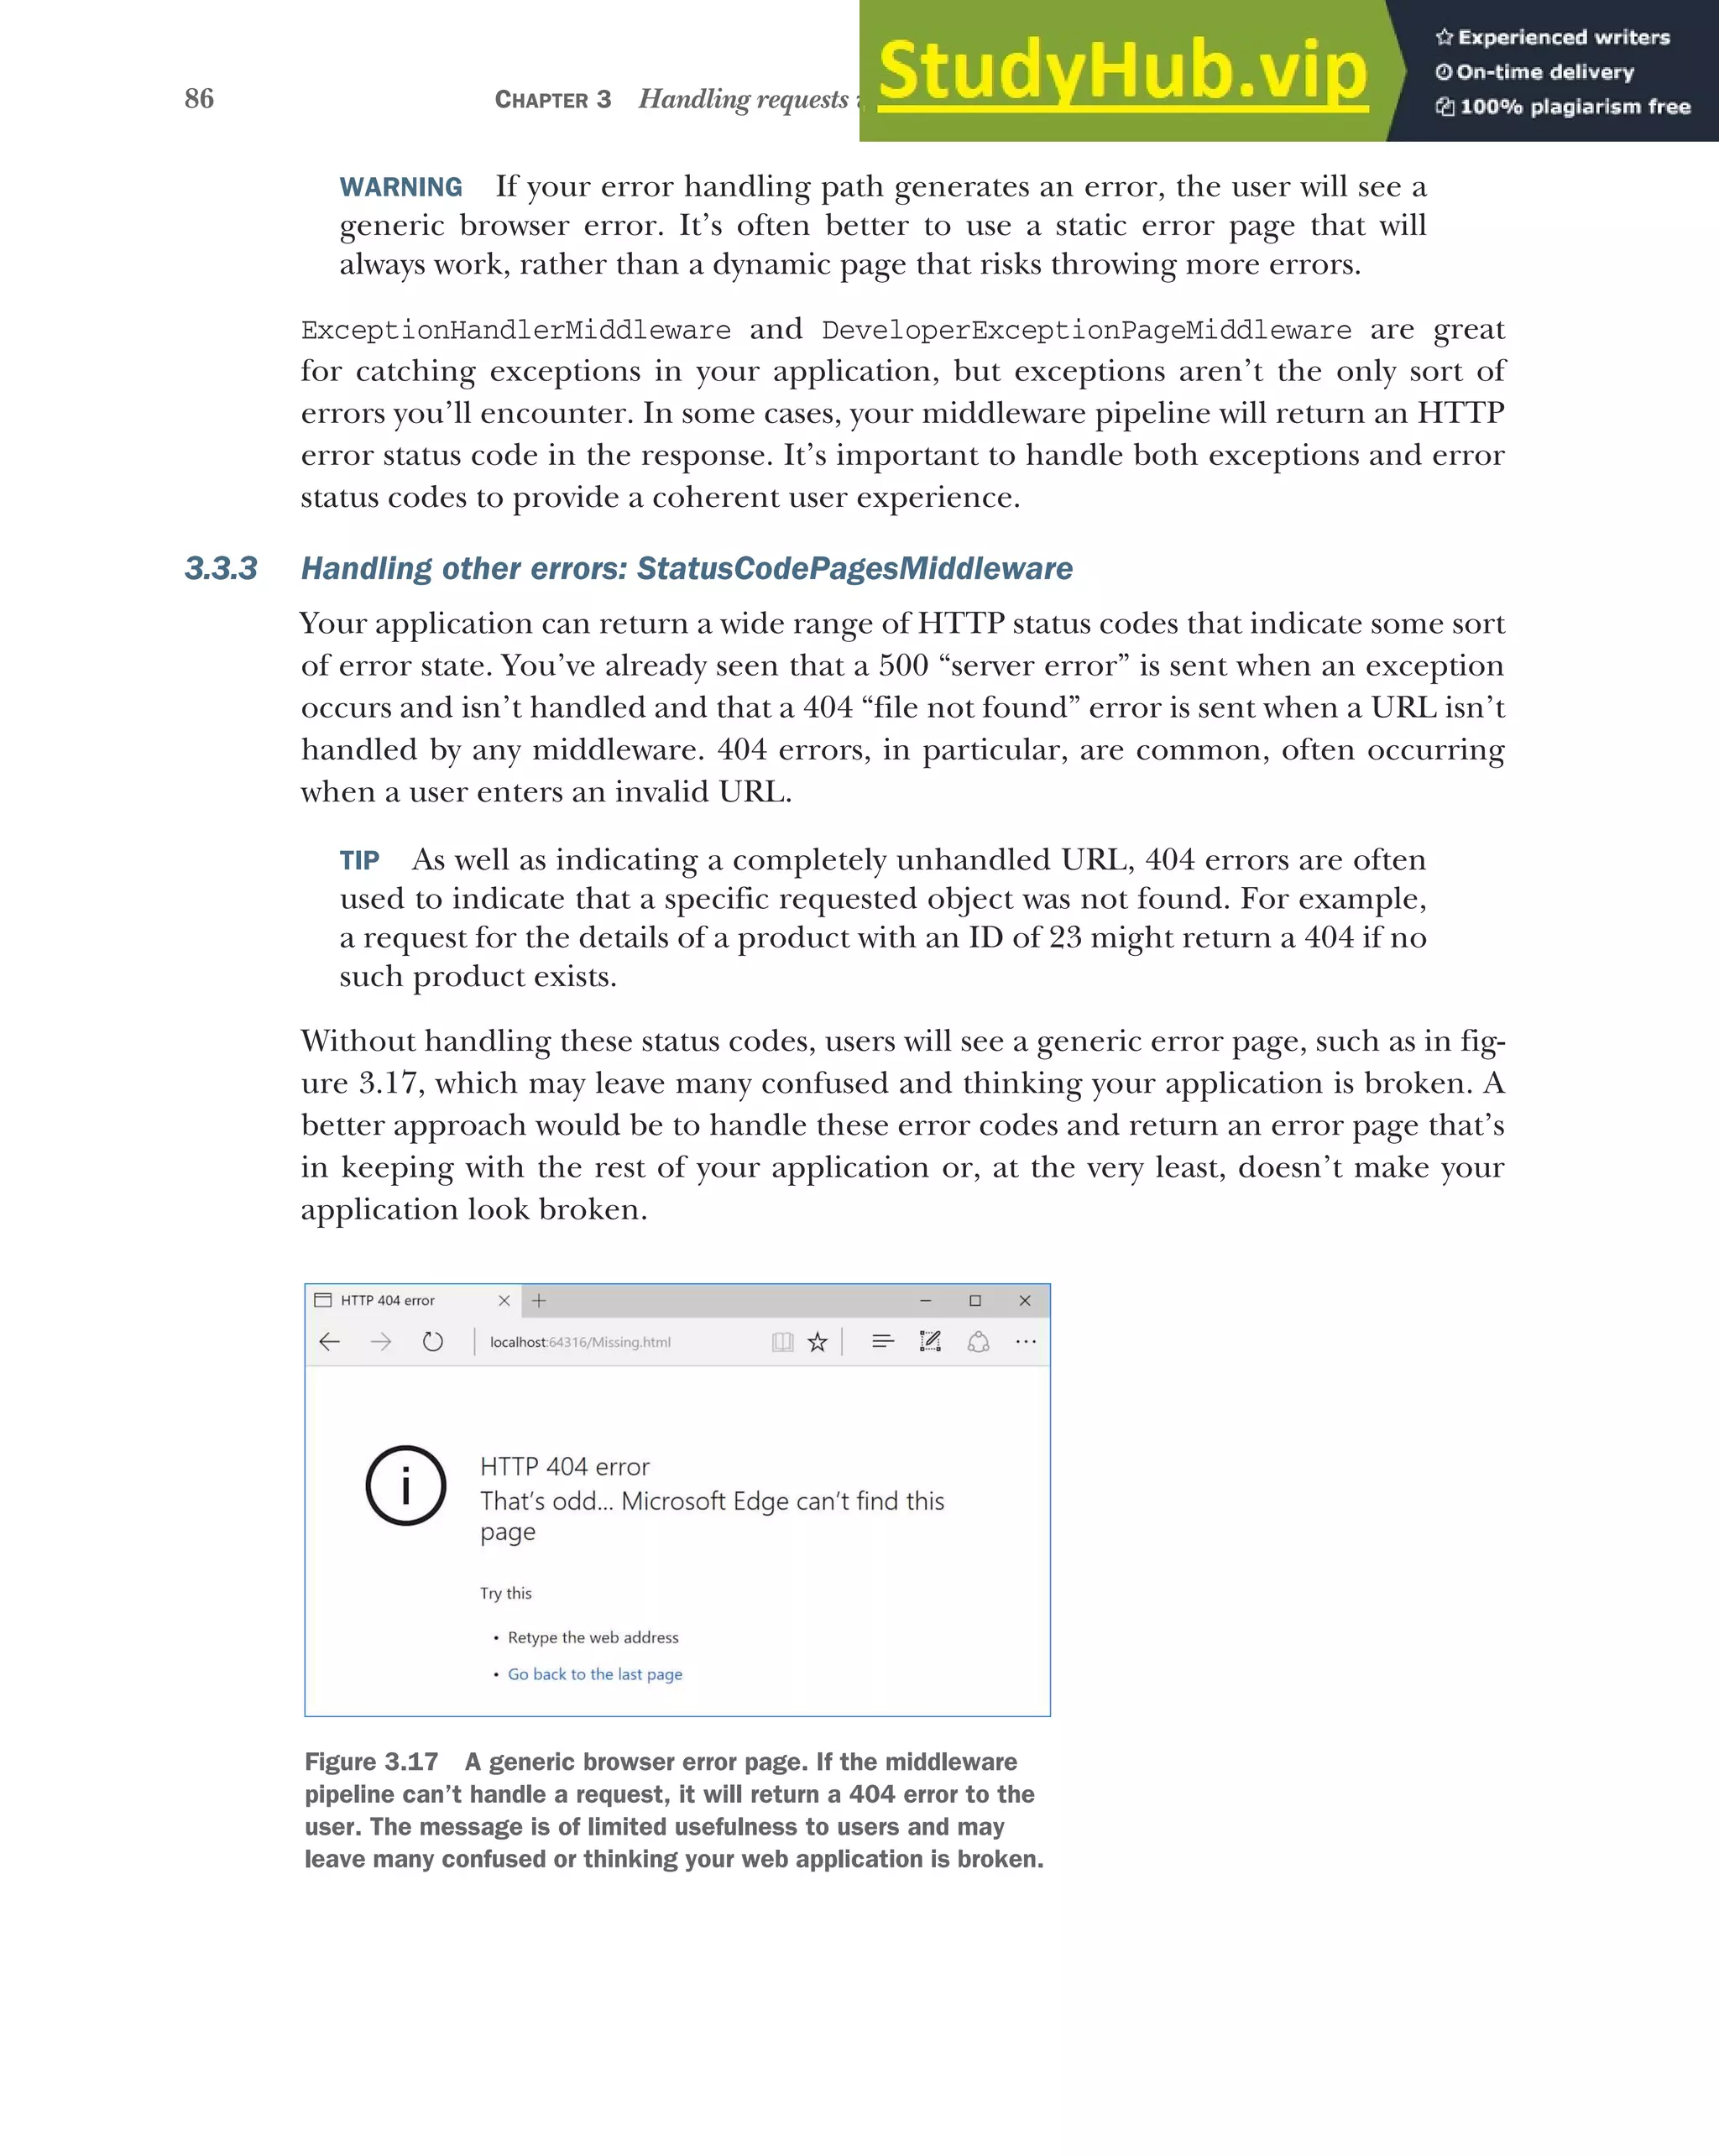
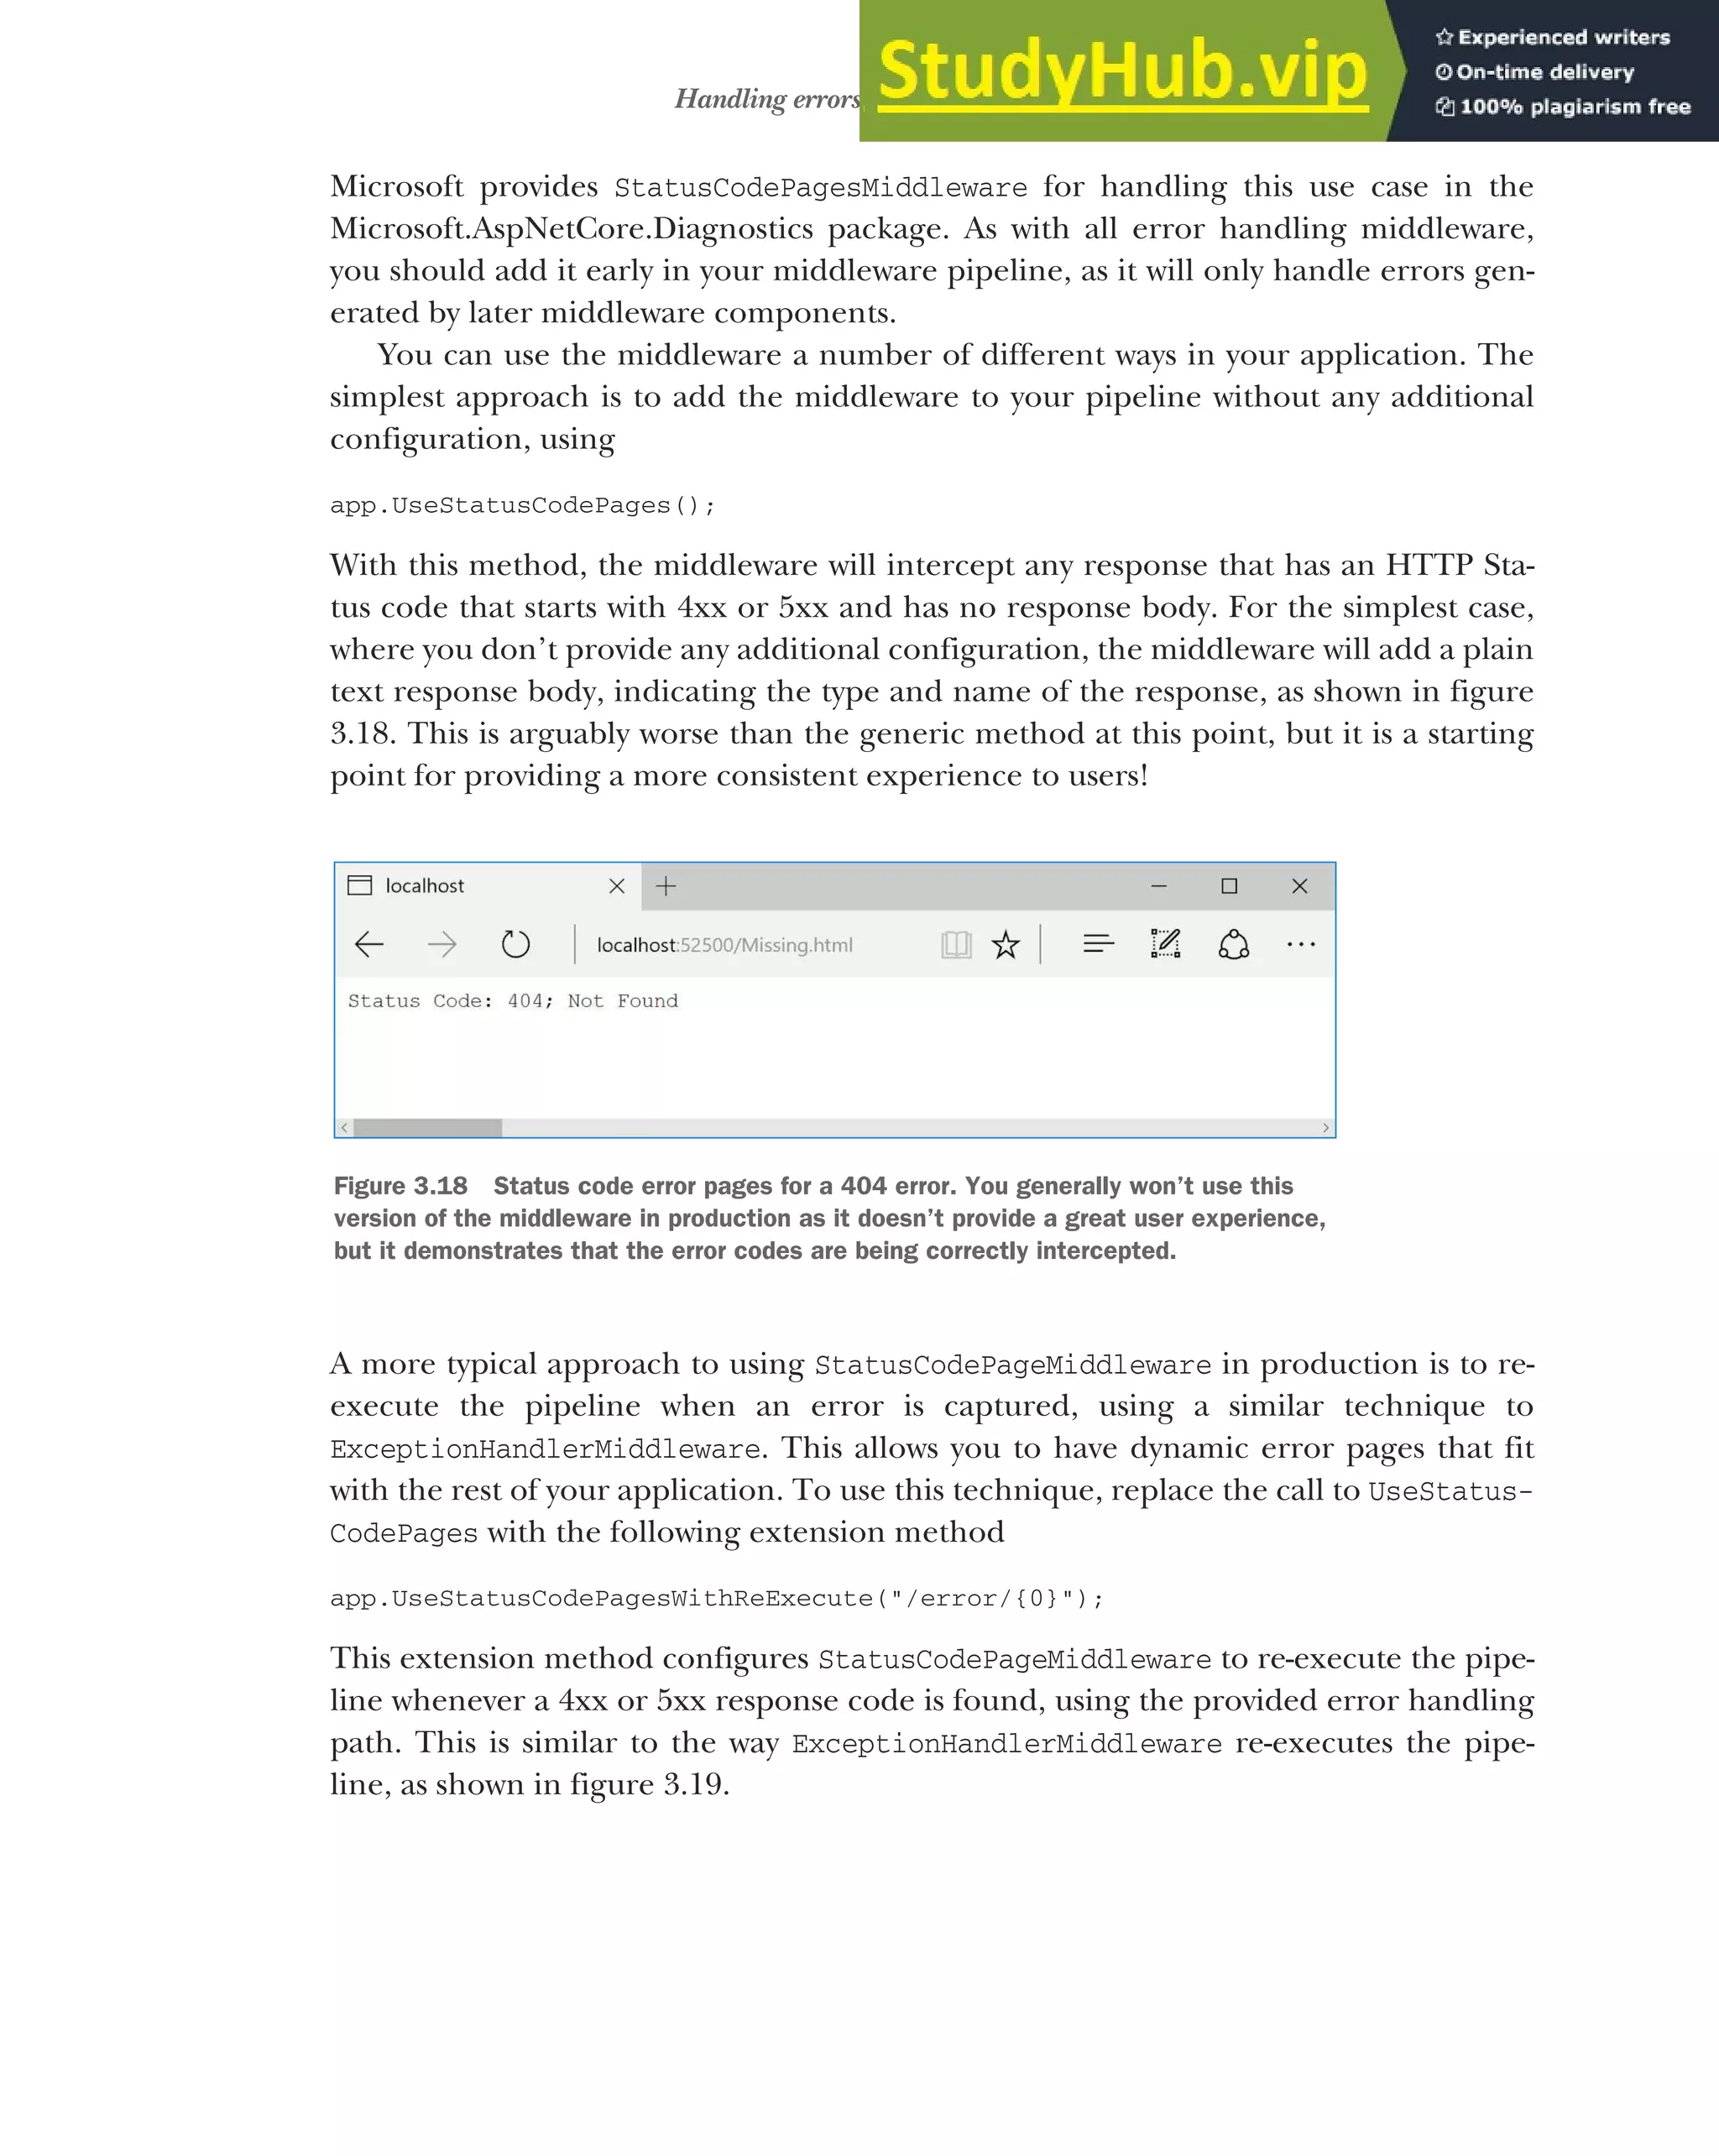
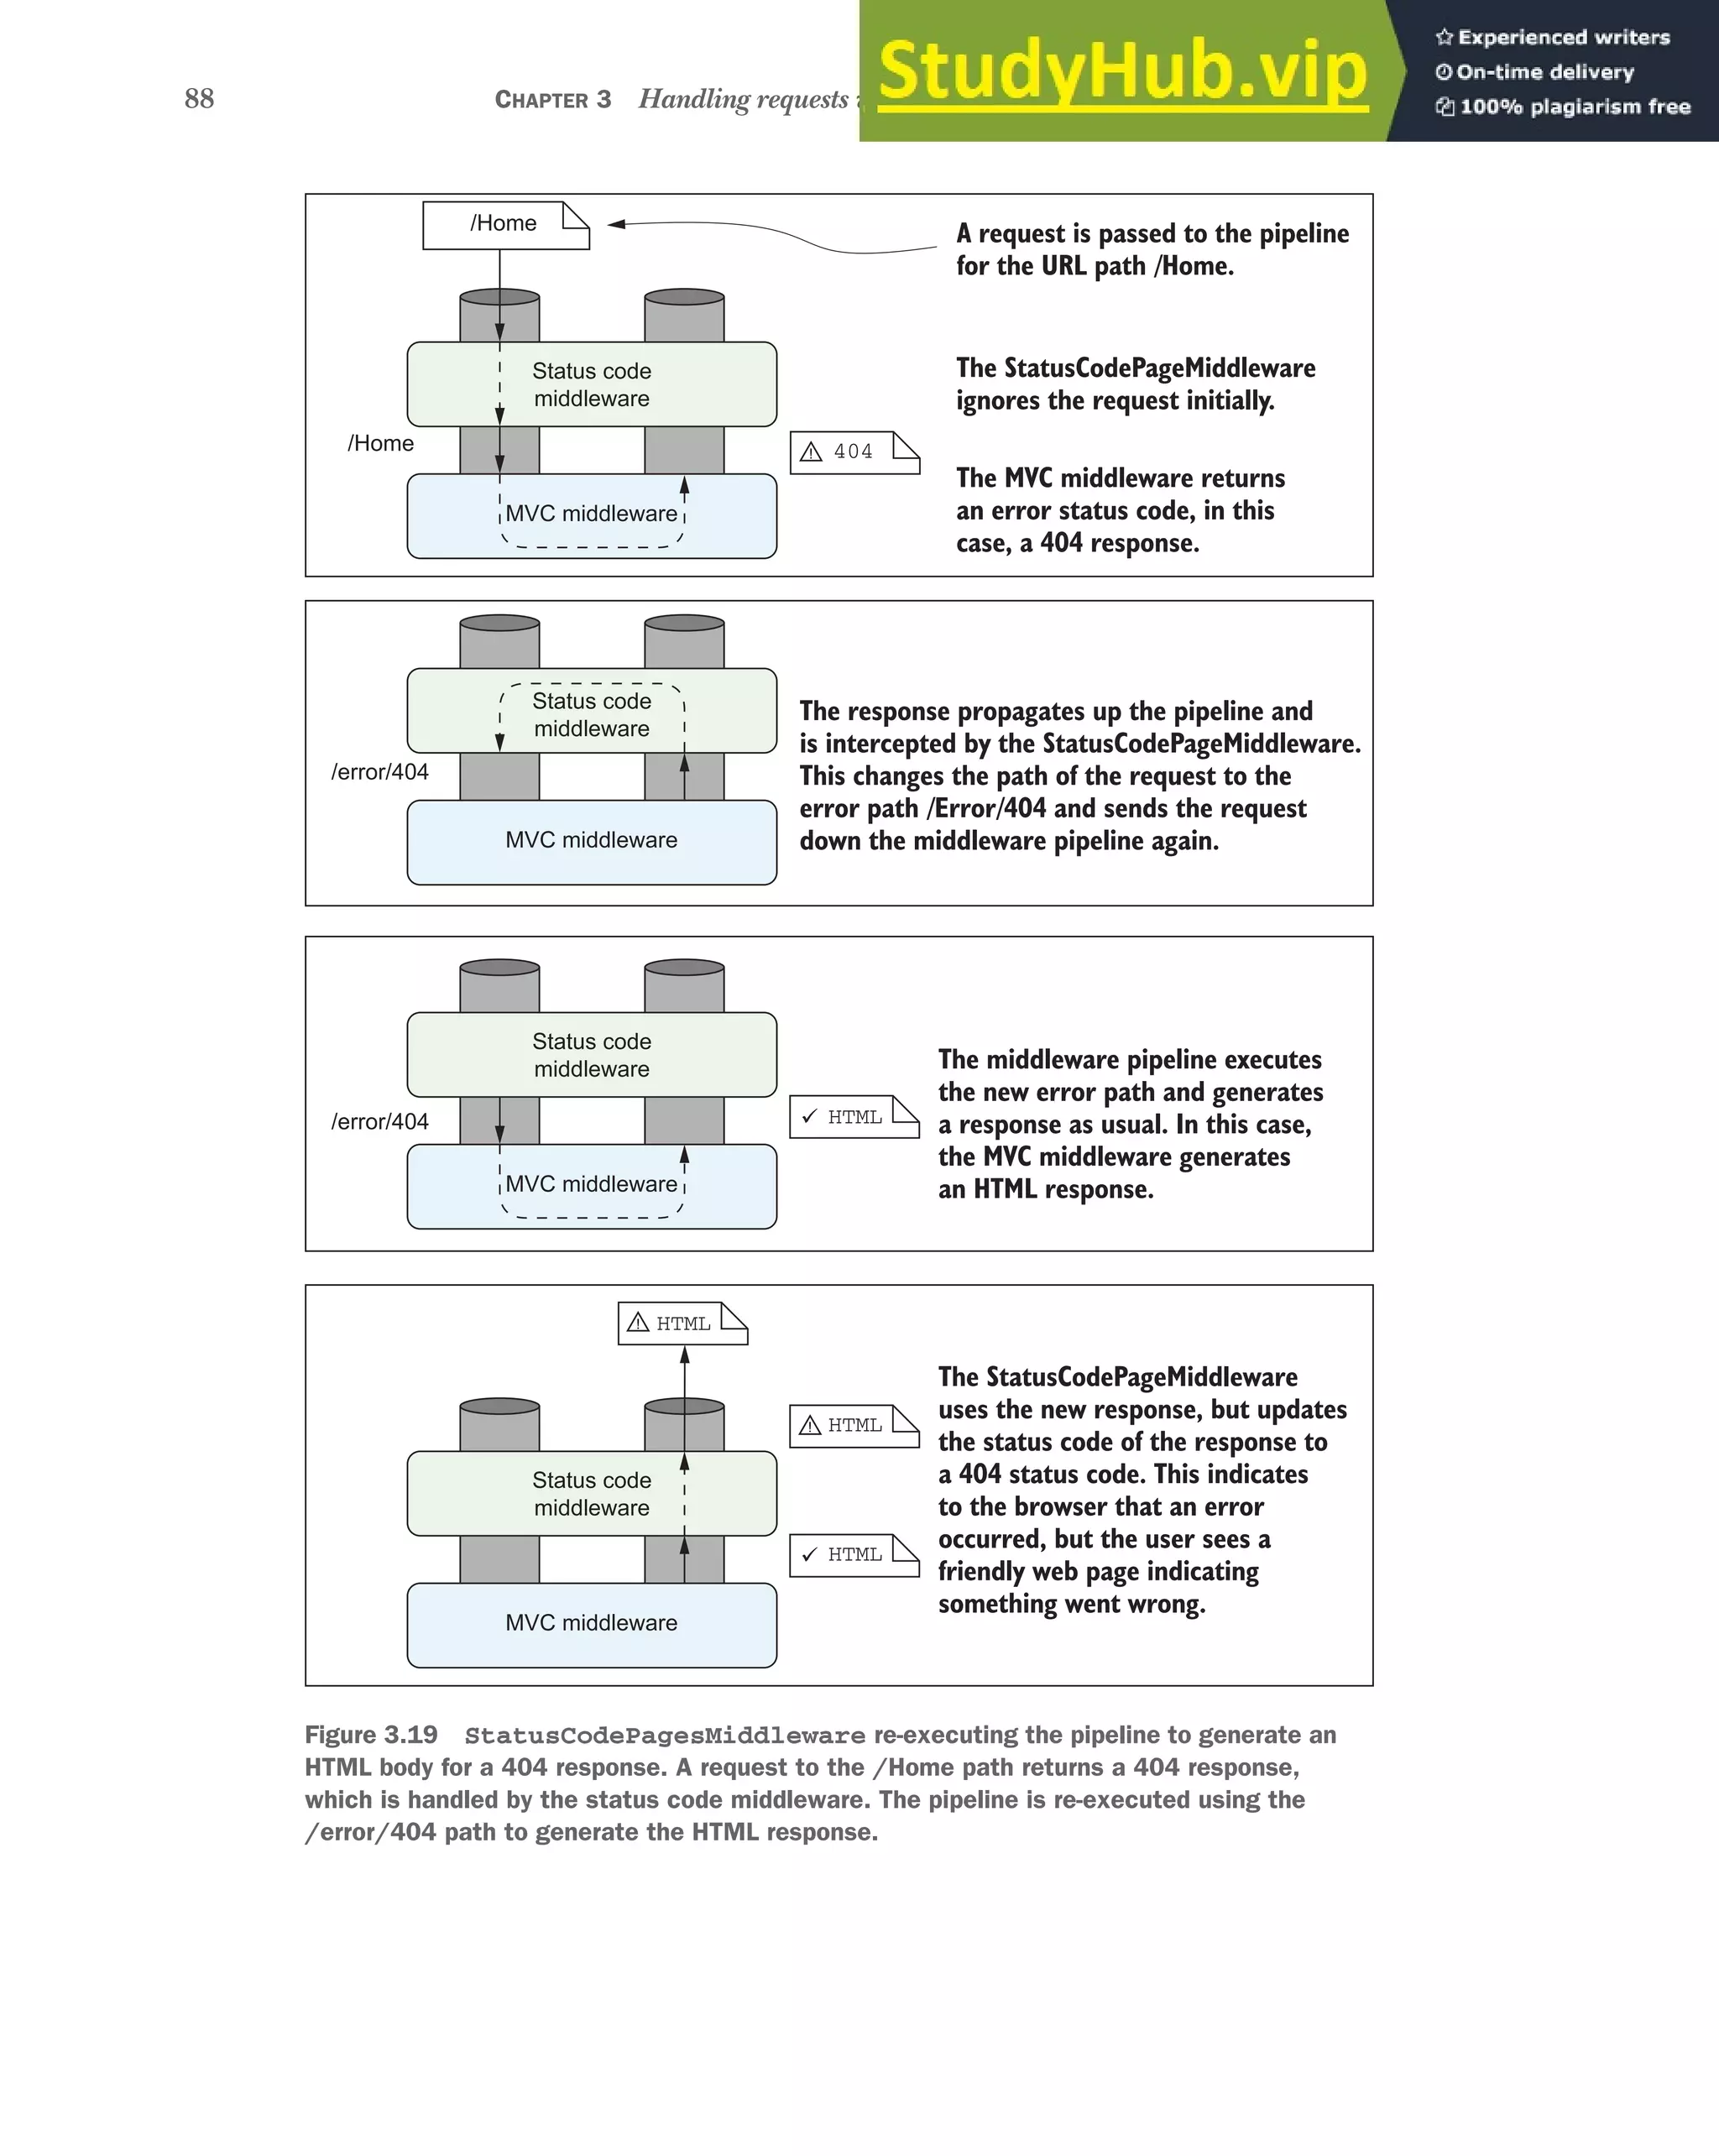
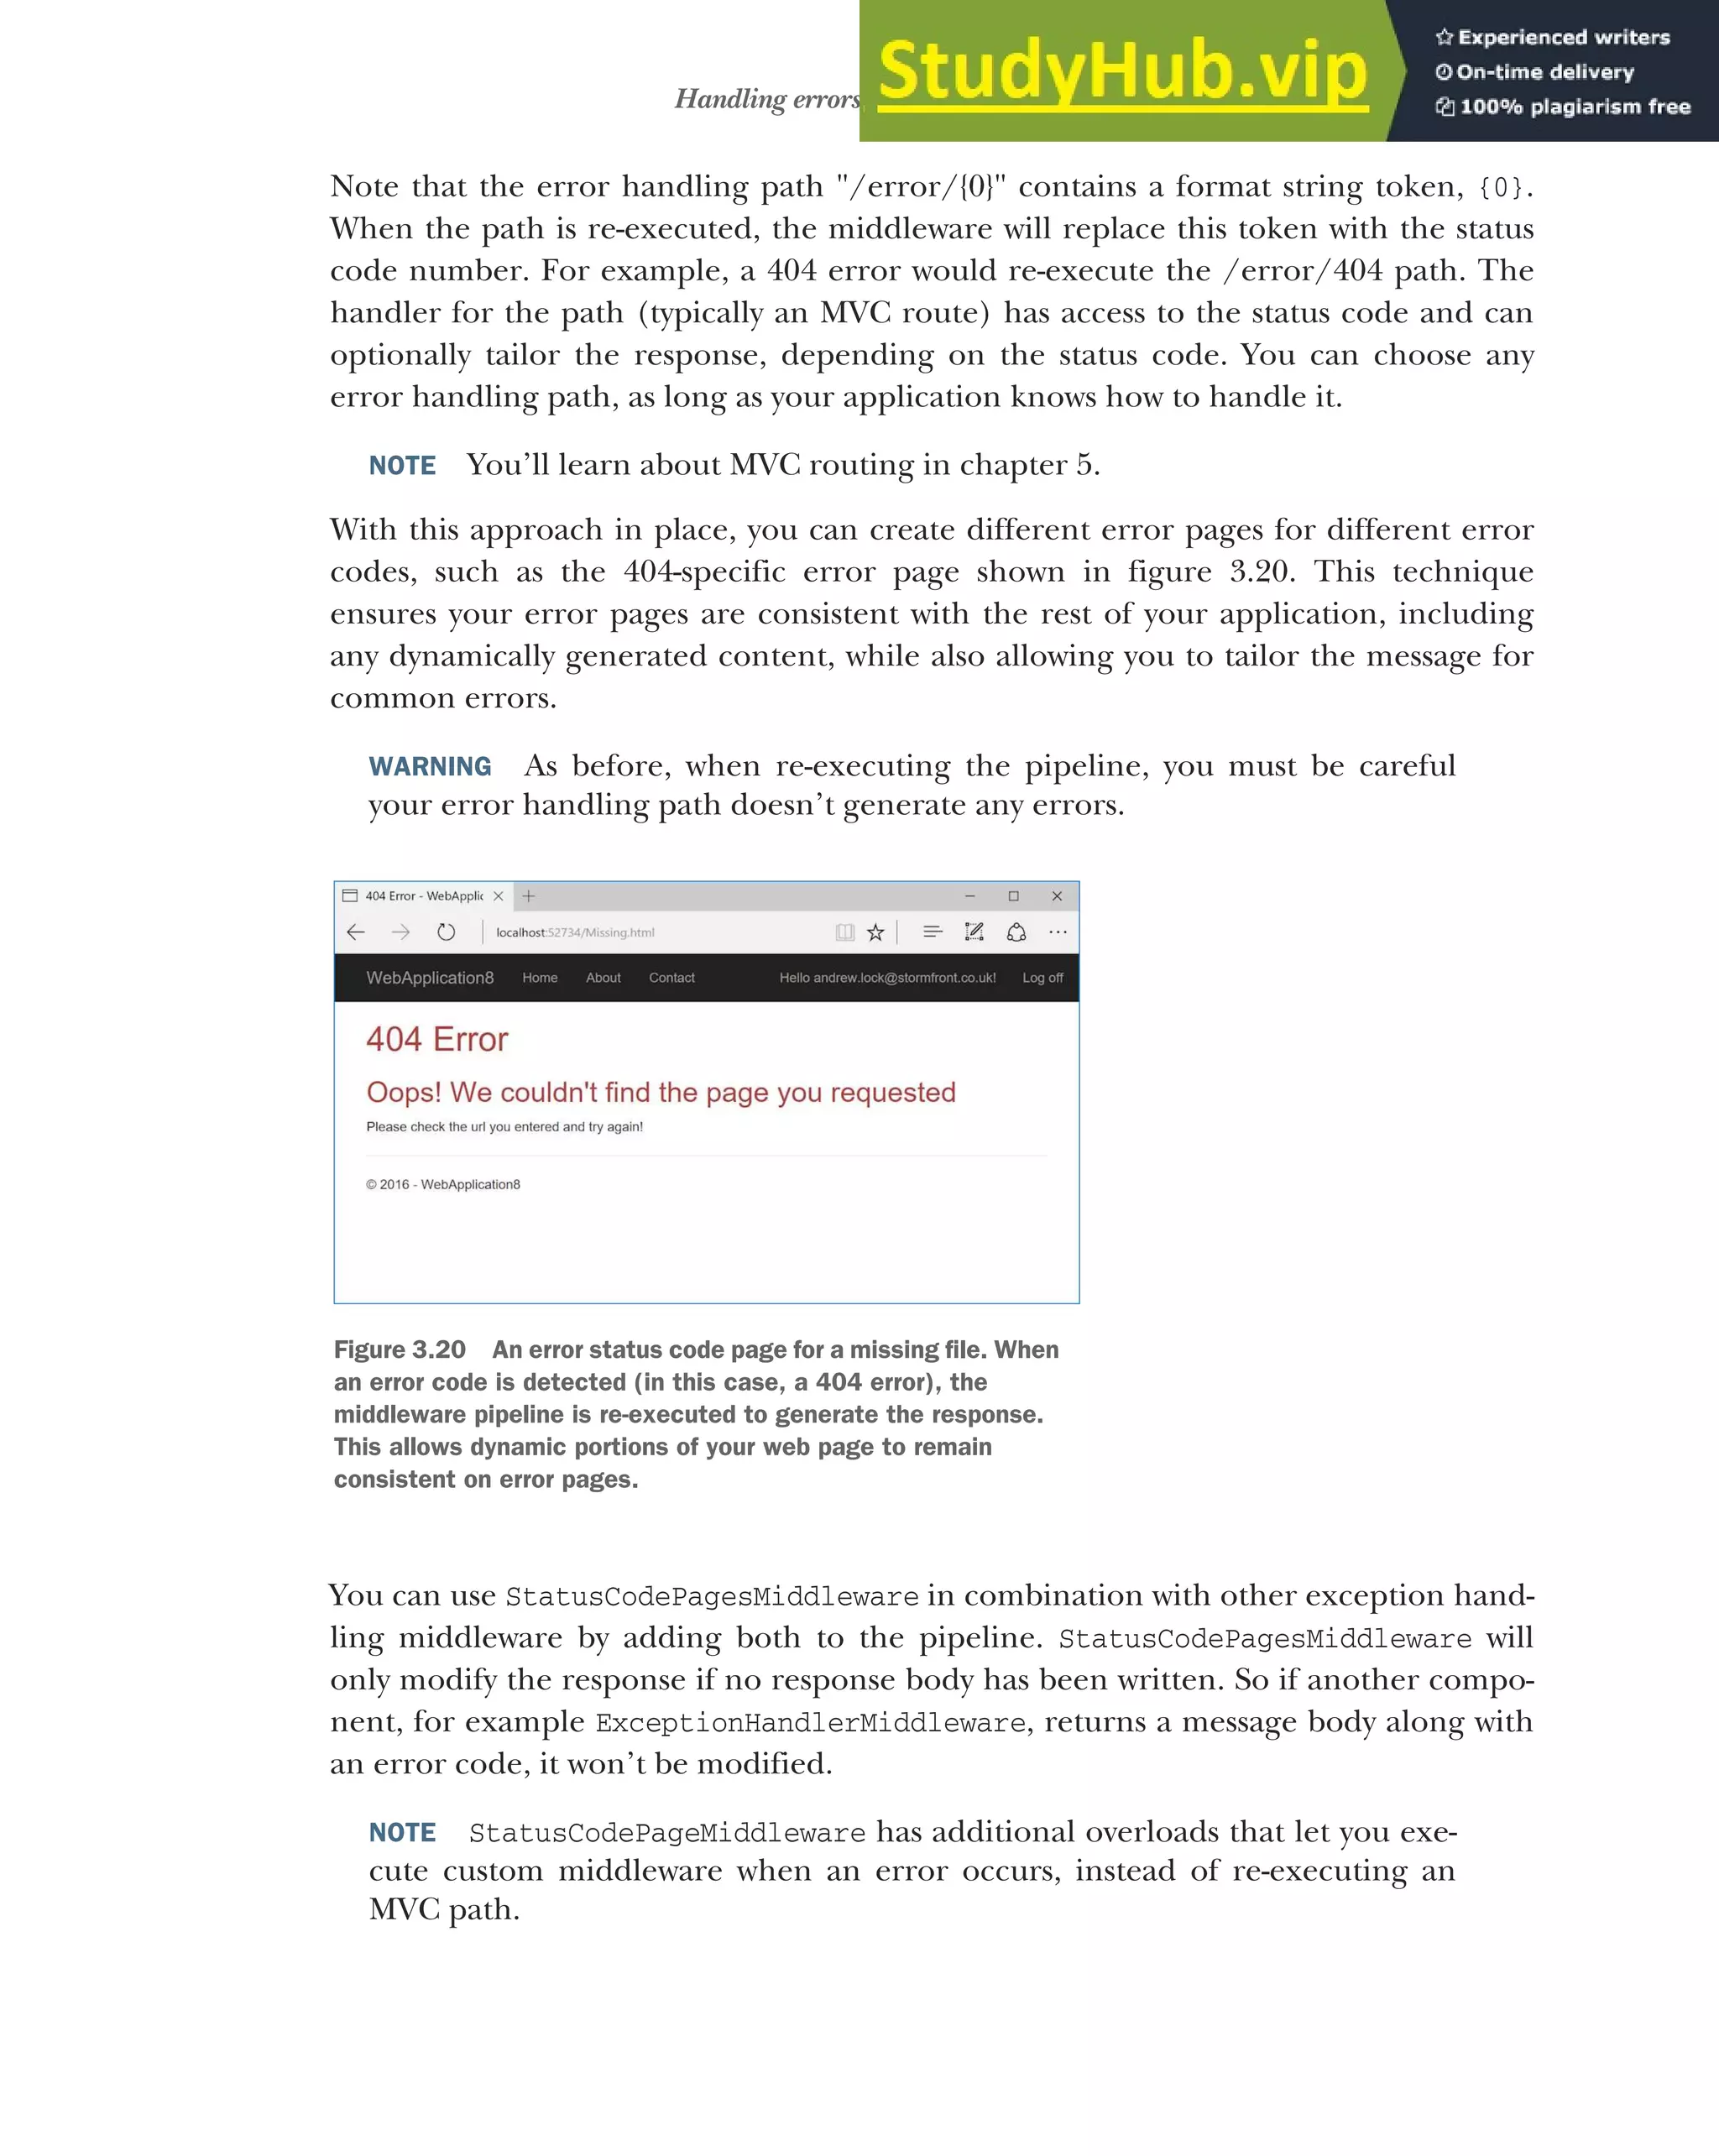


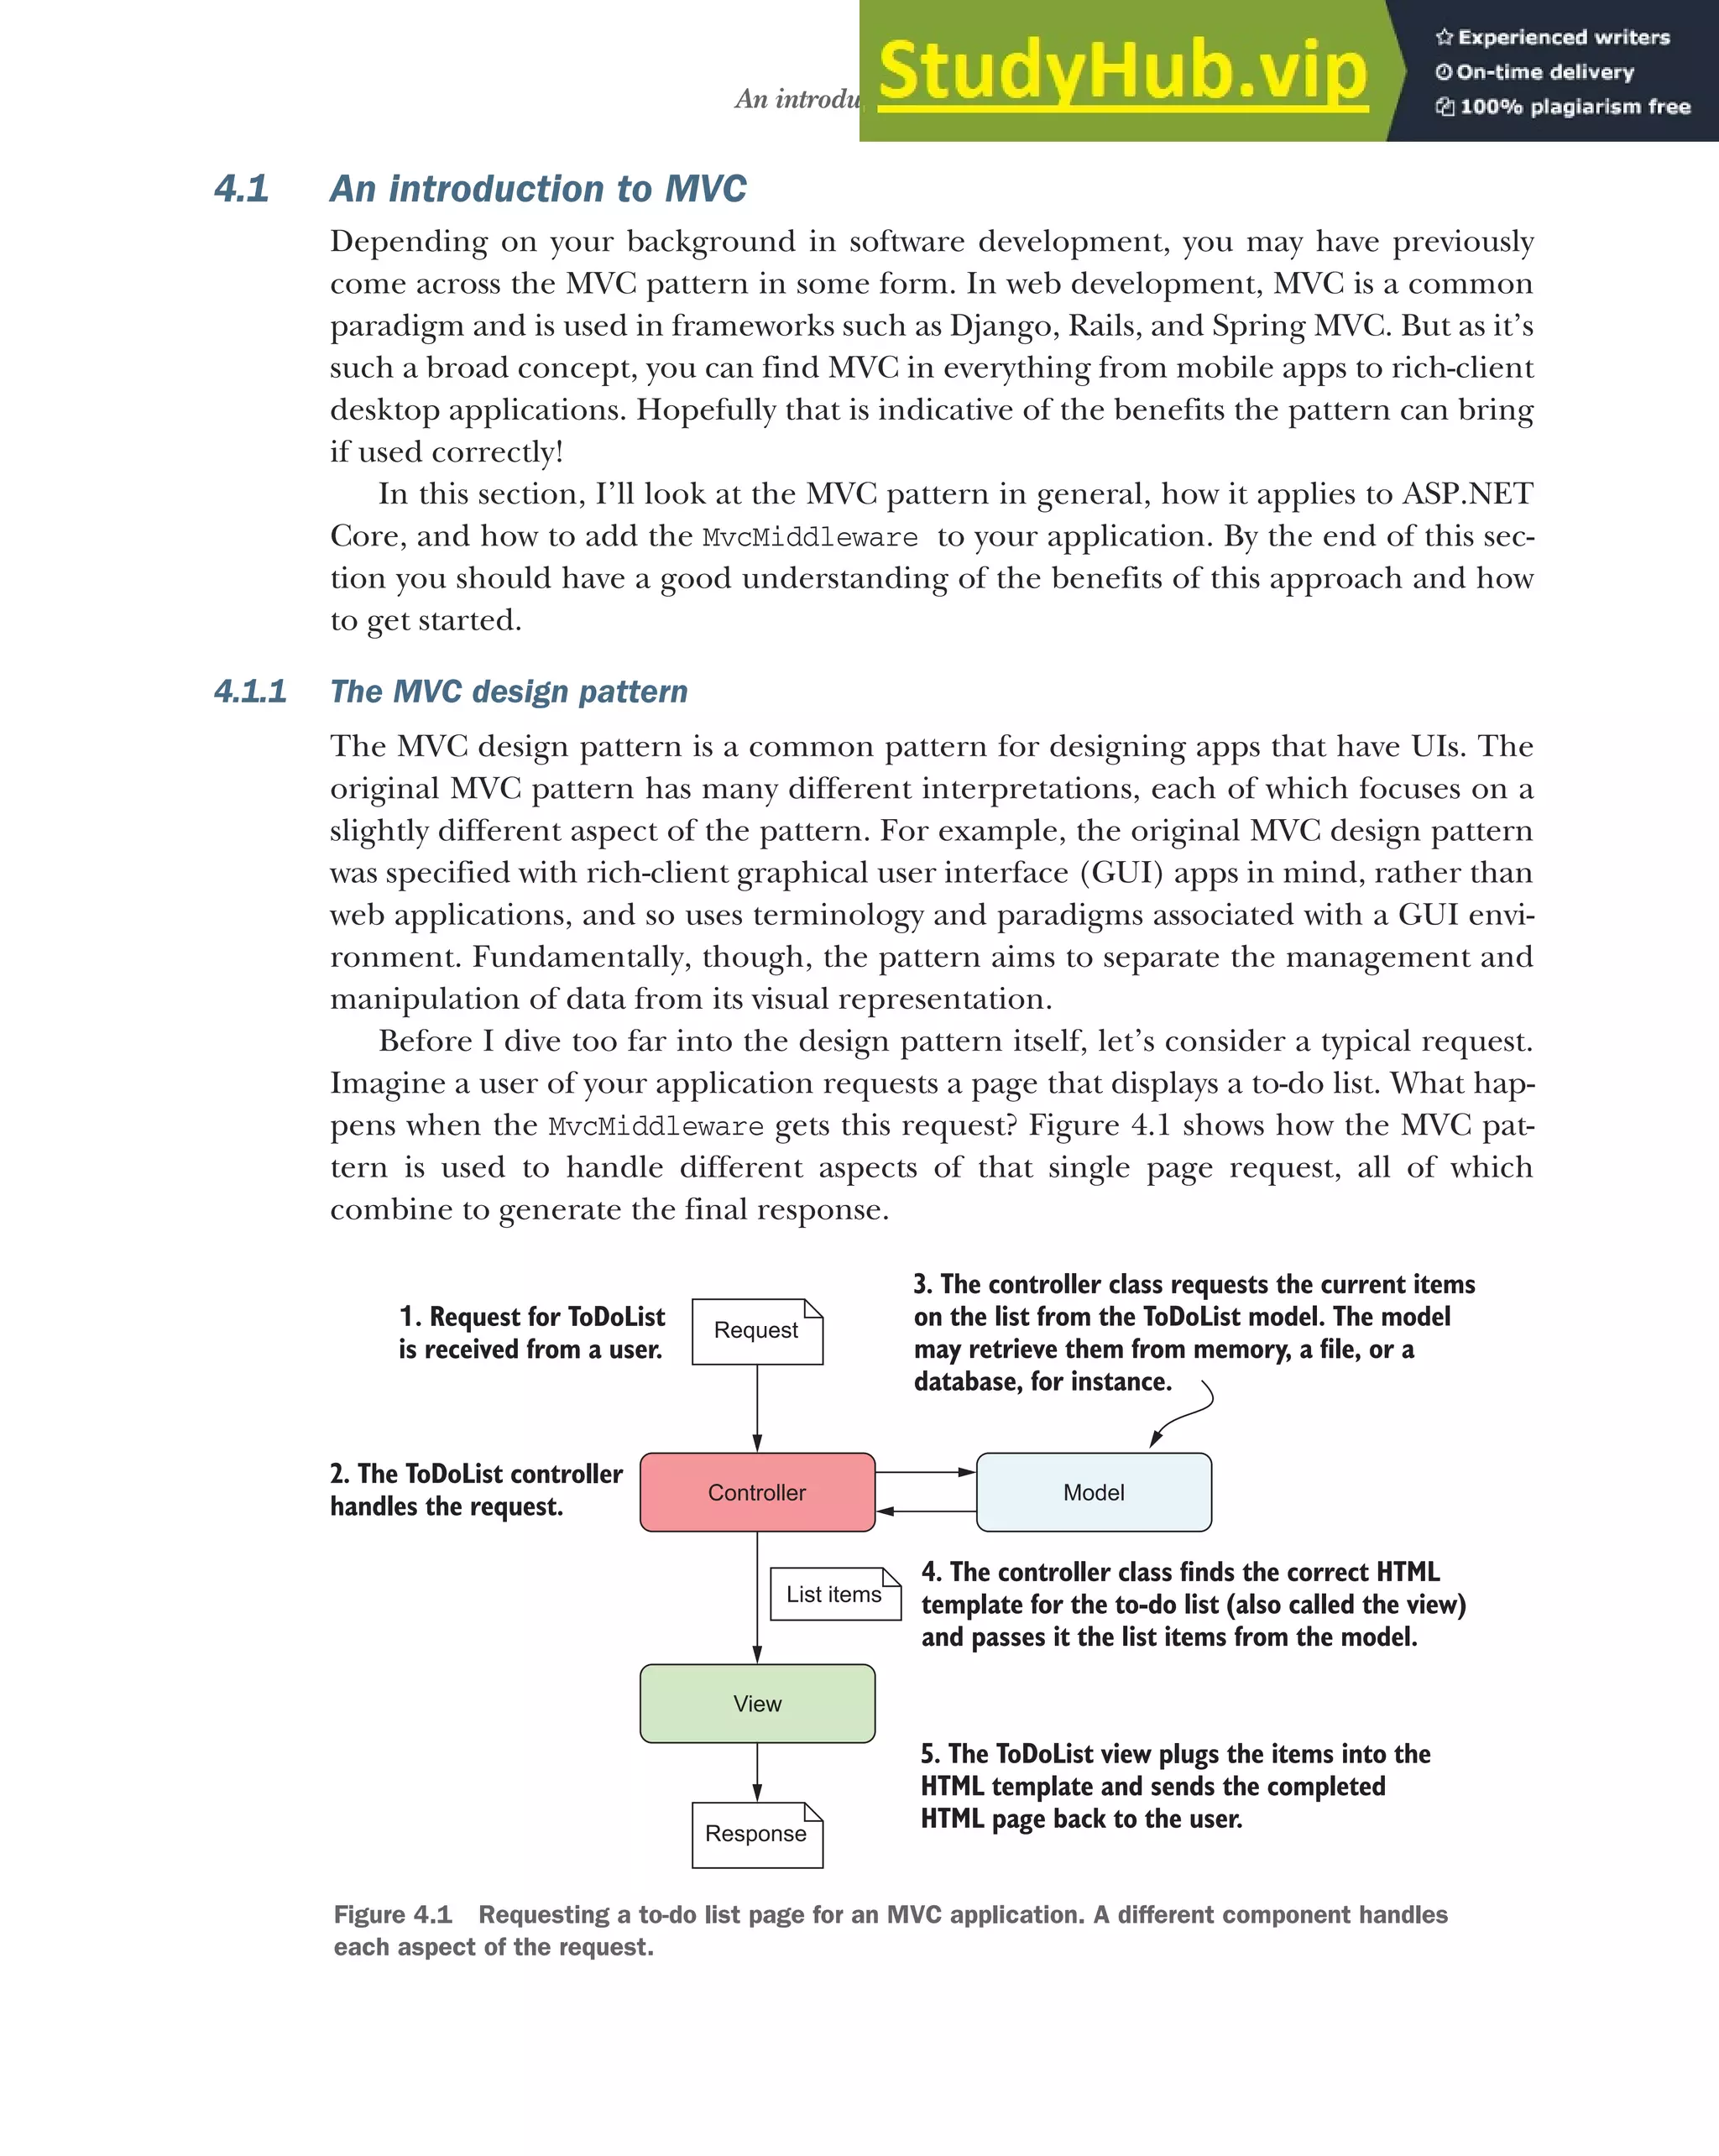


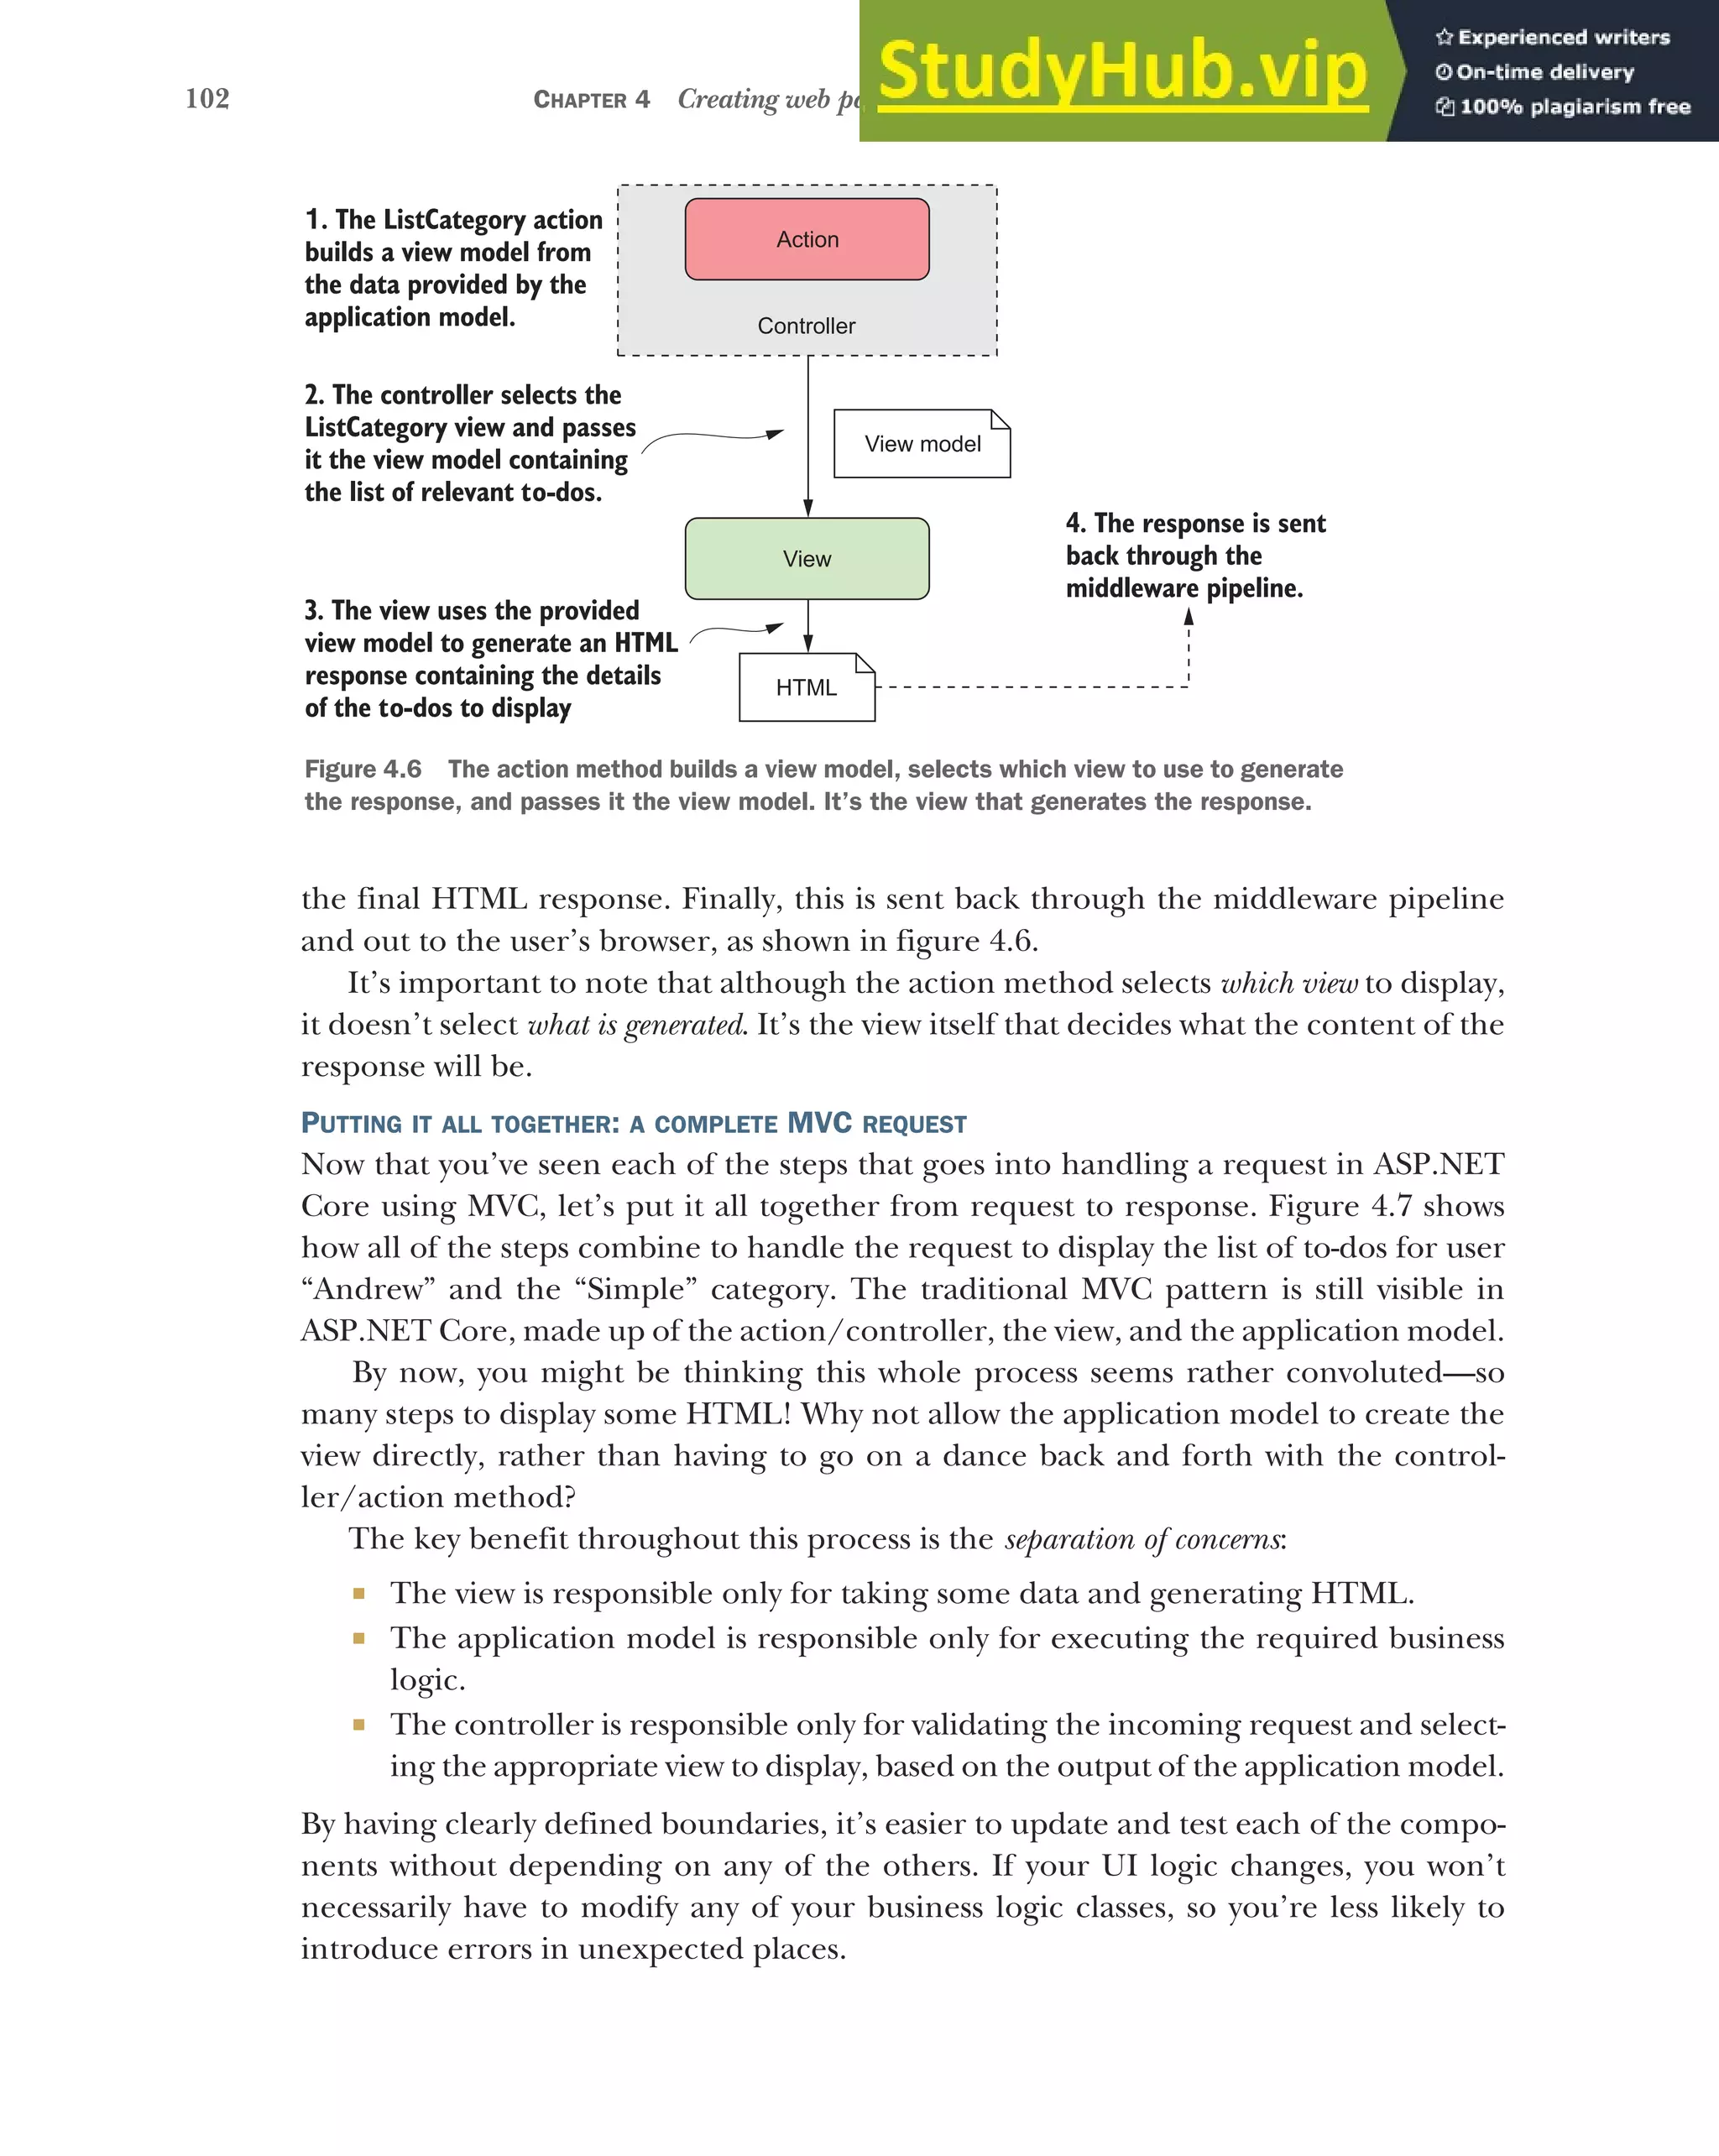
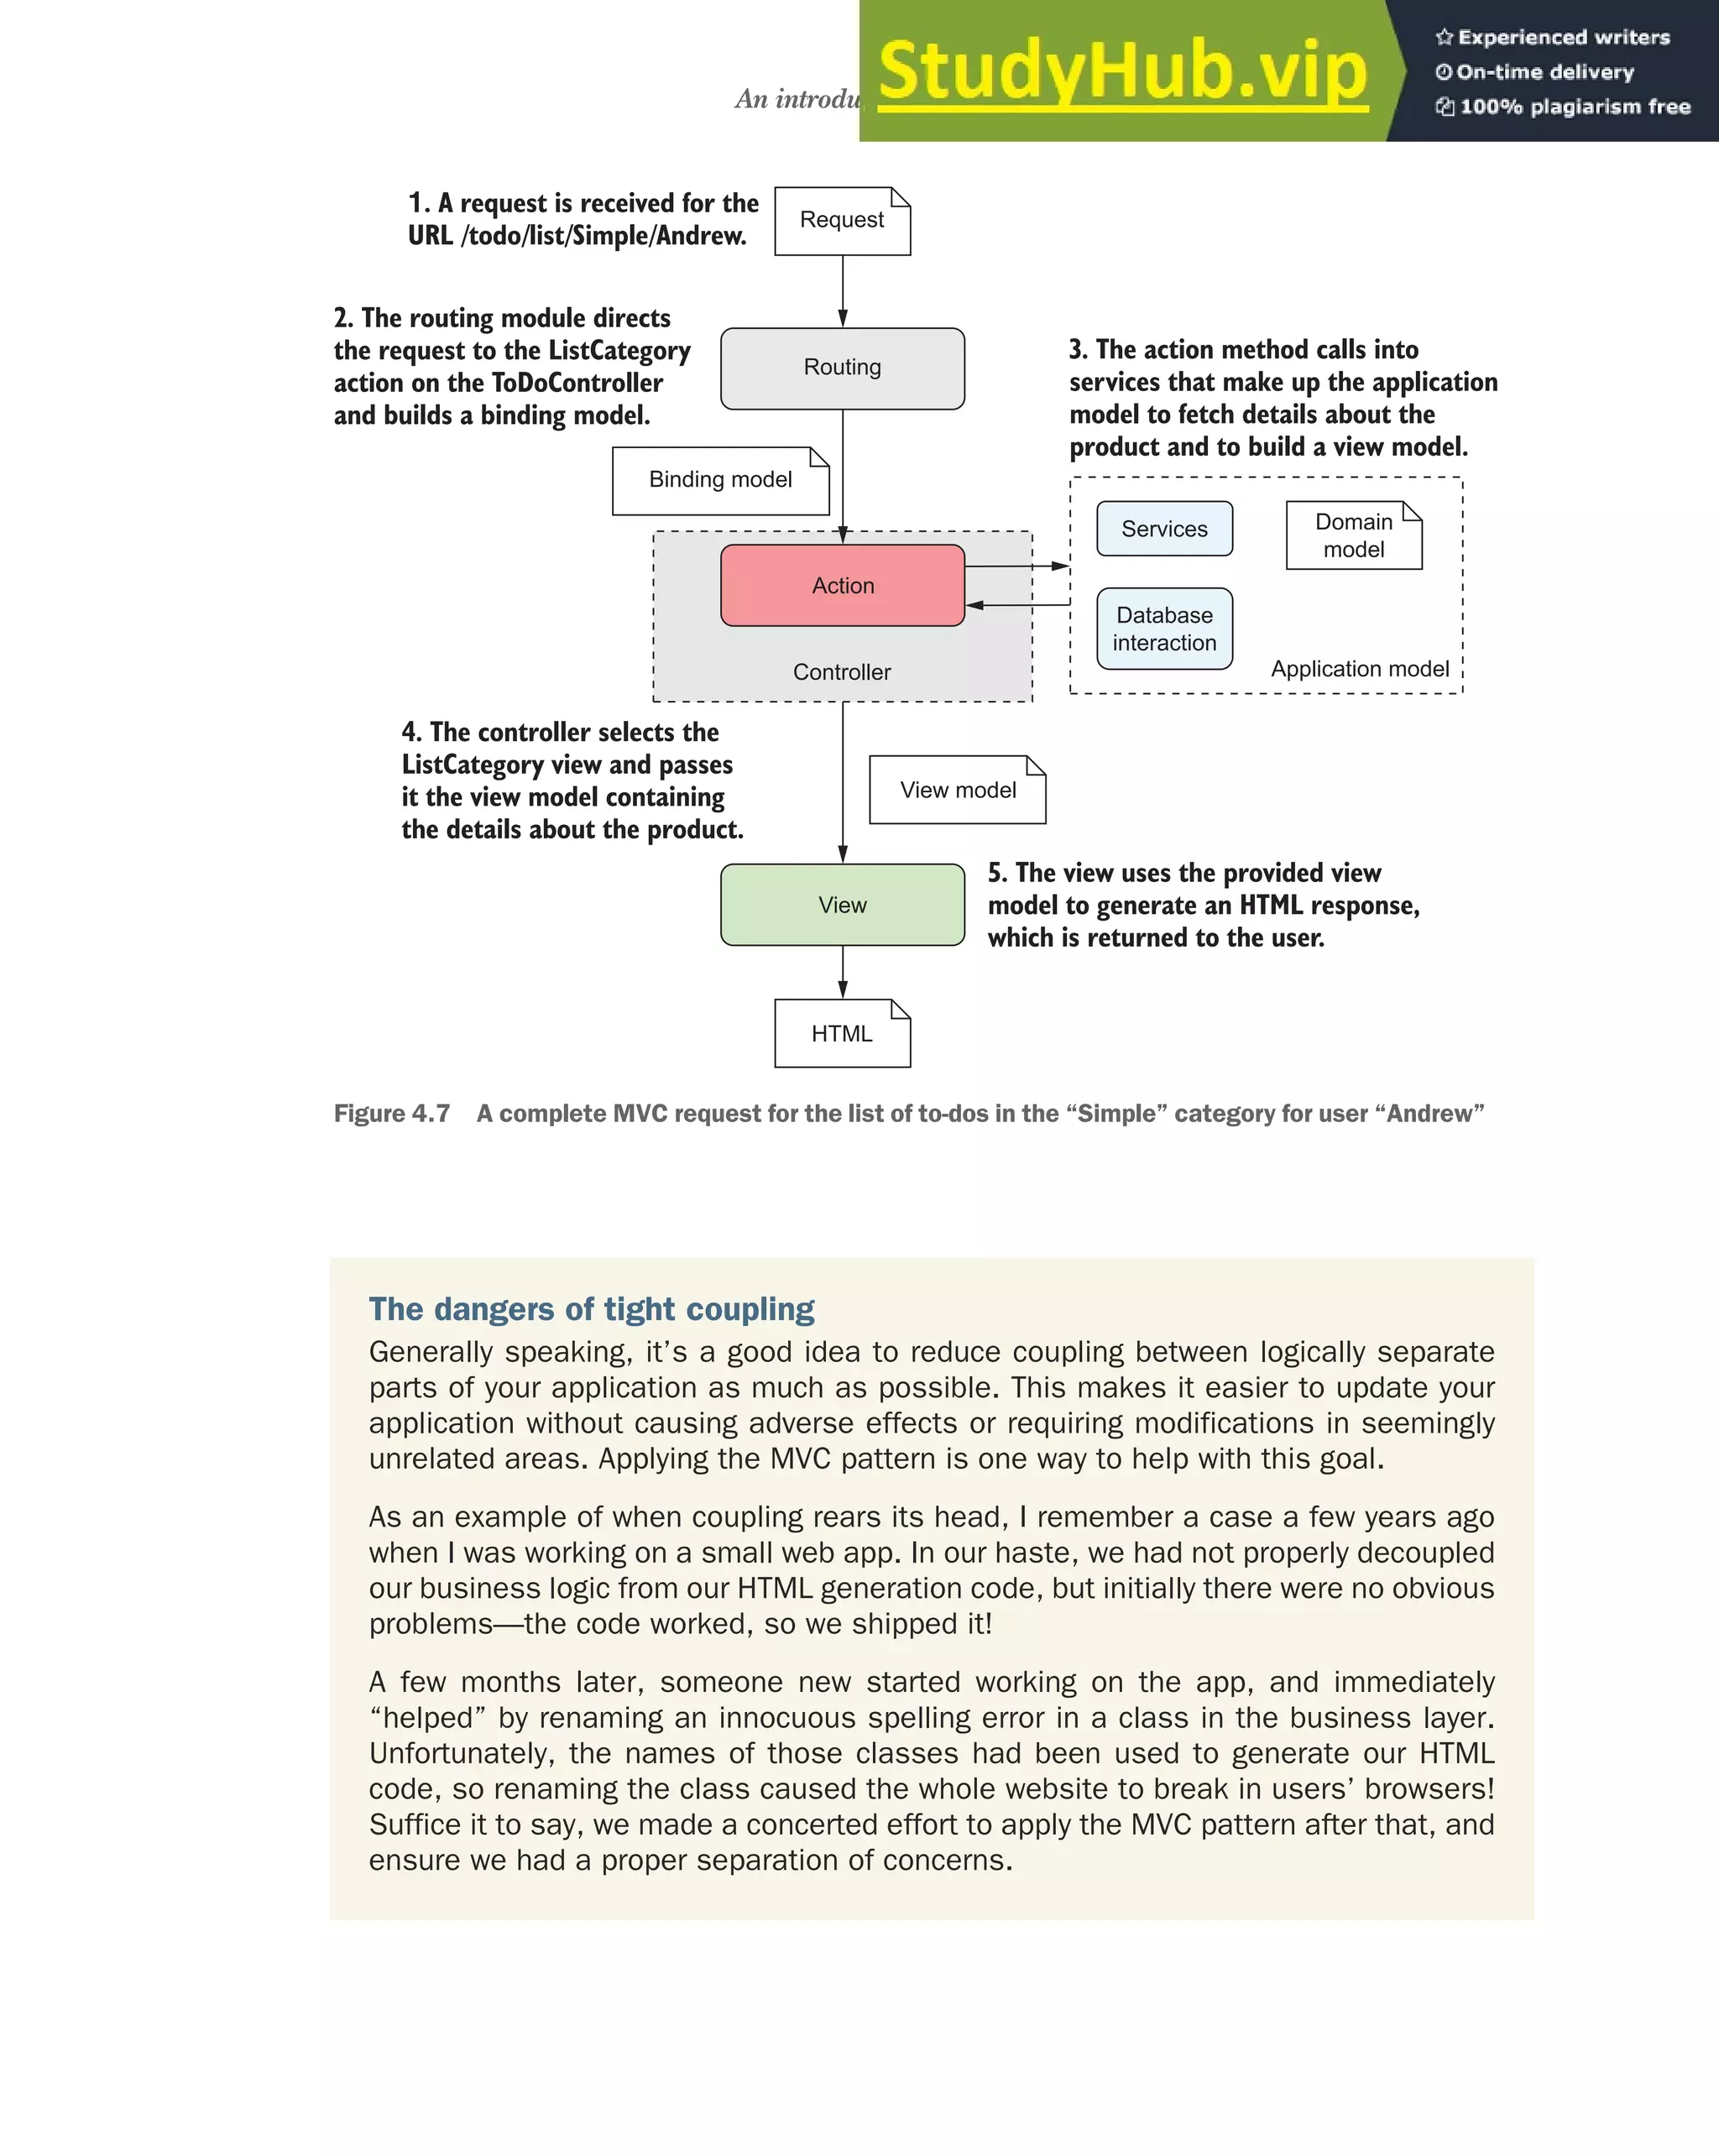
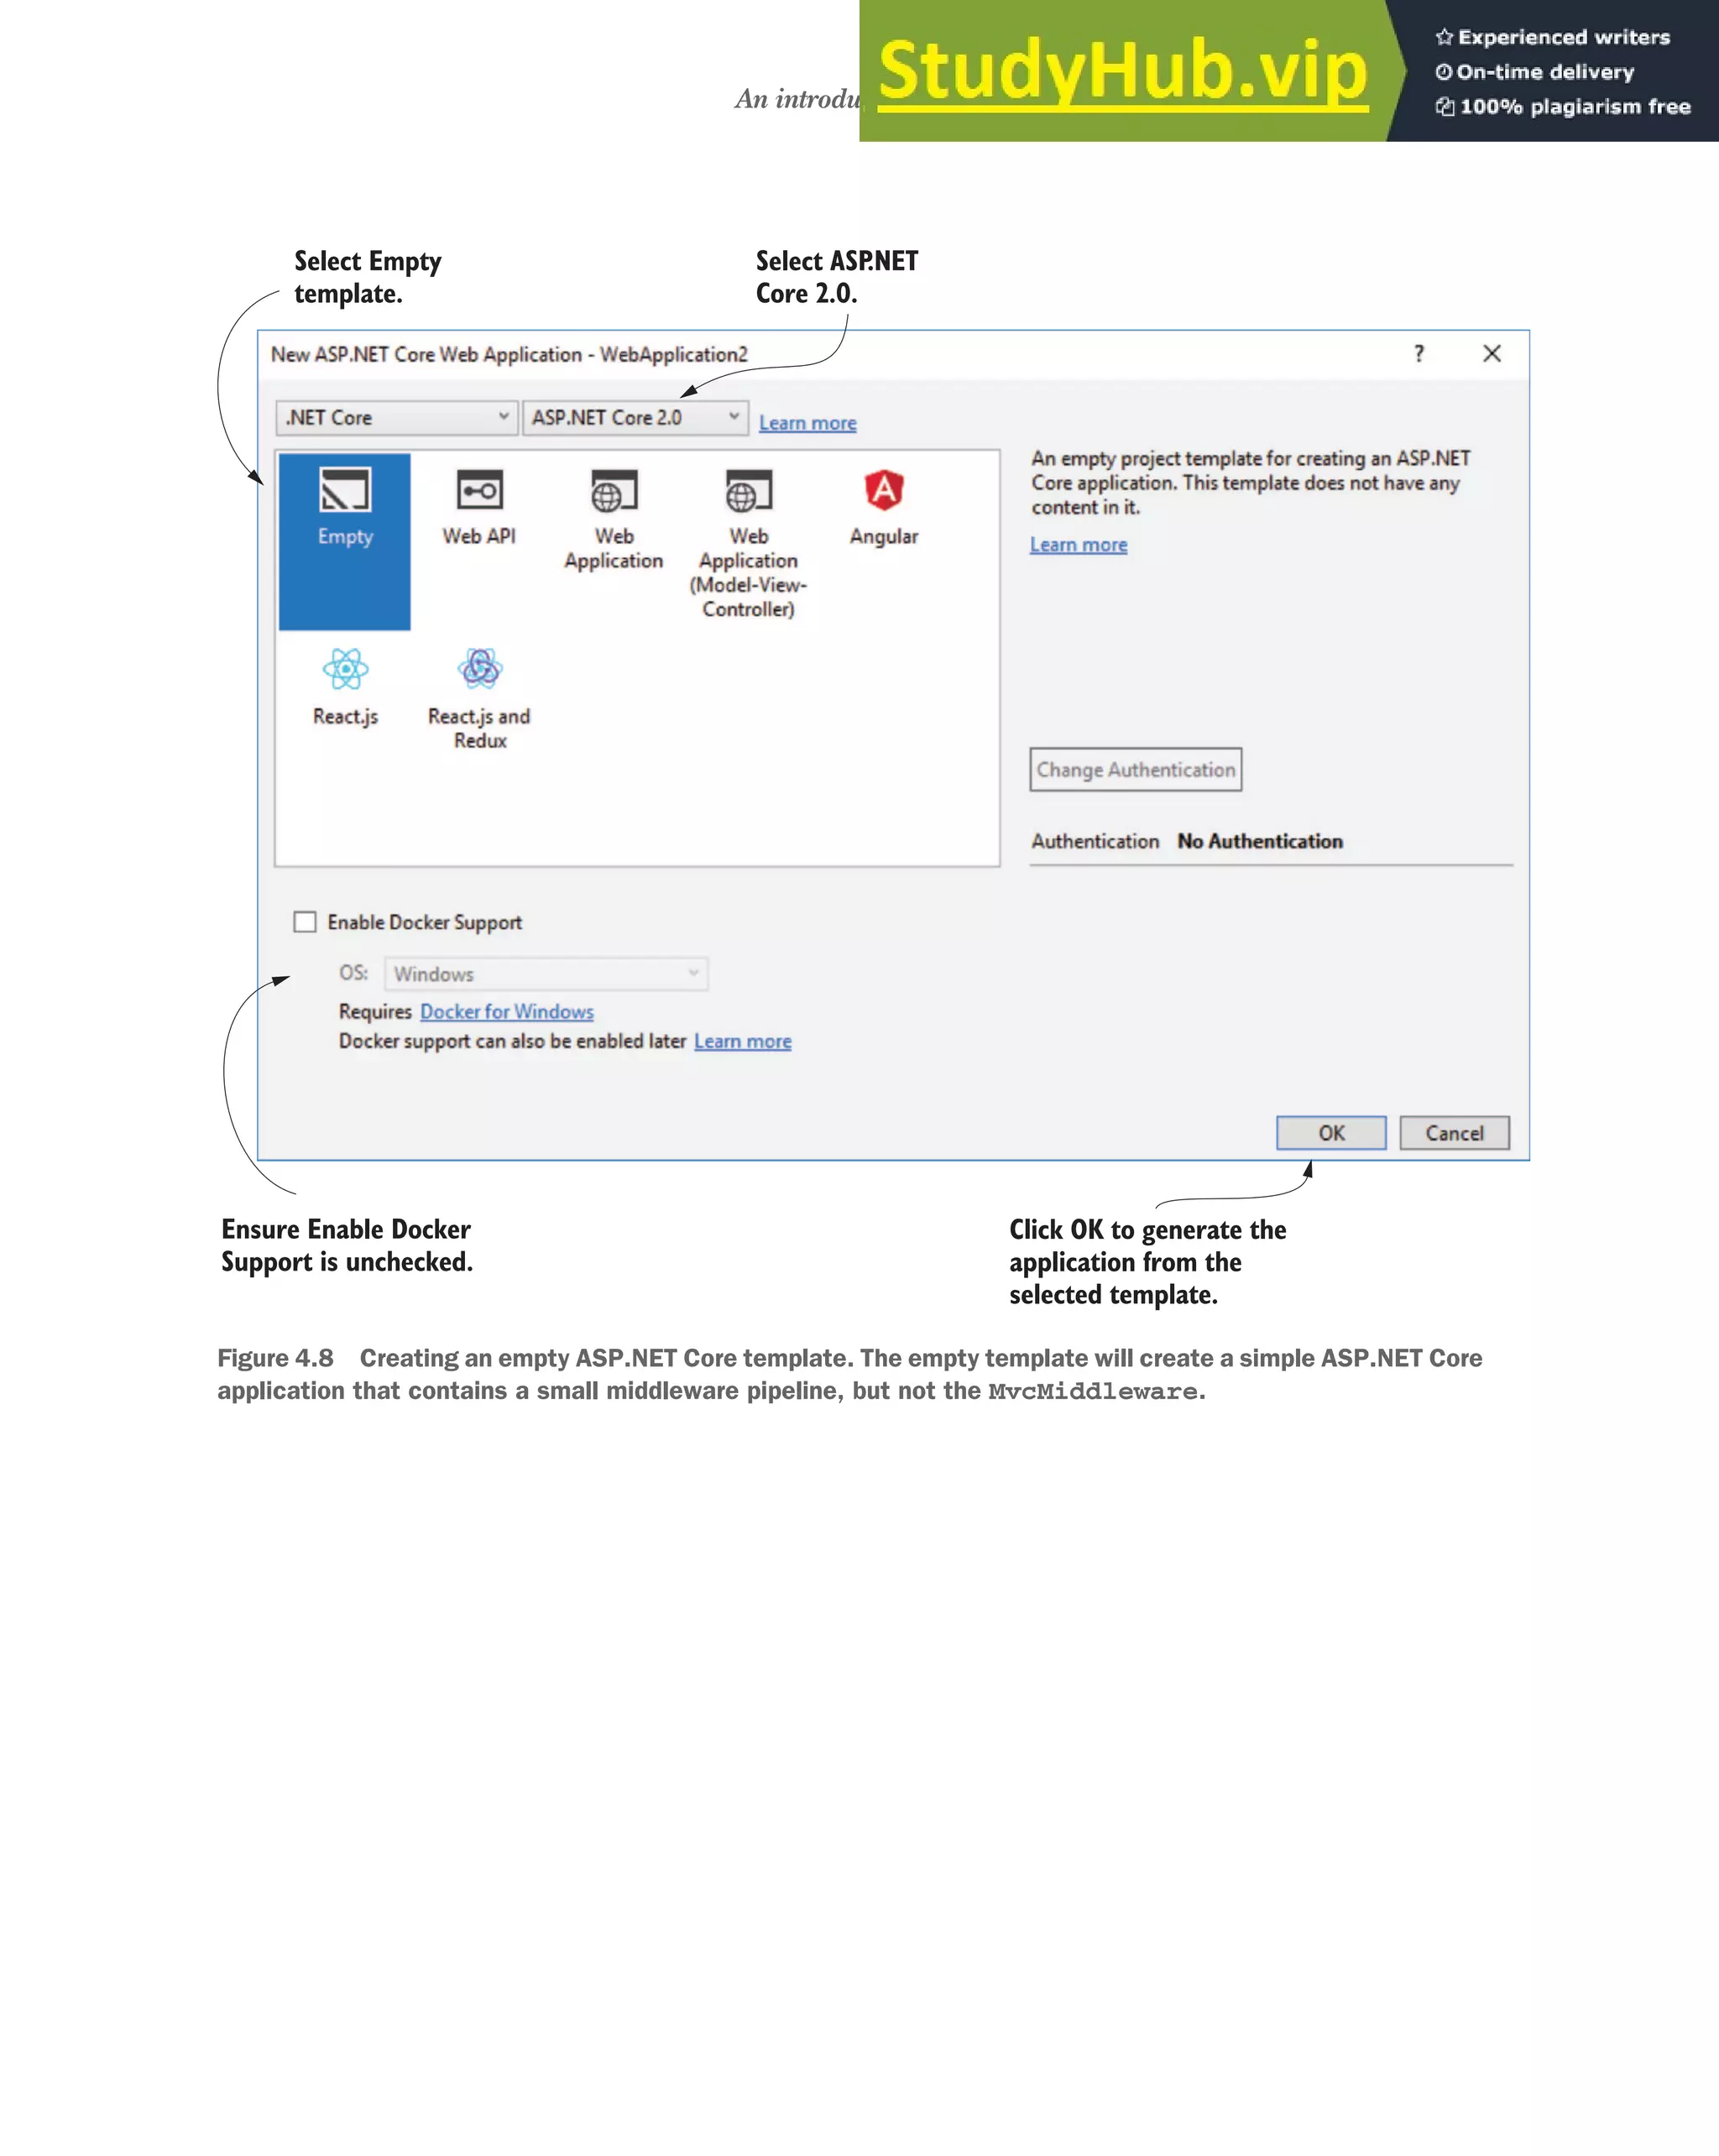
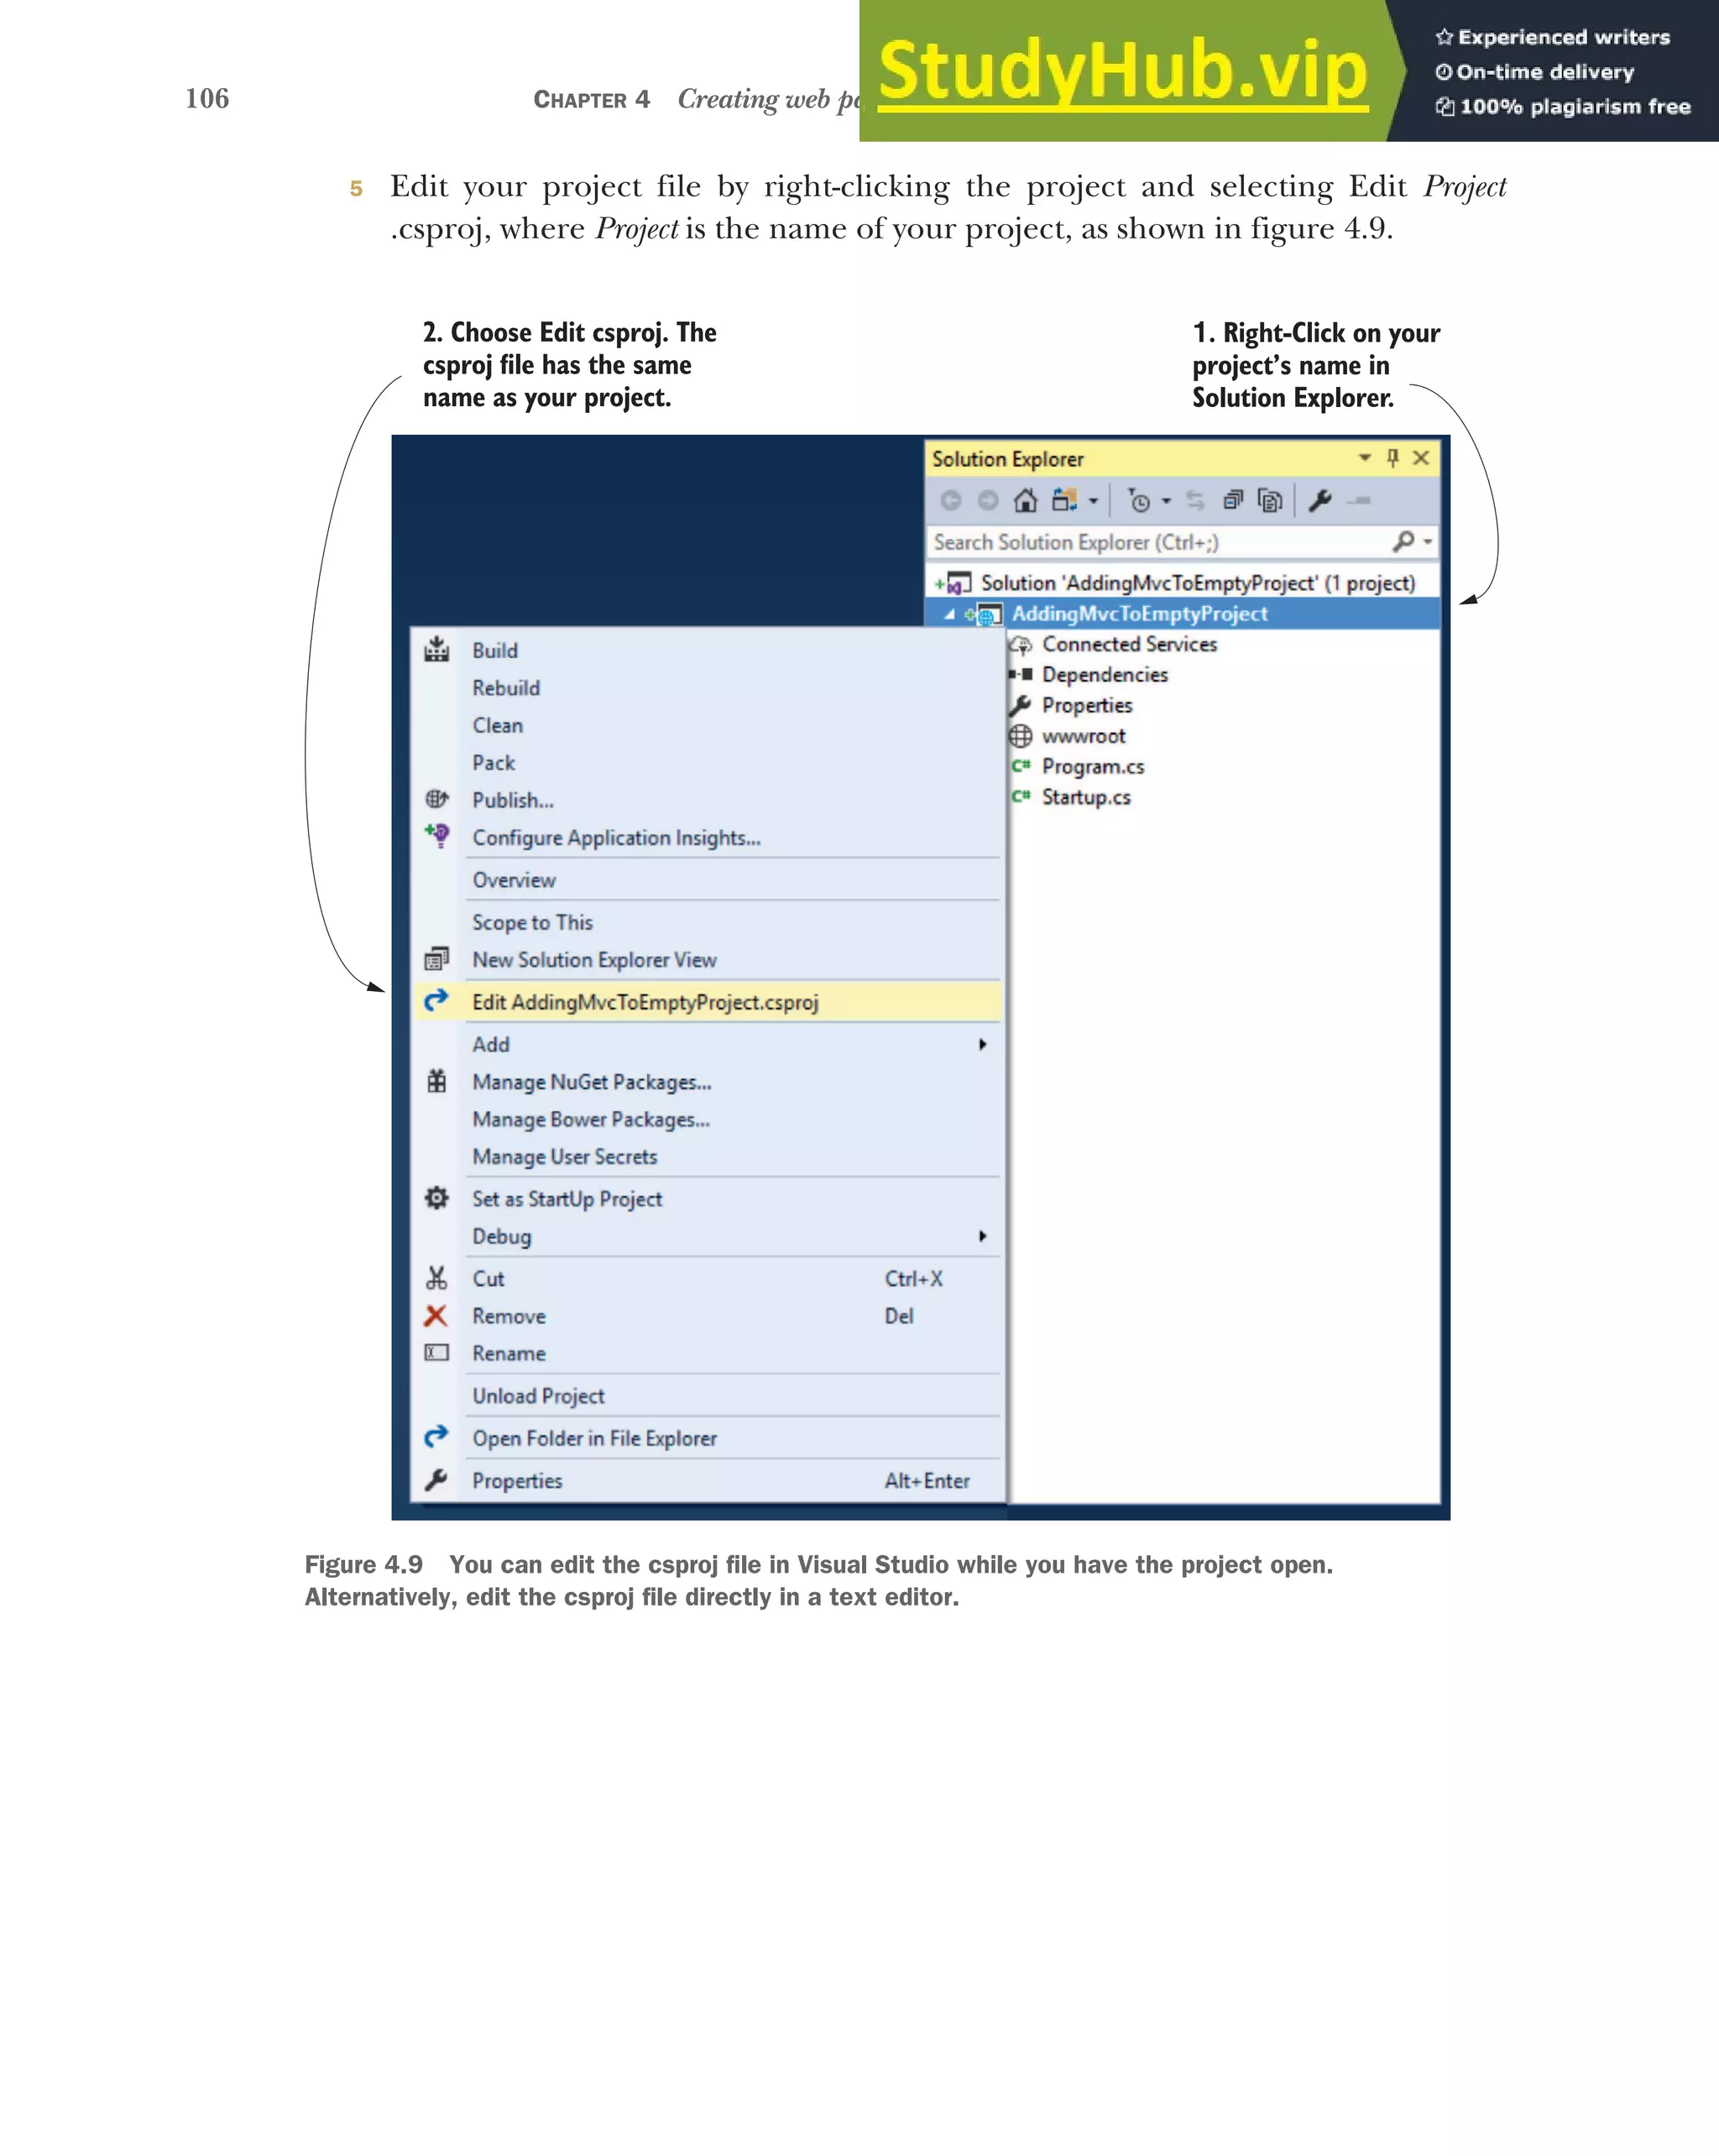
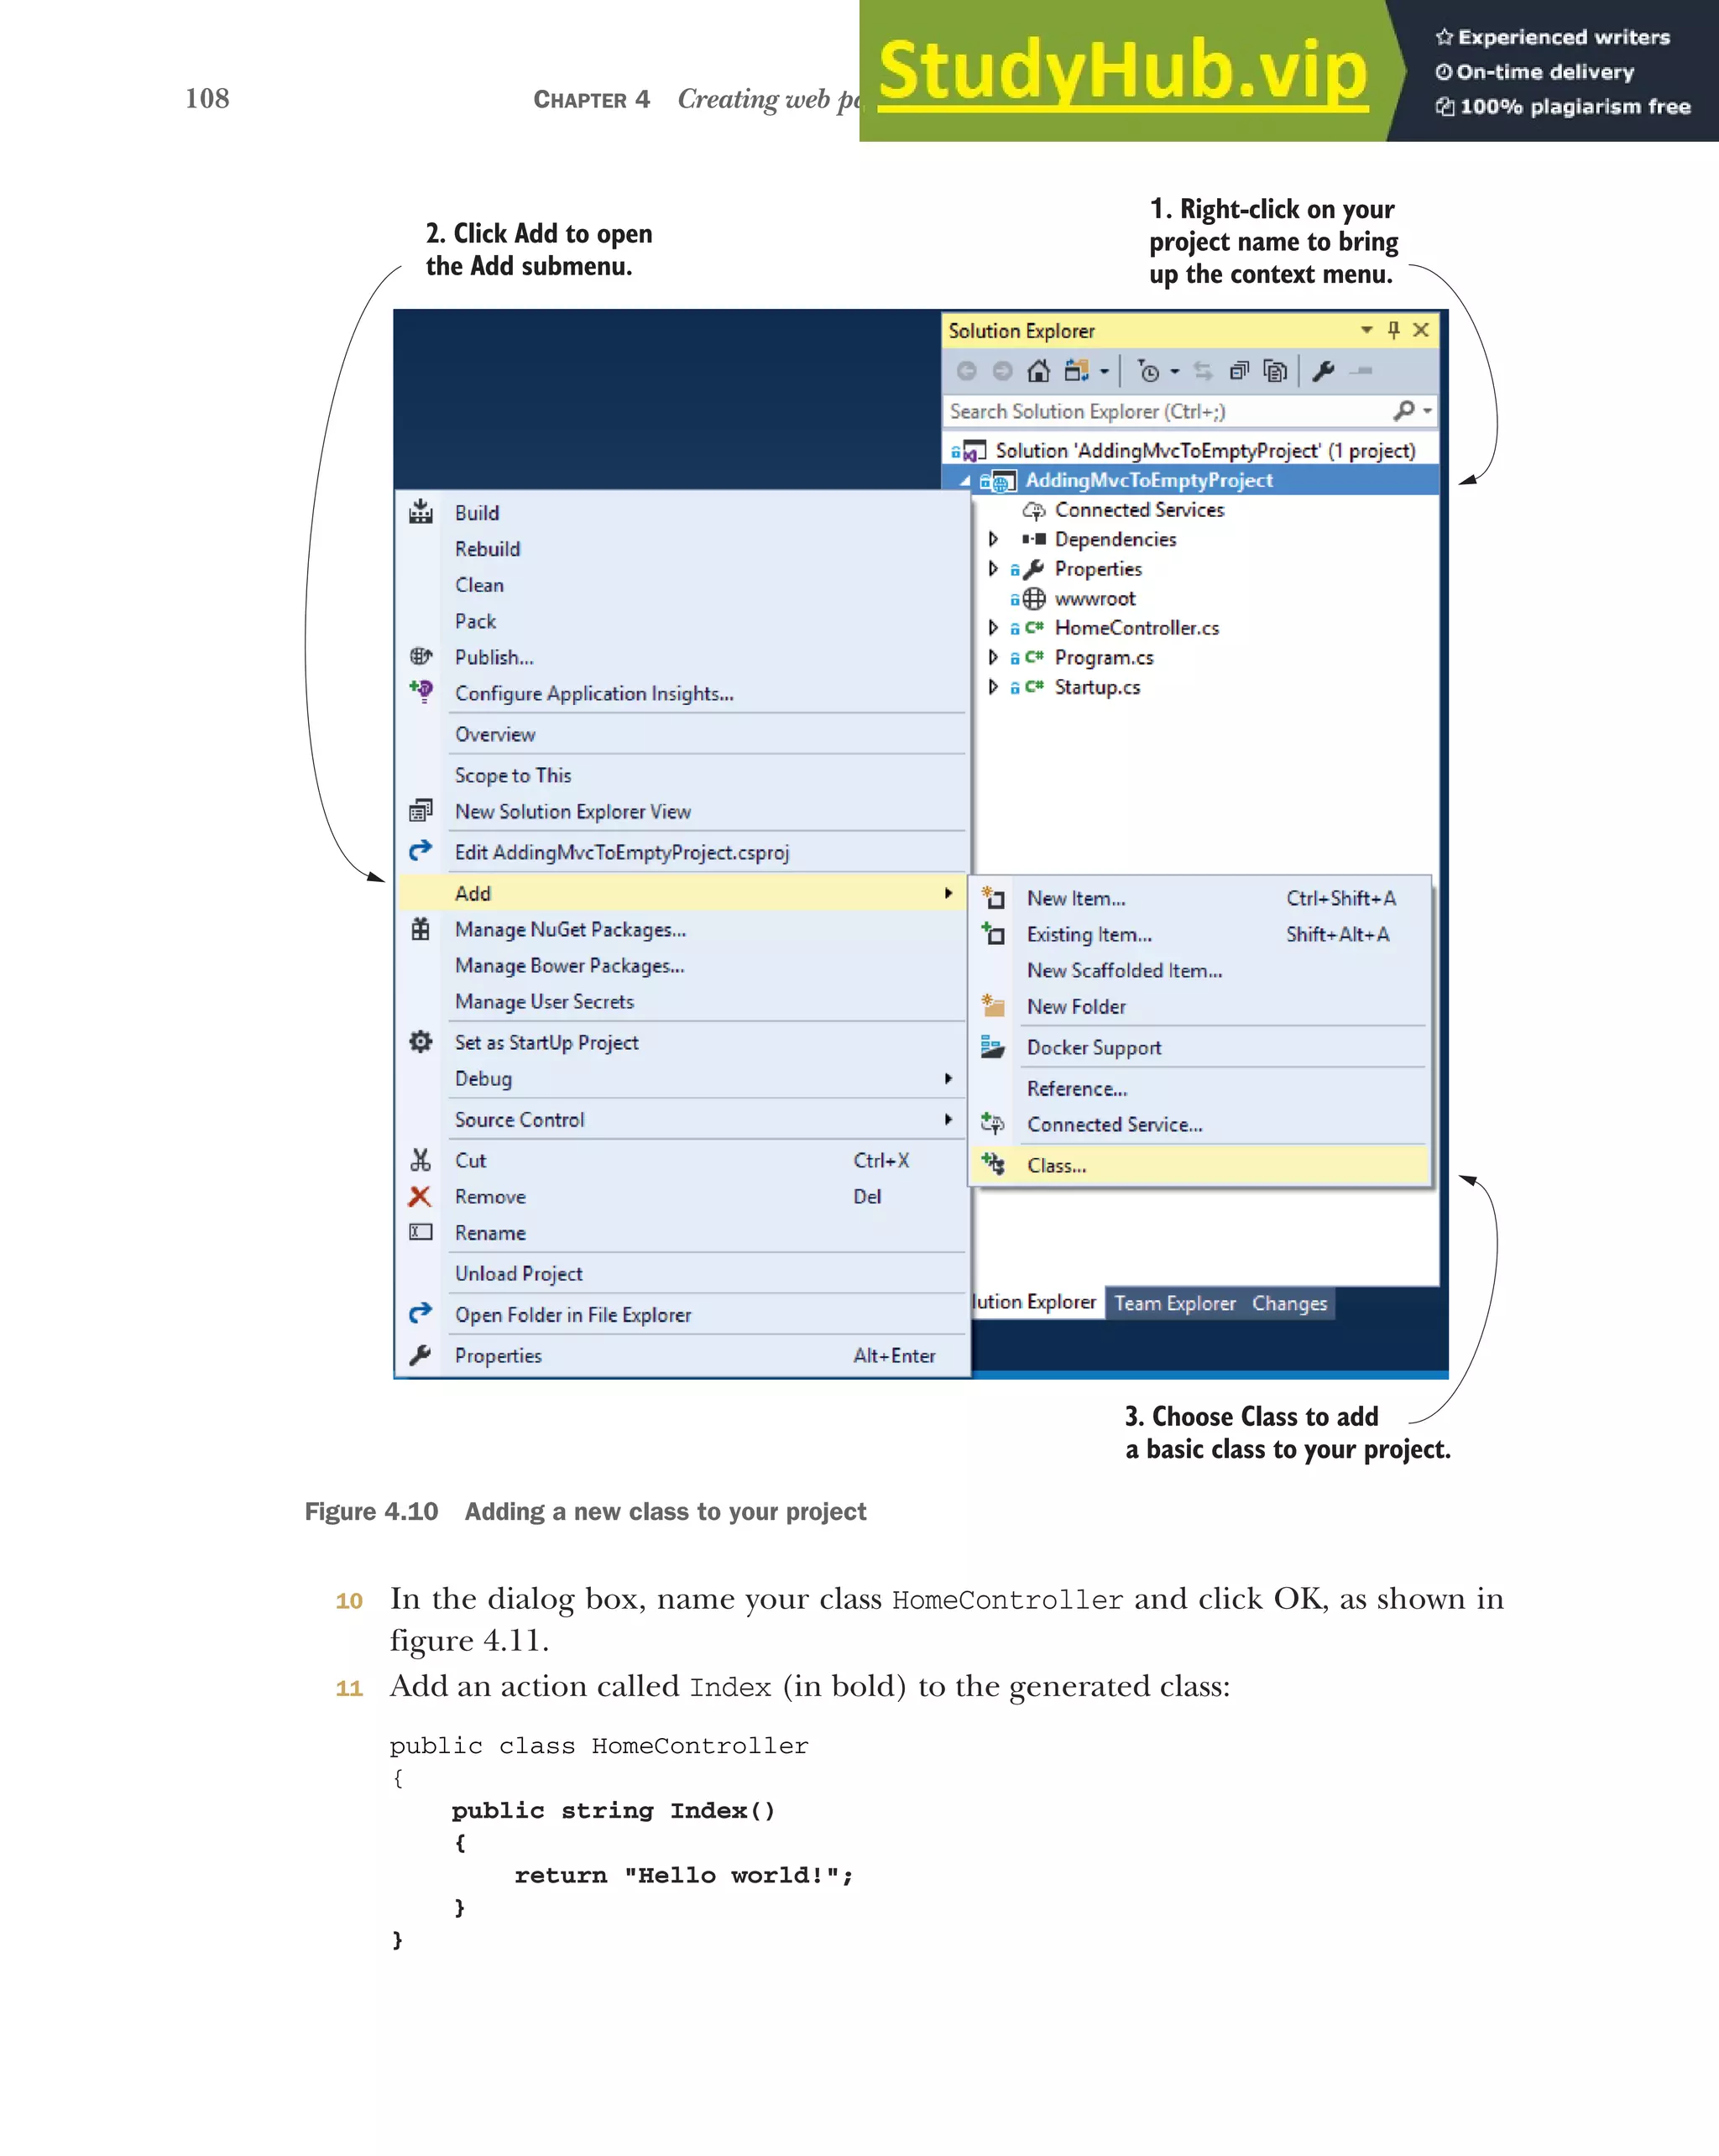
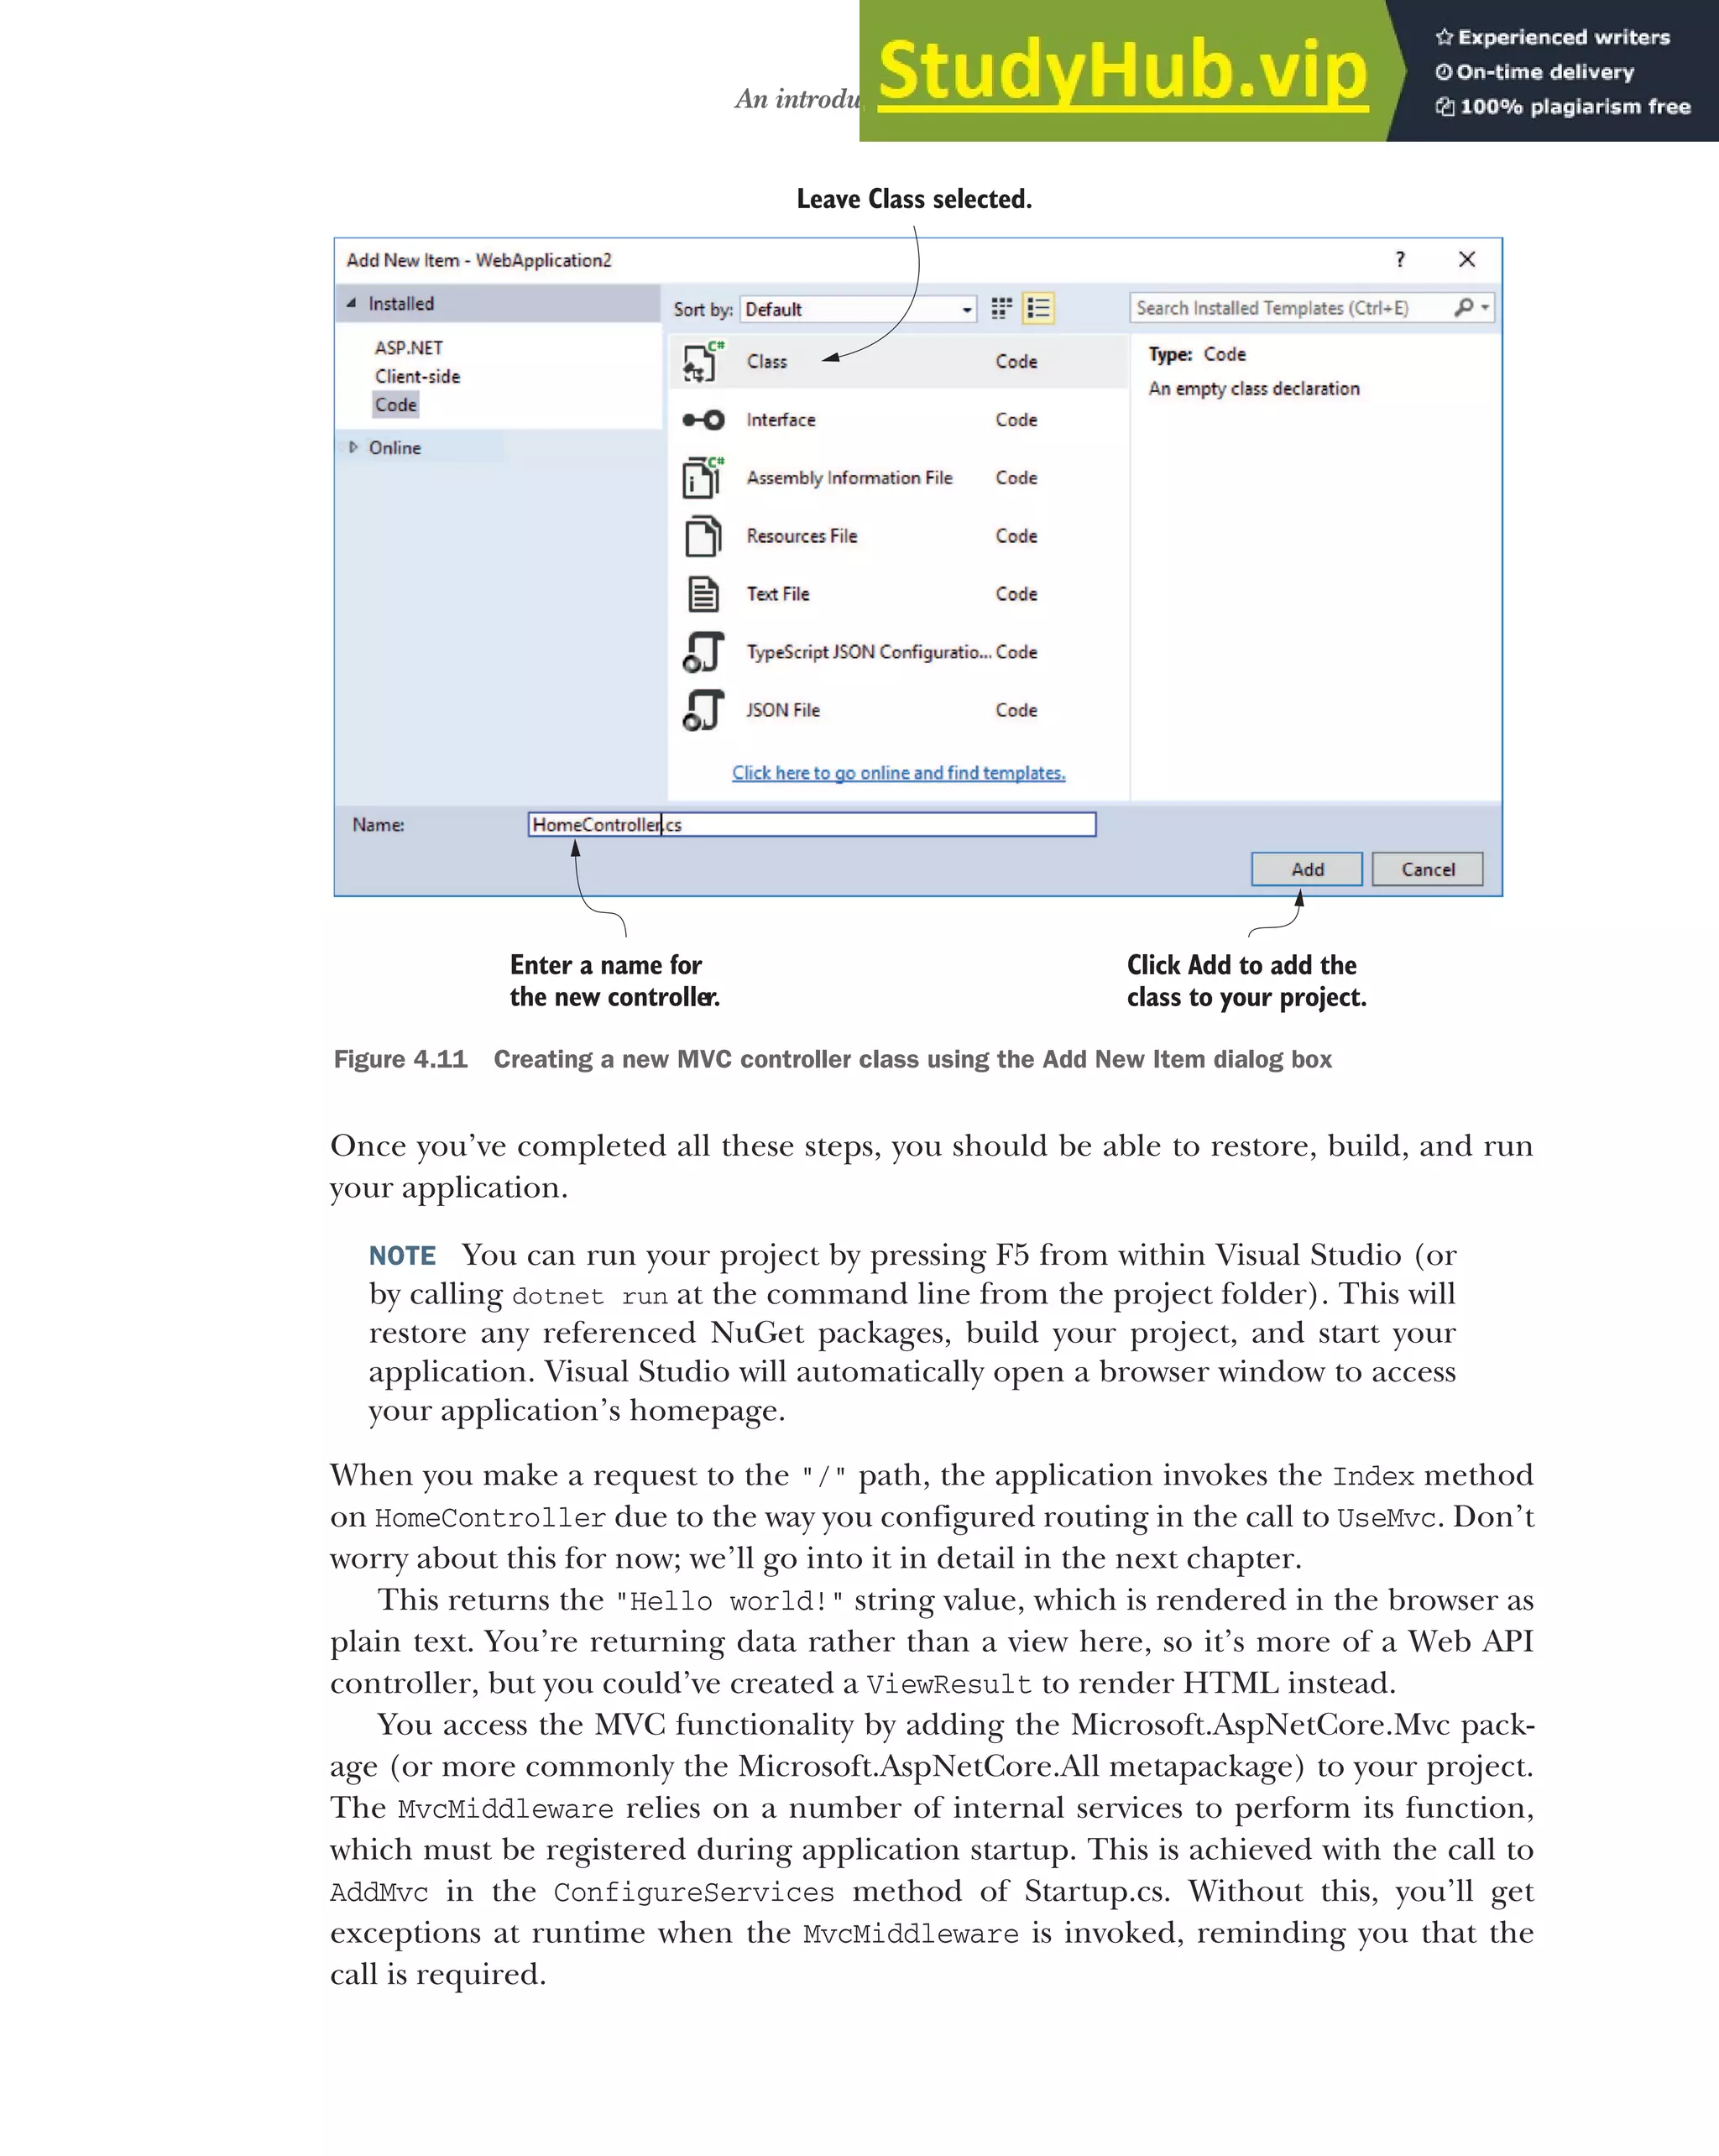


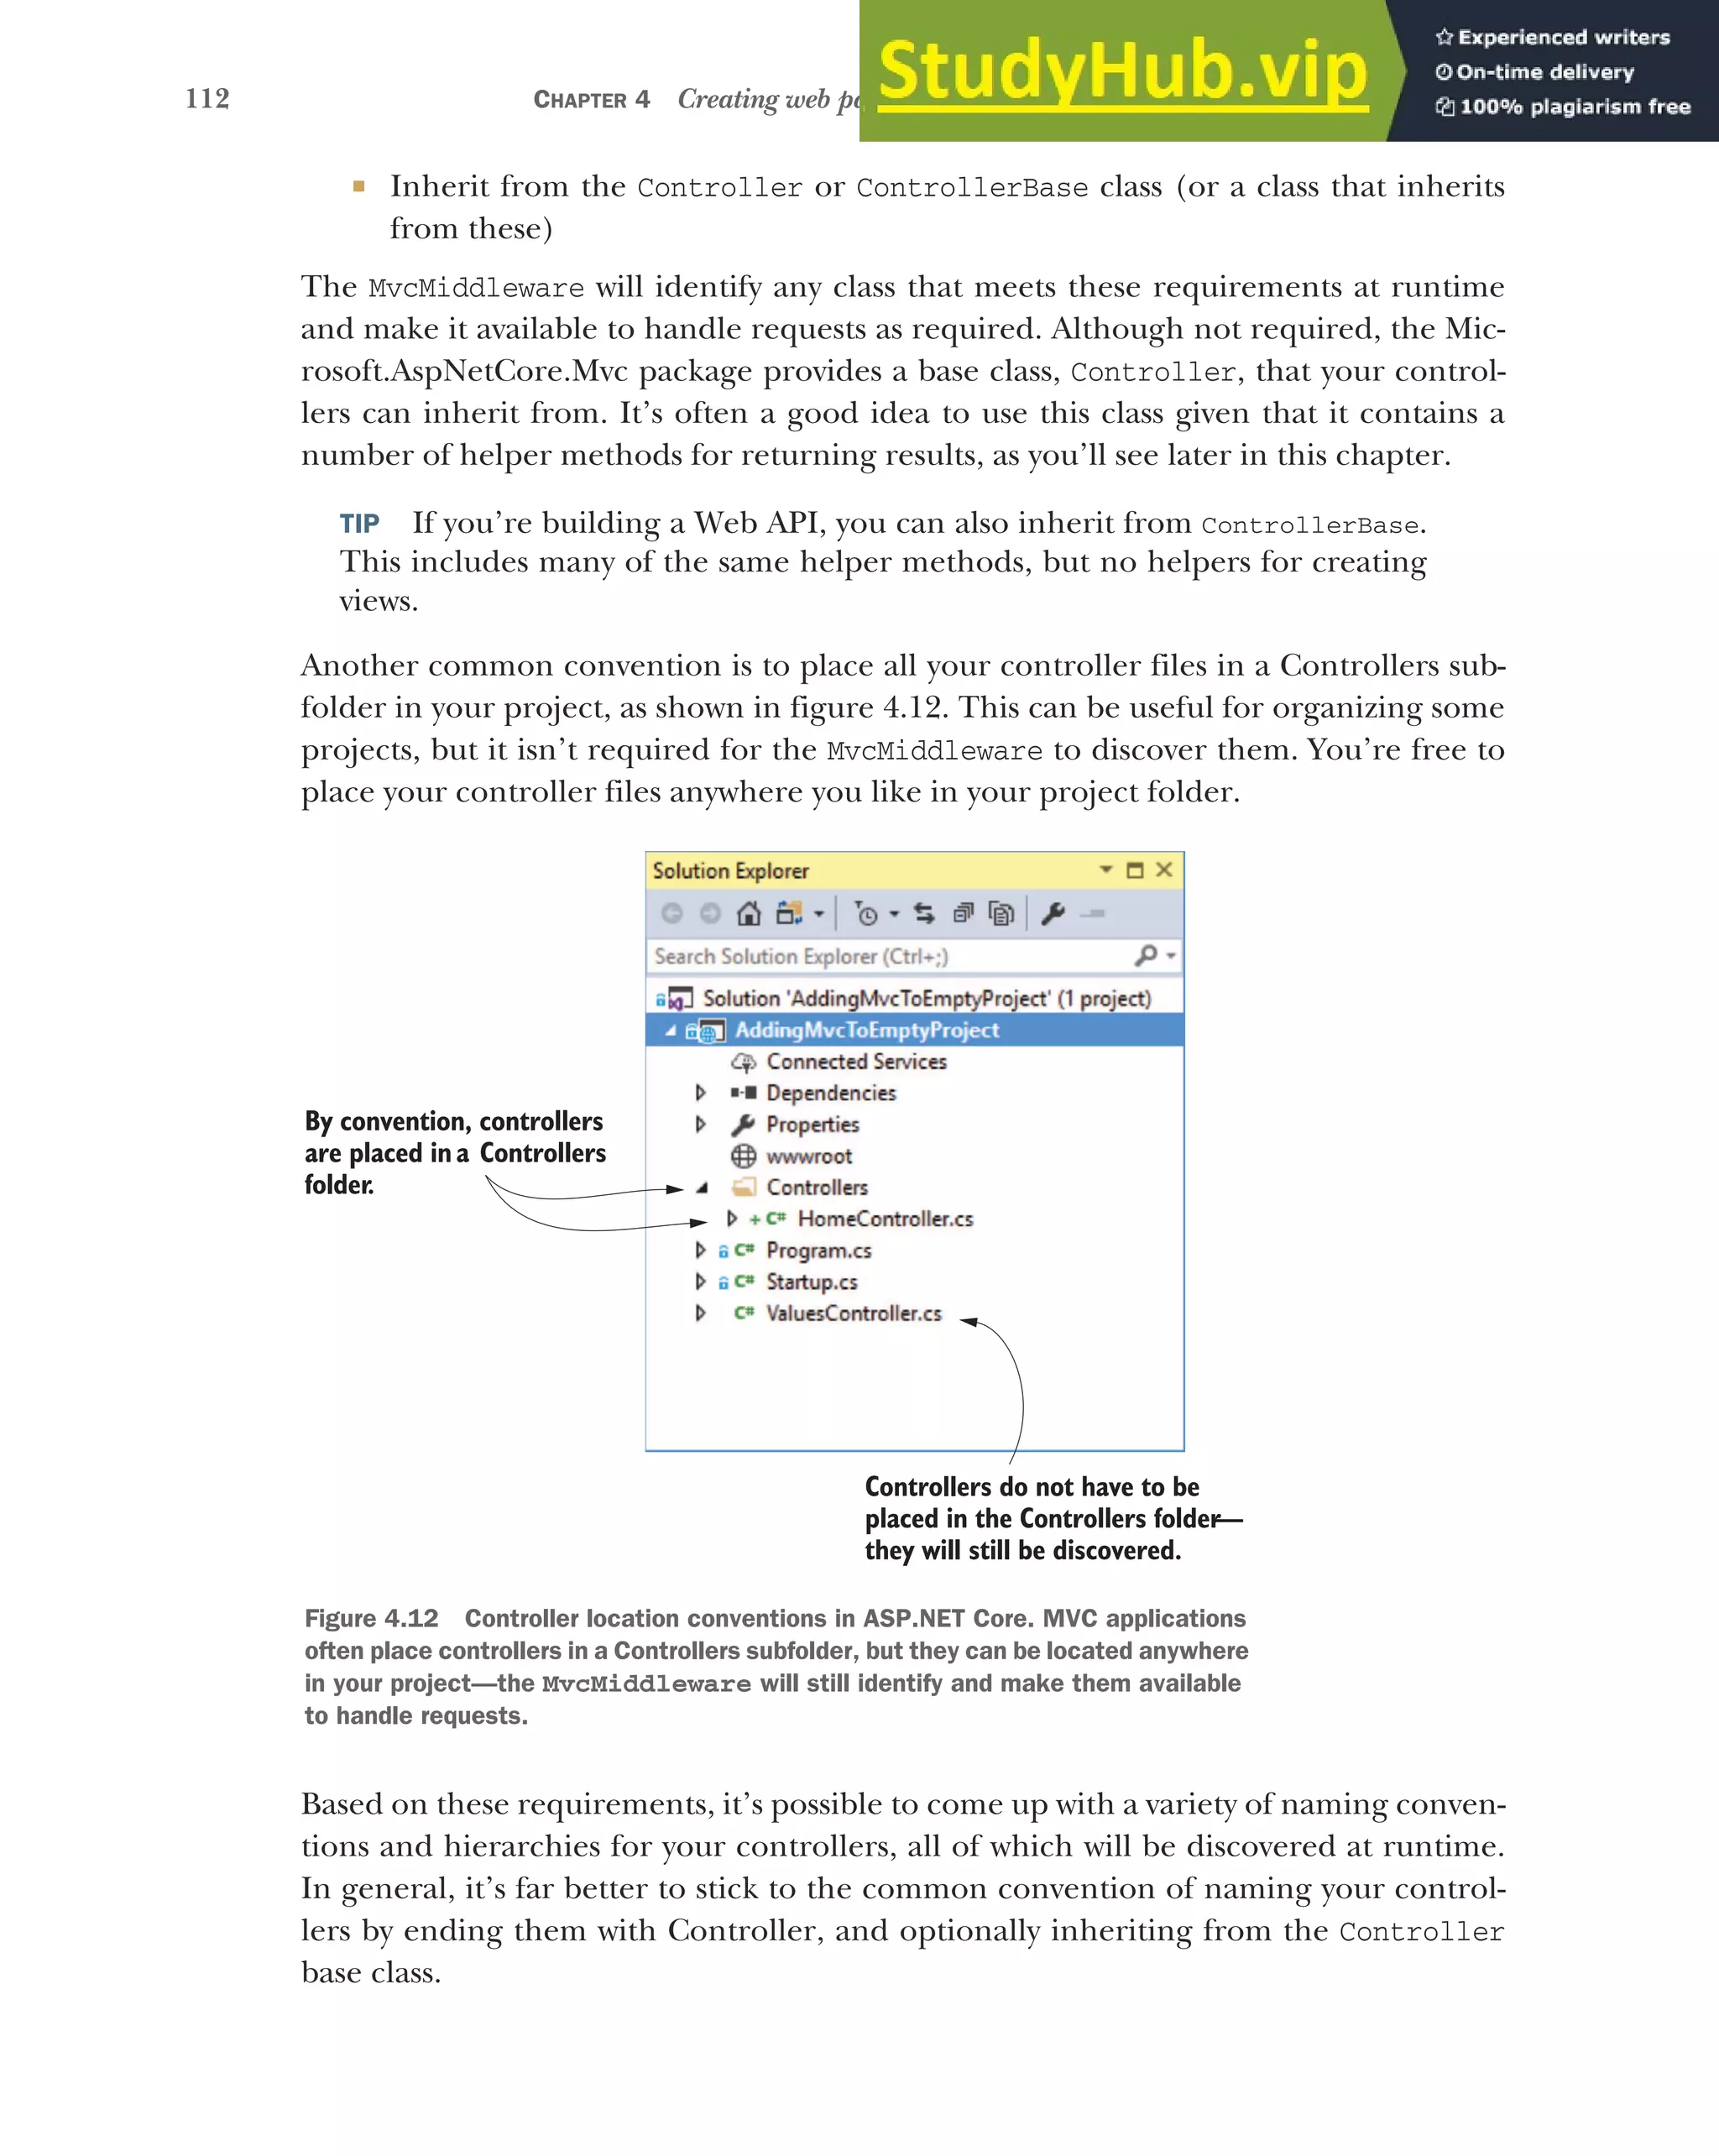
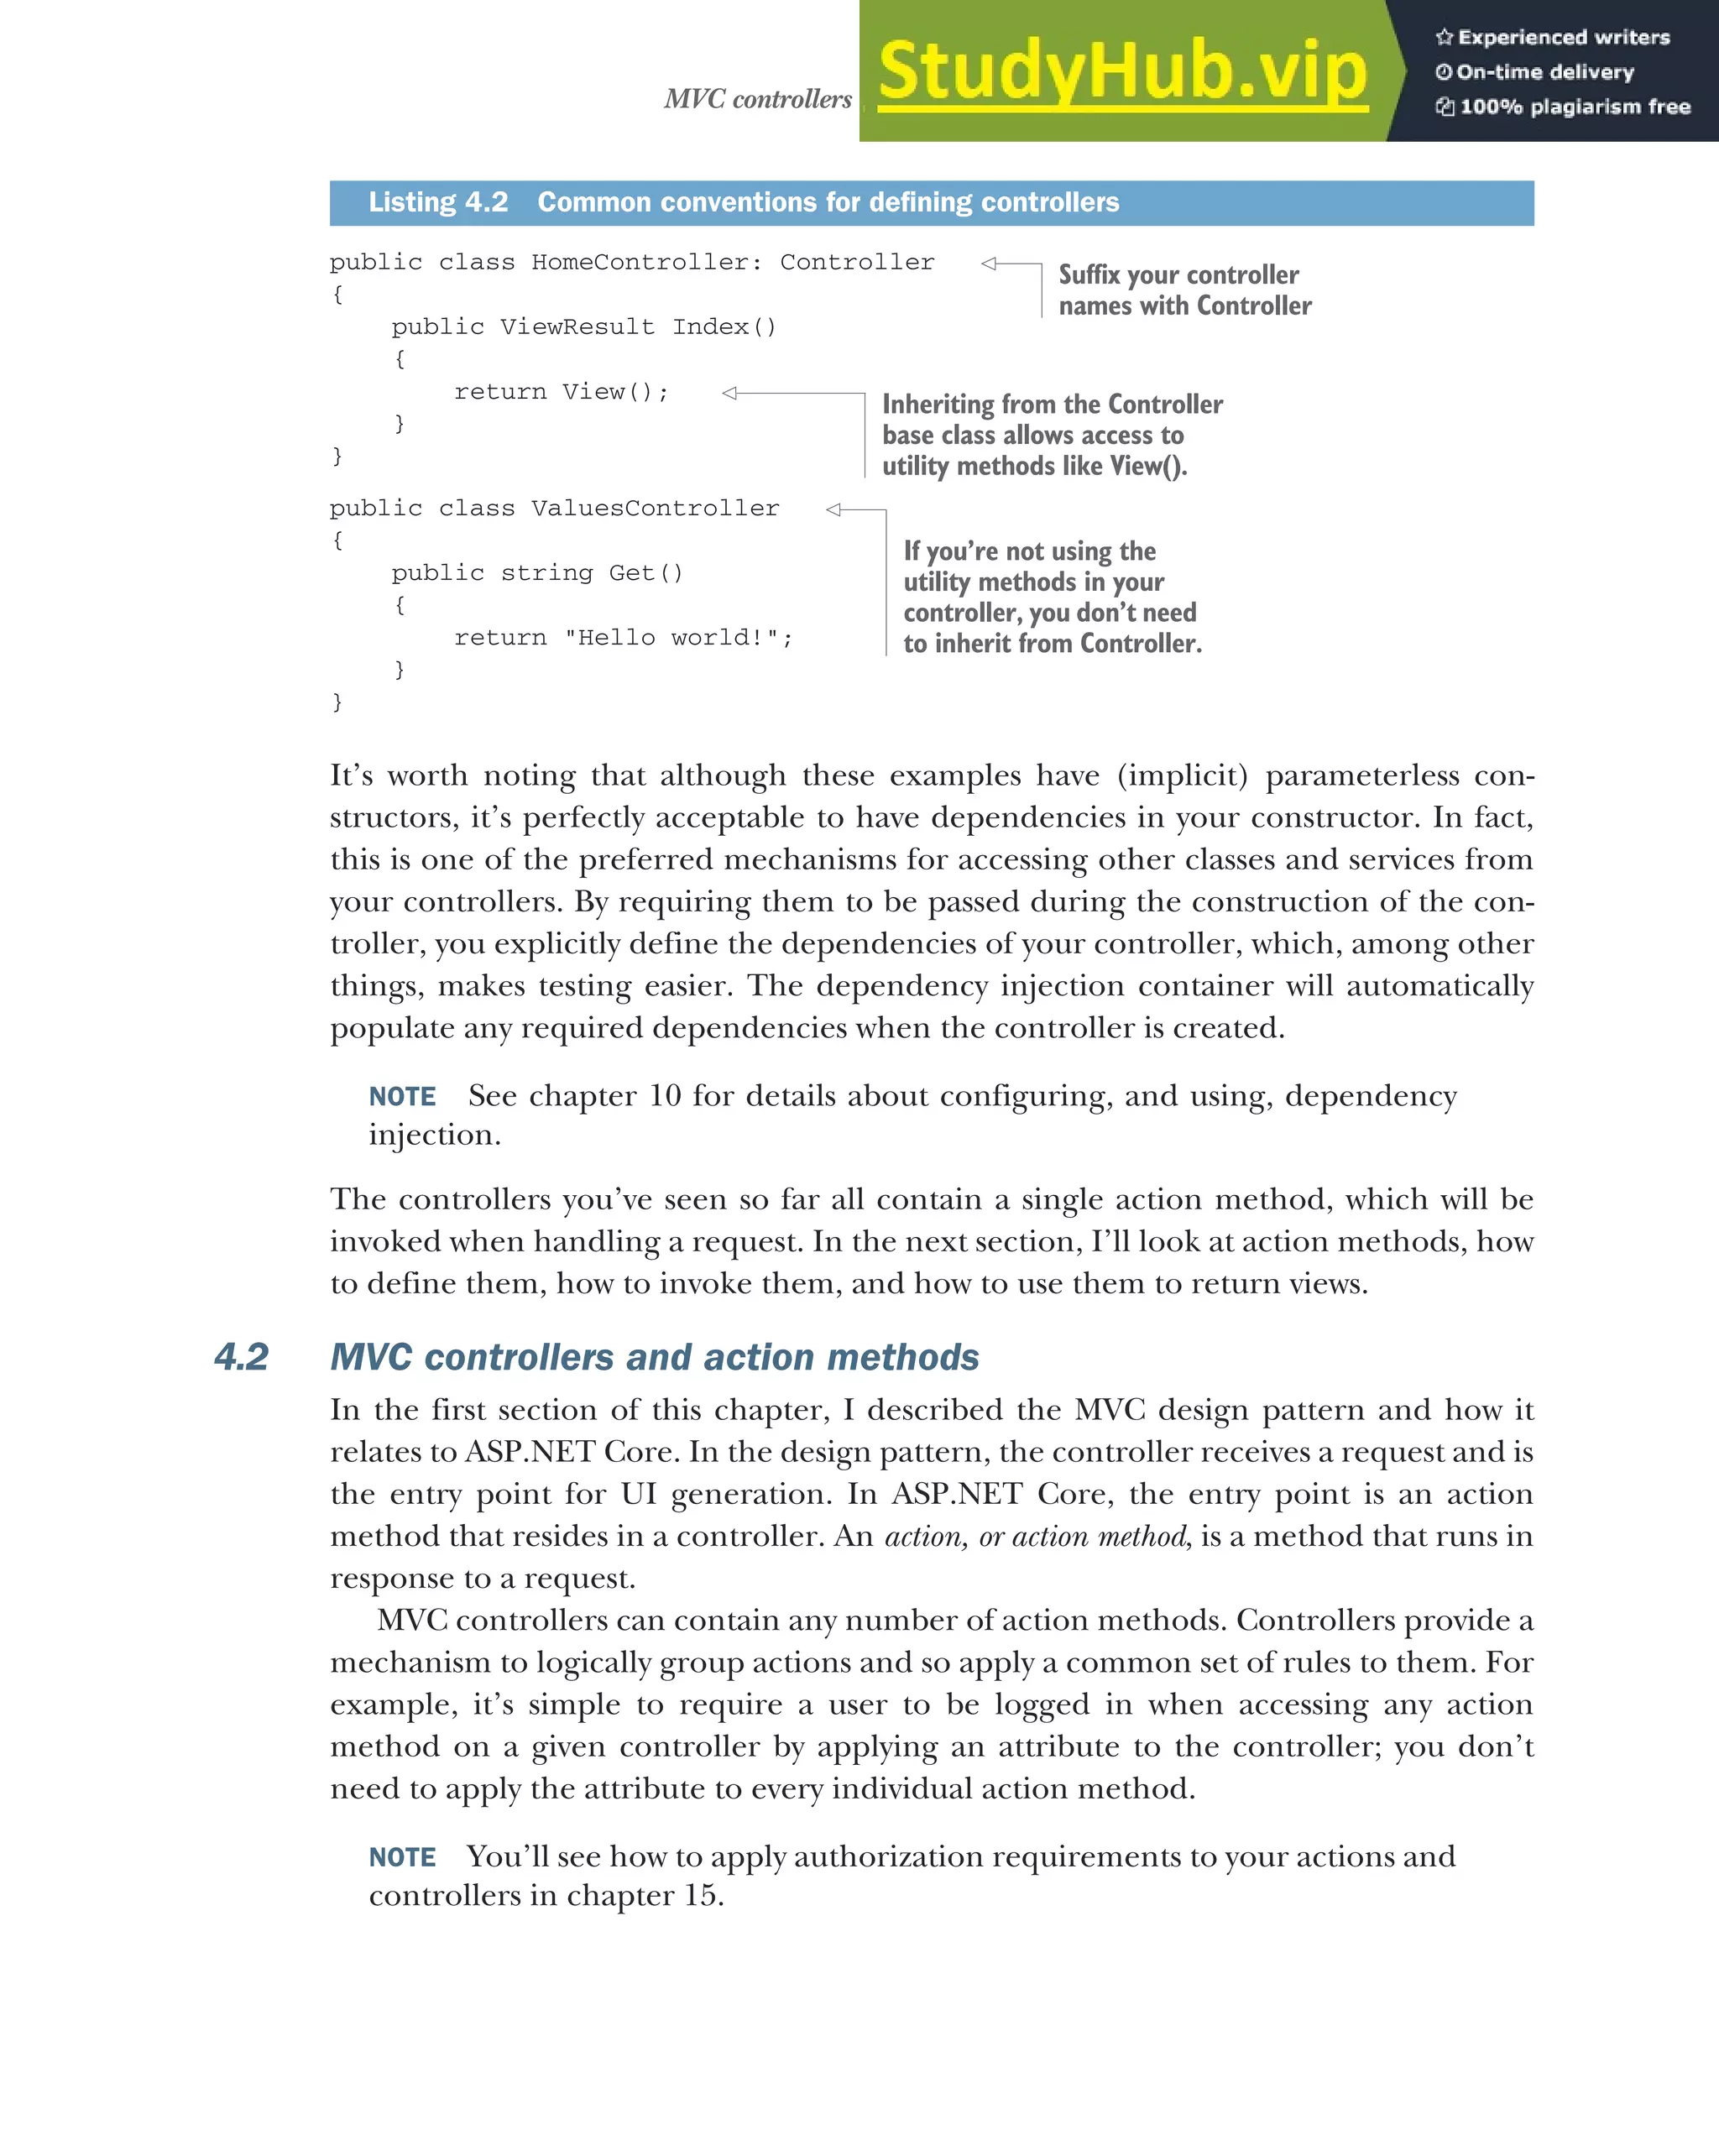
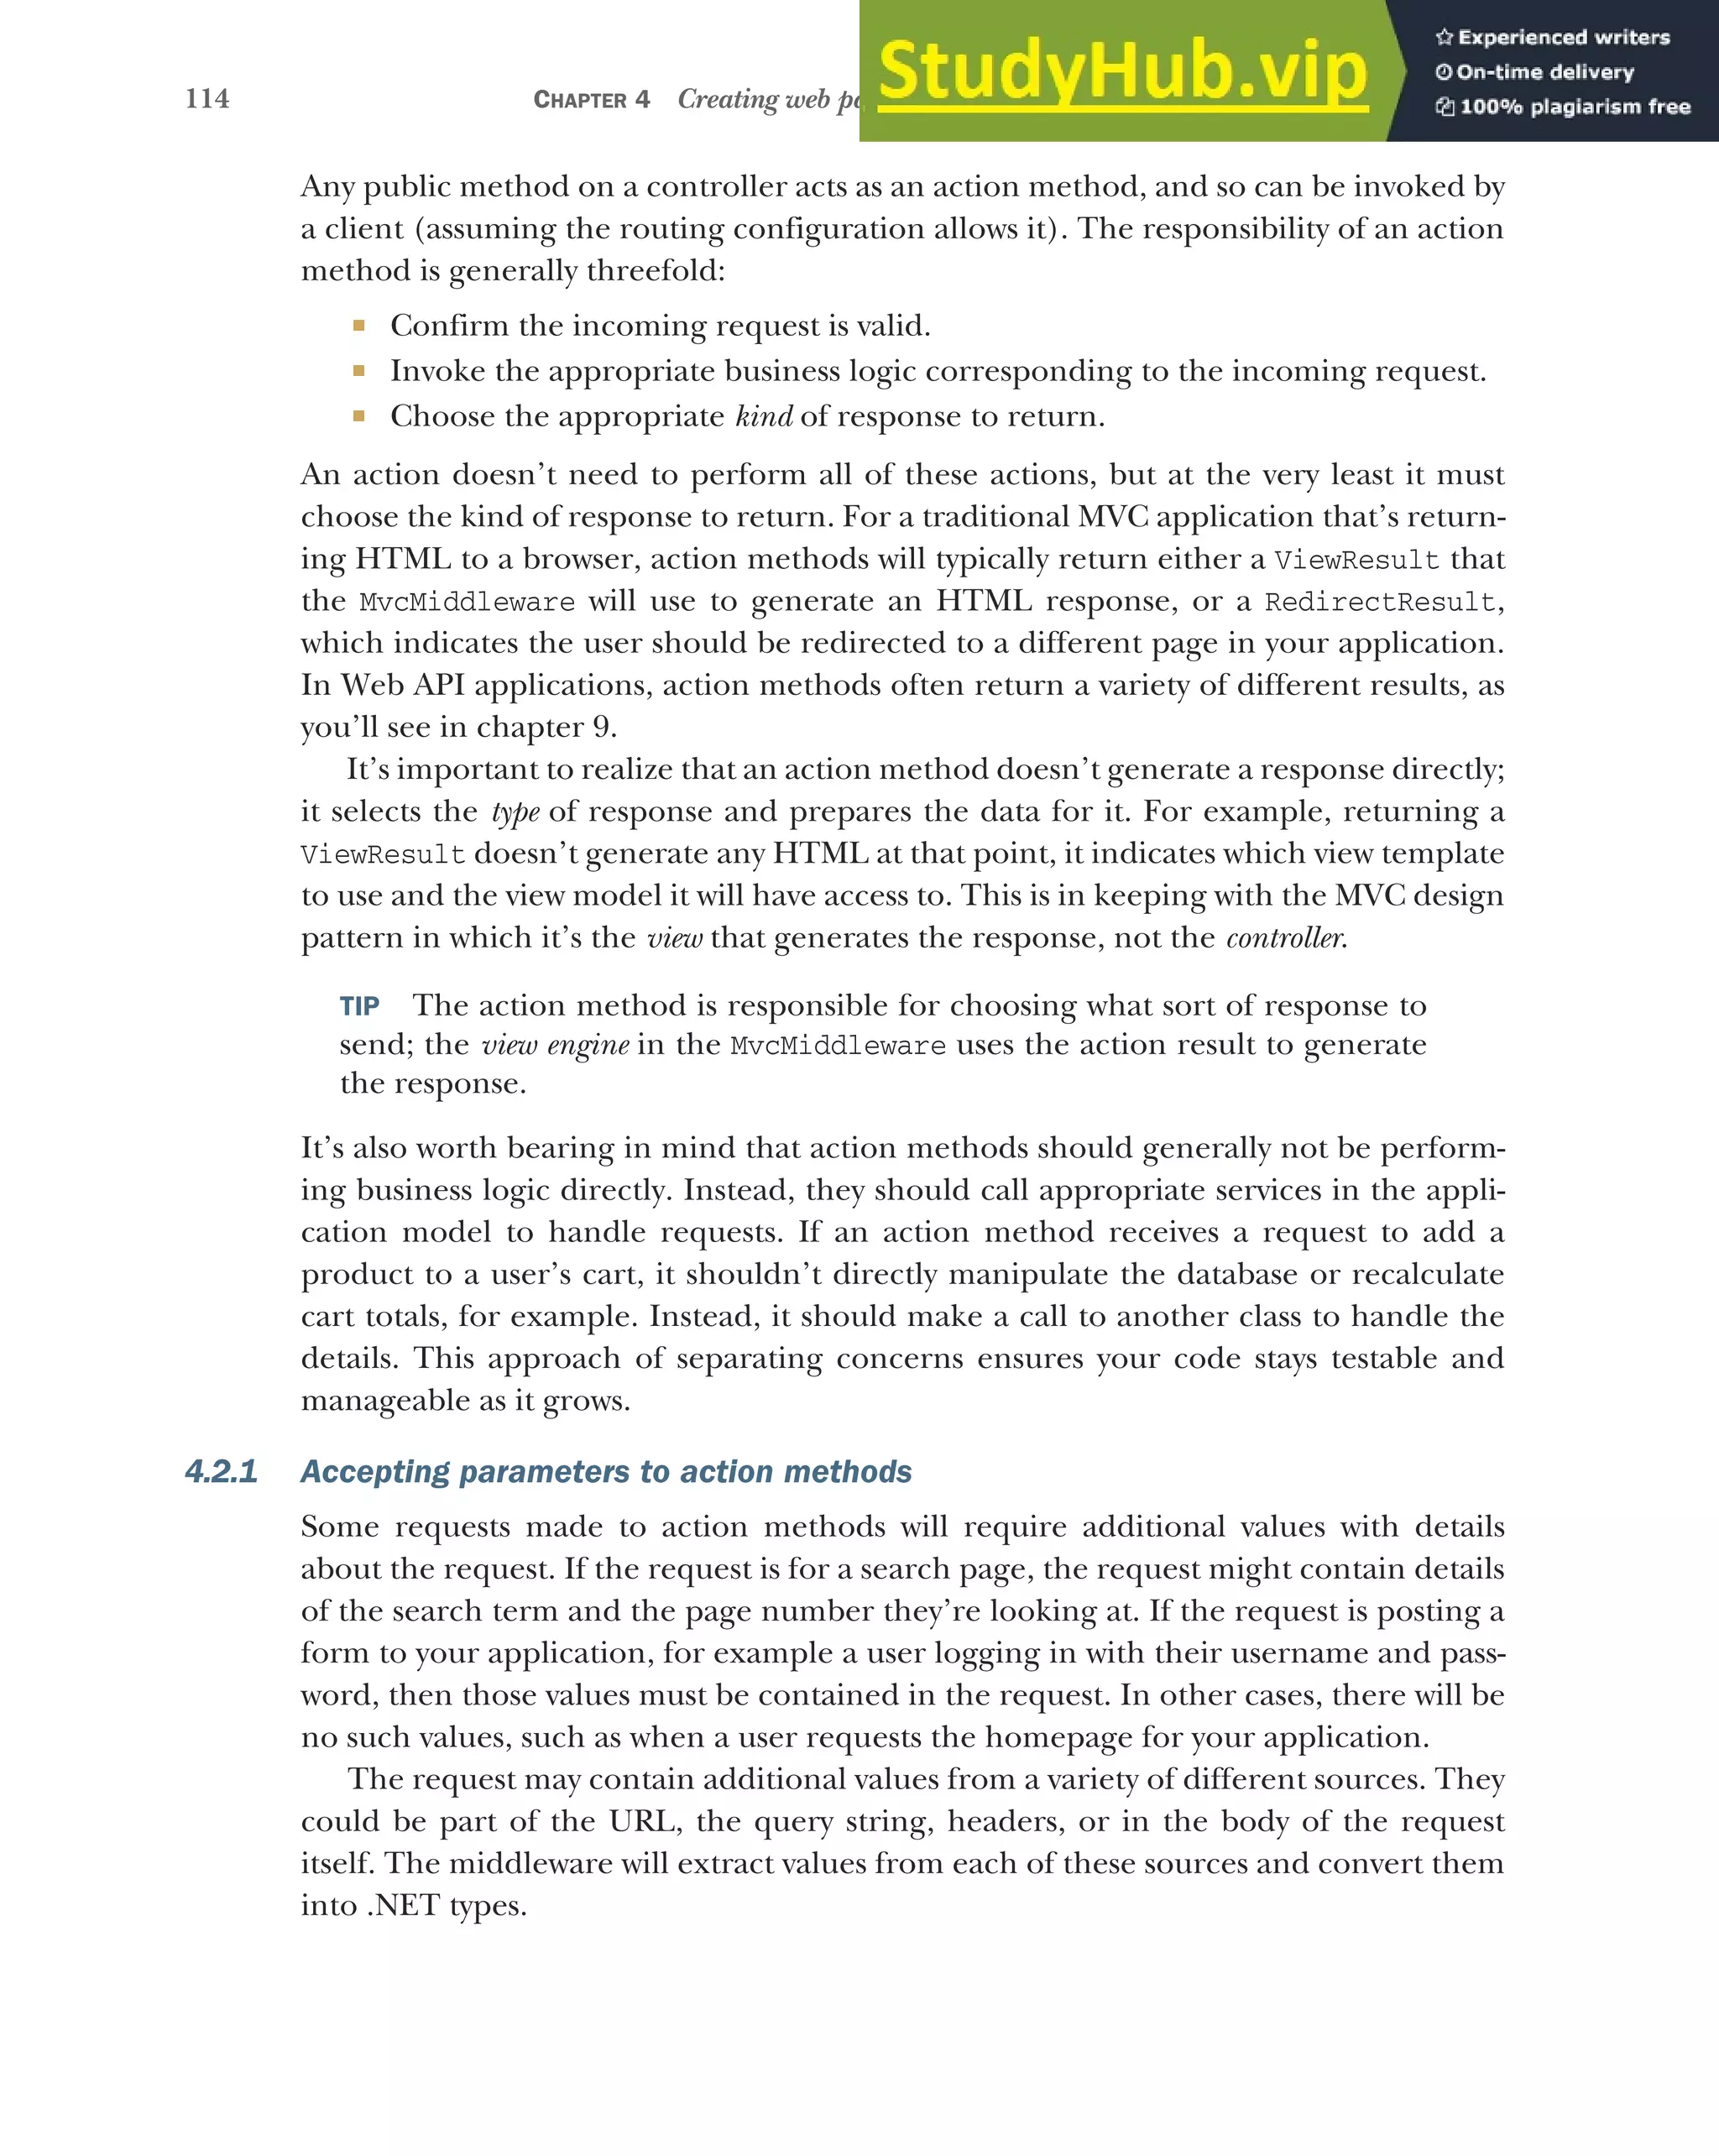

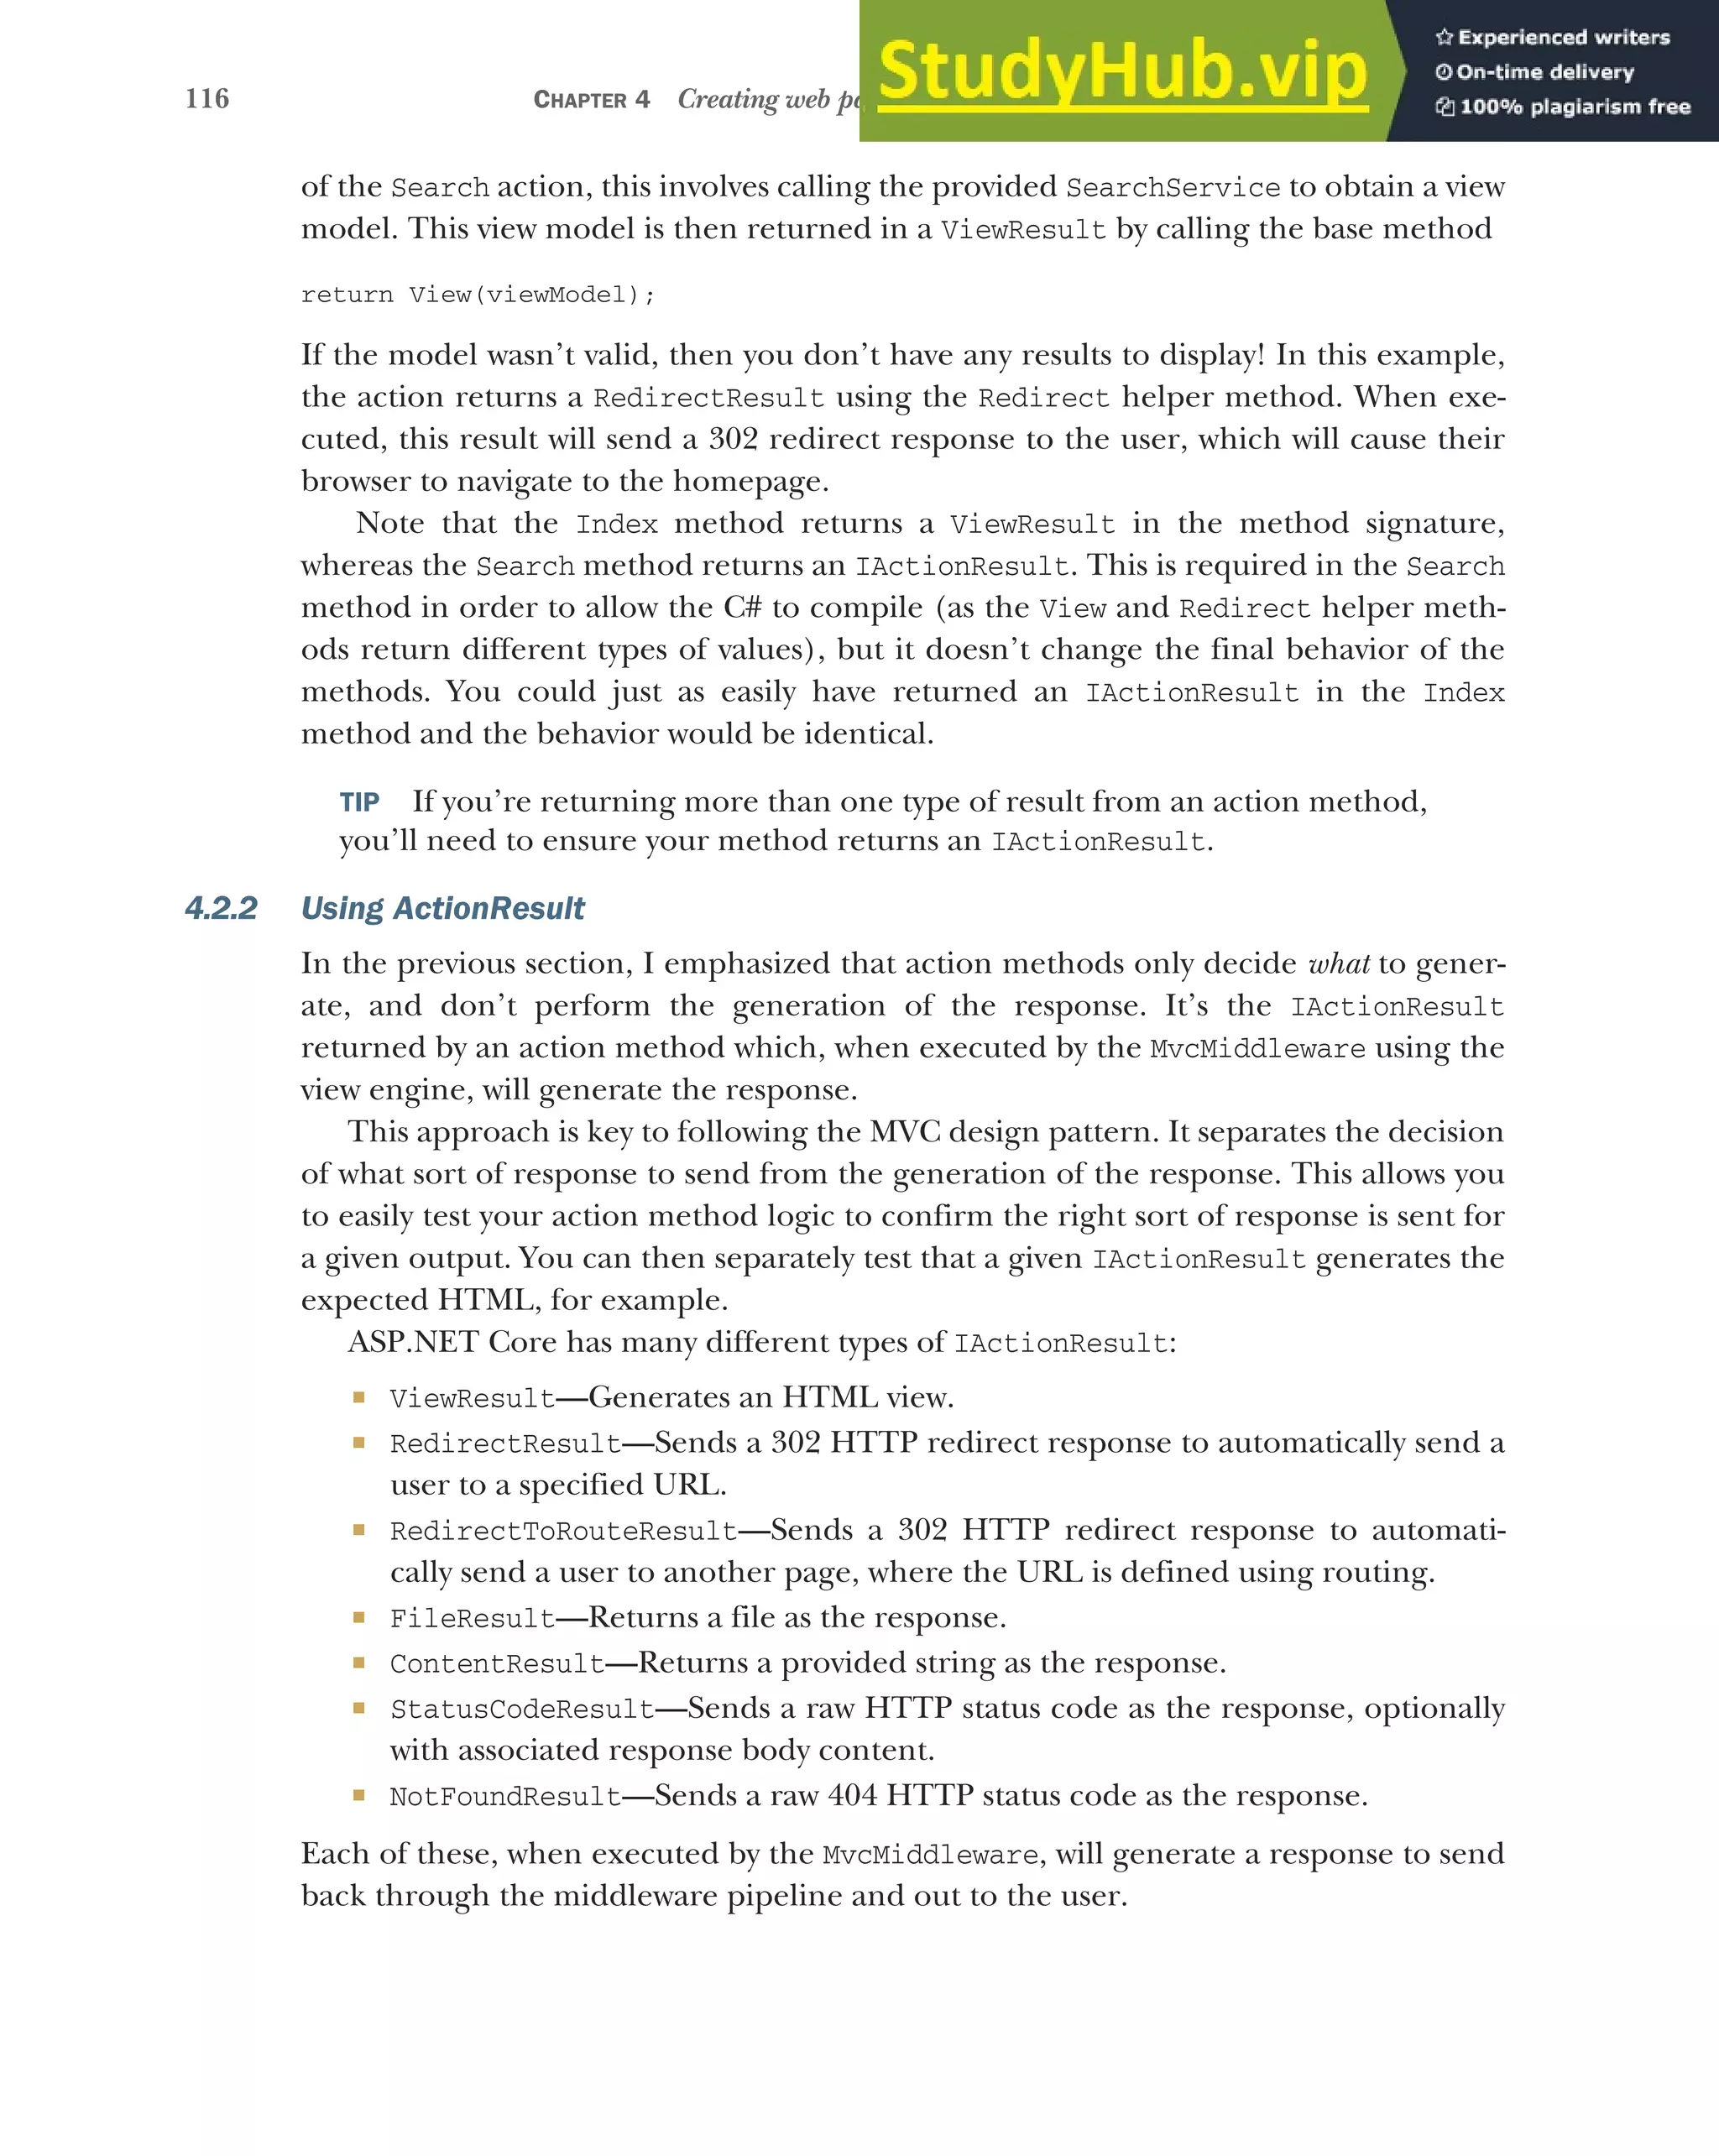


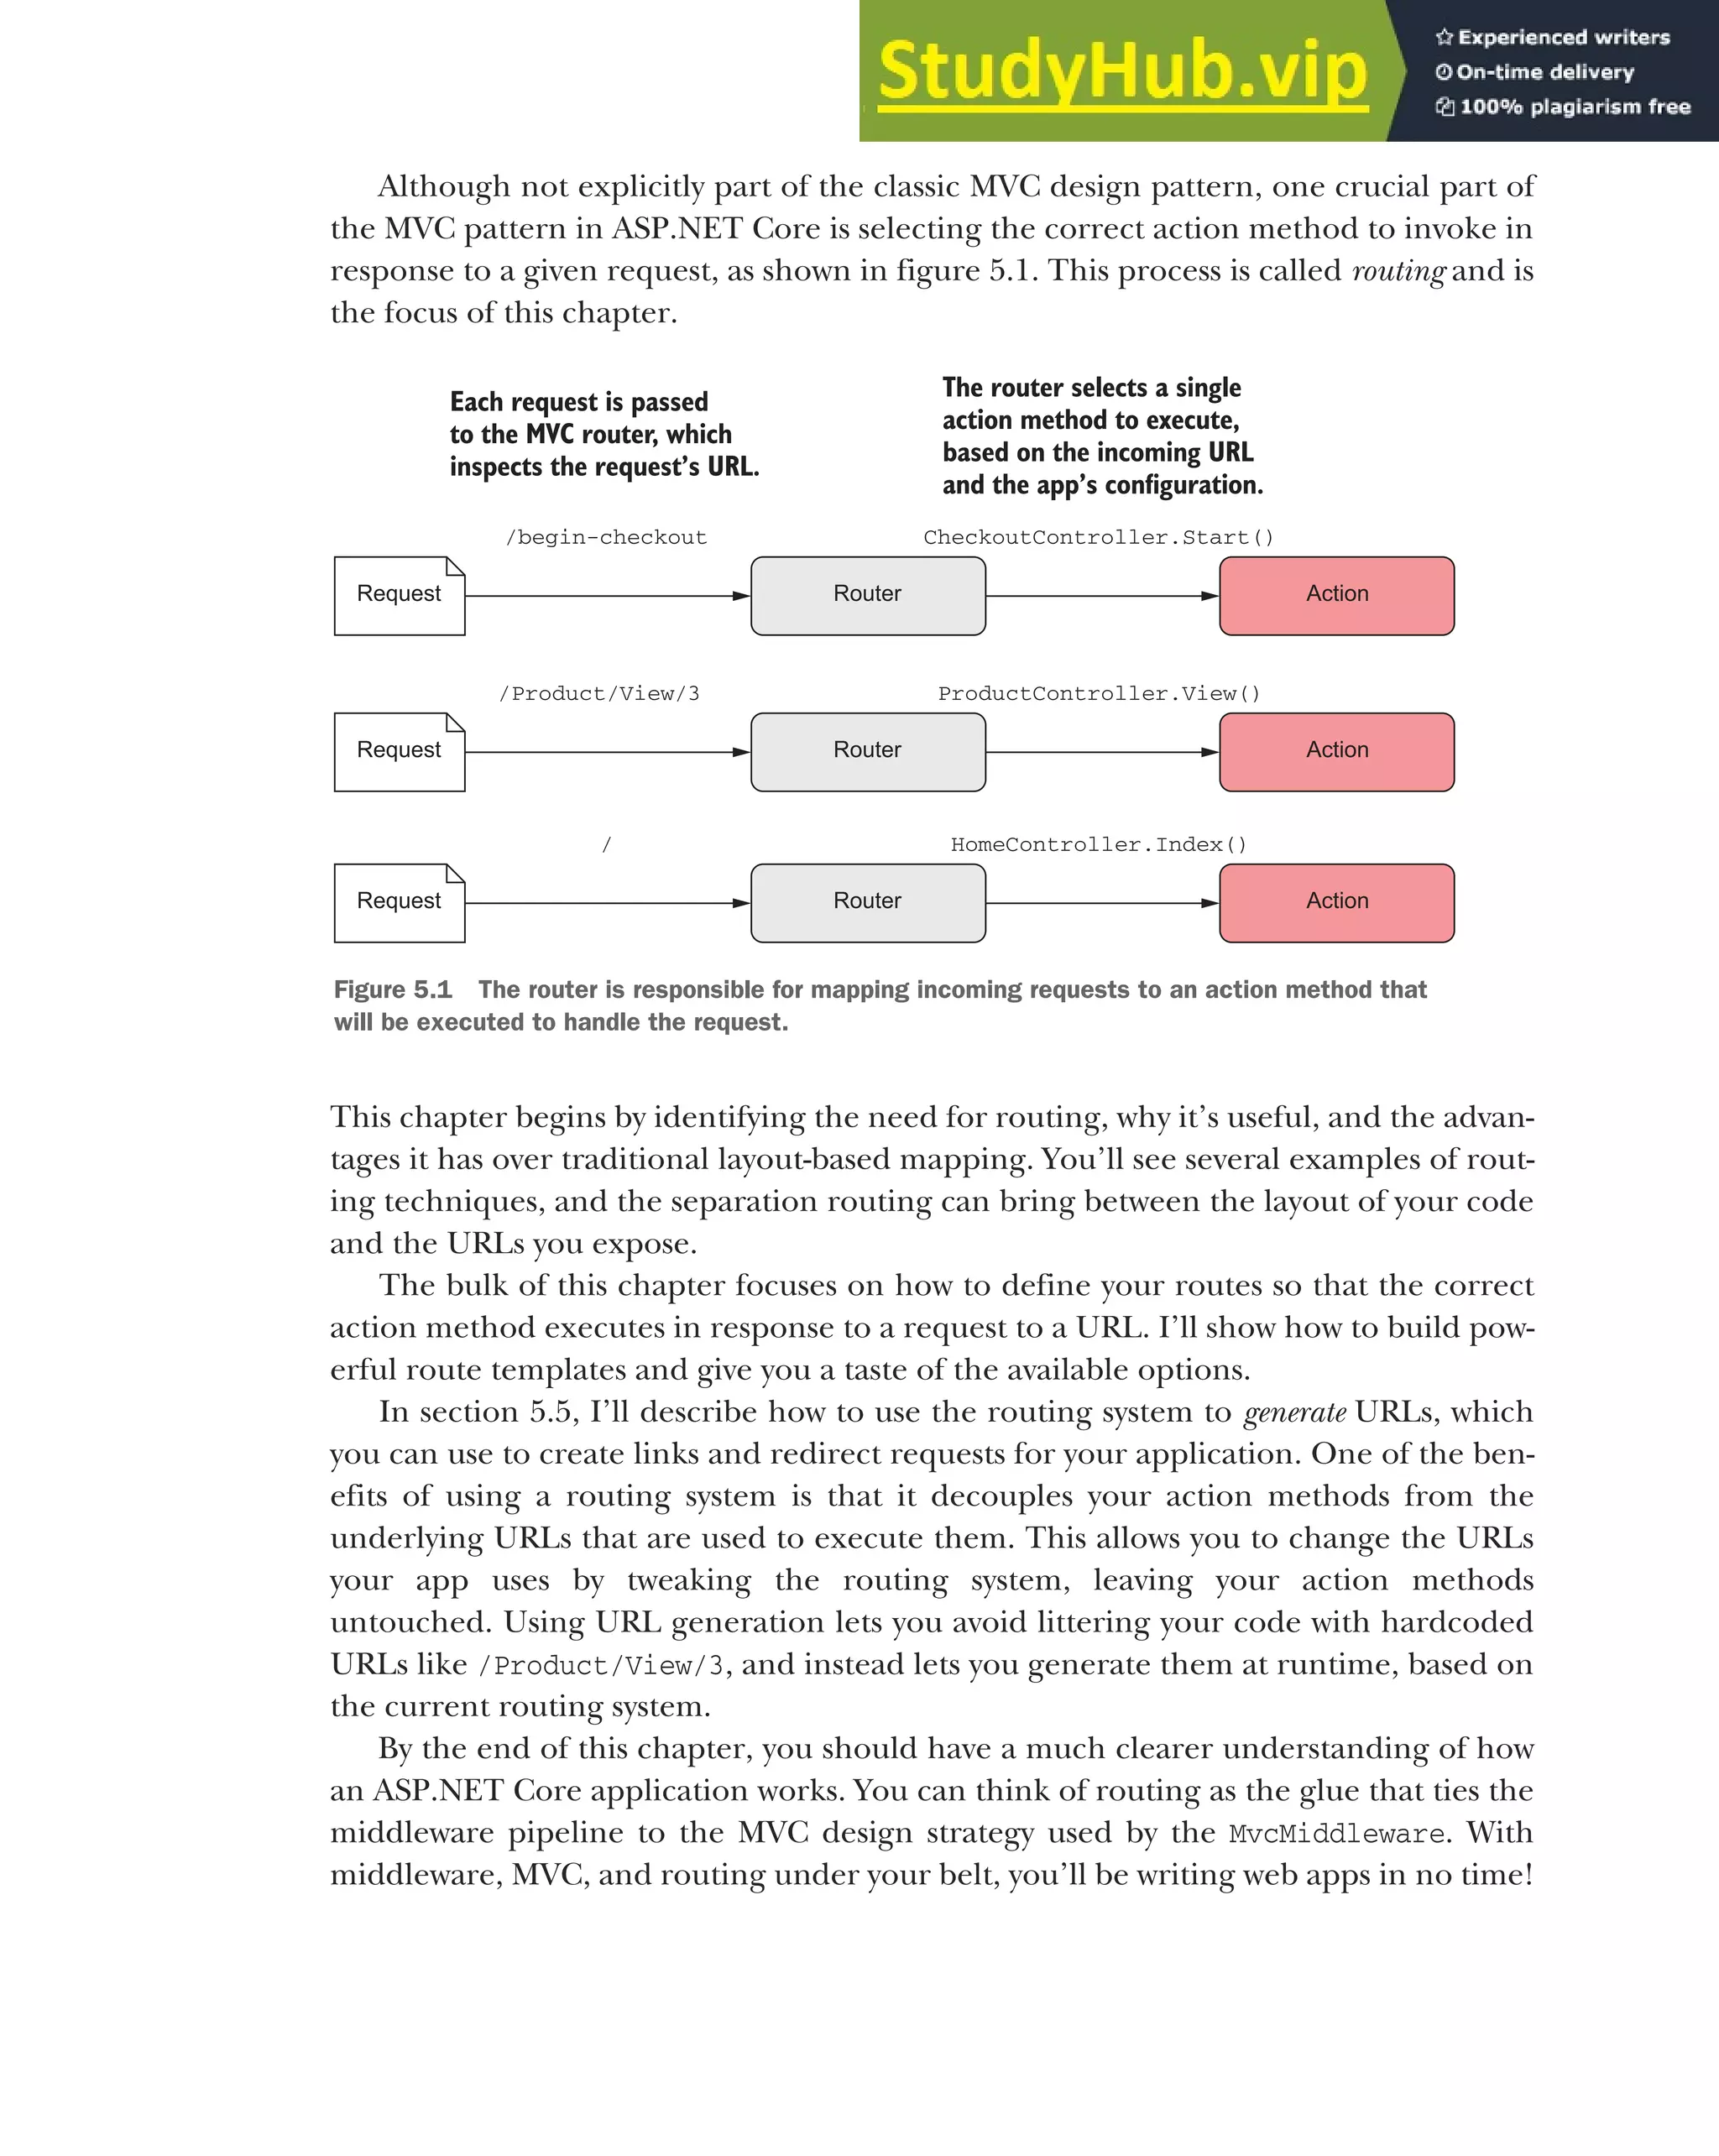
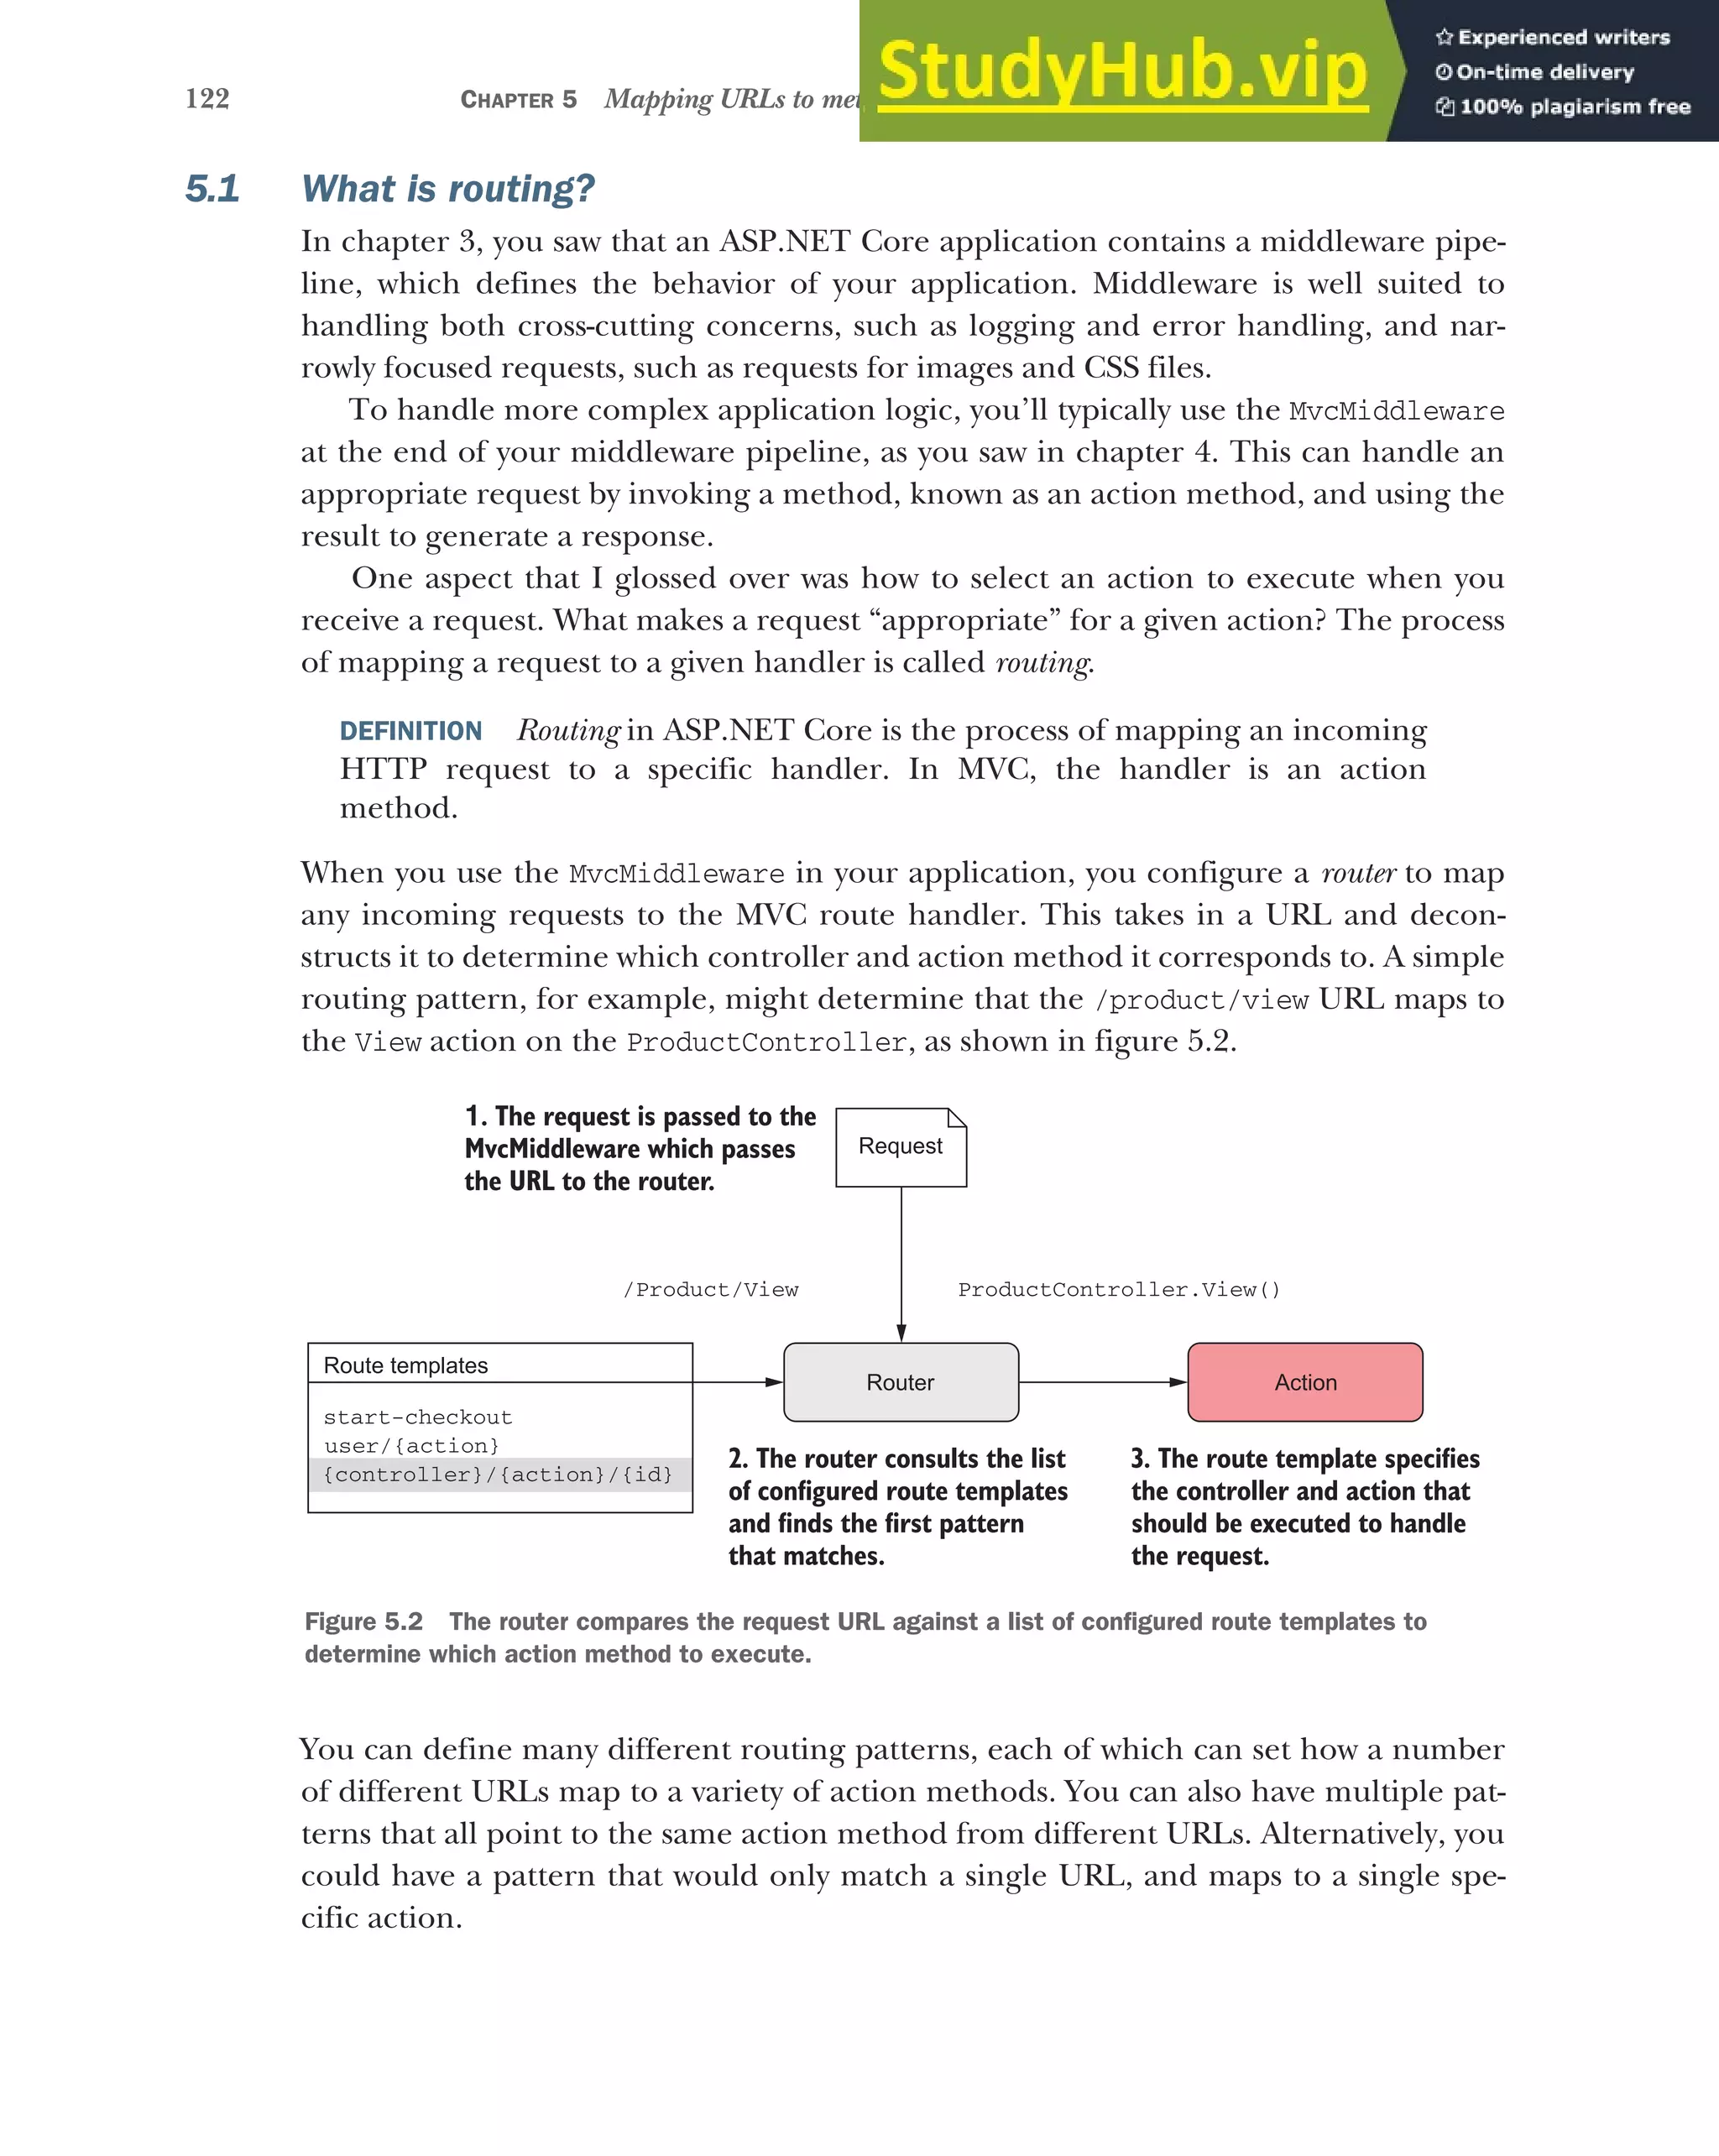
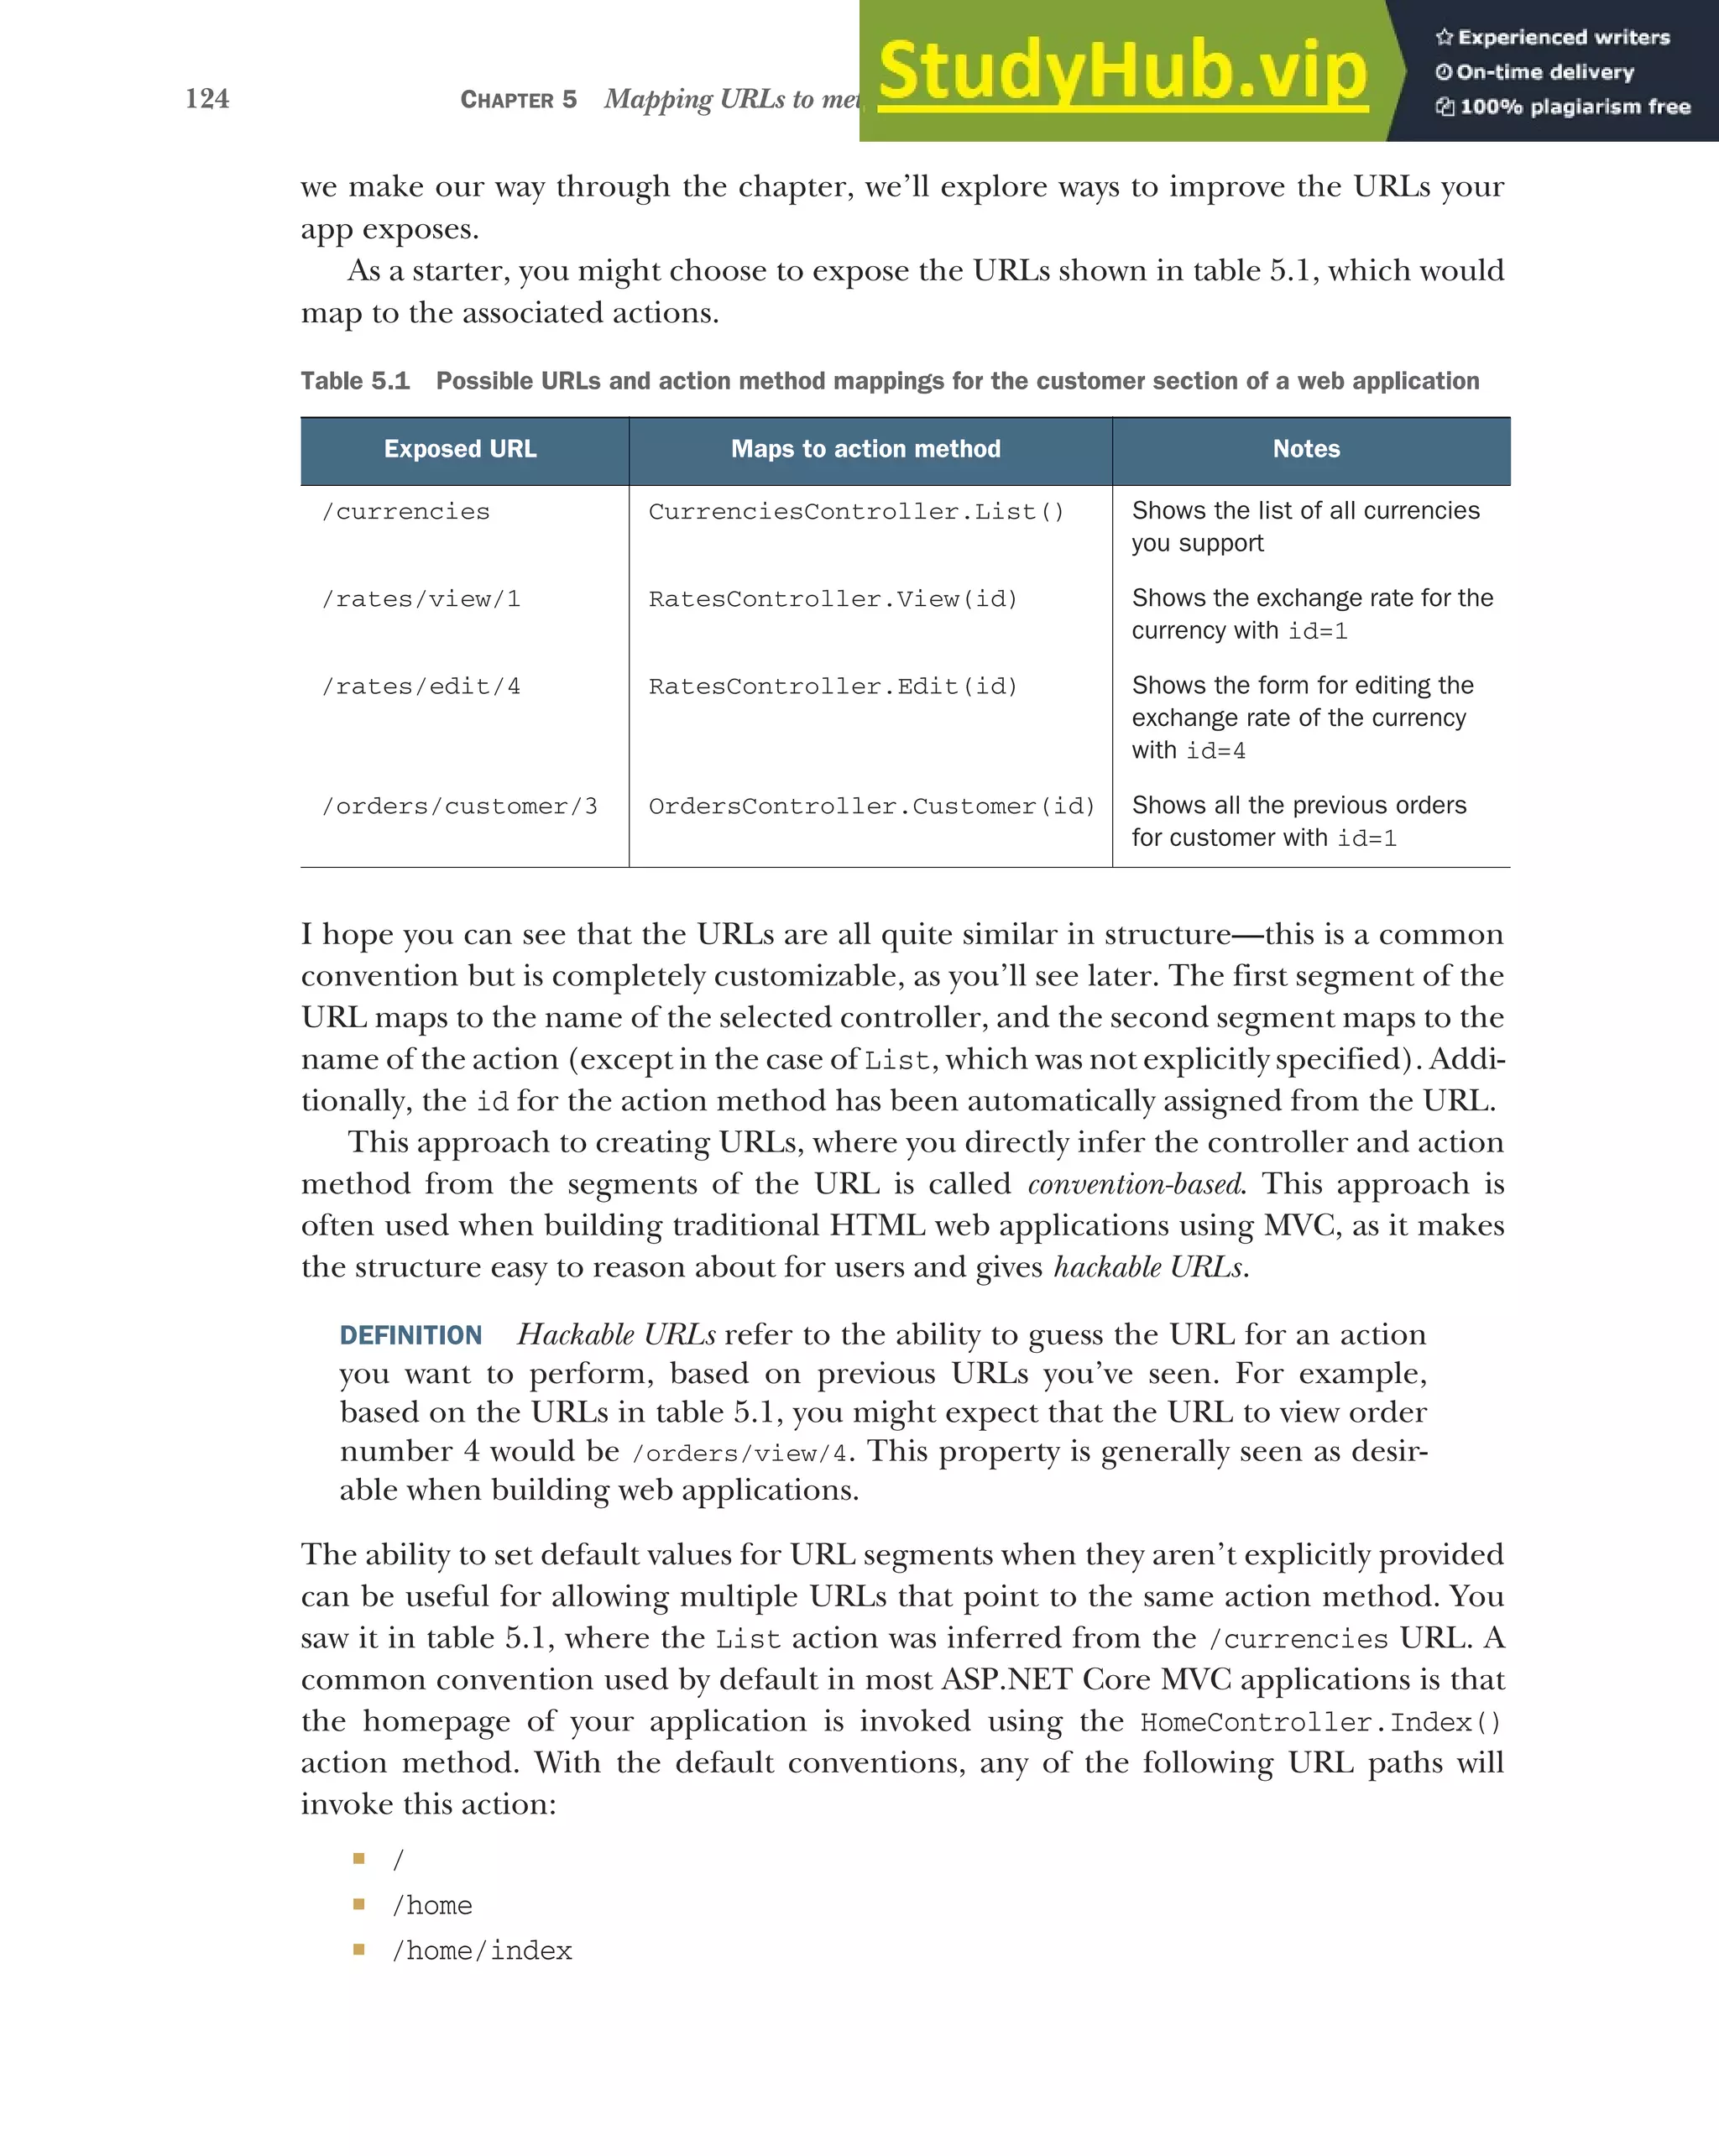
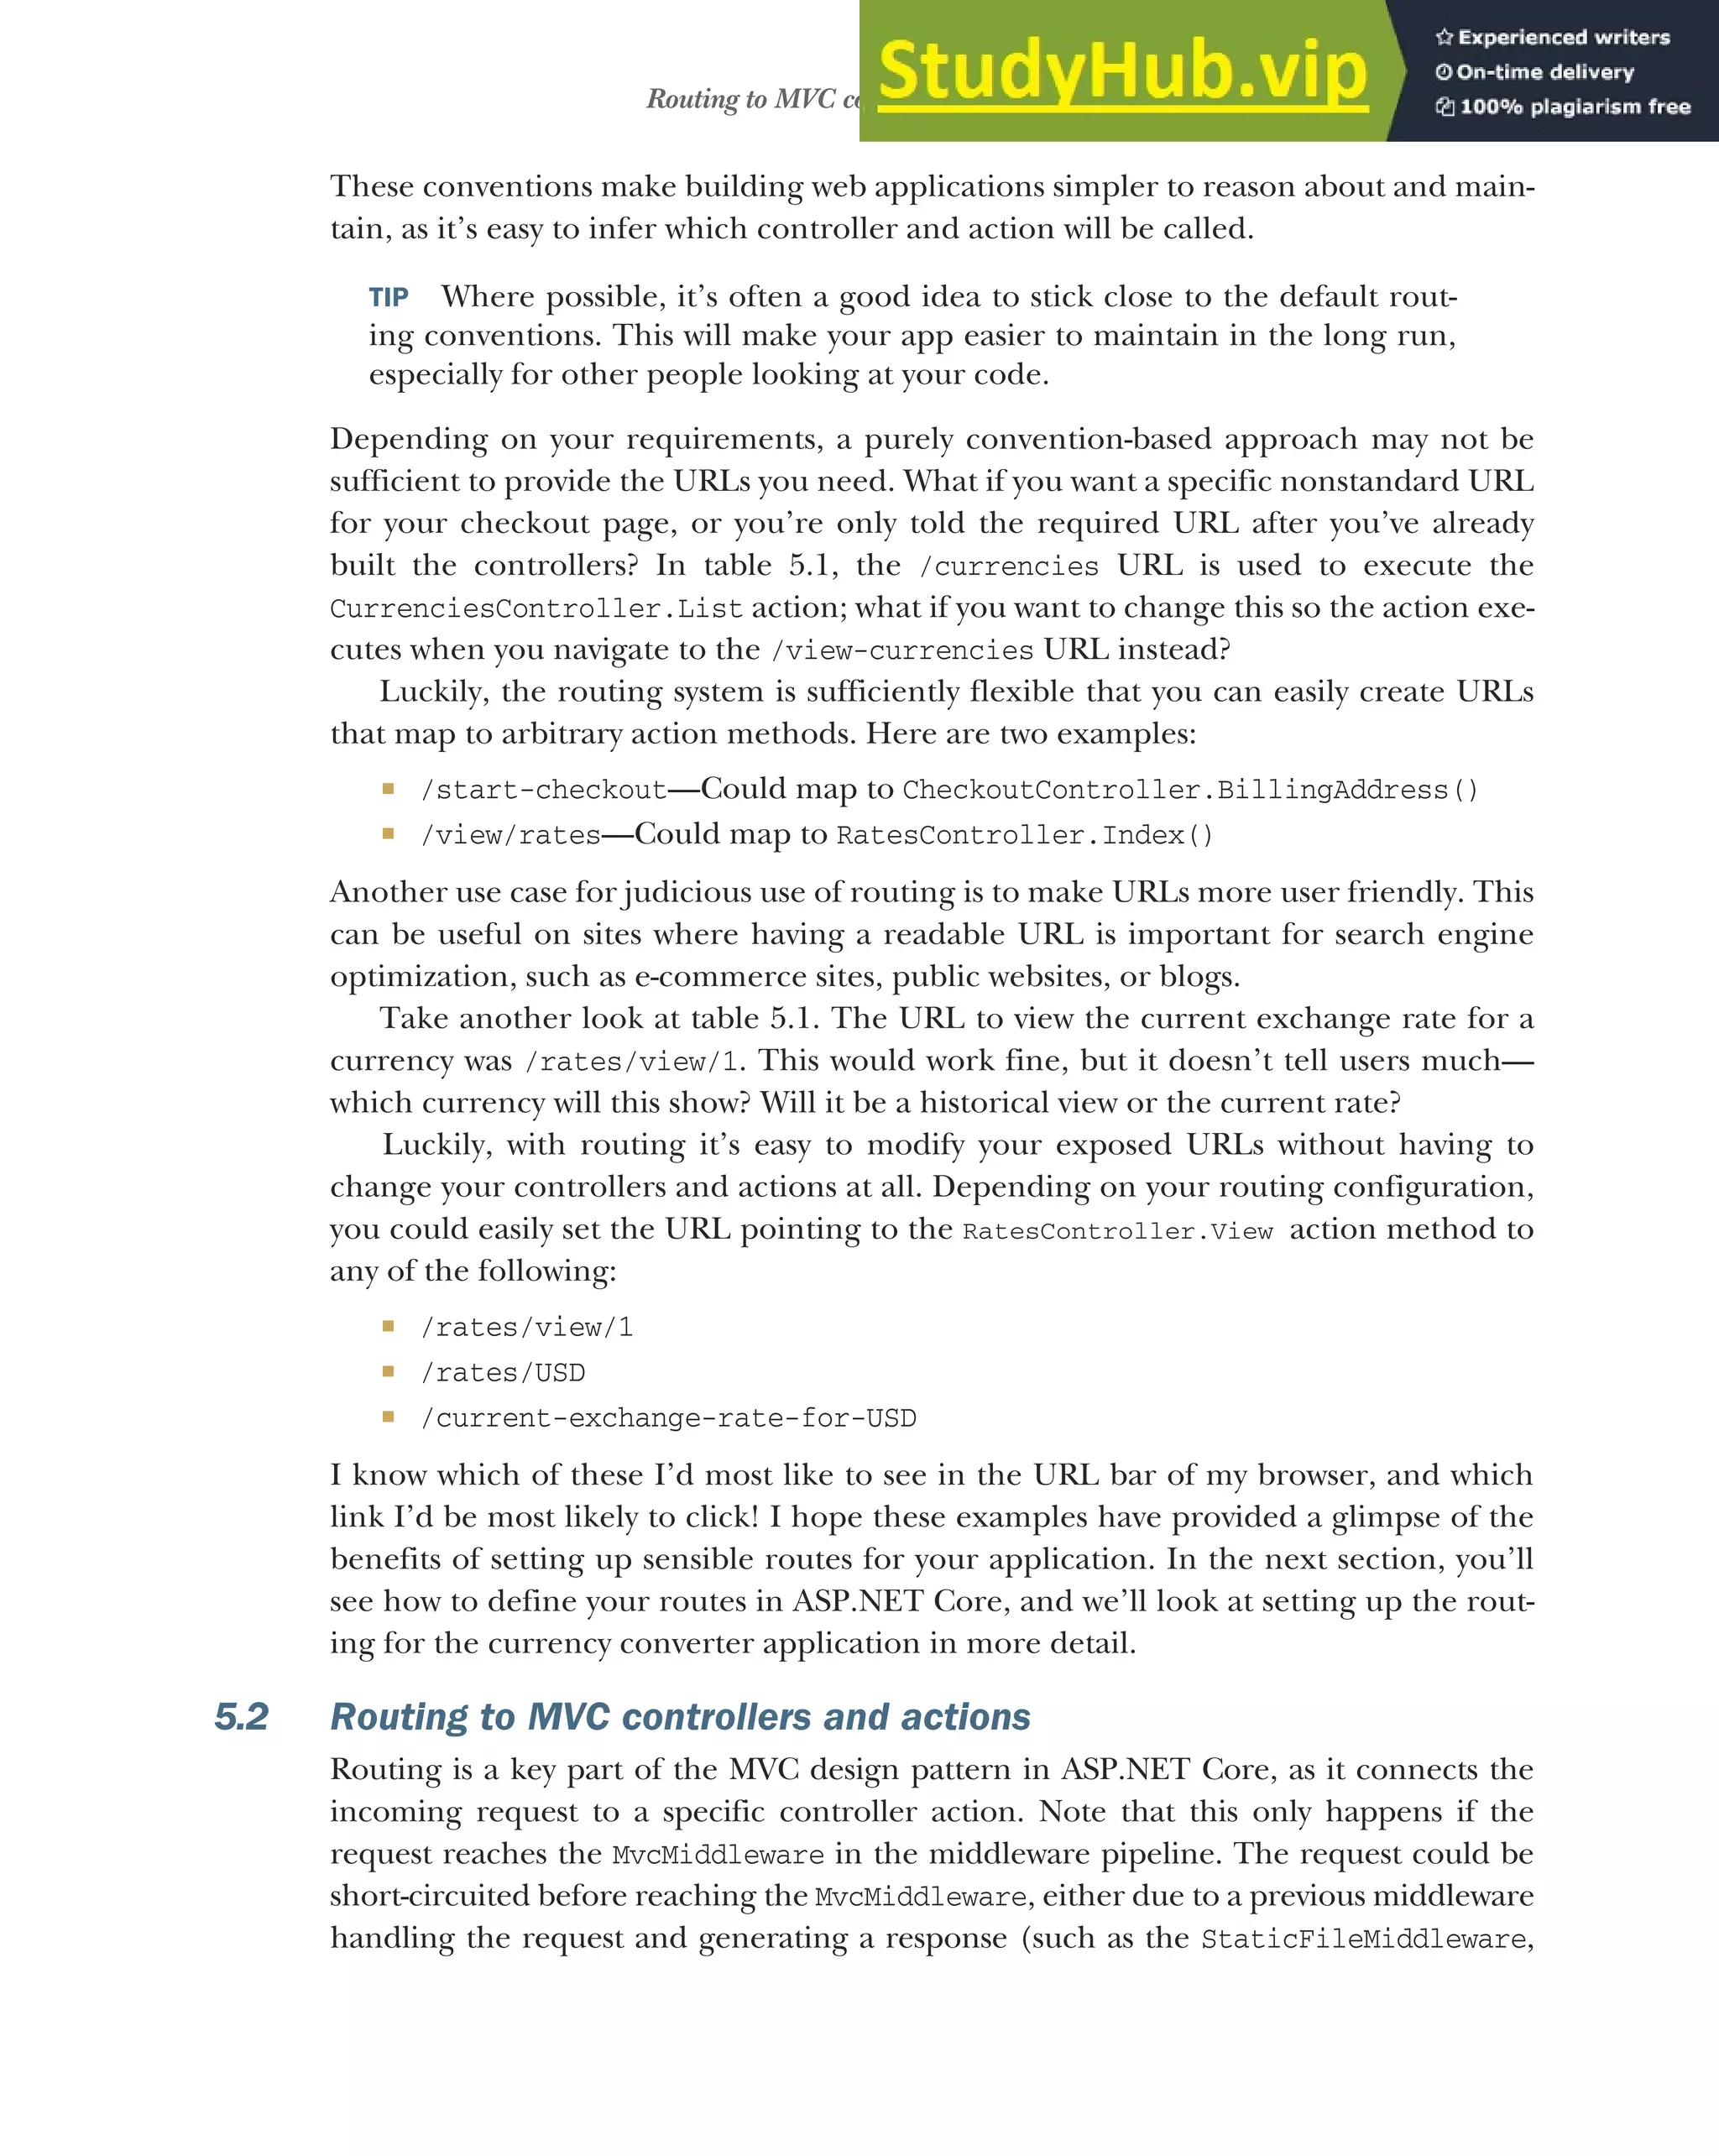
![126 CHAPTER 5 Mapping URLs to methods using conventional routing
for example) or a previous middleware generating an error. In these two cases, the Mvc-
Middleware won’t run, and so no routing will occur.
If the request does make it to the MvcMiddleware, then the first step is to route the
request to the required action method. You have two different ways to define these
mappings in your application:
Using global, conventional routing
Using attribute routing
The convention-based routes are defined globally for your application. You can use
convention-based routes to map all of the controllers and actions in your application,
as long as your code conforms to the conventions you define. This provides a succinct
and terse way to expose your action methods at easily understood URLs. Traditional
HTML-based MVC web applications typically use this approach to routing.
You can also use attribute-based routes to tie a given URL to a specific action
method by placing [Route] attributes on the action methods themselves. This pro-
vides a lot more flexibility as you can explicitly define what a URL for a given action
method should be. This approach is more verbose than the convention-based
approach, as it requires applying attributes to every action method in your applica-
tion. Despite this, the additional flexibility it provides can often be useful, especially
when building Web APIs.
Whichever technique you use, you’ll define your expected URLs using route tem-
plates. These define the pattern of the URL you’re expecting, with placeholders for
parts that may vary.
DEFINITION Route templates define the structure of known URLs in your appli-
cation. They’re strings with placeholders for variables that can contain
optional values and map to controllers and actions.
A single route template can match a number of different URLs. The /product/index
and /product URLs would both be matched by the product/{action=index} route
template, for example, and the /customer/1 and /customer/2 URLs would both be
matched by the customer/{id} route template. The route template syntax is power-
ful and contains many different features that are controlled by splitting a URL into
multiple segments.
DEFINITION A segment is a small contiguous section of a URL. It’s separated
from other URL segments by at least one character, often by the / character.
Routing involves matching the segments of a URL to a route template.
For a single-route template, you can define
Specific, expected strings
Variable segments of the URL
Optional segments of a URL
Default values when an optional segment isn’t provided
Constraints on segments of a URL, for example, ensuring that it’s numeric](https://image.slidesharecdn.com/asp-230807173723-31e70040/75/ASP-NET-Core-in-Action-2018-pdf-154-2048.jpg)
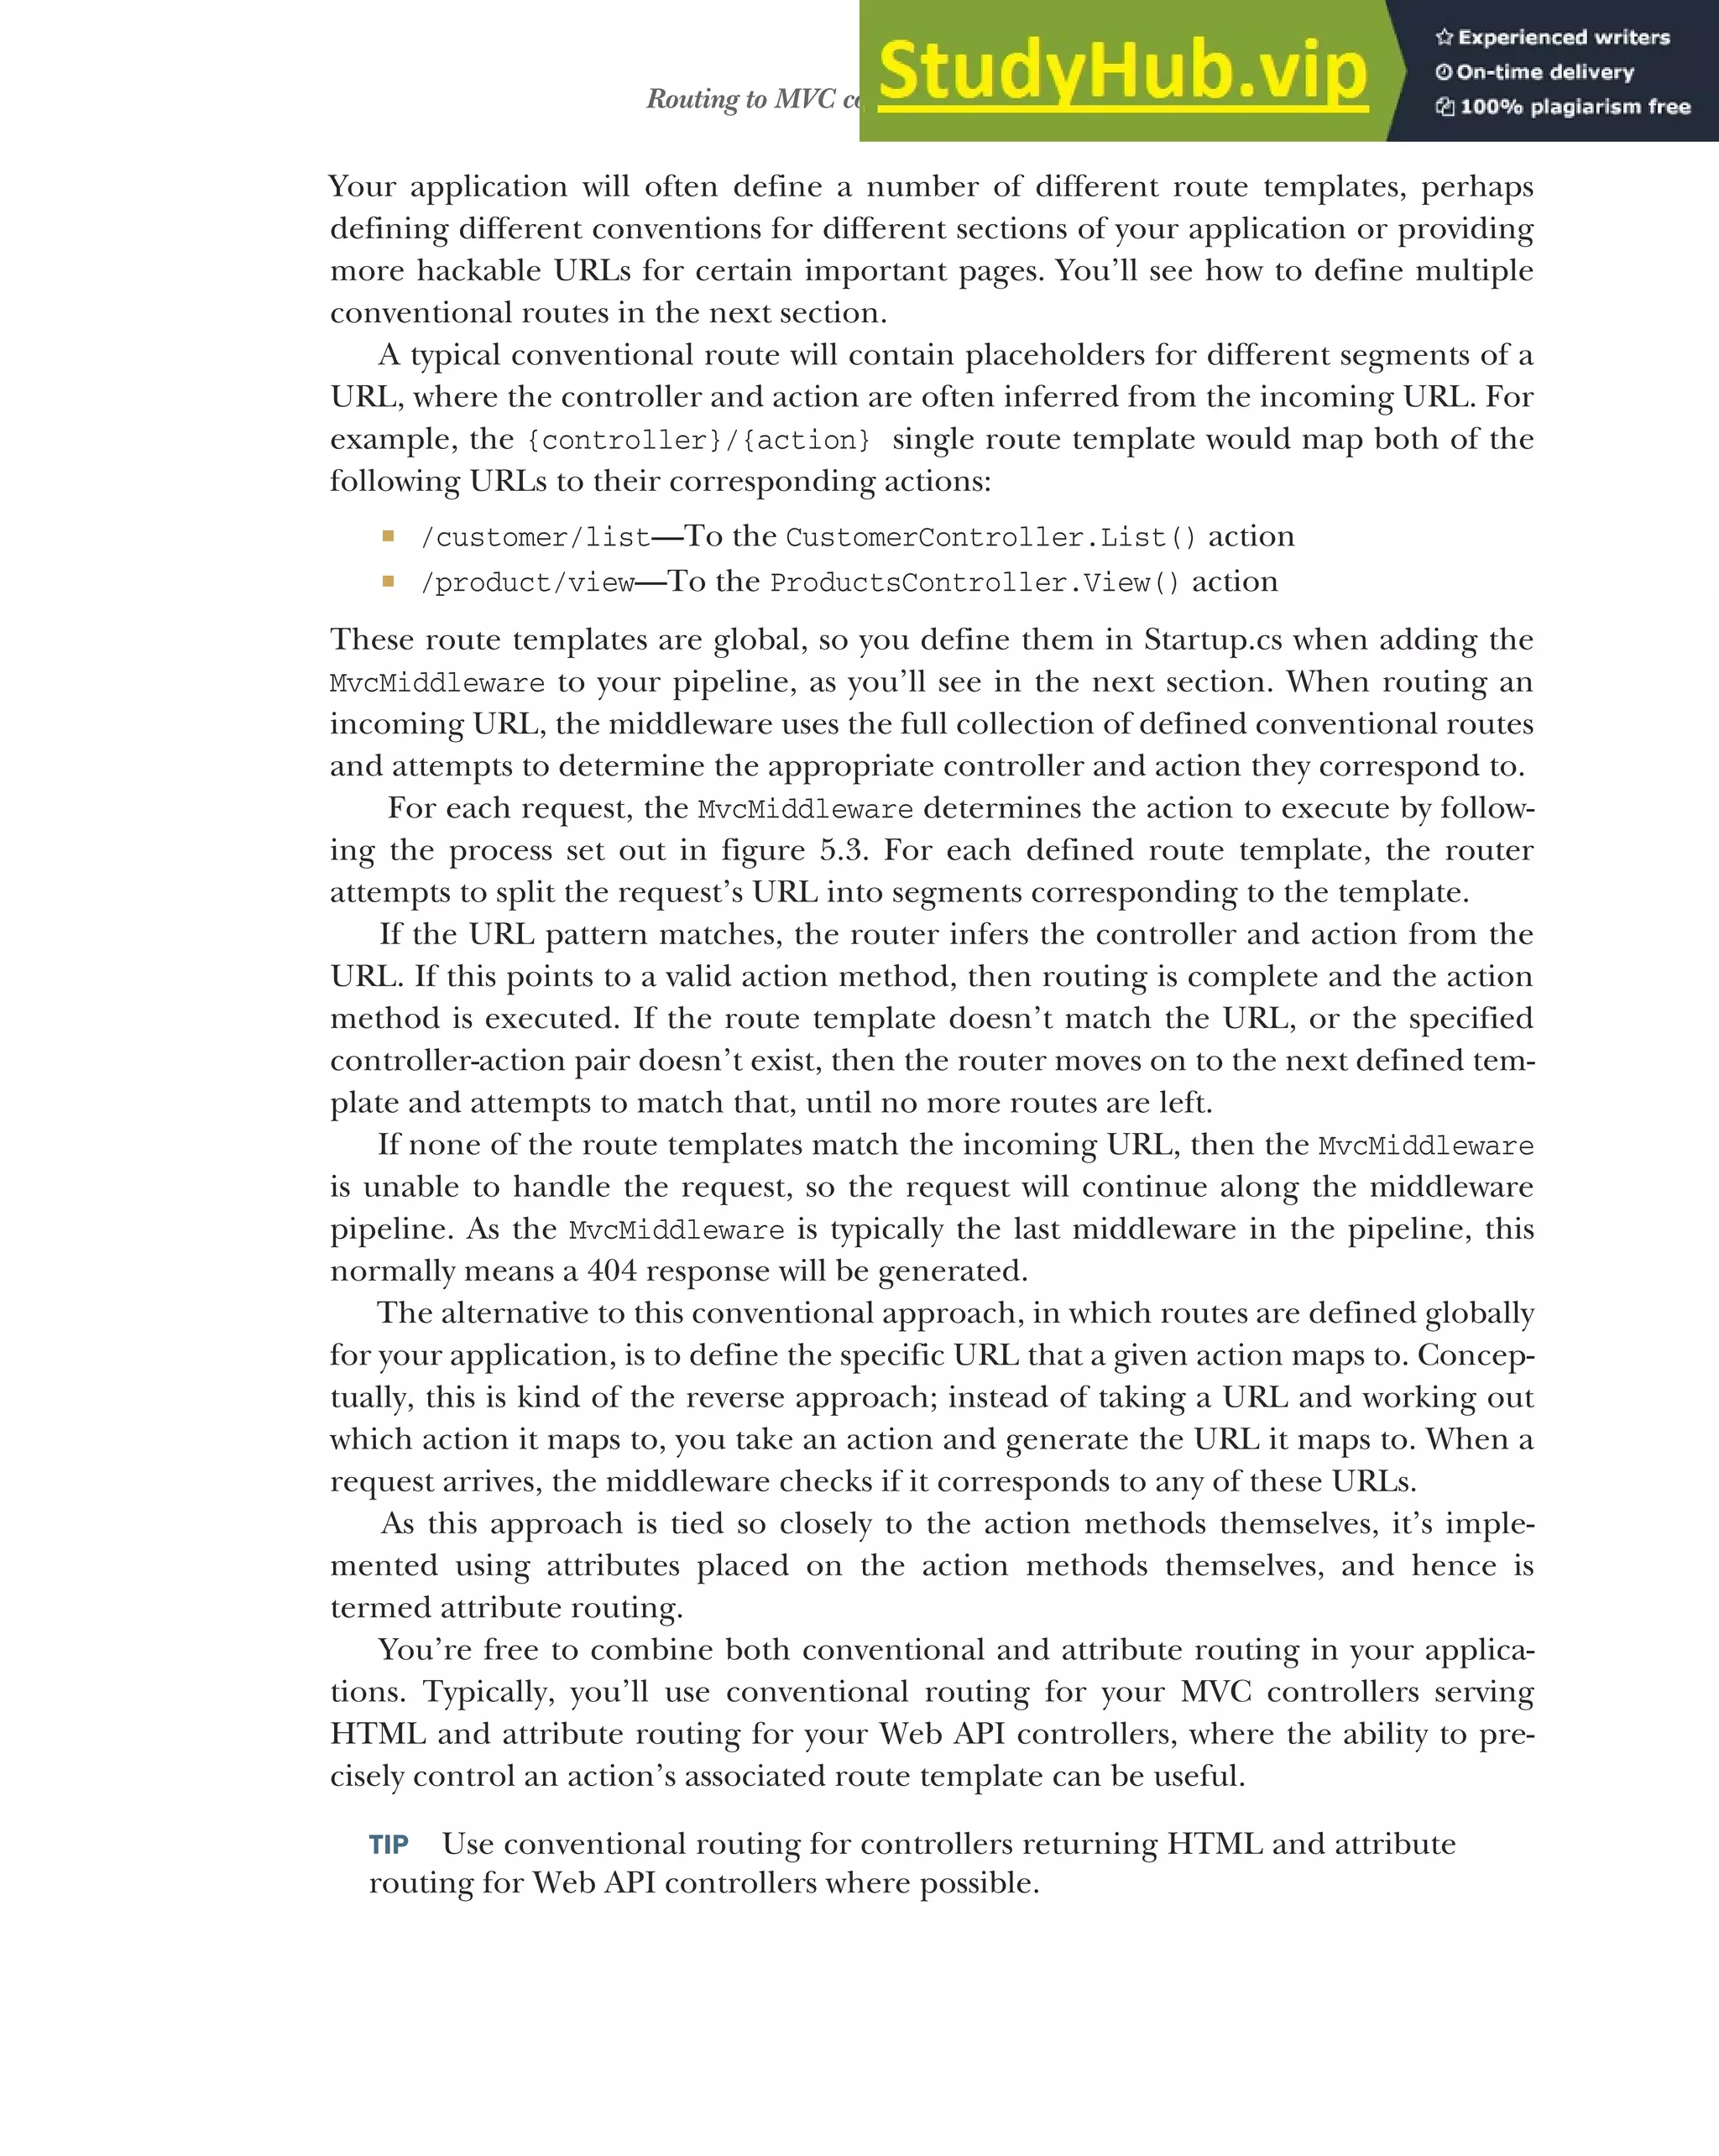
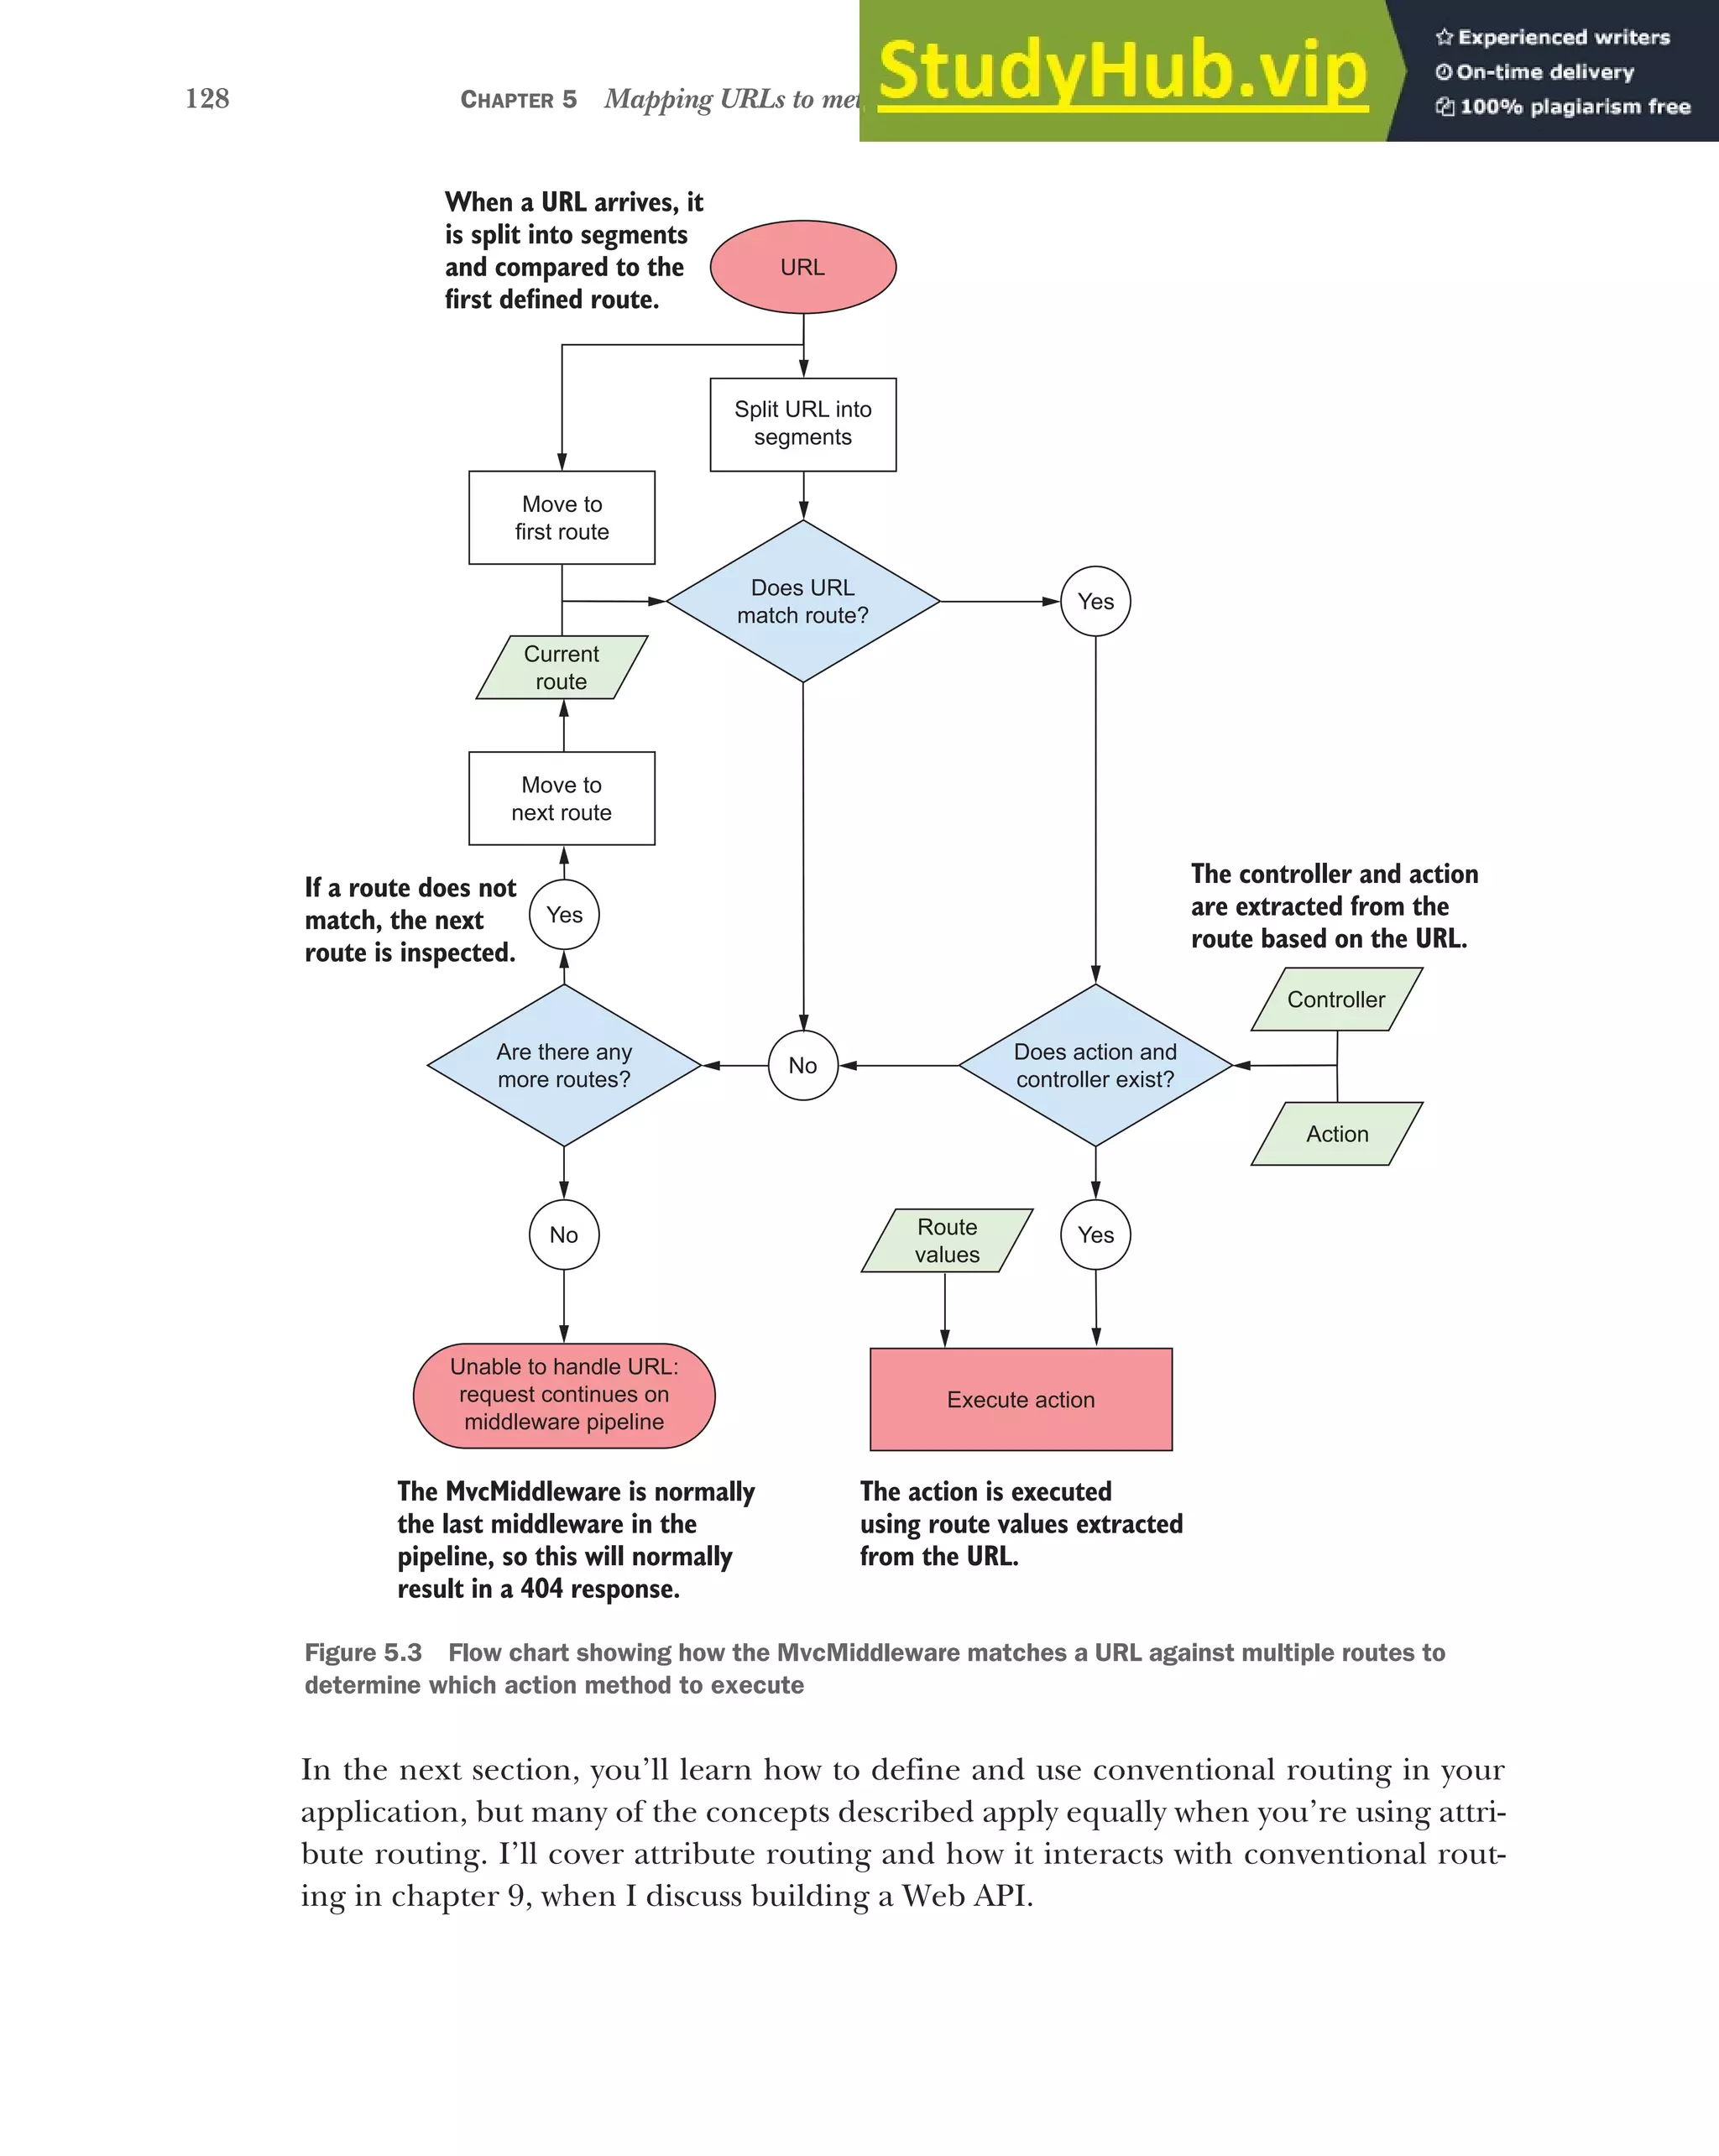

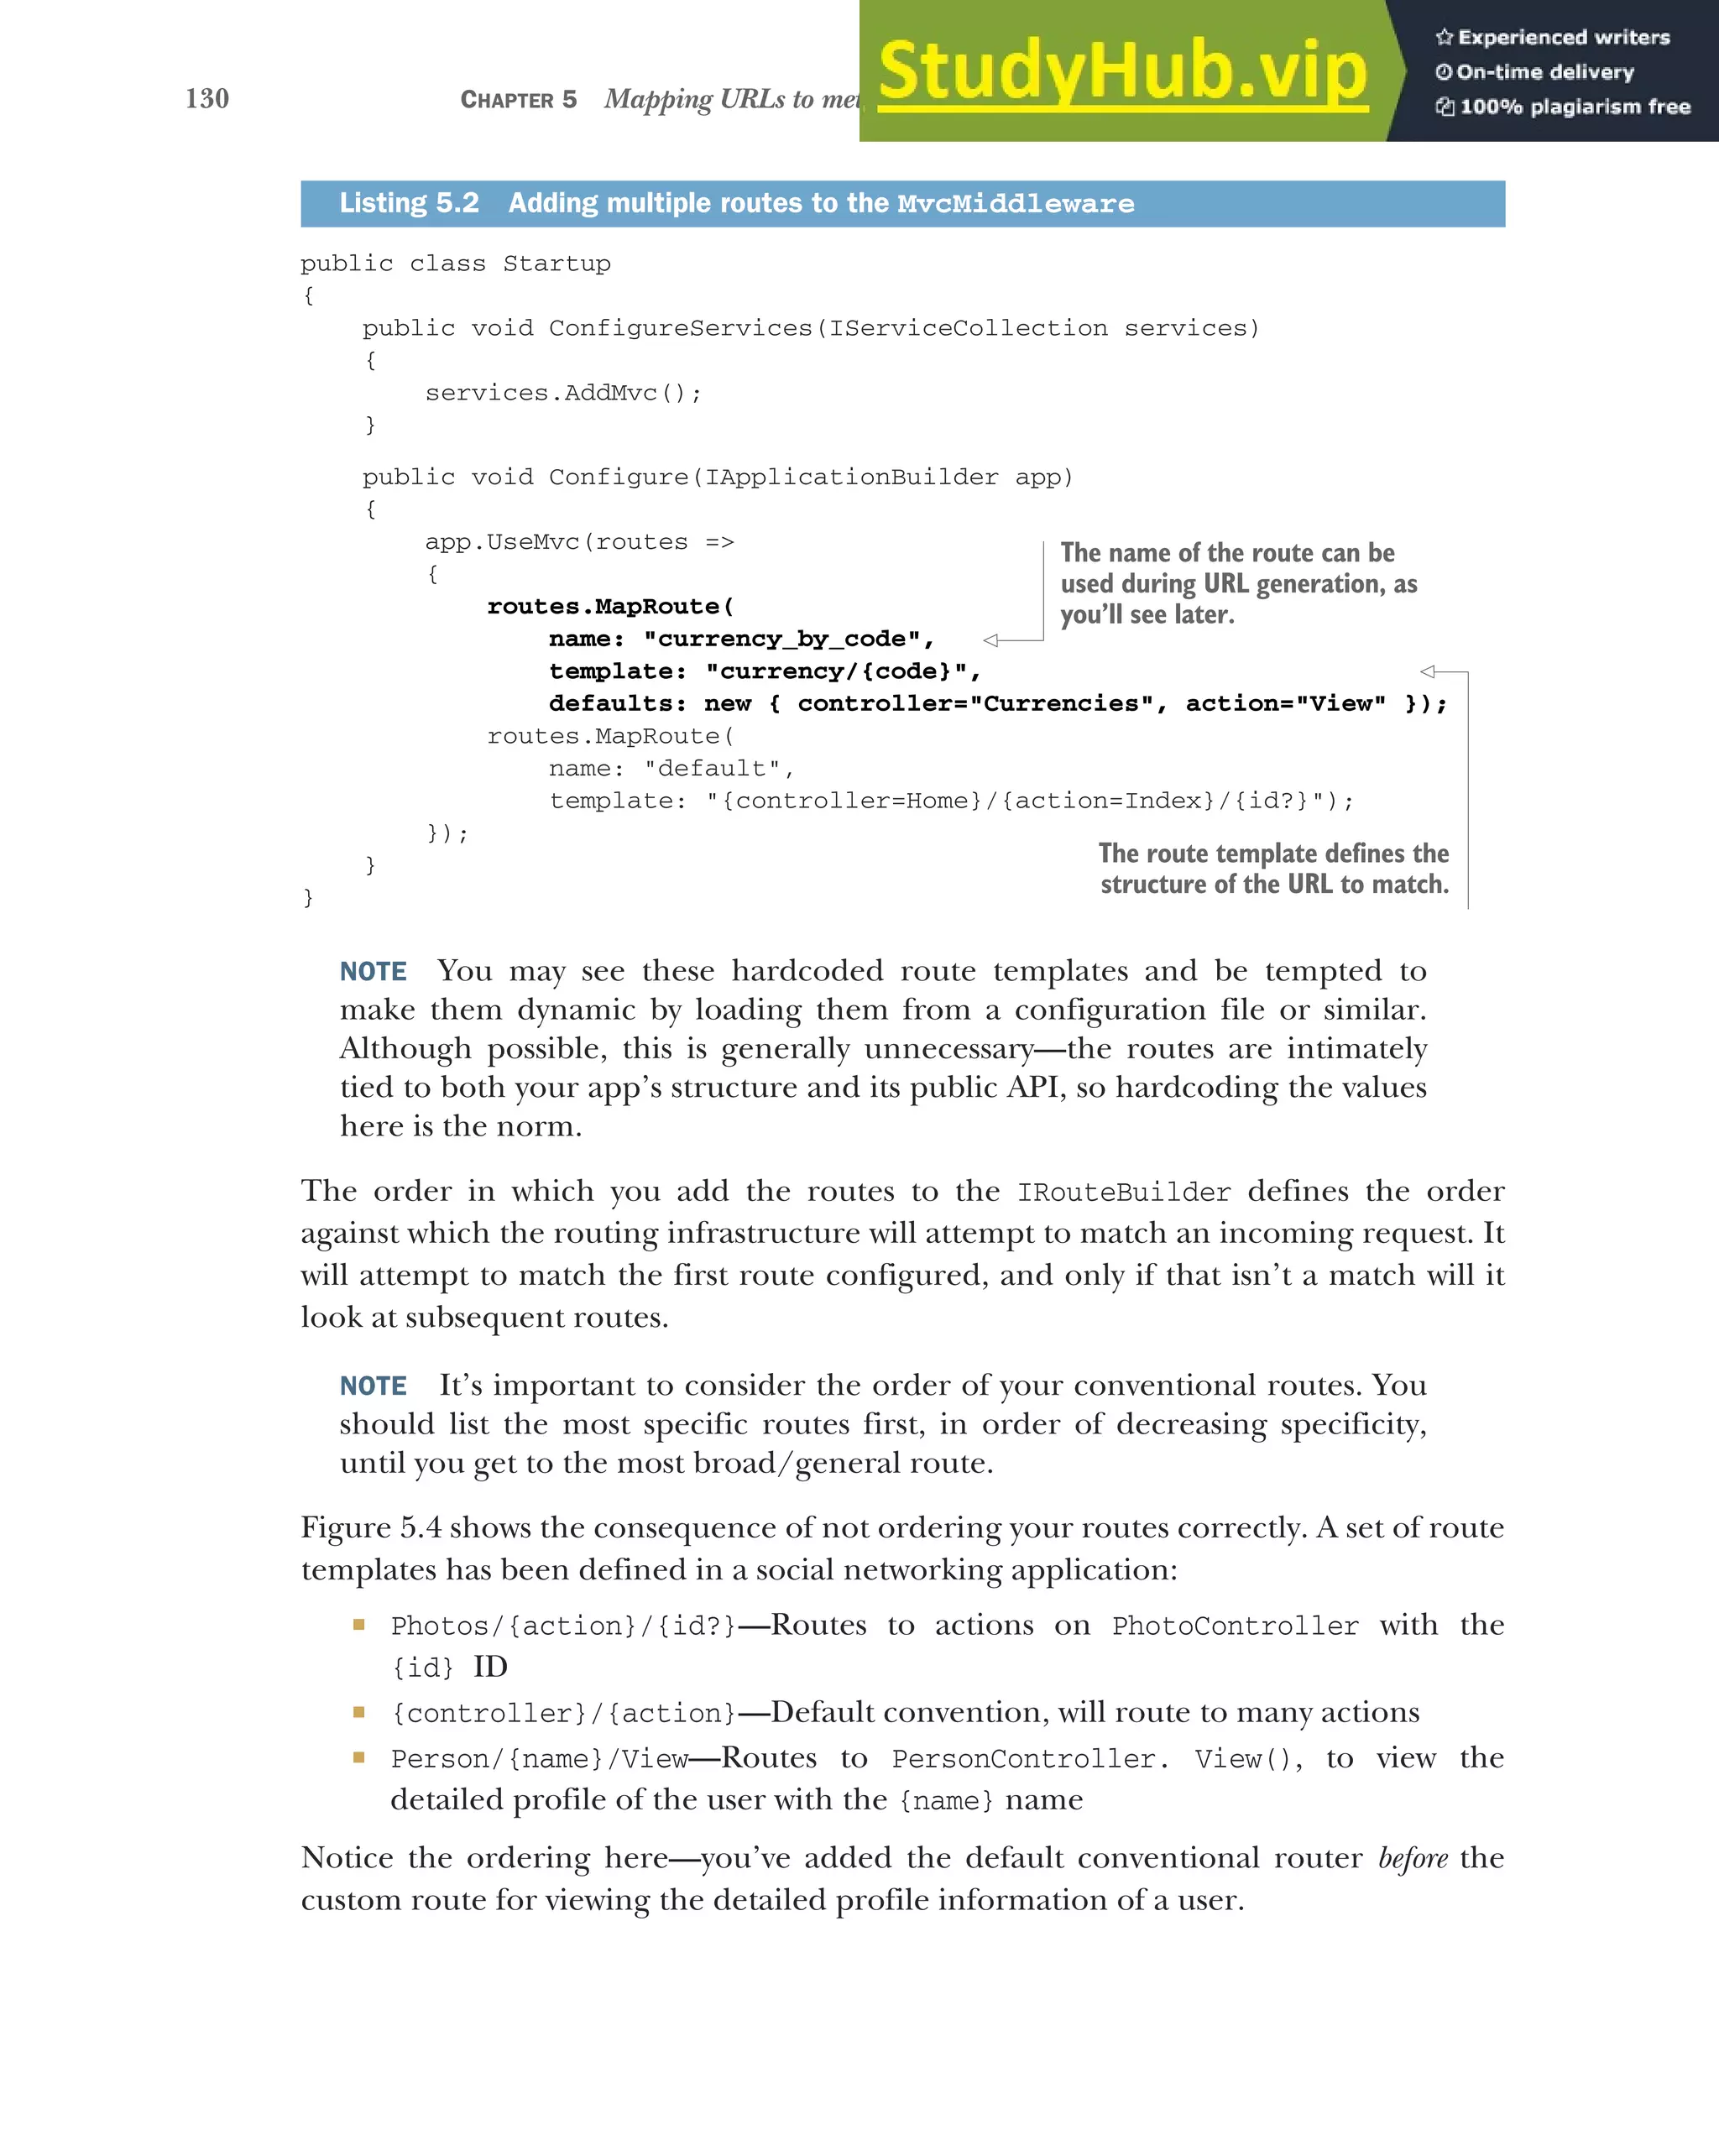


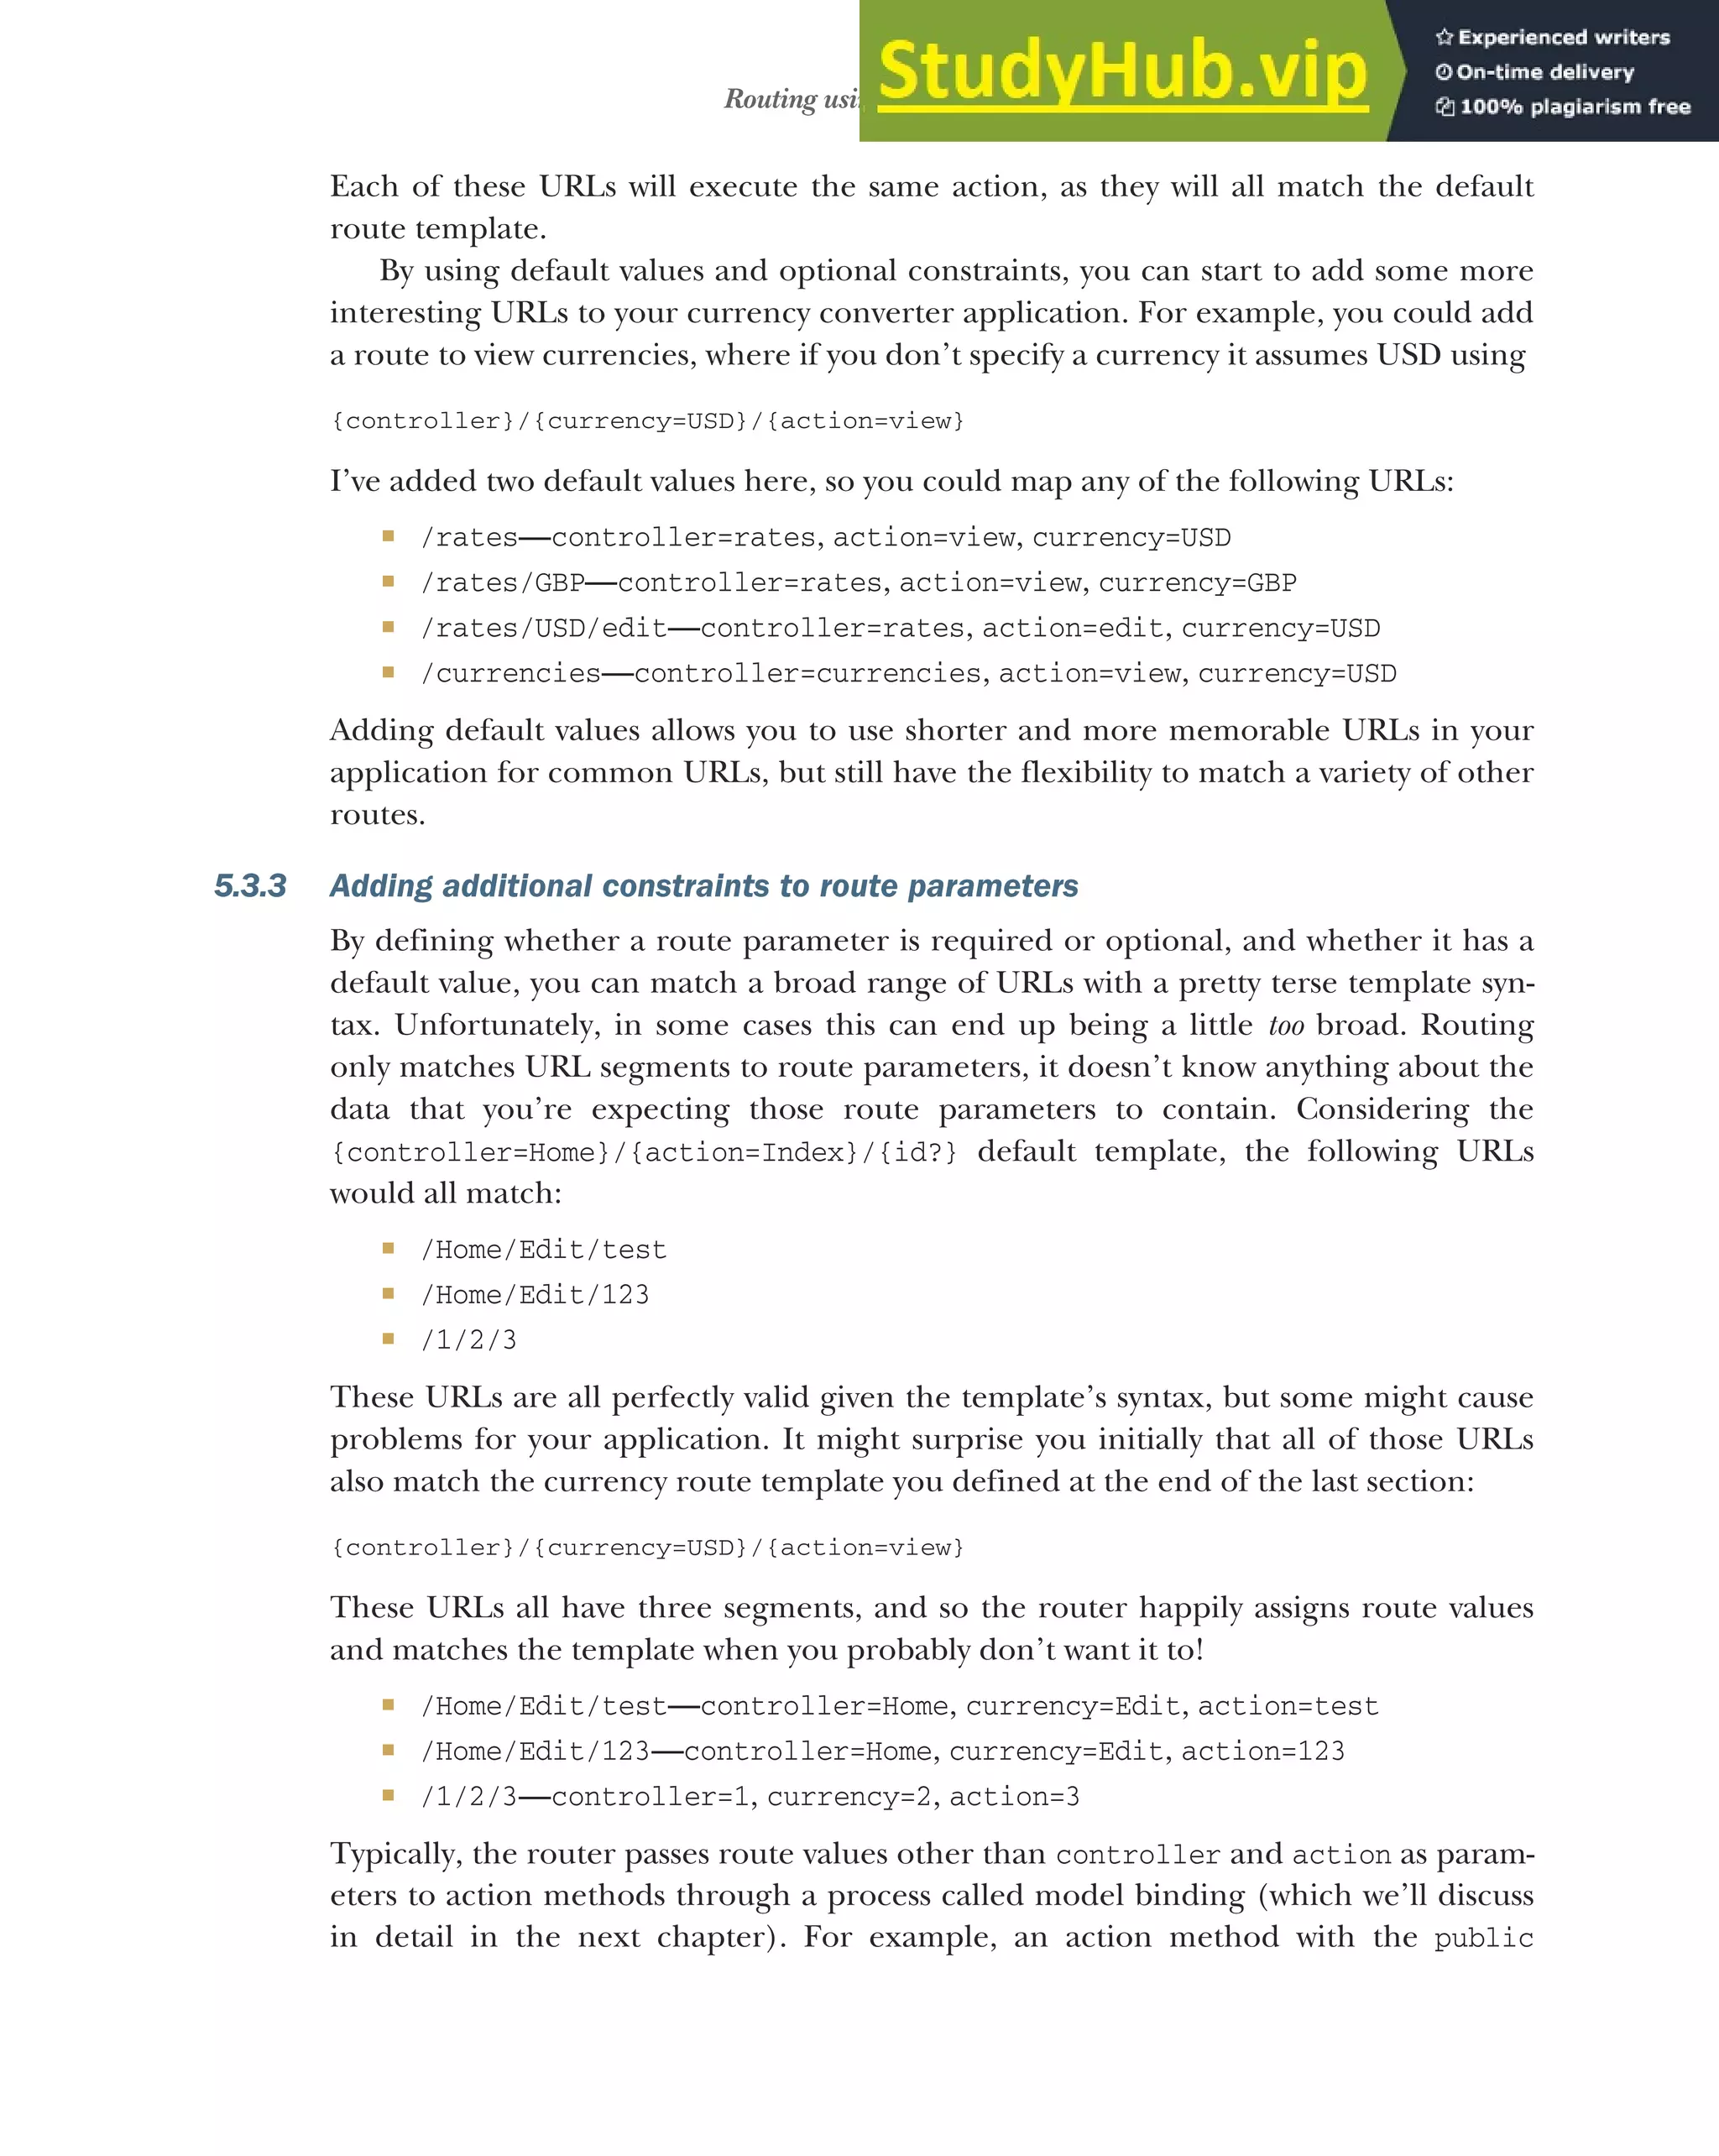

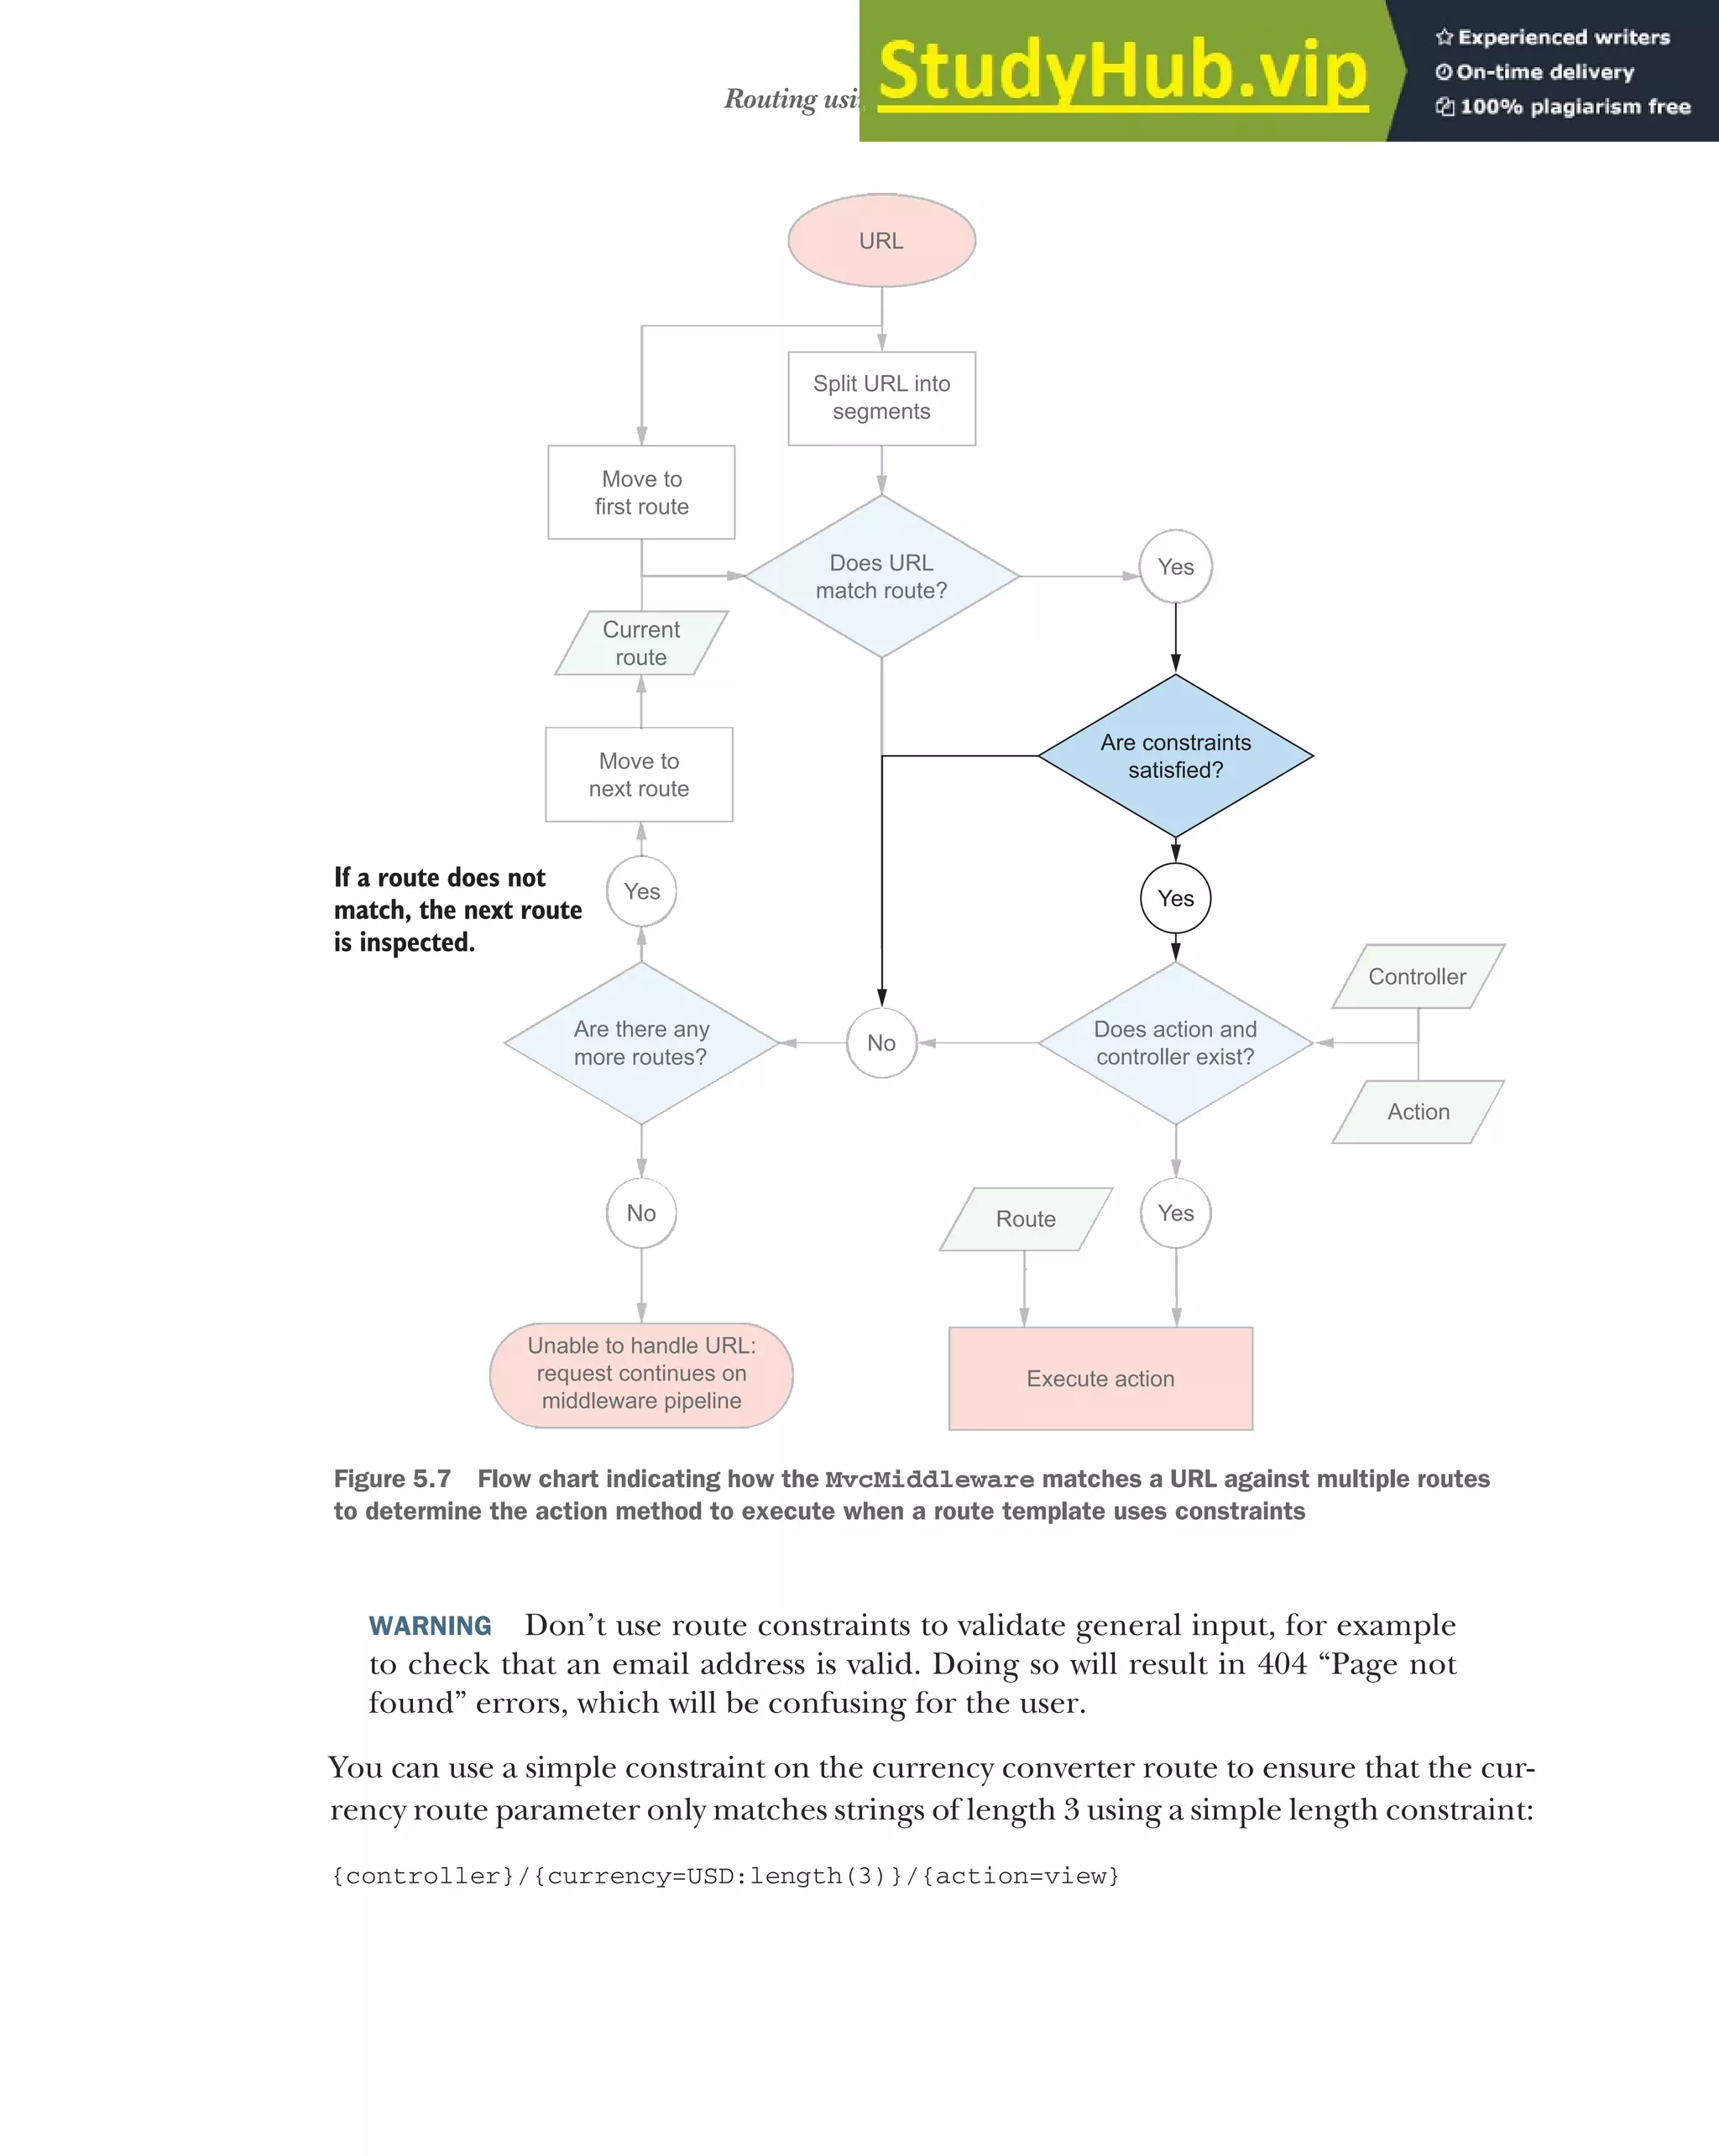


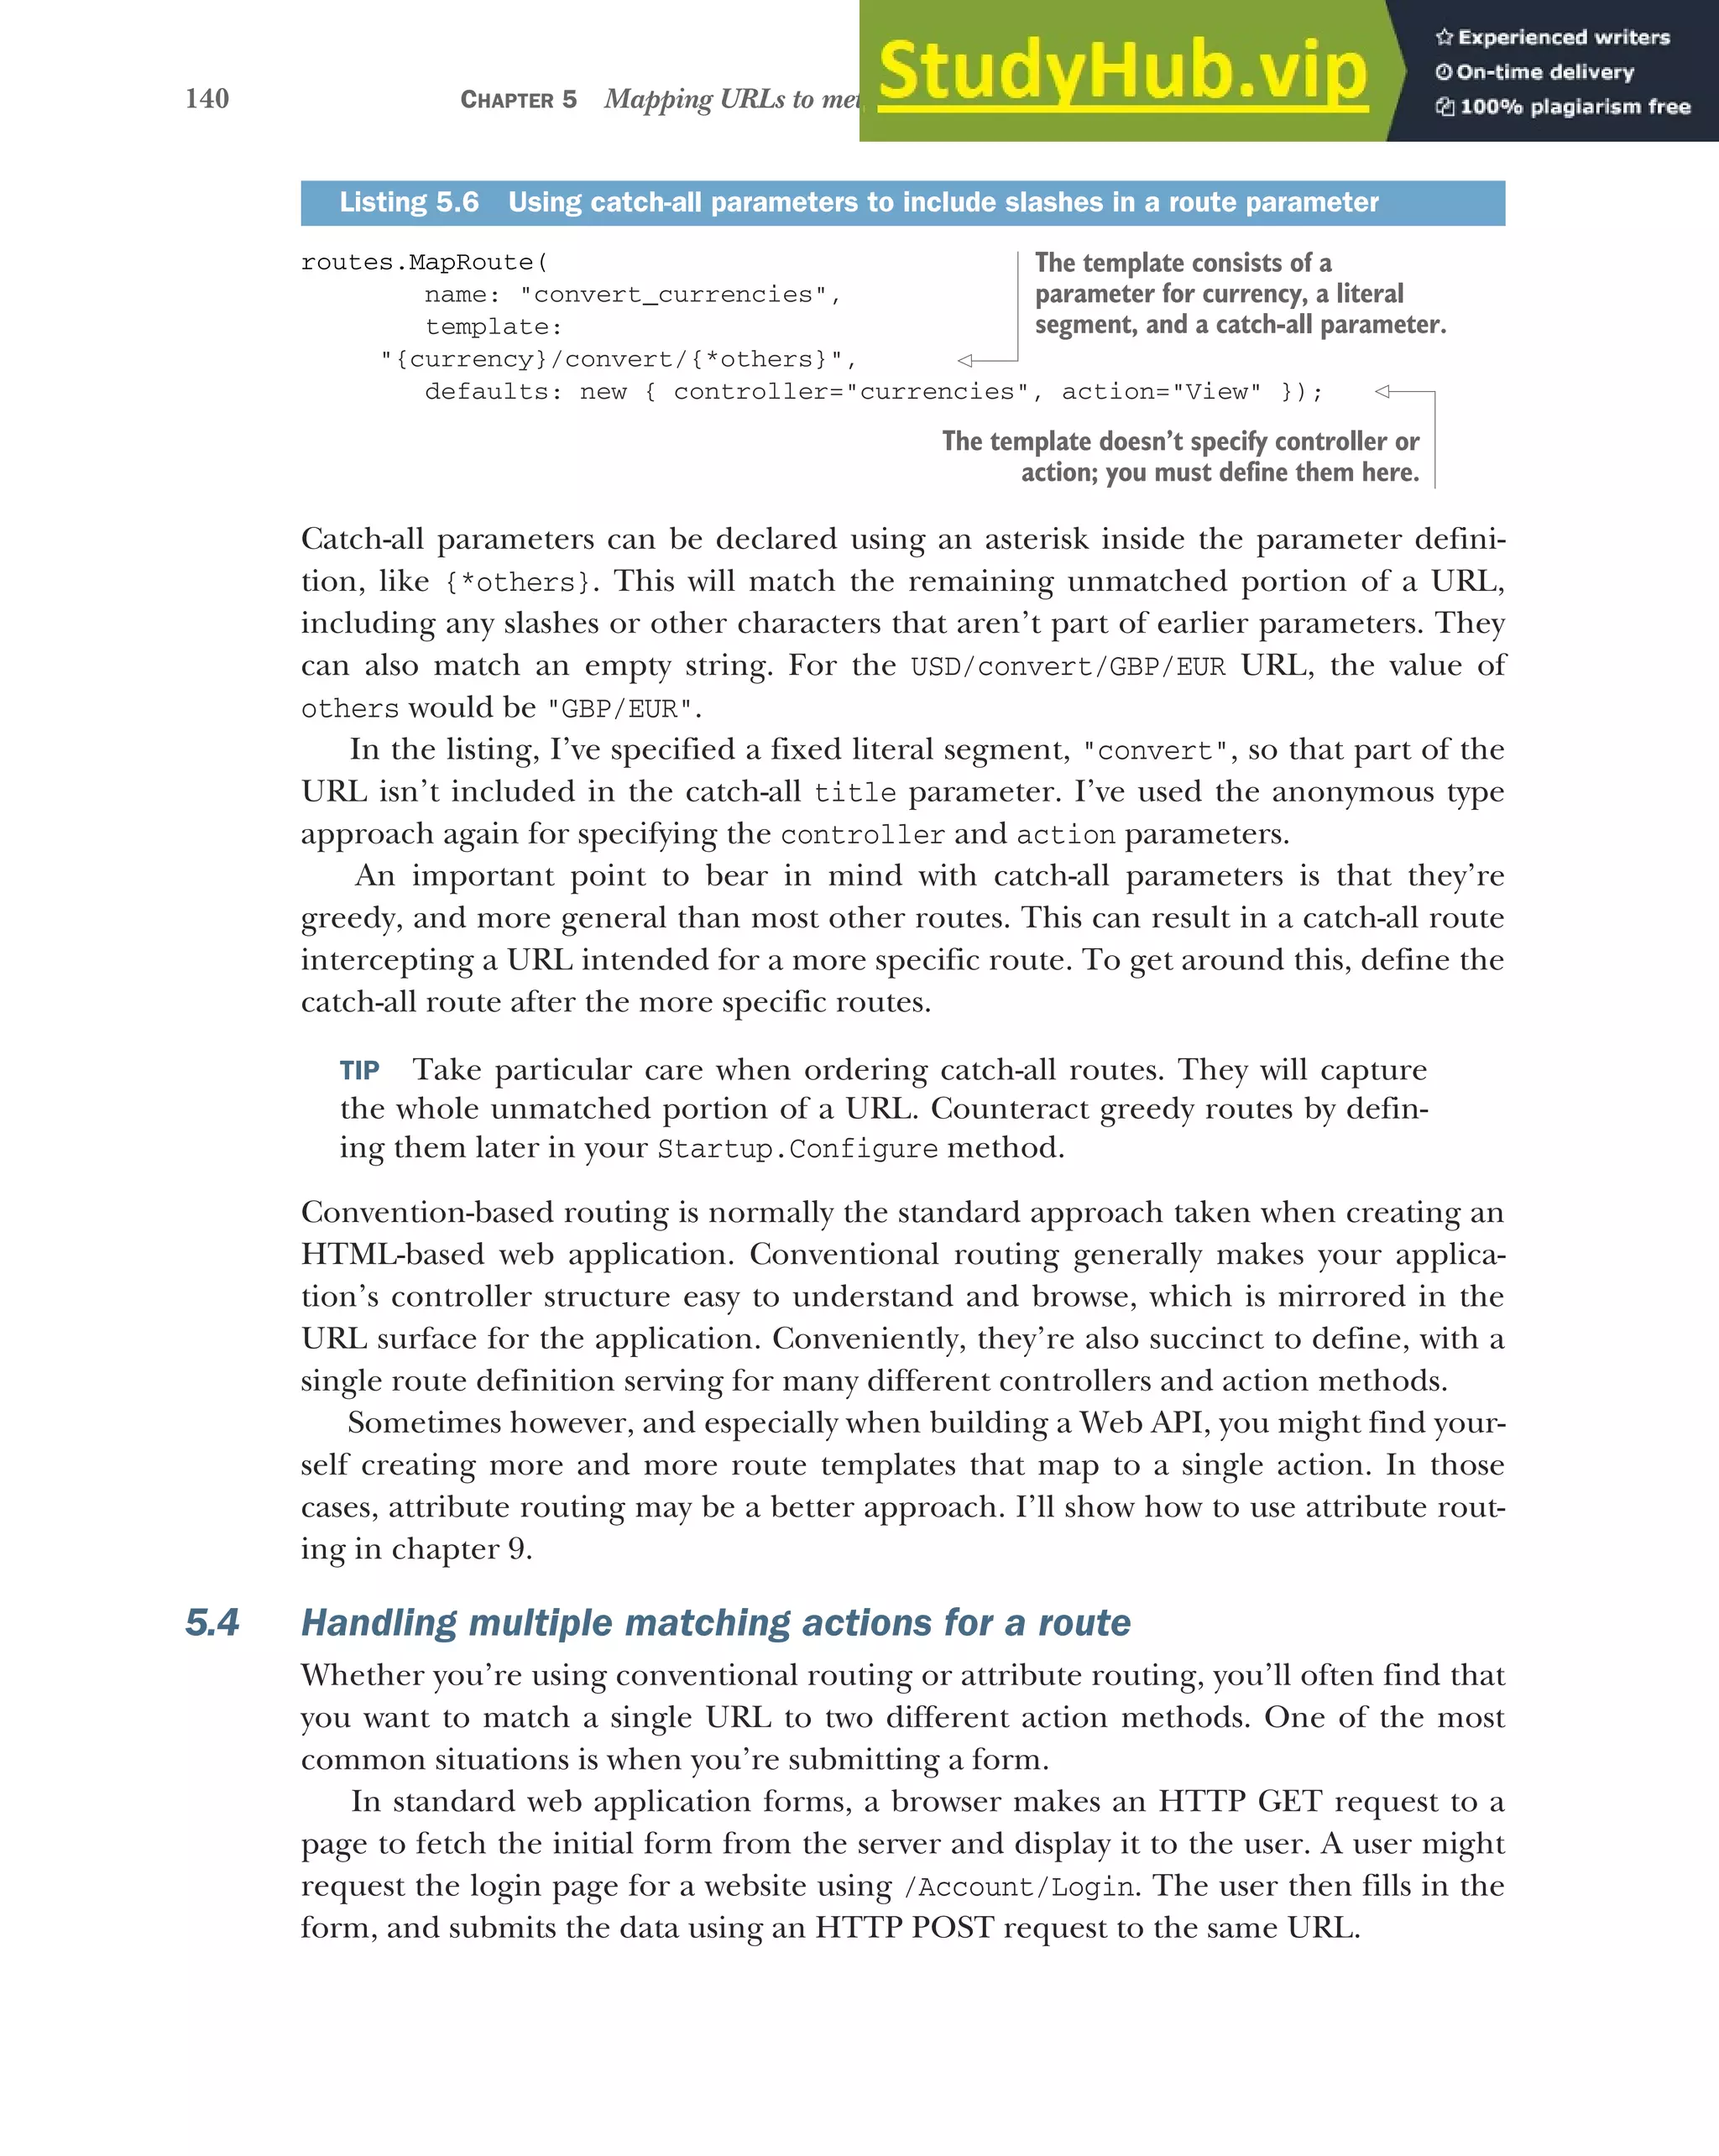
![141
Handling multiple matching actions for a route
Up to this point, I’ve said that the router uses only the URL to determine the
selected controller and action, and that only a single action may be executed. If that’s
the case, how can this possibly work?! Well, without further work, it won’t. The Mvc-
Middleware would throw an exception when the URL is requested saying “Multiple
actions matched.”
Luckily, ASP.NET Core provides a number of attributes you can use to pick a win-
ning action method, when the router would normally end up selecting multiple
actions. Listing 5.7 shows an AccountController with the two action methods you
want to disambiguate. It’s typical for the two corresponding methods to have the same
name, where the POST action takes additional parameters corresponding to the form
values entered by the user.
public class AccountController : Controller
{
public IActionResult Login()
{
/* method implementation*/
}
[HttpPost]
public IActionResult Login(string username, string password)
{
/* method implementation*/
}
}
In order to select one action over the other for a given request, you’ve decorated the
second method with an HttpPostAttribute. This limits the type of requests an action
can match. In this case, the [HttpPost] attribute indicates that the second Login
method is a match for POST requests only, and not any other HTTP methods.
For the initial GET request, there’s now only one method that’s a match—the first
action in the controller—so this action executes to generate the response. The user
can then enter their details, press submit, and send a POST request.
Now, both methods can still handle POST requests—the first method can handle
any HTTP method and the second method can handle only POST requests. But an
action method with an IActionContraint attribute “trumps” an action method with-
out one. The second action method “wins” the contest and executes in response to
the POST request. All the common HTTP methods, such as GET, POST, PUT, and
DELETE, have IActionContraint HTTP methods.
NOTE Use types of IActionConstraint, such as [HttpPost] and [HttpGet],
to provide precedence to one action method over another where they would
match the same URL.
That brings us to the end of the discussion of mapping URLs to action methods when
the MvcMiddleware receives a request. One of the most important things to keep in mind
Listing 5.7 Selecting an action using the HttpPostAttribute
As the method has no Http attribute,
it can match GET or POST requests.
The method names are identical,
hence both methods match the
same /Account/Login URL.
Indicates the method is a match
for POST requests only.](https://image.slidesharecdn.com/asp-230807173723-31e70040/75/ASP-NET-Core-in-Action-2018-pdf-169-2048.jpg)

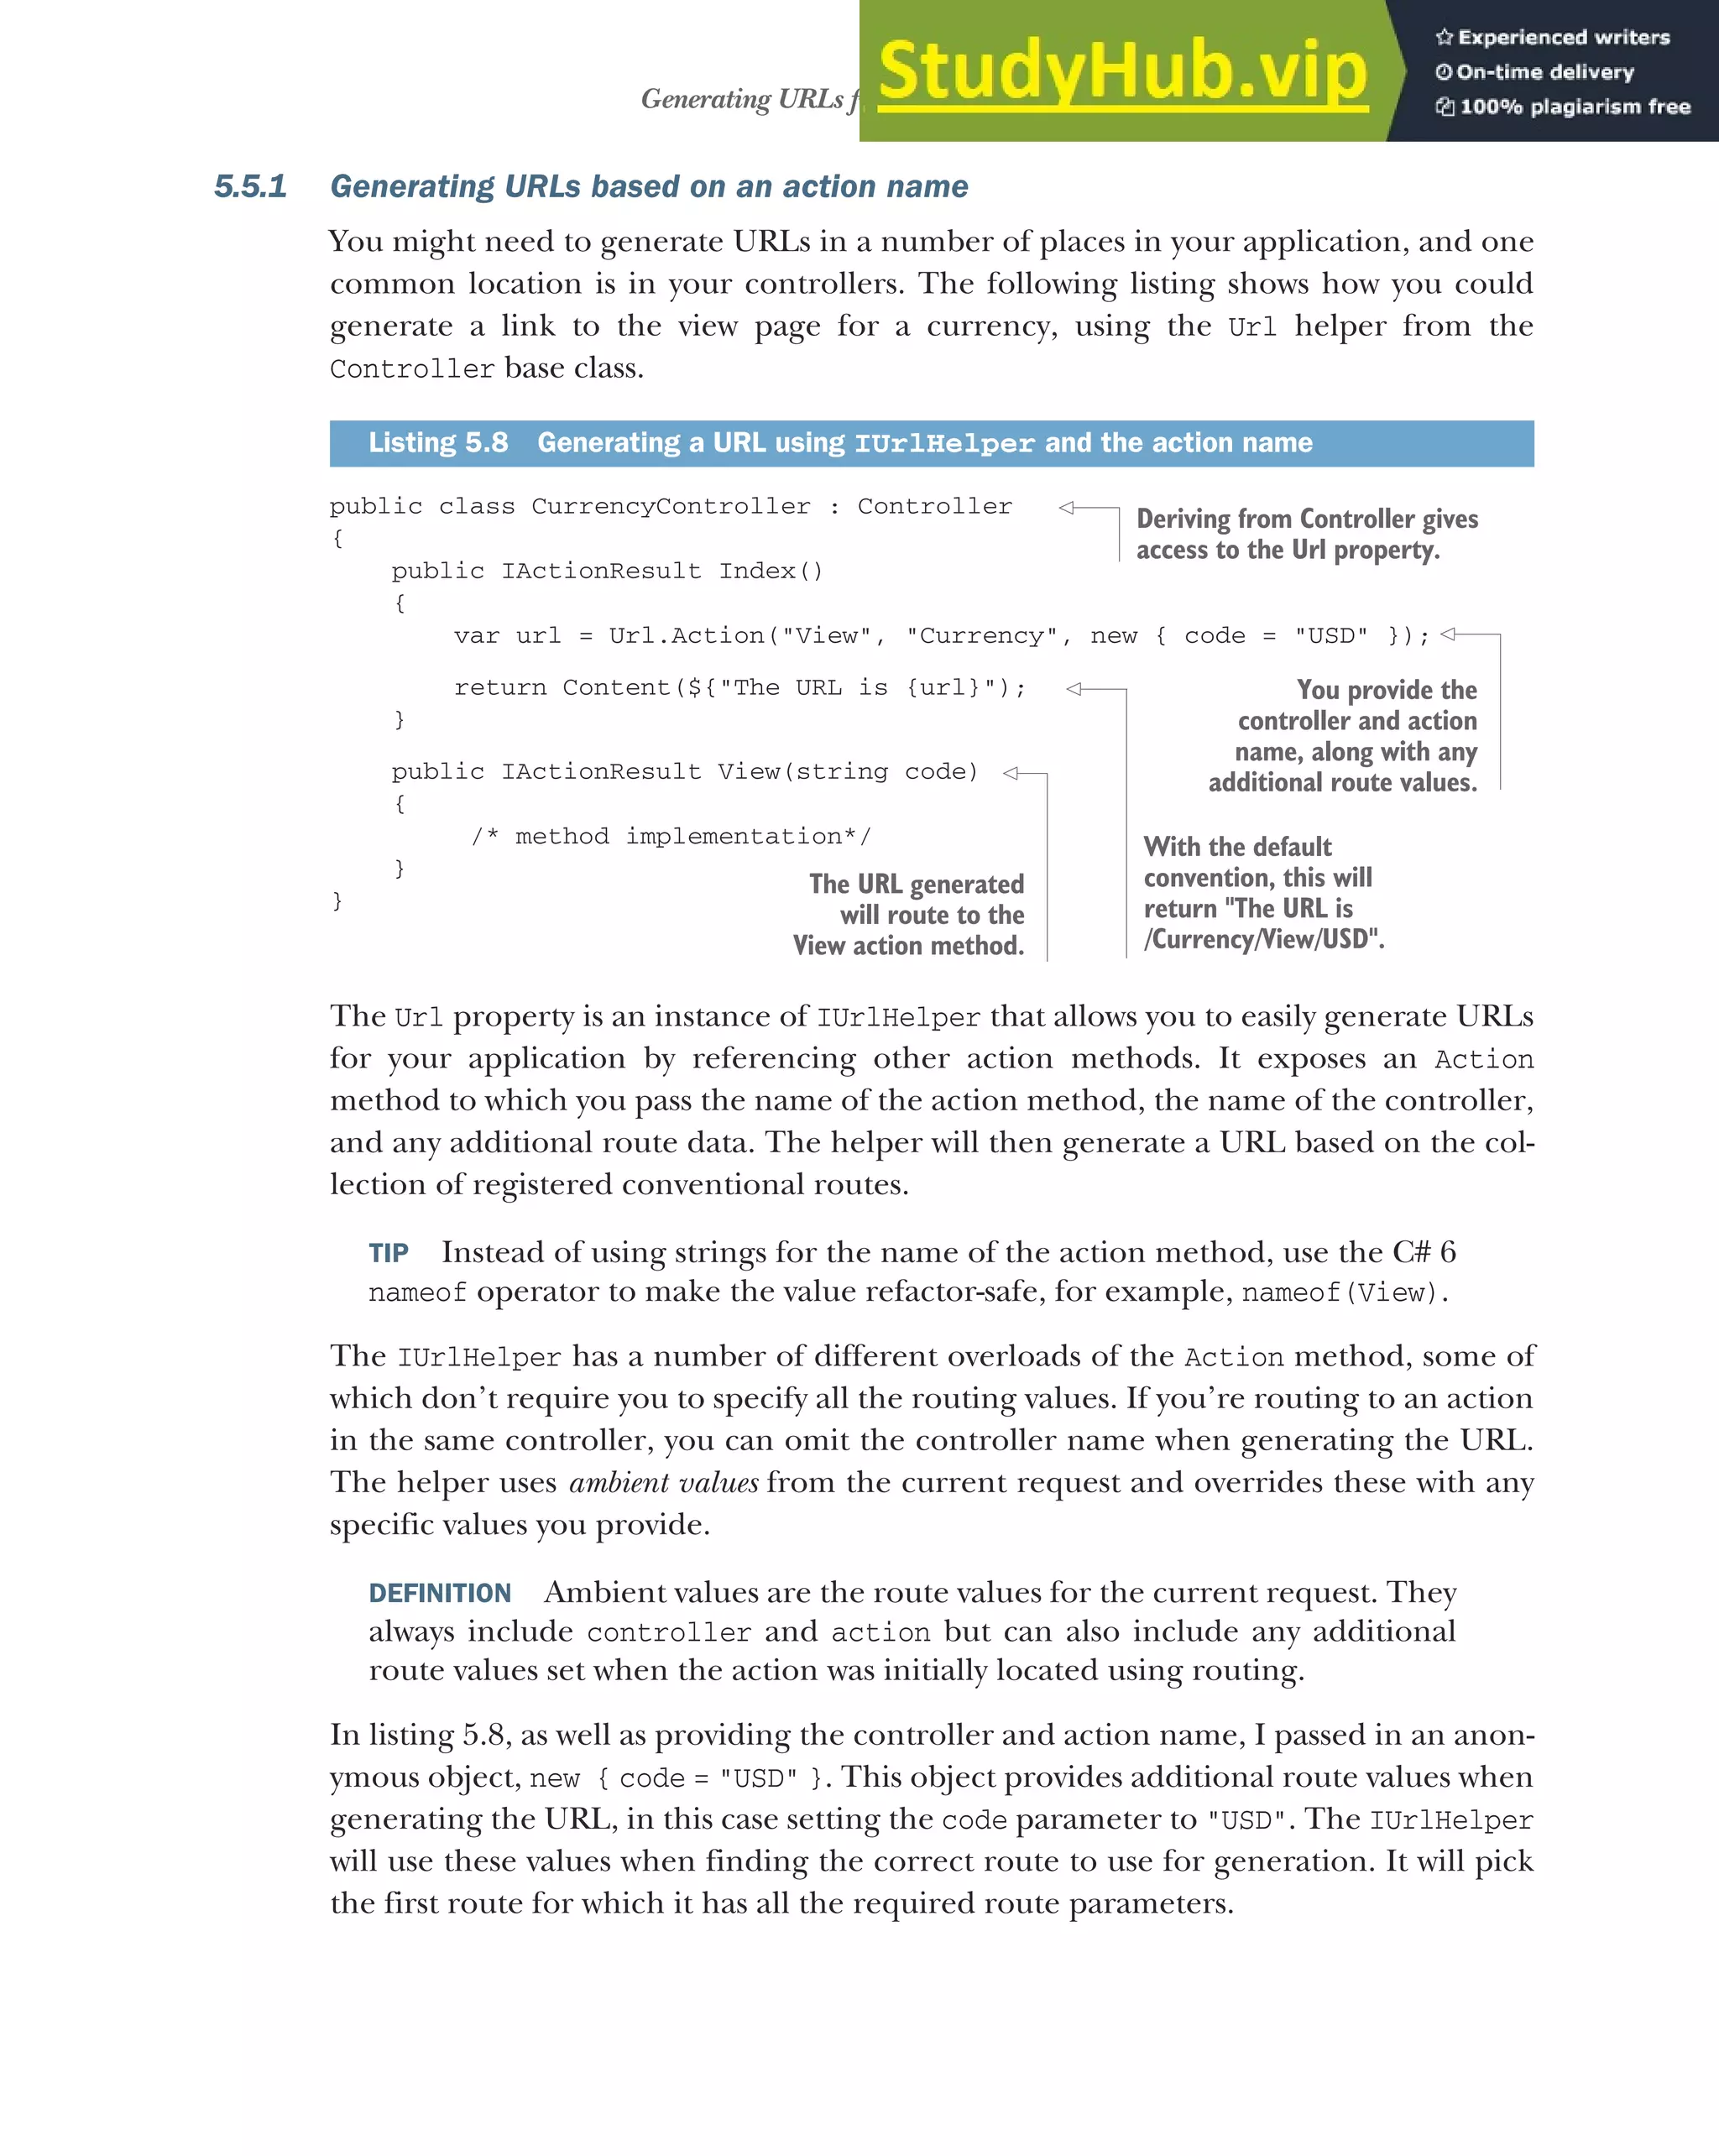
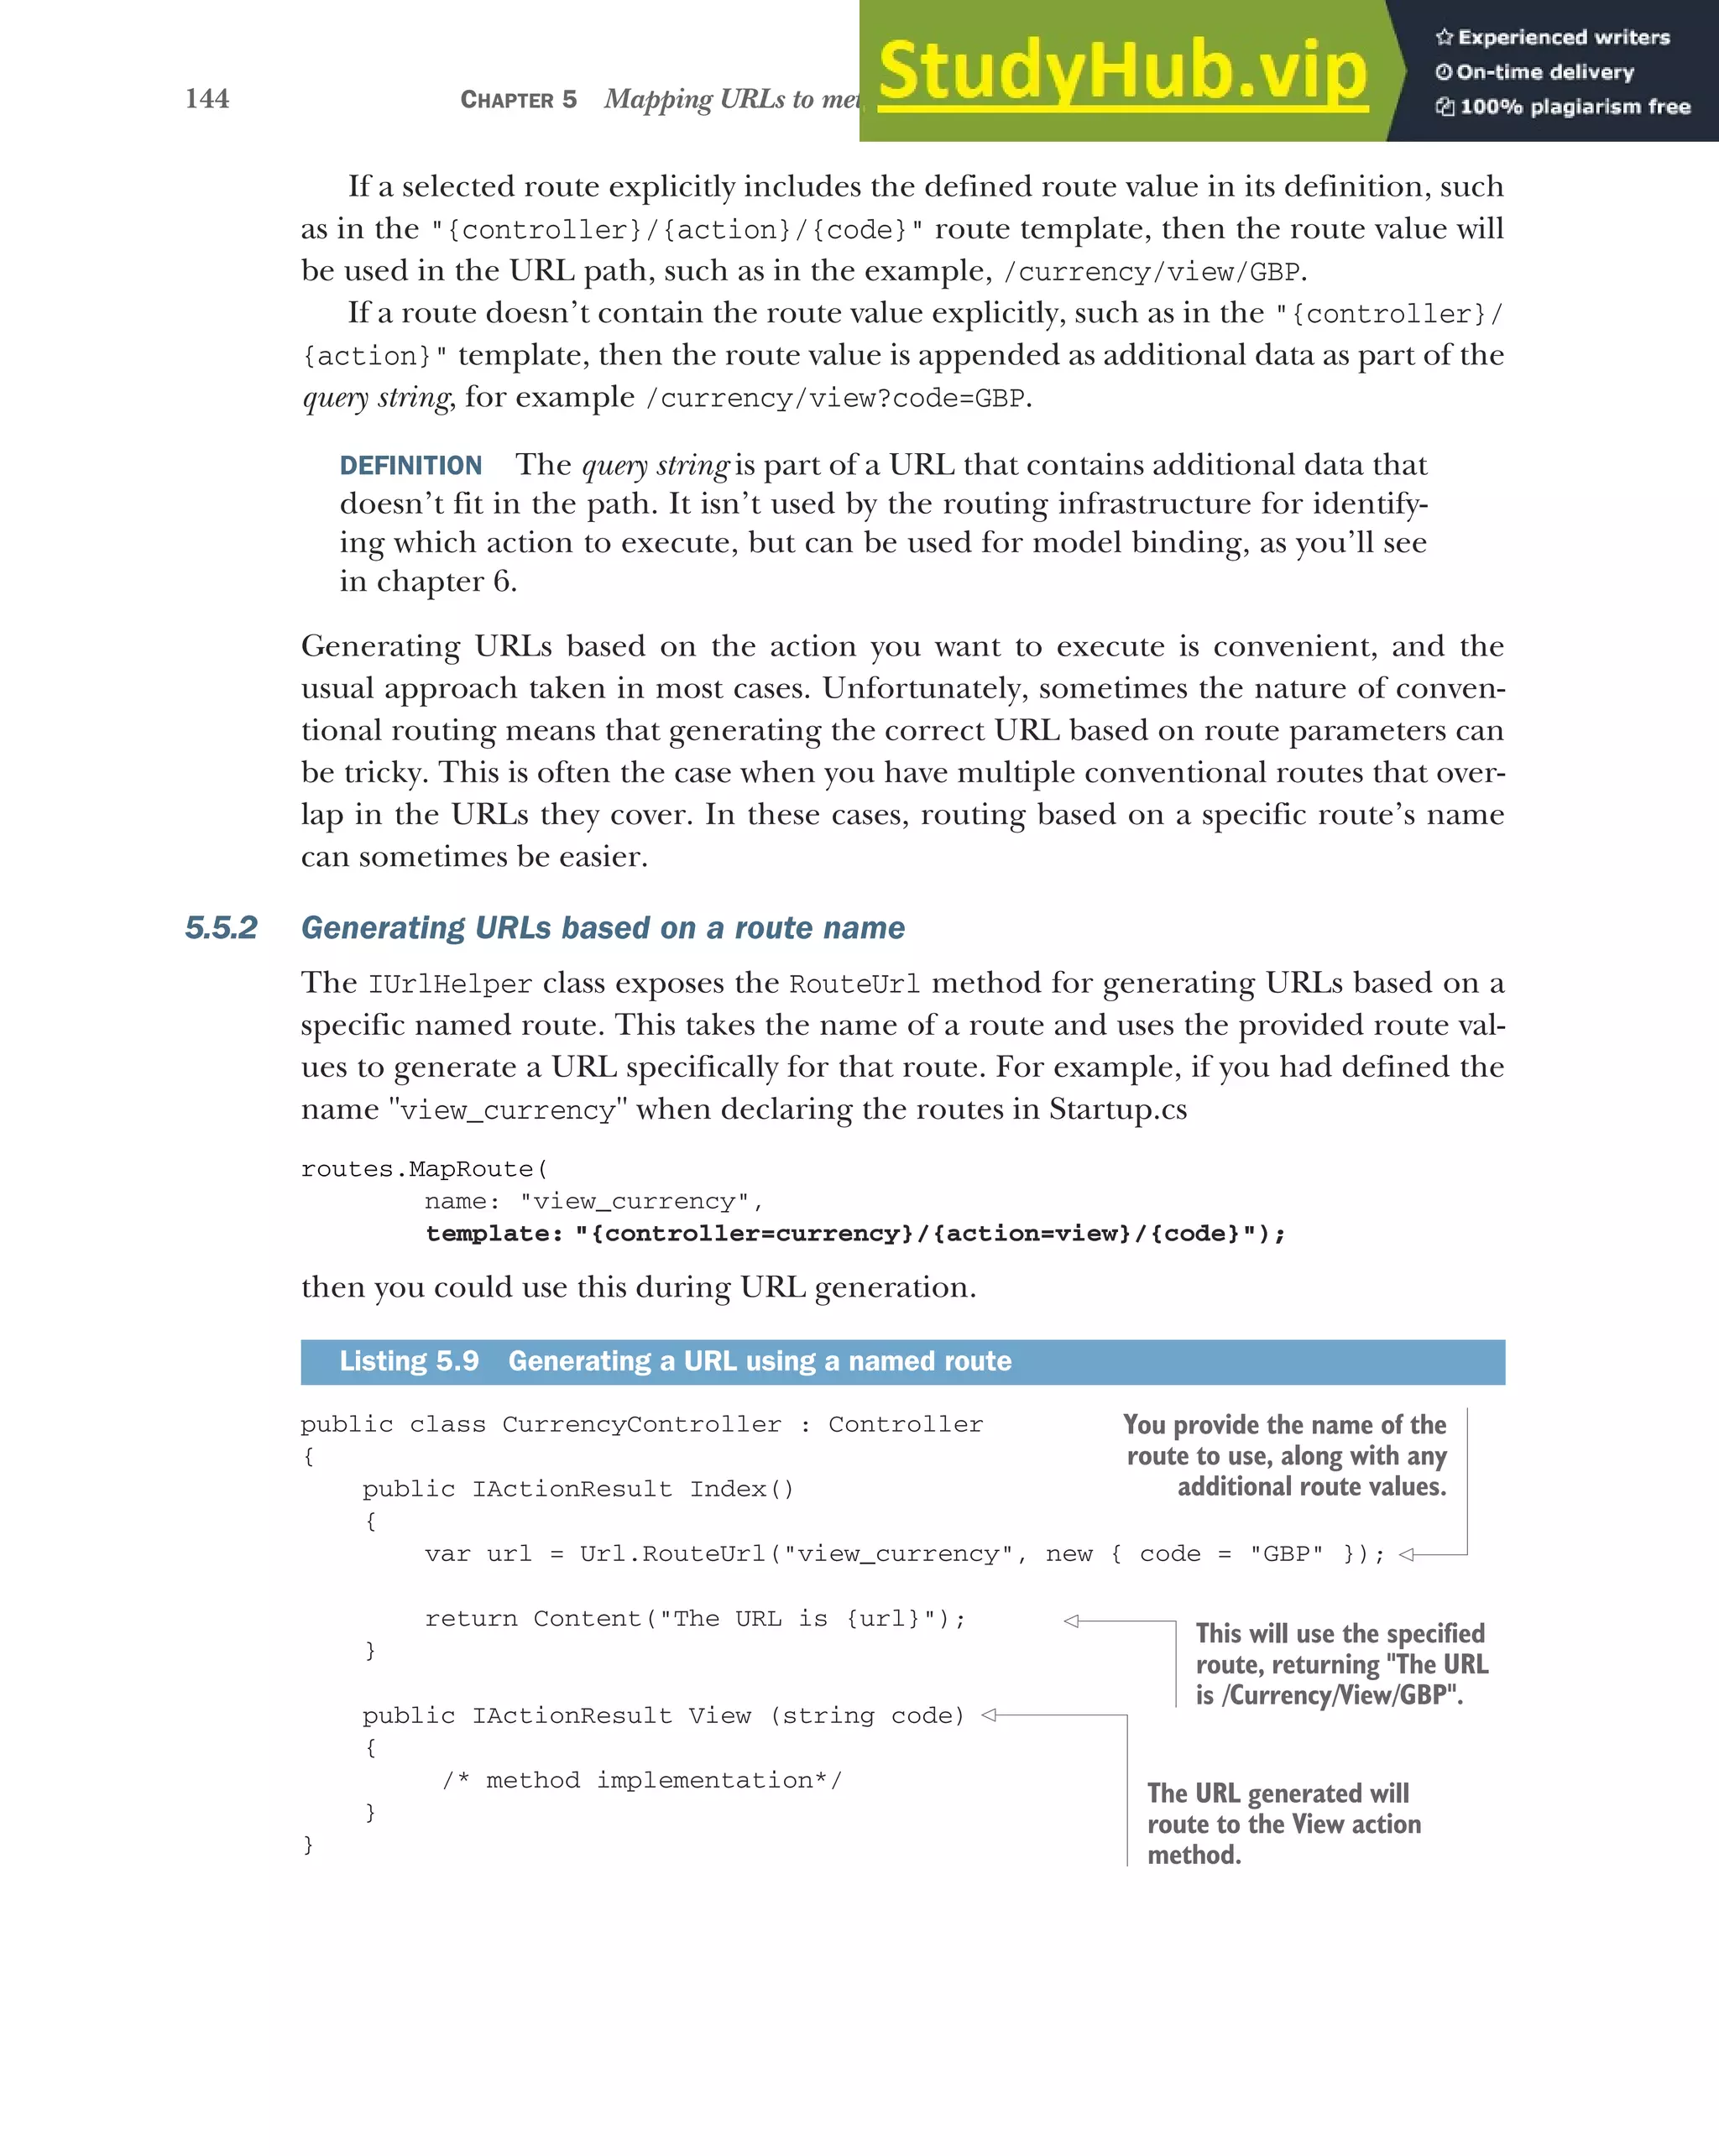
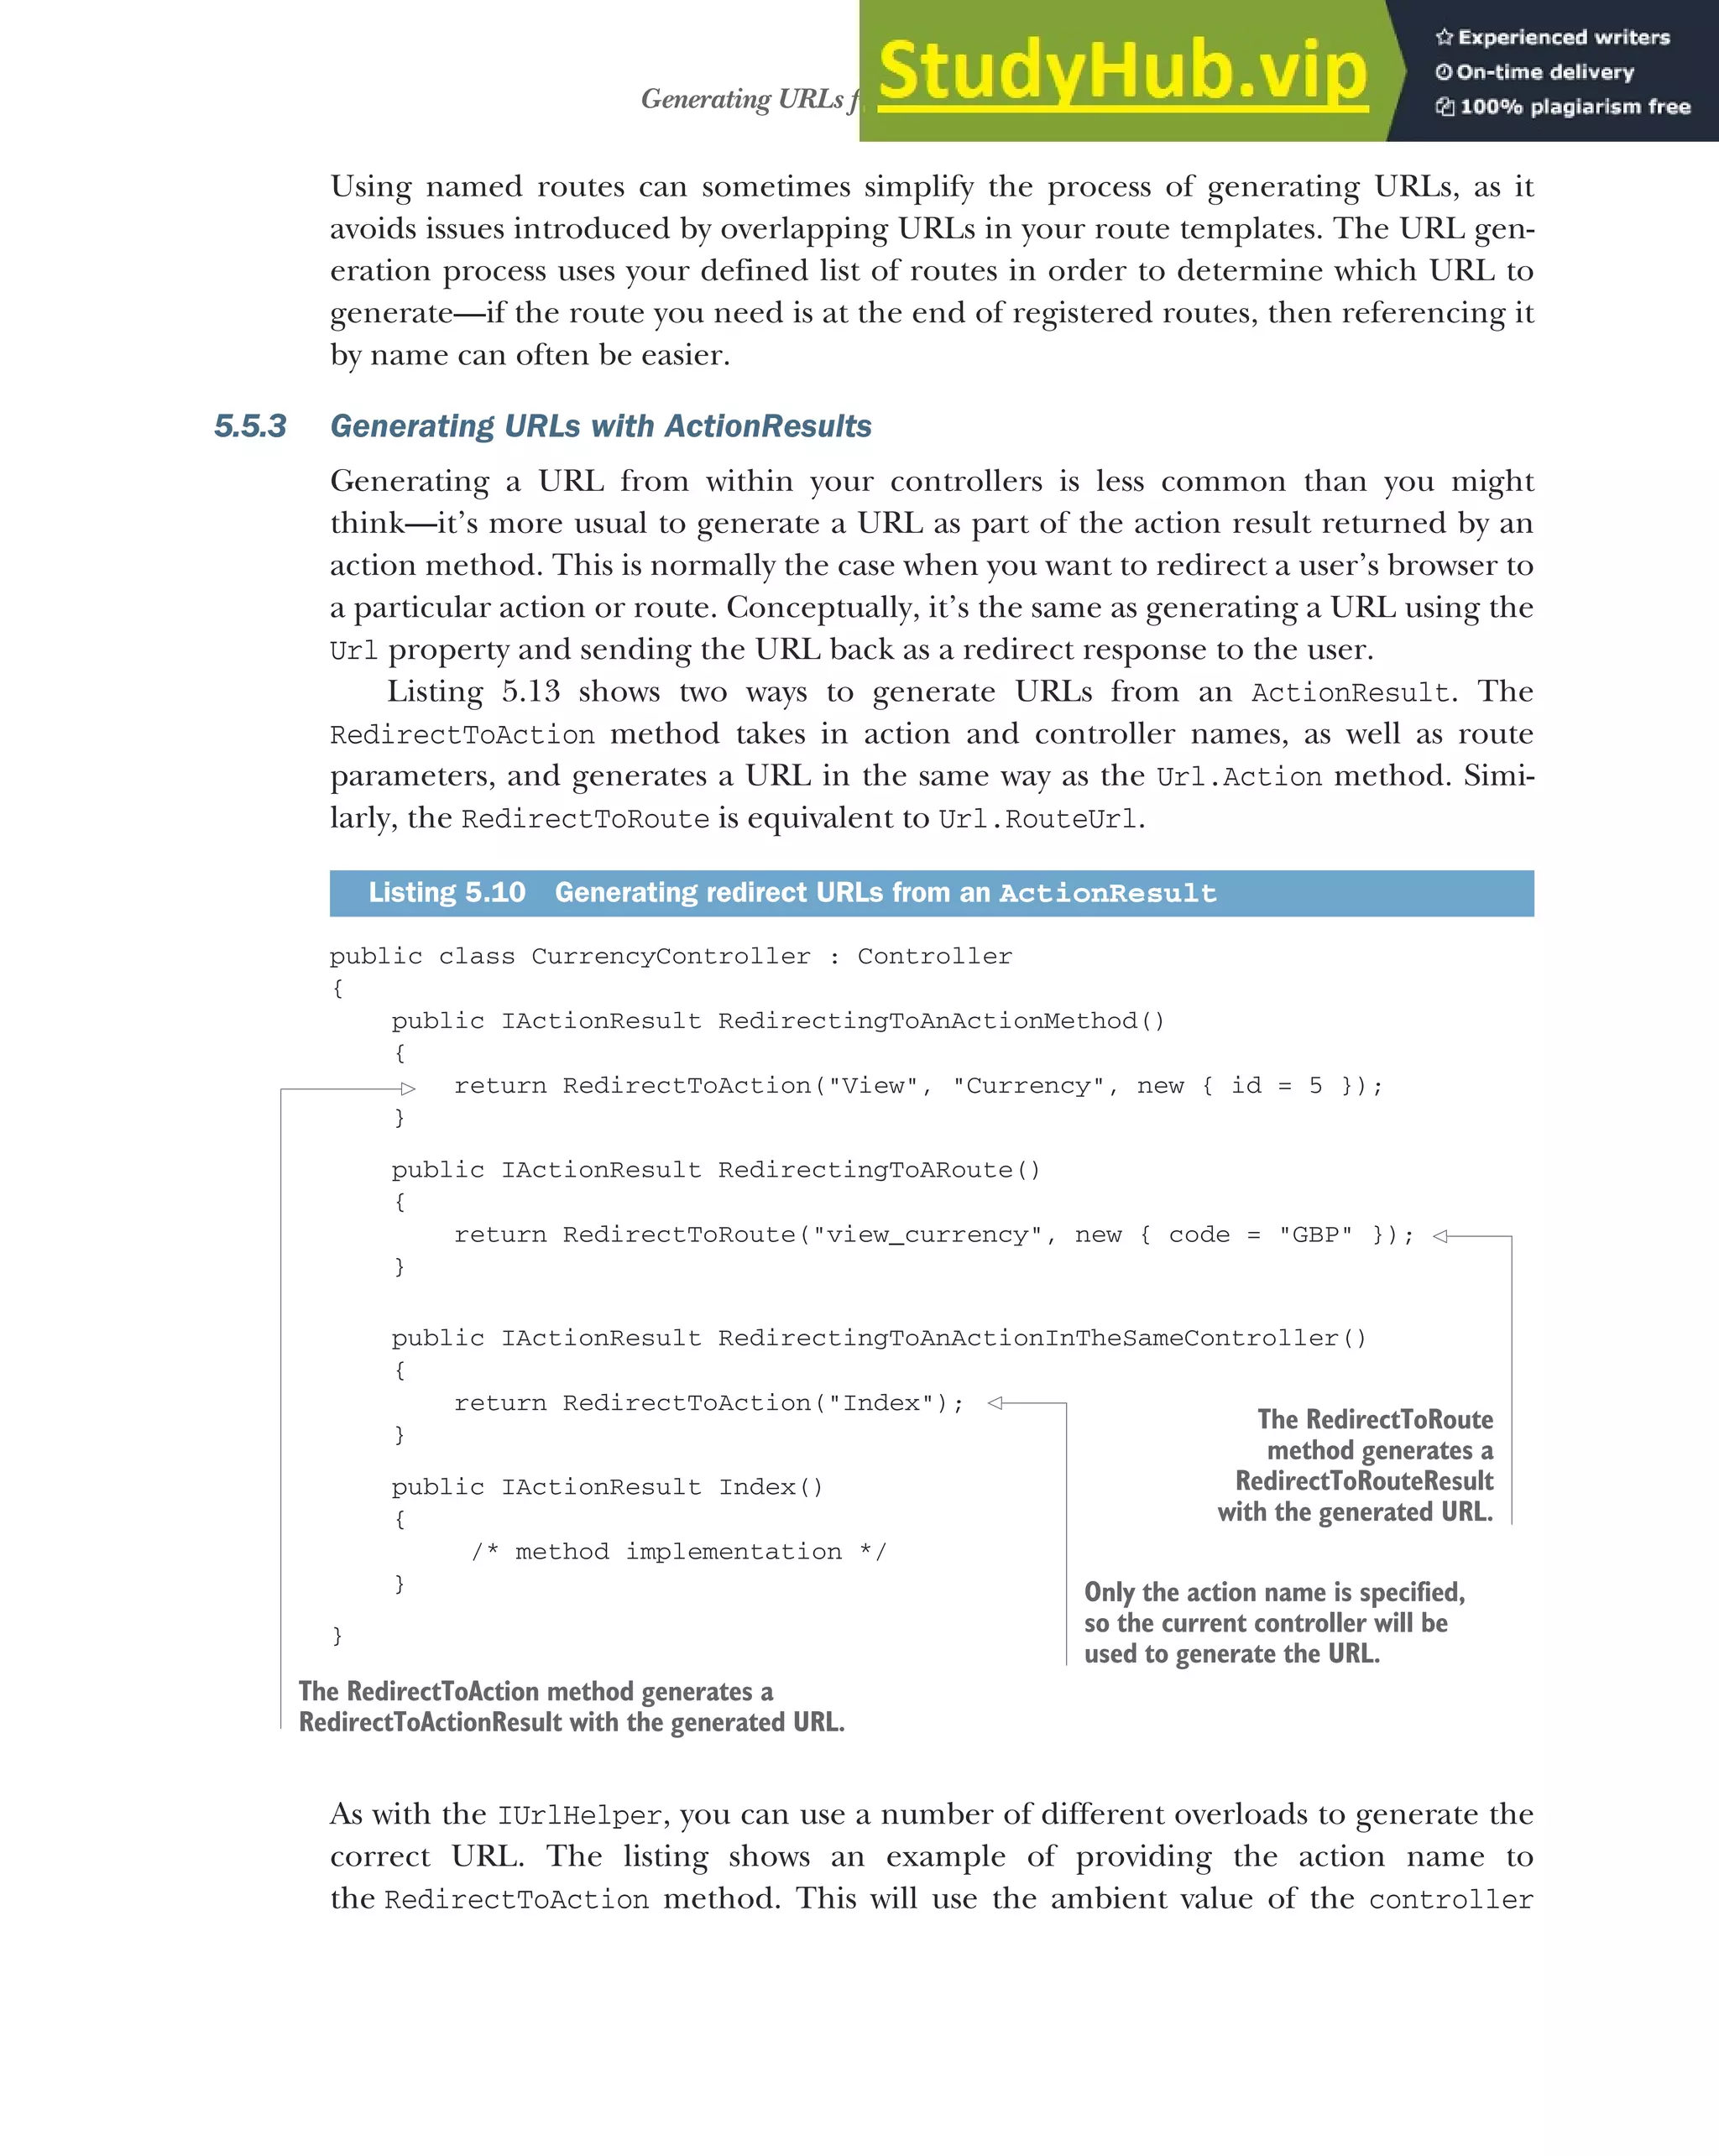

![147
Summary
The controller and action route values must be able to be calculated for
every route template. They can either be matched from the URL or using
default values.
Don’t use route constraints as general input validators. Use them to disambigu-
ate between two similar routes.
Use a catch-all parameter to capture the remainder of a URL into a route value.
The [HttpPost] and [HttpGet] attributes allow choosing between actions
based on the request’s HTTP method when two actions correspond to the same
URL.
You can use the routing infrastructure to generate internal URLs for your
application.
The IUrlHelper can be used to generate URLs as a string based on an action
name or on the name of a specific route.
You can use the RedirectToAction and RedirectToRoute methods to generate
URLs while also generating a redirect response.](https://image.slidesharecdn.com/asp-230807173723-31e70040/75/ASP-NET-Core-in-Action-2018-pdf-175-2048.jpg)
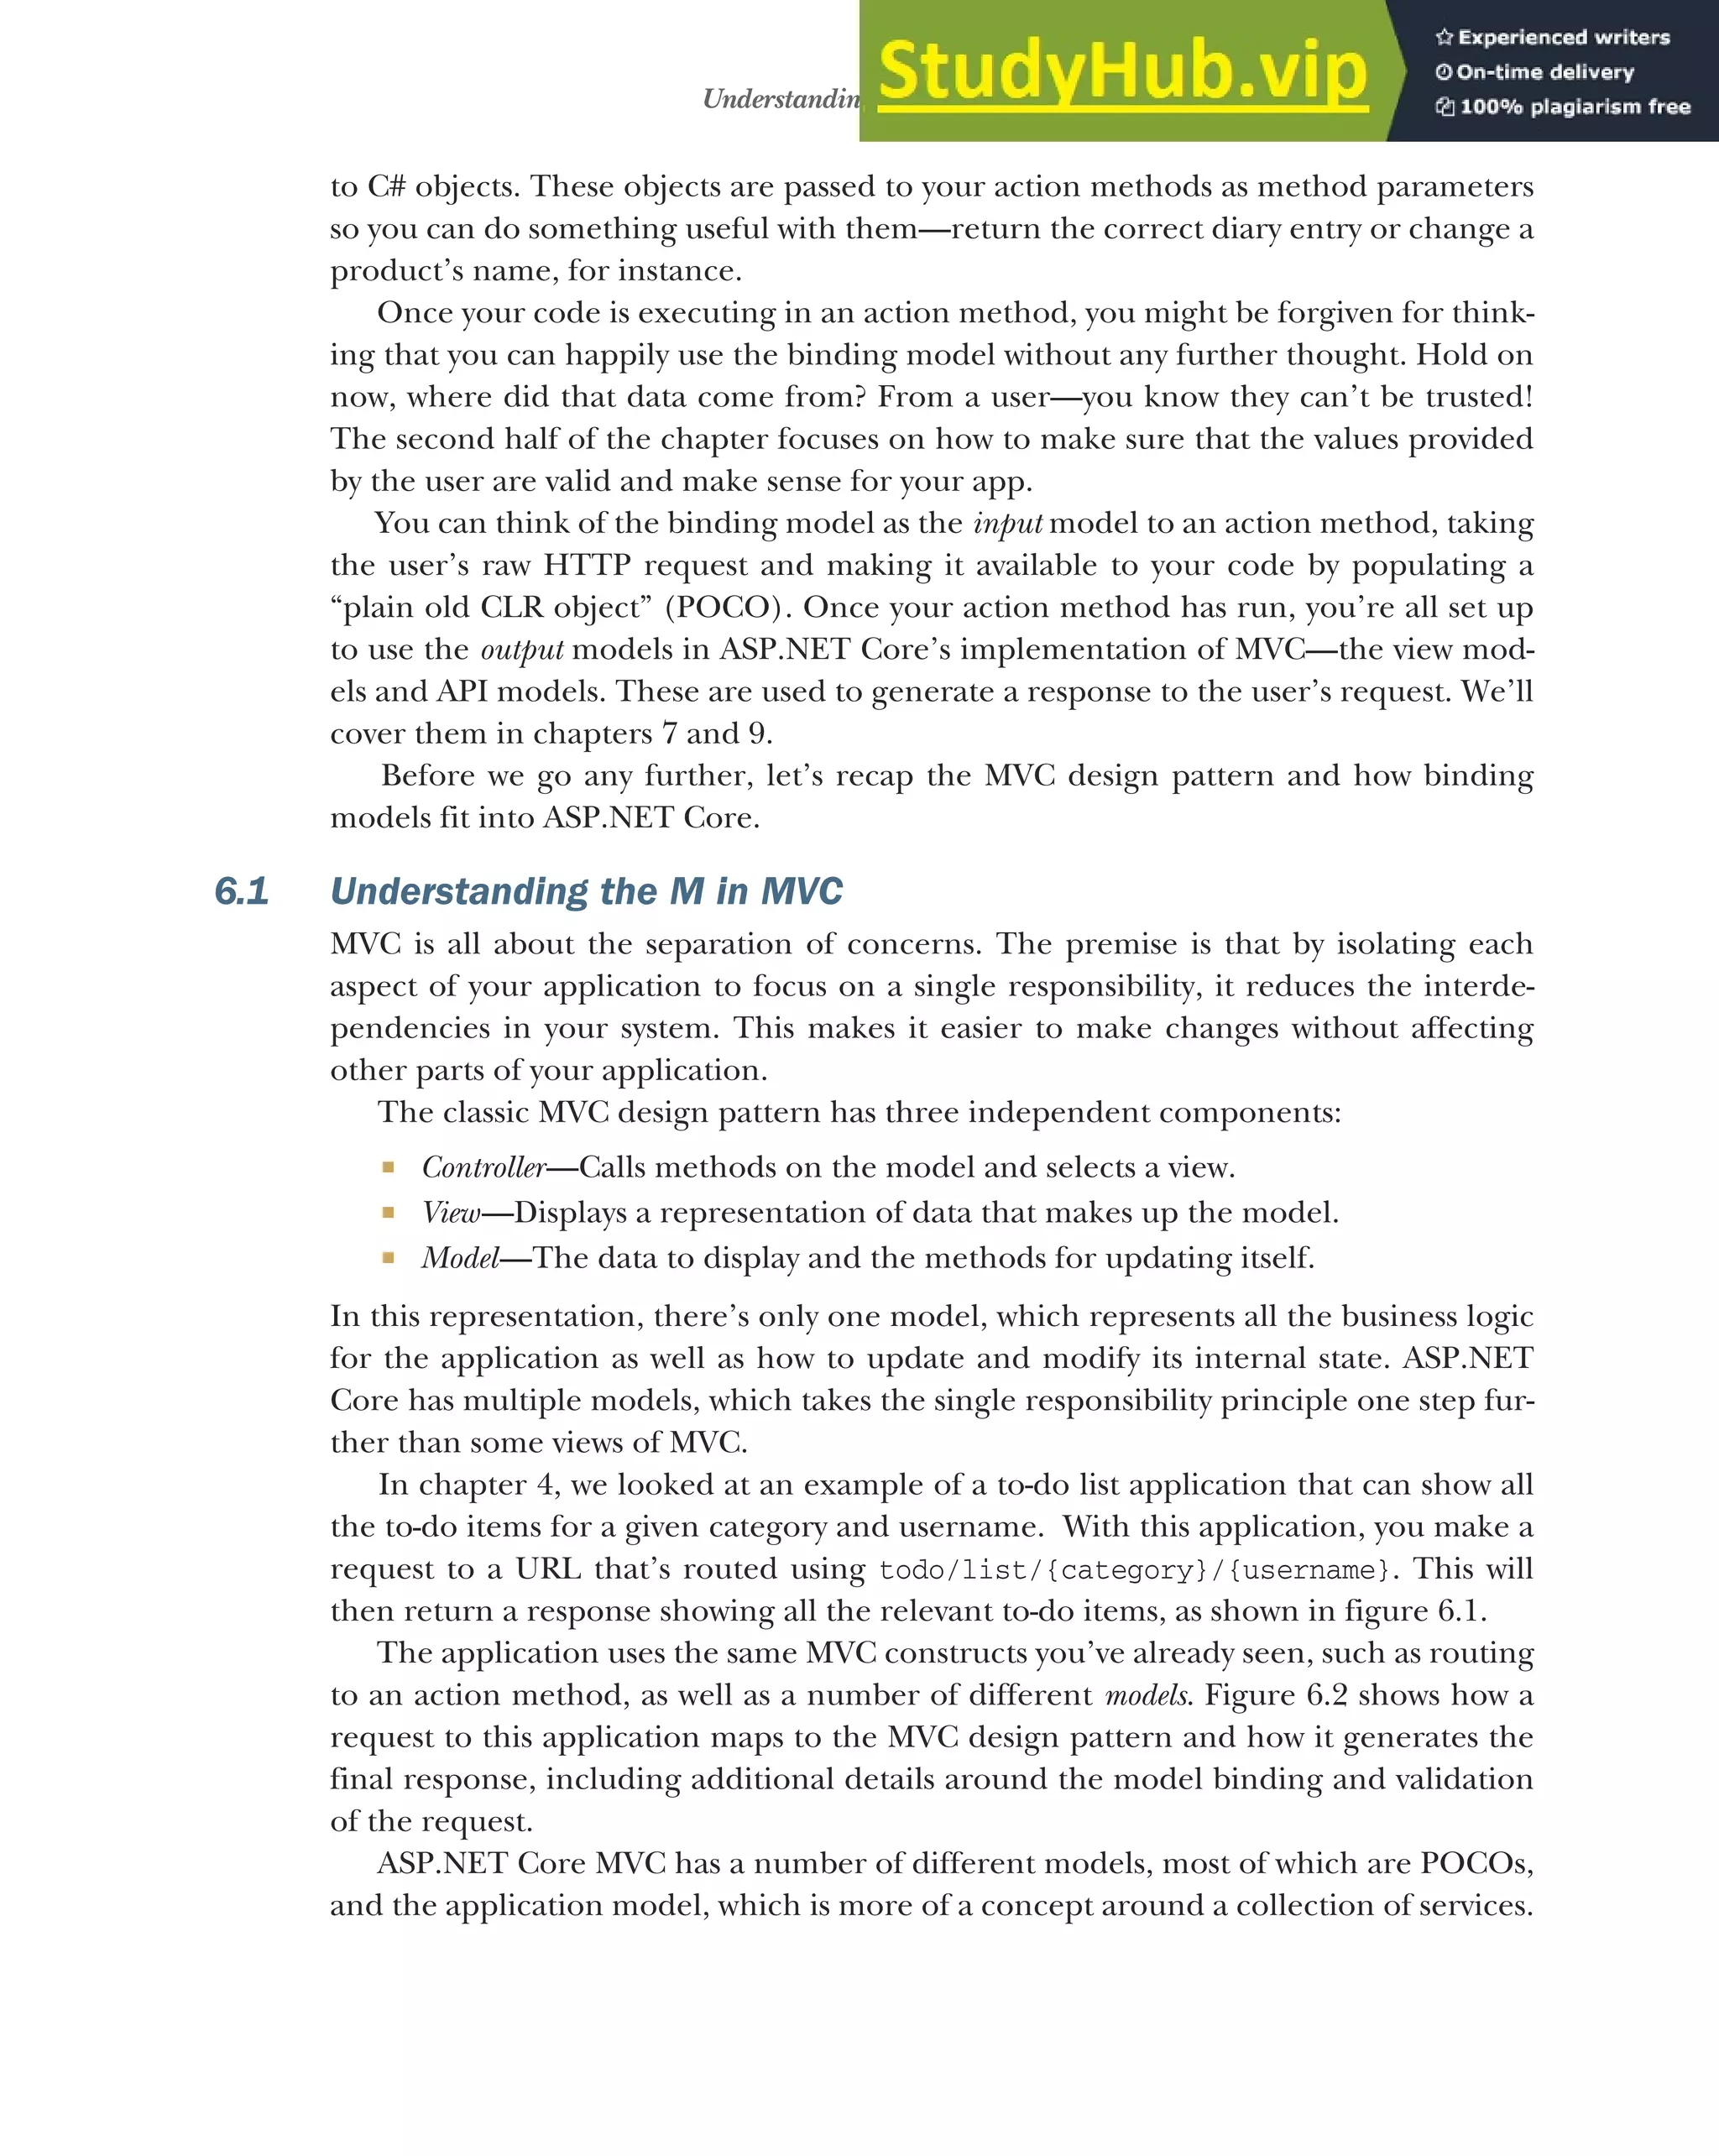
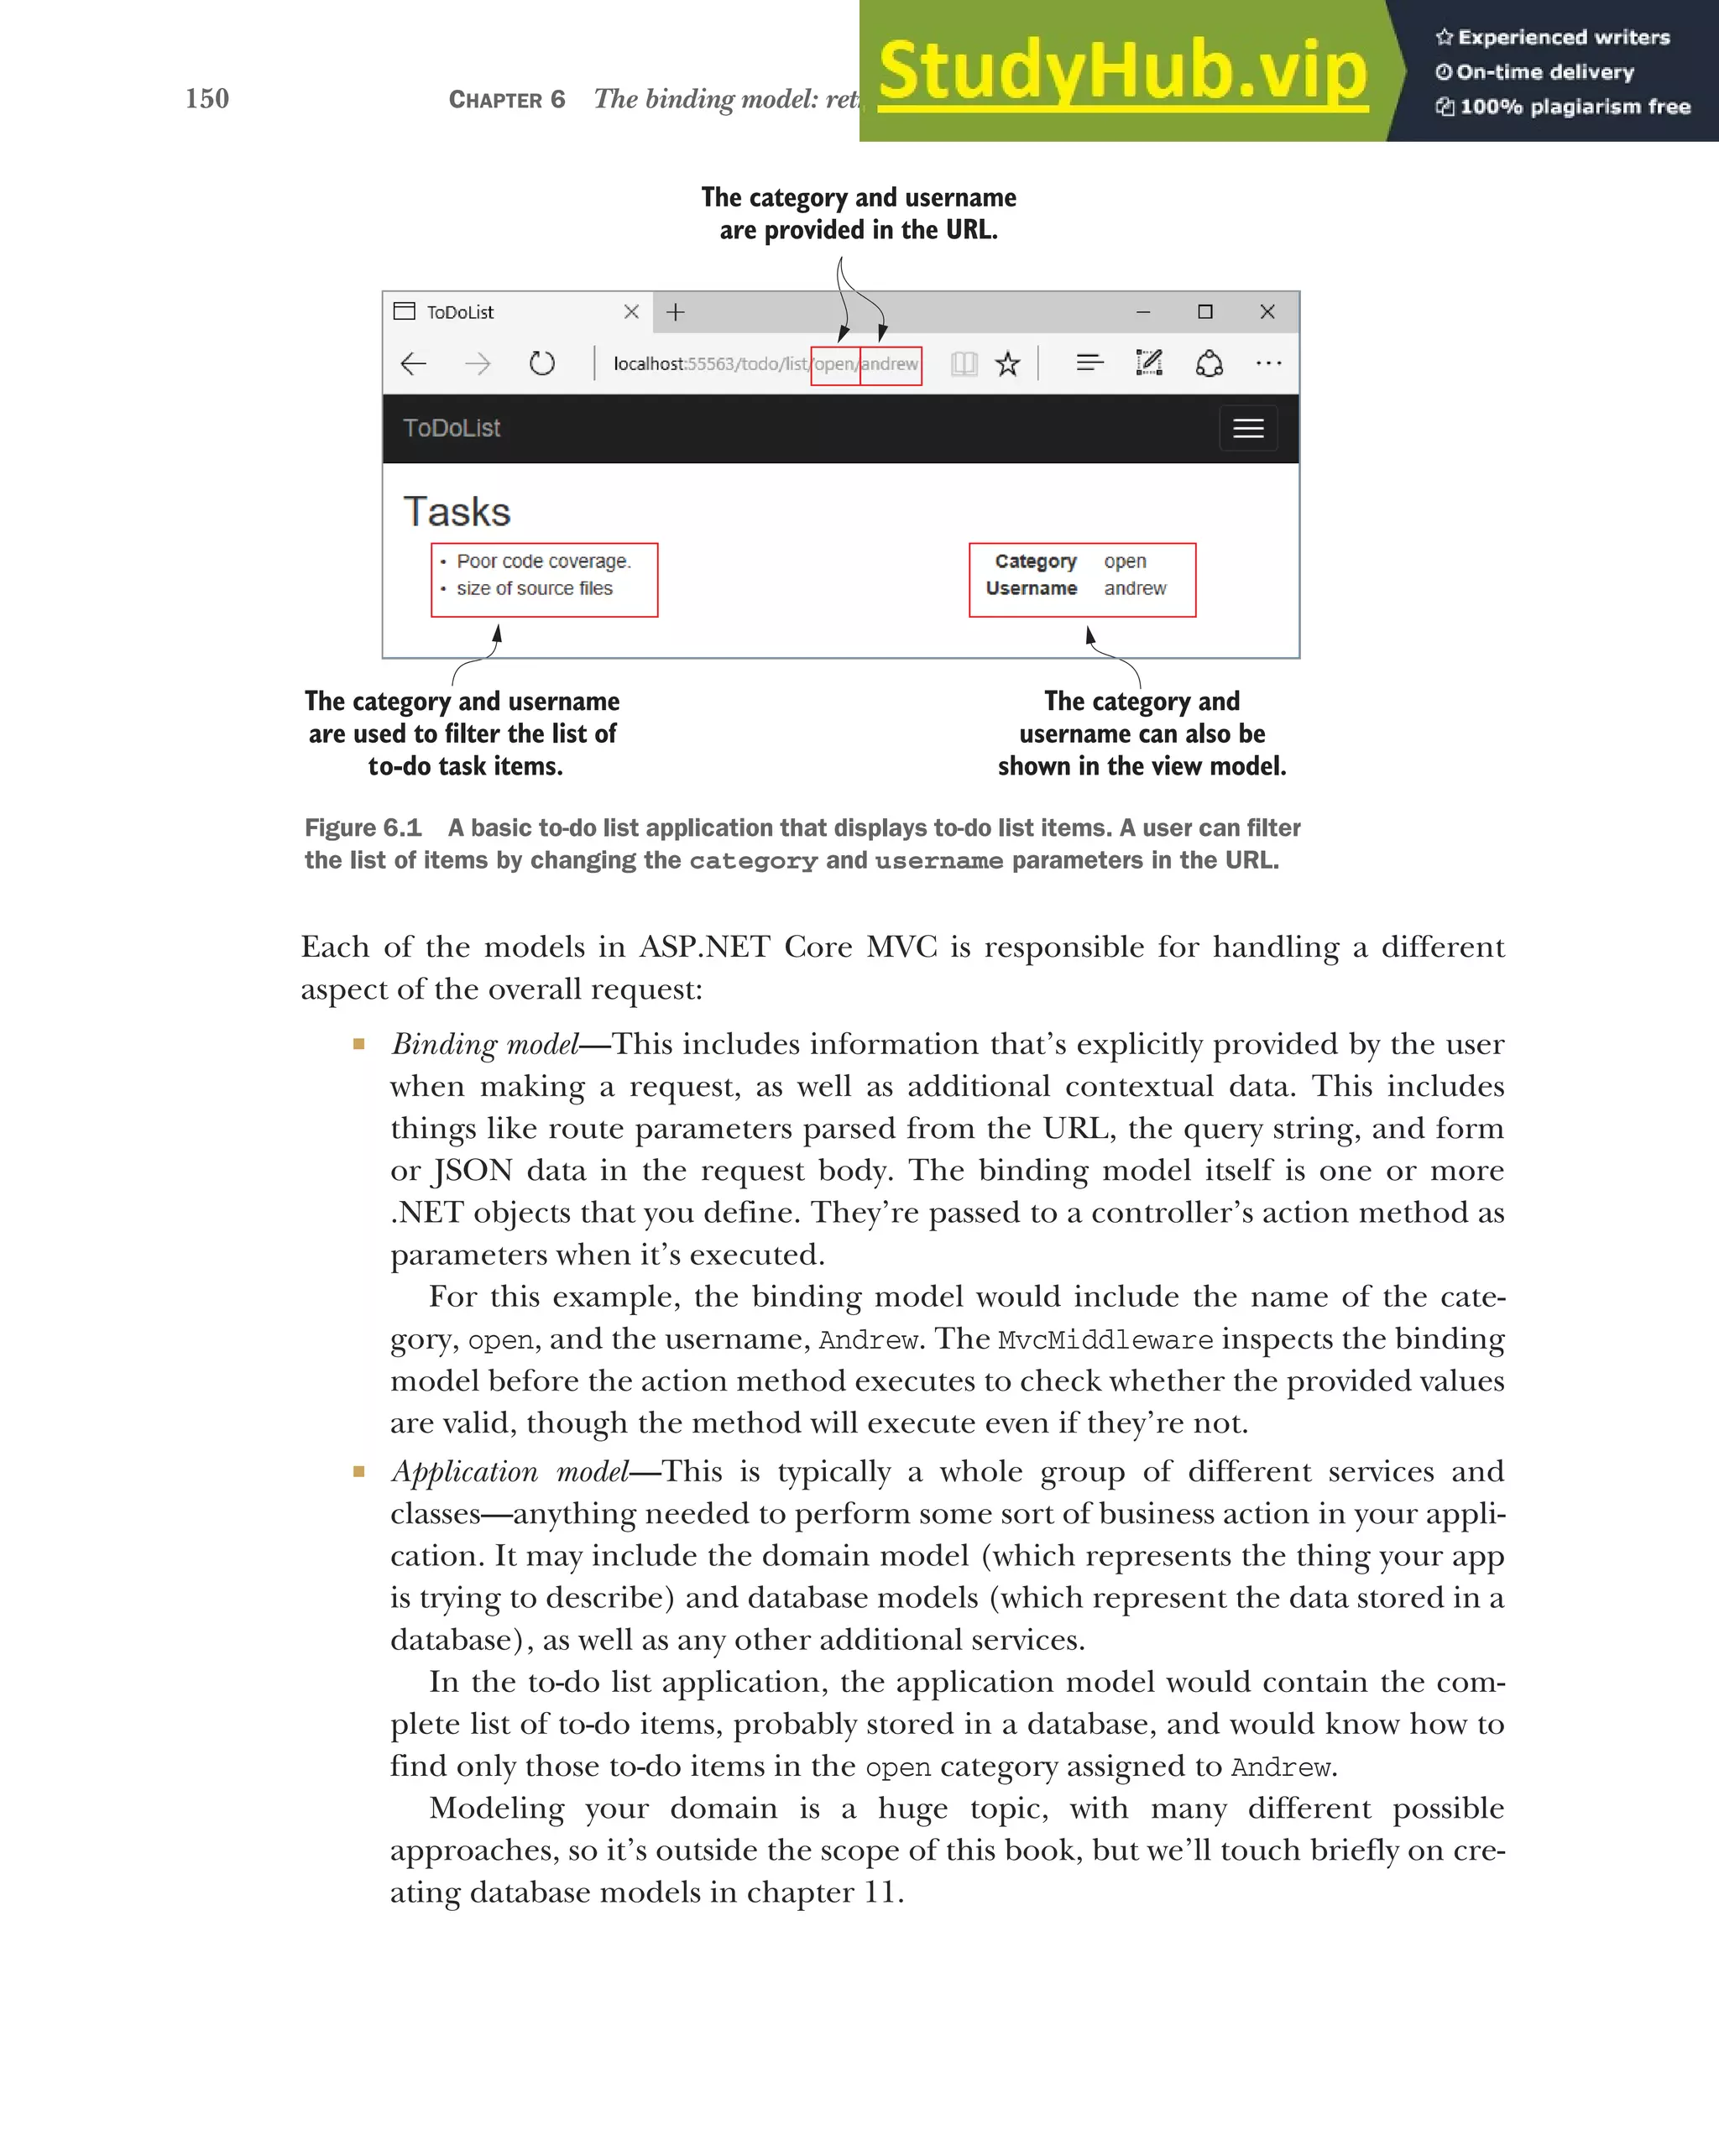
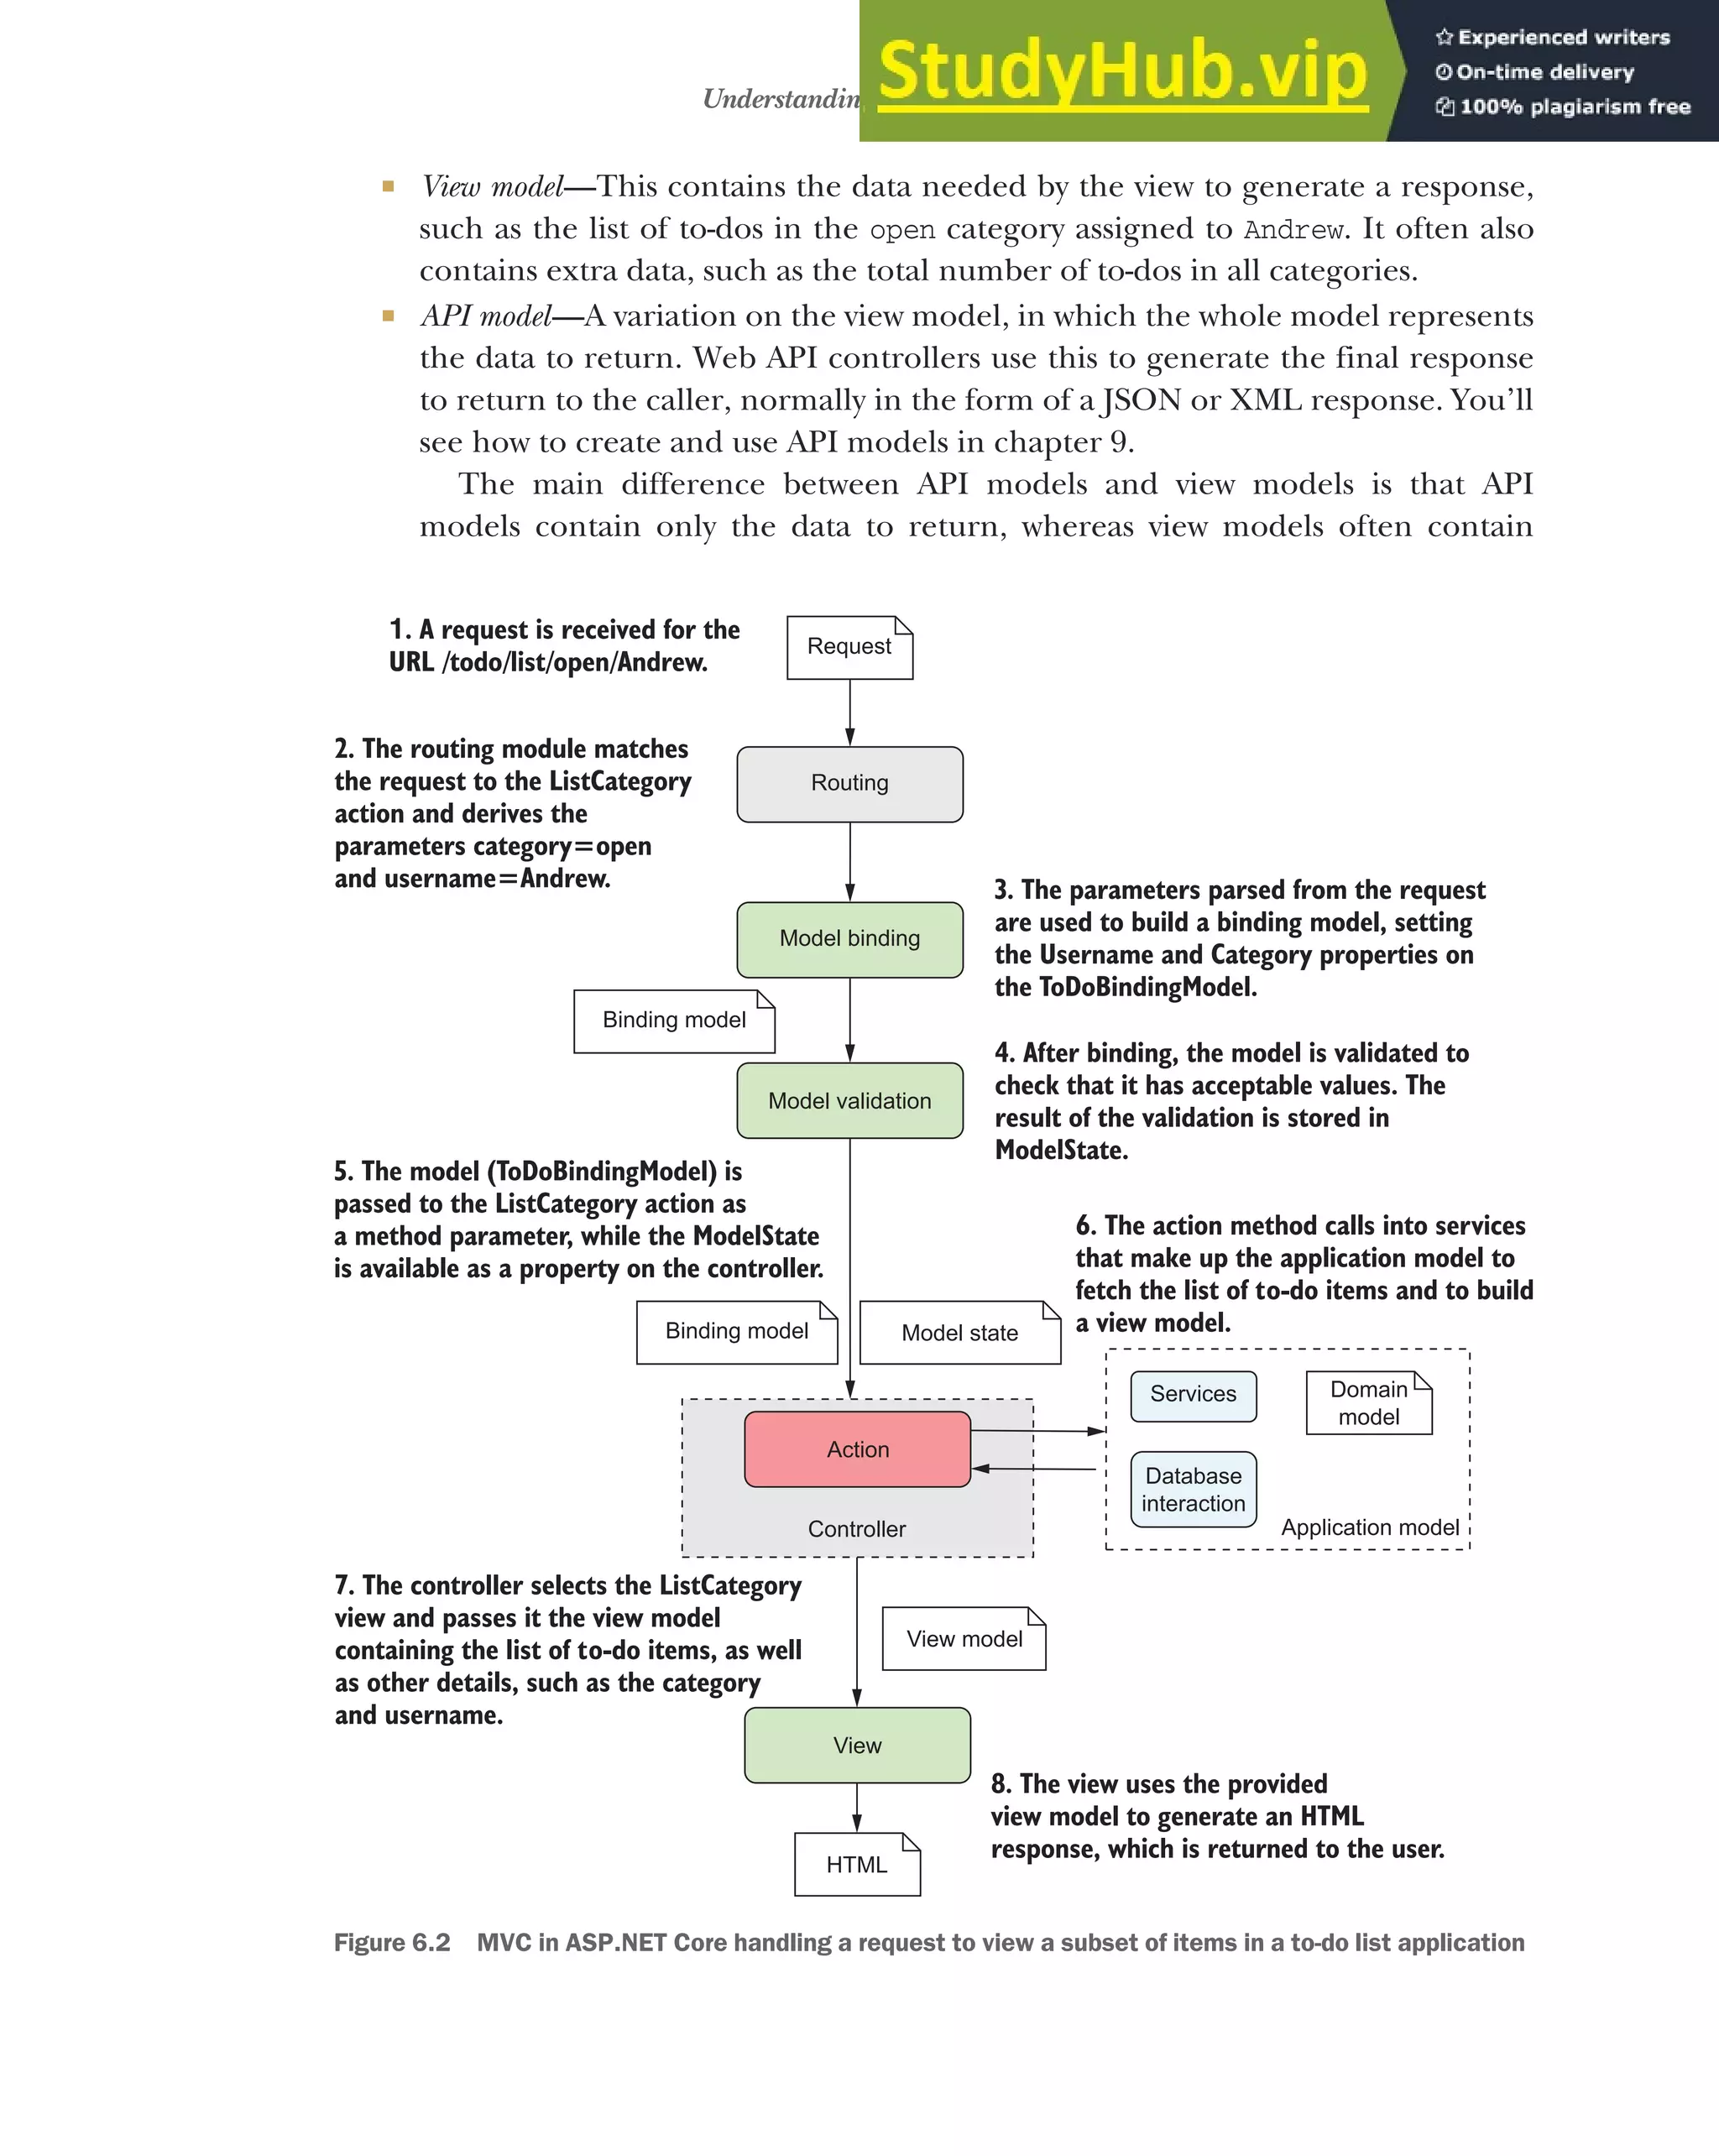


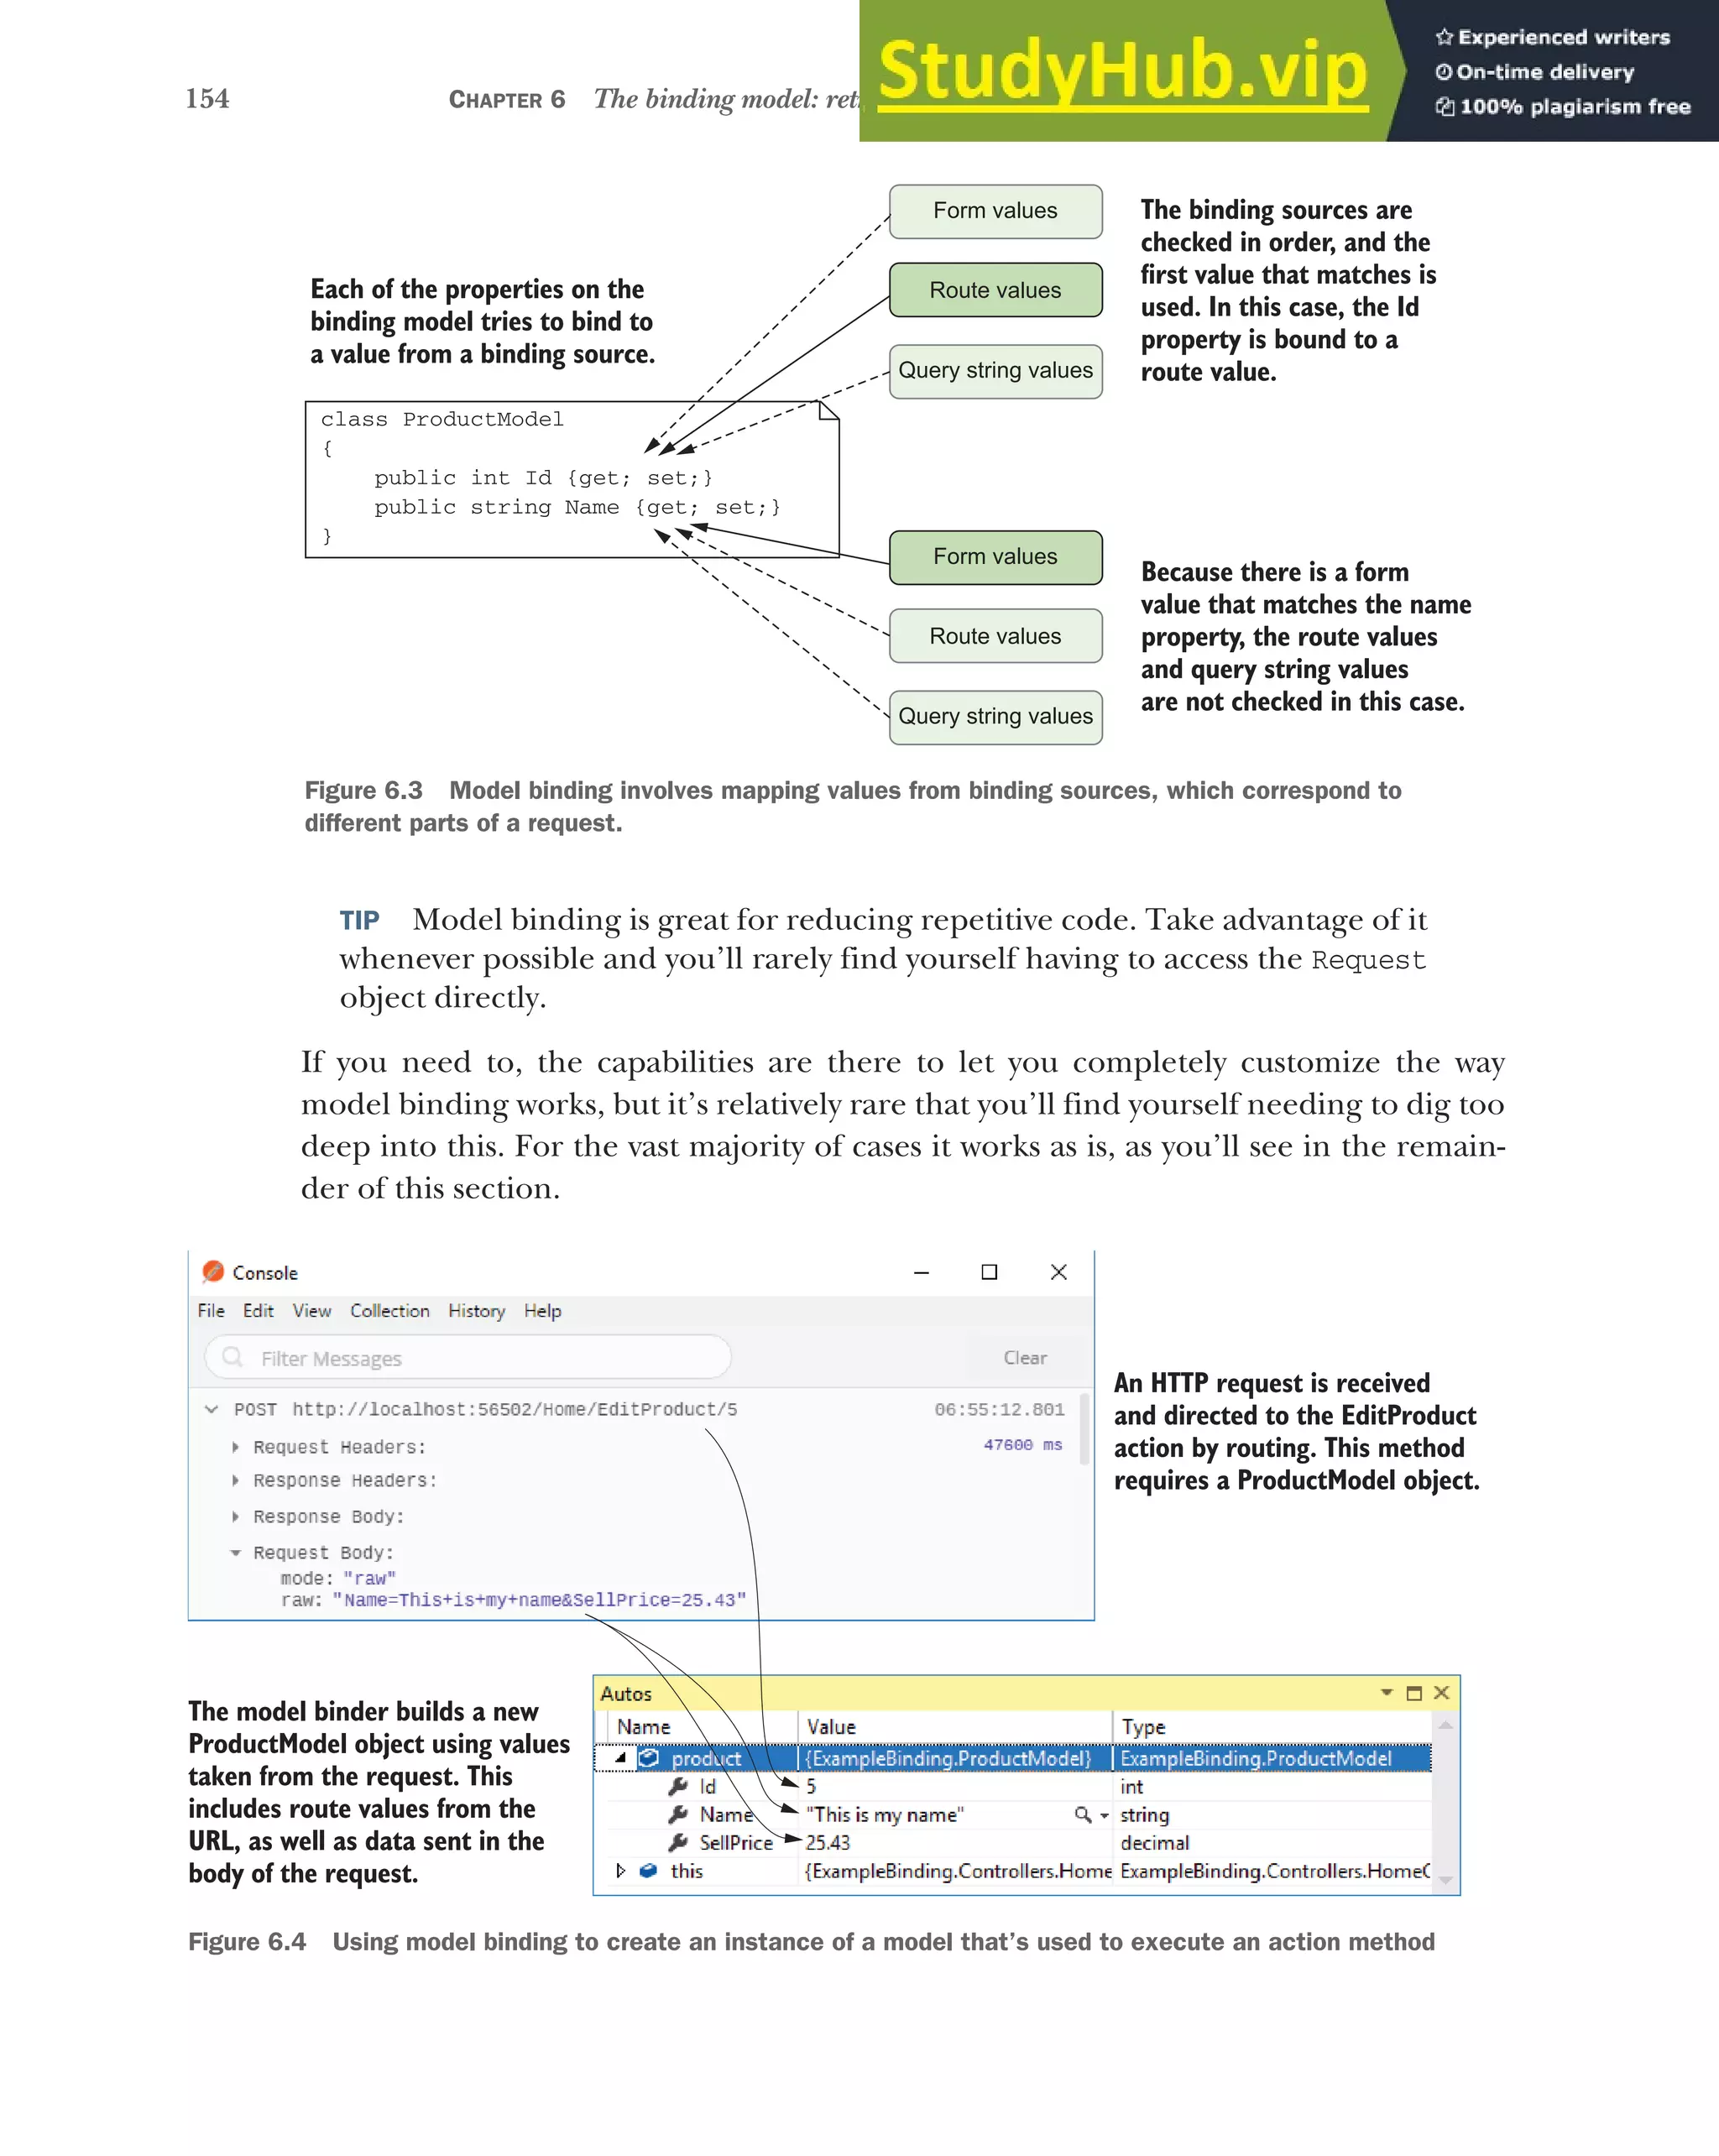
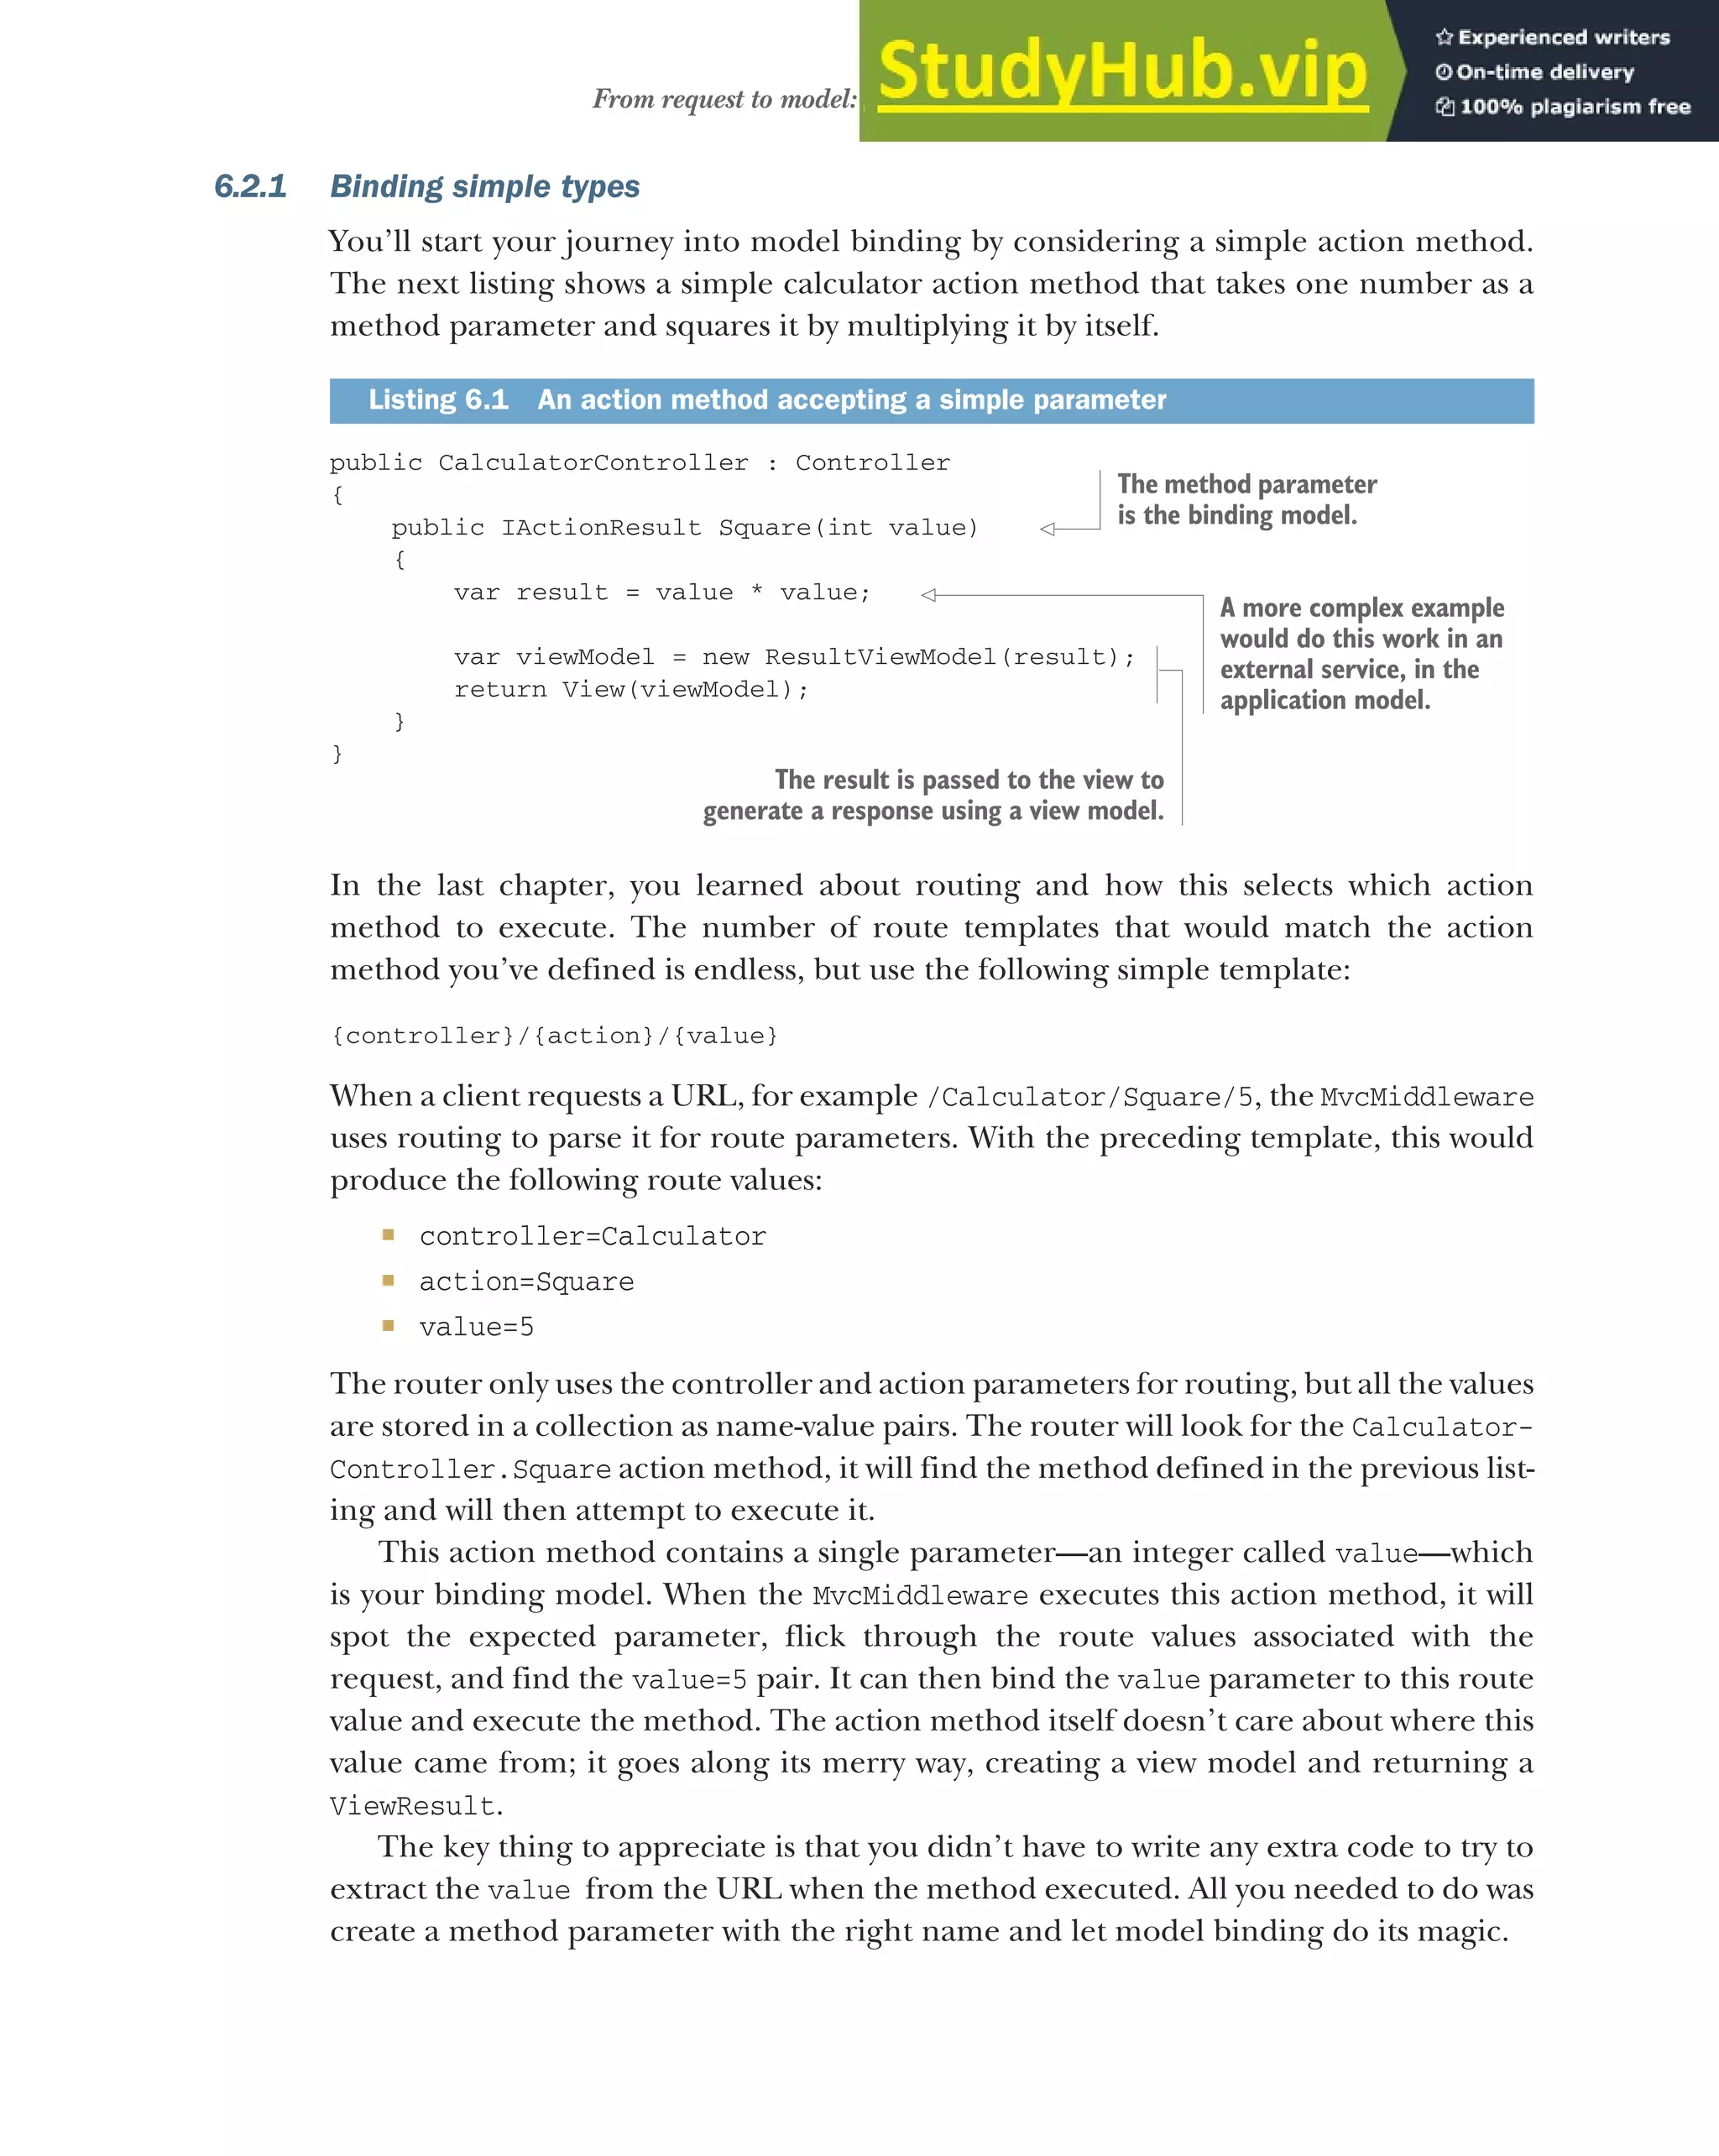

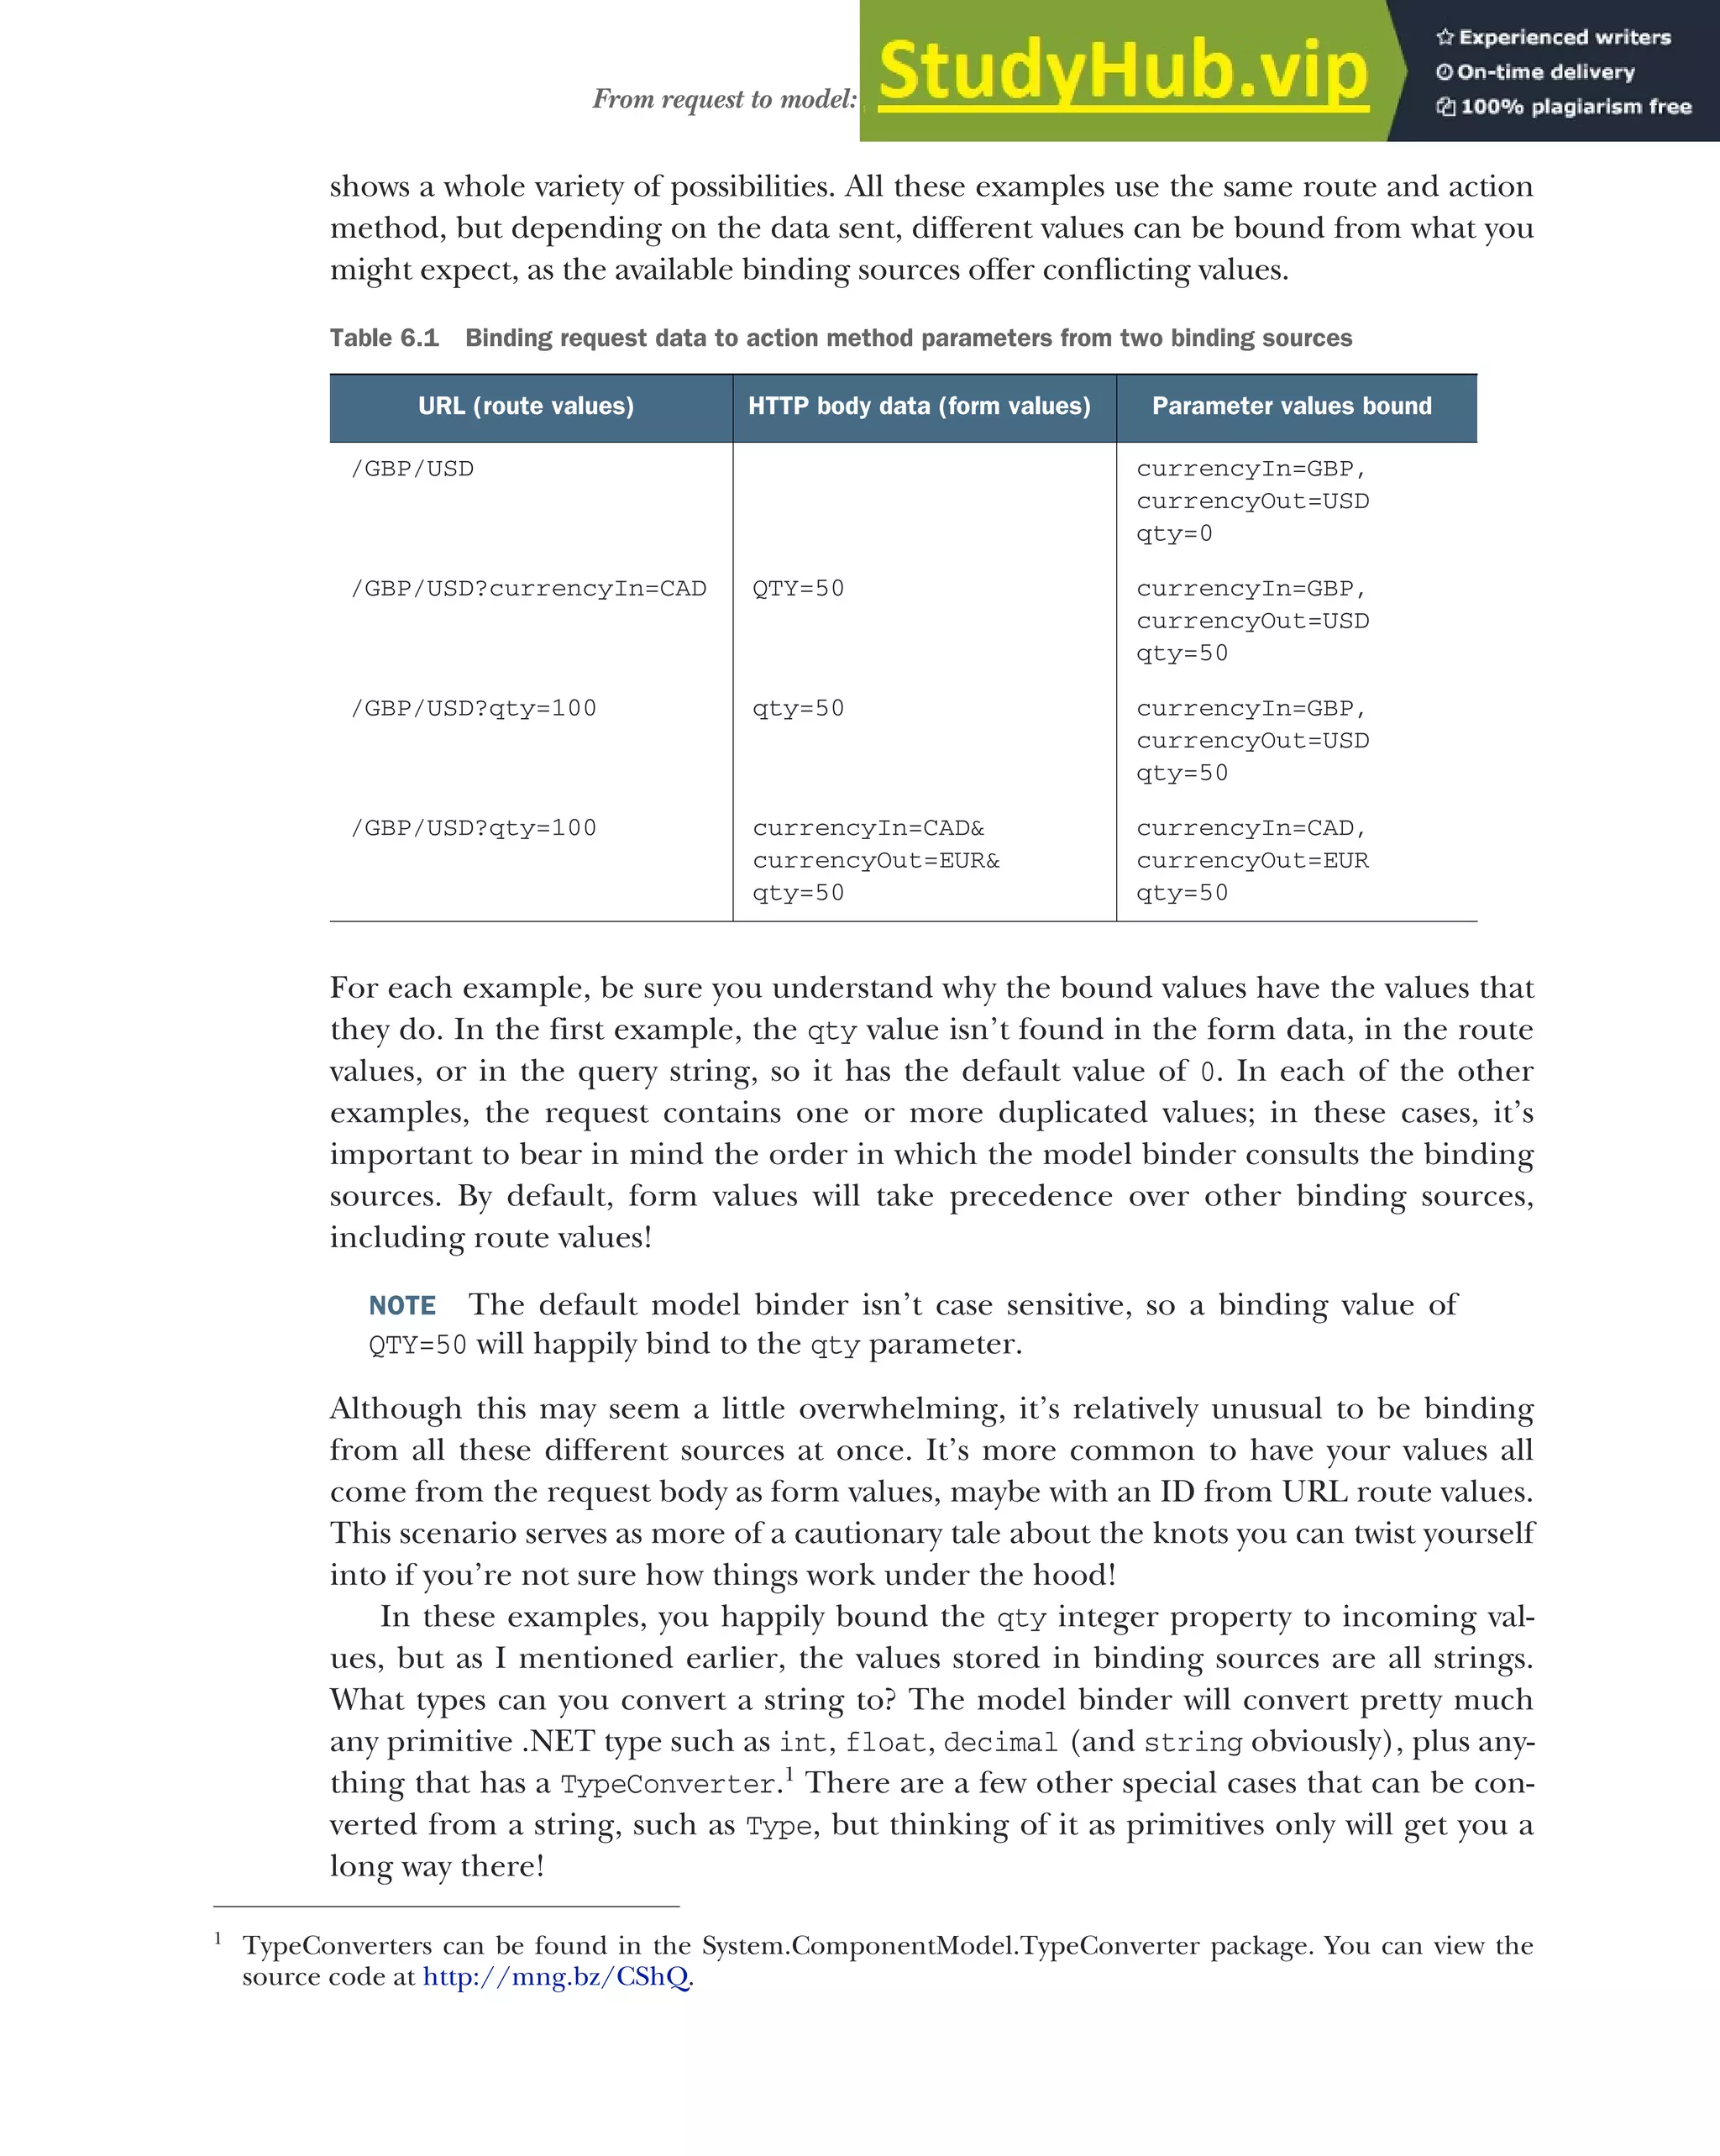

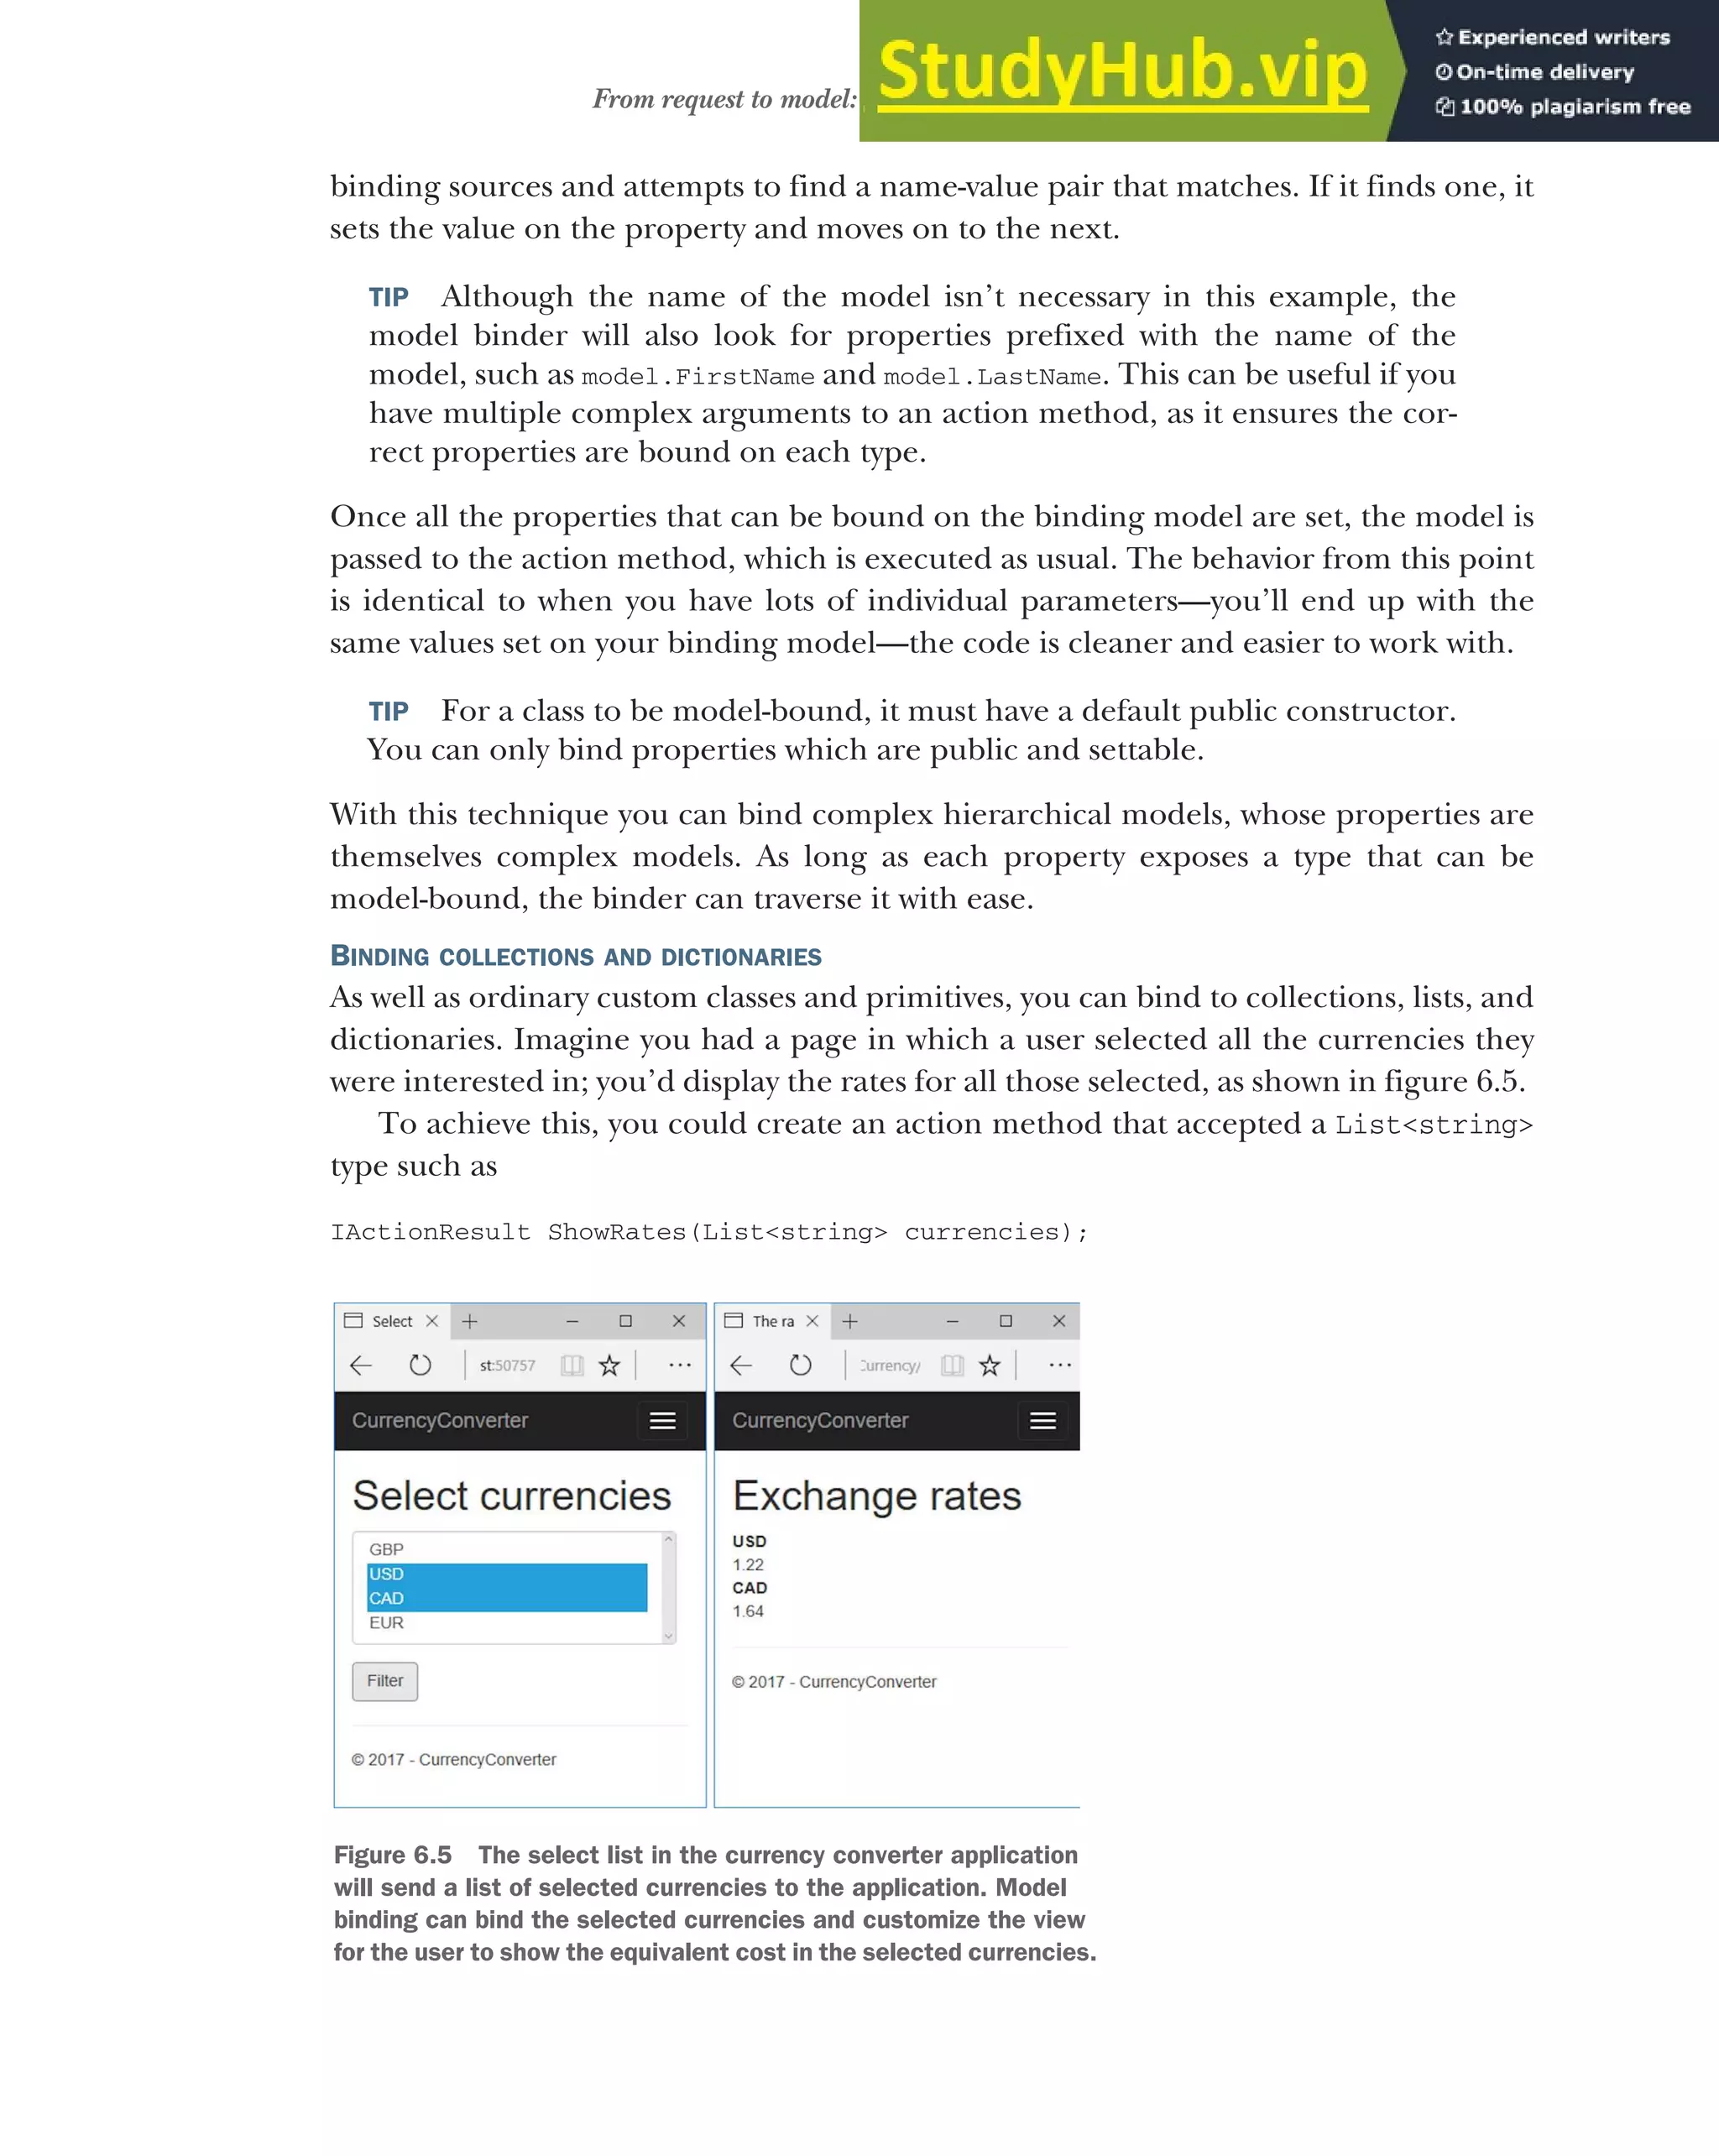
![160 CHAPTER 6 The binding model: retrieving and validating user input
You could then POST data to this method by providing values in a number of differ-
ent formats:
currencies[index]—Where currencies is the name of the parameter to bind
and index is the index of the item to bind, for example, currencies[0]=
GBR¤cies[1]=USD.
[index]—If there’s only a single list, you can omit the name of the parameter,
for example, [0]=GBR&[1]=USD.
currencies—Alternatively, you can omit the index and send currencies as the
key value for every value, for example, currencies=GBR¤cies=USD.
The key values can come from route values and query values, but it’s far more com-
mon to POST them in a form. Dictionaries can use similar binding, where the dictio-
nary key replaces the index both where the parameter is named and where it’s
omitted.
If this all seems a bit confusing, don’t feel too alarmed. If you’re building a tradi-
tional web application, and using Razor views to generate HTML, then it will take care
of most of the naming for you. As you’ll see in chapter 8, the view will ensure that any
form data you POST will be generated in the correct format.
BINDING FILE UPLOADS WITH IFORMFILE
A common feature of many websites is the ability to upload files. This could be a rela-
tively infrequent activity, for example if a user uploads a profile picture for their Stack
Overflow profile, or it may be integral to the application, like uploading photos to
Facebook.
ASP.NET Core supports uploading files by exposing the IFormFile interface. You can
use this interface as a method parameter to your action method and it will be popu-
lated with the details of the file upload:
public IActionResult UploadFile(IFormFile file);
Letting users upload files to your application
Uploading files to websites is a pretty common activity, but you should carefully con-
sider whether your application needs that ability. Whenever files can be uploaded by
users the road is fraught with danger.
You should be careful to treat the incoming files as potentially malicious, don’t trust
the filename provided, take care of large files being uploaded, and don’t allow the
files to be executed on your server.
Files also raise questions as to where the data should be stored—should they go in
a database, in the filesystem, or some other storage? None of these questions has
a straightforward answer and you should think hard about the implications of choos-
ing one over the other. Better yet, if you can avoid it, don’t let users upload files!](https://image.slidesharecdn.com/asp-230807173723-31e70040/75/ASP-NET-Core-in-Action-2018-pdf-188-2048.jpg)

![162 CHAPTER 6 The binding model: retrieving and validating user input
6.2.3 Choosing a binding source
As you’ve already seen, by default the ASP.NET Core model binder will attempt to
bind all action method parameters from three different binding sources: form data,
route data, and the query string.
Occasionally, you may find it necessary to specifically declare which binding source
to bind to, but in other cases, these three sources won’t be sufficient. The most com-
mon scenarios are when you want to bind a method parameter to a request header
value, or when the body of a request contains JSON-formatted data that you want to
bind to a parameter. In these cases, you can decorate your action method parameters
(or binding model class properties) with attributes that say where to bind from, as
shown here.
public class PhotosController
{
public IActionResult TagPhotosWithUser(
[FromHeader] string userId,
[FromBody] List<Photo> photos)
{
/* method implementation */
}
}
In this example, an action method updates a collection of photos with a user. You’ve
got method parameters for the ID of the user to tag in the photos, userId, and a list of
Photo objects to tag, photos.
Rather than binding these action methods using the standard binding sources,
you’ve added attributes to each parameter, indicating the binding source to use. The
[FromHeader] attribute has been applied to the userId parameter. This tells the
model binder to bind the value to an HTTP request header value called userId.
You’re also binding a list of photos to the body of the HTTP request by using the
[FromBody] attribute. This will read JSON from the body of the request and will bind
it to the List<Photo> method parameter.
WARNING Developers familiar with the previous version of ASP.NET should
take note that the [FromBody] attribute is explicitly required when binding to
JSON requests. This differs from previous ASP.NET behavior, in which no
attribute was required.2
You aren’t limited to binding JSON data from the request body—you can use other
formats too, depending on which InputFormatters you configure the MvcMiddleware
Listing 6.4 Choosing a binding source for model binding
2
ASP.NET Core 2.1 introduces the [ApiController] attribute, which allows you to add model binding con-
ventions designed for Web API controllers. This means [FromBody] is automatically used for complex
parameters. For details see http://mng.bz/FYH1.
The userId will be bound from an
HTTP header in the request.
The list of photos will be bound to
the body of the request, typically
in JSON format.](https://image.slidesharecdn.com/asp-230807173723-31e70040/75/ASP-NET-Core-in-Action-2018-pdf-190-2048.jpg)
![163
From request to model: making the request useful
to use. By default, only a JSON input formatter is configured. You’ll see how to add an
XML formatter in chapter 9, when I discuss Web APIs.
You can use a few different attributes to override the defaults and to specify a bind-
ing source for each method parameter:
[FromHeader]—Bind to a header value
[FromQuery]—Bind to a query string value
[FromRoute]—Bind to route parameters
[FromForm]—Bind to form data posted in the body of the request
[FromBody]—Bind to the request’s body content
You can apply each of these to any number of method parameters, as you saw in listing
6.4, with the exception of the [FromBody] attribute—only one parameter may be dec-
orated with the [FromBody] attribute. Also, as form data is sent in the body of a
request, the [FromBody] and [FromForm] attributes are effectively mutually exclusive.
TIP Only one parameter may use the [FromBody] attribute. This attribute
will consume the incoming request as HTTP request bodies can only be safely
read once.
As well as these attributes for specifying binding sources, there are a few other attri-
butes for customizing the binding process even further:
[BindNever]—The model binder will skip this parameter completely.3
[BindRequired]—If the parameter was not provided, or was empty, the binder
will add a validation error.
[FromServices]—Used to indicate the parameter should be provided using
dependency injection (see chapter 10 for details).
In addition, you’ve got the [ModelBinder] attribute, which puts you into “God mode”
with respect to model binding. With this attribute, you can specify the exact binding
source, override the name of the parameter to bind to, and specify the type of binding
to perform. It’ll be rare that you need this one, but when you do, at least it’s there!
By combining all these attributes, you should find you’re able to configure the
model binder to bind to pretty much any data your action method wants to receive. If
you’re building a traditional web app, then you’ll probably find you rarely need to use
them; the defaults should work well for you in most cases.
This brings us to the end of this section on model binding. If all has gone well, you
should have a populated binding model, and the middleware can execute the action
method. It’s time to handle the request, right? Nothing to worry about?
Not so fast! How do you know that the data you received was valid? That you
haven’t been sent malicious data attempting a SQL injection attack, or a phone num-
ber full of letters?
3
You can use the [BindNever] attribute to prevent mass assignment, as discussed in this post:
http://mng.bz/QvfG.](https://image.slidesharecdn.com/asp-230807173723-31e70040/75/ASP-NET-Core-in-Action-2018-pdf-191-2048.jpg)
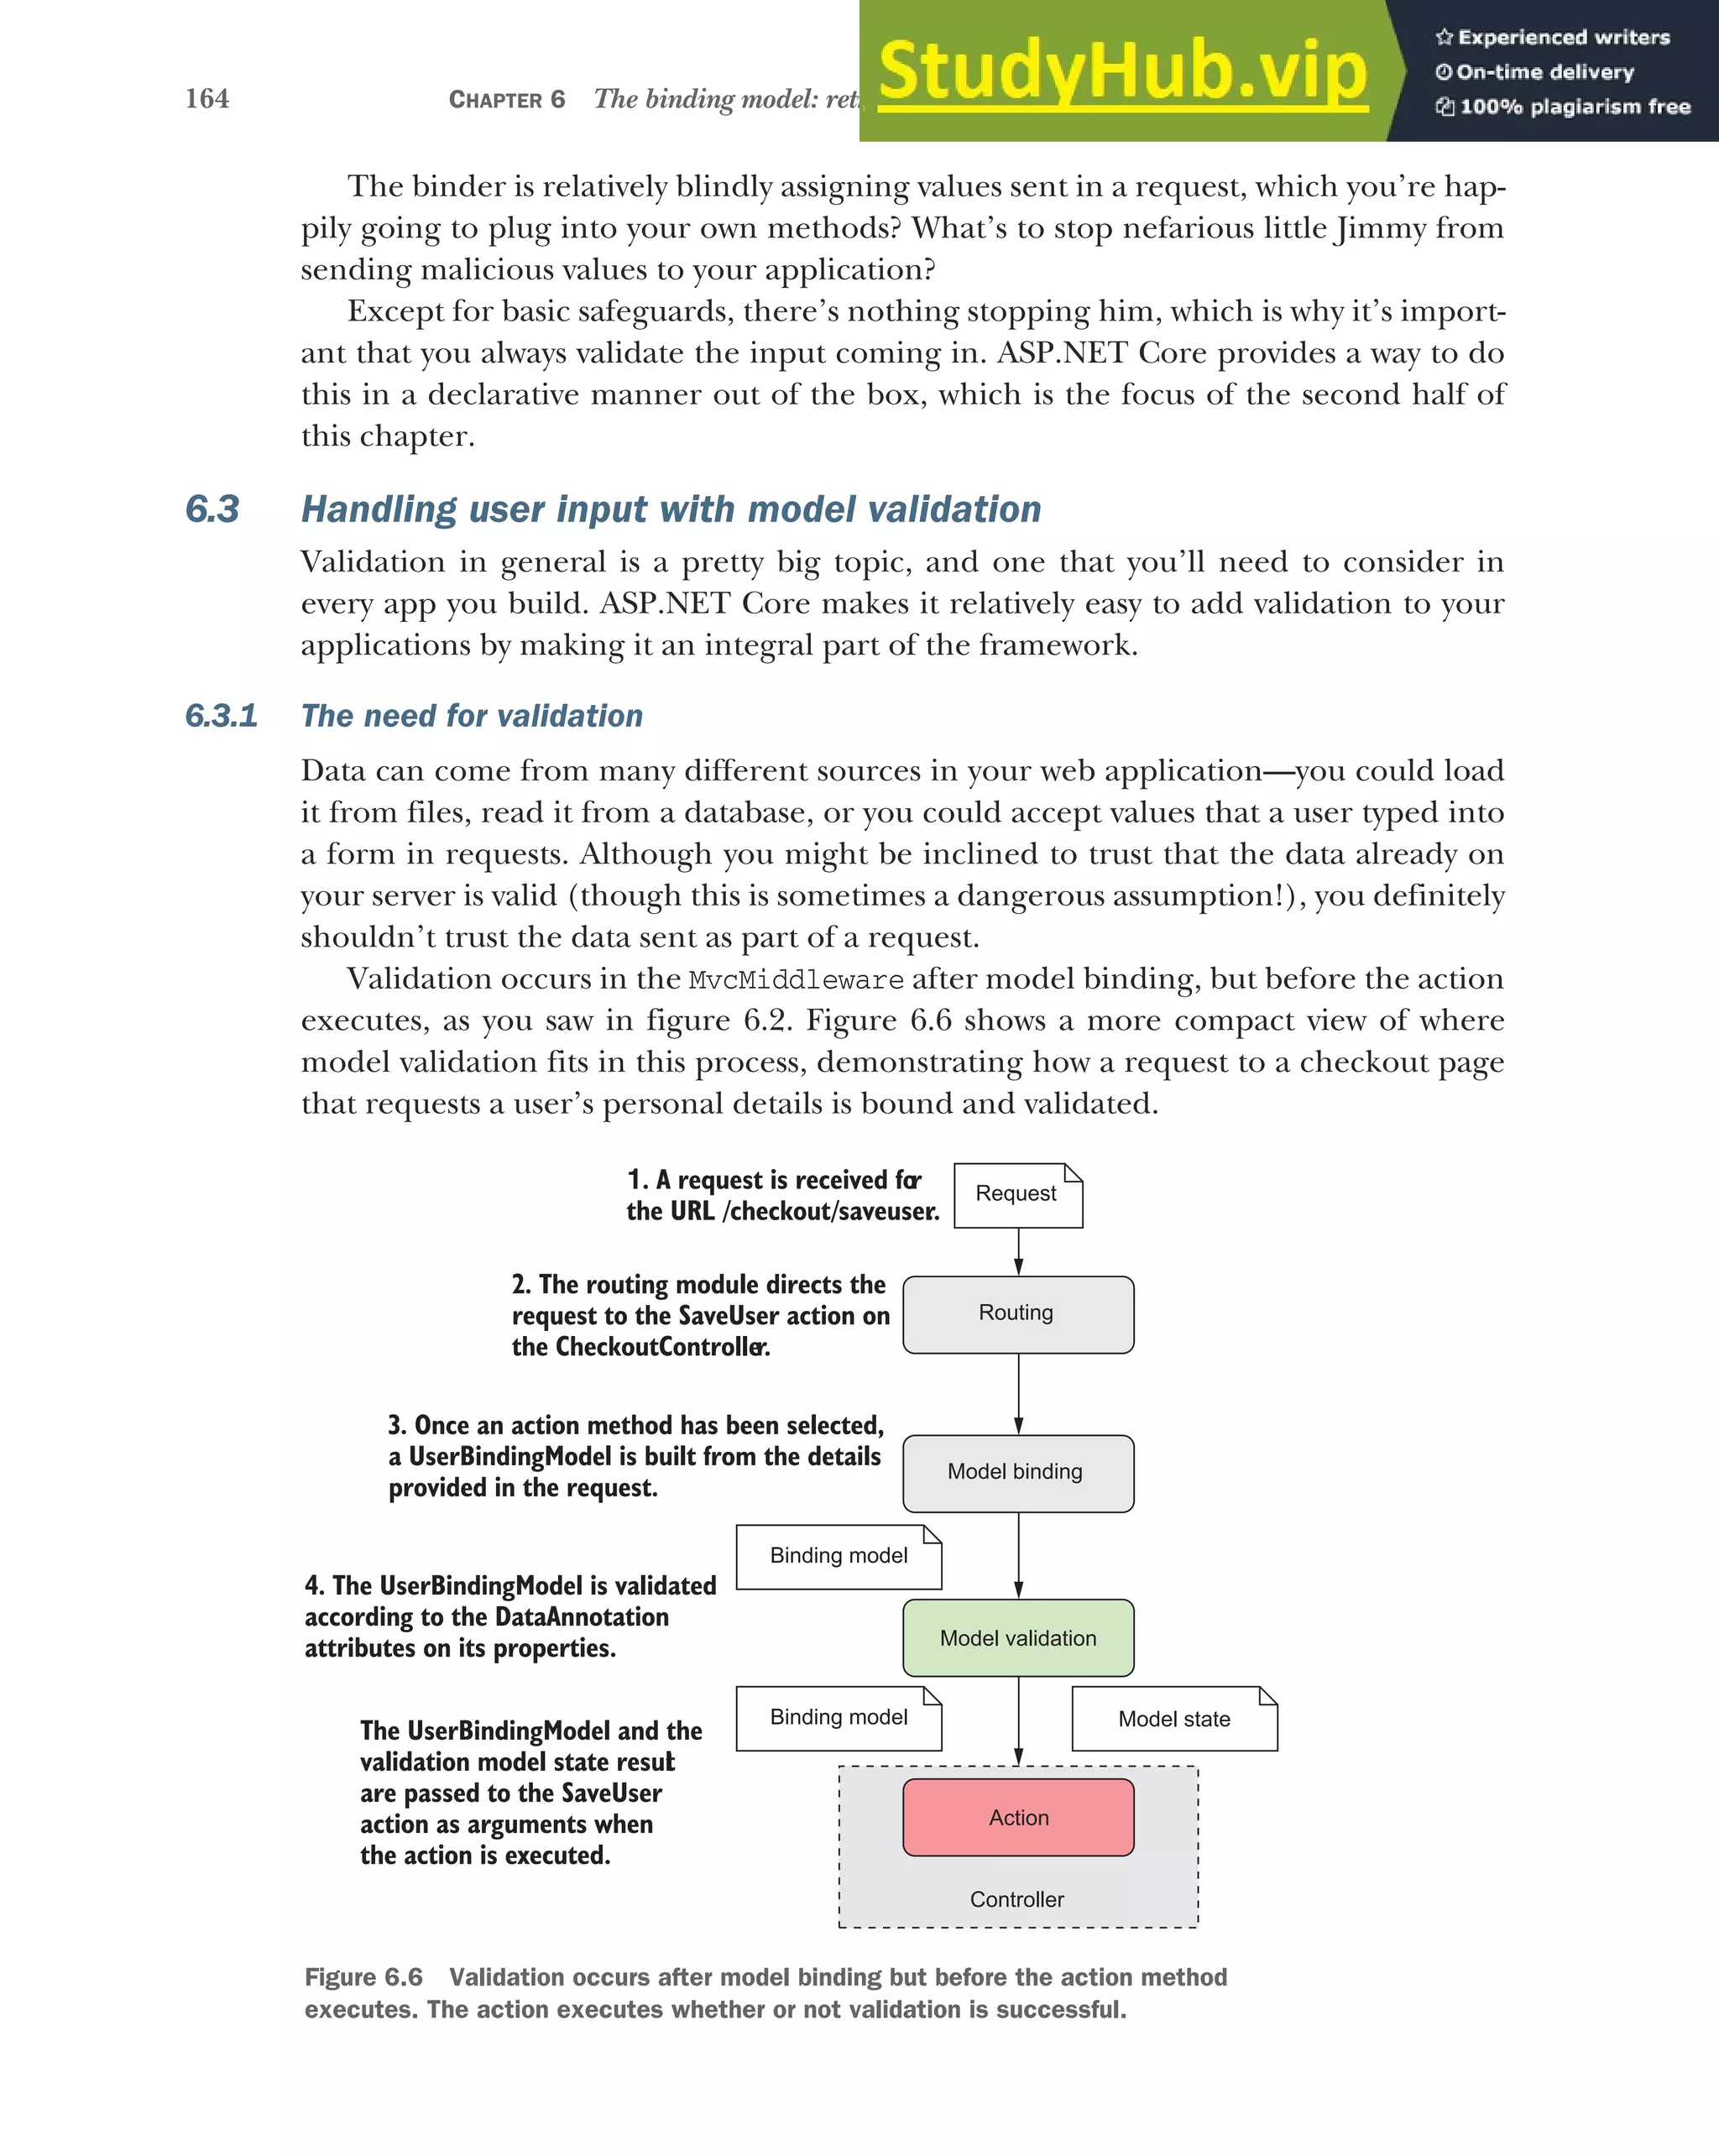
![166 CHAPTER 6 The binding model: retrieving and validating user input
As an example, let’s consider the checkout page for your currency converter appli-
cation. You need to collect details about the user before you can continue, so you ask
them to provide their name, email and, optionally, a phone number. The following list-
ing shows the UserBindingModel decorated with validation attributes that represent
the validation rules for the model. This expands on the example you saw in listing 6.3.
Public class UserBindingModel
{
[Required]
[StringLength(100)]
[Display(Name = "Your name")]
public string FirstName { get; set; }
[Required]
[StringLength(100)]
[Display(Name = "Last name")]
public string LastName { get; set; }
[Required]
[EmailAddress]
public string Email { get; set; }
[Phone]
[Display(Name = "Phone number")]
public string PhoneNumber { get; set; }
}
Suddenly your binding model contains a whole wealth of information where previ-
ously it was pretty sparse on details. For example, you’ve specified that the FirstName
property should always be provided, that it should have a maximum length of 100
characters, and that when it’s referred to (in error messages, for example) it should
be called "Your name" instead of "FirstName".
The great thing about these attributes is that they clearly declare the expected state
of the model. By looking at these attributes, you know what the properties will/should
contain. They also provide hooks for the ASP.NET Core framework to validate that the
data set on the model during model binding is valid, as you’ll see shortly.
You’ve got a plethora of attributes to choose from when applying DataAnnotations
to your models. I’ve listed some of the common ones here, but you can find more in
the System.ComponentModel.DataAnnotations namespace. For a more complete list,
I recommend using IntelliSense in Visual Studio/Visual Studio Code, or you can
always look at the source code directly on GitHub (http://mng.bz/7N7s).
[CreditCard]—Validates that a property has a valid credit card format
[EmailAddress]—Validates that a property has a valid email address format
Listing 6.5 Adding DataAnnotations to a binding model to provide metadata
Values marked Required
must be provided.
Customizes the
name used to
describe the
property
The StringLengthAttribute sets the
maximum length for the property.
The StringLengthAttribute sets the
maximum length for the property.
Validates the value of Email
is a valid email address](https://image.slidesharecdn.com/asp-230807173723-31e70040/75/ASP-NET-Core-in-Action-2018-pdf-194-2048.jpg)
![167
Handling user input with model validation
[StringLength(max)]—Validates that a string has at most the max amount of
characters
[MinLength(min)]—Validates that a collection has at least the min amount of
items
[Phone]—Validates that a property has a valid phone number format
[Range(min, max)]—Validates that a property has a value between min and max
[RegularExpression(regex)]—Validates that a property conforms to the
regex regular expression pattern
[Url]—Validates that a property has a valid URL format
[Required]—Indicates the property that must be provided
[Compare]—Allows you to confirm that two properties have the same value (for
example, Email and ConfirmEmail)
WARNING The [EmailAddress] and other attributes only validate that the
format of the value is correct. They don’t validate that the email address exists.
The DataAnnotations attributes aren’t a new feature—they have been part of the
.NET Framework since version 3.5—and their usage in ASP.NET Core is almost the
same as in the previous version of ASP.NET.
They’re also used for other purposes, in addition to validation. Entity Framework
Core (among others) uses DataAnnotations to define the types of column and rule to
use when creating database tables from C# classes. You can read more about Entity
Framework Core in chapter 12, and in Jon P Smith’s Entity Framework Core in Action
(Manning, 2018).
If the DataAnnotation attributes provided out of the box don’t cover everything
you need, then it’s also possible to write custom attributes by deriving from the base
ValidationAttribute. You’ll see how to create a custom attribute for your currency
converter application in chapter 19.
Alternatively, if you’re not a fan of the attribute-based approach, the MvcMiddleware
is flexible enough that you can replace the validation infrastructure with your
preferred technique. For example, you could use the popular FluentValidation
library (https://github.com/JeremySkinner/FluentValidation) in place of the Data-
Annotations attributes if you prefer.
TIP DataAnnotations are good for input validation of properties in isola-
tion, but not so good for validating business rules. You’ll most likely need to
perform this validation outside the DataAnnotations framework.
Whichever validation approach you use, it’s important to remember that these tech-
niques don’t protect your application by themselves. The MvcMiddleware will ensure
the validation occurs, but it doesn’t automatically do anything if validation fails. In the
next section, we’ll look at how to check the validation result on the server and handle
the case where validation has failed.](https://image.slidesharecdn.com/asp-230807173723-31e70040/75/ASP-NET-Core-in-Action-2018-pdf-195-2048.jpg)
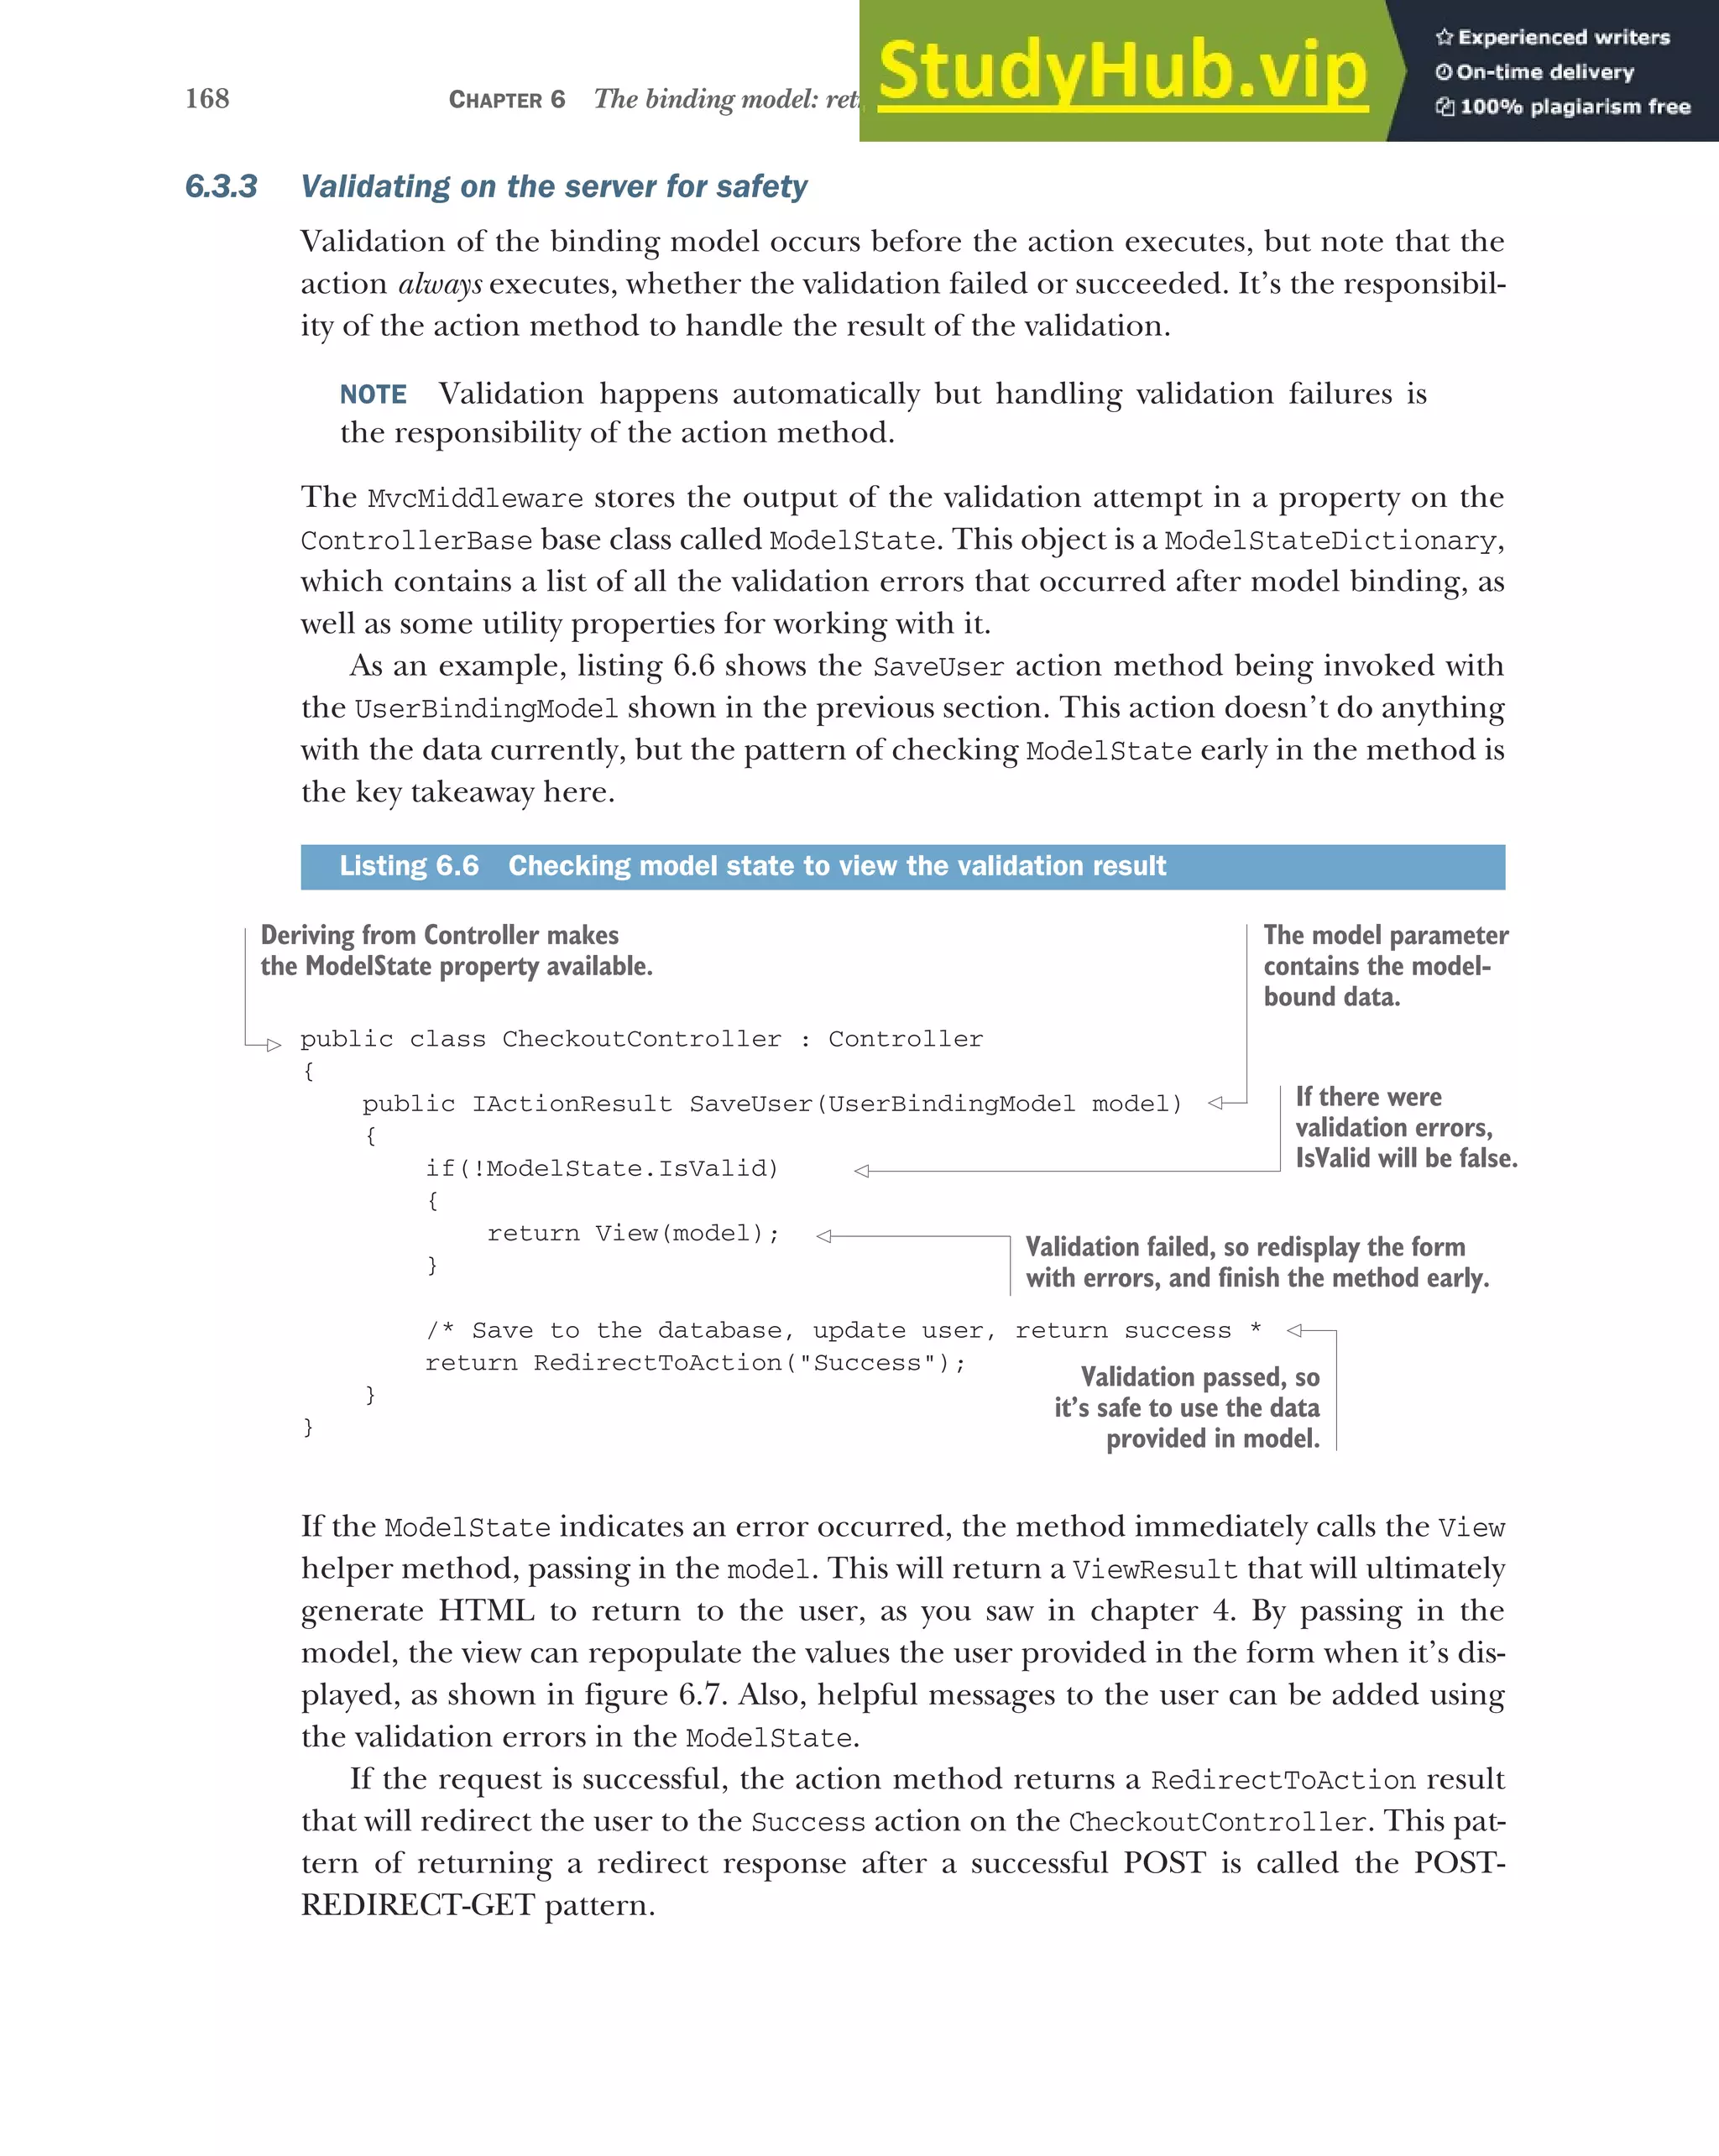
![169
Handling user input with model validation
NOTE The error messages displayed on the form are the default values for
each validation attribute. You can customize the message by setting the
ErrorMessage property on any of the validation attributes. For example, you
could customize a [Required] attribute using [Required(ErrorMessage=
"Required")].
Figure 6.7 When validation fails, you can
redisplay the form to display ModelState
validation errors to the user. Note the “Your
name” field has no associated validation errors,
unlike the other fields.
POST-REDIRECT-GET
The POST-REDIRECT-GET design pattern is a web development pattern that prevents
users from accidently submitting the same form multiple times. Users typically sub-
mit a form using the standard browser POST mechanism, sending data to the server.
This is the normal way by which you might take a payment, for example.
If a server takes the naive approach and responds with a 200 OK response and some
HTML to display, then the user will still be on the same URL. If the user refreshes
their browser, they will be making an additional POST to the server, potentially making
another payment! Browsers have some mechanisms to avoid this, such as in the fol-
lowing figure, but the user experience isn’t desirable.](https://image.slidesharecdn.com/asp-230807173723-31e70040/75/ASP-NET-Core-in-Action-2018-pdf-197-2048.jpg)
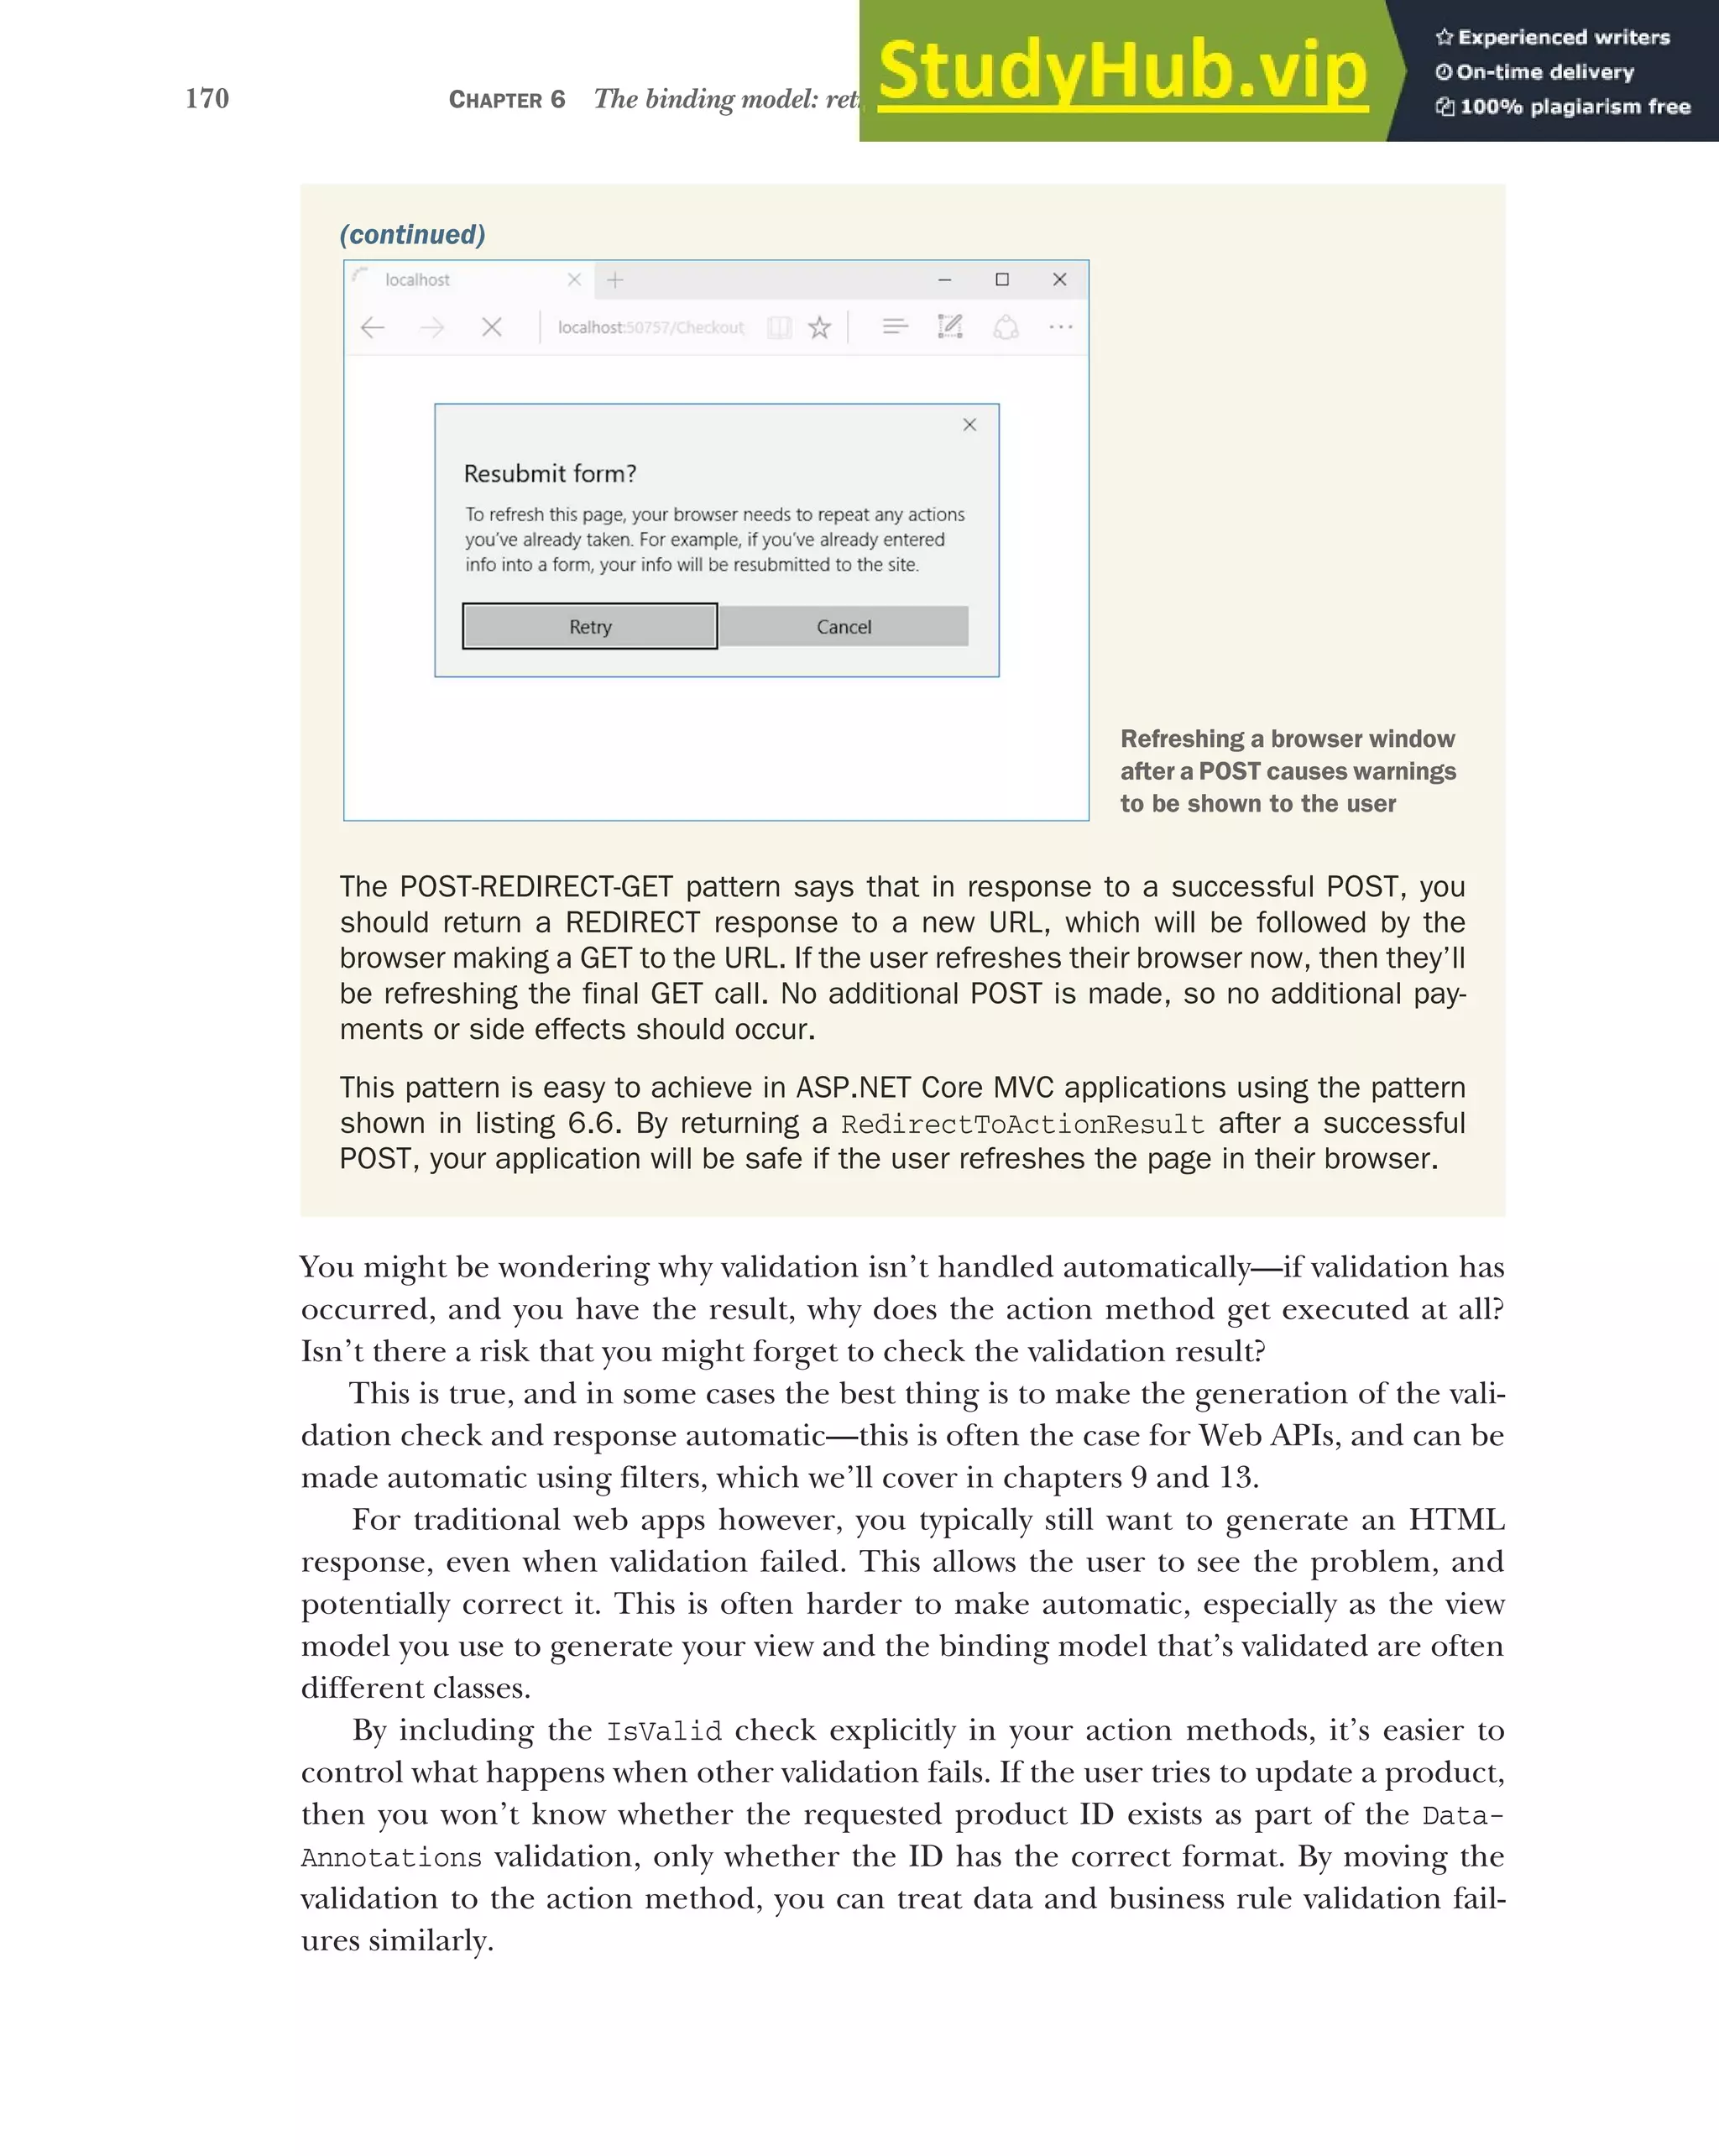

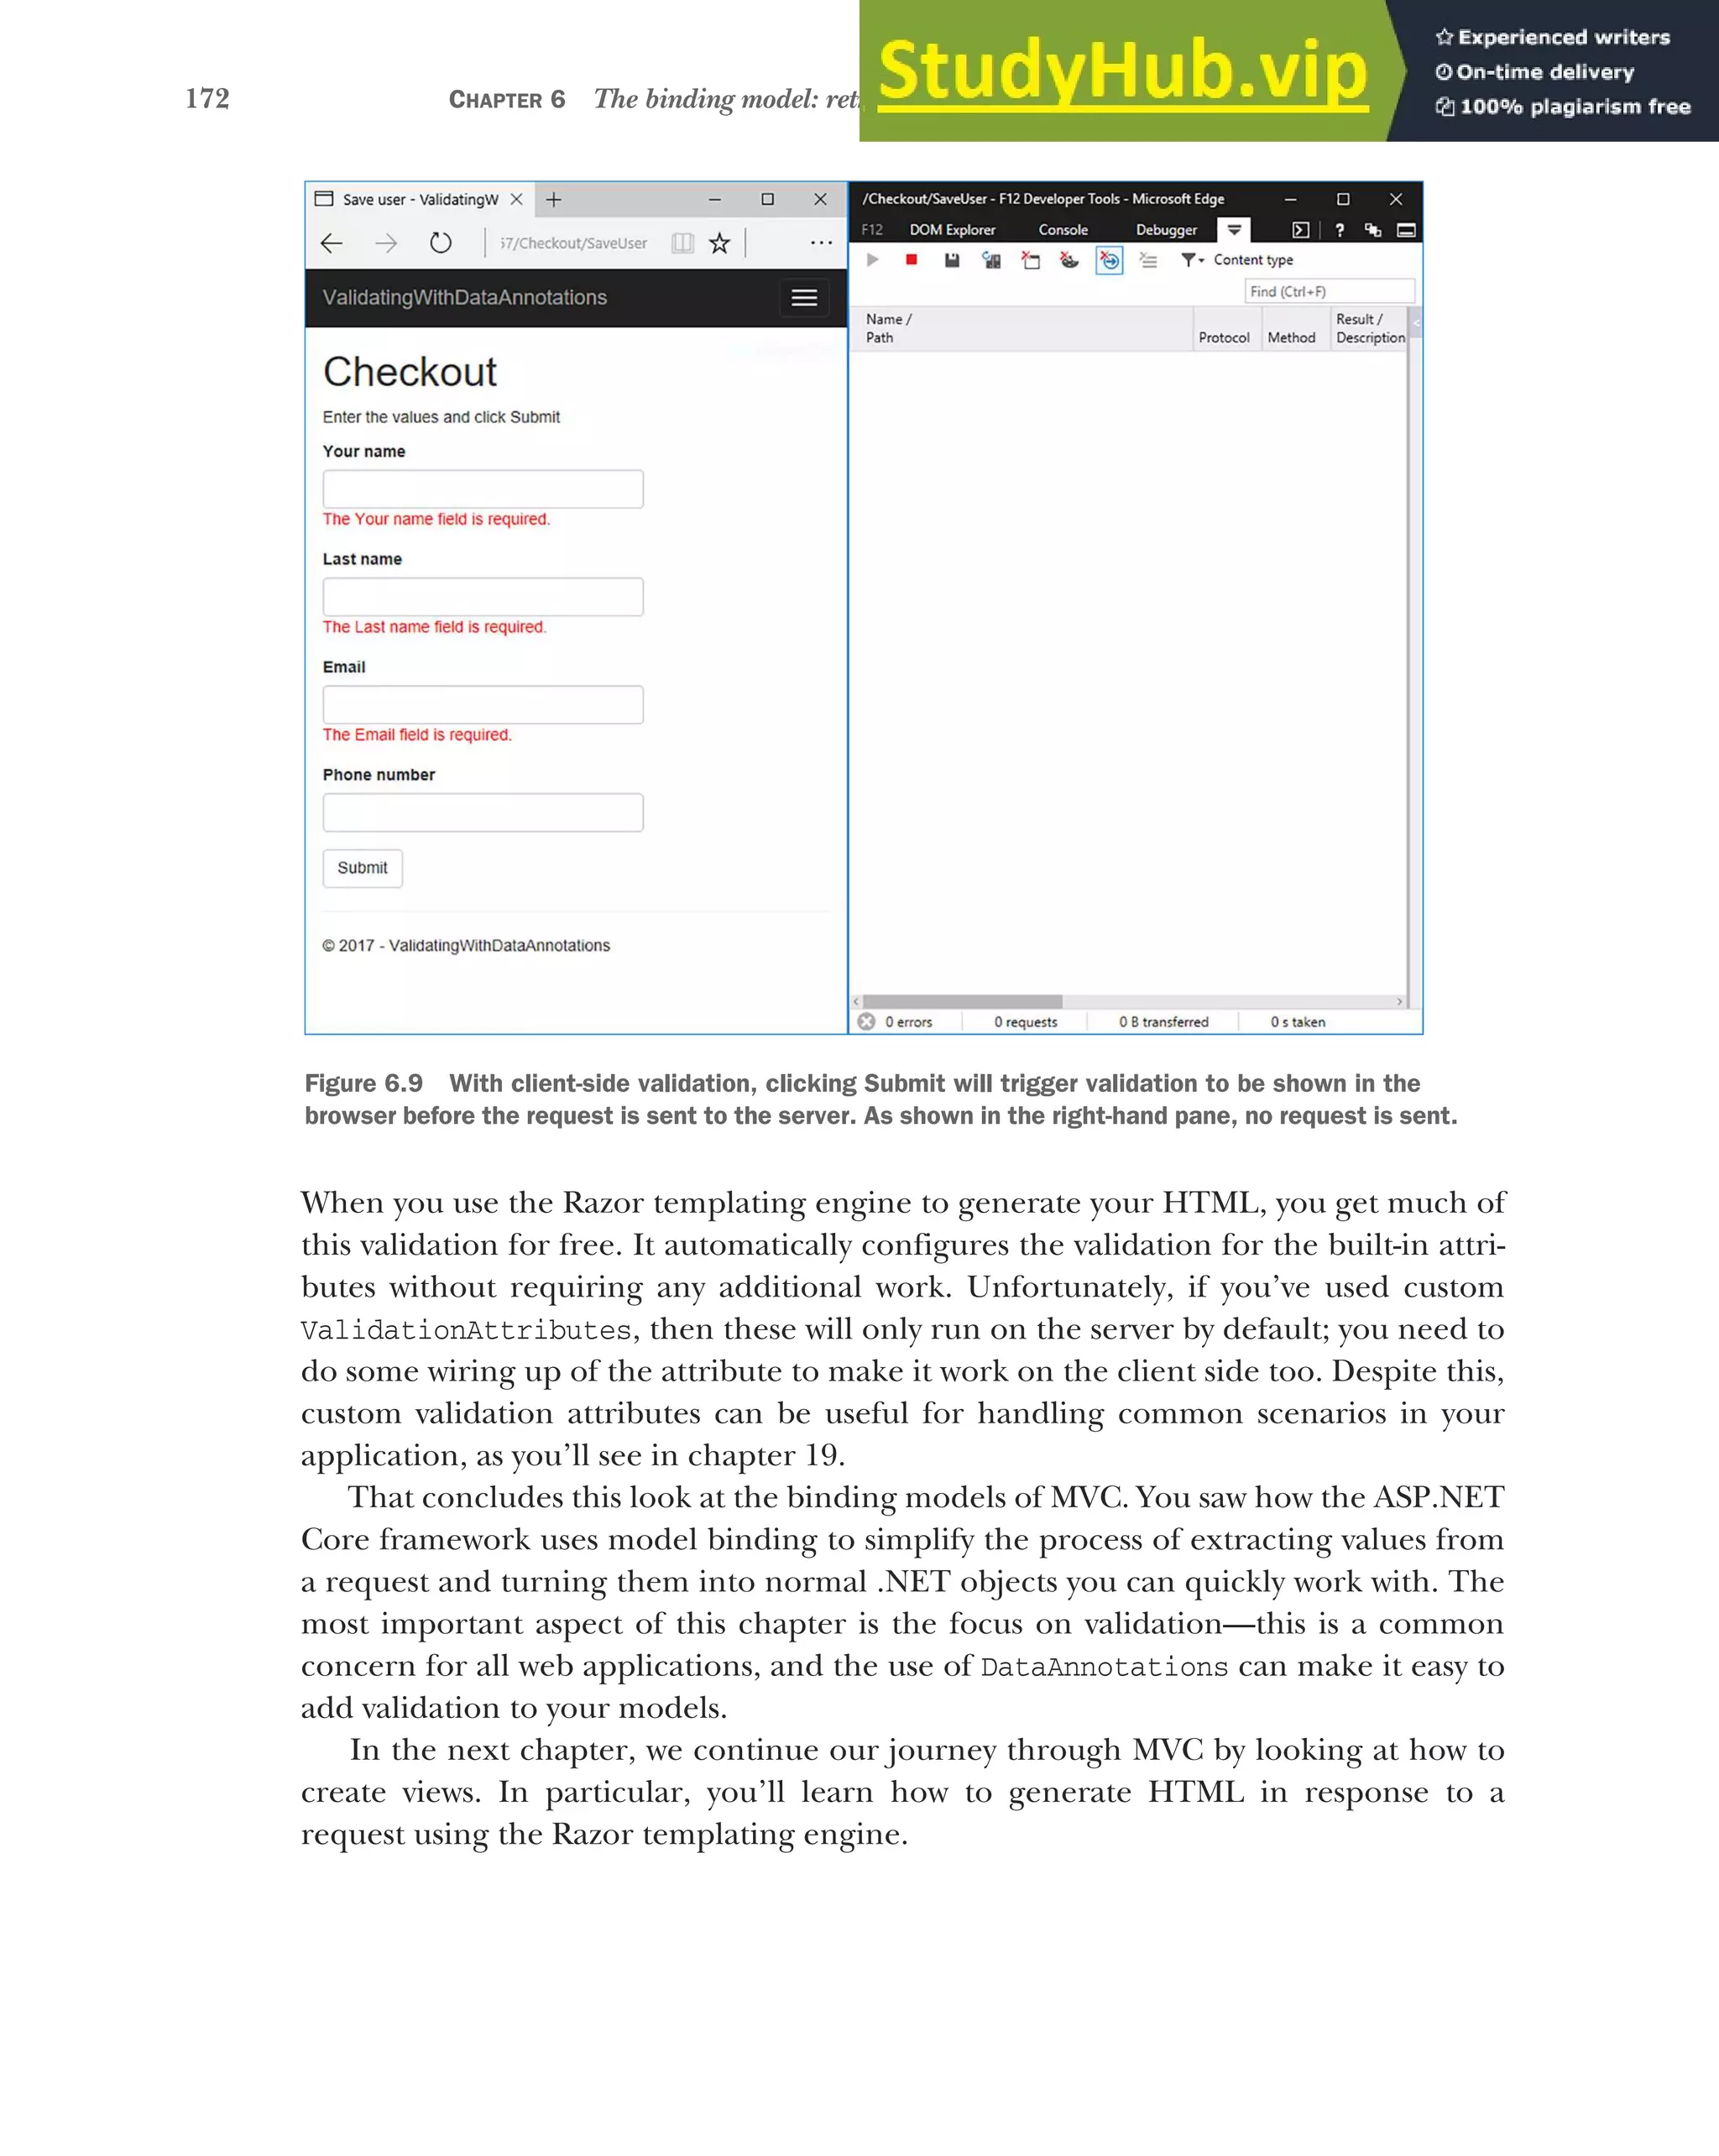
![173
Summary
Summary
ASP.NET Core MVC has three distinct models, each responsible for a different
aspect of a request. The binding model encapsulates data sent as part of a
request, the application model represents the state of the application, and the
view model contains data used by the view to generate a response.
Model binding extracts values from a request and uses them to create .NET
objects to pass as method parameters to the action being executed.
By default, there are three binding sources: POSTed form values, route values,
and the query string. The binder will interrogate these in order when trying to
bind an action method parameter.
When binding values to parameters, the names of the parameters aren’t case
sensitive.
You can bind to simple method parameter types or to the properties of complex
types.
To bind complex types, they must have a default constructor and public, setta-
ble properties.
Simple types must be convertible to strings to be bound automatically, for
example numbers, dates, and Boolean values.
Collections and dictionaries can be bound using the [index]=value and
[key]=value syntax, respectively.
You can customize the binding source for an action parameter using [From*]
attributes applied to the method, such as [FromHeader] and [FromBody]. These
can be used to bind to nondefault binding sources, such as headers or JSON
body content.
In contrast to the previous version of ASP.NET, the [FromBody] attribute is
required when binding JSON properties (previously it was not required).
Validation is necessary to check for security threats. Check that data is format-
ted correctly, confirm it conforms to expected values and that it meets your
business rules.
ASP.NET Core provides DataAnnotations attributes to allow you to declara-
tively define the expected values.
Validation occurs automatically after model binding, but you must manually
check the result of the validation and act accordingly in your action method by
interrogating the ModelState property.
Client-side validation provides a better user experience than server-side valida-
tion alone, but you should always use server-side validation.
Client-side validation uses JavaScript and attributes applied to your HTML ele-
ments to validate form values.](https://image.slidesharecdn.com/asp-230807173723-31e70040/75/ASP-NET-Core-in-Action-2018-pdf-201-2048.jpg)

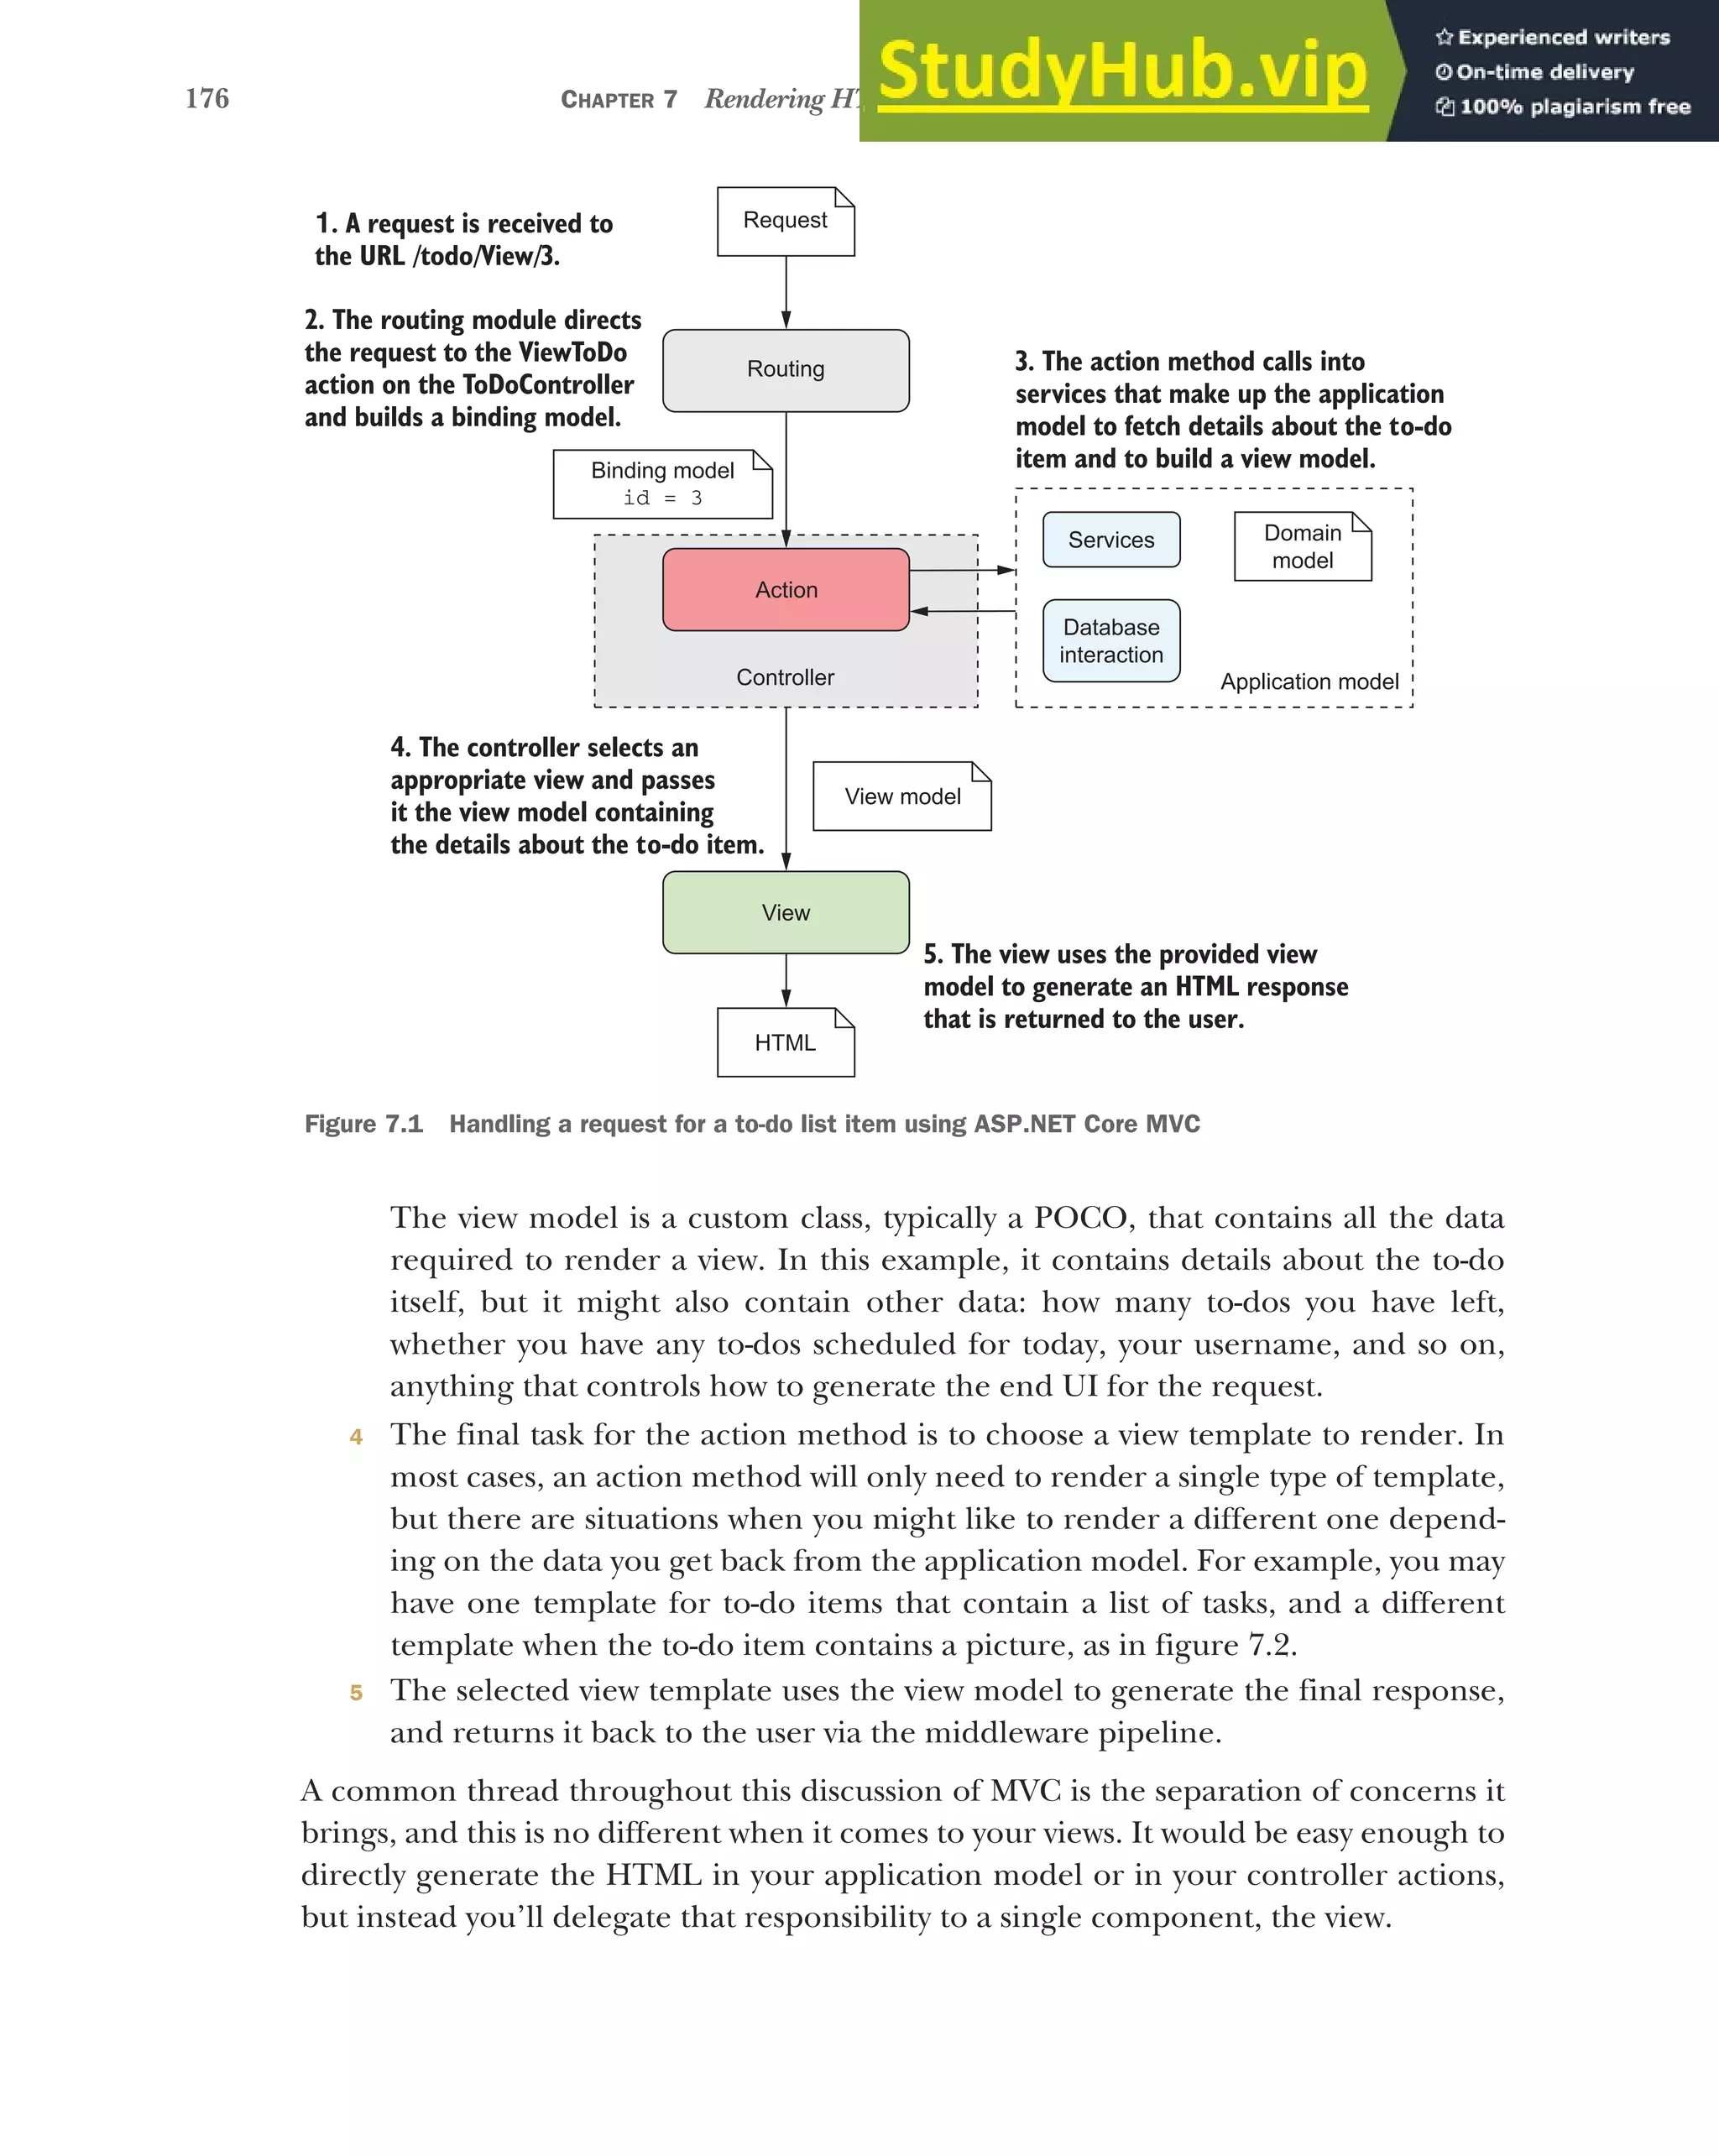

![178 CHAPTER 7 Rendering HTML using Razor views
@model IndexViewModel
<div class="row">
<div class="col-md-12">
<form asp-action="Index">
<div class="form-group">
<label asp-for="NewUser"></label>
<input class="form-control" asp-for="NewUser" />
<span asp-validation-for="NewUser"></span>
</div>
<div class="form-group">
<button type="submit"
class="btn btn-success">Add</button>
</div>
</form>
</div>
</div>
<h4>Number of users: @Model.ExistingUsers.Count</h4>
<div class="row">
<div class="col-md-12">
<ul>
@foreach (var user in Model.ExistingUsers)
Listing 7.1 A Razor template to list users and a form for adding a new user
Form elements can be used
to send values back to the
application.
The view model contains the data
you wish to display on the page.
Razor markup describes how to display this
data using a mixture of HTML and C#.
By combining the data in your view
model with the Razor markup, HTML
can be generated dynamically, instead
of being fixed at compile time.
@foreach(var user in Model.ExistingUsers)
{
<li>
<button>View</button>
<span>@user</span>
</li>
}
Model.ExistingUsers = new[]
{
'Andrew',
'Robbie',
'Jimmy',
'Bart'
};
Figure 7.3 The use of C# in Razor lets you easily generate dynamic HTML that varies at runtime.
Normal HTML is sent to
the browser unchanged.
Tag Helpers attach to
HTML elements to
create forms.
Values can be written
from C# objects to
the HTML.
C# constructs like for
loops can be used in Razor.](https://image.slidesharecdn.com/asp-230807173723-31e70040/75/ASP-NET-Core-in-Action-2018-pdf-206-2048.jpg)
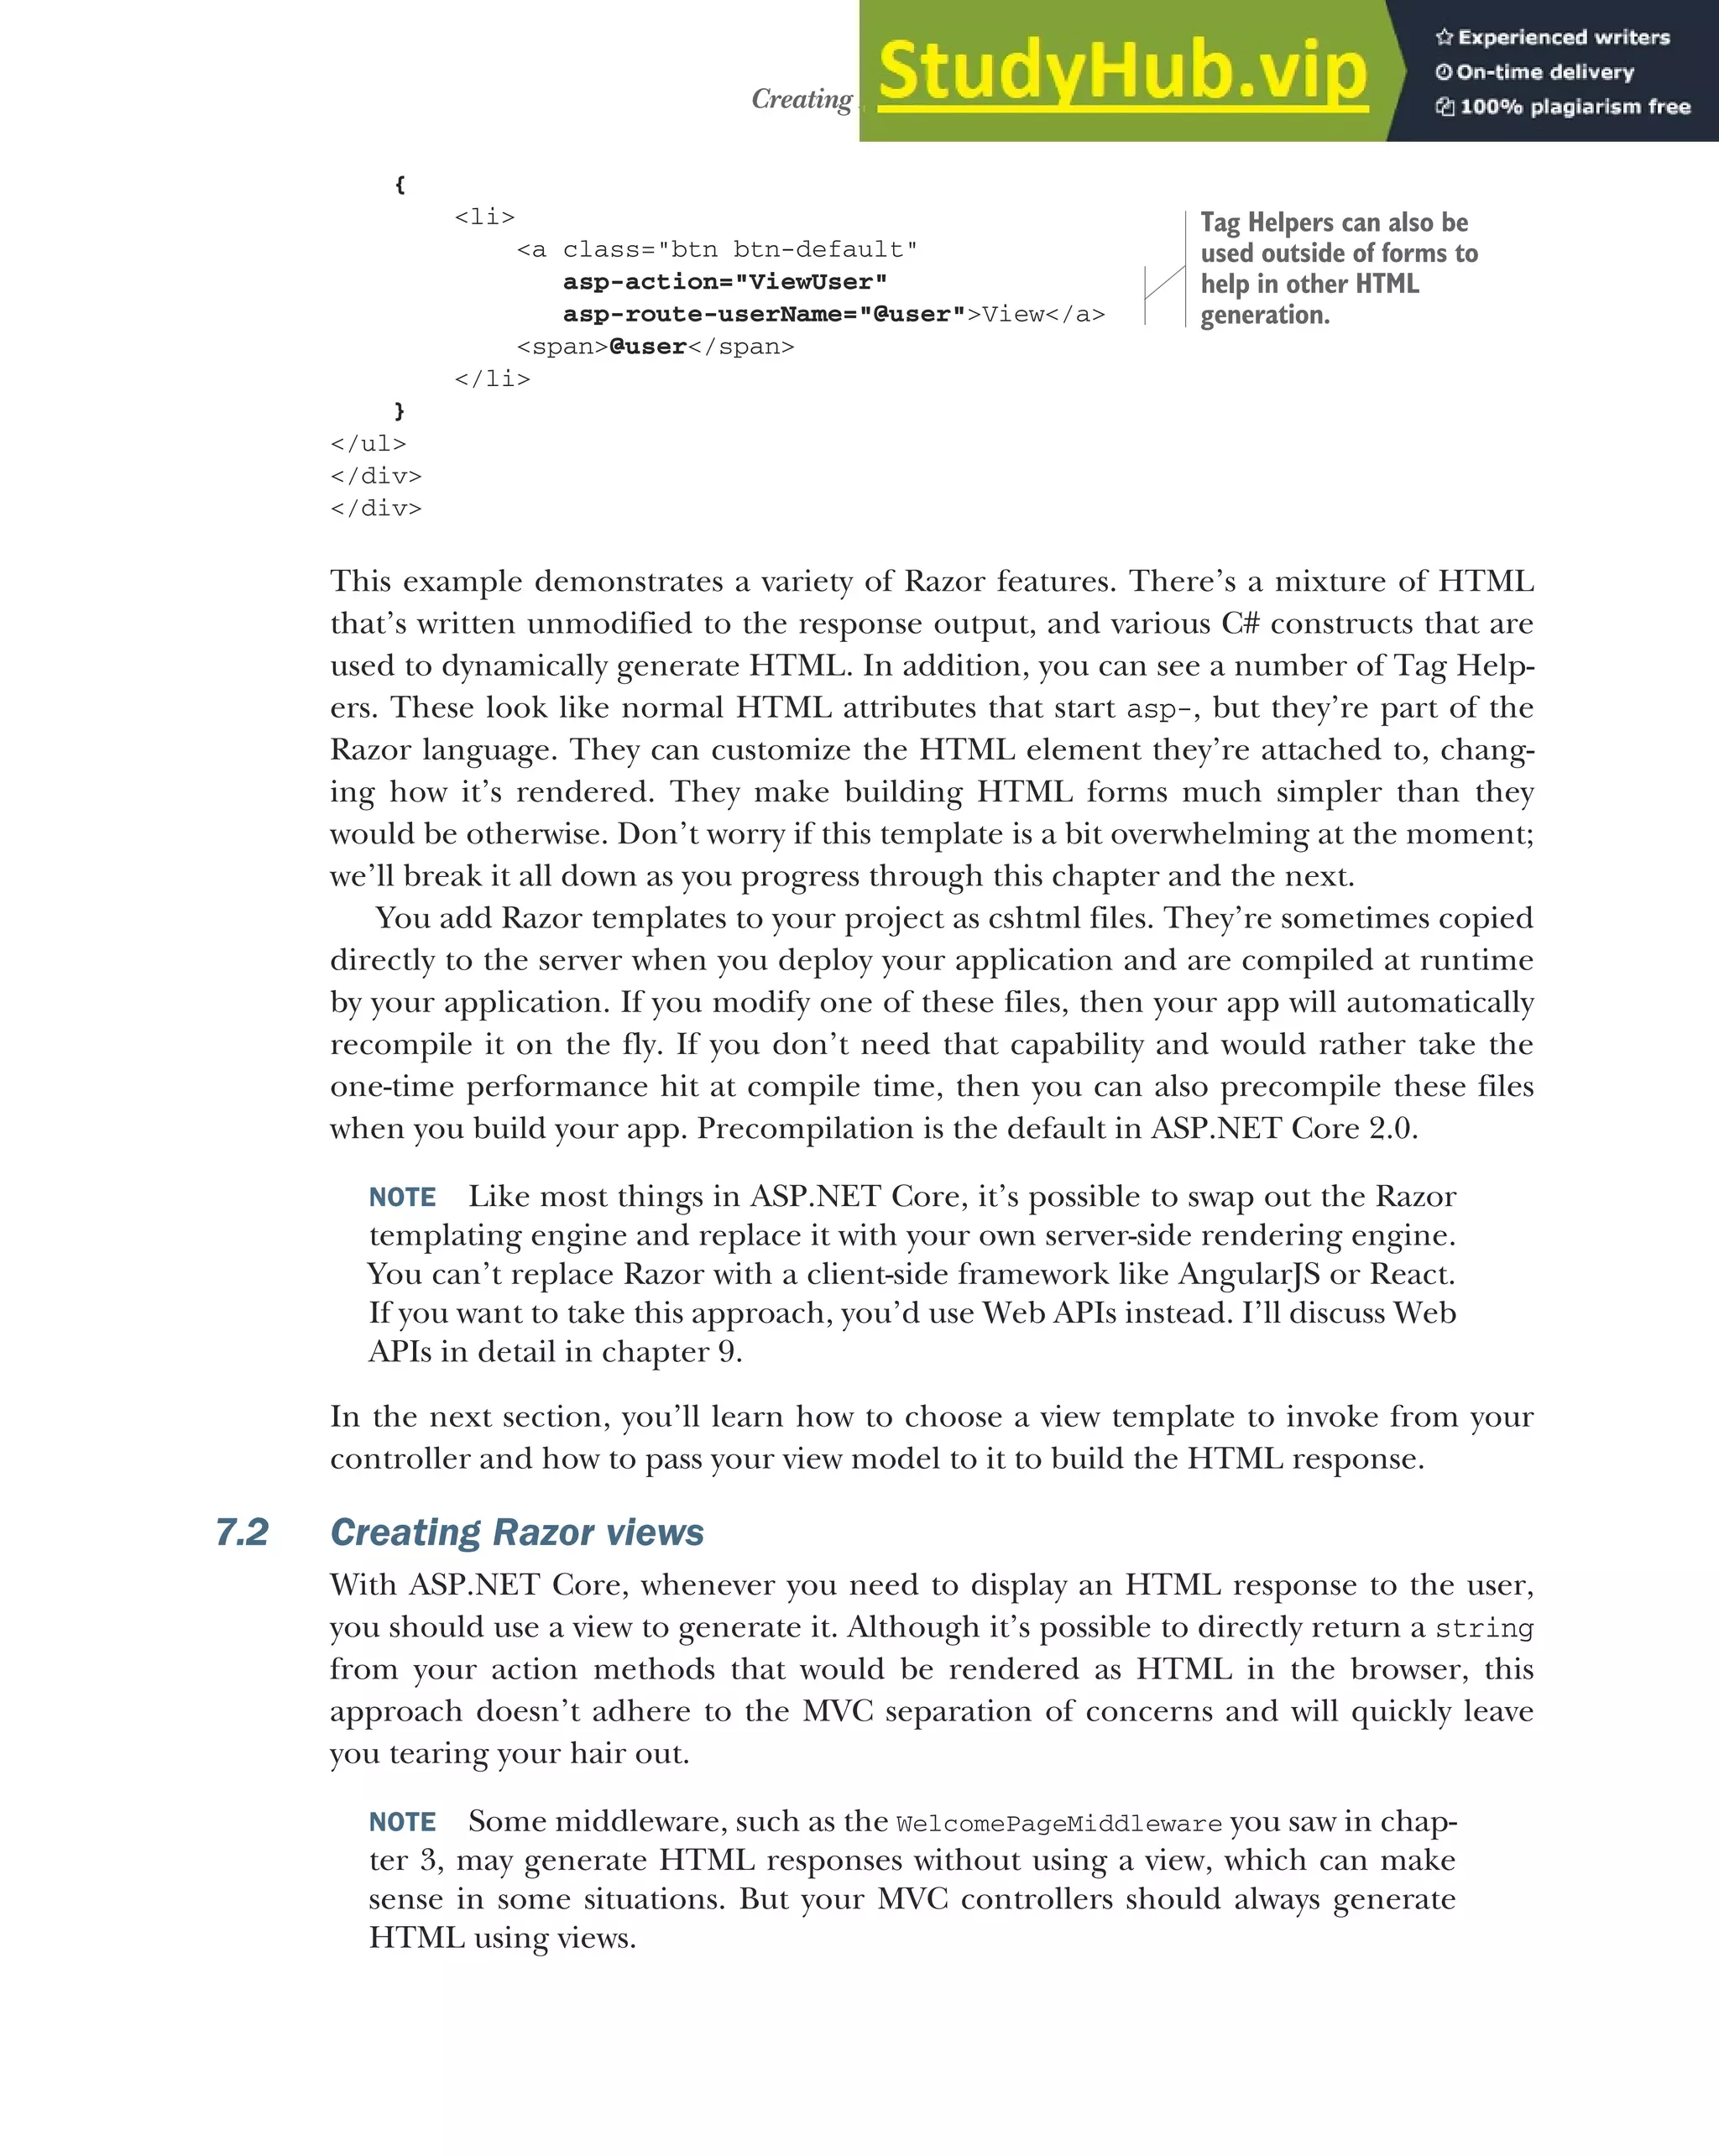
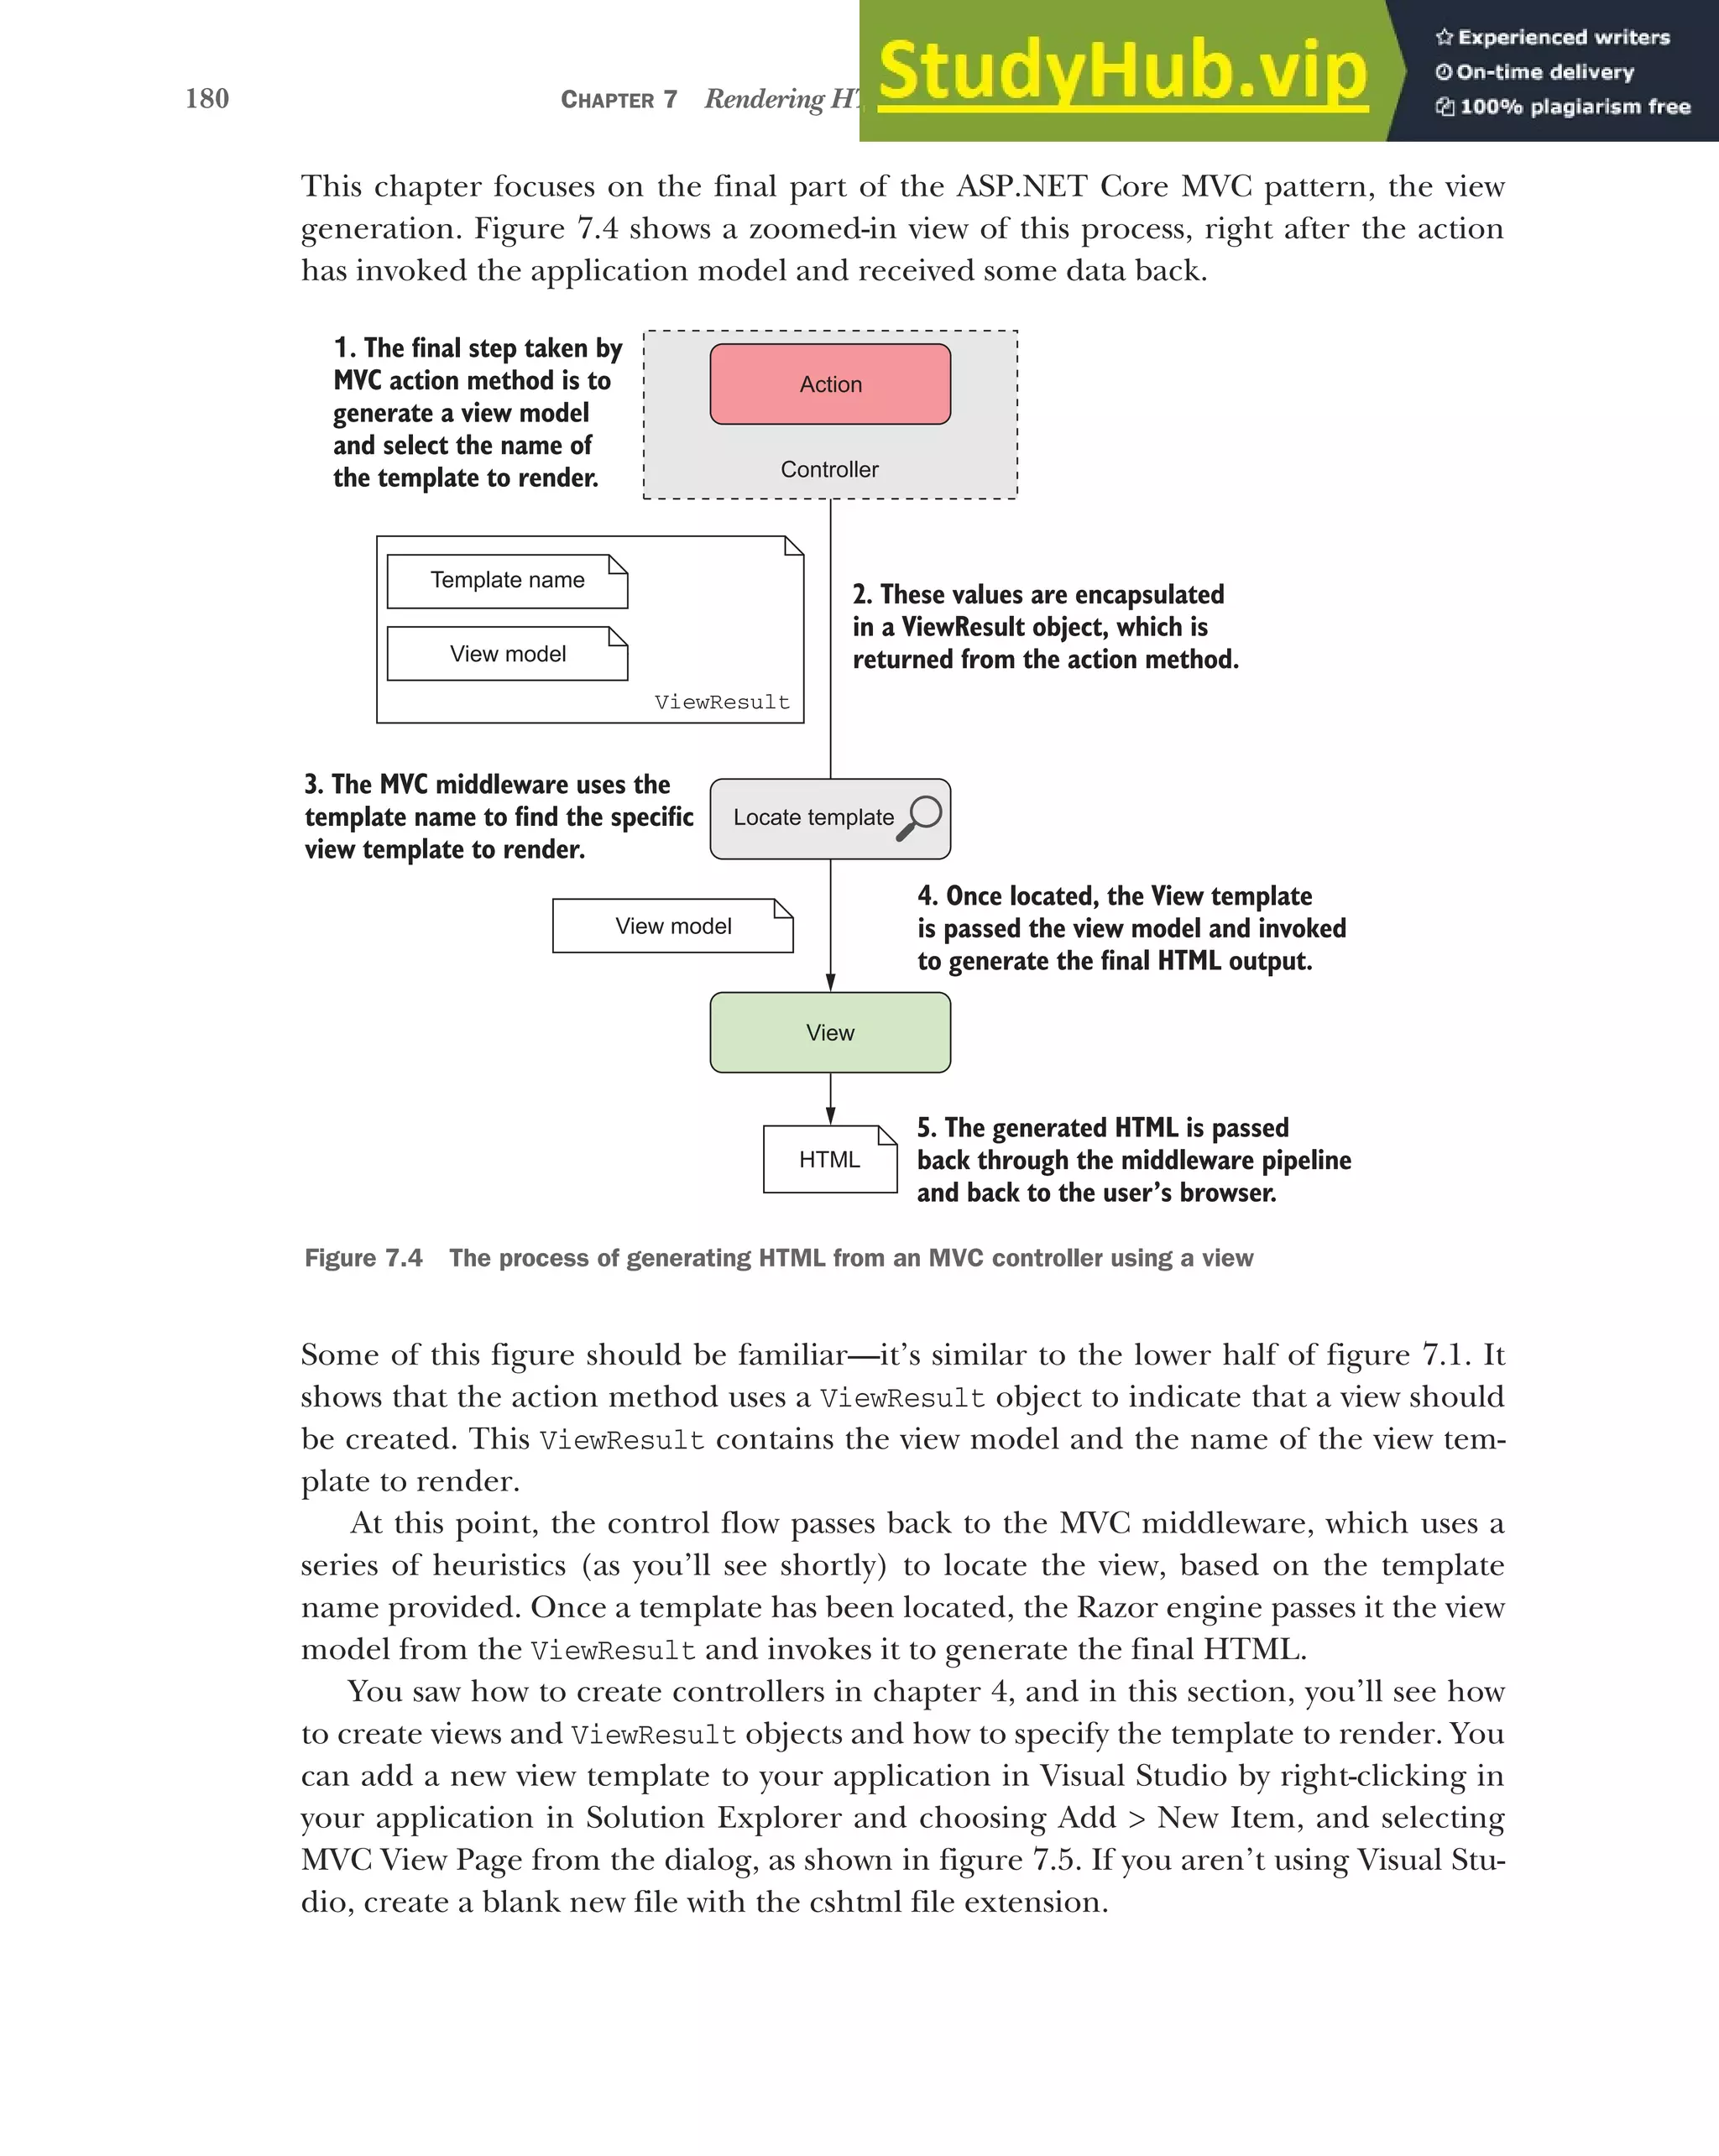

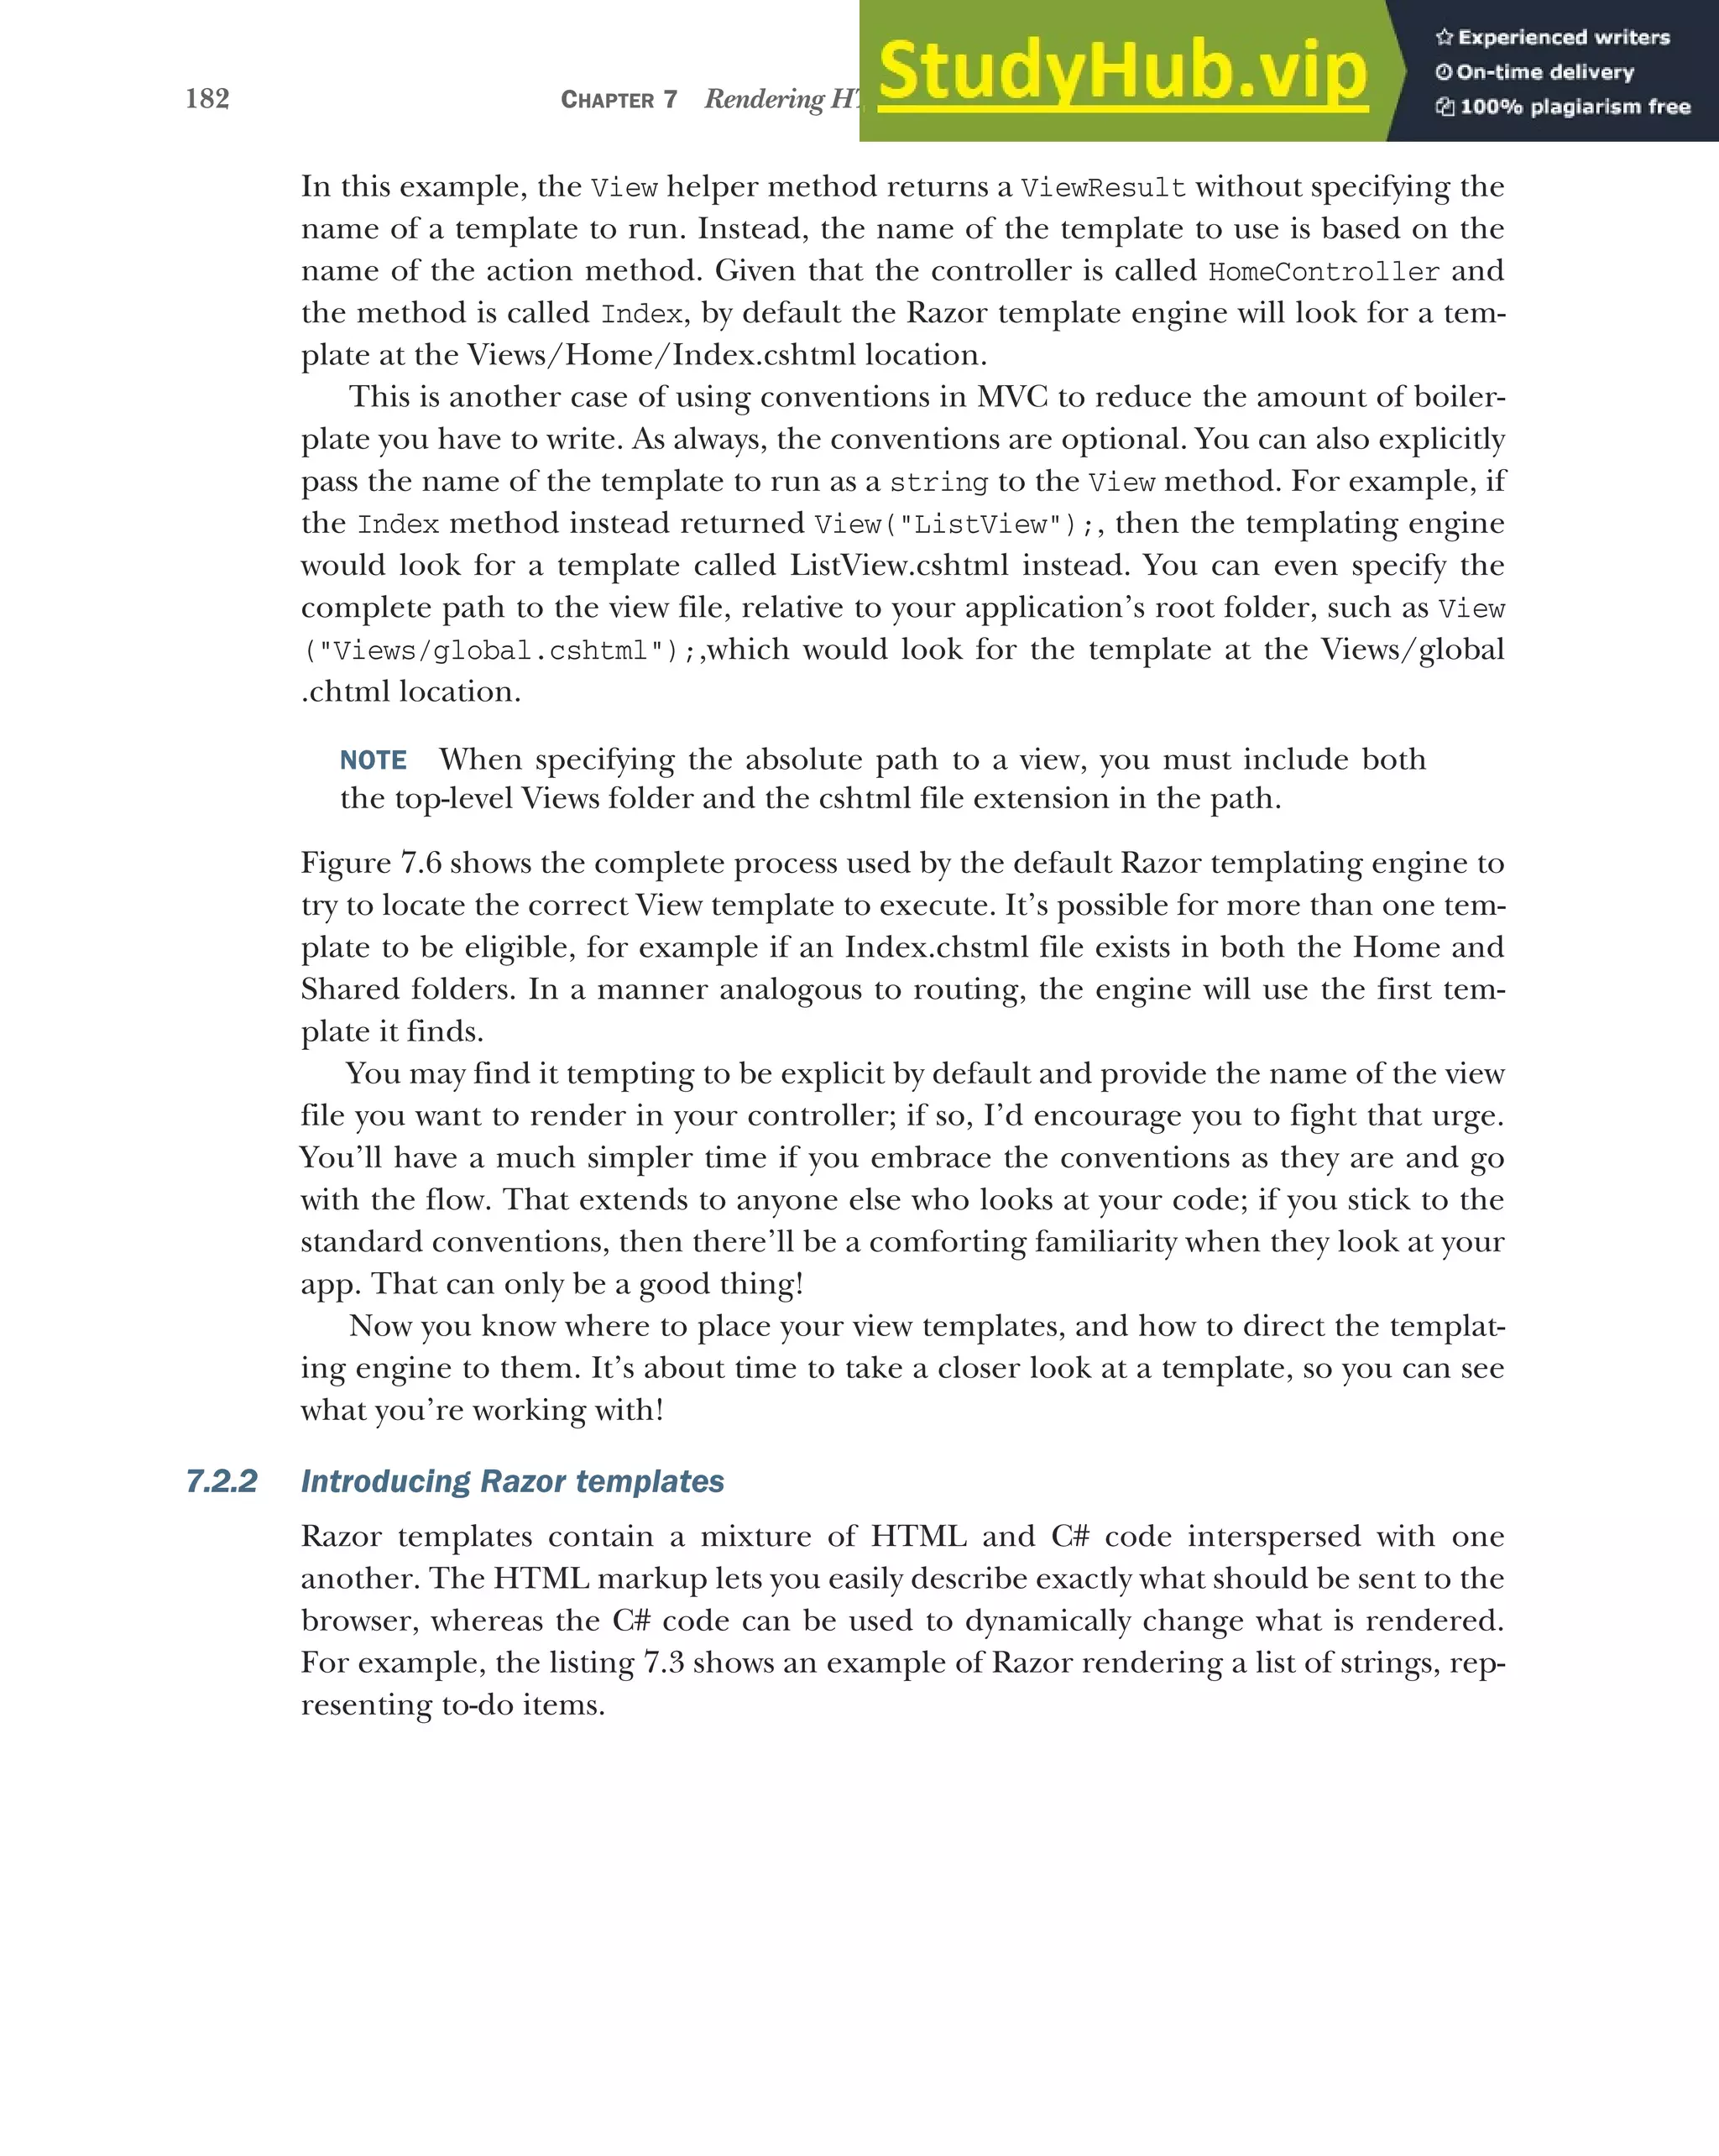

![184 CHAPTER 7 Rendering HTML using Razor views
<h1>Tasks to complete</h1>
<ul>
@for(var i=0; i< tasks.Count; i++)
{
var task = tasks[i];
<li>@i - @task</li>
}
</ul>
The pure HTML sections in this template are the angle brackets. The Razor engine
copies this HTML directly to the output, unchanged, as though you were writing a
normal HTML file.
As well as HTML, you can also see a number of C# statements in there. The advan-
tage of being able to, for example, use a for loop rather than having to explicitly write
out each <li> element should be self-evident. I’ll dive a little deeper into more of the
C# features of Razor in the next section. When rendered, this template would pro-
duce the HTML shown here.
<h1>Tasks to complete</h1>
<ul>
<li>0 - Buy milk</li>
<li>1 - Buy eggs</li>
<li>2 - Buy bread</li>
</ul>
As you can see, the final output of a Razor template after it’s been rendered is simple
HTML. There’s nothing complicated left, just straight markup that can be sent to the
browser and rendered. Figure 7.7 shows how a browser would render it.
Listing 7.4 HTML output produced by rendering a Razor template
Standard HTML markup will be
rendered to the output unchanged.
Mixing C# and HTML
allows you to dynamically
create HTML at runtime.
HTML from the Razor template is
written directly to the output.
The <li> elements are generated
dynamically based on the data.
HTML from the Razor template is
written directly to the output.
The data to display is defined in C# .
Razor markup describes how to display this
data using a mixture of HTML and C#.
By combining the C# object data
with the Razor markup, HTML can
be generated dynamically, instead
of being fixed at compile time.
<h1>Tasks to complete</h1>
<ul>
@for(var i=0; i<tasks.Count; i++)
{
var task = tasks[i];
<li>@i - @task</li>
}
</ul>
var tasks = new List<string>
{
'Buy milk',
'Buy eggs',
'Buy bread'
}
Figure 7.7 Razor templates can be used to generate the HTML dynamically at runtime from C# objects.](https://image.slidesharecdn.com/asp-230807173723-31e70040/75/ASP-NET-Core-in-Action-2018-pdf-212-2048.jpg)
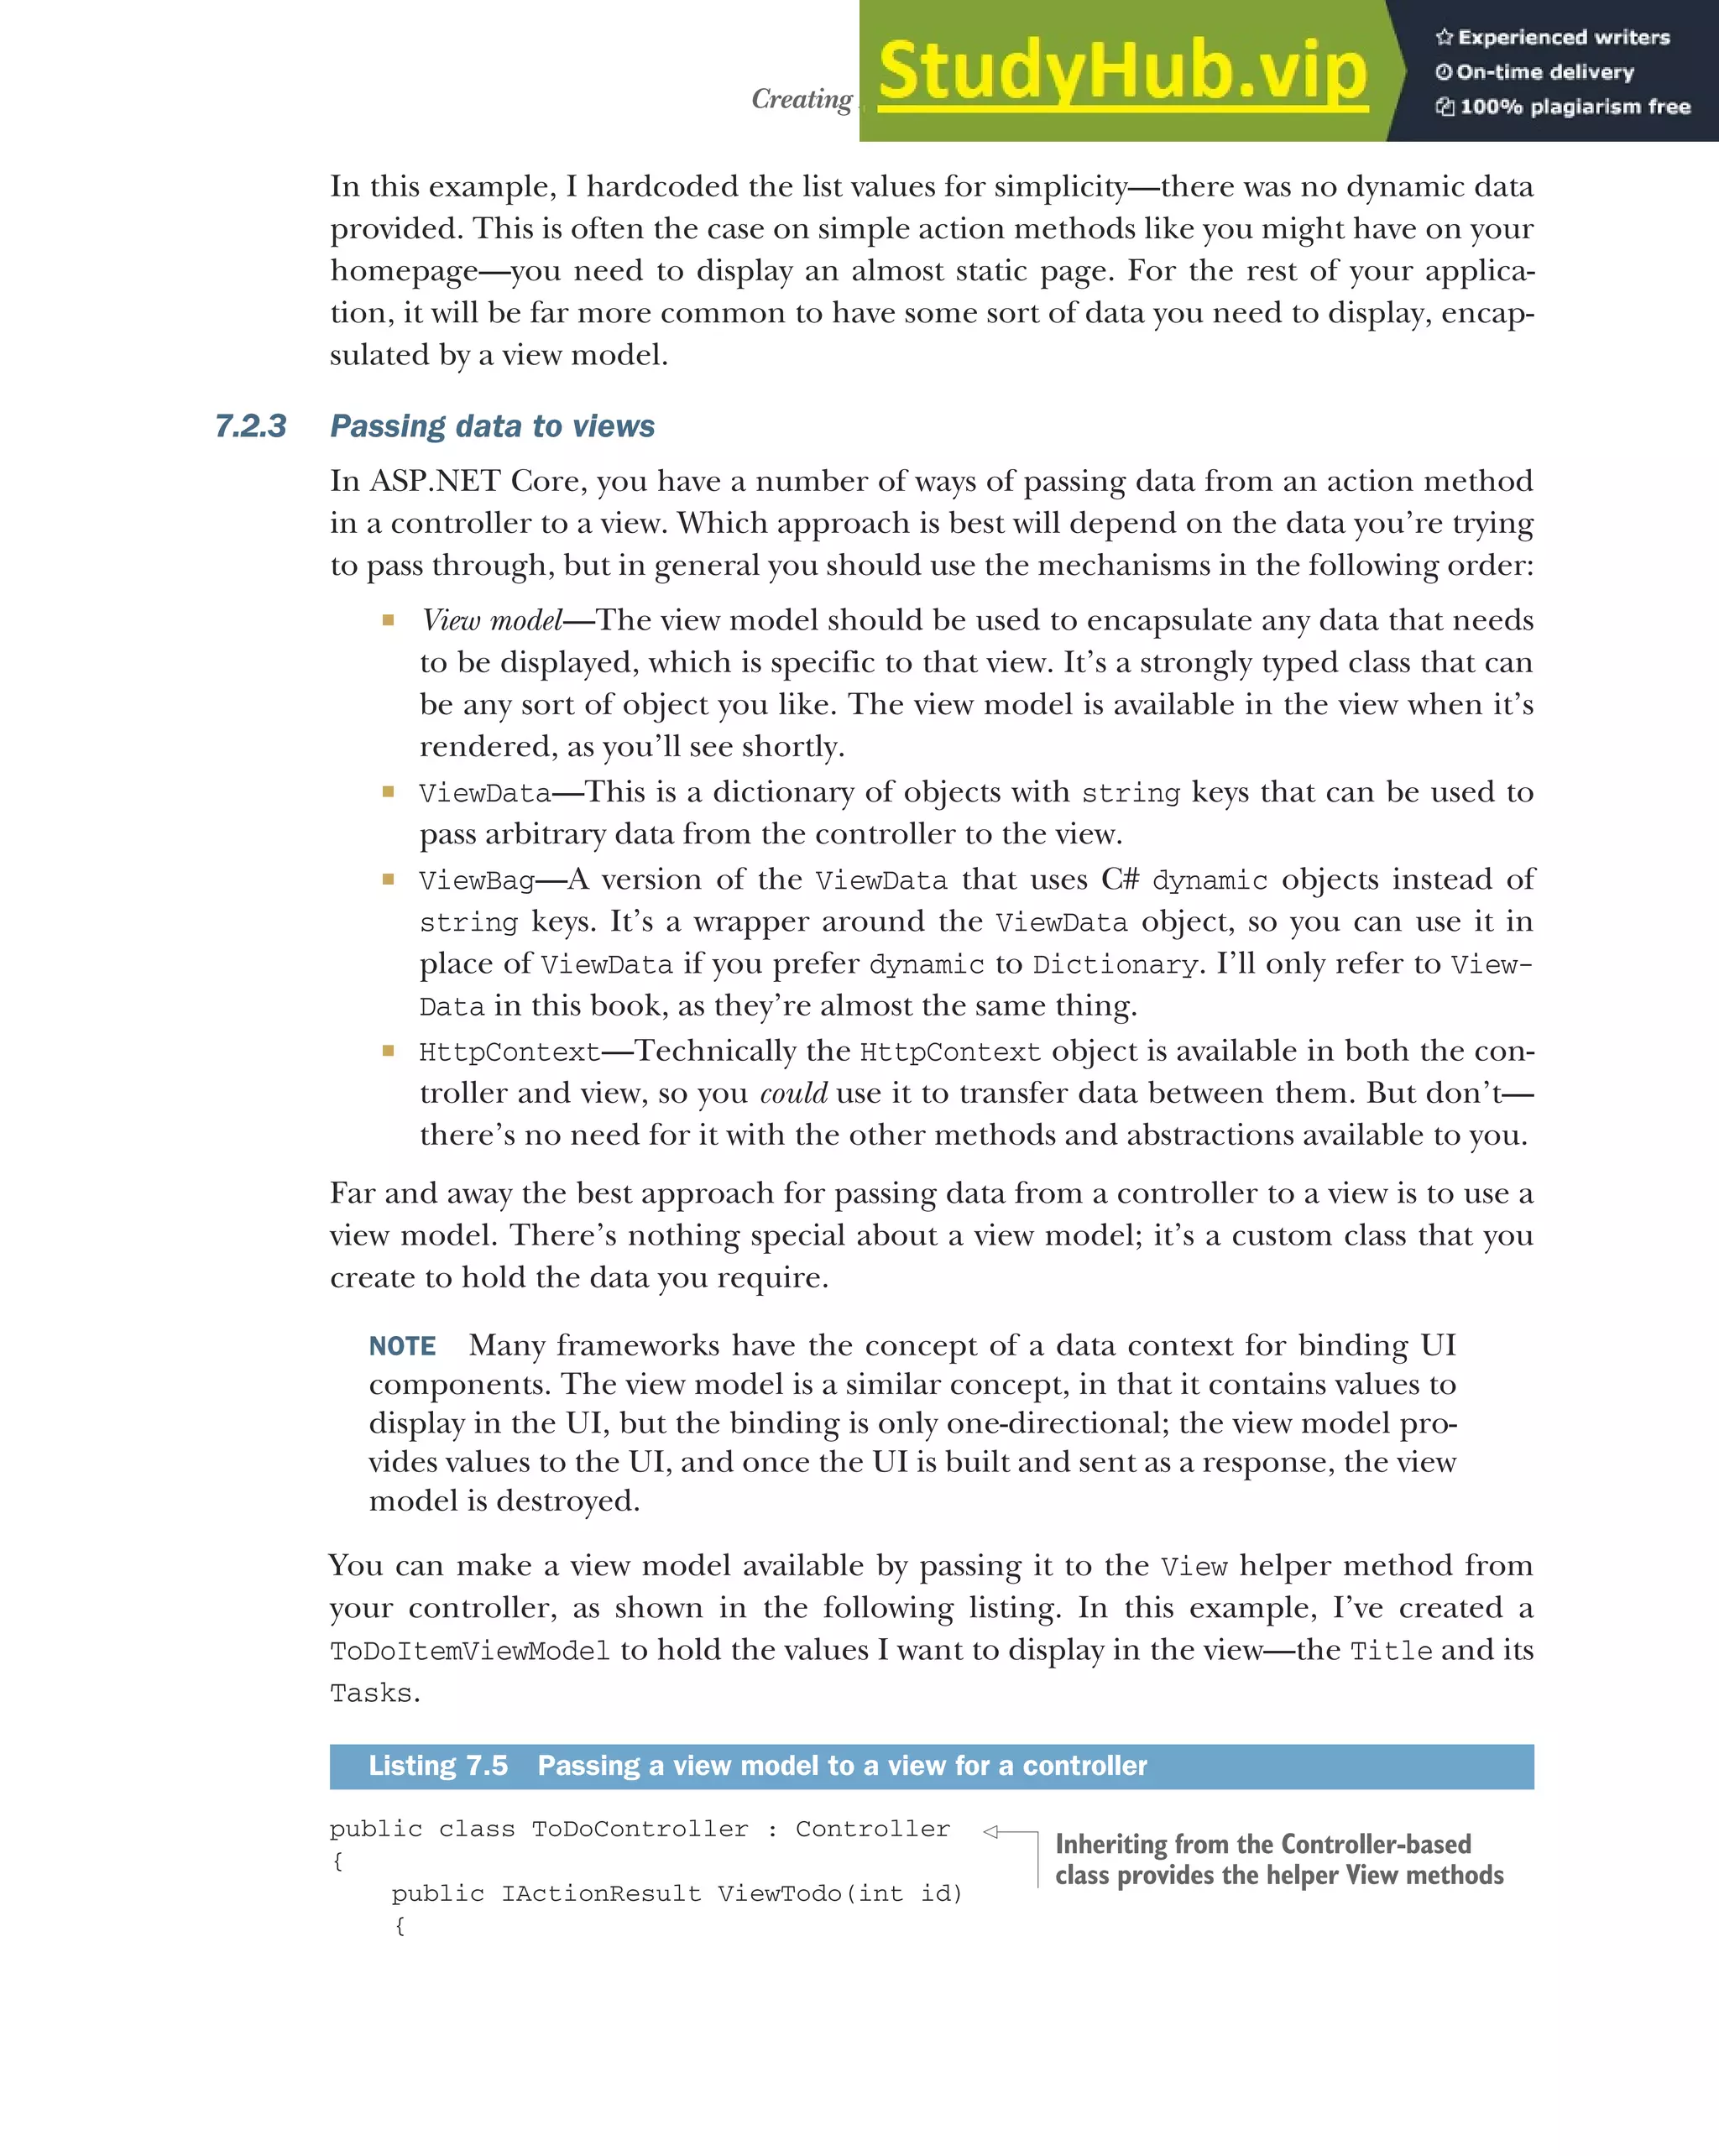
![186 CHAPTER 7 Rendering HTML using Razor views
var viewModel = new ToDoItemViewModel
{
Title = "Tasks for today",
Tasks = new List<string>{
{
"Get fuel",
"Check oil",
"Check tyre pressure"
}
};
return View(viewModel);
}
}
By passing it to the View method, the viewModel instance will be available in the tem-
plate, allowing you to access the values it contains from the view template. All that’s
required is to add an @model directive at the top of your template so that it knows the
Type of the view model it should expect:
@model ToDoItemViewModel
DEFINITION A directive is a statement in a Razor file that changes the way the
template is parsed or compiled. Another common directive is the @using
newNamespace directive, which would make objects in the newNamespace name-
space available.
Once you’ve added this directive, you can access any of the data on the todoModel you
provided, using the Model property. For example, to display the Title property from
the ToDoItemViewModel, you’d use <h1>@Model.Title</h1>. This would render the
string provided on the original viewModel object, producing the <h1>Tasks for
today</h1> HTML.
TIP Note that the @model directive should be at the top of your view, and has
a lowercase m. The Model property can be accessed anywhere in the view and
has an uppercase M.
In the vast majority of cases, using a view model is the way to go; it’s the standard mech-
anism for passing data between the controller and the view. But in some circumstances,
a view model may not be the best fit. This is often the case when you want to pass data
between view layouts (you’ll see how this works in the last section of this chapter).
A common example is the title of the page. You need to provide a title for every
page, so you could create a base class with a Title property and make all your view
models inherit from it. But that’s a little cumbersome, so a common approach for this
situation is to use the ViewData collection to pass data around.
In fact, the standard MVC templates use this approach by default rather than using
view models by setting values in the ViewData dictionary from within the action methods:
public IActionResult Contact()
{
ViewData["Message"] = "Your contact page.";
Building a view model: this would
normally call out to a database or
filesystem to load the data.
Creates a ViewResult that looks for a view
called ViewTodo, and passes it the viewModel](https://image.slidesharecdn.com/asp-230807173723-31e70040/75/ASP-NET-Core-in-Action-2018-pdf-214-2048.jpg)
![187
Creating dynamic web pages with Razor
return View();
}
They’re then displayed in the template using
<h3>@ViewData["Message"]</h3>
NOTE Personally, I don’t agree with the default approach in the templates—
the message being presented is integral to the page, so it should probably be
part of a view model.
You can also set values on the ViewData dictionary from within the view itself:
@{
ViewData["Title"] = "About";
}
<h2>@ViewData["Title"].</h2>
This template sets the value of the "Title" key in the ViewData dictionary to "About"
and then fetches the key to render in the template. This might seem superfluous, but
as the ViewData dictionary is shared throughout the request, it makes the title of the
page available in layouts, as you’ll see later. When rendered, this would produce the
following output:
<h2>About.</h2>
TIP Create a set of global, static constants for any ViewData keys, and refer-
ence those instead of typing "Title" repeatedly. You’ll get IntelliSense for
the values, they’ll be refactor-safe, and you’ll avoid hard-to-spot typos.
As I mentioned previously, there are other mechanisms besides view models and
ViewData that you can use to pass data around, but these two are the only ones I use
personally, as you can do everything you need with them.
You’ve had a small taste of the power available to you in Razor templates, but in the
next section, I’d like to dive a little deeper into some of the available C# capabilities.
7.3 Creating dynamic web pages with Razor
You might be glad to know that pretty much anything you can do in C# is possible in
Razor syntax. Under the covers, the cshtml files are compiled into normal C# code
(with string for the raw HTML sections), so whatever weird and wonderful behavior
you need can be created.
Having said that, just because you can do something doesn’t mean you should.
You’ll find it much easier to work with, and maintain, your files if you keep them as
simple as possible. This is true of pretty much all programming, but I find especially
so with Razor templates.
This section covers some of the more common C# constructs you can use. If you
find you need to achieve something a more exotic, refer to the Razor syntax docu-
mentation at https://docs.microsoft.com/en-us/aspnet/core/mvc/views/razor.](https://image.slidesharecdn.com/asp-230807173723-31e70040/75/ASP-NET-Core-in-Action-2018-pdf-215-2048.jpg)
![188 CHAPTER 7 Rendering HTML using Razor views
7.3.1 Using C# in Razor templates
One of the most common requirements when working with Razor templates is to ren-
der a value you’ve calculated in C# to the HTML. For example, you might want to
print the current year to use with a copyright statement in your HTML, to give
<p>Copyright 2018 ©</p>
or you might want to print the result of a calculation, for example
<p>The sum of 1 and 2 is <i>3</i><p>
You can do this in two ways, depending on the exact C# code you need to execute. If
the code is a single statement, then you can use the @ symbol to indicate you want to
write the result to the HTML output, as shown in figure 7.8. You’ve already seen this
used to write out values from the view model or from ViewData.
If the C# you want to execute is something that needs a space, then you need to use
parentheses to demarcate the C#, as shown in figure 7.9.
These two approaches, in which C# is evaluated and written directly to the HTML out-
put, are called Razor expressions. Sometimes you want to execute some C#, but you
don’t need to output the values. I used this technique when we were setting values in
ViewData:
@{
ViewData["Title"] = "About";
}
<p>Copyright @DateTime.Now.Year ©</p>
@ indicates start of
C# expression
Whitespace indicates
end of C# expression
HTML HTML
C# expression. The result
will be written to the
HTML output.
Figure 7.8 Writing the result of a C#
expression to HTML. The @ symbol
indicates where the C# code begins and
the expression ends at the end of the
statement, in this case at the space.
<p>The sum of 1 and 2 is <i>@(1 + 2)</i></p>
HTML
The whole C# expression within @() is
evaluated and written to the HTML output.
HTML
Figure 7.9 When a C# expression
contains whitespace, you must wrap
it in parentheses using @() so the
Razor engine knows where the C#
stops and HTML begins.](https://image.slidesharecdn.com/asp-230807173723-31e70040/75/ASP-NET-Core-in-Action-2018-pdf-216-2048.jpg)
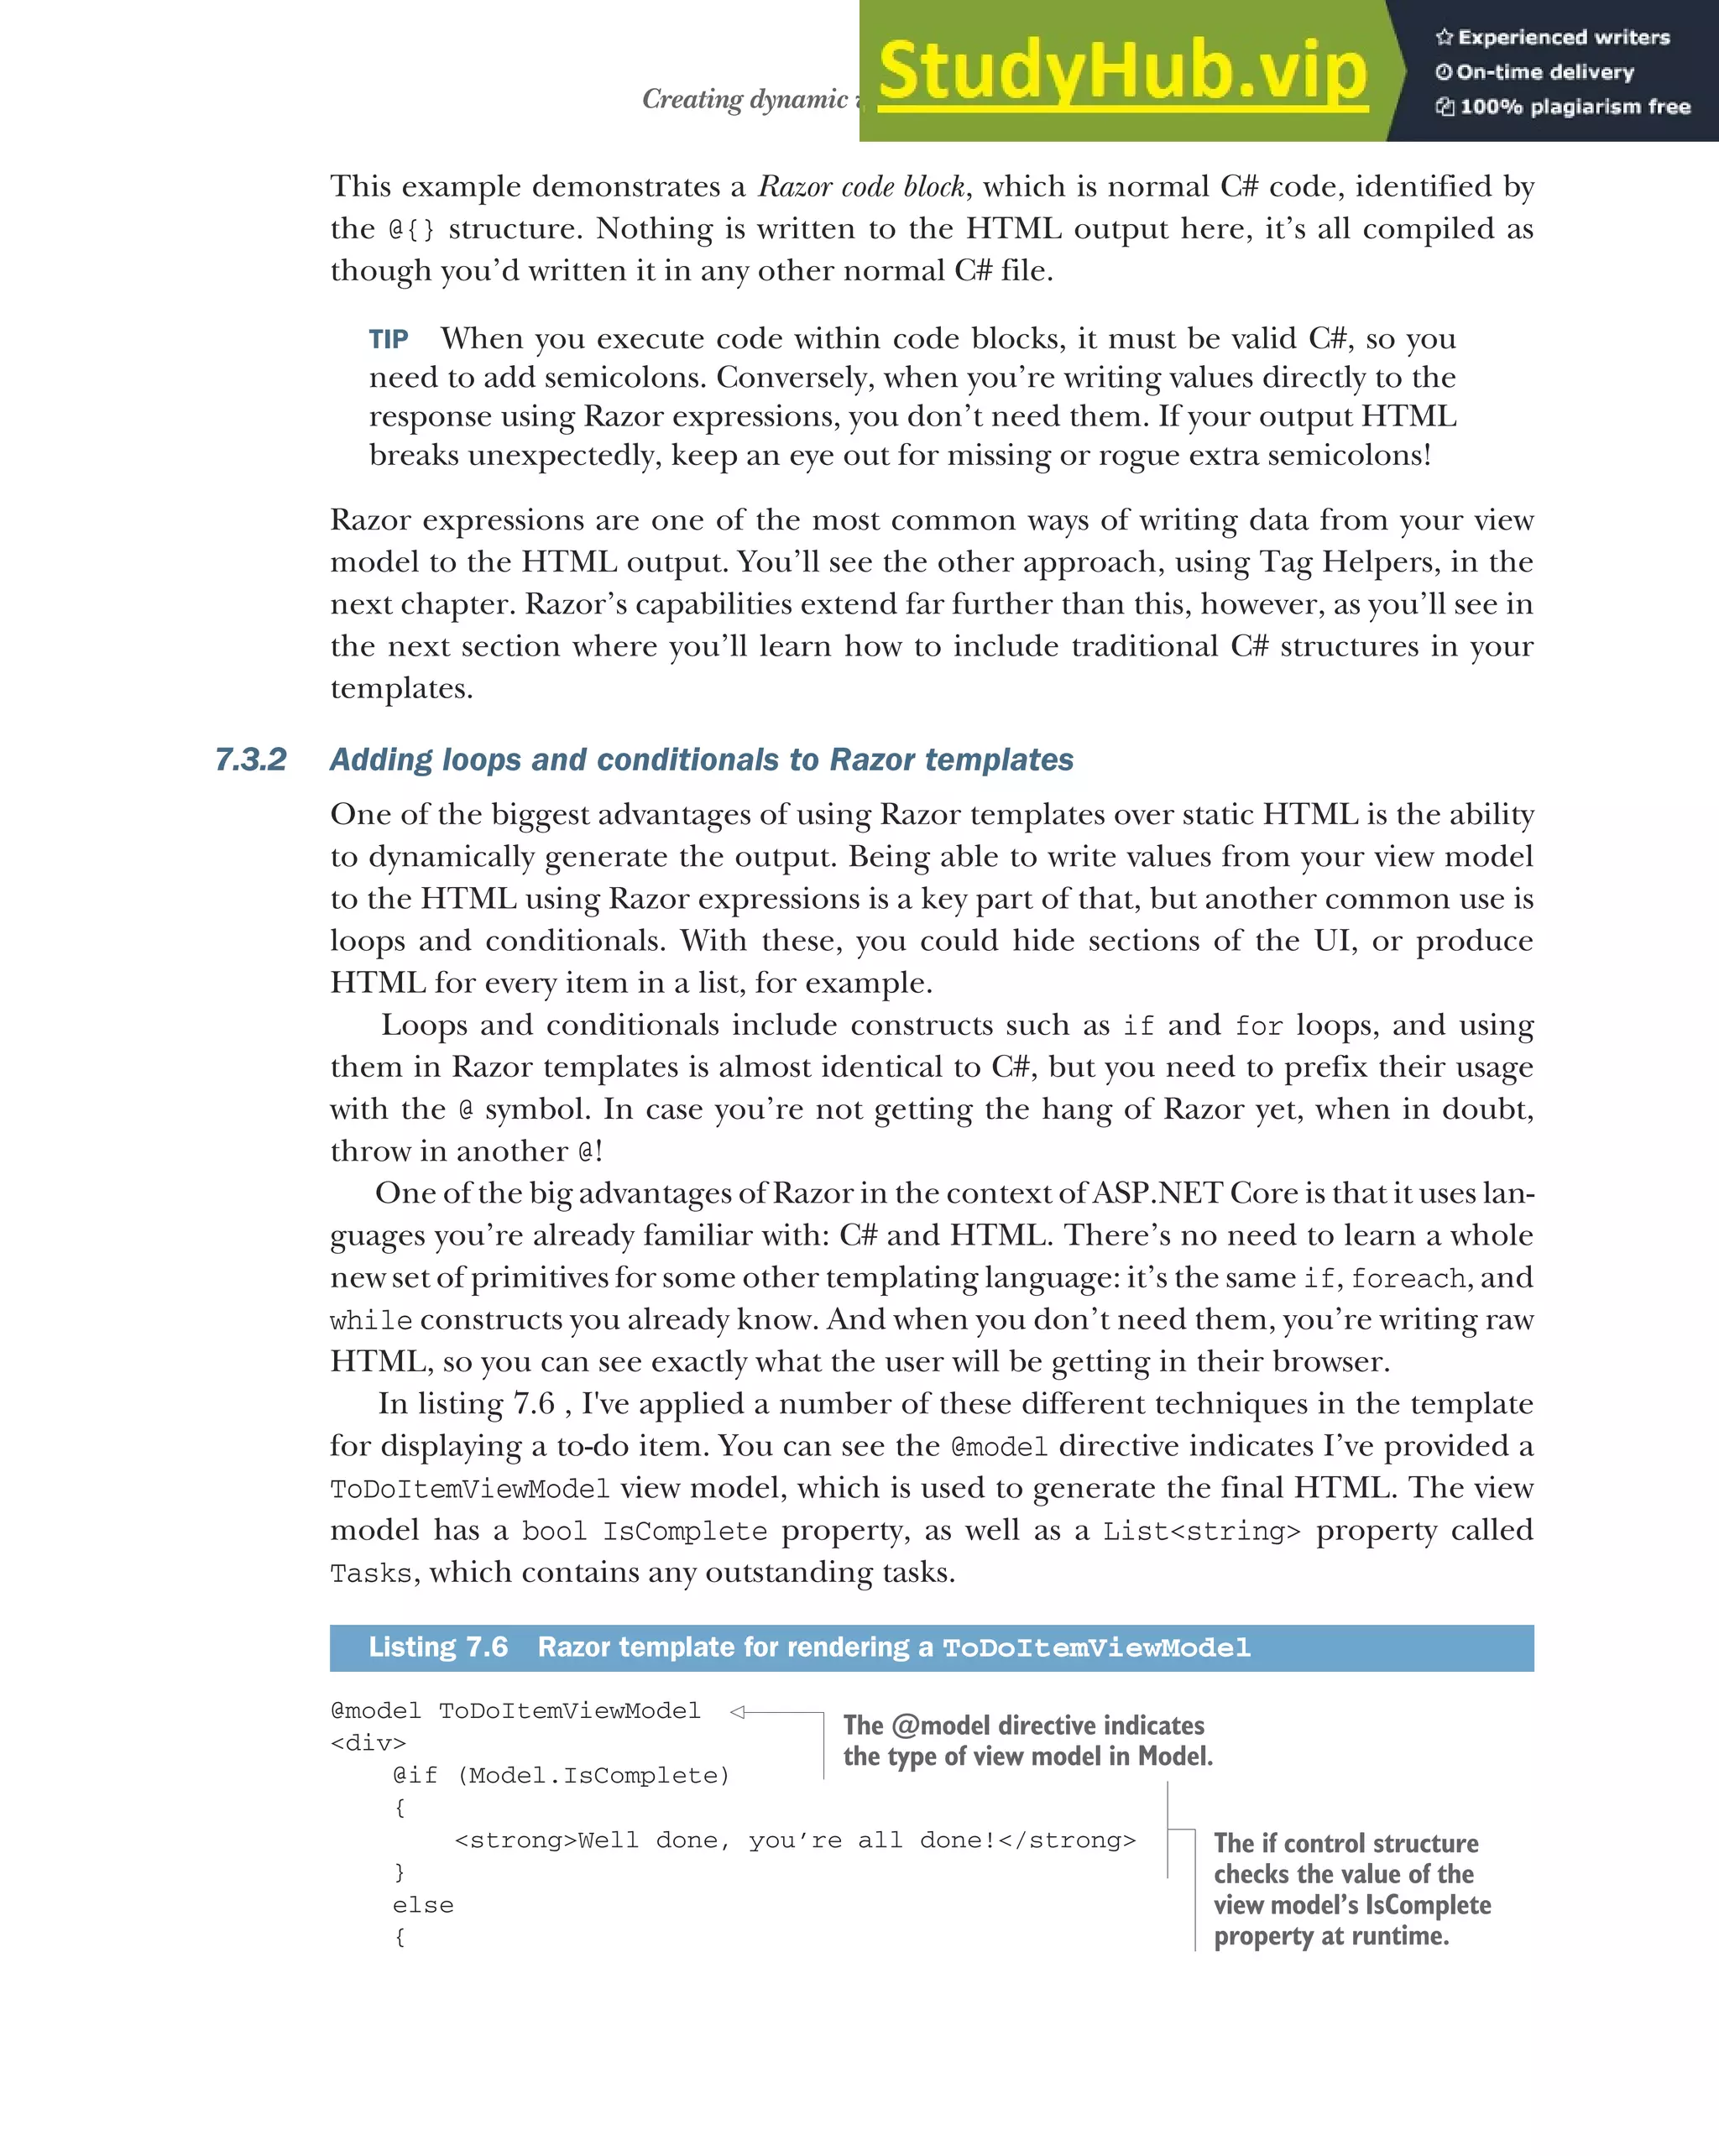

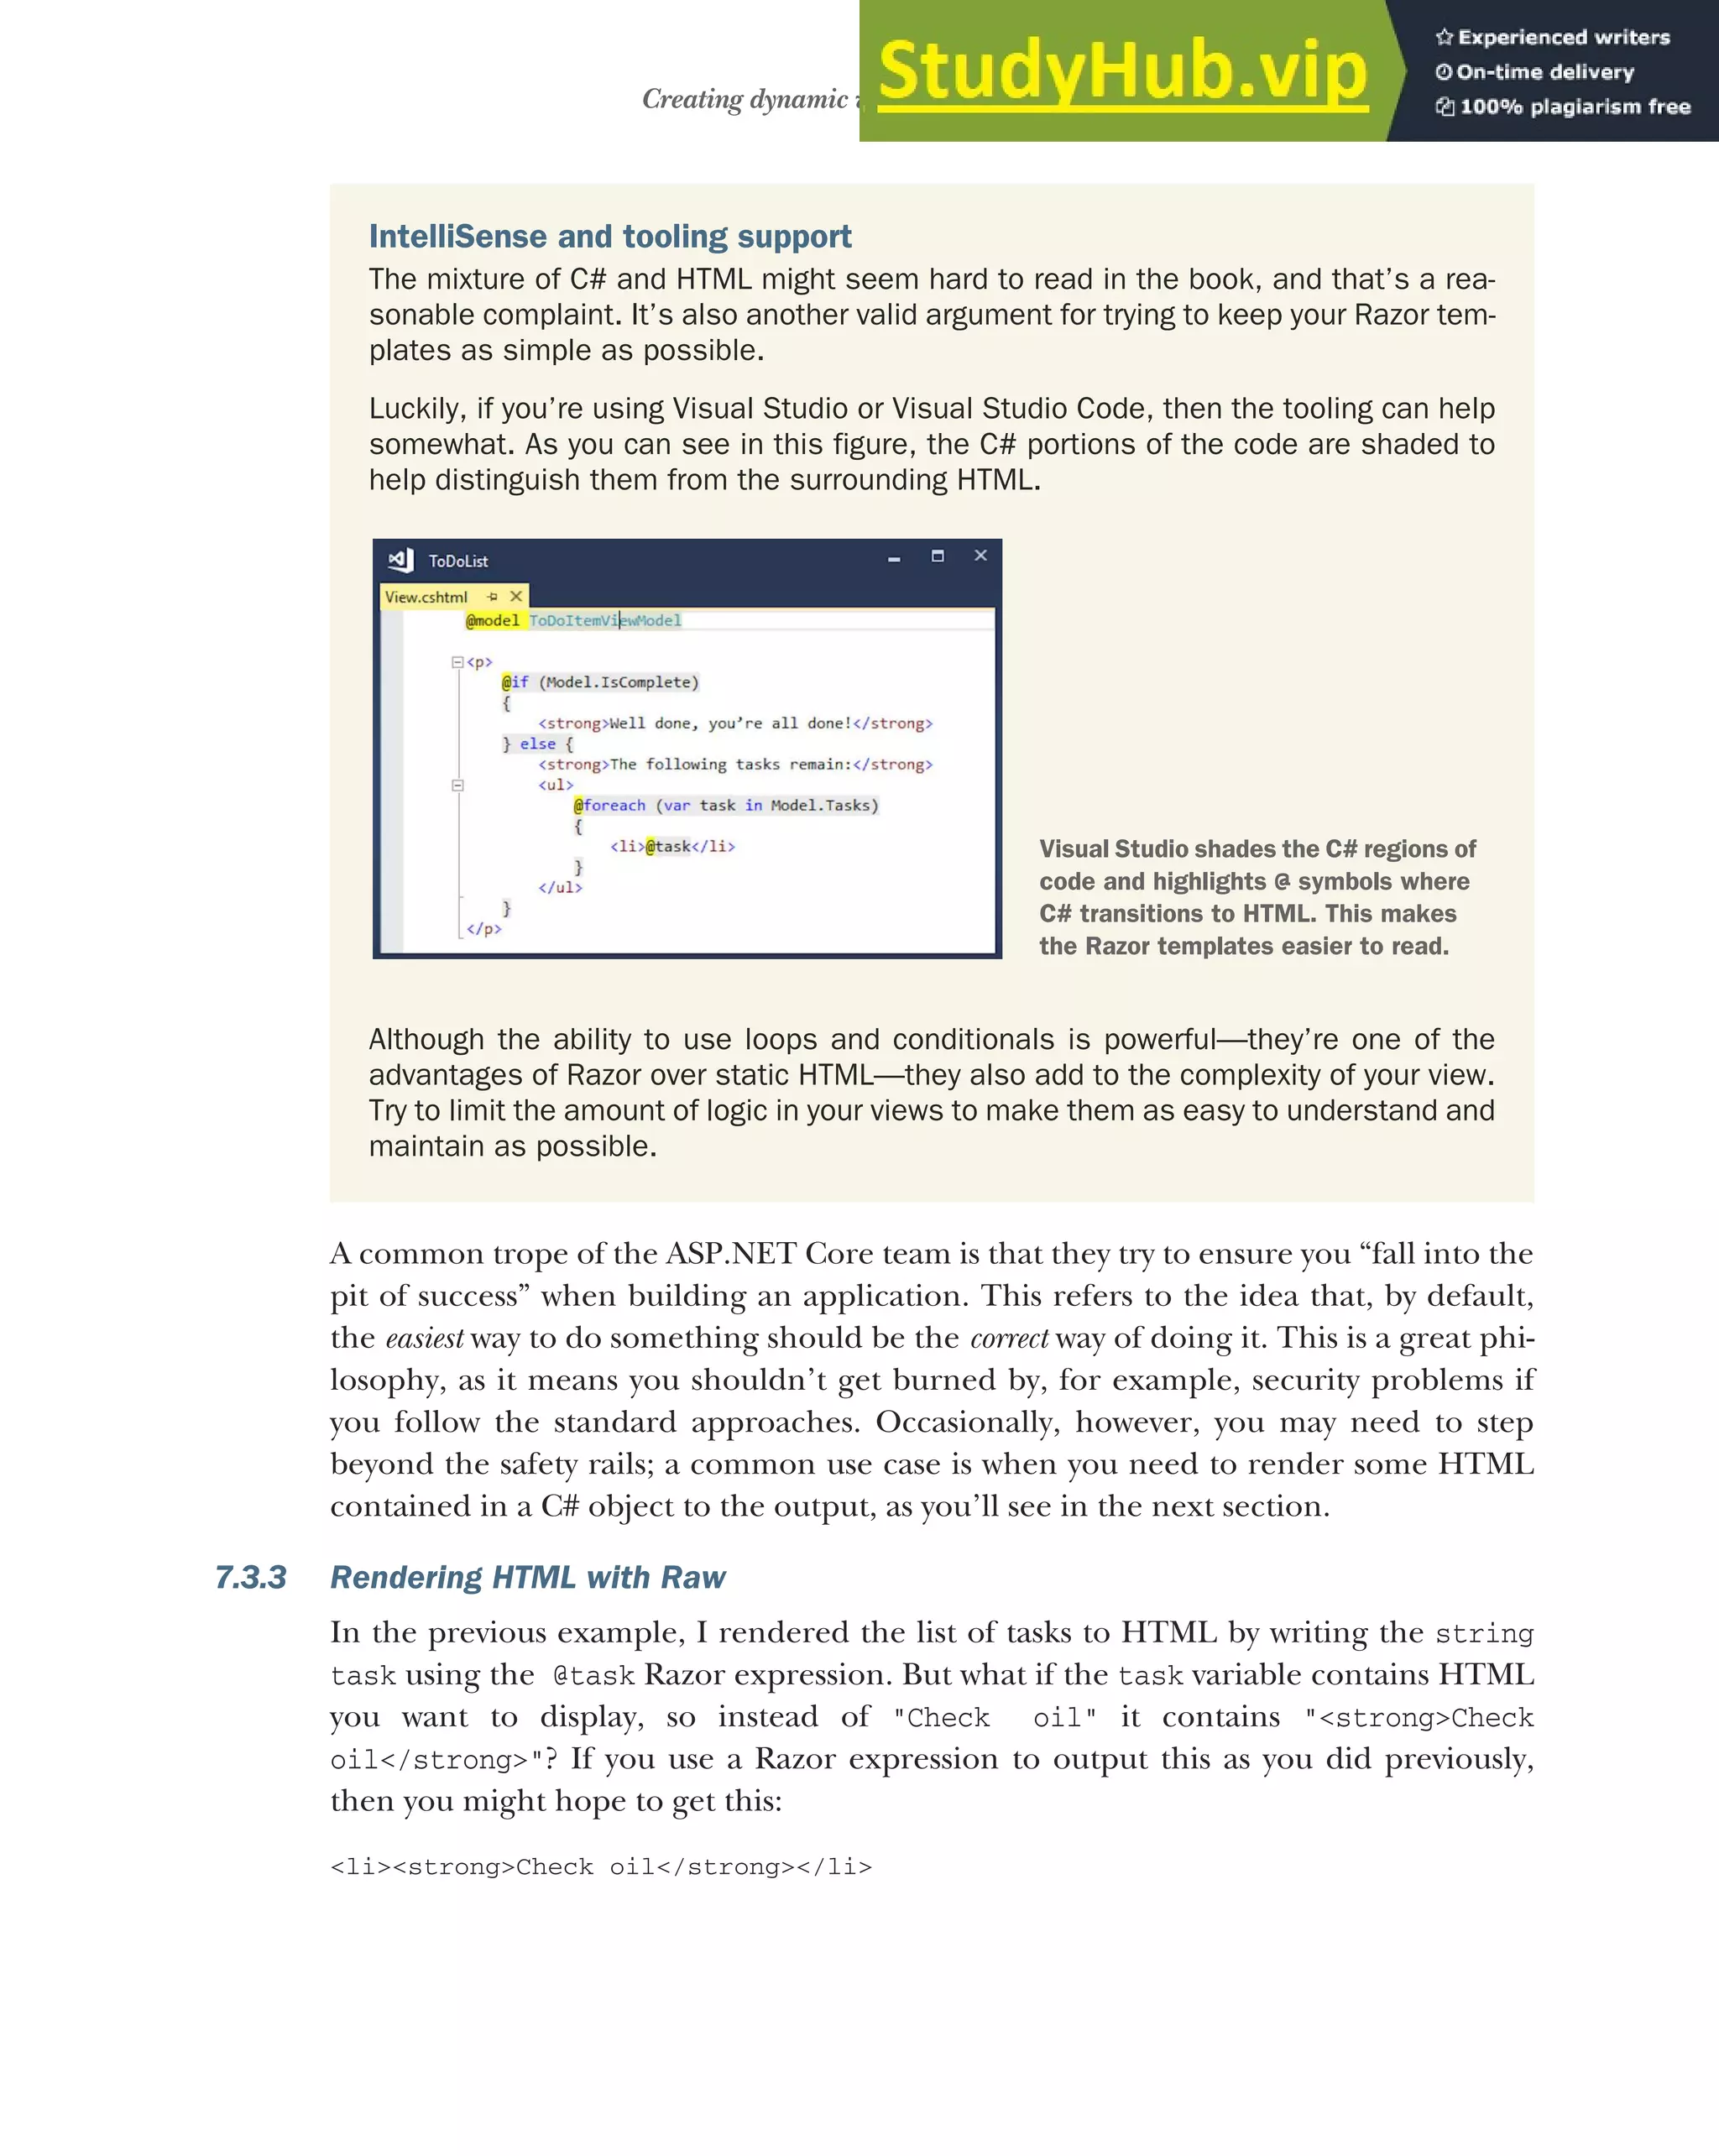
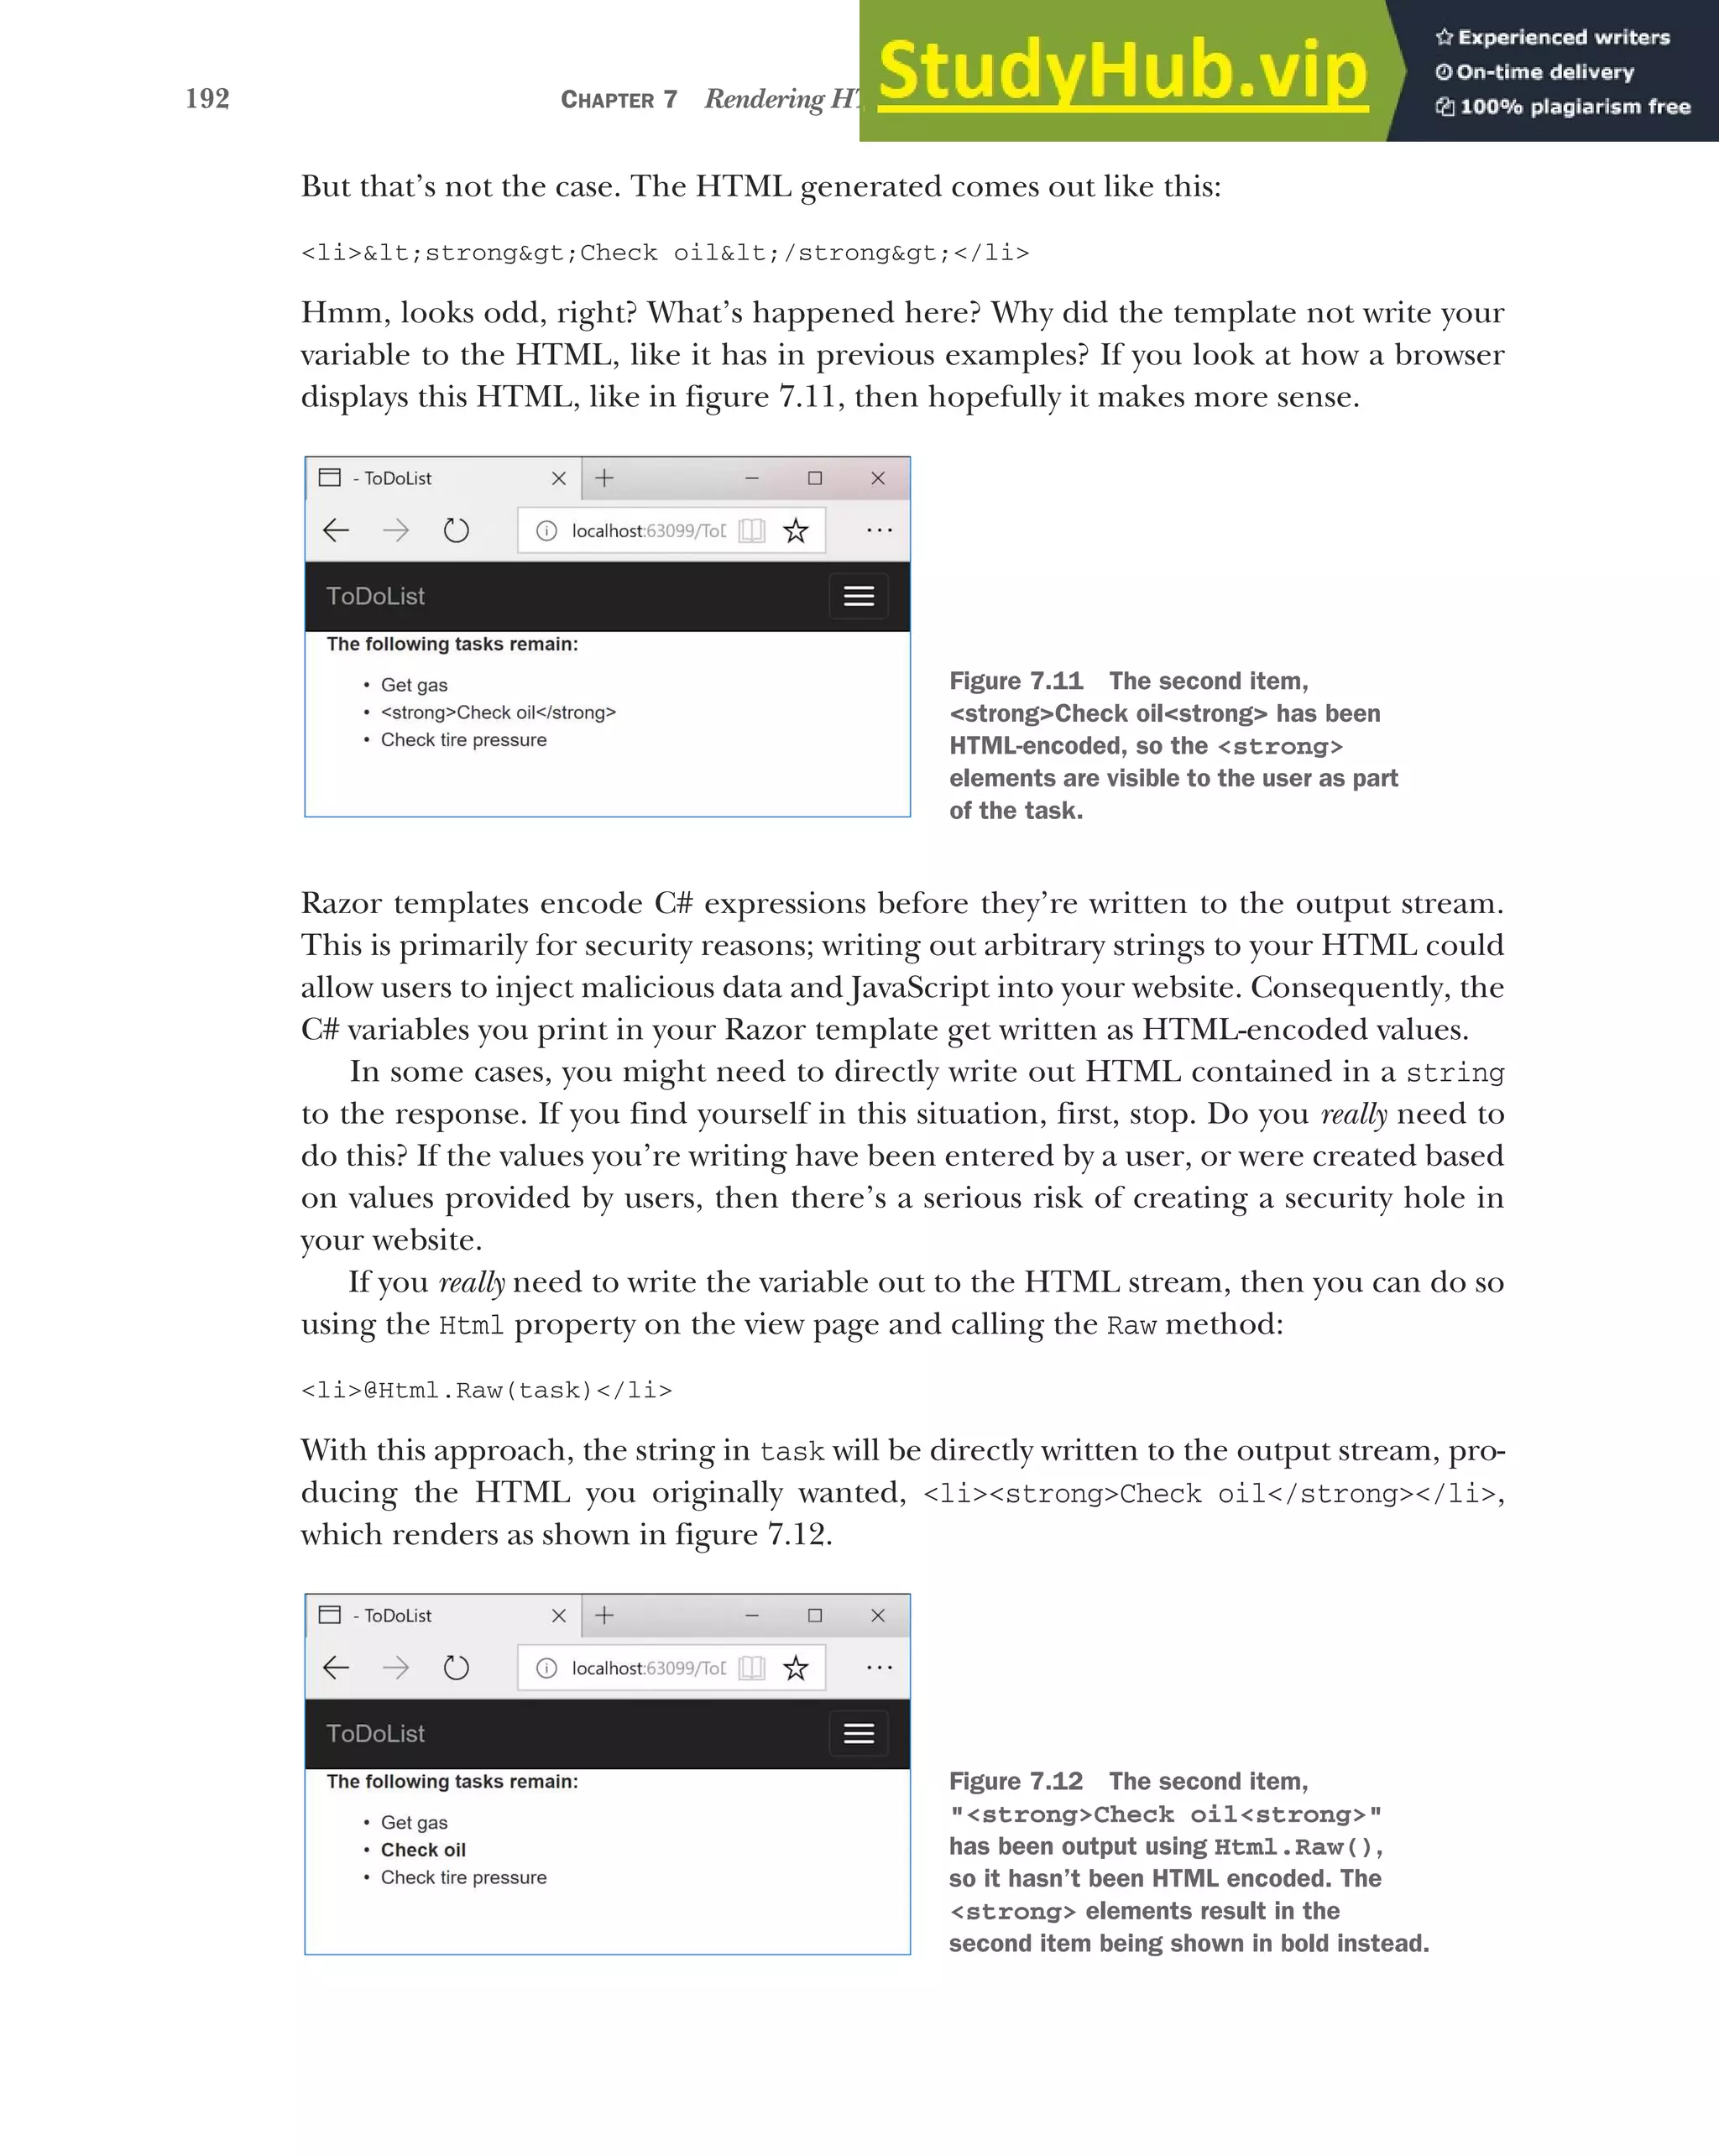
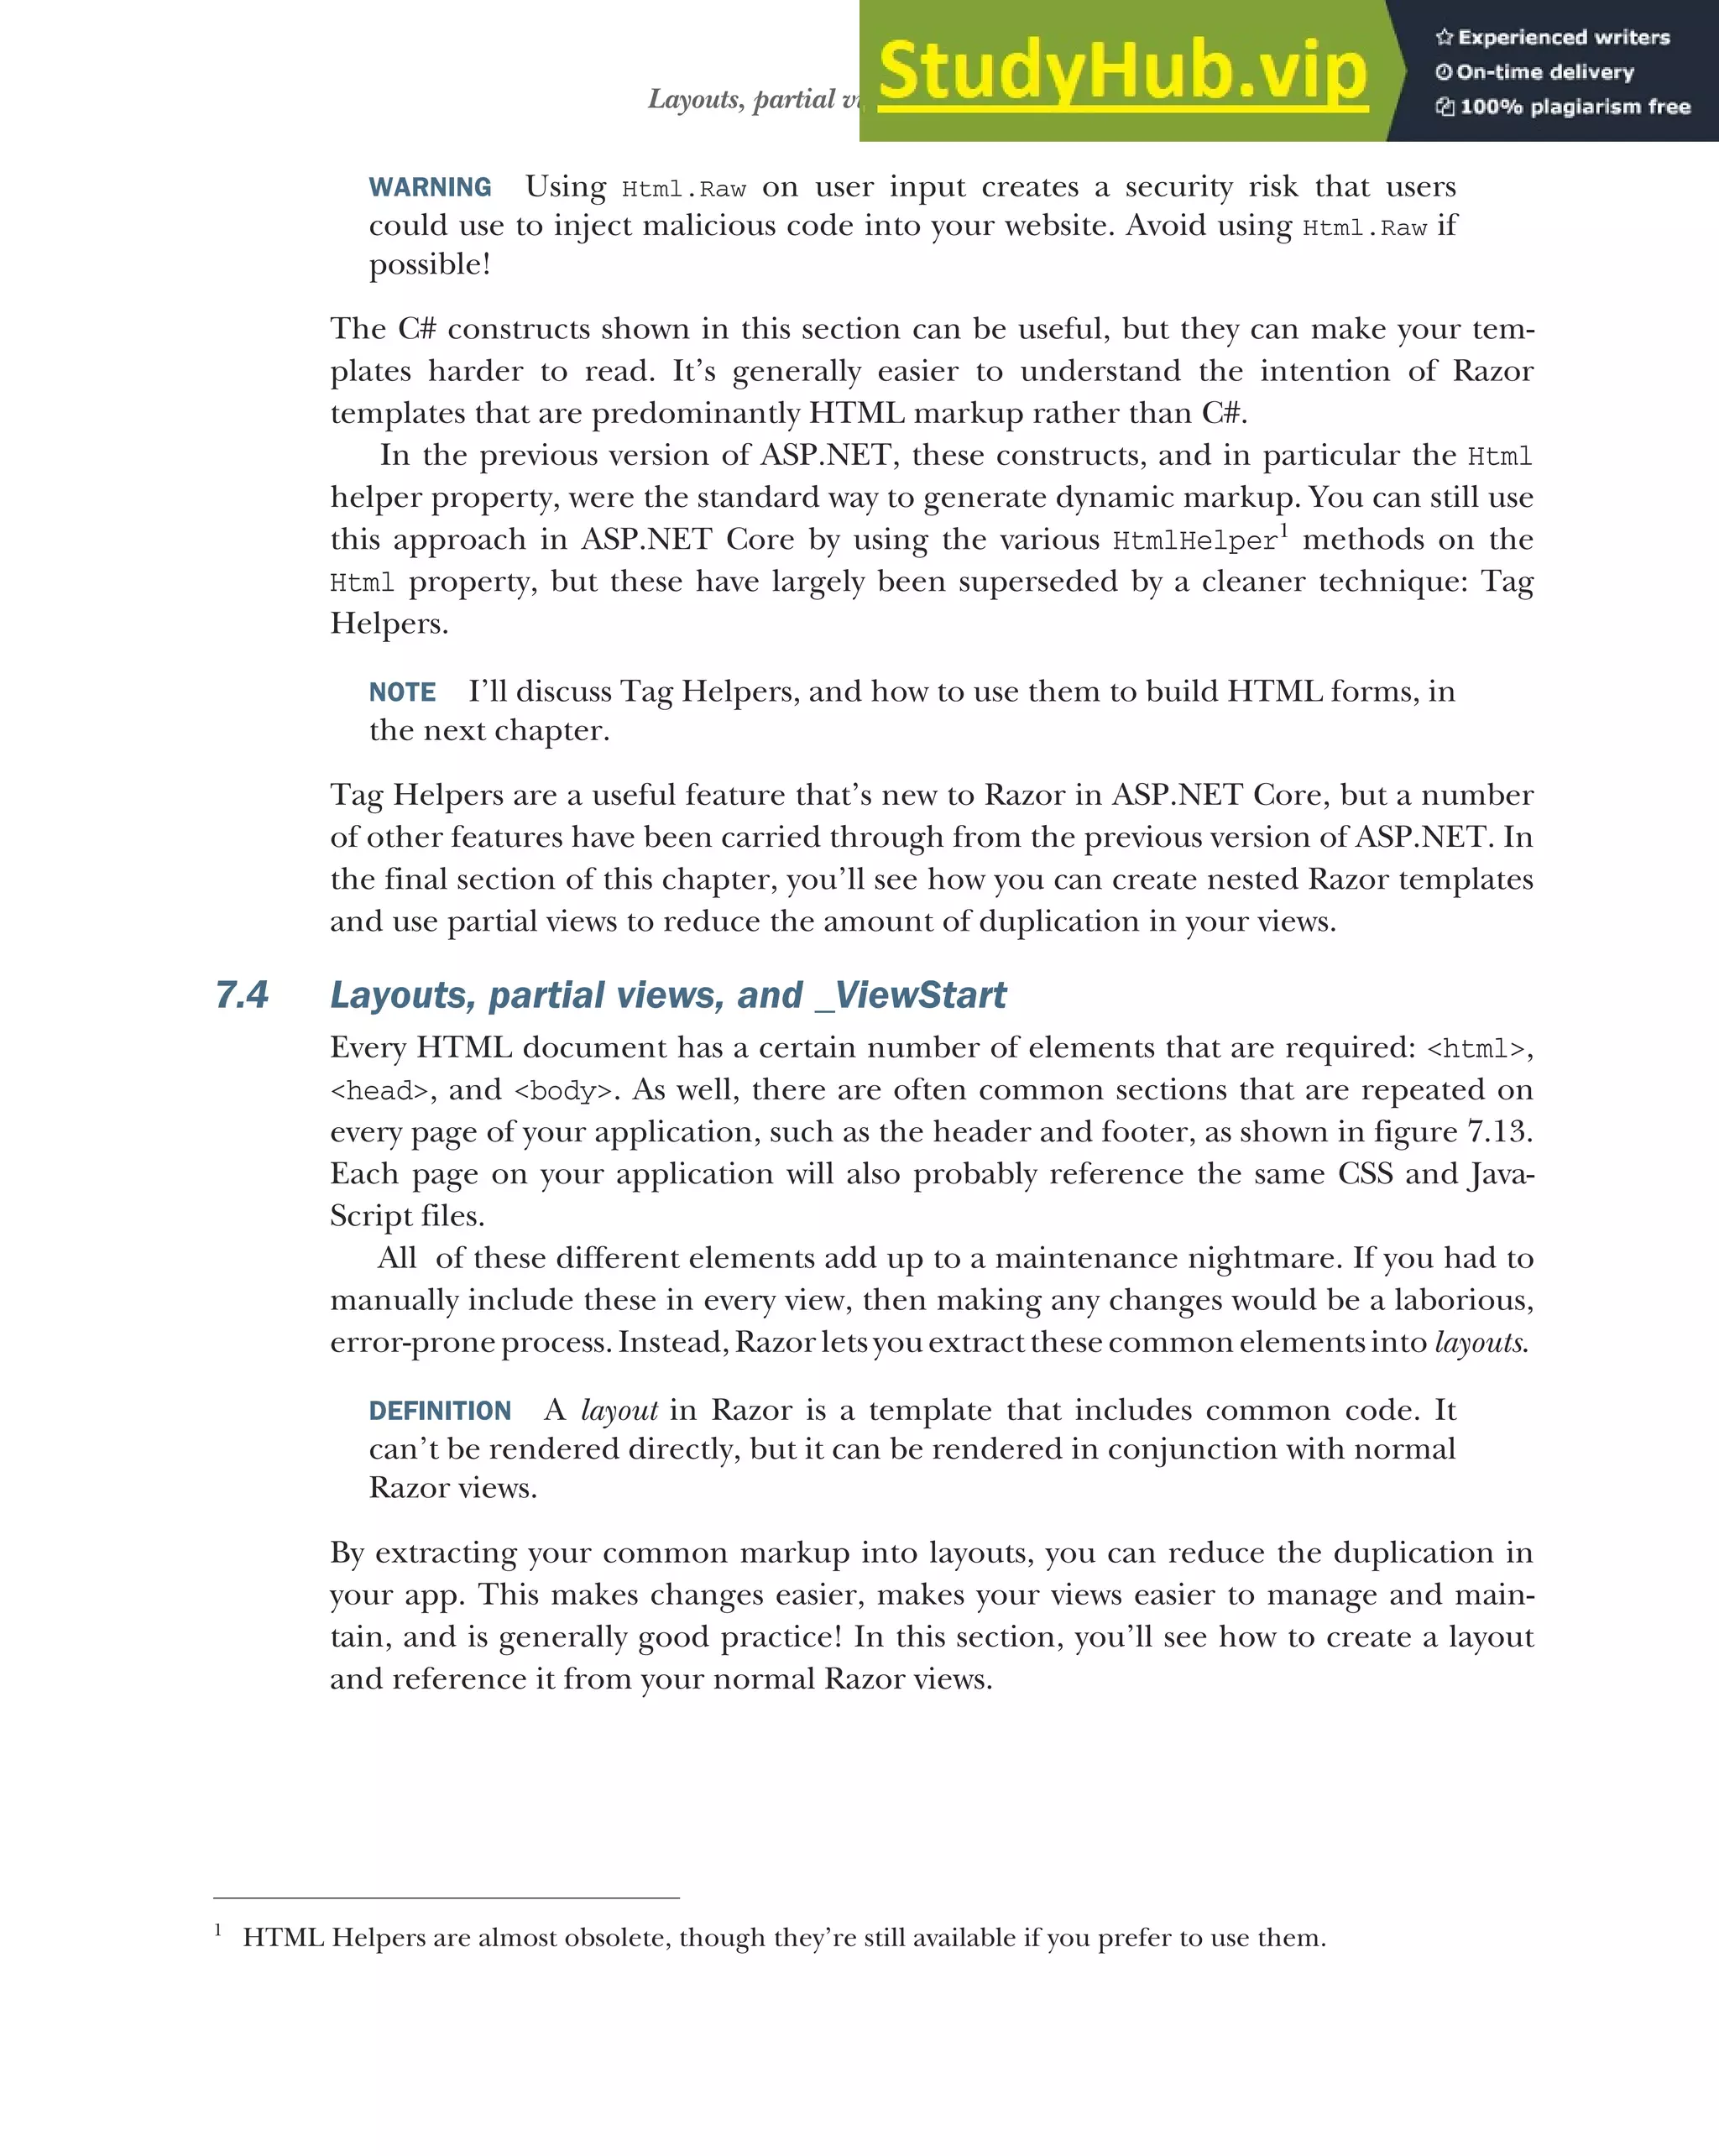
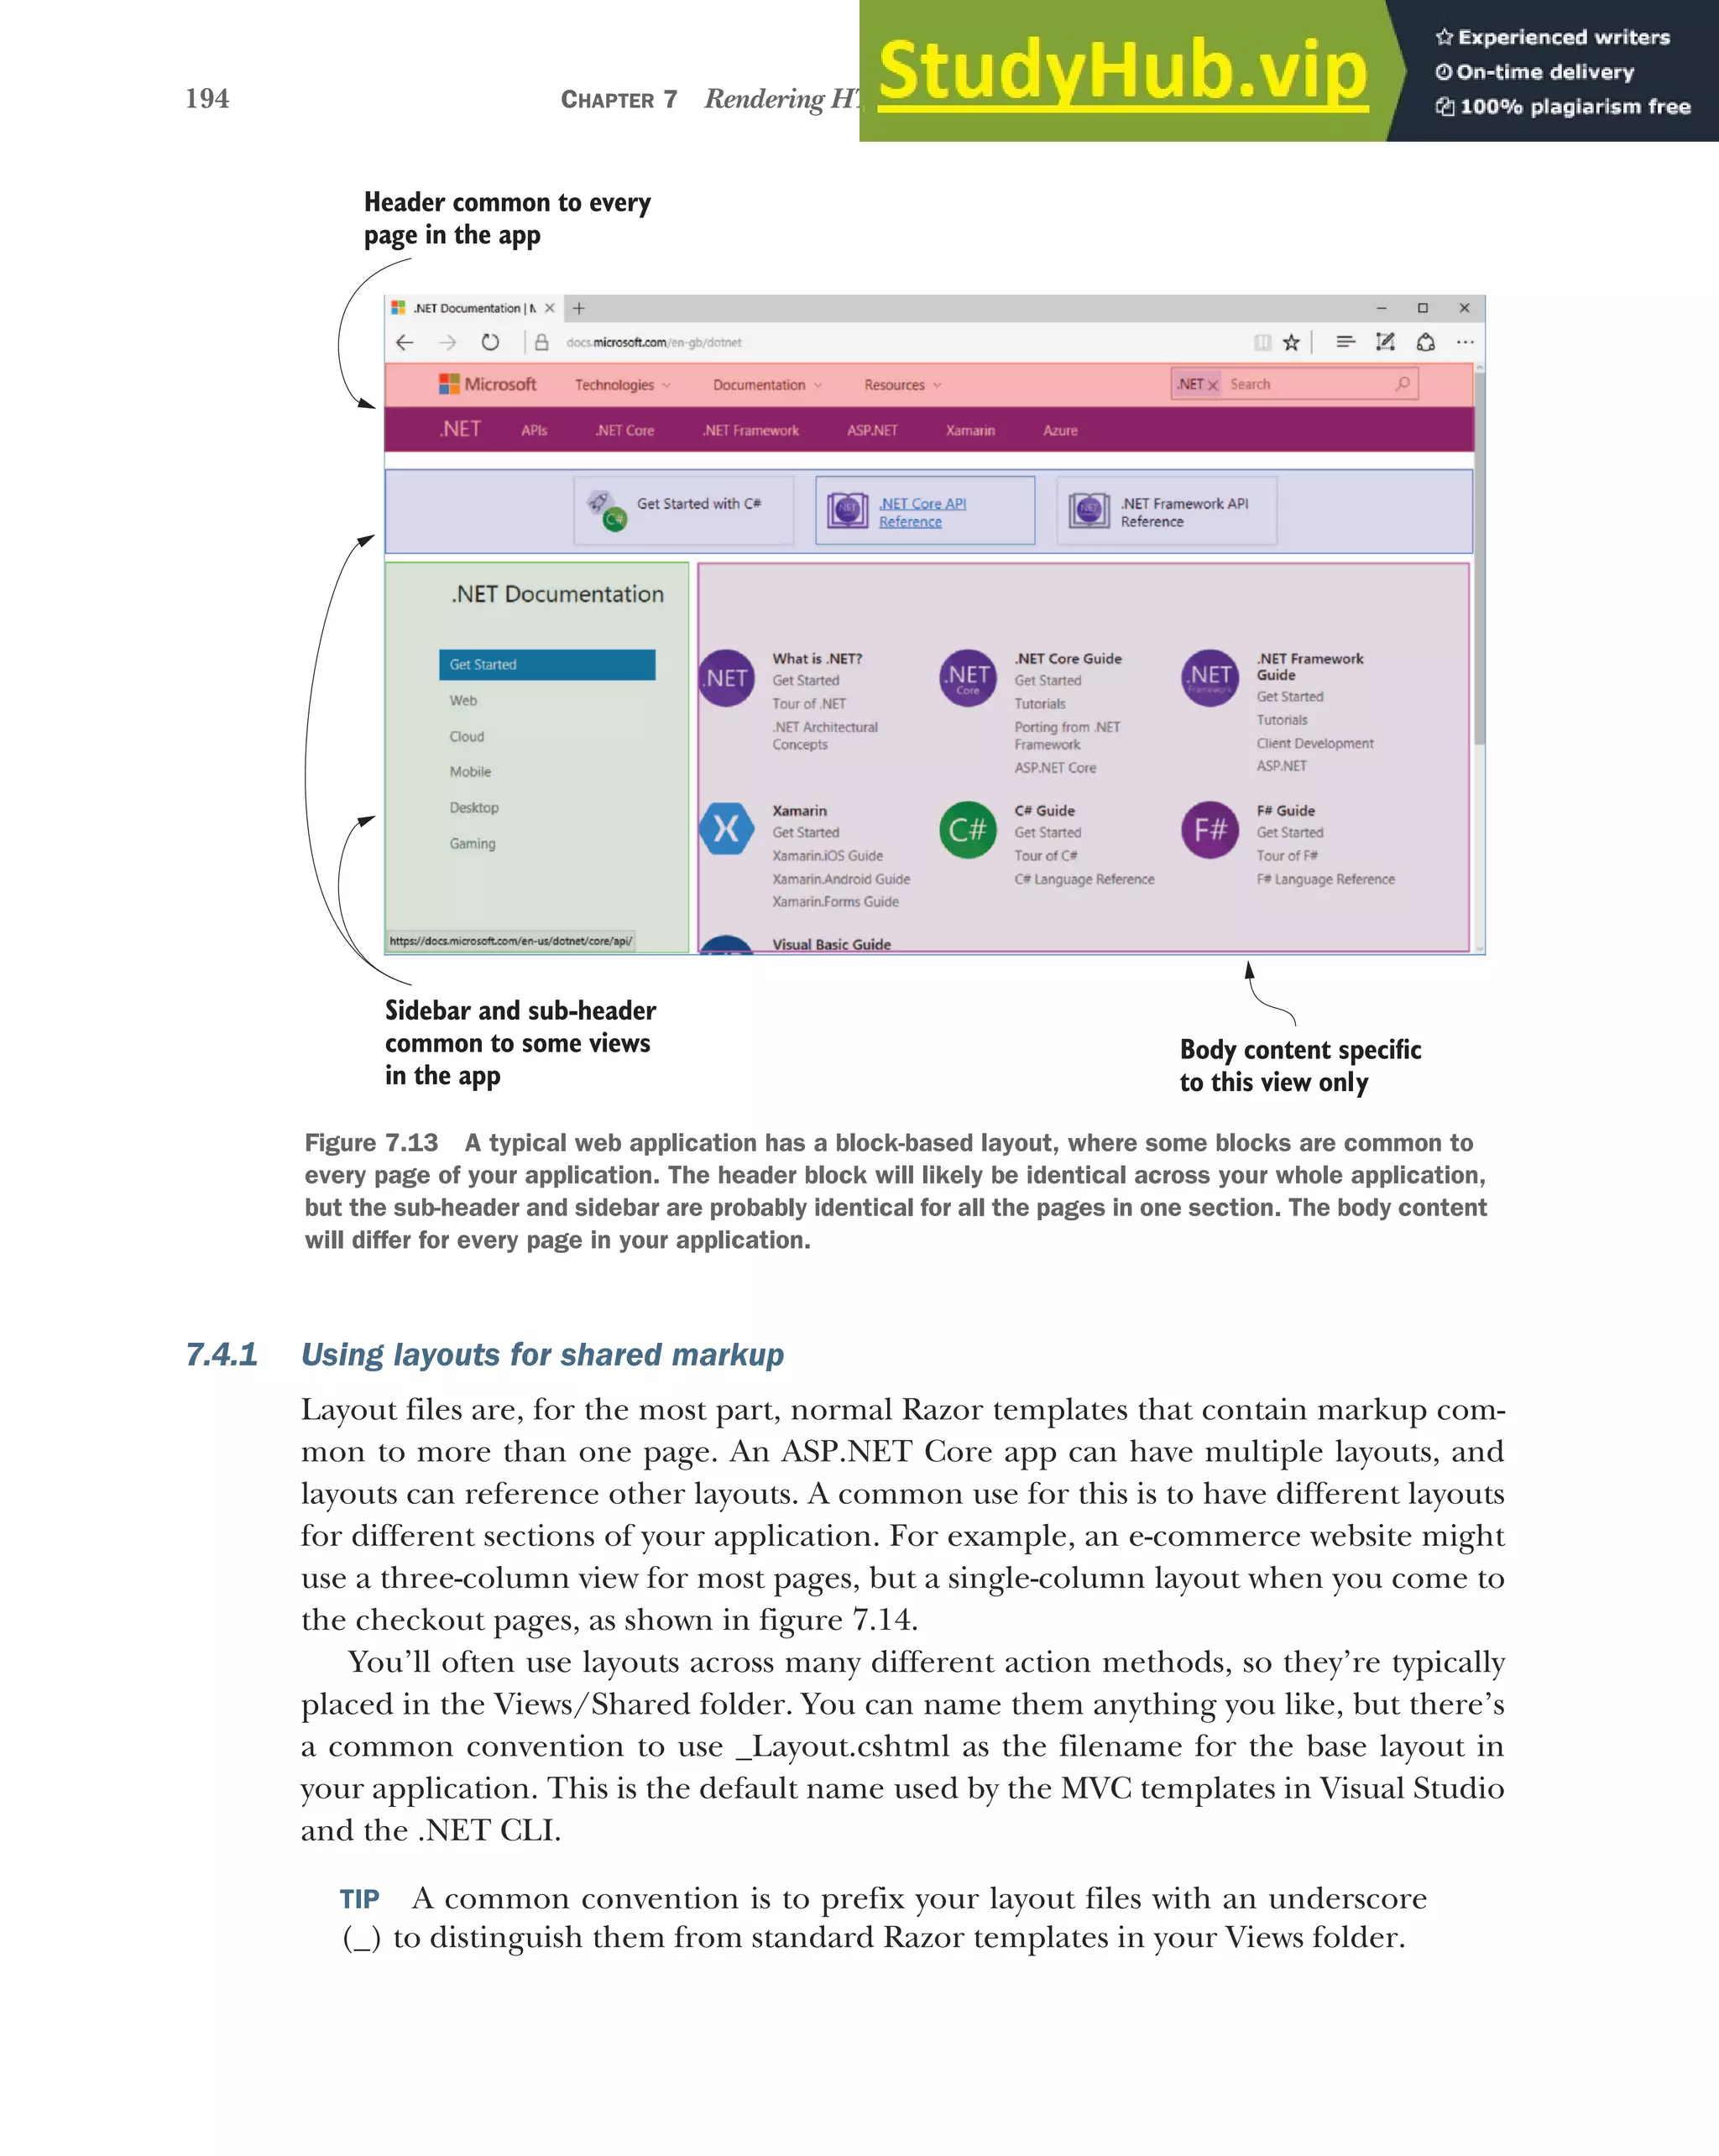
![195
Layouts, partial views, and _ViewStart
A layout file looks similar to a normal Razor template, with one exception: every lay-
out must call the @RenderBody() function. This tells the templating engine where to
insert the content from the child views. A simple layout is shown in the following list-
ing. Typically, your application will reference all your CSS and JavaScript files in the
layout, as well as include all the common elements such as headers and footers, but
this example includes pretty much the bare minimum HTML.
<!DOCTYPE html>
<html>
<head>
<meta charset="utf-8" />
<title>@ViewData["Title"]</title>
<link rel="stylesheet" href="~/css/site.css" />
</head>
<body>
@RenderBody()
</body>
</html>
As you can see, the layout file includes the required elements, such as <html> and
<head>, as well as elements you need on every page, such as <title> and <link>. This
example also shows the benefit of storing the page title in ViewData; the layout can
render it in the <title> element so that it shows in the browser’s tab, as shown in fig-
ure 7.15.
Listing 7.7 A basic Layout.cshtml file calling RenderBody
Three-column layout Single-column layout
Figure 7.14 The https://manning.com website uses different layouts for different parts of the web application.
The product pages use a three-column layout, but the cart page uses a single-column layout.
ViewData is the standard
mechanism for passing data
to a layout from a view.
Elements common to
every page, such as
your CSS, are typically
found in the layout.
Tells the templating engine where
to insert the child view’s content](https://image.slidesharecdn.com/asp-230807173723-31e70040/75/ASP-NET-Core-in-Action-2018-pdf-223-2048.jpg)
![196 CHAPTER 7 Rendering HTML using Razor views
Views can specify a layout file to use by setting the Layout property inside a Razor
code block.
@{
Layout = "_Layout";
ViewData["Title"] = "Home Page";
}
<h1>@ViewData[“Title”]</h1>
<p>This is the home page</p>
Any contents in the view will be rendered inside the layout, where the call to @Render-
Body() occurs. Combining the two previous listings will result in the following HTML
being generated and sent to the user.
<!DOCTYPE html>
<html>
<head>
<meta charset="utf-8" />
<title>Home Page</title>
<link rel="stylesheet" href="/css/site.css" />
</head>
<body>
<h1>Home Page</h1>
<p>This is the home page</p>
</body>
<html>
Judicious use of layouts can be extremely useful in reducing the duplication on a
page. By default, layouts only provide a single location where you can render content
from the view, at the call to @RenderBody. In cases where this is too restrictive, you can
render content using sections.
7.4.2 Overriding parent layouts using sections
A common requirement when you start using multiple layouts in your application is to
be able to render content from child views in more than one place in your layout.
Consider the case of a layout that uses two columns. The view needs a mechanism for
Listing 7.8 Setting the Layout property from a view
Listing 7.9 Rendered output from combining a view with its layout
Figure 7.15 The contents of the <title>
element is used to name the tab in the
user’s browser, in this case Home Page.
Set the layout for the page
to _Layout.cshtml.
ViewData is a convenient way of passing
data from a view to the layout.
The content in the view to
render inside the layout
ViewData set in the
view is used to render
the layout.
The RenderBody call renders
the contents of the view.](https://image.slidesharecdn.com/asp-230807173723-31e70040/75/ASP-NET-Core-in-Action-2018-pdf-224-2048.jpg)
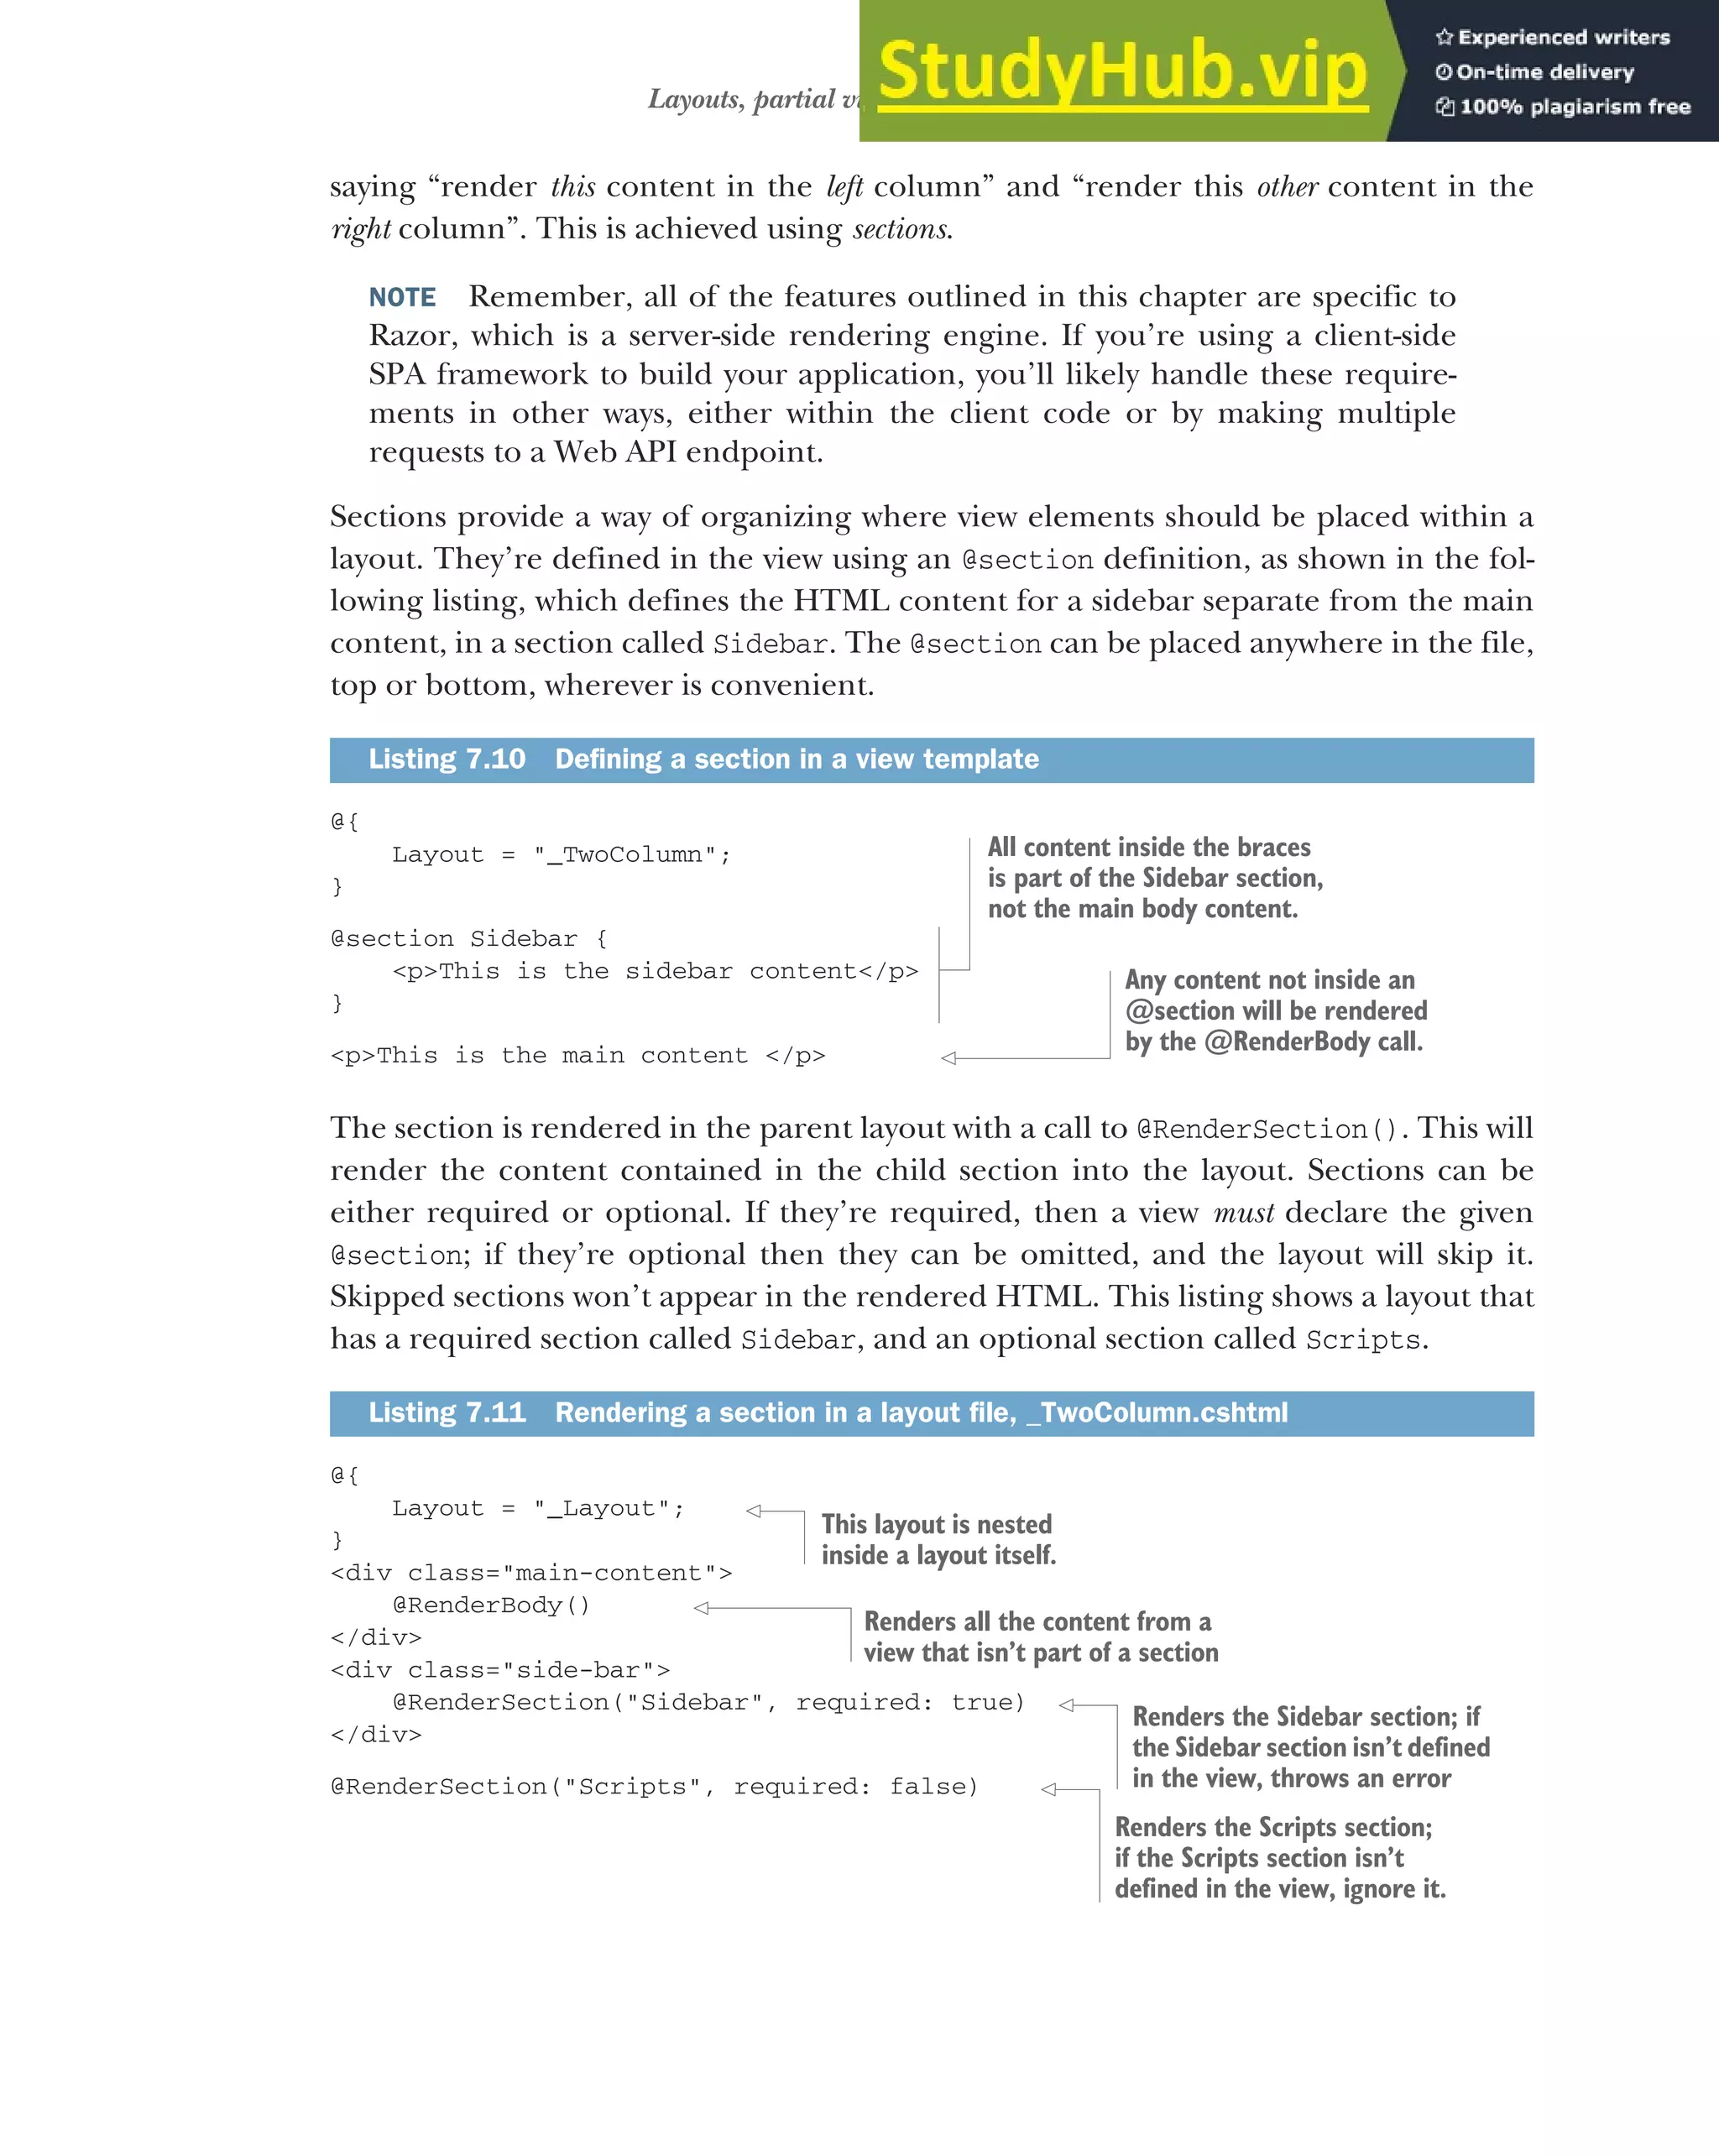


![208 CHAPTER 8 Building forms with Tag Helpers
TIP Visual Studio 2017 currently doesn’t have native IntelliSense support for
the asp-* Tag Helpers themselves, though it will be enabled in an update. In
the meantime, install the Razor Language Services extension.1
Unfortunately,
IntelliSense for Tag Helpers isn’t available in Visual Studio Code.
Tag Helpers are extra attributes on standard HTML elements (or new elements
entirely) that work by modifying the HTML element they’re attached to. They let you
easily integrate your server-side values, such as those in your view model, with the gen-
erated HTML.
Notice that listing 8.1 didn’t specify the captions to display in the labels. Instead, you
declaratively used asp-for="CurrencyFrom" to say, “for this <label>, use the Currency-
From property to work out what caption to use.” Similarly, for the <input> elements, Tag
Helpers are used to
Automatically populate the values from the view model
Choose the correct input type to display (for example, a number input for the
Quantity property)
Display any validation errors, as shown in figure 8.32
1
You can install Visual Studio extensions by clicking Tools > Extensions and Updates, or by viewing on the
Visual Studio Marketplace at http://mng.bz/LcNX.
2
To learn more about the internals of Tag Helpers, read the documentation at http://mng.bz/Idb0.
Figure 8.3 Tag Helpers hook into the metadata provided by DataAnnotations,
as well as the property types themselves. The Validation Tag Helper can even
populate error messages based on the ModelState, as you saw in the last
chapter on validation.
Label caption calculated
from [Display] attribute
Validation error message
populated from ModelState
Input types determined
from DataAnnotations and
property type](https://image.slidesharecdn.com/asp-230807173723-31e70040/75/ASP-NET-Core-in-Action-2018-pdf-236-2048.jpg)
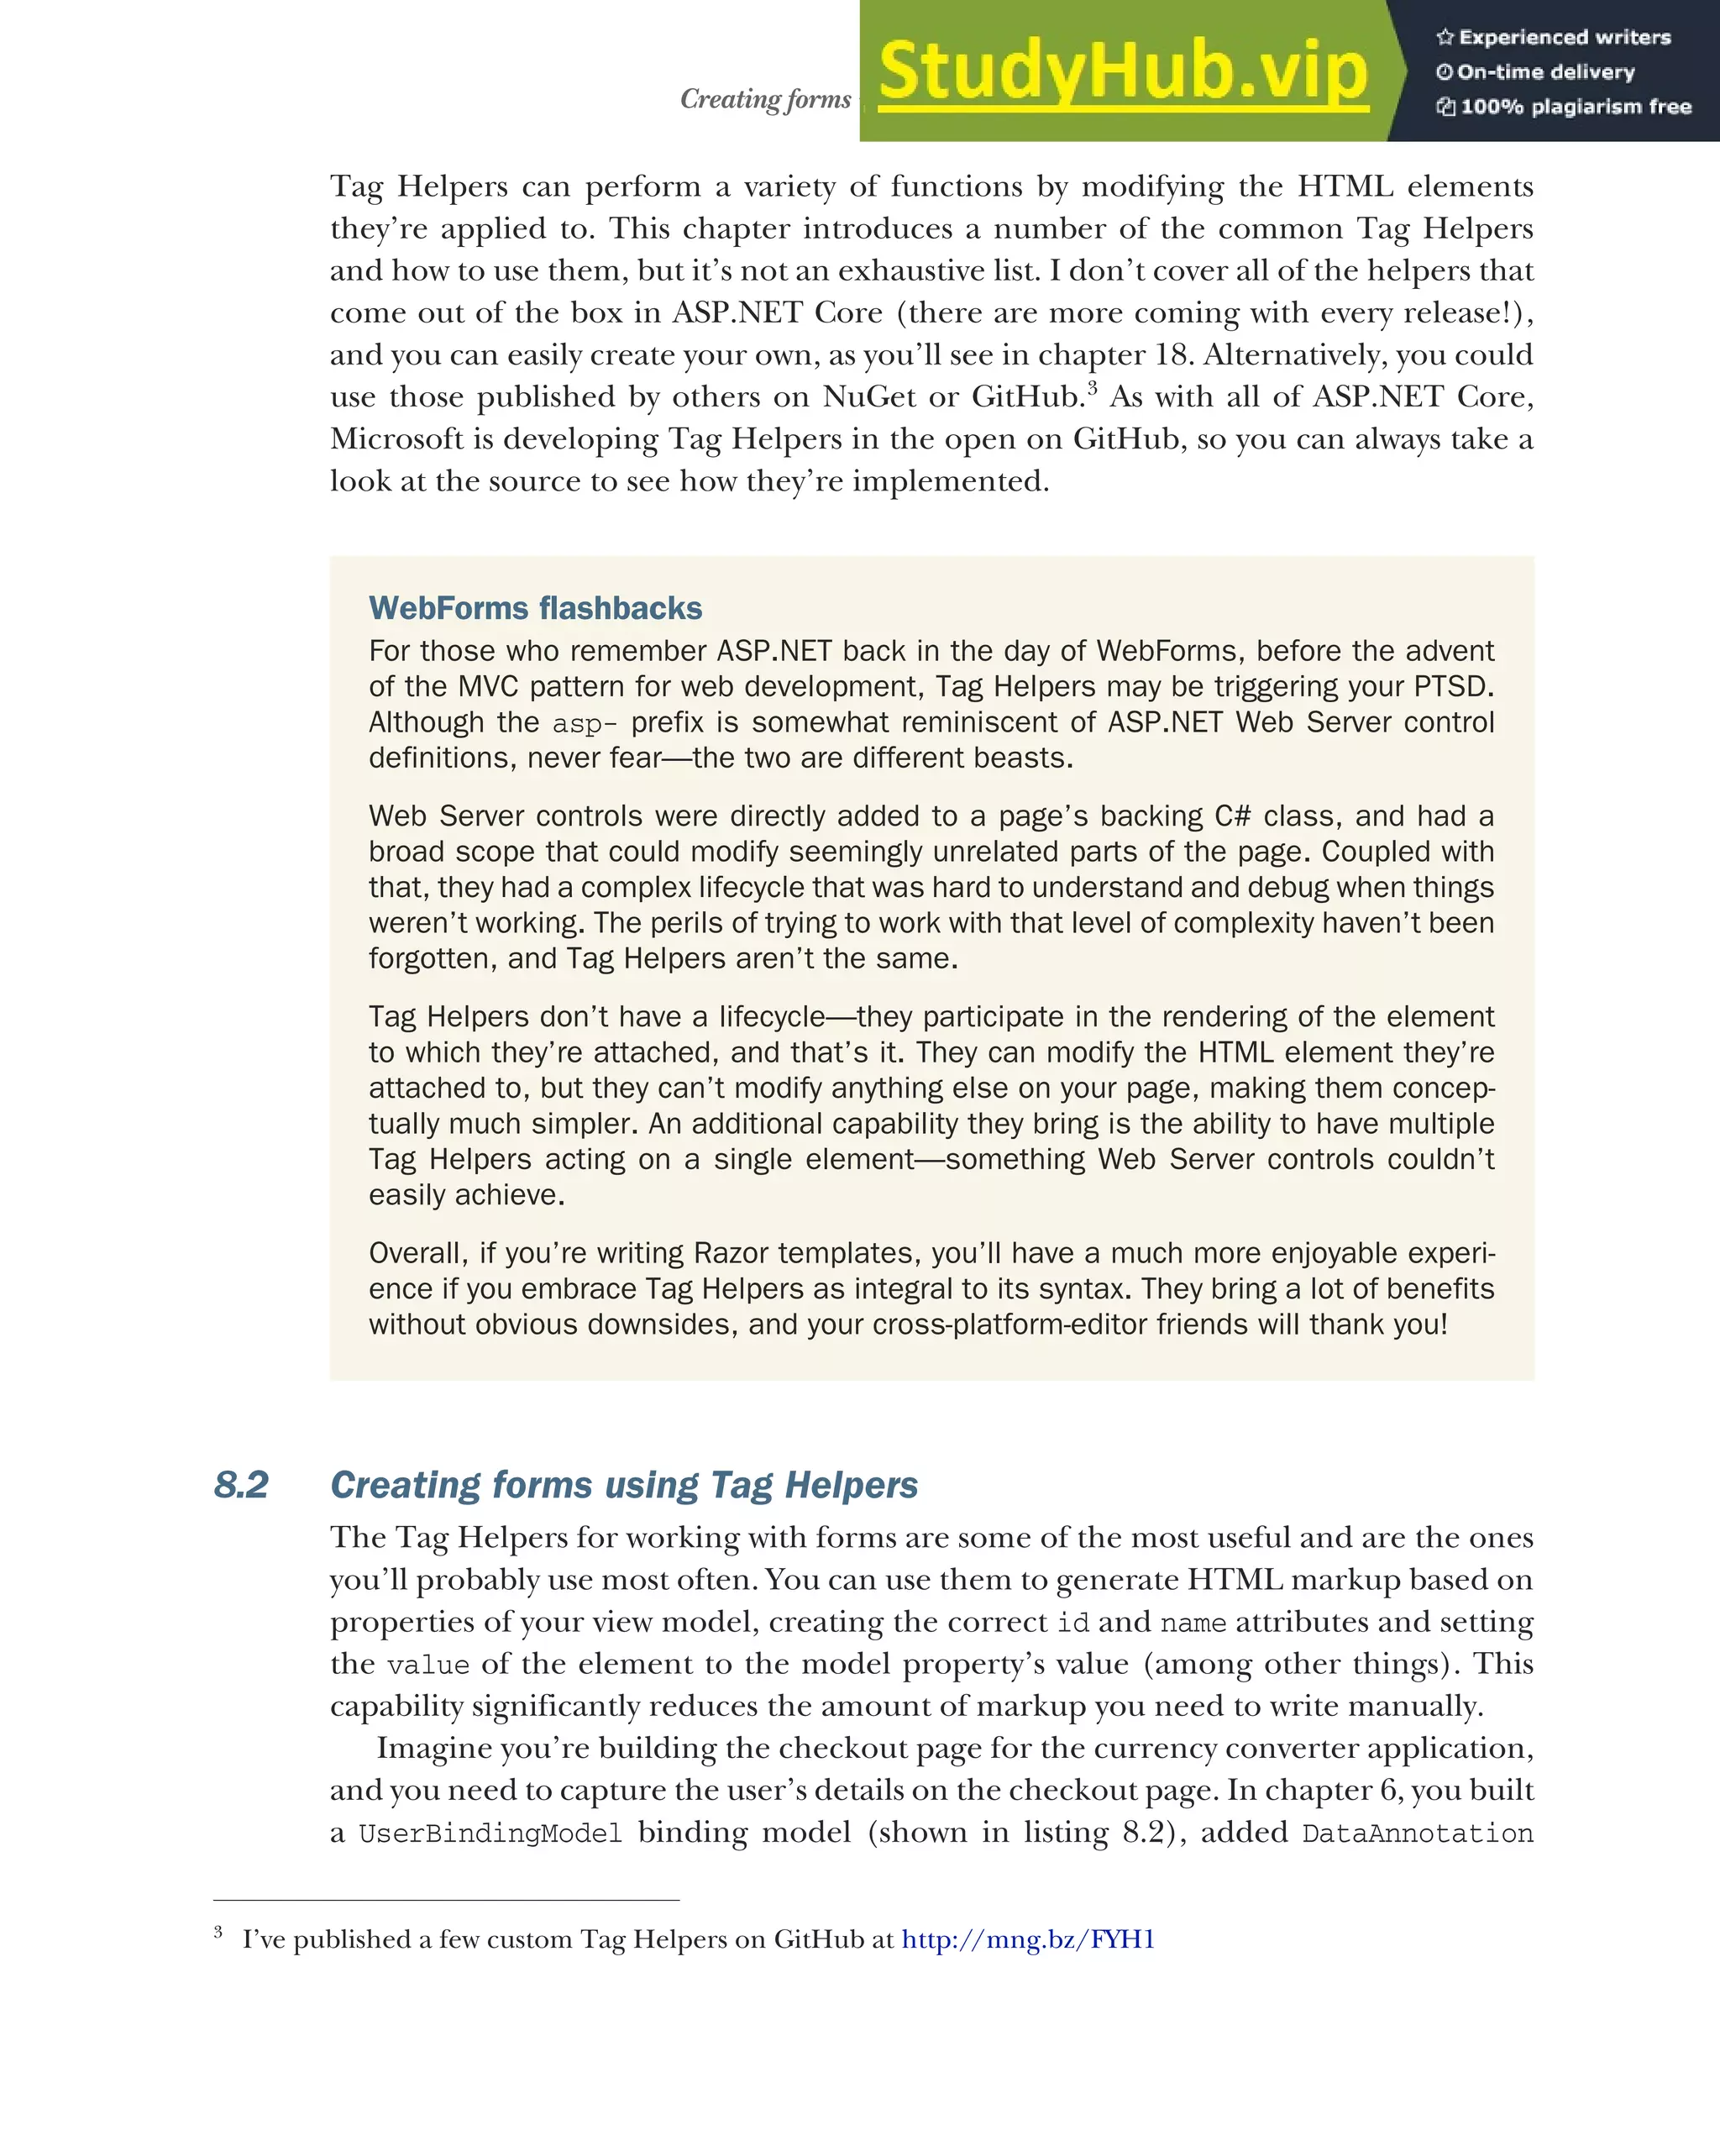
![210 CHAPTER 8 Building forms with Tag Helpers
attributes for validation, and saw how to model bind it in your action method. In this
chapter, you’ll see how to create the view for it, using the UserBindingModel as a view
model.
WARNING For simplicity, I’m using the same object for both my binding
model and view model, but in practice you should use two separate objects to
avoid mass-assignment attacks on your app.4
public class UserBindingModel
{
[Required]
[StringLength(100, ErrorMessage = "Maximum length is {1}")]
[Display(Name = "Your name")]
public string FirstName { get; set; }
[Required]
[StringLength(100, ErrorMessage = "Maximum length is {1}")]
[Display(Name = "Last name")]
public string LastName { get; set; }
[Required]
[EmailAddress]
public string Email { get; set; }
[Phone(ErrorMessage = "Not a valid phone number.")]
[Display(Name = "Phone number")]
public string PhoneNumber { get; set; }
}
The UserBindingModel is decorated with a number of DataAnnotations attributes. In
the previous chapter, you saw that these attributes are used during model validation
when your binding model is bound, before the action method is executed. These
attributes are also used by the Razor templating language to provide the metadata
required to generate the correct HTML when you use Tag Helpers.
With the help of the UserBindingModel, Tag Helpers, and a little HTML, you can
create a Razor view that lets the user enter their details, as shown in figure 8.4.
The Razor template to generate this page is shown in listing 8.3. This code uses a
variety of tag helpers, including
A Form Tag Helper on the <form> element
Label Tag Helpers on the <label>
Input Tag Helpers on the <input>
Validation Message Tag Helpers on <span> validation elements for each prop-
erty in the UserBindingModel
Listing 8.2 UserBindingModel for creating a user on a checkout page
4
You can read about techniques for working with separate binding and view models at http://mng.bz/QvfG.](https://image.slidesharecdn.com/asp-230807173723-31e70040/75/ASP-NET-Core-in-Action-2018-pdf-238-2048.jpg)
![211
Creating forms using Tag Helpers
@model UserBindingModel
@{
ViewData["Title"] = "Checkout";
}
<h1>@ViewData["Title"]</h1>
<form asp-action="Index" asp-controller="Checkout">
<div class="form-group">
<label asp-for="FirstName"></label>
<input class="form-control" asp-for="FirstName" />
<span asp-validation-for="FirstName"></span>
</div>
<div class="form-group">
<label asp-for="LastName"></label>
<input class="form-control" asp-for="LastName" />
<span asp-validation-for="LastName"></span>
</div>
<div class="form-group">
<label asp-for="Email"></label>
<input class="form-control" asp-for="Email" />
<span asp-validation-for="Email"></span>
</div>
Listing 8.3 Razor template for binding to UserBindingModel on the checkout page
Figure 8.4 The checkout page for an
application. The HTML is generated
based on a UserBindingModel,
using Tag Helpers to render the
required element values, input types,
and validation messages.
The @model directive describes
the view model for the page.
Form Tag Helpers use
routing to determine
the URL the form will
be posted to.
The Label Tag Helper
uses DataAnnotations
on a property to
determine the caption
to display.
The Input Tag Helper
uses DataAnnotations
to determine the type
of input to generate.](https://image.slidesharecdn.com/asp-230807173723-31e70040/75/ASP-NET-Core-in-Action-2018-pdf-239-2048.jpg)
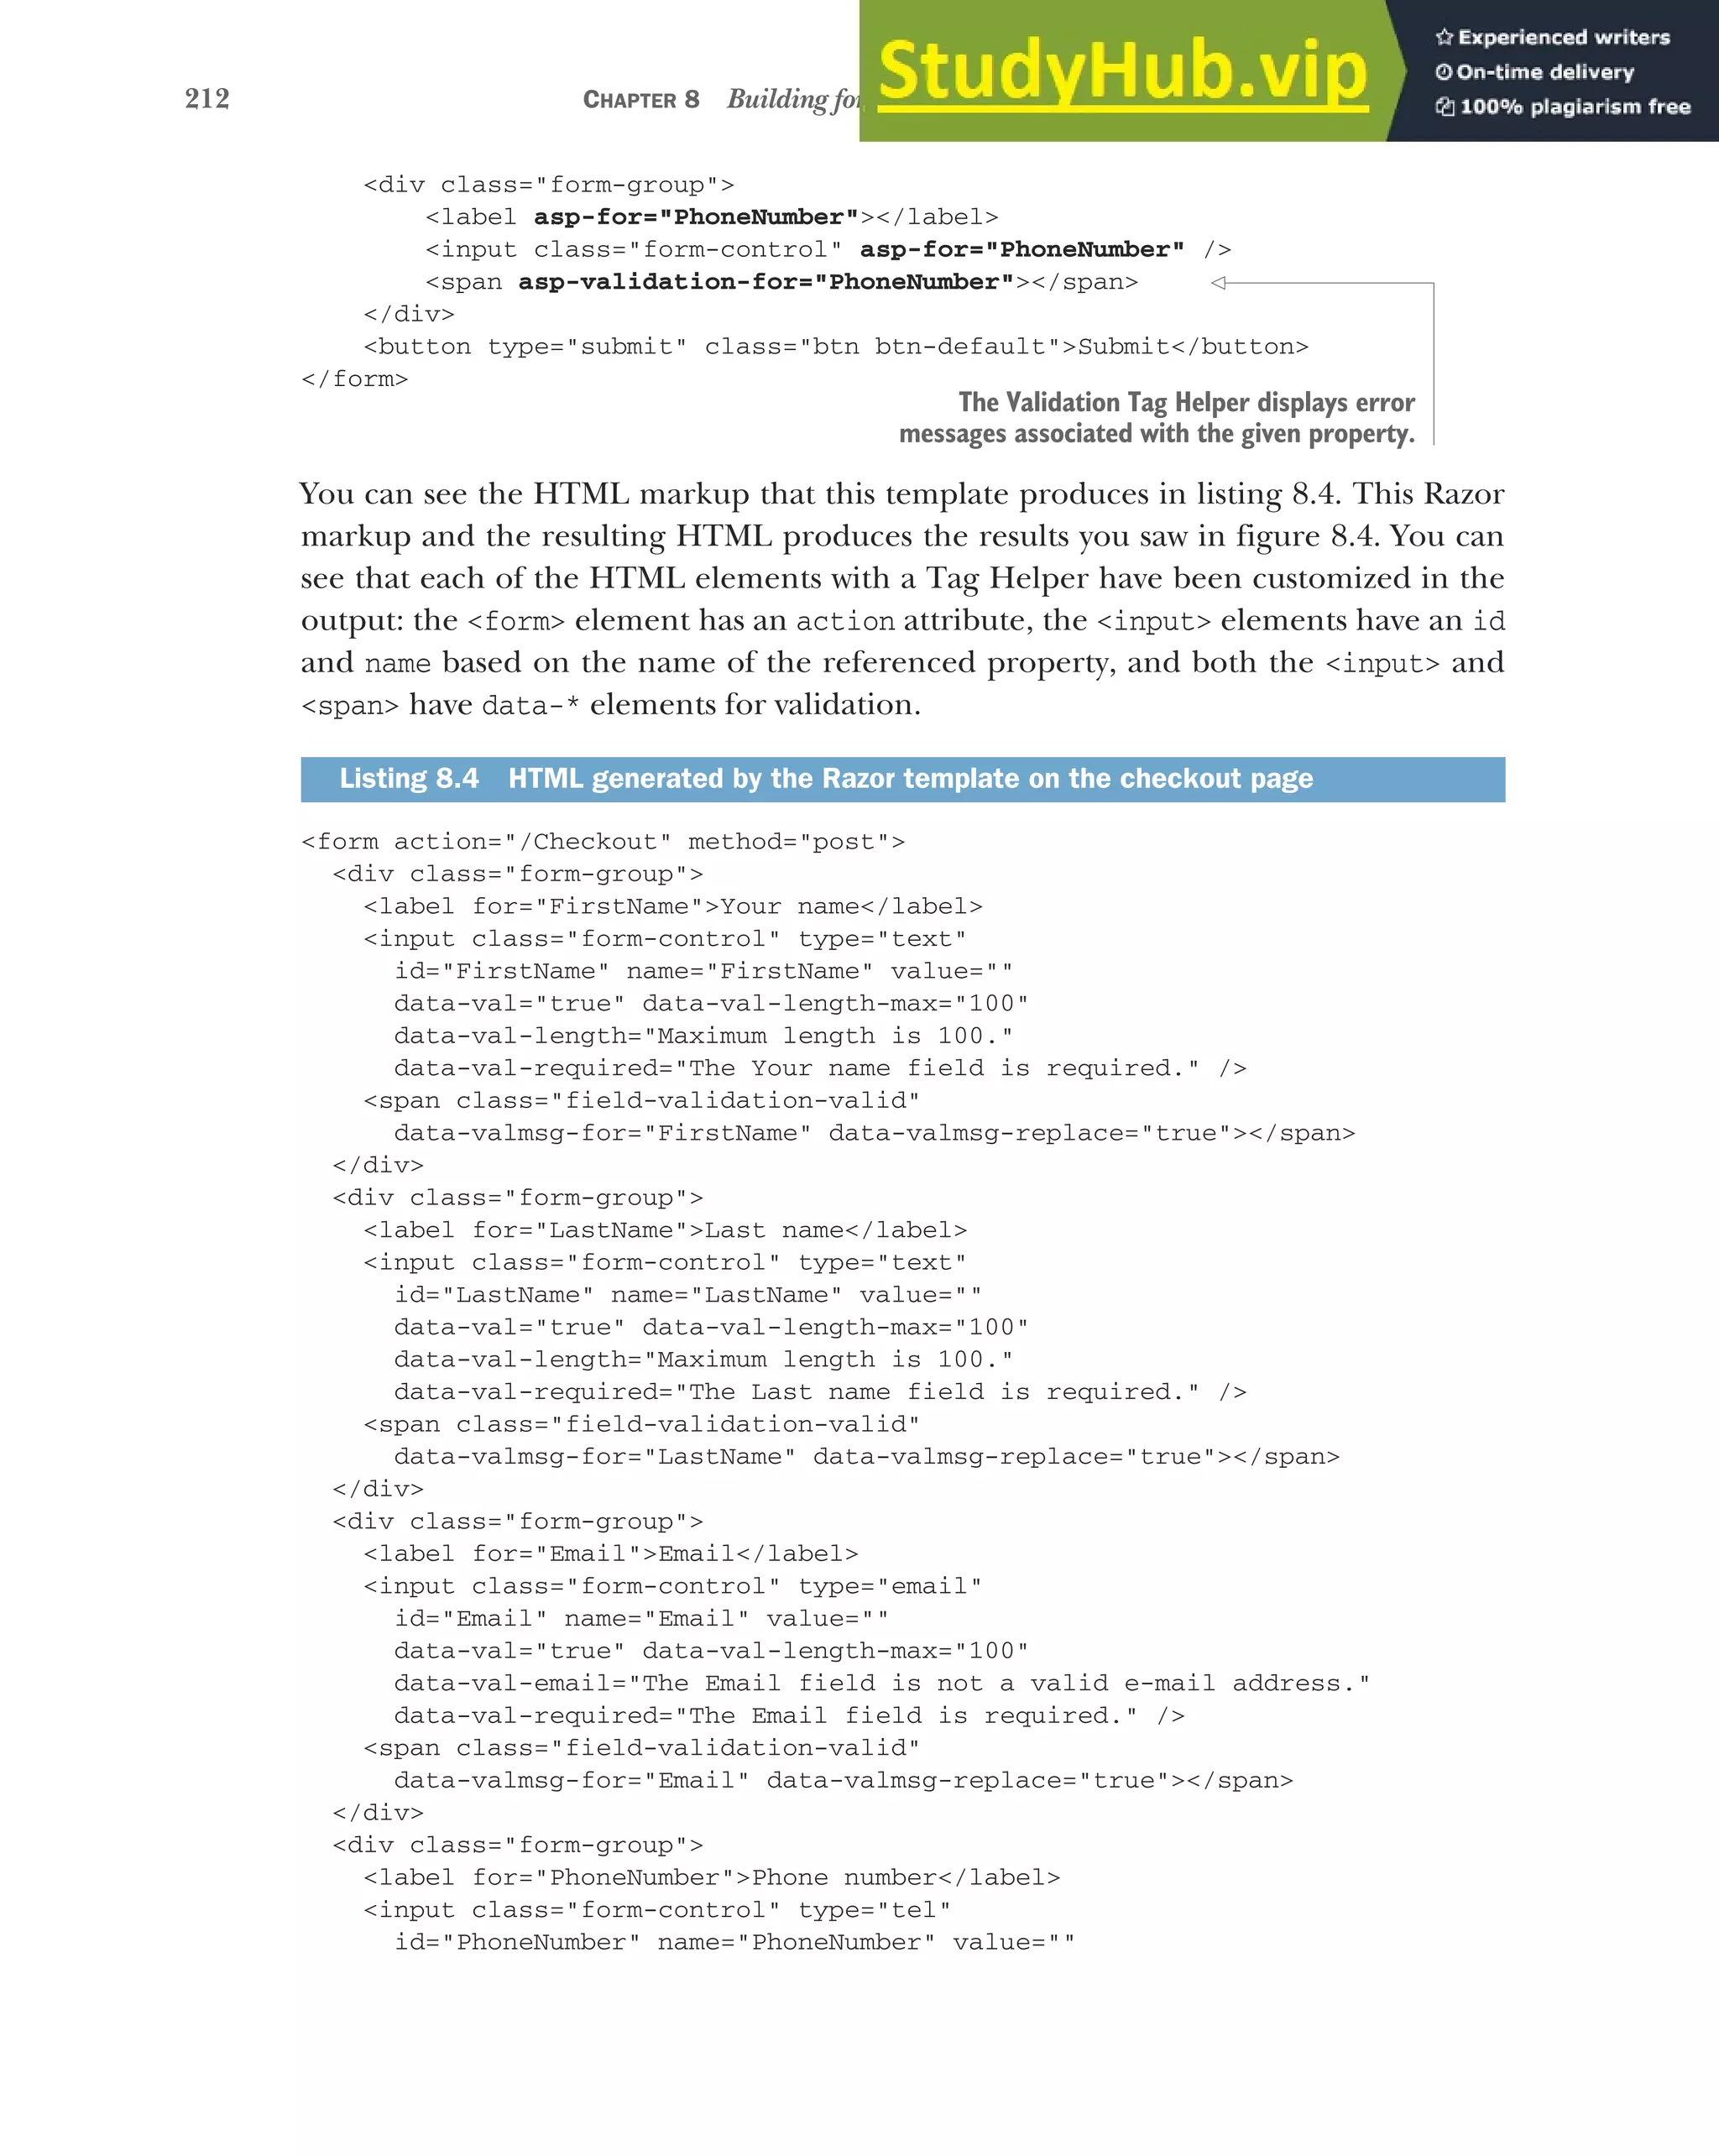


![216 CHAPTER 8 Building forms with Tag Helpers
The Label Tag Helper is used to generate the caption (the visible text) and the for
attribute for a <label> element, based on the properties in the view model. It’s used
by providing the name of the property in the asp-for attribute:
<label asp-for="FirstName"></label>
The Label Tag Helper uses the [Display] DataAnnotations attribute that you saw in
chapter 6 to determine the appropriate value to display. If the property you’re gener-
ating a label for doesn’t have a [Display] attribute, the Label Tag Helper will use the
name of the property instead. So, for the model
public class UserBindingModel
{
[Display(Name = "Your name")]
public string FirstName { get; set; }
public string Email { get; set; }
}
in which the FirstName property has an [Display] attribute, but the Email property
doesn’t; the following Razor
<label asp-for="FirstName"></label>
<label asp-for="Email"></label>
would generate the HTML
<label for="FirstName">Your Name</label>
<label for="Email">Email</label>
The caption text inside the <label> element uses the value set in the [Display] attri-
bute, or the property name in the case of the Email property. Also note that the for
attribute has been generated with the name of the property. This is a key bonus of
using Tag Helpers—it hooks in with the element IDs generated by other Tag Helpers,
as you’ll see shortly.
NOTE The for attribute is important for accessibility. It specifies the ID of
the element to which the label refers.
As is typical with Tag Helpers, the Label Tag Helper won’t override values you set your-
self. If, for example, you don’t want to use the caption generated by the helper, you
could insert your own manually. The following code
<label asp-for="Email">Please enter your Email</label>
would generate the HTML
<label for="Email">Please enter your Email</label>
As ever, you’ll generally have an easier time with maintenance if you stick to the stan-
dard conventions and don’t override values like this, but the option is there. Right,
next up is a biggie: the Input and Textarea Tag Helpers.](https://image.slidesharecdn.com/asp-230807173723-31e70040/75/ASP-NET-Core-in-Action-2018-pdf-244-2048.jpg)
![217
Creating forms using Tag Helpers
8.2.3 The Input and Textarea Tag Helpers
Now you’re getting into the meat of your form—the <input> elements that handle
user input. Given that there’s such a wide array of possible input types, there’s a vari-
ety of different ways they can be displayed in the browser. For example, Boolean val-
ues are typically represented by a checkbox type <input> element, whereas integer
values would use a number type <input> element, and a date would use the date type,
shown in figure 8.5.
To handle this diversity, the Input Tag Helper is one of the most powerful Tag Help-
ers. It uses information based on both the type of the property (bool, string, int,
and so on) and any DataAnnotations attributes applied to it ([EmailAddress] and
[Phone], among others) to determine the type of the input element to generate. The
DataAnnotations are also used to add data-val-* client-side validation attributes to
the generated HTML.
Consider the Email property from listing 8.2 that was decorated with the [Email-
Address] attribute. Adding an <input> is as simple as using the asp-for attribute:
<input asp-for="Email" />
The property is a string, so ordinarily, the Input Tag Helper would generate an
<input> with type="text". But the addition of the [EmailAddress] attribute provides
additional metadata about the property. Consequently, the Tag Helper generates an
HTML5 <input> with type="email":
Figure 8.5 Various input element
types. The exact way in which each
type is displayed varies by browser.](https://image.slidesharecdn.com/asp-230807173723-31e70040/75/ASP-NET-Core-in-Action-2018-pdf-245-2048.jpg)
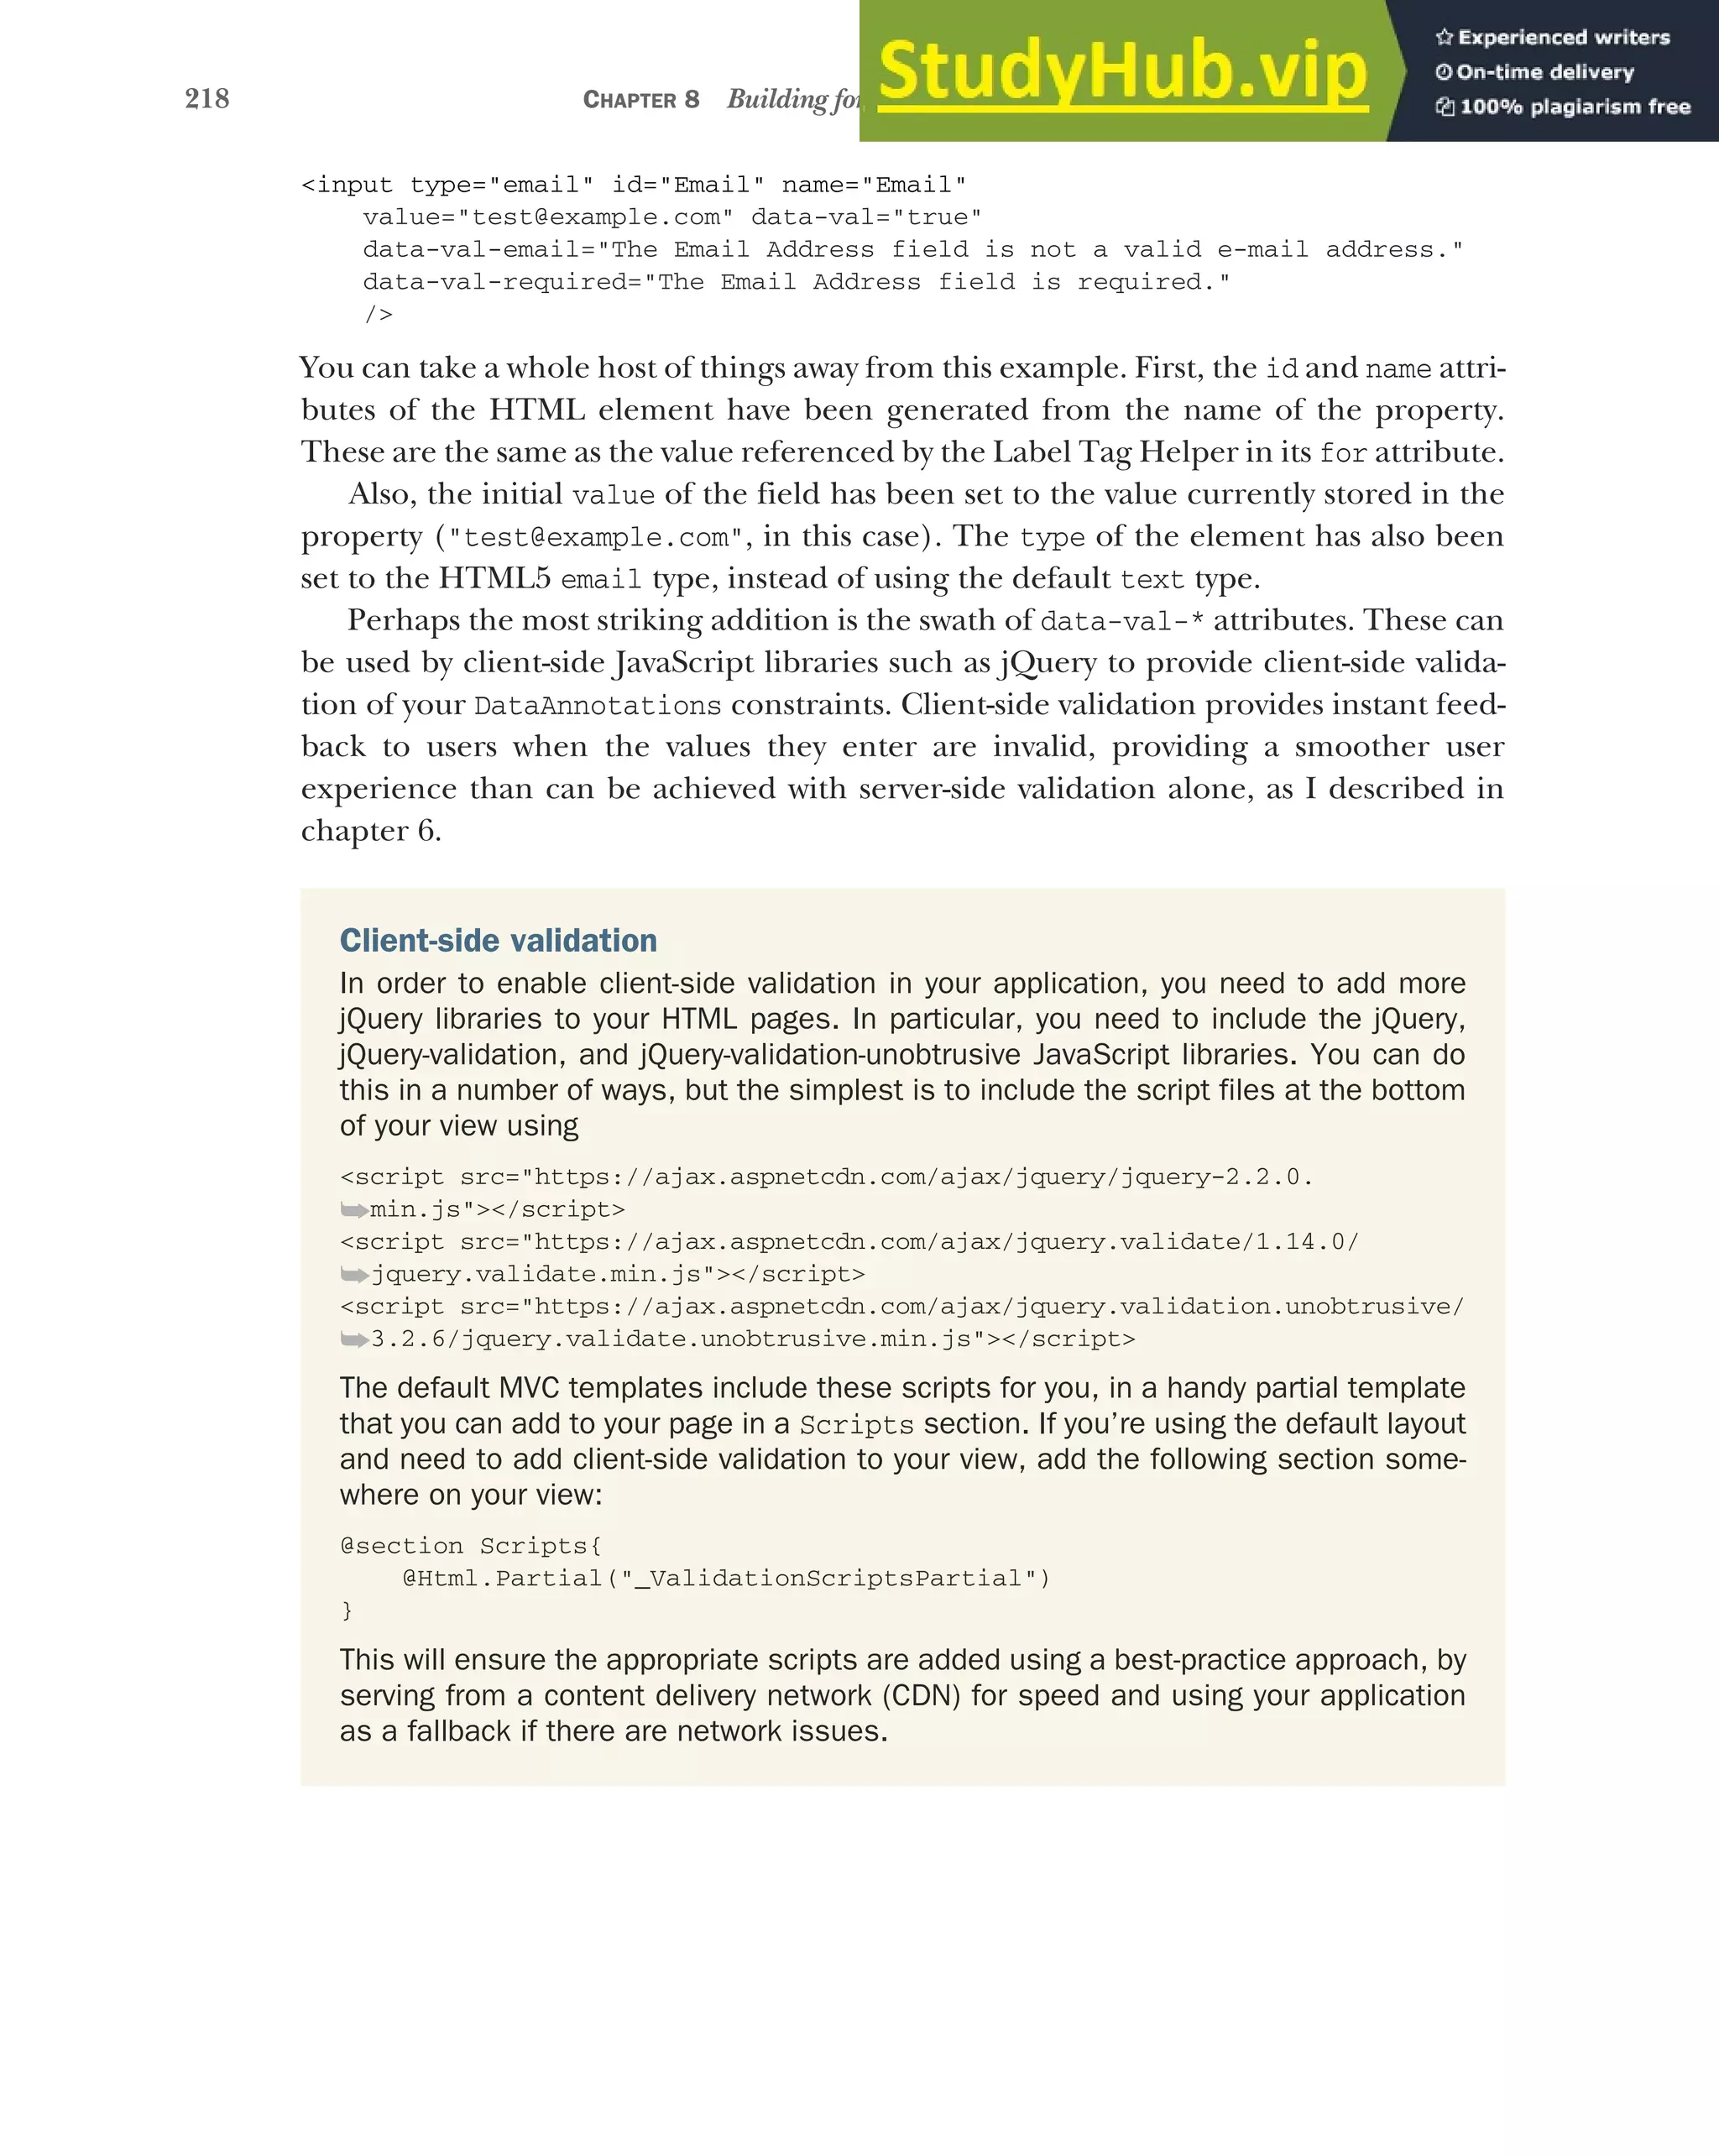
![219
Creating forms using Tag Helpers
The Input Tag Helper tries to pick the most appropriate template for a given property
based on DataAnnotation attributes or the type of the property. Whether this gener-
ates the exact <input> type you need may depend, to an extent, on your application.
As always, you can override the generated type by adding your own type attribute to
the Razor. Table 8.1 shows how some of the common data types are mapped to
<input> types, and how the data types themselves can be specified.
The Input Tag Helper has one additional attribute that can be used to customize the
way data is displayed: asp-format. HTML forms are entirely string-based, so when the
value of an <input> is set, the Input Tag Helper must take the value stored in
the property and convert it to a string. Under the covers, this performs a string
.Format() on the property’s value, passing in a format string.
The Input Tag Helper uses a default format string for each different data type, but
with the asp-format attribute, you can set the specific format string to use. For exam-
ple, you could ensure a decimal property, Dec, is formatted to three decimal places
with the following code:
<input asp-for="Dec" asp-format="0.000" />
If the Dec property had a value of 1.2, this would generate HTML similar to
<input type="text" id="Dec" name="Dec" value="1.200">
Table 8.1 Common data types, how to specify them, and the input element type they map to
Data type How it’s specified Input element type
byte, int, short, long, uint Property type number
decimal, double, float Property type text
string Property type,
[DataType(DataType.Text)]
attribute
text
HiddenInput [HiddenInput] attribute hidden
Password [Password] attribute password
PhoneAttribute [Phone] attribute tel
EmailAddress [EmailAddress] attribute email
Url [Url] attribute url
Date DateTime property type,
[DataType(DataType.Date)]
attribute
date](https://image.slidesharecdn.com/asp-230807173723-31e70040/75/ASP-NET-Core-in-Action-2018-pdf-247-2048.jpg)
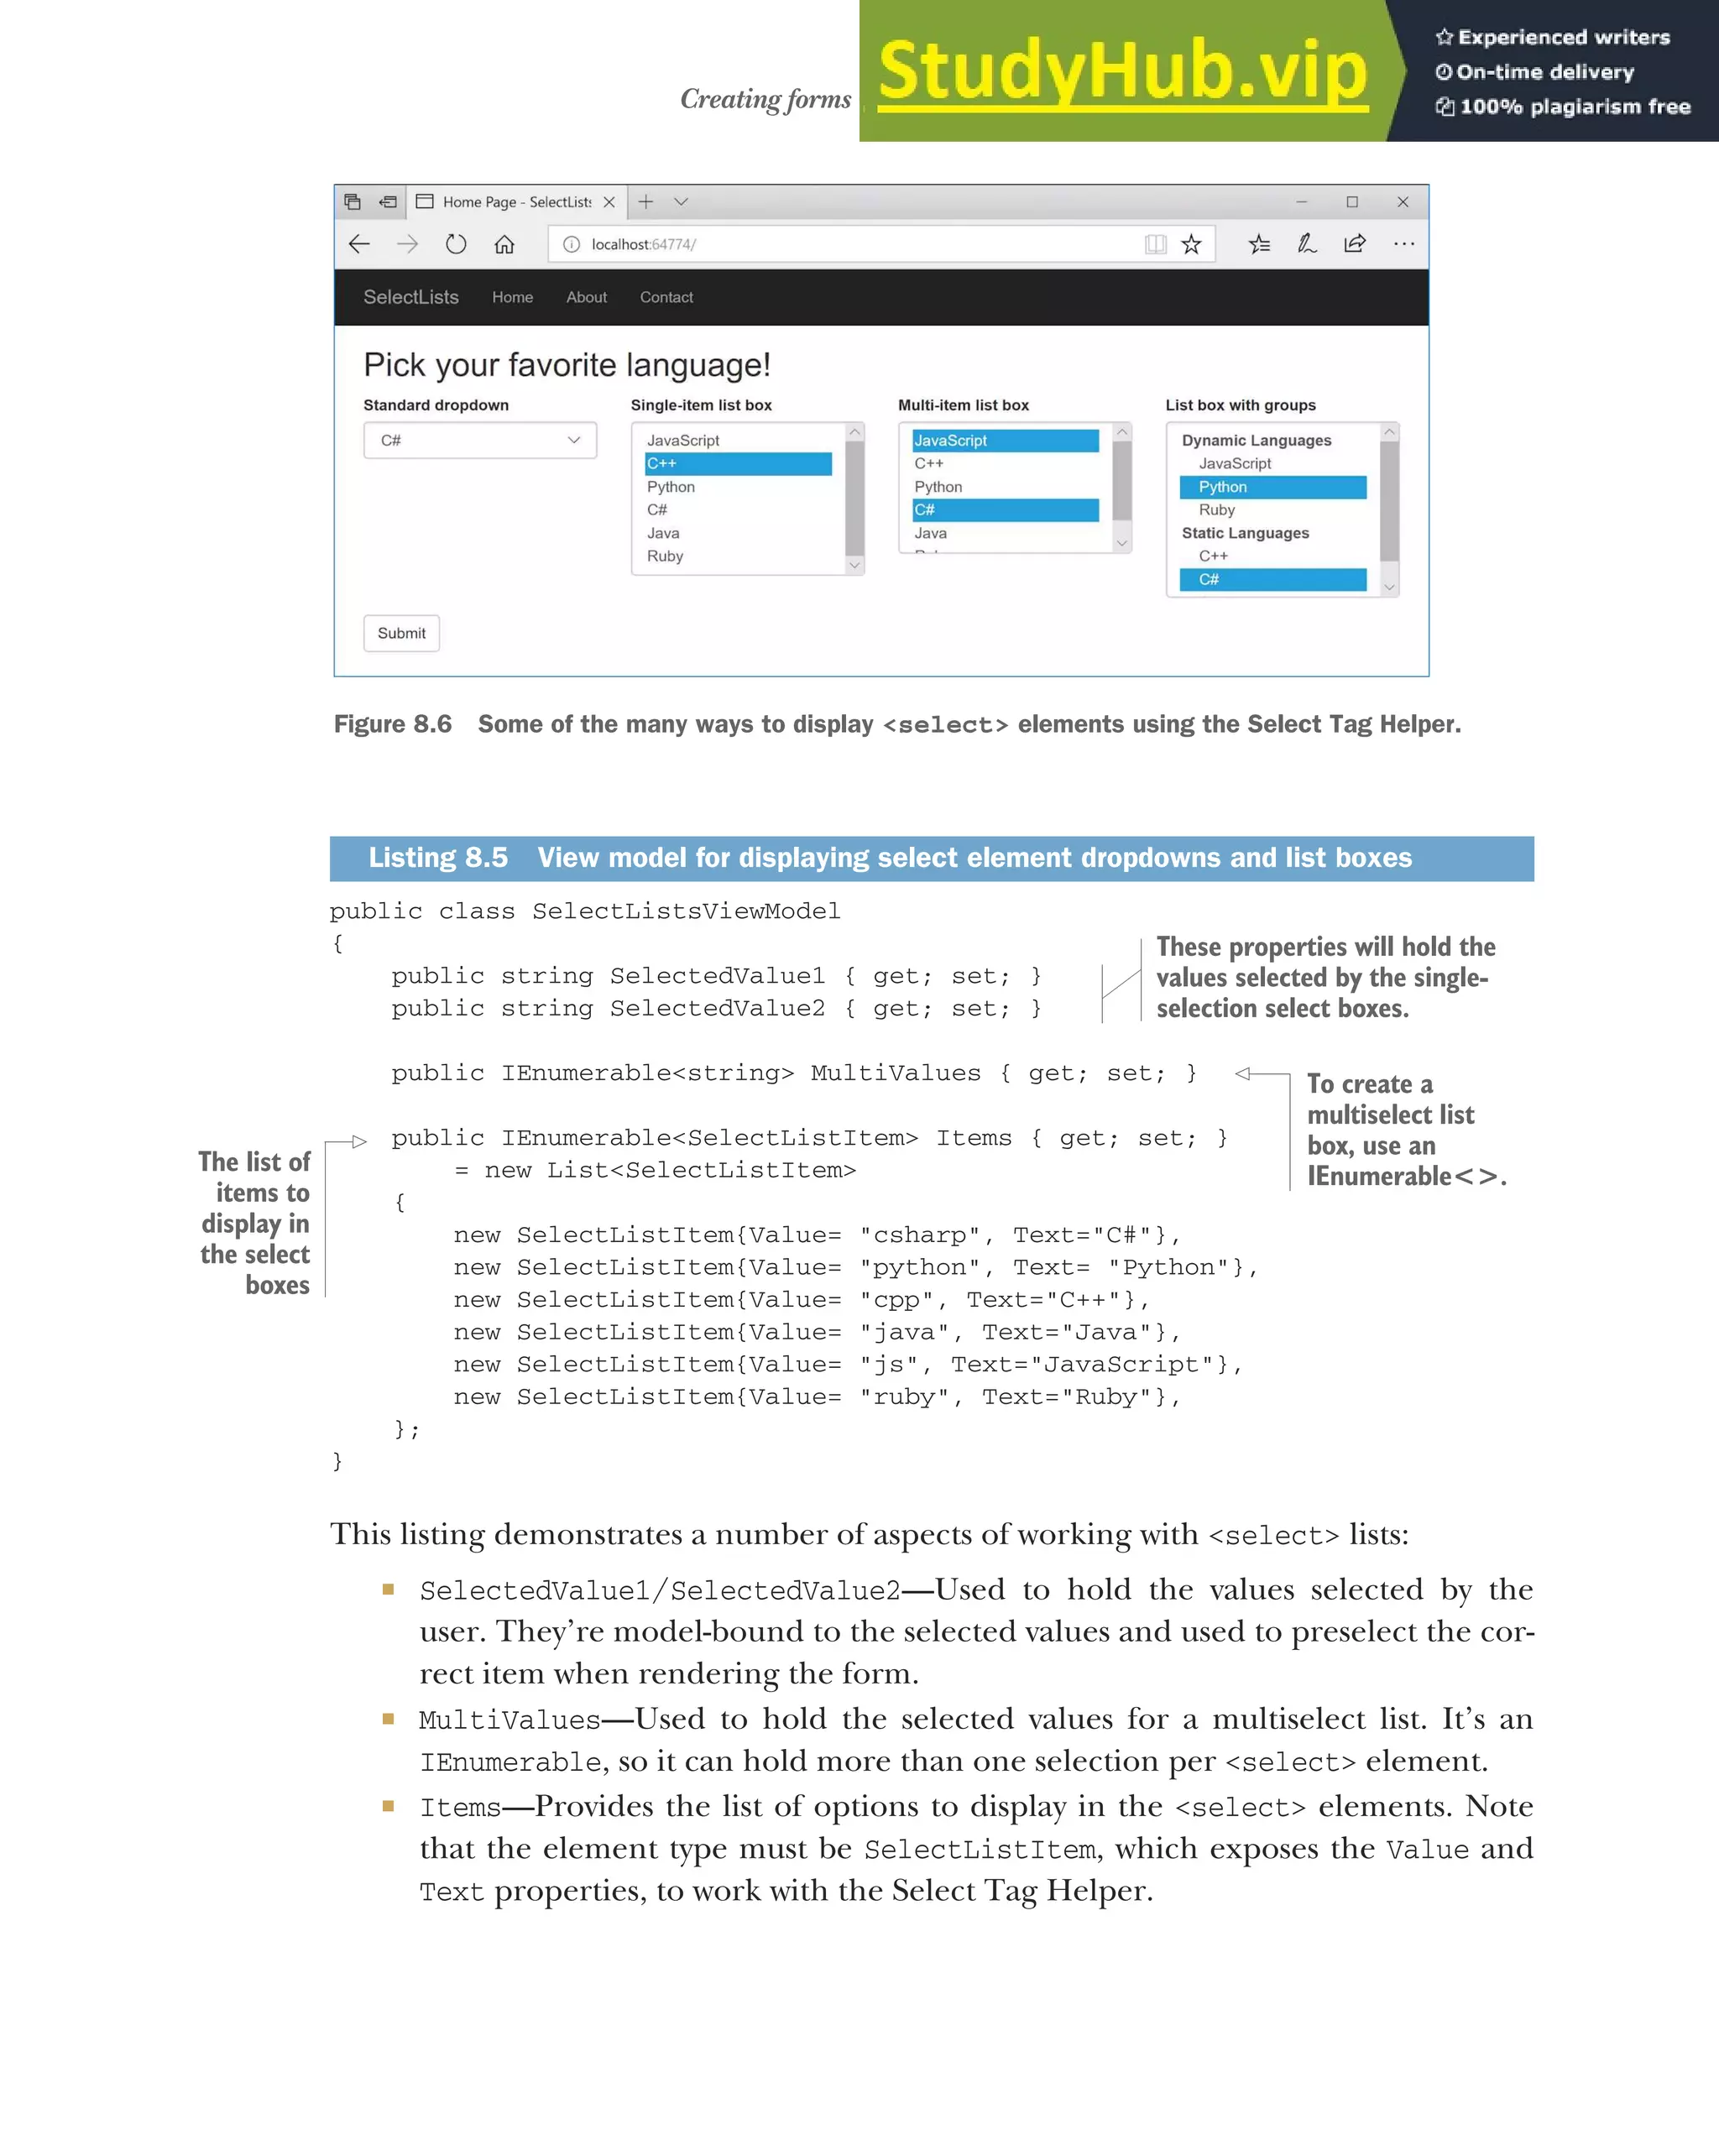
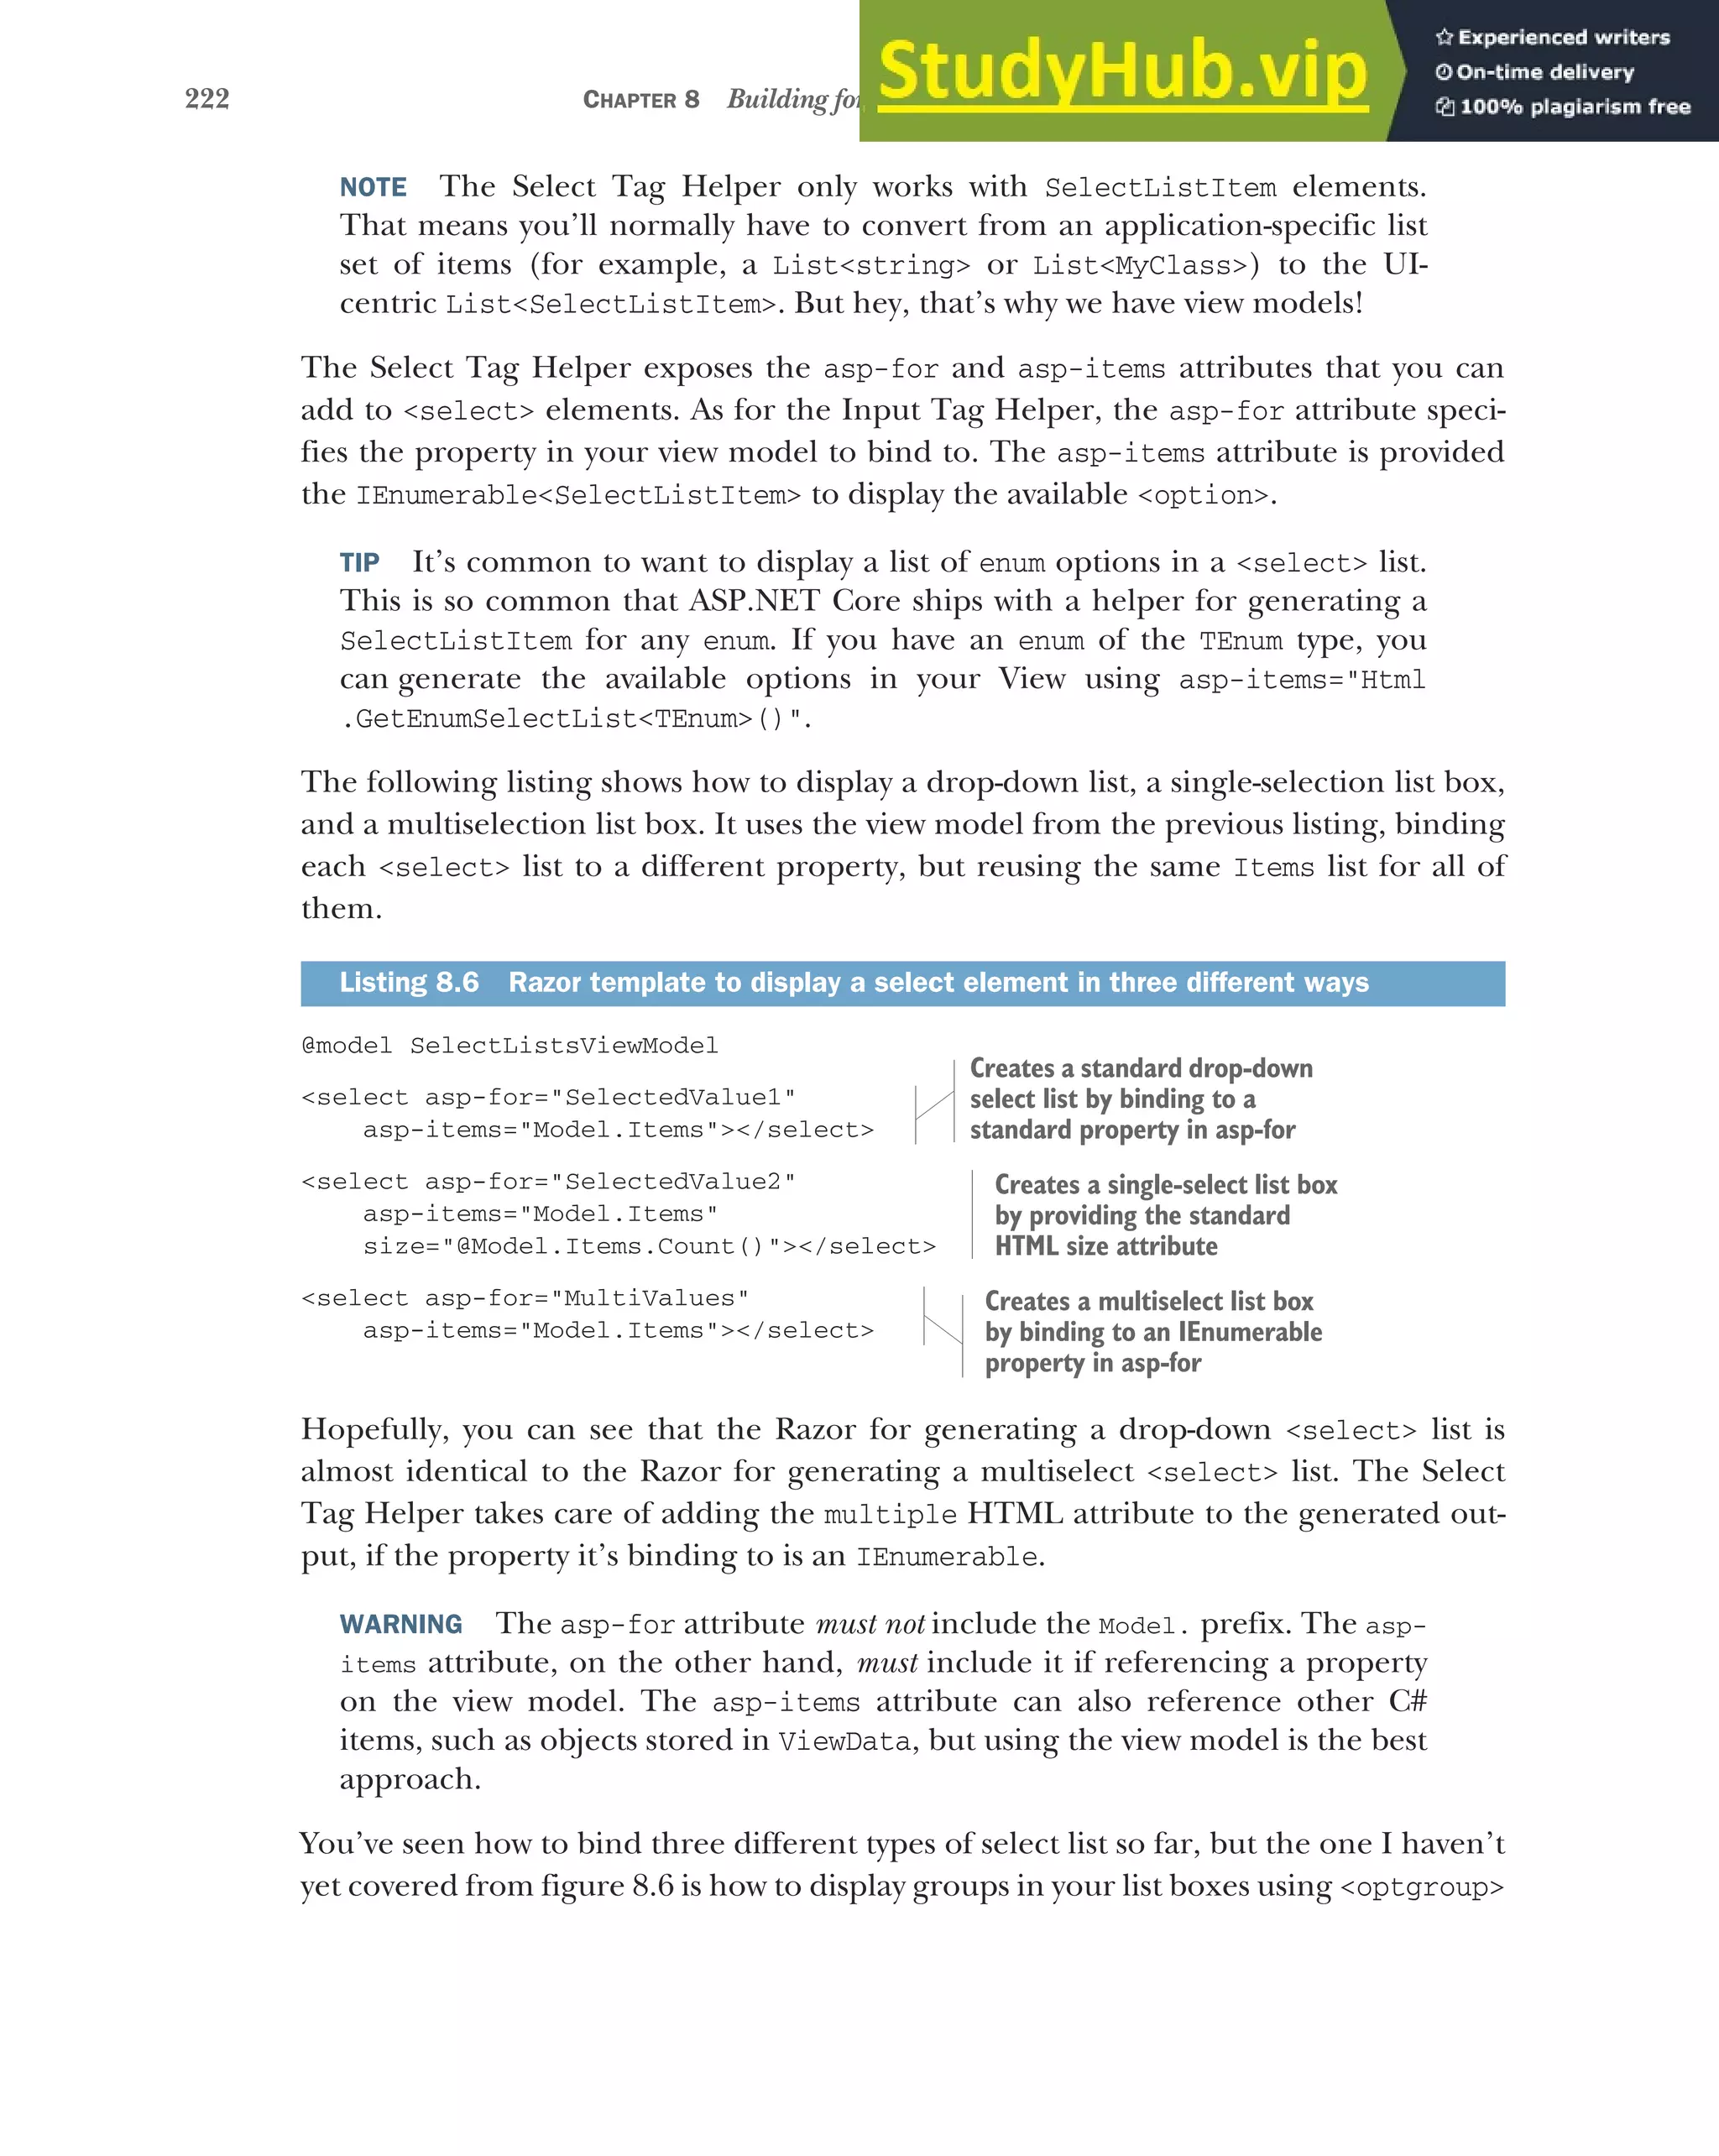
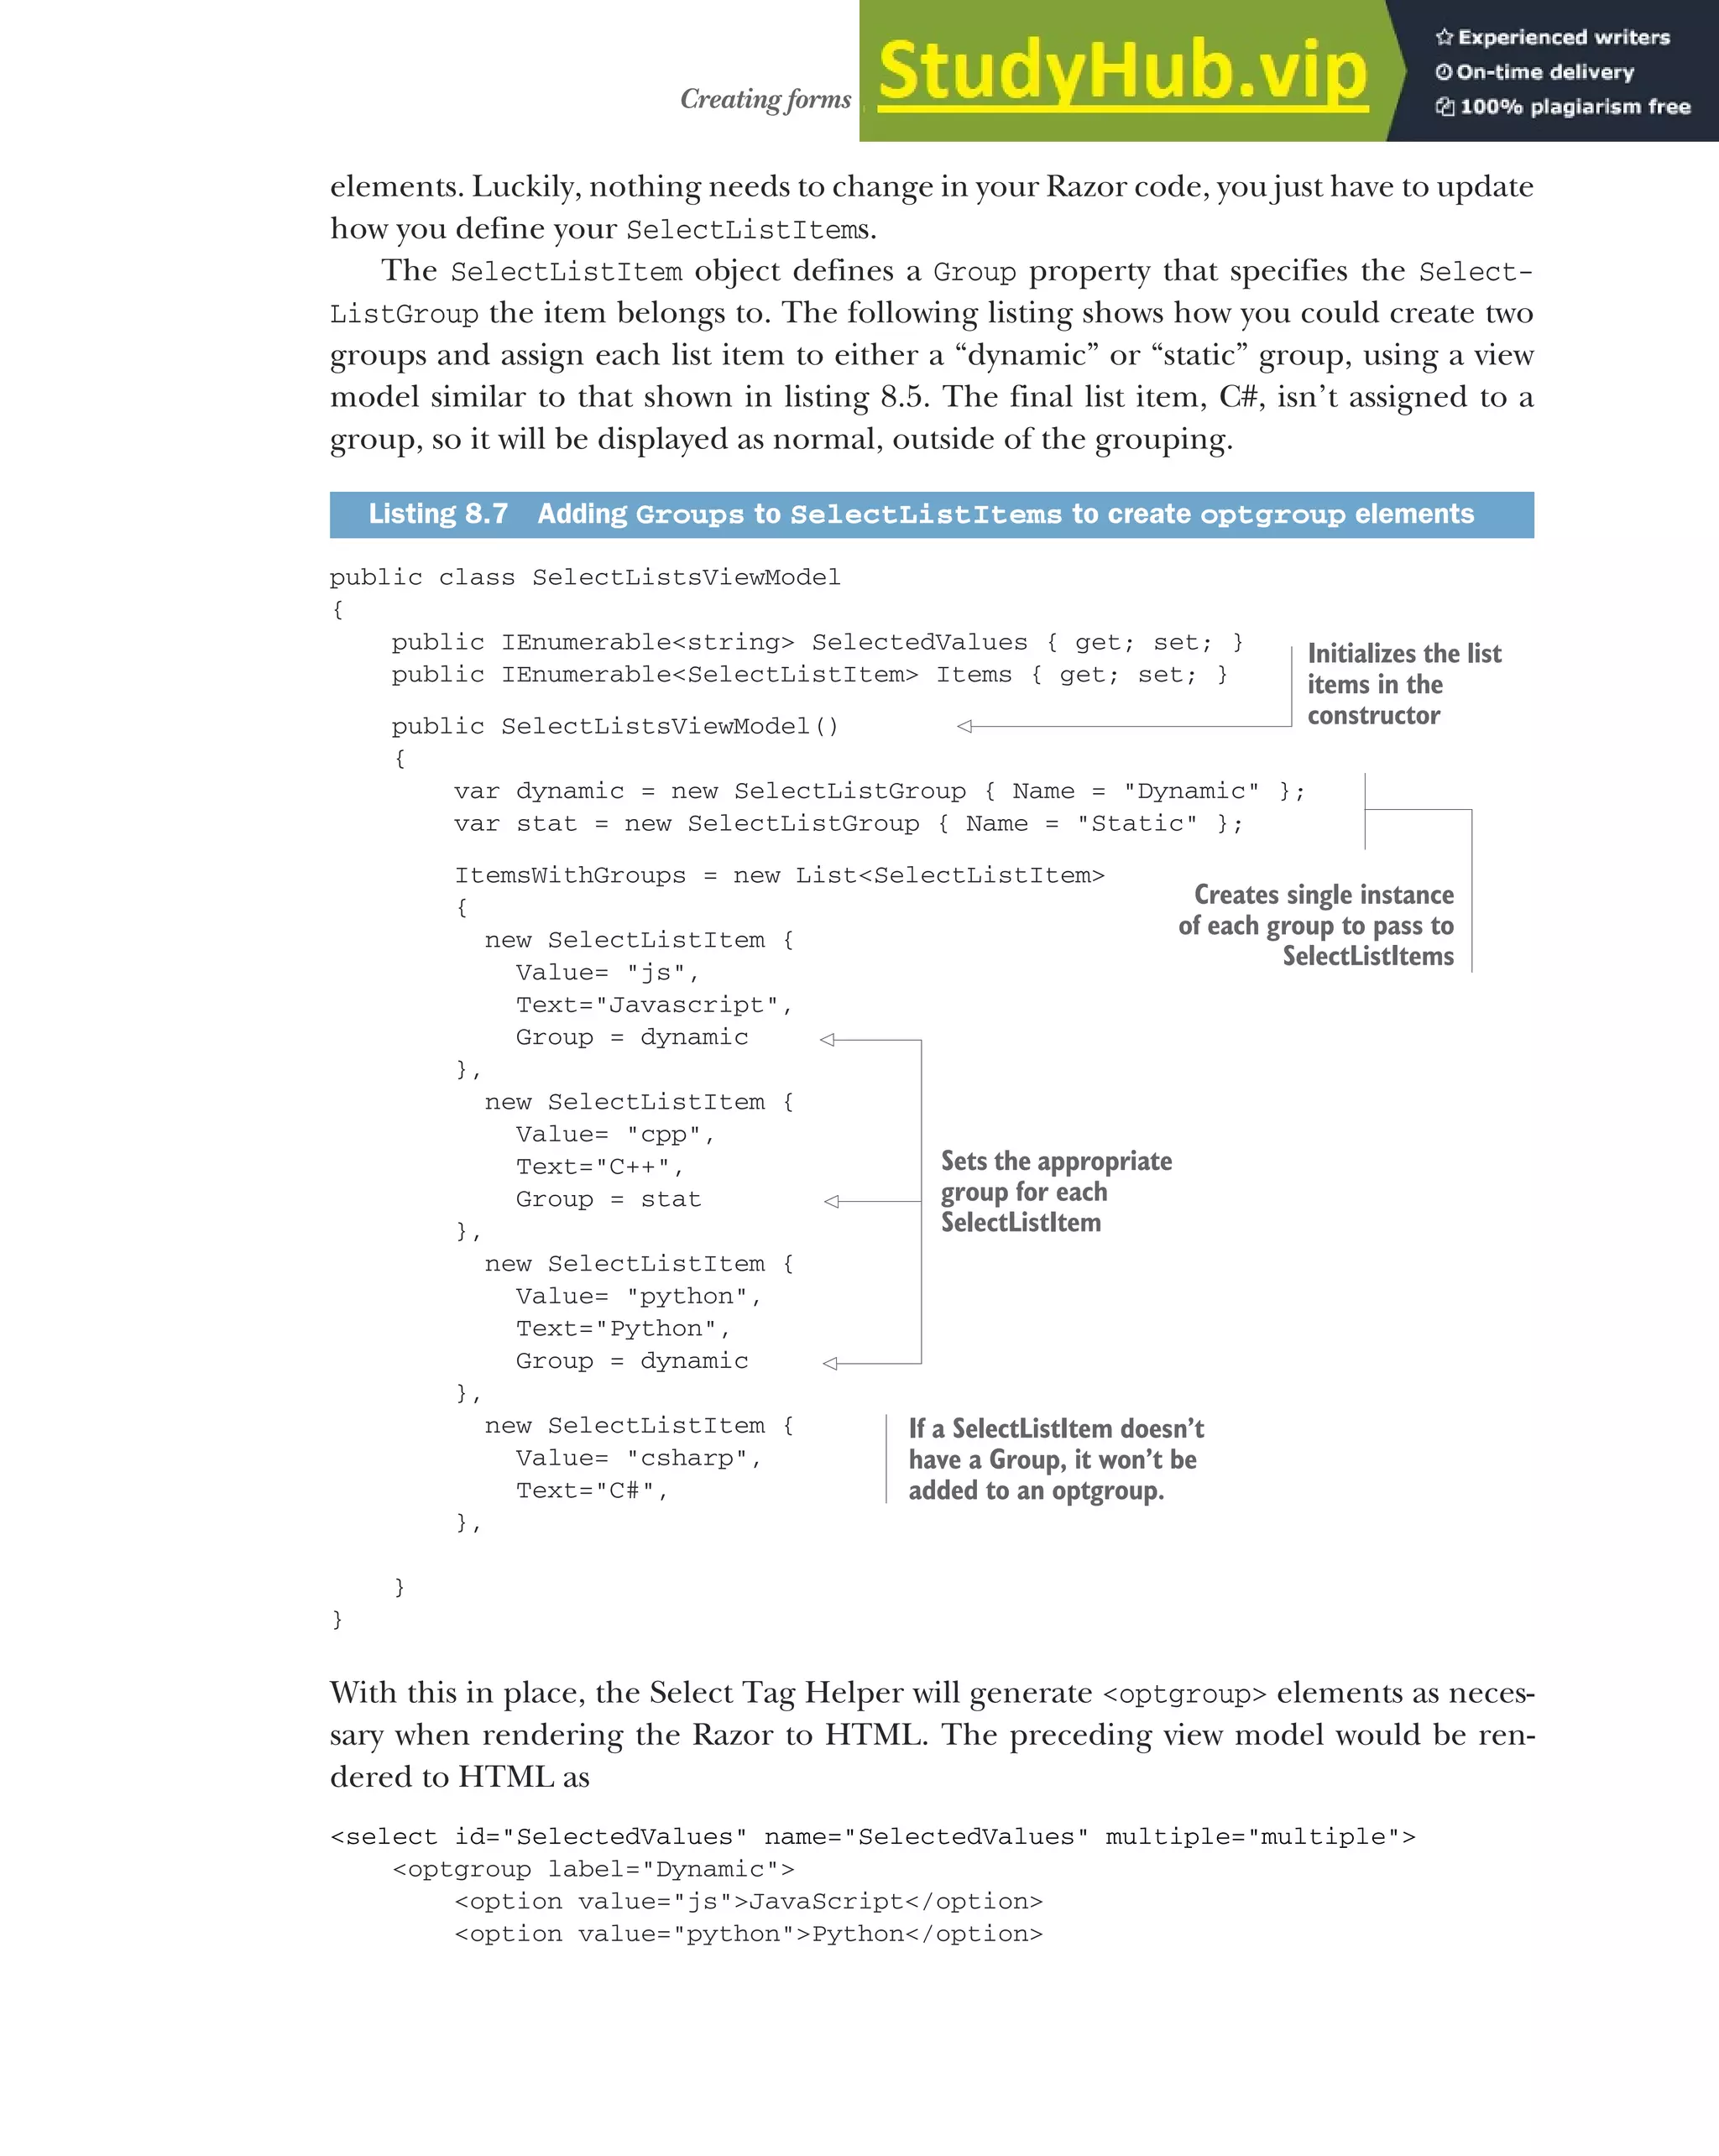
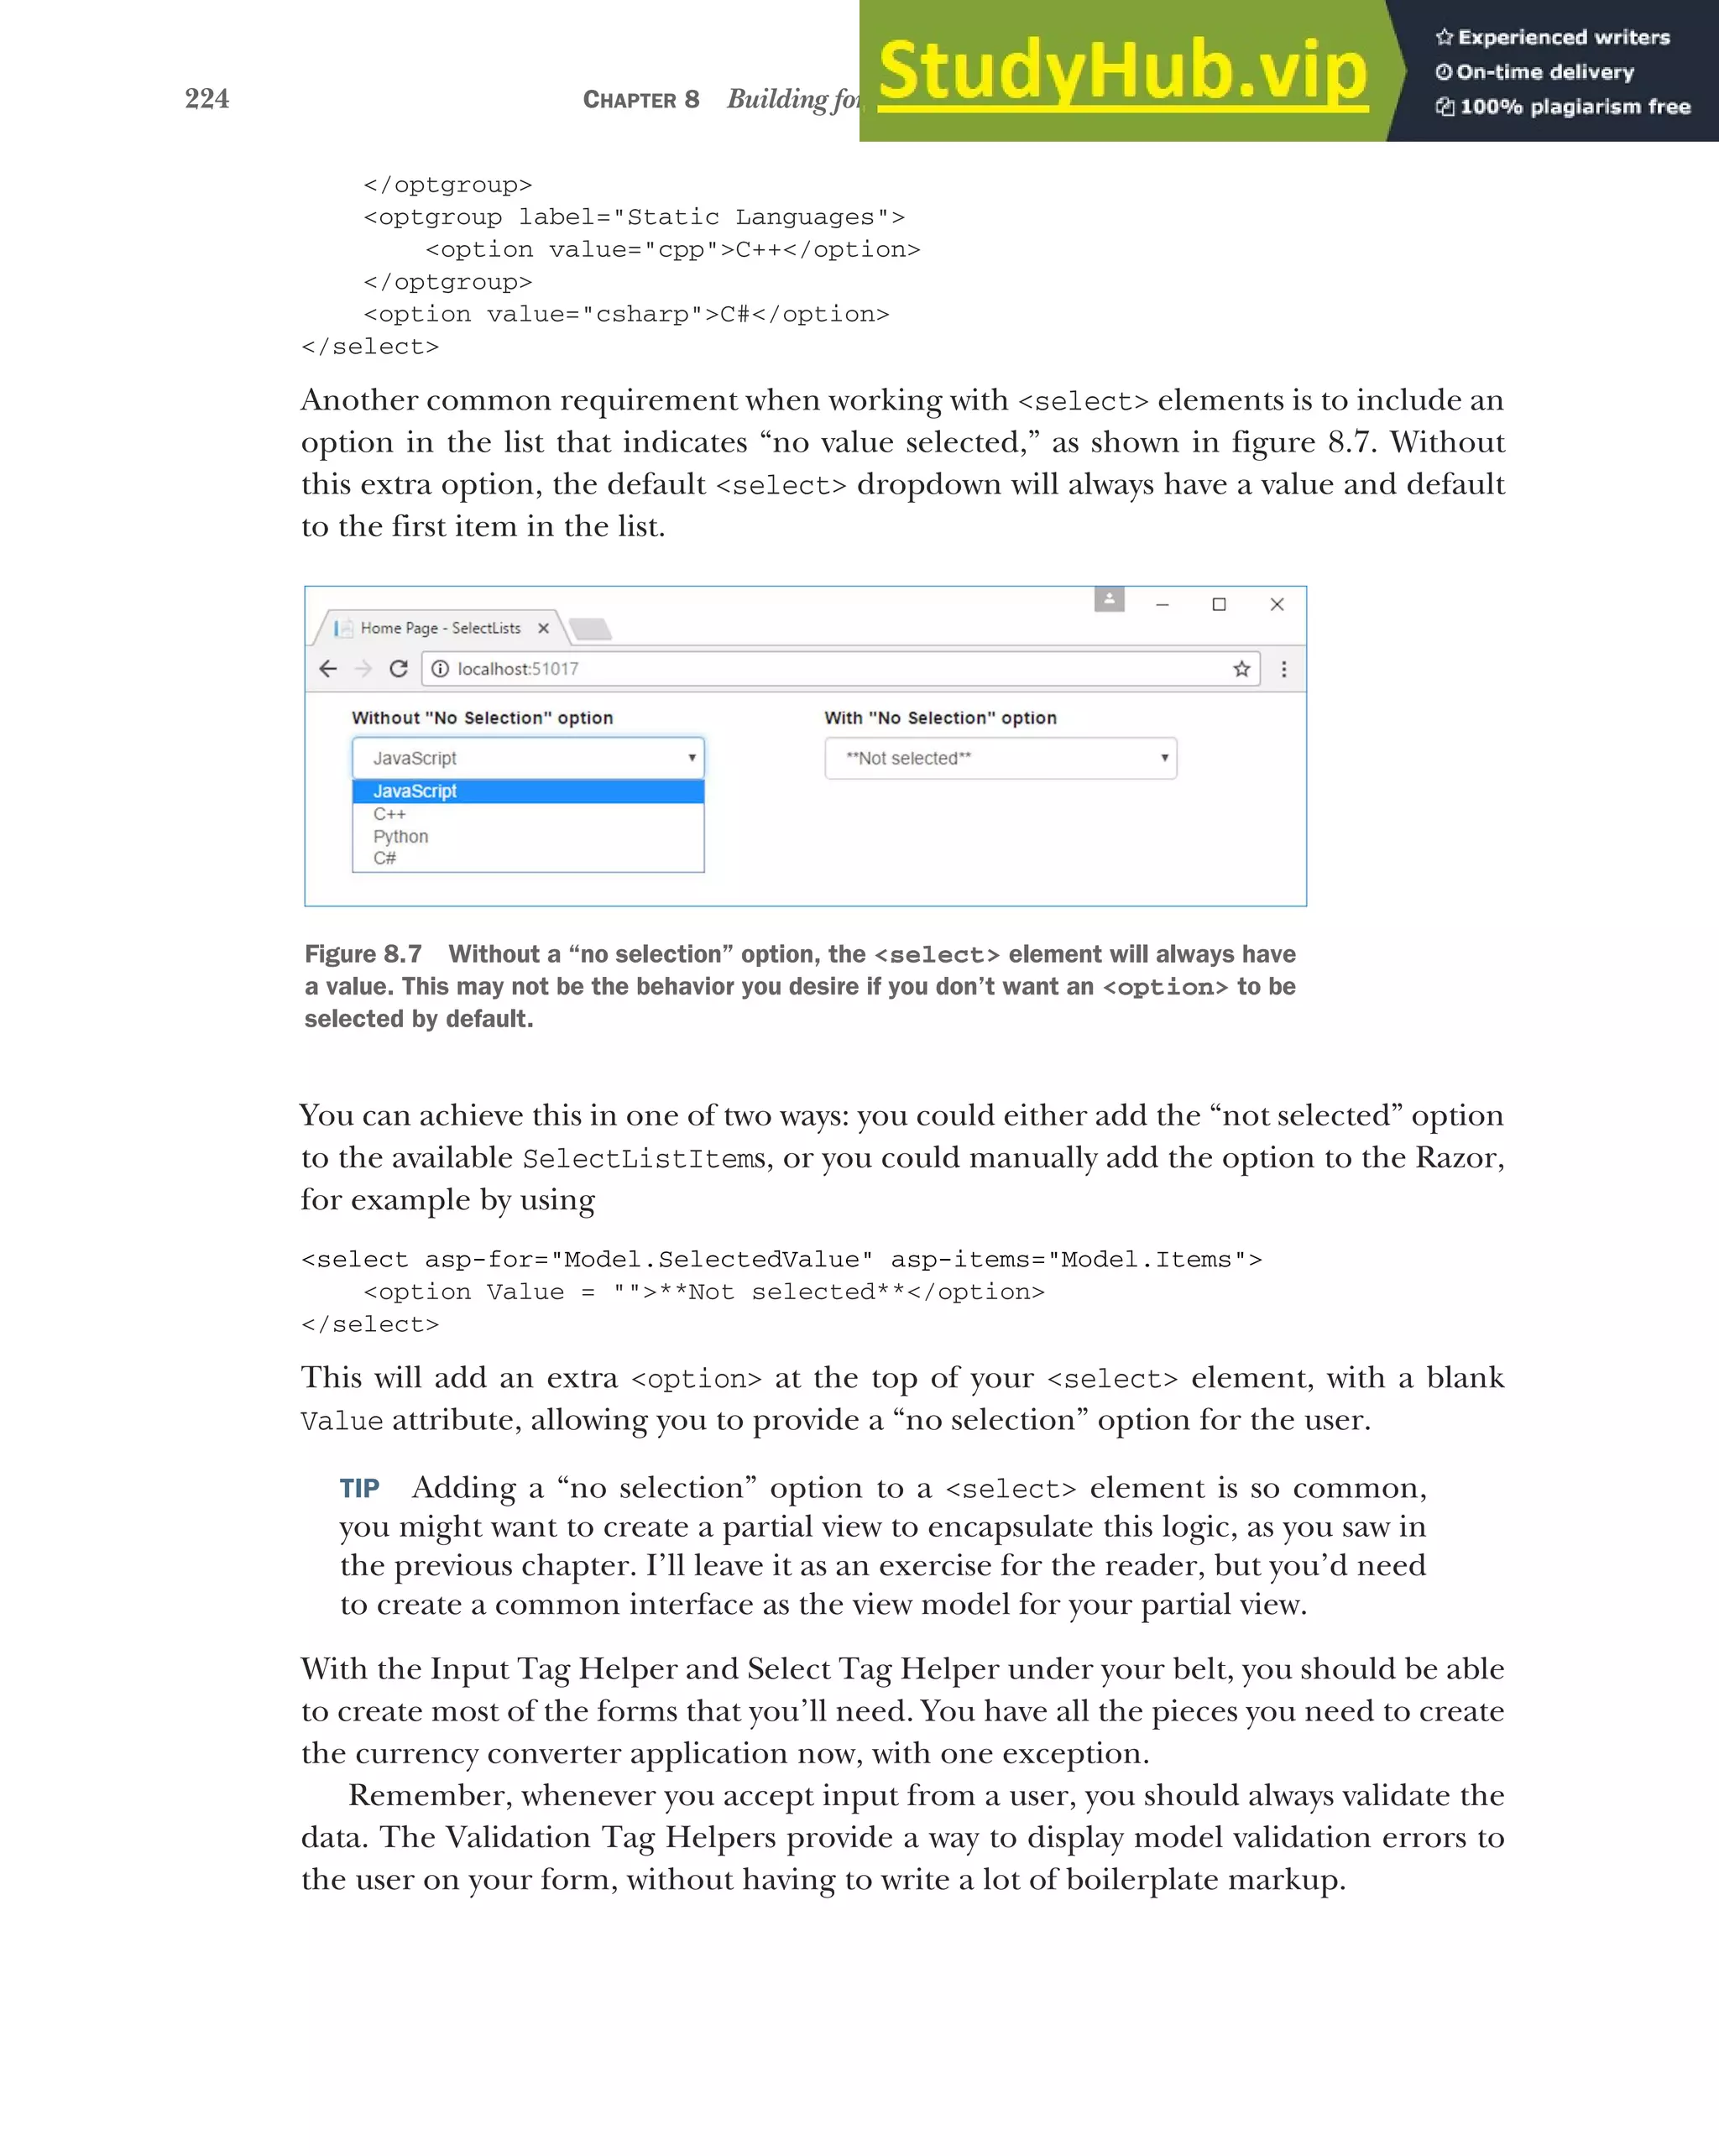
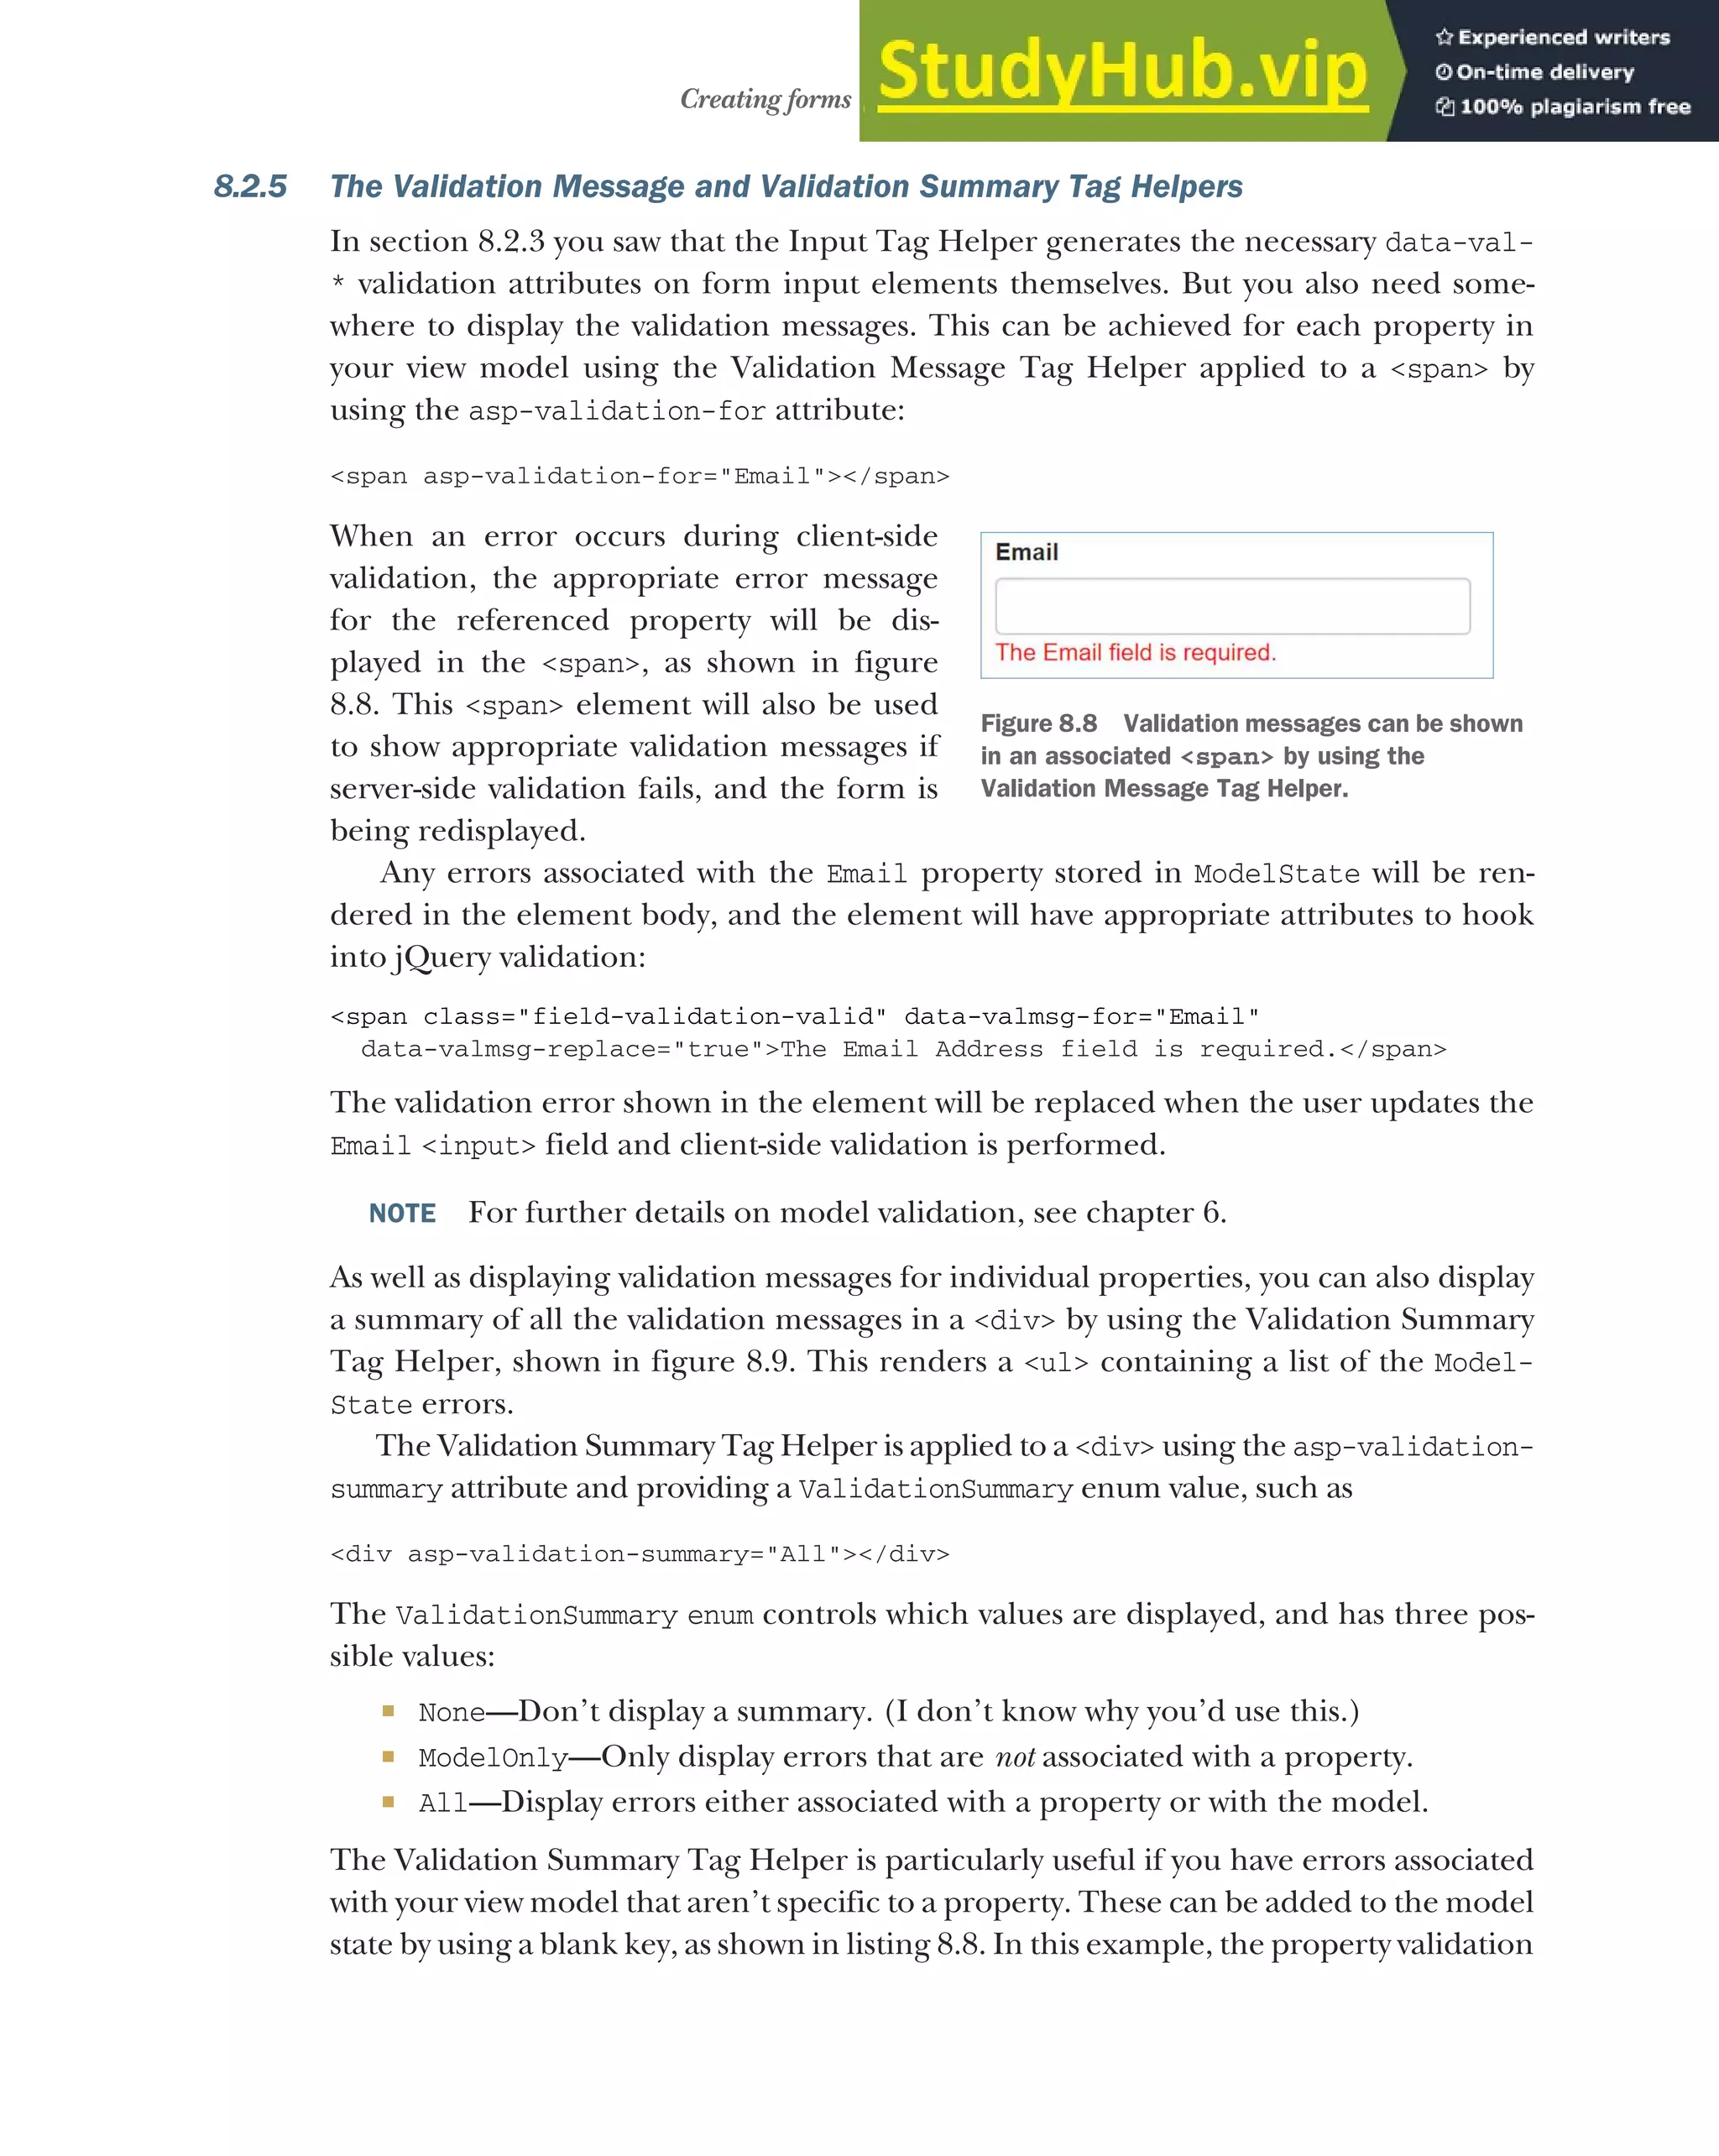
![226 CHAPTER 8 Building forms with Tag Helpers
passed, but we provide additional model-level validation that we aren’t trying to convert
a currency to itself.
public class CurrencyController : Controller
{
[HttpPost]
public IActionResult Convert(
CurrencyConverterModel model)
{
if(model.CurrencyFrom == model.CurrencyTo)
{
ModelState.AddModelError(
string.Empty,
"Cannot convert currency to itself");
}
if (!ModelState.IsValid)
{
return View(model);
}
Listing 8.8 Adding model-level validation errors to the ModelState
Figure 8.9 Form showing validation errors. The Validation Message Tag Helper
is applied to <span>, close to the associated input. The Validation Summary
Tag Helper is applied to a <div>, normally at the top or bottom of the form.
Validation Message
Tag Helpers
Validation Summary
Tag Helper
Can’t convert
currency to itself
Adds model-level error
by using empty key
If there are any property-
level or model-level errors,
display them.](https://image.slidesharecdn.com/asp-230807173723-31e70040/75/ASP-NET-Core-in-Action-2018-pdf-254-2048.jpg)

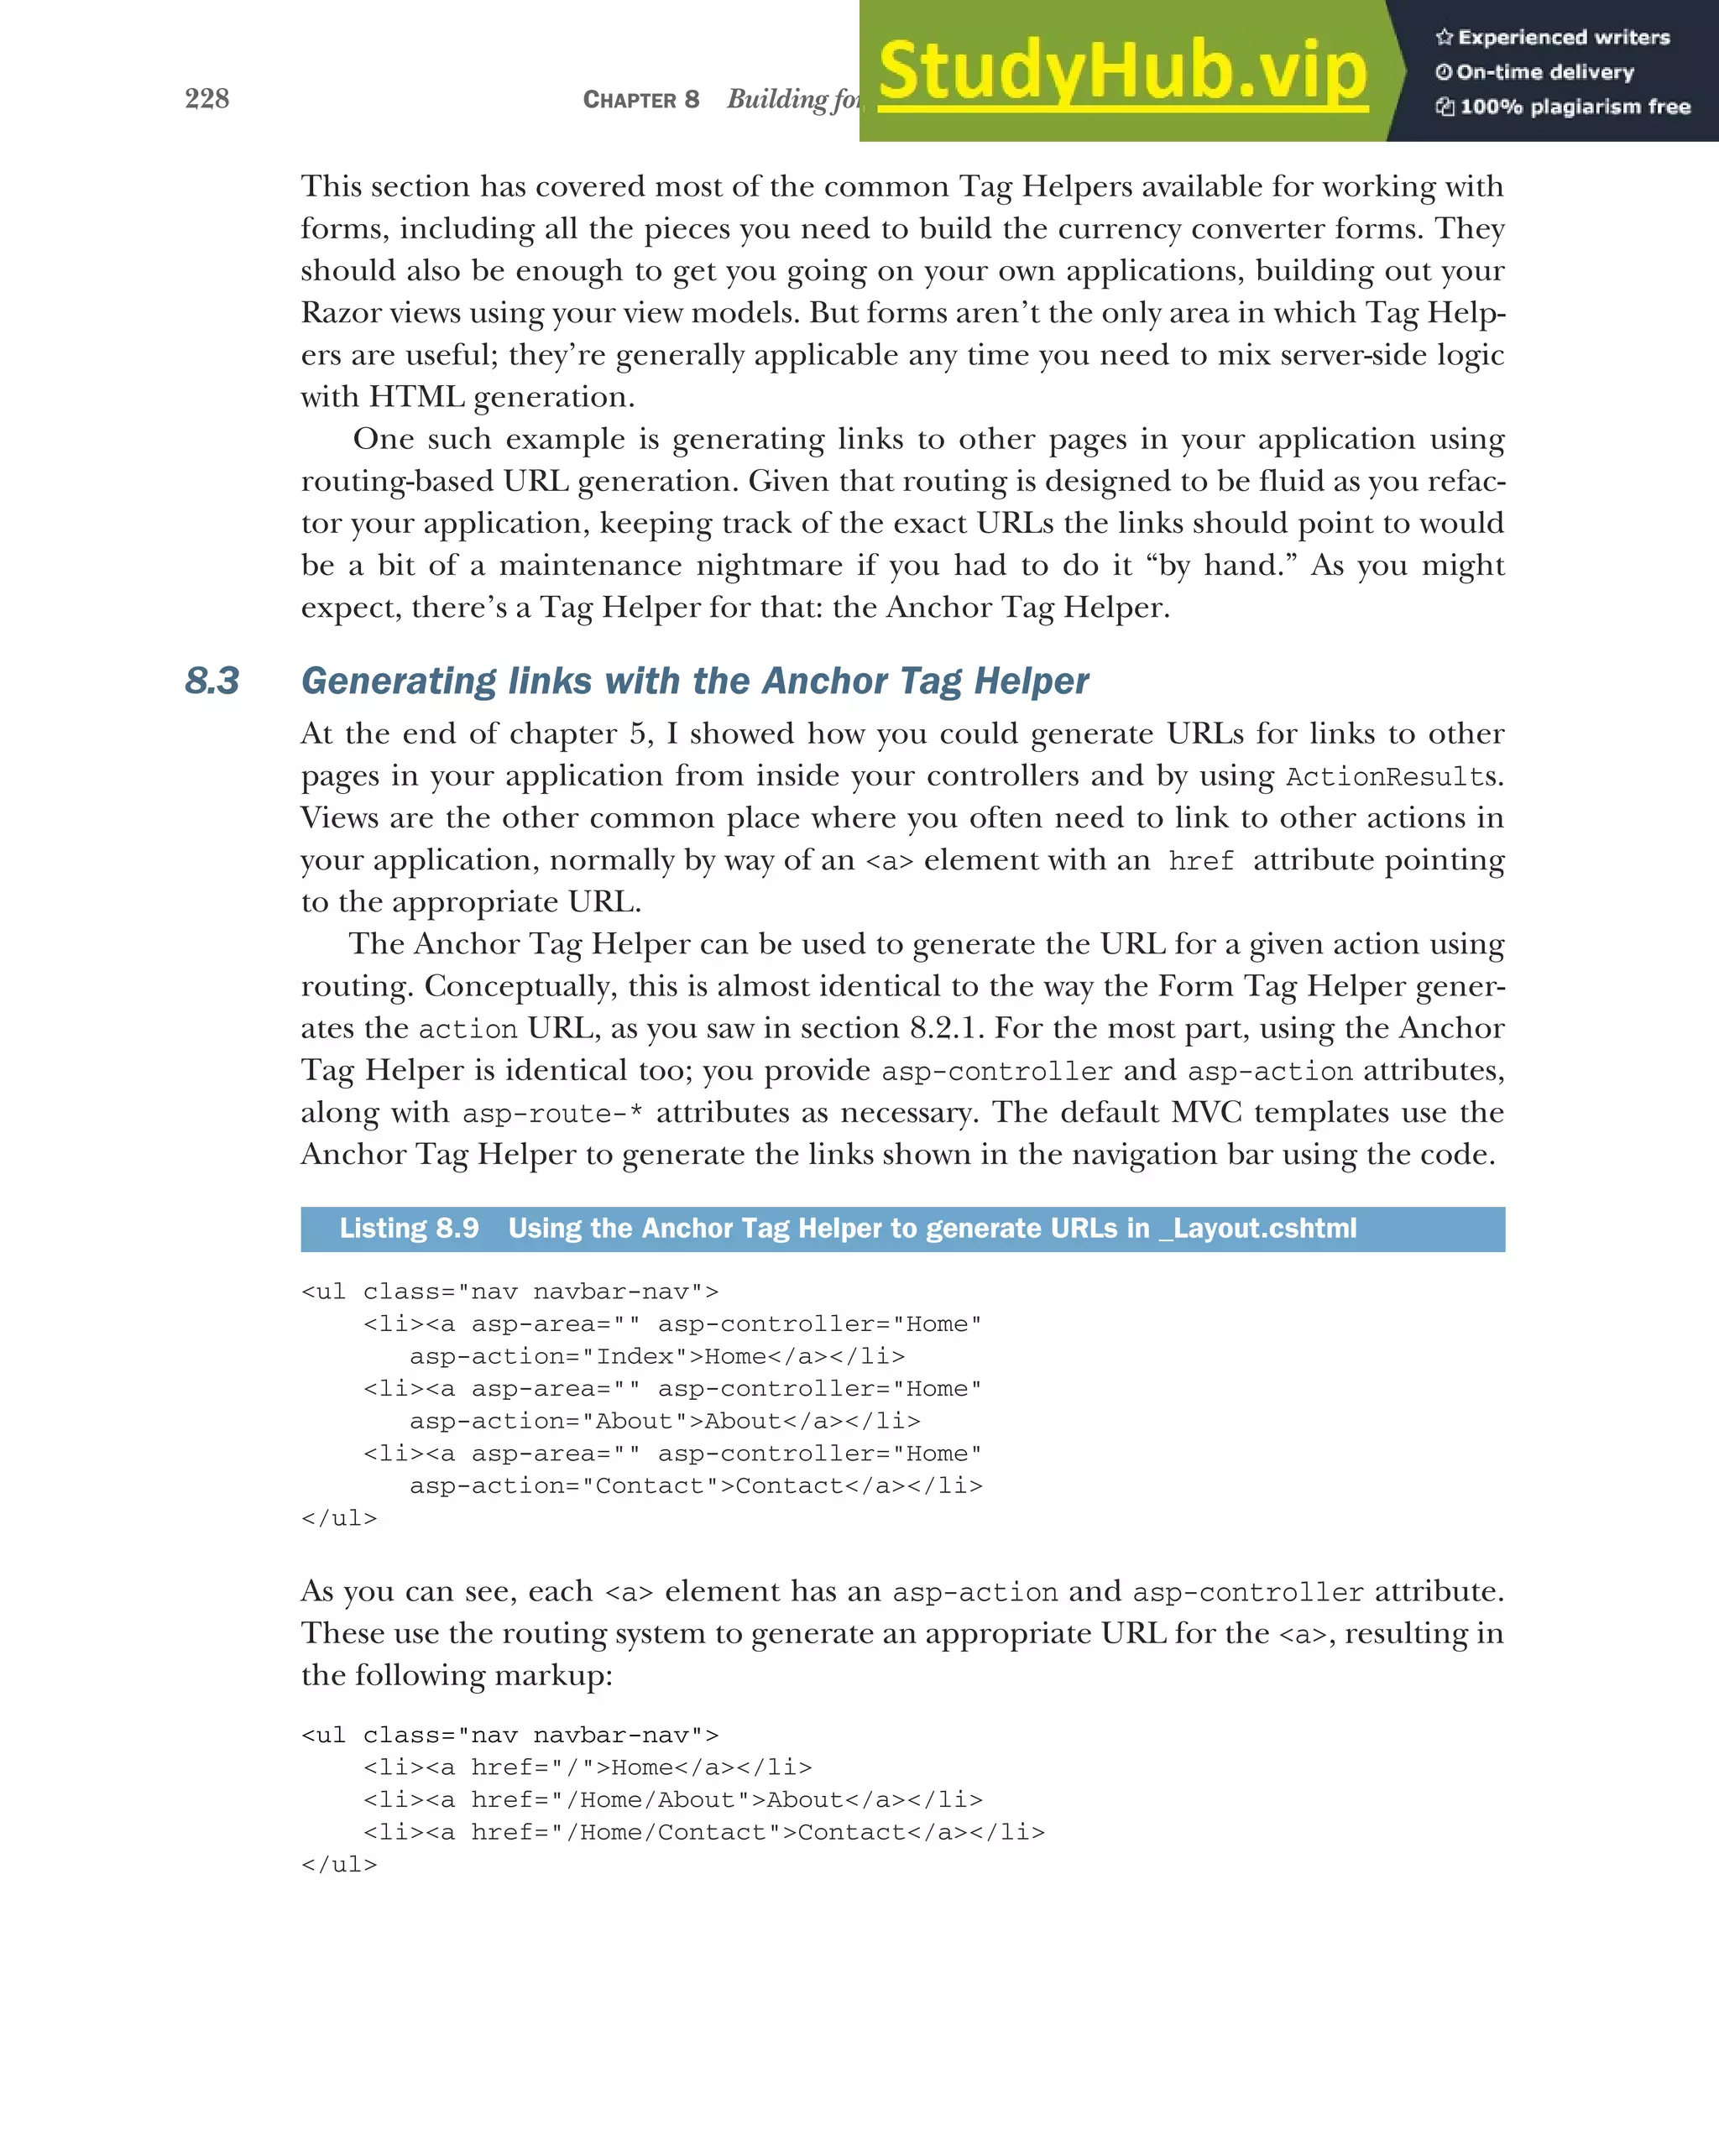
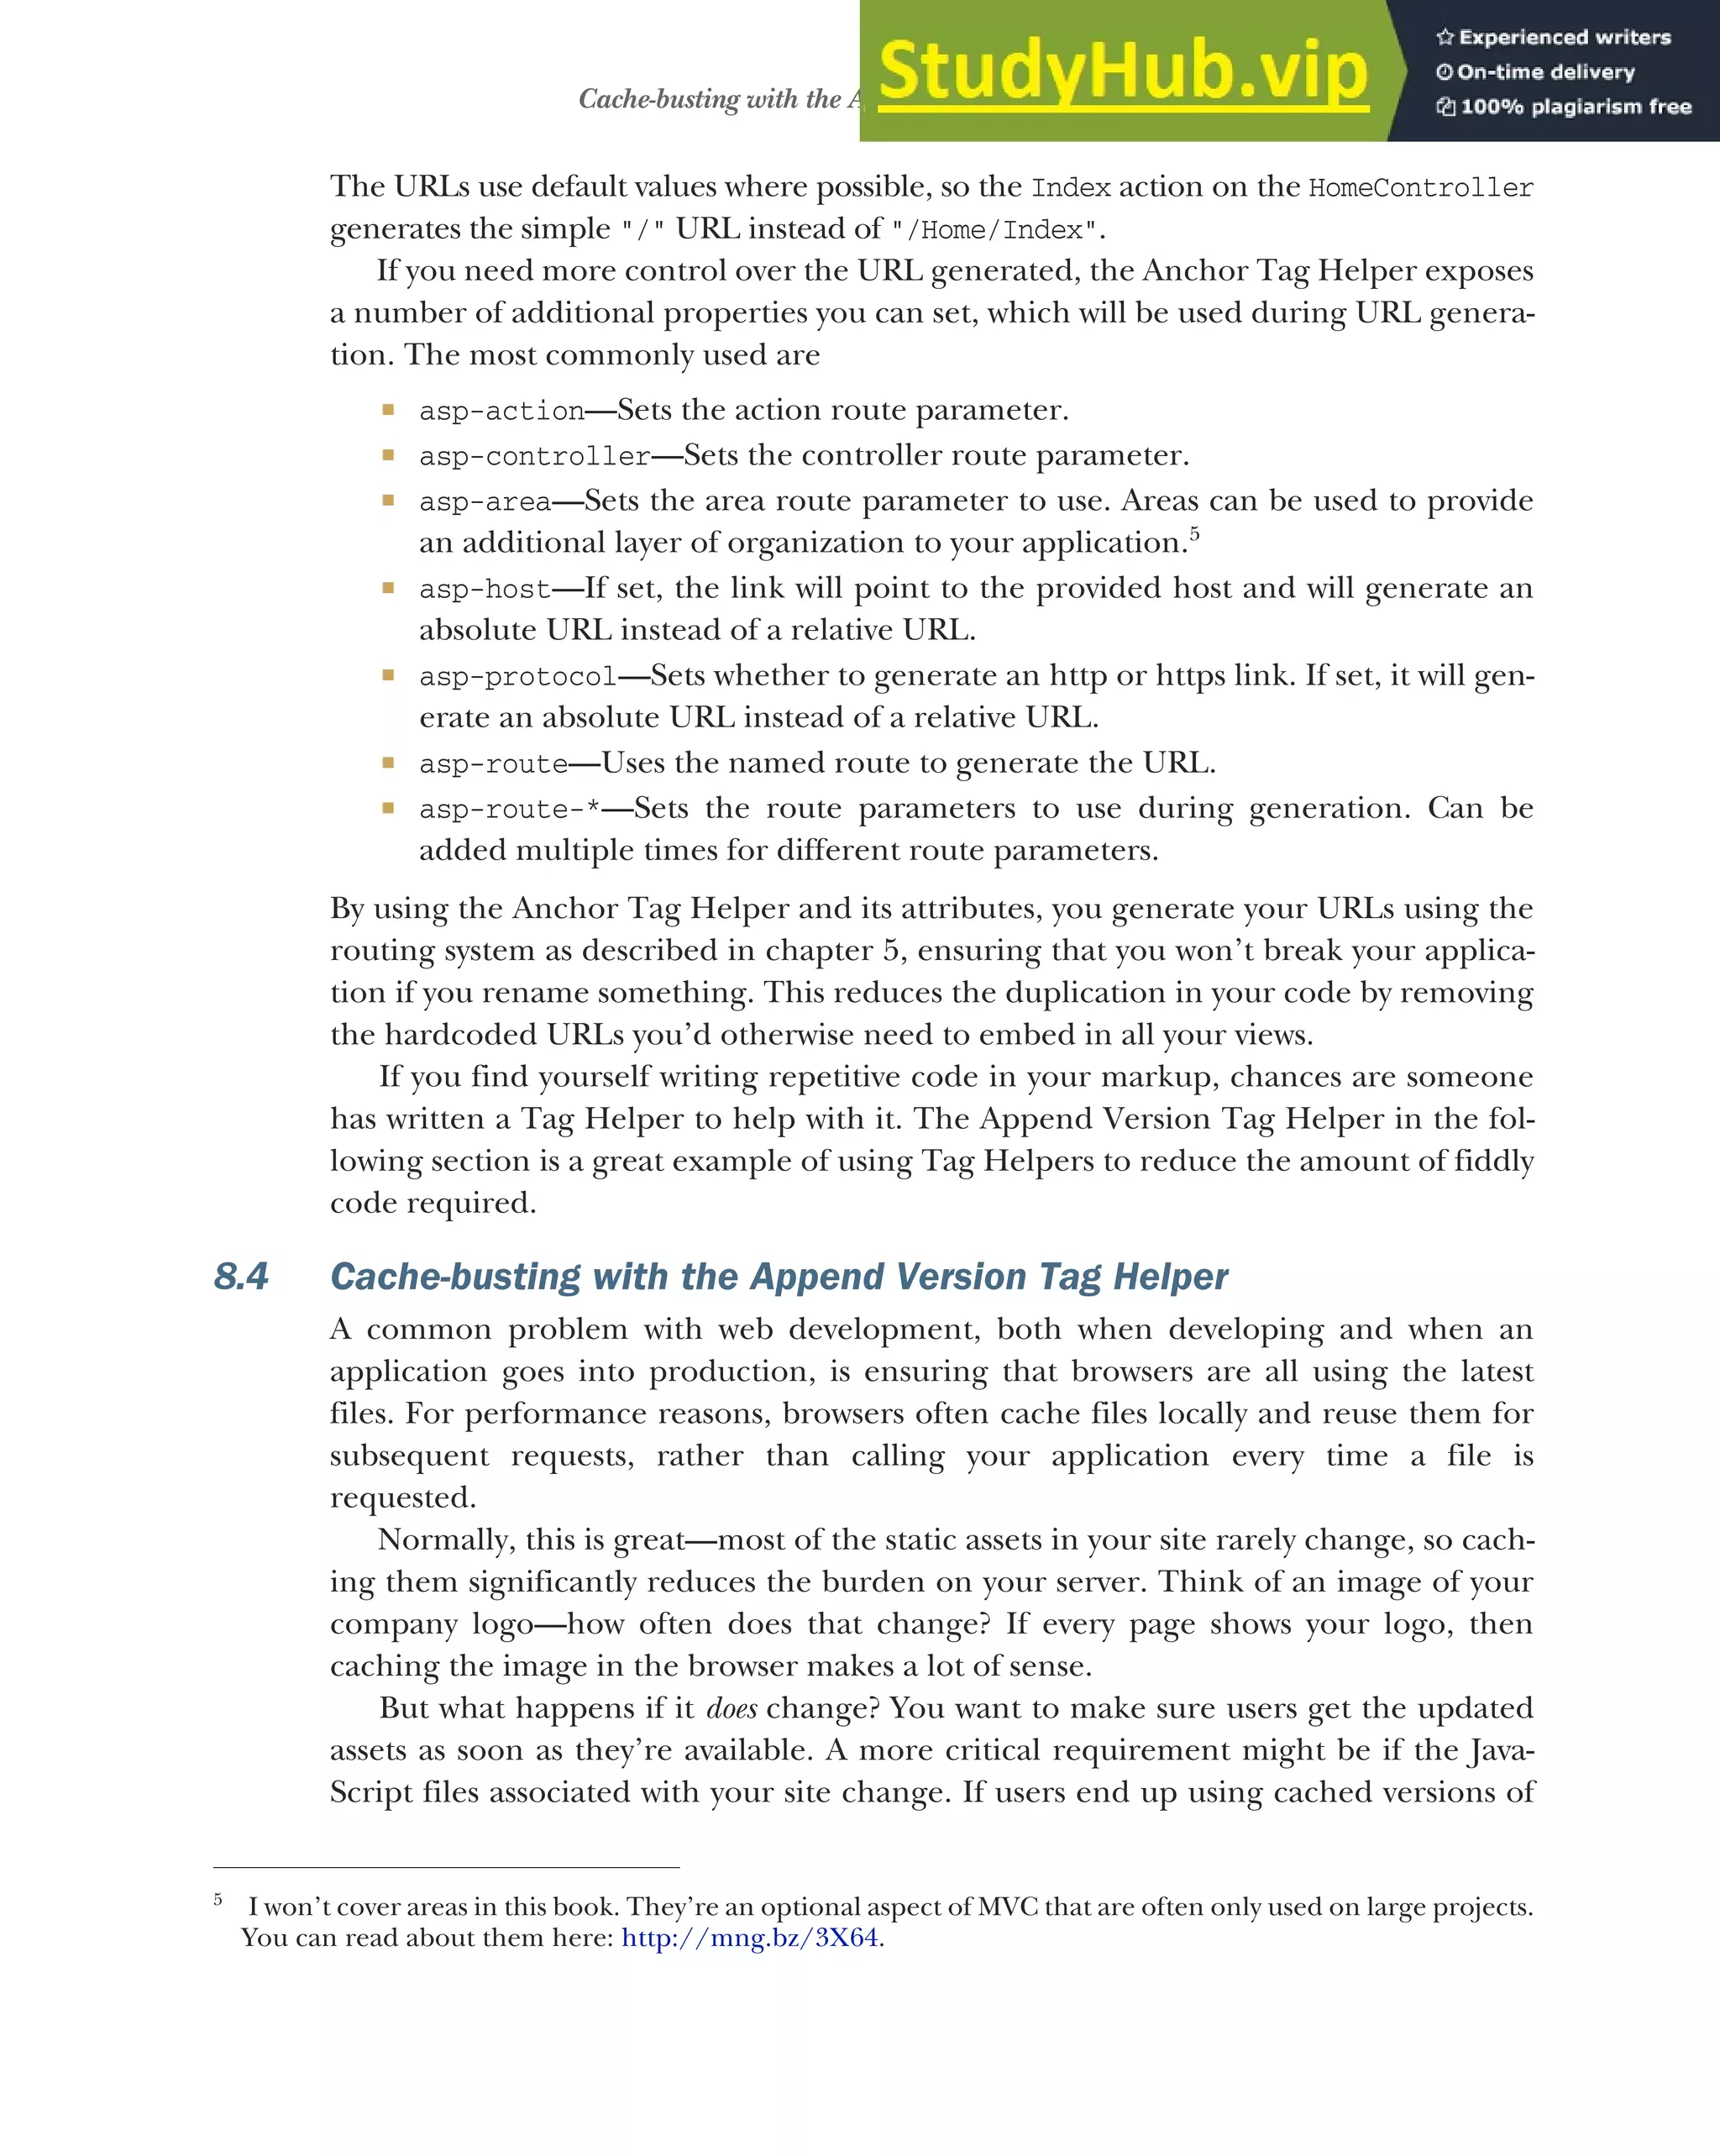
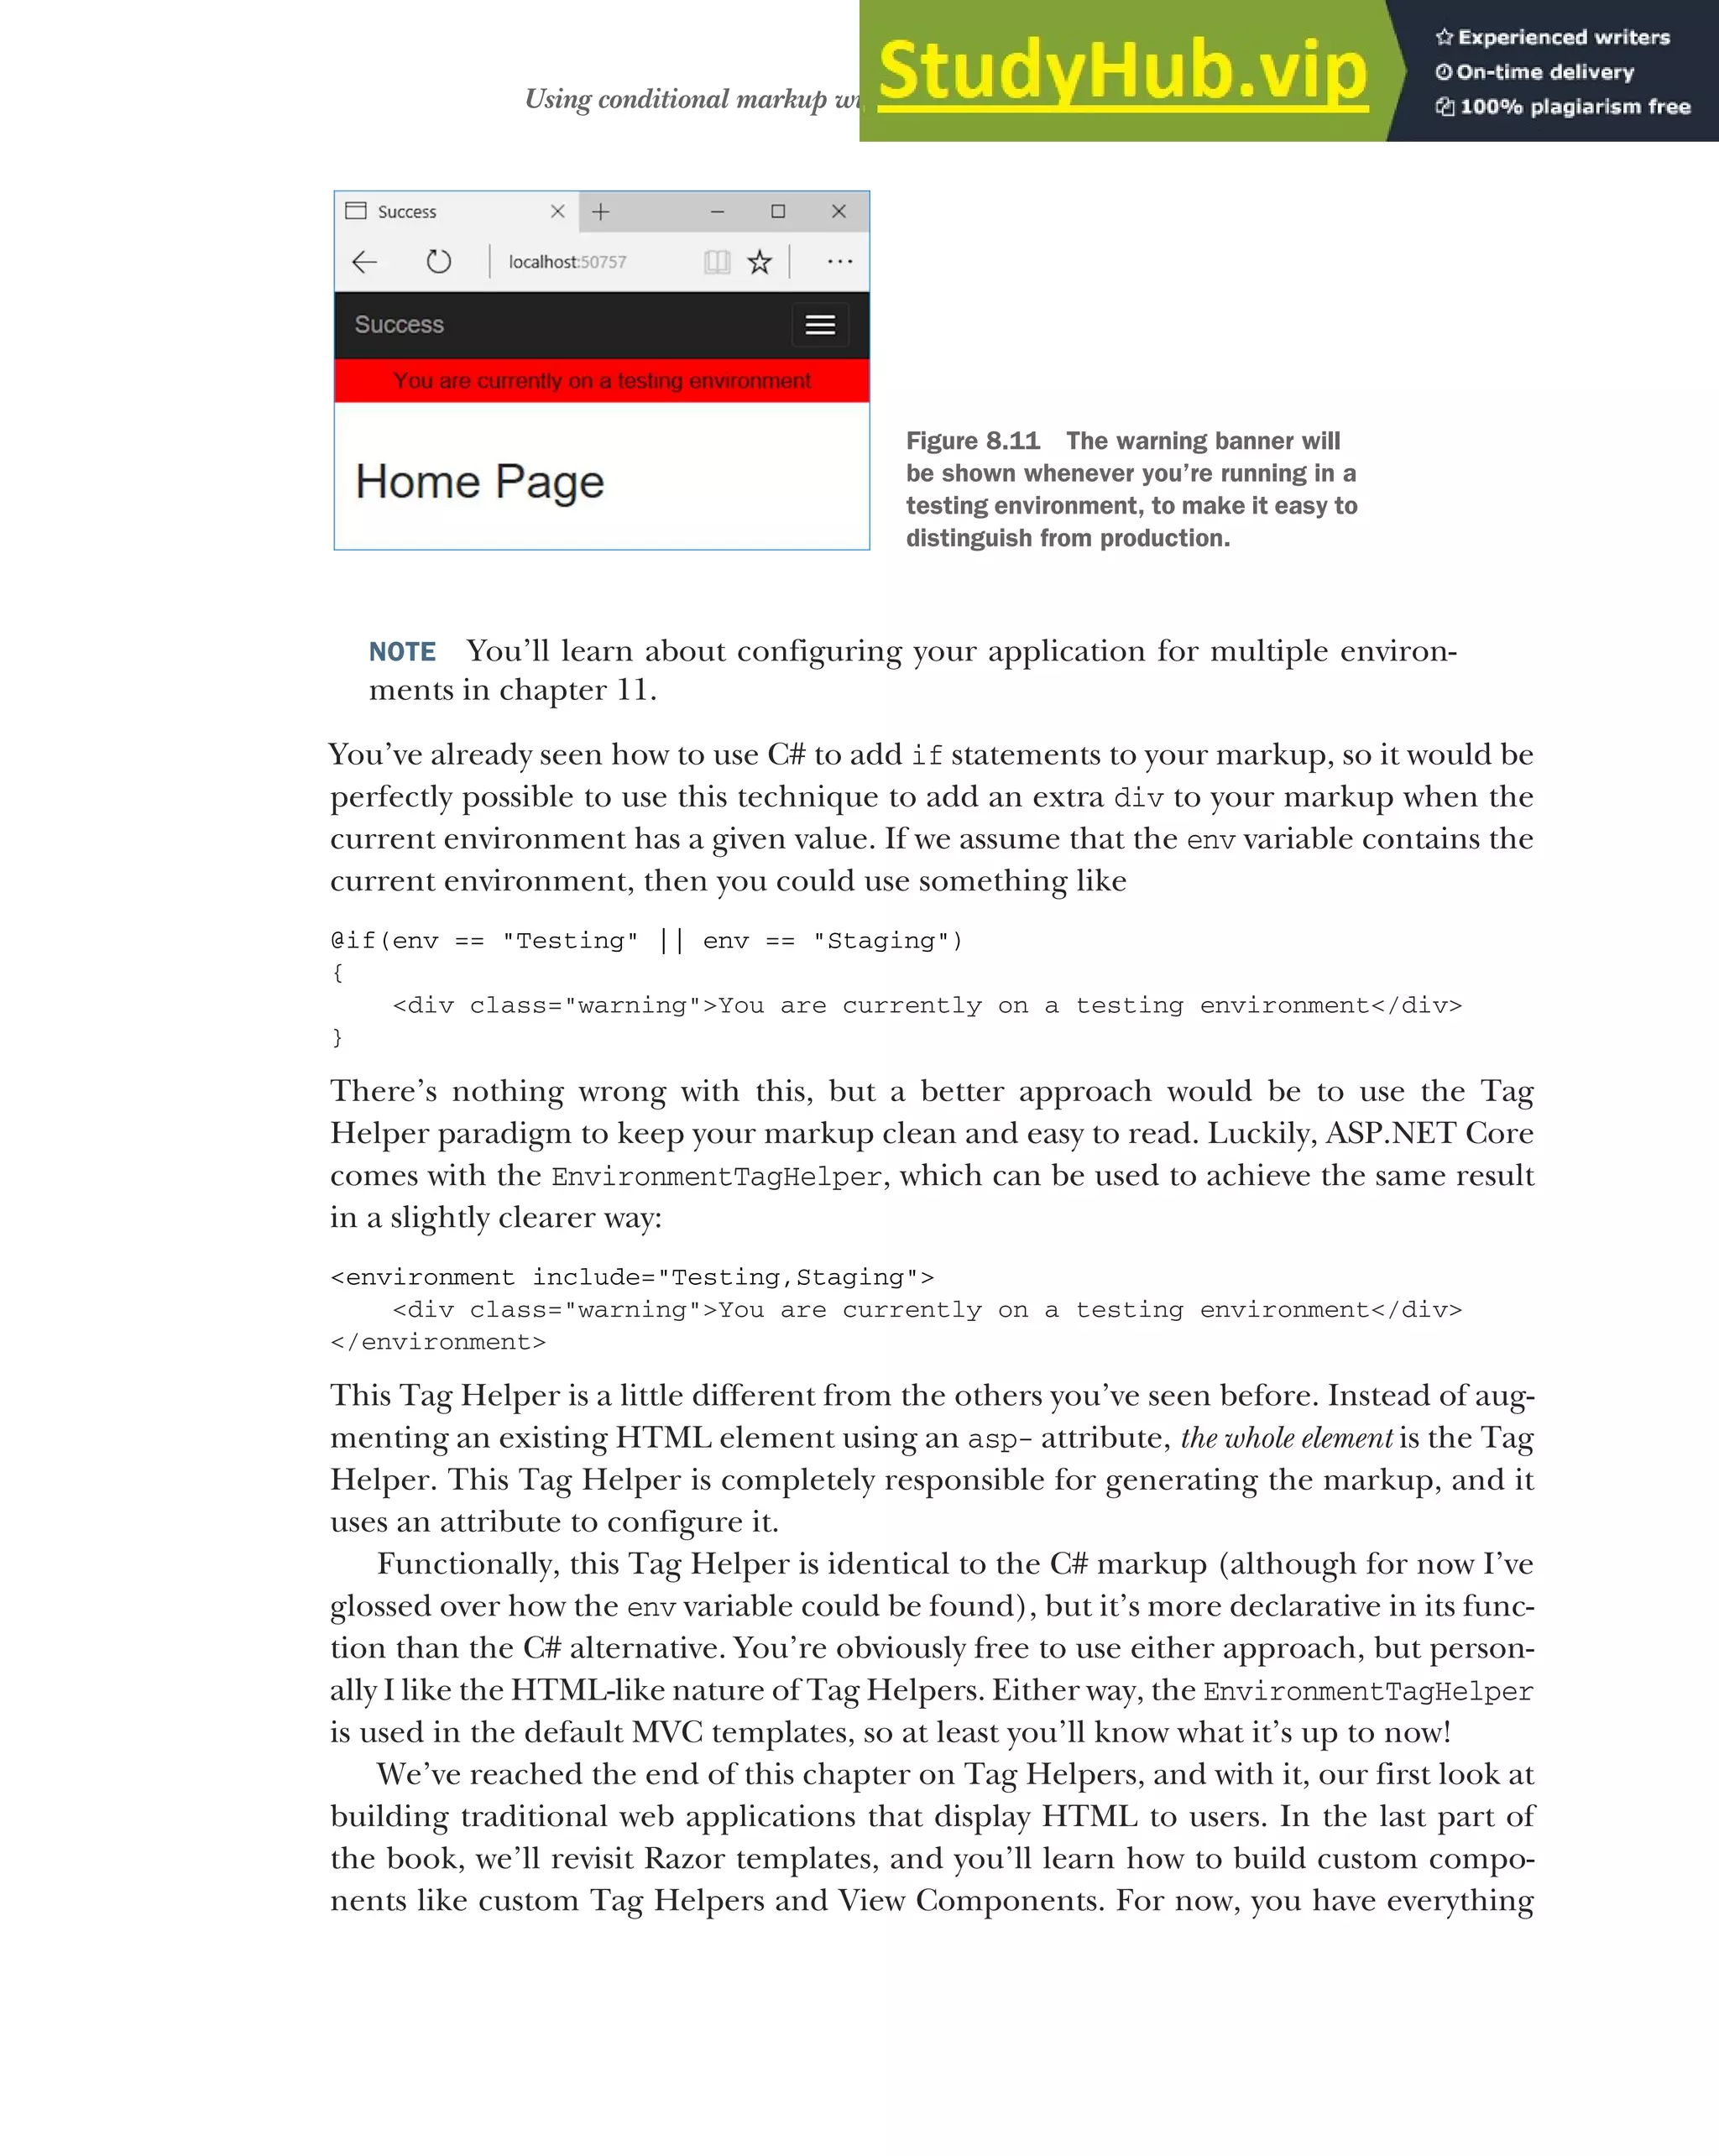
![232 CHAPTER 8 Building forms with Tag Helpers
you need to build complex Razor layouts—the custom components can help tidy up
your code down the line.
This chapter, along with the previous four, has been a whistle-stop tour of how to
build MVC applications with ASP.NET Core. You now have the basic building blocks to
start making simple ASP.NET Core applications. In the second part of this book, I’ll
show you some of the additional features you’ll need to understand to build complete
applications. But before we get to that, I’ll take a chapter to discuss building Web APIs.
I’ve mentioned the Web API approach previously, in which your application serves
data using the MVC framework, but instead of returning user-friendly HTML, it
returns machine-friendly JSON or XML. In the next chapter, you’ll see why and how
to build a Web API, take a look at an alternative routing system designed for APIs, and
learn how to generate JSON responses to requests.
Summary
Tag Helpers let you bind your data model to HTML elements, making it easier
to generate dynamic HTML while remaining editor friendly.
As with Razor in general, Tag Helpers are for server-side rendering of HTML
only. You can’t use them directly in frontend frameworks, such as Angular or
React.
Tag Helpers can be standalone elements or can attach to existing HTML using
attributes.
Tag Helpers can customize the elements they’re attached to, add additional
attributes, and customize how they’re rendered to HTML. This can greatly
reduce the amount of markup you need to write.
Tag Helpers can expose multiple attributes on a single element.
You can add the asp-action and asp-controller attributes to the <form> ele-
ment to set the action URL using the URL generation feature of the MVC
middleware’s router.
You specify route values to use during routing with the Form Tag Helper using
asp-route-* attributes.
The Form Tag Helper also generates a hidden field that you can use to prevent
CSRF attacks.
You can attach the Label Tag Helper to a <label> using asp-for. It generates an
appropriate for attribute and caption based on the [Display] DataAnnotations
attribute and the view model property name.
The Input Tag Helper sets the type attribute of an <input> element to the
appropriate value based on a bound property’s Type and any DataAnnotations
applied to it. It also generates the data-val-* attributes required for client-side
validation.
To enable client-side validation, you must add the necessary JavaScript files to
your view for jQuery validation and unobtrusive validation.](https://image.slidesharecdn.com/asp-230807173723-31e70040/75/ASP-NET-Core-in-Action-2018-pdf-260-2048.jpg)


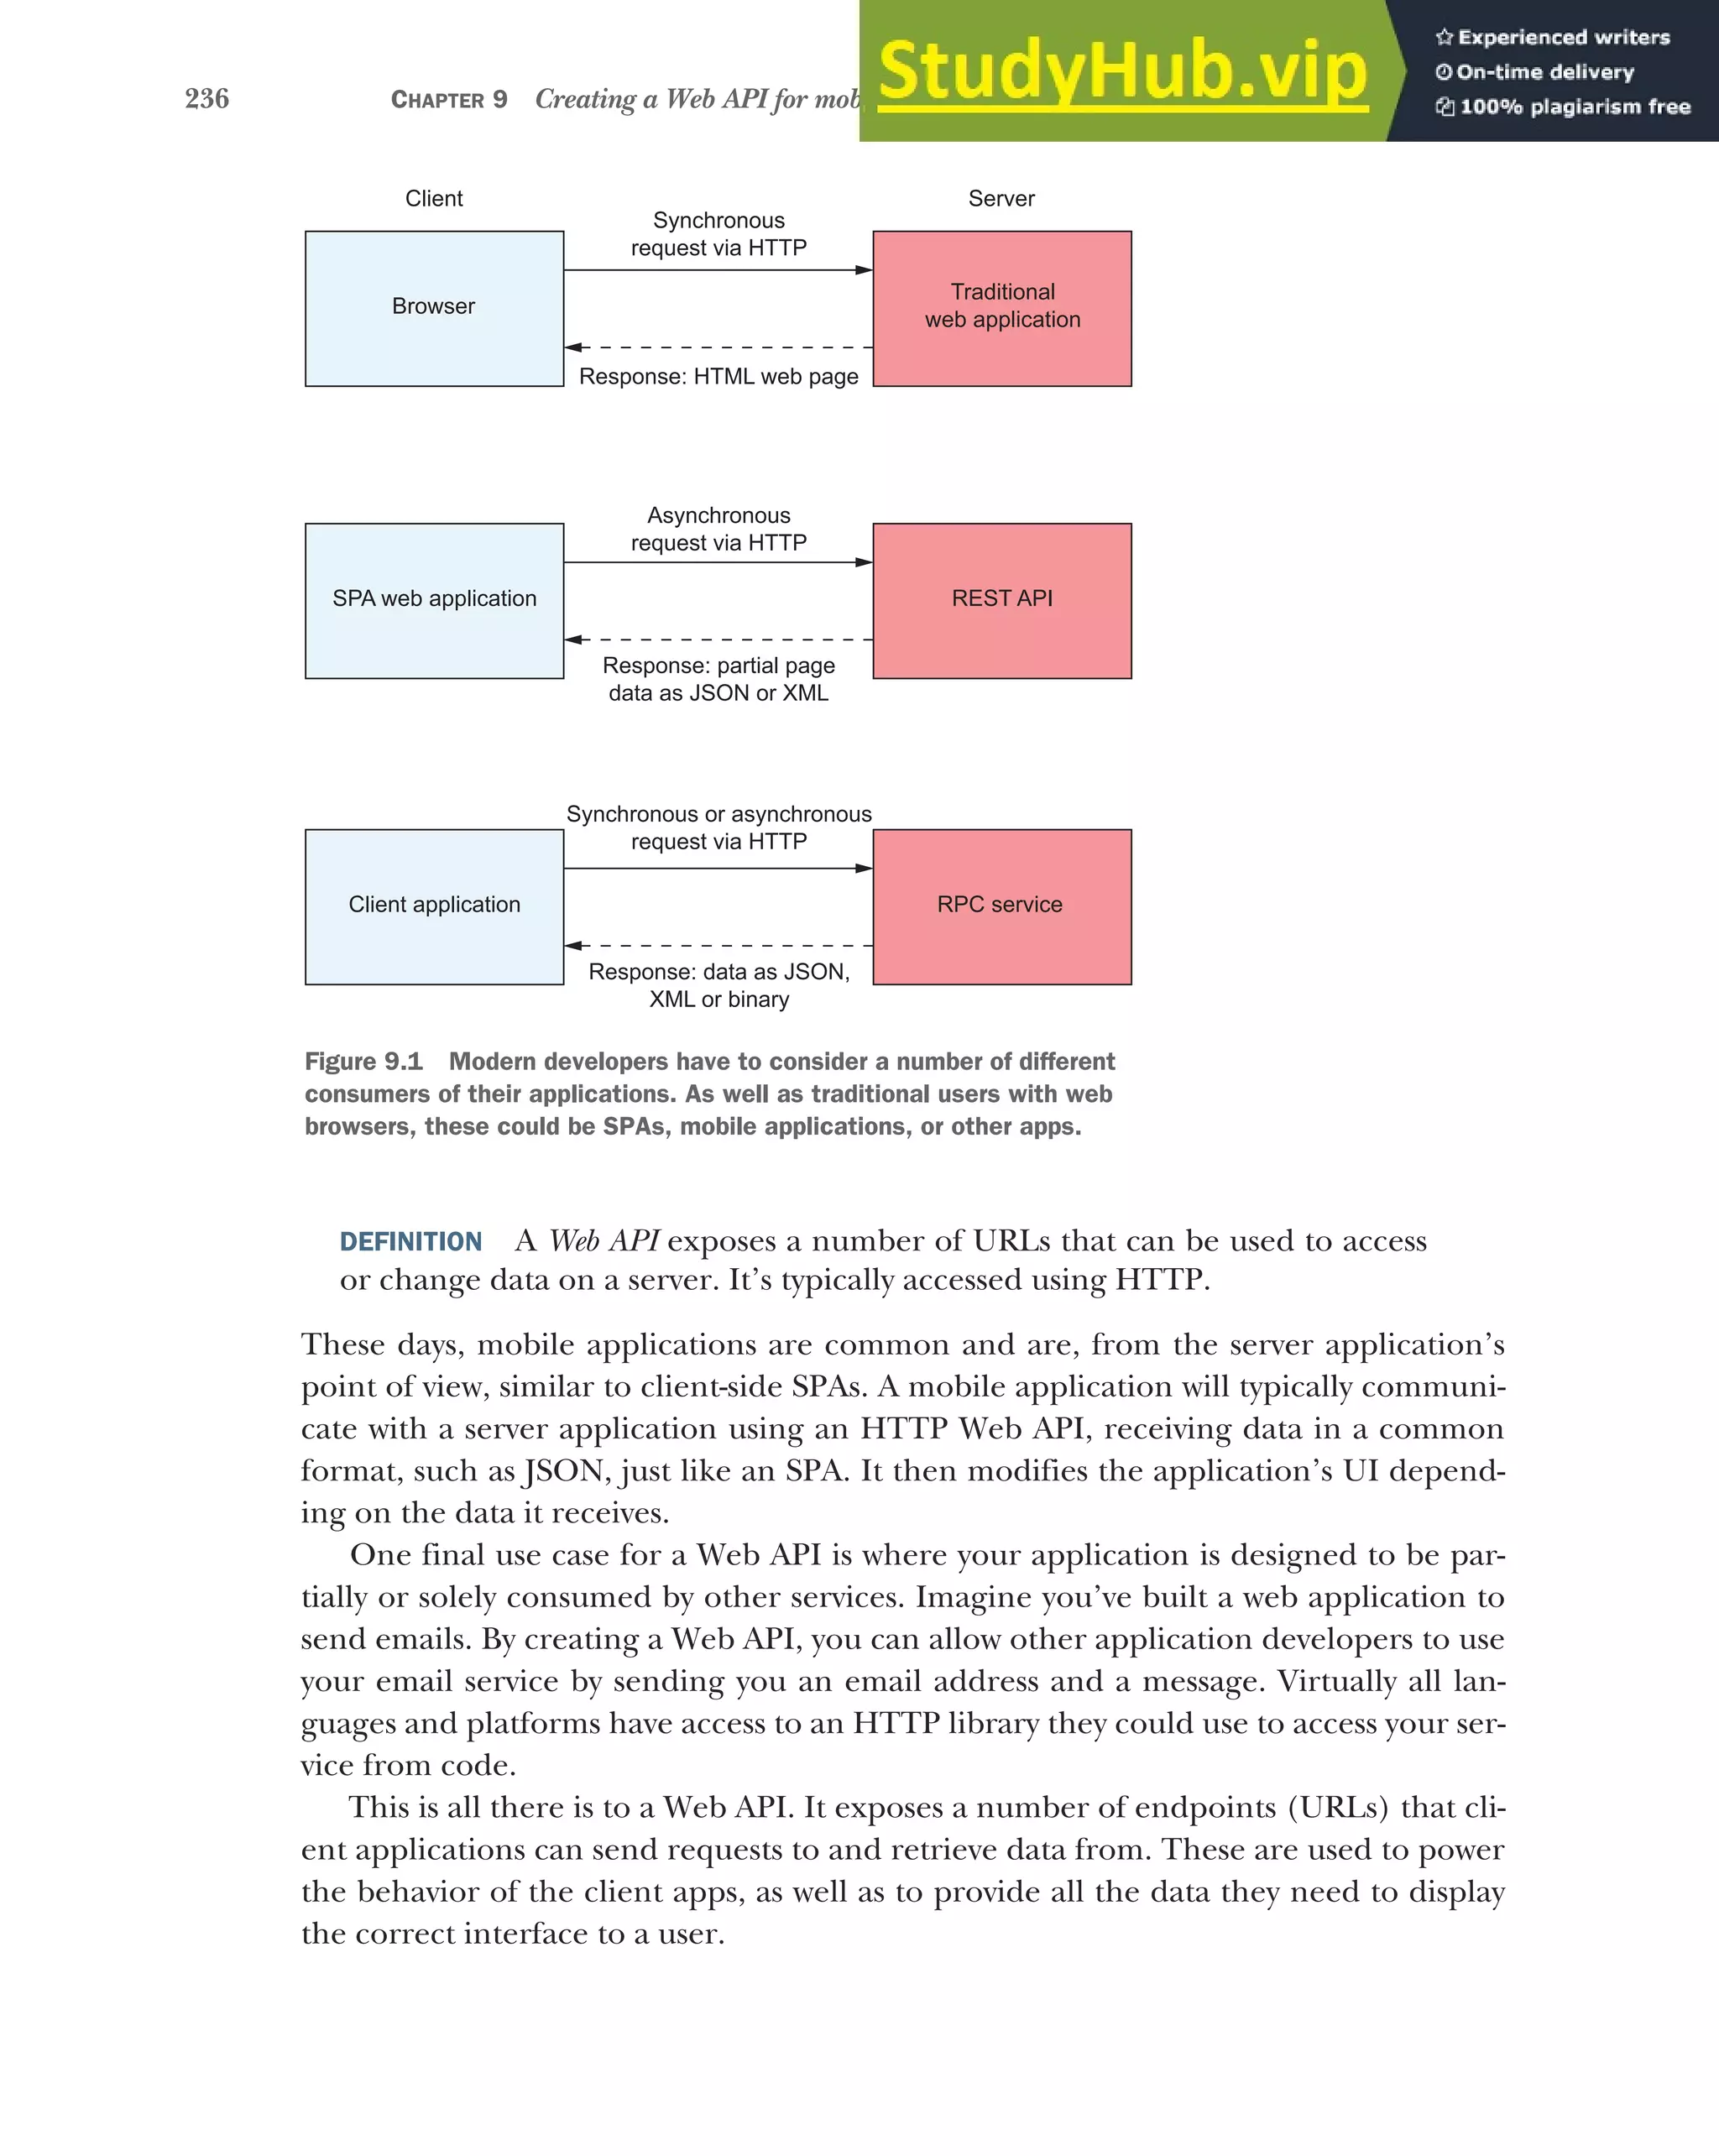
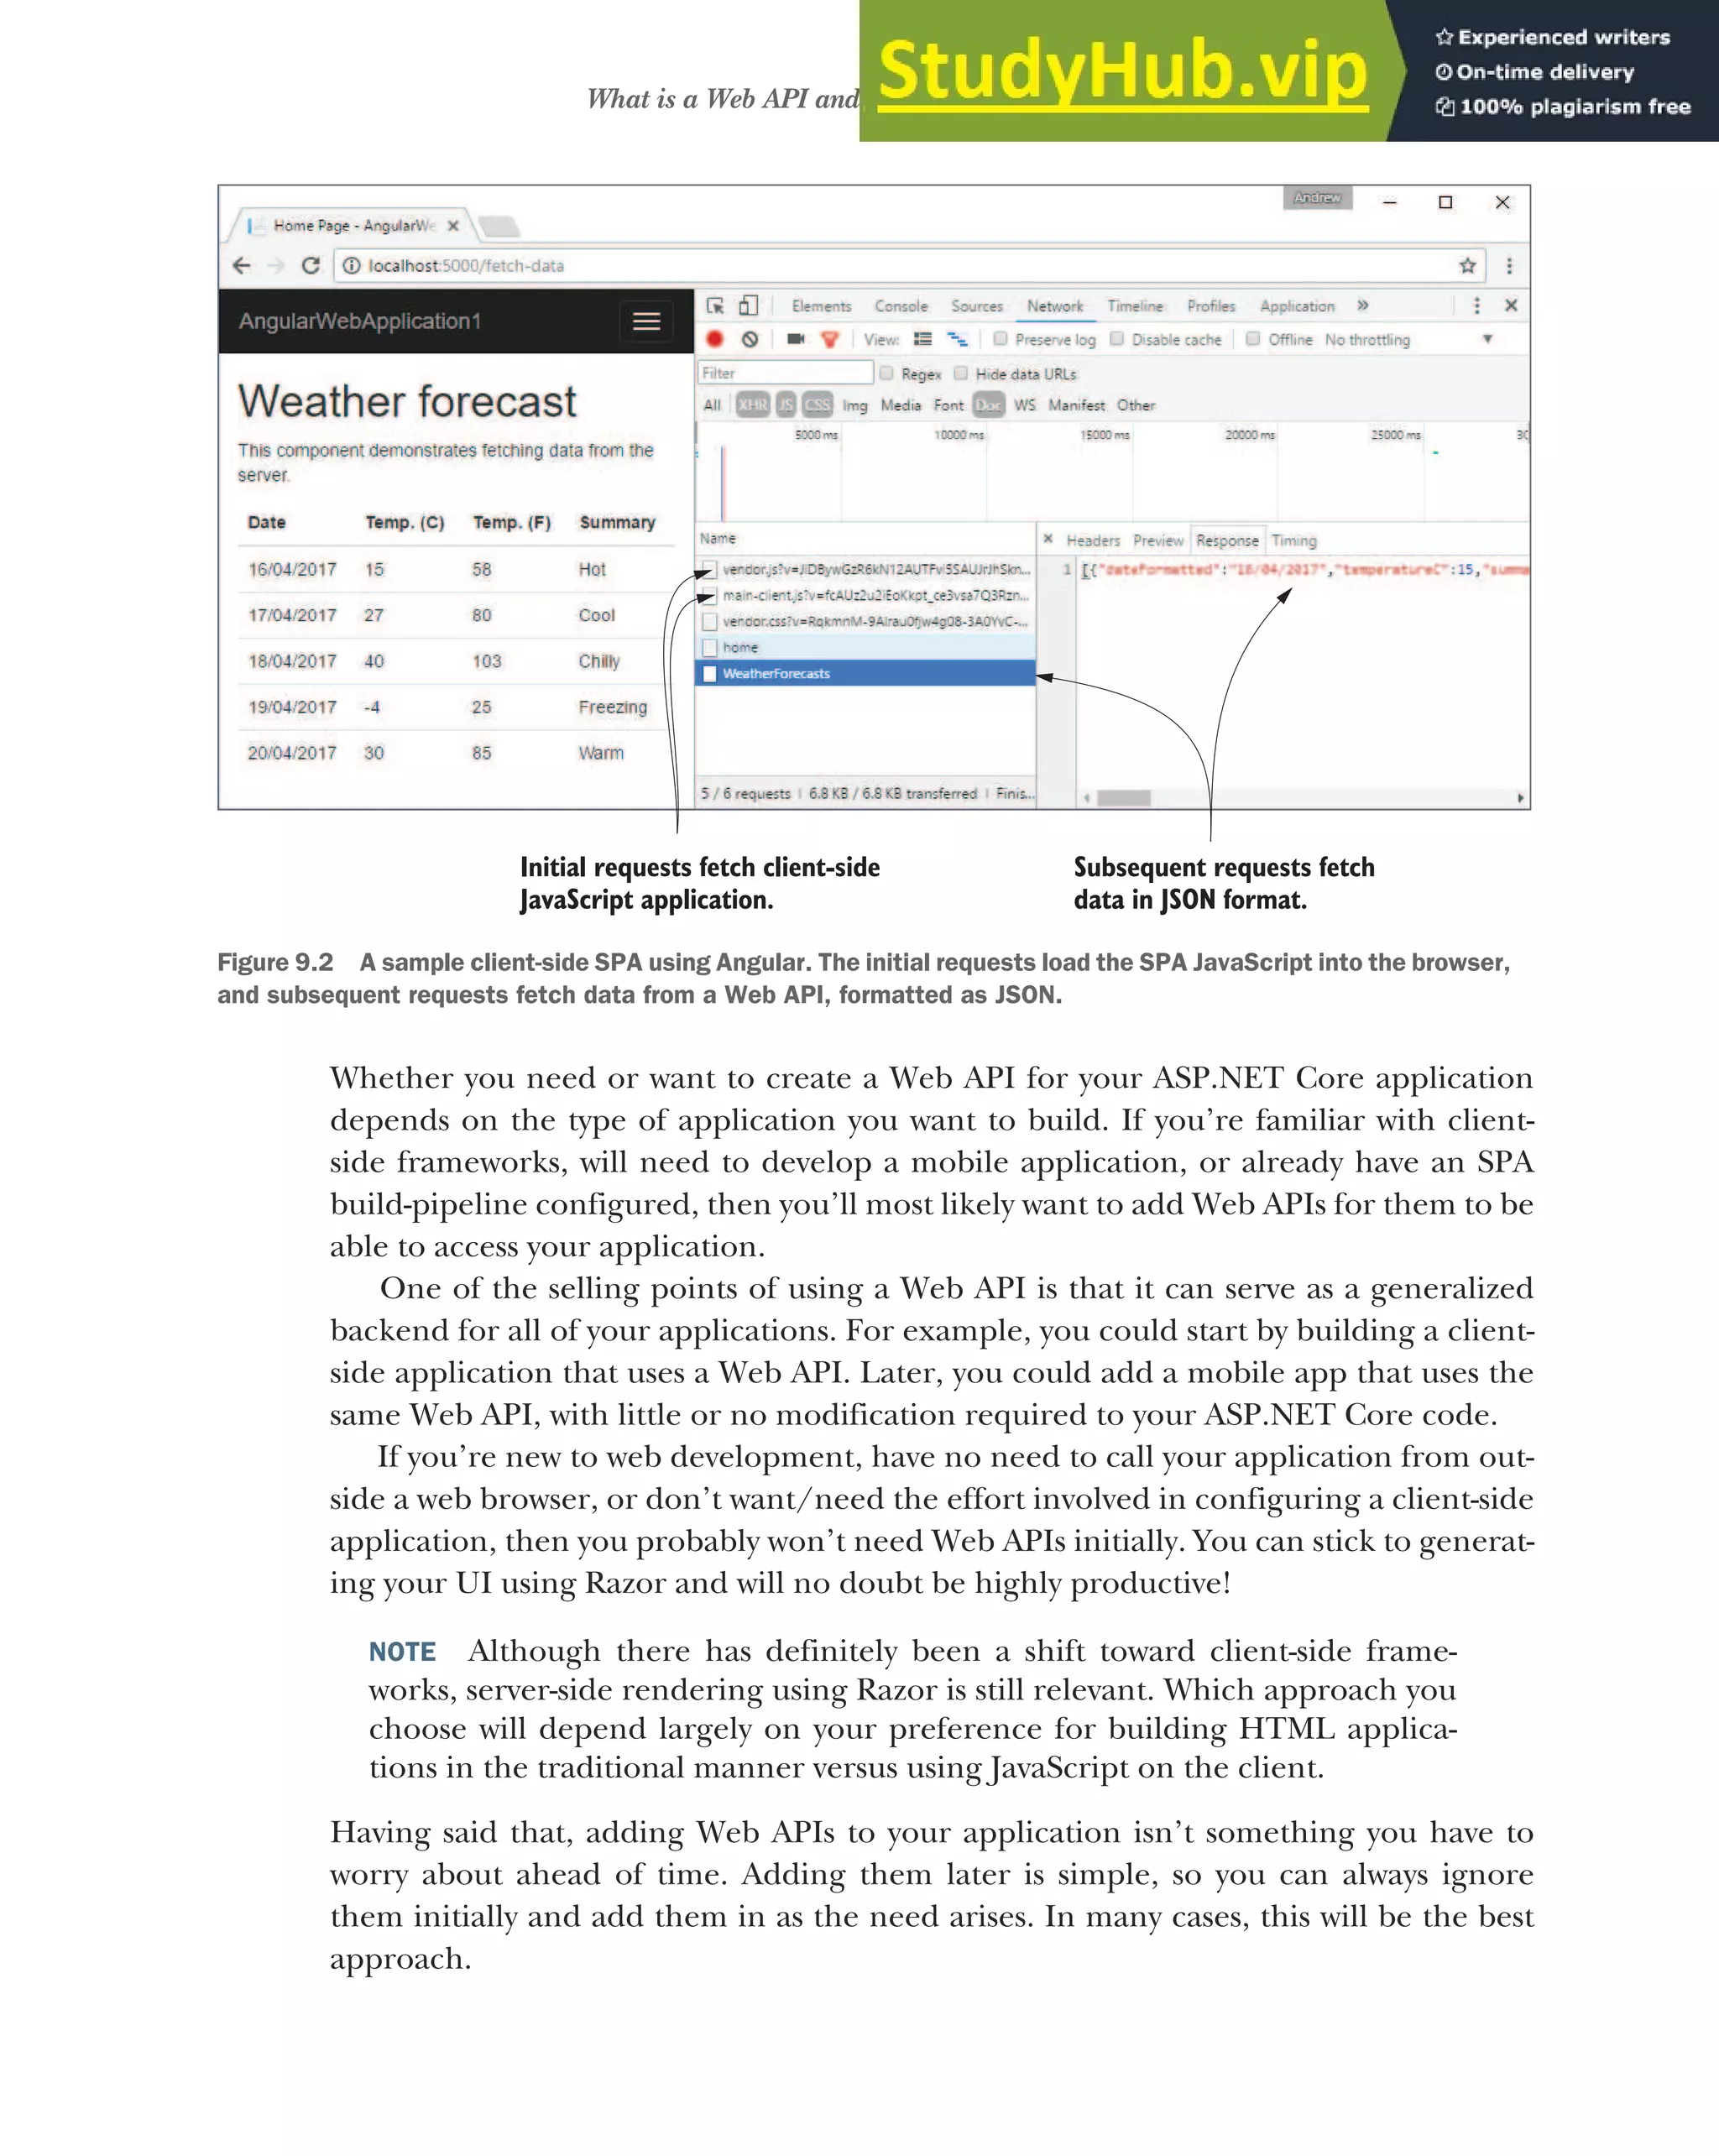
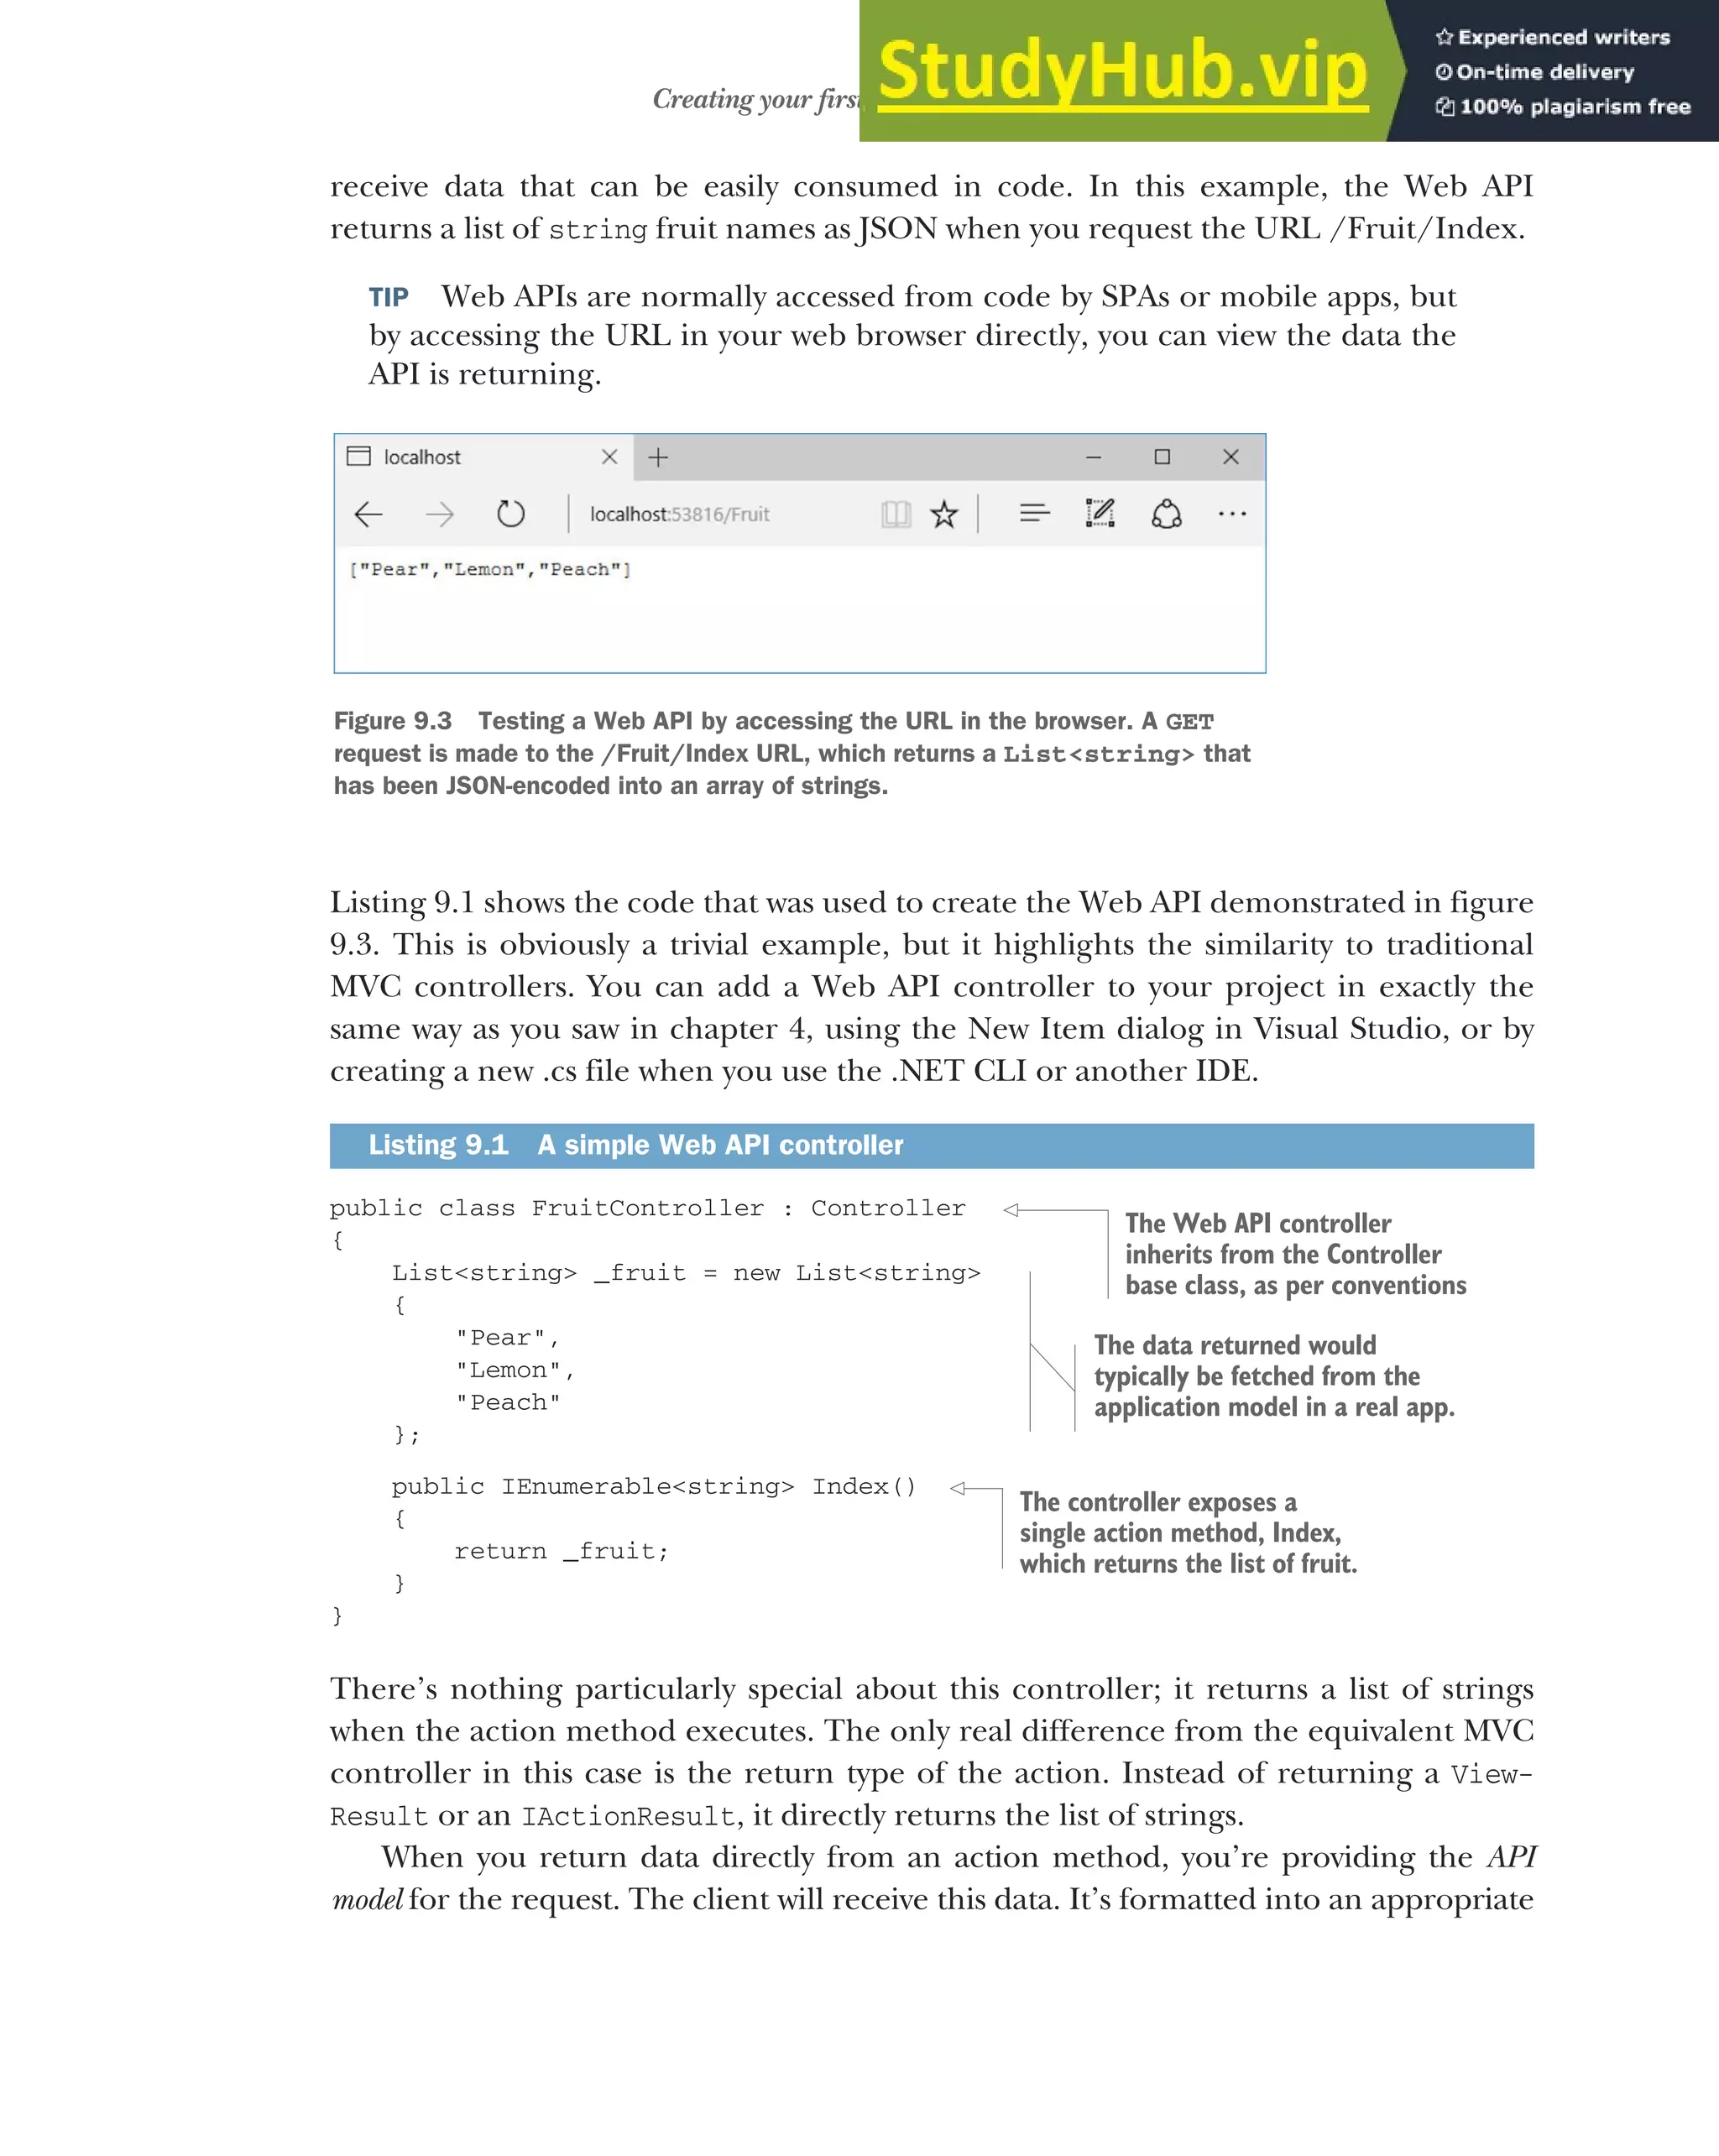
![240 CHAPTER 9 Creating a Web API for mobile and client applications using MVC
response, in this case a JSON representation of the list, and sent back to the browser
with a 200 (OK) status code.
TIP ASP.NET Core will format returned data as JSON by default. You’ll see
how to format the returned data in other ways later in this chapter.
The URL at which a Web API controller is exposed is handled in the same way as for
traditional MVC controllers—using routing. The routing module directs a request to
a particular controller and action, which is then invoked and returns a result. This
result is then used to generate an appropriate response.
Web API controllers don’t have to return data directly. You’re free to return an
IActionResult instead, and often this is required. Depending on the desired behav-
ior of your API, you may sometimes want to return data, and other times you may want
to return a raw HTTP status code, indicating whether the request was successful. If an
API call is made requesting details of a product that does not exist, you might want to
return a 404 (Not Found) status code, as you’ll see shortly.1
Although the primary goal of a Web API is to return data, typically only the most
trivial of cases will be able to return data directly from the action method in the man-
ner you’ve seen. For example, if the request represented a command, such as “Delete
the user with ID 9,” then there might not be any data to return, other than a success/
failure status code.
Listing 9.2 shows an example of a case where you’d want to return an IAction-
Result instead of returning the data directly. It shows another method on the same
FruitController as before. This method exposes a way for clients to fetch a specific
fruit by an id, which we’ll assume is its index in the list of _fruit you defined in the
previous listing. Model binding is used to set the value of the id parameter from the
request.
public IActionResult View(int id)
{
if (id >= 0 && id < _fruit.Count)
{
return Ok(_fruit[id]);
}
return NotFound();
}
1
ASP.NET Core 2.1 introduces IActionResult<T>, which can simplify generating OpenAPI specifications
for your Controllers. See http://mng.bz/FYH1 for details.
Listing 9.2 A Web API action returning IActionResult to handle error conditions
The action method returns an
IActionResult as it can no longer
always return List<string>.
An element can only be
returned if the id value is a
valid _fruit element index.
Using Ok to return data will
format the data passed to it
and send a 200 status code.
NotFound returns a
NotFoundResult, which will
send a 404 status code.](https://image.slidesharecdn.com/asp-230807173723-31e70040/75/ASP-NET-Core-in-Action-2018-pdf-268-2048.jpg)
![241
Creating your first Web API Controller
In the successful path for the action method, the id parameter has a value greater
than zero and less than the number of elements in _fruit. When that’s true, the value
of the element can be returned to the caller. This is achieved by creating an OkResult,
using the Ok helper method1
on the Controller base class. This generates a 200 status
code and returns the element in the response body, as shown in figure 9.4, as if you
had returned the _fruit[id] object from the method directly.
If the id is outside the bounds of the _fruit list, then the method calls NotFound to
create a NotFoundResult. When executed, this method generates a raw 404 HTTP sta-
tus code response, which will show the default “not found” page for your browser, as
shown in figure 9.5. The fact that you’re returning two different types depending on
the code path taken means that you must mark the action method as returning an
IActionResult in order to make the code compile.
1
Some people get uneasy when they see the phrase “helper method,” but there’s nothing magic about the
Controller helpers—they’re shorthand for creating a new IActionResult of a given type. You don’t have
to take my word for it though, you can always view the source code for the base class on GitHub at
http://mng.bz/NZDt.
Figure 9.4 Returning data using the Ok helper method. The Ok method uses the
data passed to it to create the response body, then sets the status code to 200.
Figure 9.5 A request that generates a raw 404 response without any
content, as is typical for a Web API, will show the default “not found”
page in a browser.](https://image.slidesharecdn.com/asp-230807173723-31e70040/75/ASP-NET-Core-in-Action-2018-pdf-269-2048.jpg)

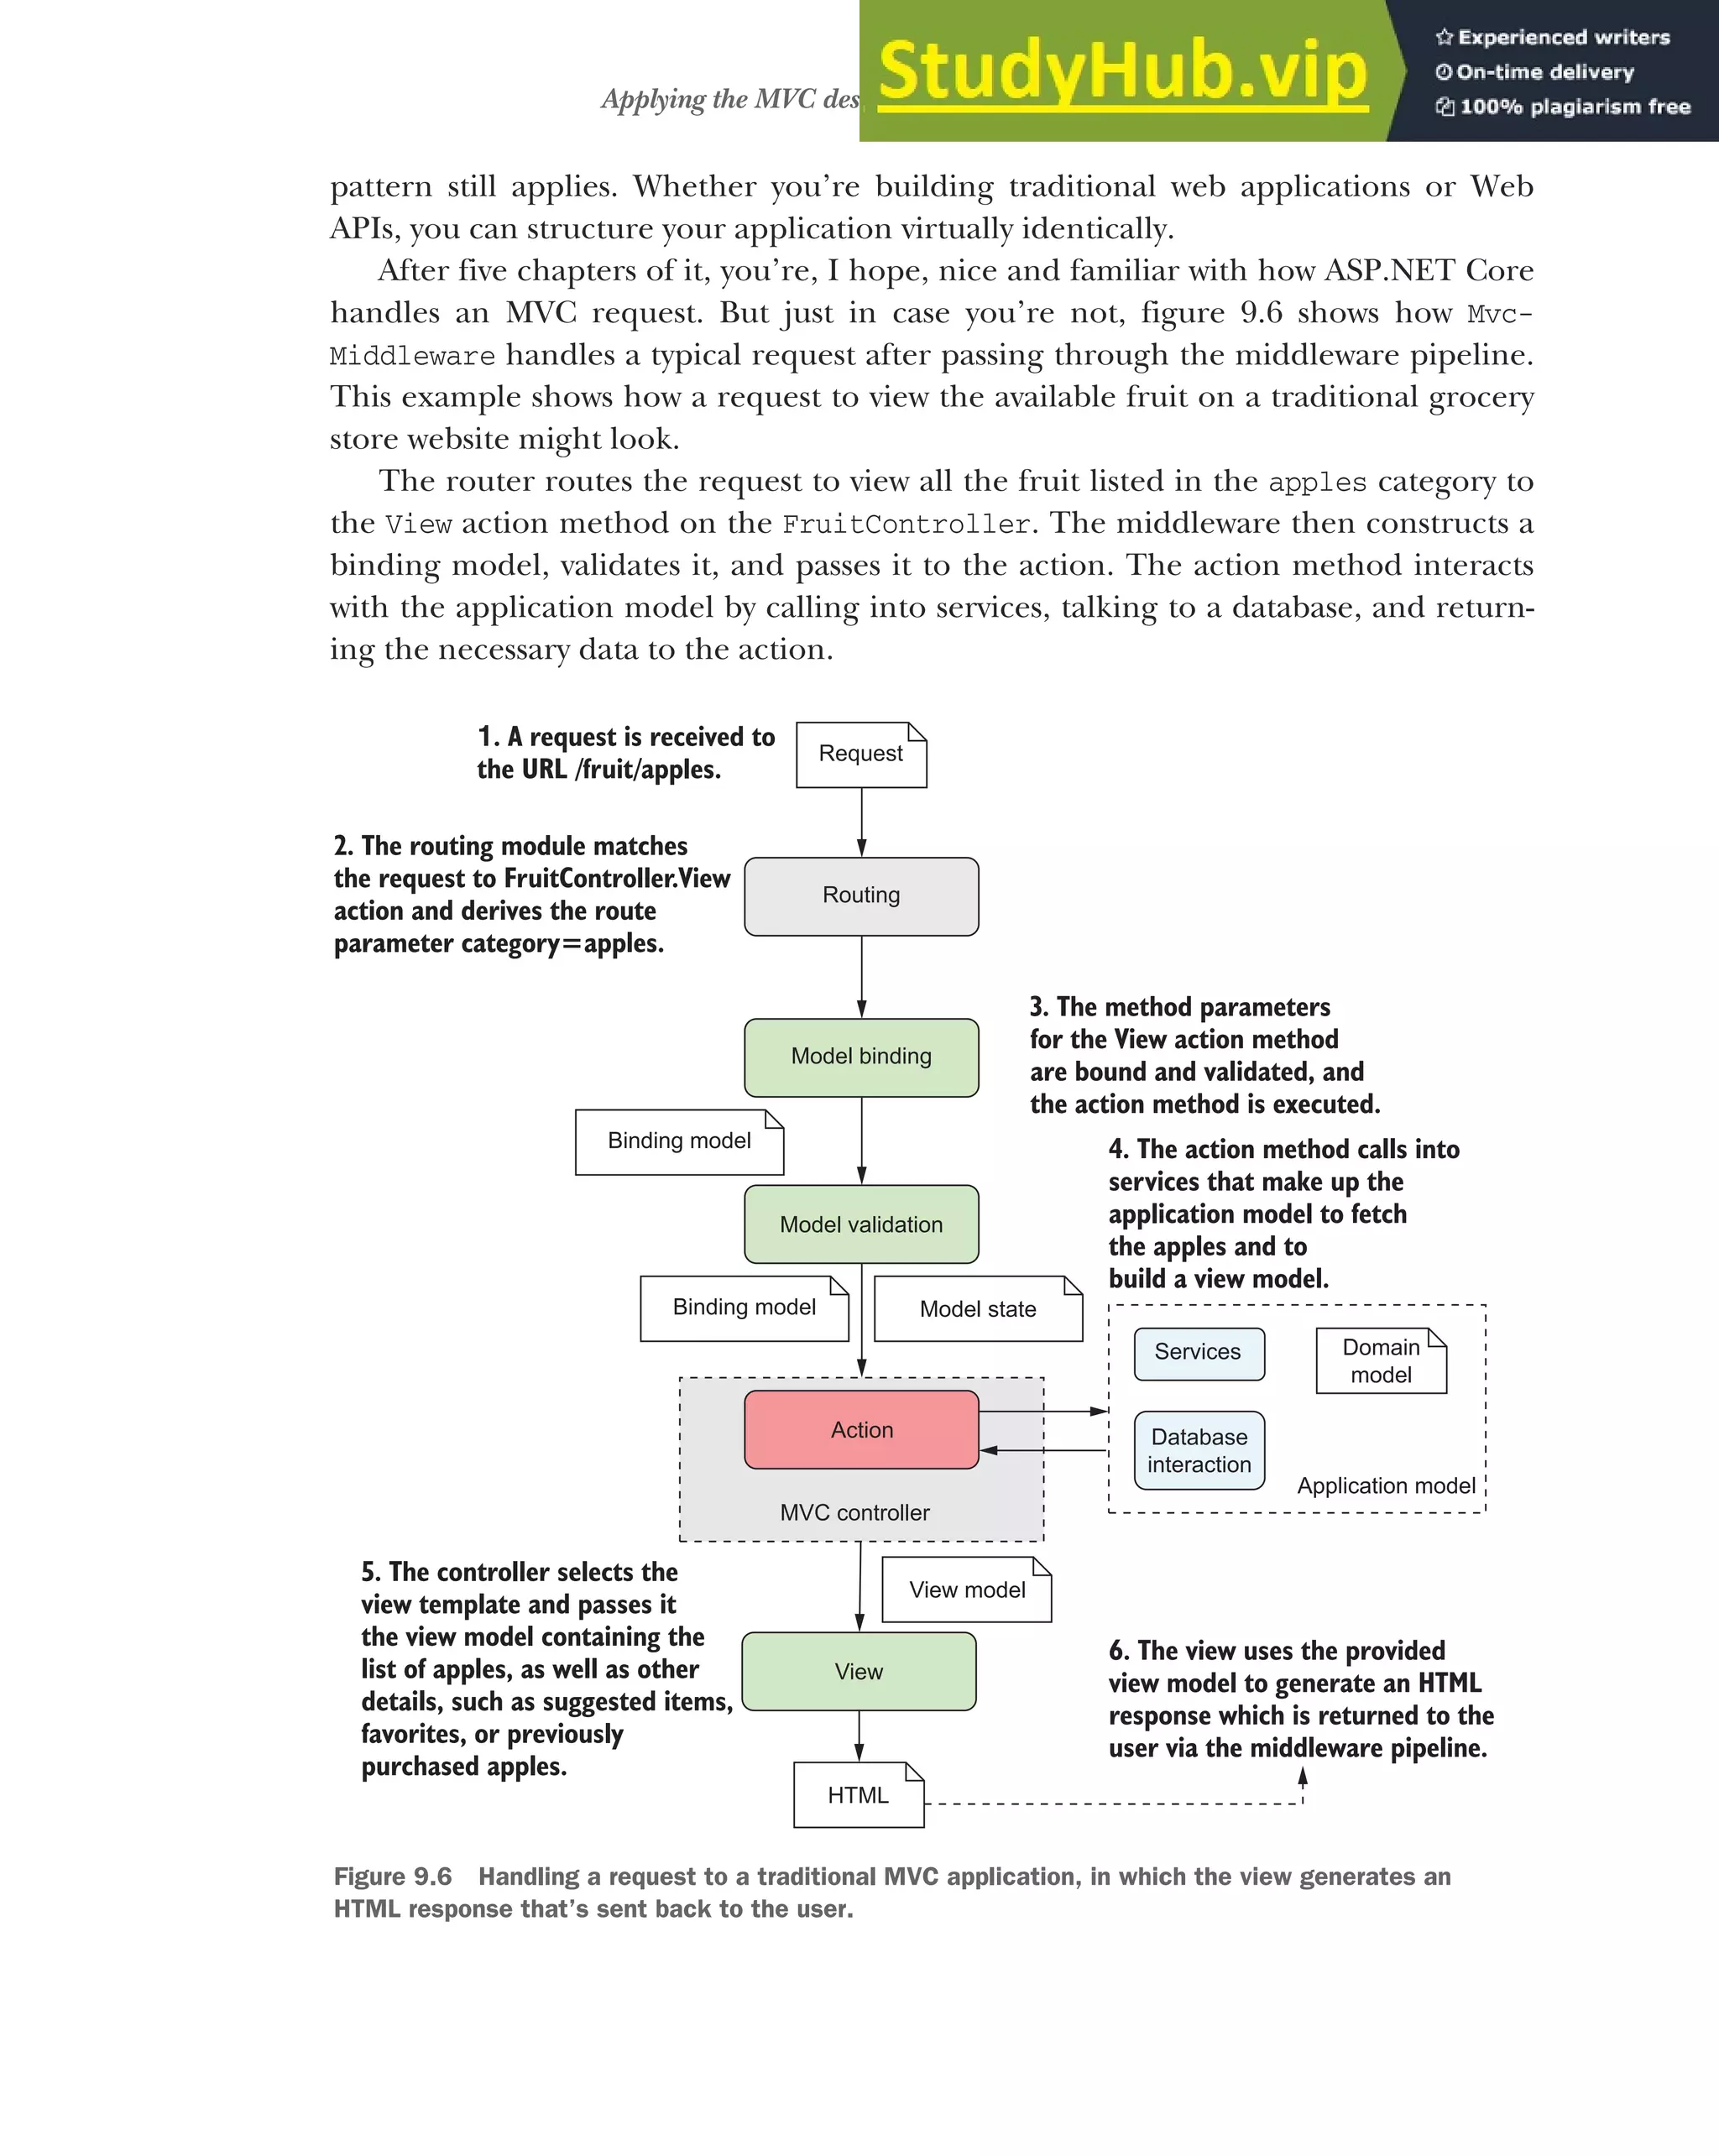
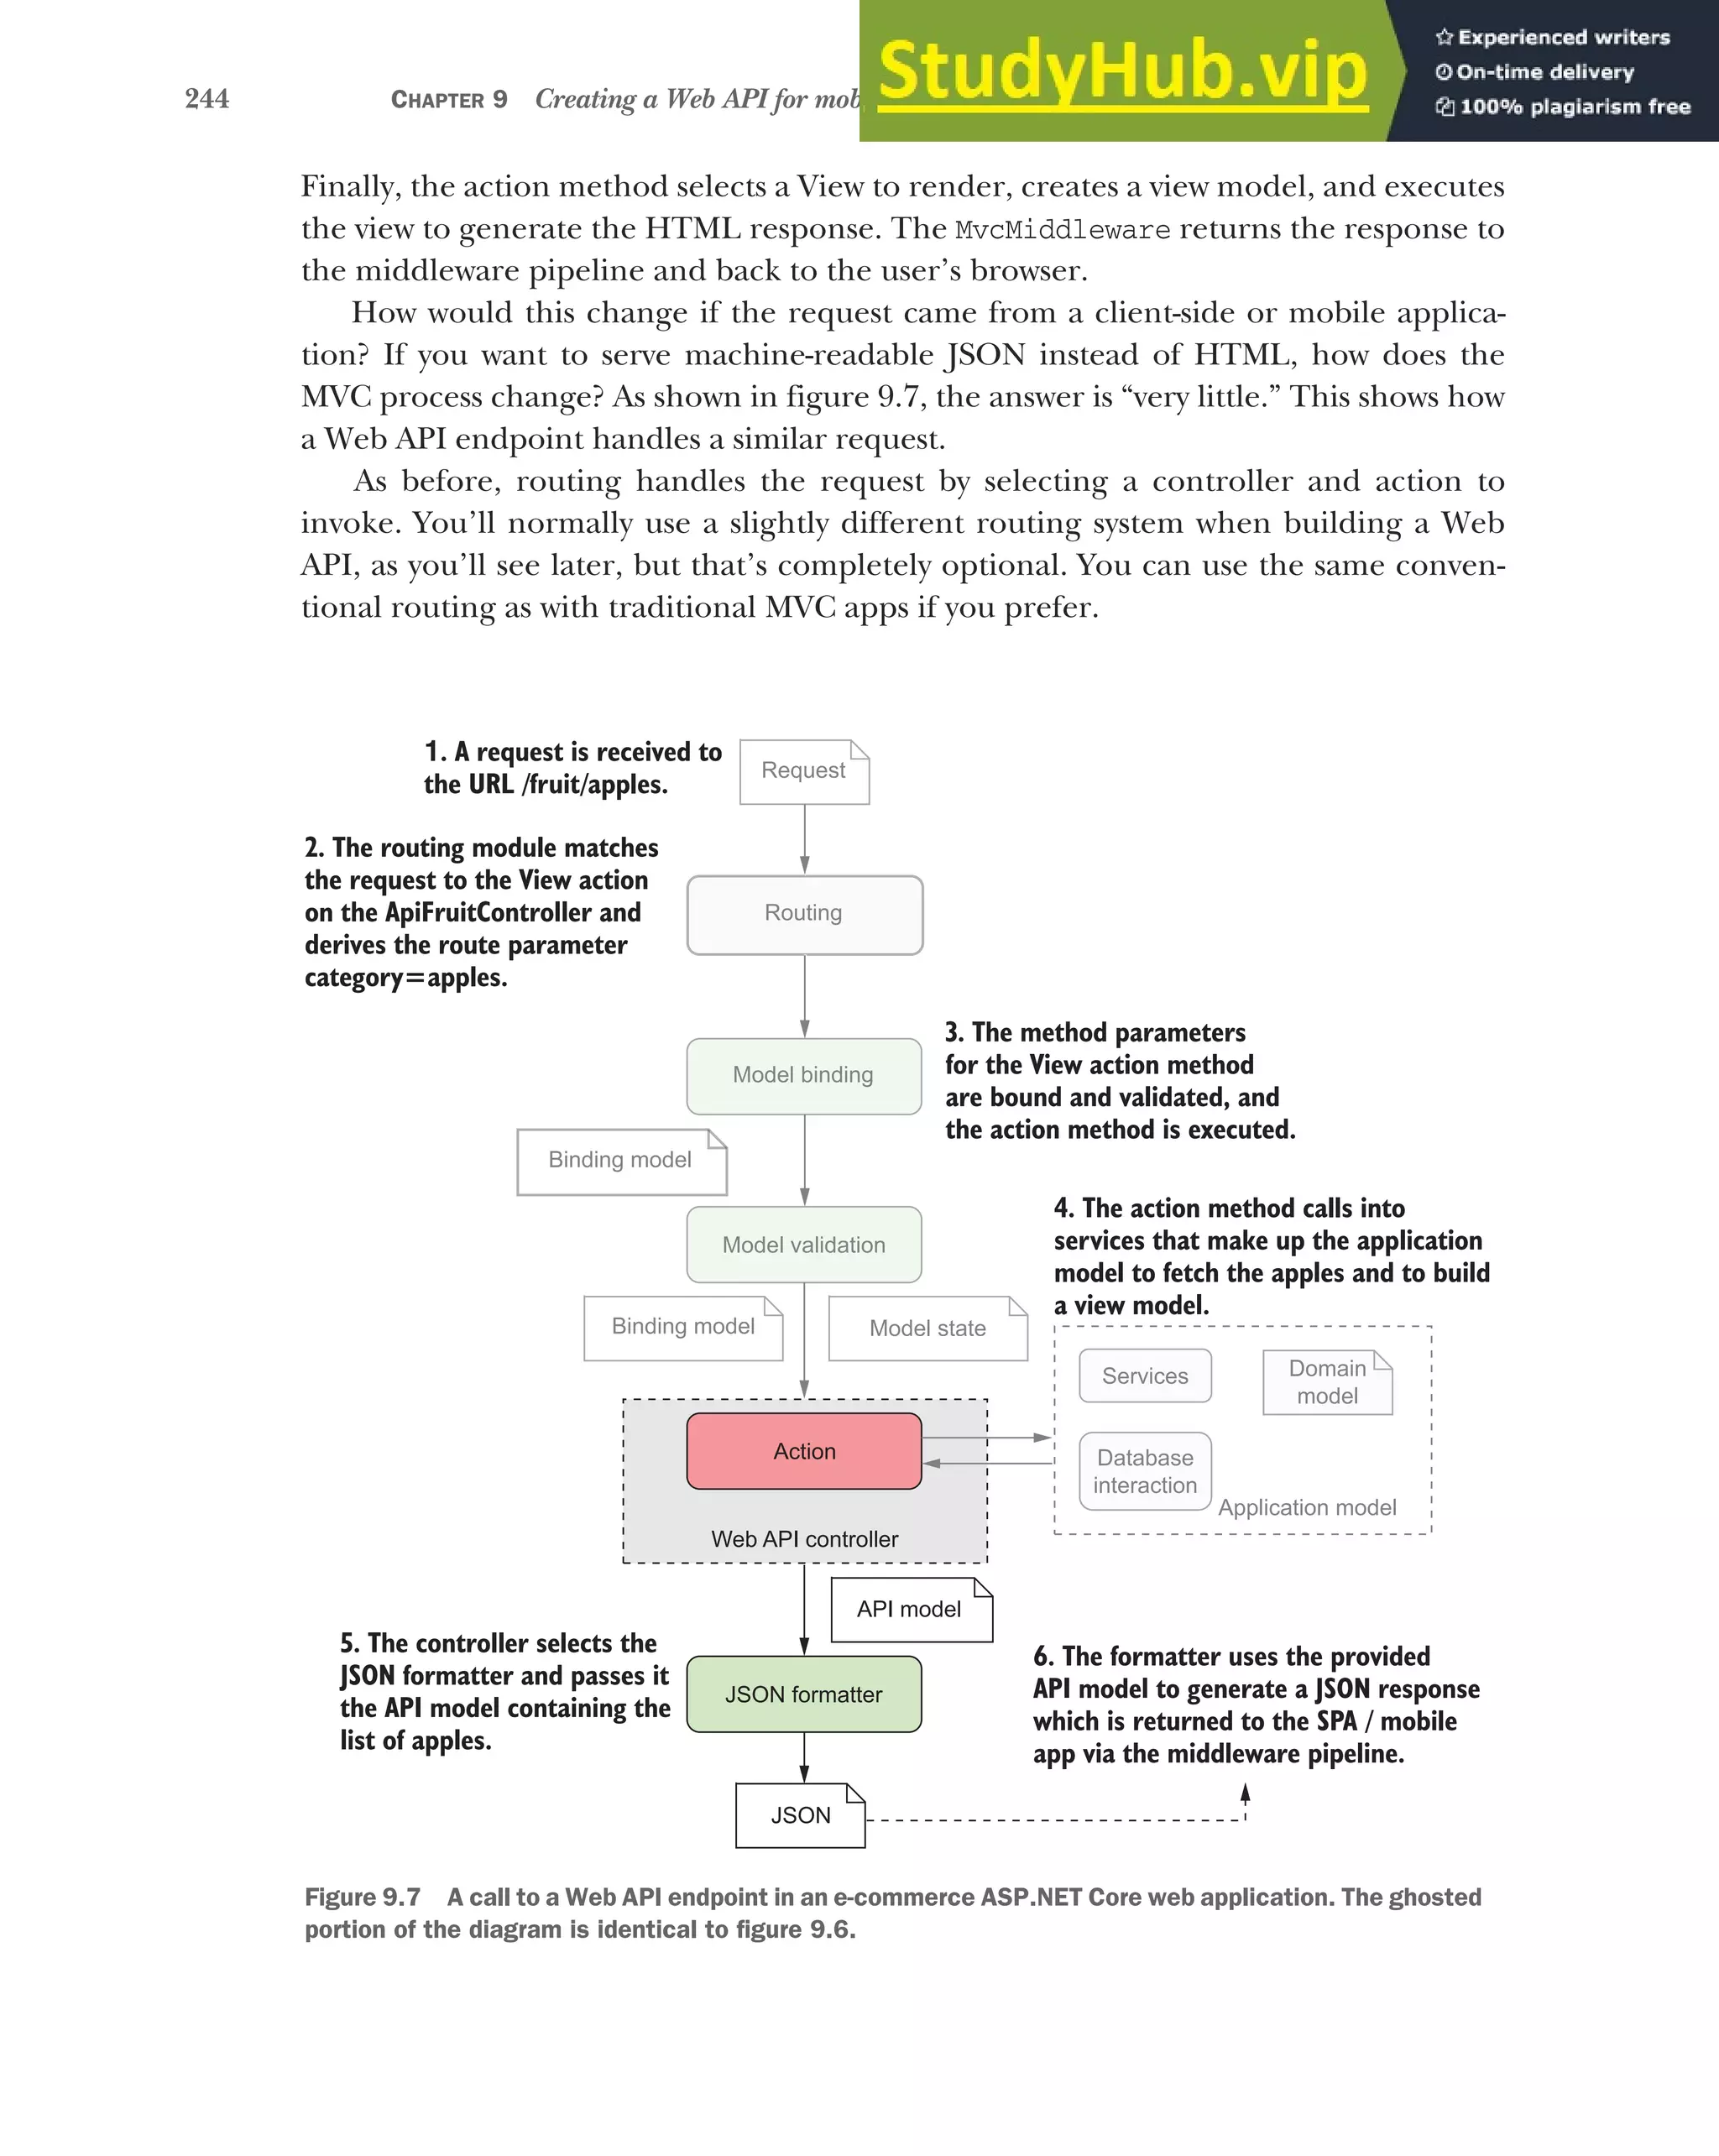
![245
Applying the MVC design pattern to a Web API
In this example, routing directs the request to a controller described as a Web API
controller, but there’s nothing special about this class compared to the MVC control-
ler from figure 9.6. The only difference is that the Web API controller will return data
in a machine-readable format, rather than as HTML.
TIP In ASP.NET Core, there’s no difference between MVC controllers and
Web API controllers. The naming refers only to the difference in the data
returned by their methods and the purpose for which they’re used.1
After routing comes model binding, in which the binder creates a binding model and
populates it with values from the request, exactly as in the MVC request. Validation
occurs in the same way.
The action executes in the same way as for the MVC controller, by interacting with
the application model—the very same application model as is used by the MVC con-
troller. This is an important point; by separating the behavior of your app into an
application model, instead of incorporating it into the controllers themselves, you’re
able to reuse the business logic of your application.
After the application model has returned the data necessary to service the
request—the fruit objects in the apples category—you see the first difference to the
traditional HTML app. Instead of building a view model, the action method creates an
API model. This is analogous to the view model used previously, but rather than con-
taining data used to generate an HTML view, it contains the data that will be sent back
in the response.
DEFINITION View models contain both data required to build a response and
metadata about how to build the response. API Models only contain the data
to be returned in the response.
When we looked at the traditional MVC app, we used the view model in conjunction
with a Razor view template to build the final response. With the Web API app, we use
the API model in conjunction with a formatter. A formatter, as the name suggests, seri-
alizes the API model into a machine-readable response, such as JSON or XML. The
formatter forms the “V” in the Web API version of MVC, by choosing an appropriate
representation for the data to return.
Finally, as with the traditional web app, the generated response is then sent back
through the middleware pipeline, passing through each of the configured middle-
ware components, and back to the original caller.
Hopefully, the parallels between traditional web applications and Web APIs are
clear; the majority of behavior is identical, only the response varies. Everything from
when the request comes in to the interaction with the application model is similar
between the paradigms.
1
ASP.NET Core 2.1 introduces the [ApiController] attribute. You can use this attribute to opt-in to specific
Web API conventions. To learn more about this attribute, see http://mng.bz/FYH1.](https://image.slidesharecdn.com/asp-230807173723-31e70040/75/ASP-NET-Core-in-Action-2018-pdf-273-2048.jpg)
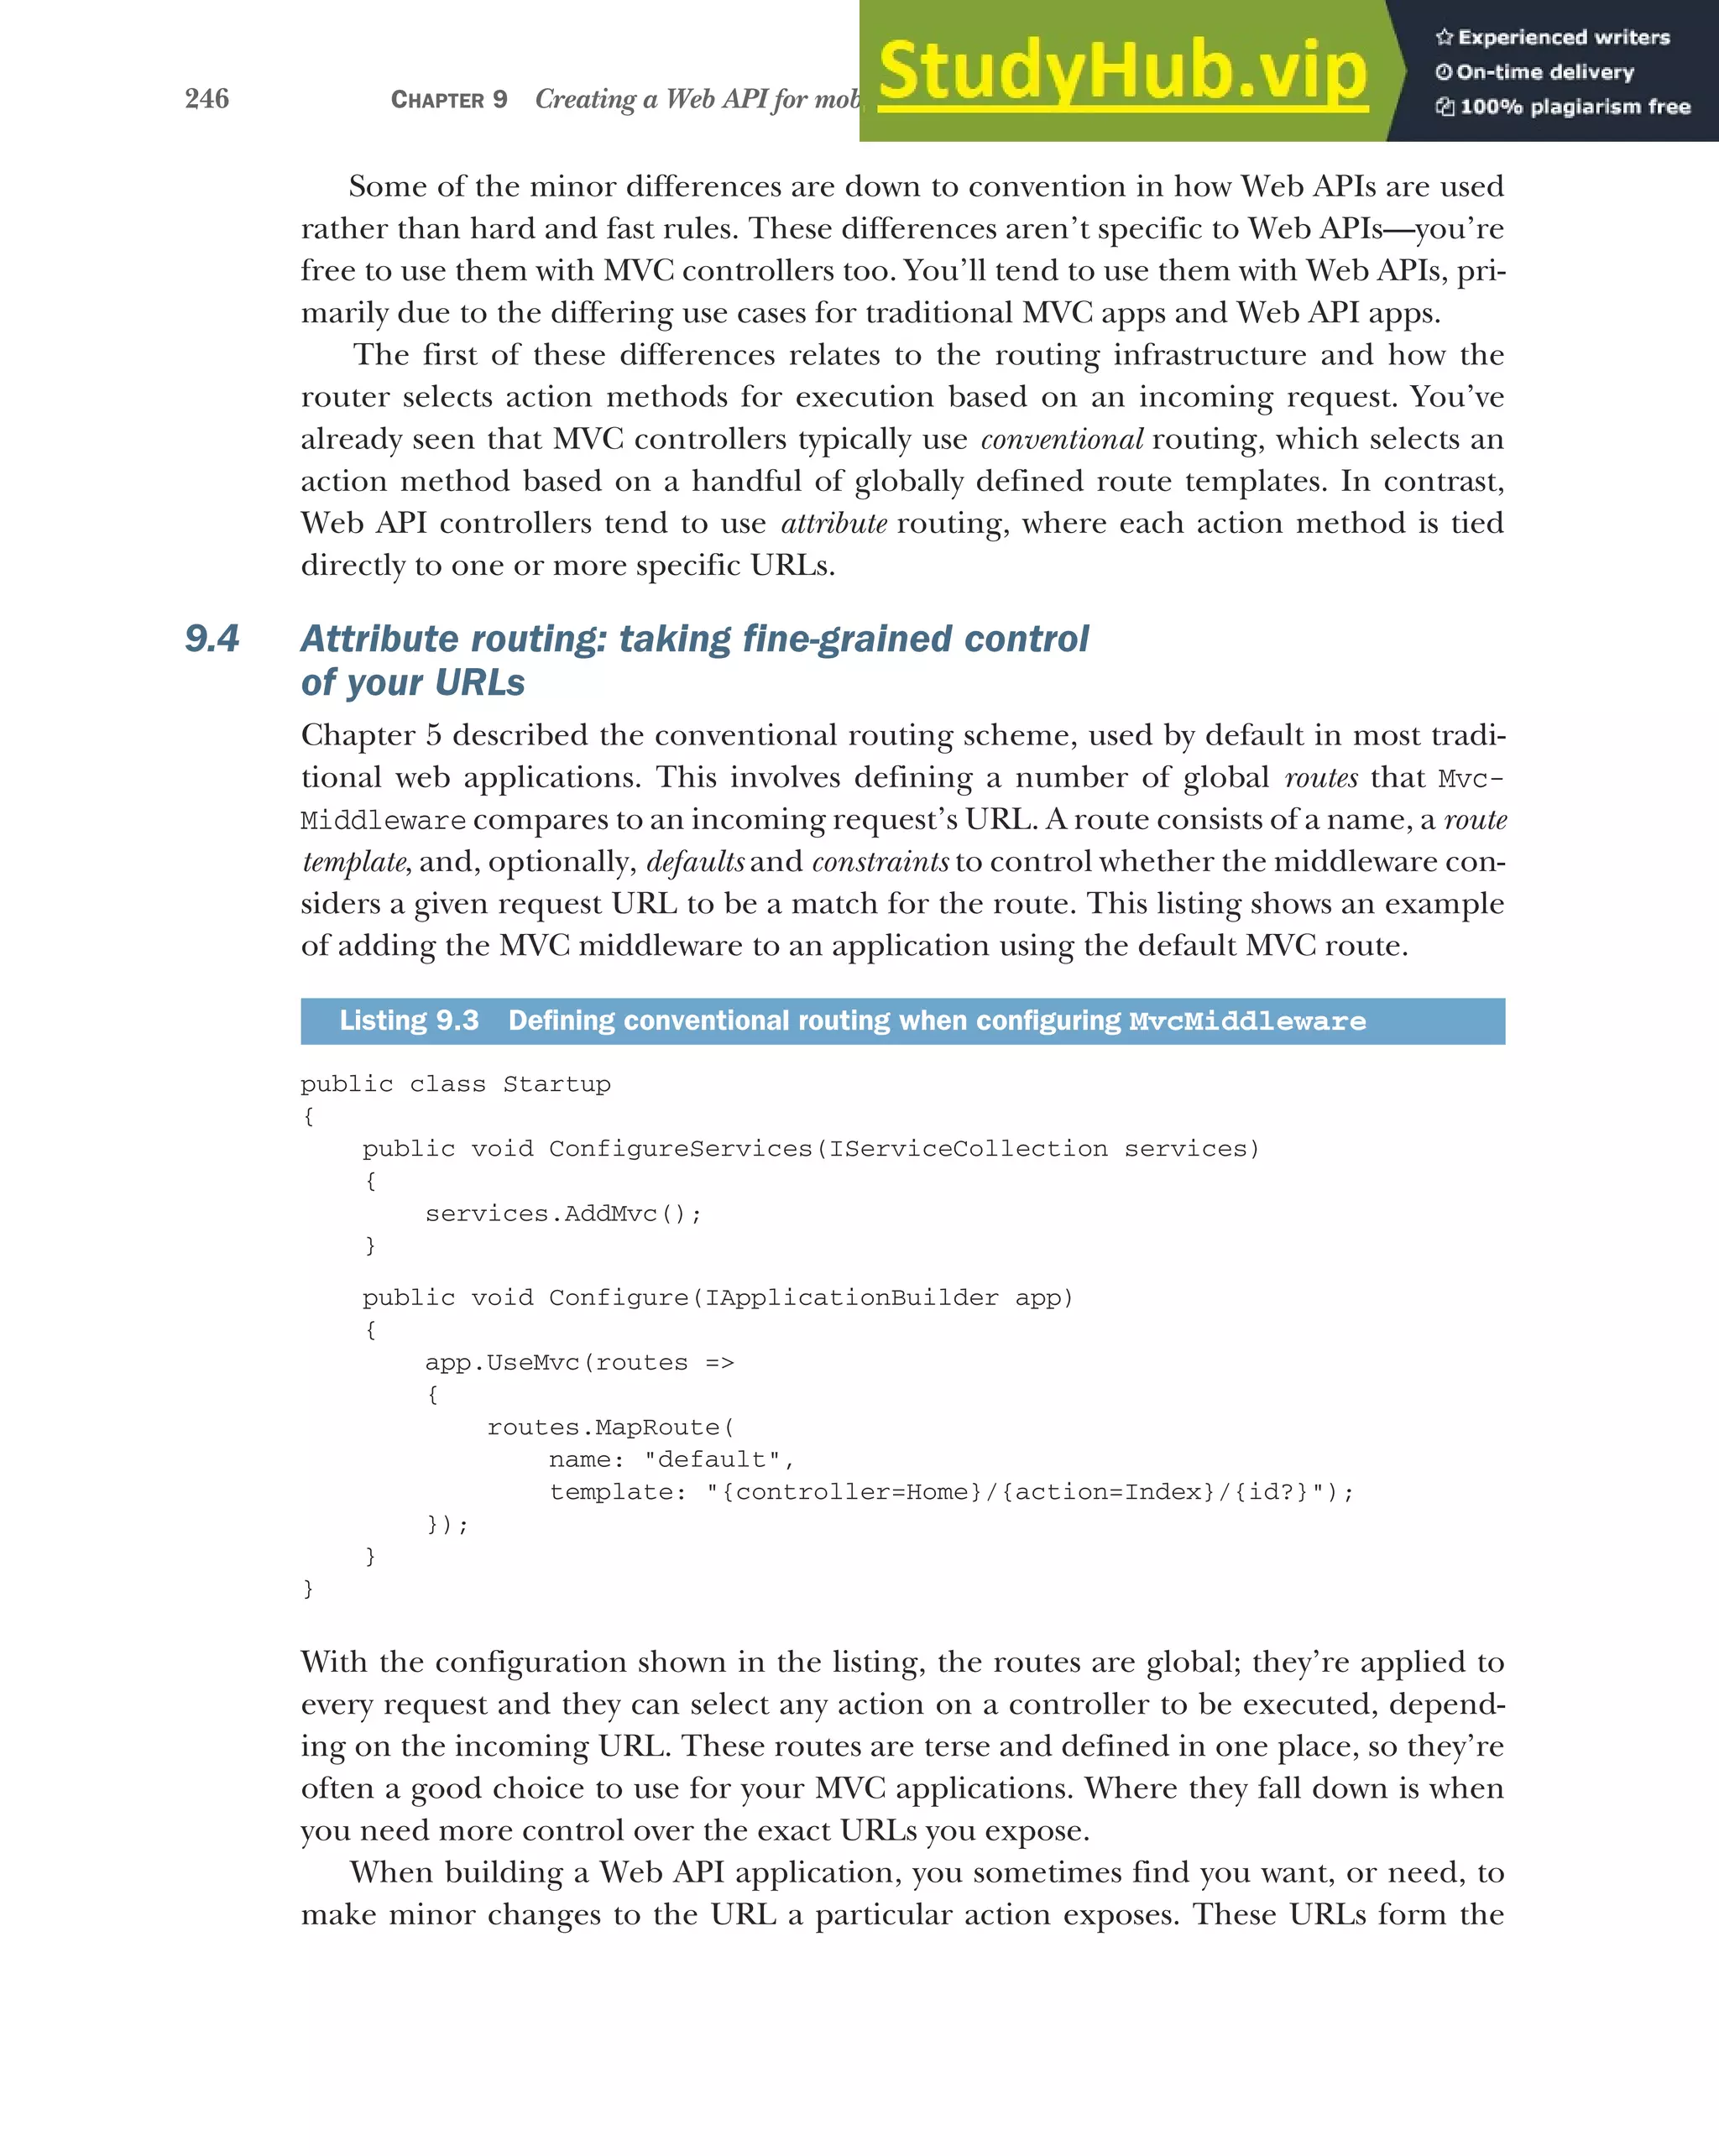
![247
Attribute routing: taking fine-grained control of your URLs
public API of your application, so it’s important that they’re easy to consume. Imagine
you have a commonly called action on the CategoriesController that returns a list
of all the current categories on your e-commerce site that contain available products:
public IActionResult ListAllCurrentCategoriesWithProducts();
Using conventional routing, that would map to an excessively long URL,
/Categories/ListAllCurrentCategoriesWithProducts. The team decides to shorten
it to /CurrentCategories, so users can easily understand which section of your app
they’re in.
With conventional routing you’d need to add a new, highly specific, route in the
global configuration, to handle this outlier method. Over time, you might add other
similarly specific routes, giving the potential for clashes and breaking other routes in
your application. Conventional routing is not as useful when you need to have this
level of fine-grained control over your routes.
Instead, a more common approach is to use attribute routing for your Web APIs.
Attribute routing, as the name suggests, involves applying attributes to your action
methods to specify the URL that they should match.
public class HomeController: Controller
{
[Route("")]
public IActionResult Index()
{
/* method implementation*/
}
[Route("contact")]
public IActionResult Contact()
{
/* method implementation*/
}
}
By applying [Route] attributes to your controller, you bypass conventional routing for
that action method. Each [Route] attribute defines a specific URL that corresponds
to the associated action method. In the example provided, the "/" URL maps directly
to the Index method and the "/contact" URL maps to the Contact method.
TIP If you use [Route] attributes on all your action methods, then you don’t
need to set up any conventional routes when you call UseMvc() in
Startup.Configure().
Conceptually, attribute routing takes the opposite approach to conventional routing.
The MVC-style conventional routing looks at the incoming URL, checks it against
your route templates to fill in the blanks for the controller and action, and then
checks to see if the requested controller and action exist in your application.
Listing 9.4 Attribute routing example
The Index action will be
executed when the "/"
URL is requested.
The Contact action will be
executed when the
"/home/contact" URL is
requested.](https://image.slidesharecdn.com/asp-230807173723-31e70040/75/ASP-NET-Core-in-Action-2018-pdf-275-2048.jpg)
![248 CHAPTER 9 Creating a Web API for mobile and client applications using MVC
Attribute routing, on the other hand, starts by looking for all the controllers and
action methods in your application that have [Route] attributes. It uses these to calcu-
late the URL that needs to be called to invoke a given action, building a dictionary
where the key is the URL and the value is the action method. When a request arrives,
the router can check if the key is in the dictionary—if it is, then it knows which action
to execute, if it isn’t, then the action isn’t attribute-routed.
Attribute routing maps URLs to a specific action method, but a single action
method can still have multiple URLs. Each URL must be declared with its own Route-
Attribute, as shown in this listing, which shows the skeleton of the Web API for a car-
racing game.
public class CarController
{
[Route("car/start")]
[Route("car/ignition")]
[Route("start-car")]
public IActionResult Start()
{
/* method implementation*/
}
[Route("car/speed/{speed}")]
[Route("set-speed/{speed}")]
public IActionResult SetCarSpeed(int speed)
{
/* method implementation*/
}
}
The listing shows two different action methods, both of which can be accessed from
multiple URLs. For example, the Start method will be executed when any of the fol-
lowing URLS are requested:
/car/start
/car/ignition
/start-car
These URLs are completely independent of the controller and action method names;
only the value in the RouteAttribute matters.
NOTE The controller and action name have no bearing on the URLs or
route templates when RouteAttributes are used.
The templates used by the route attributes are standard route templates, the same as
you used in chapter 5. You can use literal segments and you’re free to define route
parameters that will extract values from the URL, as shown by the SetCarSpeed
Listing 9.5 Attribute routing with multiple attributes
The Start method will be
executed when any of these
URLs are reached.
The name of the action
method has no effect on
the RouteAttribute or URL.
The RouteAttributes can
contain route parameters, in
this case speed.](https://image.slidesharecdn.com/asp-230807173723-31e70040/75/ASP-NET-Core-in-Action-2018-pdf-276-2048.jpg)
![249
Attribute routing: taking fine-grained control of your URLs
method in the previous listing. That method defines two route templates, both of
which define a route parameter, {speed}.
TIP I’ve used multiple [Route] attributes on each action in this example, but
it’s best practice to expose your action at a single URL. This will make your
API easier to understand and consume by other applications.
Route parameters are handled in the very same way as for conventional routing—they
represent a segment of the URL that can vary. The only difference with attribute rout-
ing is that the controller and action name are already known, so you’re not allowed to
use the {controller} and {action} parameters—these are already set to the control-
ler and action that corresponds to the decorated action method.
As before, when defining conventional routes, the route parameters in your Route-
Attribute templates can
Be optional
Have default values
Use route constraints
For example, you could update the SetCarSpeed method in the previous listing to
constrain {speed} to an integer and to default to 20 like so:
[Route("car/speed/{speed=20:int}")]
[Route("set-speed/{speed=20:int}")]
public IActionResult SetCarSpeed(int speed)
It’s also possible to give your route attributes a name by providing one to Route-
Attribute, for example:
[Route("set-speed/{speed}", Name = "set_speed")]
public IActionResult SetCarSpeed(int speed)
Route names are optional, and aren’t used when matching URLs, but they can be use-
ful for URL generation. You saw in chapter 5 how to create URLs in your action meth-
ods using the Url helper and the RedirectToRoute method, and how to use them
with Tag Helpers in chapter 8. Although you may only have half a dozen conventional
routes, you effectively have a route for every attribute-routed action method that has
been given a name. Each route name must be unique in the application, so be sure to
keep track of them if you do use them!
If you managed to get your head around routing in chapter 5, then attribute rout-
ing shouldn’t hold any dangers for you. You’re writing a custom route template for
every action method in your application. When combining both conventional and
attribute routing in your application, you need to bear in mind how these two
approaches interact and what it means for your URLs.
9.4.1 Ordering of conventional and attribute routes
In chapter 5, you saw that the order in which you define conventional routes in
Startup.cs controls the order in which those routes are checked when MvcMiddleware](https://image.slidesharecdn.com/asp-230807173723-31e70040/75/ASP-NET-Core-in-Action-2018-pdf-277-2048.jpg)
![250 CHAPTER 9 Creating a Web API for mobile and client applications using MVC
receives a request. A route template defined earlier will be tested first, so gets first dibs
on handling the request. Because of that, it’s important to define the most specific
routes first, and the most general routes at the end.
With attribute routing, ordering doesn’t happen in quite the same way. On startup,
MvcMiddleware scans your app using reflection and locates all the routes applied
using RouteAttributes. It then automatically orders the routes from most specific to
least specific, as though you had defined the routes in the most optimum way.
Having said that, RouteAttributes do have an Order property. You can use this to
explicitly ensure a particular route attribute match is attempted before other routes,
but I’d strongly advise against using it. Doing so adds another layer of complexity that
you need to manage and could be indicative of excessive complexity in the URLs your
application exposes.
WARNING If you find yourself relying on a route order, then your URLs are
probably confusing. This will make it difficult for clients to consume your
API. Instead of using the Order property, look at ways to reduce the overlap
between your routes.
What does ordering routes in the most optimum way look like? Well, it obviously
depends on your application, and if you’ve defined your [Route] attributes using a
confusing URL space, then there may not be a truly optimum order. In those cases,
falling back to route naming can sometimes be an easier solution than trying to
coerce the correct order.
An aspect I haven’t touched on yet is what happens when you have an application
with both conventional and attribute routing. For example, the standard conventional
routing for the Index action method
public class HomeController
{
[Route("view”)]
public IActionResult Index() { }
}
would suggest that the /home/index URL would invoke the action. On the other
hand, attribute routing suggests the /view URL would invoke the action. Who wins?
Either? Both?
Well, applying attribute routing to an action means that it can never be matched
using conventional routing. Even though the action theoretically matches the
/home/index route, the conventional router can’t even see it, so it will never match.
You’re free to use both conventional routing and attribute routing in a single
application, but you need to bear this conflict between the two approaches in mind.
Even if a convention seems like it should match a particular action, the presence of an
attribute route will mean the action won’t be matched by the convention.
TIP Attribute routing on an action (or a controller, as you’ll see) will make
the action unreachable by conventional routing.](https://image.slidesharecdn.com/asp-230807173723-31e70040/75/ASP-NET-Core-in-Action-2018-pdf-278-2048.jpg)
![251
Attribute routing: taking fine-grained control of your URLs
This fact lends credence to the convention of sticking to conventional routing for tra-
ditional MVC controllers that return HTML using Razor templates and using attribute
routing for your Web API controllers. Doing so will make your life a lot simpler and
can help avoid conflicts if you’re consistent with your naming.1
TIP Use conventional routing for MVC controllers, and attribute routing for
Web API controllers. Adding a prefix such as "api" to your Web API route
templates helps to separate the Web API URL space from the MVC URL
space.
One thing you might begin noticing when you start using attribute routing is how
much more verbose it is than conventional routing. Where with conventional routing
you had only a handful of routes, you now have one for every single action method!
This is largely a symptom of the greater control attribute routing provides, but
there are a few features available to make your life a little easier. In particular, combin-
ing route attributes and token replacement can help reduce duplication in your code.
9.4.2 Combining route attributes to keep your route templates DRY
Adding route attributes to all of your API controllers can get a bit tedious, especially if
you’re mostly following conventions where your routes have a standard prefix such as
"api" or the controller name. Generally, you’ll want to ensure you don’t repeat your-
self (DRY) when it comes to these strings. The following listing shows two action meth-
ods with a number of [Route] attributes. (This is for demonstration purposes only.
Stick to one per action if you can!)
public class CarController
{
[Route("api/car/start")]
[Route("api/car/ignition")]
[Route("/start-car")]
public IActionResult Start()
{
/* method implementation*/
}
[Route("api/car/speed/{speed}")]
[Route("/set-speed/{speed}")]
public IActionResult SetCarSpeed(int speed)
{
/* method implementation*/
}
}
1
ASP.NET Core 2.1 introduces the [ApiController] attribute. Applying this attribute to your controller
means it must only use [Route] attributes; it will never match conventional routes.
Listing 9.6 Duplication in RouteAttribute templates](https://image.slidesharecdn.com/asp-230807173723-31e70040/75/ASP-NET-Core-in-Action-2018-pdf-279-2048.jpg)
![252 CHAPTER 9 Creating a Web API for mobile and client applications using MVC
There’s quite a lot of duplication here—you’re adding "api/car" to most of your
routes. Presumably, if you decided to change this to "api/vehicles", you’d have to go
through each attribute and update it. Code like that is asking for a typo to creep in!
To alleviate this pain, it’s also possible to apply RouteAttributes to controllers, in
addition to action methods. When a controller and an action method both have a
route attribute, the overall route template for the method is calculated by combining
the two templates.
[Route("api/car")]
public class CarController
{
[Route("start")]
[Route("ignition")]
[Route("/start-car")]
public IActionResult Start()
{
/* method implementation*/
}
[Route("speed/{speed}")]
[Route("/set-speed/{speed}")]
public IActionResult SetCarSpeed(int speed)
{
/* method implementation*/
}
}
Combining attributes in this way can reduce some of the duplication in your route
templates and makes it easier to add or change the prefixes (such as switching "car"
to "vehicle") for multiple action methods. To ignore the RouteAttribute on the
controller and create an absolute route template, start your action method route tem-
plate with a slash (/).
You can combine multiple RouteAttribute on controllers too, if you use inheri-
tance. If all your controllers inherit from a base class, you can use this approach to
add a global prefix to all your attribute routes.
[Route("api")]
public class BaseController : Controller { }
[Route("car")]
public class CarController : BaseController
{
[Route("start")]
[Route("ignition")]
Listing 9.7 Combining RouteAttribute templates
Listing 9.8 Using a base class to add a global prefix to RouteAttribute templates
Combines to give
the"api/car/start"
template
Combines to give
the "api/car/ignition"
template
Does not combine as
starts with /, gives the
"start-car" template
Combines to give the
"api/car/speed/{speed}"
template
Does not combine as starts
with /, gives the "set-
speed/{speed}" template
The BaseController defines
the "api" global prefix
The CarController inherits the
RouteAttribute from the BaseController
and adds its own prefix
Combines all attributes
to give the
"api/car/start" template
Combines all attributes
to give the
"api/car/ignition" template](https://image.slidesharecdn.com/asp-230807173723-31e70040/75/ASP-NET-Core-in-Action-2018-pdf-280-2048.jpg)
![253
Attribute routing: taking fine-grained control of your URLs
[Route("/start-car")]
public IActionResult Start()
{
/* method implementation*/
}
}
As you can see, the [Route] attribute from the “most-base” controller is used first, fol-
lowed by the action controller, and finally, the action method, combining to give a sin-
gle route for the action method. Once again, specifying a leading "/" to the route will
prevent route combination and will use only the final [Route] attribute to define the
route. This has reduced a lot of the duplication, but you can do one better by using
token replacement.
9.4.3 Using token replacement to reduce duplication
in attribute routing
The ability to combine attribute routes is handy, but you’re still left with some duplica-
tion if you’re prefixing your routes with the name of the controller, or your route tem-
plates use the action name. Luckily, you can simplify even further!
Attribute routes support the automatic replacement of the [action] and
[controller] tokens in your attribute routes. These will be replaced with the name of
the action and the controller (without the “Controller” suffix), respectively. The
tokens are replaced after all attributes have been combined, so this is useful when you
have controller inheritance hierarchies. This listing shows how you can simplify the
previous route attribute hierarchy.
[Route("api/[controller]")]
public abstract class BaseController { }
public class CarController : BaseController
{
[Route("[action]")]
[Route("ignition")]
[Route("/start-car")]
public IActionResult Start()
{
/* method implementation*/
}
}
The router will also replace tokens in the Name property of RouteAttributes, which
can make generating unique route names easier. If you use a RouteAttribute on a
base controller with a tokenized name
[Route("api/[controller]", Name = "[controller]_[action]")]
Listing 9.9 Token replacement in RouteAttributes
Does not combine with base
attributes as it starts with /, so
remains as "start-car"
Token replacement happens
last, so [controller] is replaced
with "car" not "base"
Combines and replaces
tokens to give the
"api/car/start" template
Combines and replaces
tokens to give the
"api/car/ignition" template
Does not combine with base attributes as
it starts with /, so remains as "start-car"](https://image.slidesharecdn.com/asp-230807173723-31e70040/75/ASP-NET-Core-in-Action-2018-pdf-281-2048.jpg)
![254 CHAPTER 9 Creating a Web API for mobile and client applications using MVC
then a unique route name will be generated for each action. You need to be careful if
you have multiple RouteAttributes applied to a single action, as in the previous list-
ing, as then the route names will no longer be unique!
TIP Avoid using multiple [Route] attributes on your Web API action meth-
ods. Having multiple URLs invoke the same action can be confusing for con-
sumers of your app and complicates routing.
We’ve covered pretty much everything there is to know about attribute routing now,
with one exception: handling different HTTP request types like GET and POST.
9.4.4 Handling multiple matching actions with attribute routing
In chapter 5, you saw that you could discriminate between two action methods that
match the same URL by using HTTP verb attributes such as [HttpPost]. With Web
API controllers, the need to distinguish between identical URLs becomes more preva-
lent, due to their typical design.
Imagine you’re building an API to manage your calendar. You want to be able to
list and create appointments. Well, a traditional HTTP REST service might define the
following URLs and HTTP verbs to achieve this:
GET /appointments—List all your appointments
POST /appointments—Create a new appointment
Note that these two endpoints define the same URL, only the HTTP verb differs. This
is common when building Web APIs and, luckily, is easy to model in ASP.NET Core. As
with conventional routing, you use attributes such as [HttpPost] to define the HTTP
verb an action method corresponds to.
public class AppointmentController
{
[HttpGet("/appointments")]
public IActionResult ListAppointments()
{
/* method implementation */
}
[HttpPost("/appointments")]
public IActionResult CreateAppointment()
{
/* method implementation */
}
}
These HTTP verb attributes are the same ones you saw used in chapter 5 with conven-
tional routing, but in this case, they also contain the route template themselves.
[HttpGet("/appointments")] effectively combines [Route("/appointments")] and
Listing 9.10 Using HTTP verb attributes with attribute routing
Only executed in response
to GET /appointments
Only executed in response
to POST /appointments](https://image.slidesharecdn.com/asp-230807173723-31e70040/75/ASP-NET-Core-in-Action-2018-pdf-282-2048.jpg)
![255
Enabling additional input formatters: binding to XML data
[HttpGet] into a more compact representation. For that reason, this is the preferred
approach for defining your attribute routes.
TIP Define routes using attributes such as [HttpGet], [HttpPost], and
[HttpDelete]. This makes the action methods more specific and easier to
reason about.
And with that, you’ll probably be glad to hear we’re finished with routing for Web
APIs and, in fact, for the whole book! With the route template details you have in
chapter 5 and in this section, you have everything you need to customize the URLs in
your application, whether you’re using conventional routes or attribute routing.
Conceptually, people often find attribute routing a bit easier to grok, as you’re nor-
mally mapping a URL one-to-one with an action method. Although having the free-
dom to define the exact URL for a particular action method is useful, try not to get
too power-crazed; always try to think about the users and clients consuming your API.
Having a simple and well-defined set of URLs for your application should be your
main goal.
With routing checked off the list, it’s time to consider the next step in an MVC
request—model binding—and how you can customize it for Web APIs. The process is
identical for both MVC and Web API, but Web APIs often run into an additional
requirement, especially when interoperating with legacy systems—the ability to post
XML to a Web API action method. By default, this isn’t possible but, luckily, enabling
it is easy.
9.5 Enabling additional input formatters:
binding to XML data
In chapter 6, I introduced model binding as a way of mapping an incoming request to
the method parameters of an action. After the router selects an action method, the
model binder is responsible for taking the data posted in a request and mapping it to
the method parameters of the action method.
In particular, you saw that by using the [FromBody] attribute on a method parame-
ter, you could bind a parameter to the body of a request.
These days, with mobile applications and SPAs becoming increasingly popular, the
vast majority of data posted to Web APIs is JSON. The default model binder supports
this out of the box, so all that’s required to have the JSON data bound to your method
parameter is to add the [FromBody] attribute.1
There was a time, however, when XML was king. It’s still used for configuration
(good old MSBuild and .csproj files) and many communication protocols (SOAP,
RSS). Consequently, it’s quite likely you’ll need to be able to accept XML data to a
Web API action at some point.
1
ASP.NET Core 2.1 introduces the [ApiController] attribute. If you decorate your Web API controller with
this attribute, you don’t need to decorate your binding models with [FromBody]. The MVC middleware will
infer that complex types should be bound using [FromBody] automatically.](https://image.slidesharecdn.com/asp-230807173723-31e70040/75/ASP-NET-Core-in-Action-2018-pdf-283-2048.jpg)
![256 CHAPTER 9 Creating a Web API for mobile and client applications using MVC
By default, MvcMiddleware only accepts POST data in JSON format. In order to be
able to accept XML data and have it bind automatically to your models, you’ll need
additional services.
Before you dig into how to add the formatters, it’s worth considering what happens if
you try to send XML to an ASP.NET Core application that you haven’t yet configured
to accept it.
In this example, I’ve created a simple Web API Controller that parses an object
form the request body and returns a 200 OK response:
[HttpPost]
public IActionResult Add([FromBody] Car car)
{
return Ok();
}
Figure 9.8 shows a screenshot of Postman (www.getpostman.com), which you can use
to create requests for testing your application. I created a request with XML in the
body and POSTed it to the preceding action. As you can see, the application returns a
415 response code, which means “Unsupported Media Type”, indicating that Mvc-
Middleware was unable to parse the XML in the body of the request.
Clients include the content-type header as part of POST requests to tell the server
what sort of data it’s sending. In this case, the request is sent with a content-type of
text/xml. When the request arrives, it checks this header and looks for an input for-
matter that can deserialize the request.
TIP The input formatter is selected based on the content-type header of
the request.
Customizable by default
The ability to customize each aspect of ASP.NET Core is one of the features that sets
it apart from the previous version of ASP.NET. ASP.NET Core configures the vast
majority of its internal components using one of two mechanisms—dependency injec-
tion or by configuring an Options object when you add the service to your application,
as you’ll see in chapters 10 (dependency injection) and 11 (Options object).
As an adjunct to this, much of ASP.NET Core starts from the assumption that you
want nothing in your application, and lets you add in the things you need. This means
you can easily create small, stripped-back web applications, when compared to the
monolithic System.Web-based previous version of ASP.NET. Your application has only
the features you need.
In counterpoint to this, this philosophy means you’ll run into many more situations
where the default settings won’t fit your requirements. Luckily, the ability to easily
customize all the components of ASP.NET Core means you’ll normally be able to add
additional features without too much difficulty.](https://image.slidesharecdn.com/asp-230807173723-31e70040/75/ASP-NET-Core-in-Action-2018-pdf-284-2048.jpg)
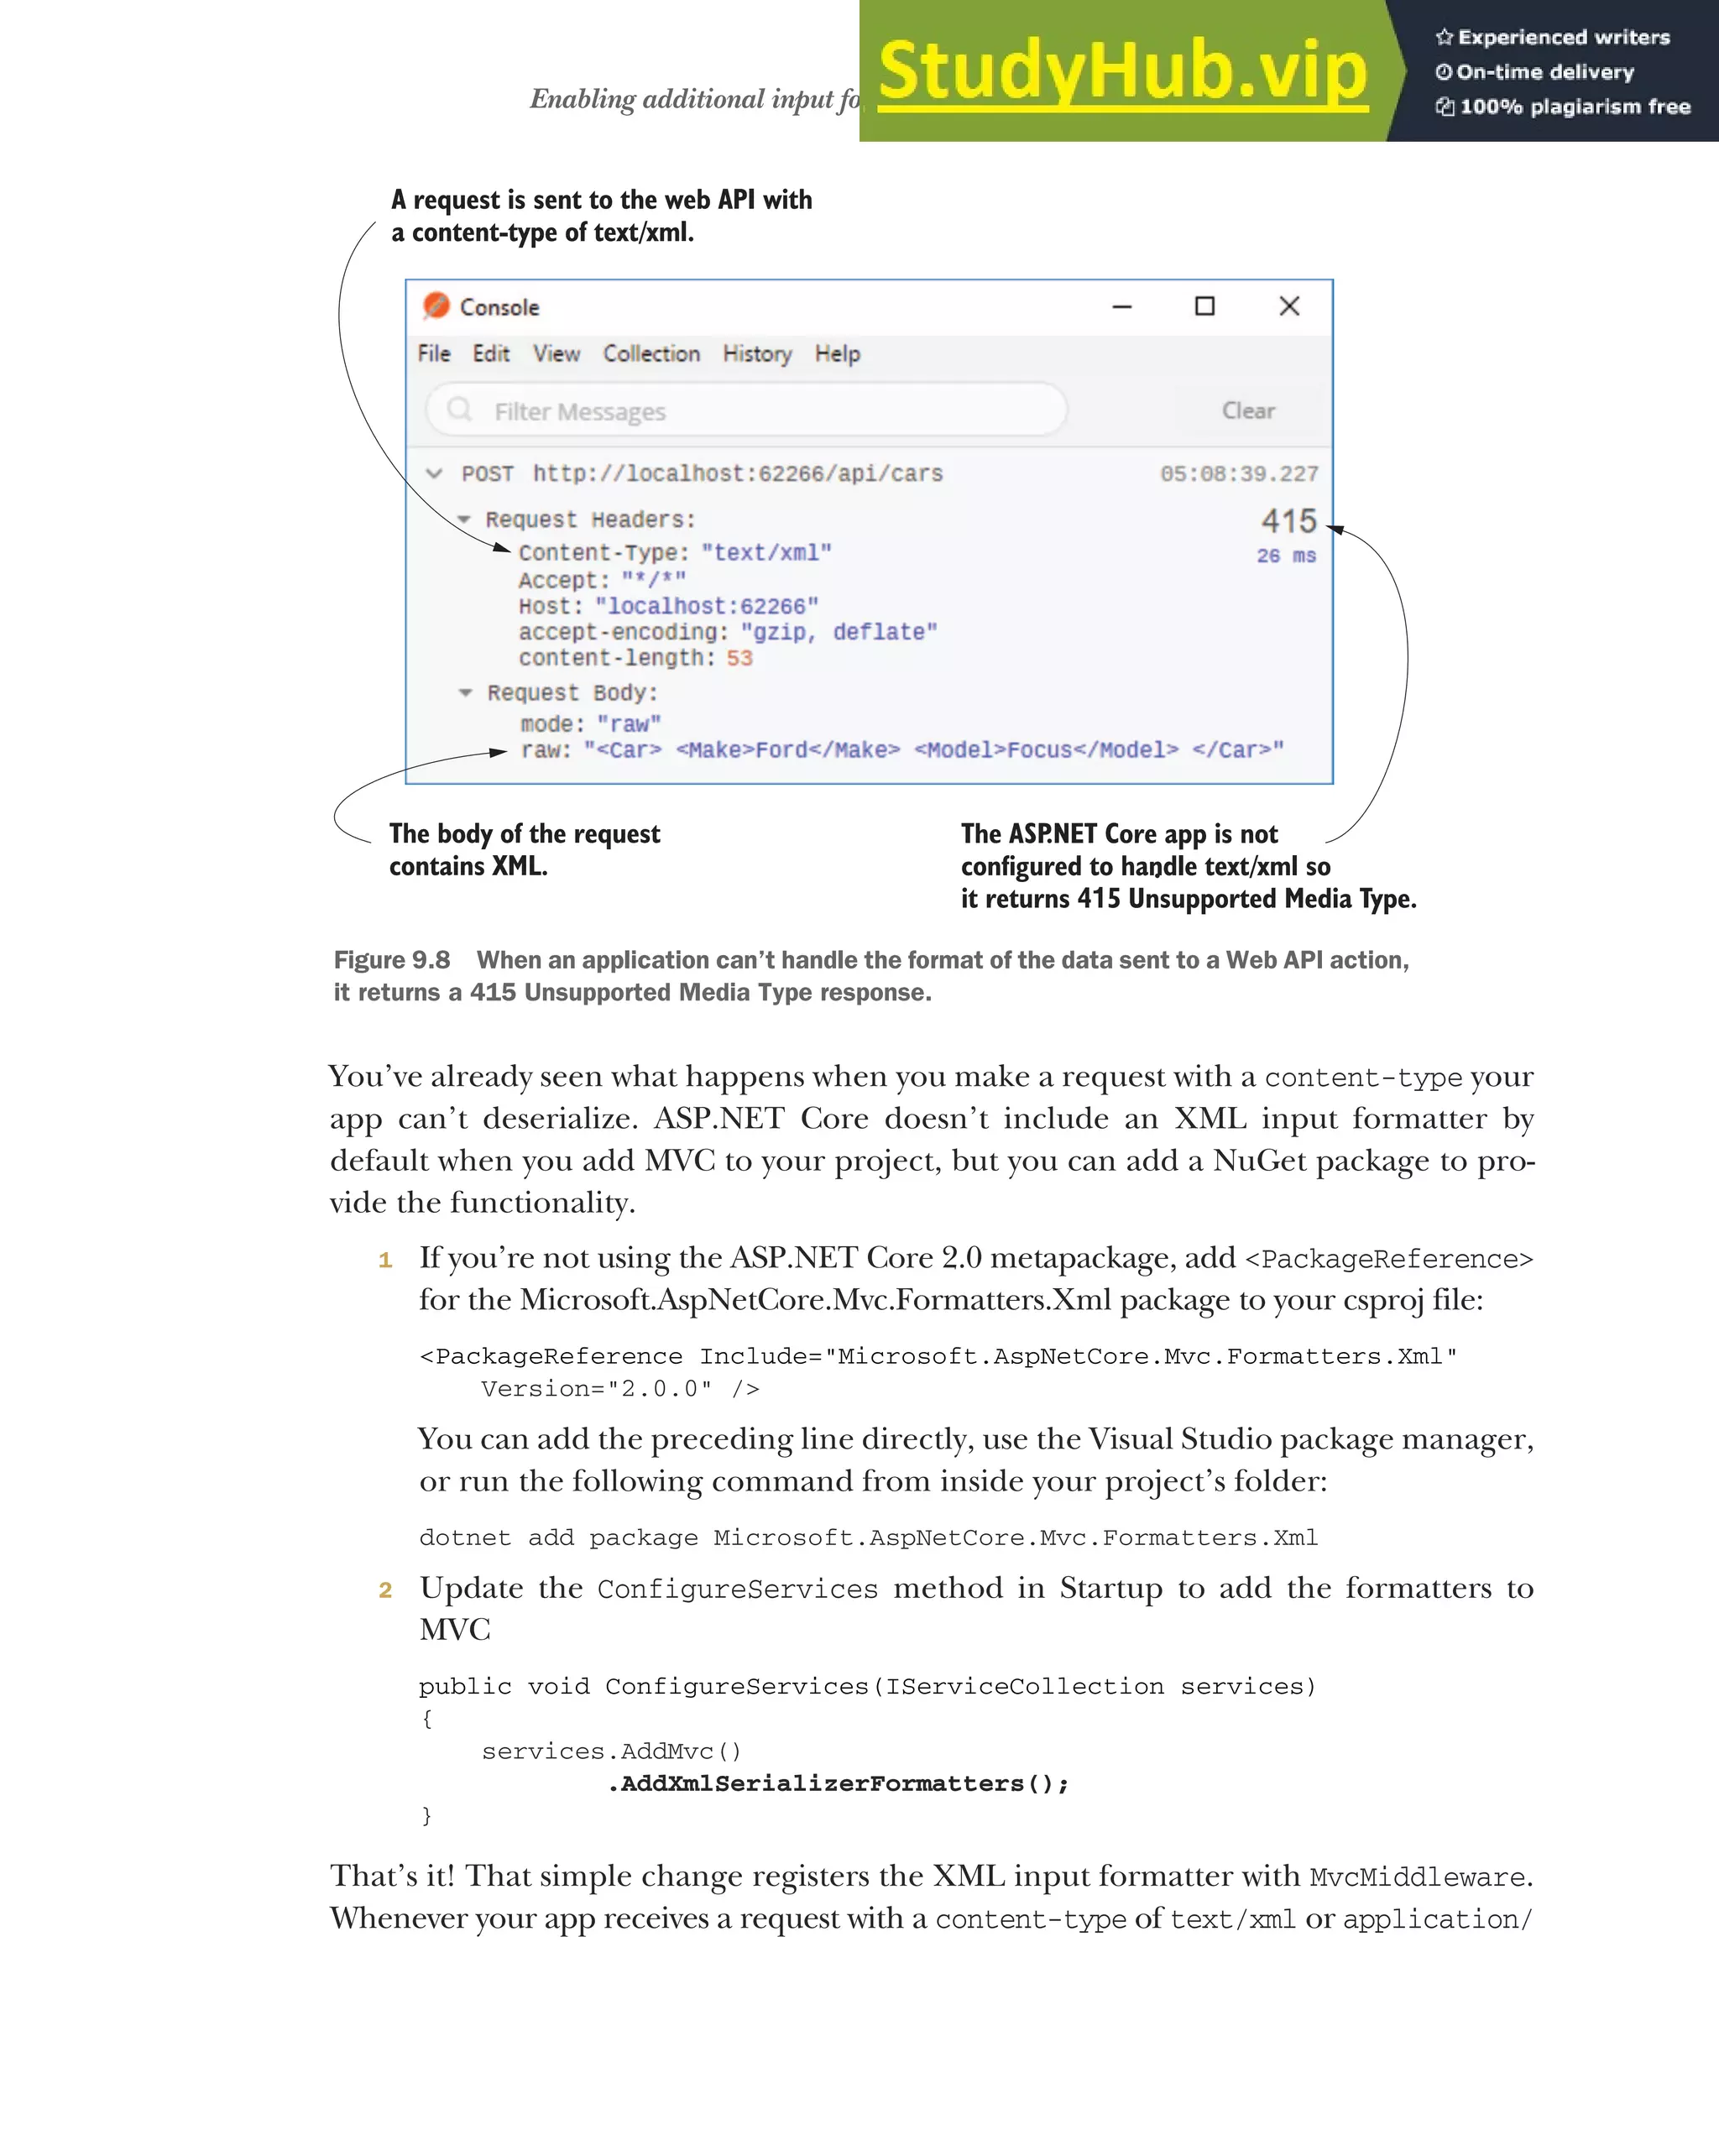
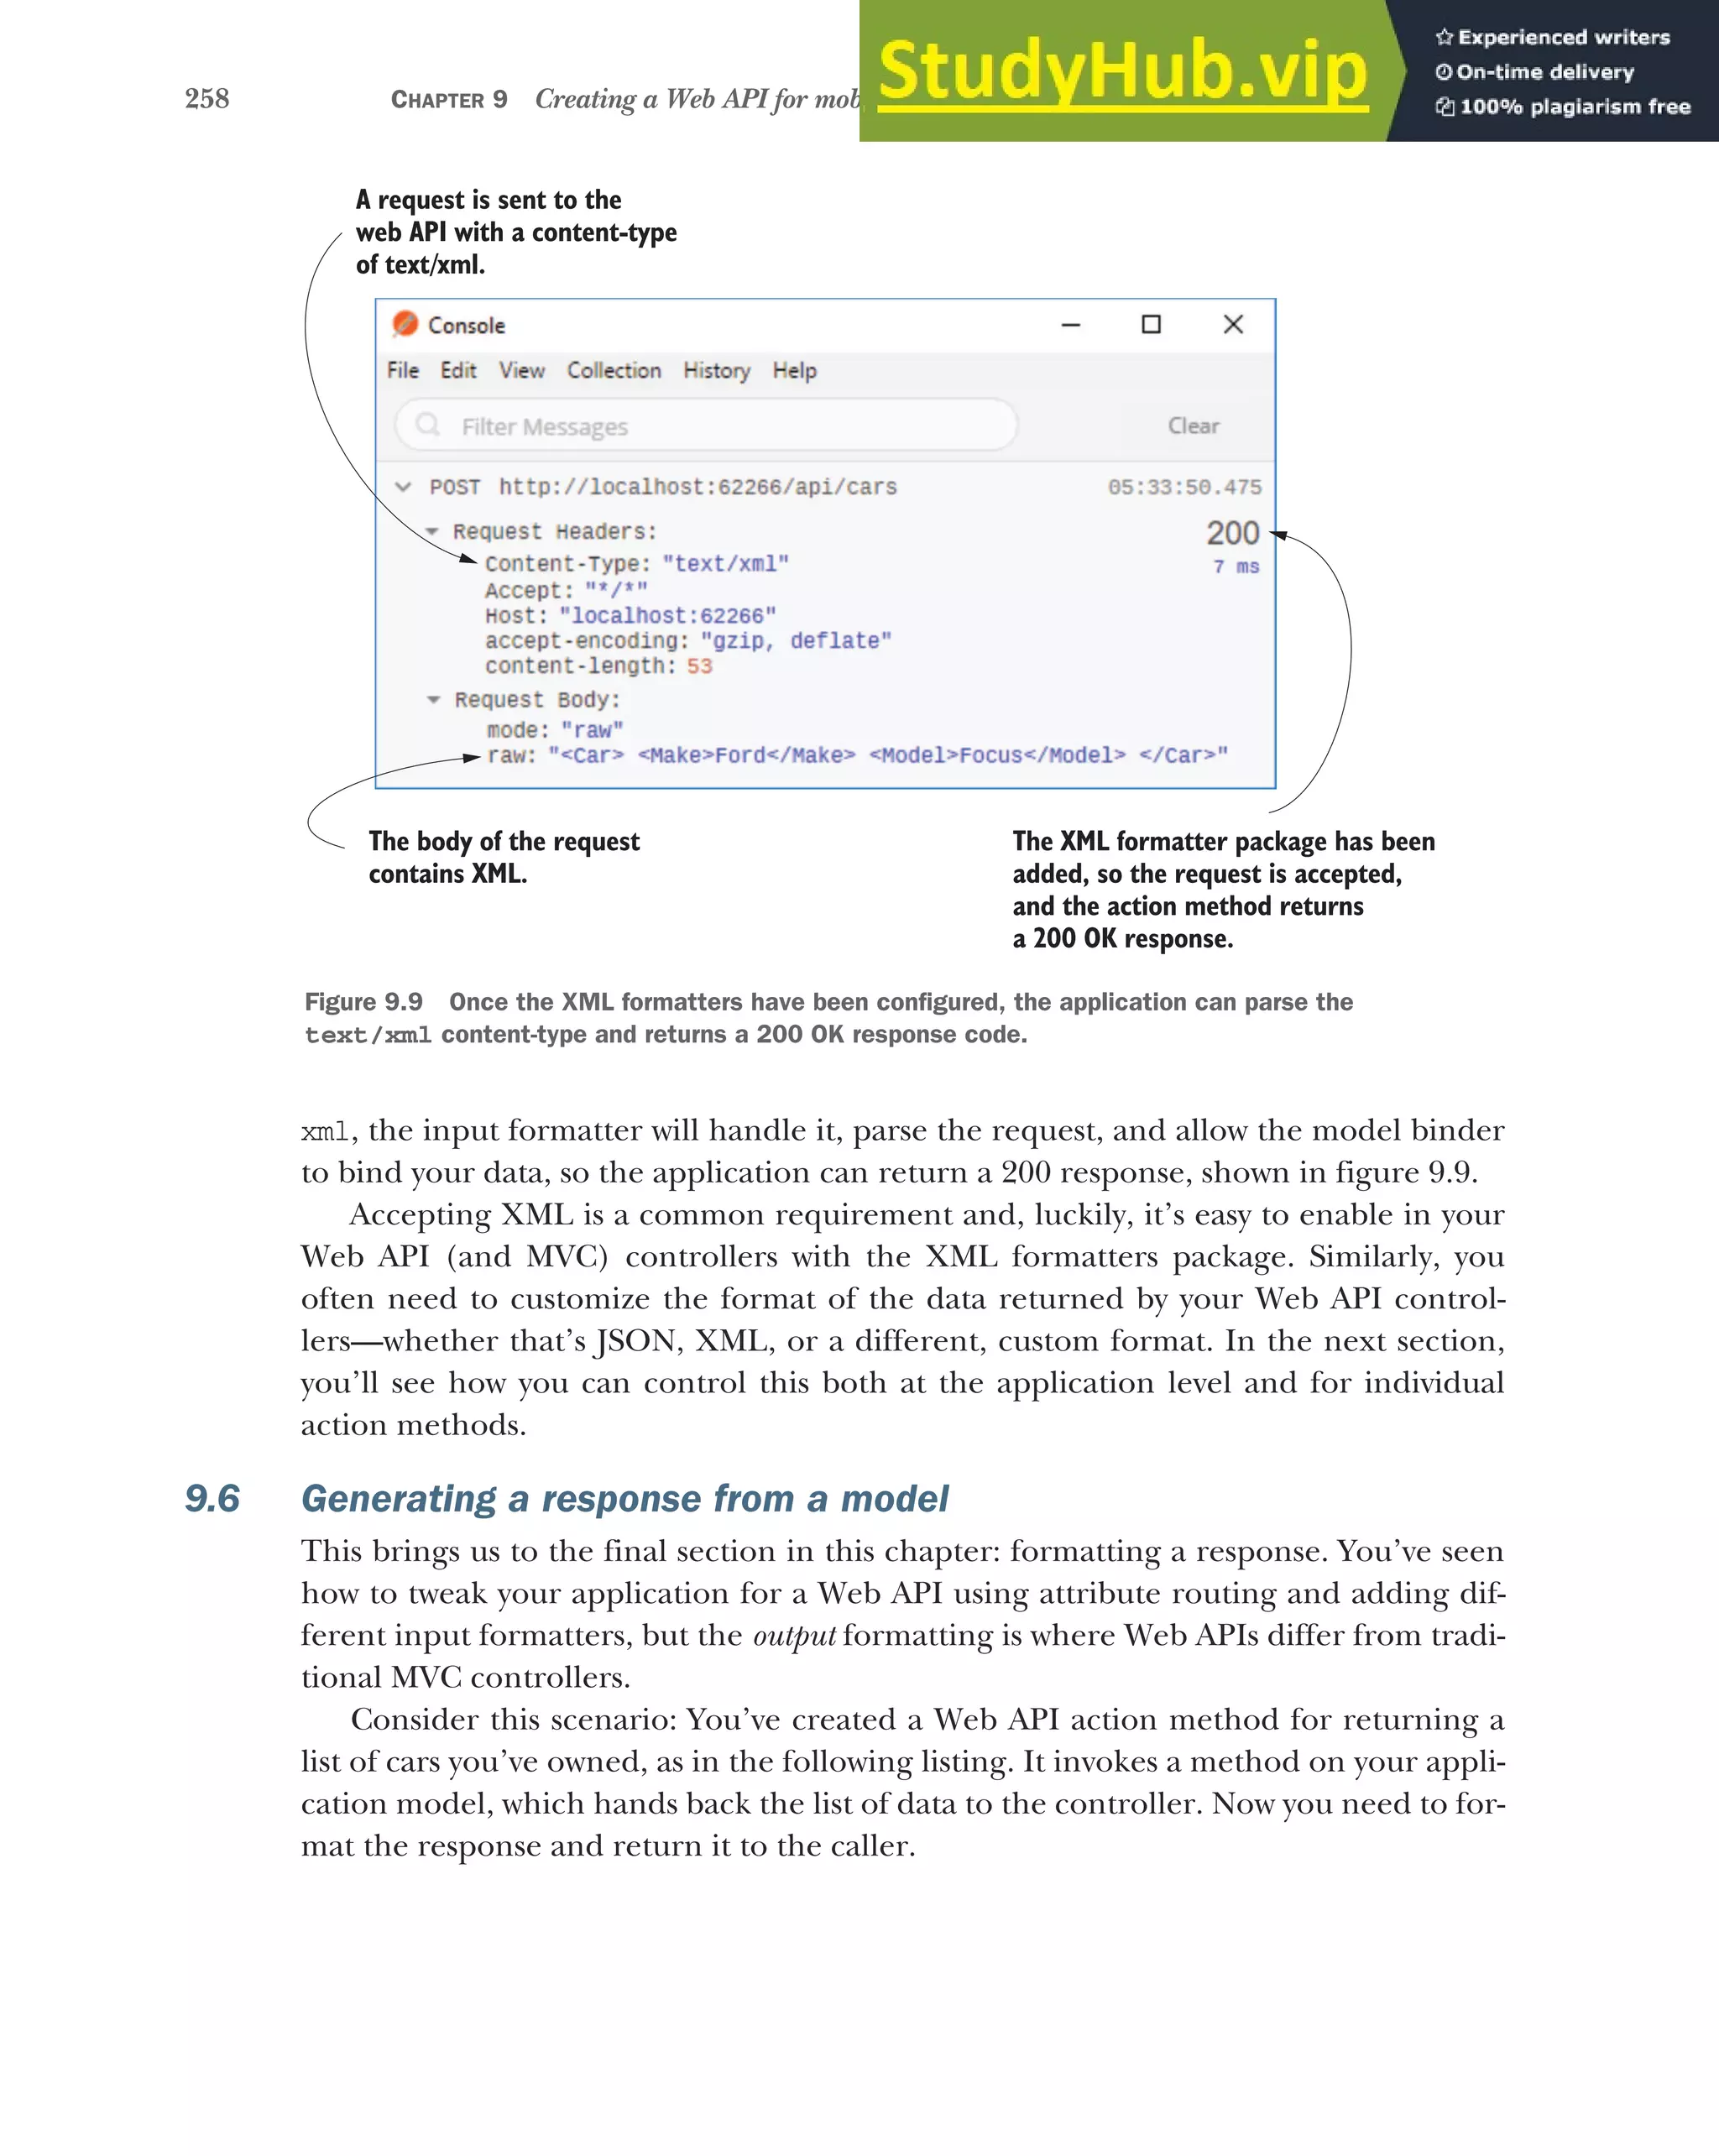
![259
Generating a response from a model
public class CarsController : Controller
{
[HttpGet("api/cars")]
public IEnumerable<string> ListCars()
{
return new string[]
{ "Nissan Micra", "FordFocus" };
}
}
You’ve already seen that it’s possible to return data directly from an action method, in
which case, the middleware formats it and returns the formatted data to the caller. But
how does the middleware know which format to use? After all, you could serialize it as
JSON, as XML, even with a simple ToString() call.
The process of determining the format of data to send to clients is known gener-
ally as content negotiation (conneg). At a high level, the client sends a header indicating
the types of content it can understand—the Accept header—and the server picks one
of these, formats the response, and sends a content-type header in the response,
indicating which it chose.
You’re not forced into only sending a content-type the client expects and, in some
cases, you may not even be able to handle the types it requests. What if a request stipu-
lates it can only accept Excel spreadsheets? It’s unlikely you’d support that, even if
that’s the only content-type the request contains!
When you return an API model from an action method, whether directly (as in the
previous listing) or via an OkResult or other StatusCodeResult, ASP.NET Core will
Listing 9.11 A Web API controller to return a list of cars
The action is executed with
a request to GET /api/cars.
The API Model containing
the data is an
IEnumerable<string>.
This data would normally be
fetched from the application model.
The accept and content-type headers
The accept header is sent by a client as part of a request to indicate the type of con-
tent that the client can handle. It consists of a number of MIME types,a
with optional
weightings (from 0 to 1) to indicate which type would be preferred. For example, the
application/json,text/xml;q=0.9,text/plain;q=0.6 header indicates that
the client can accept JSON, XML, and plain text, with weightings of 1.0, 0.9, and 0.6,
respectively. JSON has a weighting of 1.0, as no explicit weighting was provided. The
weightings can be used during content negotiation to choose an optimal representa-
tion for both parties.
The content-type header describes the data sent in a request or response. It con-
tains the MIME type of the data, with an optional character encoding. For example,
the application/json; charset=utf-8 header would indicate that the body of the
request or response is JSON, encoded using UTF-8.
a
For more on MIME types see http://mng.bz/D3UB.](https://image.slidesharecdn.com/asp-230807173723-31e70040/75/ASP-NET-Core-in-Action-2018-pdf-287-2048.jpg)
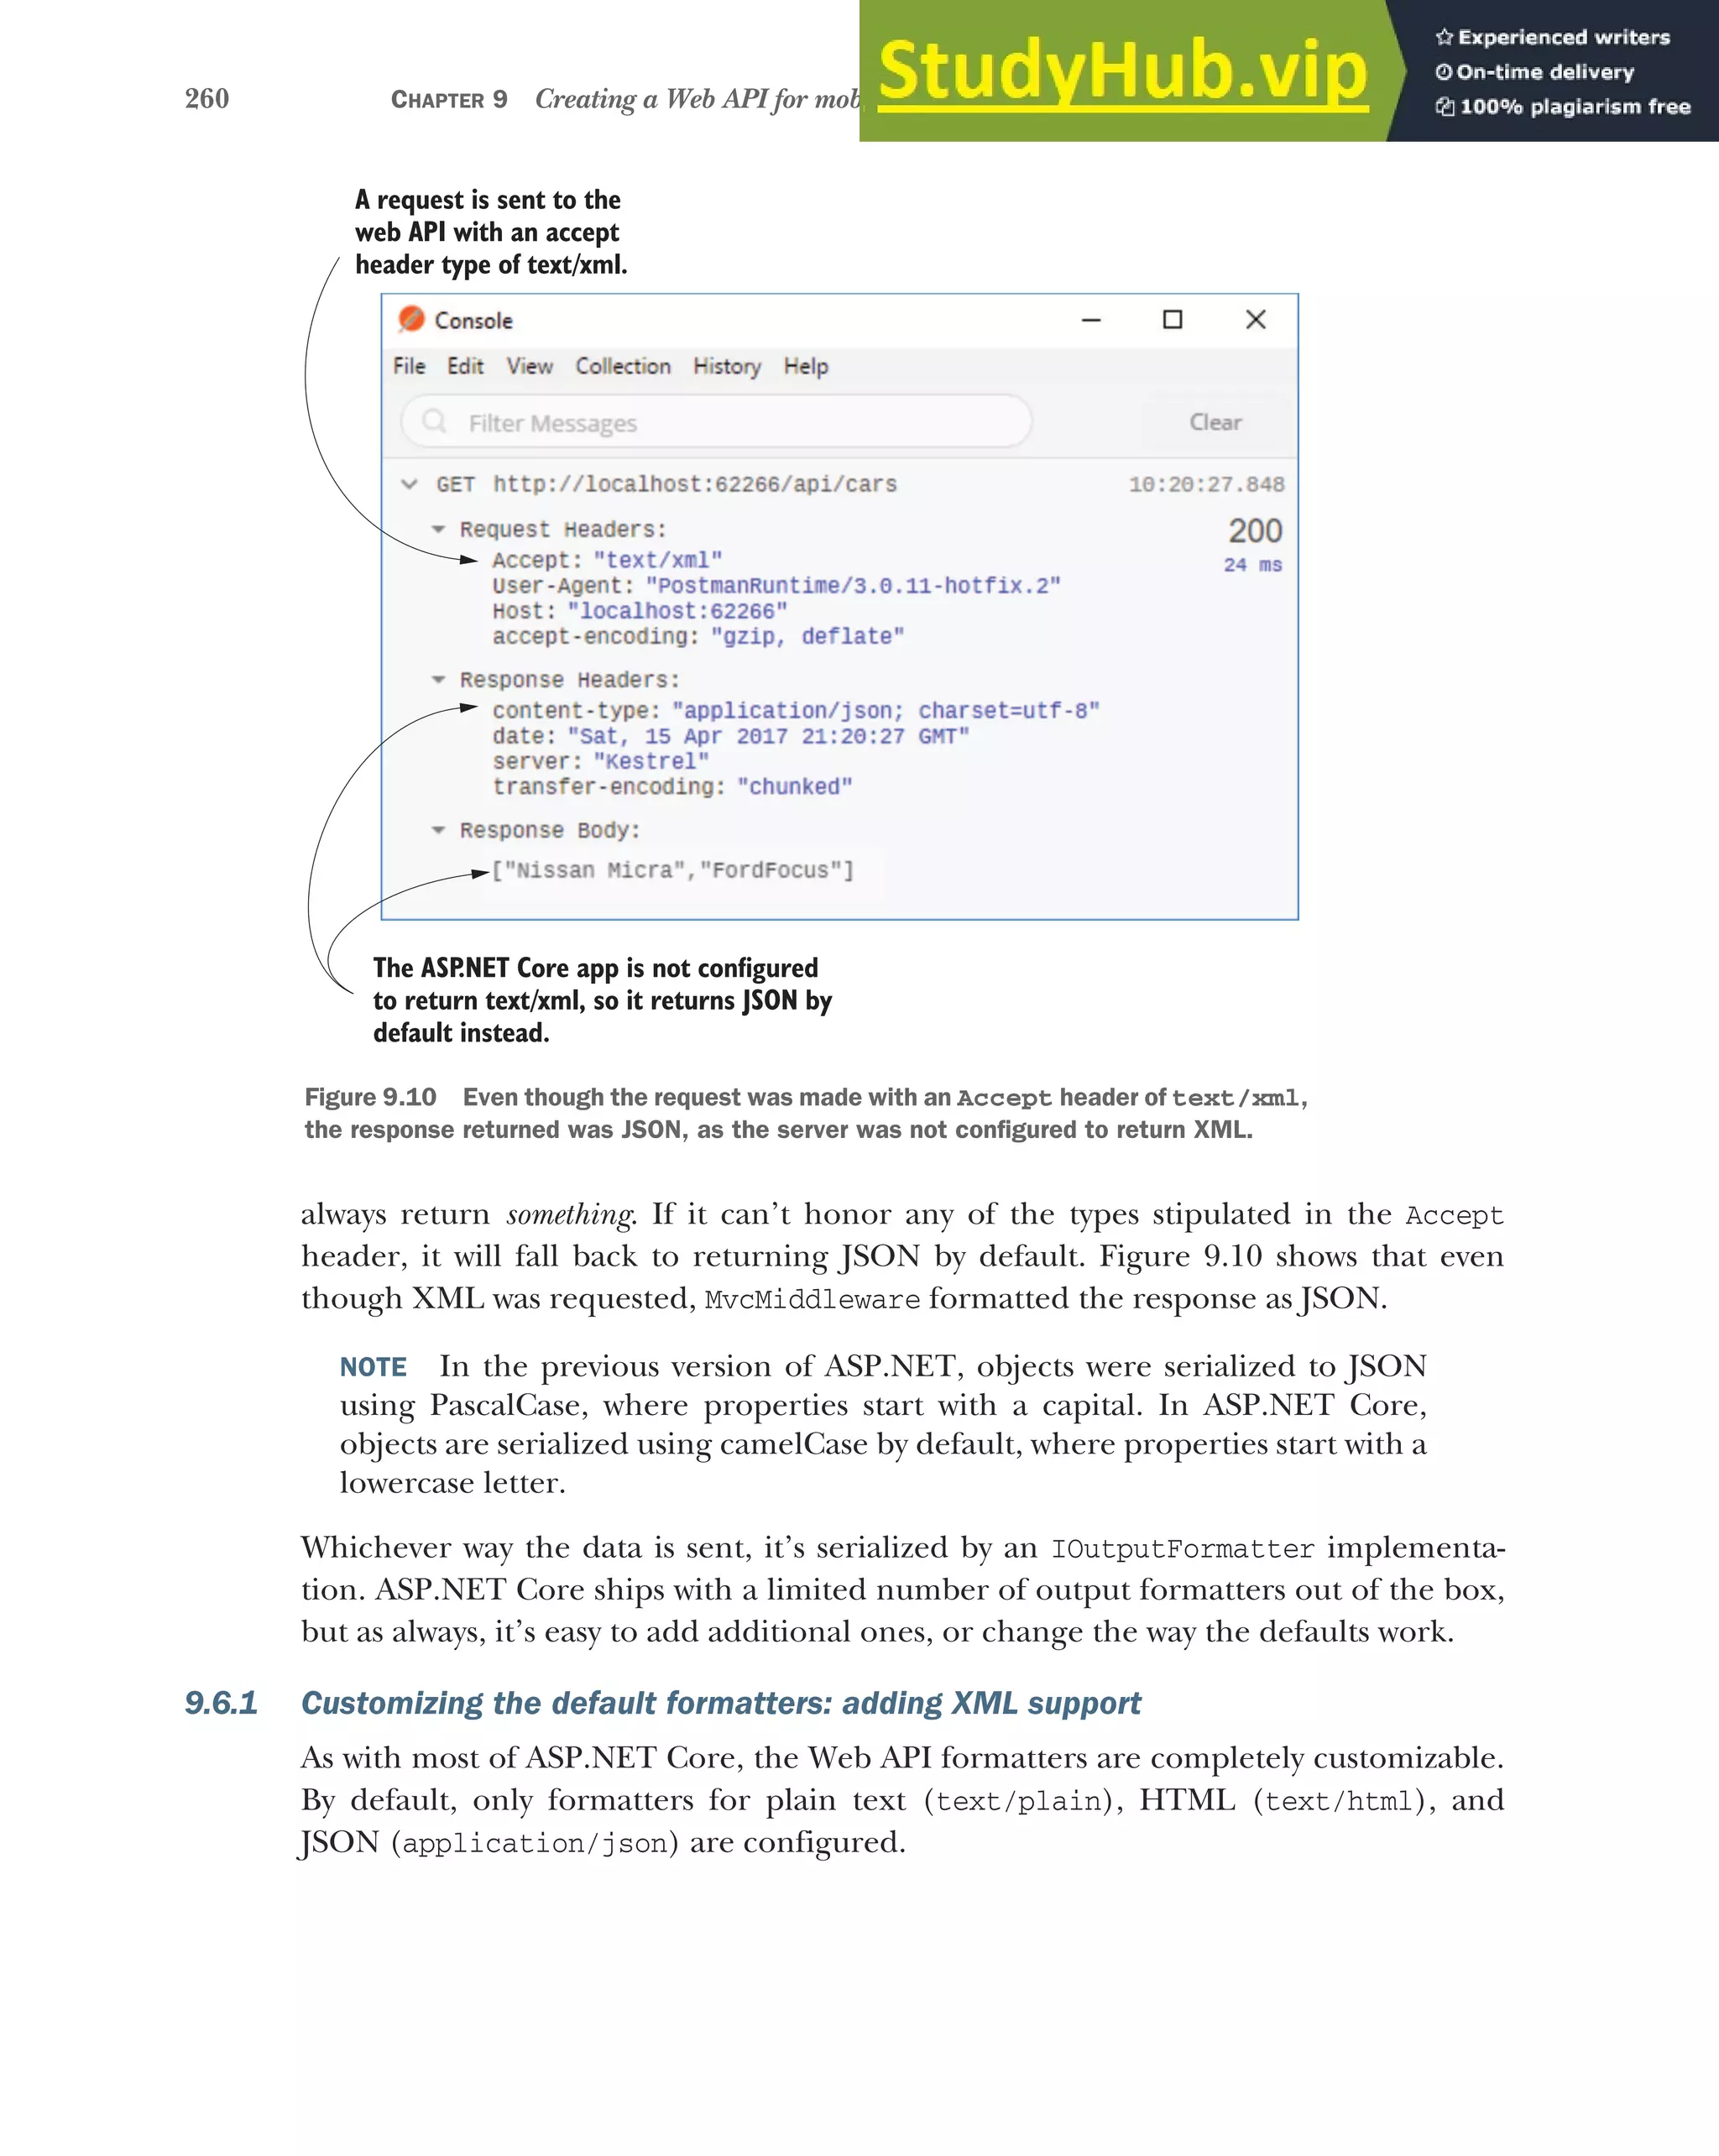
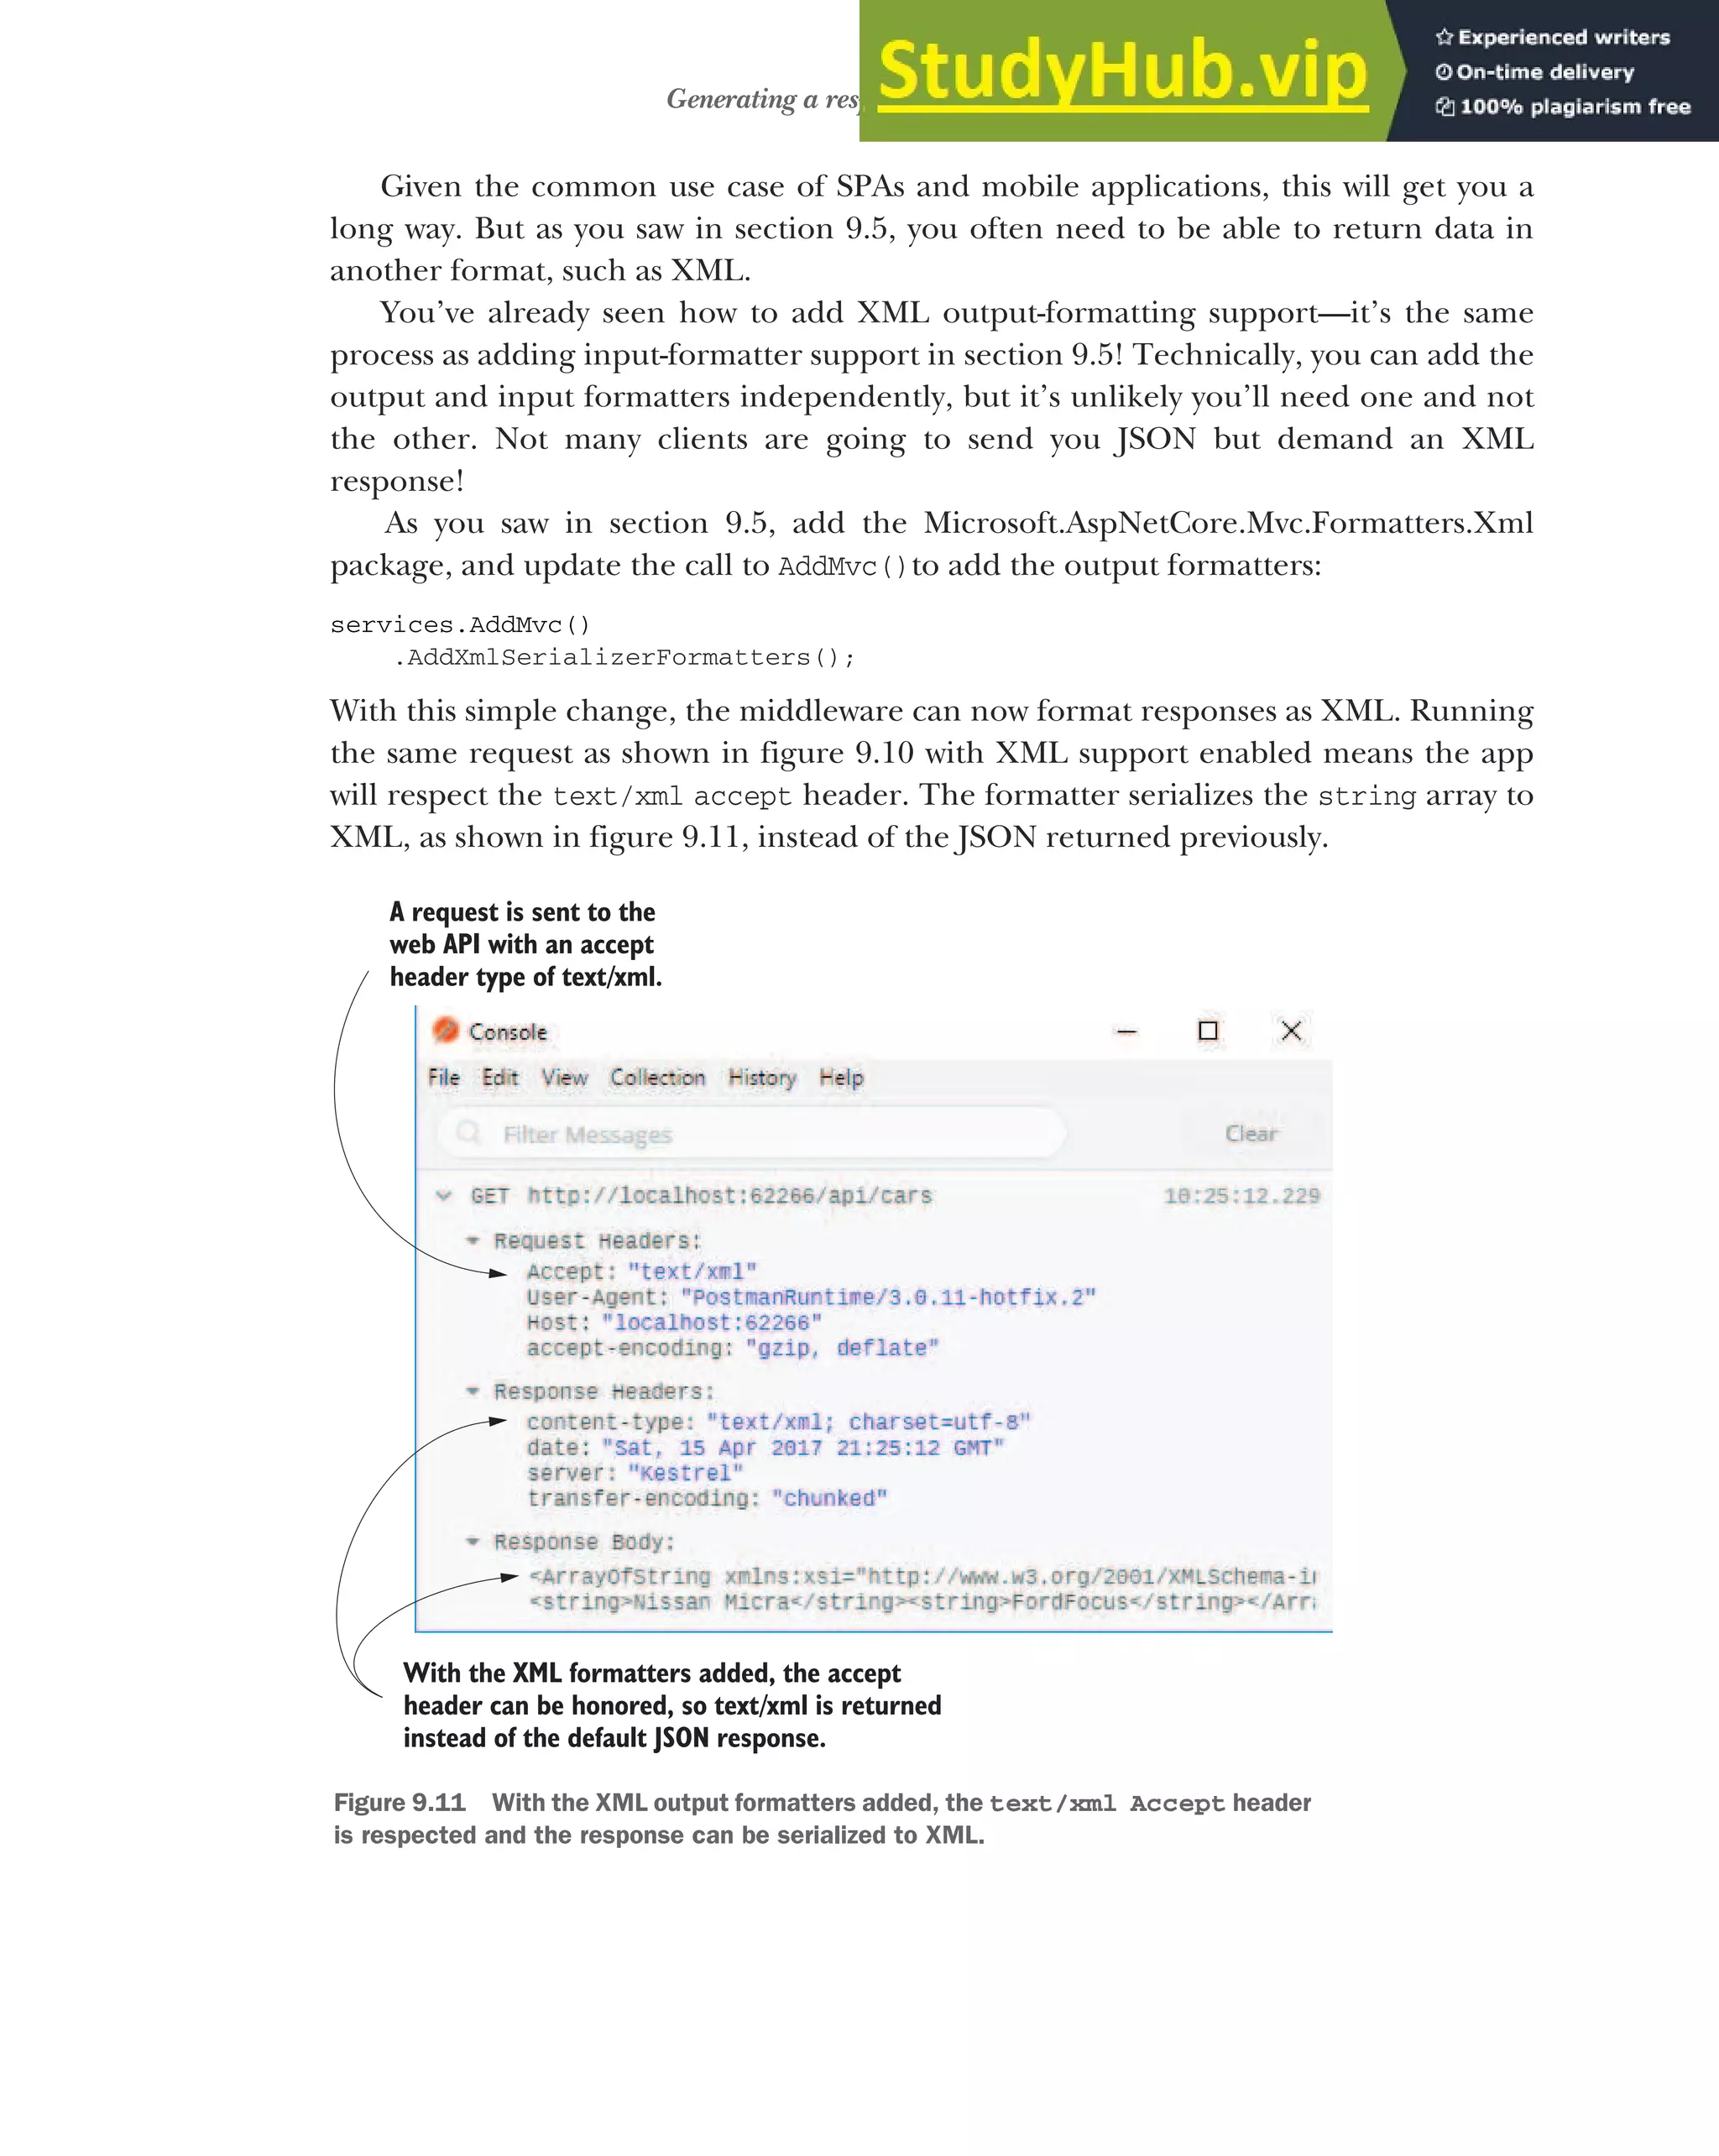
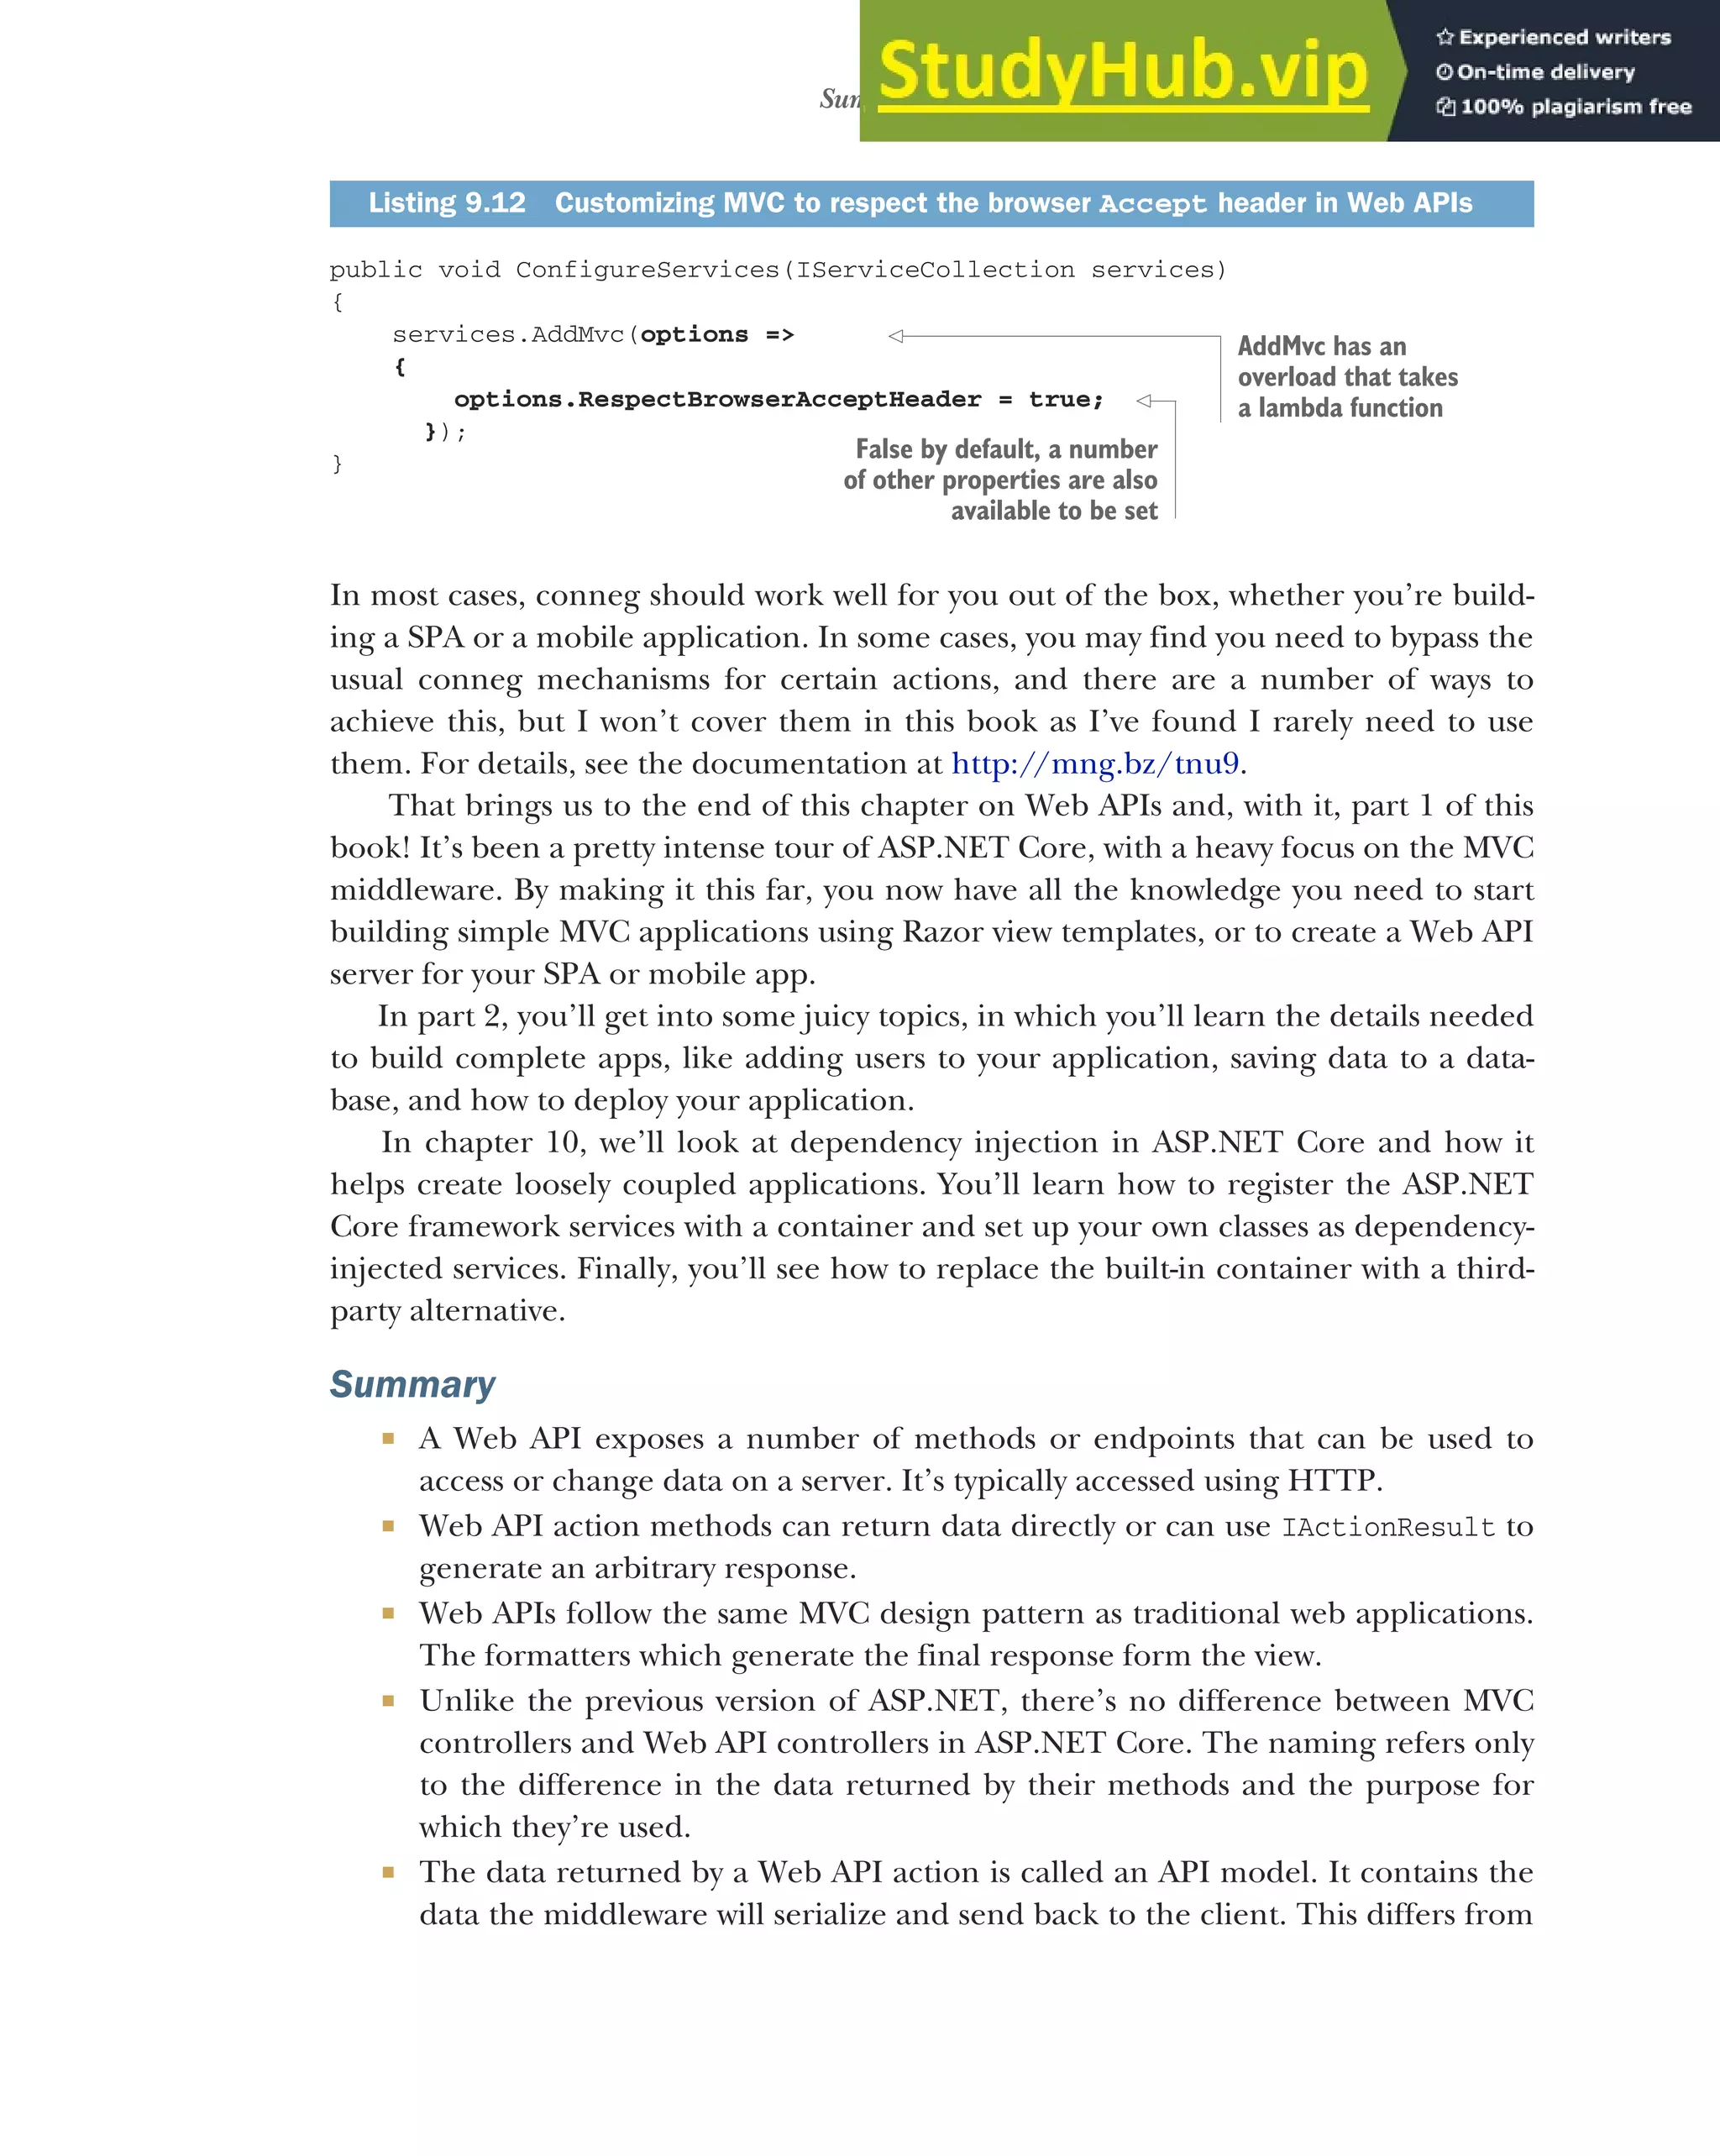
![264 CHAPTER 9 Creating a Web API for mobile and client applications using MVC
view models, as view models contain both data and metadata about how to gen-
erate the response.
Attribute routing is an alternative way of defining the routes in your application
by applying RouteAttributes to your action methods. Web API controllers
often use this approach, as it allows tighter control over the URL generated for
each action method.
The controller and action name have no bearing on the URLs or route tem-
plates when you use attribute routing.
Route attributes applied to a controller combine with attributes on action
methods to form the final template. These are also combined with attributes on
inherited base classes.
If an action or controller uses attribute routing, it can no longer be reached via
conventional routing.
Use the "[controller]" and "[action]" tokens in your route templates to
reduce repetition. They’ll be replaced with the current controller and action
name.
The [HttpPost] and [HttpGet] attributes allow choosing between actions
based on the request’s HTTP method when two actions correspond to the same
URL.
You can model bind requests sent in the XML format using the Microsoft
.AspNetCore.Mvc.Formatters.Xml package. Add the XML formatters by calling
services.AddMvc().AddXmlSerializerFormatters() in your Startup class.
This will also enable XML responses.
By default, ASP.NET Core will format the API model returned from a Web API
controller as JSON.
If you return more than one type of result from an action method, the method
signature must return IActionResult.
In contrast to the previous version of ASP.NET, JSON data is serialized using
camelCase rather than PascalCase.
Content negotiation occurs when the client specifies the type of data it can han-
dle and the server chooses a return format based on this.
By default, ASP.NET Core can return text/plain, text/html, and application/
json, but you can add additional formatters.
Content negotiation isn’t used when the accept header contains */*, such as in
most browsers. You can disable this option by modifying the RespectBrowser-
AcceptHeader option when adding MVC services in Startup.cs.](https://image.slidesharecdn.com/asp-230807173723-31e70040/75/ASP-NET-Core-in-Action-2018-pdf-292-2048.jpg)


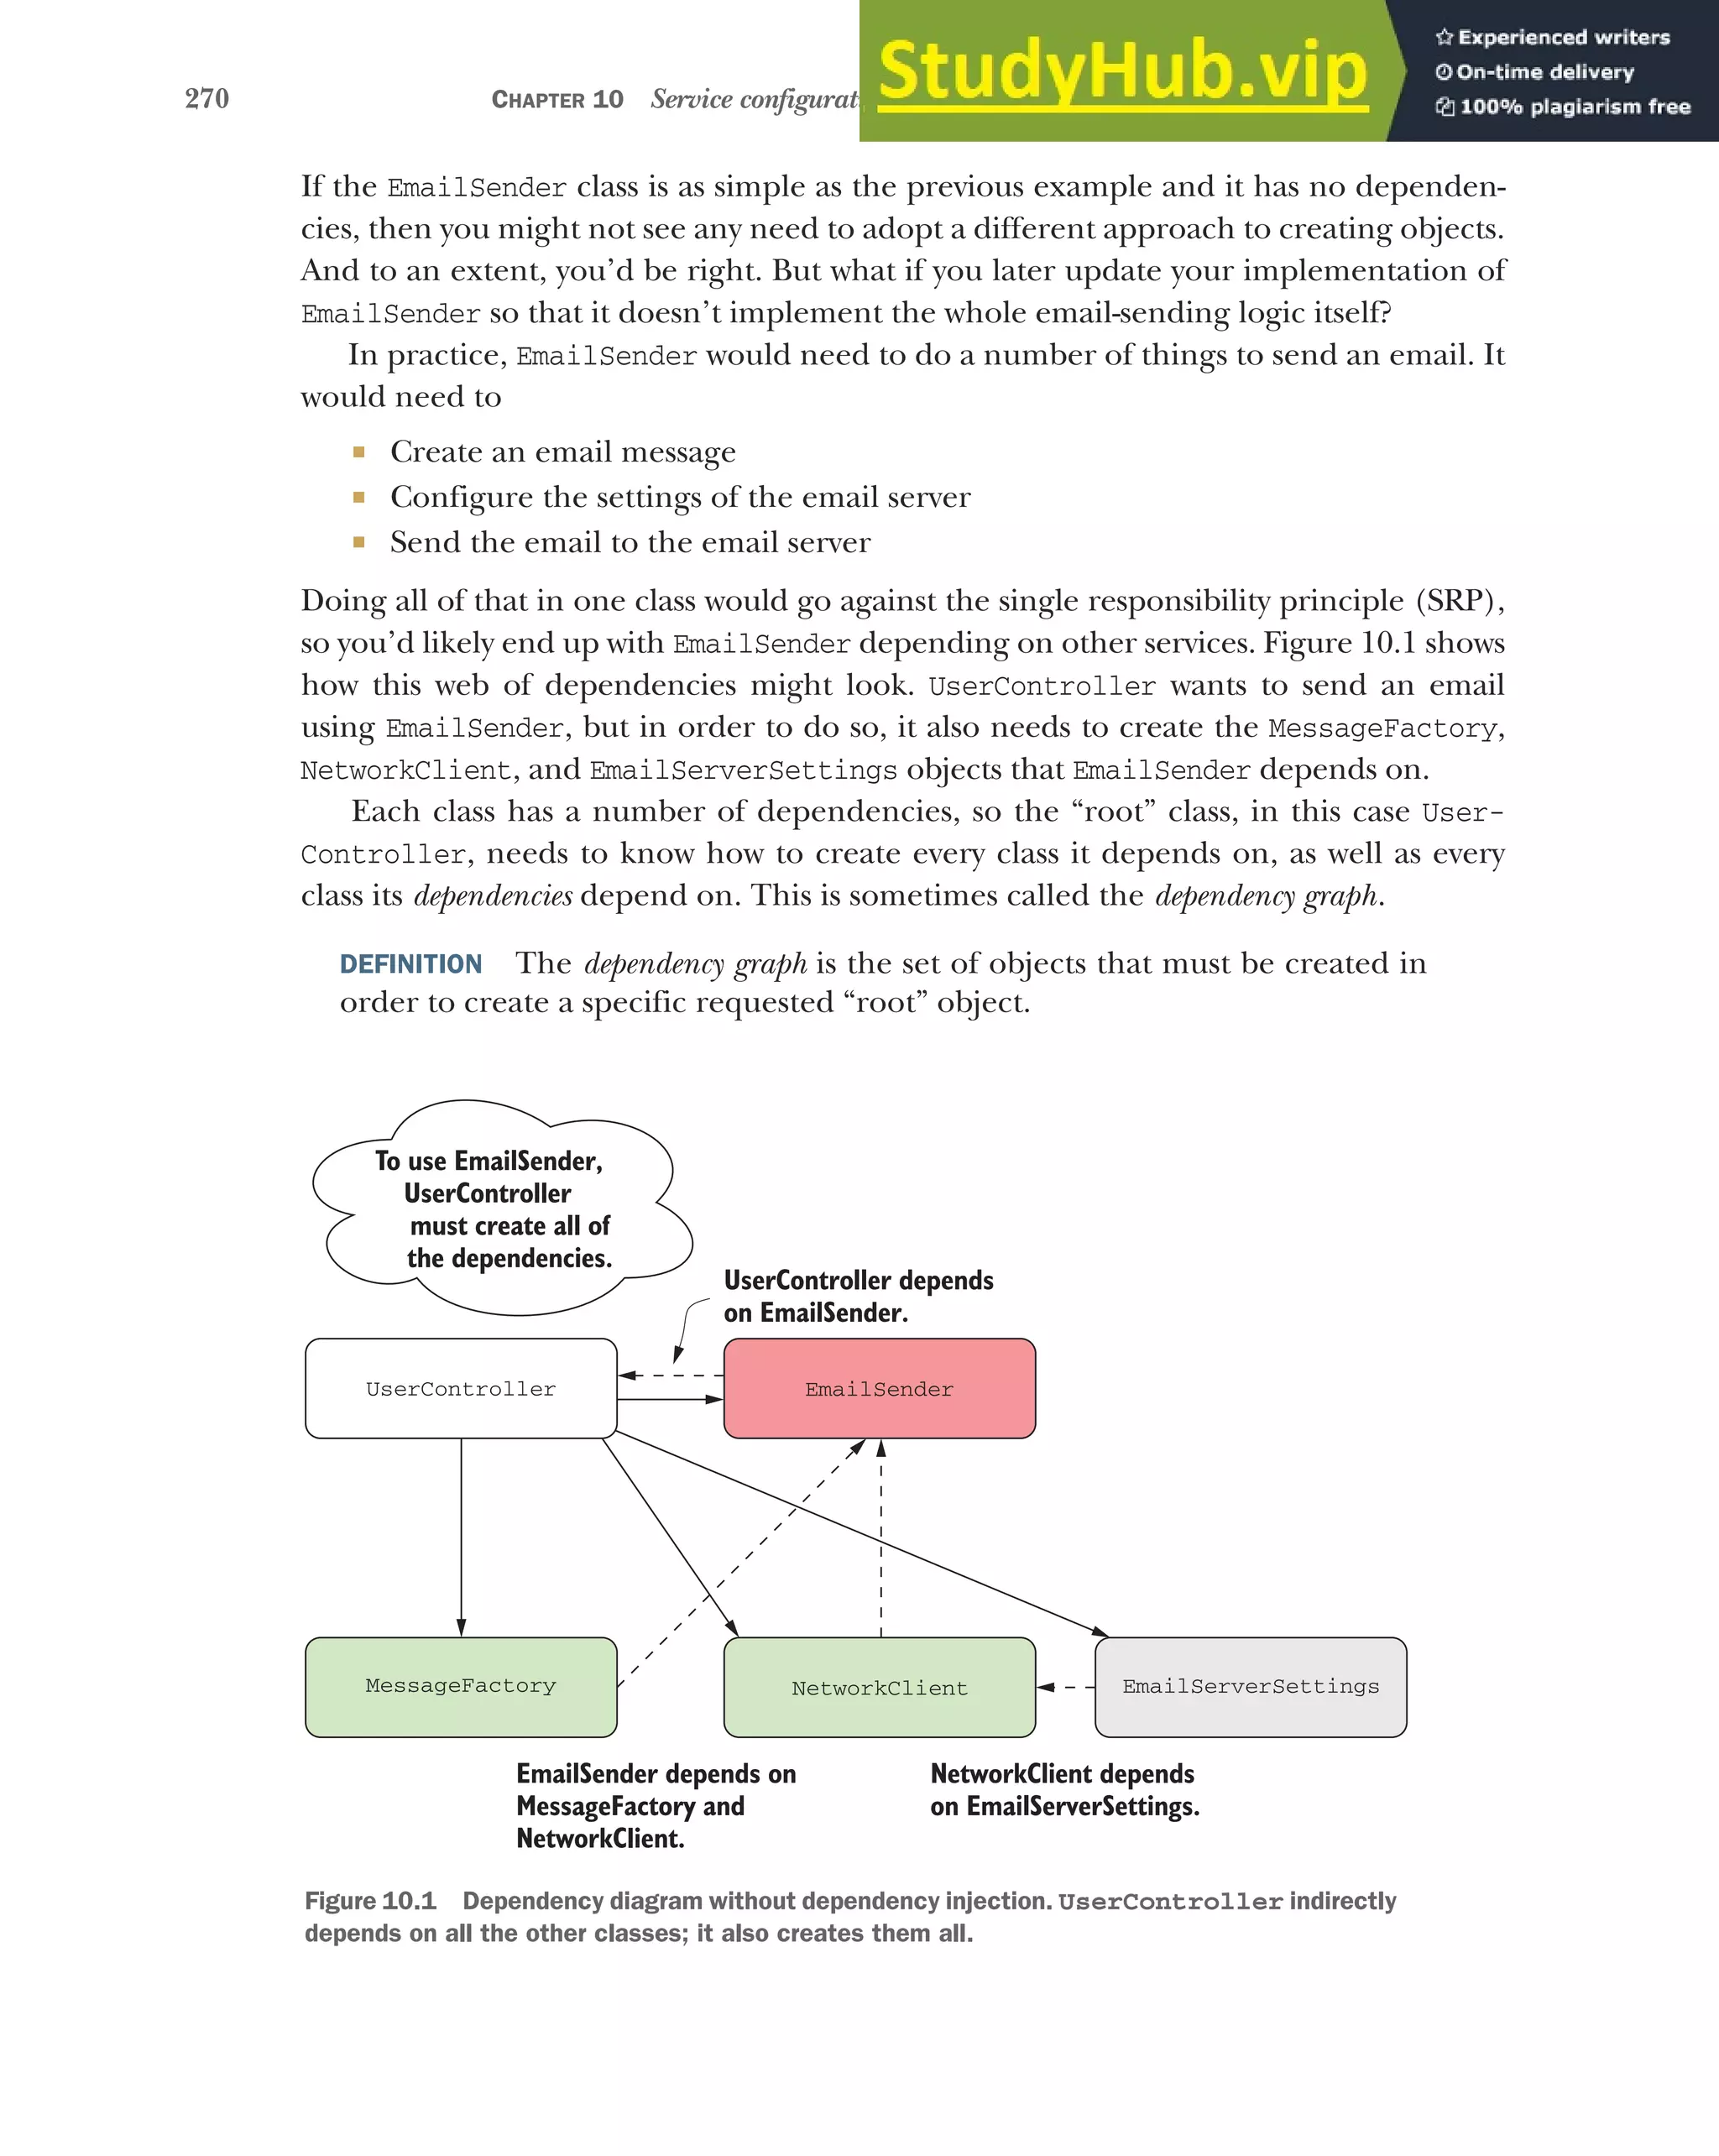
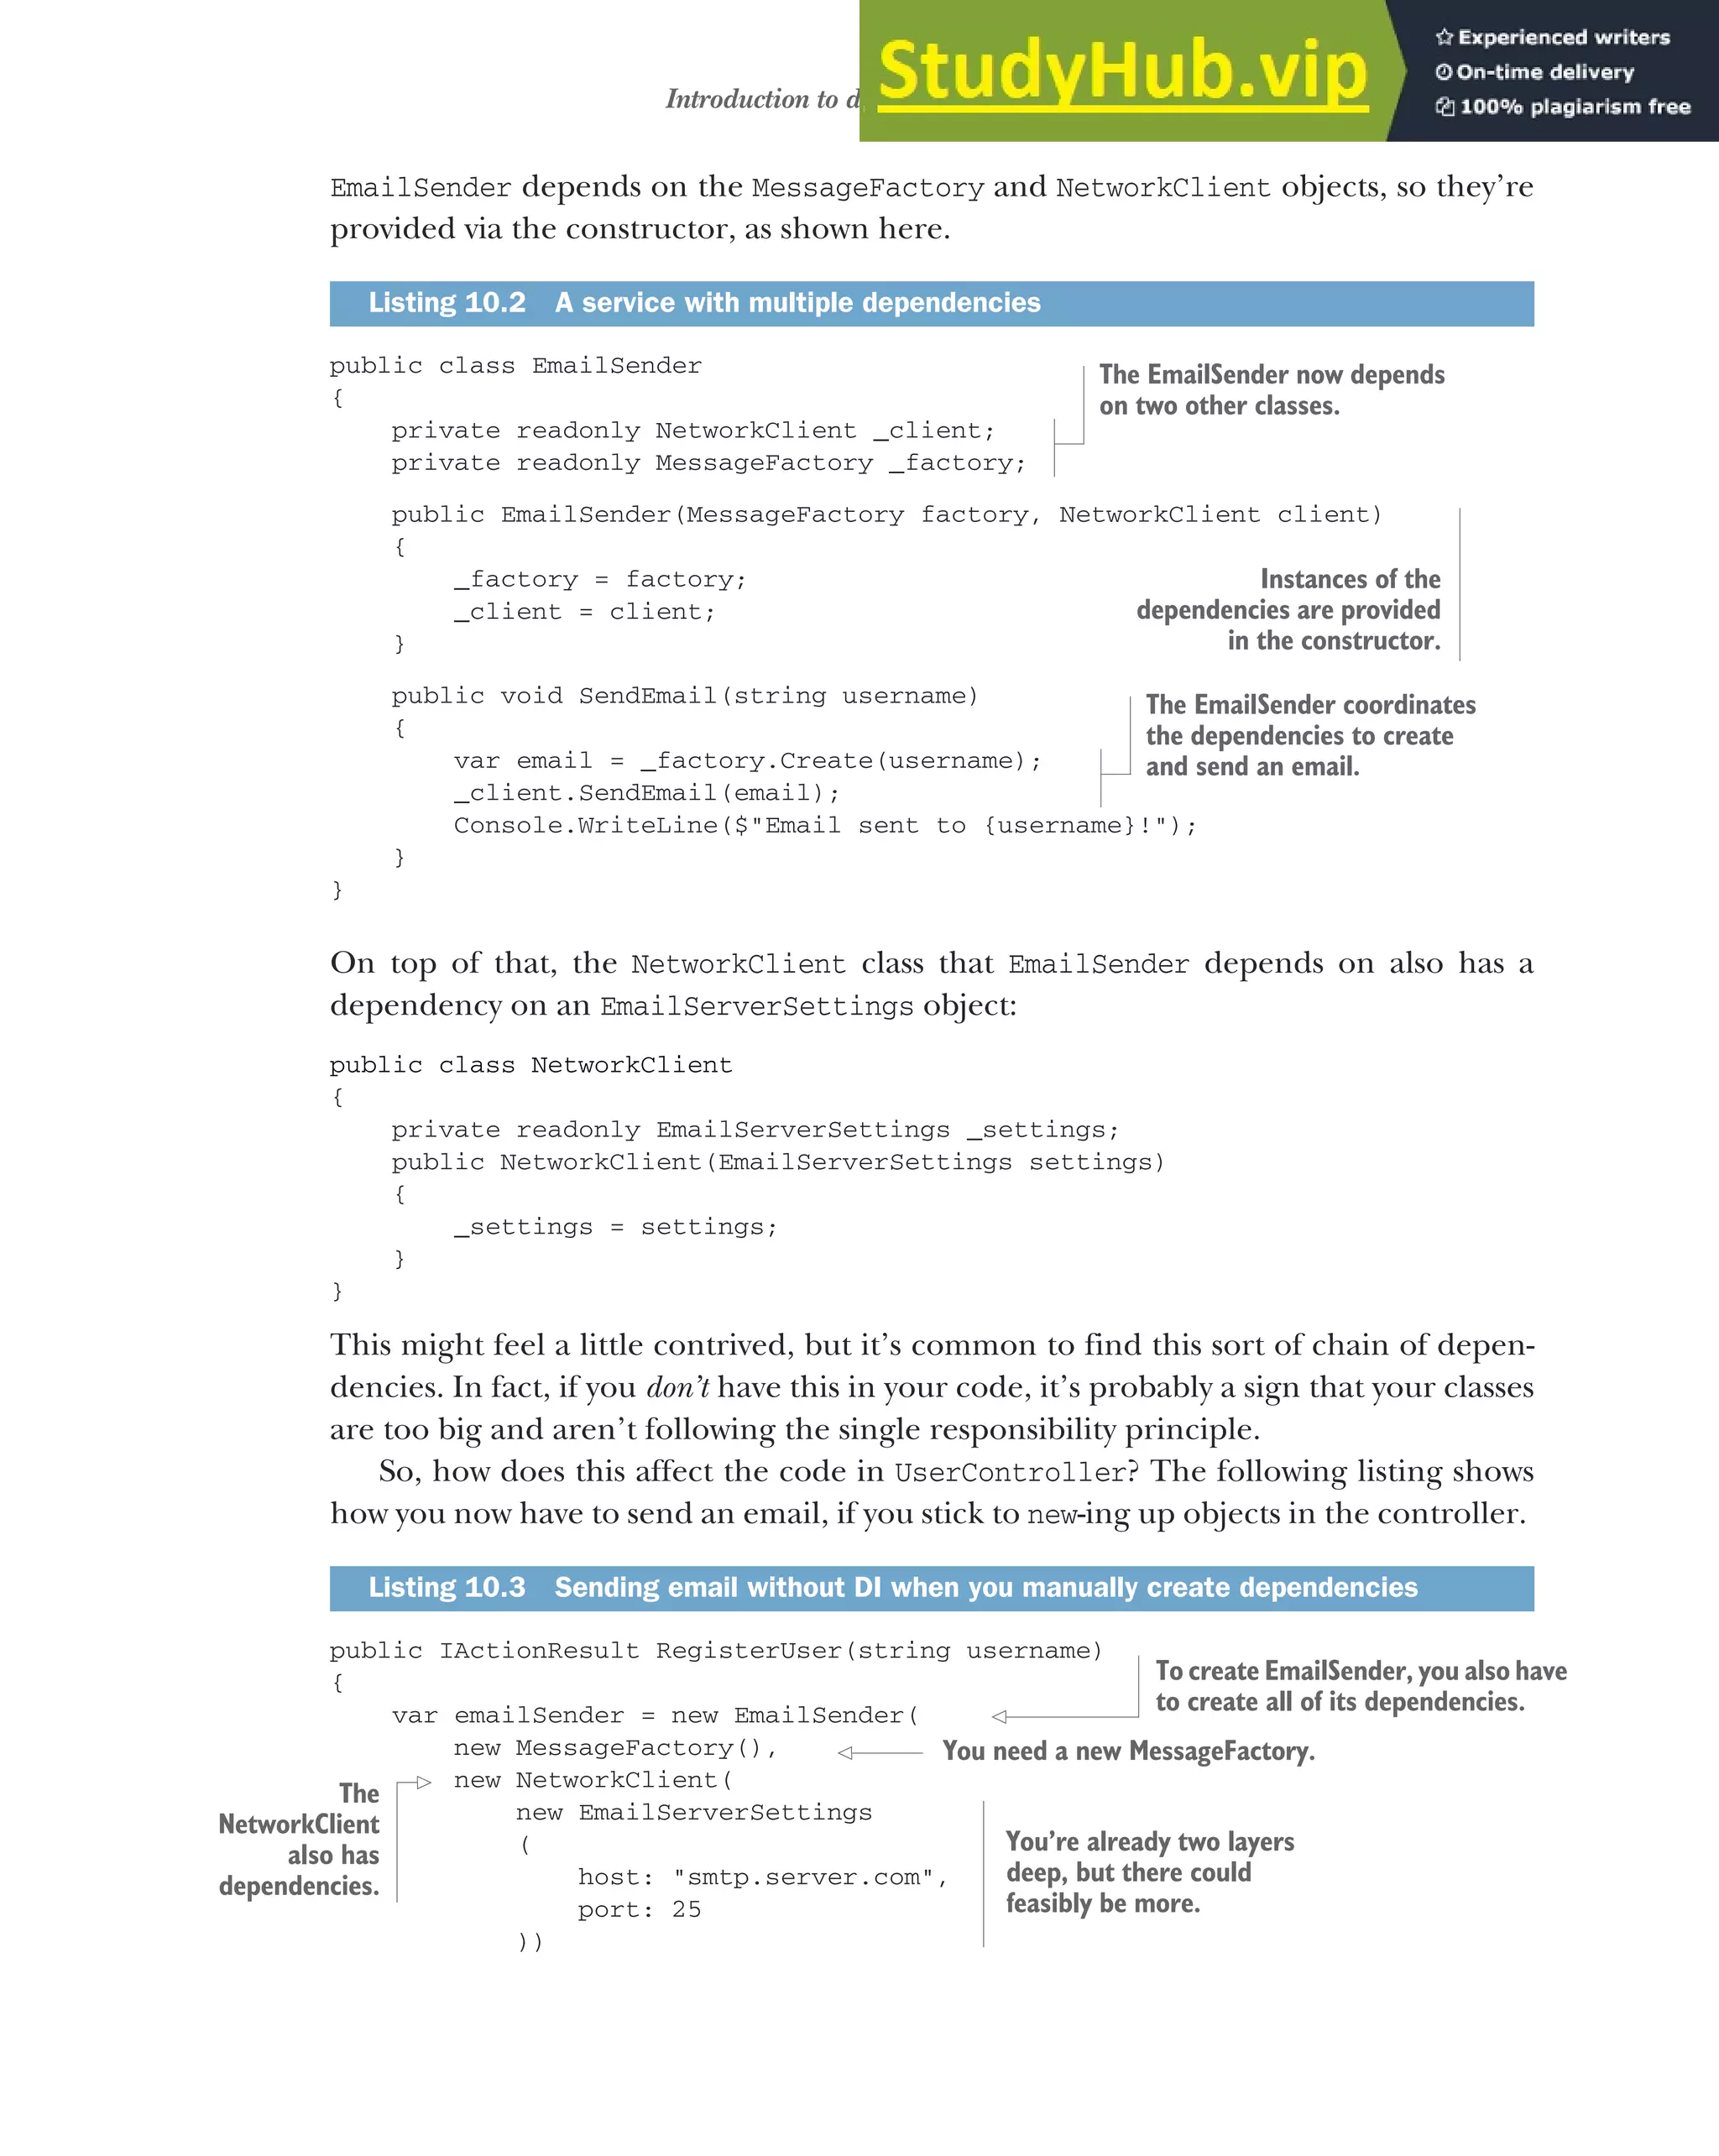


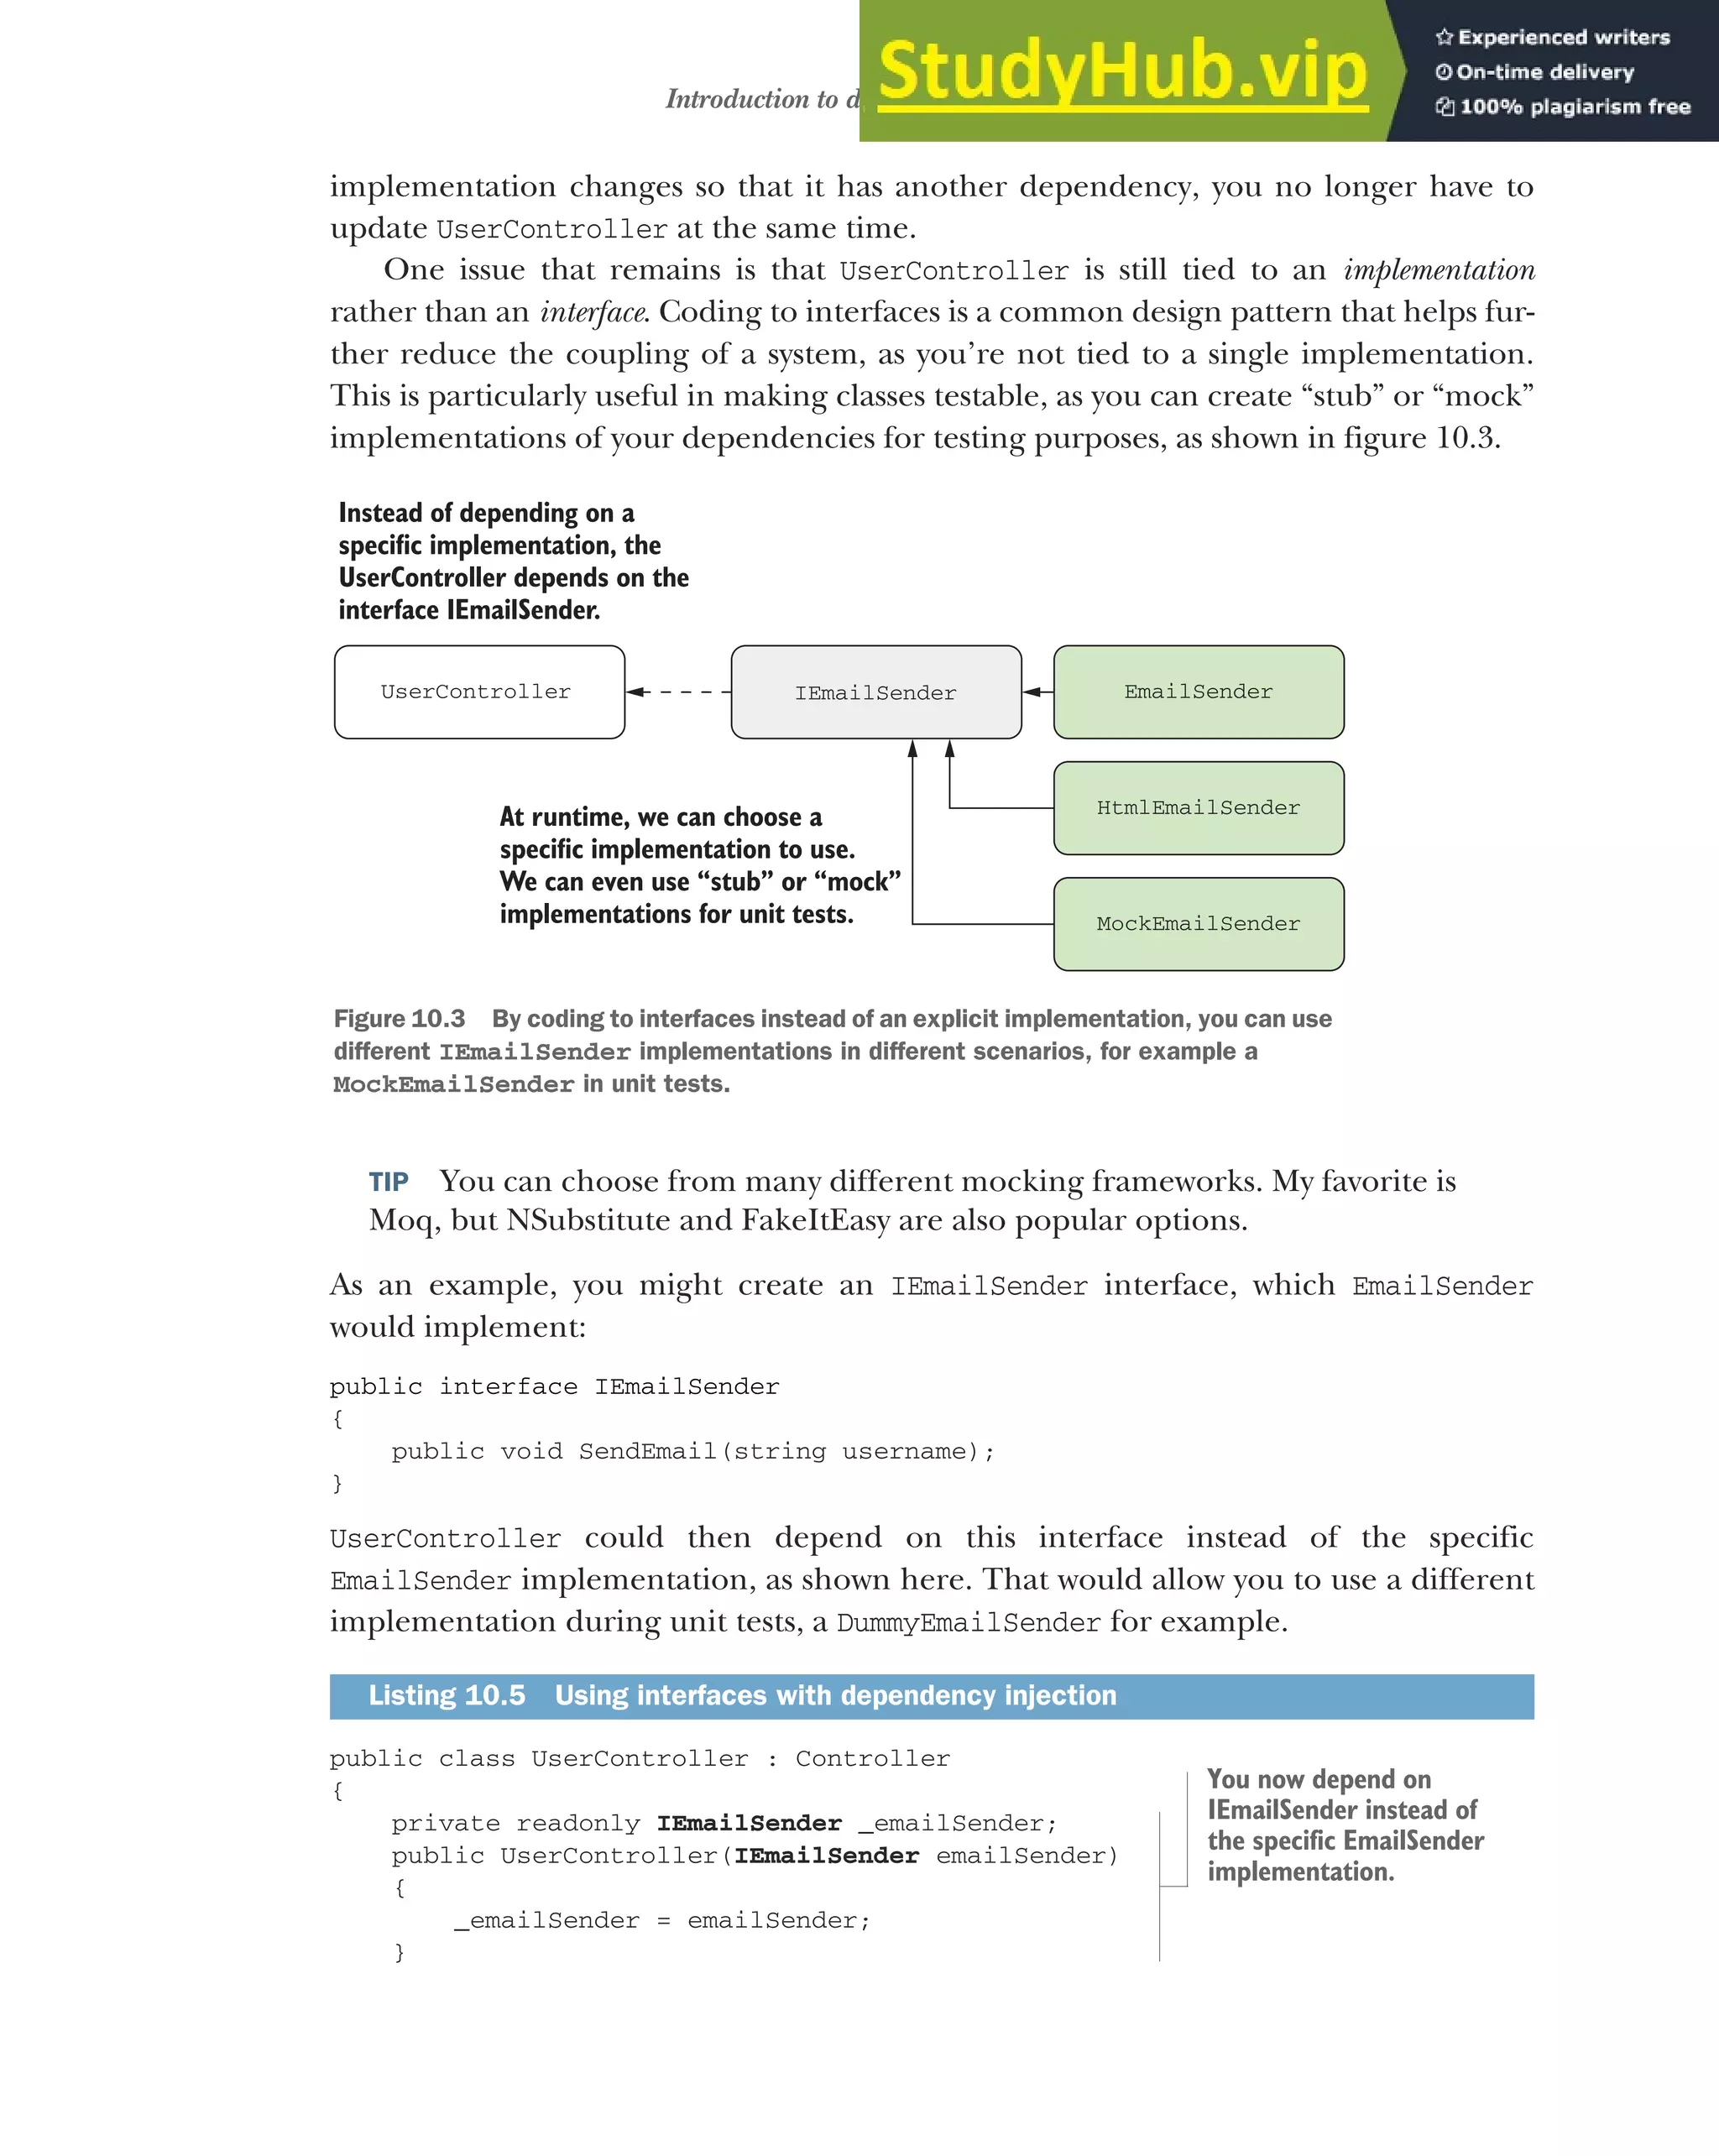
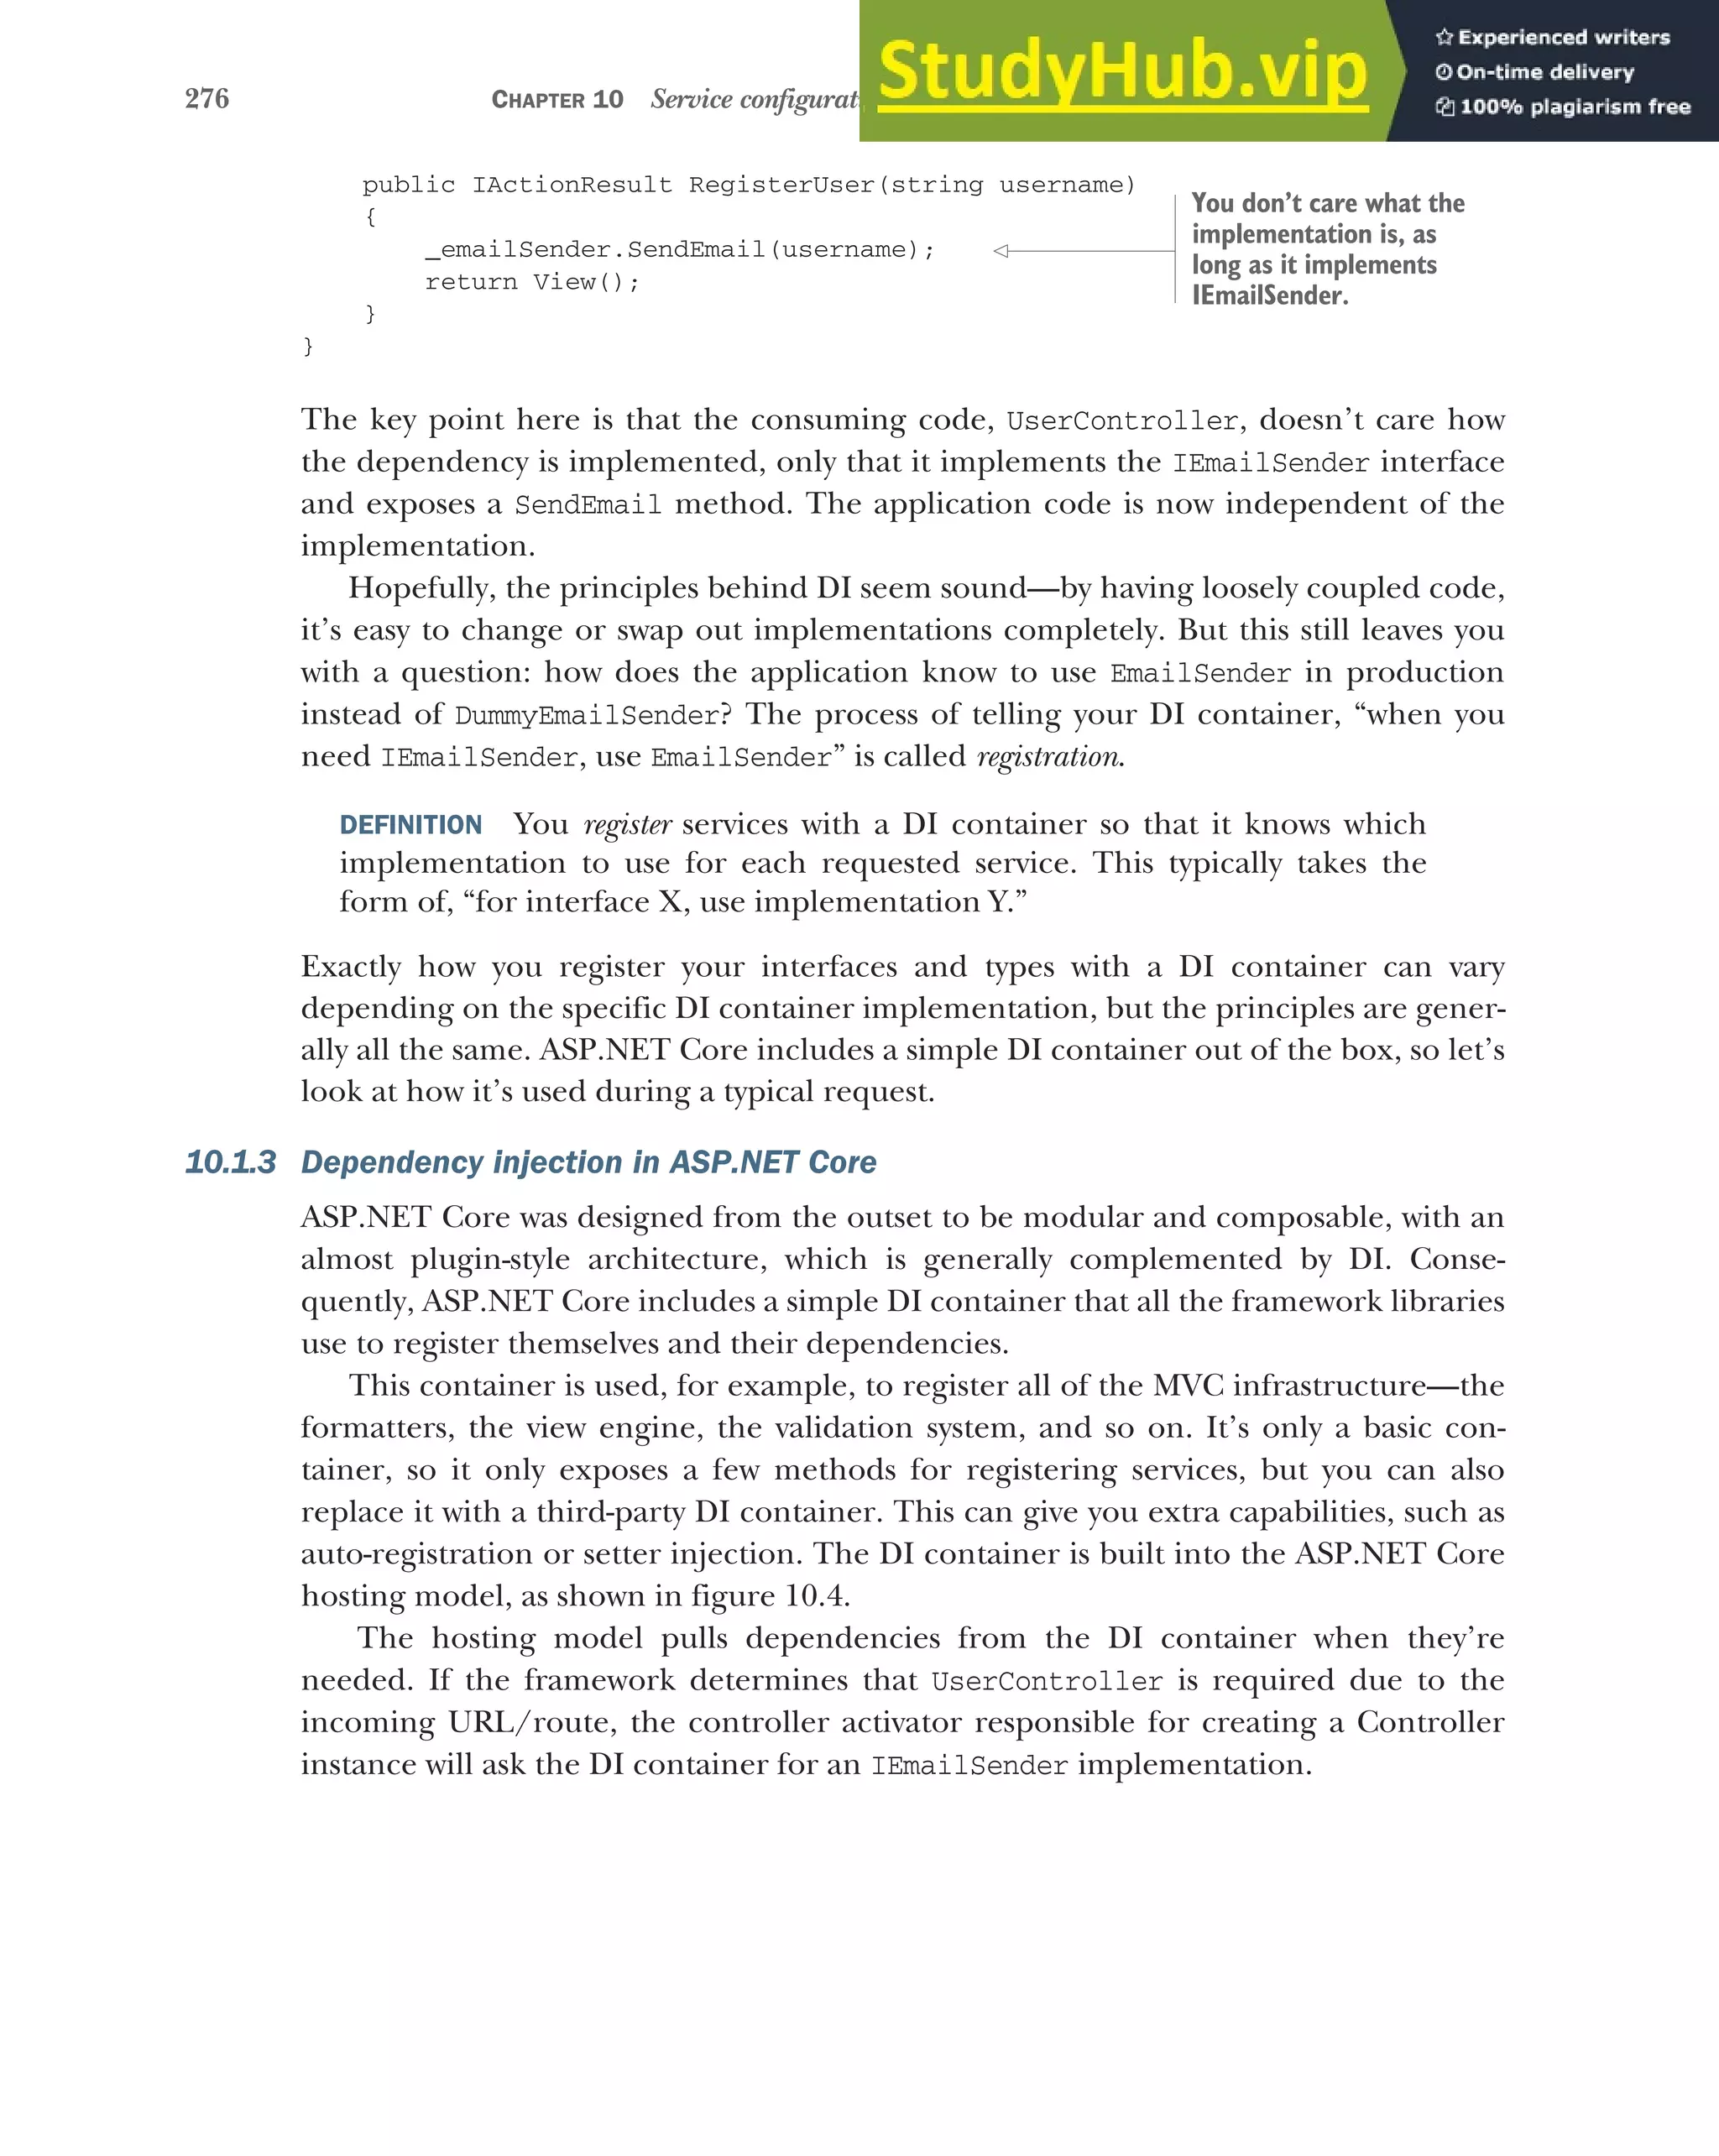
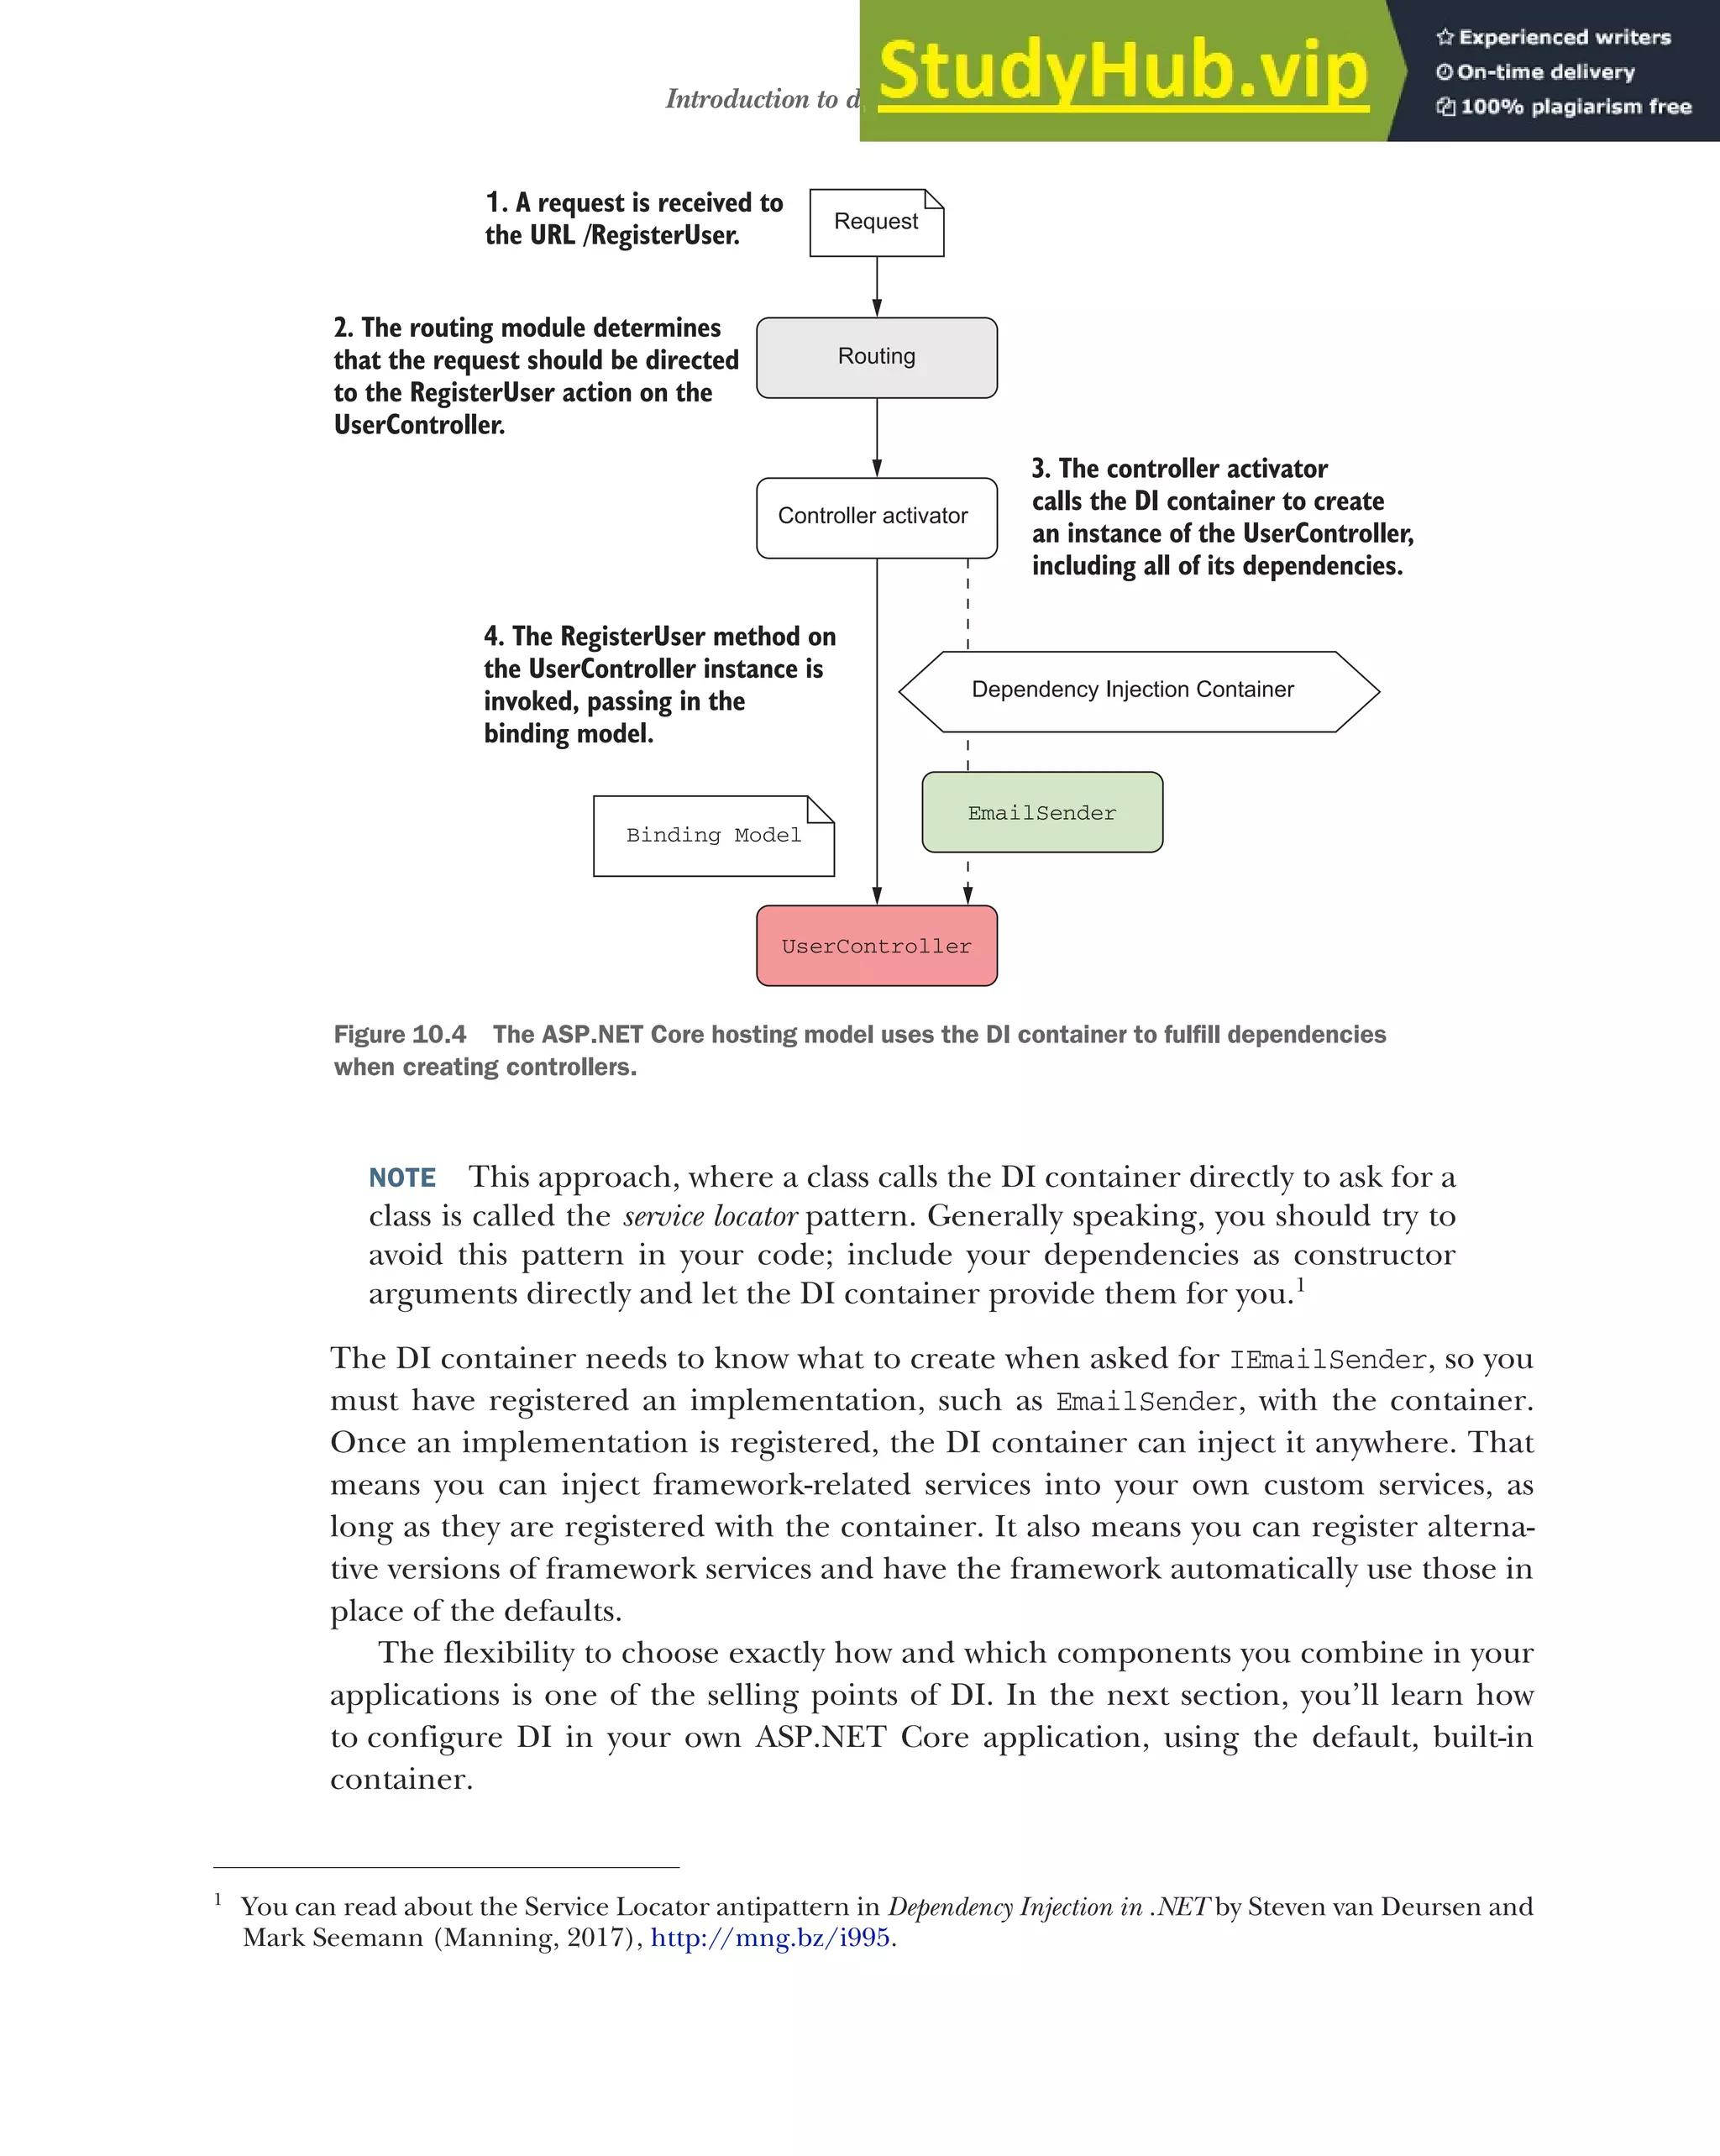
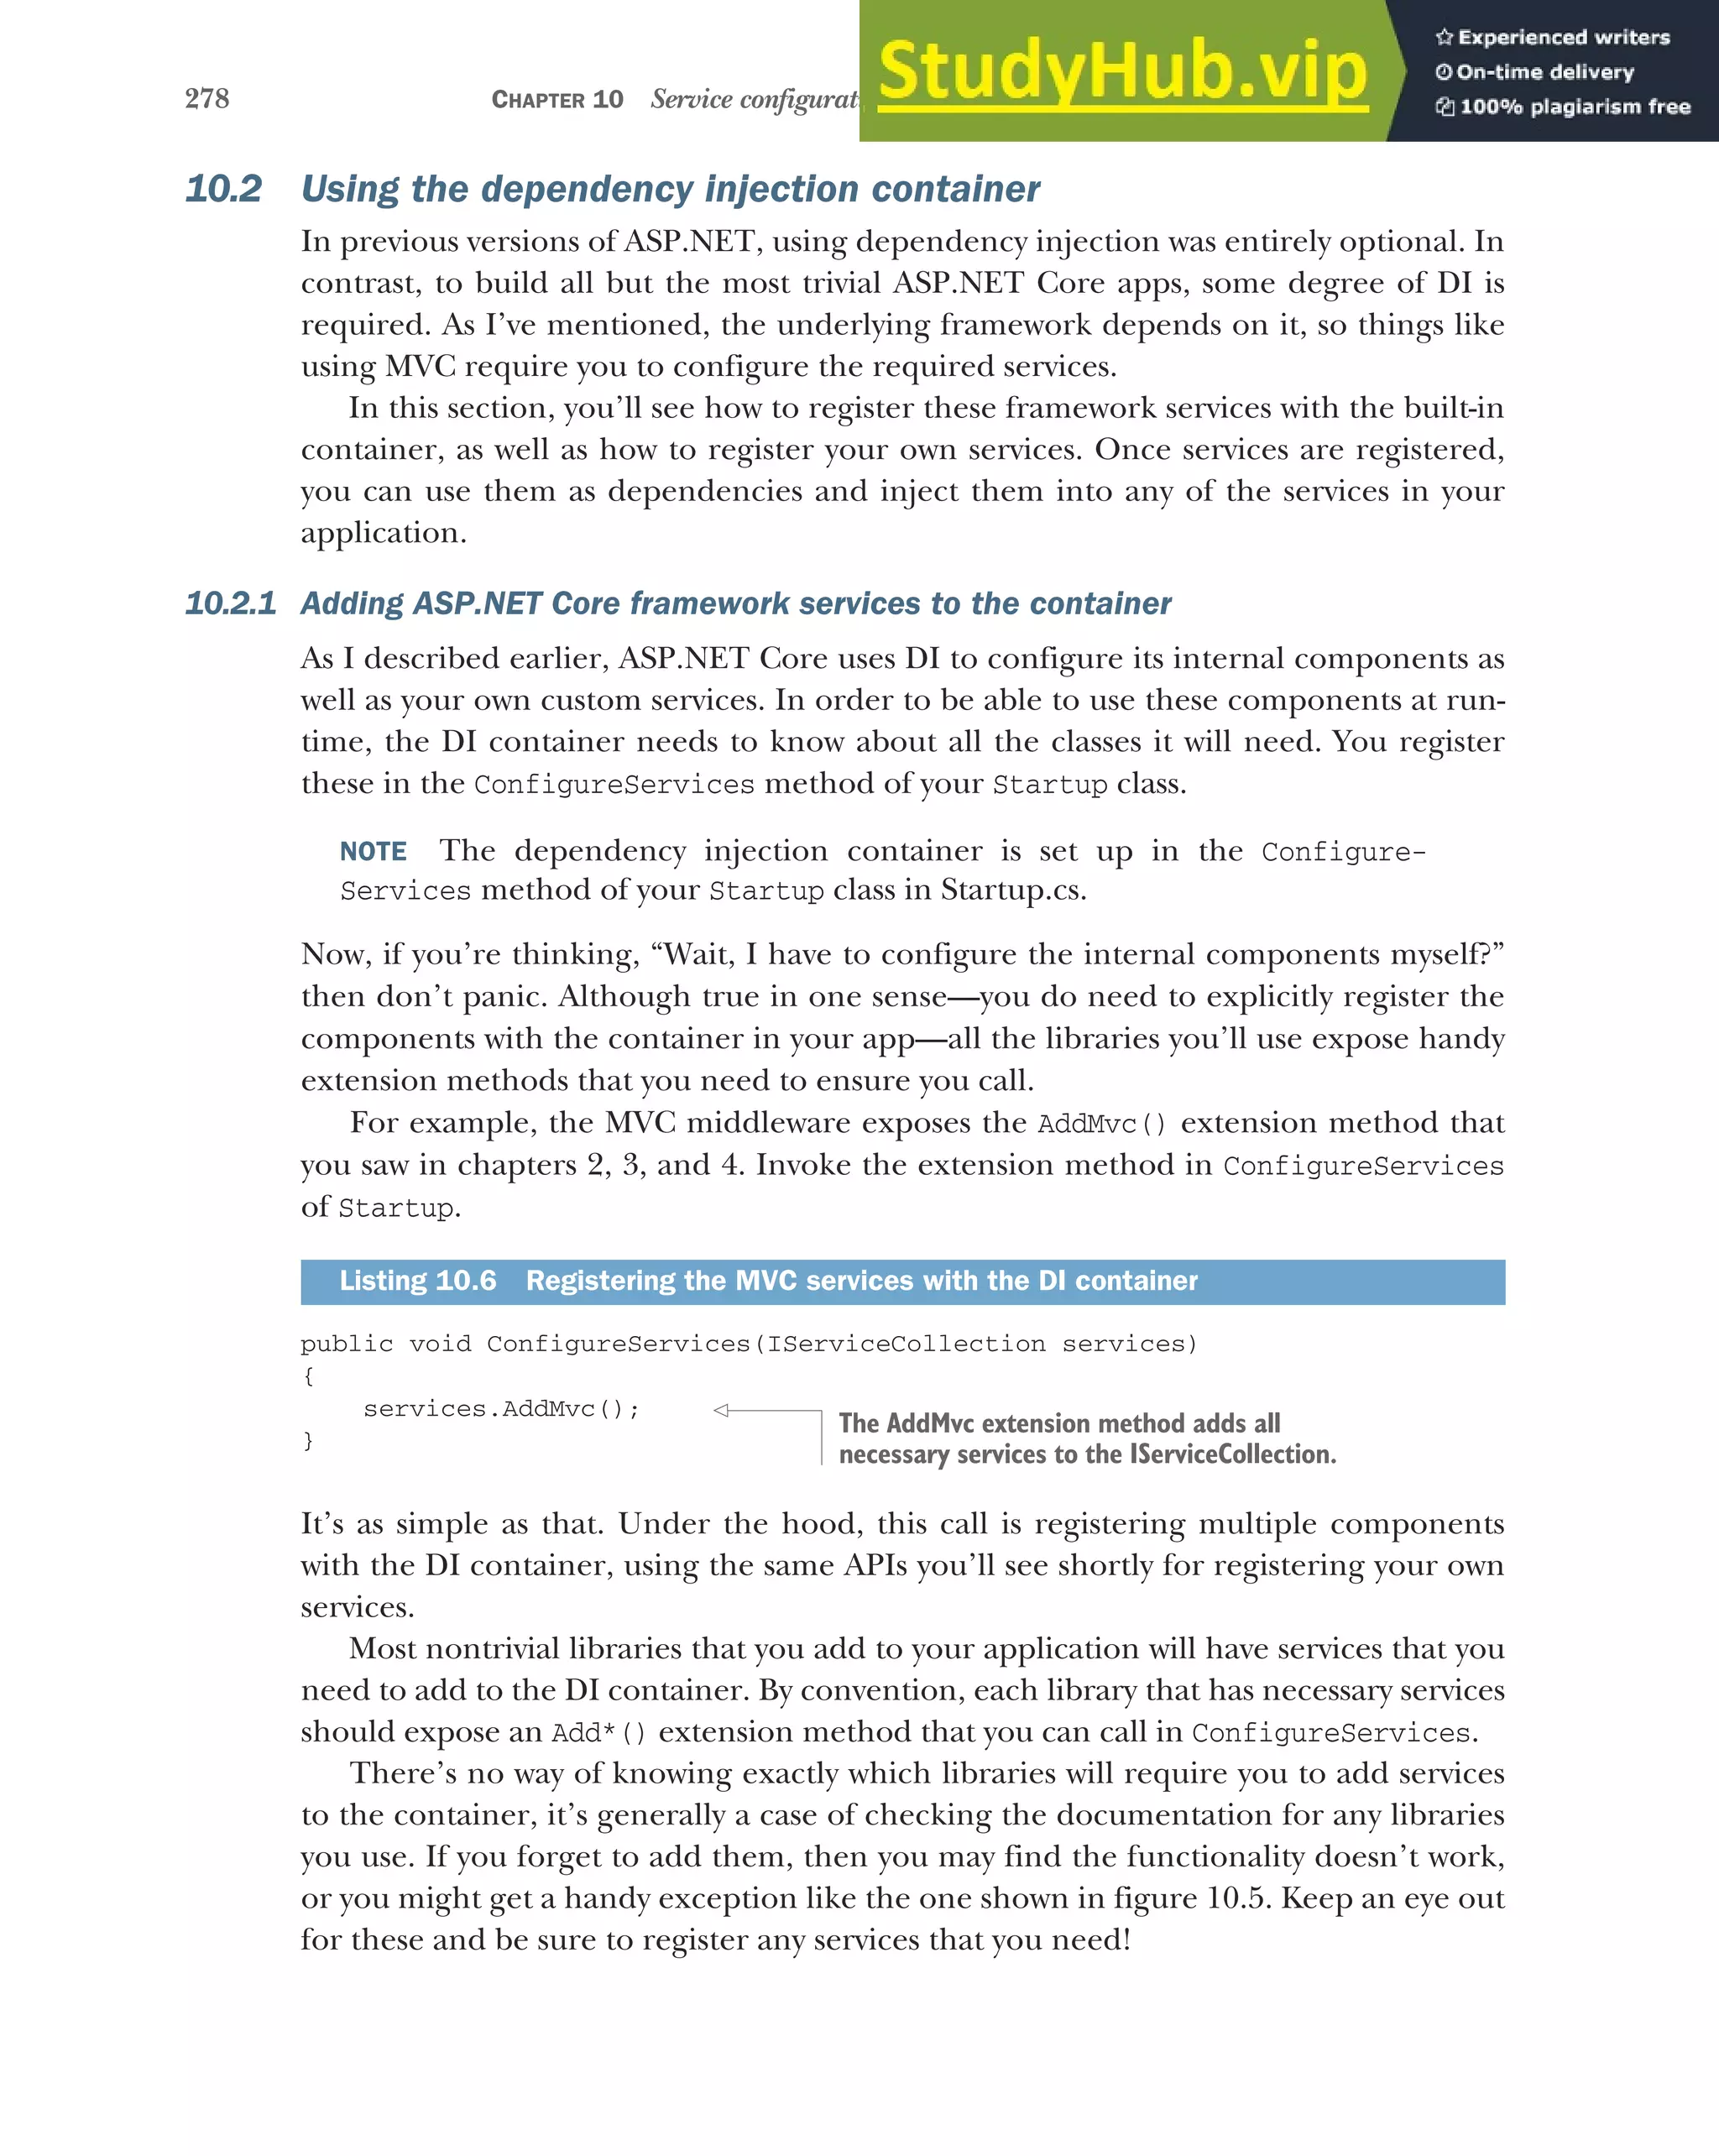
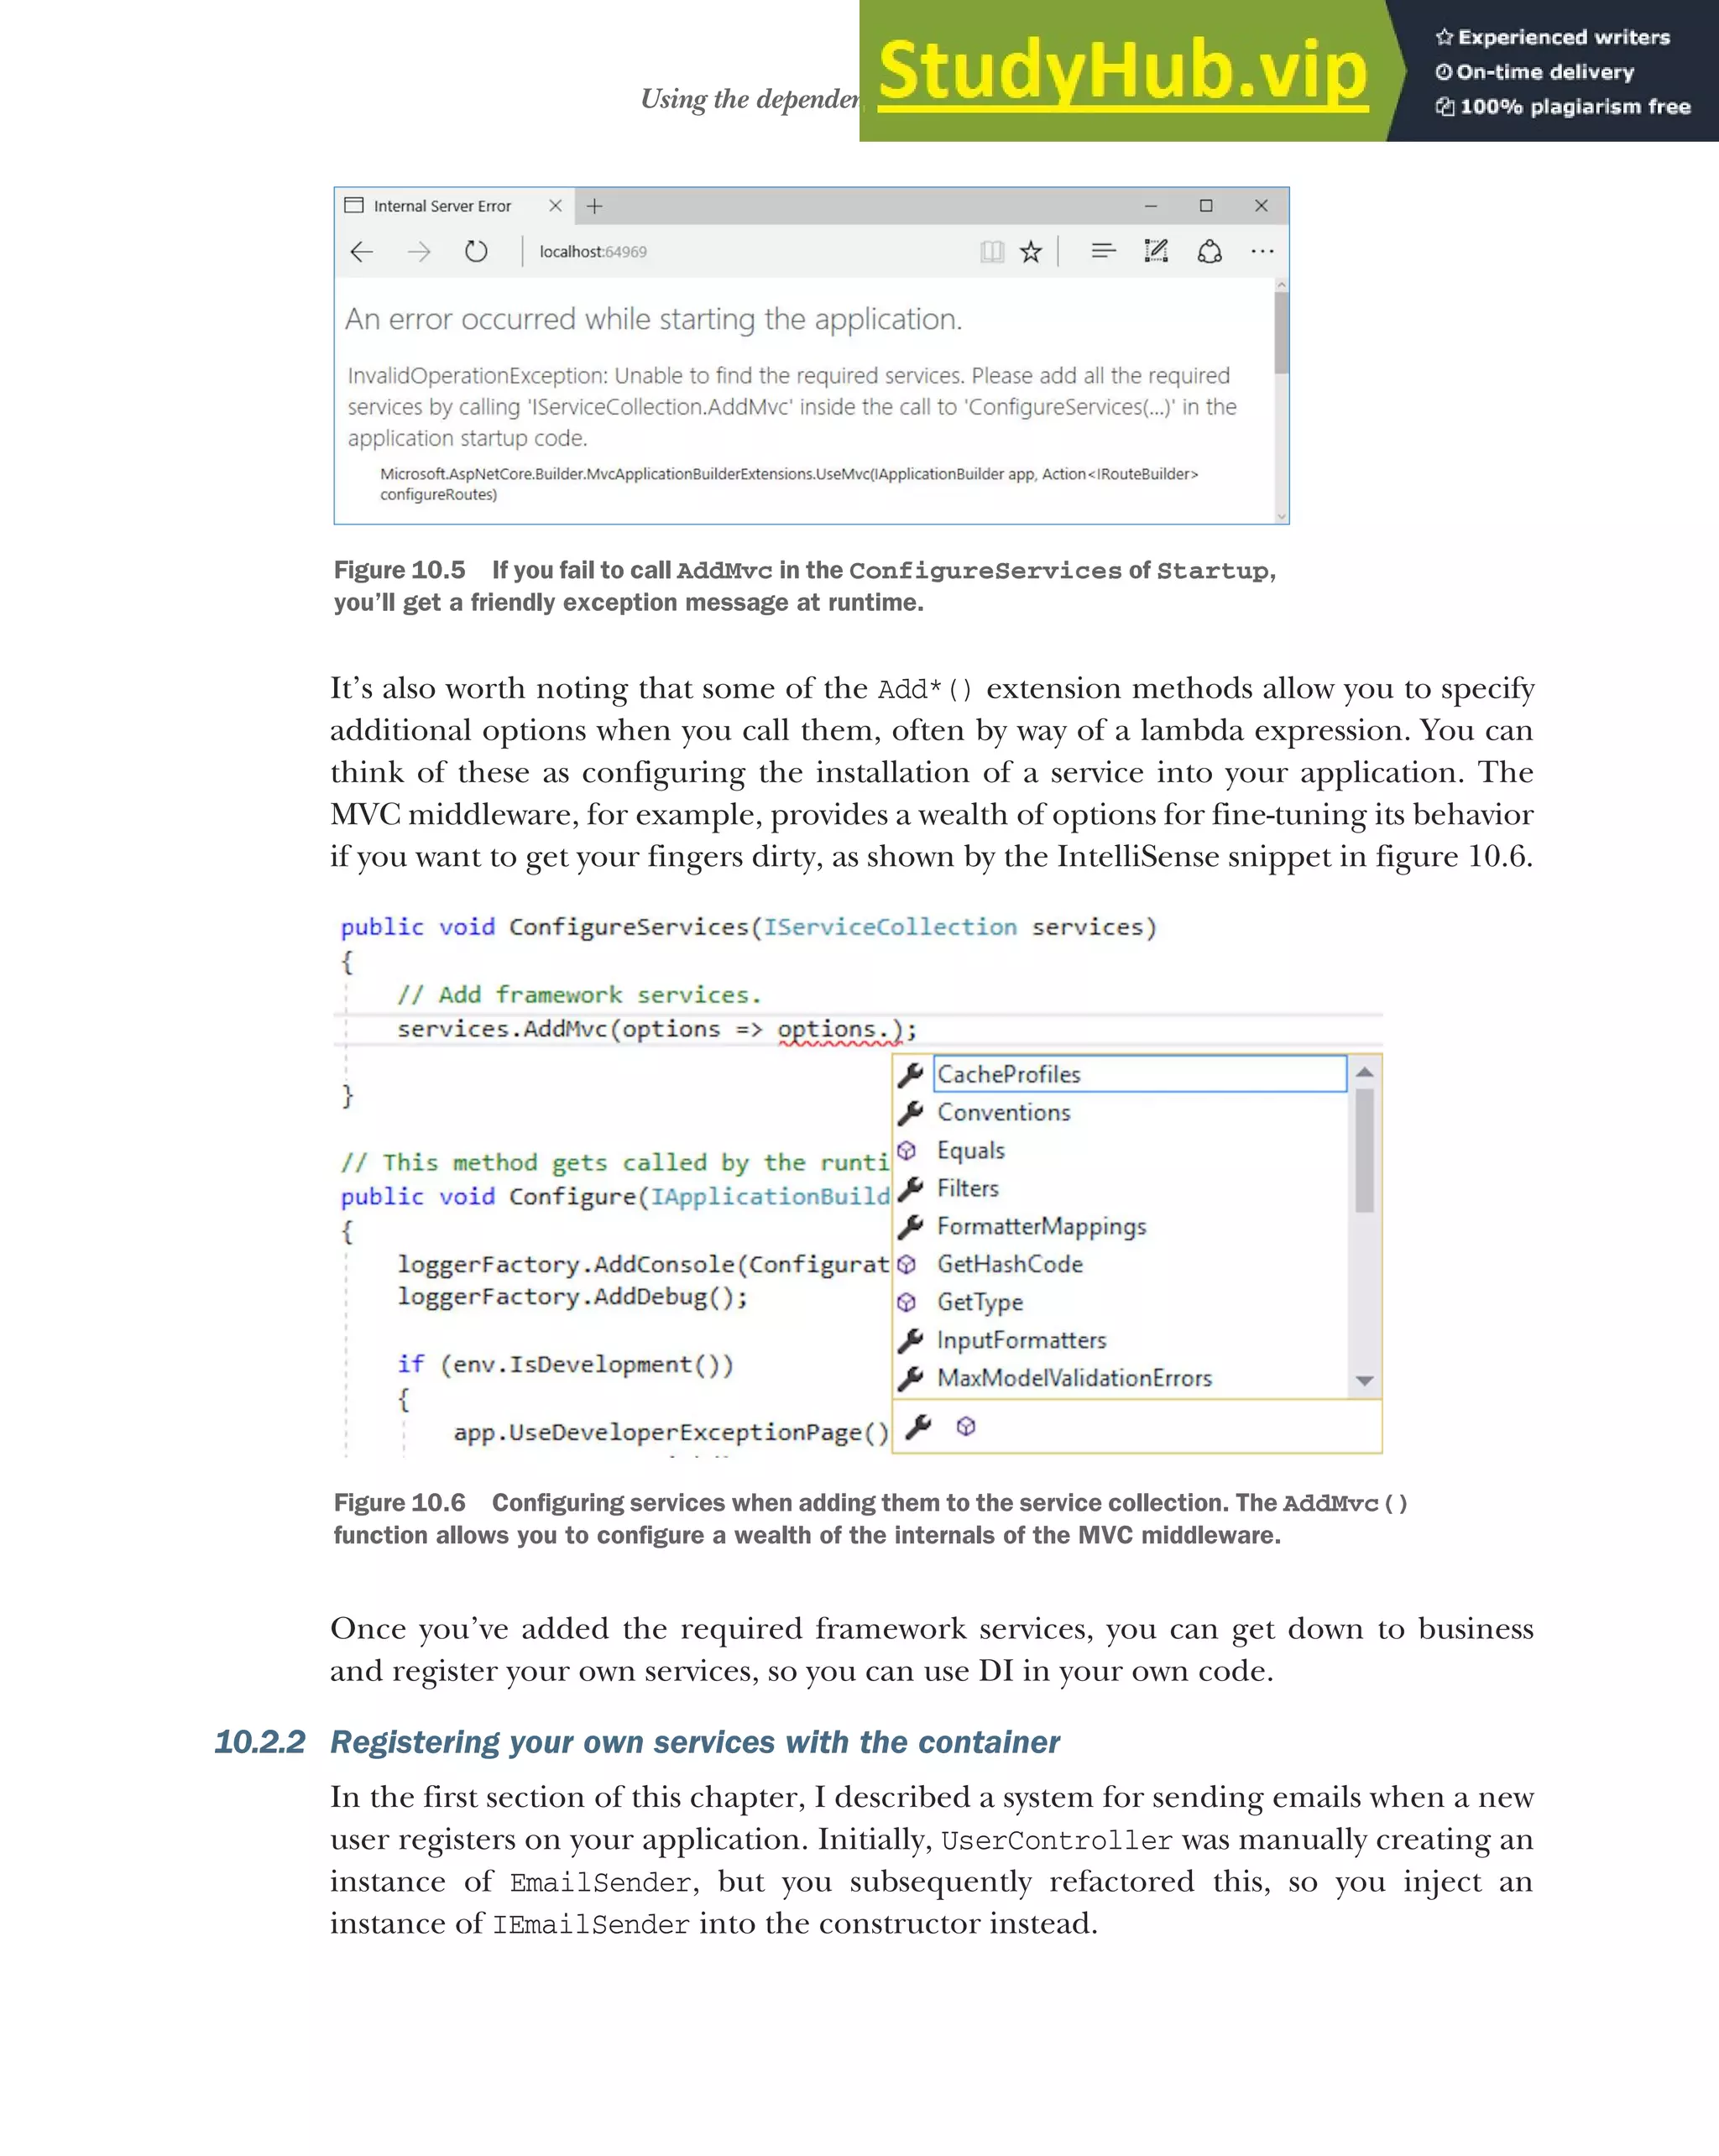
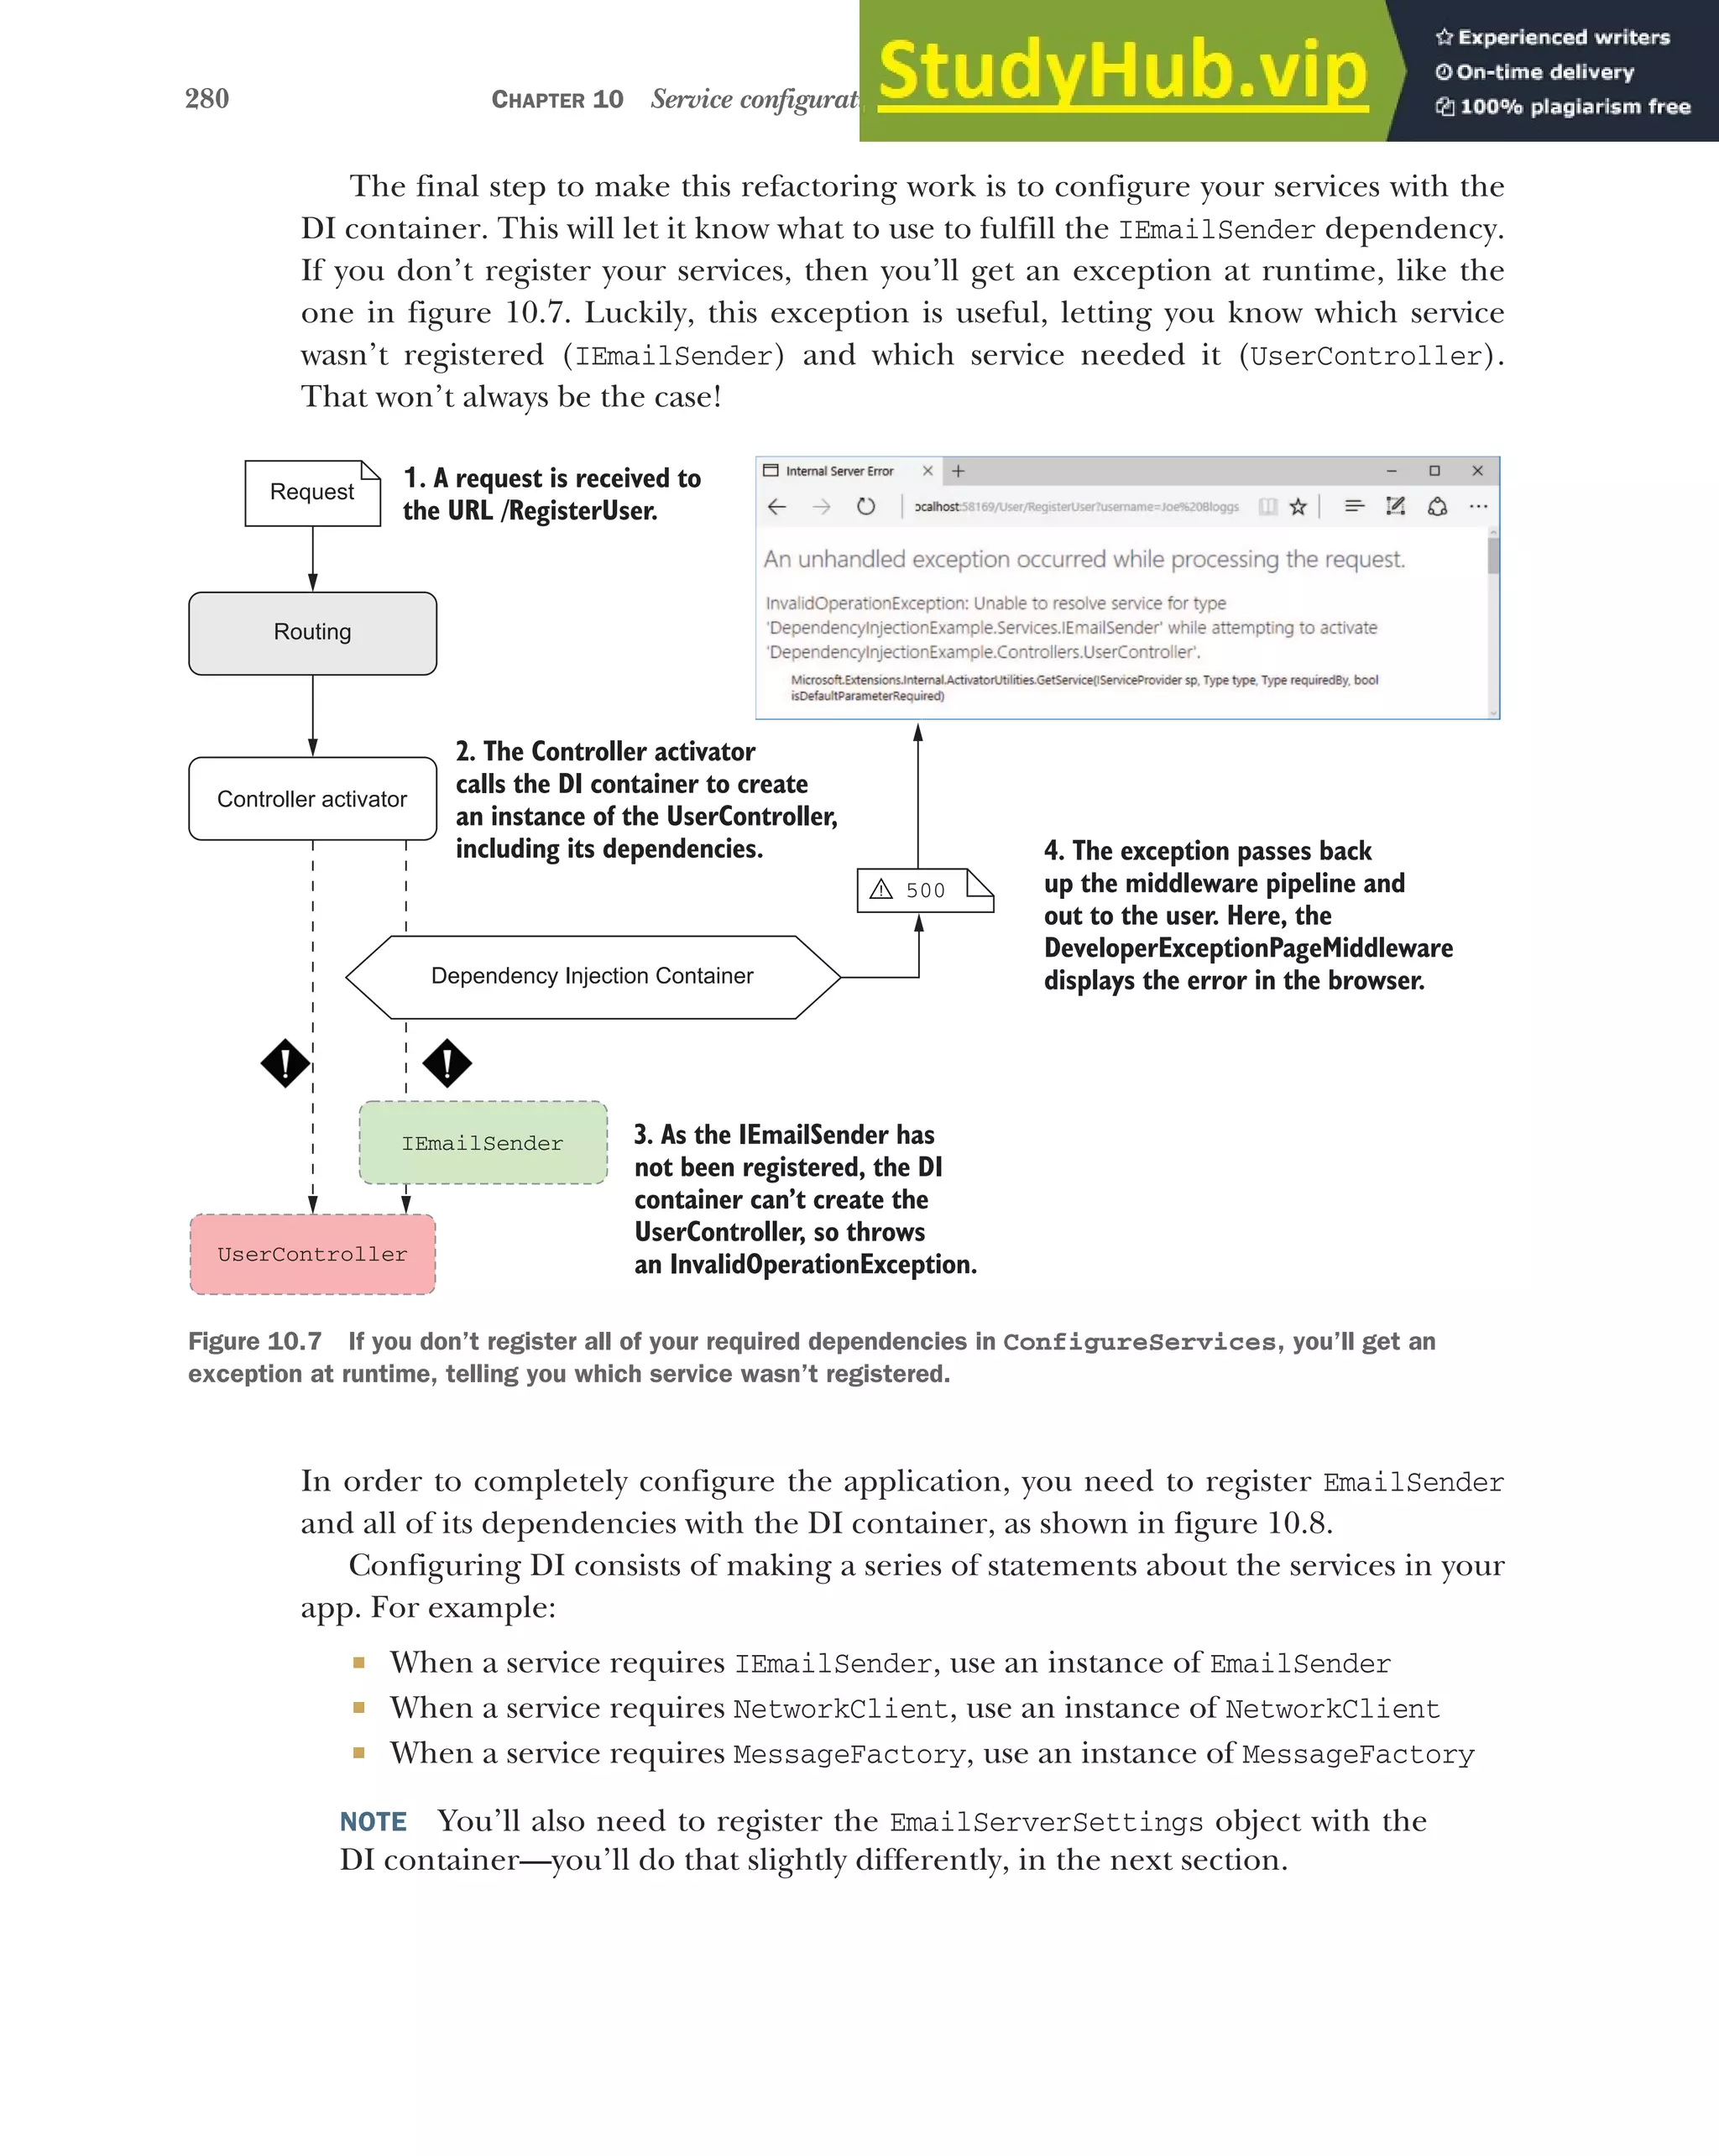
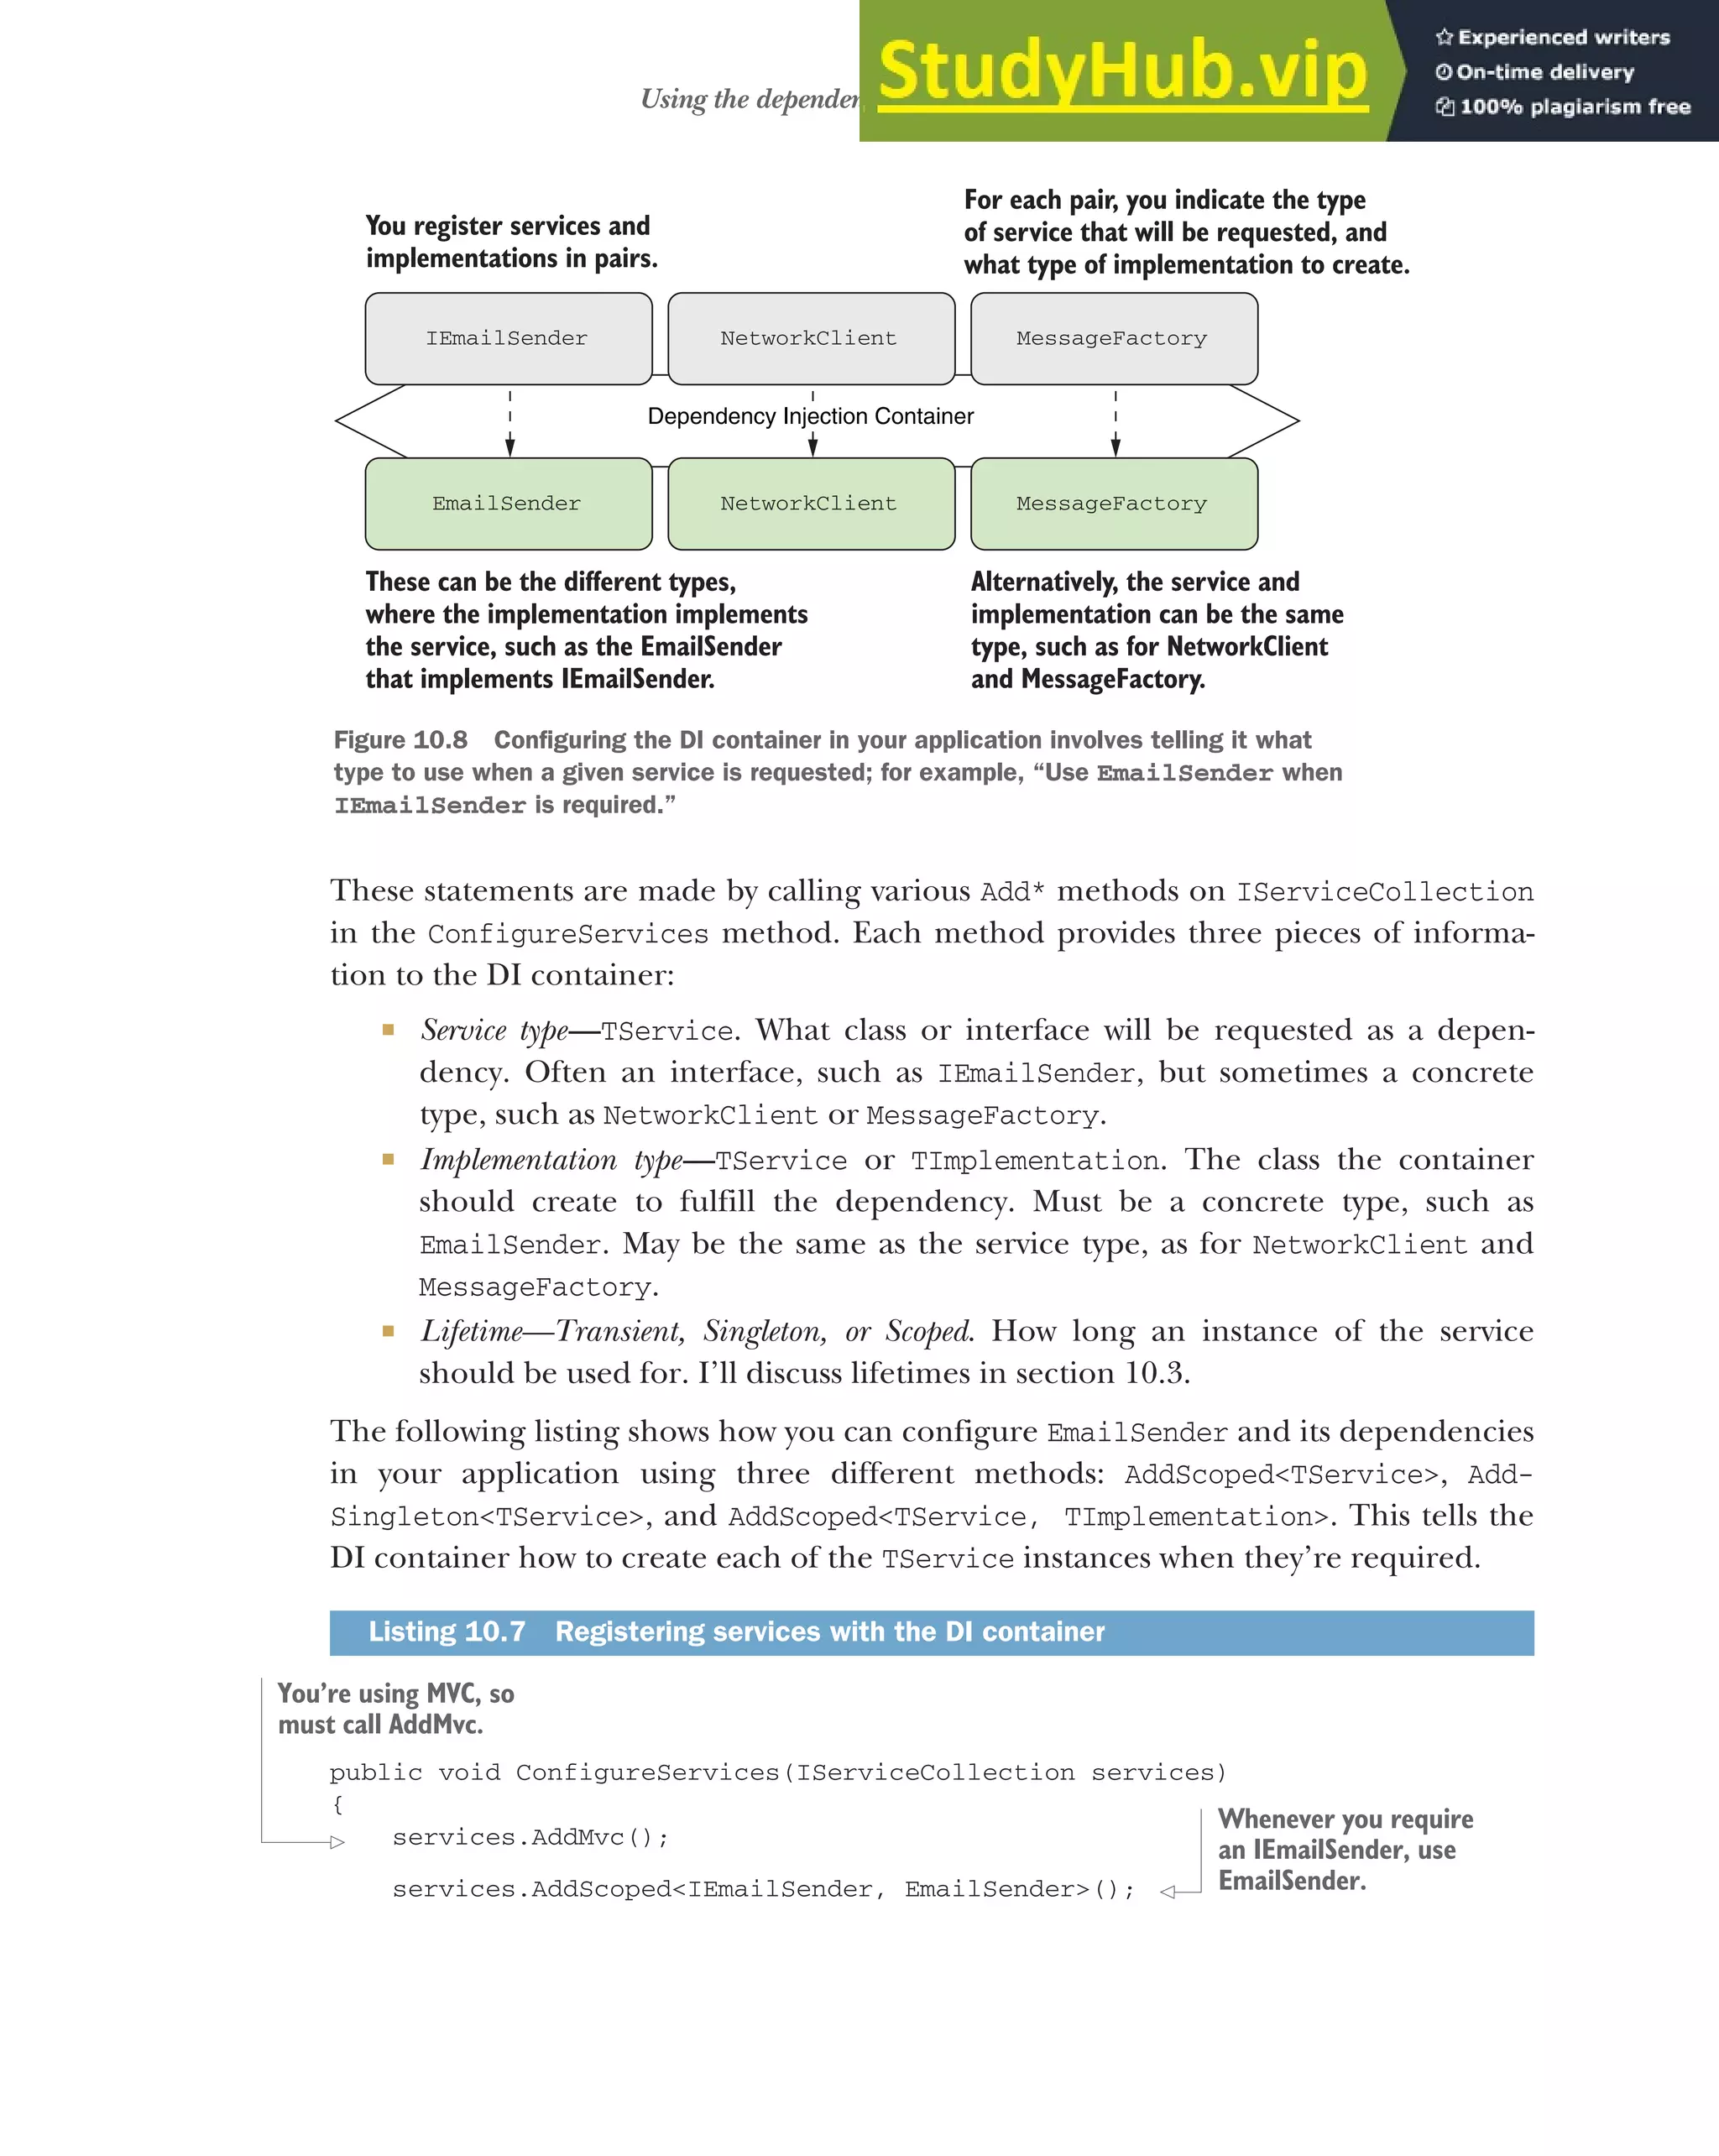

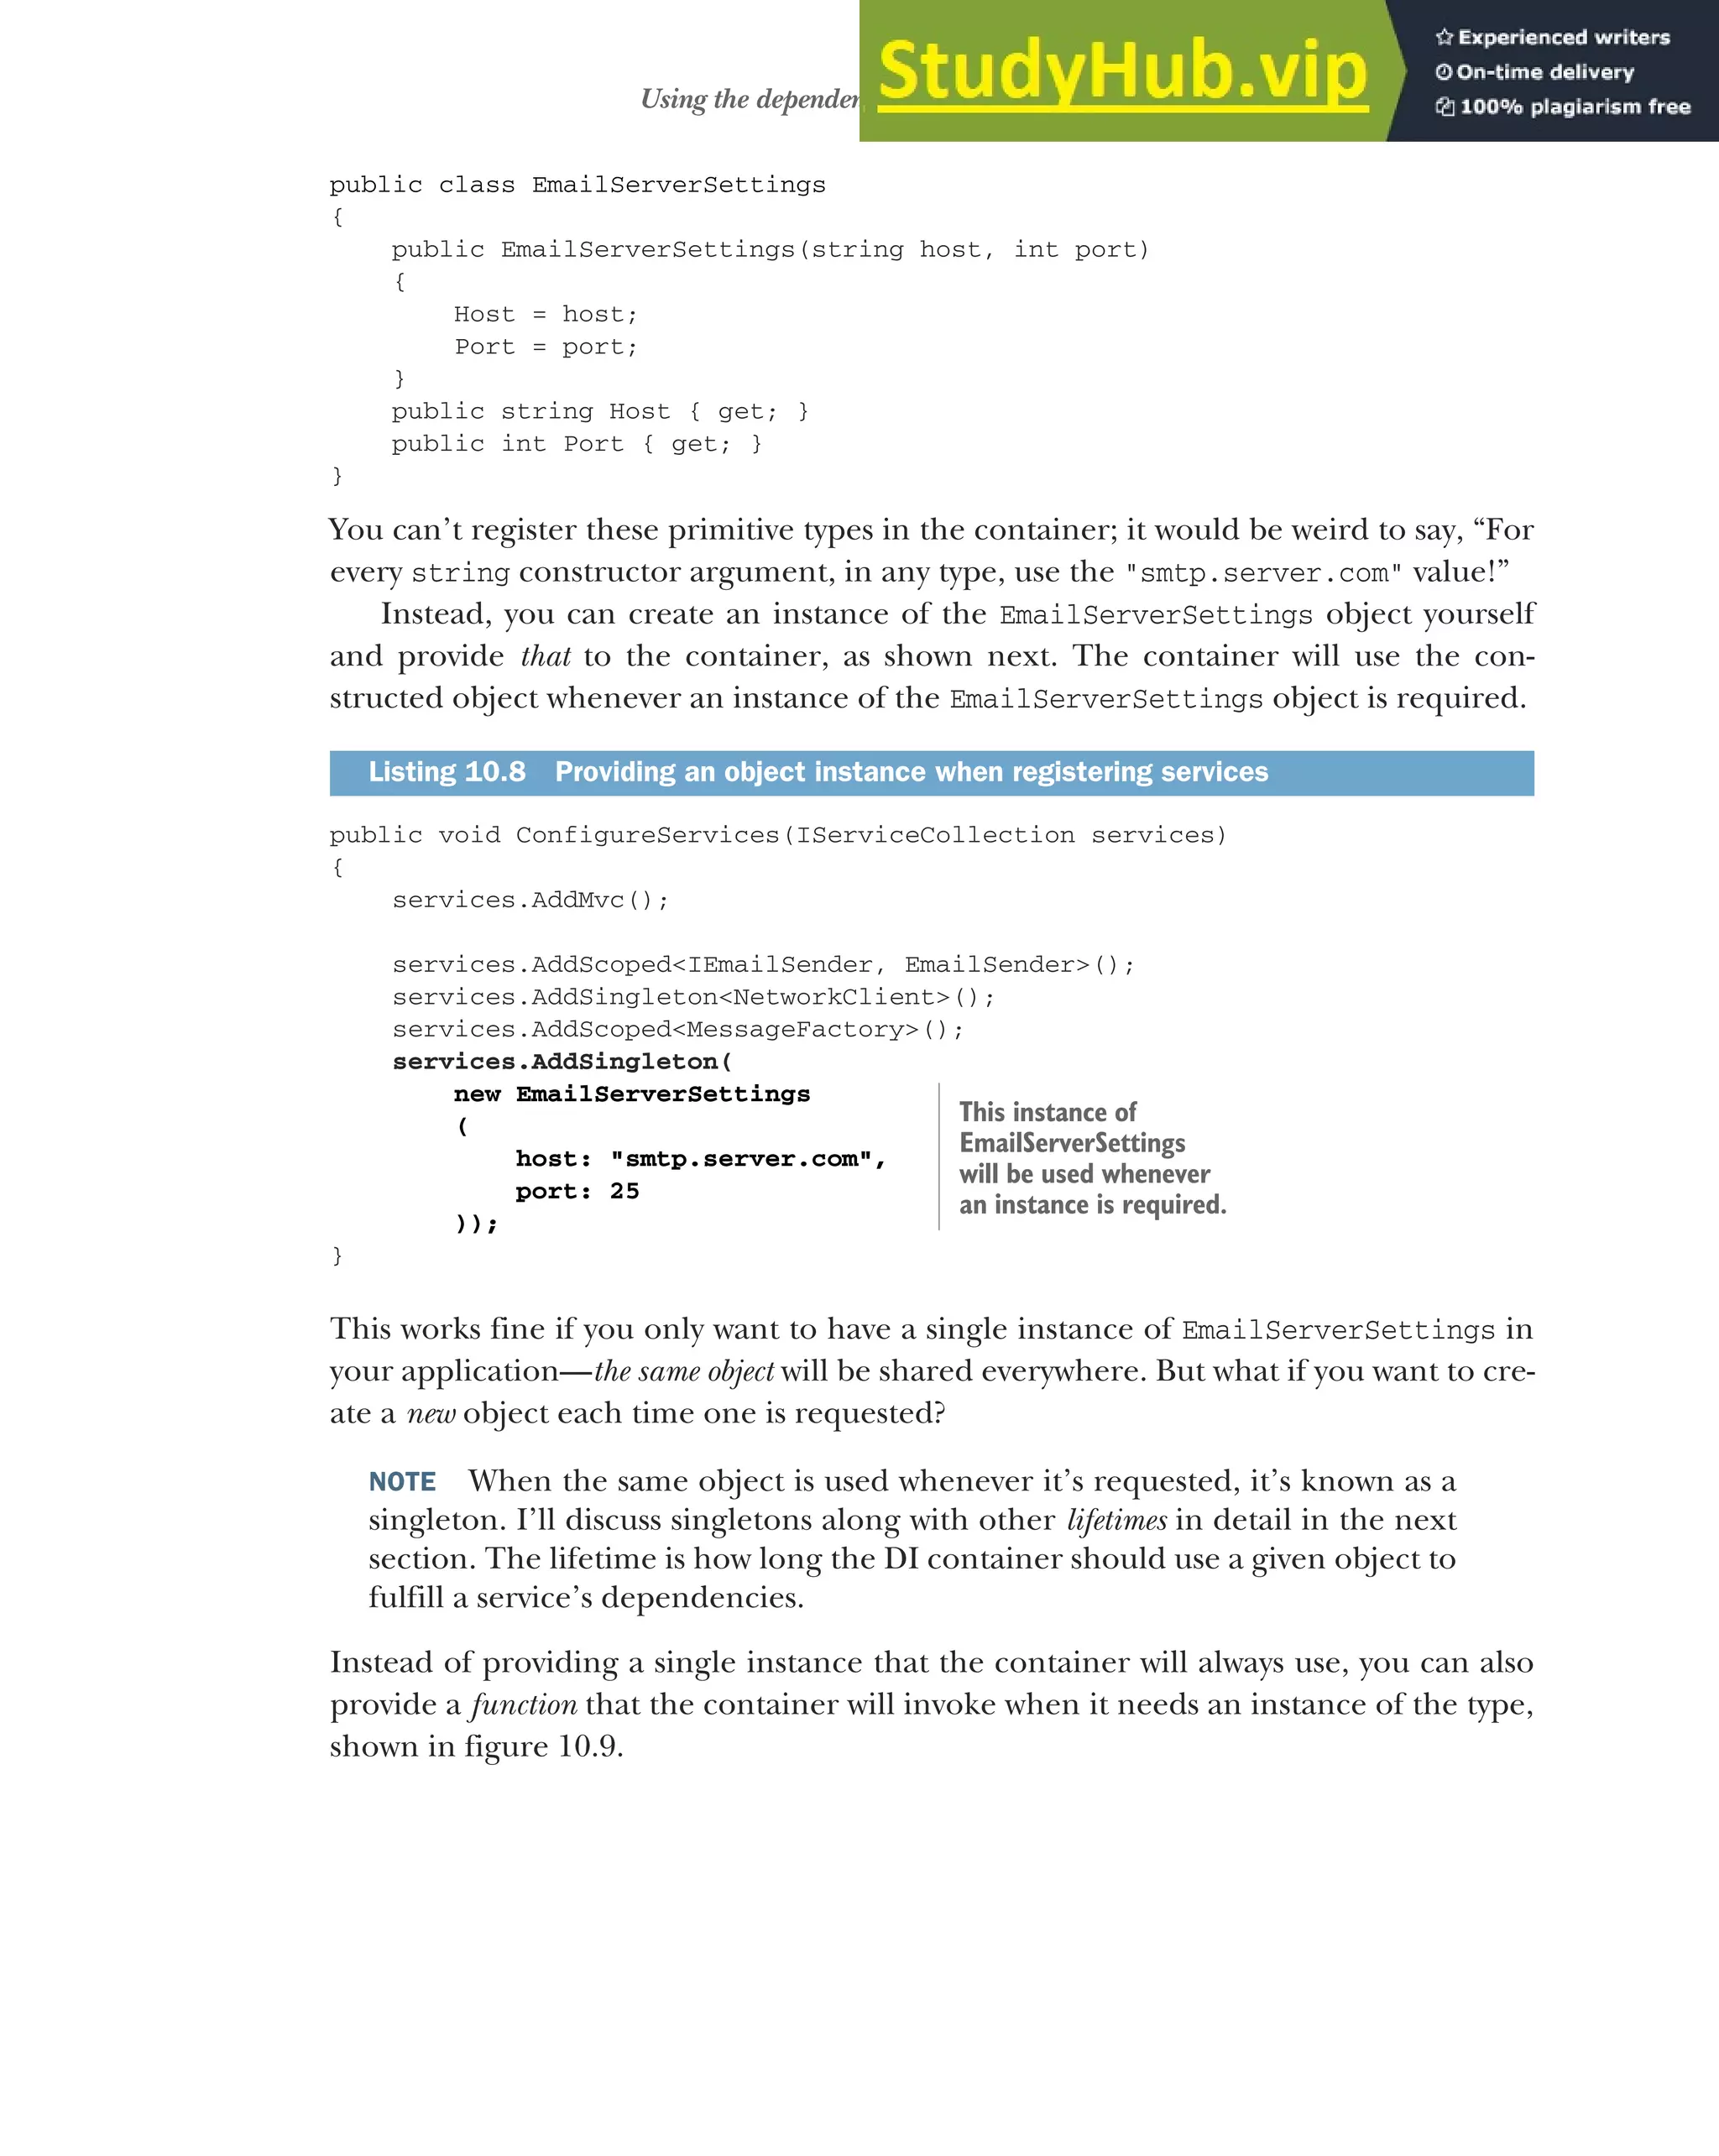

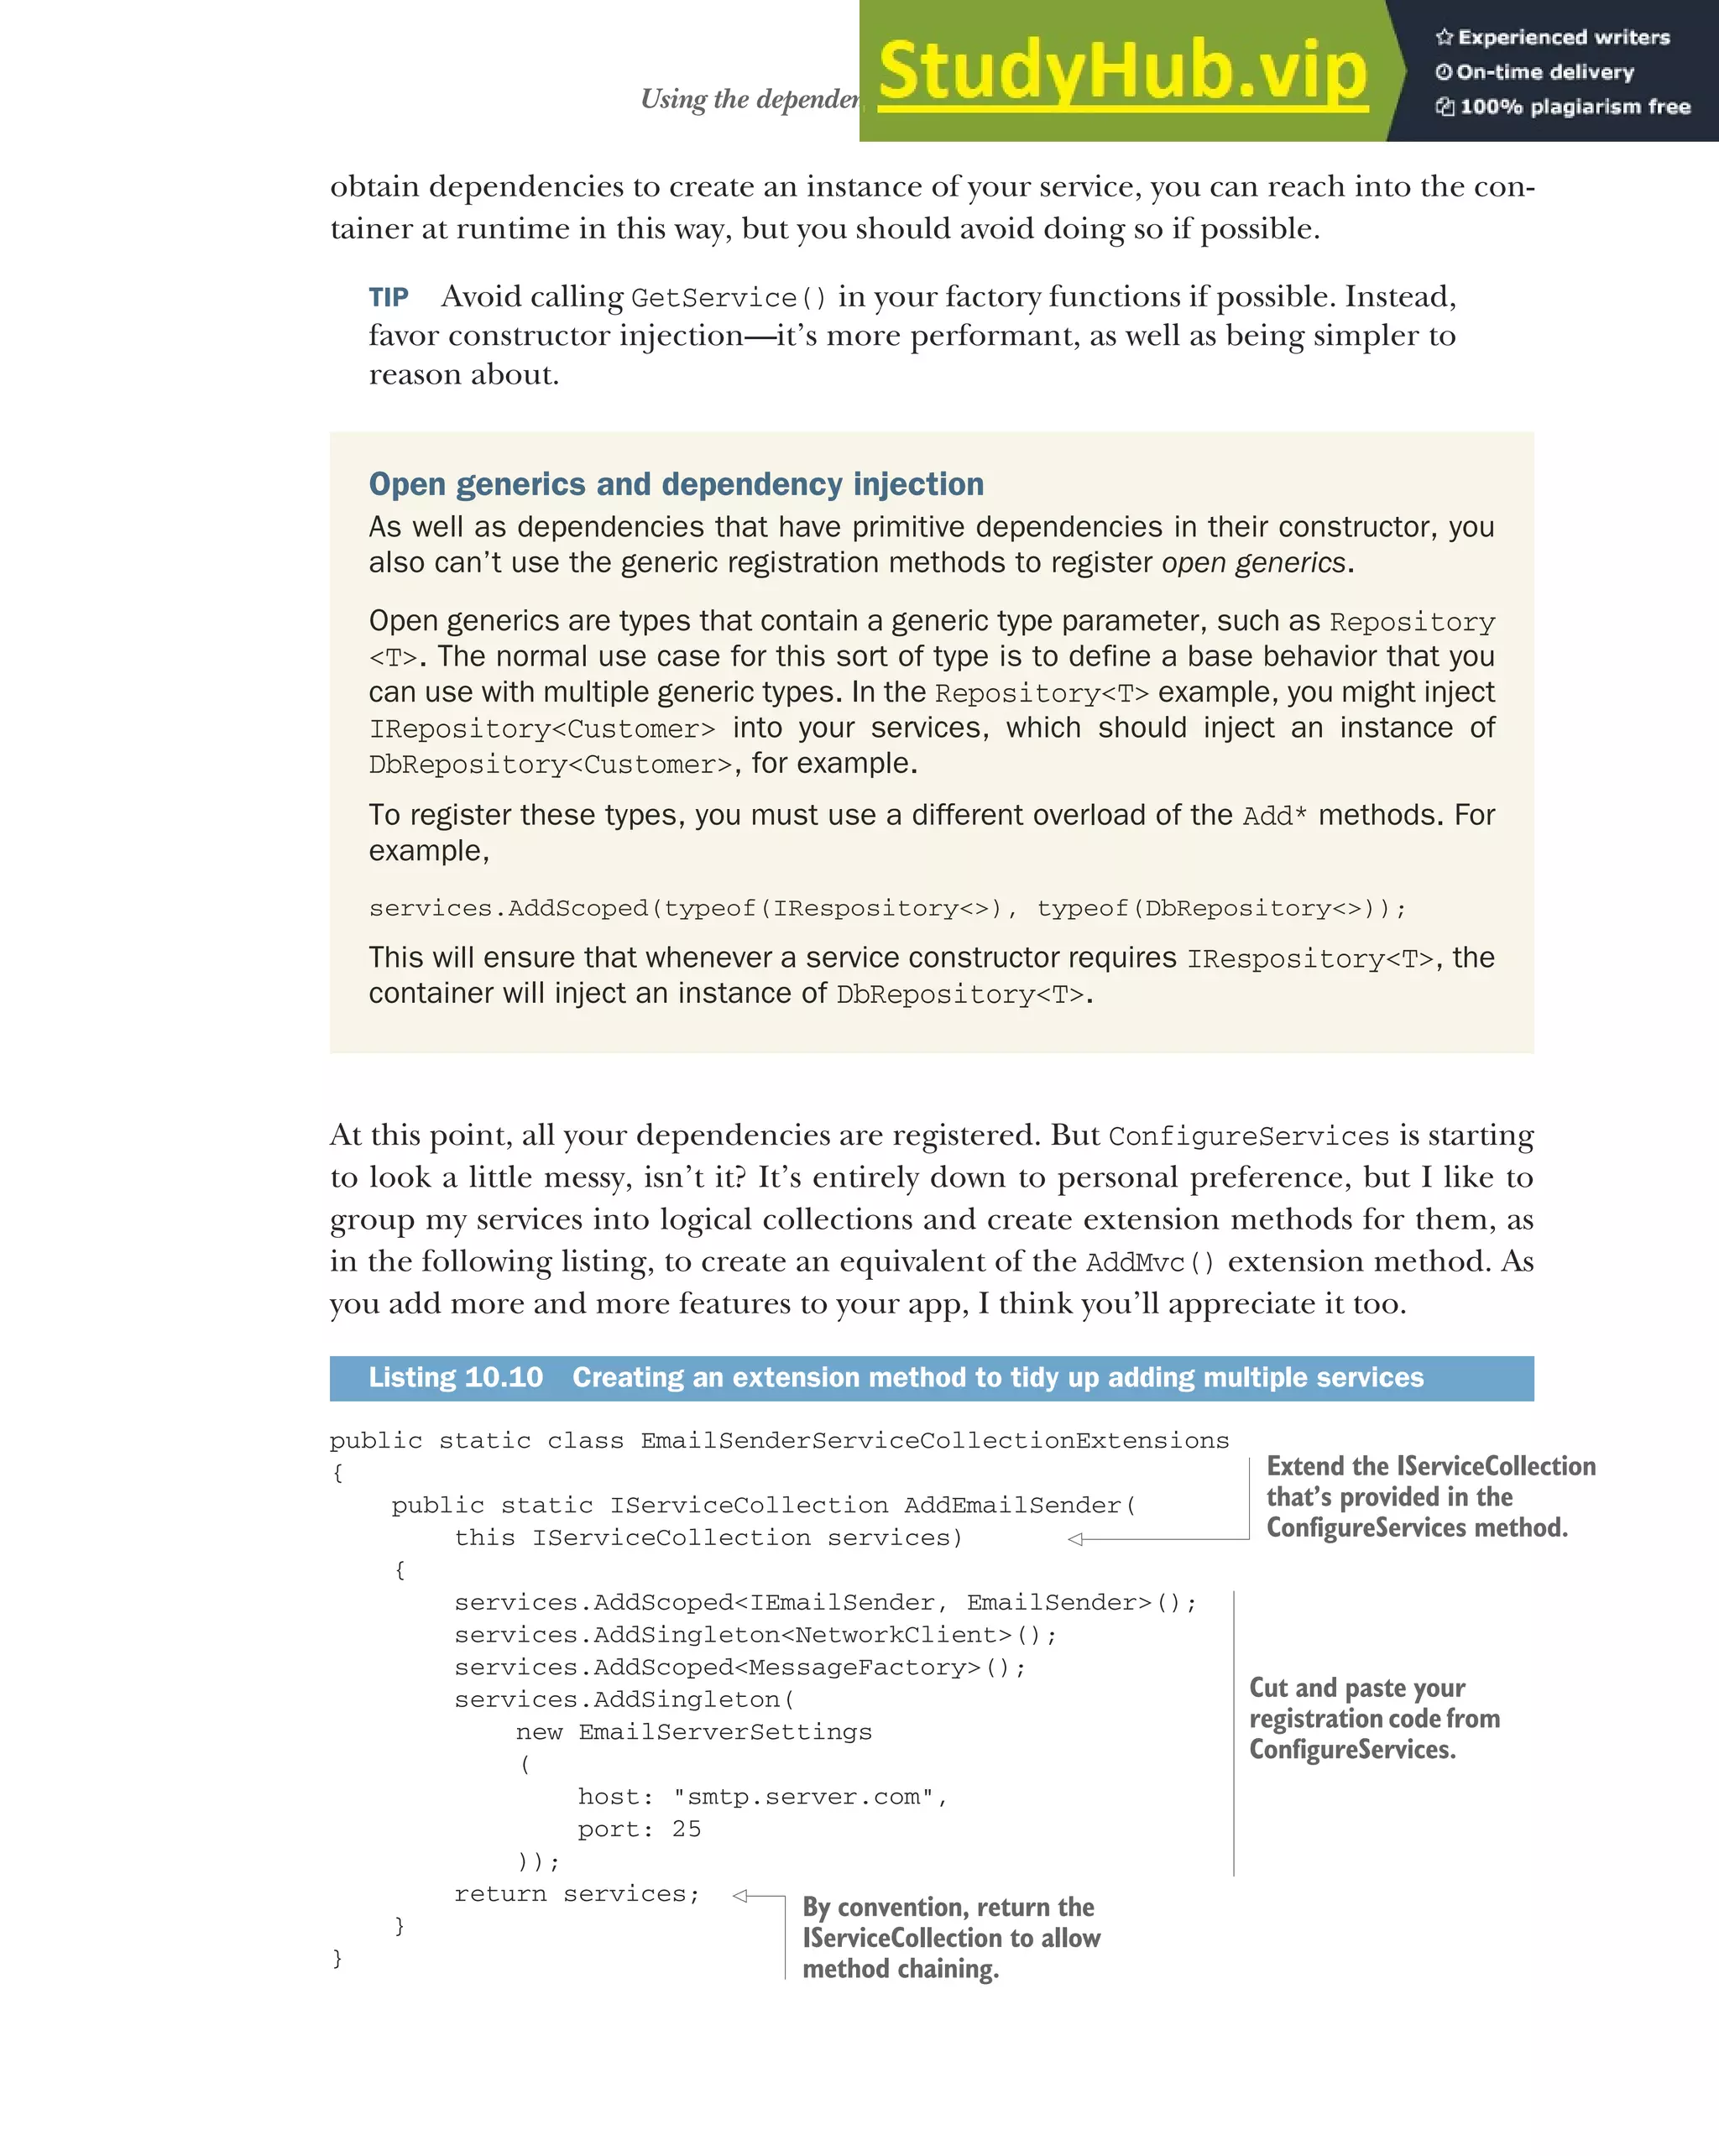
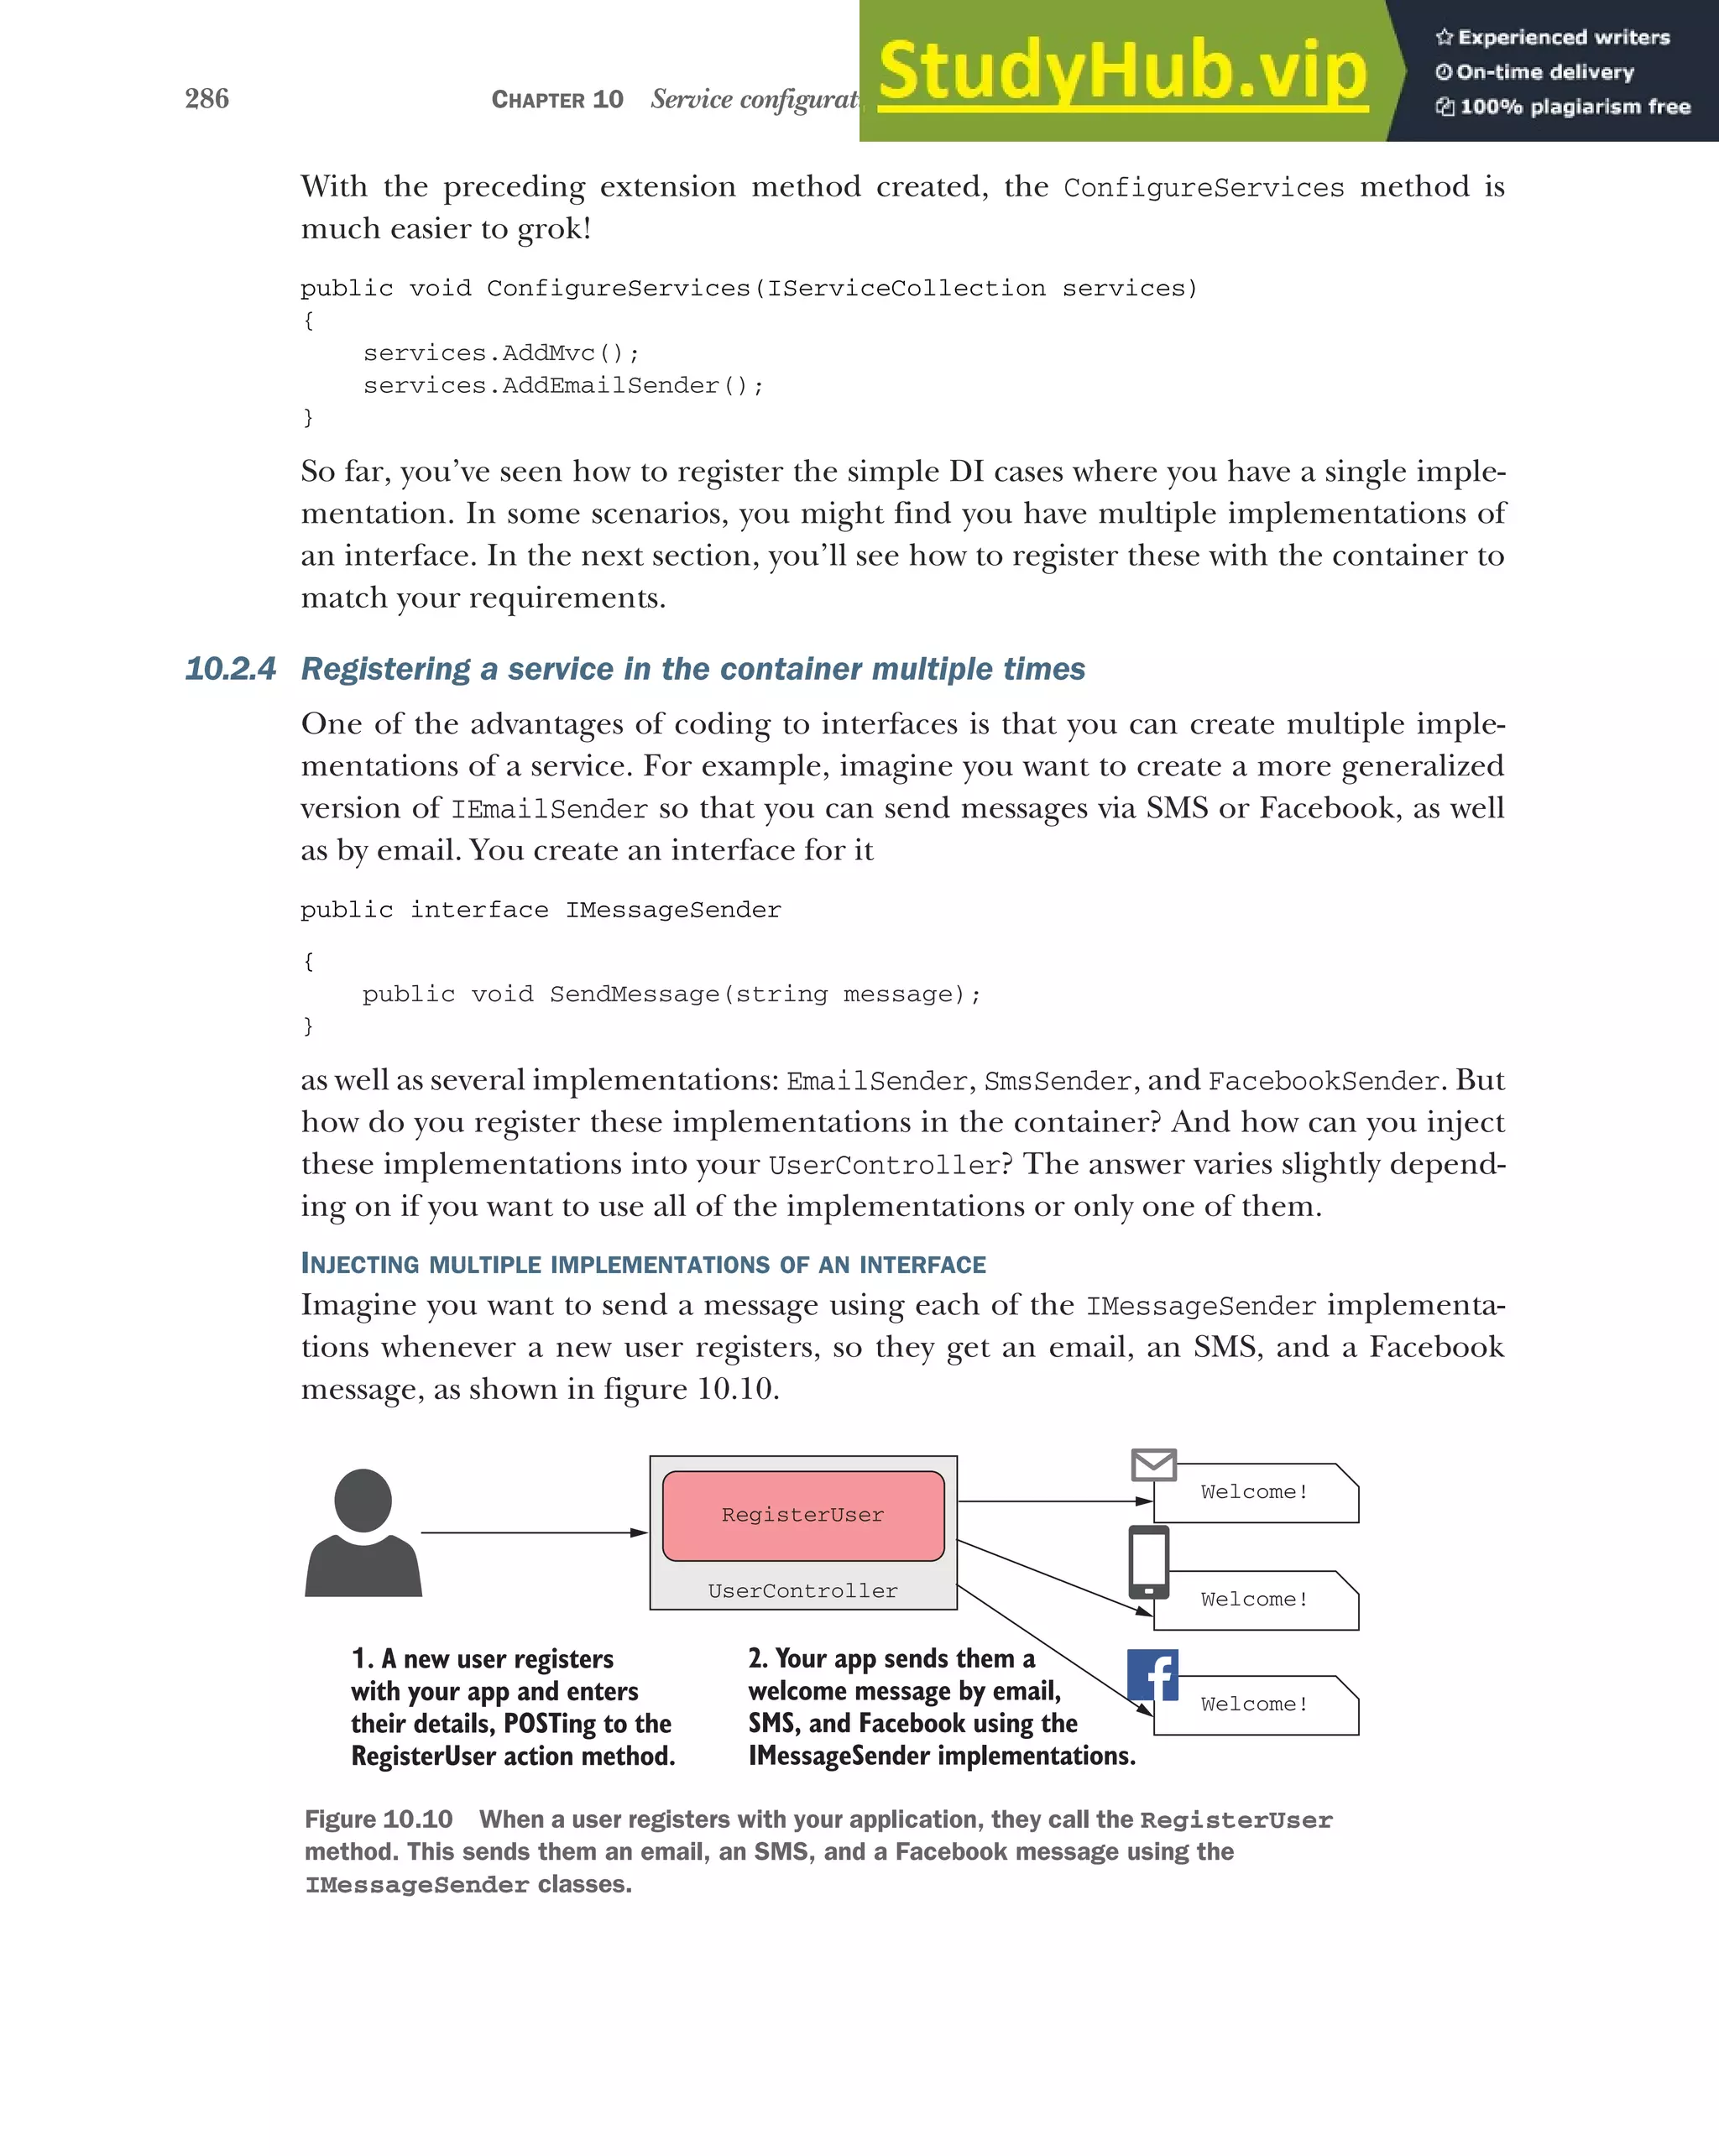
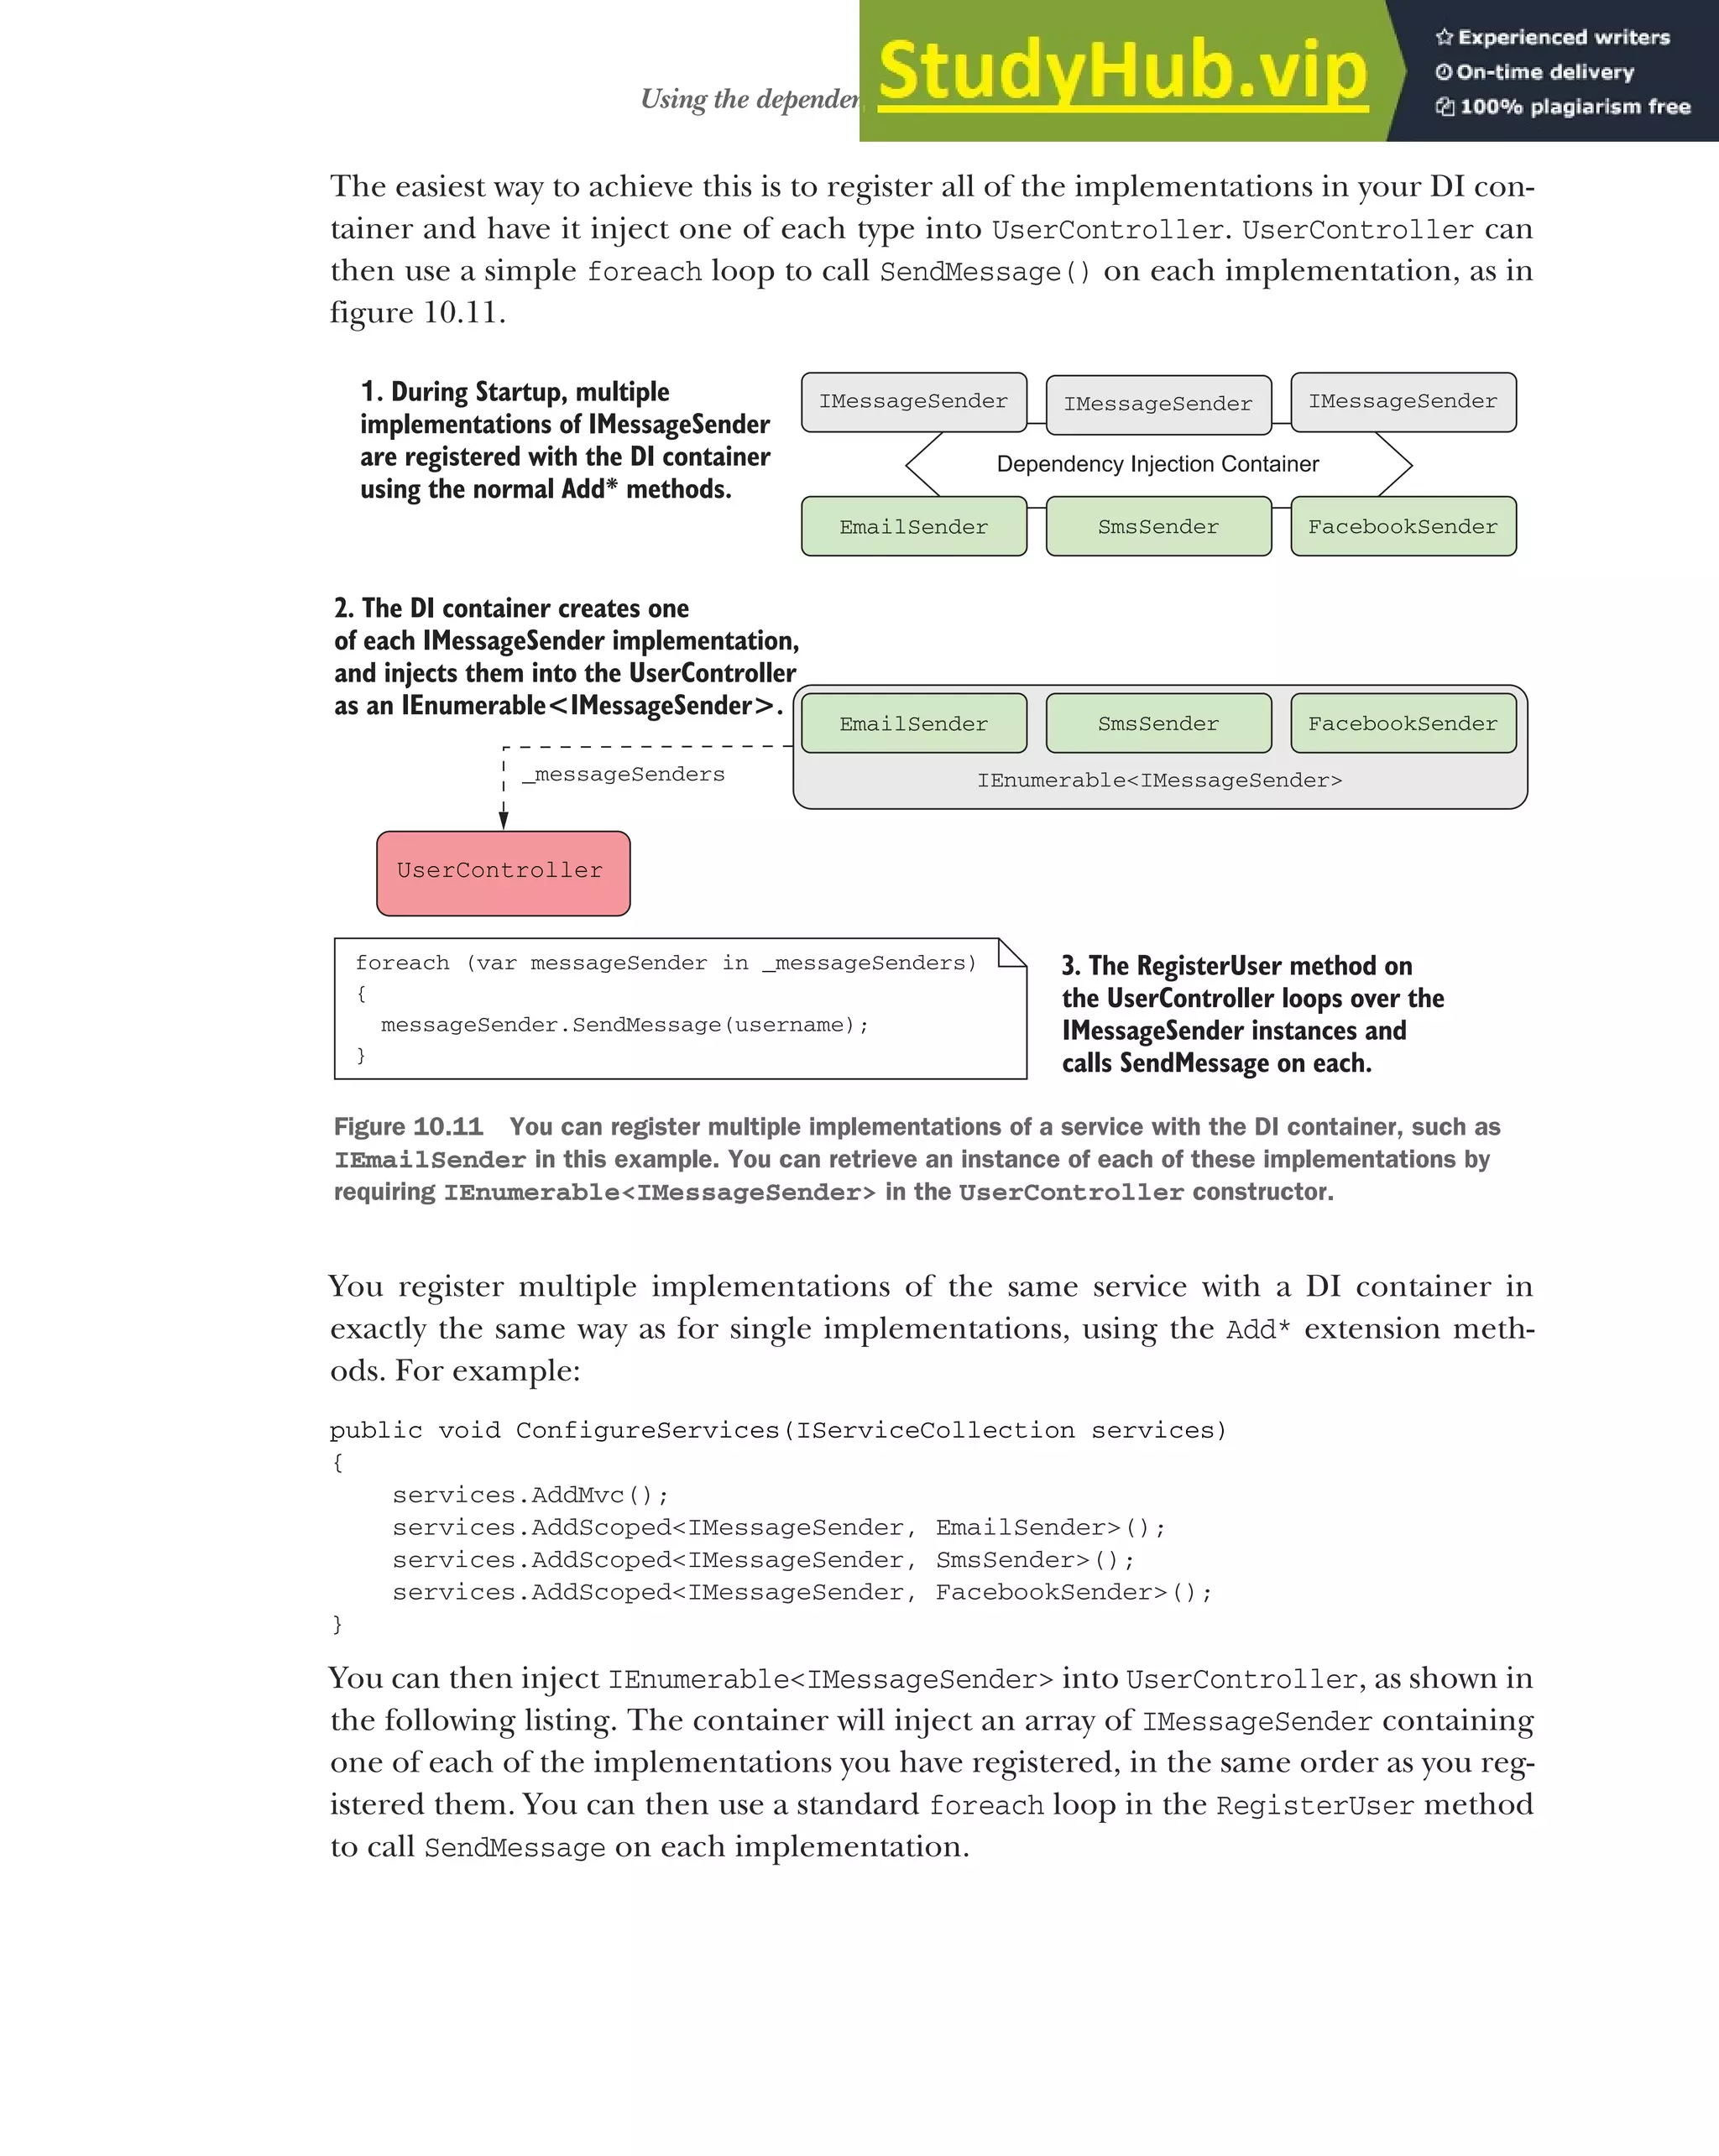
![288 CHAPTER 10 Service configuration with dependency injection
public class UserController : Controller
{
private readonly IEnumerable<IMessageSender> _messageSenders;
public UserController(
IEnumerable<IMessageSender> messageSenders)
{
_messageSenders = messageSenders;
}
public IActionResult RegisterUser(string username)
{
foreach (var messageSender in _messageSenders)
{
messageSender.SendMessage(username);
}
return View();
}
}
WARNING You must use IEnumerable<T> as the constructor argument to
inject all of the registered types of a service, T. Even though this will be
injected as a T[] array, you can’t use T[] or ICollection<T> as your construc-
tor argument. Doing so will cause an InvalidOperationException, as you
saw in figure 10.7.
It’s simple enough to inject all of the registered implementations of a service, but
what if you only need one? How does the container know which one to use?
INJECTING A SINGLE IMPLEMENTATION WHEN MULTIPLE SERVICES ARE REGISTERED
Imagine you’ve already registered all of the IMessageSender implementations, what
happens if you have a service that requires only one of them? For example
public class SingleMessageSender
{
private readonly IMessageSender _messageSender;
public SingleMessageSender(IMessageSender messageSender)
{
_messageSender = messageSender;
}
}
The container needs to pick a single IMessageSender to inject into this service, out of
the three implementations available. It does this by using the last registered imple-
mentation—the FacebookSender from the previous example.
NOTE The DI container will use the last registered implementation of a ser-
vice when resolving a single instance of the service.
Listing 10.11 Injecting multiple implementations of a service into a consumer
Requesting an
IEnumerable will
inject an array of
IMessageSender.
Each IMessageSender
in the IEnumerable is
a different
implementation.](https://image.slidesharecdn.com/asp-230807173723-31e70040/75/ASP-NET-Core-in-Action-2018-pdf-316-2048.jpg)

![290 CHAPTER 10 Service configuration with dependency injection
1 Action methods
2 View templates
In this section, I’ll briefly discuss these two situations, how they work, and when you
might want to use them.
INJECTING SERVICES DIRECTLY INTO ACTION METHODS USING [FROMSERVICES]
MVC controllers typically contain multiple action methods that logically belong
together. You might group all the action methods related to managing user accounts
into the same controller, for example. This allows you to apply filters and authoriza-
tion to all of the action methods collectively, as you’ll see in chapter 13.
As you add additional action methods to a controller, you may find the controller
needs additional services to implement new action methods. With constructor injec-
tion, all of these dependencies are provided via the constructor. That means the DI
container must create all of the services for every action method in a controller, even
if none of them are required by the action method being called.
Consider listing 10.13 for example. This shows UserController with two stub
methods: RegisterUser and SignInUser. Each action method requires a different
dependency, so both dependencies will be created and injected, whichever action
method is called by the request. If ISignInManager or IMessageSender have lots of
dependencies themselves, the DI container may have to create lots of objects for a ser-
vice that is often not used.
public class UserController : Controller
{
private readonly IMessageSender _messageSender;
private readonly ISignInService _signInService;
public UserController(
IMessageSender messageSender, ISignInService signInService)
{
messageSenders = messageSender;
_signInService = signInService;
}
public IActionResult RegisterUser(string username)
{
_messageSender.SendMessage(username);
return View();
}
public IActionResult SignInUser(string username, string password)
{
_signInService.SignUserIn(username, password);
return View();
}
}
Listing 10.13 Injecting services into a controller via the constructor
Both IMessageSender
and ISignInService are
injected into the
constructor every time.
Only the RegisterUser
method uses
IMessageSender.
Only the SignInUser
method uses
ISignInService.](https://image.slidesharecdn.com/asp-230807173723-31e70040/75/ASP-NET-Core-in-Action-2018-pdf-318-2048.jpg)
![291
Using the dependency injection container
If you know a service is particularly expensive to create, you can choose to inject it as a
dependency directly into the action method, instead of into the controller’s construc-
tor. This ensures the DI container only creates the dependency when the specific action
method is invoked, as opposed to when any action method on the controller is
invoked.
NOTE Generally speaking, your controllers should be sufficiently cohesive
that this approach isn’t necessary. If you find you have a controller that’s
dependent on many services, each of which is used by a single action method,
you might want to consider splitting up your controller.
You can directly inject a dependency into an action method by passing it as a parame-
ter to the method and using the [FromServices] attribute. During model binding,
MvcMiddleware will resolve the parameter from the DI container, instead of from the
request values, like you saw in chapter 6. This listing shows how you could rewrite list-
ing 10.13 to use [FromServices] instead of constructor injection.
public class UserController : Controller
{
public IActionResult RegisterUser(
[FromServices] IMessageSender messageSender,
string username)
{
messageSender.SendMessage(username);
return View();
}
public IActionResult SignInUser(
[FromServices] ISignInService signInService
string username, string password)
{
signInService.SignUserIn(username, password);
return View();
}
}
You might be tempted to use the [FromServices] attribute in all of your action meth-
ods, but I’d encourage you to use standard constructor injection most of the time.
Having the constructor as a single location that declares all the dependencies of a
class can be useful, so I only use [FromServices] where creating an instance of a
dependency is expensive and is only used in a single action method.
INJECTING SERVICES INTO VIEW TEMPLATES
Injecting dependencies into the constructor is recommended, but what if you don’t
have a constructor? In particular, how do you go about injecting services into a Razor
view template when you don’t have control over how the template is constructed?
Listing 10.14 Injecting services into a controller using the [FromServices] attribute
The [FromServices]
attribute ensures
IMessageSender is resolved
from the DI container.
IMessageSender is only
available in RegisterUser.
ISignInService is resolved
from the DI container and
injected as a parameter.
Only the SignInUser
method can use
ISignInService.](https://image.slidesharecdn.com/asp-230807173723-31e70040/75/ASP-NET-Core-in-Action-2018-pdf-319-2048.jpg)
![292 CHAPTER 10 Service configuration with dependency injection
Imagine you have a simple service, HtmlGenerator, to help you generate HTML in
your view templates. The question is, how do you pass this service to your view tem-
plates, assuming you’ve already registered it with the DI container?
One option is to inject HtmlGenerator into your controller using constructor injec-
tion or the [FromServices] attribute. Then you can pass the service via ViewData or
the view model, as you saw in chapter 7. In some cases, that approach may make sense,
but other times, you might not want to have references to the HtmlGenerator service
in your controller or view model at all. In those cases, you can directly inject Html-
Generator into your view templates.
NOTE Some people take offense at injecting services into views in this way.
You definitely shouldn’t be injecting services related to business logic into
your views, but I think it makes sense for services that are related to HTML
generation.
You can inject a service into a Razor template with the @inject directive by providing
the type to inject and a name for the injected service in the template.
@inject HtmlGenerator helper
<h1>The page title</h1>
<footer>
@helper.Copyright()
</footer>
Injecting services directly into views can be a useful way of exposing UI-related ser-
vices to your view templates without having to closely couple your views to your con-
trollers and actions. You shouldn’t find you need to rely on it too much, but it’s a
useful tool to have.
That pretty much covers registering and using dependencies, but there’s one
important aspect I’ve only vaguely touched on: lifetimes, or, when does the container
create a new instance of a service? Understanding lifetimes is crucial to working with
DI containers, so it’s important to pay close attention to them when registering your
services with the container.
10.3 Understanding lifetimes: when are services created?
Whenever the DI container is asked for a particular registered service, for example an
instance of IMessageSender, it can do one of two things:
Create and return a new instance of the service
Return an existing instance of the service
The lifetime of a service controls the behavior of the DI container with respect to these
two options. You define the lifetime of a service during DI service registration. This
Listing 10.15 Injecting a service into a Razor view template with @inject
Injects an instance of HtmlGenerator
into the view, named helper
Uses the injected service by
calling the helper instance](https://image.slidesharecdn.com/asp-230807173723-31e70040/75/ASP-NET-Core-in-Action-2018-pdf-320-2048.jpg)
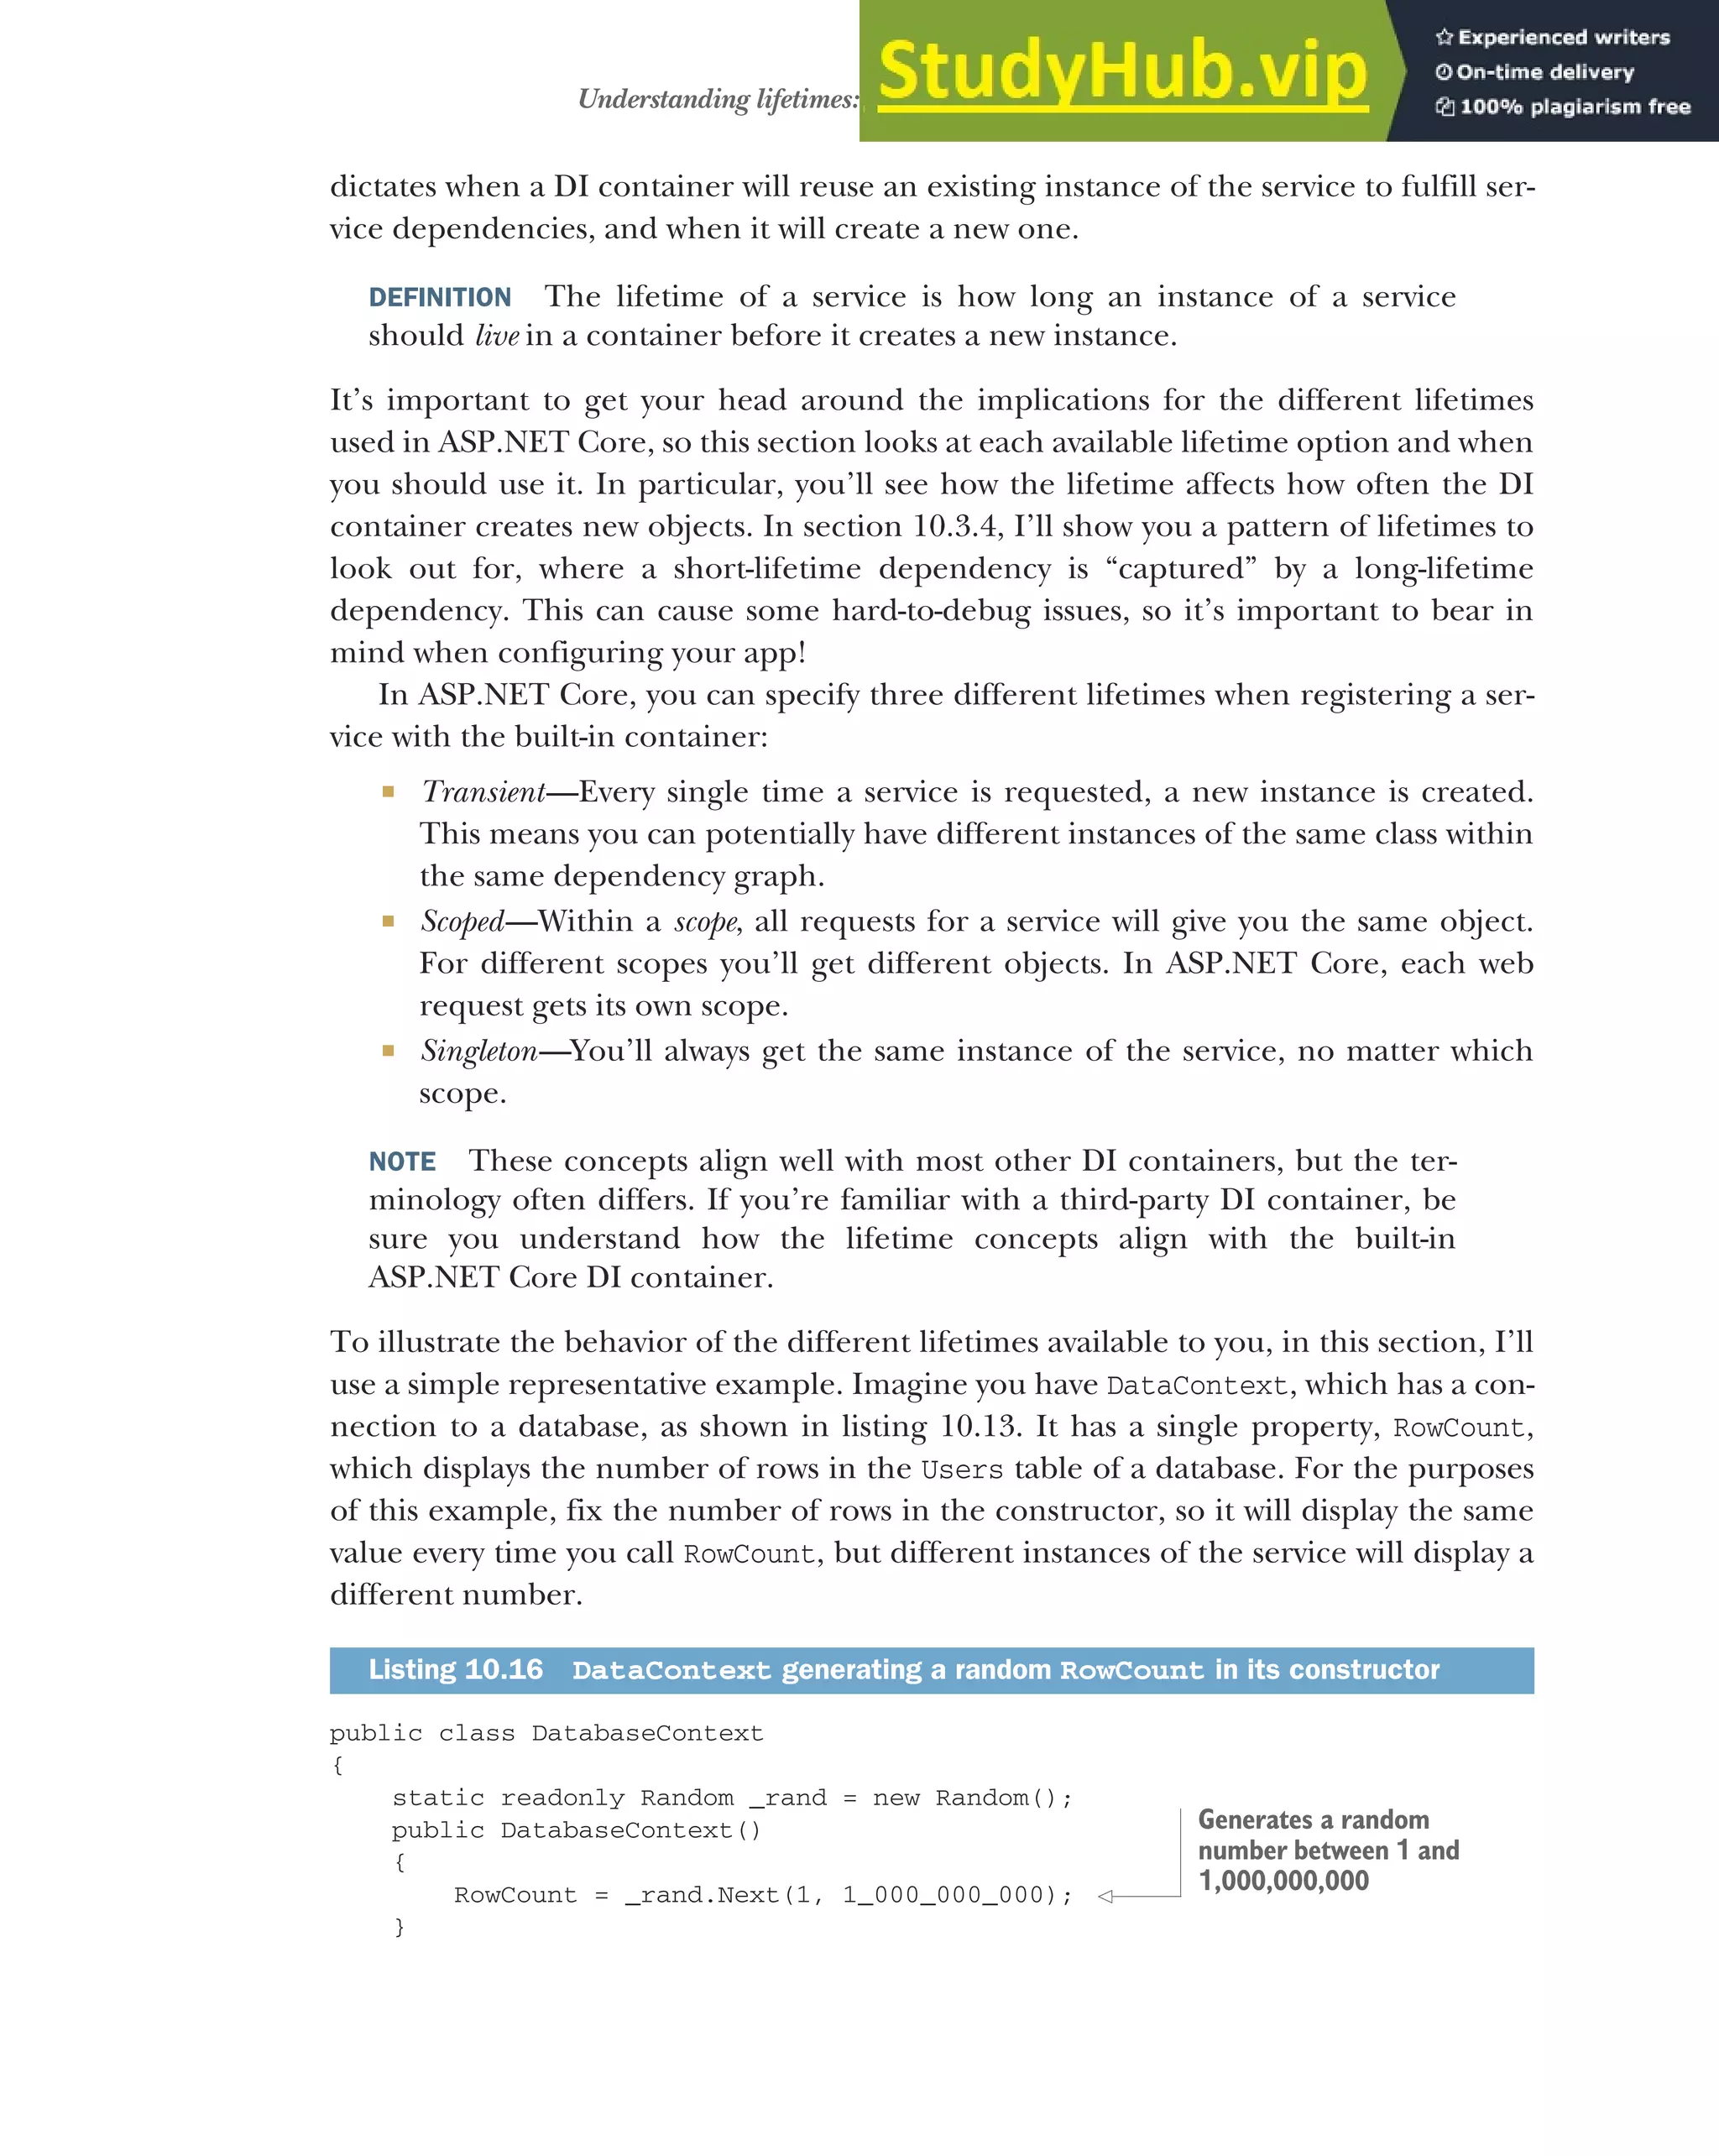

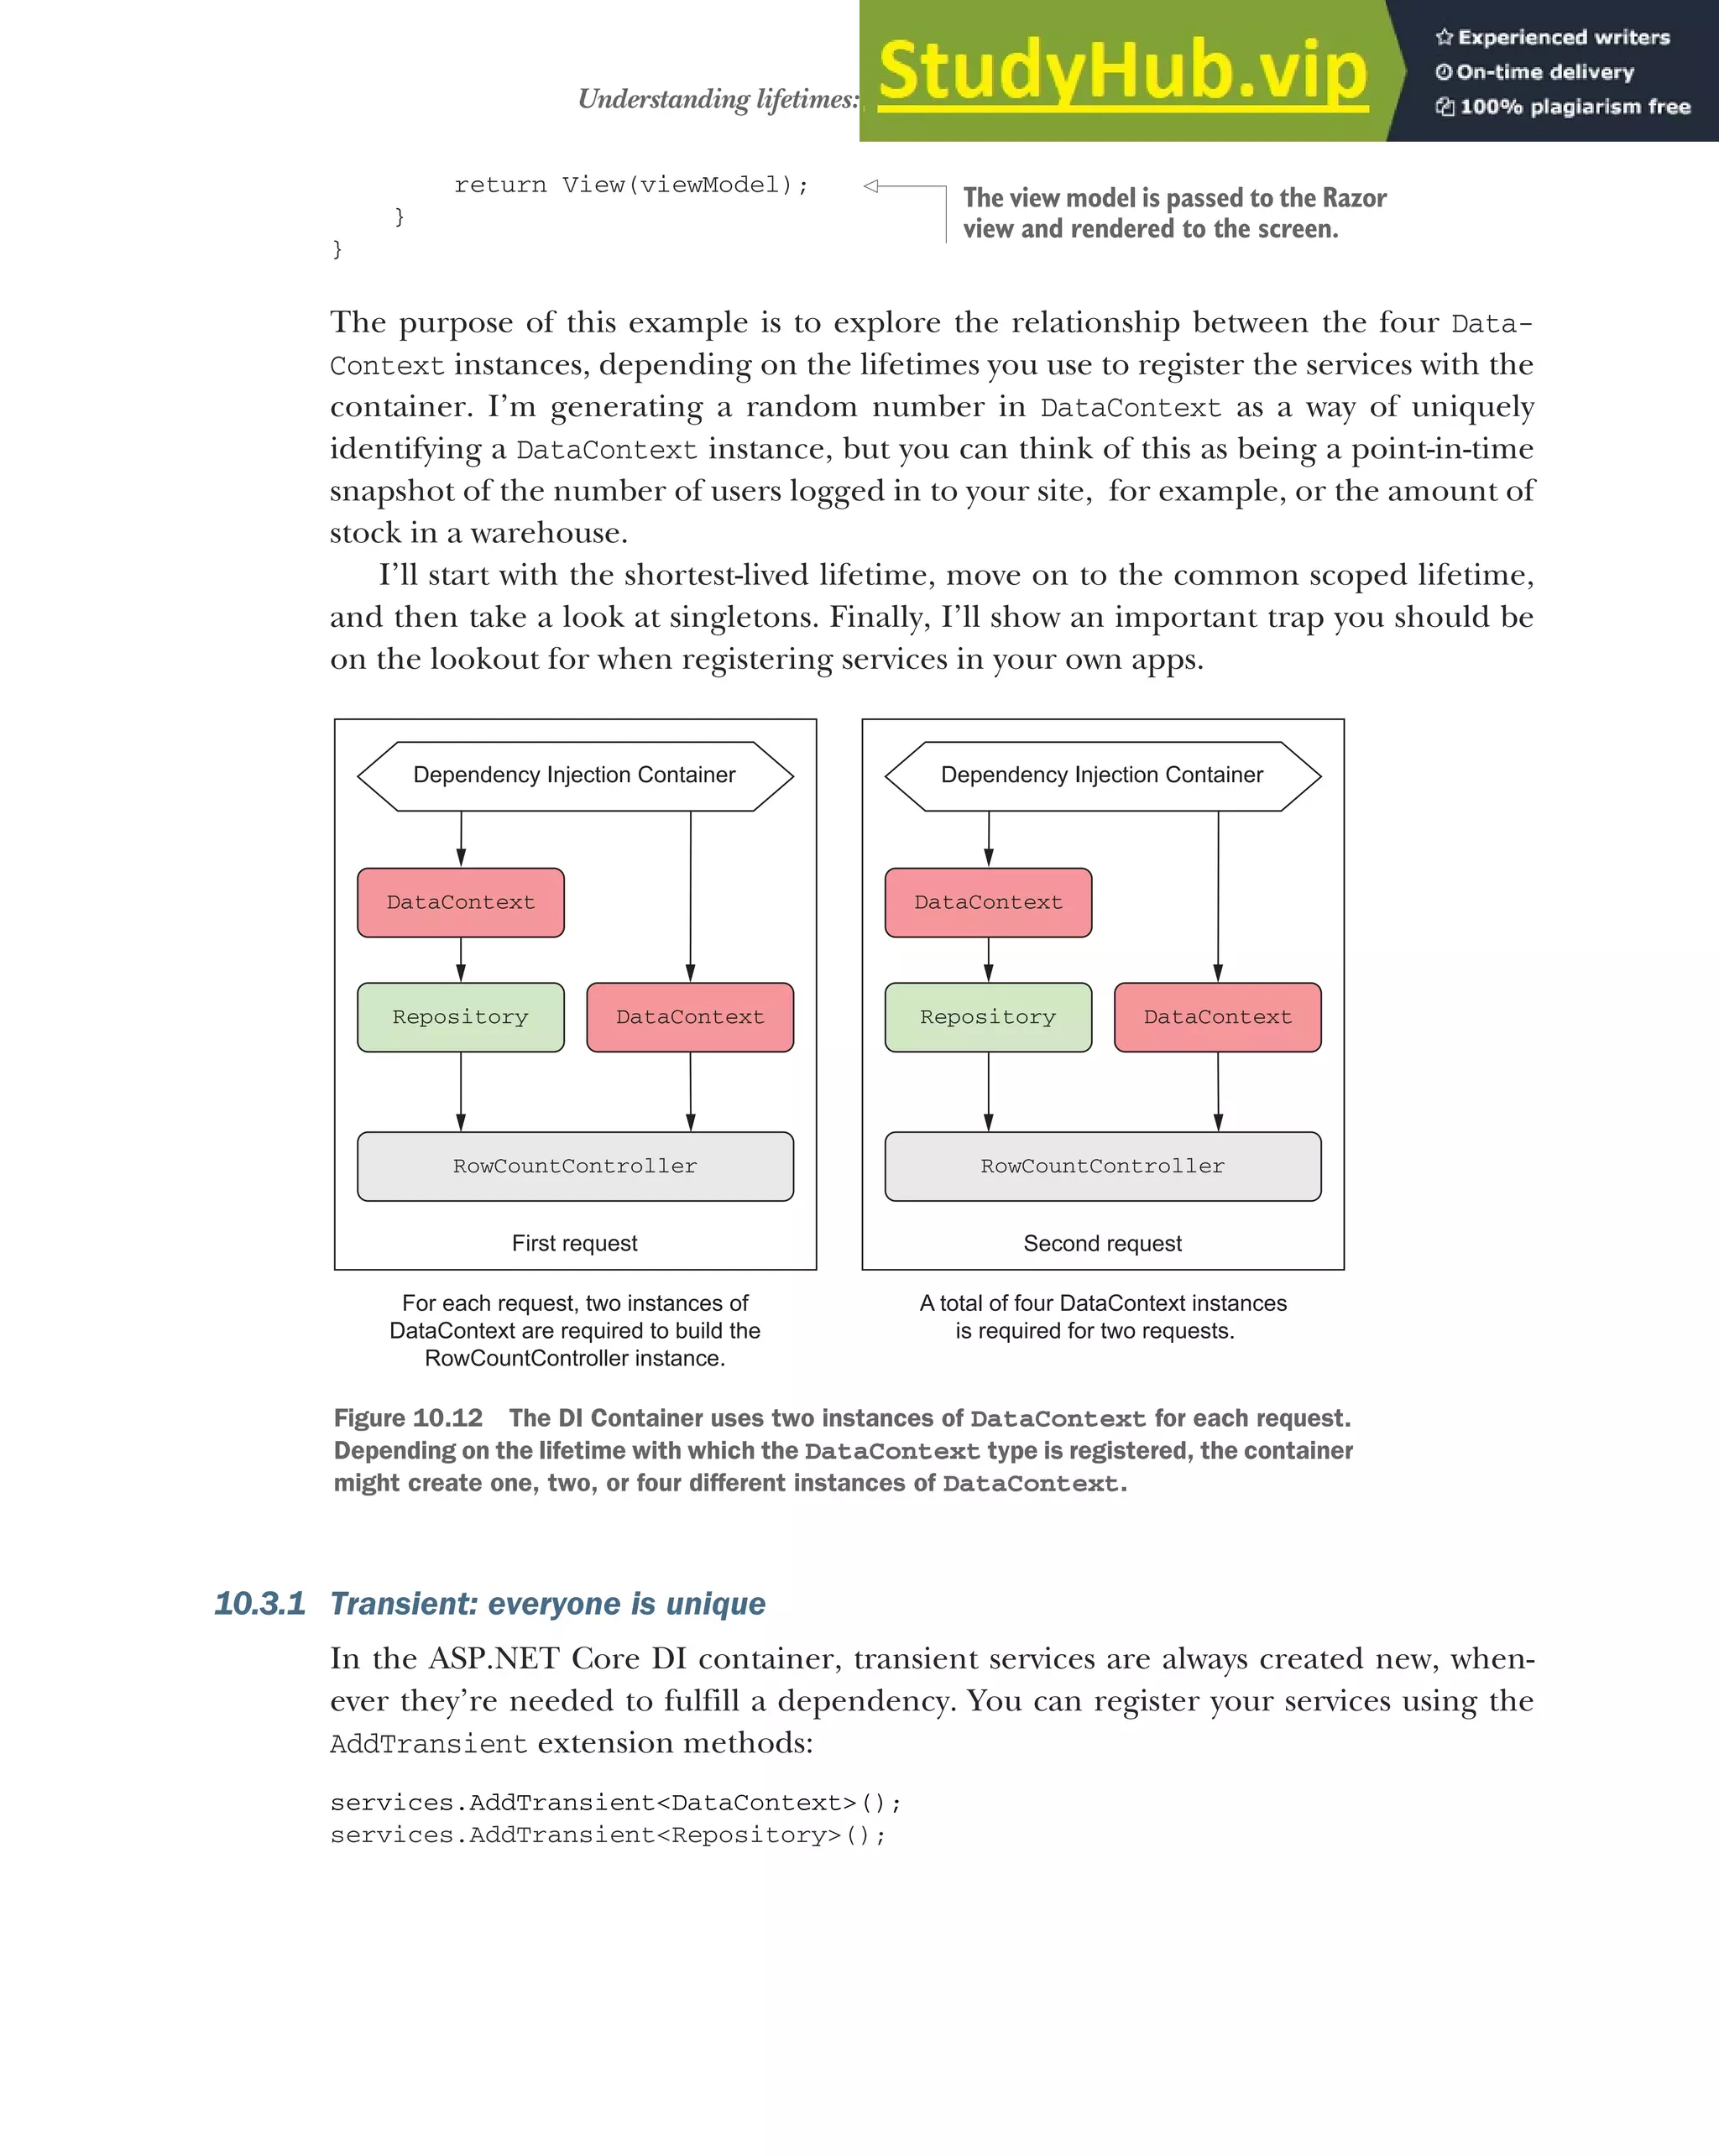
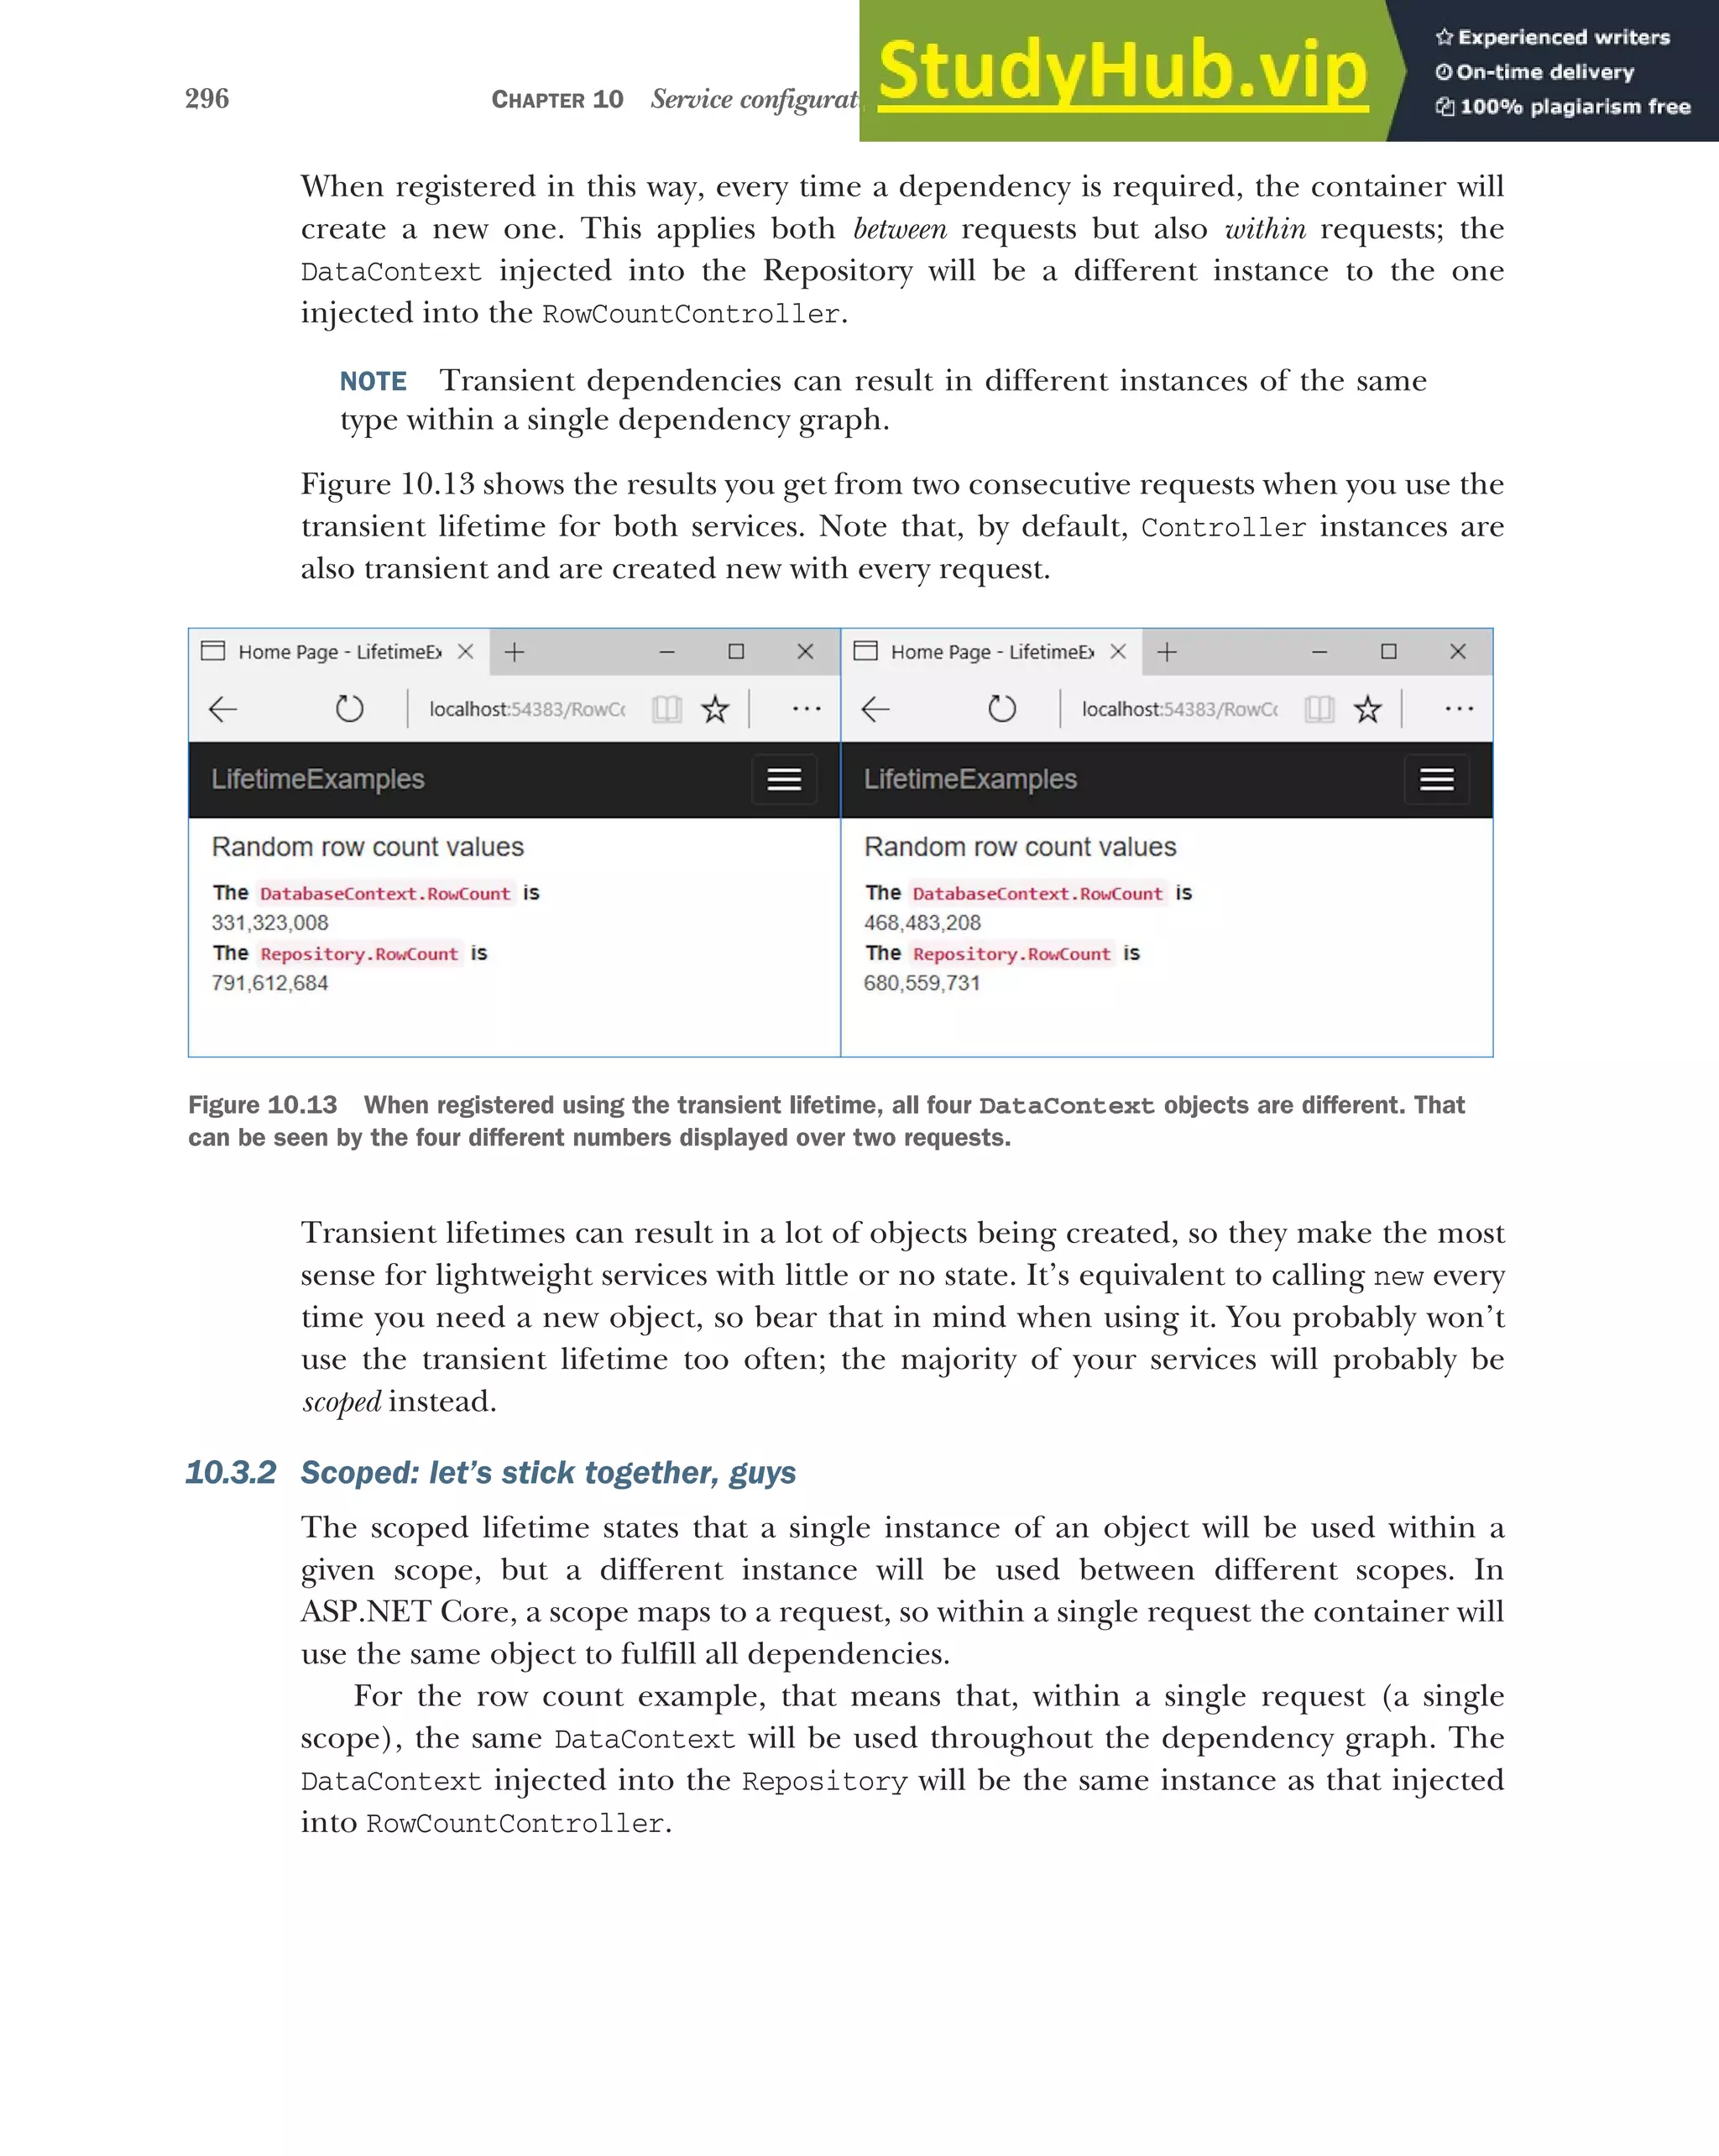
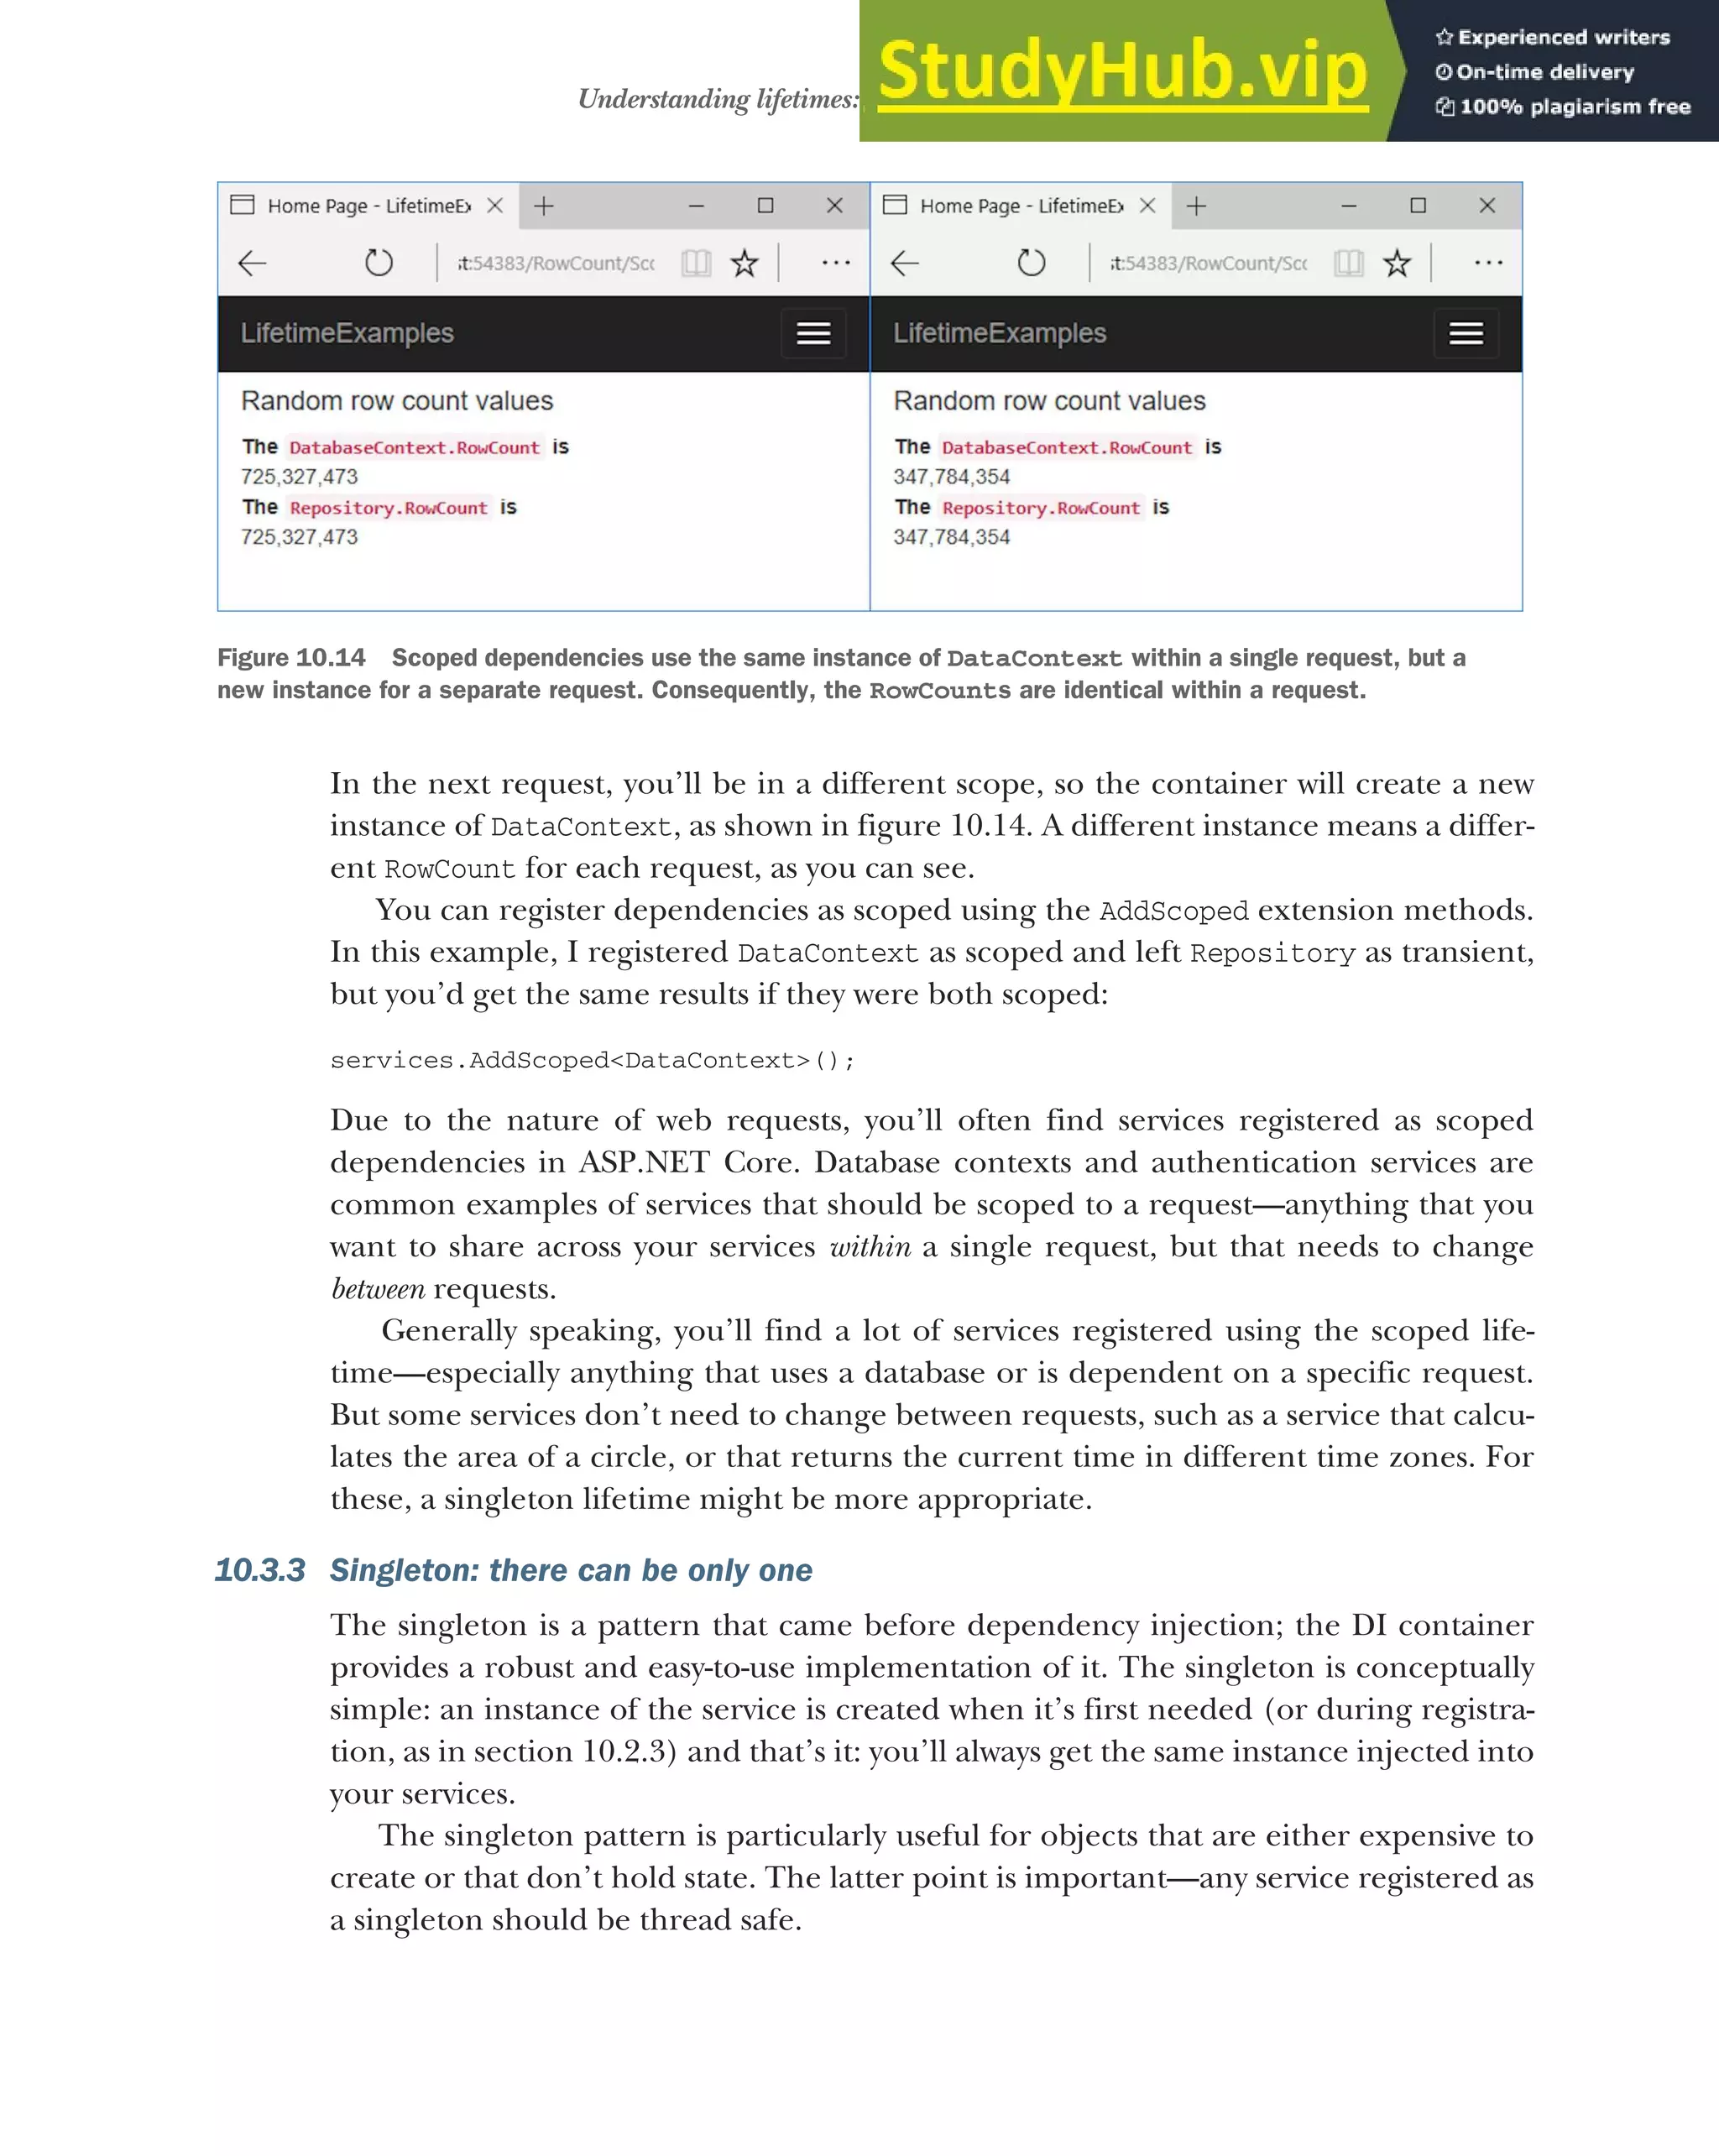


![300 CHAPTER 10 Service configuration with dependency injection
At this point, I should mention that there’s one glimmer of hope in this cautionary
tale. ASP.NET Core 2.0 includes a new option that lets you check for these kinds of
captured dependencies and will throw an exception on application startup if it detects
them, as shown in figure 10.17.
This scope validation check has a performance impact, so by default it’s only enabled
when your app is running in a development environment, but it should help you
catch most issues of this kind. You can enable or disable this check regardless of envi-
ronment by setting the ValidateScopes option when creating your WebHostBuilder
in Program.cs, as shown in the following listing.
public class Program
{
public static void Main(string[] args)
{
BuildWebHost(args).Run();
}
public static IWebHost BuildWebHost(string[] args) =>
WebHost.CreateDefaultBuilder(args)
.UseStartup<Startup>()
.UseDefaultServiceProvider(options =>
{
options.ValidateScopes = true;
})
.Build();
}
Listing 10.19 Setting the ValidateScopes property to always validate scopes
In ASP
.NET Core 2.0, you will get
an Exception when the DI container
detects a captured dependency.
The exception message
describes which service
was captured...
...and which
service captured
the dependency
.
Figure 10.17 In ASP.NET Core 2.0, the DI container will throw an exception when it creates a
service with a captured dependency. By default, this check is only enabled for development
environments.
The default builder
sets ValidateScopes
to validate only in
development
environments.
You can override the
validation check with
the UseDefaultService-
Provider extension.
Setting to true will
validate scopes in all
environments. This
has performance
implications.](https://image.slidesharecdn.com/asp-230807173723-31e70040/75/ASP-NET-Core-in-Action-2018-pdf-328-2048.jpg)


![306 CHAPTER 11 Configuring an ASP.NET Core application
Before we get into the details of loading configuration from providers, we’ll take a
step back and look at where this process happens—inside WebHostBuilder. For
ASP.NET Core 2.0 apps built using the default templates, that’s invariably inside the
WebHost.CreateDefaultBuilder() method.
11.2 Configuring your application with
CreateDefaultBuilder
As you saw in chapter 2, the default templates in ASP.NET Core 2.0 use the Create-
DefaultBuilder method. This is an opinionated helper method that sets up a num-
ber of defaults for your app.
public class Program
{
public static void Main(string[] args)
{
BuildWebHost(args).Run();
}
public static IWebHost BuildWebHost(string[] args) =>
WebHost.CreateDefaultBuilder(args)
.UseStartup<Startup>()
.Build();
}
In chapter 2, I glossed over this method, as you will only rarely need to change it for
simple apps. But as your application grows, and if you want to change how configura-
tion is loaded for your application, you may find you need to break it apart.
This listing shows an overview of the CreateDefaultBuilder method, so you can
see how WebHostBuilder is constructed.
public static IWebHostBuilder CreateDefaultBuilder(string[] args)
{
var builder = new WebHostBuilder()
.UseKestrel()
.UseContentRoot(Directory.GetCurrentDirectory())
.ConfigureAppConfiguration((hostingContext, config) =>
{
// Configuration provider setup
})
Listing 11.1 Using CreateDefaultBuilder to set up configuration
Listing 11.2 The WebHost.CreateDefaultBuilder method
The entry point for your
application creates
IWebHost and calls Run.
CreateDefaultBuilder sets up
a number of defaults,
including configuration.
Creating an instance of
WebHostBuilder
Kestrel is the default HTTP
server in ASP.NET Core.
The content root defines the
directory where configuration
files can be found.
Configures application settings,
the topic of this chapter](https://image.slidesharecdn.com/asp-230807173723-31e70040/75/ASP-NET-Core-in-Action-2018-pdf-334-2048.jpg)
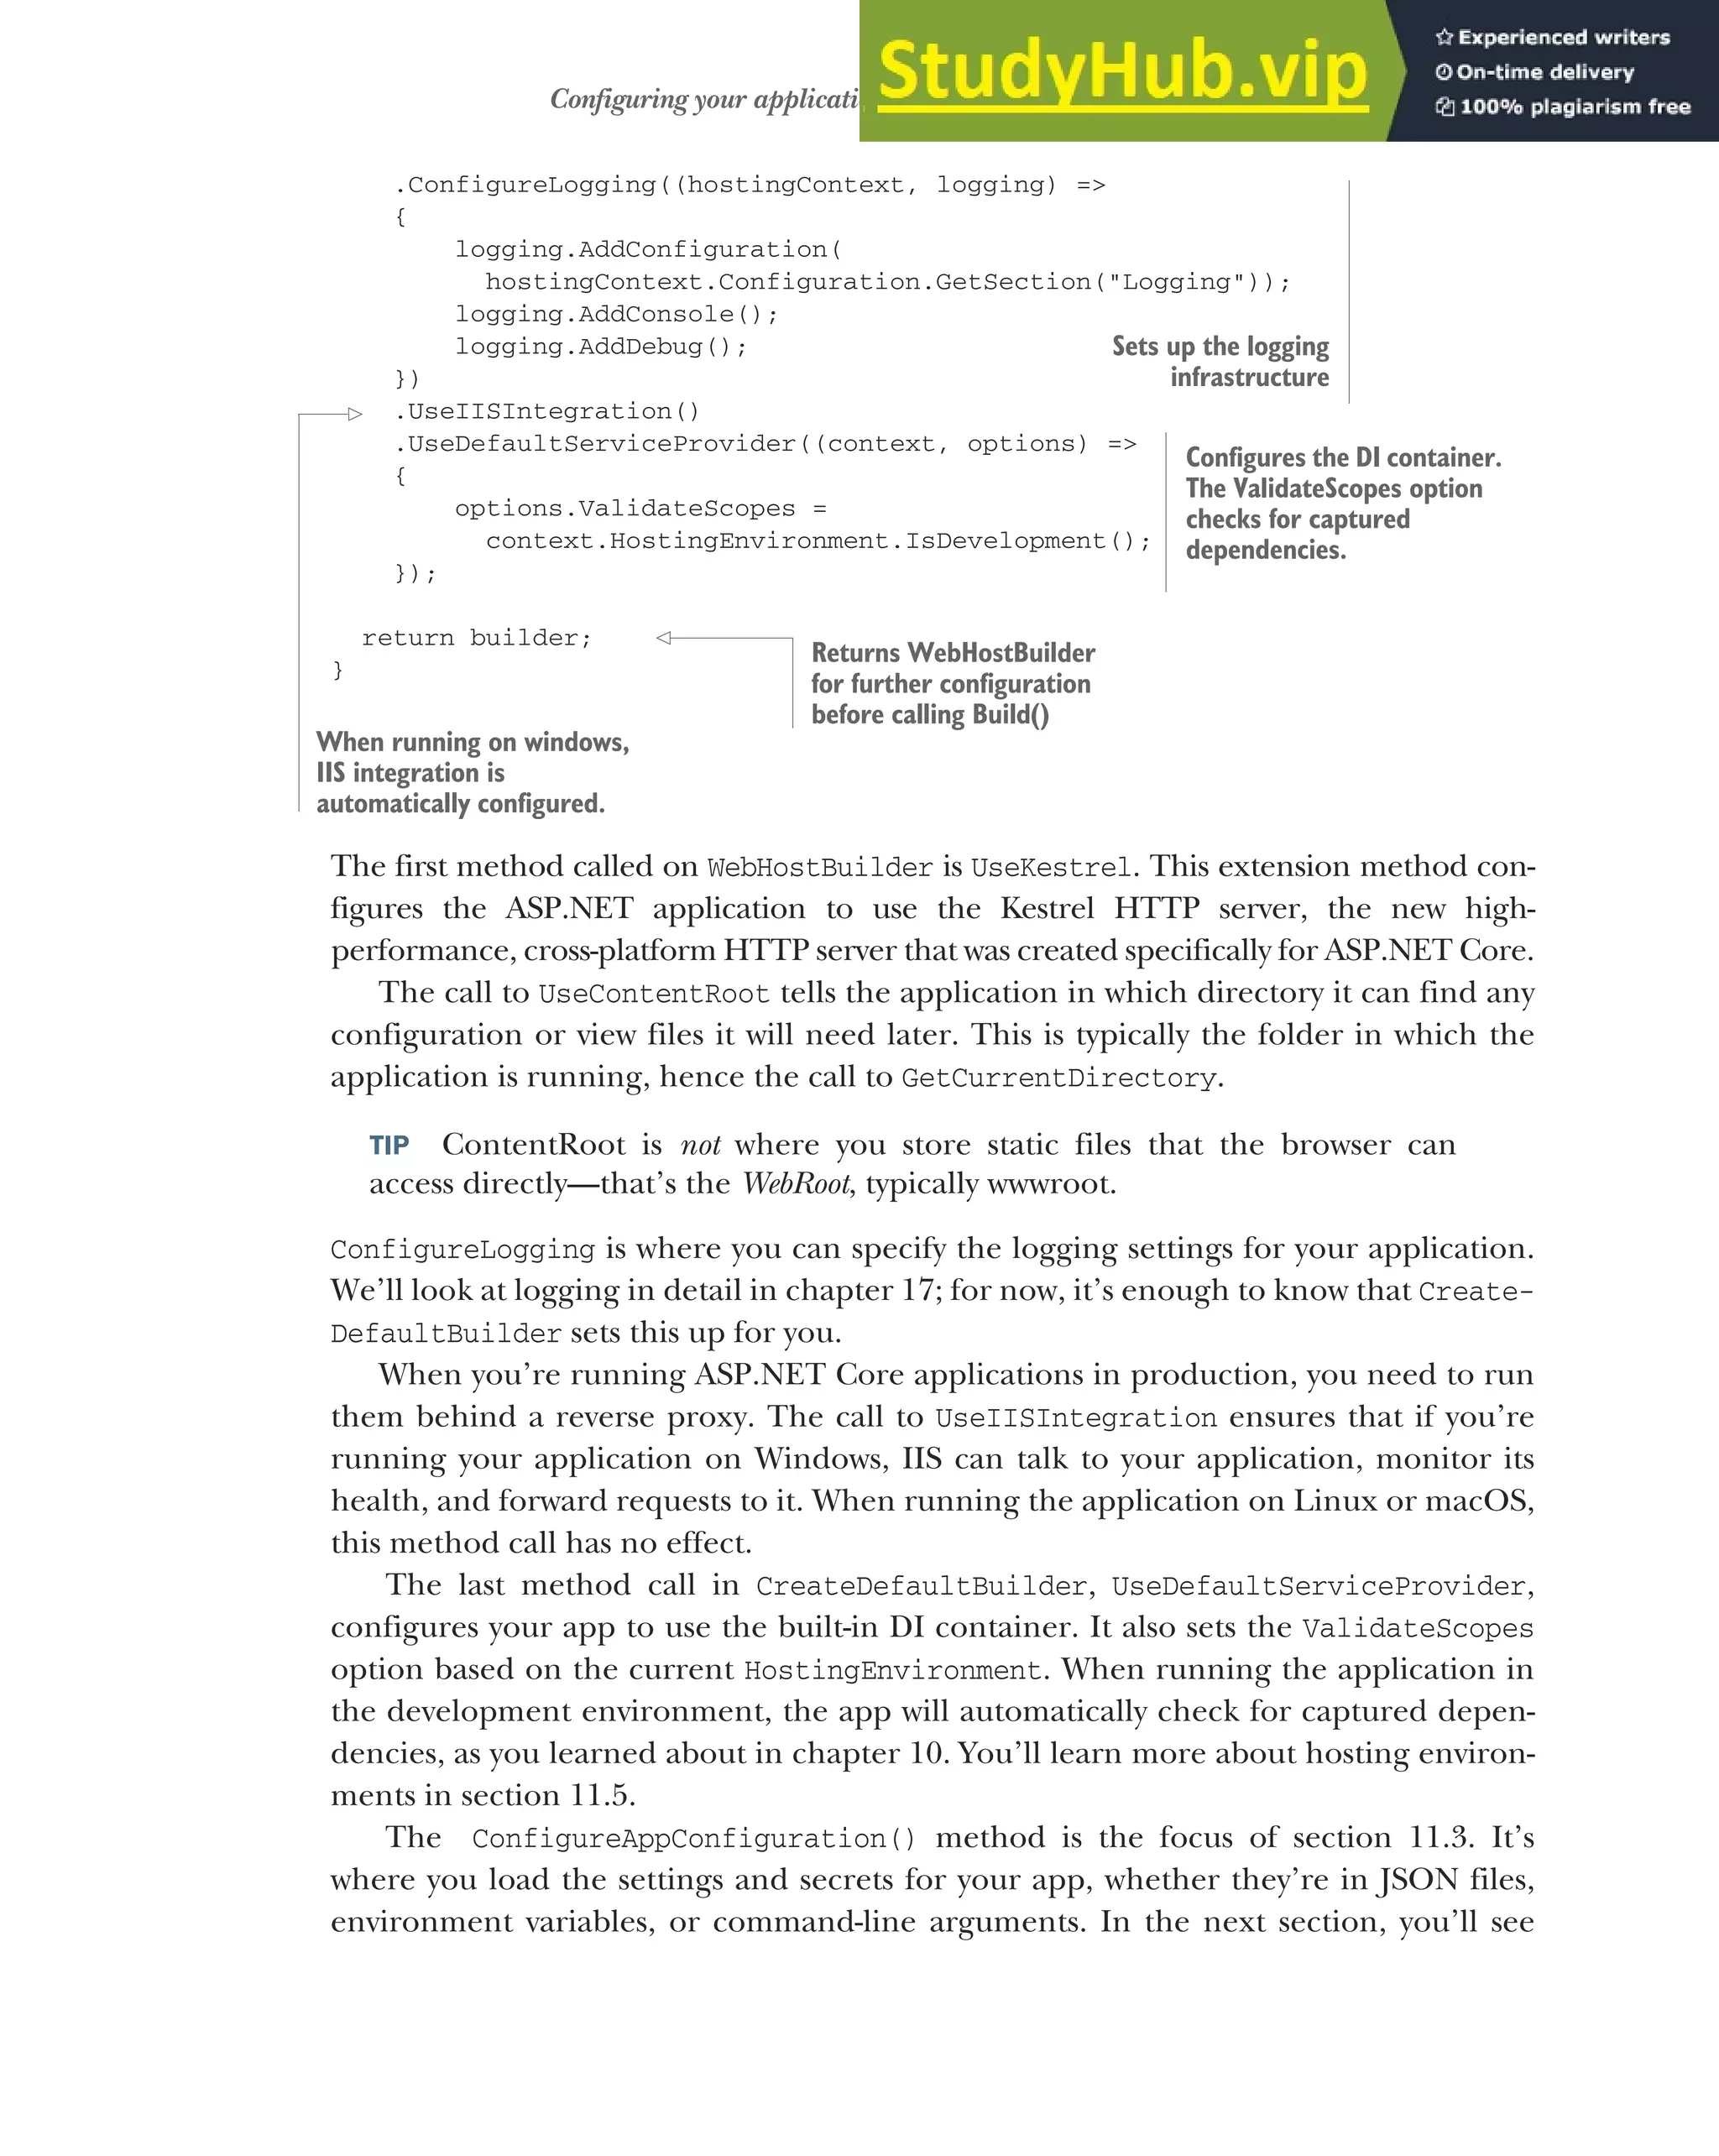

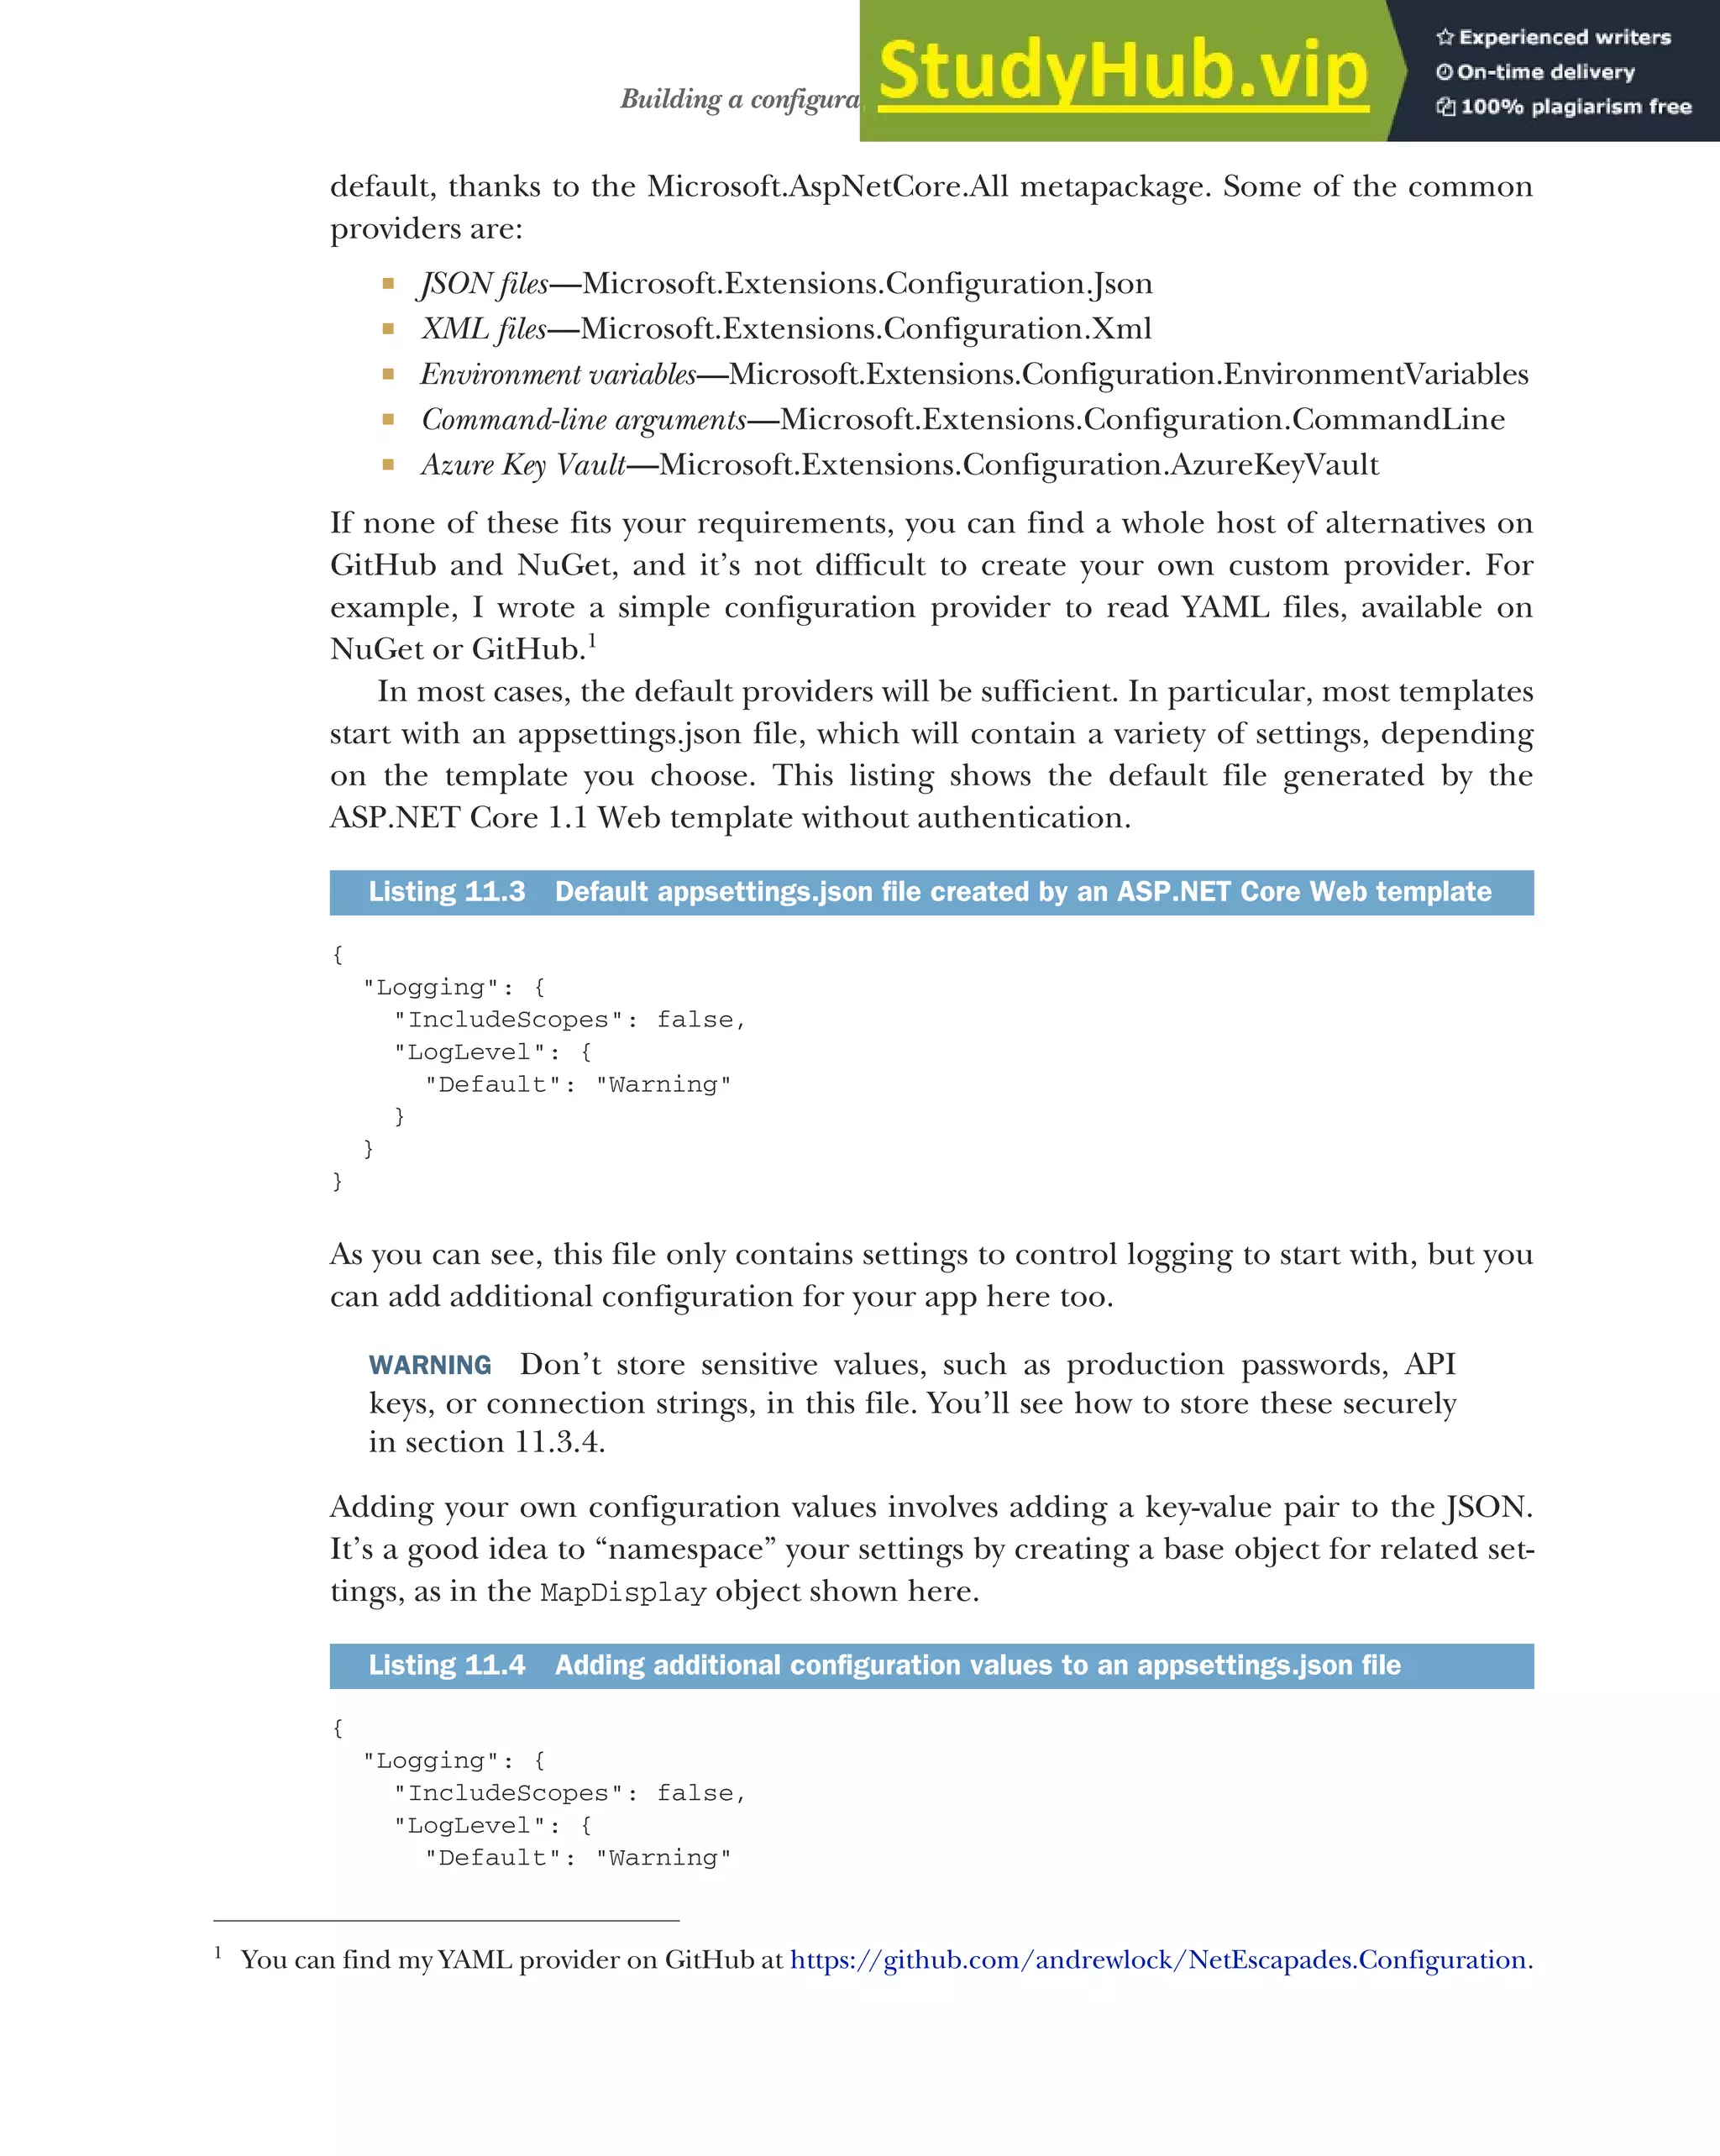
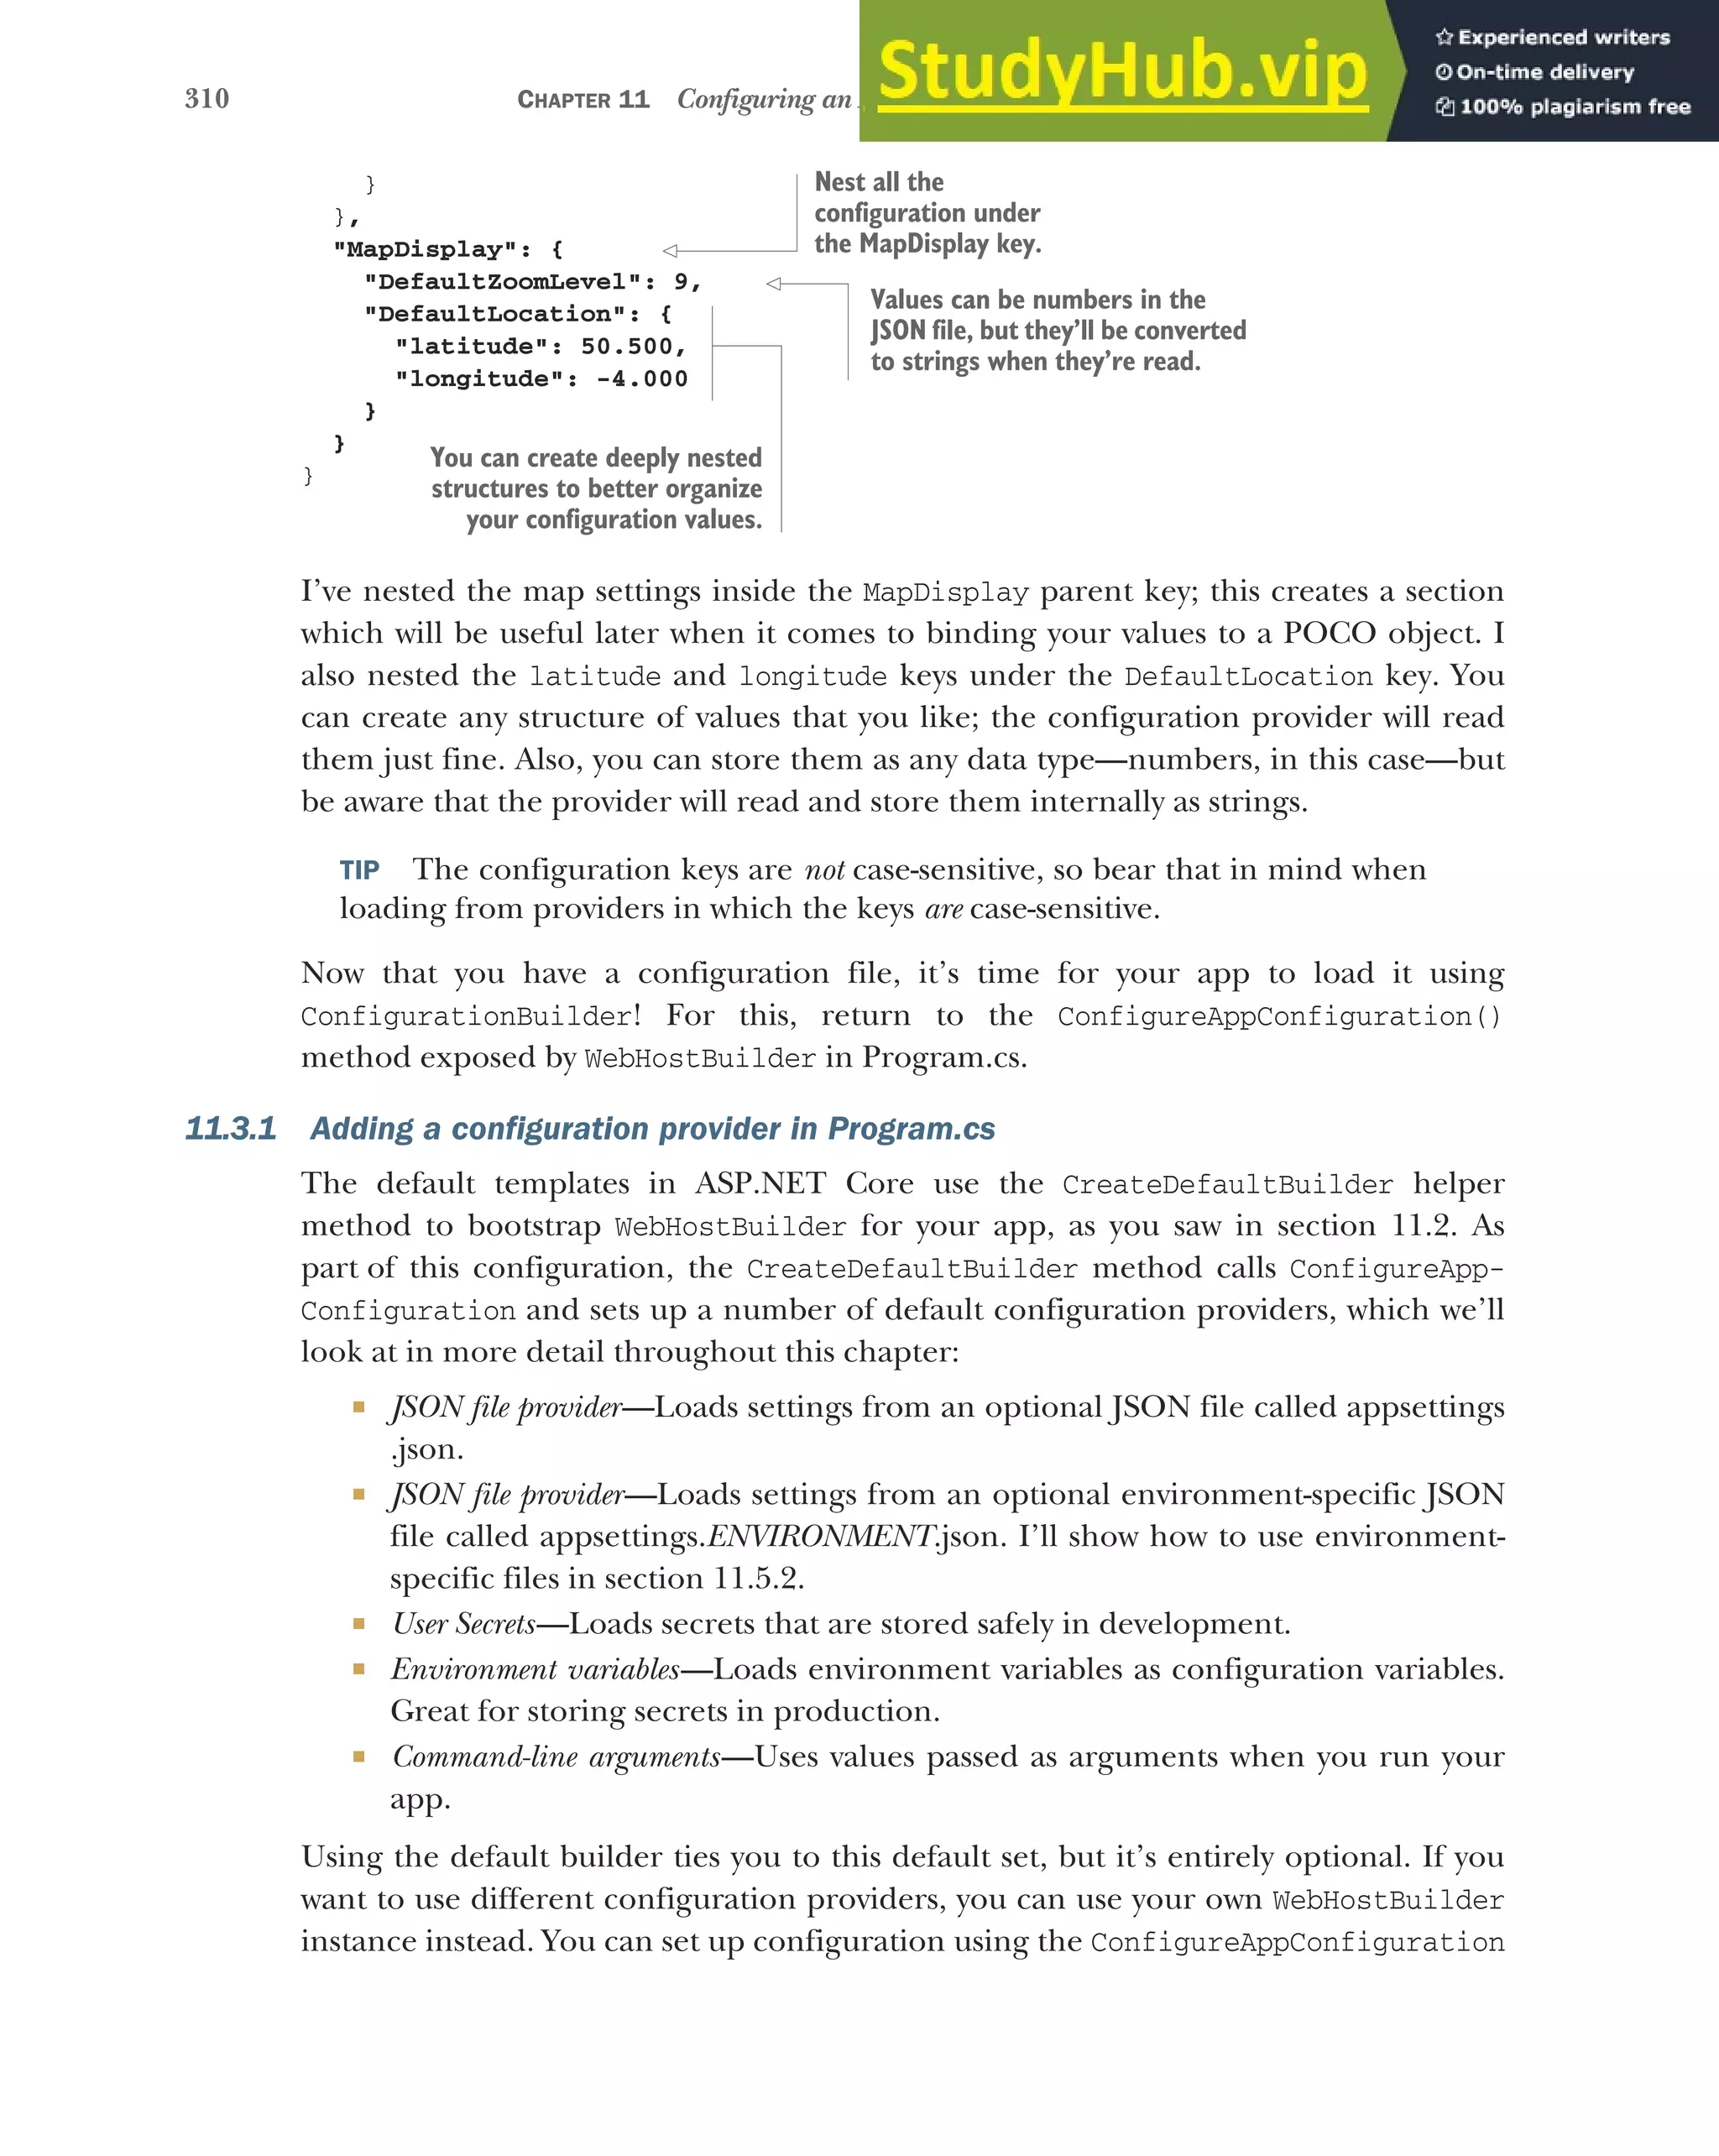
![311
Building a configuration object for your app
method, as shown in the following listing, in which you configure a JSON provider to
load the appsettings.json file. For brevity, I’ve omitted the logging and service provider
configuration that you saw in listing 11.2, but you’d need to include this in practice.
public class Program
{
public static void Main(string[] args)
{
BuildWebHost(args).Run();
}
public static IWebHost BuildWebHost(string[] args) =>
new WebHostBuilder()
.UseKestrel()
.UseContentRoot(Directory.GetCurrentDirectory())
.ConfigureAppConfiguration(AddAppConfiguration)
.ConfigureLogging(
(hostingContext, logging) => { /* Detail not shown */ })
.UseIISIntegration()
.UseDefaultServiceProvider(
(context, options) =>{ /* Detail not shown */ })
.UseStartup<Startup>()
.Build();
public static void AddAppConfiguration(
WebHostBuilderContext hostingContext,
IConfigurationBuilder config)
{
config.AddJsonFile("appsettings.json", optional: true);
}
}
TIP In listing 11.5, I extracted the configuration to a static helper method,
AddAppConfiguration, but you can also provide this inline as a lambda
method.
In ASP.NET Core 2.0, WebHostBuilder creates an IConfigurationBuilder instance
before invoking the ConfigureAppConfiguration method. All you need to do is add
the configuration providers for your application.
In this example, you’ve added a single JSON configuration provider by calling the
AddJsonFile extension method and providing a filename. You’ve also set the value of
optional to true. This tells the configuration provider to skip over files it can’t find at
runtime, instead of throwing FileNotFoundException. Note that the extension
method just registers the provider at this point, it doesn’t try to load the file yet.
And that’s it! The WebHostBuilder instance takes care of calling Build(), which
generates IConfigurationRoot, which represents your configuration object. This is
then registered as an IConfiguration instance with the DI container, so you can
Listing 11.5 Loading appsettings.json using a custom WebHostBuilder
Adds the
configuration
setup function to
WebHostBuilder
WebHostBuilder provides a
hosting context and an instance of
ConfigurationBuilder.
Adds a JSON configuration
provider, providing the filename
of the configuration file](https://image.slidesharecdn.com/asp-230807173723-31e70040/75/ASP-NET-Core-in-Action-2018-pdf-339-2048.jpg)
![312 CHAPTER 11 Configuring an ASP.NET Core application
inject it into your classes. You’d commonly inject this into the constructor of your
Startup class, so you can use it in the Configure and ConfigureServices methods:
public class Startup
{
public Startup(IConfiguration config)
{
Configuration = config
}
public IConfiguration Configuration { get; }
}
NOTE The ASP.NET Core 2.0 WebHostBuilder registers the configuration
object as an IConfiguration in the DI container, not an IConfiguration-
Root. In ASP.NET Core 1, you have to manually register the configuration
with DI yourself.
At this point, at the end of the Startup constructor, you have a fully loaded configura-
tion object! But what can you do with it? The IConfigurationRoot stores configuration
as a set of key-value string pairs. You can access any value by its key, using standard dic-
tionary syntax. For example, you could use
var zoomLevel = Configuration["MapDisplay:DefaultZoomLevel"];
to retrieve the configured zoom level for your application. Note that I used a : to des-
ignate a separate section. Similarly, to retrieve the latitude key, you could use
Configuration["MapDisplay:DefaultLocation:Latitude"];
You can also grab a whole section of the configuration using the GetSection(section)
method. This grabs a chunk of the configuration and resets the namespace. Another
way of getting the latitude key would be
Configuration.GetSection("MapDisplay”)["DefaultLocation:Latitude"];
Accessing setting values like this is useful in the ConfigureServices and Configure
methods of Startup, when you’re defining your application. When setting up your
application to connect to a database, for example, you’ll often load a connection
string from the Configuration object (you’ll see a concrete example of this in the
next chapter, when we look at Entity Framework Core).
If you need to access the configuration object like this from classes other than
Startup, you can use DI to take it as a dependency in your service’s constructor. But
accessing configuration using string keys like this isn’t particularly convenient; you
should try to use strongly typed configuration instead, as you’ll see in section 11.4.
WARNING ASP.NET Core 1 doesn’t register the configuration object with the
DI container by default. If you need this functionality, you can register it your-
self as a singleton by calling services.AddSingleton(Configuration) in
Startup.ConfigureServices.](https://image.slidesharecdn.com/asp-230807173723-31e70040/75/ASP-NET-Core-in-Action-2018-pdf-340-2048.jpg)

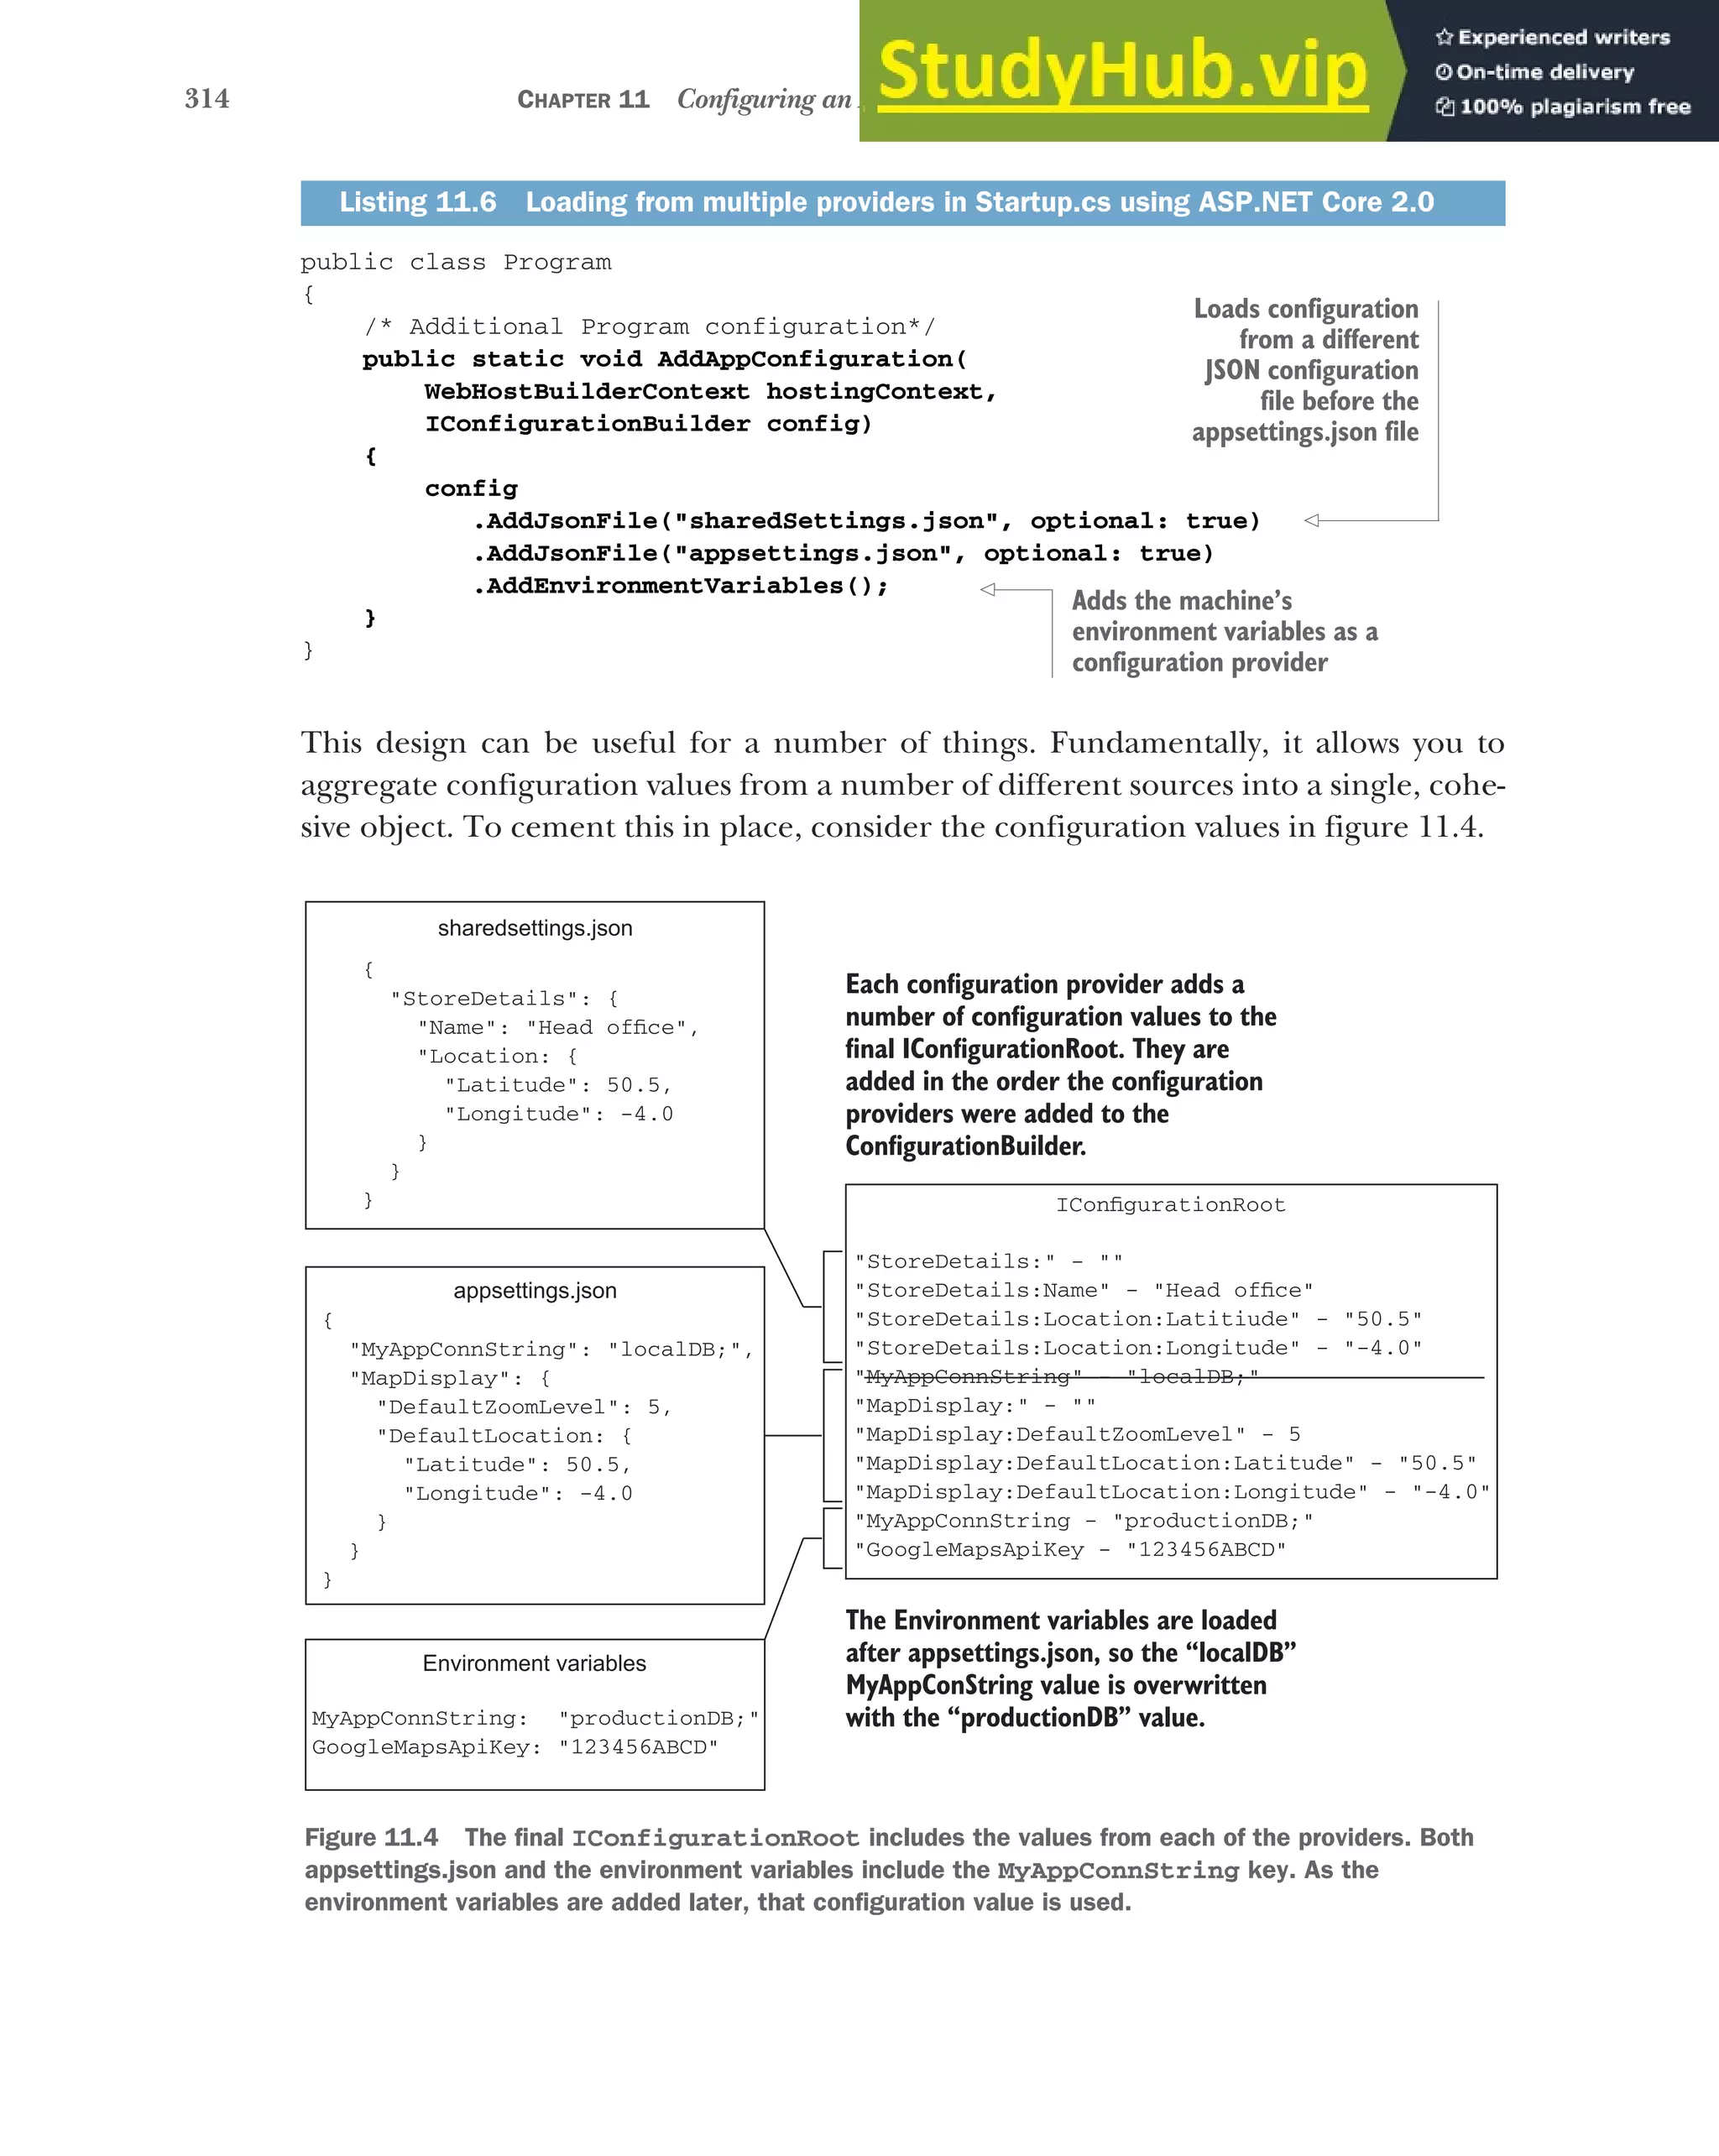

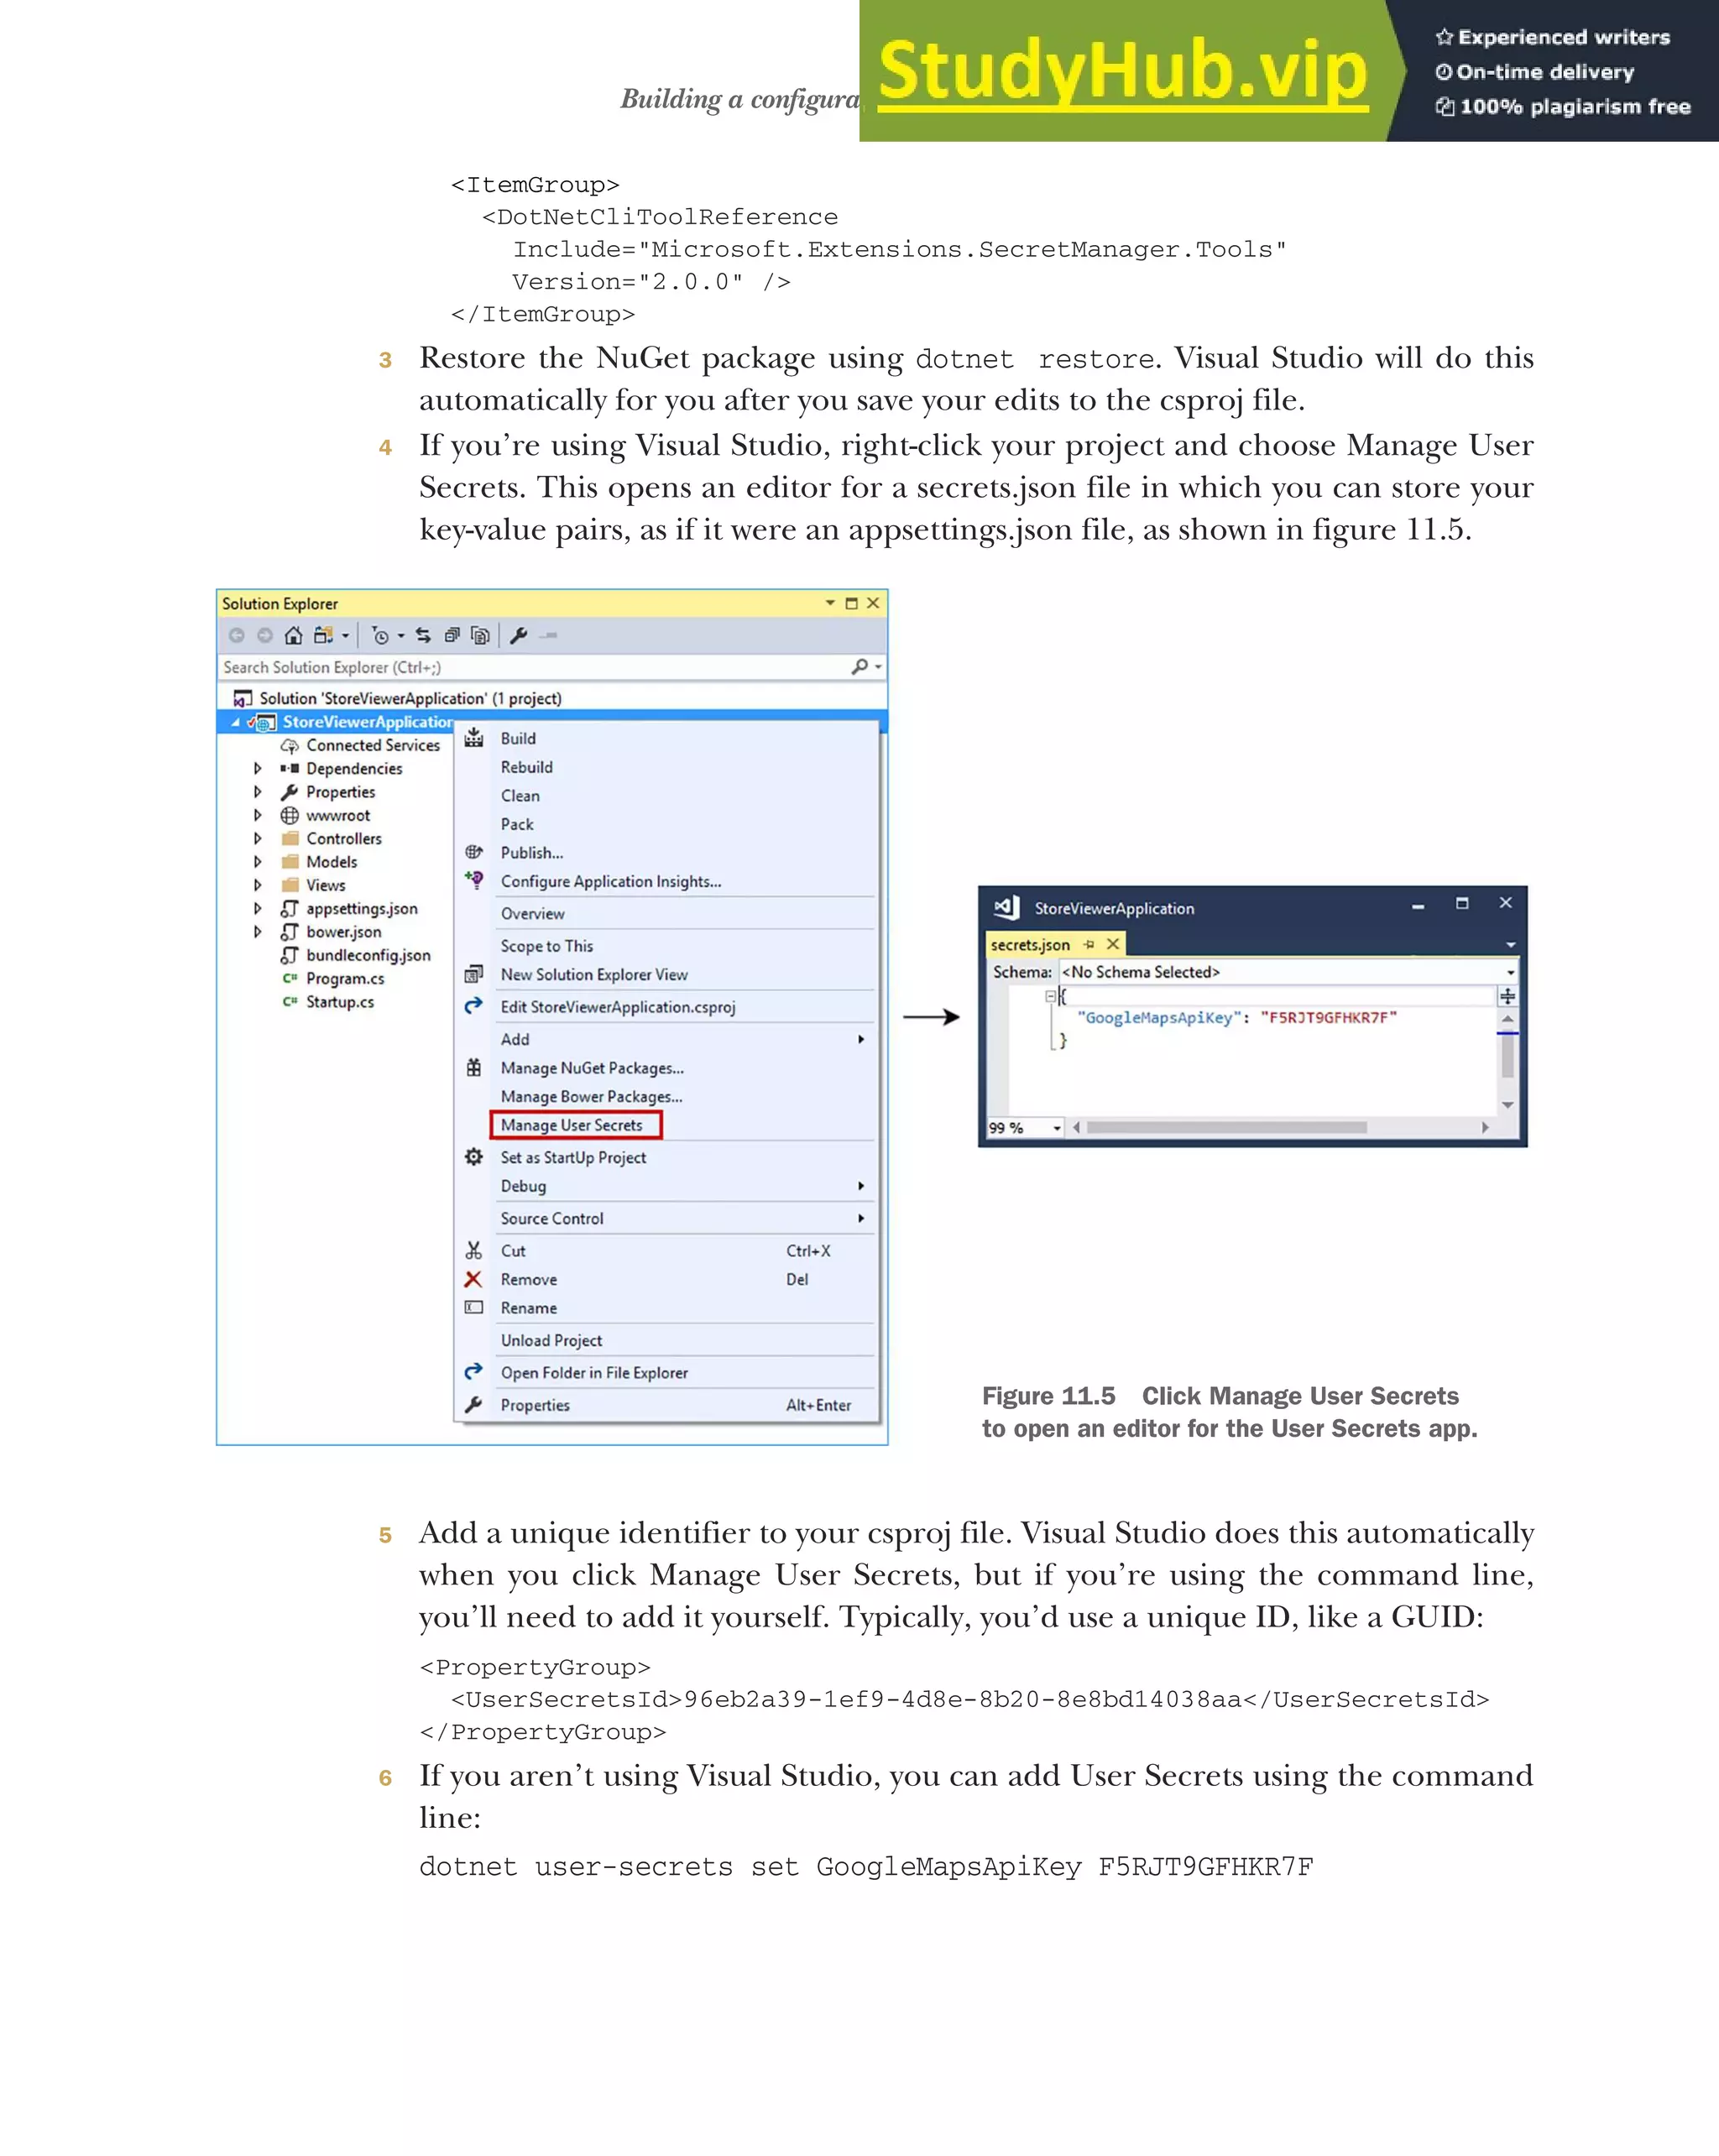

![320 CHAPTER 11 Configuring an ASP.NET Core application
With that in place, any changes you make to the file will be mirrored in IConfiguration-
Root. But as I said at the start of this chapter, IConfigurationRoot isn’t the preferred
way to pass settings around in your application. Instead, as you’ll see in the next sec-
tion, you should favor strongly typed POCO objects.
11.4 Using strongly typed settings with the options pattern
Most of the examples I’ve shown so far have been how to get values into IConfiguration-
Root, as opposed to how to use them. You’ve seen that you can access a key using the
Configuration["key"] dictionary syntax, but using string keys like this feels messy
and prone to typos.
Instead, ASP.NET Core promotes the use of strongly typed settings. These are
POCO objects that you define and create and represent a small collection of settings,
scoped to a single feature in your app.
The following listing shows both the settings for your store locator component and
display settings to customize the homepage of the app. They’re separated into two
separate objects with "MapDisplay" and "HomePageSettings" keys corresponding to
the different areas of the app they impact.
{
"MapDisplay": {
"DefaultZoomLevel": 6,
"DefaultLocation": {
"latitude": 50.500,
"longitude": -4.000
}
},
"HomePageSettings": {
"Title": "Acme Store Locator",
"ShowCopyright": true
}
}
The simplest approach to making the homepage settings available to HomeController
would be to inject IConfiguration and access the values using the dictionary syntax;
for example:
public class HomeController : Controller
{
public HomeController(IConfiguration config)
{
var title = config["HomePageSettings:Title"];
var showCopyright = bool.Parse(
config["HomePageSettings:ShowCopyright"]);
}
}
Listing 11.8 Separating settings into different objects in appsettings.json
Settings related to the store
locator section of the app
General settings related to
the app’s homepage](https://image.slidesharecdn.com/asp-230807173723-31e70040/75/ASP-NET-Core-in-Action-2018-pdf-348-2048.jpg)

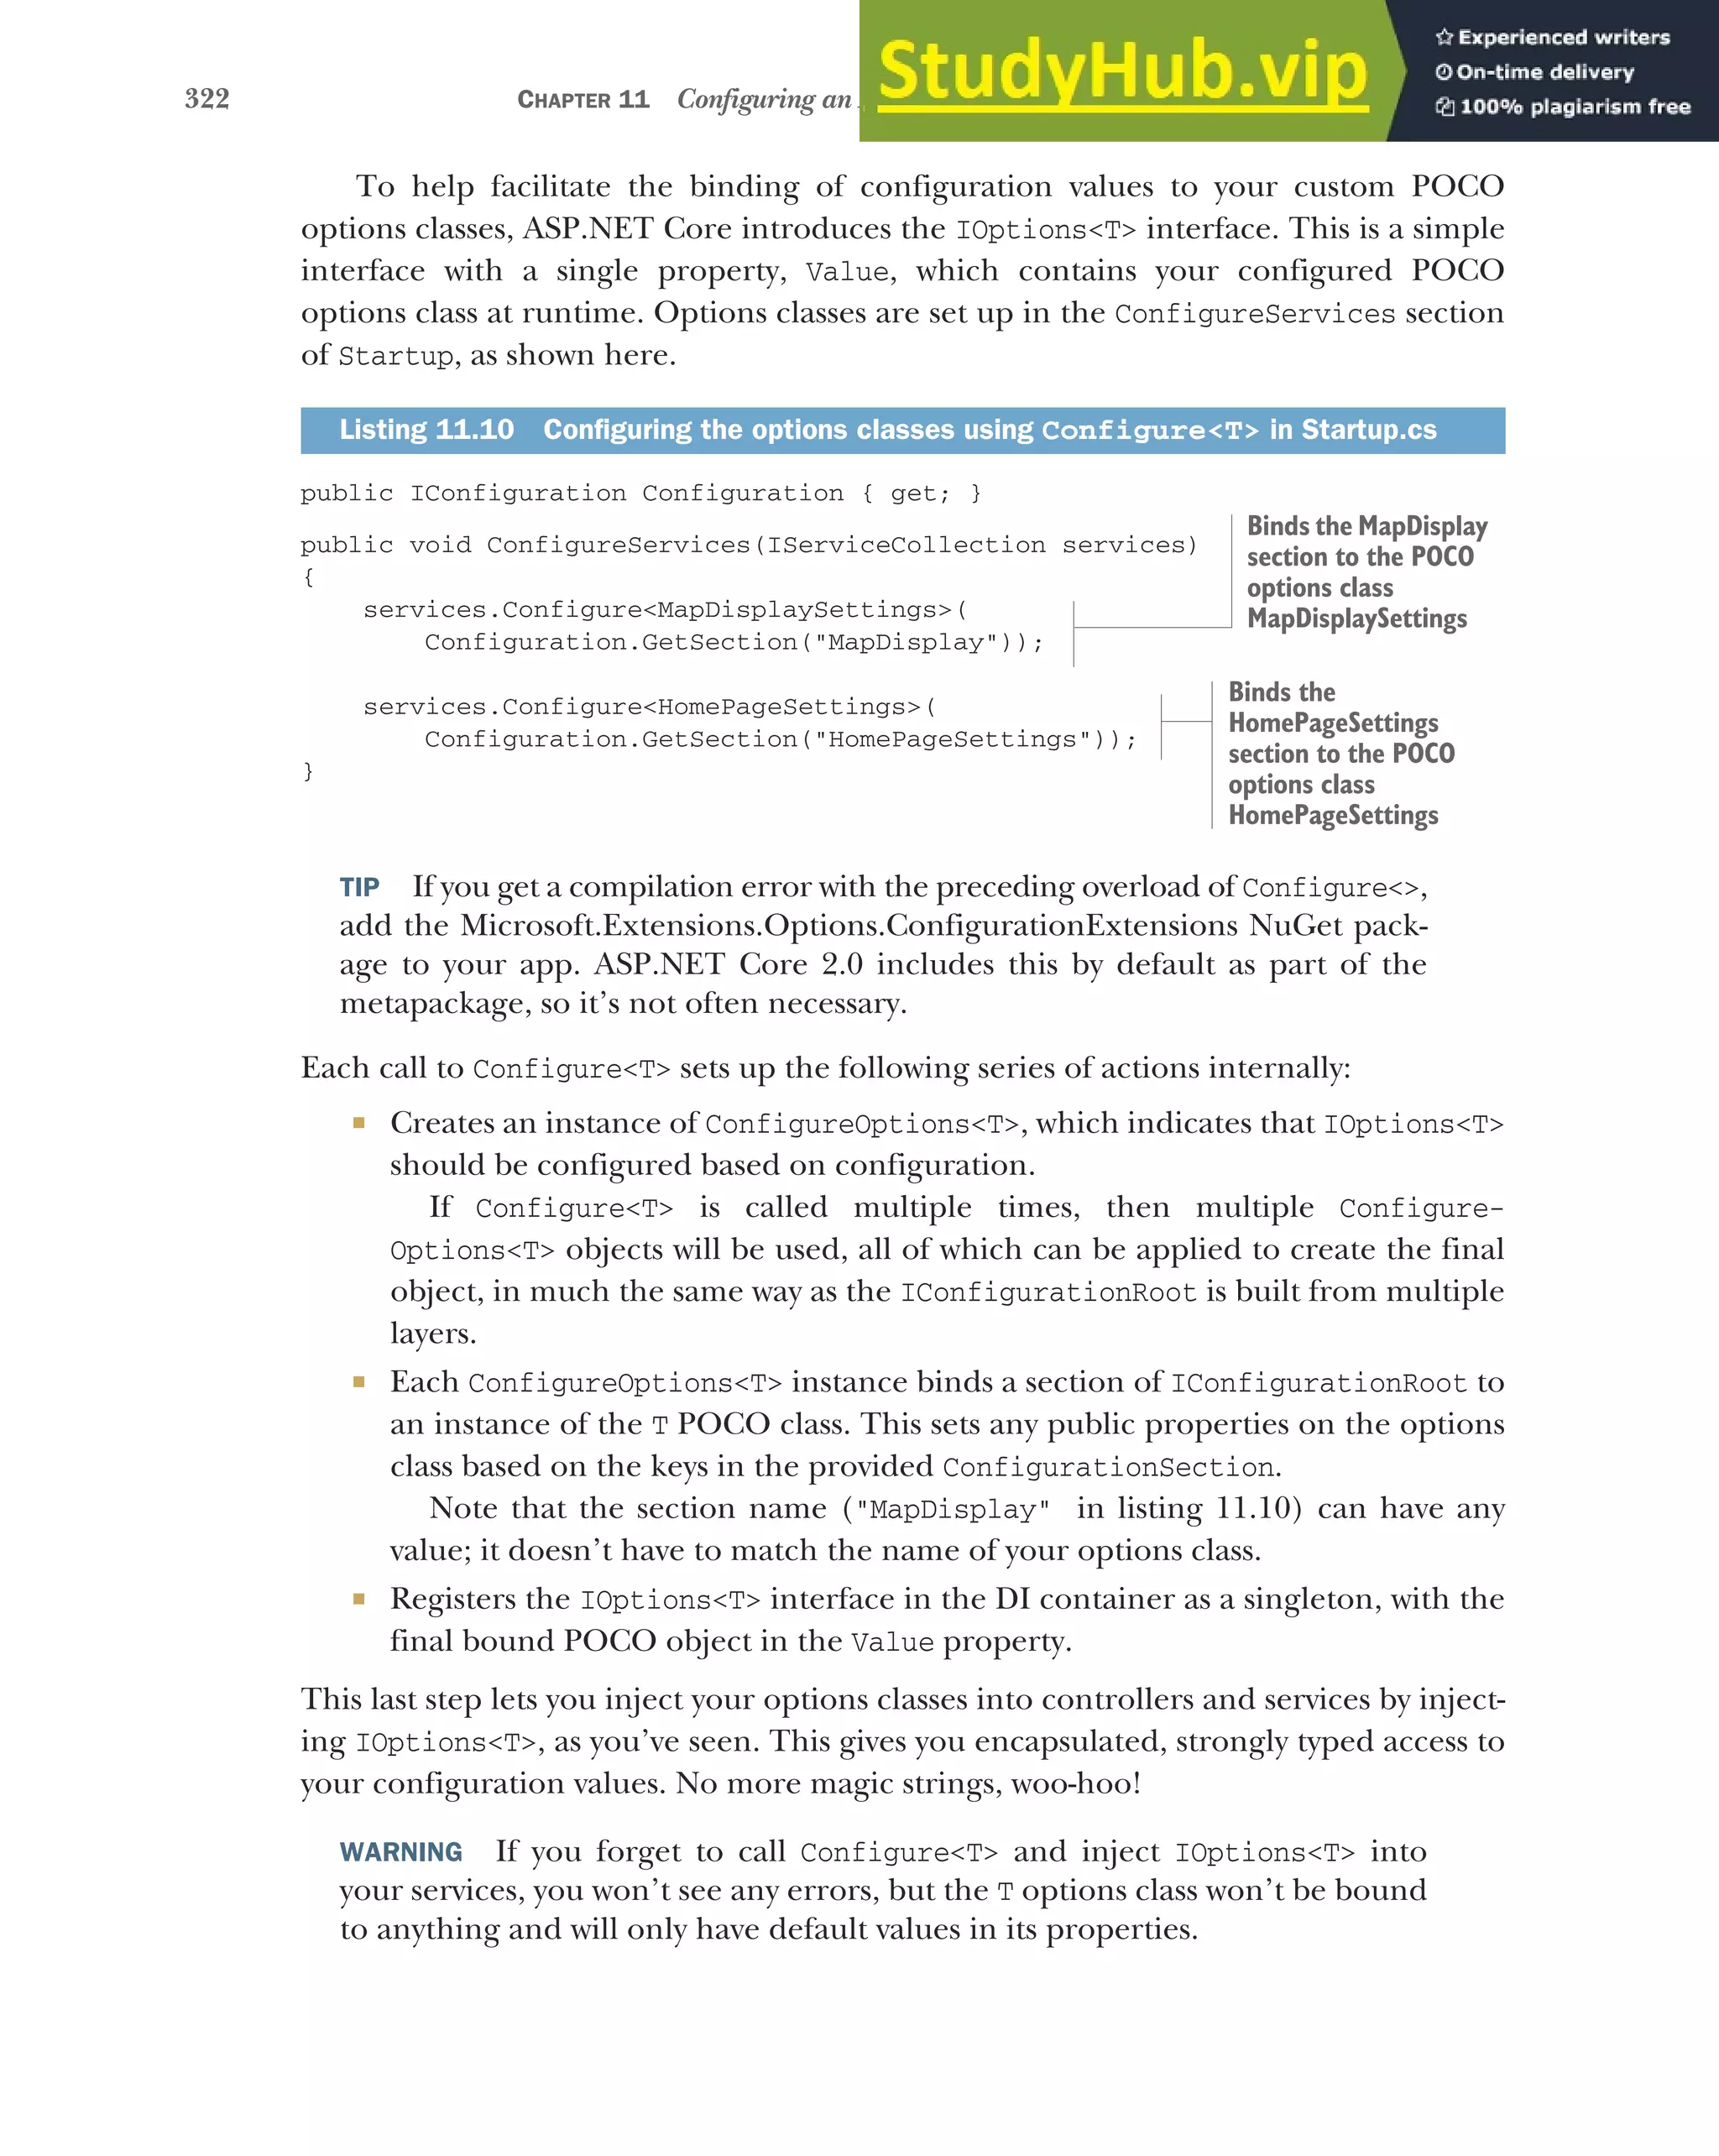
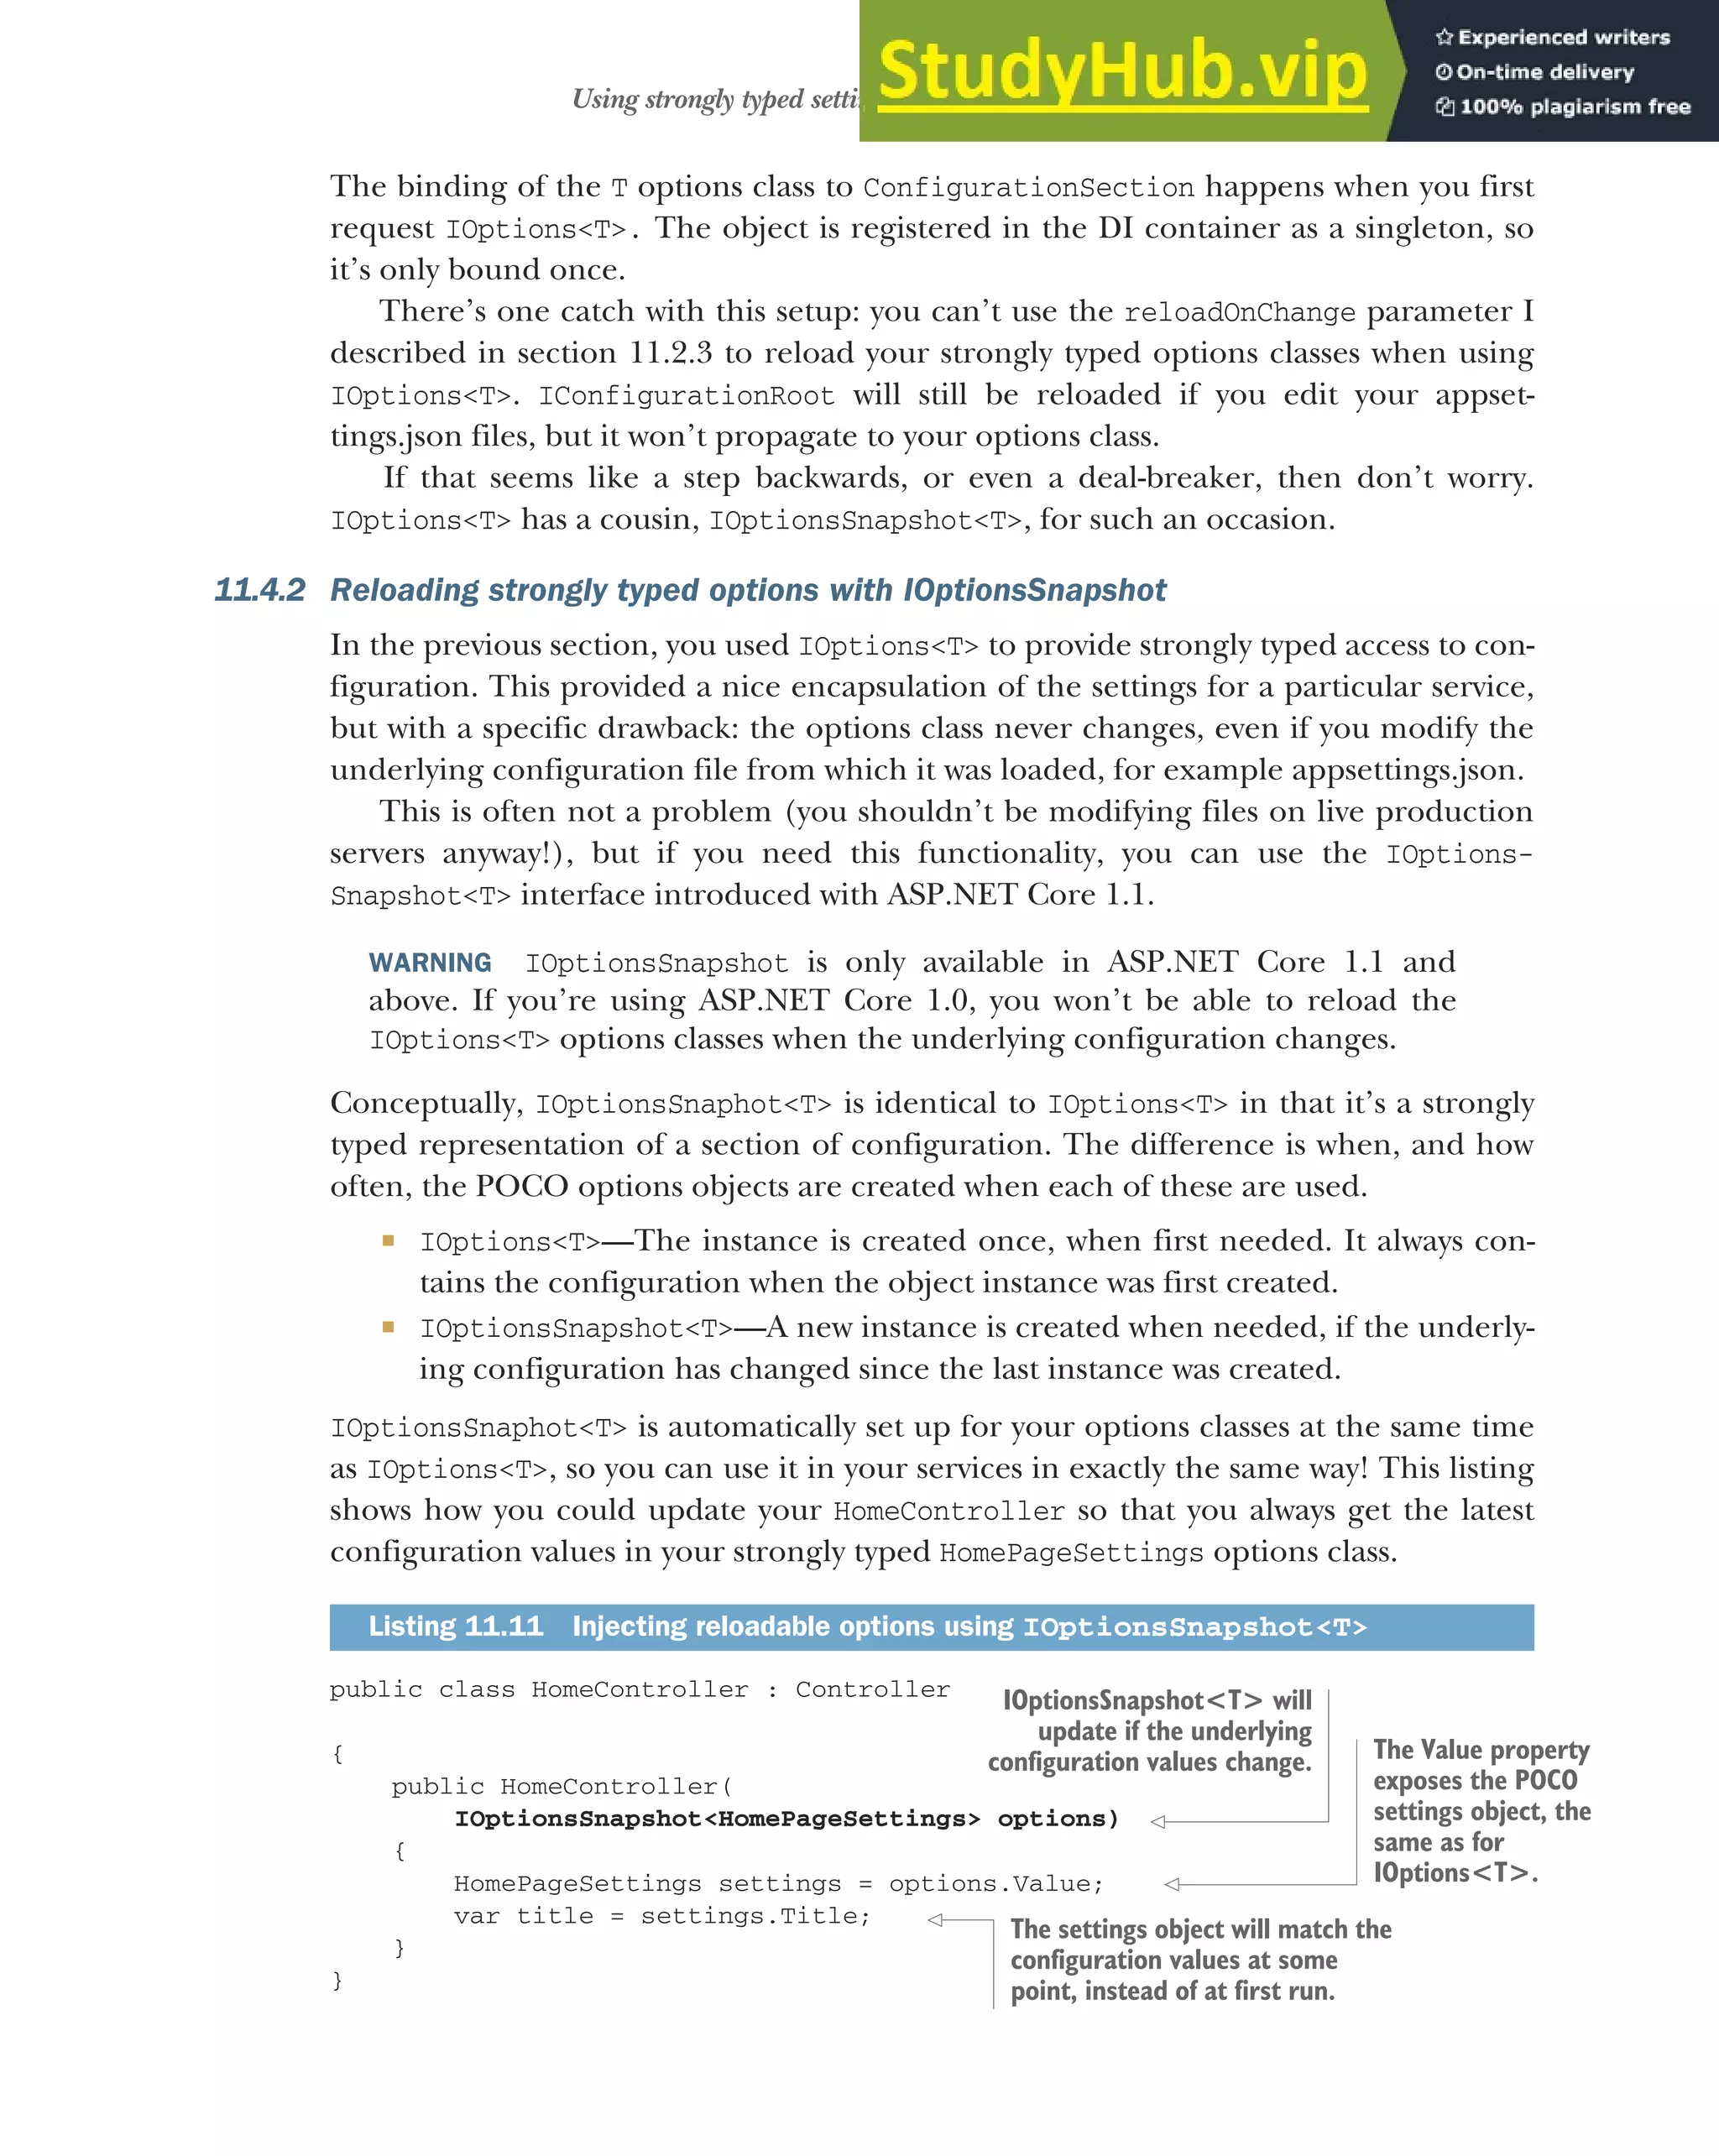
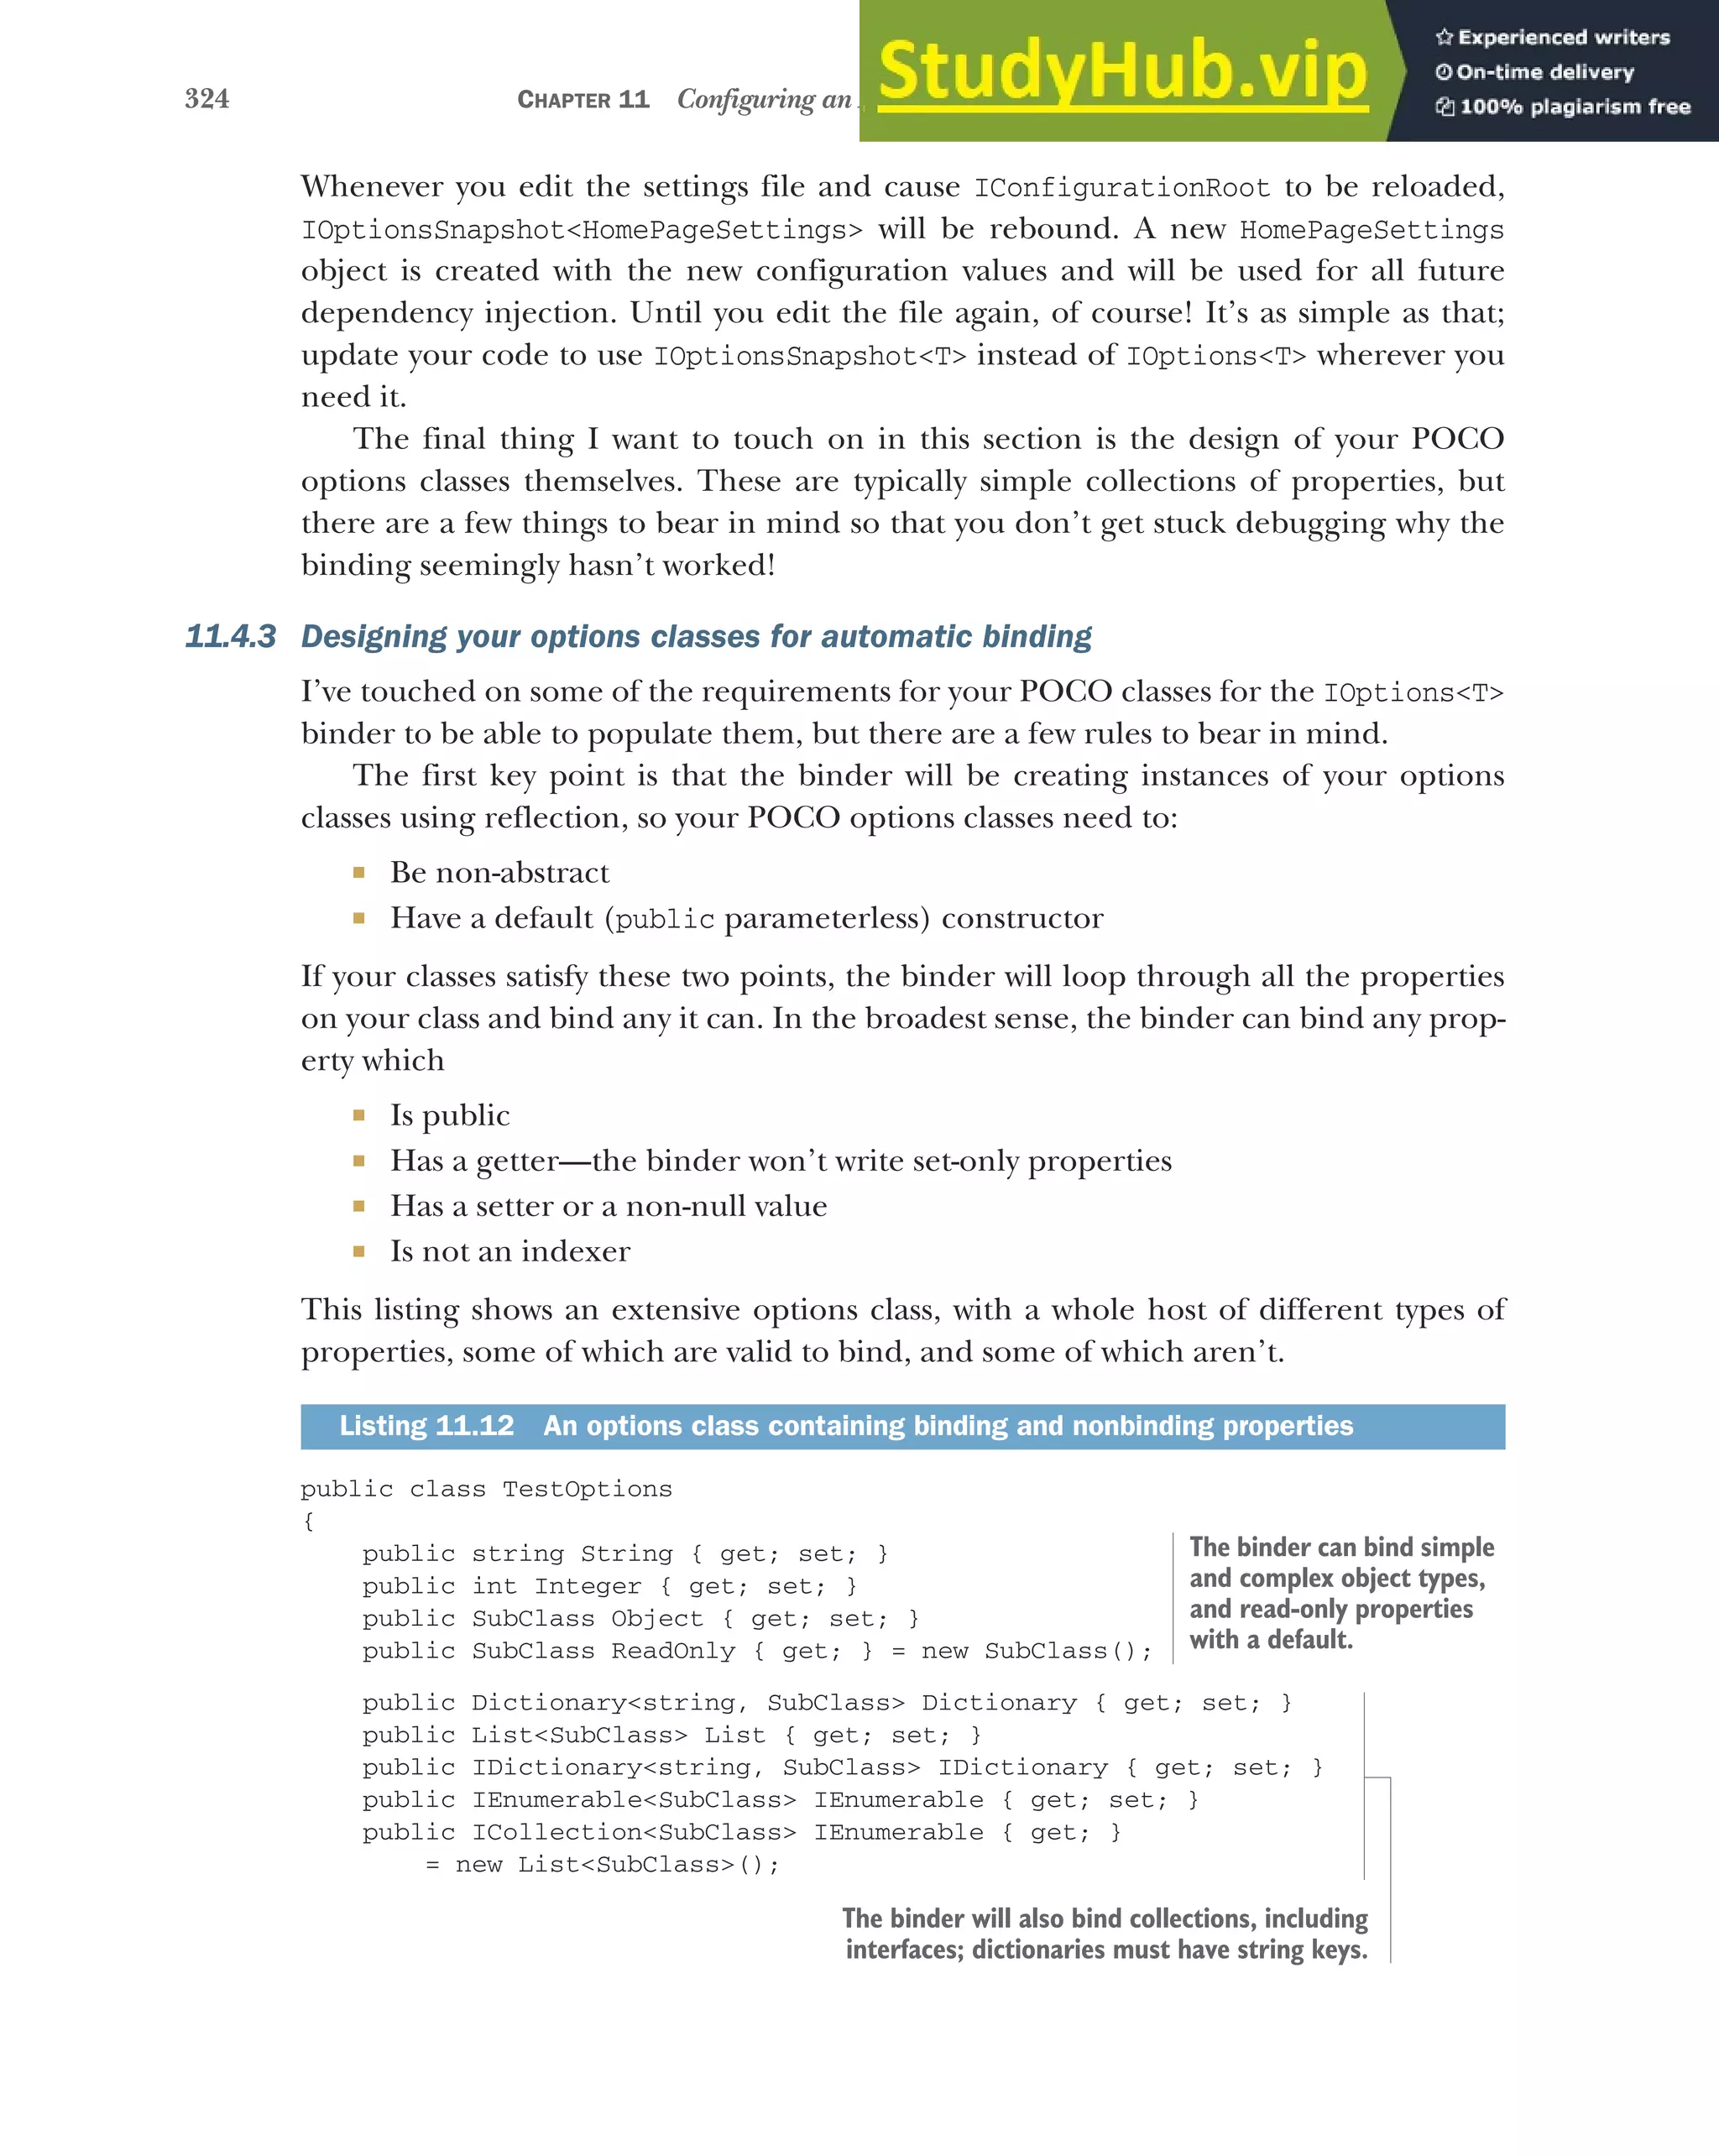
![325
Using strongly typed settings with the options pattern
internal string NotPublic { get; set; }
public SubClass SetOnly { set => _setOnly = value; }
public SubClass NullReadOnly { get; } = null;
public SubClass NullPrivateSetter { get; private set; } = null;
public SubClass this[int i] {
get => _indexerList[i];
set => _indexerList[i] = value;
}
public List<SubClass> NullList { get; }
public Dictionary<int, SubClass> IntegerKeys { get; set; }
public IEnumerable<SubClass> ReadOnlyEnumerable { get; }
= new List<SubClass>();
public SubClass _setOnly = null;
private readonly List<SubClass> _indexerList
= new List<SubClass>();
public class SubClass
{
public string Value { get; set; }
}
}
As shown in the listing, the binder generally supports collections too—both imple-
mentations and interfaces. If the collection property is already initialized, it will use
that, but the binder can also create backing fields for them. If your property imple-
ments any of the following classes, the binder will create a List<> of the appropriate
type as the backing object:
IReadOnlyList<>
IReadOnlyCollection<>
ICollection<>
IEnumerable<>
WARNING You can’t bind to an IEnumerable<> property that has already
been initialized, as the underlying type doesn’t expose an Add function! You
can bind to an IEnumerable<> if you leave its initial value as null.
Similarly, the binder will create a Dictionary<,> as the backing field for properties
with dictionary interfaces, as long as they use string keys:
IDictionary<,>
IReadOnlyDictionary<,>
WARNING You can’t bind dictionaries with nonstring values, such as int.
Clearly there are quite a few nuances here, but if you stick to the simple cases from the
preceding example, you’ll be fine. Be sure to check for typos in your JSON files!
That brings us to the end of this section on strongly typed settings. In the next sec-
tion, we’ll look at how you can dynamically change your settings at runtime, based on
the environment in which your app is running.
The binder can’t
bind nonpublic,
set-only, null-read-
only, or indexer
properties.
These
collection
properties
can’t be
bound.
The backing fields
for SetOnly and
Indexer properties](https://image.slidesharecdn.com/asp-230807173723-31e70040/75/ASP-NET-Core-in-Action-2018-pdf-353-2048.jpg)
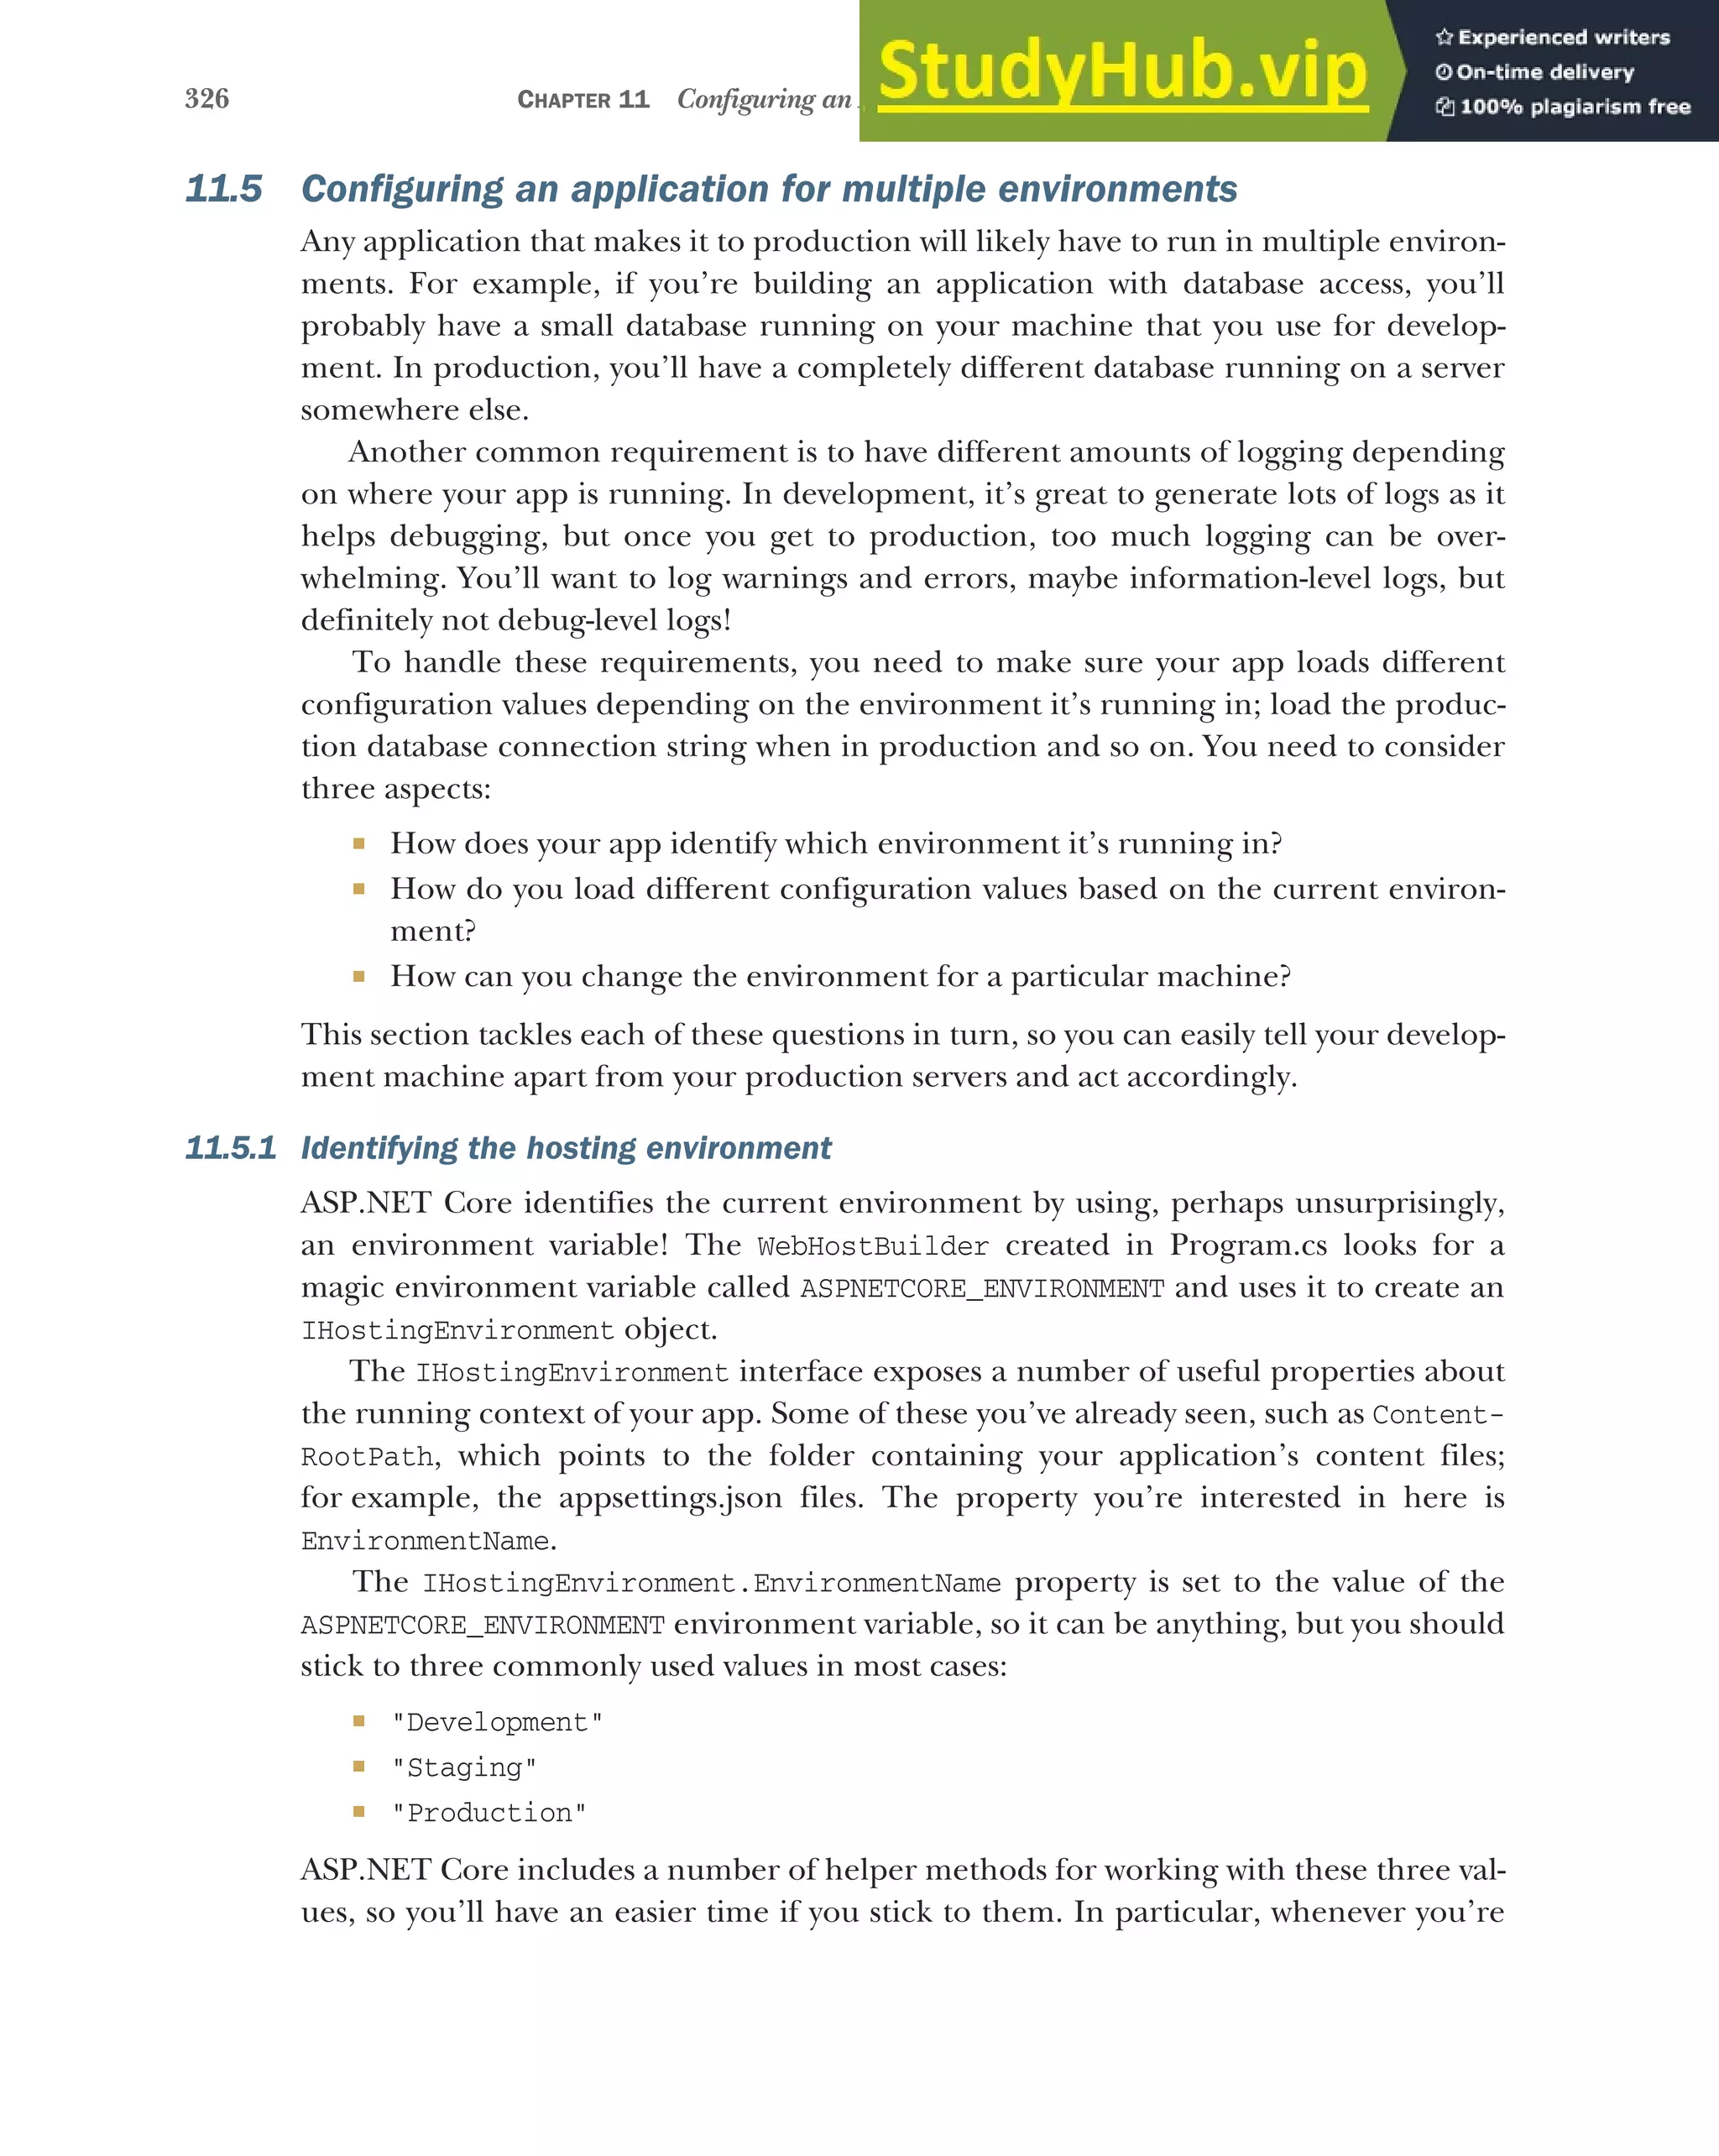


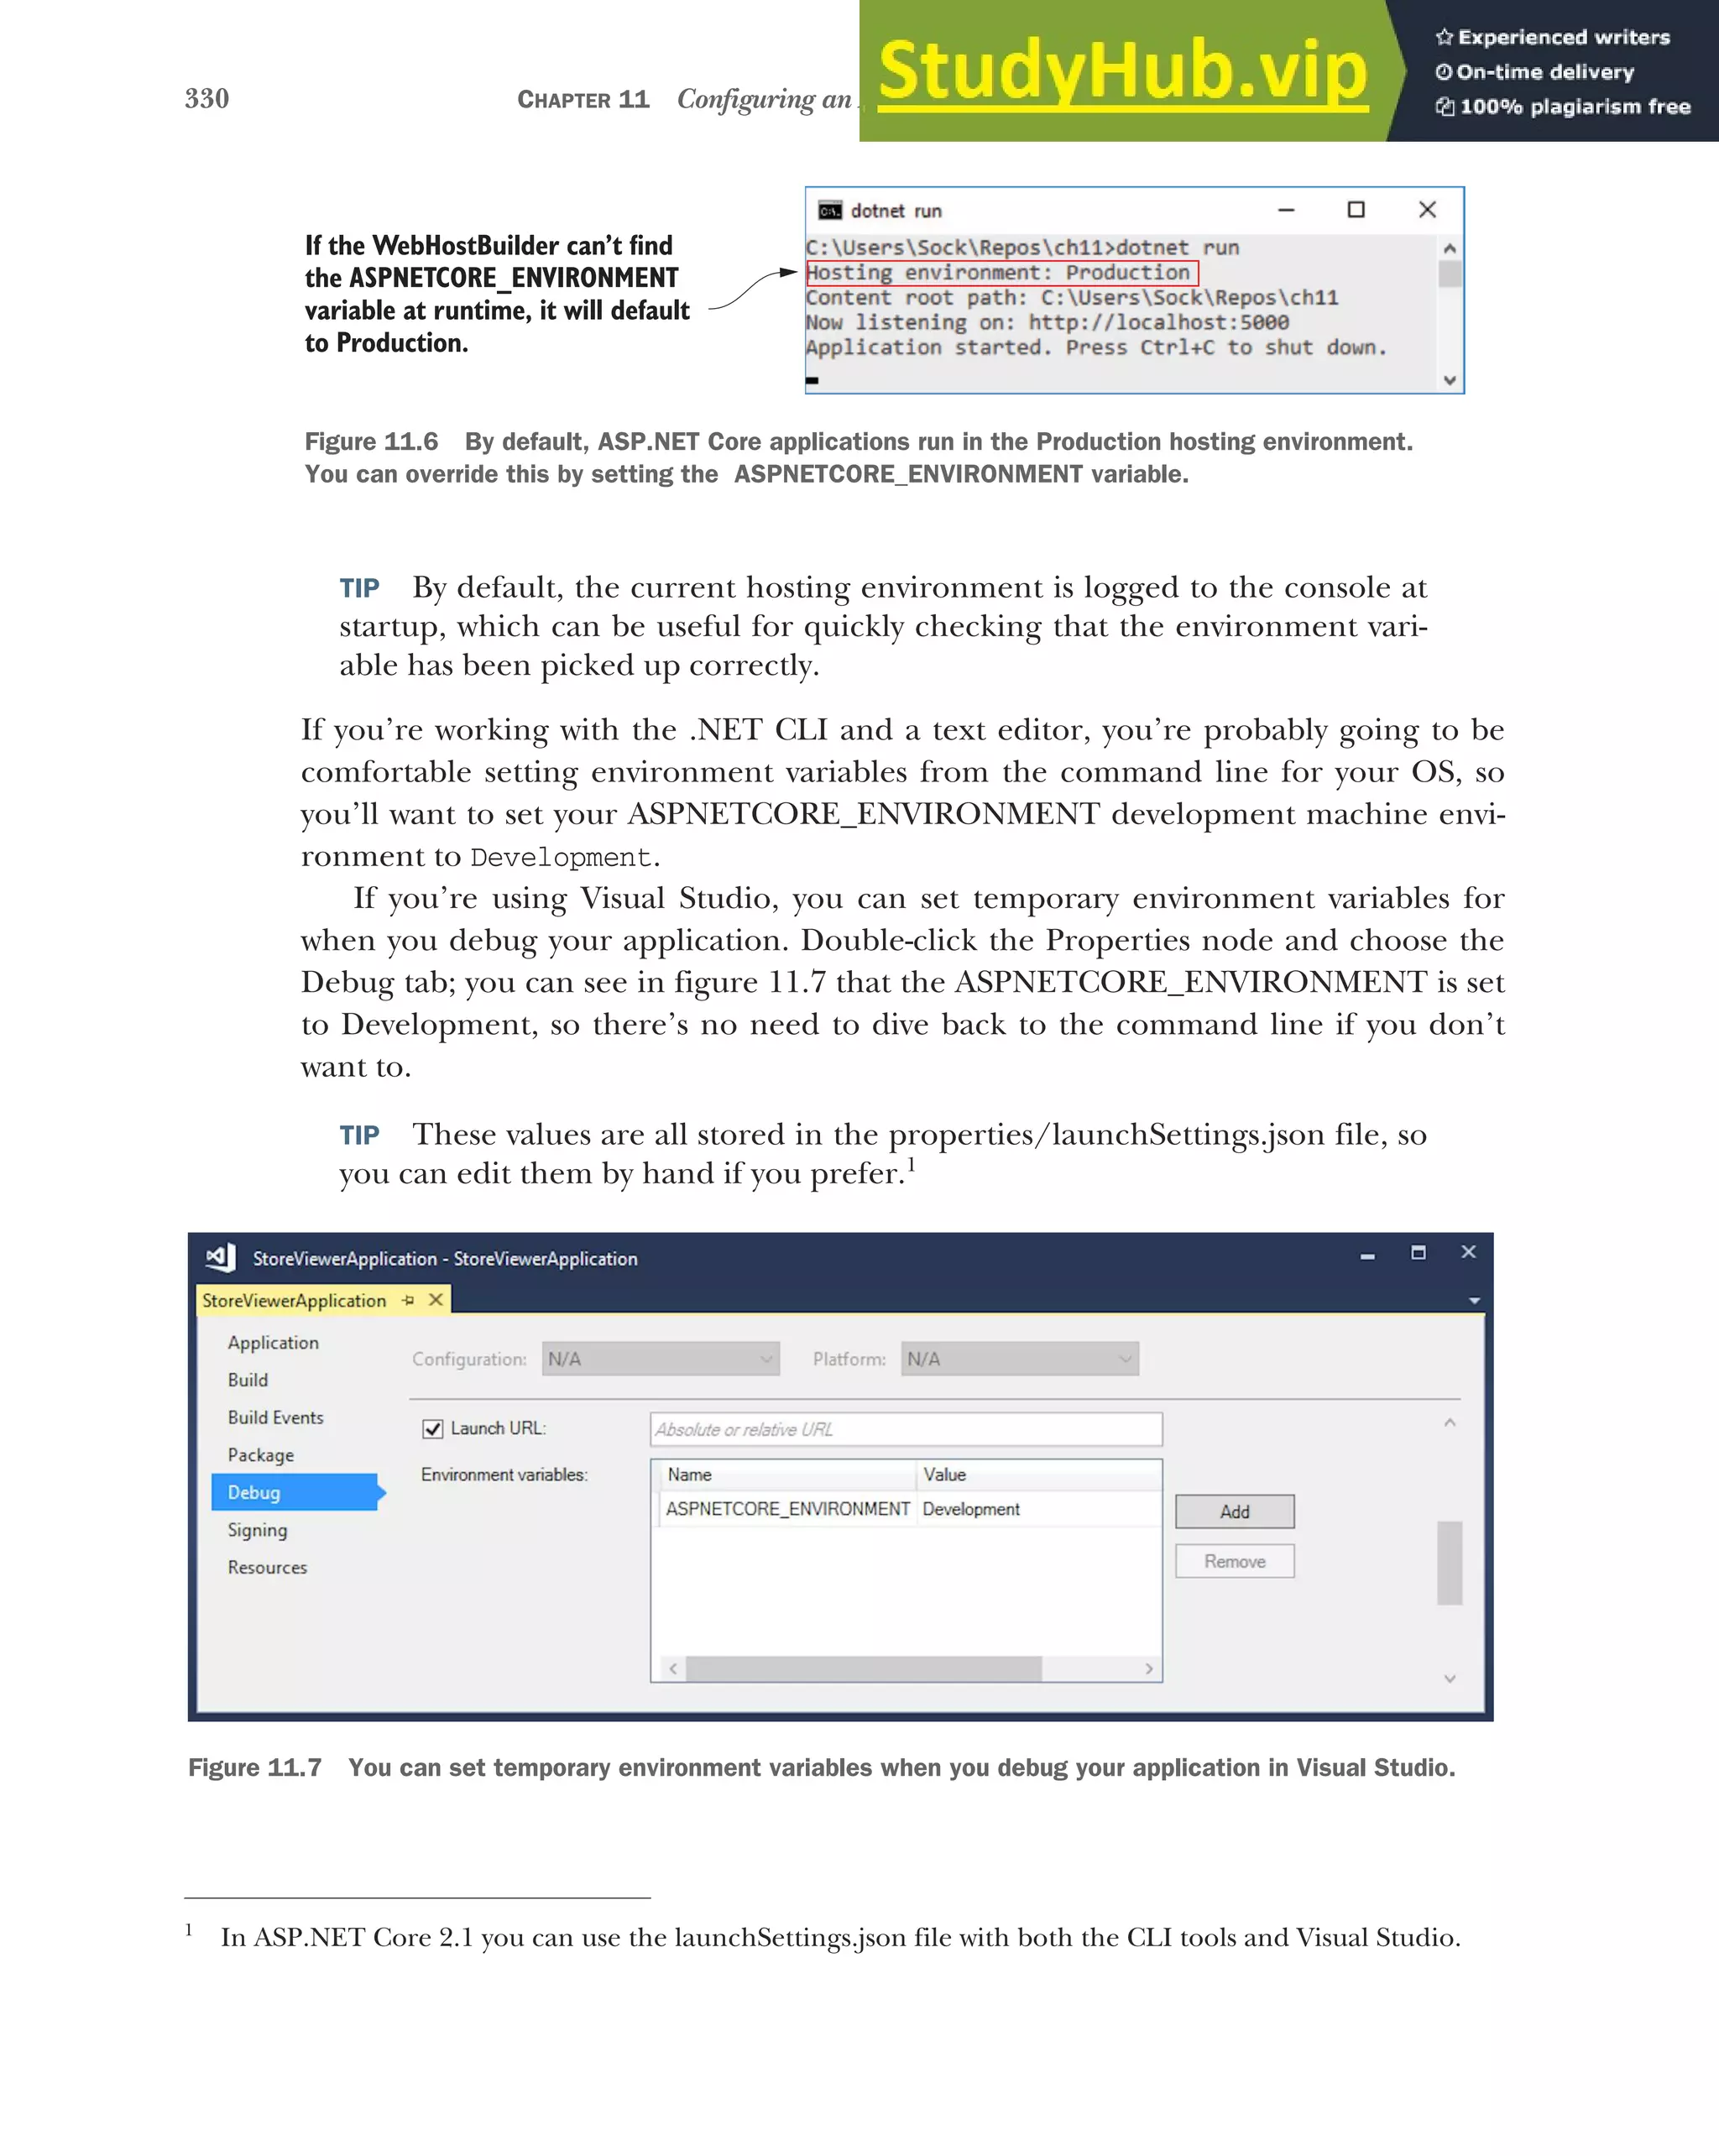
![331
Configuring an application for multiple environments
Visual Studio Code uses a similar approach with its own launch.json file. Add the
ASPNETCORE_ENVIRONMENT variable, as shown in figure 11.8.
These temporary environment variables are a great way to test your application in
different variables. In Visual Studio, you could even add a new debugging profile, IIS
Express (Production) perhaps, so you can quickly switch between testing different
environments.
There’s one final trick I’ve seen used. If you want to completely hardcode the envi-
ronment your app runs in to a single value, you can use the UseEnvironment exten-
sion method on WebHostBuilder, as shown next. This forces the app to use the
value you provide. I still suggest using one of the standard values though, preferably
EnvironmentName.Production.
public class Program
{
public static void Main(string[] args)
{
Listing 11.16 Hardcoding EnvironmentName with UseEnvironment
You can define temporary variables to
use when debugging your application
in the launch.json file.
Figure 11.8 Visual Studio code lets you define temporary environment variables to use when debugging. Your
application will treat them the same as any other environment variable but they won’t affect other applications,
only the ASP.NET Core app you’re debugging.](https://image.slidesharecdn.com/asp-230807173723-31e70040/75/ASP-NET-Core-in-Action-2018-pdf-359-2048.jpg)
![332 CHAPTER 11 Configuring an ASP.NET Core application
BuildWebHost(args).Run();
}
public static IWebHost BuildWebHost(string[] args) =>
new WebHostBuilder()
.UseEnvironment(EnvironmentName.Production)
.UseKestrel()
.UseContentRoot(Directory.GetCurrentDirectory())
.ConfigureAppConfiguration( /* Not shown*/)
.UseIISIntegration()
.UseStartup<Startup>()
.Build();
}
TIP This approach only makes sense if you always want to run your app in a
single environment. That’s overly restrictive, so I recommend setting the host-
ing environment using an environment variable or your IDE instead.
That brings us to the end of this chapter on configuration. Configuration isn’t glam-
orous, but it’s an essential part of all apps. The ASP.NET Core configuration provider
model handles a wide range of scenarios, letting you store settings and secrets in a
variety of locations.
Simple settings can be stored in appsettings.json, where they’re easy to tweak and
modify during development, and can be overwritten by using environment-specific
JSON files. Meanwhile, your secrets and sensitive settings can be stored outside
the project file, in the User Secrets manager, or as environment variables. This gives
you both flexibility and safety—as long as you don’t go writing your secrets to
appsettings.json!
In the next chapter, we’ll take a brief look at the new object relational mapper that
fits well with ASP.NET Core: Entity Framework Core. We’ll only be getting a taste of it
in this book, but you’ll learn how to load and save data, build a database from your
code, and migrate the database as your code evolves.
Summary
Anything that could be considered a setting or a secret is normally stored as a
configuration value.
ASP.NET Core uses configuration providers to load key-value pairs from a vari-
ety of sources. Applications can use many different configuration providers.
ConfigurationBuilder describes how to construct the final configuration rep-
resentation for your app and IConfigurationRoot holds the configuration val-
ues themselves.
You create a configuration object by adding configuration providers to an
instance of ConfigurationBuilder using extension methods such as AddJson-
File(). WebHostBuilder creates the ConfigurationBuilder instance for you
and calls Build() to create an instance of IConfigurationRoot.
ASP.NET Core includes built-in providers for JSON files, XML files, environ-
ment files, command-line arguments, and Azure Key Vault, among others.
This ignores ASPNETCORE_ENVIRONMENT and
hardcodes the environment to Production.](https://image.slidesharecdn.com/asp-230807173723-31e70040/75/ASP-NET-Core-in-Action-2018-pdf-360-2048.jpg)
![333
Summary
The order in which you add providers to ConfigurationBuilder is important;
subsequent providers replace the values of settings defined in earlier providers.
Configuration keys aren’t case-sensitive.
ASP.NET Core 1.x doesn’t register the IConfigurationRoot object with the DI
container by default. In ASP.NET Core 2.0, it’s registered as an IConfiguration
object.
You can retrieve settings from IConfiguration directly using the indexer syn-
tax, for example Configuration["MySettings:Value"].
In ASP.NET Core 2.0, the CreateDefaultBuilder method configures JSON,
environment variable, command-line argument, and User Secret providers for
you. You can customize the configuration providers used in your app by manu-
ally creating a WebHostBuilder and calling ConfigureAppConfiguration.
In production, store secrets in environment variables. These can be loaded
after your file-based settings in the configuration builder.
On development machines, the User Secrets Manager is a more convenient
tool than using environment variables. It stores secrets in your OS user’s profile,
outside the project folder.
Be aware that neither environment variables nor the User Secrets Manager tool
encrypt secrets, they merely store them in locations that are less likely to be
made public, as they’re outside your project folder.
File-based providers, such as the JSON provider, can automatically reload con-
figuration values when the file changes. This allows you to update configuration
values in real time, without having to restart your app.
Use strongly typed POCO options classes to access configuration in your app.
Use the Configure<T>() extension method in ConfigureServices to bind your
POCO options objects to ConfigurationSection.
You can inject the IOptions<T> interface into your services using DI. You can
access the strongly typed options object on the Value property.
If you want to reload your POCO options objects when your configuration
changes, use the IOptionsSnapshot<T> interface instead.
Applications running in different environments, Development versus Produc-
tion for example, often require different configuration values.
ASP.NET Core determines the current hosting environment using the
ASPNETCORE_ENVIRONMENT environment variable. If this variable isn’t set,
the environment is assumed to be Production.
The current hosting environment is exposed as an IHostingEnvironment
interface. You can check for specific environments using IsDevelopment(),
IsStaging(), and IsProduction().
You can use the IHostingEnvironment object to load files specific to the cur-
rent environment, such as appsettings.Production.json.](https://image.slidesharecdn.com/asp-230807173723-31e70040/75/ASP-NET-Core-in-Action-2018-pdf-361-2048.jpg)


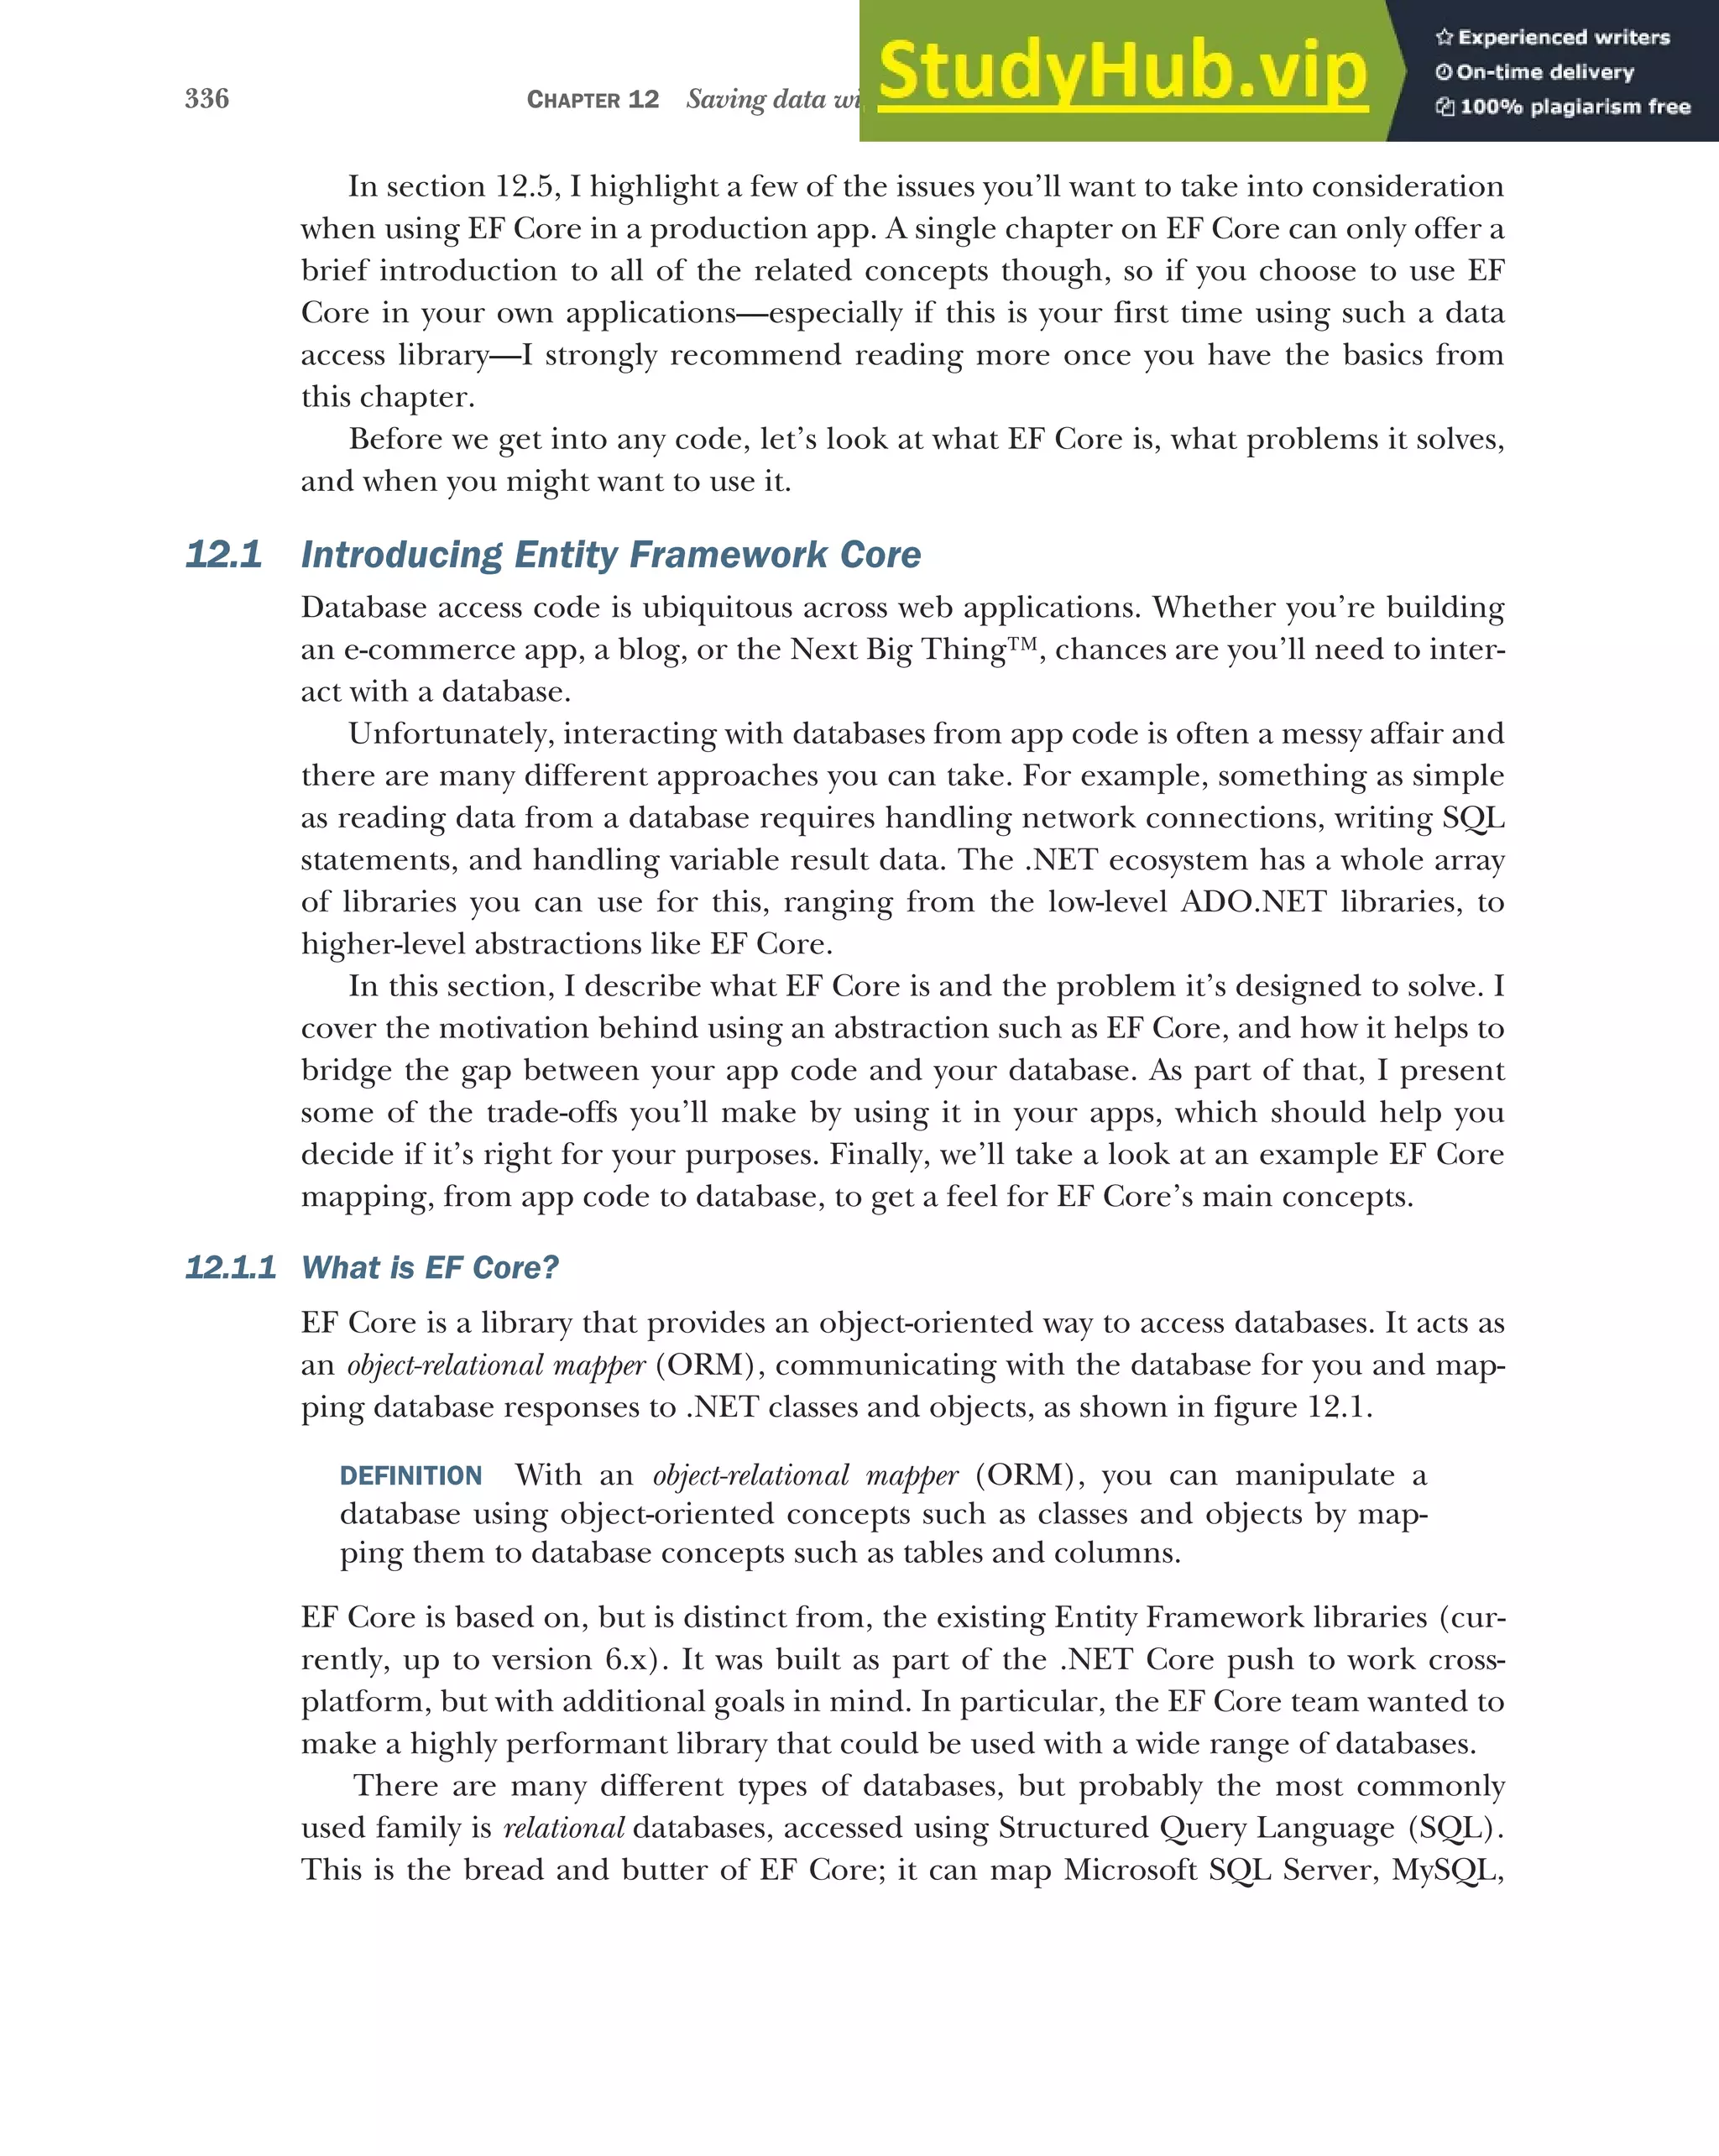
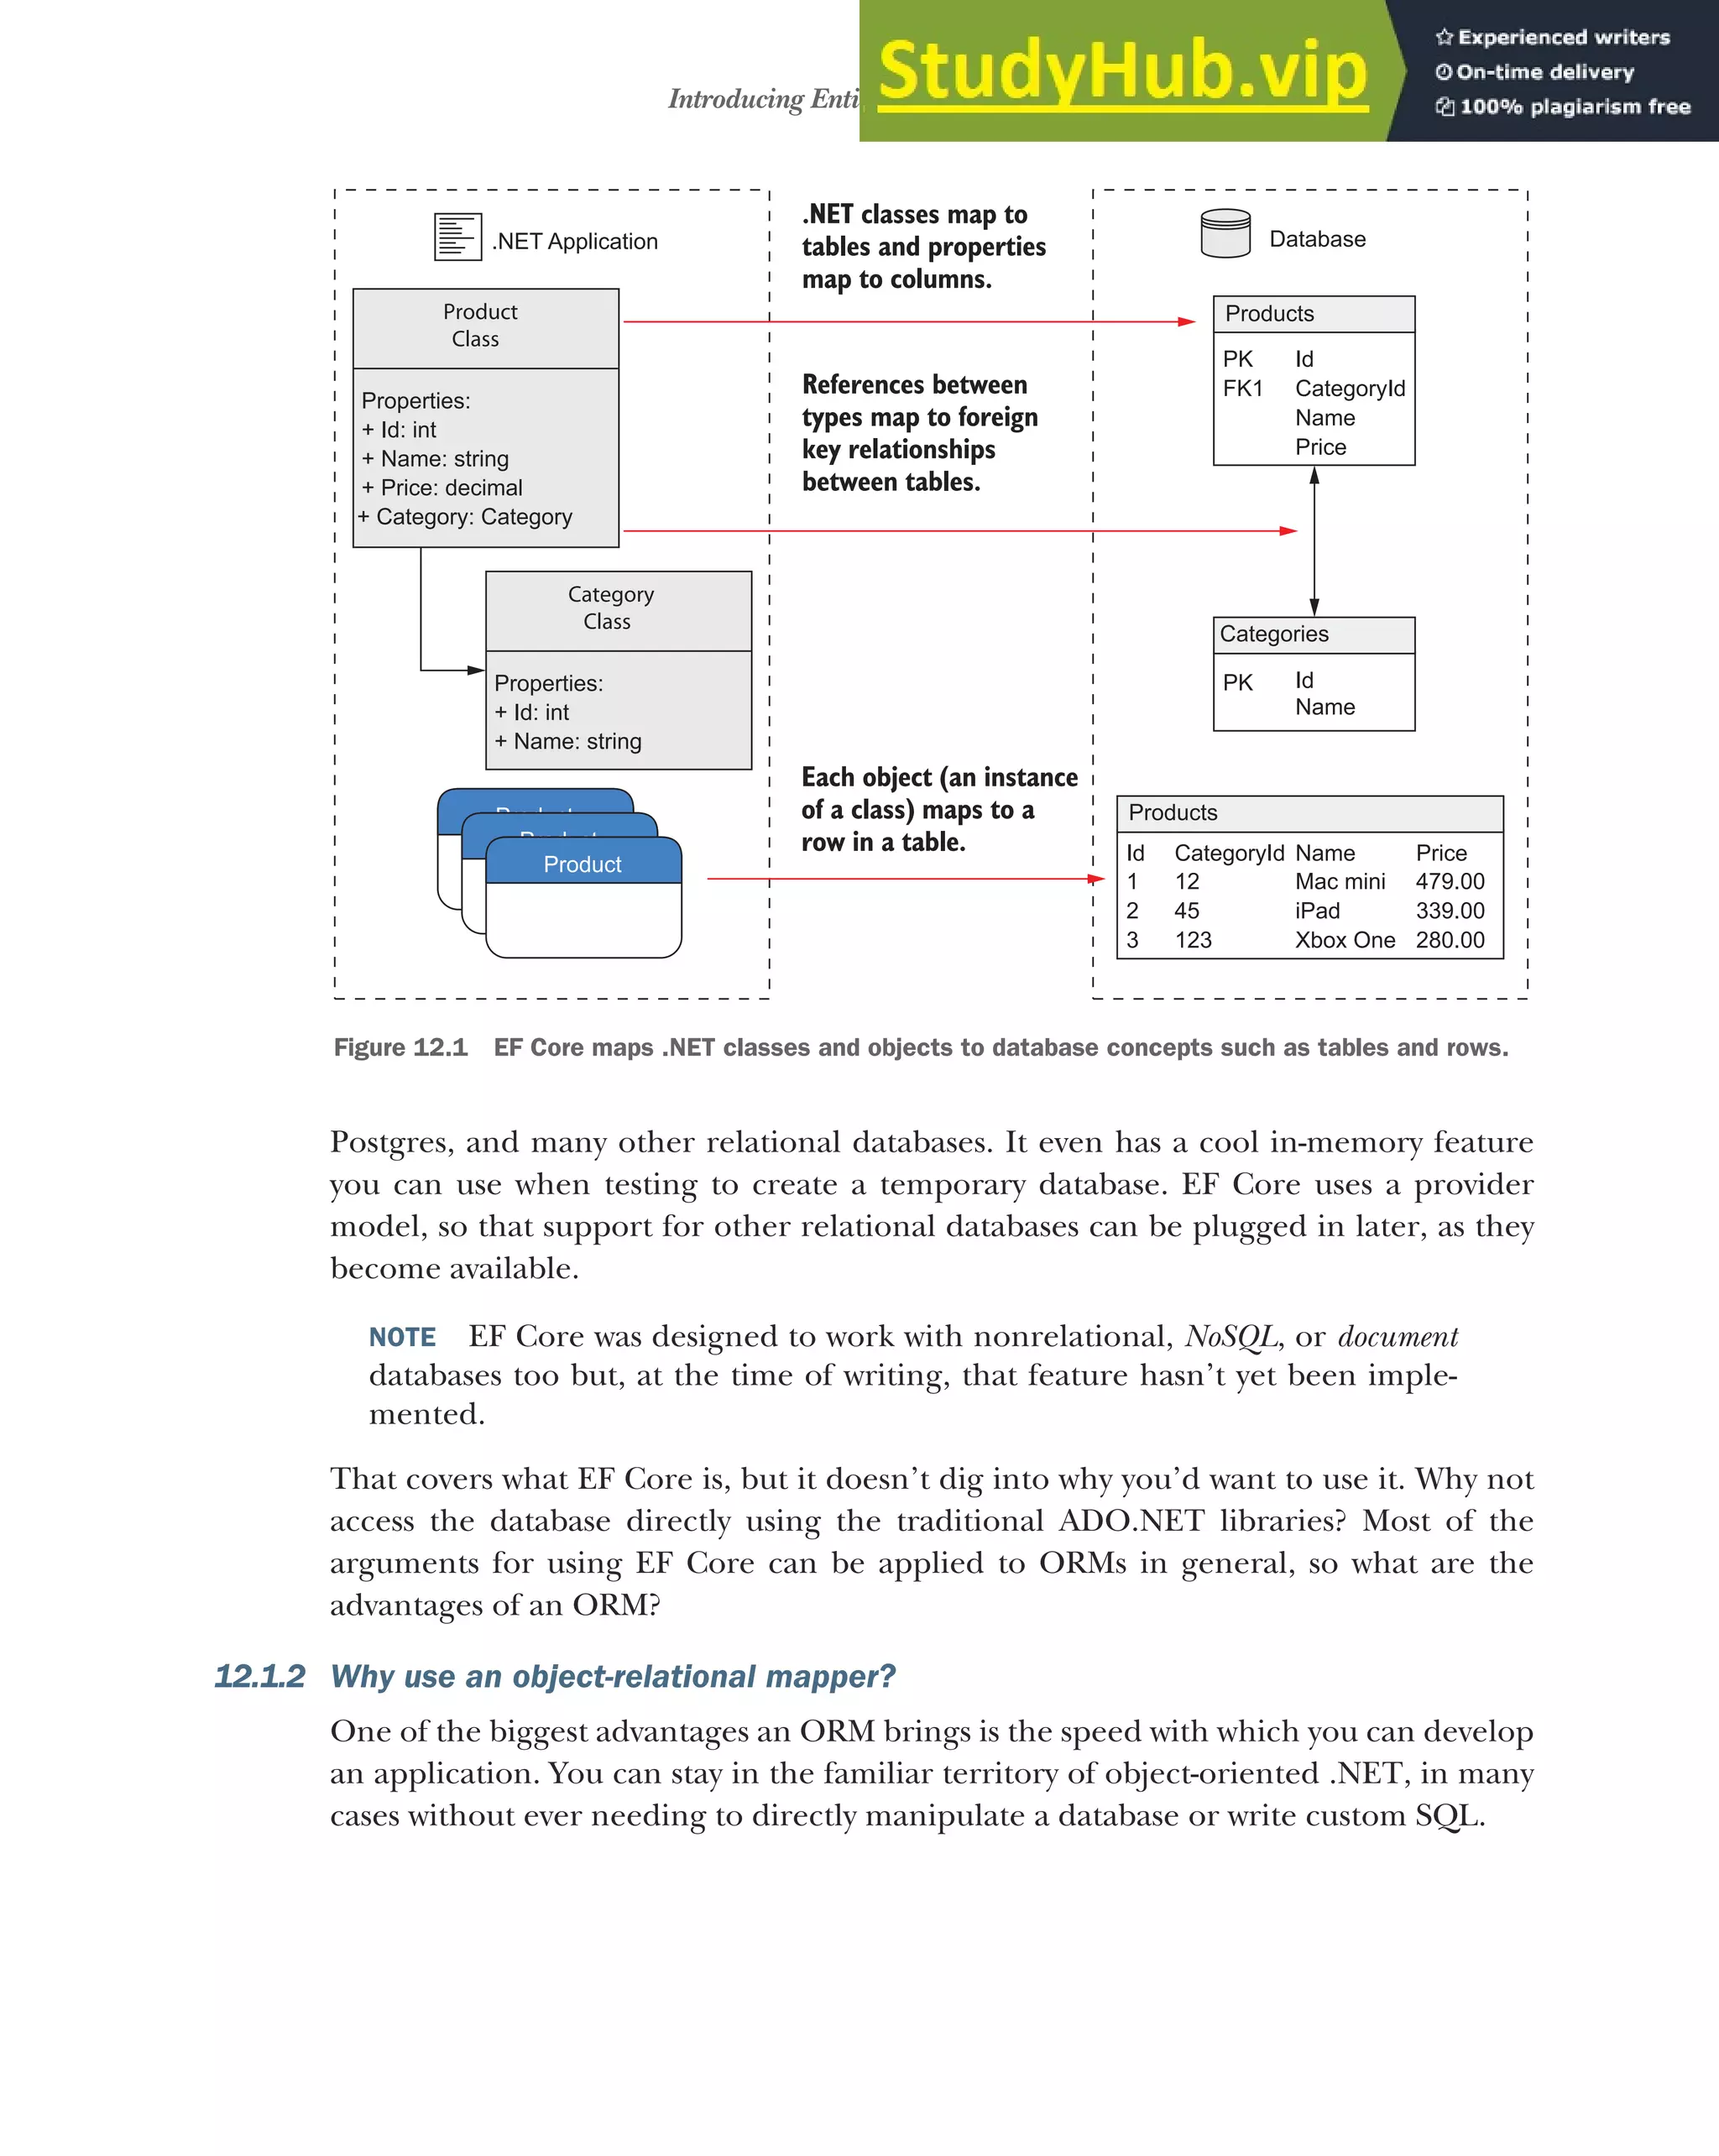

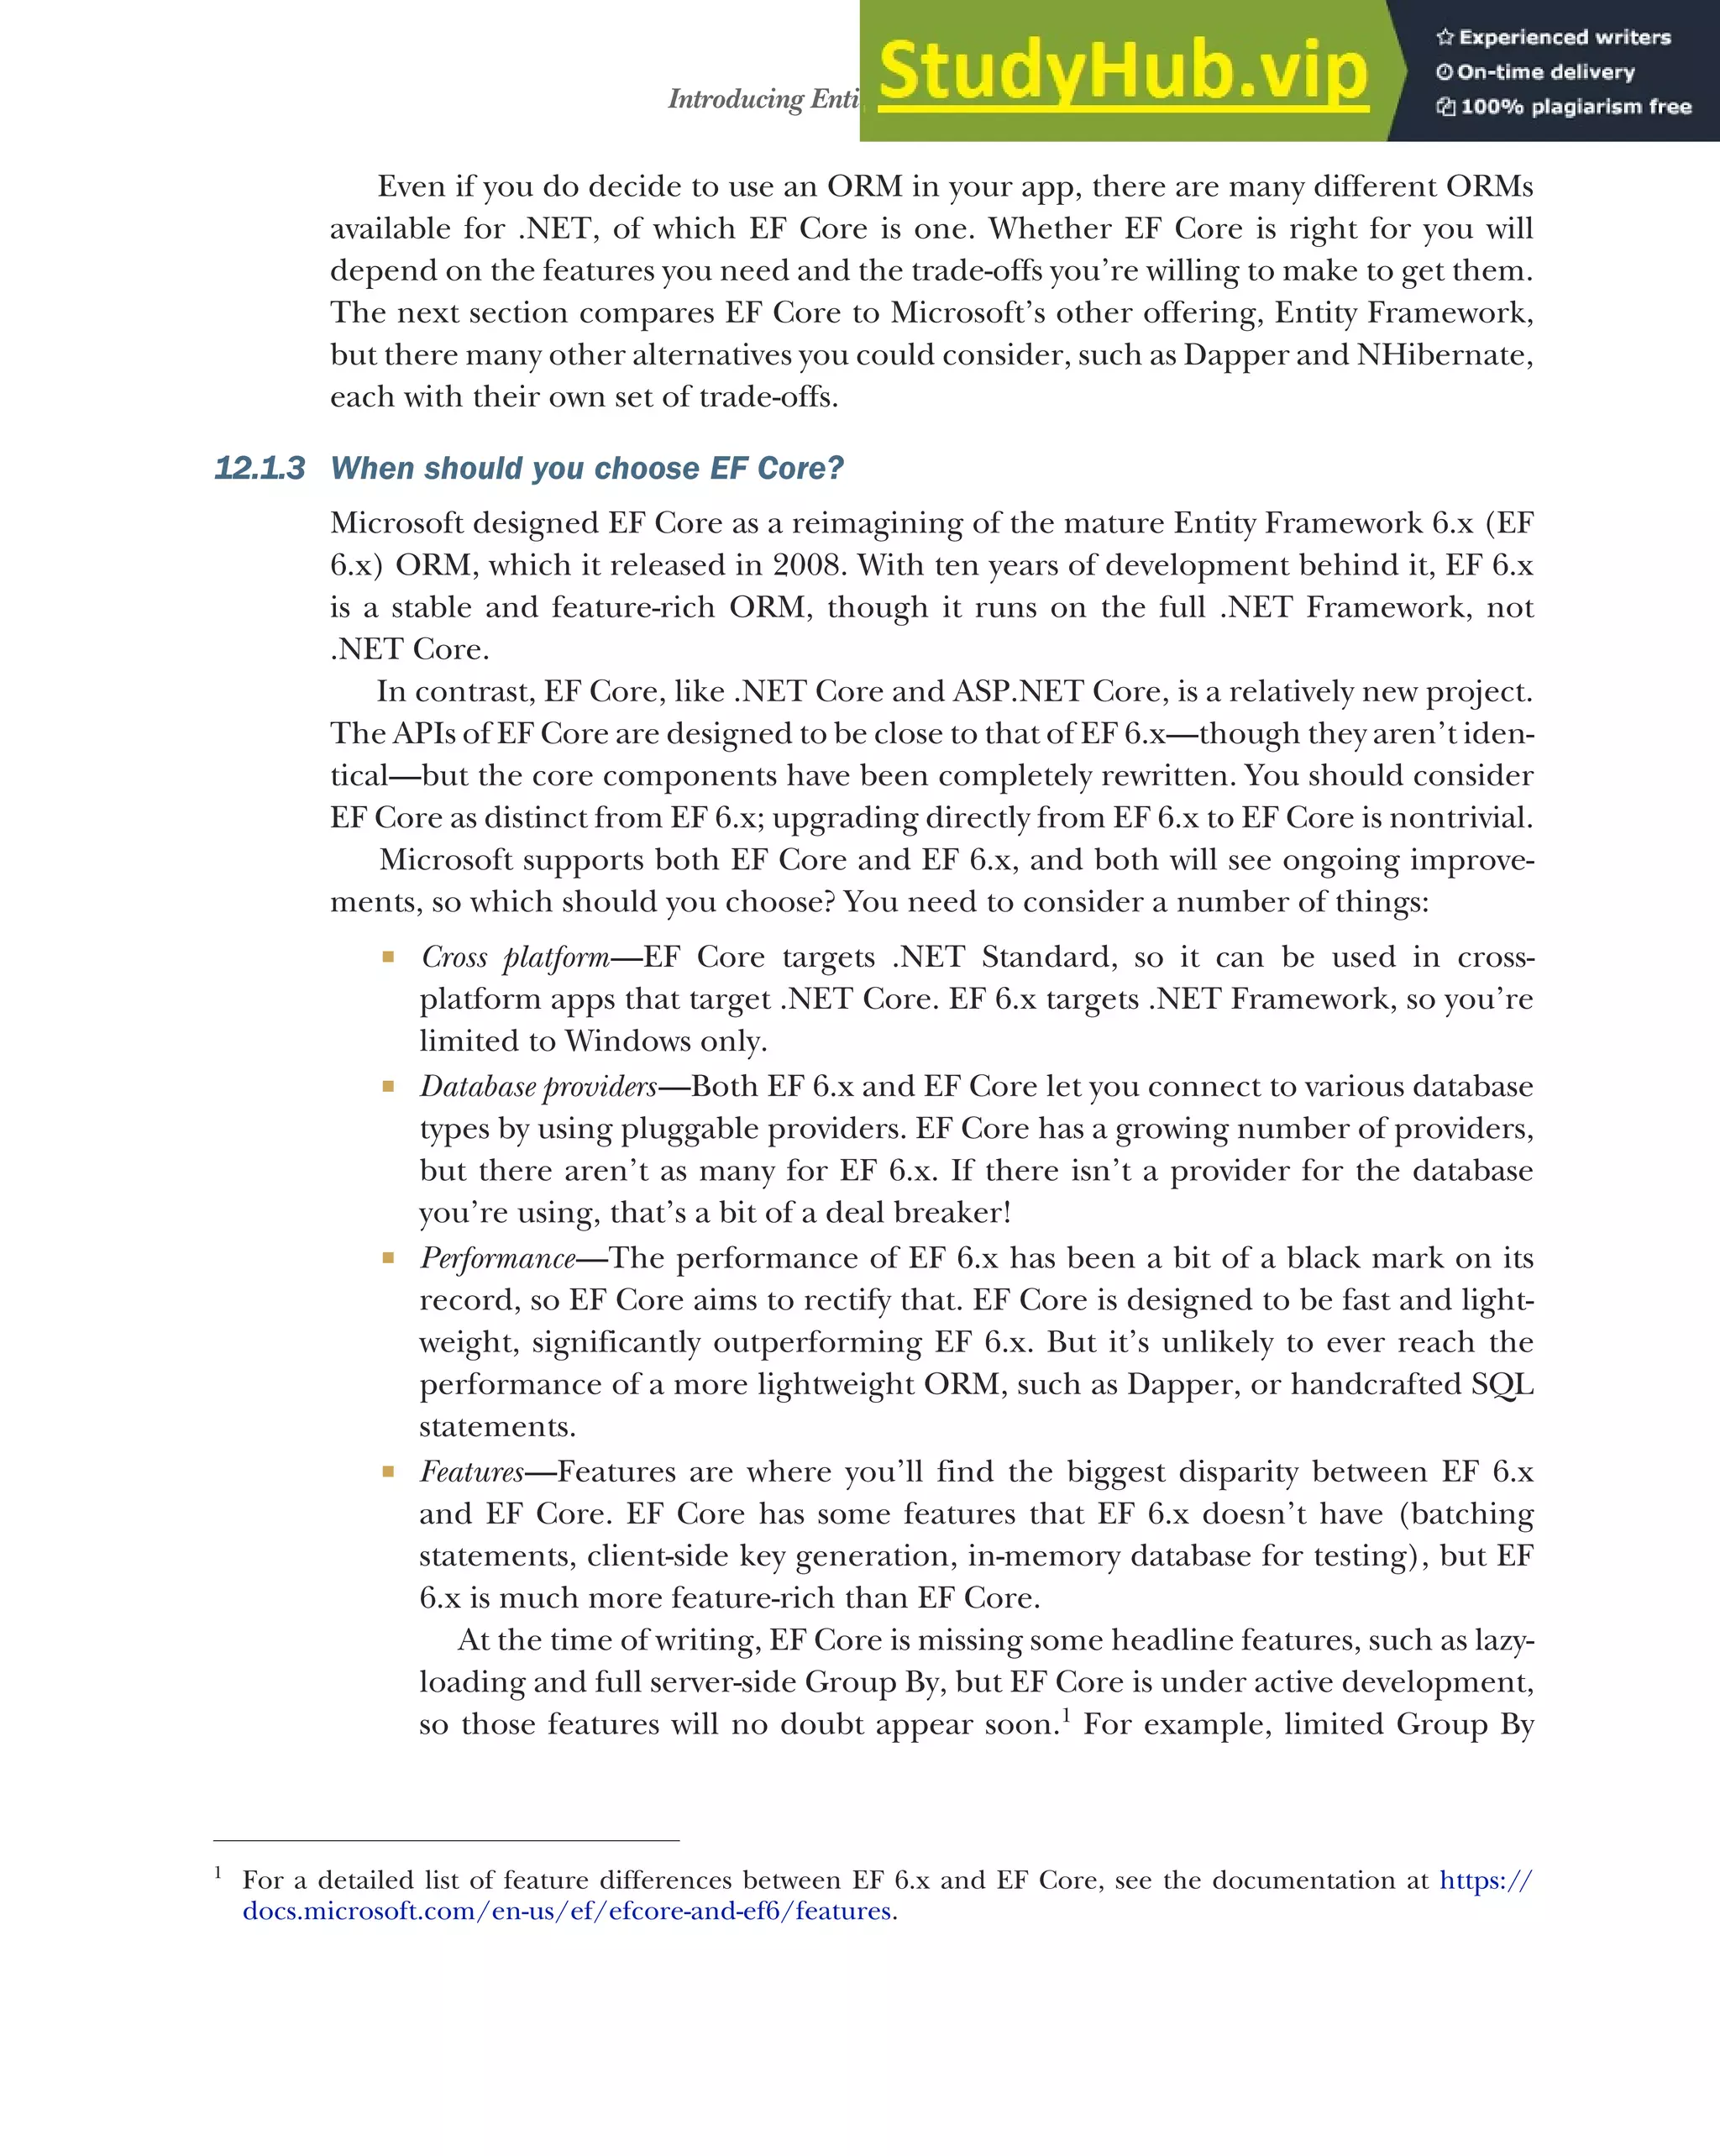

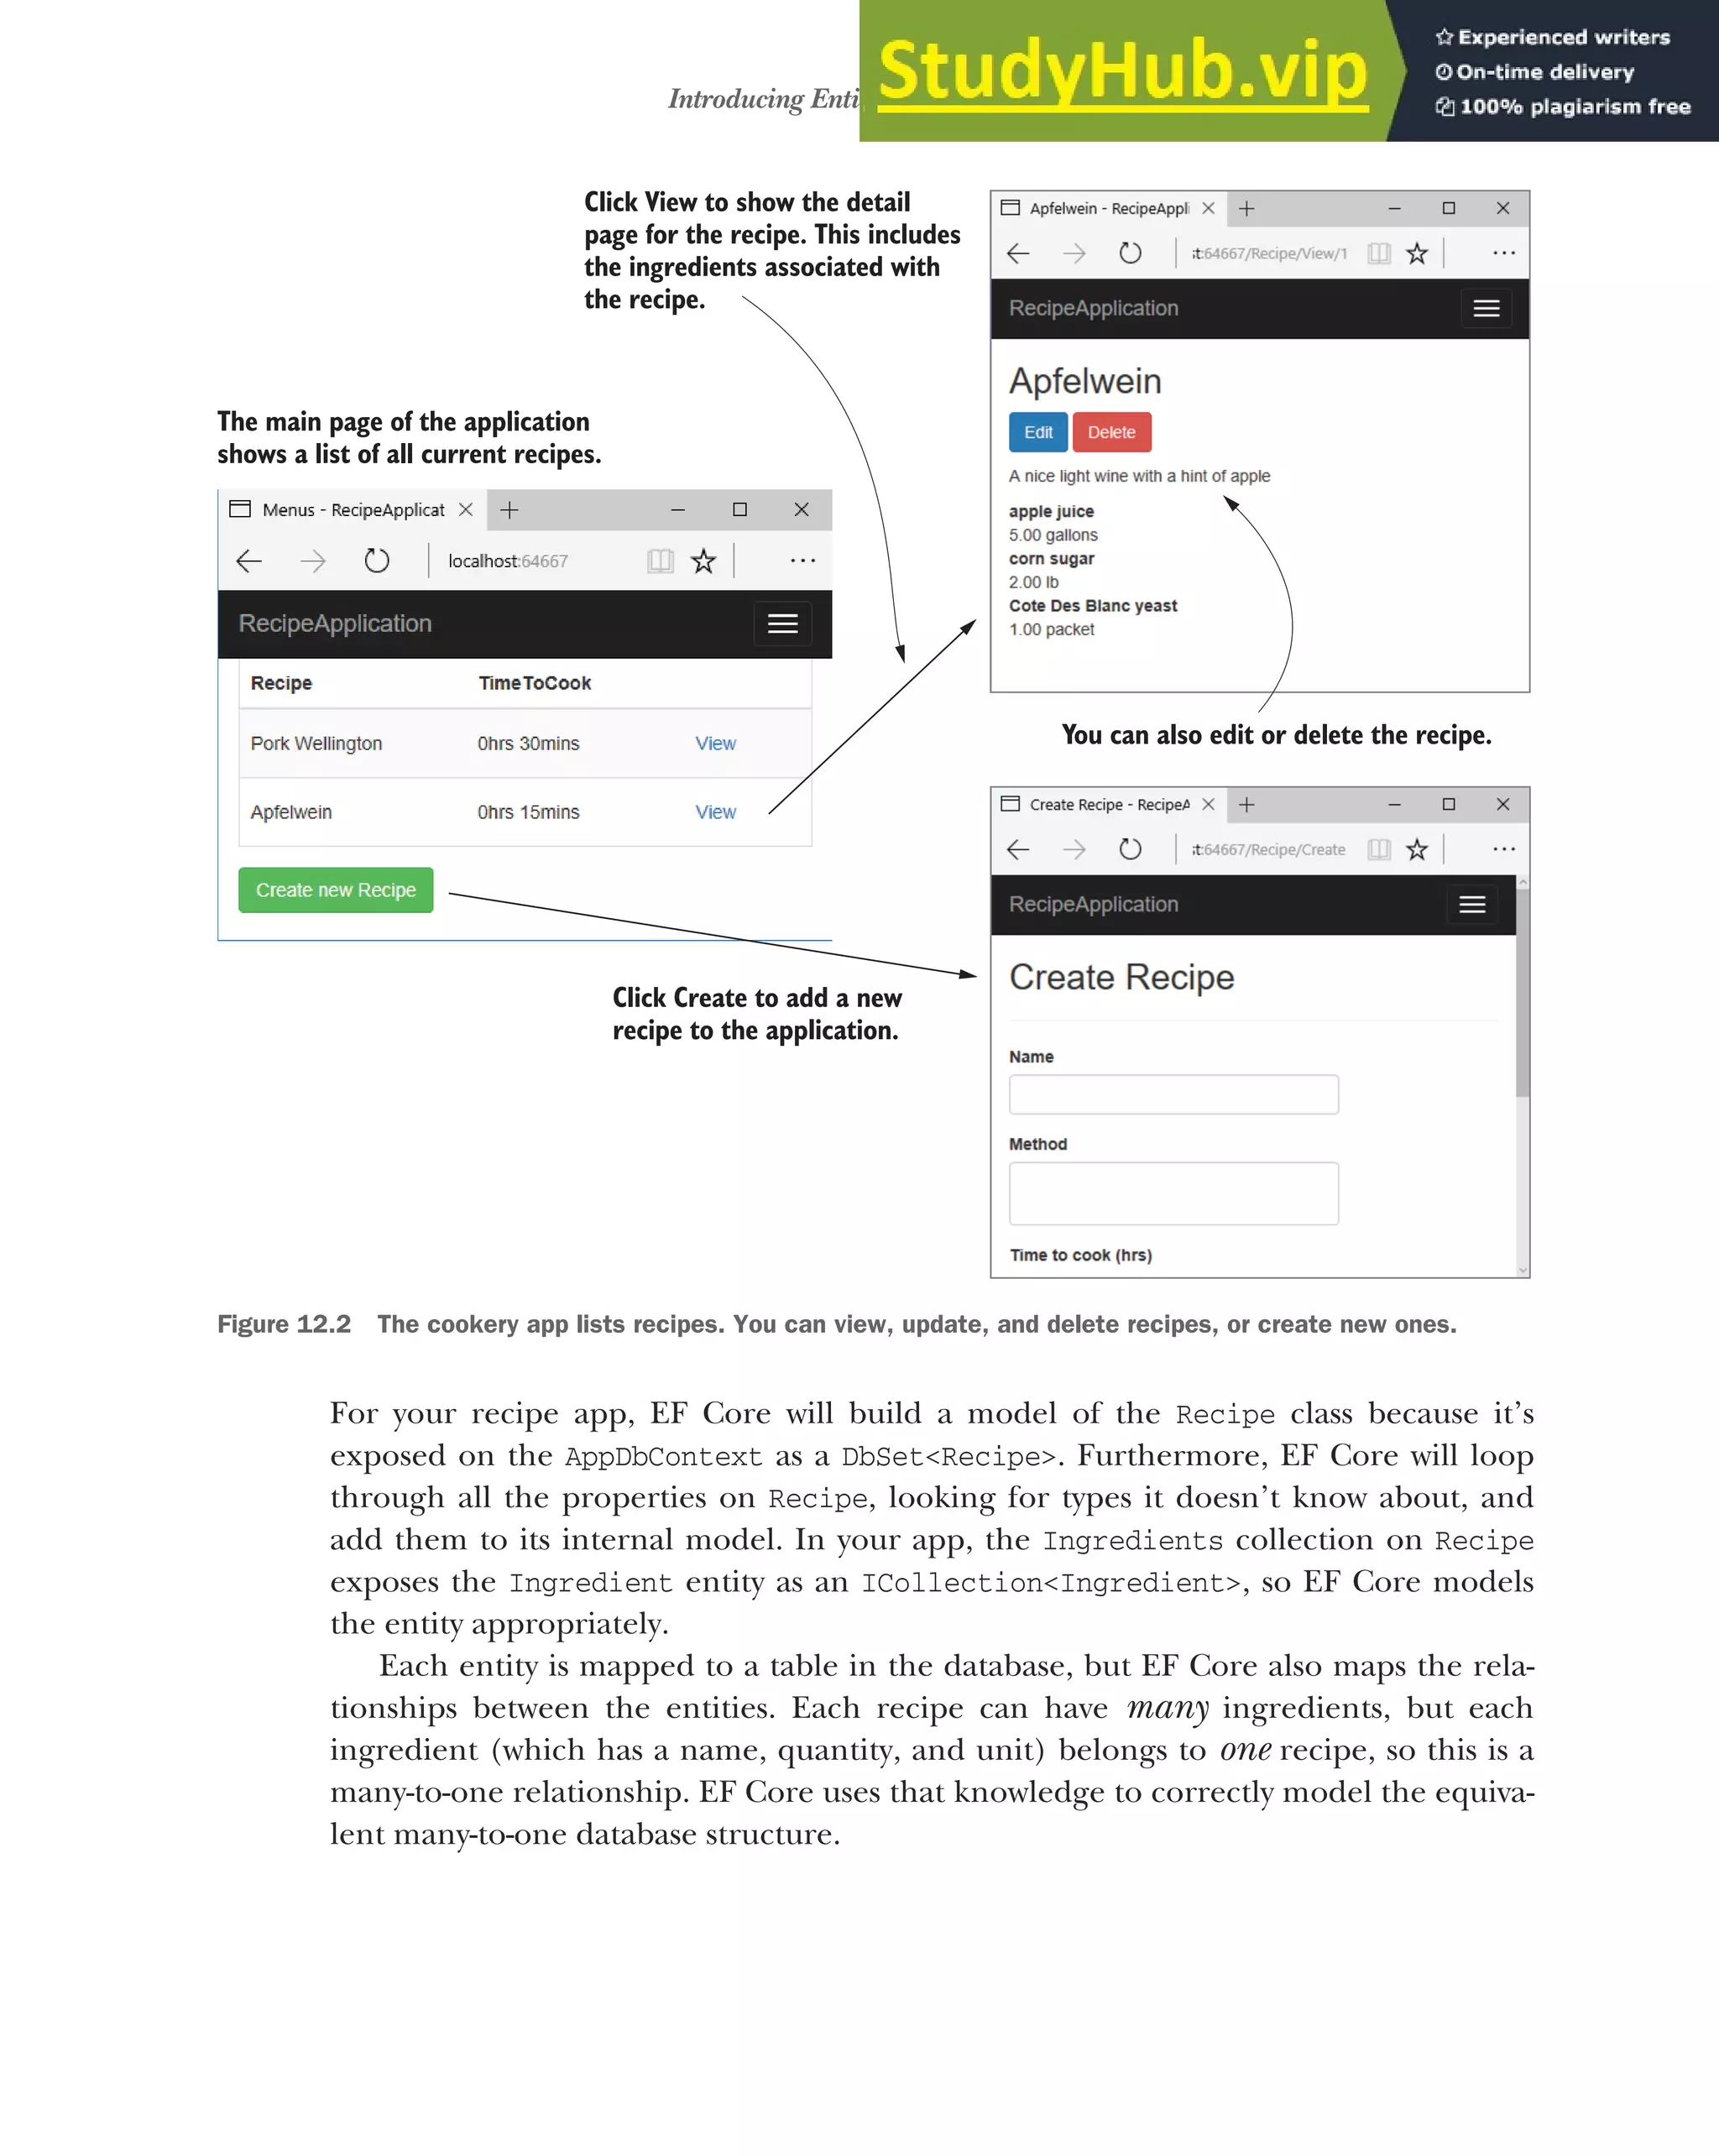
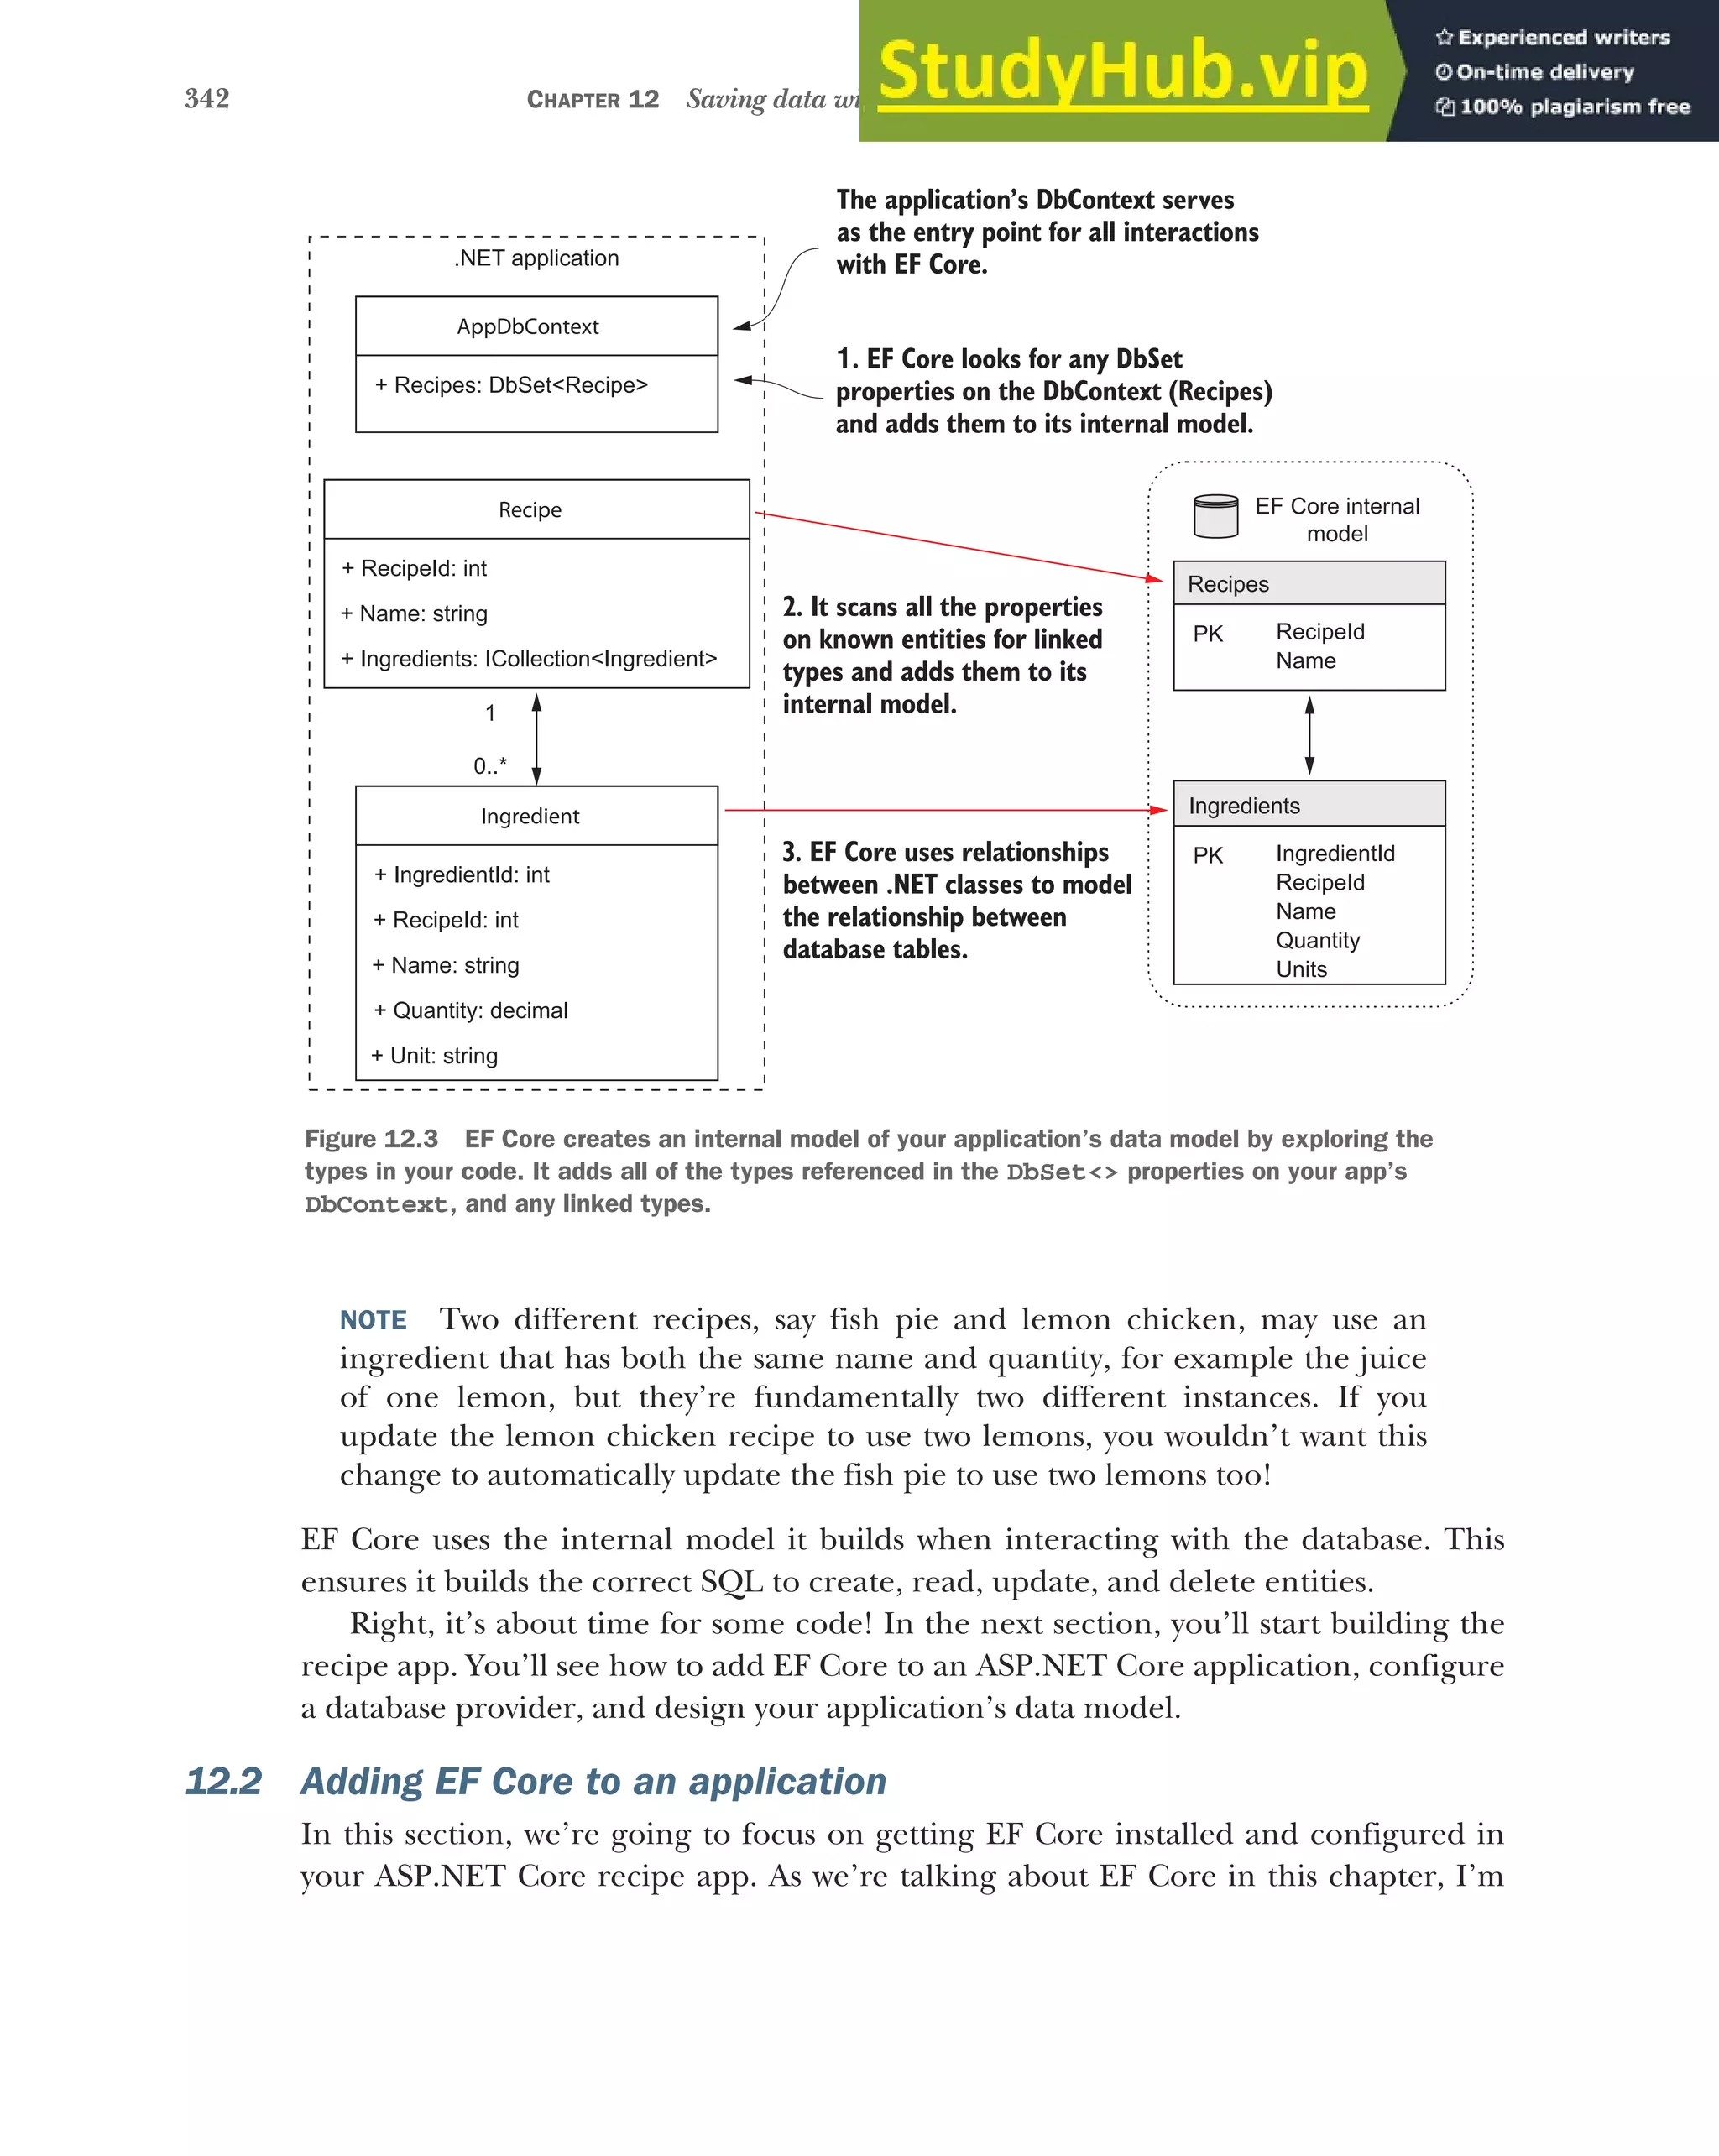
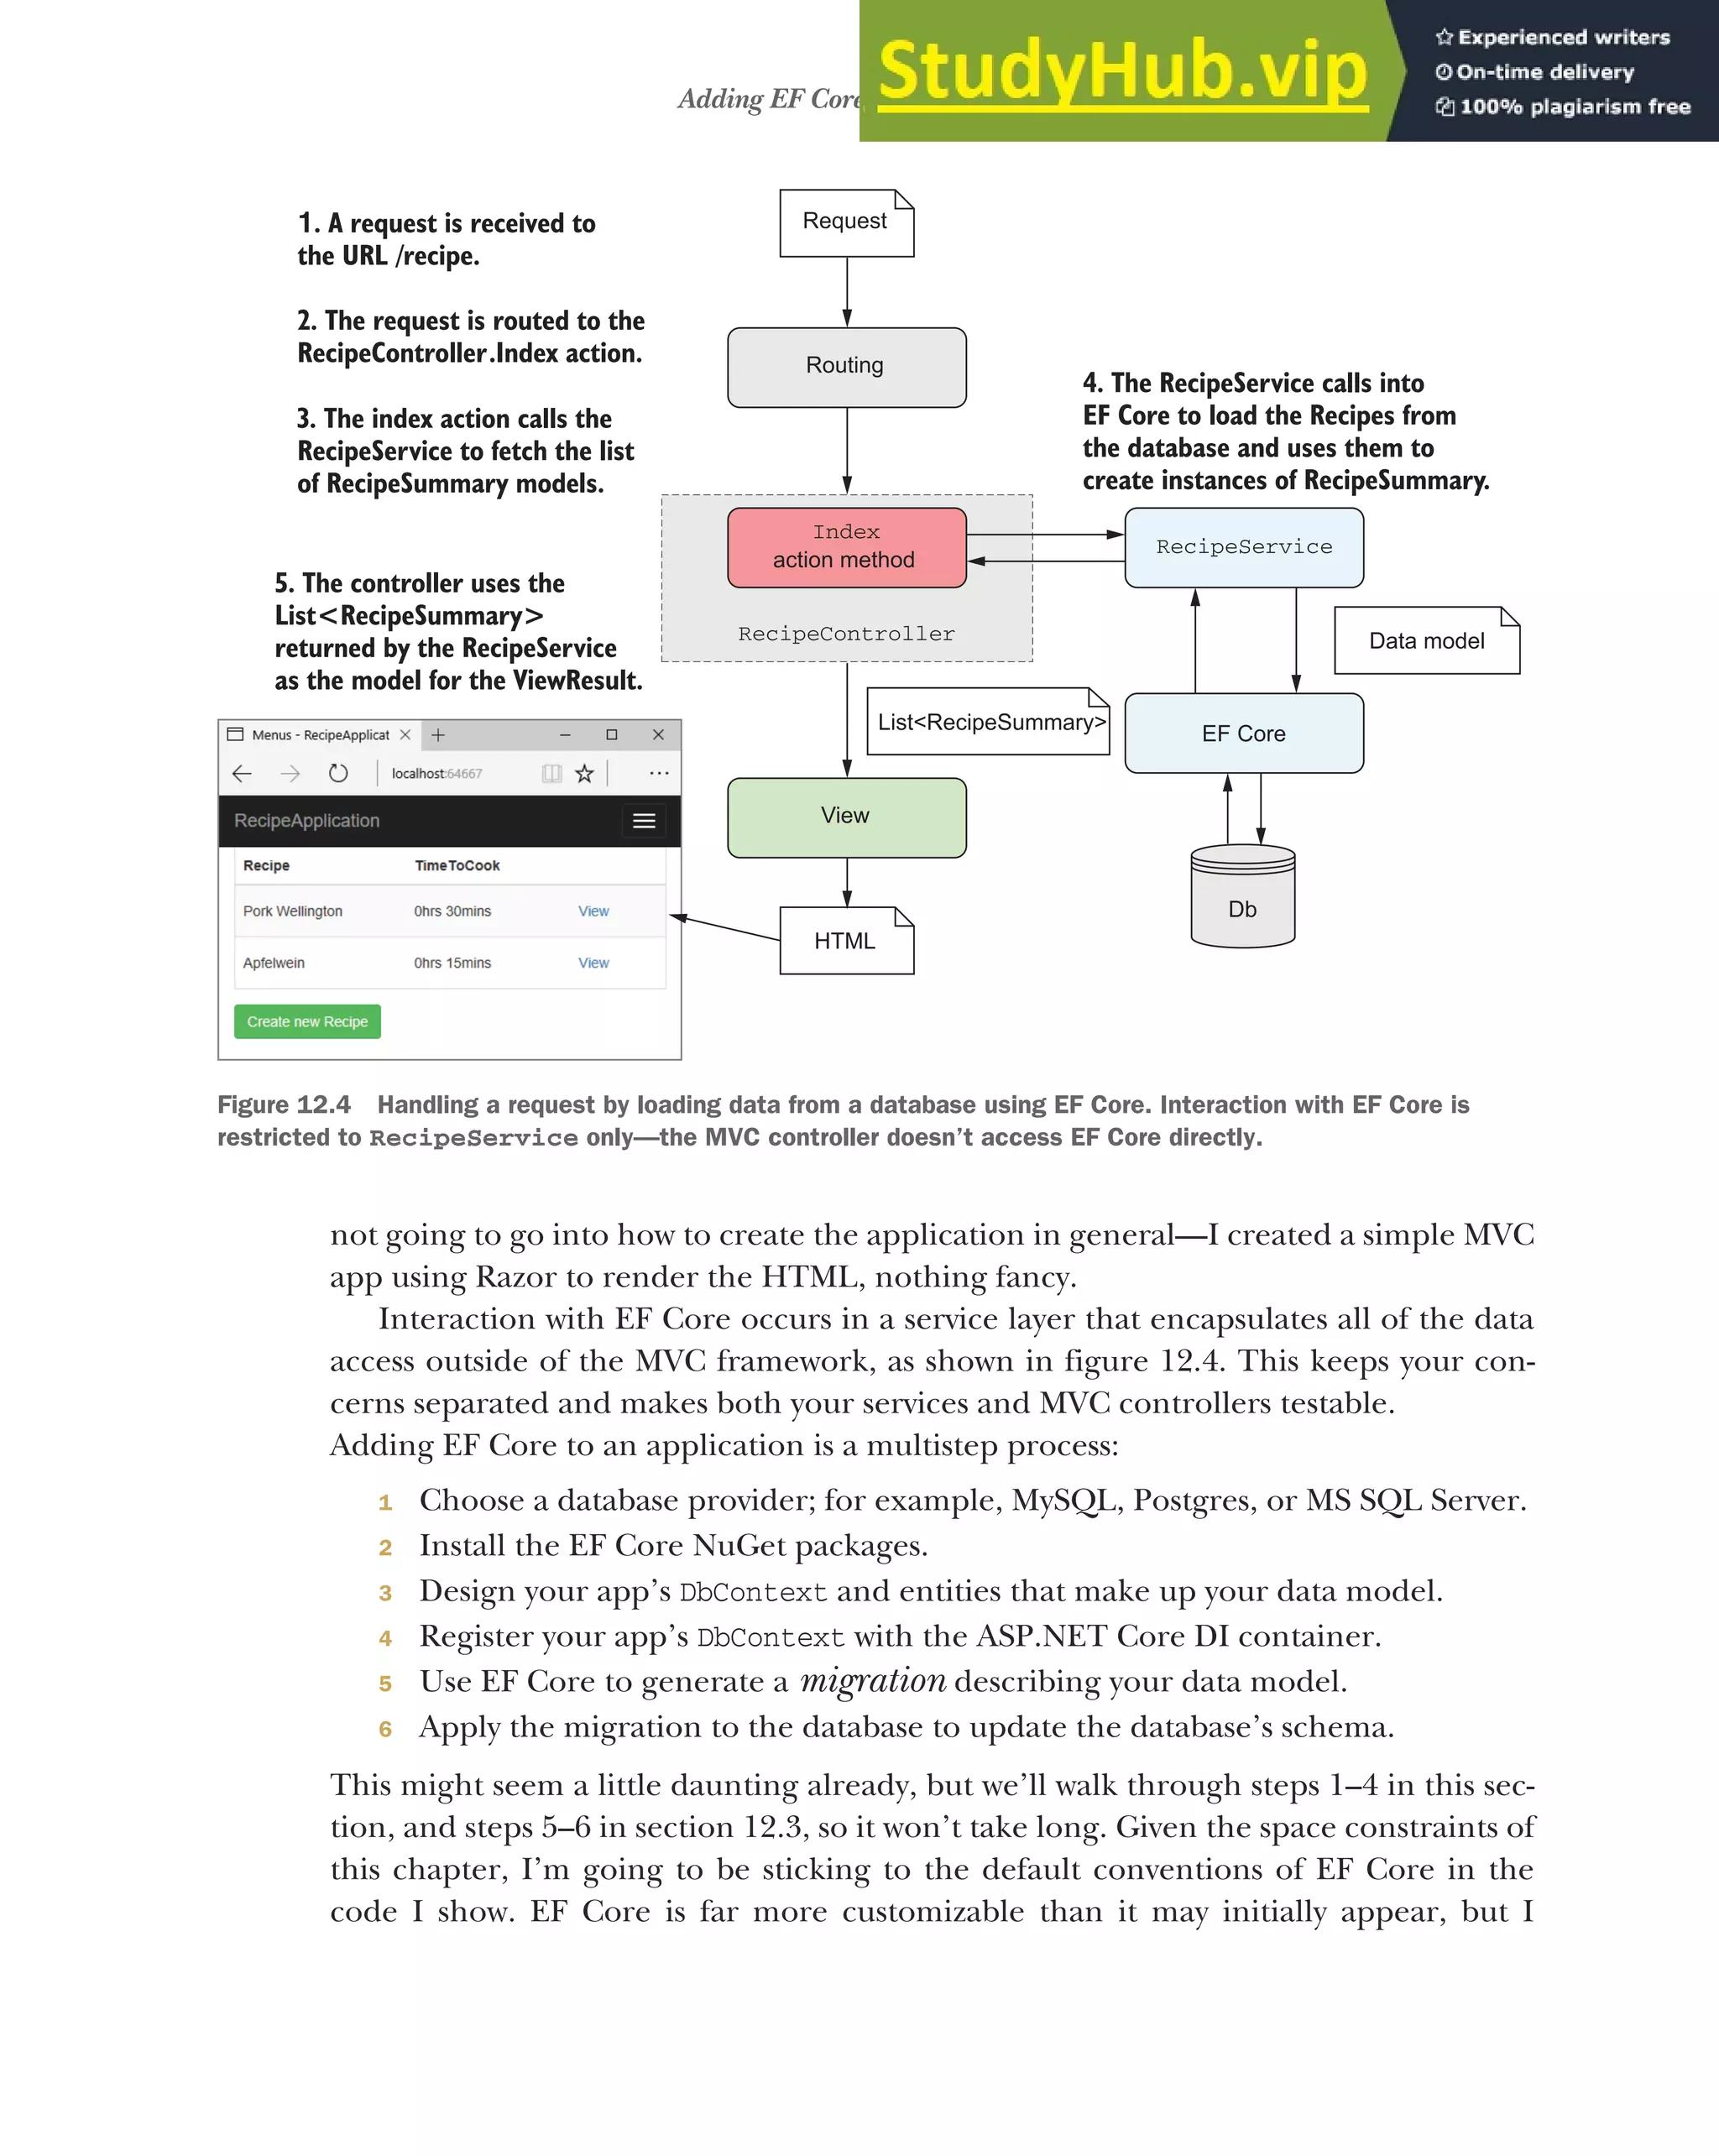
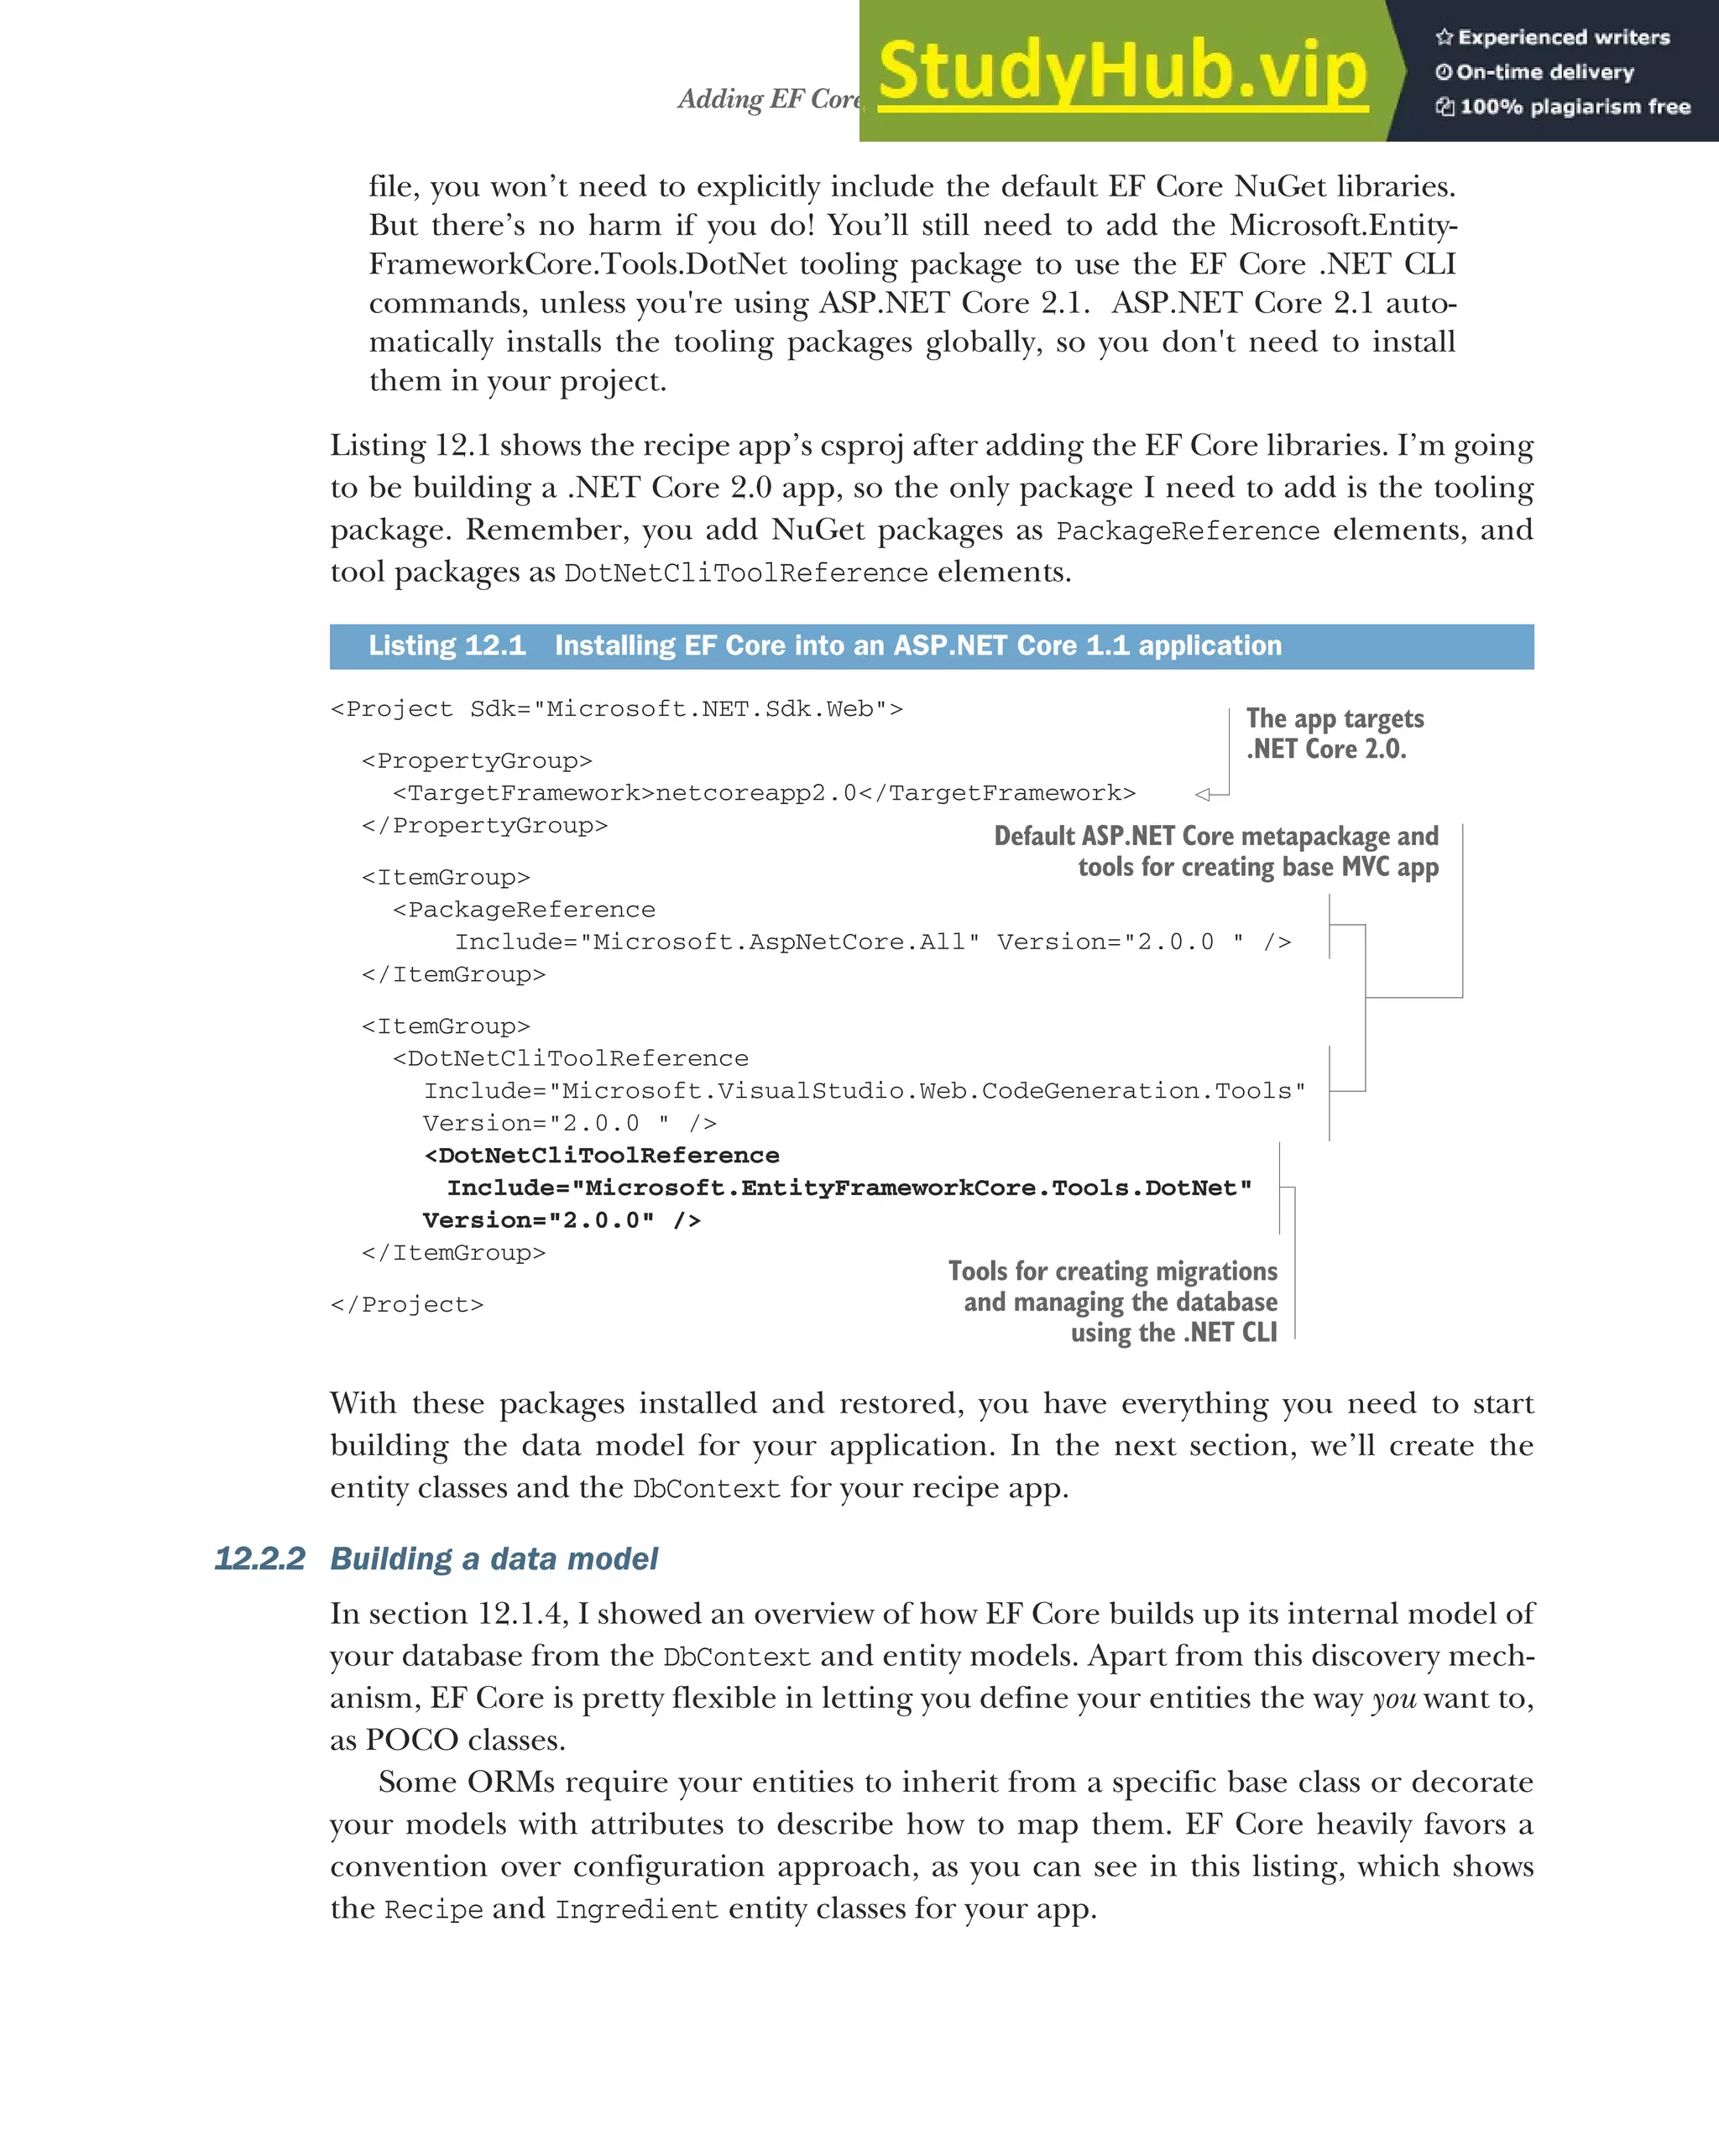
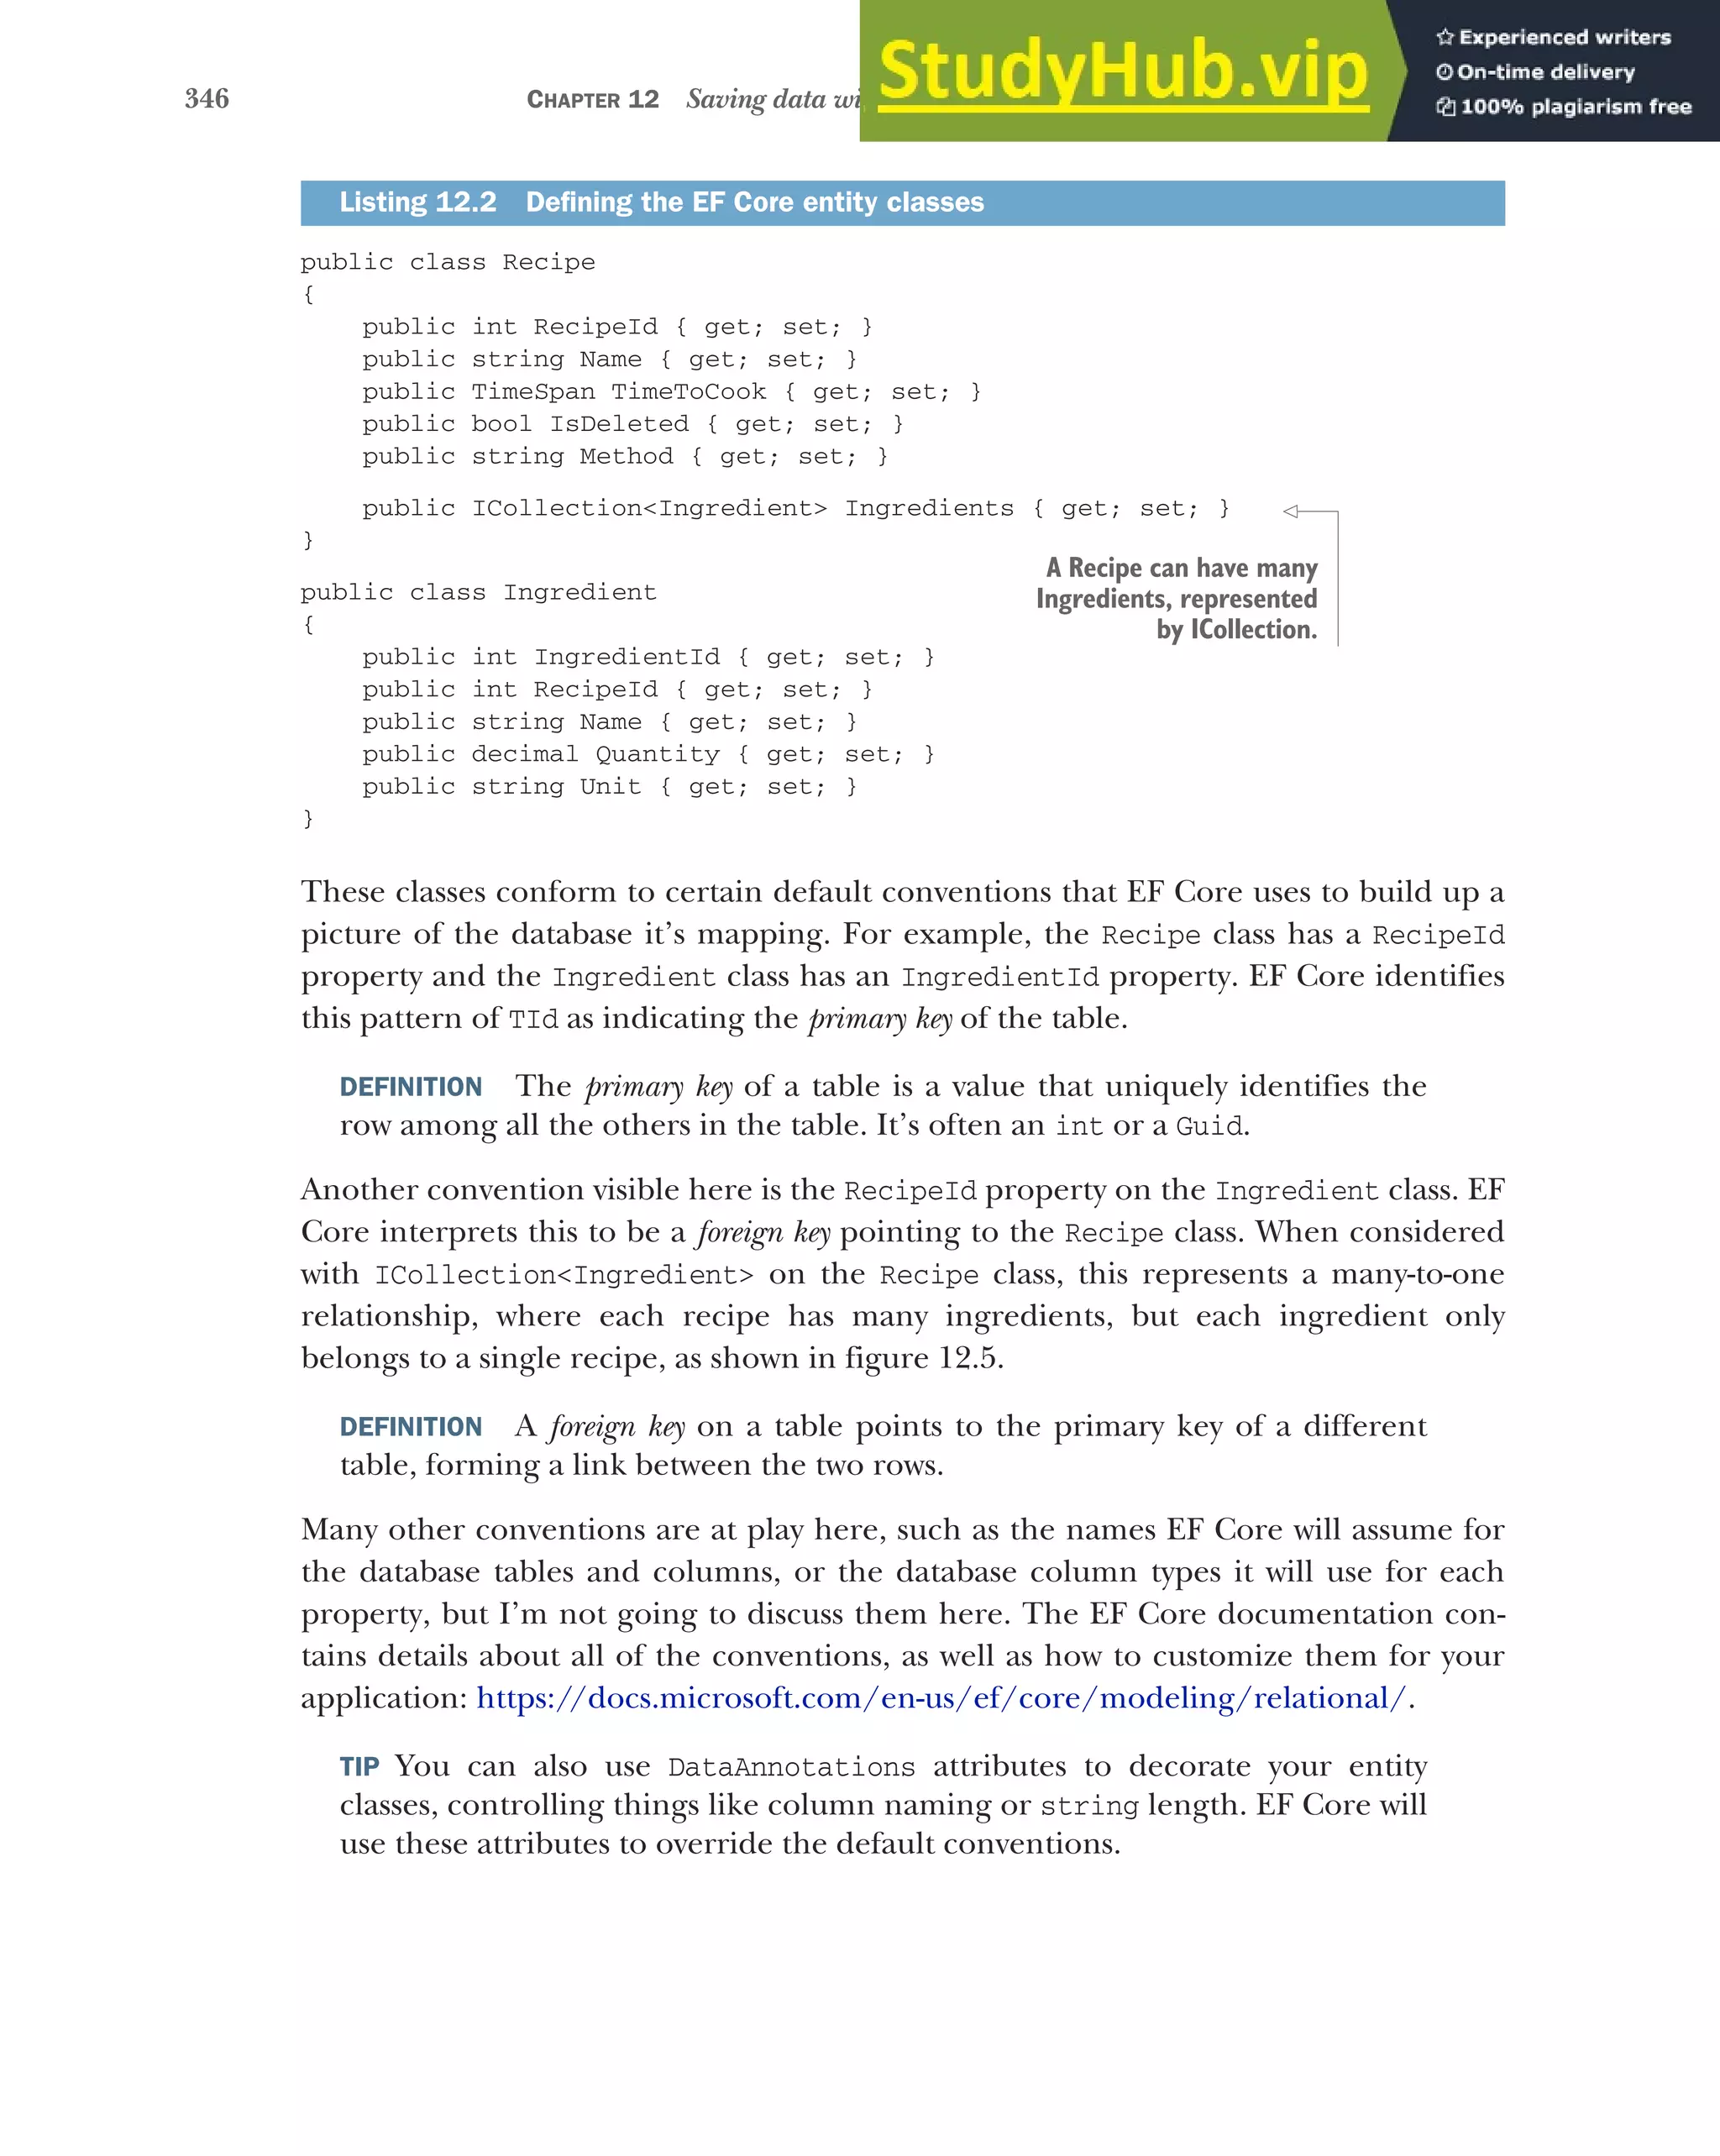

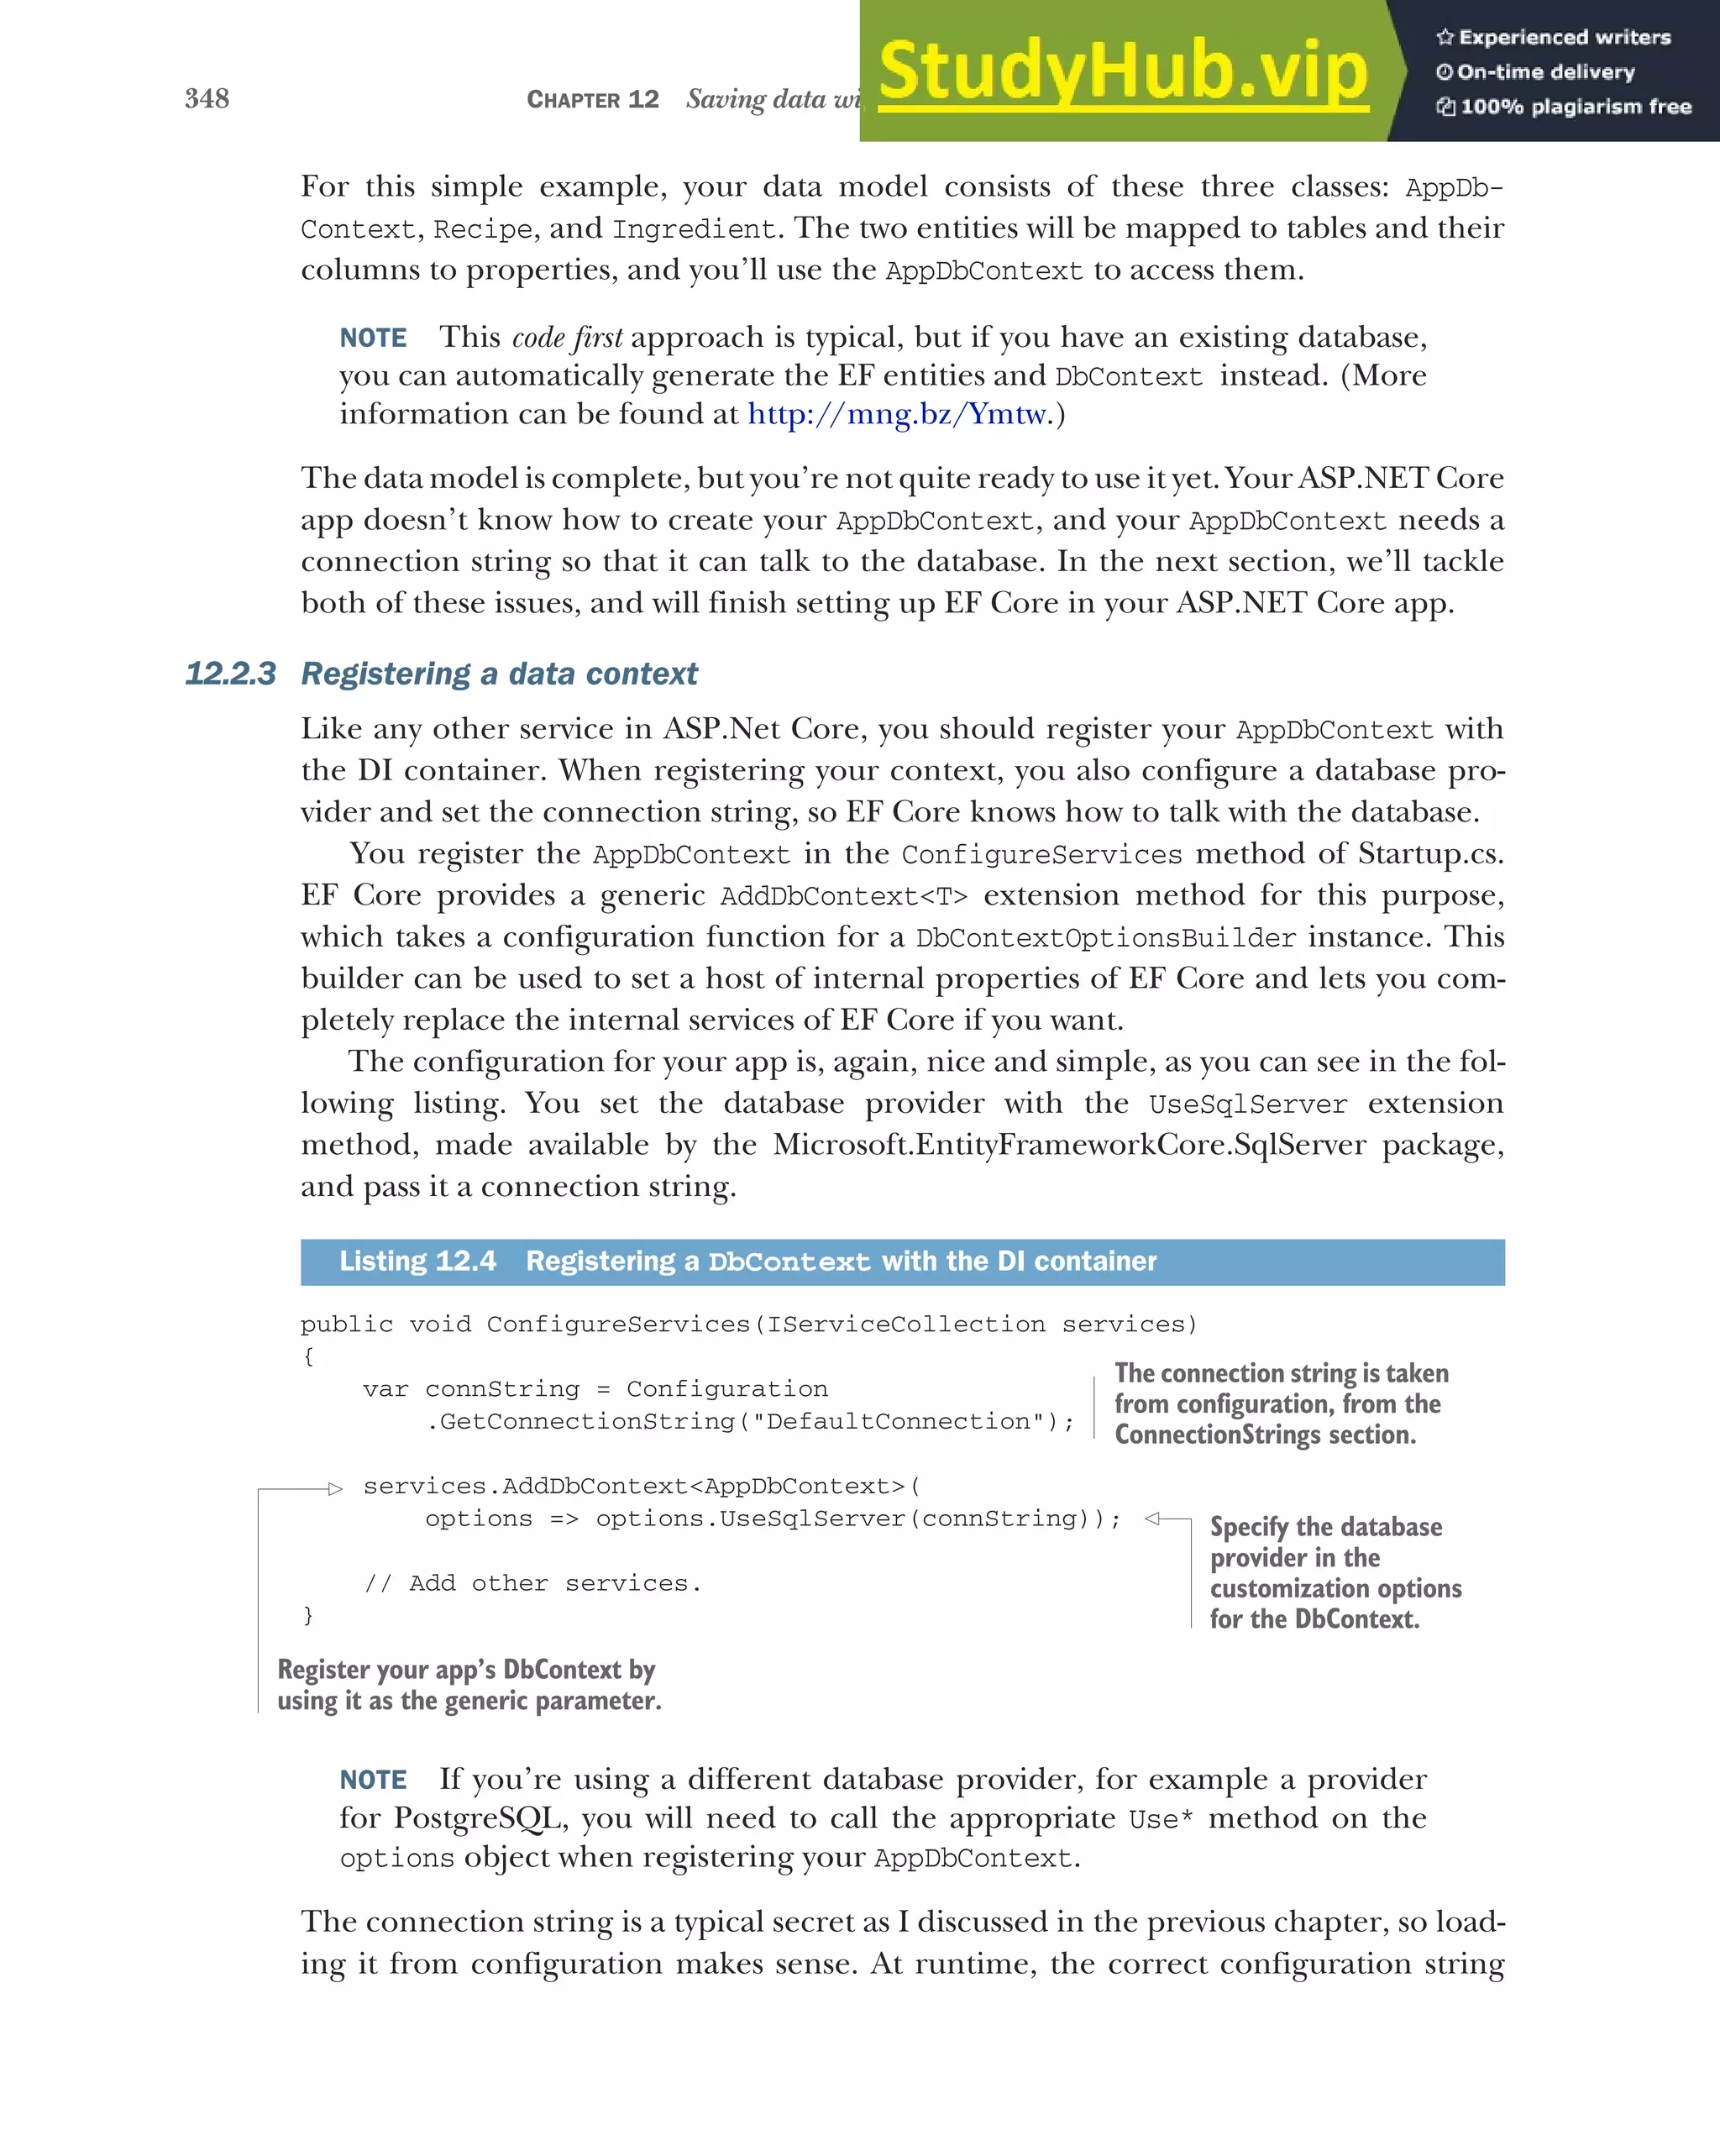


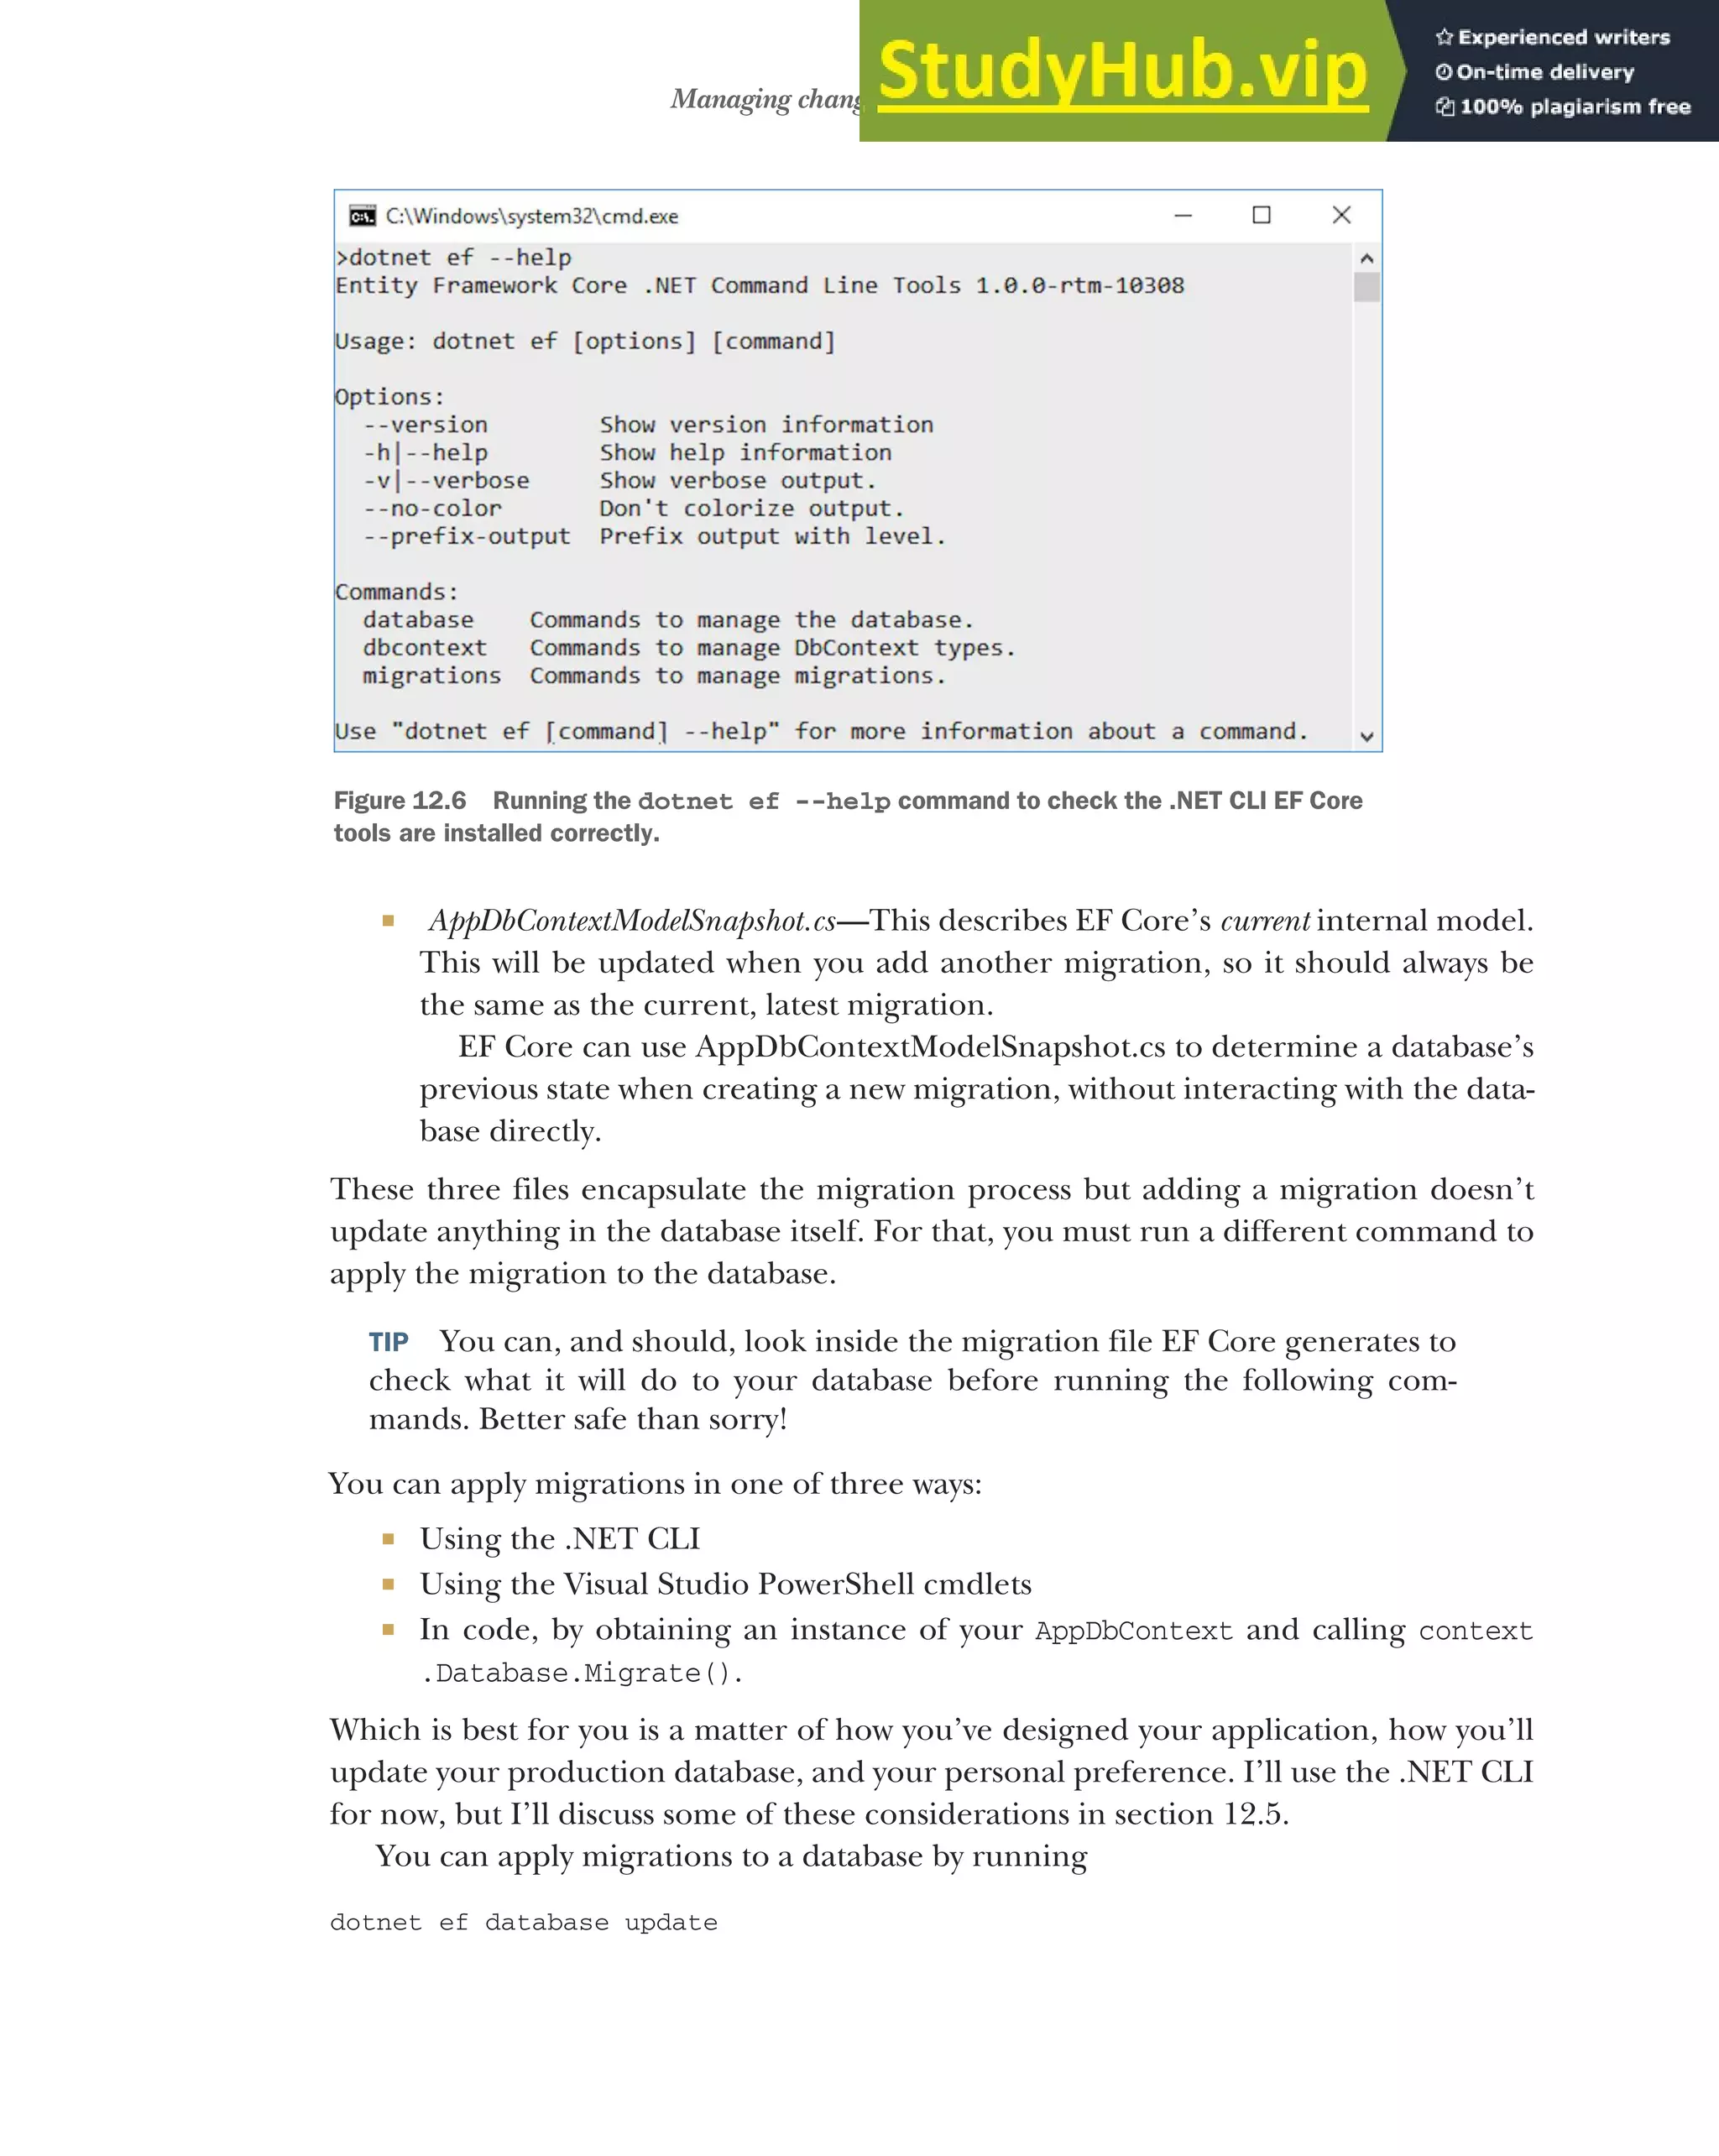

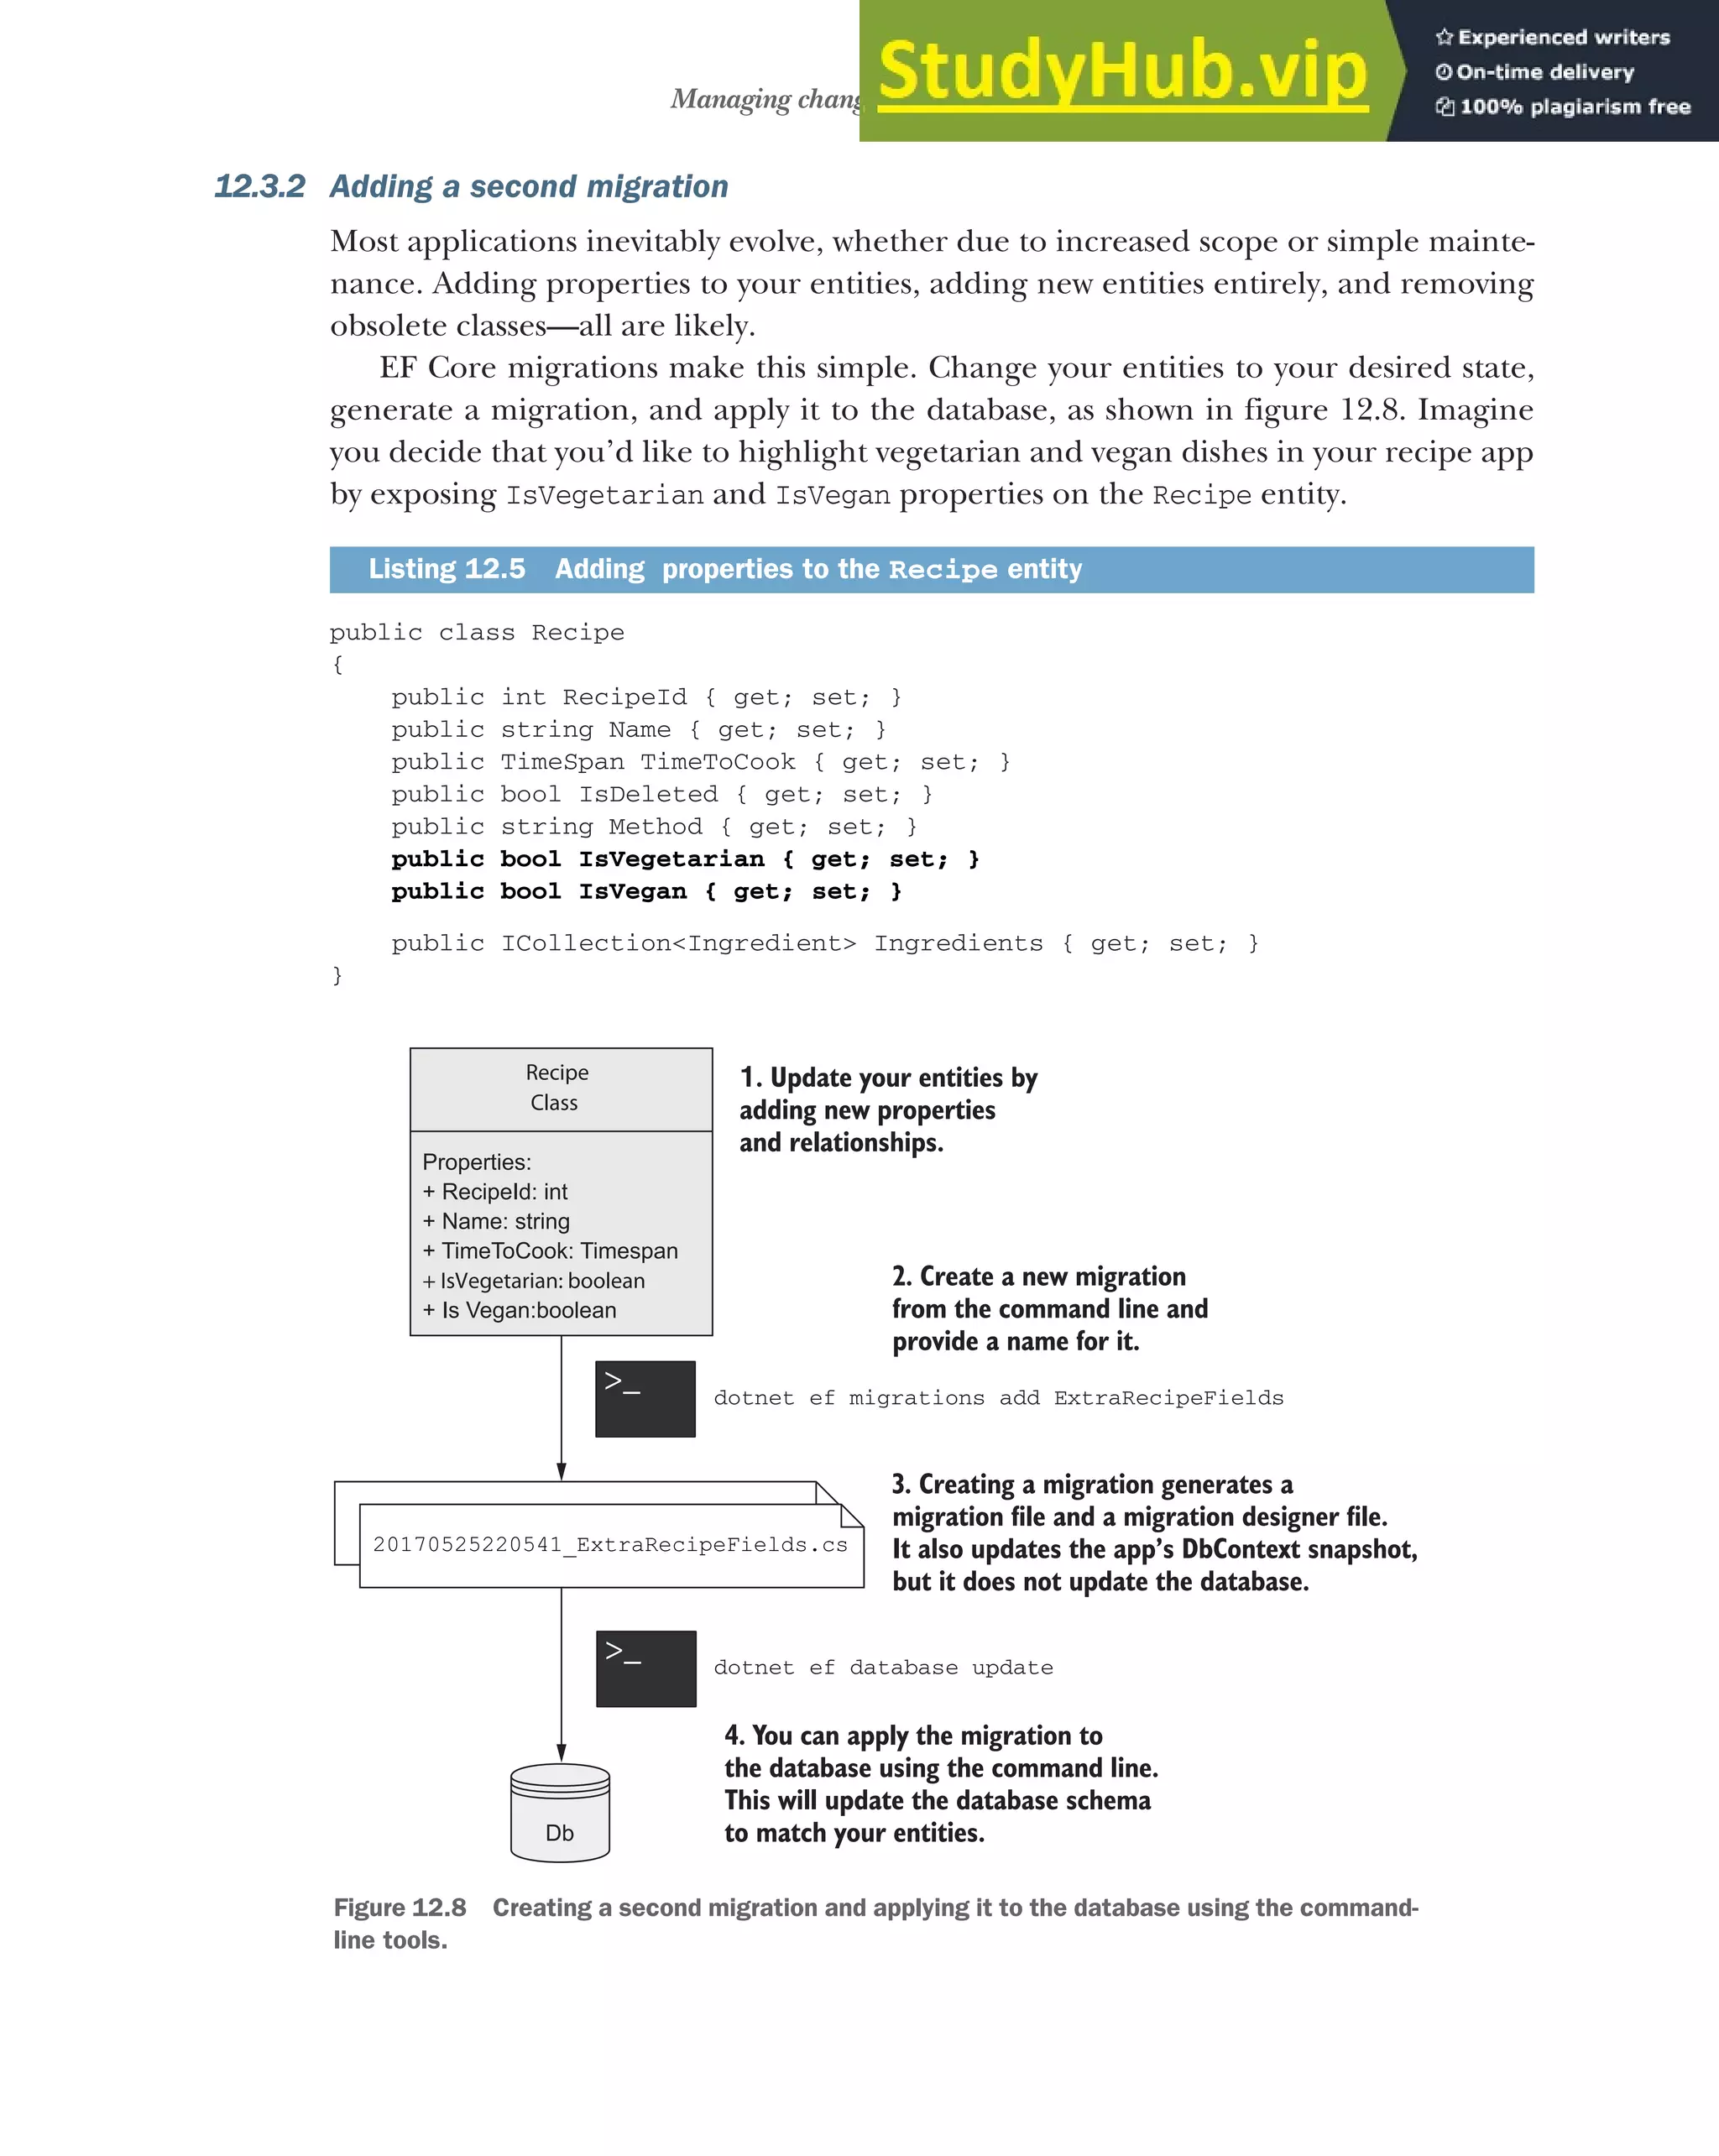
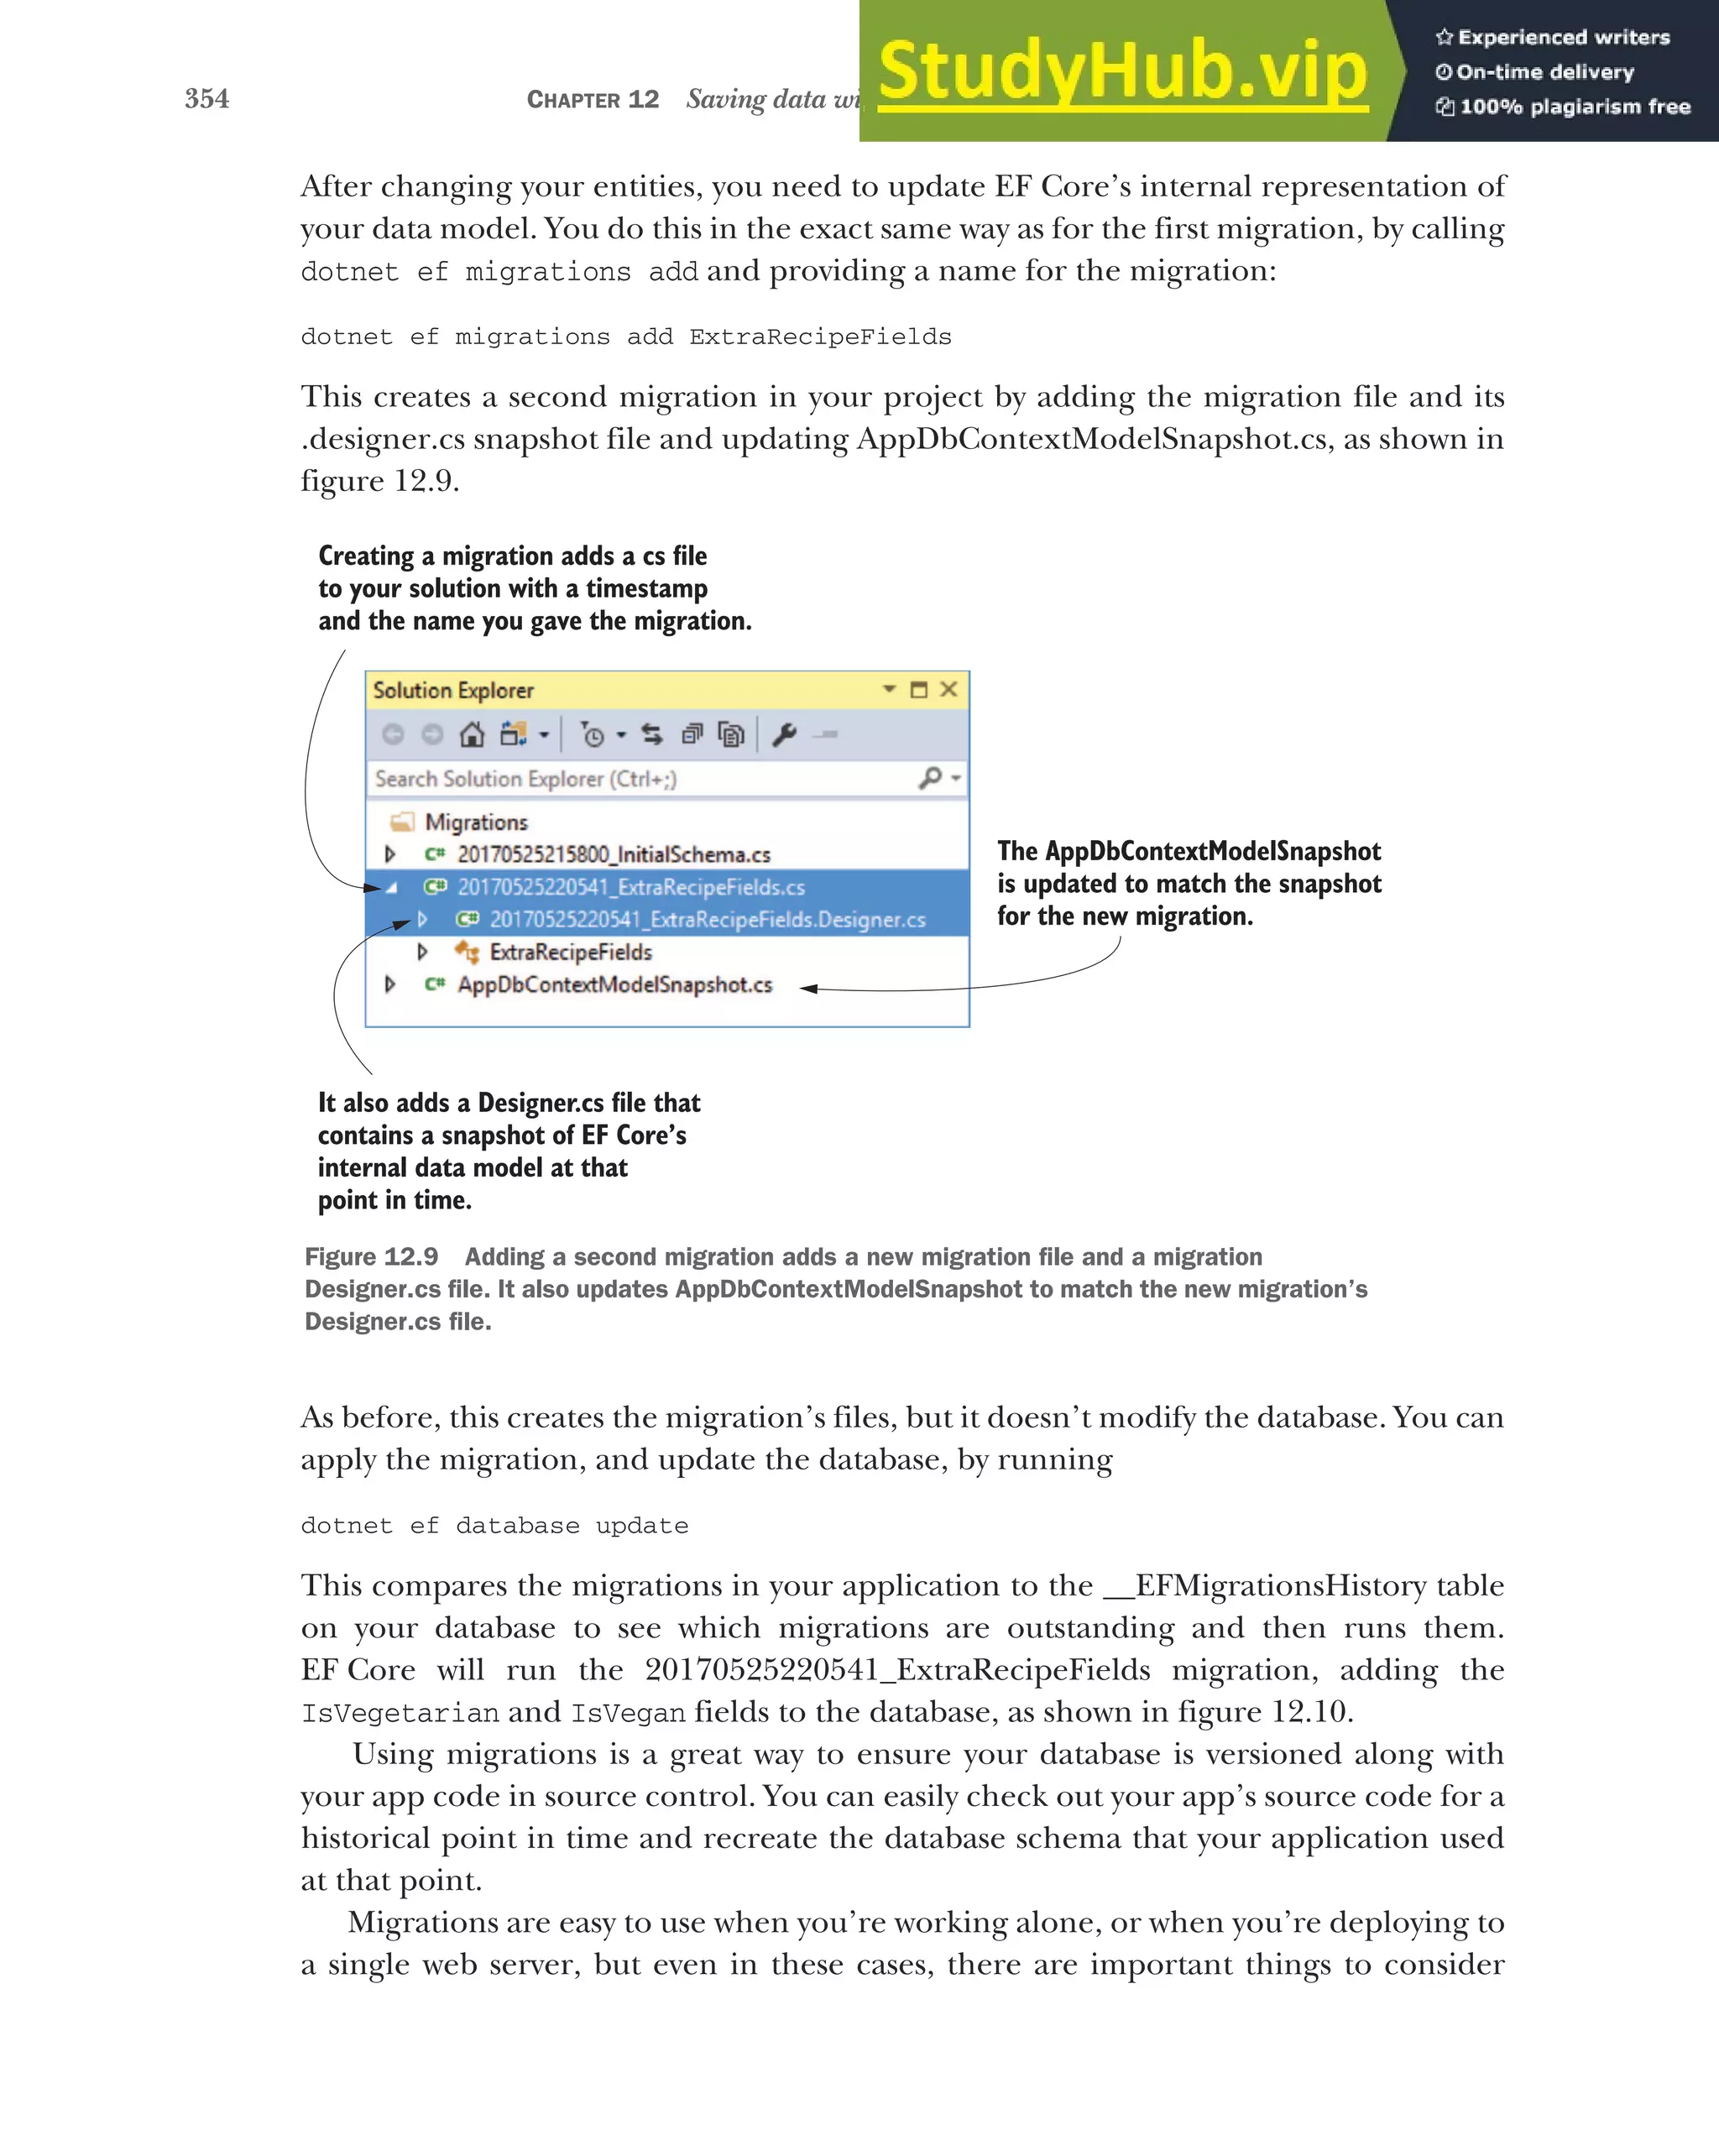
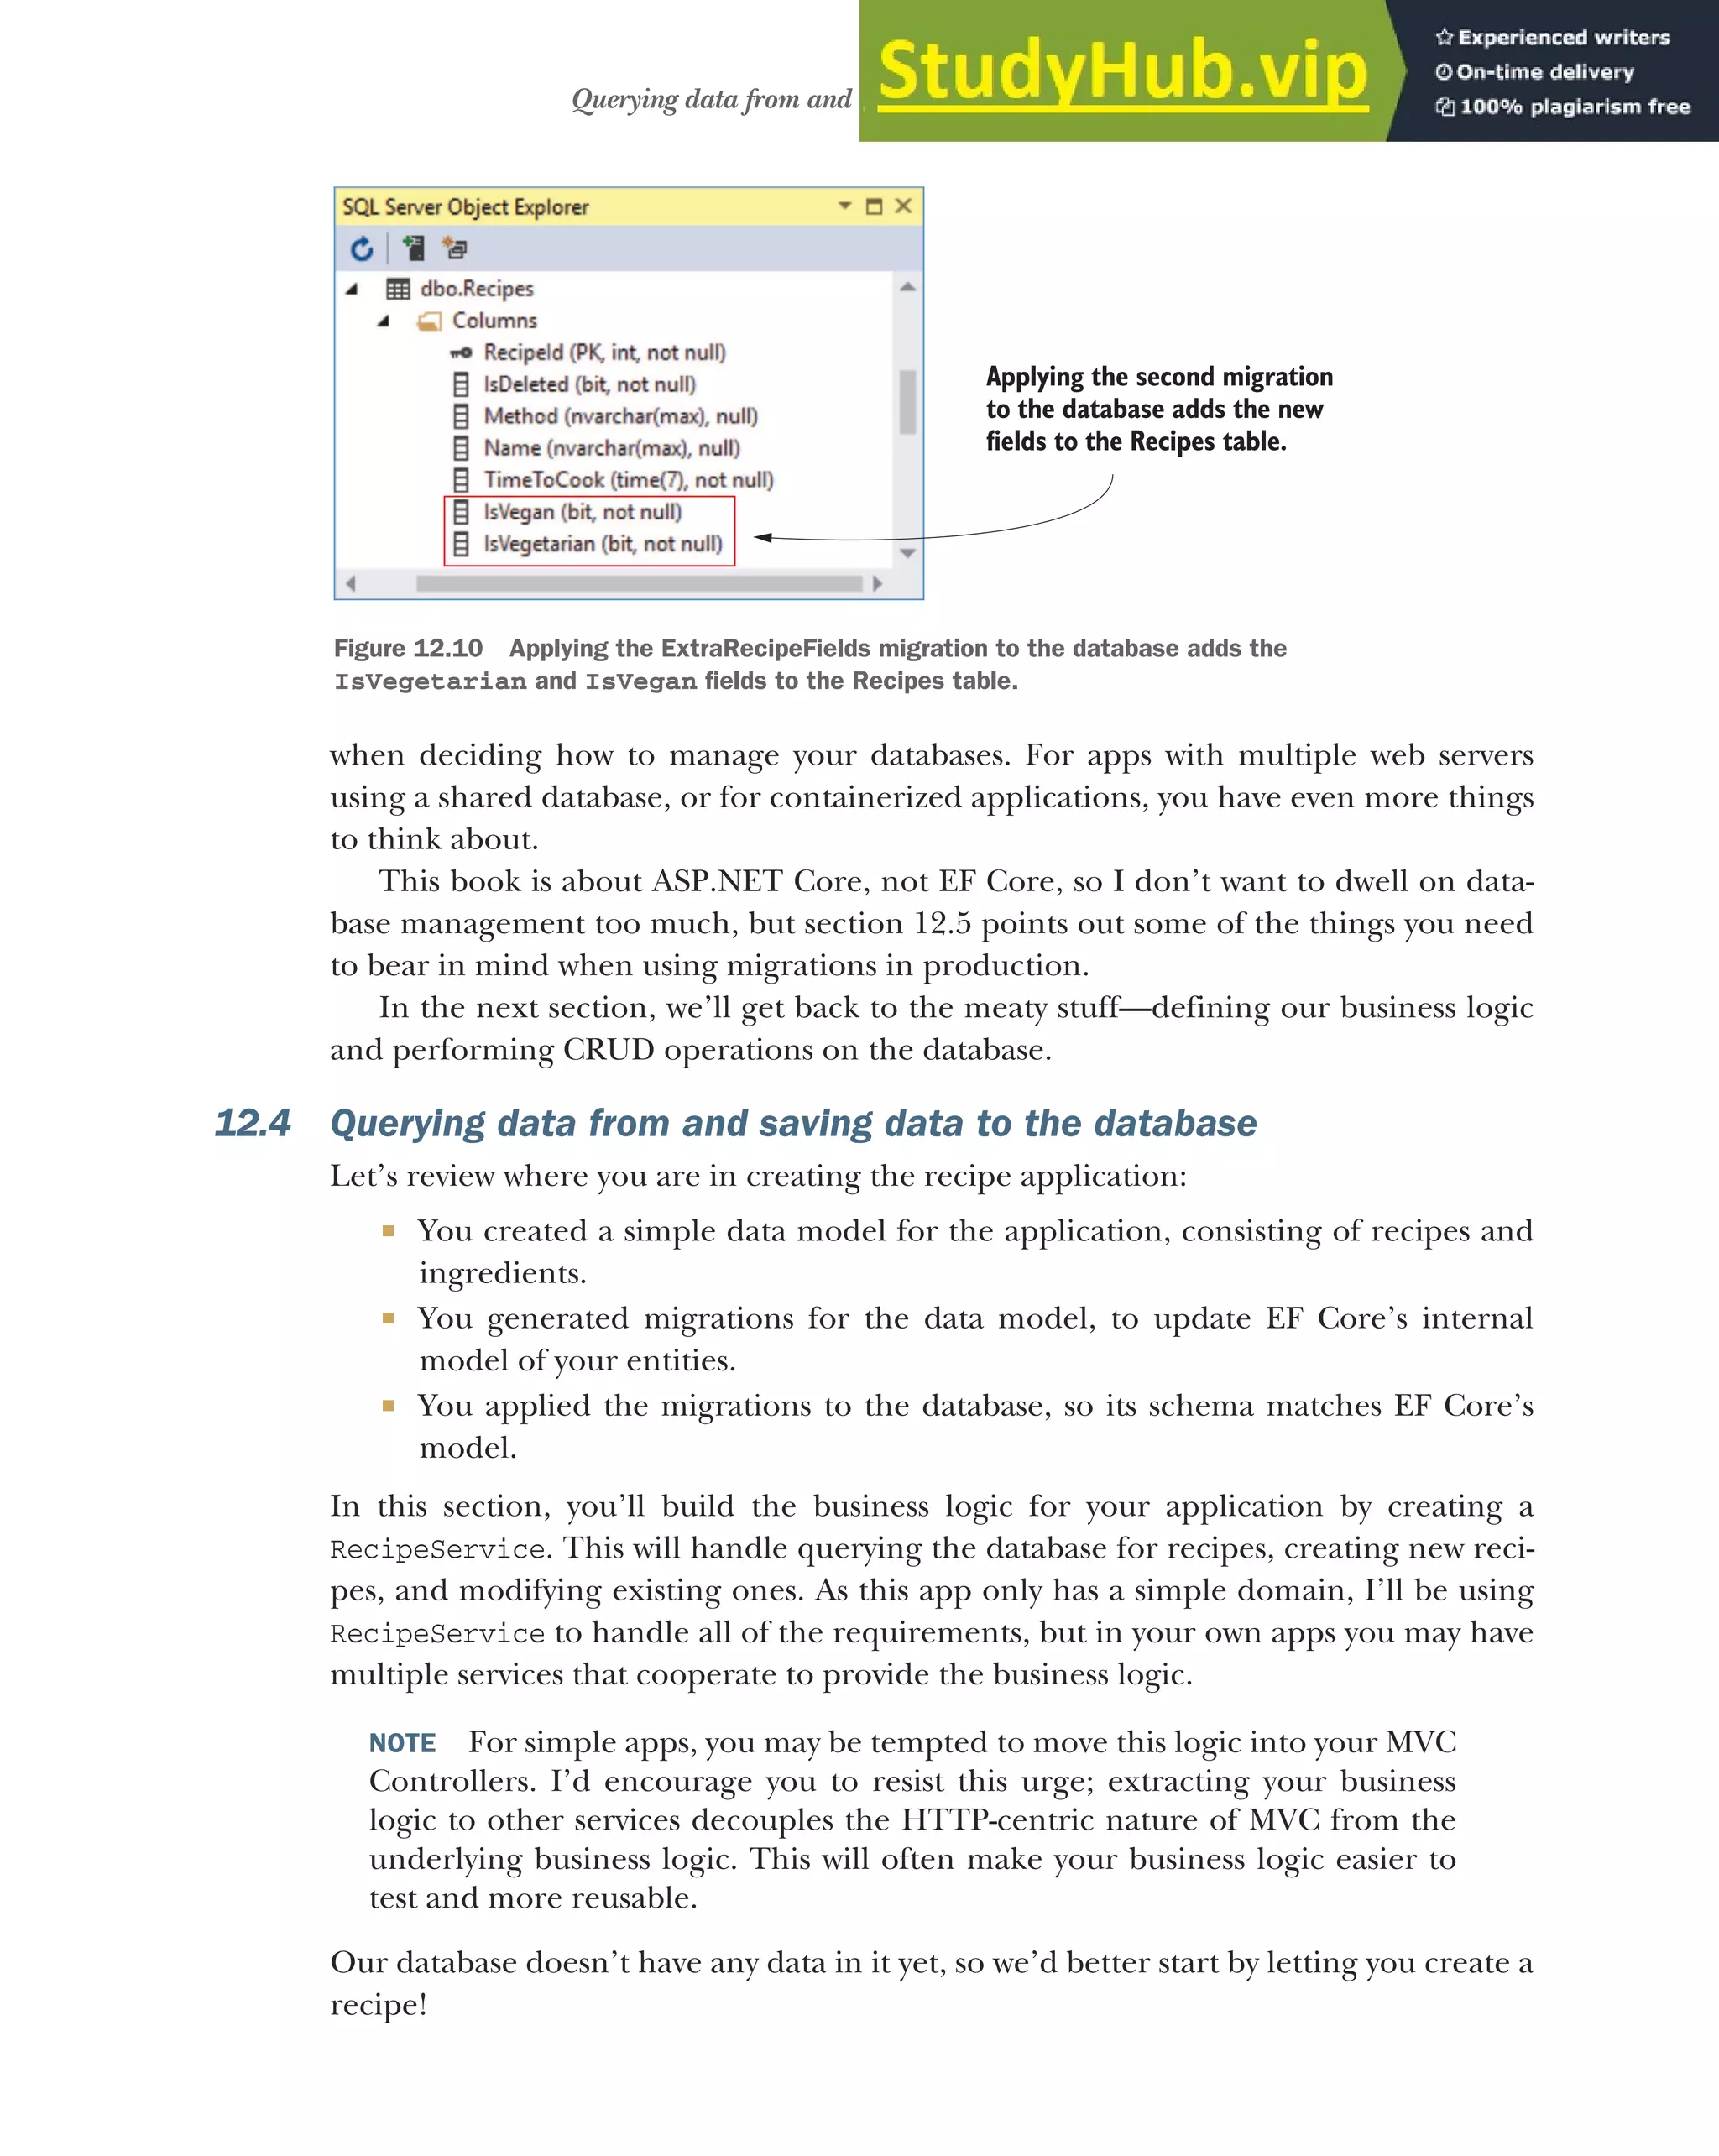
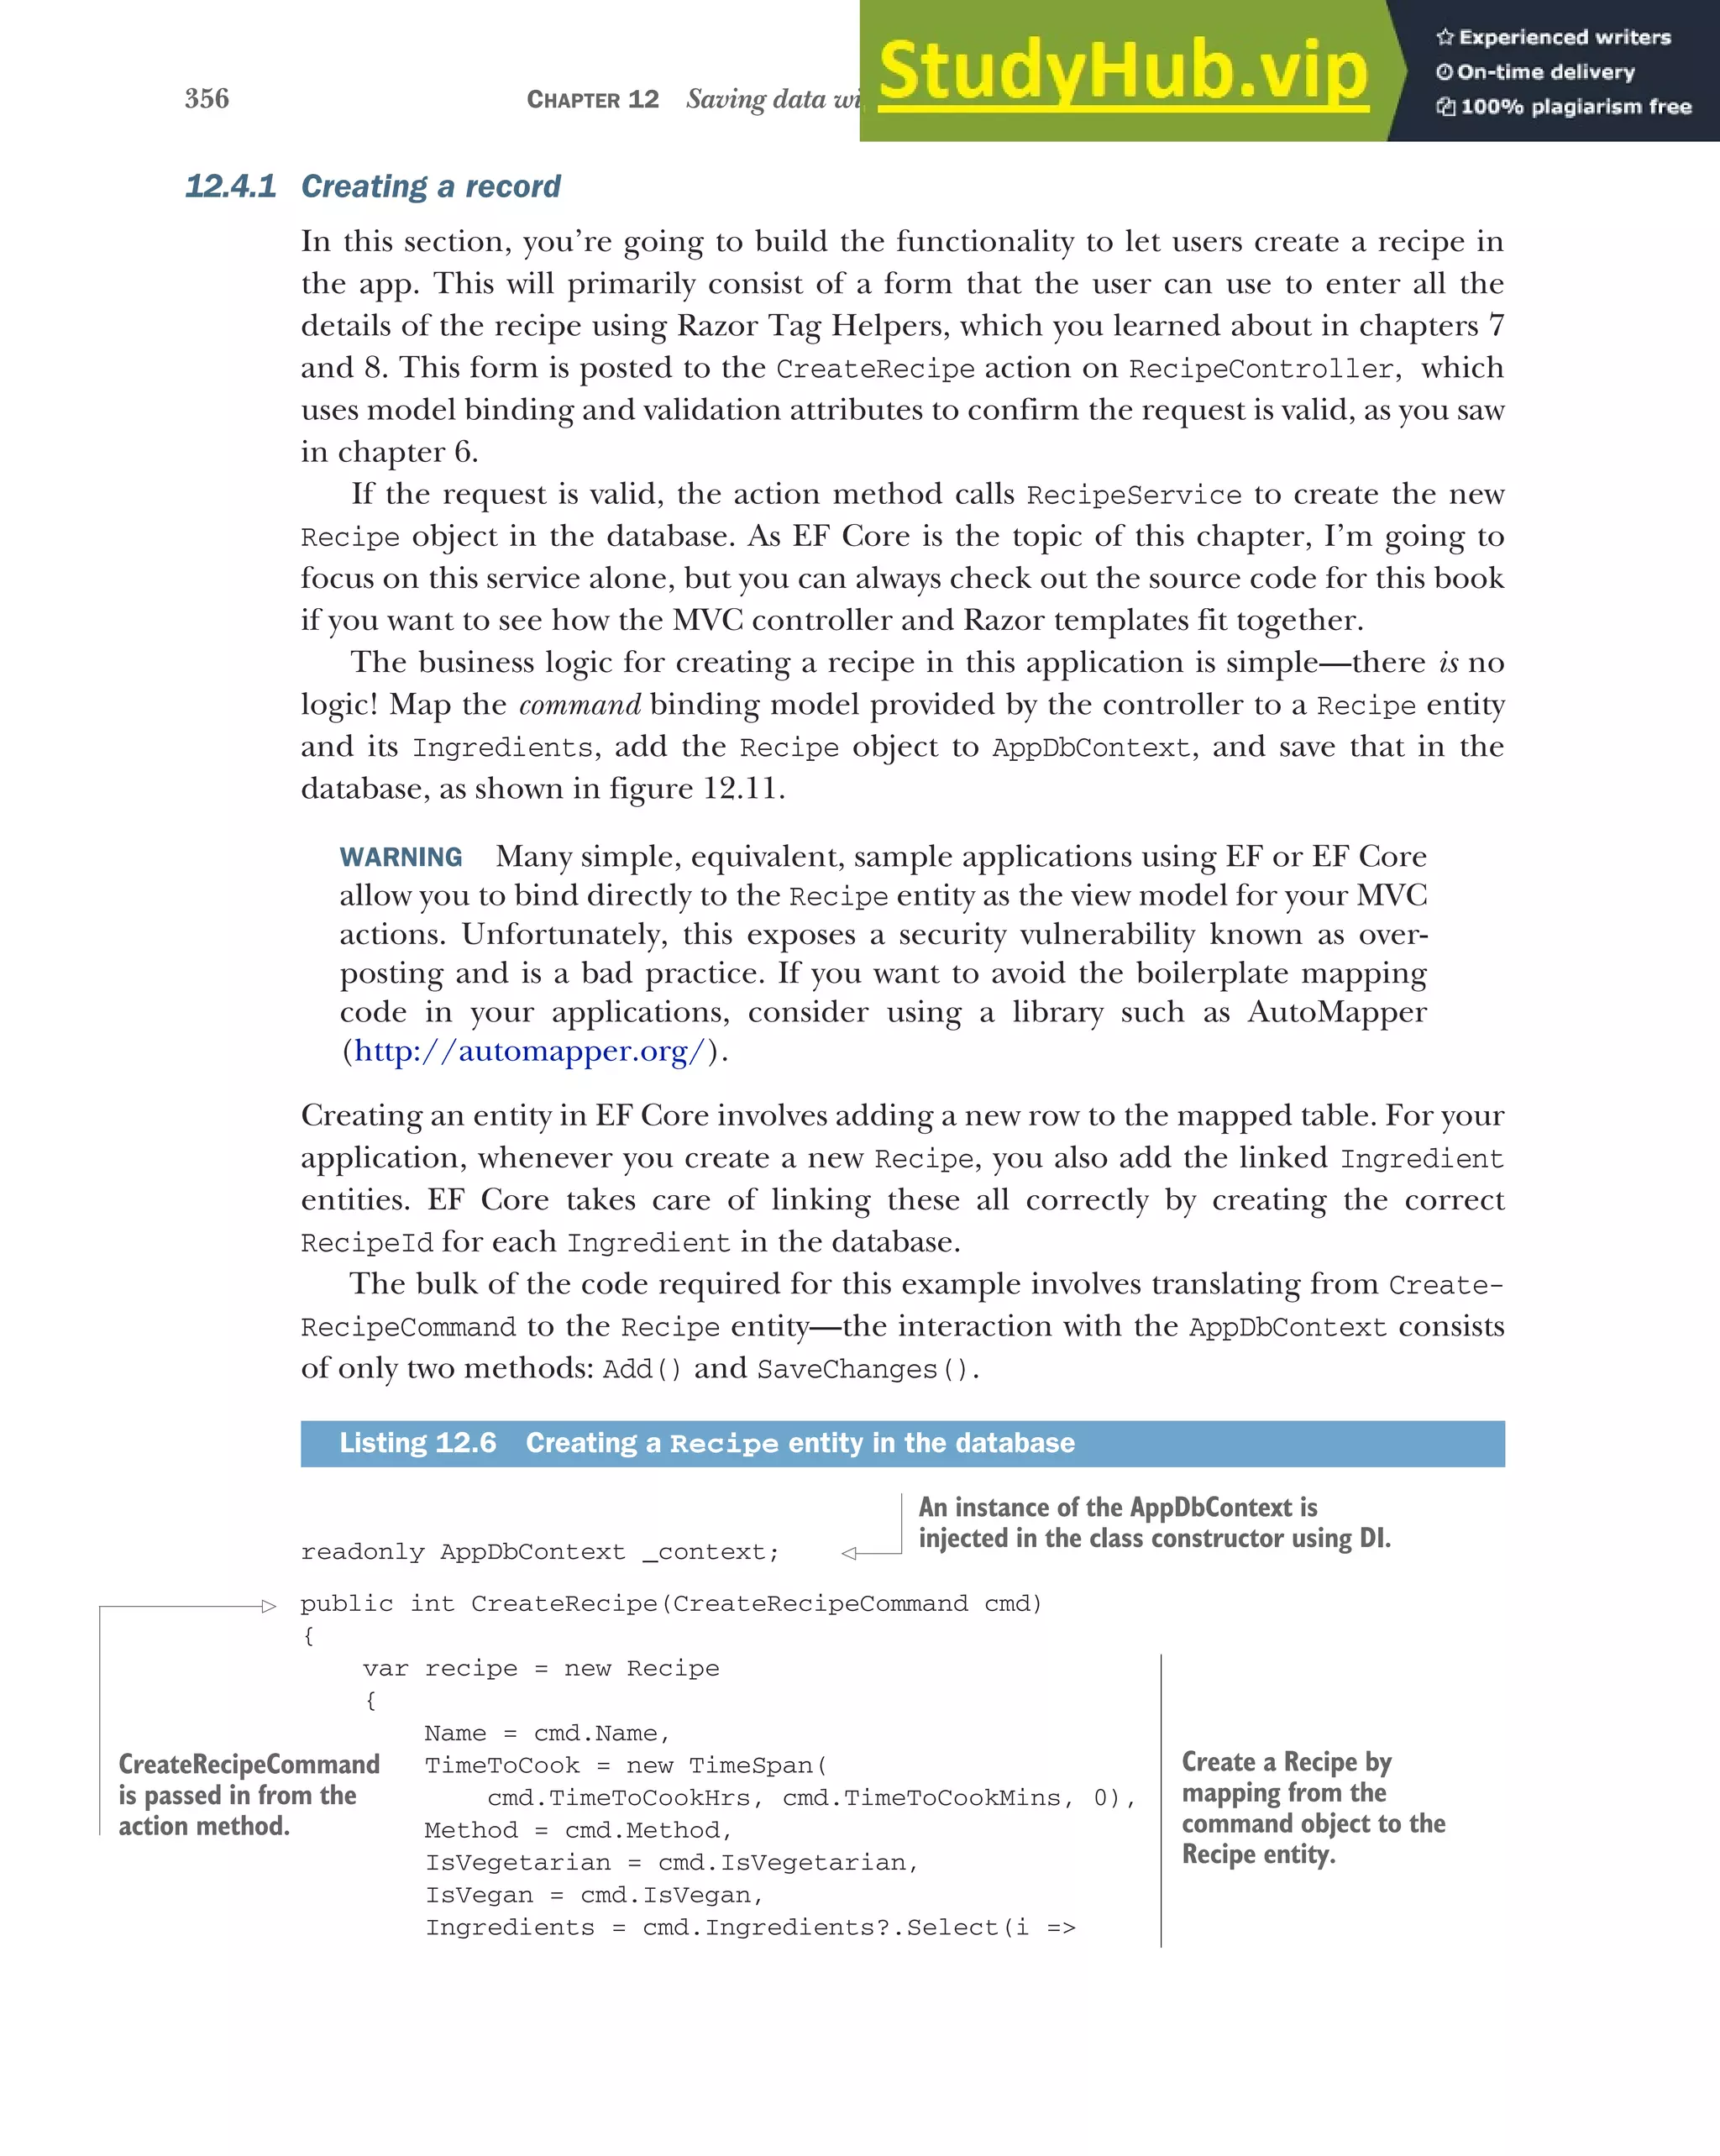

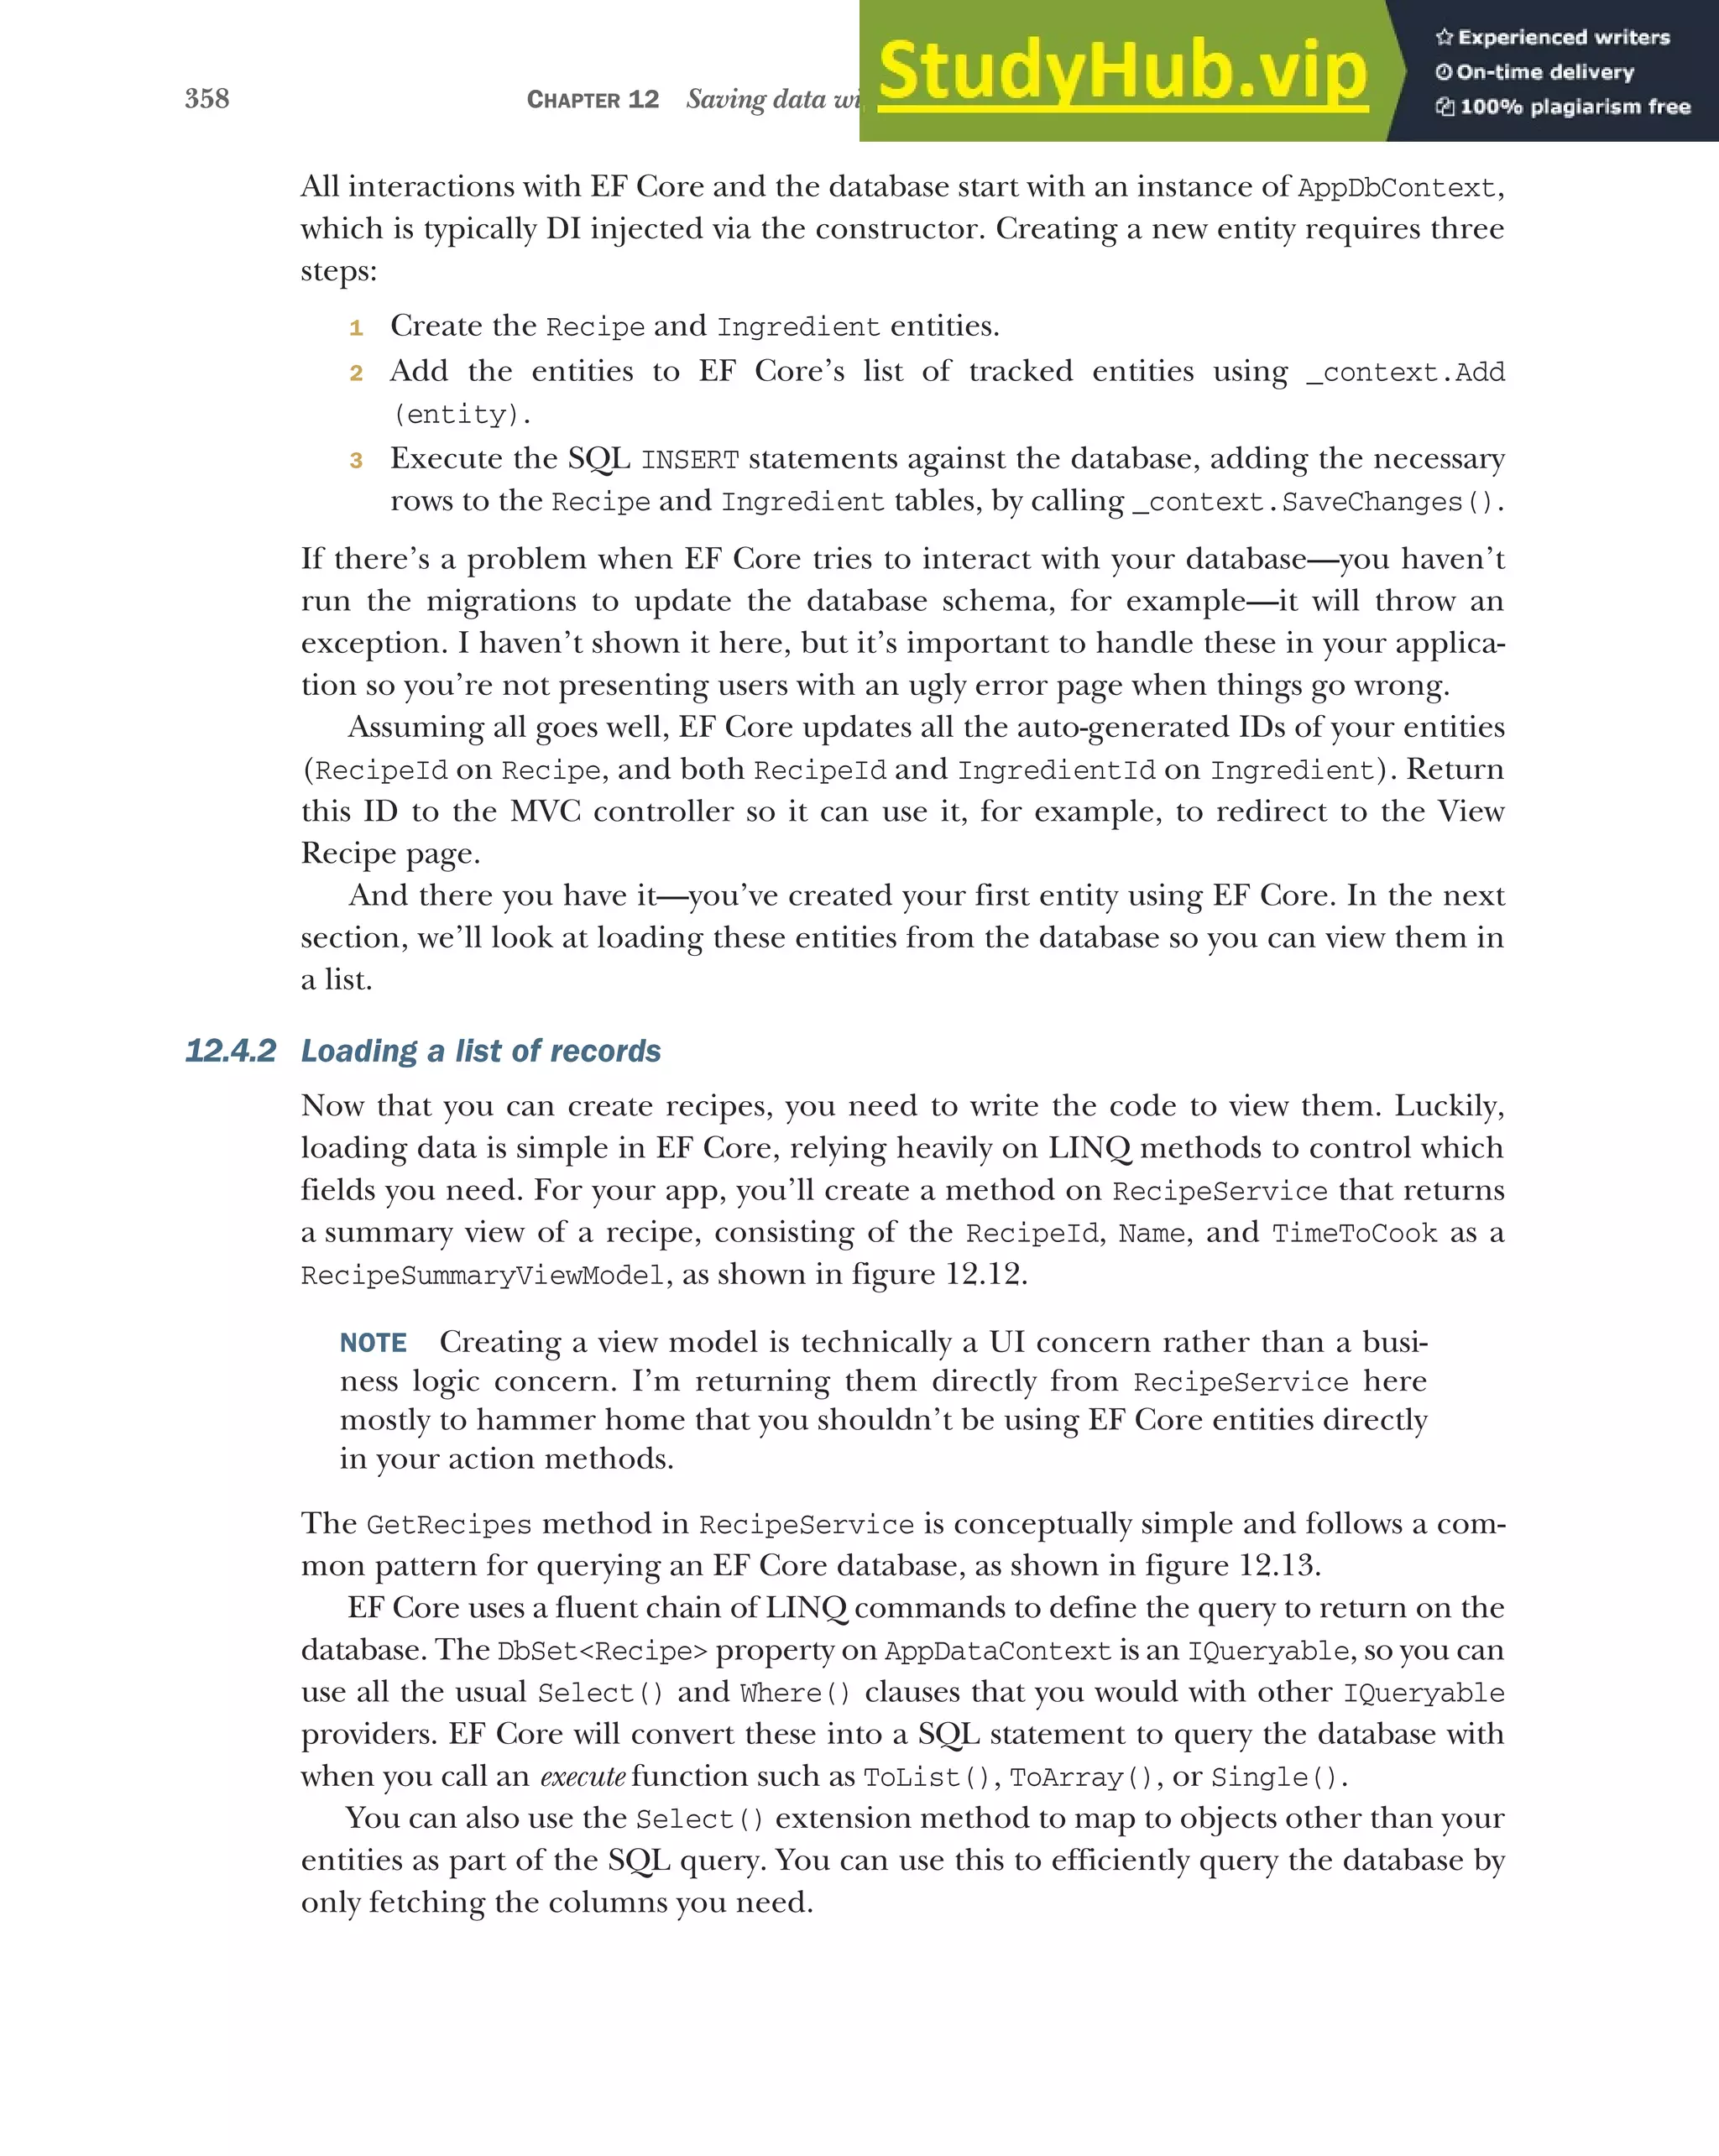
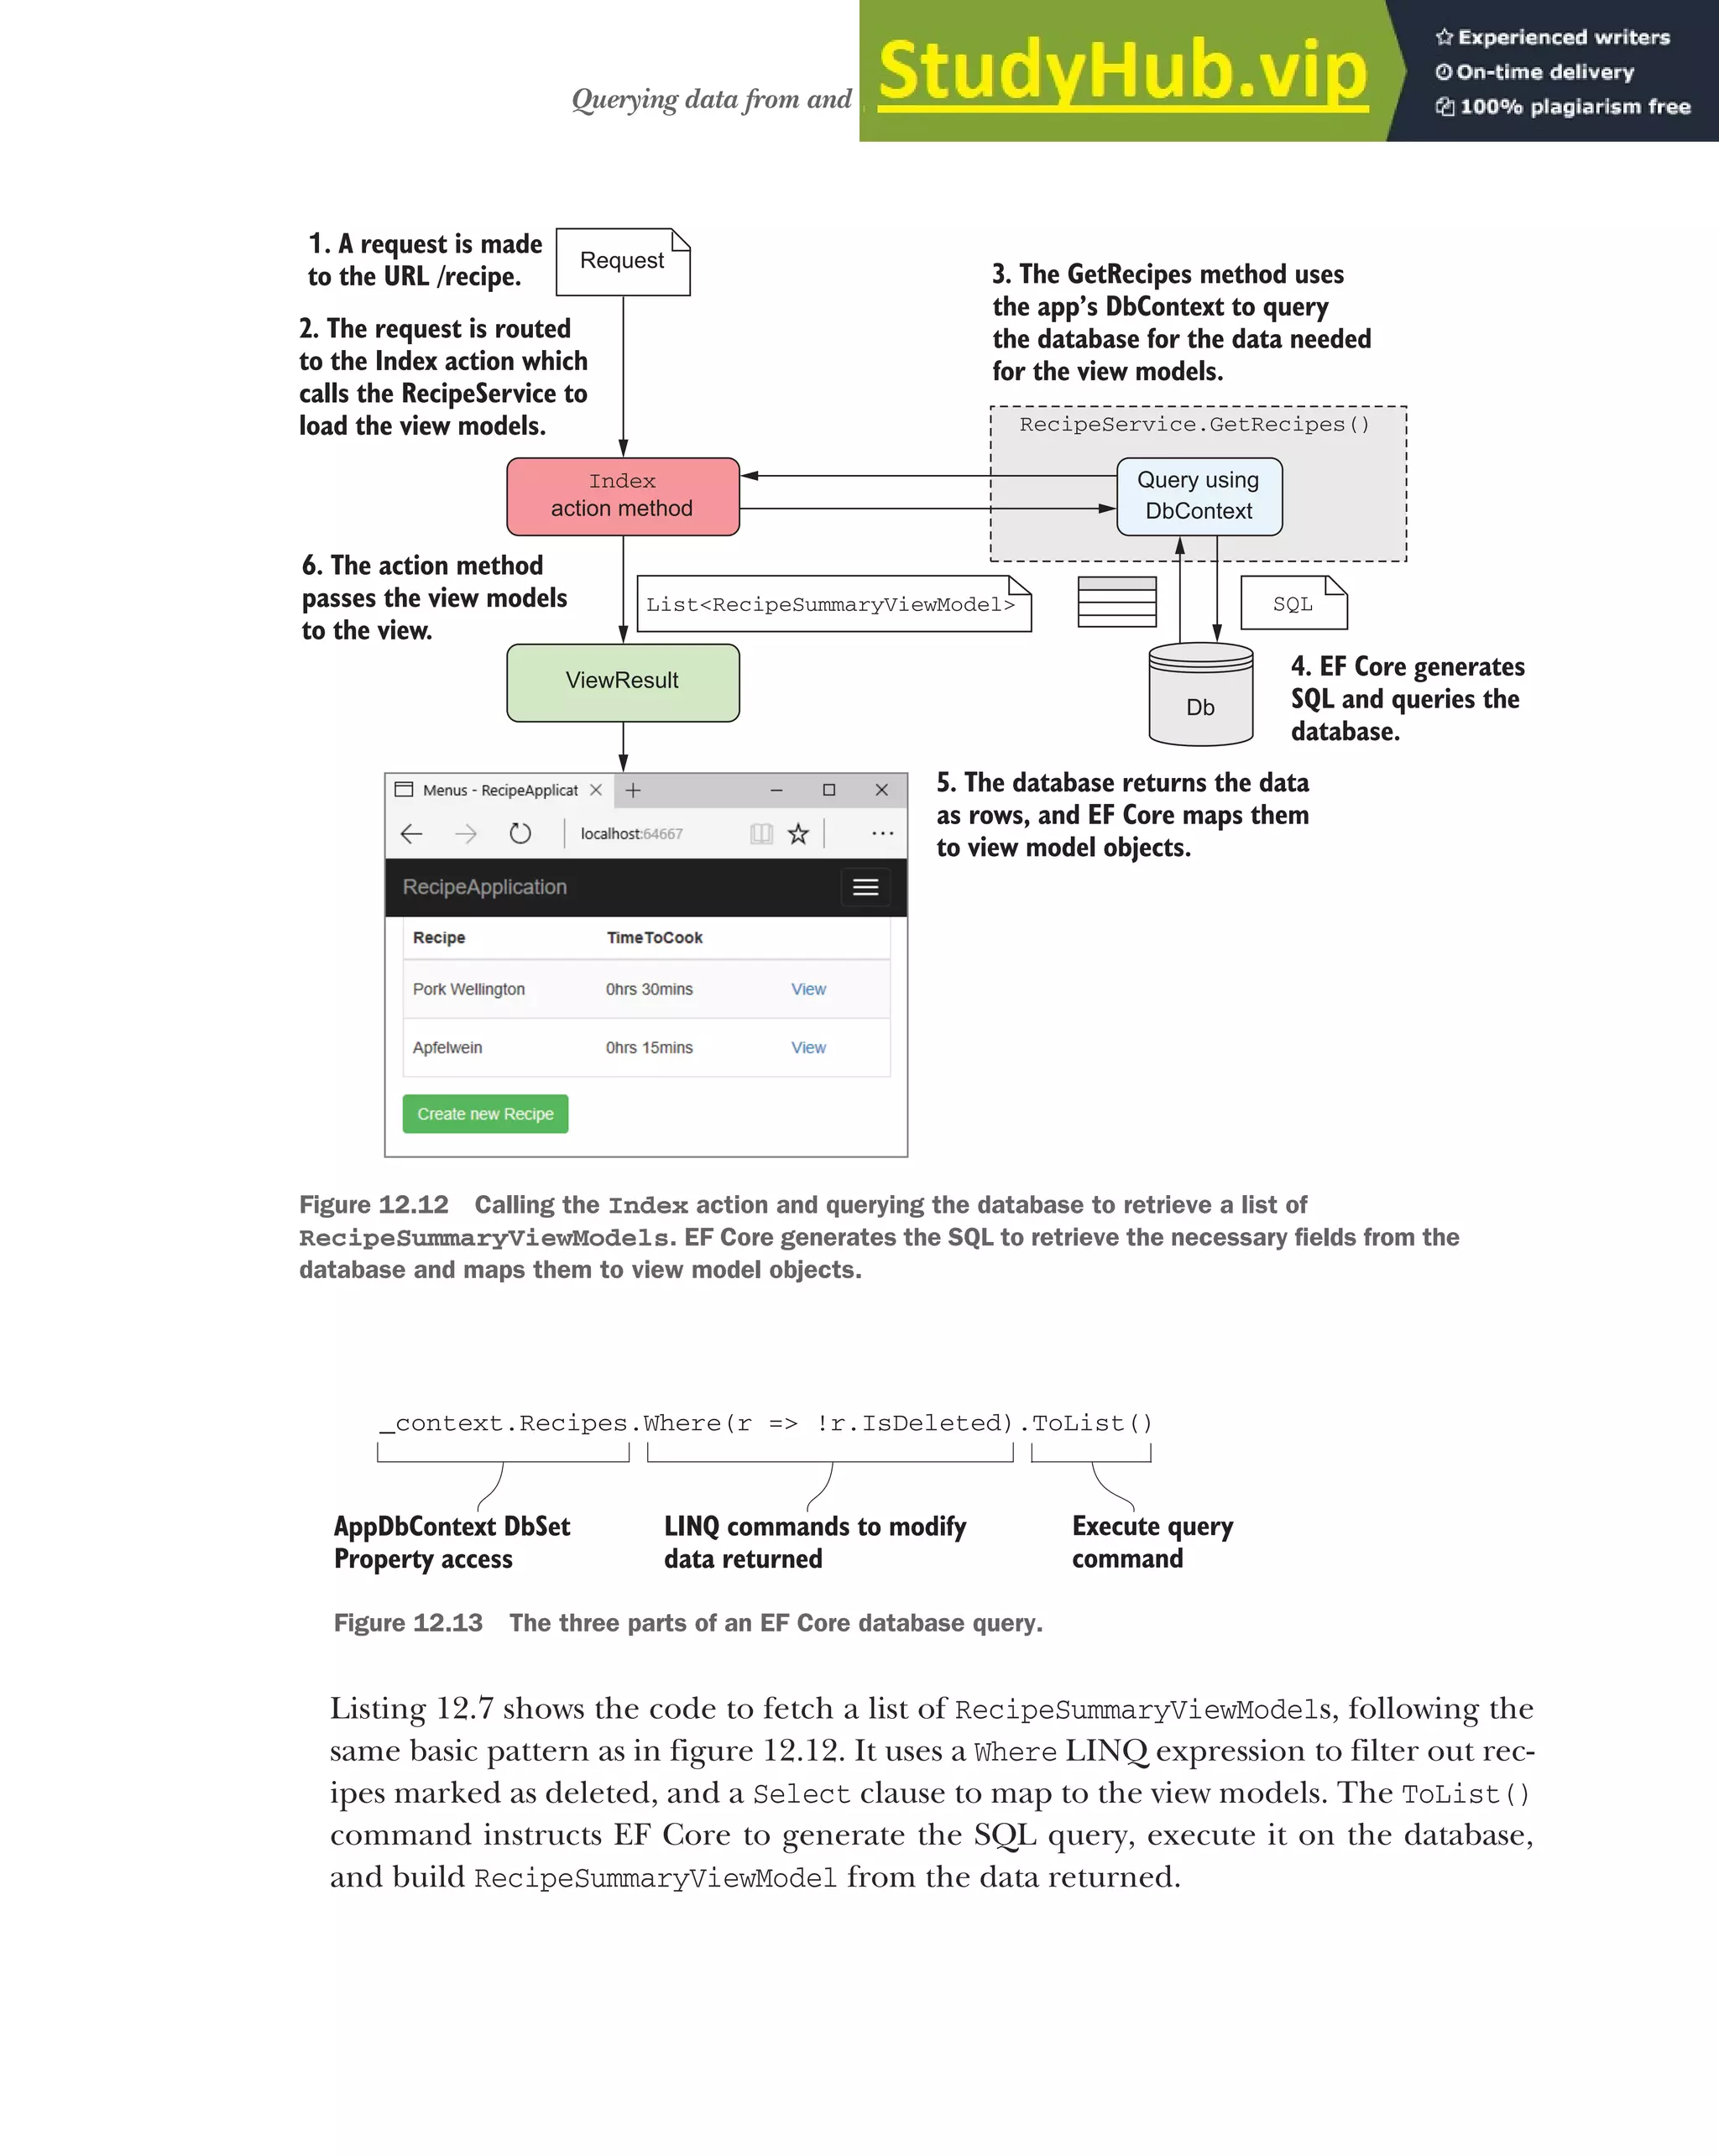
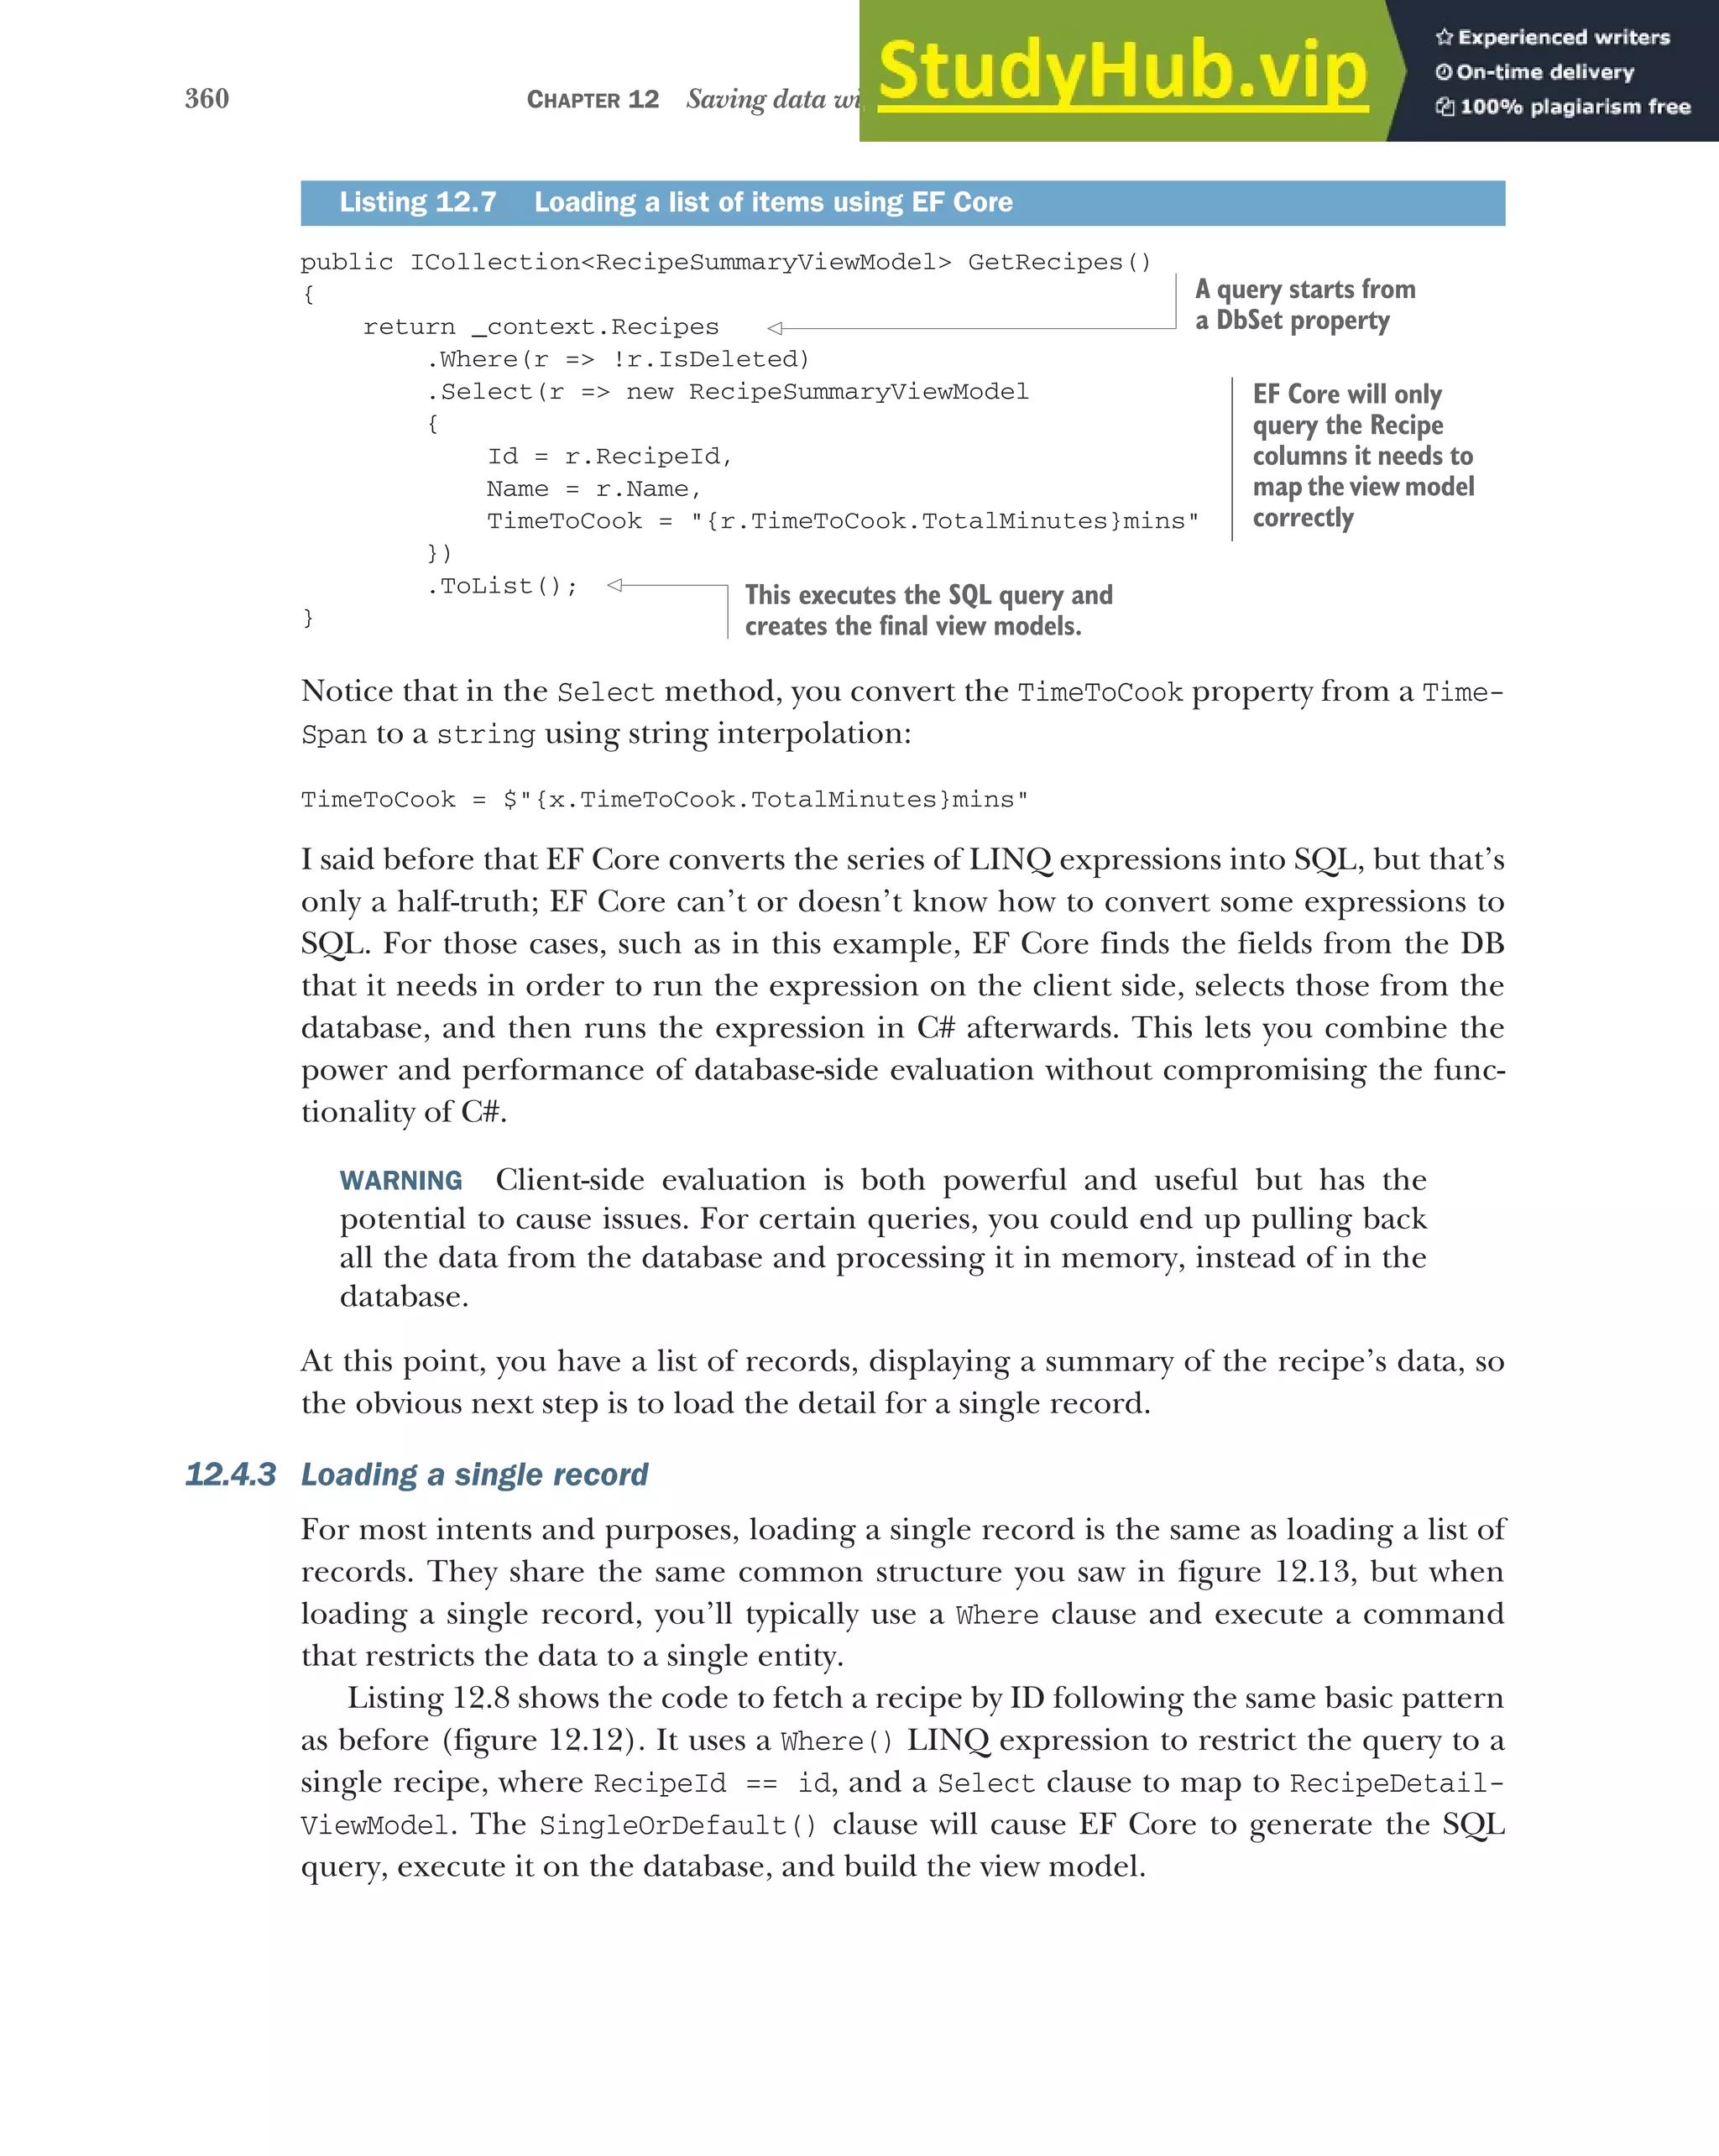
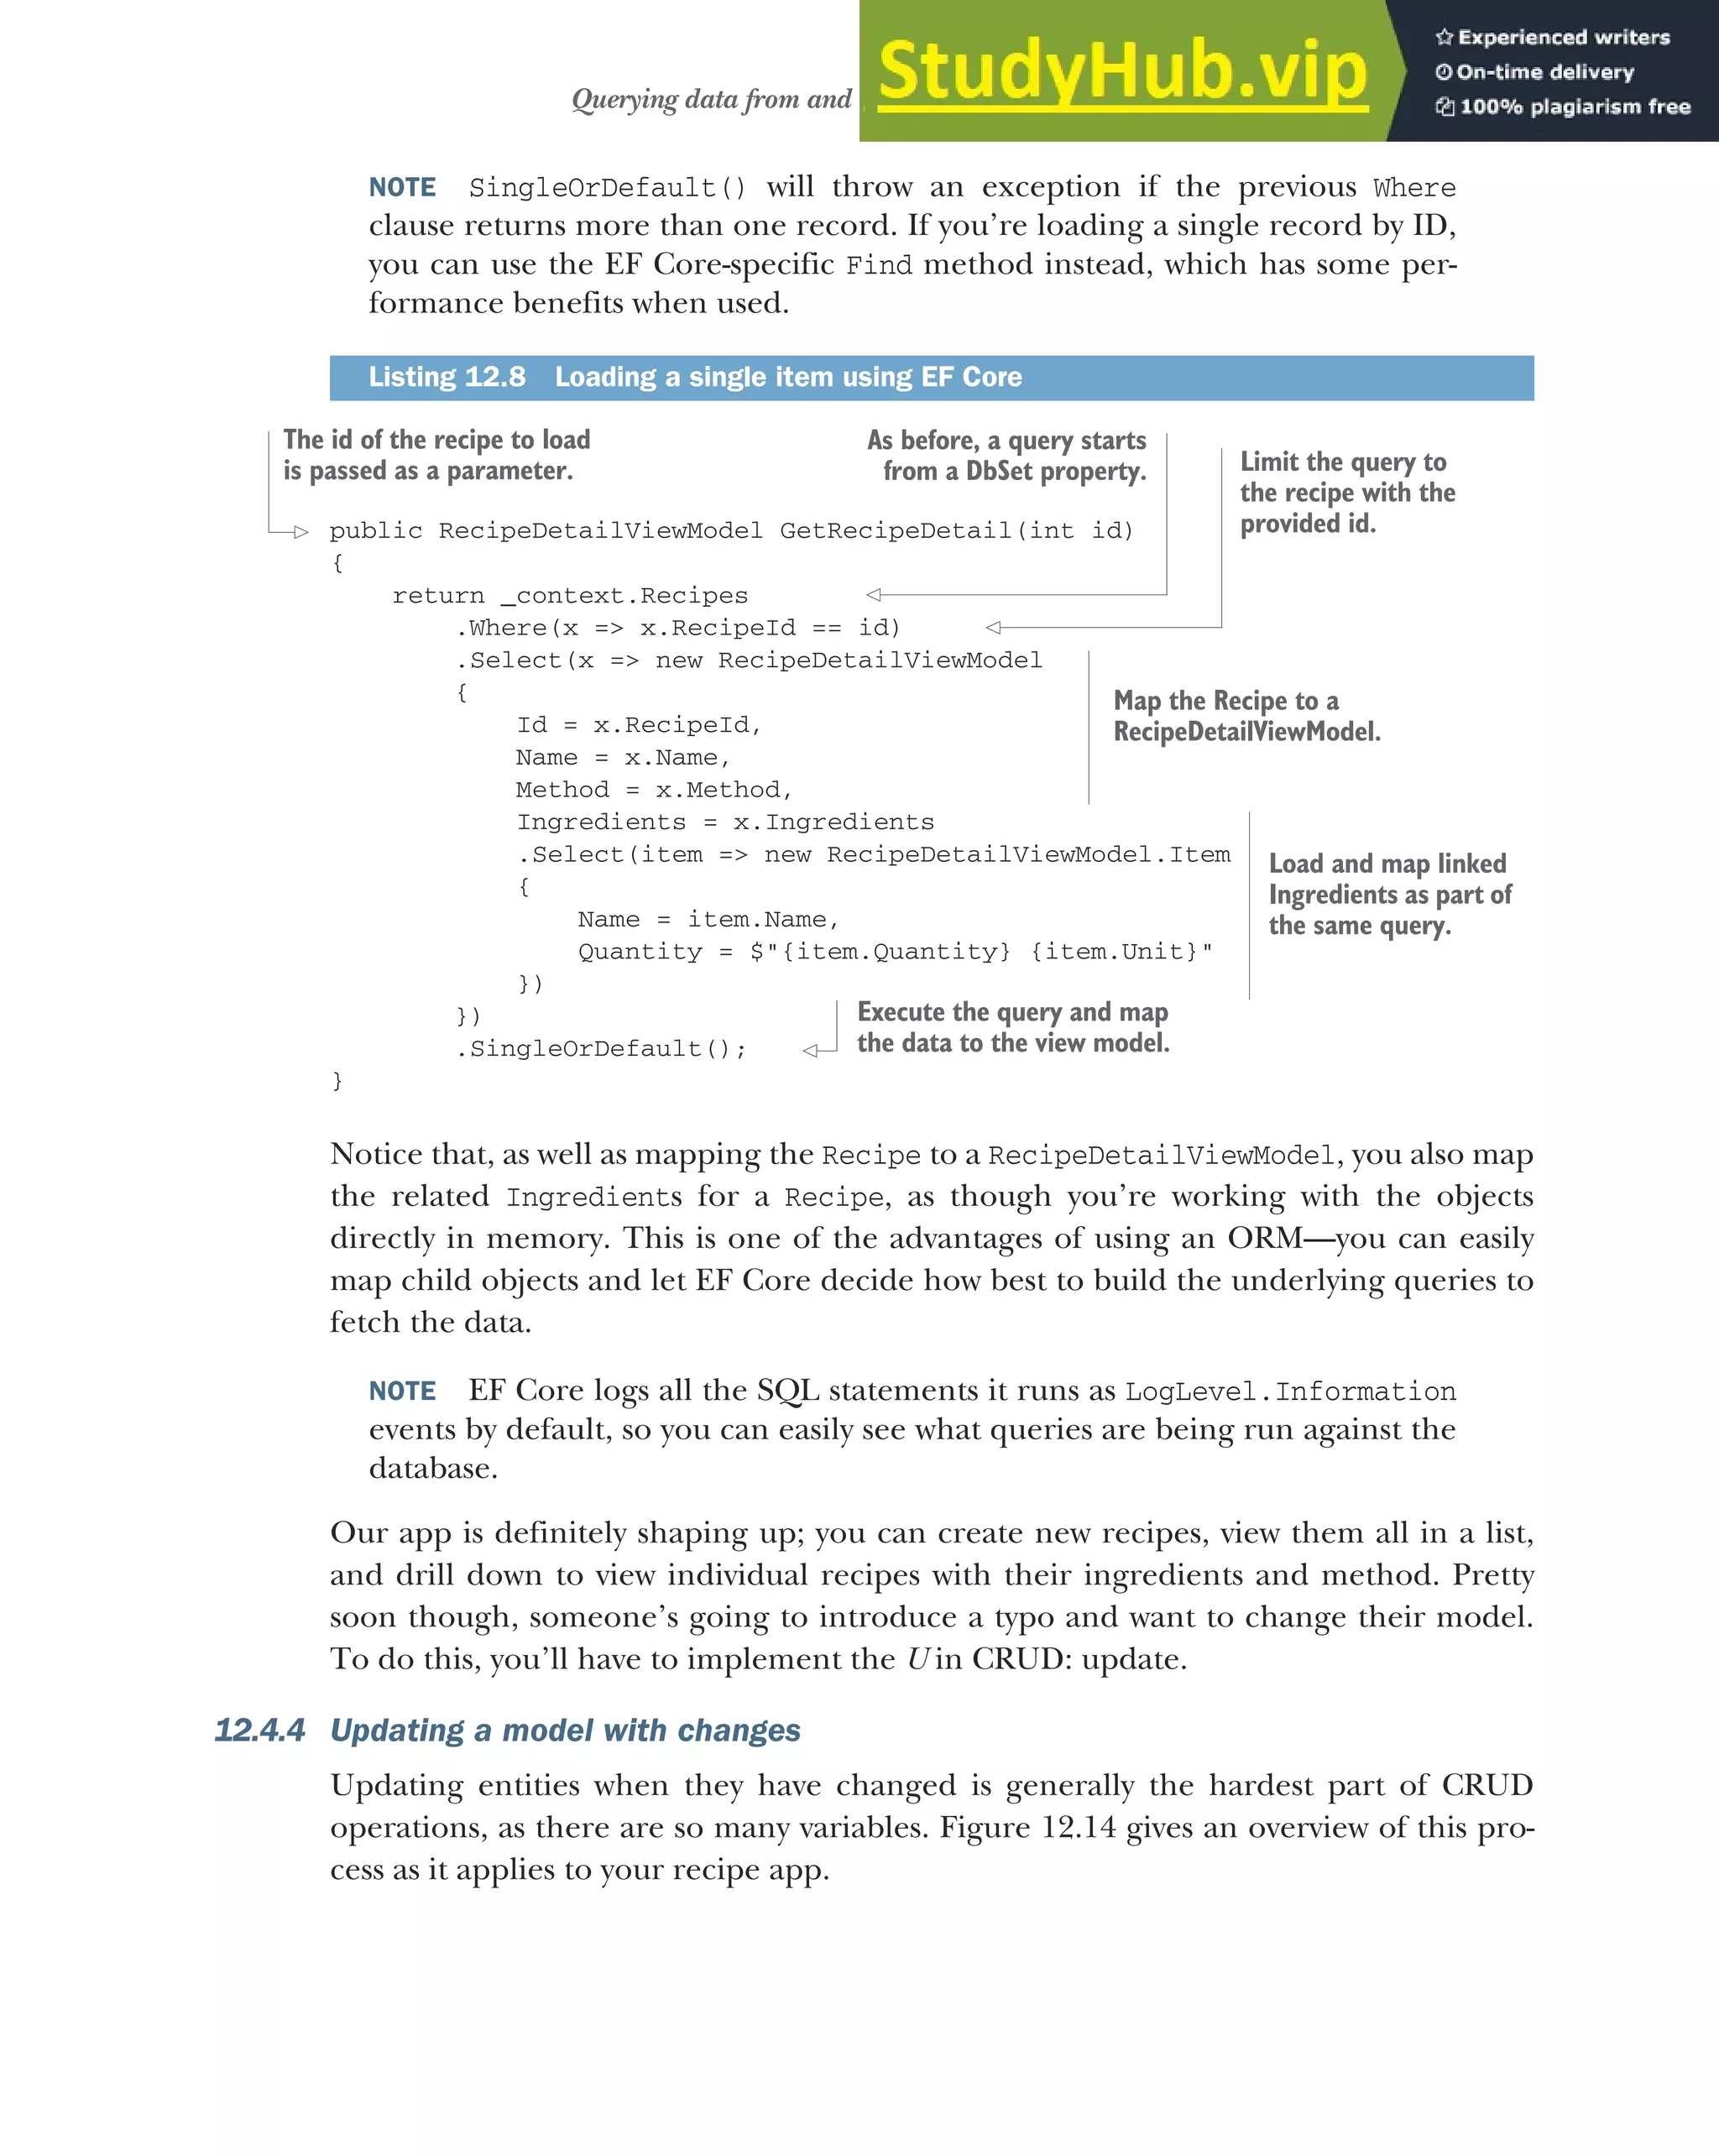

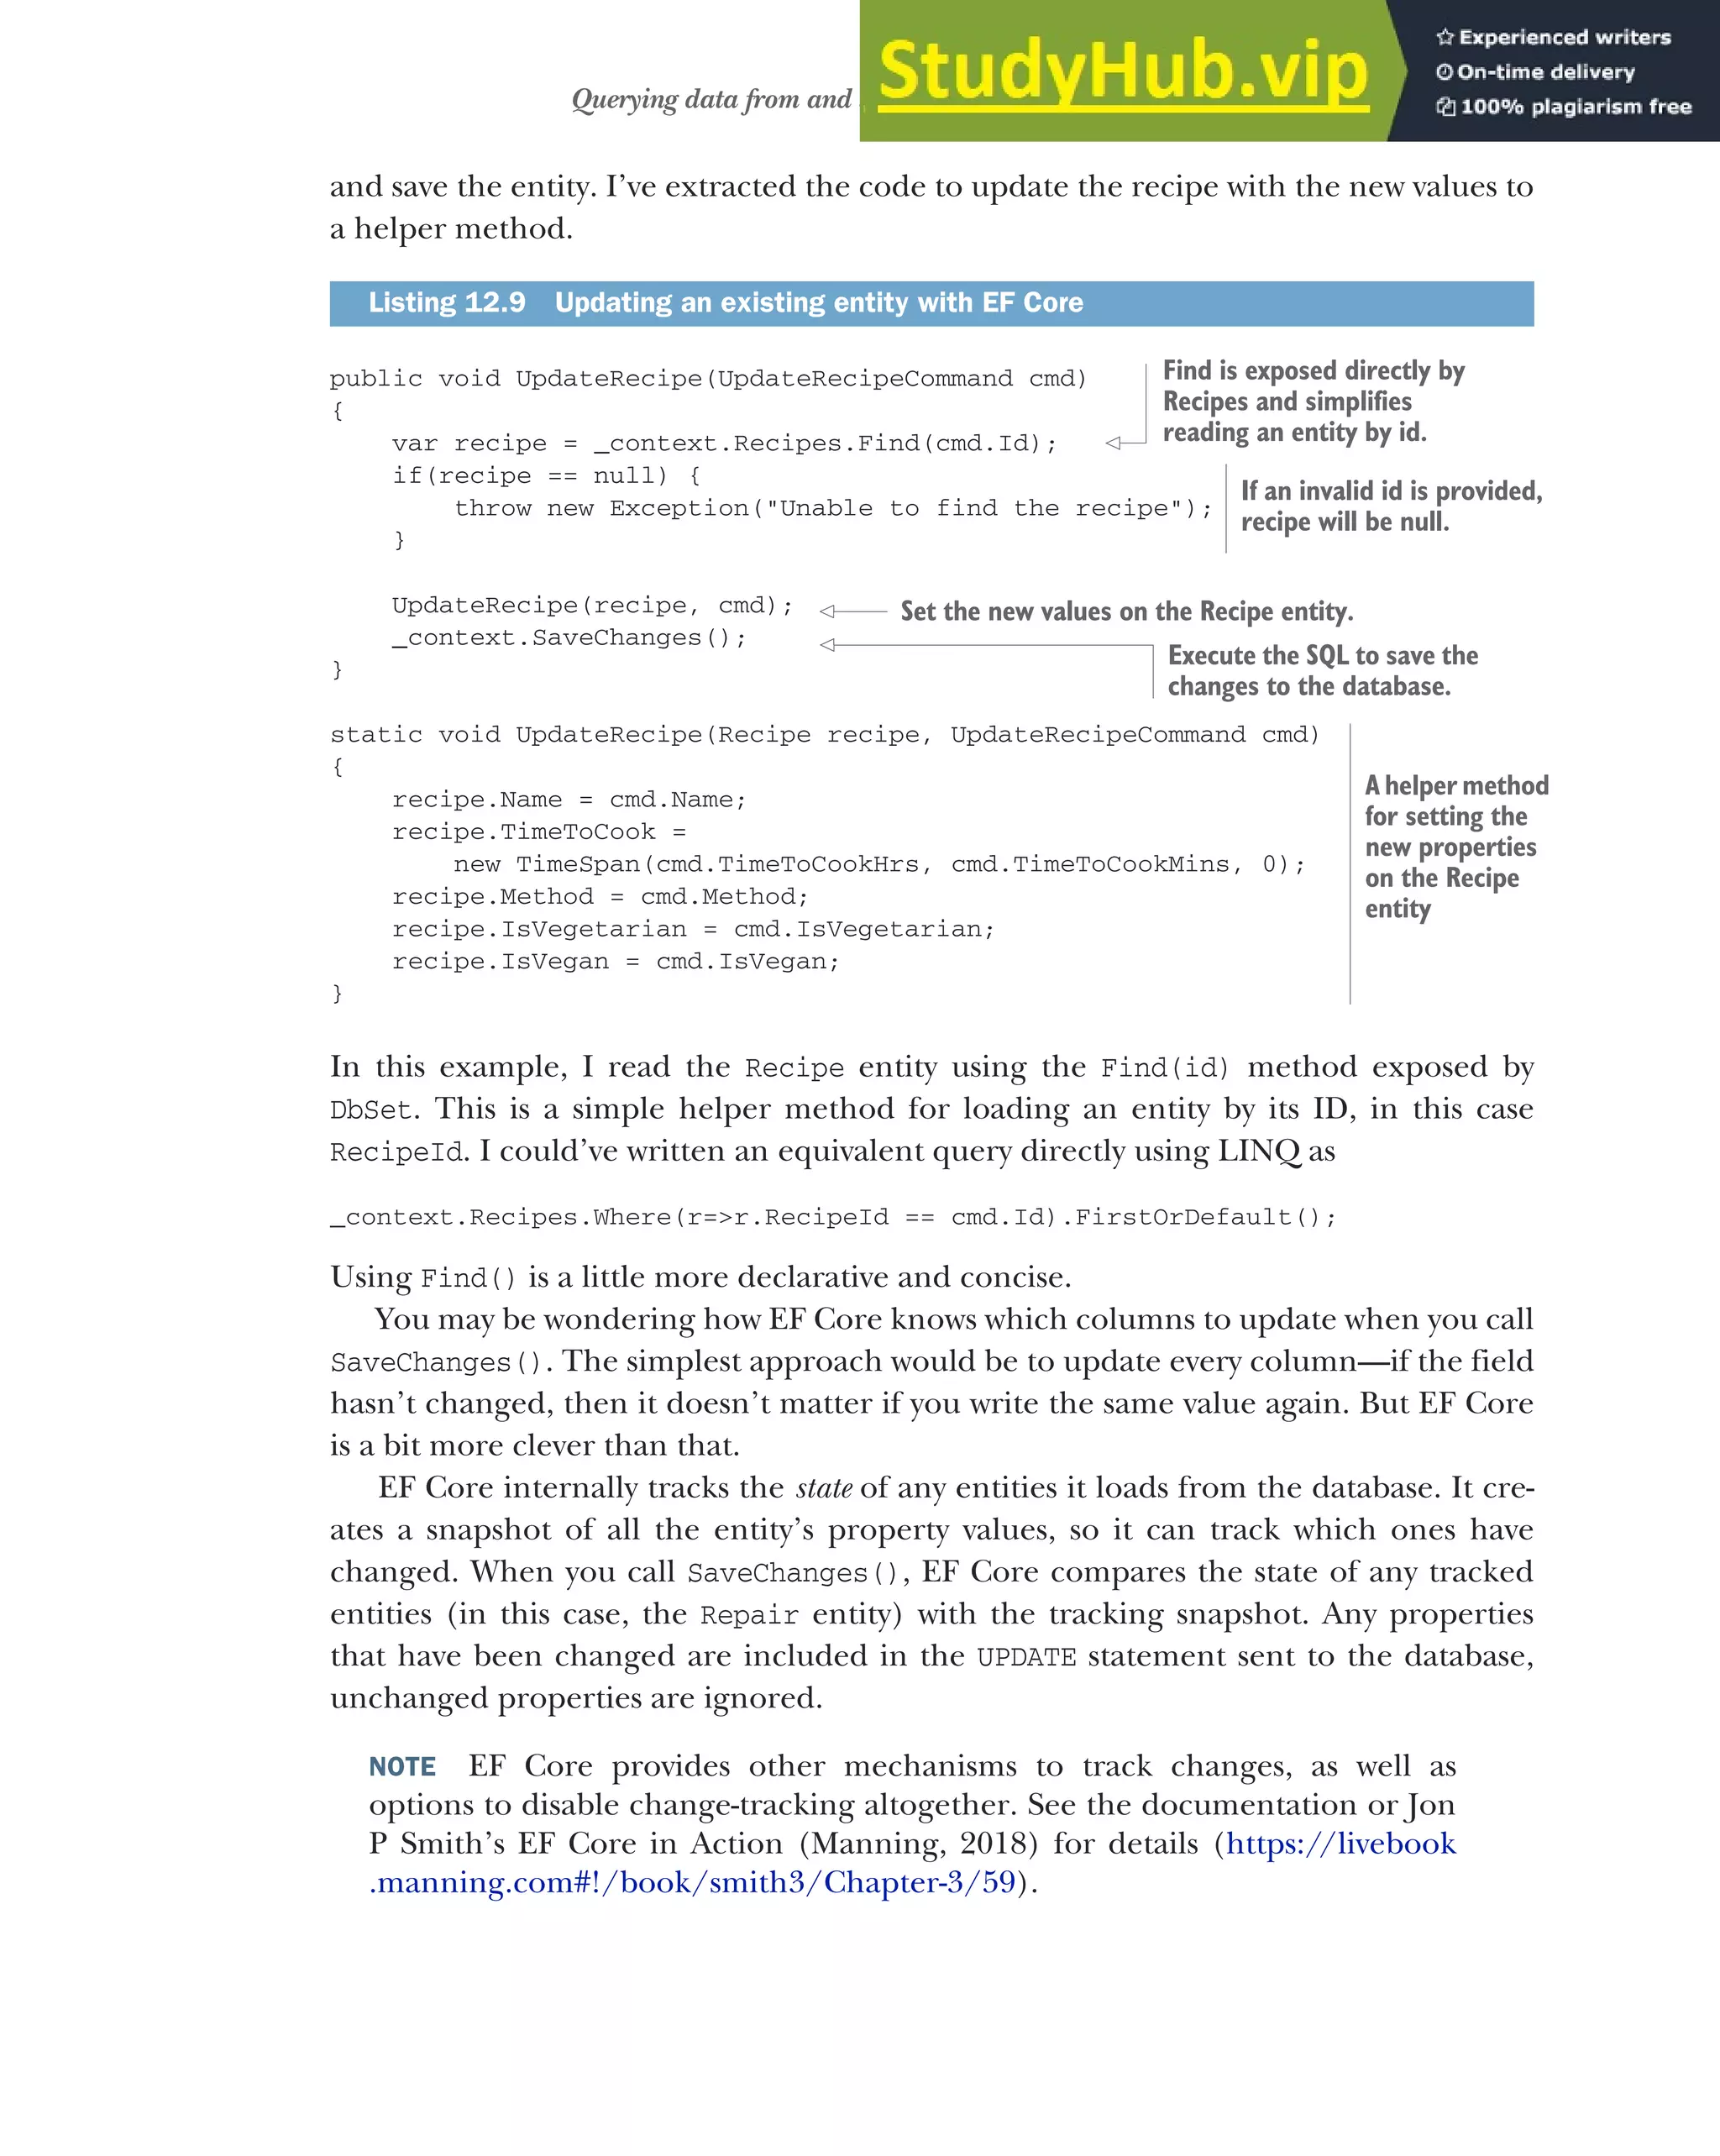


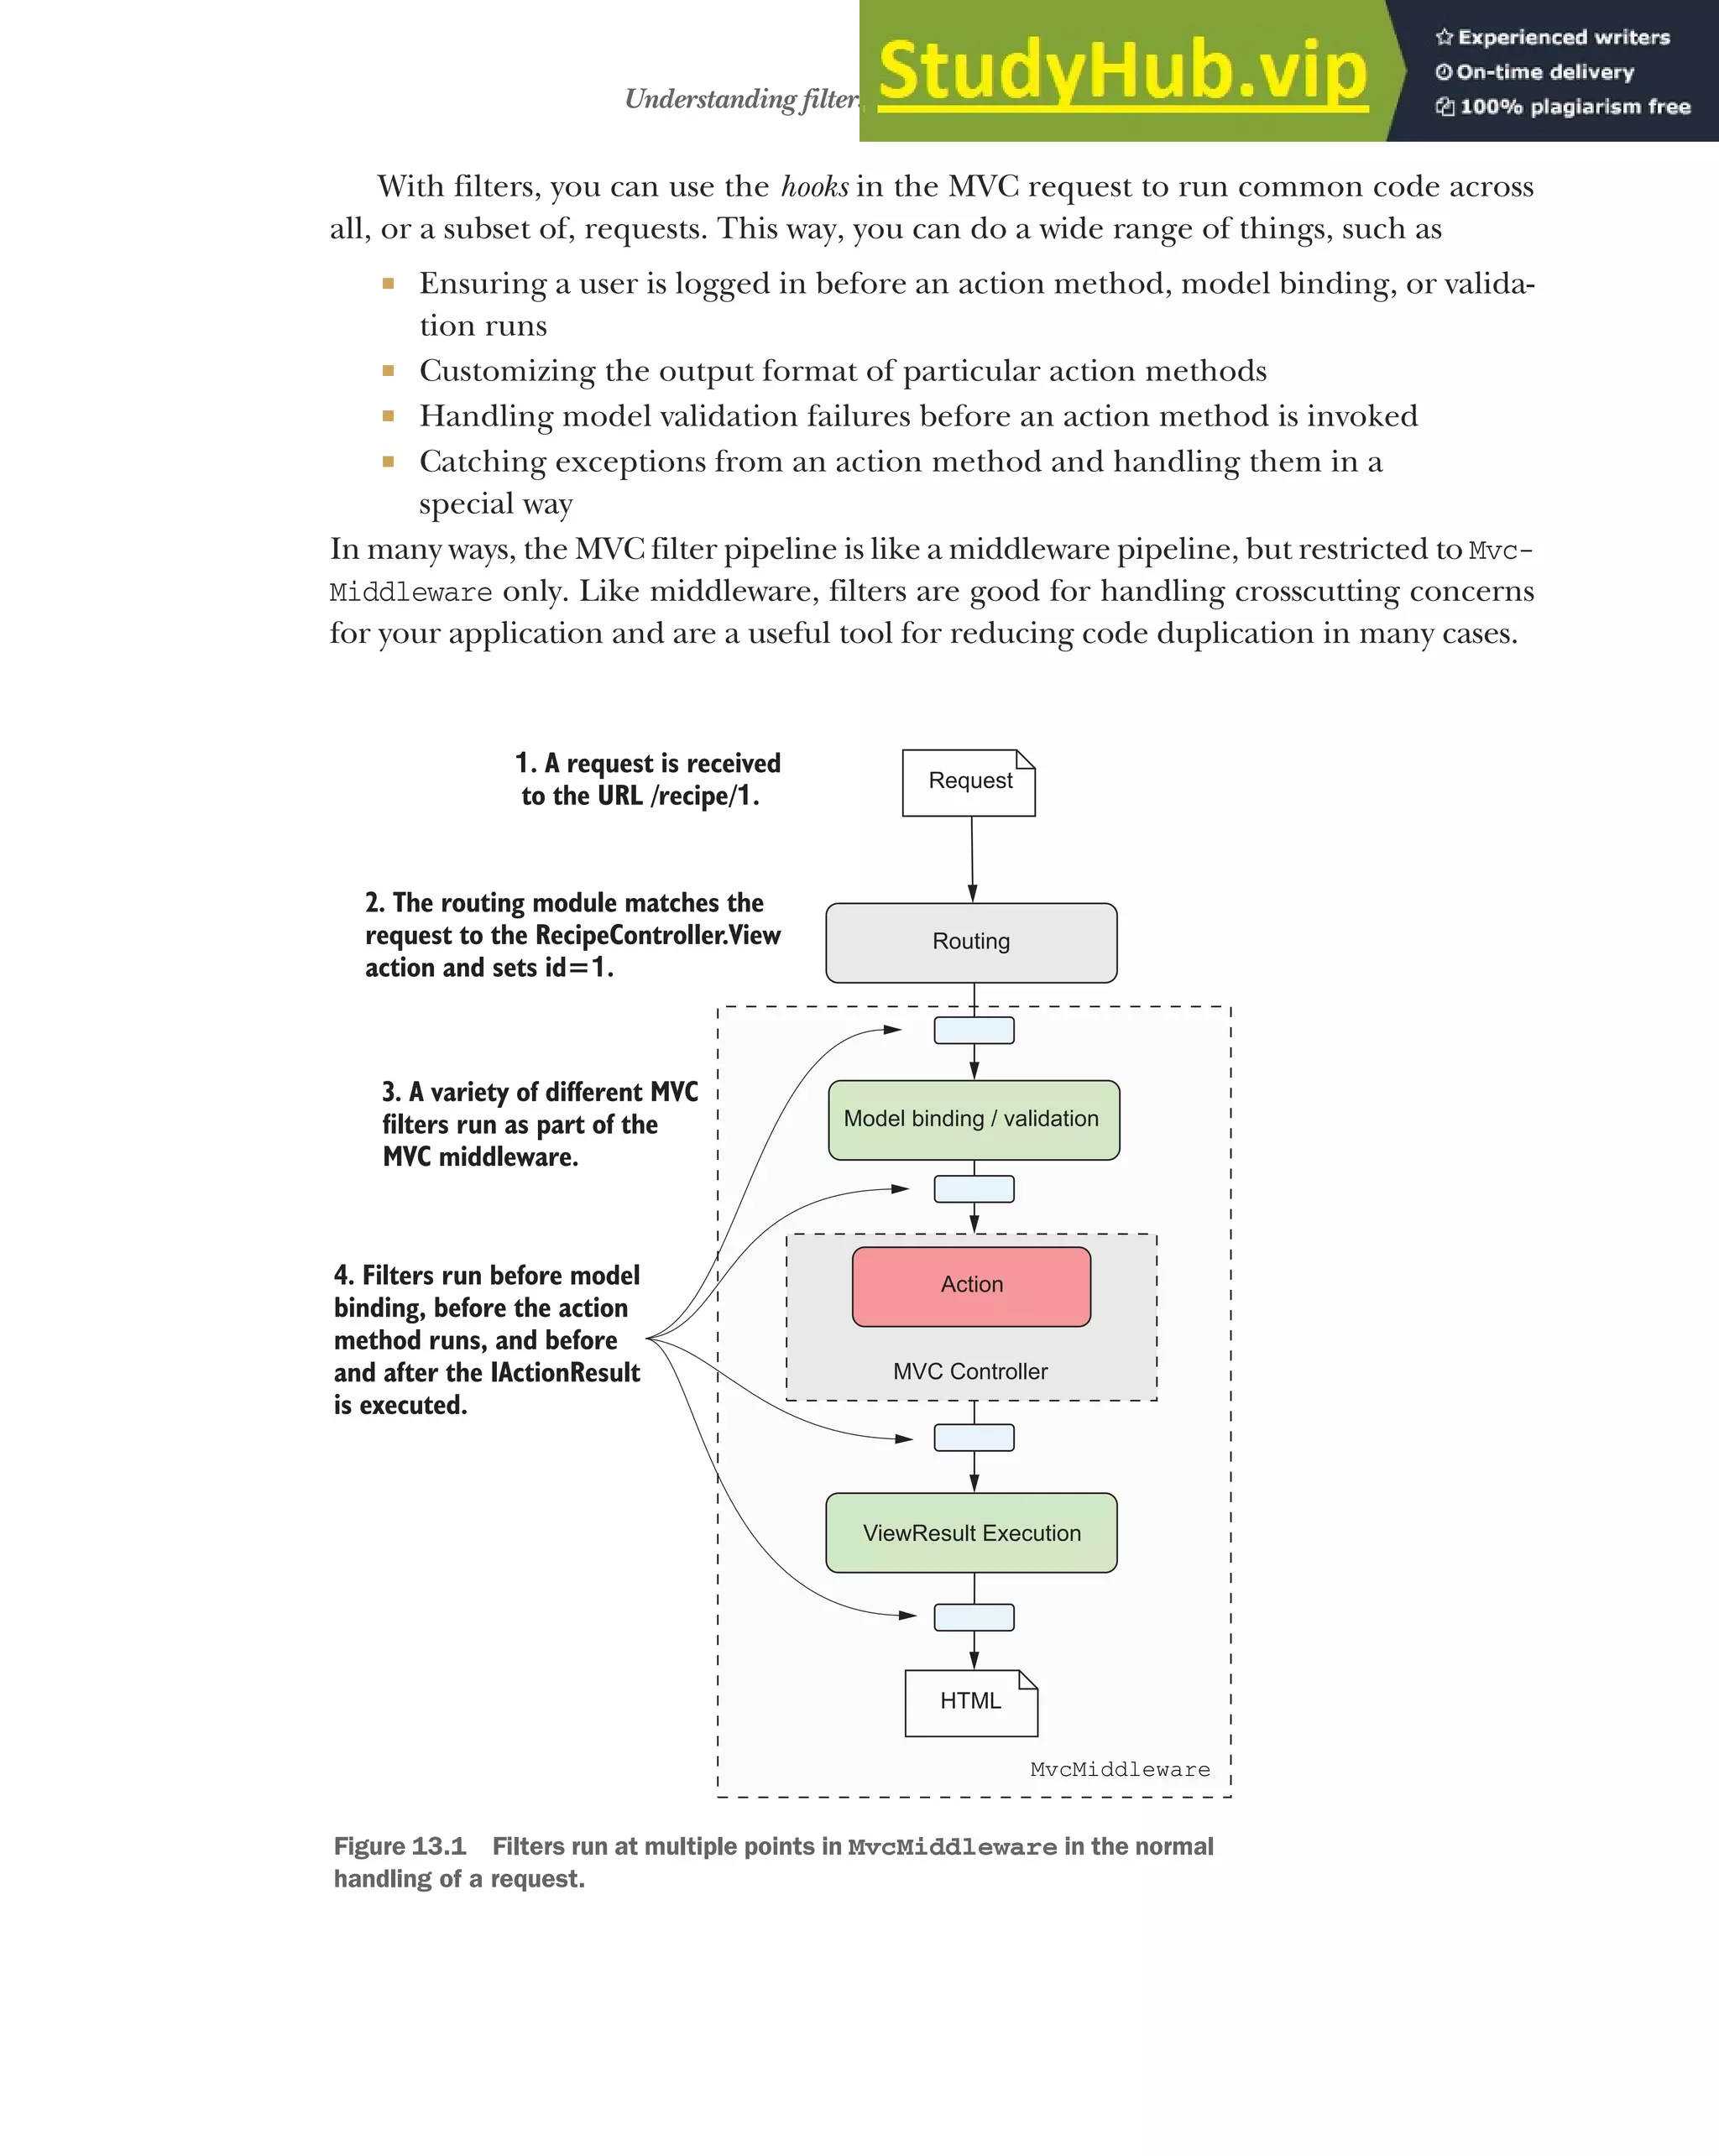


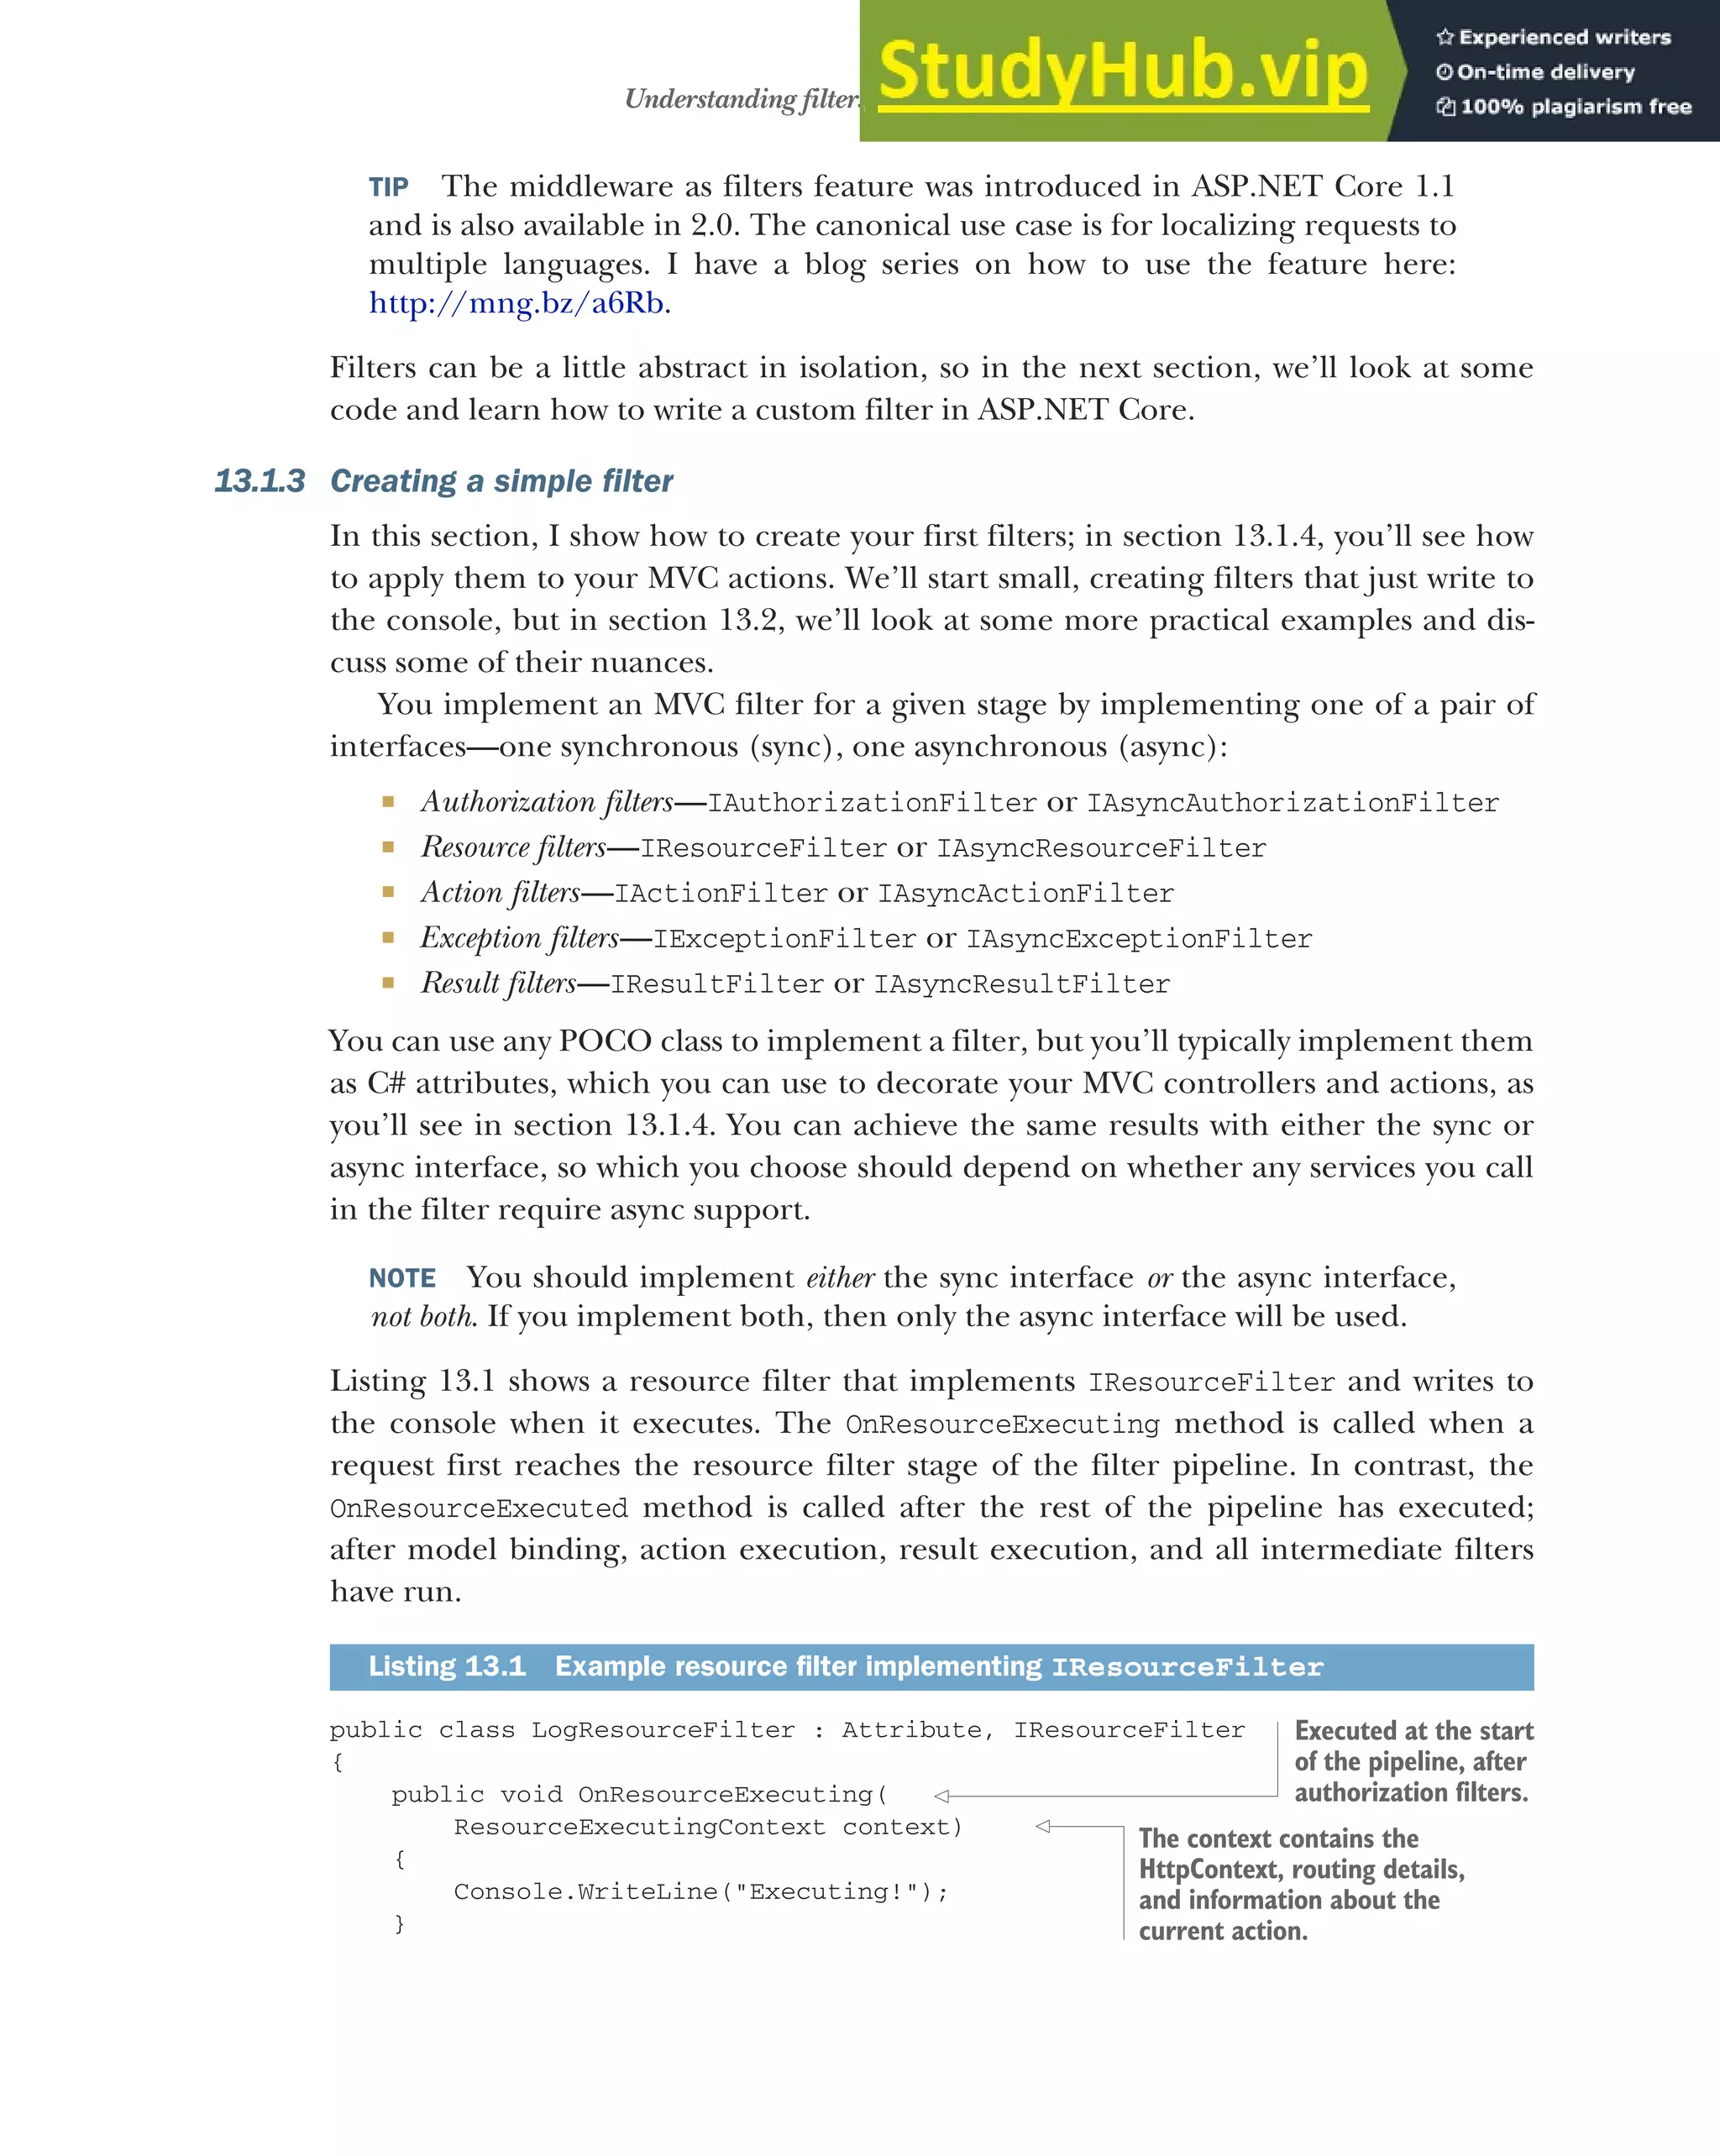
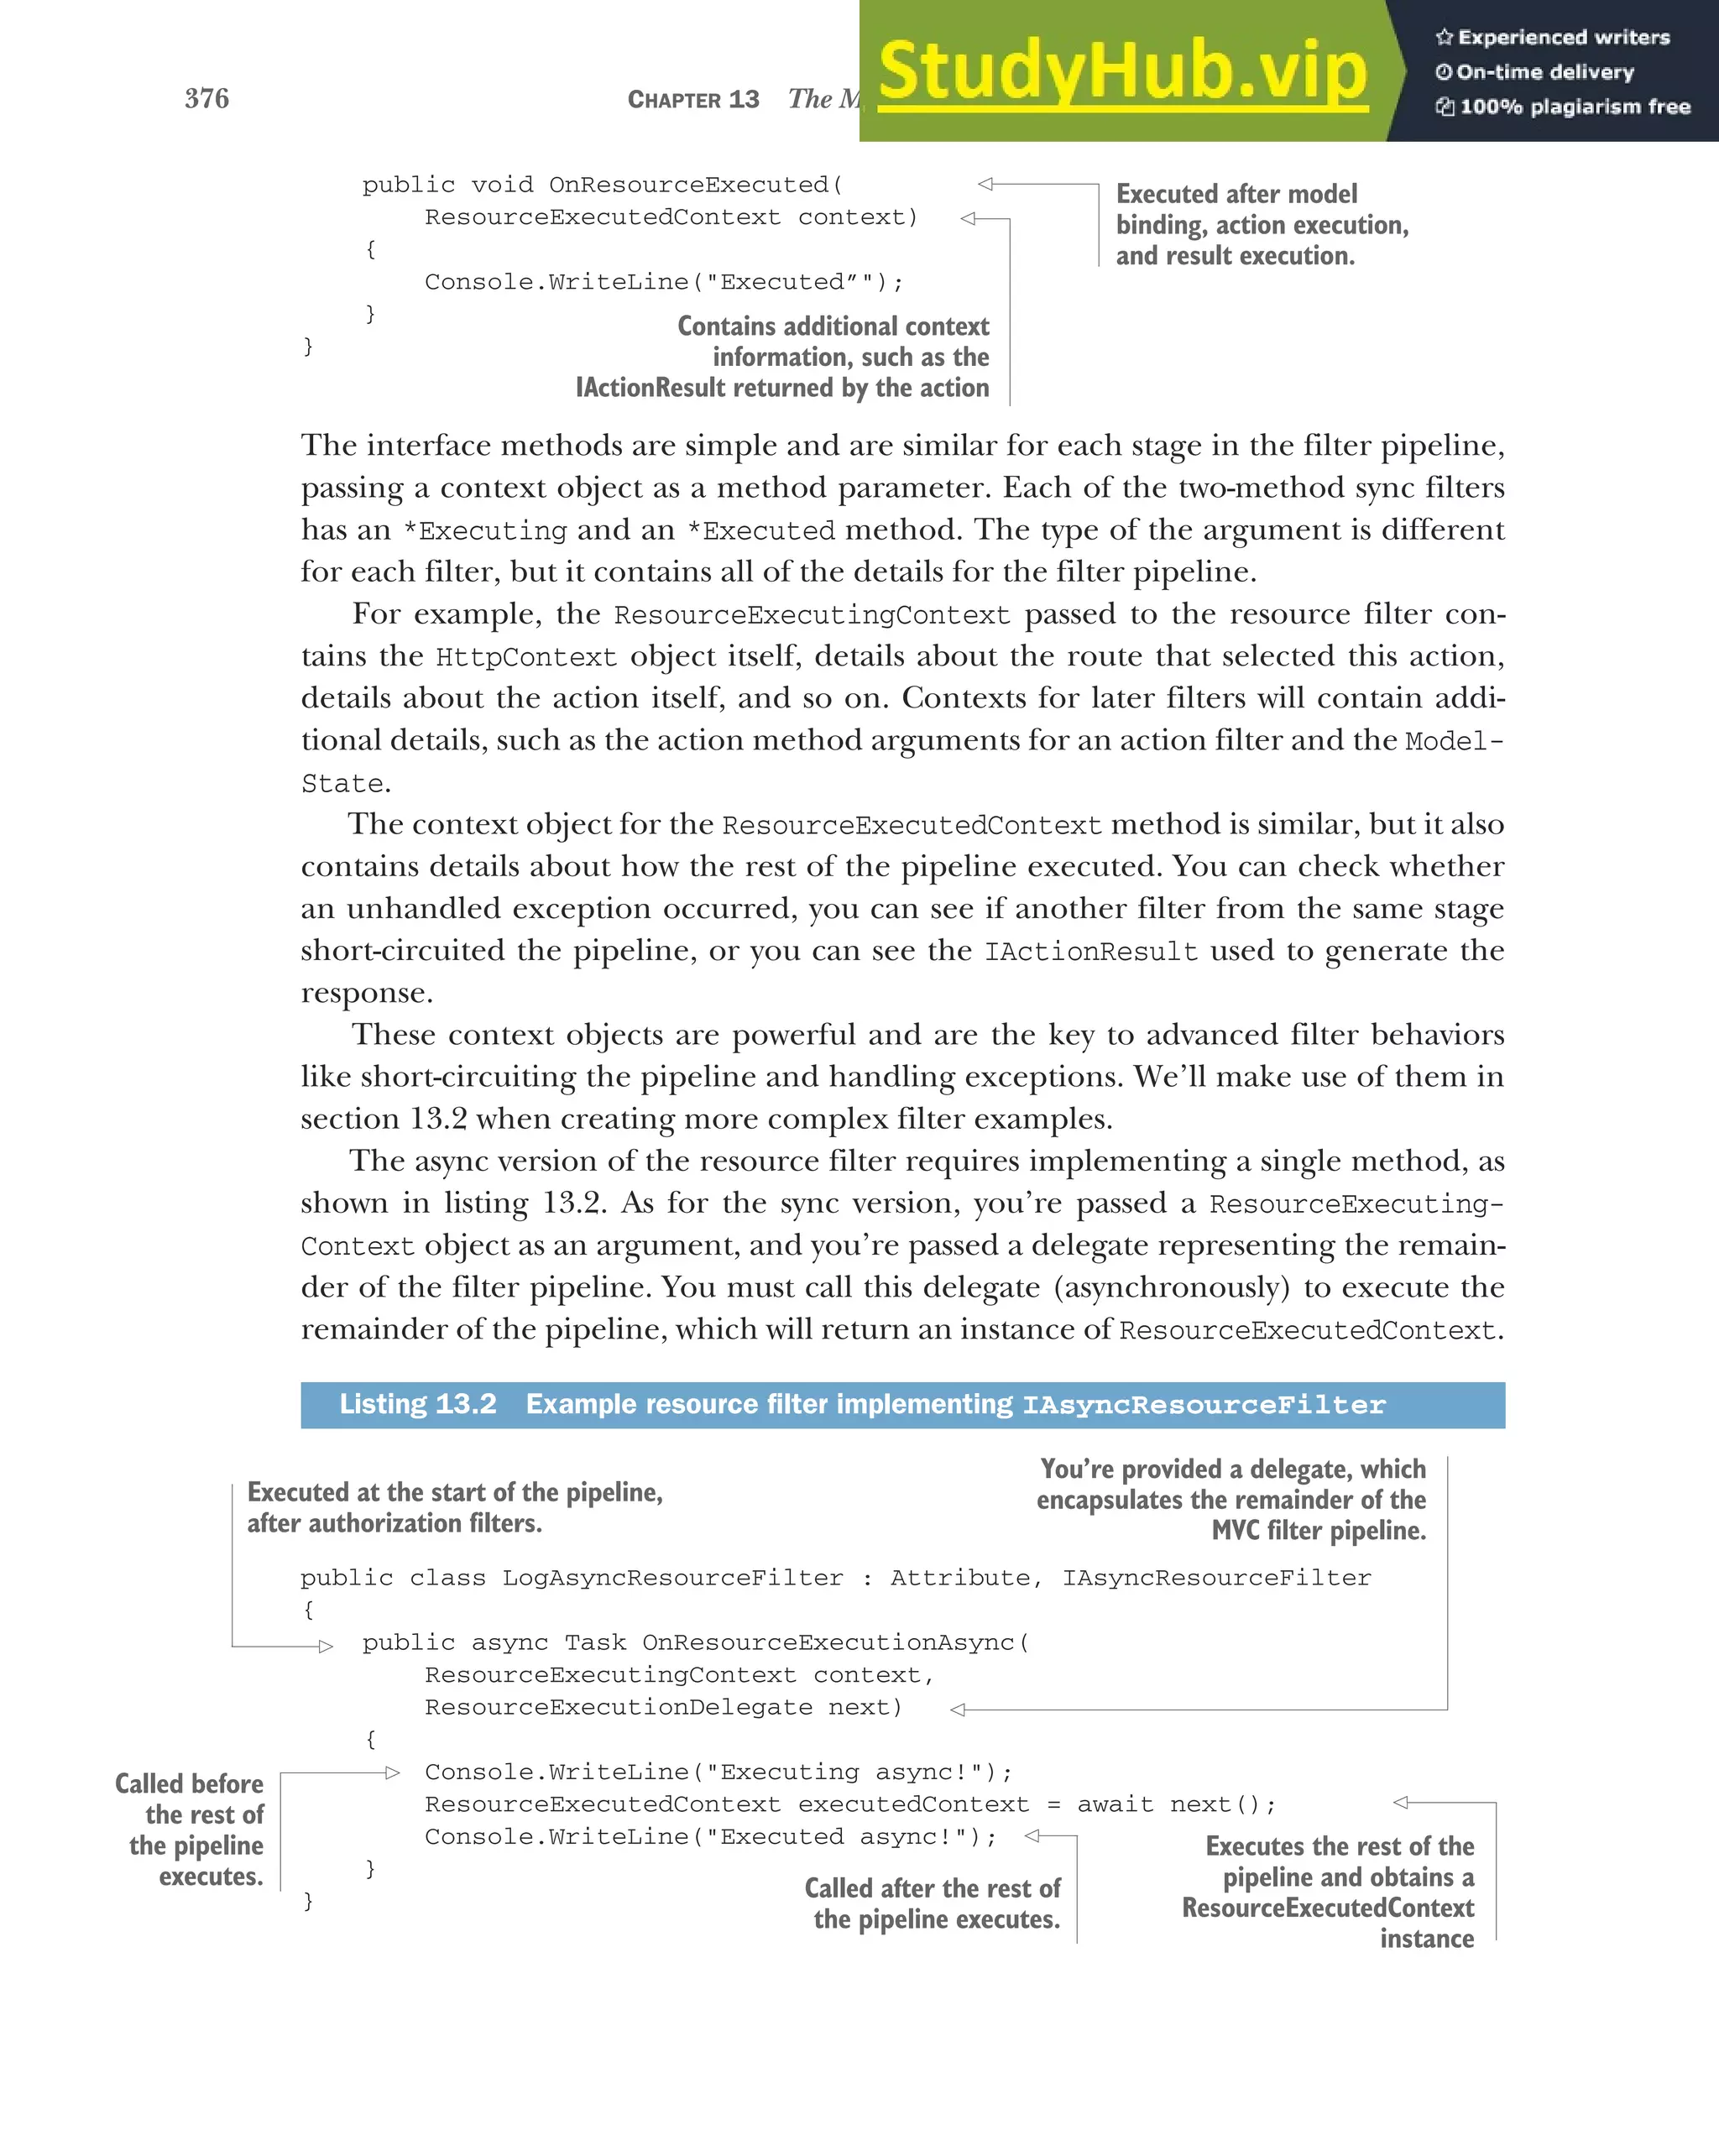
![377
Understanding filters and when to use them
The sync and async filter implementations have subtle differences, but for most pur-
poses they’re identical. I recommend implementing the sync version if possible, and
only falling back to the async version if you need to.
You’ve created a couple of filters now, so we should look at how to use them in the
application. In the next section, we’ll tackle two specific issues: how to control which
requests execute your new filters and how to control the order in which they execute.
13.1.4 Adding filters to your actions, your controllers, and globally
In section 13.1.2, I discussed the similarities and differences between middleware and
filters. One of those differences is that filters can be scoped to specific actions or con-
trollers, so that they only run for certain requests. Alternatively, you can apply a filter
globally, so that it runs for every MVC action.
By adding filters in different ways, you can achieve a number of different results.
Imagine you have a filter that forces you to log in to view an action. How you add the
filter to your app will significantly change your app’s behavior:
Apply the filter to a single action—Anonymous users could browse the app as normal,
but if they tried to access the protected action, they would be forced to log in.
Apply the filter to a controller—Anonymous users could access actions from other
controllers, but accessing any action on the protected controller would force
them to log in.
Apply the filter globally—Users couldn’t use the app without logging in. Any
attempt to access an action would redirect the user to the login page.
NOTE ASP.NET Core comes with just such a filter out of the box, Authorize-
Filter. I’ll discuss this filter in section 13.2.1, and you’ll be seeing a lot more
of it in chapter 15.
As I described in the previous section, you normally create filters as attributes, and for
good reason—it makes applying them to MVC controllers and actions easy. In this sec-
tion, you’ll see how to apply LogResourceFilter from listing 13.1 to an action, a con-
troller, and globally. The level at which the filter applies is called its scope.
DEFINITION The scope of a filter refers to how many different actions it applies
to. A filter can be scoped to the action method, to the controller, or globally.
You’ll start at the most specific scope—applying filters to a single action. The follow-
ing listing shows an example of an MVC controller that has two action methods: one
with LogResourceFilter and one without.
public class HomeController : Controller
{
[LogResourceFilter]
public IActionResult Index()
{
return View();
}
Listing 13.3 Applying filters to an action method
LogResourceFilter will
run as part of the
pipeline when executing
this action.](https://image.slidesharecdn.com/asp-230807173723-31e70040/75/ASP-NET-Core-in-Action-2018-pdf-405-2048.jpg)
![378 CHAPTER 13 The MVC filter pipeline
public IActionResult About()
{
return View();
}
}
Alternatively, if you want to apply the same filter to every action method, you could
add the attribute at the controller scope, as in the next listing. Every action method in
the controller will use LogResourceFilter, without having to specifically decorate
each method:
[LogResourceFilter]
public class HomeController : Controller
{
public IActionResult Index ()
{
return View();
}
public IActionResult SendInvoice()
{
return View();
}
}
Filters you apply as attributes to controllers and actions are automatically discovered
by MvcMiddleware when your application starts up. For common attributes, you can
go one step further and apply filters globally, without having to decorate individual
controllers.
You add global filters in a different way to controller- or action-scoped filters—by
adding a filter directly to the MVC services, when configuring MVC in Startup. This
listing shows three equivalent ways to add a globally scoped filter.
public class Startup
{
public void ConfigureServices(IServiceCollection services)
{
services.AddMvc(options =>
{
options.Filters.Add(new LogResourceFilter());
options.Filters.Add(typeof(LogAsyncResourceFilter));
options.Filters.Add<LogAsyncResourceFilter>();
});
}
}
Listing 13.4 Applying filters to a controller
Listing 13.5 Applying filters globally to an application
This action method has no
filters at the action level.
The LogResourceFilter Is
added to every action on
the controller.
Every action in the
controller is decorated
with the filter.
Adds filters using
the MvcOptions
object
Alternatively, the
framework can
create a global
filter using a
generic type
parameter.
. . . or pass in the Type of the filter
and let the framework create it.
You can pass
an instance
of the filter
directly. . .](https://image.slidesharecdn.com/asp-230807173723-31e70040/75/ASP-NET-Core-in-Action-2018-pdf-406-2048.jpg)
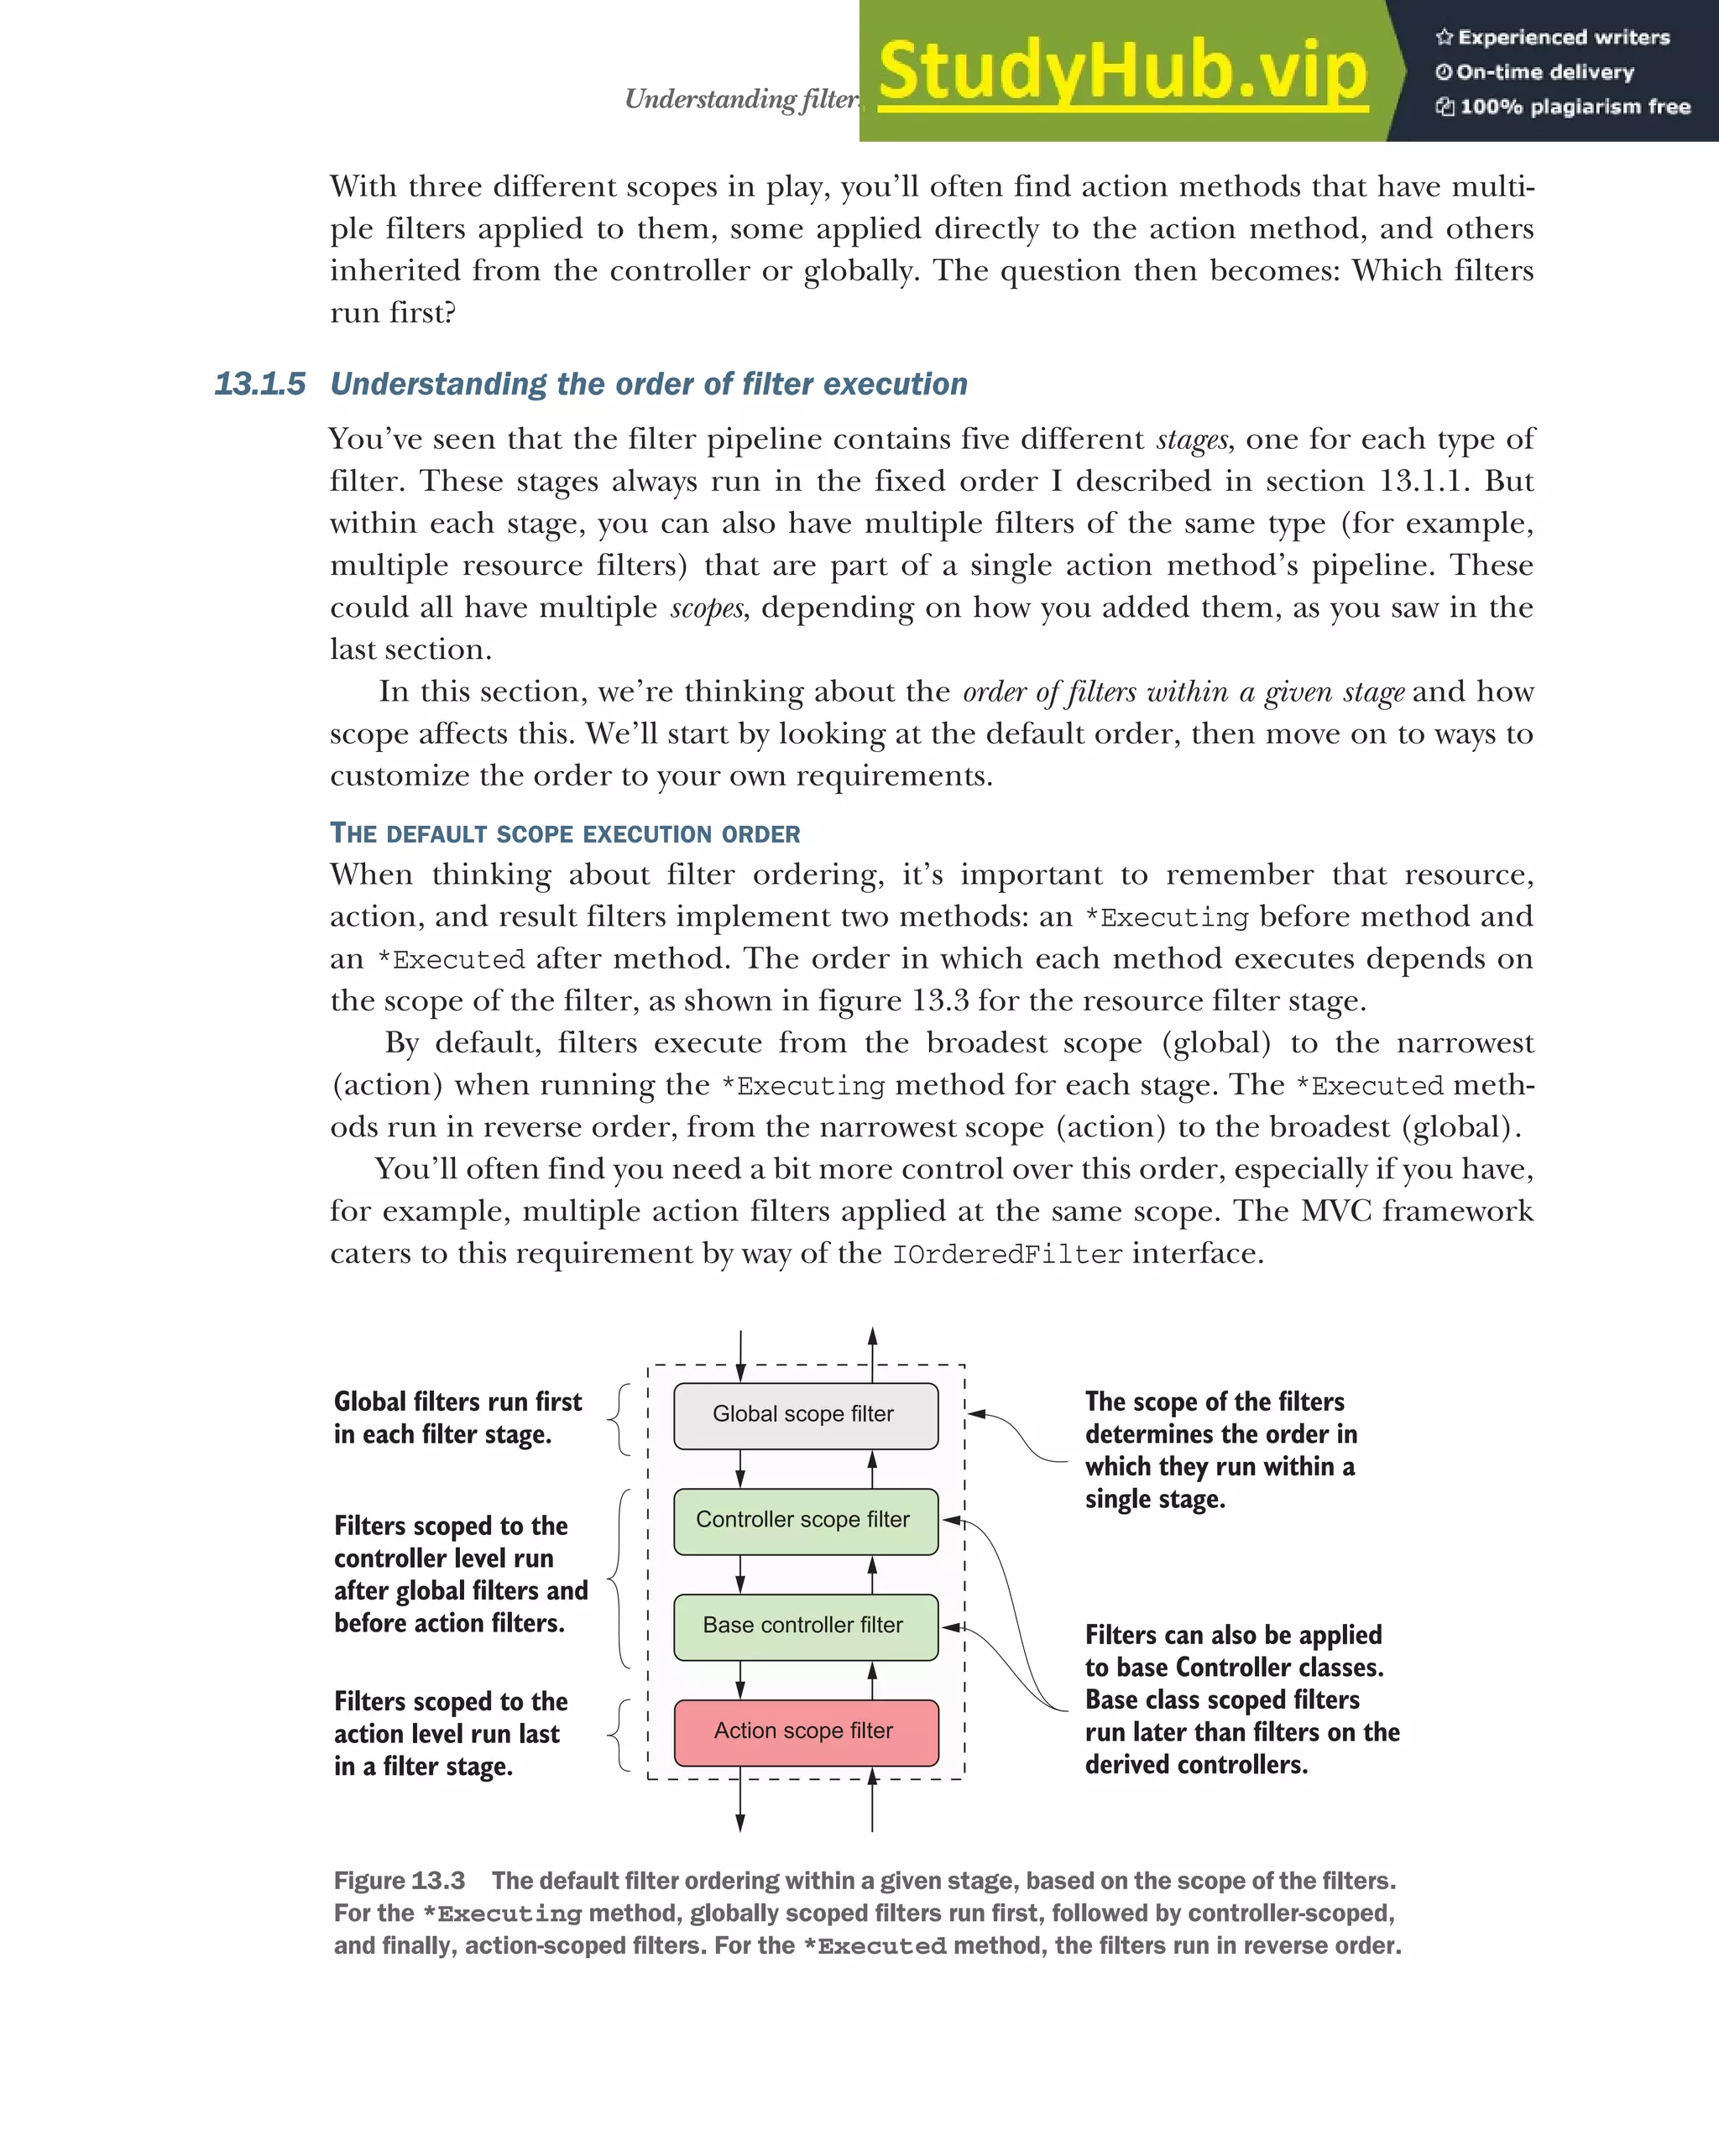
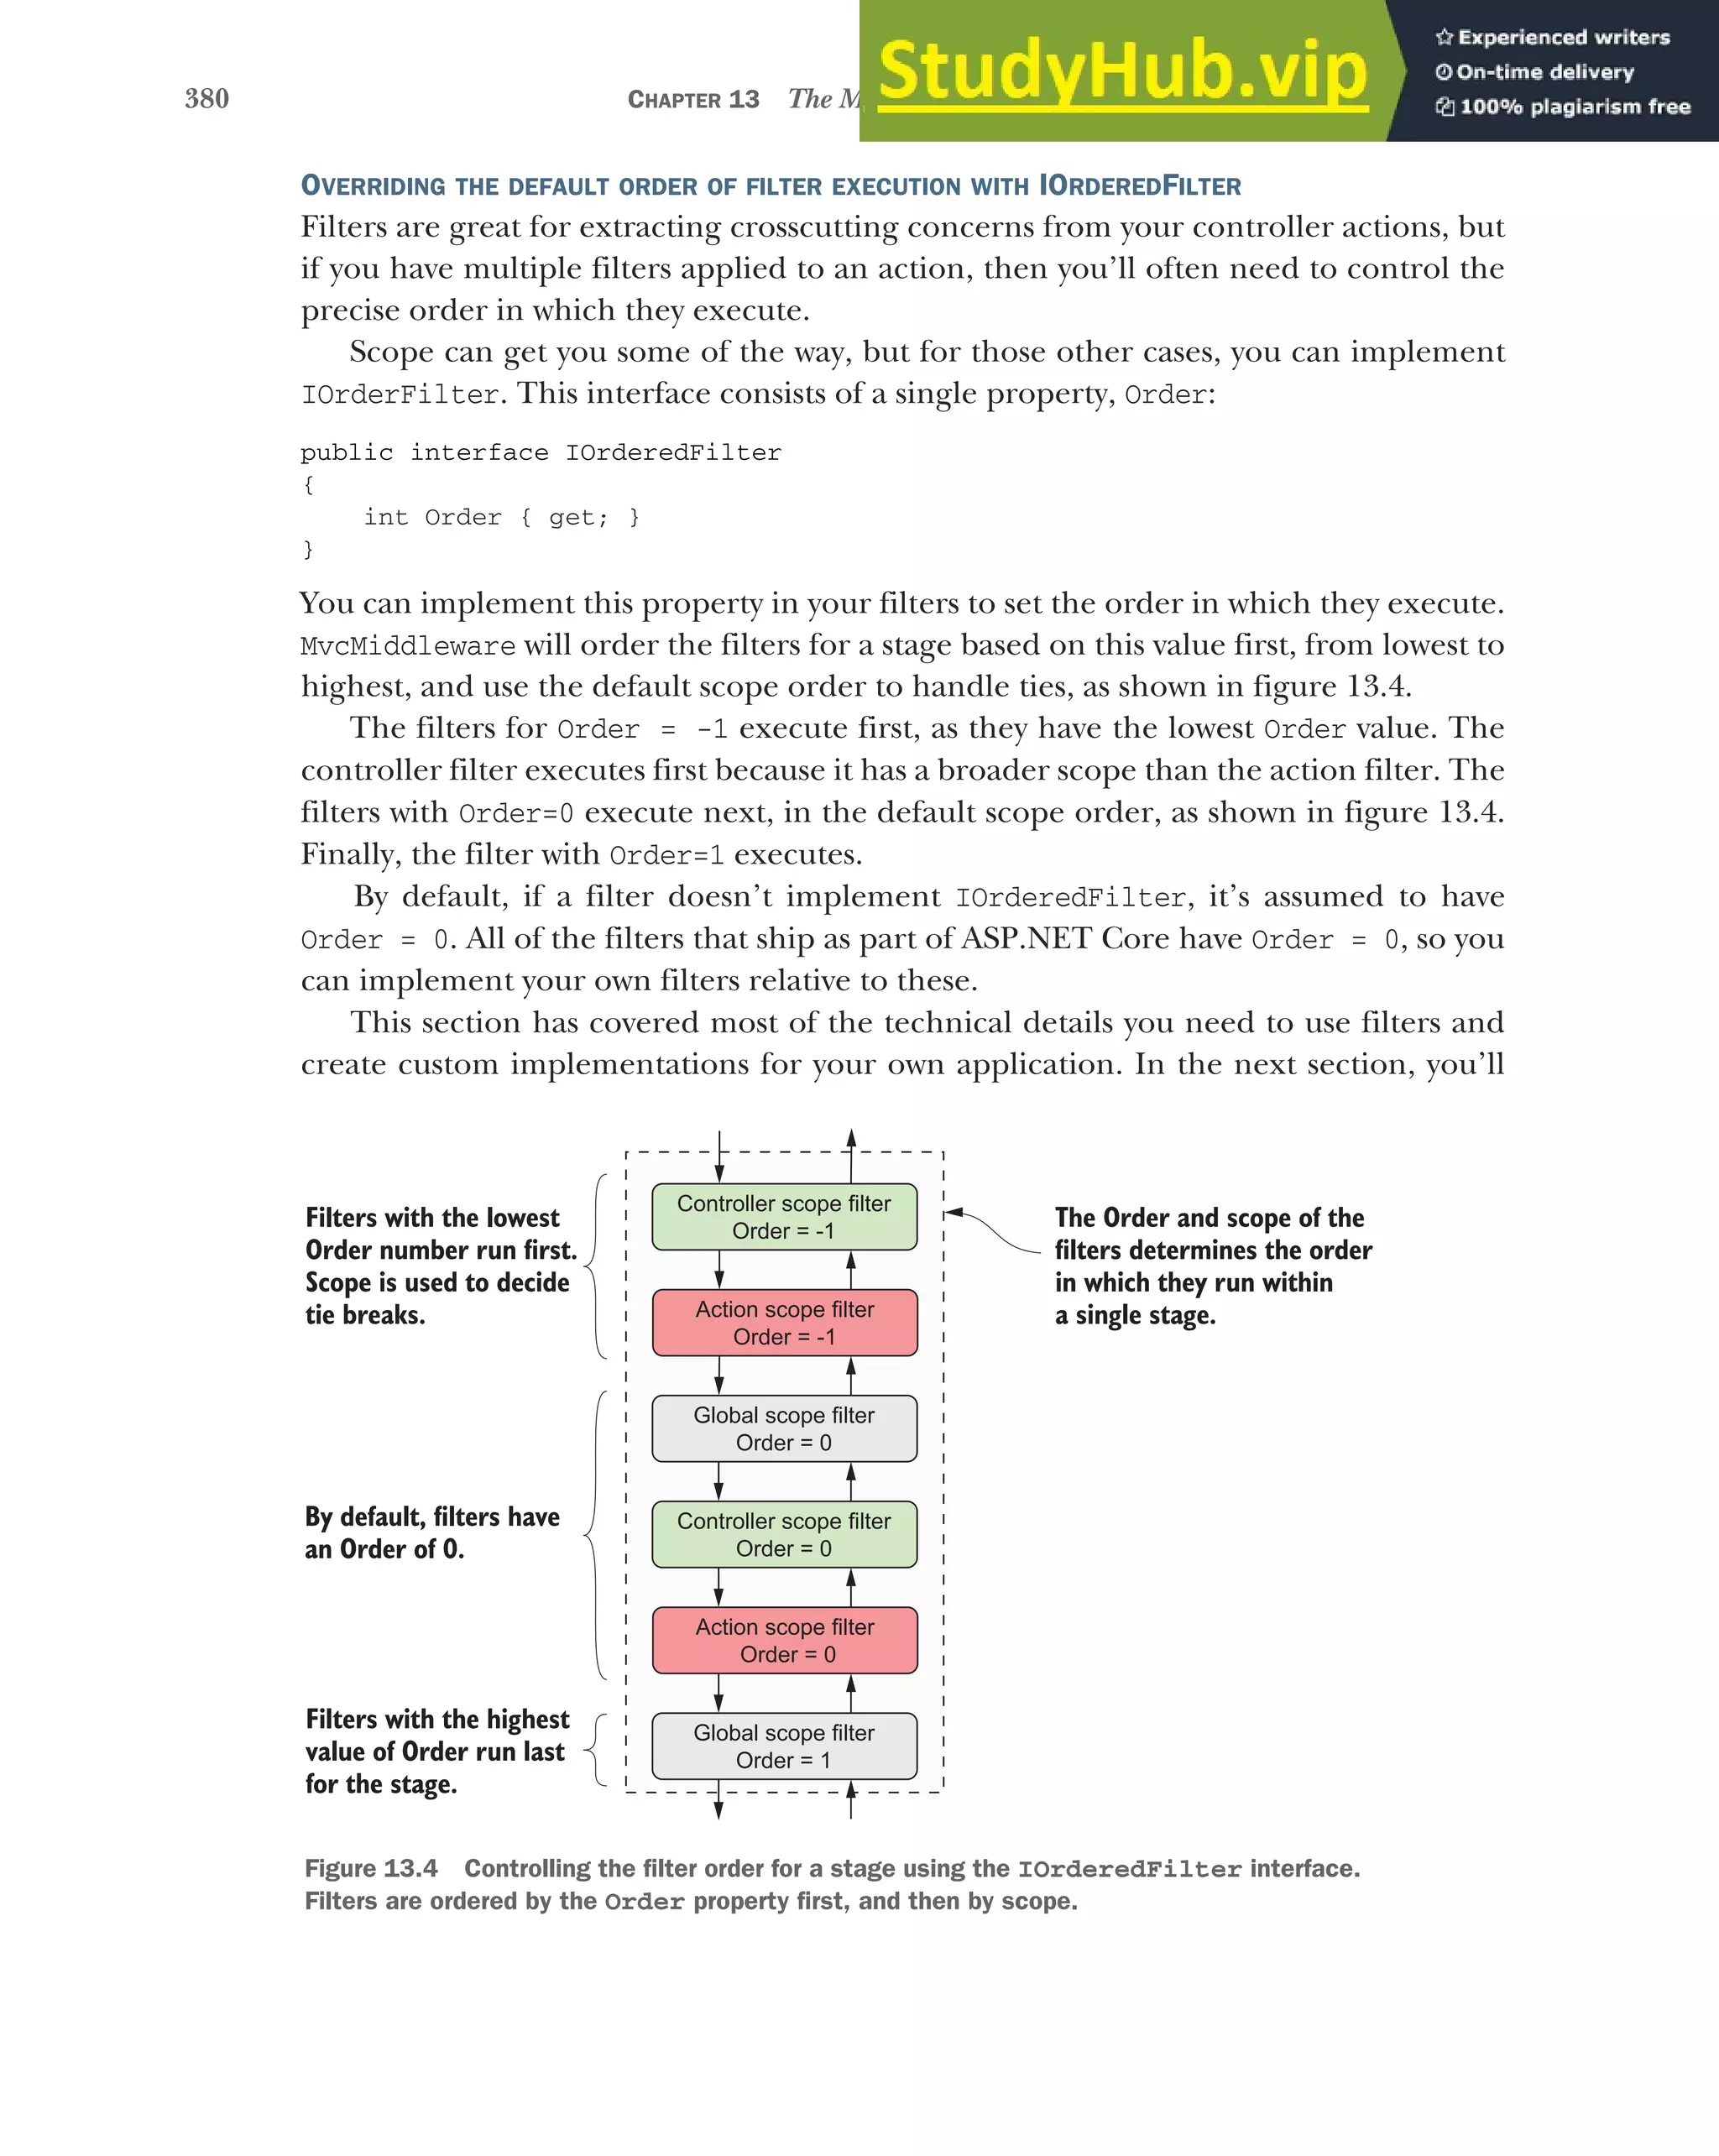
![381
Creating custom filters for your application
see some of the built-in filters provided by ASP.NET Core, as well as some practical
examples of filters you might want to use in your own applications.
13.2 Creating custom filters for your application
ASP.NET Core includes a number of filters that you can use, but often, the most use-
ful filters are the custom ones that are specific to your own apps. In this section, you’ll
work through each of the five types of filters. I’ll explain in more detail what they’re
for and when you should use them. I’ll point out examples of these filters that are part
of ASP.NET Core itself and you’ll see how to create custom filters for an example
application.
To give you something realistic to work with, you’ll start with a Web API controller
for accessing the recipe application from chapter 12. This controller contains two
actions: one for fetching a RecipeDetailViewModel and another for updating a
Recipe with new values. This listing shows your starting point for this chapter, includ-
ing both of the action methods.
[Route("api/recipe")]
public class RecipeApiController : Controller
{
private const bool IsEnabled = true;
public RecipeService _service;
public RecipeApiController(RecipeService service)
{
_service = service;
}
[HttpGet("{id}")]
public IActionResult Get(int id)
{
if (!IsEnabled) { return BadRequest(); }
try
{
if (!_service.DoesRecipeExist(id))
{
return NotFound();
}
var detail = _service.GetRecipeDetail(id);
Response.GetTypedHeaders().LastModified =
detail.LastModified;
return Ok(detail);
}
catch (Exception ex)
{
return GetErrorResponse(ex);
}
}
Listing 13.6 Recipe Web API controller before refactoring to use filters
These fields would be passed in as
configuration values and are used
to control access to actions.
If the API isn’t enabled,
block further execution.
If the requested Recipe
doesn’t exist, return a
404 response.
Fetch
RecipeDetailViewModel.
Sets the Last-Modified
response header to the
value in the model
Returns the
view model
with a 200
response
If an exception occurs, catch it,
and return the error in an
expected format, as a 500 error.](https://image.slidesharecdn.com/asp-230807173723-31e70040/75/ASP-NET-Core-in-Action-2018-pdf-409-2048.jpg)
![382 CHAPTER 13 The MVC filter pipeline
[HttpPost("{id}")]
public IActionResult Edit(
int id, [FromBody] UpdateRecipeCommand command)
{
if (!IsEnabled) { return BadRequest(); }
try
{
if (!ModelState.IsValid)
{
return BadRequest(ModelState);
}
if (!_service.DoesRecipeExist(id))
{
return NotFound();
}
_service.UpdateRecipe(command);
return Ok();
}
catch (Exception ex)
{
return GetErrorResponse(ex);
}
}
private static IActionResult GetErrorResponse(Exception ex)
{
var error = new
{
Success = false,
Errors = new[]
{
ex.Message
}
};
return new ObjectResult(error)
{
StatusCode = 500
};
}
}
These action methods currently have a lot of code to them, which hides the intent of
each action. There’s also quite a lot of duplication between the methods, such as
checking that the Recipe entity exists, and formatting exceptions.
In this section, you’re going to refactor this controller to use filters for all the code
in the methods that’s unrelated to the intent of each action. By the end of the chapter,
you’ll have a much simpler controller that’s far easier to understand, as shown here.
If the API isn’t enabled,
block further execution.
Validates the binding model
and returns a 400 response
if there are errors
If the requested Recipe
doesn’t exist, return a
404 response.
Updates the Recipe from the command
and returns a 200 response
If an exception occurs, catch it,
and return the error in an
expected format, as a 500 error.](https://image.slidesharecdn.com/asp-230807173723-31e70040/75/ASP-NET-Core-in-Action-2018-pdf-410-2048.jpg)
![383
Creating custom filters for your application
[Route("api/recipe")]
[ValidateModel, HandleException, FeatureEnabled(IsEnabled = true)]
public class RecipeApiController : Controller
{
public RecipeService _service;
public RecipeApiController(RecipeService service)
{
_service = service;
}
[HttpGet("{id}"), EnsureRecipeExists, AddLastModifedHeader]
public IActionResult Get(int id)
{
var detail = _service.GetRecipeDetail(id);
return Ok(detail);
}
[HttpPost("{id}"), EnsureRecipeExists]
public IActionResult Edit(
int id, [FromBody] UpdateRecipeCommand command)
{
_service.UpdateRecipe(command);
return Ok();
}
}
I think you'll have to agree, the controller in listing 13.7 is much easier to read! In this
section, you’ll refactor the controller bit by bit, removing crosscutting code to get to
something more manageable. All the filters I’ll create in this section will use the sync
filter interfaces—I’ll leave it as an exercise for the reader to create their async coun-
terparts. You’ll start by looking at authorization filters and how they relate to security
in ASP.NET Core.
13.2.1 Authorization filters: protecting your APIs
Authentication and authorization are related, fundamental concepts in security that we’ll
be looking at in detail in chapters 14 and 15.
DEFINITION Authentication is concerned with determining who made a
request. Authorization is concerned with what a user is allowed to access.
Authorization filters run first in the MVC filter pipeline, before any other filters. They
control access to the action method by immediately short-circuiting the pipeline when
a request doesn’t meet the necessary requirements.
ASP.NET Core has a built-in authorization framework that you should use when
you need to protect your MVC application or your Web APIs. You can configure this
framework with custom policies that let you finely control access to your actions.
Listing 13.7 Recipe Web API controller after refactoring to use filters
The filters encapsulate
the majority of logic
common to multiple
action methods.
Placing filters at the action level
limits them to a single action.
The intent of the action,
return a Recipe view model,
is much clearer.
Placing filters at the action level
can be used to control the order
in which they execute.
The intent of the action, update
a Recipe, is much clearer.](https://image.slidesharecdn.com/asp-230807173723-31e70040/75/ASP-NET-Core-in-Action-2018-pdf-411-2048.jpg)
![384 CHAPTER 13 The MVC filter pipeline
TIP It’s possible to write your own authorization filters by implementing
IAuthorizationFilter or IAsyncAuthorizationFilter, but I strongly advise
against it. The ASP.NET Core authorization framework is highly configurable
and should meet all your needs.
At the heart of the ASP.NET Core authorization framework is an Authorization filter,
AuthorizeFilter, which you can add to the filter pipeline by decorating your actions
or controllers with the [Authorize] attribute. In its simplest form, adding the
[Authorize] attribute to an action, as in the following listing, means the request must
be made by an authenticated user to be allowed to continue. If you’re not logged in, it
will short-circuit the pipeline, returning a 401 Unauthorized response to the browser.
public class RecipeApiController : Controller
{
public IActionResult Get(int id)
{
// method body
}
[Authorize]
public IActionResult Edit(
int id, [FromBody] UpdateRecipeCommand command)
{
// method body
}
}
As with all filters, you can apply the [Authorize] attribute at the controller level to
protect all the actions on a controller, or even globally, to protect every method in
your app.
NOTE We’ll explore authorization in detail in chapter 15, including how to
add more detailed requirements, so that only specific sets of users can exe-
cute an action.
The next filters in the pipeline are resource filters. In the next section, you’ll extract
some of the common code from RecipeApiController and see how easy it is to create
a short-circuiting filter.
13.2.2 Resource filters: short-circuiting your action methods
Resource filters are the first general-purpose filters in the MVC filter pipeline. In sec-
tion 13.1.3, you saw minimal examples of both sync and async resource filters, which
logged to the console. In your own apps, you can use resource filters for a wide range
of purposes, thanks to the fact they execute so early (and late) in the filter pipeline.
Listing 13.8 Adding [Authorize] to an action method
The Get method has no
[Authorize] attribute, so can
be executed by anyone.
The Edit method can
only be executed if
you’re logged in.
Adds the AuthorizeFilter to the MVC
filter pipeline using [Authorize]](https://image.slidesharecdn.com/asp-230807173723-31e70040/75/ASP-NET-Core-in-Action-2018-pdf-412-2048.jpg)
![385
Creating custom filters for your application
The ASP.NET Core framework includes a few different implementations of
resource filters you can use in your apps, for example:
ConsumesAttribute—Can be used to restrict the allowed formats an action
method can accept. If your action is decorated with [Consumes("application/
json")] but the client sends the request as XML, then the resource filter will
short-circuit the pipeline and return a 415 Unsupported Media Type response.
DisableFormValueModelBindingAttribute—This filter prevents model bind-
ing from binding to form data in the request body. This can be useful if you
know an action method will be handling large file uploads that you need to
manage manually yourself. The resource filters run before model binding, so
you can disable the model binding for a single action in this way.2
resource filters are useful when you want to ensure the filter runs early in the pipeline,
before model binding. They provide an early hook into the pipeline for your logic, so
you can quickly short-circuit the request if you need to.
Look back at listing 13.6 and see if you can refactor any of the code into a
Resource filter. One candidate line appears at the start of both the Get and Edit
methods:
if (!IsEnabled) { return BadRequest(); }
This line of code is a feature toggle that you can use to disable the availability of the
whole API, based on the IsEnabled field. In practice, you’d probably load the
IsEnabled field from a database or configuration file so you could control the avail-
ability dynamically at runtime but, for this example, I’m using a hardcoded value.
This piece of code is self-contained, crosscutting logic, which is somewhat tangen-
tial to the main action method intent—a perfect candidate for a filter. You want to
execute the feature toggle early in the pipeline, before any other logic, so a resource
filter makes sense.
TIP Technically, you could also use an Authorization filter for this example,
but I’m following my own advice of “Don’t write your own Authorization
filters!”
The next listing shows an implementation of FeatureEnabledAttribute, which
extracts the logic from the action methods and moves it into the filter. I’ve also
exposed the IsEnabled field as a property on the filter.
public class FeatureEnabledAttribute : Attribute, IResourceFilter
{
public bool IsEnabled { get; set; }
2
For details on handling file uploads, see http://mng.bz/2rrk.
Listing 13.9 The FeatureEnabledAttribute resource filter
Defines whether the feature is enabled](https://image.slidesharecdn.com/asp-230807173723-31e70040/75/ASP-NET-Core-in-Action-2018-pdf-413-2048.jpg)
![386 CHAPTER 13 The MVC filter pipeline
public void OnResourceExecuting(
ResourceExecutingContext context)
{
if (!IsEnabled)
{
context.Result = new BadRequestResult();
}
}
public void OnResourceExecuted(
ResourceExecutedContext context) { }
}
This simple resource filter demonstrates a number of important concepts, which are
applicable to most filter types:
The filter is an attribute as well as a filter. This lets you decorate your controller
and action methods with it using [FeatureEnabled(IsEnabled = true)].
The filter interface consists of two methods—*Executing that runs before
model binding and *Executed that runs after the result has been executed. You
must implement both, even if you only need one for your use case.
The filter execution methods provide a context object. This provides access to,
among other things, the HttpContext for the request and metadata about the
action method the middleware will execute.
To short-circuit the pipeline, set the context.Result property to IAction-
Result. The MVC pipeline will execute this result to generate the response,
bypassing any remaining filters in the pipeline and the action method itself. In
this example, if the feature isn’t enabled, you bypass the pipeline by returning
BadRequestResult, which will return a 400 error to the client.
By moving this logic into the resource filter, you can remove it from your action meth-
ods, and instead decorate the whole API controller with a simple attribute:
[Route("api/recipe"), FeatureEnabled(IsEnabled = true)]
public class RecipeApiController : Controller
You’ve only extracted two lines of code from your action methods so far, but you’re on
the right track. In the next section, we’ll move on to Action filters and extract two
more filters from the action method code.
13.2.3 Action filters: customizing model binding and action results
Action filters run just after model binding, before the action method executes.
Thanks to this positioning, action filters can access all the arguments that will be used
to execute the action method, which makes them a powerful way of extracting com-
mon logic out of your actions.
On top of this, they also run just after the action method has executed and can
completely change or replace the IActionResult returned by the action if you want.
They can even handle exceptions thrown in the action.
Executes before model binding,
early in the filter pipeline
If the feature isn’t enabled,
short-circuits the pipeline
by setting the
context.Result property
Must be implemented to satisfy
IResourceFilter, but not needed
in this case.](https://image.slidesharecdn.com/asp-230807173723-31e70040/75/ASP-NET-Core-in-Action-2018-pdf-414-2048.jpg)
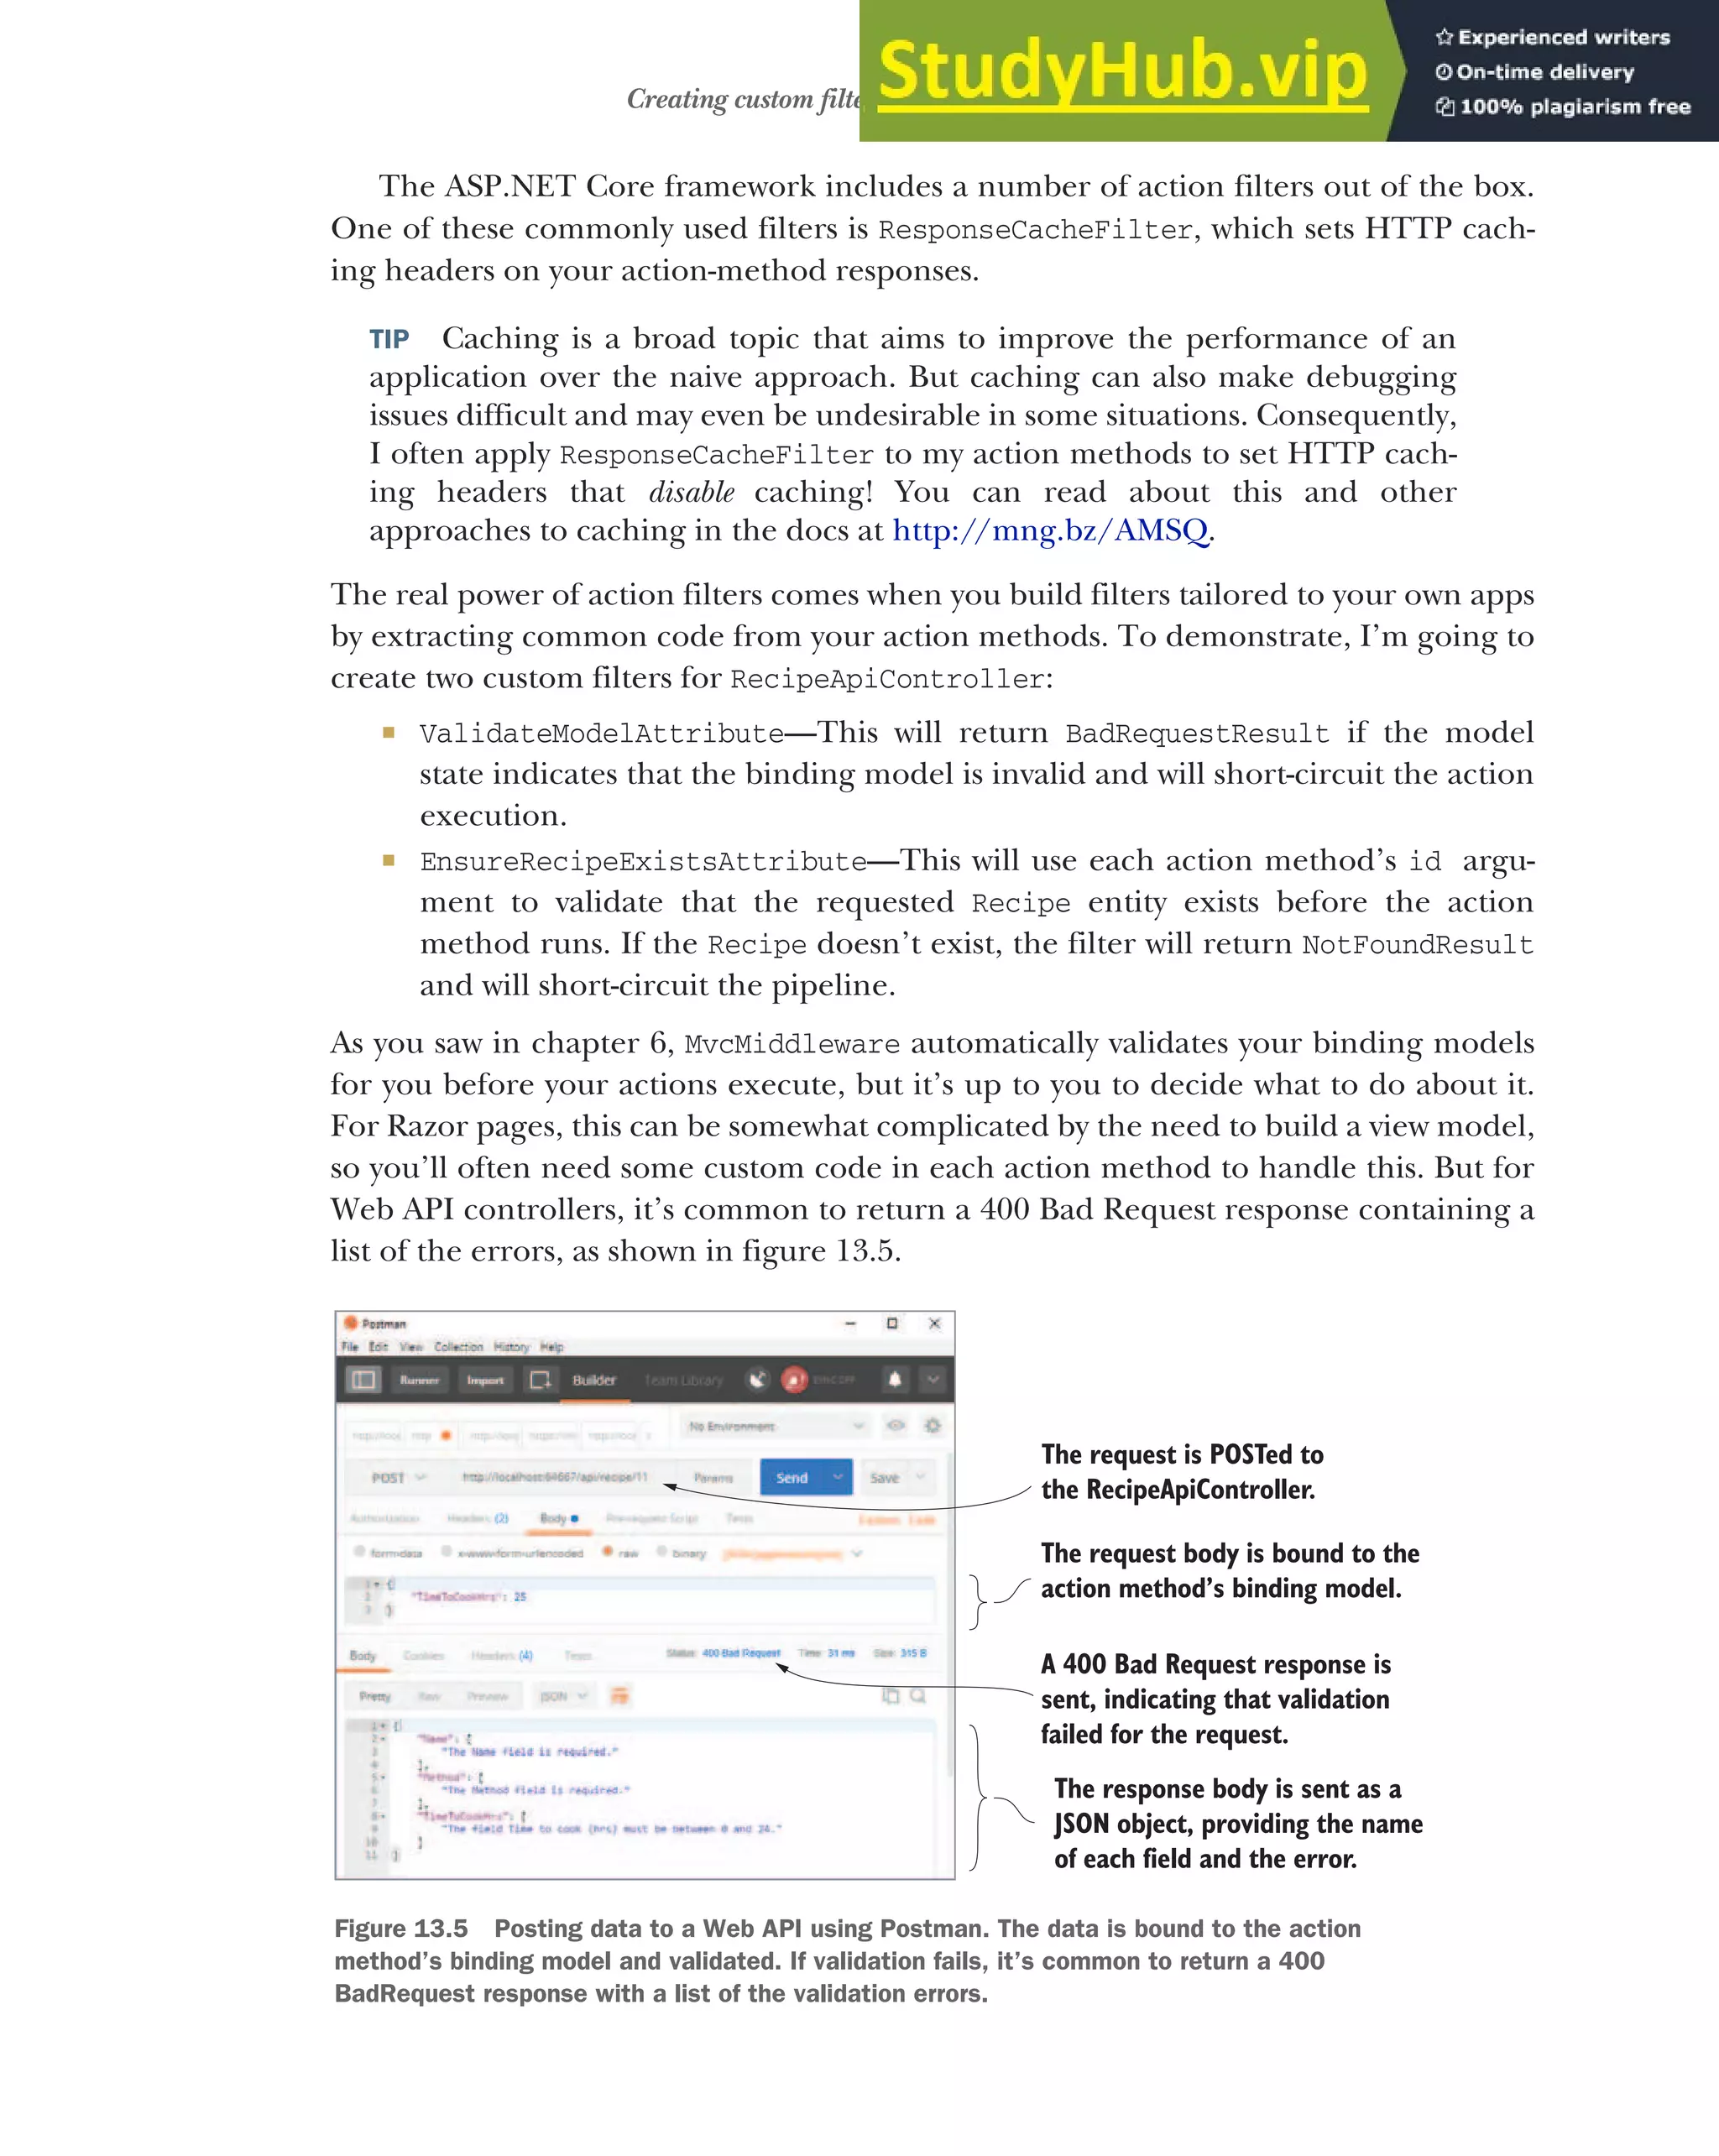
![388 CHAPTER 13 The MVC filter pipeline
It’s likely that all of your Web API controllers will use this approach, so an action filter
that automatically validates your binding models is a perfect fit. It’s normally the first
filter I create for any new project. Listing 13.10 shows a simple implementation that
you can use in your own apps.3
public class ValidateModelAttribute : ActionFilterAttribute
{
public override void OnActionExecuting(
ActionExecutingContext context)
{
if (!context.ModelState.IsValid)
{
context.Result =
new BadRequestObjectResult(context.ModelState);
}
}
}
This attribute is self-explanatory and follows a similar pattern to the resource filter in
section 13.2.2, but with a few interesting points:
I have derived from the abstract ActionFilterAttribute. This class imple-
ments IActionFilter and IResultFilter, as well as their async counterparts,
so you can override the methods you need as appropriate. This avoids needing
to add an unused OnActionExecuted() method, but is entirely optional and a
matter of preference.
Action filters run after model binding has taken place, so context.ModelState
contains the validation errors if validation failed.
Setting the Result property on context short-circuits the pipeline. But, due to
the position of the action filter stage, only the action method execution and
later action filters are bypassed; all the other stages of the pipeline run as
though the action had executed as normal.
If you apply this action filter to your RecipeApiController, you can remove
if (!ModelState.IsValid)
{
return BadRequest(ModelState);
}
Listing 13.10 The action filter for validating ModelState
3
ASP.NET Core 2.1 added this behavior by default for controllers decorated with the [ApiController] attri-
bute. For details, see https://blogs.msdn.microsoft.com/webdev/2018/02/27/asp-net-core-2-1-web-apis/.
For convenience, you derive from
the ActionFilterAttribute base class.
Overrides the Executing
method to run the filter
before the Action executes
Model binding and validation have already
run at this point, so you can check the state.
If the model isn’t valid, set the
Result property; this short-
circuits the action execution.](https://image.slidesharecdn.com/asp-230807173723-31e70040/75/ASP-NET-Core-in-Action-2018-pdf-416-2048.jpg)
![389
Creating custom filters for your application
from the start of both the action methods, as it will run automatically in the filter pipe-
line. You’ll use a similar approach to remove the duplicate code checking whether the id
provided as an argument to the action methods corresponds to an existing Recipe entity.
This listing shows the EnsureRecipeExistsAttribute action filter. This uses an
instance of RecipeService to check whether the Recipe exists and returns a 404 Not
Found if it doesn’t.
public class EnsureRecipeExistsAtribute : ActionFilterAttribute
{
public override void OnActionExecuting(
ActionExecutingContext context)
{
var service = (RecipeService) context.HttpContext
.RequestServices.GetService(typeof(RecipeService));
var recipeId = (int) context.ActionArguments["id"];
if (!service.DoesRecipeExist(recipeId))
{
context.Result = new NotFoundResult();
}
}
}
As before, you’ve derived from ActionFilterAttribute for simplicity and overridden
the OnActionExecuting method. The main functionality of the filter relies on the
DoesRecipeExist() method of RecipeService, so the first step is to obtain an
instance of RecipeService. The context parameter provides access to the Http-
Context for the request, which in turn lets you access the DI container and use
RequestServices.GetService() to return an instance of RecipeService.
WARNING This technique for obtaining dependencies is known as service loca-
tion and is generally considered an antipattern.4
In section 13.4, I’ll show a
much better way to use the DI container to inject dependencies into your filters.
As well as RecipeService, the other piece of information you need is the id argument
of the Get and Edit action methods. In action filters, model binding has already
occurred, so the arguments that the MVC middleware will use to execute the action
method are already known and are exposed on context.ActionArguments.
The action arguments are exposed as Dictionary<string, object>, so you can
obtain the id parameter using the "id" string key. Remember to cast the object to
the correct type.
Listing 13.11 An action filter to check whether a Recipe exists
4
For a detailed discussion on DI patterns and antipatterns, see Dependency Injection in .NET by Mark Seemann
(Manning, 2012) https://livebook.manning.com/#!/book/dependency-injection-in-dot-net/chapter-5/.
Fetches an
instance of
RecipeService
from the DI
container
Retrieves the id
parameter that
will be passed to
action method
when it executes
Checks whether a Recipe entity
with the given RecipeId exists
If it doesn’t exist, returns a
404 Not Found result and
short-circuits the pipeline.](https://image.slidesharecdn.com/asp-230807173723-31e70040/75/ASP-NET-Core-in-Action-2018-pdf-417-2048.jpg)
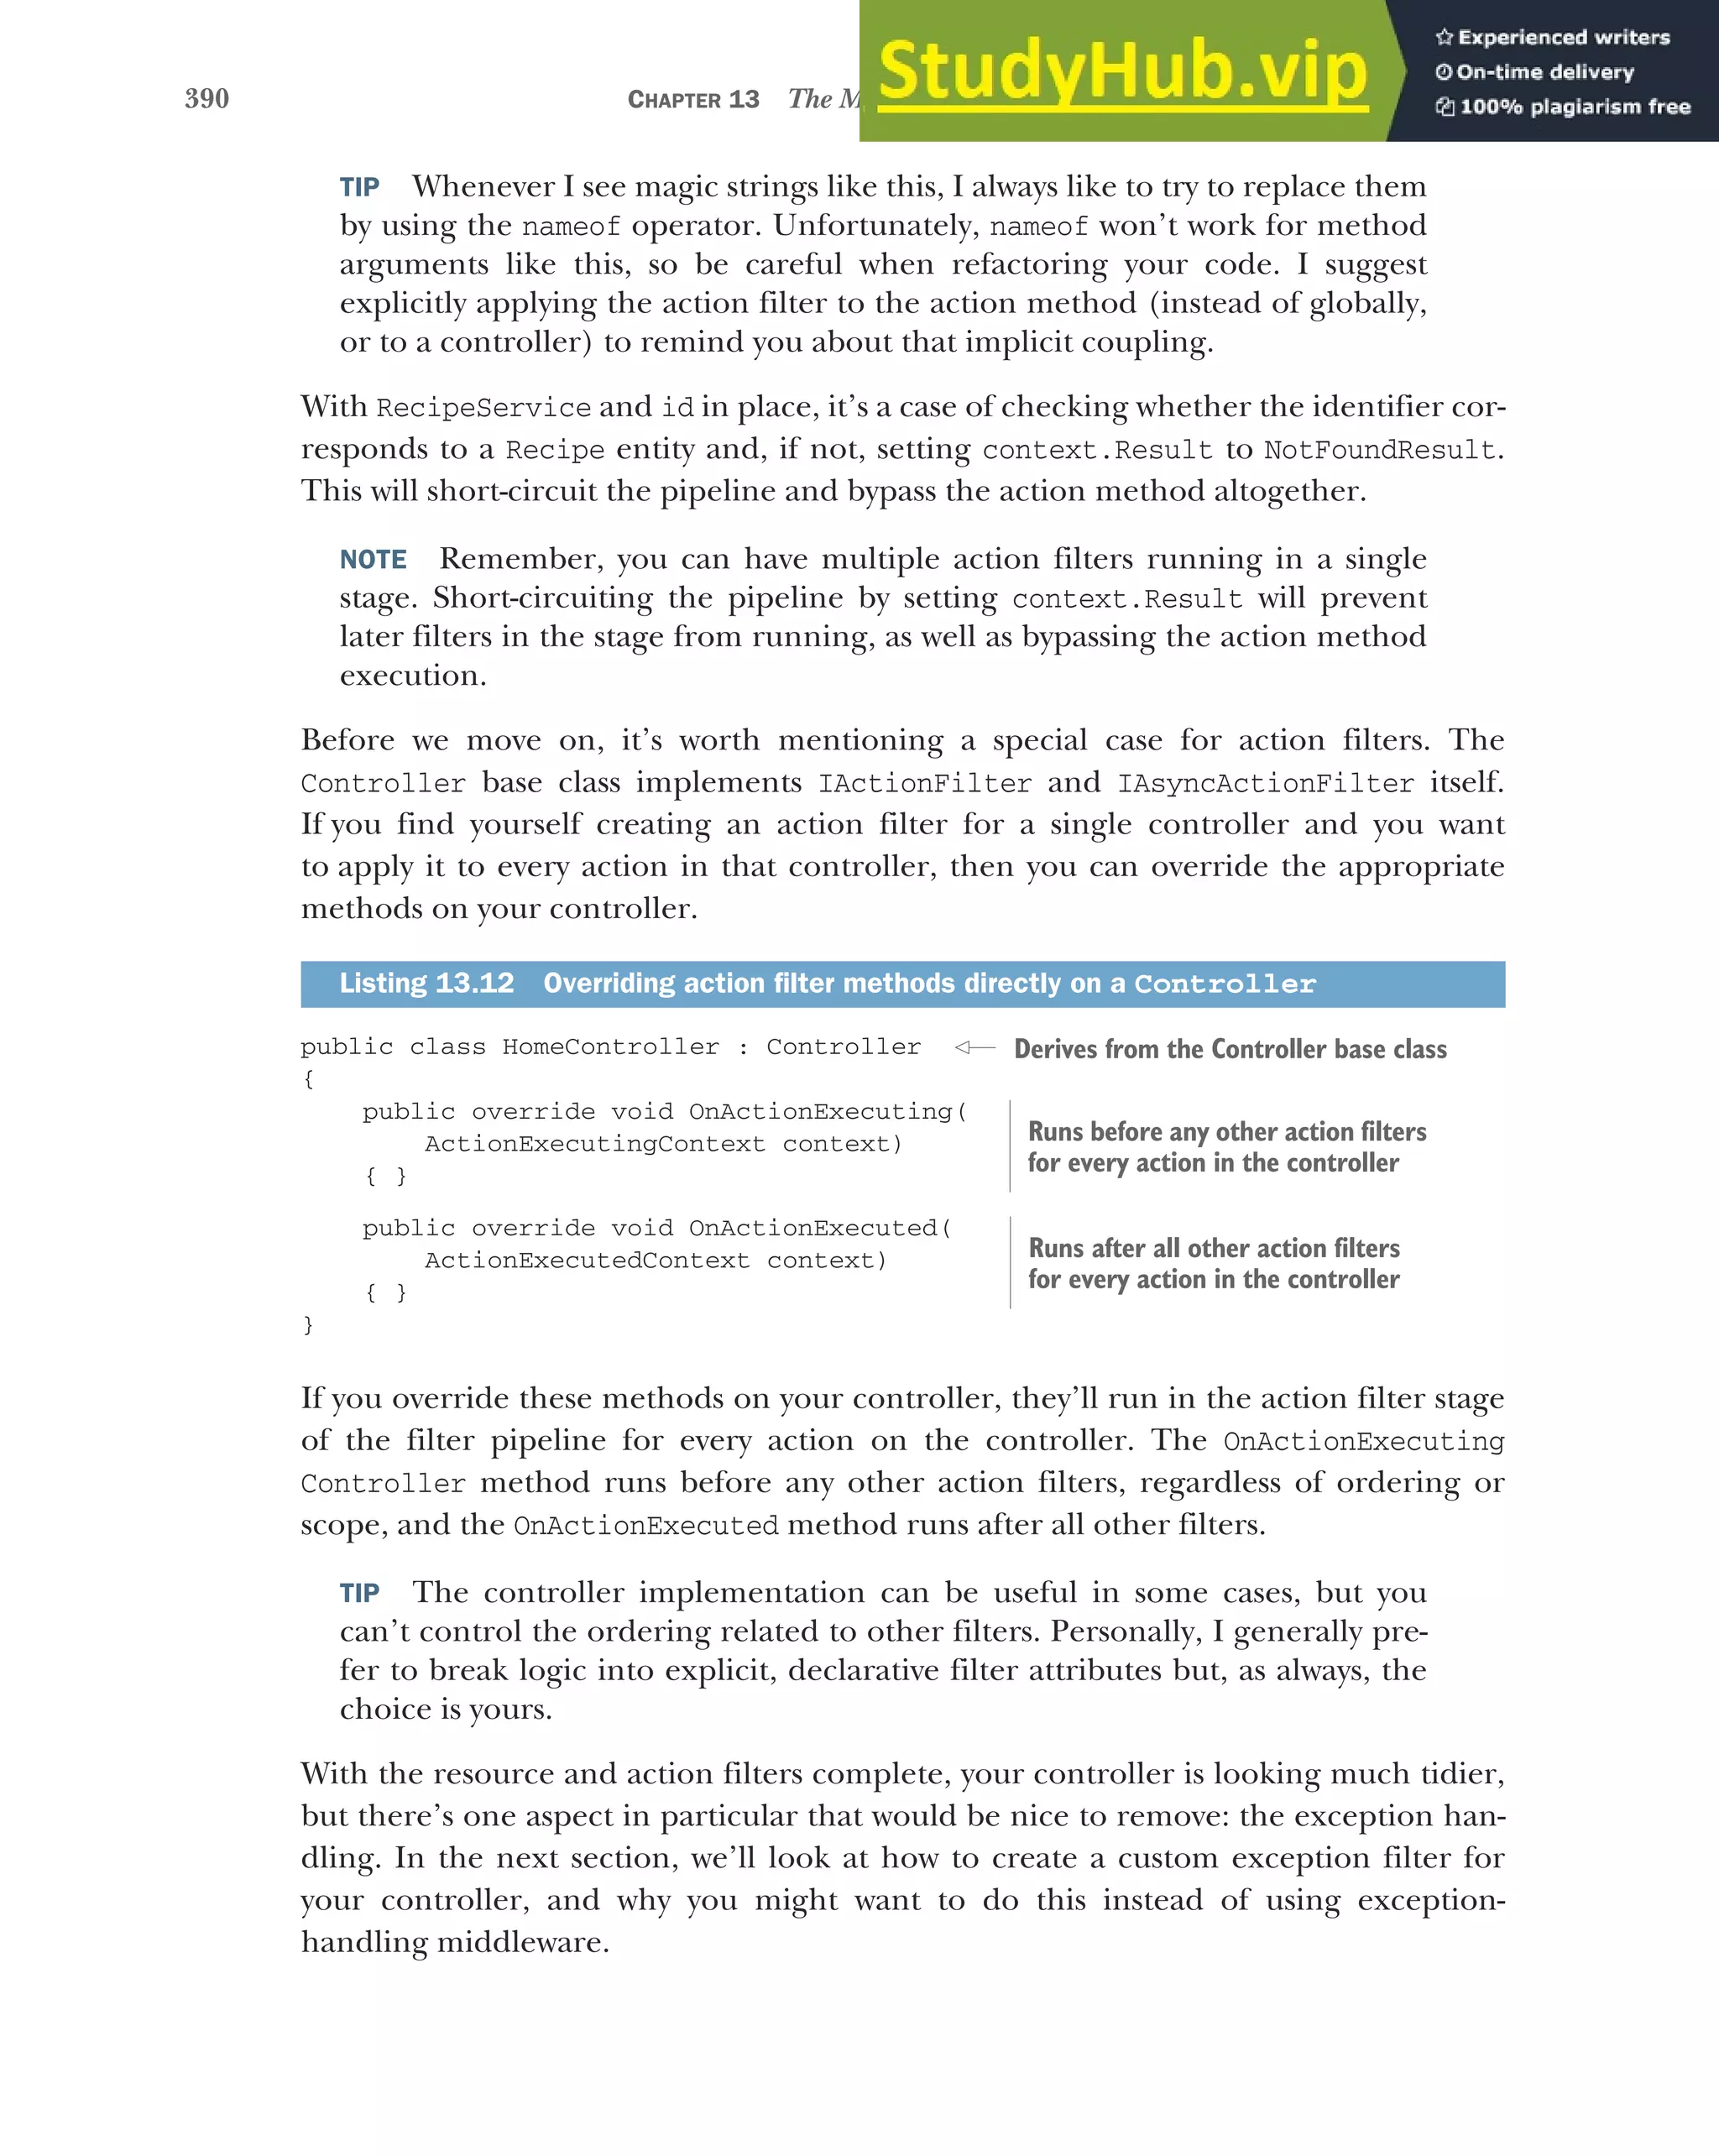
![392 CHAPTER 13 The MVC filter pipeline
Now that you know why you might want an exception filter, go ahead and imple-
ment one for RecipeApiController, as shown next. This lets you safely remove the
try-catch block from your action methods, knowing that your filter will catch any
errors.
public class HandleExceptionAttribute : ExceptionFilterAttribute
{
public override void OnException(ExceptionContext context)
{
var error = new
{
Success = false,
Errors = new [] { context.Exception.Message }
};
context.Result = new ObjectResult(error)
{
StatusCode = 500
};
context.ExceptionHandled = true;
}
}
It’s quite common to have one or two different exception filters in your application,
one for your MVC controllers and one for your Web API controllers, but they’re not
always necessary. If you can handle all the exceptions in your application with a single
piece of middleware, then ditch the exception filters and go with that instead.
You’re coming to the last type of filter now, result filters, and with it, you’re almost
done refactoring your RecipeApiController. Custom result filters tend to be rela-
tively rare in the apps I’ve written, but they have their uses, as you’ll see.
13.2.5 Result filters: customizing action results before they execute
If everything runs successfully in the pipeline, and there’s no short-circuiting, then
the next stage of the pipeline after action filters are result filters. These run just
before and after the IActionResult returned by the Action method (or action filters)
is executed.
WARNING If the pipeline is short-circuited by setting context.Result, the
result filter stage won’t be run, but IActionResult will still be executed to
generate the response. The one exception to this rule is action filters—these
only short-circuit the action execution, as you saw in figure 13.2, and so result
filters run as normal, as though the action itself generated the response.
Listing 13.13 The HandleExceptionAttribute exception filter
ExceptionFilterAttibute is an abstract base
class that implements IExceptionFilter.
There’s only a single method to
override for IExceptionFilter.
Building a custom
object to return in
the response
Creates an ObjectResult
to serialize the error
object and to set the
response status code
Marks the exception as handled to
prevent it propagating out of
MvcMiddleware](https://image.slidesharecdn.com/asp-230807173723-31e70040/75/ASP-NET-Core-in-Action-2018-pdf-420-2048.jpg)
![393
Creating custom filters for your application
Result filters run immediately after action filters, so many of their use cases are similar,
but you typically use result filters to customize the way the IActionResult executes.
For example, ASP.NET Core has several result filters built into its framework:
ProducesAttribute—This forces the Web API result to be serialized to a
specific output format. For example, decorating your action method with
[Produces("application/xml")] forces the formatters to try to format the
response as XML, even if the client doesn’t list XML in its Accept header.
FormatFilterAttribute—Decorating an action method with this filter tells the
formatter to look for a route value or query string parameter called format, and
to use that to determine the output format. For example, you could call
/api/recipe/11?format=json and FormatFilter will format the response as
JSON, or call api/recipe/11?format=xml and get the response as XML.5
As well as controlling the output formatters, you can use result filters to make any last-
minute adjustments before IActionResult is executed and the response is generated.
As an example of the kind of flexibility available to you, in the following listing I
demonstrate setting the Last-Modified header, based on the object returned from
the action. This is a somewhat contrived example—it’s specific enough to a single
action that it doesn’t warrant being moved to a result filter—but, hopefully, you get
the idea!
public class AddLastModifedHeaderAttribute : ResultFilterAttribute
{
public override void OnResultExecuting(
ResultExecutingContext context)
{
if (context.Result is OkObjectResult result
&& result.Value is RecipeDetailViewModel detail)
{
var viewModelDate = detail.LastModified;
context.HttpContext.Response
.GetTypedHeaders().LastModified = viewModelDate;
}
}
}
I’ve used another helper base class here, ResultFilterAttribute, so you only need
to override a single method to implement the filter. Fetch the current IActionResult,
5
Remember, you need to explicitly configure the XML formatters if you want to serialize to XML. For details,
see http://mng.bz/0J2z.
Listing 13.14 Setting a response header in a result filter
ResultFilterAttribute provides a
useful base class you can override
You could also override the Executed
method, but the response would
already be sent by then.
Checks
whether the
action result
returned a 200
Ok result with
a view model
Checks whether
the view model
type is
RecipeDetailView
Model . . .
. . . if it is, fetches the LastModified field and
sets the Last-Modified header in the response](https://image.slidesharecdn.com/asp-230807173723-31e70040/75/ASP-NET-Core-in-Action-2018-pdf-421-2048.jpg)
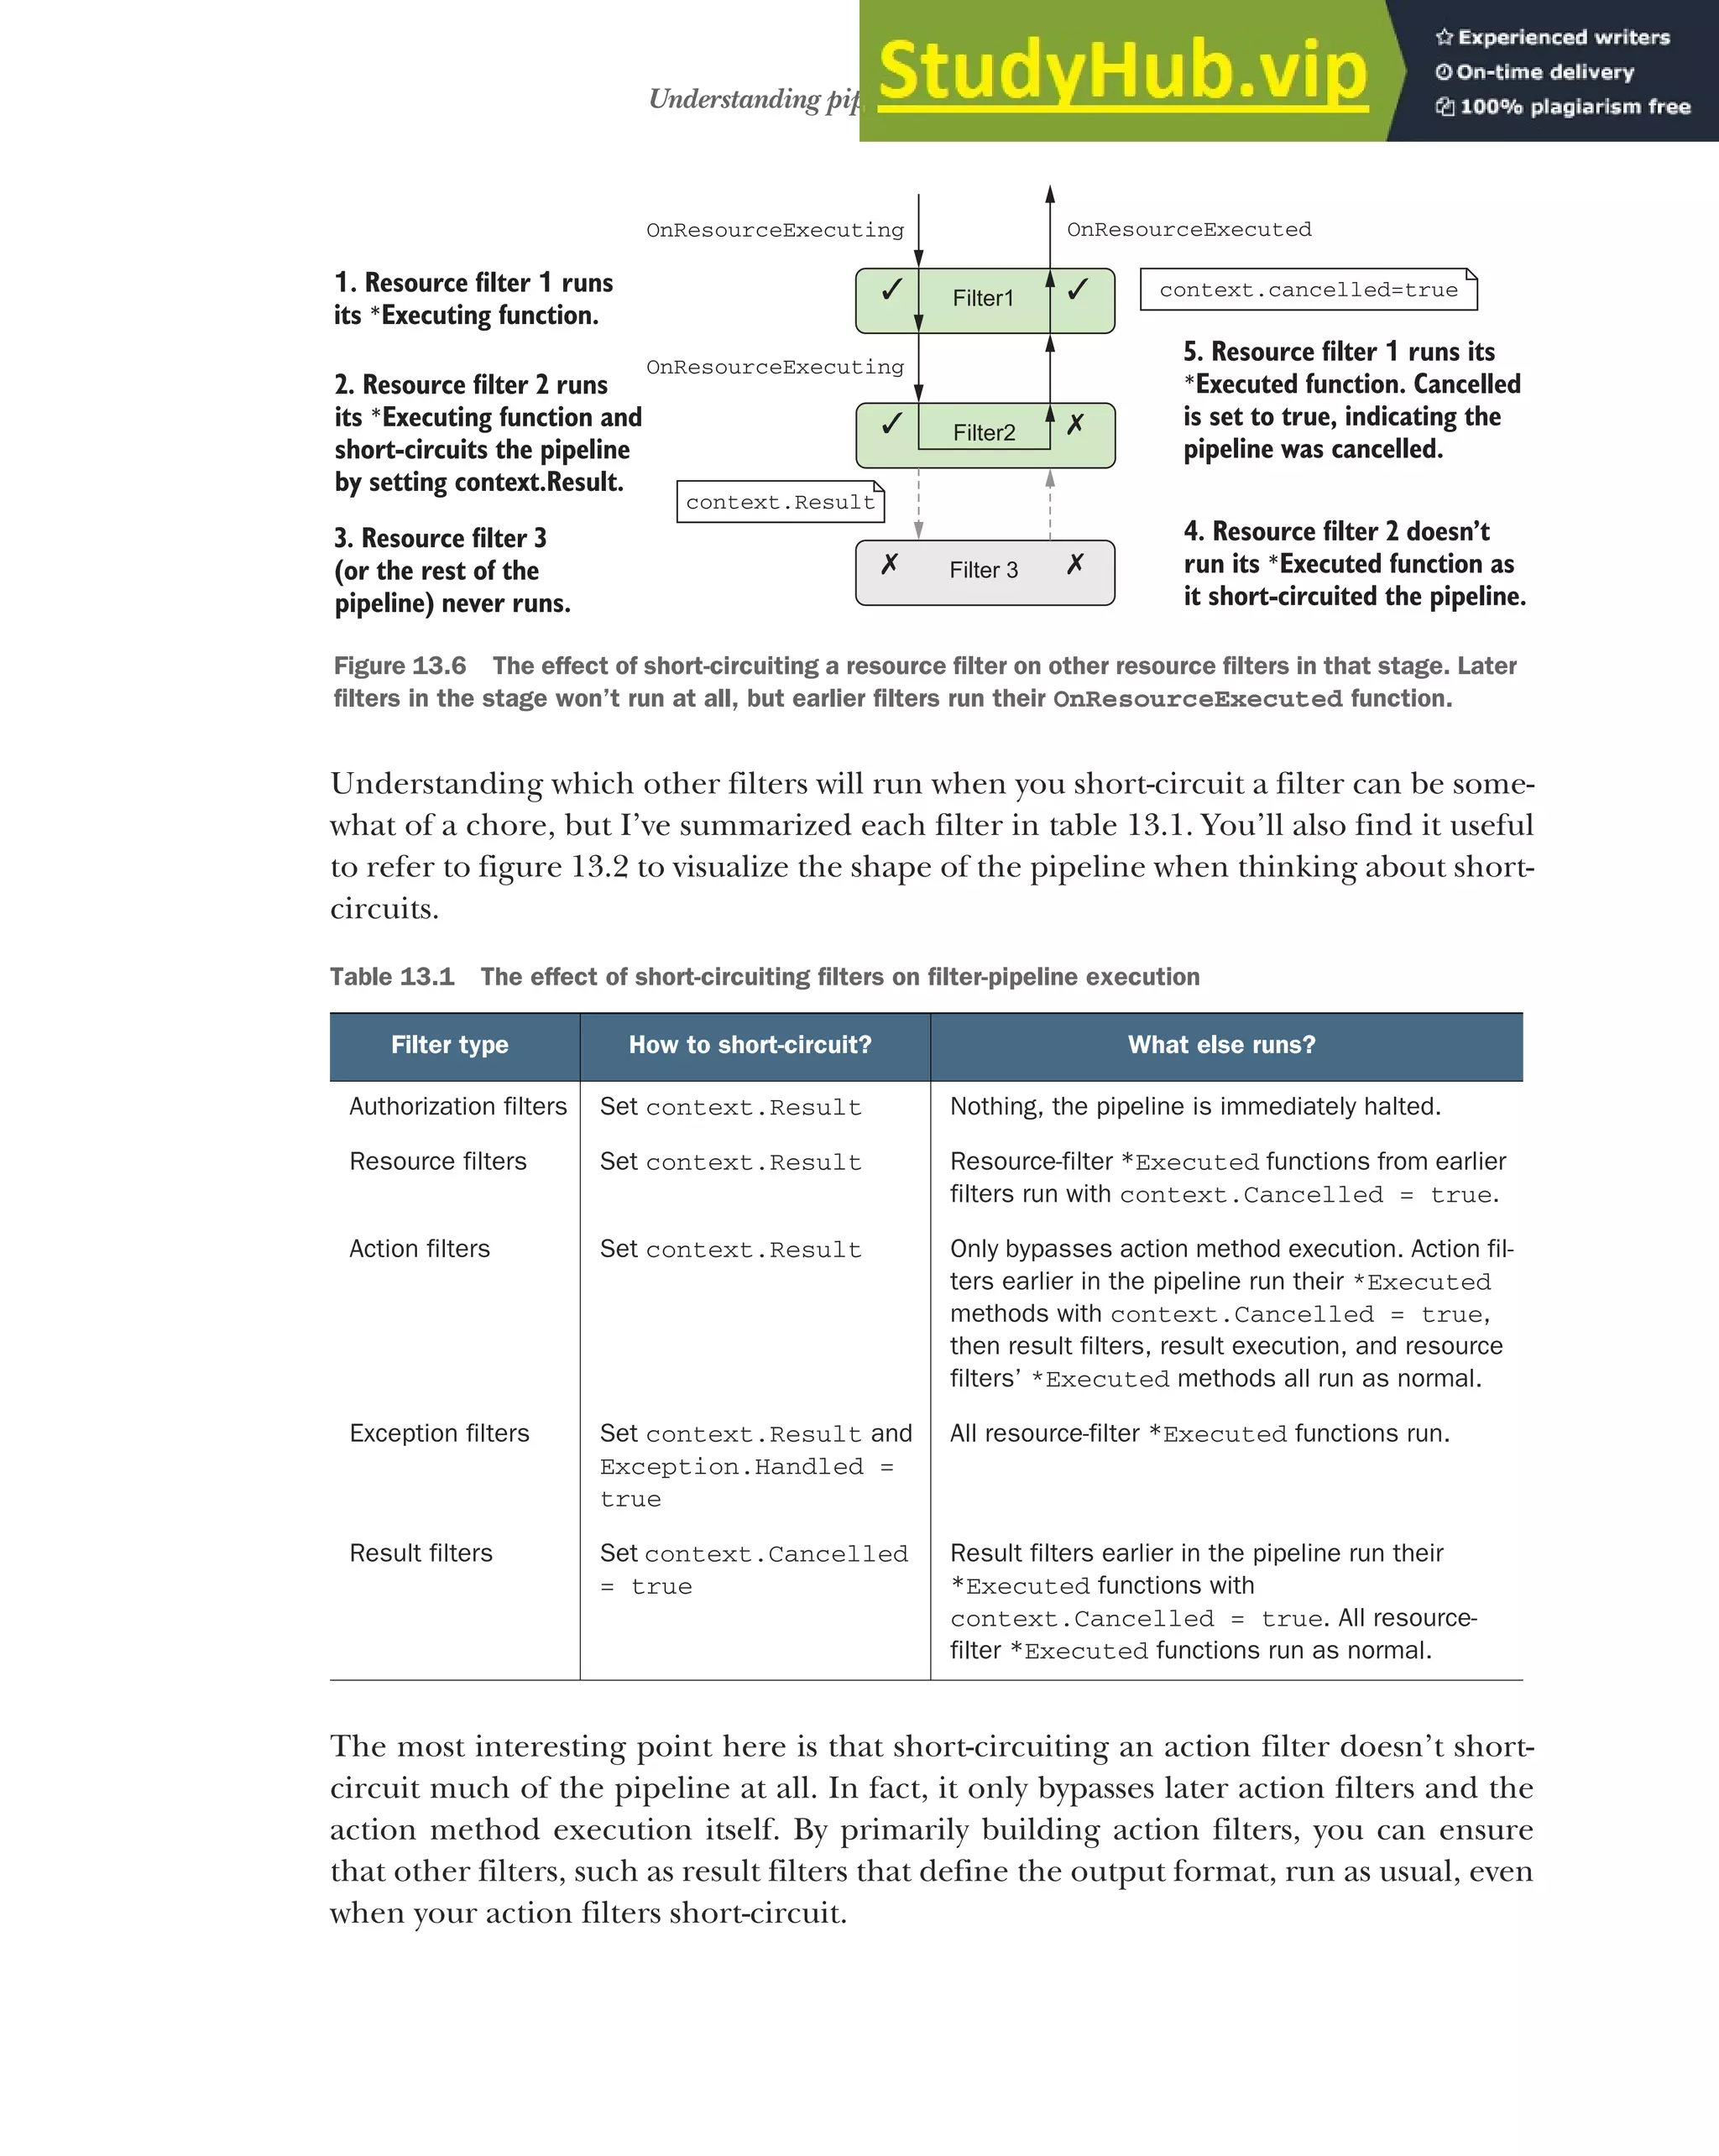
![396 CHAPTER 13 The MVC filter pipeline
The last thing I’d like to talk about in this chapter is how to use DI with your filters.
You saw in chapter 10 that DI is integral to ASP.NET Core, and in the next section,
you’ll see how to design your filters so that the framework can inject service depen-
dencies into them for you.
13.4 Using dependency injection with filter attributes
The previous version of ASP.NET used filters, but they suffered from one problem in
particular: it was hard to use services from them. This was a fundamental issue with
implementing them as attributes that you decorate your actions with. C# attributes
don’t let you pass dependencies into their constructors (other than constant values),
and they’re created as singletons, so there’s only a single instance for the lifetime of
your app.
In ASP.NET Core, this limitation is still there in general, in that filters are typically
created as attributes that you add to your controller classes and action methods. What
happens if you need to access a transient or scoped service from inside the singleton
attribute?
Listing 13.11 showed one way of doing this, using a pseudo service locator pattern
to reach into the DI container and pluck out RecipeService at runtime. This works
but is generally frowned upon as a pattern, in favor of proper DI. How can you add DI
to your filters?
The key is to split the filter into two. Instead of creating a class that’s both an attri-
bute and a filter, create a filter class that contains the functionality and an attribute
that tells MvcMiddleware when and where to use the filter.
Let’s apply this to the action filter from listing 13.11. Previously, I derived from
ActionFilterAttribute and obtained an instance of RecipeService from the context
passed to the method. In the following listing, I show two classes, EnsureRecipeExists-
Filter and EnsureRecipeExistsAttribute. The filter class is responsible for the func-
tionality and takes in RecipeService as a constructor dependency.
public class EnsureRecipeExistsFilter : IActionFilter
{
private readonly RecipeService _service;
public EnsureRecipeExistsFilter(RecipeService service)
{
_service = service;
}
public void OnActionExecuting(ActionExecutingContext context)
{
var recipeId = (int) context.ActionArguments["id"];
if (!_service.DoesRecipeExist(recipeId))
{
context.Result = new NotFoundResult();
}
}
Listing 13.15 Using DI in a filter by not deriving from Attribute
Doesn’t derive from
an Attribute class
RecipeService
is injected
into the
constructor.
The rest of
the method
remains the
same.](https://image.slidesharecdn.com/asp-230807173723-31e70040/75/ASP-NET-Core-in-Action-2018-pdf-424-2048.jpg)
![397
Using dependency injection with filter attributes
public void OnActionExecuted(ActionExecutedContext context) { }
}
public class EnsureRecipeExistsAttribute : TypeFilterAttribute
{
public EnsureRecipeExistsAttribute()
: base(typeof(EnsureRecipeExistsFilter)) {}
}
EnsureRecipeExistsFilter is a valid filter; you could use it on its own by adding it as
a global filter (as global filters don’t need to be attributes). But you can’t use it directly
by decorating controller classes and action methods, as it’s not an attribute. That’s
where EnsureRecipeExistsAttribute comes in.
You can decorate your methods with EnsureRecipeExistsAttribute instead. This
attribute inherits from TypeFilterAttribute and passes the Type of filter to create as
an argument to the base constructor. This attribute acts as a factory for EnsureRecipe-
ExistsFilter by implementing IFilterFactory.
When MvcMiddleware initially loads your app, it scans your actions and controllers,
looking for filters and filter factories. It uses these to form a filter pipeline for every
action in your app, as shown in figure 13.7.
When an action decorated with EnsureRecipeExistsAttribute is called, Mvc-
Middleware calls CreateInstance() on the attribute. This creates a new instance of
EnsureRecipeExistsFilter and uses the DI container to populate its dependencies
(RecipeService).
You must implement
the Executed action to
satisfy the interface.
Passes the type EnsureRecipeExistsFilter
as an argument to the base TypeFilter
constructor
Derives from
TypeFilter, which
is used to fill
dependencies
using the DI
container.
public class HomeController
{
[ValidateModel]
[EnsureRecipeExistsFilter]
public IActionResult Index()
{
return View();
}
}
ValidateModelAttribute
EnsureRecipeExistsFilter
IFilterFactory
Attributes that implement
filter interfaces are added
directly to the pipeline.
The MvcMiddleware calls CreateInstance () on each
IFilterFactory when a request is received to create
a filter instance, which is added to the pipeline.
CreateInstance()
The MvcMiddleware scans your
app looking for filters or attributes
that implement IFilterFactory.
Figure 13.7 The MvcMiddleware scans your app on startup to find both filters and attributes that
implement IFilterFactory. At runtime, the middleware calls CreateInstance() to get an
instance of the filter.](https://image.slidesharecdn.com/asp-230807173723-31e70040/75/ASP-NET-Core-in-Action-2018-pdf-425-2048.jpg)

![399
Summary
You can add filters globally, at the controller level, or at the action level. This is
called the scope of the filter.
Within a given stage, global-scoped filters run first, then controller-scoped, and
finally, action-scoped.
You can override the default order by implementing the IOrderedFilter inter-
face. Filters will run from lowest to highest Order and use scope to break ties.
Authorization filters run first in the pipeline and control access to APIs.
ASP.NET Core includes an [Authorization] attribute that you can apply to
action methods so that only logged-in users can execute the action.
Resource filters run after authorization filters, and again after a result has been
executed. They can be used to short-circuit the pipeline, so that an action
method is never executed. They can also be used to customize the model bind-
ing process for an action method.
Action filters run after model binding has occurred, just before an action
method executes. They also run after the action method has executed. They can
be used to extract common code out of an action method to prevent duplication.
The Controller base class also implements IActionFilter and IAsyncAction-
Filter. They run at the start and end of the action filter pipeline, regardless of
the ordering or scope of other action filters.
Exception filters execute after action filters, when an action method has thrown
an exception. They can be used to provide custom error handling specific to
the action executed.
Generally, you should handle exceptions at the middleware level, but exception
filters let you customize how you handle exceptions for specific actions or
controllers.
Result filters run just before and after an IActionResult is executed. You can
use them to control how the action result is executed, or to completely change
the action result that will be executed.
You can use ServiceFilterAttribute and TypeFilterAttribute to allow
dependency injection in your custom filters. ServiceFilterAttribute requires
that you register your filter and all its dependencies with the DI container,
whereas TypeFilterAttribute only requires that the filter’s dependencies have
been registered.](https://image.slidesharecdn.com/asp-230807173723-31e70040/75/ASP-NET-Core-in-Action-2018-pdf-427-2048.jpg)

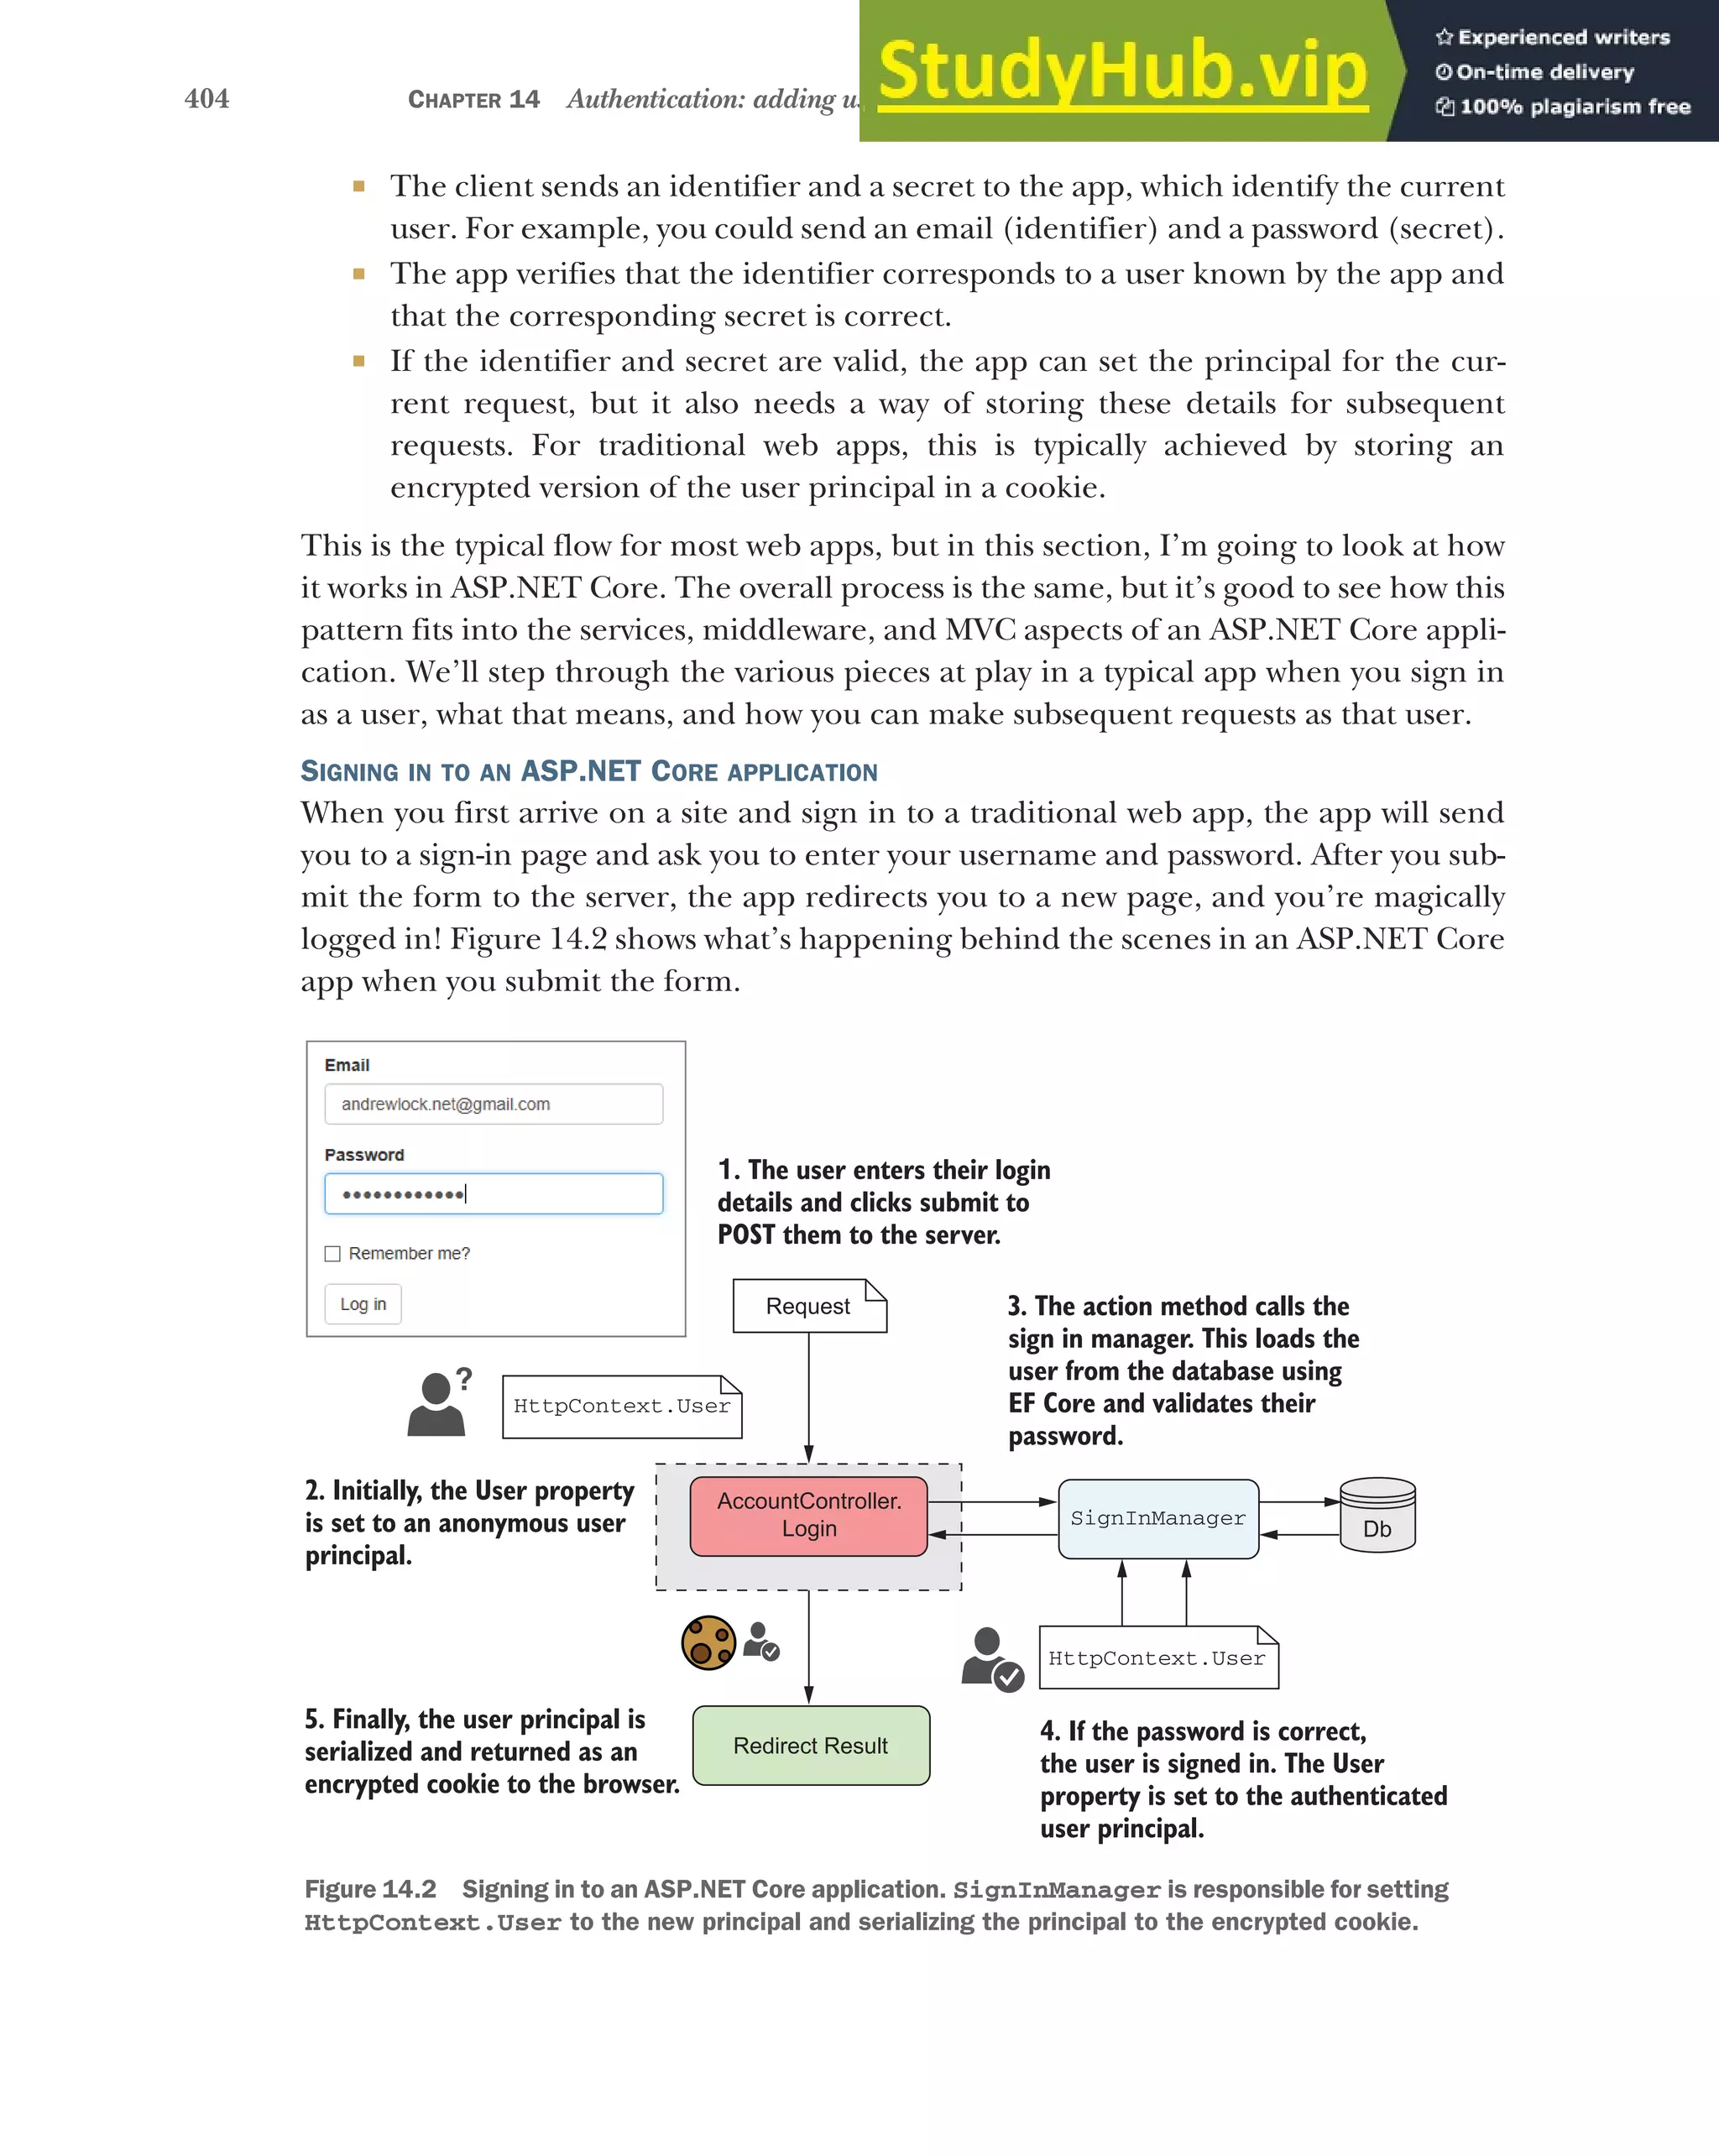


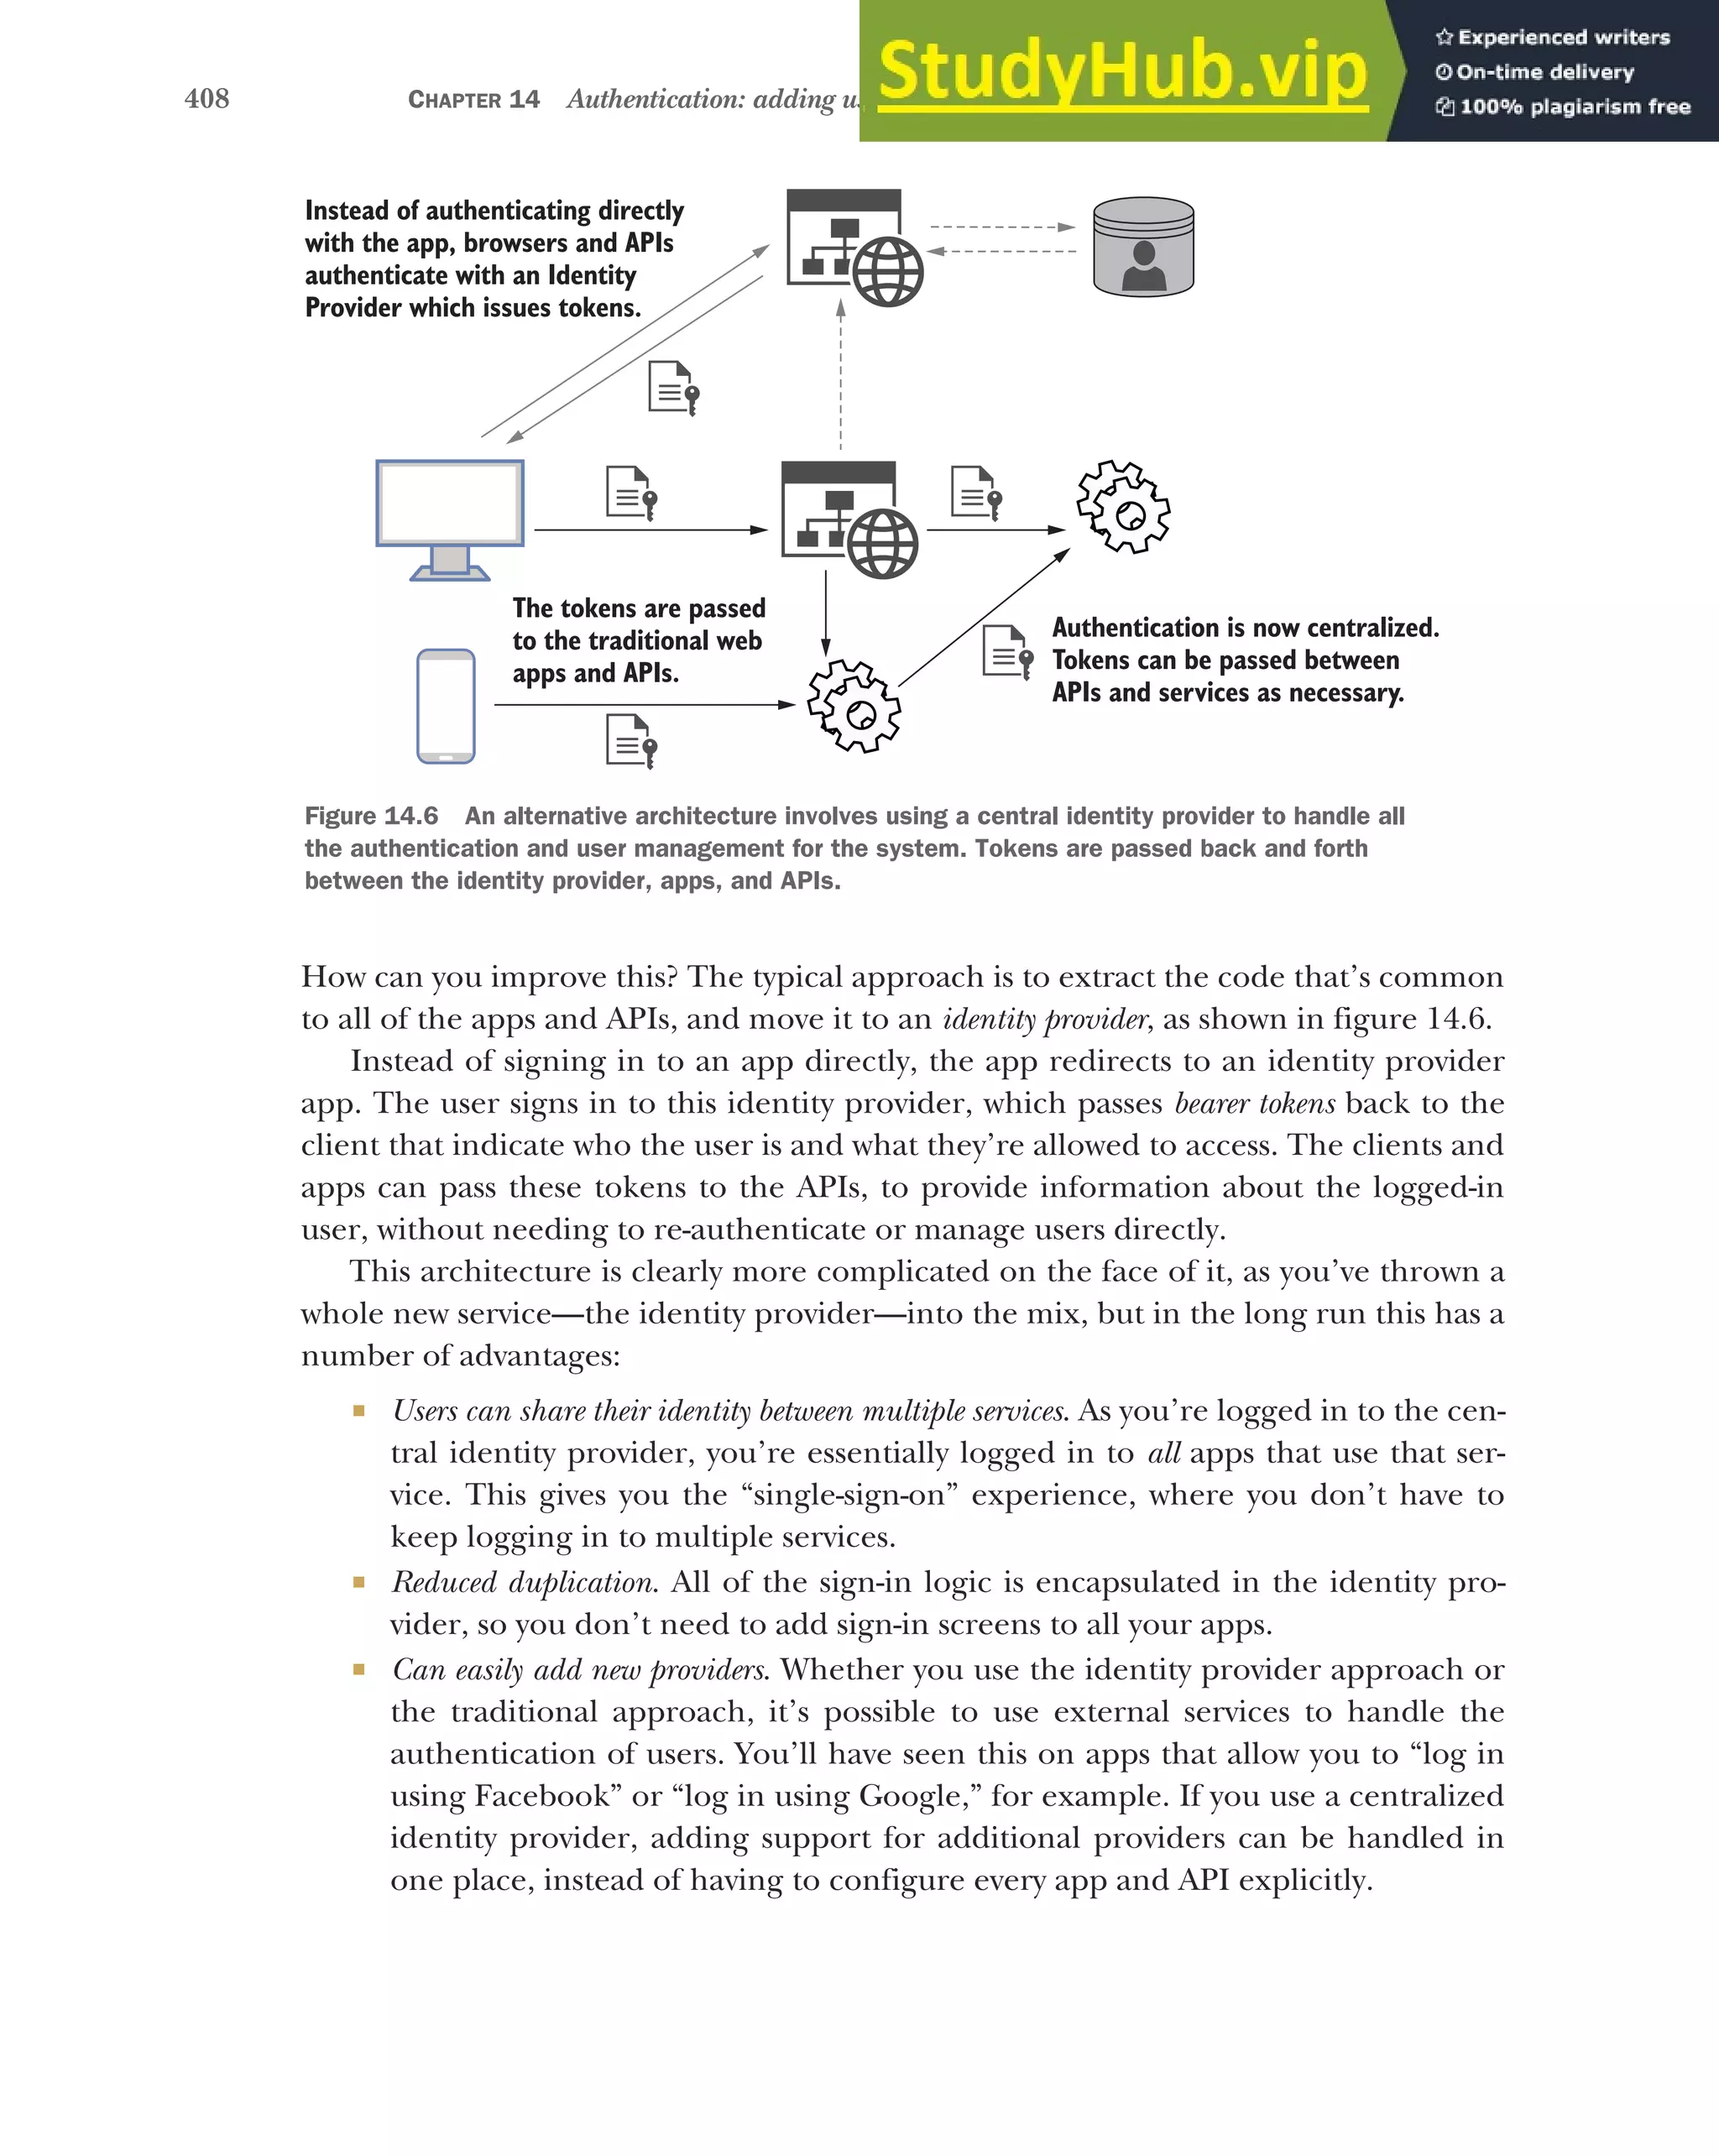

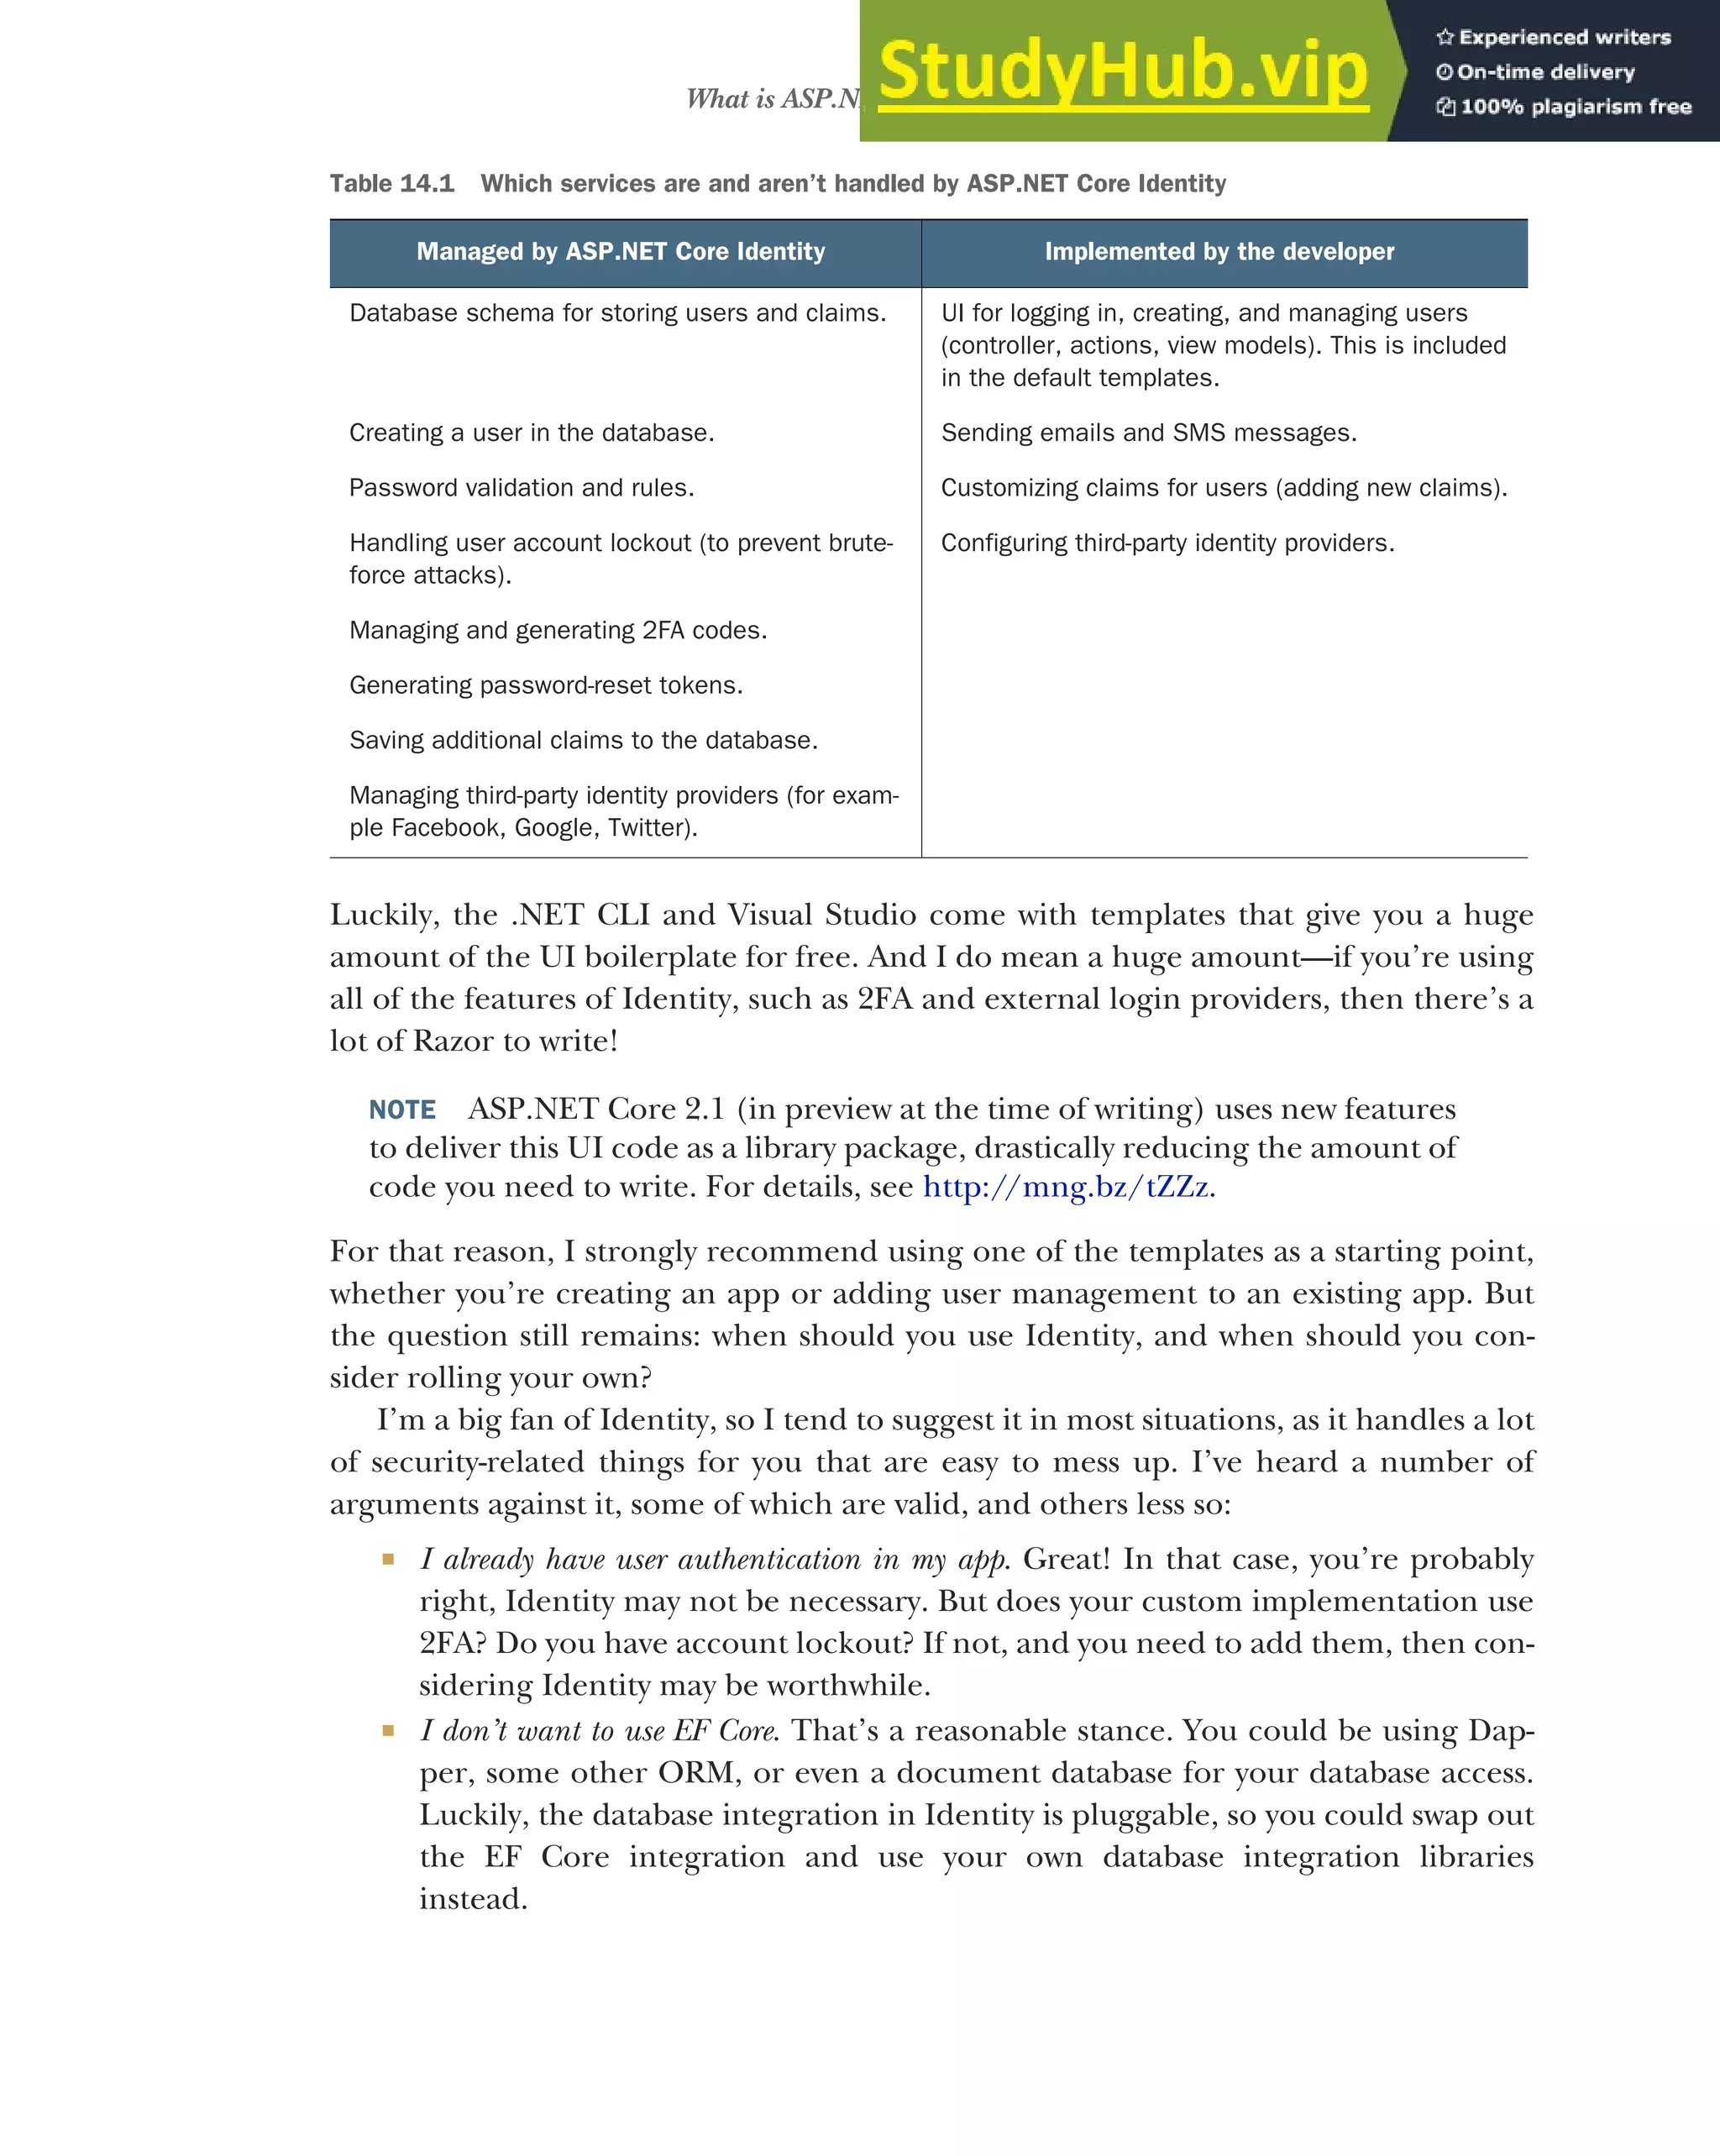
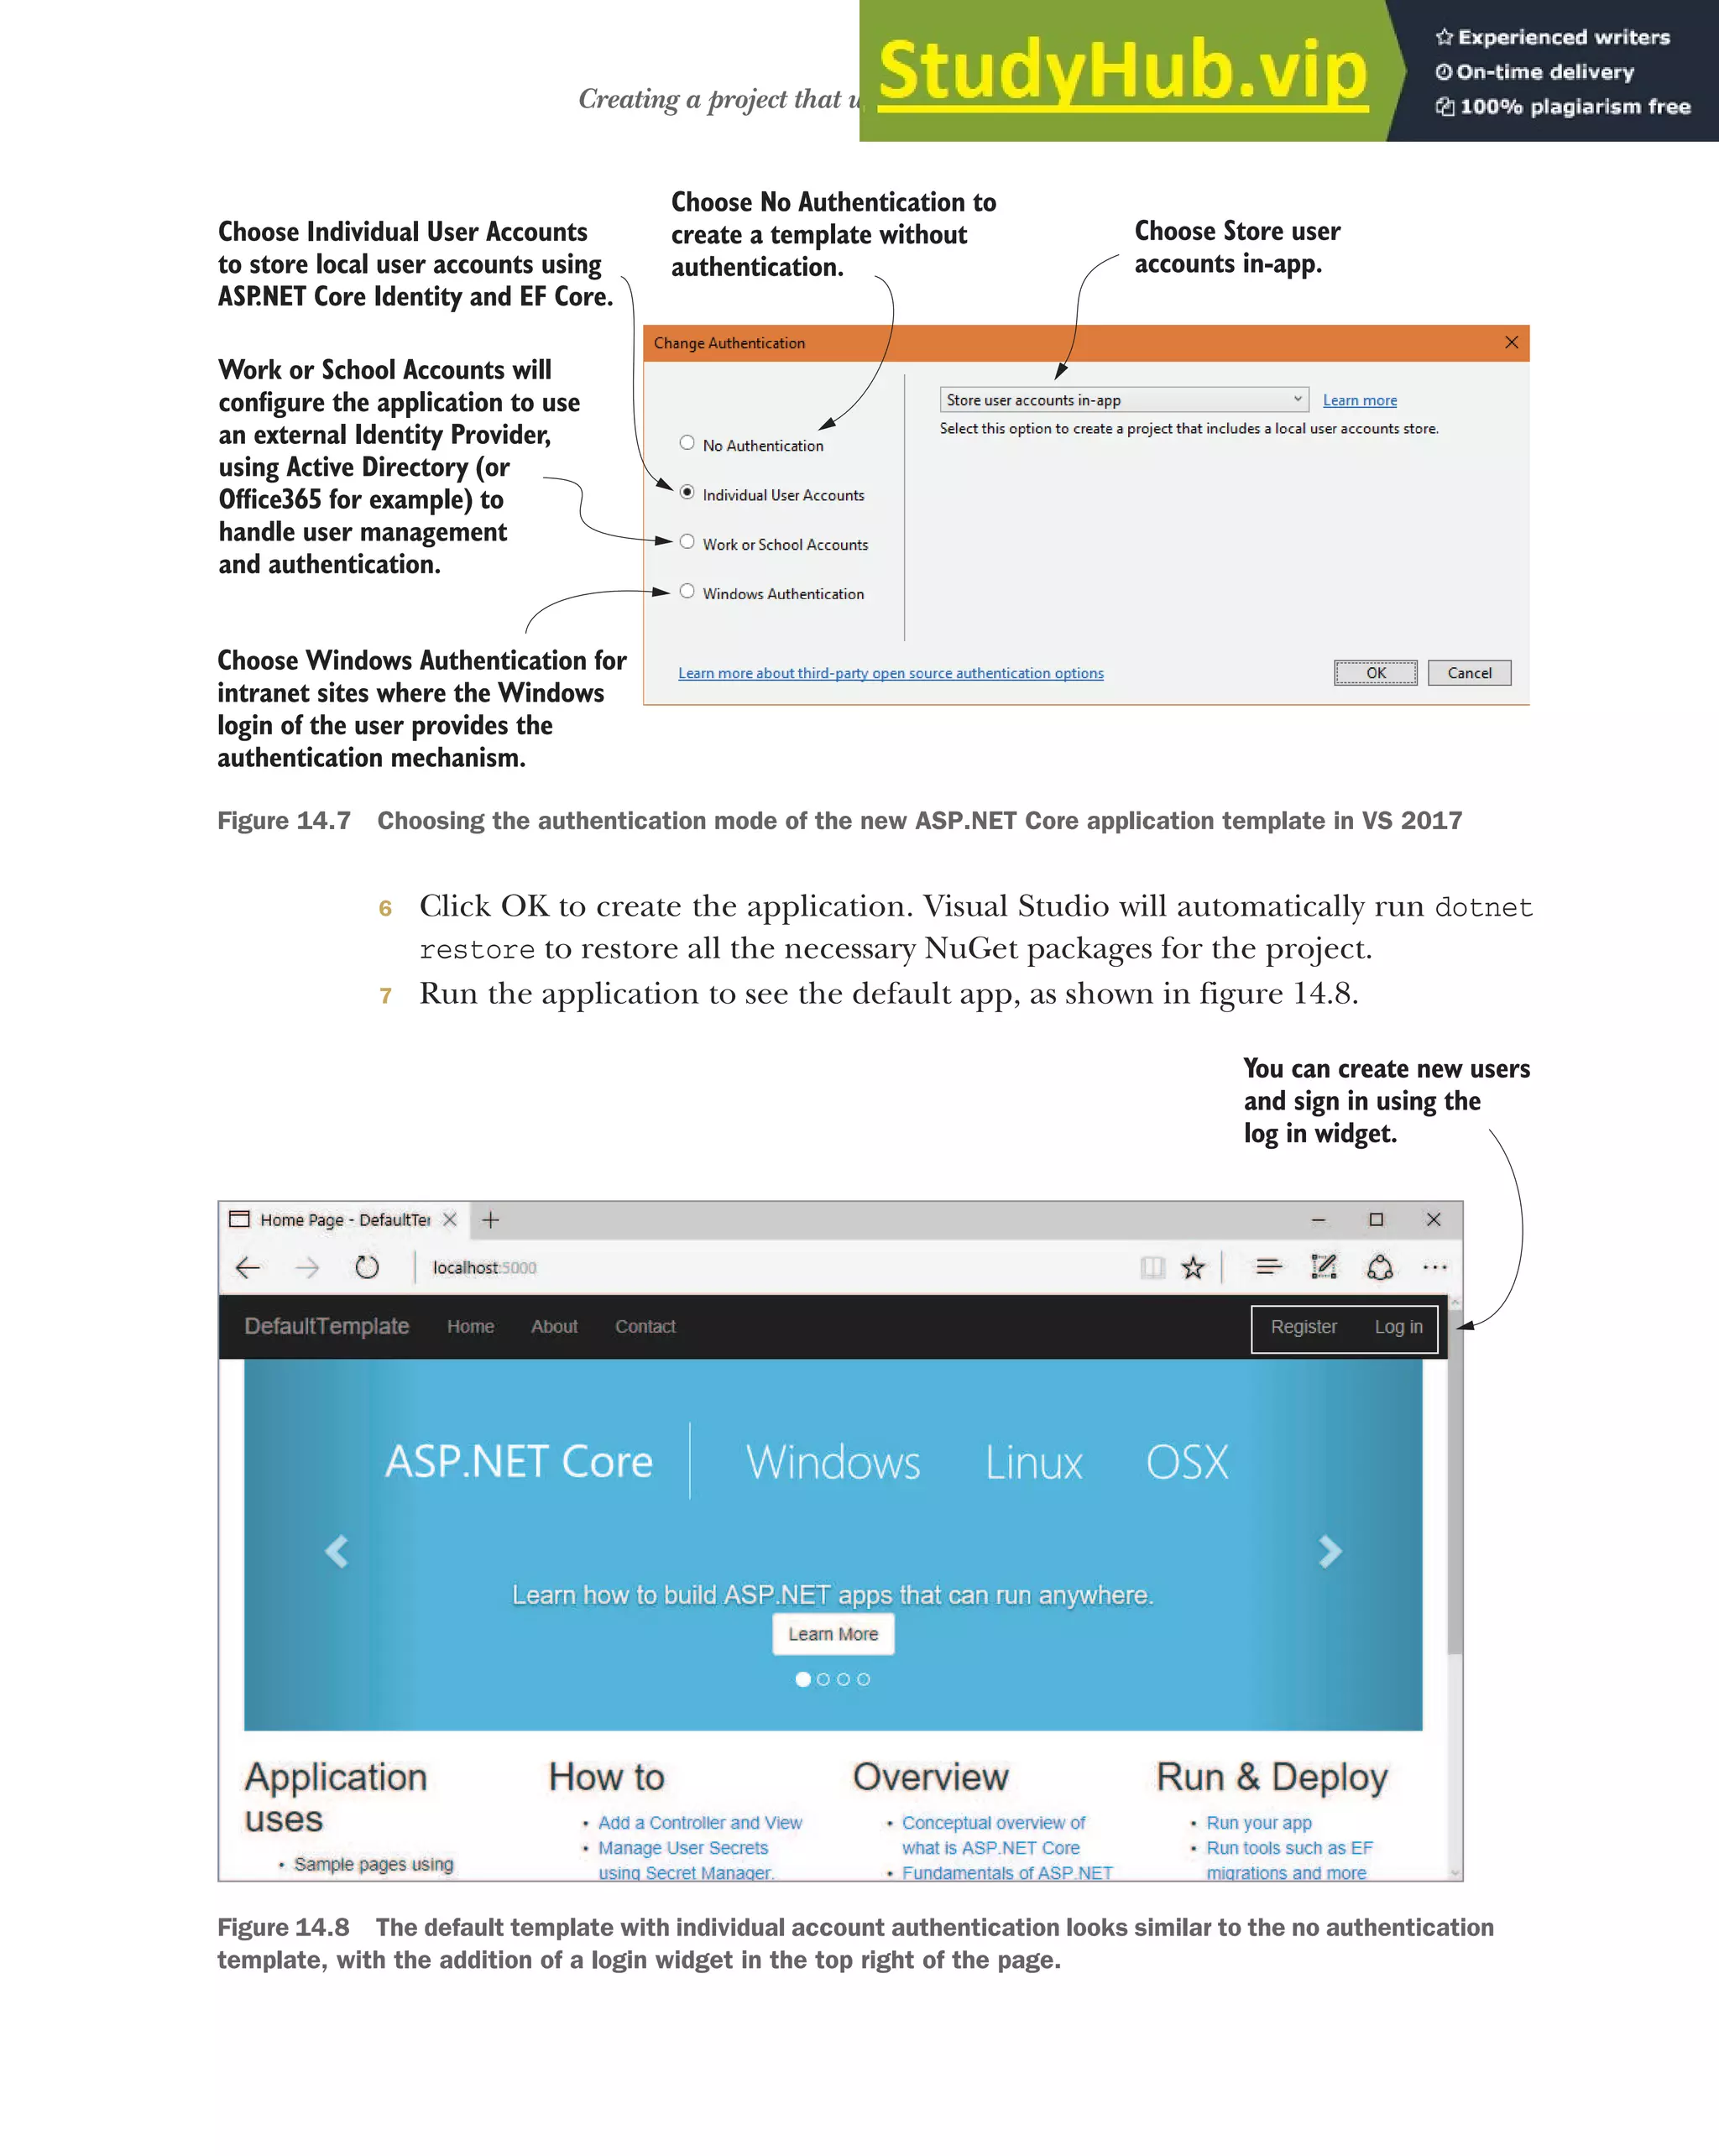
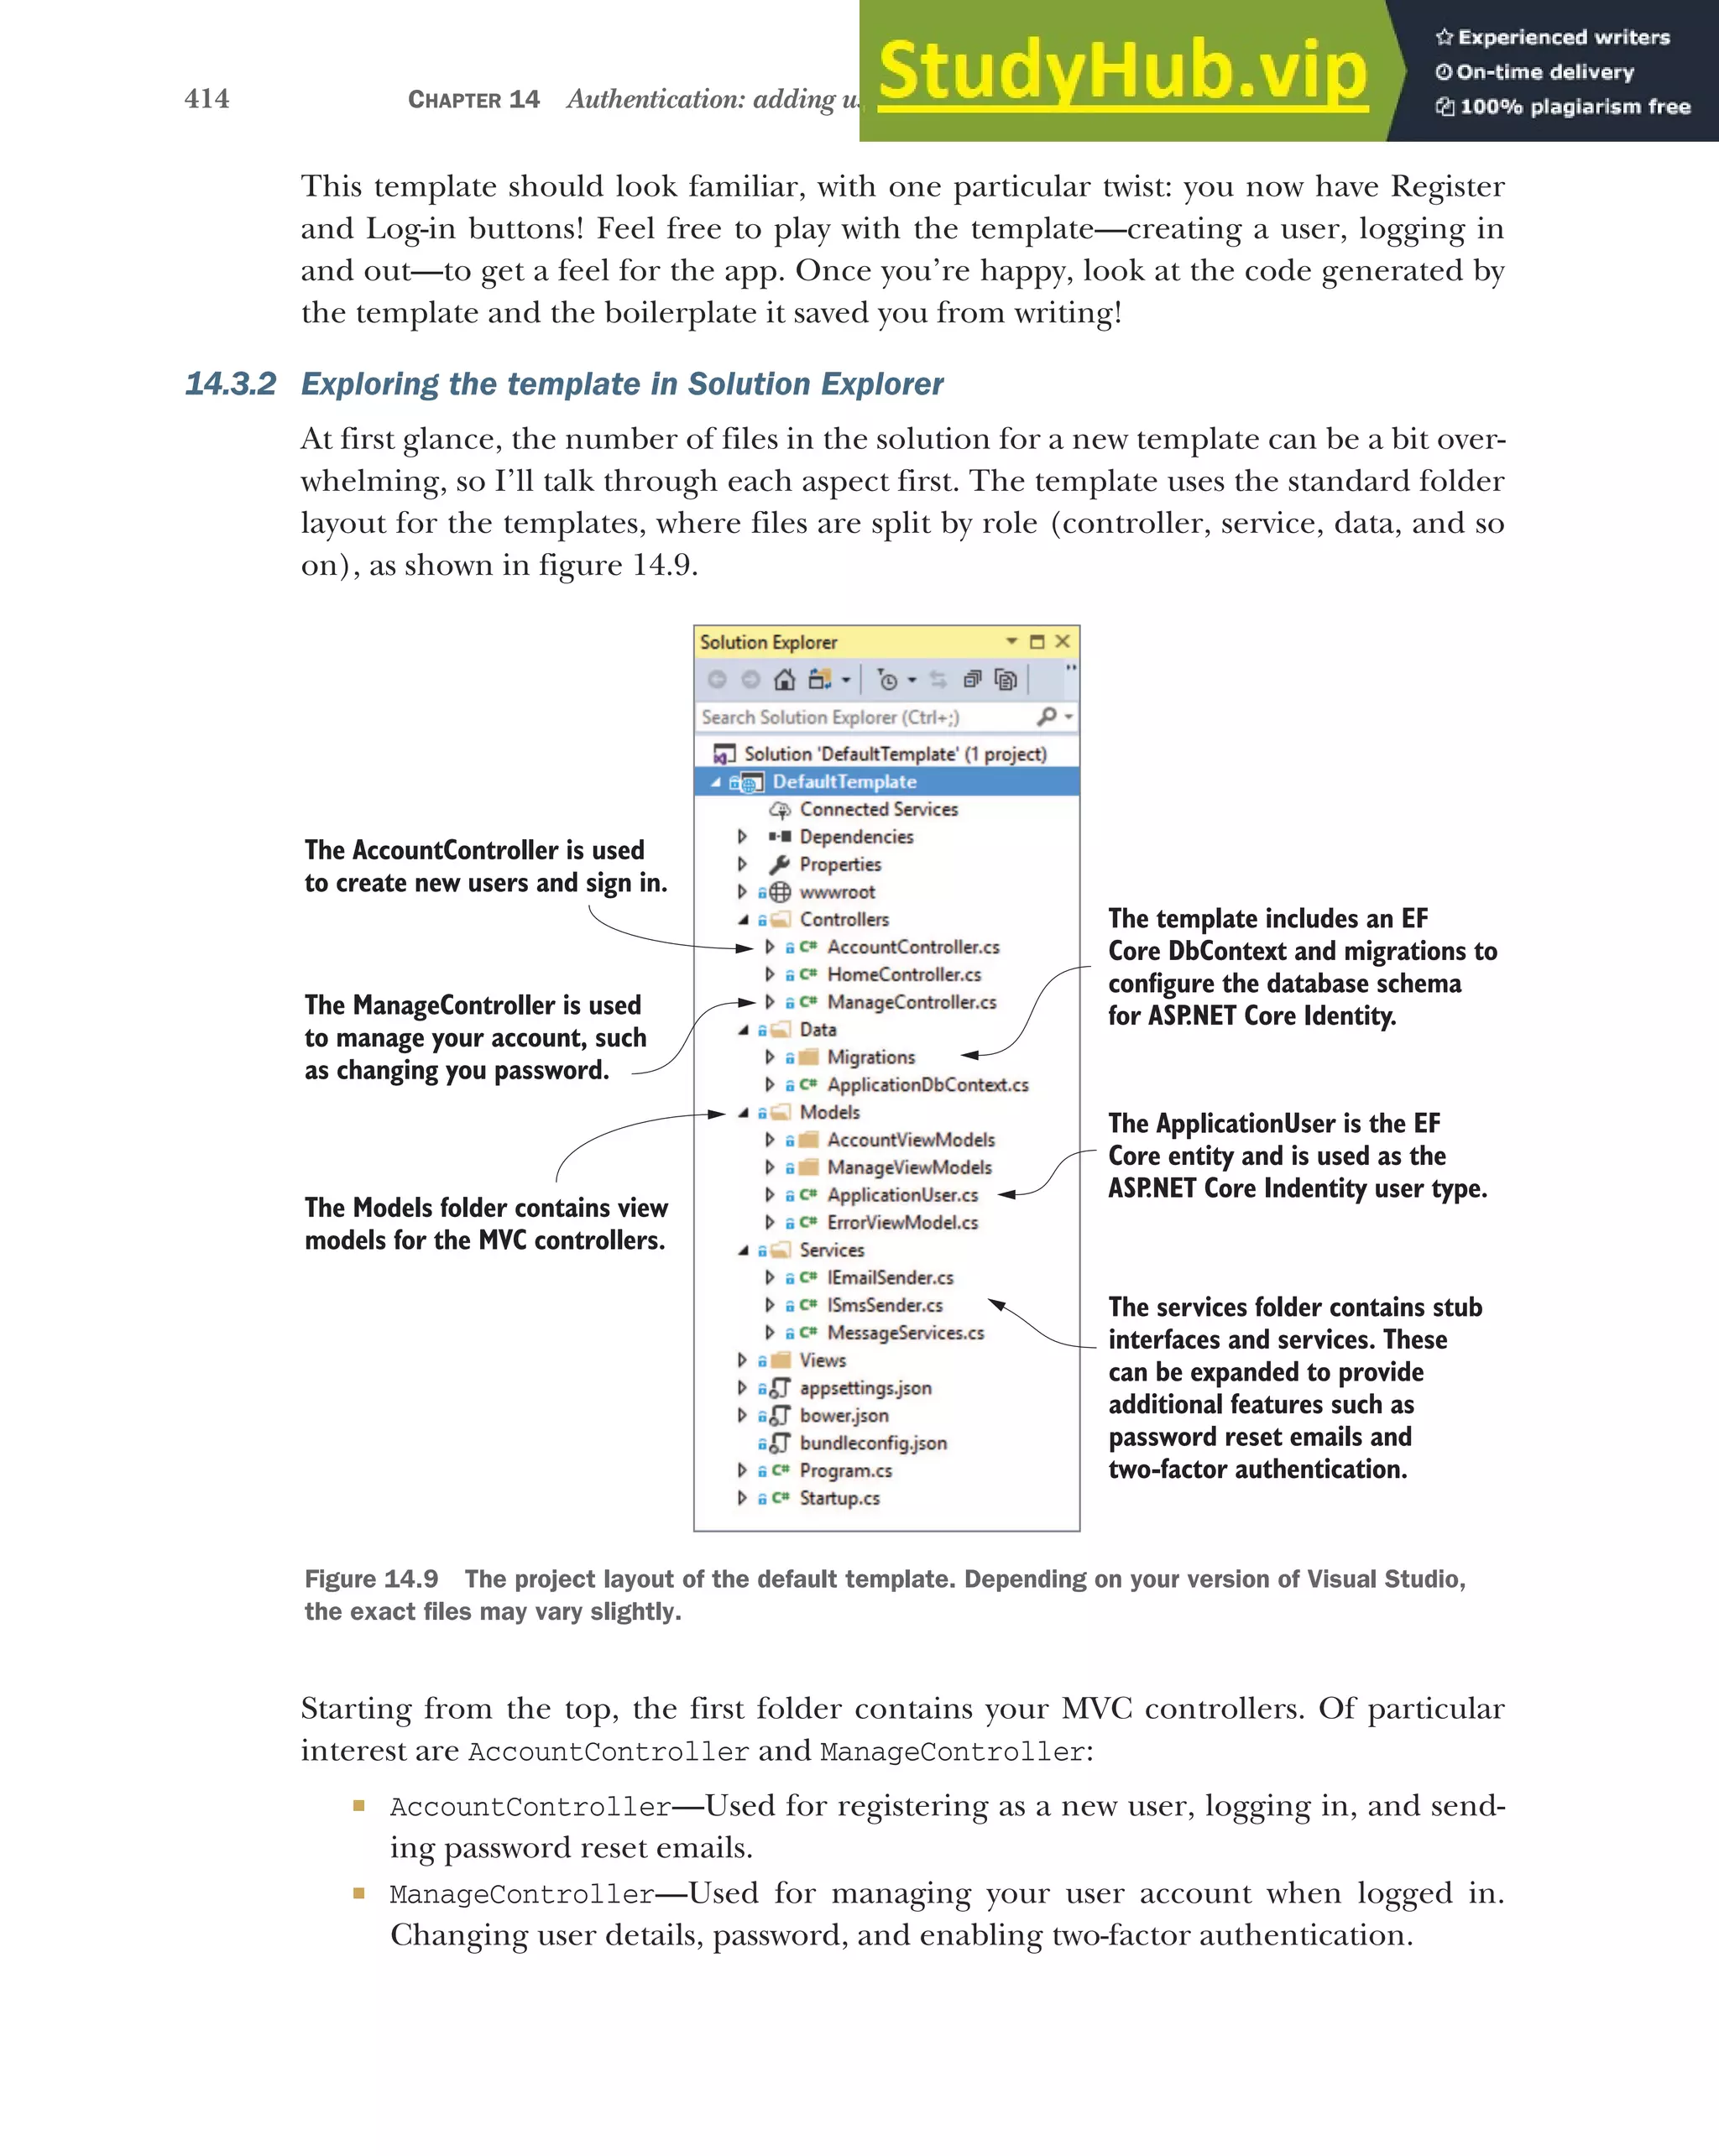

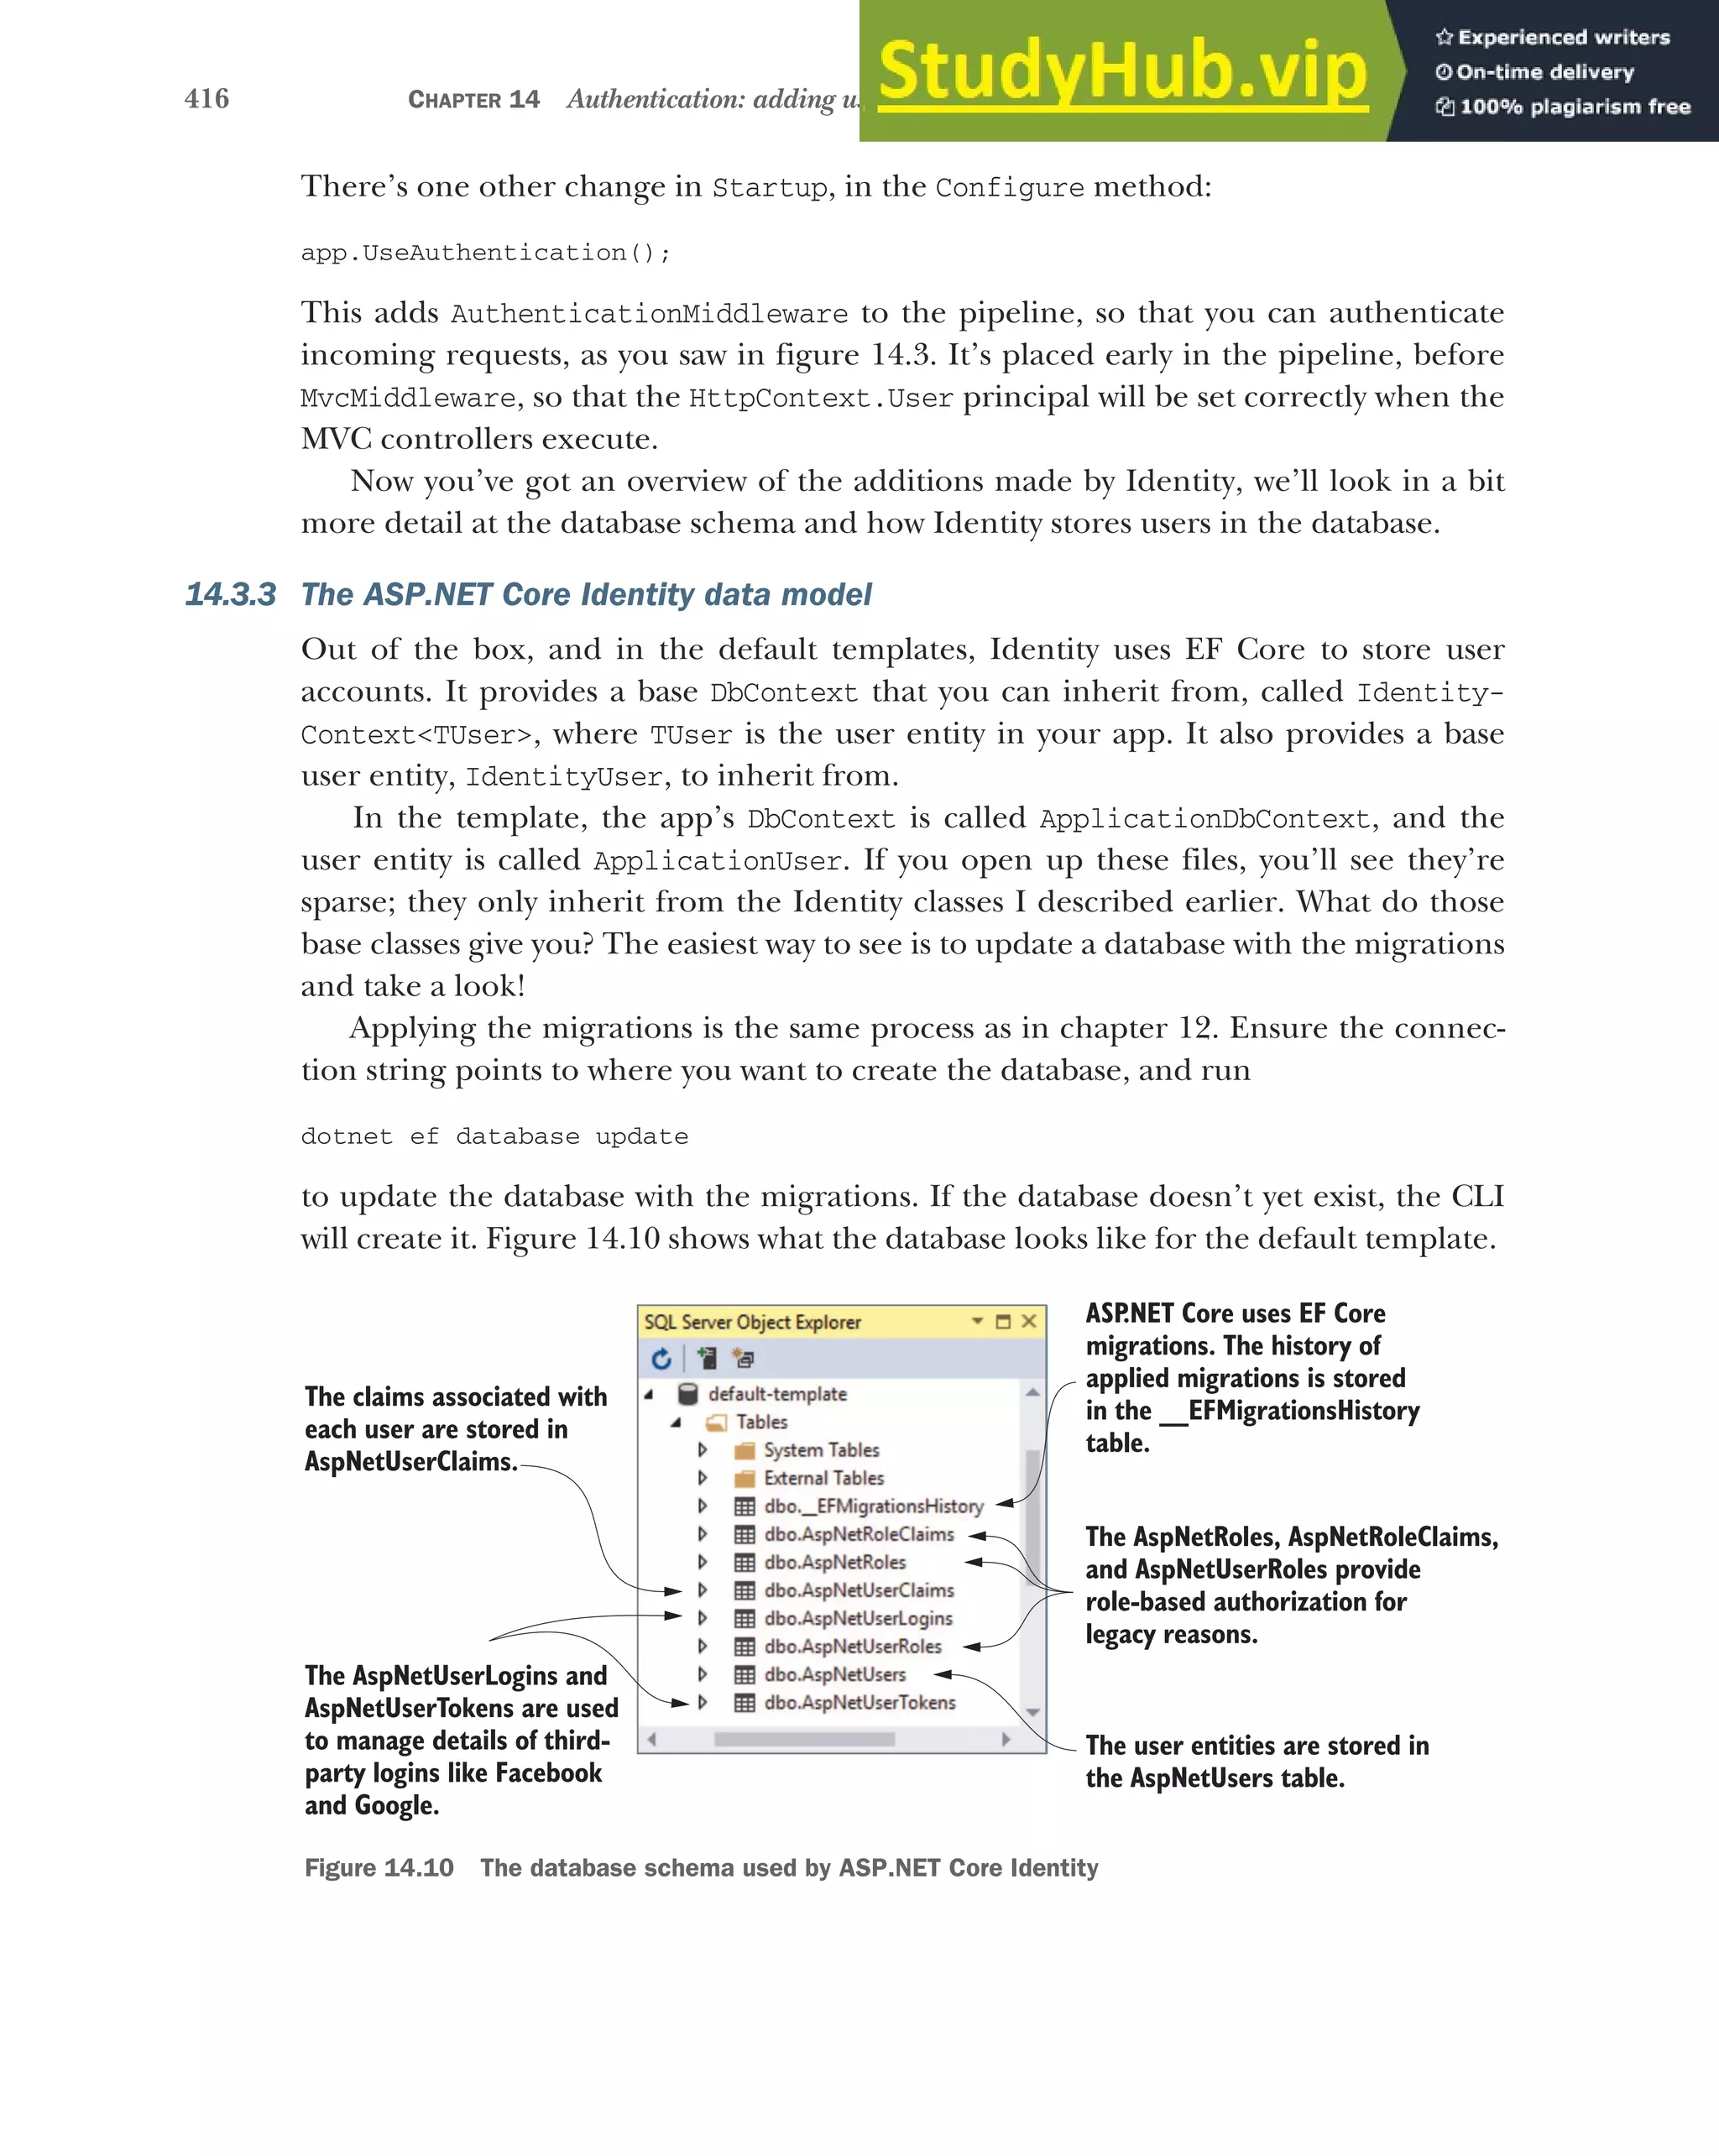
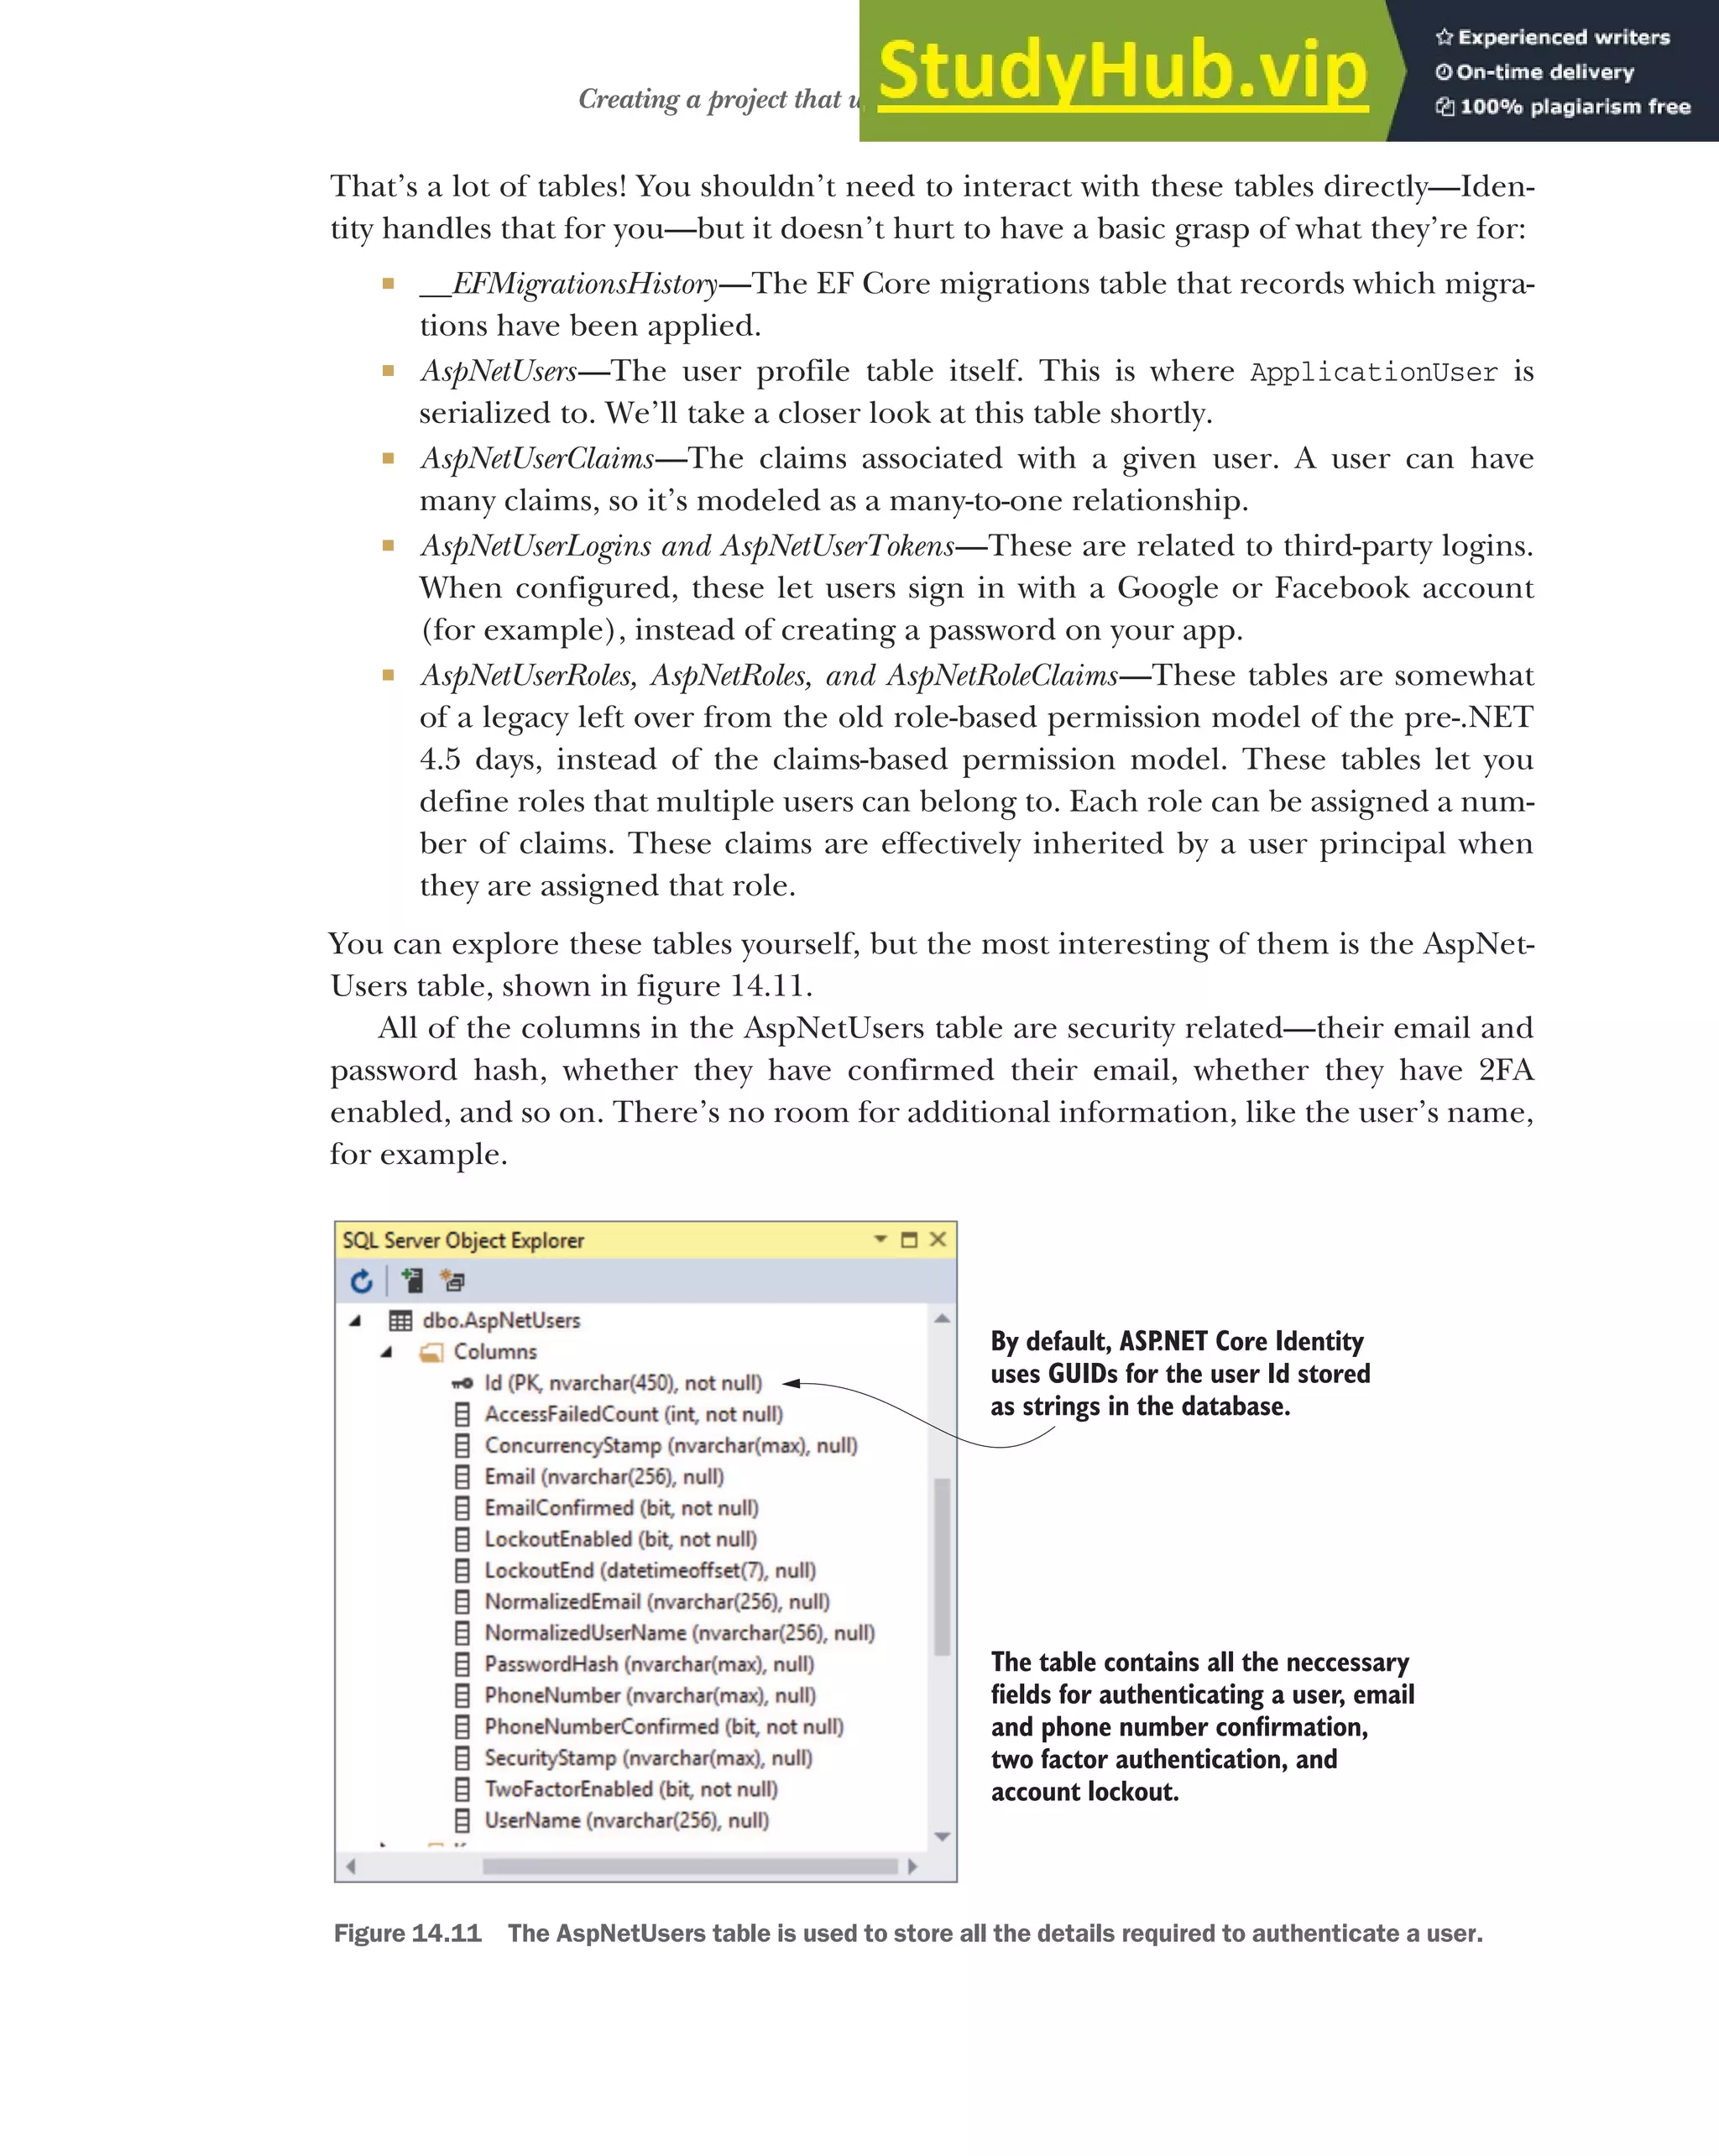
![419
Creating a project that uses ASP.NET Core Identity
public async Task<IActionResult> Register(
RegisterViewModel model, string returnUrl = null)
{
ViewData["ReturnUrl"] = returnUrl;
if (ModelState.IsValid)
{
var user = new ApplicationUser {
UserName = model.Email, Email = model.Email };
var result = await _userManager.CreateAsync(
user, model.Password);
if (result.Succeeded)
{
await _signInManager.SignInAsync(user);
return RedirectToLocal(returnUrl);
}
AddErrors(result);
}
return View(model);
}
Listing 14.2 AccountController.Register POST action for creating new users
Figure 14.12 The user registration
form in the default template
The form is bound to
RegisterViewModel.
If the binding mode
is valid, creates an
instance of the
user entity
Checks that the provided
password is valid and
creates the new user in
the database
If the user
was created
successfully,
sign them in.
Updates the
HttpContext.User principal
and sets a cookie containing
the serialized principal
Redirects to the previous
page using a helper
method to protect against
open redirect attacks
If something went
wrong, adds the errors
to the model state and
redisplays the form](https://image.slidesharecdn.com/asp-230807173723-31e70040/75/ASP-NET-Core-in-Action-2018-pdf-447-2048.jpg)
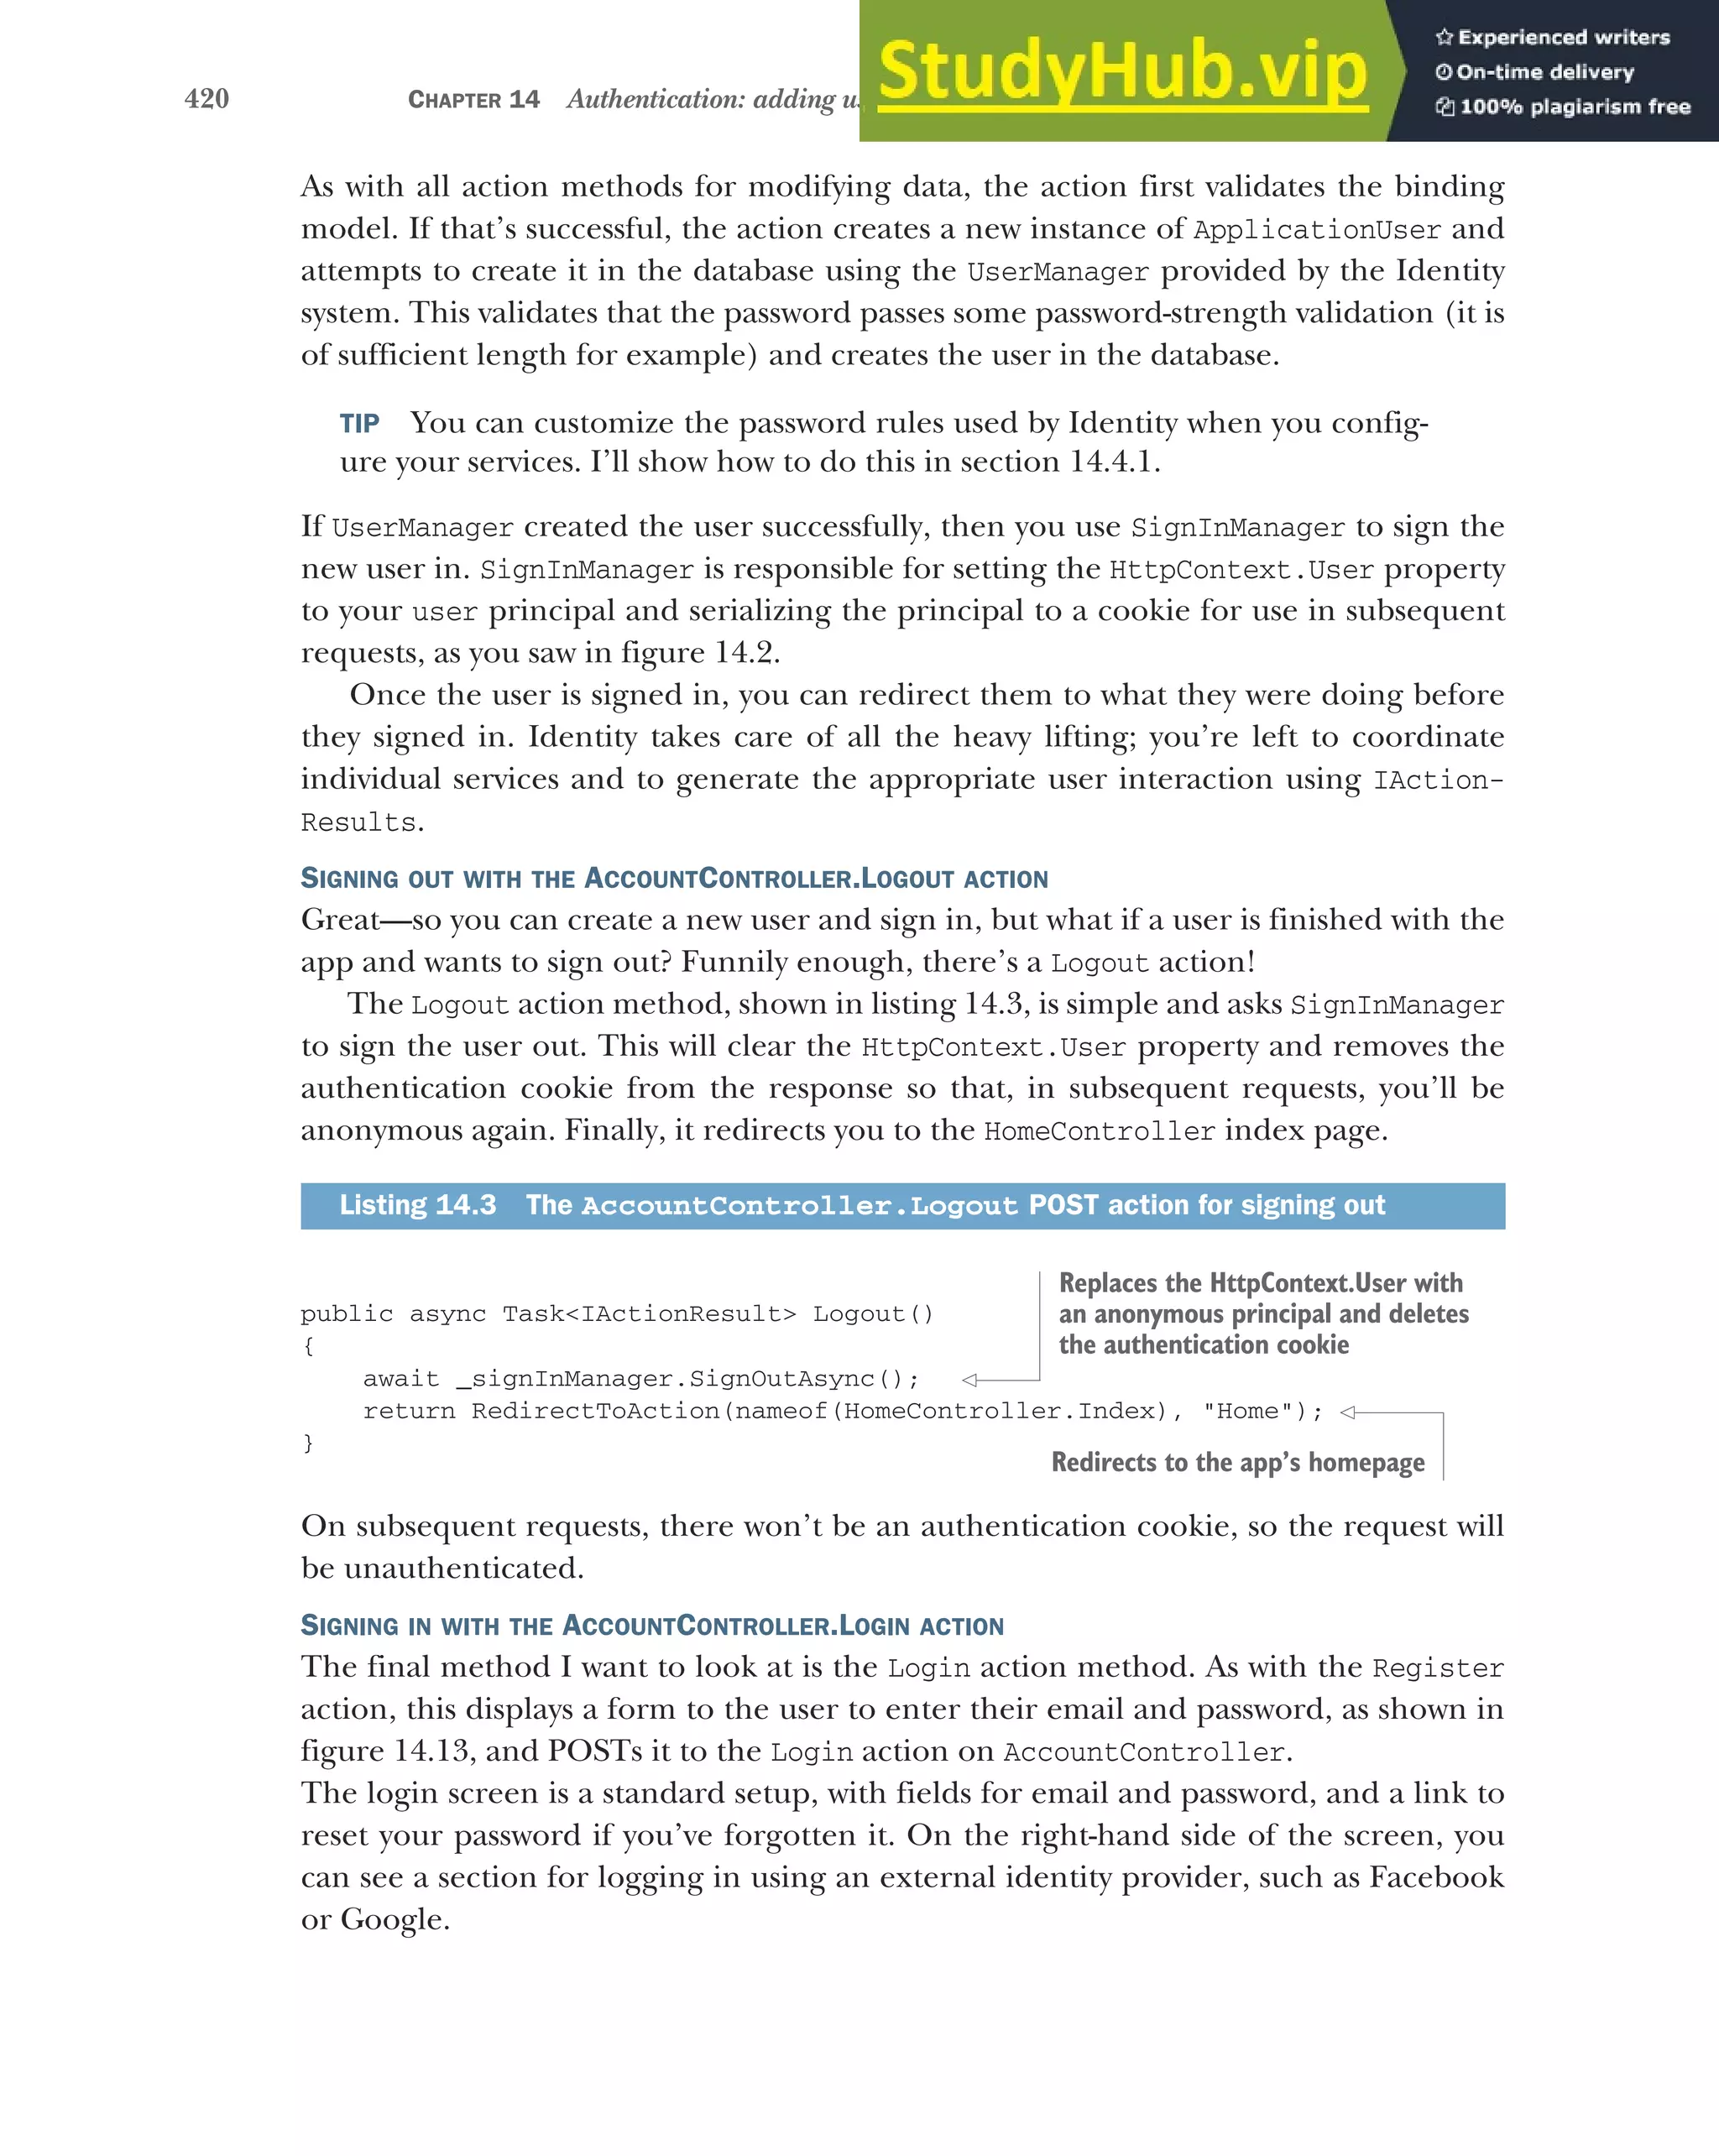
![421
Creating a project that uses ASP.NET Core Identity
NOTE Adding external providers is a fully supported feature of Identity,
which requires relatively minimal configuration to your app. Unfortunately,
you also have to register your app with the external provider, Google or Face-
book, for example, which can be a convoluted process!3
As with the Register method, the Identity system does all the hard work associated
with loading a user from the database, validating the password, checking that the
account isn’t locked, and whether they have enabled 2FA on the account. The follow-
ing listing shows that the SignInManager handles all this; you only need to display a
view or redirect to an action, as appropriate.
public async Task<IActionResult> Login(
LoginViewModel model, string returnUrl = null)
{
ViewData["ReturnUrl"] = returnUrl;
if (ModelState.IsValid)
{
var result = await _signInManager.PasswordSignInAsync(
model.Email, model.Password, model.RememberMe);
if (result.Succeeded)
{
return RedirectToLocal(returnUrl);
}
3
For documentation on adding external providers see http://mng.bz/MR2m.
Listing 14.4 The AccountController.Login POST action for logging in
Figure 14.13 The login form in the default templates. The right-hand side of the screen can be used to
configure external identity providers, so users can log in to your app using their Google or Facebook accounts.
Attempts to sign
in with the email
and password
The sign-in succeeded, so the
HttpContext.User and authentication
cookie have been set.](https://image.slidesharecdn.com/asp-230807173723-31e70040/75/ASP-NET-Core-in-Action-2018-pdf-449-2048.jpg)

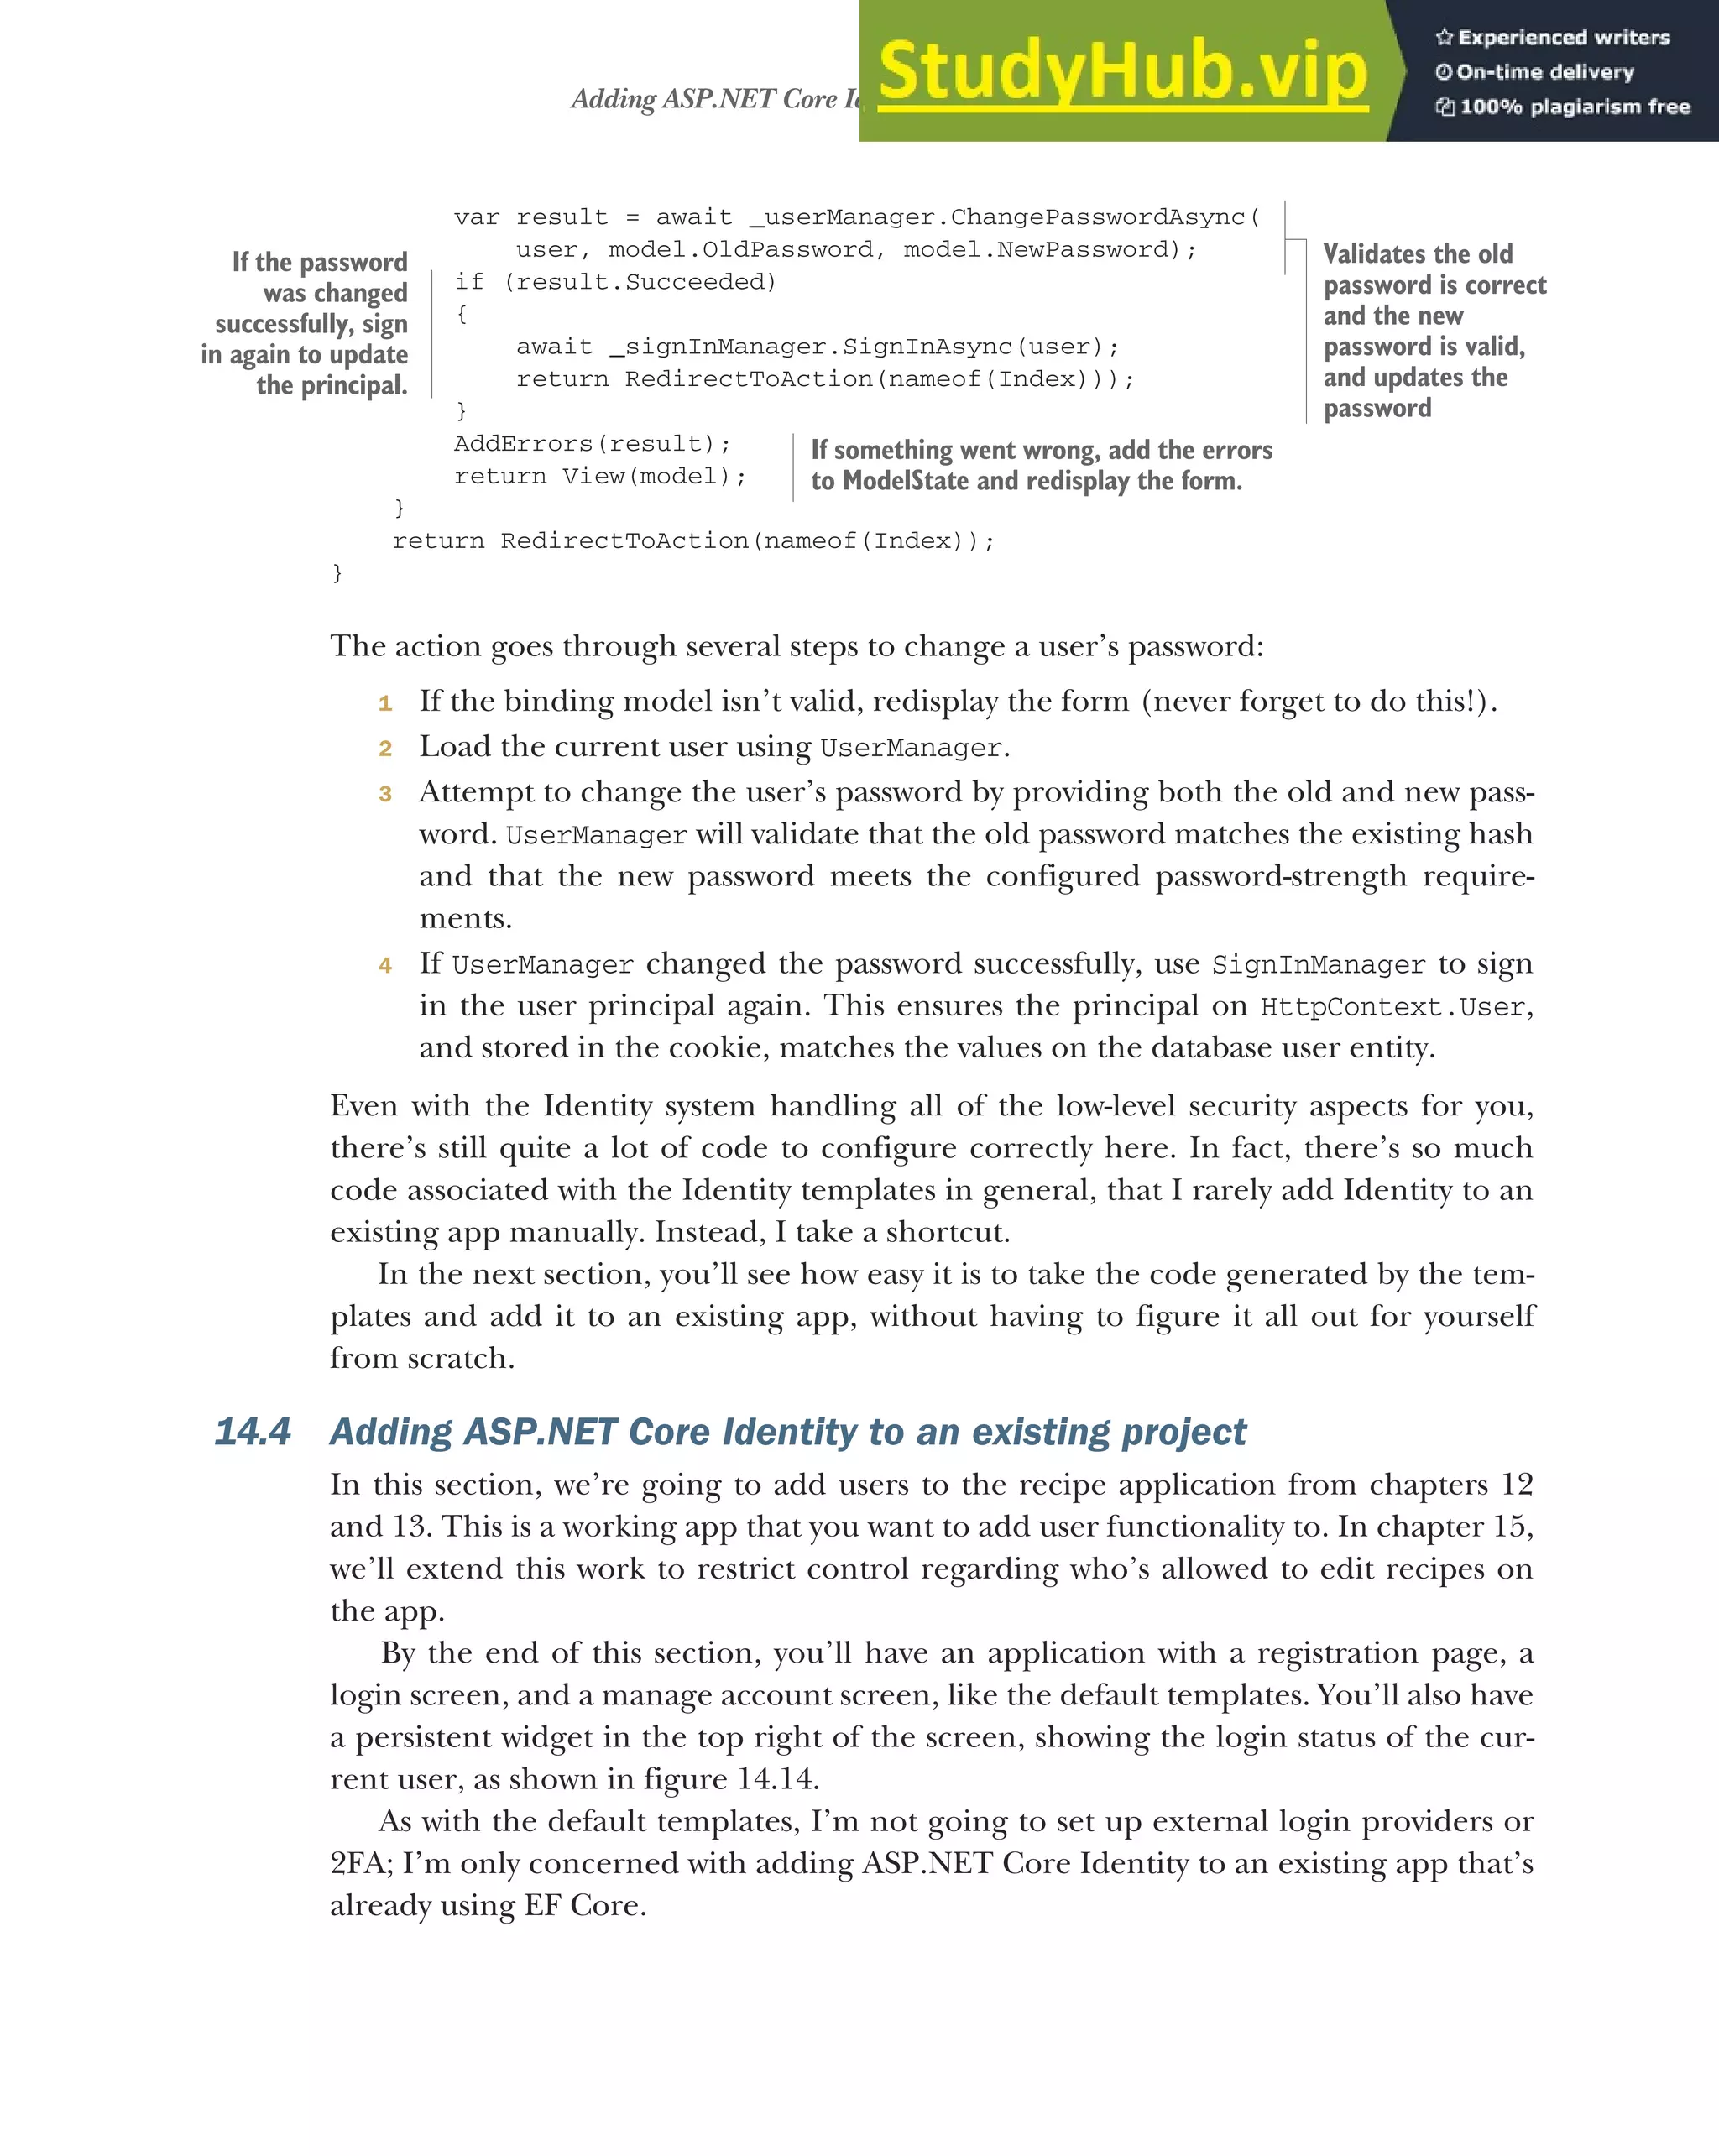
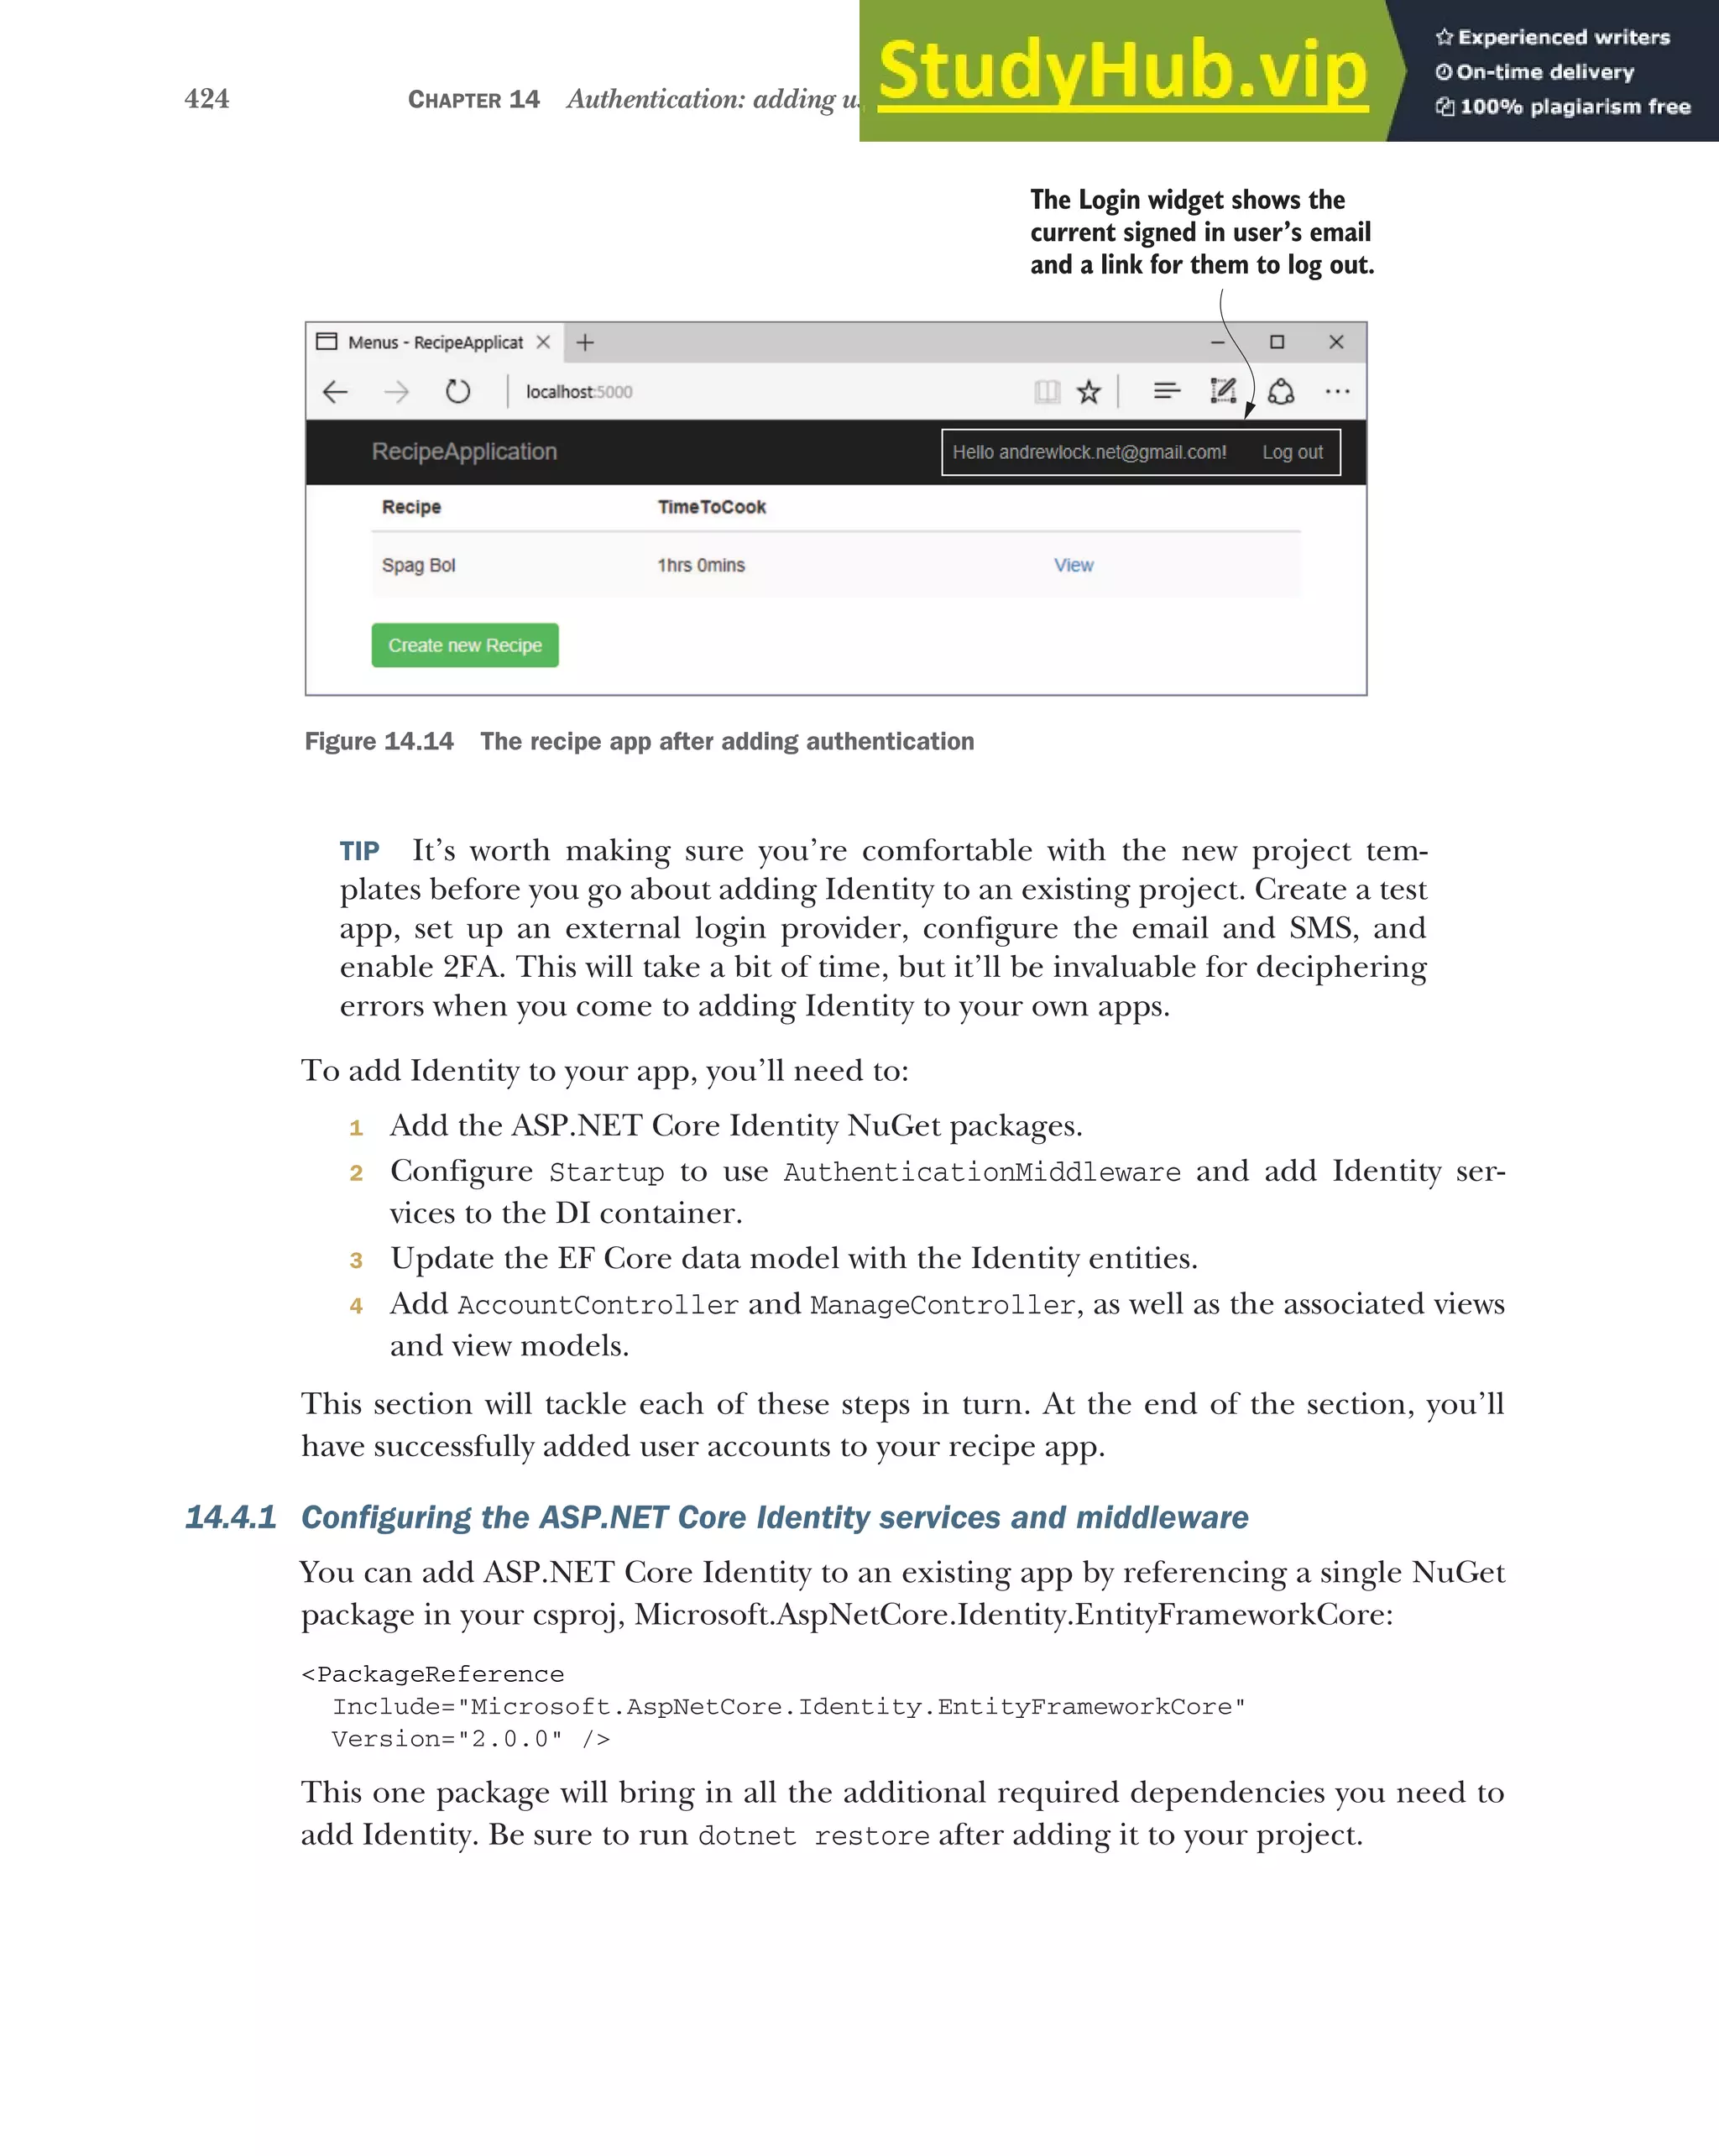
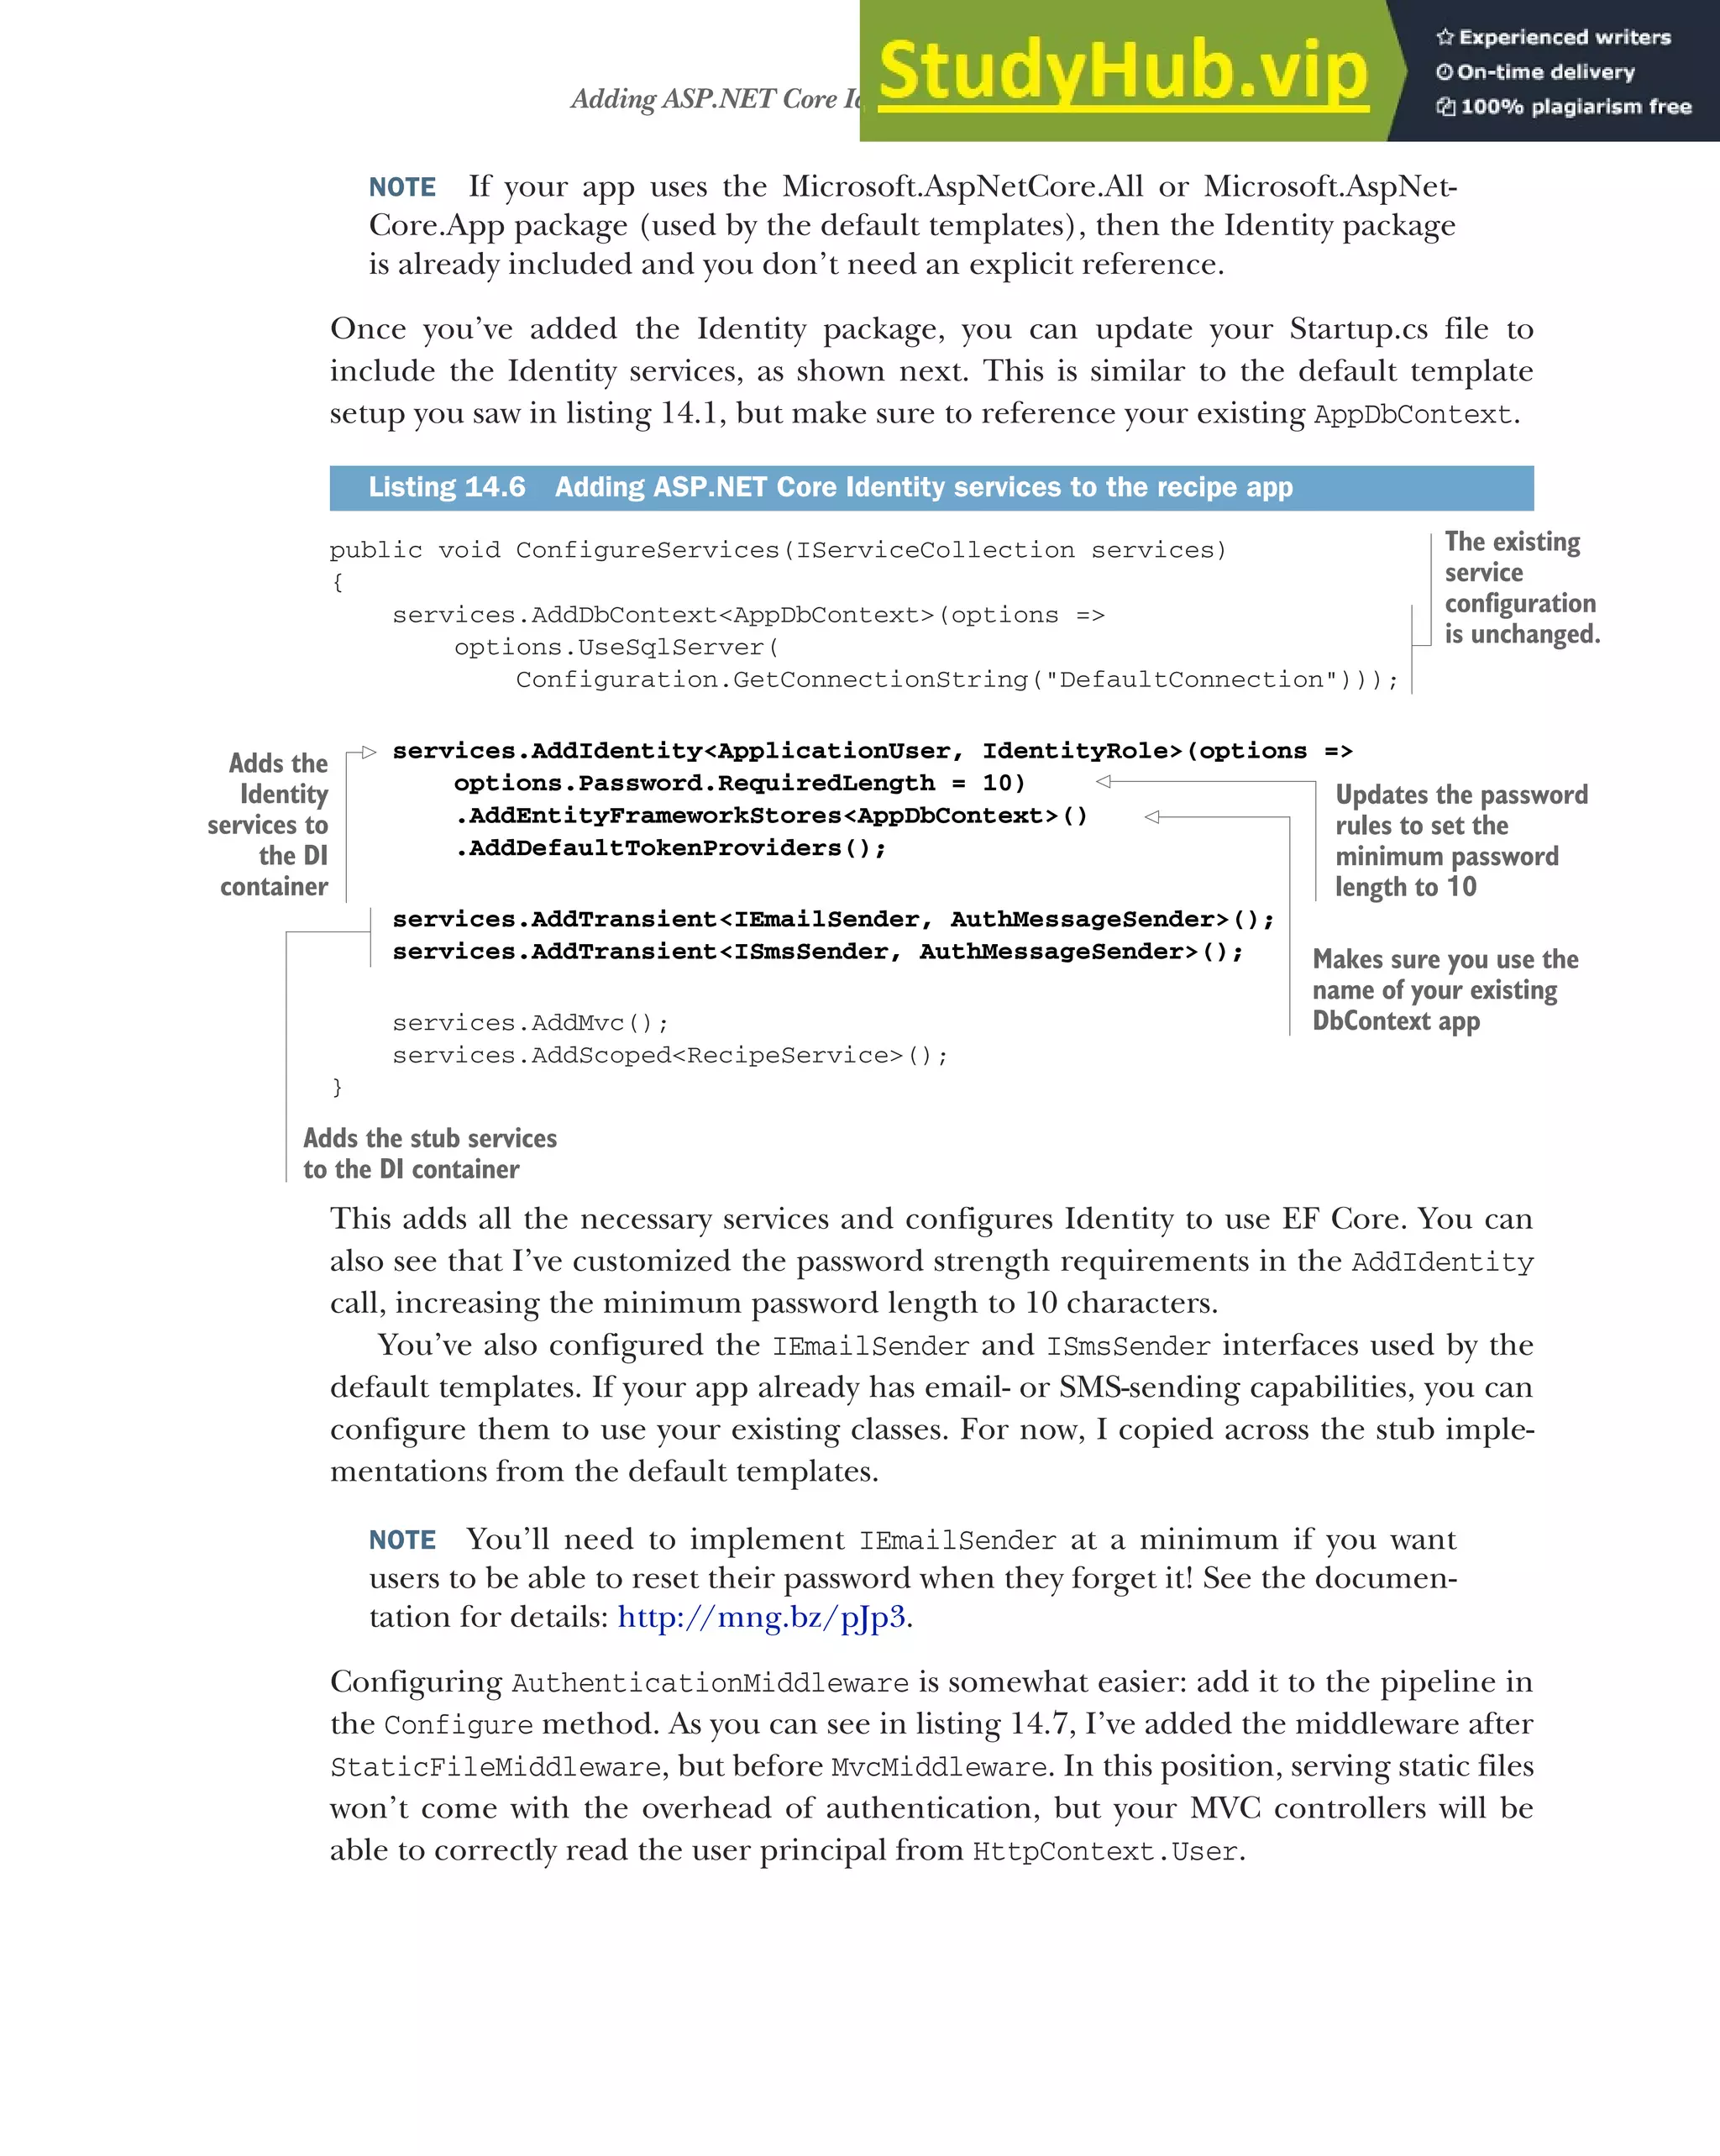
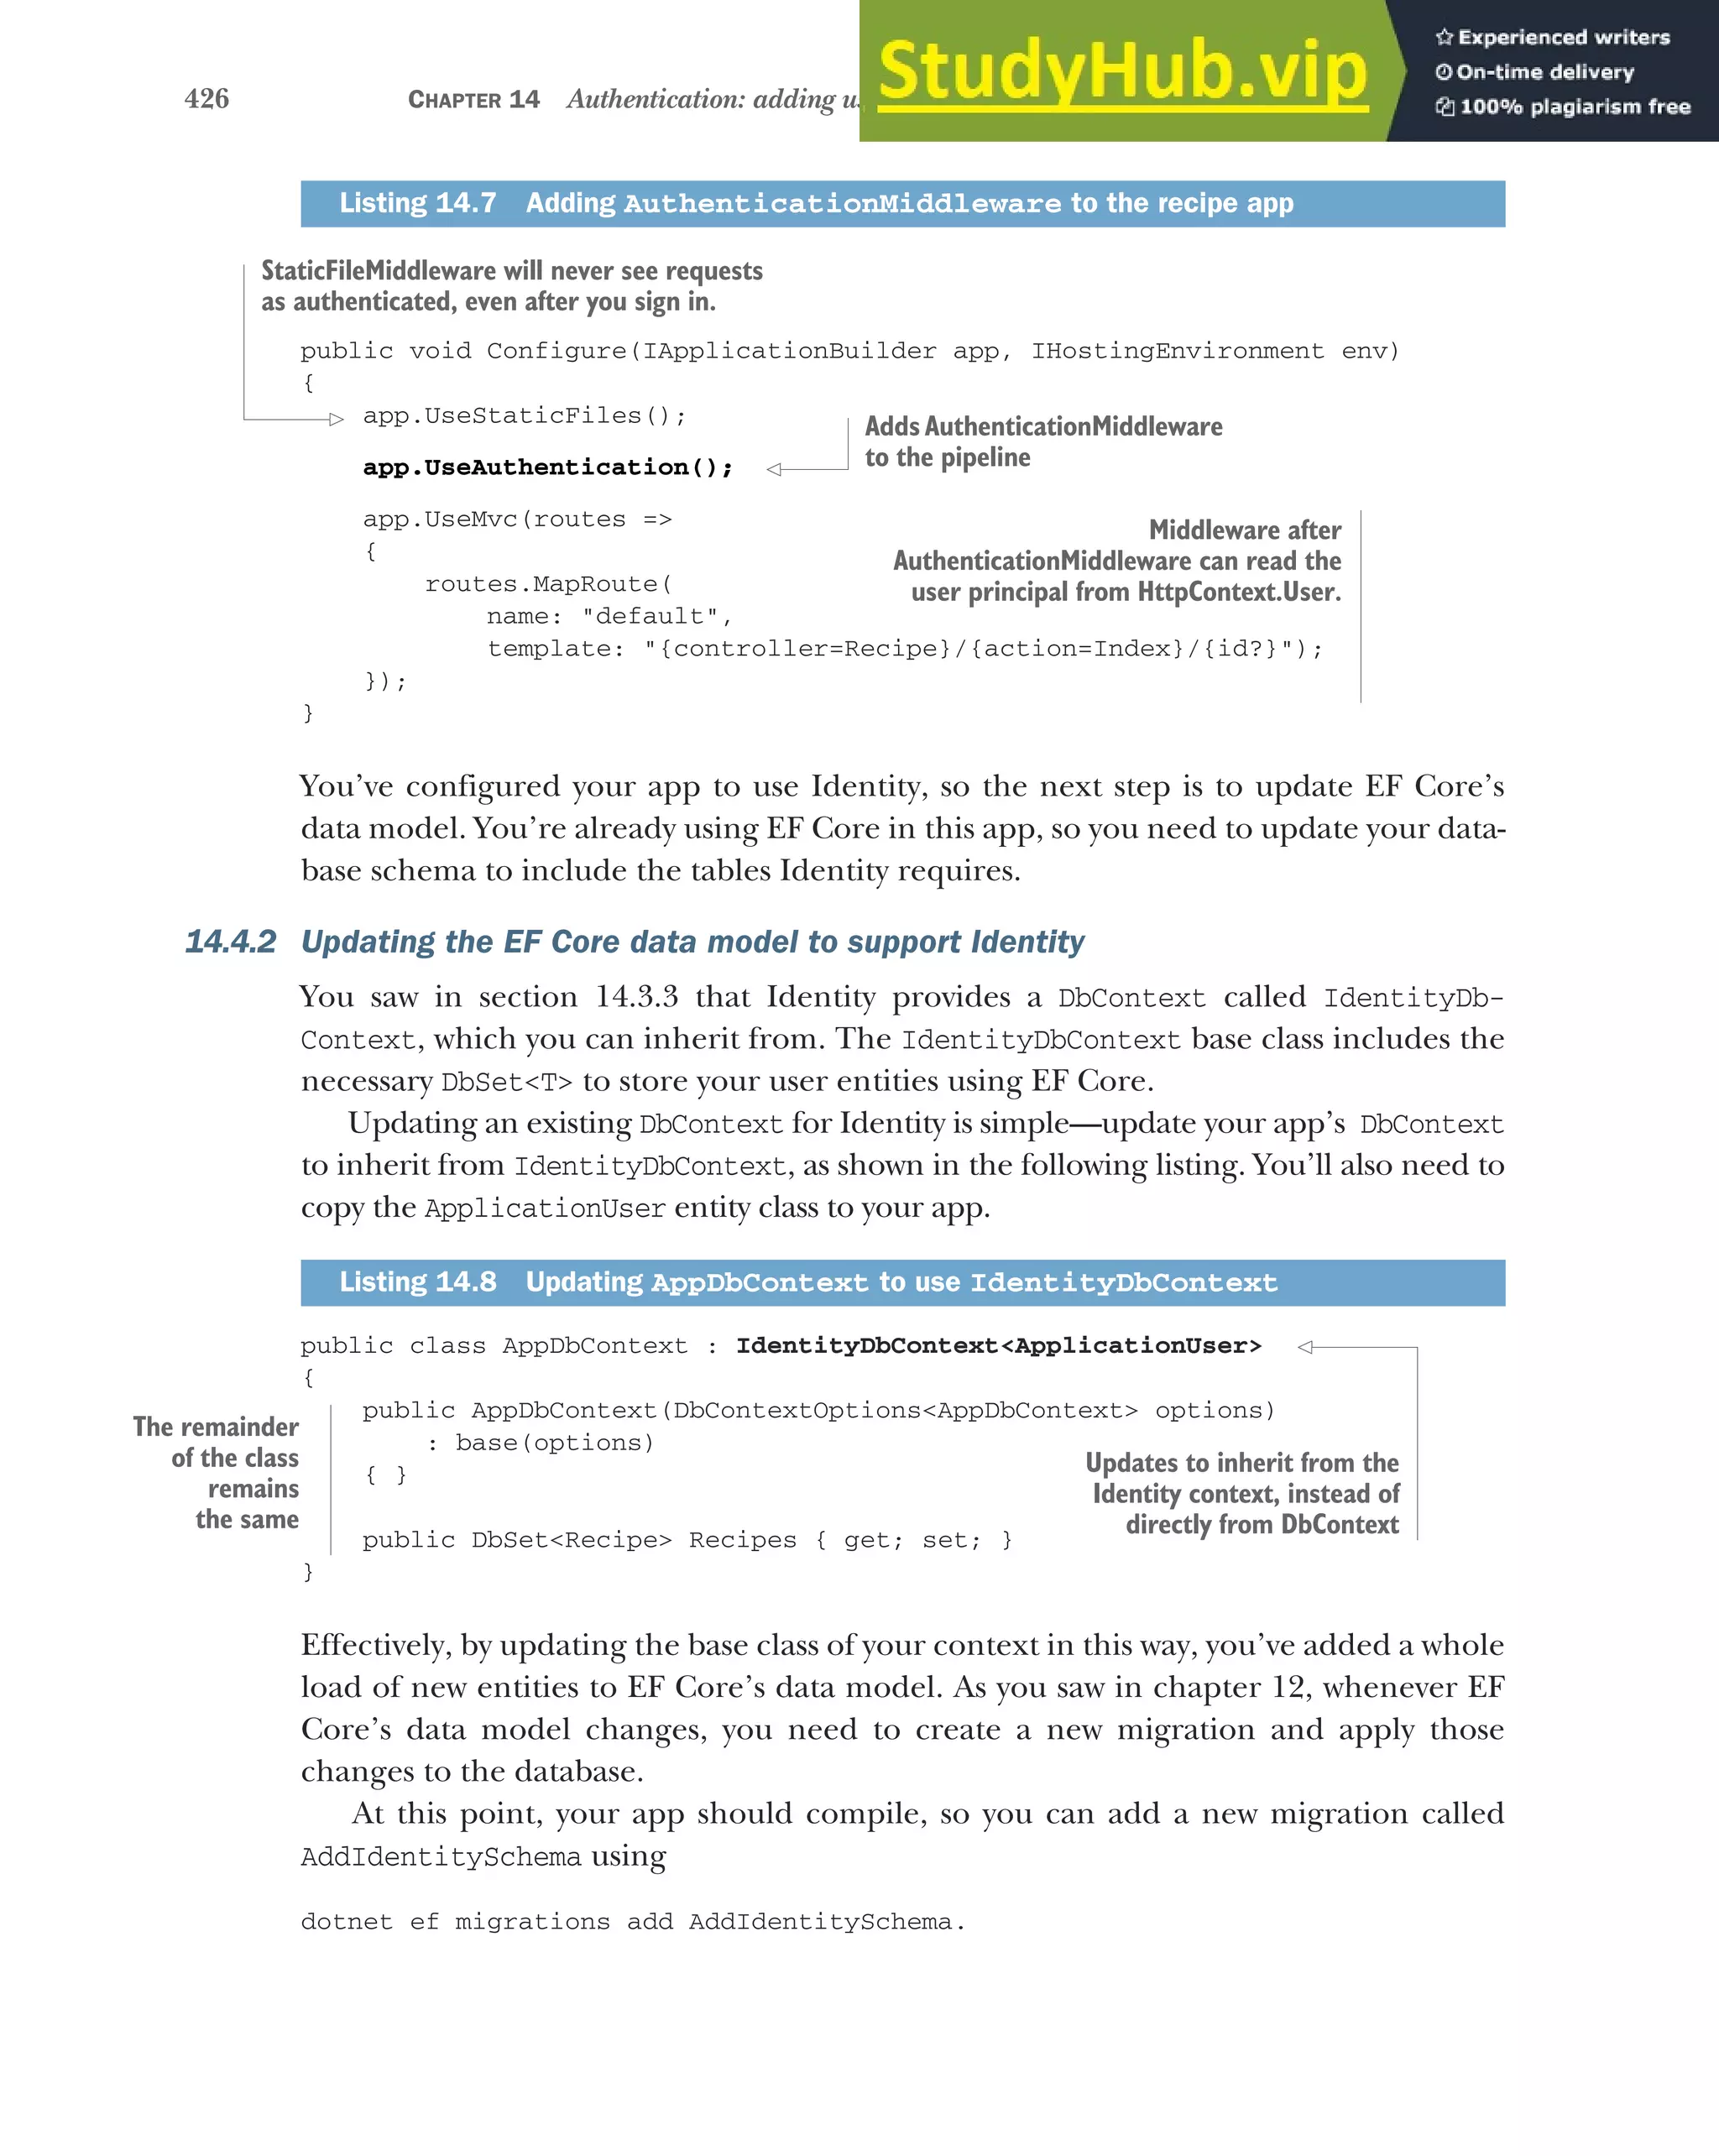
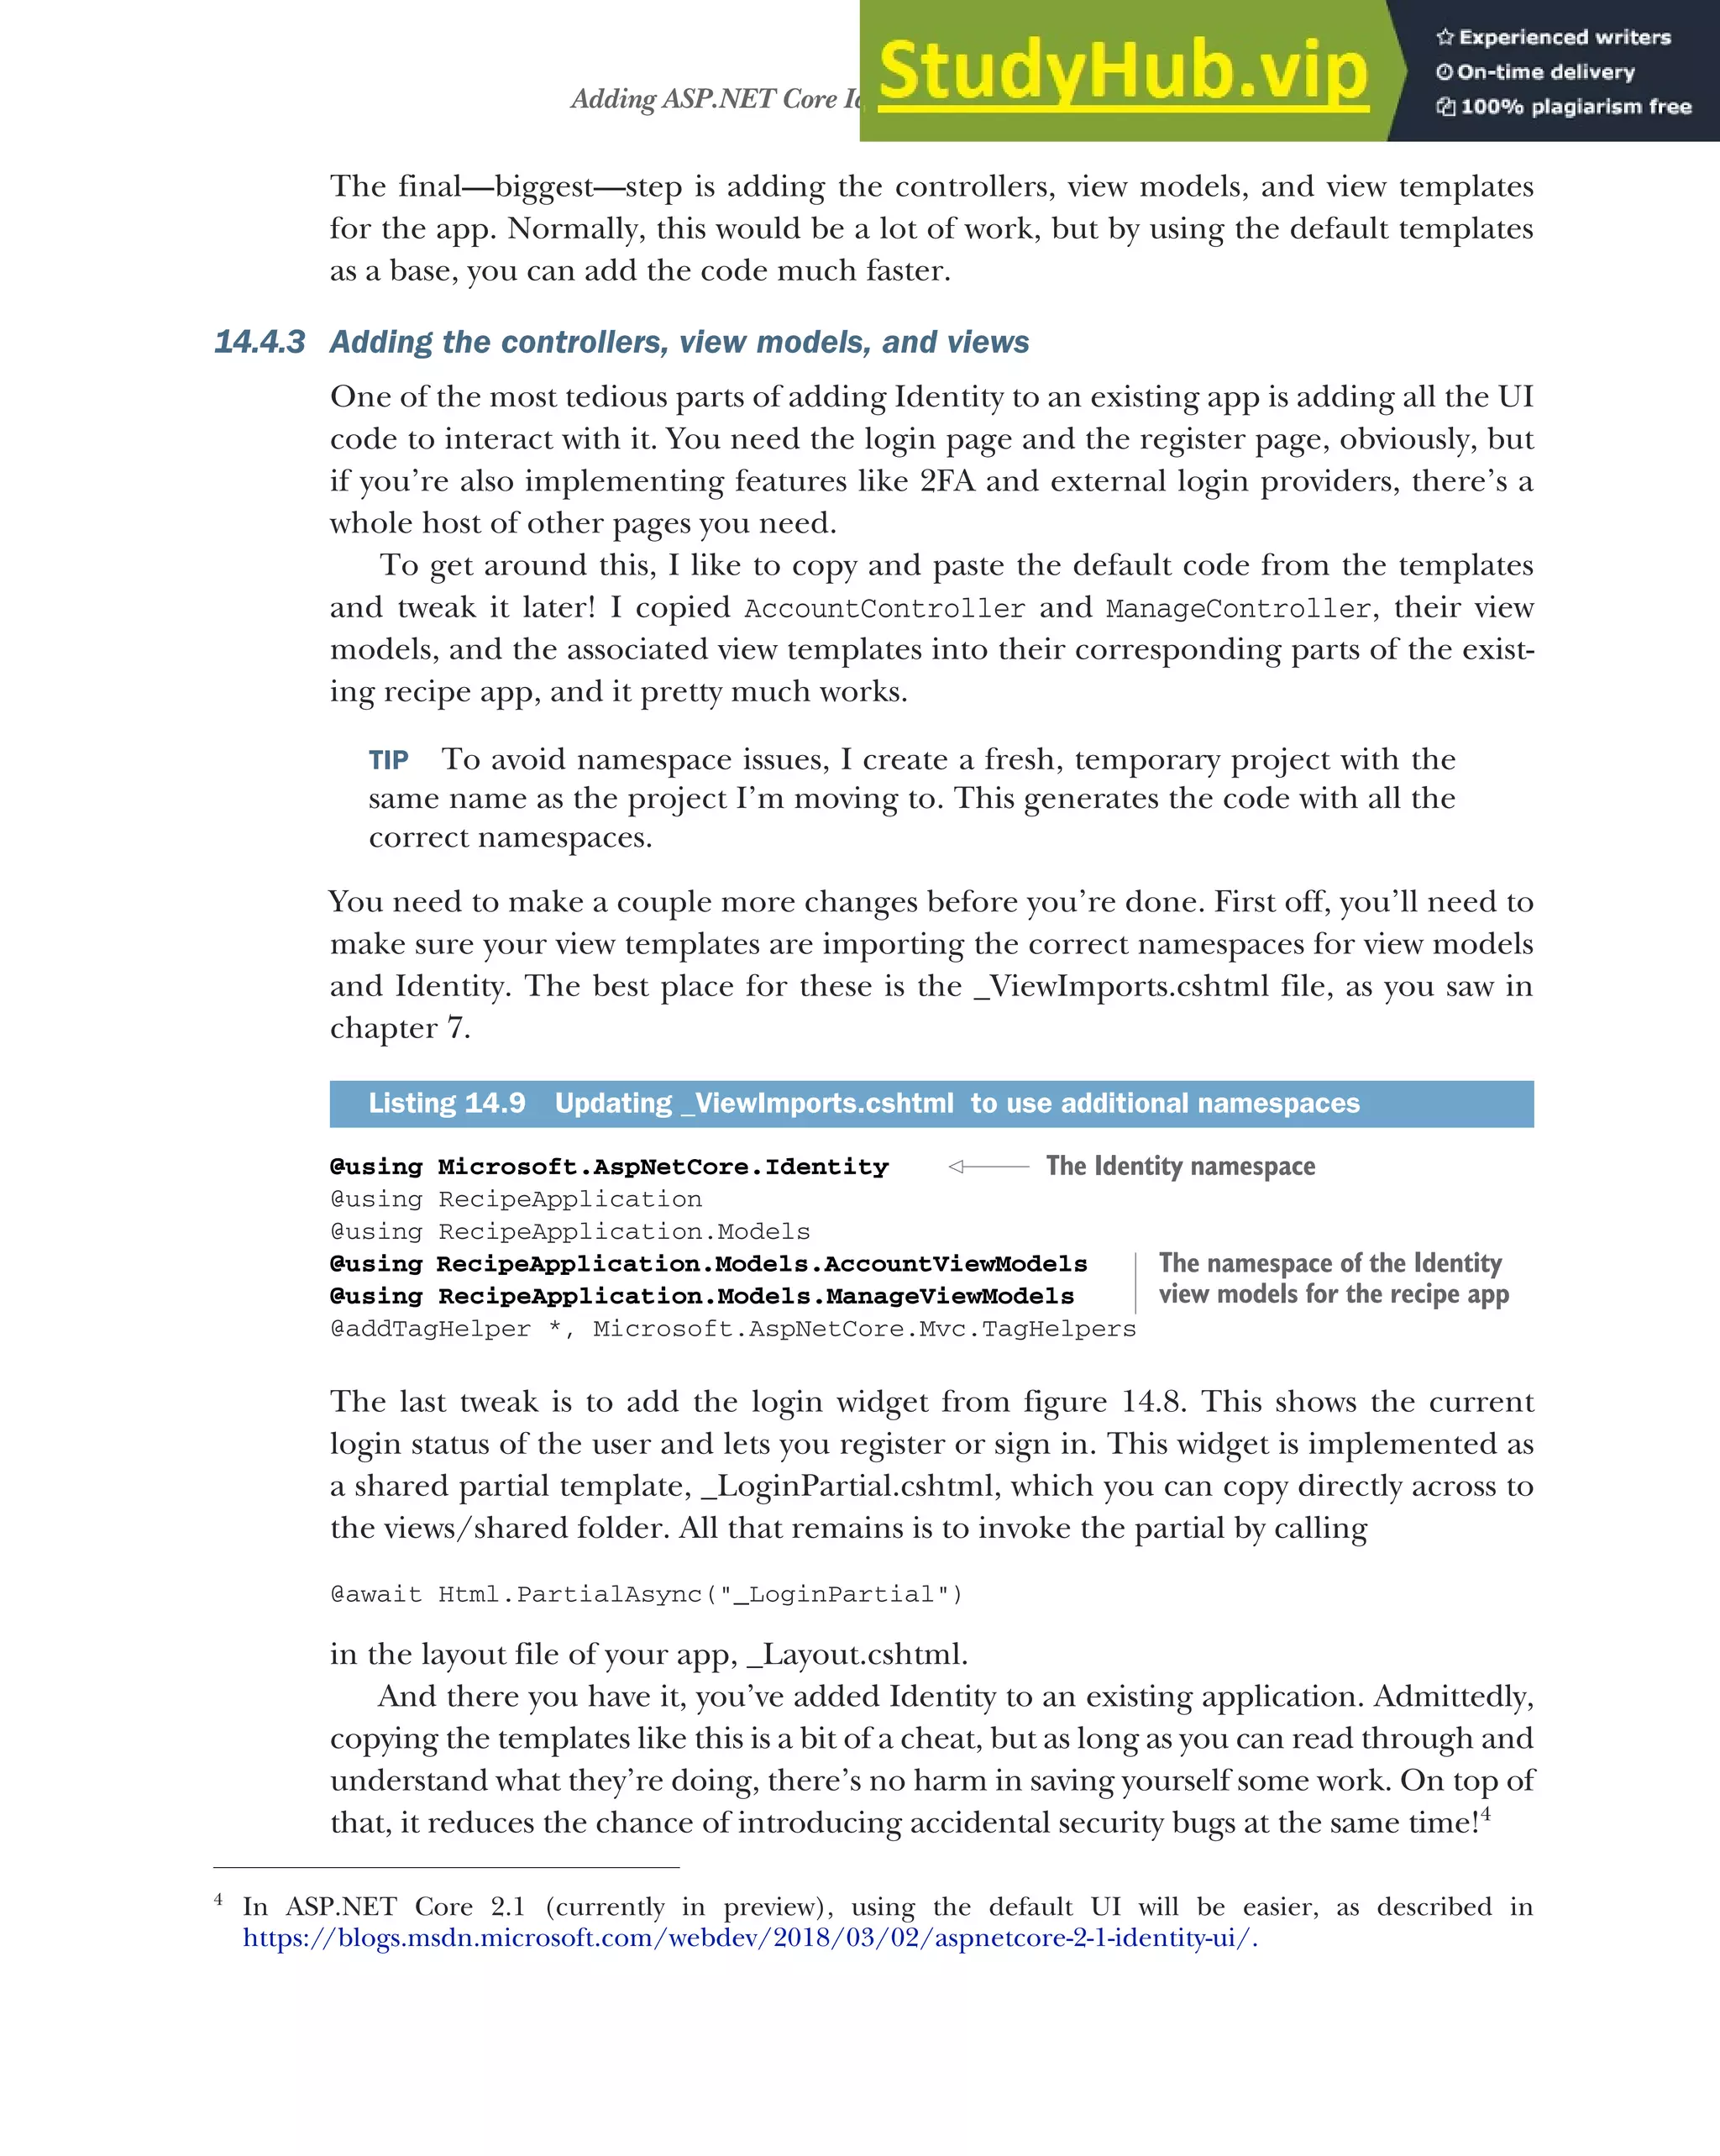
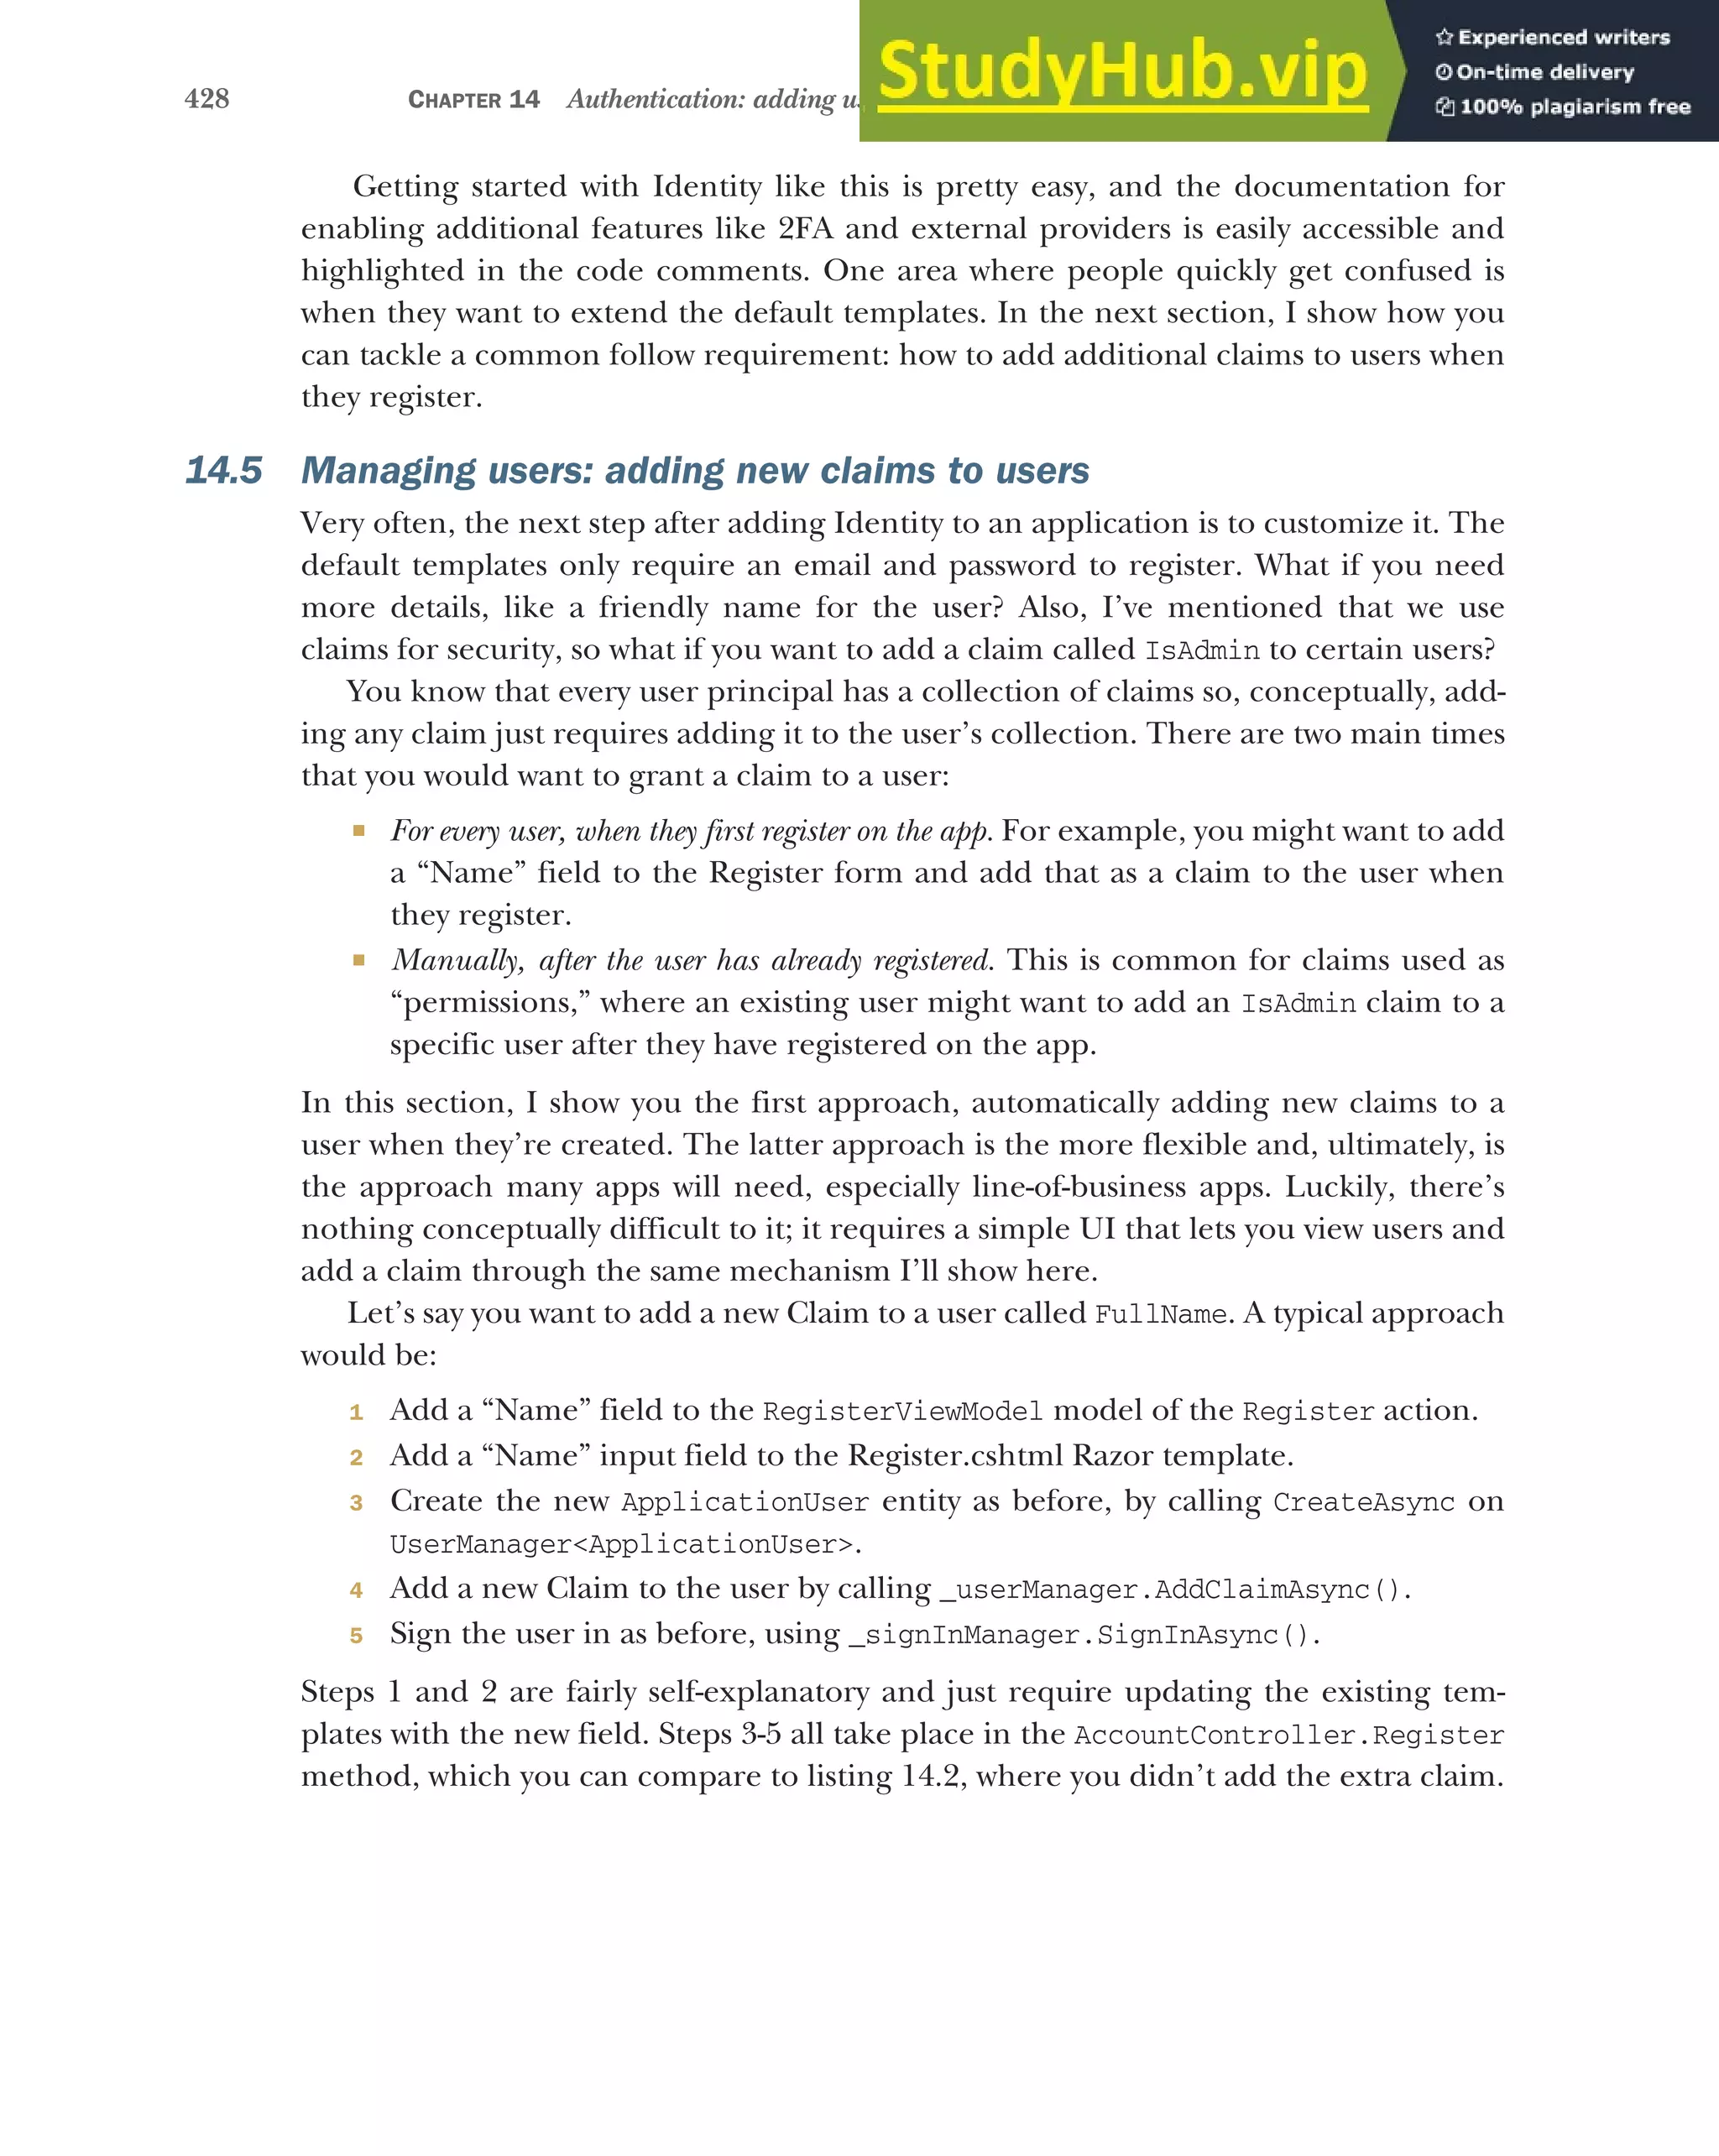
![429
Managing users: adding new claims to users
public async Task<IActionResult> Register(
RegisterViewModel model, string returnUrl = null)
{
ViewData["ReturnUrl"] = returnUrl;
if (ModelState.IsValid)
{
var user = new ApplicationUser {
UserName = model.Email, Email = model.Email };
var result = await _userManager.CreateAsync(
user, model.Password);
if (result.Succeeded)
{
var claim = new Claim("FullName", model.Name);
await _userManager.AddClaimAsync(user, nameClaim);
await _signInManager.SignInAsync(user);
return RedirectToLocal(returnUrl);
}
AddErrors(result);
}
return View(model);
}
This is all that’s required to add the new claim, but you’re not using it anywhere cur-
rently. What if you want to display it? Well, you’ve added a claim to the user principal,
which was assigned to the HttpContext.User property when you called SignInAsync.
That means you can access the claims anywhere you have access to HttpContext—in
your controllers or in view templates. For example, you could display the user’s Full-
Name claim anywhere in a Razor template with the following statement:
@User.Claims.FirstOrDefault(x=>x.Type == "FullName").Value
This finds the first claim on the current users with a Type of "FullName" and prints
the assigned value. The Identity system even includes a handy extension method that
tidies up this LINQ expression (found in the System.Security.Claims namespace):
@User.FindFirstValue("FullName")
And with that last titbit, we’ve reached the end of this chapter on ASP.NET Core Iden-
tity. I hope you’ve come to appreciate the amount of effort using Identity can save
you, especially when you make use of the templates that come with Visual Studio and
the .NET CLI.
ASP.NET Core Identity provides so many additional features, such as 2FA and
external login providers, that there isn’t space to cover them here. Although not
essential for adding user functionality to your app, I strongly recommend looking into
them. In particular, consider adding 2FA to give your users additional protection.
Listing 14.10 Adding a custom claim to a new user in the Register action
Creates an
instance of the
ApplicationUser
entity, as usual
Validates that the provided
password is valid and creates
the user in the database
Adds the new
claim to the
ApplicationUser’s
collection
Creates a claim,
with a string
name of
"FullName" and
the provided
value
Signs the user in by setting
the HttpContext.User, the
principal will include the
custom claim](https://image.slidesharecdn.com/asp-230807173723-31e70040/75/ASP-NET-Core-in-Action-2018-pdf-457-2048.jpg)


![437
Authorization in ASP.NET Core
There’s an even more basic level of authorization that you haven’t considered yet—
only allowing authenticated users to execute an action. This is even simpler than the
claims scenario (which we’ll come to later) as there are only two possibilities:
The user is authenticated—The action executes as normal.
The user is unauthenticated—The user can’t execute the action.
You can achieve this basic level of authorization by using the [Authorize] attribute, as
you saw in chapter 13, when we discussed authorization filters. You can apply this attri-
bute to your actions, as shown in the following listing, to restrict them to authenti-
cated (logged-in) users only. If an unauthenticated user tries to execute an action
protected with the [Authorize] attribute in this way, they’ll be redirected to the login
page.
public class HomeController : Controller
{
public IActionResult Index()
{
return View();
}
[Authorize]
Listing 15.1 Applying [Authorize] to an action
Static file
middleware
Authentication
middleware
Index
action method
Authorize filter
Index view
A request is made
to the URL /recipe/index.
MvcMiddleware
The authentication middleware
deserializes the ClaimsPrincipal
from the encrypted cookie.
The authorize filter runs
after routing but before
model binding or validation.
If authorization is successful,
the action method executes
and generates a response
as normal.
If authorization fails, the
authorize filter returns an
error to the user, and the
action is not executed.
Figure 15.2 Authorization occurs before an action method executes as part of the MVC filter
pipeline in MvcMiddleware.
This action can be
executed by anyone, even
when not logged in.
Applies [Authorize] to
individual actions or
whole controllers](https://image.slidesharecdn.com/asp-230807173723-31e70040/75/ASP-NET-Core-in-Action-2018-pdf-465-2048.jpg)
![438 CHAPTER 15 Authorization: securing your application
public IActionResult AuthedUsersOnly()
{
return View();
}
}
You can apply the [Authorize] attribute at the action scope, controller scope, or glob-
ally, as you saw in chapter 13. Any action that has the [Authorize] attribute applied in
this way can be executed only by an authenticated user. Unauthenticated users will be
redirected to the login page.
Sometimes, especially when you apply the [Authorize] attribute globally, you
might need to “poke holes” in this authorization requirement. If you apply the
[Authorize] attribute globally, then any unauthenticated request will be redirected to
the login page for your app. But the [Authorize] attribute is global, so when the
login page tries to load, you’ll be unauthenticated and redirected to the login page
again. And now you’re stuck in an infinite redirect loop.
To get around this, you can designate specific actions to ignore the [Authorize]
attribute by applying the [AllowAnonymous] attribute to an action, as shown next.
This allows unauthenticated users to execute the action, so you can avoid the redirect
loop that would otherwise result.
[Authorize]
public class AccountController : Controller
{
public IActionResult ManageAccount()
{
return View();
}
[AllowAnonymous]
public IActionResult Login()
{
return View();
}
}
WARNING If you apply the [Authorize] attribute globally, be sure to add the
[AllowAnonymous] attribute to your login actions, error actions, password
reset actions, and any other actions that you need unauthenticated users to
execute.
If an unauthenticated user attempts to execute an action protected by the [Authorize]
attribute, traditional web apps will redirect them to the login page. But what about web
APIs? And what about more complex scenarios, where a user is logged in but doesn’t
have the necessary claims to execute an action? In the next section, we’ll look at how the
ASP.NET Core authentication services handle all of this for you.
Listing 15.2 Applying [AllowAnonymous] to allow unauthenticated access
This action can only be executed
by authenticated users.
Applied at the controller scope,
so user must be authenticated
for all actions on the controller.
Only authenticated users may
execute ManageAccount.
[AllowAnonymous] overrides
[Authorize] to allow
unauthenticated users.
Login can be executed
by anonymous users.](https://image.slidesharecdn.com/asp-230807173723-31e70040/75/ASP-NET-Core-in-Action-2018-pdf-466-2048.jpg)
![439
Authorization in ASP.NET Core
15.2.2 Handling unauthorized requests
In the previous section, you saw how to apply the [Authorize] attribute to an action
to ensure only authenticated users can execute it. In section 15.3, we’ll look at more
complex examples that require you to also have a specific claim. In both cases, you
must meet one or more authorization requirements (for example, you must be
authenticated) to execute the action.
If the user meets the authorization requirements, then they can execute the action
as normal and the request continues down the MVC filter pipeline. If they don’t meet
the requirements, the authorization filter will short-circuit the request. Depending on
why they failed authorization, the authorization filter will return one of two different
types of IActionResult:
ChallengeResult—This indicates that the user was not authorized to execute
the action because they weren’t yet logged in.
ForbidResult—This indicates that the user was logged in but didn’t meet the
requirements to execute the action. They didn’t have a required claim, for
example.
NOTE If you apply the [Authorize] attribute in basic form, as you did in sec-
tion 15.2.1, then the filter will only create ChallengeResults. The filter will
return ChallengeResult for unauthenticated users, but authenticated users
will always be authorized.
When authorization fails, the authorization filter short-circuits the MVC filter pipe-
line, and the ChallengeResult or ForbidResult executes to generate a response.
This response passes back through the middleware pipeline as usual. The exact
response generated depends on the type of application you’re building, and so the
type of authentication your application uses.
For traditional web apps using cookie authentication, such as when you use
ASP.NET Core Identity, as in chapter 14, ChallengeResult and ForbidResult redi-
rect users to a different page in your application. ChallengeResult indicates the user
isn’t yet authenticated, so they’re redirected to the login page for the app. After log-
ging in, they can attempt to execute the protected resource again.
ForbidResult means the request was from a user that already logged in, but
they’re still not allowed to execute the action. Consequently, the user is redirected to a
Forbidden or Access Denied web page, as shown in figure 15.3, which informs them
they can’t execute the action.
The preceding behavior is typical for traditional web apps, but web APIs typically
use a different approach to authentication, as you saw in chapter 14. Instead of log-
ging in using the web API directly, you’d typically log in to a third-party application
that provides a token to the client-side SPA or mobile app. The client-side app sends
this token when it makes a request to your web API.
Authenticating a request for a web API using tokens is essentially identical to a tra-
ditional web app that uses cookies; AuthenticationMiddleware deserializes the](https://image.slidesharecdn.com/asp-230807173723-31e70040/75/ASP-NET-Core-in-Action-2018-pdf-467-2048.jpg)
![440 CHAPTER 15 Authorization: securing your application
cookie or token to create the ClaimsPrincipal. The difference is in how a web API
handles ChallengeResult and ForbidResult.
When a web API app executes a ChallengeResult, it returns a 401 Unauthorized
error response to the caller. Similarly, when the app executes a ForbidResult, it
returns a 403 Forbidden response. The traditional web app essentially handled these
errors by automatically redirecting unauthorized users to the login or Access Denied
page, but the web API doesn’t do this. It’s up to the client-side SPA or mobile app to
detect these errors and handle them as appropriate.
The important takeaway from all this is that the framework largely handles these
intricacies for you. Whether you’re building a web API or a traditional MVC web app,
the authorization code looks the same in both cases. Apply your [Authorize] attri-
butes as normal and let the framework take care of the differences for you.
NOTE In chapter 14, you saw how to configure ASP.NET Core Identity as a
traditional web app. This chapter assumes you’re building a traditional web
app, but it’s equally applicable if you’re building a web API. Remember that a
web API will return 401 and 403 status codes directly, instead of redirecting
unauthorized users.
You’ve seen how to apply the most basic authorization requirement—restricting an
action to authenticated users only—but most apps need something more subtle than
this all-or-nothing approach.
Consider the airport scenario from section 15.1. Being authenticated (having a
passport) isn’t enough to get you through security. Instead, you also need a specific
claim: BoardingPassNumber. In the next section, we’ll look at how you can implement
a similar requirement in ASP.NET Core.
15.3 Using policies for claims-based authorization
In the previous chapter, you saw that authentication in ASP.NET Core centers around
a ClaimsPrincipal object, which represents the user. This object has a collection of
claims that contain pieces of information about the user, such as their name, email,
and date of birth.
Figure 15.3 In traditional web apps using cookie authentication, if you don’t
have permission to execute an action and you’re already logged in, you’ll be
redirected to an Access Denied page.](https://image.slidesharecdn.com/asp-230807173723-31e70040/75/ASP-NET-Core-in-Action-2018-pdf-468-2048.jpg)
![441
Using policies for claims-based authorization
You can use these to customize the app for each user, by displaying a welcome mes-
sage addressing the user by name, but you can also use claims for authorization. For
example, you might only authorize a user if they have a specific claim (such as Boarding-
PassNumber) or if a claim has a specific value (FrequentFlyerClass claim with the
value Gold).
In ASP.NET Core, the rules that define whether a user is authorized are encapsu-
lated in a policy.
DEFINITION A policy defines the requirements you must meet in order for a
request to be authorized.
Policies can be applied to an action using the [Authorize] attribute, similar to the
way you saw in section 15.2.1. This listing shows a controller and action that represent
the first step in the airport scenario. The AirportSecurity action method is pro-
tected by an [Authorize] attribute, but you’ve also provided a policy name: "Can-
EnterSecurity".
public class AirportController : Controller
{
public IActionResult Index()
{
return View();
}
[Authorize("CanEnterSecurity")]
public IActionResult AirportSecurity()
{
return View();
}
}
If a user attempts to execute the AirportSecurity action, the authorize filter will ver-
ify whether the user satisfies the policy’s requirements (we’ll look at the policy itself
shortly). This gives one of three possible outcomes:
The user satisfies the policy.—The action will execute as normal.
The user is unauthenticated.—The user will be redirected to the login page.
The user is authenticated but doesn’t satisfy the policy.—The user will be redirected to
a “Forbidden” or “Access Denied” page.
These three outcomes correlate with the real-life outcomes you might expect when
trying to pass through security at the airport:
You have a boarding pass.—You can enter security as normal.
You’re unauthenticated.—You’re redirected to purchase a ticket.
Your boarding pass is invalid (you turned up a day late, for example).—You’re blocked
from entering.
Listing 15.3 Applying an authorization policy to an action
The Index method can be
executed by
unauthenticated users.
Applying the
"CanEnterSecurity" policy
using [Authorize]
Only users that satisfy the
"CanEnterSecurity" policy can
execute the AirportSecurity action.](https://image.slidesharecdn.com/asp-230807173723-31e70040/75/ASP-NET-Core-in-Action-2018-pdf-469-2048.jpg)
![442 CHAPTER 15 Authorization: securing your application
Listing 15.3 shows how you can apply a policy to an action using the [Authorize]
attribute, but you still need to define the CanEnterSecurity policy.
You add policies to an ASP.NET Core application in the ConfigureServices
method of Startup.cs, as shown in listing 15.4. First, you add the authorization services
using AddAuthorization(), and then you can add policies by calling AddPolicy() on
the AuthorizationOptions object. You define the policy itself by calling methods on a
provided AuthorizationPolicyBuilder (called policyBuilder here).
public void ConfigureServices(IServiceCollection services)
{
services.AddAuthorization(options =>
{
options.AddPolicy(
"CanEnterSecurity",
policyBuilder => policyBuilder
.RequireClaim("BoardingPassNumber"));
});
// Additional service configuration
}
When you call AddPolicy you provide a name for the policy, which should match the
value you use in your [Authorize] attributes, and you define the requirements of the
policy. In this example, you have a single simple requirement: the user must have a
claim of type BoardingPassNumber. If a user has this claim, whatever its value, then the
policy will be satisfied and they’ll be authorized.
AuthorizationPolicyBuilder contains several methods for creating simple poli-
cies like this, as shown in table 15.1. For example, an overload of the RequireClaim()
method lets you specify a specific value that a claim must have. The following would let
you create a policy that the "BoardingPassNumber" claim must have a value of "A1234":
policyBuilder => policyBuilder.RequireClaim("BoardingPassNumber", "A1234");
Listing 15.4 Adding an authorization policy using AuthorizationPolicyBuilder
Table 15.1 Simple policy builder methods on AuthorizationPolicyBuilder
Method Policy behavior
RequireAuthenticatedUser() The required user must be authenticated. Creates a policy
similar to the default [Authorize] attribute, where you
don’t set a policy.
RequireClaim(claim, values) The user must have the specified claim. Optionally, with one
of the specified values.
RequireUsername(username) The user must have the specified username.
RequireAssertion(function) Executes the provided lambda function, which returns a
bool, indicating whether the policy was satisfied.
Calls AddAuthorization
to configure
AuthorizationOptions
Adds a new policy
Provides a name for the policy
Defines the policy
requirements using
AuthorizationPolicyBuilder](https://image.slidesharecdn.com/asp-230807173723-31e70040/75/ASP-NET-Core-in-Action-2018-pdf-470-2048.jpg)
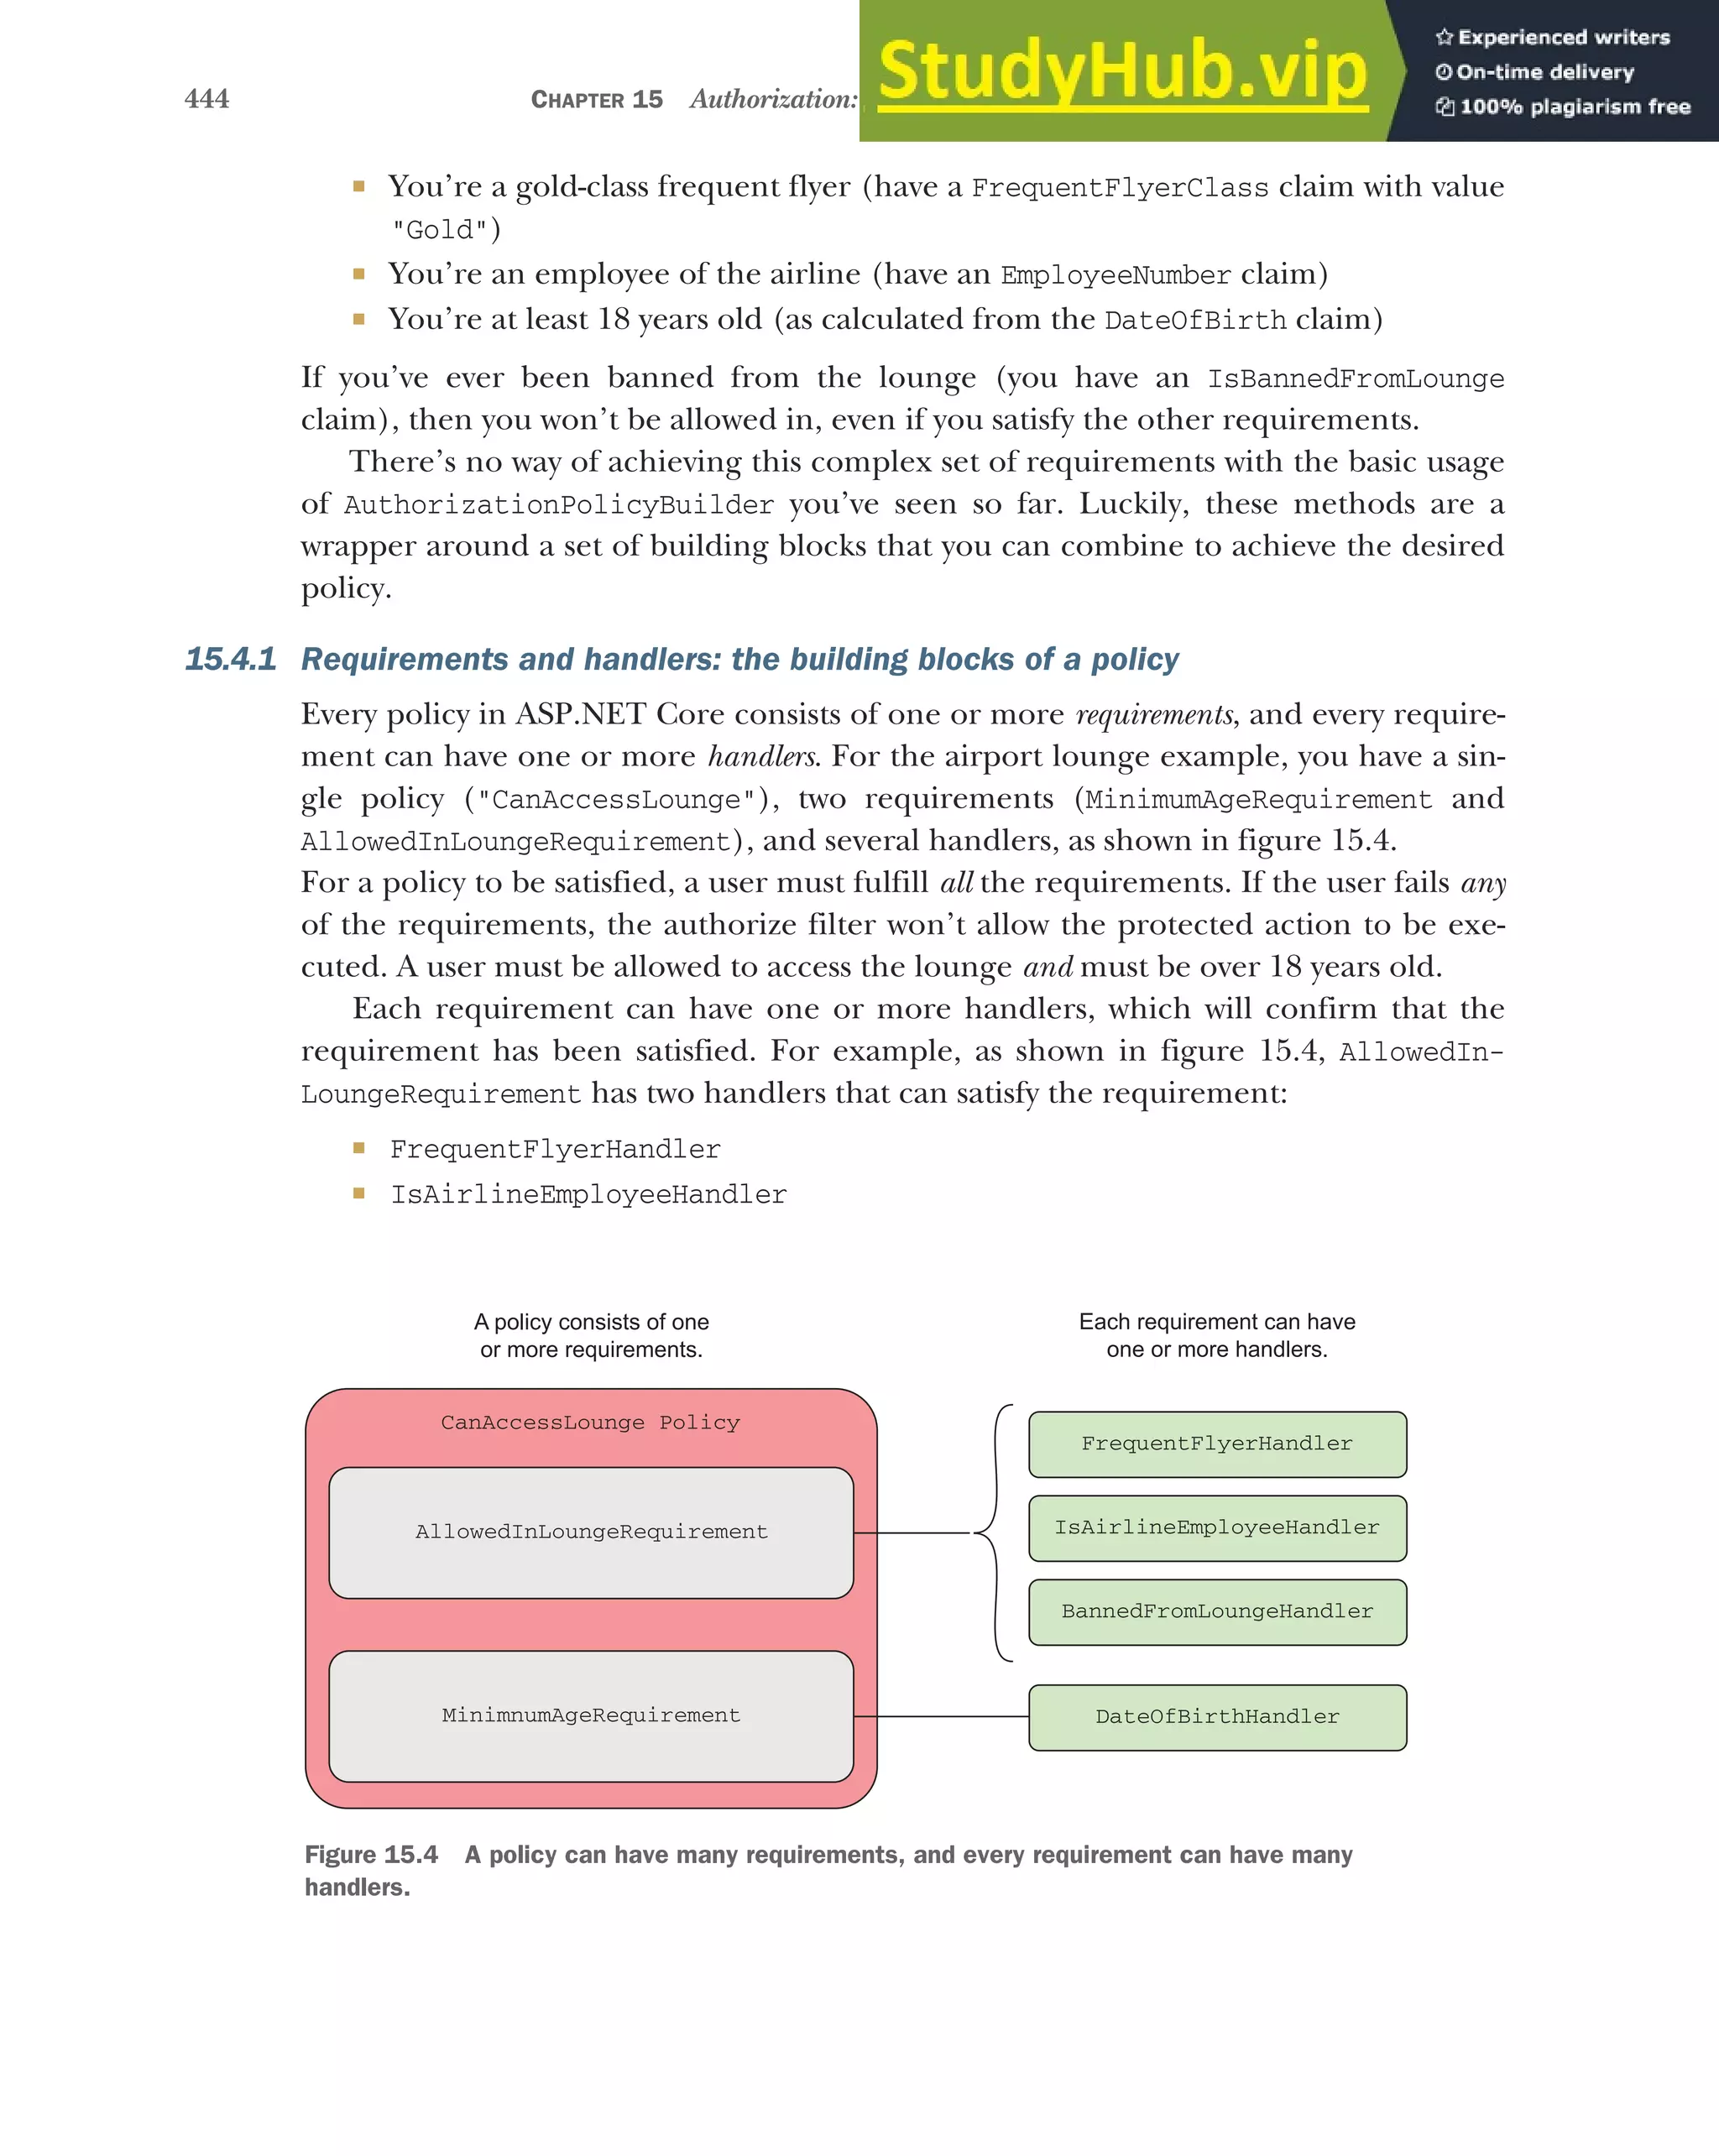
![445
Creating custom policies for authorization
If the user satisfies either of these handlers, then AllowedInLoungeRequirement is sat-
isfied. You don’t need all handlers for a requirement to be satisfied, you just need one.
NOTE Figure 15.4 showed a third handler, BannedFromLoungeHandler, which
I’ll cover in the next section. It’s slightly different, in that it can only fail a
requirement, not satisfy it.
You can use requirements and handlers to achieve most any combination of behavior
you need for a policy. By combining handlers for a requirement, you can validate con-
ditions using a logical OR: if any of the handlers are satisfied, the requirement is satis-
fied. By combining requirements, you create a logical AND: all of the requirements
must be satisfied for the policy to be satisfied, as shown in figure 15.5.
TIP You can also add multiple policies to an action method by applying the
[Authorize] attribute multiple times, for example [Authorize("Policy1"),
Authorize("Policy2")]. All policies must be satisfied for the request to be
authorized.
I’ve highlighted requirements and handlers that will make up your "CanAccess-
Lounge" policy, so in the next section, you’ll build each of the components and apply
them to the airport sample app.
15.4.2 Creating a policy with a custom requirement and handler
You’ve seen all the pieces that make up a custom authorization policy, so in this sec-
tion, we’ll explore the implementation of the "CanAccessLounge" policy.
CREATING AN IAUTHORIZATIONREQUIREMENT TO REPRESENT A REQUIREMENT
As you’ve seen, a custom policy can have multiple requirements, but what is a require-
ment in code terms? Authorization requirements in ASP.NET Core are any class that
implements the IAuthorizationRequirement interface. This is a blank, marker inter-
face, which you can apply to any class to indicate that it represents a requirement.
Requirement
1
Requirement
2
AND AND
Requirement
N
AND
...
Handler
2A
Handler
2B
Policy
Satisfied? =
OR
Handler
M
...
For the policy to be satisfied, every
requirement must be satisfied.
If any of the handlers are satisfied,
the requirement is satisfied.
OR
OR
Figure 15.5 For a policy to be satisfied, every requirement must be satisfied. A requirement is
satisfied if any of the handlers are satisfied.](https://image.slidesharecdn.com/asp-230807173723-31e70040/75/ASP-NET-Core-in-Action-2018-pdf-473-2048.jpg)

![447
Creating custom policies for authorization
{
options.AddPolicy(
"CanEnterSecurity",
policyBuilder => policyBuilder
.RequireClaim(Claims.BoardingPassNumber));
options.AddPolicy(
"CanAccessLounge",
policyBuilder => policyBuilder.AddRequirements(
new MinimumAgeRequirement(18),
new AllowedInLoungeRequirement()
));
});
// Additional service configuration
}
You now have a policy called "CanAccessLounge" with two requirements, so you can
apply it to an action method using the [Authorize] attribute, in exactly the same way
you did for the "CanEnterSecurity" policy:
[Authorize("CanAccessLounge")]
public IActionResult AirportLounge()
{
return View();
}
When a user attempts to execute the AirportLounge action, the authorize filter policy
will be executed and each of the requirements will be inspected. But you saw earlier
that the requirements are purely data; they indicate what needs to be fulfilled, they
don’t describe how that has to happen. For that, you need to write some handlers.
CREATING AUTHORIZATION HANDLERS TO SATISFY YOUR REQUIREMENTS
Authorization handlers contain the logic of how a specific IAuthorizationRequirement
can be satisfied. When executed, a handler can do one of three things:
Mark the requirement handling as a success
Not do anything
Explicitly fail the requirement
Handlers should implement AuthorizationHandler<T>, where T is the type of requirement
they handle. For example, the following listing shows a handler for AllowedInLounge-
Requirement that checks whether the user has a claim called FrequentFlyerClass with a
value of Gold.
public class FrequentFlyerHandler :
AuthorizationHandler<AllowedInLoungeRequirement>
{
protected override Task HandleRequirementAsync(
Listing 15.8 FrequentFlyerHandler for AllowedInLoungeRequirement
Adds the previous
simple policy for
passing through
security
Adds a new
policy for the
airport lounge,
called
CanAccessLounge
Adds an instance of each
IAuthorizationRequirement object
The handler implements
AuthorizationHandler<T>.
You must override the abstract
HandleRequirementAsync method.](https://image.slidesharecdn.com/asp-230807173723-31e70040/75/ASP-NET-Core-in-Action-2018-pdf-475-2048.jpg)
![448 CHAPTER 15 Authorization: securing your application
AuthorizationHandlerContext context,
AllowedInLoungeRequirement requirement)
{
if(context.User.HasClaim("FrequentFlyerClass", "Gold"))
{
context.Succeed(requirement);
}
return Task.CompletedTask;
}
}
This handler is functionally equivalent to the simple RequireClaim()handler you saw
at the start of section 15.4, but using the requirement and handler approach instead.
When a user attempts to execute the AirportLounge action method, the authoriza-
tion filter added by the [Authorize] attribute validates the "CanAccessLounge" pol-
icy. It loops through all of the requirements in the policy, and all of the handlers for
each requirement, calling the HandleRequirementAsync method for each.
The filter passes in the current AuthorizationHandlerContext and the require-
ment to be checked. The current ClaimsPrincipal being authorized is exposed on the
context as the User property. In listing 15.8, FrequentFlyerHandler uses the context to
check for a claim called FrequentFlyerClass with the Gold value, and if it exists, con-
cludes that the user is allowed to enter the airline lounge, by calling Succeed().
NOTE Handlers mark a requirement as being successfully satisfied by calling
context.Succeed() and passing in the requirement.
It’s important to note the behavior when the user doesn’t have the claim. Frequent-
FlyerHandler doesn’t do anything if this is the case (it returns a completed Task to
satisfy the method signature).
NOTE Remember, if any of the handlers associated with a requirement pass,
then the requirement is a success. Only one of the handlers has to succeed for
the requirement to be satisfied.
This behavior, whereby you either call context.Succeed() or do nothing, is typical
for authorization handlers. This listing shows the implementation of IsAirline-
EmployeeHandler, which uses a similar claim check to determine whether the require-
ment is satisfied.
public class IsAirlineEmployeeHandler :
AuthorizationHandler<AllowedInLoungeRequirement>
{
Listing 15.9 IsAirlineEmployeeHandler handler
The context contains details
such as the ClaimsPrincipal
user object.
The
requirement
to handle
Checks whether the user
has the FrequentFlyerClass
claim with the Gold value
If the user had the necessary claim,
then mark the requirement as
satisfied by calling Succeed.
If the requirement wasn’t
satisfied, do nothing.
The handler implements
AuthorizationHandler<T>.](https://image.slidesharecdn.com/asp-230807173723-31e70040/75/ASP-NET-Core-in-Action-2018-pdf-476-2048.jpg)

![450 CHAPTER 15 Authorization: securing your application
The final step to complete your authorization implementation for the app is to regis-
ter the authorization handlers with the DI container, as shown in listing 15.11.
public void ConfigureServices(IServiceCollection services)
{
services.AddAuthorization(options =>
{
options.AddPolicy(
"CanEnterSecurity",
policyBuilder => policyBuilder
.RequireClaim(Claims.BoardingPassNumber));
options.AddPolicy(
"CanAccessLounge",
policyBuilder => policyBuilder.AddRequirements(
new MinimumAgeRequirement(18),
new AllowedInLoungeRequirement()
));
});
services.AddSingleton<IAuthorizationHandler, MinimumAgeHandler>();
services.AddSingleton<IAuthorizationHandler, FrequentFlyerHandler>();
services
.AddSingleton<IAuthorizationHandler, BannedFromLoungeHandler>();
Services
.AddSingleton<IAuthorizationHandler, IsAirlineEmployeeHandler>();
// Additional service configuration
}
For this app, the handlers don’t have any constructor dependencies, so I’ve registered
them as singletons with the container. If your handlers have scoped or transient
dependencies (the EF Core DbContext, for example), then you might want to register
them as scoped instead, as appropriate.
You can combine the concepts of policies, requirements, and handlers in many
different ways to achieve your goals for authorization in your application. The exam-
ple in this section, although contrived, demonstrates each of the components you
need to apply authorization at the action method level, by creating policies and apply-
ing the [Authorize] attribute as appropriate.
There’s one area, however, where the [Authorize] attribute falls short: resource-
based authorization. The [Authorize] attribute uses an authorization filter to autho-
rize the user before the action method is executed, but what if you need to authorize
the action during the action method?
This is common when you’re applying authorization at the document or resource
level. If users are only allowed to edit documents they created, then you need to load
the document before you can tell whether you’re allowed to edit it! This isn’t possible
with the declarative [Authorize] attribute approach, so you must use an alternative,
Listing 15.11 Registering the authorization handlers with the DI container](https://image.slidesharecdn.com/asp-230807173723-31e70040/75/ASP-NET-Core-in-Action-2018-pdf-478-2048.jpg)
![451
Controlling access with resource-based authorization
imperative approach. In the next section, you’ll see how to apply this resource-based
authorization to an action method.
15.5 Controlling access with resource-based authorization
Resource-based authorization is a common problem for applications, especially when
you have users that can create or edit some sort of document. Consider the recipe
application you built in the previous 3 chapters. This app lets users create, view, and
edit recipes.
Up to this point, everyone is able to create new recipes, and anyone can edit a rec-
ipe, even if they haven’t logged in. Now you want to add some additional behavior:
Only authenticated users should be able to create new recipes
You can only edit recipes you created
You’ve already seen how to achieve the first of these requirements; decorate the Create
action method with an [Authorize] attribute and don’t specify a policy, as shown in this
listing. This will force the user to authenticate before they can create a new recipe.
public class RecipeController : Controller
{
[Authorize]
public IActionResult Create()
{
return View(new CreateRecipeCommand());
}
[HttpPost, Authorize]
public async Task<IActionResult> Create(CreateRecipeCommand command)
{
// Method body not shown for brevity
}
}
TIP When applying the [Authorize] attribute to single actions, it’s import-
ant to protect both the GET method and the POST action method.
Adding the [Authorize] attribute fulfills your first requirement, but unfortunately,
with the techniques you’ve seen so far, you have no way to fulfill the second. You could
apply a policy that either permits or denies a user the ability to edit all recipes, but
there’s currently no way to restrict this so that a user can only edit their own recipes.
In order to find out who created the Recipe, you must first load it from the data-
base. Only then can you attempt to authorize the user, taking the specific recipe
(resource) into account. The following listing shows a partially implemented method
for how this might look, where authorization occurs part way through the method,
after the Recipe object has been loaded.
Listing 15.12 Adding AuthorizeAttribute to RecipeController.Create
Users must be authenticated
to execute the Create action.
It’s important to protect
the HttpPost actions, too.](https://image.slidesharecdn.com/asp-230807173723-31e70040/75/ASP-NET-Core-in-Action-2018-pdf-479-2048.jpg)
![452 CHAPTER 15 Authorization: securing your application
public IActionResult Edit(int id)
{
var recipe = _service.GetRecipe(id);
var createdById = recipe.CreatedById;
// Authorize user based on createdById
if(isAuthorized)
{
return View(recipe);
}
}
The [Authorize] attribute can’t help you here; authorization filters run before model
binding and before the action method executes. In the next section, you’ll see the
approach you need to take to handle these situations and to apply authorization
inside the action.
WARNING Be careful when exposing the integer ID of your entities in the
URL, as in listing 15.13. Users will be able to edit every entity by modifying the
ID in the URL to access a different entity. Be sure to apply authorization
checks, otherwise you could expose a security vulnerability called Insecure
Direct Object Reference.3
15.5.1 Manually authorizing requests with IAuthorizationService
All of the approaches to authorization so far have been declarative. You apply the
[Authorize] attribute, with or without a policy name, and you let the framework take
care of performing the authorization itself.
For this recipe-editing example, you need to use imperative authorization, so you
can authorize the user after you’ve loaded the Recipe from the database. Instead of
applying a marker saying “Authorize this method,” you need to write some of the
authorization code yourself.
DEFINITION Declarative and imperative are two different styles of programming.
Declarative programming describes what you’re trying to achieve, and lets the
framework figure out how to achieve it. Imperative programming describes
how to achieve something by providing each of the steps needed.
ASP.NET Core exposes IAuthorizationService, which you can inject into your con-
trollers for imperative authorization. This listing shows how you can update the Edit
action shown in listing 15.13 to use the IAuthorizationService and verify whether
the action is allowed to continue execution.
Listing 15.13 The Edit action must load the Recipe before authorizing the request
3
You can read about this vulnerability and ways to counteract it on the Open Web Application Security Project
(OWASP): www.owasp.org/index.php/Top_10_2007-Insecure_Direct_Object_Reference.
The id of the recipe to edit is
provided by model binding.
You must load the Recipe from the
database before you know who created it.
You must authorize the
current user, to verify
they’re allowed to edit this
specific Recipe.
The action method
can only continue if
the user was
authorized.](https://image.slidesharecdn.com/asp-230807173723-31e70040/75/ASP-NET-Core-in-Action-2018-pdf-480-2048.jpg)
![453
Controlling access with resource-based authorization
public class RecipeController : Controller
{
private IAuthorizationService _authService
public RecipeController(IAuthorizationService authService)
{
_authService = authService;
}
[Authorize]
public async Task<IActionResult> Edit(int id)
{
var recipe = _service.GetRecipe(id);
var authResult = await _authService
.AuthorizeAsync(User, recipe, "CanManageRecipe");
if (!authResult.Succeeded)
{
return new ForbidResult();
}
return View(recipe);
}
}
IAuthorizationService exposes an AuthorizeAsync method, which requires three
things to authorize the request:
The ClaimsPrincipal user object, exposed on the Controller as User
The resource being authorized: recipe
The policy to evaluate: "CanManageRecipe"
The authorization attempt returns an AuthorizationResult object, which indicates
whether the attempt was successful via the Succeeded property. If the attempt wasn’t
successful, then you should return a new ForbidResult, which will return a 403 For-
bidden response to the user.
WARNING In ASP.NET Core 1.x resource-based authorization, you’d return a
ChallengeResult instead of a ForbidResult and the framework would gener-
ate the appropriate 401 or 403 response, depending on whether you
were logged in or not. In the changes that came with ASP.NET Core 2.0,
this behavior was lost, so you have to work out whether to return a 401 or
403 yourself. The easiest approach is: mark your action methods with the
[Authorize] attribute and always return a ForbidResult.
You’ve configured the imperative authorization in the Edit method itself, but you still
need to define the "CanManageRecipe" policy that you use to authorize the user. This
is the same process as for declarative authorization, so you have to:
Create a policy in ConfigureServices by calling AddAuthorization()
Define one or more requirements for the policy
Listing 15.14 Using IAuthorizationService for resource-based authorization
IAuthorizationService
is injected into the
class constructor
using DI.
Only authenticated
users should be
allowed to edit recipes.
Load the recipe
from the database.
If authorization failed,
returns a 403
Forbidden result
Calls
IAuthorizationService,
providing
ClaimsPrinicipal,
resource, and the
policy name
If authorization was successful,
continues the action method](https://image.slidesharecdn.com/asp-230807173723-31e70040/75/ASP-NET-Core-in-Action-2018-pdf-481-2048.jpg)
![454 CHAPTER 15 Authorization: securing your application
Define one or more handlers for each requirement
Register the handlers in the DI container
With the exception of the handler, these steps are all identical to the declarative
authorization approach with the [Authorize] attribute, so I’ll only run through them
briefly here.
First, you can create a simple IAuthorizationRequirement. As with all require-
ments, this contains no functionality and simply implements the marker interface.
public class IsRecipeOwnerRequirement : IAuthorizationRequirement { }
Defining the policy in ConfigureServices is similarly simple, as you have only this sin-
gle requirement. Note that there’s nothing resource-specific in any of this code so far:
public void ConfigureServices(IServiceCollection services)
{
services.AddAuthorization(options => {
options.AddPolicy("CanManageRecipe", policyBuilder =>
policyBuilder.AddRequirements(new IsRecipeOwnerRequirement()));
});
}
You’re halfway there; all you need to do now is create an authorization handler for
IsRecipeOwnerRequirement and register it with the DI container.
15.5.2 Creating a resource-based AuthorizationHandler
Resource-based authorization handlers are essentially the same as the authorization
handler implementations you saw in section 15.4.2. The only difference is that the
handler also has access to the resource being authorized.
To create a resource-based handler, you should derive from the Authorization-
Handler<TRequirement, TResource> base class, where TRequirement is the type of
requirement to handle, and TResource is the type of resource that you provide when
calling IAuthorizationService. Compare this to the AuthorizationHandler<T> class
you implemented previously, where you only specified the requirement.
This listing shows the handler implementation for your recipe application. You can
see that you’ve specified the requirement as IsRecipeOwnerRequirement, the
resource as Recipe, and have implemented the HandleRequirementAsync method.
public class IsRecipeOwnerHandler :
AuthorizationHandler<IsRecipeOwnerRequirement, Recipe>
{
private readonly UserManager<ApplicationUser> _userManager;
public IsRecipeOwnerHandler(
UserManager<ApplicationUser> userManager)
{
_userManager = userManager;
}
Listing 15.15 IsRecipeOwnerHandler for resource-based authorization
Injects an instance
of the
UserManager<T>
class using DI
Implements the
necessary base class,
specifying the
requirement and
resource type](https://image.slidesharecdn.com/asp-230807173723-31e70040/75/ASP-NET-Core-in-Action-2018-pdf-482-2048.jpg)
![455
Controlling access with resource-based authorization
protected override async Task HandleRequirementAsync(
AuthorizationHandlerContext context,
IsRecipeOwnerRequirement requirement,
Recipe resource)
{
var appUser = await _userManager.GetUserAsync(context.User);
if(appUser == null)
{
return;
}
if(resource.CreatedById == appUser.Id)
{
context.Succeed(requirement);
}
}
}
This handler is slightly more complicated than the examples you’ve seen previously,
primarily because you’re using an additional service, UserManager<>, to load the
ApplicationUser entity based on ClaimsPrincipal from the request.
The other significant difference is that the HandleRequirementAsync method is
called with a Recipe resource. This is the same object that you provided when calling
AuthorizeAsync on IAuthorizationService. You can use this resource to verify
whether the current user created it. If so, you Succeed() the requirement, otherwise
you do nothing.
Our final task is to add IsRecipeOwnerHandler to the DI container. Your handler
uses an additional dependency, UserManager<>, which you know uses EF Core, so you
should register the handler as a scoped service:
services.AddScoped<IAuthorizationHandler, IsRecipeOwnerHandler>();
TIP If you’re wondering how to know whether you register a handler as
scoped or a singleton, think back to chapter 10. Essentially, if you have
scoped dependencies, then you must register the handler as scoped; other-
wise, singleton is fine.
With everything hooked up, you can take the application for a spin. If you try to edit a
recipe you didn’t create by clicking the Edit button on the recipe, you’ll either be
redirected to the login page (if you hadn’t yet authenticated) or you’ll be presented
with an Access Denied page, as shown in figure 15.6.
By using resource-based authorization, you’re able to enact more fine-grained
authorization requirements that you can apply at the level of an individual document
or resource. Instead of only being able to authorize that a user can edit any recipe, you
can authorize whether a user can edit this recipe.
All of the authorization techniques you’ve seen so far have focused on server-side
checks. Both the [Authorize] attribute and resource-based authorization approaches
focus on stopping users from executing a protected action on the server. This is
As well as the
context and
requirement,
you’re also
provided the
resource instance.
If you aren’t authenticated,
then appUser will be null.
Checks whether the
current user created
the Recipe by checking
the CreatedById
property
If the user created the document,
Succeed the requirement;
otherwise, do nothing.](https://image.slidesharecdn.com/asp-230807173723-31e70040/75/ASP-NET-Core-in-Action-2018-pdf-483-2048.jpg)

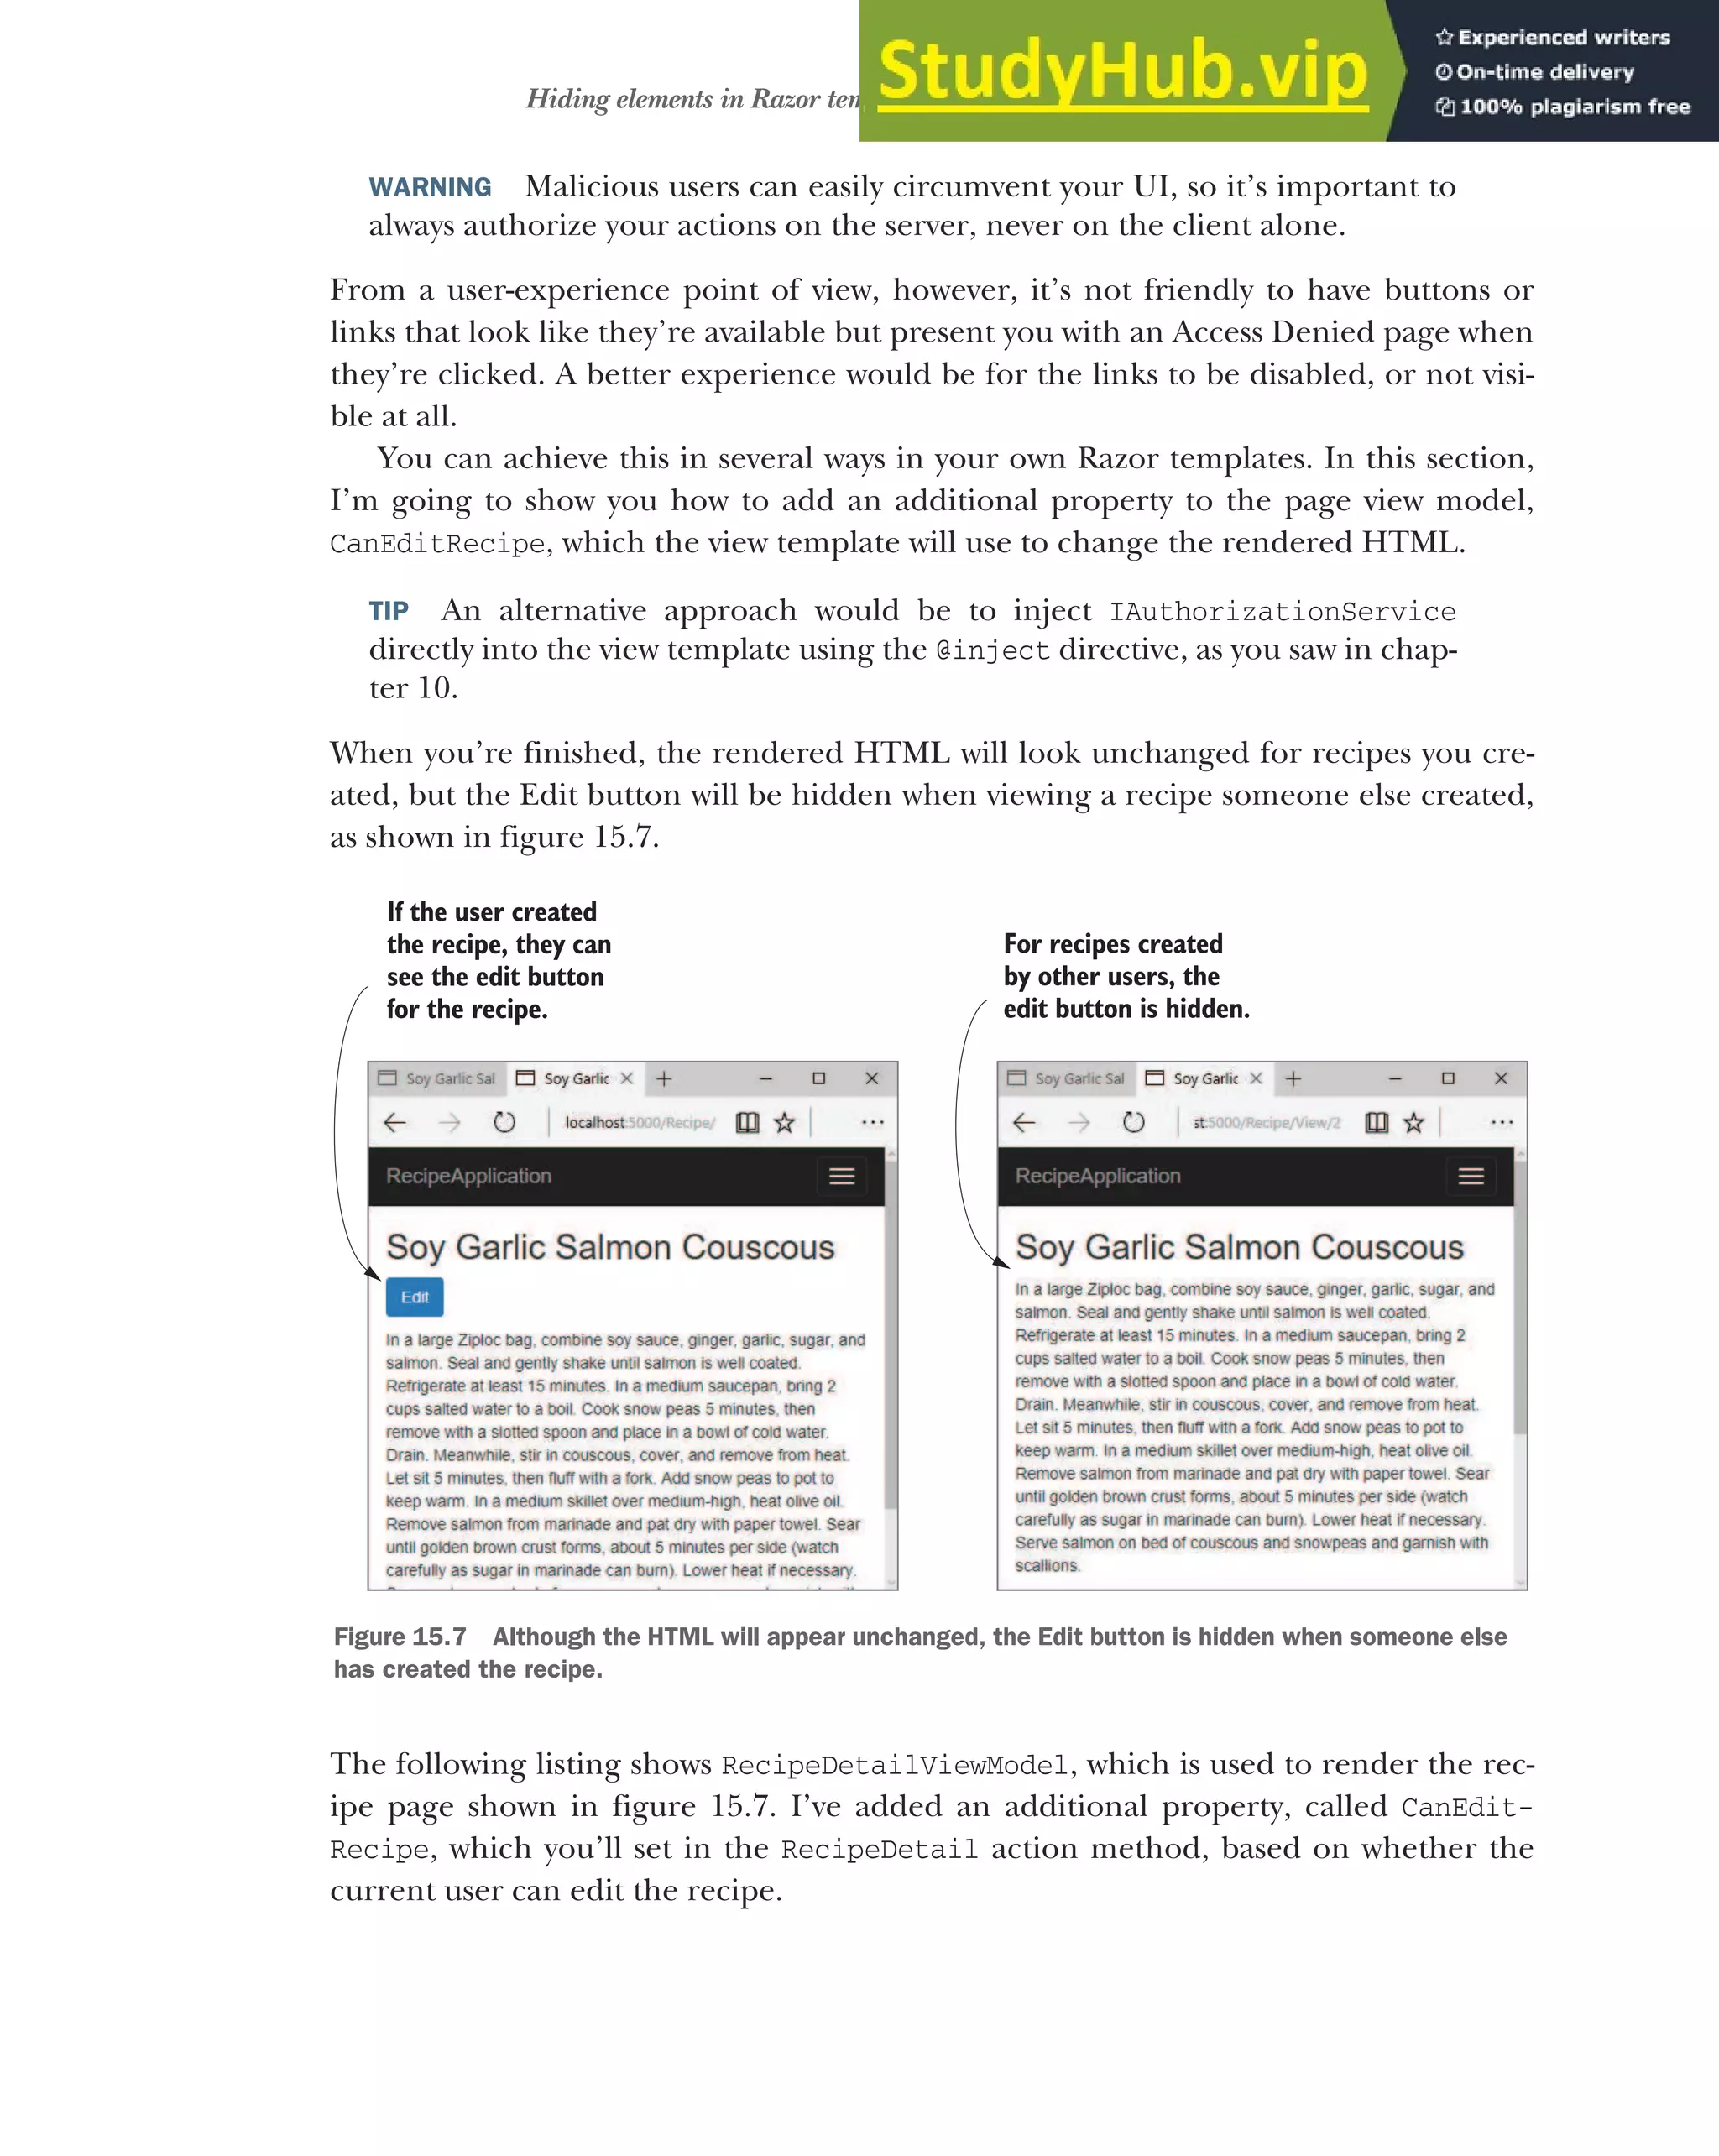
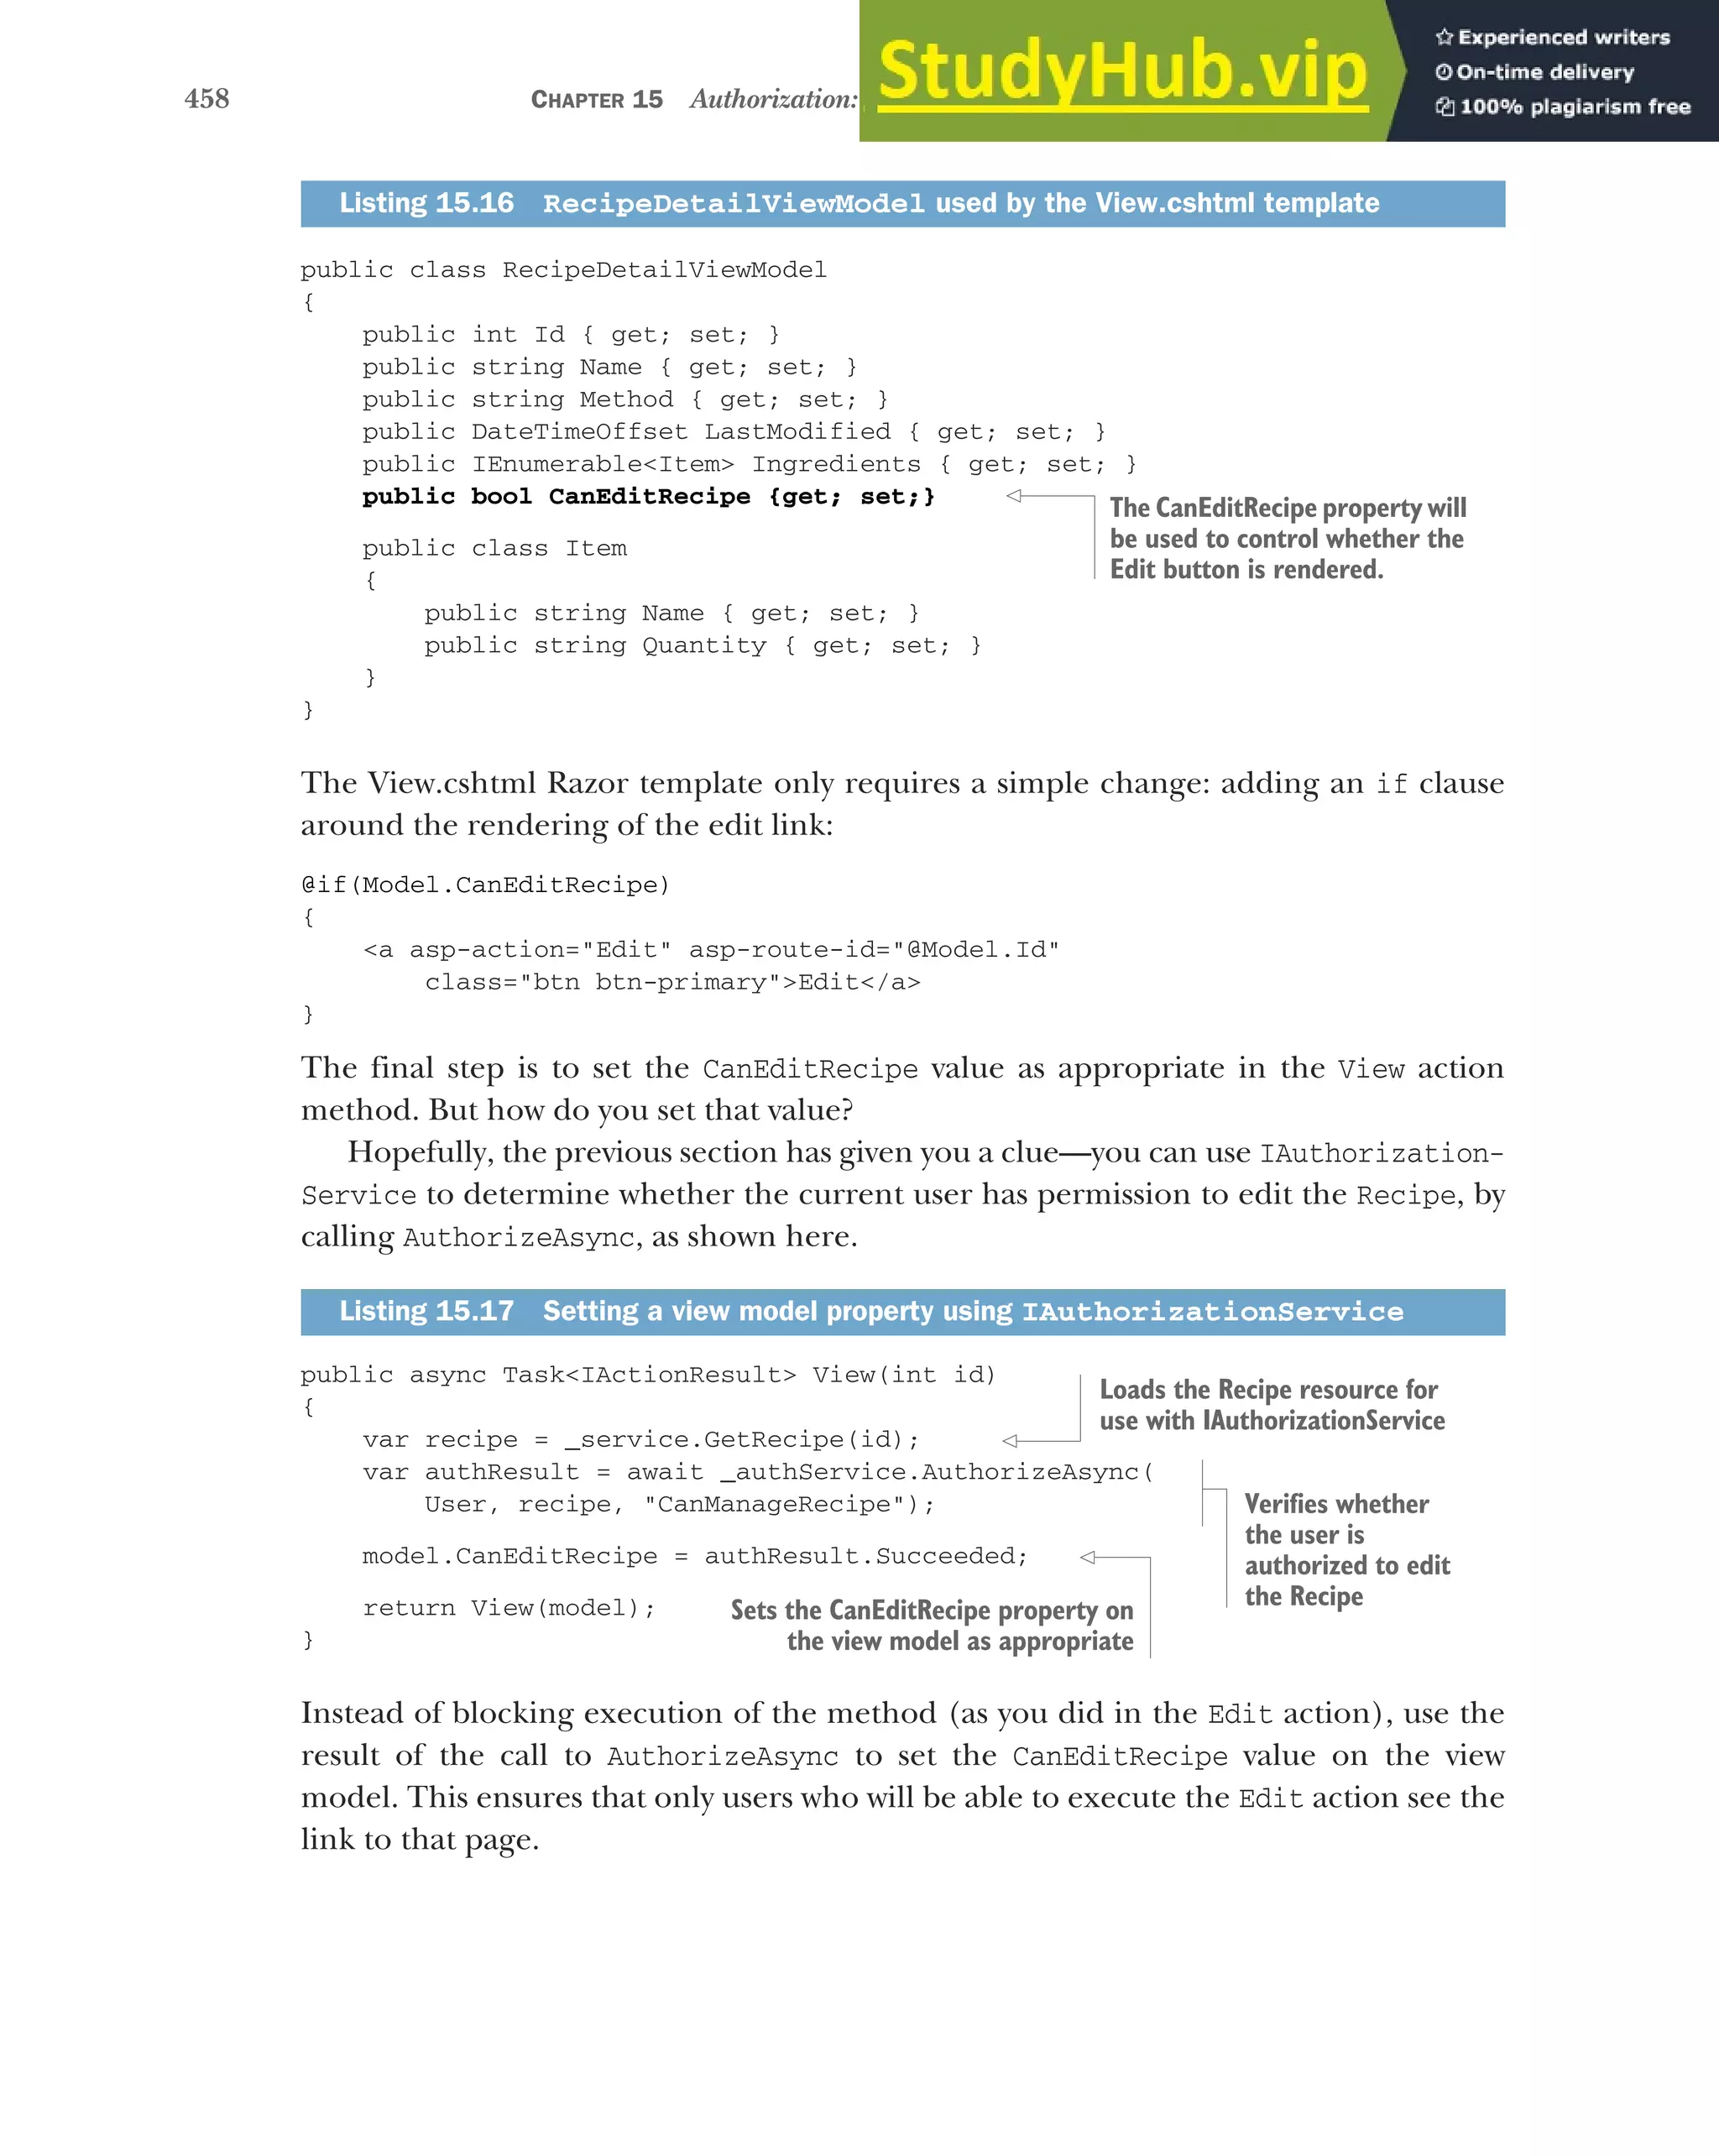
![459
Summary
WARNING Note that you didn’t remove the server-side authorization check
from the Edit action. This is important for preventing malicious users from
circumventing your UI.
With that final change, you’ve finished adding authorization to the recipe application.
Anonymous users can browse the recipes created by others, but they must log in to
create new recipes. Additionally, users can only edit the recipes that they created, and
won’t see an edit link for other people’s recipes.
Authorization is a key aspect of most apps, so it’s important to bear it in mind from
an early point. Although it’s possible to add authorization later, as you did with the
recipe app, it’s normally preferable to consider authorization sooner rather than later
in the app’s development.
In the next chapter, we’re going to be looking at your ASP.NET Core application
from a different point of view. Instead of focusing on the code and logic behind your
app, we’re going to look at how you prepare an app for production. You’ll see how to
specify the URLs your application uses, and how to publish an app so that it can be
hosted in IIS. Finally, you’ll learn about the bundling and minification of client-side
assets, why you should care, and how to use BundlerMinifier in ASP.NET Core.
Summary
Authorization is the process of determining what a user can do. It’s distinct
from authentication, the process of determining who a user is. Authentication
typically occurs before authorization.
You can use authorization in any part of your application, but it’s typically
applied to MVC controllers and actions, using the [Authorize] attribute to
control which actions a user can execute.
The simplest form of authorization requires that a user is authenticated before
executing an action. You can achieve this by applying the [Authorize] attribute
to an action, to a controller, or globally.
Claims-based authorization uses the current user’s claims to determine whether
they’re authorized to execute an action. You define the claims needed to exe-
cute an action in a policy.
Policies have a name and are configured in Startup.cs as part of the call to
AddAuthorization() in ConfigureServices. You define the policy using Add-
Policy(), passing in a name and a lambda that defines the claims needed.
You can apply a policy to an action or controller by specifying the policy in the
authorize attribute, for example [Authorize("CanAccessLounge")].
If an unauthenticated user attempts to execute a protected action, they’ll typi-
cally be redirected to the login page for your app. If they’re already authenti-
cated, but don’t have the required claims, they’ll be shown an Access Denied
page instead.](https://image.slidesharecdn.com/asp-230807173723-31e70040/75/ASP-NET-Core-in-Action-2018-pdf-487-2048.jpg)
![460 CHAPTER 15 Authorization: securing your application
For complex authorization policies, you can build a custom policy. A custom
policy consists of one or more requirements, and a requirement can have one
or more handlers.
For a policy to be authorized, every requirement must be satisfied. For a
requirement to be satisfied, one or more of the associated handlers must indi-
cate success, and none must indicate explicit failure.
AuthorizationHandler<T> contains the logic that determines whether a
requirement is satisfied. If a requirement requires that users are over 18, the
handler could look for a DateOfBirth claim and calculate the user’s age.
Handlers can mark a requirement as satisfied by calling context.Succeed
(requirement). If a handler can’t satisfy the requirement, then it shouldn’t call
anything on the context, as a different handler could call Succeed() and satisfy
the requirement.
If a handler calls context.Fail(), then the requirement will fail, even if a dif-
ferent handler marked it as a success using Succeed().
Resource-based authorization uses details of the resource being protected to
determine whether the current user is authorized. For example, if a user is only
allowed to edit their own documents, then you need to know the author of the
document before you can determine whether they’re authorized.
Resource-based authorization uses the same policy, requirements, and handlers
system as before. Instead of applying authorization with the [Authorize] attri-
bute, you must manually call IAuthorizationService and provide the resource
you’re protecting.
You can modify the user interface to account for user authorization by adding
additional properties to your view models. If a user isn’t authorized to execute
an action, you can remove or disable the link to that action method in the UI.
You should always authorize on the server, even if you’ve removed links from
the UI.](https://image.slidesharecdn.com/asp-230807173723-31e70040/75/ASP-NET-Core-in-Action-2018-pdf-488-2048.jpg)


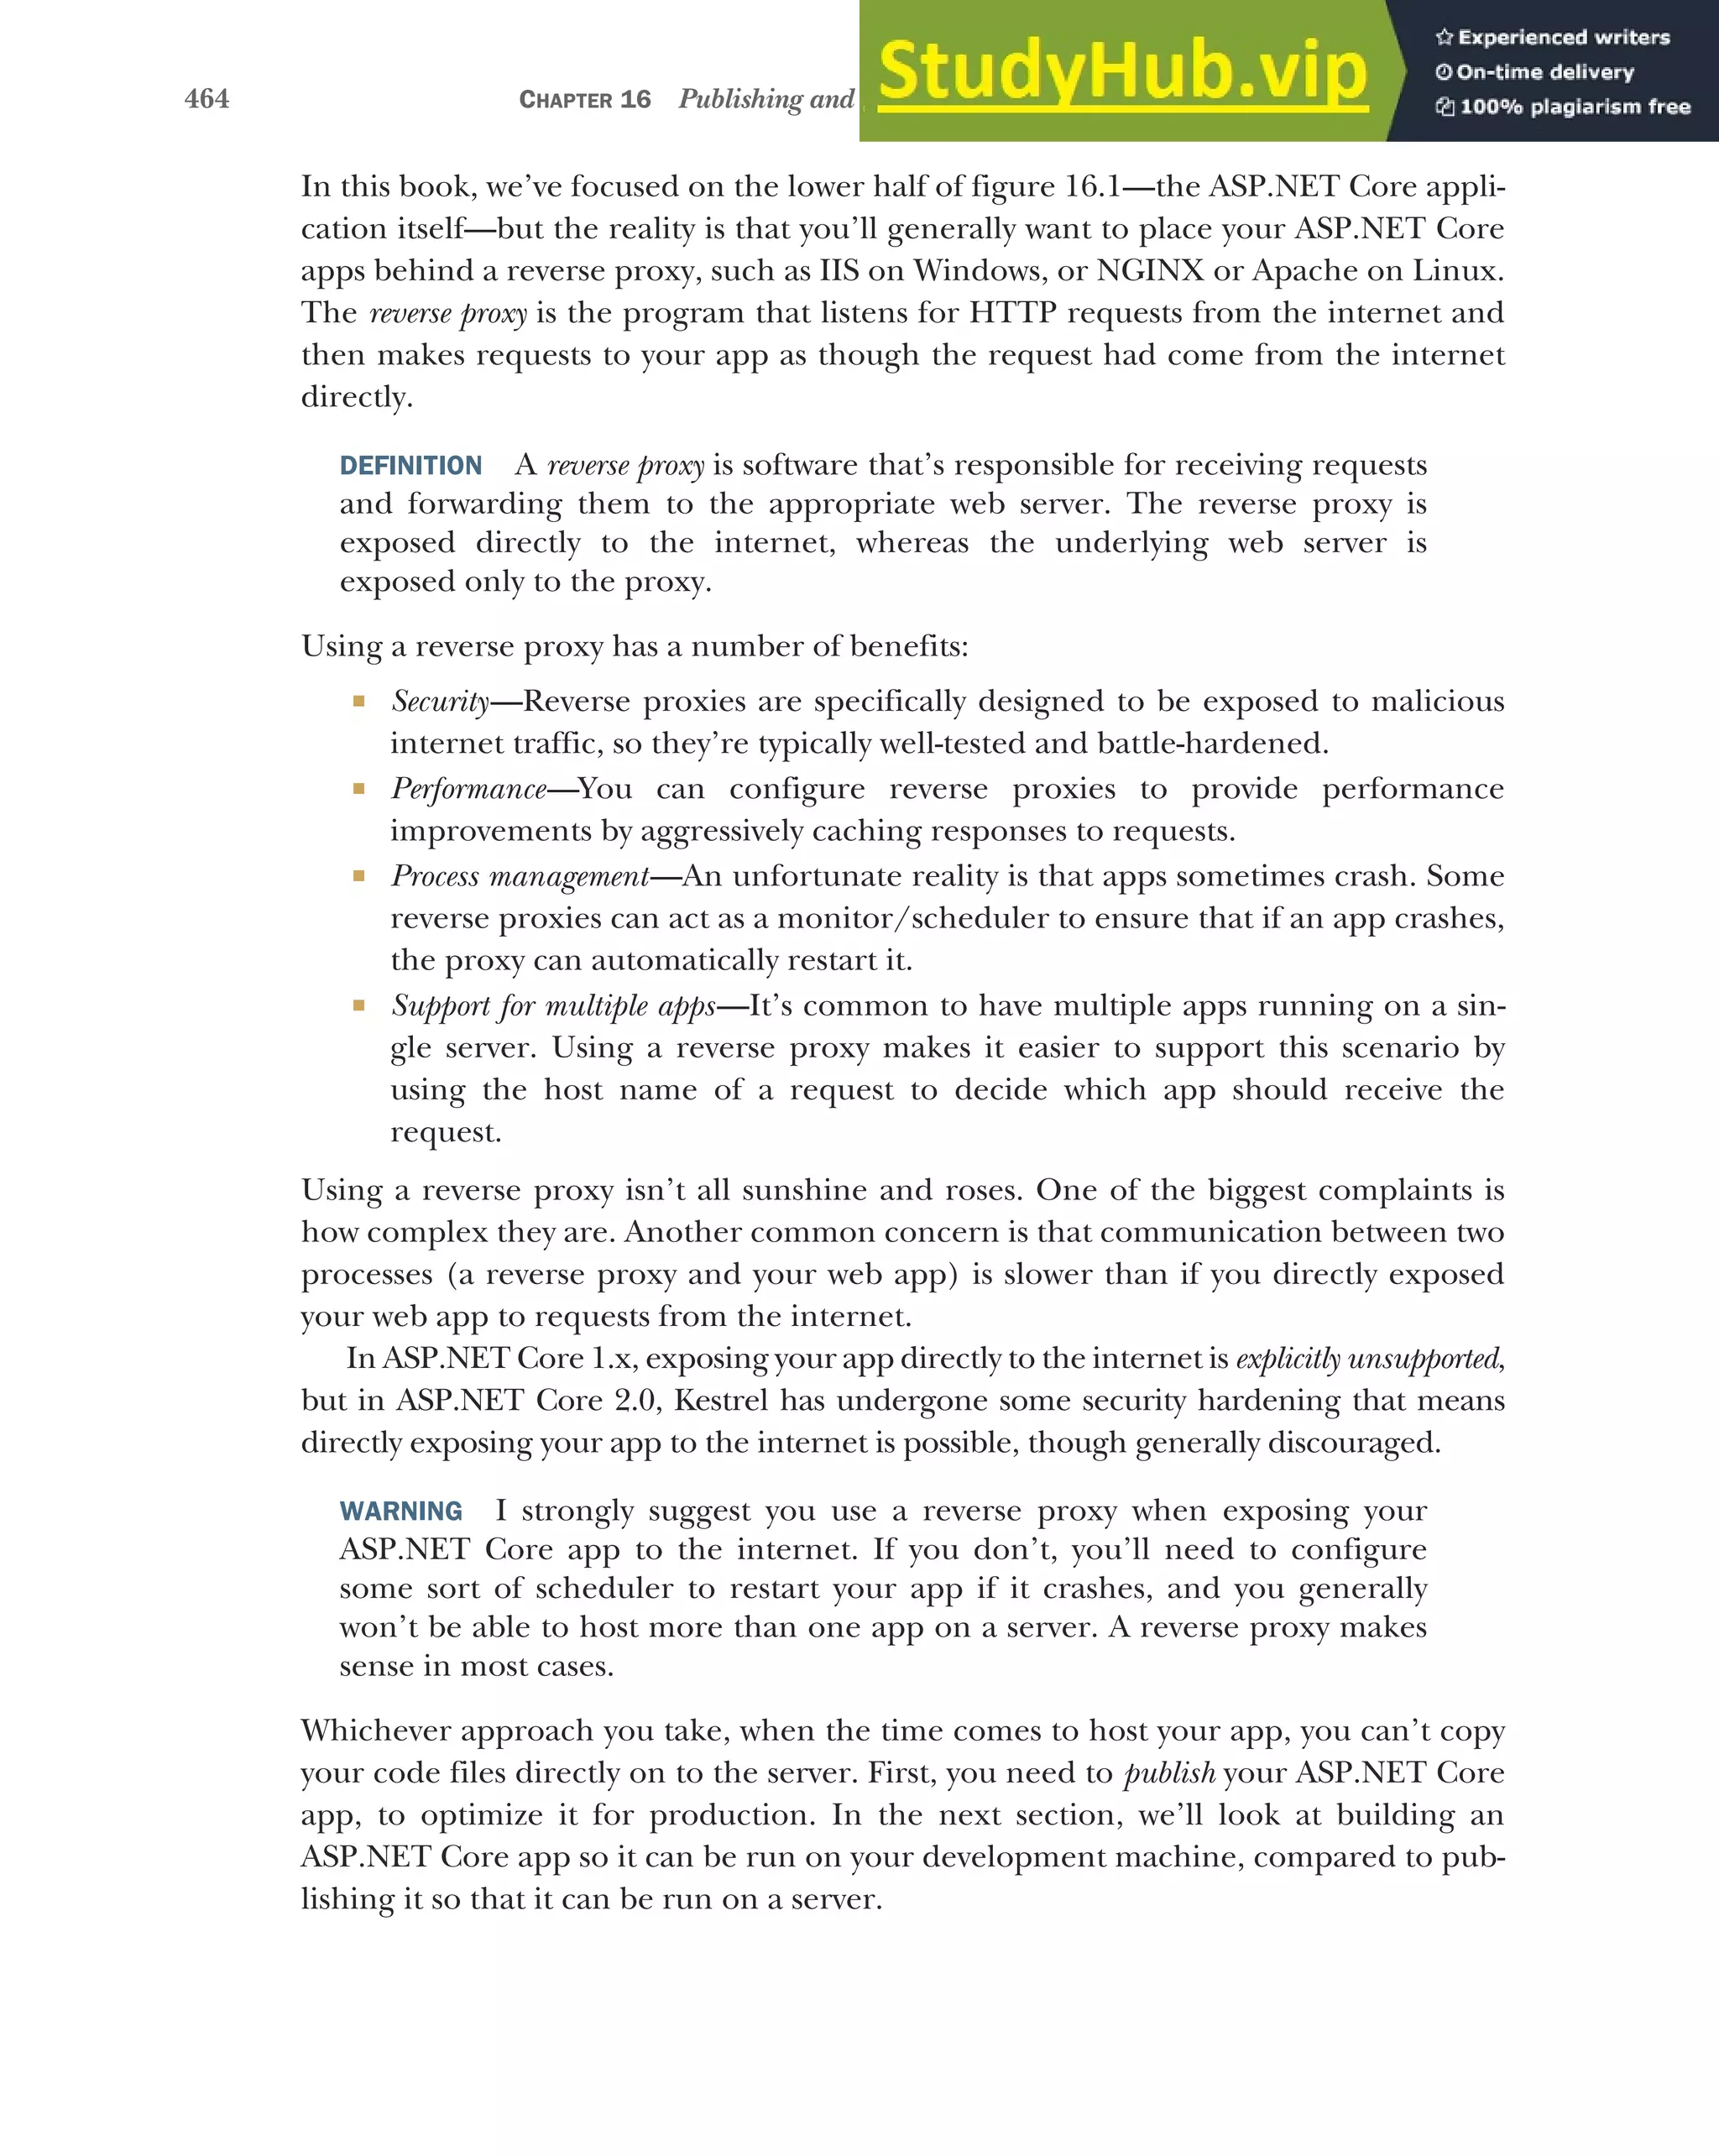
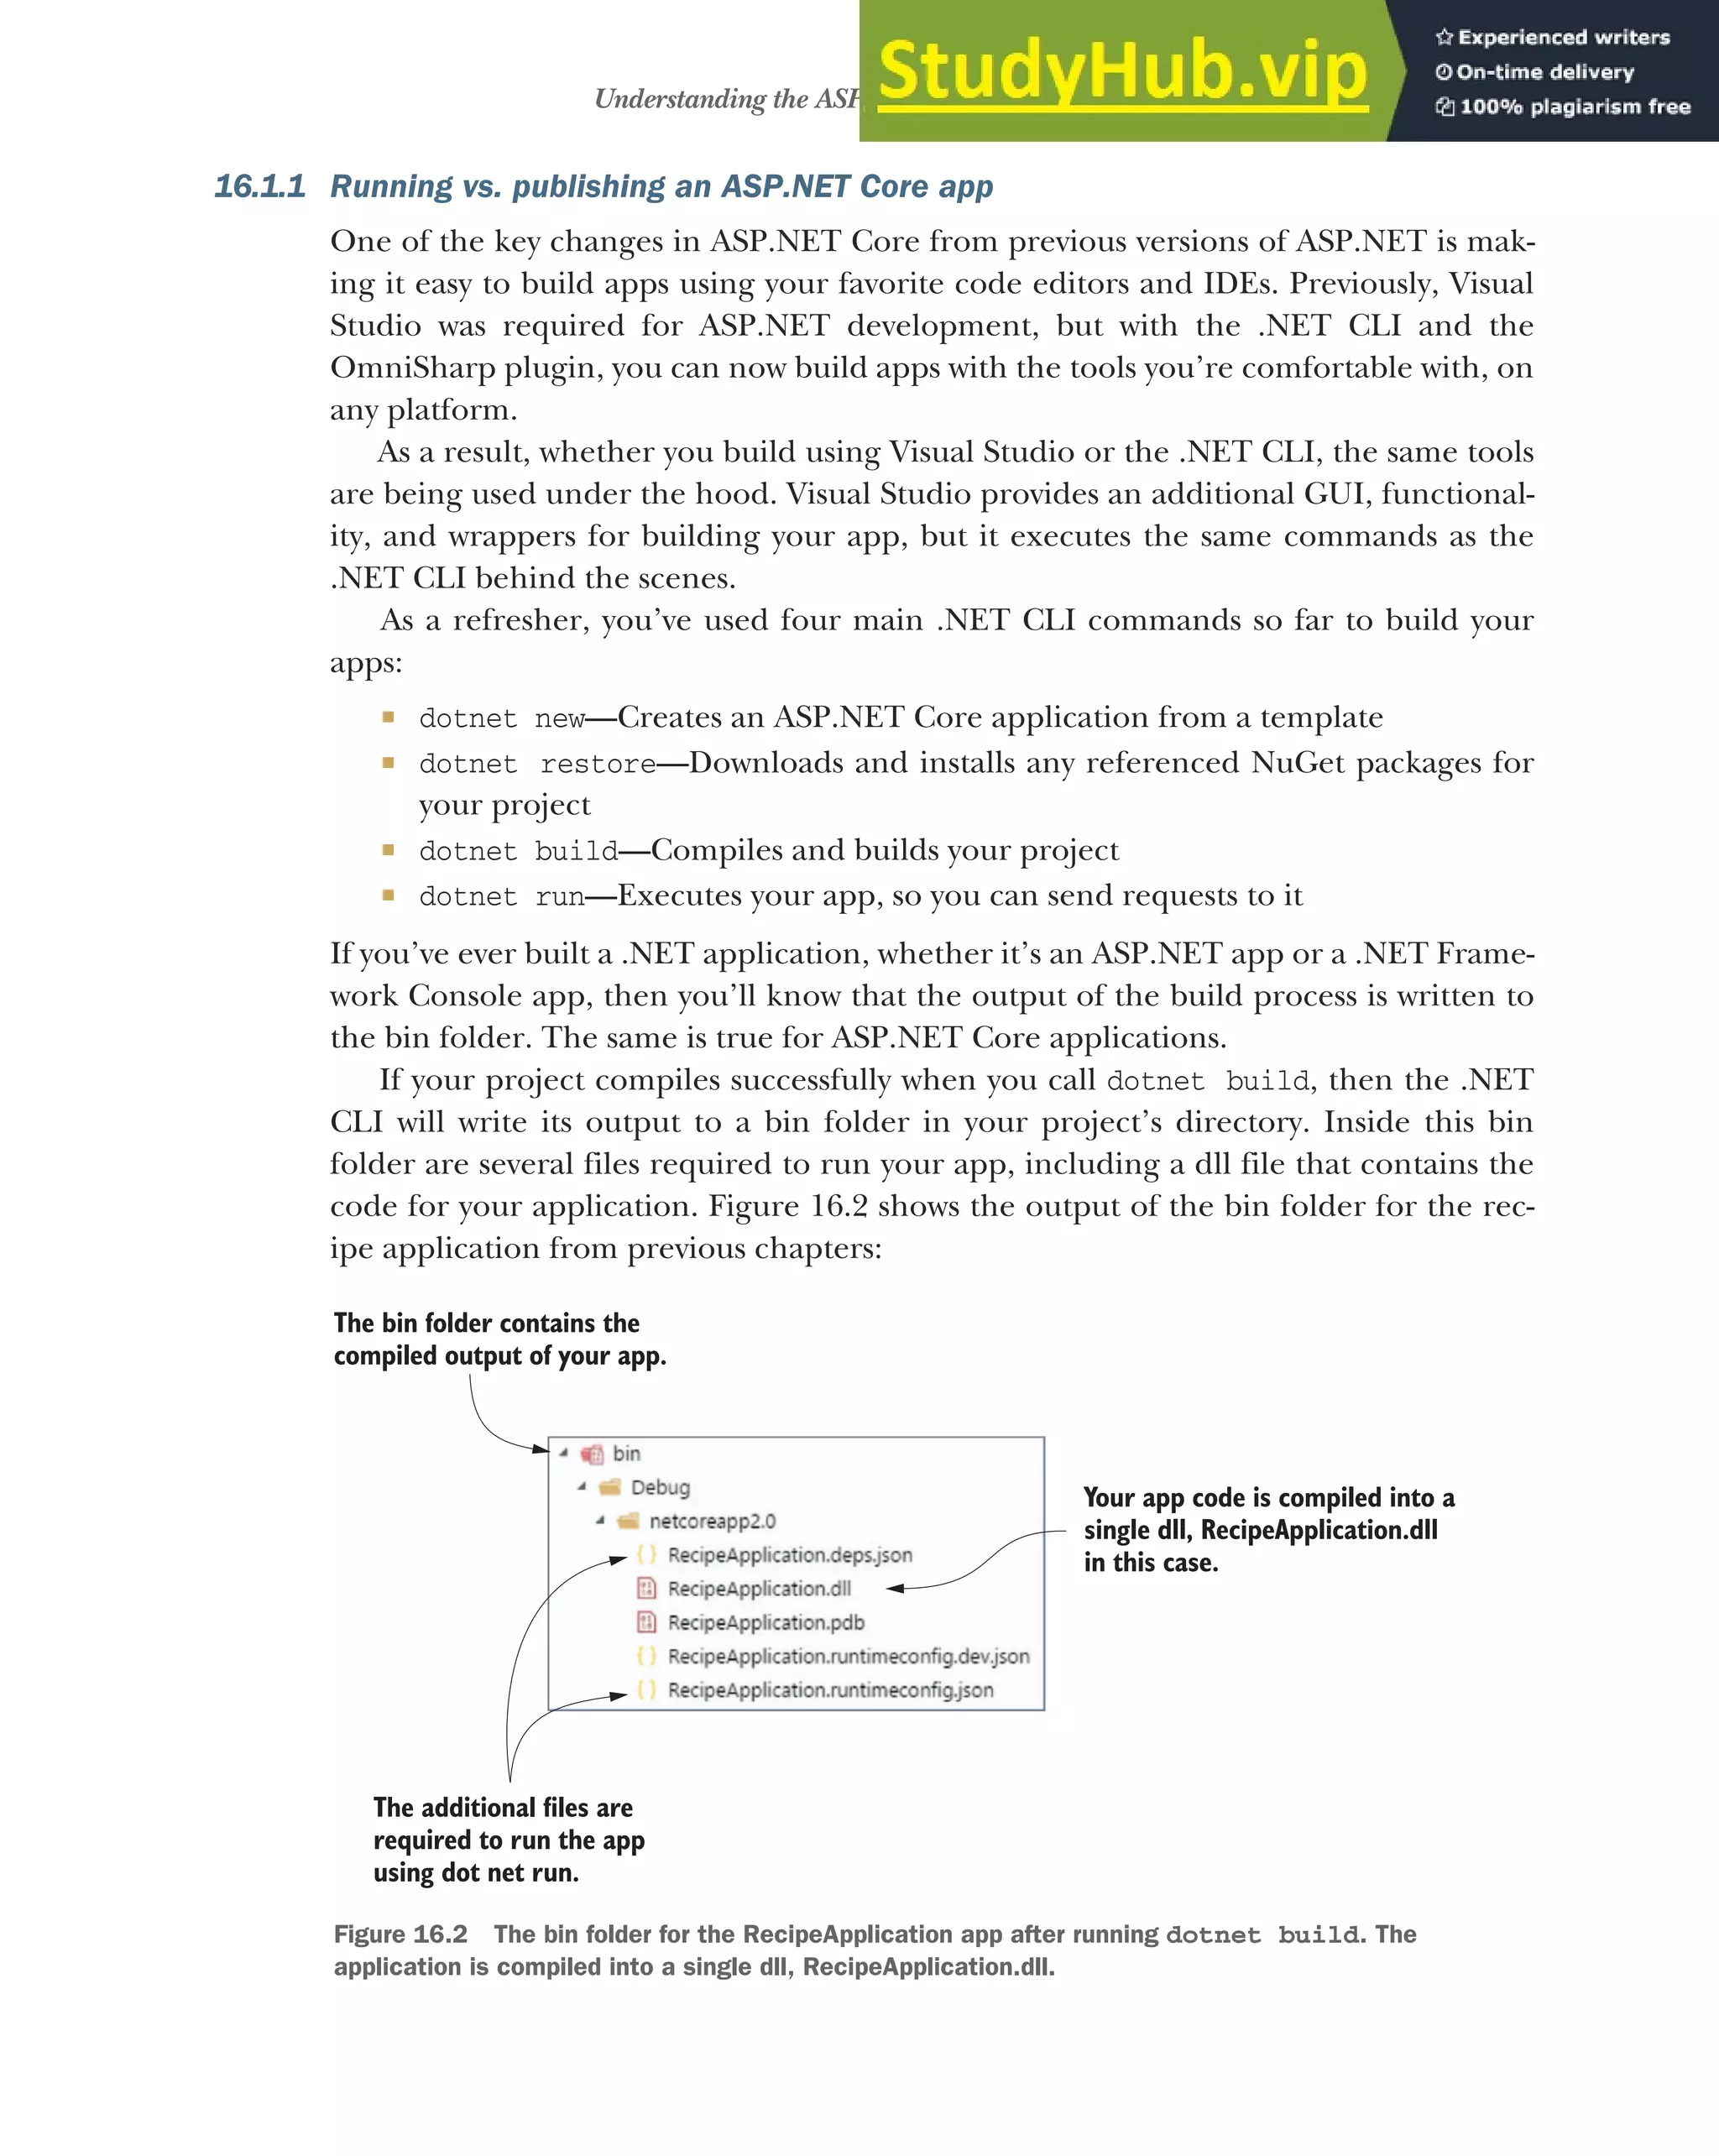
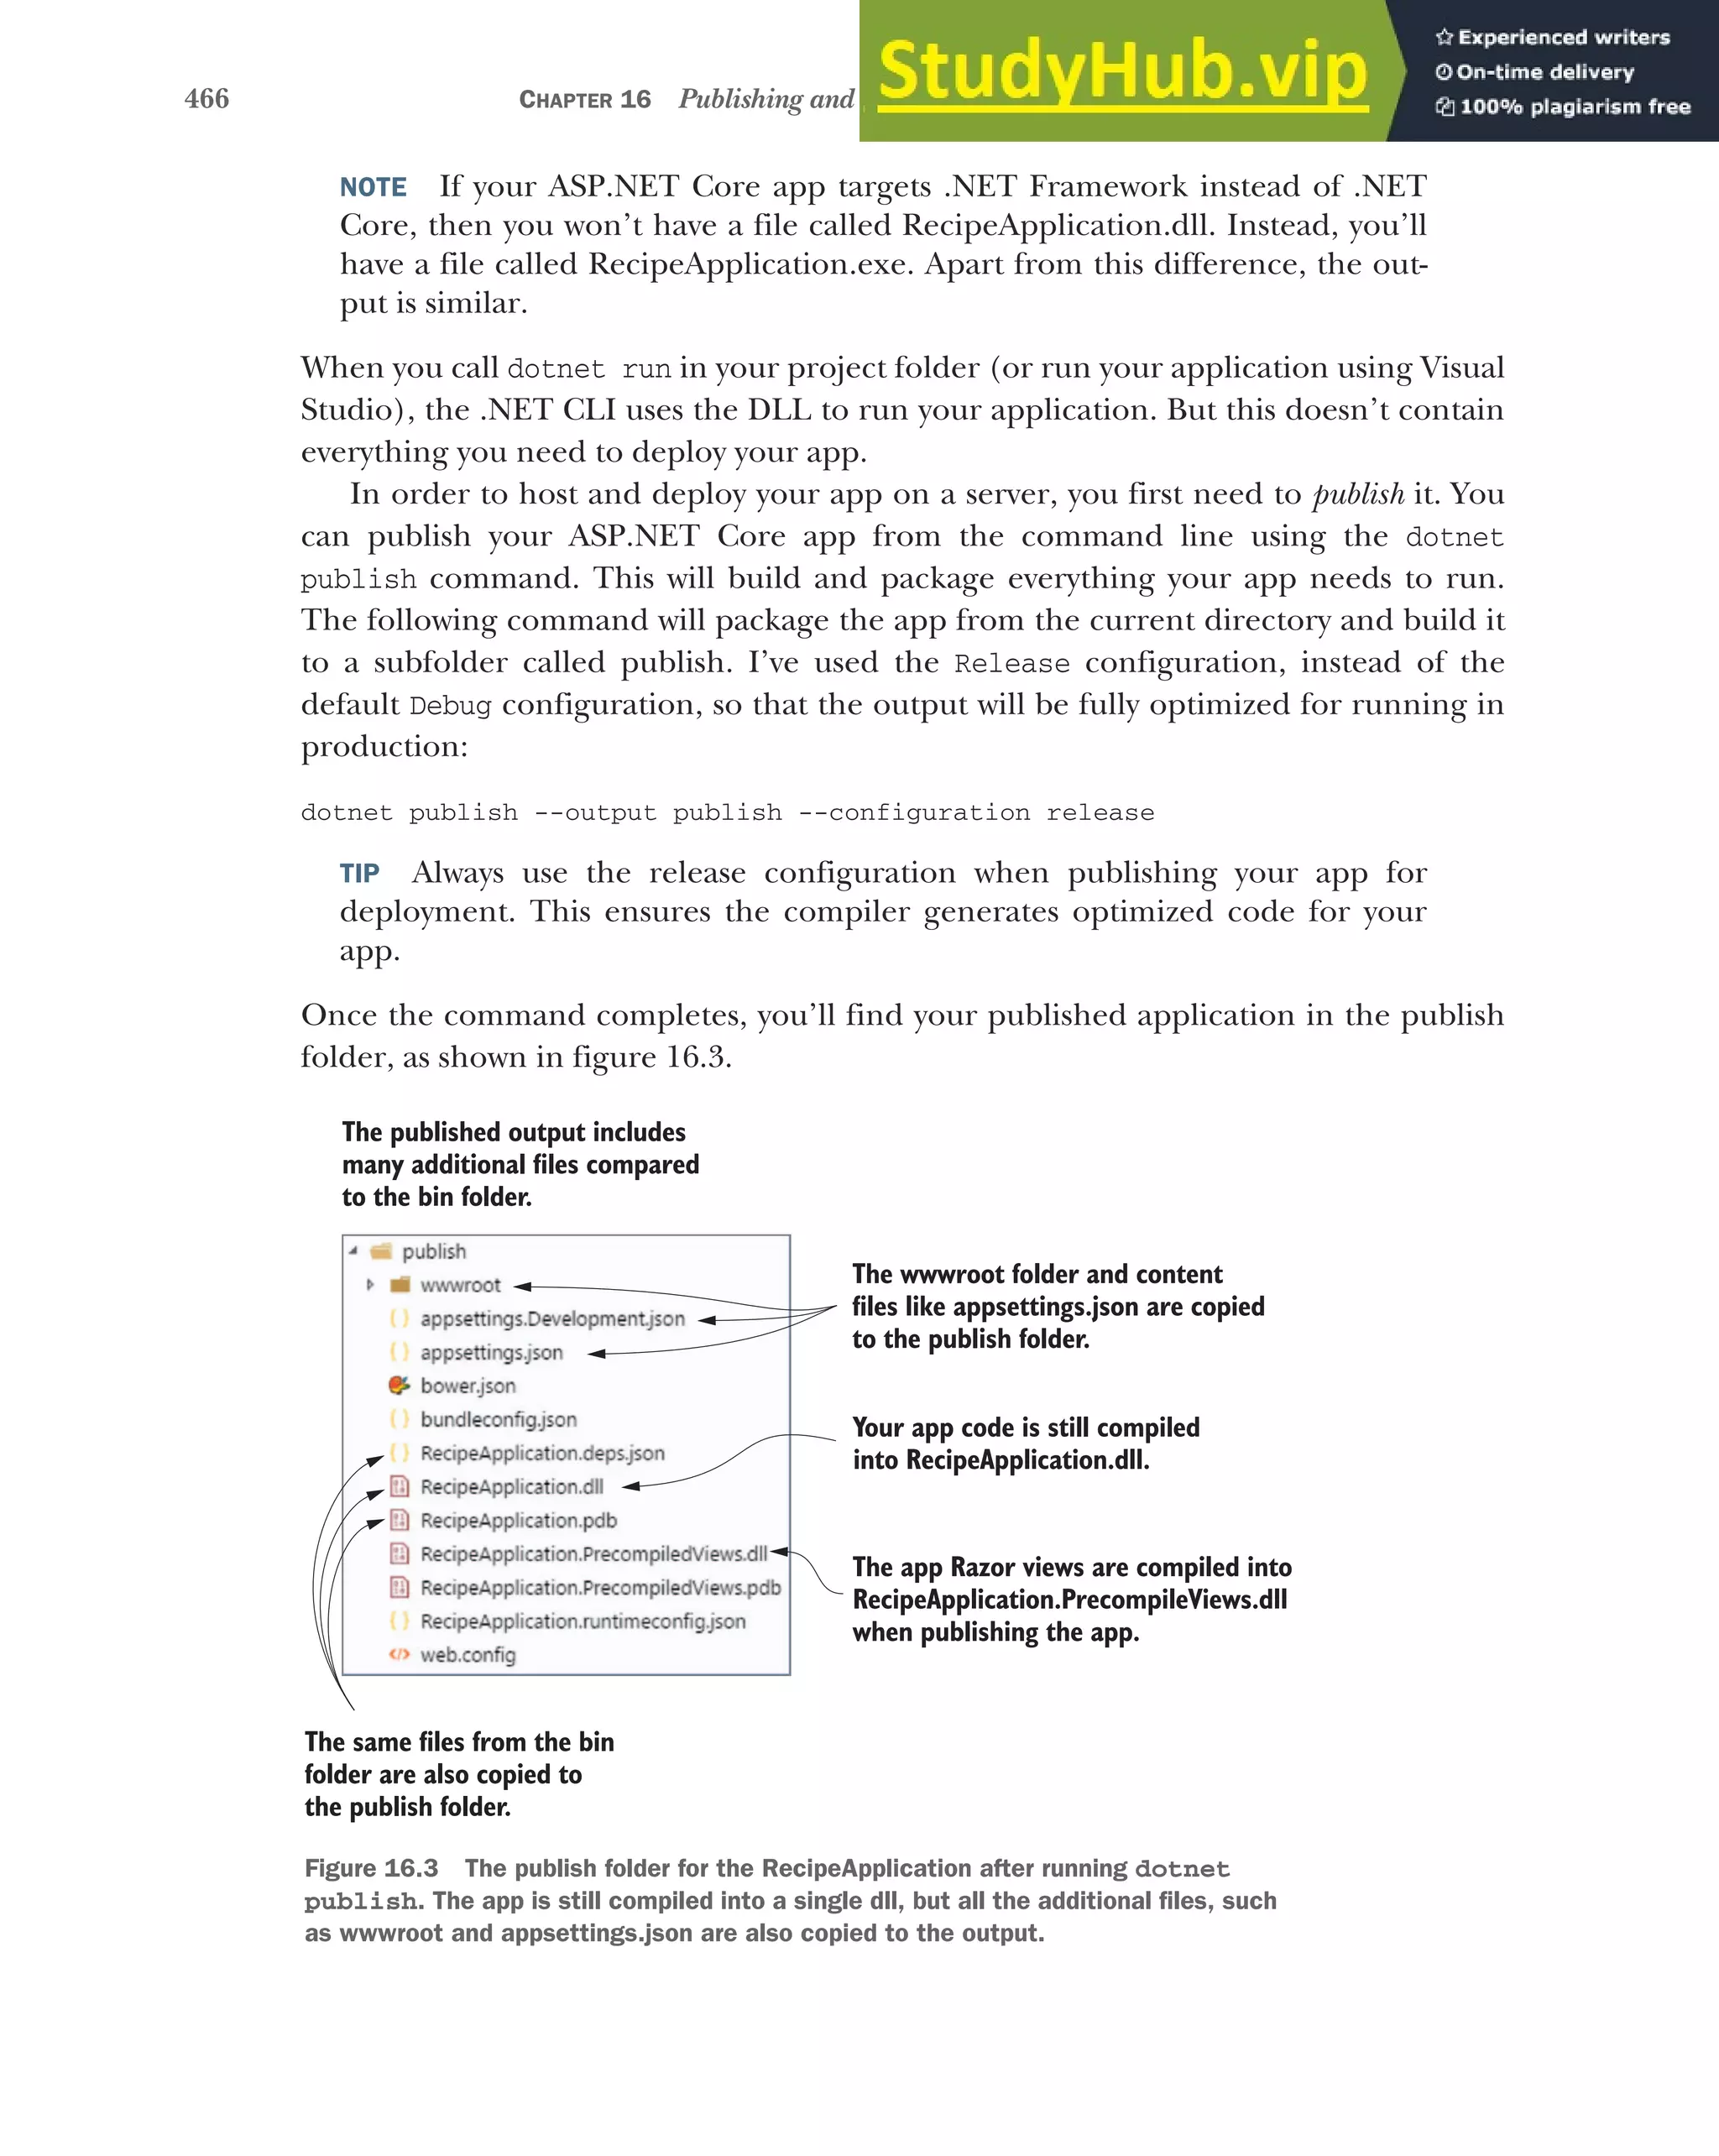


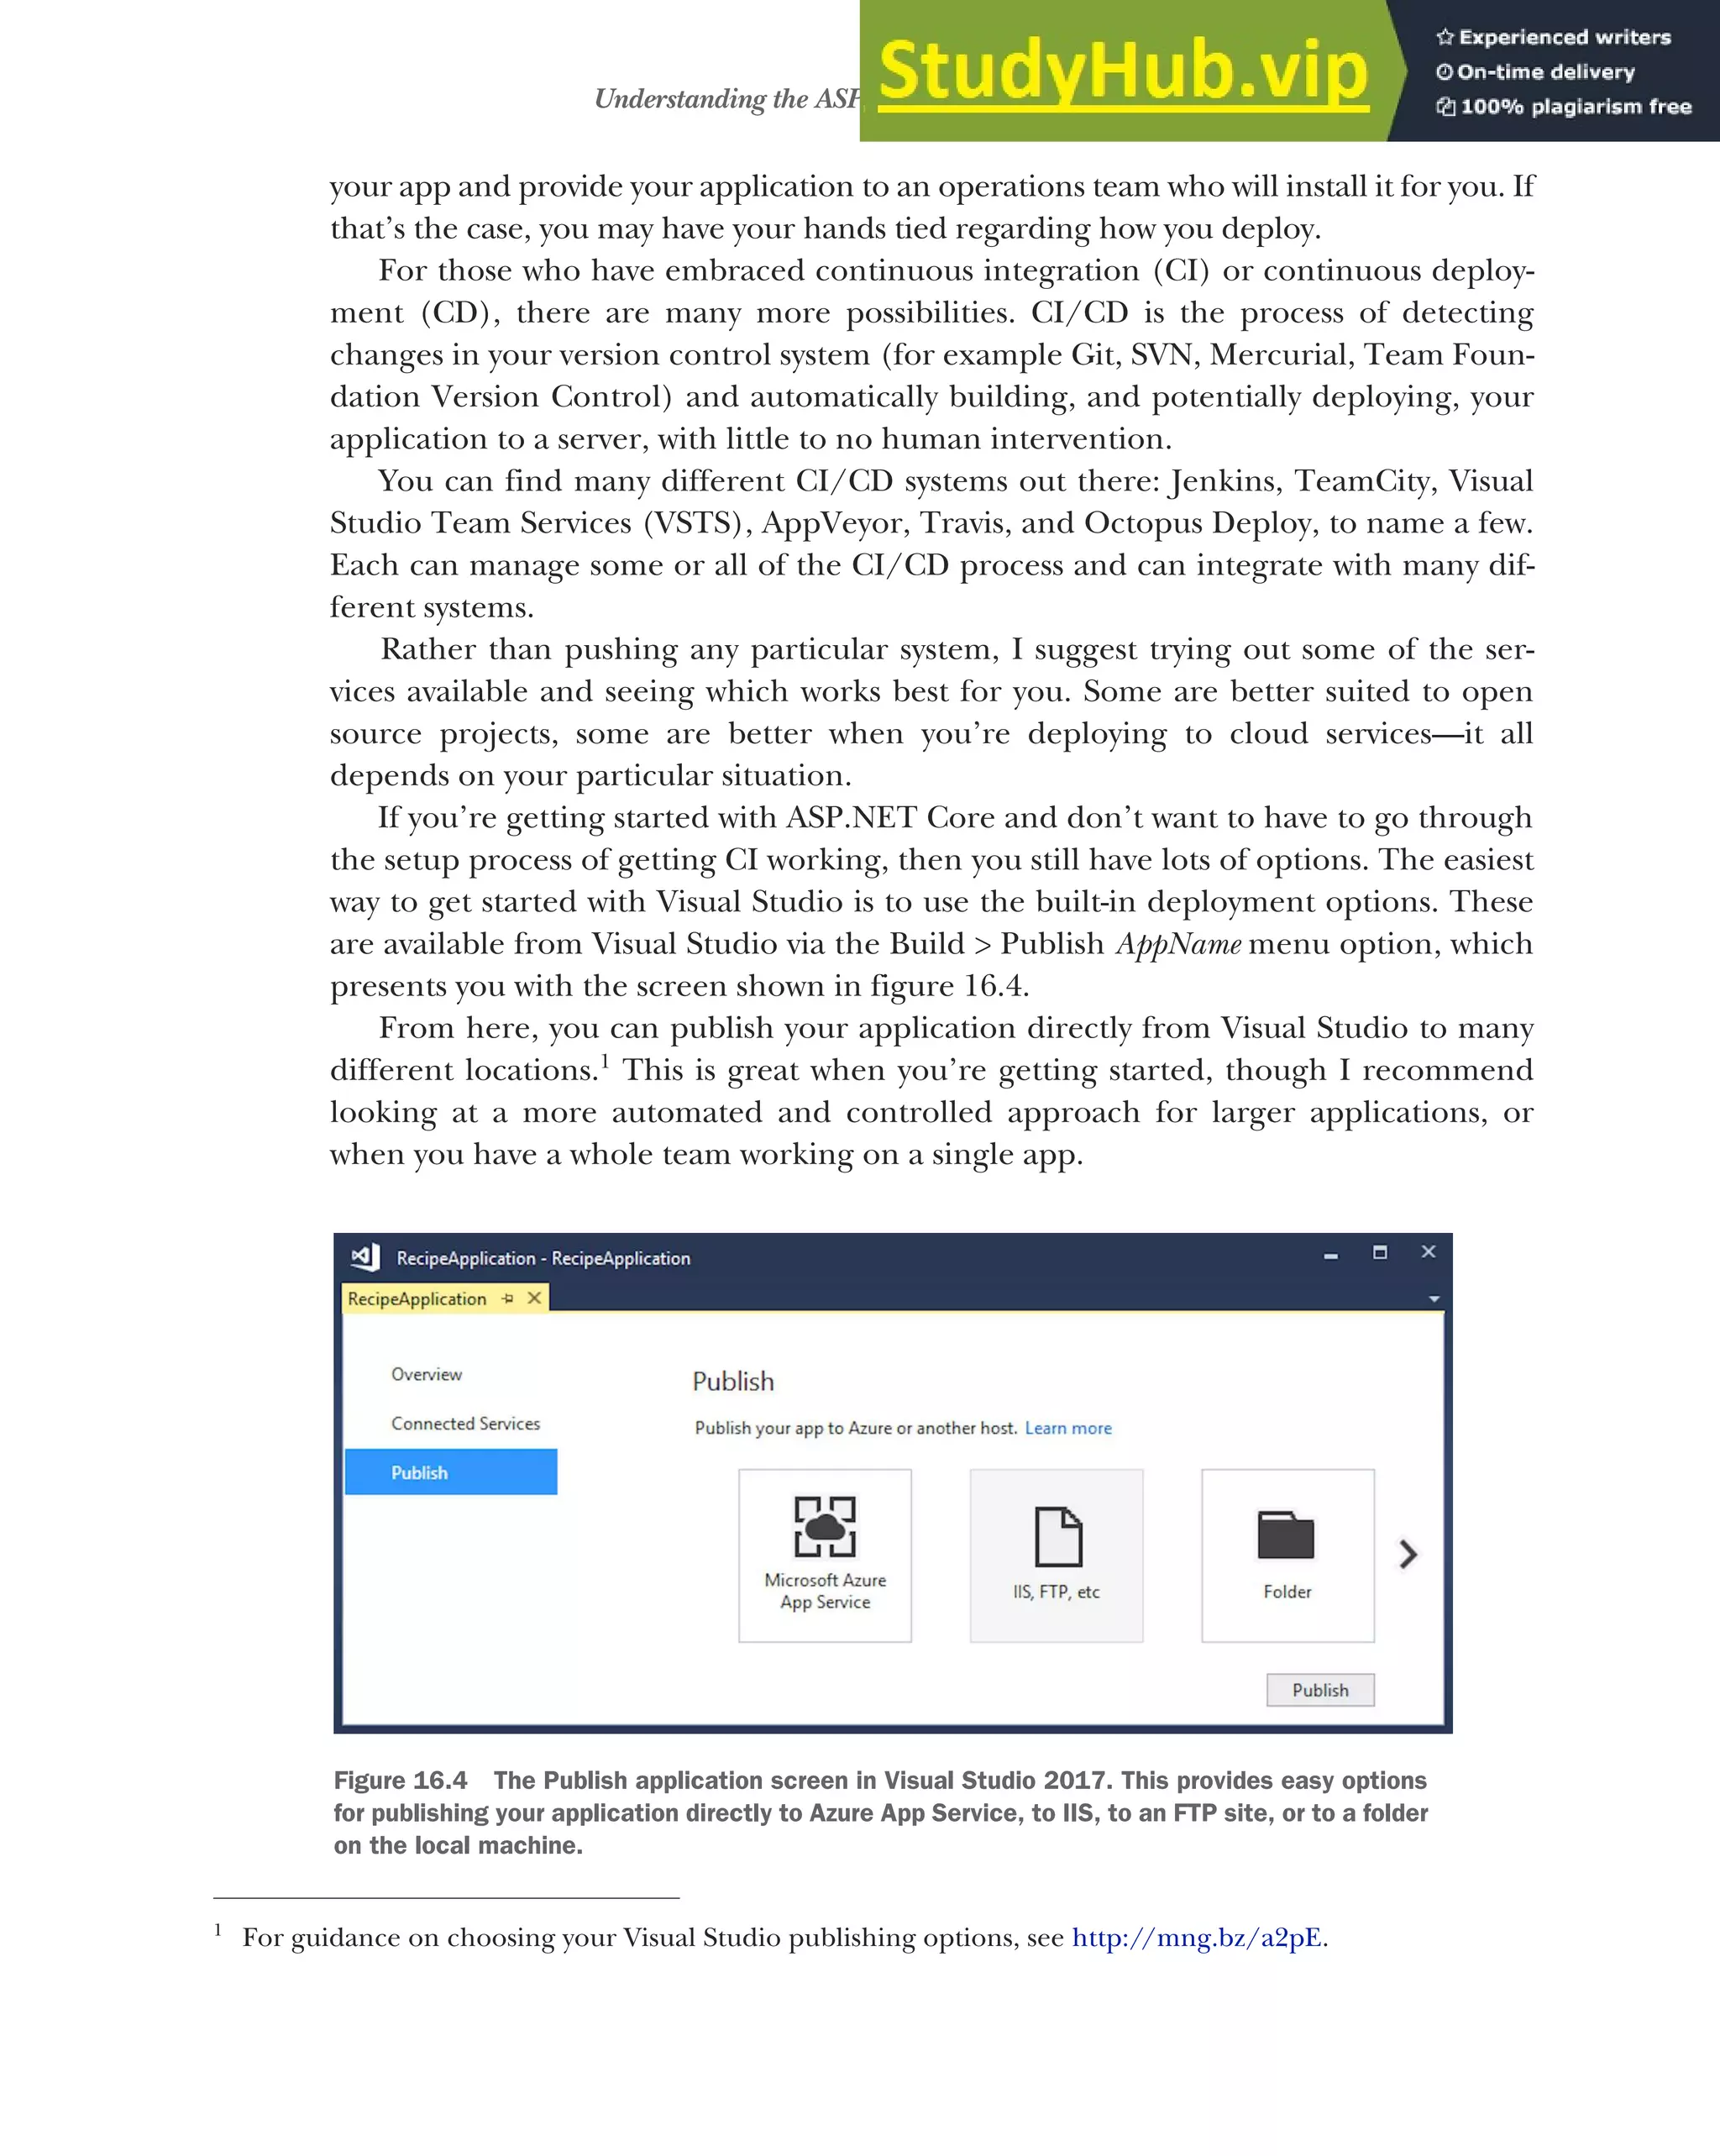
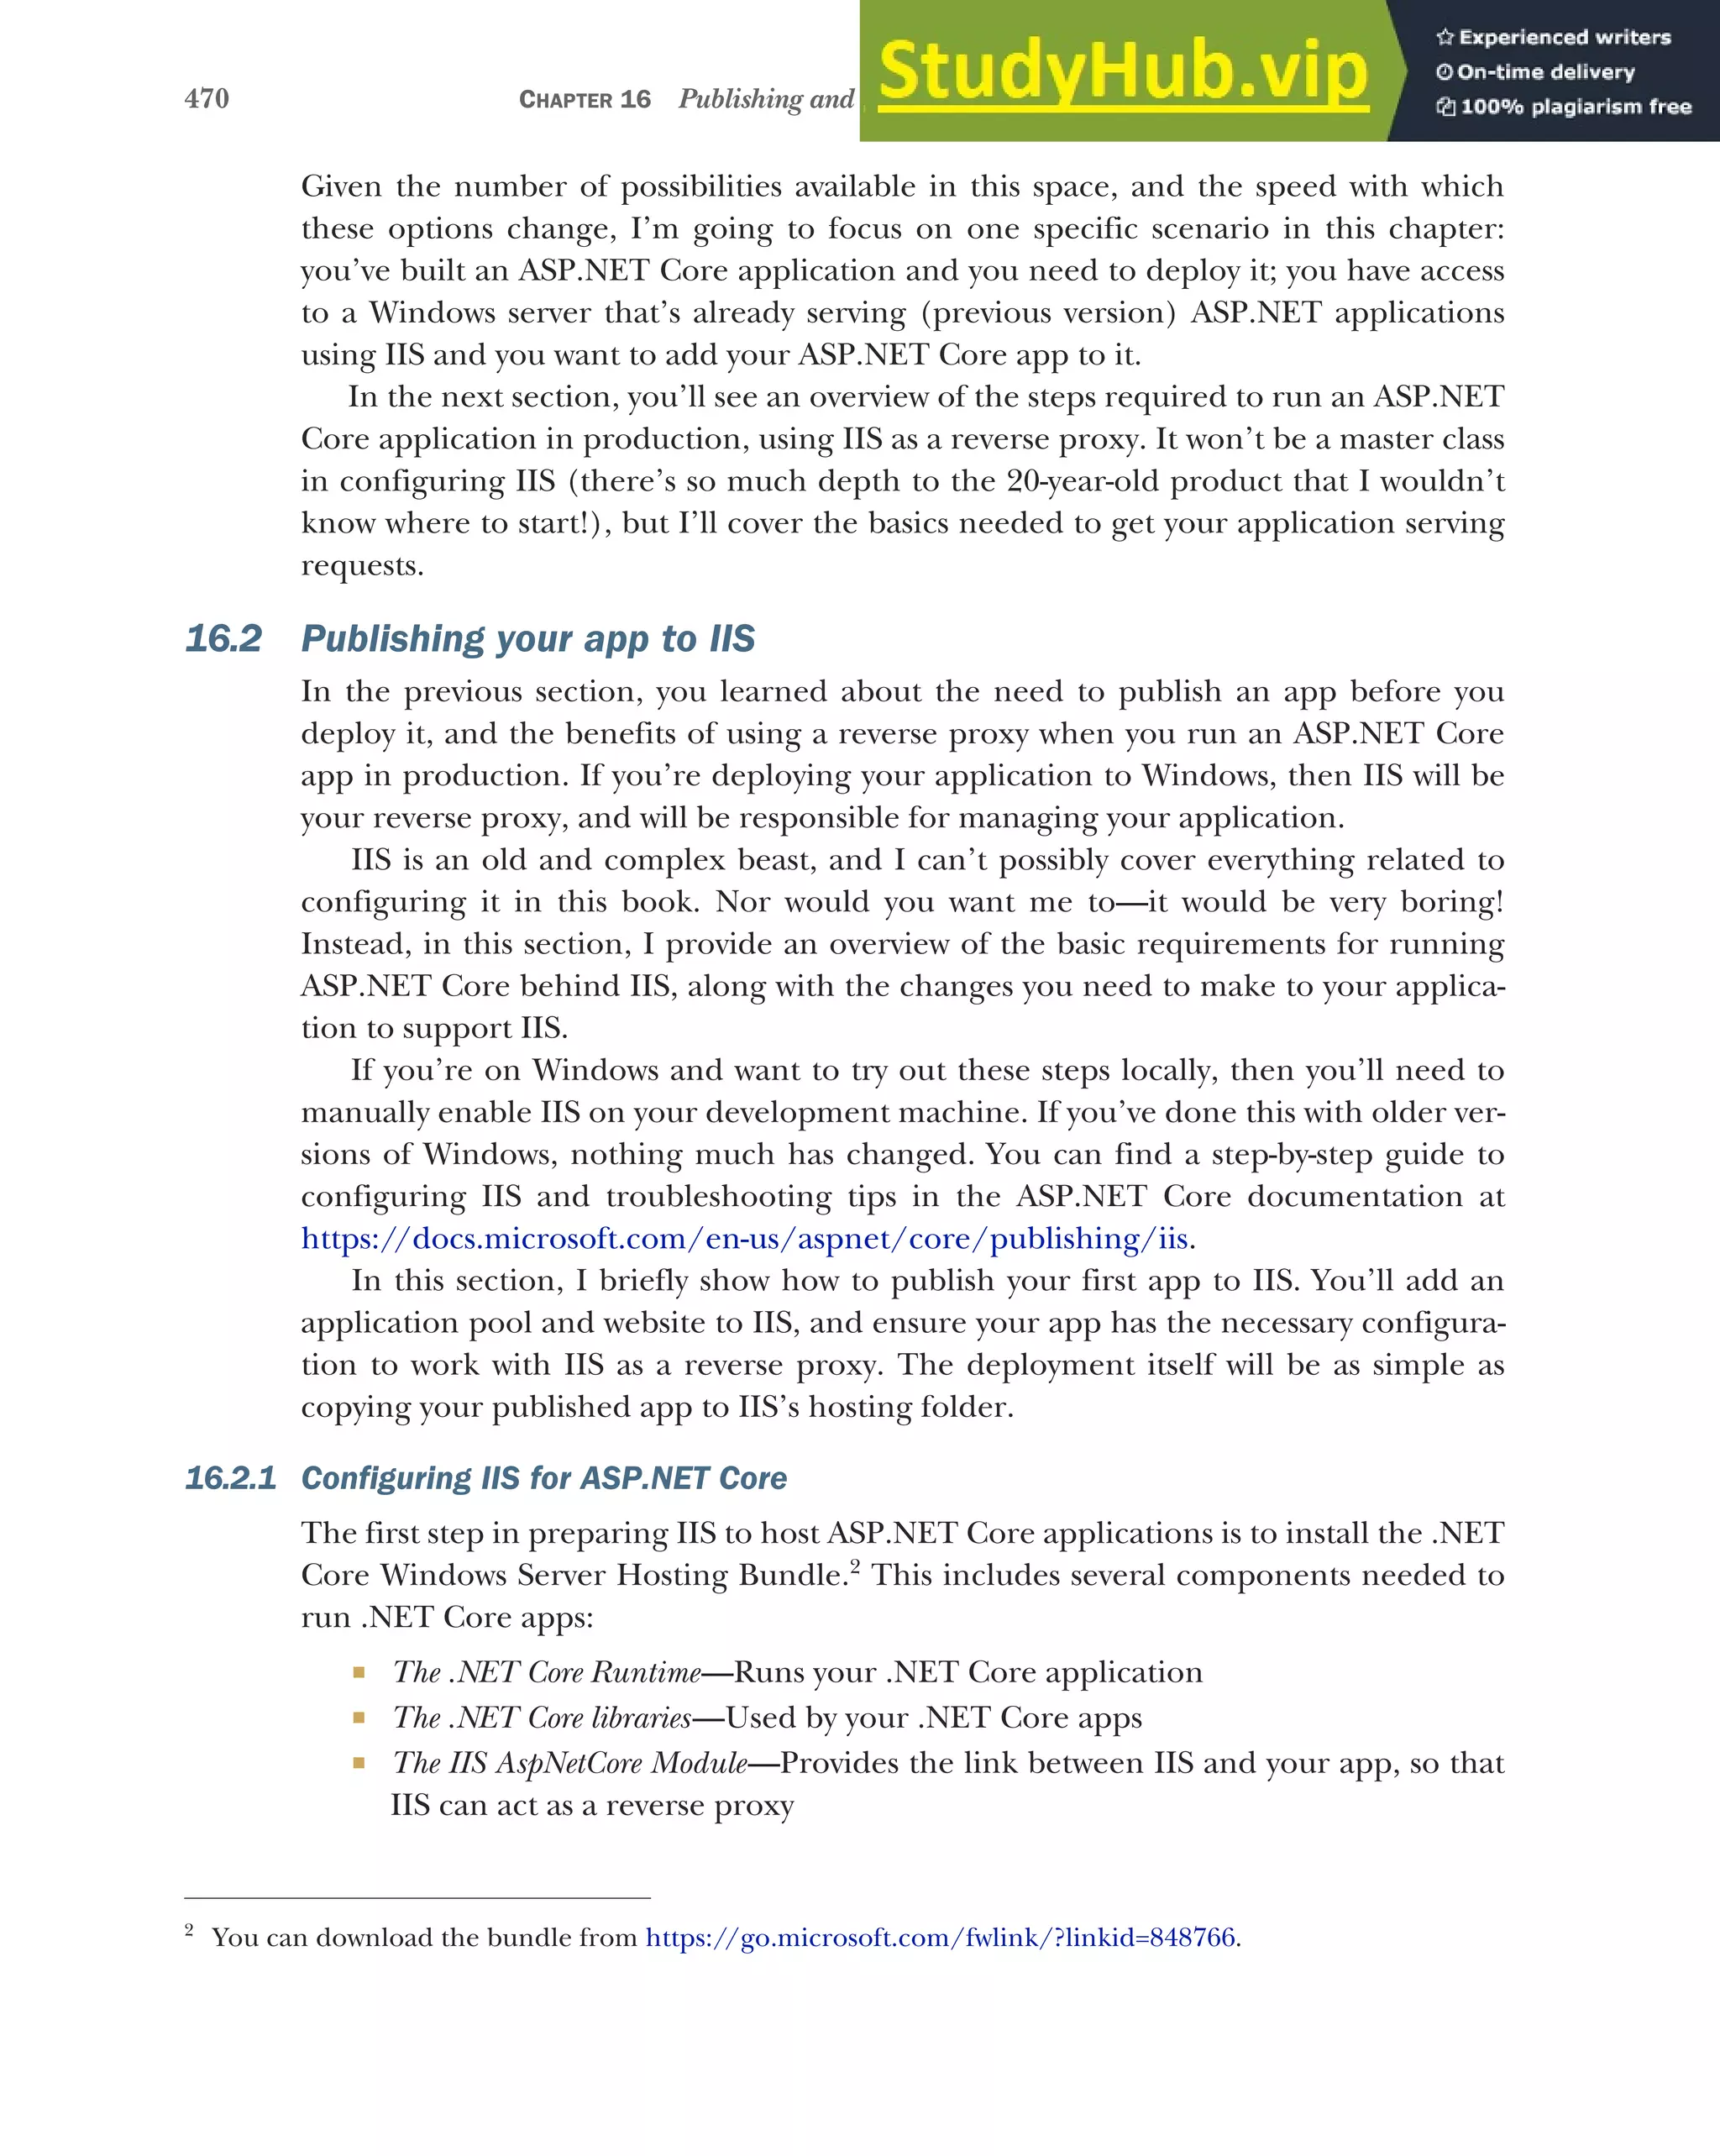
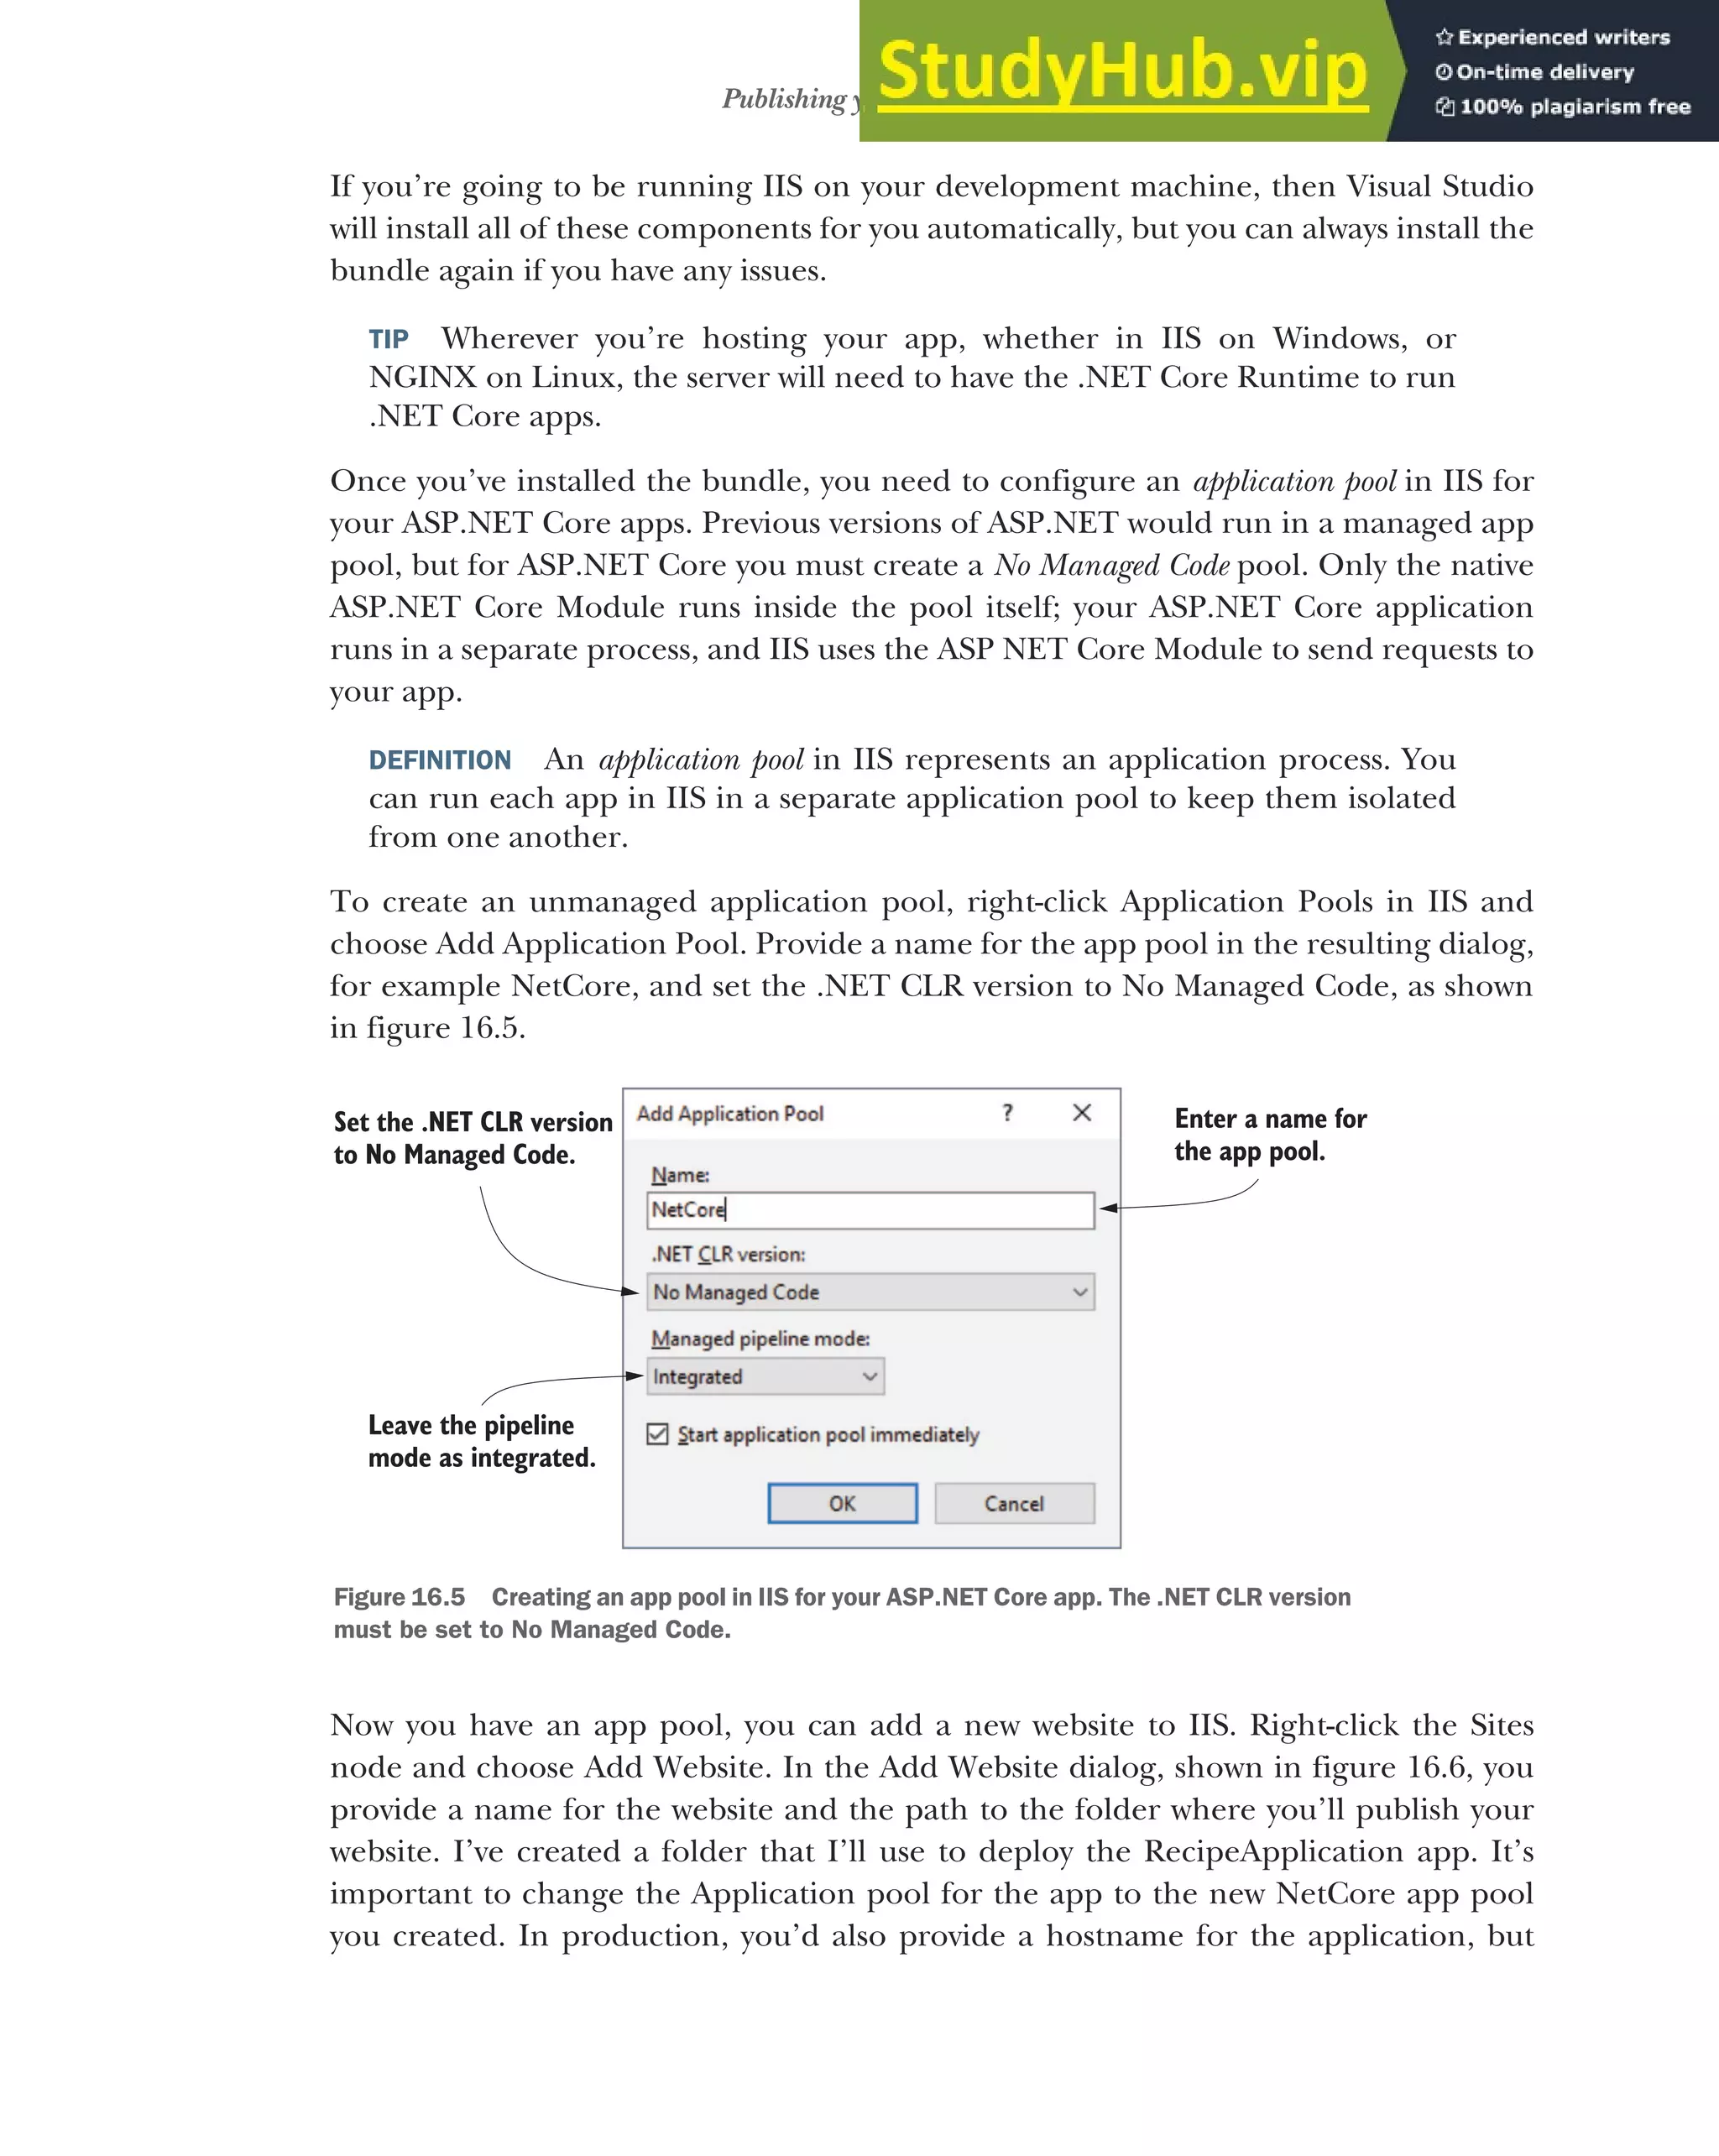
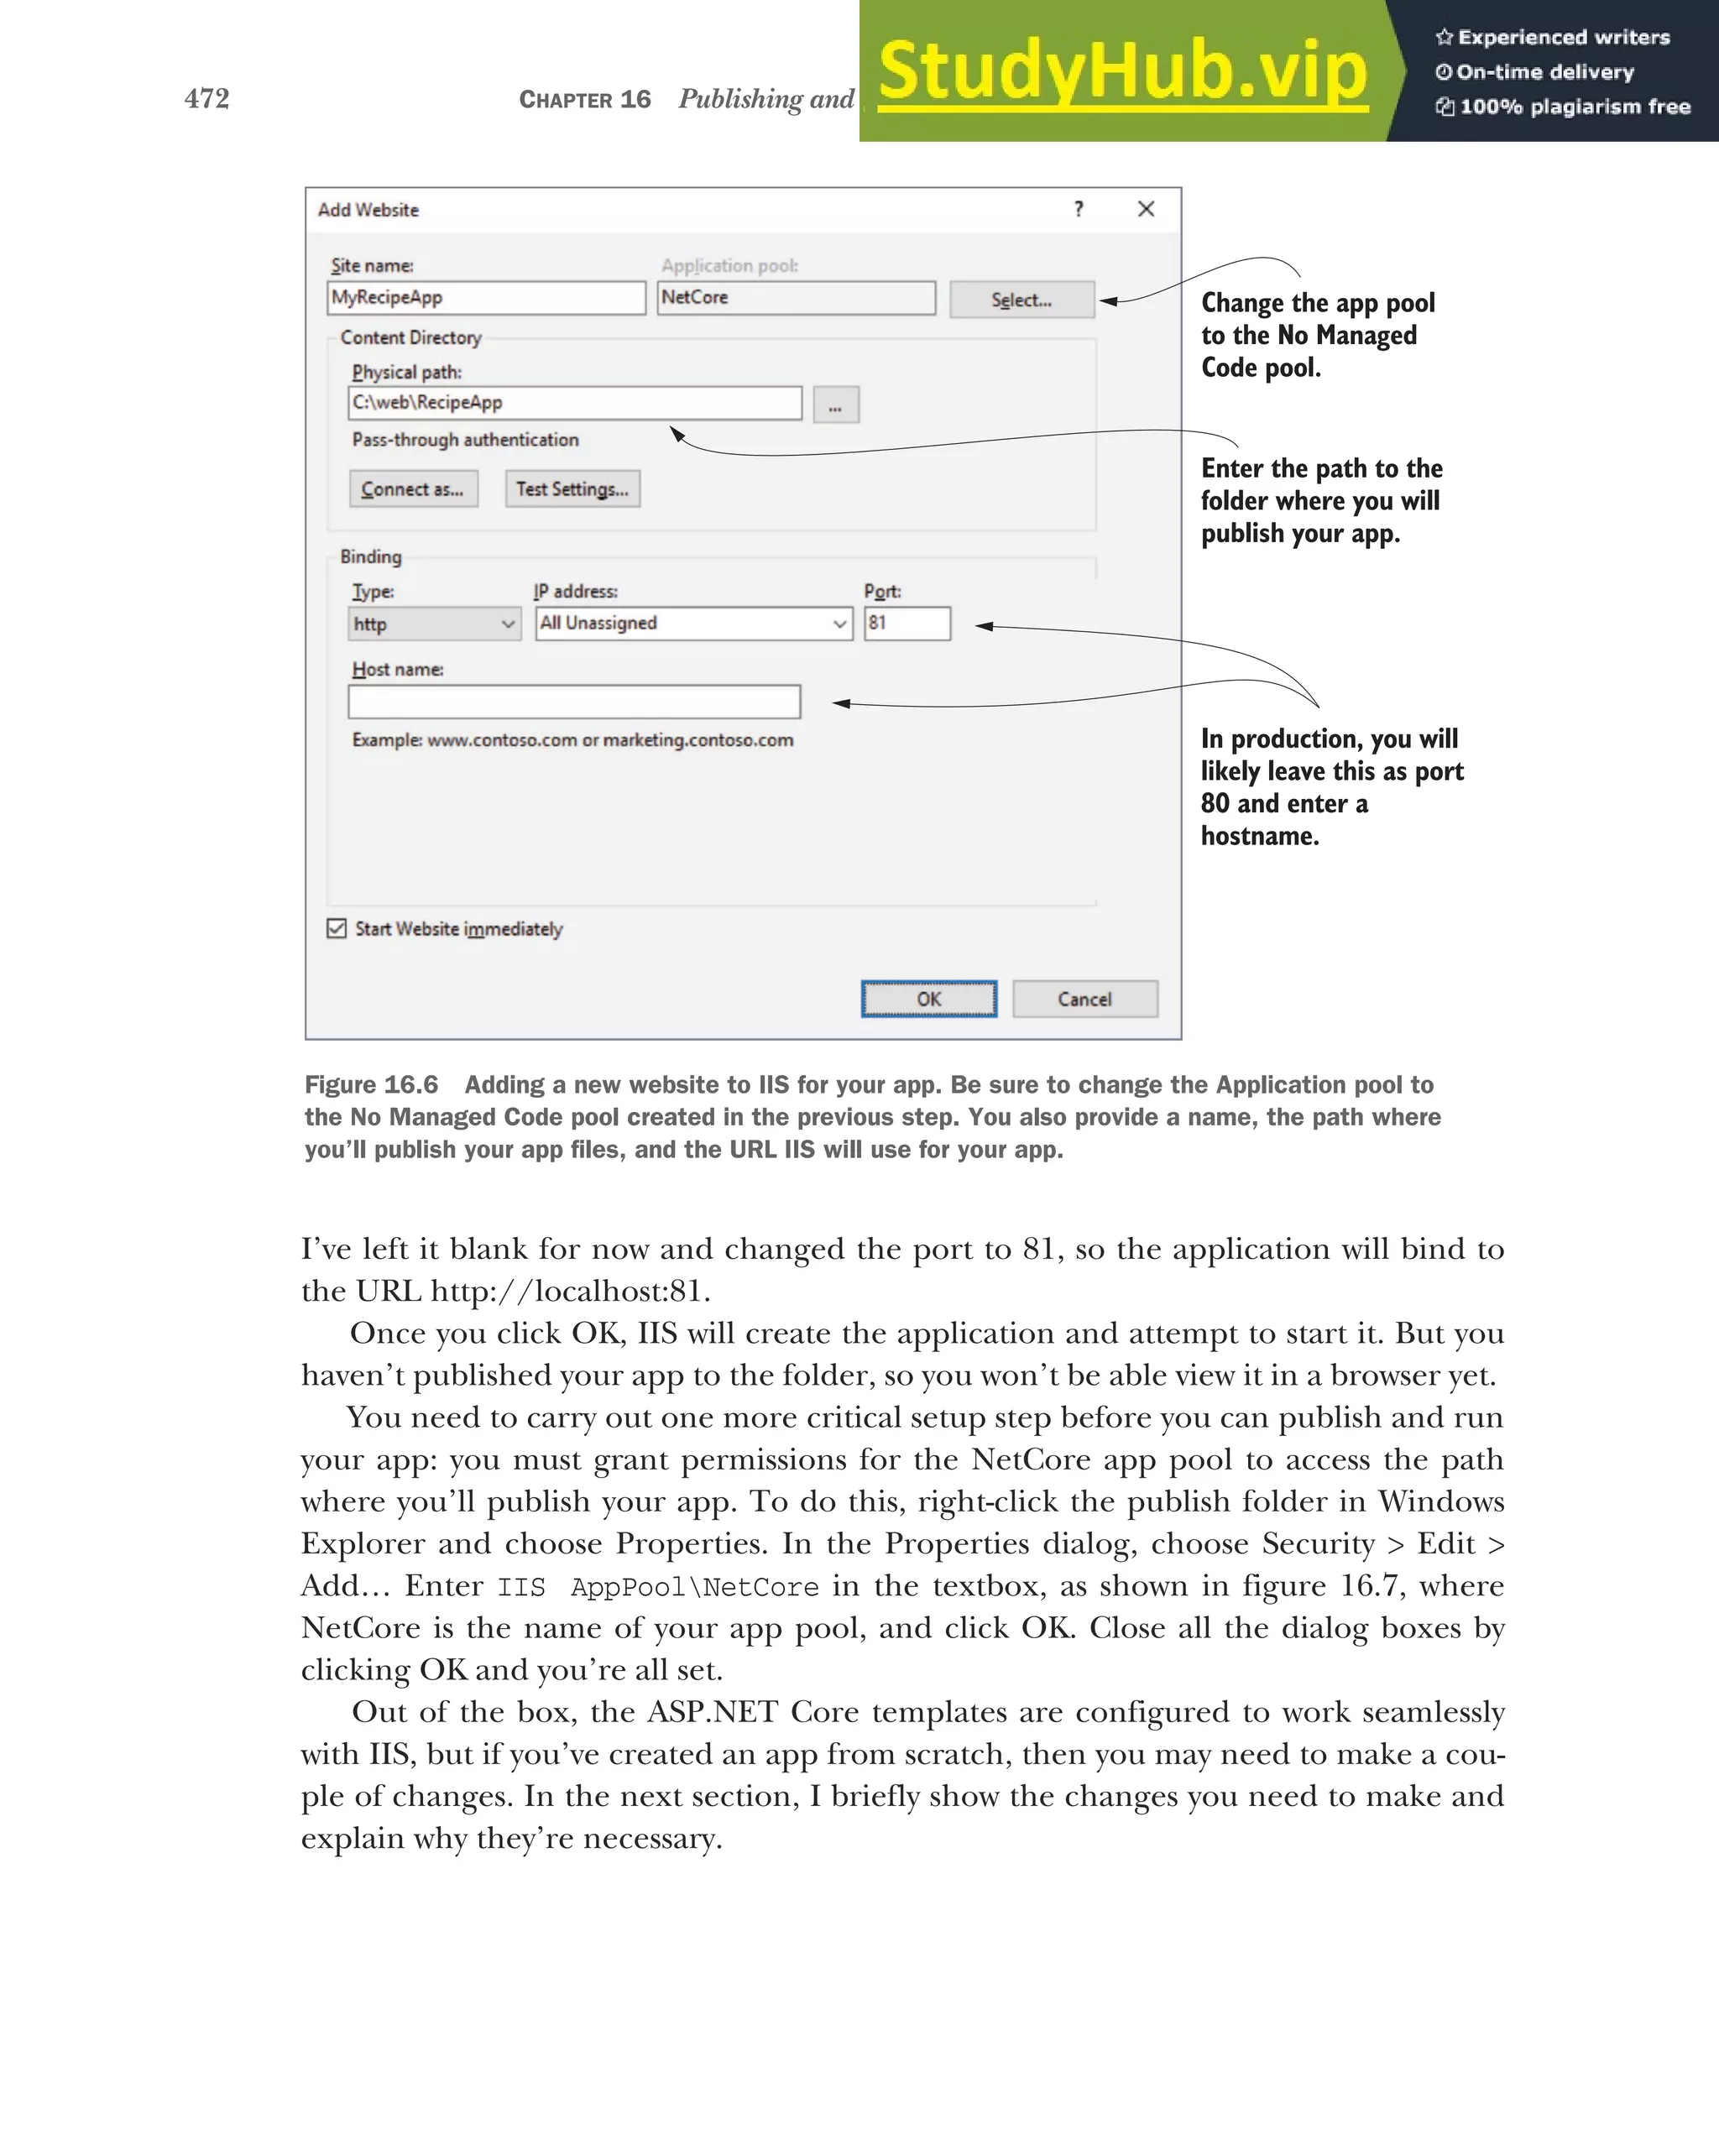
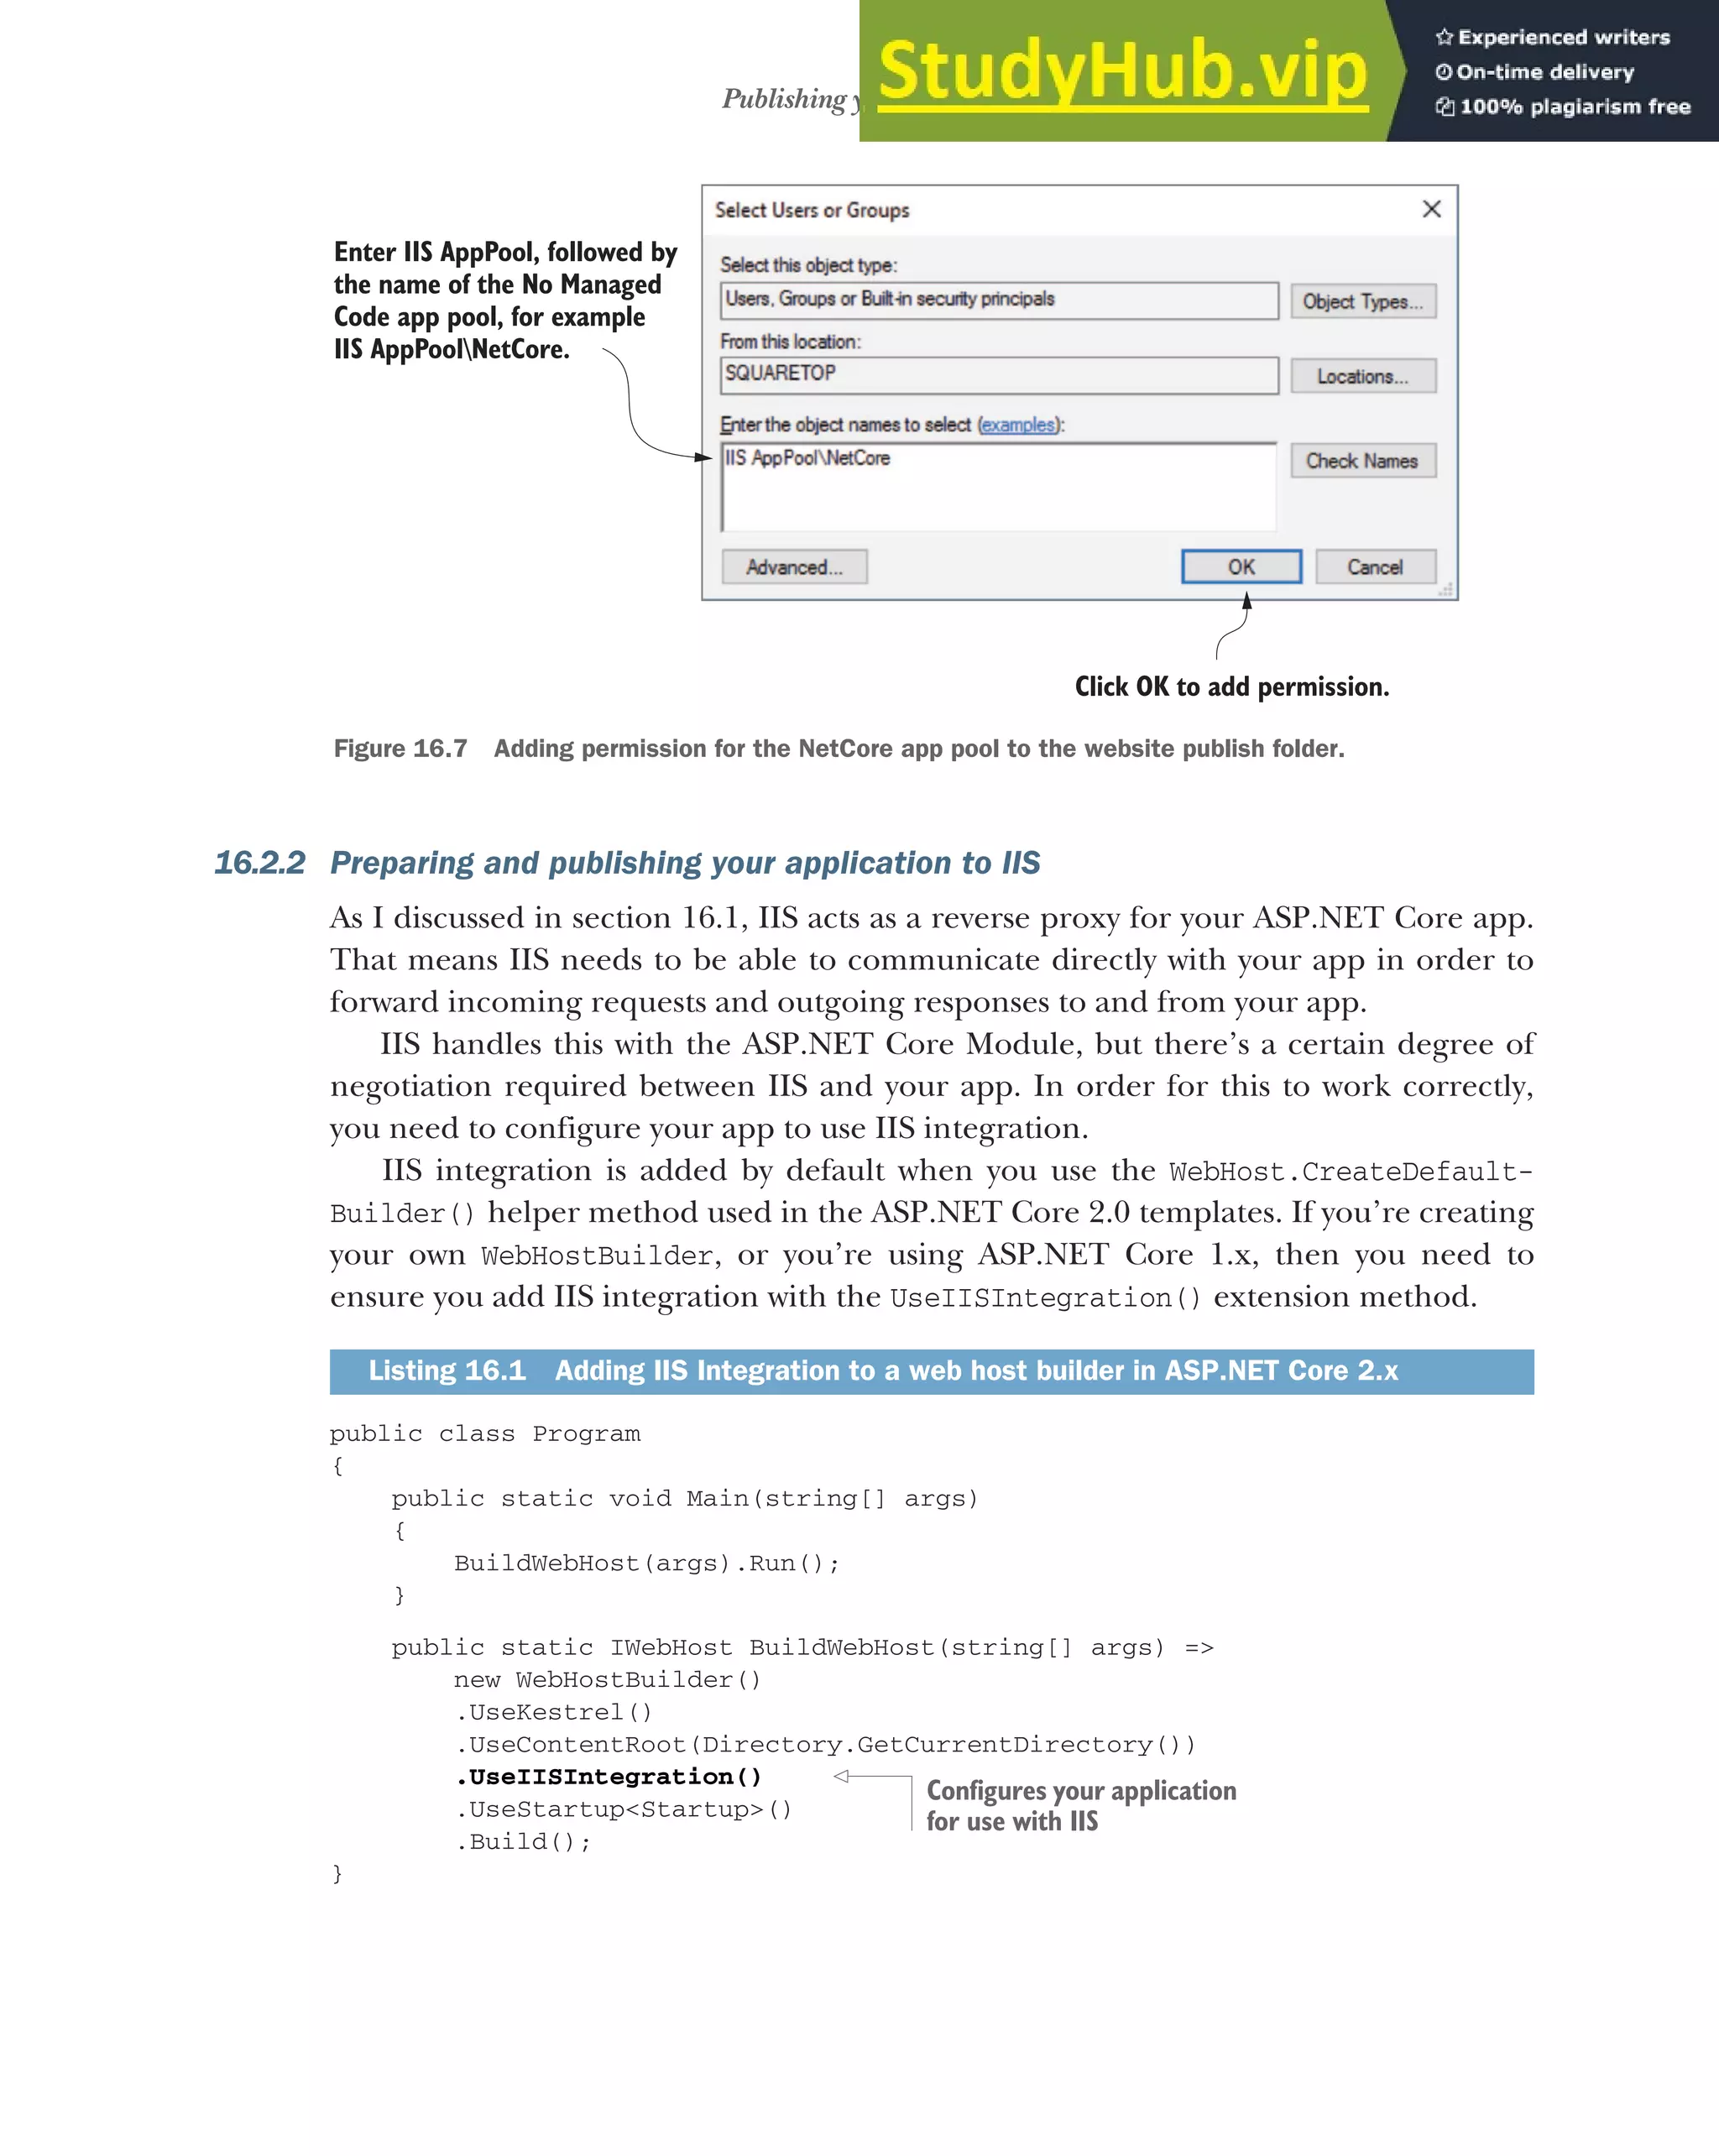

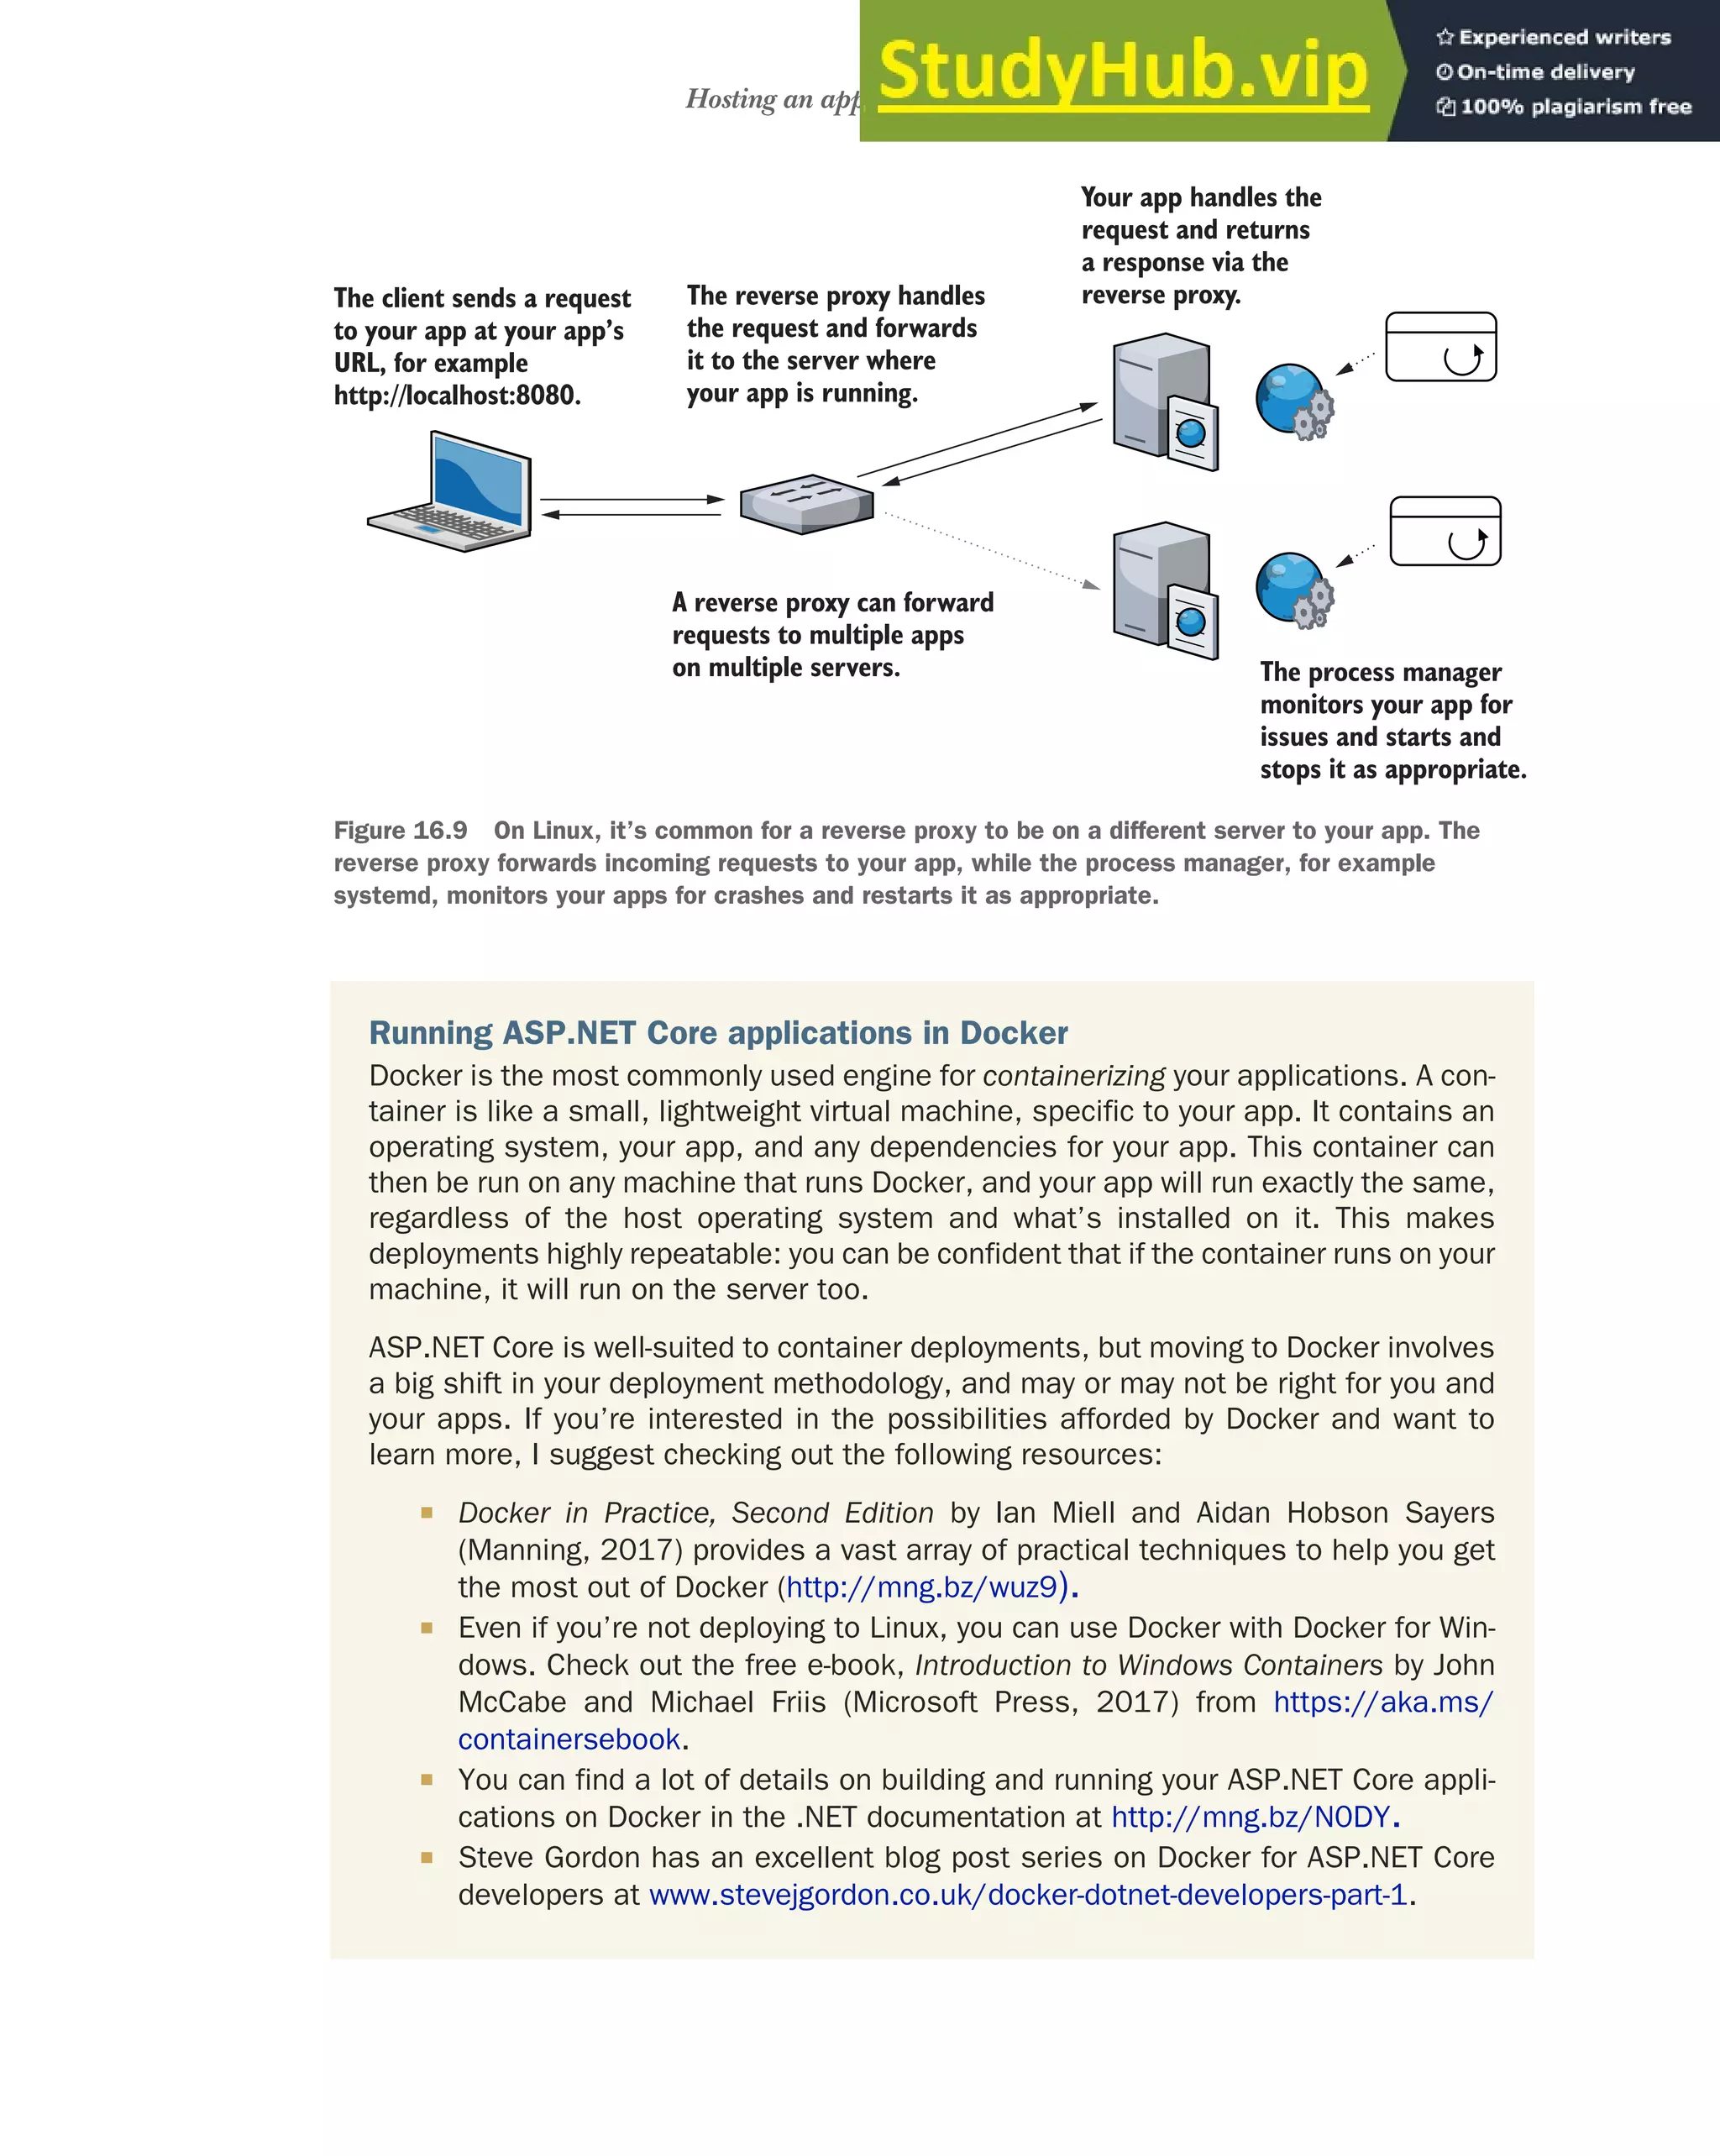

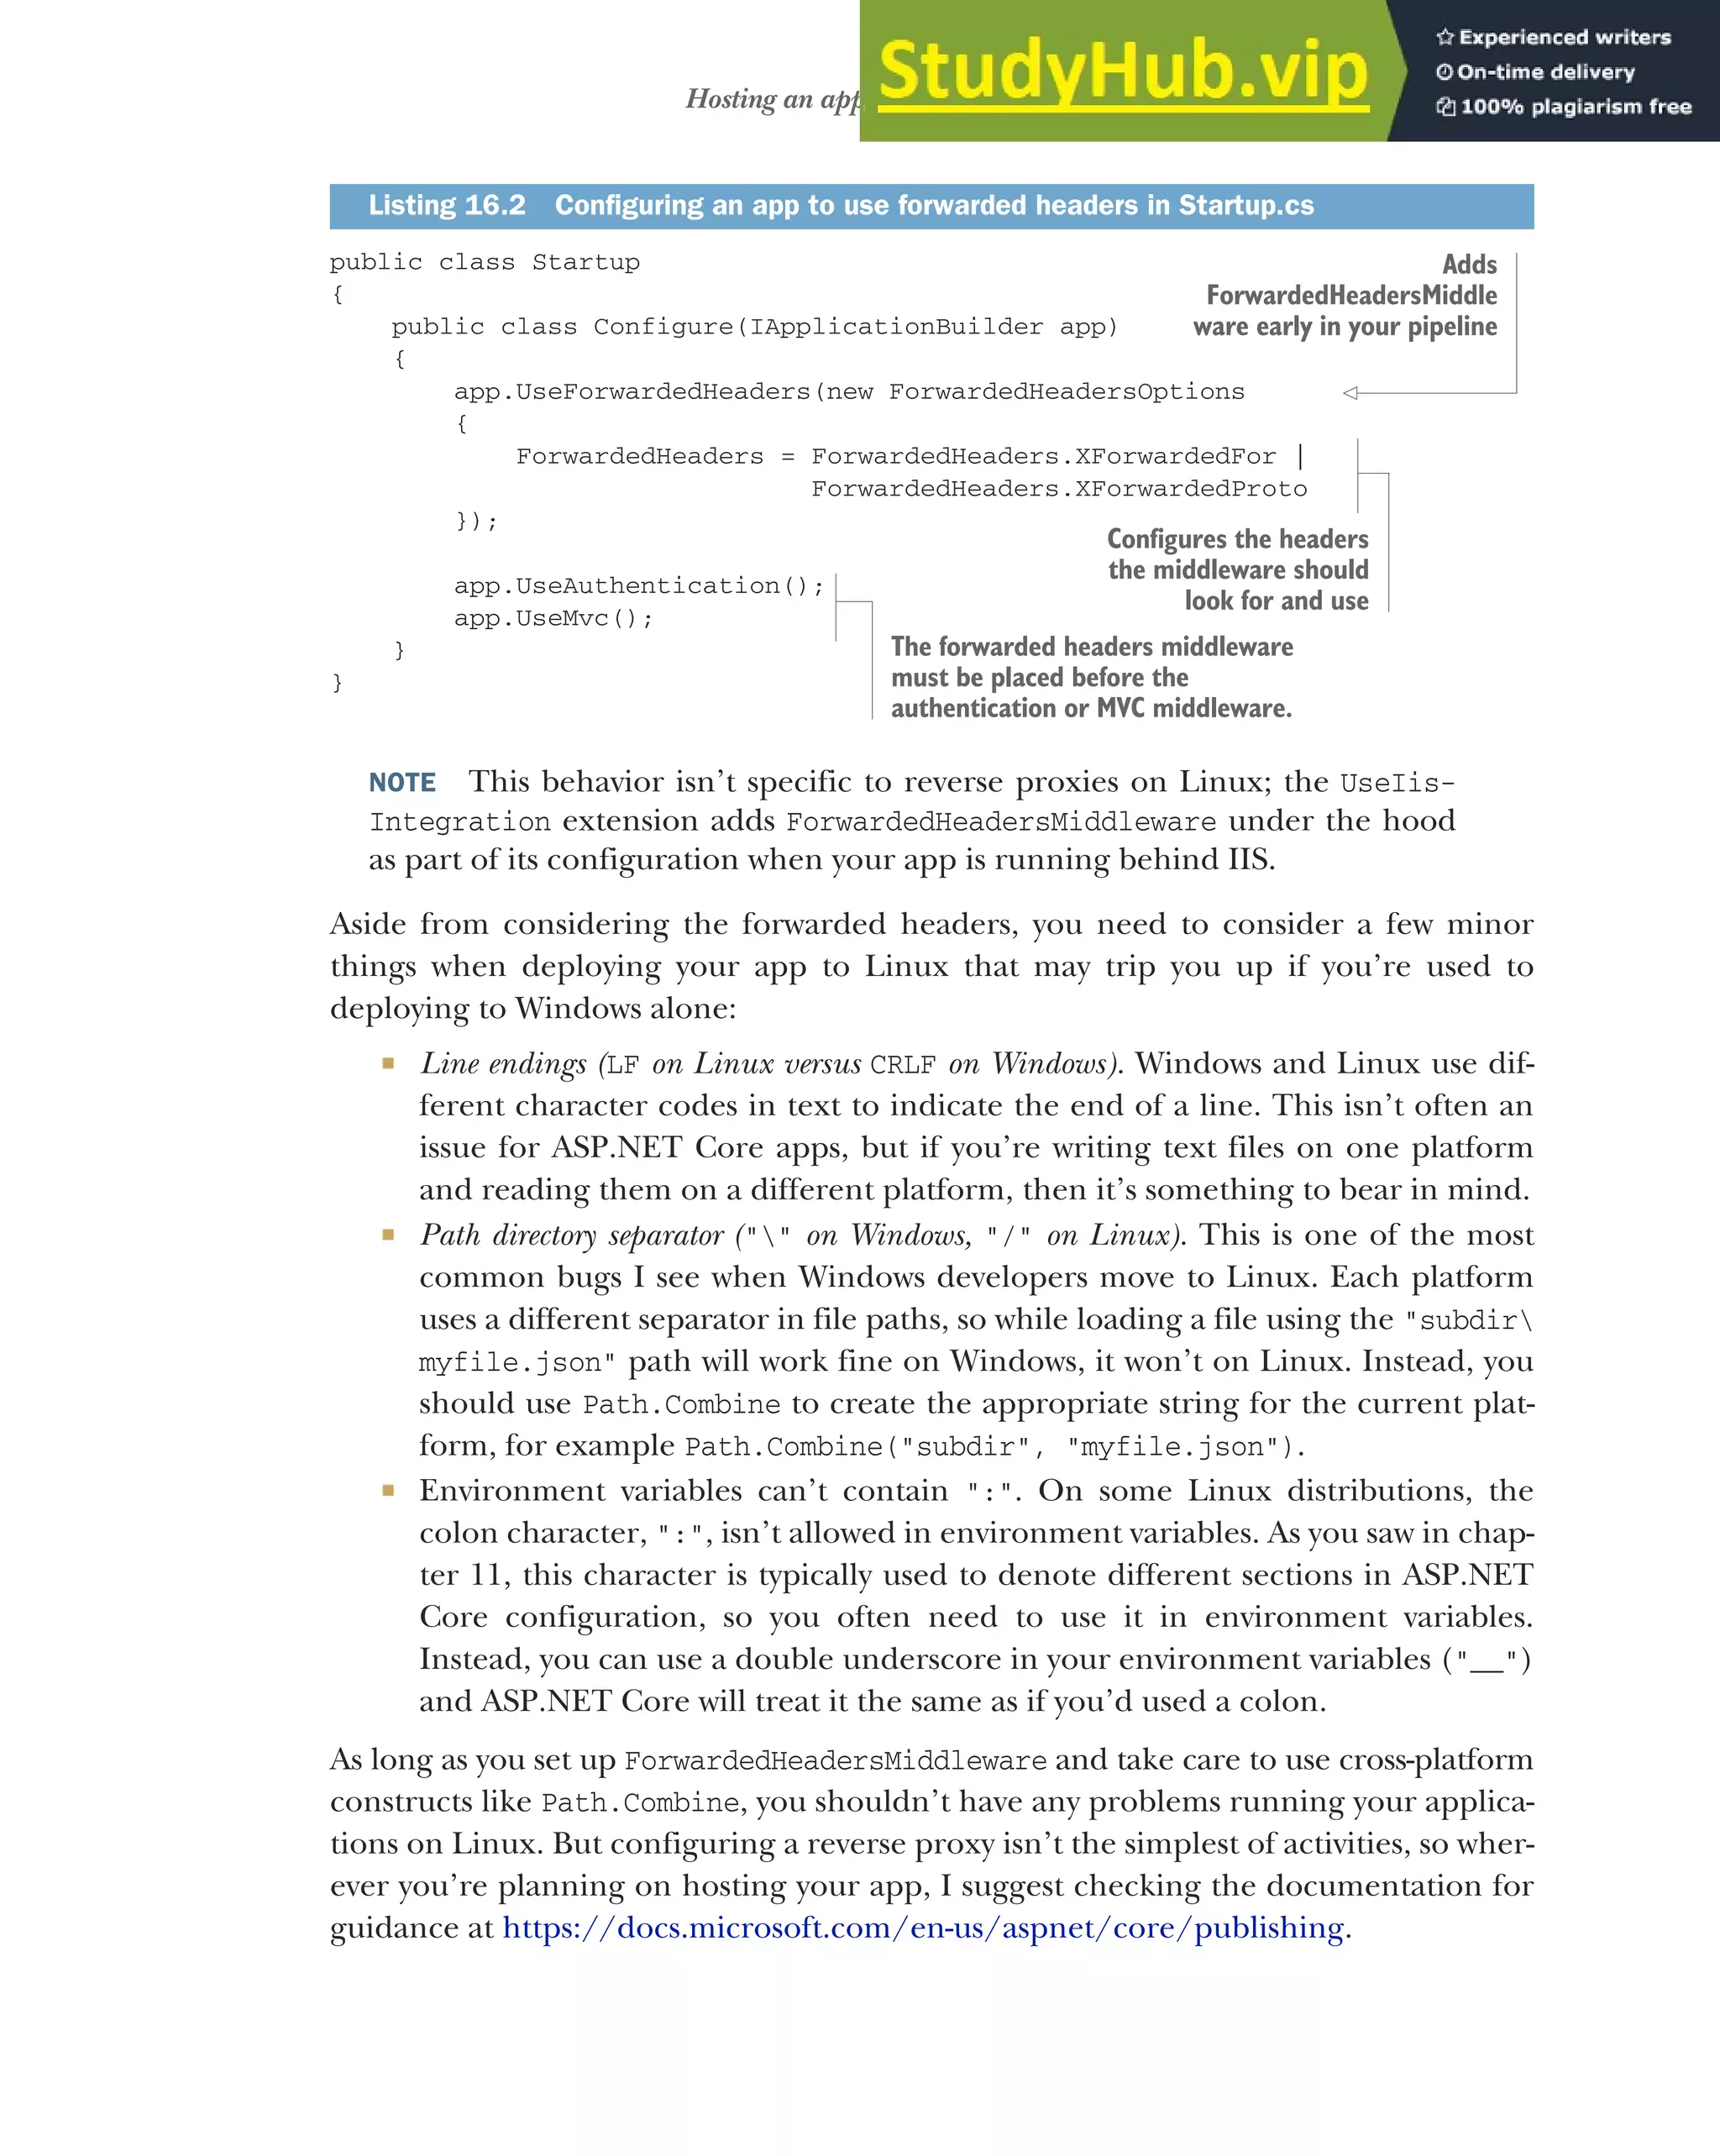

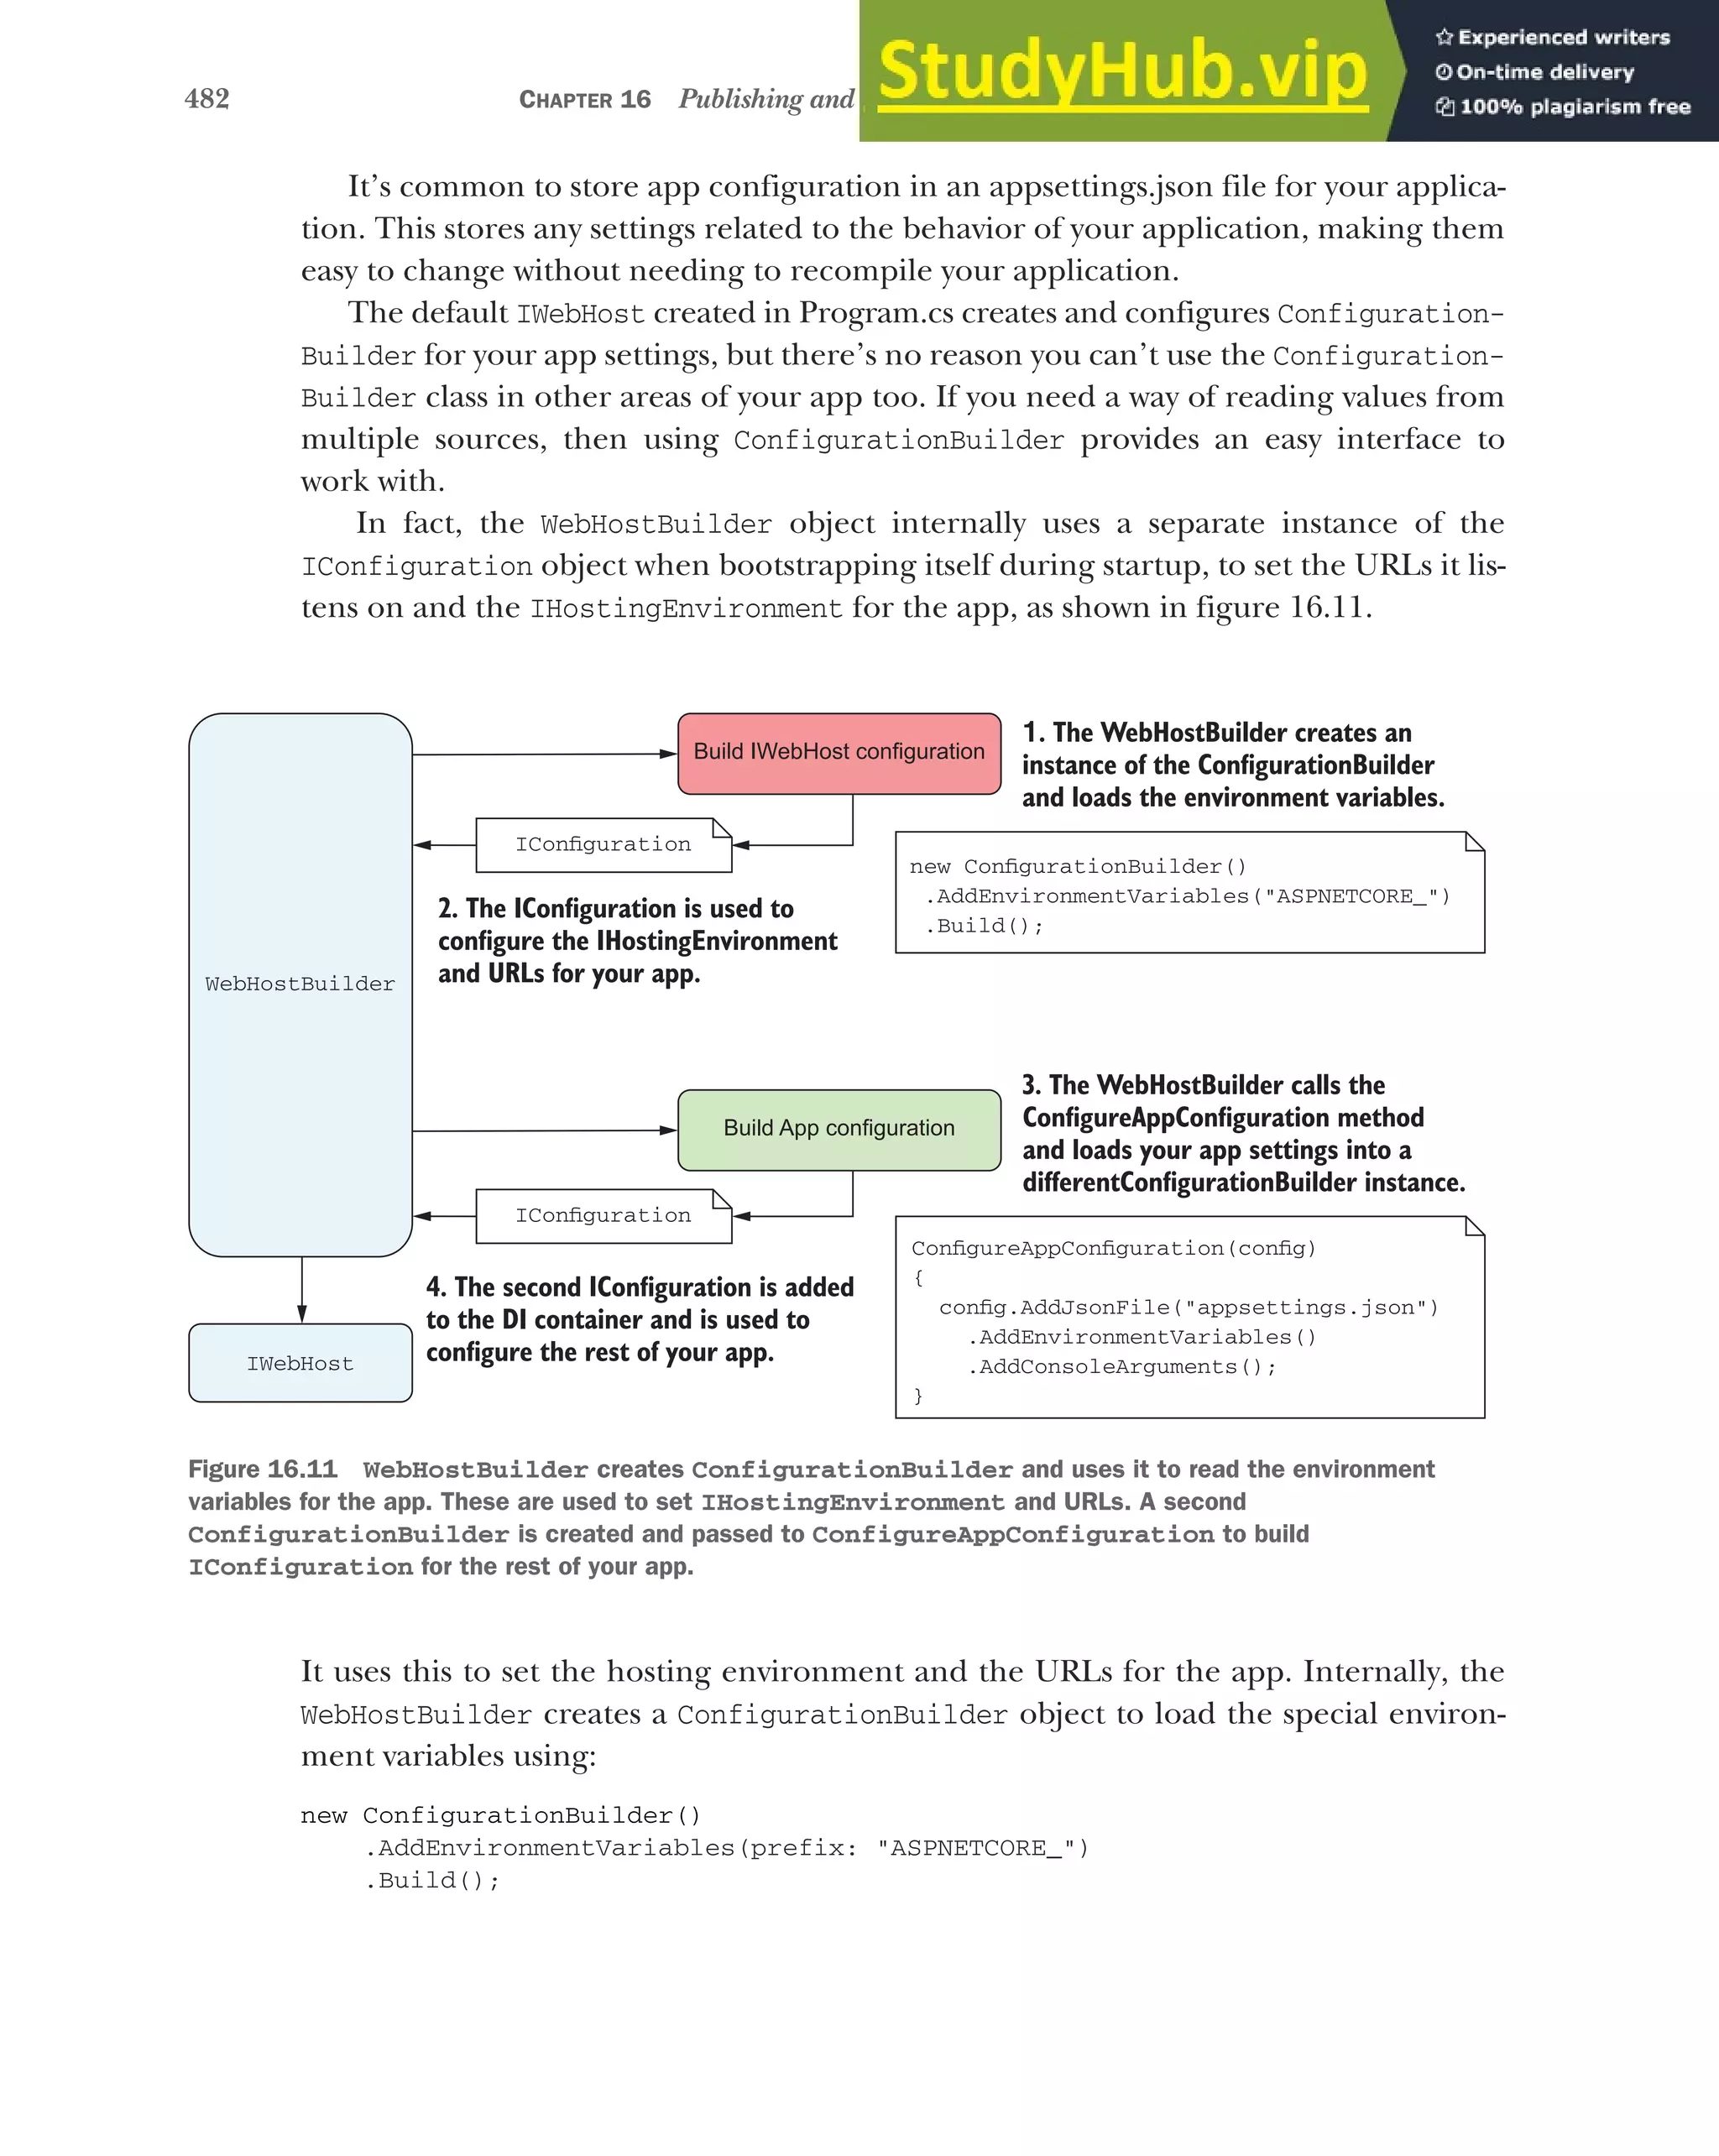

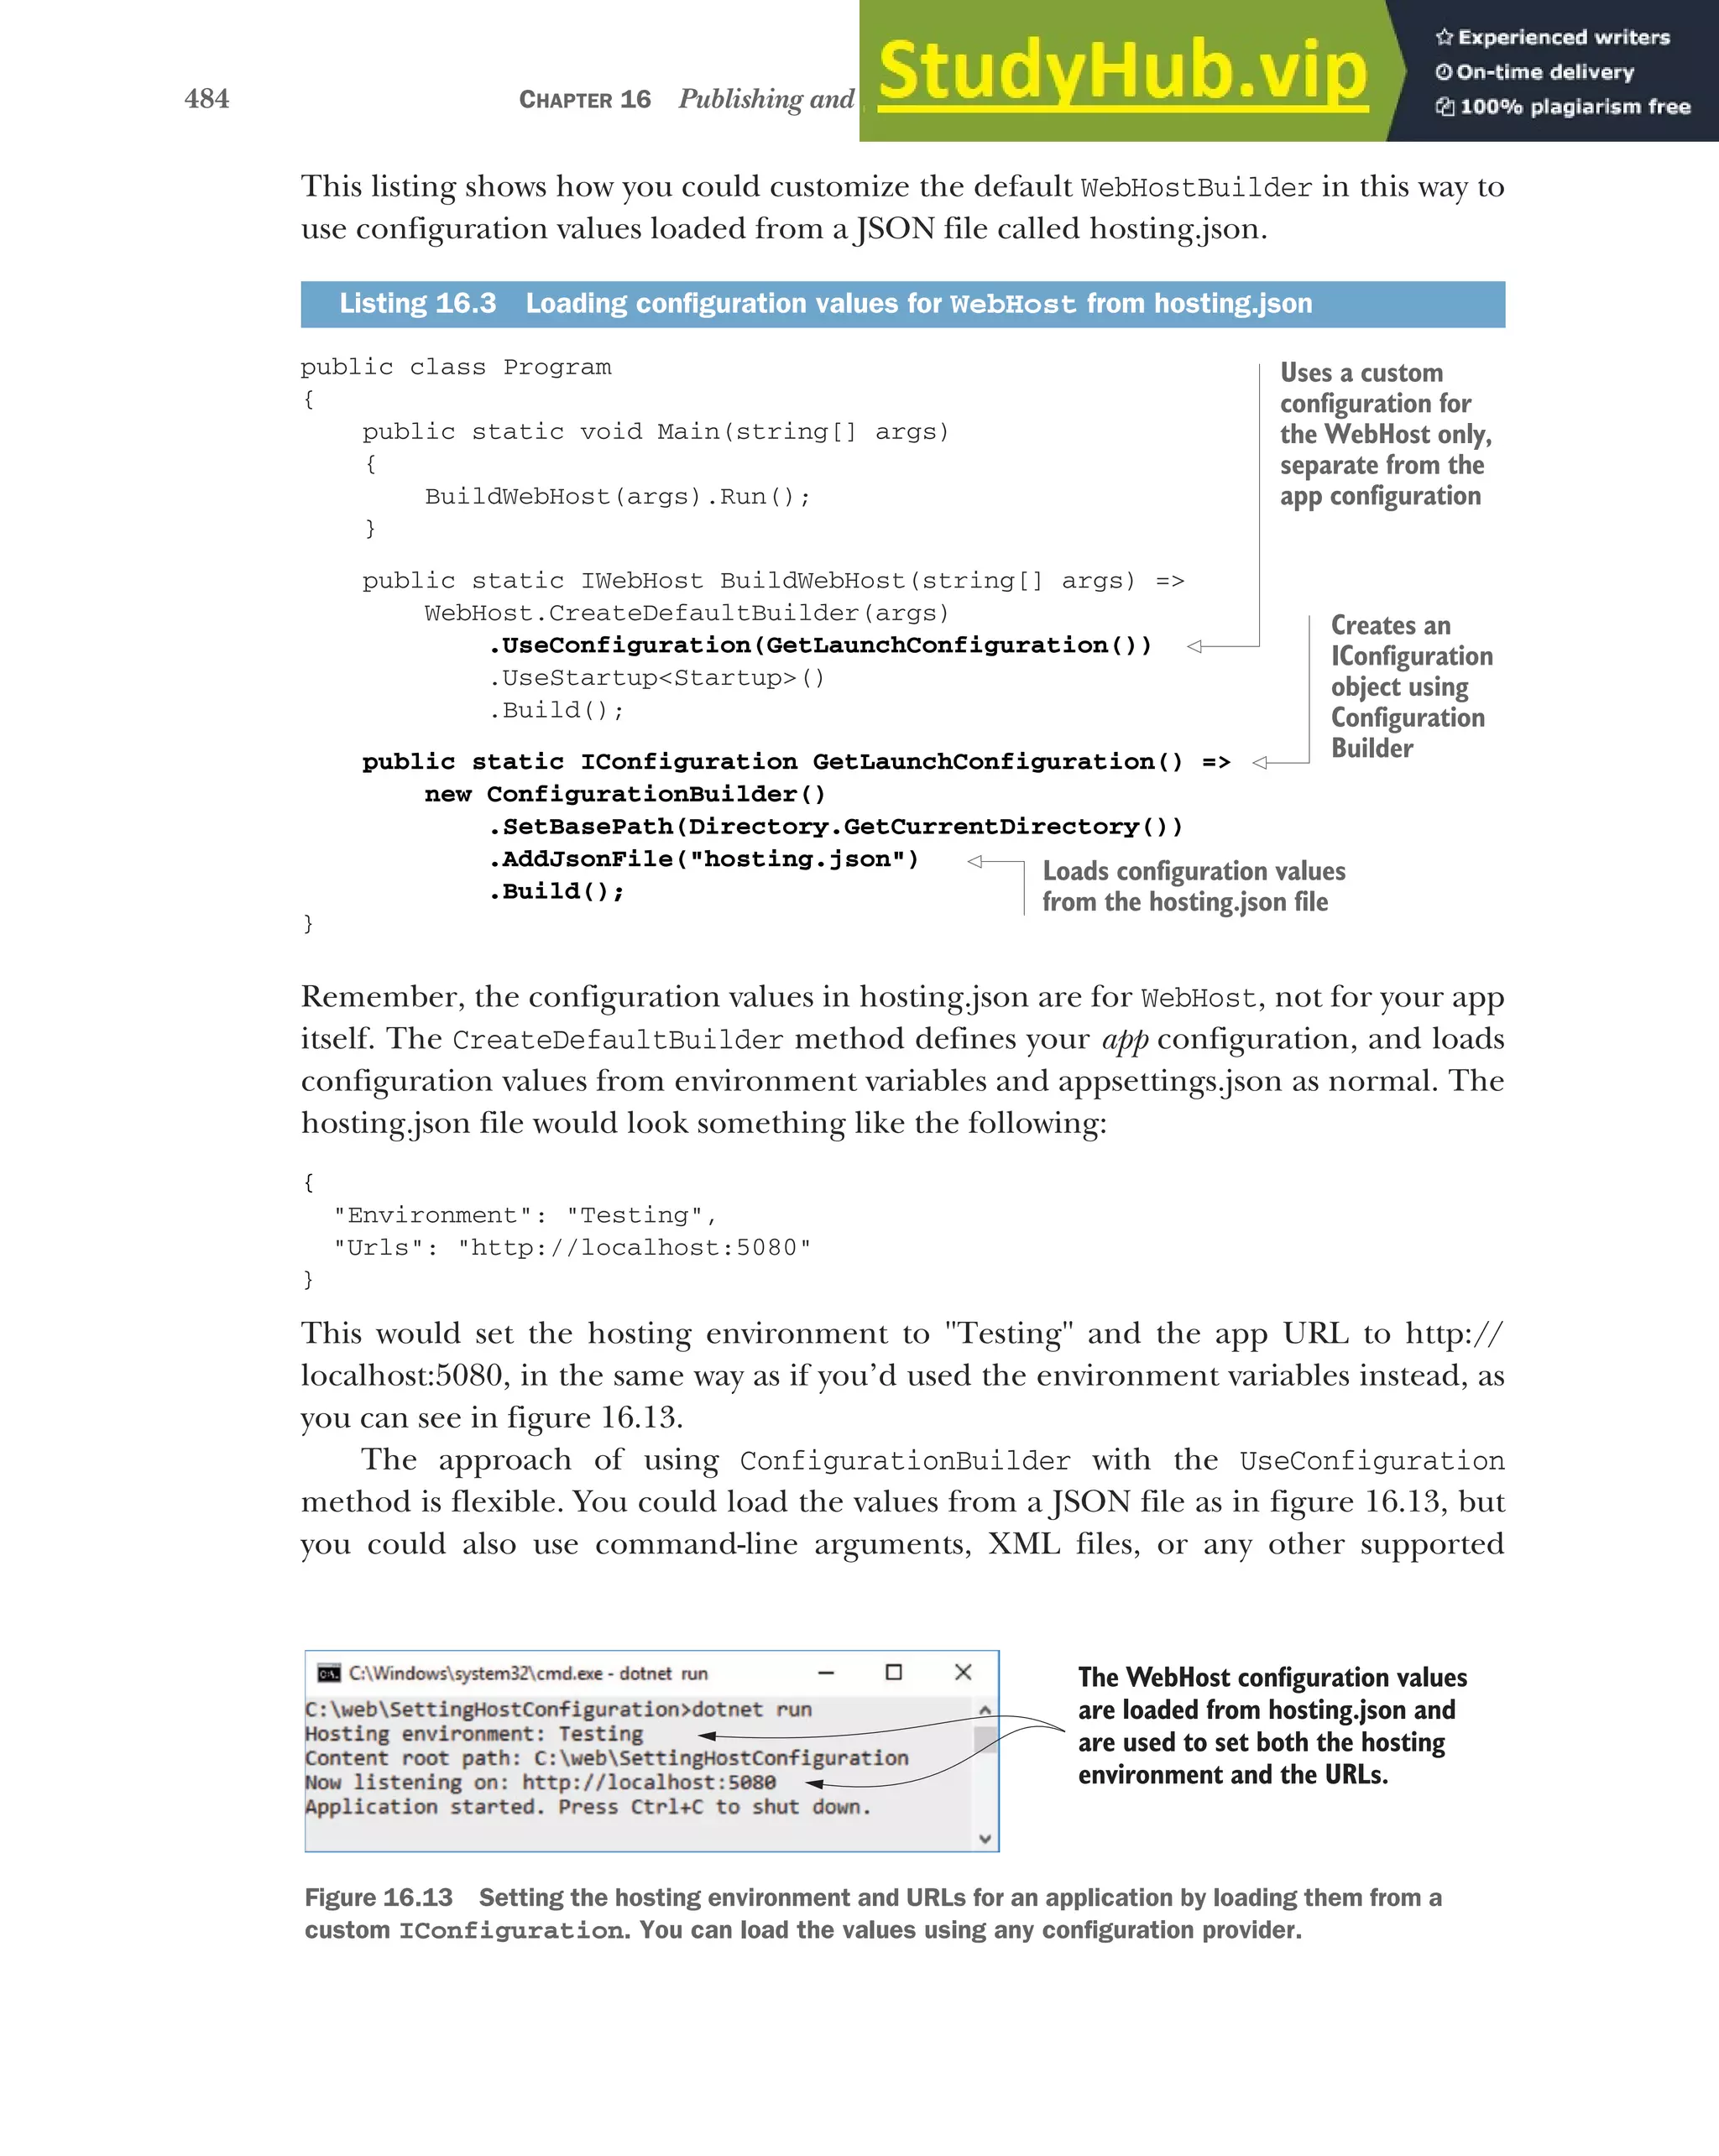
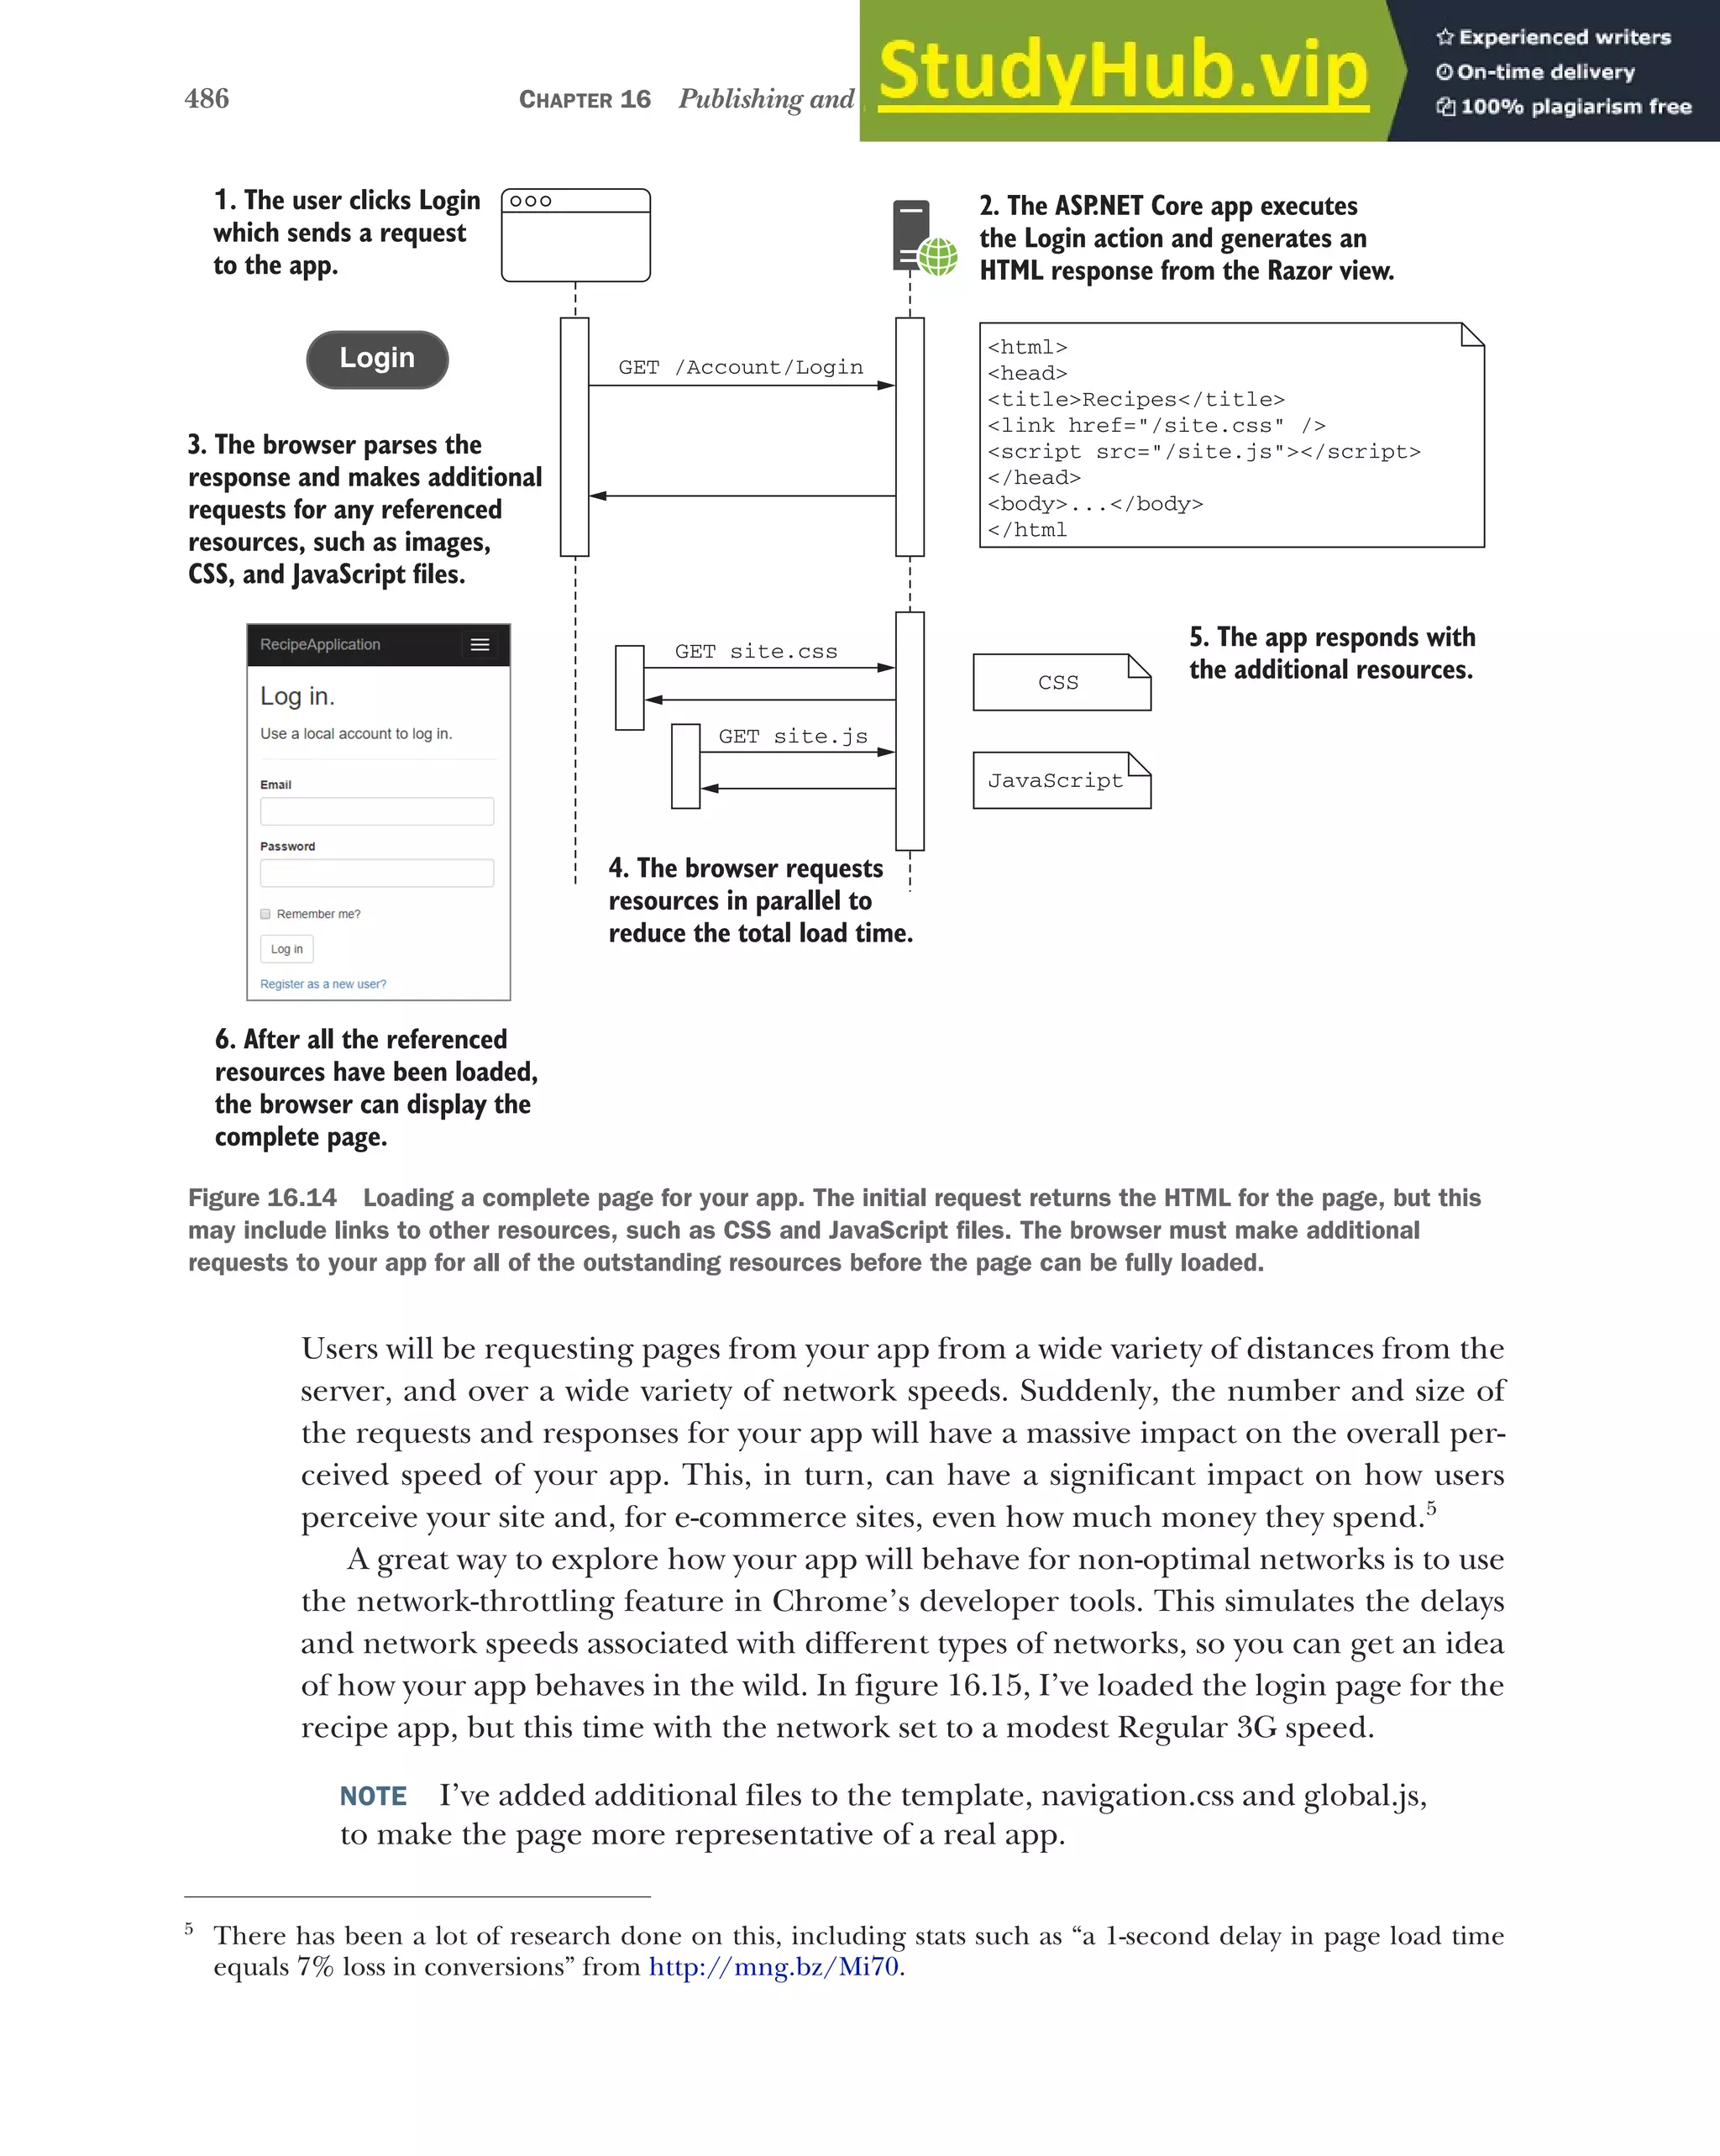
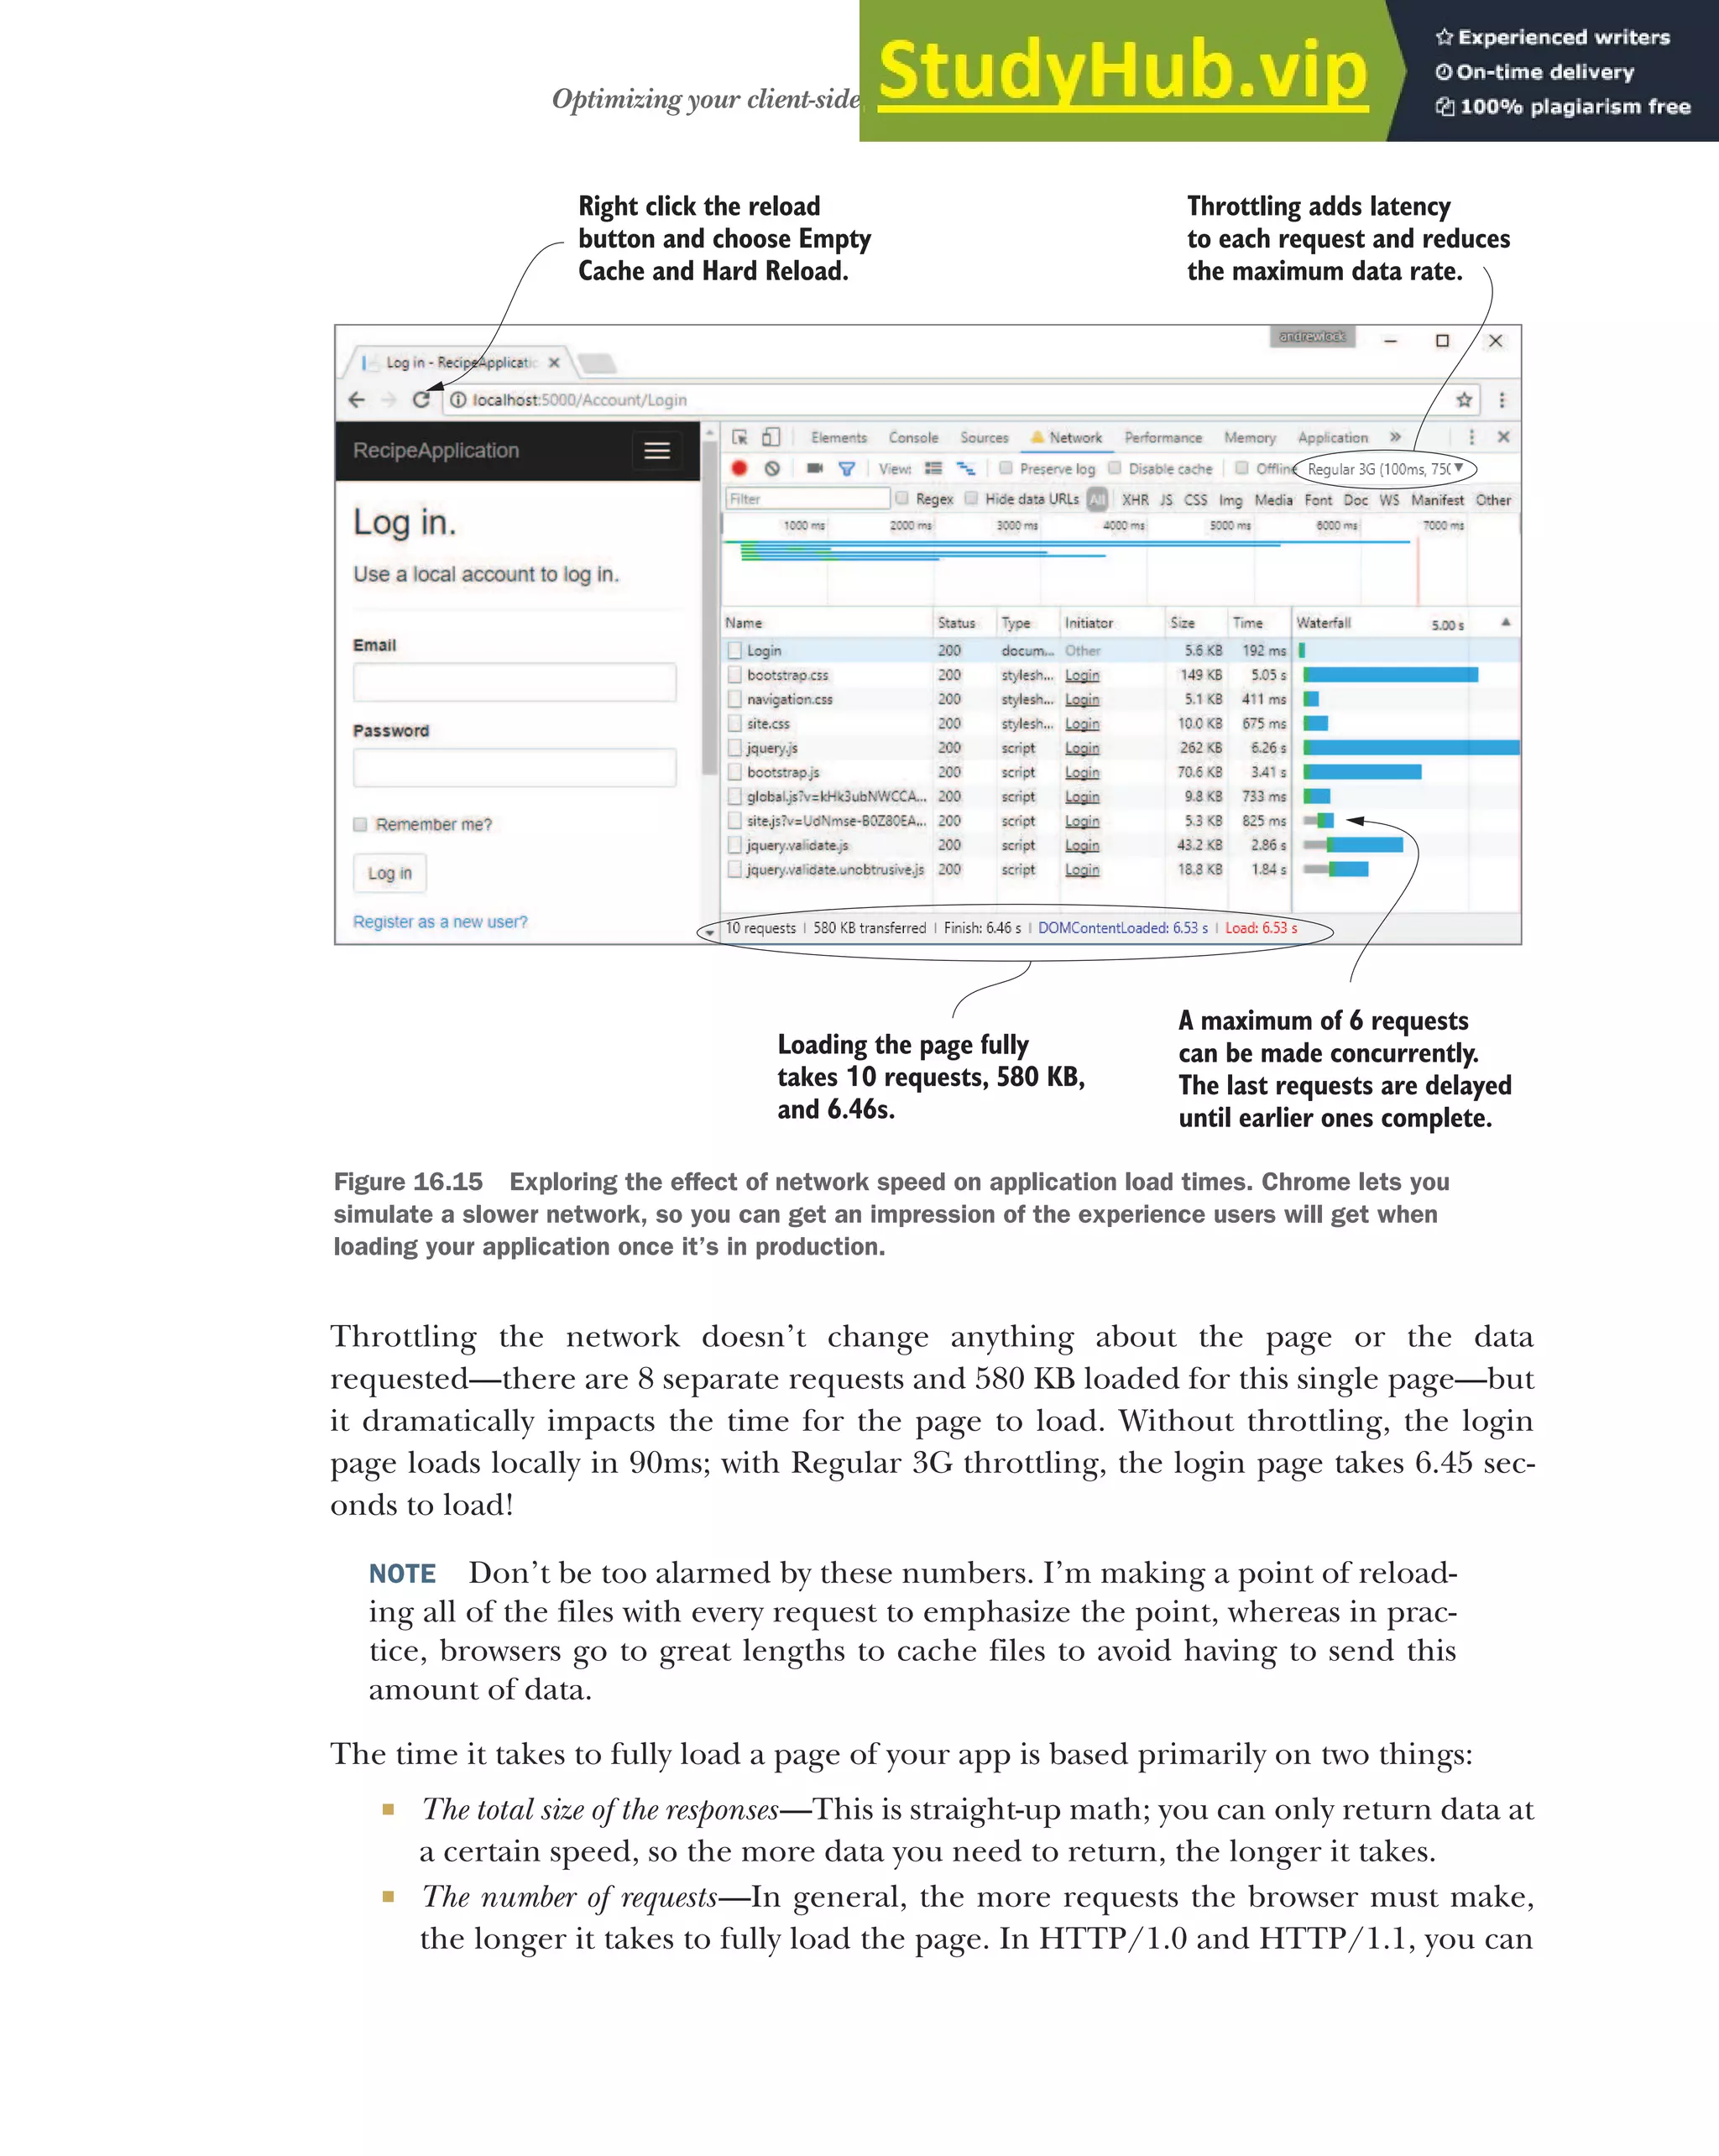
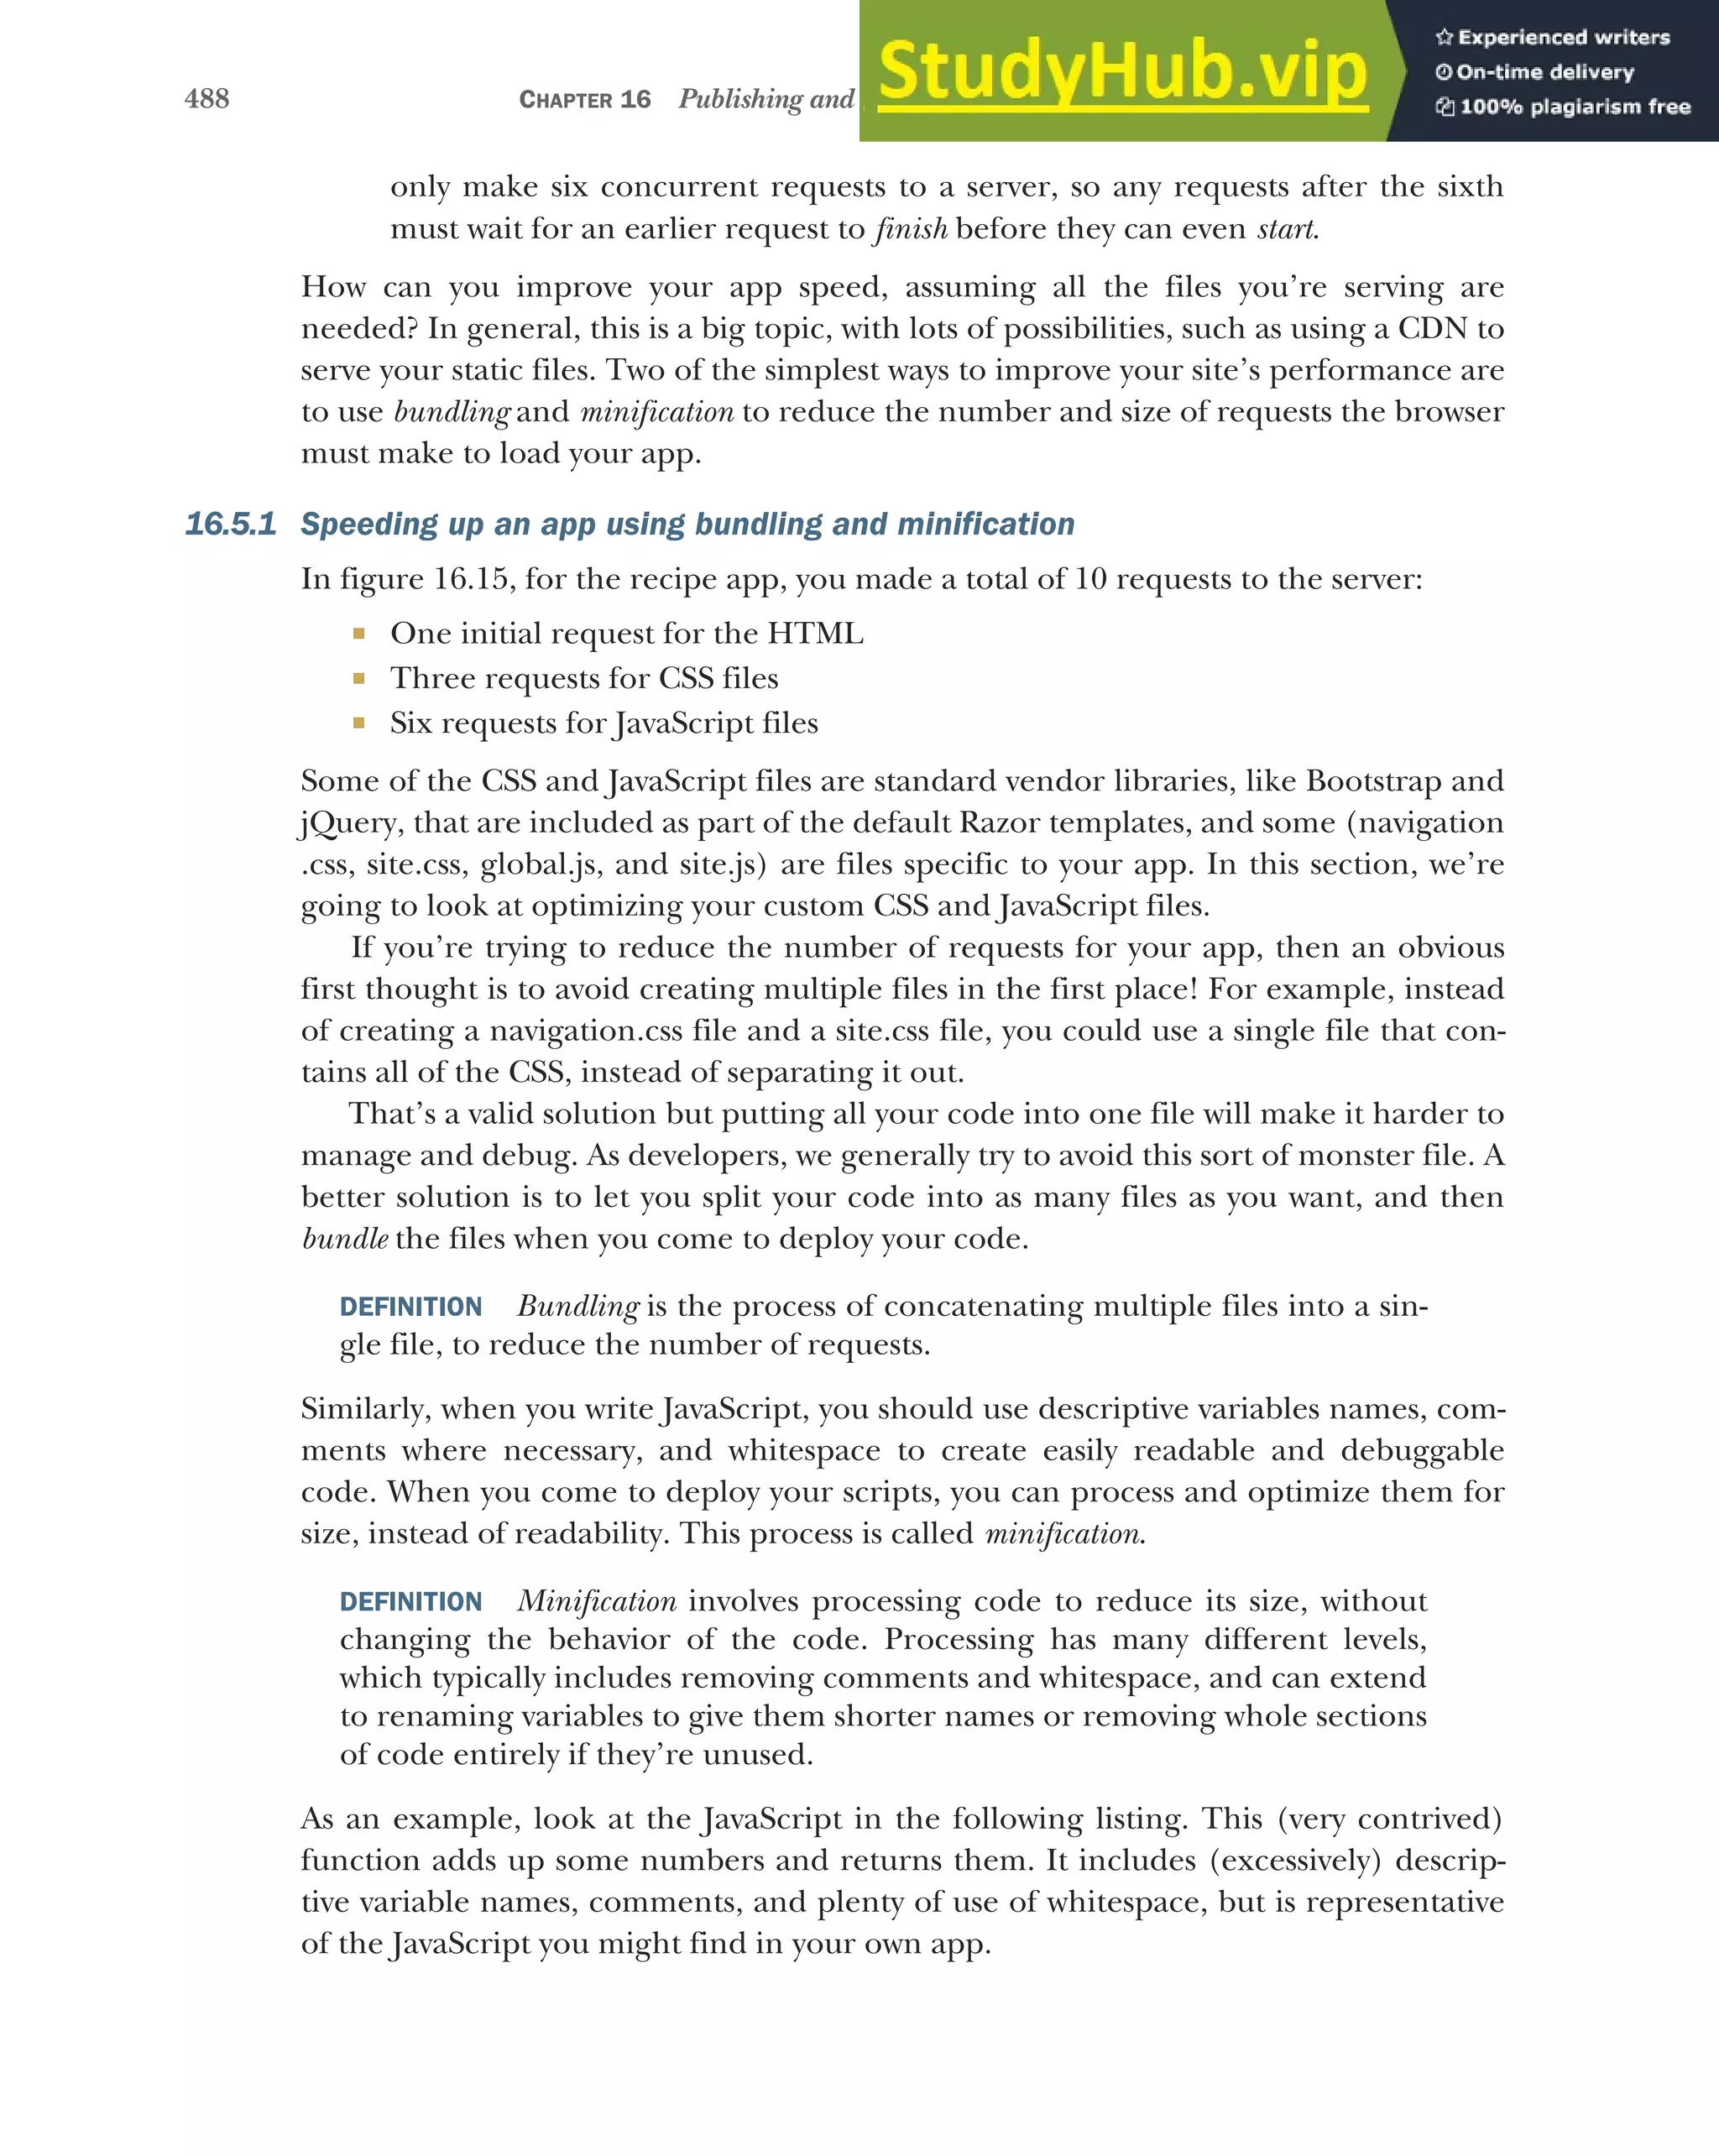
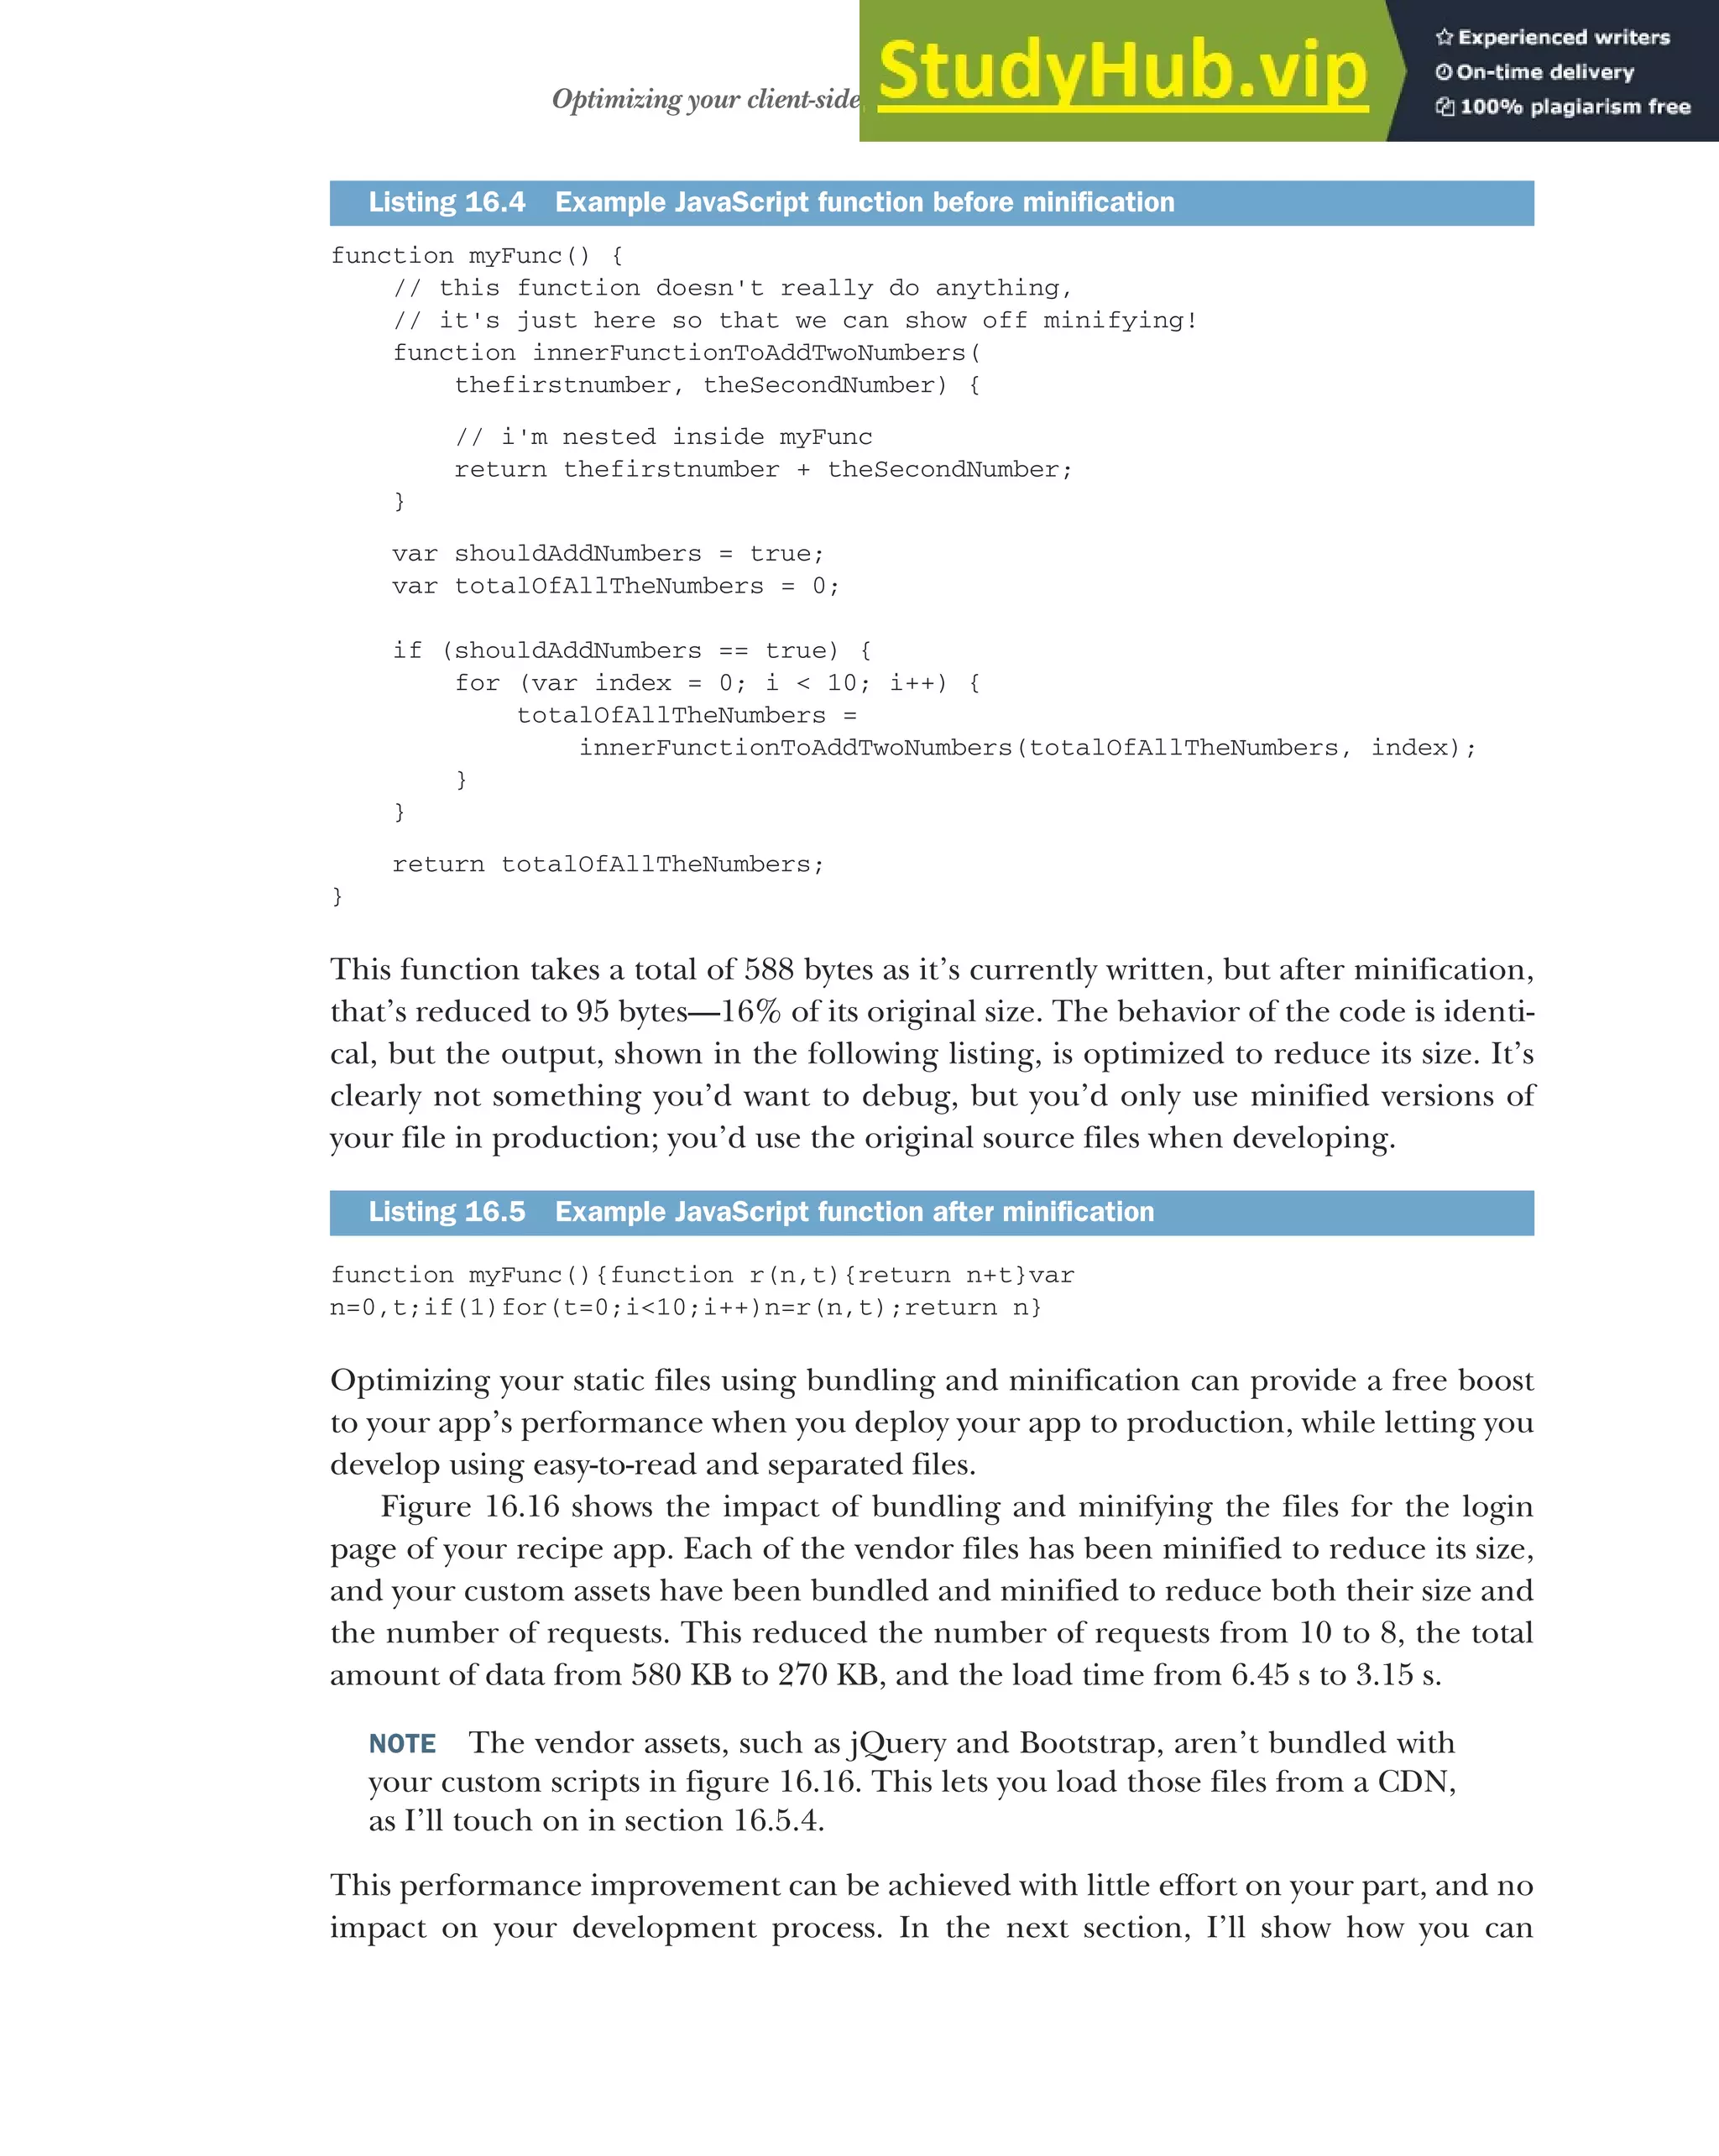
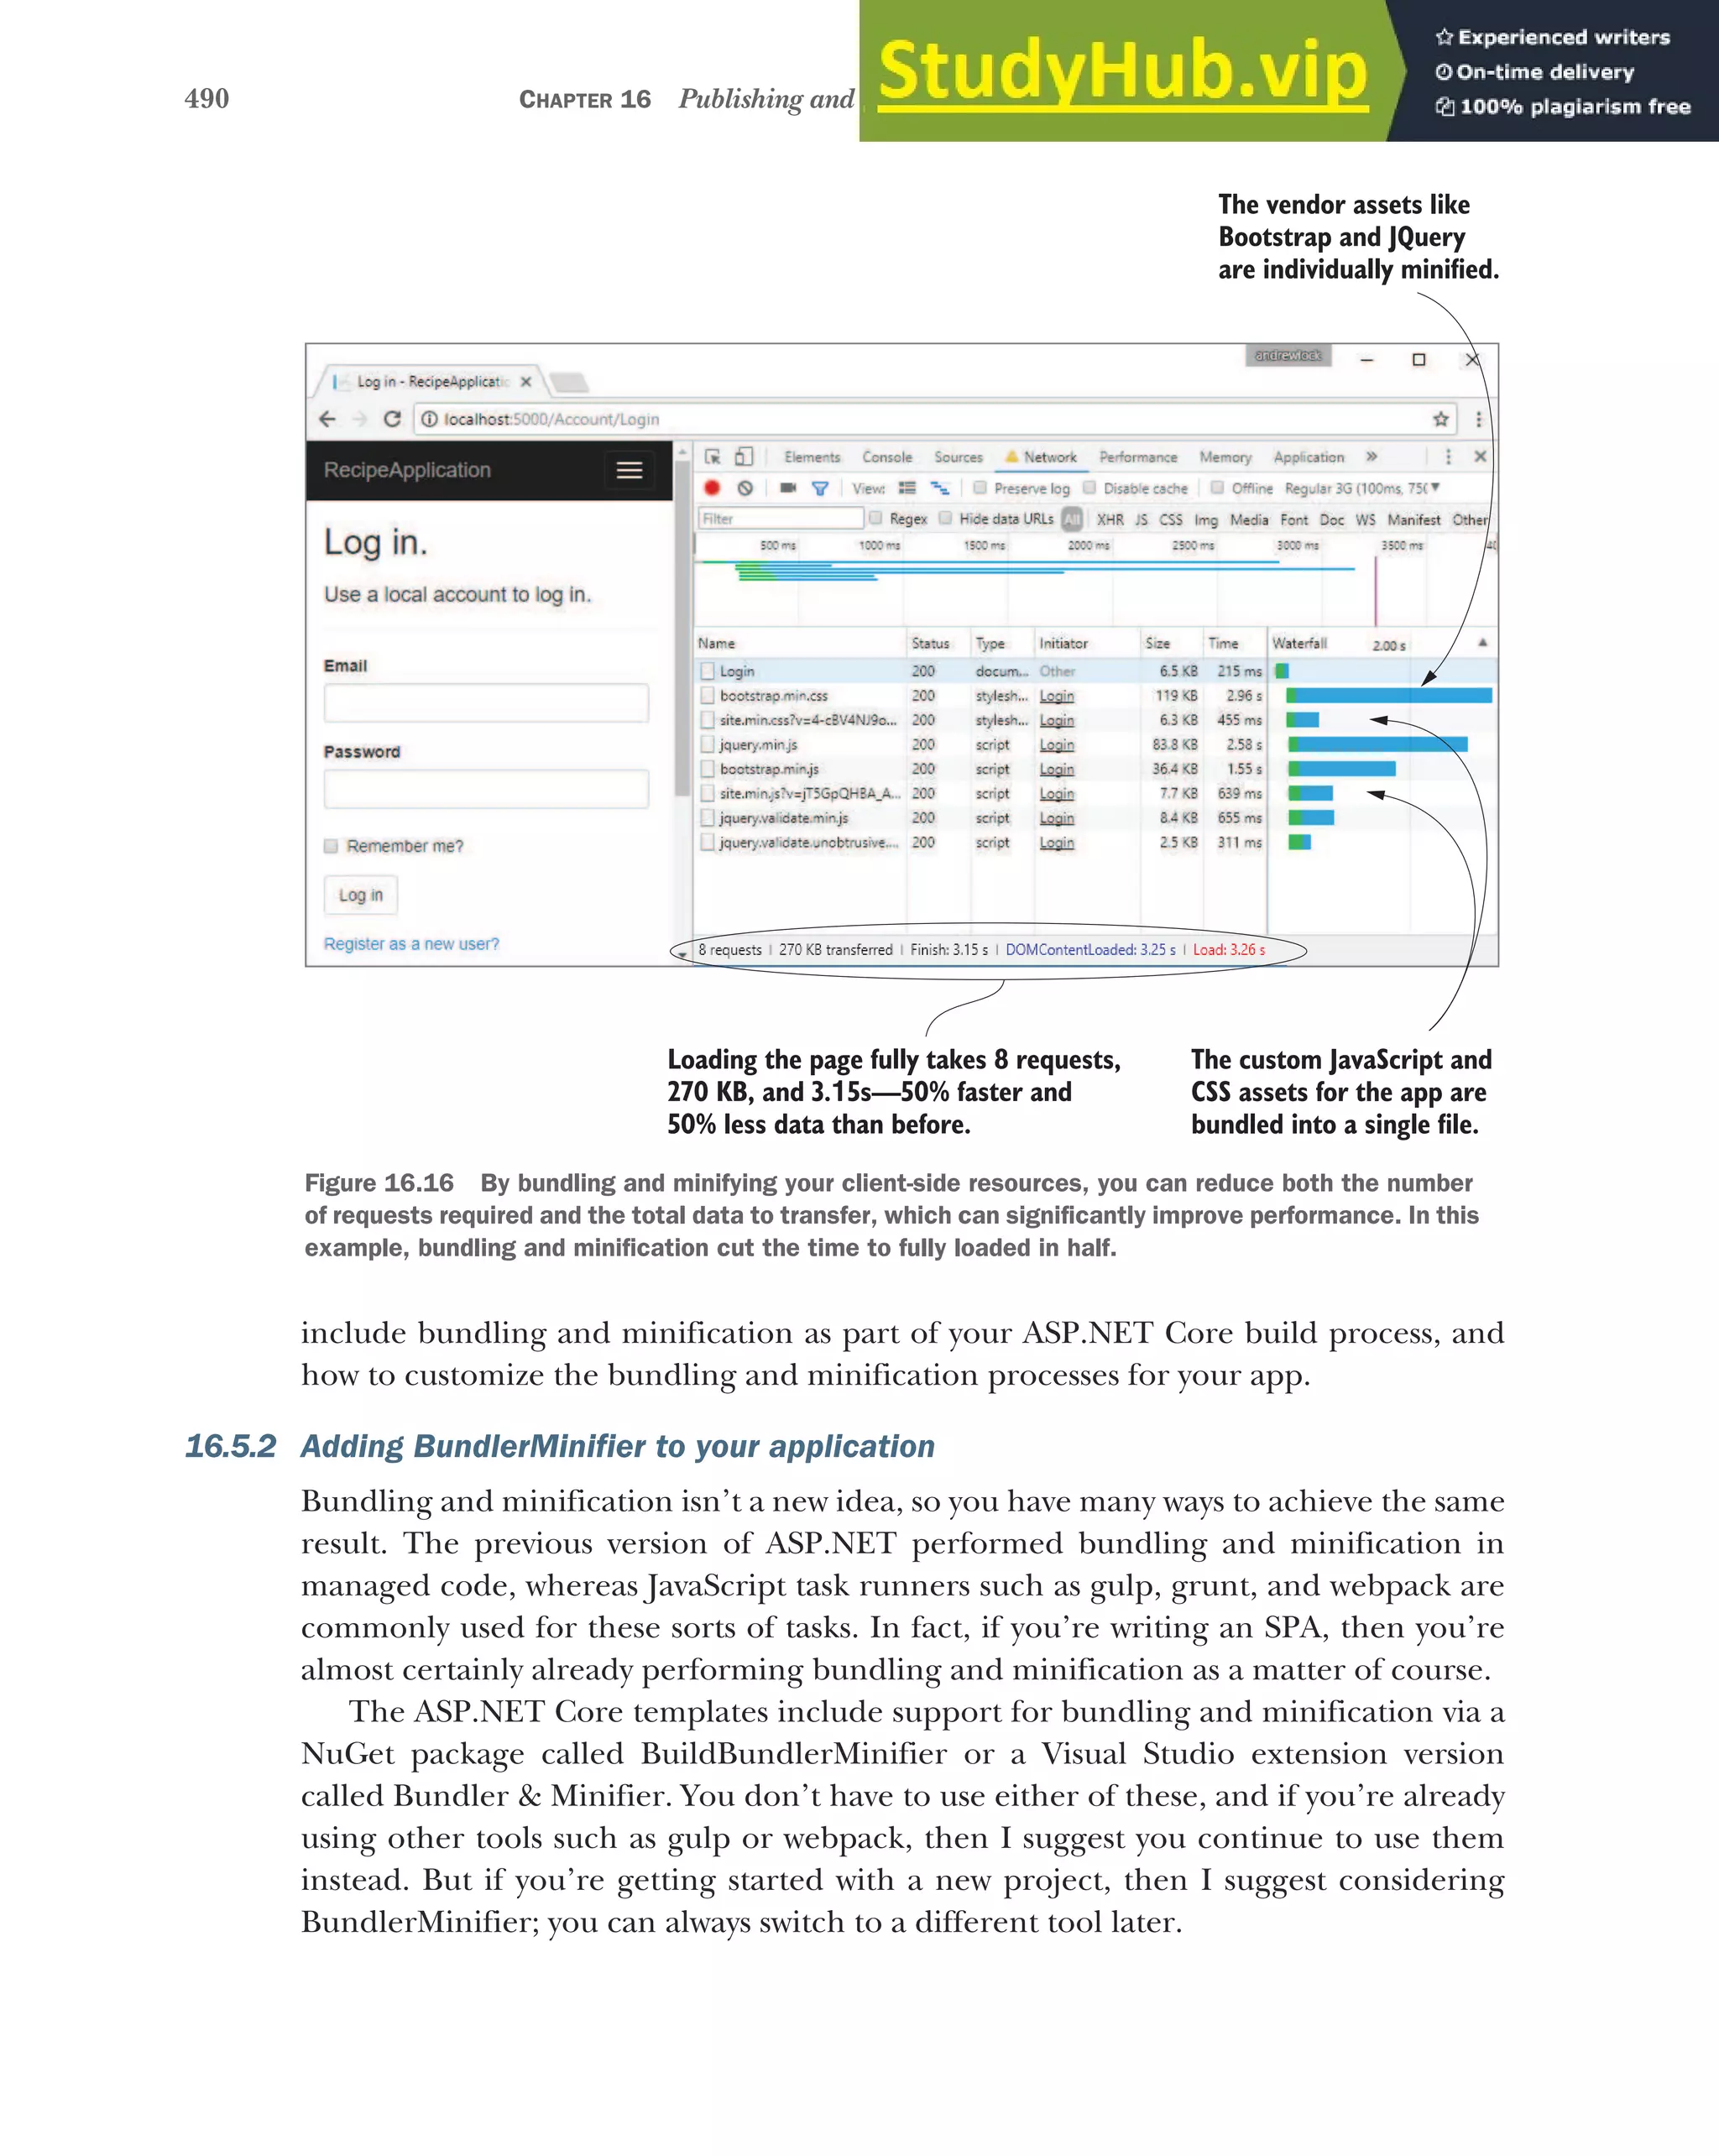
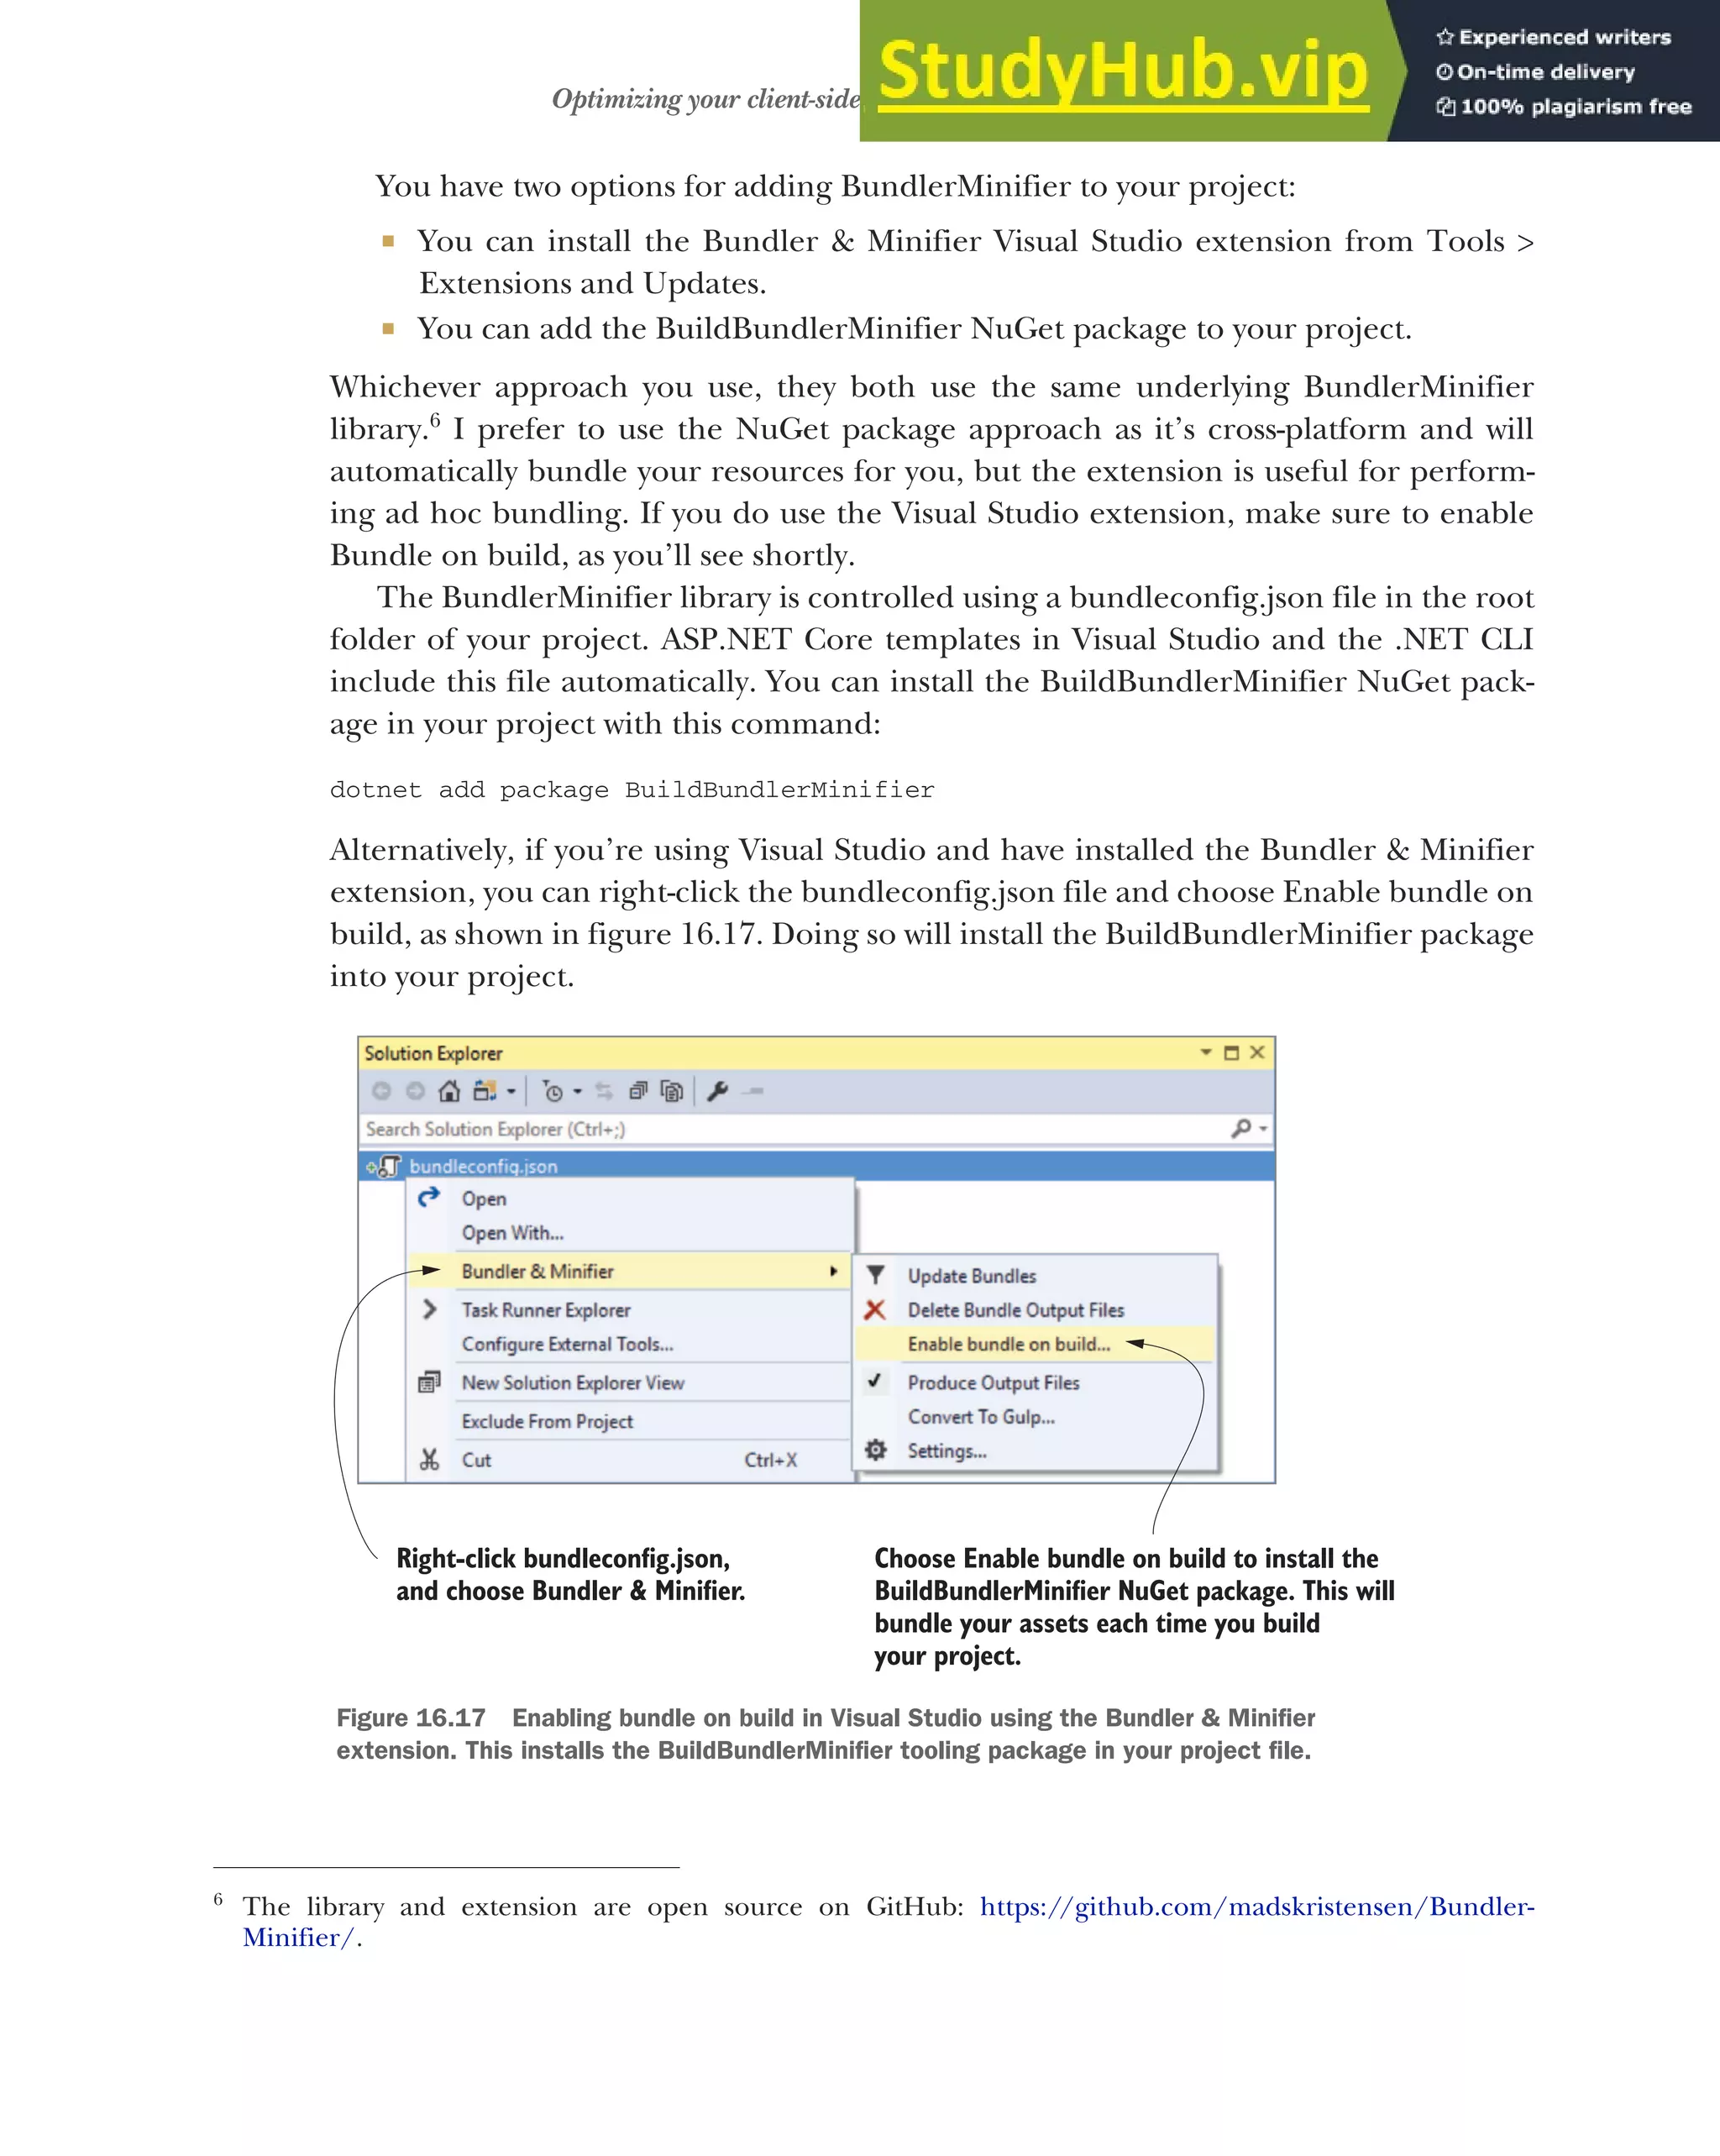
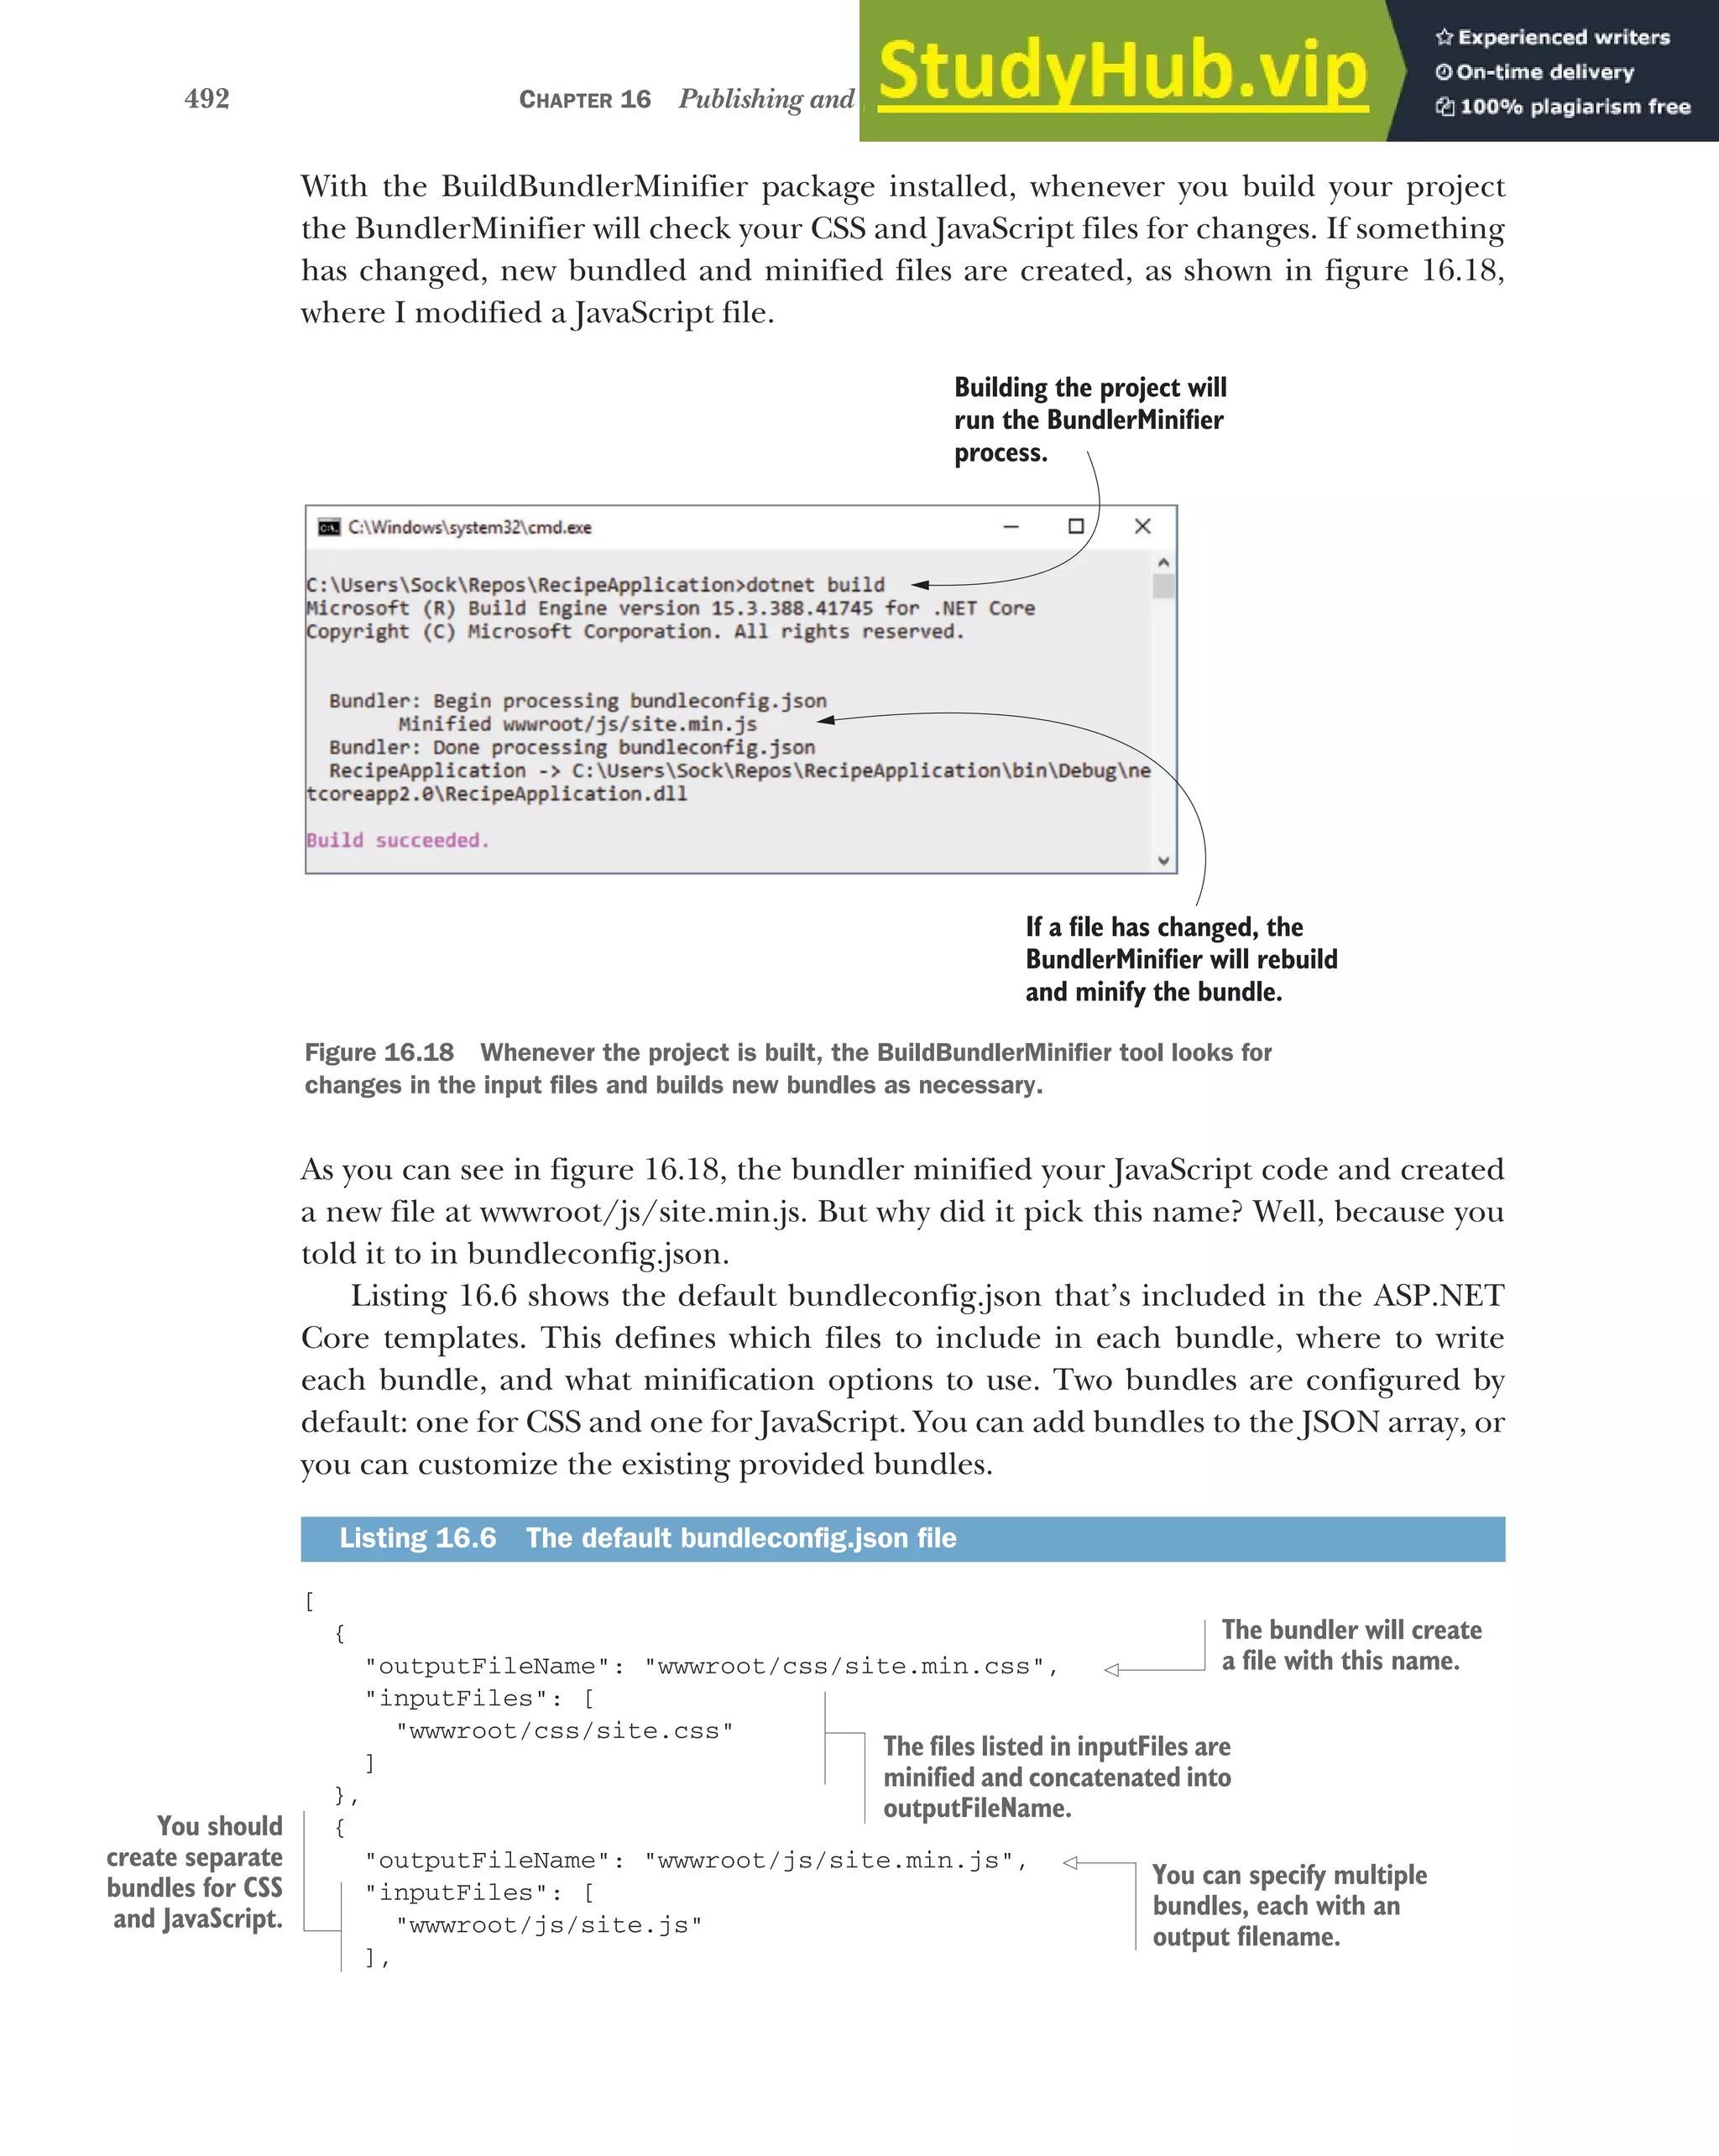
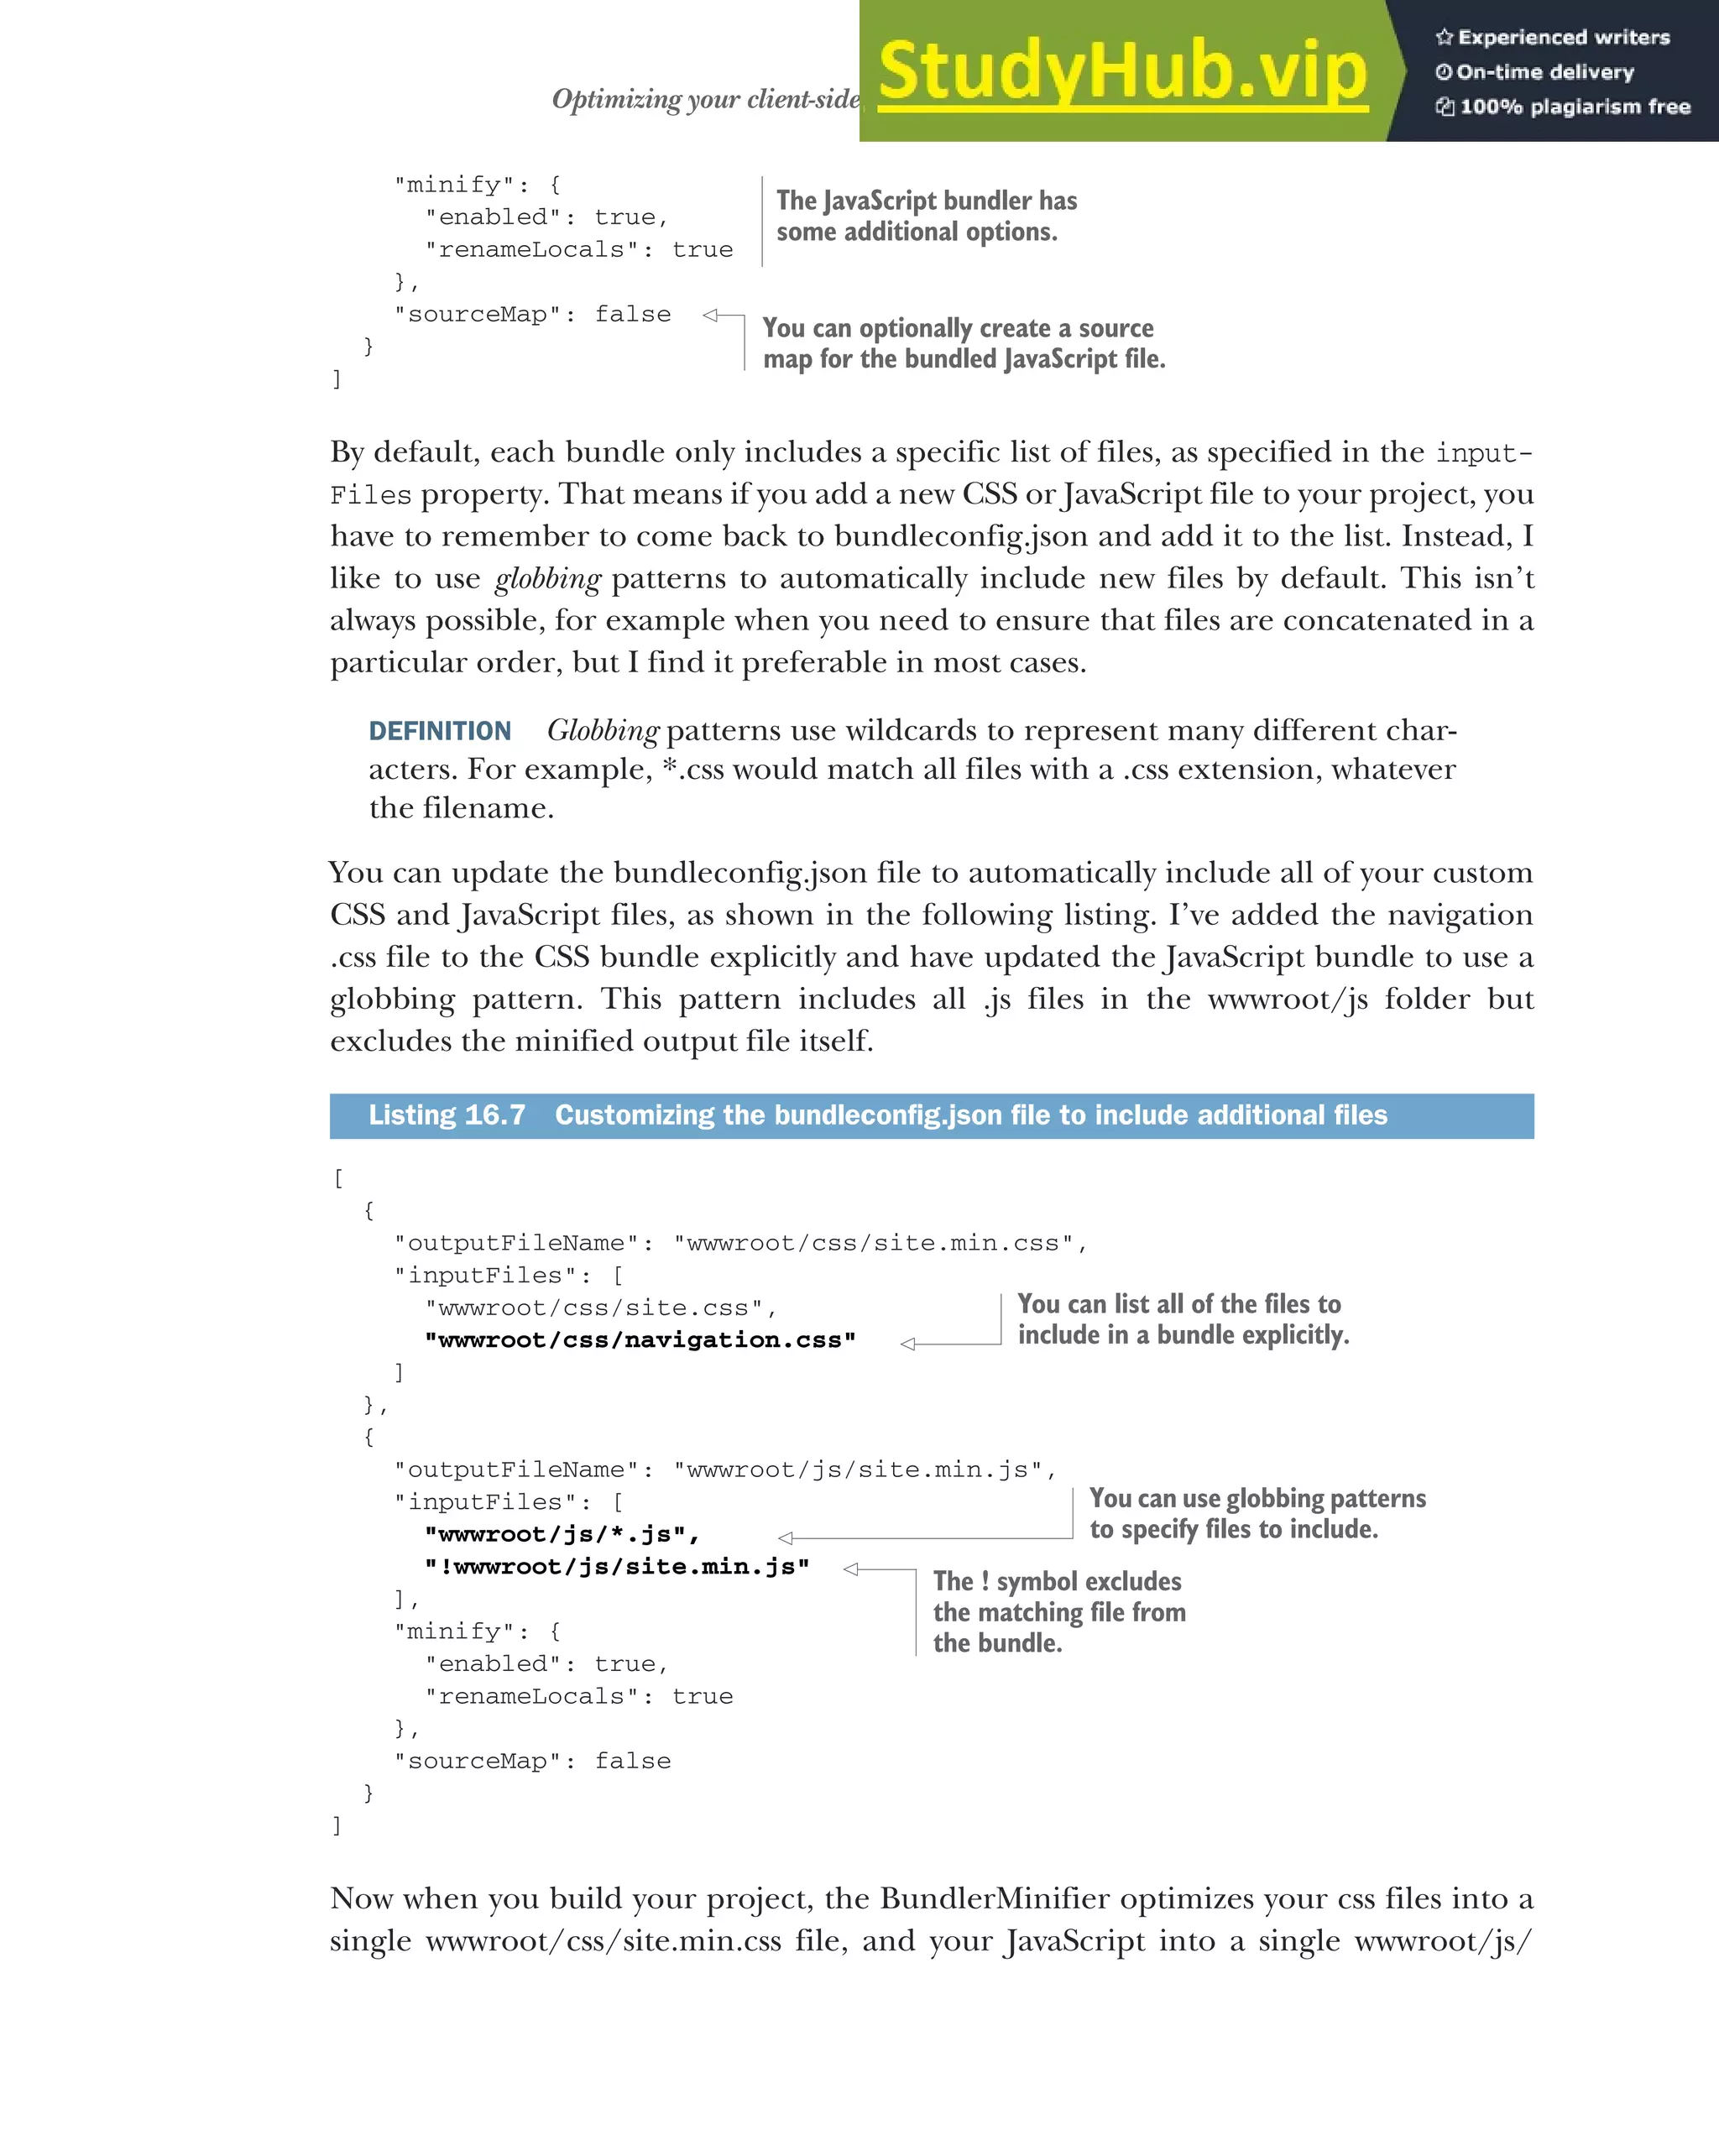
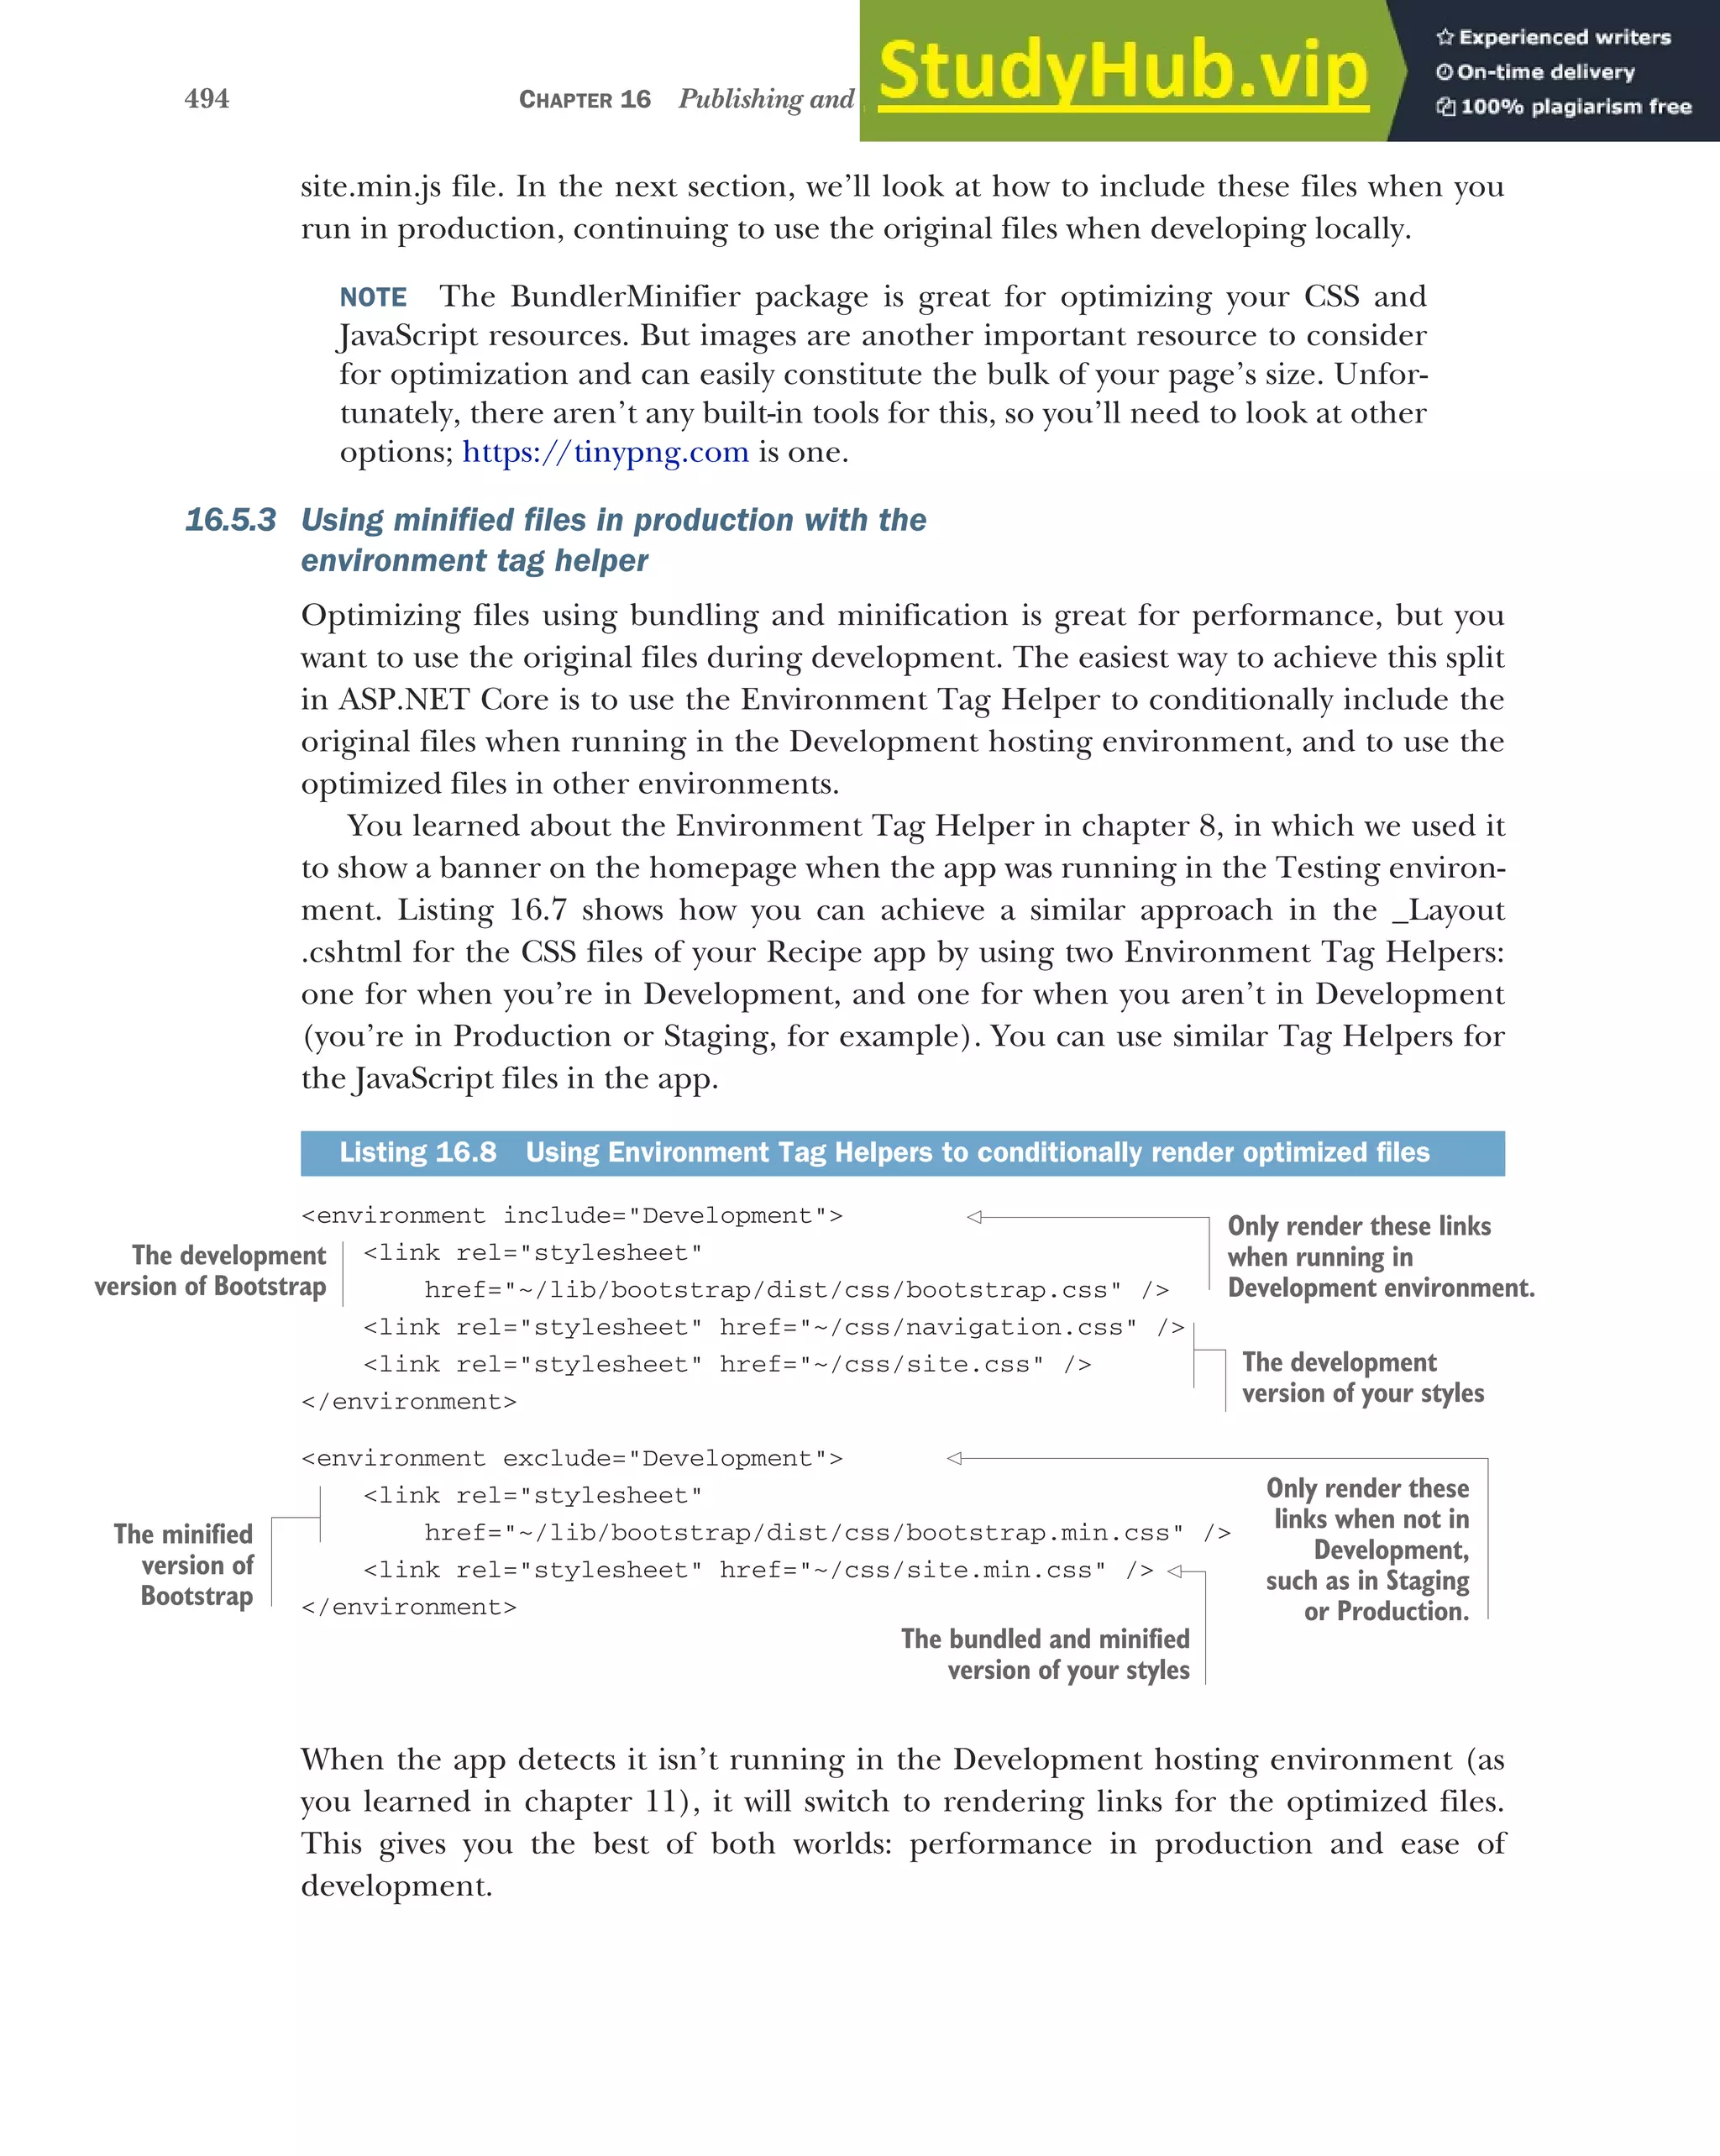
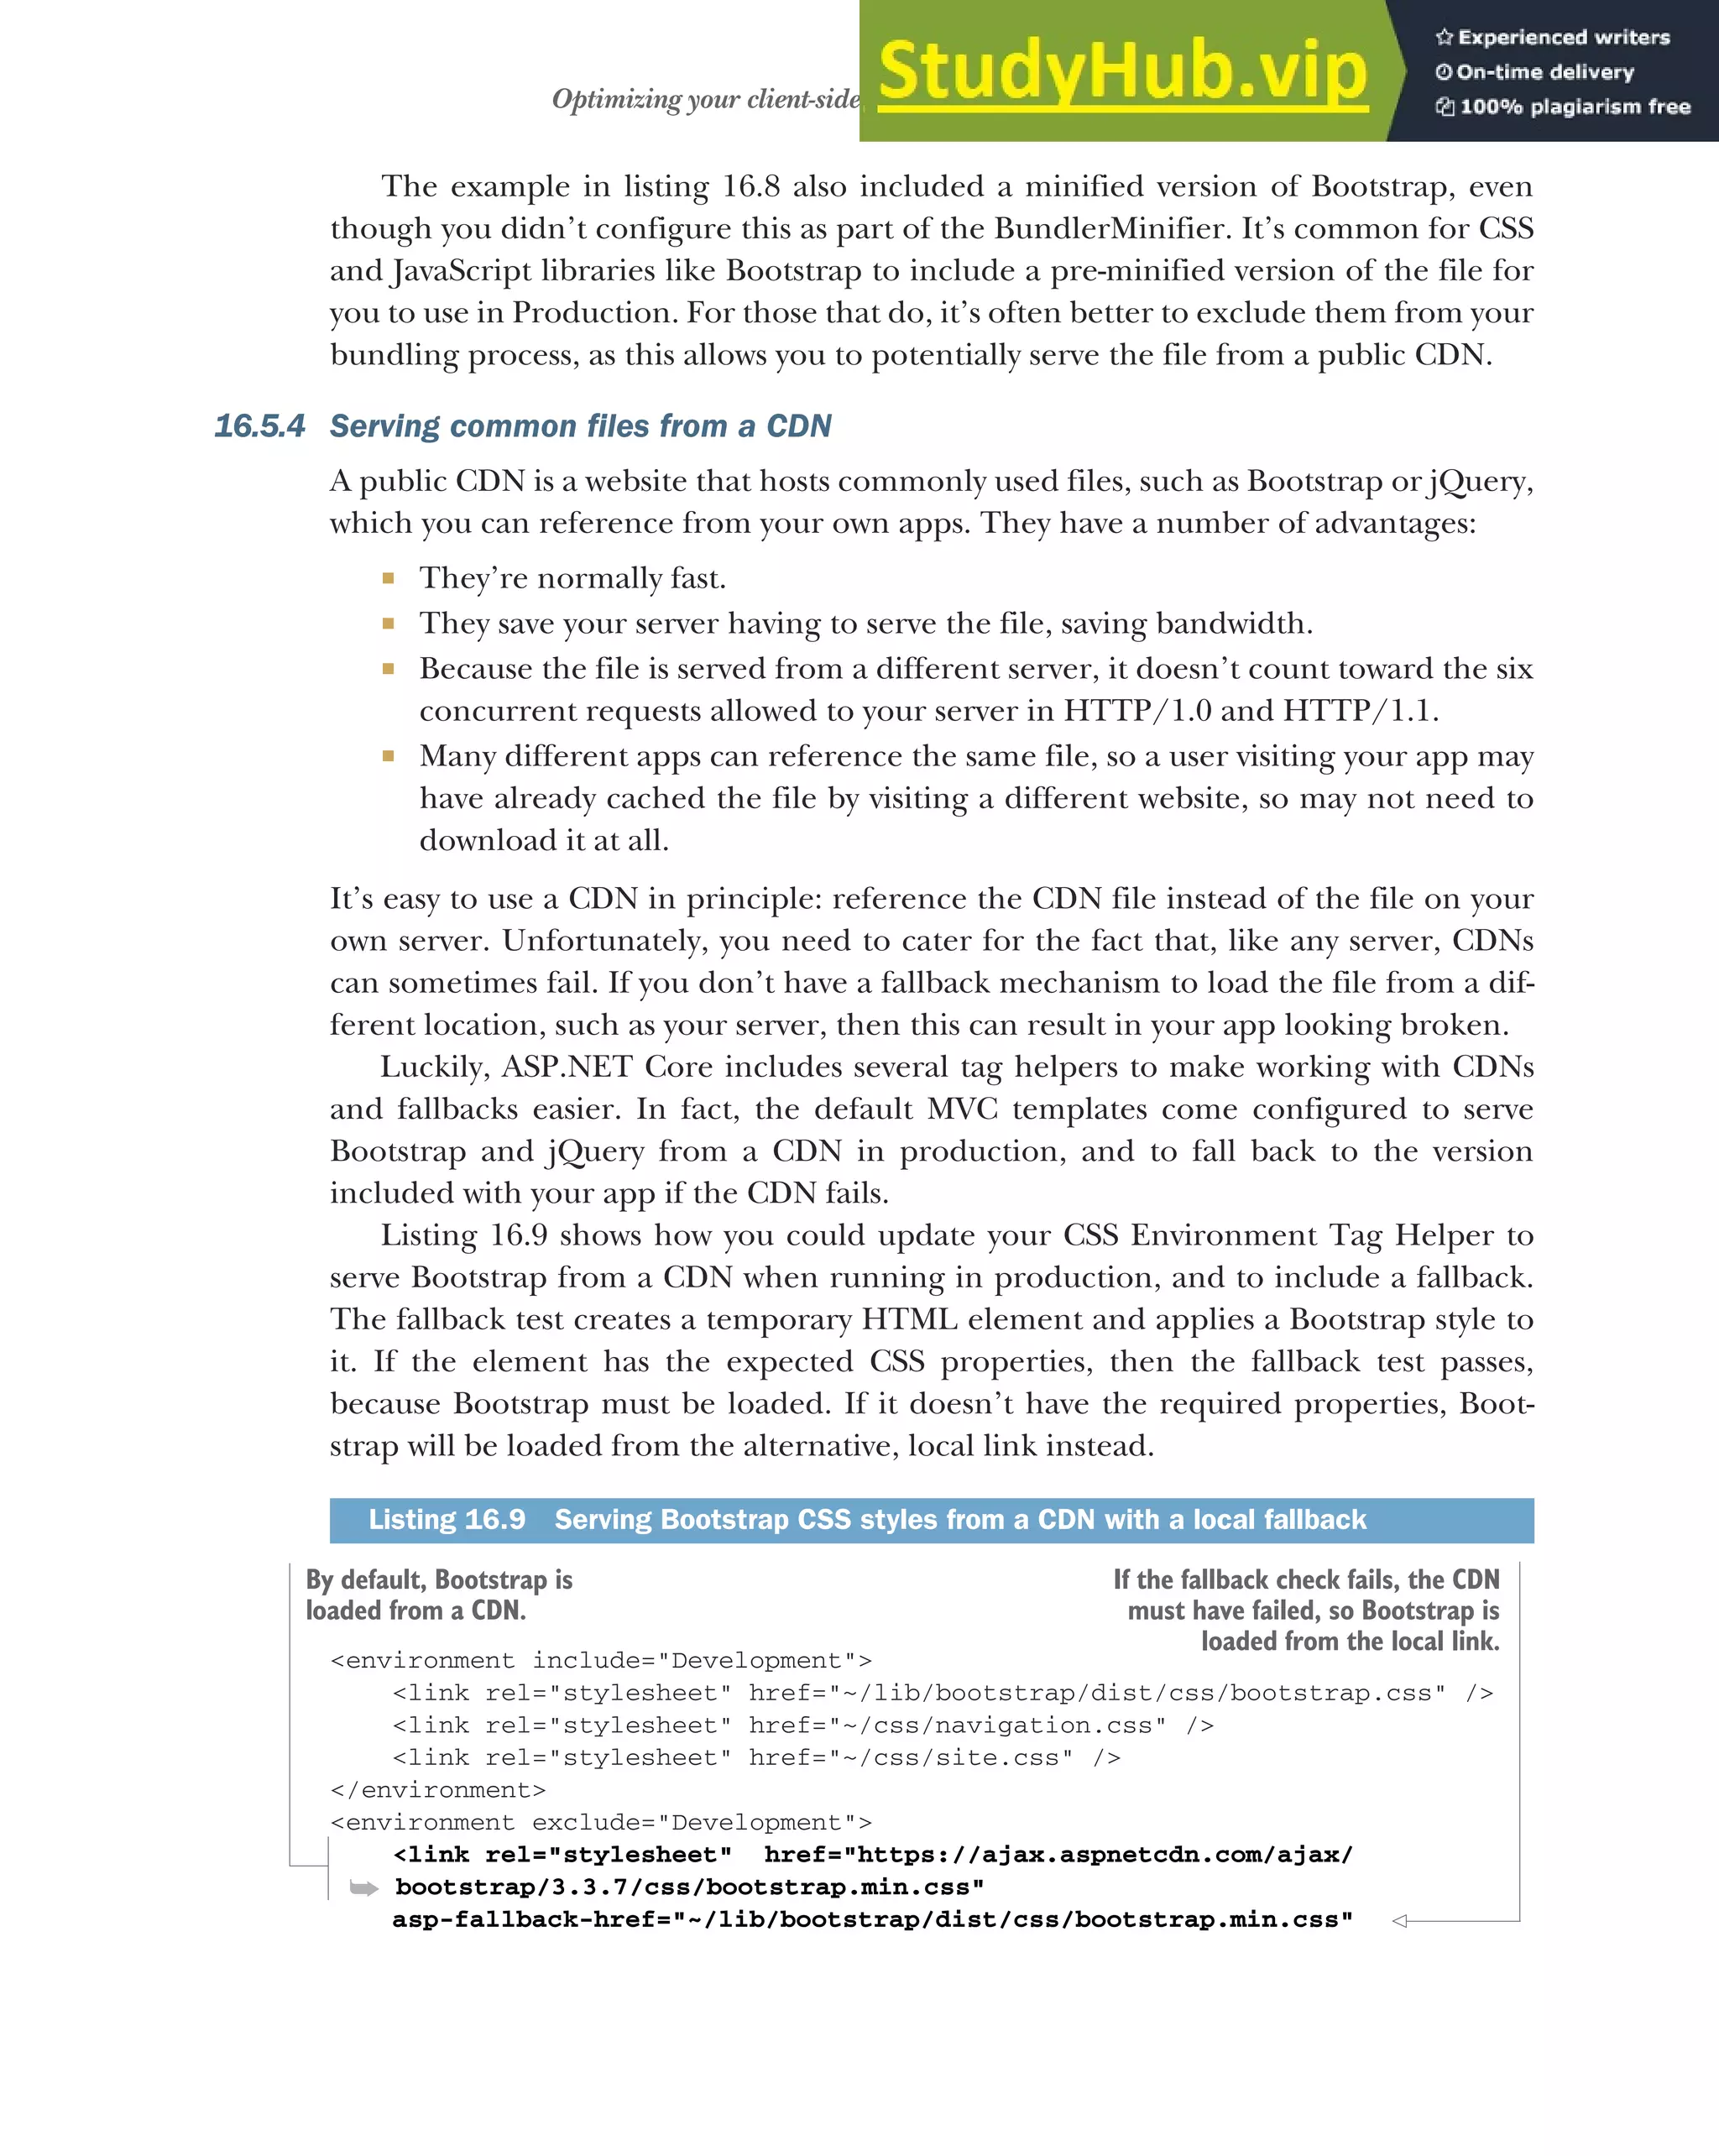
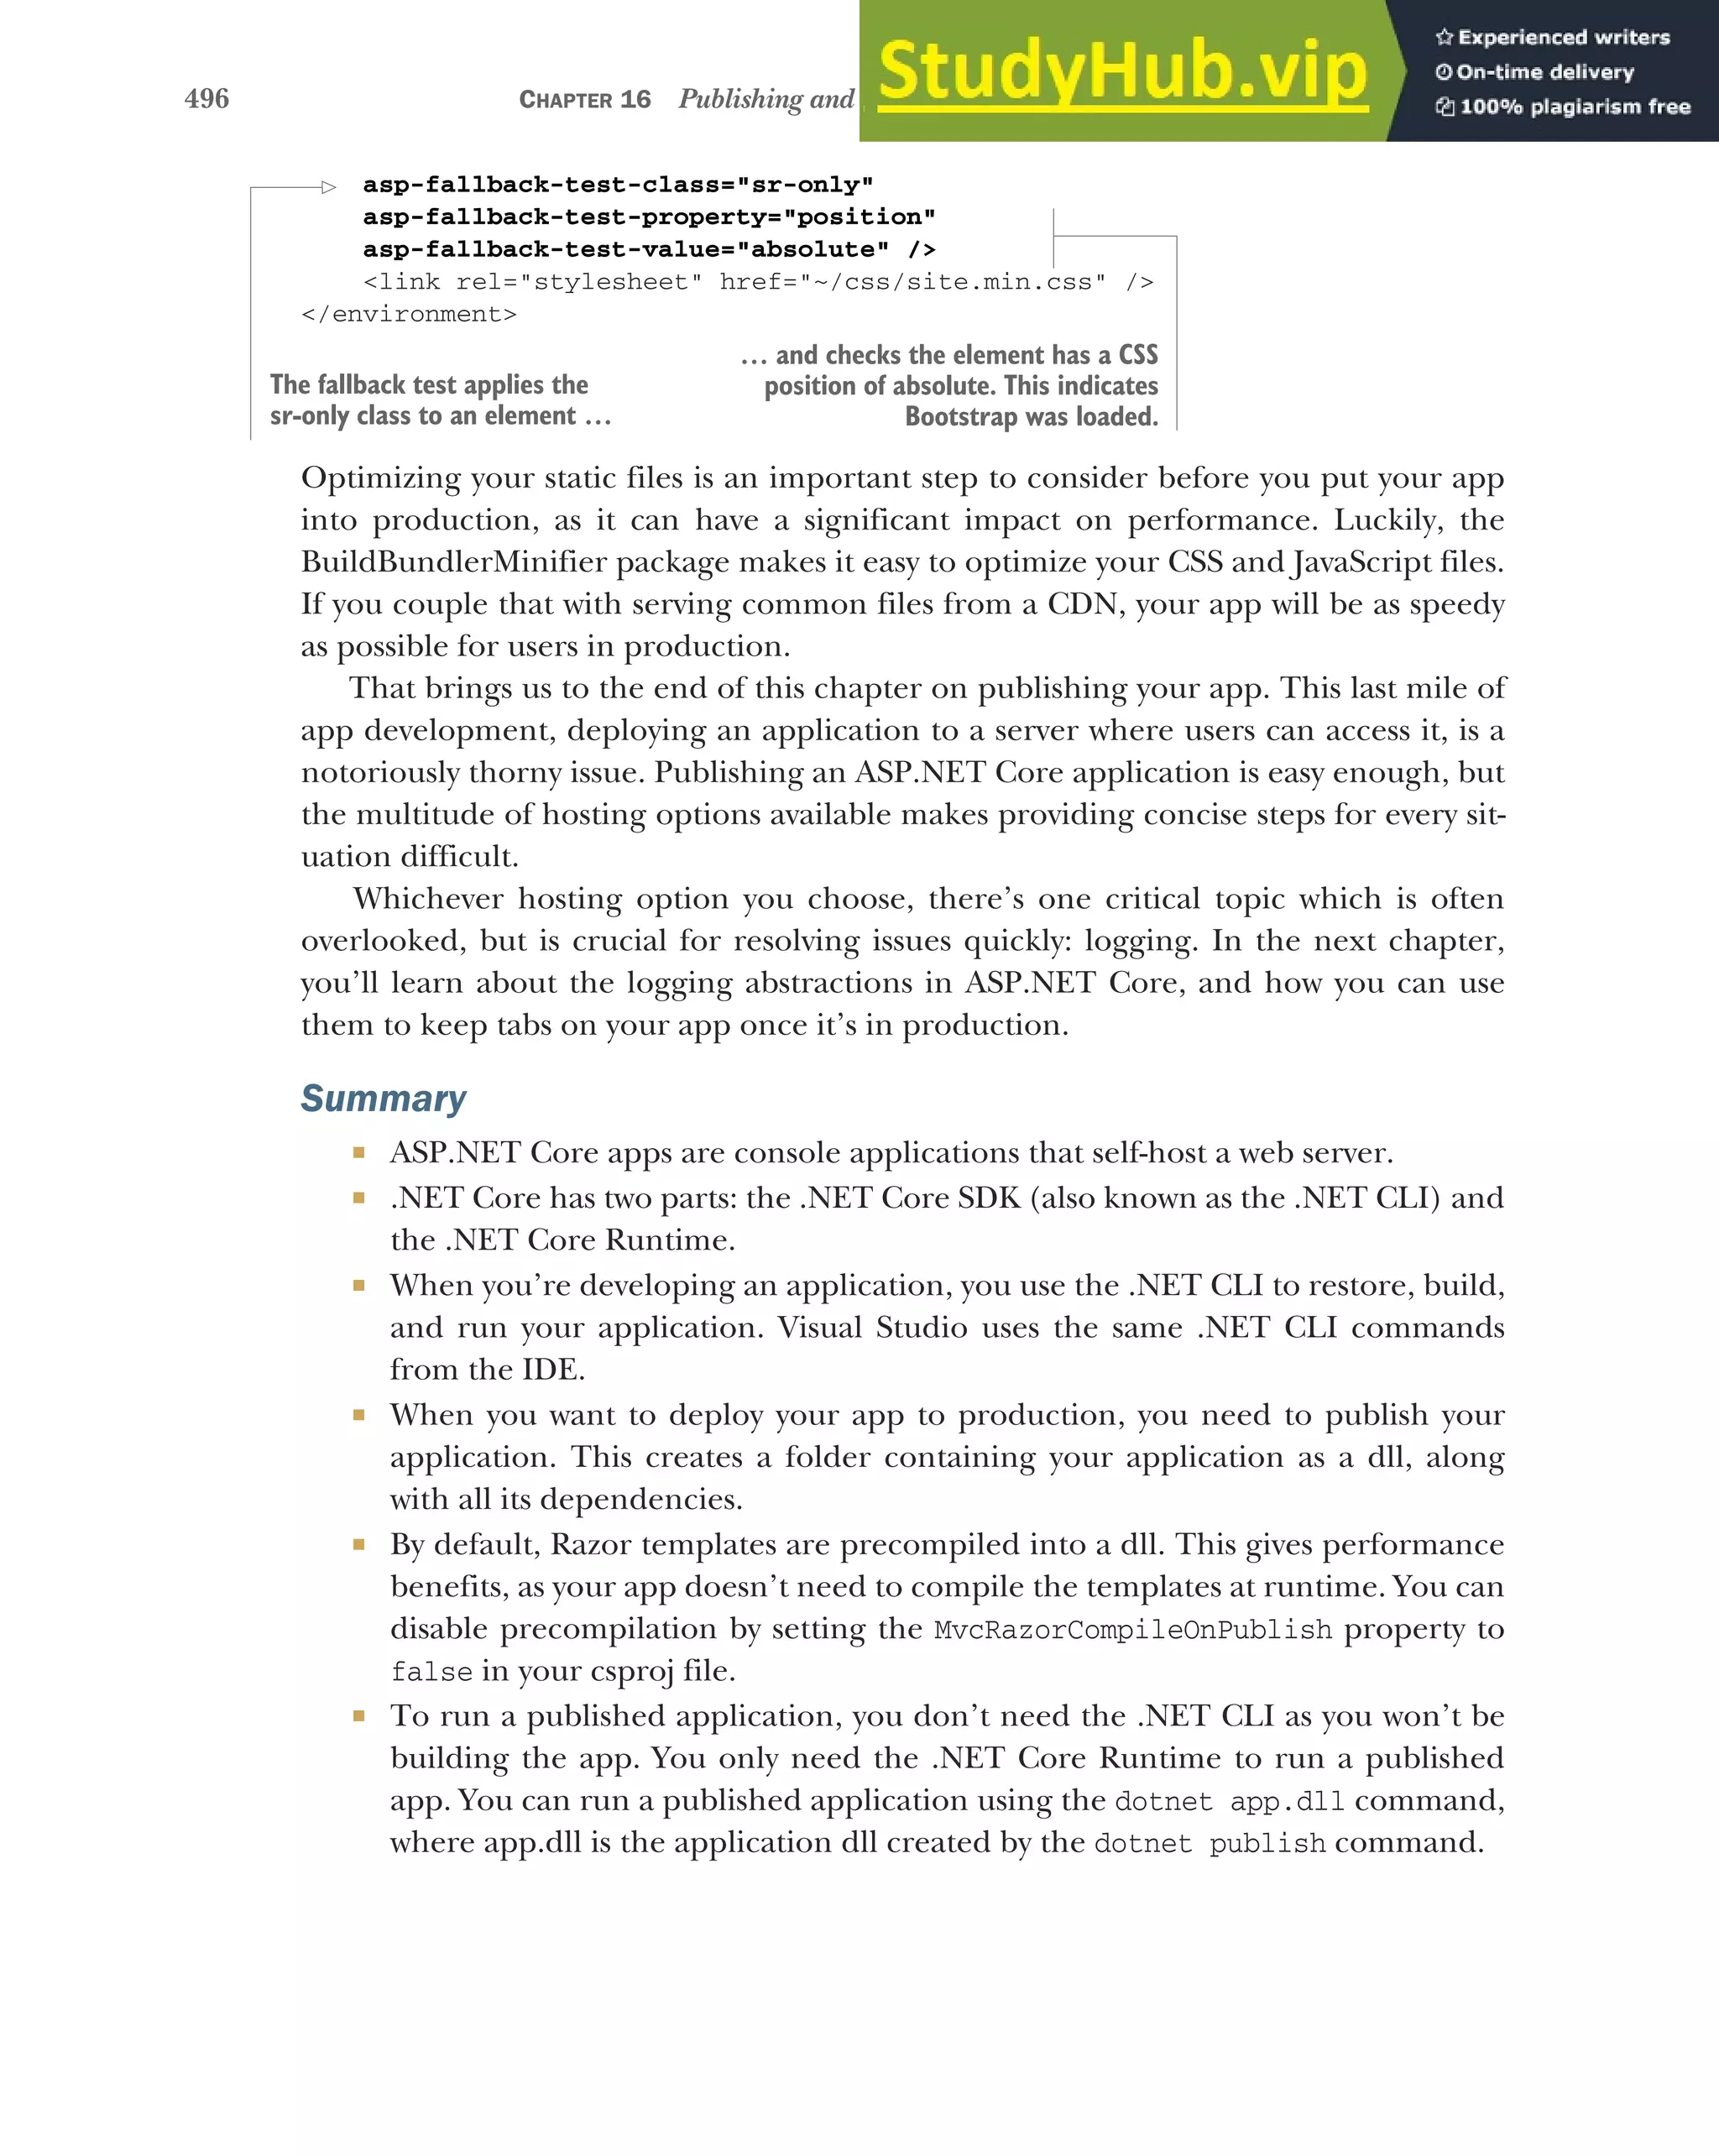


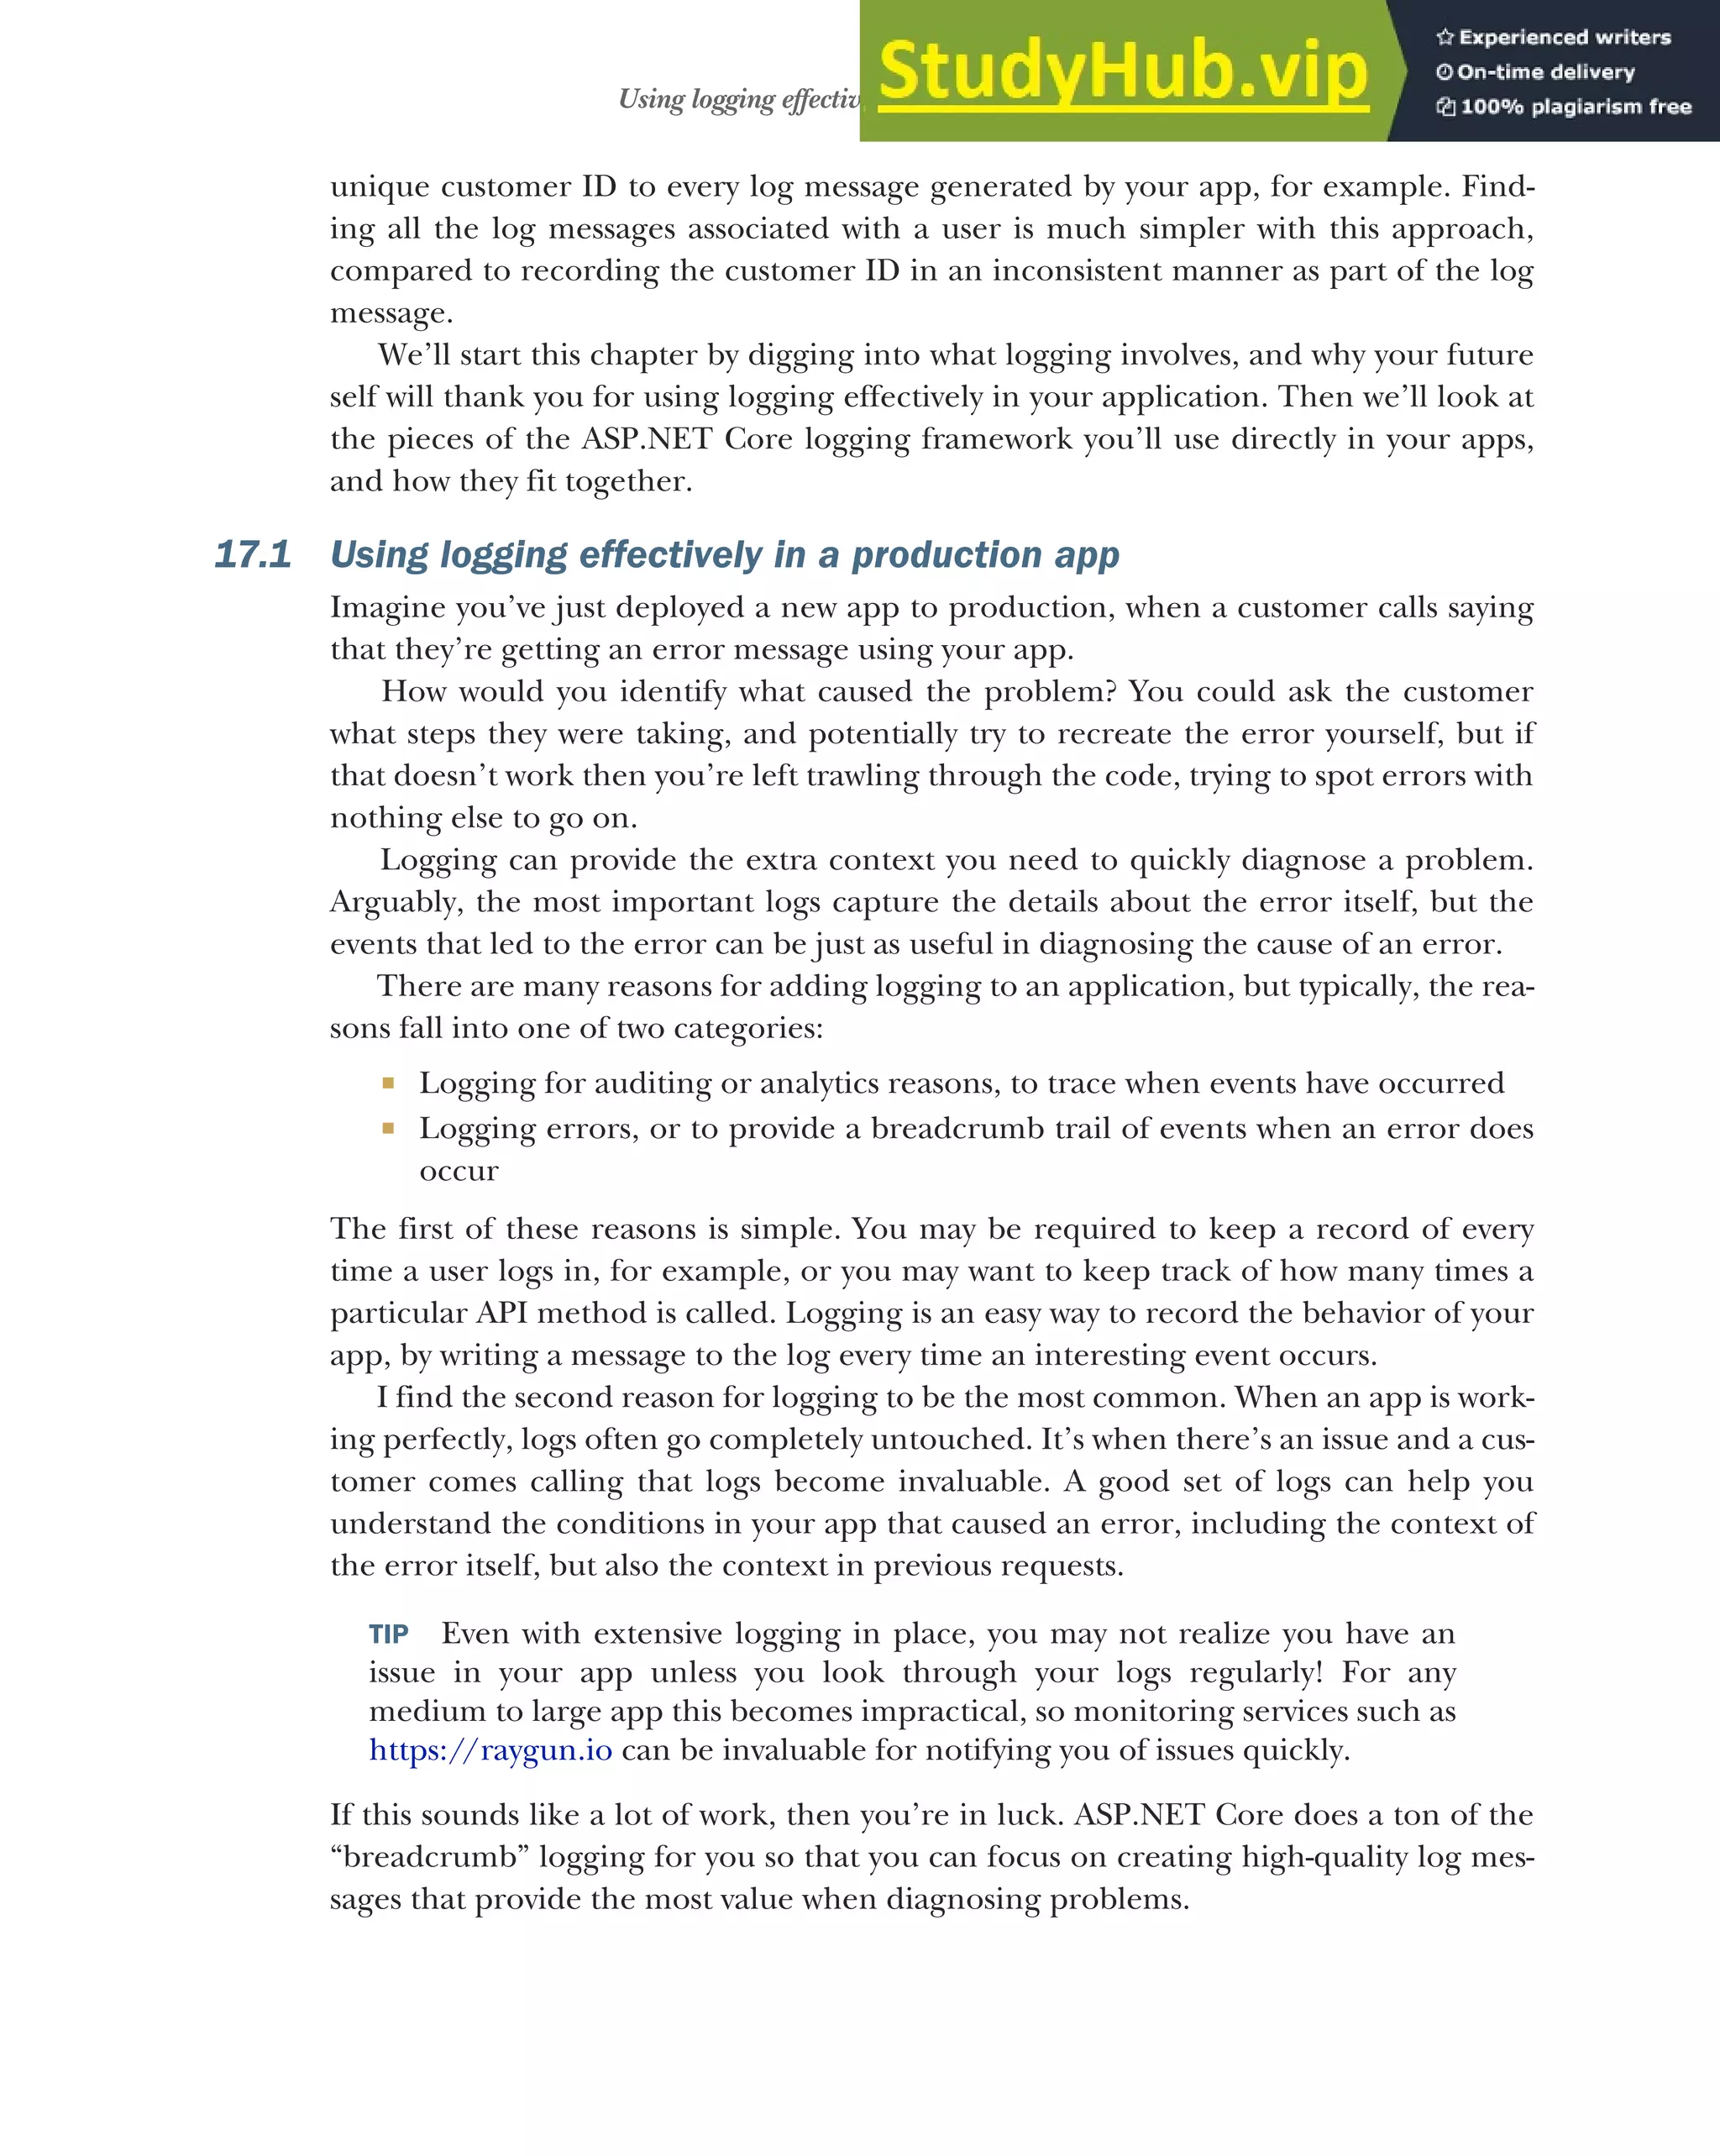
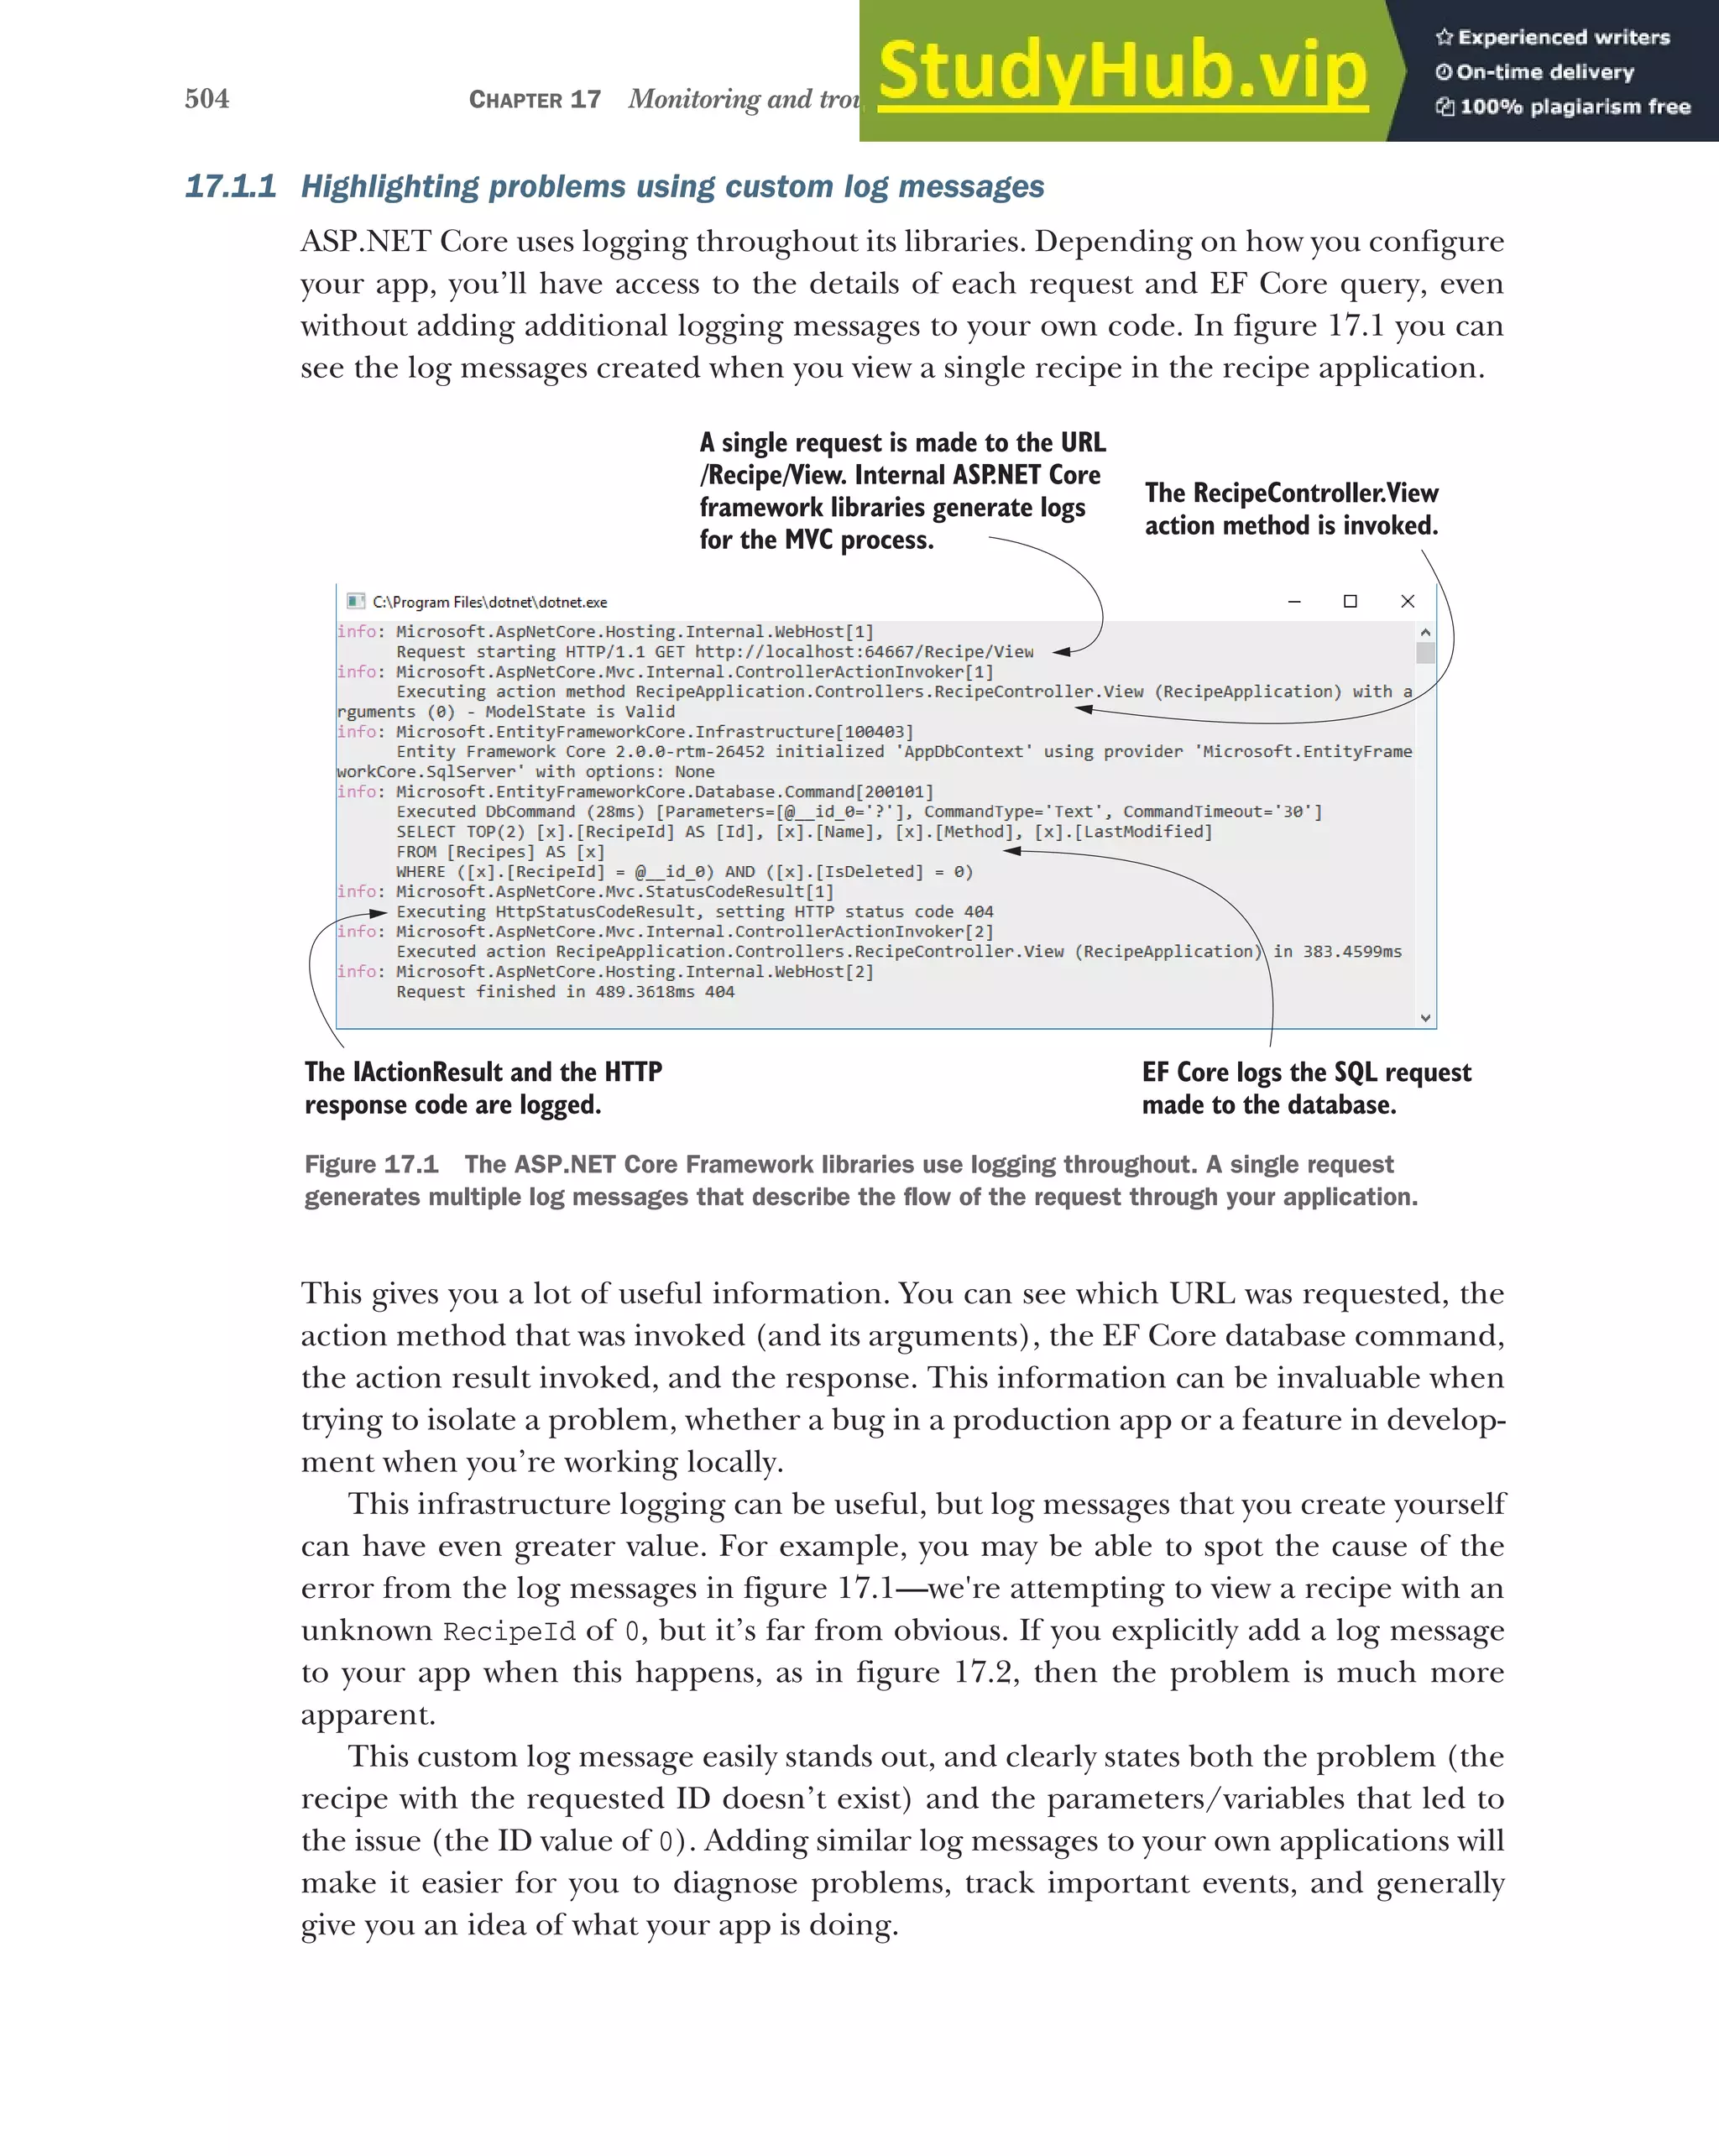
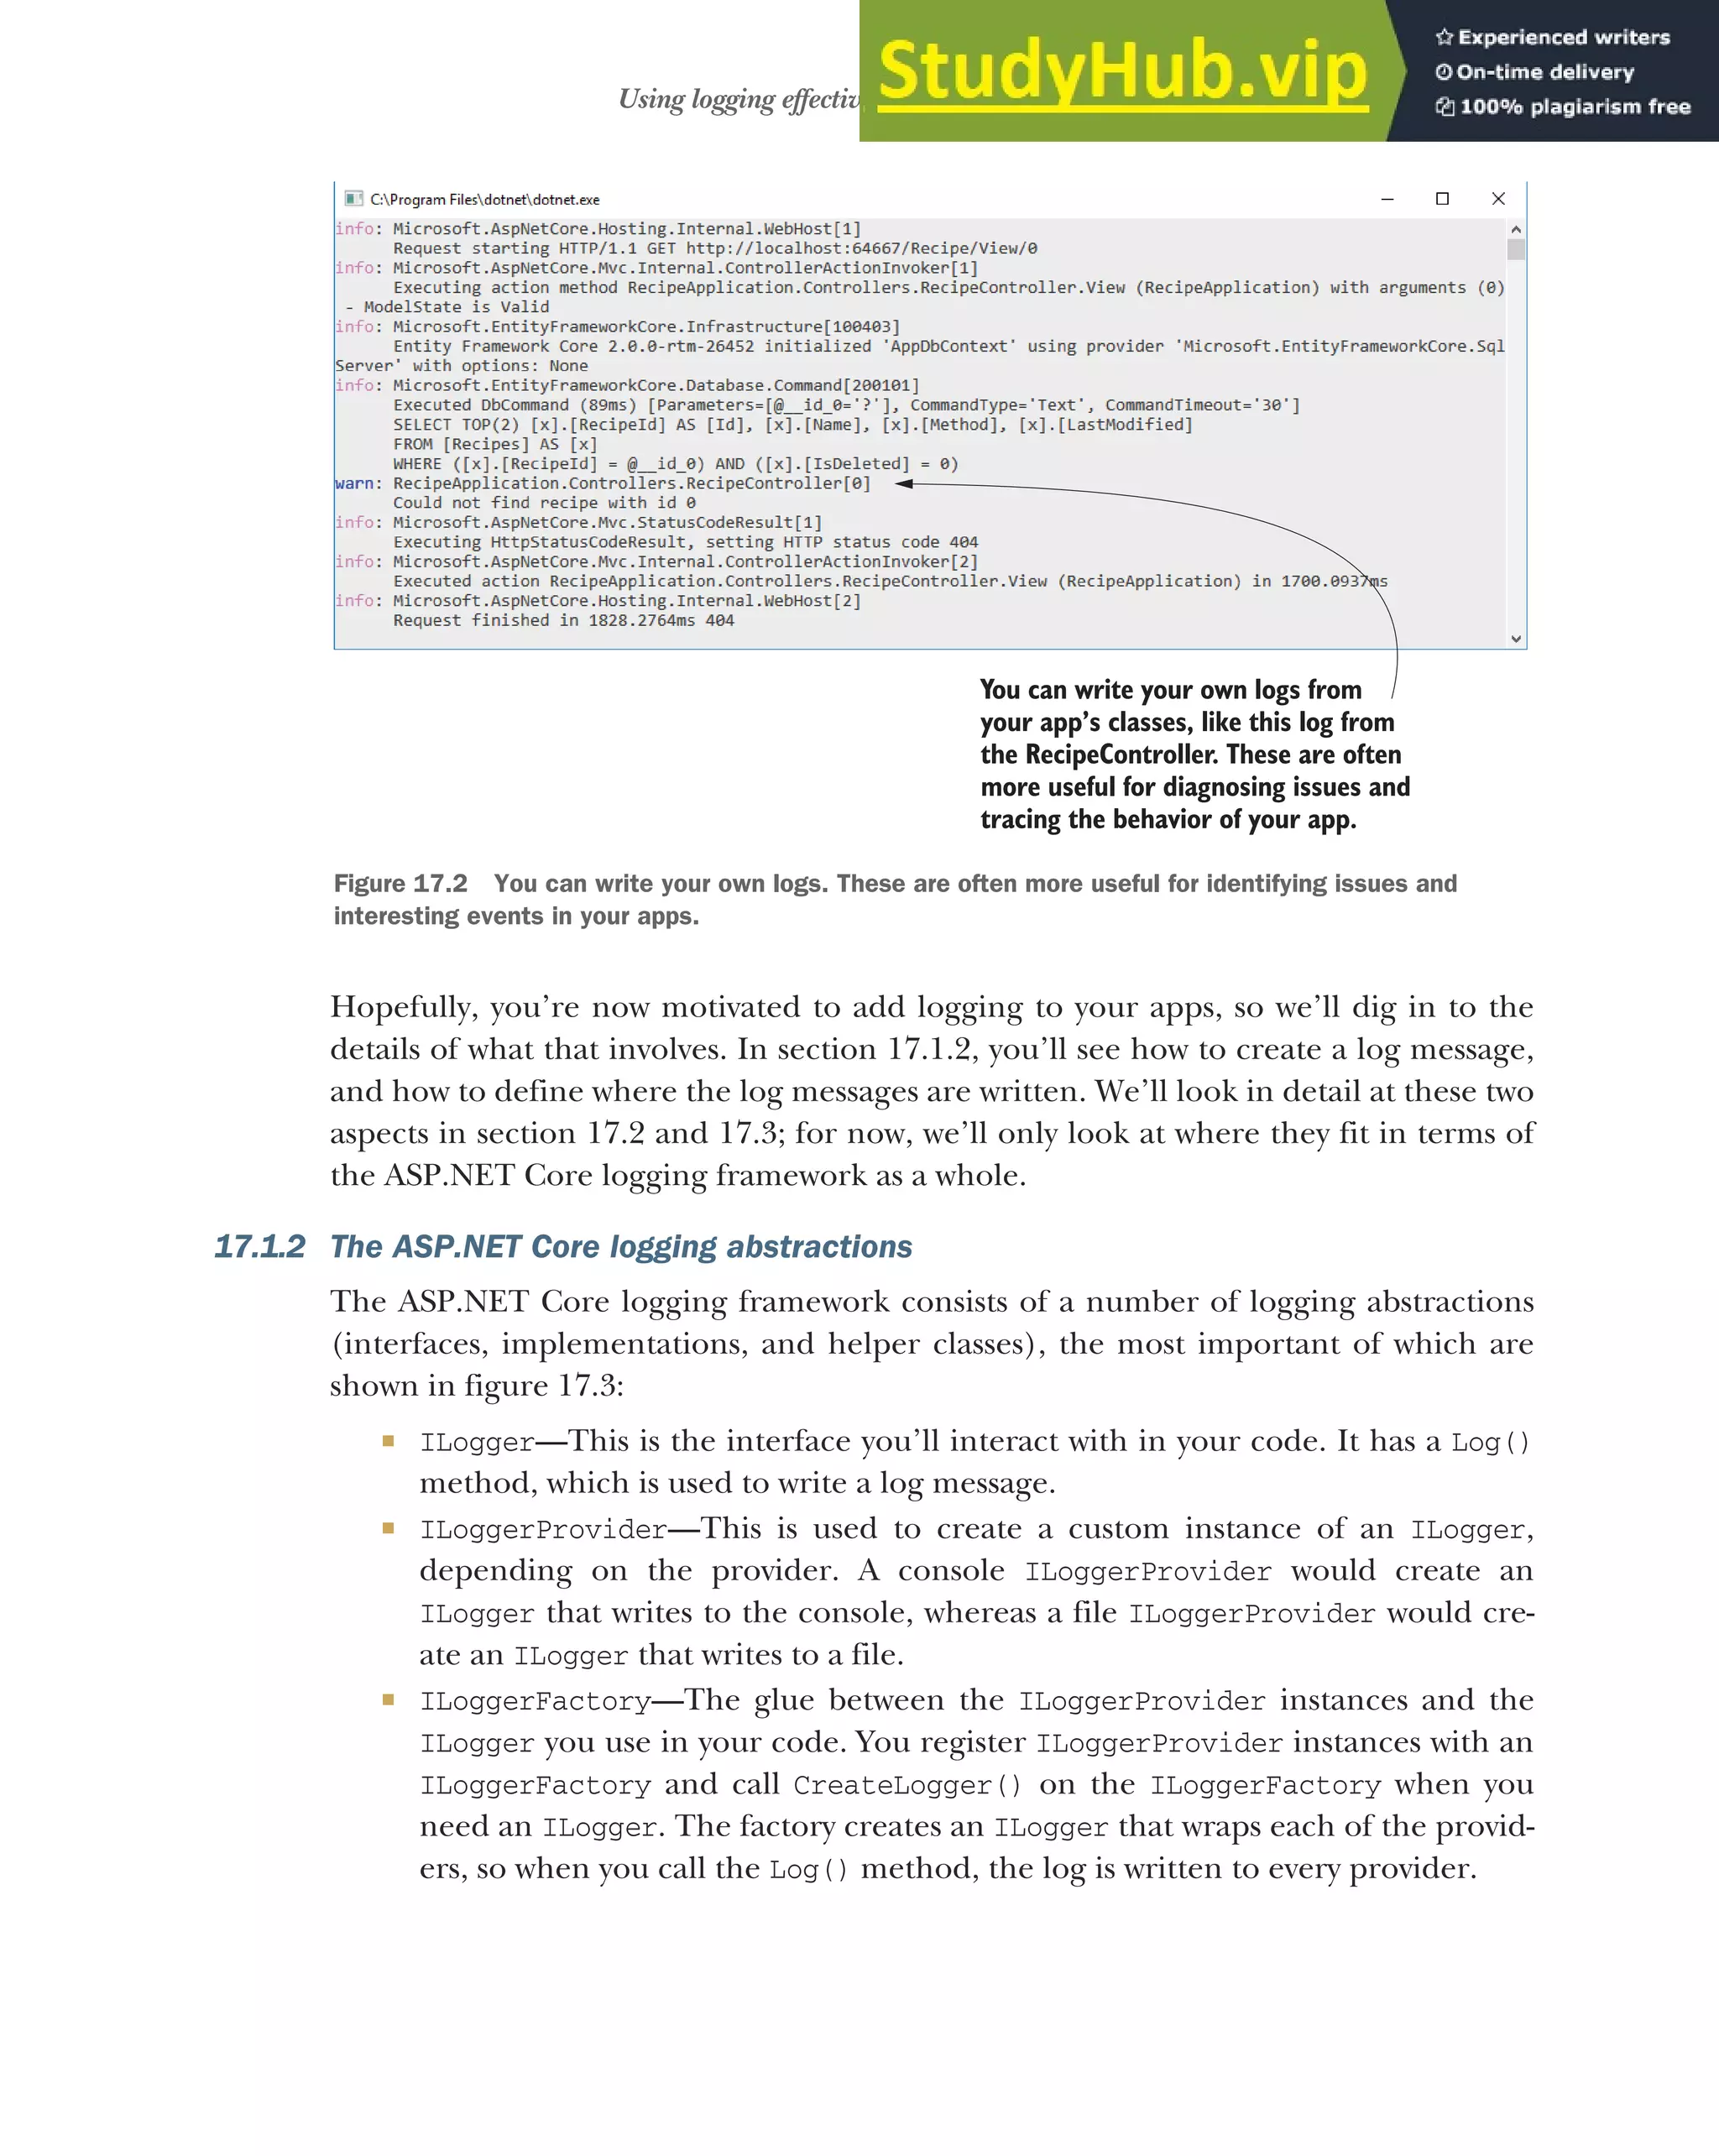

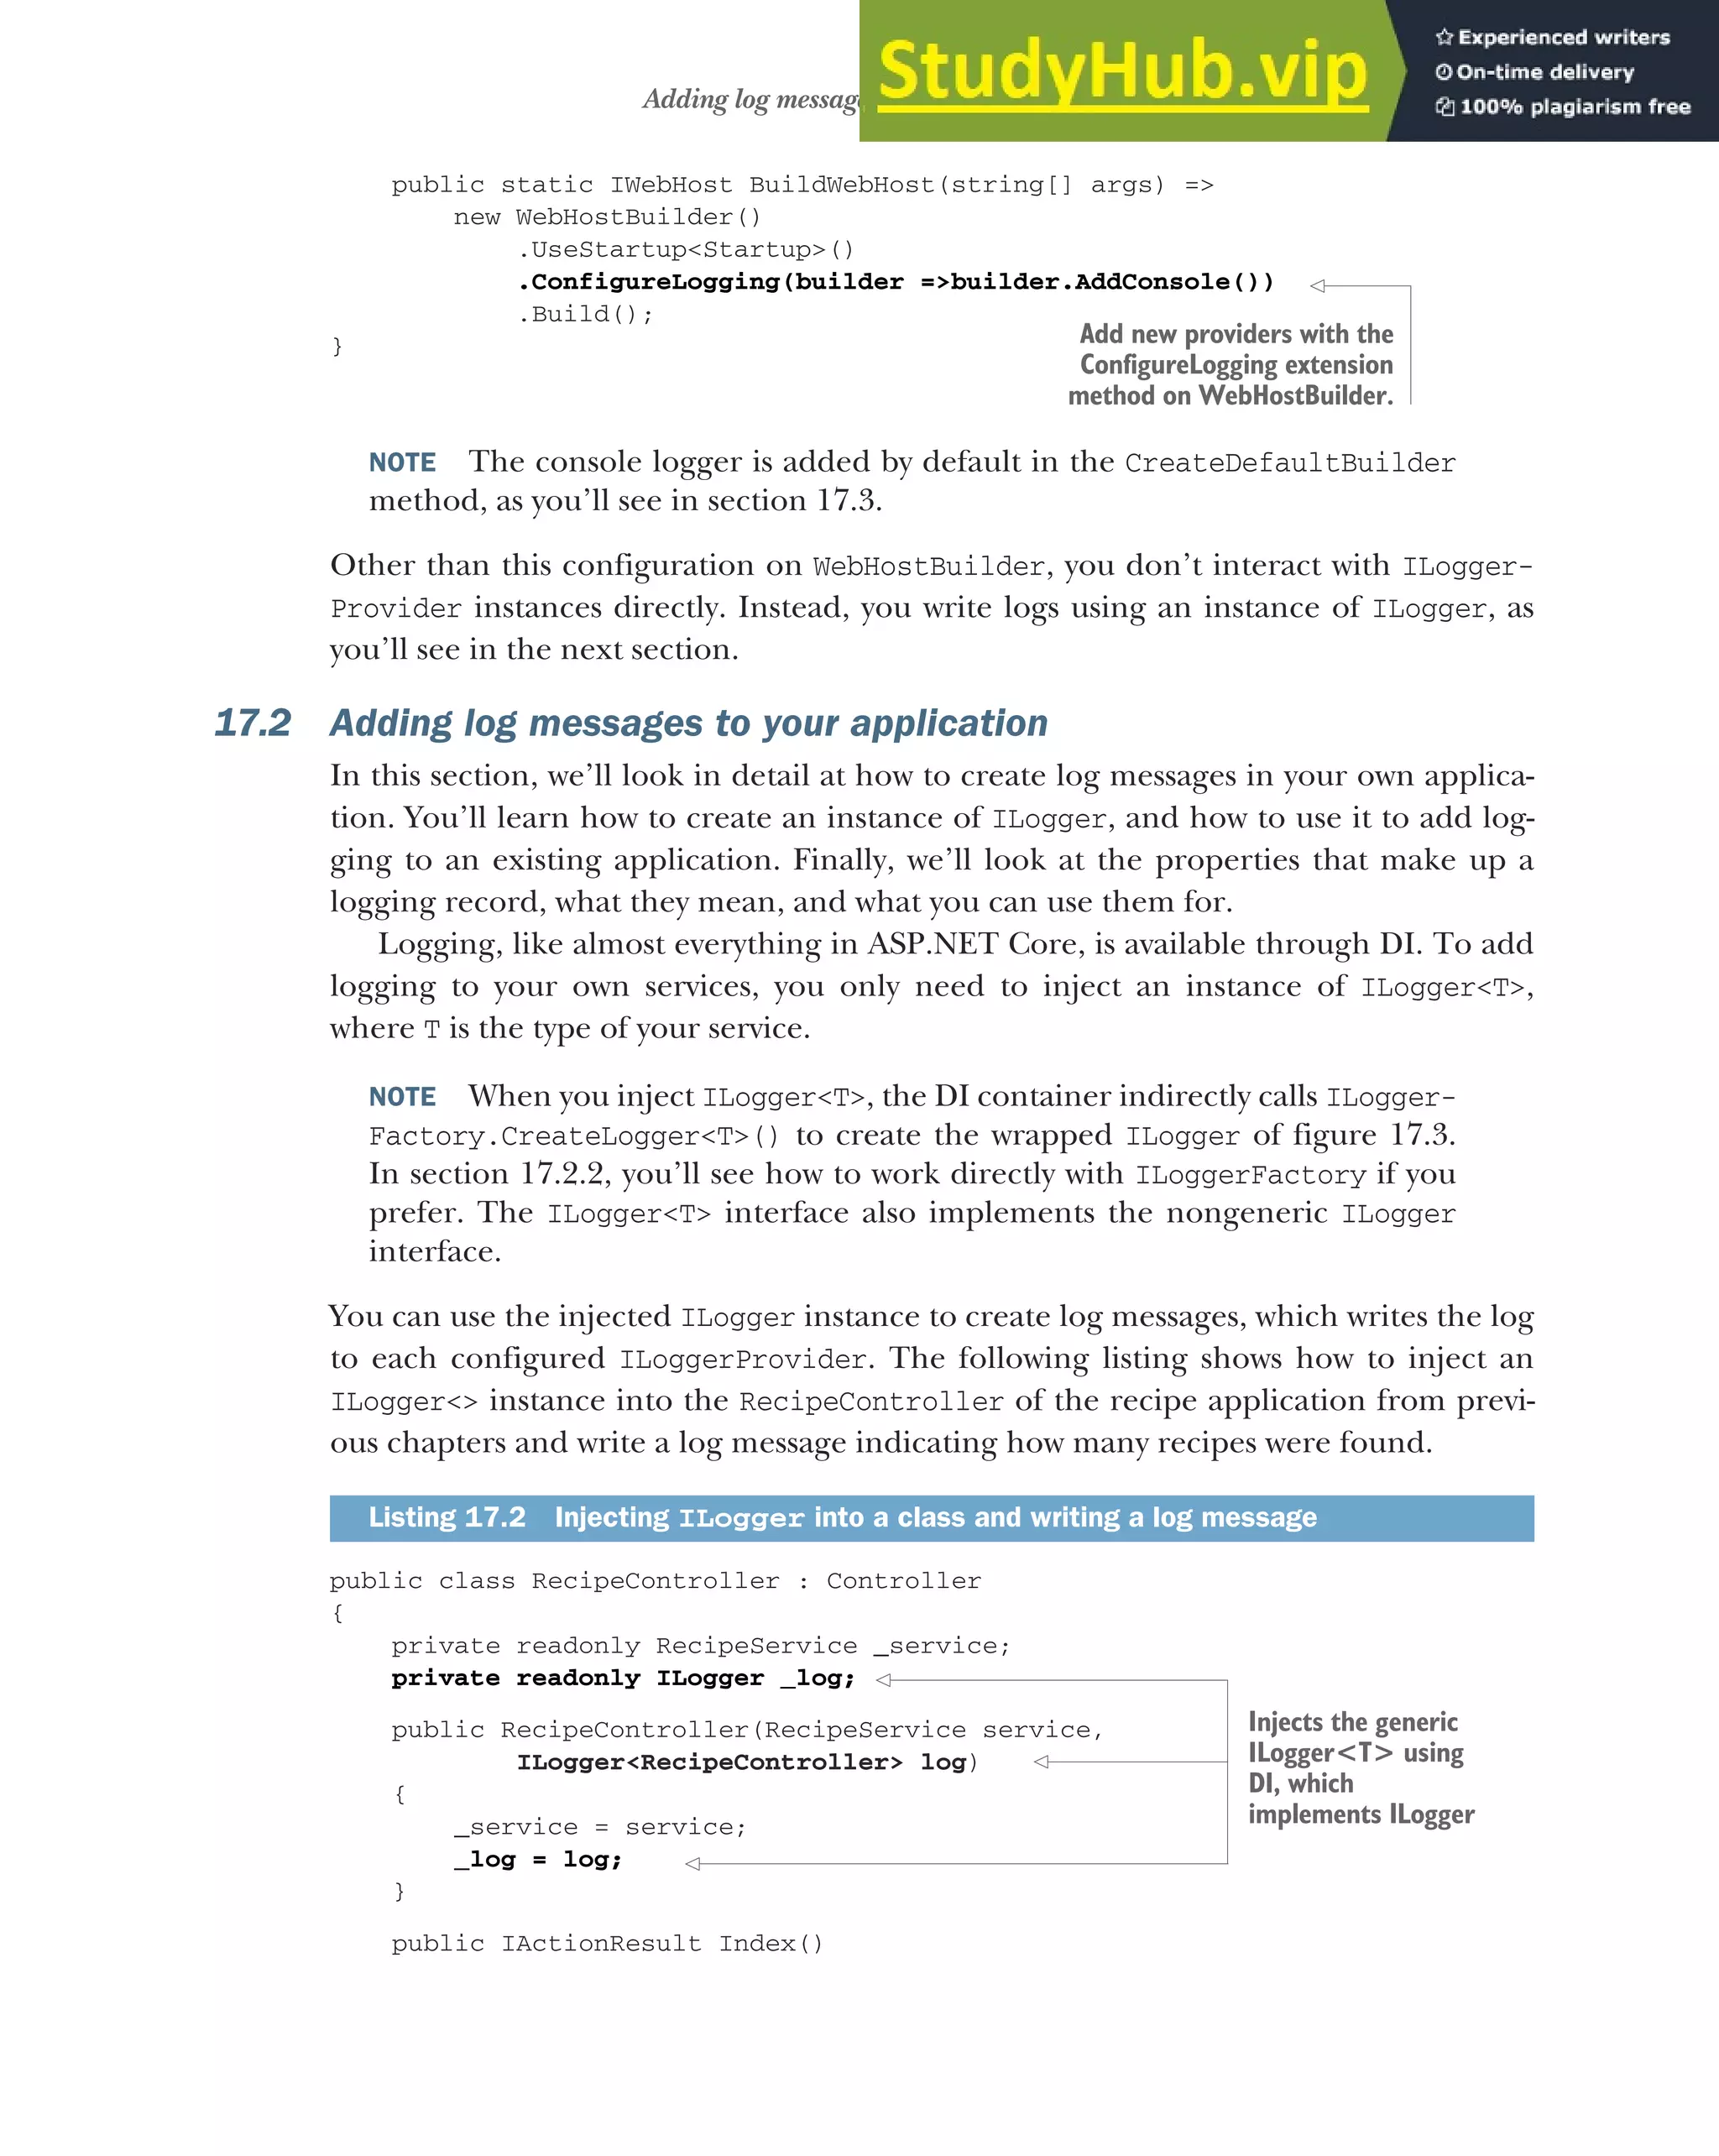
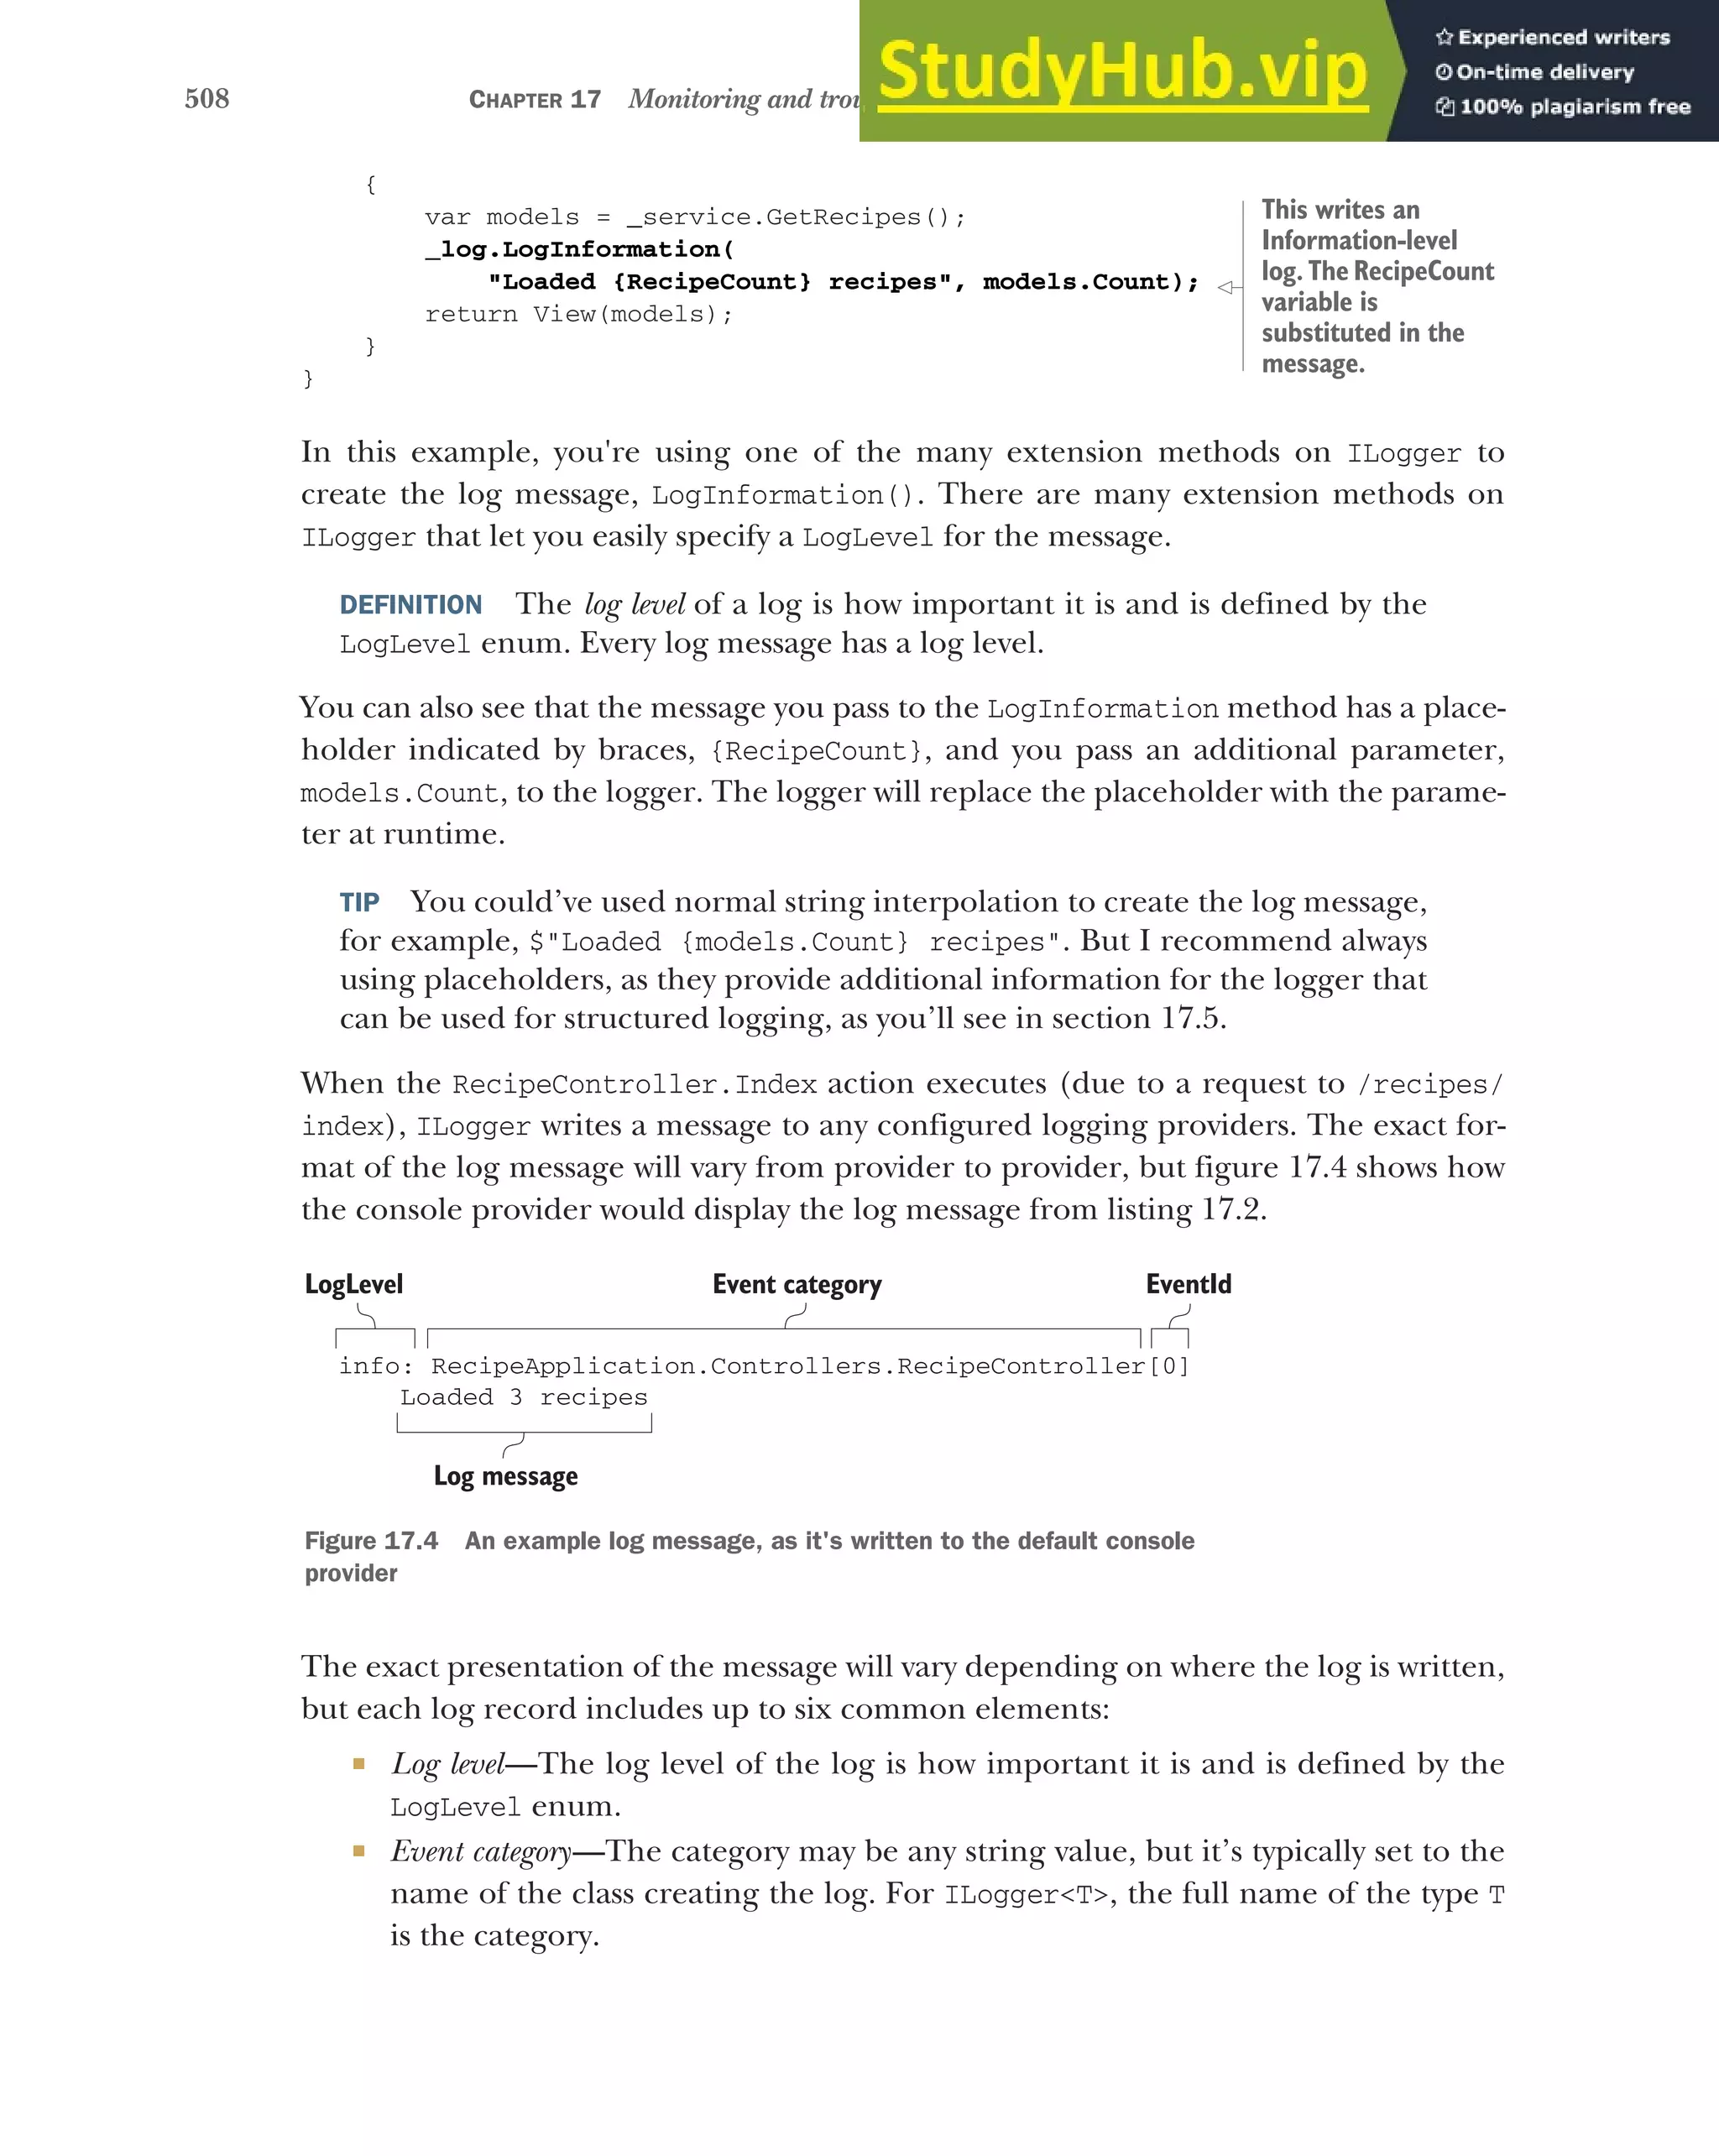


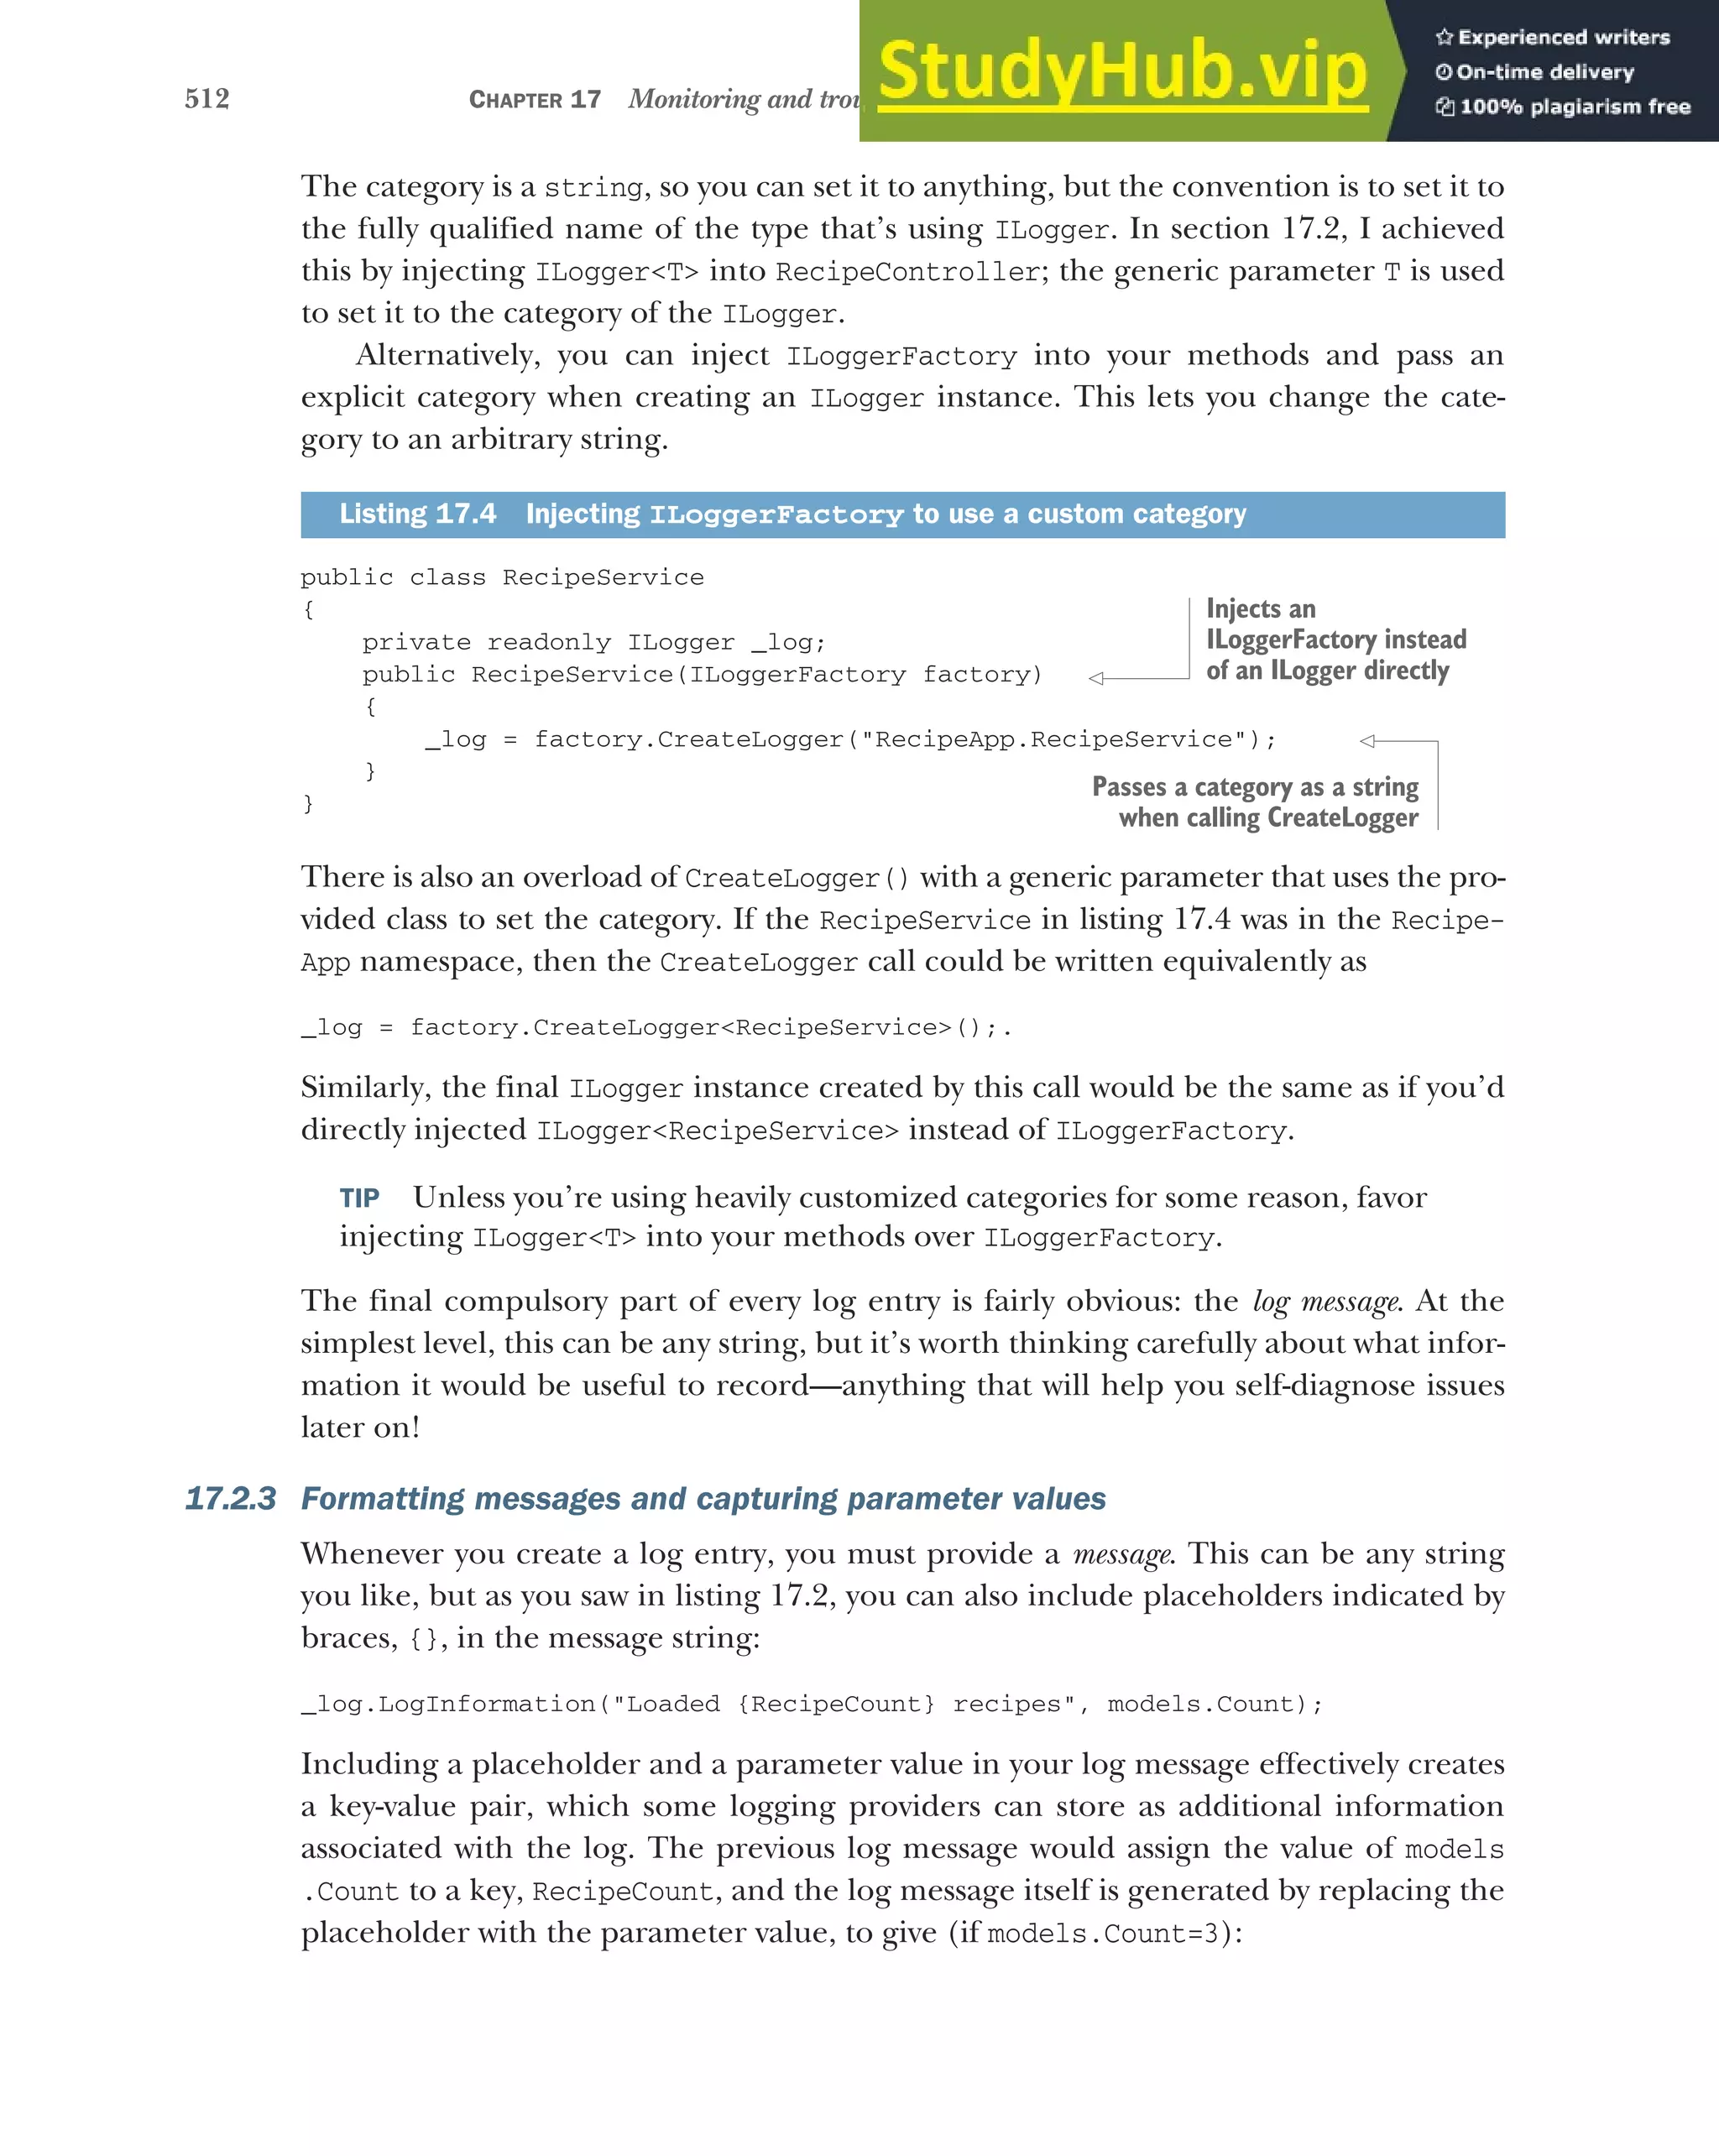
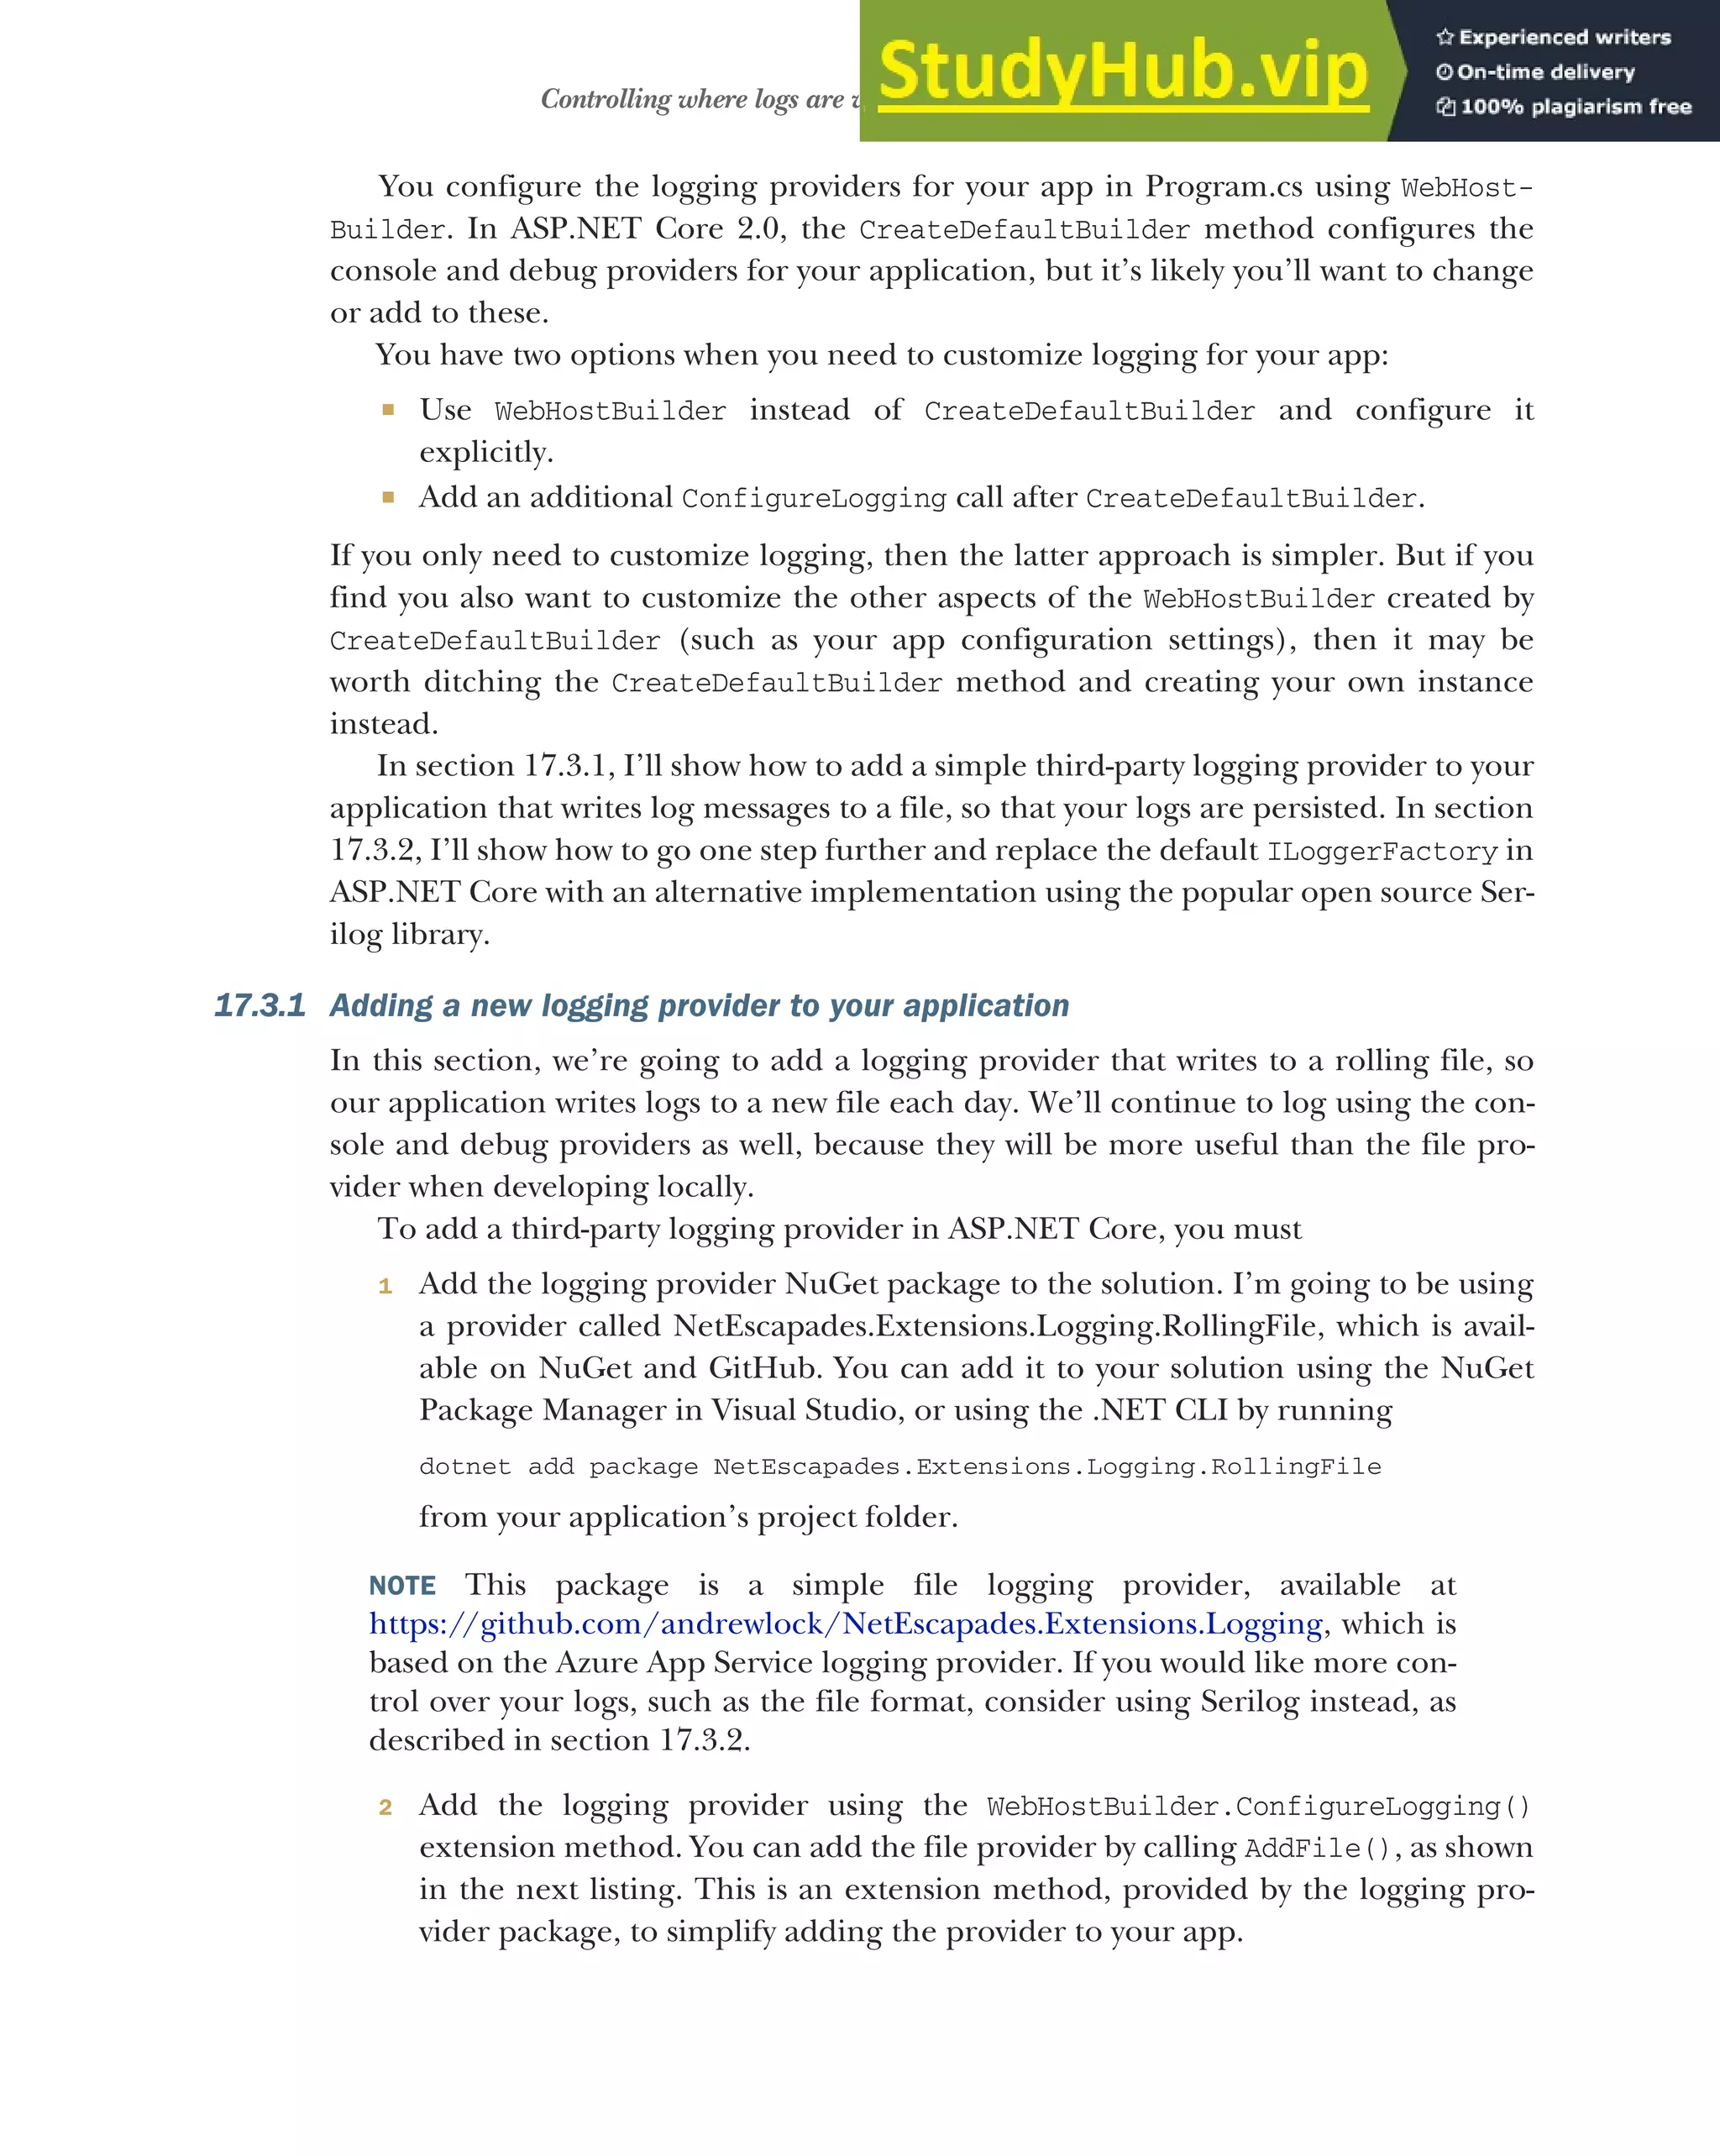
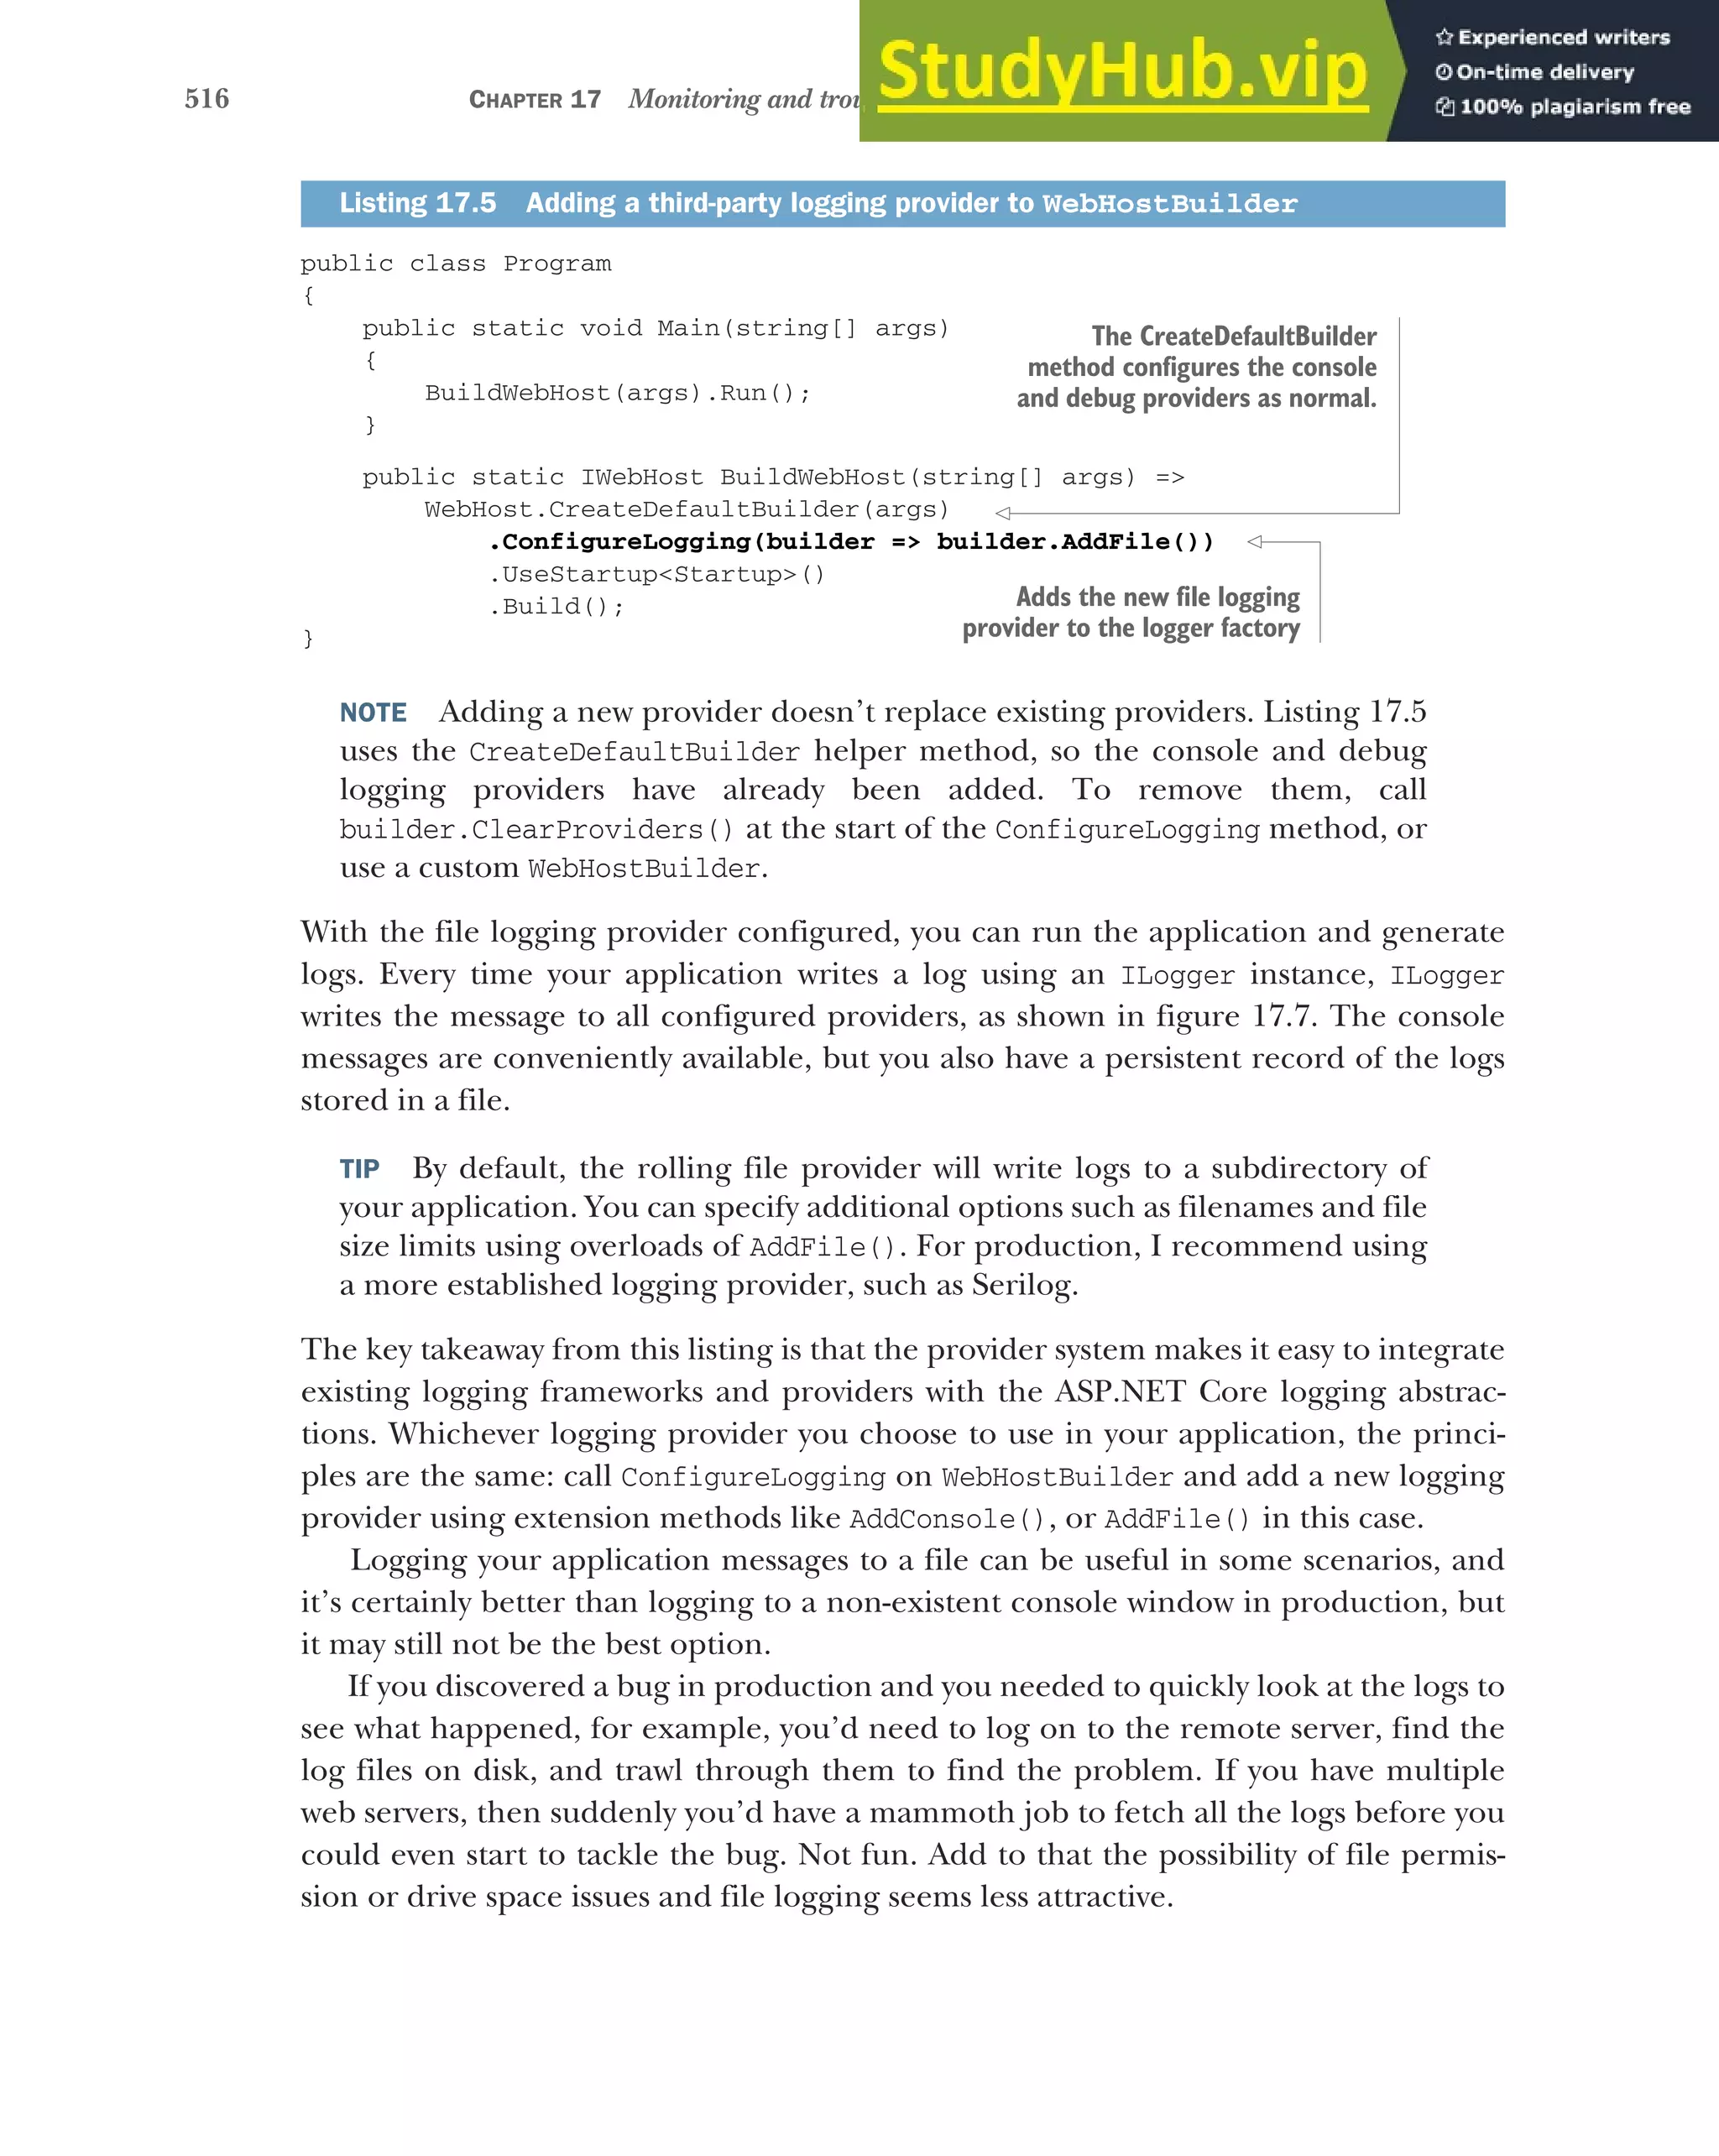
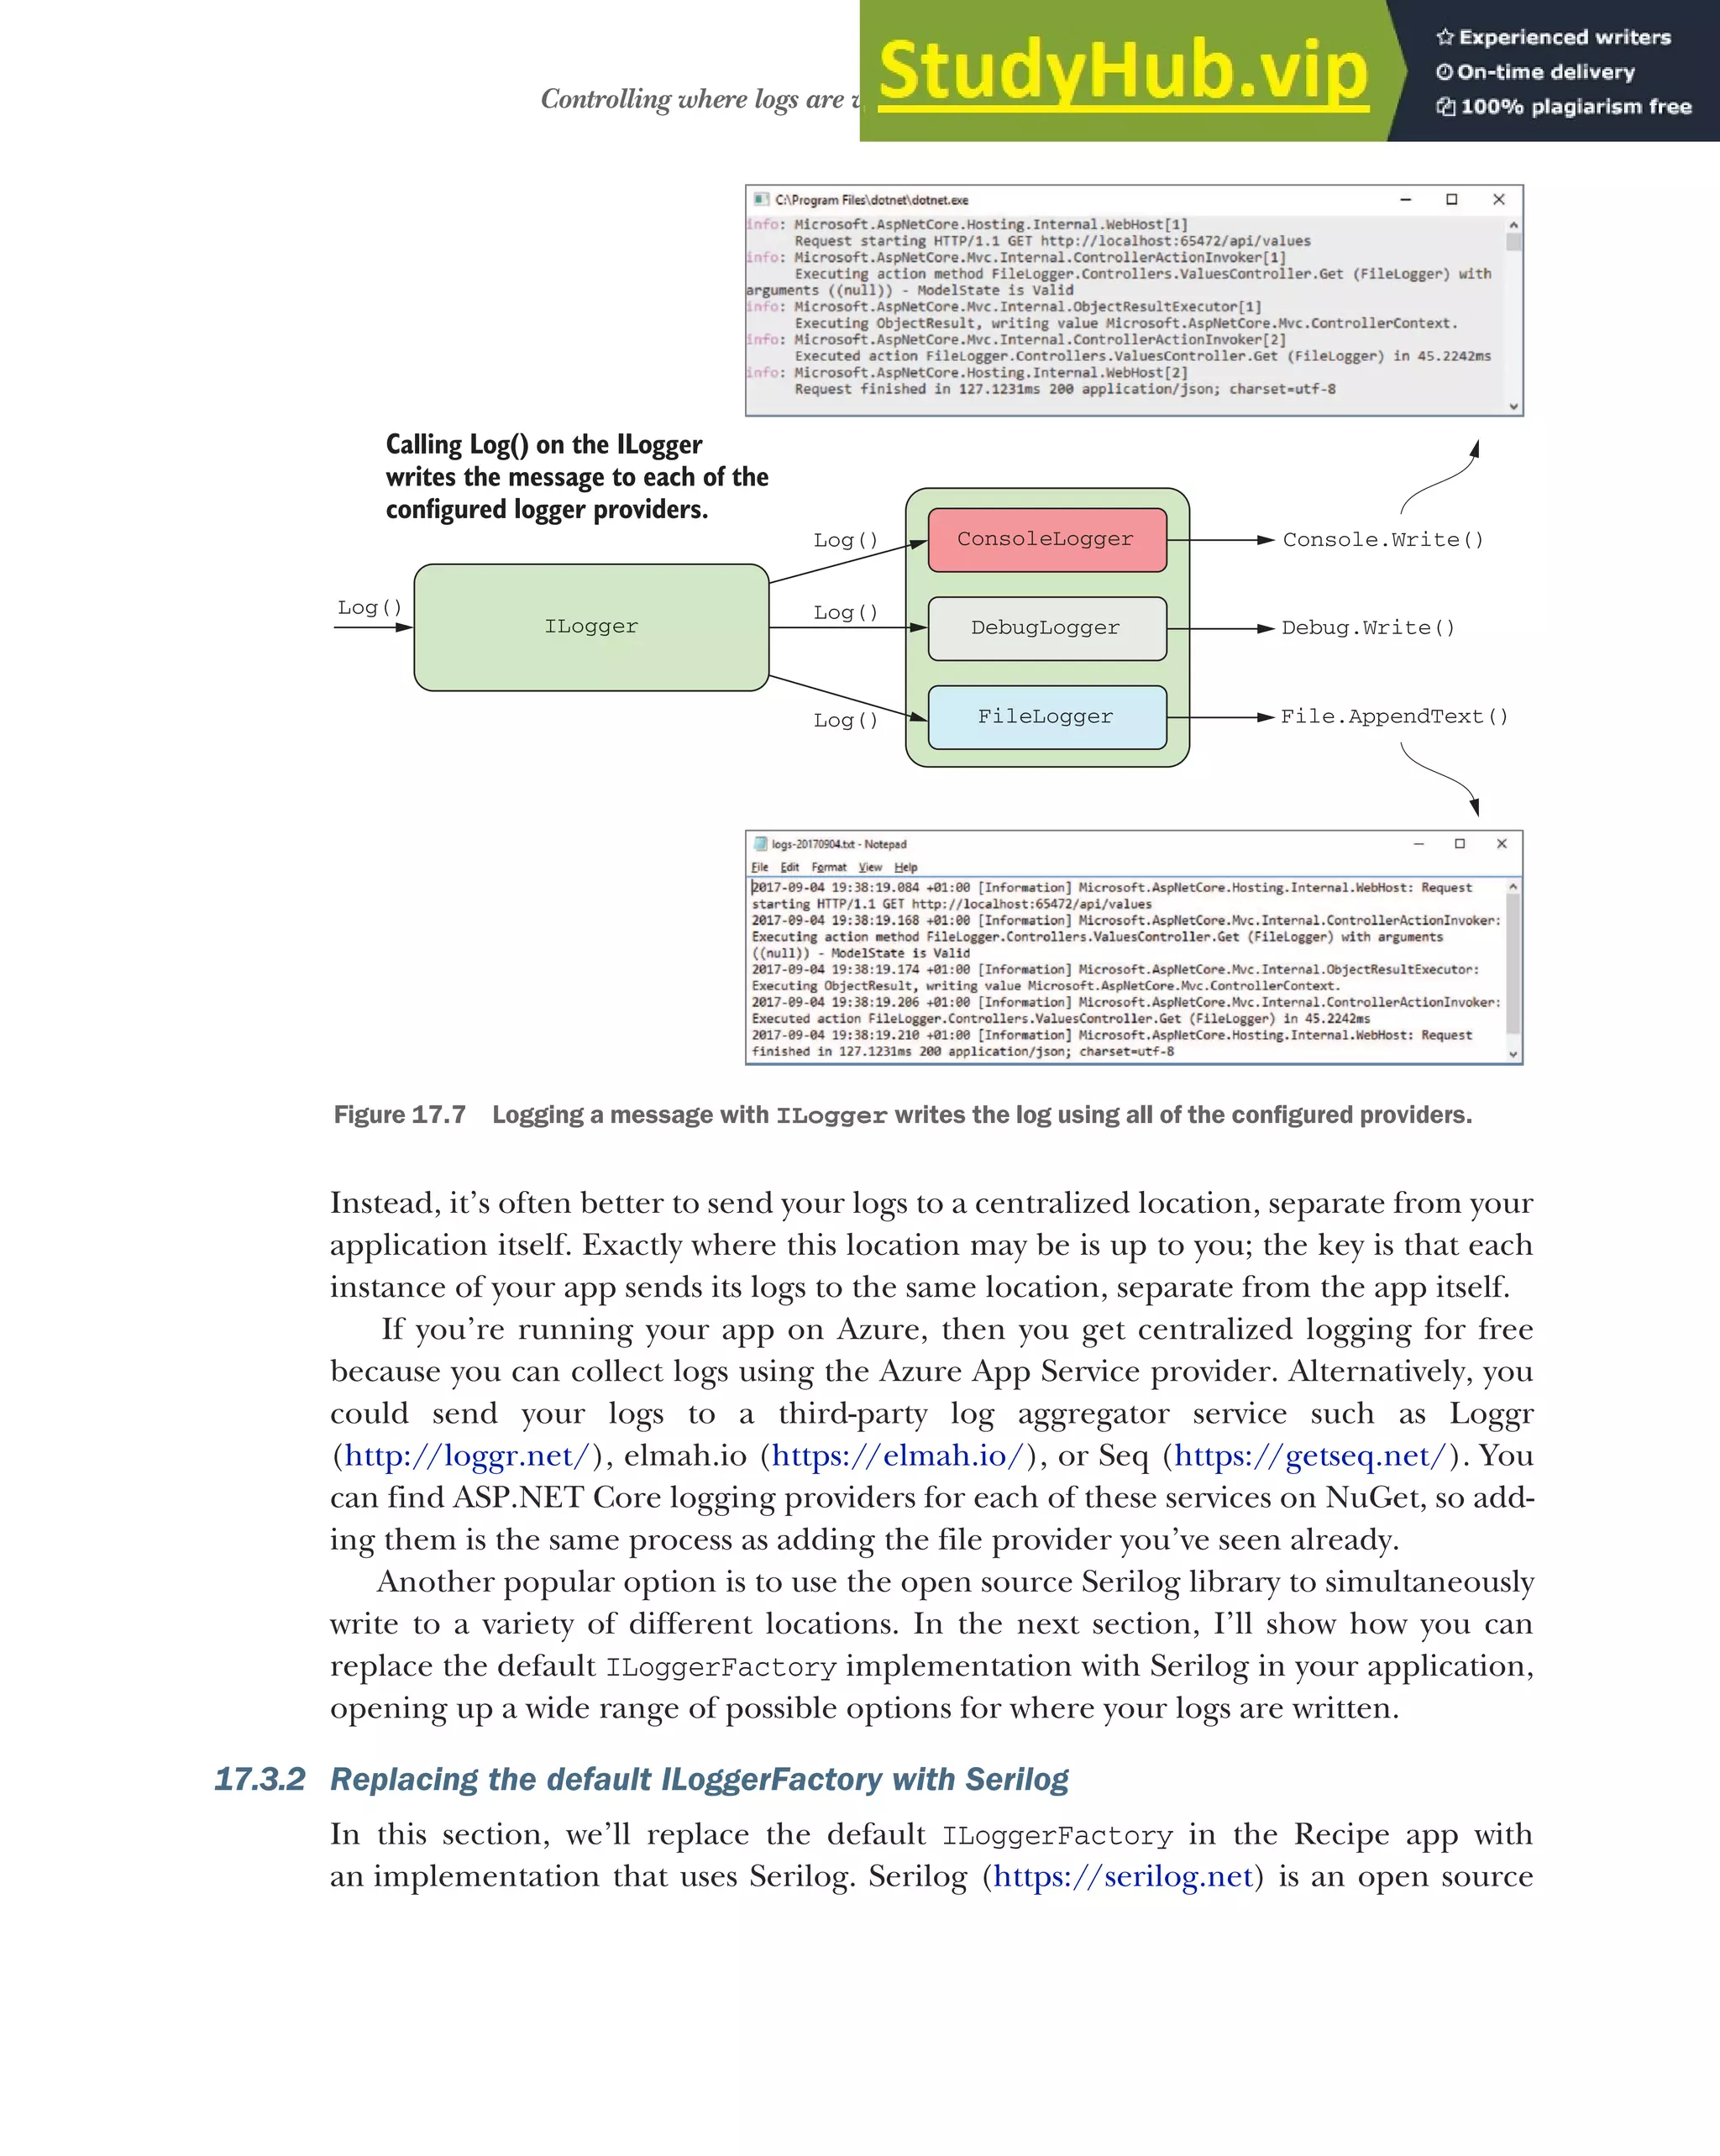


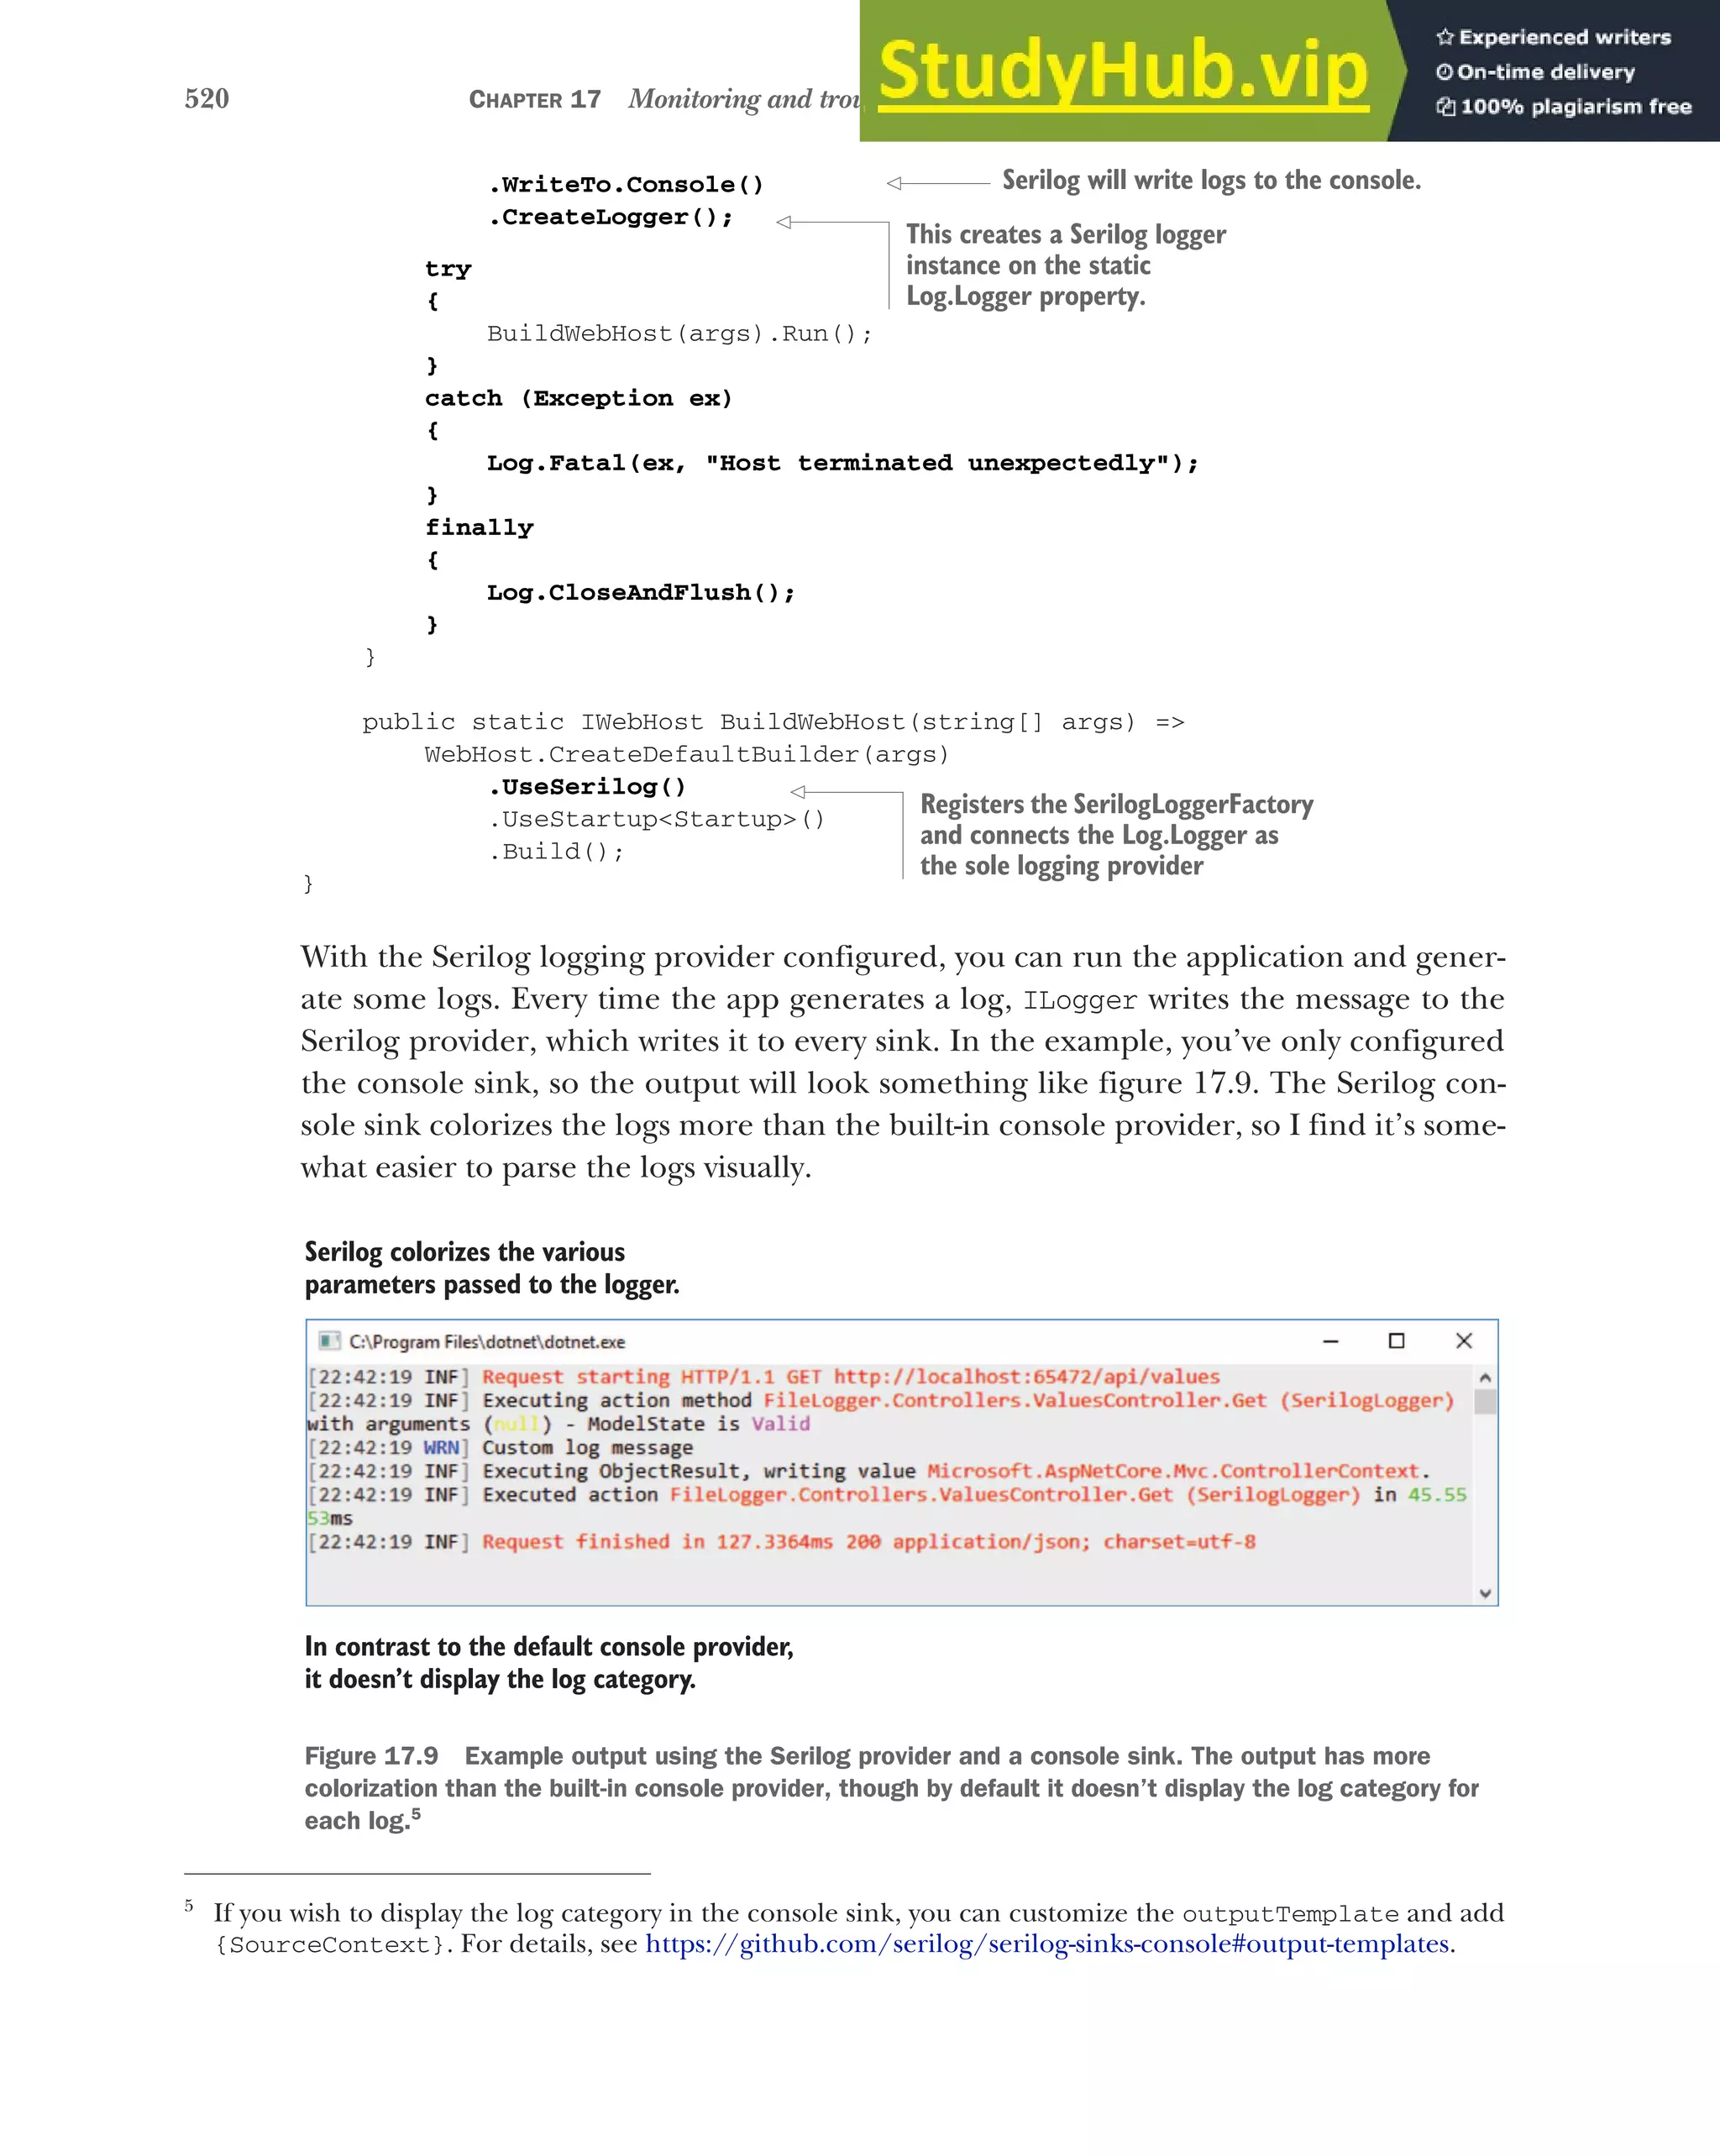


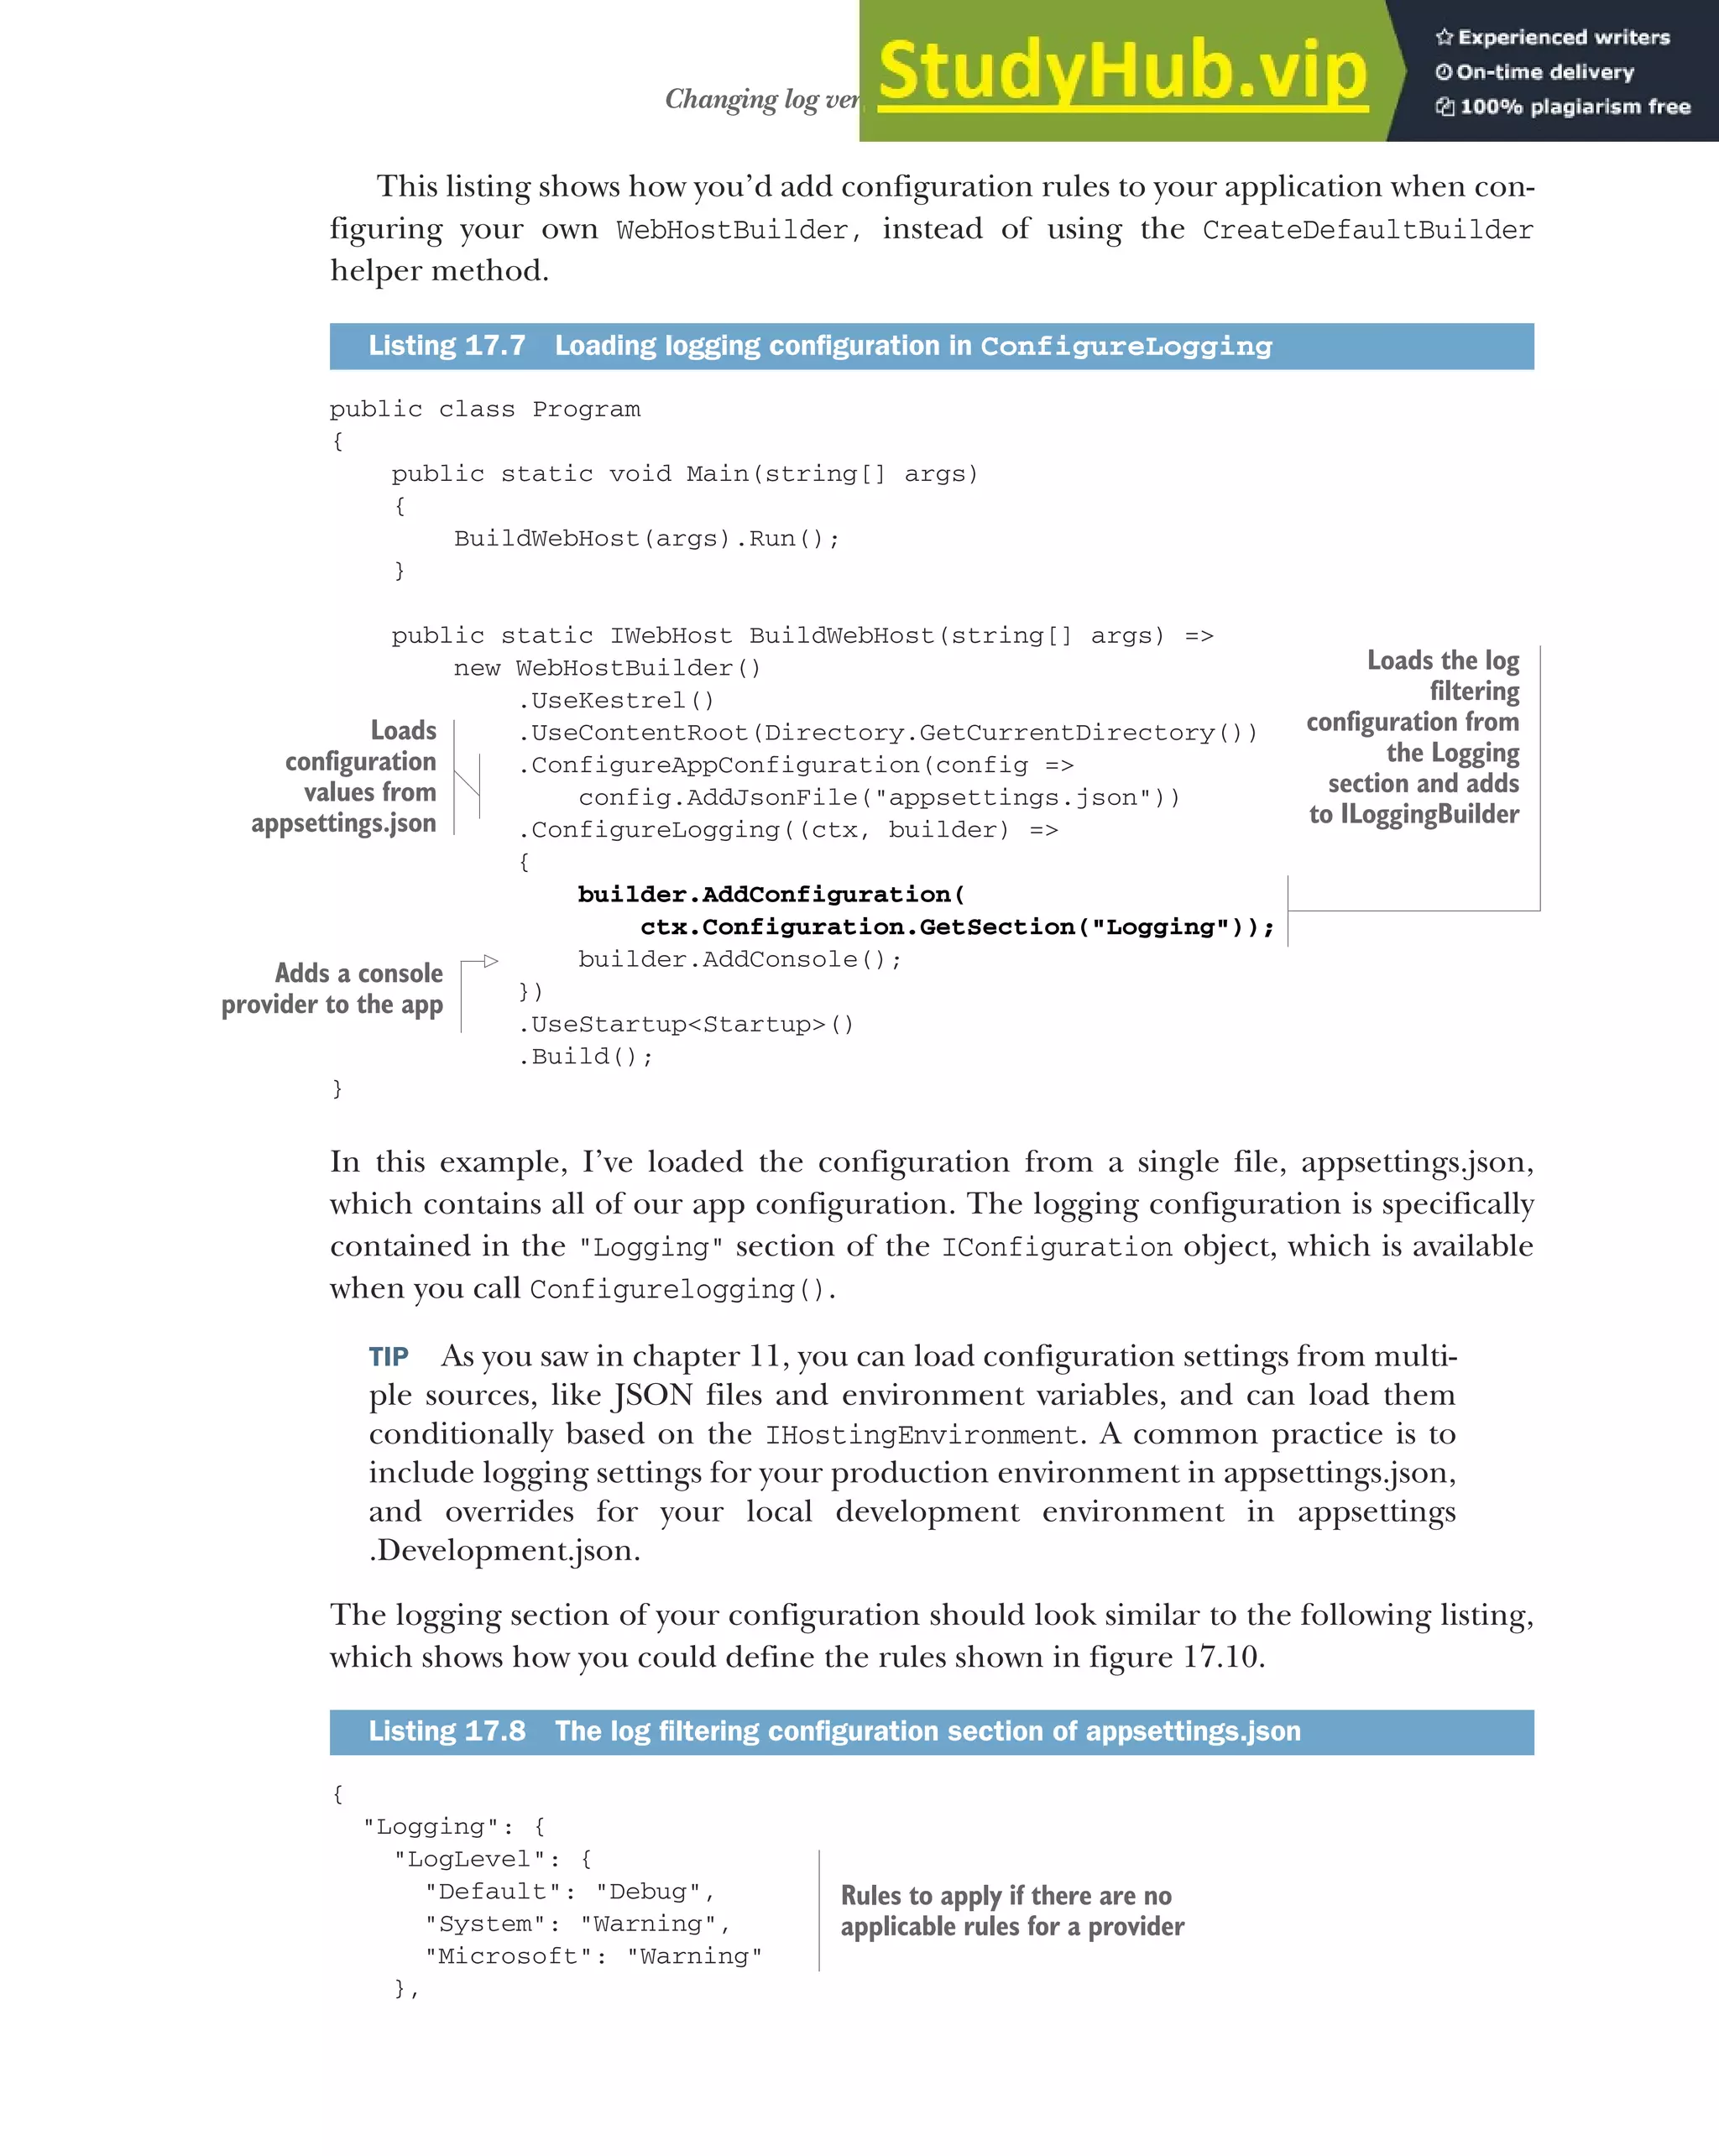
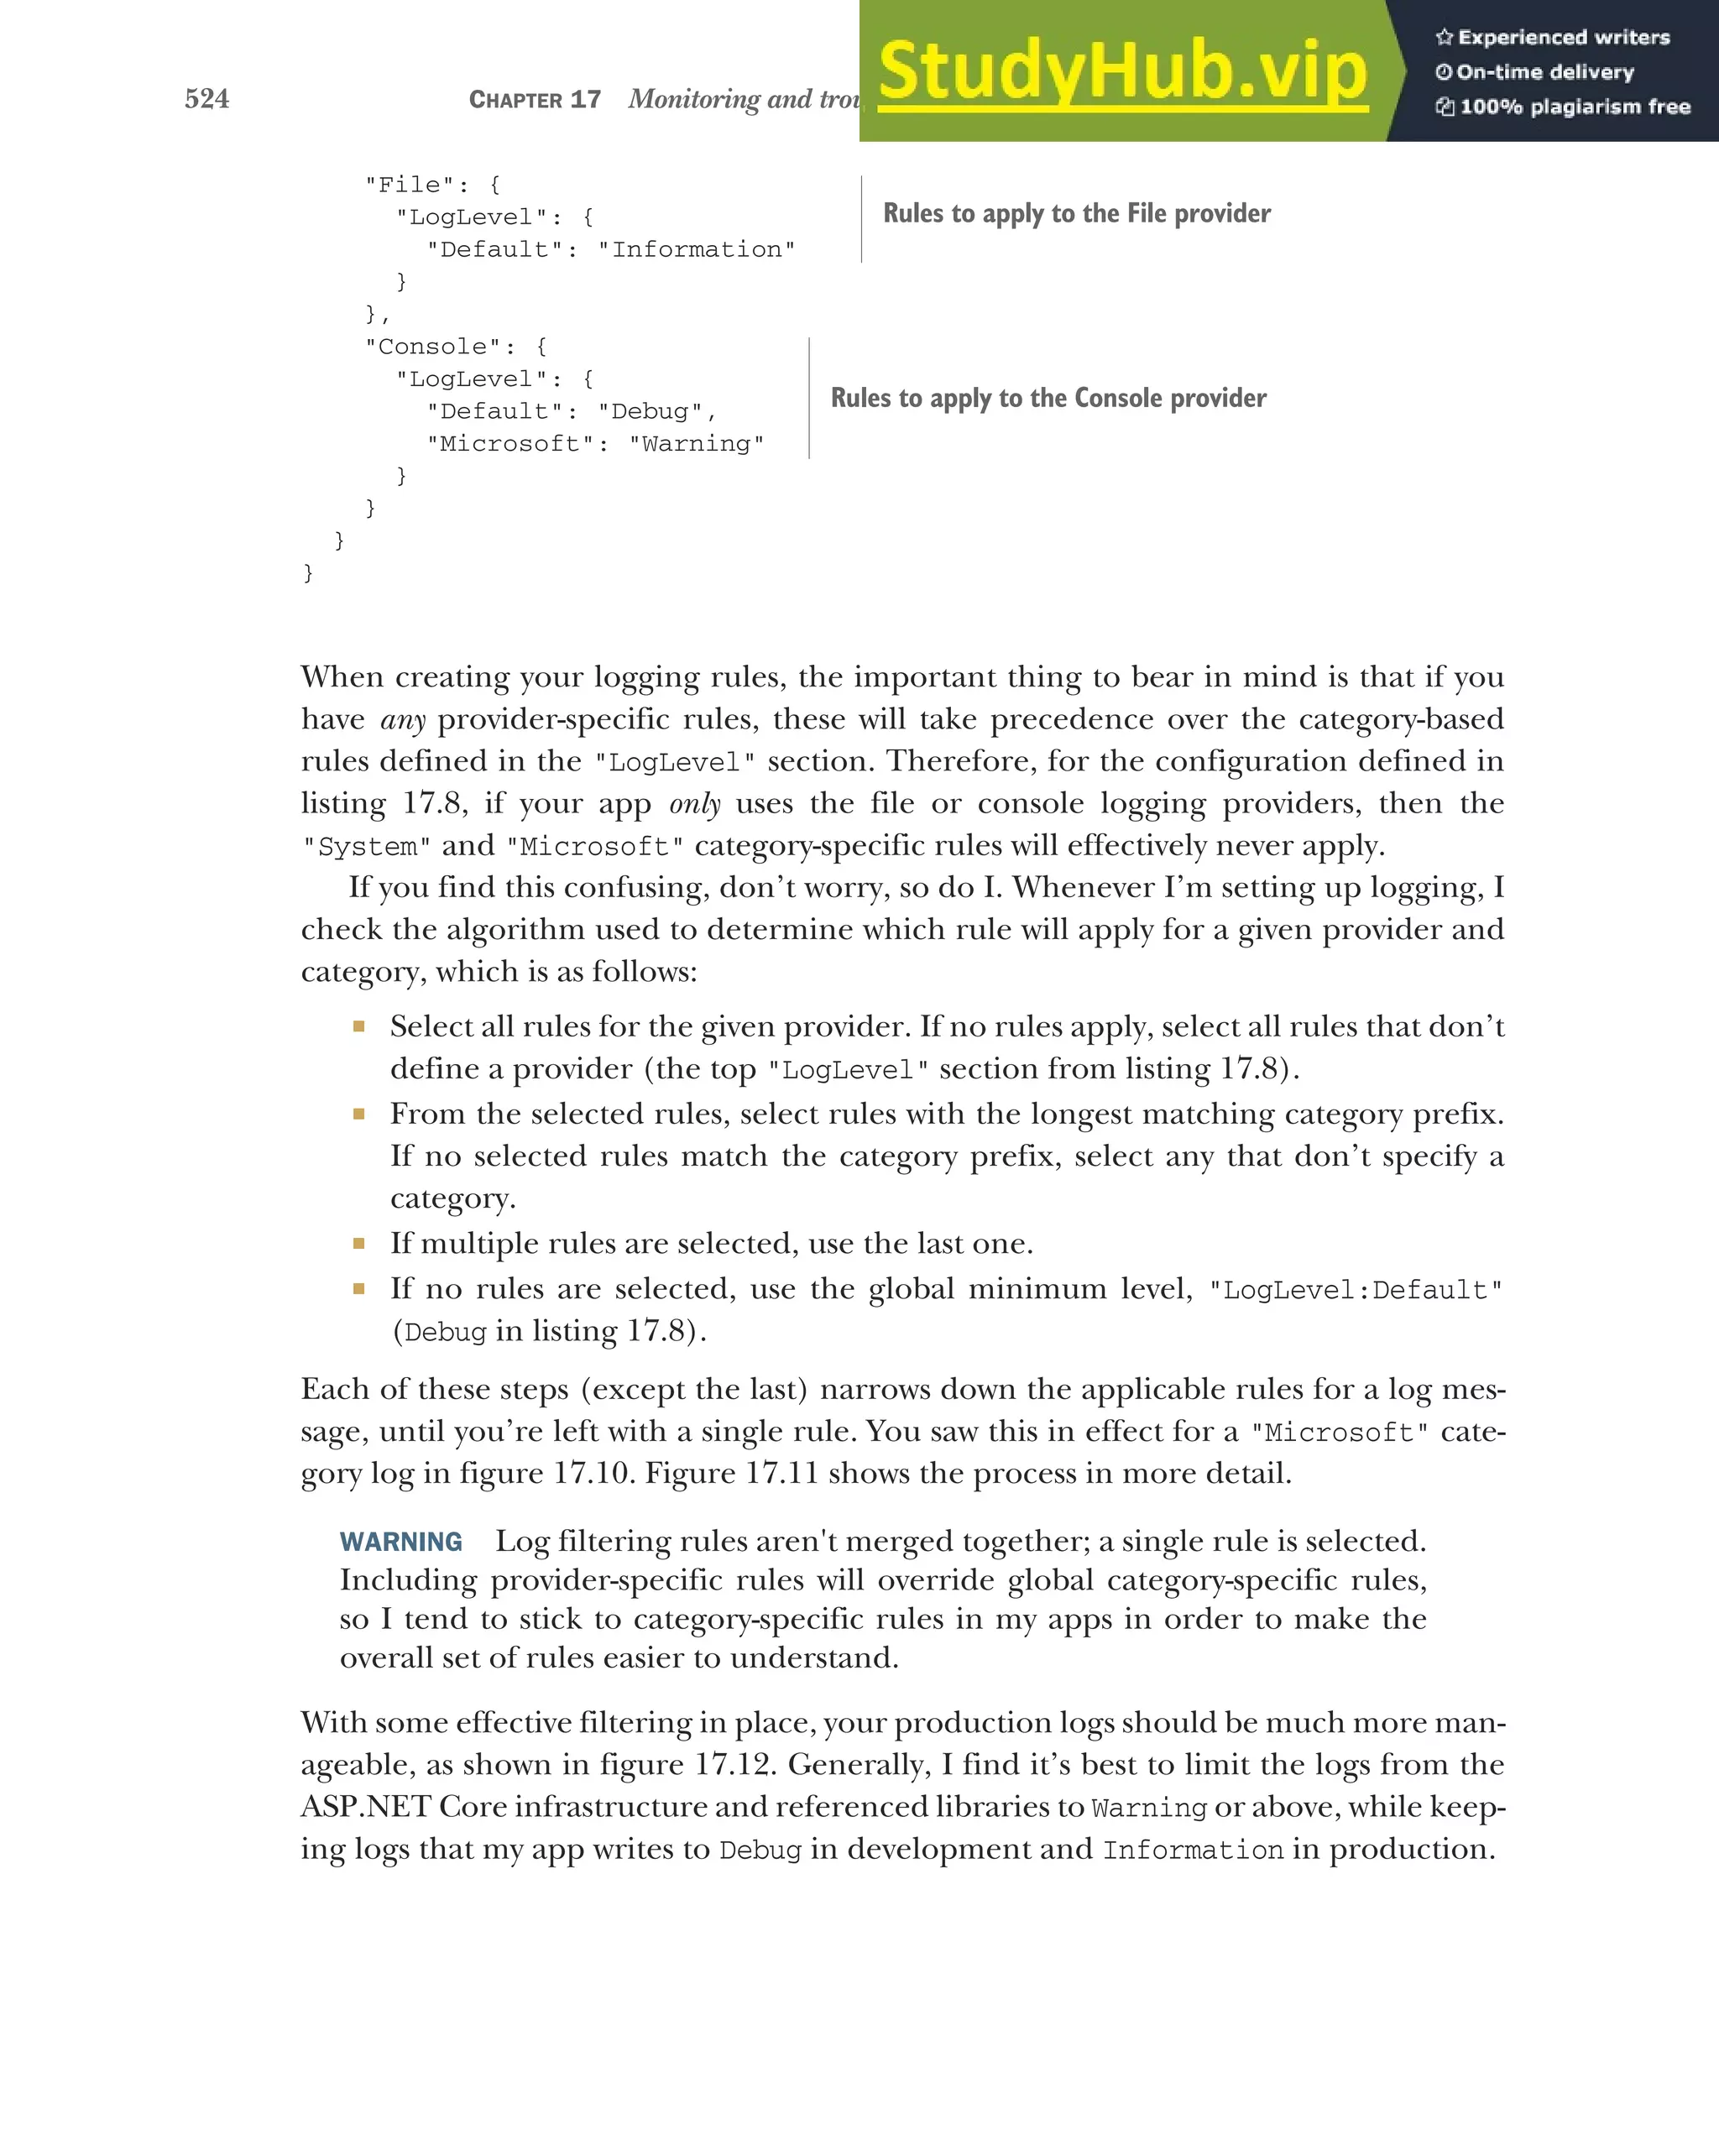
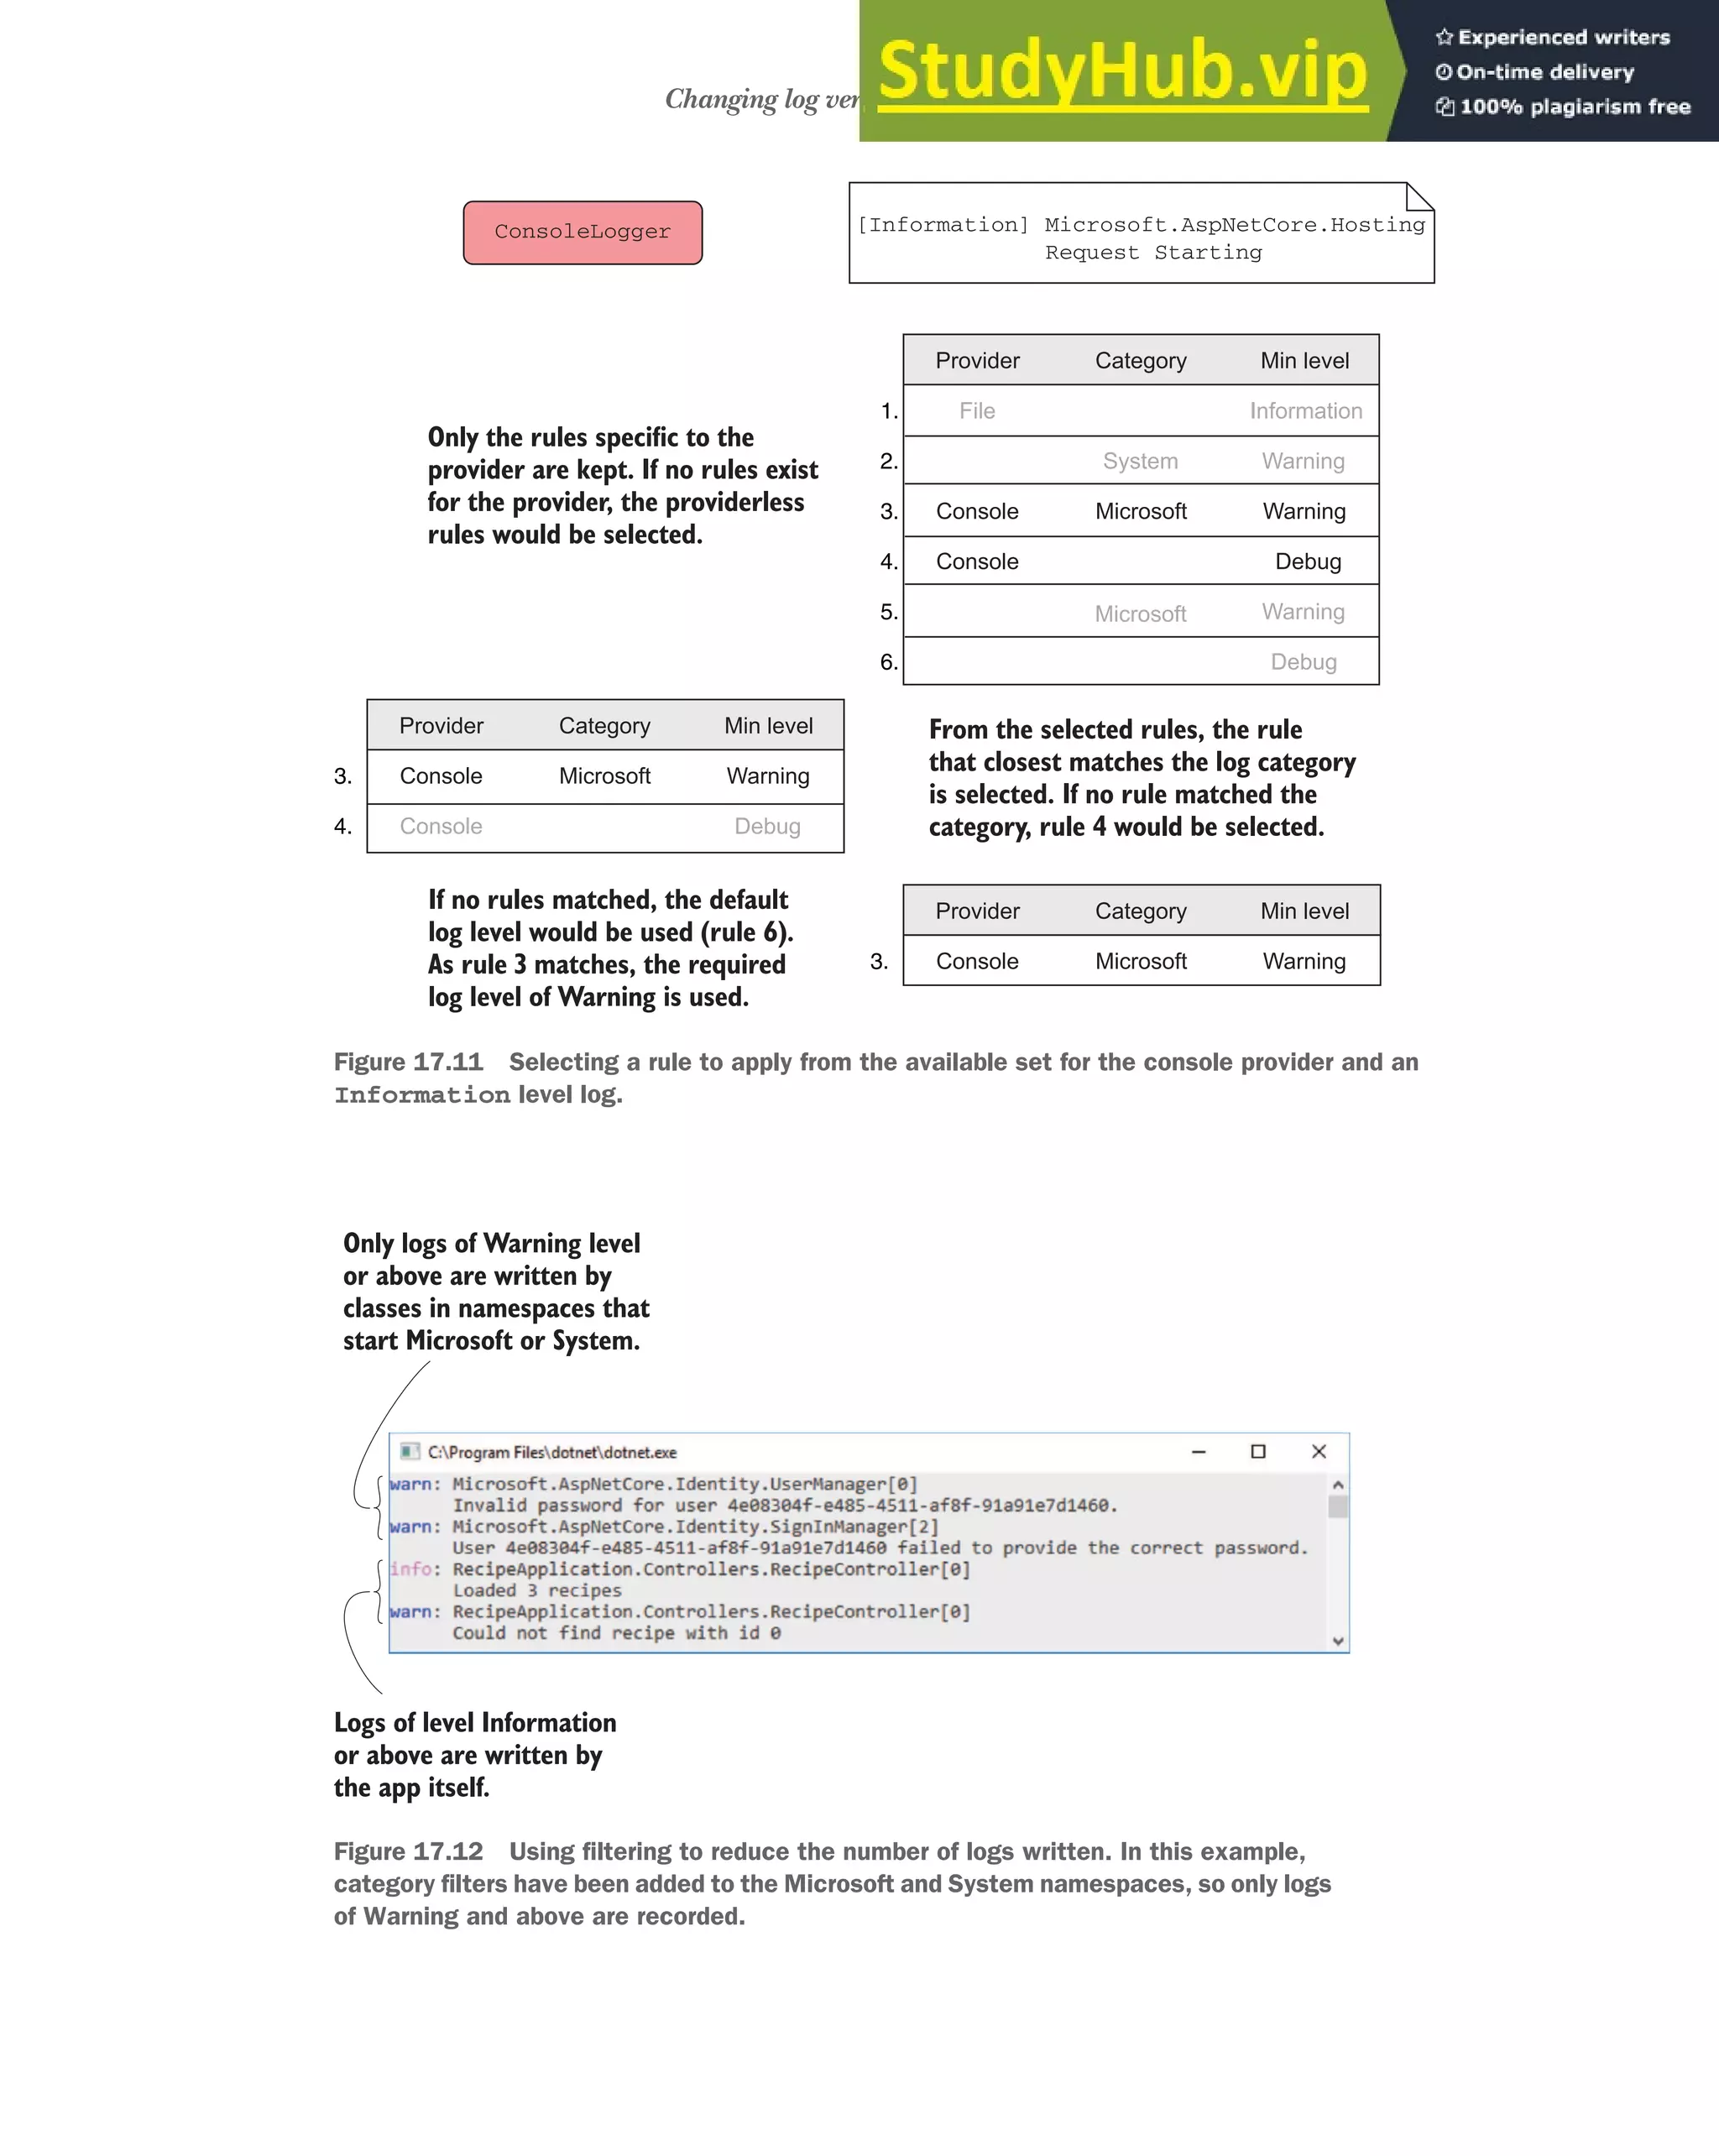

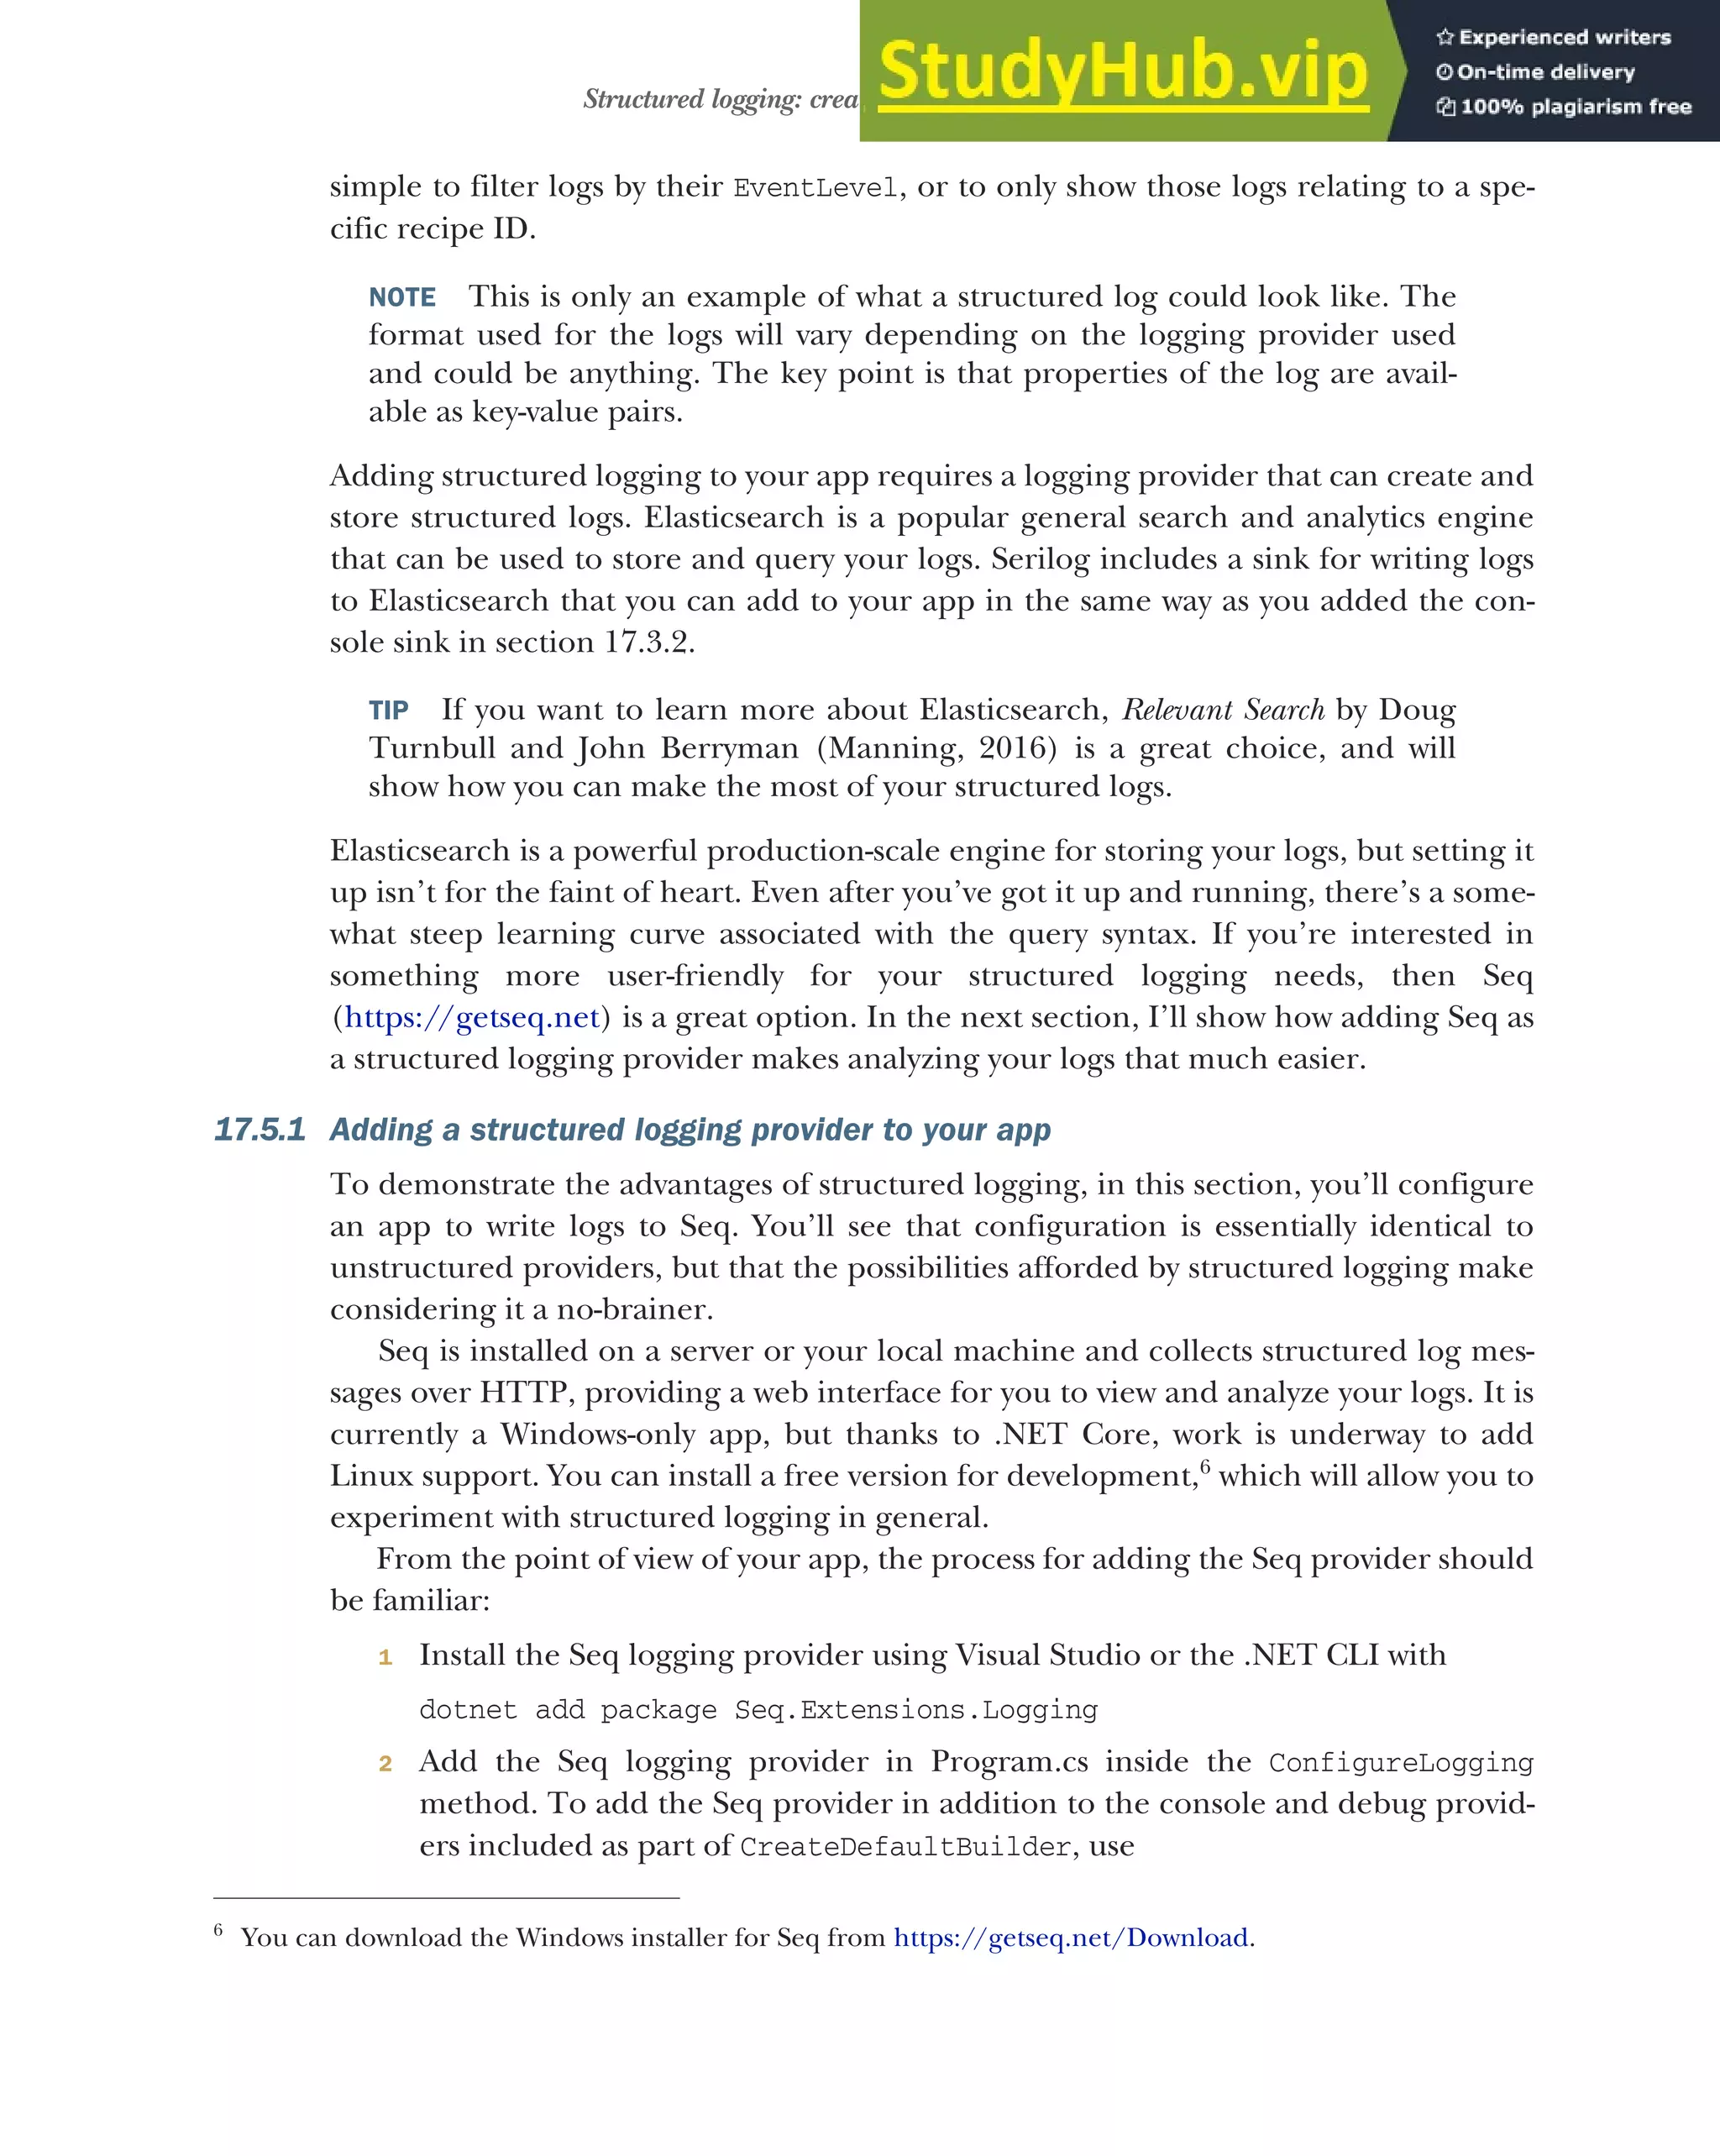
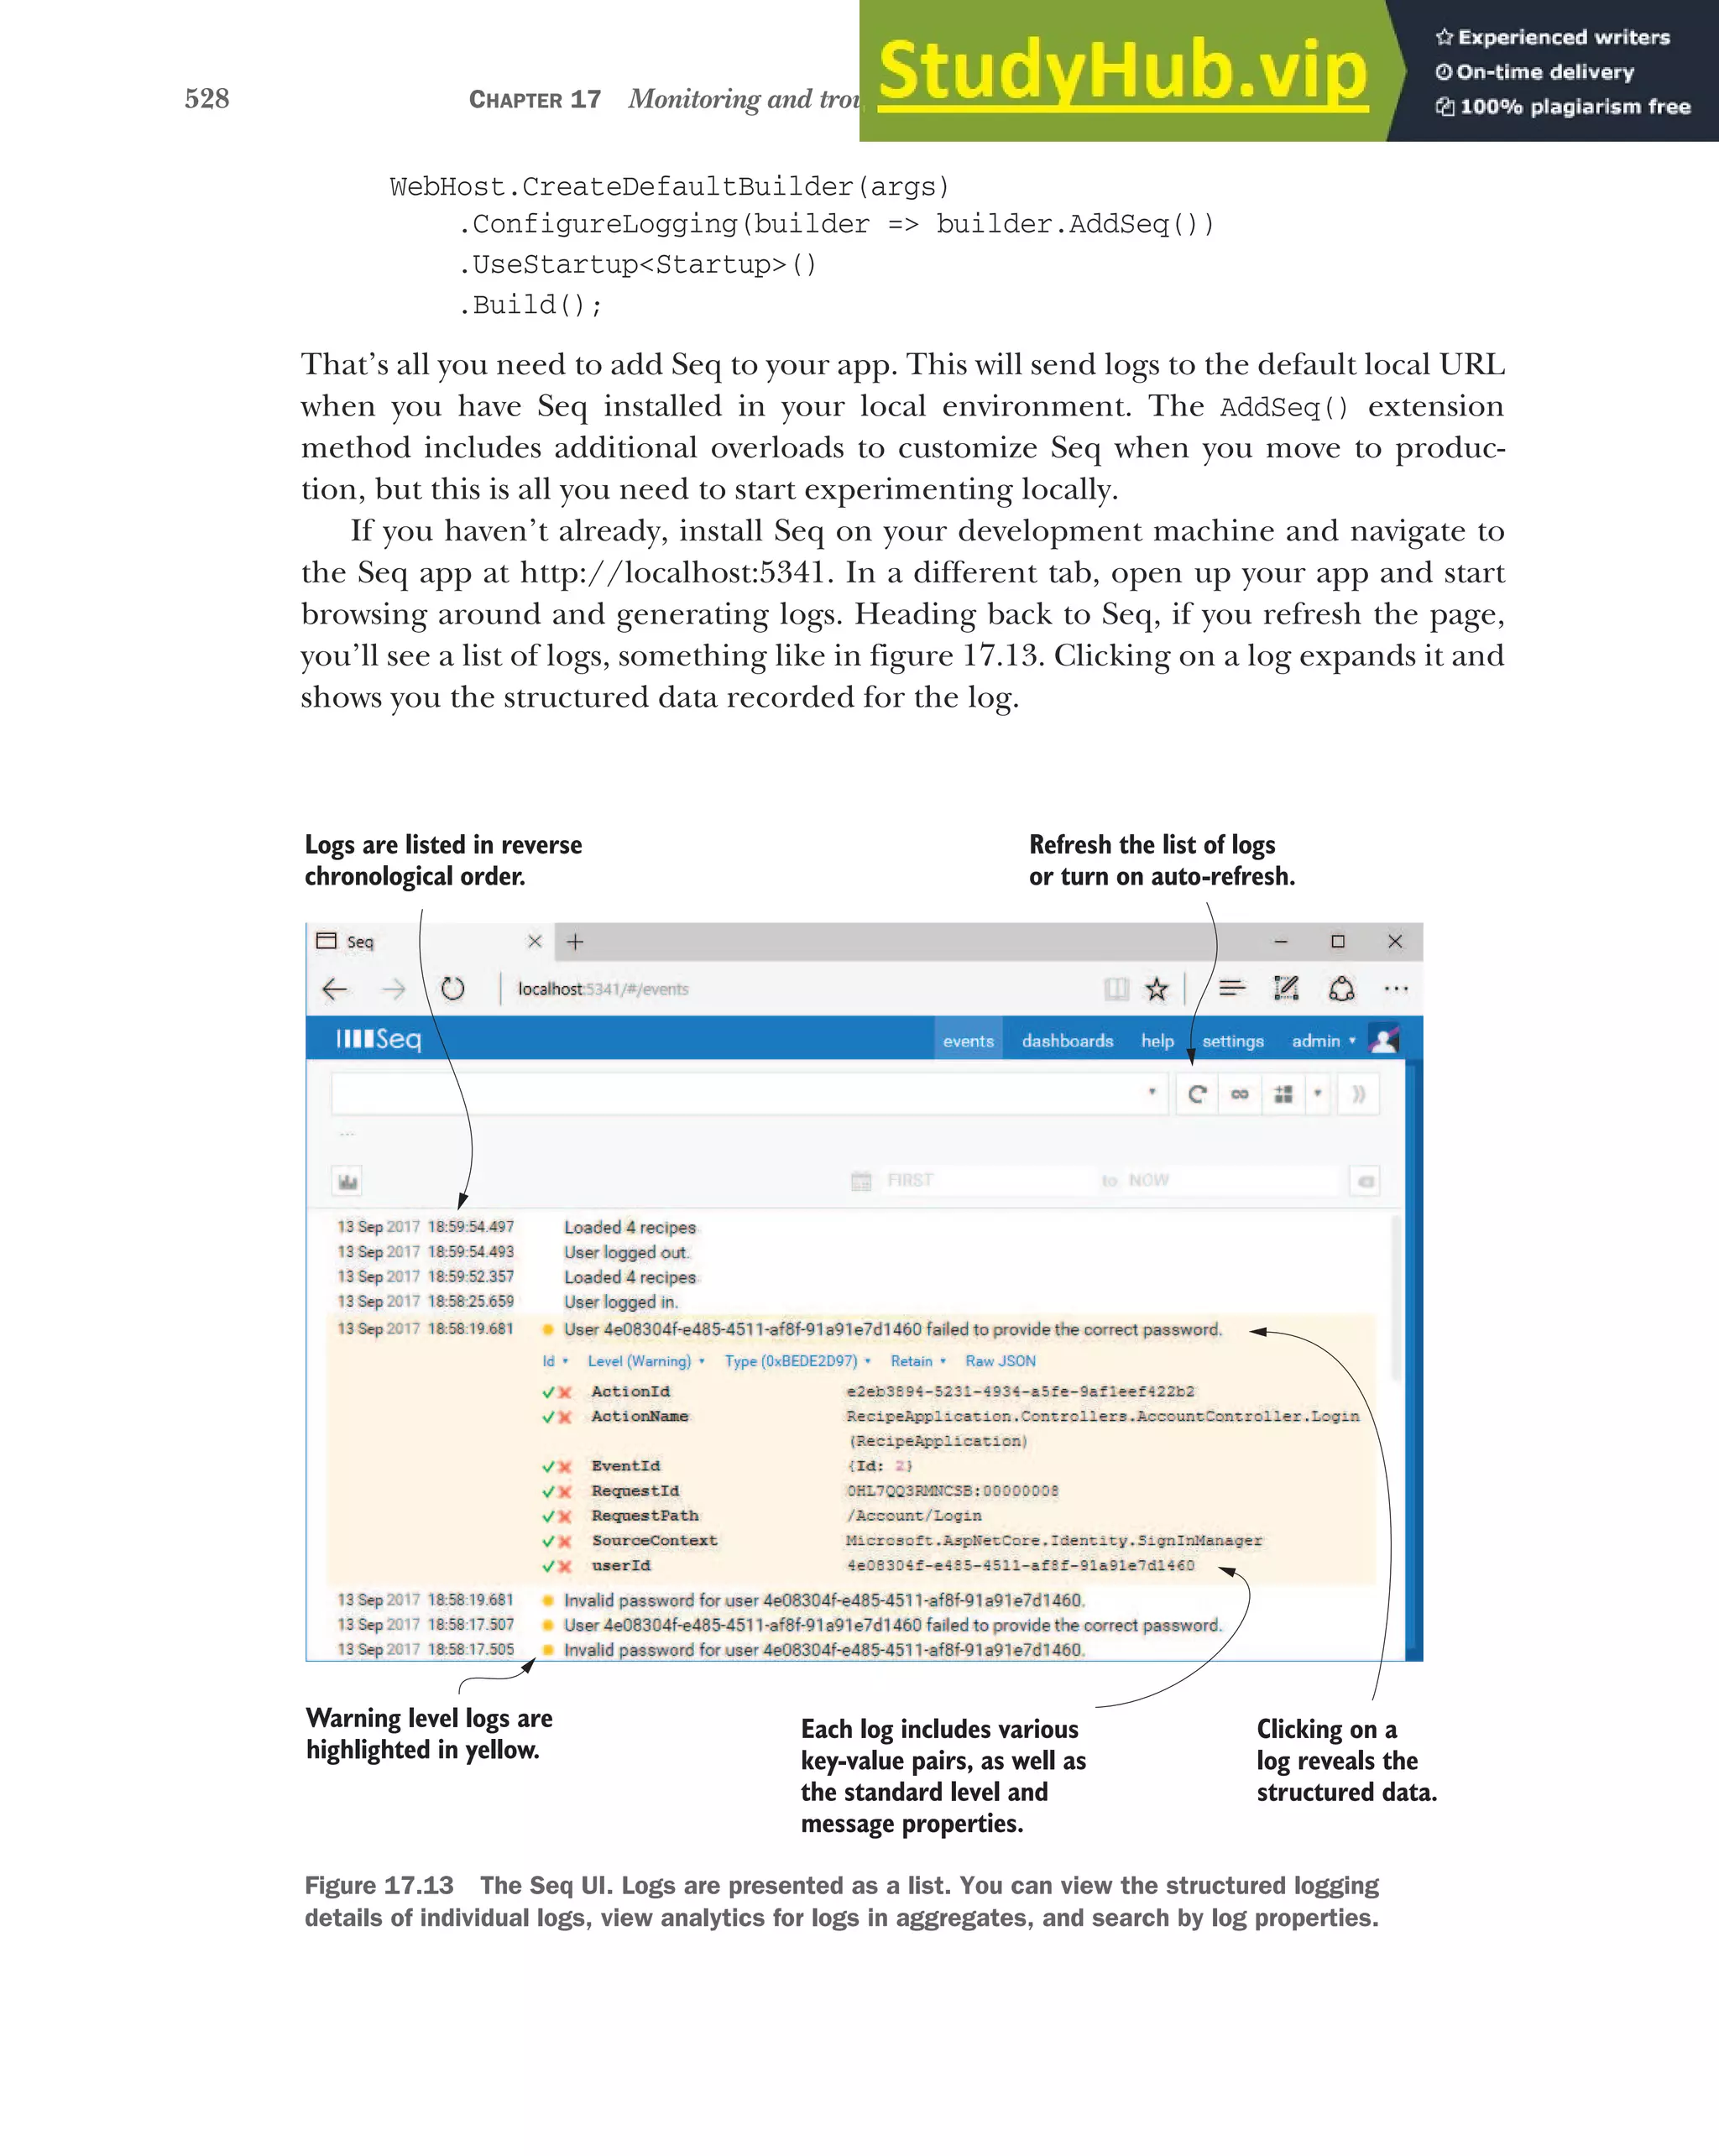
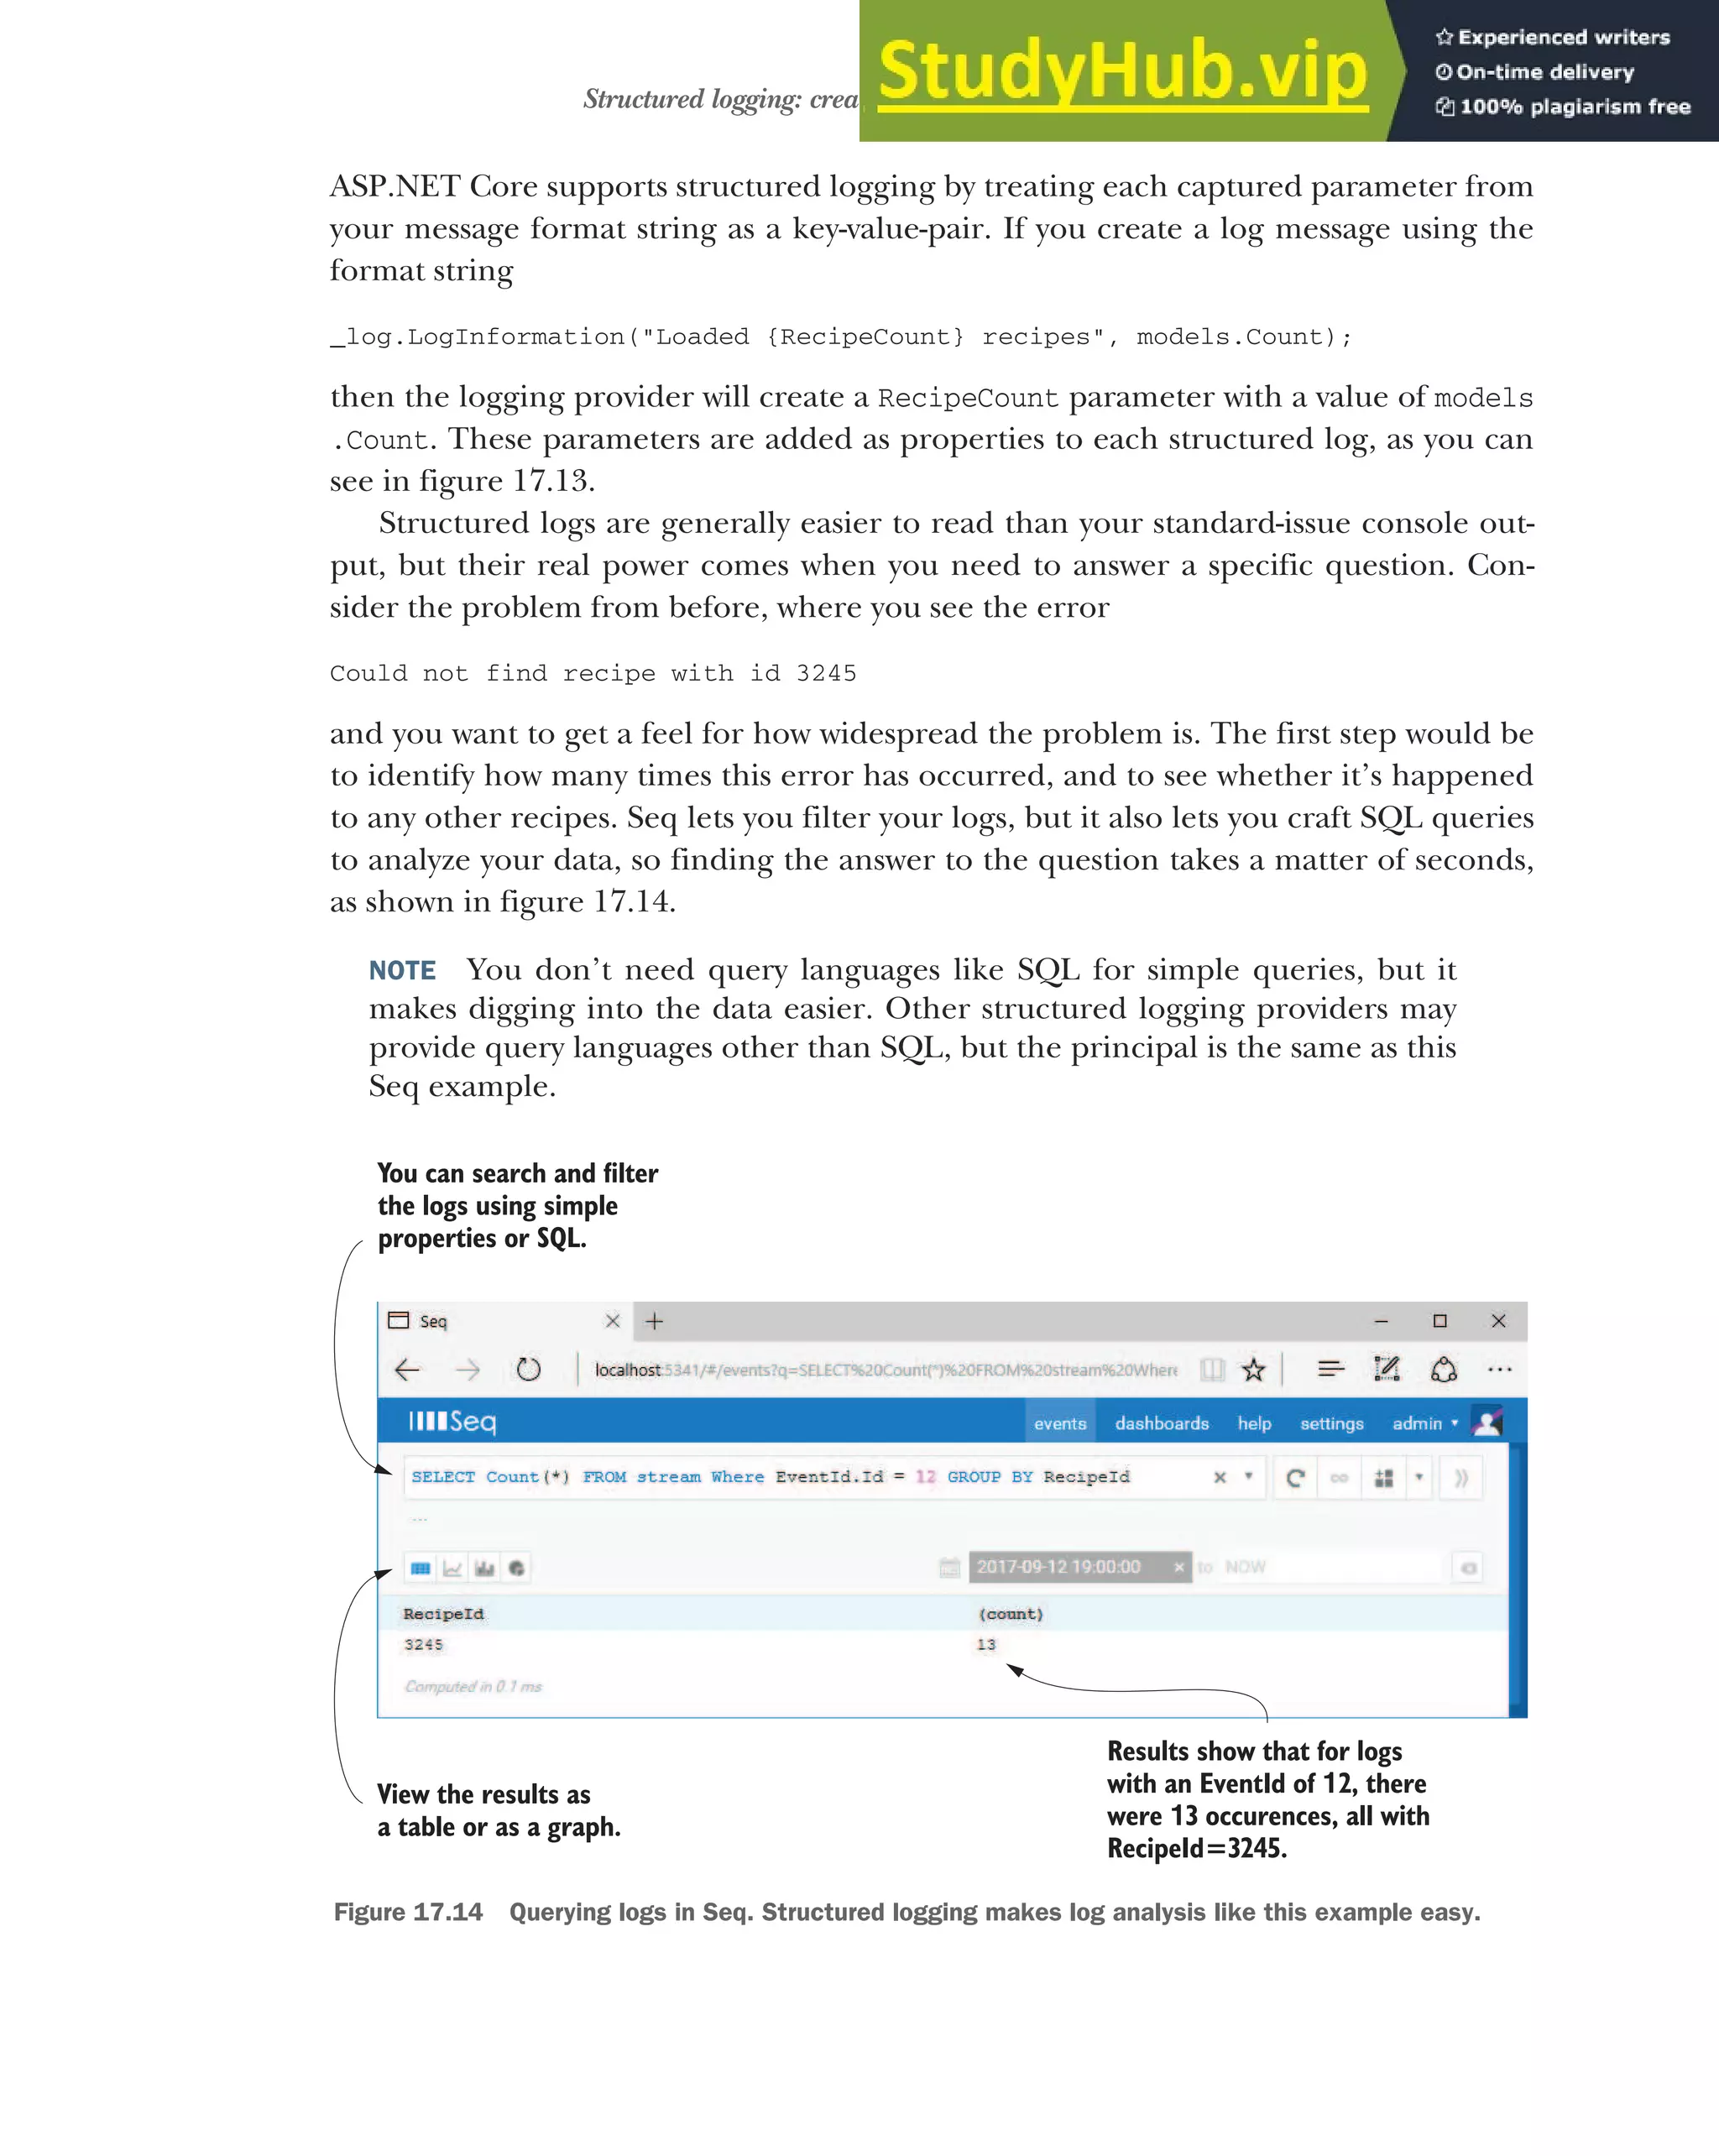
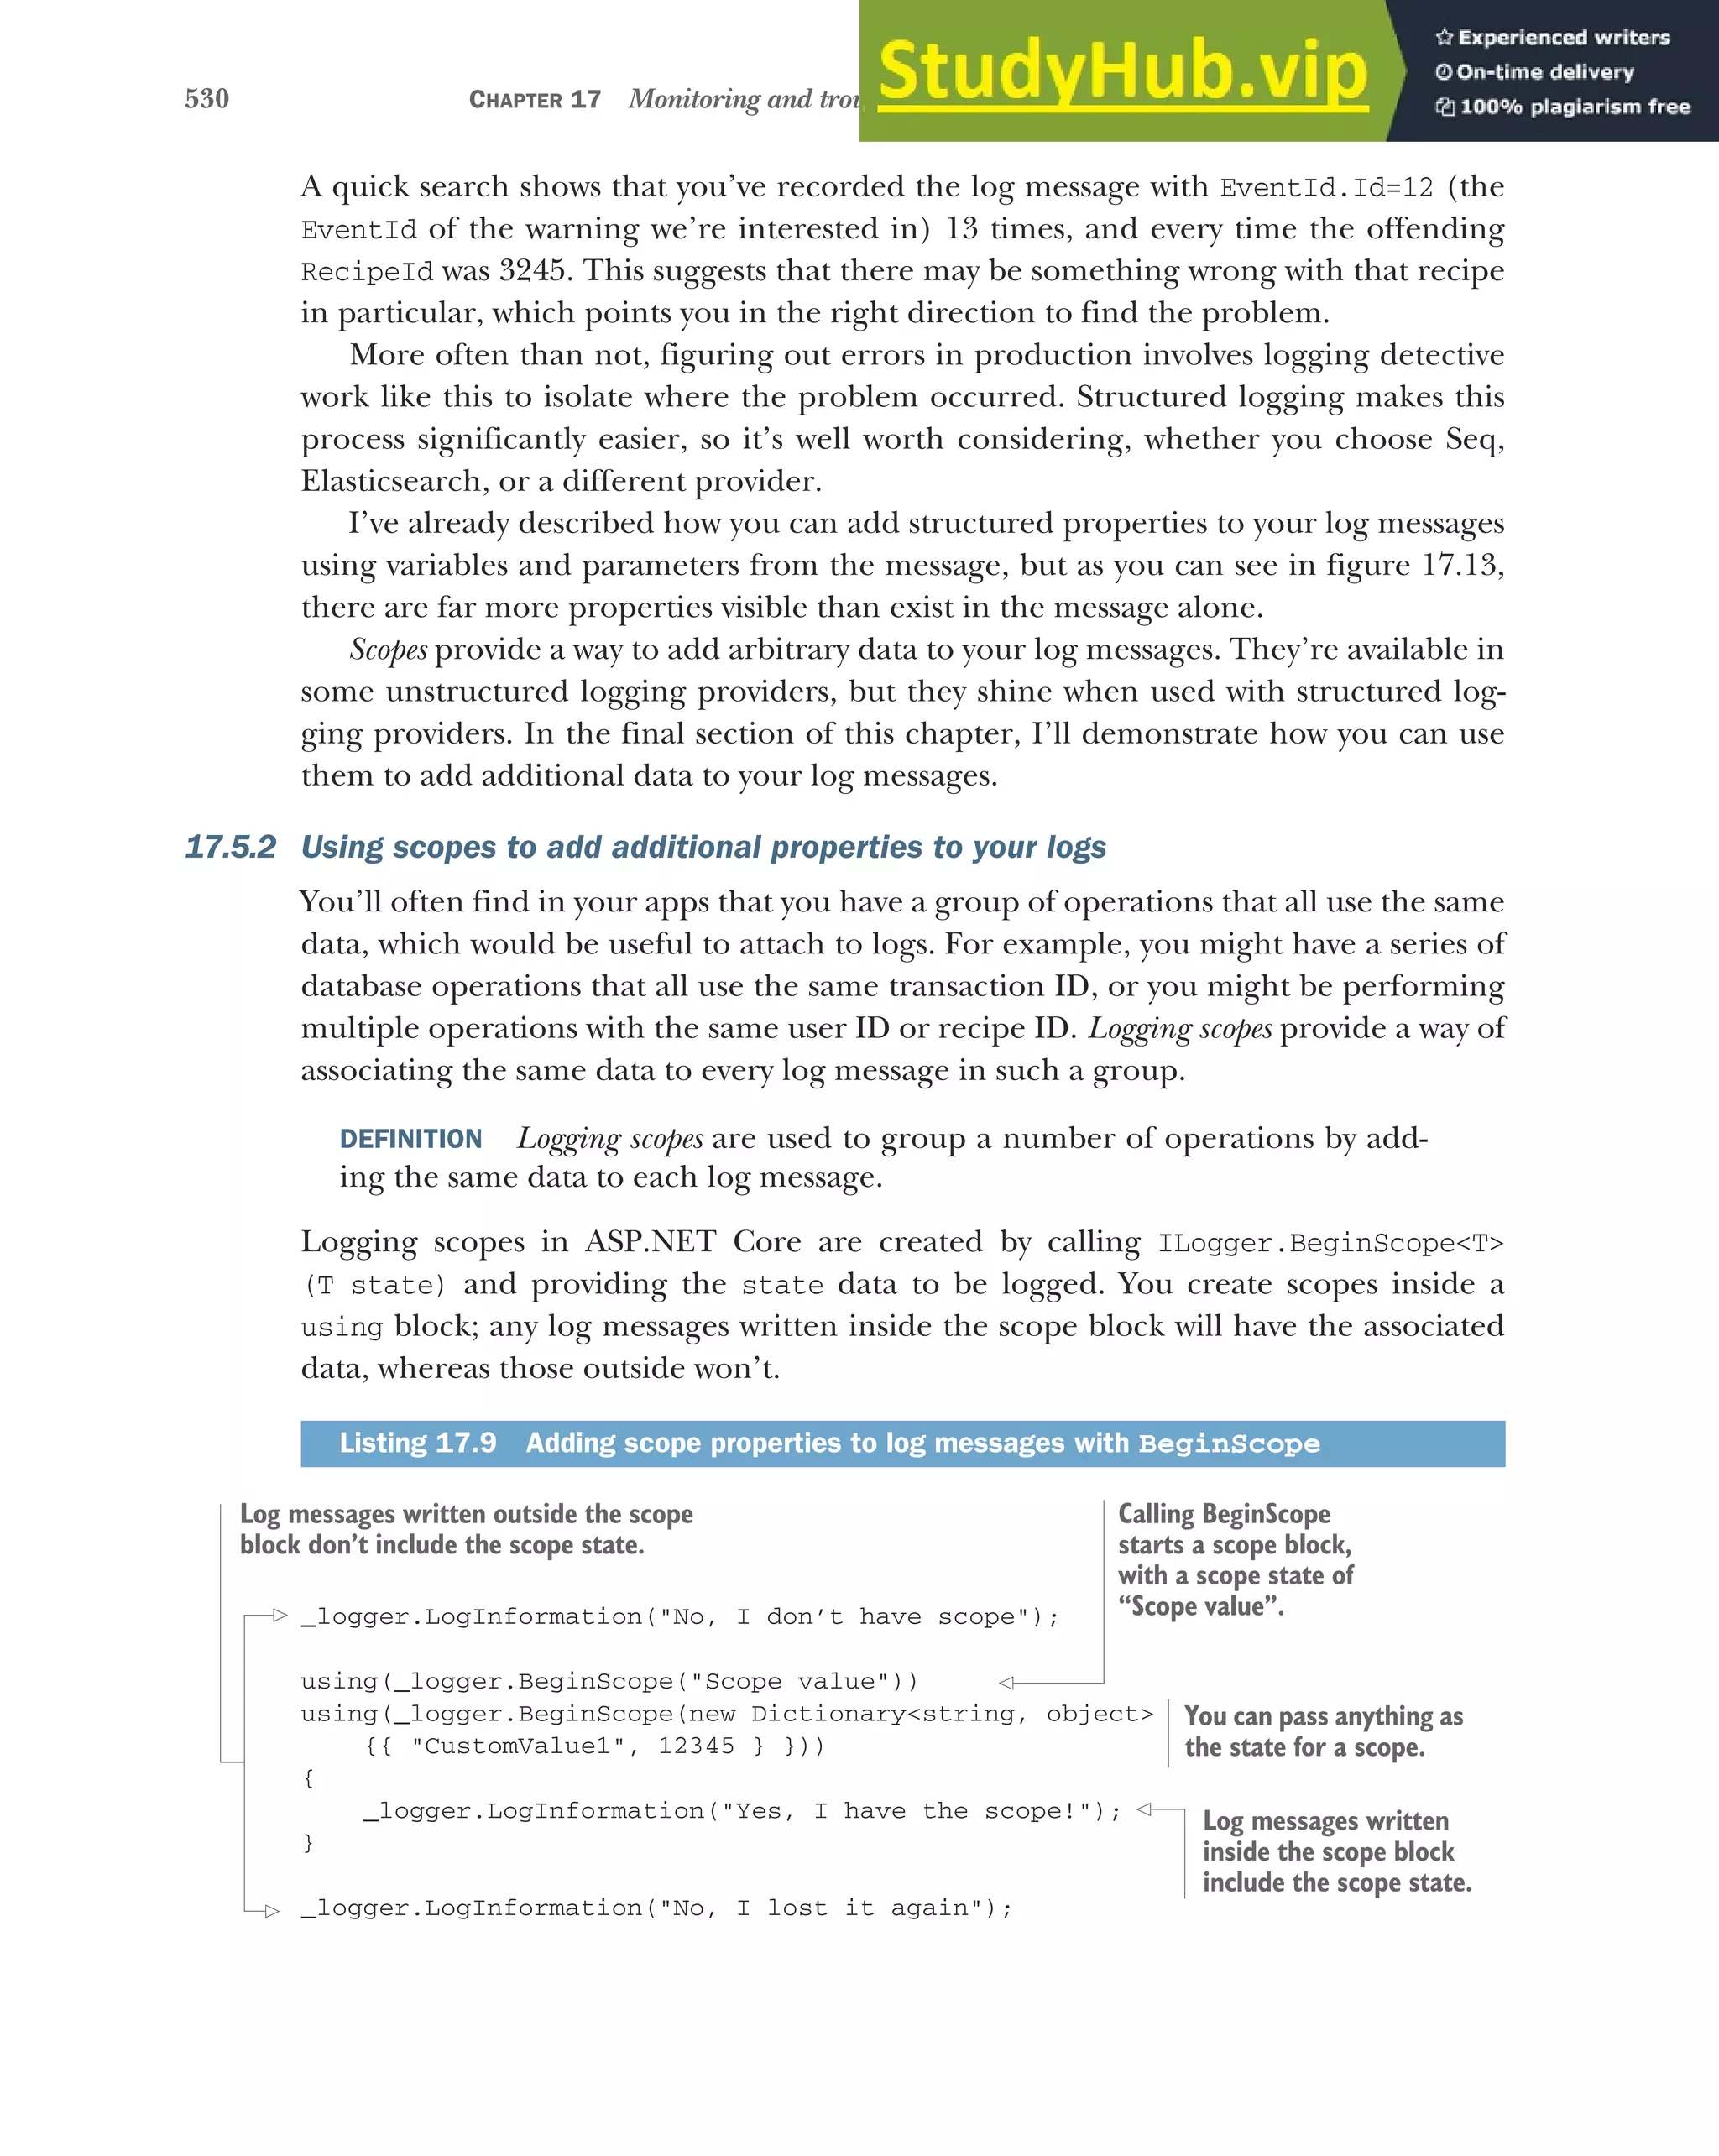
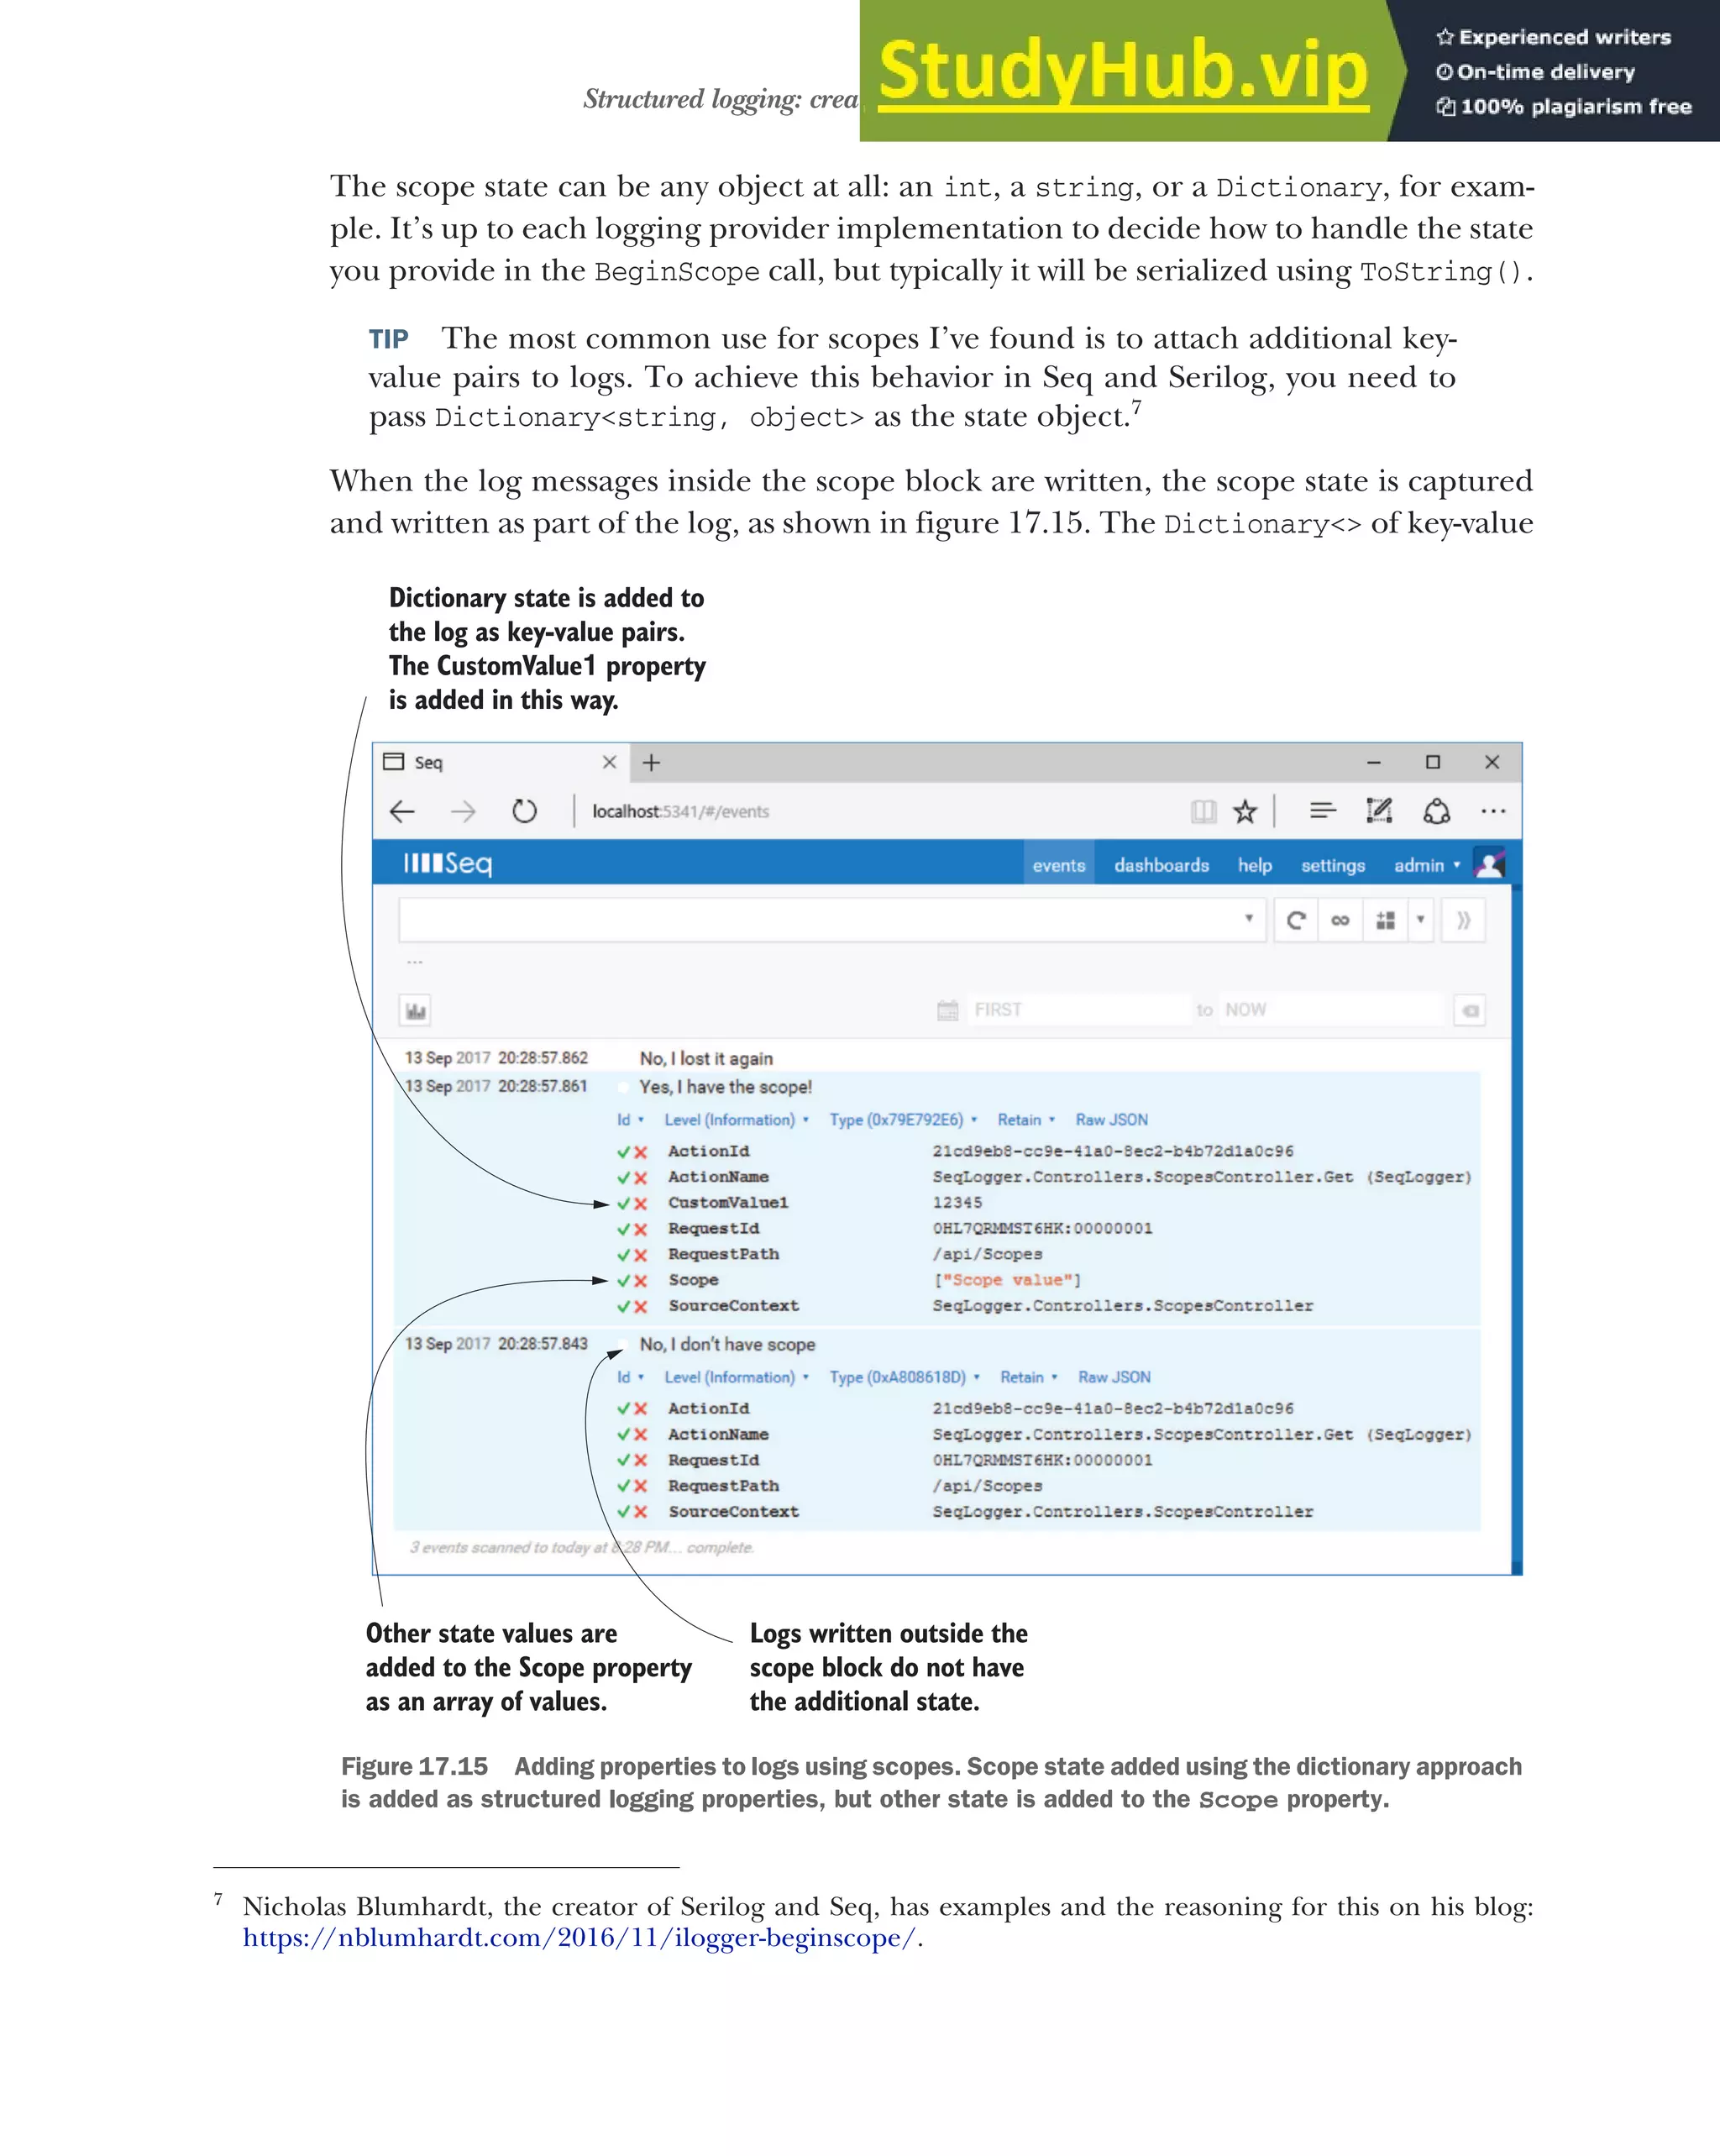


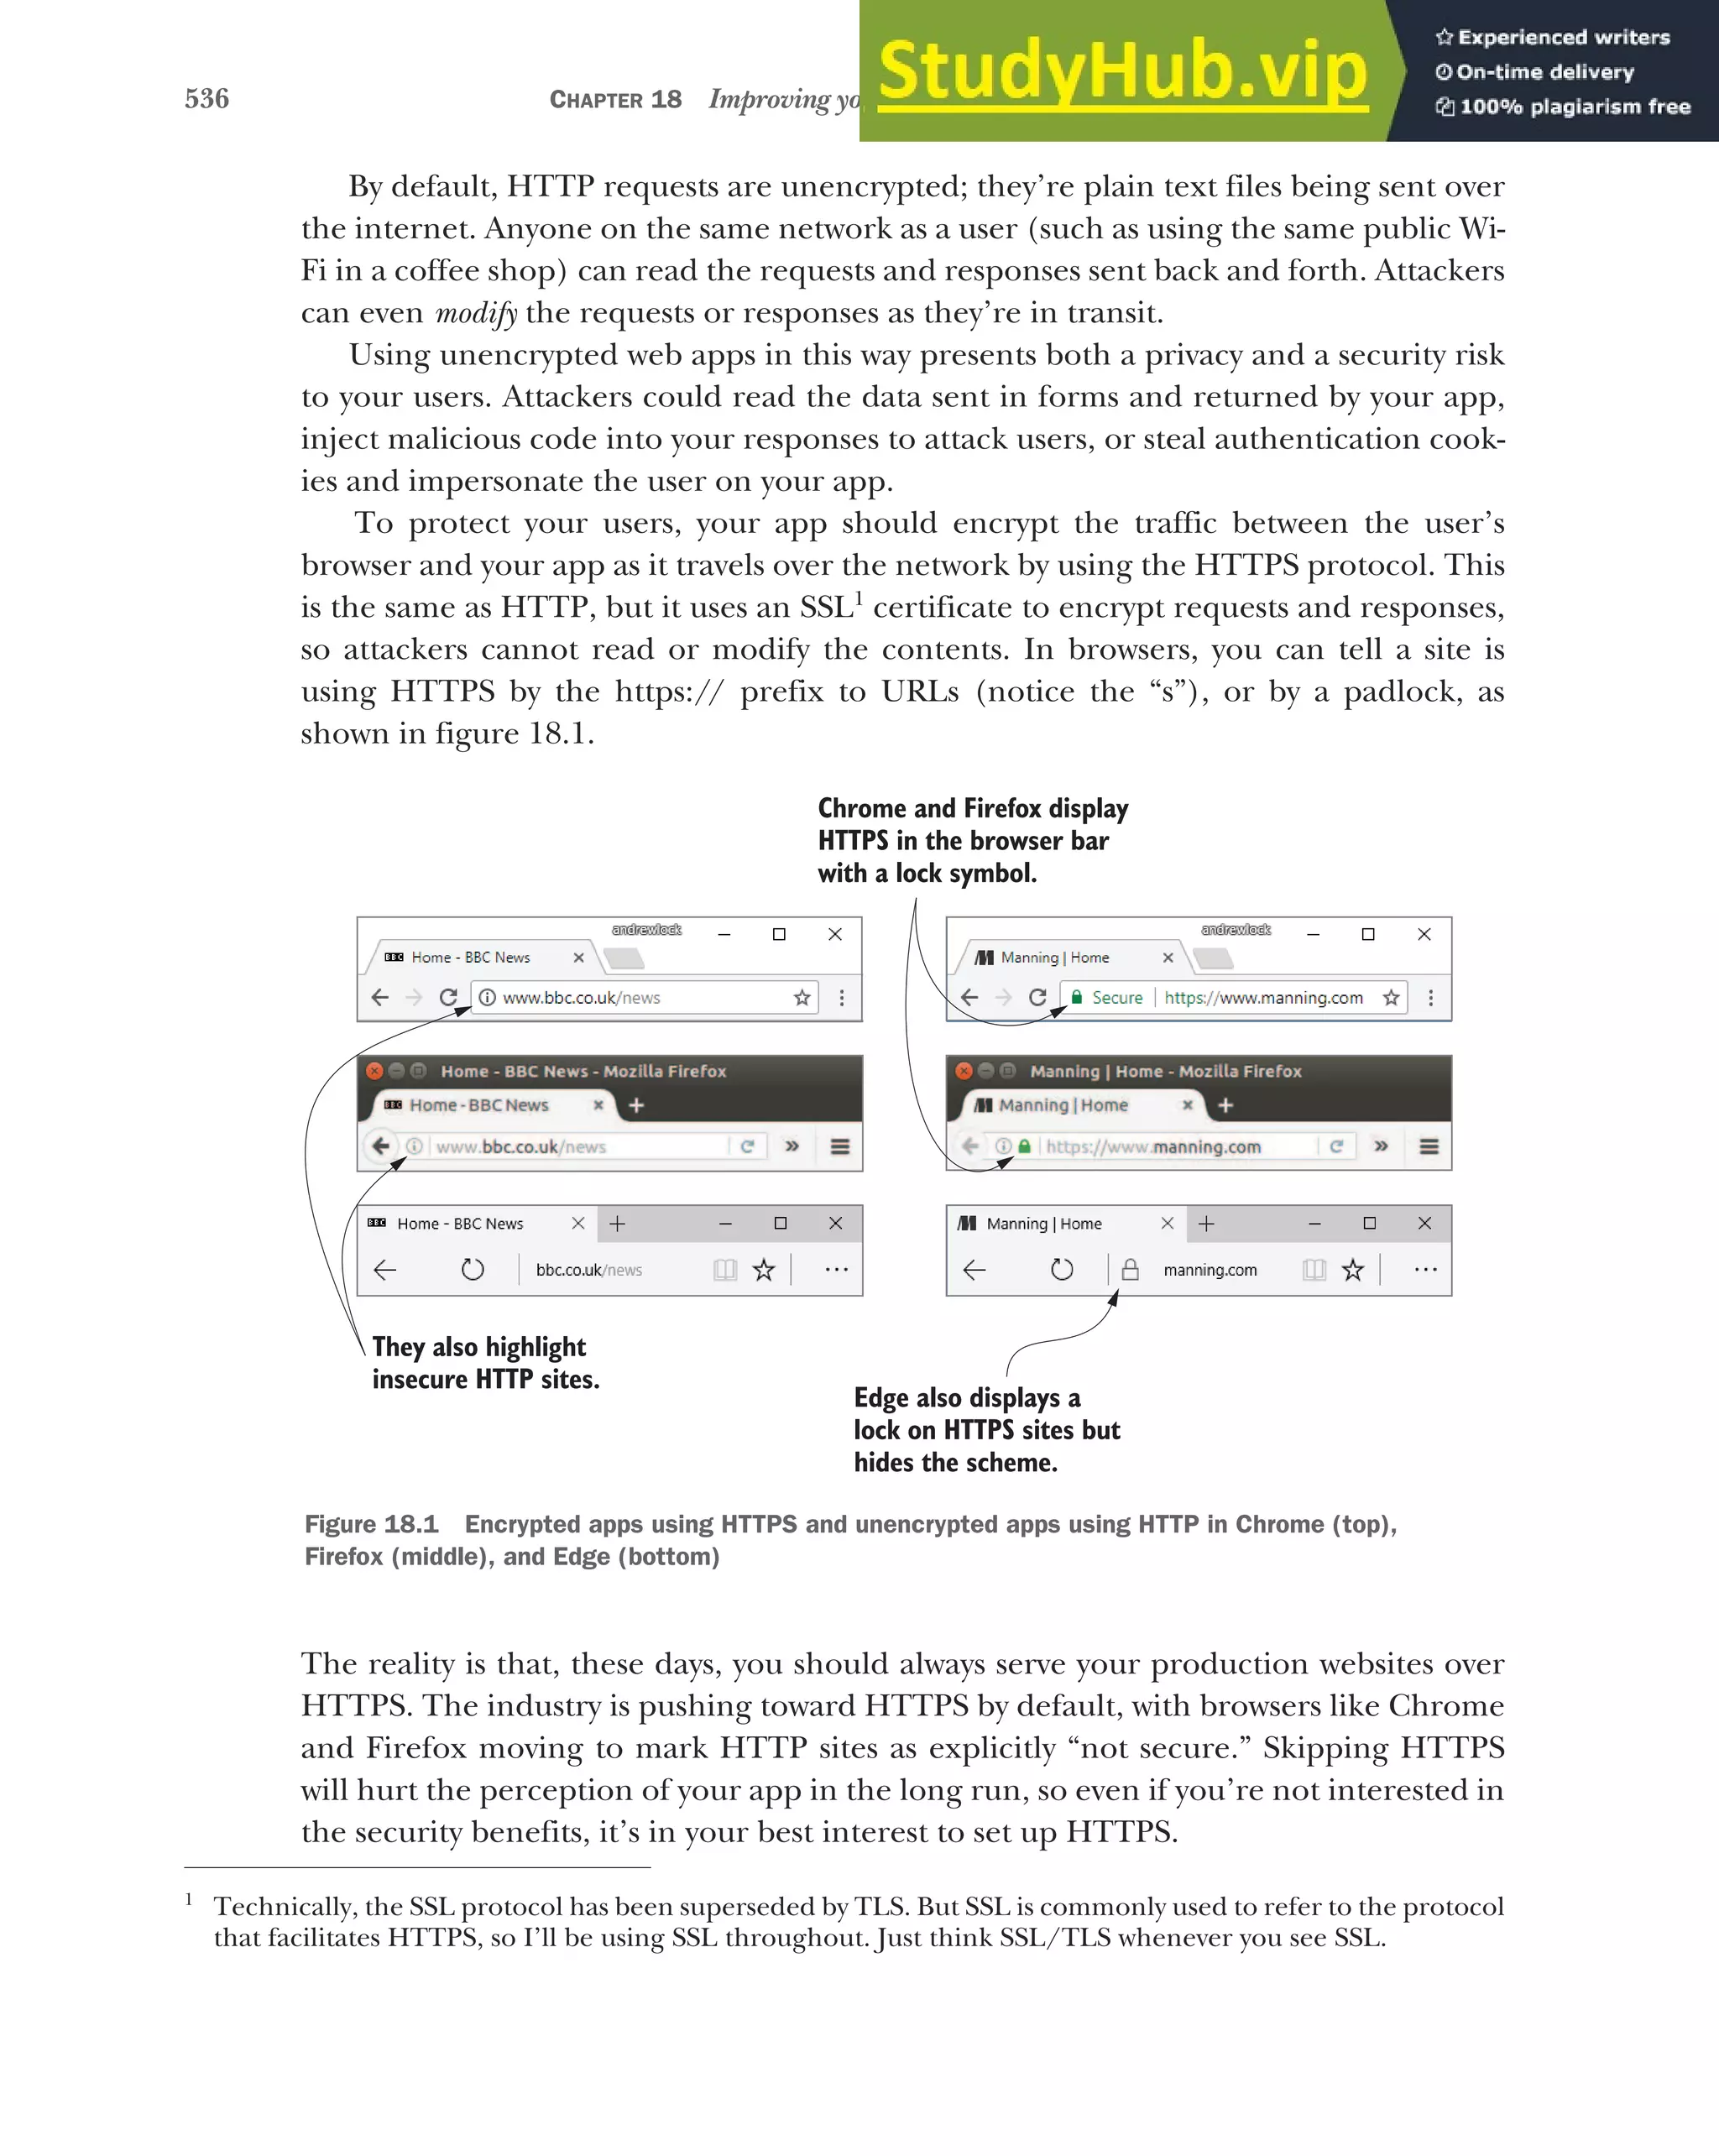
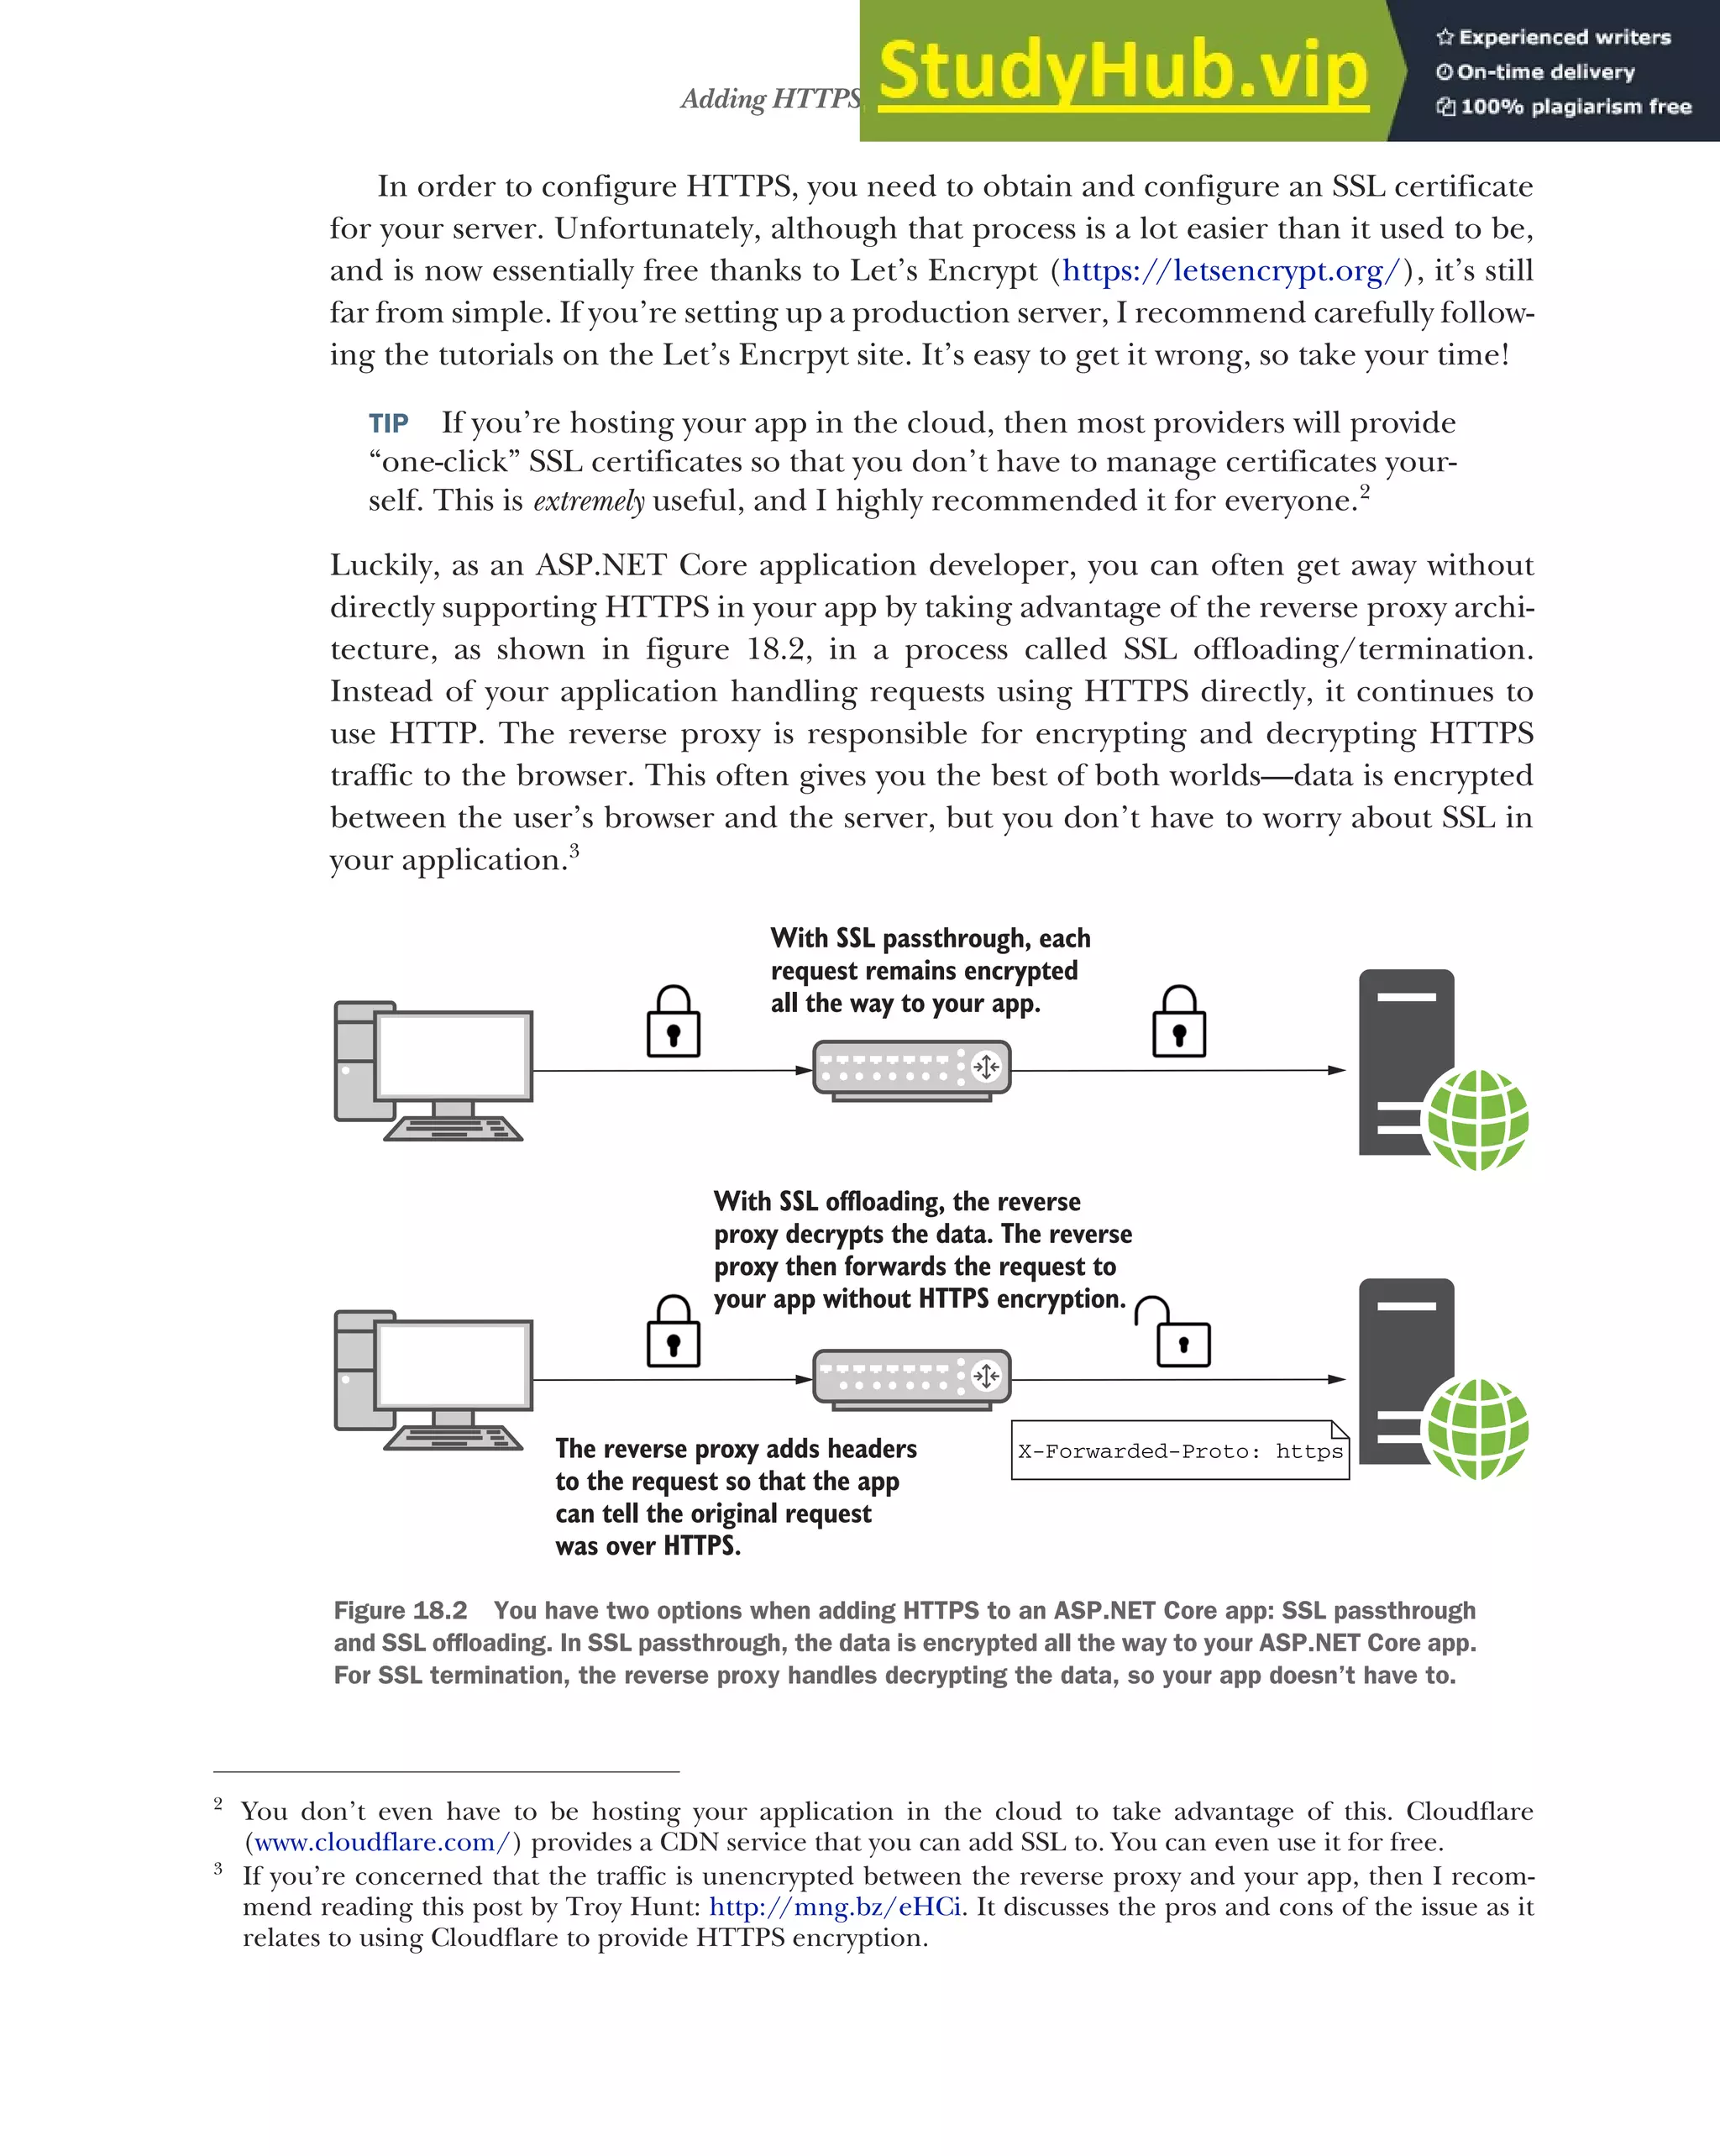
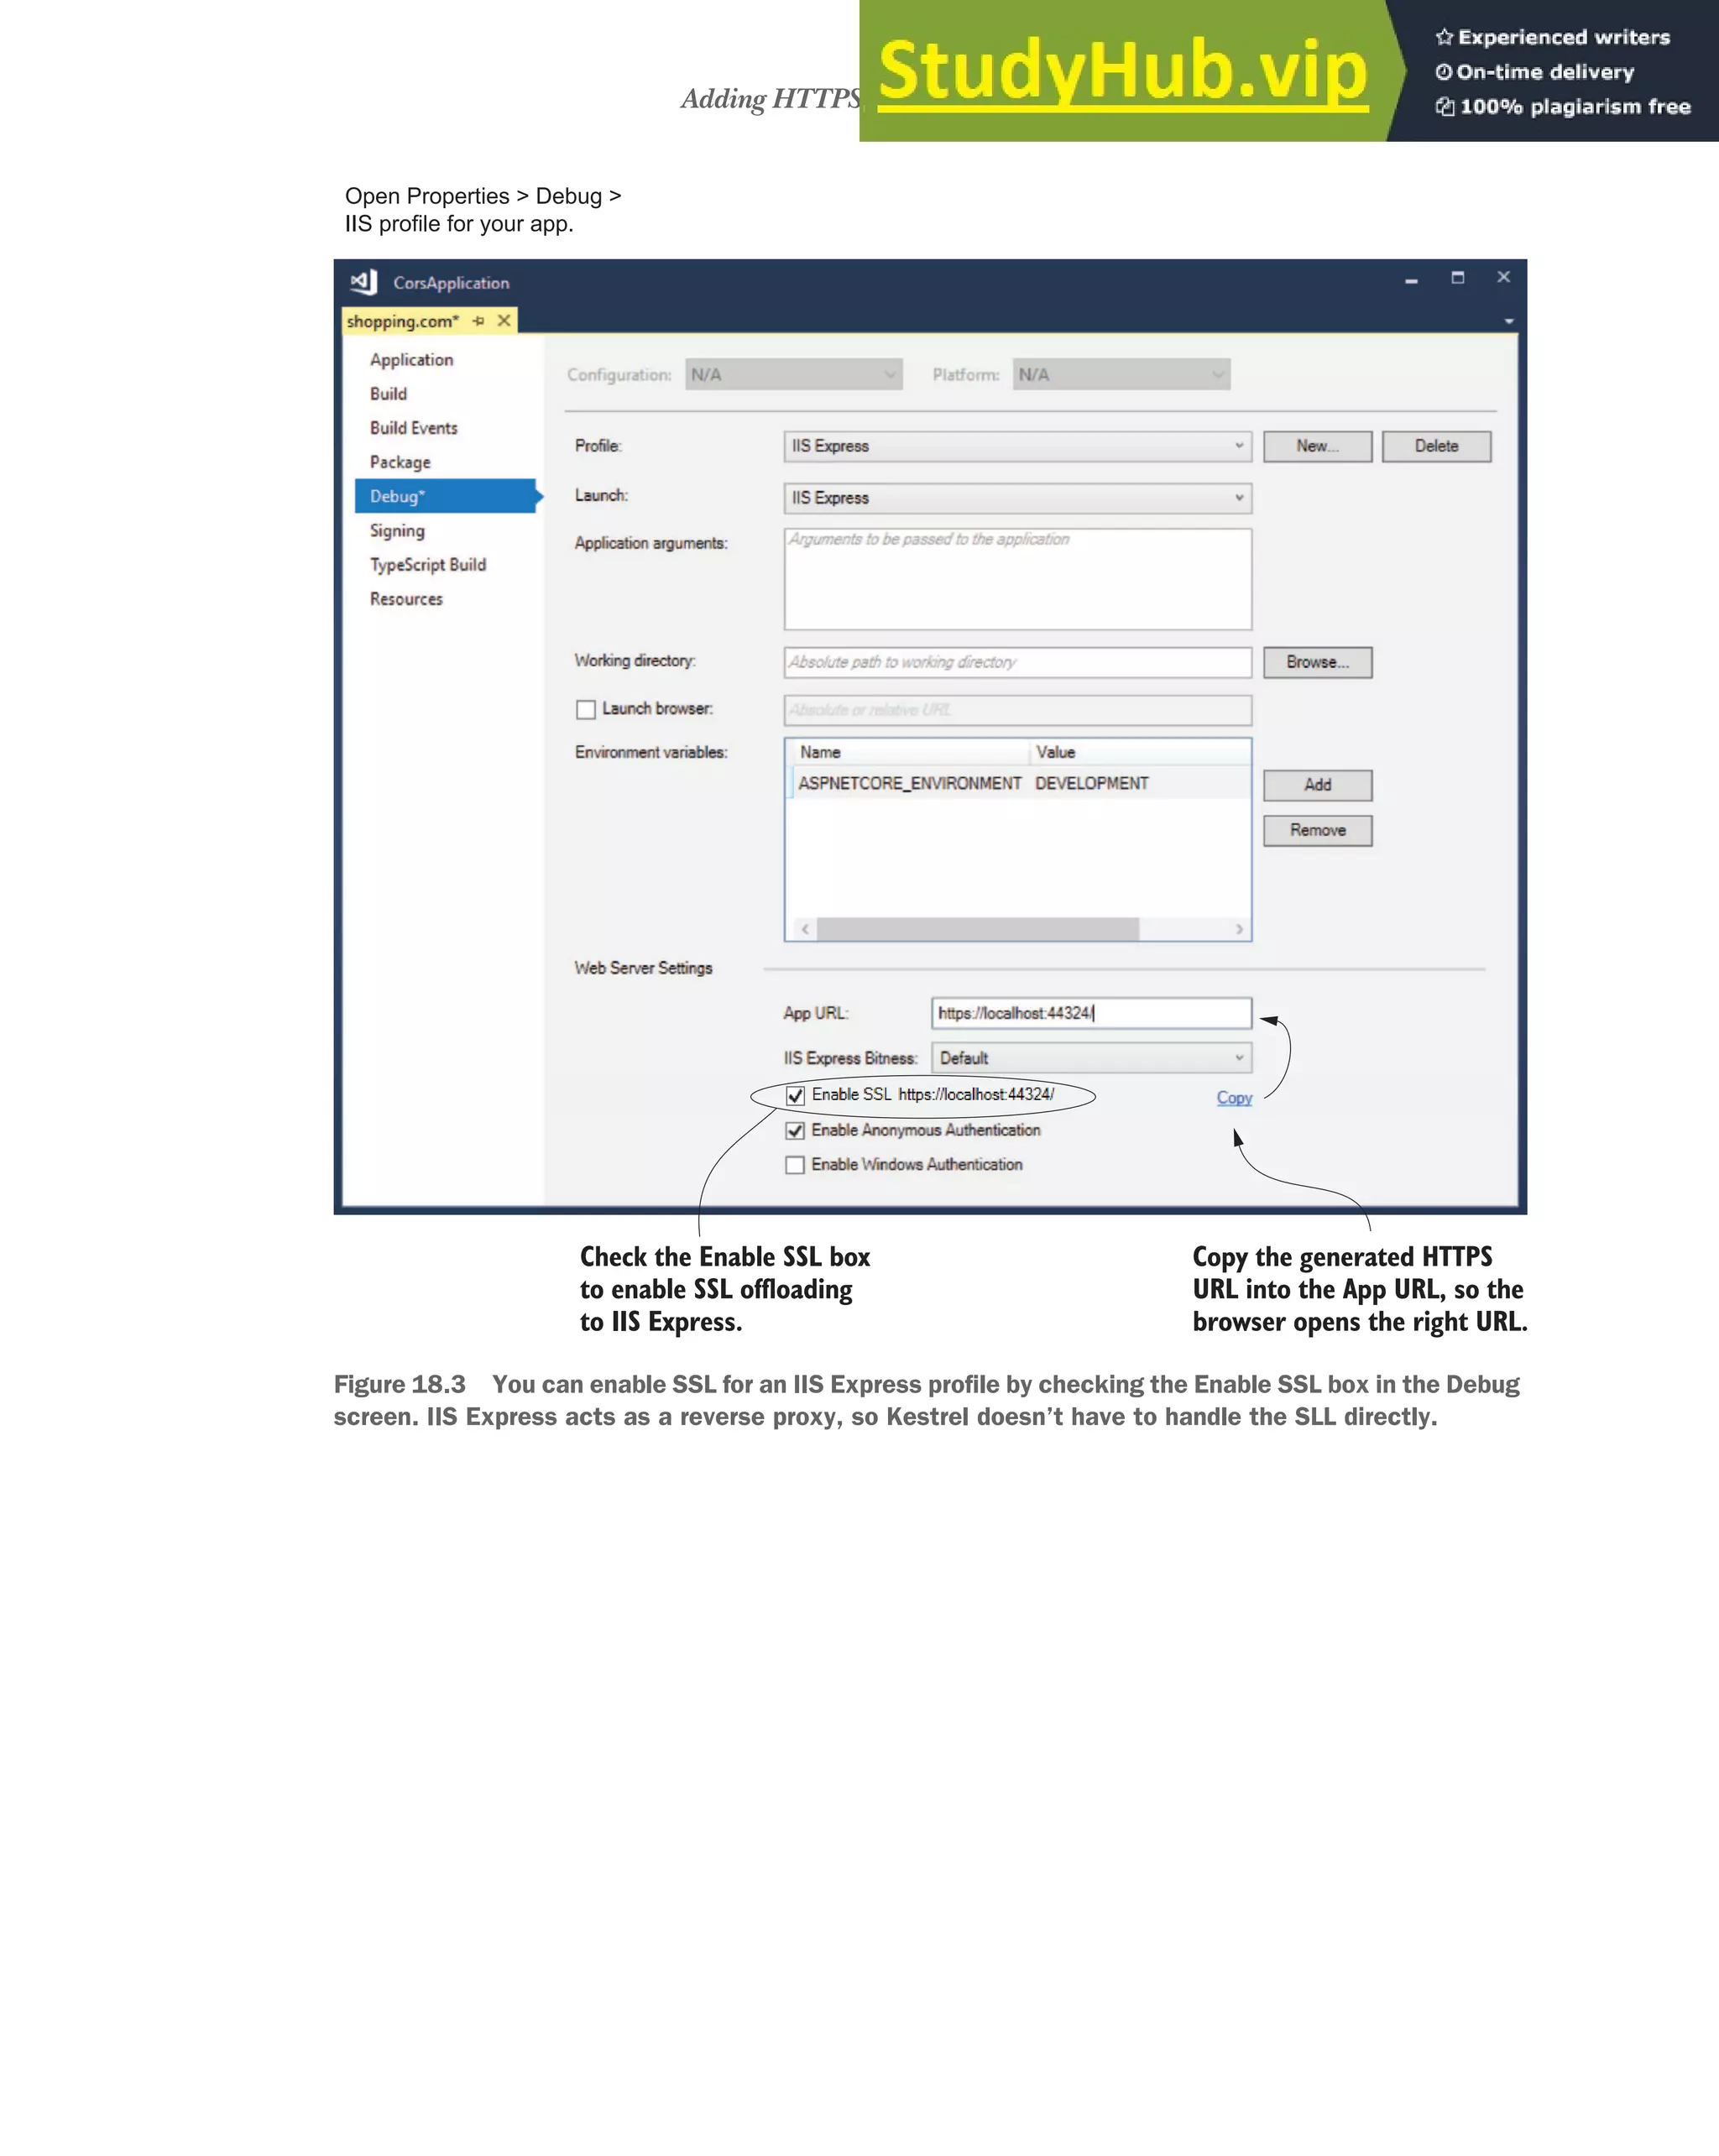


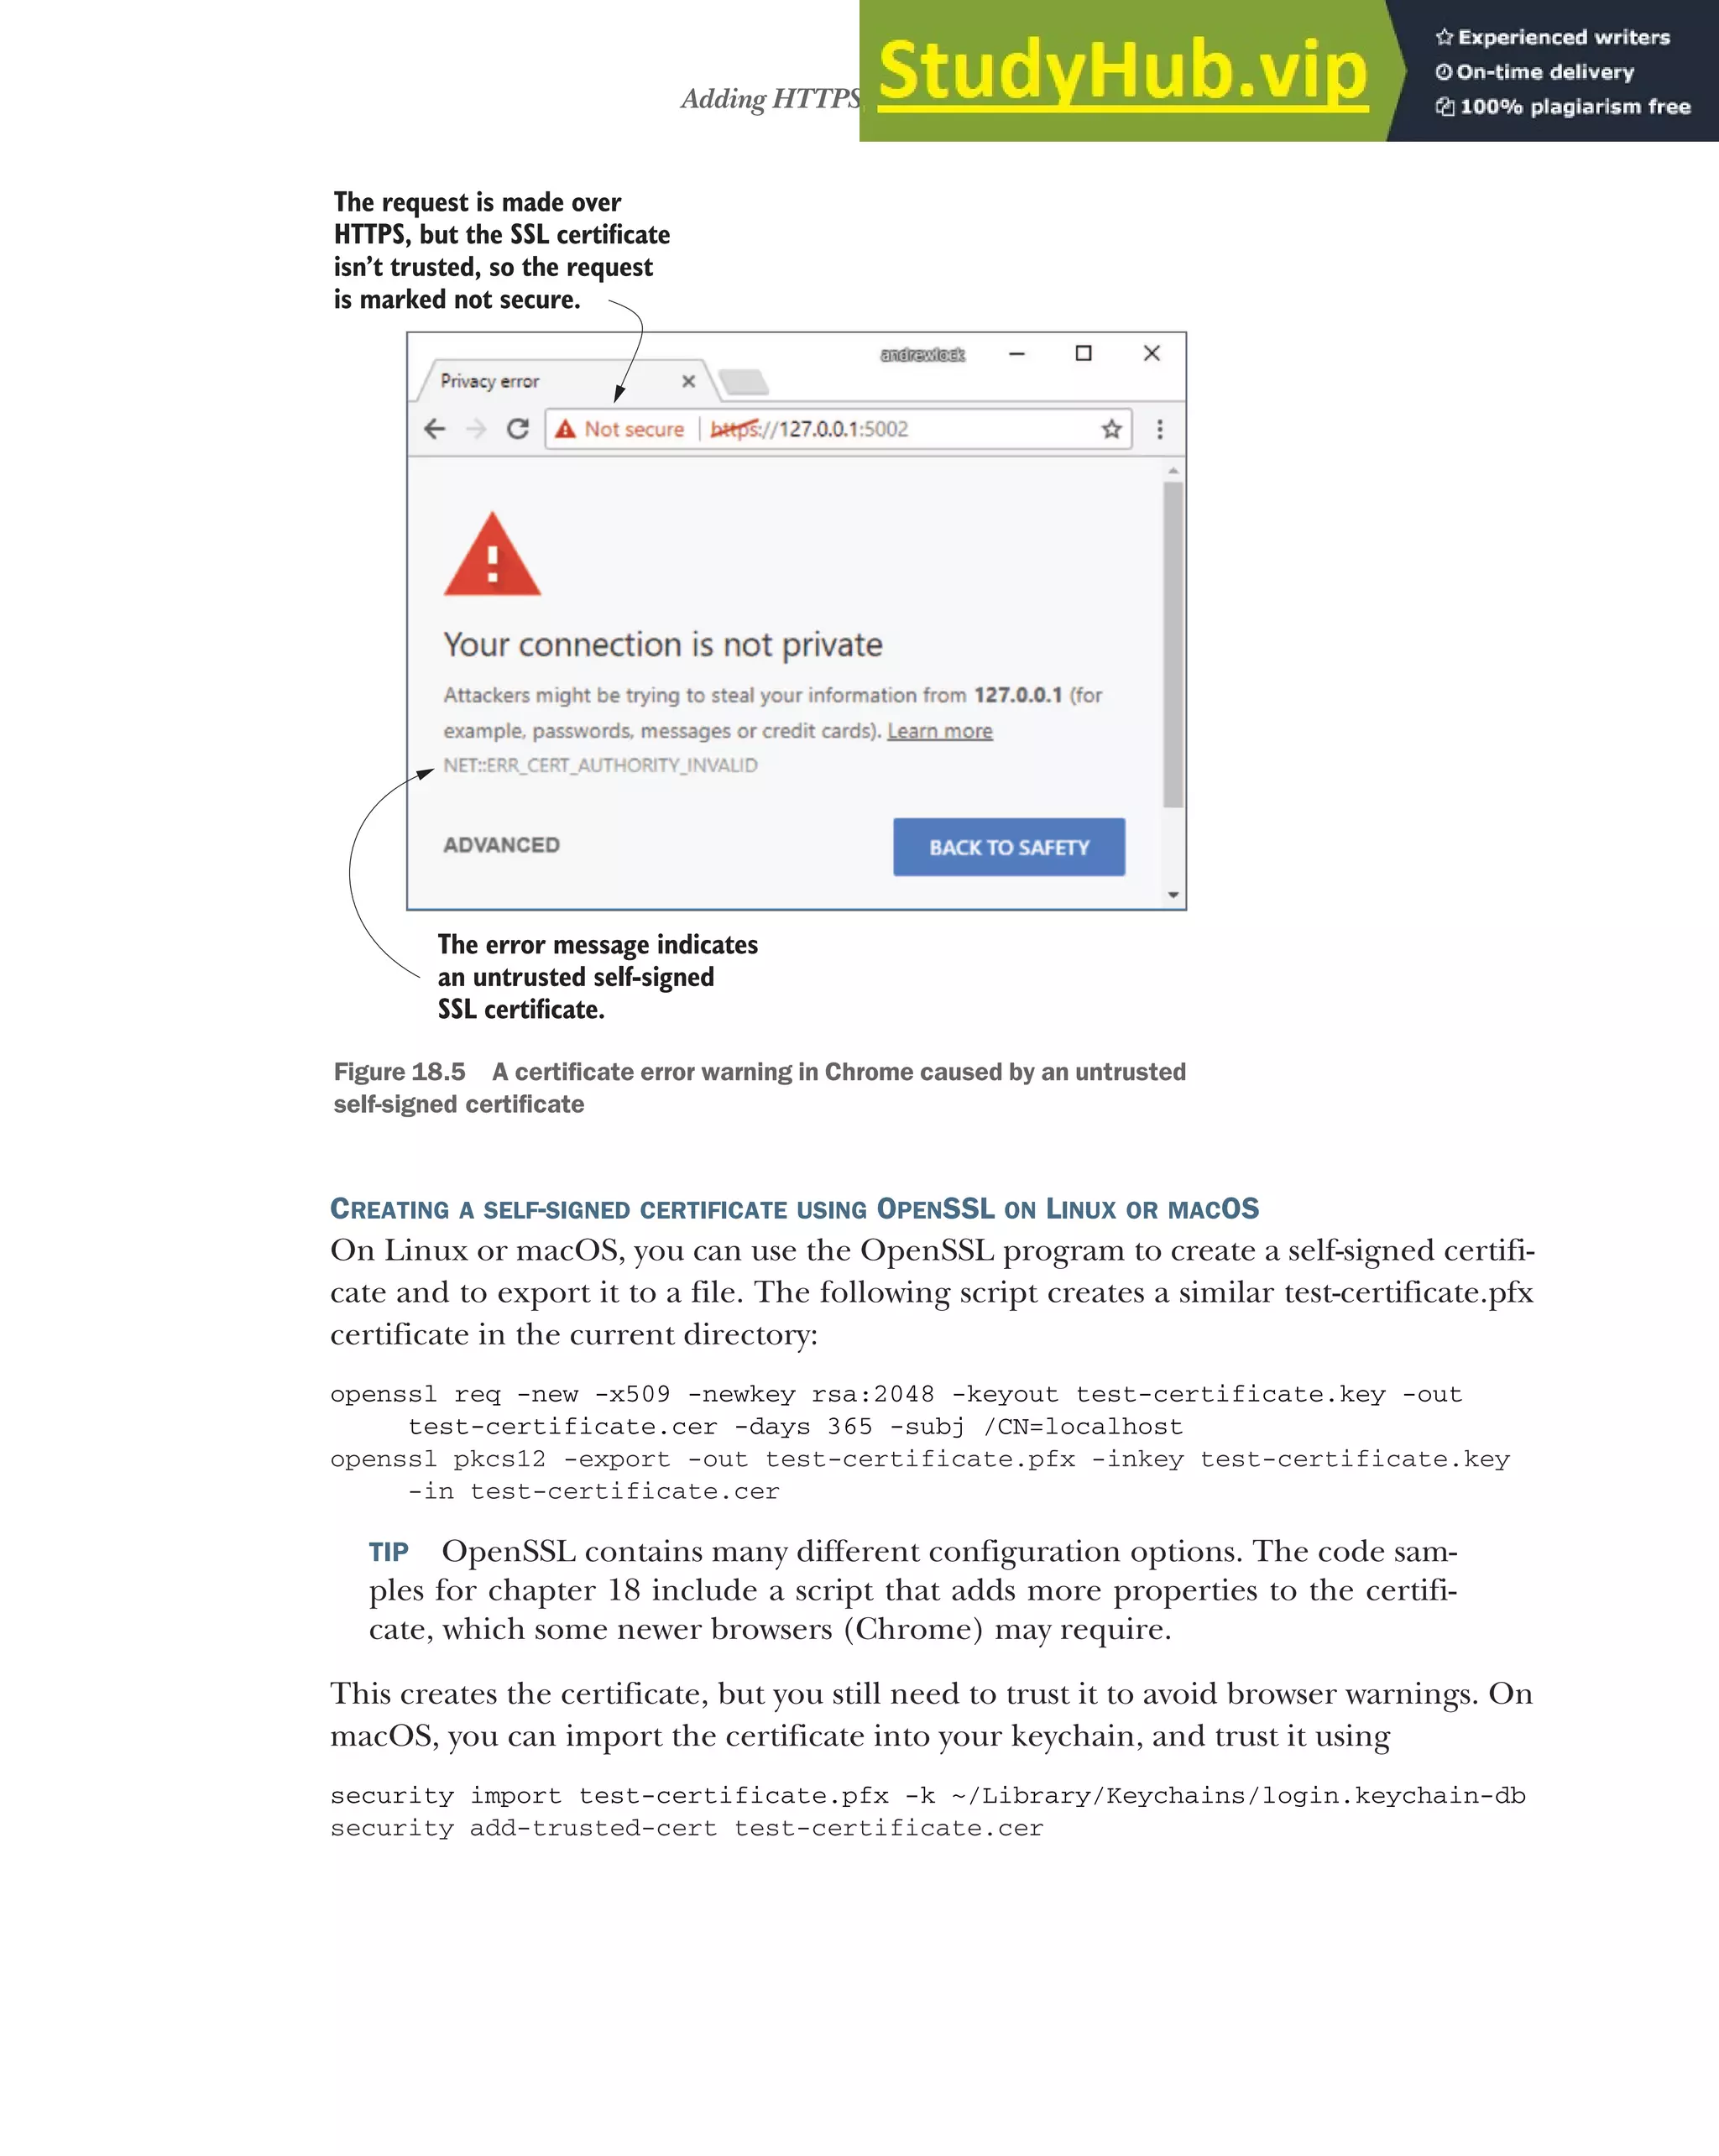
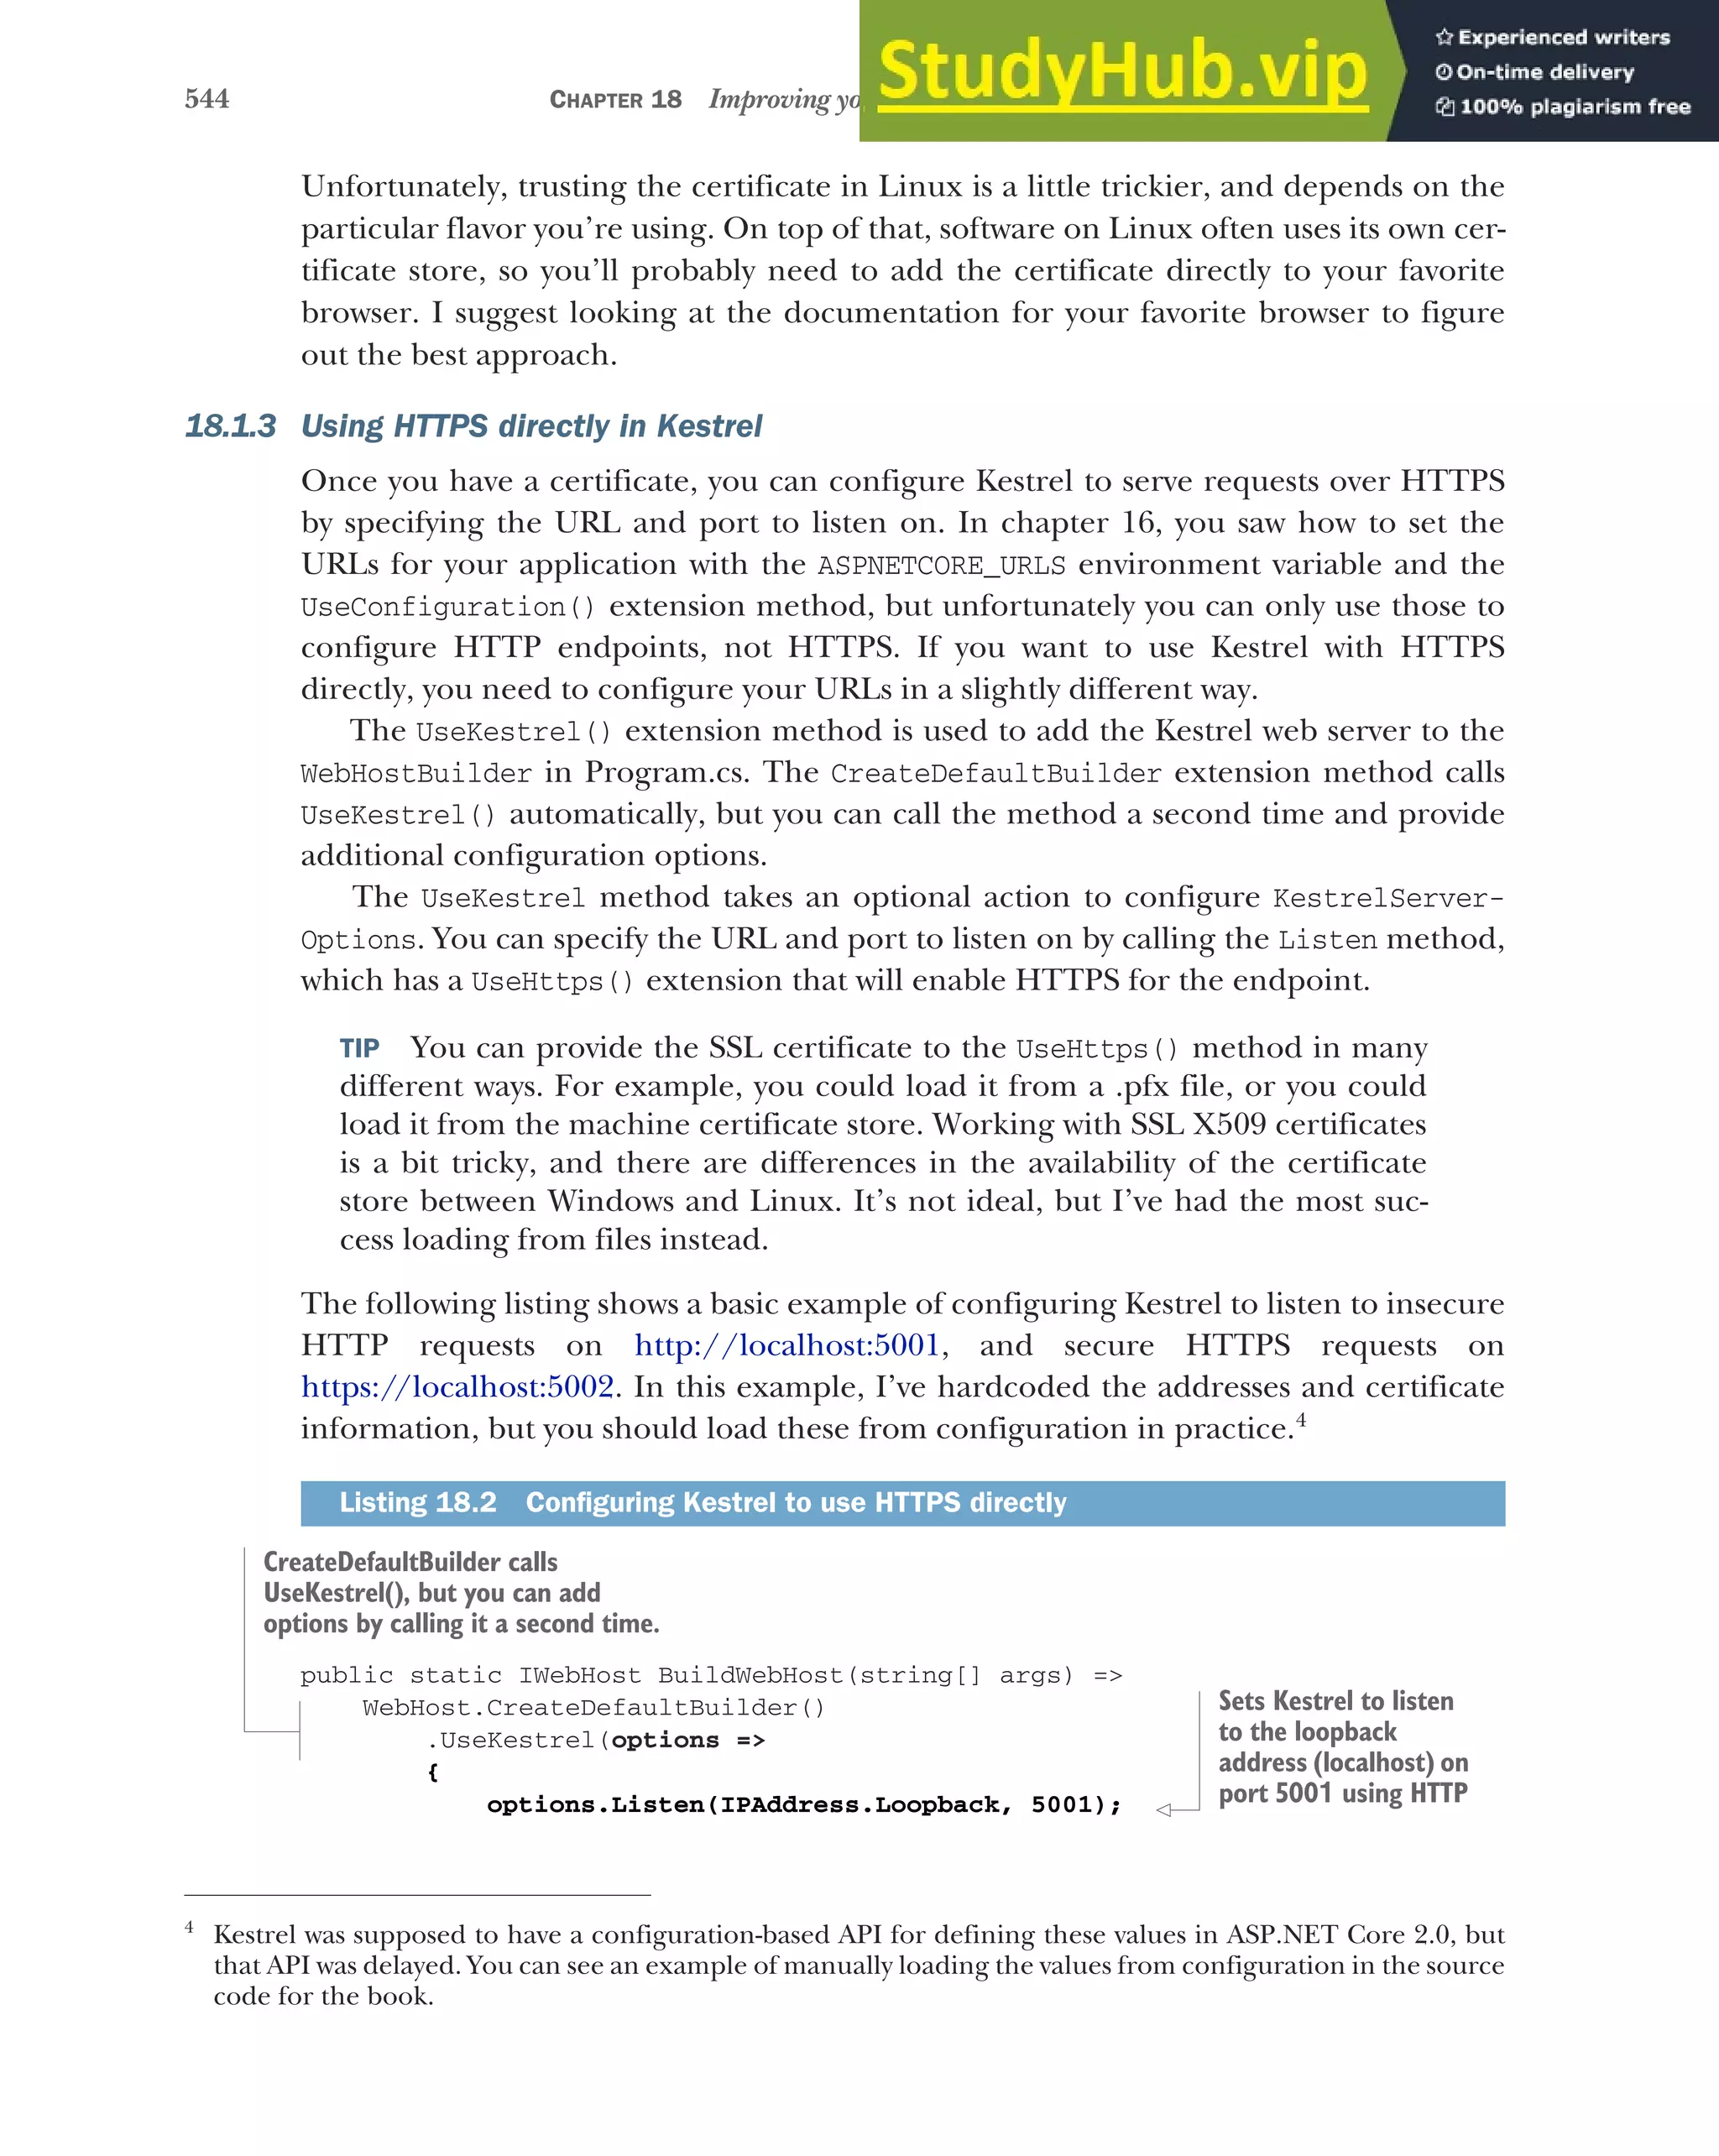
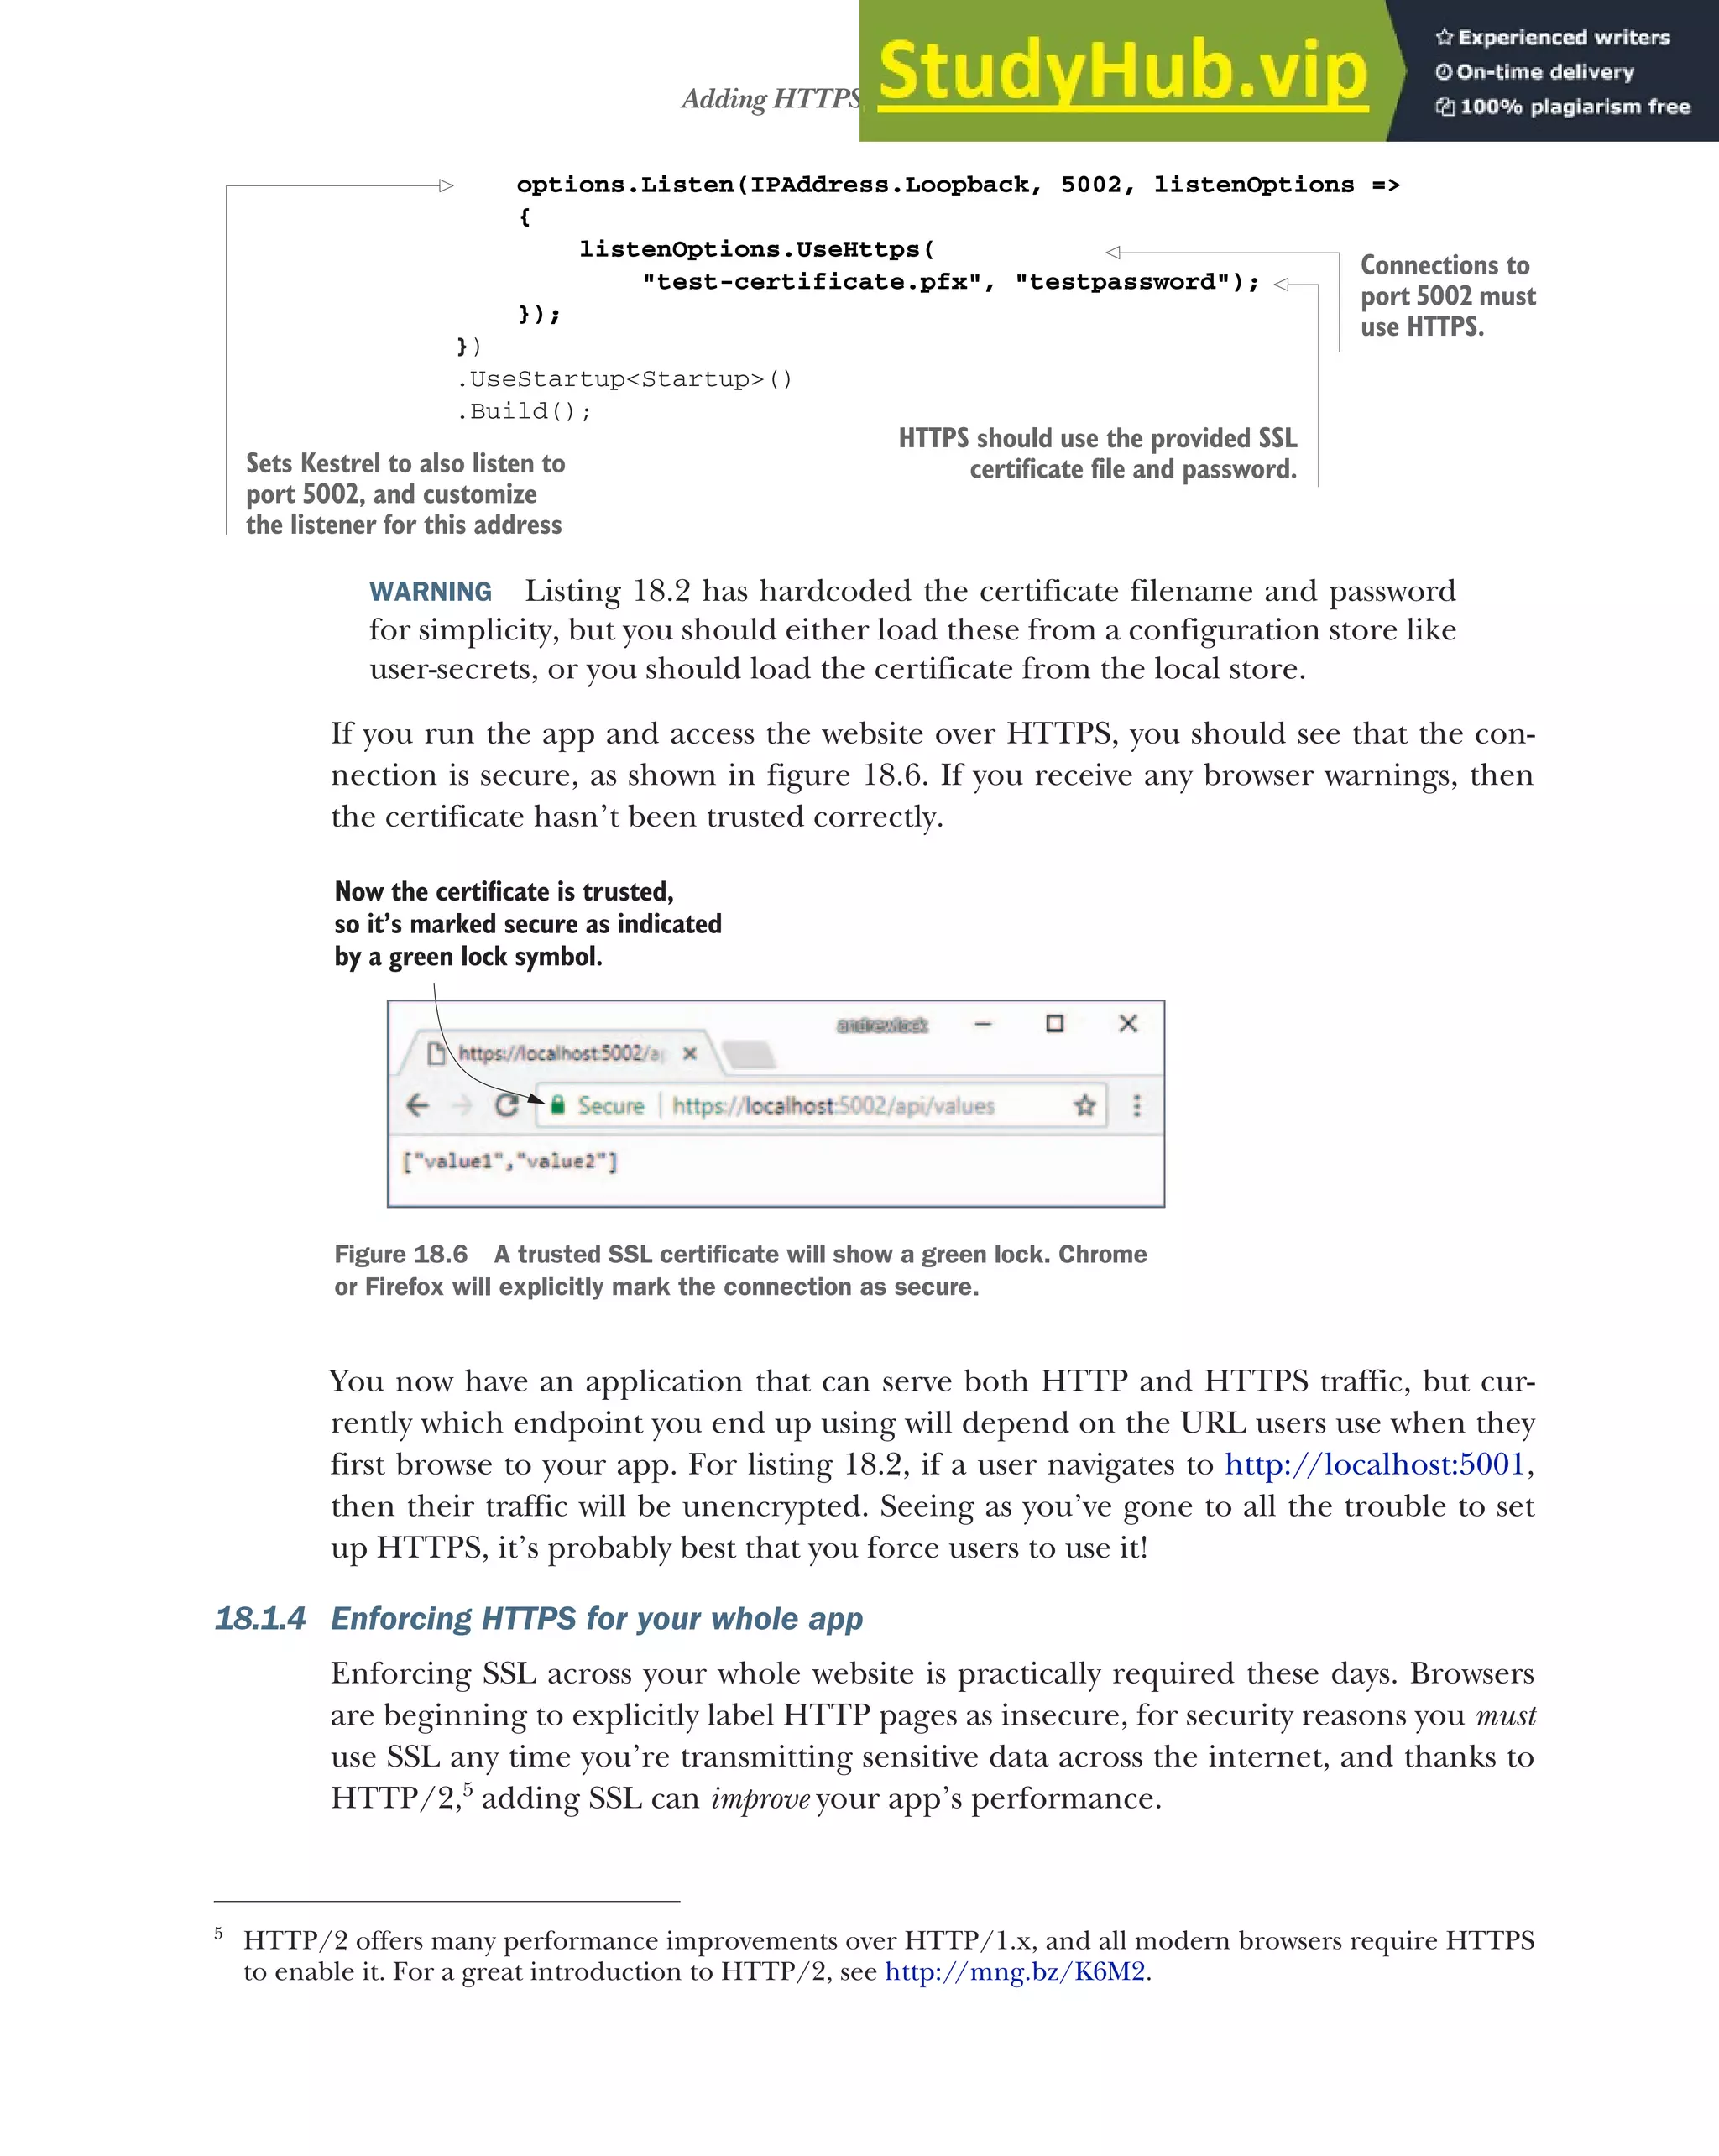
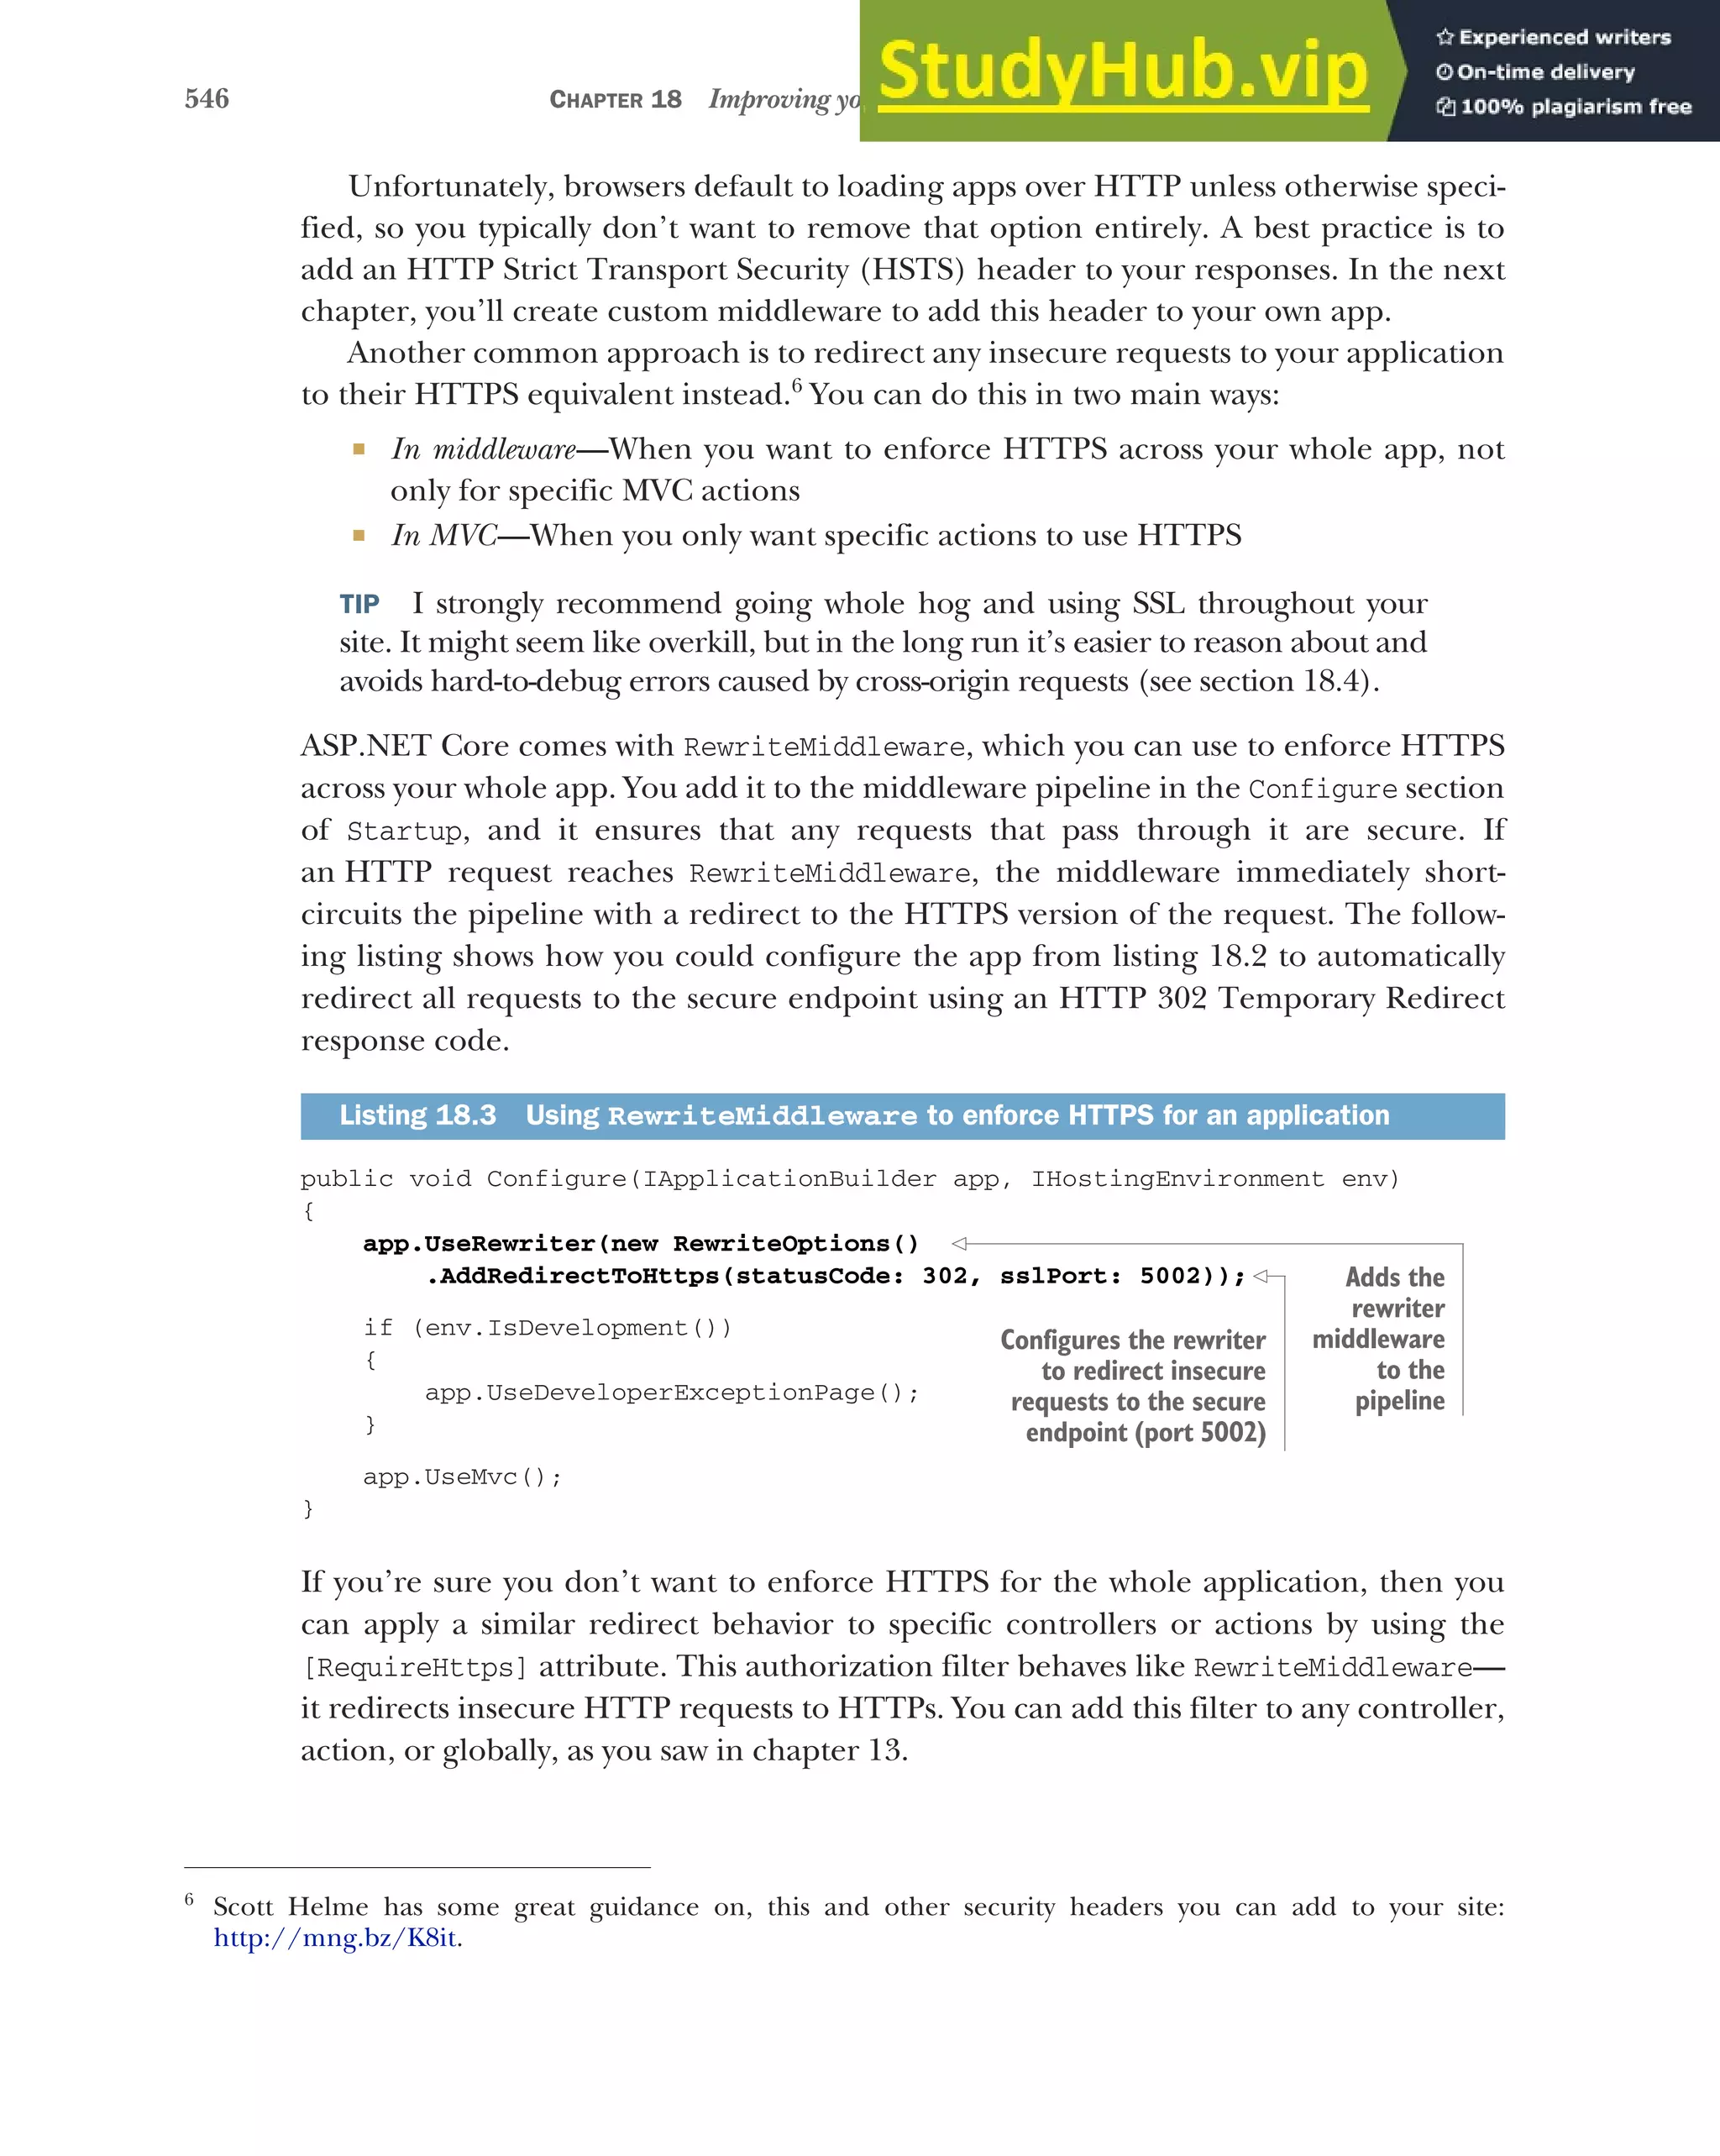
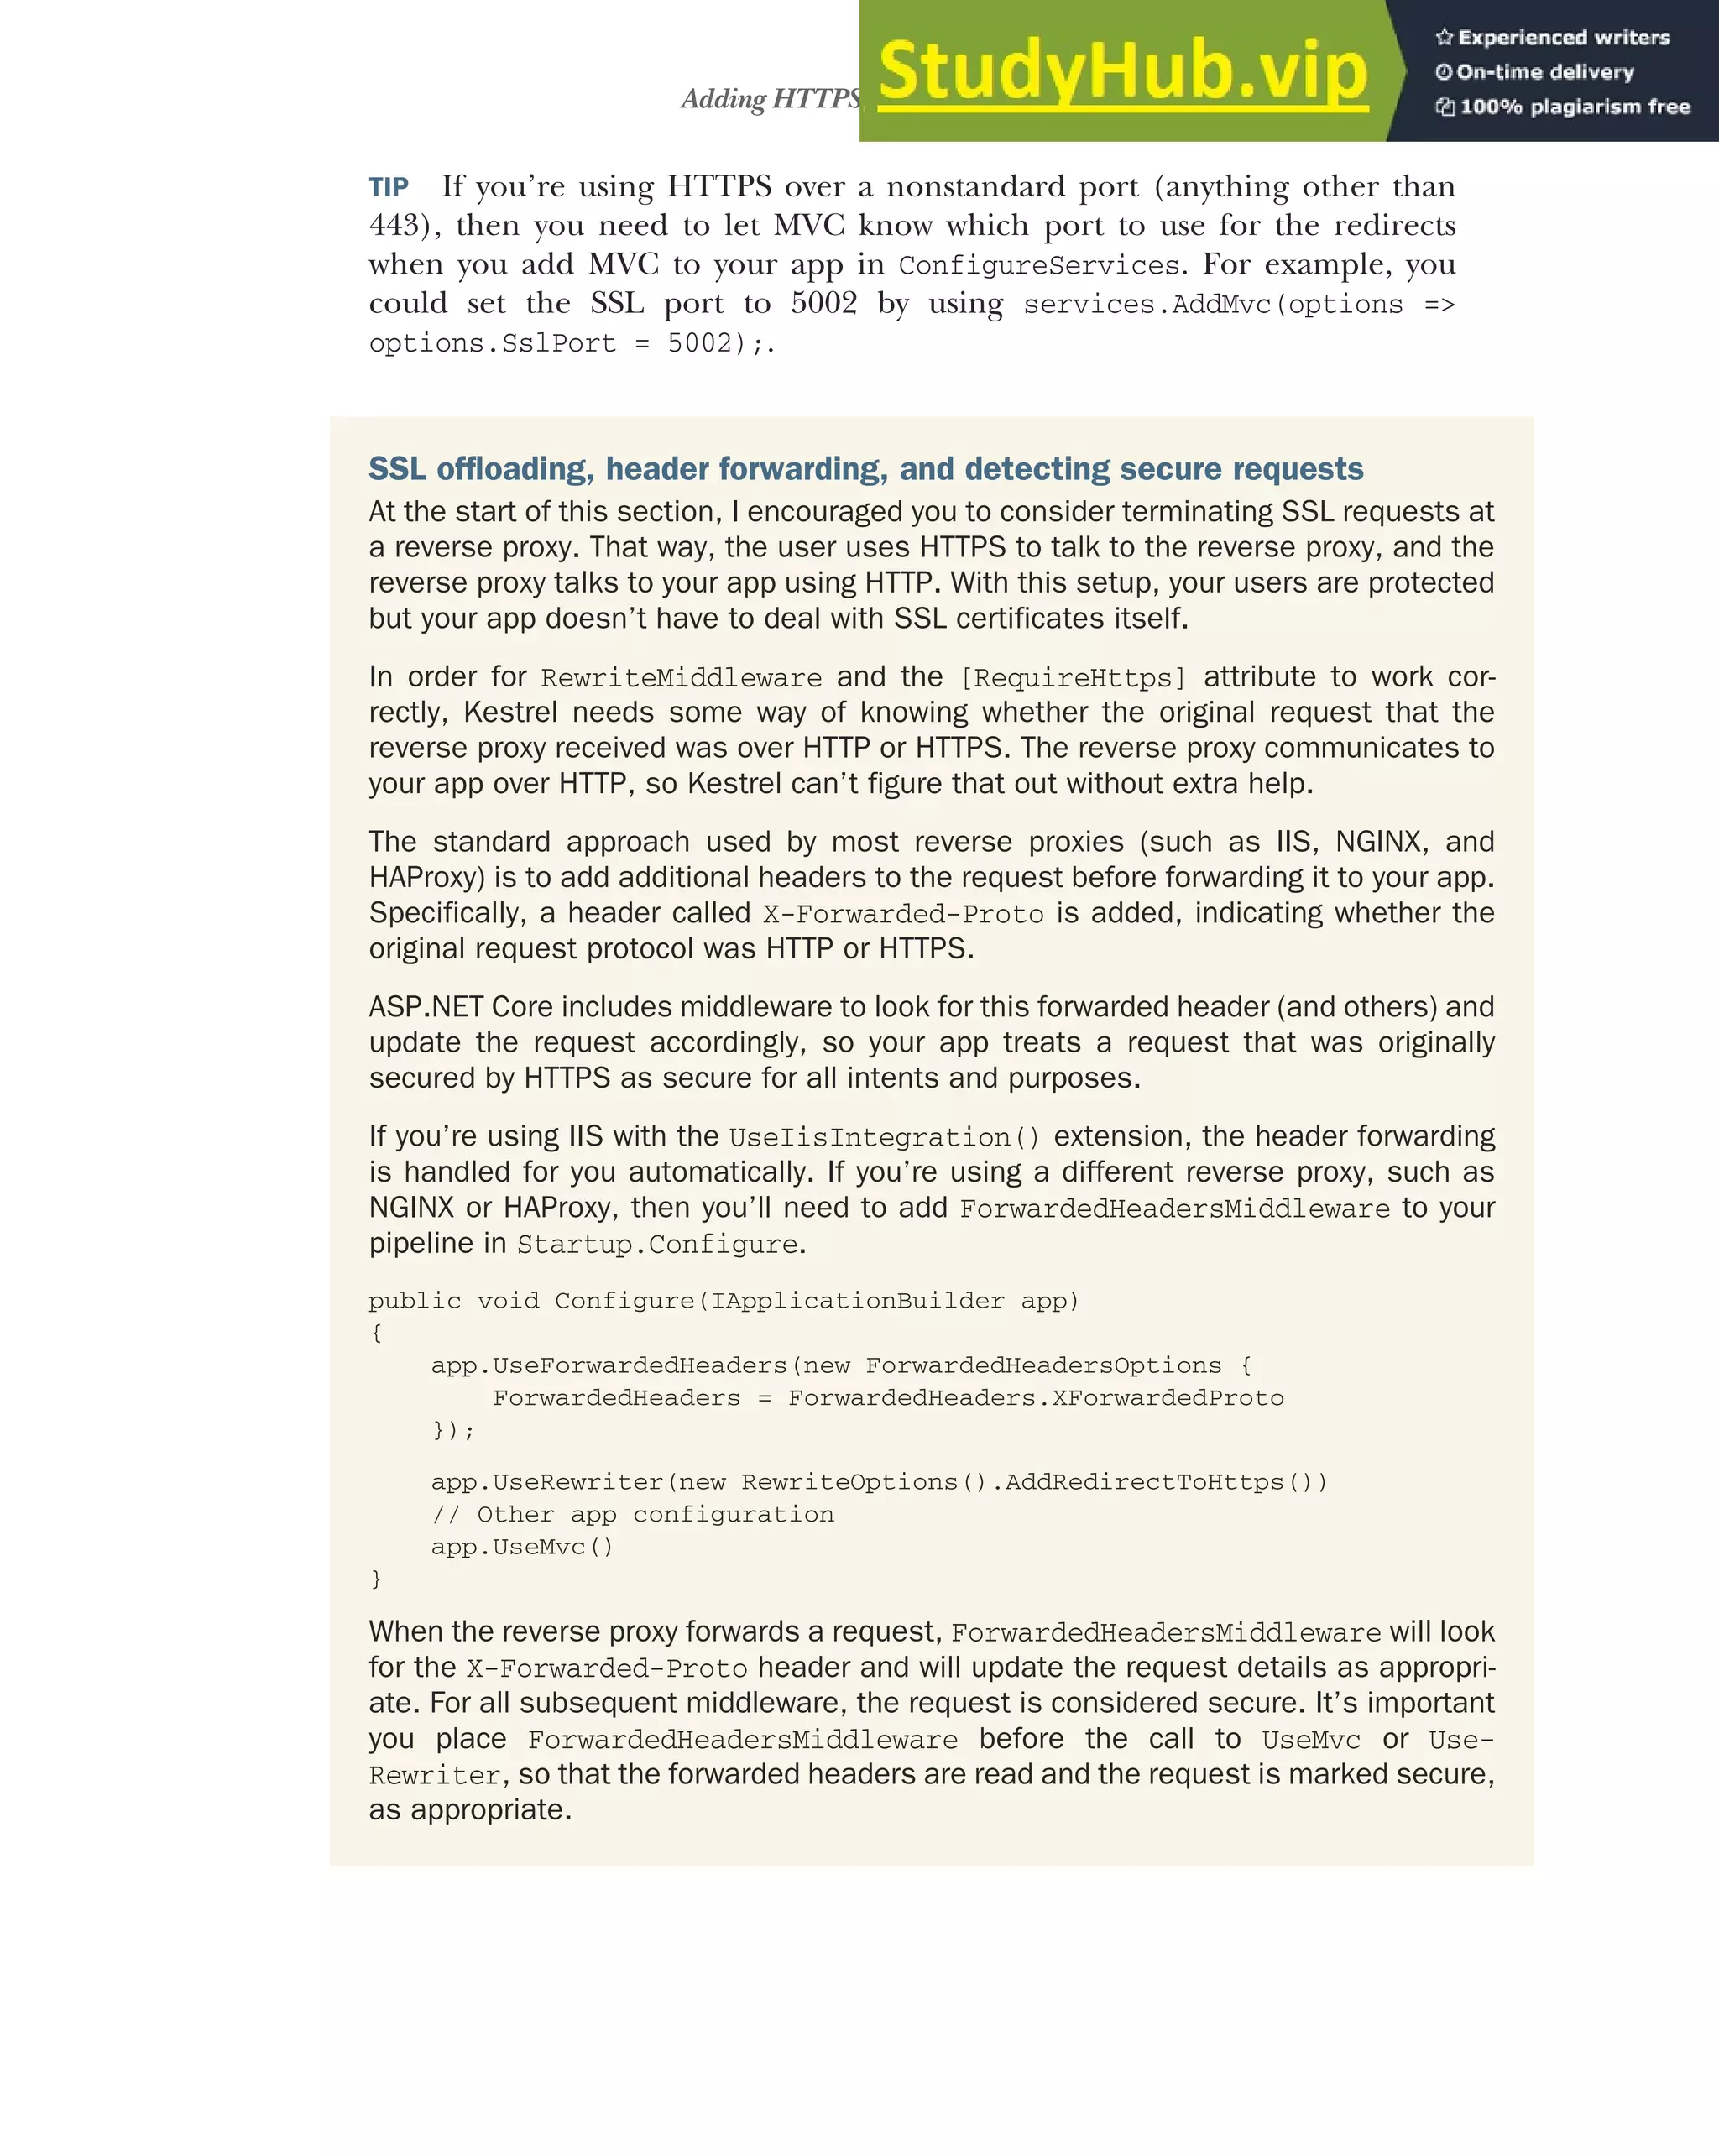

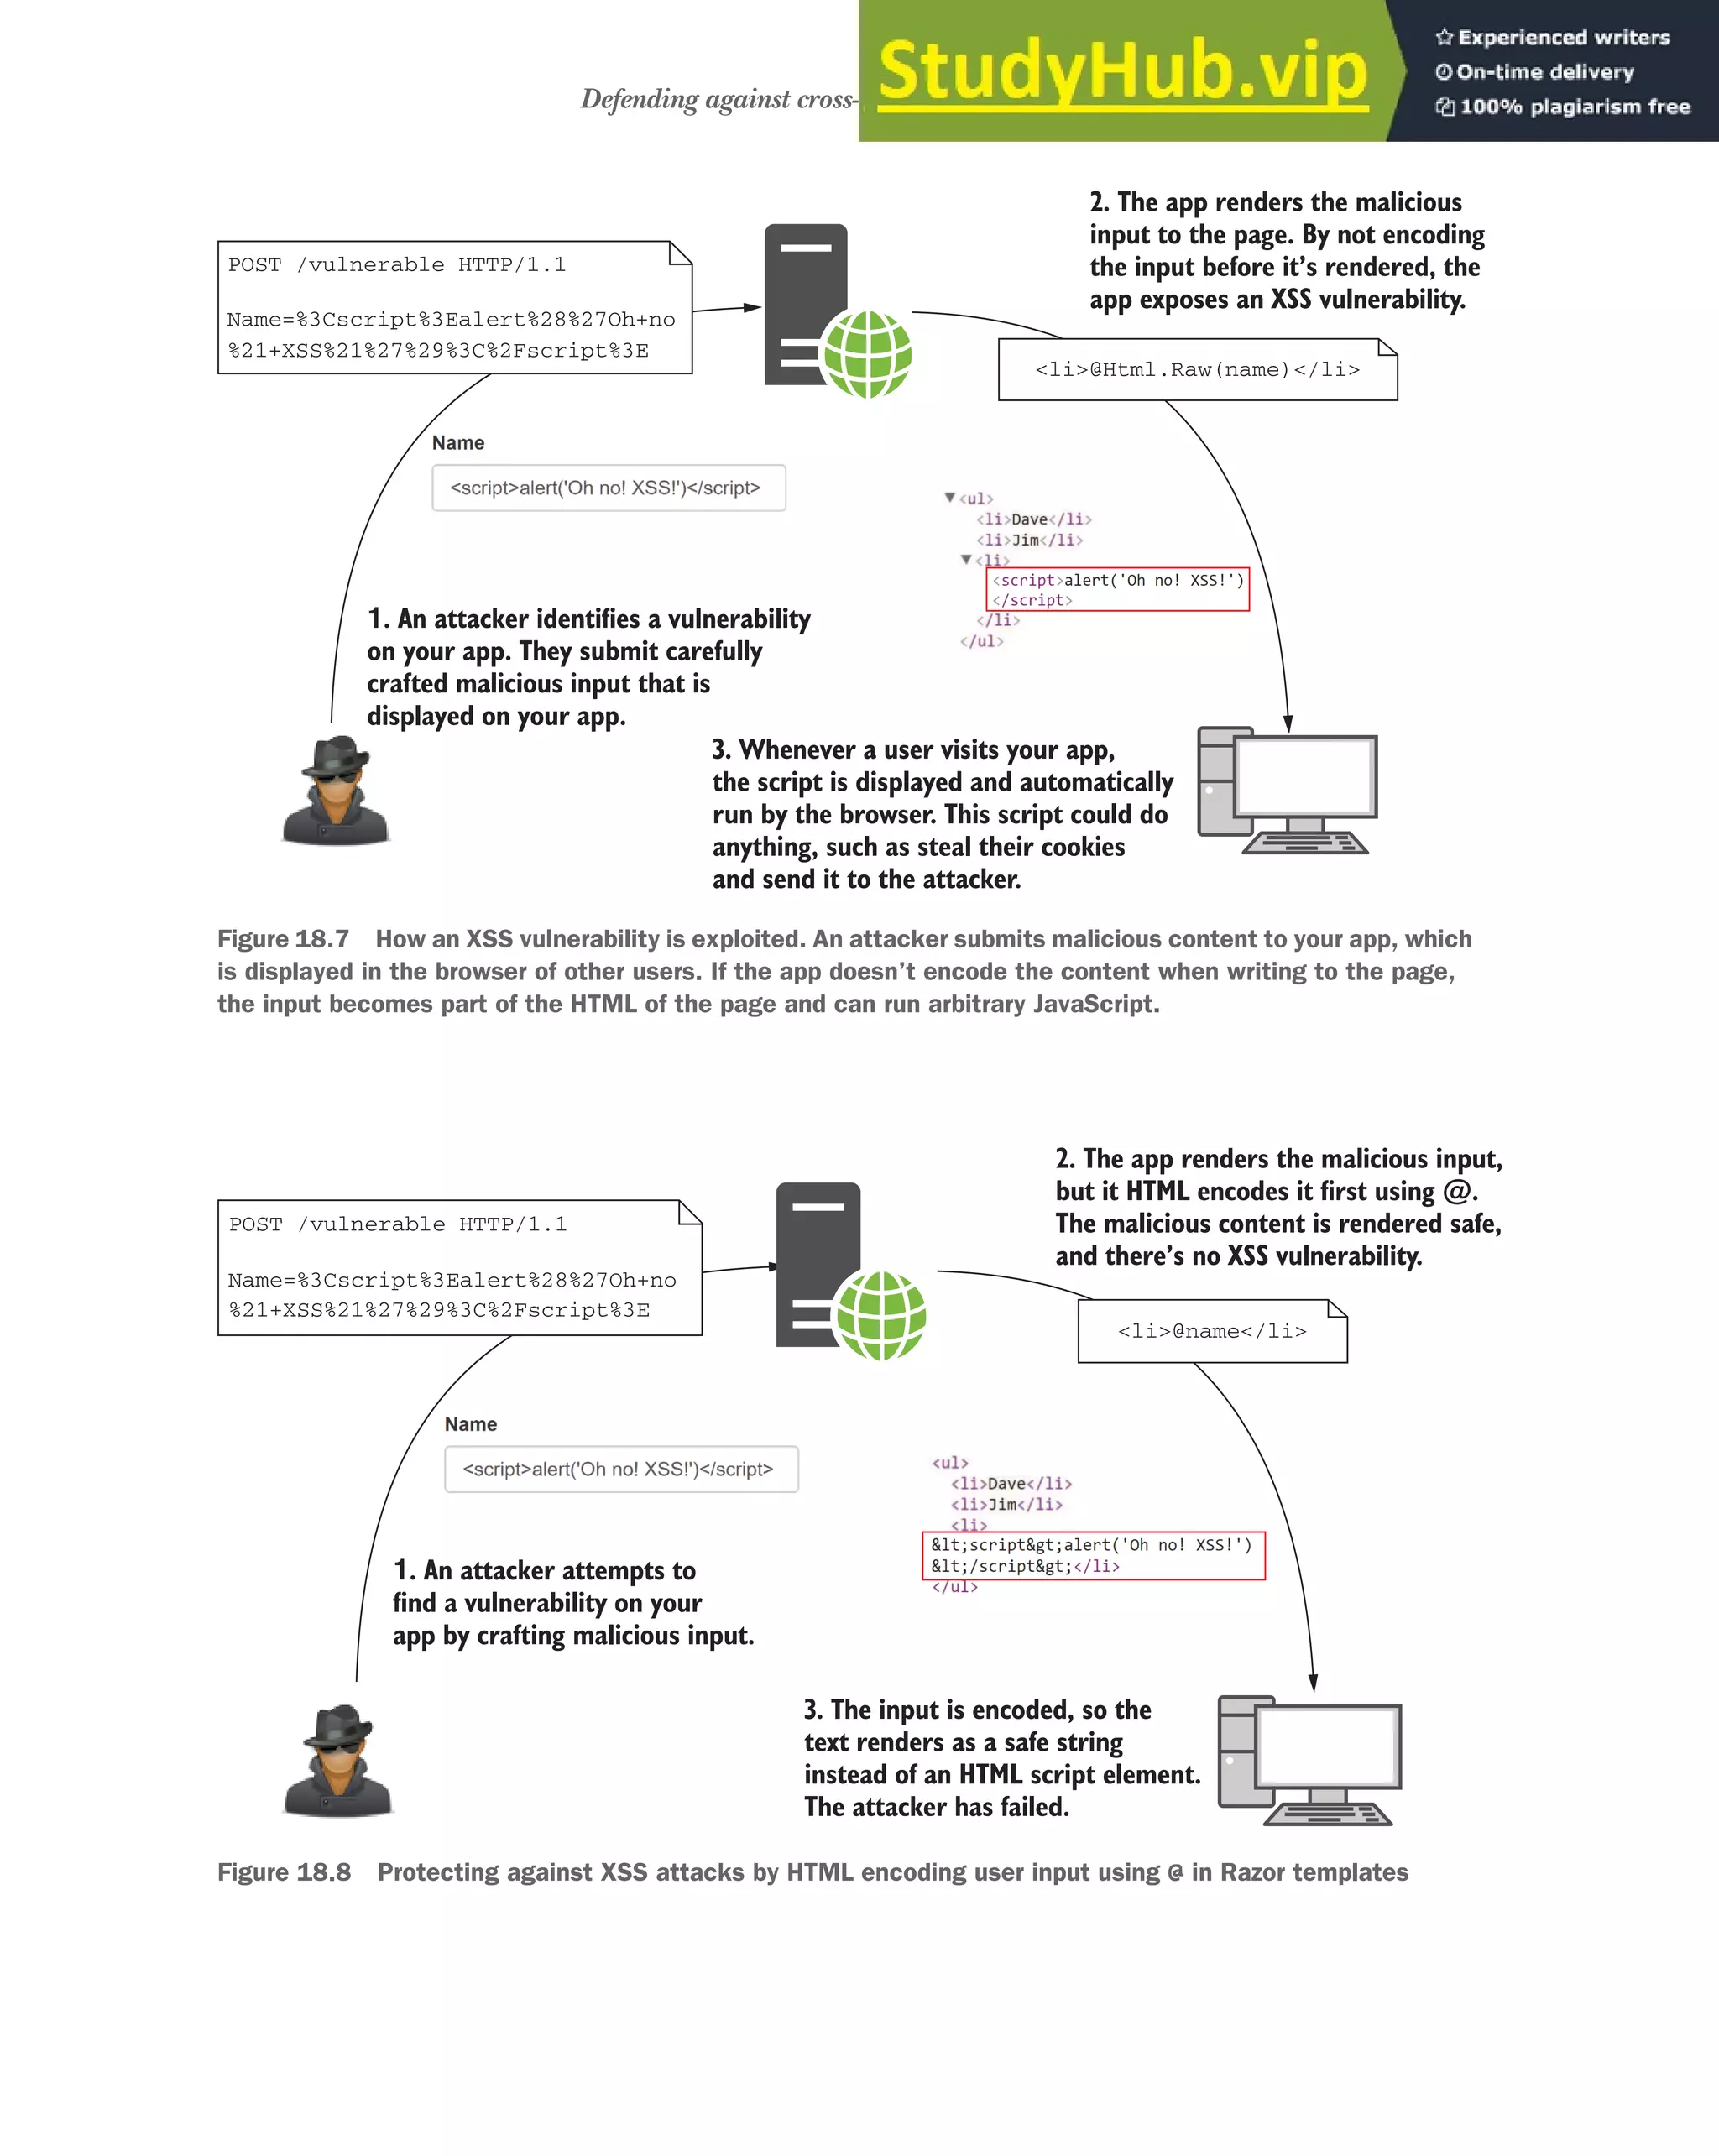
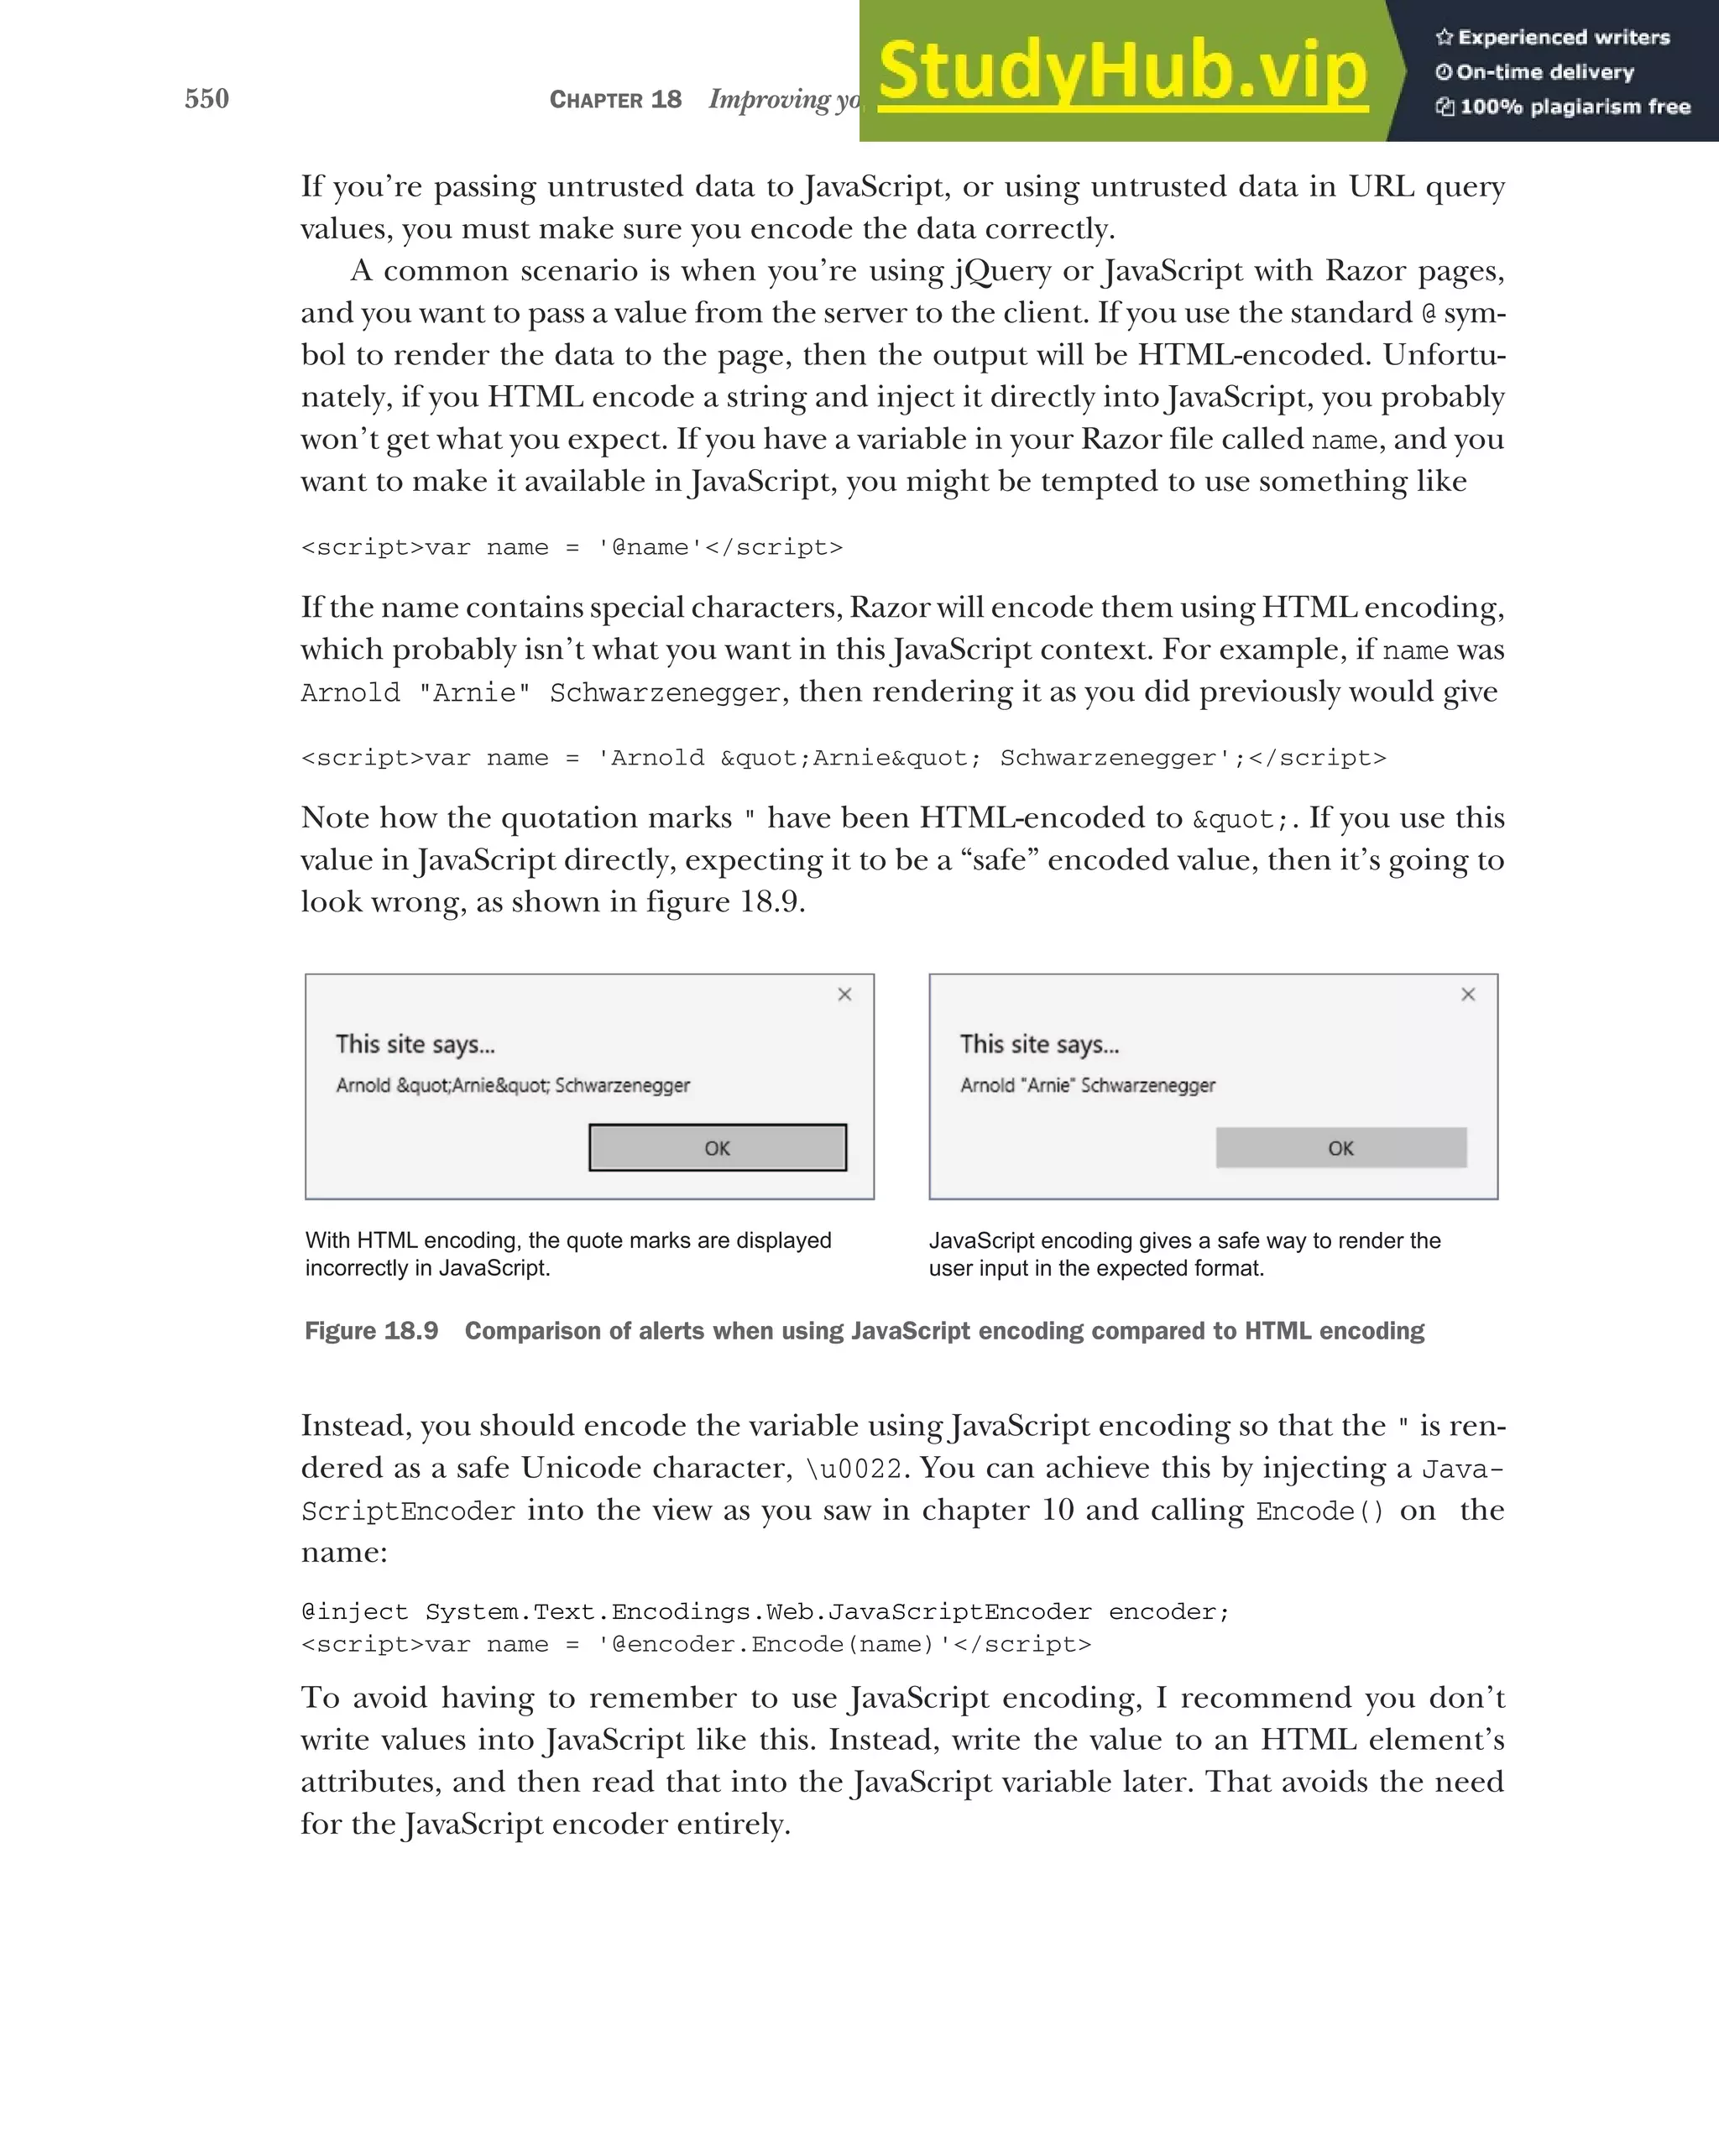
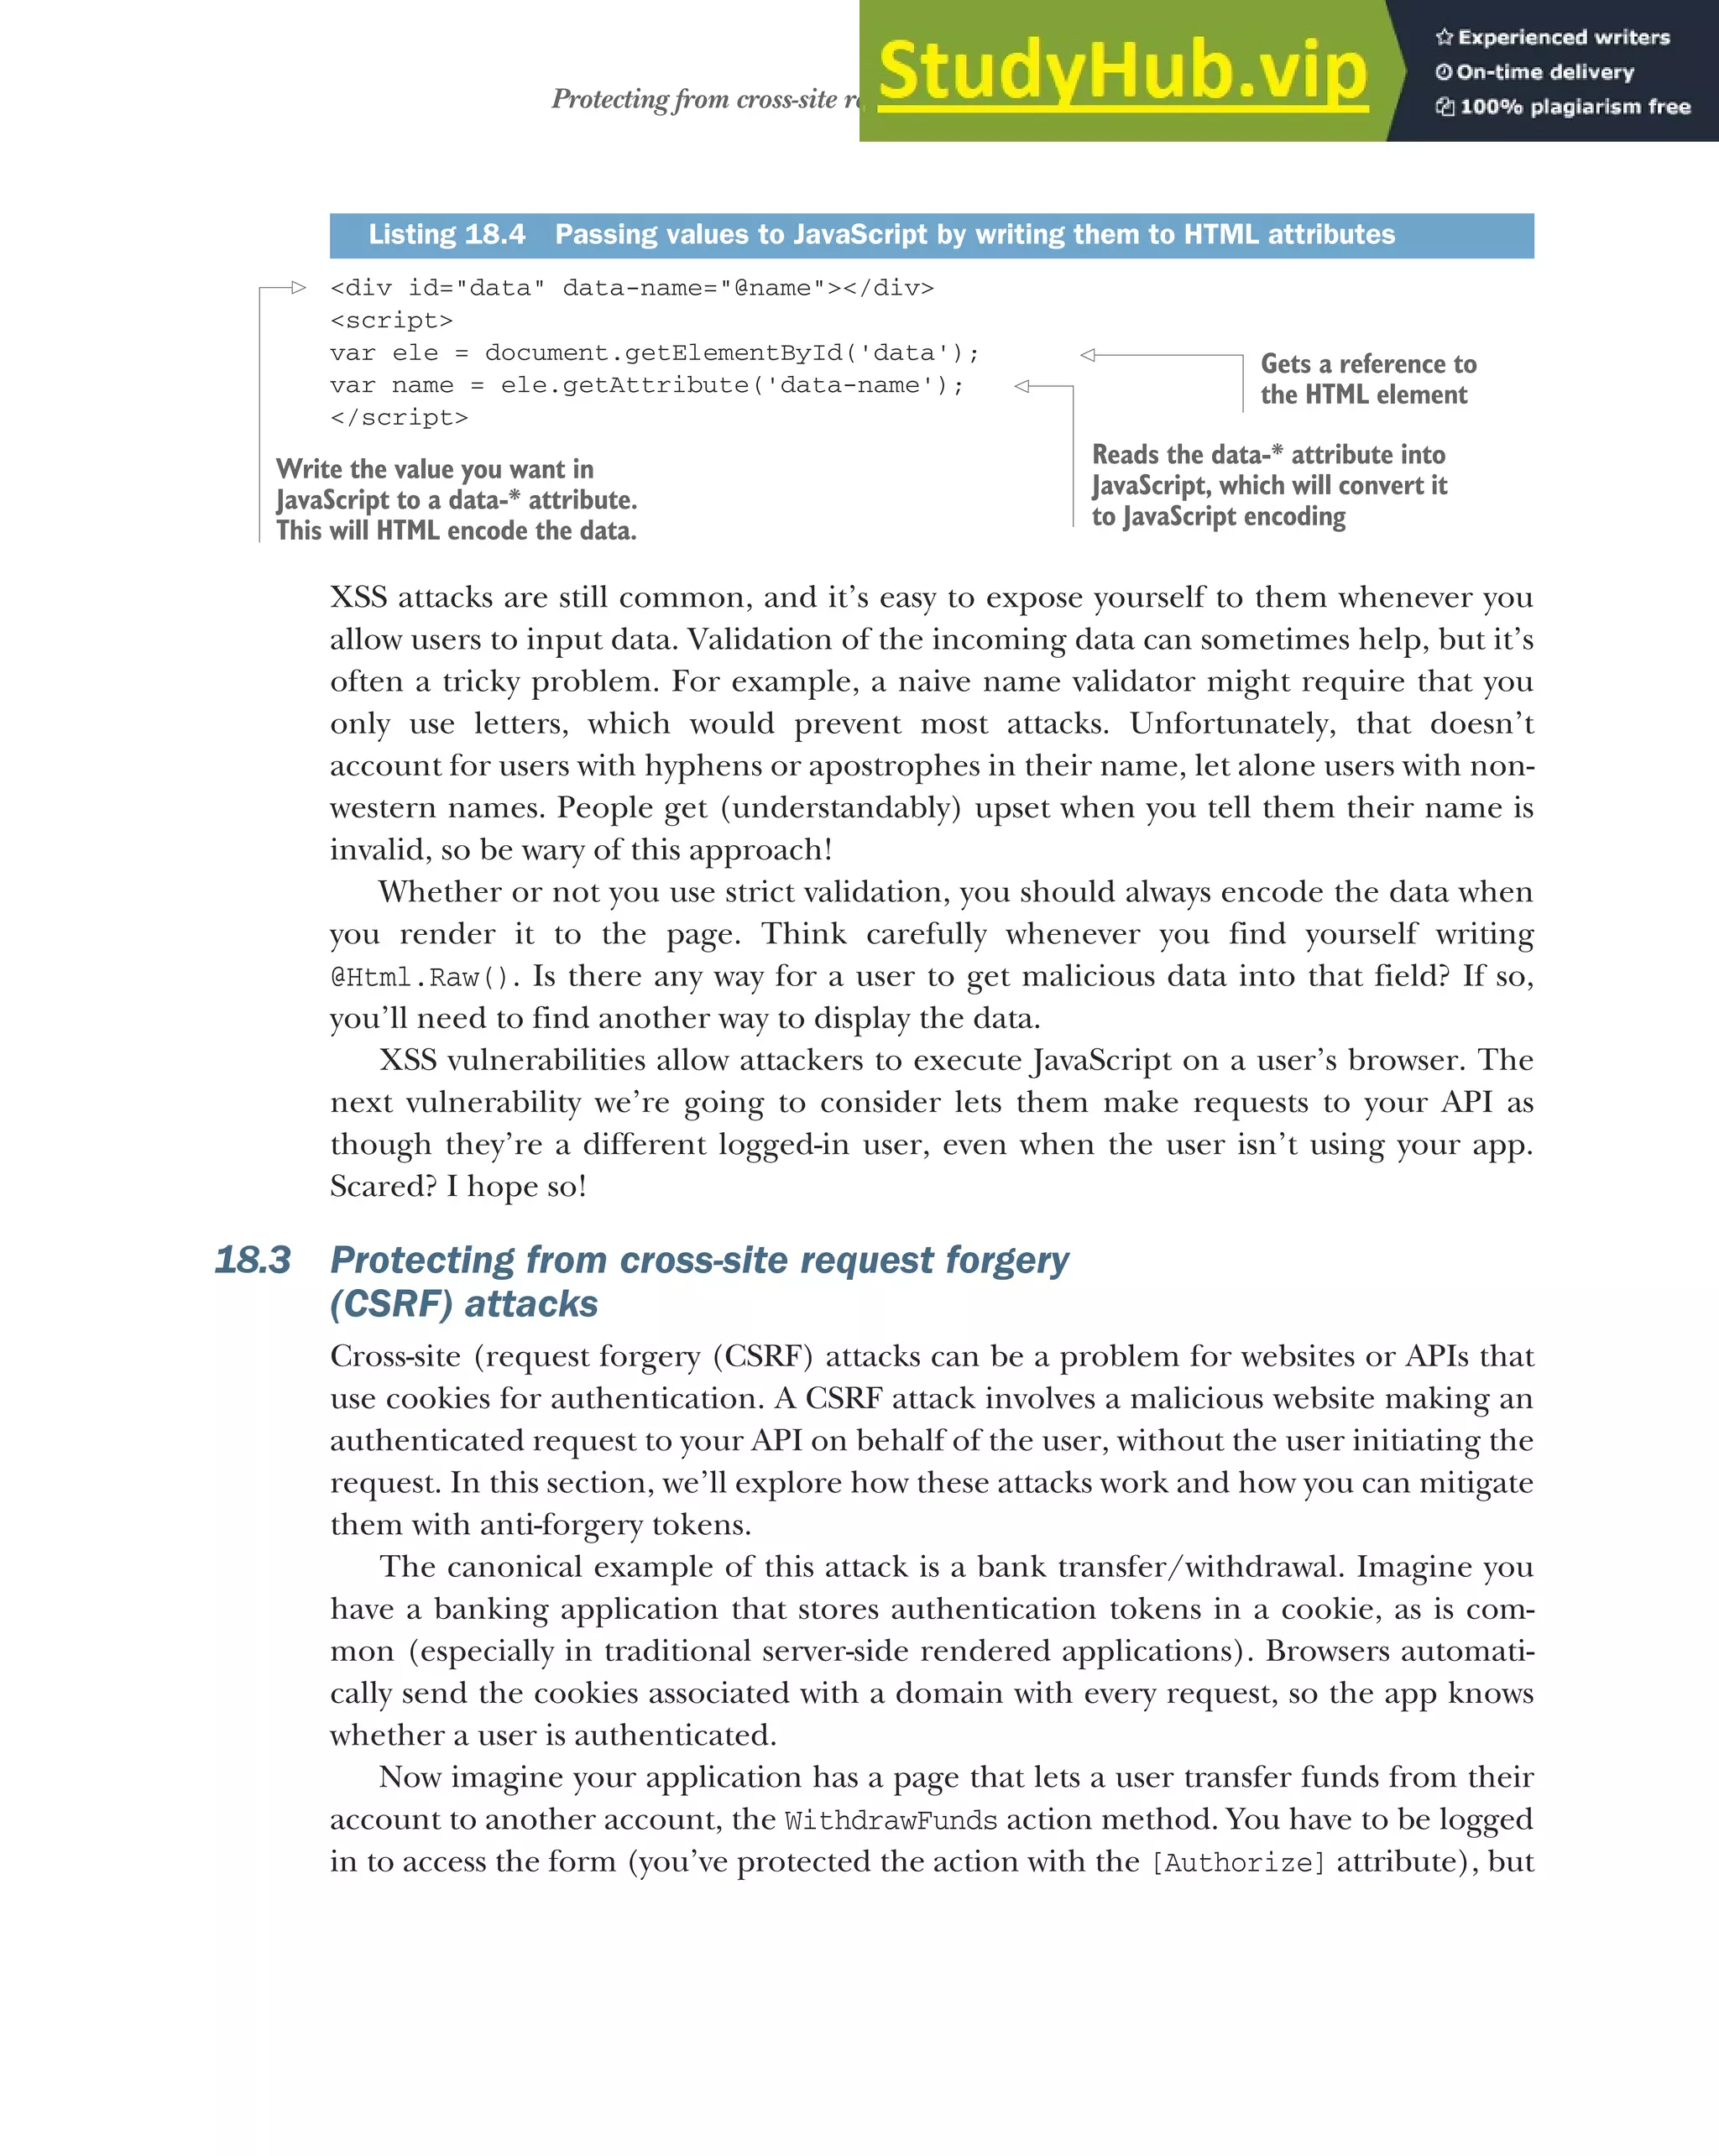
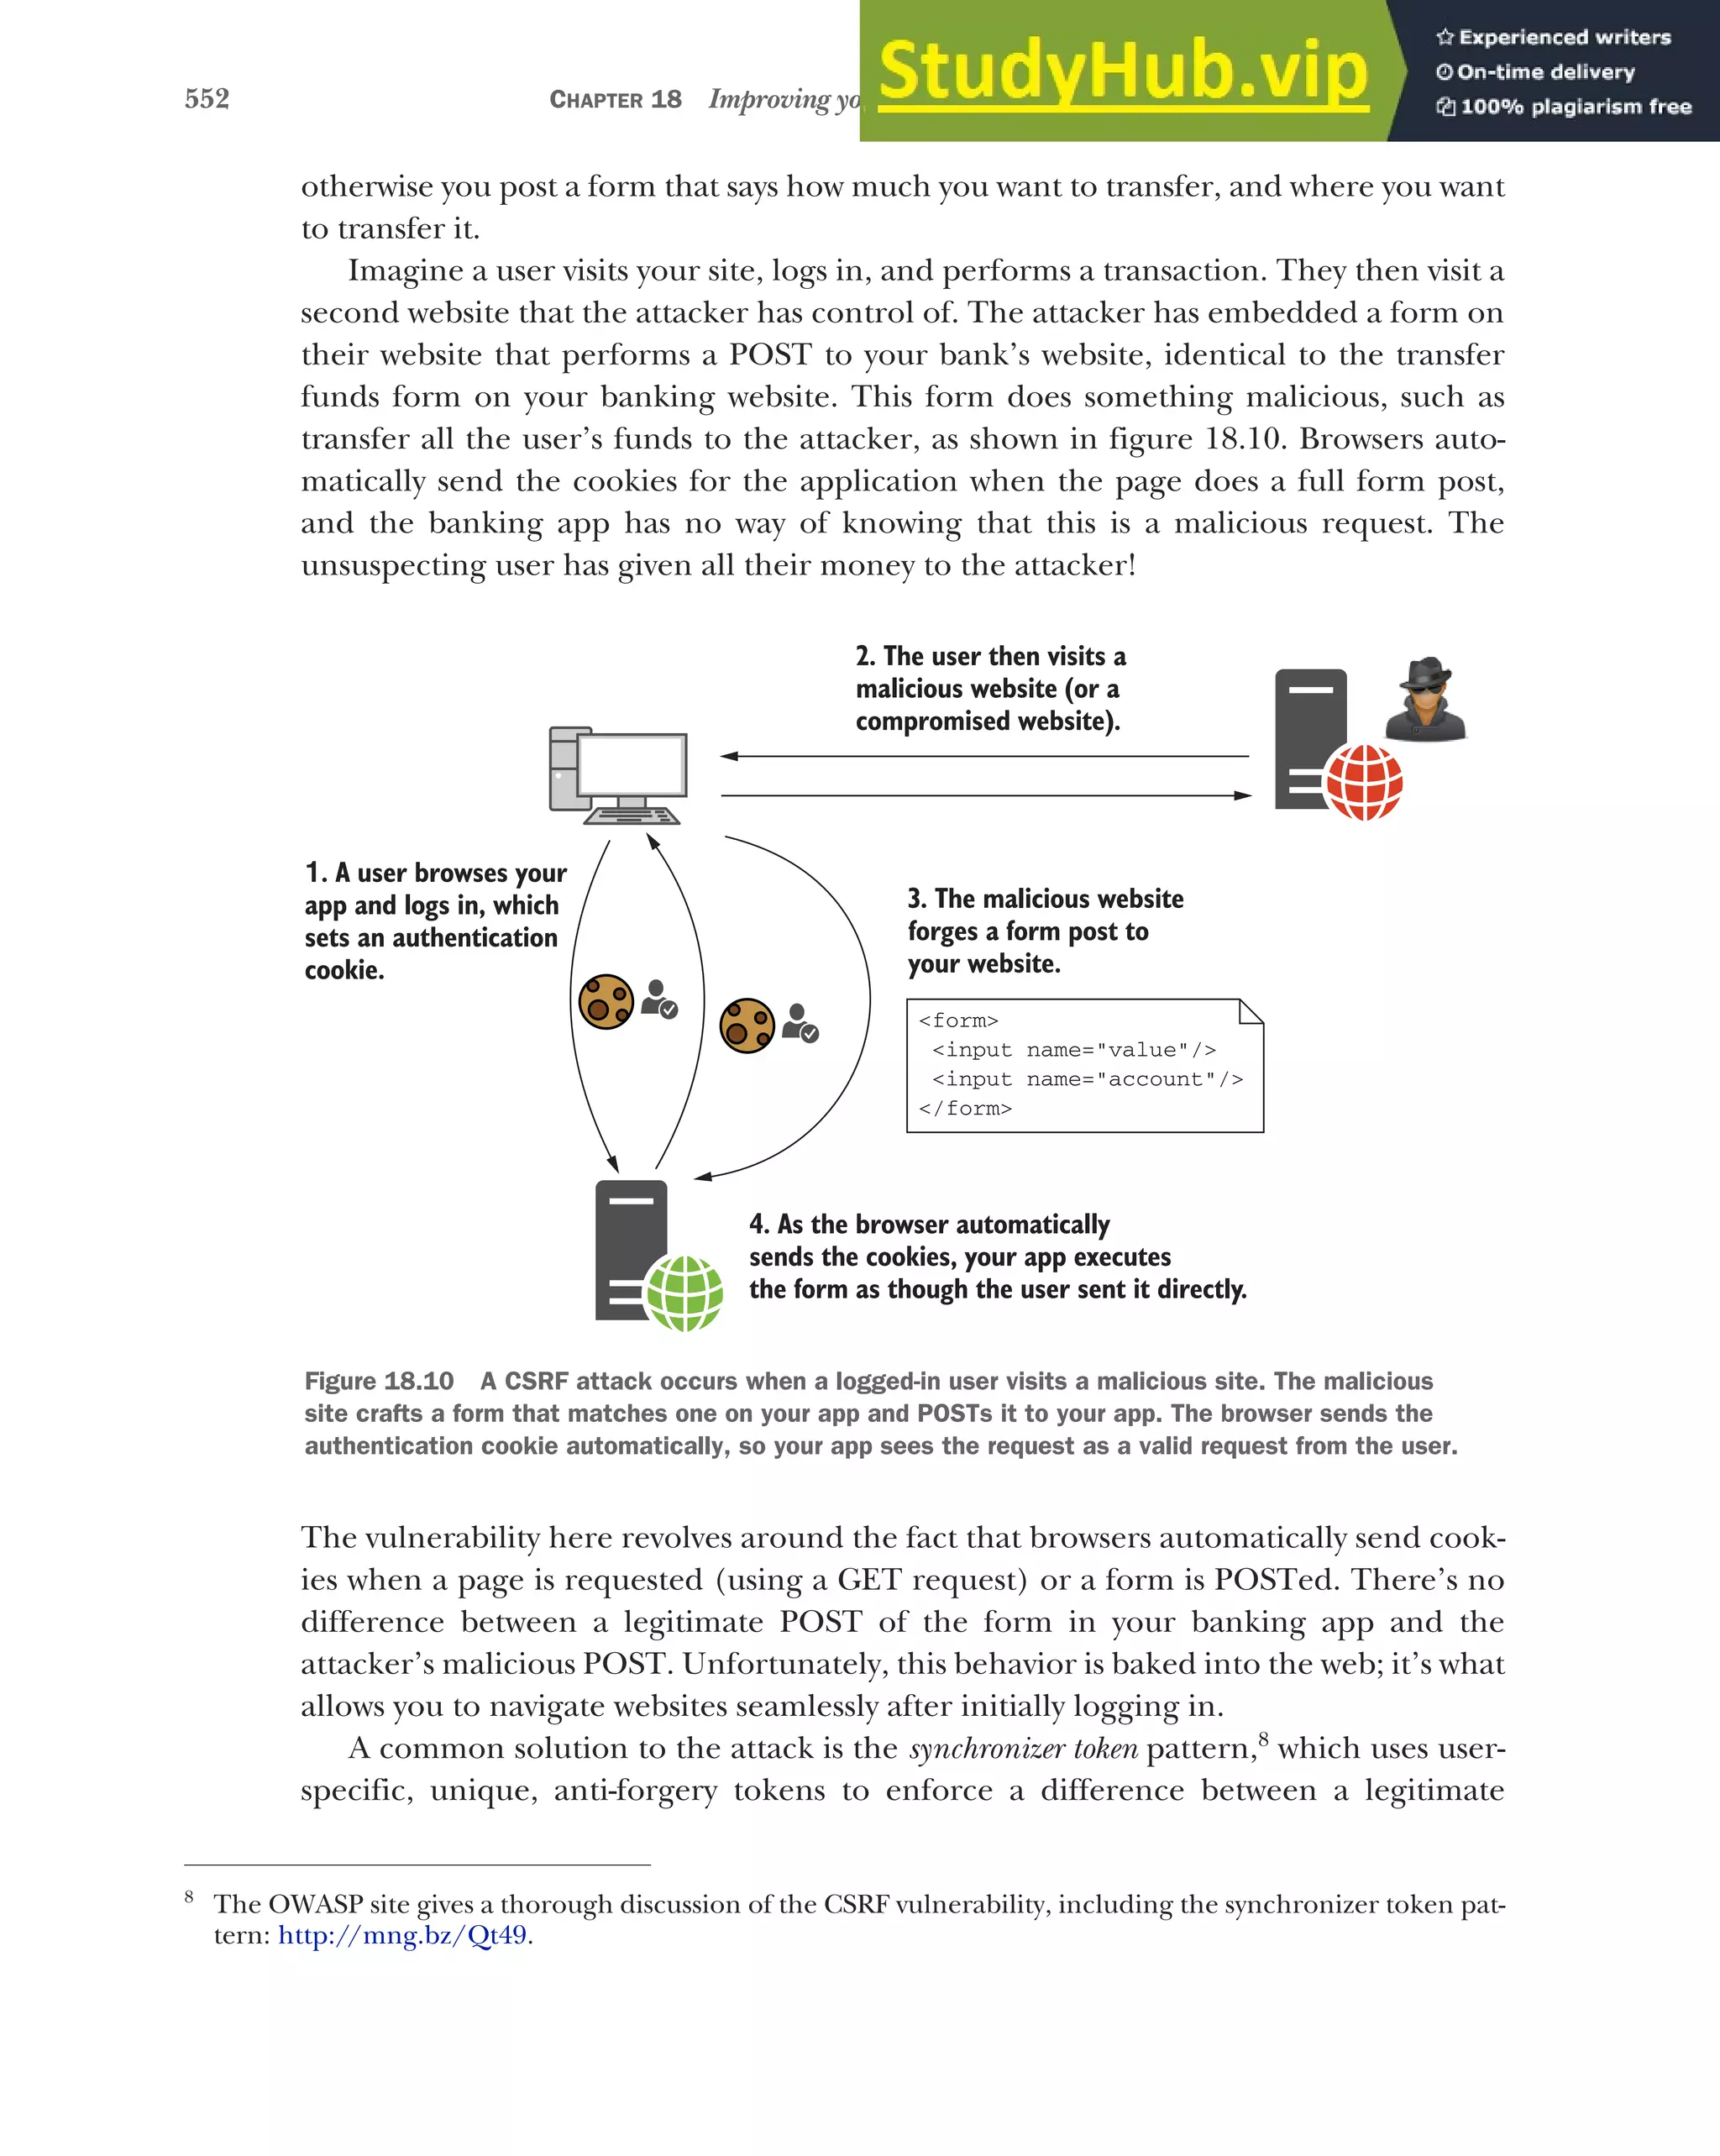


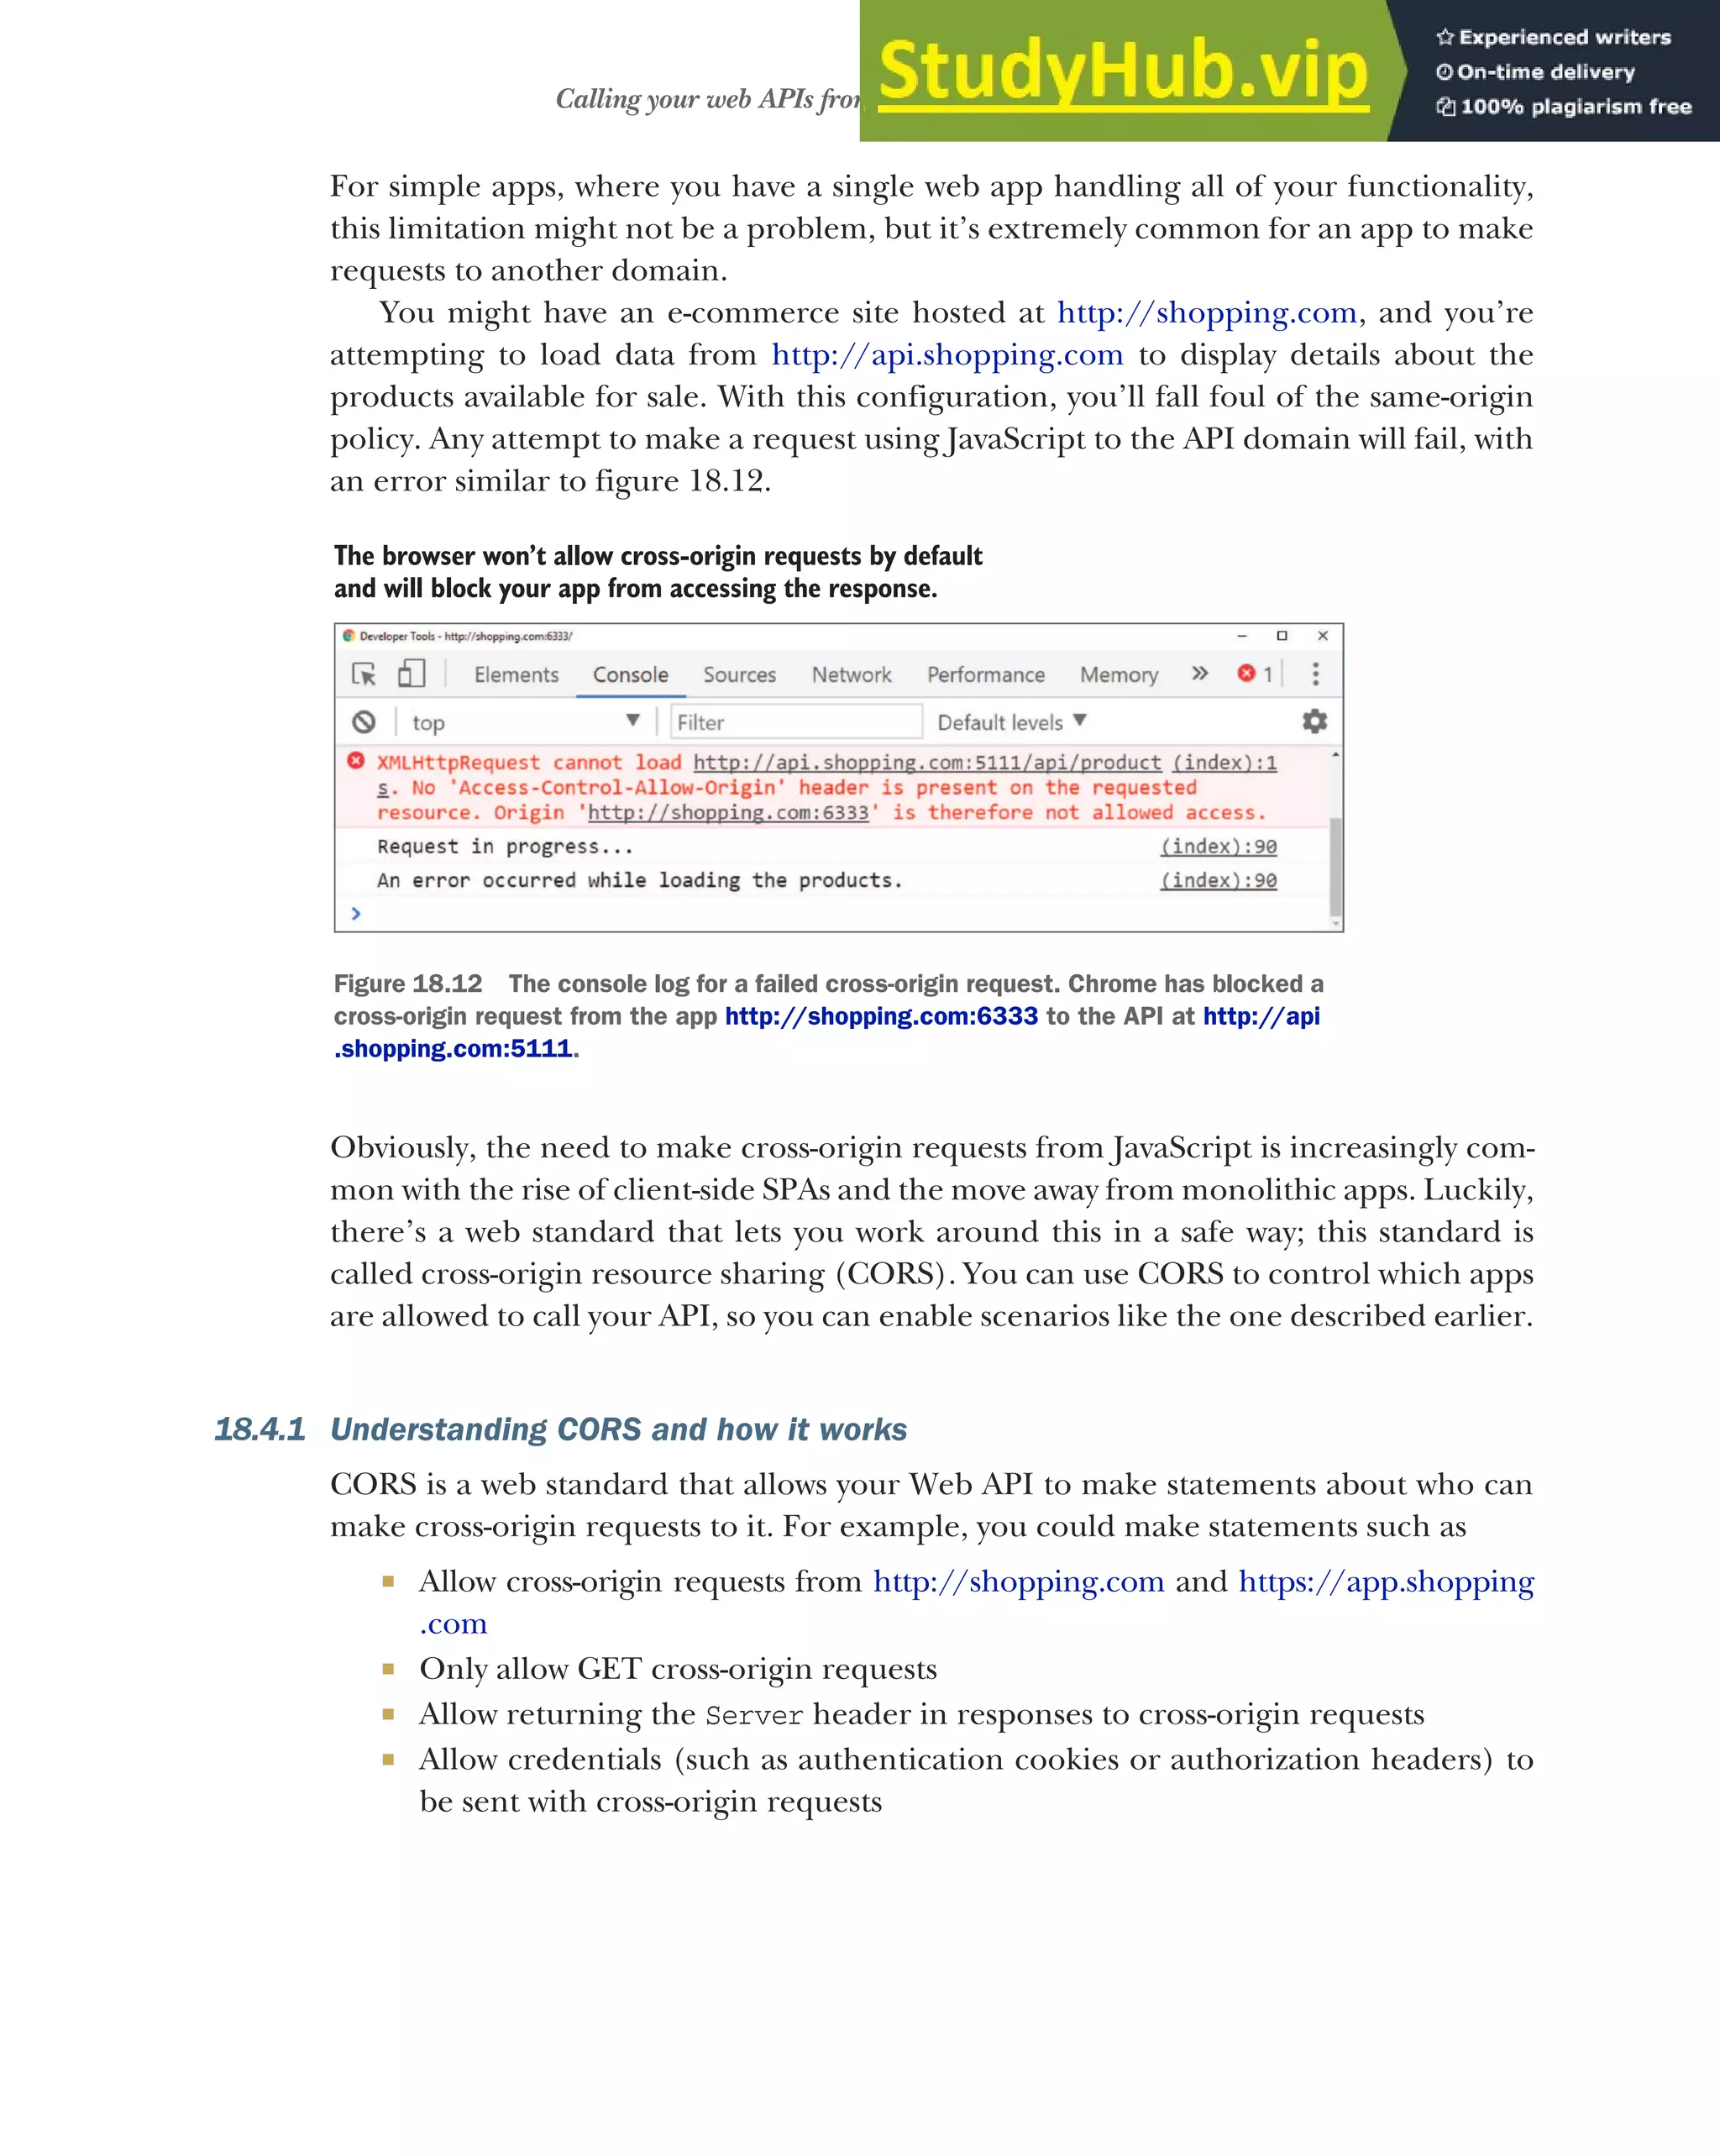
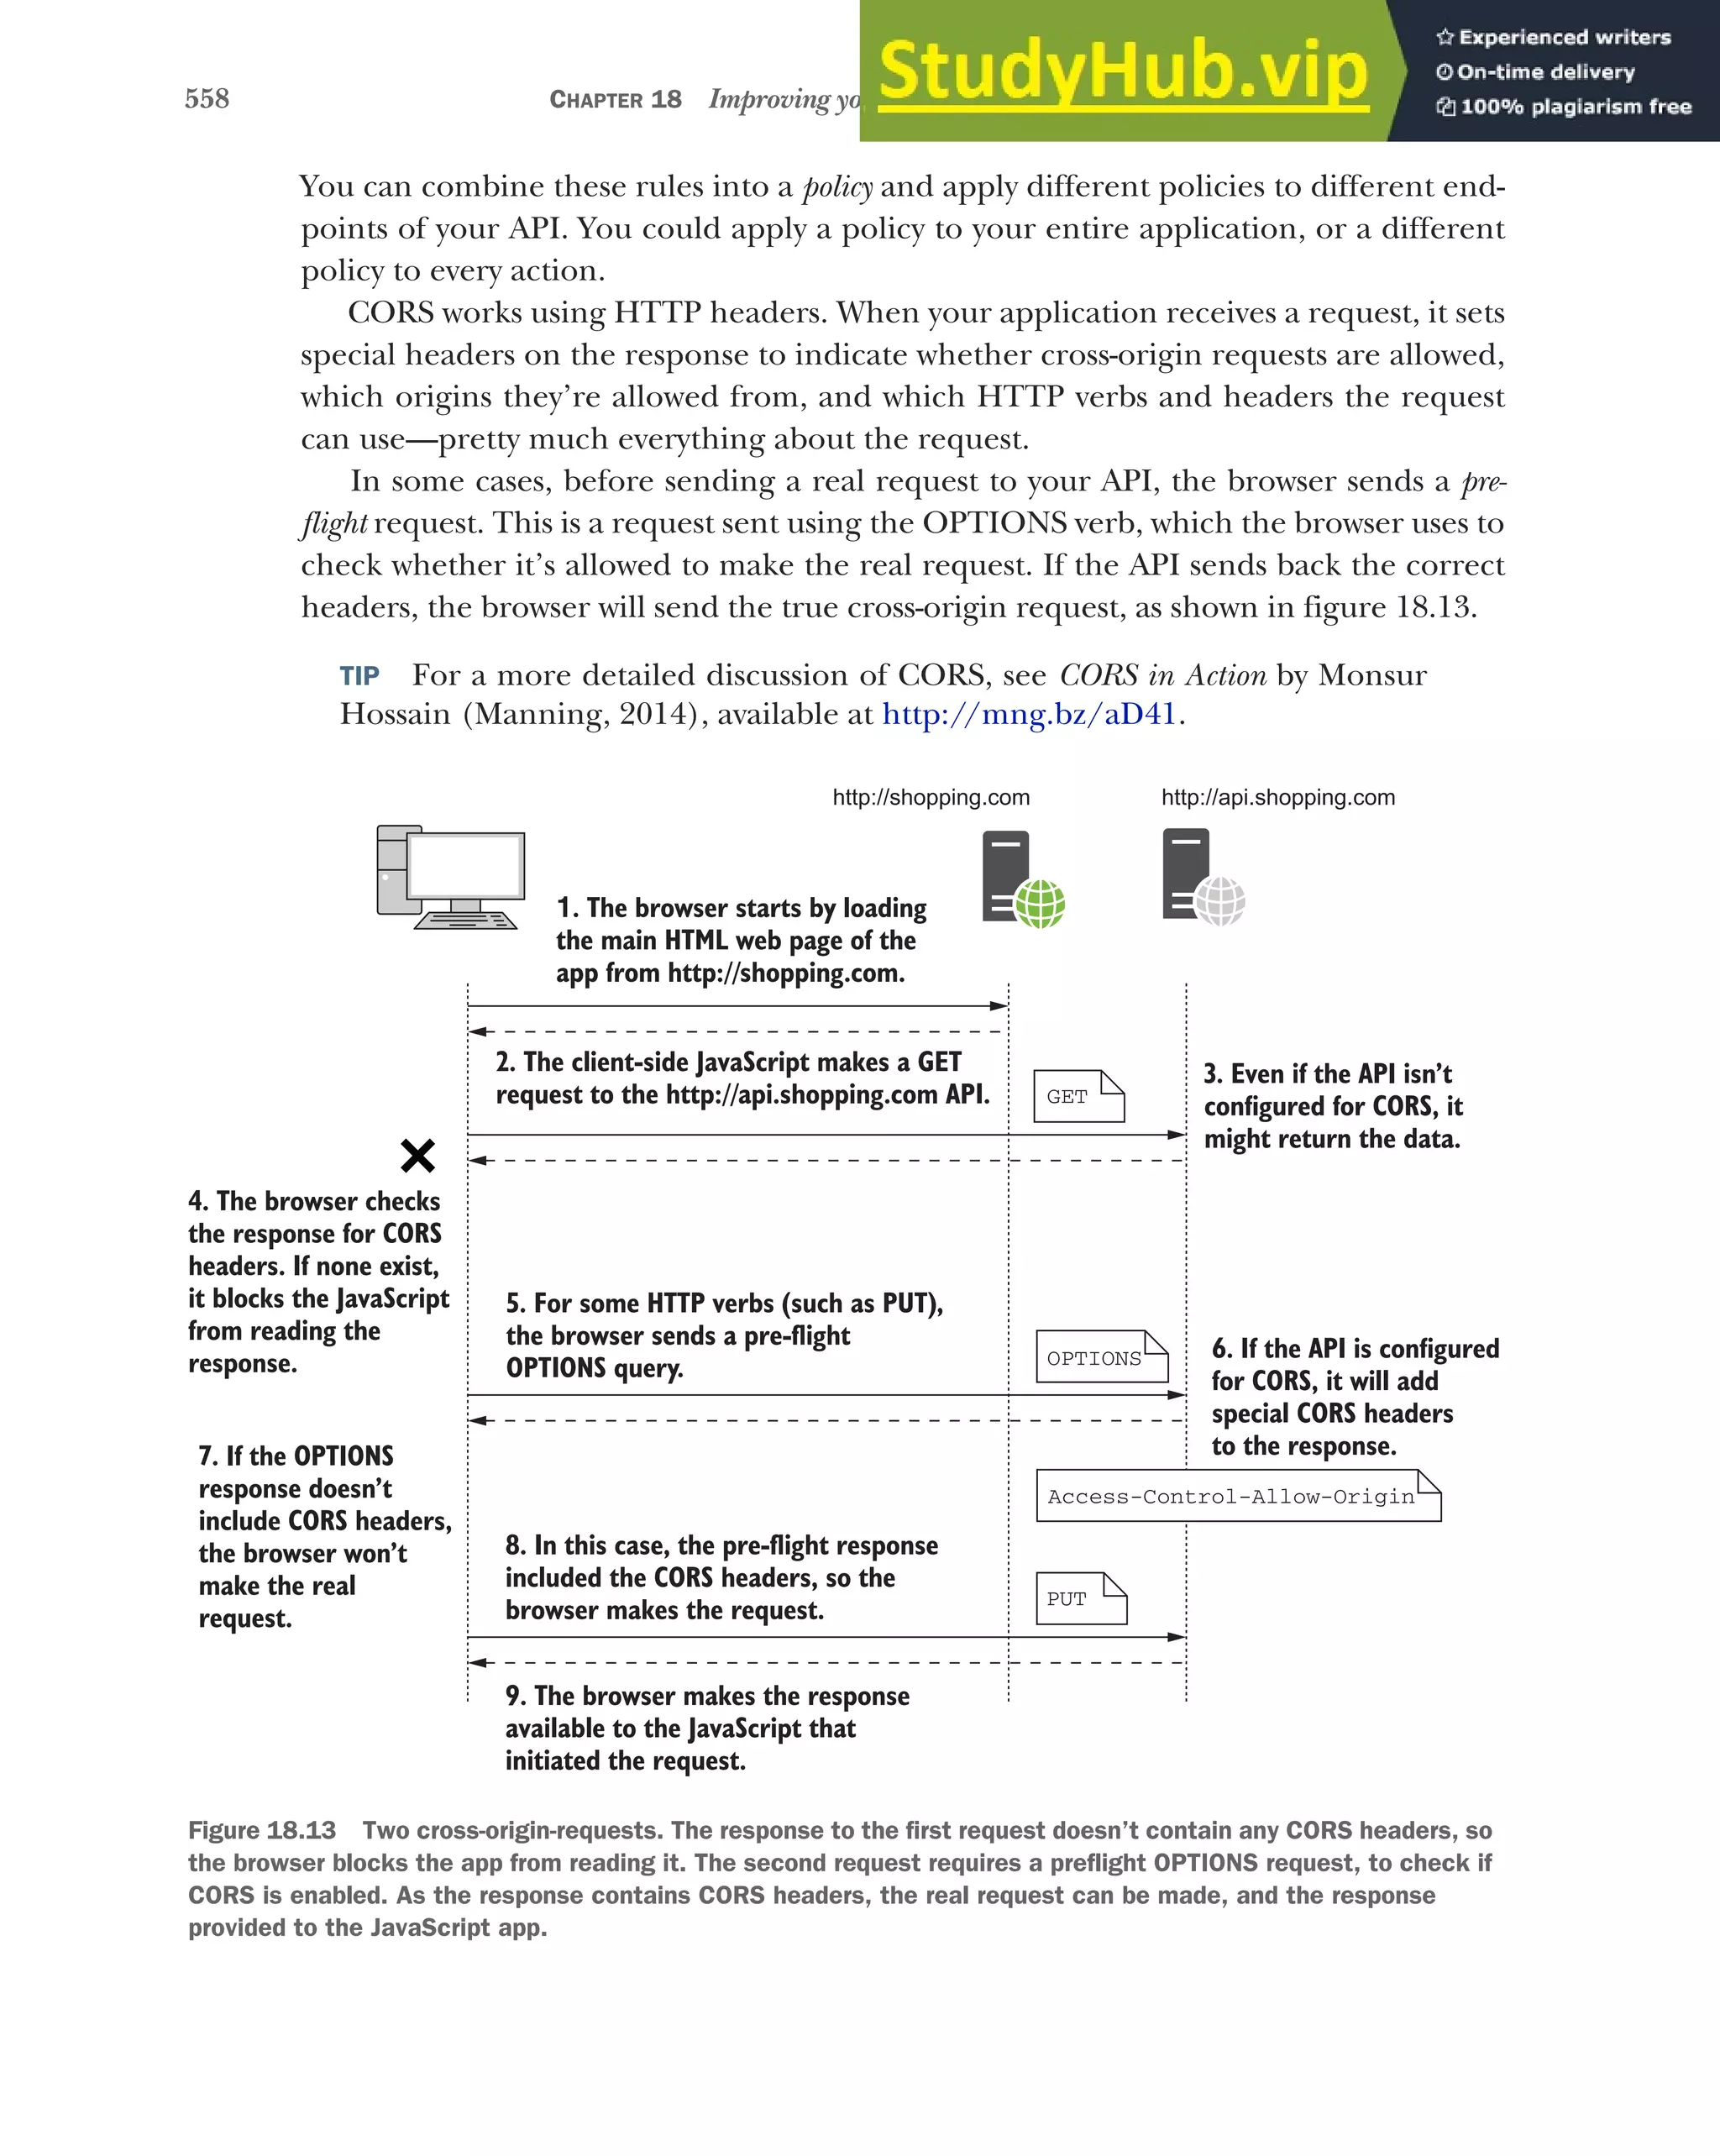
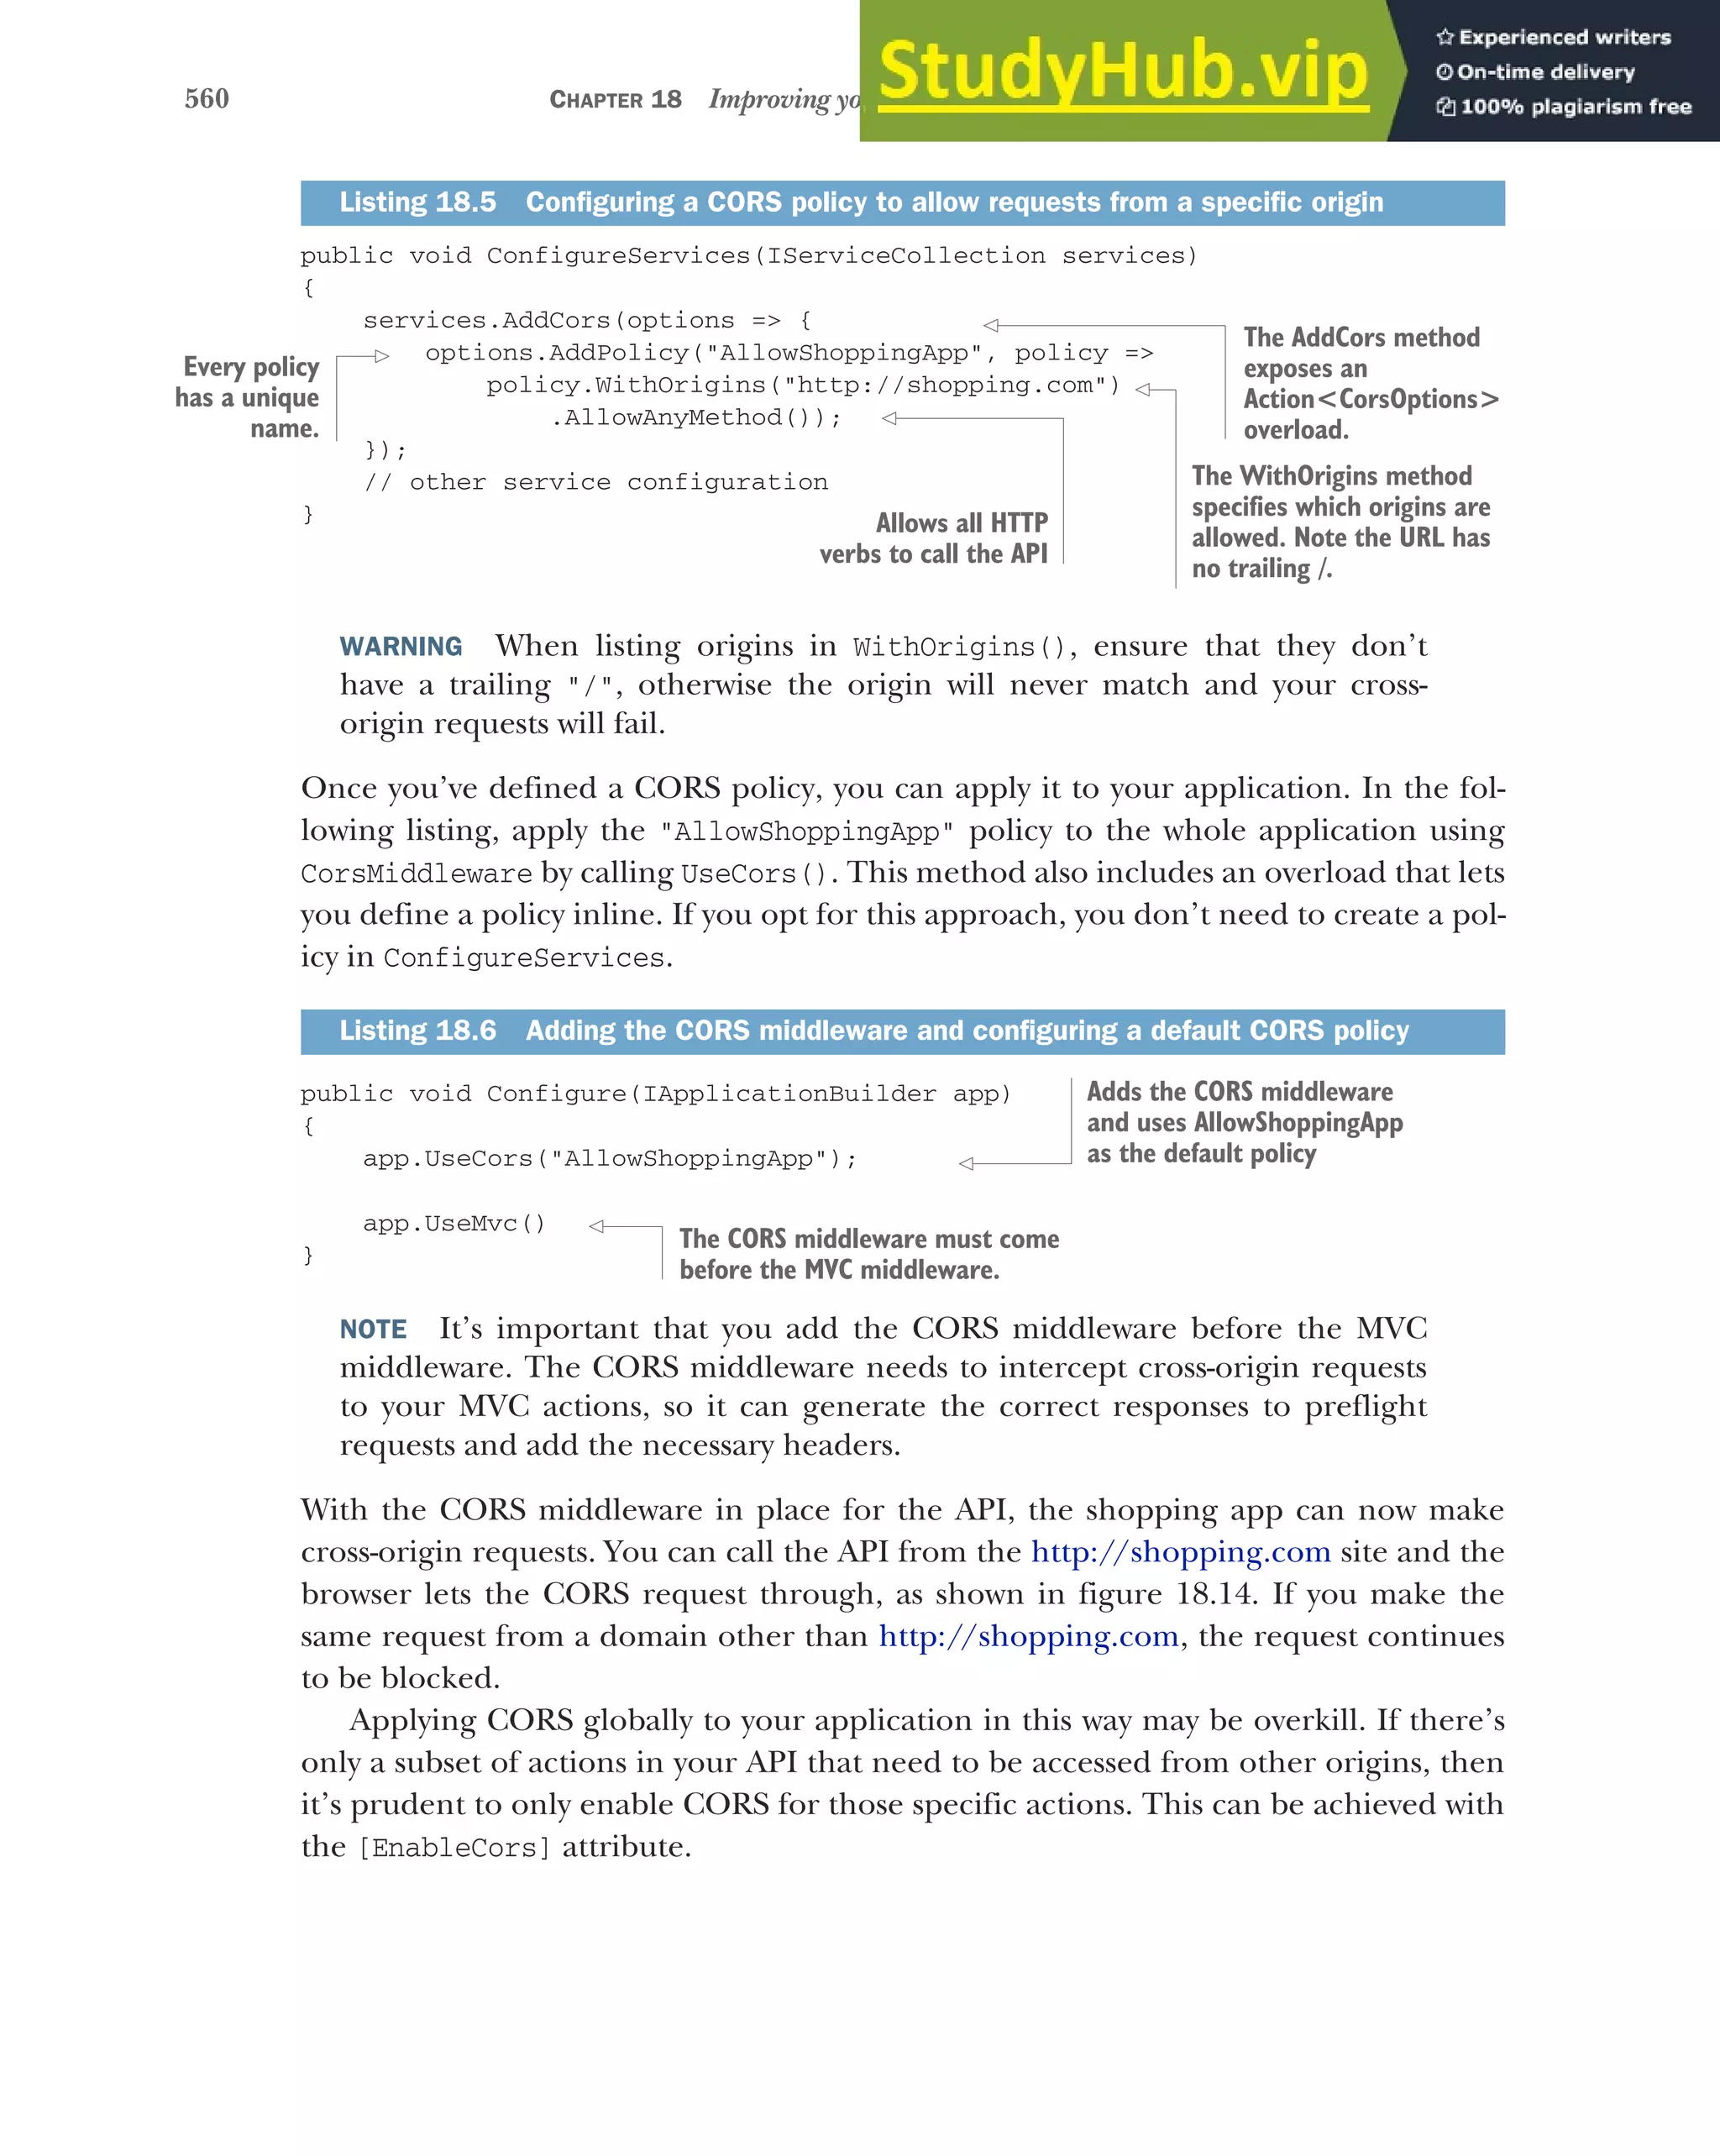


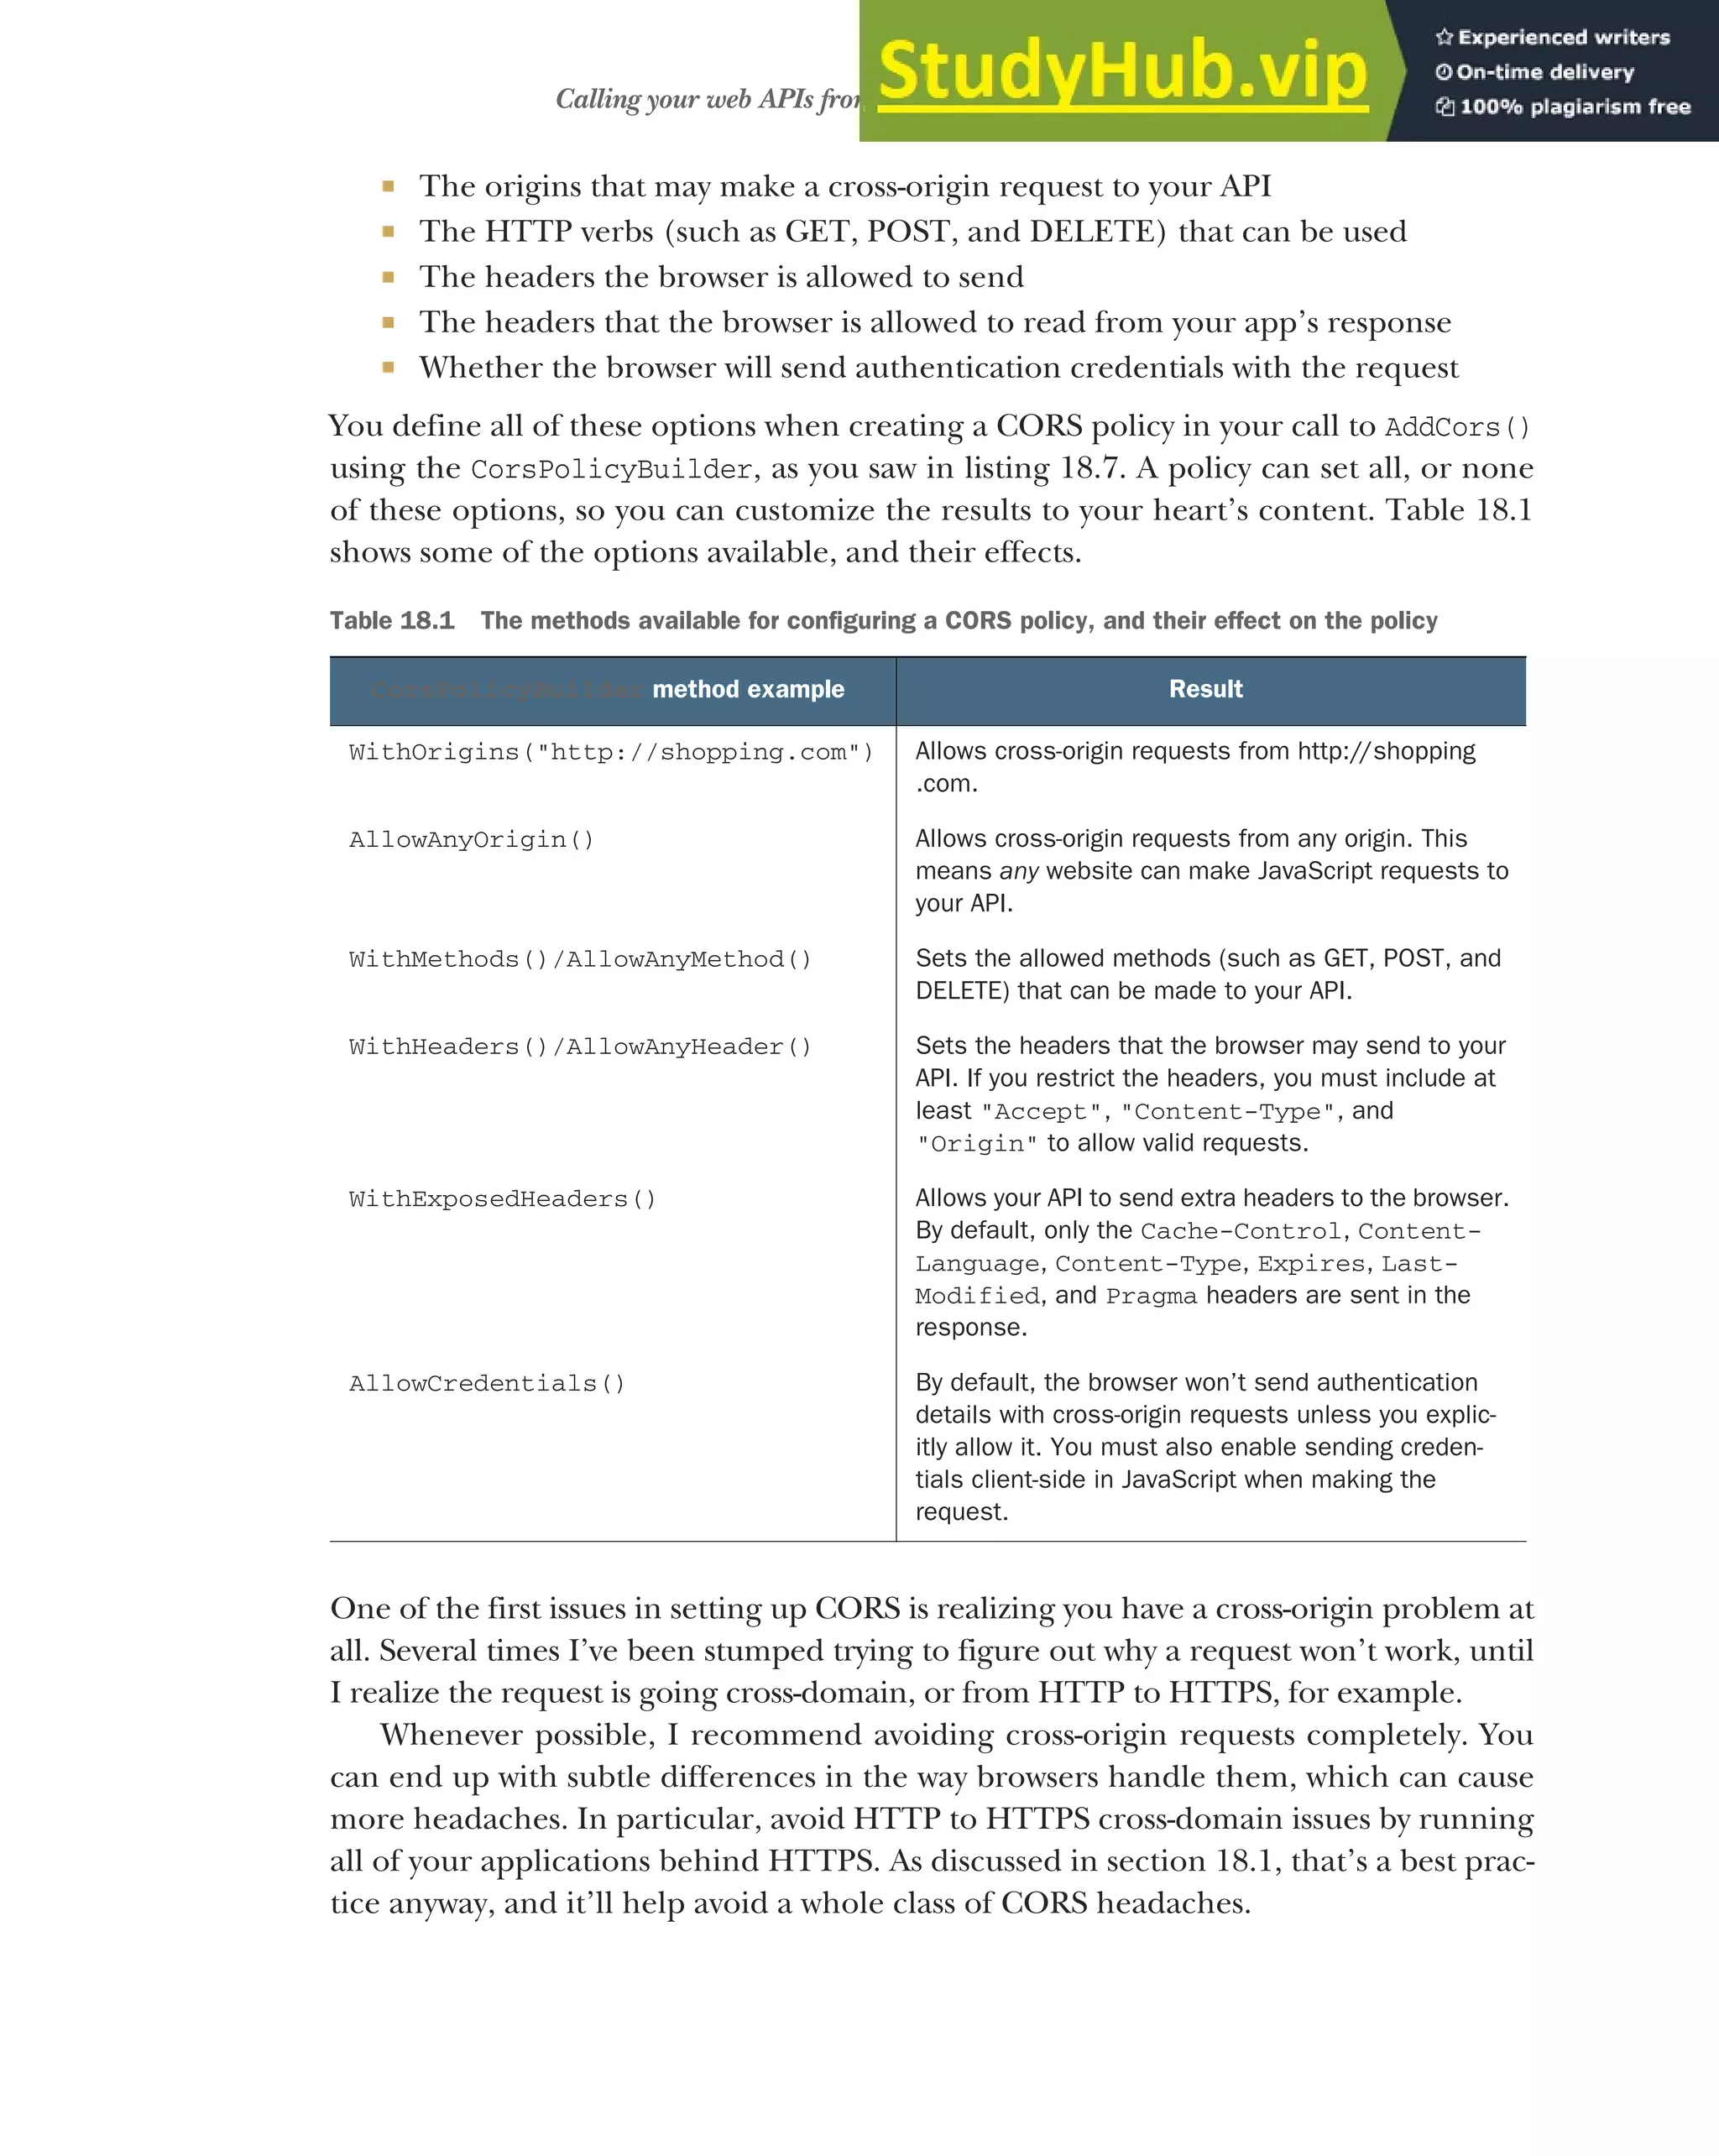

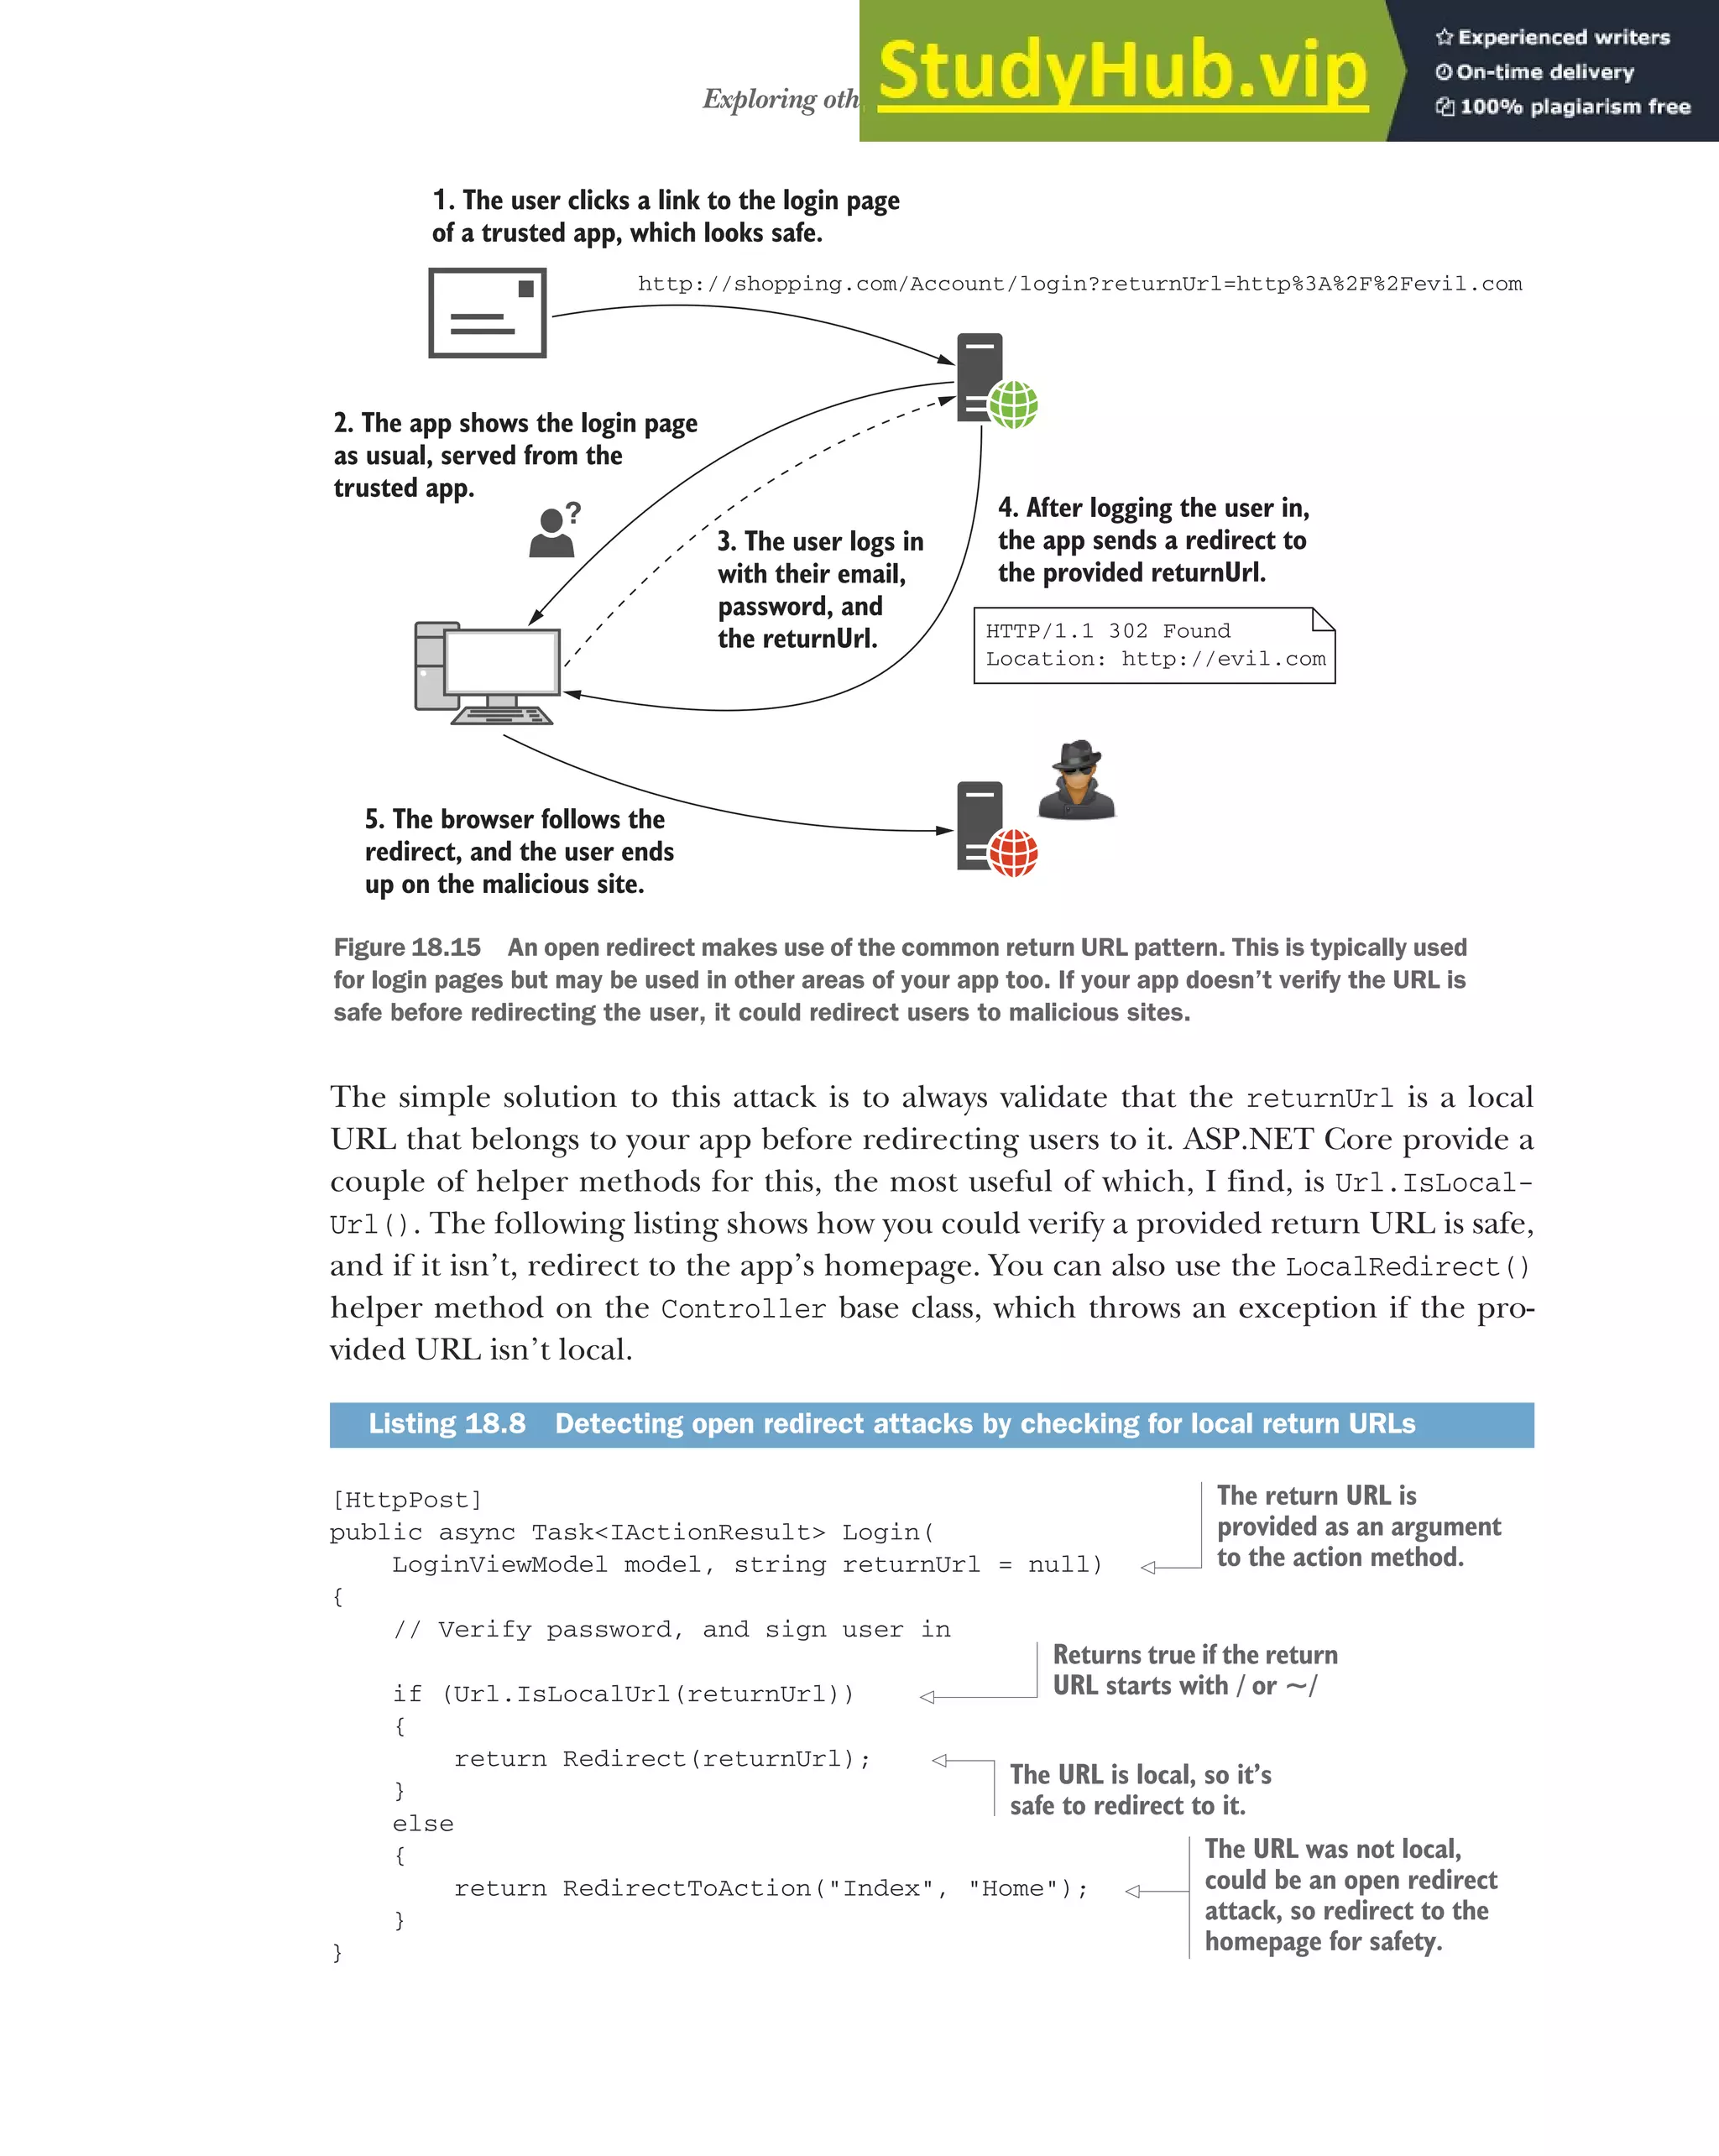
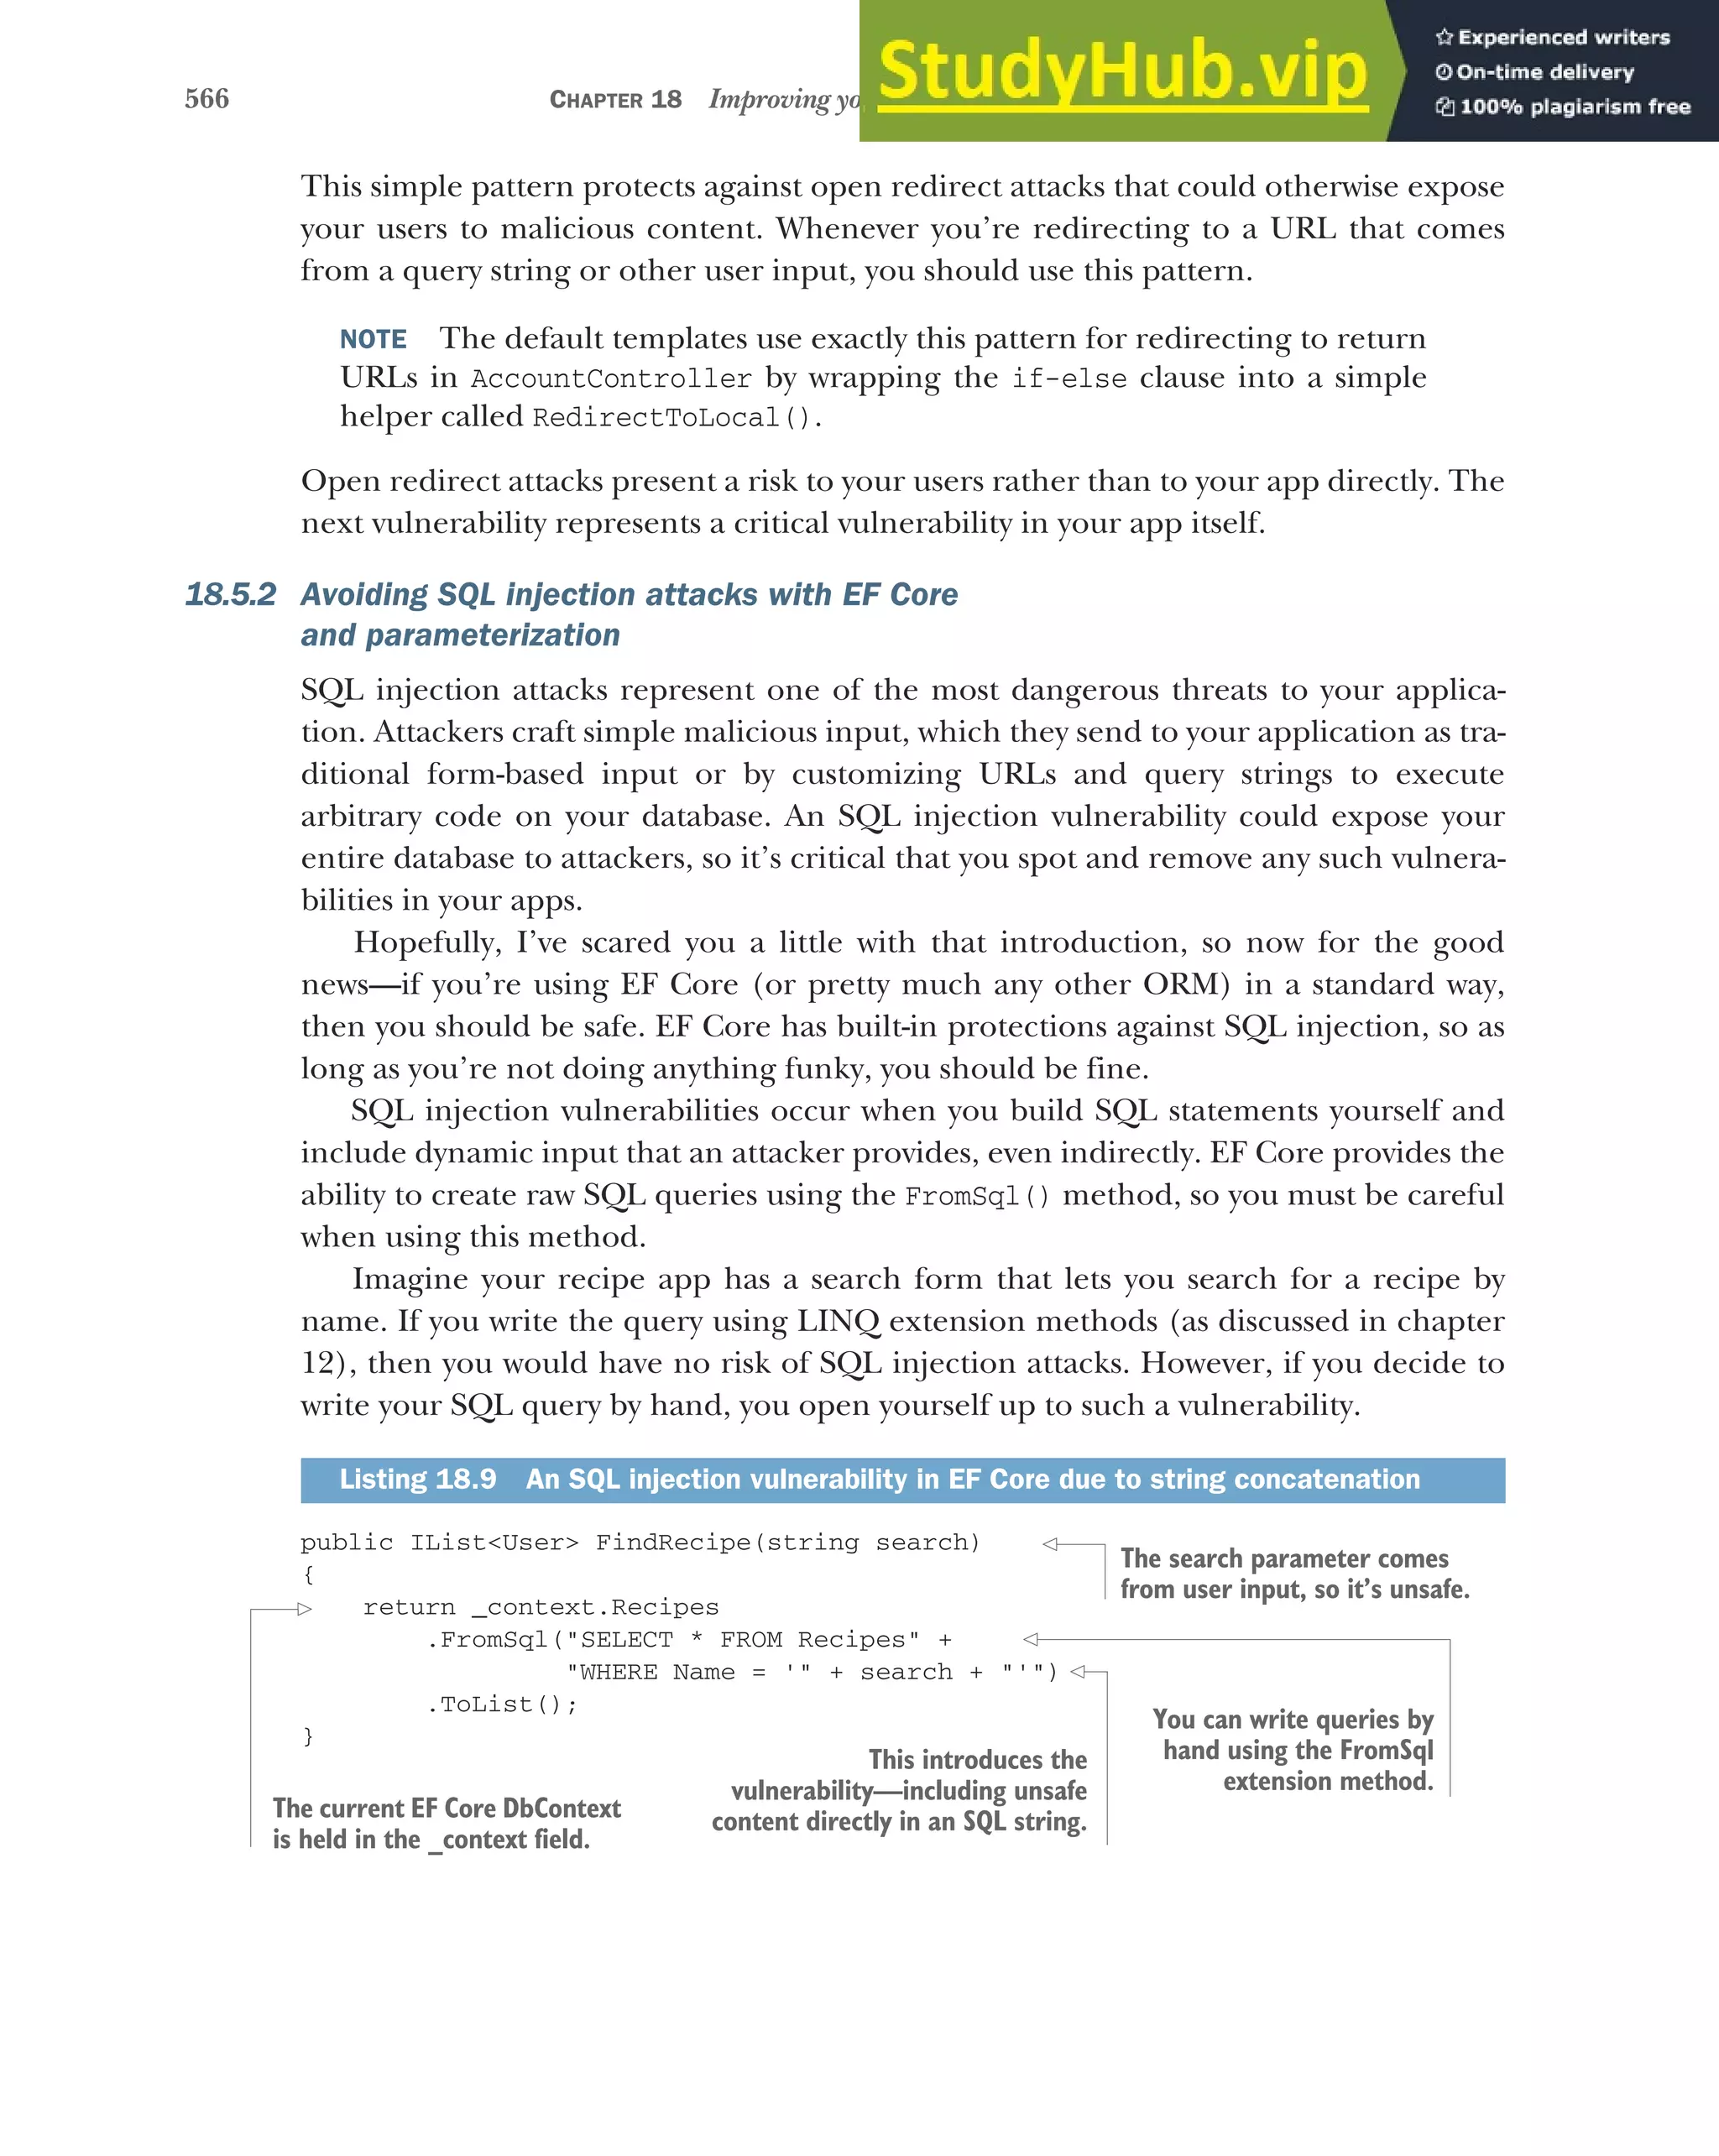
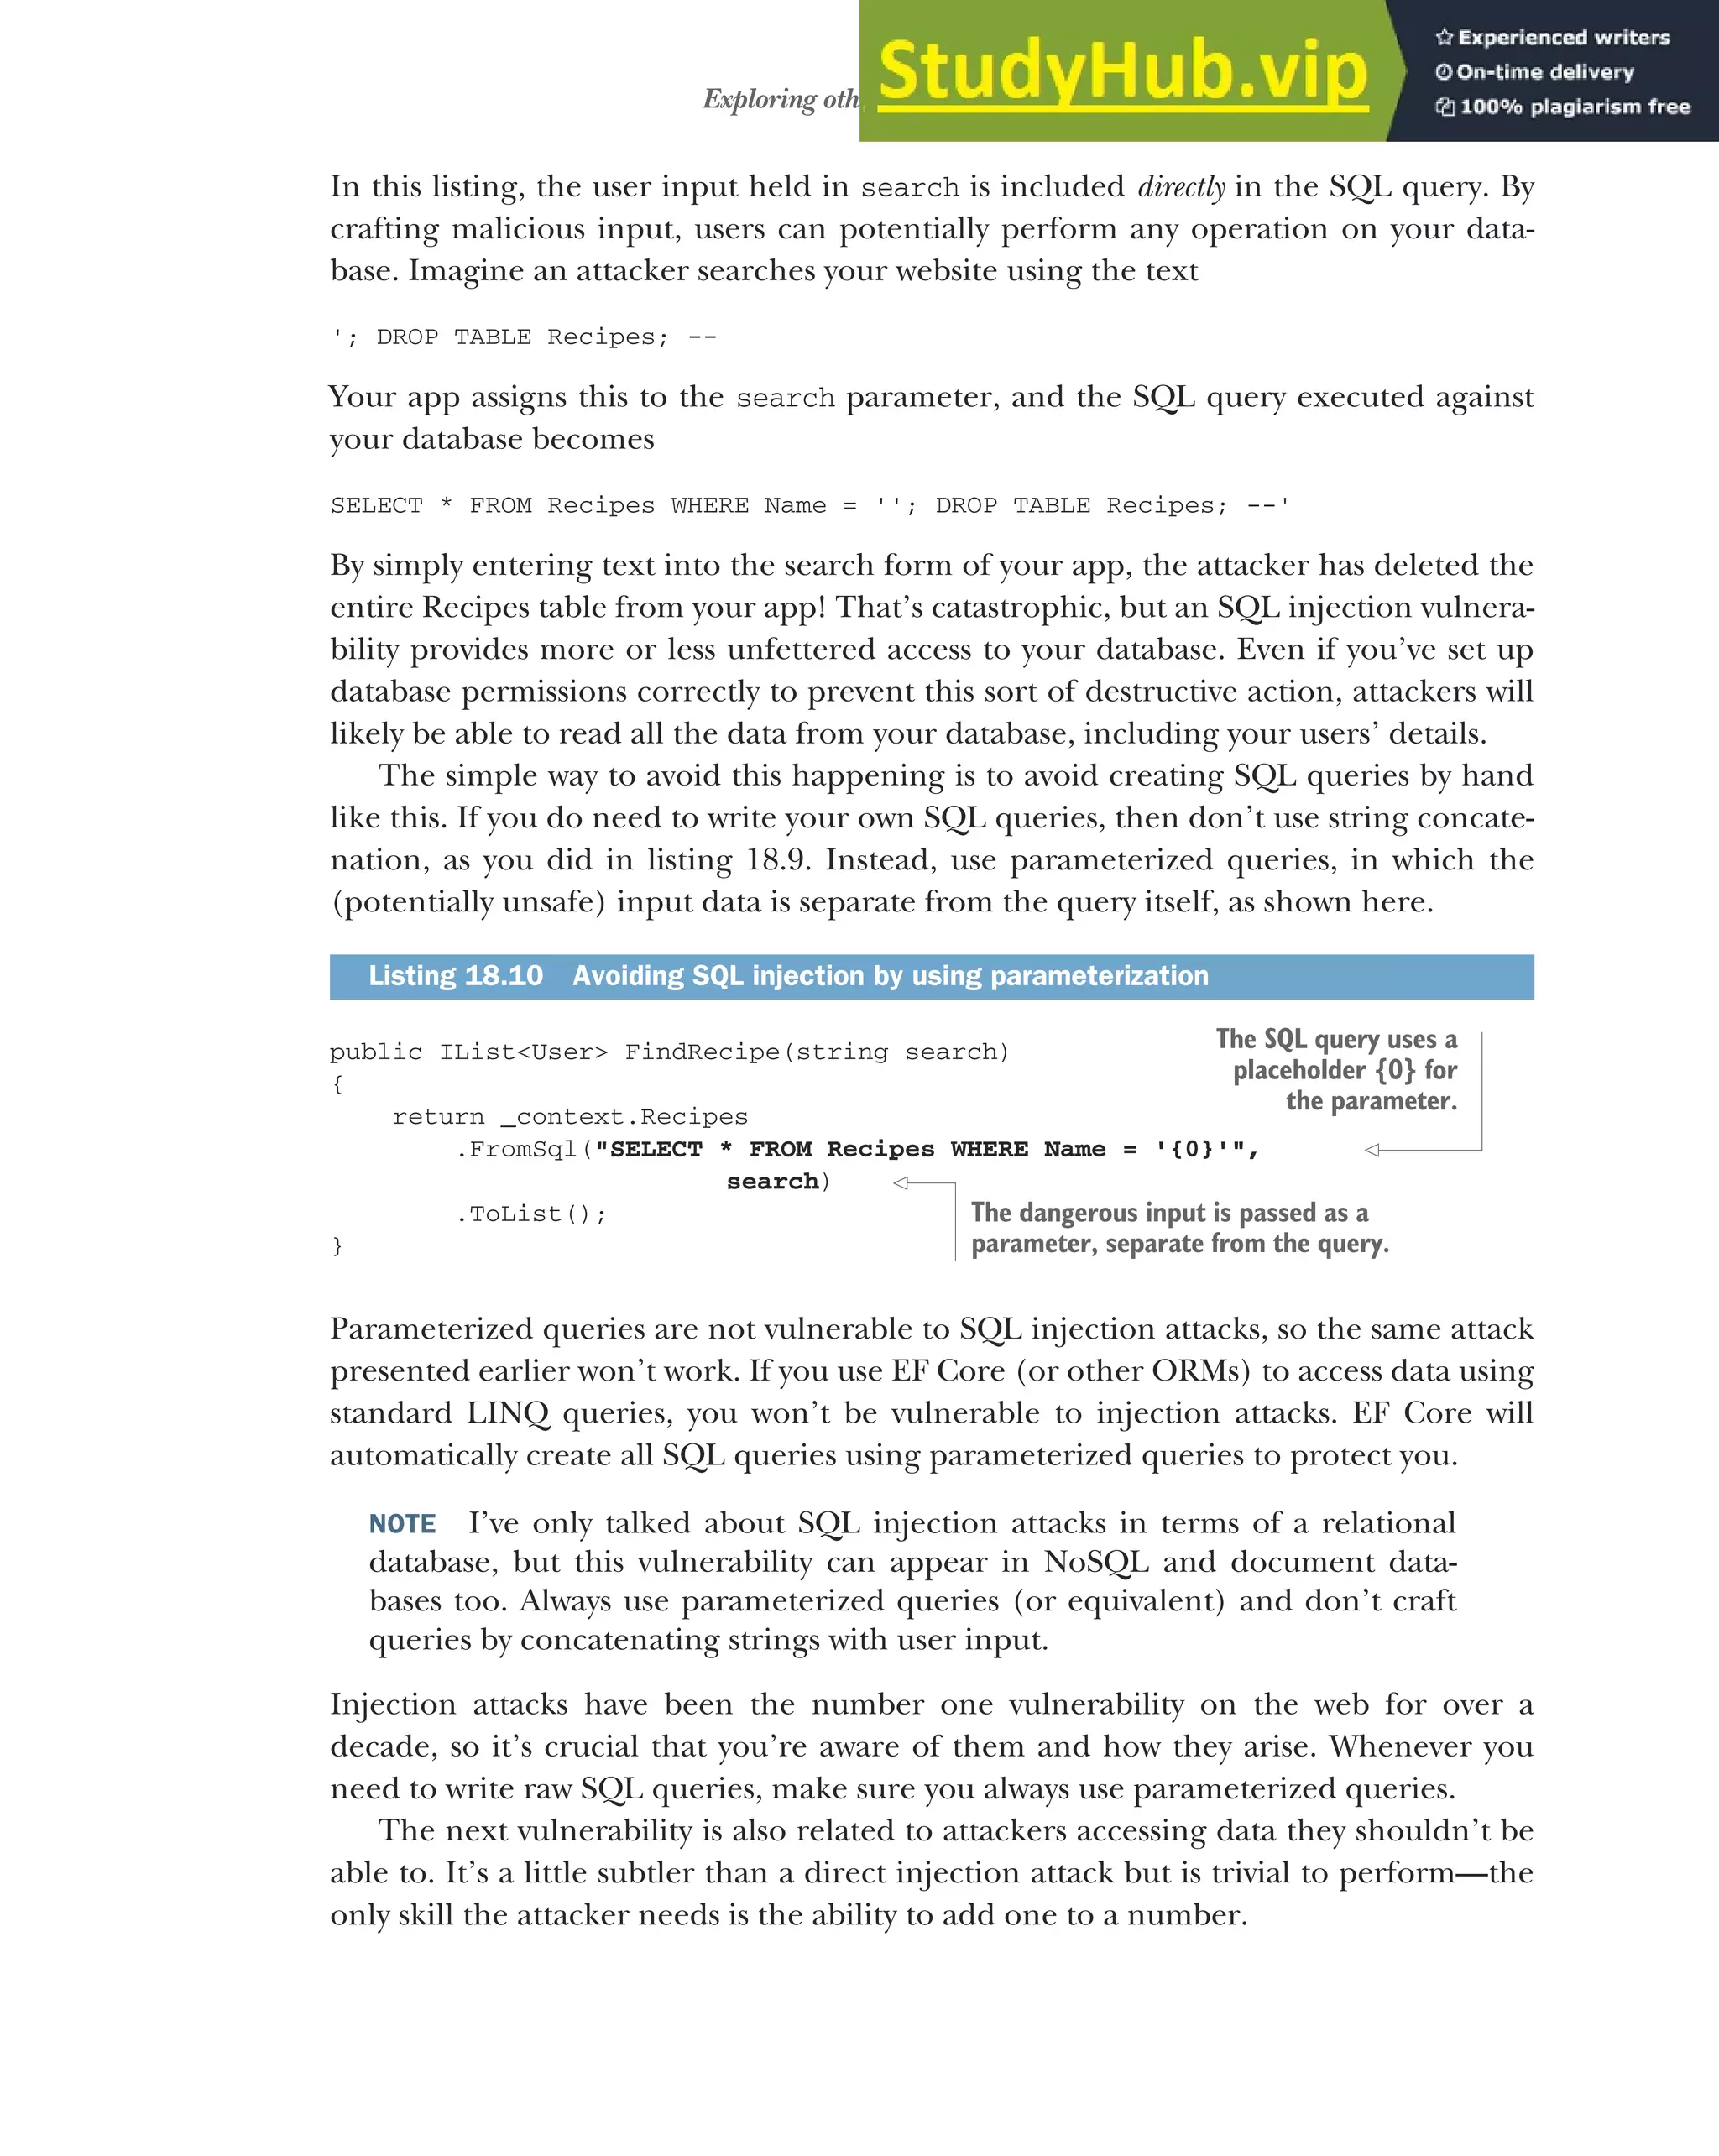


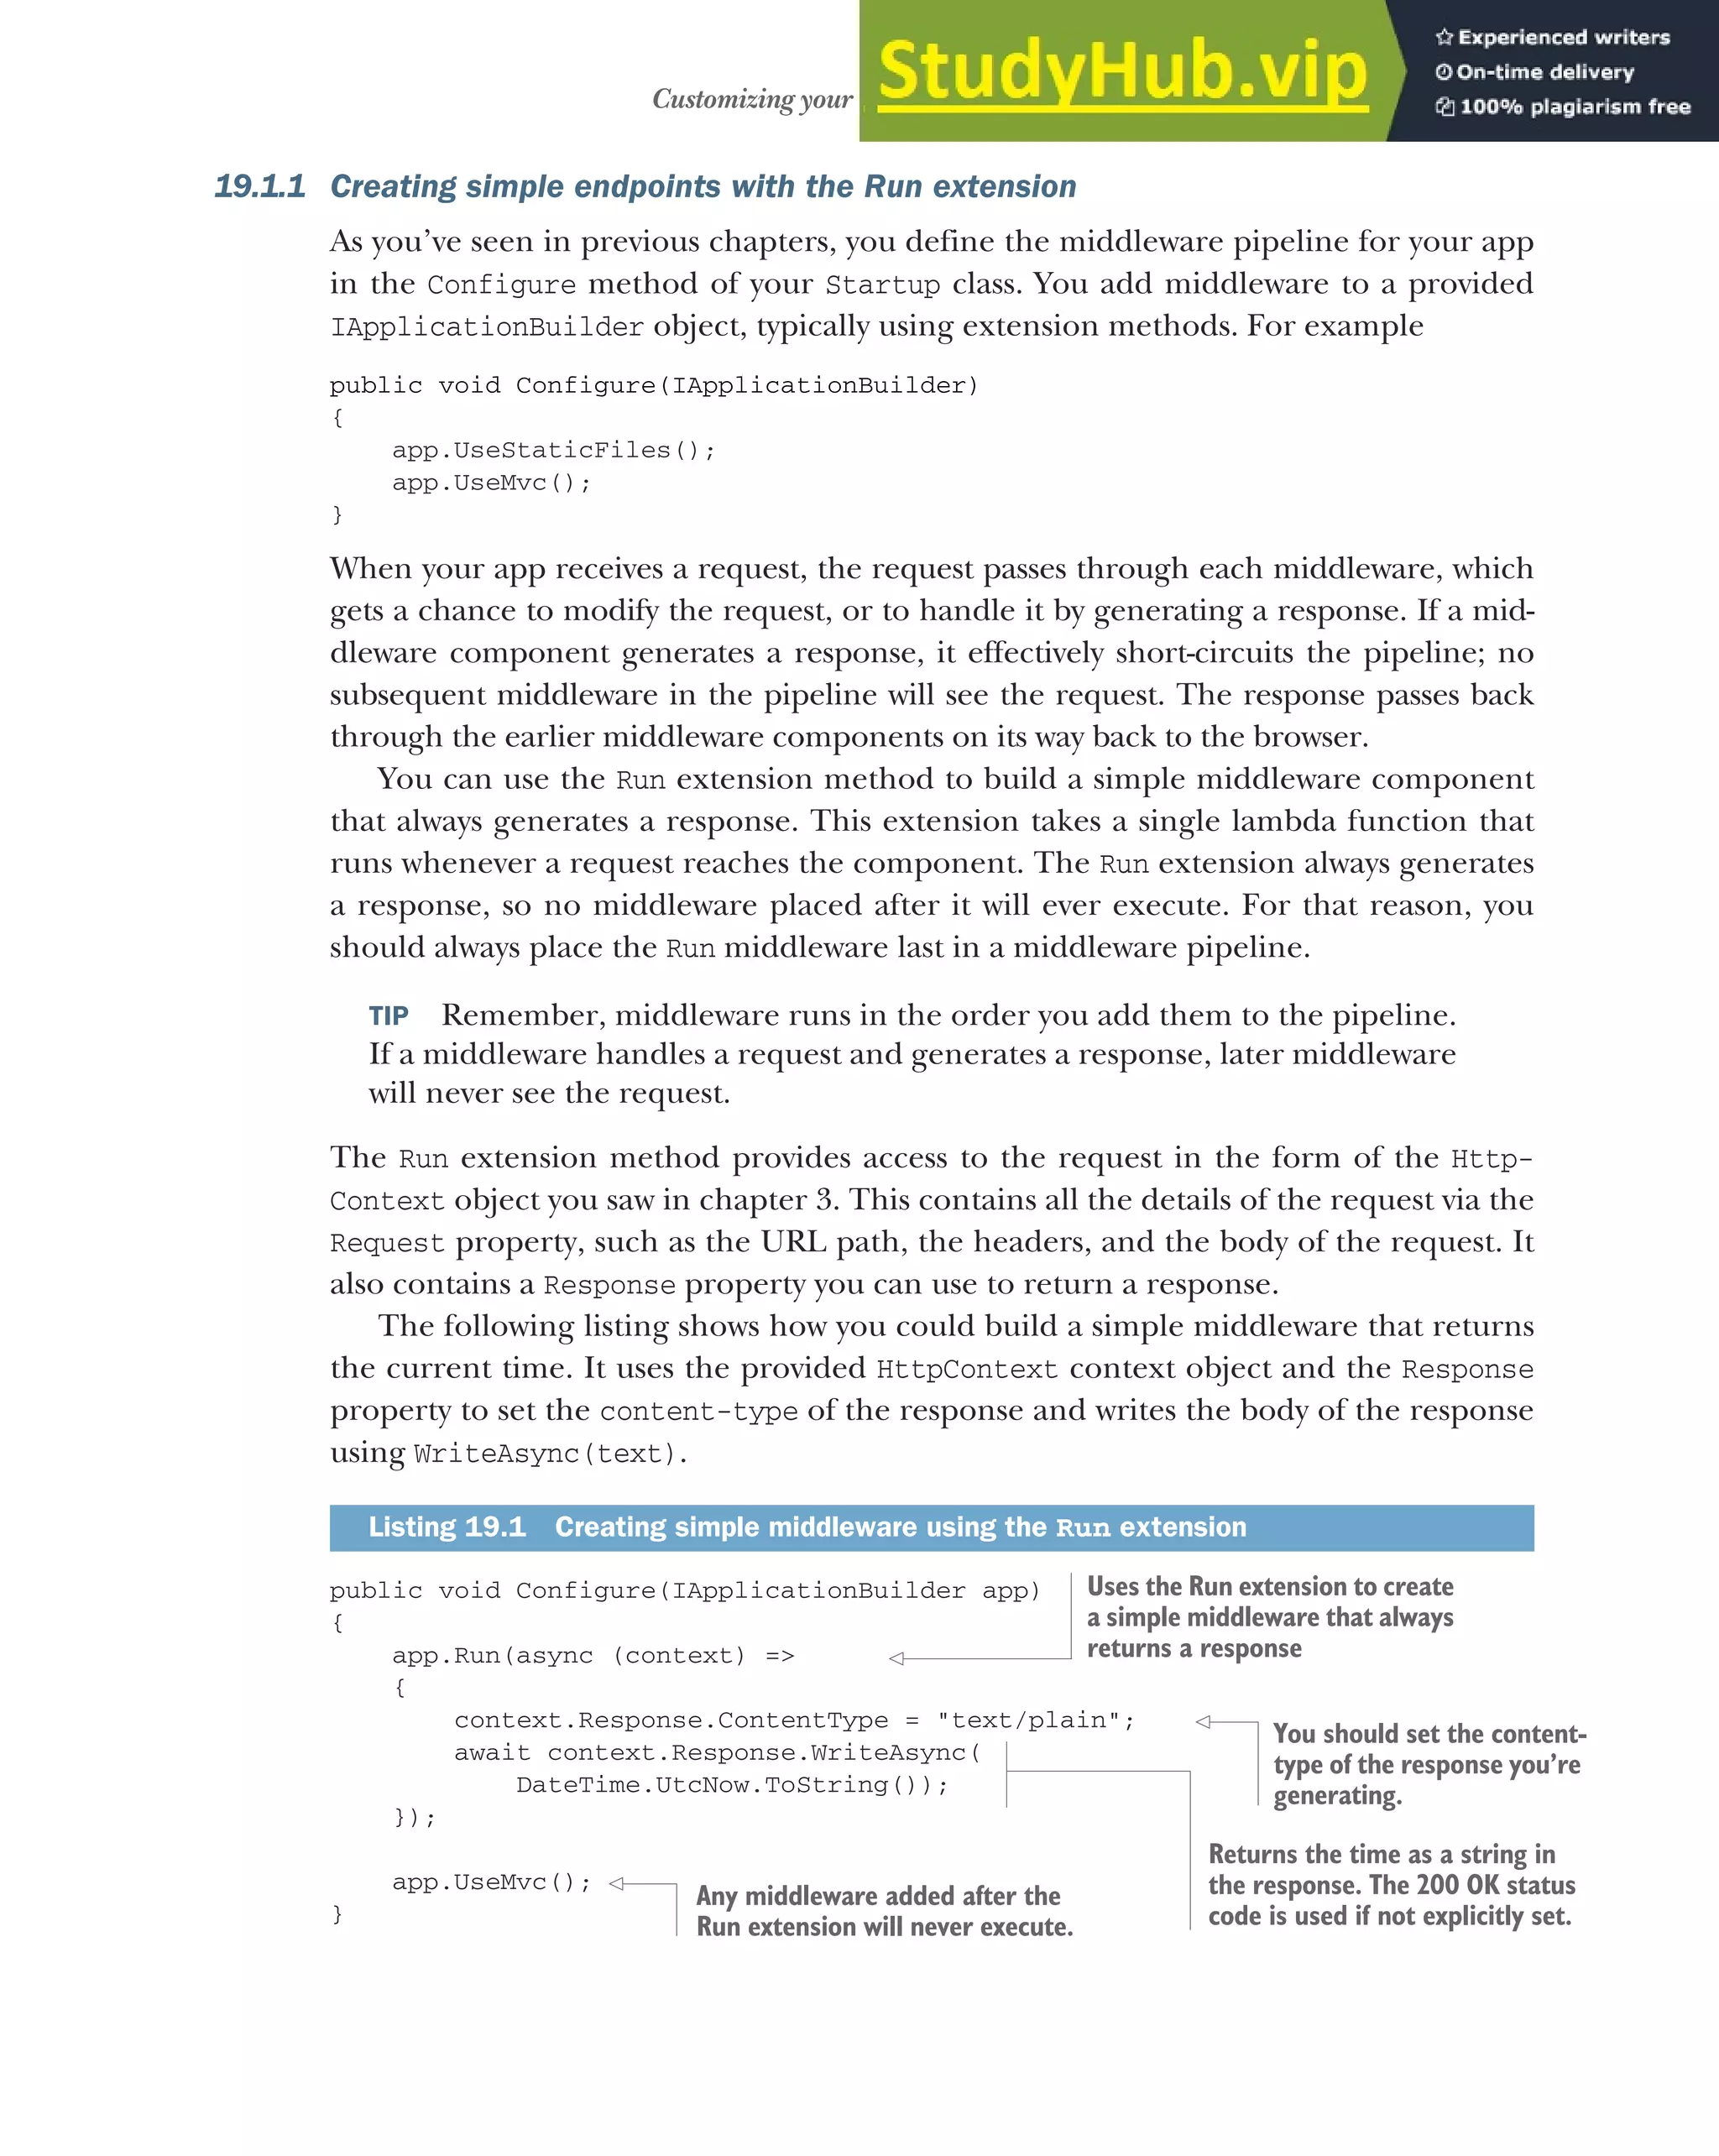
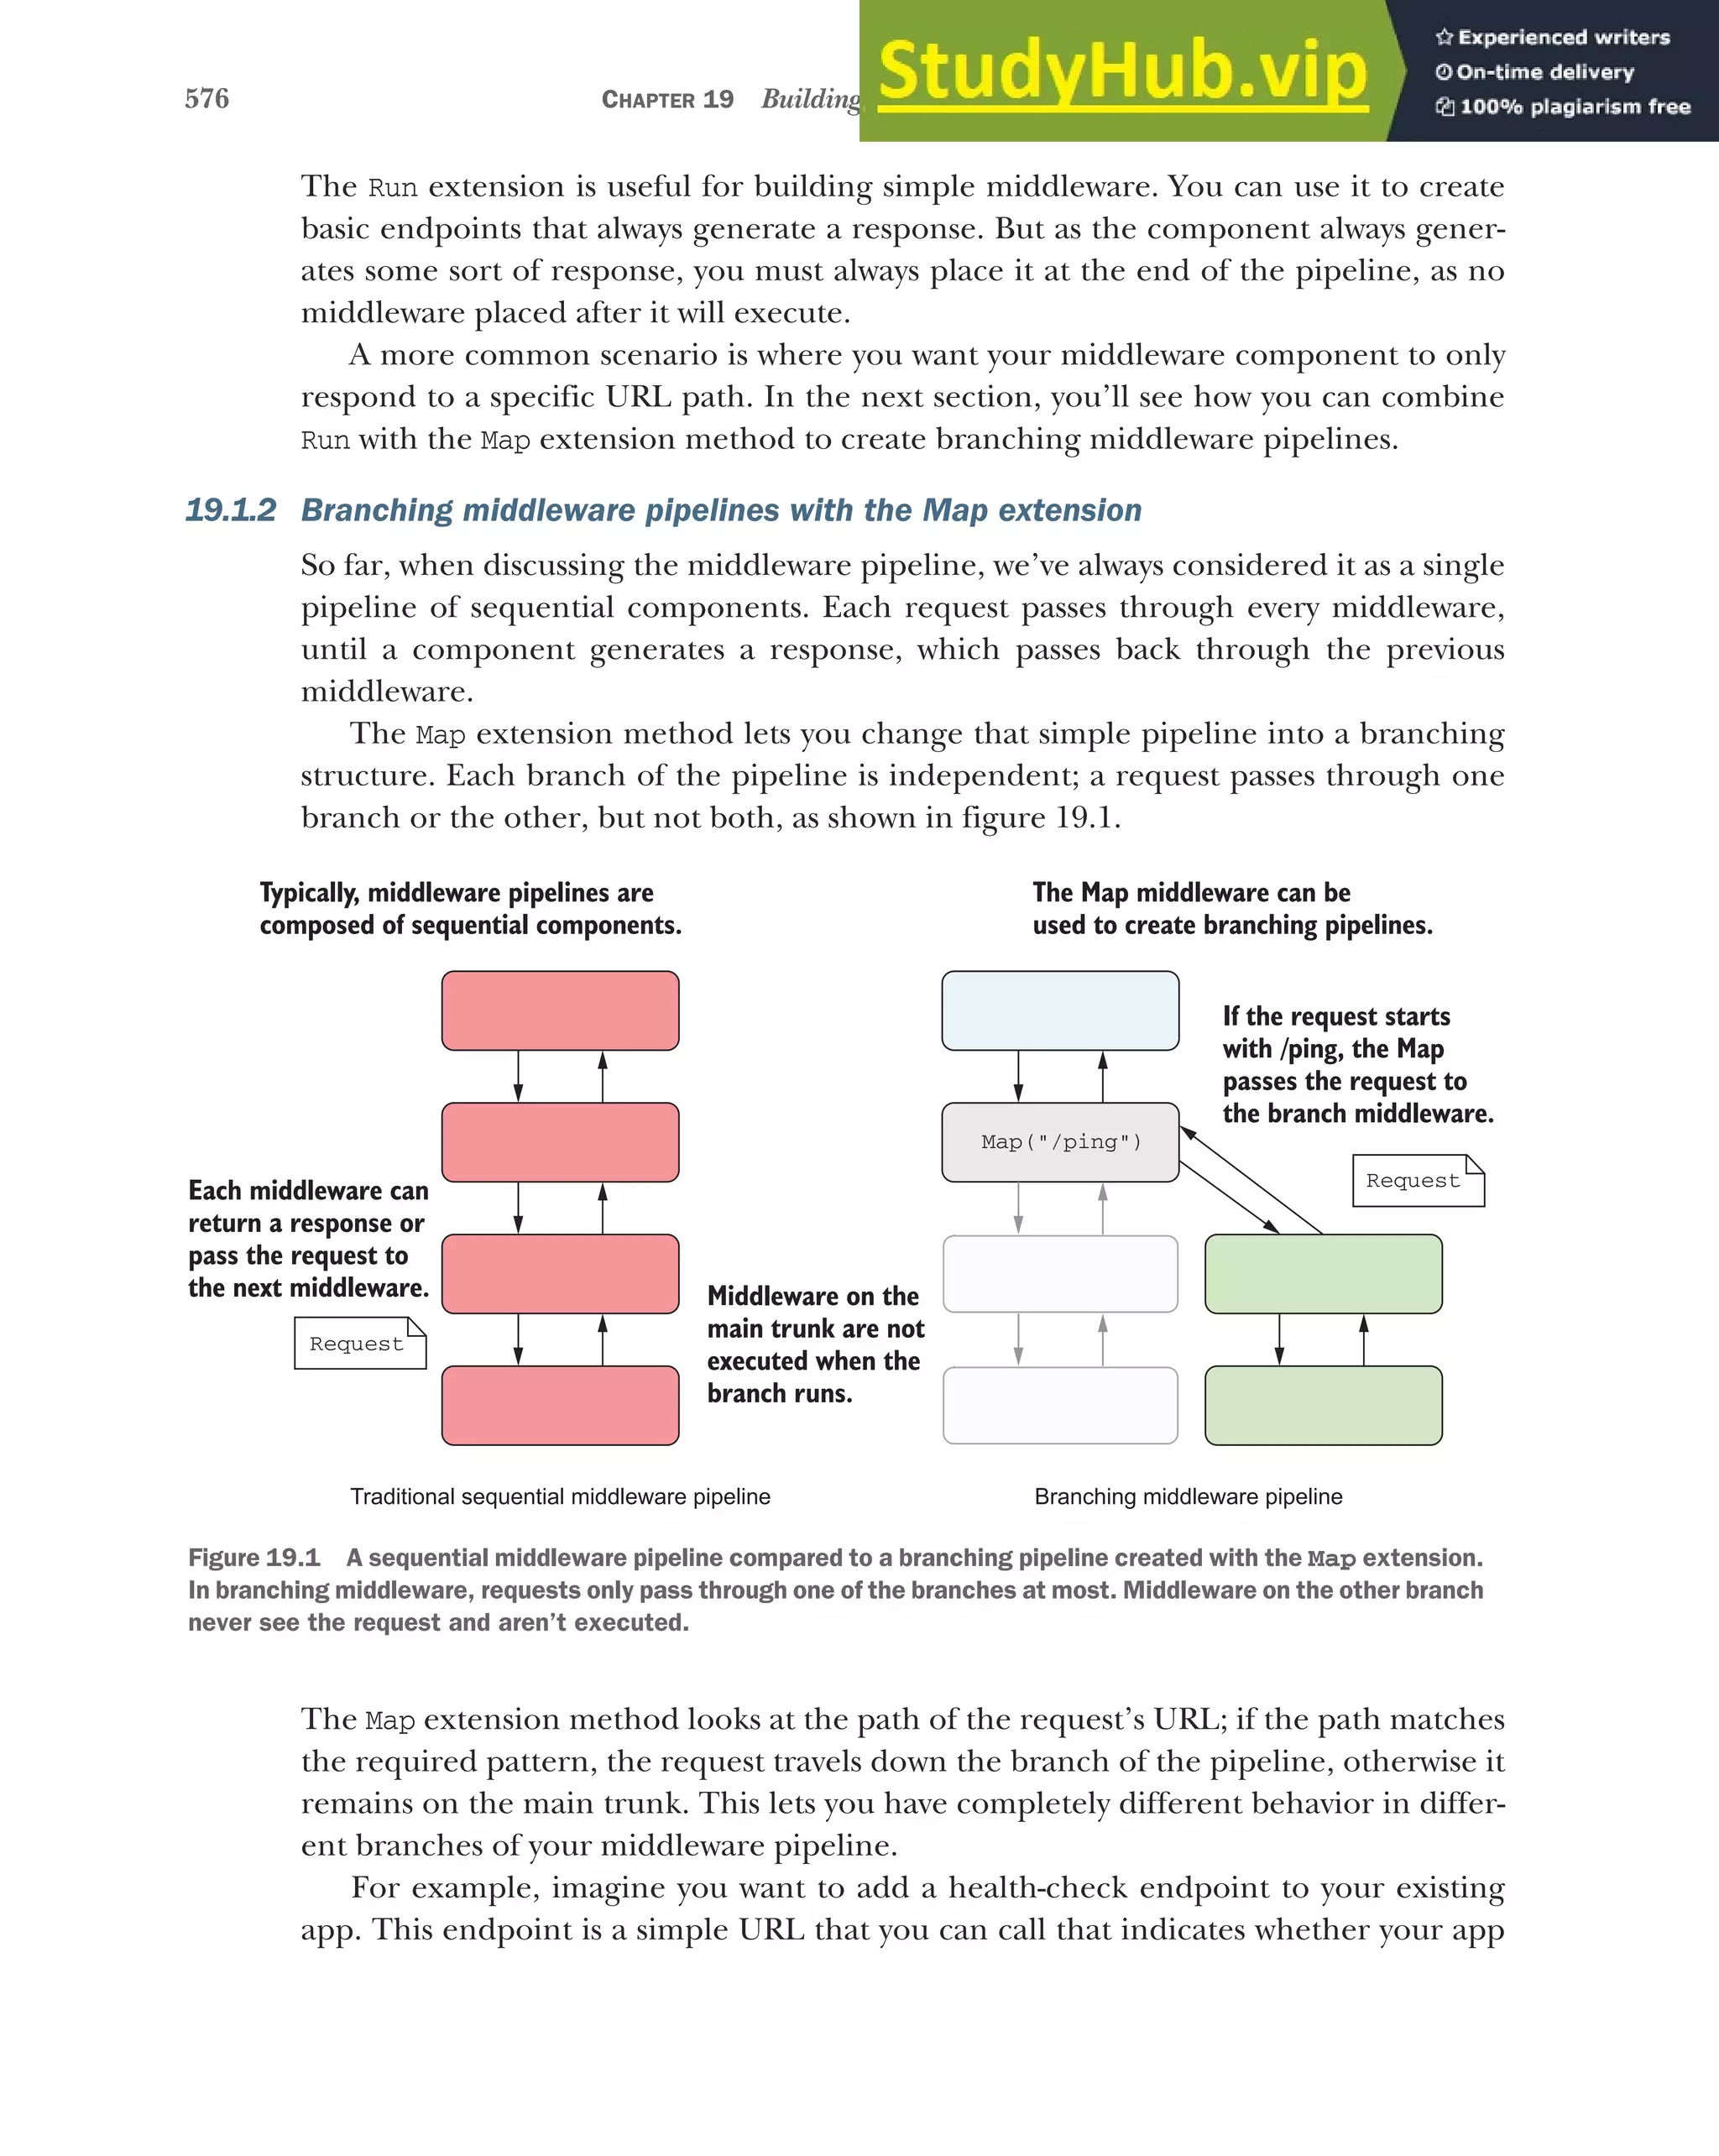
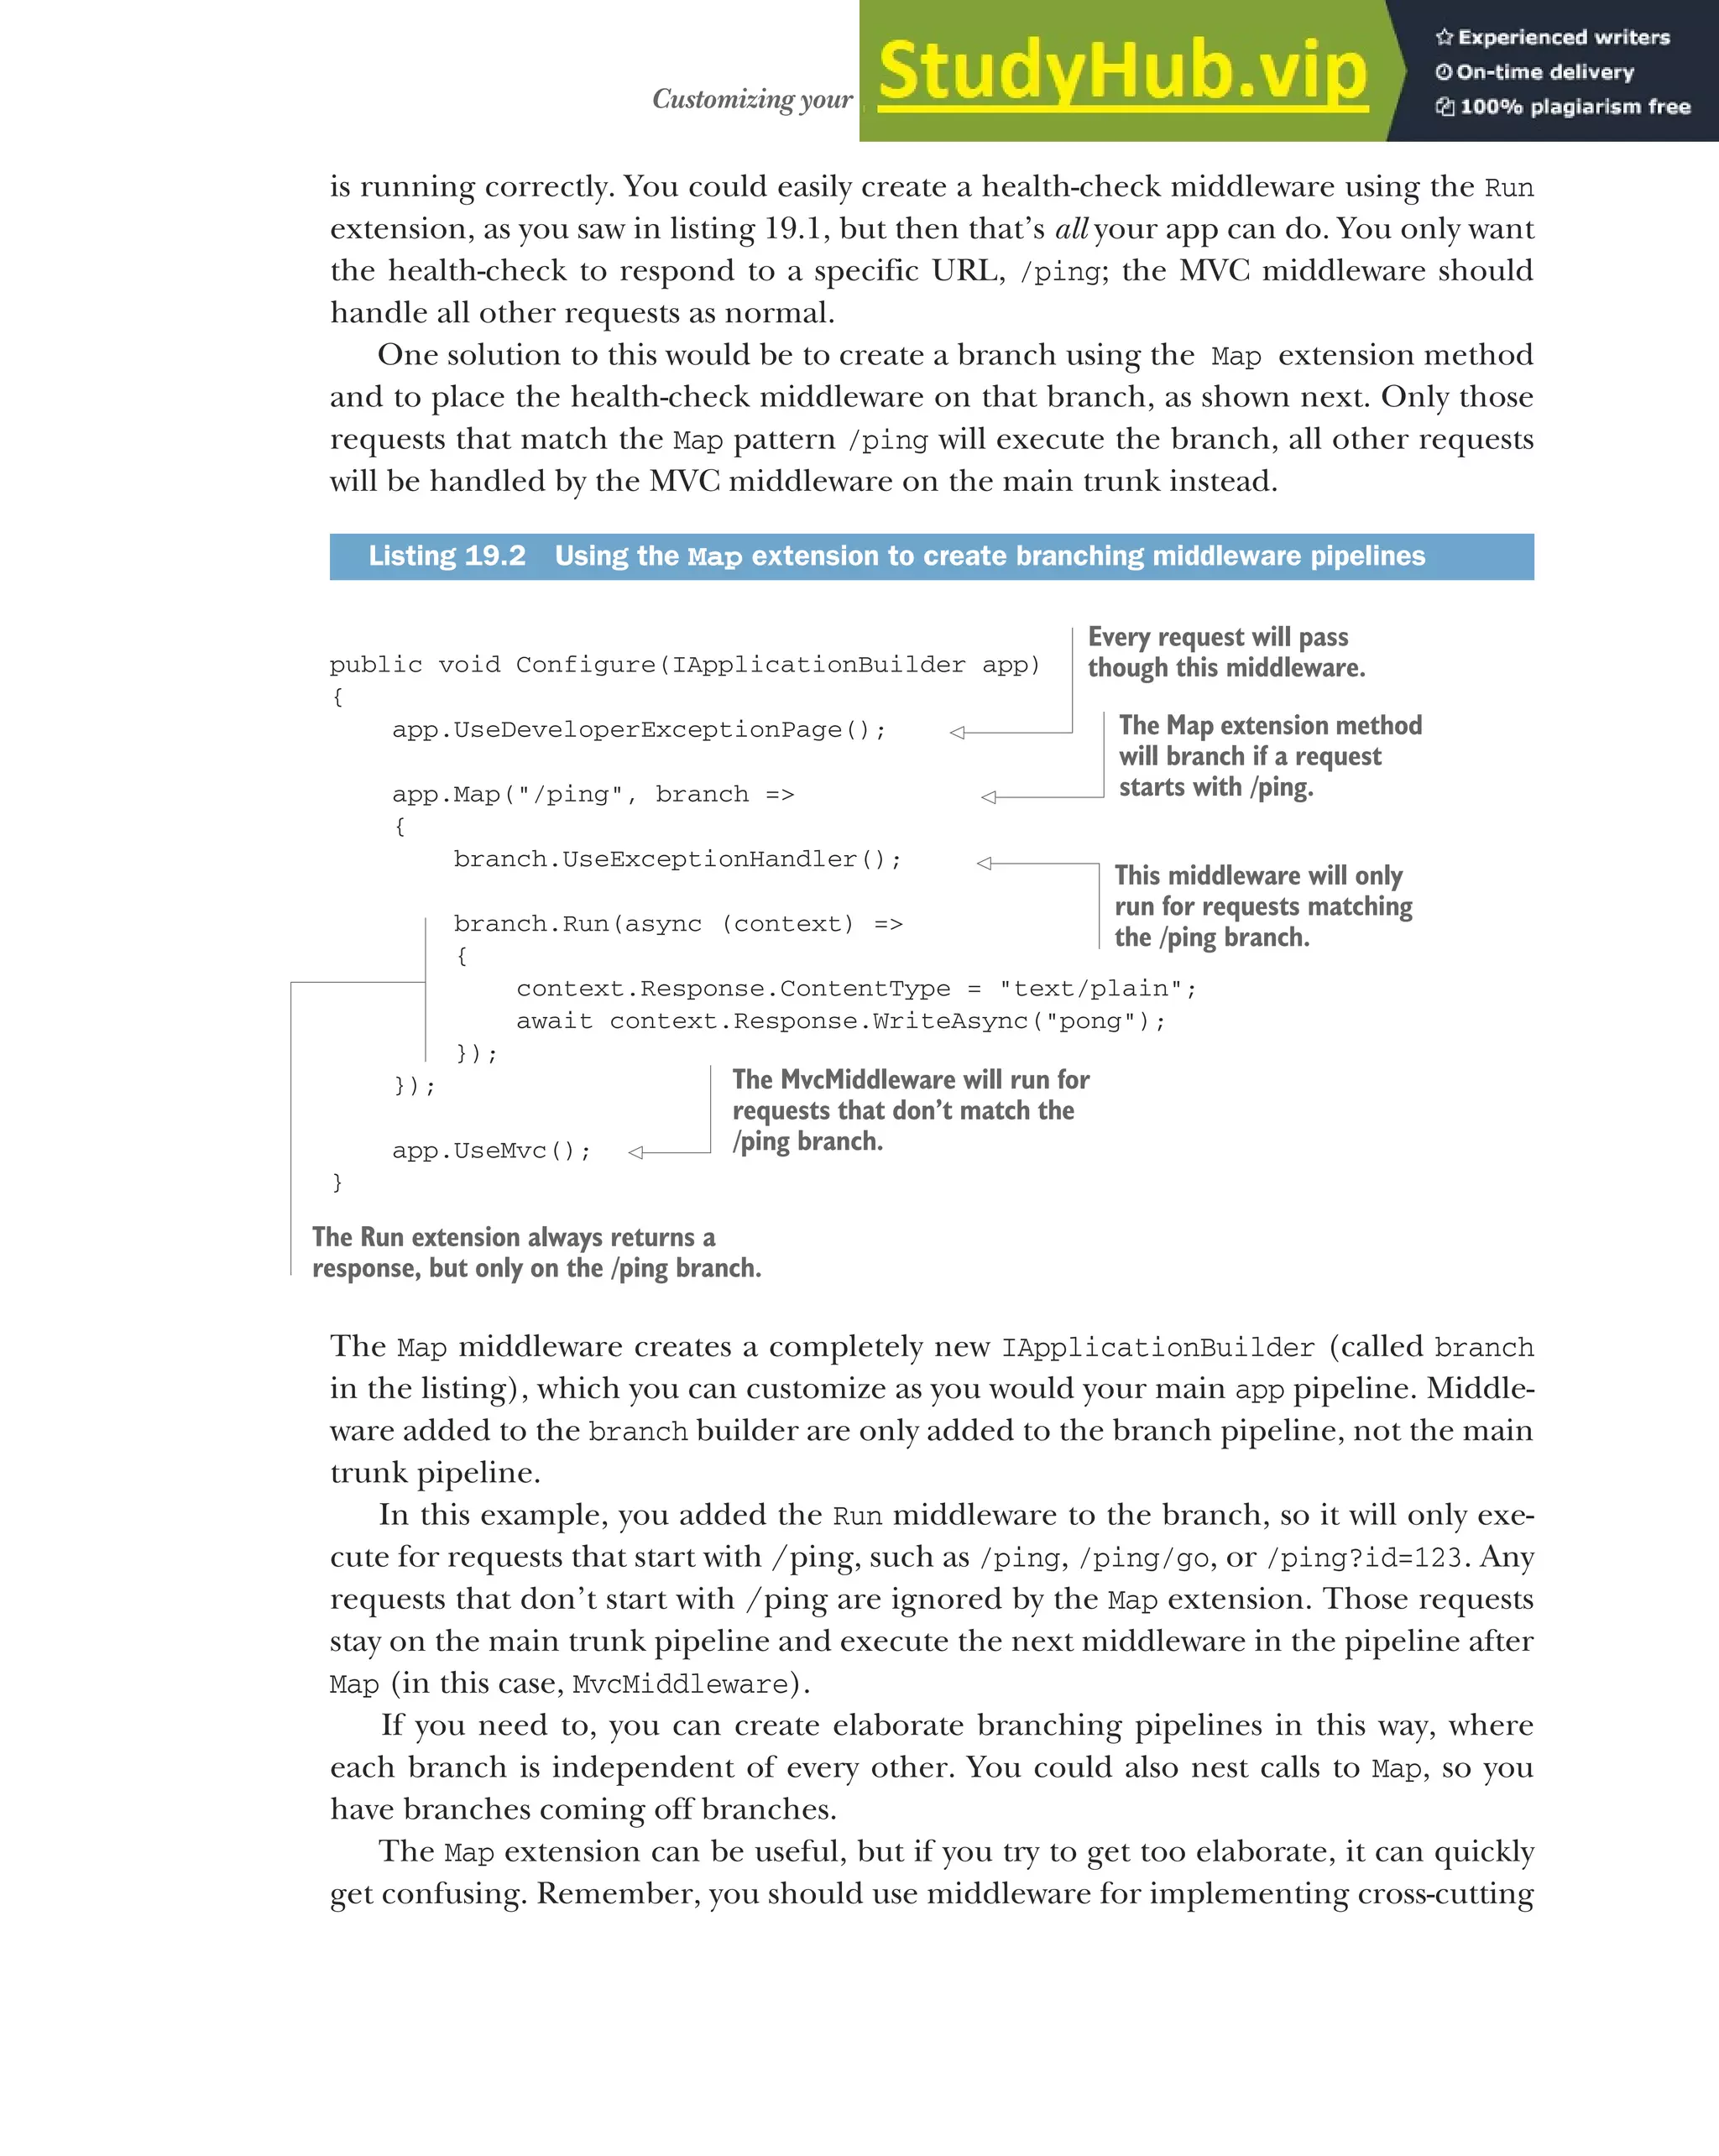
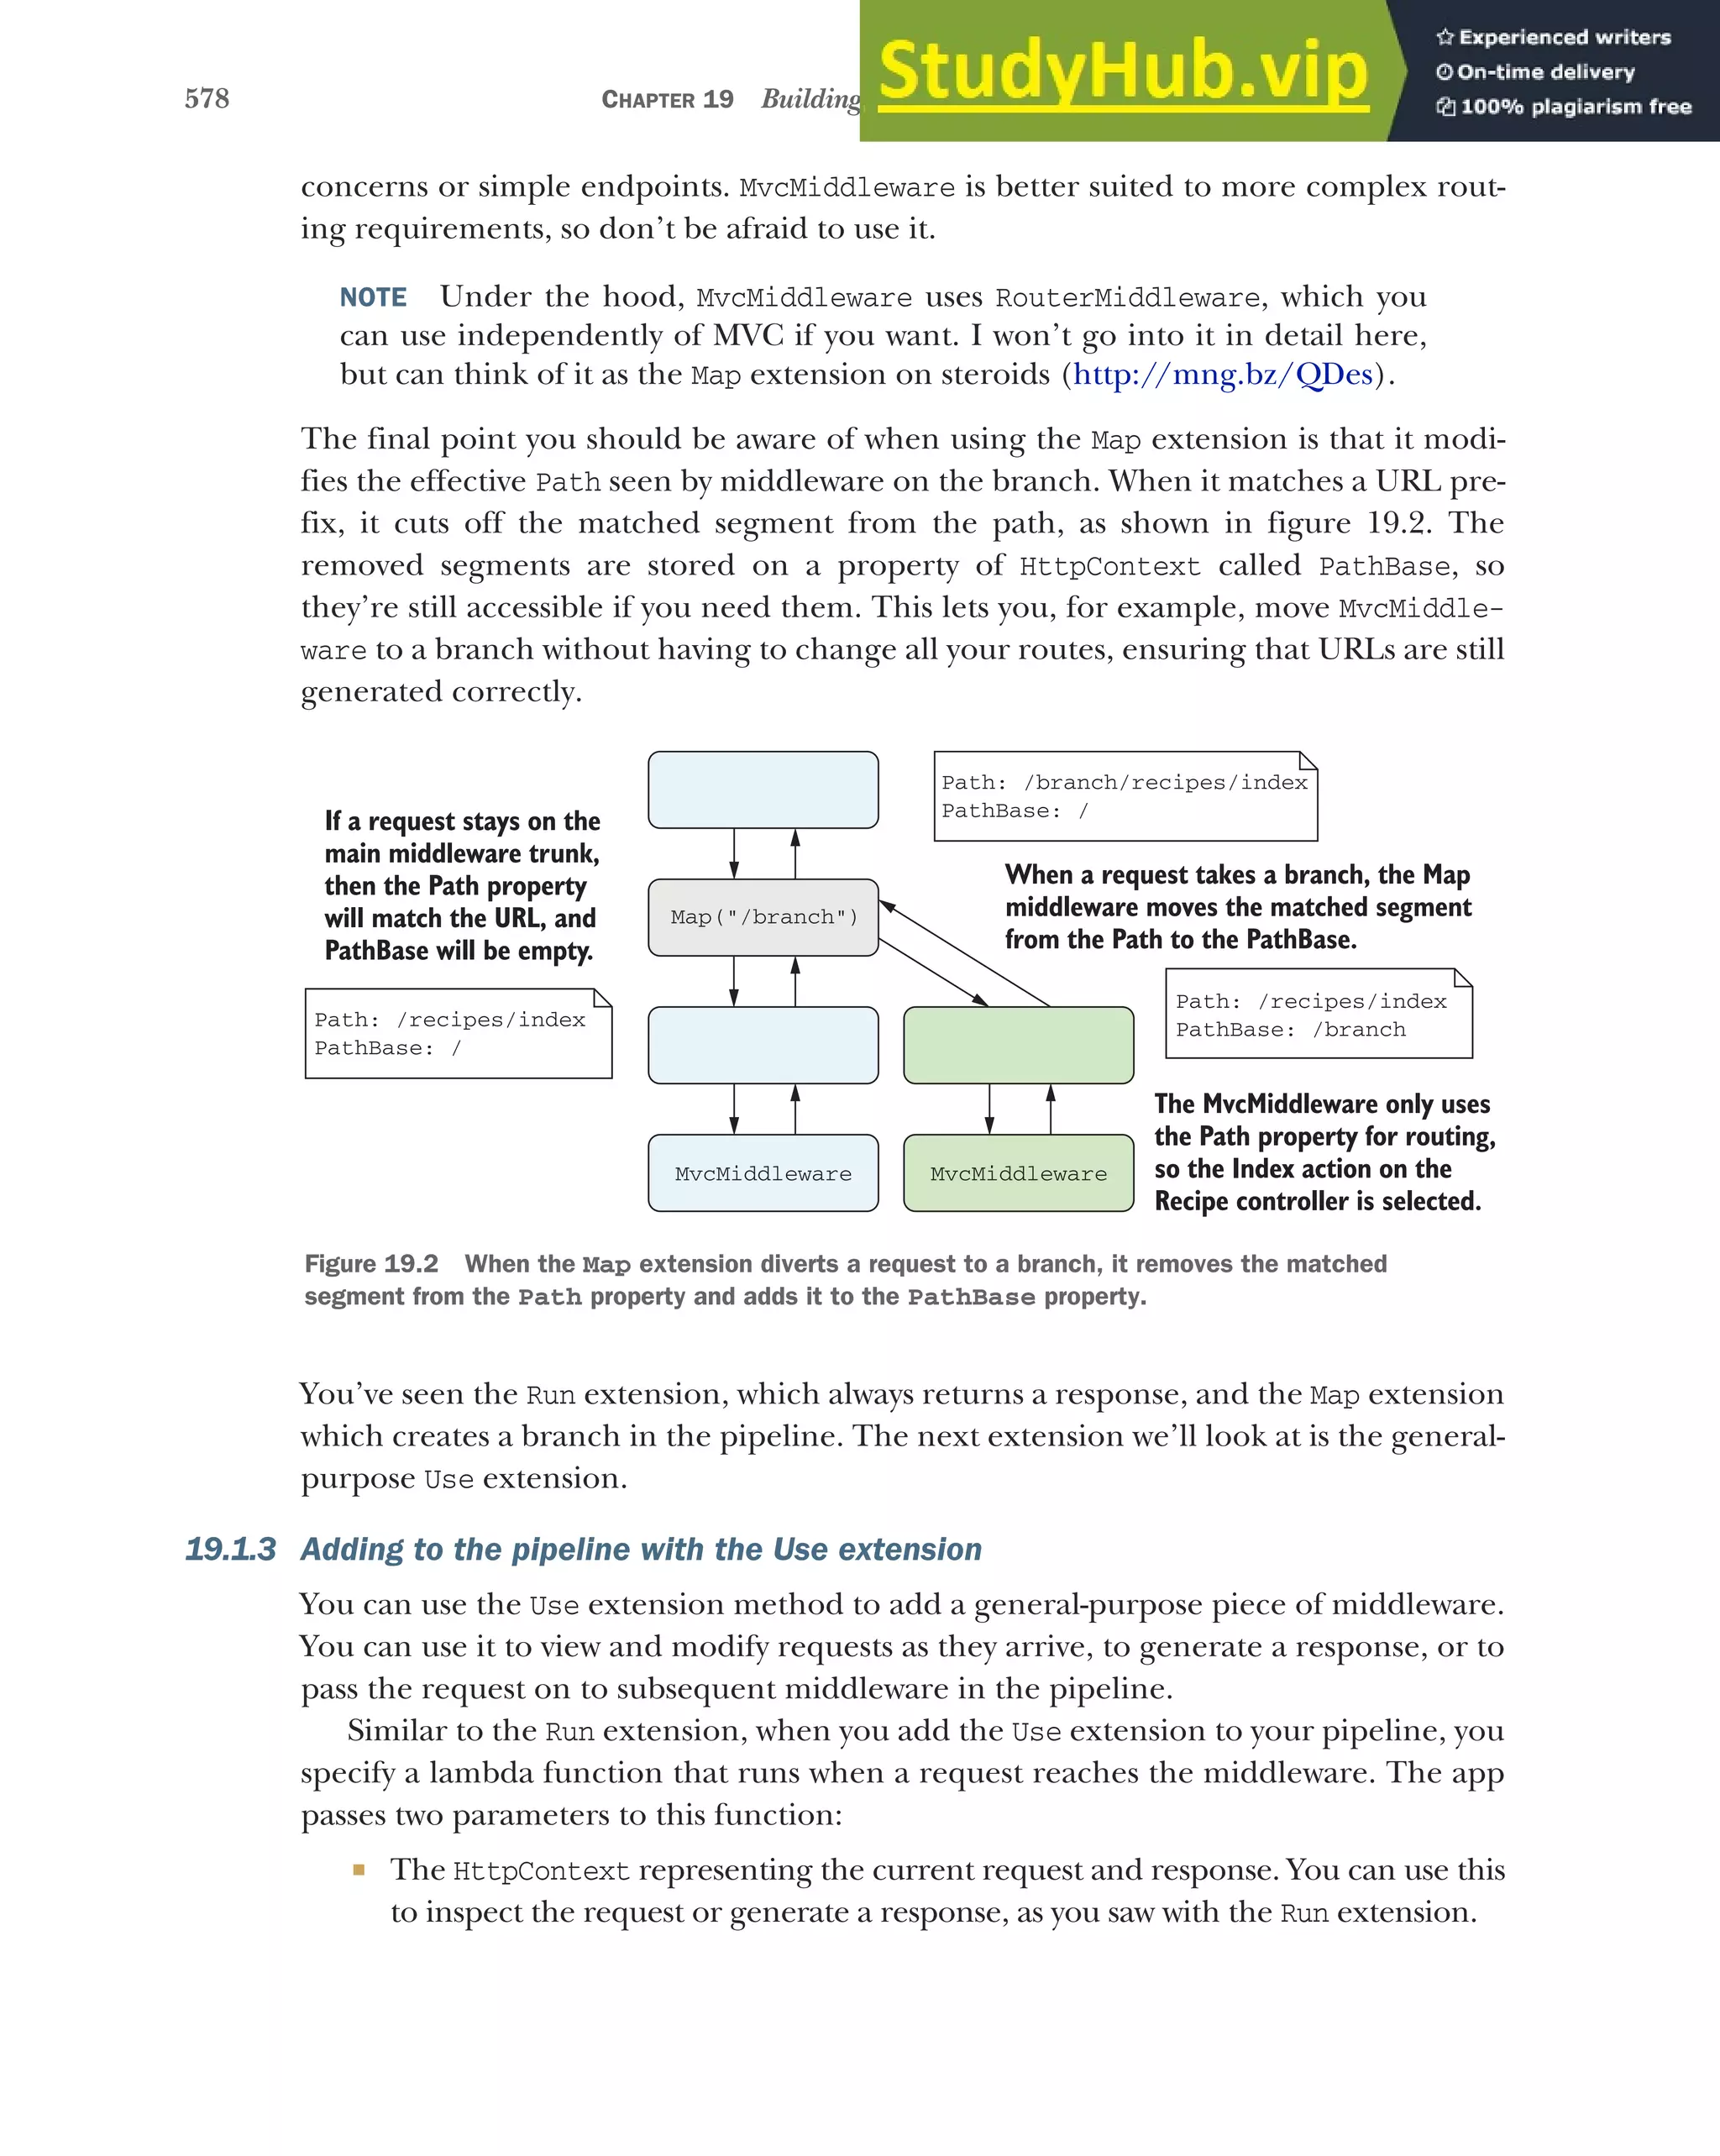
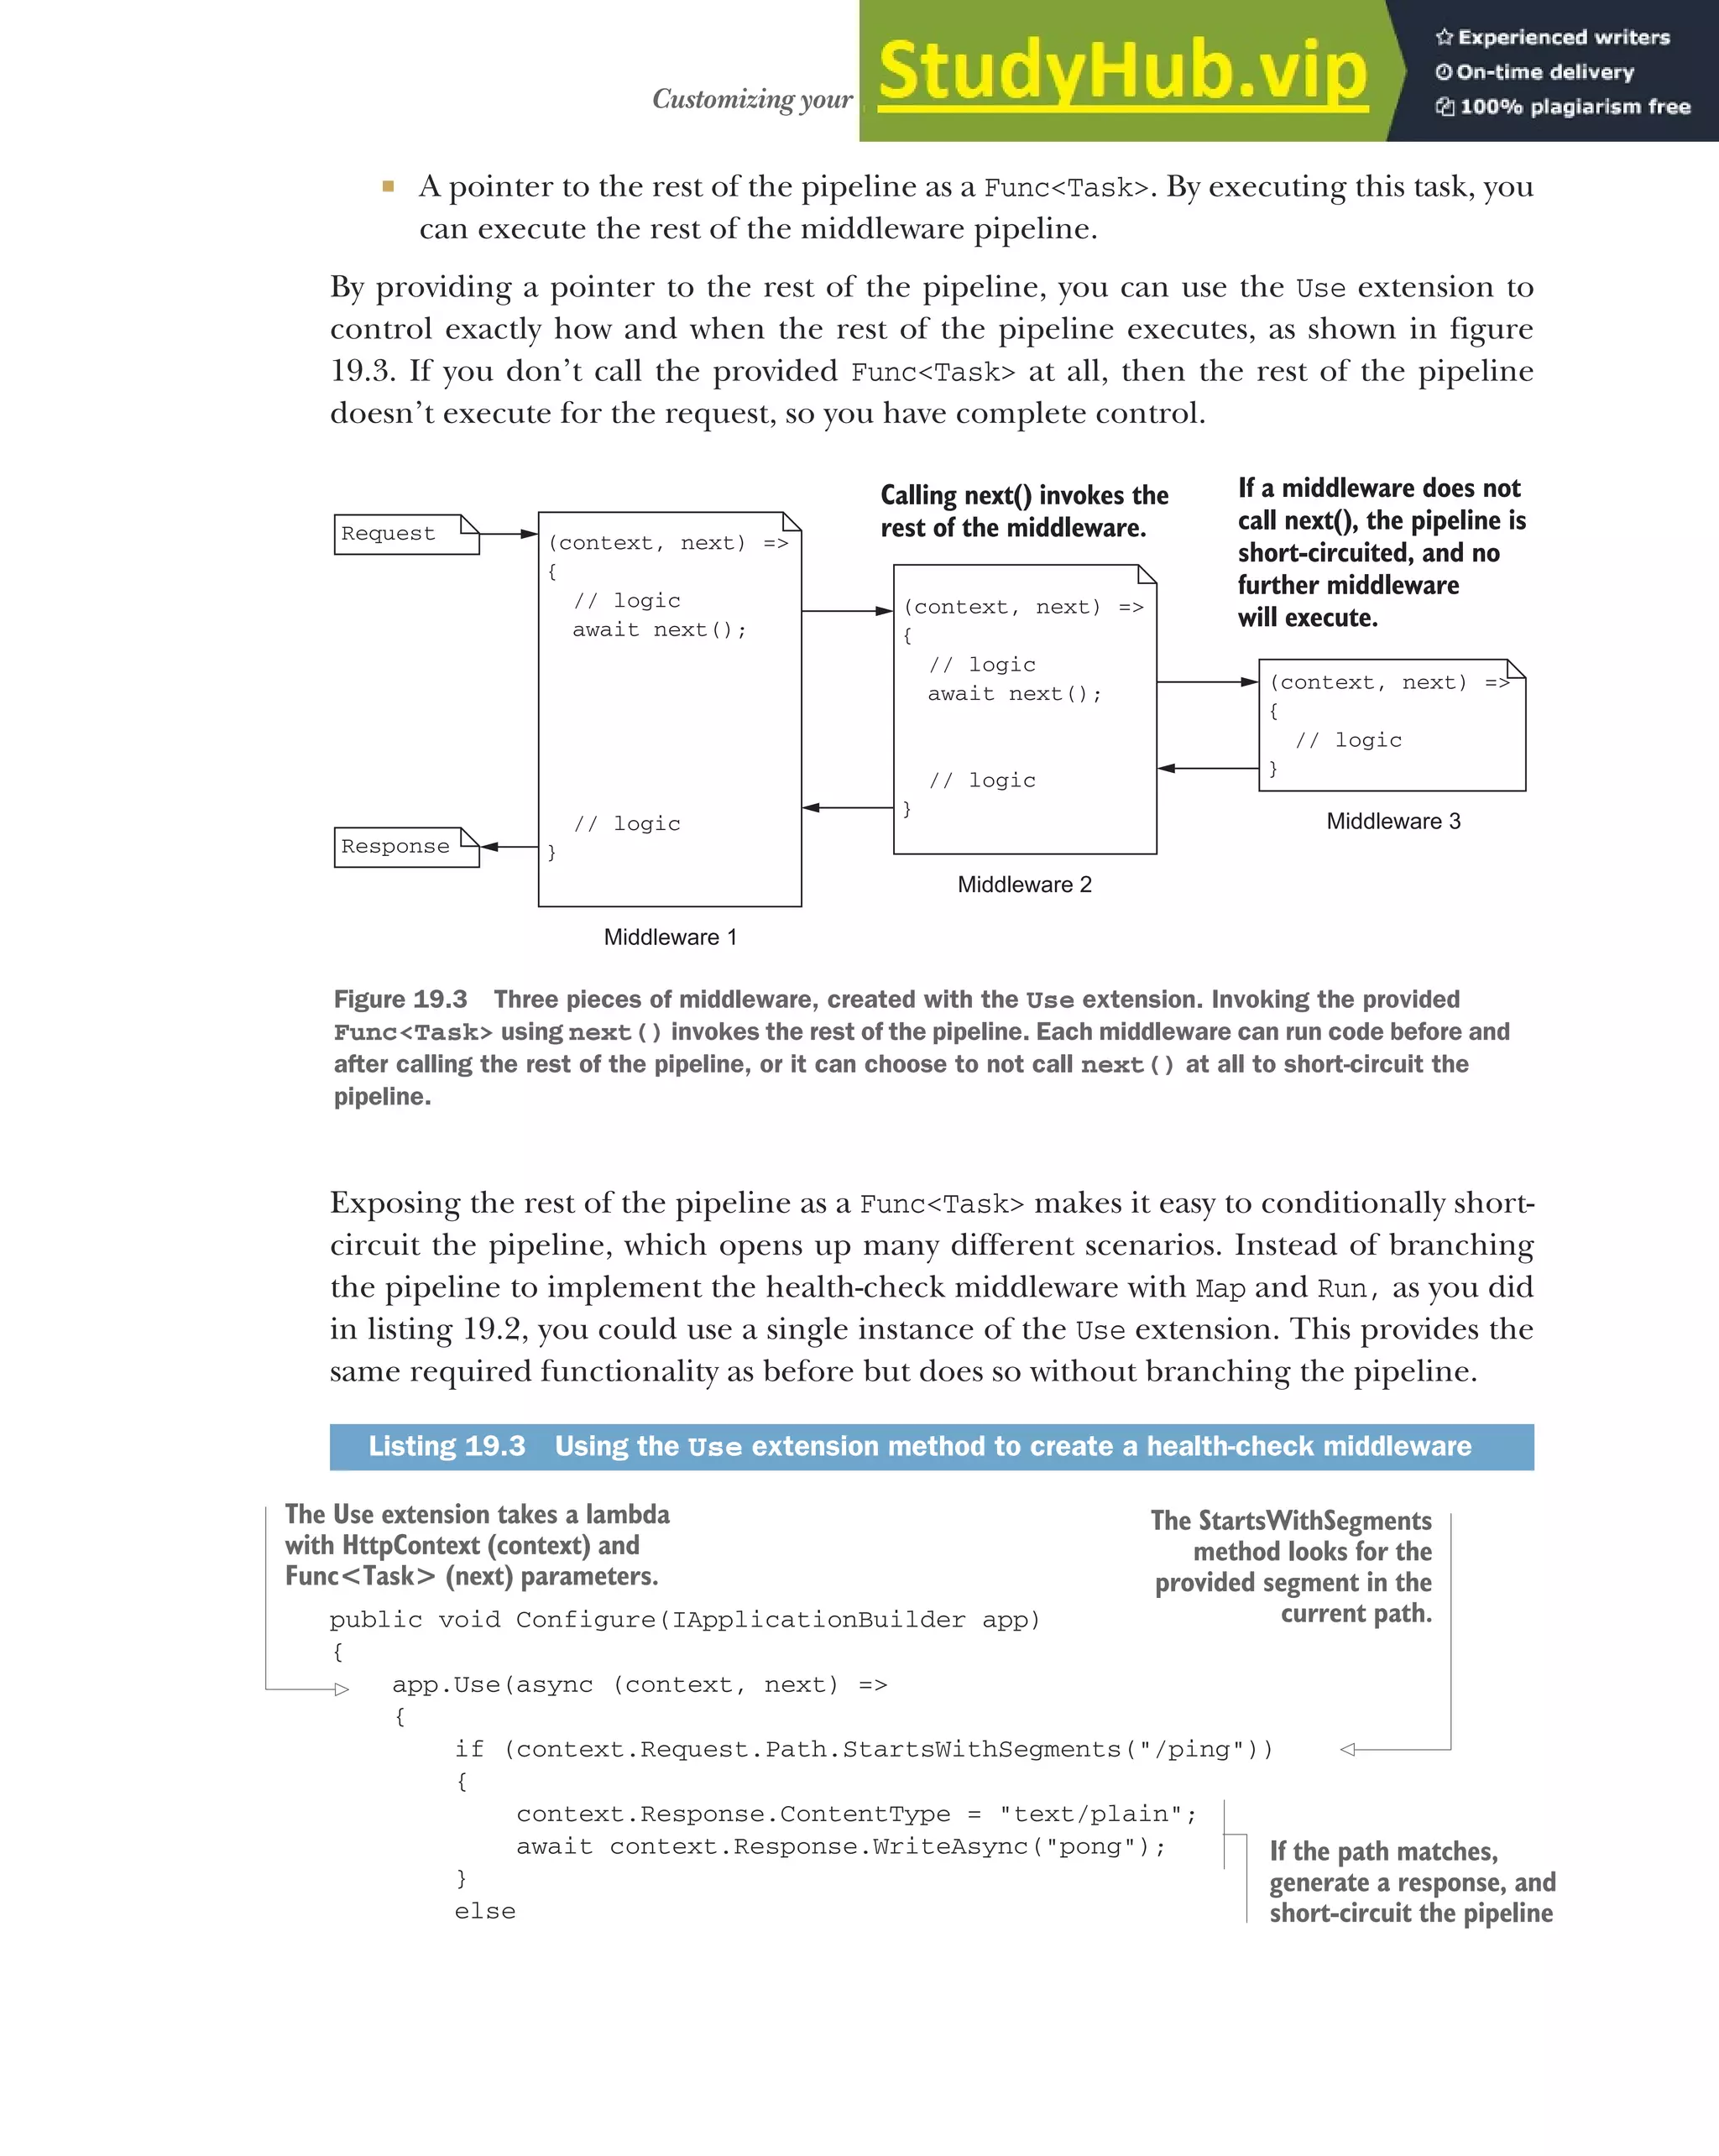
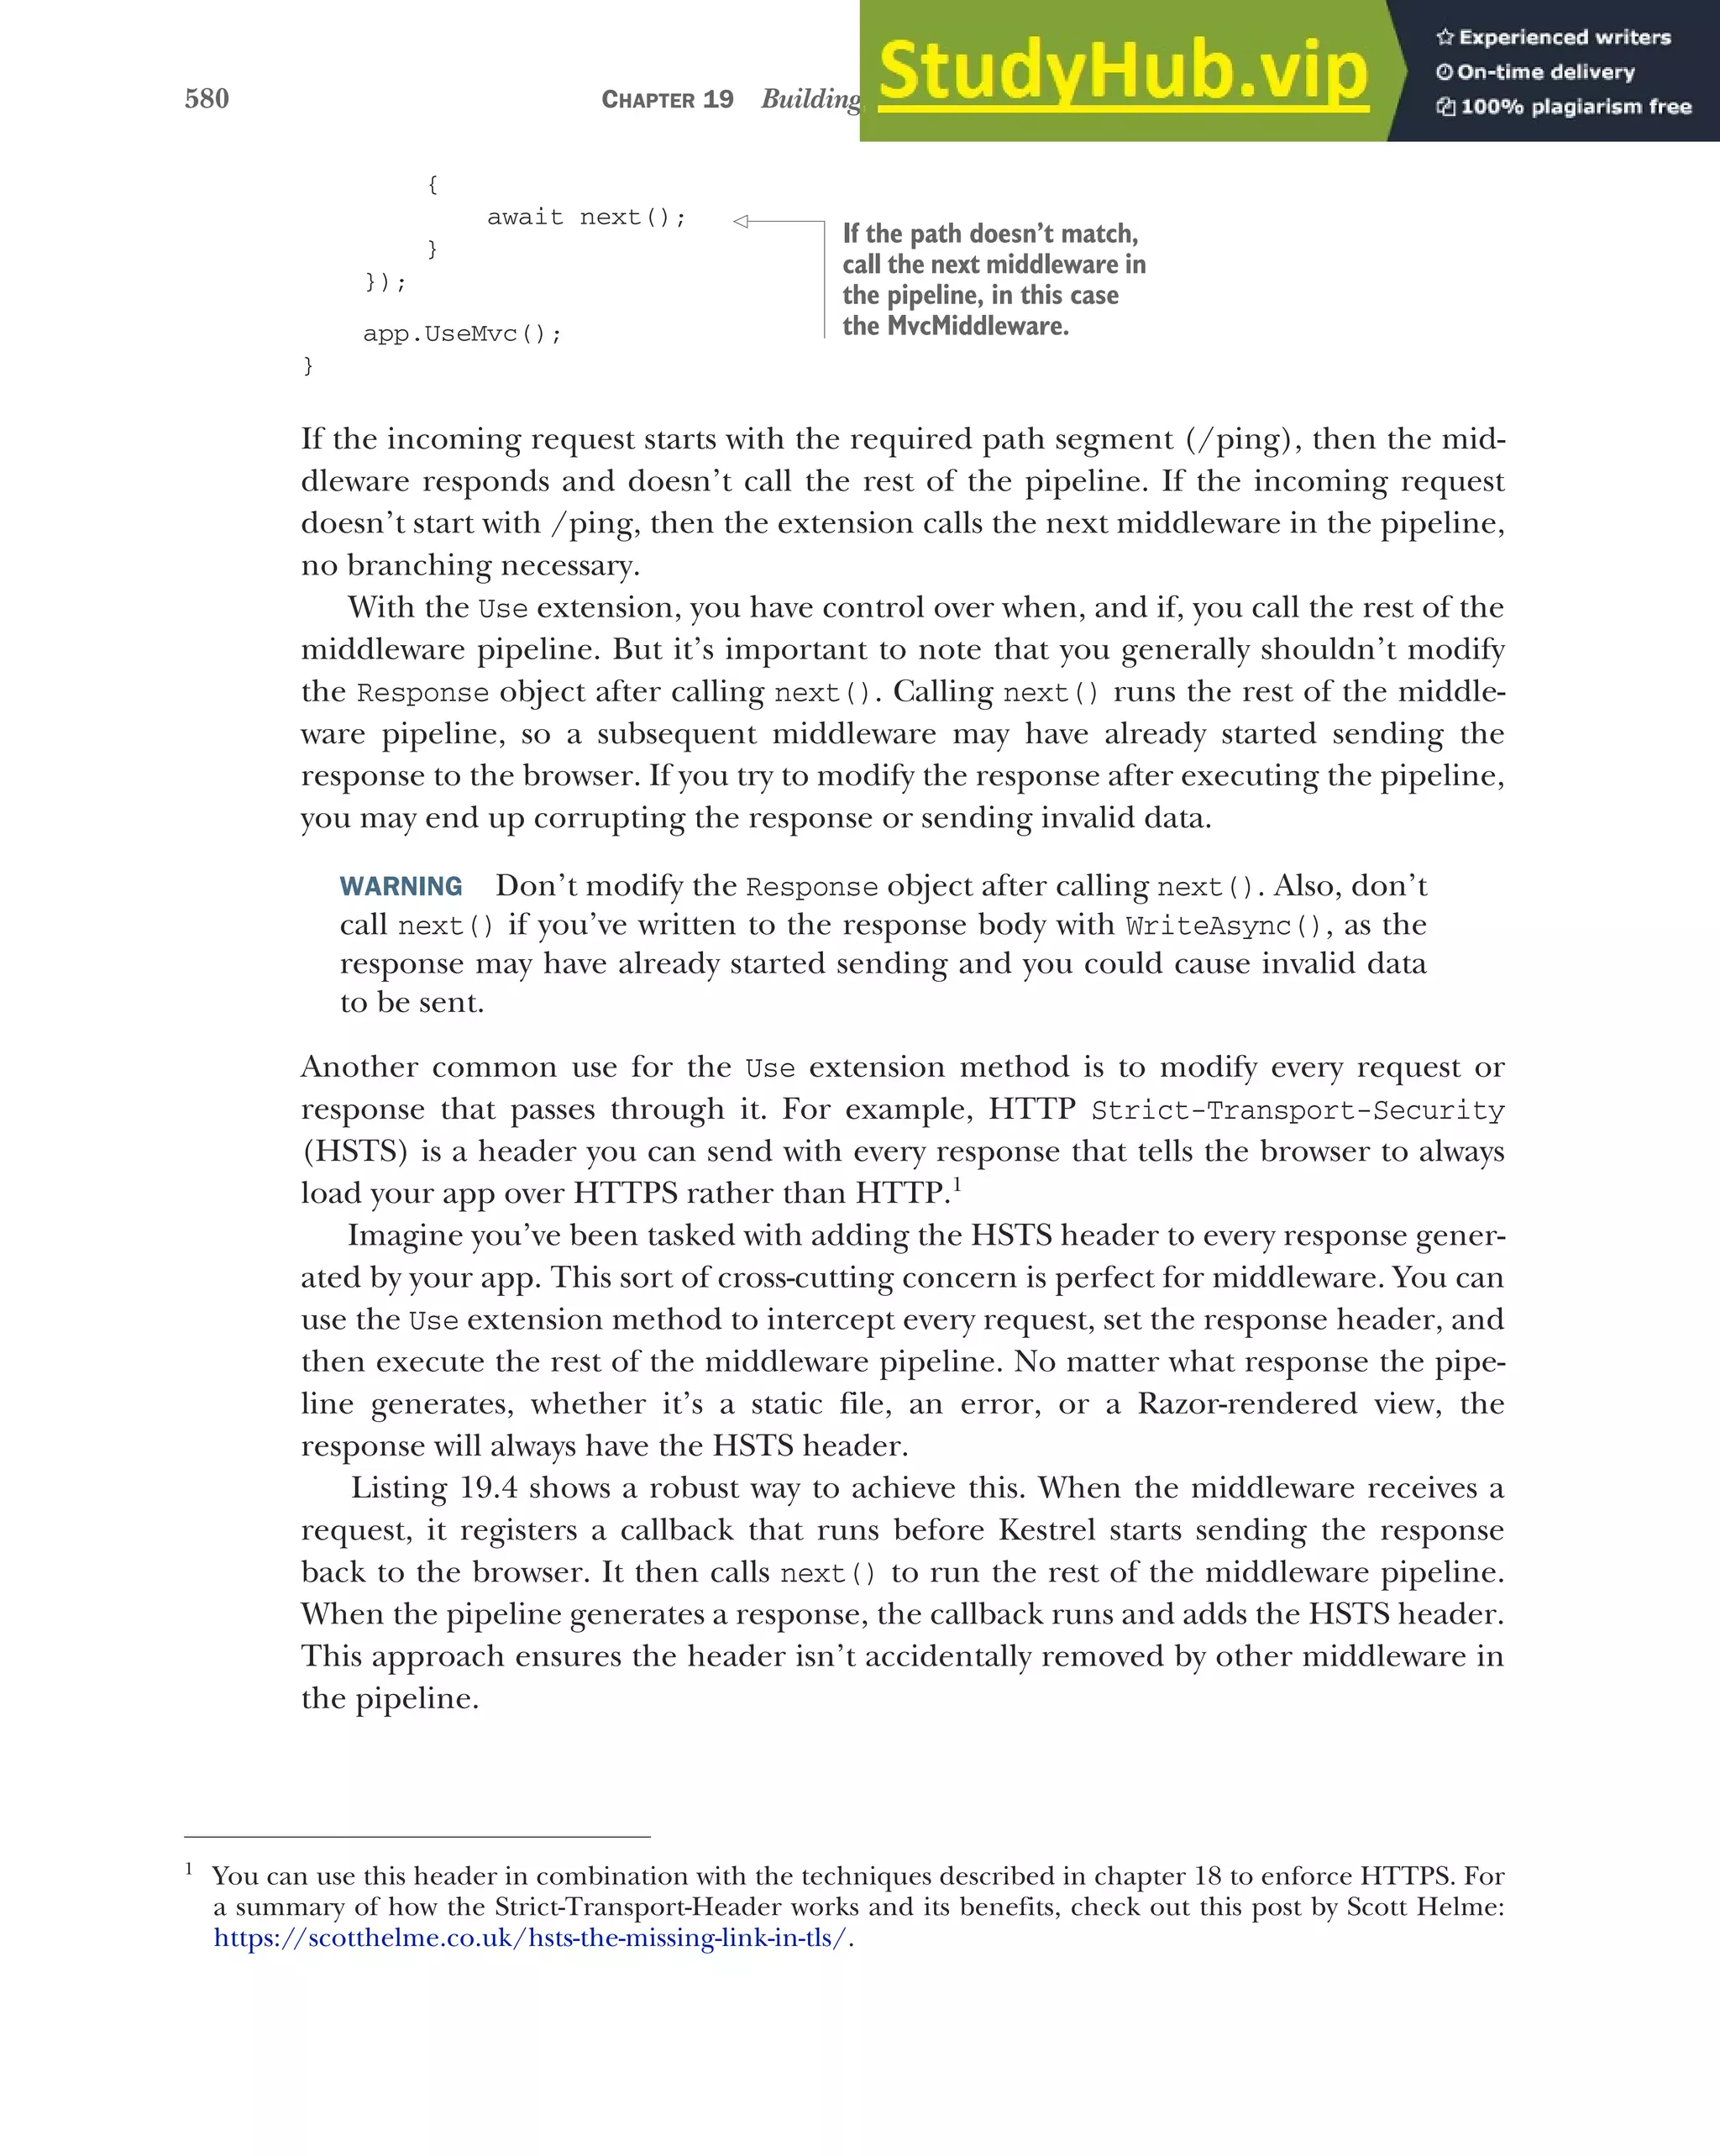


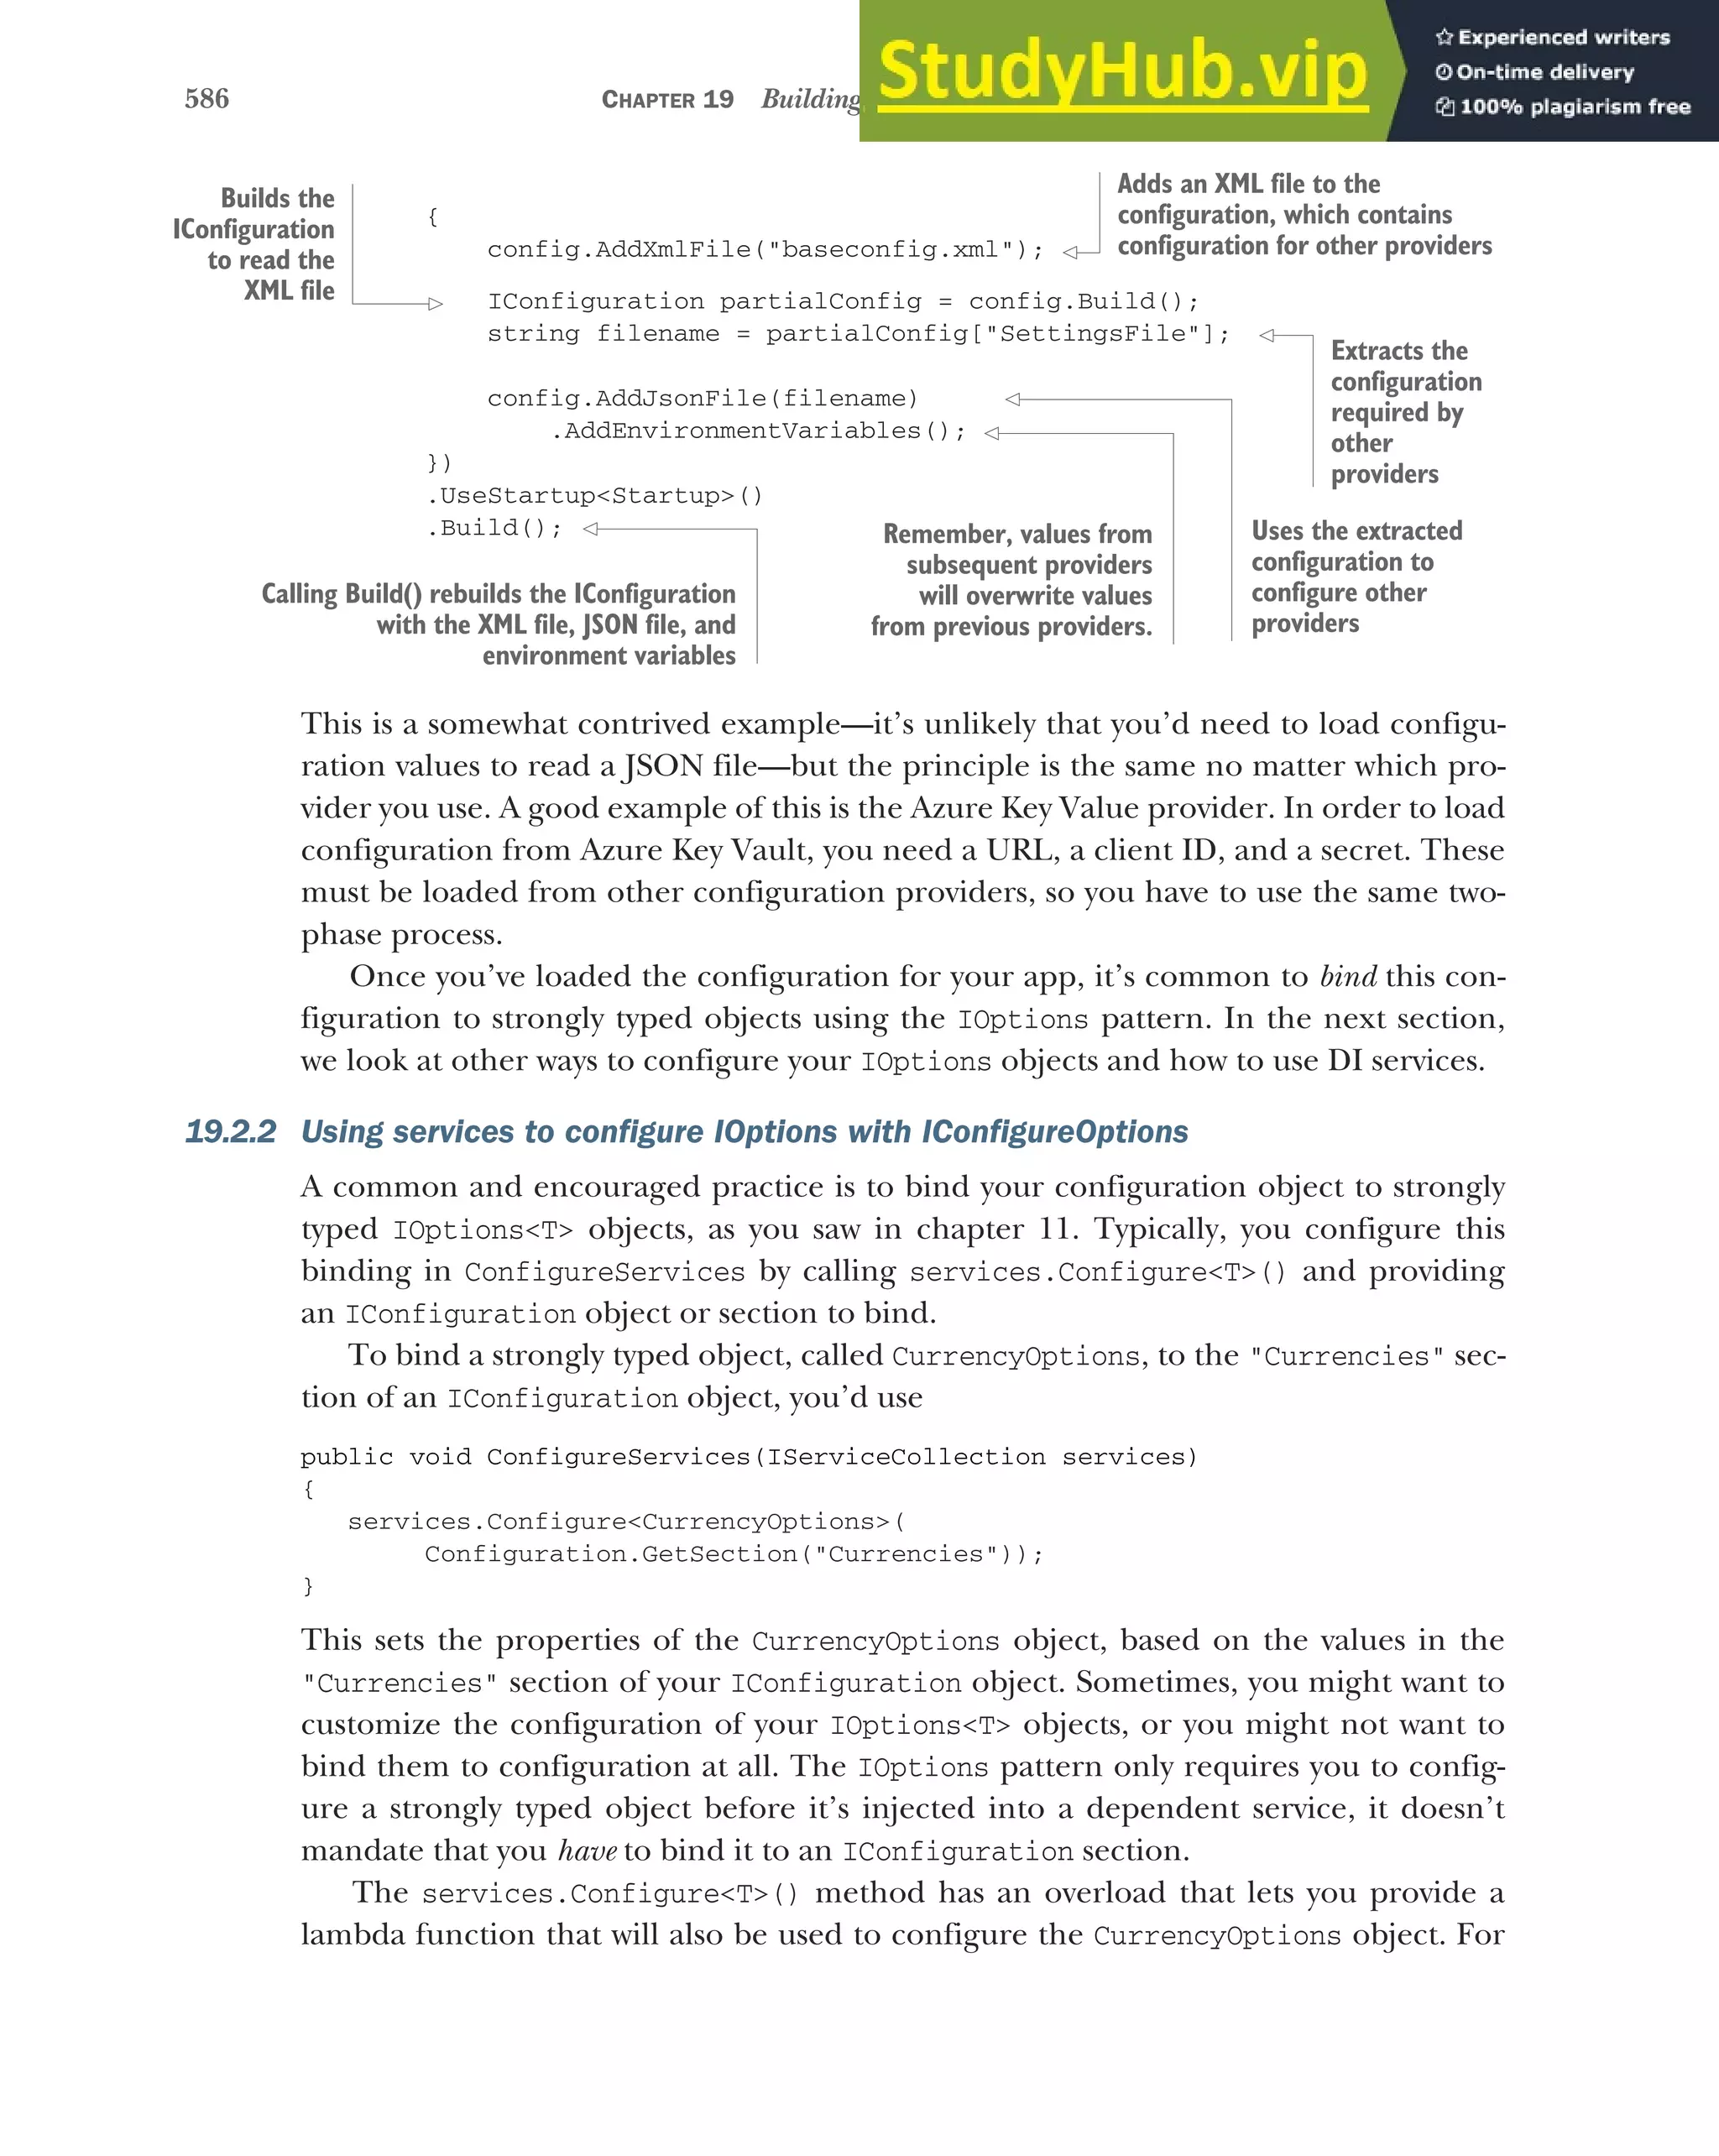


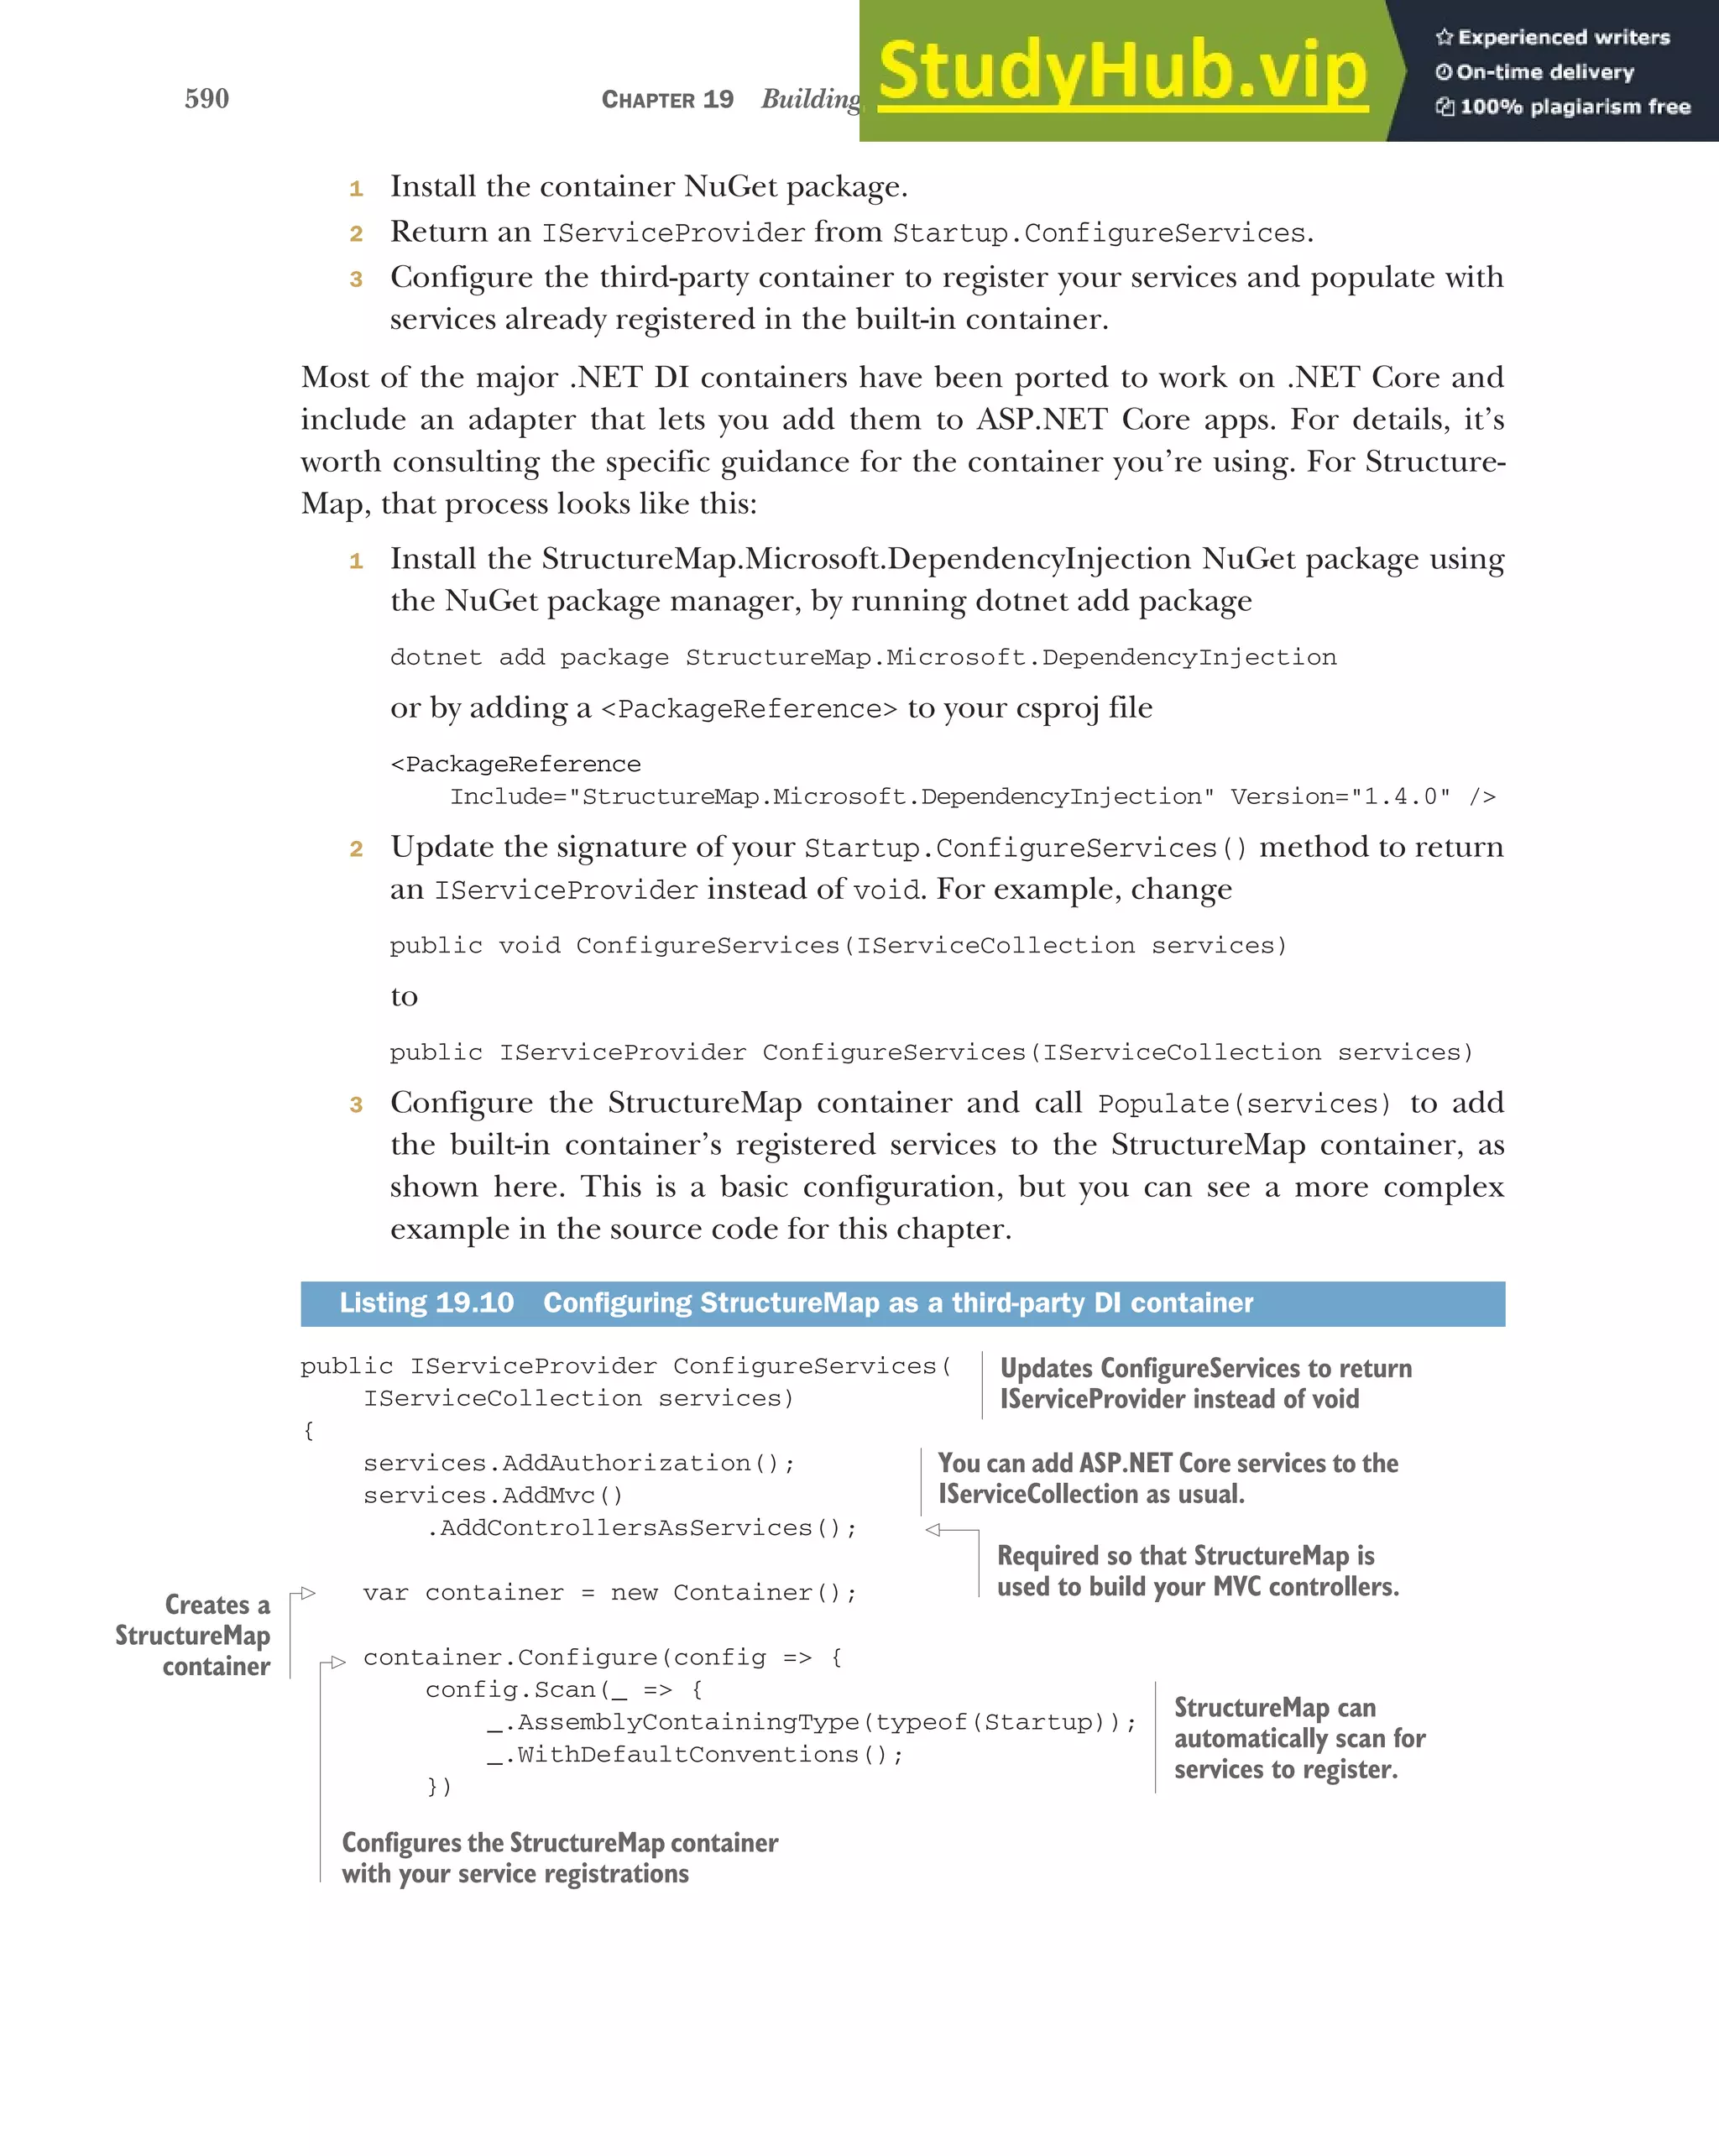
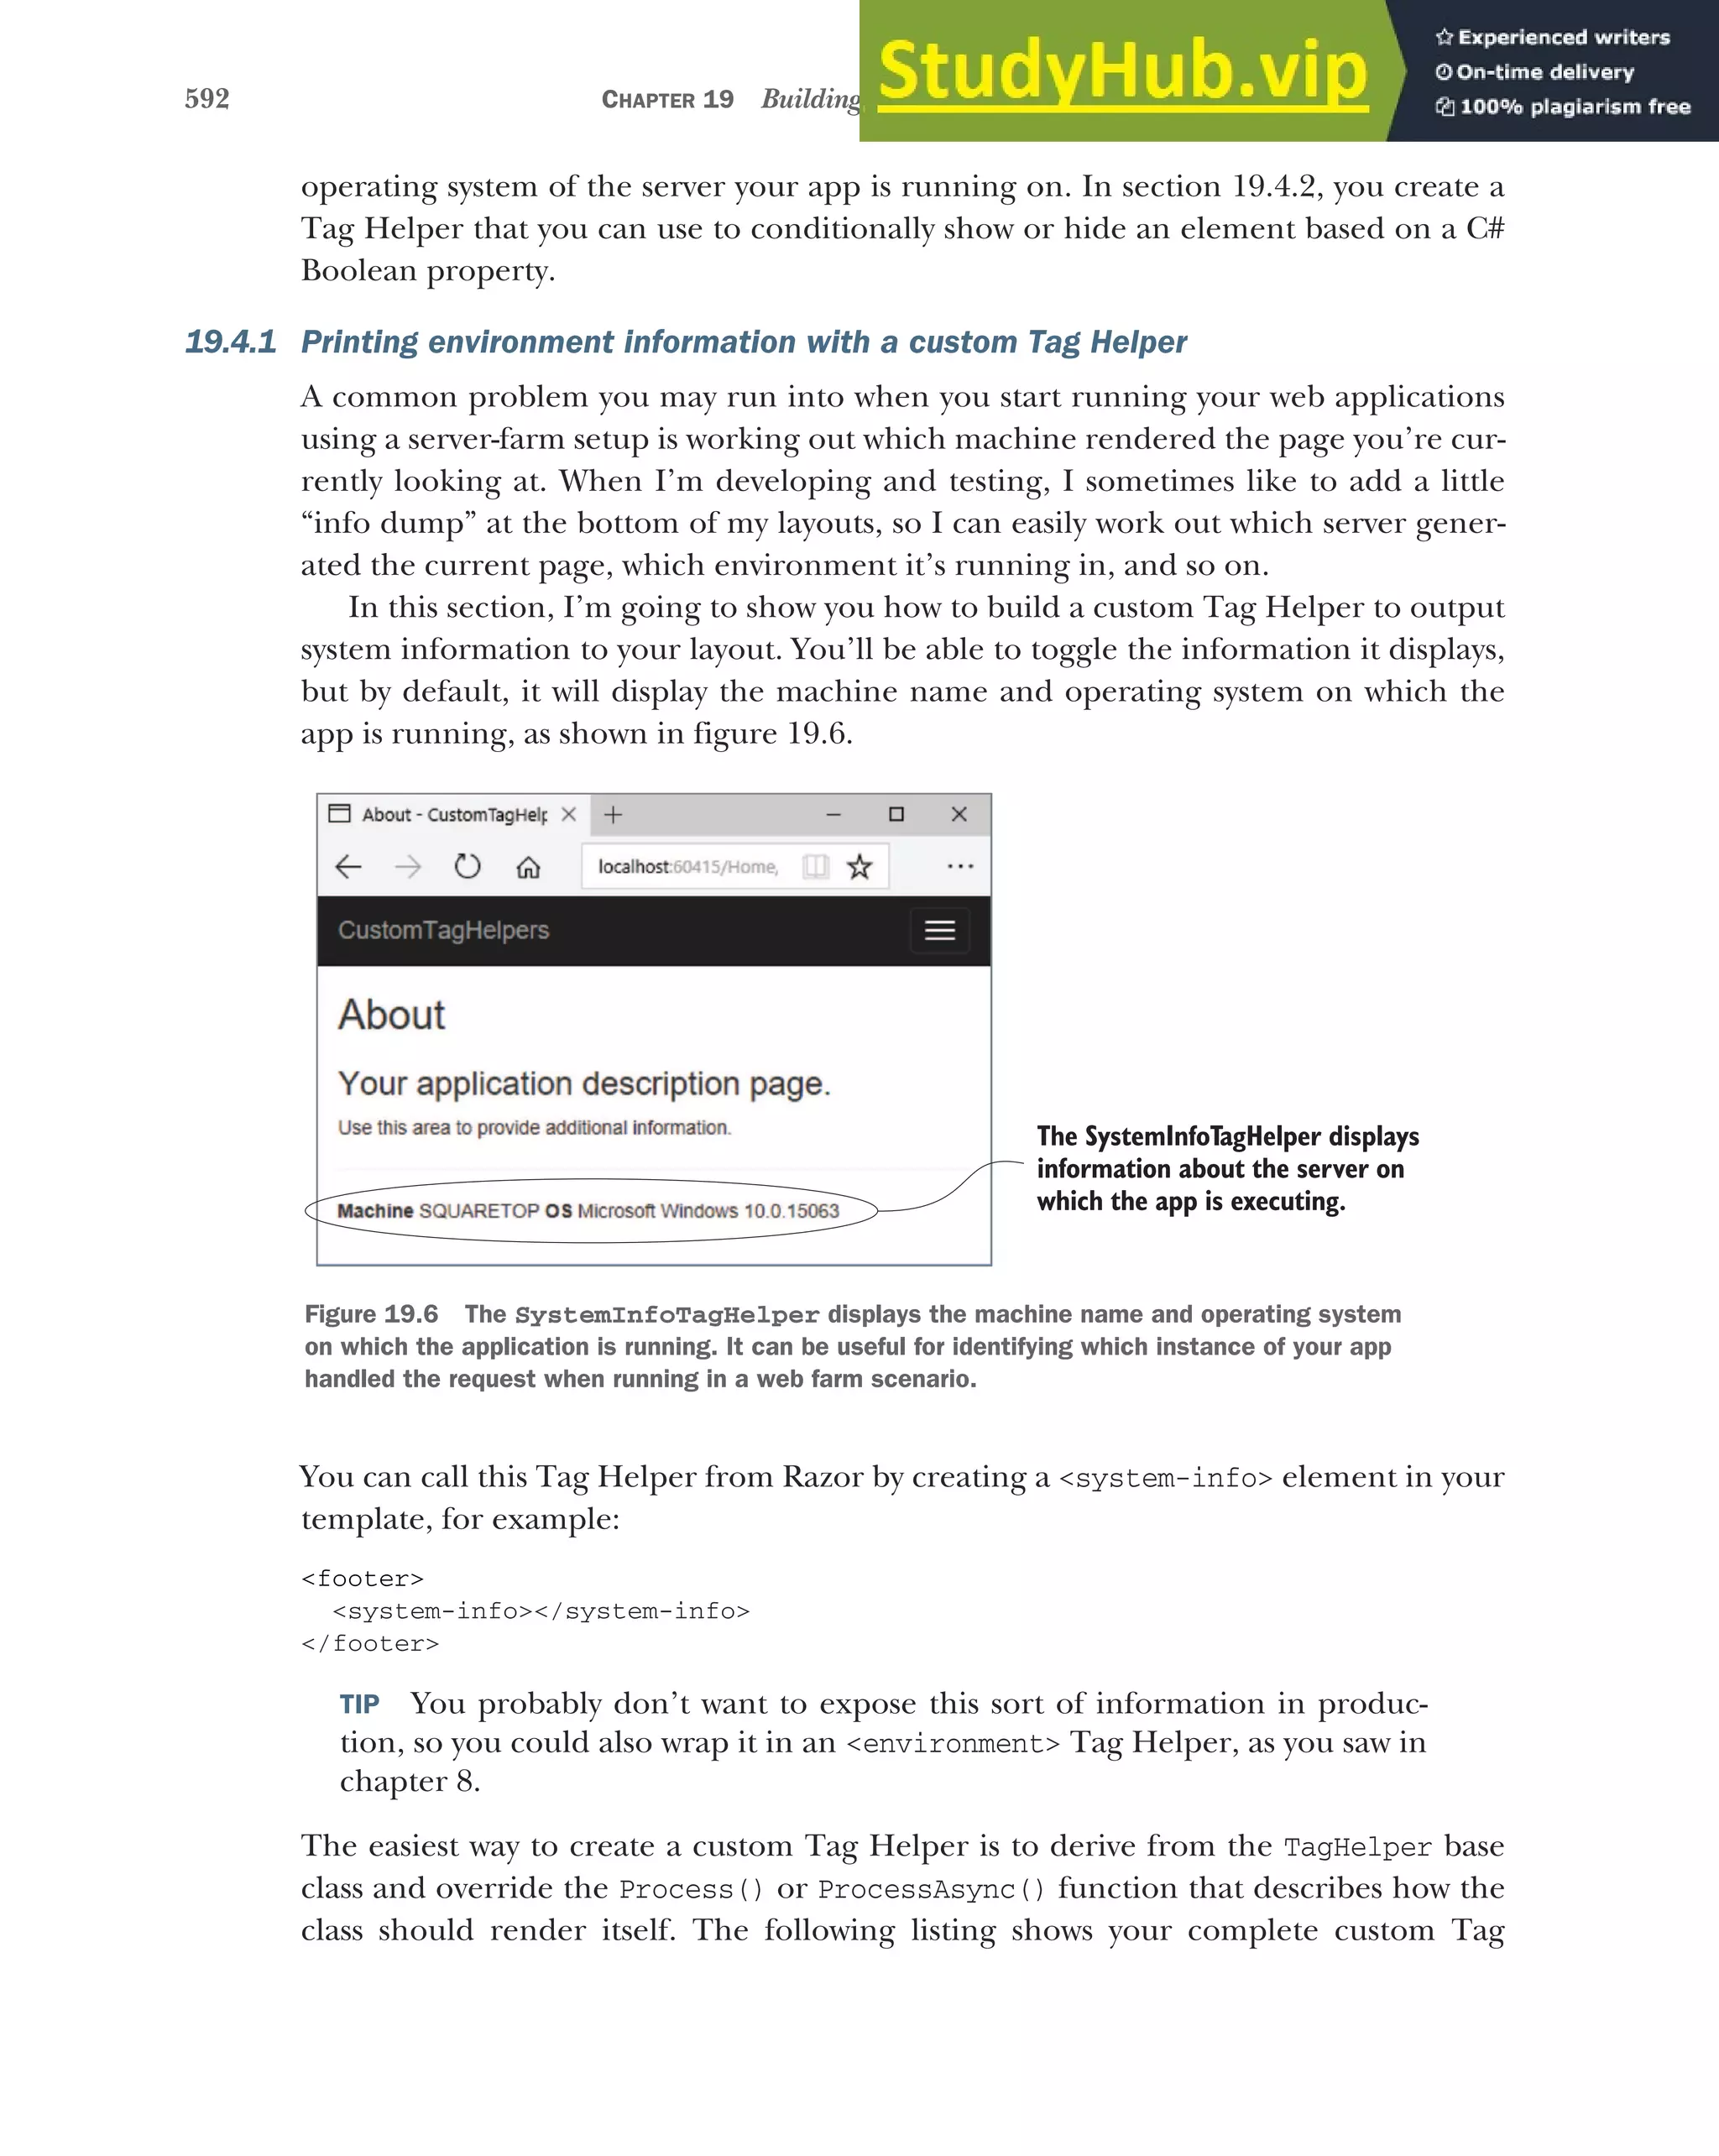
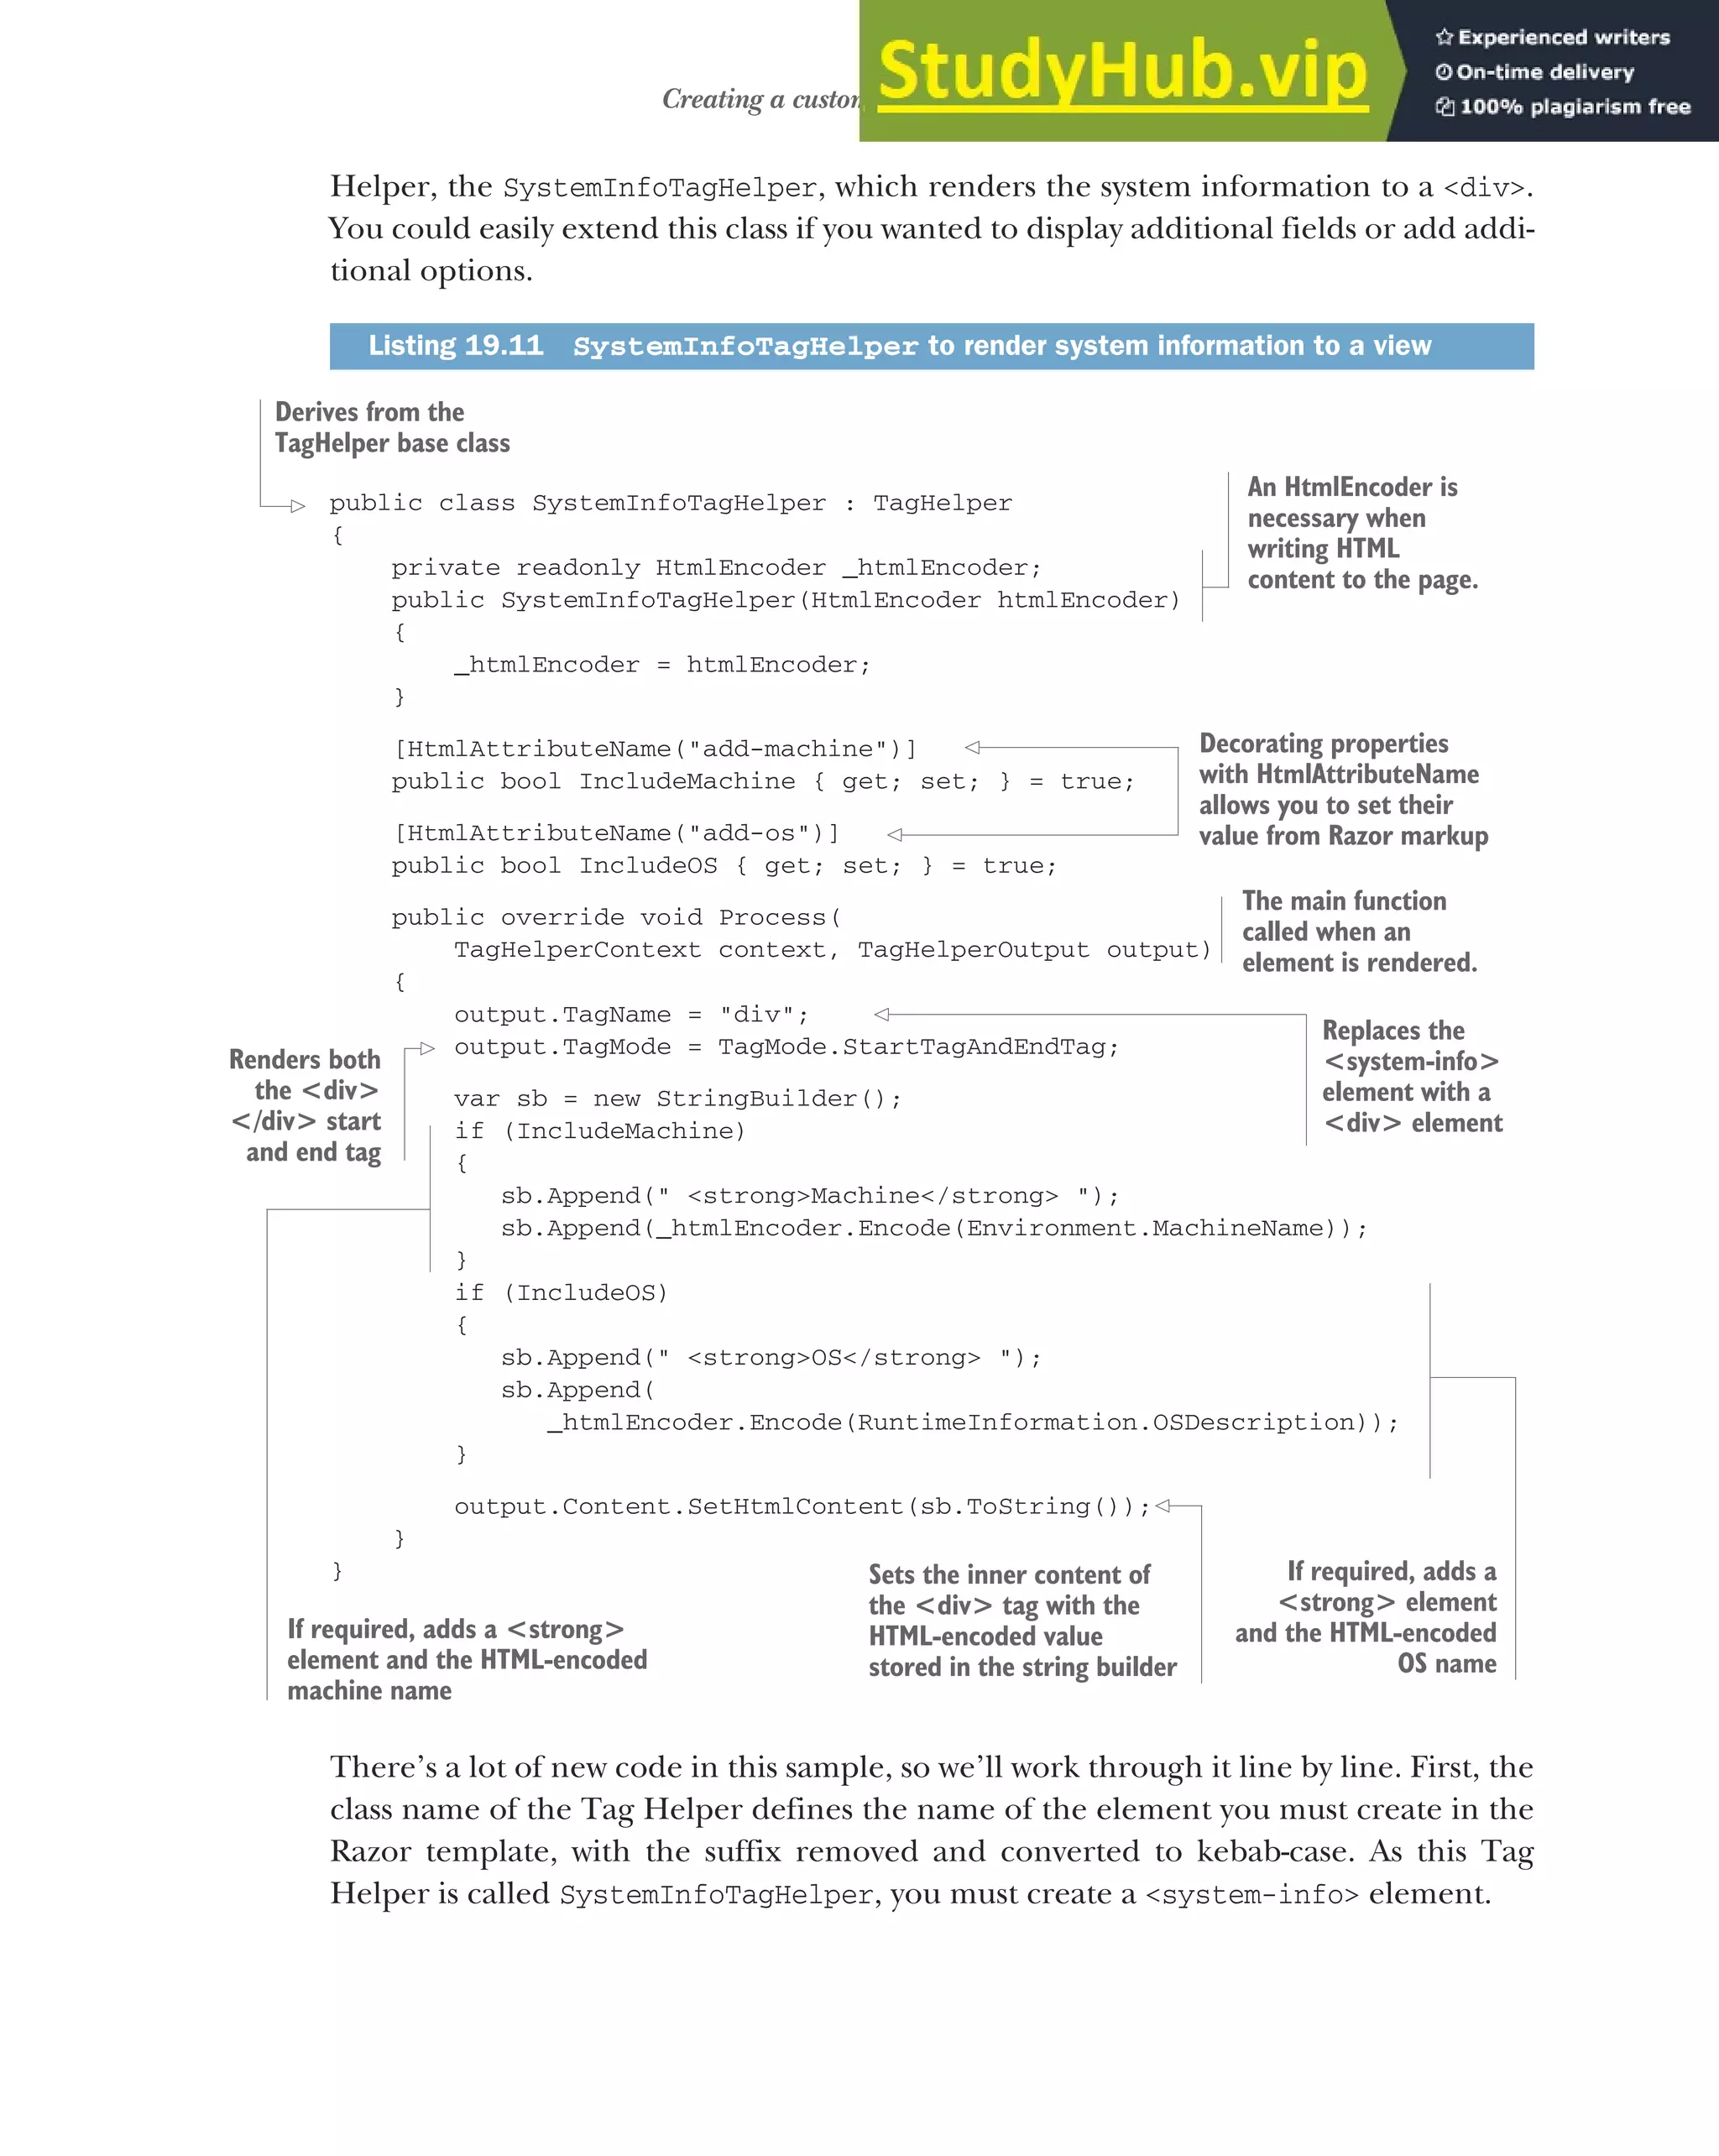
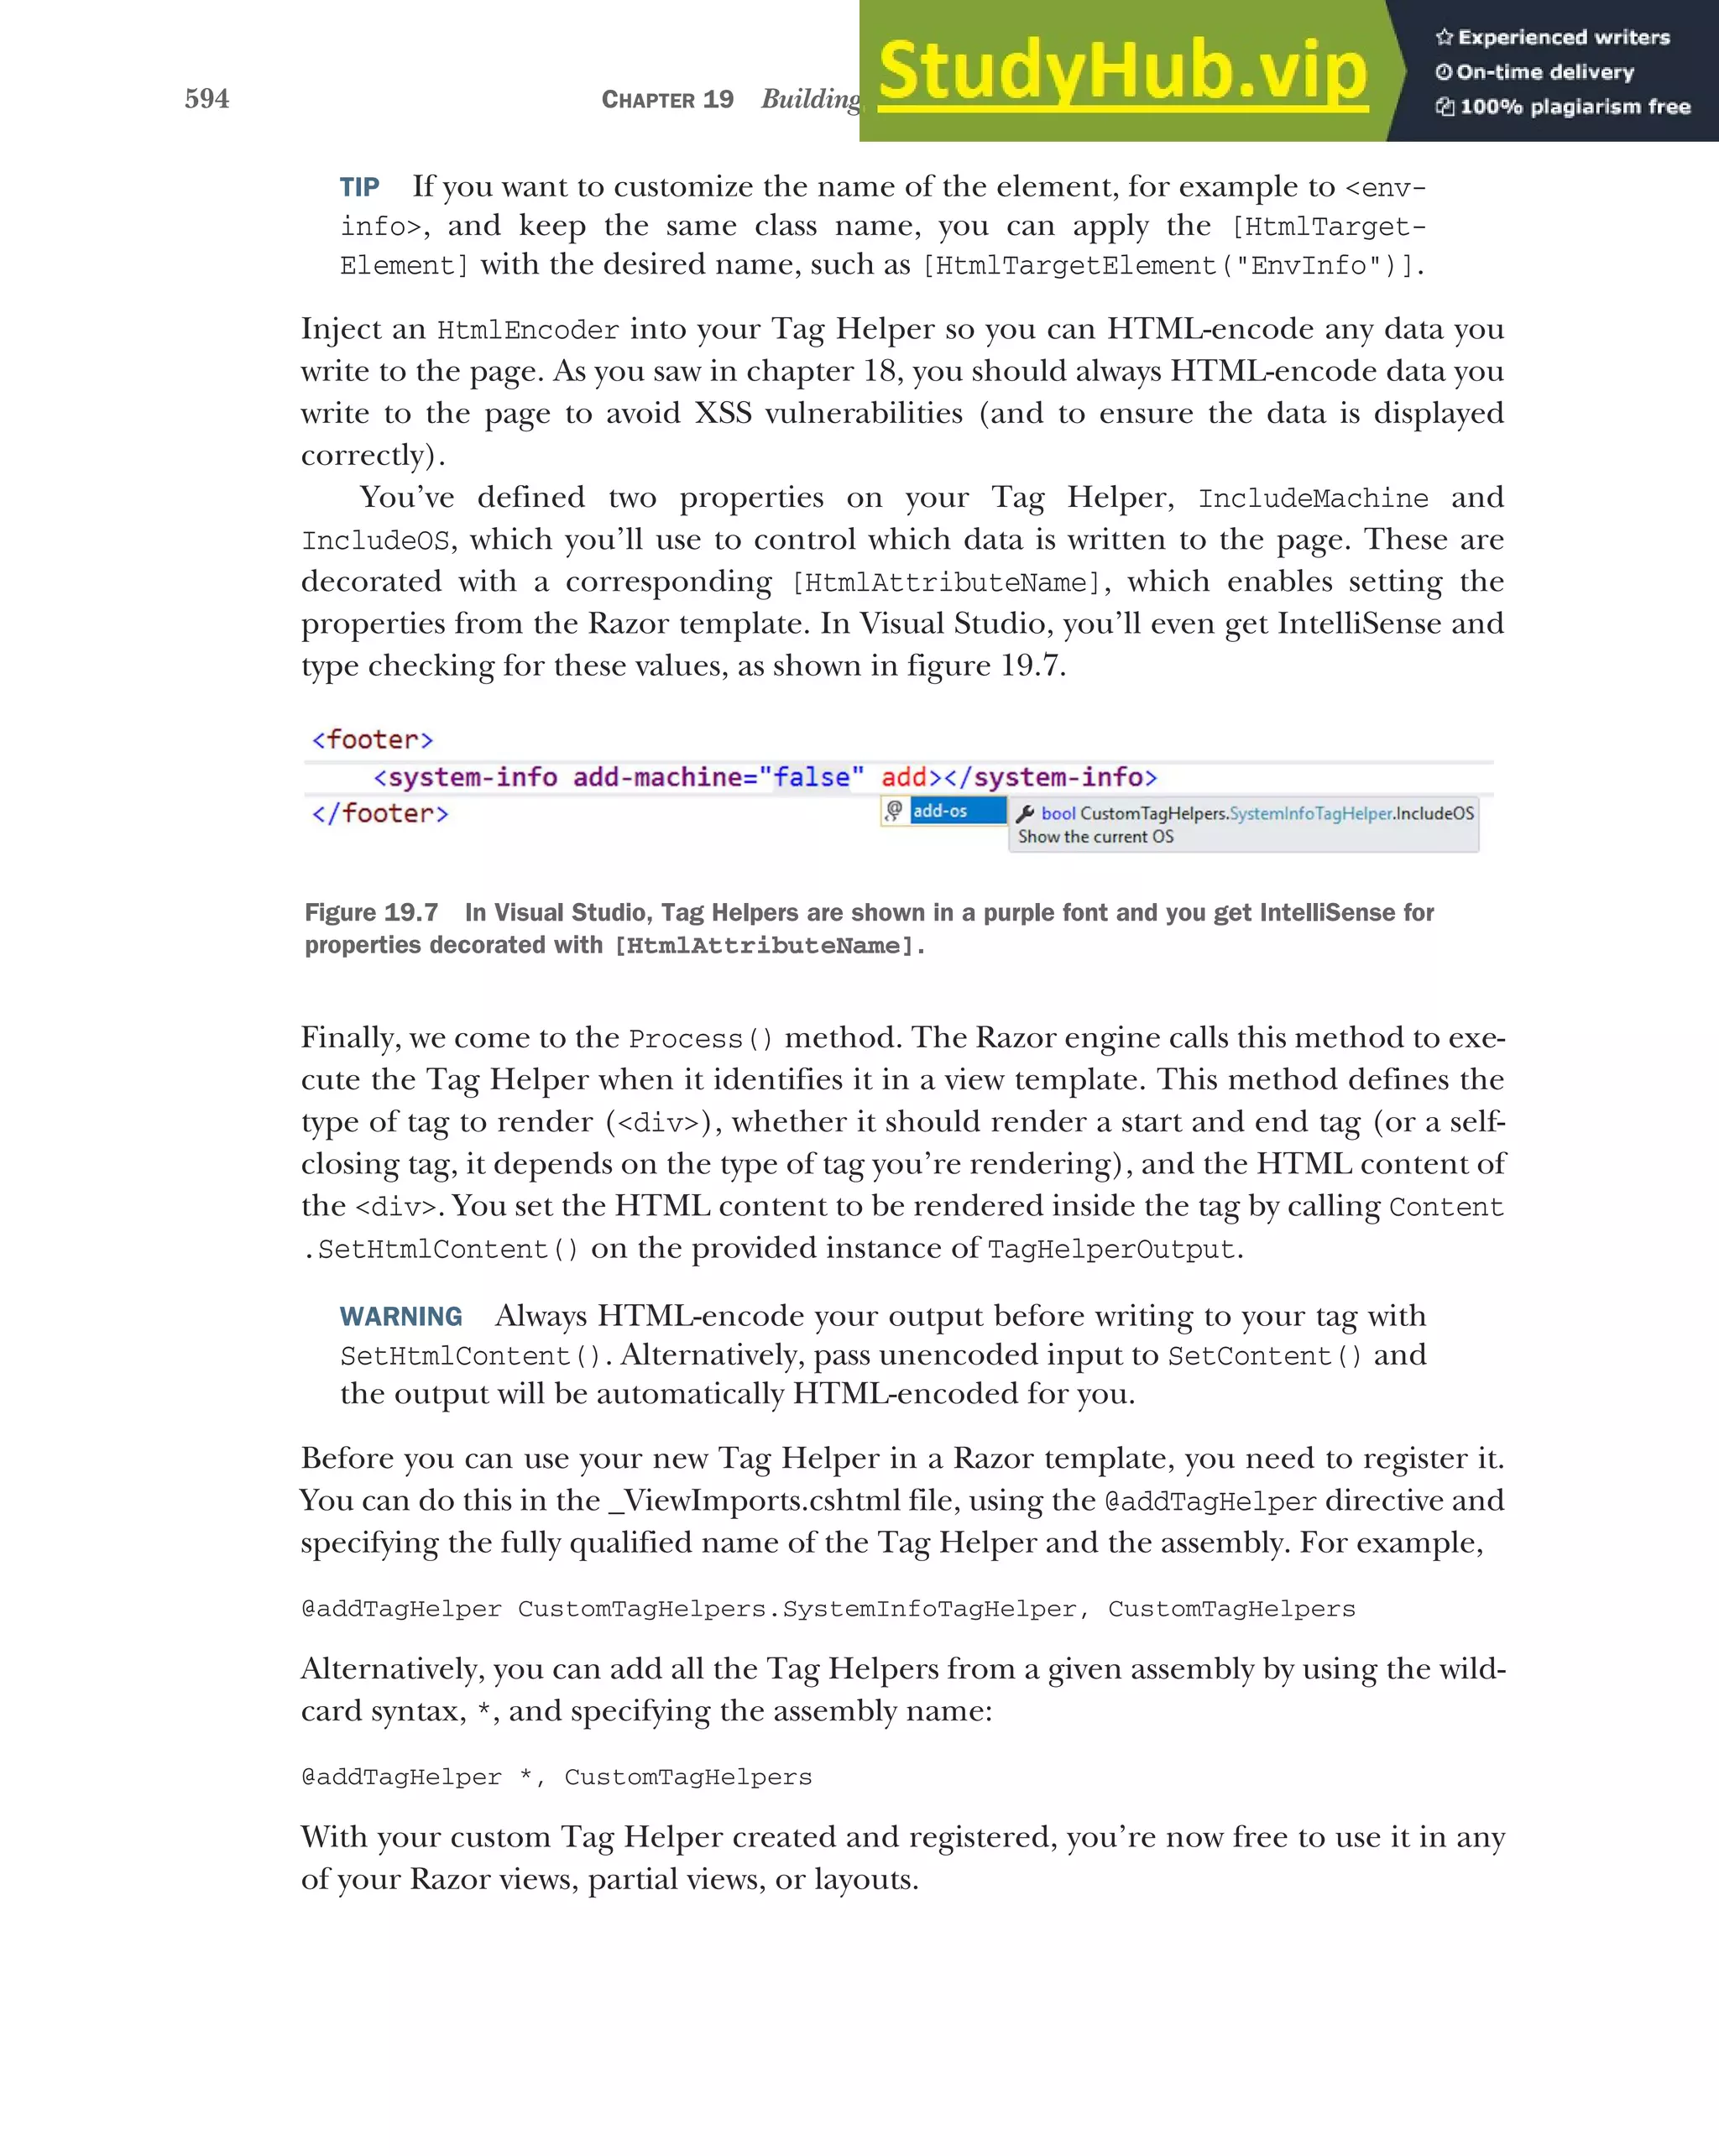
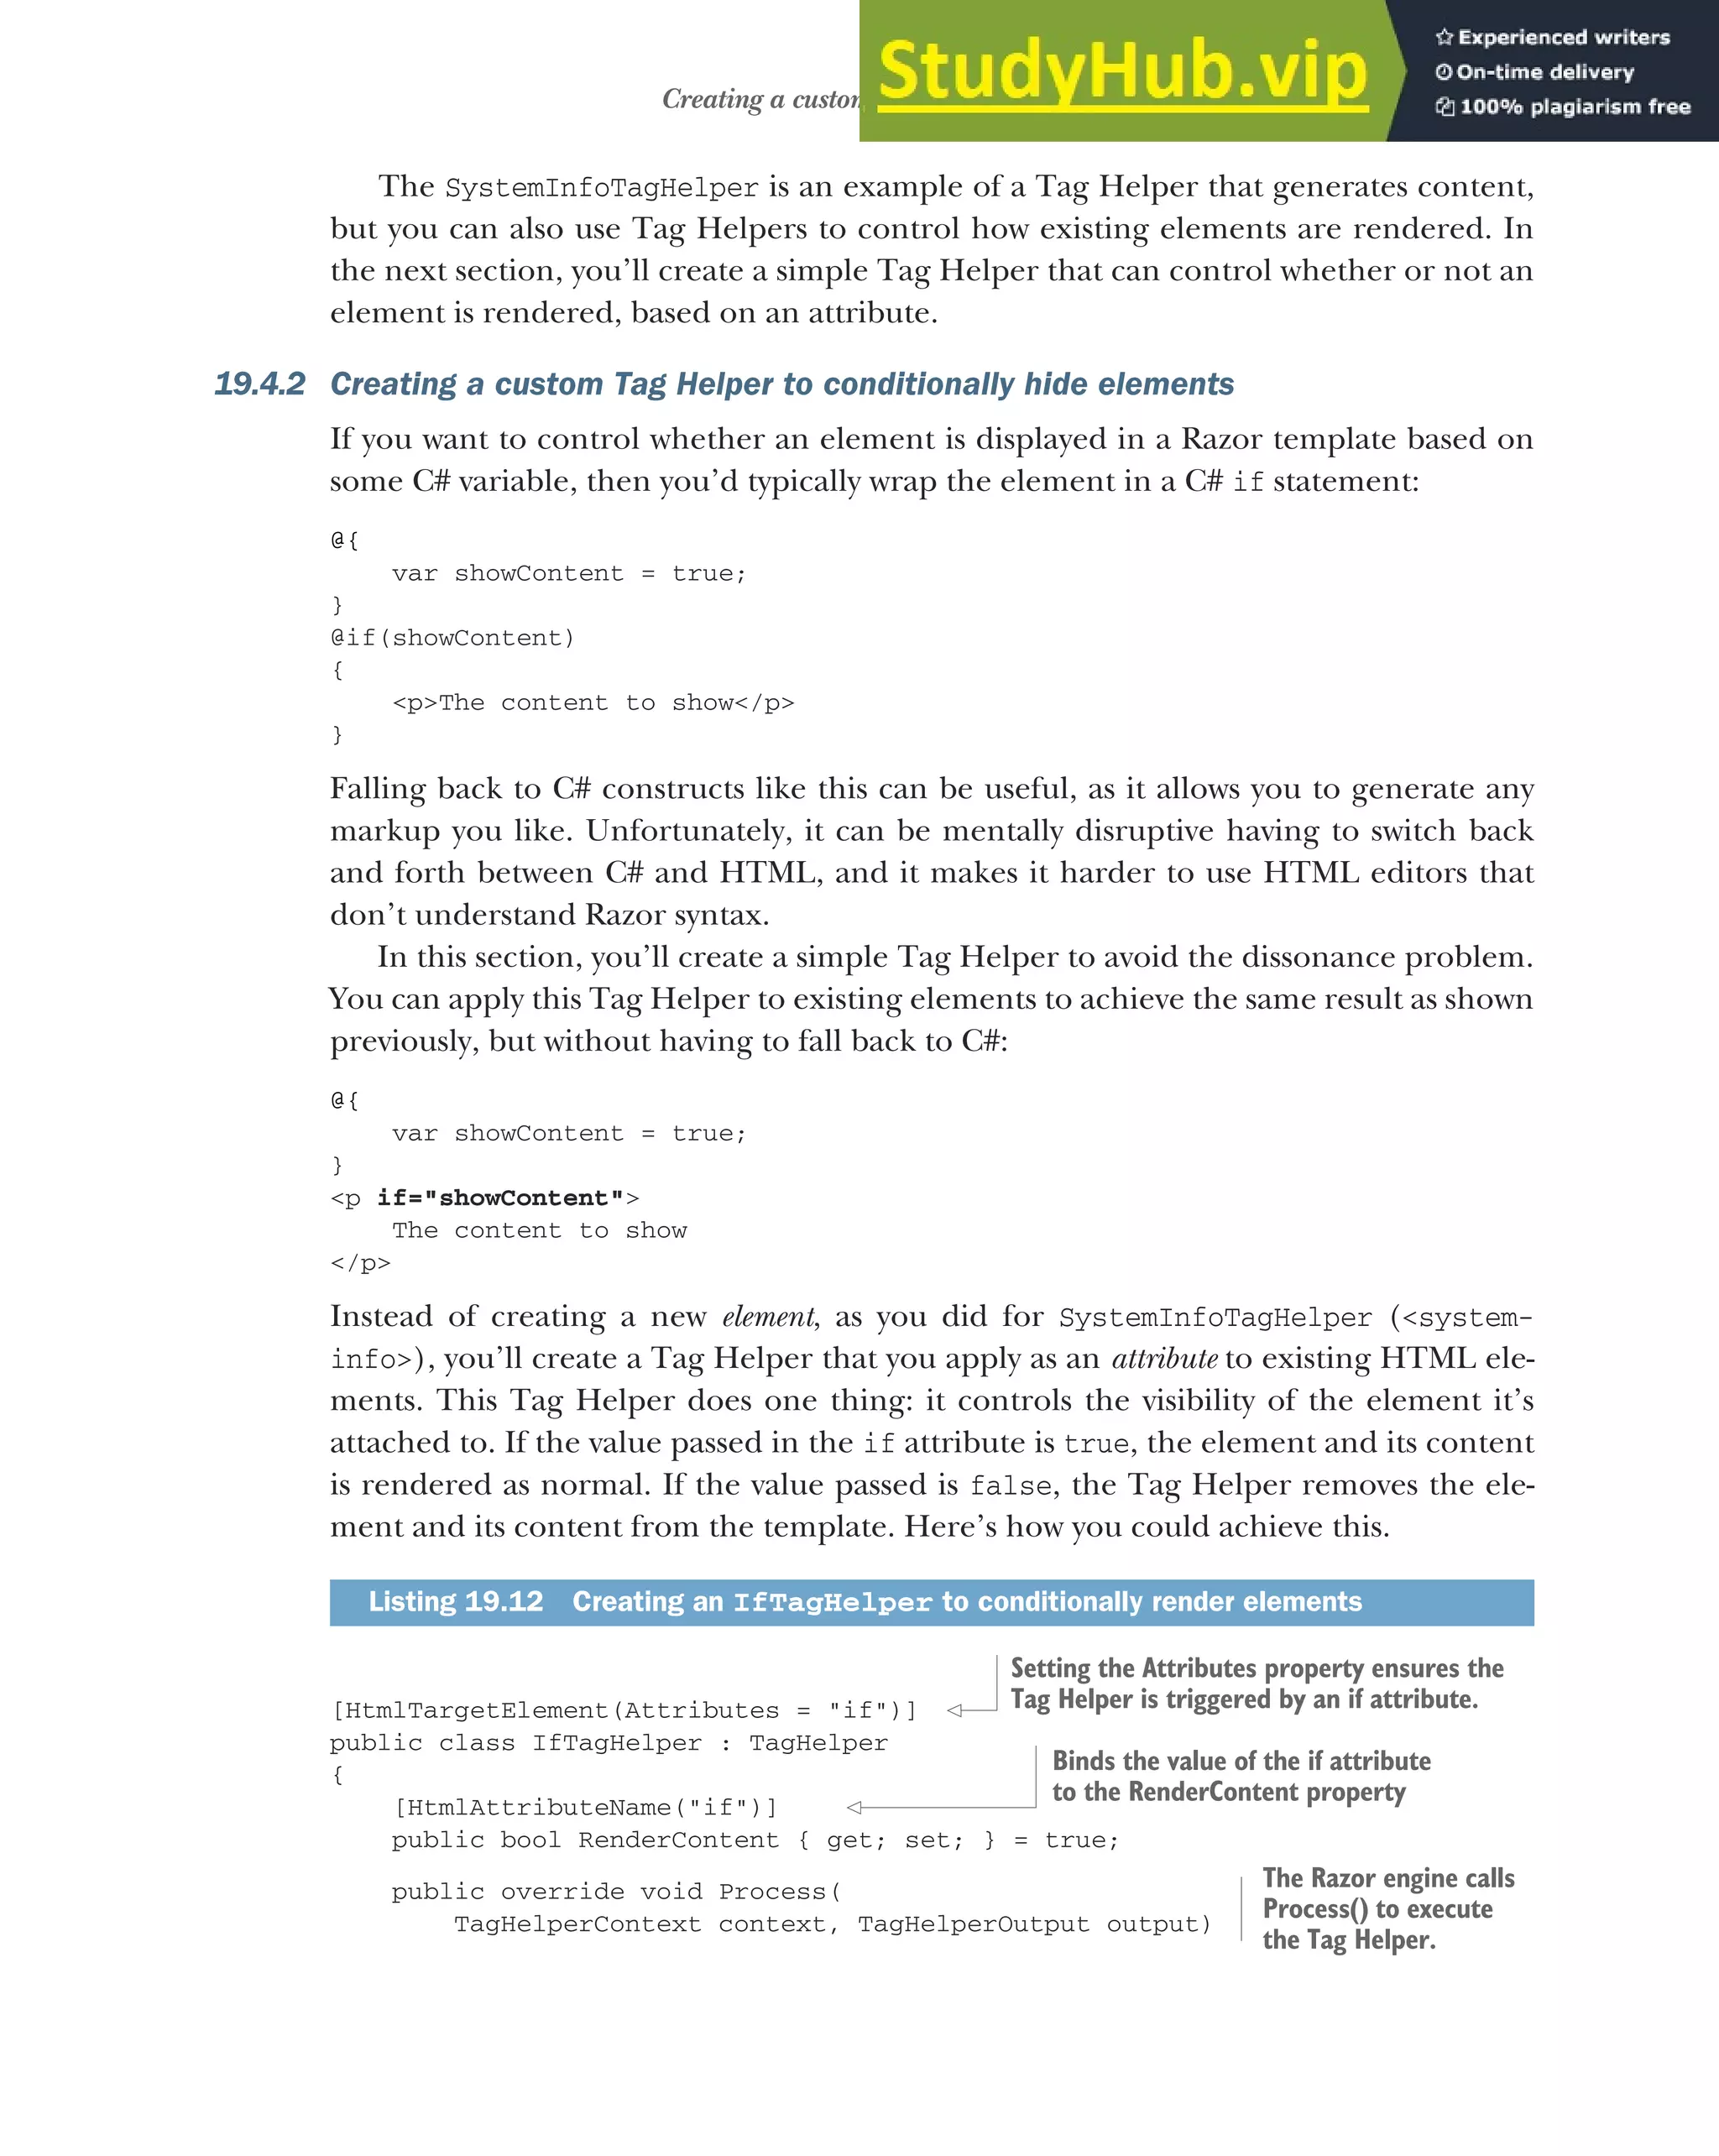
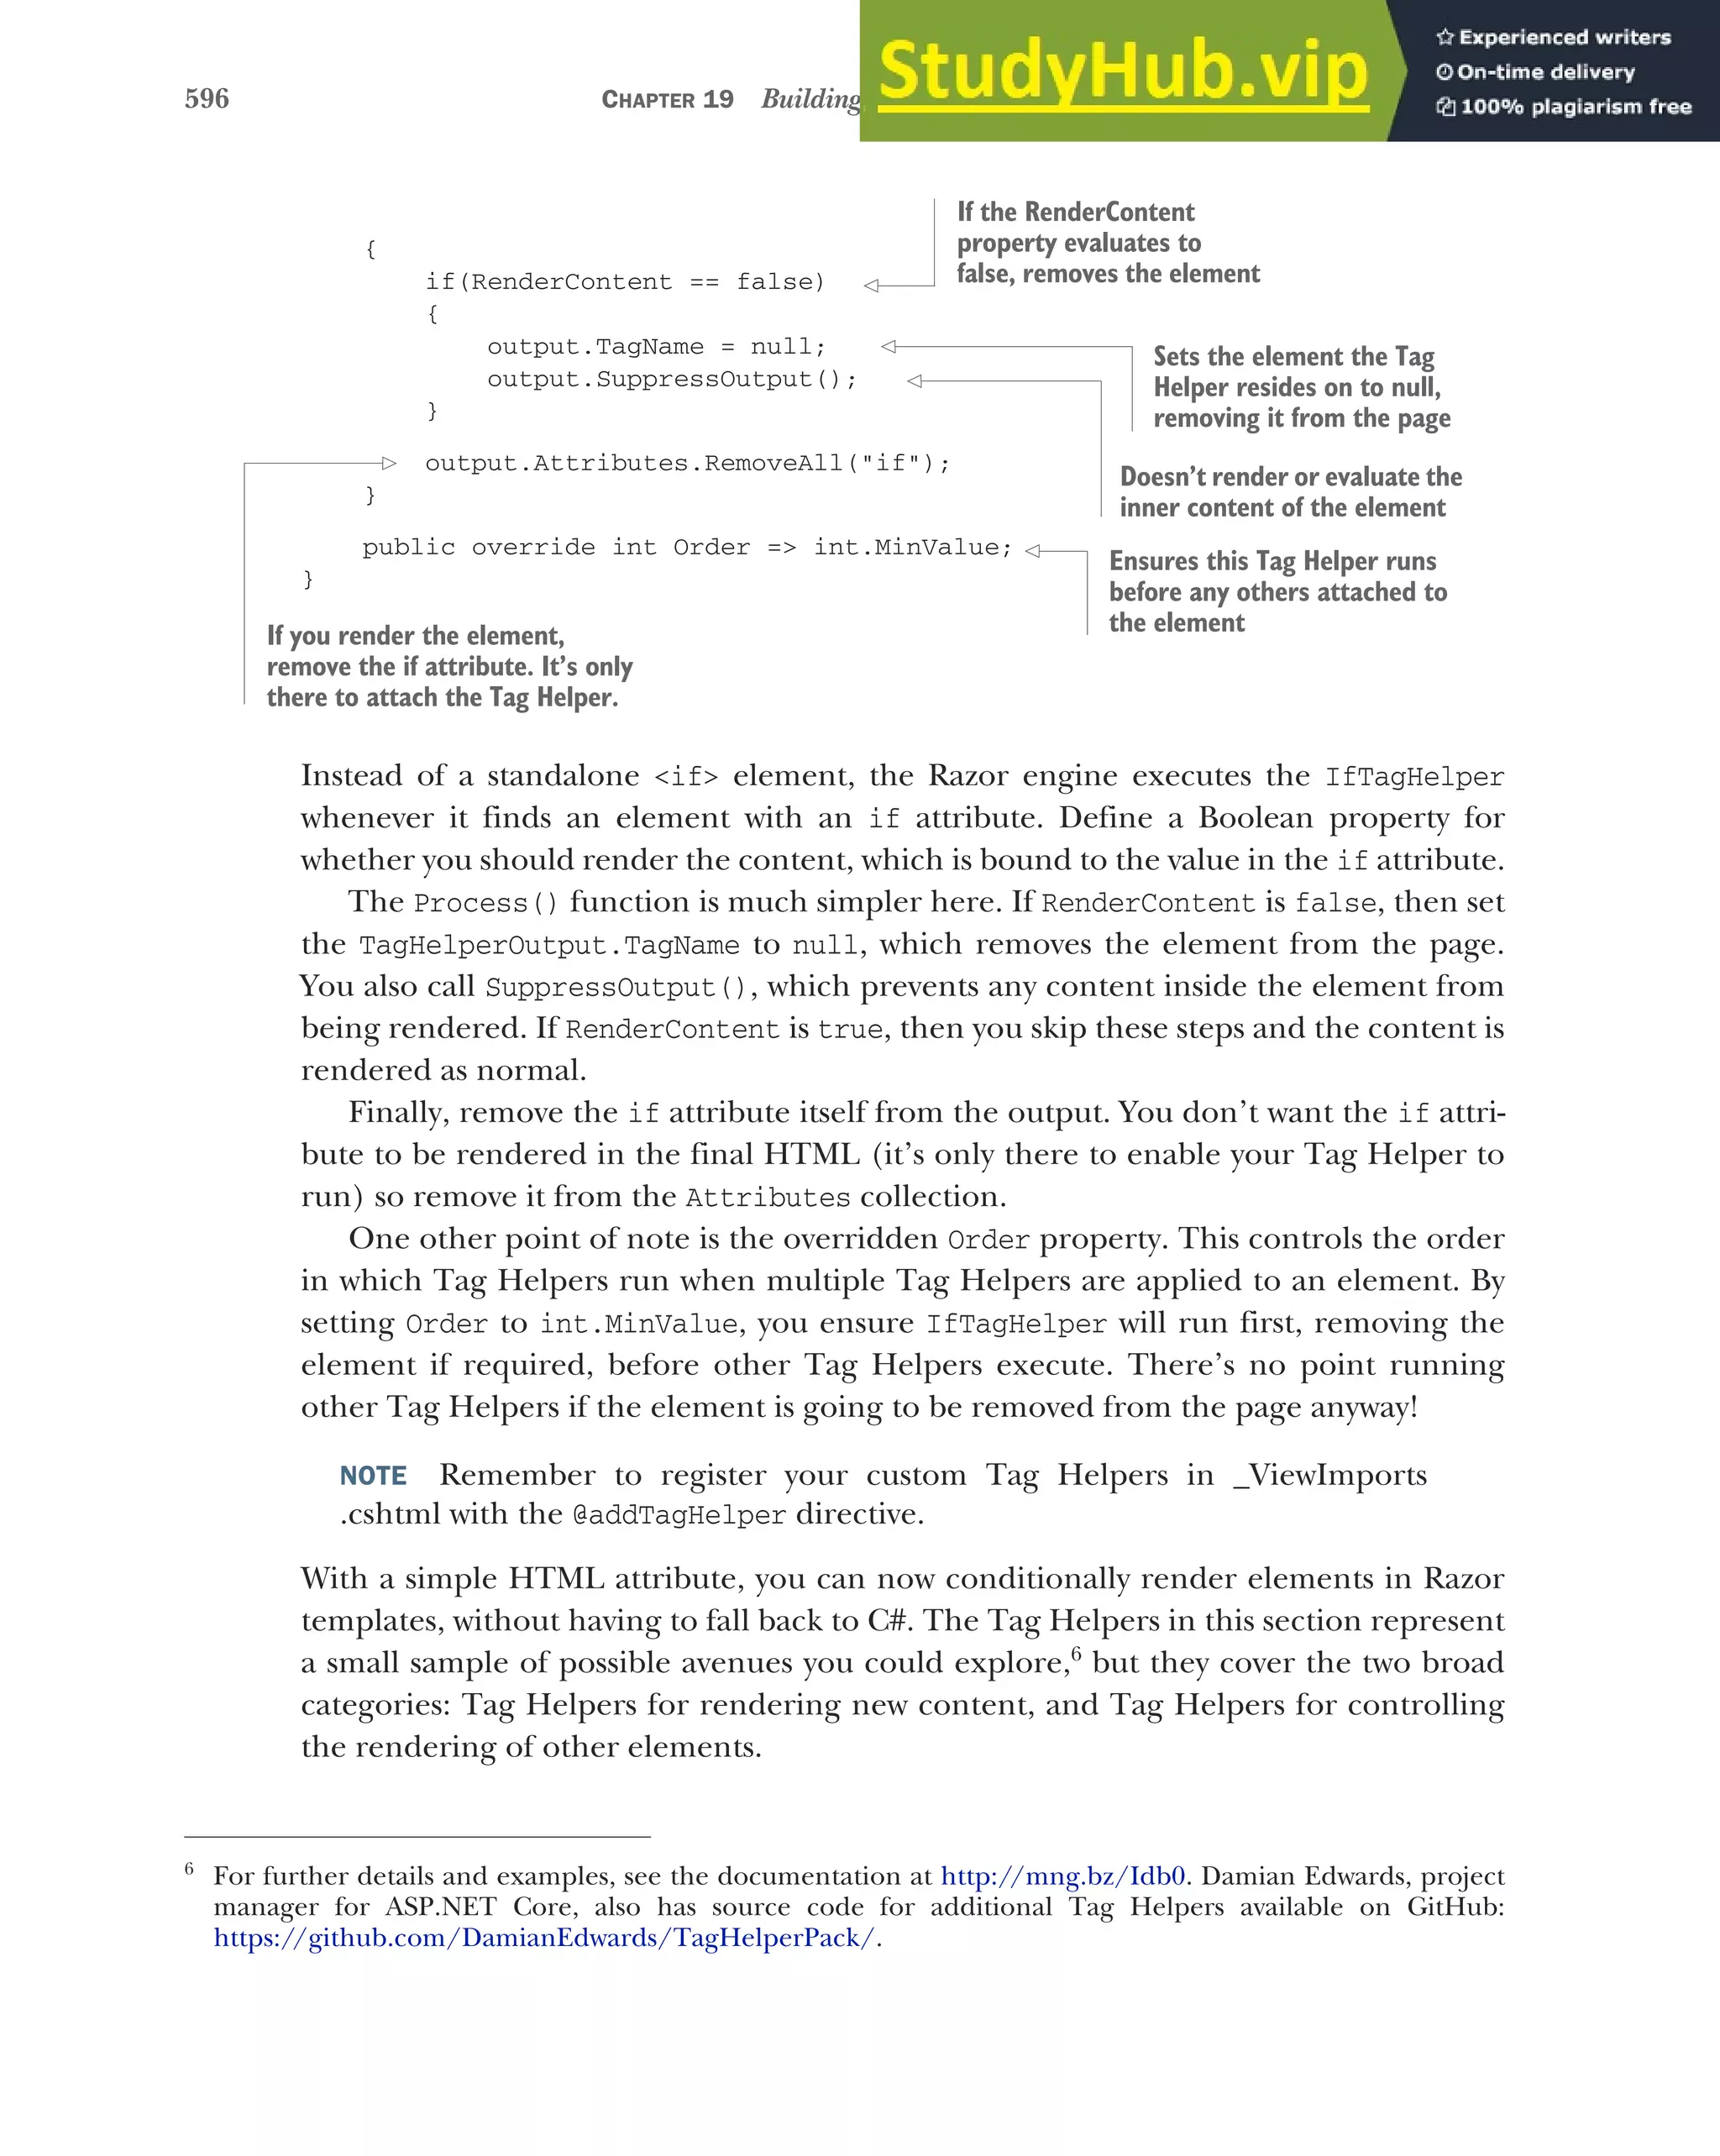

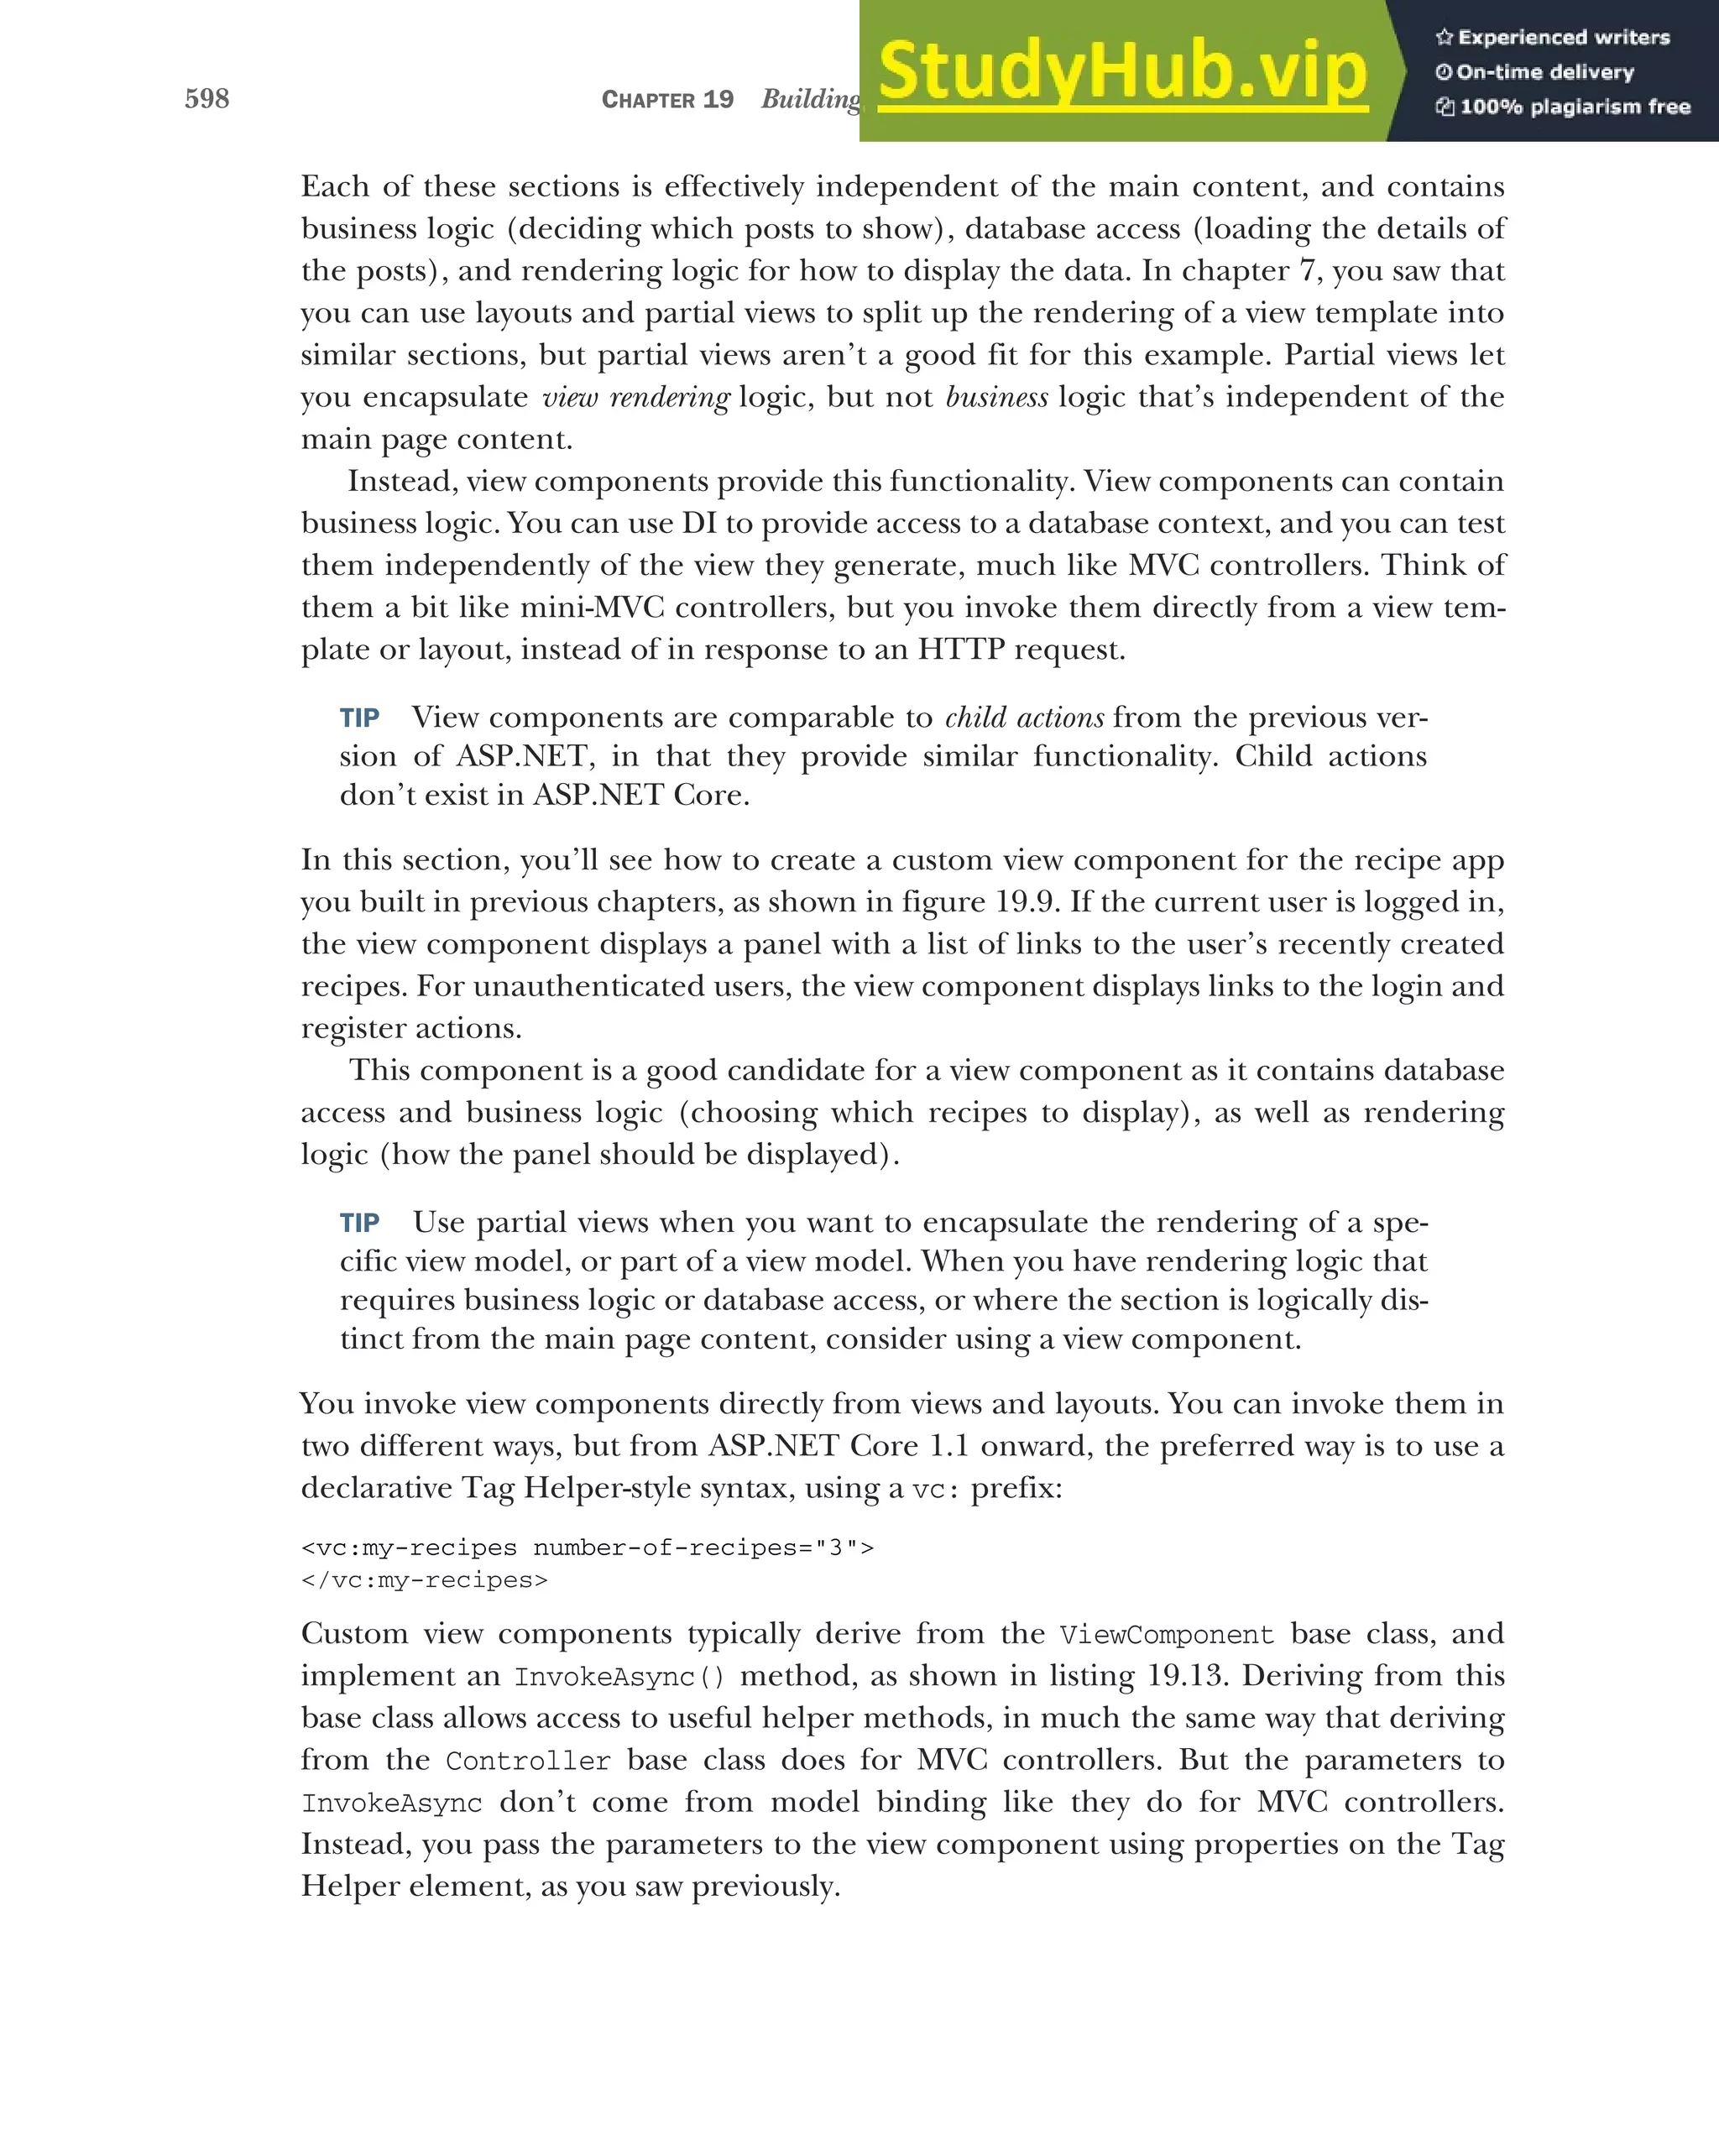
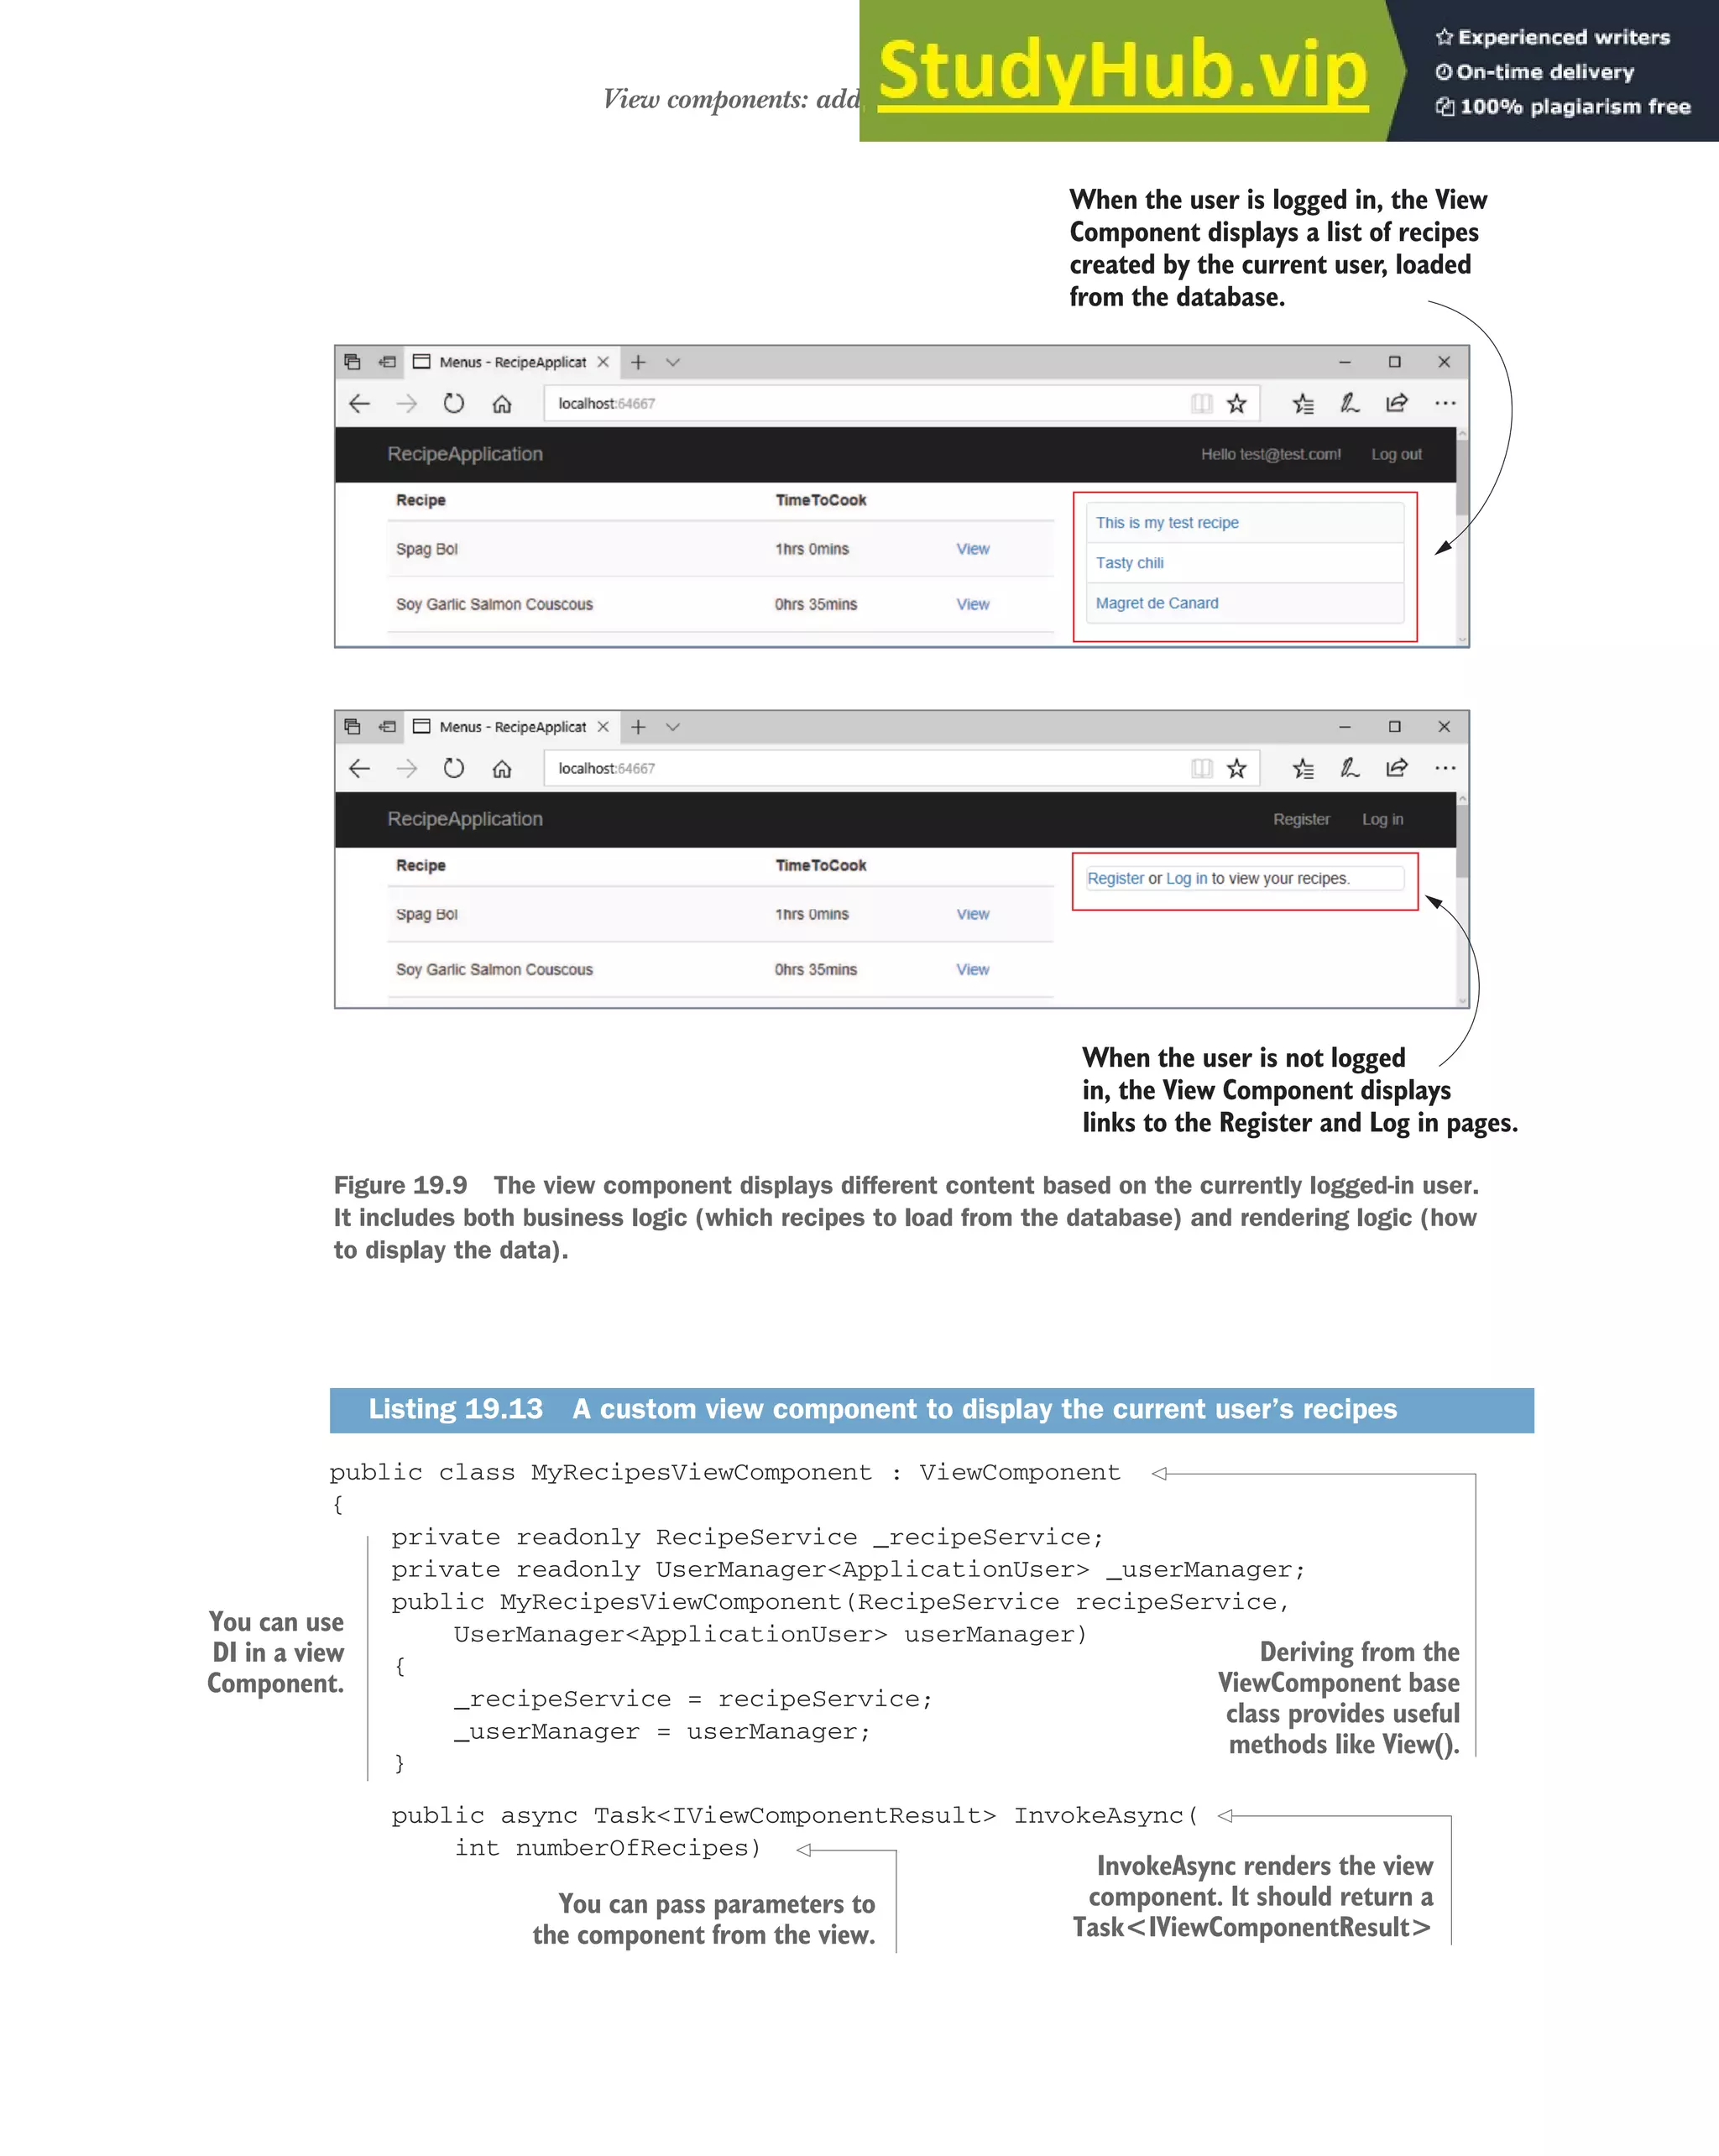

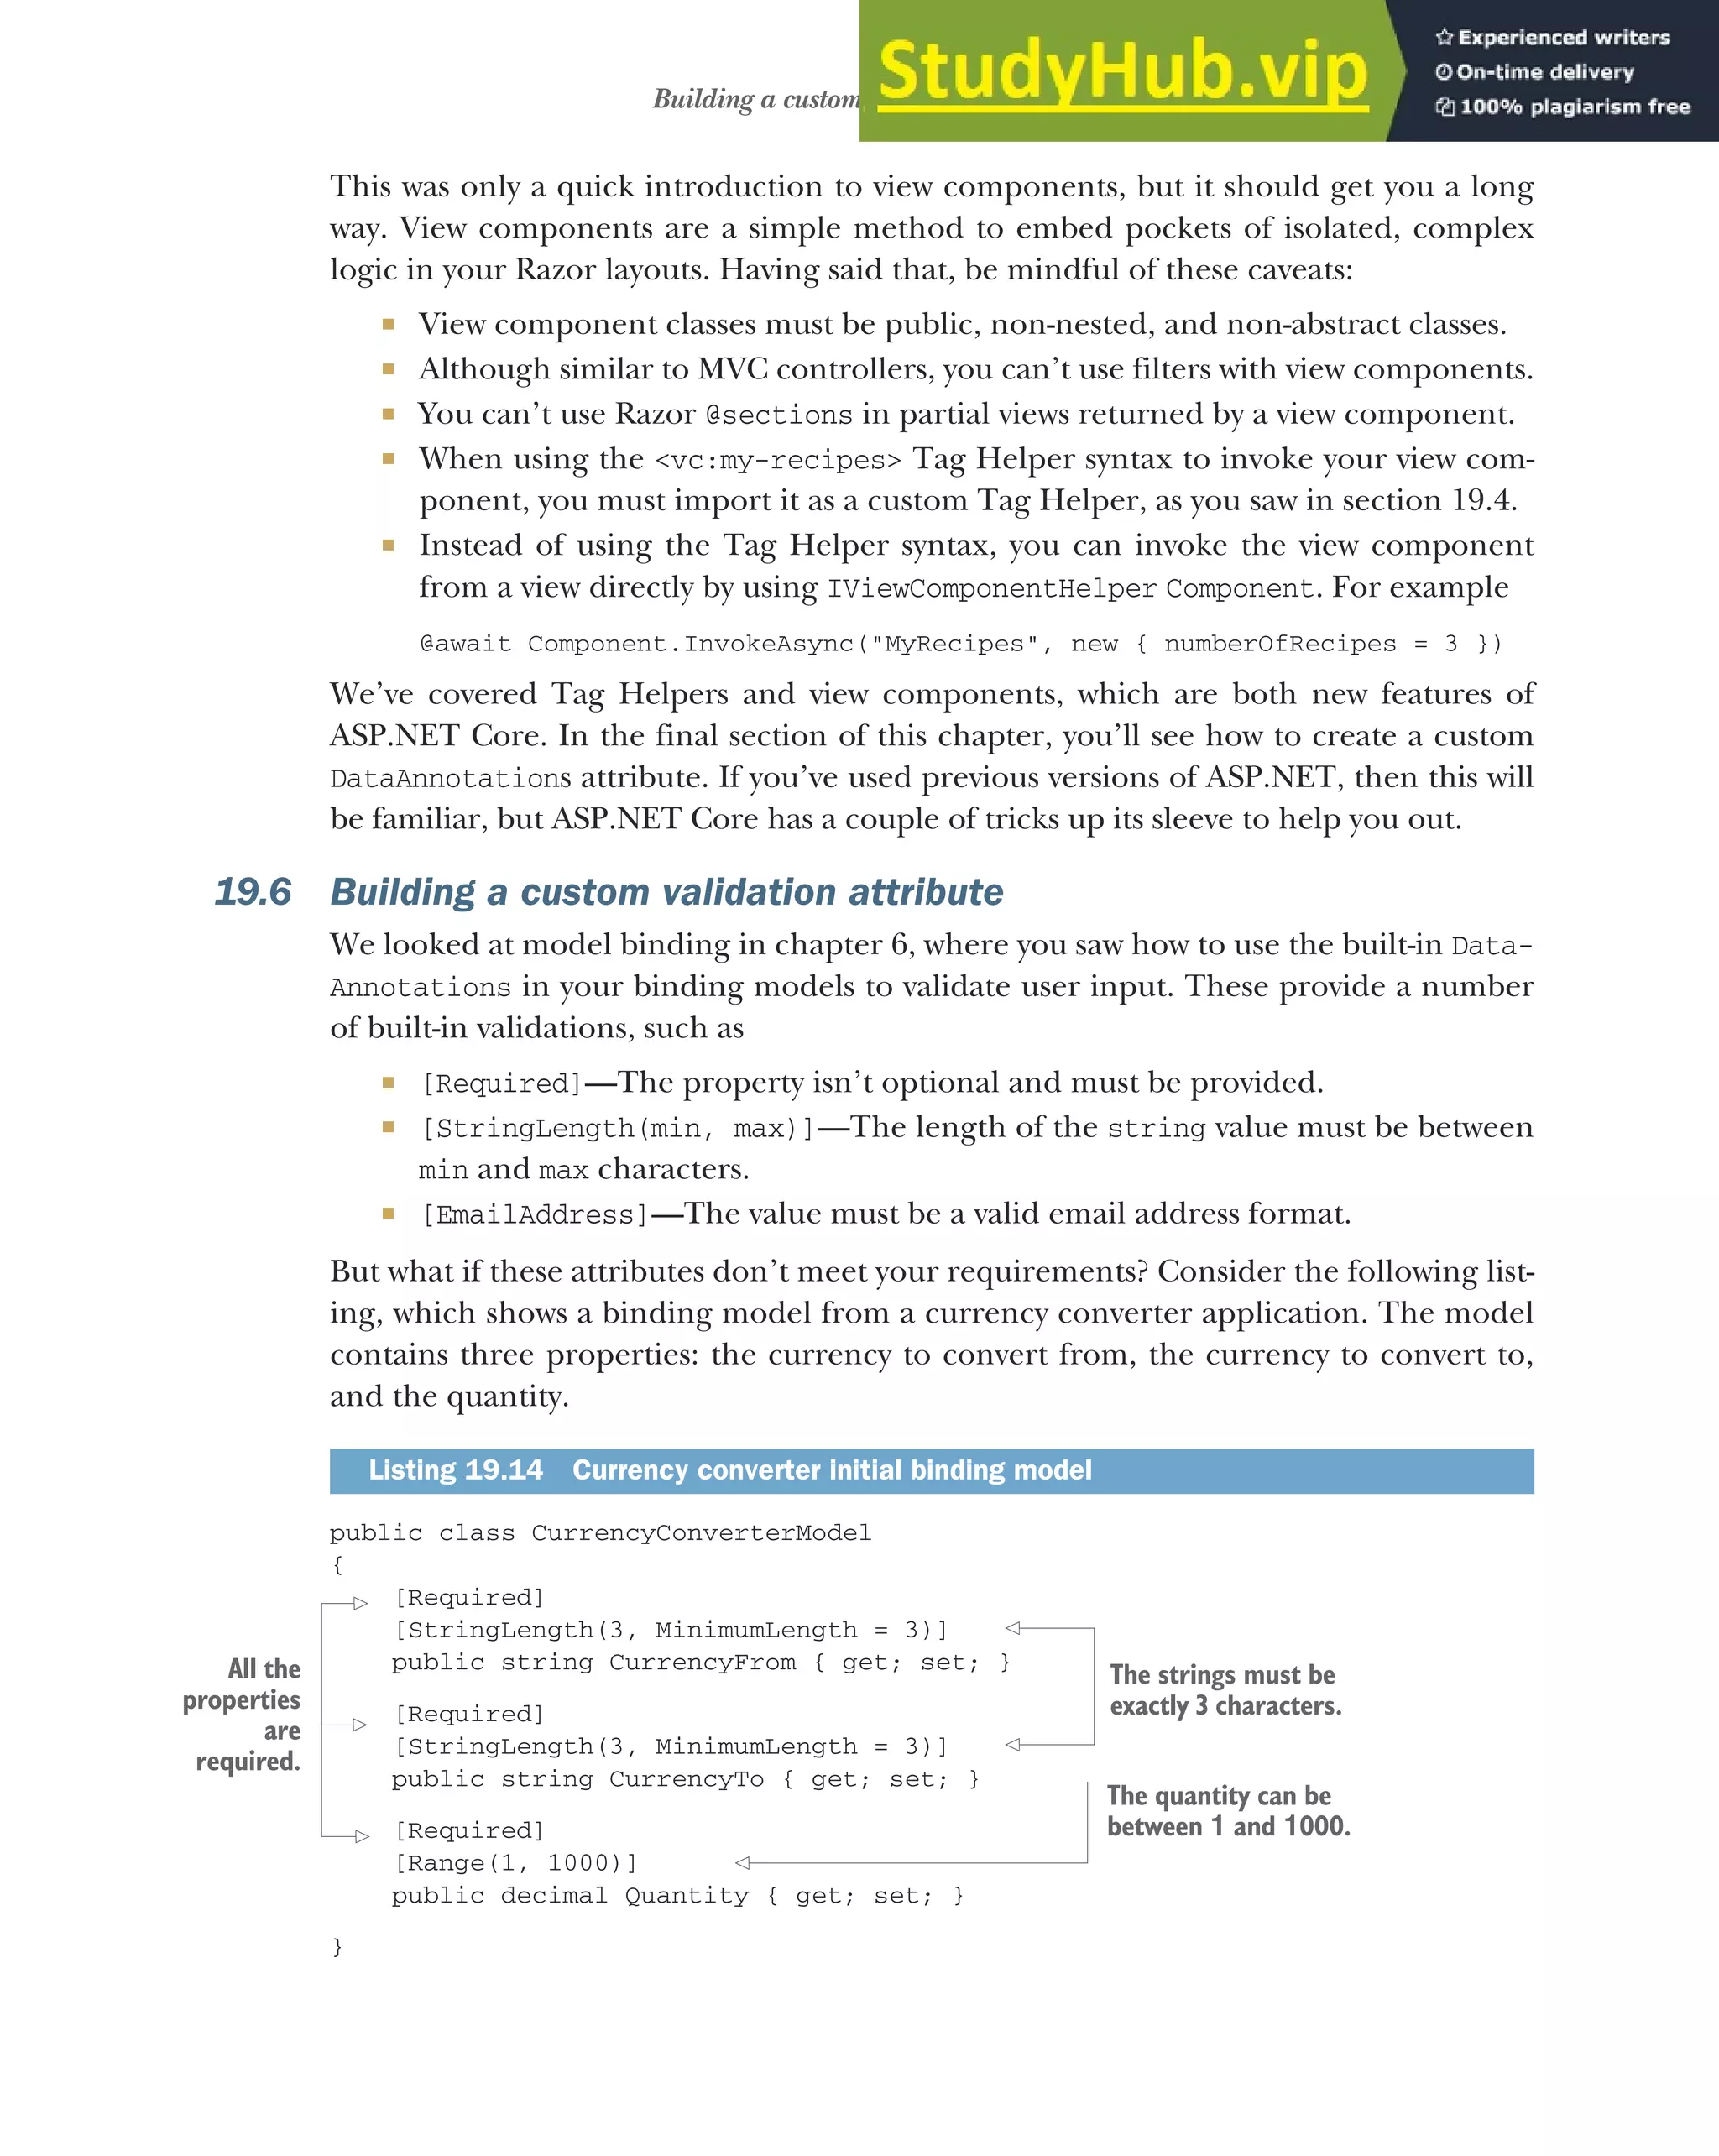
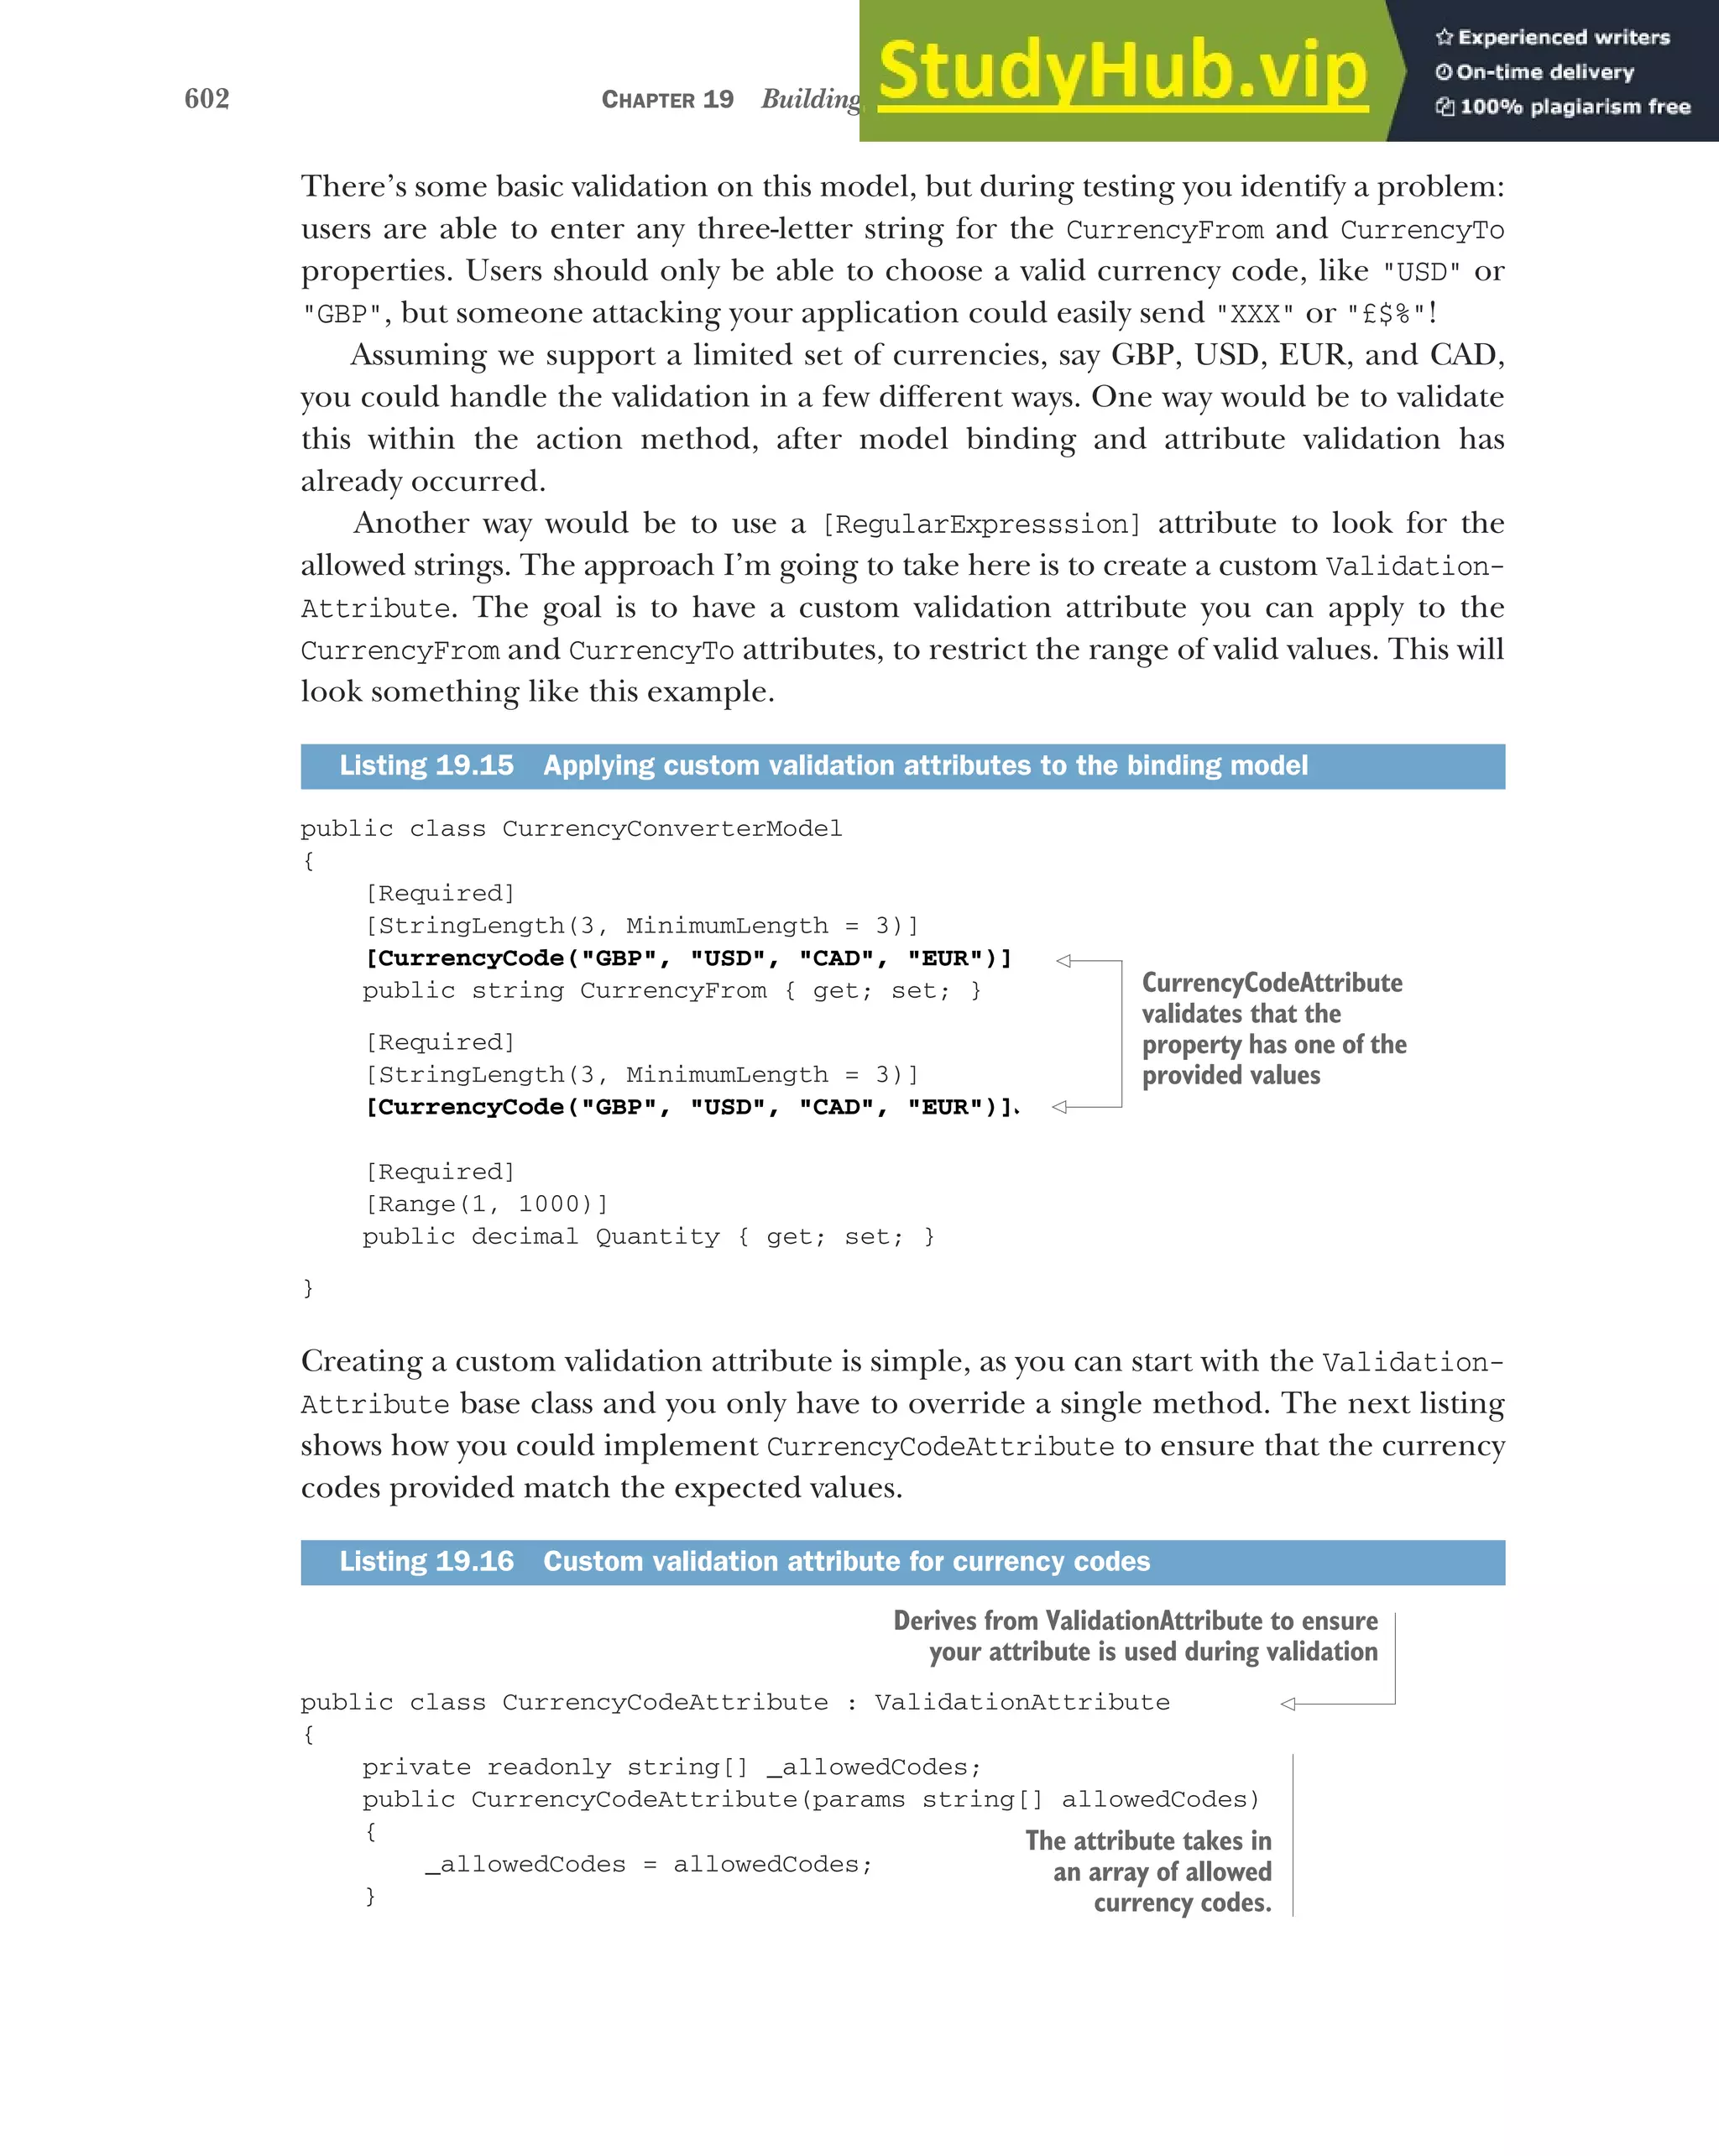
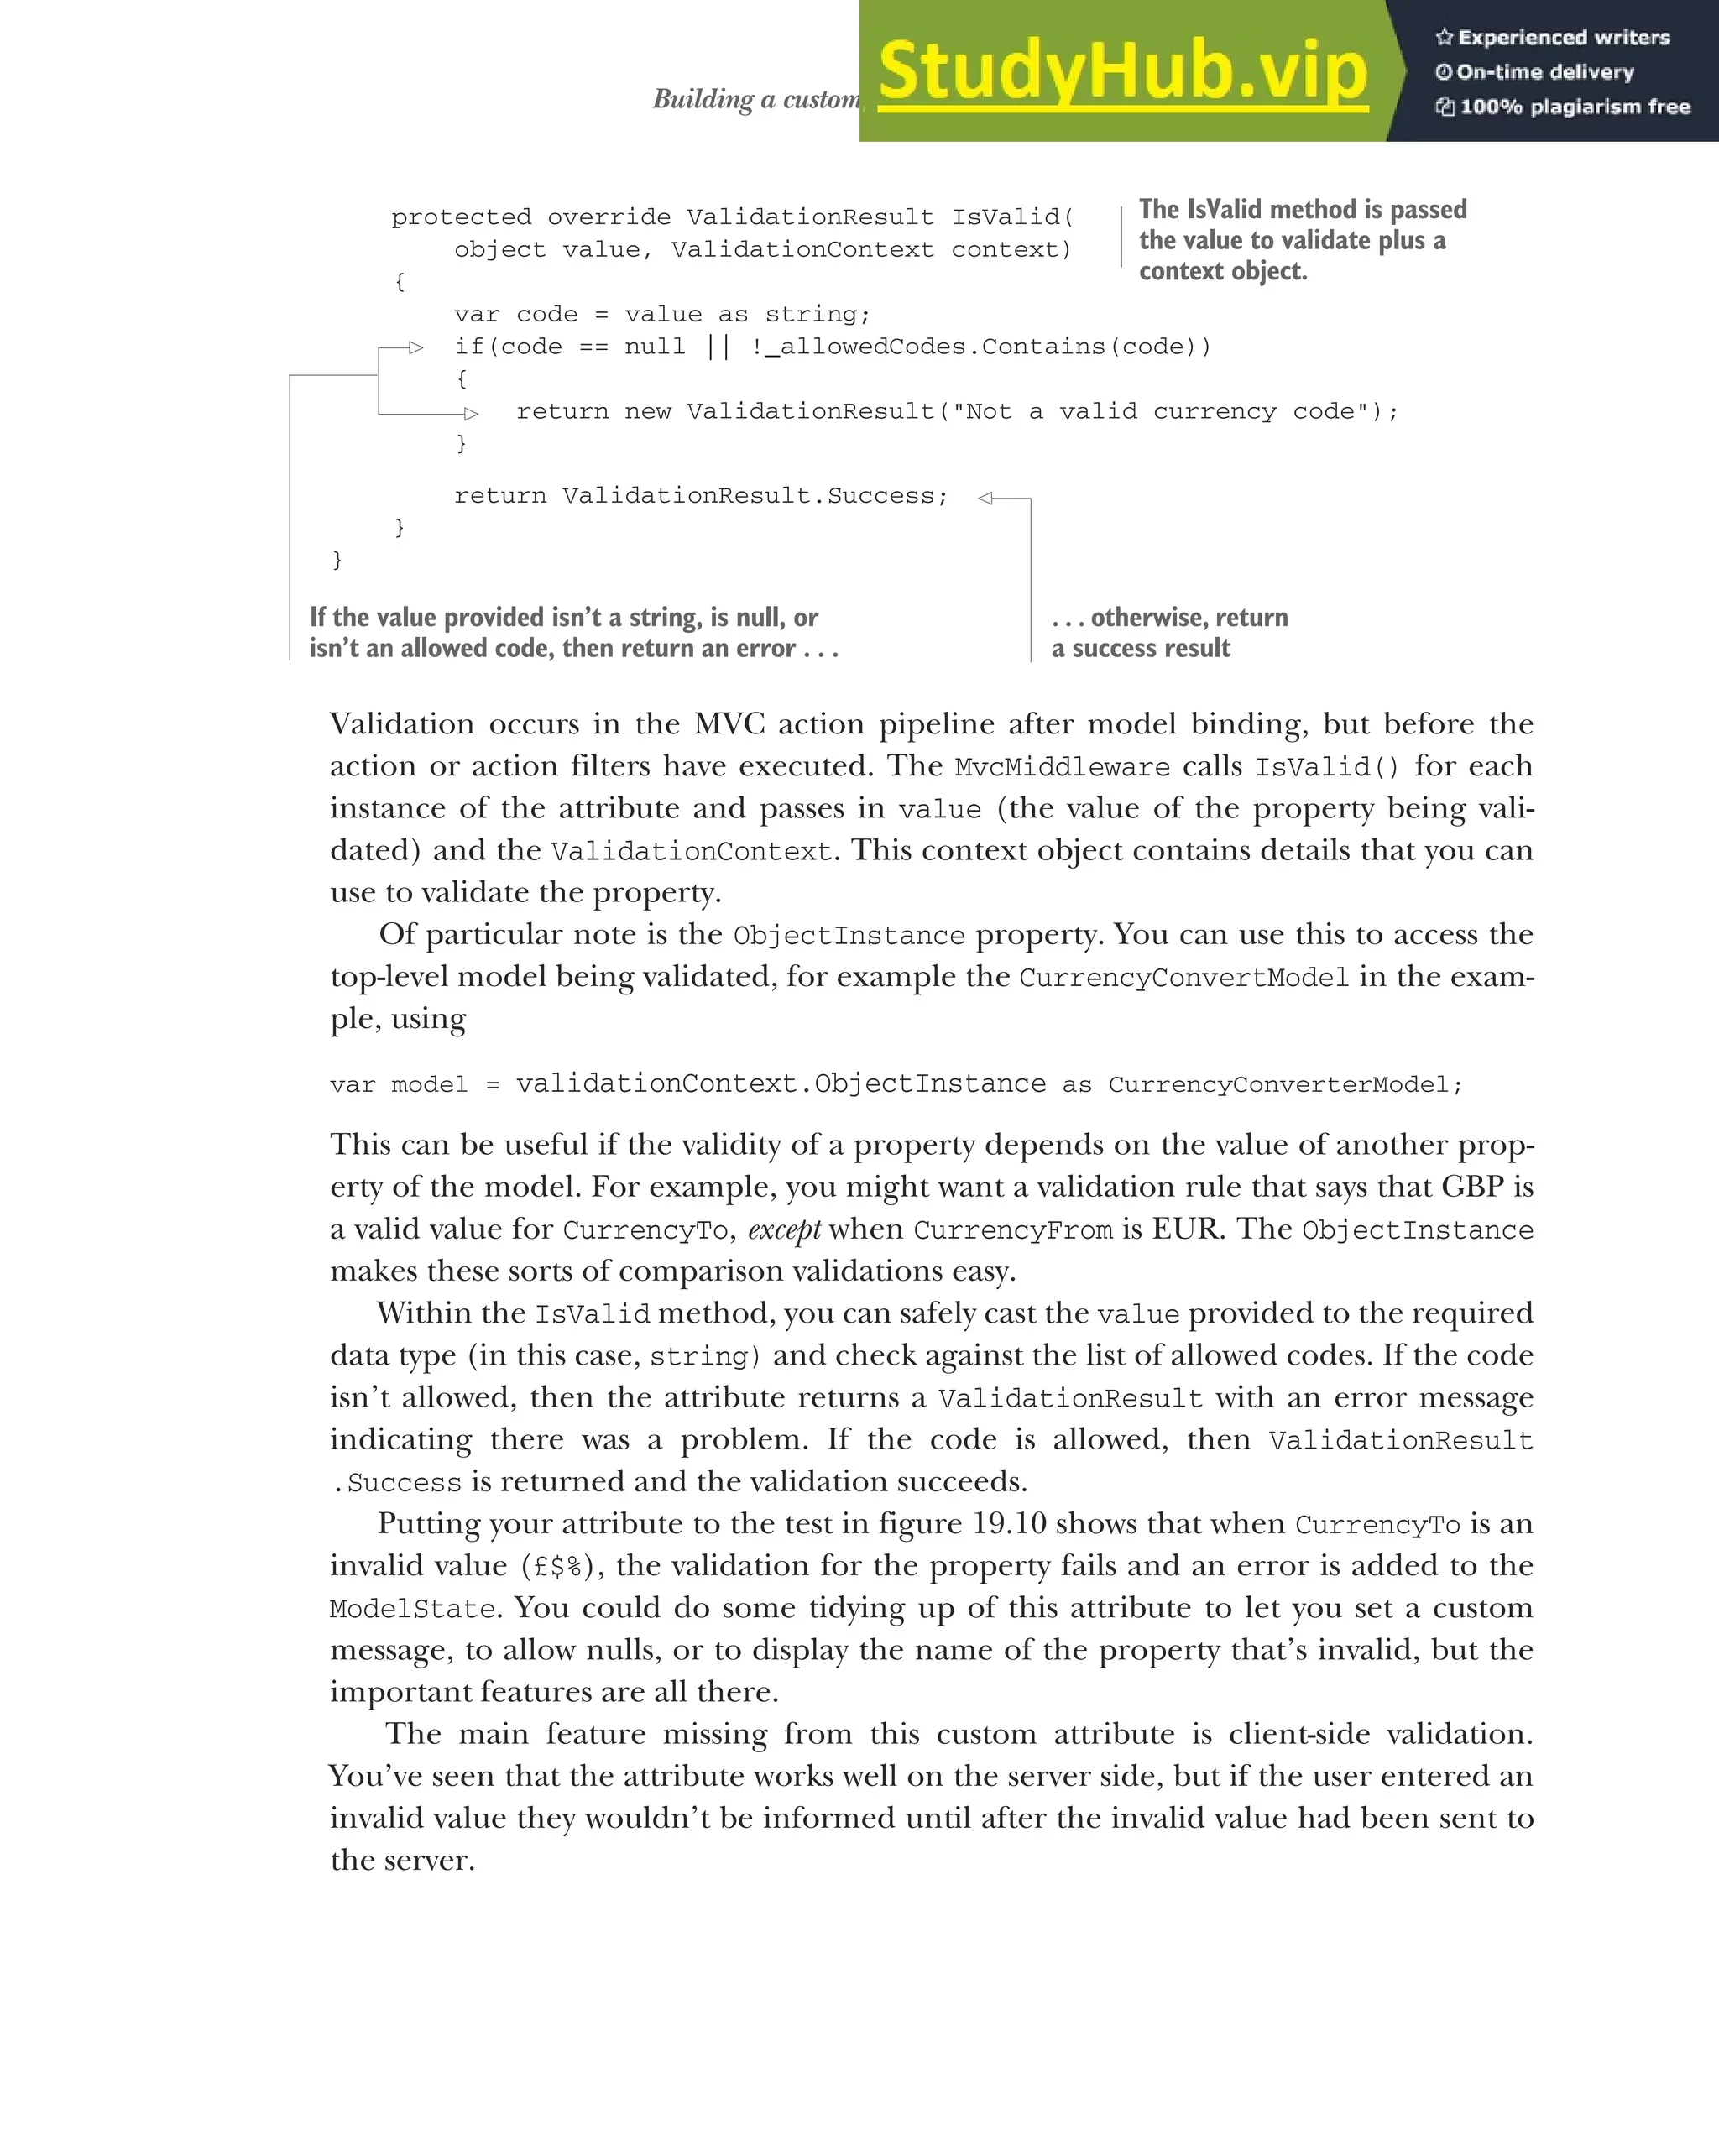
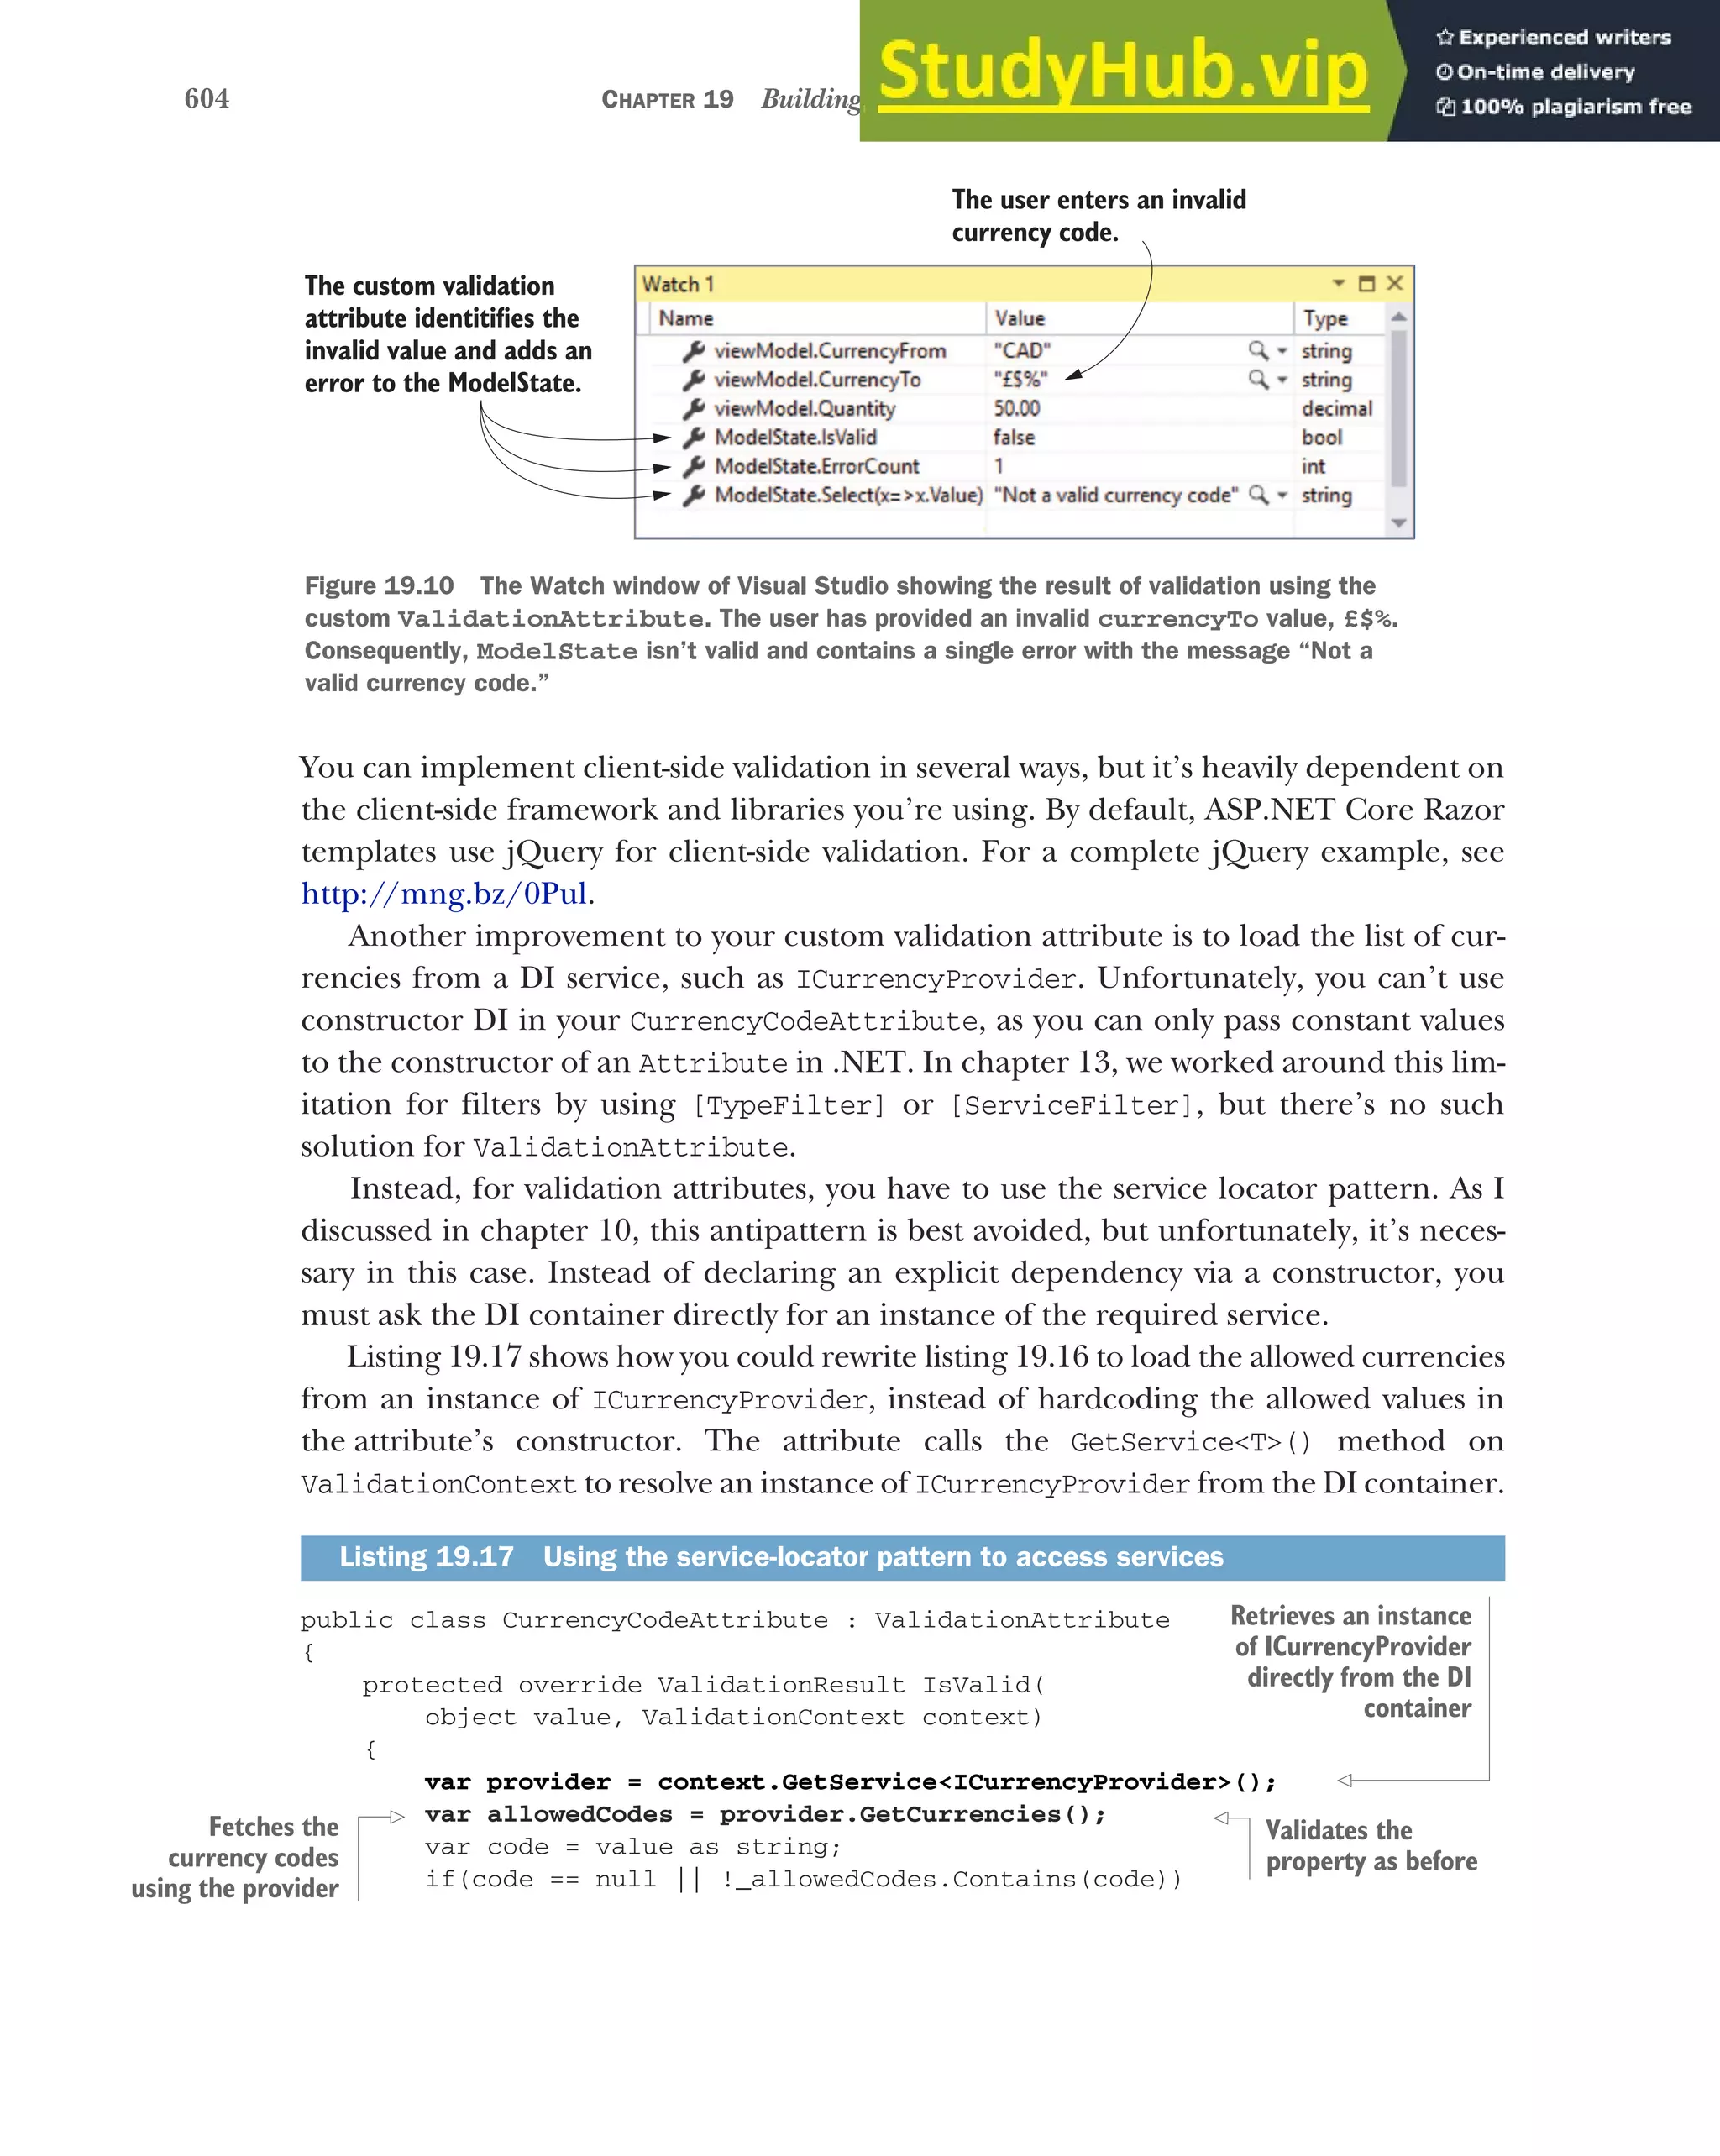


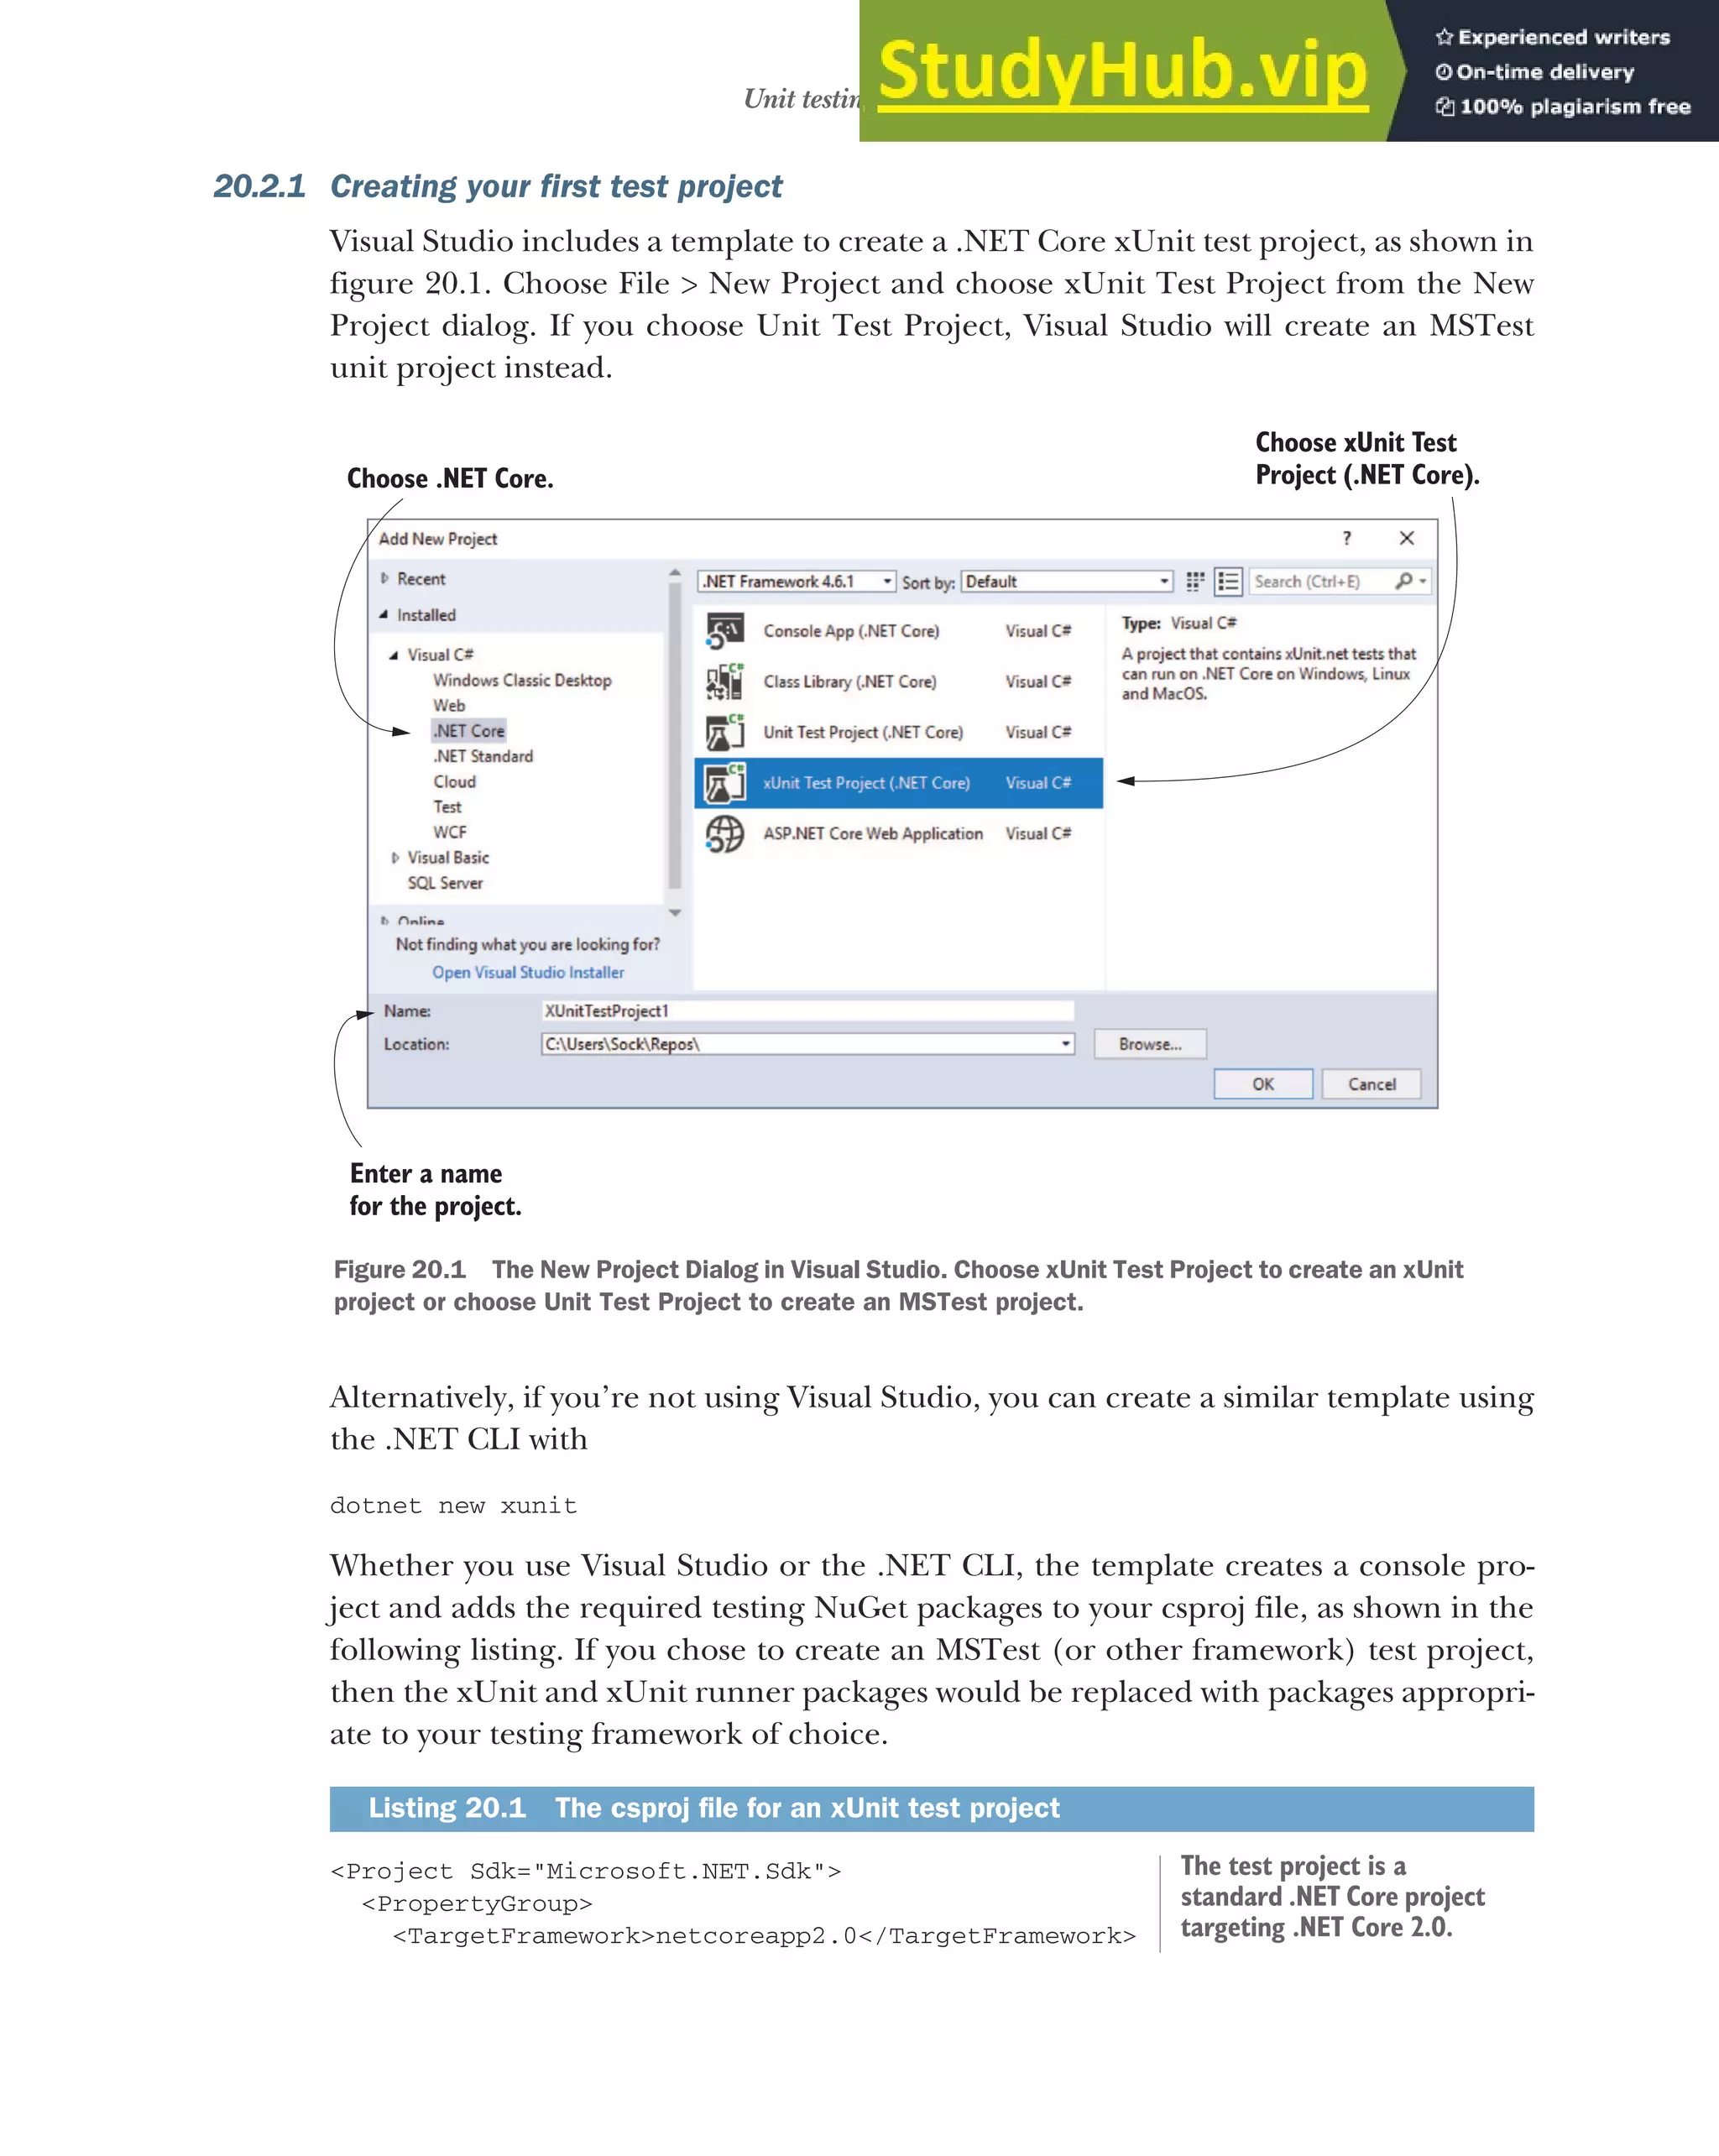

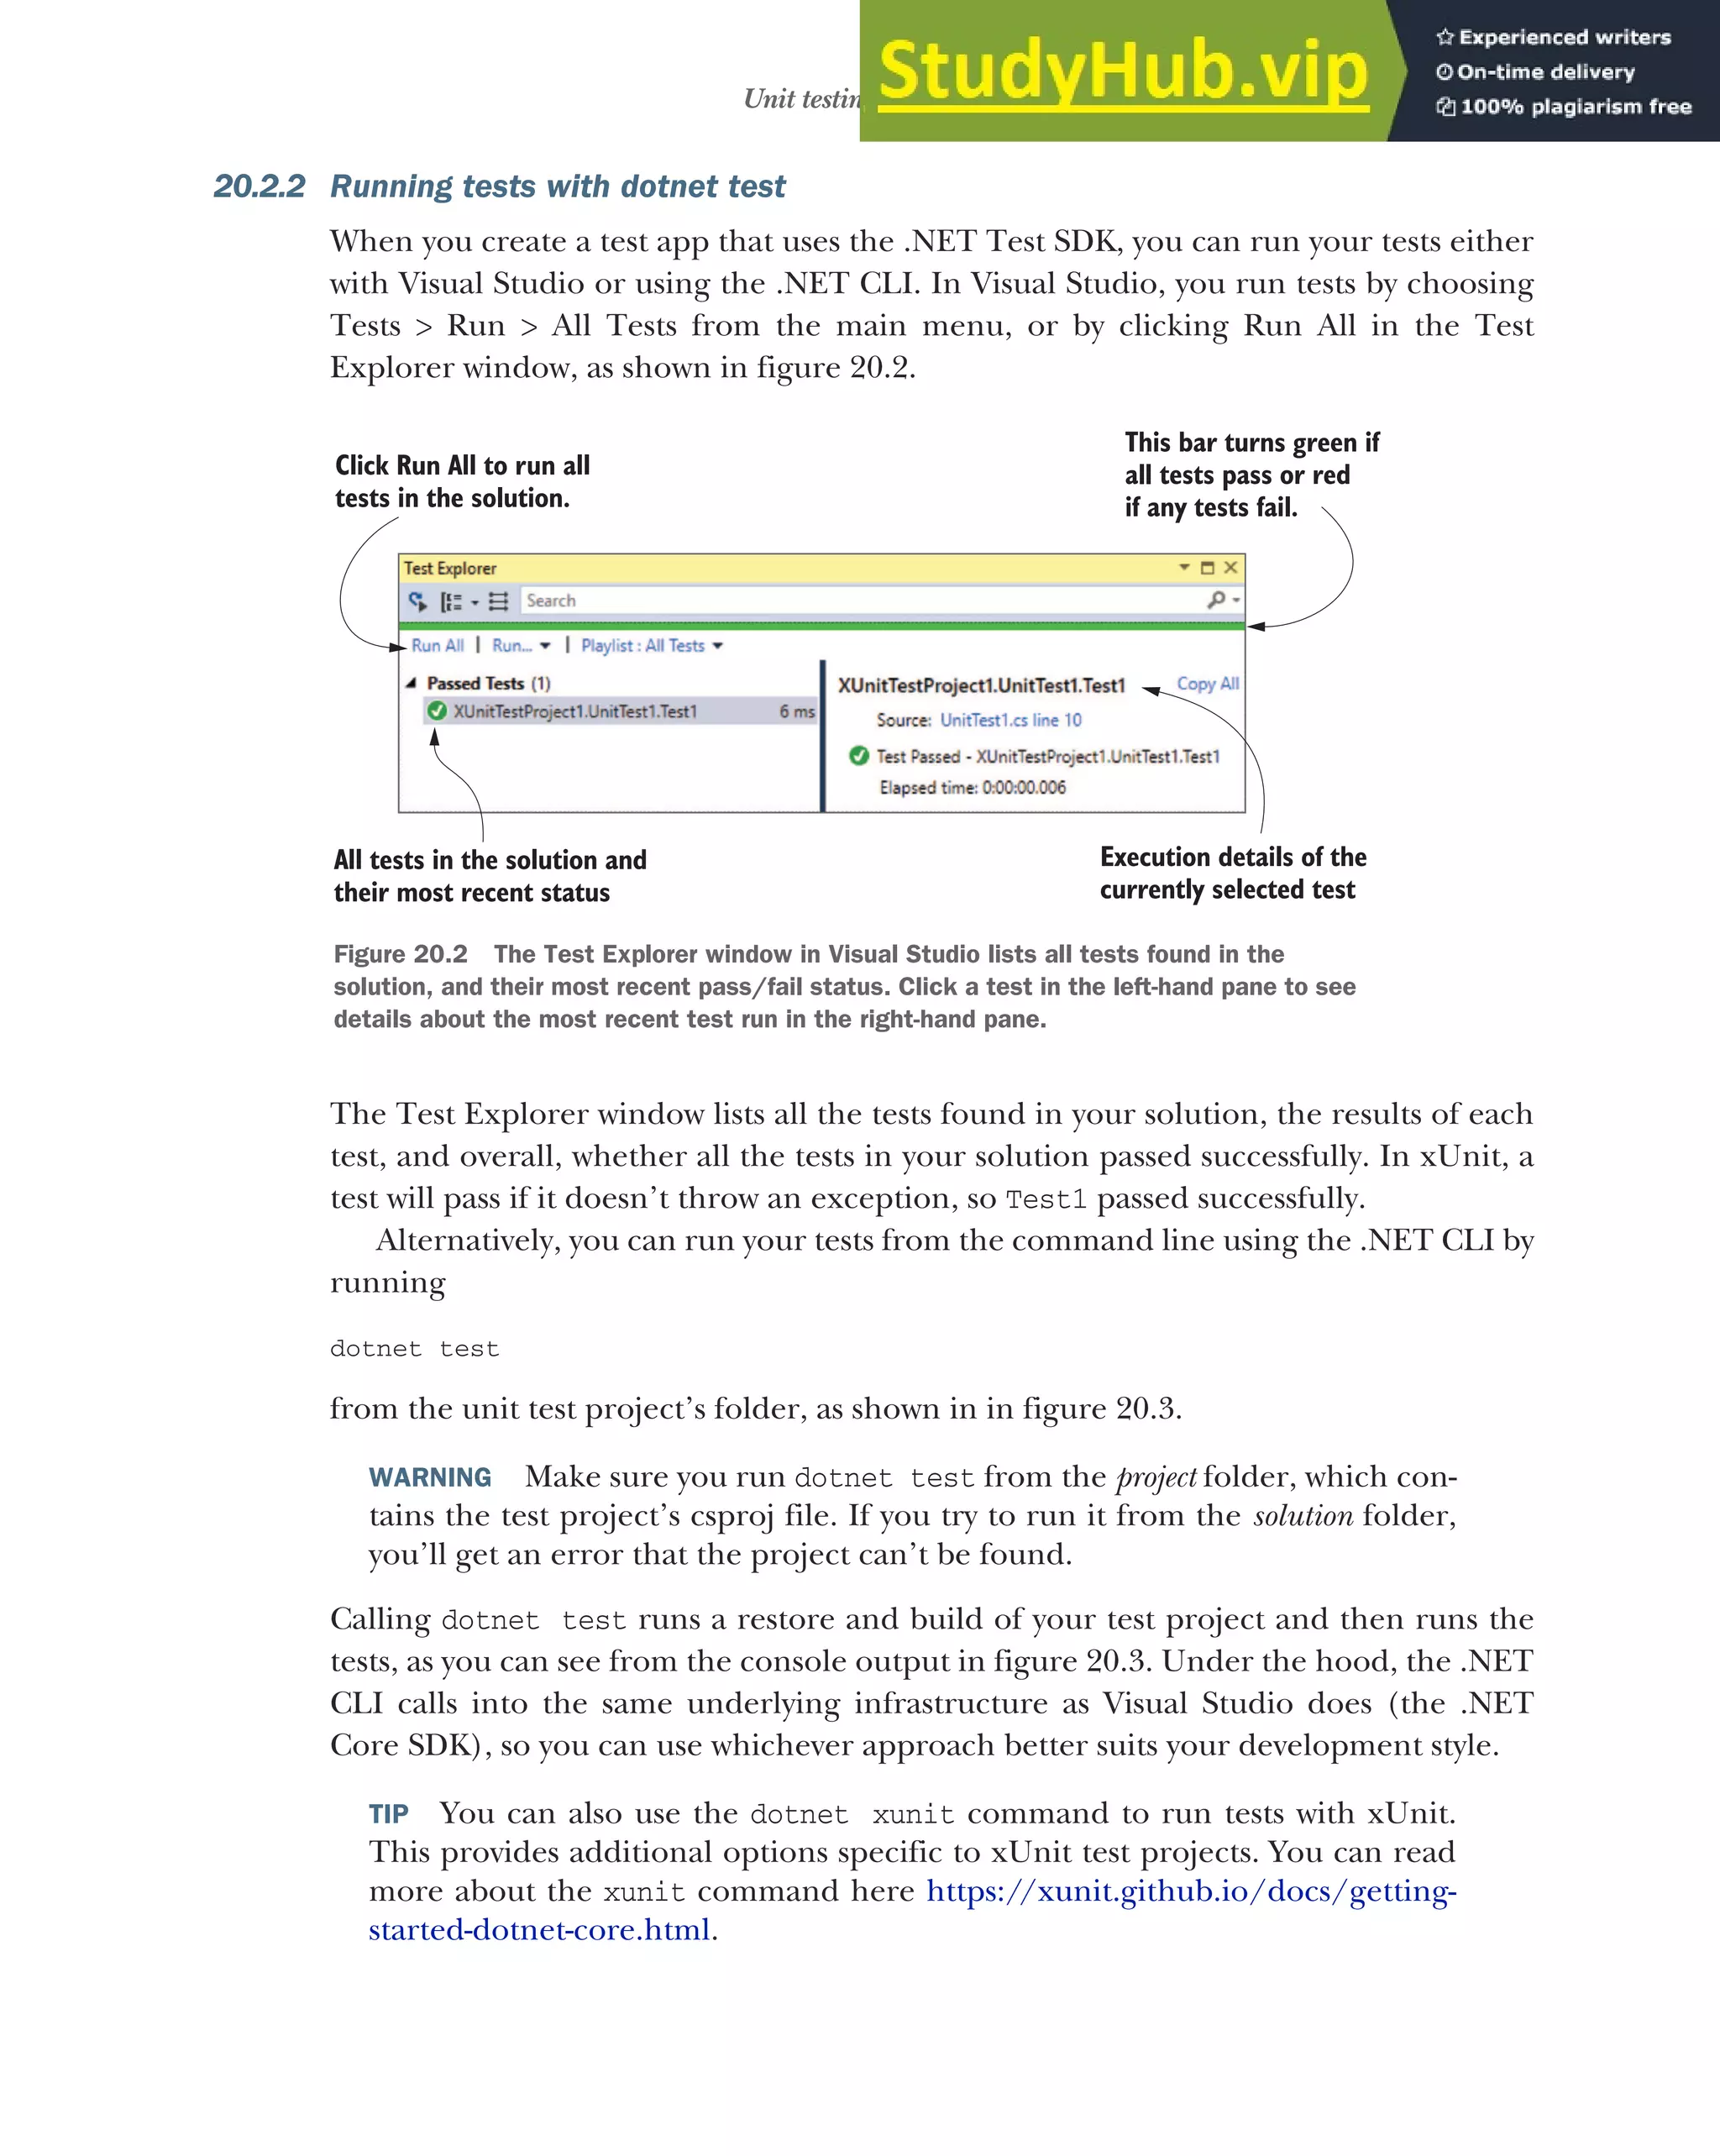
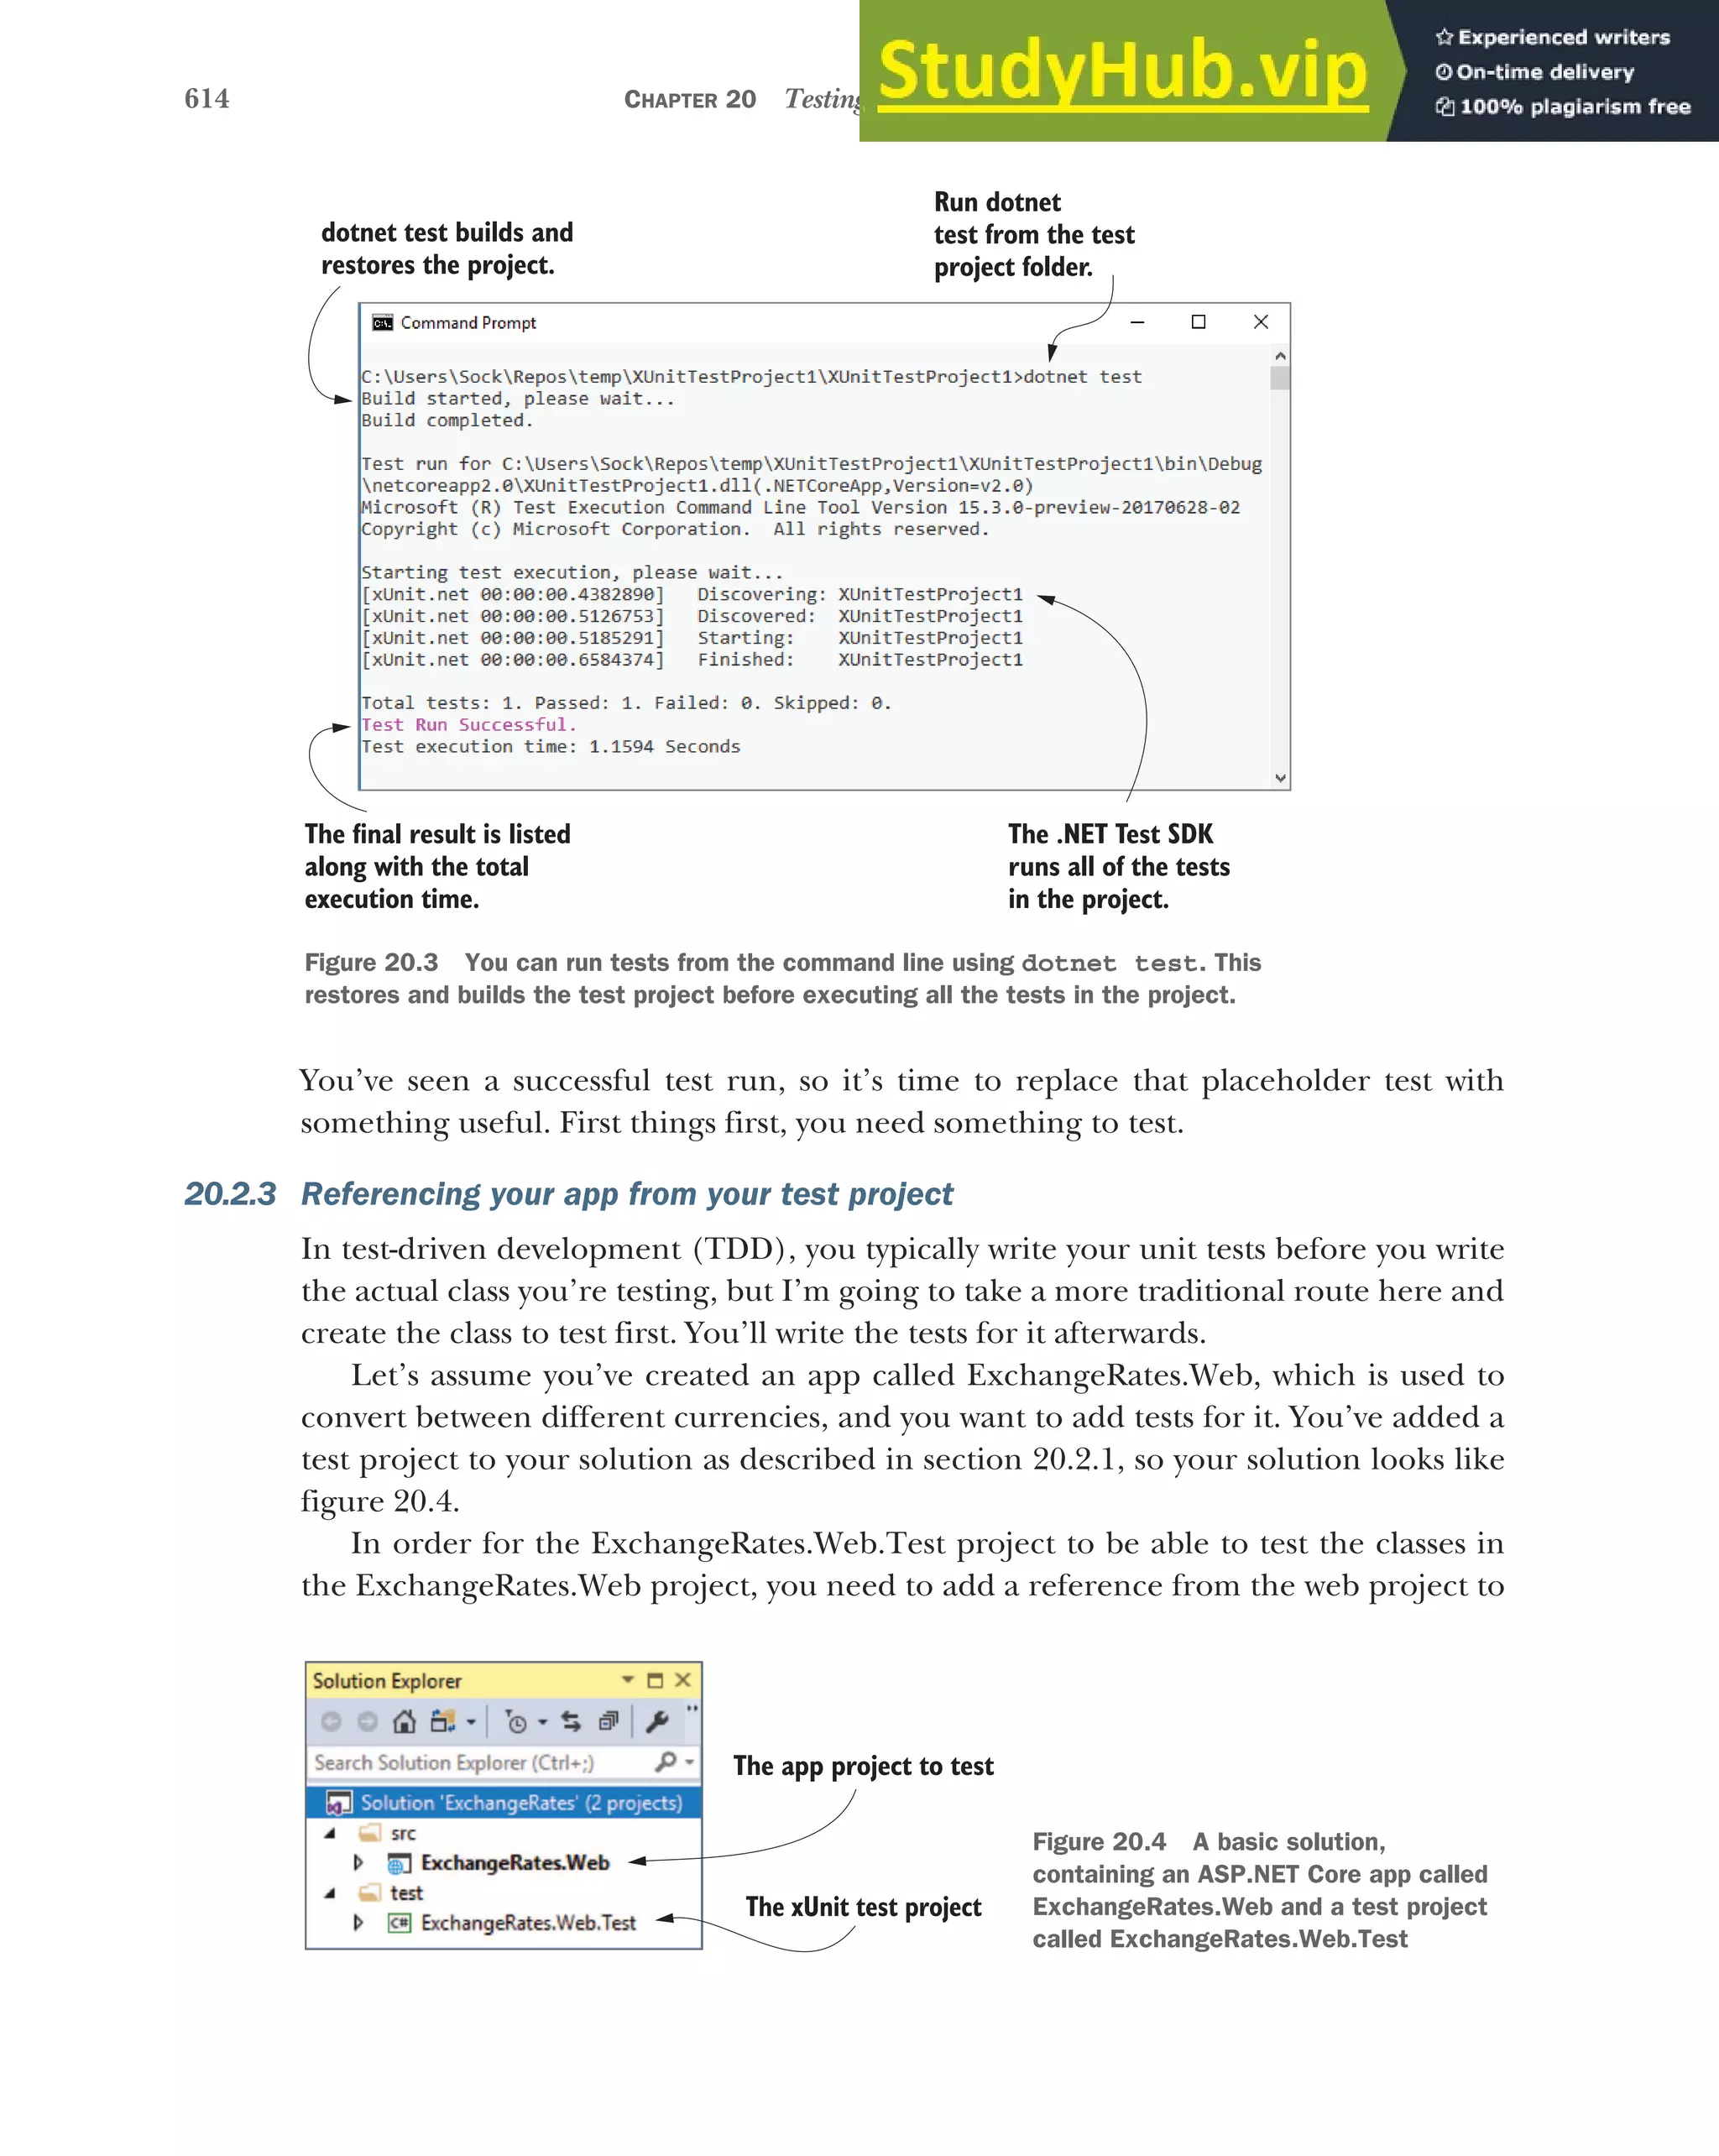
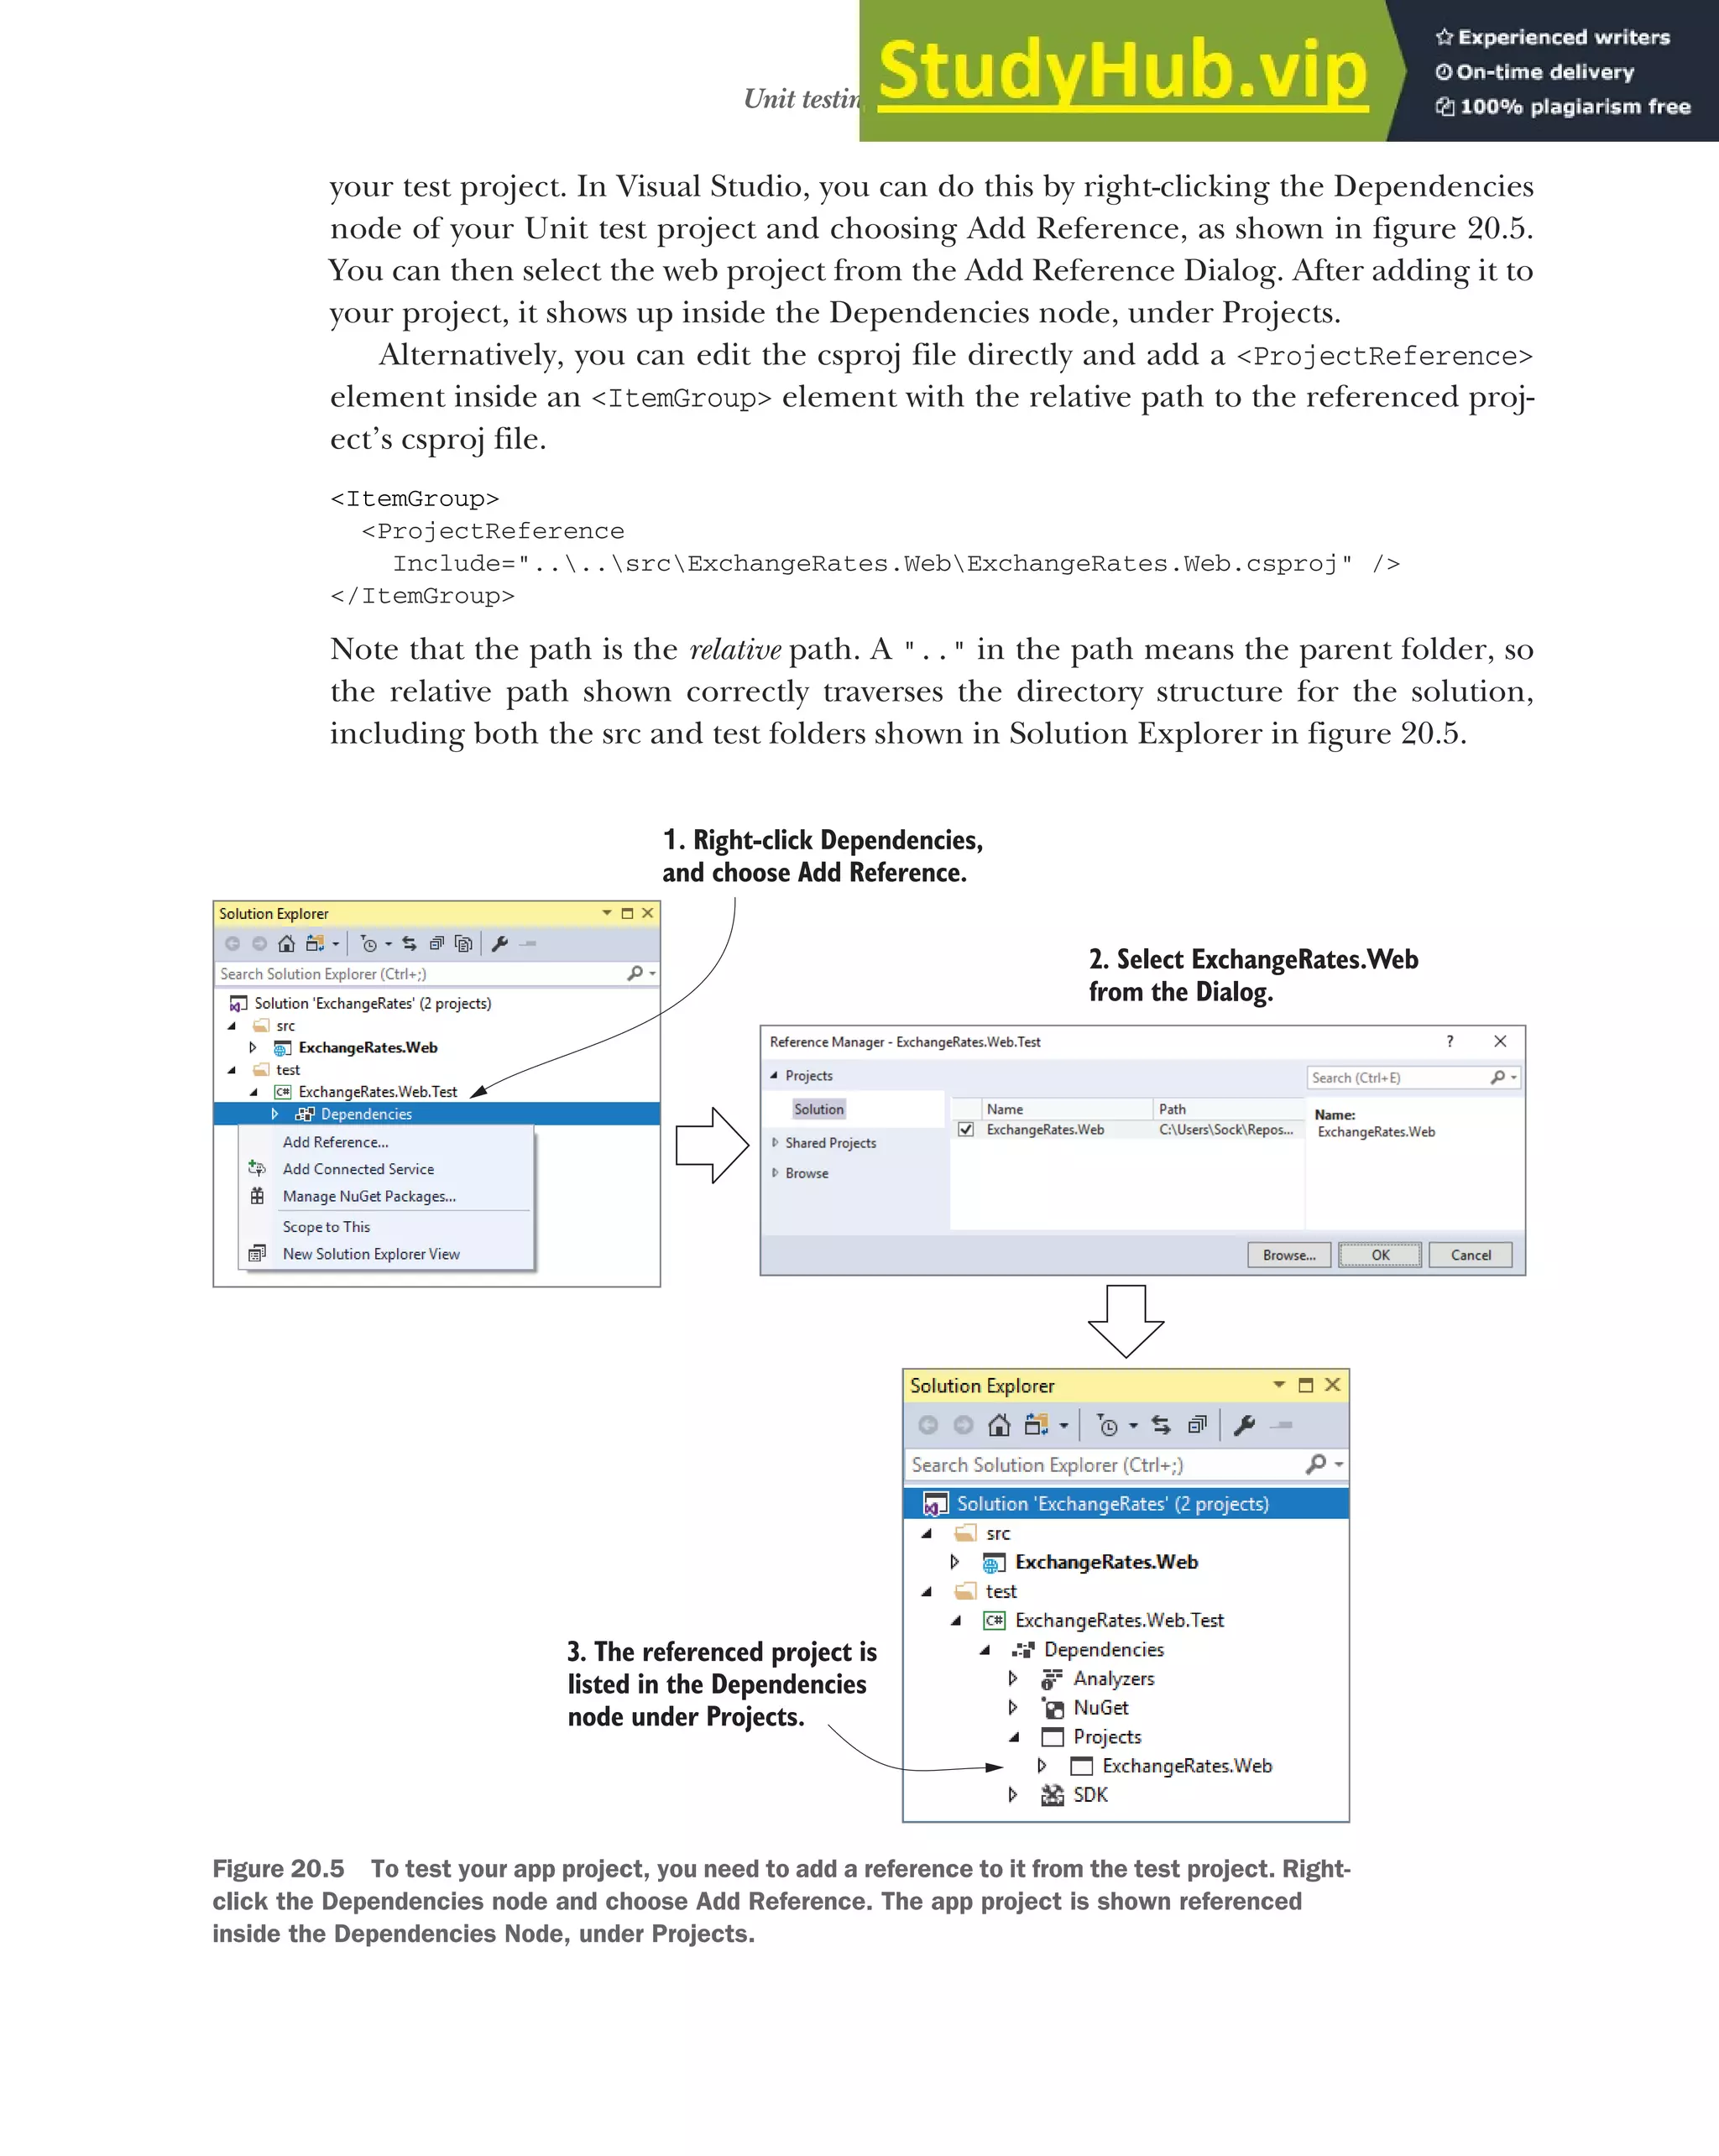
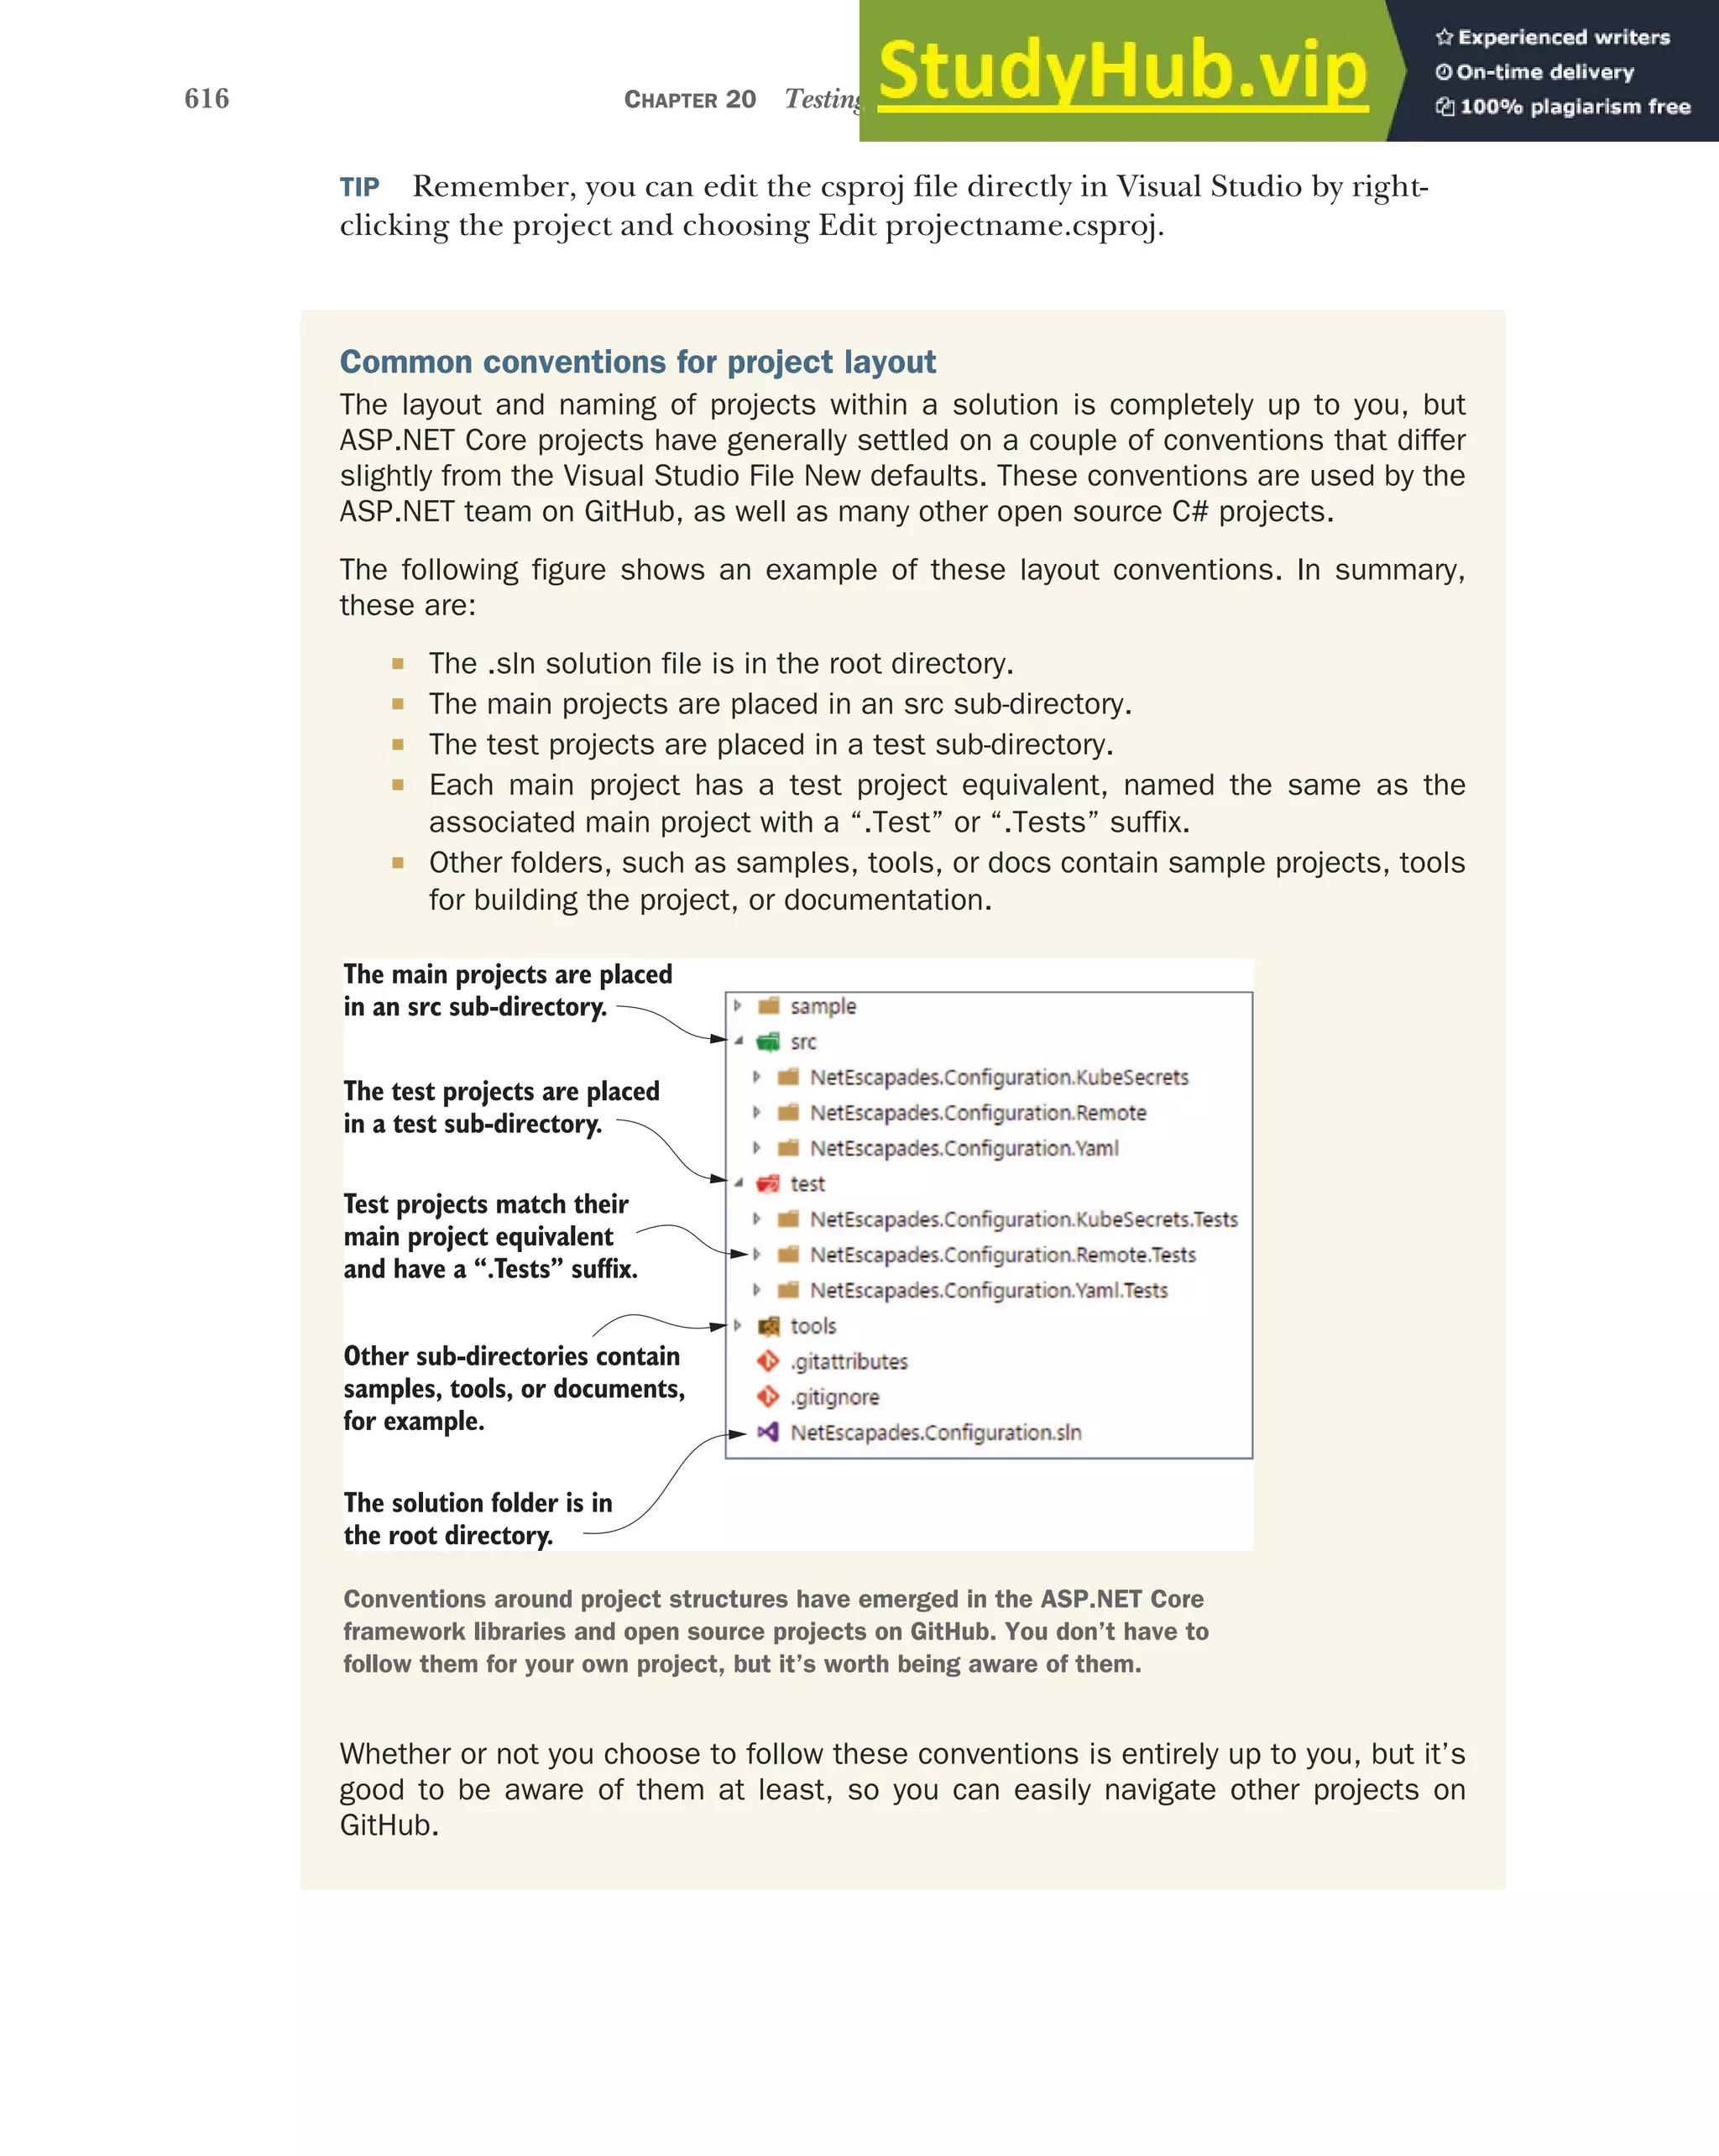
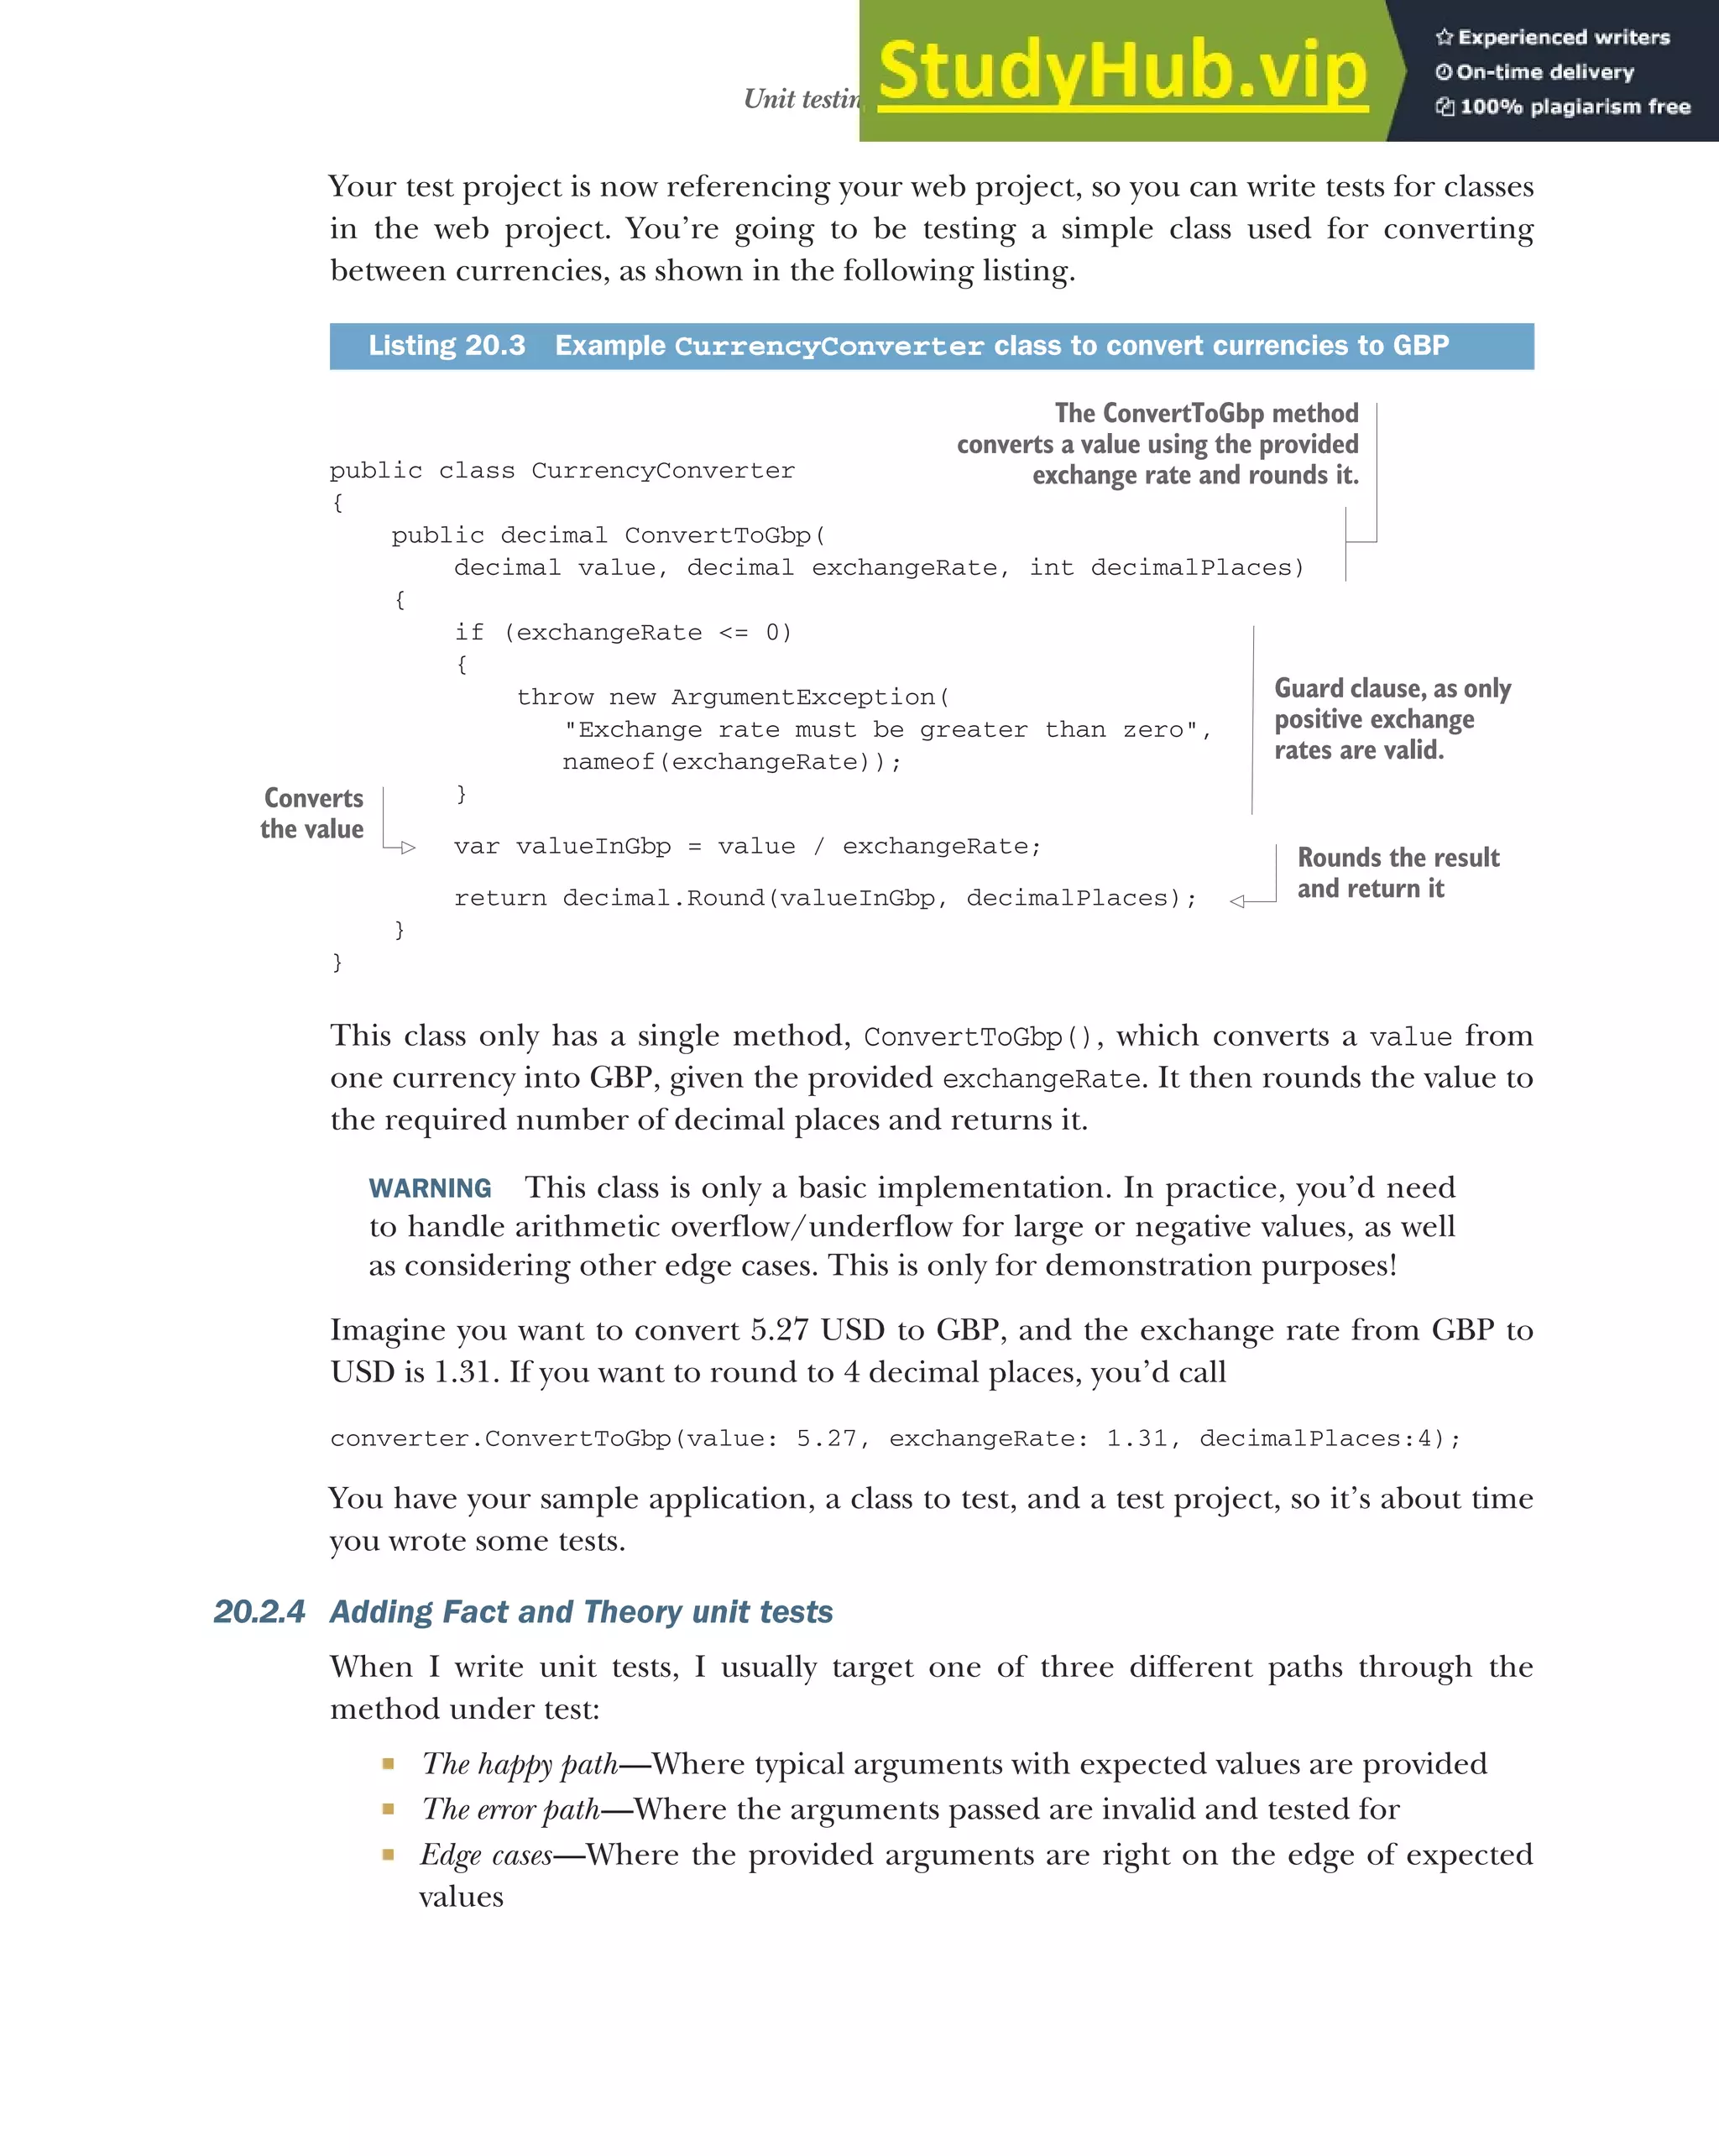


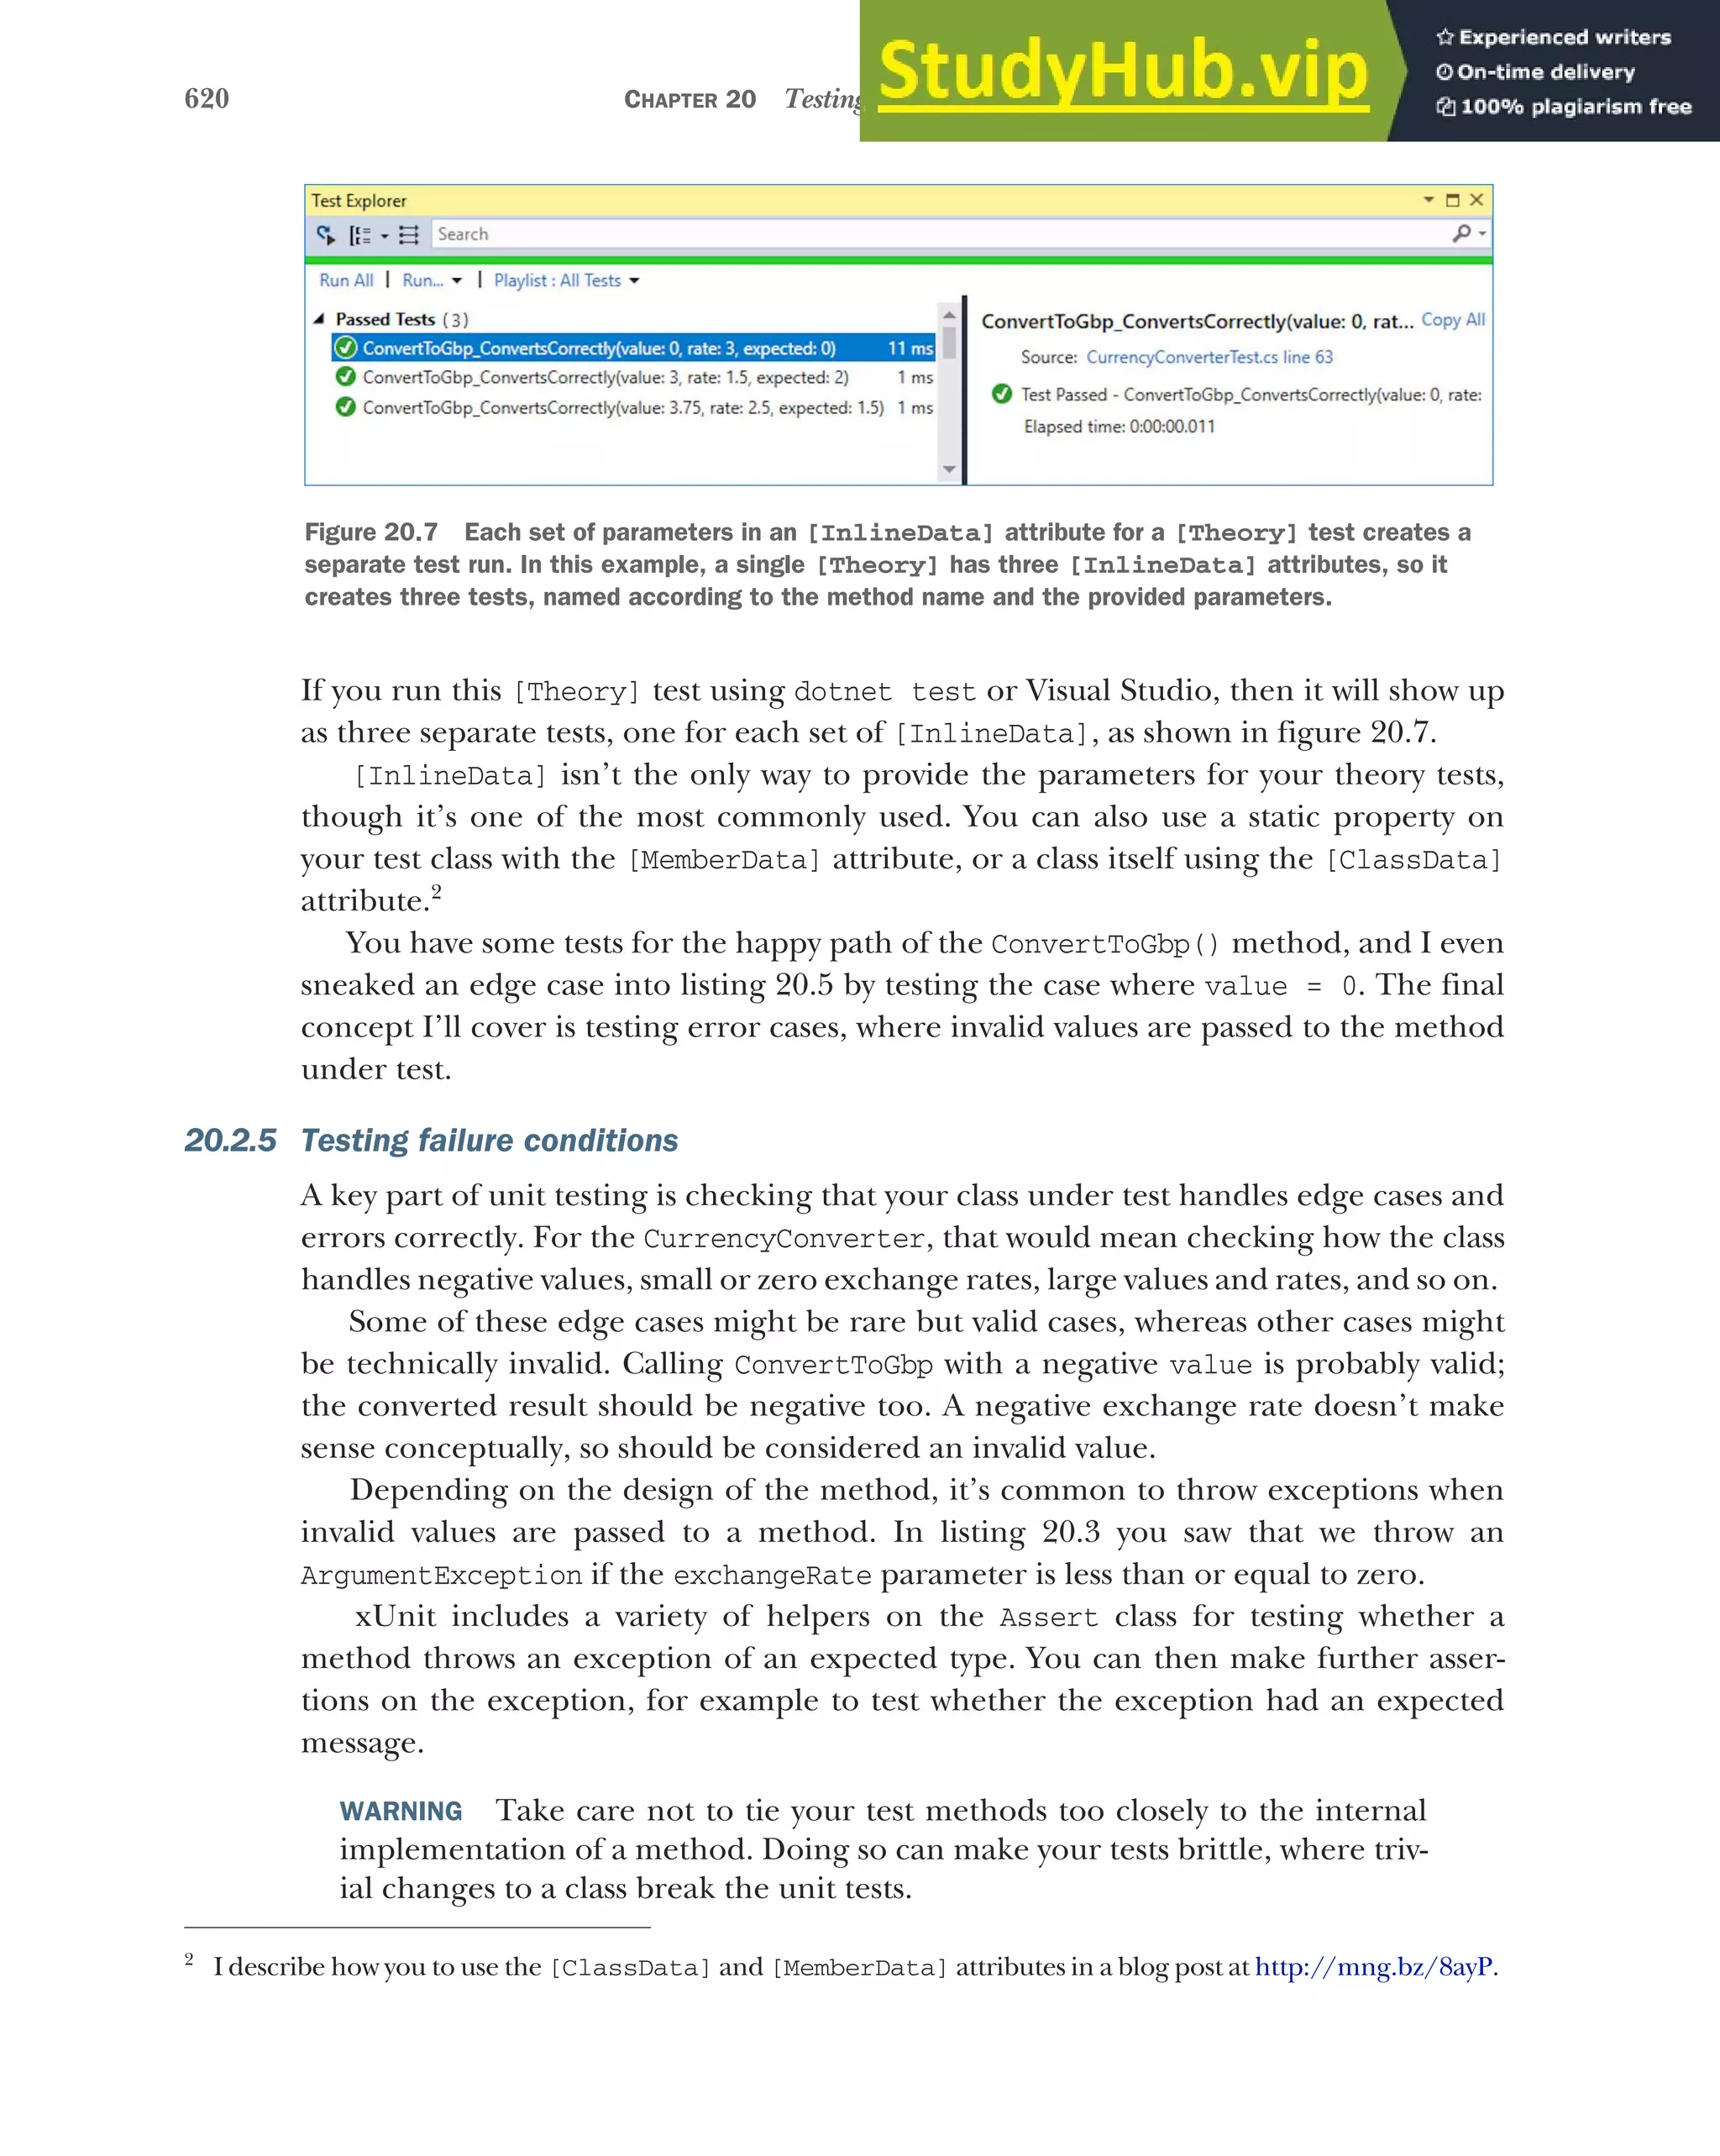
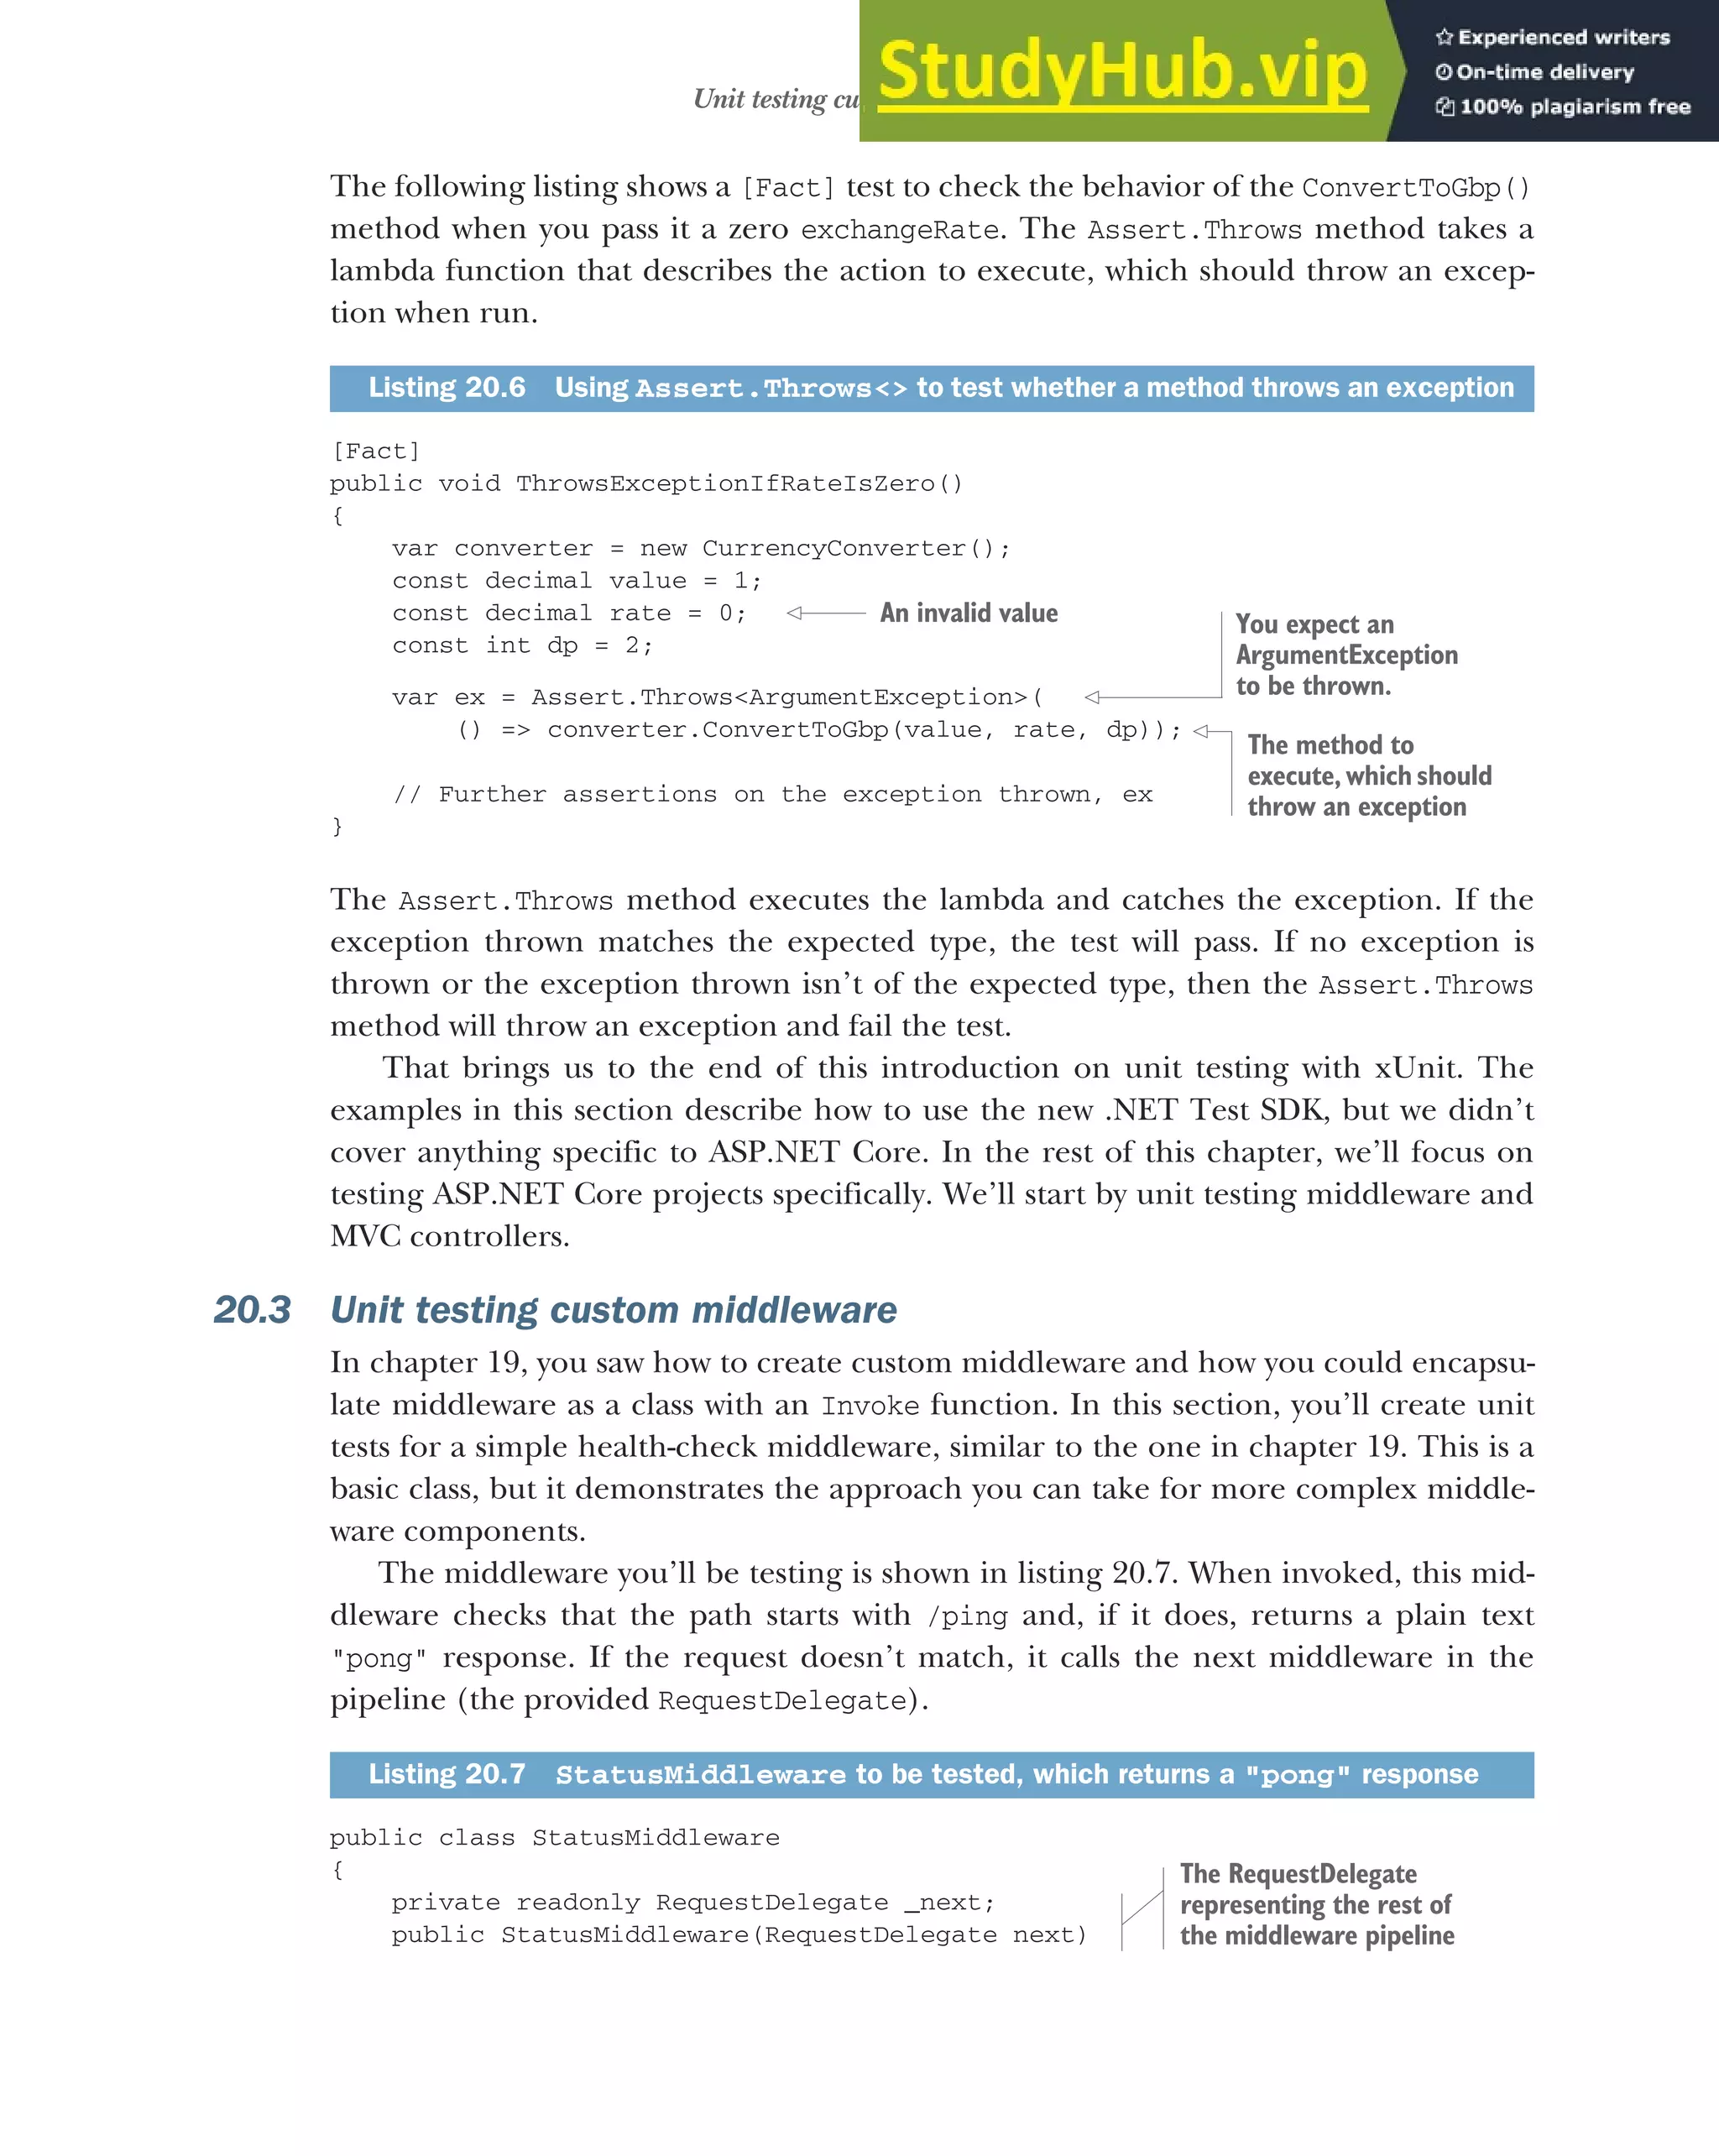
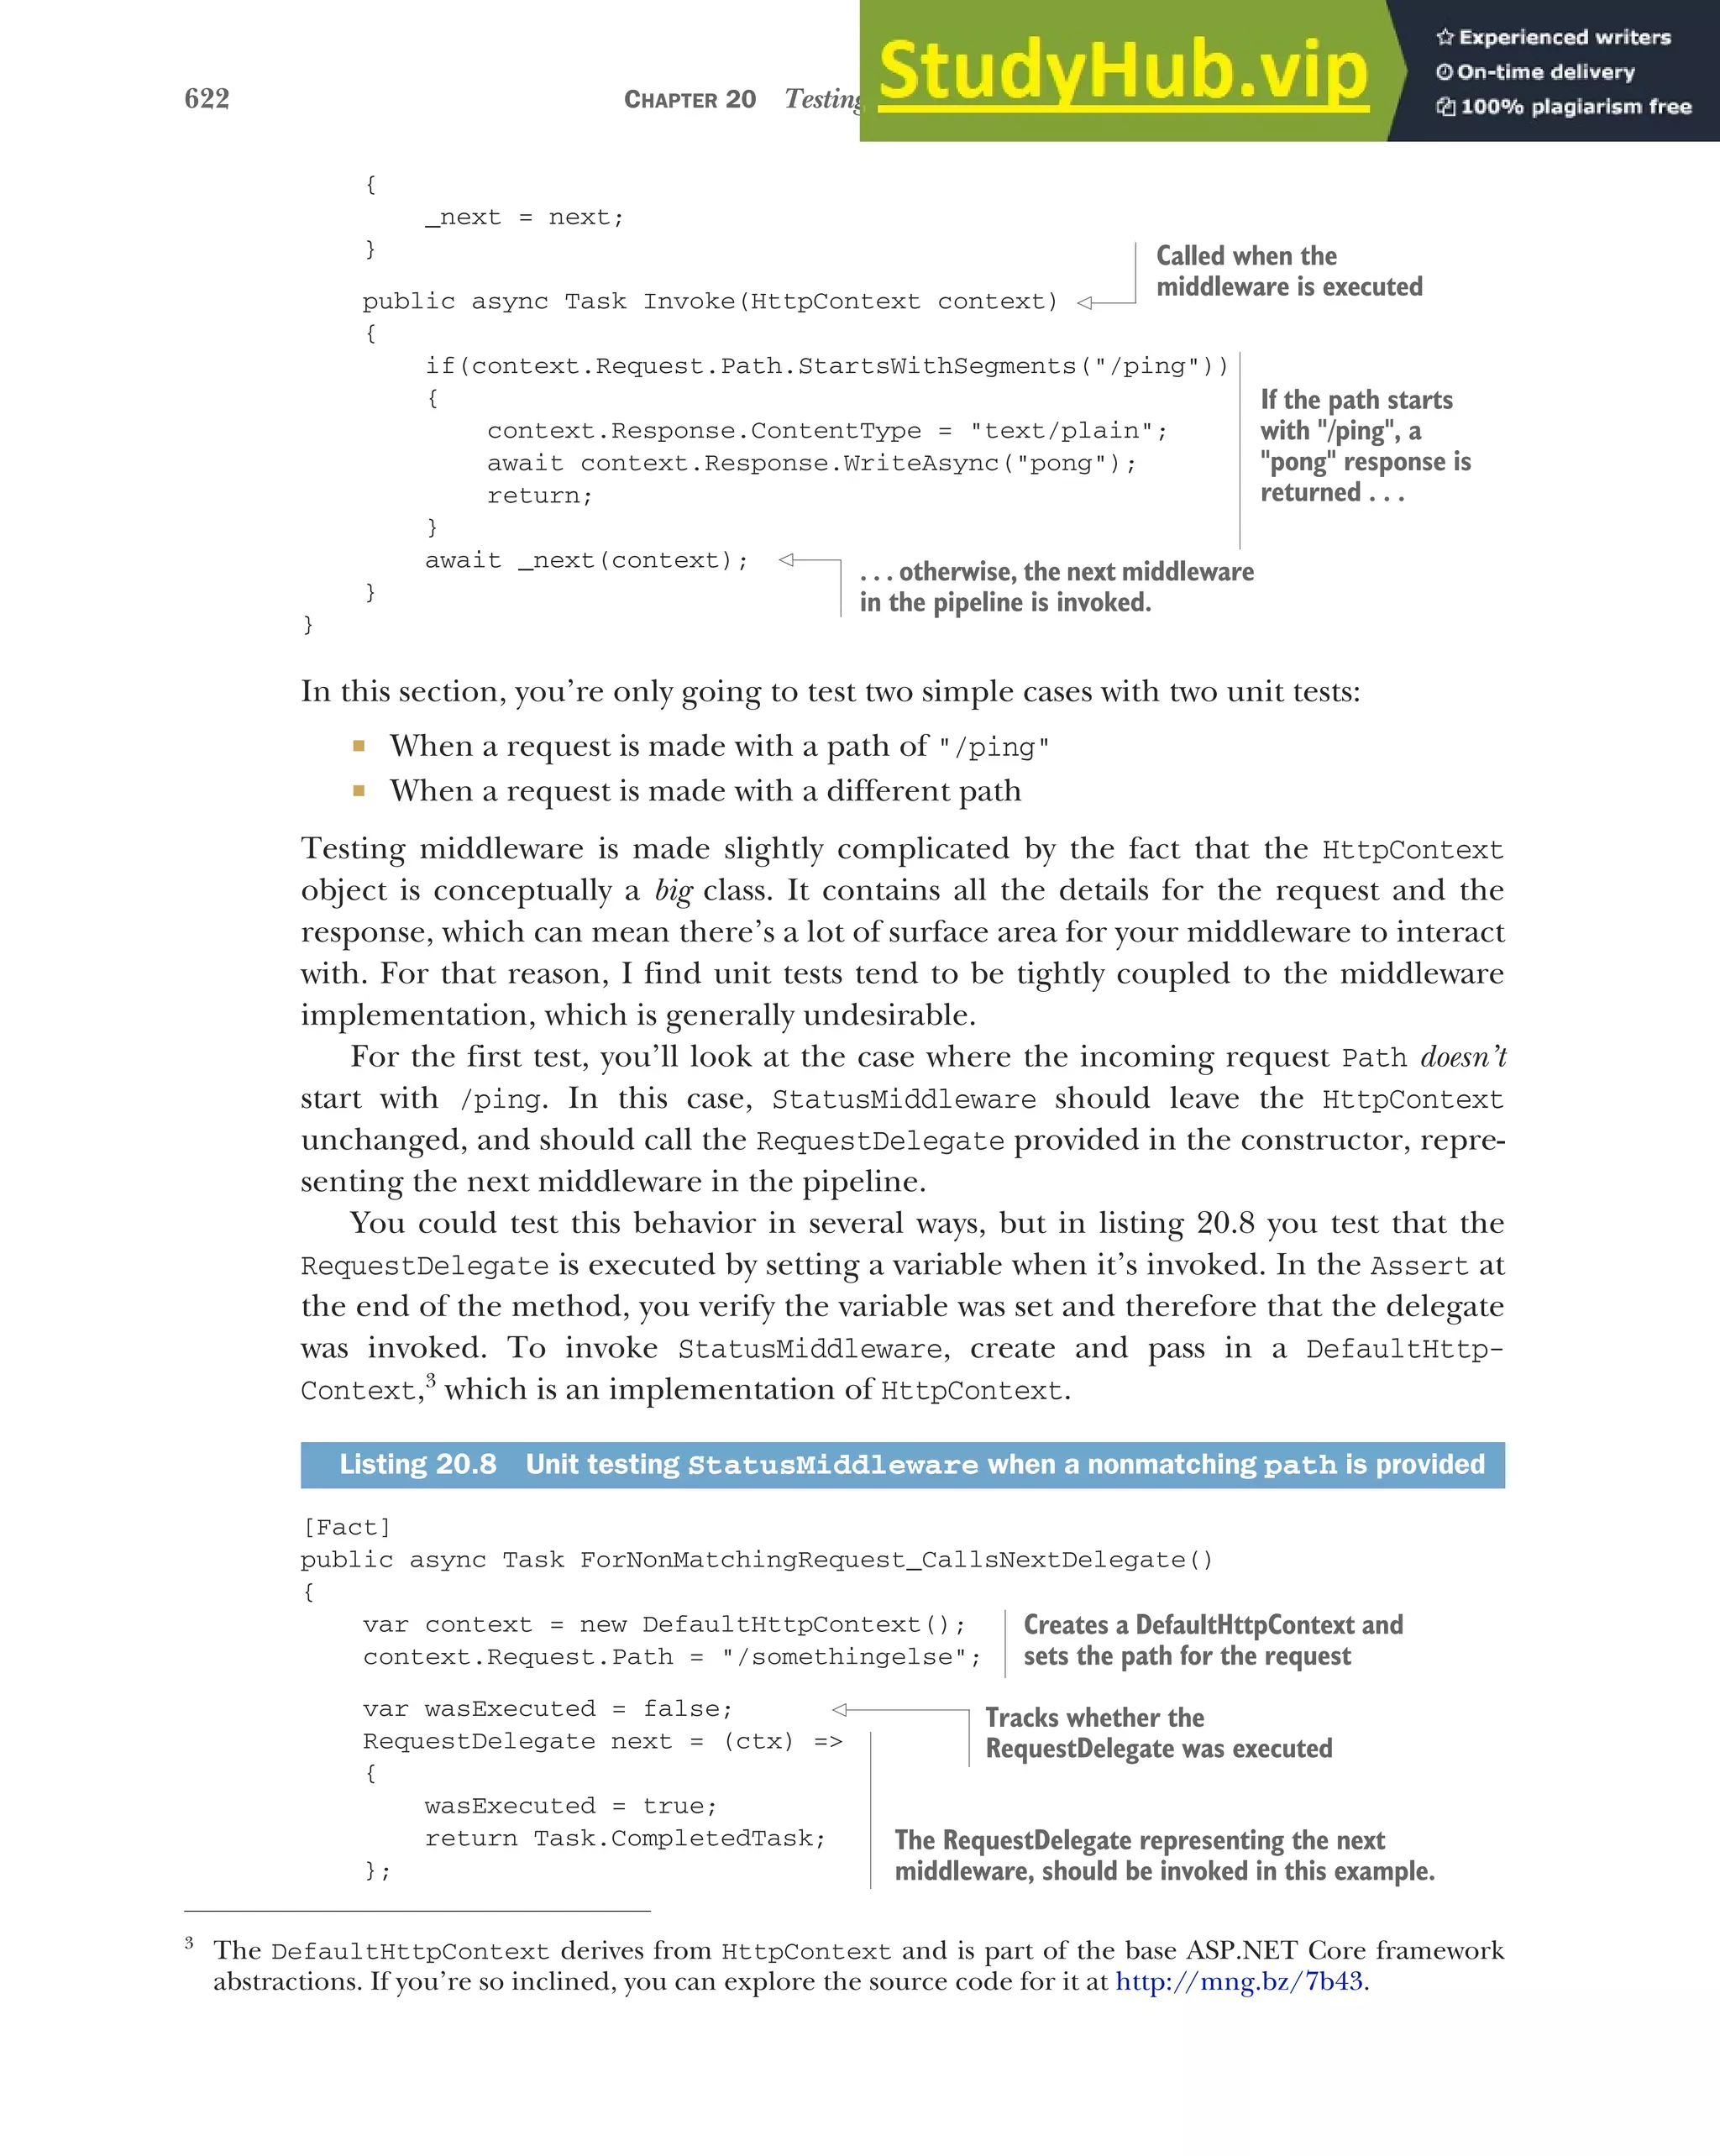

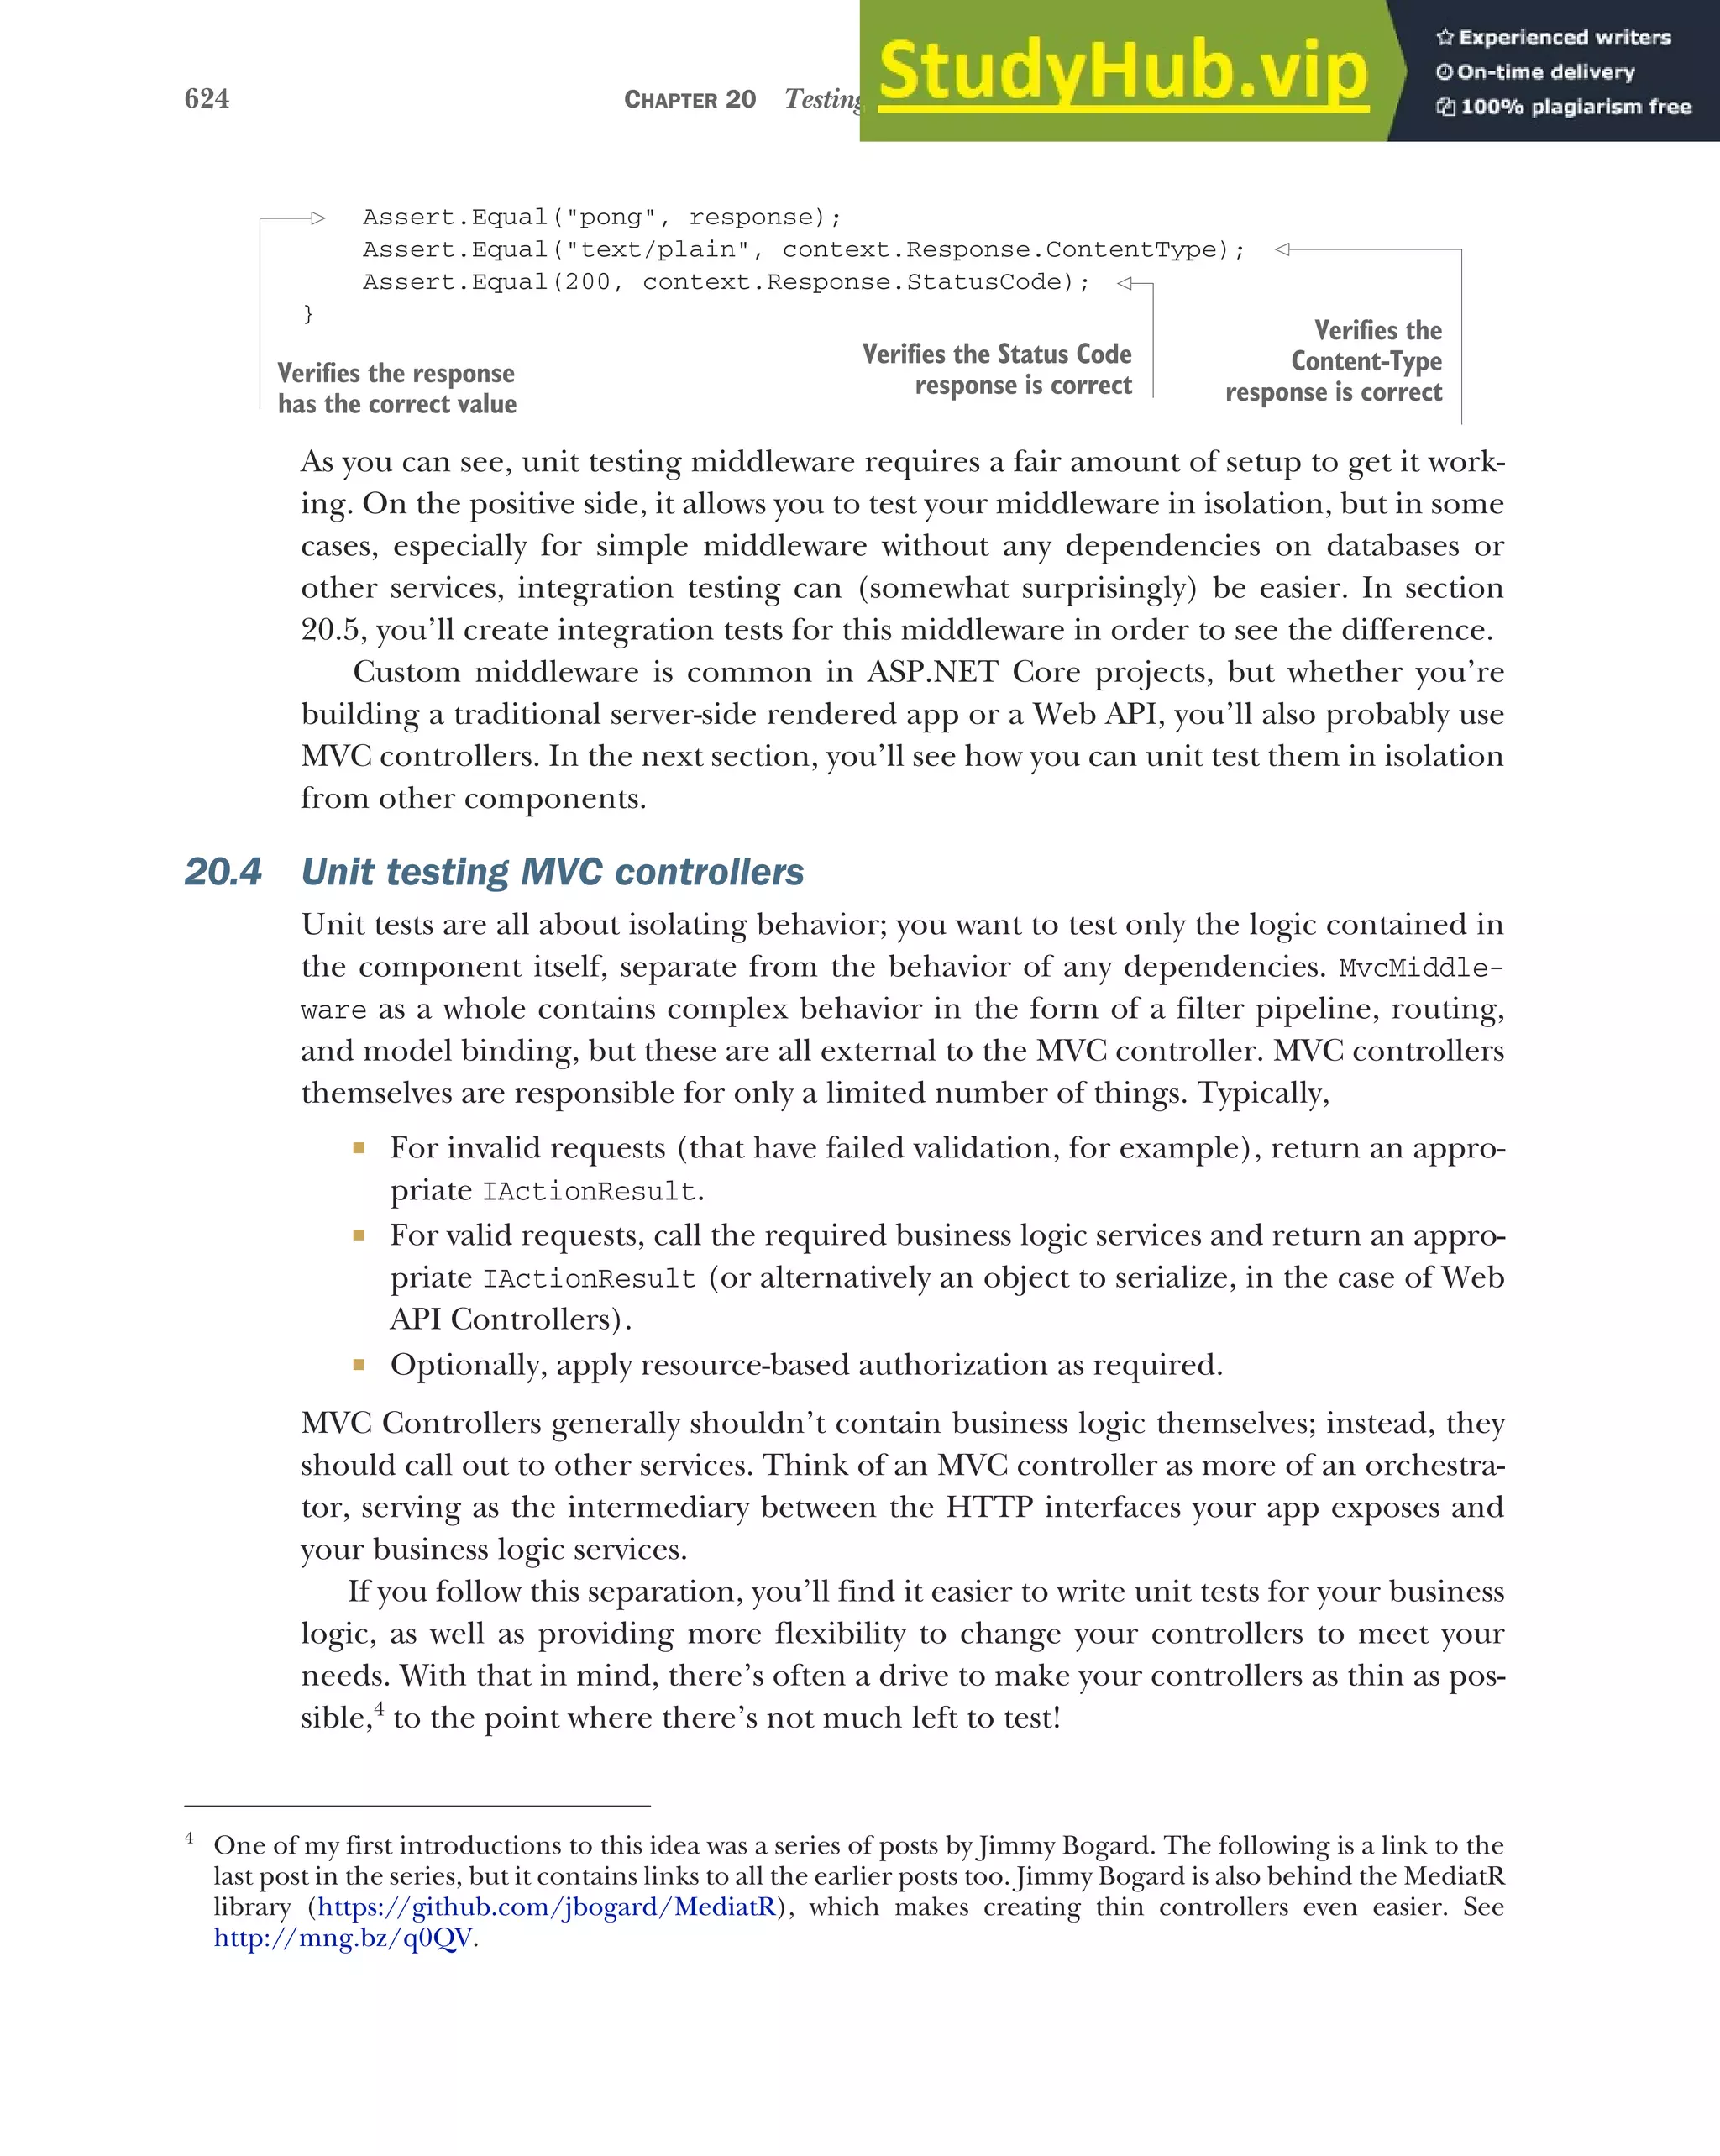
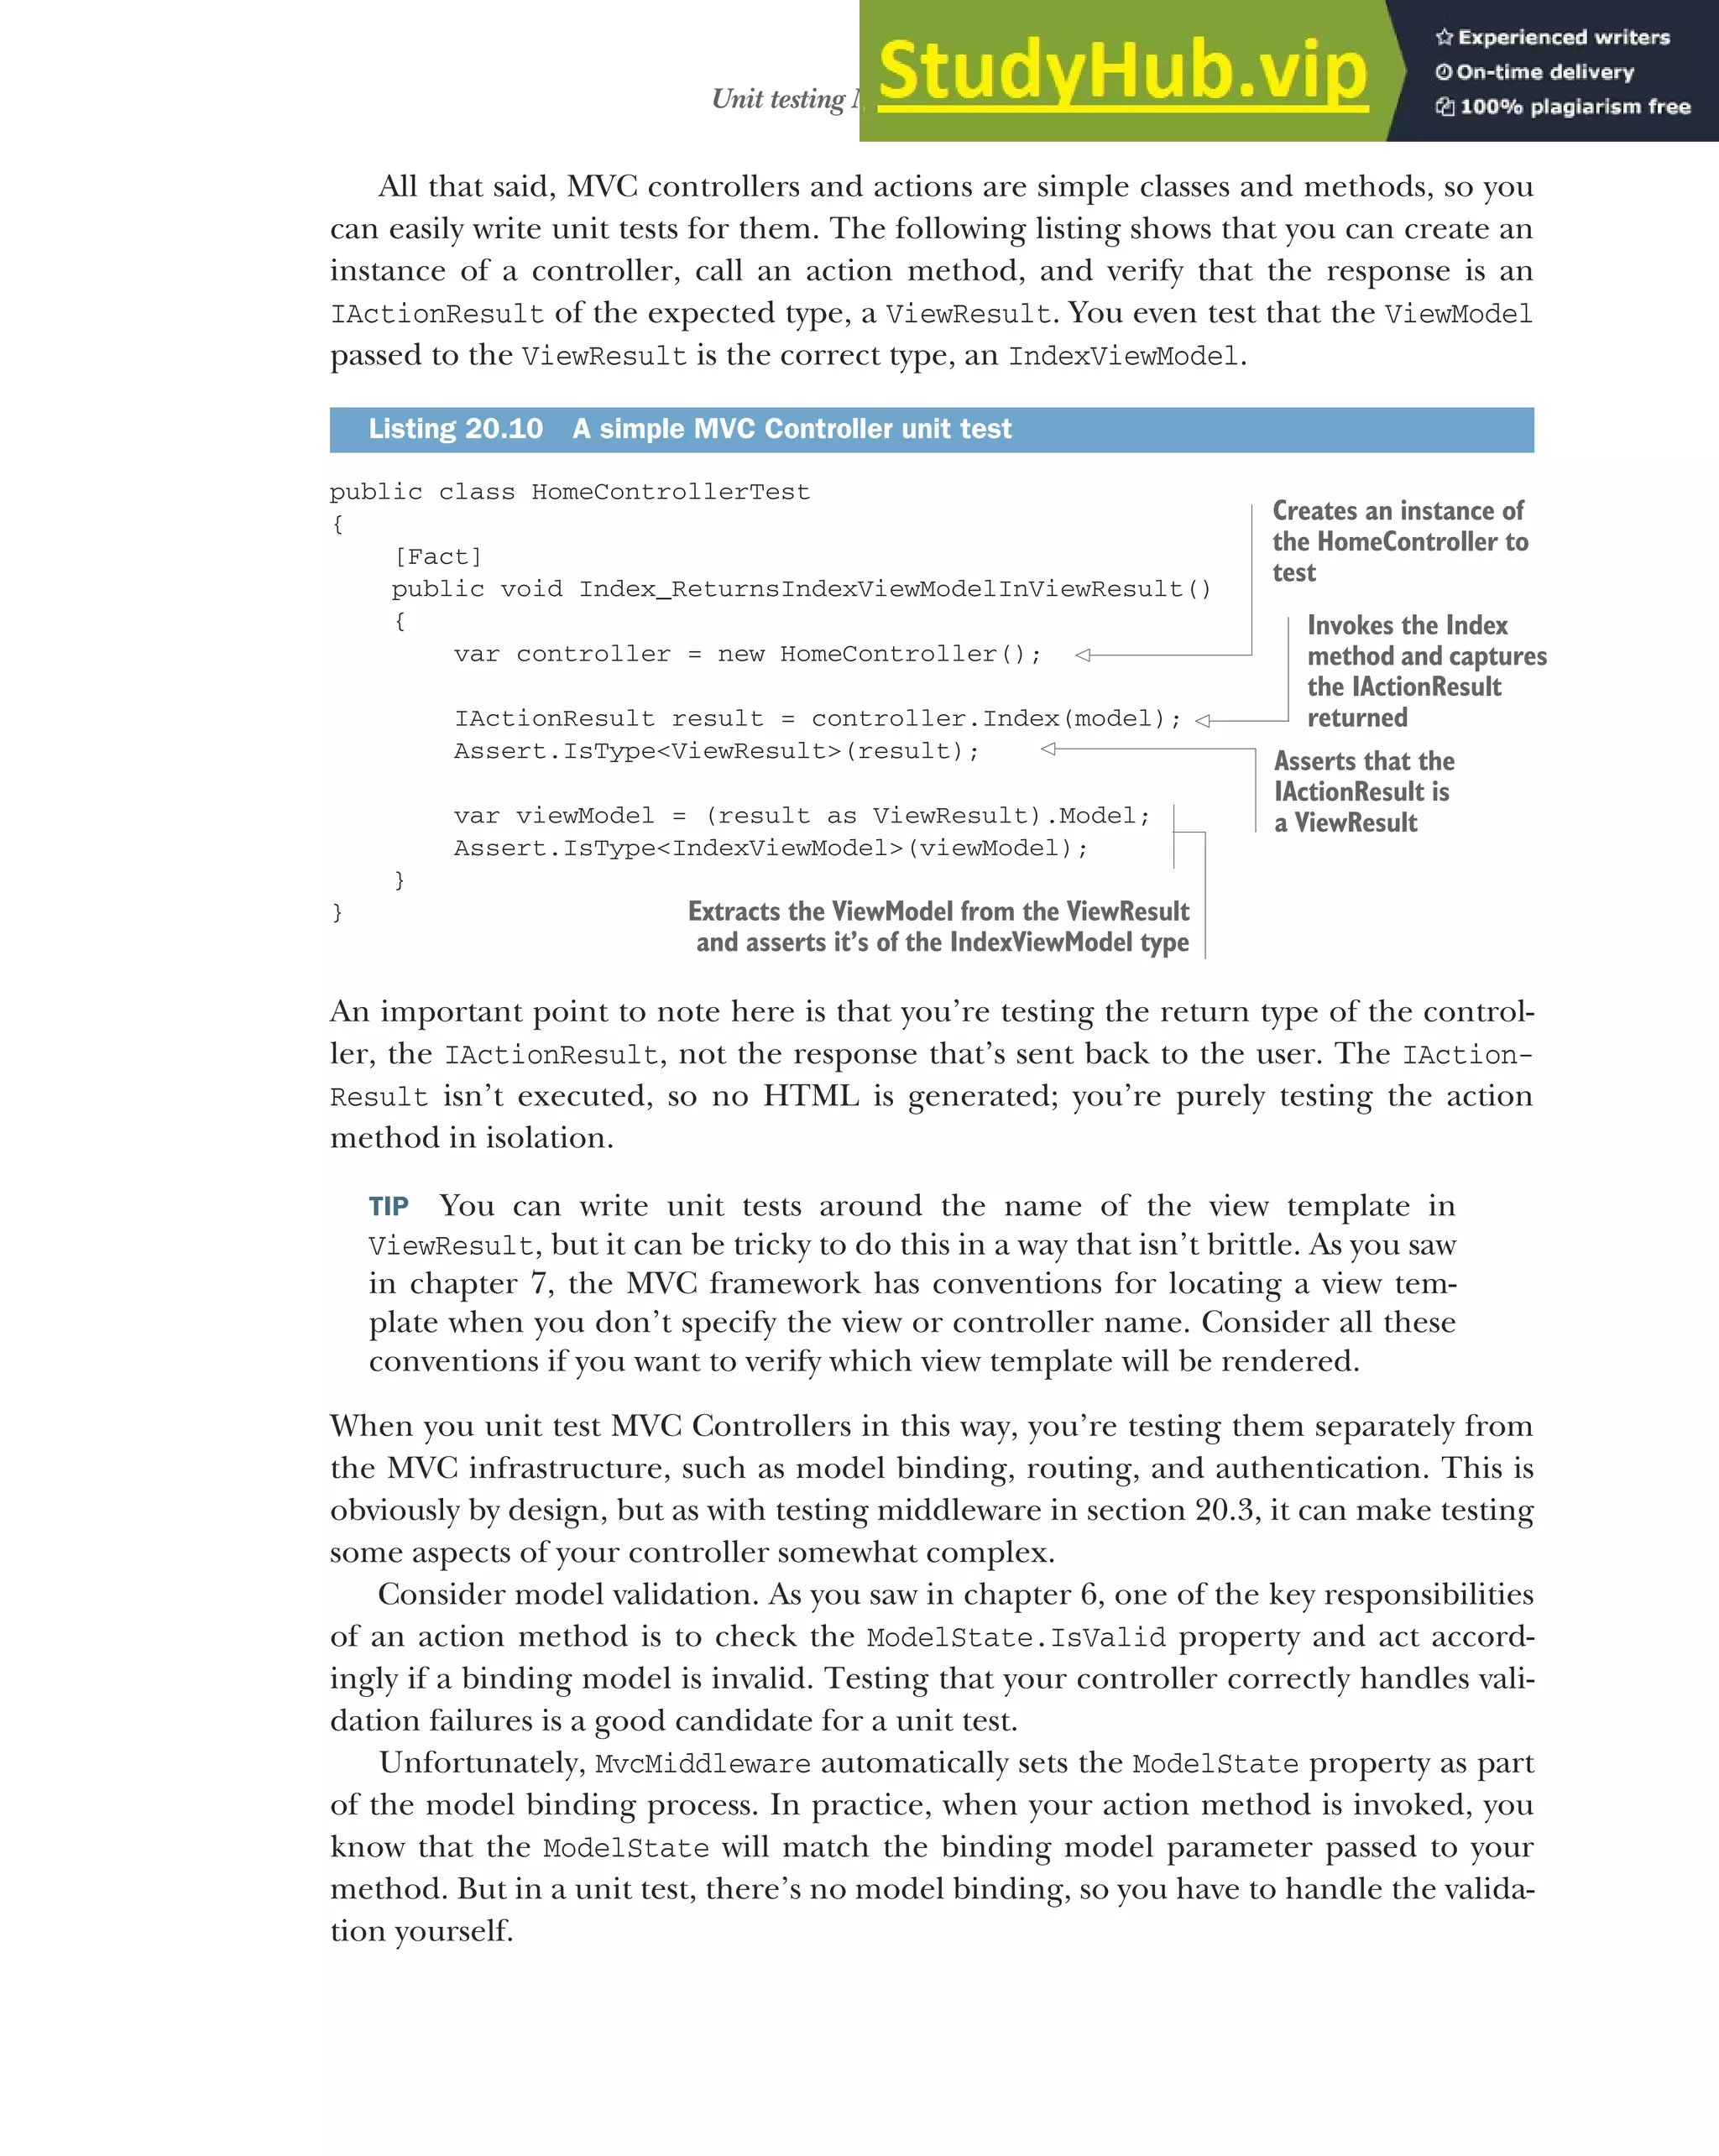
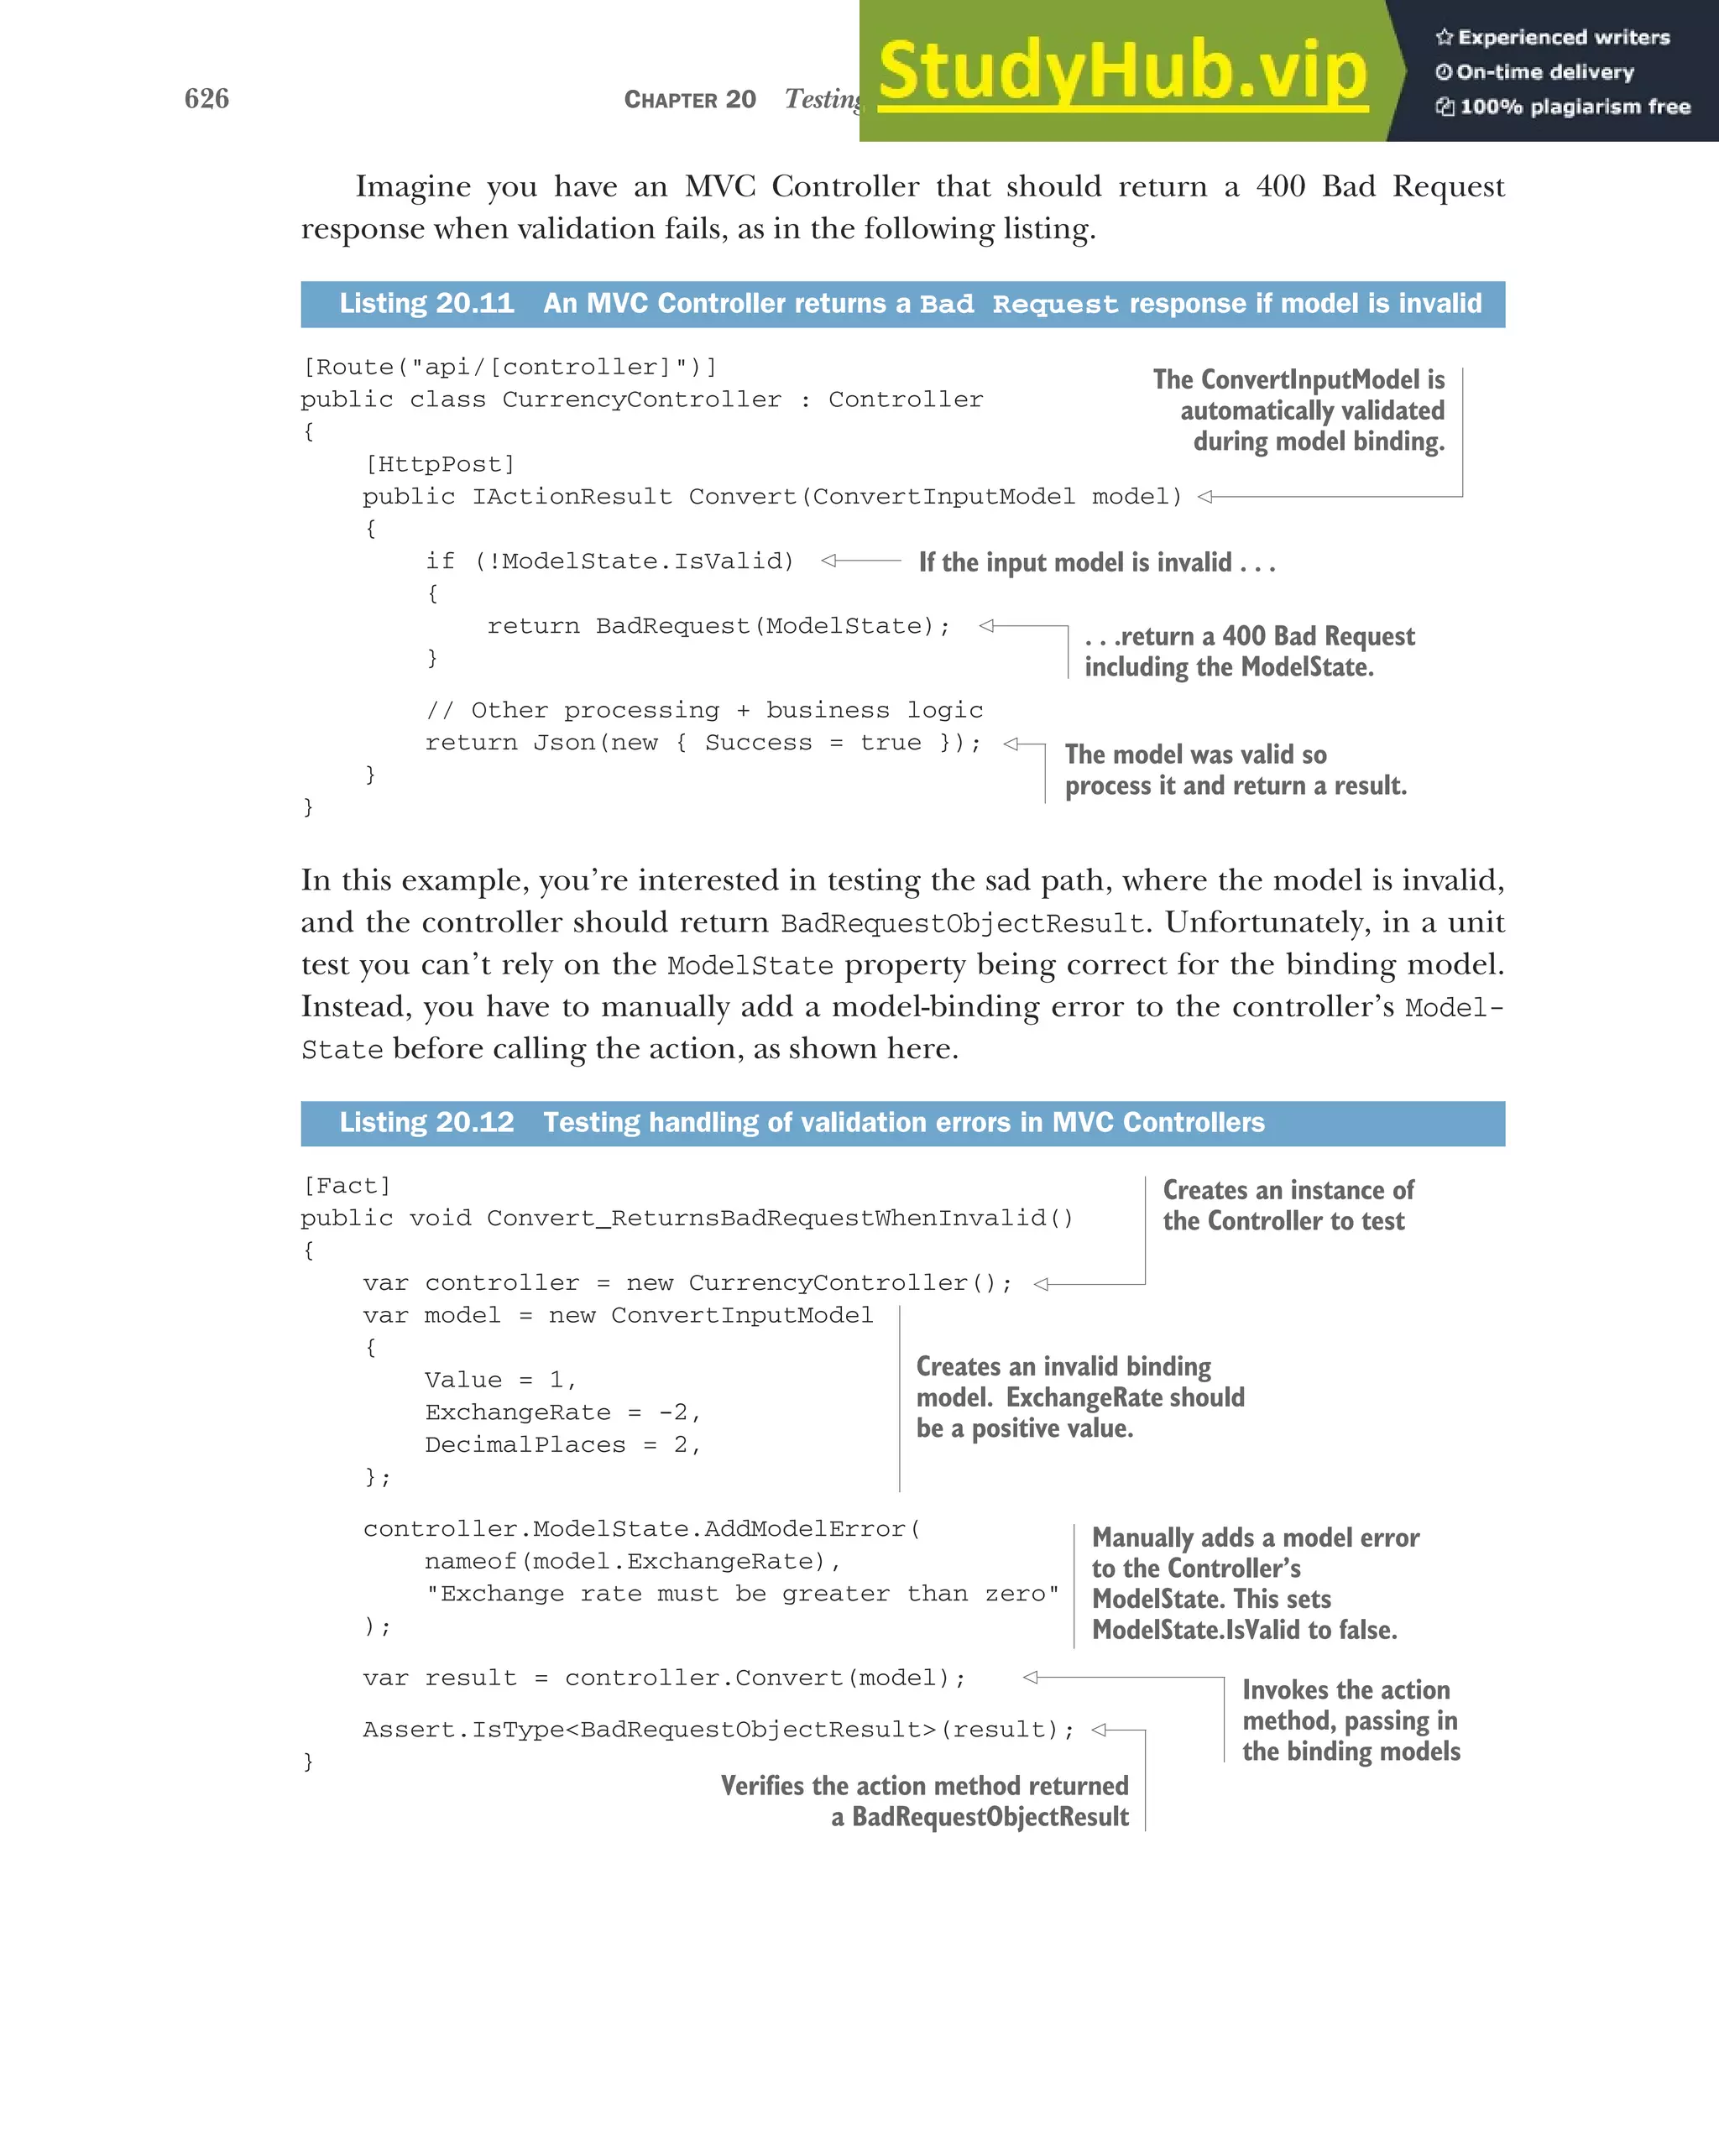

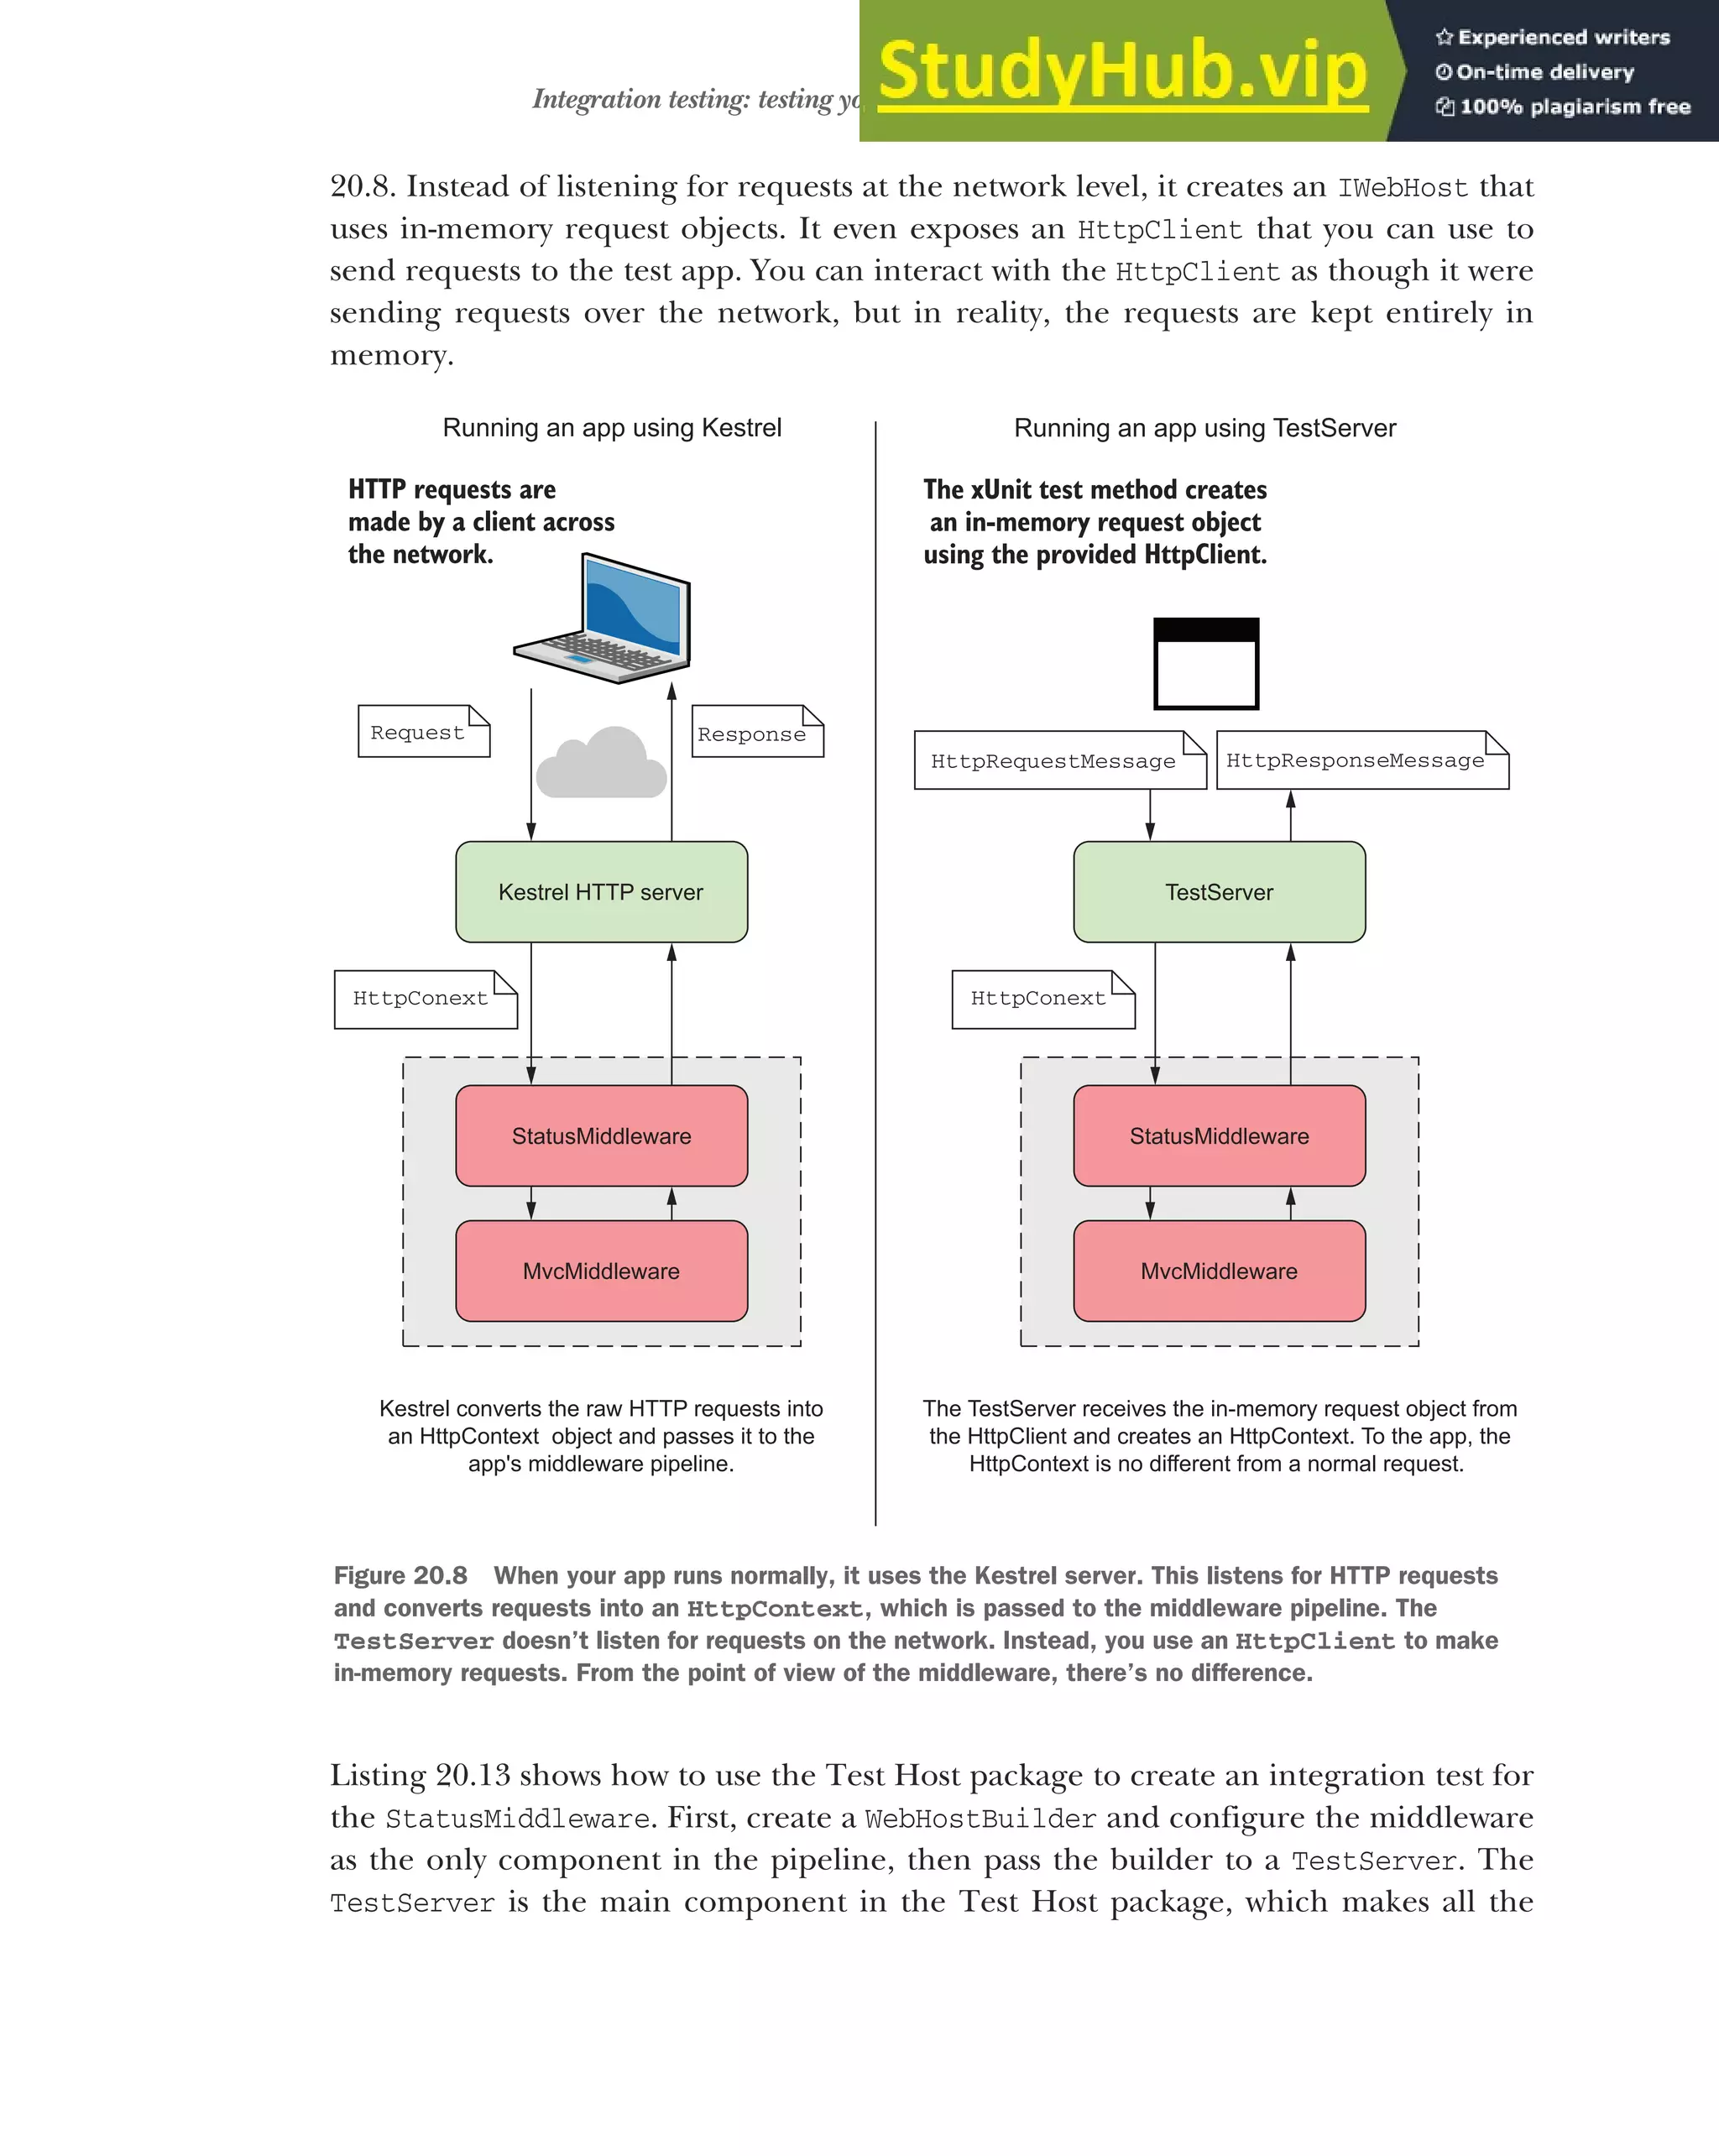
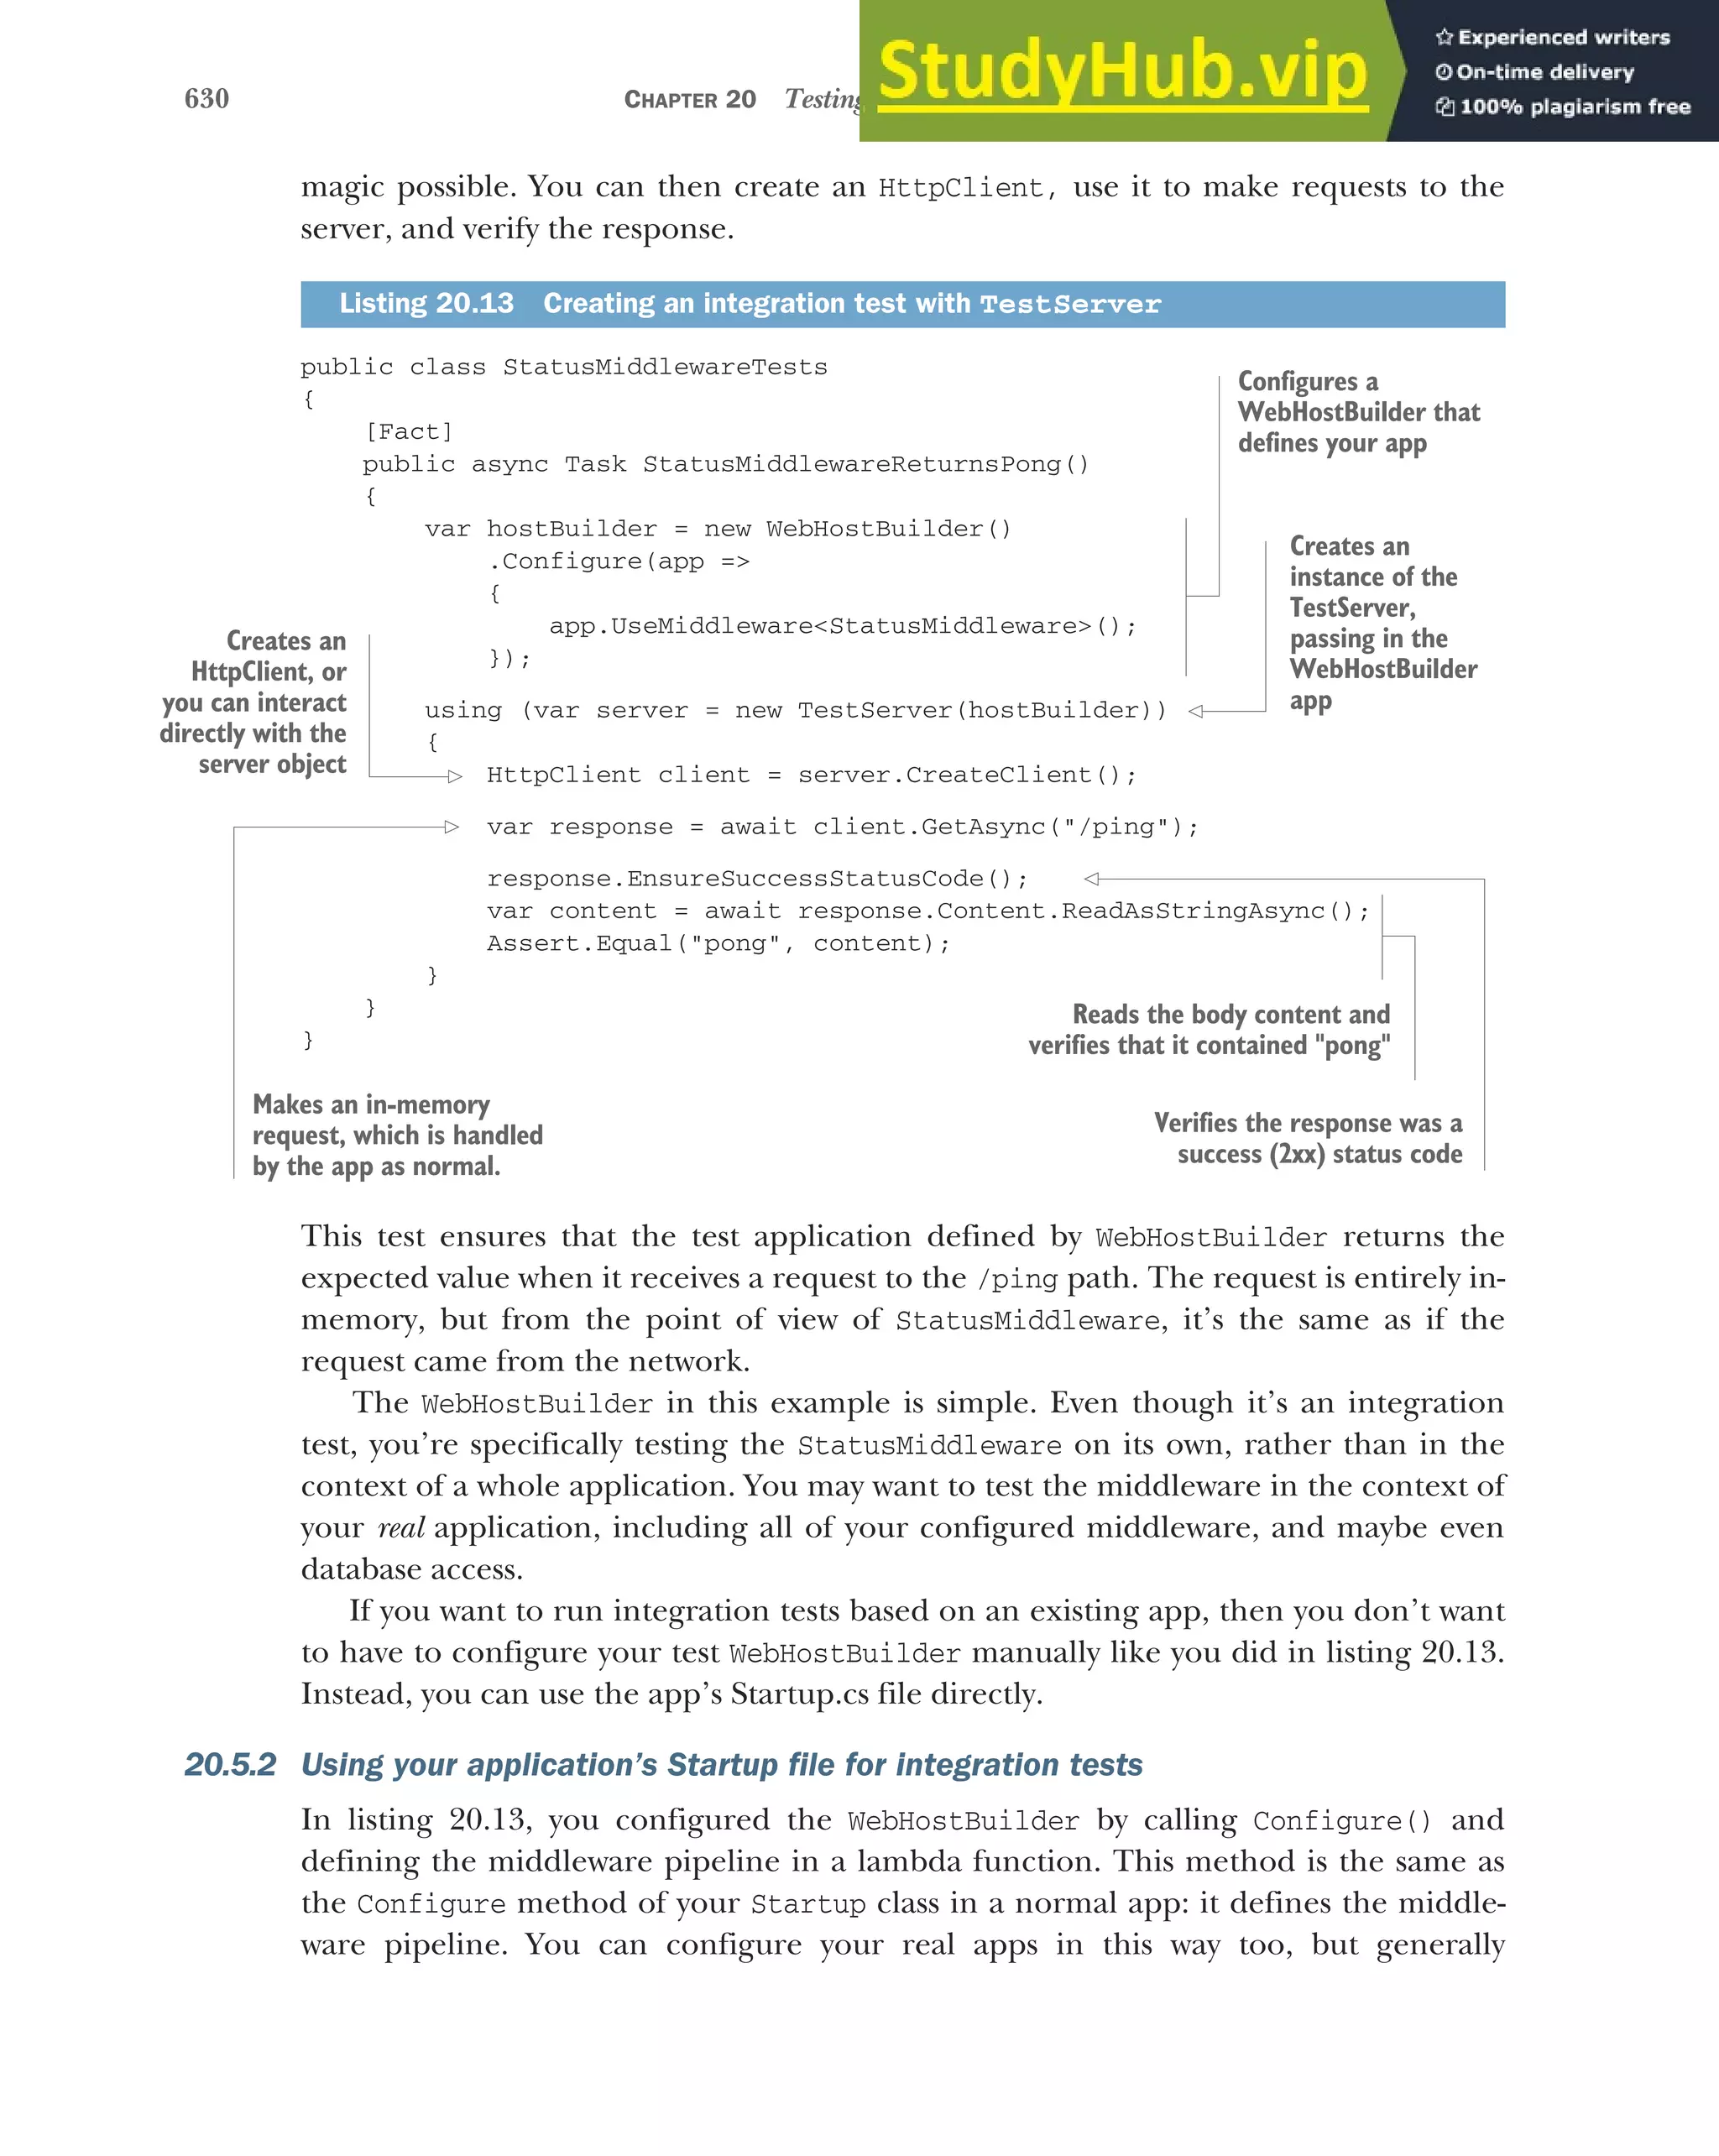

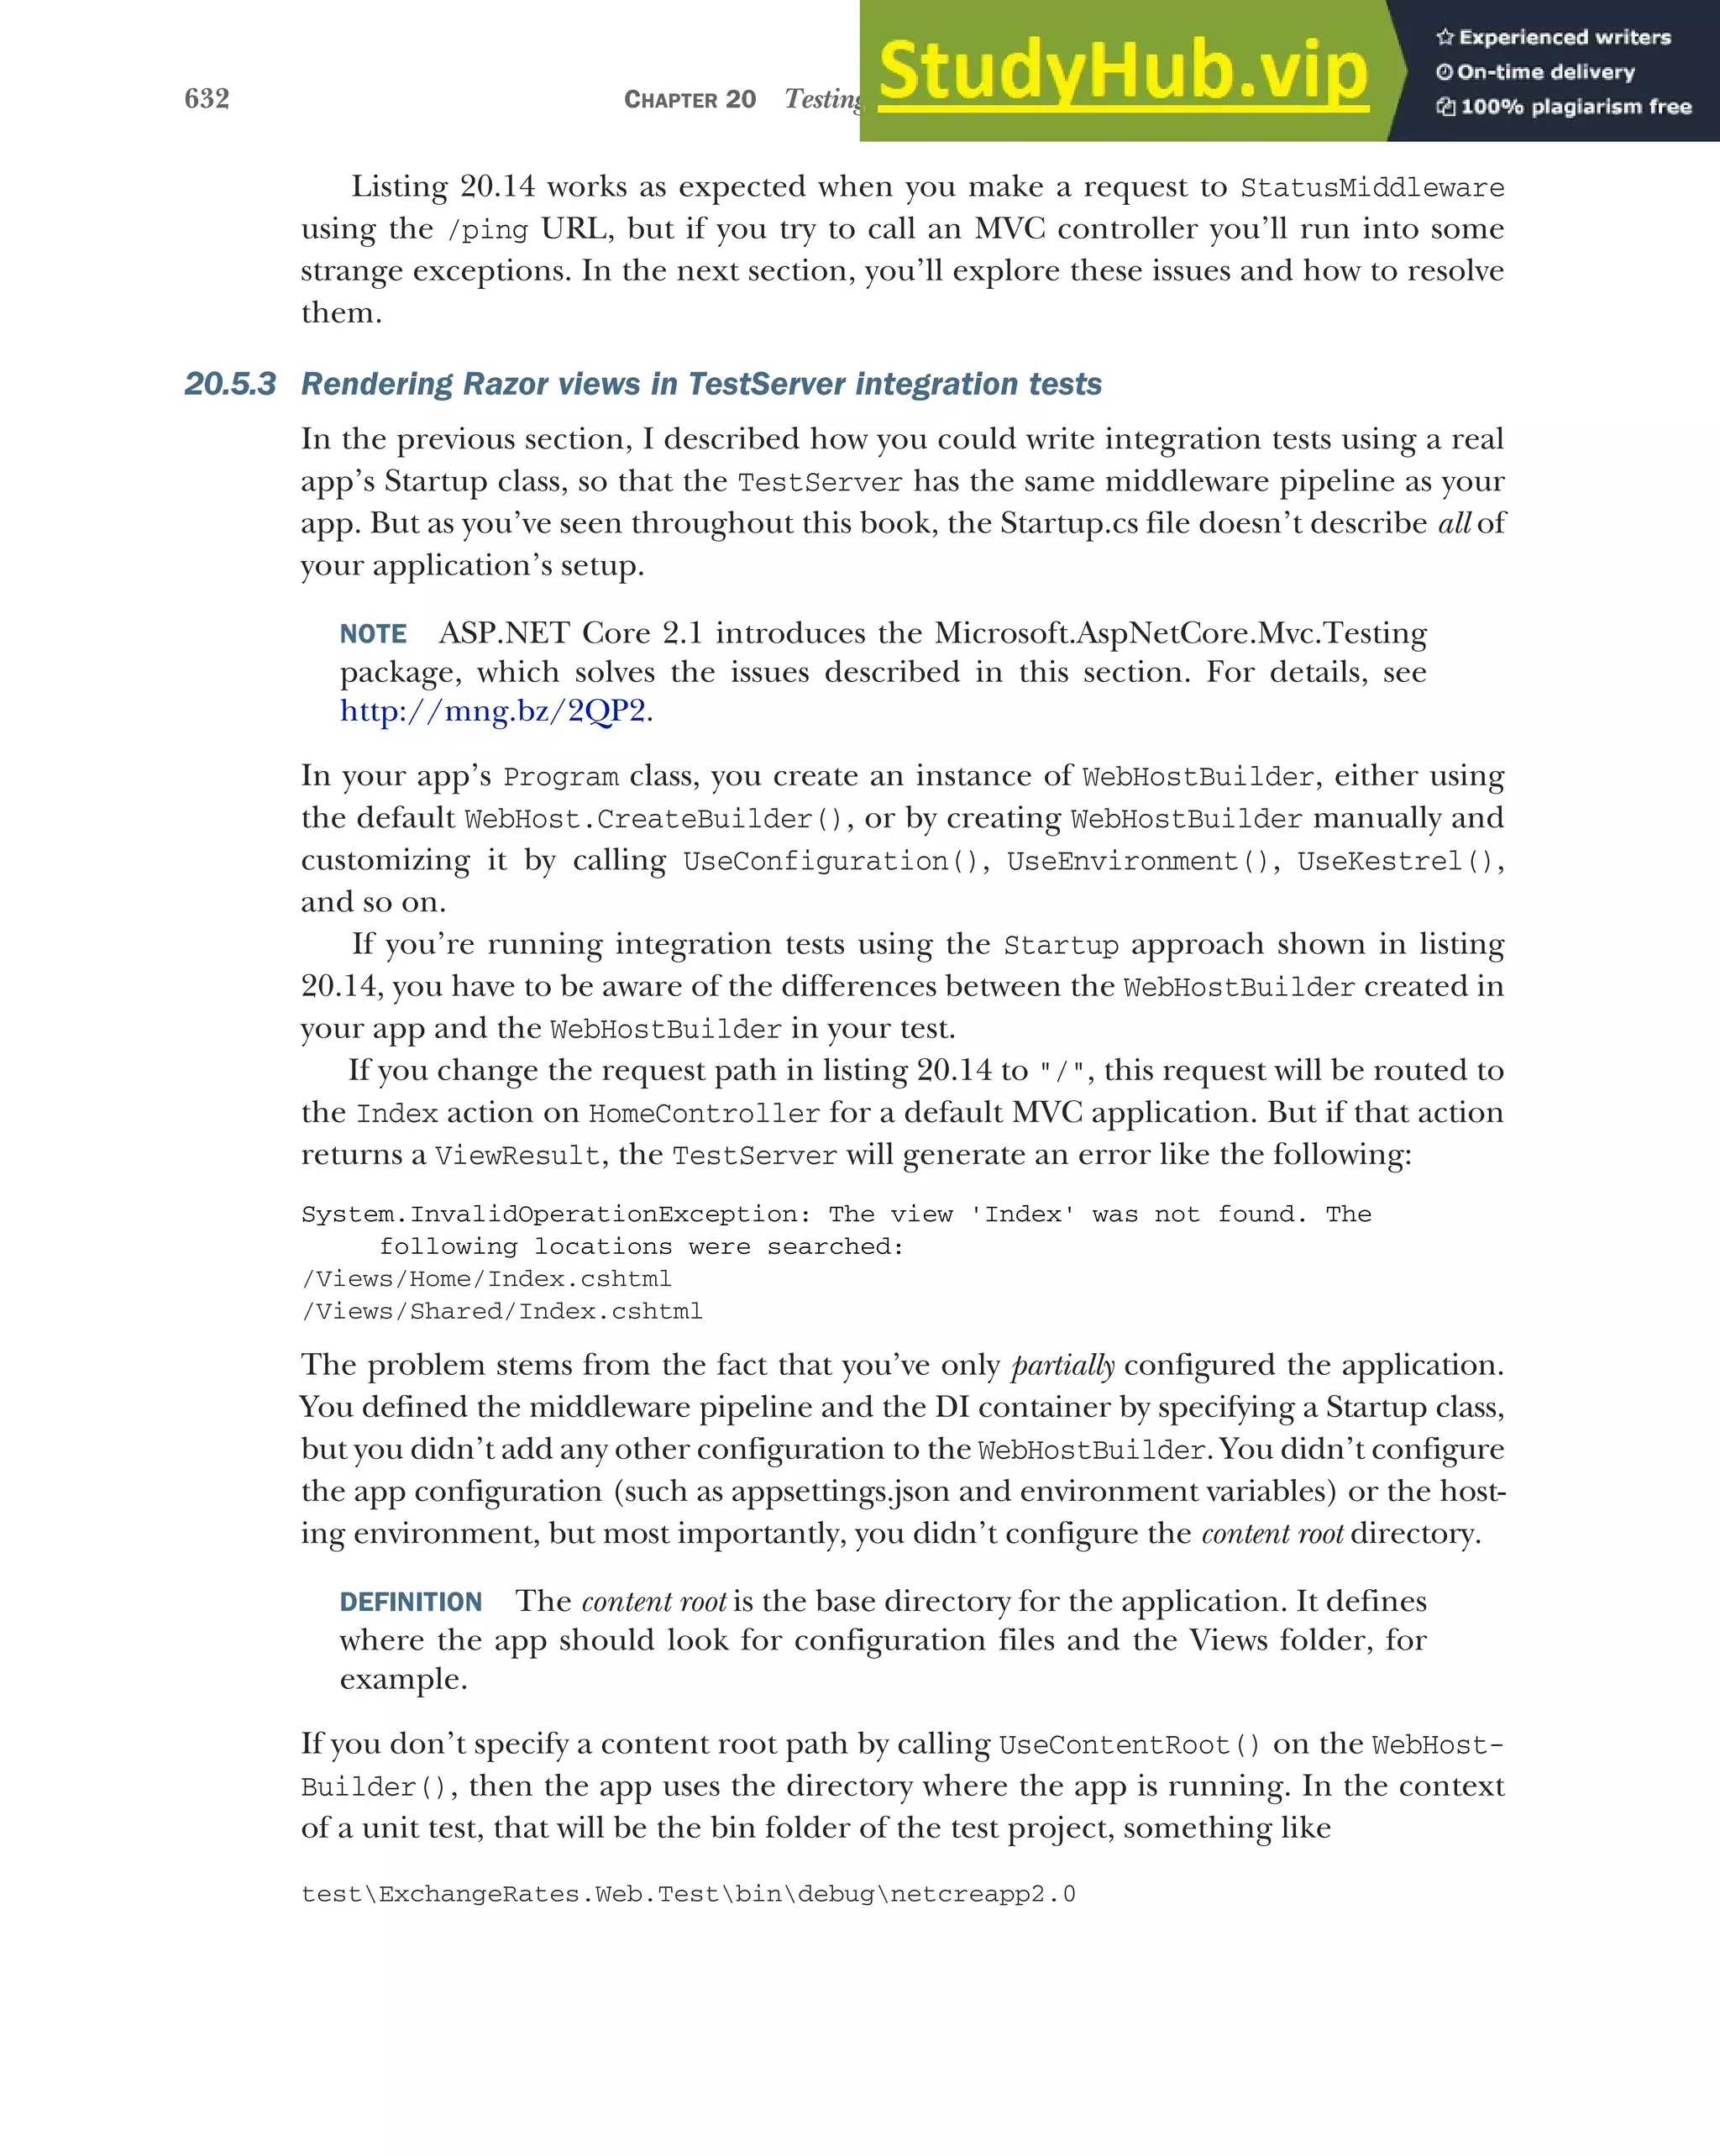

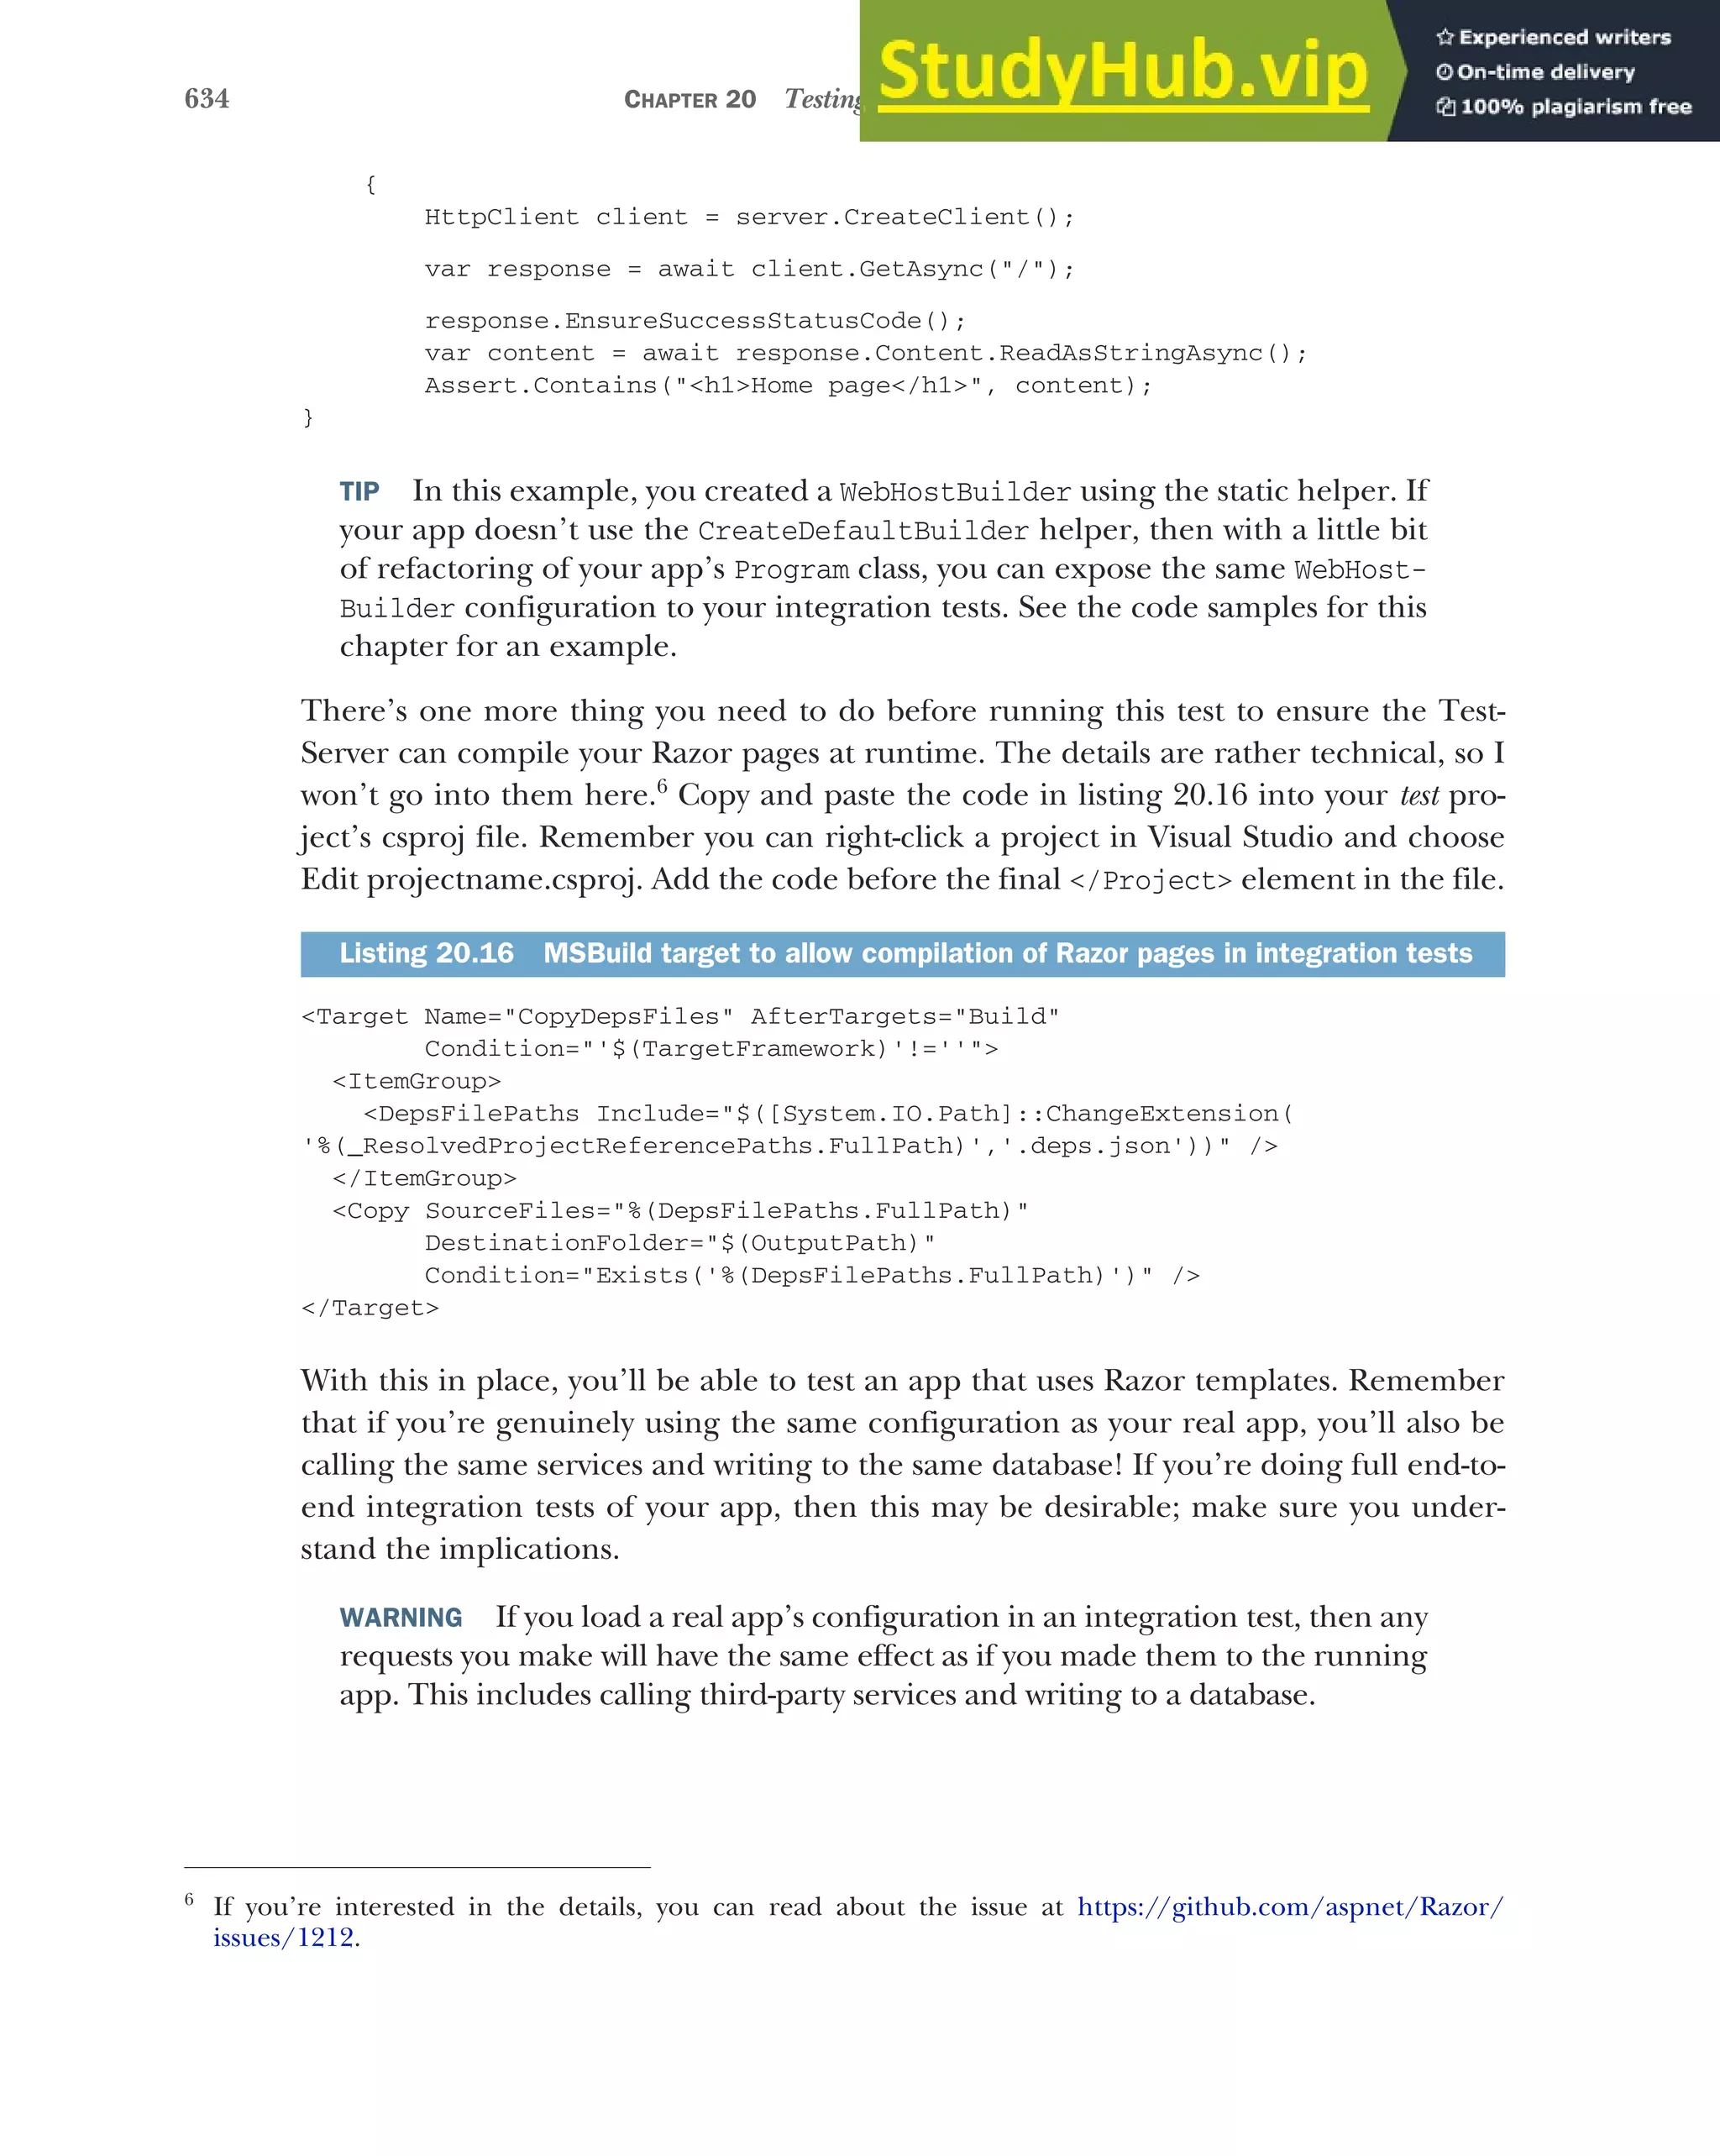
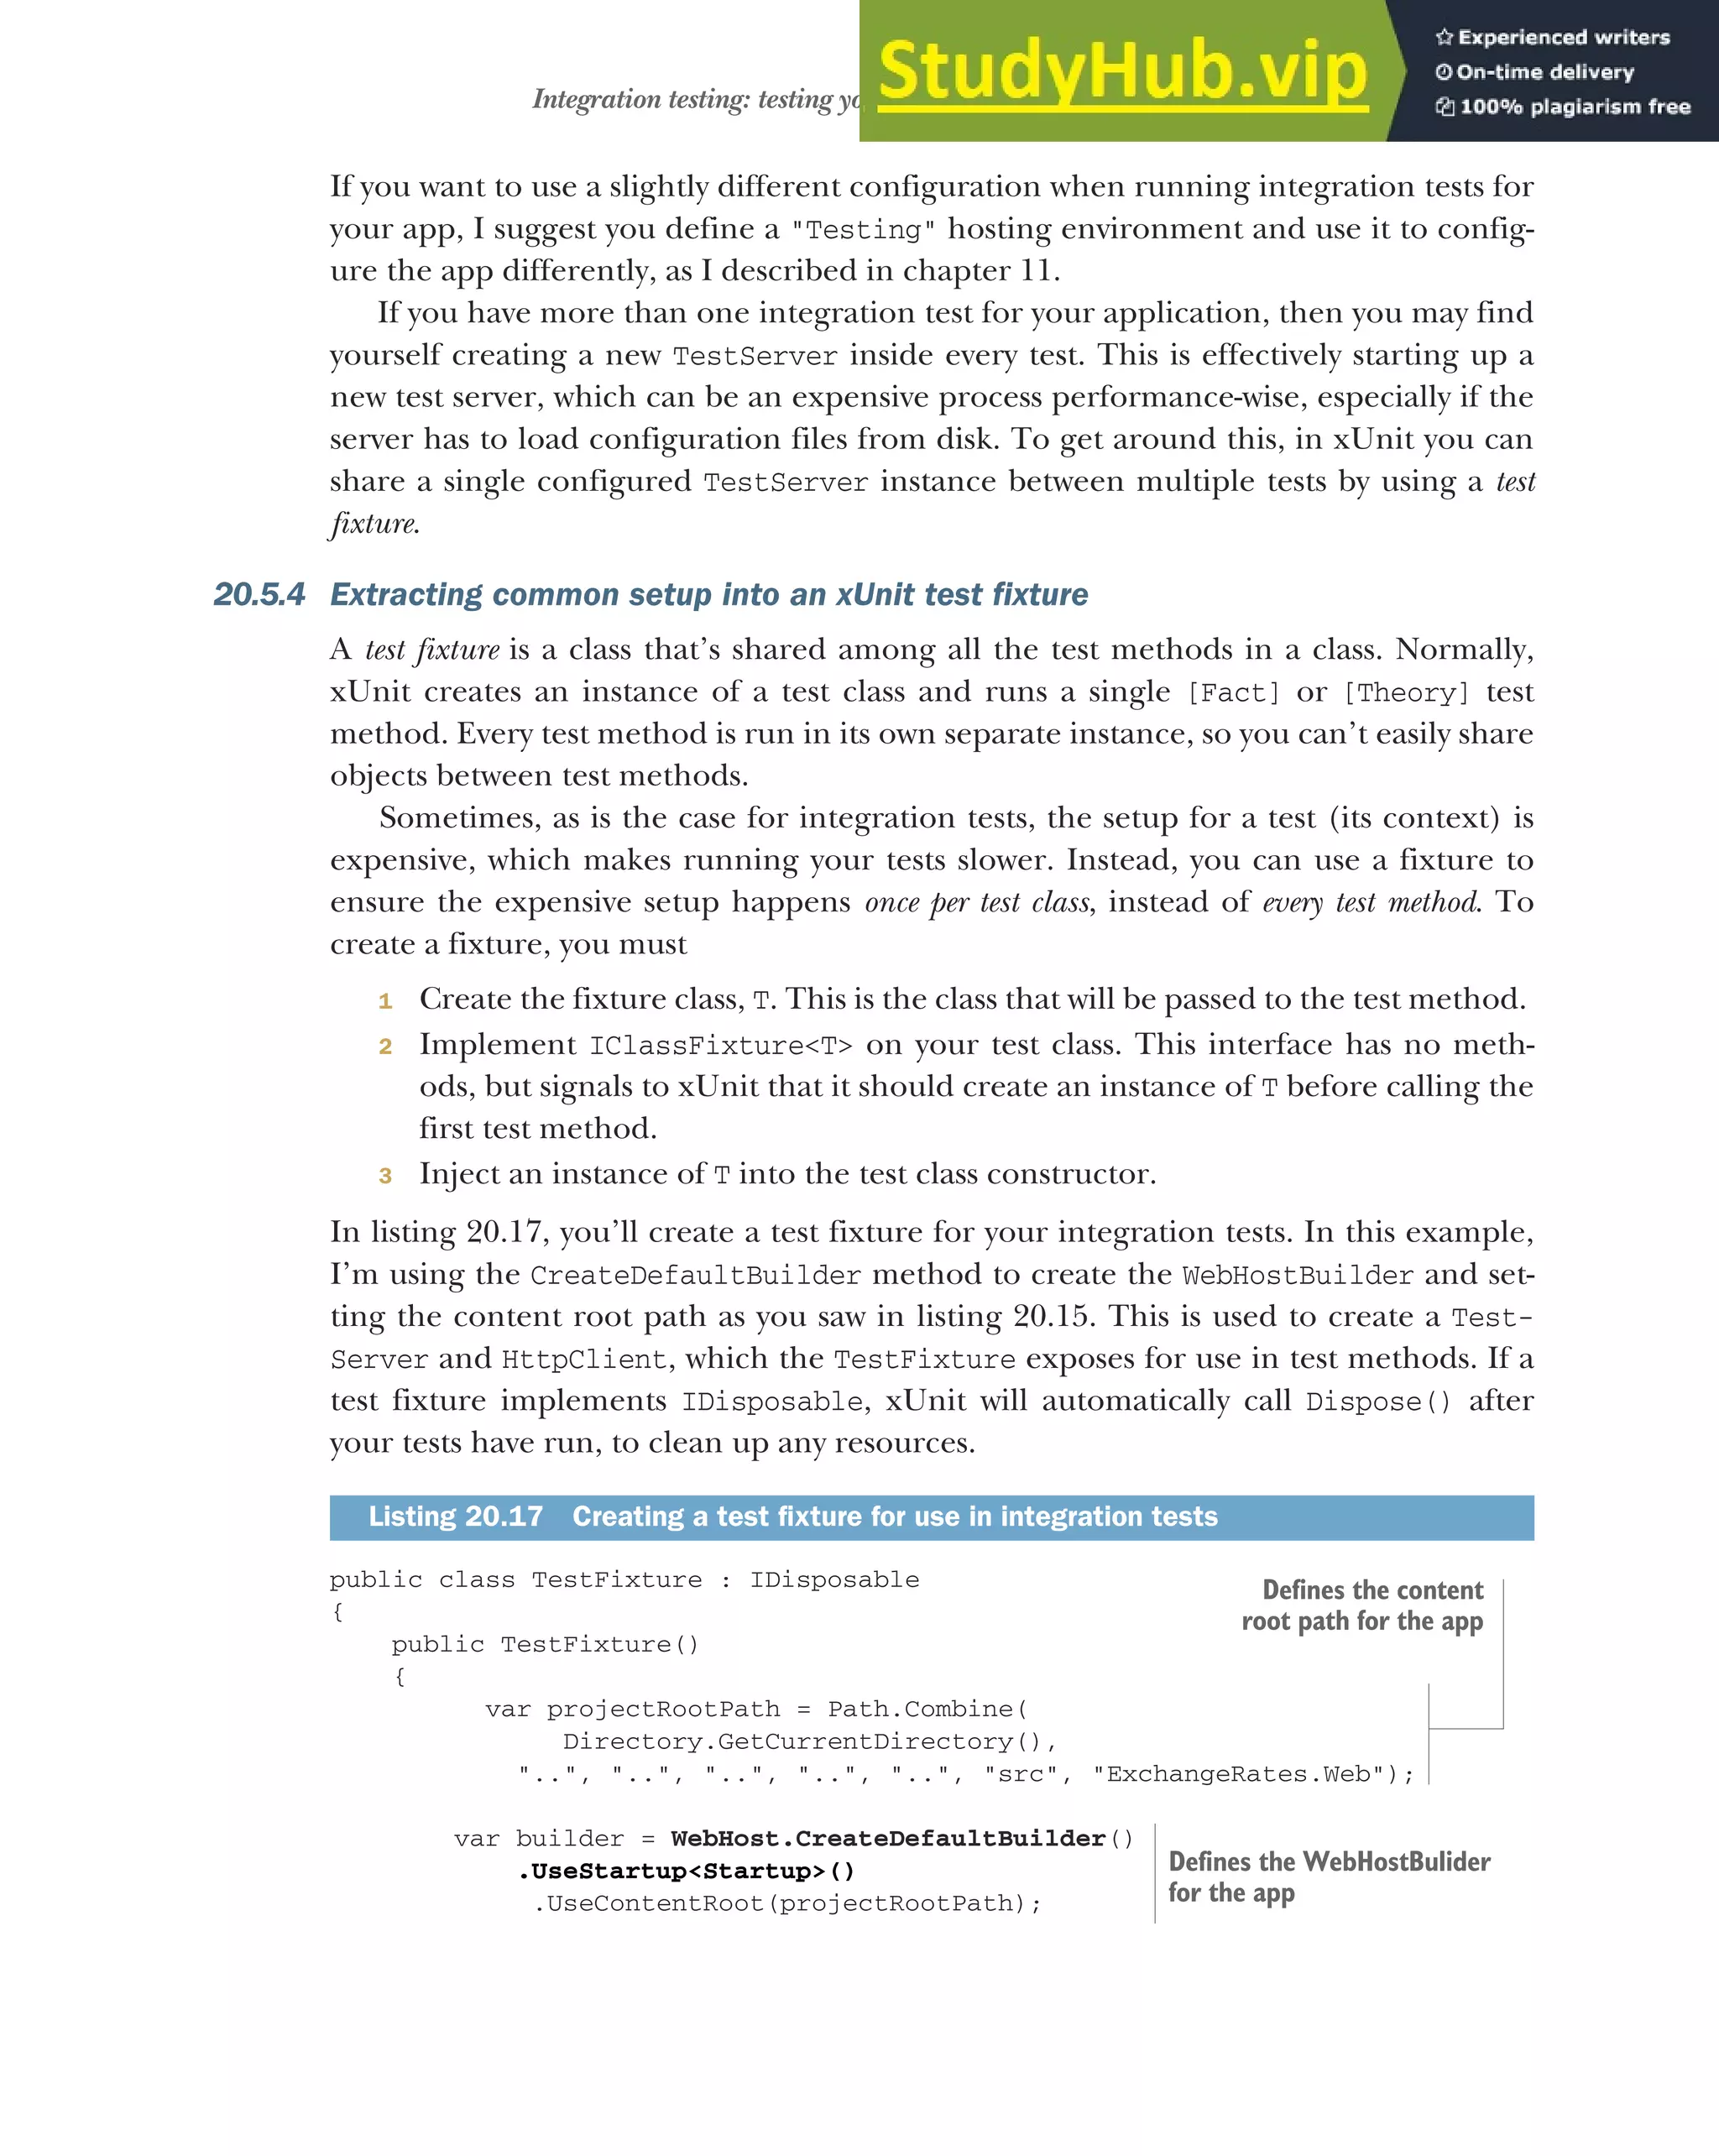
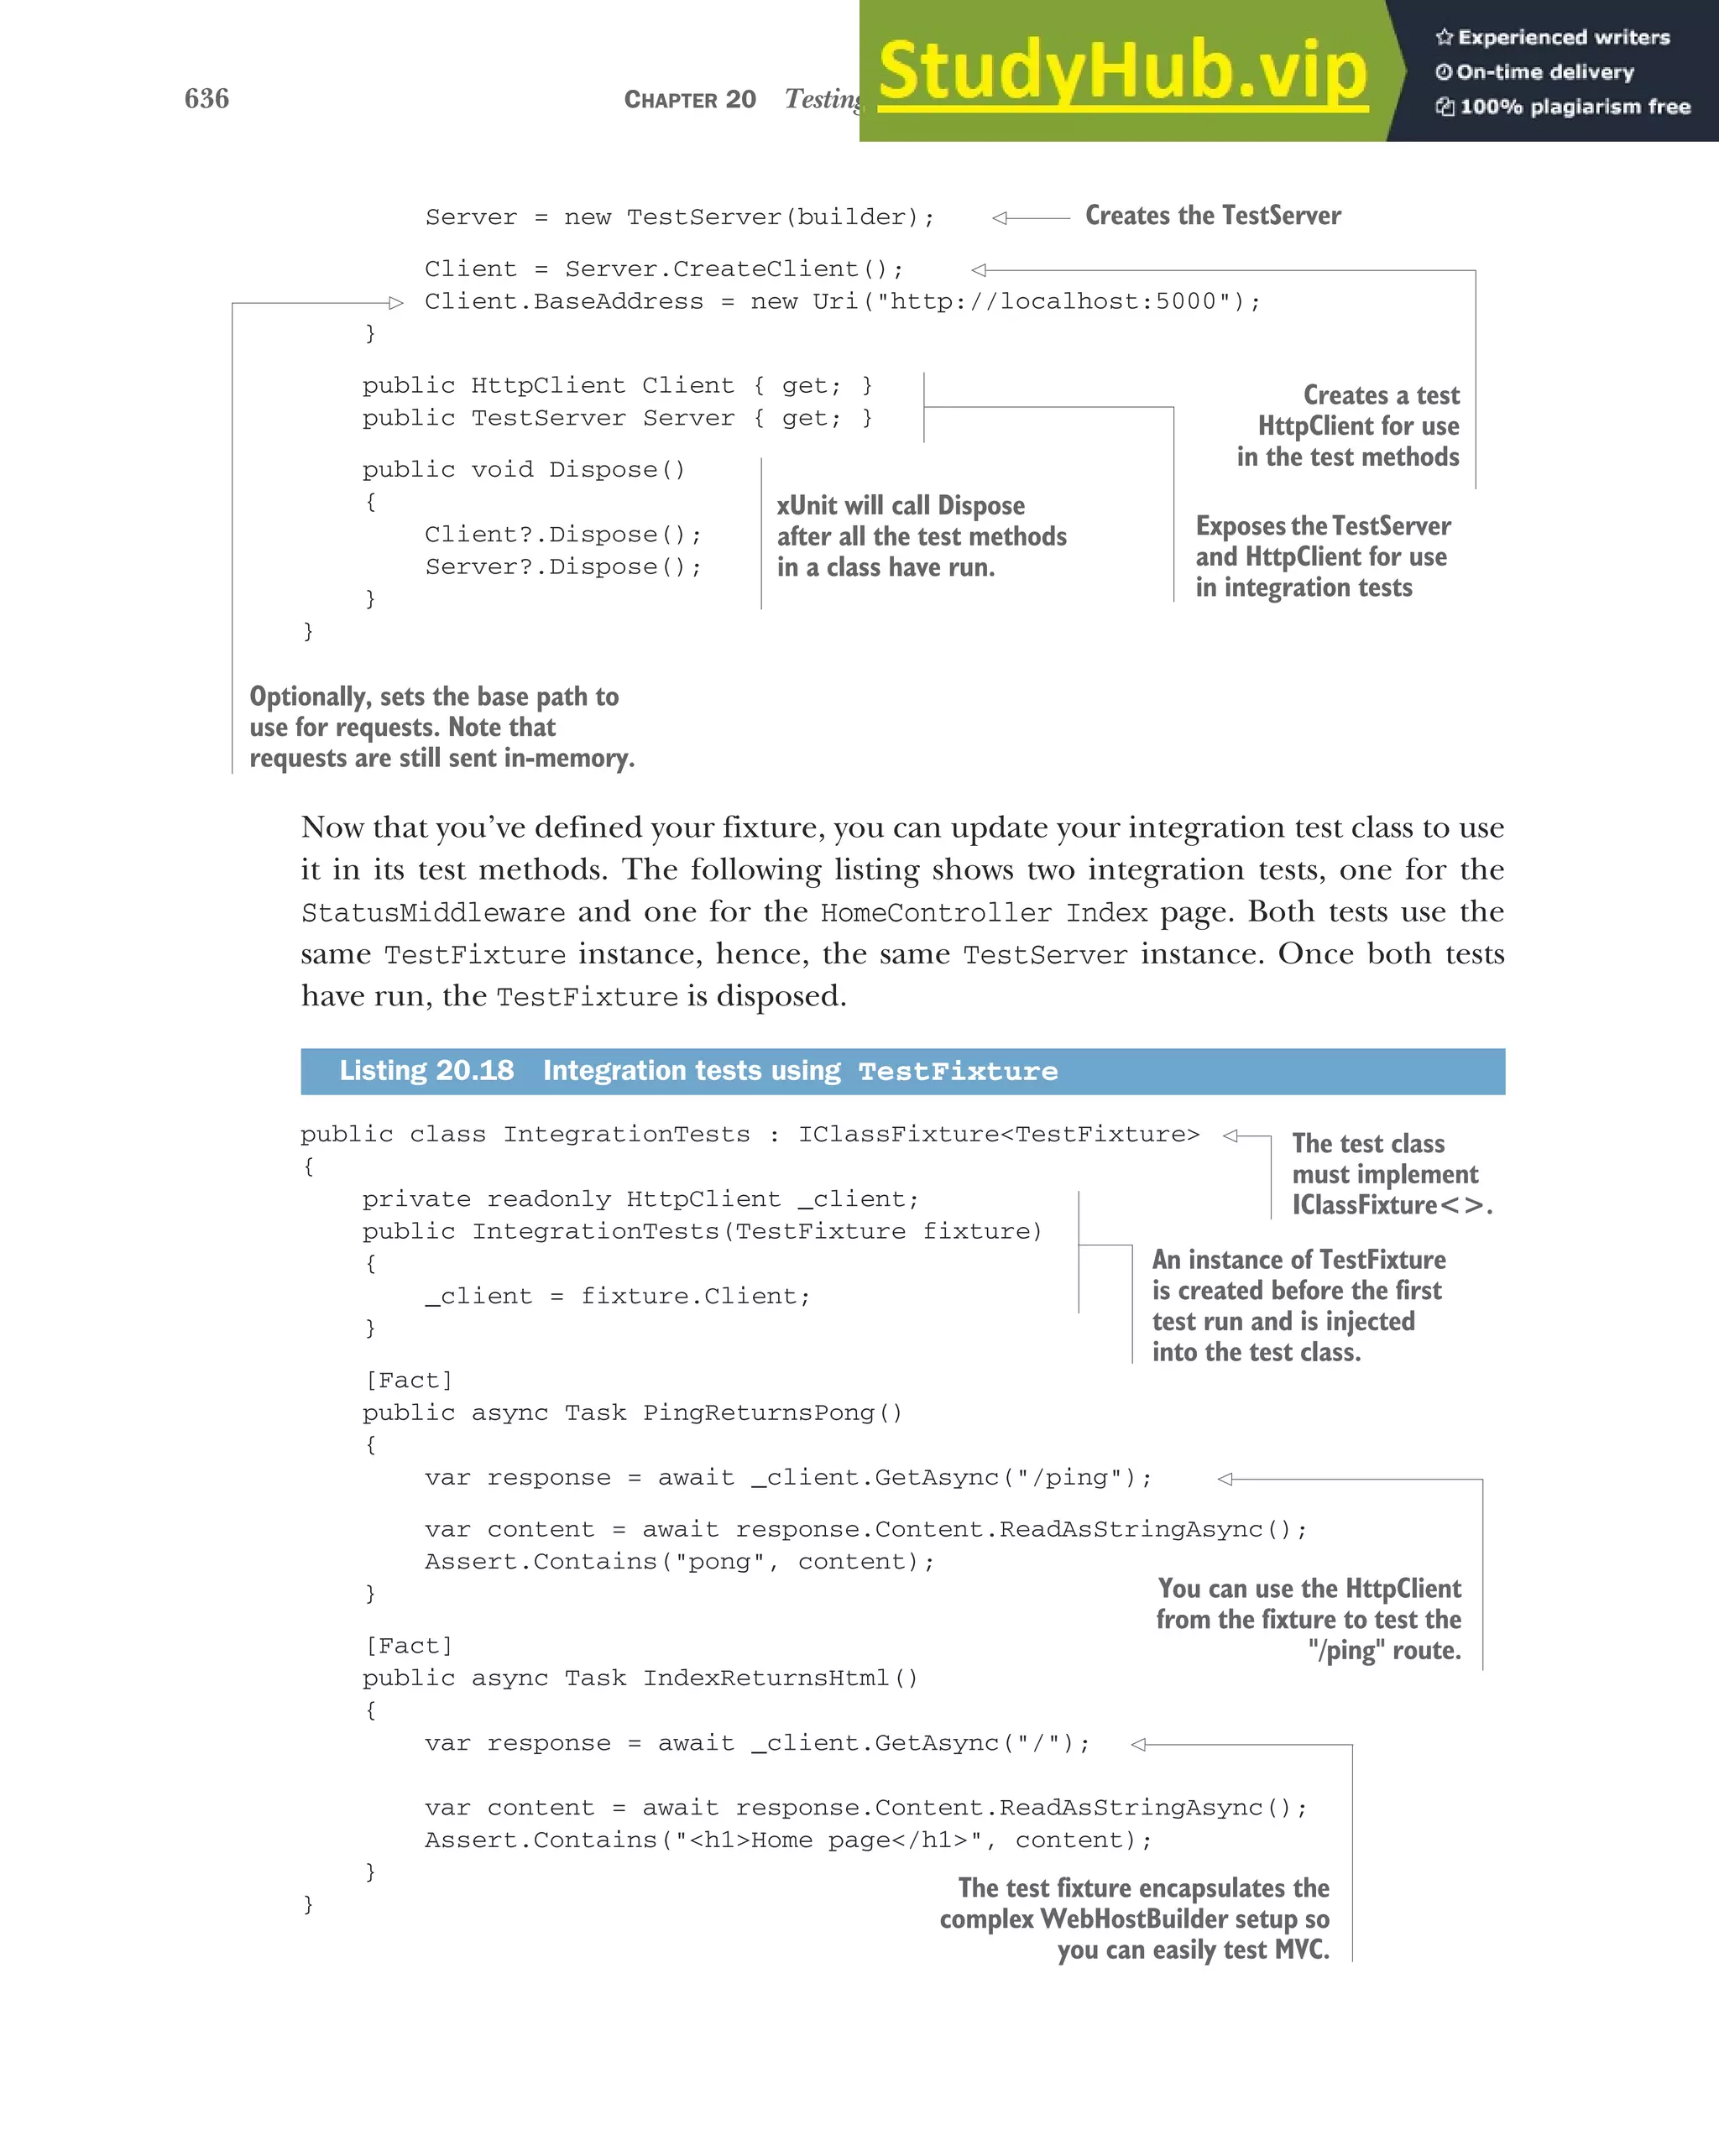
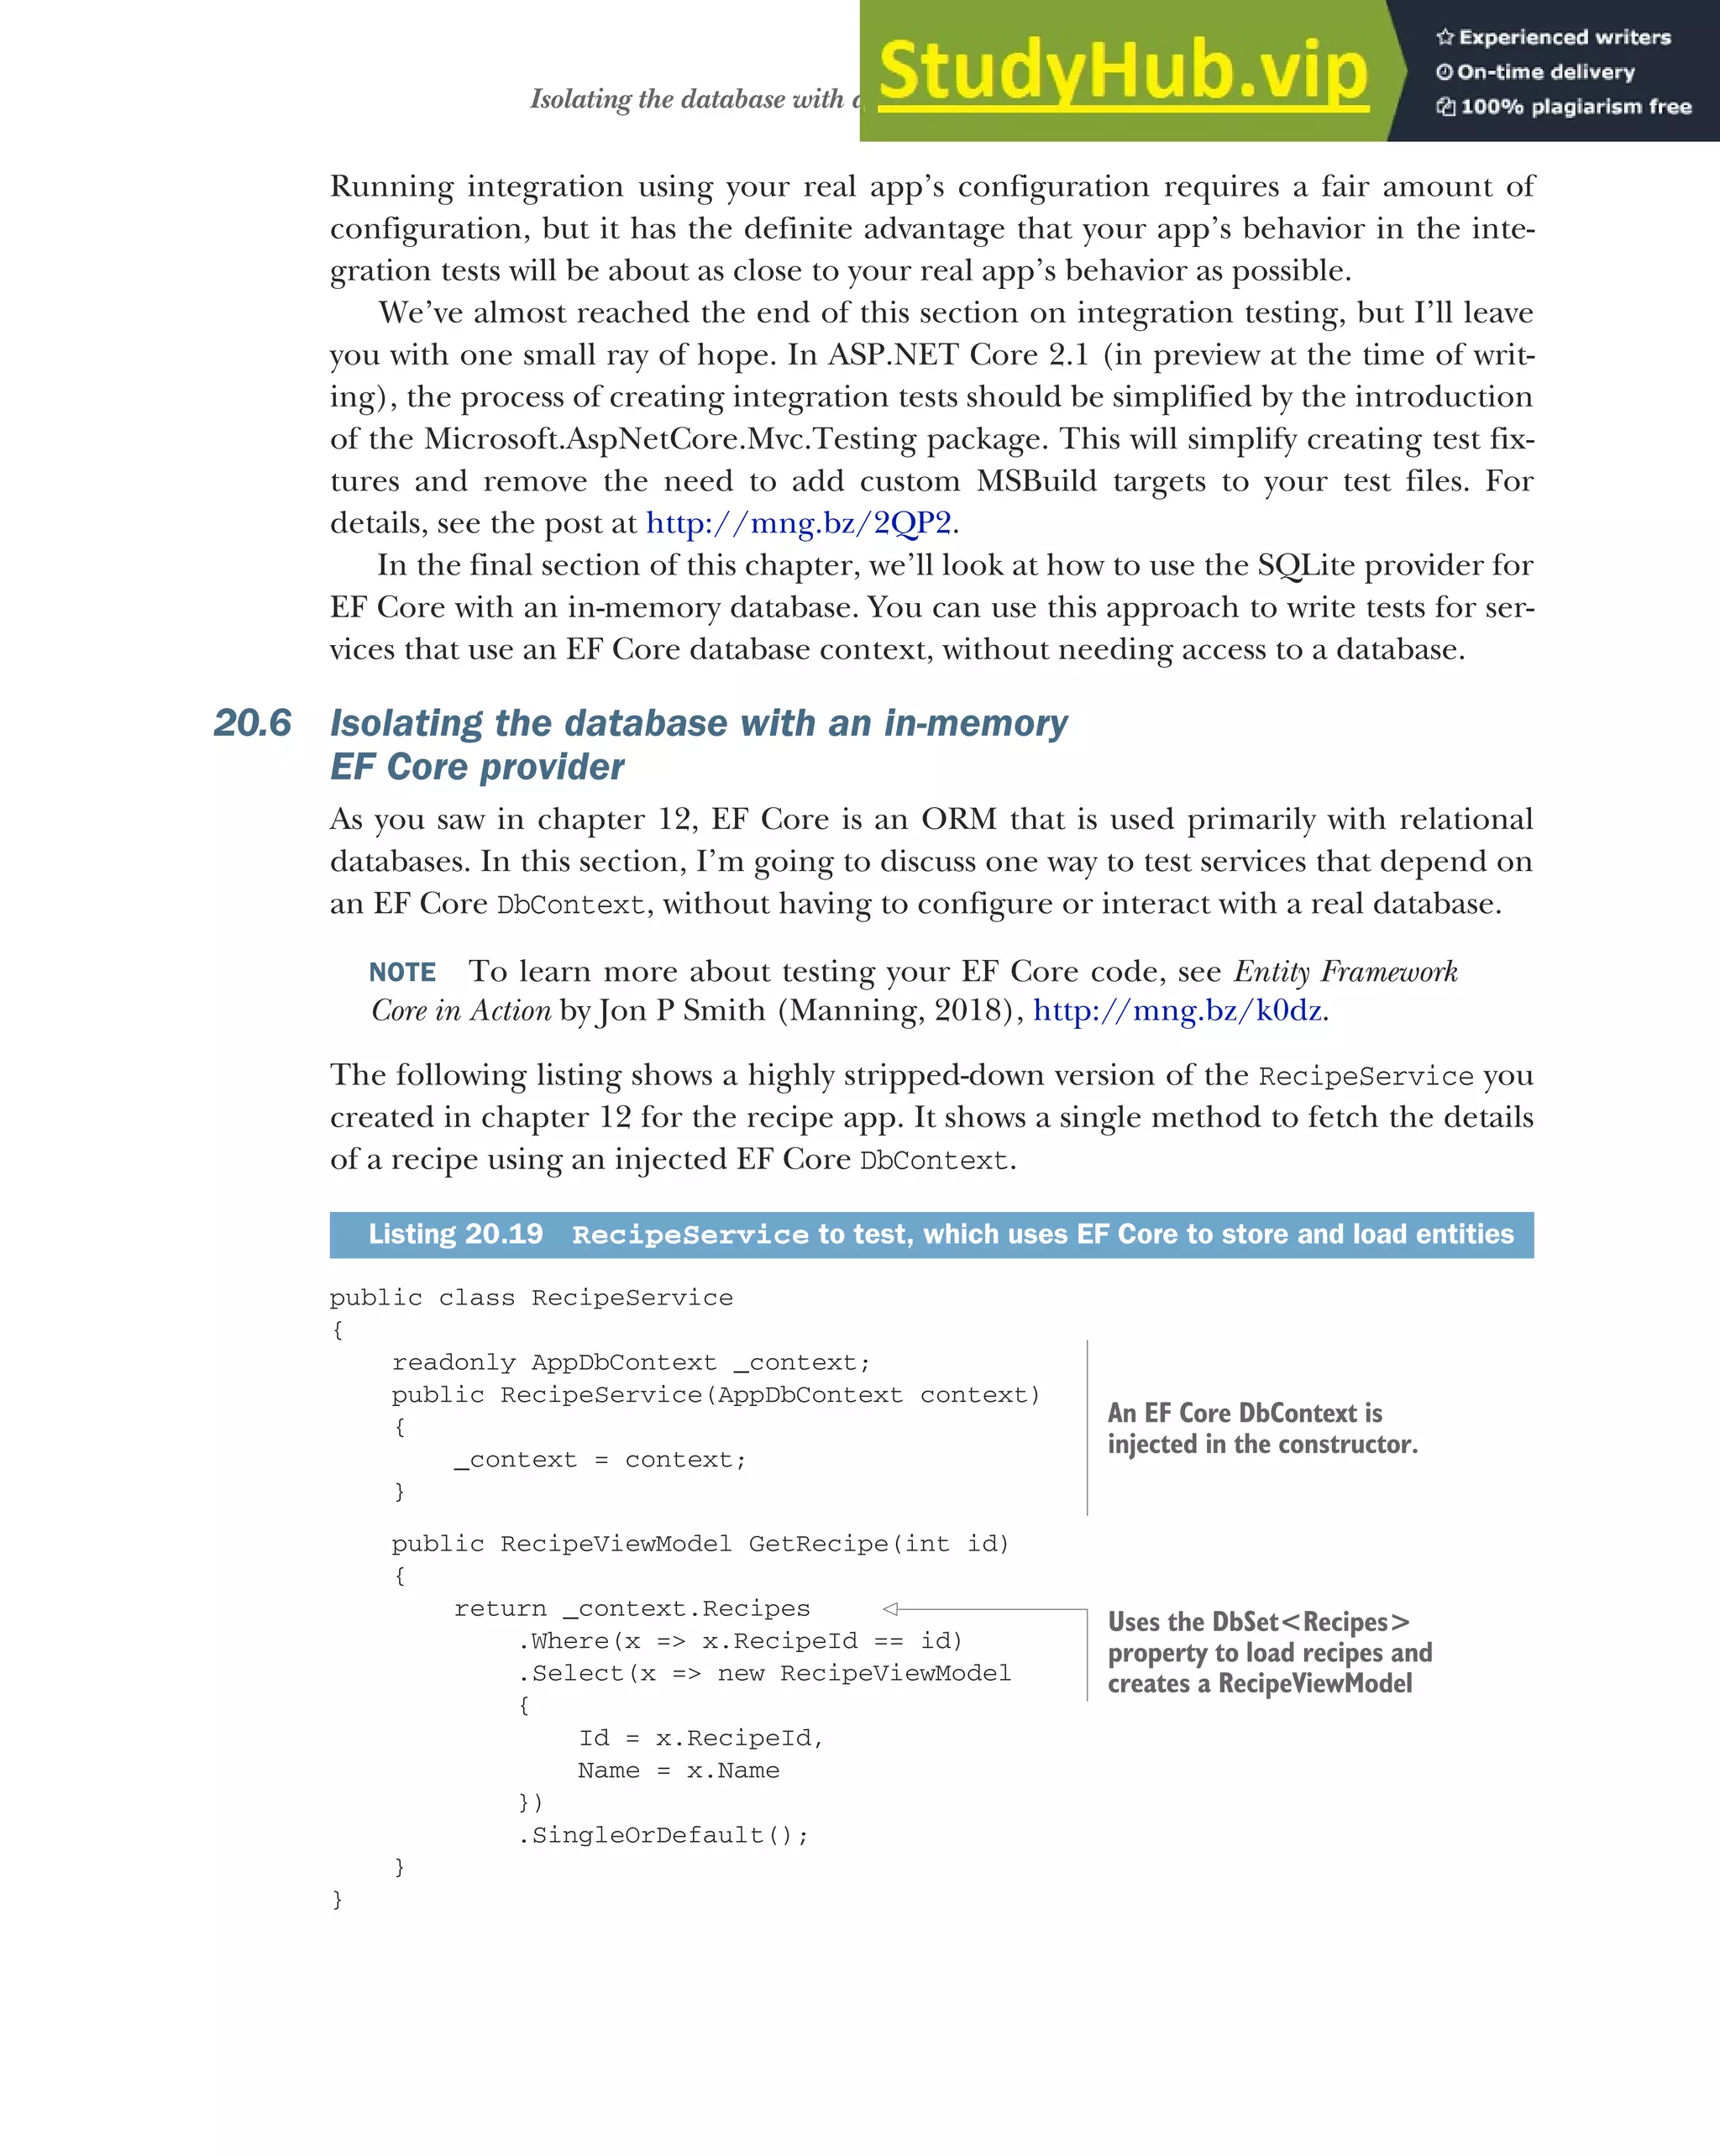
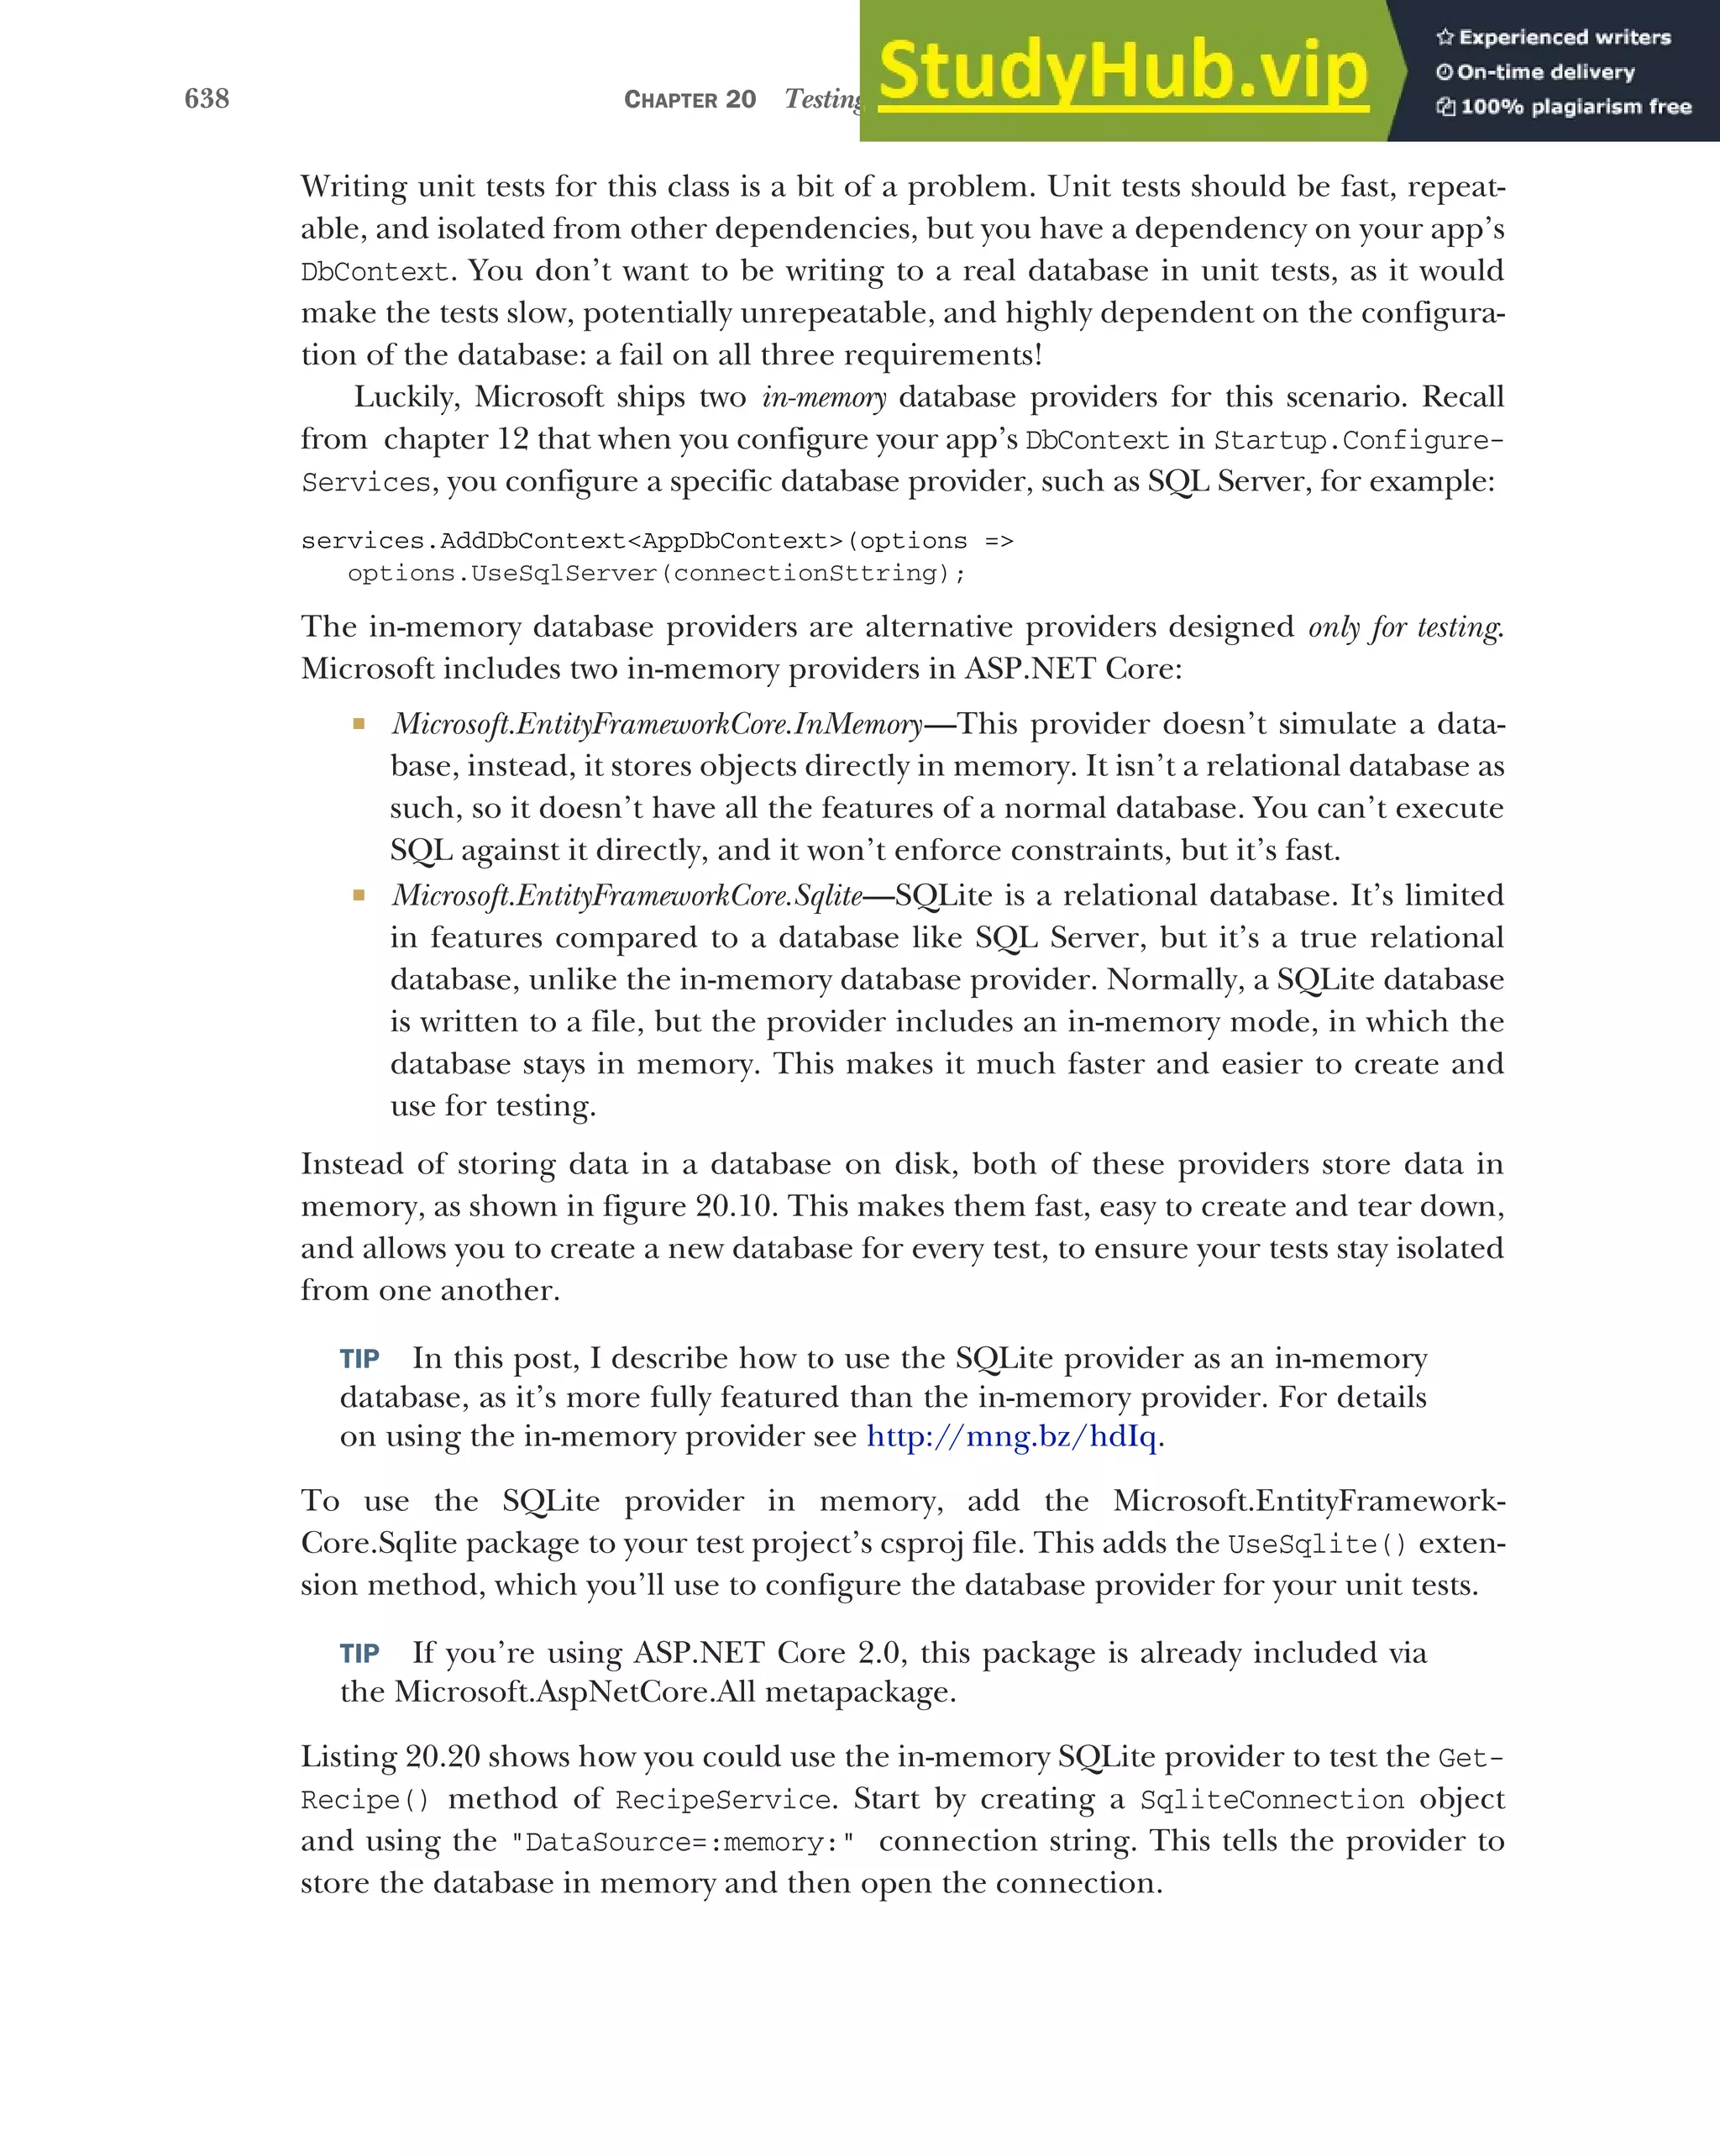
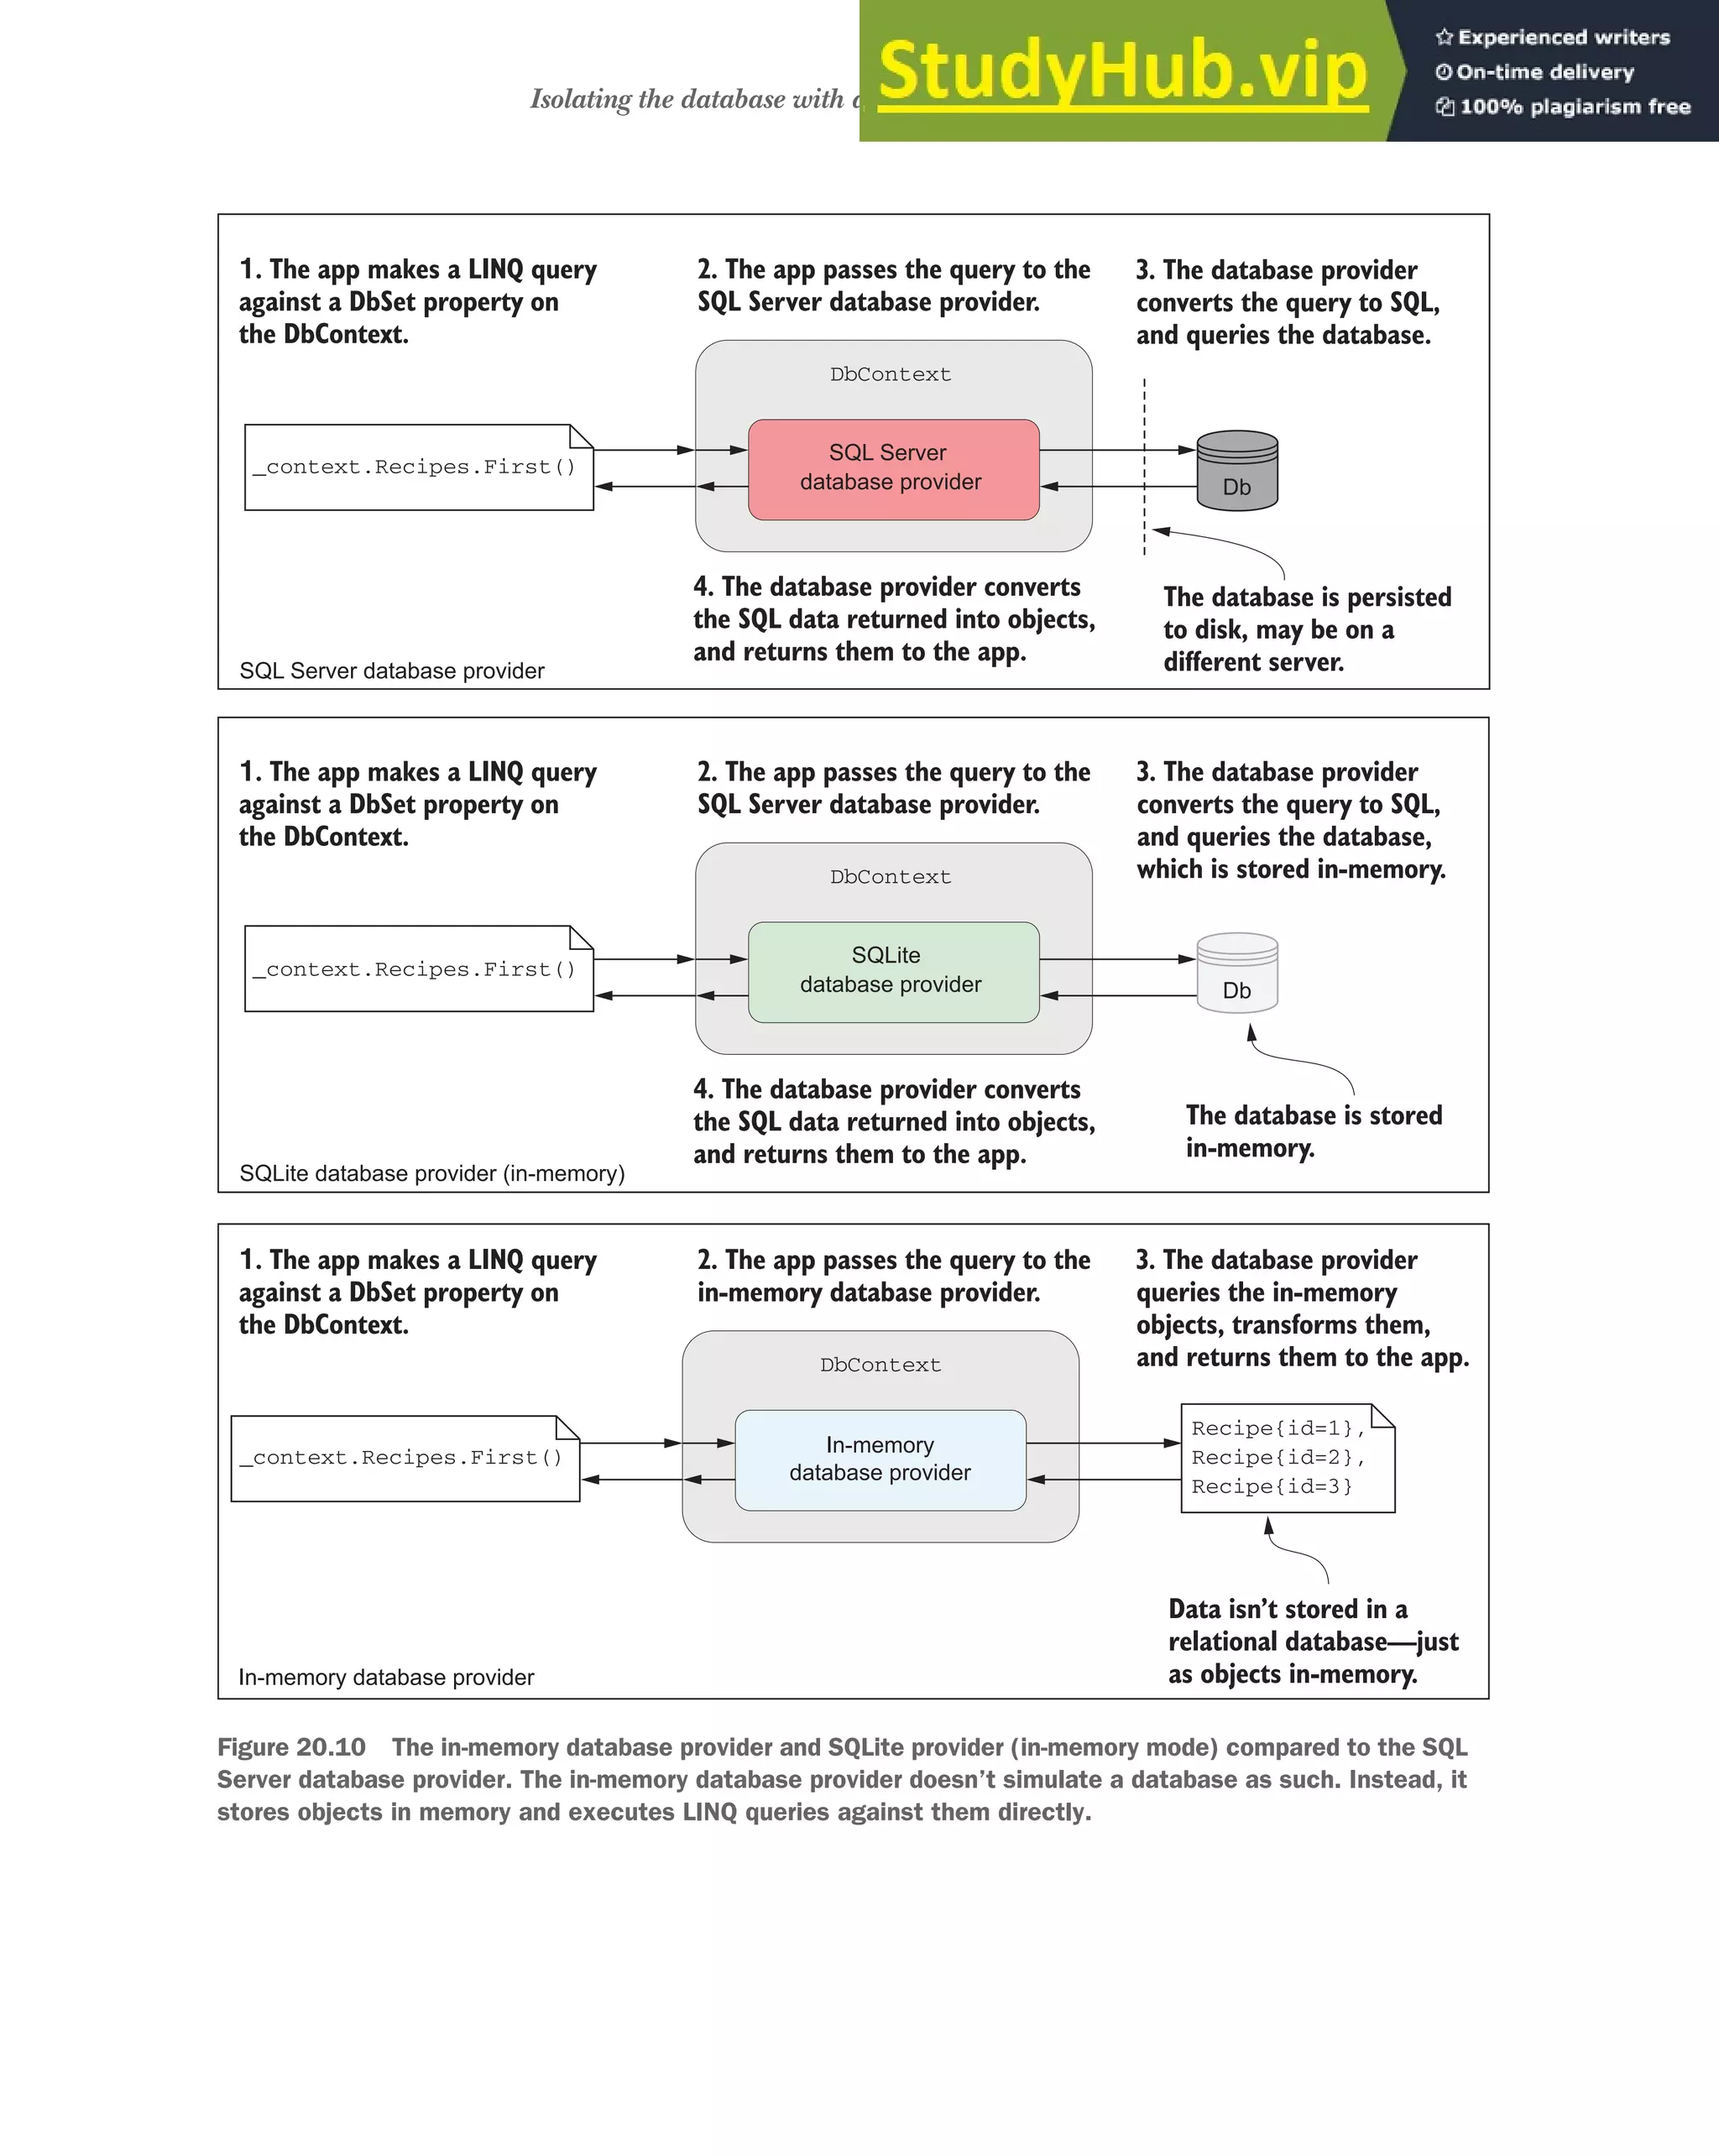
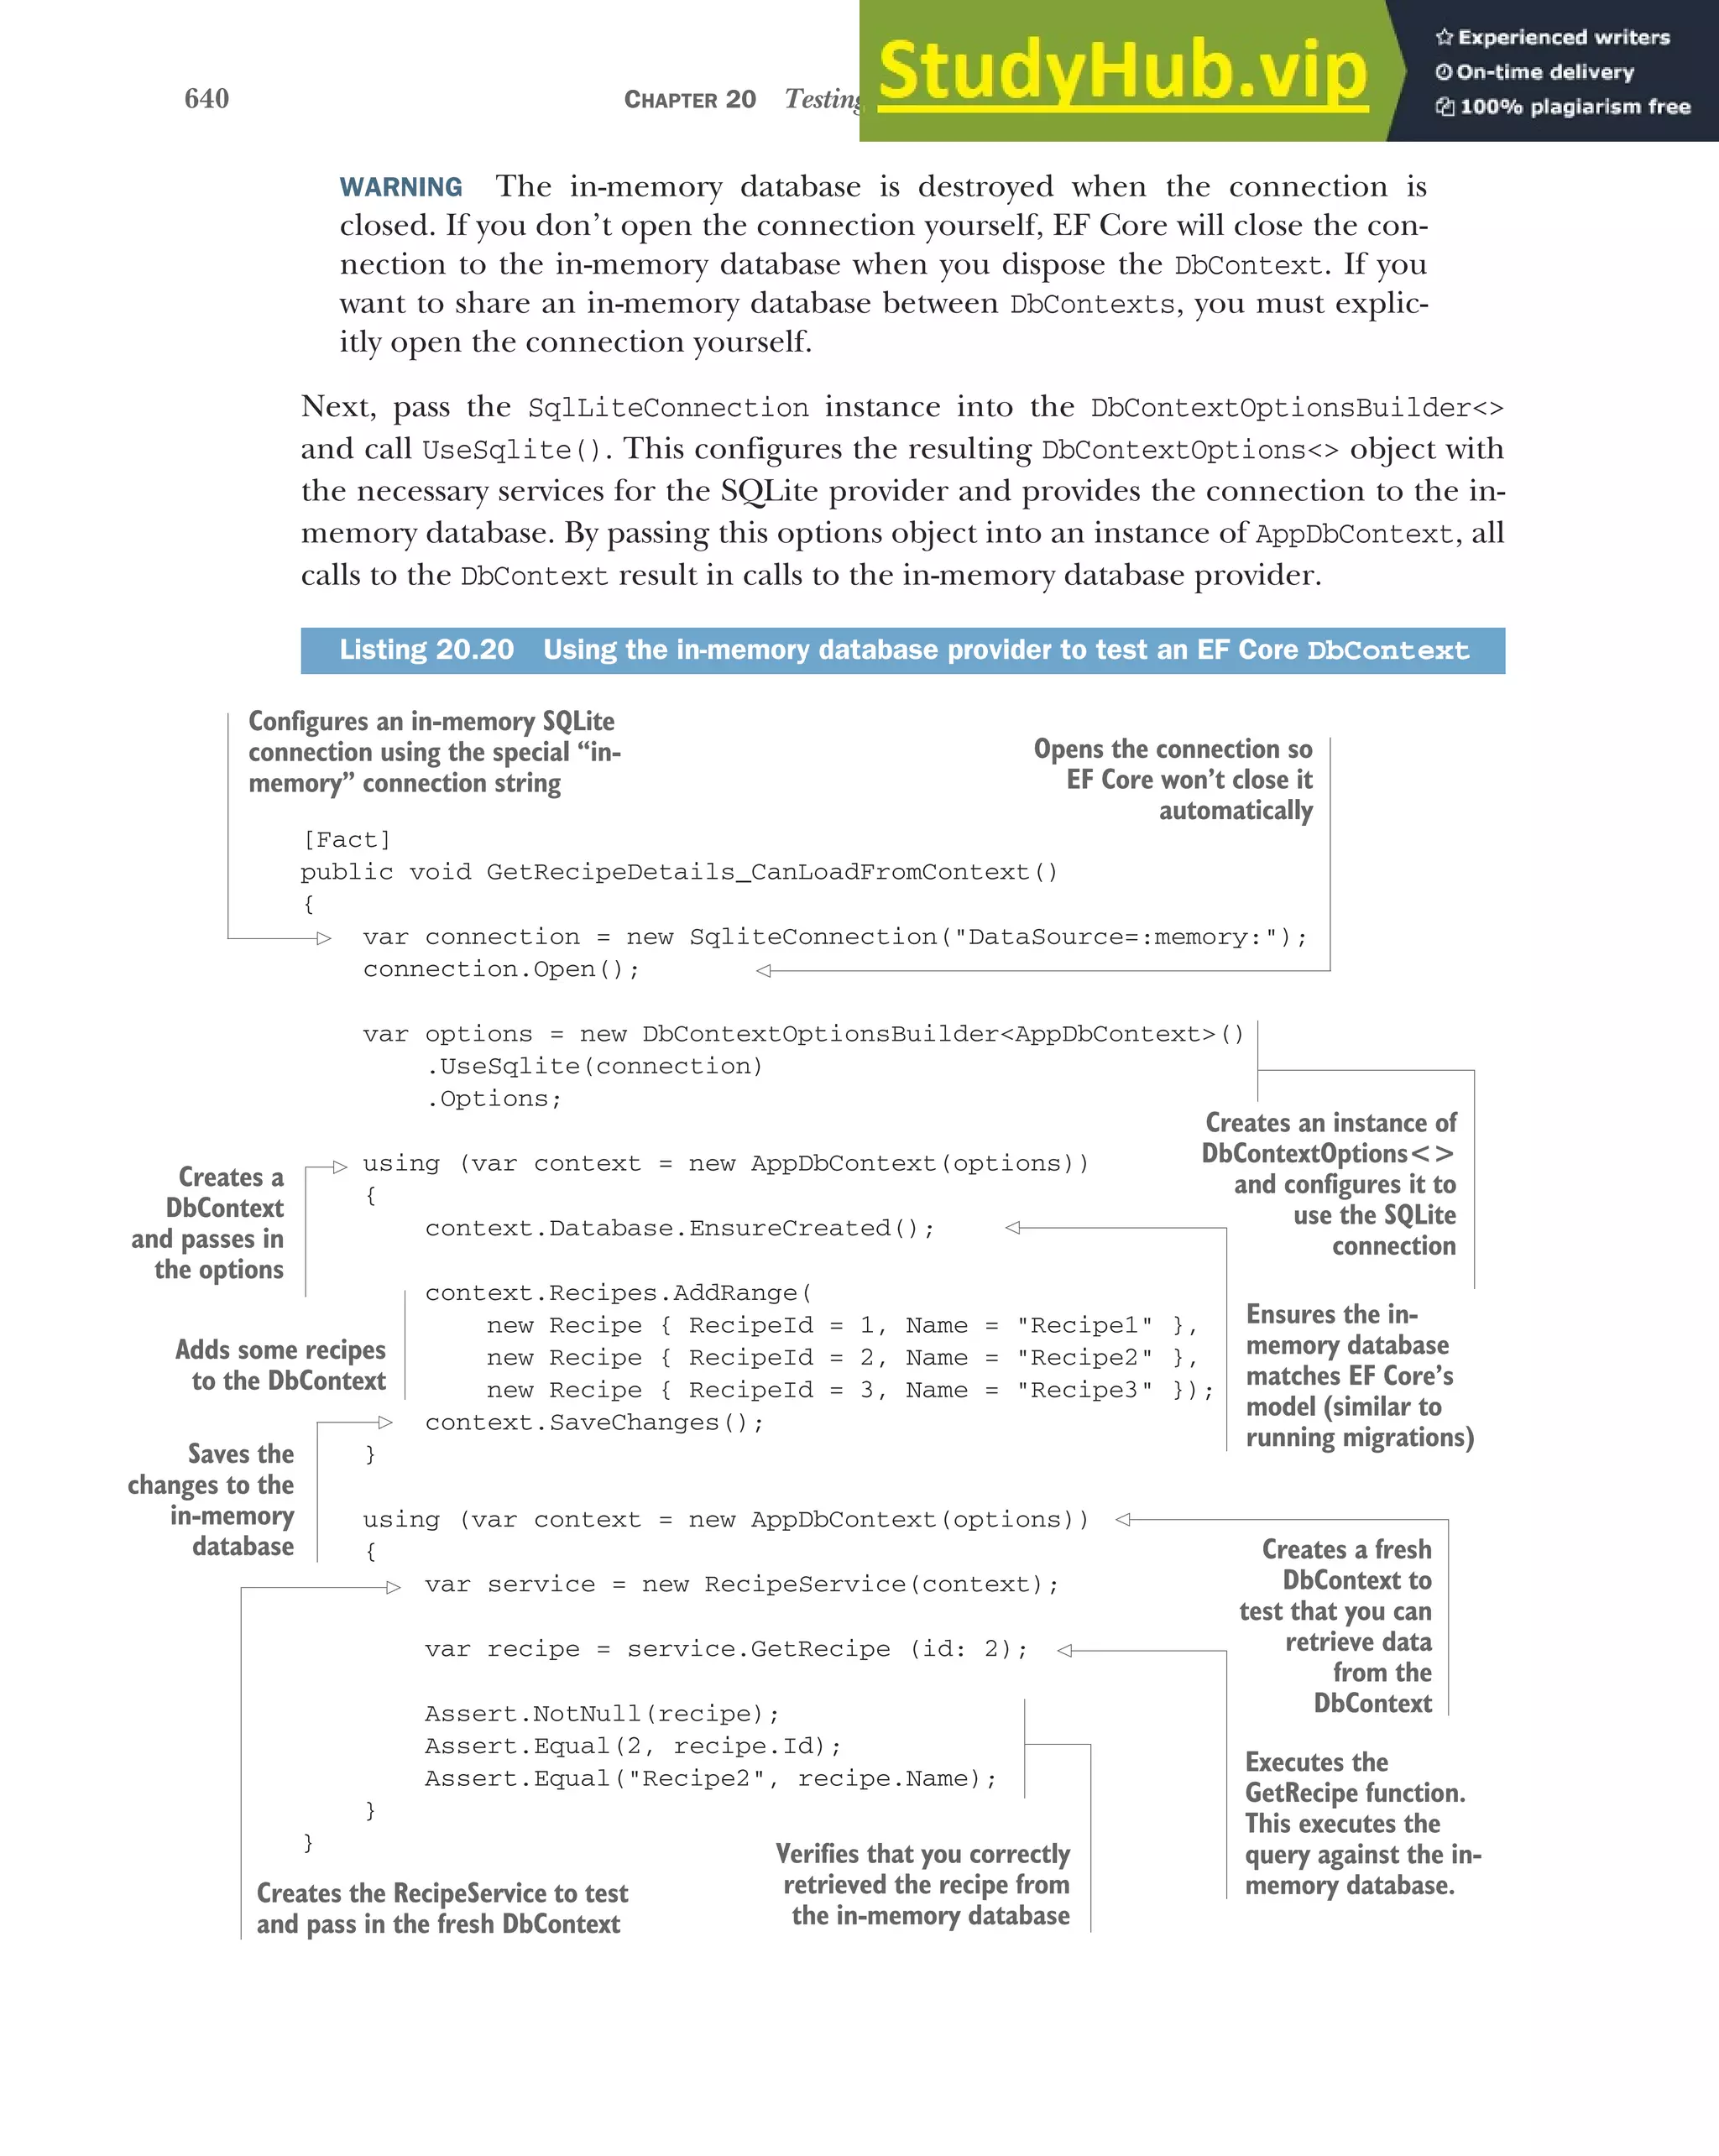


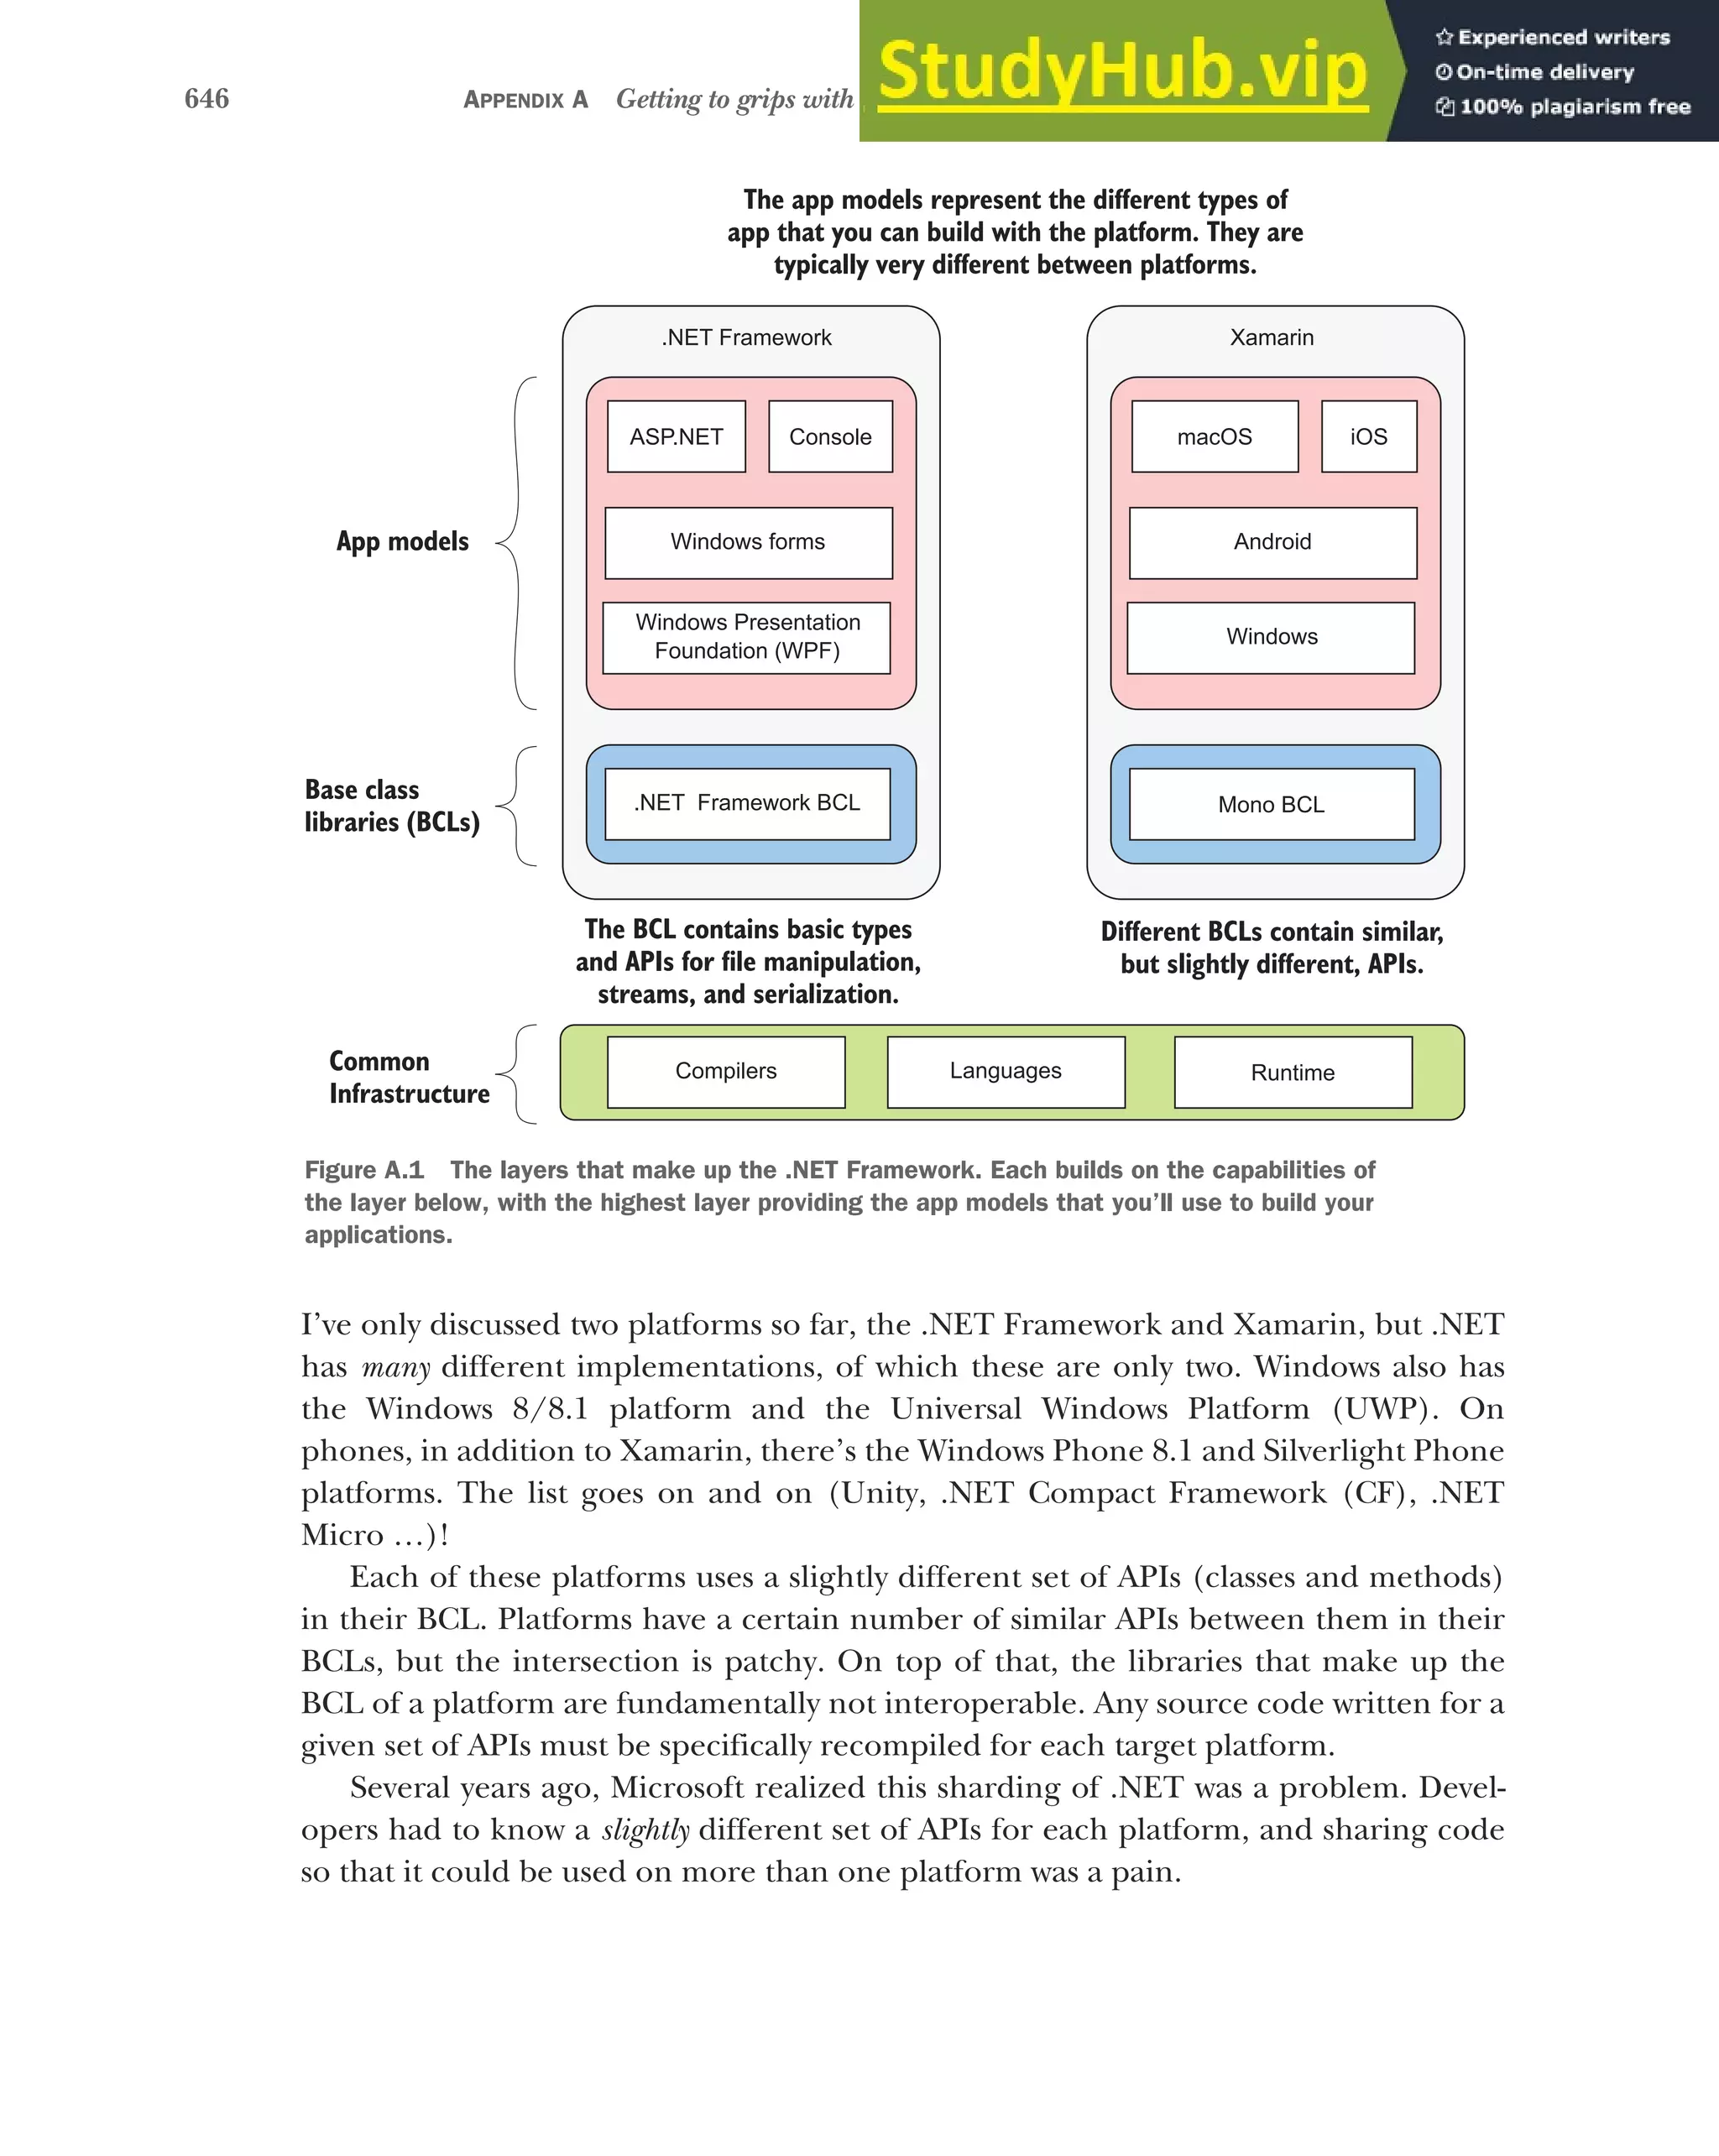

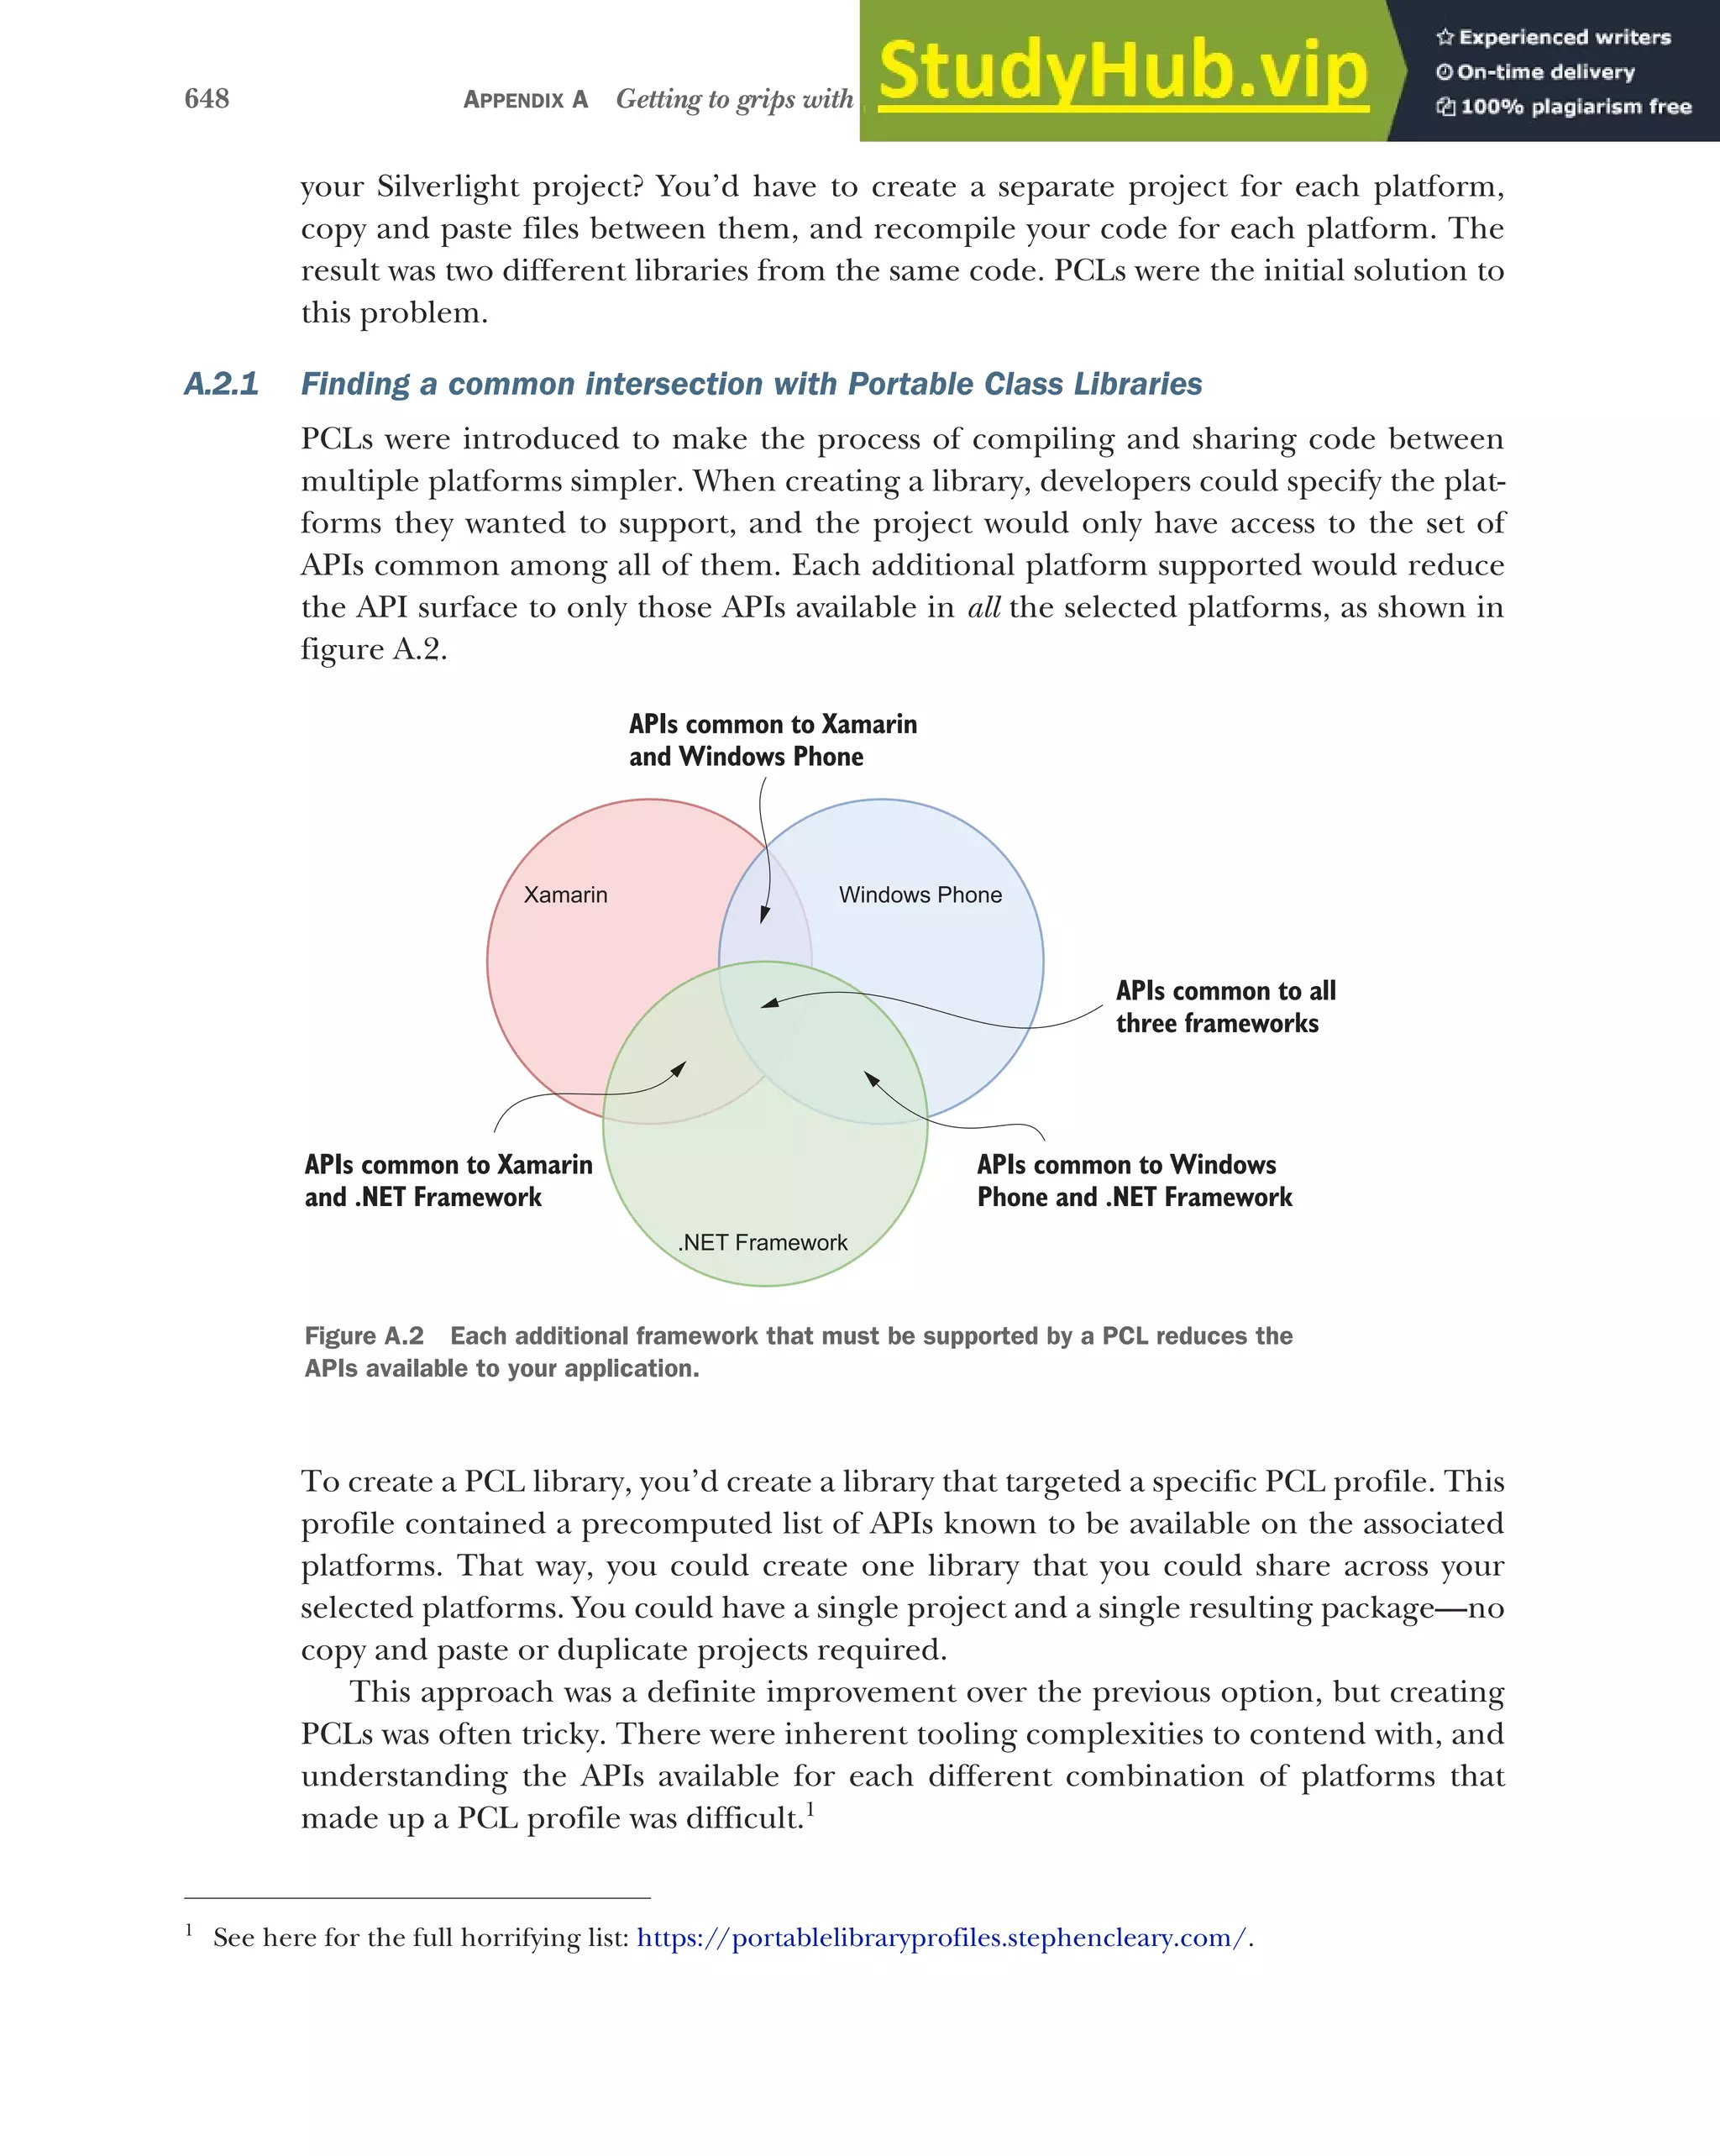
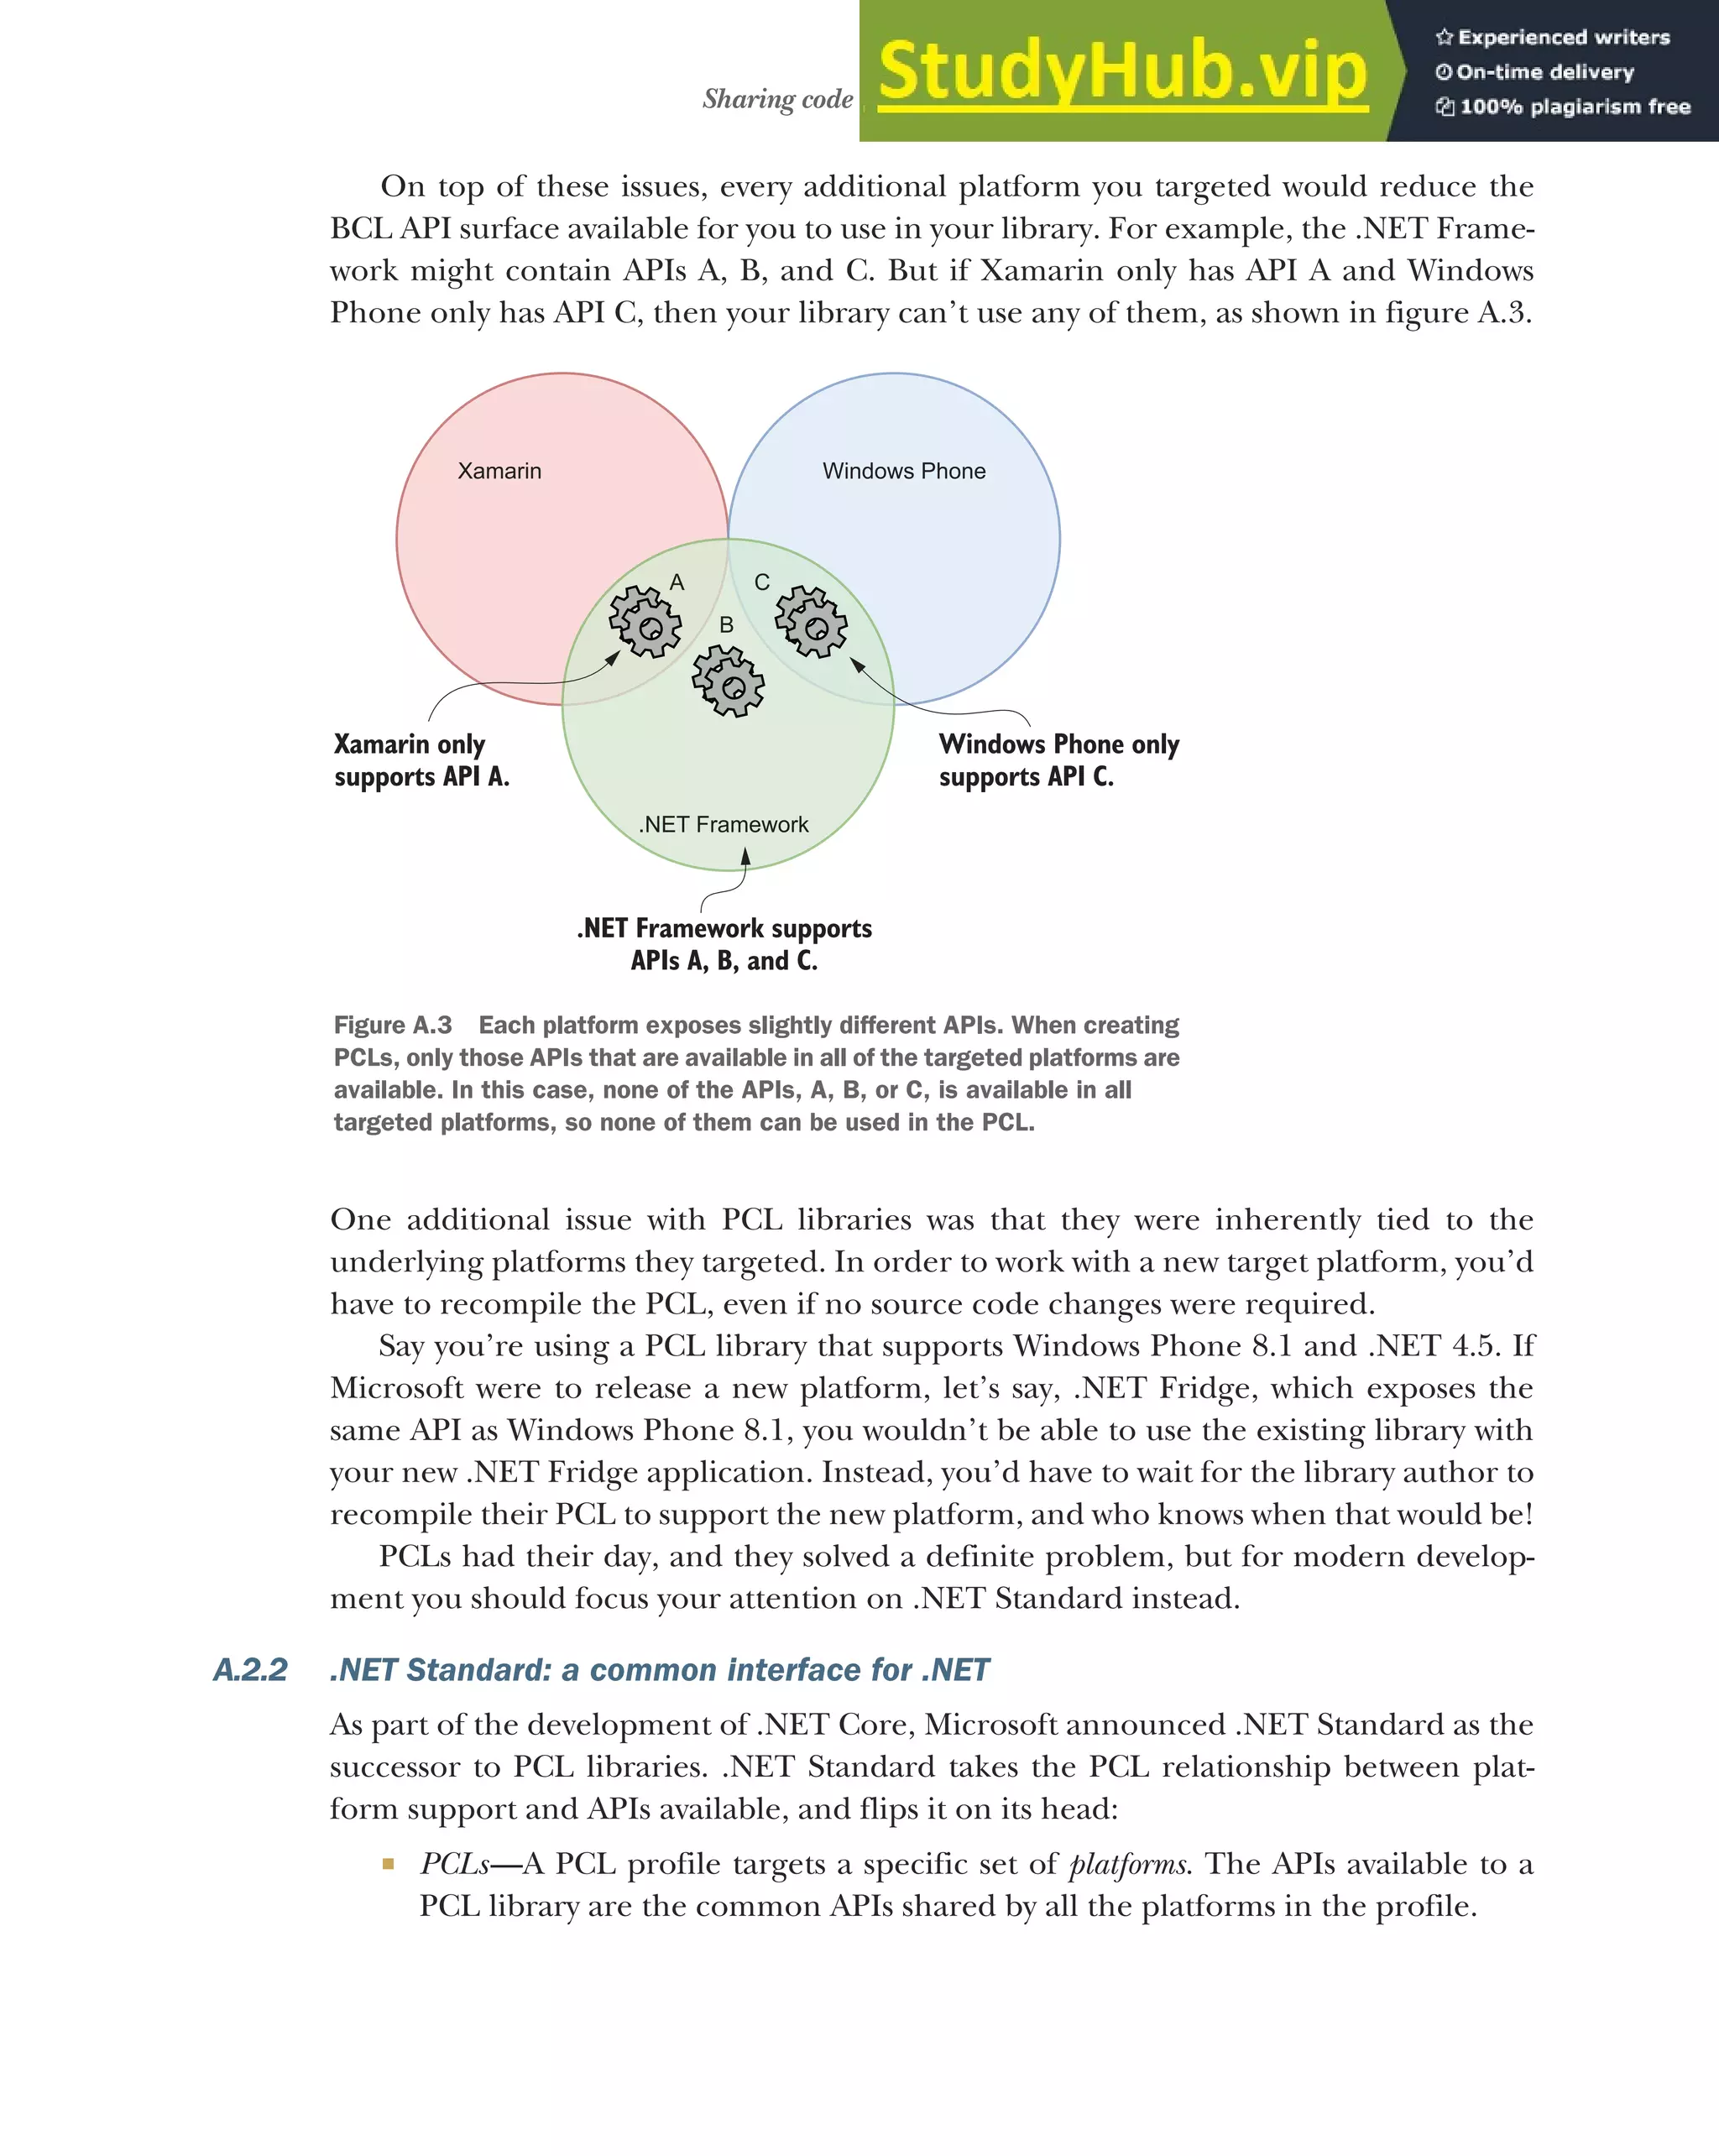
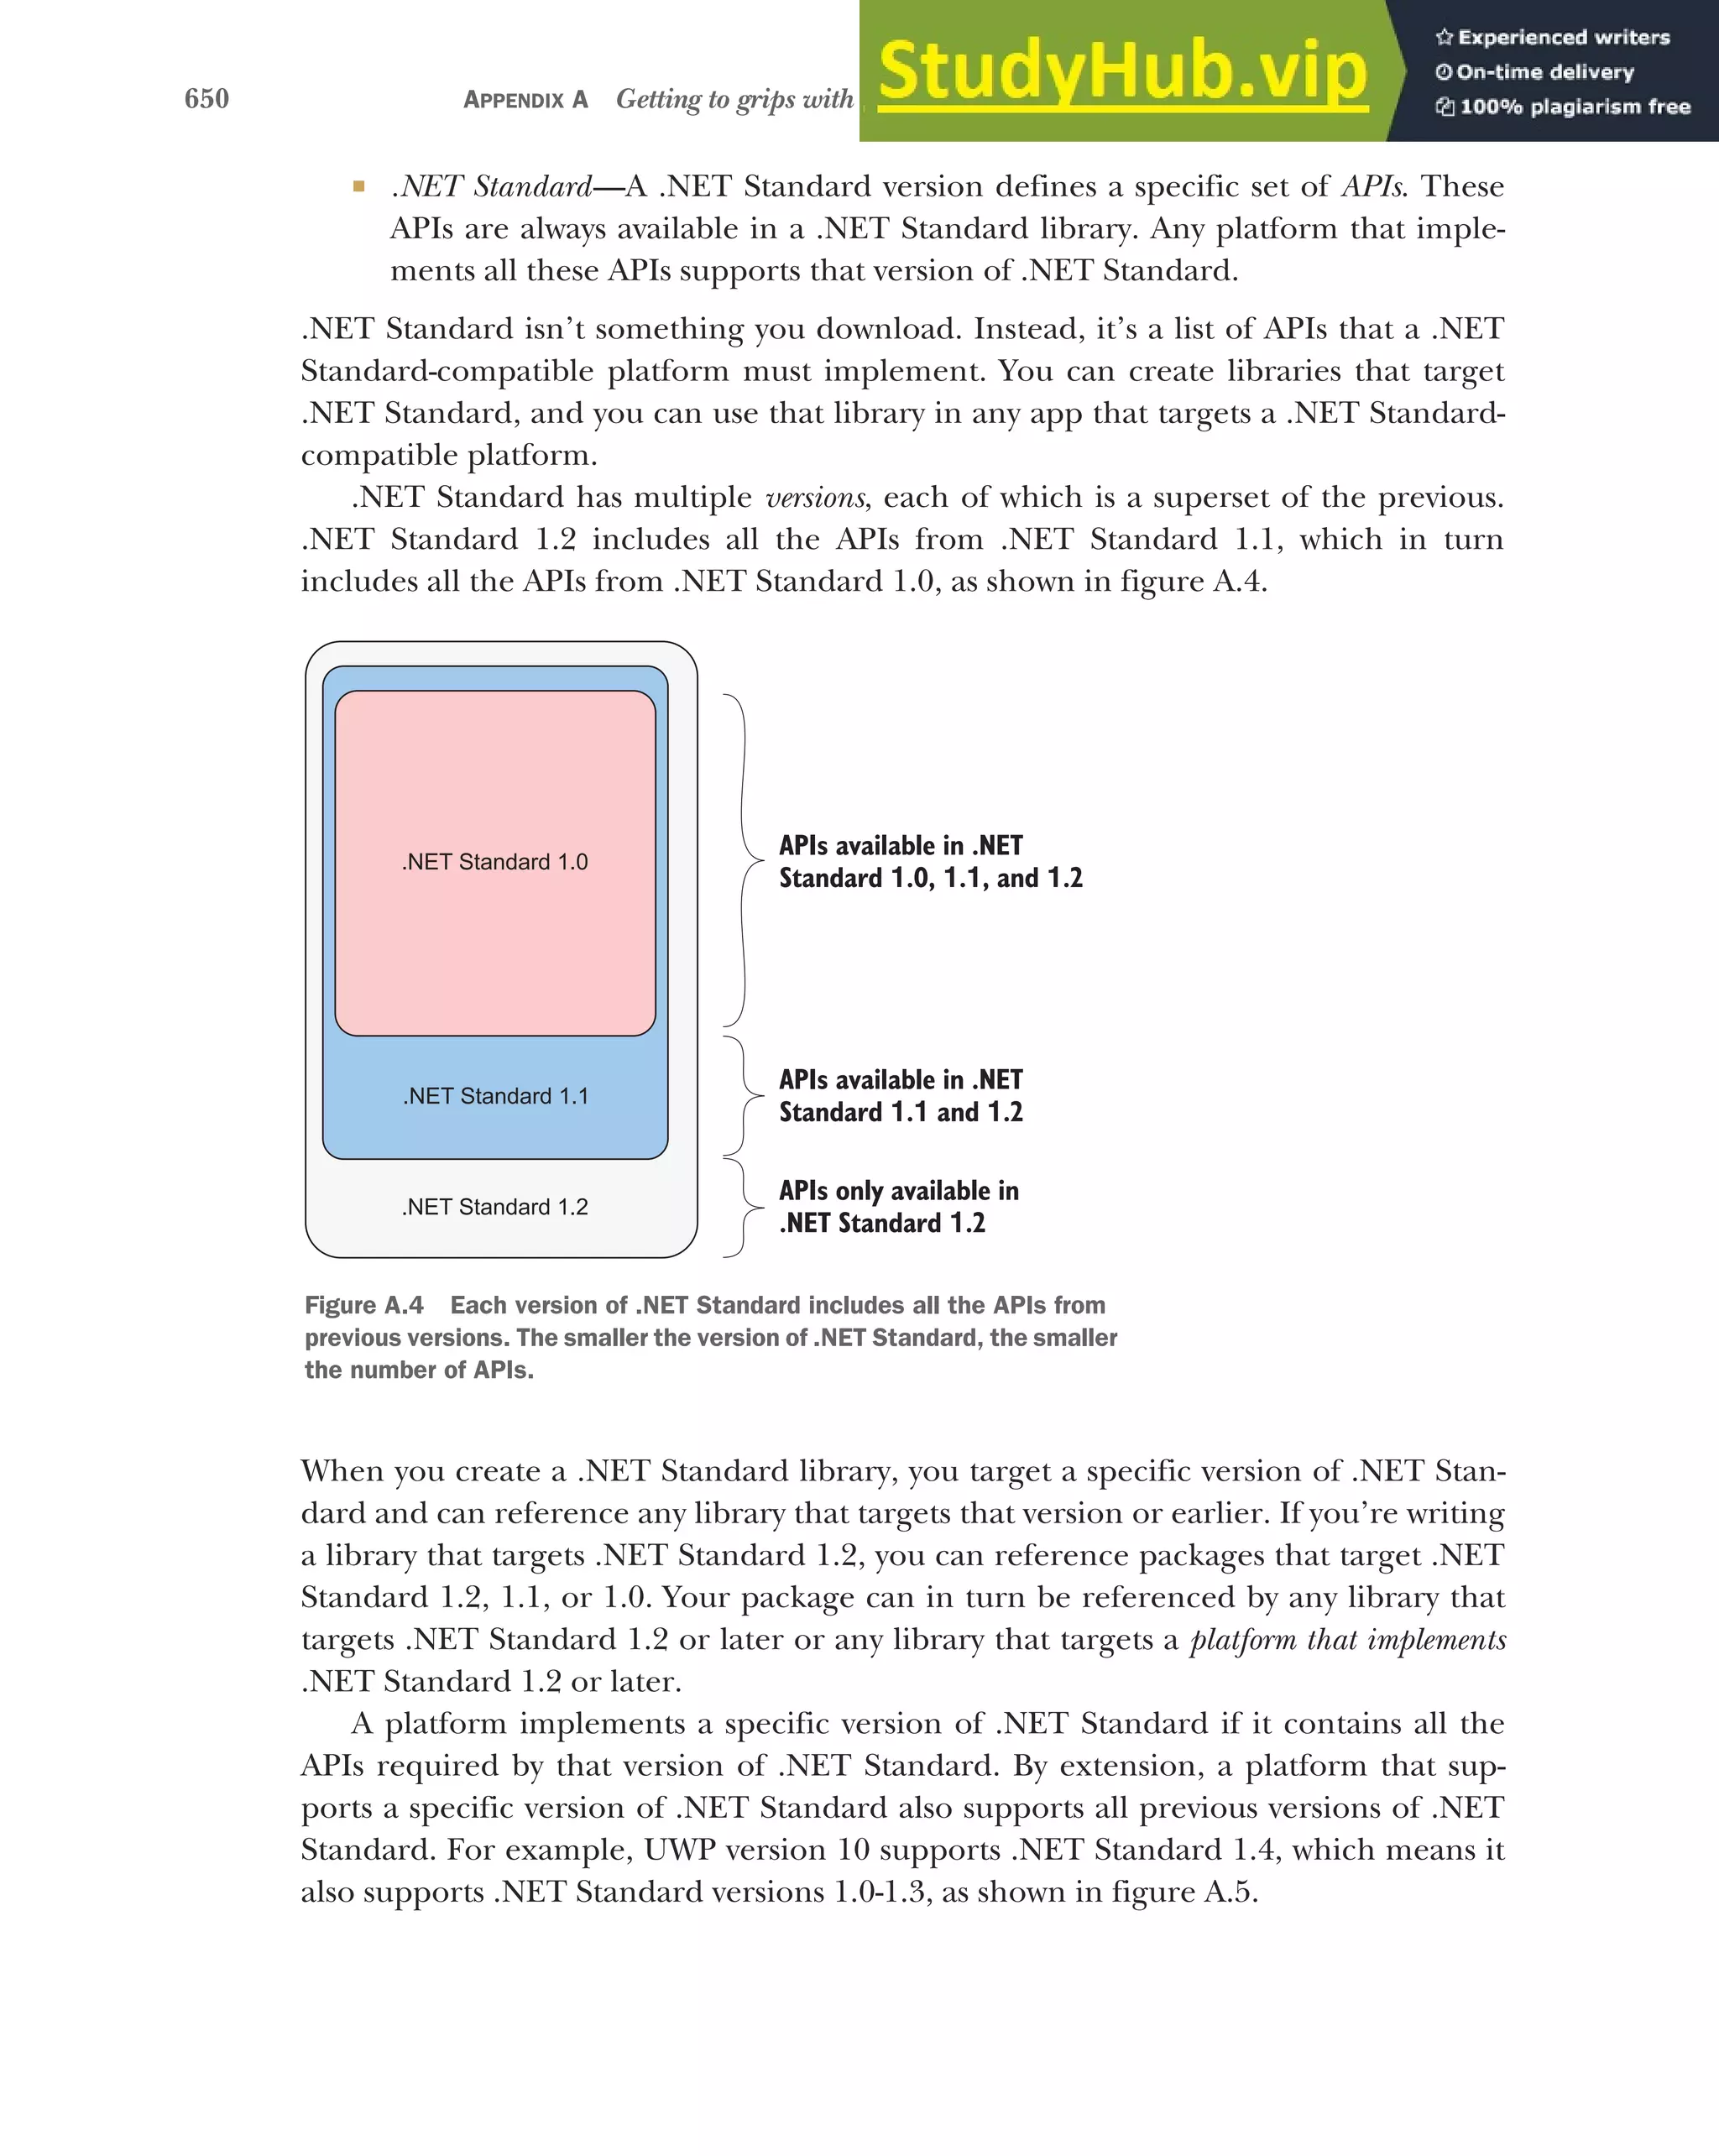


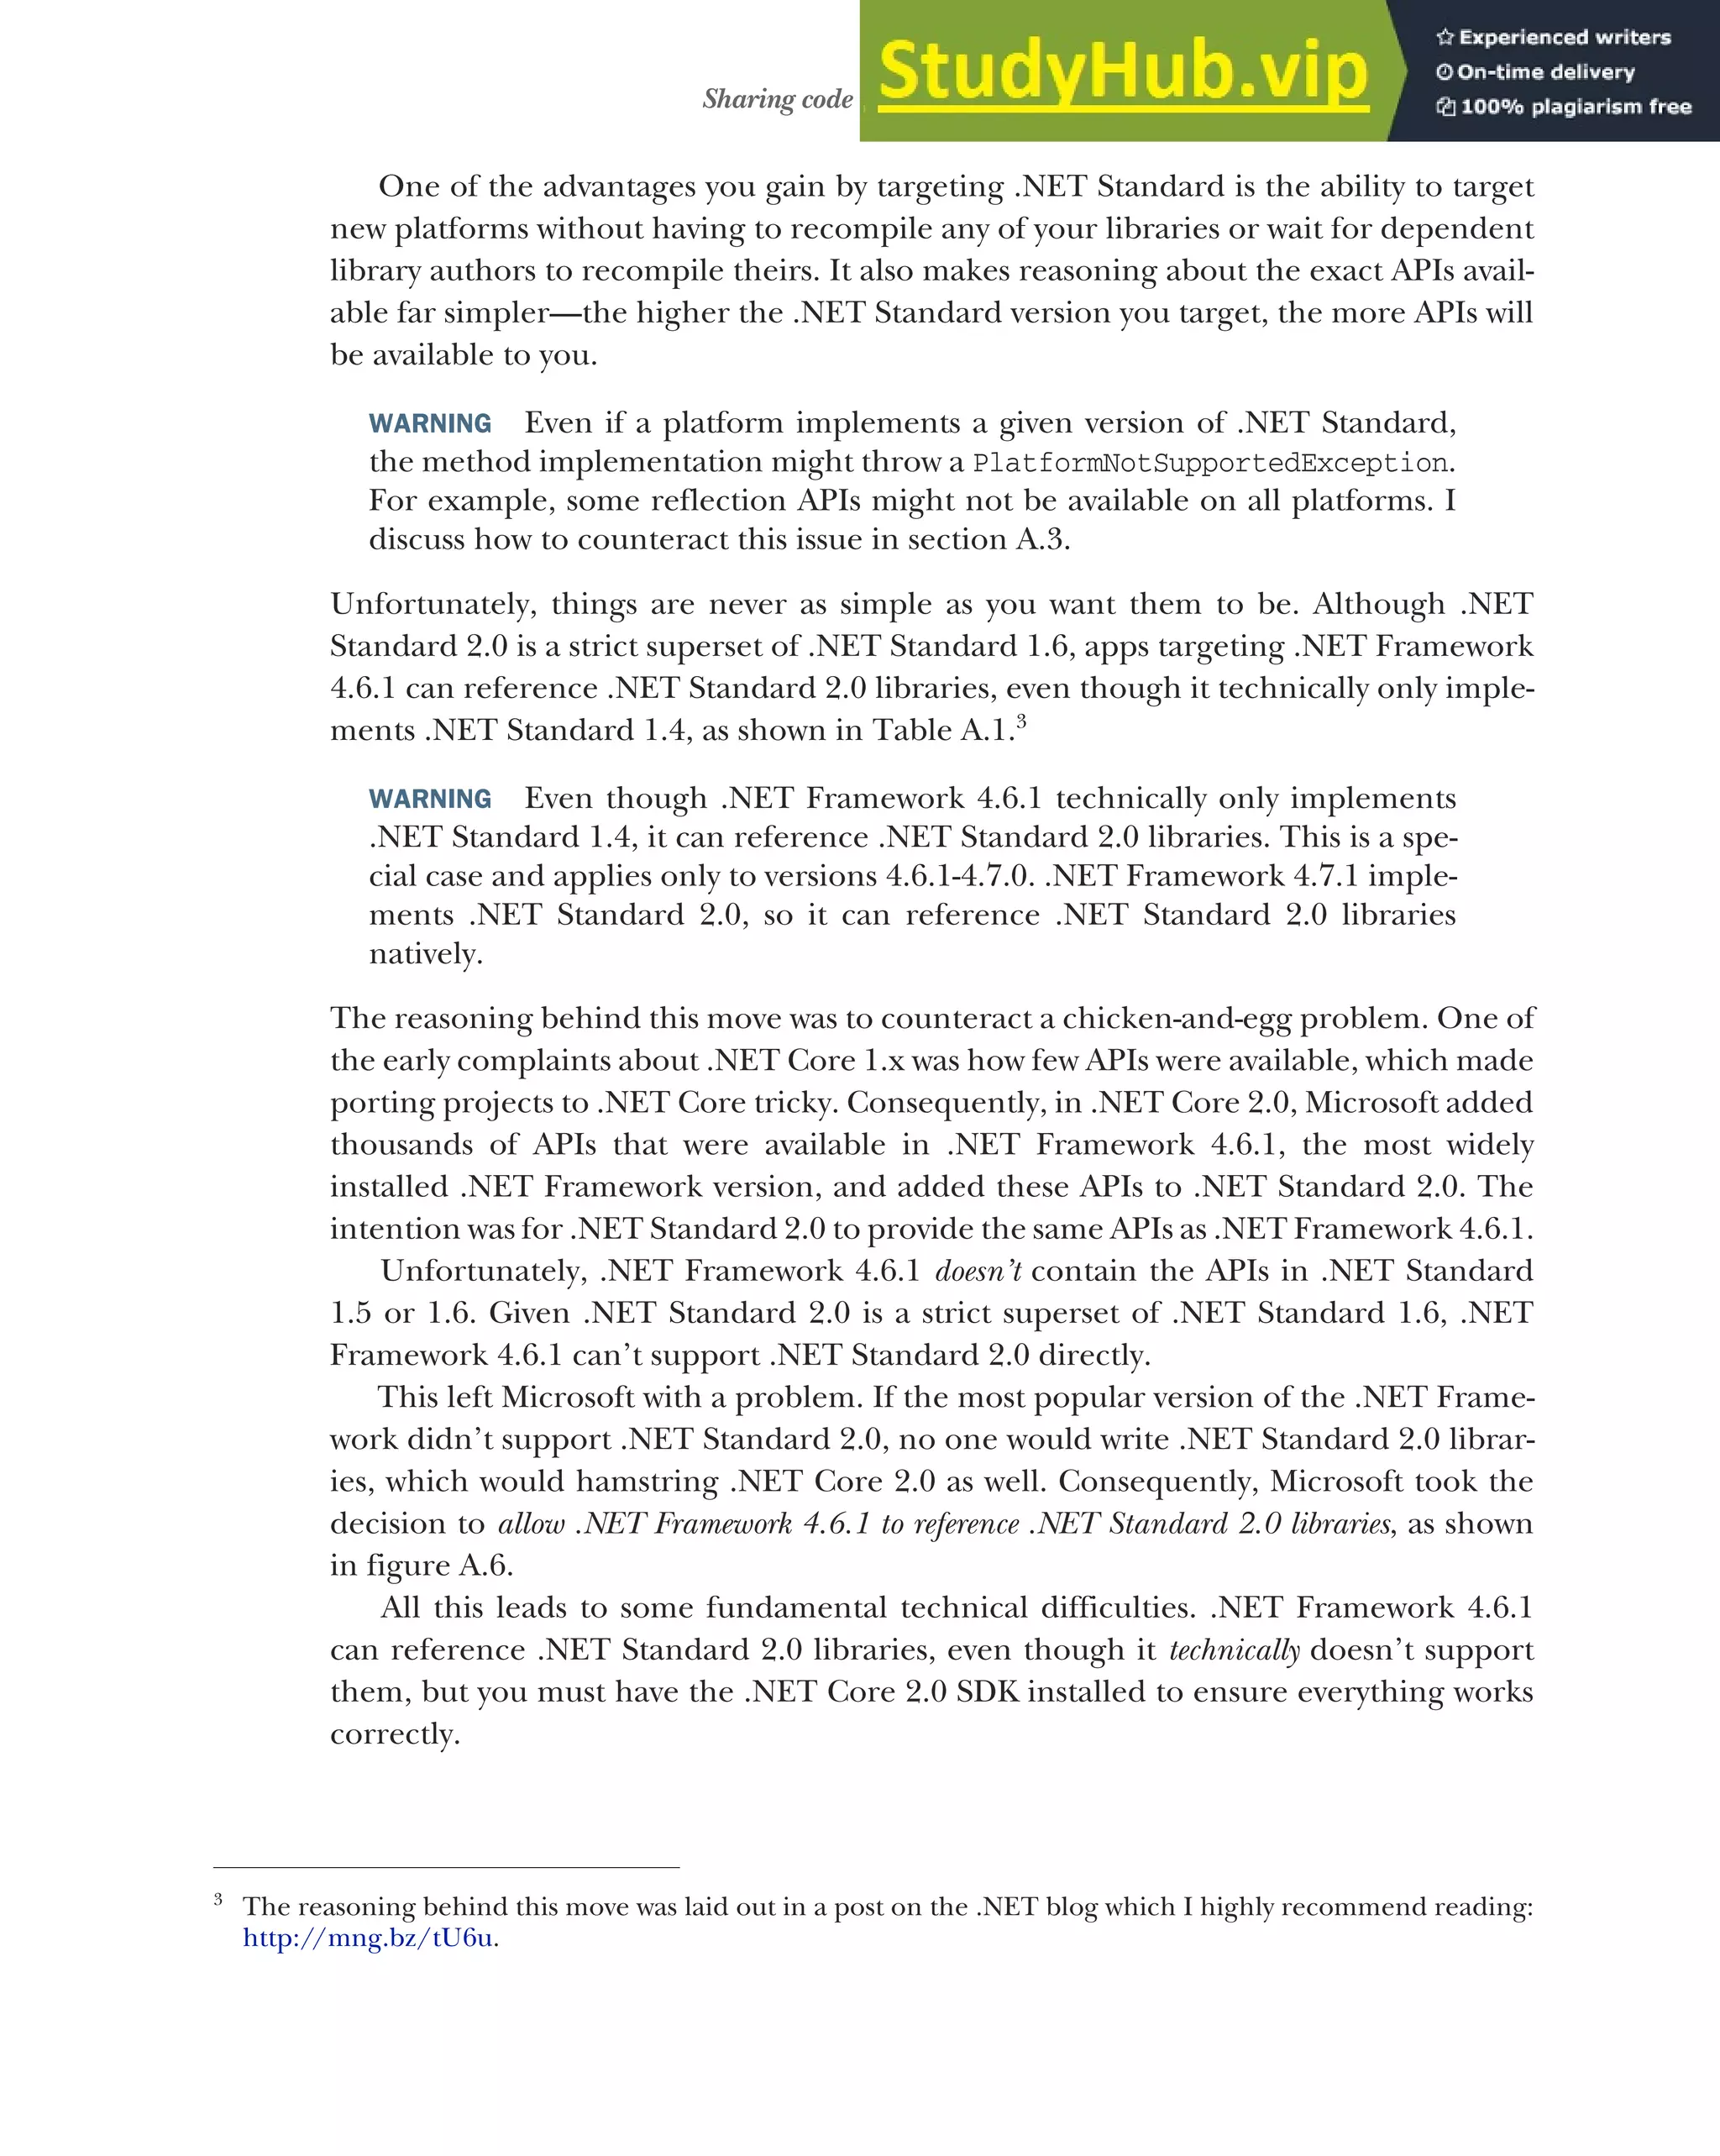
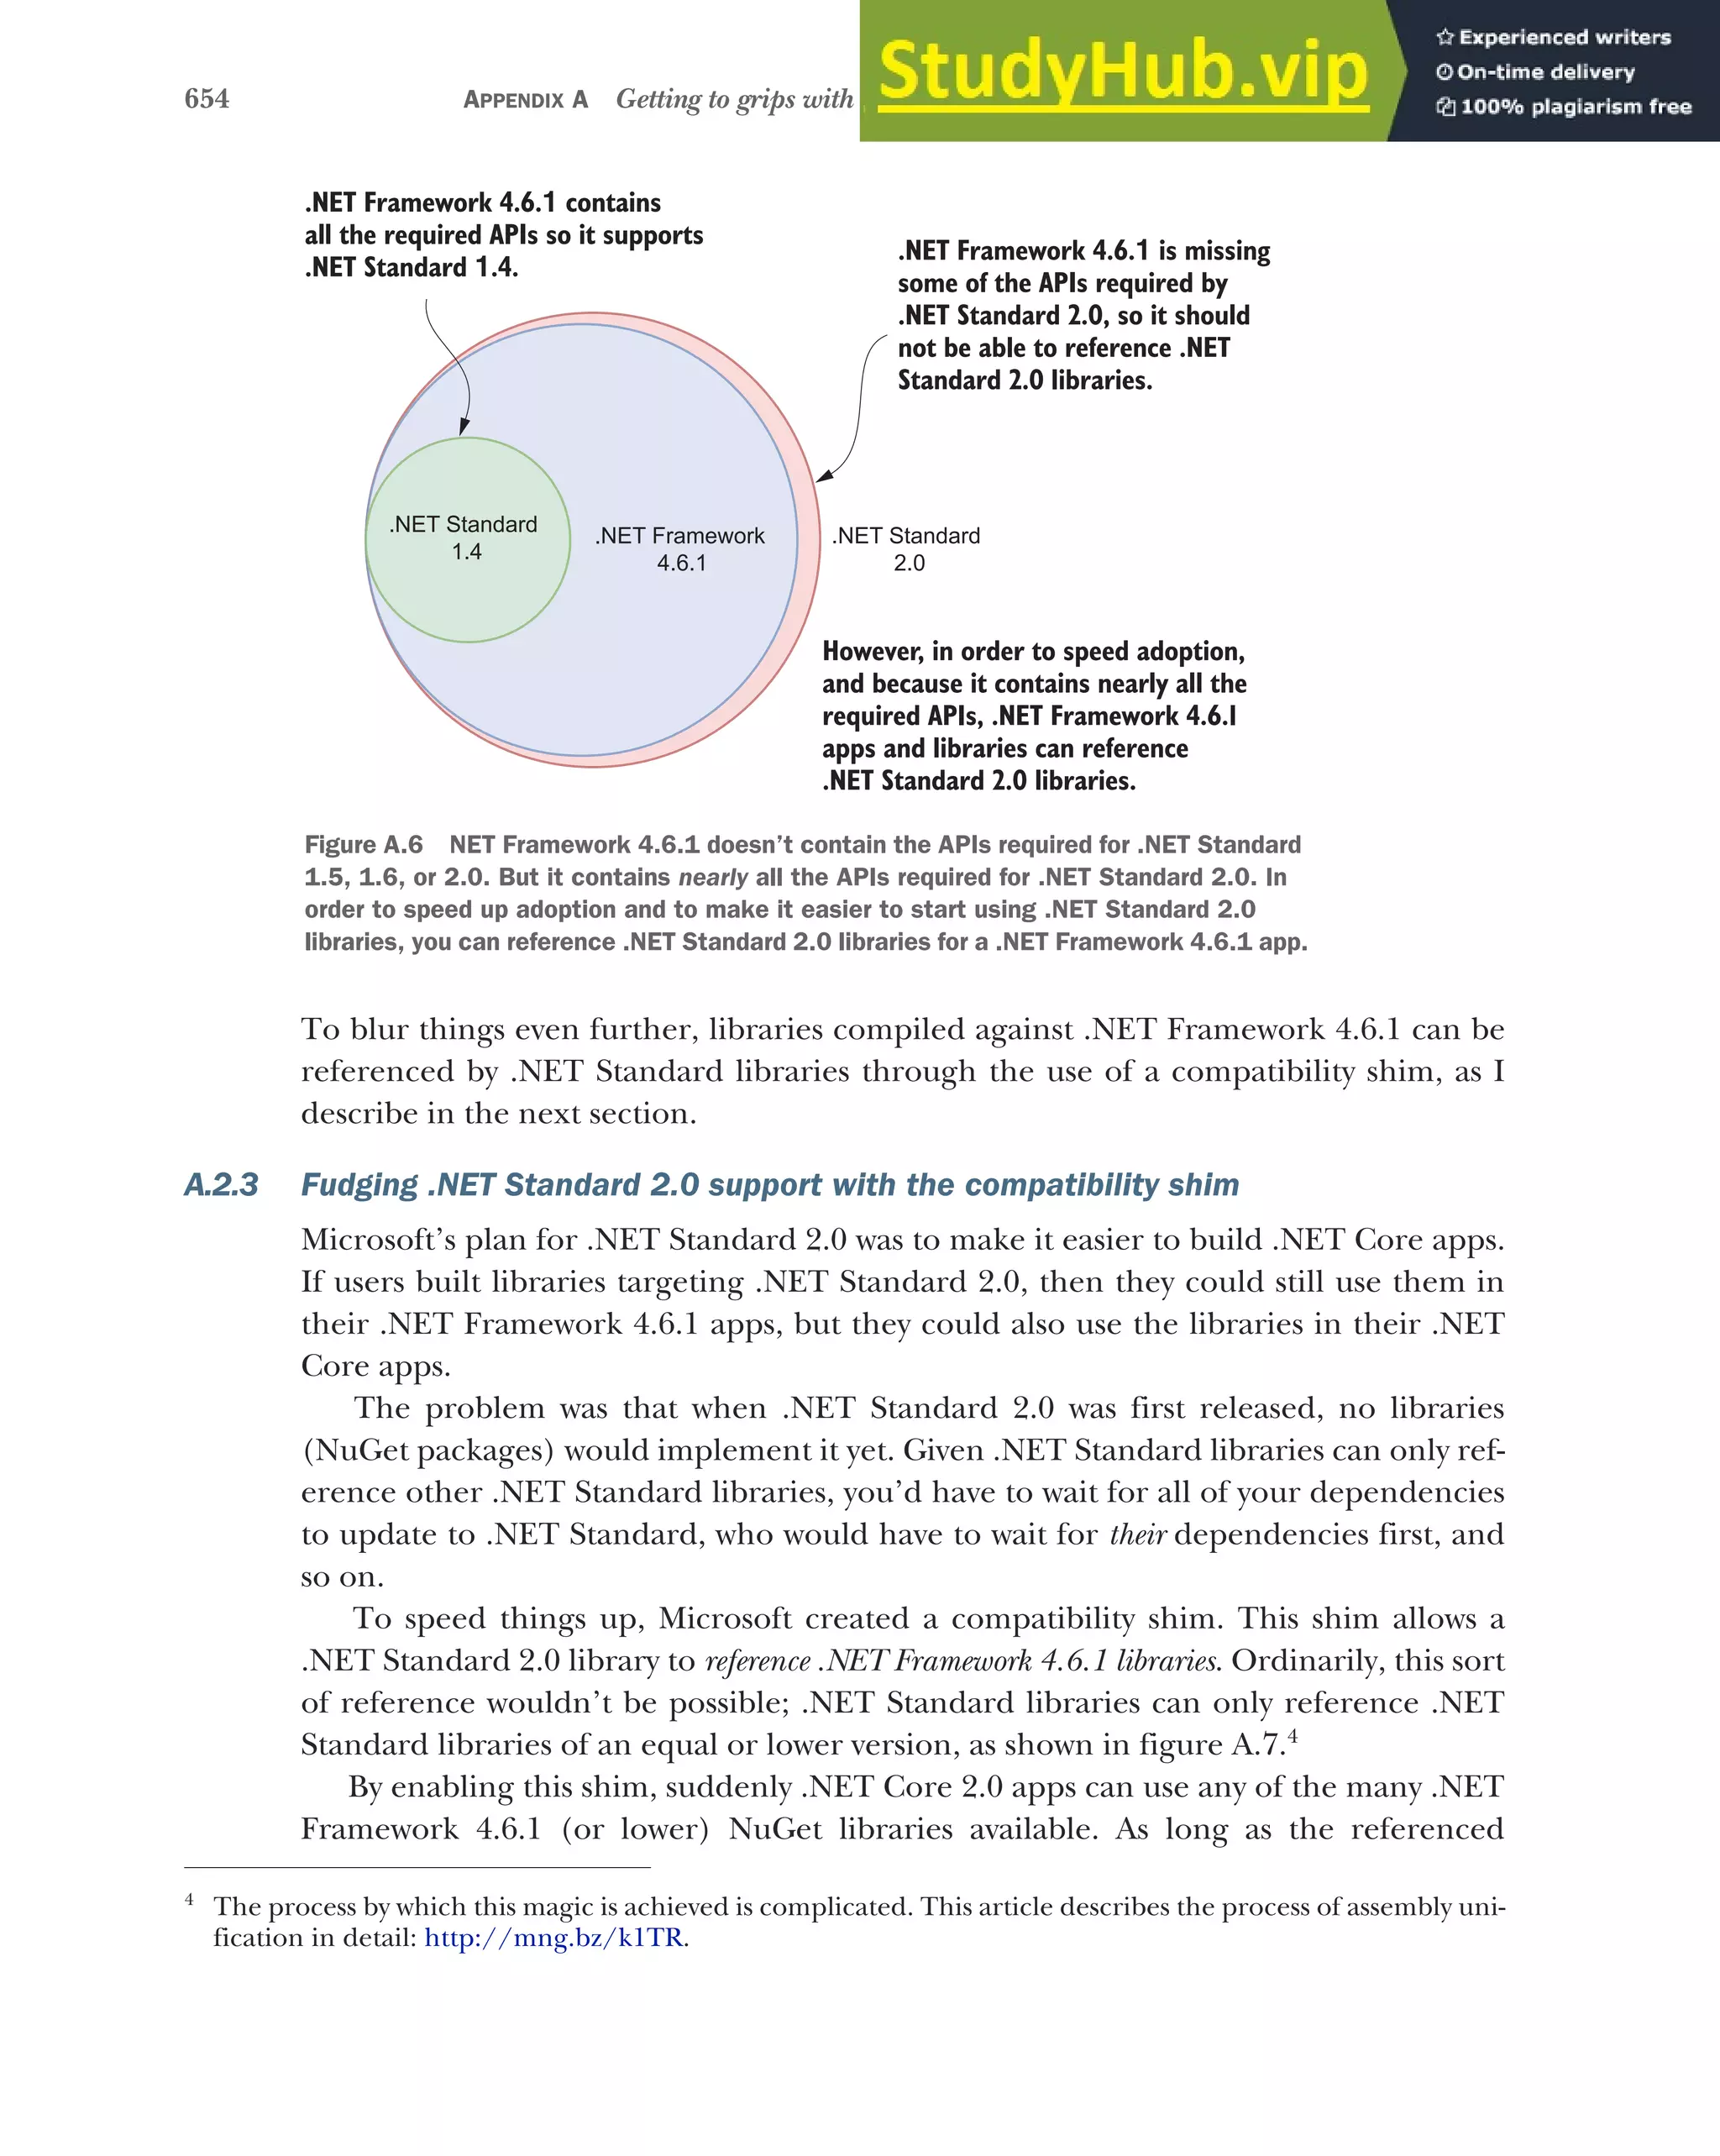
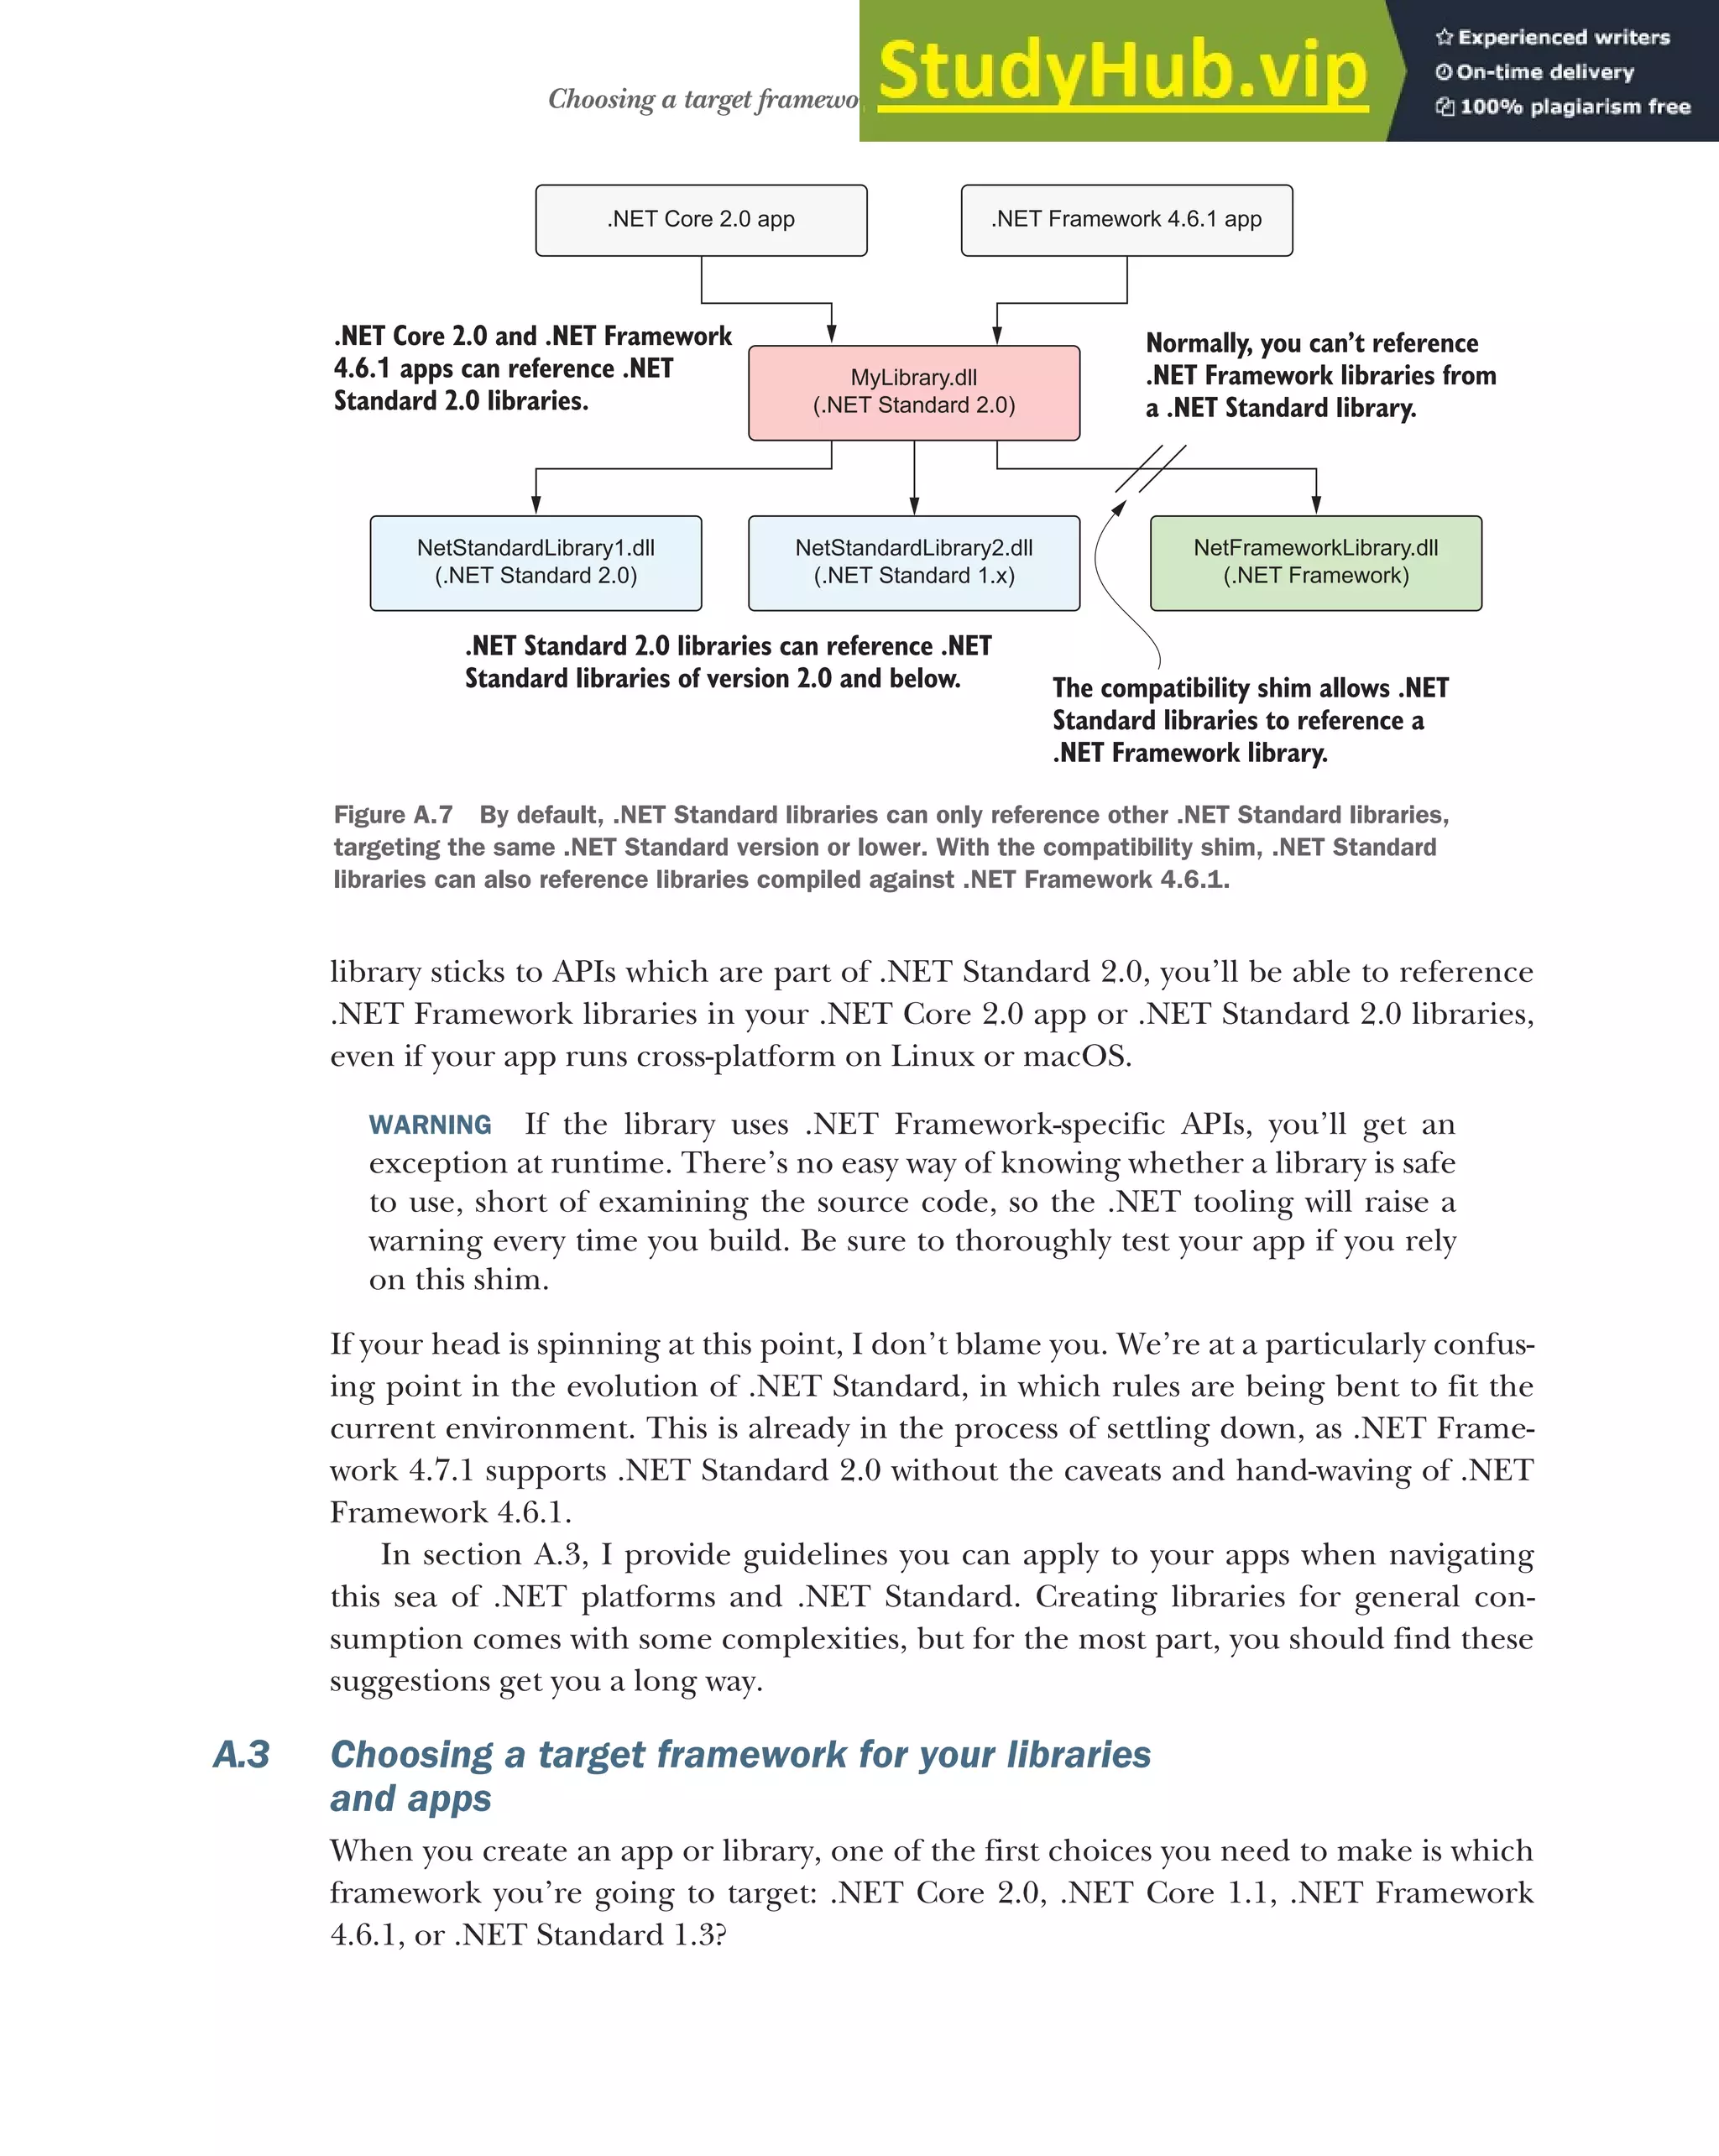
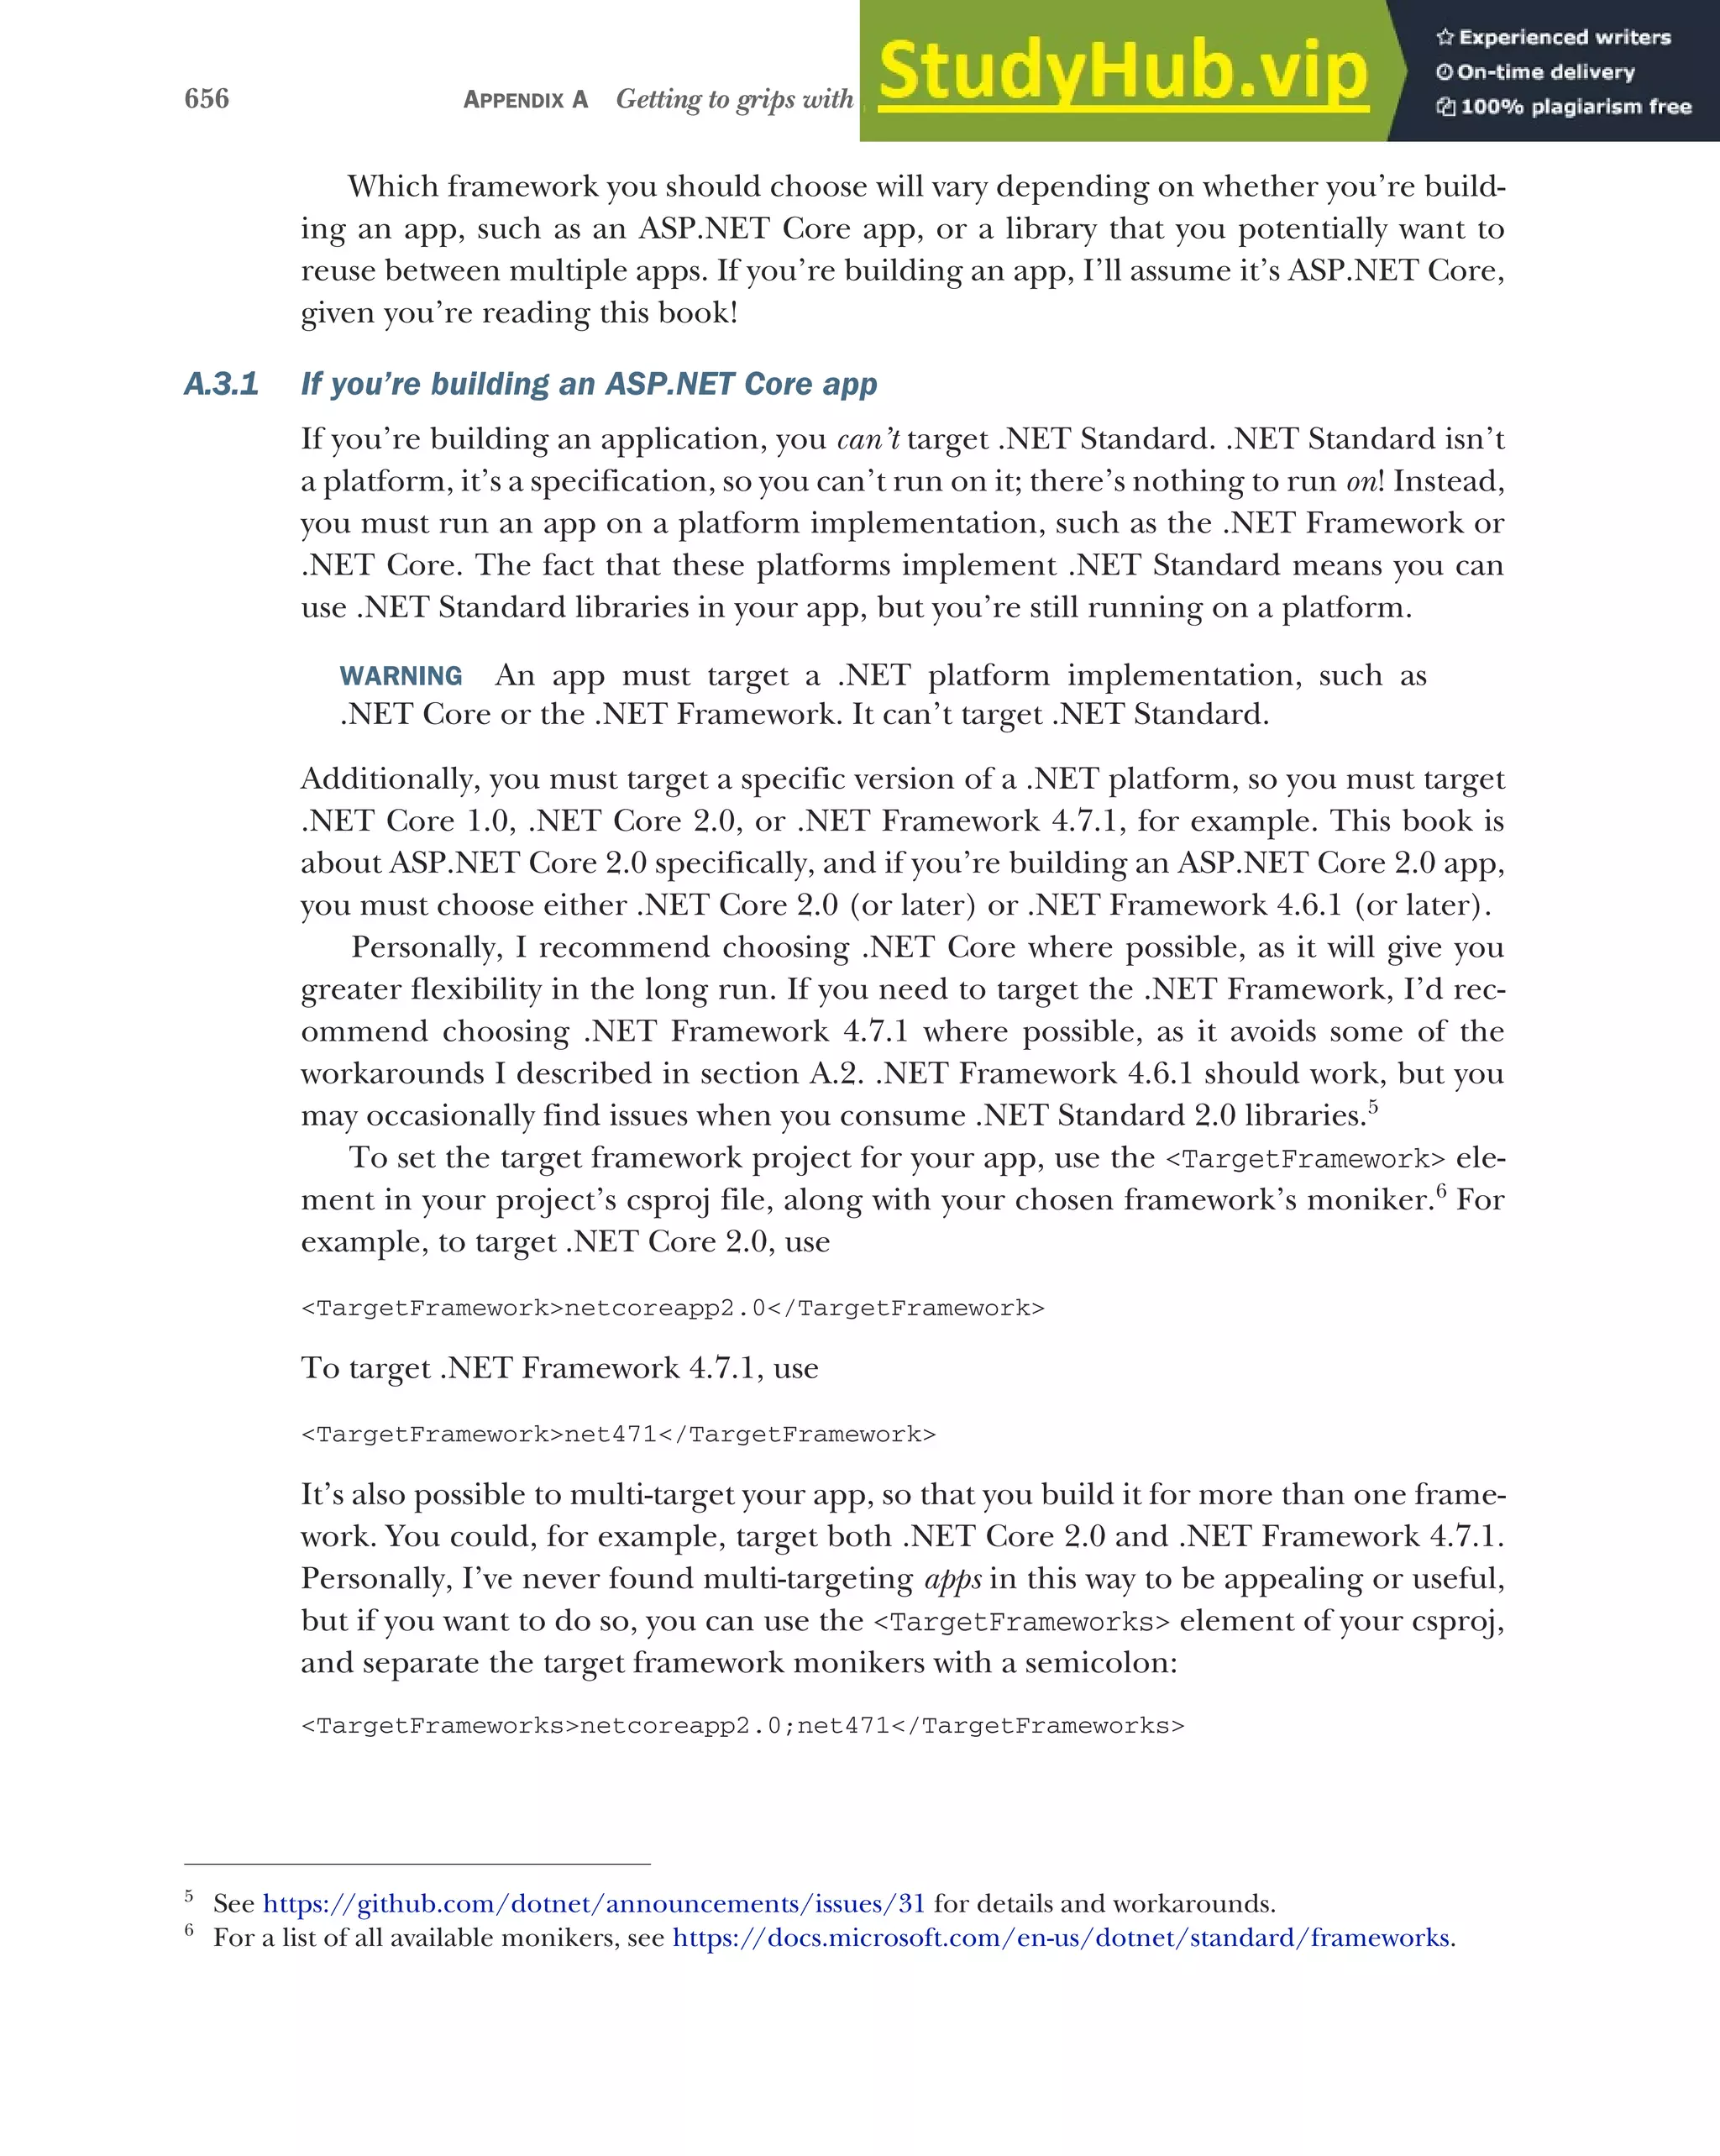


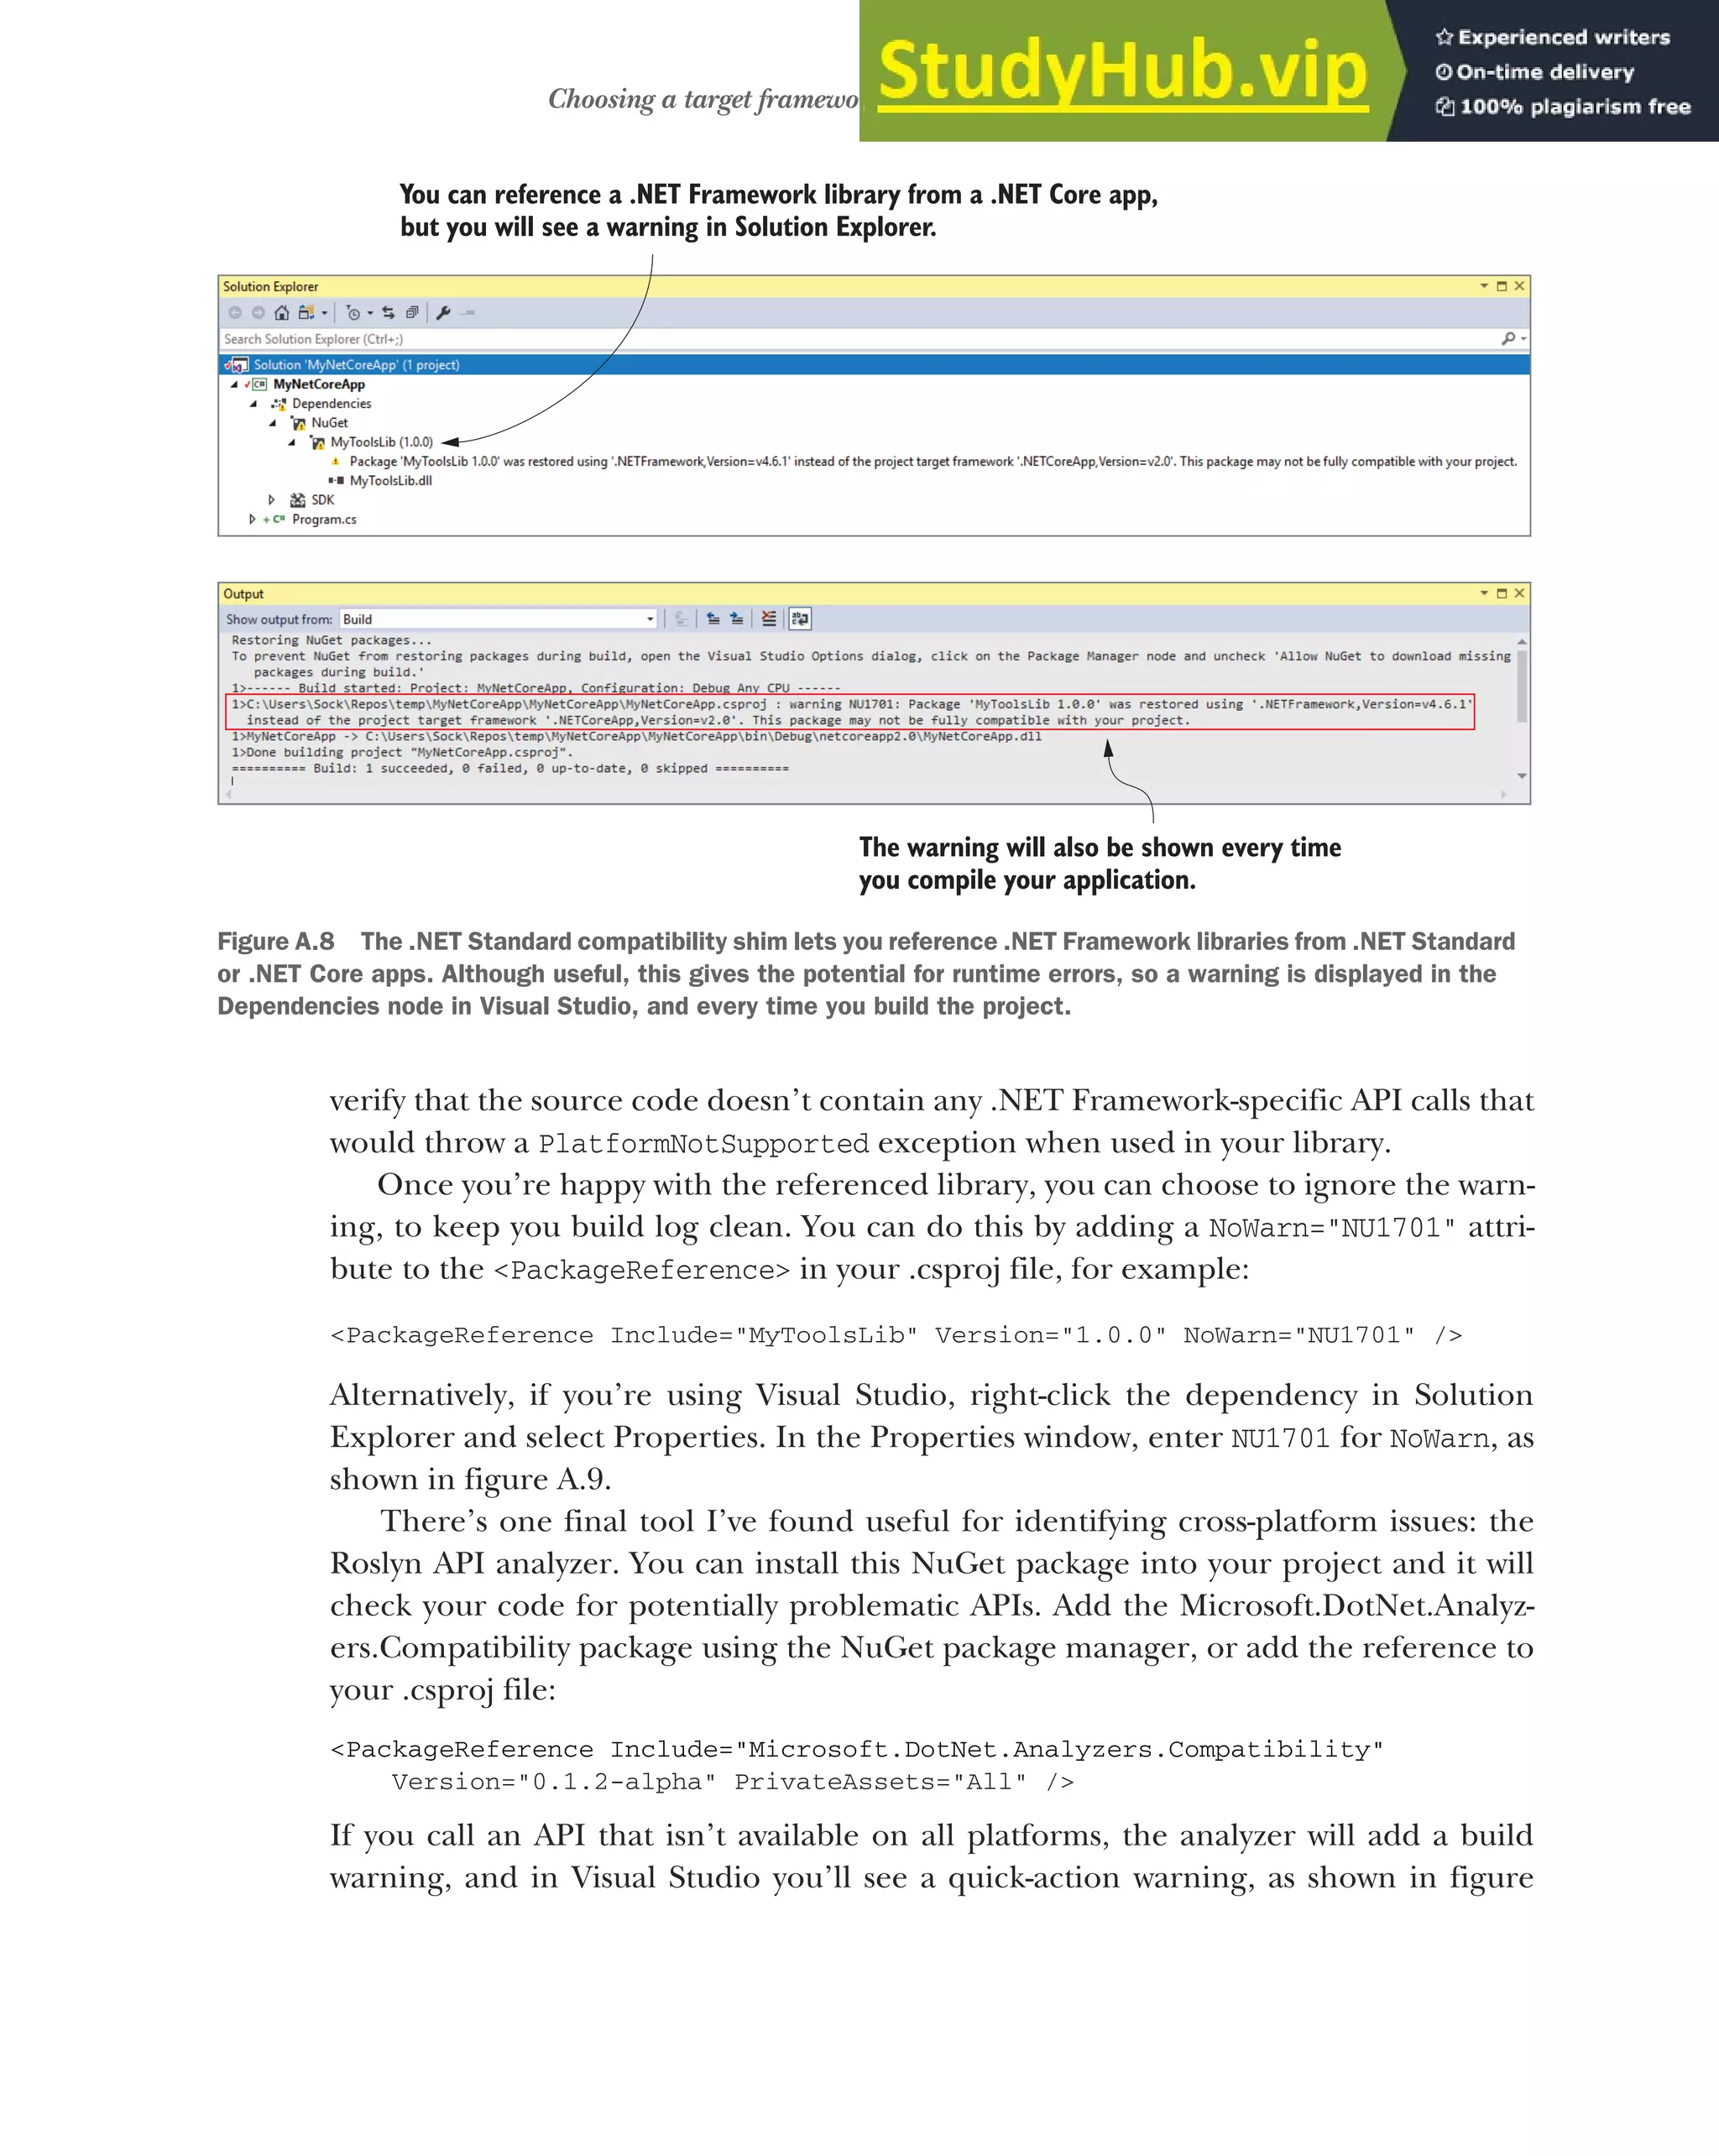

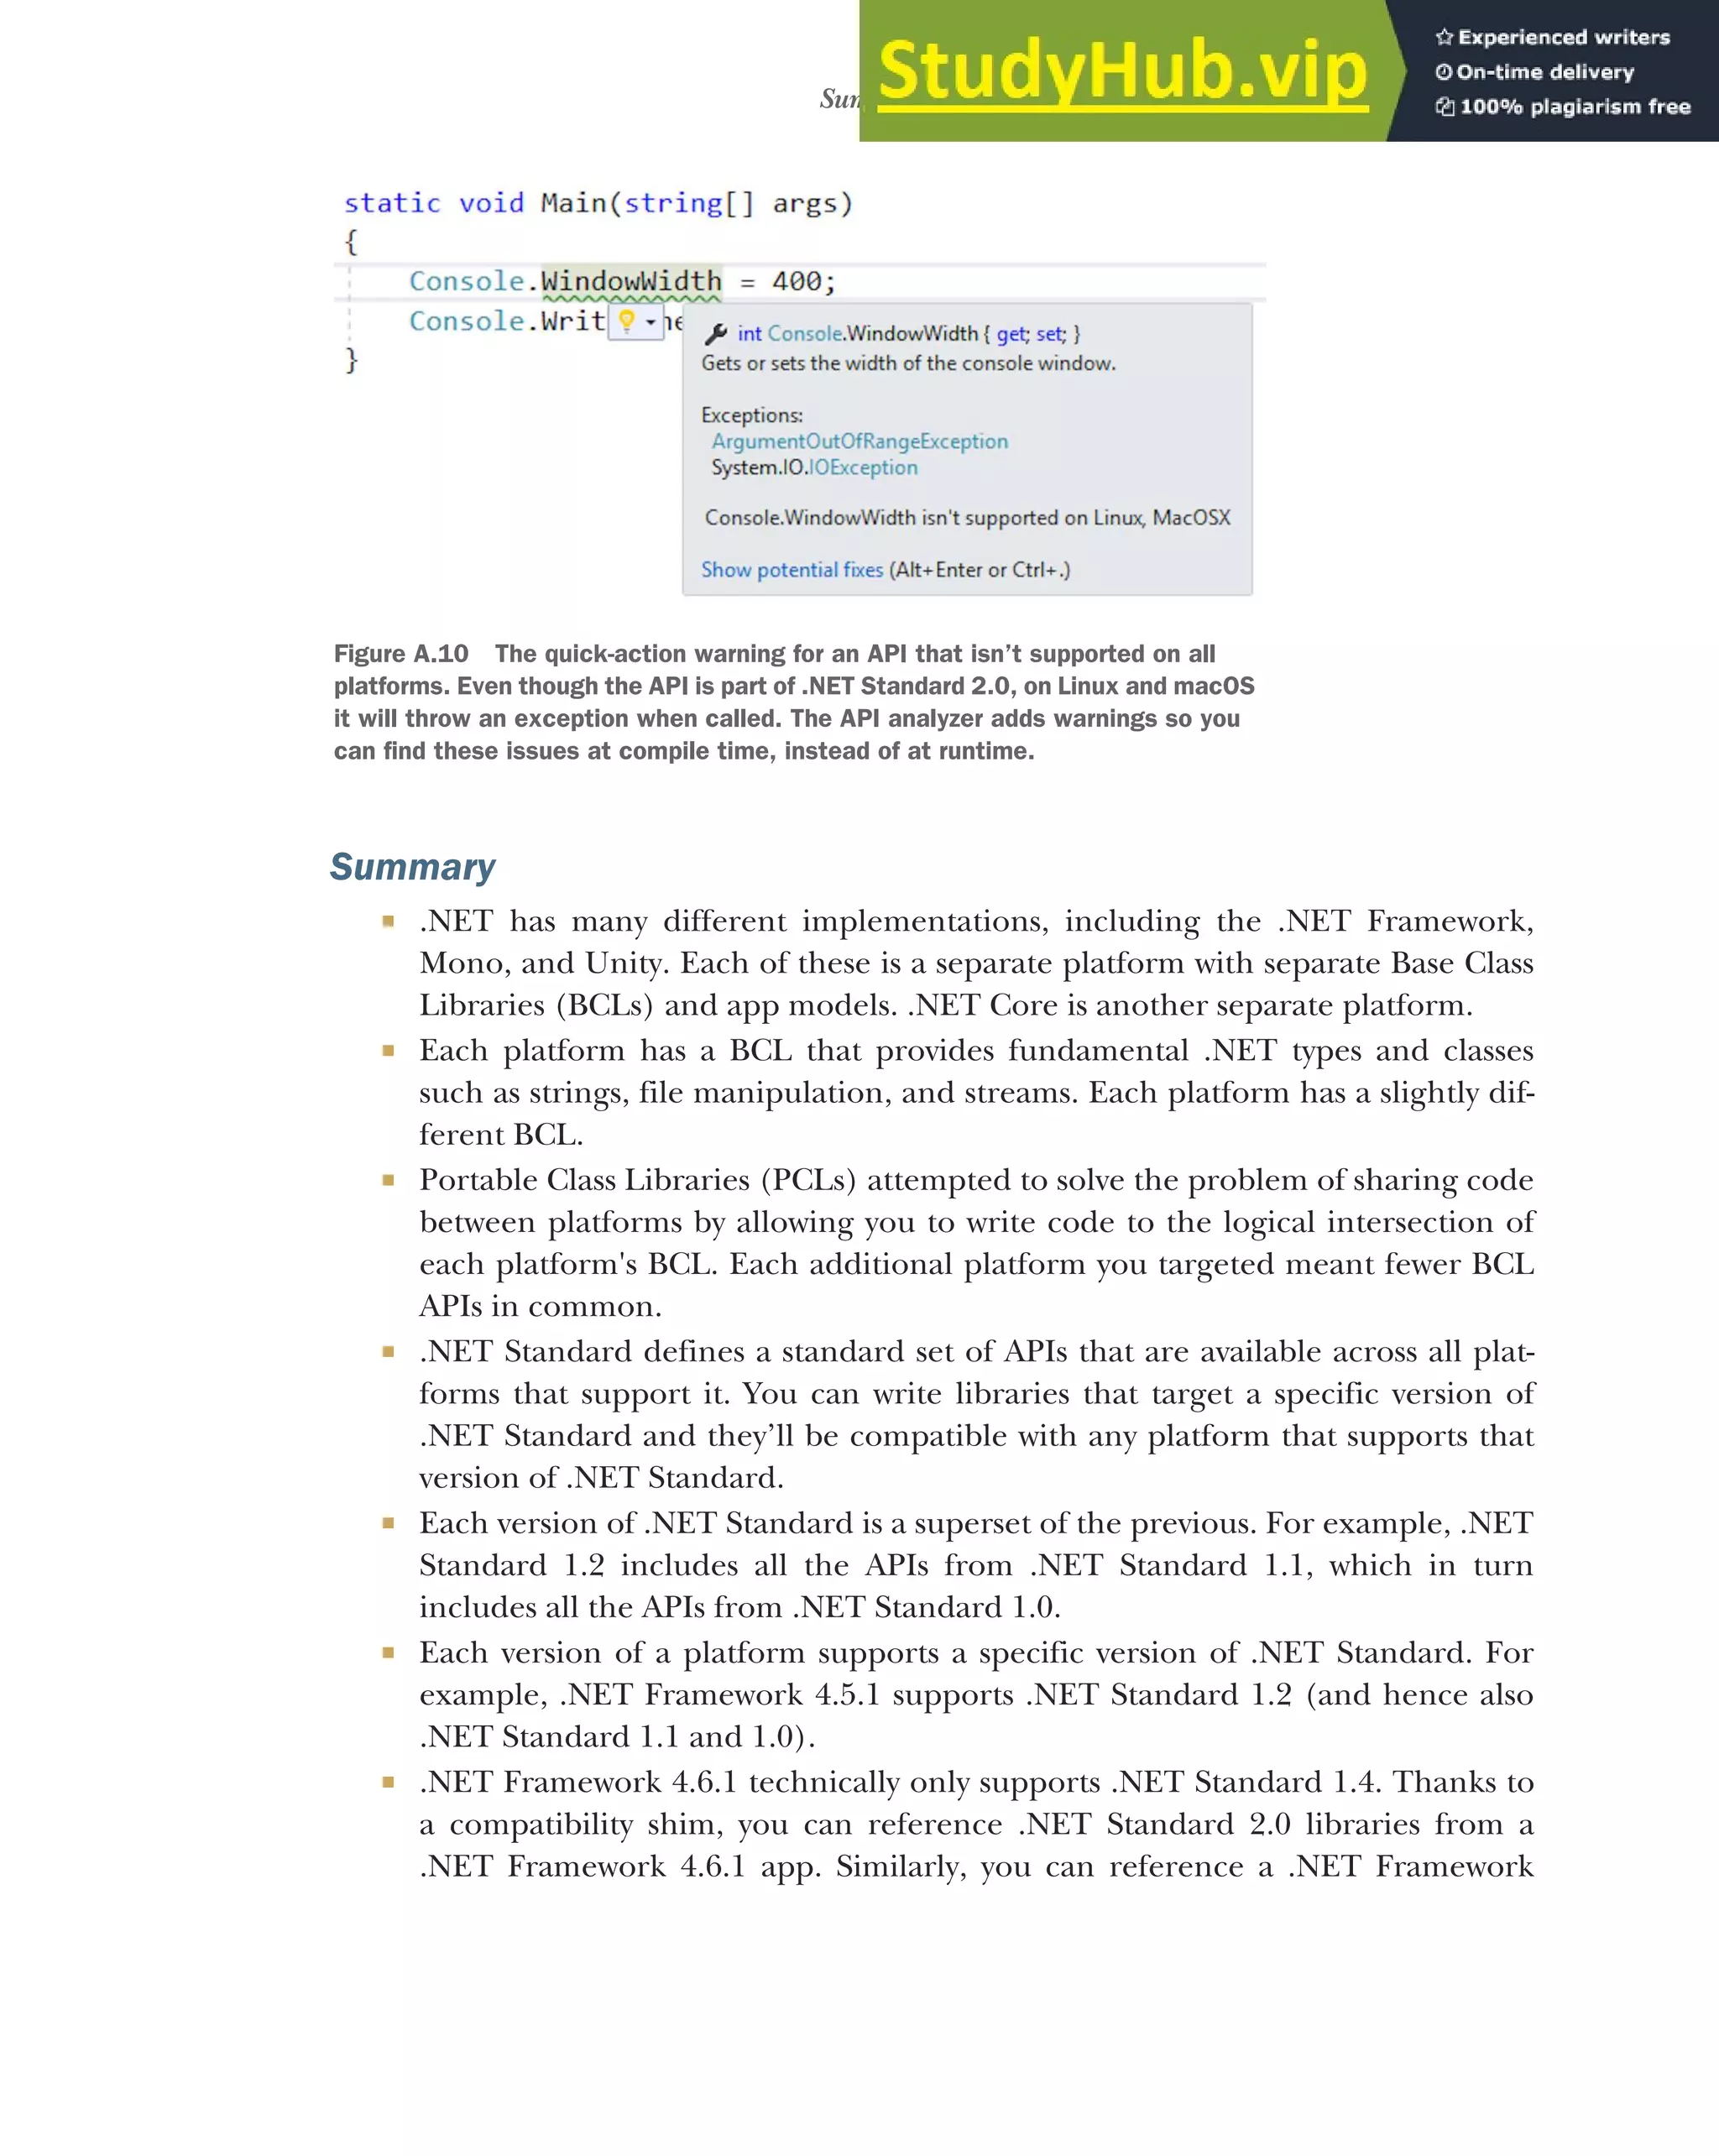


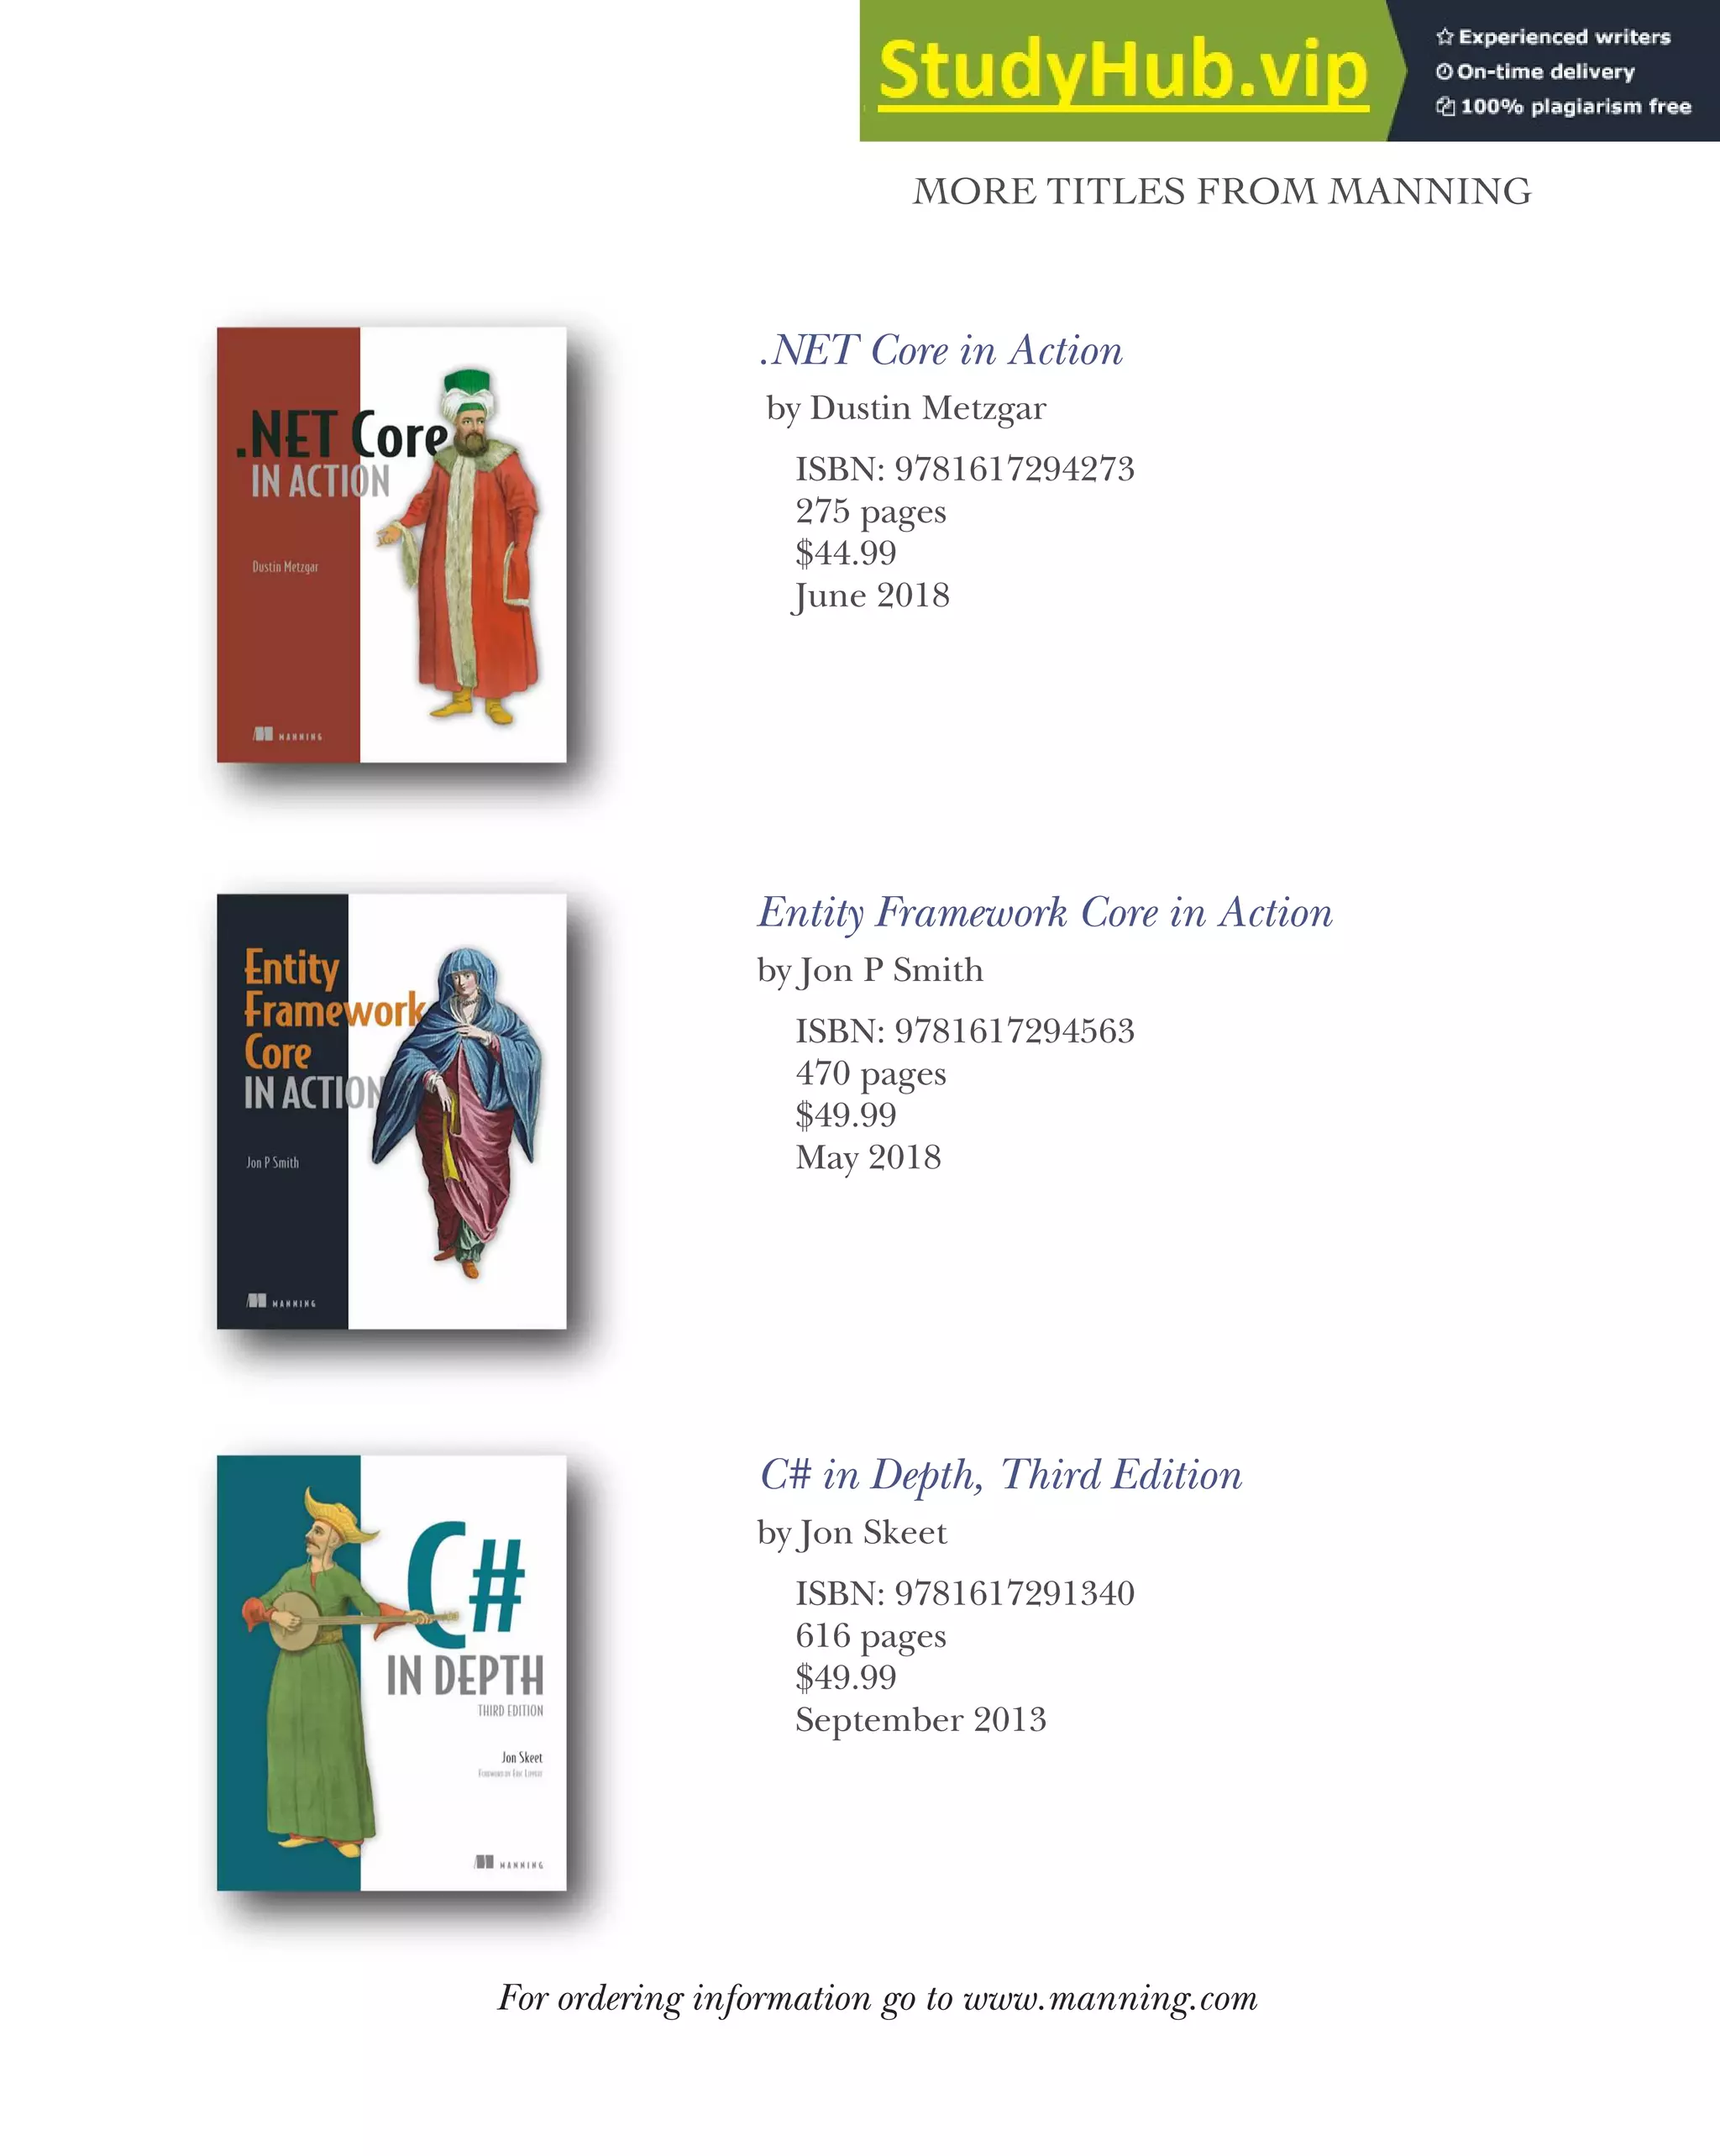


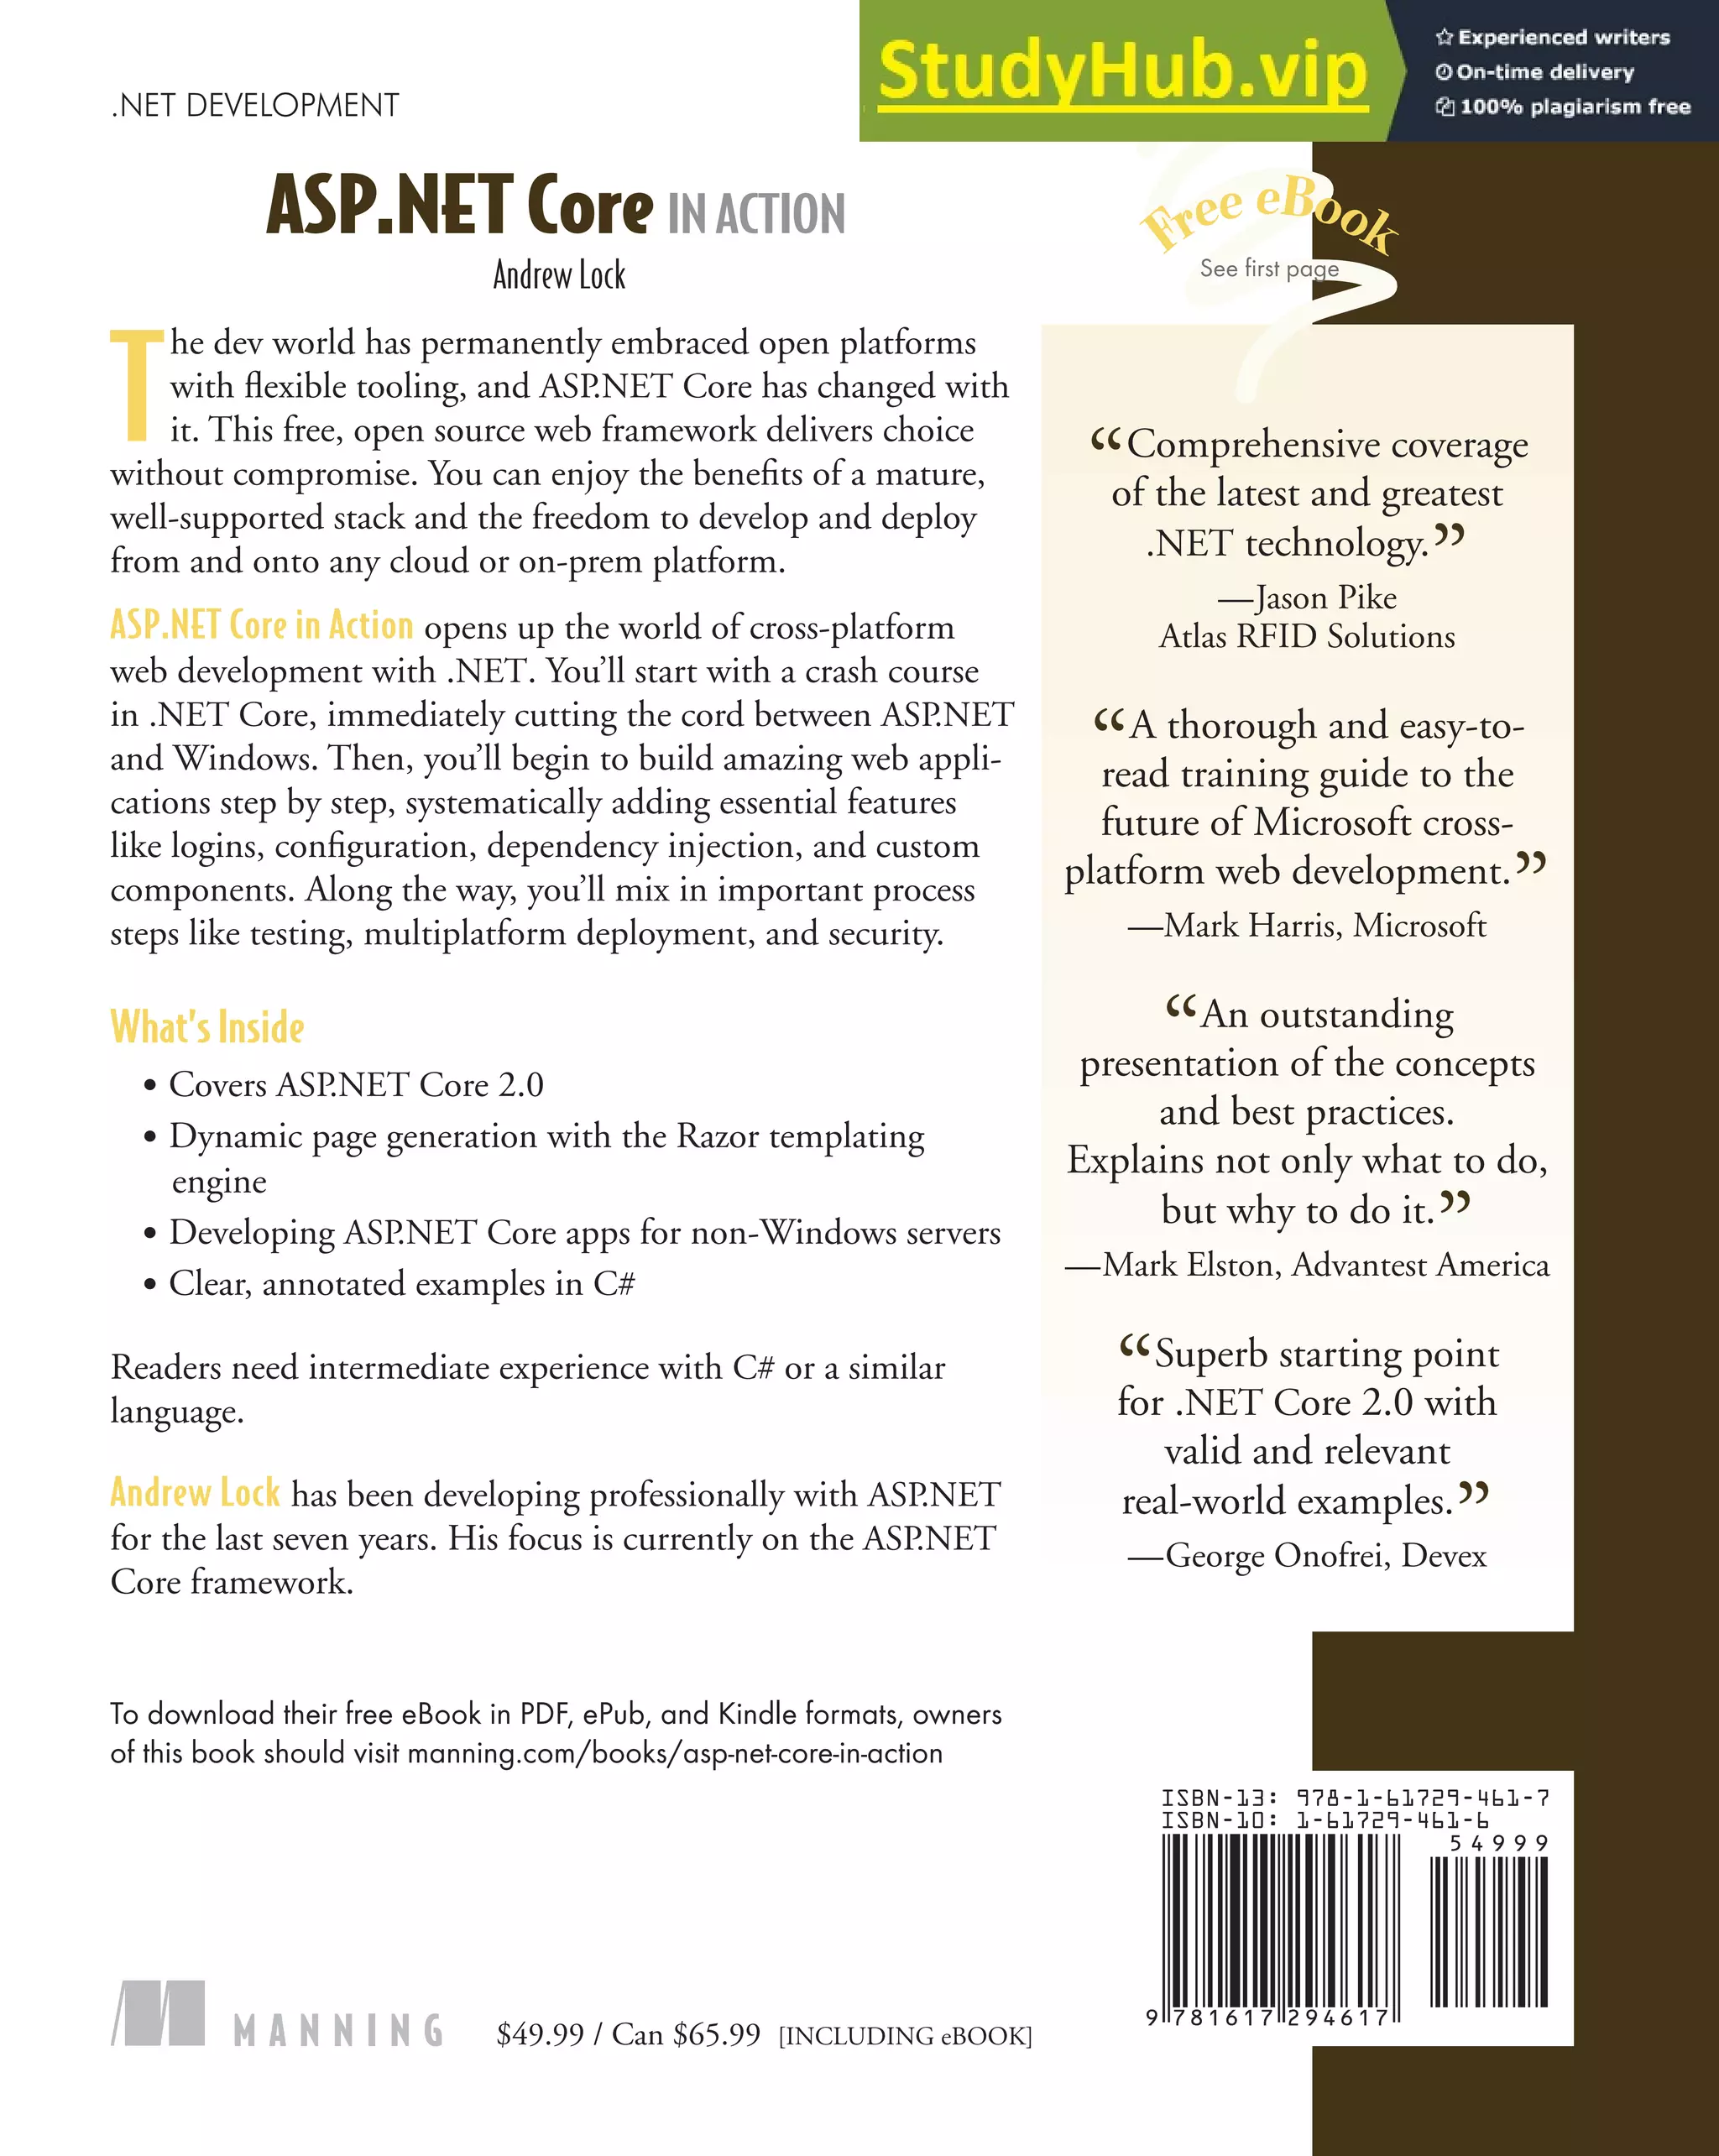

This document provides a summary of useful .NET Core CLI (dotnet) commands for building and running ASP.NET Core applications. It lists common commands like dotnet restore, dotnet build, dotnet run, dotnet publish, dotnet test, dotnet add package, dotnet new, and dotnet ef commands for Entity Framework Core. It also explains what each command does and the folder from which it should be run, such as the solution folder for commands that affect the whole solution.


![[PDF Download] Architecting ASP.NET Core Applications Carl-Hugo Marcotte full...](https://cdn.slidesharecdn.com/ss_thumbnails/14913-240731152559-9e08b611-thumbnail.jpg?width=600ounds&width=560&fit=bounds)


