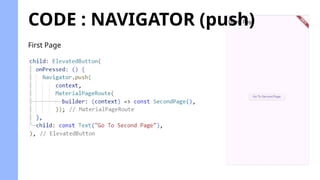
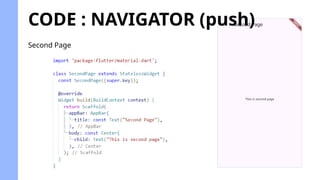
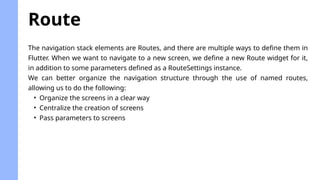
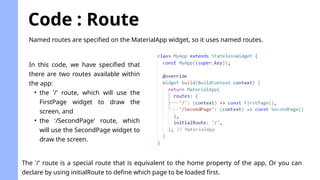
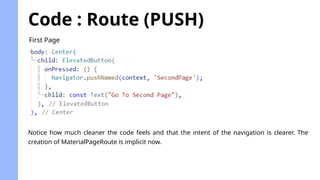
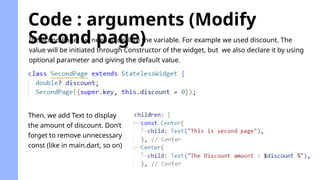
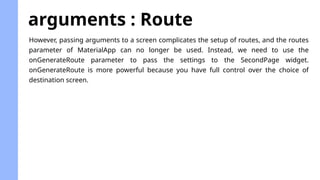
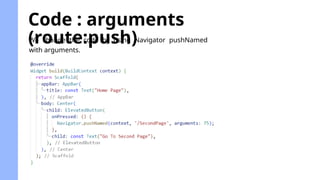
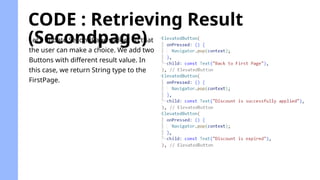
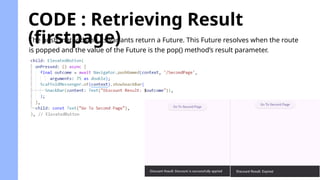
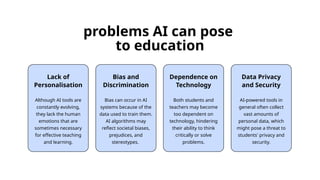
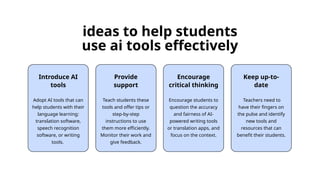
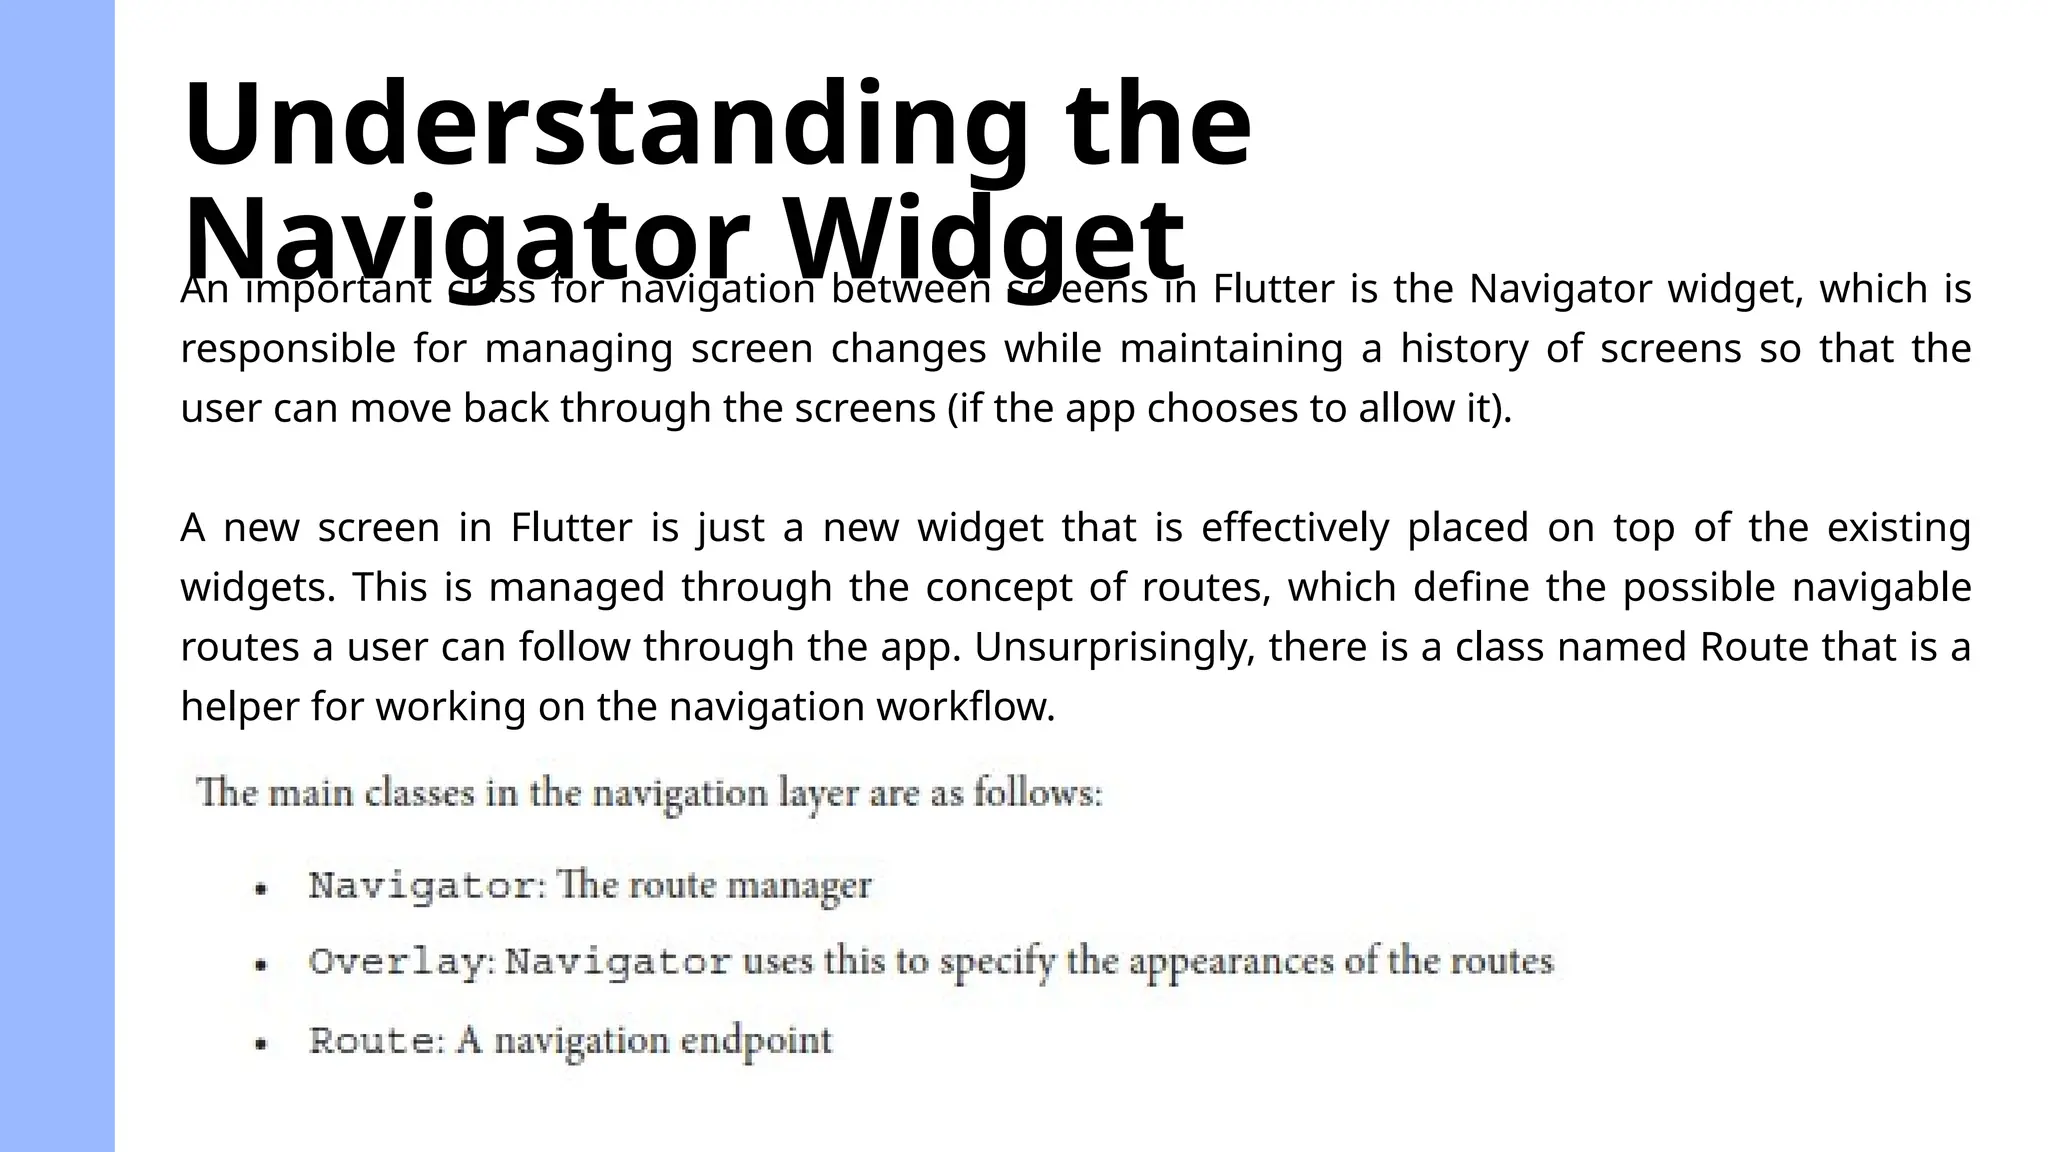
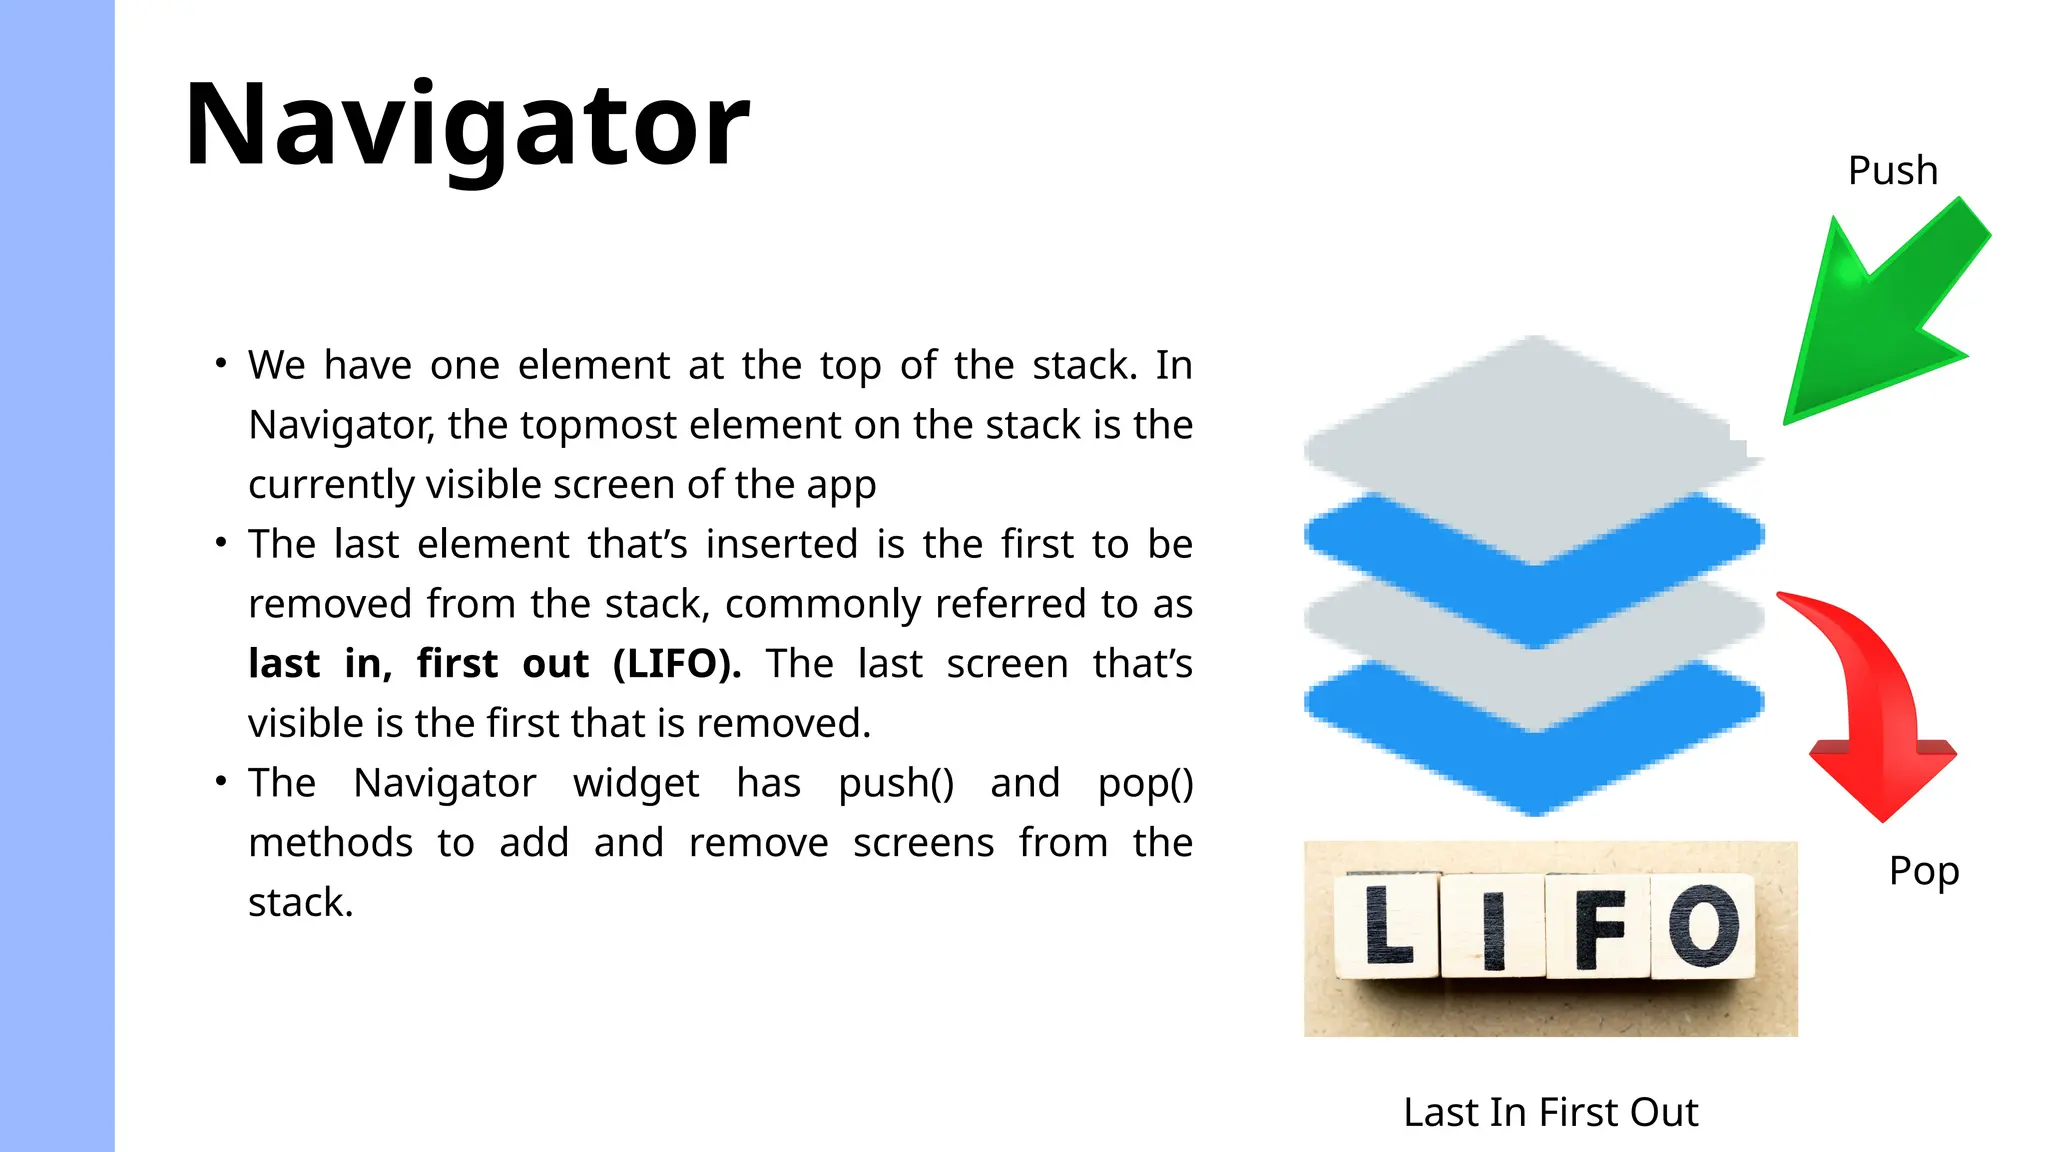
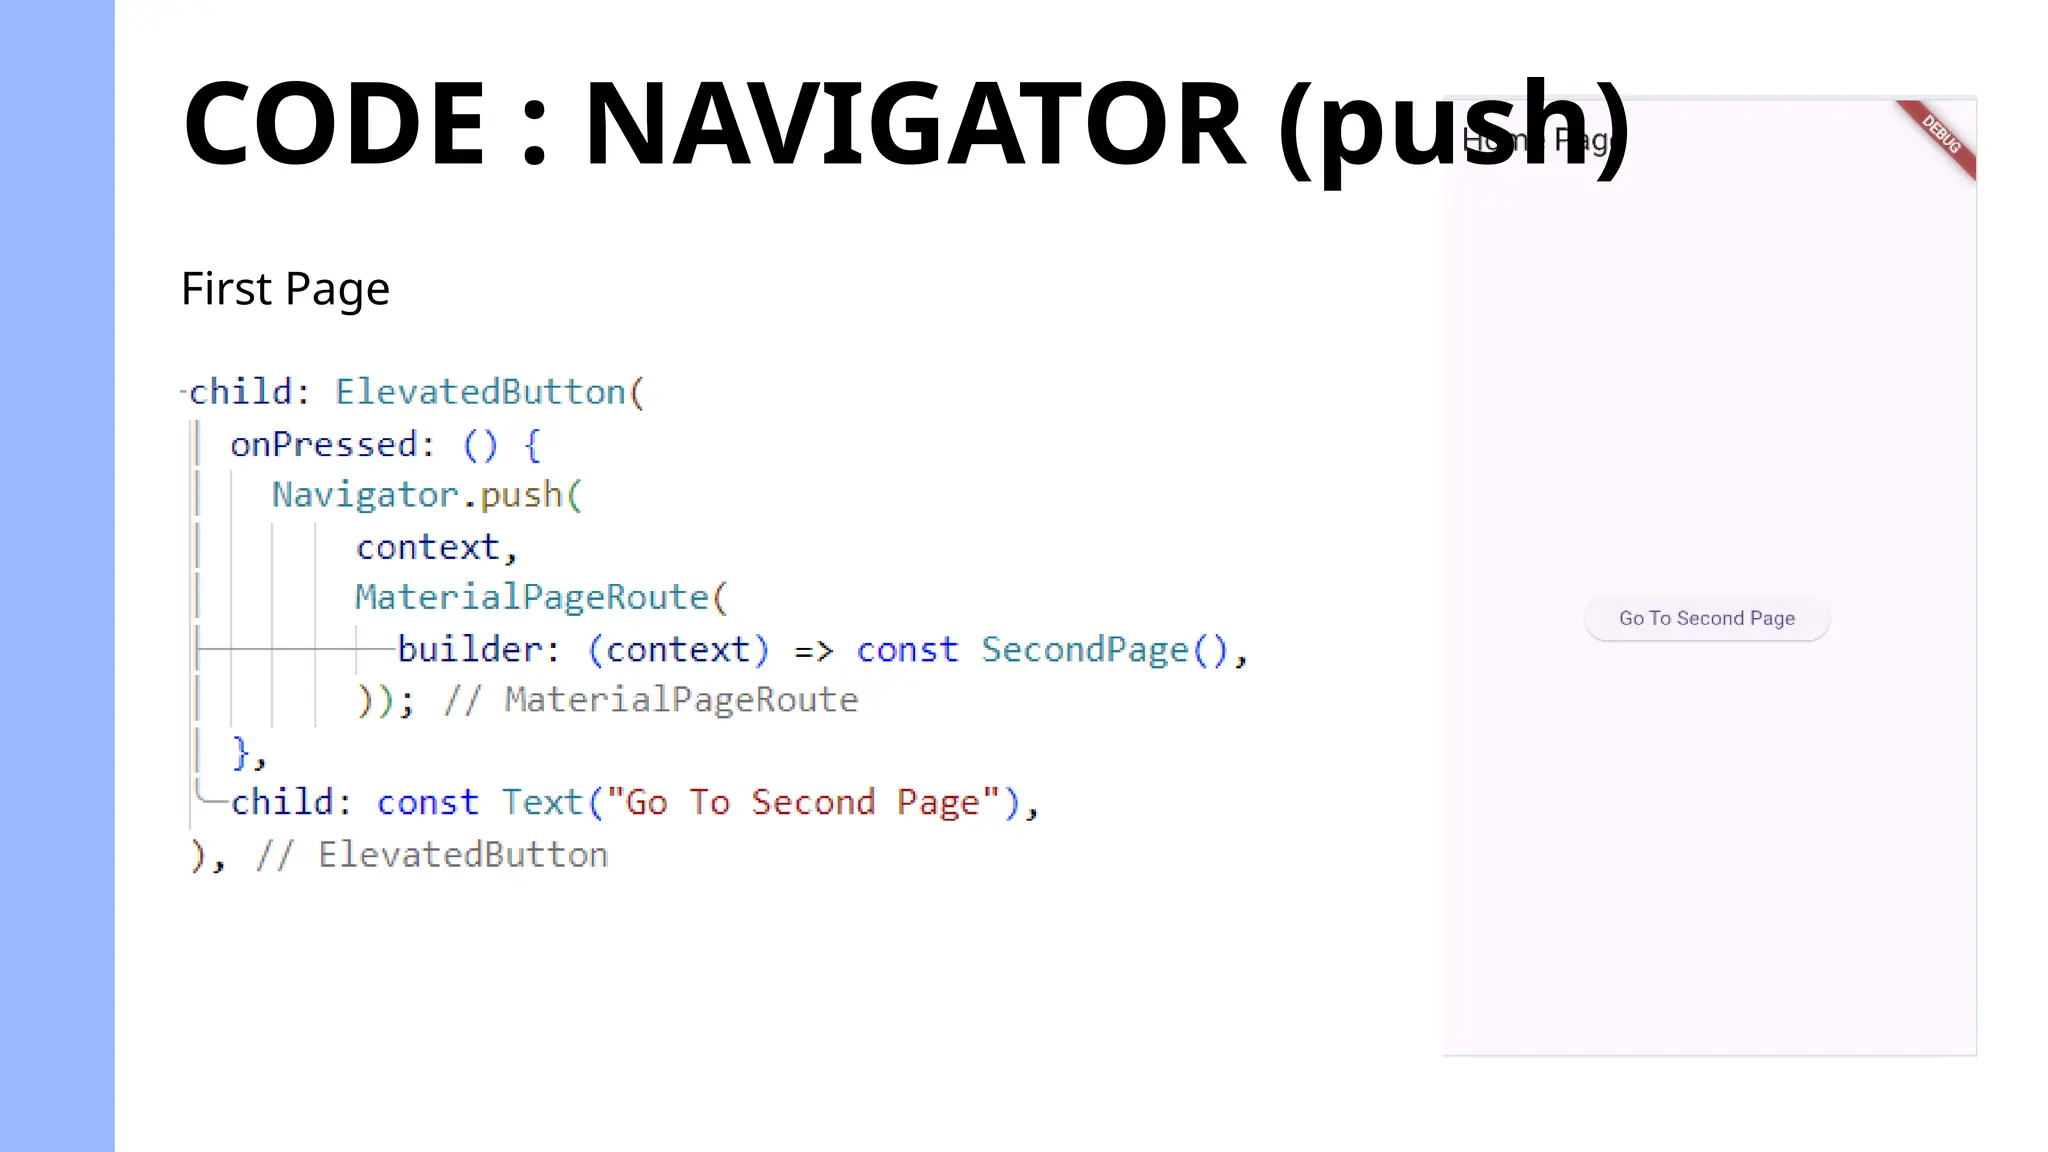
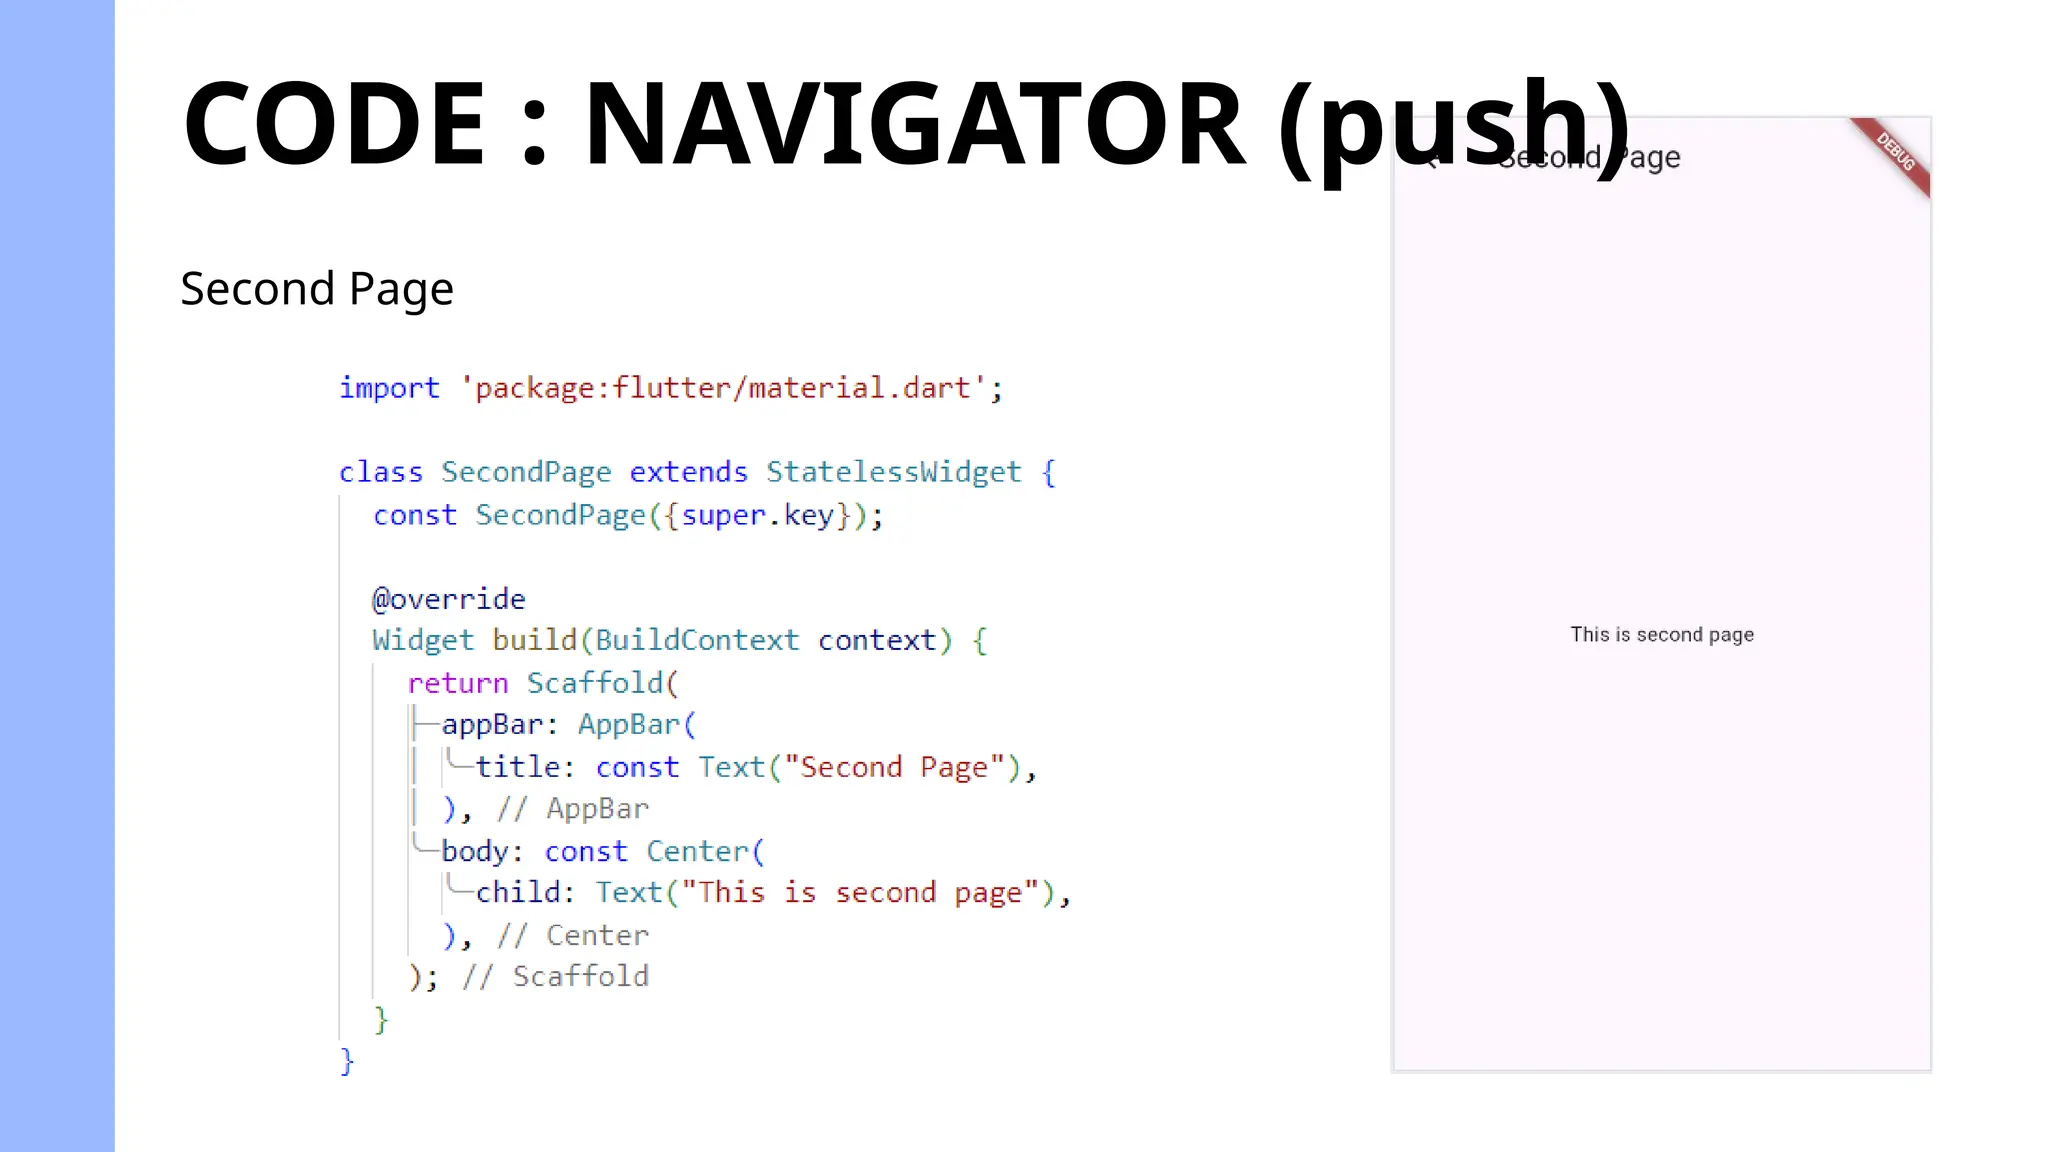
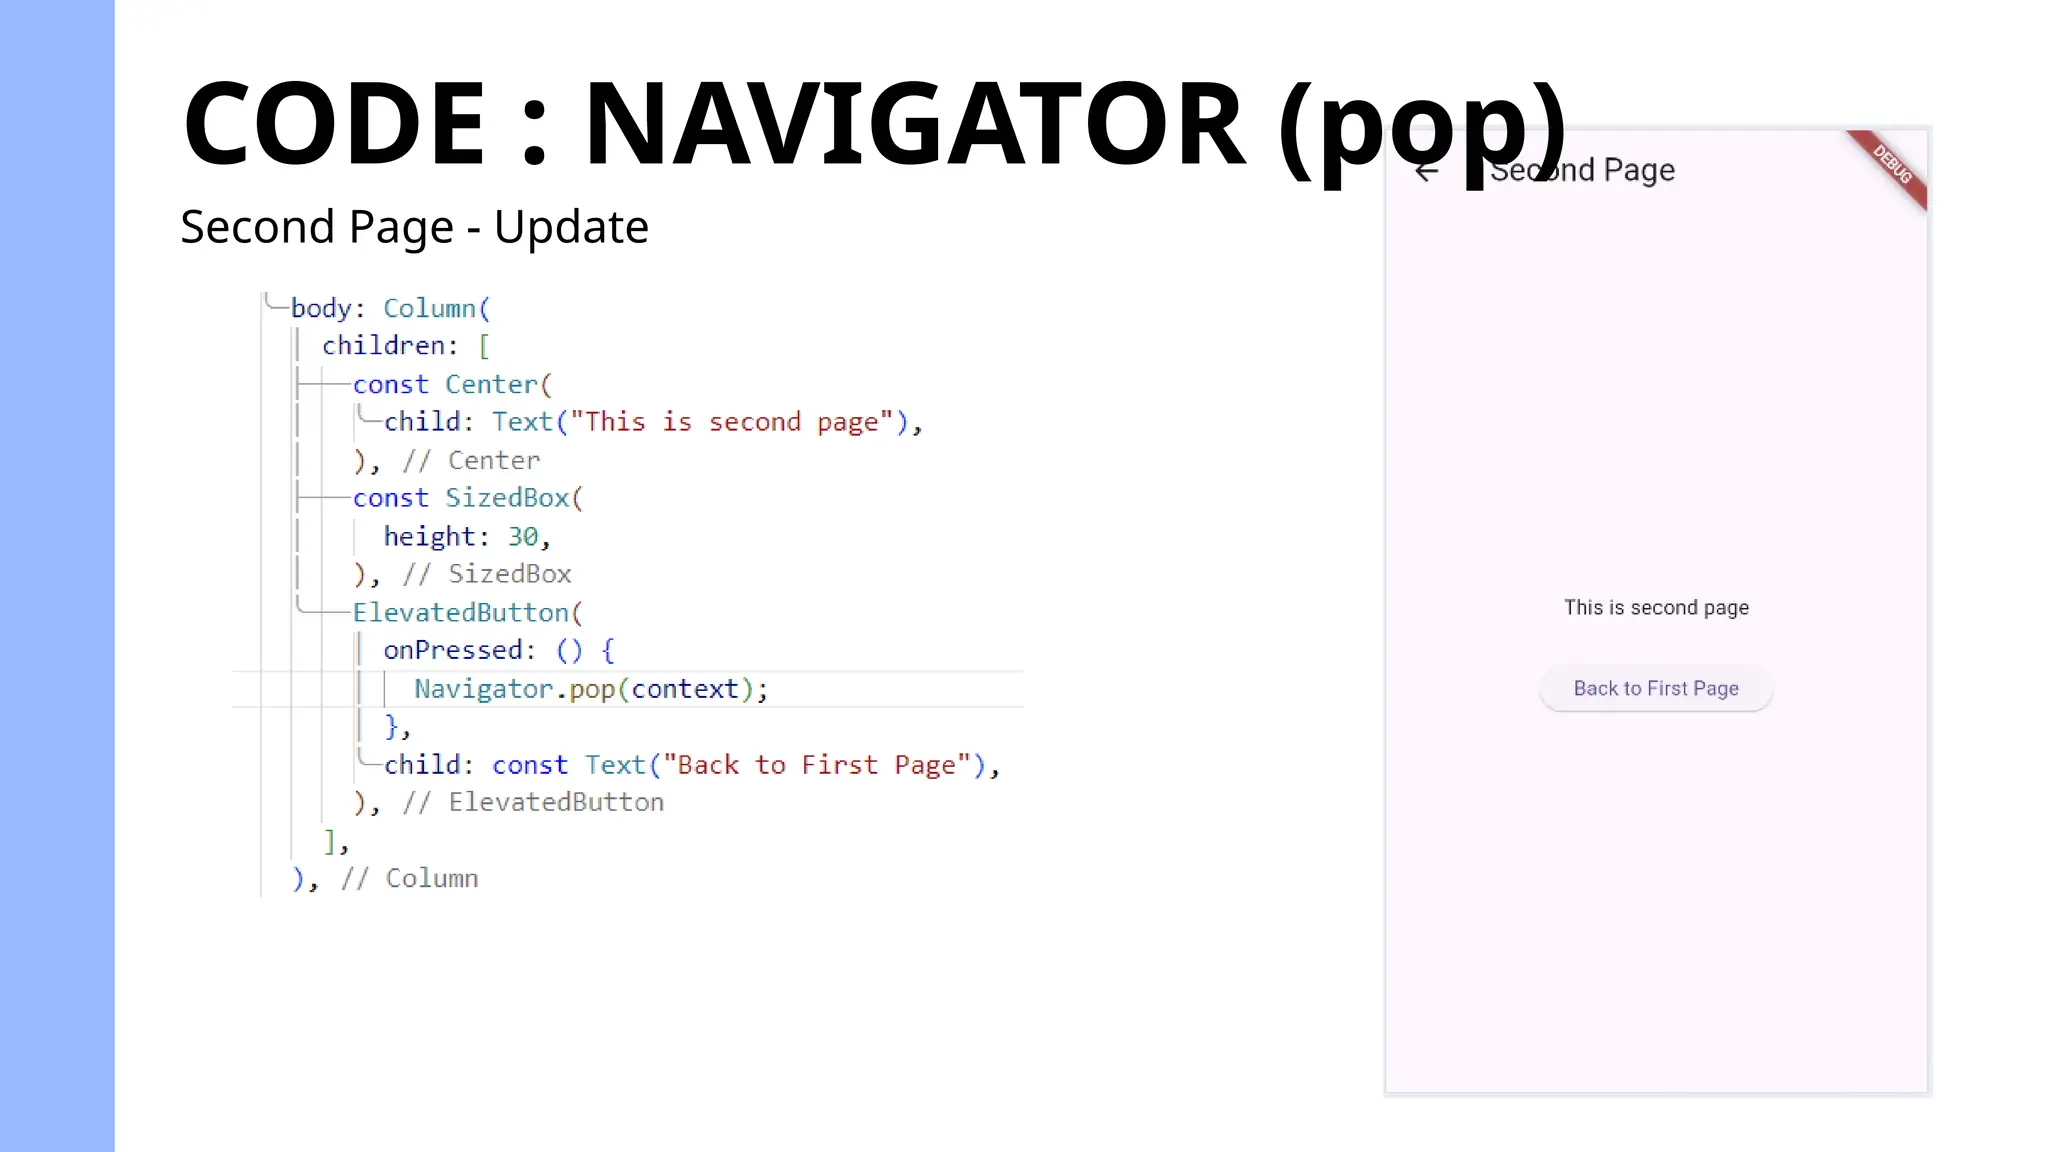
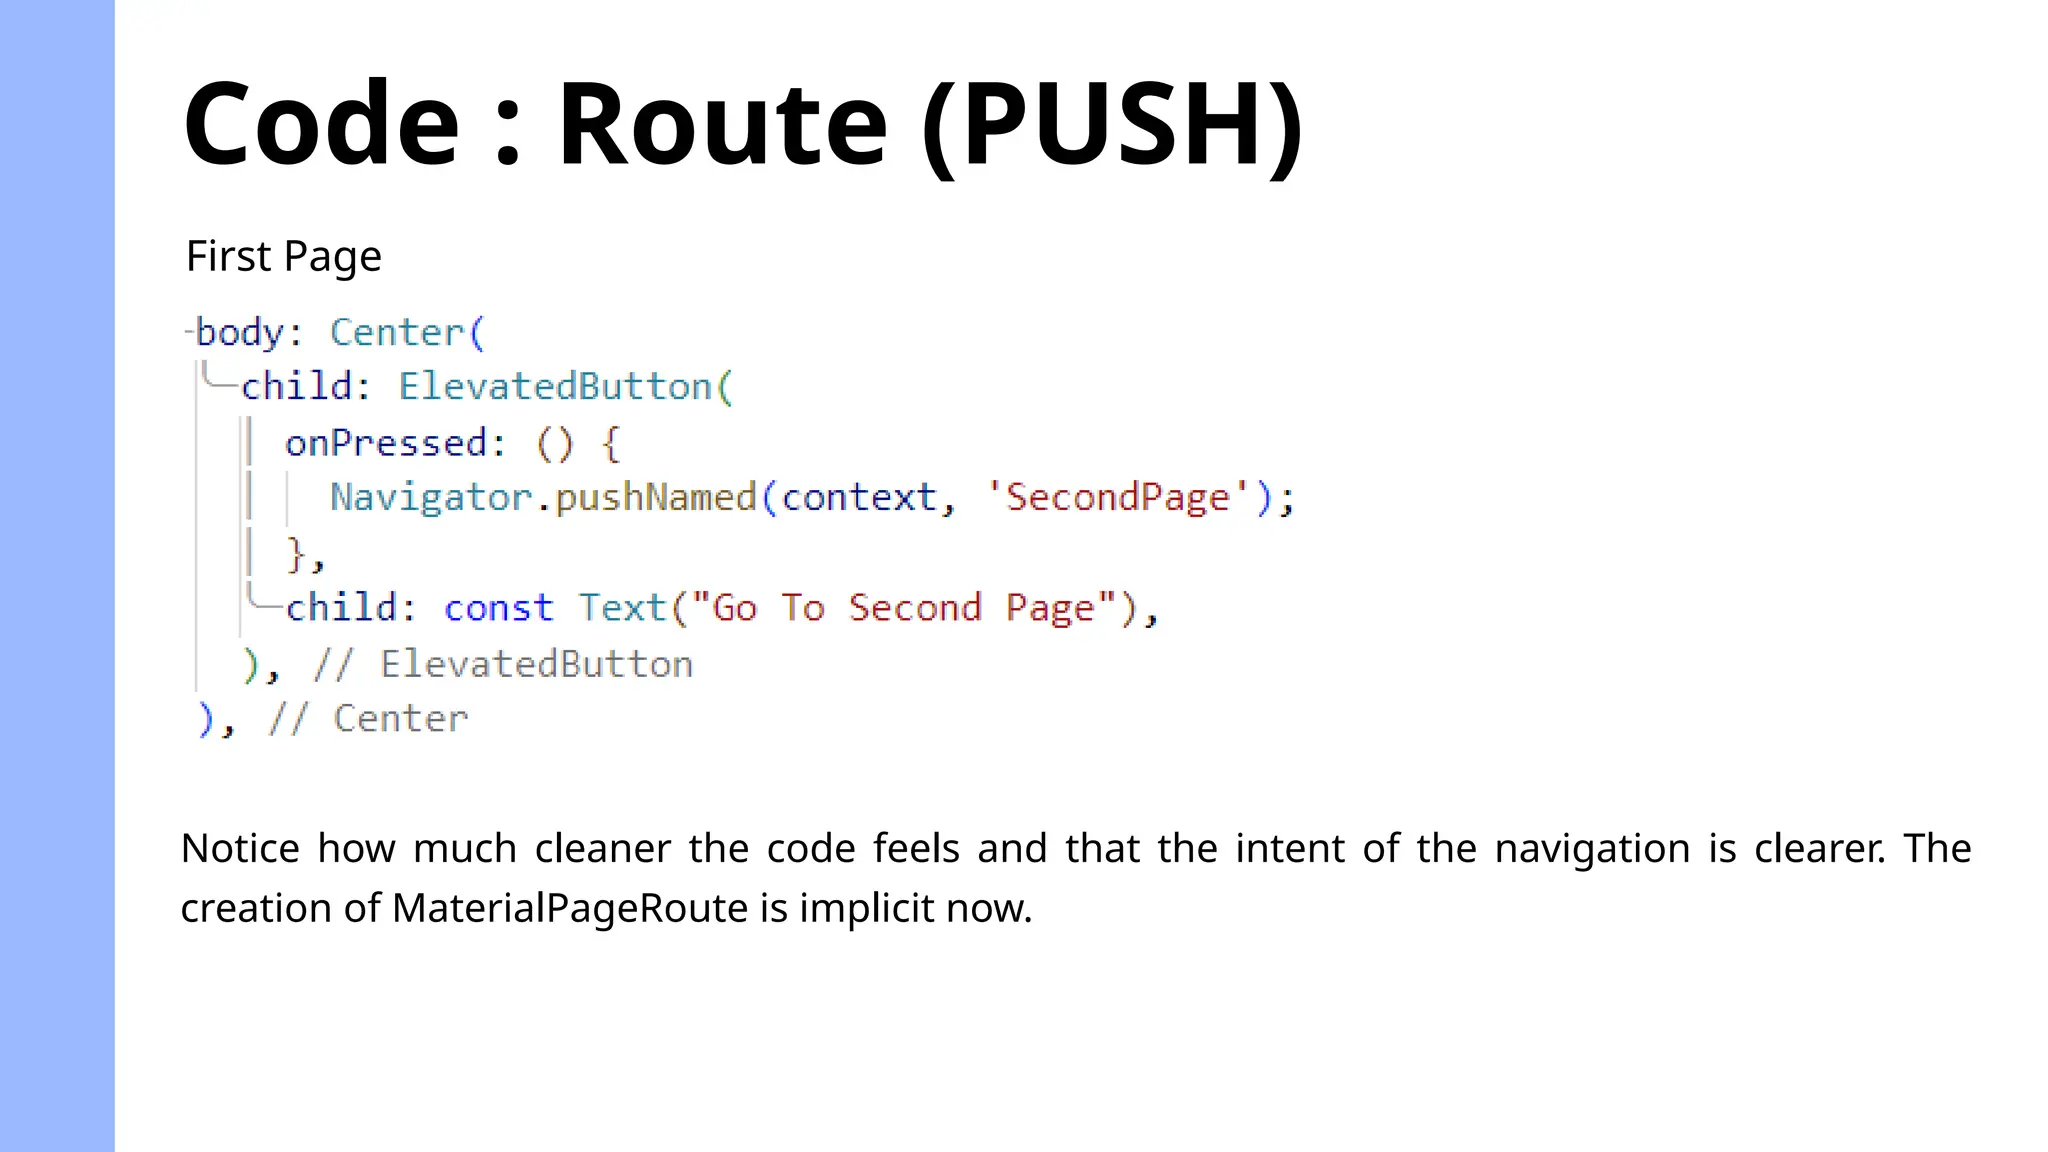
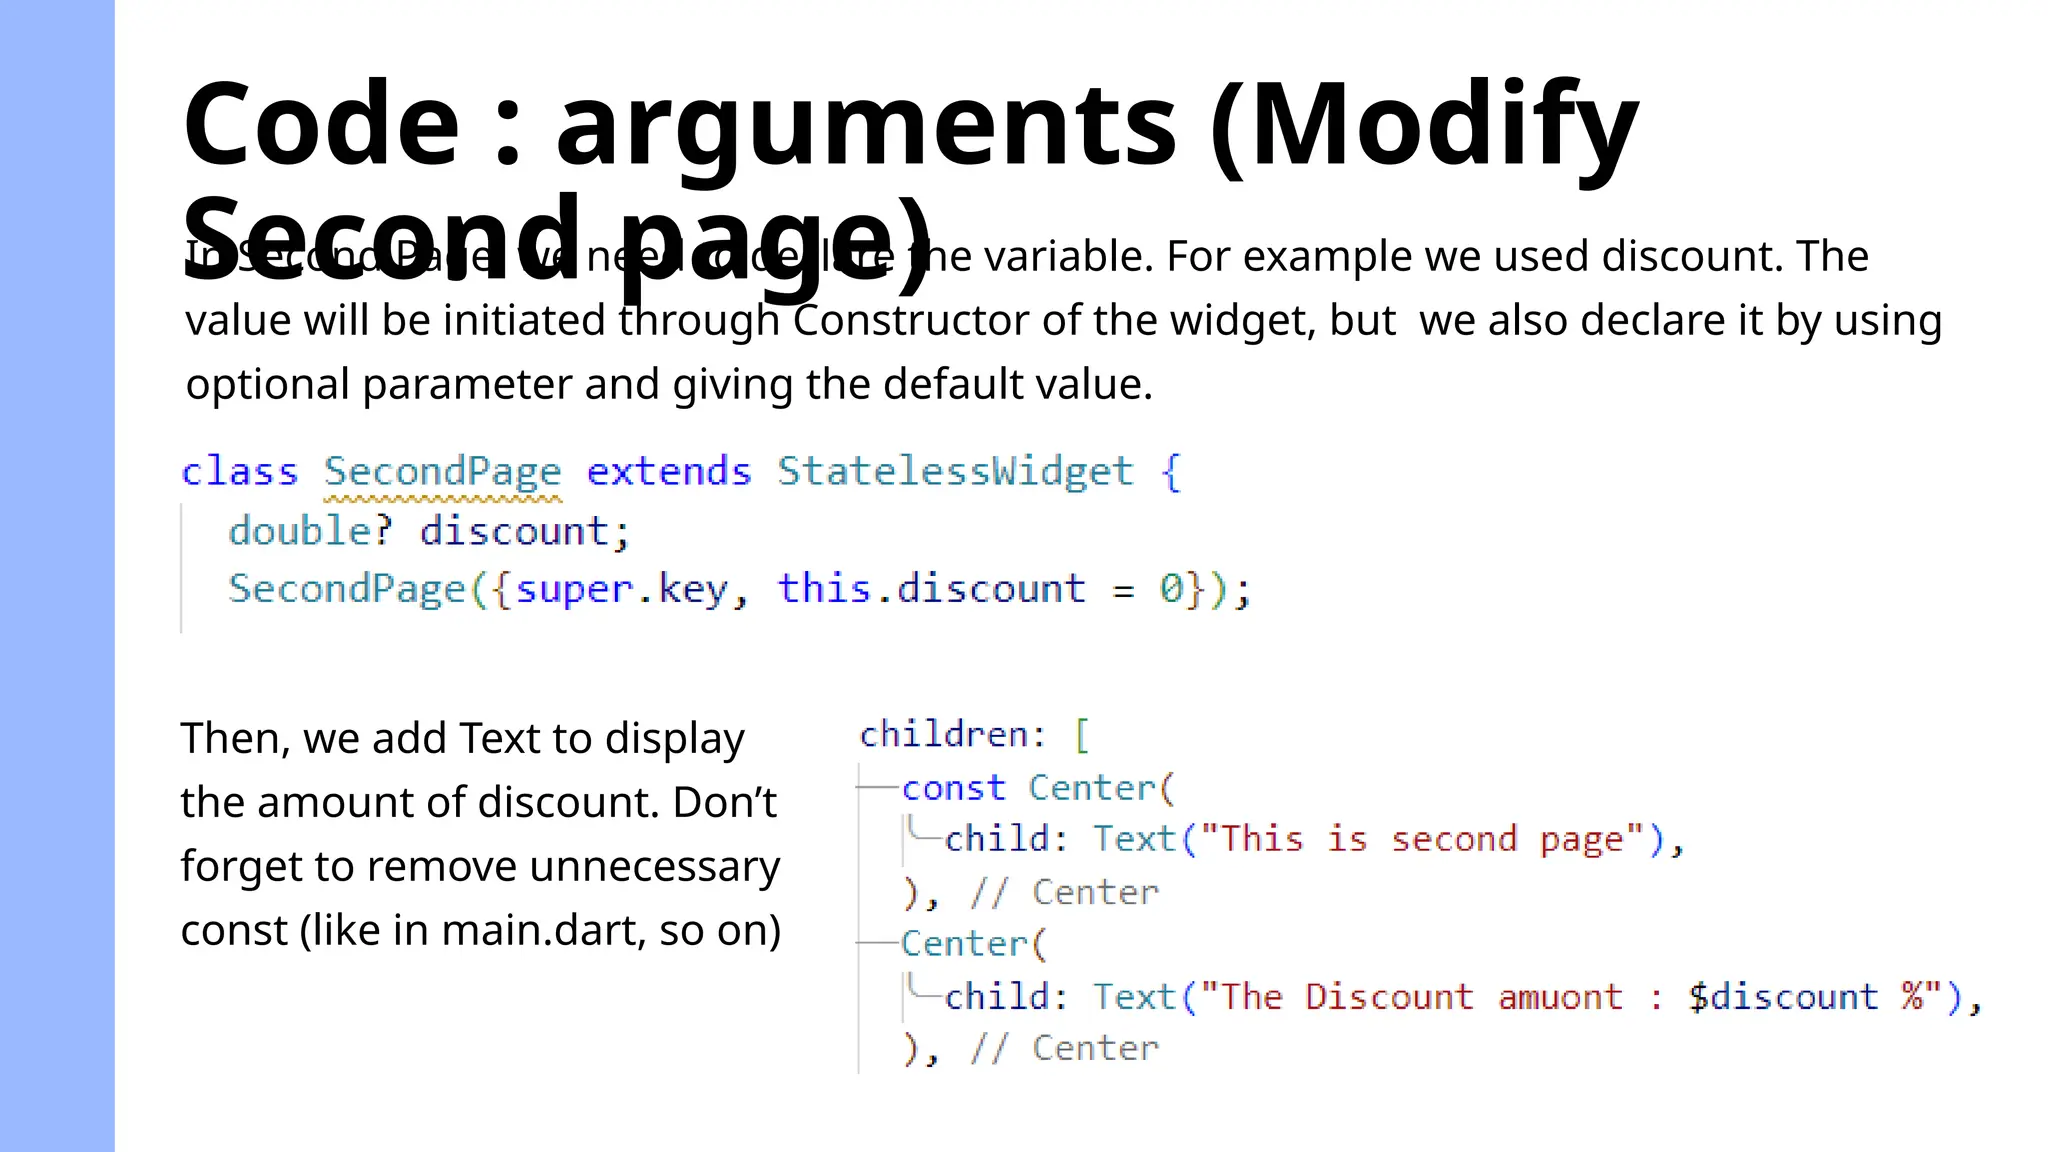
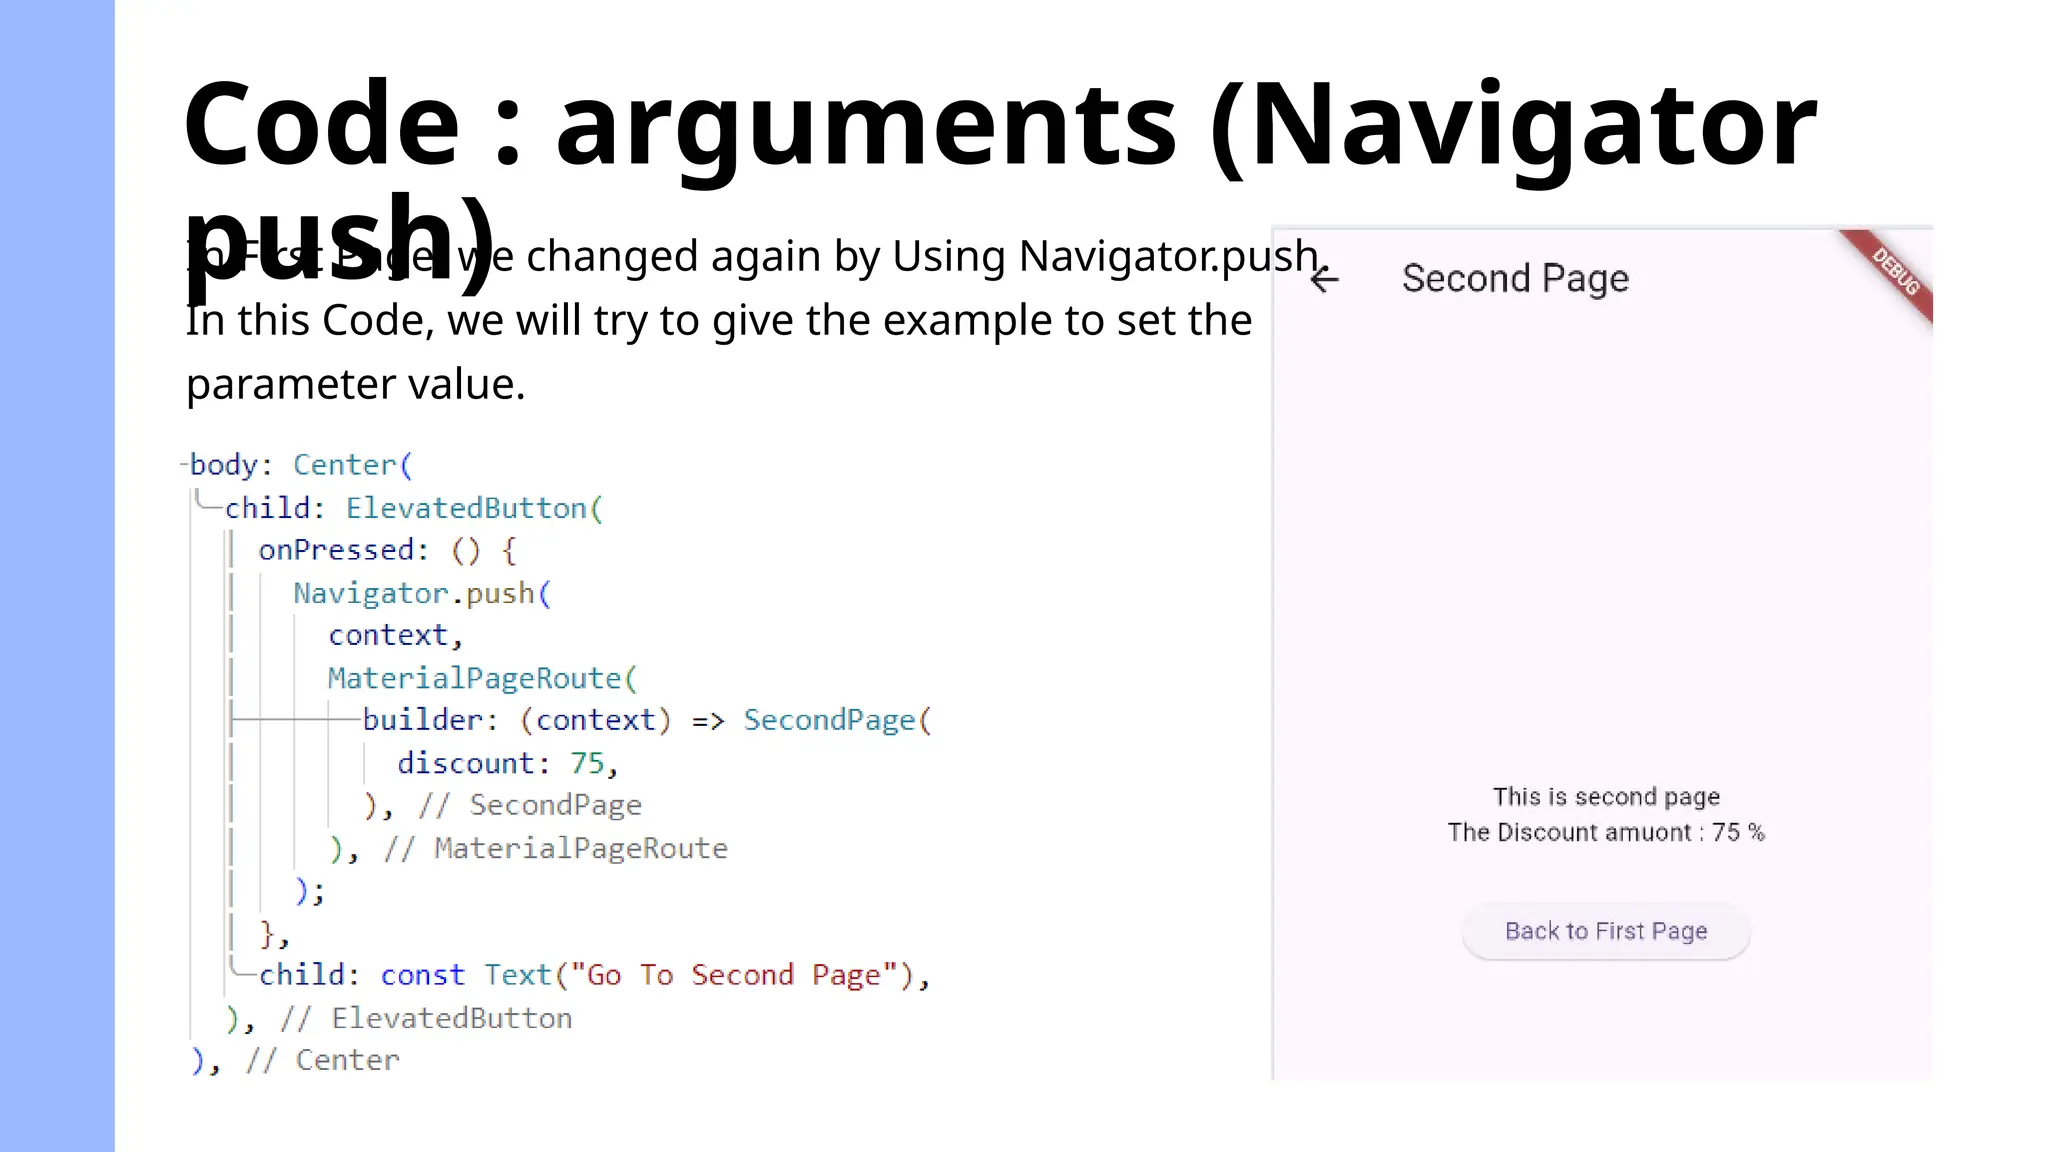
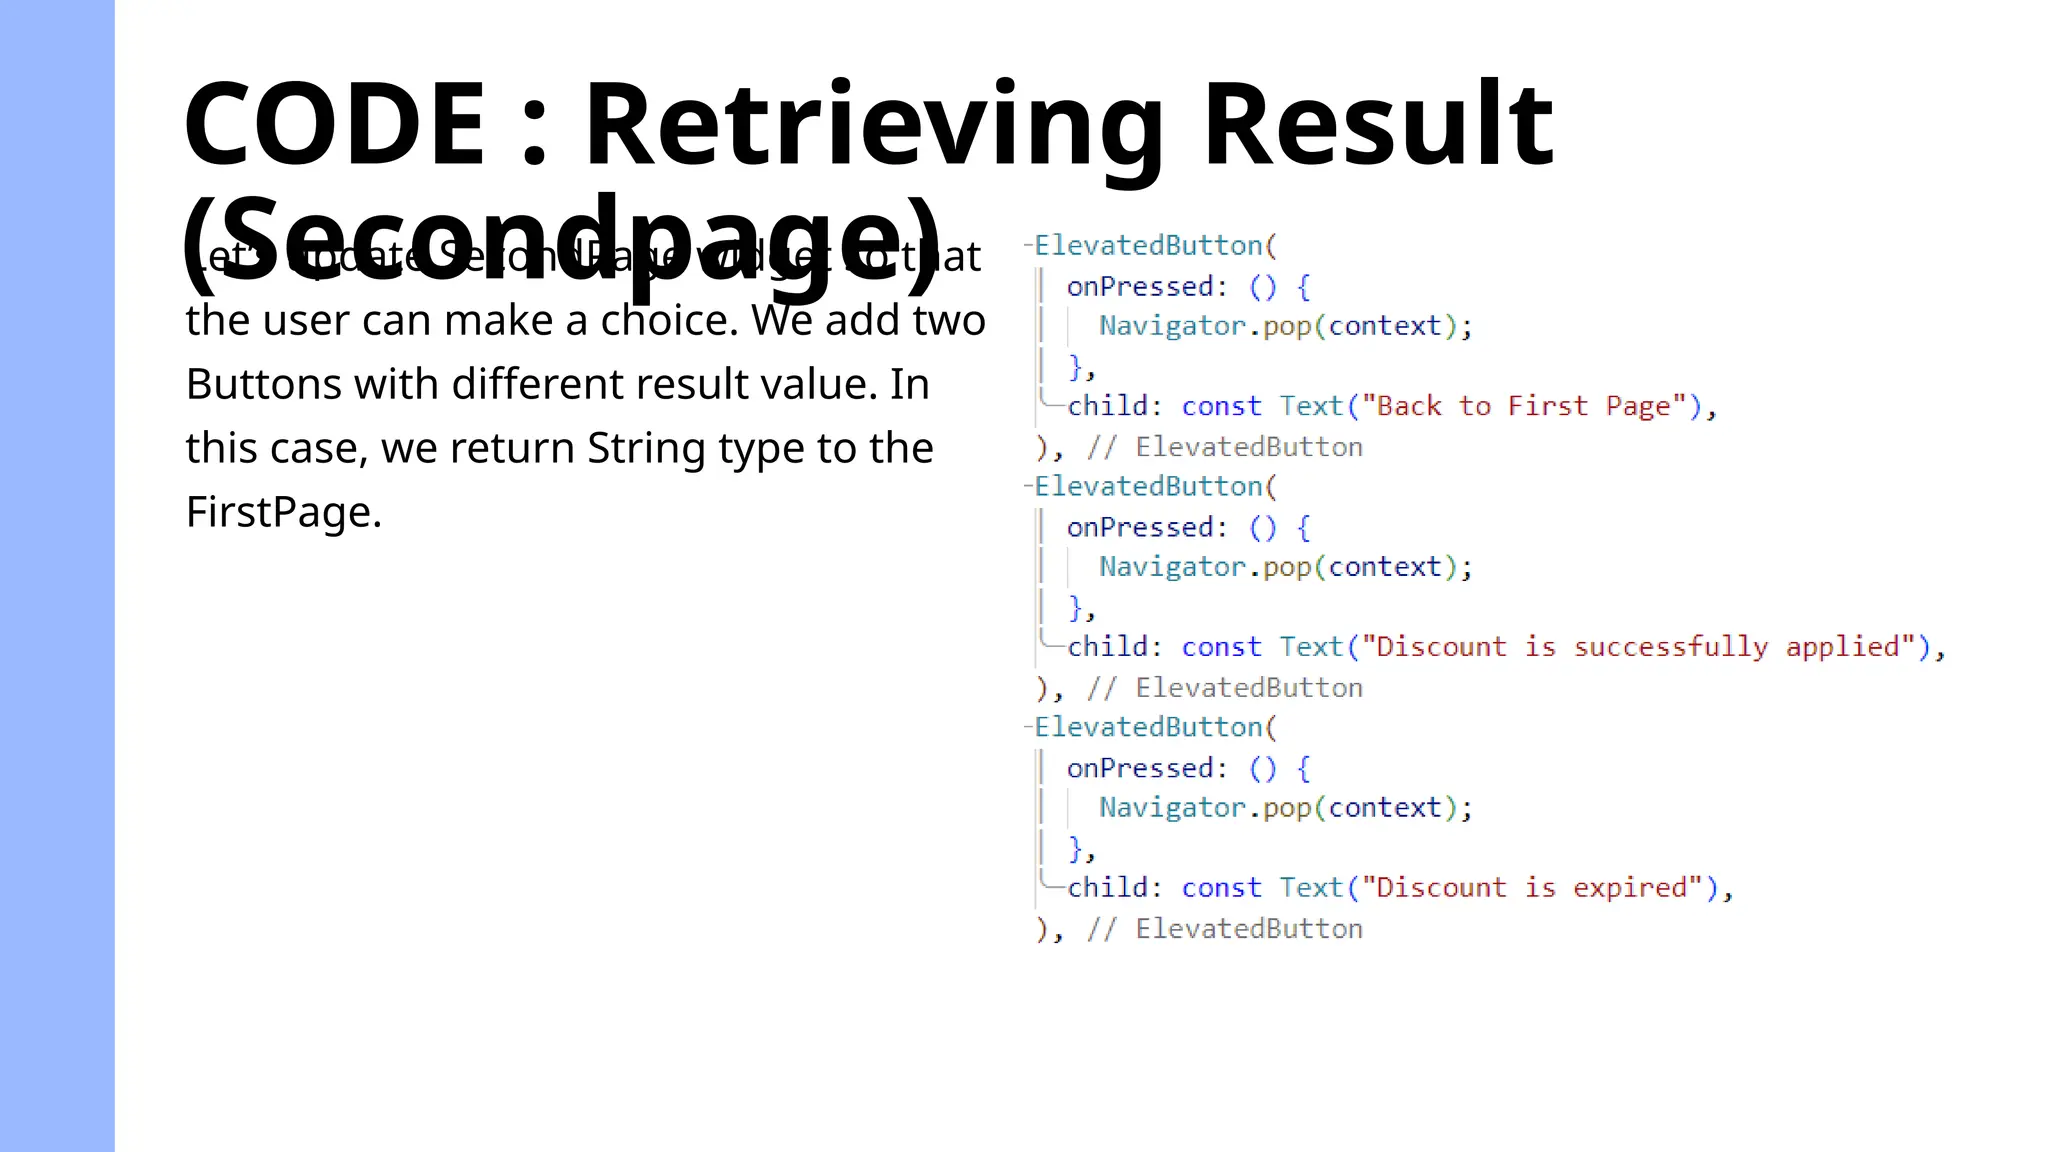
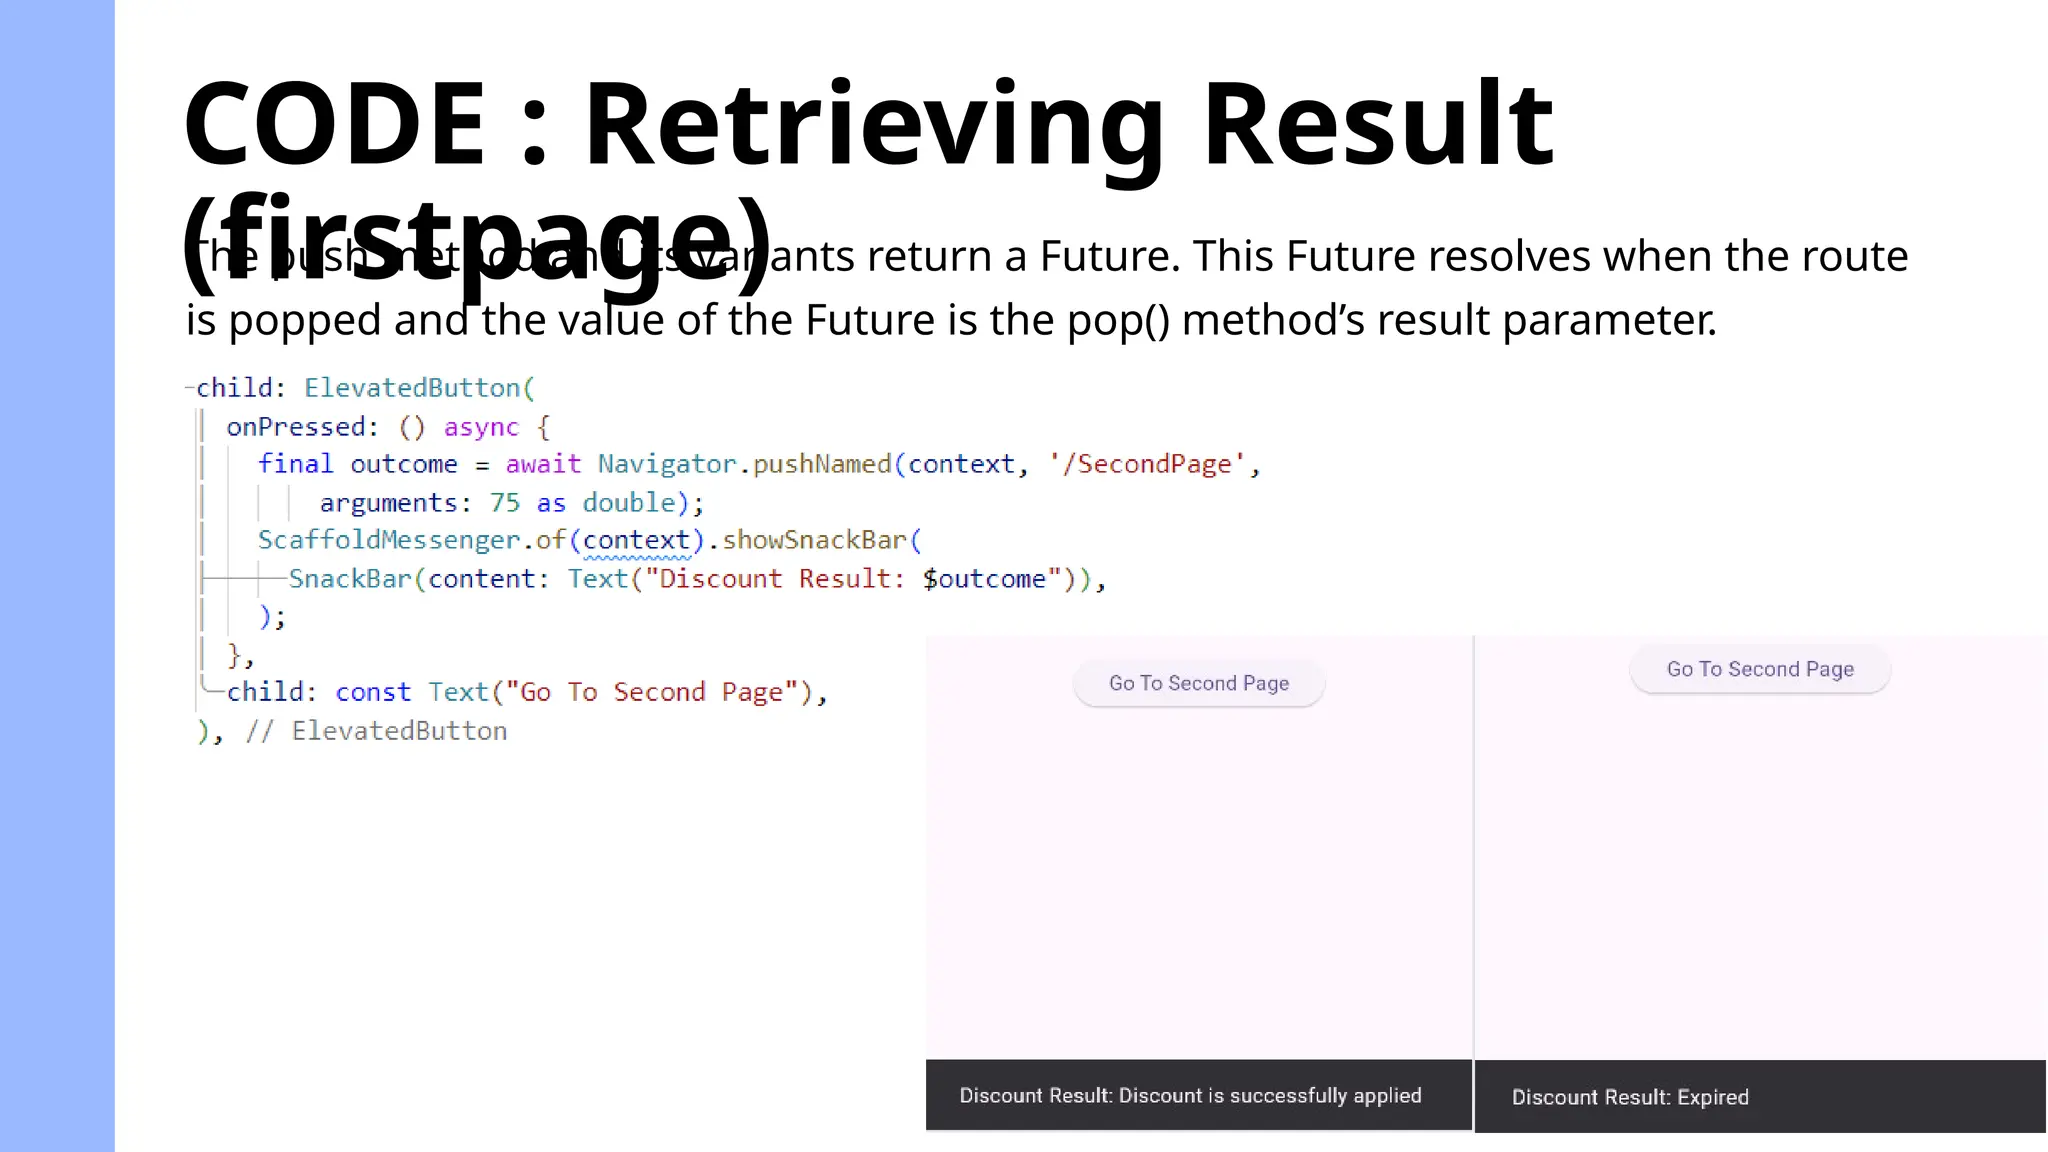
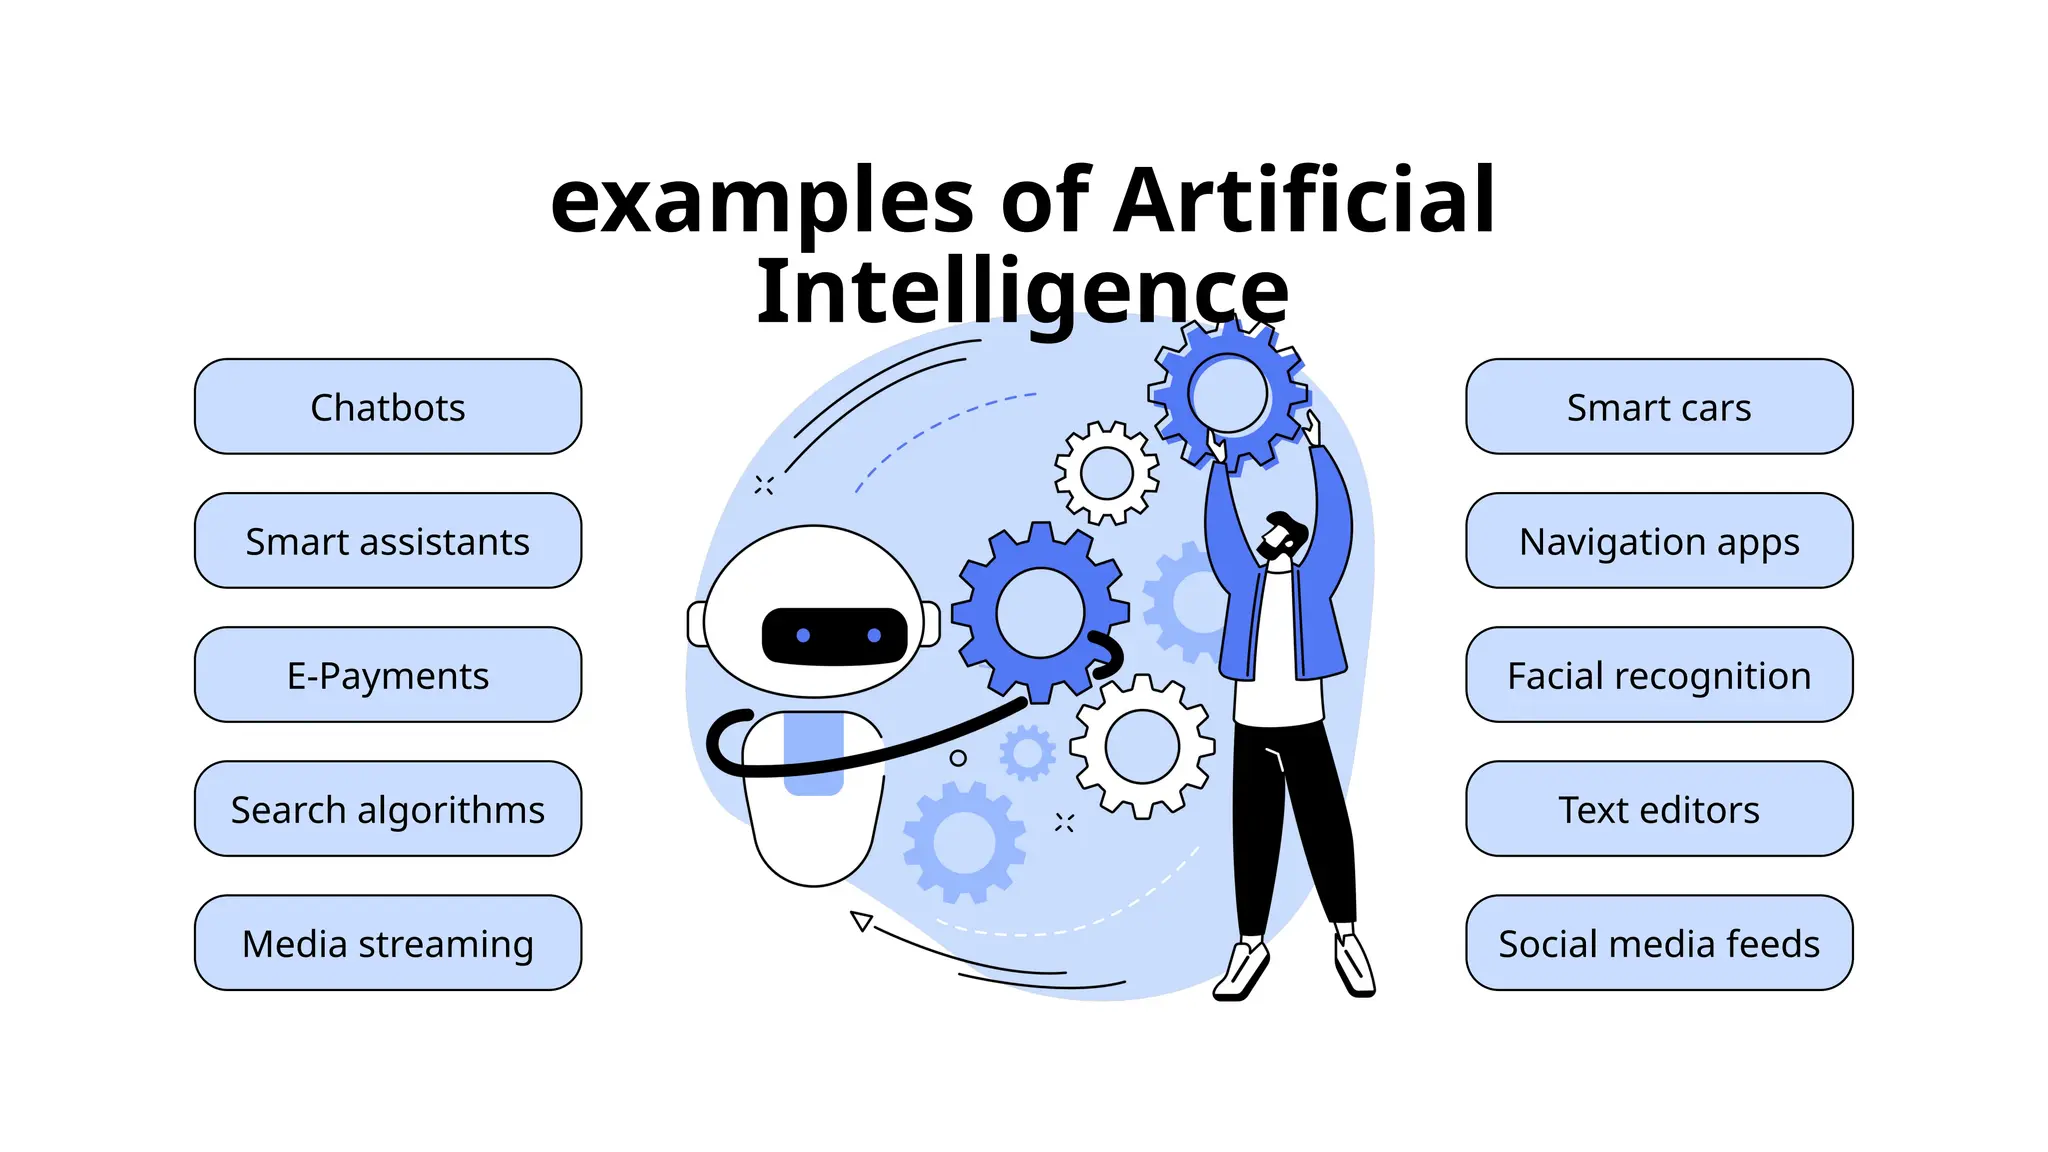
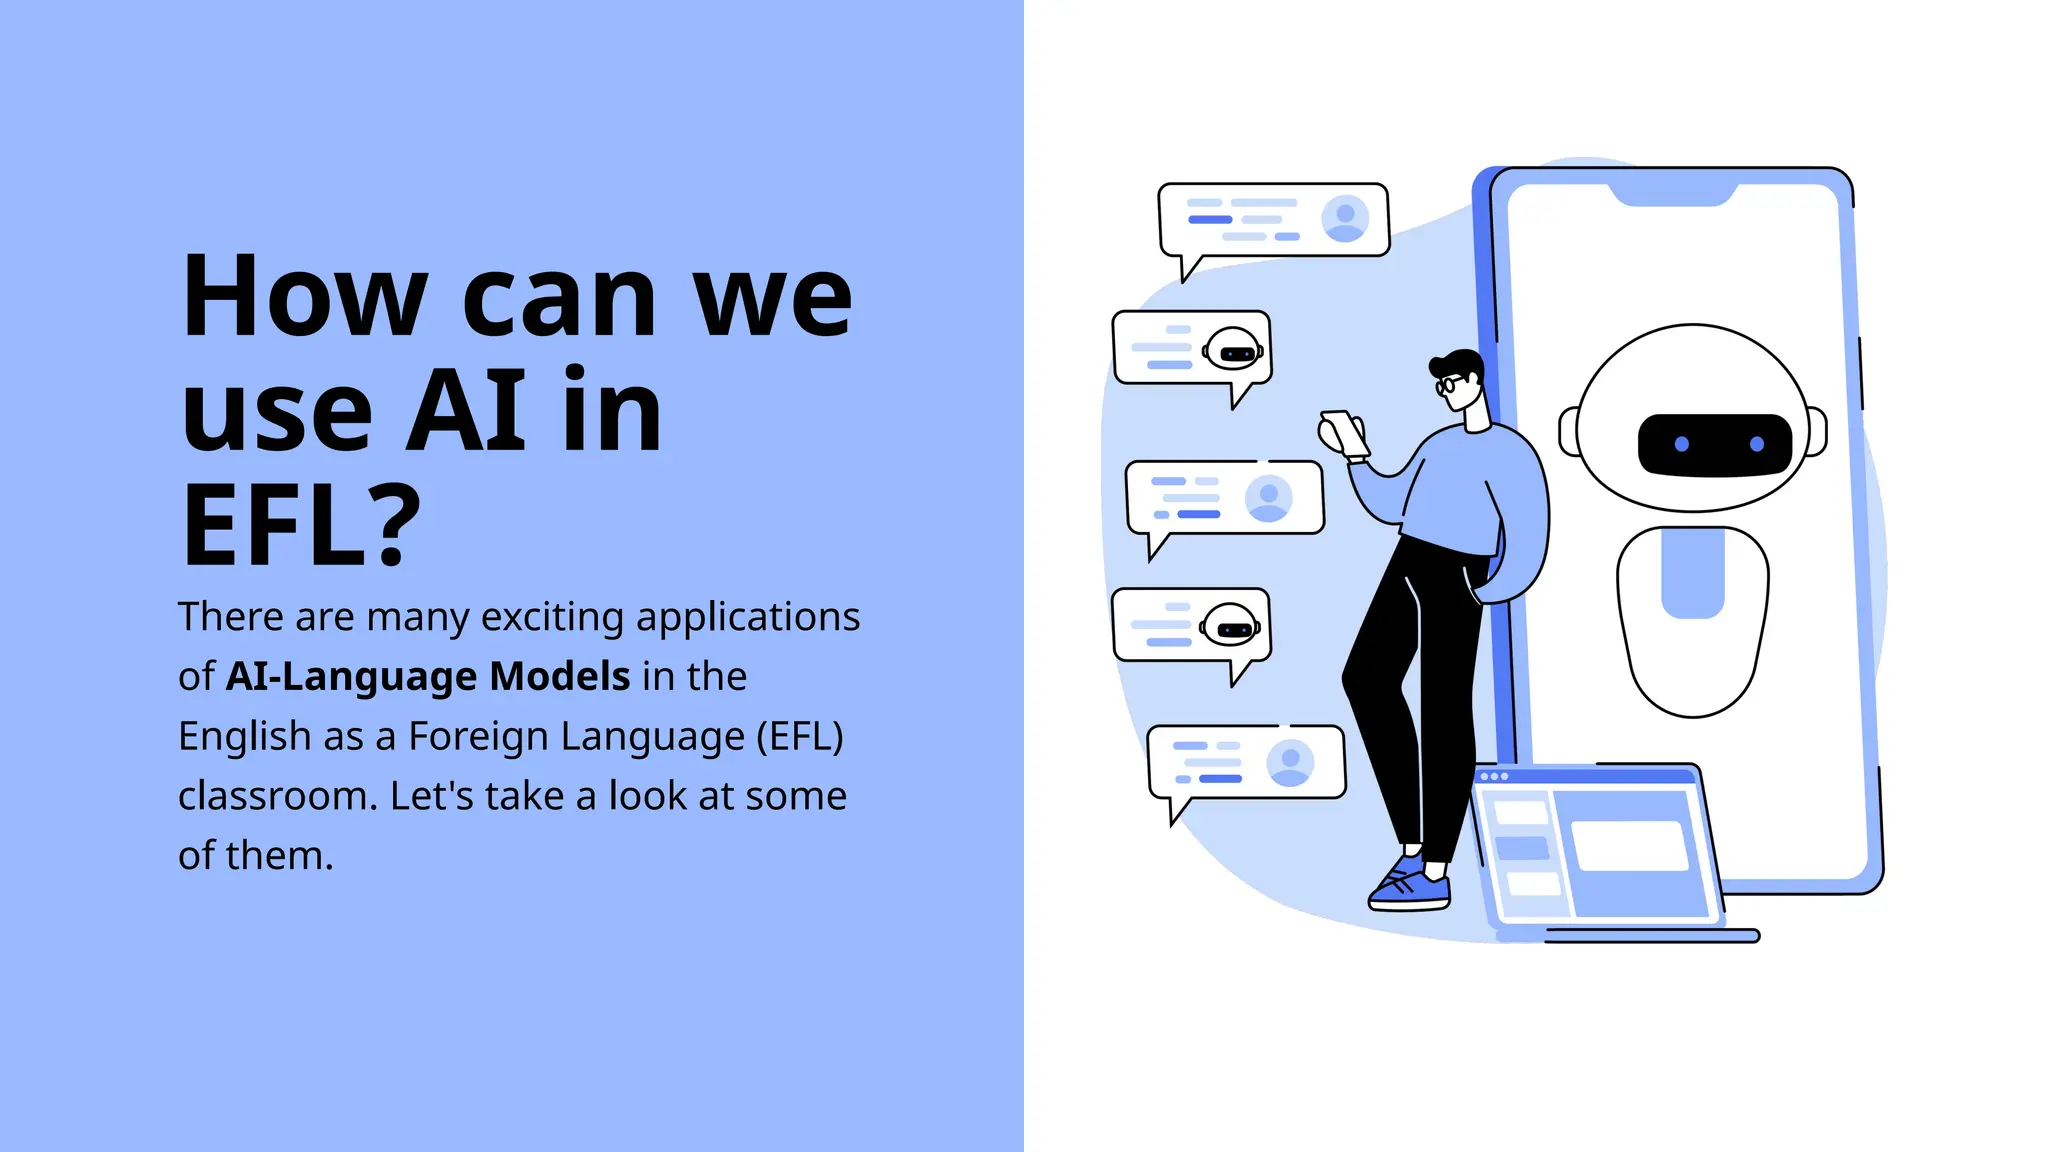
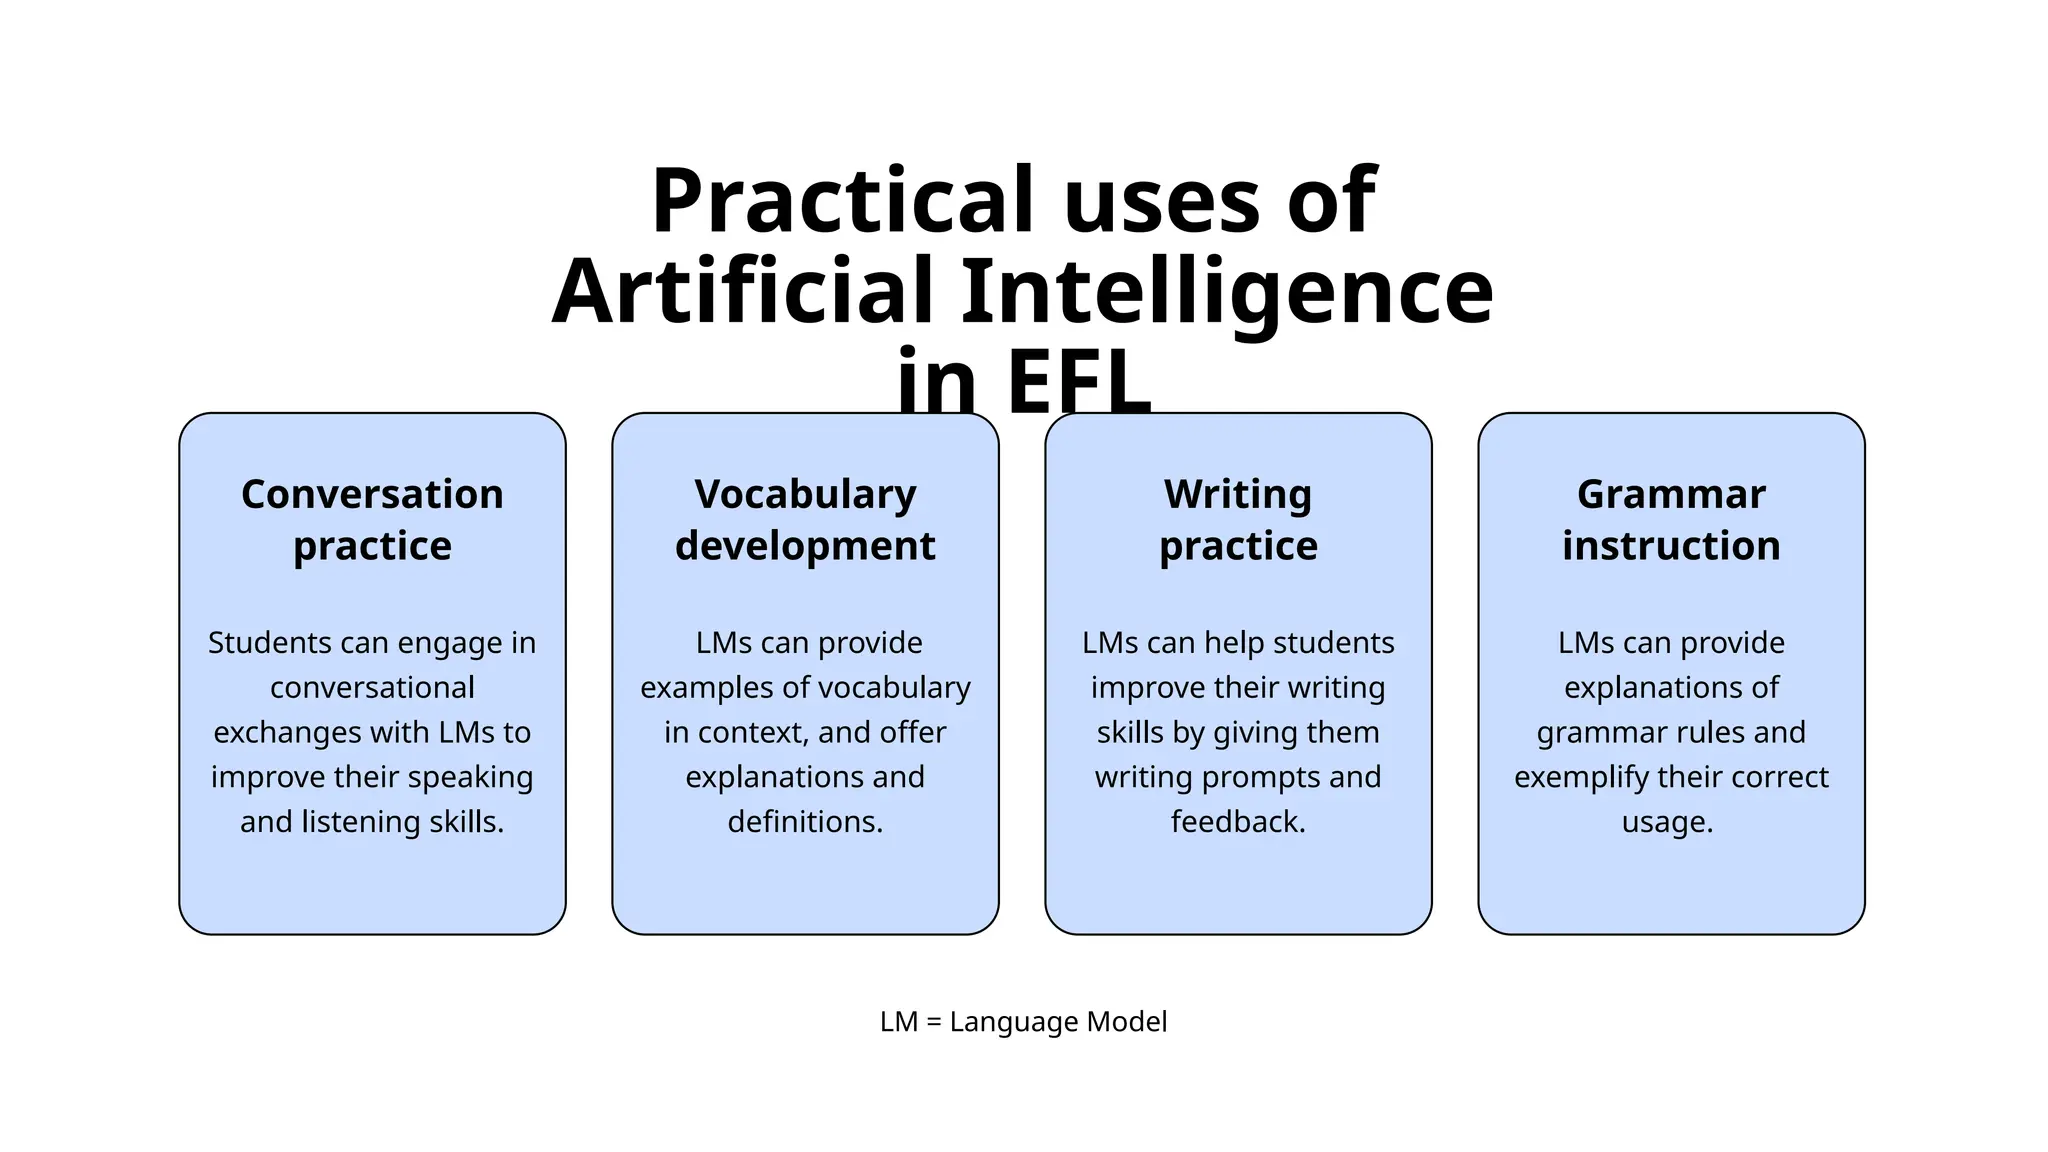
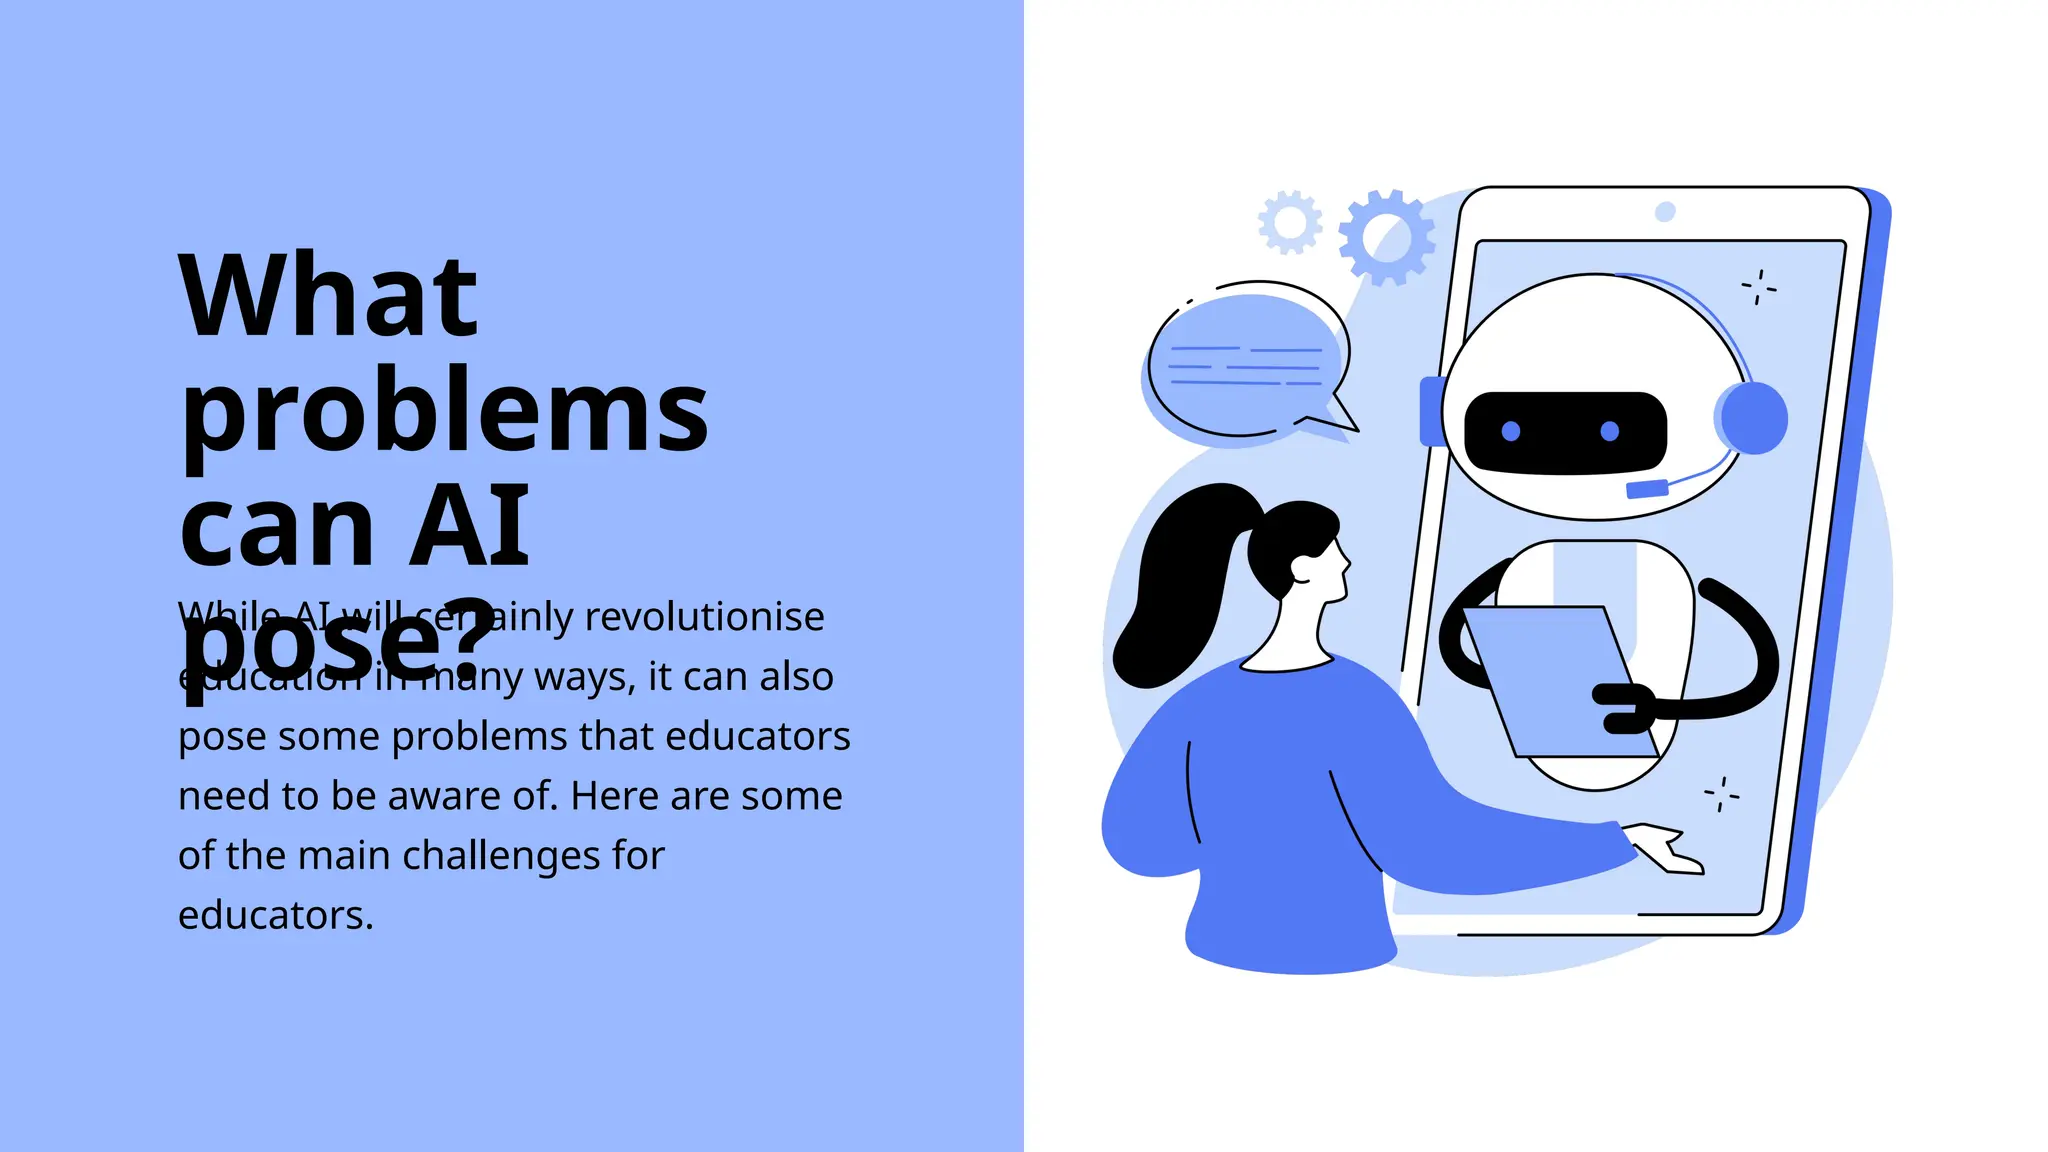
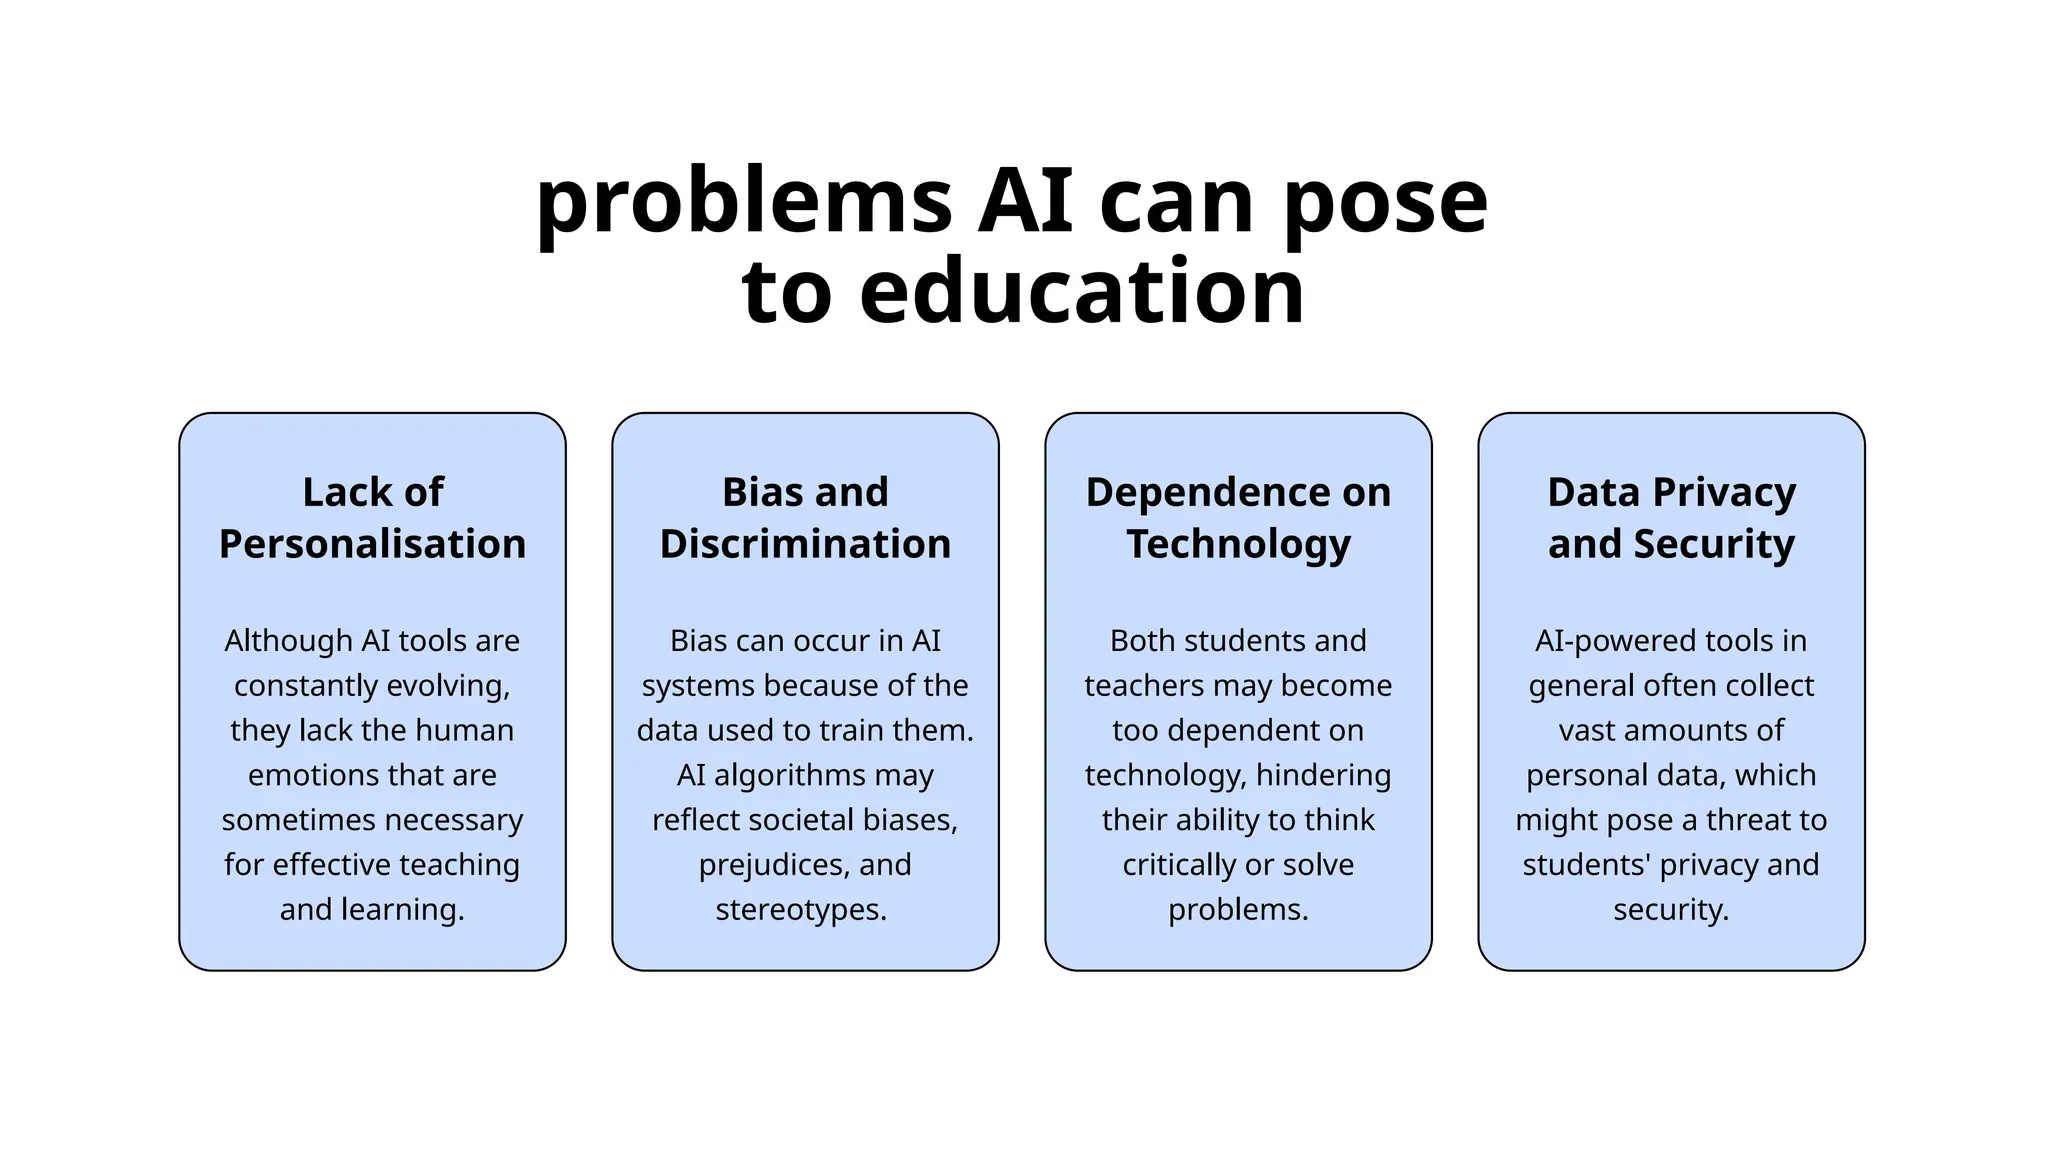
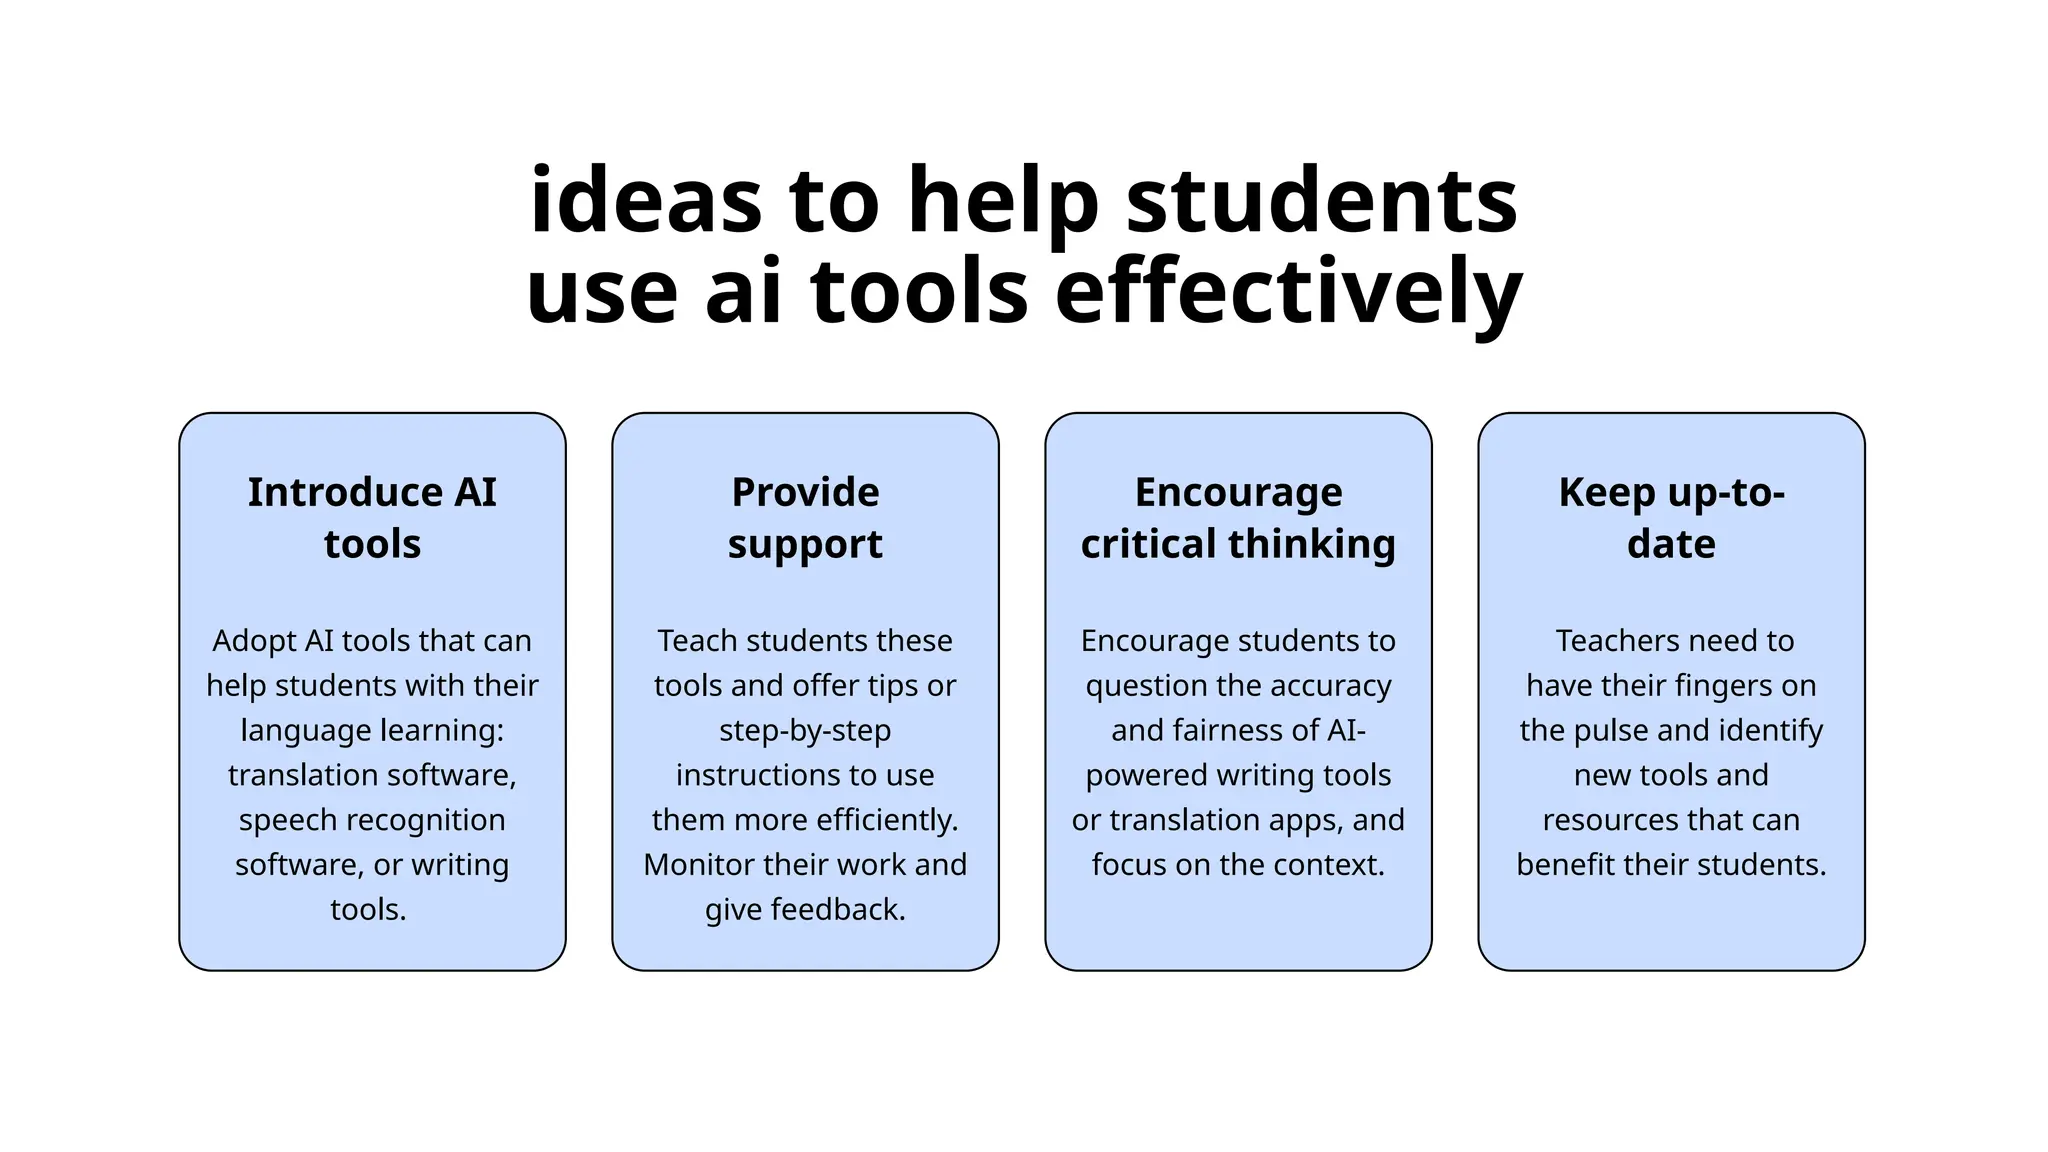
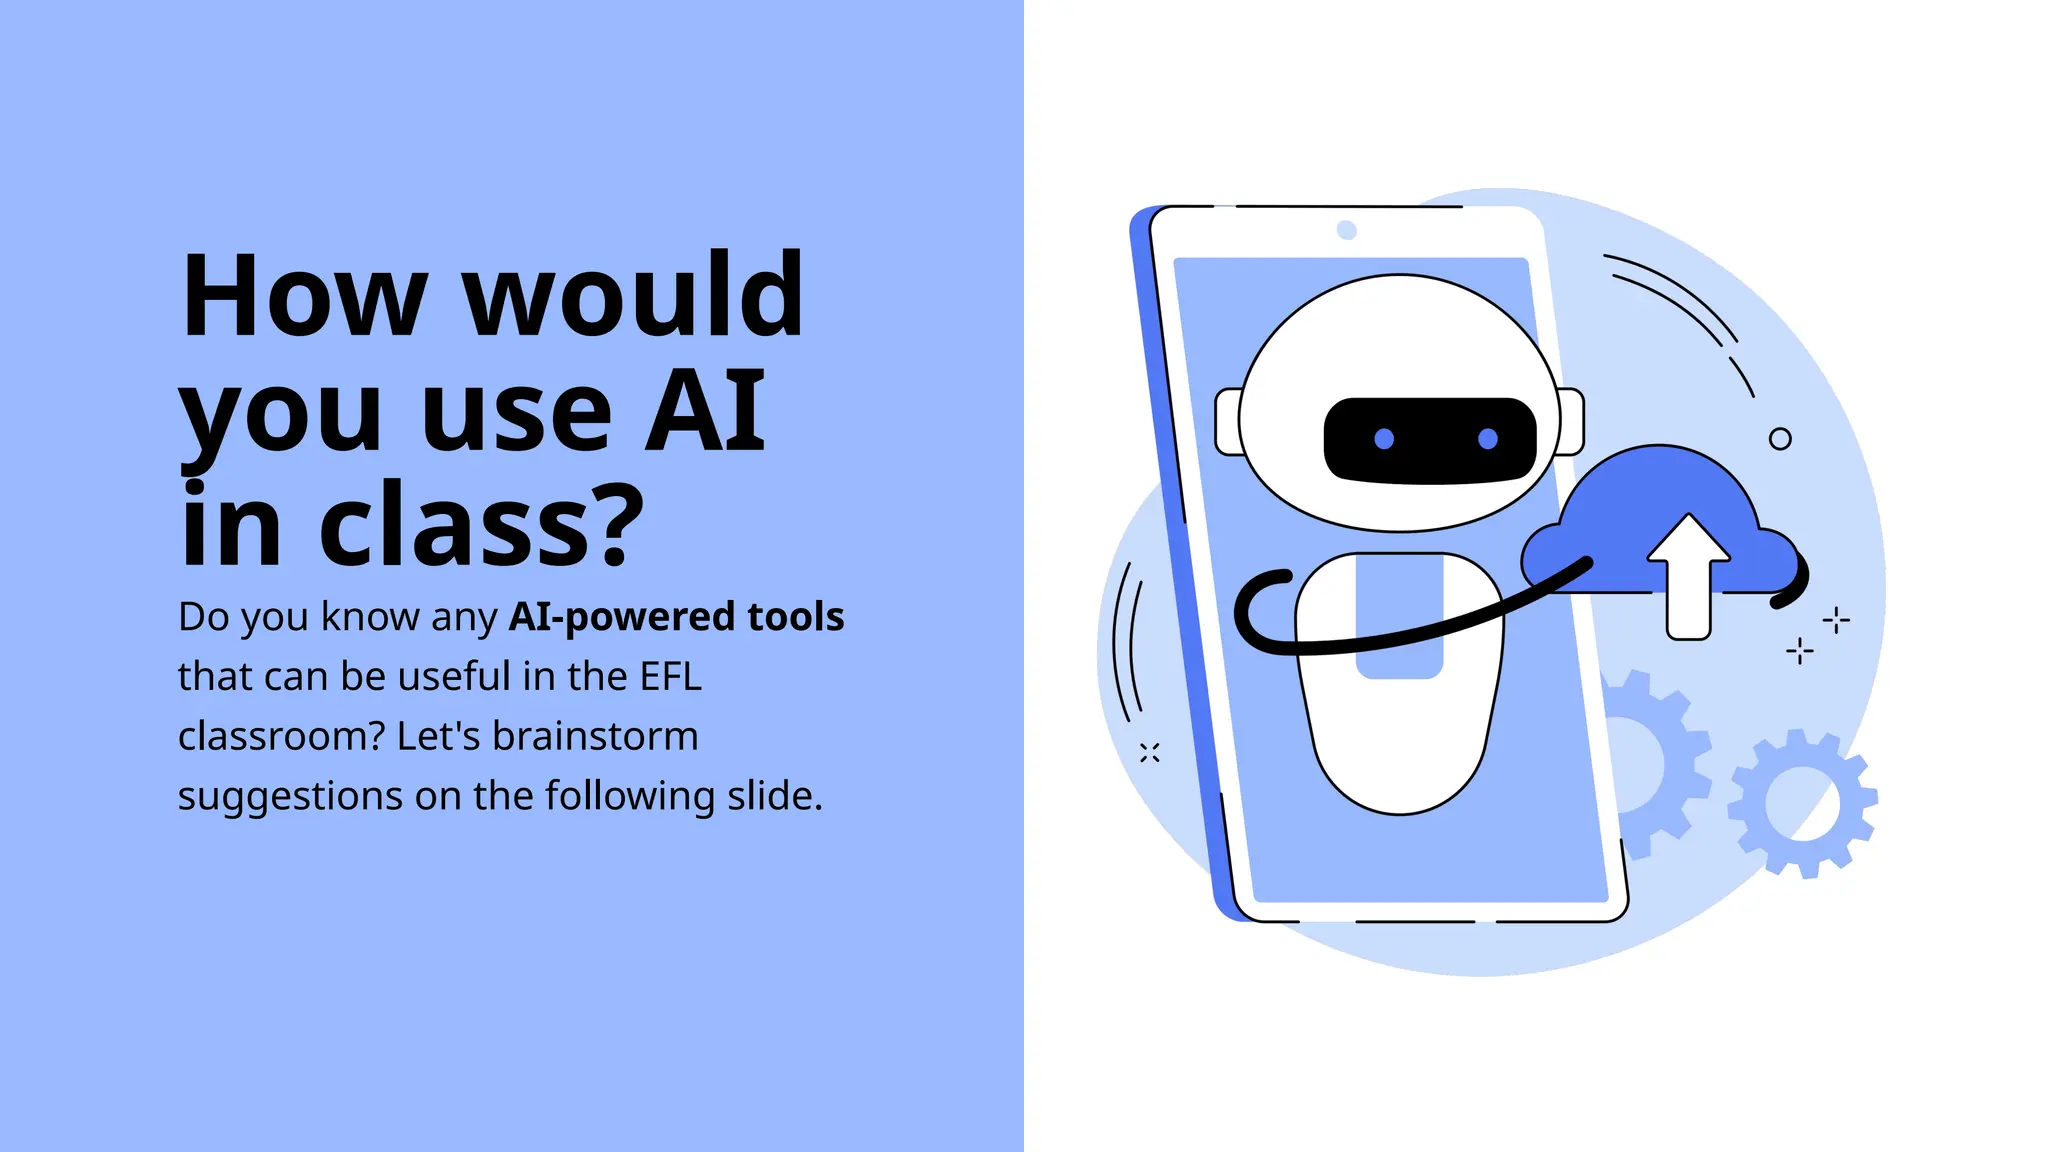
KEMBAR78
Mobile Flutter Module for Navigation.pptx
Poliwangi
MOBILE
PROGRA
MMING
An important class for navigation between screens in Flutter is the Navigator widget, which is
responsible for managing screen changes while maintaining a history of screens so that the
user can move back through the screens (if the app chooses to allow it).
A new screen in Flutter is just a new widget that is effectively placed on top of the existing
widgets. This is managed through the concept of routes, which define the possible navigable
routes a user can follow through the app. Unsurprisingly, there is a class named Route that is a
helper for working on the navigation workflow.
Understanding the
Navigator Widget
Mobile apps are typically organized into multiple screens or pages. You will have seen this in
the mobile apps you already use. For example, perhaps an app has an initial list view of items
(such as groceries or films), and, when you choose one of the items, you are taken to another
screen or page where more details are shown about the item. When you do this, you have
just navigated from one screen to another.
Navigator
In Flutter, moving between screens is called a route
and is managed by the Navigator widget of the
application. The Navigator widget manages the
navigation stack, pushing a new route onto the
stack or popping a previous one-off. You will learn
how to use the Navigator widget to manage your
app routes, how to add transition animations, and
how to pass information (state) between screens.
The Navigator widget is the key to moving a user from one screen to another. Most of the time,
the user will change screens and need their data to be passed along to the new screen. This is
another important task for the Navigator widget.
Navigator
Conceptually, navigation in Flutter is a stack of screens
Navigator
• We have one element at the top of the stack. In
Navigator, the topmost element on the stack is the
currently visible screen of the app
• The last element that’s inserted is the first to be
removed from the stack, commonly referred to as
last in, first out (LIFO). The last screen that’s
visible is the first that is removed.
• The Navigator widget has push() and pop()
methods to add and remove screens from the
stack.
Last In First Out
Push
Pop
CODE : NAVIGATOR (push)
First Page
CODE : NAVIGATOR (push)
Second Page
CODE : NAVIGATOR (pop)
Second Page - Update
Route
The navigation stack elements are Routes, and there are multiple ways to define them in
Flutter. When we want to navigate to a new screen, we define a new Route widget for it,
in addition to some parameters defined as a RouteSettings instance.
We can better organize the navigation structure through the use of named routes,
allowing us to do the following:
• Organize the screens in a clear way
• Centralize the creation of screens
• Pass parameters to screens
Route
Code : Route
Named routes are specified on the MaterialApp widget, so it uses named routes.
In this code, we have specified that
there are two routes available within
the app:
• the '/' route, which will use the
FirstPage widget to draw the
screen, and
• the '/SecondPage' route, which
will use the SecondPage widget to
draw the screen.
The '/' route is a special route that is equivalent to the home property of the app, Or you can
declare by using initialRoute to define which page to be loaded first.
Code : Route (PUSH)
First Page
Notice how much cleaner the code feels and that the intent of the navigation is clearer. The
creation of MaterialPageRoute is implicit now.
Arguments
arguments
In page transitions, there is a possibility of value changes influenced by the calling page.
For example, when we perform a checkout for the number of items in an application, the
target page will also have the same quantity. In this process, we can simply send it as a
parameter.
Code : arguments (Modify
Second page)
In Second Page, we need to declare the variable. For example we used discount. The
value will be initiated through Constructor of the widget, but we also declare it by using
optional parameter and giving the default value.
Then, we add Text to display
the amount of discount. Don’t
forget to remove unnecessary
const (like in main.dart, so on)
Code : arguments (Navigator
push)
In First Page, we changed again by Using Navigator.push.
In this Code, we will try to give the example to set the
parameter value.
arguments : Route
However, passing arguments to a screen complicates the setup of routes, and the routes
parameter of MaterialApp can no longer be used. Instead, we need to use the
onGenerateRoute parameter to pass the settings to the SecondPage widget.
onGenerateRoute is more powerful because you have full control over the choice of
destination screen.
Code : arguments (Route)
In your MaterialApp widget, remove the
routes parameter and add onGenerateRoute
so that it looks like this:
The onGenerateRoute code looks at
settings.name to see which route was selected
and then returns MaterialPageRoute with the
details required for that route. This looks very
similar to the code that we had when we were
using the push method instead of
pushNamed, but has the obvious
disadvantage that we’ve lost type safety on
settings.arguments and have to hope the
cast to Double works correctly.
Code : arguments
(route:push)
We change the code by using Navigator pushNamed
with arguments.
NOTICE: Should i use named
routes?
Whether you choose to use named routes is your choice – there is no right answer
because the choice will be based on personal opinion.
Its better to use the push() method because it has strong type safety on the
constructor parameters of the widget within the route. However, if you are not
passing arguments to the routes, or you prefer the style of having central route
management, then you may choose named routes.
Retrieving
results
from Route
Retrieving results from
Route
When a route is pushed to the navigation, we may expect something back from it – for
example, when we ask for something from the user in a new route, we can take the value
returned via the pop() method’s result parameter.
The push method and its variants return a Future. This Future resolves when the route is
popped and the value of the Future is the pop() method’s result parameter.
We have seen that we can pass arguments to a new Route. As the inverse path is also
possible, instead of sending a message to the second screen, we can take a message
when it pops back.
CODE : Retrieving Result
(Secondpage)
Let’s update SecondPage widget so that
the user can make a choice. We add two
Buttons with different result value. In
this case, we return String type to the
FirstPage.
CODE : Retrieving Result
(firstpage)
The push method and its variants return a Future. This Future resolves when the route
is popped and the value of the Future is the pop() method’s result parameter.
examples of Artificial
Intelligence
Media streaming
Chatbots
Smart assistants
E-Payments
Search algorithms
Social media feeds
Smart cars
Navigation apps
Facial recognition
Text editors
There are many exciting applications
of AI-Language Models in the
English as a Foreign Language (EFL)
classroom. Let's take a look at some
of them.
How can we
use AI in
EFL?
Conversation
practice
Students can engage in
conversational
exchanges with LMs to
improve their speaking
and listening skills.
Writing
practice
LMs can help students
improve their writing
skills by giving them
writing prompts and
feedback.
Grammar
instruction
LMs can provide
explanations of
grammar rules and
exemplify their correct
usage.
Practical uses of
Artificial Intelligence
in EFL
Vocabulary
development
LMs can provide
examples of vocabulary
in context, and offer
explanations and
definitions.
LM = Language Model
While AI will certainly revolutionise
education in many ways, it can also
pose some problems that educators
need to be aware of. Here are some
of the main challenges for
educators.
What
problems
can AI
pose?
Lack of
Personalisation
Although AI tools are
constantly evolving,
they lack the human
emotions that are
sometimes necessary
for effective teaching
and learning.
Dependence on
Technology
Both students and
teachers may become
too dependent on
technology, hindering
their ability to think
critically or solve
problems.
Data Privacy
and Security
AI-powered tools in
general often collect
vast amounts of
personal data, which
might pose a threat to
students' privacy and
security.
problems AI can pose
to education
Bias and
Discrimination
Bias can occur in AI
systems because of the
data used to train them.
AI algorithms may
reflect societal biases,
prejudices, and
stereotypes.
As Language Models improve, it
can be helpful for EFL teachers to
adopt these tools and help their
students learn how to use them
effectively. Here are some practical
ideas.
How can we
help
students
use AI?
Introduce AI
tools
Adopt AI tools that can
help students with their
language learning:
translation software,
speech recognition
software, or writing
tools.
Encourage
critical thinking
Encourage students to
question the accuracy
and fairness of AI-
powered writing tools
or translation apps, and
focus on the context.
Keep up-to-
date
Teachers need to
have their fingers on
the pulse and identify
new tools and
resources that can
benefit their students.
ideas to help students
use ai tools effectively
Provide
support
Teach students these
tools and offer tips or
step-by-step
instructions to use
them more efficiently.
Monitor their work and
give feedback.
Do you know any AI-powered tools
that can be useful in the EFL
classroom? Let's brainstorm
suggestions on the following slide.
How would
you use AI
in class?
AI tool
Write your ideas to use
this tool in EFL.
AI tool
Write your ideas to use
this tool in EFL.
AI tool
Write your ideas to use
this tool in EFL.
AI tool
Write your ideas to use
this tool in EFL.
AI tool
Write your ideas to use
this tool in EFL.
AI tool
Write your ideas to use
this tool in EFL.
AI tool
Write your ideas to use
this tool in EFL.
AI tool
Write your ideas to use
this tool in EFL.
ai tools and ideas
THANK
YOU FOR
LISTENIN
G!

Mobile Flutter Module for Navigation.pptx

  • 1.
  • 2.
    An important classfor navigation between screens in Flutter is the Navigator widget, which is responsible for managing screen changes while maintaining a history of screens so that the user can move back through the screens (if the app chooses to allow it). A new screen in Flutter is just a new widget that is effectively placed on top of the existing widgets. This is managed through the concept of routes, which define the possible navigable routes a user can follow through the app. Unsurprisingly, there is a class named Route that is a helper for working on the navigation workflow. Understanding the Navigator Widget
  • 3.
    Mobile apps aretypically organized into multiple screens or pages. You will have seen this in the mobile apps you already use. For example, perhaps an app has an initial list view of items (such as groceries or films), and, when you choose one of the items, you are taken to another screen or page where more details are shown about the item. When you do this, you have just navigated from one screen to another. Navigator In Flutter, moving between screens is called a route and is managed by the Navigator widget of the application. The Navigator widget manages the navigation stack, pushing a new route onto the stack or popping a previous one-off. You will learn how to use the Navigator widget to manage your app routes, how to add transition animations, and how to pass information (state) between screens.
  • 4.
    The Navigator widgetis the key to moving a user from one screen to another. Most of the time, the user will change screens and need their data to be passed along to the new screen. This is another important task for the Navigator widget. Navigator Conceptually, navigation in Flutter is a stack of screens
  • 5.
    Navigator • We haveone element at the top of the stack. In Navigator, the topmost element on the stack is the currently visible screen of the app • The last element that’s inserted is the first to be removed from the stack, commonly referred to as last in, first out (LIFO). The last screen that’s visible is the first that is removed. • The Navigator widget has push() and pop() methods to add and remove screens from the stack. Last In First Out Push Pop
  • 6.
    CODE : NAVIGATOR(push) First Page
  • 7.
    CODE : NAVIGATOR(push) Second Page
  • 8.
    CODE : NAVIGATOR(pop) Second Page - Update
  • 9.
  • 10.
    The navigation stackelements are Routes, and there are multiple ways to define them in Flutter. When we want to navigate to a new screen, we define a new Route widget for it, in addition to some parameters defined as a RouteSettings instance. We can better organize the navigation structure through the use of named routes, allowing us to do the following: • Organize the screens in a clear way • Centralize the creation of screens • Pass parameters to screens Route
  • 11.
    Code : Route Namedroutes are specified on the MaterialApp widget, so it uses named routes. In this code, we have specified that there are two routes available within the app: • the '/' route, which will use the FirstPage widget to draw the screen, and • the '/SecondPage' route, which will use the SecondPage widget to draw the screen. The '/' route is a special route that is equivalent to the home property of the app, Or you can declare by using initialRoute to define which page to be loaded first.
  • 12.
    Code : Route(PUSH) First Page Notice how much cleaner the code feels and that the intent of the navigation is clearer. The creation of MaterialPageRoute is implicit now.
  • 13.
  • 14.
    arguments In page transitions,there is a possibility of value changes influenced by the calling page. For example, when we perform a checkout for the number of items in an application, the target page will also have the same quantity. In this process, we can simply send it as a parameter.
  • 15.
    Code : arguments(Modify Second page) In Second Page, we need to declare the variable. For example we used discount. The value will be initiated through Constructor of the widget, but we also declare it by using optional parameter and giving the default value. Then, we add Text to display the amount of discount. Don’t forget to remove unnecessary const (like in main.dart, so on)
  • 16.
    Code : arguments(Navigator push) In First Page, we changed again by Using Navigator.push. In this Code, we will try to give the example to set the parameter value.
  • 17.
    arguments : Route However,passing arguments to a screen complicates the setup of routes, and the routes parameter of MaterialApp can no longer be used. Instead, we need to use the onGenerateRoute parameter to pass the settings to the SecondPage widget. onGenerateRoute is more powerful because you have full control over the choice of destination screen.
  • 18.
    Code : arguments(Route) In your MaterialApp widget, remove the routes parameter and add onGenerateRoute so that it looks like this: The onGenerateRoute code looks at settings.name to see which route was selected and then returns MaterialPageRoute with the details required for that route. This looks very similar to the code that we had when we were using the push method instead of pushNamed, but has the obvious disadvantage that we’ve lost type safety on settings.arguments and have to hope the cast to Double works correctly.
  • 19.
    Code : arguments (route:push) Wechange the code by using Navigator pushNamed with arguments.
  • 20.
    NOTICE: Should iuse named routes? Whether you choose to use named routes is your choice – there is no right answer because the choice will be based on personal opinion. Its better to use the push() method because it has strong type safety on the constructor parameters of the widget within the route. However, if you are not passing arguments to the routes, or you prefer the style of having central route management, then you may choose named routes.
  • 21.
  • 22.
    Retrieving results from Route Whena route is pushed to the navigation, we may expect something back from it – for example, when we ask for something from the user in a new route, we can take the value returned via the pop() method’s result parameter. The push method and its variants return a Future. This Future resolves when the route is popped and the value of the Future is the pop() method’s result parameter. We have seen that we can pass arguments to a new Route. As the inverse path is also possible, instead of sending a message to the second screen, we can take a message when it pops back.
  • 23.
    CODE : RetrievingResult (Secondpage) Let’s update SecondPage widget so that the user can make a choice. We add two Buttons with different result value. In this case, we return String type to the FirstPage.
  • 24.
    CODE : RetrievingResult (firstpage) The push method and its variants return a Future. This Future resolves when the route is popped and the value of the Future is the pop() method’s result parameter.
  • 25.
    examples of Artificial Intelligence Mediastreaming Chatbots Smart assistants E-Payments Search algorithms Social media feeds Smart cars Navigation apps Facial recognition Text editors
  • 26.
    There are manyexciting applications of AI-Language Models in the English as a Foreign Language (EFL) classroom. Let's take a look at some of them. How can we use AI in EFL?
  • 27.
    Conversation practice Students can engagein conversational exchanges with LMs to improve their speaking and listening skills. Writing practice LMs can help students improve their writing skills by giving them writing prompts and feedback. Grammar instruction LMs can provide explanations of grammar rules and exemplify their correct usage. Practical uses of Artificial Intelligence in EFL Vocabulary development LMs can provide examples of vocabulary in context, and offer explanations and definitions. LM = Language Model
  • 28.
    While AI willcertainly revolutionise education in many ways, it can also pose some problems that educators need to be aware of. Here are some of the main challenges for educators. What problems can AI pose?
  • 29.
    Lack of Personalisation Although AItools are constantly evolving, they lack the human emotions that are sometimes necessary for effective teaching and learning. Dependence on Technology Both students and teachers may become too dependent on technology, hindering their ability to think critically or solve problems. Data Privacy and Security AI-powered tools in general often collect vast amounts of personal data, which might pose a threat to students' privacy and security. problems AI can pose to education Bias and Discrimination Bias can occur in AI systems because of the data used to train them. AI algorithms may reflect societal biases, prejudices, and stereotypes.
  • 30.
    As Language Modelsimprove, it can be helpful for EFL teachers to adopt these tools and help their students learn how to use them effectively. Here are some practical ideas. How can we help students use AI?
  • 31.
    Introduce AI tools Adopt AItools that can help students with their language learning: translation software, speech recognition software, or writing tools. Encourage critical thinking Encourage students to question the accuracy and fairness of AI- powered writing tools or translation apps, and focus on the context. Keep up-to- date Teachers need to have their fingers on the pulse and identify new tools and resources that can benefit their students. ideas to help students use ai tools effectively Provide support Teach students these tools and offer tips or step-by-step instructions to use them more efficiently. Monitor their work and give feedback.
  • 32.
    Do you knowany AI-powered tools that can be useful in the EFL classroom? Let's brainstorm suggestions on the following slide. How would you use AI in class?
  • 33.
    AI tool Write yourideas to use this tool in EFL. AI tool Write your ideas to use this tool in EFL. AI tool Write your ideas to use this tool in EFL. AI tool Write your ideas to use this tool in EFL. AI tool Write your ideas to use this tool in EFL. AI tool Write your ideas to use this tool in EFL. AI tool Write your ideas to use this tool in EFL. AI tool Write your ideas to use this tool in EFL. ai tools and ideas
  • 34.