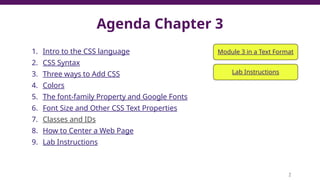
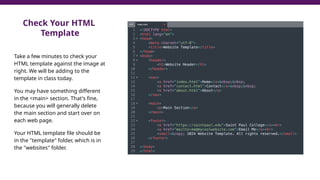
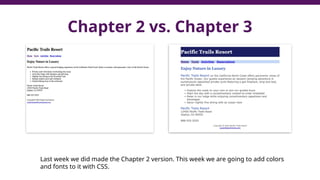
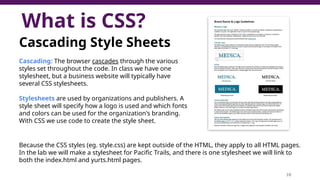
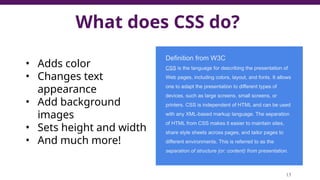
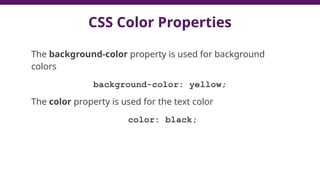
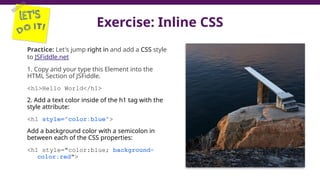
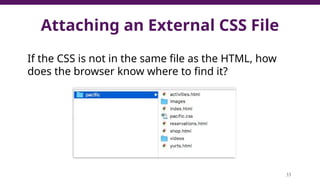
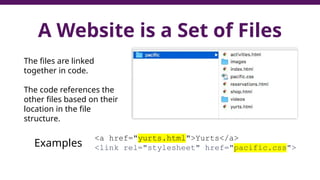
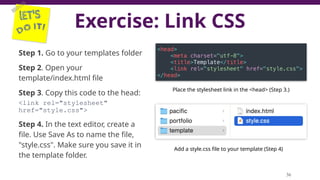
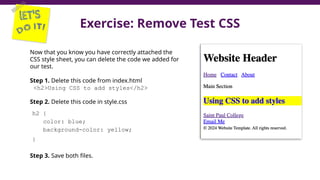
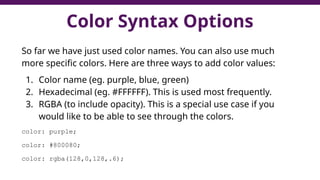
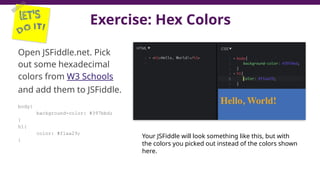
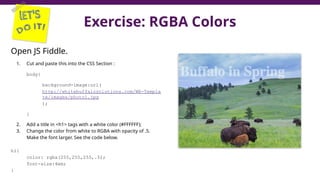
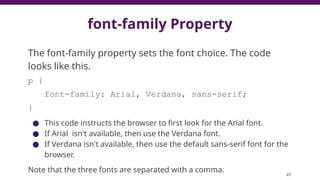
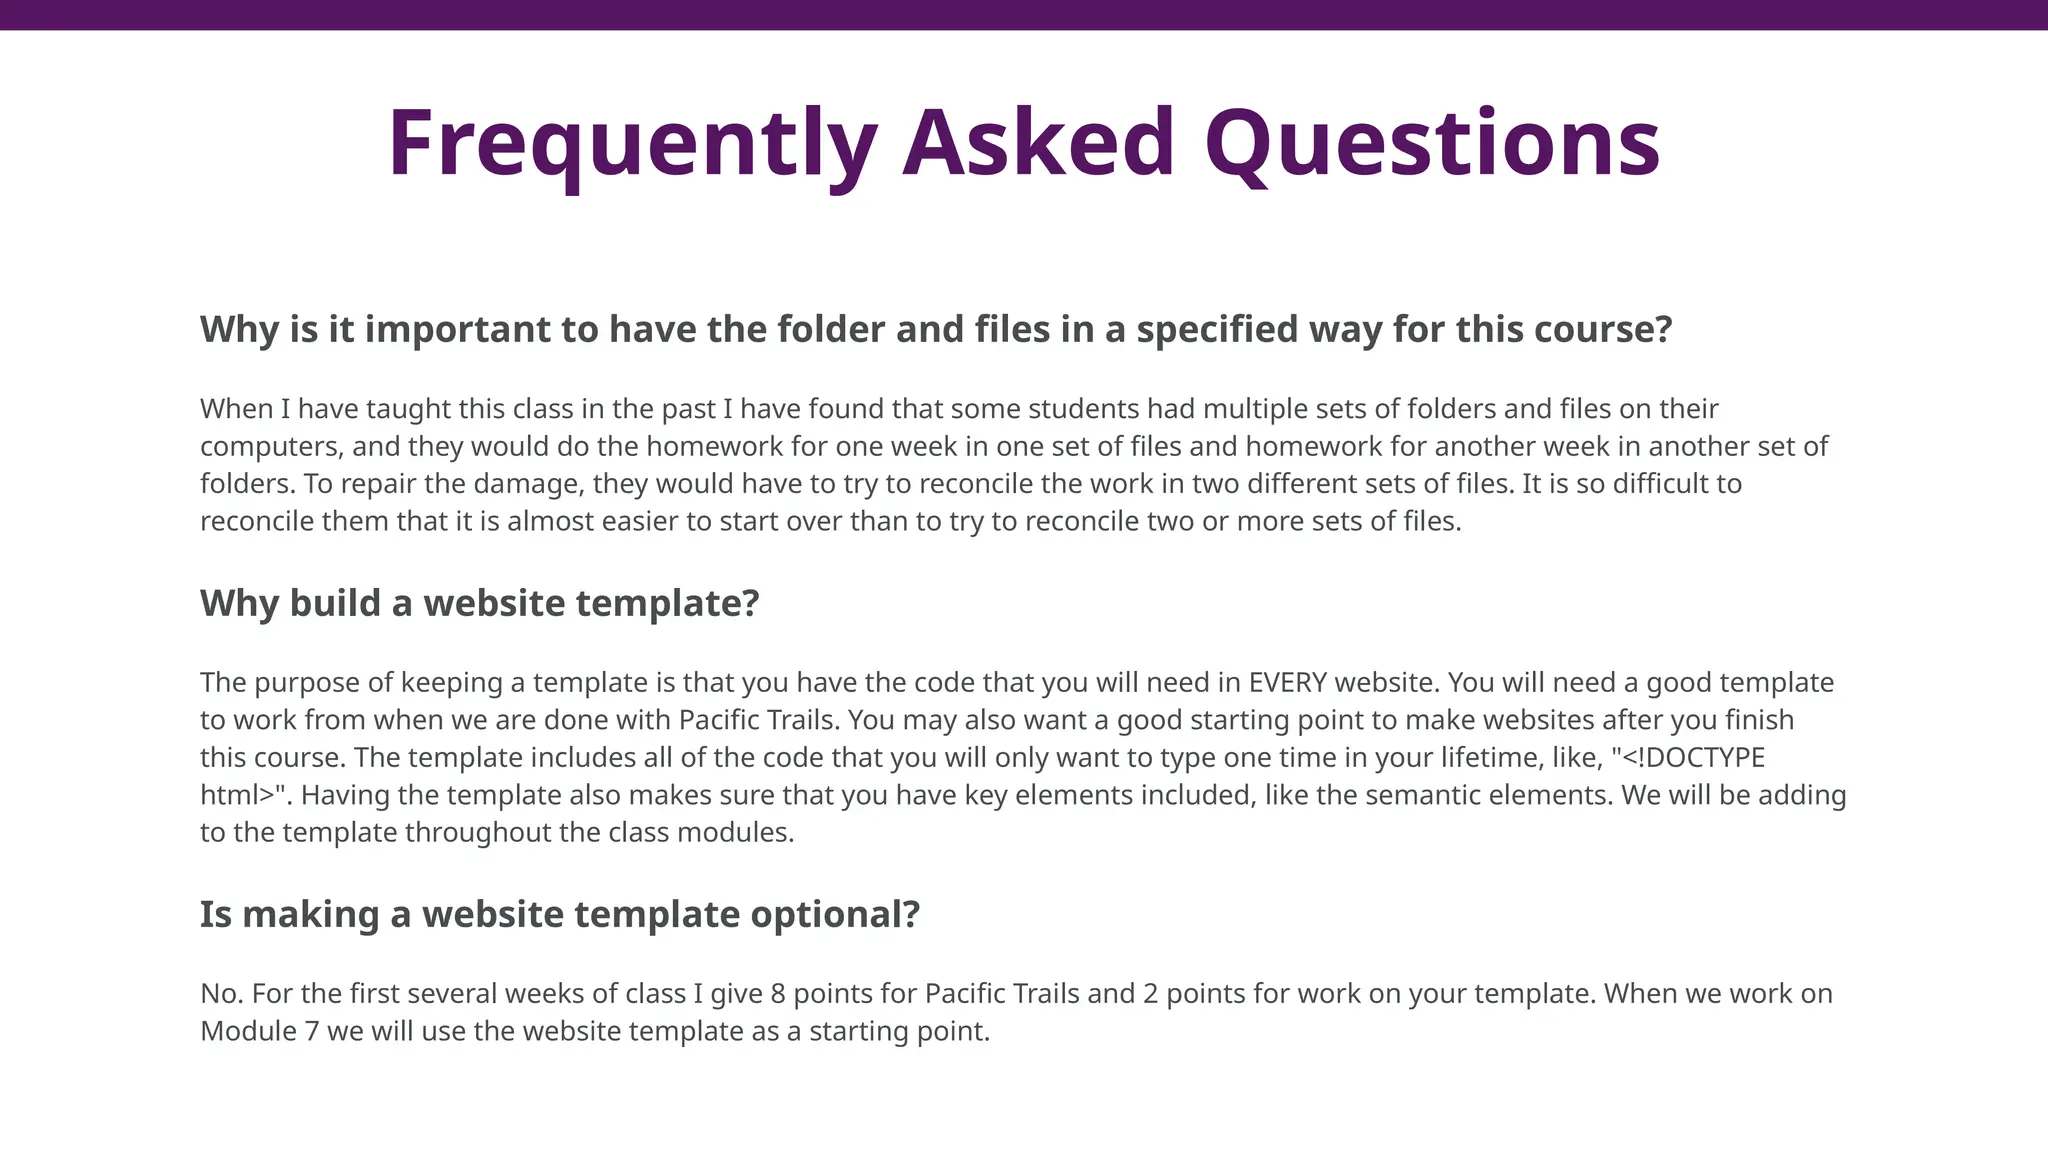
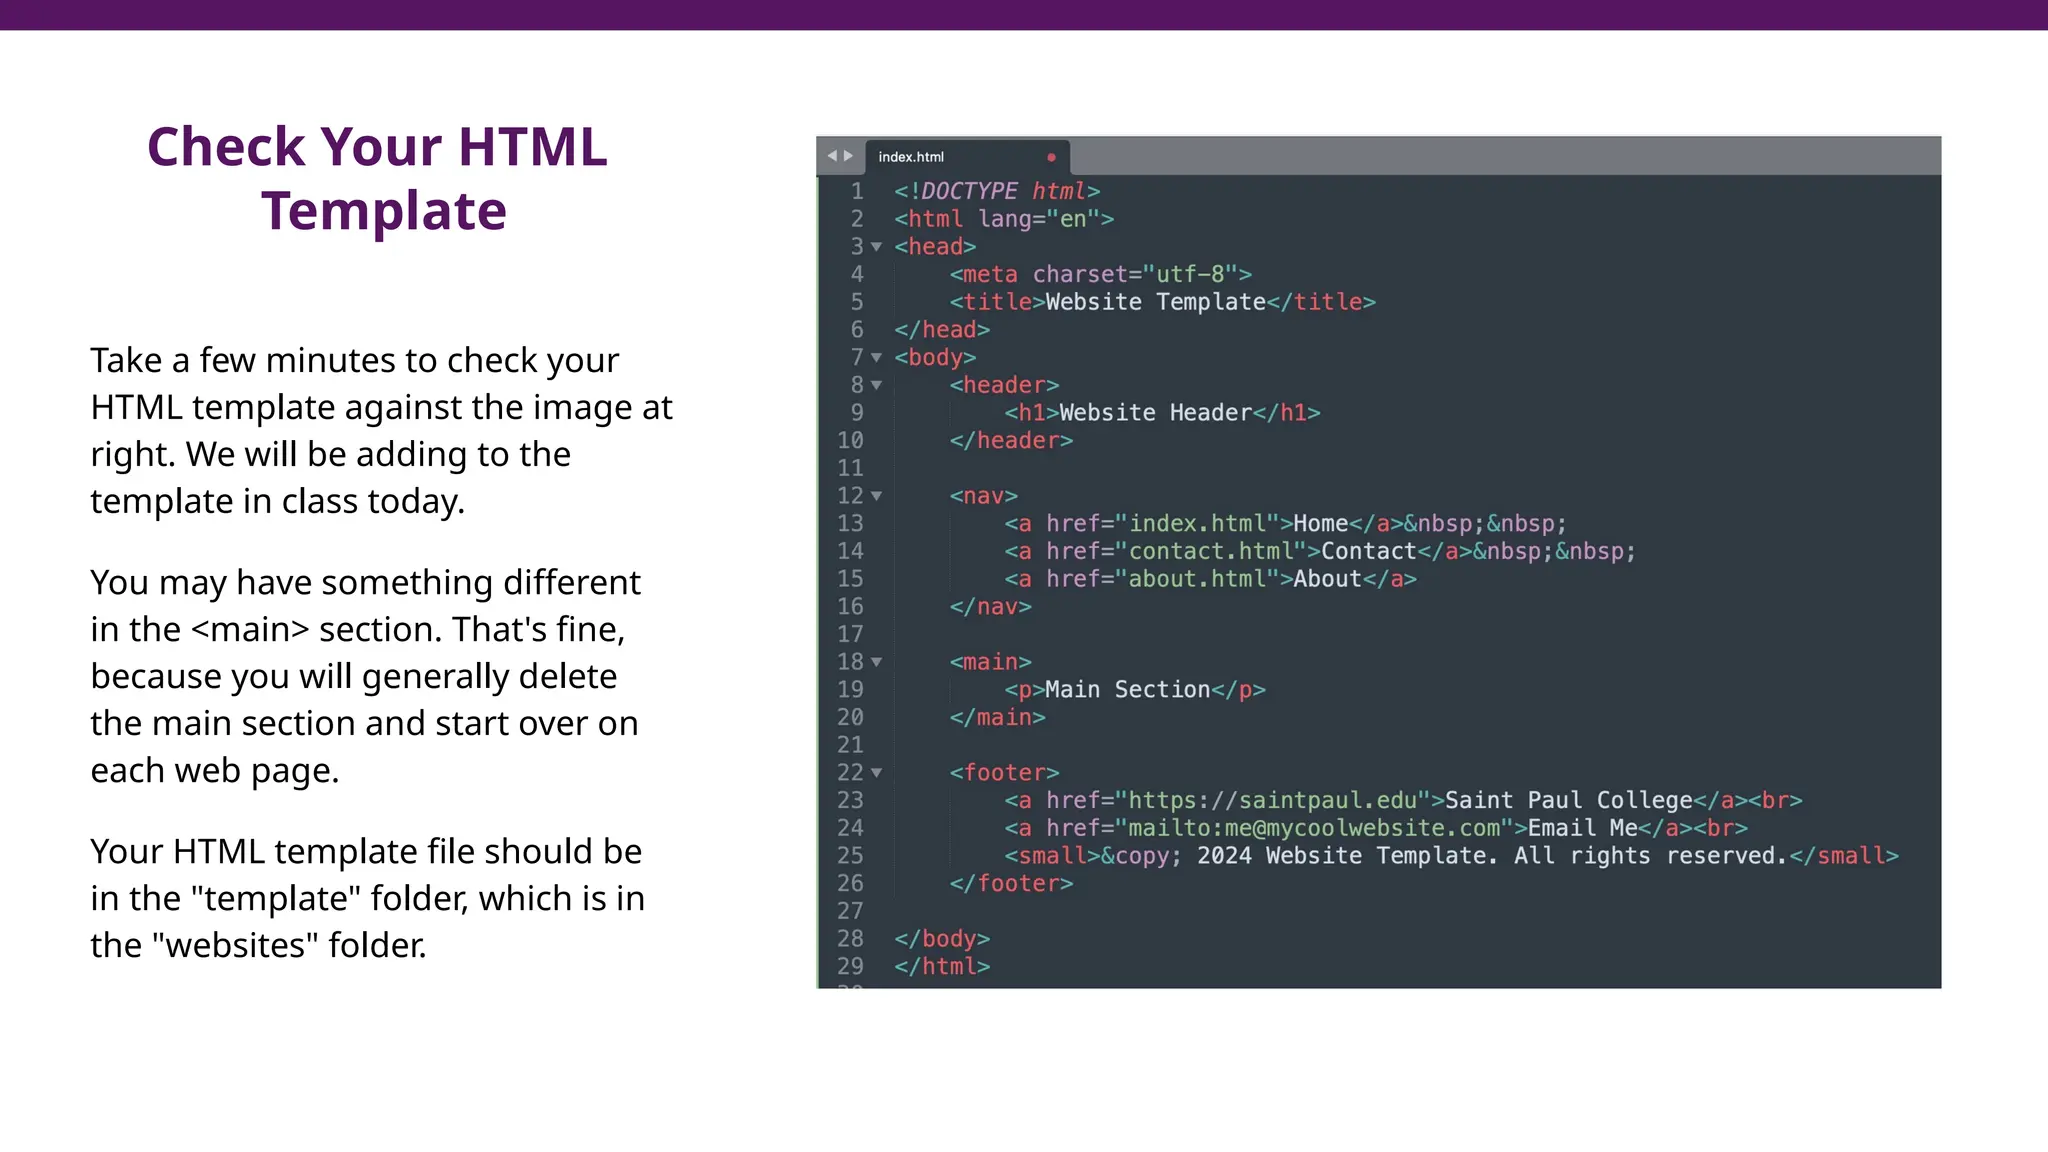
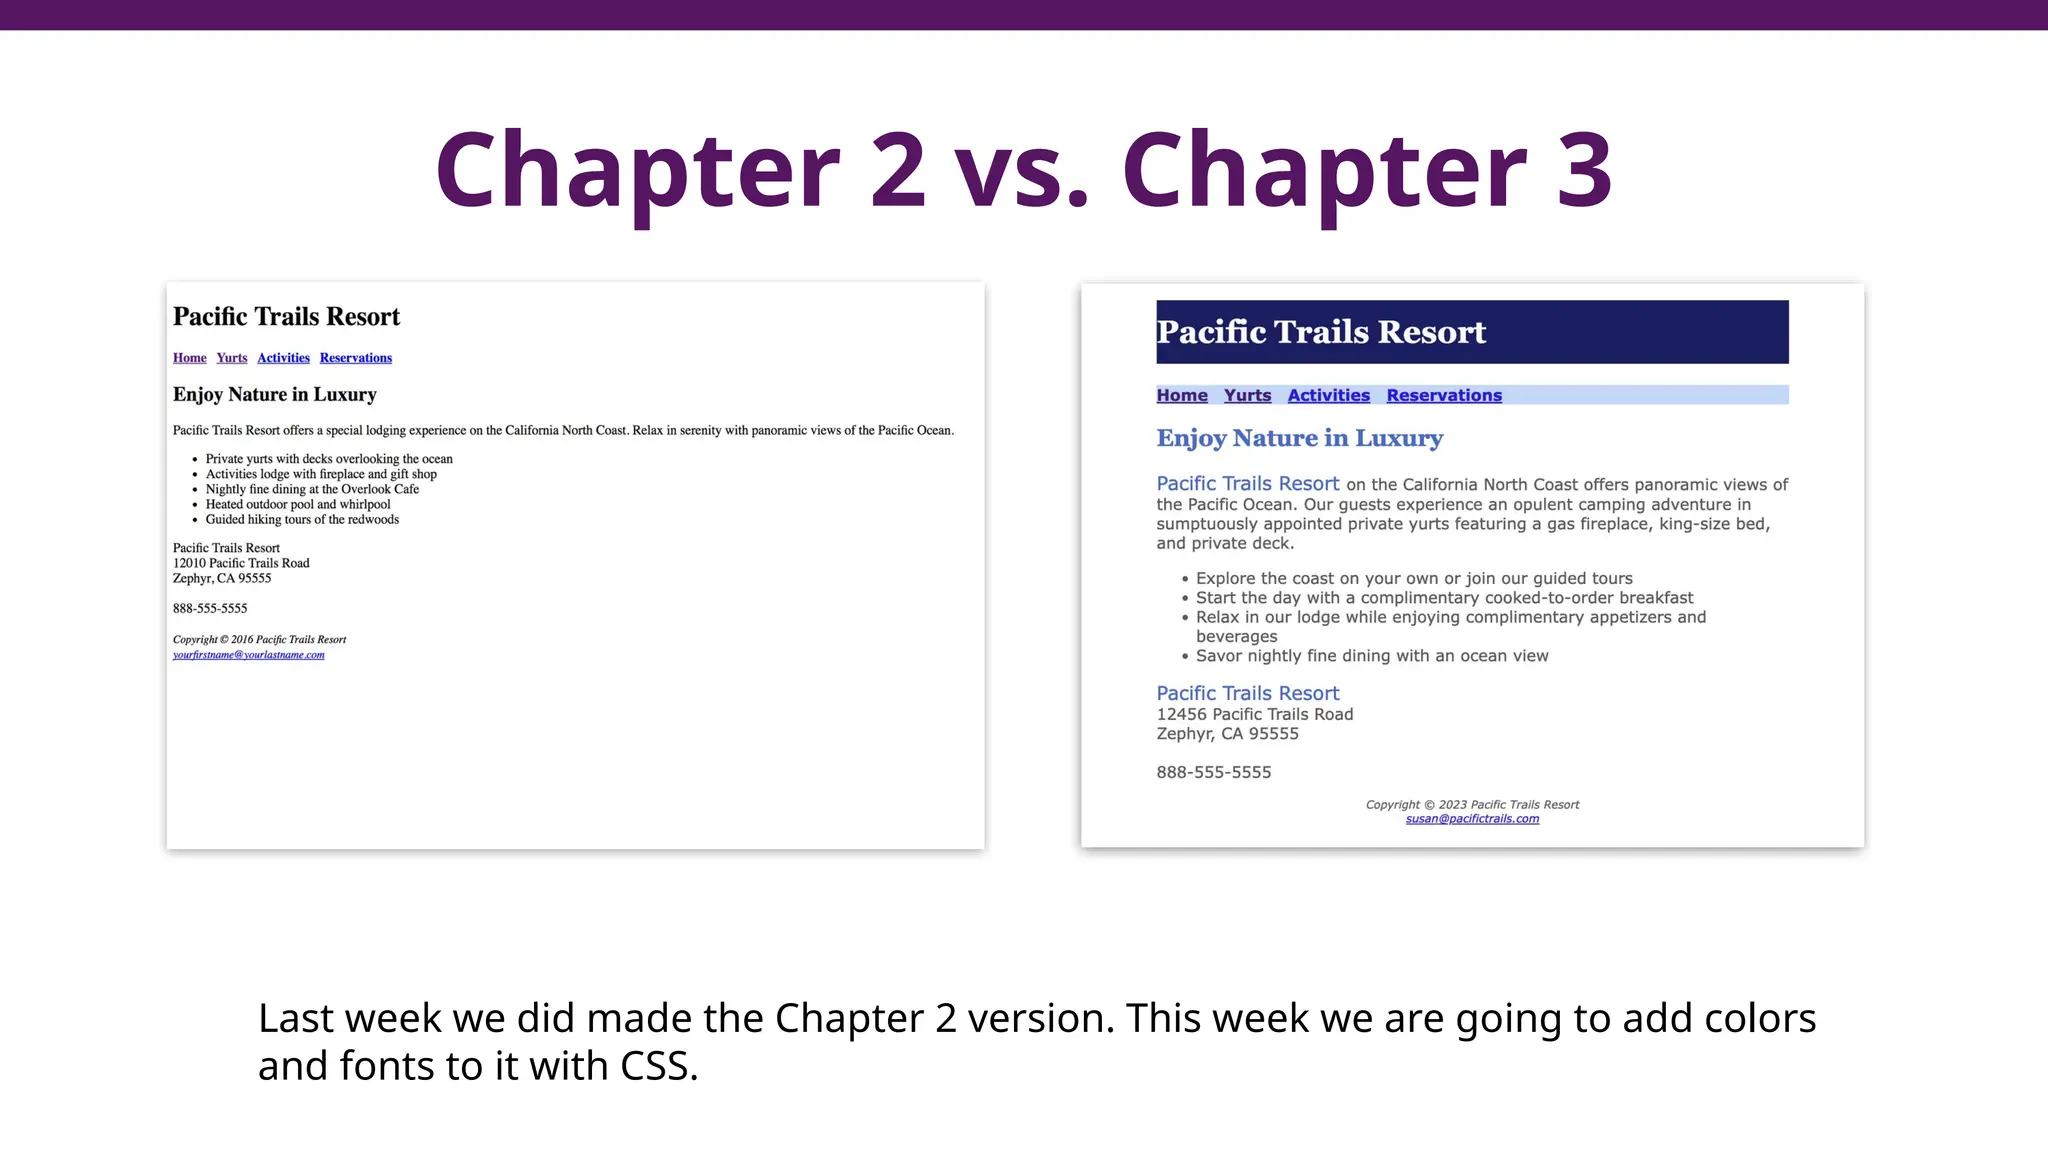
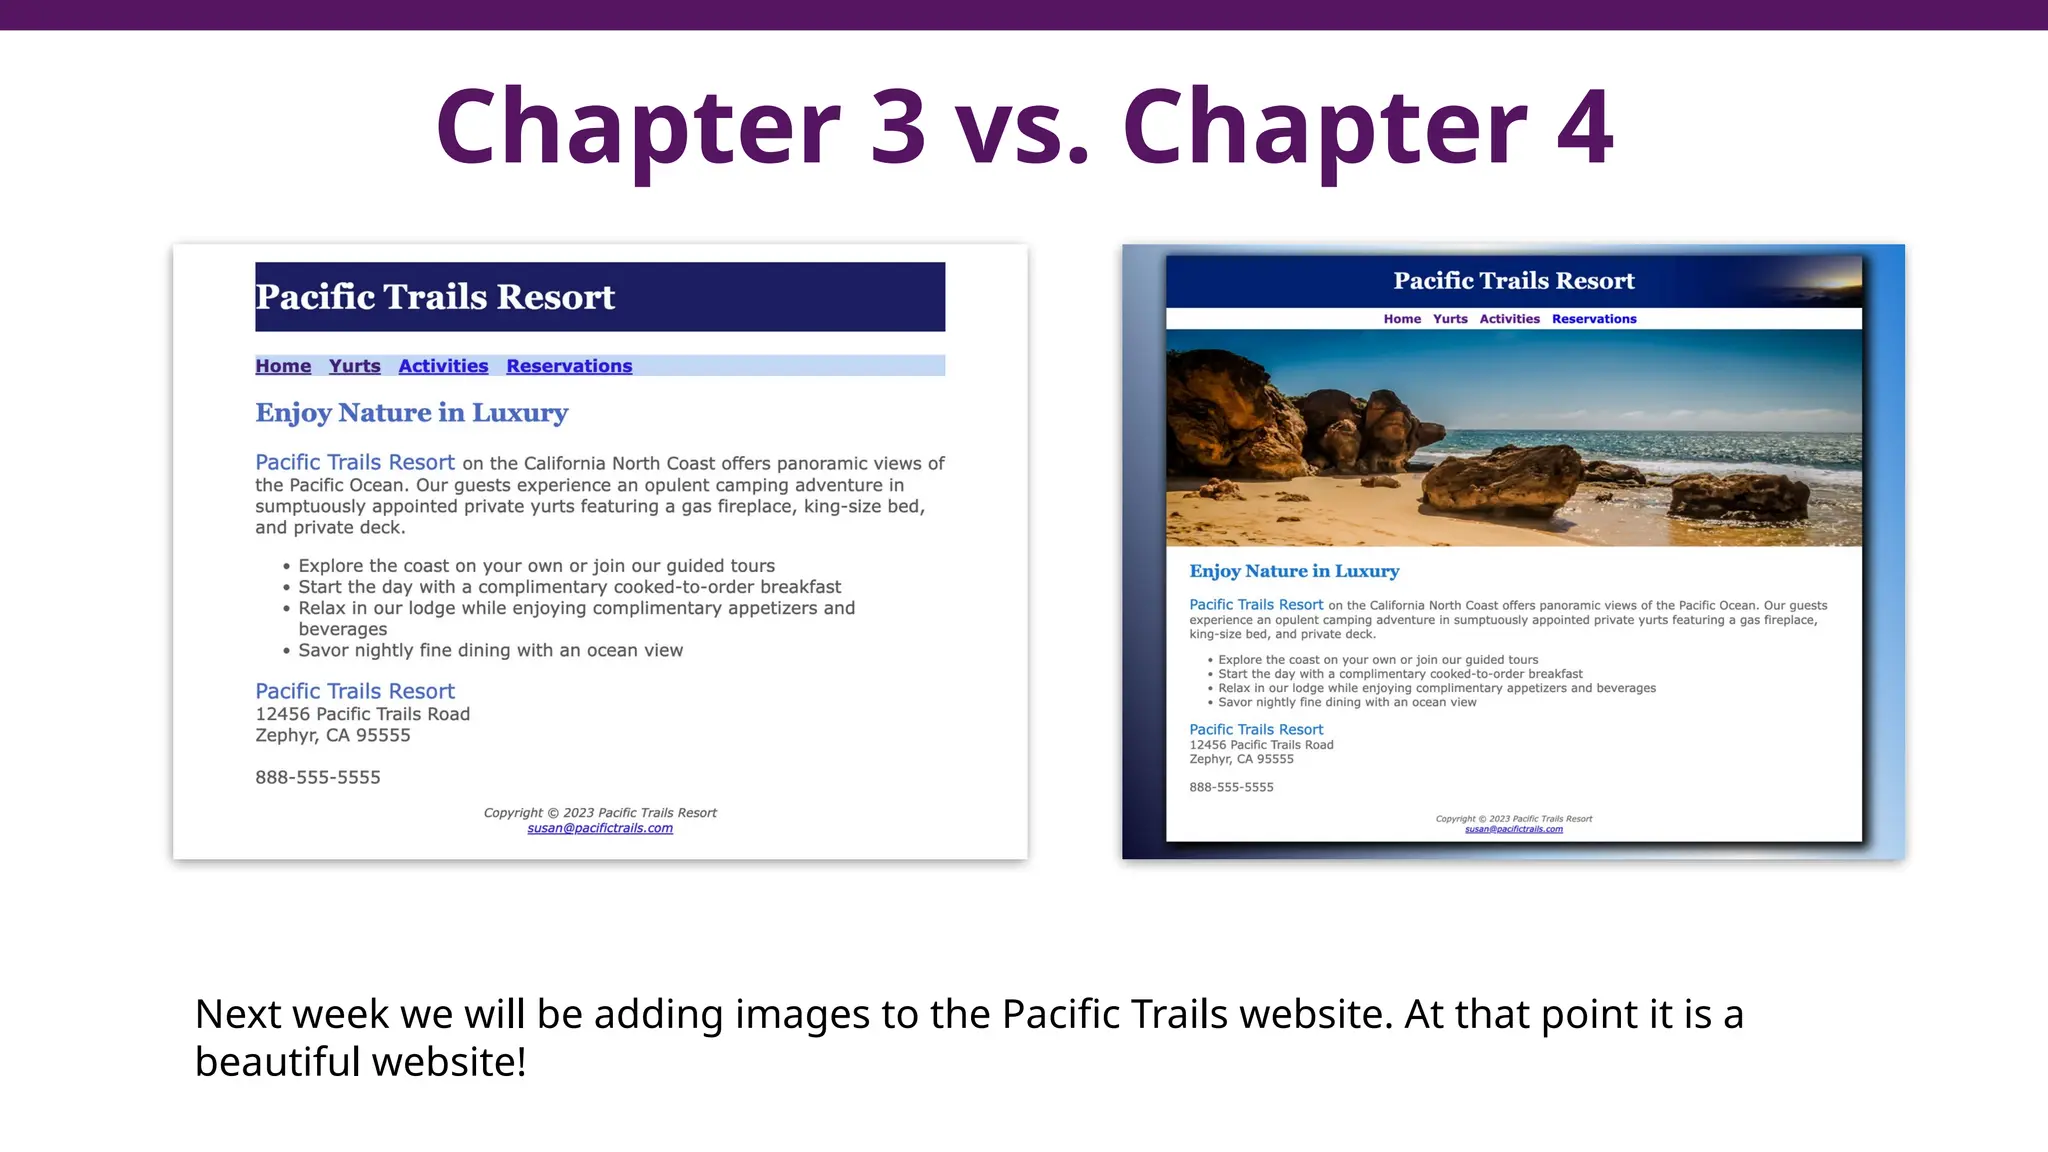
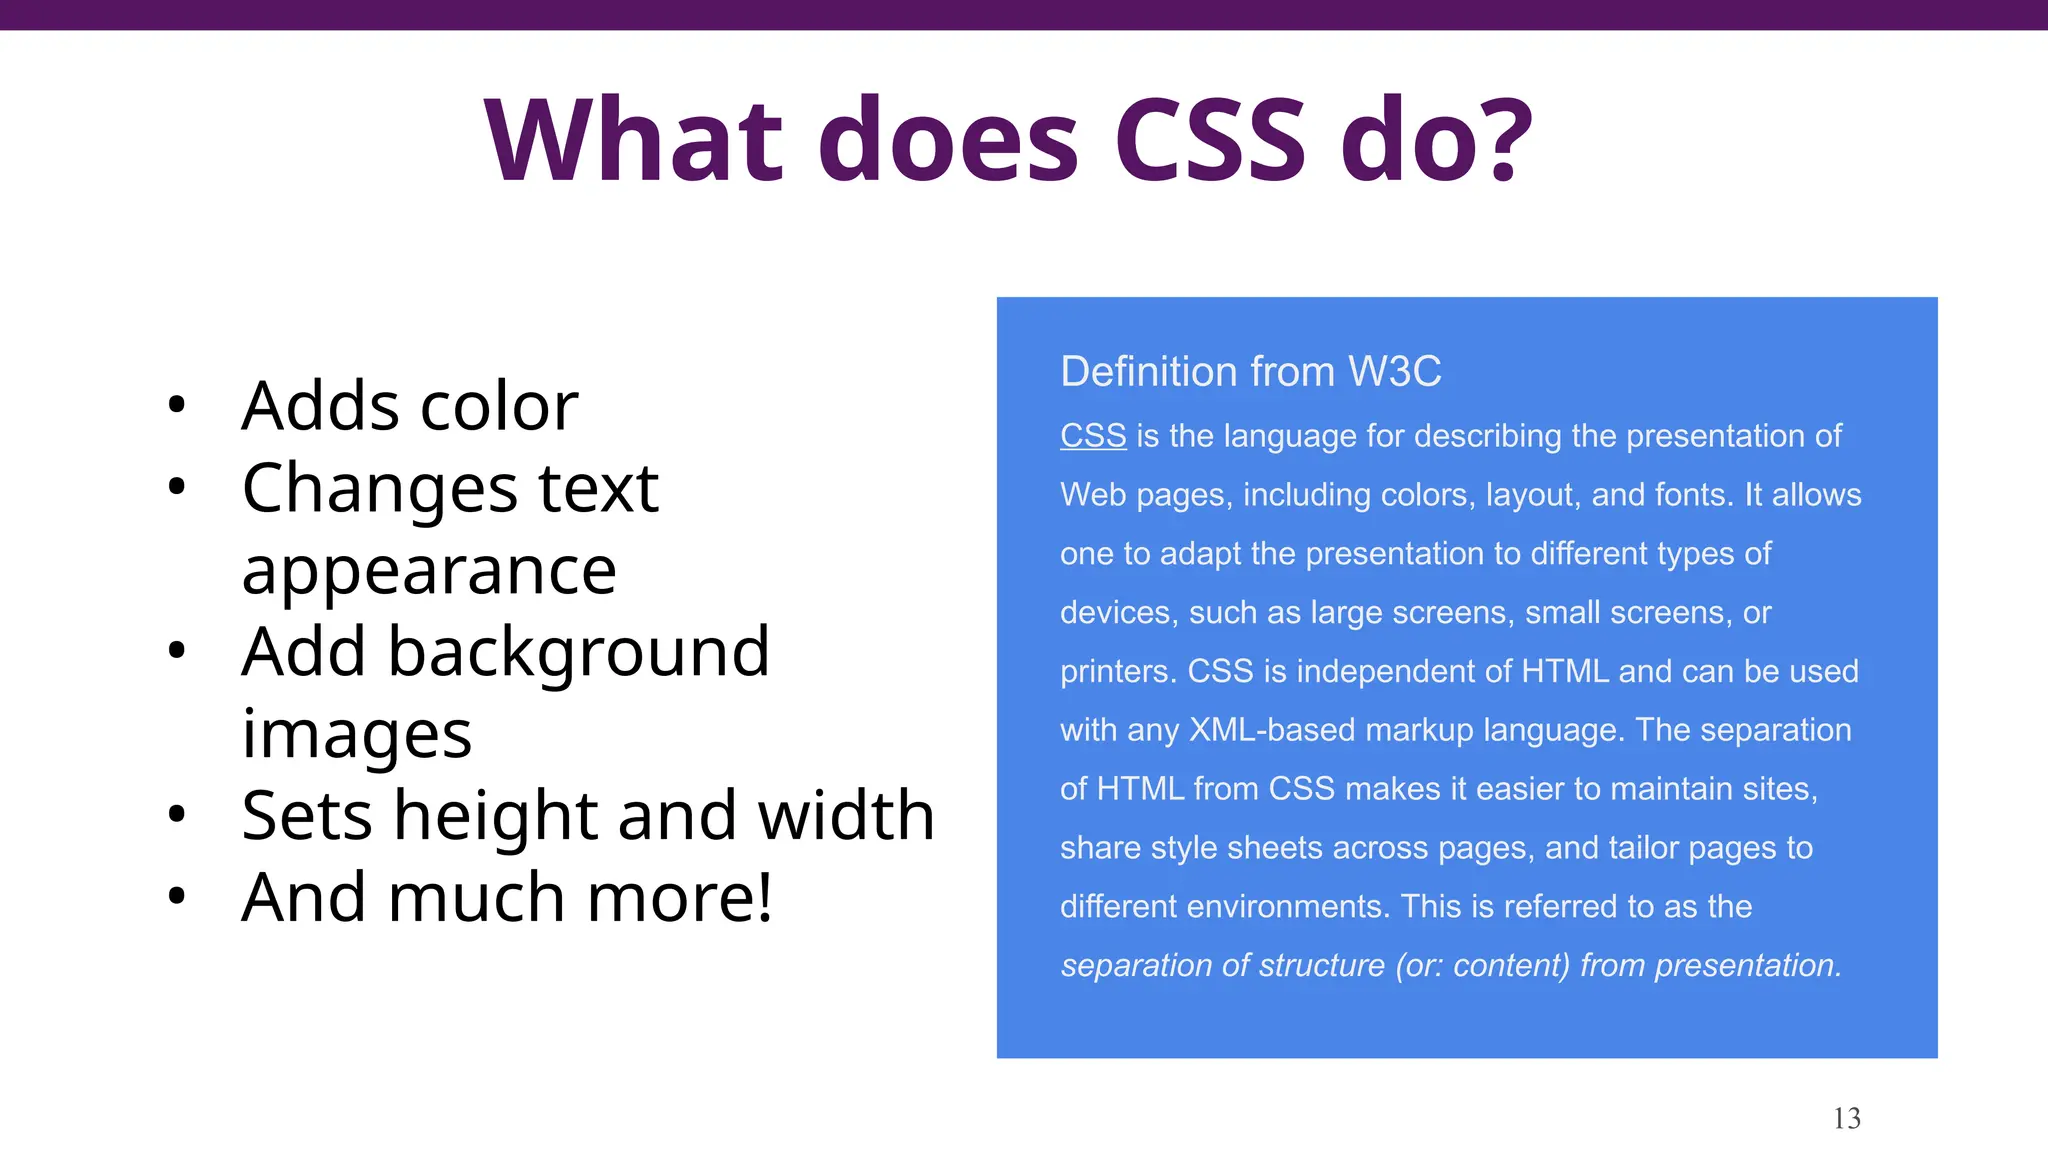
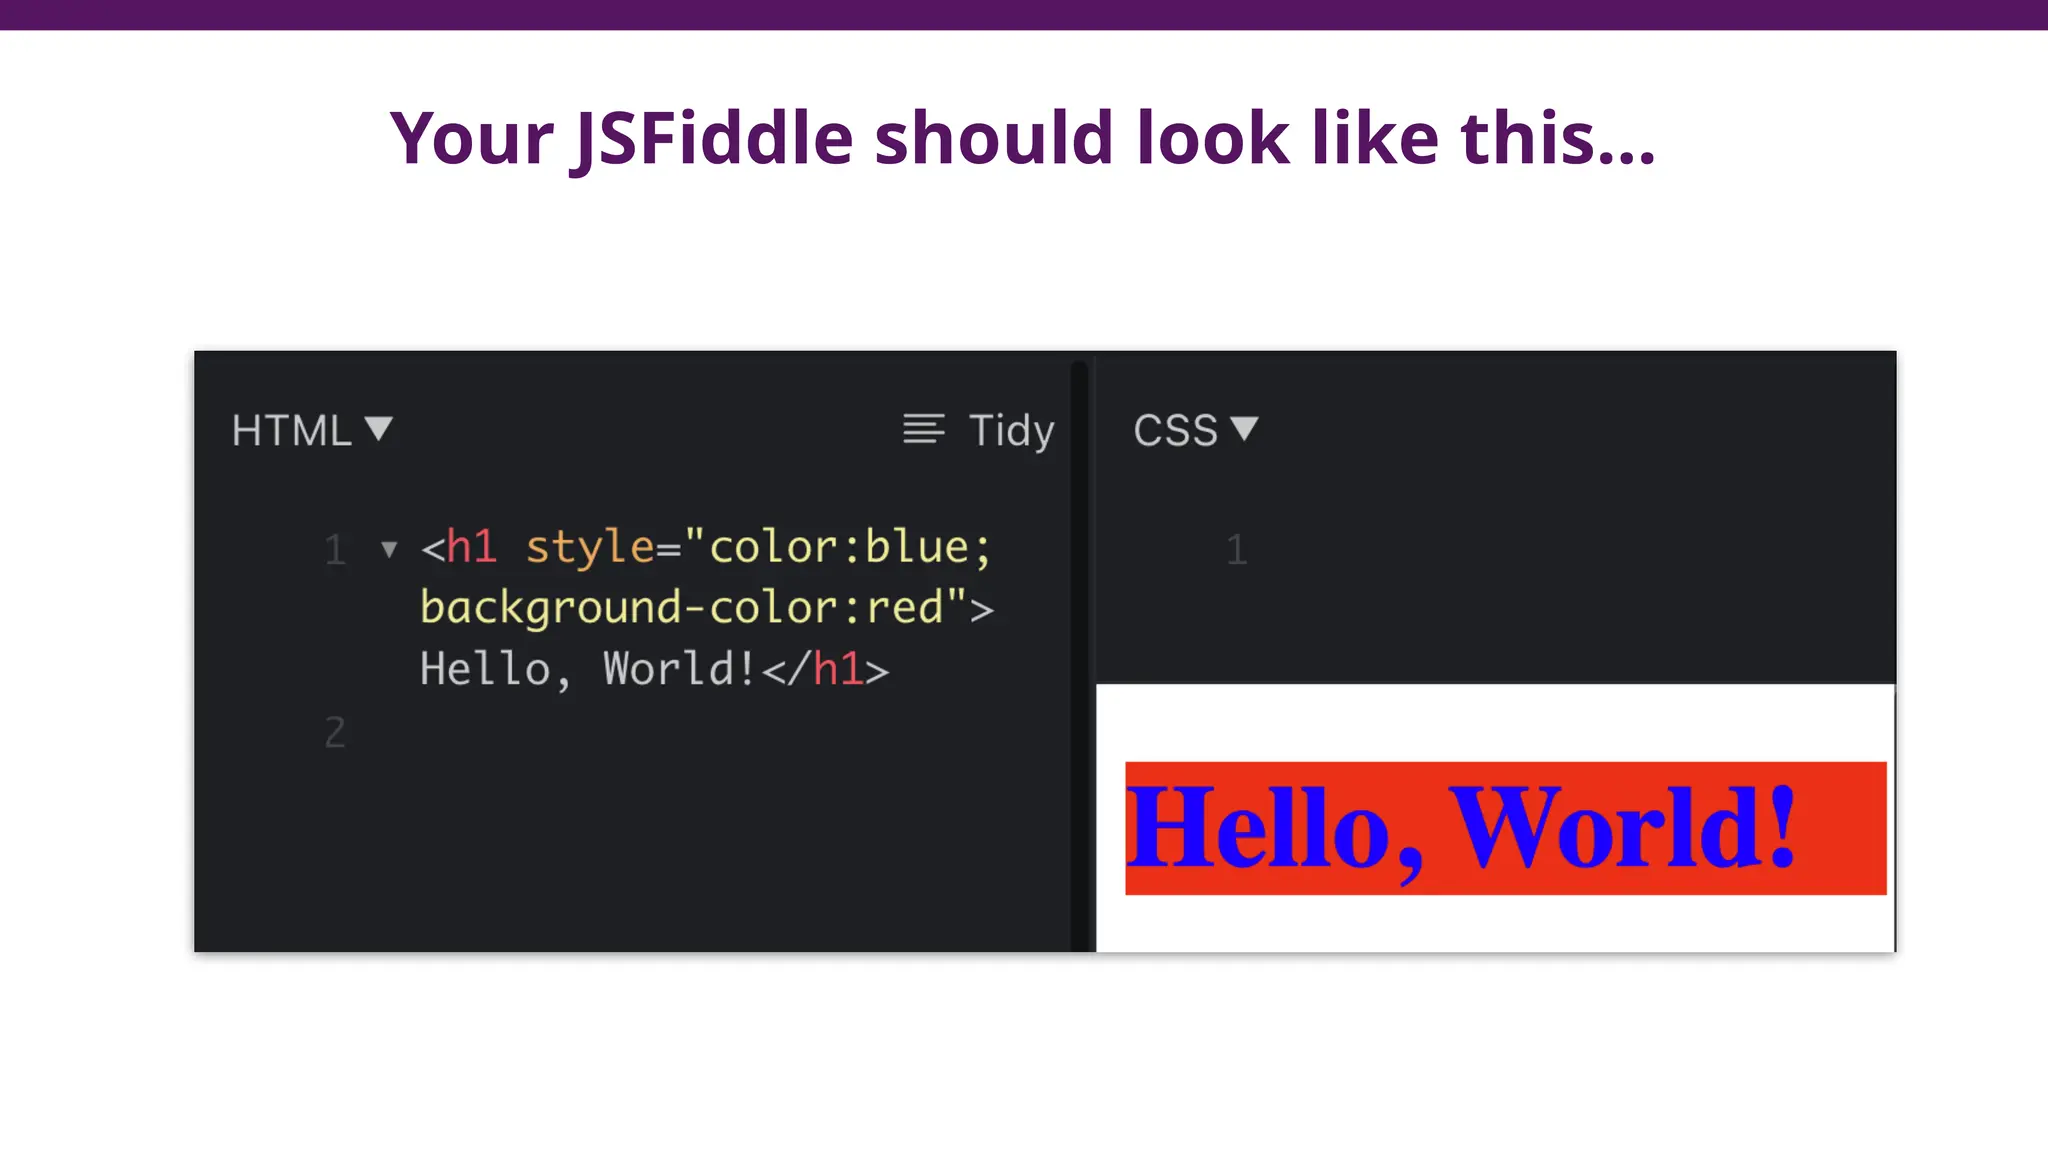
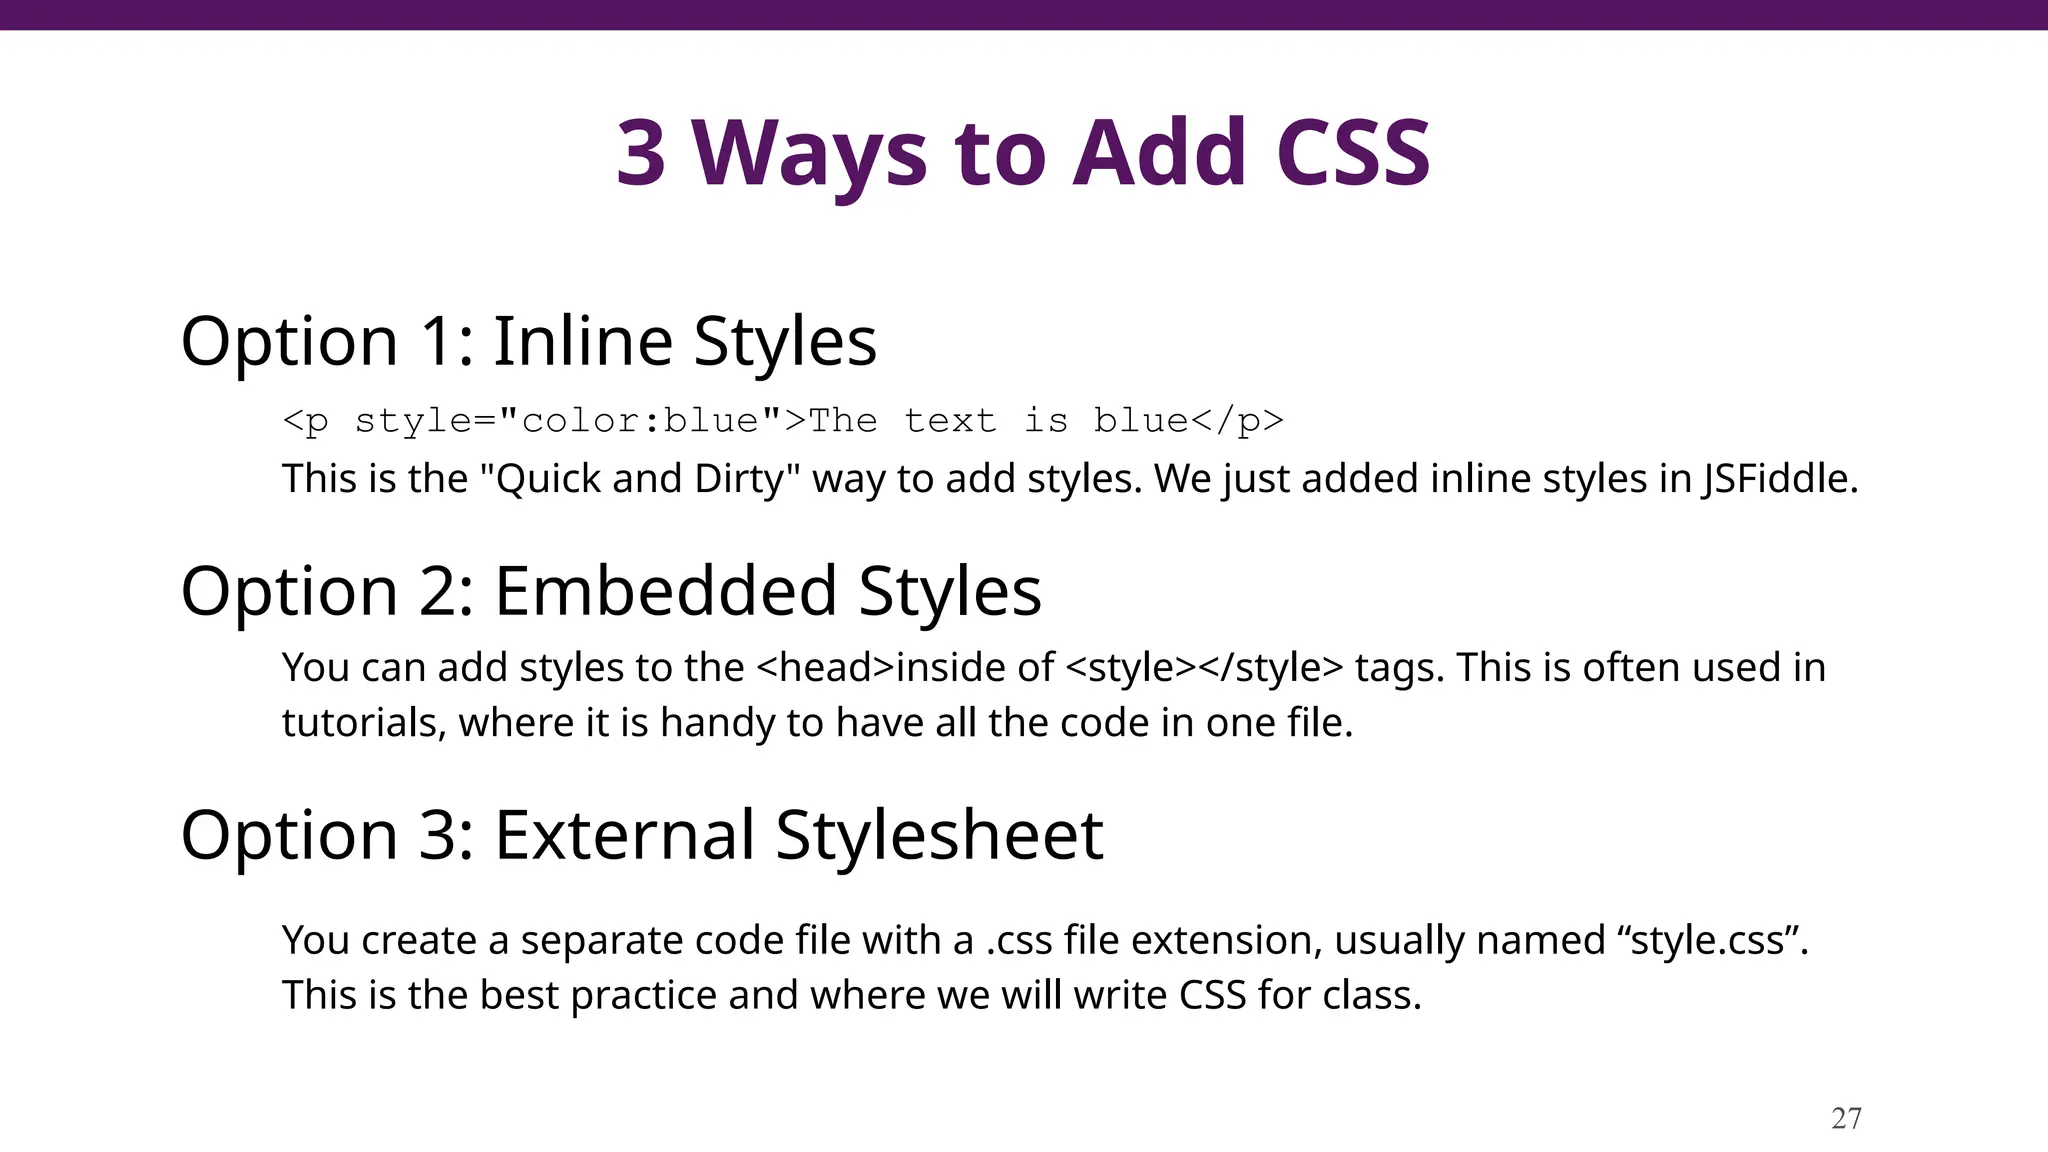
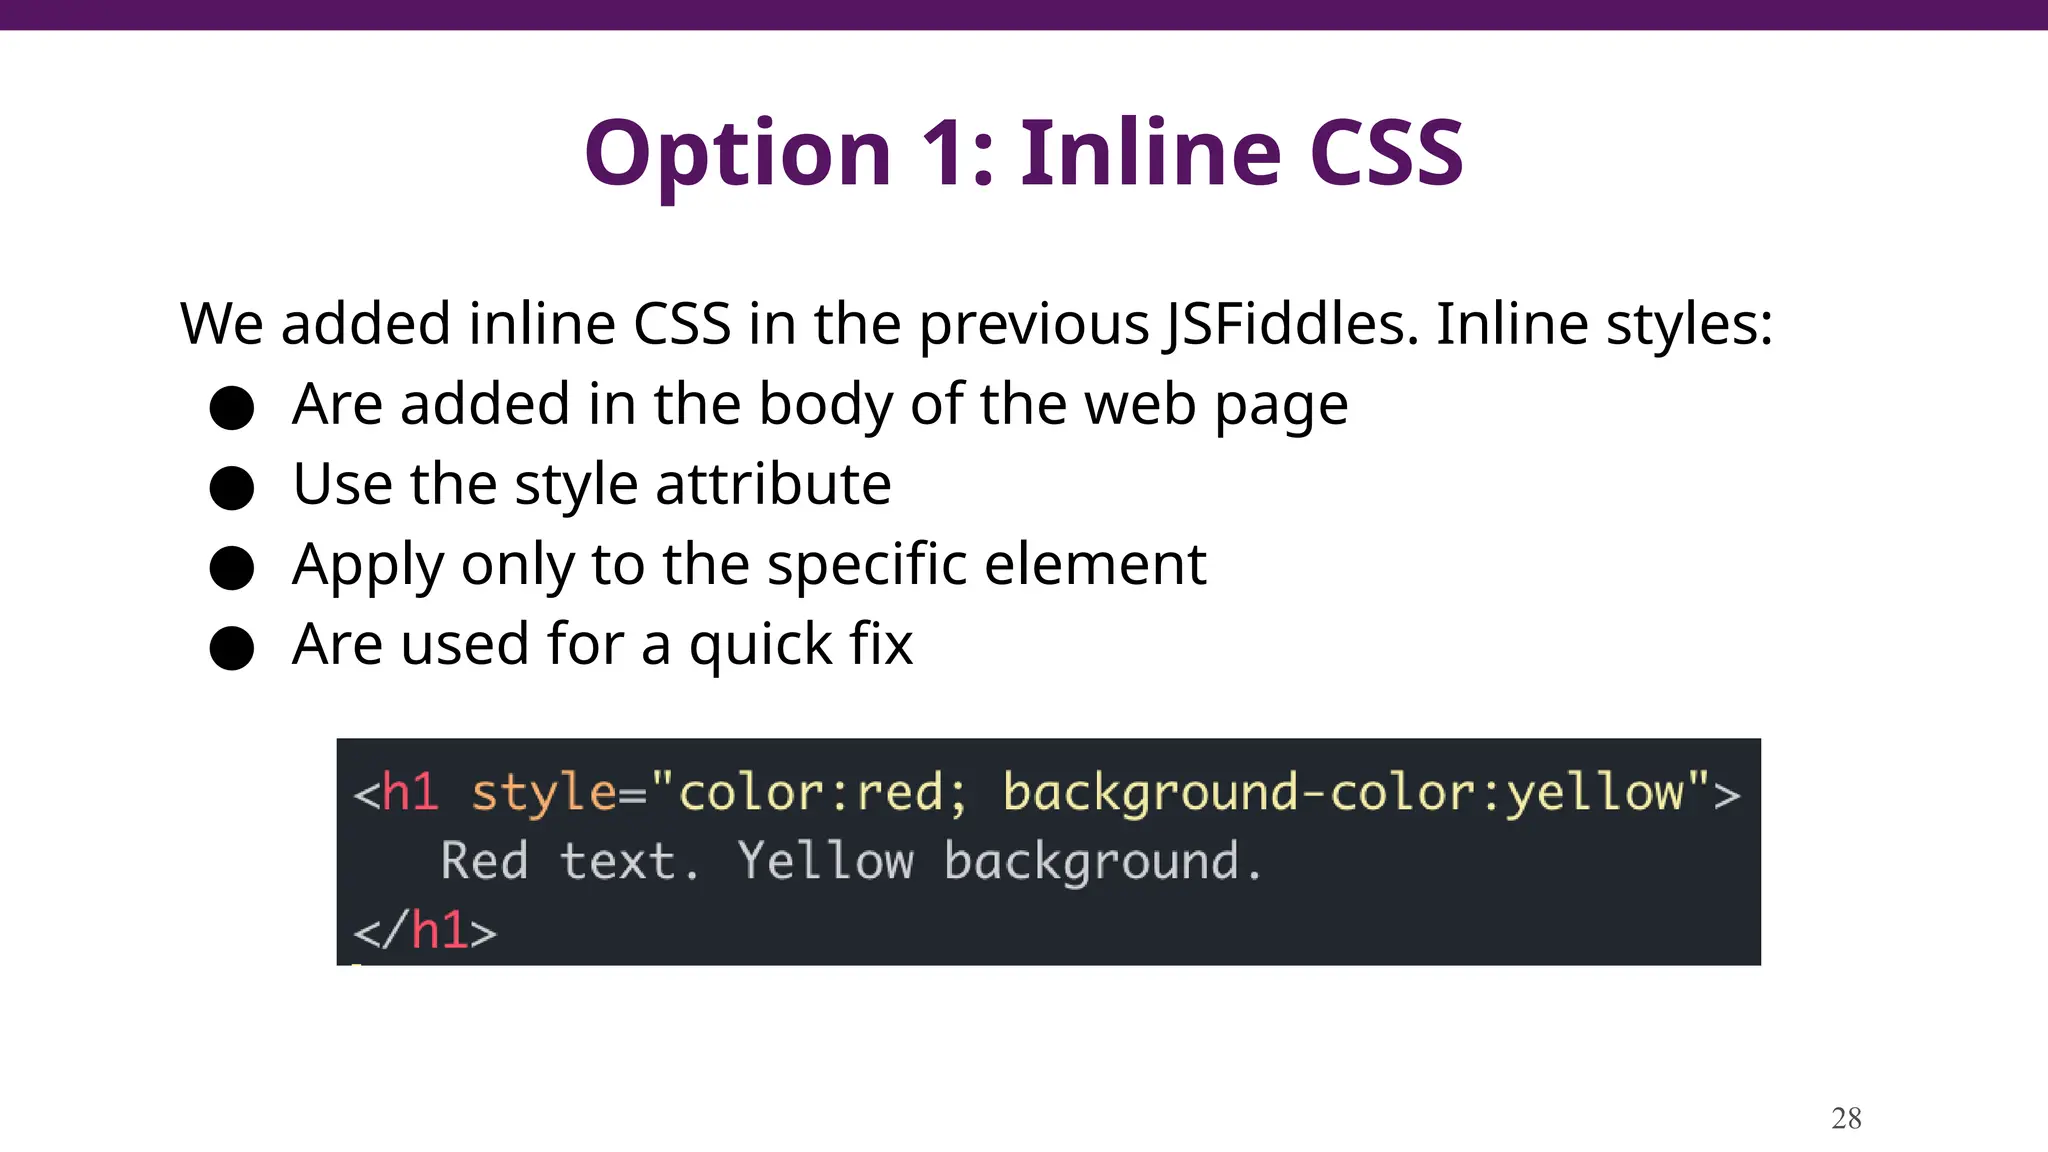
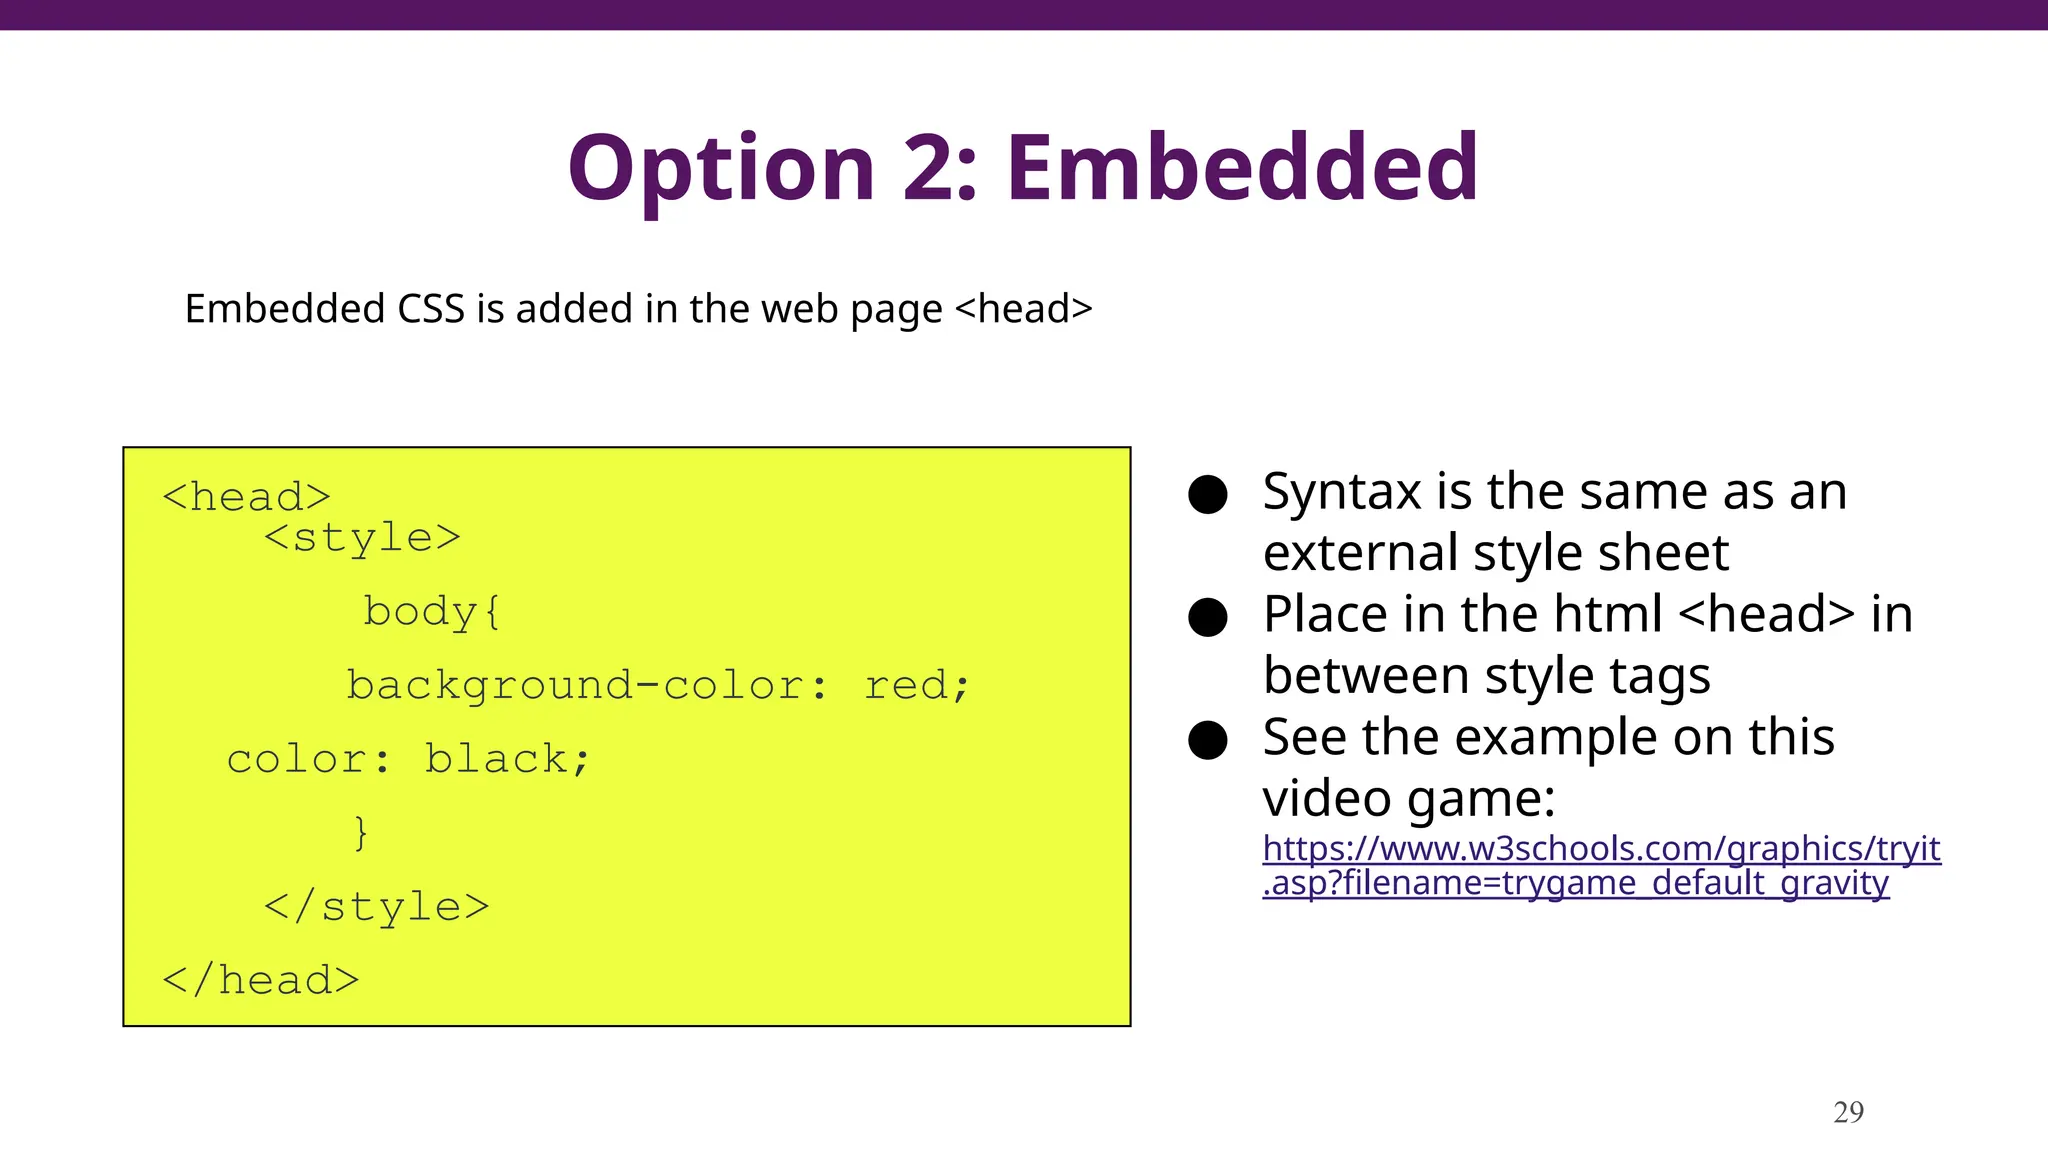
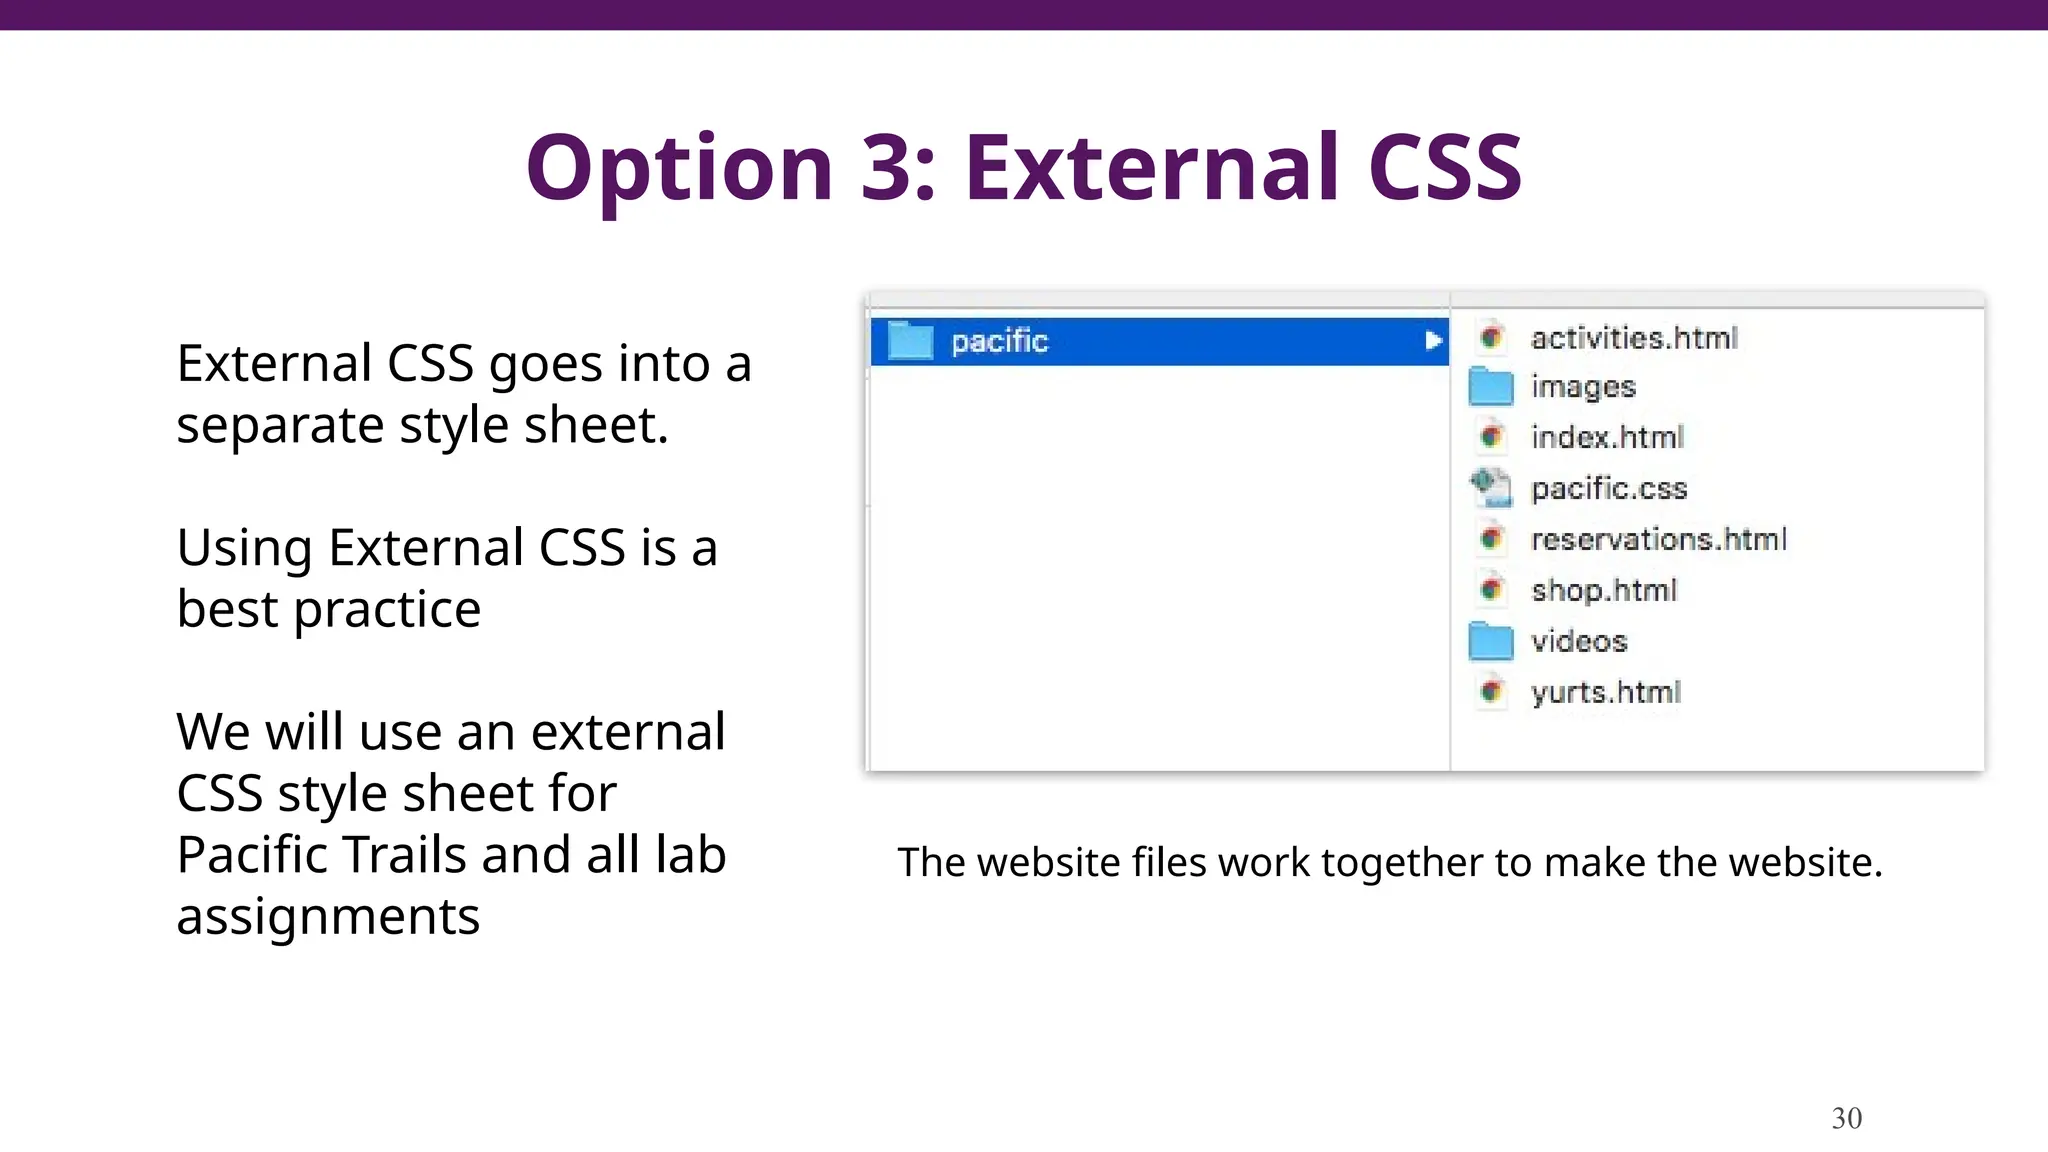
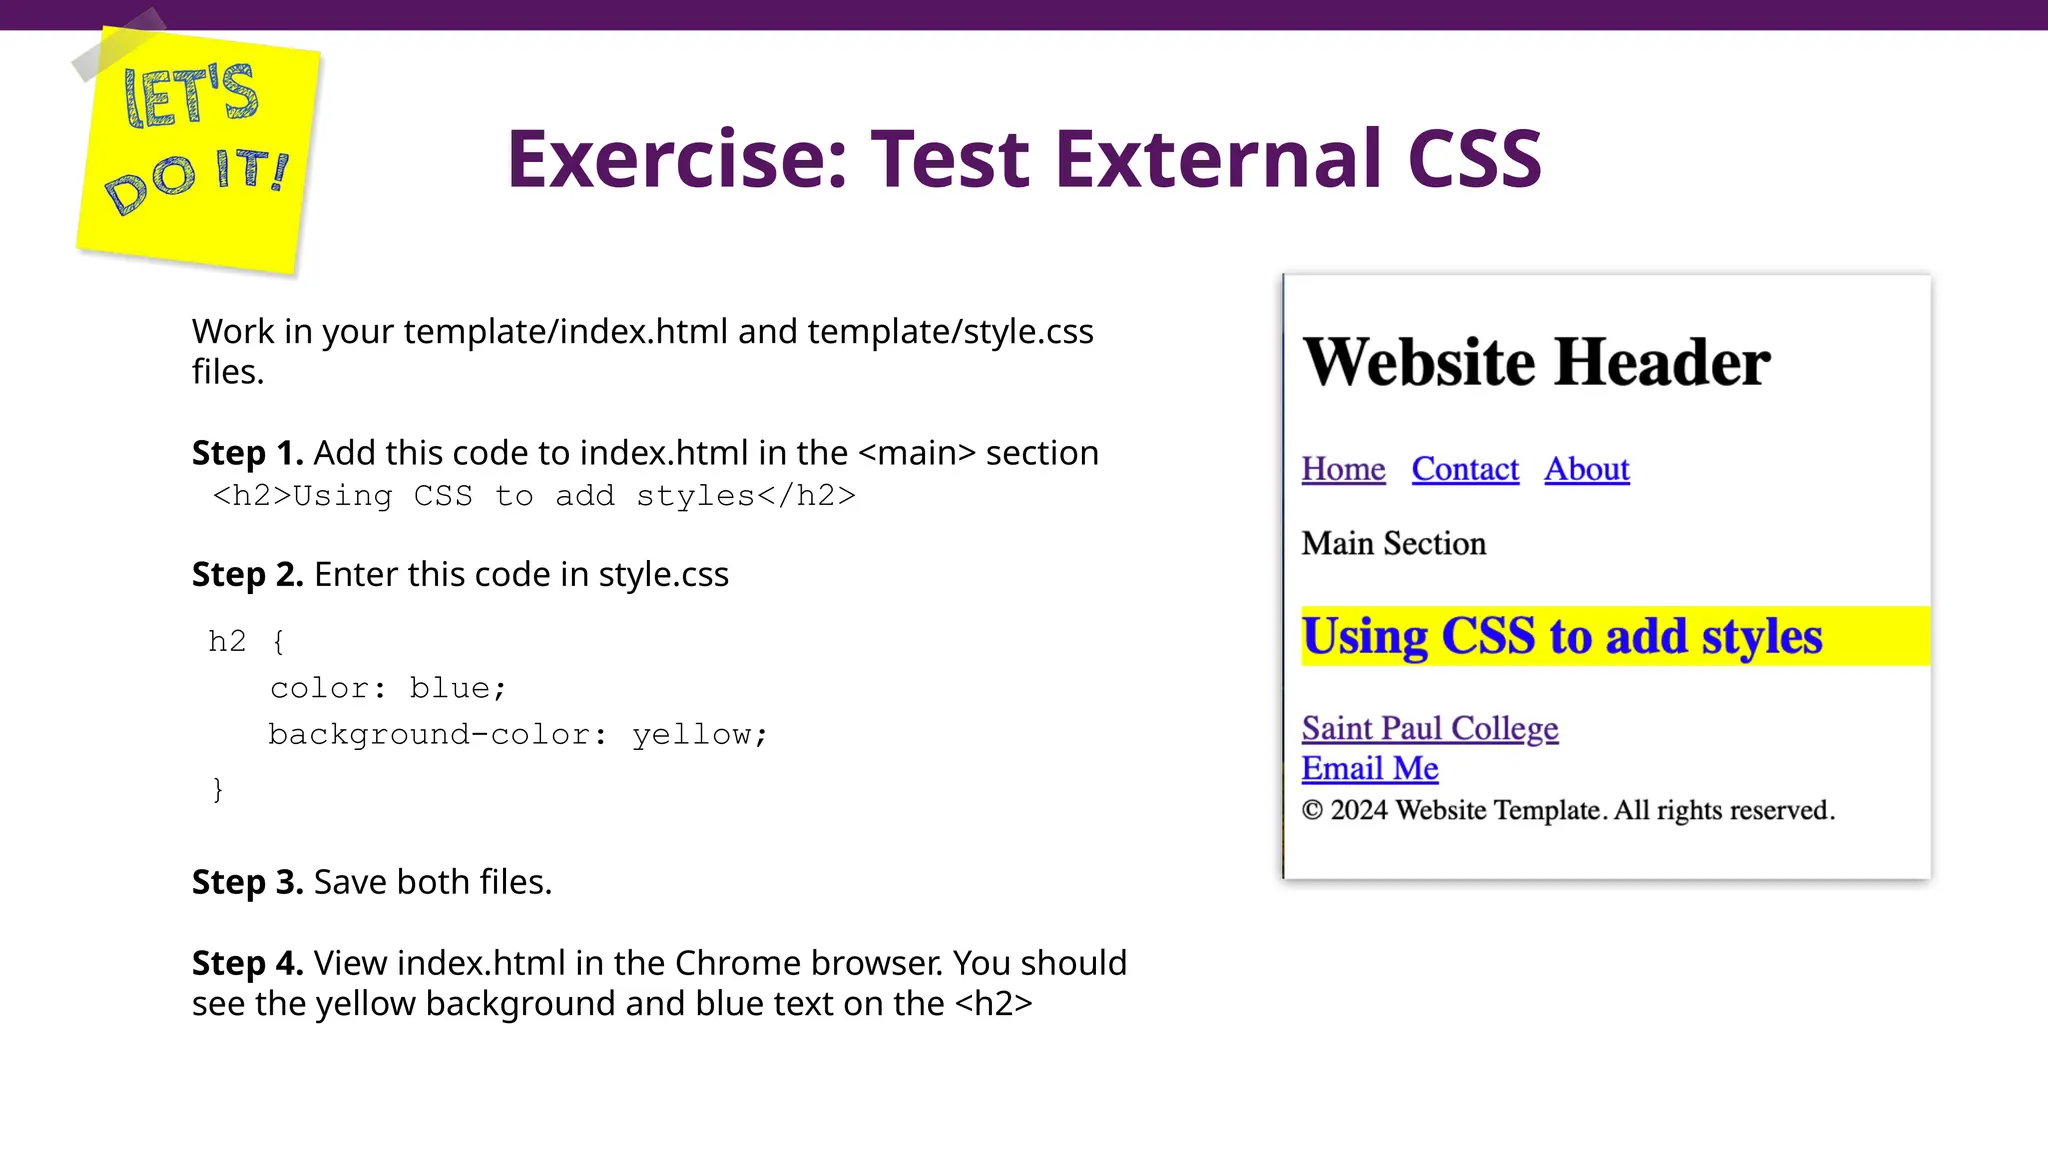
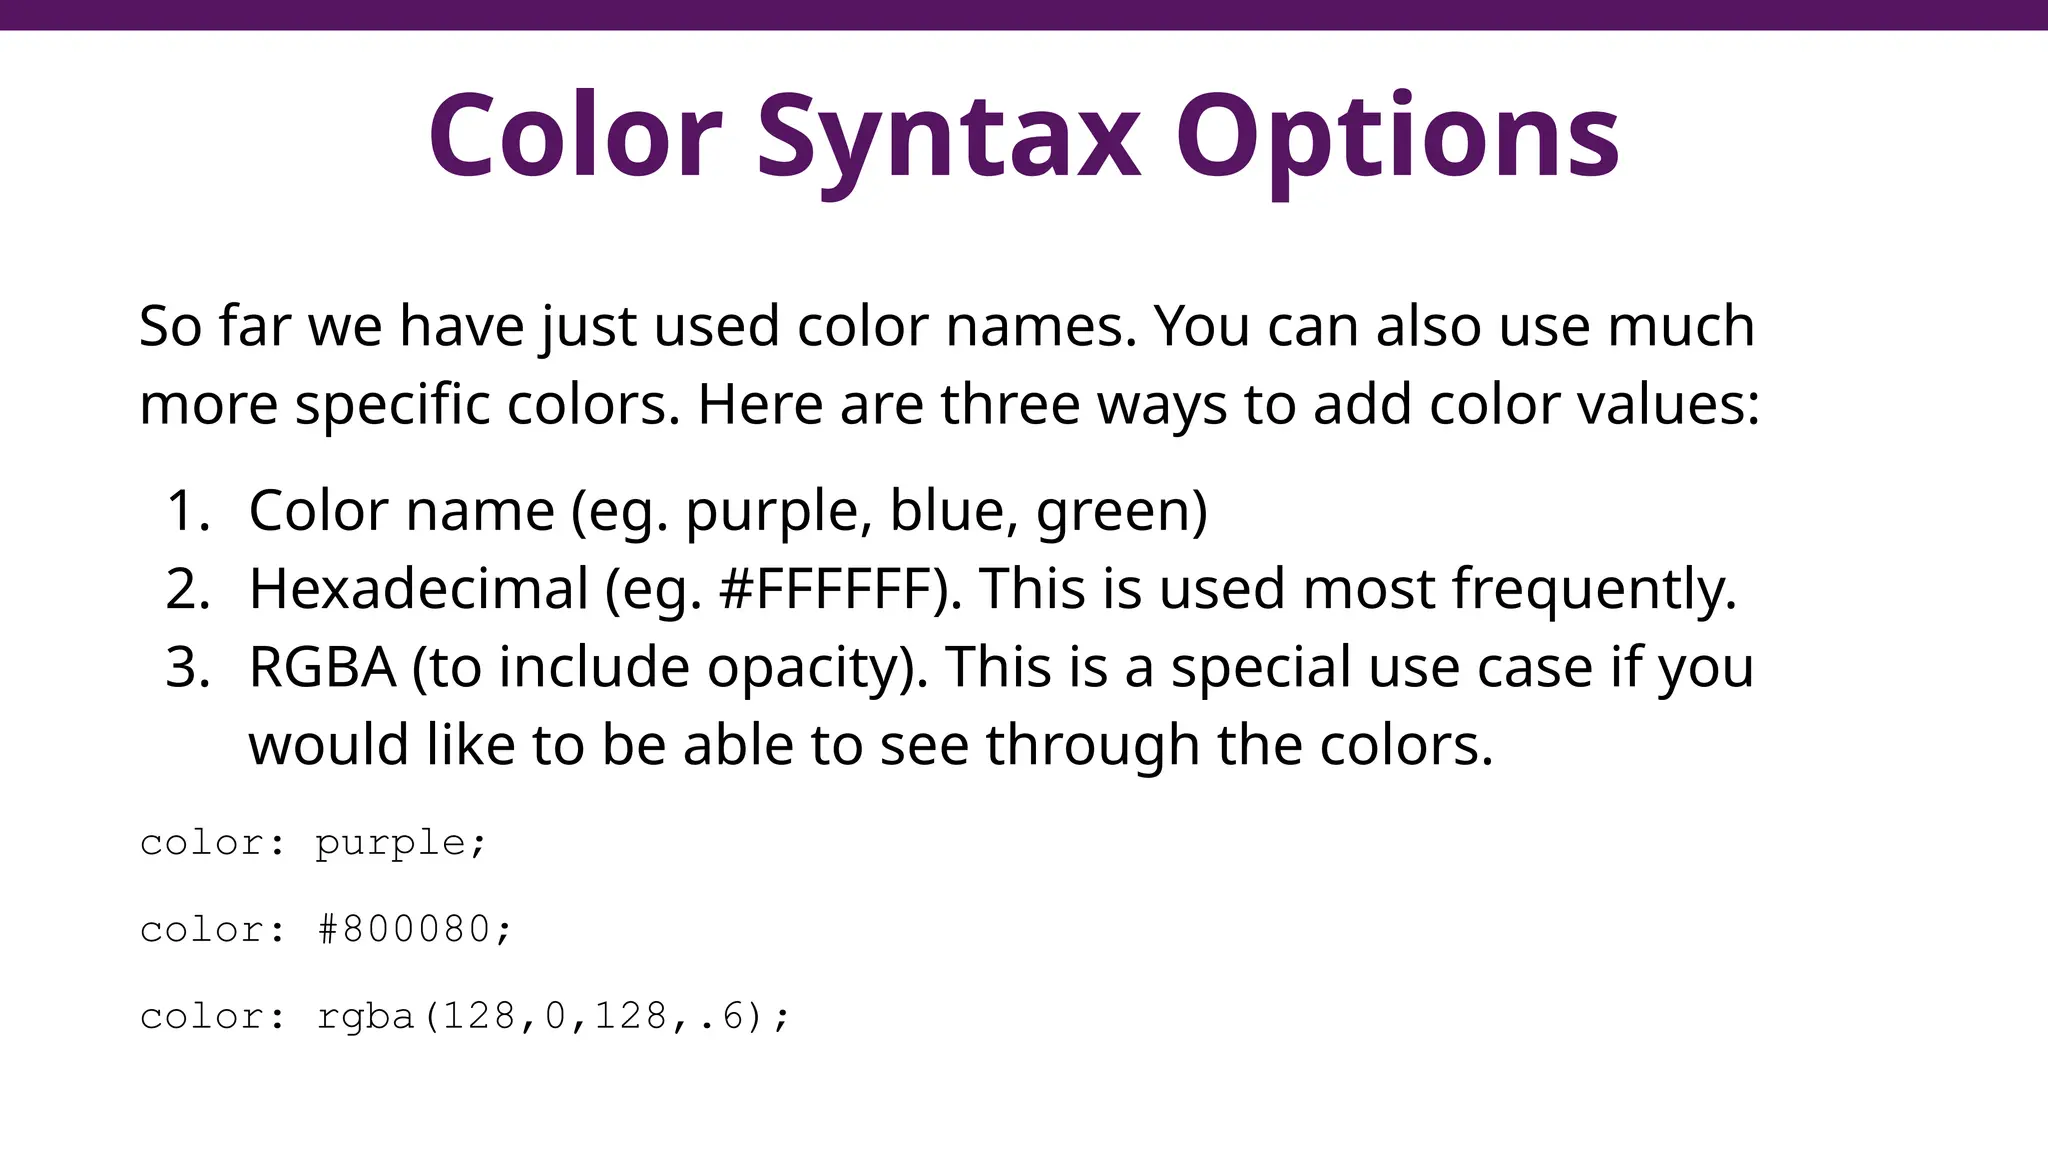
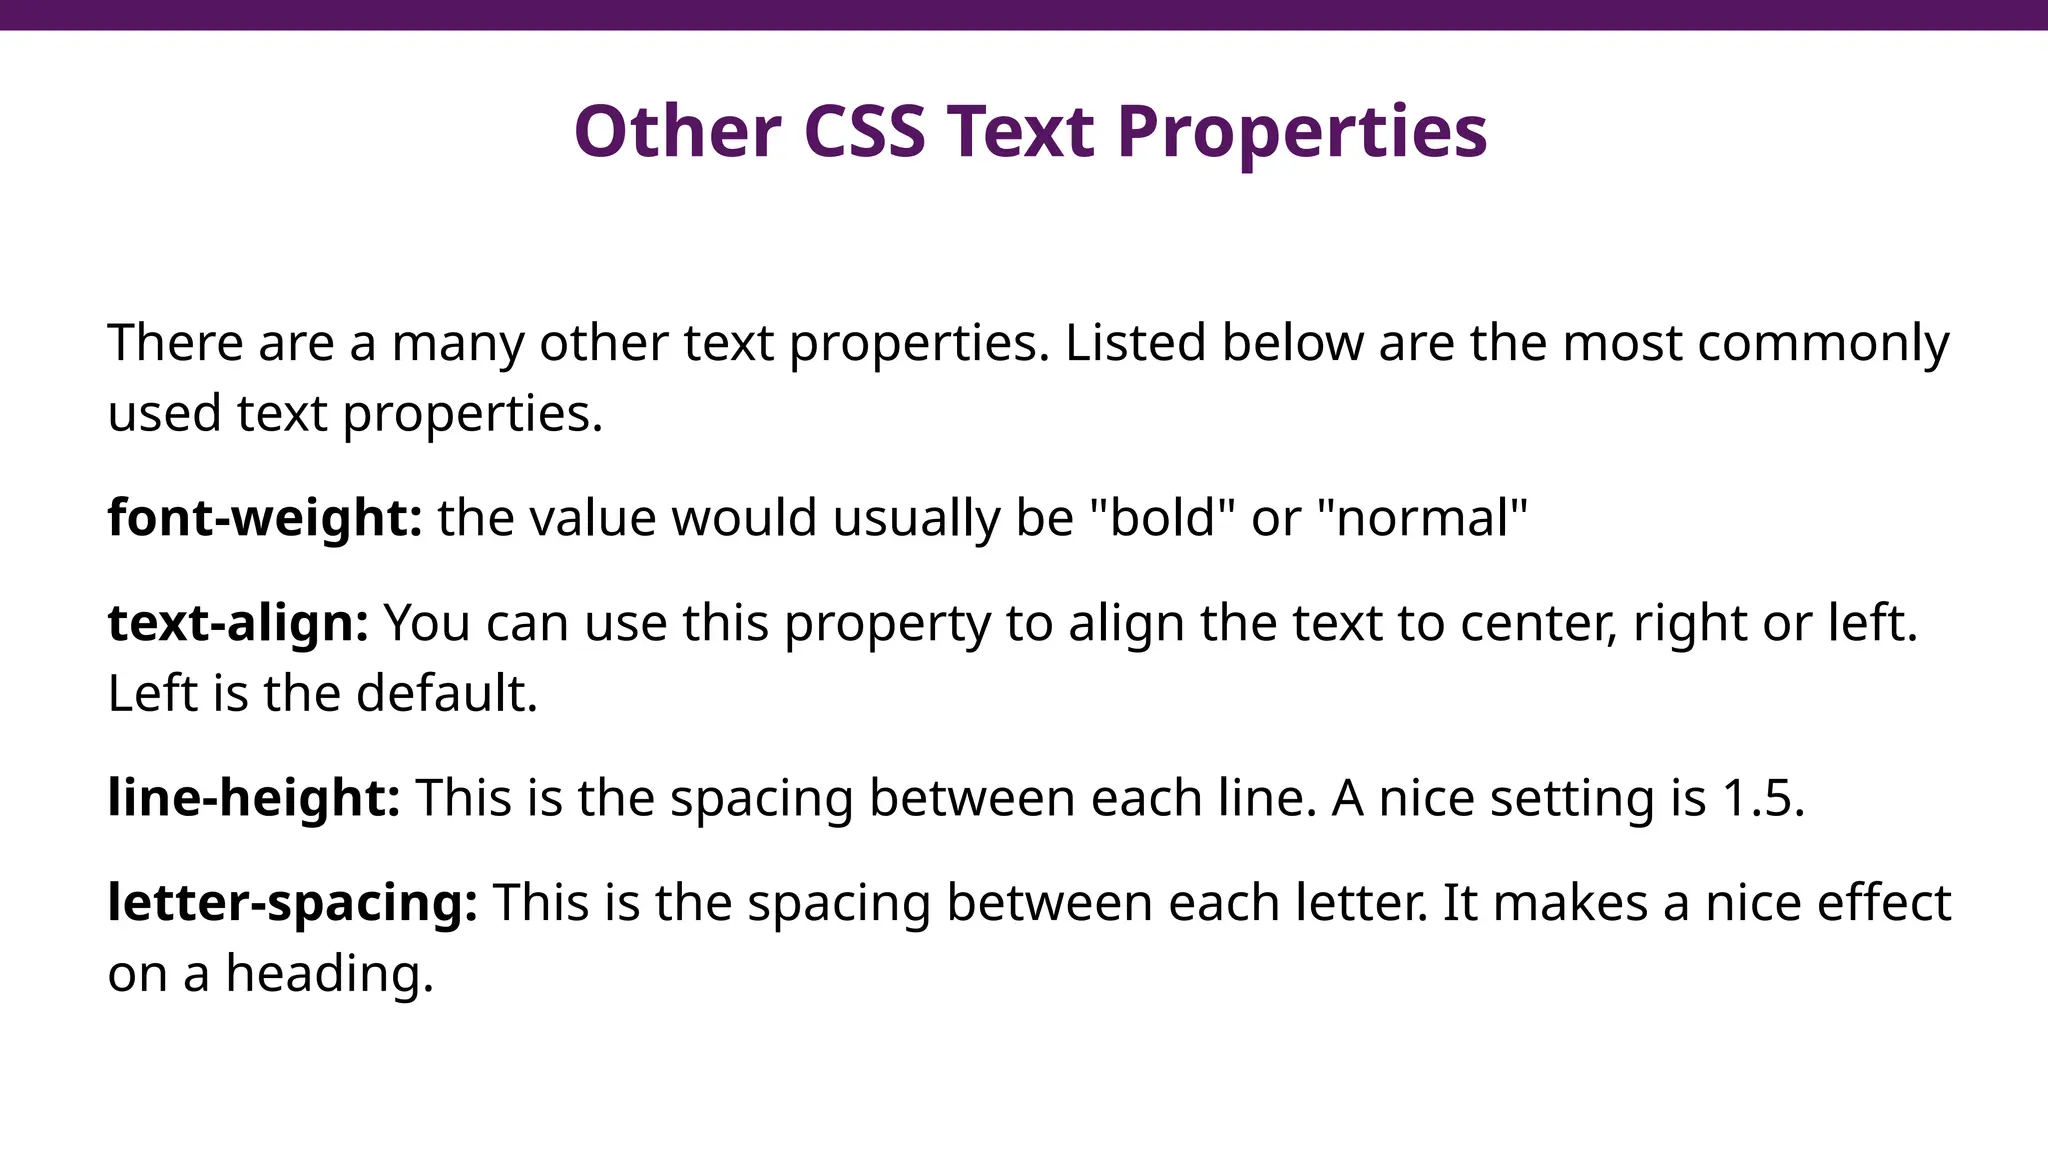
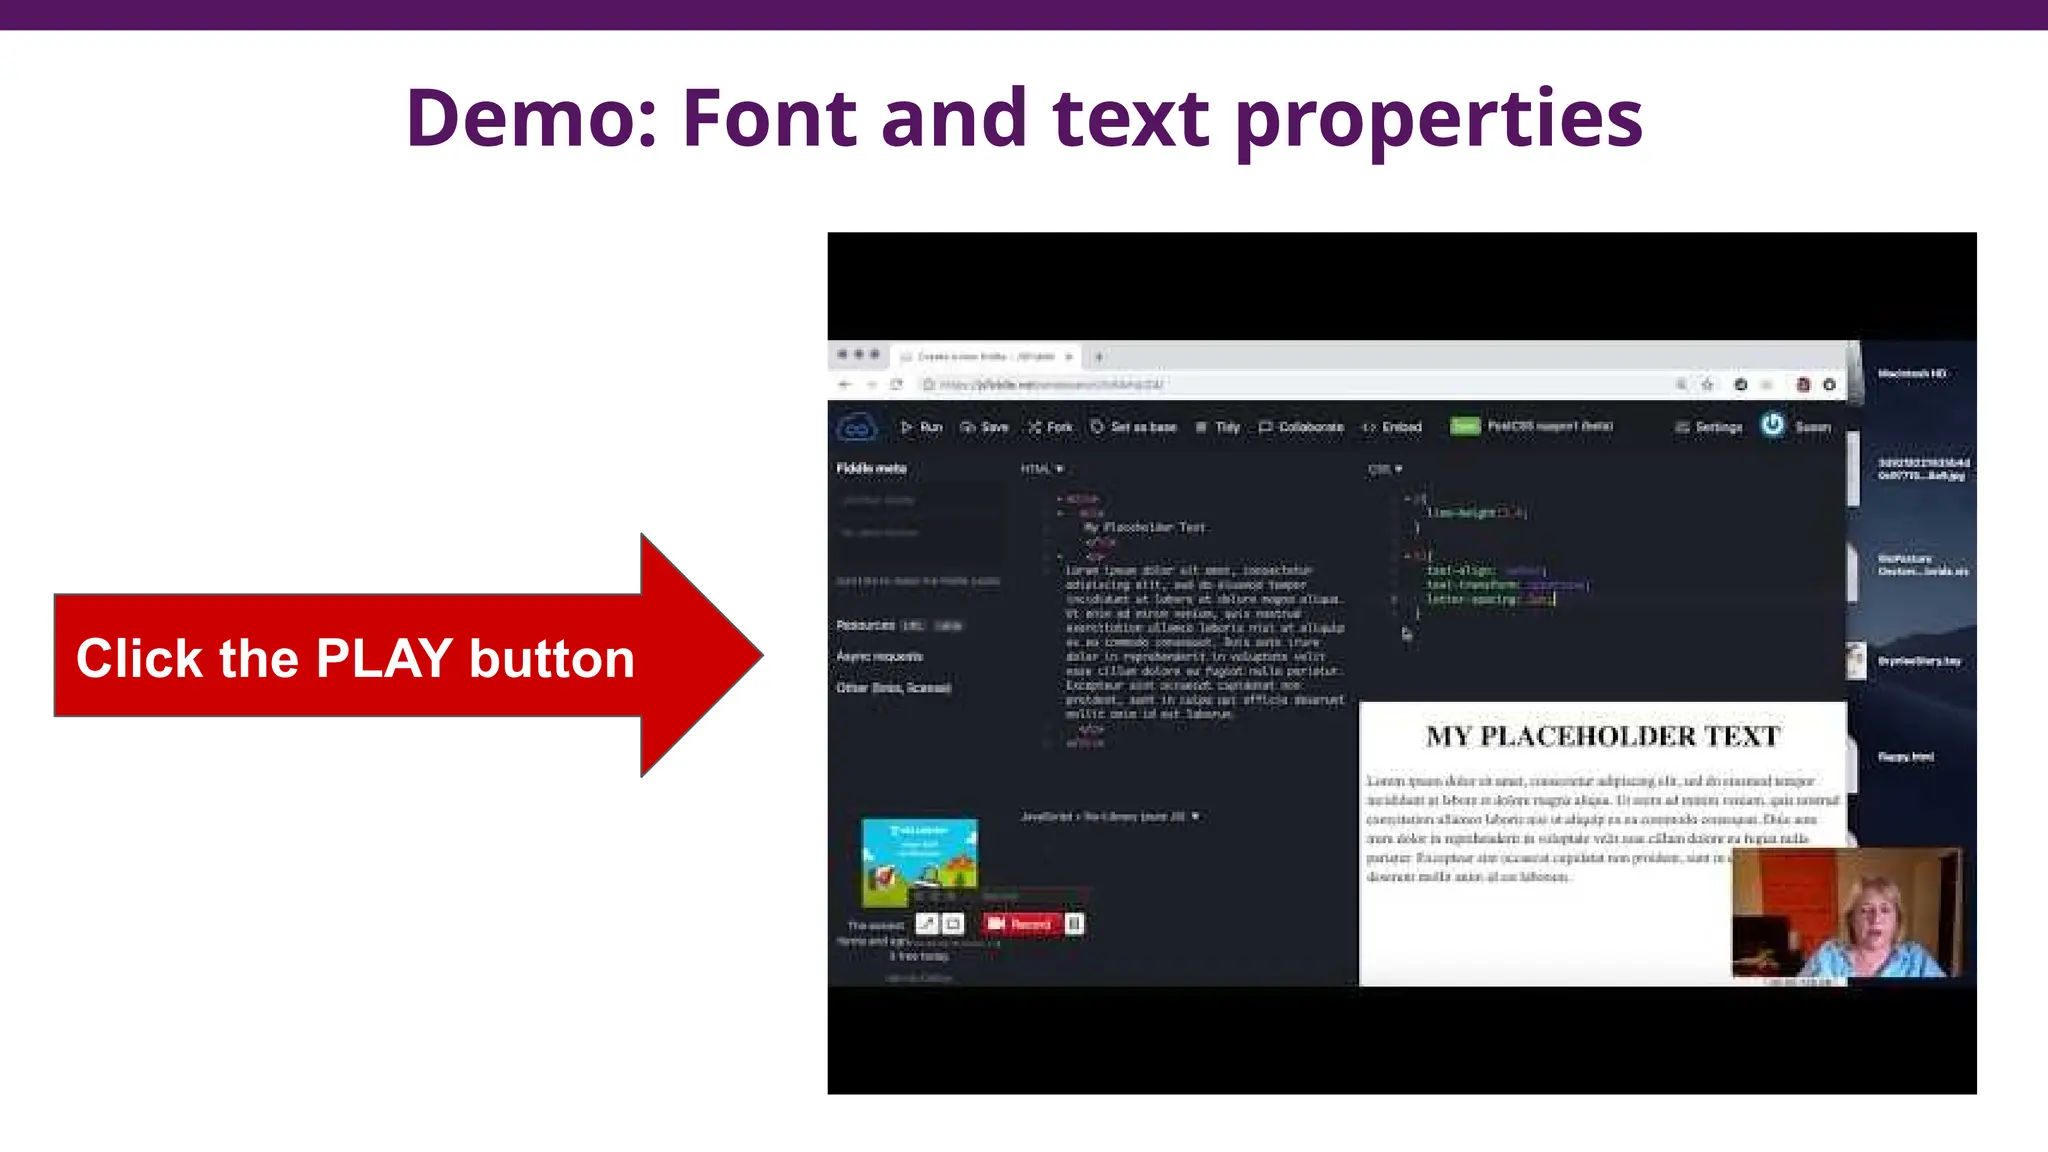
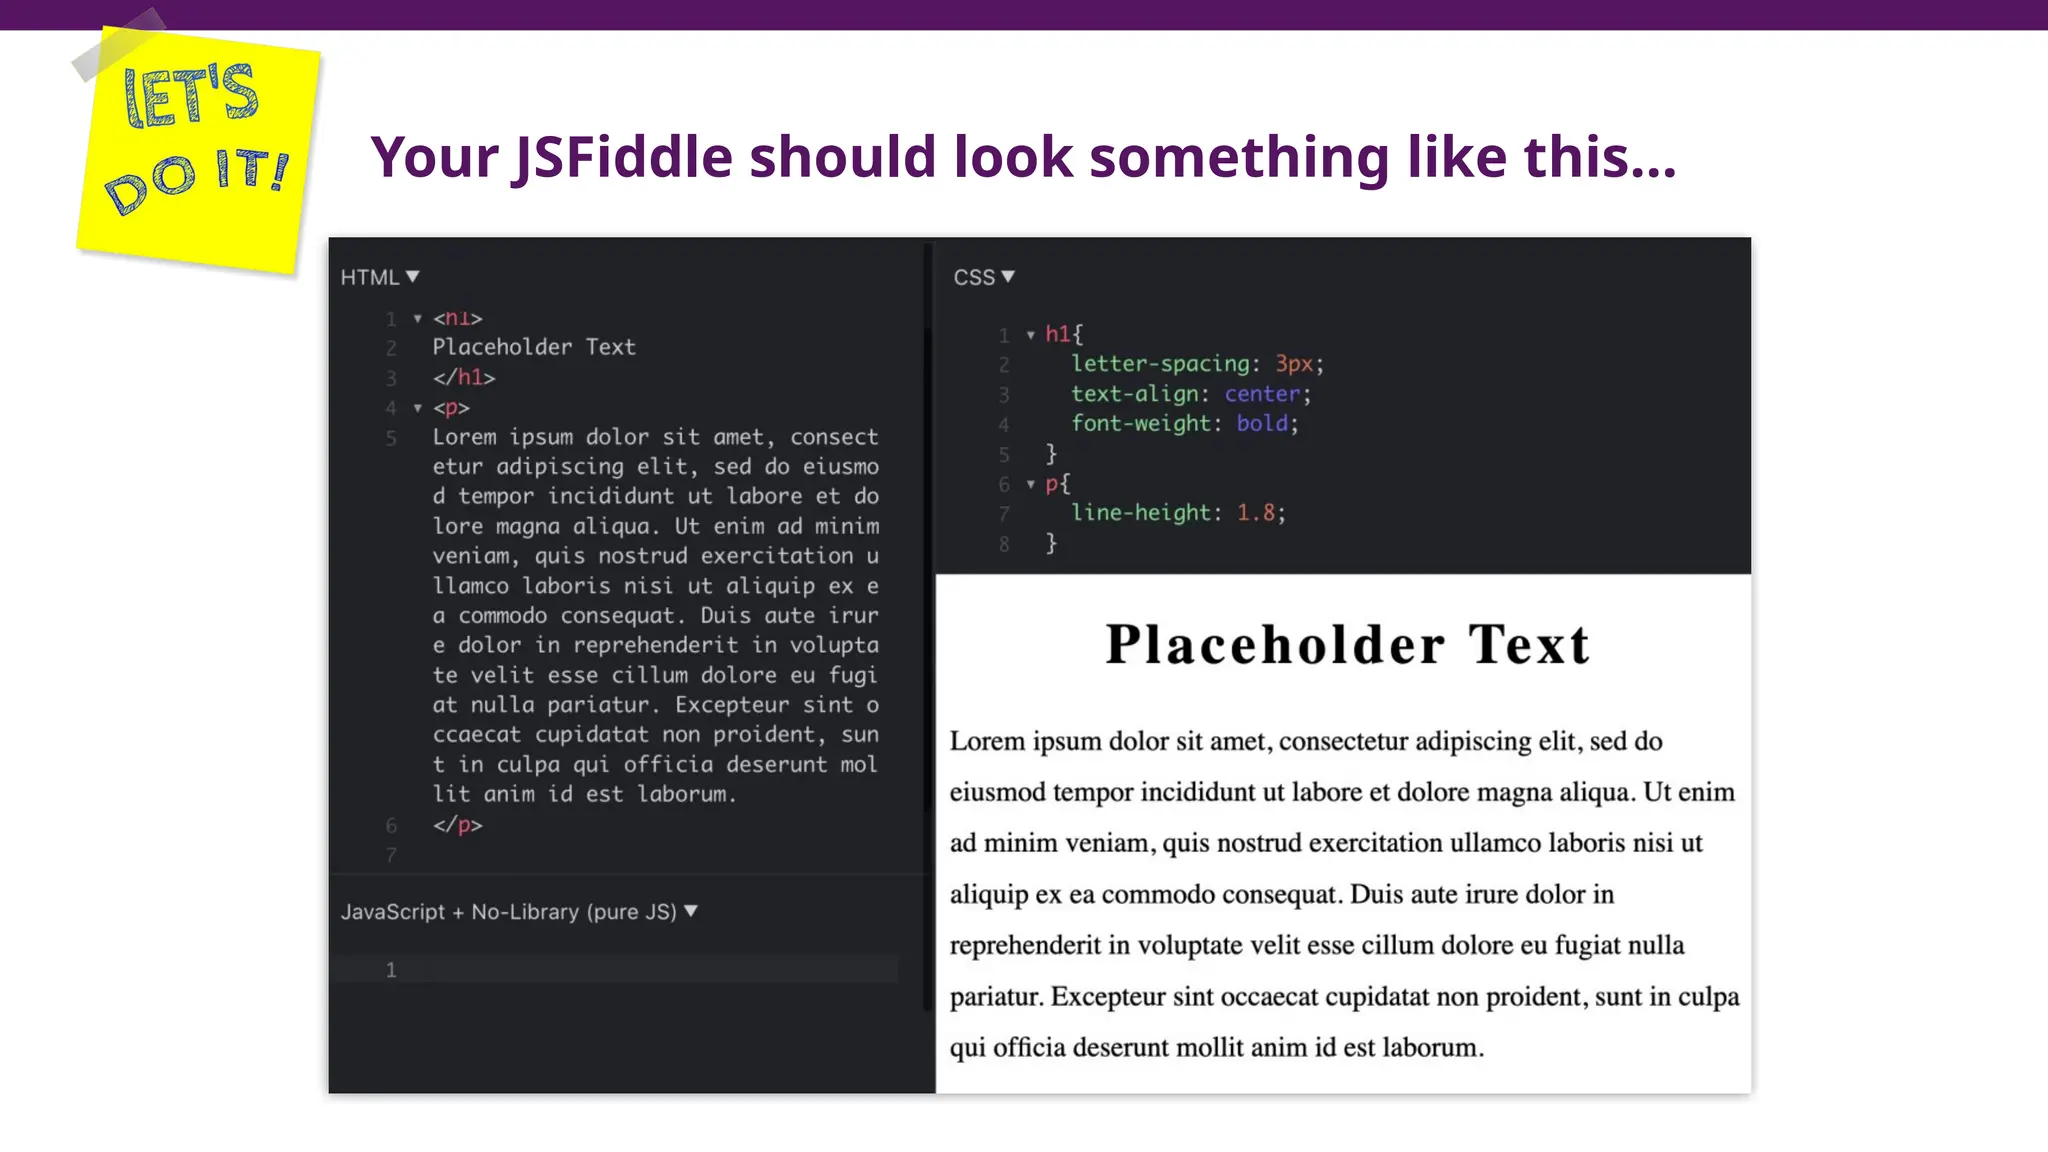
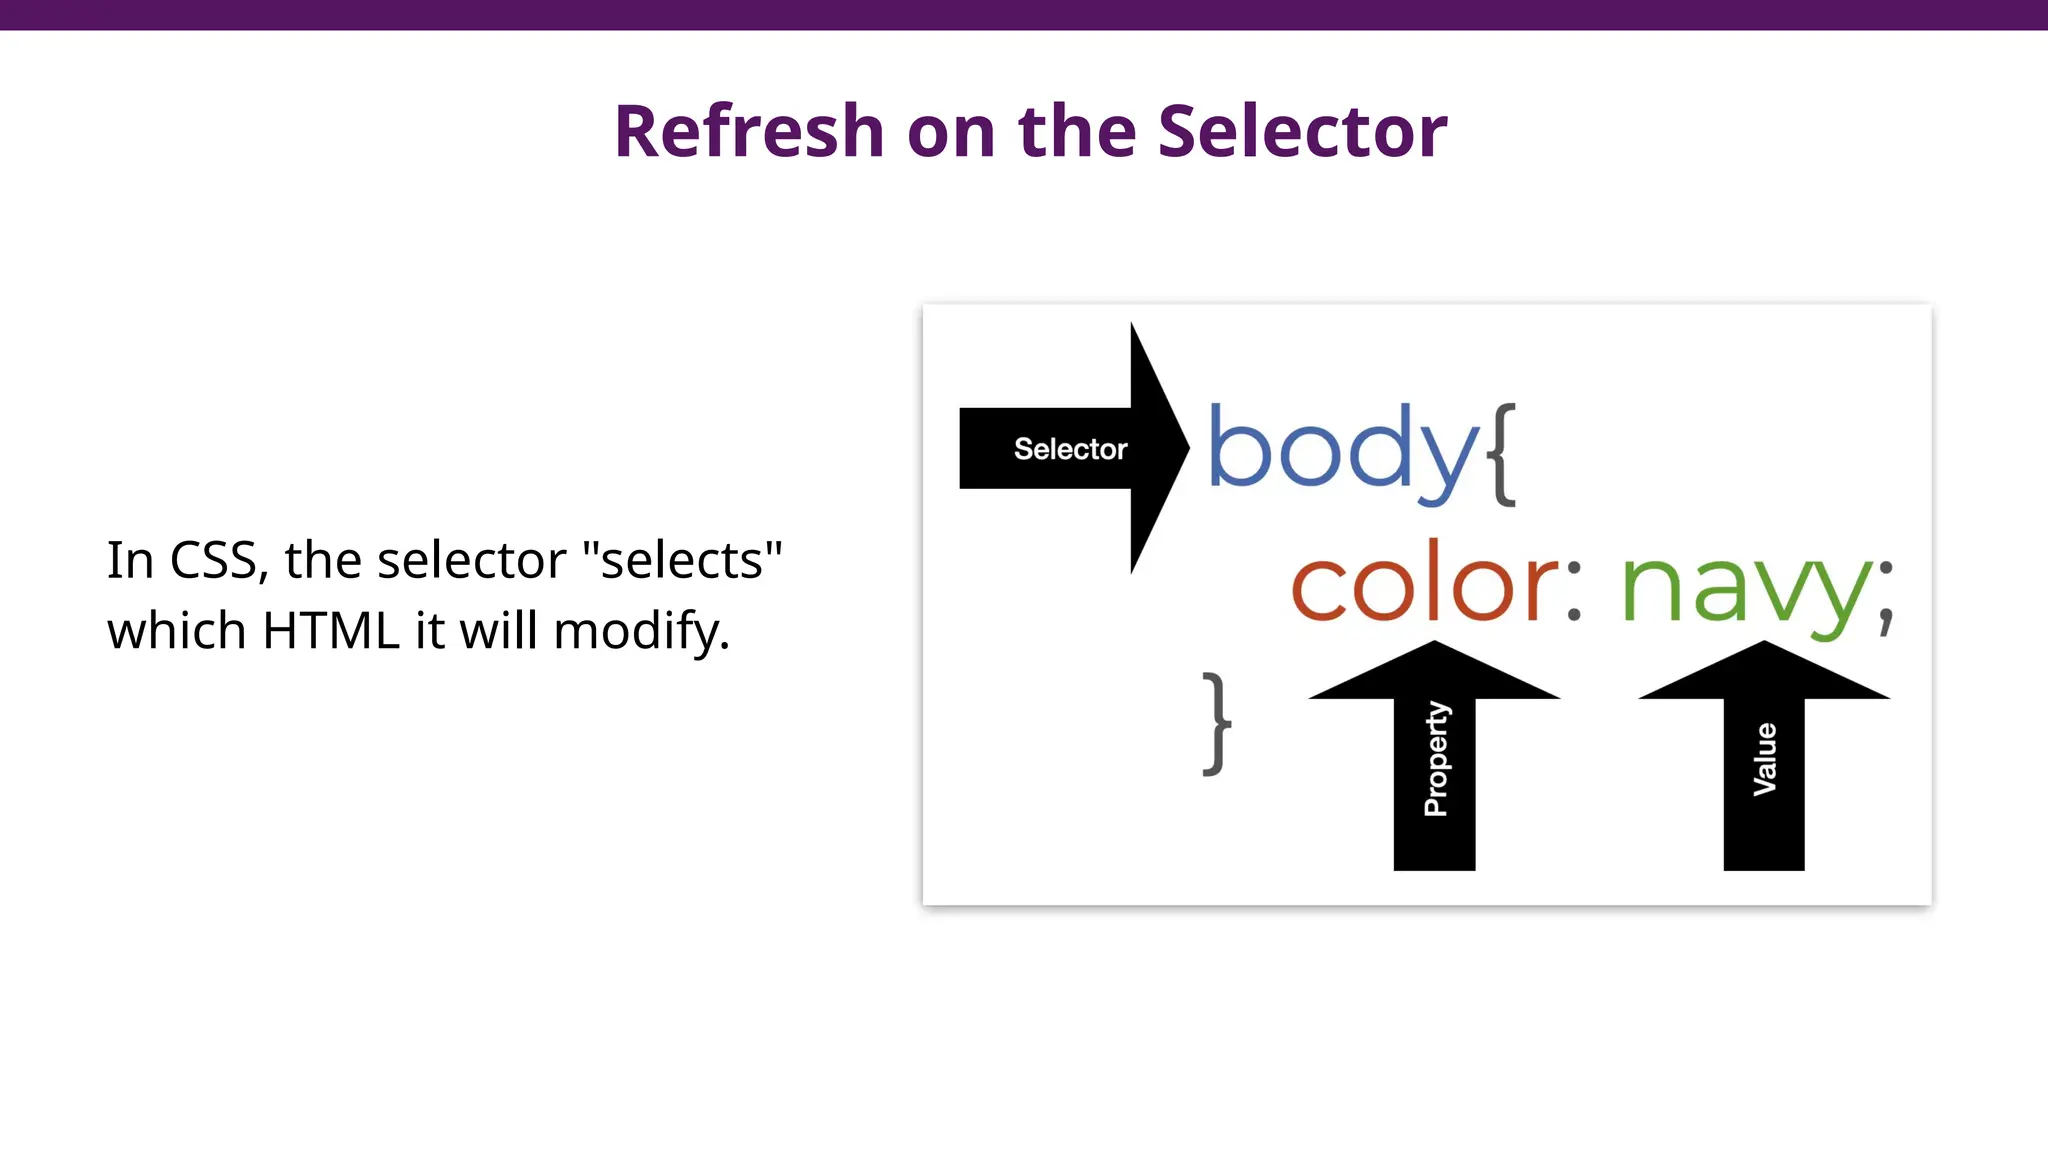
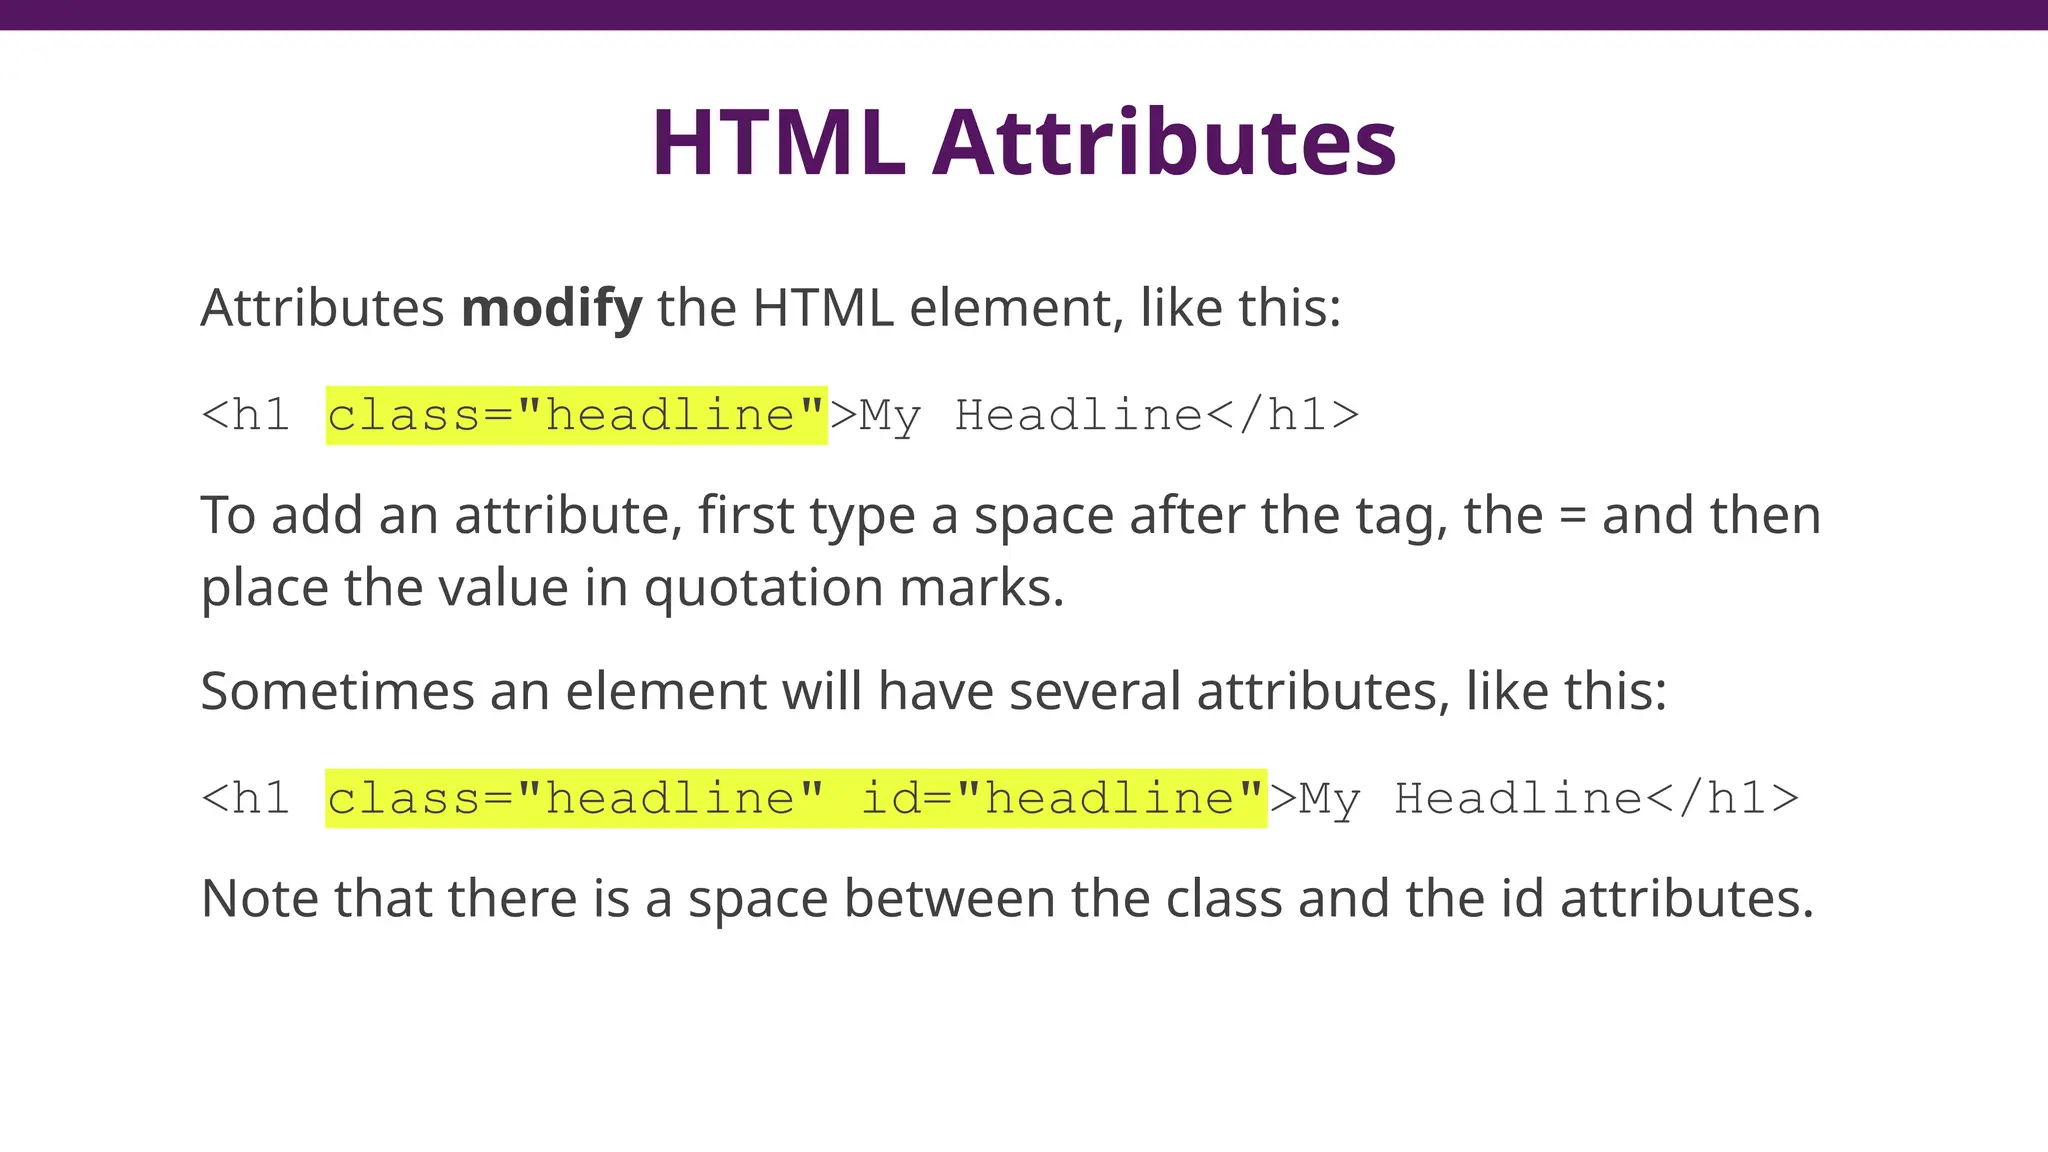
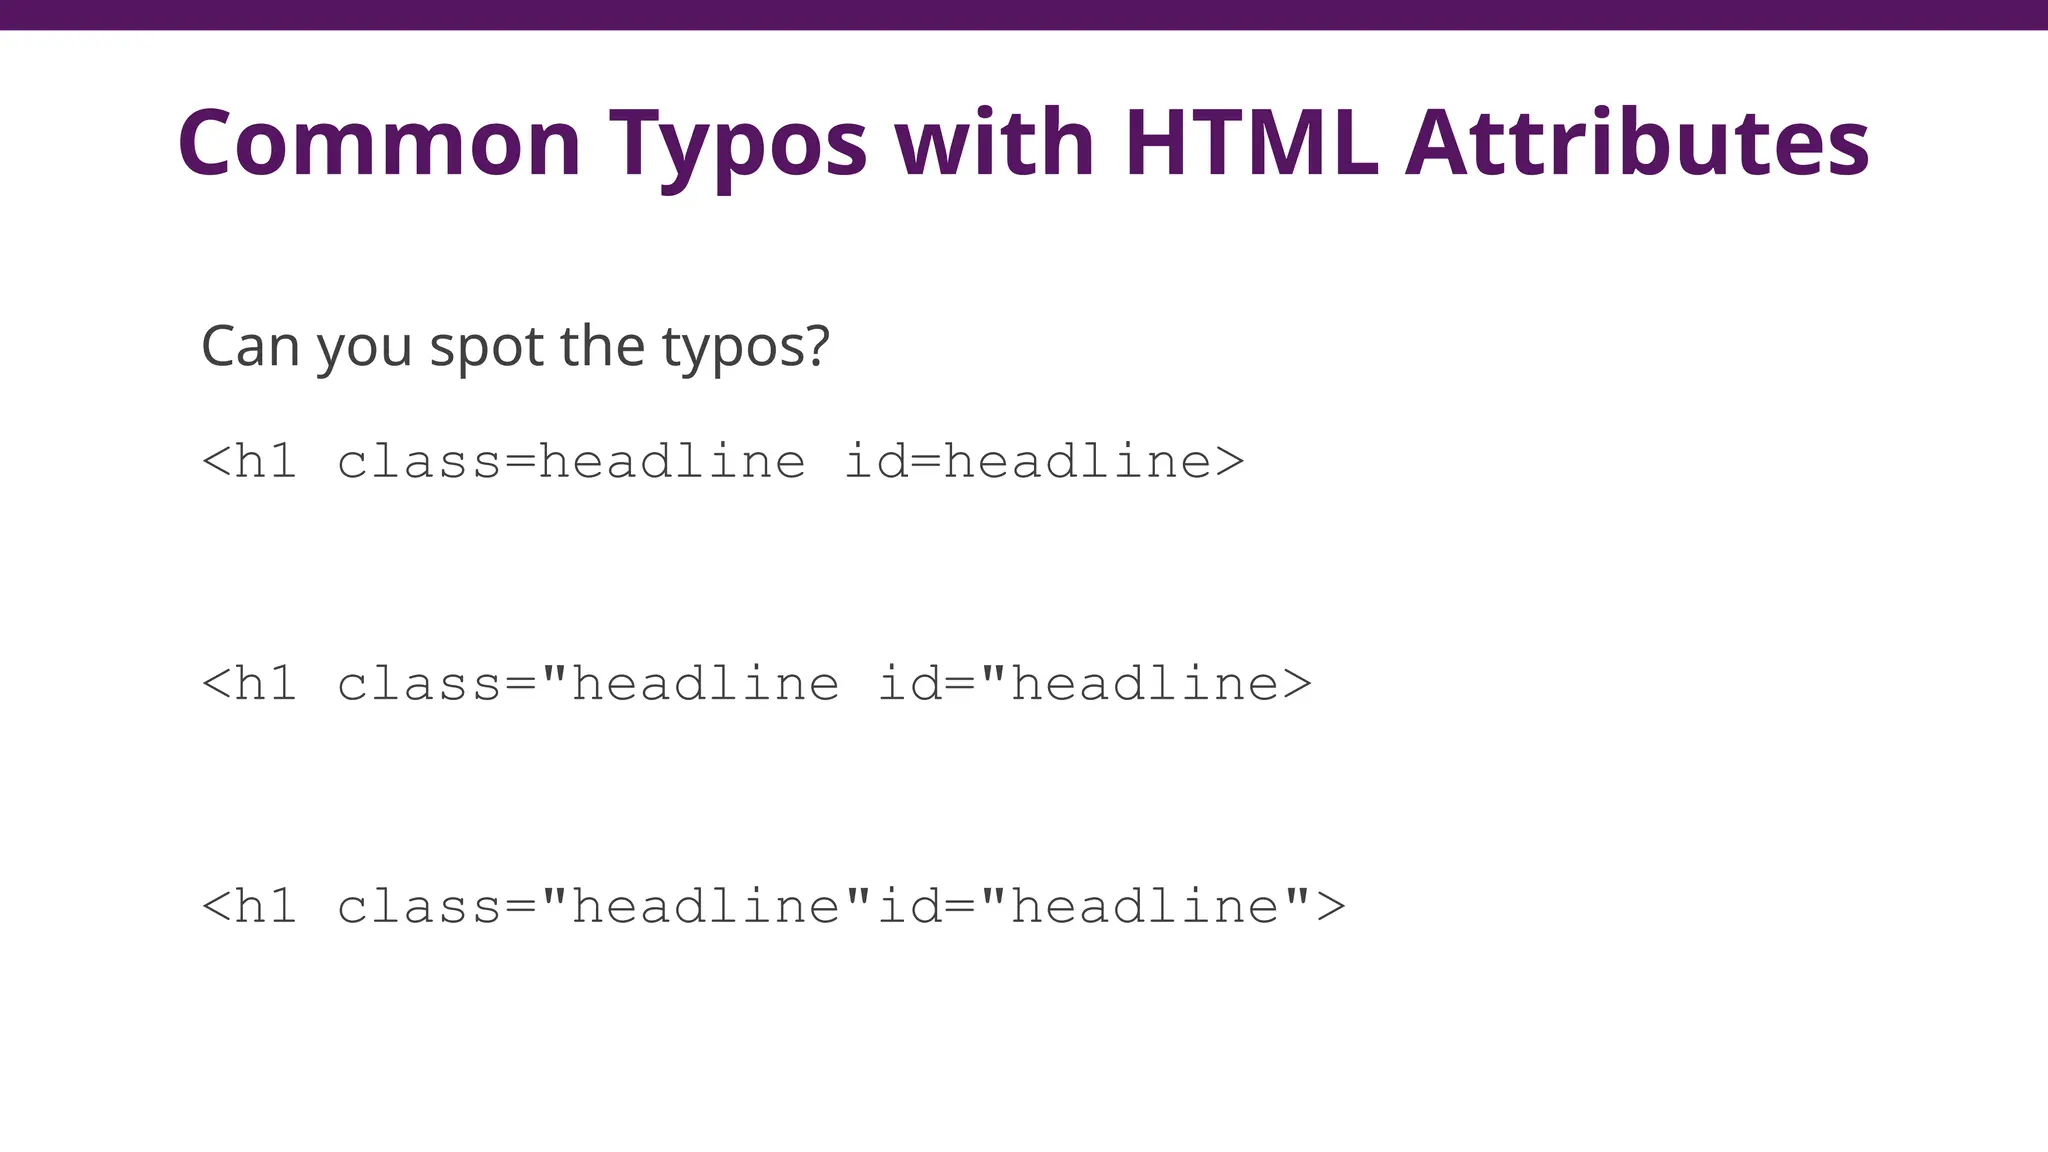
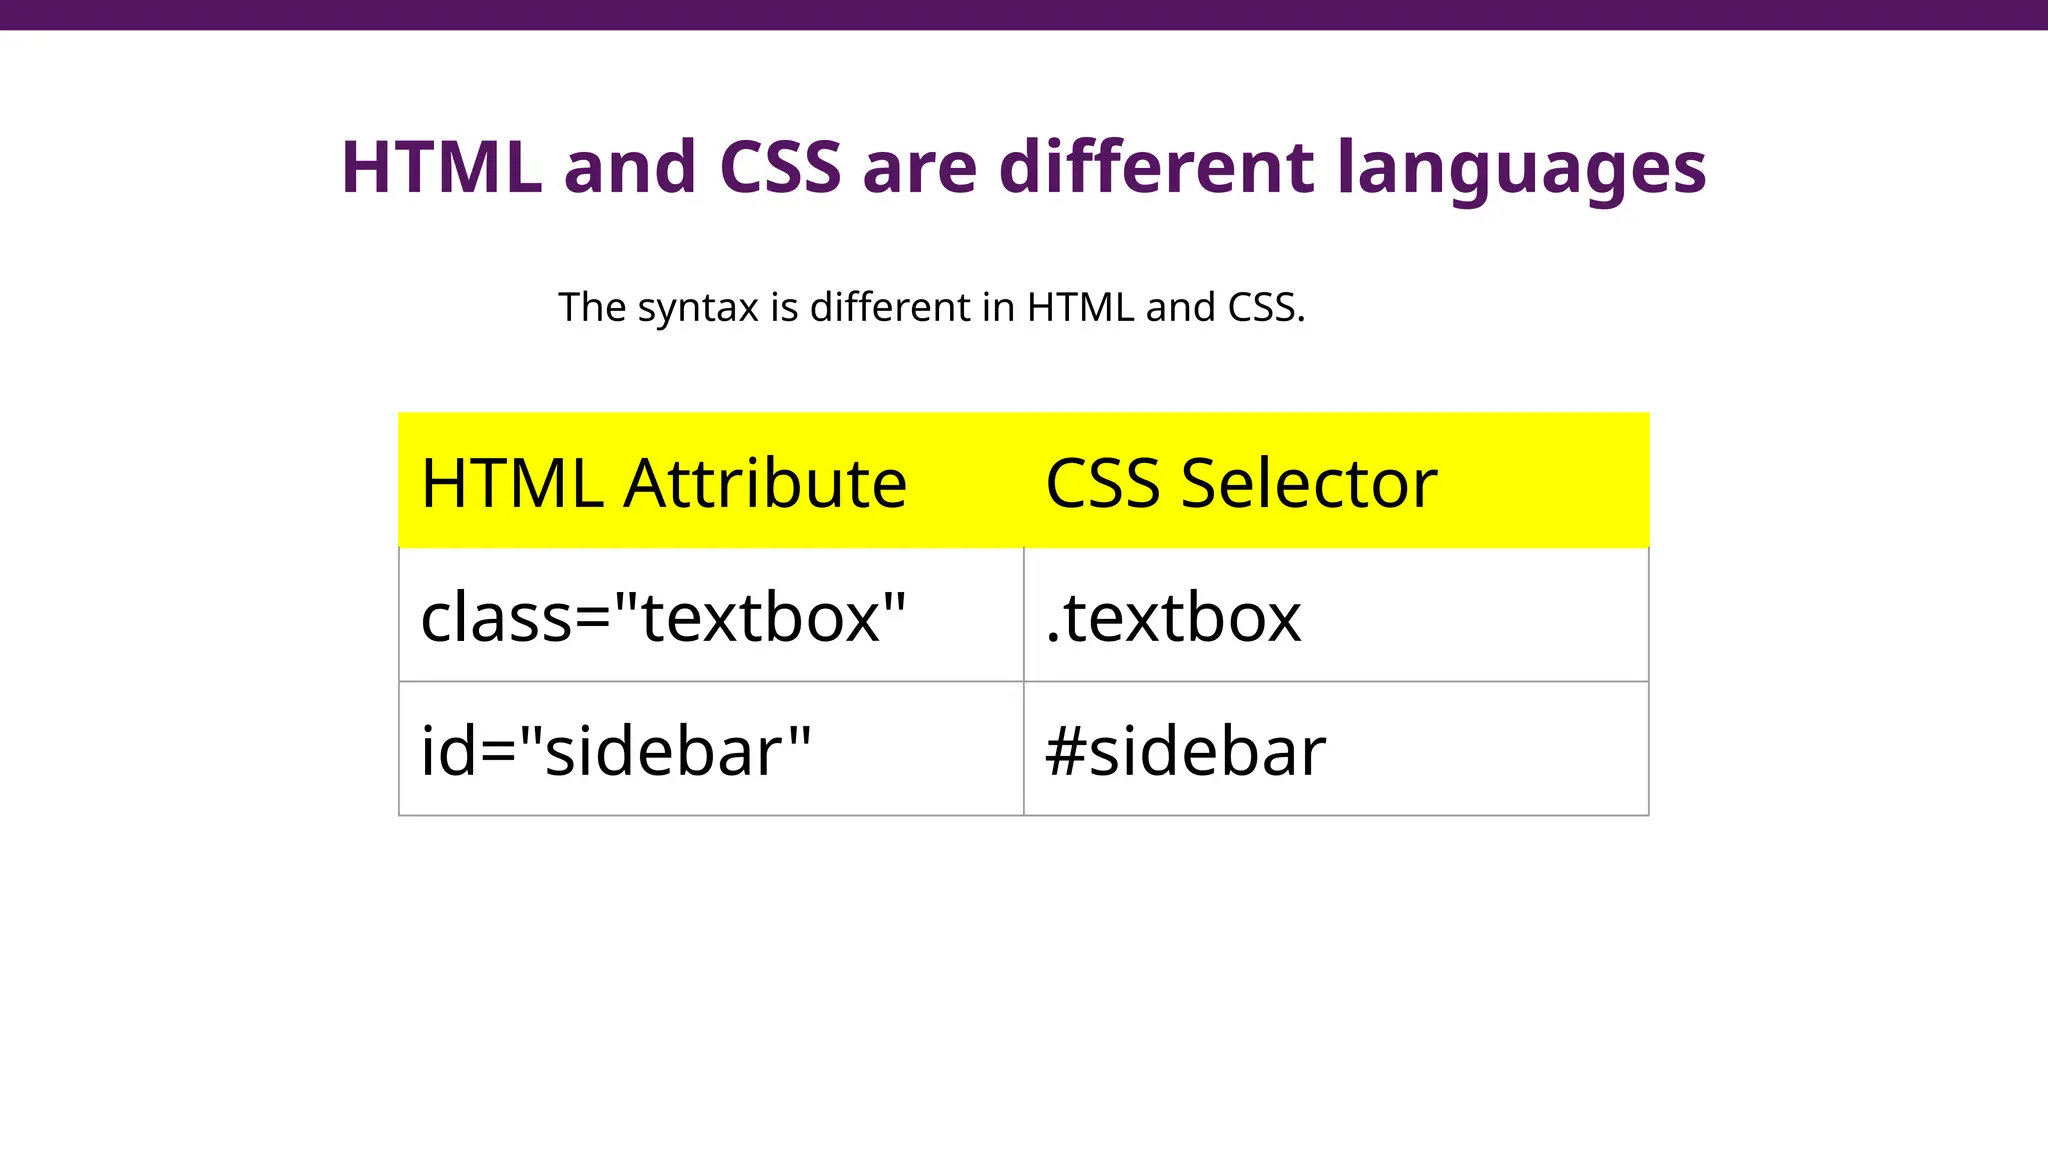
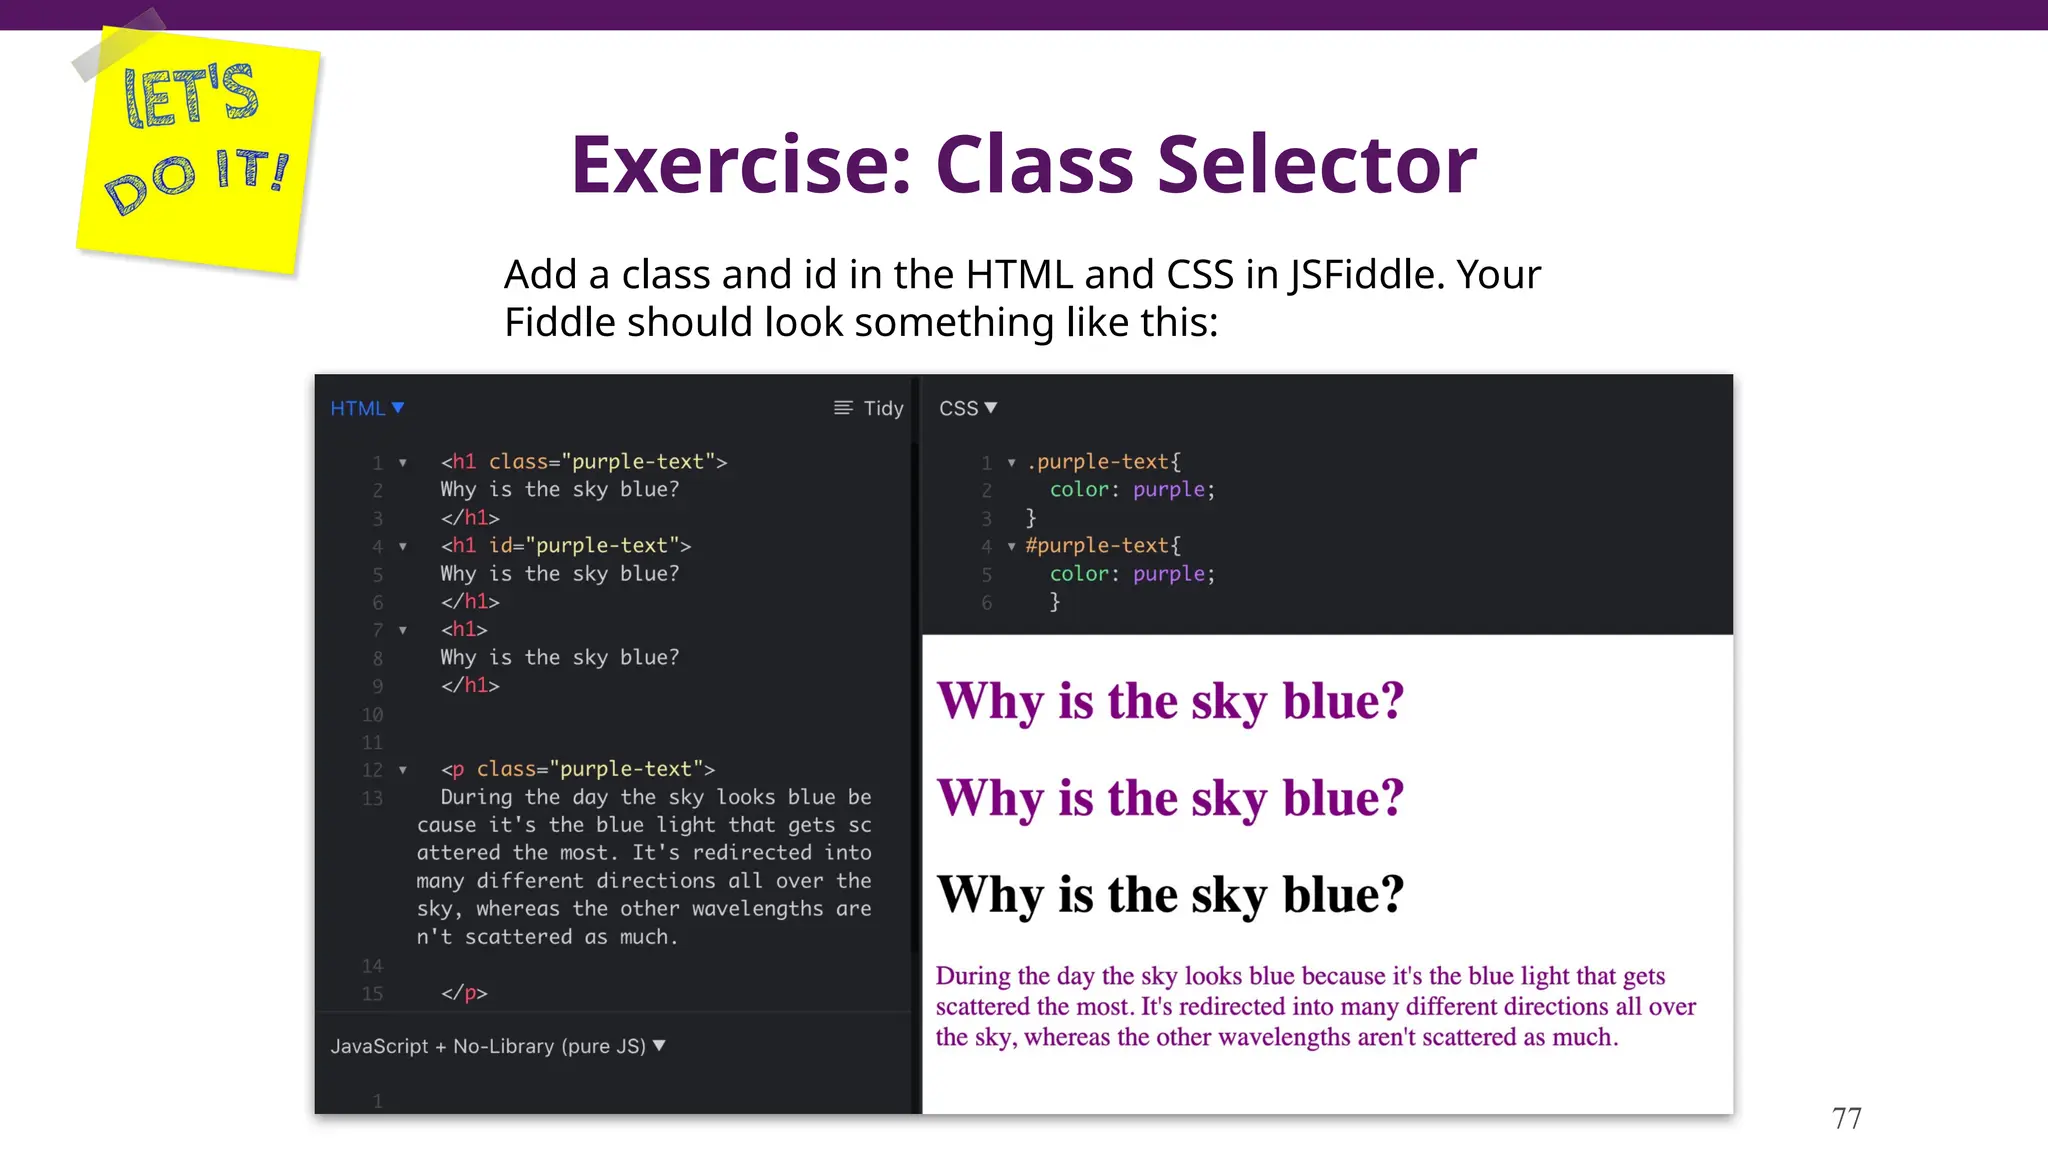
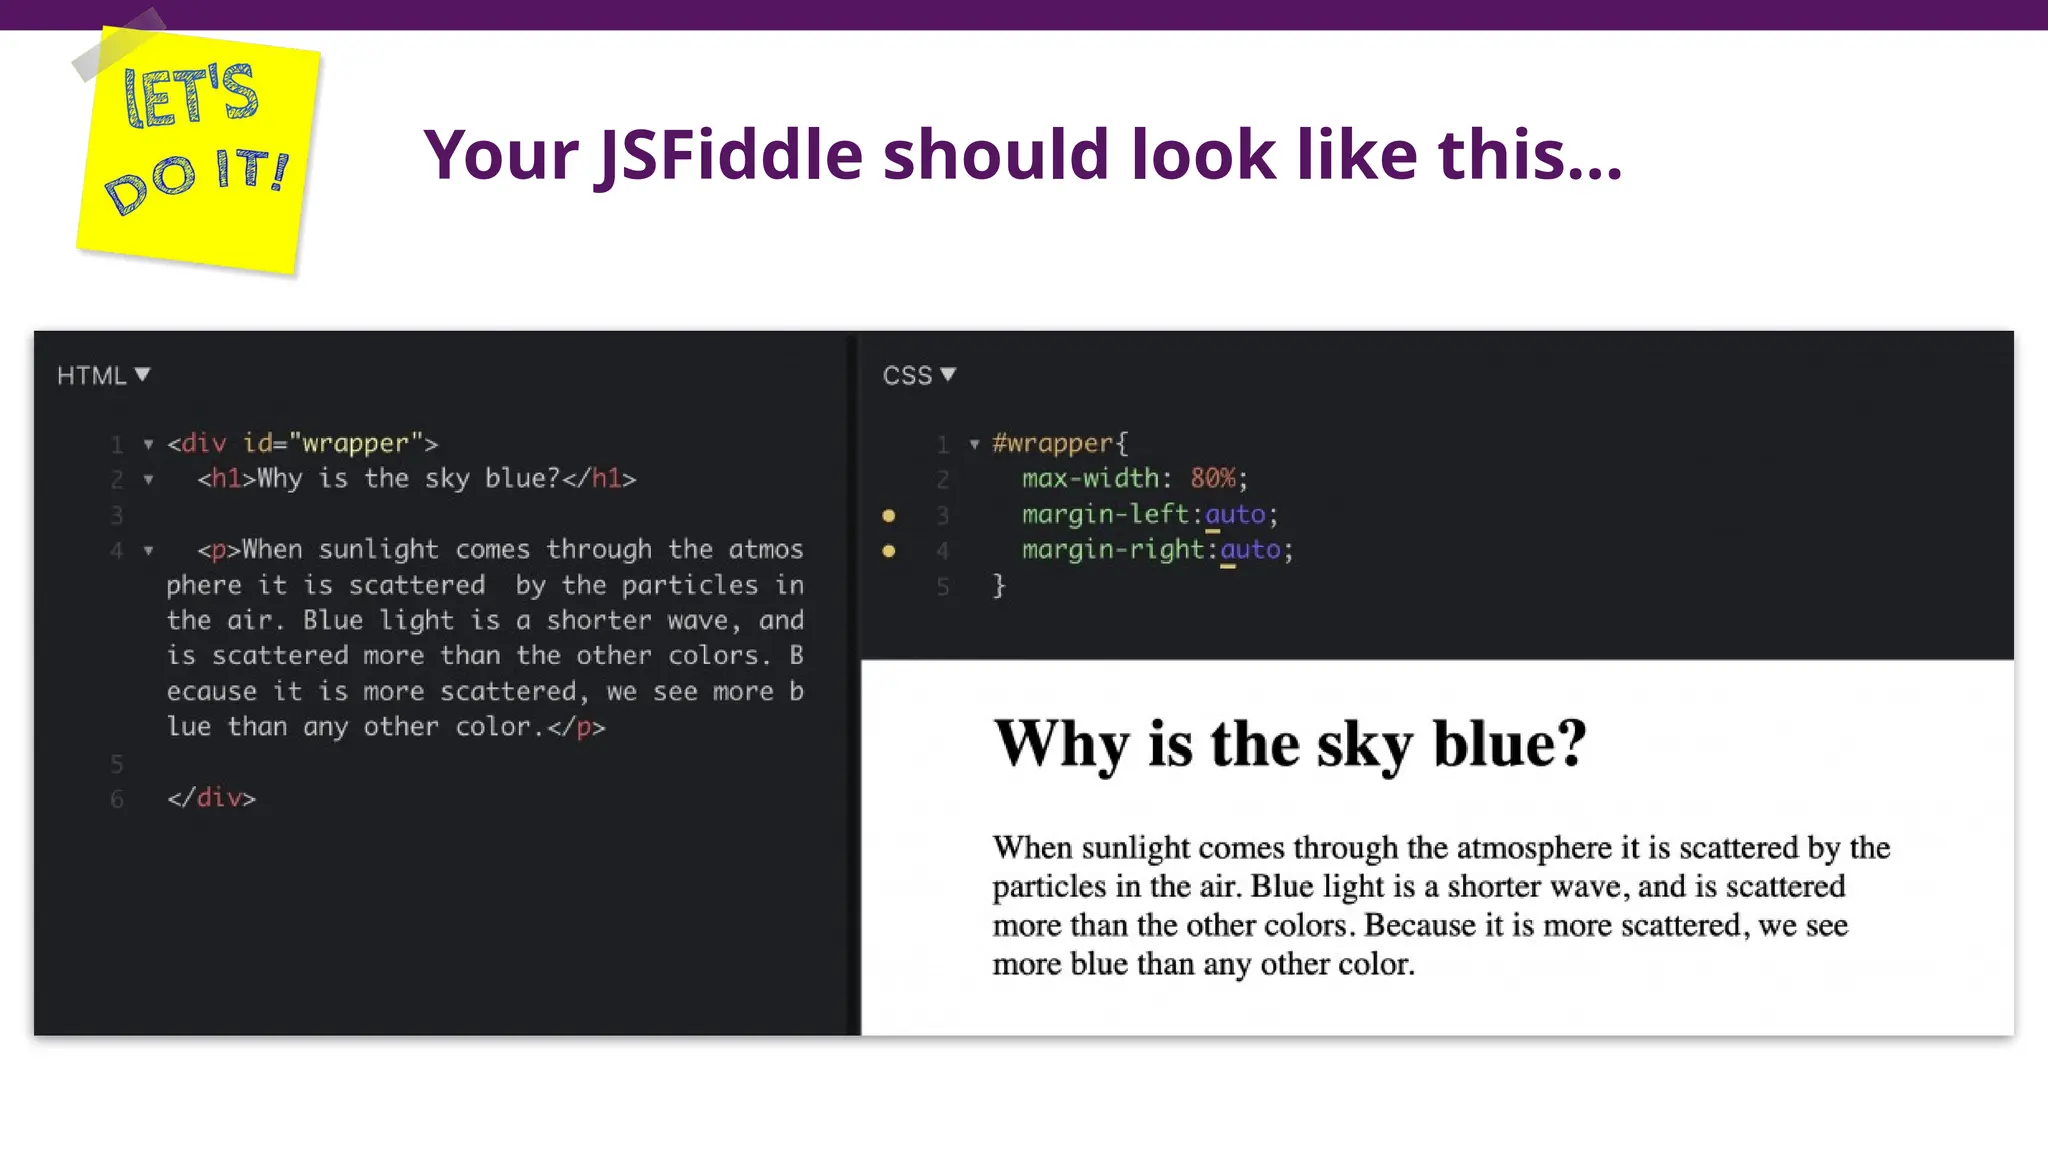
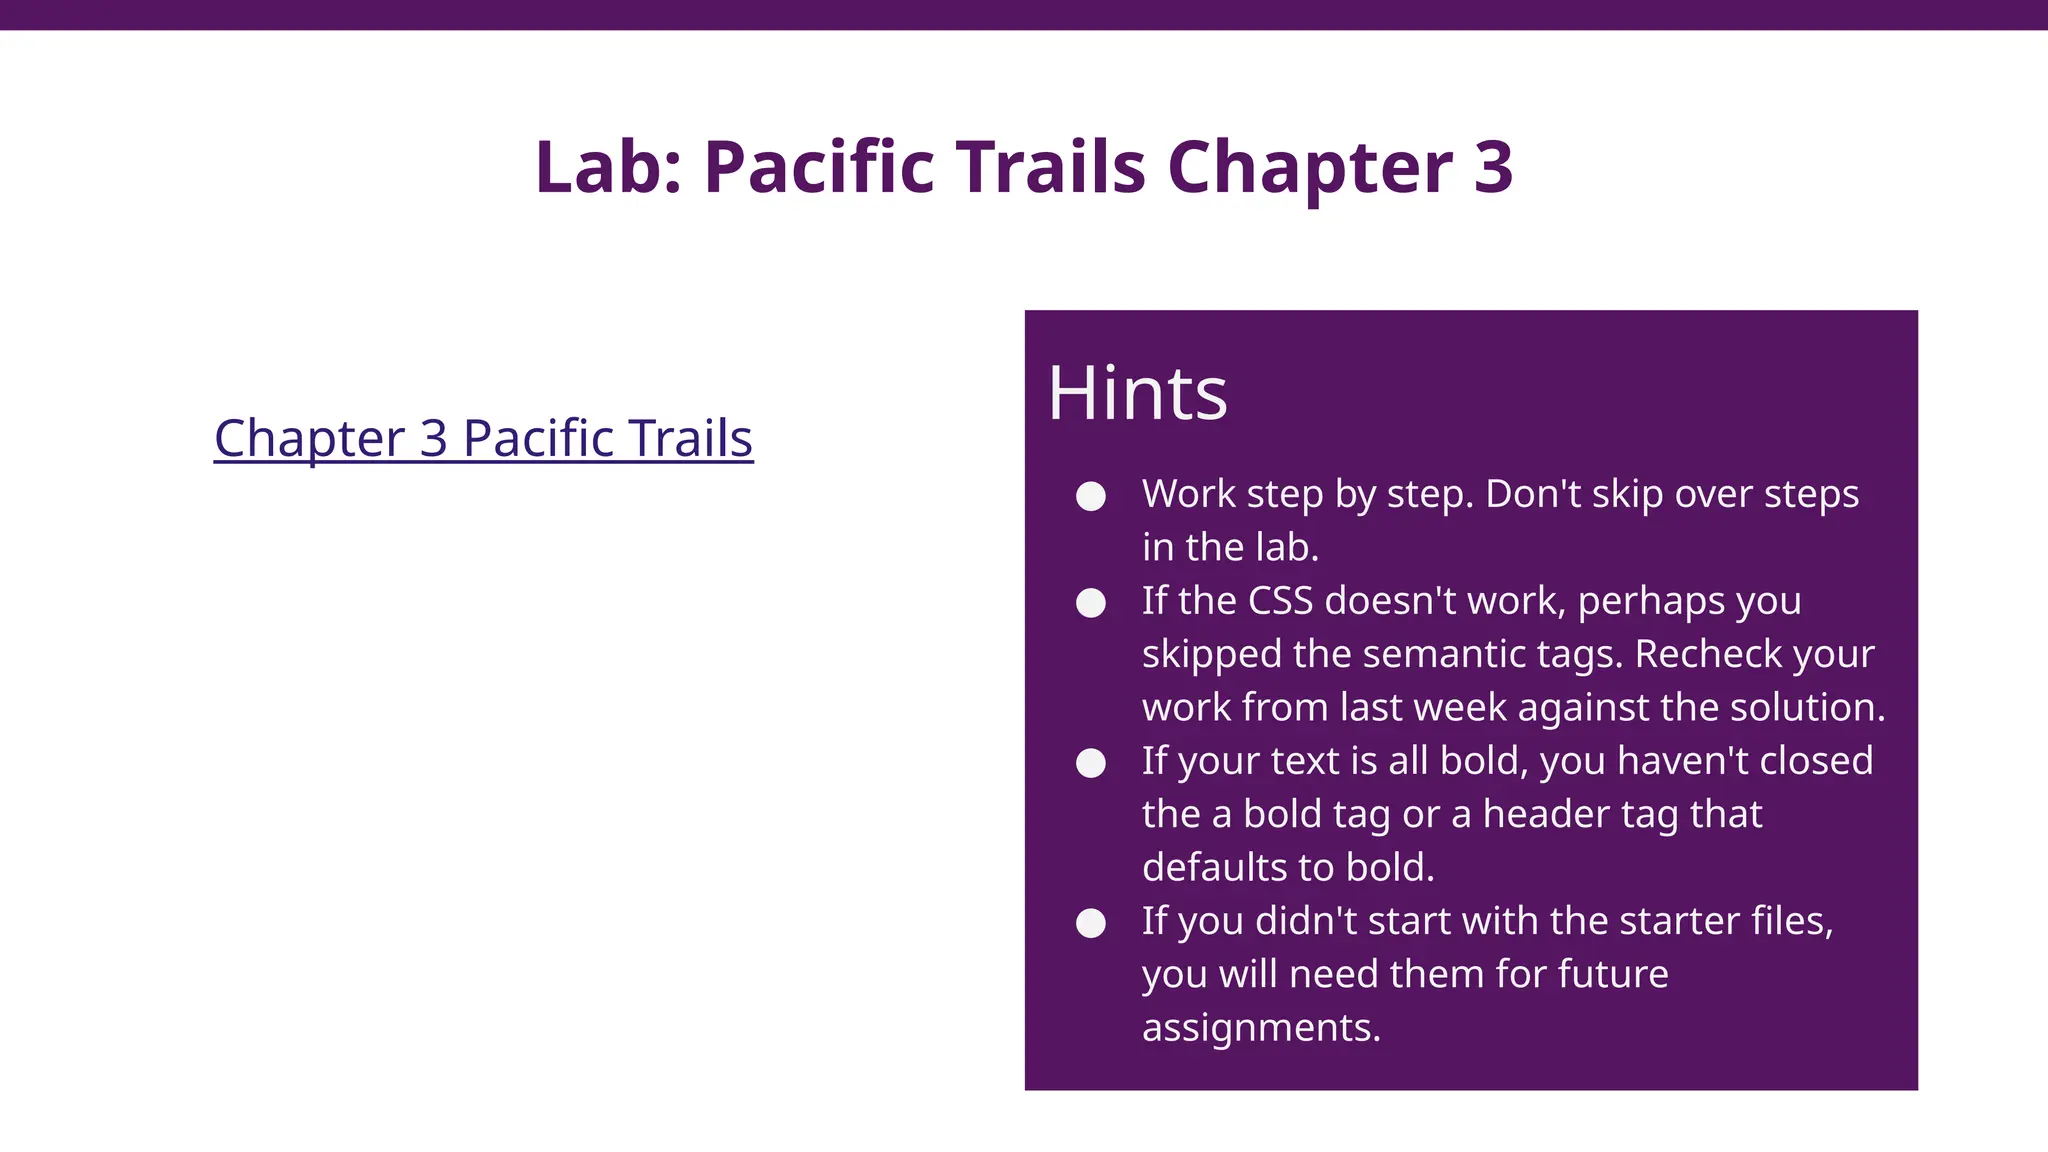
KEMBAR78
Module 3-Introduction to CSS (Chapter 3).pptx
Introduction to CSS
USING STYLES TO ADD COLORS AND TEXT
This slideshow supplements the material in Chapter 3 of
Web Development and Design Foundations with HTML5
by Terry Felke-Morris.
1
Module 3
Agenda Chapter 3
1. Intro to the CSS language
2. CSS Syntax
3. Three ways to Add CSS
4. Colors
5. The font-family Property and Google Fonts
6. Font Size and Other CSS Text Properties
7. Classes and IDs
8. How to Center a Web Page
9. Lab Instructions
2
Module 3 in a Text Format
Lab Instructions
Why is it important to have the folder and files in a specified way for this course?
When I have taught this class in the past I have found that some students had multiple sets of folders and files on their
computers, and they would do the homework for one week in one set of files and homework for another week in another set of
folders. To repair the damage, they would have to try to reconcile the work in two different sets of files. It is so difficult to
reconcile them that it is almost easier to start over than to try to reconcile two or more sets of files.
Why build a website template?
The purpose of keeping a template is that you have the code that you will need in EVERY website. You will need a good template
to work from when we are done with Pacific Trails. You may also want a good starting point to make websites after you finish
this course. The template includes all of the code that you will only want to type one time in your lifetime, like, "<!DOCTYPE
html>". Having the template also makes sure that you have key elements included, like the semantic elements. We will be adding
to the template throughout the class modules.
Is making a website template optional?
No. For the first several weeks of class I give 8 points for Pacific Trails and 2 points for work on your template. When we work on
Module 7 we will use the website template as a starting point.
Frequently Asked Questions
Check Your HTML
Template
Take a few minutes to check your
HTML template against the image at
right. We will be adding to the
template in class today.
You may have something different
in the <main> section. That's fine,
because you will generally delete
the main section and start over on
each web page.
Your HTML template file should be
in the "template" folder, which is in
the "websites" folder.
Where are we going?
Chapter 2 vs. Chapter 3
Last week we did made the Chapter 2 version. This week we are going to add colors
and fonts to it with CSS.
Chapter 3 vs. Chapter 4
Next week we will be adding images to the Pacific Trails website. At that point it is a
beautiful website!
At the end of
this slideshow,
you will know
two coding
languages:
HTML and
CSS
Intro to CSS
What is CSS?
10
Cascading Style Sheets
Cascading: The browser cascades through the various
styles set throughout the code. In class we have one
stylesheet, but a business website will typically have
several CSS stylesheets.
Stylesheets are used by organizations and publishers. A
style sheet will specify how a logo is used and which fonts
and colors can be used for the organization's branding.
With CSS we use code to create the style sheet.
Because the CSS styles (eg. style.css) are kept outside of the HTML, they apply to all HTML pages.
In the lab we will make a stylesheet for Pacific Trails, and there is one stylesheet we will link to
both the index.html and yurts.html pages.
What is a cascade, anyway?
This is a
cascading
waterfall.
Definition of "cascade"
What does CSS do?
13
• Adds color
• Changes text
appearance
• Add background
images
• Sets height and width
• And much more!
Definition from W3C
CSS is the language for describing the presentation of
Web pages, including colors, layout, and fonts. It allows
one to adapt the presentation to different types of
devices, such as large screens, small screens, or
printers. CSS is independent of HTML and can be used
with any XML-based markup language. The separation
of HTML from CSS makes it easier to maintain sites,
share style sheets across pages, and tailor pages to
different environments. This is referred to as the
separation of structure (or: content) from presentation.
CSS Color Properties
The background-color property is used for background
colors
background-color: yellow;
The color property is used for the text color
color: black;
Demo: Inline CSS
Click the PLAY button
Exercise: Inline CSS
Practice: Let's jump right in and add a CSS style
to JSFiddle.net
1. Copy and your type this Element into the
HTML Section of JSFiddle.
<h1>Hello World</h1>
2. Add a text color inside of the h1 tag with the
style attribute:
<h1 style="color:blue">
Add a background color with a semicolon in
between each of the CSS properties:
<h1 style="color:blue; background-
color:red">
Your JSFiddle should look like this…
Why isn’t the font color called
font-color or text-color?
There is no clear answer to that
question. Make a mental note that
"color" means text color in CSS.
Use the
"color"
property to
set the text-
color in CSS
Demo: Cascading Styles
Click the PLAY button
Exercise: Cascading Styles
Go to JSFiddle.net. Type or copy this code into the HTML section.
<div style="background-color:gray">
<h1 style="background-color:green">Adding inline
CSS styles</h1>
</div>
Note that we have set the h1 background-color to be both gray and
green. When there are two styles for the background-color, which one
wins?
21
And we have a winner….
And the winner is the more specific
CSS in the <h1> element!
CSS Syntax
Proper CSS Formatting
CSS syntax has requires three definitions: the selector,
the property and the value.
Selector: The "selector" selects the HTML. This can be an
HTML Element or it also can be defined by an HTML
attribute, like class and id. In the example below, the
selector selects the <body> of the website.
Property: The property defines which aspect of the
selector will be changed; for example, the color or the
font.
Value: The value defines what the color, size or shape of
the property. For example, if the property is "color", then
the value could be "blue".
The selector is followed by curly braces, and the
property:value statements go inside of the curly braces.
The property and value are separated by a colon, and the
property:value statement ends with a semicolon.
Pop Quiz
Identify the following:
Value
Selector
Property
1._____________
2.____________
3.____________
Three Ways to Add CSS
3 Ways to Add CSS
Option 1: Inline Styles
<p style="color:blue">The text is blue</p>
This is the "Quick and Dirty" way to add styles. We just added inline styles in JSFiddle.
Option 2: Embedded Styles
You can add styles to the <head>inside of <style></style> tags. This is often used in
tutorials, where it is handy to have all the code in one file.
Option 3: External Stylesheet
You create a separate code file with a .css file extension, usually named “style.css”.
This is the best practice and where we will write CSS for class.
27
Option 1: Inline CSS
We added inline CSS in the previous JSFiddles. Inline styles:
● Are added in the body of the web page
● Use the style attribute
● Apply only to the specific element
● Are used for a quick fix
28
Option 2: Embedded
<head>
<style>
body{
background-color: red;
color: black;
}
</style>
</head>
29
● Syntax is the same as an
external style sheet
● Place in the html <head> in
between style tags
● See the example on this
video game:
https://www.w3schools.com/graphics/tryit
.asp?filename=trygame_default_gravity
Embedded CSS is added in the web page <head>
Option 3: External CSS
30
External CSS goes into a
separate style sheet.
Using External CSS is a
best practice
We will use an external
CSS style sheet for
Pacific Trails and all lab
assignments
The website files work together to make the website.
Demo: External CSS
Click the PLAY button
Exercise: External CSS
1. Go to JSFiddle.net
2. Change your fiddle from inline to external CSS by moving the CSS to the CSS section.
Attaching an External CSS File
33
If the CSS is not in the same file as the HTML, how
does the browser know where to find it?
A Website is a Set of Files
The files are linked
together in code.
The code references the
other files based on their
location in the file
structure.
<a href="yurts.html">Yurts</a>
<link rel="stylesheet" href="pacific.css">
Examples
Demo: Link and Test Stylesheet
Click the PLAY button
Exercise: Link CSS
36
Step 1. Go to your templates folder
Step 2. Open your
template/index.html file
Step 3. Copy this code to the head:
<link rel="stylesheet"
href="style.css">
Step 4. In the text editor, create a
file. Use Save As to name the file,
"style.css". Make sure you save it in
the template folder.
Place the stylesheet link in the <head> (Step 3.)
Add a style.css file to your template (Step 4)
Exercise: Test External CSS
37
Work in your template/index.html and template/style.css
files.
Step 1. Add this code to index.html in the <main> section
<h2>Using CSS to add styles</h2>
Step 2. Enter this code in style.css
h2 {
color: blue;
background-color: yellow;
}
Step 3. Save both files.
Step 4. View index.html in the Chrome browser. You should
see the yellow background and blue text on the <h2>
Exercise: Remove Test CSS
38
Now that you know you have correctly attached the
CSS style sheet, you can delete the code we added for
our test.
Step 1. Delete this code from index.html
<h2>Using CSS to add styles</h2>
Step 2. Delete this code in style.css
h2 {
color: blue;
background-color: yellow;
}
Step 3. Save both files.
Add Stylesheet to Template
If you skipped the exercise in the previous slide, go back an do it
now. This is part of the lab for this week. When going through the
slideshow, look for the sticky notes and take a moment to try the
exercises. Some exercises, like this one, involve modifications to
the template and are graded.
Colors
Color Syntax Options
So far we have just used color names. You can also use much
more specific colors. Here are three ways to add color values:
1. Color name (eg. purple, blue, green)
2. Hexadecimal (eg. #FFFFFF). This is used most frequently.
3. RGBA (to include opacity). This is a special use case if you
would like to be able to see through the colors.
color: purple;
color: #800080;
color: rgba(128,0,128,.6);
Tricks of the trade
● Use Color Picker tool at W3 Schools to find hex numbers for
colors.
● Invest in a color picker tool. Use colors from key images, like
the logo.
● Use hex colors unless you need to set the opacity and then
use RGBA.
● Adobe tool for color selection: https://color.adobe.com/create
42
Demo: Color Practice with Hex
Click the PLAY button
Exercise: Hex Colors
Open JSFiddle.net. Pick
out some hexadecimal
colors from W3 Schools
and add them to JSFiddle.
body{
background-color: #397bbd;
}
h1{
color: #f1aa29;
}
44
Your JSFiddle will look something like this, but with
the colors you picked out instead of the colors shown
here.
Demo: Color Practice with RGBA
Click the PLAY button
Exercise: RGBA Colors
Open JS Fiddle.
1. Cut and paste this into the CSS Section :
body{
background-image:url(
http://whitebuffalosolutions.com/WB-Templa
te/images/photo1.jpg
);
}
2. Add a title in <h1> tags with a white color (#FFFFFF);
3. Change the color from white to RGBA with opacity of .5.
Make the font larger. See the code below.
h1{
color: rgba(255,255,255,.5);
font-size:4em;
}
46
Your JSFiddle Should Look Like This…
The font-family Property
font-family Property
The font-family property sets the font choice. The code
looks like this.
p {
font-family: Arial, Verdana, sans-serif;
}
● This code instructs the browser to first look for the Arial font.
● If Arial isn't available, then use the Verdana font.
● If Verdana isn't available, then use the default sans-serif font for the
browser.
Note that the three fonts are separated with a comma.
49
Web-Safe Fonts
For a complete list: Web-safe fonts
Web-safe fonts are generally
available on all browsers. You can
see five of them on the image at the
right.
Most websites today use Google
Fonts instead of Web Safe Fonts
50
Google Fonts
See the Google Font choices at fonts.google.com
Google Fonts are FREE!
There are two steps to using a Google Font.
1. Import the font stylesheets to your stylesheet
2. Add the font to the specified CSS, like the body or an
h1.
Filtering Google Fonts
Because there are so many free fonts
available, it can be difficult to navigate.
● For a fancy font for your headings, try
filtering the Handwriting and Display
fonts.
● For a font to use for regular text, filter for
a serif or san-serif font
Selecting Fonts
Once you decide on a font-family, then
click the Get Font button.
When you are done selecting font-
families, go to your shopping cart.
Click the Get Embed Code button.
Importing Google Fonts
In order to make a font-family available for your use, you need to
import the font-family into your website. The easiest way to do
this is by adding the @import code to the top of your CSS file.
Demo: Google Fonts
Click the PLAY button
This video is a bit outdated, but may
help you see what we are trying to do.
Use the detailed instruction on the
prior page for up to date screenshots.
Exercise:
Add a Google font that is easy to read
Work in your template/style.css file.
Step 1. Go to fonts.google.com
Step 2. Select a font that is easy to read. This will be the base
font for your website template. Some popular fonts that are
easy to read are Roboto, Open Sans, Montserrat, or Lora.
Step 3. Find and click the Get Font button.
Step 4. Place the @import at the top of your CSS file in your
website template. (Don't bring over the <style> tags
Step 5. Now that you have the font imported, you can use it on
the website. Write the CSS to add the font to everything in the
website body, using "body" as the selector with the font-family
property.
Step 6. Save your CSS file, and open index.html in the browser
The code in your CSS file should look
something like this:
@import url('https://fonts.googleapis.com/css2?
family=Montserrat:ital,wght@0,100..900;1,100..900&di
splay=swap');
body{
font-family: "Montserrat", sans-serif;
}
Having Trouble?
I have a blog post with detailed instructions:
https://webdevstudents.com/how-to-use-google-fonts/
Optional Exercise:
Add a decorative Google font for headings
Step 1. Go to fonts.google.com
Step 2. Select a second decorative fonts.
Step 3. Place the @import at the top of your CSS
file in your website template. You can either
bring over a second import tag, or replace your
original import with the code for multiple fonts.
You can see your font selections inside of the
import tag.
Step 4. Add a selector for the headings, eg. h1,
h2 or h1, h2, h3. Add the font-family code to the
selector.
The code in your CSS file should look
something like this:
@import url('
https://fonts.googleapis.com/css2?family=Shadow
s+Into+Light&family=Ubuntu+Sans:ital,wght@0,100
..800;1,100..800&display=swap
');
body{
font-family: "Ubuntu Sans", sans-serif;
}
h1, h2, h3{
font-family: "Shadows Into Light", cursive;
}
Sample Font Code
Your code will look something like this.
● In this example I have a different
font for h1 and h2 only.
● I put in the overall body font-family
and color first and then I overrode
it with the special font-family and
color for the h1 and h2.
● Use your own font-families and
colors for this step.
A word of warning: Do not attempt to type the import tag at
left. Find your own fonts and cut and paste them into your
stylesheet.
Make sure there is a
semicolon at the end.
Add one or two Google Fonts to style.css in your template
If you skipped the exercise in the previous slide, go back an do it
now. This is part of the lab for this week. When going through the
slideshow, look for the sticky notes and take a moment to try the
exercises. Some exercises, like this one, involve modifications to
the template and are graded.
font-size and Other Text Properties
font-size Property
● You can use pixels, points,
EMs, or percentage to set the
font size
● EMs are best practice
● EMs come from the width of
an “M” in typography
● 16 pixels = 1em
Other CSS Text Properties
There are a many other text properties. Listed below are the most commonly
used text properties.
font-weight: the value would usually be "bold" or "normal"
text-align: You can use this property to align the text to center, right or left.
Left is the default.
line-height: This is the spacing between each line. A nice setting is 1.5.
letter-spacing: This is the spacing between each letter. It makes a nice effect
on a heading.
Demo: Font and text properties
Click the PLAY button
Exercise:
font and text properties
1. Open JSFiddle.net.
2. Add some text to the HTML
section with HTML markup. Copy
the code and text at right.
3. Modify your font-size with in the
CSS, eg.
Try the following CSS properties.
font-weight: normal|bold
line-height: Eg. 1.5
text-align: left|right|center
letter-spacing: Eg. 2px
65
<h1> Placeholder Text </h1>
<p> Lorem ipsum dolor sit amet,
consectetur adipiscing elit, sed do
eiusmod tempor incididunt ut labore et
dolore magna aliqua. Ut enim ad minim
veniam, quis nostrud exercitation
ullamco laboris nisi ut aliquip ex ea
commodo consequat. Duis aute irure
dolor in reprehenderit in voluptate
velit esse cillum dolore eu fugiat
nulla pariatur. Excepteur sint
occaecat cupidatat non proident, sunt
in culpa qui officia deserunt mollit
anim id est laborum. </p>
Your JSFiddle should look something like this…
Classes and IDs
Refresh on the Selector
In CSS, the selector "selects"
which HTML it will modify.
CSS Selectors
SELECT
which HTML to style
Pick me! Pick
me!
Types of CSS Selectors
So far we have use the HTML element as the selector, like body
or h1. Now we are going to learn about more types of selectors.
● class selector
● id selector
● descendant selector
But first, we need a quick review of HTML Attributes.
70
HTML Attributes
Attributes modify the HTML element, like this:
<h1 class="headline">My Headline</h1>
To add an attribute, first type a space after the tag, the = and then
place the value in quotation marks.
Sometimes an element will have several attributes, like this:
<h1 class="headline" id="headline">My Headline</h1>
Note that there is a space between the class and the id attributes.
Common Typos with HTML Attributes
Can you spot the typos?
<h1 class=headline id=headline>
<h1 class="headline id="headline>
<h1 class="headline"id="headline">
Common Typos with HTML Attributes
Can you spot the typos?
<h1 class=headline id=headline>
The developer missed the quotation marks.
<h1 class="headline id="headline>
The developer missed the closing quotation marks
<h1 class="headline"id="headline">
The developer didn't put a space in between the two attributes.
New attributes: id and class
Use id when you need to use the CSS once on the page.
Use class if the CSS may be used more than once on the page.
Note: Classes are typically used for CSS rather than ids,
because they can be reused.
HTML and CSS are different languages
HTML Attribute CSS Selector
class="textbox" .textbox
id="sidebar" #sidebar
The syntax is different in HTML and CSS.
Demo: Class and ID Selectors
Click the PLAY button
Exercise: Class Selector
77
Add a class and id in the HTML and CSS in JSFiddle. Your
Fiddle should look something like this:
Pop Quiz
When would you use "id"?
When would you use "class"?
78
Class vs ID
• Class is used more frequently than ID, because it can be
reused throughout a website
• ID can only be used once on a page.
• Before CSS3 and the semantic elements, we used it for a footer
or nav, eg. <div id="footer">
• ID is often used as a selector in Javascript
• In most cases you should use a class instead of an ID.
79
Span and Div
<span> and <div> are generic elements you can add in order to select parts of
the websites.
For example:
<p>We can help you make a website at <span class="company-name">Platypus
Web Design</span>.
We will work with you to build your website.</p>
<span> tags are used for smaller sections of text.
<div> is used around larger sections (more to come on this).
80
How to Center a Web Page
You can center a block element by setting the margin to auto on both the left
and right sides. The code below is used to set the main section of the website
to a maximum width of 800px, and then center it horizontally.
main{
margin-left: auto;
margin-right: auto;
max-width: 800px;
}
Demo: Centering Page Content 3.10
Click the PLAY button
Exercise: Centering A Page
Open JSFiddle.net. Add some content and add a div
with the id of wrapper around it. Center it.
#wrapper {
width:80%;
margin-left: auto;
margin-right: auto;
}
84
Your JSFiddle should look like this…
Take the Quiz
Now that you have finished reading Chapter 3 and studying this slideshow,
take the quiz.
Quizzes are due Thursdays at 10pm each week.
The Lab Assignment is due Sunday at 10pm each week.
Lab Instructions
On the index.html file, the only thing
we added is the <link> in the
template to the stylesheet.
In the style.css file, we imported one
or two Google Fonts, and added
some code to select those fonts.
Check Template
Is it better to do the
lab your own way, or
to do it step by step
with the instructions?
Follow Each Step
● For this phase of class, follow each step exactly.
● When doing the labs, not every instruction has a purpose that you
can see immediately.
● For example, if you skipped the semantic tags in Lab 2, your website
would display perfectly in the browser. However, some of the CSS will
not work in Lab 3, because it relies on the semantic tags being there.
There will be more opportunity for creativity in a few weeks.
Lab: Pacific Trails Chapter 3
Chapter 3 Pacific Trails
Hints
● Work step by step. Don't skip over steps
in the lab.
● If the CSS doesn't work, perhaps you
skipped the semantic tags. Recheck your
work from last week against the solution.
● If your text is all bold, you haven't closed
the a bold tag or a header tag that
defaults to bold.
● If you didn't start with the starter files,
you will need them for future
assignments.

Module 3-Introduction to CSS (Chapter 3).pptx

  • 1.
    Introduction to CSS USINGSTYLES TO ADD COLORS AND TEXT This slideshow supplements the material in Chapter 3 of Web Development and Design Foundations with HTML5 by Terry Felke-Morris. 1 Module 3
  • 2.
    Agenda Chapter 3 1.Intro to the CSS language 2. CSS Syntax 3. Three ways to Add CSS 4. Colors 5. The font-family Property and Google Fonts 6. Font Size and Other CSS Text Properties 7. Classes and IDs 8. How to Center a Web Page 9. Lab Instructions 2 Module 3 in a Text Format Lab Instructions
  • 3.
    Why is itimportant to have the folder and files in a specified way for this course? When I have taught this class in the past I have found that some students had multiple sets of folders and files on their computers, and they would do the homework for one week in one set of files and homework for another week in another set of folders. To repair the damage, they would have to try to reconcile the work in two different sets of files. It is so difficult to reconcile them that it is almost easier to start over than to try to reconcile two or more sets of files. Why build a website template? The purpose of keeping a template is that you have the code that you will need in EVERY website. You will need a good template to work from when we are done with Pacific Trails. You may also want a good starting point to make websites after you finish this course. The template includes all of the code that you will only want to type one time in your lifetime, like, "<!DOCTYPE html>". Having the template also makes sure that you have key elements included, like the semantic elements. We will be adding to the template throughout the class modules. Is making a website template optional? No. For the first several weeks of class I give 8 points for Pacific Trails and 2 points for work on your template. When we work on Module 7 we will use the website template as a starting point. Frequently Asked Questions
  • 4.
    Check Your HTML Template Takea few minutes to check your HTML template against the image at right. We will be adding to the template in class today. You may have something different in the <main> section. That's fine, because you will generally delete the main section and start over on each web page. Your HTML template file should be in the "template" folder, which is in the "websites" folder.
  • 5.
  • 6.
    Chapter 2 vs.Chapter 3 Last week we did made the Chapter 2 version. This week we are going to add colors and fonts to it with CSS.
  • 7.
    Chapter 3 vs.Chapter 4 Next week we will be adding images to the Pacific Trails website. At that point it is a beautiful website!
  • 8.
    At the endof this slideshow, you will know two coding languages: HTML and CSS
  • 9.
  • 10.
    What is CSS? 10 CascadingStyle Sheets Cascading: The browser cascades through the various styles set throughout the code. In class we have one stylesheet, but a business website will typically have several CSS stylesheets. Stylesheets are used by organizations and publishers. A style sheet will specify how a logo is used and which fonts and colors can be used for the organization's branding. With CSS we use code to create the style sheet. Because the CSS styles (eg. style.css) are kept outside of the HTML, they apply to all HTML pages. In the lab we will make a stylesheet for Pacific Trails, and there is one stylesheet we will link to both the index.html and yurts.html pages.
  • 11.
    What is acascade, anyway? This is a cascading waterfall.
  • 12.
  • 13.
    What does CSSdo? 13 • Adds color • Changes text appearance • Add background images • Sets height and width • And much more! Definition from W3C CSS is the language for describing the presentation of Web pages, including colors, layout, and fonts. It allows one to adapt the presentation to different types of devices, such as large screens, small screens, or printers. CSS is independent of HTML and can be used with any XML-based markup language. The separation of HTML from CSS makes it easier to maintain sites, share style sheets across pages, and tailor pages to different environments. This is referred to as the separation of structure (or: content) from presentation.
  • 14.
    CSS Color Properties Thebackground-color property is used for background colors background-color: yellow; The color property is used for the text color color: black;
  • 15.
    Demo: Inline CSS Clickthe PLAY button
  • 16.
    Exercise: Inline CSS Practice:Let's jump right in and add a CSS style to JSFiddle.net 1. Copy and your type this Element into the HTML Section of JSFiddle. <h1>Hello World</h1> 2. Add a text color inside of the h1 tag with the style attribute: <h1 style="color:blue"> Add a background color with a semicolon in between each of the CSS properties: <h1 style="color:blue; background- color:red">
  • 17.
    Your JSFiddle shouldlook like this…
  • 18.
    Why isn’t thefont color called font-color or text-color?
  • 19.
    There is noclear answer to that question. Make a mental note that "color" means text color in CSS. Use the "color" property to set the text- color in CSS
  • 20.
  • 21.
    Exercise: Cascading Styles Goto JSFiddle.net. Type or copy this code into the HTML section. <div style="background-color:gray"> <h1 style="background-color:green">Adding inline CSS styles</h1> </div> Note that we have set the h1 background-color to be both gray and green. When there are two styles for the background-color, which one wins? 21
  • 22.
    And we havea winner…. And the winner is the more specific CSS in the <h1> element!
  • 23.
  • 24.
    Proper CSS Formatting CSSsyntax has requires three definitions: the selector, the property and the value. Selector: The "selector" selects the HTML. This can be an HTML Element or it also can be defined by an HTML attribute, like class and id. In the example below, the selector selects the <body> of the website. Property: The property defines which aspect of the selector will be changed; for example, the color or the font. Value: The value defines what the color, size or shape of the property. For example, if the property is "color", then the value could be "blue". The selector is followed by curly braces, and the property:value statements go inside of the curly braces. The property and value are separated by a colon, and the property:value statement ends with a semicolon.
  • 25.
    Pop Quiz Identify thefollowing: Value Selector Property 1._____________ 2.____________ 3.____________
  • 26.
  • 27.
    3 Ways toAdd CSS Option 1: Inline Styles <p style="color:blue">The text is blue</p> This is the "Quick and Dirty" way to add styles. We just added inline styles in JSFiddle. Option 2: Embedded Styles You can add styles to the <head>inside of <style></style> tags. This is often used in tutorials, where it is handy to have all the code in one file. Option 3: External Stylesheet You create a separate code file with a .css file extension, usually named “style.css”. This is the best practice and where we will write CSS for class. 27
  • 28.
    Option 1: InlineCSS We added inline CSS in the previous JSFiddles. Inline styles: ● Are added in the body of the web page ● Use the style attribute ● Apply only to the specific element ● Are used for a quick fix 28
  • 29.
    Option 2: Embedded <head> <style> body{ background-color:red; color: black; } </style> </head> 29 ● Syntax is the same as an external style sheet ● Place in the html <head> in between style tags ● See the example on this video game: https://www.w3schools.com/graphics/tryit .asp?filename=trygame_default_gravity Embedded CSS is added in the web page <head>
  • 30.
    Option 3: ExternalCSS 30 External CSS goes into a separate style sheet. Using External CSS is a best practice We will use an external CSS style sheet for Pacific Trails and all lab assignments The website files work together to make the website.
  • 31.
    Demo: External CSS Clickthe PLAY button
  • 32.
    Exercise: External CSS 1.Go to JSFiddle.net 2. Change your fiddle from inline to external CSS by moving the CSS to the CSS section.
  • 33.
    Attaching an ExternalCSS File 33 If the CSS is not in the same file as the HTML, how does the browser know where to find it?
  • 34.
    A Website isa Set of Files The files are linked together in code. The code references the other files based on their location in the file structure. <a href="yurts.html">Yurts</a> <link rel="stylesheet" href="pacific.css"> Examples
  • 35.
    Demo: Link andTest Stylesheet Click the PLAY button
  • 36.
    Exercise: Link CSS 36 Step1. Go to your templates folder Step 2. Open your template/index.html file Step 3. Copy this code to the head: <link rel="stylesheet" href="style.css"> Step 4. In the text editor, create a file. Use Save As to name the file, "style.css". Make sure you save it in the template folder. Place the stylesheet link in the <head> (Step 3.) Add a style.css file to your template (Step 4)
  • 37.
    Exercise: Test ExternalCSS 37 Work in your template/index.html and template/style.css files. Step 1. Add this code to index.html in the <main> section <h2>Using CSS to add styles</h2> Step 2. Enter this code in style.css h2 { color: blue; background-color: yellow; } Step 3. Save both files. Step 4. View index.html in the Chrome browser. You should see the yellow background and blue text on the <h2>
  • 38.
    Exercise: Remove TestCSS 38 Now that you know you have correctly attached the CSS style sheet, you can delete the code we added for our test. Step 1. Delete this code from index.html <h2>Using CSS to add styles</h2> Step 2. Delete this code in style.css h2 { color: blue; background-color: yellow; } Step 3. Save both files.
  • 39.
    Add Stylesheet toTemplate If you skipped the exercise in the previous slide, go back an do it now. This is part of the lab for this week. When going through the slideshow, look for the sticky notes and take a moment to try the exercises. Some exercises, like this one, involve modifications to the template and are graded.
  • 40.
  • 41.
    Color Syntax Options Sofar we have just used color names. You can also use much more specific colors. Here are three ways to add color values: 1. Color name (eg. purple, blue, green) 2. Hexadecimal (eg. #FFFFFF). This is used most frequently. 3. RGBA (to include opacity). This is a special use case if you would like to be able to see through the colors. color: purple; color: #800080; color: rgba(128,0,128,.6);
  • 42.
    Tricks of thetrade ● Use Color Picker tool at W3 Schools to find hex numbers for colors. ● Invest in a color picker tool. Use colors from key images, like the logo. ● Use hex colors unless you need to set the opacity and then use RGBA. ● Adobe tool for color selection: https://color.adobe.com/create 42
  • 43.
    Demo: Color Practicewith Hex Click the PLAY button
  • 44.
    Exercise: Hex Colors OpenJSFiddle.net. Pick out some hexadecimal colors from W3 Schools and add them to JSFiddle. body{ background-color: #397bbd; } h1{ color: #f1aa29; } 44 Your JSFiddle will look something like this, but with the colors you picked out instead of the colors shown here.
  • 45.
    Demo: Color Practicewith RGBA Click the PLAY button
  • 46.
    Exercise: RGBA Colors OpenJS Fiddle. 1. Cut and paste this into the CSS Section : body{ background-image:url( http://whitebuffalosolutions.com/WB-Templa te/images/photo1.jpg ); } 2. Add a title in <h1> tags with a white color (#FFFFFF); 3. Change the color from white to RGBA with opacity of .5. Make the font larger. See the code below. h1{ color: rgba(255,255,255,.5); font-size:4em; } 46
  • 47.
    Your JSFiddle ShouldLook Like This…
  • 48.
  • 49.
    font-family Property The font-familyproperty sets the font choice. The code looks like this. p { font-family: Arial, Verdana, sans-serif; } ● This code instructs the browser to first look for the Arial font. ● If Arial isn't available, then use the Verdana font. ● If Verdana isn't available, then use the default sans-serif font for the browser. Note that the three fonts are separated with a comma. 49
  • 50.
    Web-Safe Fonts For acomplete list: Web-safe fonts Web-safe fonts are generally available on all browsers. You can see five of them on the image at the right. Most websites today use Google Fonts instead of Web Safe Fonts 50
  • 51.
    Google Fonts See theGoogle Font choices at fonts.google.com Google Fonts are FREE! There are two steps to using a Google Font. 1. Import the font stylesheets to your stylesheet 2. Add the font to the specified CSS, like the body or an h1.
  • 52.
    Filtering Google Fonts Becausethere are so many free fonts available, it can be difficult to navigate. ● For a fancy font for your headings, try filtering the Handwriting and Display fonts. ● For a font to use for regular text, filter for a serif or san-serif font
  • 53.
    Selecting Fonts Once youdecide on a font-family, then click the Get Font button. When you are done selecting font- families, go to your shopping cart. Click the Get Embed Code button.
  • 54.
    Importing Google Fonts Inorder to make a font-family available for your use, you need to import the font-family into your website. The easiest way to do this is by adding the @import code to the top of your CSS file.
  • 55.
    Demo: Google Fonts Clickthe PLAY button This video is a bit outdated, but may help you see what we are trying to do. Use the detailed instruction on the prior page for up to date screenshots.
  • 56.
    Exercise: Add a Googlefont that is easy to read Work in your template/style.css file. Step 1. Go to fonts.google.com Step 2. Select a font that is easy to read. This will be the base font for your website template. Some popular fonts that are easy to read are Roboto, Open Sans, Montserrat, or Lora. Step 3. Find and click the Get Font button. Step 4. Place the @import at the top of your CSS file in your website template. (Don't bring over the <style> tags Step 5. Now that you have the font imported, you can use it on the website. Write the CSS to add the font to everything in the website body, using "body" as the selector with the font-family property. Step 6. Save your CSS file, and open index.html in the browser The code in your CSS file should look something like this: @import url('https://fonts.googleapis.com/css2? family=Montserrat:ital,wght@0,100..900;1,100..900&di splay=swap'); body{ font-family: "Montserrat", sans-serif; }
  • 57.
    Having Trouble? I havea blog post with detailed instructions: https://webdevstudents.com/how-to-use-google-fonts/
  • 58.
    Optional Exercise: Add adecorative Google font for headings Step 1. Go to fonts.google.com Step 2. Select a second decorative fonts. Step 3. Place the @import at the top of your CSS file in your website template. You can either bring over a second import tag, or replace your original import with the code for multiple fonts. You can see your font selections inside of the import tag. Step 4. Add a selector for the headings, eg. h1, h2 or h1, h2, h3. Add the font-family code to the selector. The code in your CSS file should look something like this: @import url(' https://fonts.googleapis.com/css2?family=Shadow s+Into+Light&family=Ubuntu+Sans:ital,wght@0,100 ..800;1,100..800&display=swap '); body{ font-family: "Ubuntu Sans", sans-serif; } h1, h2, h3{ font-family: "Shadows Into Light", cursive; }
  • 59.
    Sample Font Code Yourcode will look something like this. ● In this example I have a different font for h1 and h2 only. ● I put in the overall body font-family and color first and then I overrode it with the special font-family and color for the h1 and h2. ● Use your own font-families and colors for this step. A word of warning: Do not attempt to type the import tag at left. Find your own fonts and cut and paste them into your stylesheet. Make sure there is a semicolon at the end.
  • 60.
    Add one ortwo Google Fonts to style.css in your template If you skipped the exercise in the previous slide, go back an do it now. This is part of the lab for this week. When going through the slideshow, look for the sticky notes and take a moment to try the exercises. Some exercises, like this one, involve modifications to the template and are graded.
  • 61.
    font-size and OtherText Properties
  • 62.
    font-size Property ● Youcan use pixels, points, EMs, or percentage to set the font size ● EMs are best practice ● EMs come from the width of an “M” in typography ● 16 pixels = 1em
  • 63.
    Other CSS TextProperties There are a many other text properties. Listed below are the most commonly used text properties. font-weight: the value would usually be "bold" or "normal" text-align: You can use this property to align the text to center, right or left. Left is the default. line-height: This is the spacing between each line. A nice setting is 1.5. letter-spacing: This is the spacing between each letter. It makes a nice effect on a heading.
  • 64.
    Demo: Font andtext properties Click the PLAY button
  • 65.
    Exercise: font and textproperties 1. Open JSFiddle.net. 2. Add some text to the HTML section with HTML markup. Copy the code and text at right. 3. Modify your font-size with in the CSS, eg. Try the following CSS properties. font-weight: normal|bold line-height: Eg. 1.5 text-align: left|right|center letter-spacing: Eg. 2px 65 <h1> Placeholder Text </h1> <p> Lorem ipsum dolor sit amet, consectetur adipiscing elit, sed do eiusmod tempor incididunt ut labore et dolore magna aliqua. Ut enim ad minim veniam, quis nostrud exercitation ullamco laboris nisi ut aliquip ex ea commodo consequat. Duis aute irure dolor in reprehenderit in voluptate velit esse cillum dolore eu fugiat nulla pariatur. Excepteur sint occaecat cupidatat non proident, sunt in culpa qui officia deserunt mollit anim id est laborum. </p>
  • 66.
    Your JSFiddle shouldlook something like this…
  • 67.
  • 68.
    Refresh on theSelector In CSS, the selector "selects" which HTML it will modify.
  • 69.
    CSS Selectors SELECT which HTMLto style Pick me! Pick me!
  • 70.
    Types of CSSSelectors So far we have use the HTML element as the selector, like body or h1. Now we are going to learn about more types of selectors. ● class selector ● id selector ● descendant selector But first, we need a quick review of HTML Attributes. 70
  • 71.
    HTML Attributes Attributes modifythe HTML element, like this: <h1 class="headline">My Headline</h1> To add an attribute, first type a space after the tag, the = and then place the value in quotation marks. Sometimes an element will have several attributes, like this: <h1 class="headline" id="headline">My Headline</h1> Note that there is a space between the class and the id attributes.
  • 72.
    Common Typos withHTML Attributes Can you spot the typos? <h1 class=headline id=headline> <h1 class="headline id="headline> <h1 class="headline"id="headline">
  • 73.
    Common Typos withHTML Attributes Can you spot the typos? <h1 class=headline id=headline> The developer missed the quotation marks. <h1 class="headline id="headline> The developer missed the closing quotation marks <h1 class="headline"id="headline"> The developer didn't put a space in between the two attributes.
  • 74.
    New attributes: idand class Use id when you need to use the CSS once on the page. Use class if the CSS may be used more than once on the page. Note: Classes are typically used for CSS rather than ids, because they can be reused.
  • 75.
    HTML and CSSare different languages HTML Attribute CSS Selector class="textbox" .textbox id="sidebar" #sidebar The syntax is different in HTML and CSS.
  • 76.
    Demo: Class andID Selectors Click the PLAY button
  • 77.
    Exercise: Class Selector 77 Adda class and id in the HTML and CSS in JSFiddle. Your Fiddle should look something like this:
  • 78.
    Pop Quiz When wouldyou use "id"? When would you use "class"? 78
  • 79.
    Class vs ID •Class is used more frequently than ID, because it can be reused throughout a website • ID can only be used once on a page. • Before CSS3 and the semantic elements, we used it for a footer or nav, eg. <div id="footer"> • ID is often used as a selector in Javascript • In most cases you should use a class instead of an ID. 79
  • 80.
    Span and Div <span>and <div> are generic elements you can add in order to select parts of the websites. For example: <p>We can help you make a website at <span class="company-name">Platypus Web Design</span>. We will work with you to build your website.</p> <span> tags are used for smaller sections of text. <div> is used around larger sections (more to come on this). 80
  • 81.
    How to Centera Web Page
  • 82.
    How to Centera Web Page You can center a block element by setting the margin to auto on both the left and right sides. The code below is used to set the main section of the website to a maximum width of 800px, and then center it horizontally. main{ margin-left: auto; margin-right: auto; max-width: 800px; }
  • 83.
    Demo: Centering PageContent 3.10 Click the PLAY button
  • 84.
    Exercise: Centering APage Open JSFiddle.net. Add some content and add a div with the id of wrapper around it. Center it. #wrapper { width:80%; margin-left: auto; margin-right: auto; } 84
  • 85.
    Your JSFiddle shouldlook like this…
  • 86.
    Take the Quiz Nowthat you have finished reading Chapter 3 and studying this slideshow, take the quiz. Quizzes are due Thursdays at 10pm each week. The Lab Assignment is due Sunday at 10pm each week.
  • 87.
  • 88.
    On the index.htmlfile, the only thing we added is the <link> in the template to the stylesheet. In the style.css file, we imported one or two Google Fonts, and added some code to select those fonts. Check Template
  • 89.
    Is it betterto do the lab your own way, or to do it step by step with the instructions?
  • 90.
    Follow Each Step ●For this phase of class, follow each step exactly. ● When doing the labs, not every instruction has a purpose that you can see immediately. ● For example, if you skipped the semantic tags in Lab 2, your website would display perfectly in the browser. However, some of the CSS will not work in Lab 3, because it relies on the semantic tags being there. There will be more opportunity for creativity in a few weeks.
  • 91.
    Lab: Pacific TrailsChapter 3 Chapter 3 Pacific Trails Hints ● Work step by step. Don't skip over steps in the lab. ● If the CSS doesn't work, perhaps you skipped the semantic tags. Recheck your work from last week against the solution. ● If your text is all bold, you haven't closed the a bold tag or a header tag that defaults to bold. ● If you didn't start with the starter files, you will need them for future assignments.