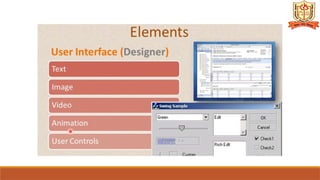
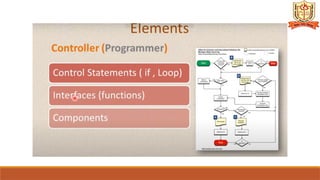
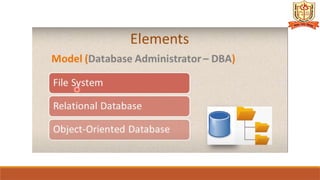
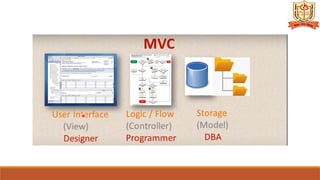
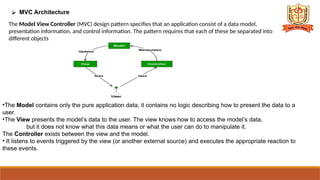
The document discusses Java's AWT and Swing for developing graphical user interfaces, highlighting their differences, advantages, components, and features. It elaborates on the construction and functionality of various swing components like JFrame, JApplet, JButtons, JCheckBoxes, JRadioButtons, and advanced components like tabbed panes, scroll panes, trees, tables, and progress bars. Additionally, it touches on the MVC architecture in applications, emphasizing the separation of model, view, and controller components.


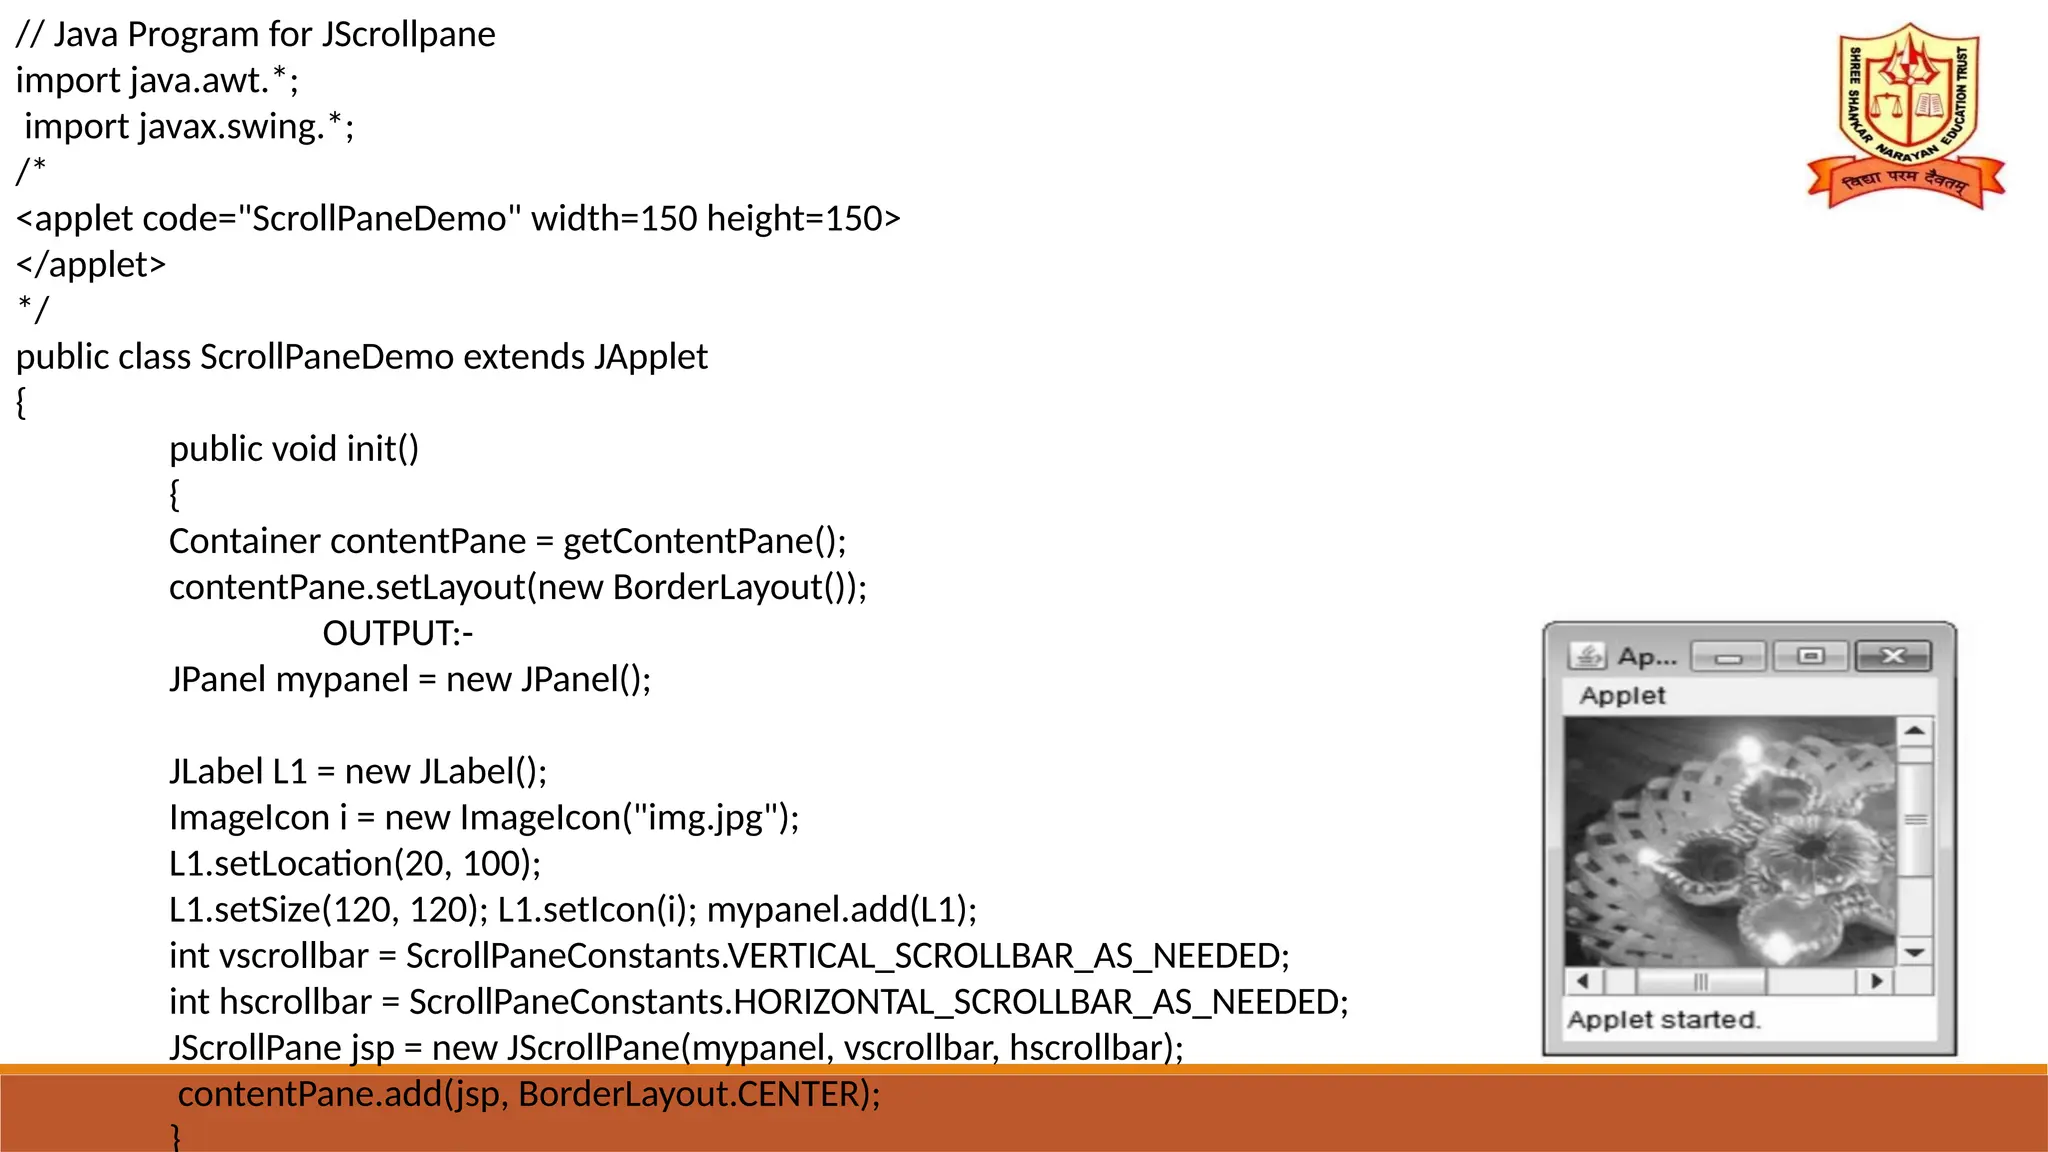
![import javax.swing.*;
class TextFieldExample
{
public static void main(String args[])
{
JFrame f= new JFrame("TextField Example");
JTextField t1,t2;
t1=new JTextField("Welcome to Javatpoint.");
t1.setBounds(50,100, 200,30);
OUTPUT:-
t2=new JTextField("AWT Tutorial");
t2.setBounds(50,150, 200,30);
f.add(t1); f.add(t2);
f.setSize(400,400);
f.setLayout(null);
f.setVisible(true);
}
}
t1 object
t2 object
setBounds(50,100,30,20)
( x, y, a, b)
x
y
a
,
b](https://image.slidesharecdn.com/unitiiswigs-241006055051-bbf60bc6/85/UNIT-2-SWIGS-for-java-programing-by-pptx-12-320.jpg)

![import javax.swing.*;
public class CheckBoxExample
{
CheckBoxExample()
{
JFrame f= new JFrame("CheckBox Example");
JCheckBox checkBox1 = new JCheckBox("C++"); OUTPUT:-
checkBox1.setBounds(100,100, 50,50);
JCheckBox checkBox2 = new JCheckBox("Java", true);
checkBox2.setBounds(100,150, 50,50);
f.add(checkBox1);
f.add(checkBox2);
f.setSize(400,400);
f.setLayout(null);
f.setVisible(true);
}
public static void main(String args[])
{
new CheckBoxExample();
}
}](https://image.slidesharecdn.com/unitiiswigs-241006055051-bbf60bc6/85/UNIT-2-SWIGS-for-java-programing-by-pptx-15-320.jpg)

![import javax.swing.*;
public class RadioButtonExample
{
JFrame f;
RadioButtonExample()
{
f=new JFrame();
JRadioButton r1=new JRadioButton("A) Male");
JRadioButton r2=new JRadioButton("B) Female");
r1.setBounds(75,50,100,30);
r2.setBounds(75,100,100,30);
ButtonGroup bg=new ButtonGroup();
bg.add(r1);bg.add(r2);
f.add(r1);f.add(r2);
f.setSize(300,300);
f.setLayout(null);
f.setVisible(true);
}
public static void main(String[] args)
{
new RadioButtonExample();
}
}](https://image.slidesharecdn.com/unitiiswigs-241006055051-bbf60bc6/85/UNIT-2-SWIGS-for-java-programing-by-pptx-17-320.jpg)

![import javax.swing.*;
public class TabbedPaneExample
{
JFrame f;
TabbedPaneExample()
{
f=new JFrame();
JTextArea ta=new JTextArea(200,200);
JPanel p1=new JPanel();
p1.add(ta);
JPanel p2=new JPanel(); JPanel p3=new JPanel(); OUTPUT:-
JTabbedPane tp=new JTabbedPane();
tp.setBounds(50,50,200,200);
tp.add("main",p1); tp.add("visit",p2); tp.add("help",p3);
f.add(tp);
f.setSize(400,400);
f.setLayout(null);
f.setVisible(true);
}
public static void main(String[] args)
{
new TabbedPaneExample();
}
}](https://image.slidesharecdn.com/unitiiswigs-241006055051-bbf60bc6/85/UNIT-2-SWIGS-for-java-programing-by-pptx-20-320.jpg)

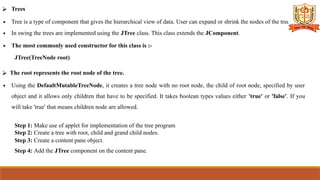

![⮚ Tables
∙ Table is a component that arranges the data in rows and columns.
∙ The JTable class extends the JComponent class.
∙ The constructor used for table component is -
JTable( object[][] tablevalues ,object [] columnheader)
The tablevalues indicate the data that can be arranged in tabular fashion. The columnheader denotes
the header for each column.
Following is a simple program that shows the use of JTable component.](https://image.slidesharecdn.com/unitiiswigs-241006055051-bbf60bc6/85/UNIT-2-SWIGS-for-java-programing-by-pptx-26-320.jpg)
![import javax.swing.*; import java.awt.*;
import javax.swing.tree.*;
/*<applet code="TableDemo" width=100 height=100></applet> */
public class TableDemo extends JApplet
{
public void init()
{
Container contentPane = getContentPane();
contentPane.setLayout(new BorderLayout());
final String[] th = { "", "", ""};
final Object[][] mytable = {
OUTPUT:-
{ "8", "1","6"},
{ "3", "5","7"},
{ "4", "9","2"}
};
JTable table = new JTable(mytable,th);
int vscrollbar = ScrollPaneConstants.VERTICAL_SCROLLBAR_AS_NEEDED;
int hscrollbar = ScrollPaneConstants.HORIZONTAL_SCROLLBAR_AS_NEEDED;
JScrollPane mypane = new JScrollPane(table, vscrollbar, hscrollbar);
contentPane.add(mypane, BorderLayout.CENTER);
}](https://image.slidesharecdn.com/unitiiswigs-241006055051-bbf60bc6/85/UNIT-2-SWIGS-for-java-programing-by-pptx-27-320.jpg)

![import java.awt.*; import javax.swing.*;
public class ProgressBarProg extends JFrame
{
static JFrame frame;
static JProgressBar pbar;
public static void main(String[] args)
{
frame =new JFrame("Progress Bar Demo");
pbar=new JProgressBar(0,2000);
pbar.setBounds(50,50,150,30);
OUTPUT:-
pbar.setValue(0); pbar.setStringPainted(true);frame.add(pbar);
frame.setLayout(null); frame.setSize(300,300); frame.setVisible(true);
frame.setDefaultCloseOperation(JFrame.EXIT_ON_CLOSE);
fillBar();
}
public static void fillBar() {
int i=0; try {
while(i<=2000) {
pbar.setValue(i);
Thread.sleep(1000); i=i+20;
}
} catch(Exception e) {}](https://image.slidesharecdn.com/unitiiswigs-241006055051-bbf60bc6/85/UNIT-2-SWIGS-for-java-programing-by-pptx-29-320.jpg)
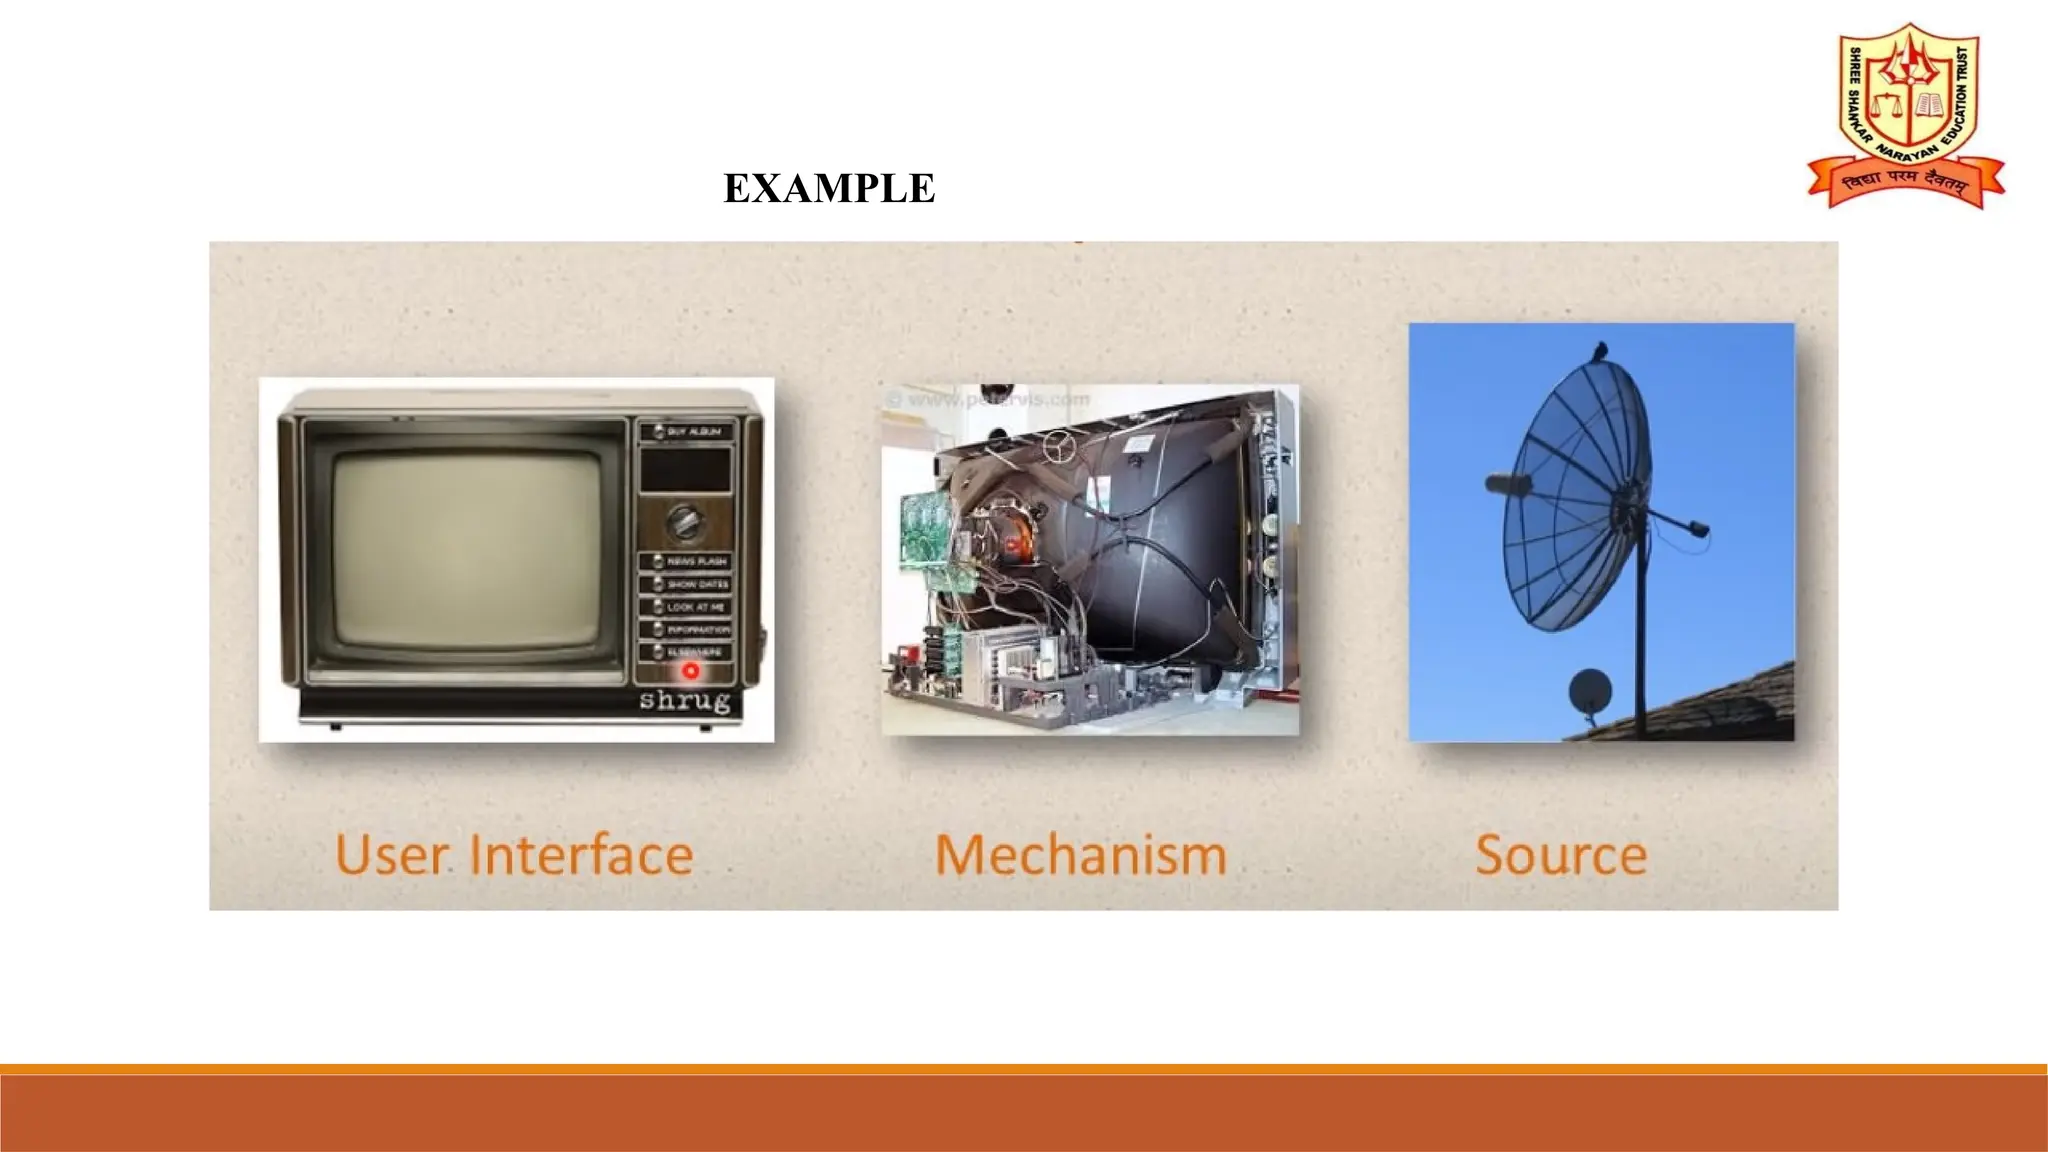
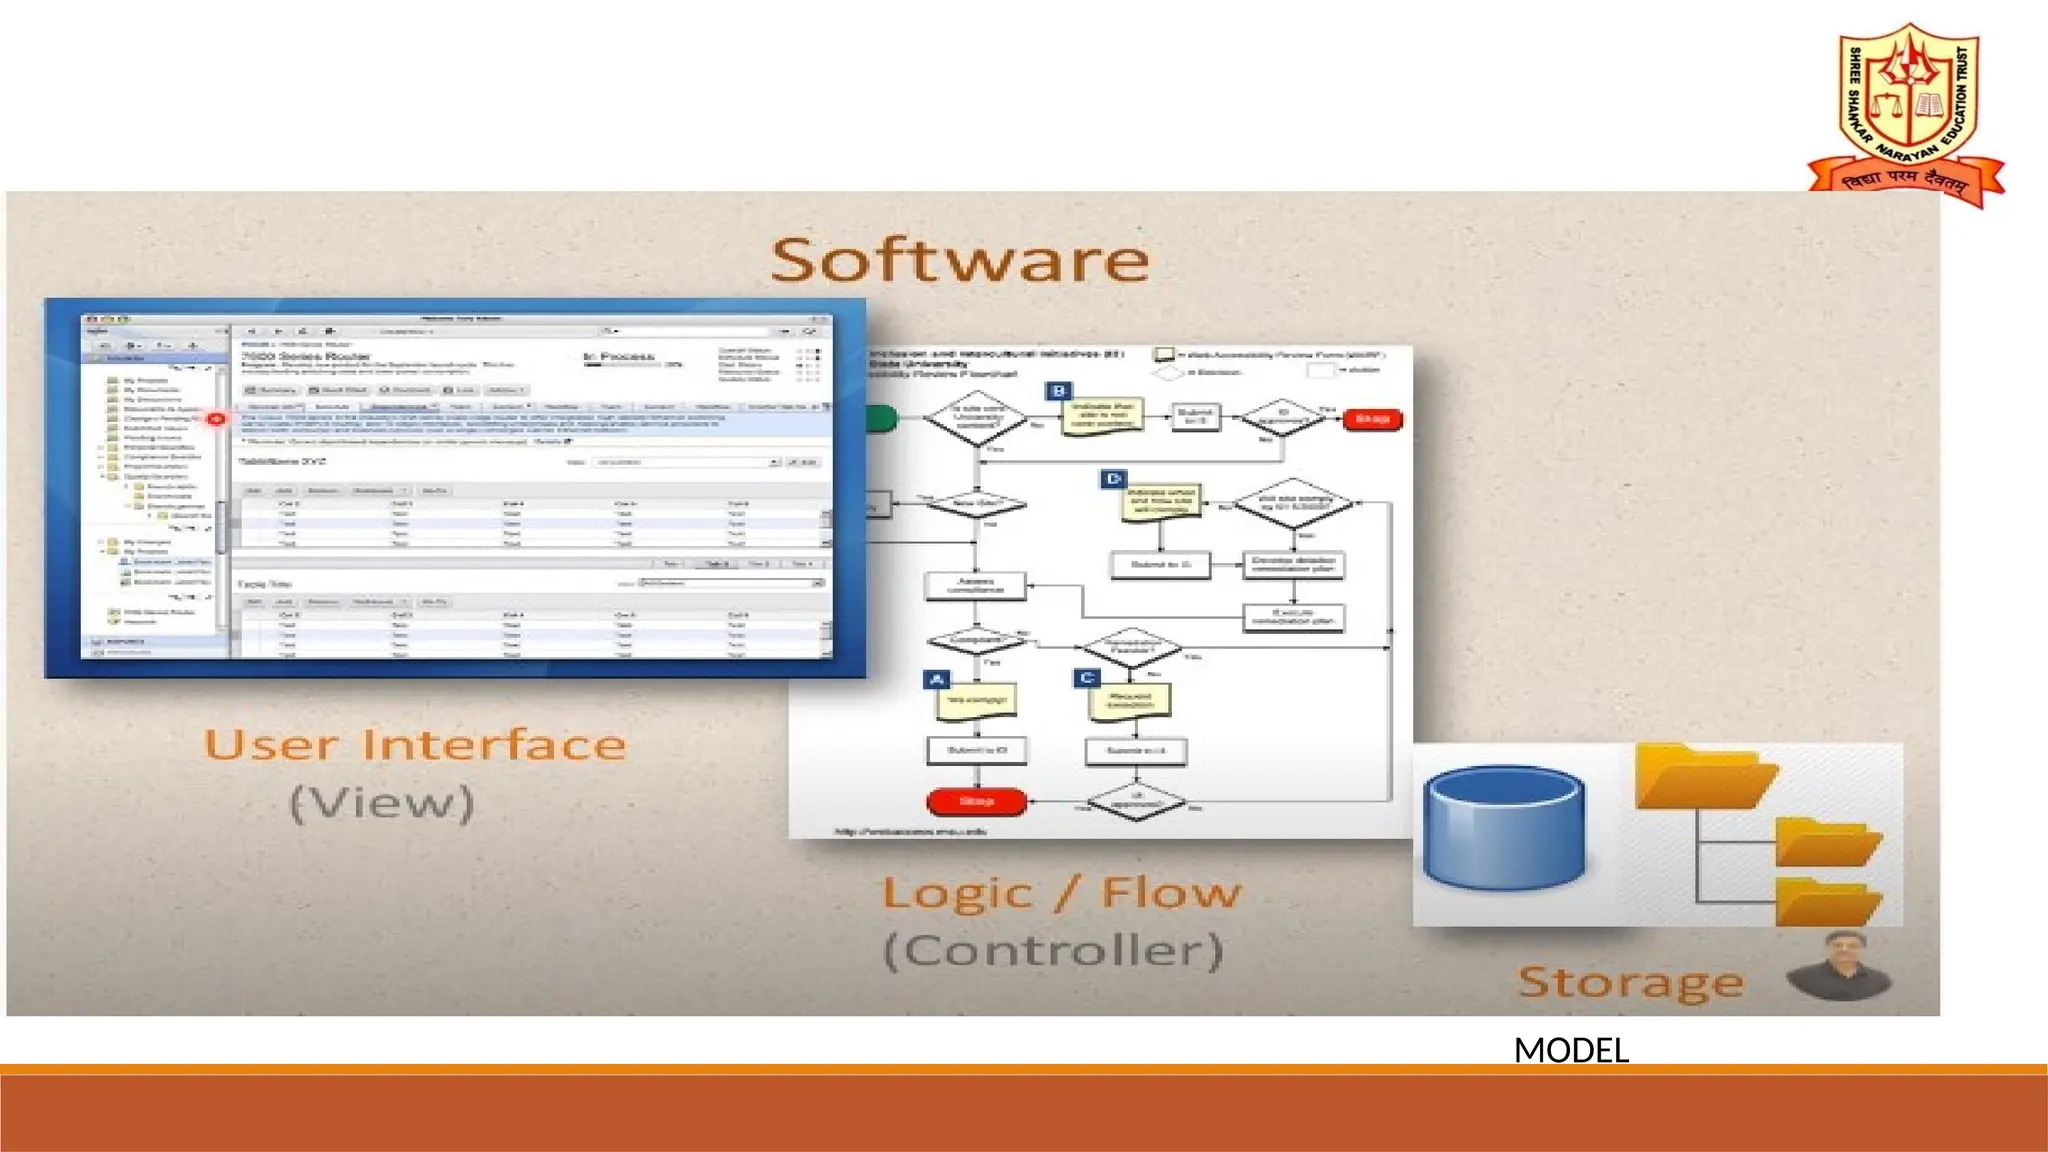
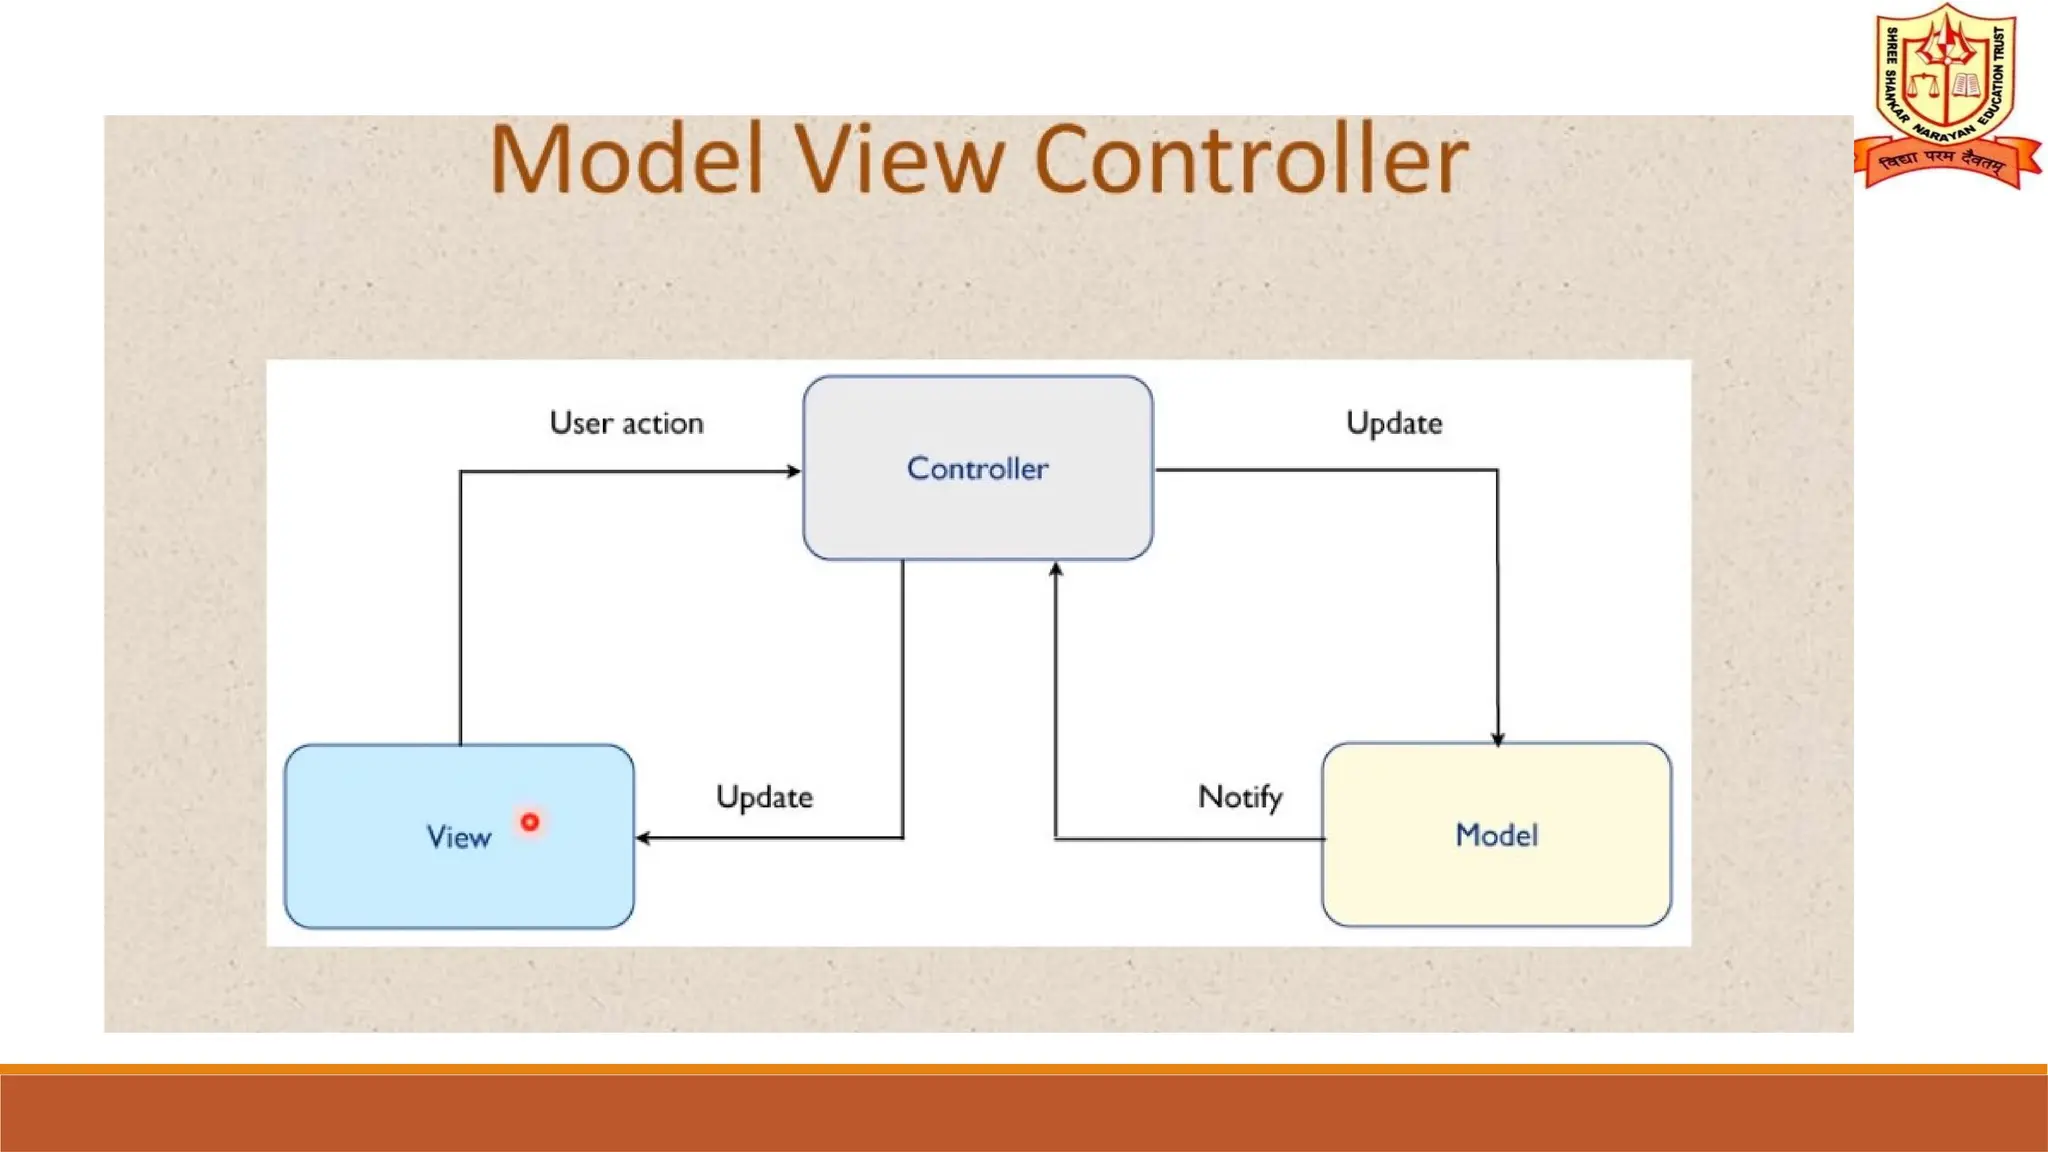
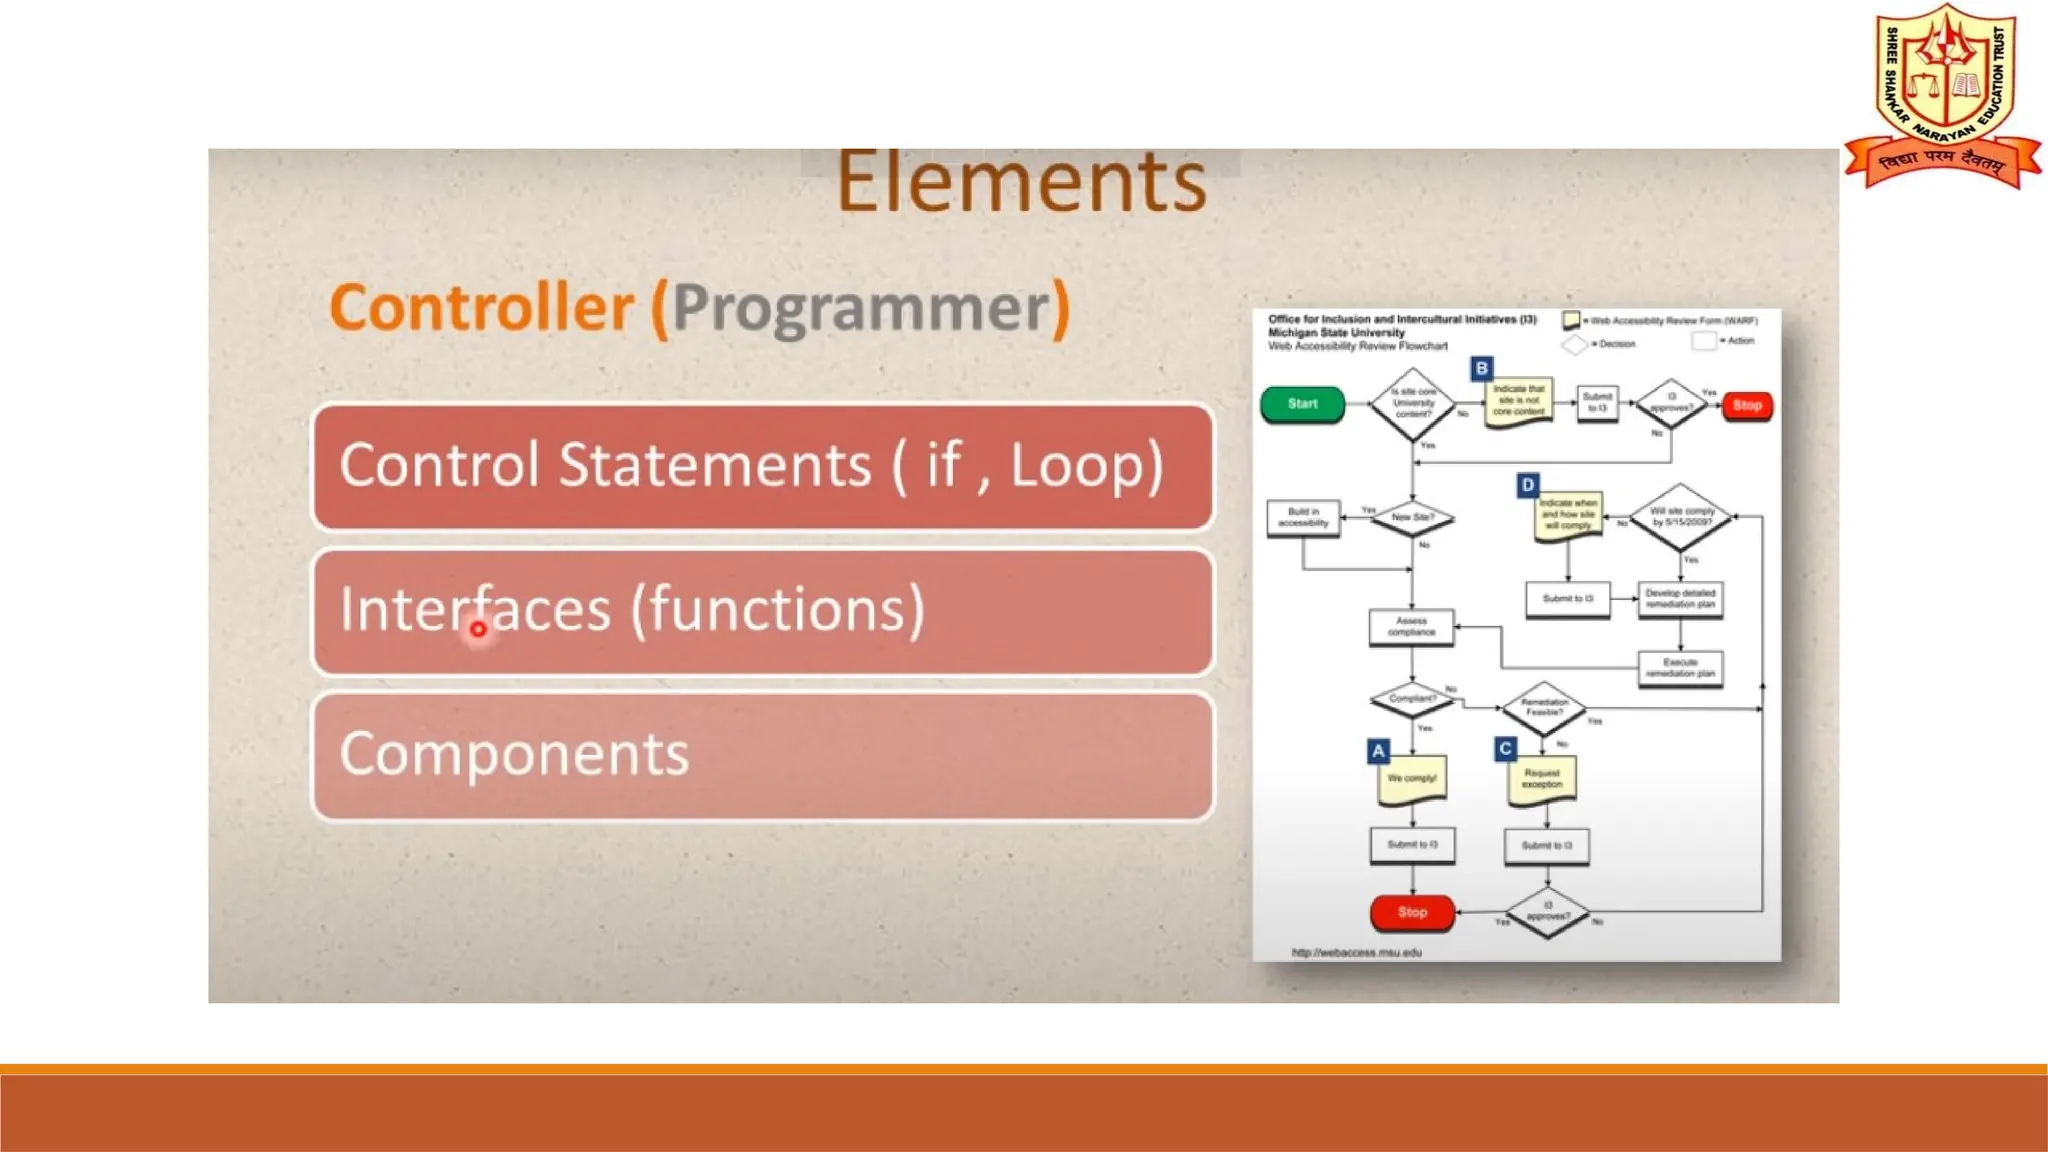
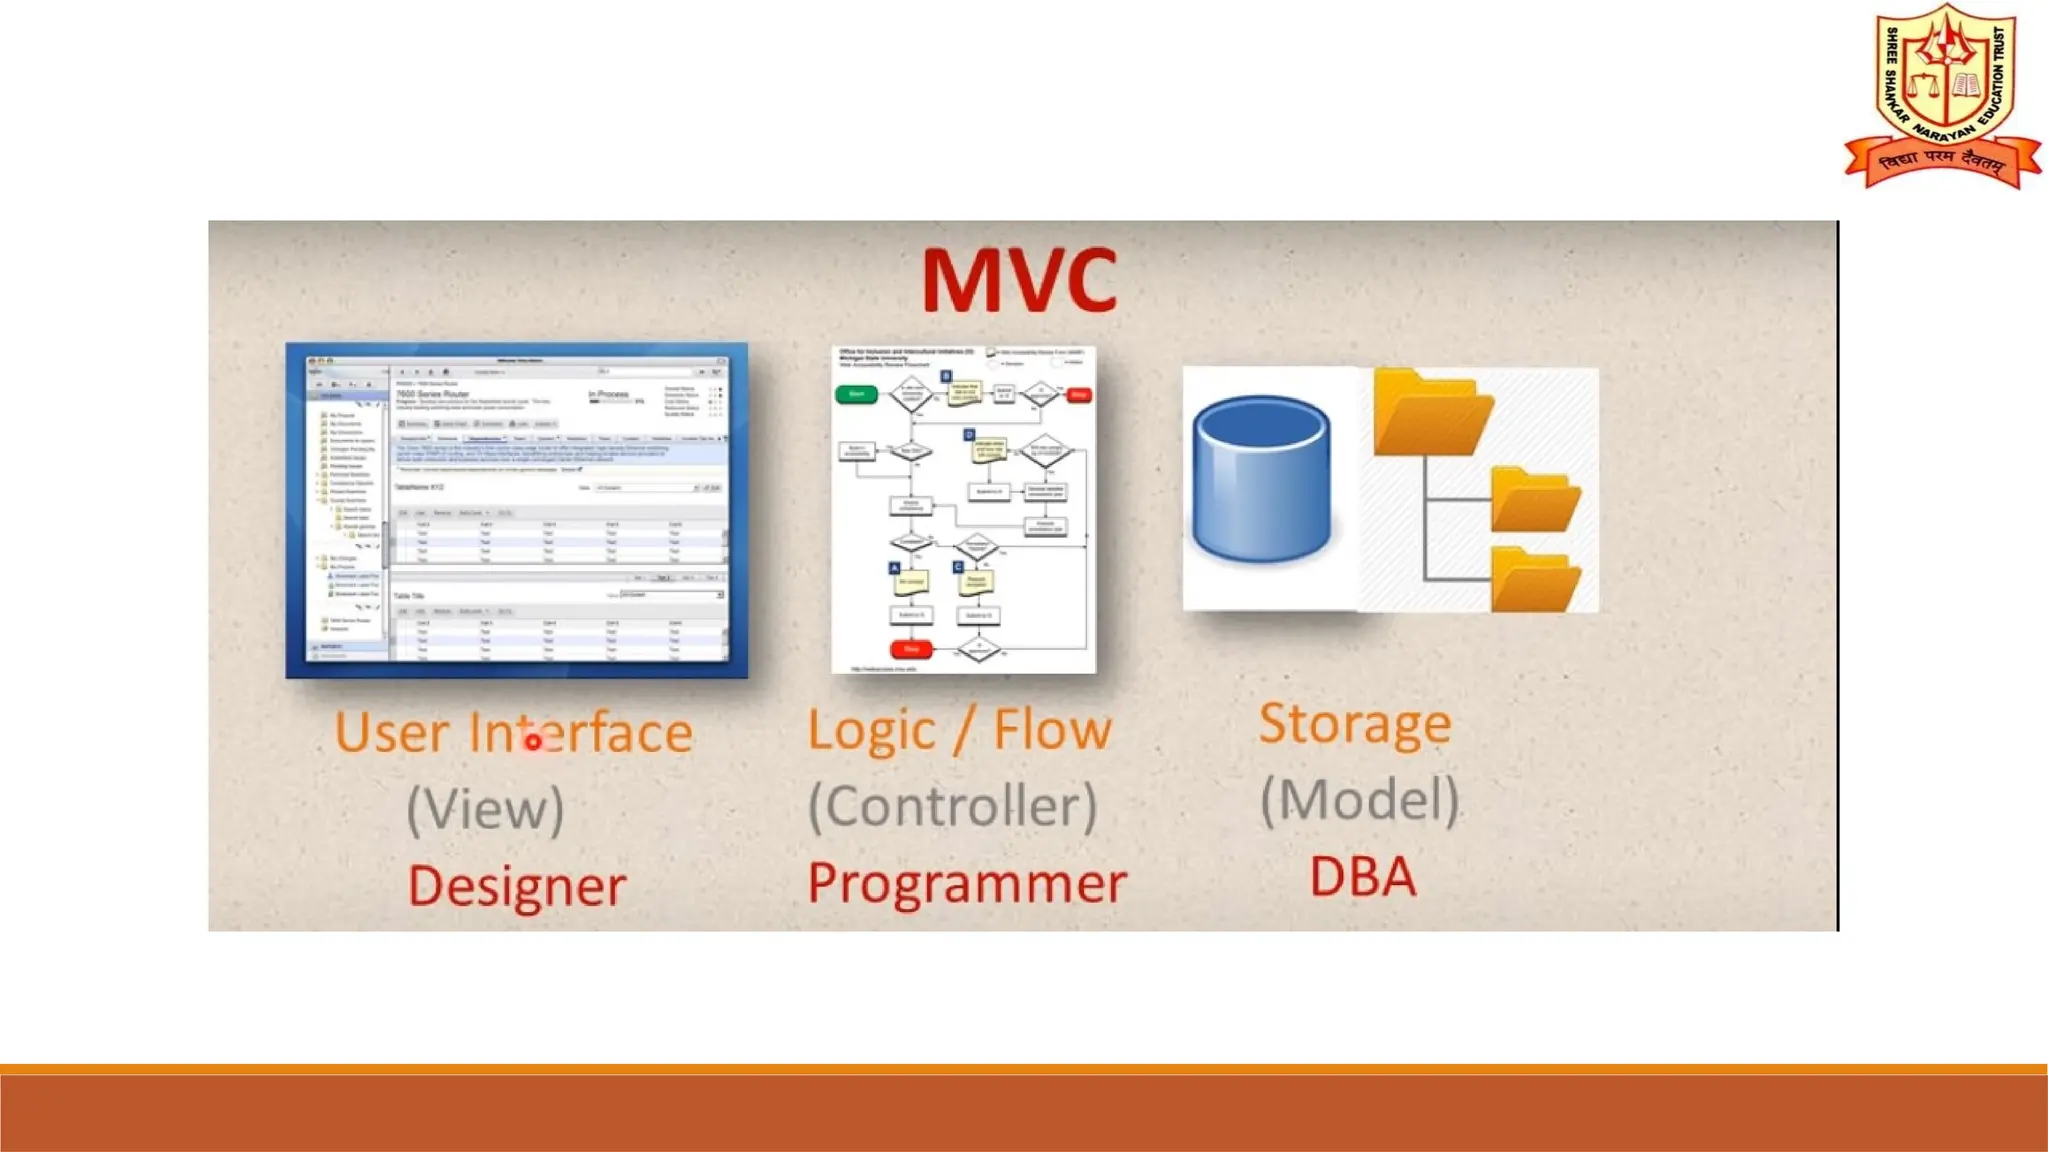
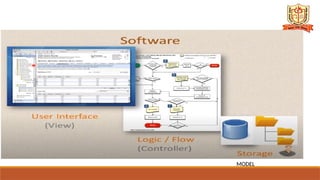
![MVC ARCHITECTURE [MODEL VIEW CONTROLLER]](https://image.slidesharecdn.com/unitiiswigs-241006055051-bbf60bc6/85/UNIT-2-SWIGS-for-java-programing-by-pptx-30-320.jpg)


![import javax.swing.*;
class TextFieldExample
{
public static void main(String args[])
{
JFrame f= new JFrame("TextField Example");
JTextField t1,t2;
t1=new JTextField("Welcome to Javatpoint.");
t1.setBounds(50,100, 200,30);
OUTPUT:-
t2=new JTextField("AWT Tutorial");
t2.setBounds(50,150, 200,30);
f.add(t1); f.add(t2);
f.setSize(400,400);
f.setLayout(null);
f.setVisible(true);
}
}
t1 object
t2 object
setBounds(50,100,30,20)
( x, y, a, b)
x
y
a
,
b](https://image.slidesharecdn.com/unitiiswigs-241006055051-bbf60bc6/75/UNIT-2-SWIGS-for-java-programing-by-pptx-12-2048.jpg)

![import javax.swing.*;
public class CheckBoxExample
{
CheckBoxExample()
{
JFrame f= new JFrame("CheckBox Example");
JCheckBox checkBox1 = new JCheckBox("C++"); OUTPUT:-
checkBox1.setBounds(100,100, 50,50);
JCheckBox checkBox2 = new JCheckBox("Java", true);
checkBox2.setBounds(100,150, 50,50);
f.add(checkBox1);
f.add(checkBox2);
f.setSize(400,400);
f.setLayout(null);
f.setVisible(true);
}
public static void main(String args[])
{
new CheckBoxExample();
}
}](https://image.slidesharecdn.com/unitiiswigs-241006055051-bbf60bc6/75/UNIT-2-SWIGS-for-java-programing-by-pptx-15-2048.jpg)
![import javax.swing.*;
public class RadioButtonExample
{
JFrame f;
RadioButtonExample()
{
f=new JFrame();
JRadioButton r1=new JRadioButton("A) Male");
JRadioButton r2=new JRadioButton("B) Female");
r1.setBounds(75,50,100,30);
r2.setBounds(75,100,100,30);
ButtonGroup bg=new ButtonGroup();
bg.add(r1);bg.add(r2);
f.add(r1);f.add(r2);
f.setSize(300,300);
f.setLayout(null);
f.setVisible(true);
}
public static void main(String[] args)
{
new RadioButtonExample();
}
}](https://image.slidesharecdn.com/unitiiswigs-241006055051-bbf60bc6/75/UNIT-2-SWIGS-for-java-programing-by-pptx-17-2048.jpg)

![import javax.swing.*;
public class TabbedPaneExample
{
JFrame f;
TabbedPaneExample()
{
f=new JFrame();
JTextArea ta=new JTextArea(200,200);
JPanel p1=new JPanel();
p1.add(ta);
JPanel p2=new JPanel(); JPanel p3=new JPanel(); OUTPUT:-
JTabbedPane tp=new JTabbedPane();
tp.setBounds(50,50,200,200);
tp.add("main",p1); tp.add("visit",p2); tp.add("help",p3);
f.add(tp);
f.setSize(400,400);
f.setLayout(null);
f.setVisible(true);
}
public static void main(String[] args)
{
new TabbedPaneExample();
}
}](https://image.slidesharecdn.com/unitiiswigs-241006055051-bbf60bc6/75/UNIT-2-SWIGS-for-java-programing-by-pptx-20-2048.jpg)

![⮚ Tables
∙ Table is a component that arranges the data in rows and columns.
∙ The JTable class extends the JComponent class.
∙ The constructor used for table component is -
JTable( object[][] tablevalues ,object [] columnheader)
The tablevalues indicate the data that can be arranged in tabular fashion. The columnheader denotes
the header for each column.
Following is a simple program that shows the use of JTable component.](https://image.slidesharecdn.com/unitiiswigs-241006055051-bbf60bc6/75/UNIT-2-SWIGS-for-java-programing-by-pptx-26-2048.jpg)
![import javax.swing.*; import java.awt.*;
import javax.swing.tree.*;
/*<applet code="TableDemo" width=100 height=100></applet> */
public class TableDemo extends JApplet
{
public void init()
{
Container contentPane = getContentPane();
contentPane.setLayout(new BorderLayout());
final String[] th = { "", "", ""};
final Object[][] mytable = {
OUTPUT:-
{ "8", "1","6"},
{ "3", "5","7"},
{ "4", "9","2"}
};
JTable table = new JTable(mytable,th);
int vscrollbar = ScrollPaneConstants.VERTICAL_SCROLLBAR_AS_NEEDED;
int hscrollbar = ScrollPaneConstants.HORIZONTAL_SCROLLBAR_AS_NEEDED;
JScrollPane mypane = new JScrollPane(table, vscrollbar, hscrollbar);
contentPane.add(mypane, BorderLayout.CENTER);
}](https://image.slidesharecdn.com/unitiiswigs-241006055051-bbf60bc6/75/UNIT-2-SWIGS-for-java-programing-by-pptx-27-2048.jpg)

![import java.awt.*; import javax.swing.*;
public class ProgressBarProg extends JFrame
{
static JFrame frame;
static JProgressBar pbar;
public static void main(String[] args)
{
frame =new JFrame("Progress Bar Demo");
pbar=new JProgressBar(0,2000);
pbar.setBounds(50,50,150,30);
OUTPUT:-
pbar.setValue(0); pbar.setStringPainted(true);frame.add(pbar);
frame.setLayout(null); frame.setSize(300,300); frame.setVisible(true);
frame.setDefaultCloseOperation(JFrame.EXIT_ON_CLOSE);
fillBar();
}
public static void fillBar() {
int i=0; try {
while(i<=2000) {
pbar.setValue(i);
Thread.sleep(1000); i=i+20;
}
} catch(Exception e) {}](https://image.slidesharecdn.com/unitiiswigs-241006055051-bbf60bc6/75/UNIT-2-SWIGS-for-java-programing-by-pptx-29-2048.jpg)
![MVC ARCHITECTURE [MODEL VIEW CONTROLLER]](https://image.slidesharecdn.com/unitiiswigs-241006055051-bbf60bc6/75/UNIT-2-SWIGS-for-java-programing-by-pptx-30-2048.jpg)