When I first started blogging, I made a classic mistake that I’ve seen many new website owners make: I thought having a website and a good social media presence was enough to connect with my audience.
But then reality hit. Facebook changed its algorithm, and my organic reach dropped by over 70%. That’s when I realized I needed a more reliable way to stay connected with my readers.
In the end, an email newsletter turned out to be the perfect solution.
I know newsletters work because I see the results every day at WPBeginner. Since focusing on our email list, we’ve seen more engagement, more repeat visitors, and a ton more conversions.
In this guide, I’ll show you how to create an email newsletter that actually gets results. I’ll share the exact process we use at WPBeginner, recommend the best tools for beginners, and provide proven strategies that have worked for us and thousands of other websites.
TLDR Quick Summary: An email newsletter is one of the most reliable ways to boost engagement, get more repeat visitors, and boost your conversion rates.
Thanks to modern tools and services, it’s never been easier to build and manage a successful mailing list, so now’s the perfect time to launch your own email newsletter.
What exactly is an email newsletter?
Simply put, an email newsletter is a message you send regularly to people who have personally requested it. It’s the most reliable, direct way you have to talk to your audience.
For any blog or business, an email list is vital because it gives you a direct connection to share updates, new articles, helpful tips, or special offers. Crucially, you can do this without having to rely on social media platforms or search engine traffic.
Does my website need an email newsletter?
Yes. In my opinion, every website owner should start an email list today.
That’s because most of the people who visit your website today will never come back. I’m talking about more than 75% of your traffic just vanishing.
This doesn’t mean your content is bad. The internet is simply a busy place, and people get distracted. It’s easy to close a browser tab and forget about your site.
An email newsletter completely solves this problem. It takes that one-time visitor and gives you a way to connect with them again and again.
Since this is a comprehensive guide, I’ve included a table of contents so you can quickly jump to any section:
- Step 1. Choosing an Email Marketing Service
- Step 2. Creating an Email List
- Step 3. Setting Up Your Email List Settings
- Step 4. Adding Newsletter Signup Forms to Get More Subscribers
- Step 5. Sending Your First Email Newsletter
- Step 6. Tips to Get More Email Subscribers
- Step 7. How to Make Money from Your Email Newsletter
- Step 8. Keep Your Email Newsletter Out of Spam
- Your Next Steps: From Setup to Success
- Video Tutorial
- FAQs About Creating an Email Newsletter
How to Create an Email Newsletter the RIGHT WAY (Step by Step)
I remember when I tried to start my first newsletter. The process felt overwhelming because there were so many confusing tutorials out there.
That’s why I created this guide to walk you through setting up your email newsletter the correct way. I’m sharing the simple, step-by-step approach we use for all our projects at WPBeginner, so you can launch a professional newsletter in no time.
Step 1. Choosing an Email Marketing Service
The first step is choosing an email marketing service provider.
The right provider will supply the tools you need to legally collect email addresses and send mass emails to your subscribers. You cannot (and should not) try to send a newsletter using your regular Gmail or business email account.
There are many newsletter tools out there. I’ve tried most of them, including Constant Contact, HubSpot, Brevo (formerly Sendinblue), Omnisend, AWeber, Drip, ConvertKit, and Mailchimp.
After testing almost every popular email marketing service, I can confidently recommend Constant Contact. They’re one of the best email newsletter services for beginners, and their support team is fantastic at helping people who are just starting out.
Constant Contact features a simple drag-and-drop editor so you can create a professional-looking email very quickly. Beyond that, it also provides powerful tools for growing your list, marketing automation, and viewing detailed reports to track your success.
To get started, just visit the Constant Contact website and click on the ‘Sign up’ button. They also offer a 14-day free trial (no credit card required) so you can try before you buy.
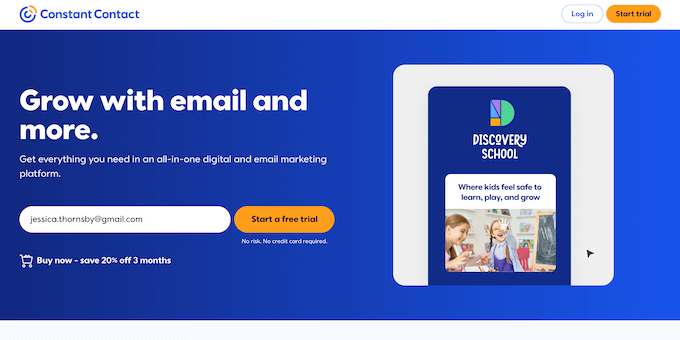
After clicking this button, you’ll see the signup page.
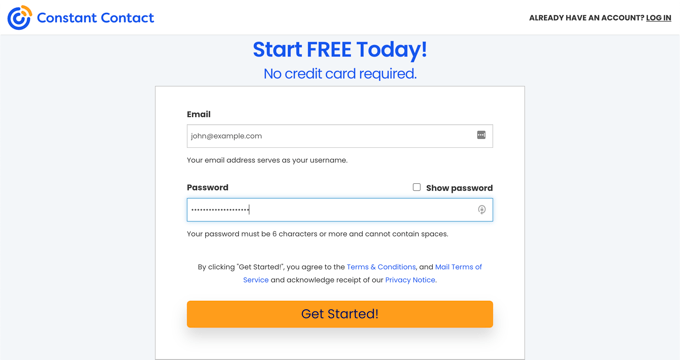
Here, you can enter your email address and password, and then click ‘Get Started.’
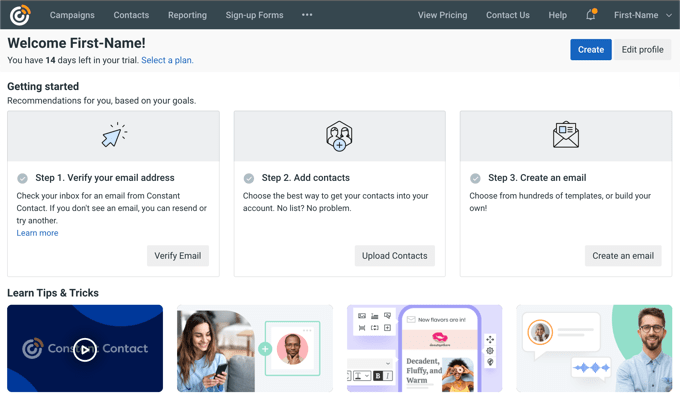
With that done, you’ll be redirected to the welcome page.
This is where you can manage your email lists and subscribers, and send your newsletter.
💰 You can send up to 100 emails using Constant Contact’s free trial.
If you want to unlock all the powerful features I use on my WPBeginner projects (like detailed analytics and automated sending), then you’ll need to purchase a paid plan.
The good news is that WPBeginner users can get a special 20% off when using our Constant Contact coupon code.
Step 2. Creating an Email List
When it comes to building a successful email newsletter, it all starts with the email list. Quite simply, this is a list of people who have said: “Yes, I want to hear from you!”
Having a dedicated list is the key to staying organized, so you don’t end up with a giant mess of email addresses. More importantly, creating a separate list lets you segment your audience later, which is a powerful trick I’ve used many times on WPBeginner.
To get started, log in to your Contact Contact account, if you haven’t already.
Then, click the ‘Contacts’ link in the top menu, and make sure you’re on the ‘Lists’ tab.
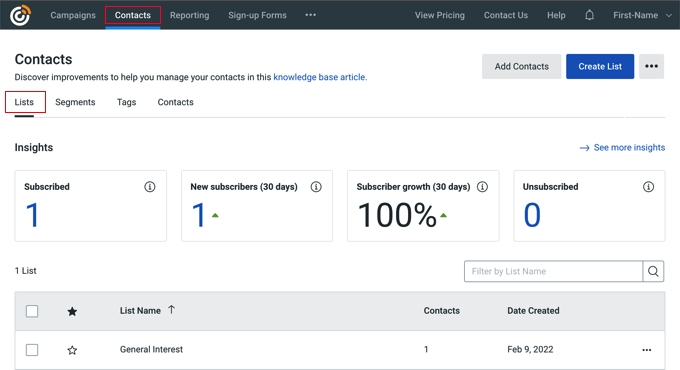
This page will show all your email lists. By default, Constant Contact creates an email list for you labeled ‘General Interest.’
You can click the ‘Create List’ button to create a new email list.

You’ll need to enter a name for your list. Don’t overthink this! After managing dozens of projects, I’ve learned that the best name is simply one that helps you identify the list easily.
With that done, click the ‘Save’ button, and Constant Contact will create the list for you.

Before you can start using this list, you need to add at least one contact to it.
You can manually add people to your list by visiting the ‘Contacts’ page and clicking the ‘Add Contacts’ button. In the popup that appears, select ‘Create a new contact’ to continue.
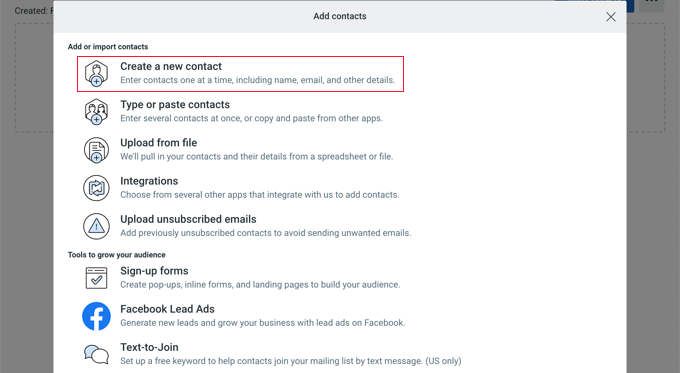
You can now enter the contact’s email address.
After that, click the ‘Continue’ button.

Now, enter the contact’s name and job title.
If you like, you can scroll down and enter the person’s physical addresses, phone numbers, and any custom fields you want to use. For a simple newsletter, I usually skip this information.
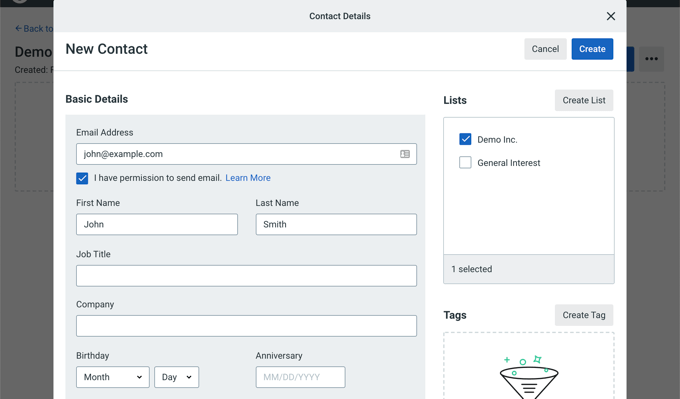
When you’re happy with the information you’ve entered, click the ‘Create’ button. Your email list is now ready to use.
Step 3. Setting Up Your Email List Settings
After setting up a new email list, I immediately start writing my welcome email.
This is an automated message sent by your service provider when someone subscribes. It’s your chance to say hello and make a great first impression.
Let’s get this set up.
First, click on the ‘Campaigns’ link and then select the ‘Create’ button.
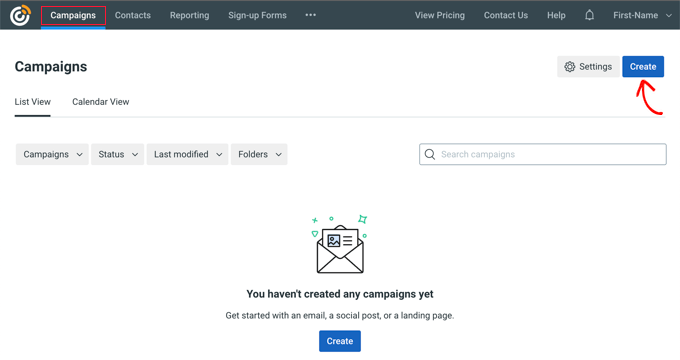
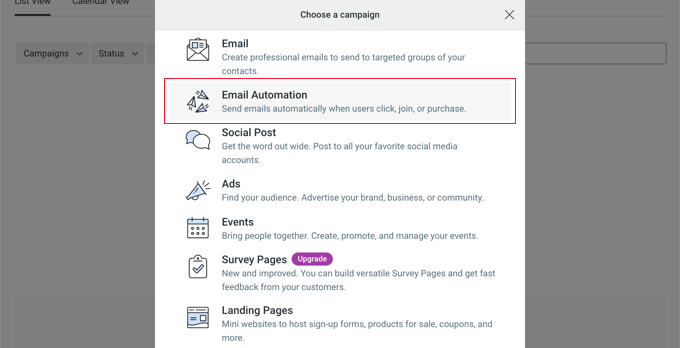
A popup will appear, asking you to choose an email campaign type.
You should click on ‘Email Automation’ to continue. After all, you want to send this message automatically every time someone signs up, and this ensures you never have to send it manually!
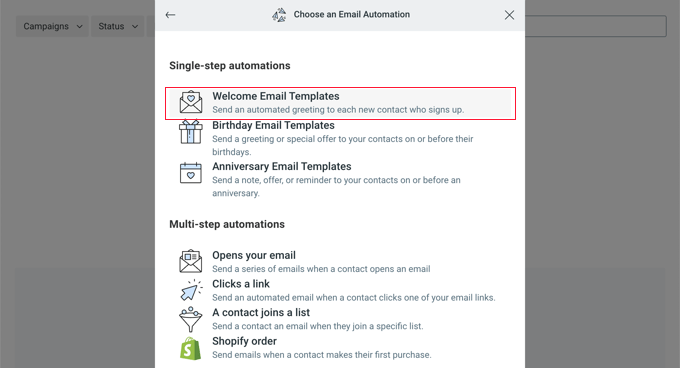
Next, it’s time to choose the email automation type.
I always choose the ‘Welcome Email Templates’ option because it’s a huge time-saver. Constant Contact provides pre-designed templates specifically for welcoming subscribers, so I don’t have to build everything from scratch.
Next, you’ll be asked to name this automated email series.
I’ve learned that choosing a good, clear name (like ‘Welcome Email’) is essential for finding and managing things later, especially when you’re running multiple campaigns.
After typing in a name, click ‘Save’ to proceed.

Next, you can choose the activity that’ll trigger the email. We’ll go with the default setting, which is ‘Welcome email.’
With that done, you can select the list that’ll receive this email. Click the ‘Send to selected lists’ option, and then choose the list you created in the previous step.
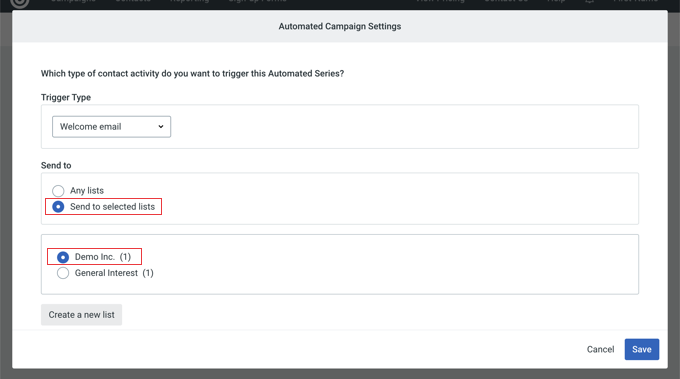
Go ahead and click the ‘Save’ button, and Constant Contact will show a summary of your email campaign so far.
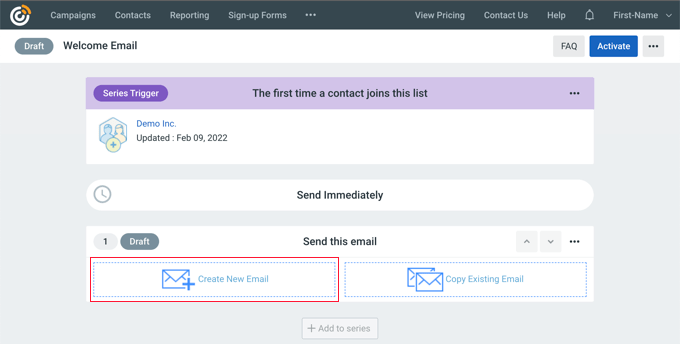
You can see that the email will be sent immediately the first time a contact joins your email list.
Now, you need to create the actual welcome message by clicking the ‘Create New Email’ button.
The system will then ask you to select a template.
It even displays welcome email templates first, giving you an immediate starting point.
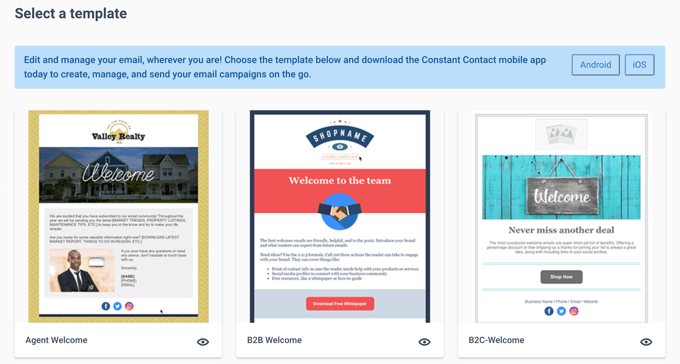
You’ll also find links to download the Constant Contact mobile apps.
Simply click a template, and it’ll open in Constant Contact’s drag-and-drop email builder. For this guide, I’m using the ‘Agent Welcome’ template because it looks clean and professional.
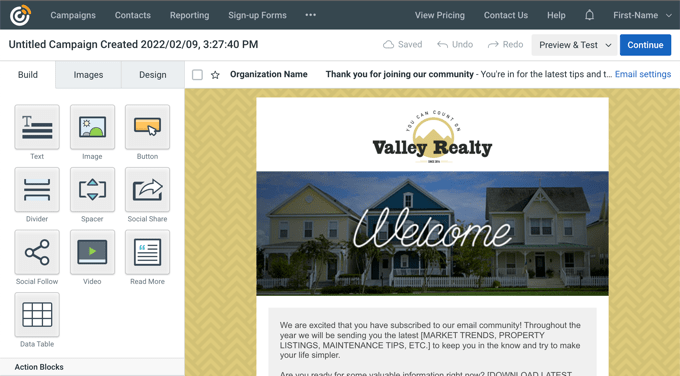
Now, it’s time to start designing your welcome email.
You can start by giving your campaign a title. This is important because a descriptive name will help you easily identify the campaign when you need to edit it later.
Go ahead and click the ‘Untitled…’ link in the upper-left corner and then enter a name like ‘Welcome Email’ or ‘New User Signup.’

After that, you can start editing the newsletter design.
The actual editing process is incredibly simple. Constant Contact has a drag-and-drop editor, so you can just point and click on anything in the email to change it.
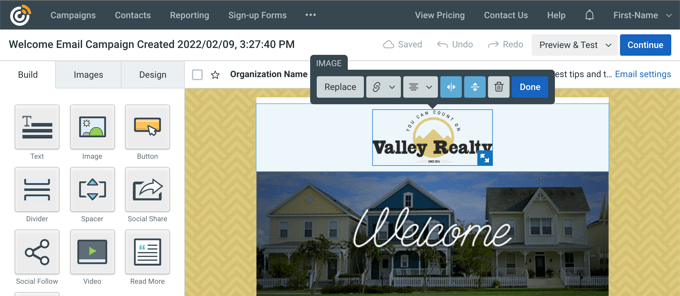
You can replace the placeholder logo, add your own header image to match your branding, change font size, and change the email subject and message text to fit your needs.
Once you’re happy with the design, click the ‘Continue’ button in the upper-right corner. Constant Contact will then take you back to the ‘Welcome Email’ campaign page.
Here, click the ‘Activate’ button to save and activate your welcome email.
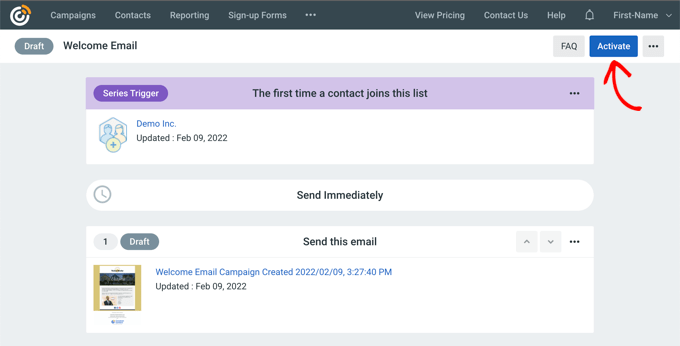
When prompted, click the ‘Continue’ button.
Constant Contact will then perform a quick verification, checking for any potential problems before saving and activating your campaign.
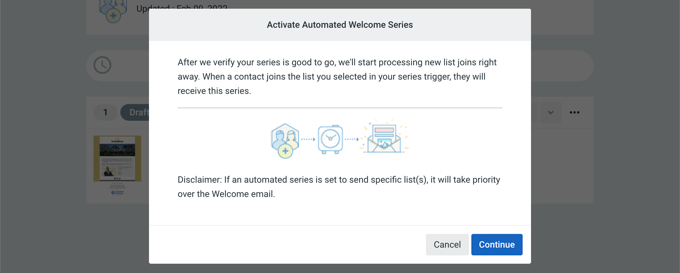
That’s it! You’ve successfully set up an automated Welcome Email. Now, every single user who joins your list will receive this email automatically.
This is a huge time-saver that gives your newsletter a professional start.
Some Tips for Writing an Effective Welcome Email
After helping thousands of people set up their first newsletter, I can confidently say that the Welcome Email is the single most important email you’ll ever send.
Welcome emails consistently have an average open rate of around 50%. That is typically significantly higher than any other newsletter email you’ll send later on!
This first email is also your chance to impress new subscribers and make them genuinely look forward to hearing from you again in the future.
When it comes to writing an effective welcome email, you don’t need to overthink it. Here’s a simple checklist I use as a quick-reference guide:
- Write an engaging subject line that makes people want to open the email, but avoid being clickbait-y or manipulative. Just be clear and exciting. Something like, “Welcome! Here’s Your First Gift from Us” works perfectly.
- Start by saying thanks. Let the new subscriber know you genuinely appreciate them sharing their contact information with you. It’s a courtesy that builds trust right away.
- Next, introduce yourself and what you do. I’ve learned that keeping this section short and simple is best.
- Set expectations by telling your users exactly how often you’ll be emailing them (such as “We send an email every Tuesday.”) Also, clearly state what kind of valuable content or offers they should expect. This is a professional best practice I picked up from speaking with countless successful website owners, and it’s always worked well for WPBeginner.
- If you offered an incentive for joining your list, then make sure that the content is front-and-center in your welcome email. Don’t make the subscriber dig through the email just to find the download or link you promised them.
- Send the subscriber directly to the most useful content on your site. This helps them get value straight away and immediately builds engagement. I usually link to my three most popular articles.
💡 If you’re struggling with the exact wording or design, my team has put together a great guide with tips and examples. Check out our full guide on how to write the perfect welcome email.
Step 4. Adding Newsletter Signup Forms to Get More Subscribers
So far, you’ve signed up for an email marketing platform, created a list, and set up that crucial welcome message. Now, you need subscribers.
After running WPBeginner for years and managing many other projects, I can tell you the single most reliable method is simply adding visible newsletter sign-up forms to your website.
If people can’t find the sign-up form, they can’t subscribe. It’s as simple as that.
Most email marketing services offer ready-made sign-up forms that you can add to your site. I’ve tested many of them, but they don’t always look great.
Plus, they often don’t fit neatly into the specific spot or container where I want to place them. This can be incredibly frustrating when I’m trying to make my site look professional.
That’s why smart business owners and professional marketers use custom newsletter forms. A custom form gives you complete control over the design, the placement, and the user experience.
I’m going to show you exactly how to easily add beautiful, high-converting newsletter sign-up forms to your WordPress site.
I’ll cover two main methods, so you can pick the one that suits your site the best. Or, you can use them together for maximum effect.
1. Add Newsletter Signup Form Using WPForms Lite (Free)
When I first started trying to get subscribers, I quickly realized that the forms provided by the email services simply didn’t perform well enough.
That’s why I always recommend WPForms. It’s the best drag-and-drop WordPress form plugin we’ve ever used at WPBeginner.
They also have a free version called WPForms Lite, which connects seamlessly to your Constant Contact account.
To start, you’ll need to install and activate the WPForms Lite plugin. If you haven’t done that before, check out our simple guide on how to install a WordPress plugin.
Upon activation, go to WPForms » Settings and click the ‘Integrations’ tab.
You’ll see Constant Contact listed as an integration. Simply click to expand it and then select the ‘Add New Account’ button.
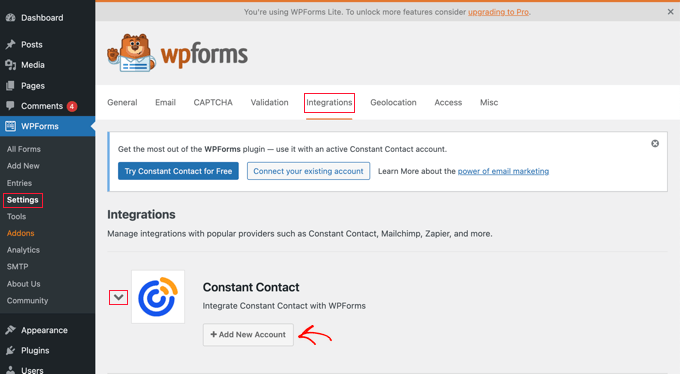
You’ll now see all the information you need to connect your Constant Contact account to WPForms.
Go ahead and click the link that says: ‘Click here to register with Constant Contact.’
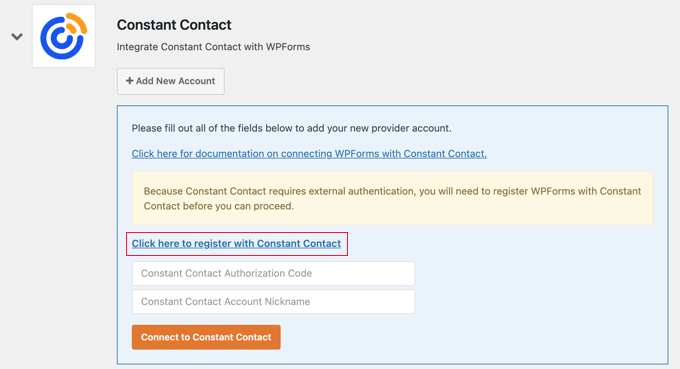
This action will open a popup that directs you to the Constant Contact website.
If prompted, log in to your account. Then, click the ‘Allow’ button, which gives WPForms permission to send new subscribers to your list.
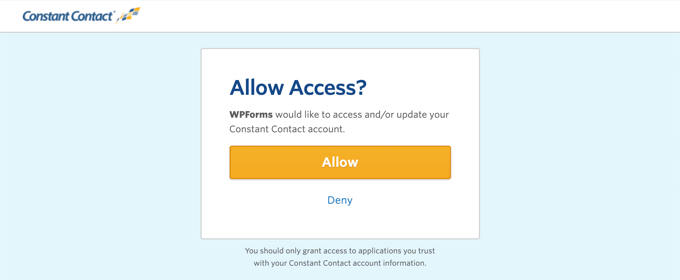
Next, you’ll see an authorization code.
Simply copy the code and head back over to the WPForms settings page.

Here, paste the authorization code. You also need to give this integration a name.
I recommend using something clear and obvious, such as ‘My Newsletter Connection.’
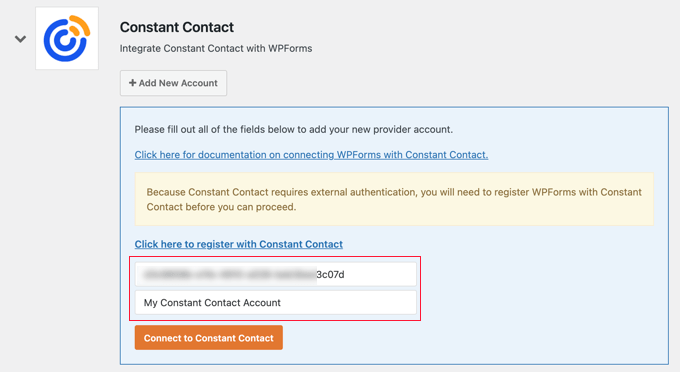
Finally, go ahead and click the ‘Connect to Constant Contact’ button.
WPForms will now connect to your Constant Contact account.

Now, you’re ready to create your newsletter sign-up form using WPForms.
Simply head over to the WPForms » Add New page to launch the WPForms builder interface. Here, type in a title for your form.
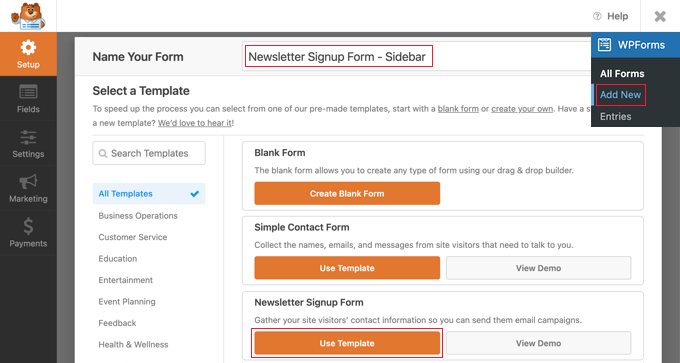
With that done, scroll down to ‘Newsletter Signup Form,’ and click the ‘Use Template’ button.
This will load the template, which already has all the required fields.
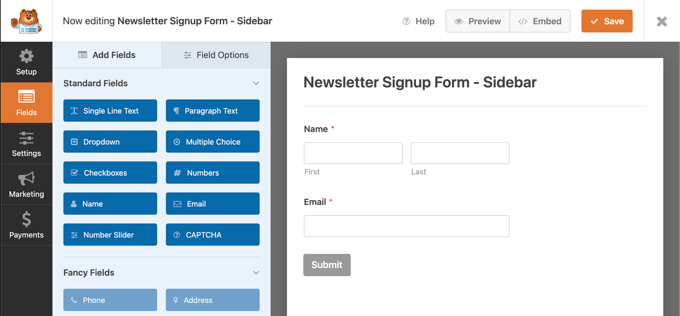
You can point and click to edit any of these form fields, change their labels, and add more fields from the left column if needed.
Once you’re happy with the form, click the ‘Marketing’ tab in the left-hand menu to integrate WPForms with Constant Contact.
On the next screen, make sure ‘Constant Contact’ is selected. Then, click the ‘Add New Connection’ button.
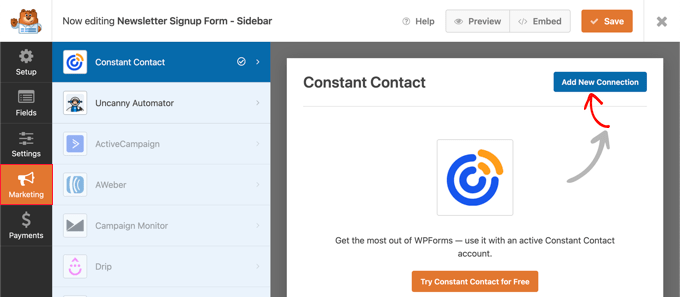
You can now type in a title for this connection.
That done, click the ‘OK’ button.

You’ll now see all the settings for this connection. WPForms will automatically detect your Constant Contact account and show it under the ‘Select Account’ field.
In the ‘Select List’ section, open the dropdown menu and select the email list you created earlier.
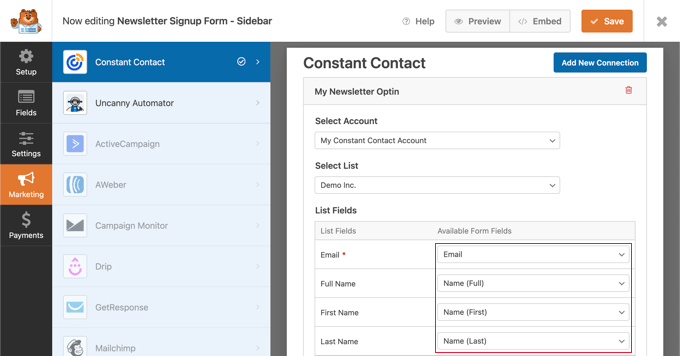
After that, you need to map your WPForms form fields to the Constant Contact fields. Once that’s done, click the ‘Save’ button to save your signup form.
WPForms makes it easy to add the finished form to your site, which is a big reason why I use WPForms in all my projects.
If you want to add the form to your website’s sidebar, then visit the Appearance » Widgets page and add the WPForms widget to your sidebar.
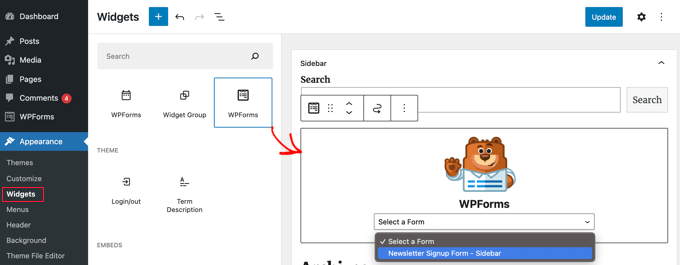
Make sure you open the dropdown menu and select the signup form you created earlier.
At this point, I also like to add a bold heading above the WPForms widget, such as ‘Don’t Miss My Next Update.’
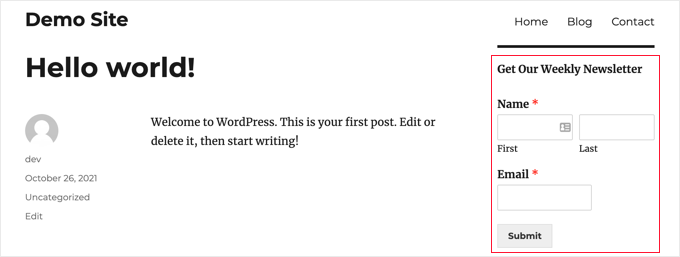
When you’re happy with how the form is set up, don’t forget to click ‘Update’ to store your settings. You can now visit your website to see your newsletter signup form in action.
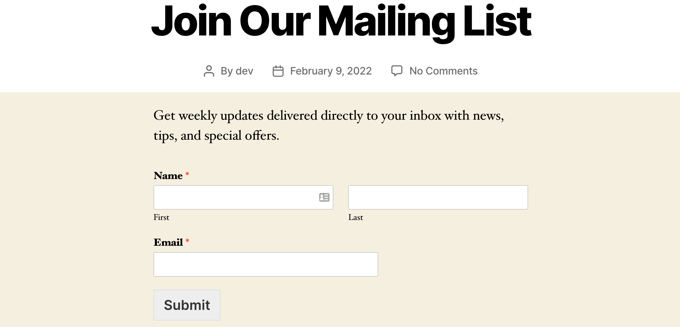
Another option is embedding the signup form into your blog posts or pages.
Simply edit the post and add the WPForms block inside the WordPress content editor.
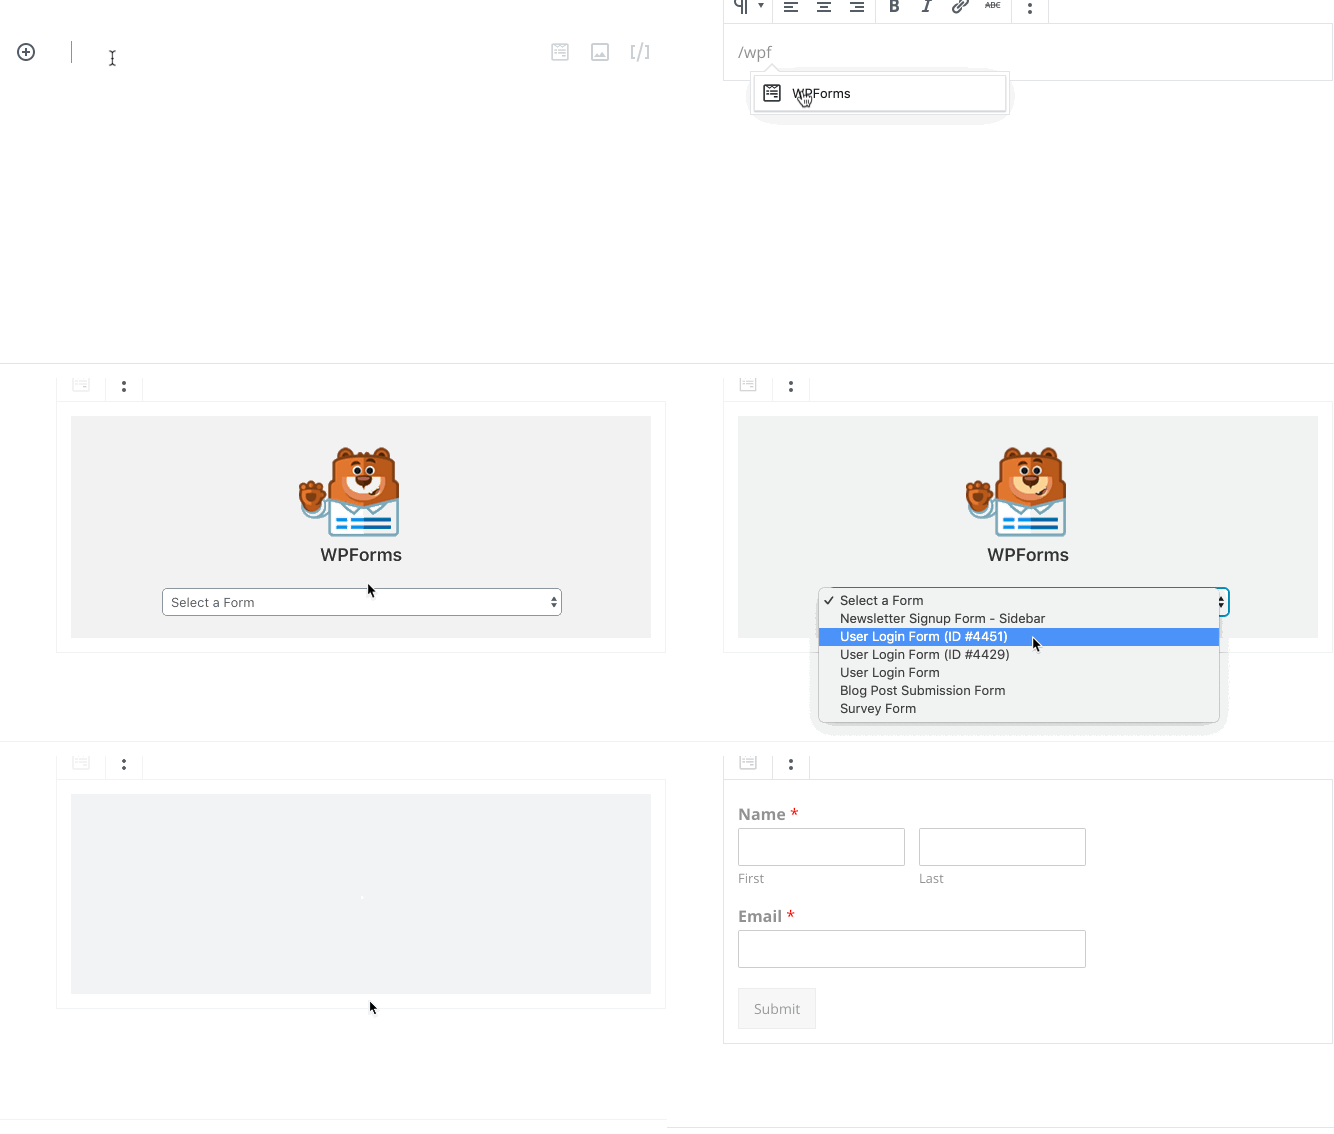
After adding the block, select the newsletter signup form you created earlier, and WordPress will add it to your page or post.
You can now save or publish the page as normal to make the form live.
2. Add Newsletter Signup Form Using OptinMonster (Pro)
While the WPForms method is perfect for embedded forms, when I started getting serious about growing WPBeginner, I knew that I needed an additional tool.
That’s where OptinMonster comes in. It’s the best tool on the market if you want to get more email subscribers, faster.
I’ve tested all the features myself and can confirm OptinMonster has everything you need. This includes eye-catching lightbox popups with amazing exit-intent technology, floating bars, and tools for A/B testing.
⭐ Want proof? We used OptinMonster on WPBeginner to increase our email subscribers by 600%. You can see our complete OptinMonster case study for all the details.
First, you’ll need to sign up for an OptinMonster account. It’s a premium service, and its plans start at $9 per month.
After signing up for OptinMonster, you can log in to your account dashboard on the OptinMonster website.
From here, you can build your first OptinMonster campaign by clicking the ‘Create New Campaign’ button.

Next, you’ll need to select an opt-in type.
For the sake of this guide, we’ll create a popup signup, as it’s the most effective campaign type I’ve used for quick growth.
After choosing your campaign type, you’ll need to choose a template.
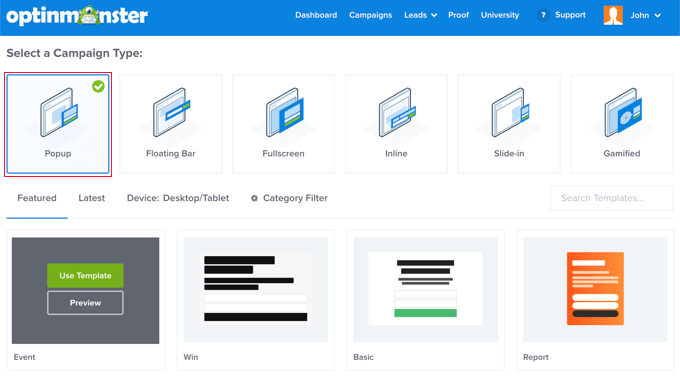
All the templates look fantastic, but in this guide, I’m using the ‘Split’ template.
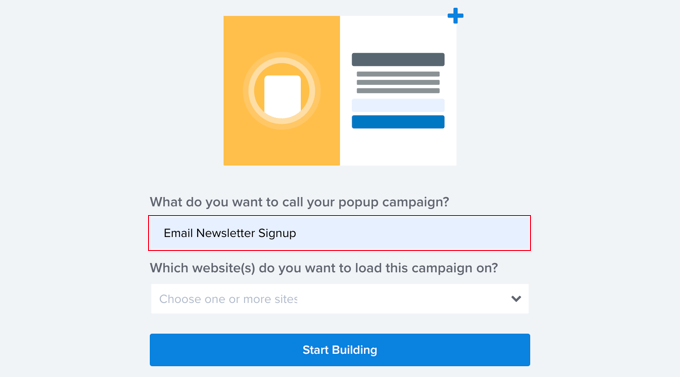
After that, you’ll need to provide a title for your popup campaign and enter your website address.
This will launch the OptinMonster builder interface.
This builder is incredibly powerful. In my opinion, it’s very similar to the WordPress block editor, but built specifically for campaigns.
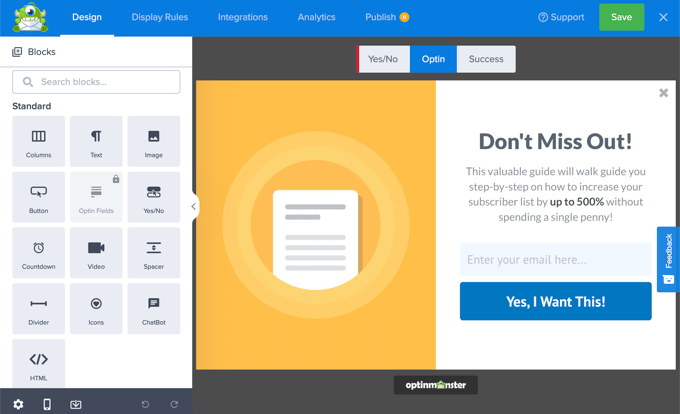
You can point and click to edit any item on the screen. You can also add new blocks to your optin.
Once you’re happy with how the optin looks, it’s time to connect the OptinMonster campaign to your Constant Contact account.
Simply select the ‘Integrations’ tab and then click the ‘Add New Integration’ button.
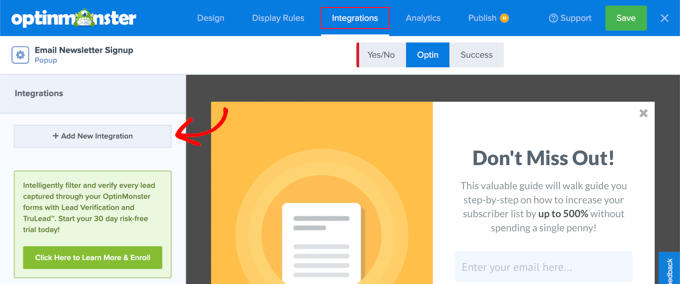
Next, select Constant Contact as your ‘Email service provider’ and then click on the ‘Register with Constant Contact’ button.
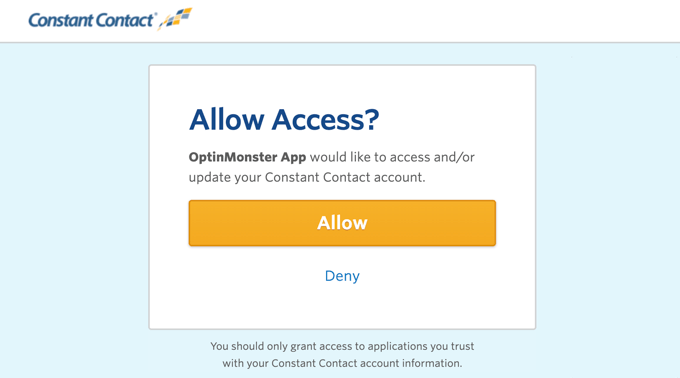
In the popup that appears, click the ‘Allow’ button. At this point, you may also need to log into Constant Contact.
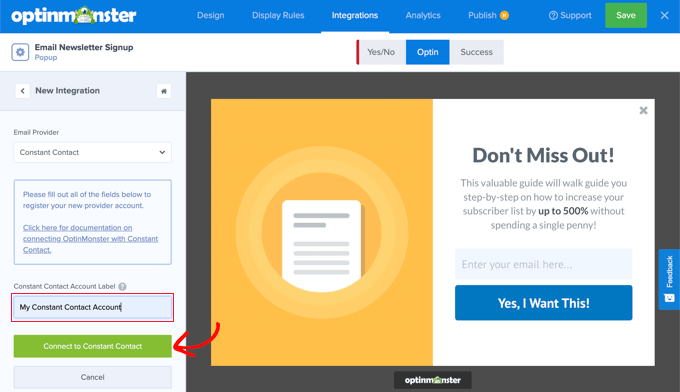
Now you can switch back to OptinMonster and give this connection a name.
After that, click the ‘Connect to Constant Contact’ button.
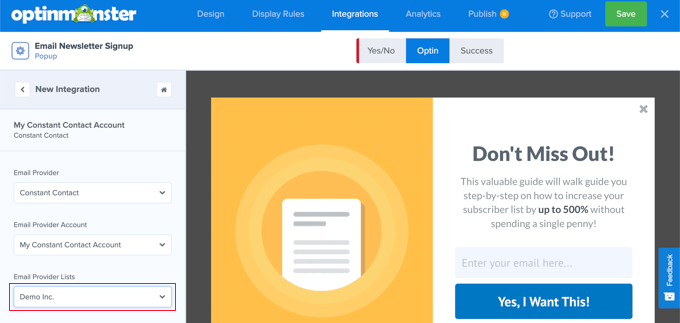
OptinMonster will now fetch your Constant Contact account details.
Once that’s done, select the email list you created for your newsletter.
The next crucial step is setting the Display Rules.
These rules tell the system when and where to show your campaign.
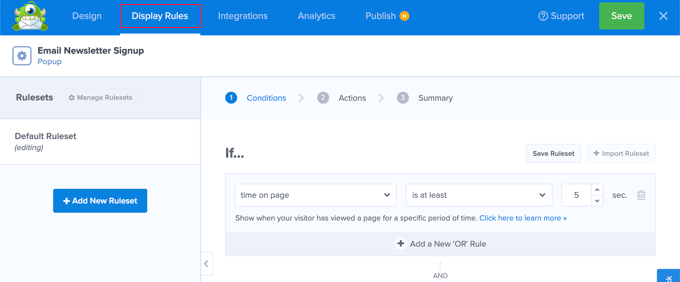
By default, OptinMonster shows the popup to first-time visitors after 5 seconds, so it won’t annoy repeat visitors.
I recommend using these default settings, as I know from experience that they work very well.
Finally, switch to the ‘Publish’ tab and change the campaign status to ‘Publish.’ Don’t forget to click on the ‘Save’ button to store all your campaign settings.

Your OptinMonster campaign is now ready, so let’s add it to your WordPress site.
First, you’ll need to install and activate the free OptinMonster plugin. This plugin acts as a connector between your WordPress site and OptinMonster.
Upon activation, go to OptinMonster » Dashboard in your WordPress admin sidebar. Once there, click the ‘Connect Your Site’ button.
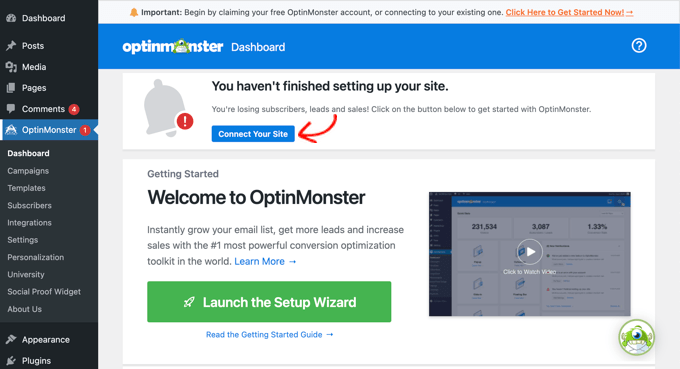
You’ll be asked to either create a new account or connect to an existing one.
Since you already have an account, click the ‘Connect Your Existing Account’ button.
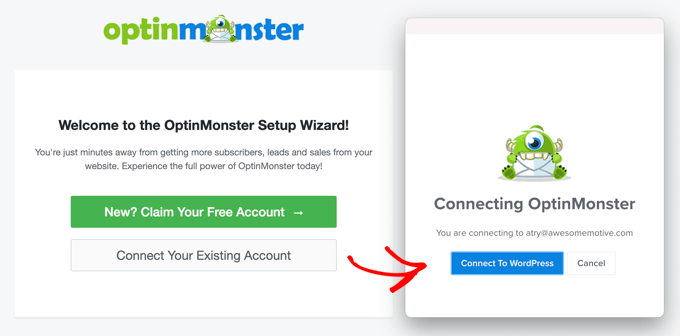
In the window that appears, select the ‘Connect to OptinMonster’ button. The plugin will now connect your website to OptinMonster.
That done, go to OptinMonster » Campaigns. This is where all your OptinMonster campaigns will appear.
You should see the campaign you created earlier on the OptinMonster website.
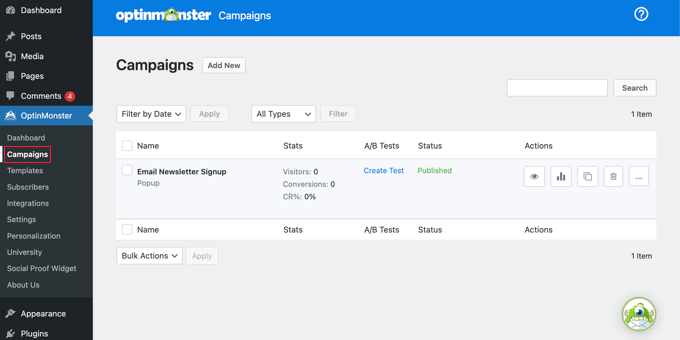
Your campaign status should already be ‘Published,’ meaning it’s live on your site.
The final step is to visit your website and confirm the popup is working correctly. It should appear automatically after 5 seconds.
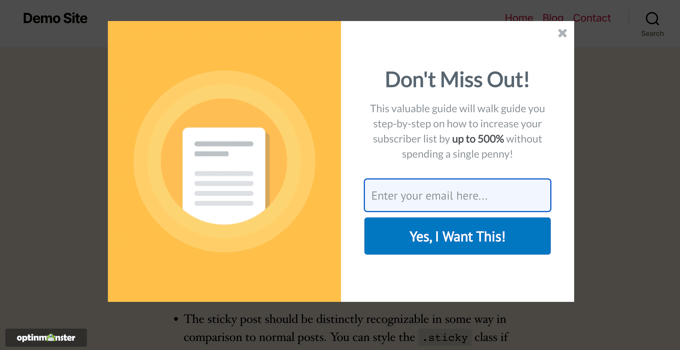
This is a great start, but OptinMonster can do so much more than just show a popup.
I constantly use OptinMonster to experiment with other campaign types like slide-in scroll boxes and sticky floating footers. Trying these different options is the fastest way I know to boost signups.
With that in mind, here are some other campaign types you can try out:
- A slide-in scroll box signup form
- A sticky floating footer signup form
- Triggering FOMO with a countdown timer signup form
- Spin to win gamified wheel to boost signups
Step 5. Sending Your First Email Newsletter
Now that you’ve added sign-up forms using WPForms or OptinMonster, you should start to see your subscriber numbers go up.
Better yet, after getting that polished welcome email, your new subscribers will be eagerly anticipating your next message. This means you’re now officially ready to start sending your regular newsletter.
The thing I really like about Constant Contact is its email builder. I’ve tested countless builders over the years, and this one is incredibly easy to use. It also comes loaded with tons of beautiful templates that are fully compatible with email clients like Outlook, Gmail, and many others.
This means it’s easy to start sending out an email newsletter.
Simply visit the Constant Contact website and log in to your account. Next, click the ‘Campaigns’ menu at the top of the screen.

The campaigns page lists all your current, past, and automated email campaigns. To start working on a new email, click the ‘Create’ button.
You can then choose a campaign type. Since we’re creating a newsletter, select ‘Email.’
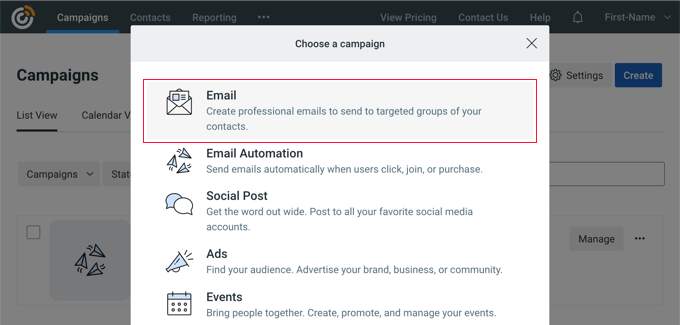
Next, you need to pick an email template for your newsletter.
Constant Contact comes with several ready-made templates for different industries, campaigns, and types of emails.
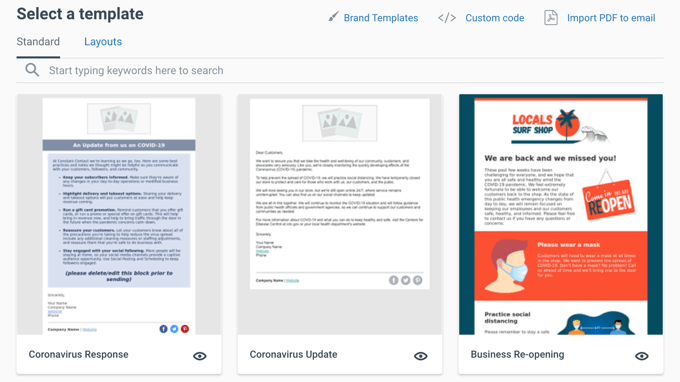
All these email templates are fully customizable, so you can add your own logo and images. Once you edit and save a template, you can easily reuse it for your future campaigns.
I always recommend starting with a simple, clean design that you can easily brand. For this tutorial, I’m using the ‘Basic Newsletter’ template.
Just click the template to select it, and Constant Contact will instantly load it into the email builder.
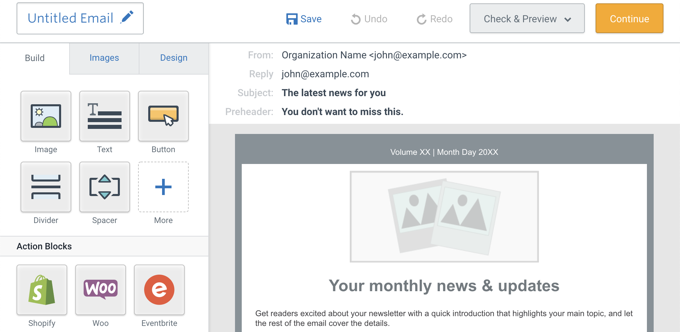
This is the same drag-and-drop builder we used to create the welcome email, so it should feel familiar. You can add your brand logo and click to add text, links, and images.
Adding Your Blog Posts to the Email Newsletter
Now, it’s time to add your content. I’ve found the easiest way to add value to my newsletter is by highlighting my recent work.
You can easily pull your WordPress blog posts right into the newsletter content. It’s a neat trick I use all the time.
Simply click the ‘+ More’ button in the left column, and then drag and drop the ‘Read More’ block onto your email.
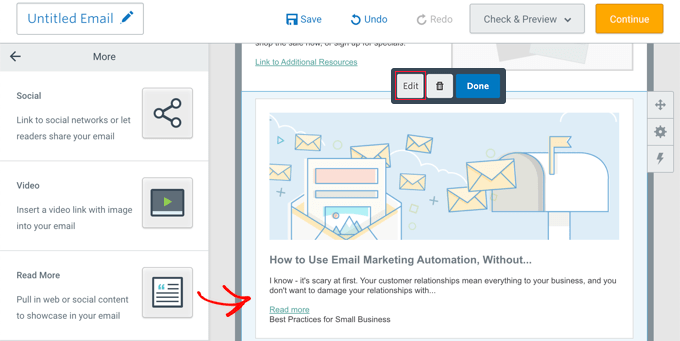
Next, click the ‘Read More’ block followed by the ‘Edit’ button.
This will open a popup where you can paste the link to the specific blog post you want to feature.
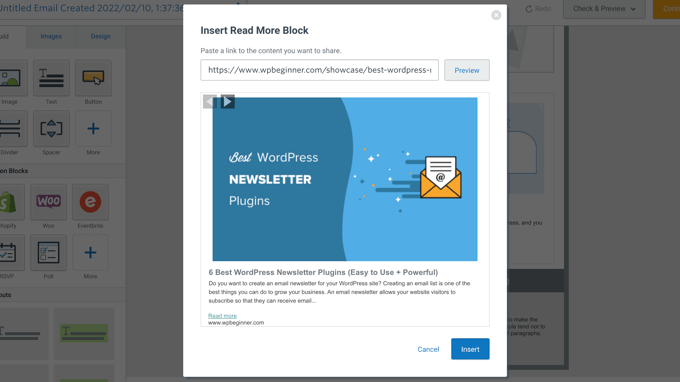
Constant Contact will display a preview of the article’s featured image and description, which is super helpful. Once you’re happy with how it looks, click the ‘Insert’ button to add the blog post to your newsletter.
To include more posts, just repeat this simple process.
If you’re running an online store, then Constant Contact also lets you add new products from Shopify, WooCommerce, and other eCommerce platforms.
Once you’re done adding content, remember to always proofread your emails to ensure there are no typos, extra white space, or other errors. It’s also important to click through all the links in your emails to make sure they work as expected.
Never skip this crucial step, as it’s saved me from embarrassing errors countless times.
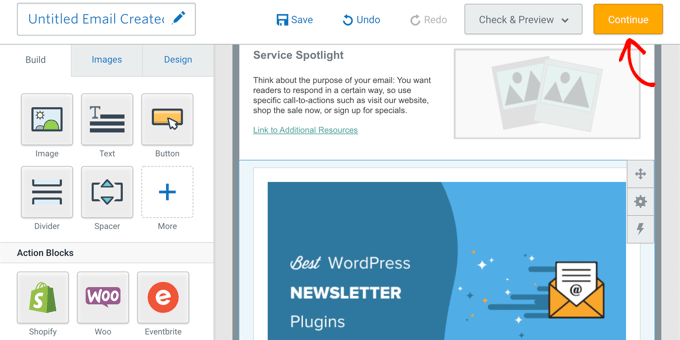
If you’re happy with your email’s design and contents, you can move forward by clicking the ‘Continue’ button.
On the next screen, your first task is to select the email list where the newsletter will go.
Constant Contact lets you send an email blast to your entire list, or you can target a custom email segment (a section of your audience with specific interests)
After making your selection, take a moment to review the other email settings on the page.
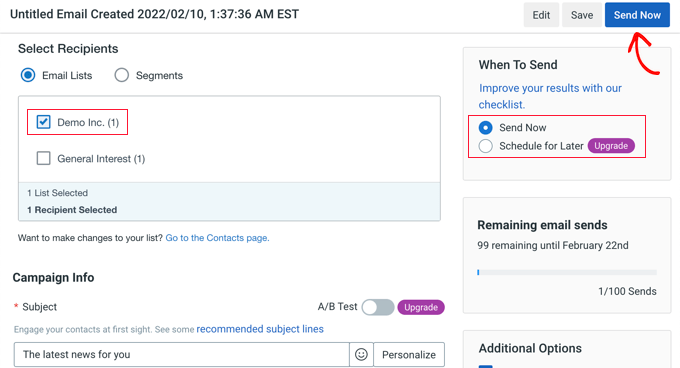
Lastly, decide whether to send the email immediately or schedule it for a later time.
I strongly recommend sending your emails on a fixed, consistent schedule, like every Wednesday morning. This sets clear expectations and encourages your subscribers to actively anticipate your newsletter.
However, note that the ‘Schedule for Later’ feature isn’t available during Constant Contact’s free trial period. This is a restriction I ran into when I was first testing the service.
If you’re on the trial, click the ‘Send Now’ button, or click ‘Schedule’ if you’re on a paid plan. For more on this topic, see this guide on choosing the best time to send newsletter emails.
That’s all! You have successfully created and scheduled your first newsletter email.
💡If you need a little help figuring out what to actually write, we have some great tips on writing effective email newsletters.
Step 6. Tips to Get More Email Subscribers
After all this setup, you may be wondering why we put so much effort into email newsletters in the first place. The simple answer is: email is where your audience lives.
In 2022, the number of global email users reached 4.1 billion, and that number is expected to grow to over 4.3 billion by the end of 2023. That means more than half the world’s population is using email.
And it’s not just about volume. People actually want to hear from you.
In another study, 49% of participants said they’d like to receive weekly email updates from their favorite brands.
I’ve seen this reflected in our own experience at WPBeginner. Our readers prefer getting updates delivered right to their inbox.
So the market is there, and the preference is there. The only question is: how do you get more subscribers for your newsletter?
The good news is that email marketing has been around for a very long time. I’ve watched experts consistently experiment, share data, and develop new ways to grow their lists. I’ve taken those best practices, tested them on my own projects, and discovered what actually works.
Here, I’ll share some of the proven methods that I use every day to grow WPBeginner’s email list.
1. Use Multiple Signup Forms
The most common mistake I see among beginners is the ‘set-and-forget’ mentality. They add a single newsletter signup form to their sidebar and then just forget about it.
Based on my experience and the testing we do at WPBeginner, that simply isn’t enough to achieve serious growth.
Instead, you need to add multiple signup forms to your website, using a variety of placements. This gives your audience several chances to say “yes” at different points in their journey.
However, be careful not to ruin the user experience with aggressive prompts. For example, in the following screenshot, the second prompt only appears when a user scrolls down, and the first signup form is no longer onscreen.

It also helps to study what the big players are doing. For example, Social Media Examiner used multiple sign-up forms to get over 250,000 email subscribers. Their success proves you must place forms everywhere your audience looks.
My best advice is to constantly experiment with different forms and placements, such as popups, floating bars, embedded forms, and welcome gates. You can then use your analytics to find out what placement delivers the best results.
2. Use Lead Magnets to Capture More Subscribers
Once your forms are ready, you need to give people a compelling reason to sign up. This is where lead magnets come in.
A lead magnet is essentially a special offer used as a powerful incentive to encourage users to join your email list. It can be anything that’s valuable to your audience, such as an exclusive download, an ebook, a helpful resource, or a discount coupon.
Lead magnets work extremely well because they offer users instant gratification and immediate value in exchange for their email address. It’s a simple transaction that benefits both of you right away.
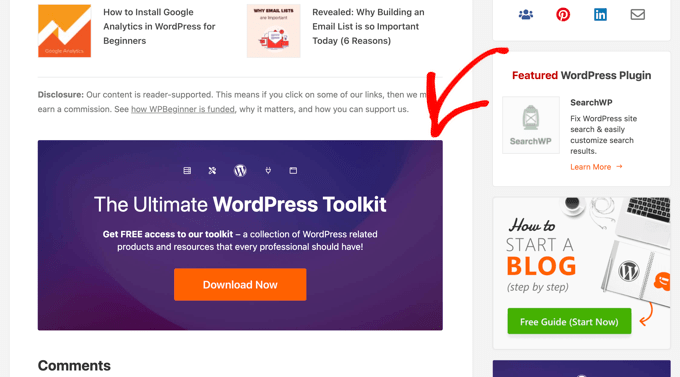
You can see an example of lead magnets just below this article, where we offer a free download of our ultimate WordPress toolkit. This single, effective offer has been a key factor in growing our subscriber list.
3. Offer Content Upgrades
Similar to lead magnets, content upgrades are a powerful trick that I’ve used to boost signups on specific articles.
A content upgrade is an additional piece of content or bonus material that a user can download after they sign up for your newsletter. Crucially, this content is offered exclusively within the context of a specific blog post.
Content upgrades are incredibly effective because they’re hyper-relevant.
You can easily add a content upgrade to any of your popular posts. For example, if you have an article about setting up a WordPress site, the content upgrade could be:
- A checklist summarizing every step in the article.
- A clean PDF download of the entire article for offline reading.
- A detailed case study or research report that supports the topic.
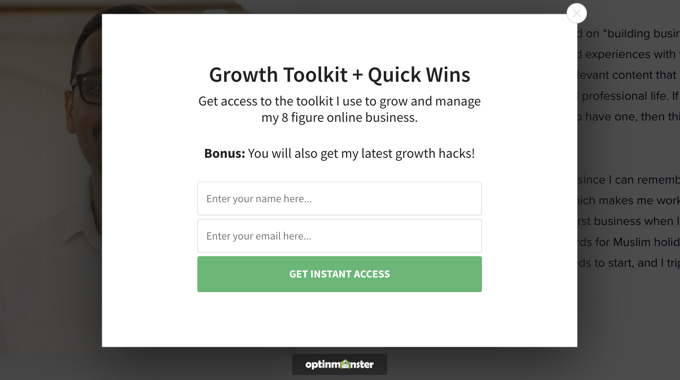
This instantly offers readers something they need right now, making it much harder to say no. I’ve used content upgrades across my personal projects, and they consistently outperform general sign-up forms.
If you want to see exactly how to set everything up, we have a detailed guide on how to add content upgrades in WordPress that walks you through the steps.
4. Use Social Media to Grow Your Email List
Your website isn’t the only place to promote your content and find new subscribers. Chances are, you have an audience on other platforms, too.
I always tell website owners to view their social media platforms as a valuable channel for converting existing followers into email subscribers.
The people following you on platforms like X/Twitter or Instagram already like your content. They just need a clear, easy way to take the next step and invite you into their inbox.
You can use simple strategies like:
- Adding a direct, permanent signup link to your social media bios.
- Creating dedicated posts or Stories that promote your lead magnets or content upgrades.
- Running social media contests where signing up is the entry requirement.
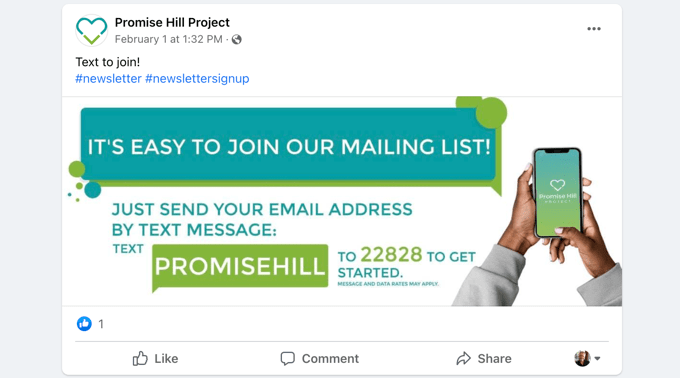
By actively promoting your newsletter where your audience already hangs out, you open up a whole new channel for growth.
For more tips, see our guide on how to use social media to grow your email list.
5. Using Giveaways to Grow Your Email List
I’ve already covered slow and steady growth, but if you want your subscriber numbers to explode, nothing beats a viral giveaway.
After running various campaigns and talking to other website owners, I’m convinced this is one of the fastest ways to build an email list.
A good giveaway campaign helps to turn your casual website visitors into brand ambassadors. As a result, you get more website traffic, more email subscribers, and greater social media engagement.
Even better, you get it all faster without having to spend any money on paid ads.
For this strategy, I recommend using RafflePress. It’s the best WordPress giveaway plugin we’ve ever tested at WPBeginner.
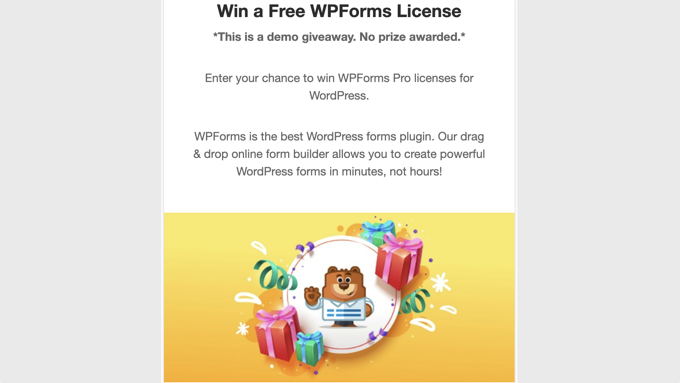
I love RafflePress for its flexibility, as it lets you add multiple giveaway actions. You can reward users for signing up for your email list and for following you on social media, or even for sharing the giveaway with their friends.
6. Create High-Converting Landing Pages
If you want to seriously boost signups, then you need to focus on landing pages. A well-designed landing page is so effective because it’s focused on one specific purpose: converting visitors into email subscribers.
When it comes to building landing pages, I always recommend SeedProd. It’s the best WordPress landing page plugin out there, used by over 1 million websites.
SeedProd integrates seamlessly with all popular email marketing services. Plus, you can use the drag-and-drop builder to create any type of landing page without writing a single line of code.
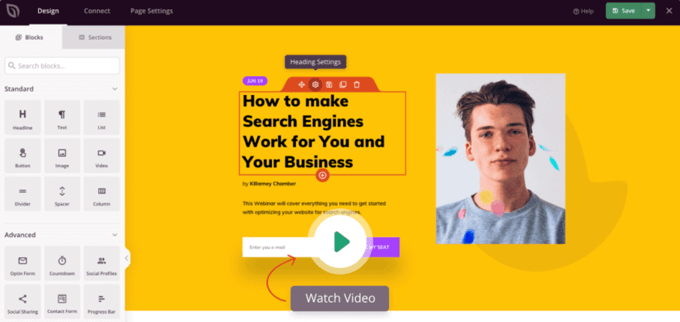
If you want even more techniques and tips, here are some of the most helpful guides we’ve put together based on our experience and research:
- 73 proven tips to grow your email list
- How to do lead generation in WordPress
- 12 tips to grow your email list quickly
Step 7. How to Make Money from Your Email Newsletter
Now that we’ve covered how to build your list, let’s talk about the payoff.
There’s a popular saying among digital marketers that I’ve found to be absolutely true: “The money is on the list.”
I’ve seen the data to back this up, and it’s compelling. Every dollar you spend on email marketing has an average return of $44.
As your subscriber count grows, you’ll naturally want to explore ways to monetize your email newsletter. With that in mind, here are some of the easiest ways I’ve found to make money directly from your email newsletter:
1. Sell Your Products
The most straightforward way to monetize your list is by selling your own products or services directly to your subscribers.
The best way to do this is by making the offers exclusive. You can use your list to send special offers and discount deals that are only available to your subscribers. This makes them feel like a valued insider.
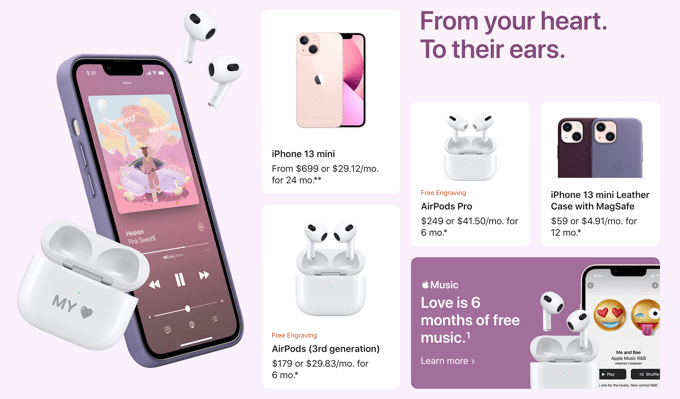
Beyond direct sales, I also use my list to bring subscribers back to my websites. I do this by adding clear calls to action and offering members-only content, video demos, or even free samples of a digital course or physical product.
When trying to sell your own products, keep the ‘Value Value Value Pitch’ formula in mind. This means you offer three times more value than your sales pitch. It’s a simple but powerful technique that I’ve seen many top marketers use.
Most marketers agree that these emails outperform a plain sales pitch. Focus on being helpful first, and the sales will follow.
2. Upsell Products and Services
The work isn’t over just because a subscriber buys something from you. That’s when you can use the technique of upselling.
Upselling is a simple sales technique where you persuade customers to buy something extra. This might be an upgrade, a slightly better version of the product they just bought, or a relevant add-on.
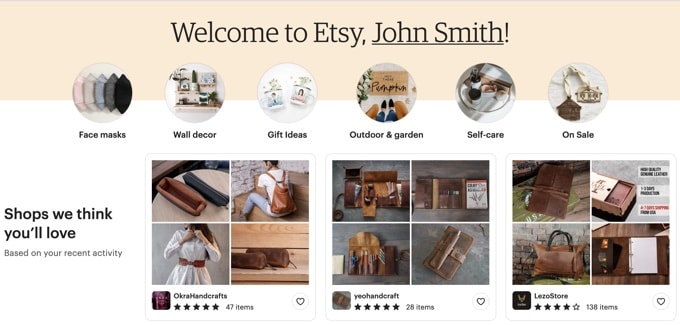
As your list grows, you can start sending highly personalized offers to specific newsletter subscribers. For example, if someone buys an ebook, then you might send them an exclusive discount code for the related video course.
I’ve found that upsell emails tend to perform way better than general sales emails.
You just need to remember that your emails should always offer value first. If you don’t, your messages will quickly become annoying, and your click-through rates will suffer.
3. Affiliate Marketing
Affiliate marketing is another powerful monetization method that I’ve used across many of my different projects.
This works like a referral program. An online retailer (advertiser) pays you a commission when a user buys their product using your unique referral link. Essentially, you’re getting paid for sending them a customer.
When it comes to doing this successfully without annoying your subscribers, authenticity is key. Only recommend products and services that genuinely interest your users and that you personally trust.
You can then add affiliate links, honest reviews, and even exclusive coupons for those products right into your newsletter emails.
If you’re new to this concept and want a full walkthrough, check out our in-depth beginner’s guide to affiliate marketing.
4. Advertisements or Renting Out Your Email List
If you follow the tips in this guide and your list starts to grow quickly, then you can make money by renting your email list.
There are plenty of businesses that are looking for someone who already has a large, engaged list of people interested in their specific products, services, or industry. Your highly targeted list is incredibly valuable to those people.
When you rent your list, you aren’t actually handing over your audience’s email addresses. That would be a huge breach of trust. Instead, you negotiate a price and then send a dedicated email on the advertiser’s behalf to your own subscribers.
You can approach potential advertisers directly if you see a good fit, or you can use email list brokers like Info USA, List Giant, or Mailing List Direct. These brokers act as middlemen, connecting you with companies willing to pay for access to your engaged audience.
This is a great, often overlooked way to monetize your email list.
Step 8. Keep Your Email Newsletter Out of Spam
In 2012, 69% of all emails were spam. This number had reduced to 45.1% by March 2021.
That huge decline is mainly thanks to the improved spam detection technology used by modern email marketing tools.
This is great news for users and businesses. However, AI-powered spam detection technologies are incredibly sensitive and can sometimes wrongfully mark a perfectly good newsletter as spam.
For that reason, you must carefully track your email metrics and ensure your newsletter design won’t trigger spam filters. If you don’t track, you won’t know if your email is landing in the inbox or the junk folder. And an email in the junk folder is lost revenue.
The easiest way to measure the real impact of your newsletter is to create a trackable URL using a tool like MonsterInsights. Whether you’re running an online store or a small business, you’ll want to see which email marketing campaigns led to a sale.
💡 To help you out, we have a detailed guide on how to set up email newsletter tracking that gives you simple, step-by-step instructions.
Based on my experience and talking to other website owners, these are the key issues that trigger filters and prevent your valuable newsletter from reaching the inbox:
1. You Didn’t Use Double Opt-in
This is one of the most critical topics I cover when speaking with new website owners.
Basically, all email marketing services require explicit user consent before you can send them emails. This consent is typically secured by the user verifying their email address after they sign up.
However, email marketing services also let you add email addresses manually. If you misuse this feature and add addresses from random sources, then you’re violating trust. As a result, your messages will end up in spam.
I cannot stress this enough: never send emails to someone who didn’t personally ask for them.
It’s also a good idea to use an email verification tool to remove invalid or non-existent email addresses from your list.
If your list is cluttered with invalid or inactive emails, then it’ll hurt your sender reputation. When your emails start bouncing because the address doesn’t exist, that tells spam filters that you’re not a legitimate sender.
By regularly cleaning your list, you’ll improve deliverability and reduce those frustrating bounce rates. You might even save on costs, since you’re not paying to send emails to invalid addresses.
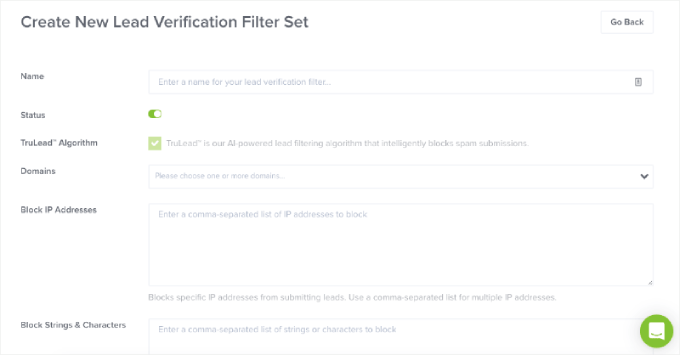
I also rely on tools to prevent bad emails from ever making it onto my list. For example, OptinMonster has a feature called TruLead, which filters and blocks spam submissions based on specific IP addresses, domains, and many other factors.
That way, you won’t waste time or money by collecting bad emails, and you will prevent newsletter signup spam. It’s a trick I use to keep my list quality high.
2. Sender’s Email Address Was Used for Spam
This is a critical point that many beginners overlook, but it’s essential for long-term success. Your sender email address builds a reputation that directly affects whether your newsletter lands safely in the inbox.
If that address is ever associated with sending spam or malware, your campaigns will land in the junk folder. This completely ruins your deliverability.
This is why you need to get a business email address. This professional address instantly boosts your credibility with both subscribers and spam filters.
By linking a dedicated address to your verified domain, you control its reputation and ensure it stays clean. This is critical for improving your email deliverability rates.
3. Misleading Subject Lines
We’ve all seen misleading email subject lines that have nothing to do with the email content. They’re annoying, and spam algorithms are now smart enough to identify these tricky lines and mark your message as spam.
I’ve seen these common misleading subject lines tank deliverability:
- “Urgent: Update your information” (when there’s no urgent need)
- “Thanks for your order!” (when you haven’t bought anything yet)
- “You have won a prize” (when it’s just a general promotional giveaway)
Instead of writing a misleading subject line, I recommend boosting your open rates by adding personalization tokens, such as the recipient’s name. This makes the email feel like a direct, personal message rather than a generic blast sent to everyone on the list.
⭐ If you need some inspiration for subject lines that are both honest and engaging, we’ve put together a huge resource. You can check out these 160+ excellent email subject lines for ideas that actually work.
4. You Included Inaccurate Information
To protect your newsletter’s reputation and guarantee deliverability, there are some legal requirements you need to follow. I always tell website owners that following these rules is the easiest way to avoid the spam folder.
In particular, you should always add the following to your messages:
- An accurate ‘from’ email address that clearly identifies you or your business.
- A complete physical address (this can be your current street address, a registered P.O. box, or your business address).
- A highly visible and working ‘unsubscribe’ link.
If you ignore any of these elements, then your message is breaking the law and will almost certainly end up in spam.
The good news is that many email marketing services build compliance features into their templates and footers, making your job easier.
5. Personalize Your Emails
I’ve already talked about adding a subscriber’s name to the subject line, but personalization can go much deeper than that.
True personalization means using the data you’ve gathered to tailor the entire content to each subscriber. This ensures you’re sending timely, relevant messages that your audience can’t resist reading.
Most email marketing services provide tools to segment your audience and add dynamic content. For example, you can segment your audience based on things like location, gender, and past purchase history.
Ultimately, personalizing your messages will improve your open rates, boost your CTRs, and maybe even increase your sales.
📝 Once you start making these changes, how do you know if they’re actually working?
Our detailed guide on how to set up WordPress email tracking has the answer. Just follow the step-by-step instructions to see whether your personalization and segmentation changes have made a real improvement to your bottom line.
Your Next Steps: From Setup to Success
If you’ve been following along, then you’ve now created a successful email newsletter, the right way. Congratulations!
I know that the first step can feel the most intimidating, so you’ve already done the hard part.
But having the tools ready is just the beginning. The real magic happens when you start consistently delivering value and building relationships with your subscribers.
Many people lose momentum after the initial excitement has worn off, and they’re faced with the reality of writing new emails every single week. Please don’t let that happen to you!
Running a successful newsletter comes from taking consistent, strategic action over time. With that in mind, here are the next steps to turn your newsletter into a powerful business asset that drives real results:
- Test Your Complete Signup Process: Use a different email address (like a personal account) to sign up for your own newsletter. Confirm you receive the welcome email immediately, check that the email looks good on both desktop and mobile, and verify that all your links work correctly.
- Set Up Basic Tracking: You need to know what’s working. I recommend installing a tool like MonsterInsights so you can see which pages drive the most signups. Also, set up a simple spreadsheet to track your subscriber growth week by week.
- Create Your Content Calendar: Decide on how often you’ll send emails (I usually send one email per week). Pick a consistent day and time (Tuesdays at 10 AM often works well). Then, brainstorm ideas for your first 4 to 6 newsletters.
- Optimize Your Signup Forms: Start by adding signup forms to your website’s highest-traffic pages. You should also create a simple lead magnet and write clear, compelling copy that tells visitors exactly what they’ll receive when they subscribe.
Video Tutorial
FAQs About Creating an Email Newsletter
Your email list is the single most powerful tool you have to connect with your audience and turn one-time visitors into loyal customers. With so much at stake, it’s natural to have questions.
To help you out, I’ve gathered together the most common questions I hear from website owners just like you. My goal is to give you all the answers you need, right in one place.
What are the major benefits of starting an email newsletter?
There are 3 major benefits to starting an email newsletter:
- You own your audience (unlike social media)
- Your list is yours forever. Unlike platforms like Facebook or Instagram, your email list cannot be taken away by a third party.
- Social media platforms can change algorithms overnight or suspend your account without warning. This can be devastating to a website or business owner.
- High daily visibility. 99% of people check their email every single day, often multiple times. Essentially, your message is placed in a location where your audience is guaranteed to see it. By contrast, a social media post is immediately buried by the feed and may only be seen by a small percentage of your audience.
2. Incredible Return On Investment (ROI)
- Highest ROI channel. Based on industry data and my own personal experience, email marketing consistently delivers a higher Return on Investment (ROI) compared to other marketing channels. In fact, the average return is $44 for every $1 spent on email marketing
- Engaged leads. Subscribers are your most engaged leads because they’ve already taken the crucial step of saying, “Yes, I want to hear from you.” This engagement makes them far more likely to visit your website, engage with content, and ultimately purchase your products or services.
3. Email lists build real relationships
- Intimate connection. An email lands directly in a subscriber’s personal inbox, creating a more intimate, one-on-one relationship compared to a fleeting post on public social media.
- Establishes trust and authority. By consistently sending valuable content, you can present yourself as an authority in your field.
- Drives positive actions. This foundation of trust leads directly to more engagement, word-of-mouth referrals, and better conversion rates.
Who should start an email newsletter?
Everyone who is building any kind of online presence needs an email list. This applies across all types of projects:
- Someone starting their first blog with only ten posts.
- A small local business with a few employees.
- A huge eCommerce store selling physical products.
- A non-profit website connecting with volunteers.
- A freelancer or consultant looking for new clients.
The biggest mistake I see beginners make is waiting. People think they need to hit a massive traffic goal before email marketing makes sense.
The truth is, you should start building your email list from Day 1.
My advice is to stop worrying about perfection and just get started. You don’t need fancy designs or complex automated welcome sequences right now.
You just need to start collecting those email addresses and sending valuable content to the people who sign up.
Even if you only get one new subscriber this week, that’s one person who made a conscious choice to hear from you again. That single signup is the first step towards building a valuable audience that no algorithm can ever take away from you.
I hope this article helped you learn how to easily create an email newsletter. You may also want to see our article on how to add web push notifications to connect with visitors after they leave your website. This works great alongside email newsletters.
If you’re interested, then you can also use our helpful guide on how to get a free virtual business phone number for your small business.
If you liked this article, then please subscribe to our YouTube Channel for WordPress video tutorials. You can also find us on Twitter and Facebook.


mike
Thank you for the amazing guide! It came in exactly when I needed it and it was extremely clear. Helped a TON.
WPBeginner Support
Glad to hear our guide was helpful!
Admin
kzain
This is a super helpful guide I’m particularly interested in using pop-up forms to capture leads, and OptinMonster seems like a great tool.
However, I currently use WPForms to collect email addresses for Mailchimp, which is where I manage my subscriber list. The article recommends Constant Contact, but I’d prefer to stick with Mailchimp since I’m already familiar with the platform.
Is it possible to integrate OptinMonster with Mailchimp to collect email addresses through pop-up forms and add them directly to my existing Mailchimp list? Thanks for any insights!
WPBeginner Comments
Yes, OptinMonster has a Mailchimp integration.
Jiří Vaněk
With this combination, I have currently set up the latest newsletter, or rather, the registration on my website. I have a campaign with the user exit trigger. The campaign is created in OptinMonster and connected to Mailchimp. When a user is leaving the website, they are prompted with a popup asking if they would like to register for the newsletter. This combination has kickstarted my address collection, which hadn’t been working at all before. So, to answer your question, yes, you can combine OptinMonster with Mailchimp, and it works absolutely brilliantly.
Hajjalah
I have successfully created my newsletters subscription and emailing campaign with knowledge from this article. My newsletter subscription rate was very low before, but with tips from this article, the rate has increased although it is not that big but i believe no achievement is small.
WPBeginner Support
Glad to hear it is improving, we hope our recommendations help your newsletter continue to grow
Admin
Moinuddin Waheed
Small steps taken at the right time and with right tools and guidance make it big at the end.
No acheivment is small or big it is only how we take it and celebrate it. The initial acheivments which carve out the path to the big ones or pathbreaking success in future are the ones that should be celebrated and appreciated most. These are the cornerstones of big success.
I have make a point to celebrate every acheivement no matter how small or big it may seem to others.
Moinuddin Waheed
Starting out my email newsletter journey again which I had left after a while.
I used mailchimp free version for that purpose and didn’t continue for long.
However, given the potential of email newsletter for growing the business, I am planning to make one for my coaching website.
Thanks for the indepth illustration of all the steps.
WPBeginner Support
You’re welcome
Admin
Mrteesurez
This is indeed an in-depth article that nailed out matters related to newsletter. I have noted some points concerning ways to keep my emails from going to spam box, everyone businesses need to know this.
Thanks for this article
WPBeginner Support
You’re welcome
Admin
Jiří Vaněk
Is it possible to connect Optinmonster with Mailchimp? I currently use WPForms to collect addresses for MailChimp, but I would like to use a pop up window from OptinMonster for this. You recommend Constant Contact, but I’d rather use Mailchimp, where I already have an account. Thank you for answer.
WPBeginner Support
Yes, you can connect OptinMonster to MailChimp
Admin
Jiří Vaněk
Thank you for the advice. Based on it, I created a campaign in OptinMonster (Yes/No) and connected OptinMonster with Mailchimp. It works brilliantly and has helped me increase newsletter registrations by dozens of percent. So, thanks for the push forward. It has helped me get my newsletter off the ground.
Jiří Vaněk
I started collecting emails on my website last week and I’m just getting ready for my first newsletter. I’m practically an absolute novice and even if I’m certainly familiar with some rules, I really appreciate a manual like this. With it, the first newsletter will be much easier.
Peter Iriogbe
Thanks for this great content!
I’d like to ask: Is Mailchimp a good choice for an email newsletter? I’ve heard many of my competitors talking about it.
WPBeginner Support
It would depend on your specific use case, we would recommend taking a look at our list below for our recommended email marketing services:
https://www.wpbeginner.com/showcase/best-email-marketing-services/
Admin
THANKGOD JONATHAN
I love the article it’s detailed and informative. However one thing I descover and I think it may be good if I share it.
Many often I see businesses putting their concern about how to build a good email newsletter but forget to learn the mistake to avoid in their newsletters.
Please as you make efforts to build an outstanding email newsletter, remember here are most of the things you should avoid in your newsletter as much as possible:
1. Excessive links much especially promotional links.
2. sending too long or too short newsletters
3. sending too often at a time. Make the number consistent.
4. Emails that do not add value or benefit
5. No branding
6. etc.
There are actually many mistakes to avoid. You need to be carefull.
Happy newsletter.
WPBeginner Support
It will require some testing depending on the content for some of these suggestions but thank you for sharing
Admin
Moinuddin Waheed
I can testify the fact that I have purchased many products and services because of the promotional offers received through email newsletter. I used to wonder how these people send customized emails to me and infact every email they send is customised and seems like it has been curated only for me. This infact is the potential of email newsletter. it creates a personal bonding with the blog or product.
I will definitely try contant contact in the future.
Sameer Hussain
Well, this was an eye opener to say the least, the fact that your website visitor should become your subscribers, now this is something insightful. Apart from this, you should really focus on copywriting aspects of your newsletter. That surely turns a visitor into subscriber.
Ahmed Omar
it is important to have a big subscriber list, as they will be your returning customers or visitors
thank you for the detailed post
WPBeginner Support
We agree and you’re welcome
Admin
Vivek verma
thank you so much
WPBeginner Support
You’re welcome, glad our article was helpful
Admin
Gloria
Can I do this with my mobile phone, cuz the process I am seeing there is different from the setup you wrote about
Honesty
Yes it is possible you can also put your web browser in desktop site so it look like your are doing it with a PC
Nathaniel
If one creates an email list with one email marketing firm if you want to choose another email marketing provider, will you lose all your subscribers, or how is it done to retain the all list when you migrate? I’m new to this blogging and will in the future be one hopefully.
WPBeginner Support
Most if not all email marketing services offer you the ability to transfer your email list to a different service but each has its own way to do so.
Admin
Adam Smith
This is very helpful and informative!
WPBeginner Support
Glad our guide was helpful
Admin
Roy Stensvold
There is a lot of conciderations I never thought of
Love the way you take this step by step
WPBeginner Support
Glad you liked our article
Admin
Dotty
I am ready to start collecting emails and doing newsletters, it has taken me a month to get to this point.
WPBeginner Support
Glad you’re ready to get started
Admin
Mahi M
Thank you wpbeginner for this wonderful post, Simply explained everything related email newsletter. Very informative for beginners in WordPress like me.Thank you very much, hope more n more posts like this.
WPBeginner Support
You’re welcome, glad you found our content helpful
Admin
Noman
Great article and extremely informative. There’s a typo (and an important one as it’s the anchor text) that I’d like to point out:
“WPForms is the best drag & drop WordPress from plugin in the market.”
It should be ‘form plugin’, not ‘from plugin’ as mistakenly typed in.
Thanks for the article again!
WPBeginner Support
Thanks for pointing out the typo, we will be sure to get that fixed
Admin
Jenny Julies
Thank you very much for this in-depth and valuable guide. It is exactly what I have been looking for.
Kind regards and God bless
WPBeginner Support
You’re welcome, glad our guide was helpful
Admin
Ranojit Kumar
This article helps me a lot because I have a small online store and a local online newspaper. Thanks, WPBeginner.
WPBeginner Support
You’re welcome
Admin
Ans
This is a very good post and it help me about setting up email newsletter.
WPBeginner Support
You’re welcome, glad our article could help
Admin
Cathy Fraser
I am so thankful that I decided to read this article! I have been wanting to start an email list and didn’t have a clue how to go about it! THANK YOU!
WPBeginner Support
Glad our article could be helpful
Admin
Jochen Gererstorfer
Thank you for your article. I really have to work on my newsletter list.
As always a very extensive article with much value.
Thank you
WPBeginner Support
You’re welcome, glad our guide could be helpful
Admin
Guy Lawfull
Thanks for this excellent article. It’s something that I need to do on our new website.
WPBeginner Support
You’re welcome, glad our article was helpful
Admin
Ahmed
Hi there,
There is not two month trial and credit card is required ! ! !
WPBeginner Support
If you use the link in our article you should be directed to the landing page for WPBeginner users that shows the free trial.
Admin
Oniri Pius
This is superb! it will incredibly help me in my digital marketing race, thank you.
WPBeginner Support
You’re welcome, glad our guide can be helpful
Admin
Clement
Email marketing is one of my favourite articles. It’s a must-read for any serious online marketer. Great to read about it here!
WPBeginner Support
Glad you like our article
Admin
Arrigo
Thank you for the amazing guide! It came in exactly when I needed it and it was extremely clear. Helped a TON. Cheers, Arrigo.
WPBeginner Support
You’re welcome, glad our article was helpful
Admin