Have you noticed how the default WordPress comment form only asks for a name, email, website, and a message? That’s fine for simple blogs, but it can feel limiting when you want more context from readers.
For example, if you run a review site, you might want star ratings right in the comments. Or on a business blog, you may need a phone number or order ID for follow-ups. Even a quick dropdown for “How did you find this post?” can make feedback more useful.
I’ve helped a few different WordPress users customize their comment forms for reviews, customer support, and communities. And the pattern that works is simple: add only the fields you truly need, label them clearly, and keep the form quick to complete.
In this guide, I’ll show you how to add custom fields to the WordPress comment form so you can collect the right details without hurting the user experience.

TL;DR: You can add custom fields to the WordPress comment form without code. You can use plugins like WPDiscuz and Thrive Comments to add fields like ratings, checkboxes, and dropdowns, plus a privacy consent field for good practice.
Why Add Custom Fields to the Comments Form in WordPress?
Custom fields in WordPress comment forms help you collect the extra details you actually need from commenters. That might be a star rating for a review, a phone number for a follow-up, or a quick question like “How did you find this post?”
By default, the comment form includes name, email, website, and a message. For many sites, that is enough. But if you want more context, then adding one or two custom fields can make feedback easier to sort and discussions more useful.
Here are a few practical ideas:
- Review sites: Add a star rating field so readers can rate a product or post.
- Business blogs: Request a phone number or order ID when a comment relates to support.
- Audience research: Use a checkbox or dropdown to ask website visitors how they found your site or what they want next.
I have seen the best results when you keep things simple: add only the fields you truly need, use clear labels, and avoid long forms. This keeps the conversation moving while creating a better user experience.
Now, I’ll share how to add custom fields to the standard comments form on your WordPress website.
Here’s a quick overview of all the topics I’ll cover:
- Step 1: Install and Activate a Comment Form Plugin
- Step 2: Configure the Comment Form Plugin Settings
- Step 3: Add and Configure Your Custom Fields
- Step 4: Finalize and Update Your Comment Form with Custom Fields
- Step 5: Test Your Comment Form with Custom Fields
- Bonus Tip: Make Your WordPress Comments Section More Engaging
- FAQs About Adding Custom Fields to the Comments Form in WordPress
- Additional Resources: More WordPress Comments Guides
Step 1: Install and Activate a Comment Form Plugin
The easiest way to add custom fields to the WordPress comment form is by using the WPDiscuz plugin. This free plugin lets you add a range of different fields to your comment forms, including checkboxes, radio buttons, and dropdowns.
I’ve tried several comment plugins over the years, and wpDiscuz stands out for how straightforward it is to use. One thing I appreciate is that it works well with most WordPress themes, so you don’t have to worry about it messing up your design.
To get started, you’ll need to install and activate the wpDiscuz plugin. From your WordPress admin area, head over to Plugins » Add Plugin and search for “wpDiscuz.”
Once you find it, click the ‘Install Now’ button, and then the ‘Activate’ button when it appears.

For more details, please see our guide on how to install a WordPress plugin.
Step 2: Configure the Comment Form Plugin Settings
Once you activate wpDiscuz, you’ll be prompted to launch the quick setup wizard. It will walk you through a simple 3-step configuration process.
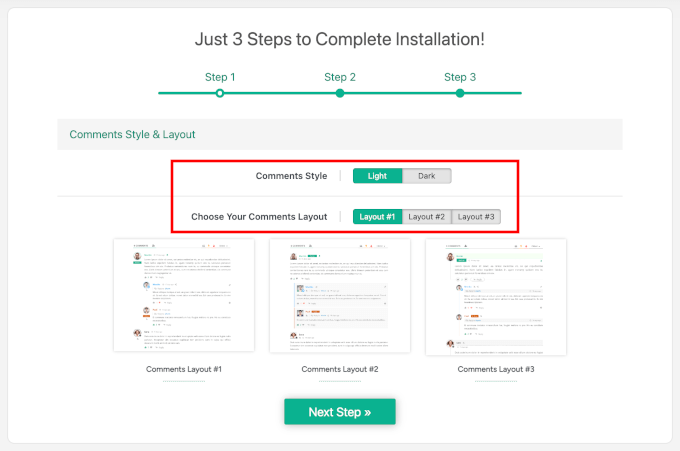
The first step helps you match the comment section to your site’s design:
- Comment Style – You can choose between a light or dark theme. I typically pick the light theme since it works well with most WordPress themes, but you can select whichever matches your site’s color scheme better.
- Comments Layout – wpDiscuz offers three layout options. Layout #1 is simple and clean (this is the default wpDiscuz layout). Layout #2 is great for narrow spaces and gives more room for each comment. Finally, Layout #3 highlights comment threads using colored vertical lines and indentation to show replies more clearly.
You can click on the ‘Next Step’ button to continue the setup process.
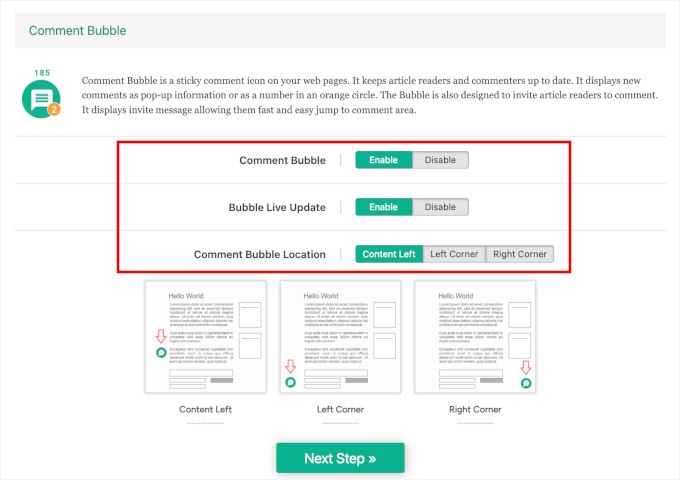
In the second step, you’ll choose to enable or disable the Comment Bubble feature. It’s a floating comment icon that helps make it easier for visitors to jump directly to the comment section.
If you enable it, you’ll see additional options:
- Bubble Live Update – This feature refreshes comment counts in real-time.
- Comment Bubble Location – This setting lets you choose where the bubble appears on your posts.
Simply click ‘Next Step’ to proceed.
On the final setup screen, wpDiscuz will ask if you want to enable article rating. This feature allows visitors to star-rate your posts, which can boost engagement and provide valuable feedback about your content quality.
Go ahead and click ‘Finish Installation’ to complete the initial configuration.

You should now see the ‘Thank You’ message as well as the ‘Start Using wpDiscuz’ button.
Go ahead and click on it.

After the setup is complete, there’s one more step you need to go through: synchronizing your existing comments with wpDiscuz. This step is important because it ensures all your current comments work properly with the new system.
From your admin area, go to wpDiscuz » Tools.
After that, you can click the ‘Synchronize Commenters Data’ button and let the plugin process your existing comments.

This usually takes just a few seconds, depending on how many comments you have on your site. Once the synchronization is complete, you’re ready to start adding custom fields to your comment form.
Step 3: Add and Configure Your Custom Fields
Now, you’re ready to add custom fields to your comment form.
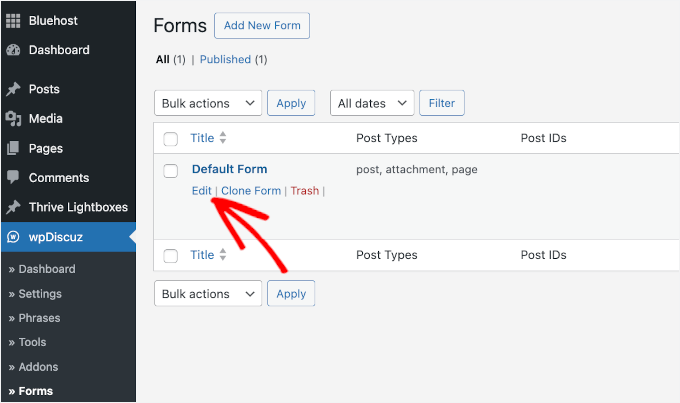
To access the form builder, go to wpDiscuz » Forms in your WordPress dashboard. You’ll see a default form that wpDiscuz has created for you, which includes the standard WordPress comment fields.
Just hover over the ‘Default Form’ and click on the ‘Edit’ button to open the form builder. This is where you’ll add all your custom fields and configure how they appear to your visitors.
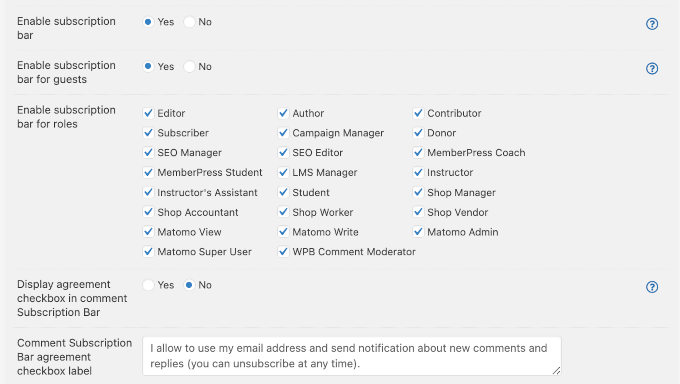
On the next screen, you’ll see a bunch of comment form settings. You have set some of these up during the setup process, but it’s a good idea to review a few key options before jumping into the builder.
For example, you can disable commenting for certain user roles if you only want feedback from specific types of users.
If you want to control who can comment, you’ll find a setting to allow or block guest commenting. When disabled, guests will just see a login prompt instead of the full comment form.

To encourage ongoing engagement, you can enable the comment subscription option.
This adds a simple bell button that lets visitors follow new replies or comments without needing to submit one themselves.
There are a lot more options available on this screen, so feel free to explore them. If you’re ever unsure about what something does, just click the little question mark icon next to the setting. It will take you straight to the relevant wpDiscuz documentation for help.
Once you’re done reviewing these options, just scroll down to the builder section to start customizing your comment form fields.
Here, you’ll notice that wpDiscuz splits the commenters’ data into two columns. This two-column layout helps organize your fields better and makes the comment form easier to scan.
To add a custom field to your comment form, simply click on the ‘Add field’ button.
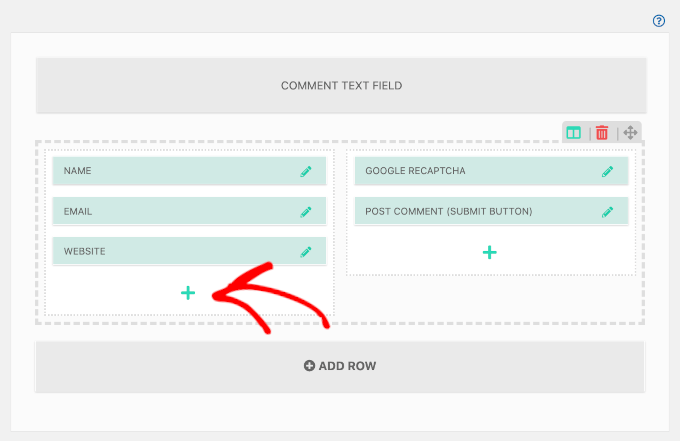
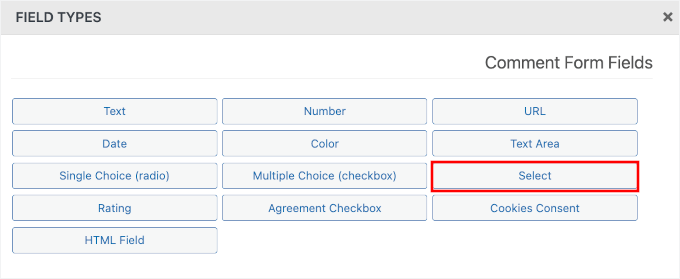
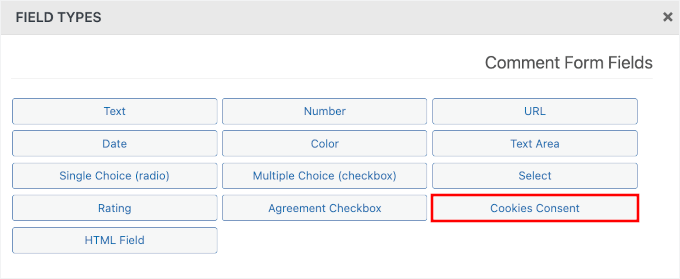
A popup window will appear with different field type options that you can choose from. Your choices include text fields, select inputs, checkboxes, and radio buttons, among other things.
For this example, I’ll show you how to add a select dropdown field. Go ahead and click on ‘Select’ from the field type options.
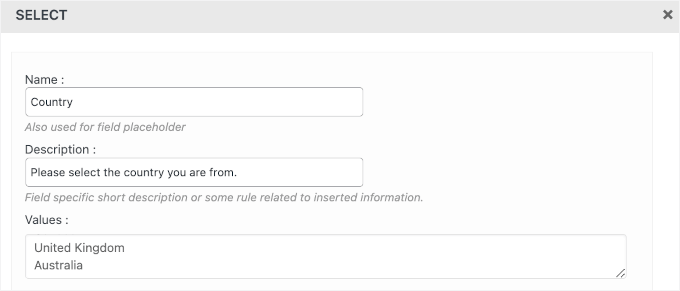
Once you’ve selected the field type, you’ll see a configuration panel where you can customize the field’s details.
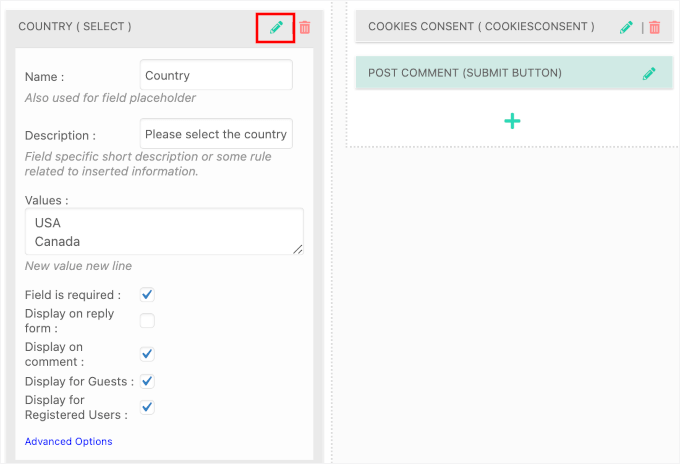
In the ‘Name’ section, you can give your field a descriptive name. I usually keep this simple and clear, like ‘Country.’ This way, commenters understand exactly what information you’re asking for.
Then, in the ‘Description’ field, you can provide more clarity about what you’re asking from them. For example, if you’re asking for their country, you might write “Please select the country you are from.”
After that, you can enter the values for your dropdown options. For a country field, you might add values like “United States,” “United Kingdom,” “Canada,” and so on. Each value should be on a separate line.
Below the Values field, there are a couple of checkboxes where you can apply rules for this custom field:
- Field is required – Check this if commenters must fill out the country field before submitting. This can be useful for websites that offer region-specific services or need geographic data for comment moderation or analytics.
- Display on reply form – This means that the country field will show when users reply to existing comments. It can be helpful if you want to keep track of where each reply is coming from, especially on international forums or multilingual blogs.
- Display on comment – This will display the commenter’s chosen country publicly with their comment. This is great for adding context to discussions. For example, on a travel blog, knowing where a commenter is from can make their recommendations even more helpful.
- Display for guest – This makes the country field visible to non-registered visitors. It can be ideal if you want to gather country info from anonymous users to better understand your audience (or limit spam).
- Display for registered users – This shows the country field to logged-in users only. It’s useful for community or membership sites where you want country information as part of user profiles or for filtering content by region.
I would typically check “Display on comment” and “Display for guest” since most comment interactions come from visitors who aren’t registered users. But you can choose whichever, depending on your needs.
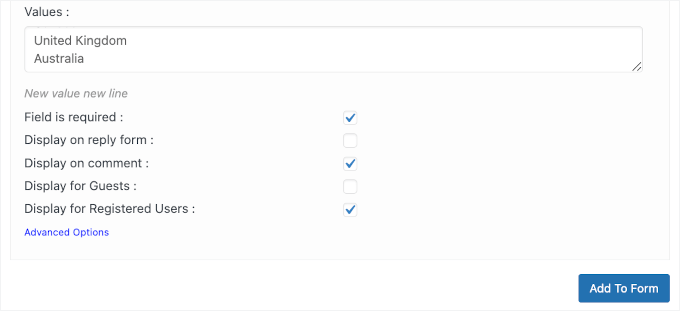
When you’re happy with the options you’ve created, just click on the ‘Add To Form’ button. The popup will then close, and you’ll see your new custom field in the comment form builder.
You can now add more fields to your custom WordPress comment form.
Since you’re collecting personal information, it’s important to include a cookie or privacy consent field, especially if your site gets visitors from the EU. This helps with GDPR compliance and also shows users that you take their privacy seriously.
Let’s go ahead and click the ‘Add Field’ button to create a cookie consent field. In this example, I’ll add it to the right-hand column.

On the popup window, go ahead and select the ‘Cookies Consent’ field.
This will take you to the field settings.
In the ‘Name’ field, you can enter something like “Cookies Consent.”
In the ‘Description’ field, you can explain what this consent does. WordPress uses a cookie to remember a visitor’s name and email so they don’t have to type them in every time they comment.
A good description would be: “By checking this box, you consent to us saving your name and email in a cookie on your browser for your convenience on future visits.”
The ‘Checkbox Label’ is the text that appears next to the checkbox itself. I usually write something like “I agree to the use of cookies as described above.”
Or, you can leave the default details as is.
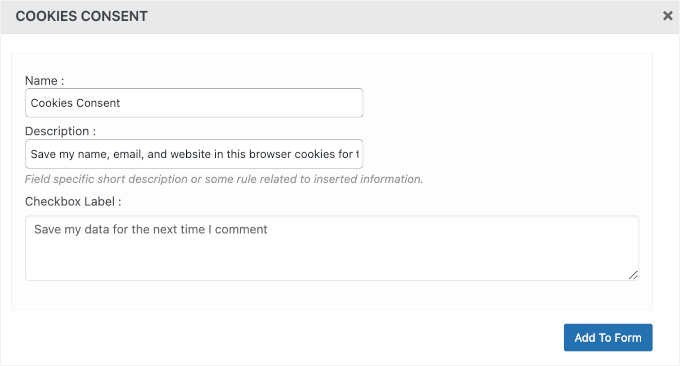
When you’re happy with the options you’ve created, just click on the ‘Add To Form’ button.
Step 4: Finalize and Update Your Comment Form with Custom Fields
The popup will now close, and you’ll see your new custom fields in the comment form builder.
One thing I really appreciate about wpDiscuz is how easy it makes organizing your fields exactly how you want them. You can adjust the placement of your fields by using the drag-and-drop feature.
Simply click and hold on any field, then drag it to where you want it positioned in your comment form.

If you need to make changes to any field after adding it, you can click on the pencil icon next to the field.
This will expand the field settings so you can modify the label, options, or visibility rules without starting over.
If you want to remove a custom field from the comment form at any point, simply click the red trash icon next to the field. The field will be deleted immediately, so make sure you really want to remove it before clicking.
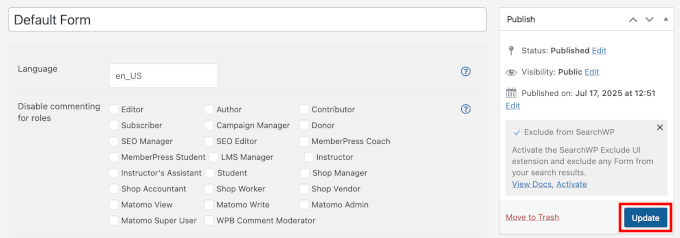
Once you’re satisfied with how your custom fields are arranged and configured, make sure to click the ‘Update’ button. This saves all your changes and makes your custom comment form active on your WordPress blog.
Step 5: Test Your Comment Form with Custom Fields
Now, if you check your website, you’ll see the comment form with custom fields in action.
Just navigate to any blog post on your site and scroll down to the comment section. You should see your new custom fields appearing exactly where you positioned them in the form builder.
The comment form will look slightly different depending on whether you’re logged in or browsing as a guest. Logged-in users will see a message like “You are logged in as [Your Username]” along with a “Log out?” link.
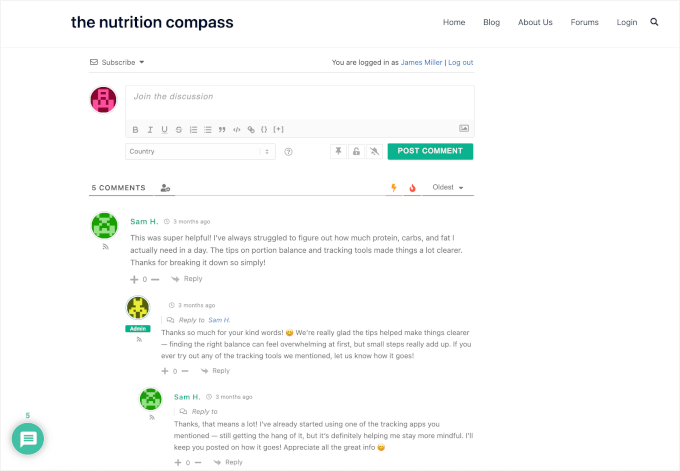
For logged-in users, WordPress already knows their name and email, so it hides those fields to make commenting faster. They will only see the comment box and your new custom fields.
On the other hand, guests (visitors who aren’t logged in) will see the Login link, along with all the required fields like name, email, and website, plus your custom fields.
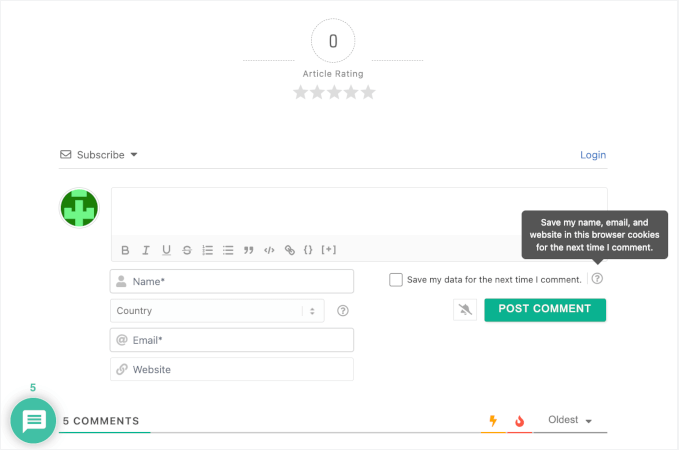
This makes it easy to collect the right information from different types of users without creating confusion.
Now, you can try filling out the comment form as a visitor would to see how everything works together.
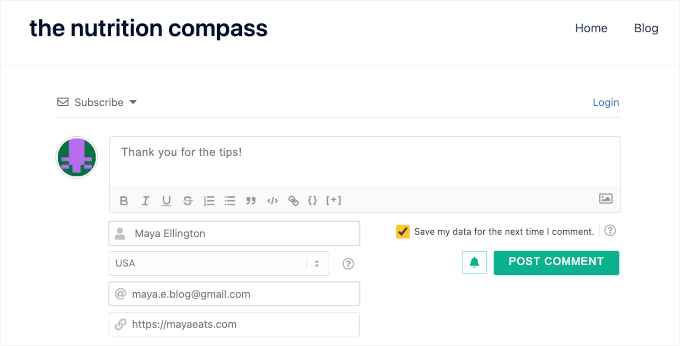
After submitting your test comment, go ahead and check how the custom field information appears in the published comment.
The data from your custom fields will be displayed along with the regular comment content, so make sure it looks readable.
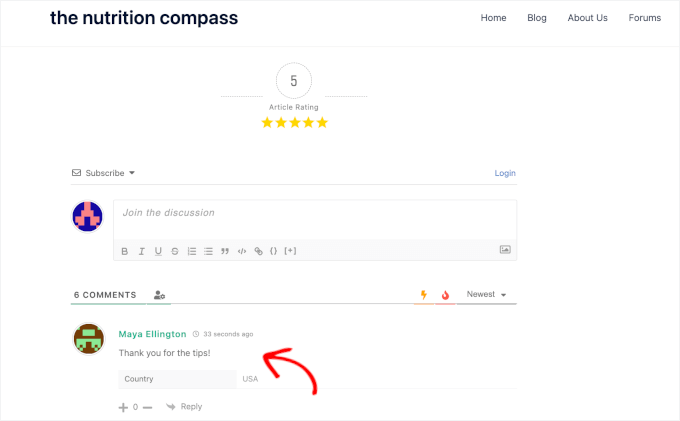
If you notice any formatting issues or if the fields aren’t appearing as expected, you can always go back to wpDiscuz » Forms and make adjustments. The changes take effect immediately, so you can fine-tune your comment form until it’s perfect.
And that’s it! You’ve successfully added custom fields to your comments form.
Bonus Tip: Make Your WordPress Comments Section More Engaging
Looking to make your comments section more engaging? Consider adding gamification features using Thrive Comments – which is the best plugin to improve WordPress comments.
Thrive Comments is my top pick because it can transform your comment section into an engagement tool. It focuses on gamification and community-building features that encourage visitors to return and participate.
For more information about the plugin, you can see our exhaustive Thrives Themes Suite review.
And here are a few powerful features you can enable with Thrive Comments:
👍 Like and 👎 Dislike Buttons
Let users vote on each other’s comments by adding like and dislike buttons. This gives readers a quick way to interact without typing a full reply, and it helps surface popular or helpful comments.
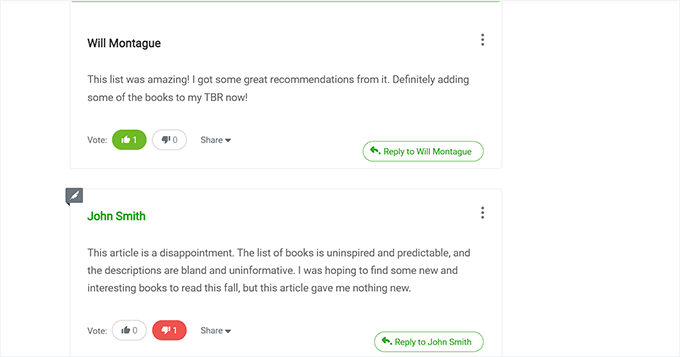
Want to add this feature? Check out our guide on how to allow users to like or dislike comments in WordPress.
📌 Feature or Bury Comments
Thrive Comments also lets you highlight the best comments (feature them) and push down low-quality ones (bury them).
Featured comments get more visibility, making your discussions easier to follow and more valuable to readers.
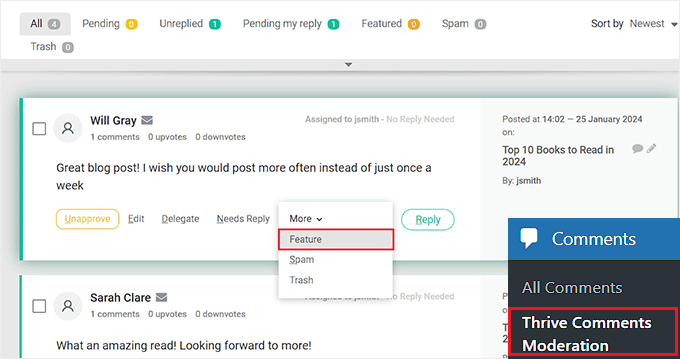
You can refer to our guide on how to feature or bury comments to set it up.
🌟 User Ranking System
You can reward active commenters with badges or user levels based on their activity.
This encourages more participation and builds a sense of community on your site.
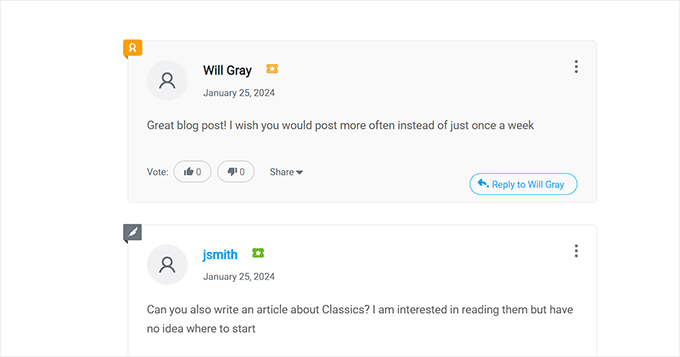
Here’s how to set it up: how to add a simple user ranking system for WordPress comments.
These features make your comments section more fun and interactive, so people are more likely to come back and join the conversation.
For more tips, feel free to check out our beginner’s guide on how to get more comments on your WordPress blog posts.
FAQs About Adding Custom Fields to the Comments Form in WordPress
After helping lots of WordPress users customize their comment forms, I’ve noticed the same questions come up again and again. Let’s go over the most common ones.
Can I add custom fields to WordPress comments without a plugin?
Yes, you can add custom fields to WordPress comments without a plugin, but it requires editing your theme’s functions.php file and working with WordPress hooks. I don’t recommend this approach for most users because it’s much more complex, and any mistakes can break your site. Using wpDiscuz is safer and gives you more flexibility without touching code.
Will custom comment fields slow down my website?
In my testing, wpDiscuz and similar comment plugins have minimal impact on site speed. The plugin loads its scripts only on pages where comments are displayed, so it won’t affect your homepage or other pages.
However, I always recommend testing your site speed after installing any new plugin to make sure everything runs smoothly. You can use free tools like IsItWP Website Speed Test, Google PageSpeed Insights, GTmetrix, or Pingdom to check your site’s performance.
What happens to my custom fields if I deactivate wpDiscuz?
If you deactivate wpDiscuz, your custom fields will stop appearing on new comments, but the data from existing comments with custom fields will remain in your database. The custom field information just won’t display on your site until you reactivate the plugin.
Can I make custom fields required for all commenters?
Yes, when you’re setting up each custom field in wpDiscuz, you can check the ‘Field is required’ option. This means visitors won’t be able to submit their comments unless they fill out that particular field. Make sure to use this feature sparingly since too many required fields can discourage people from commenting.
Do custom comment fields work with all WordPress themes?
wpDiscuz is designed to work with most WordPress themes, but occasionally you might see styling issues with certain themes. In my experience, these are usually minor and can be fixed with a few lines of custom CSS.
Can I hide custom fields from certain user roles?
Absolutely! wpDiscuz lets you control who sees each custom field using the visibility settings. You can show fields only to guests, only to registered members, or only to specific user roles. This is particularly useful if you run a membership site and want to collect different information from different types of users.
Is there a limit to how many custom fields I can add?
There’s no hard limit in wpDiscuz, but I recommend keeping your comment form reasonable in length. Too many fields can overwhelm visitors and reduce comment participation. In my experience, 2-3 custom fields in addition to the standard name, email, and comment fields work best for most websites.
Additional Resources: More WordPress Comments Guides
I hope this article helped you learn how to add custom fields to the comments form in WordPress.
If you found this helpful, you might also want to go through our guides on:
- How to Display the Total Number of Comments in WordPress
- How to Moderate Comments in WordPress
- How to Notify Users When Their Comment Is Approved
- How to Allow Users to Subscribe to Comments in WordPress
- How to Allow Users to Report Inappropriate Comments in WordPress
- Vital Tips and Tools to Combat Comment Spam in WordPress
- How to Fix ‘Comments Are Closed’ in WordPress
- Best Plugins to Improve WordPress Comments
If you liked this article, then please subscribe to our YouTube Channel for WordPress video tutorials. You can also find us on Twitter and Facebook.


MaryAnn Shank
This plug in doesn’t work with the 3 most recent versions of WP. It won’t even come up when I search for plugins. Is there any other option that you recommend.
WPBeginner Support
We will keep an eye out for possible alternatives but for the not tested warning we would recommend taking a look at our article below!
https://www.wpbeginner.com/opinion/should-you-install-plugins-not-tested-with-your-wordpress-version
Admin
Jiří Vaněk
Will this work even if I manage comments on the website using the wpDiscuz plugin?
WPBeginner Support
For any custom comment plugin we would recommend checking with the plugin’s support as normally those plugins have their own way to include a custom field
Admin
Jiří Vaněk
Hello, and thank you for your message. I tried the suggested method, but as you correctly pointed out, since I’m not using the native commenting system, it doesn’t work because the comments are now managed by the plugin itself. This might be useful information for other readers as well. Thanks again for your support.
Minimo
This plugin hasn’t been update in 2 years. Is there any trustworthy aka. actively maintained solution? Cheers!
WPBeginner Support
While we don’t have a specific plugin we would recommend at the moment, you could take a look at advanced custom fields for another possible method. We will be sure to look for other plugin options
Admin
Justin
Cool plugin. Does this work with BuddyPress comments?
Thanks,
Justin
Peter
Thanks for this great post.
I want to add a conditional php code in the comments template source file. The idea is to check the value of a custom field chosen by a user and then to display some text depending on it ((For example, ” if (CUSTOM_Field = ‘A’) { echo ‘…”; } else { echo ‘…’; }). How can I retrieve the custom field?
Olawale Daniel
Helpful tutorial…I love this plugin. But is there a way to manually code this without installing this plugin?
Thanks for your support.
R. F.
Nice tutorial! Everything works fine, but now I am looking for an option to ONLY display the extra content of the comment form on a specific page, NOT on all pages.
Does anyboday have an idea of how this can be arranged?
Thanks!
Dmitry
hi,
Maybe my solution is not universal but I had to realize the same feature on my web site.
I just added a custom field to the whole comment form for all the pages and hide this field in my css. Then showed it for a body page class.
E.g:
.custom_field_name{display: none}
body.customer-feedback .custom_field_name{display: block}
If your field must be required, just make it NOT required in the plugin admin area and do a custom field check with javascript in your page.php theme file,
E.g:
<? echo(is_page('customer-feedback')) ? 'if(document.querySelector(‘.custom_field_name’).value == ”) alert(‘Please fill Custom Field’);’ : ” ?>
FlickChicks
Thanks for this post! I am wondering if this plugin will allow you to change the phrase “Leave a Reply” to something else like “Share Your Thoughts.” I have looked around and not seen an easy fix/plugin for this. I’ve noticed that in wordpress.com sites you can change it under “Settings” but not in .orgs. Any info would be appreciated. I’m using a child theme and could add code easily in a function.php file, but other than that I’m still pretty new to all this. Thanks!
WPBeginner Staff
Here is how you can add a custom title to the comment form.
Joie
I actually have a question about something other than this regarding comments. I wrote a post on my (twenty twelve theme) blog yesterday and then shared it on my facebook (personal) page. It showed up on FB with the title of the blog -a straight vertical line- then the title of my website. In the middle of the first sentence was the “Leave a reply.” It really looked messed up. I looked all over the coding so I could cut and paste it at the bottom. It wasn’t there. I suspect it is in the Editor (under Appearnces) coding. But I am afraid to mess with that. Can you please (!) help me with this?