
The ‘Avoid an excessive DOM size’ warning in WordPress means your page has too many HTML elements, which slows it down.
The best ways to fix this are by using a performance plugin like WP Rocket, optimizing how images and galleries are loaded, and choosing a lightweight theme or page builder.
This warning can pop up in Google Lighthouse or other speed testing tools, and it sounds technical. But the concept is simple: your website is a collection of parts, and having too many can overwhelm a browser.
Here at WPBeginner, we’ve not only optimized our own high-traffic websites to solve this exact issue but have also helped countless users improve their site speed.
In this article, we’ll detail 11 of our expert methods to solve the problem and improve your WordPress performance.
What Does the ‘Avoid an Excessive DOM Size’ Warning Mean?
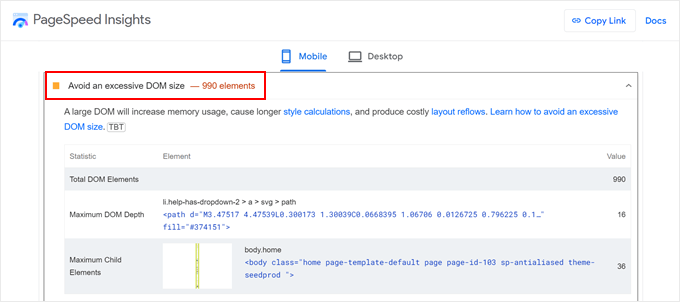
The ‘Avoid an excessive DOM size’ warning appears in speed testing tools like Google PageSpeed Insights when a webpage has too many HTML elements for a browser to process efficiently.
DOM stands for Document Object Model. It is a tree-like structure that represents all the objects on your webpage. Each element, such as a heading, paragraph, image, or button, is a ‘node’ on this tree.
The total number of these nodes makes up the DOM size. When this number becomes too large, the browser needs more time and resources to render the page, which can slow down your website.
How Does Excessive DOM Size Affect Website Performance?
A large DOM size negatively impacts your WordPress website’s performance in several key ways. Each element you add to a page, from text and images to forms and menus, increases the DOM node count.
This complexity has the following effects:
- Slower Page Rendering: A browser must parse the entire DOM tree before it can display the page. A larger tree takes longer to process, which delays the time it takes for a visitor to see your content.
- Increased Memory Usage: A complex DOM structure requires more memory and processing power from the user’s device. This can be especially noticeable on mobile phones.
- Poor User Experience: These performance hits lead to slower loading times. This can frustrate visitors and cause them to leave your site before it even loads.
- Negative SEO Impact: Search engines like Google use page speed as a ranking factor. Slow-loading pages can harm your WordPress SEO and reduce website conversions.
How Many DOM Elements Are Too Many for Google?
Testing tools like Google Lighthouse don’t use just one number to flag an excessive DOM size. Instead, they look at three specific criteria:
- Total DOM Nodes: A warning is triggered if the total number of HTML elements (nodes) on the page exceeds 1,500. This is the most common reason for the warning.
- Maximum DOM Depth: A warning is triggered if elements are nested too deeply inside each other. Lighthouse flags a page if the nesting goes deeper than 32 levels.
- Maximum Child Elements: A warning is triggered if a single parent element has more than 60 child elements directly inside it. This often happens with poorly coded mega menus or galleries.
Pages with multiple sliders, complex layouts with many nested sections, or numerous embedded items are more likely to exceed these limits. However, you don’t have to sacrifice your design to fix this issue.
We’ve put together a comprehensive guide for you to solve this. Here are 11 proven ways to reduce DOM size and improve WordPress performance:
- Use a WordPress Speed Optimization Plugin
- Check Your Theme and Plugins
- Use an Optimized Page Builder
- Optimize Your Images and Videos
- Implement Lazy Loading
- Paginate Comments or Posts With Lots of Content
- Minify CSS and JavaScript Files
- Reduce Render-Blocking JavaScript and CSS
- Enable WordPress Caching
- Use a WordPress CDN
- Optimize Your WordPress Database
Feel free to use the quick links above to learn more about a specific optimization method.
1. Use a WordPress Speed Optimization Plugin
Our first recommendation is to install a powerful WordPress speed optimization plugin. These plugins handle the technical optimizations needed to make your website faster.
This allows you to focus on managing and creating your content while the plugin works in the background.
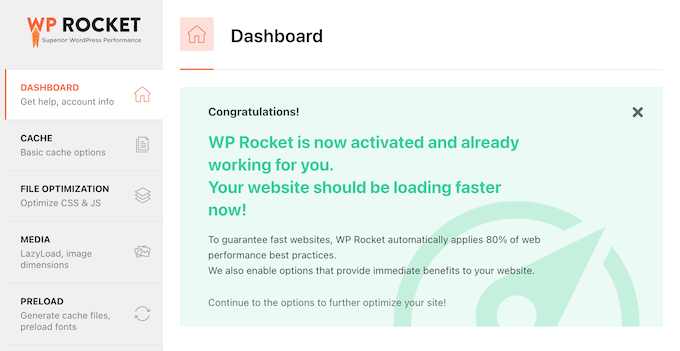
Here at WPBeginner, we use and recommend WP Rocket. We have used it on our own websites to manage caching, file optimization, and lazy loading, which you can learn more about in our article on how we boost page load speed on WPBeginner.
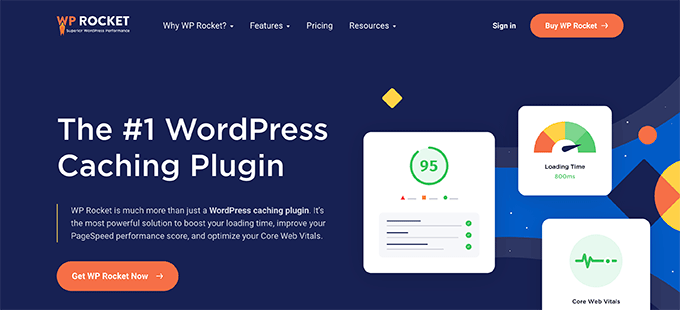
While WP Rocket is primarily known as a caching plugin, many of its features help address the problems caused by a large DOM. These include file optimization, lazy loading, and deferring JavaScript.
We’ll explain these features later in the article. You can also read our full WP Rocket review for more information, or use our setup guide to get started.
2. Check Your Theme and Plugins
While WordPress plugins and themes add functionality and style to your WordPress website, they can also contribute to an excessive DOM size.
Poorly coded themes and plugins can add unnecessary HTML elements, bloating your page’s structure. Similarly, plugins and themes with extra features you don’t use may still load their code, increasing the DOM.
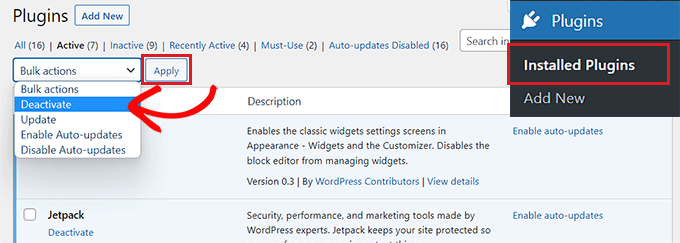
To check if a specific plugin or theme is the culprit, you can deactivate plugins one by one or temporarily switch to a default WordPress theme. After each change, run a speed test to see if the DOM size warning disappears.
To avoid this issue, always choose themes and plugins from reputable sources like the official WordPress directory or well-known developers. These resources typically have stricter coding standards.
For trusted recommendations, check out the WPBeginner Solution Center, where we test and review WordPress software.
3. Use an Optimized Page Builder
Page builders are excellent tools for designing custom layouts without code, but some can contribute to an excessive DOM size. They often wrap your content in extra HTML elements to control styling and layout.
For example, a poorly optimized page builder might wrap a single button in multiple nested <div> containers for alignment and styling. Each of these containers adds another node to the DOM, quickly increasing the total count.
If you suspect your page builder is the issue, you can test it by deactivating it on a staging site and checking the DOM size again. You can use built-in tools like the Full Site Editor, but they may lack flexibility.
For the best balance of flexibility and performance, we recommend using a speed-optimized page builder like SeedProd. In our testing, it consistently outperforms other popular builders.
You can see how it compares to others in our Elementor vs. Divi vs. SeedProd analysis.
Many of our partner brands, including WPForms and Duplicator, use SeedProd to build their websites.

4. Optimize Your Images and Videos
It’s important to clarify how images relate to DOM size. The file size of an image (in KB or MB) does not affect the number of DOM nodes. An <img> tag is a single node, no matter how large the image file is.
However, the way images are displayed can increase DOM size. Some themes and gallery plugins wrap each image in multiple <div> containers for styling, lightboxes, or captions. These extra wrapper elements are what add to the DOM count, not the image itself.
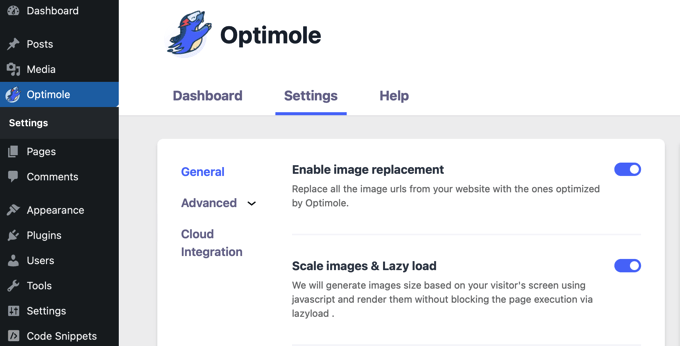
While optimizing images by compressing them is crucial for page speed, you should also choose gallery plugins that generate clean code. A plugin like Optimole can help with image compression and lazy loading.
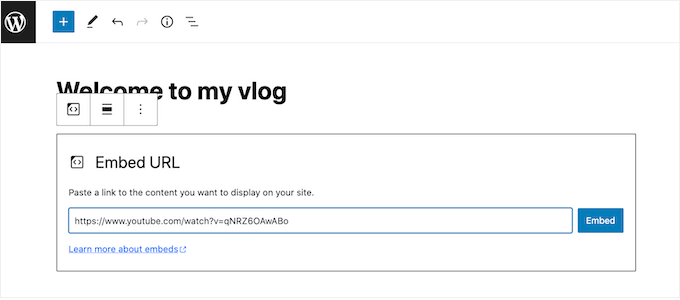
For videos, we recommend never uploading them directly to WordPress.
Instead, host them on services like YouTube or Vimeo and embed them. This reduces the load on your server and keeps your DOM cleaner.
5. Setup Lazy Loading
Lazy loading is a technique that delays loading non-critical elements, like images and videos, until they are about to enter the user’s viewport. This allows the browser to render the initial, visible part of the page much faster.
By not loading everything at once, lazy loading reduces the initial processing work for the browser and creates a much smoother user experience.
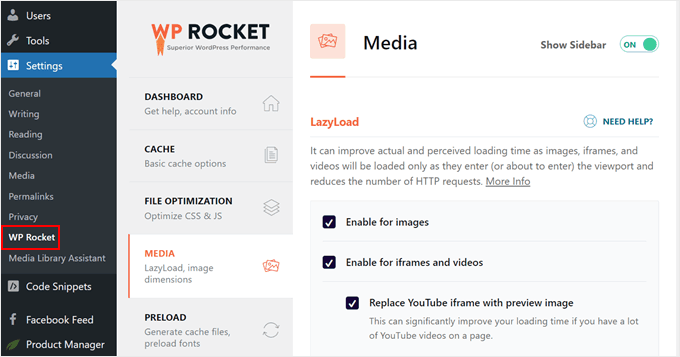
Setting up lazy loading is easy with a plugin like WP Rocket. In your WordPress dashboard, navigate to Settings » WP Rocket and open the ‘Media’ tab. Here, you can enable lazy loading for images, videos, and iframes with a single click.
For galleries, we recommend using a gallery plugin with built-in lazy loading, such as Envira Gallery.
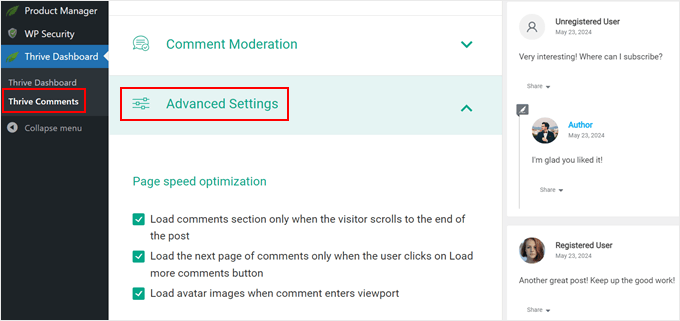
You can even lazy load your comments section using a plugin like Thrive Comments to further improve performance.
6. Paginate Comments or Posts With Lots of Content
Very long posts or comment sections can significantly increase DOM size and slow down loading times. Pagination solves this by splitting that content into multiple, smaller pages.
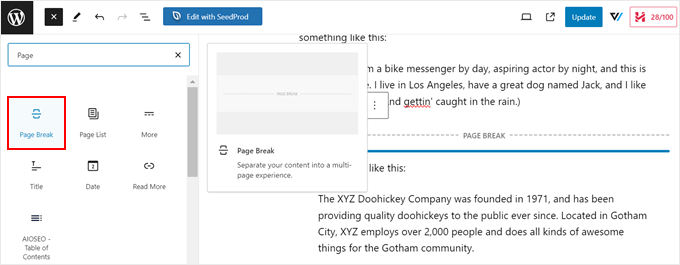
This makes the content more manageable for both the browser and the reader. You can easily break up long posts by adding the ‘Page Break’ block in the WordPress editor. For detailed instructions, see our guide on how to split WordPress posts into multiple pages.
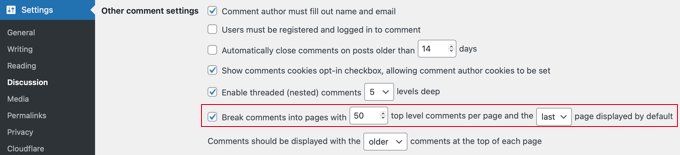
Similarly, you can paginate your comments. Go to Settings » Discussion in your WordPress admin area, check the box next to ‘Break comments into pages,’ and set the number of comments per page.
You can read more in our guide on how to paginate comments in WordPress.
We suggest avoiding infinite scroll, as it continuously adds new elements to the DOM, which can lead to performance issues.
7. Minify CSS and JavaScript Files
While this technique does not directly reduce the number of DOM nodes, it significantly improves performance and lessens the negative impact of a large DOM.
Minification removes unnecessary characters like comments, spaces, and line breaks from your CSS and JavaScript files. This reduces their file size, making them faster for a browser to download and process.
A plugin like WP Rocket makes this simple. Go to Settings » WP Rocket, switch to the ‘File Optimization’ tab, and enable the features to minify CSS and JavaScript files. For more details, see our guide on how to minify CSS and JavaScript files.
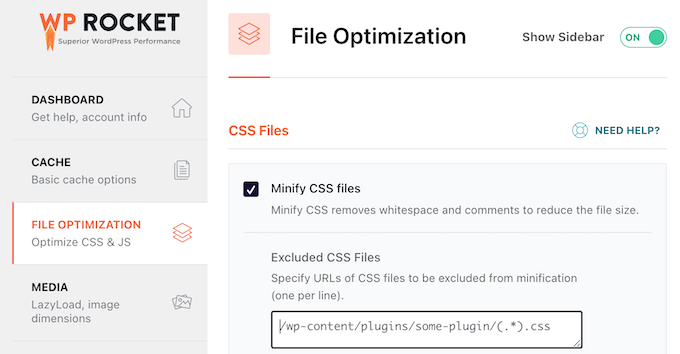
Before minifying, we recommend creating a backup of your site. In rare cases, minification can cause issues with certain themes or plugins.
8. Reduce Render-Blocking JavaScript and CSS
This is another technique that doesn’t reduce DOM nodes directly but greatly improves perceived performance by changing how files are loaded.
Think of a browser loading your page as painting a picture. Render-blocking resources force the browser to stop painting the webpage until they are fully loaded. Deferring them allows the main content to be painted first, so the user sees your site faster.
WP Rocket has features to address this. It can combine files to reduce HTTP requests and defer the loading of non-critical JavaScript. This means users see your content faster, even if background scripts haven’t finished loading.
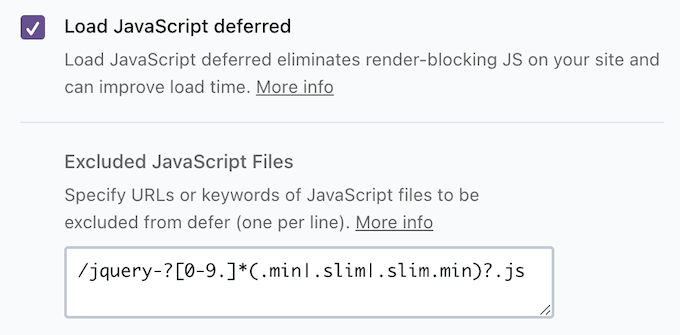
You can learn more in our article on how to fix render-blocking resources in WordPress.
9. Enable WordPress Caching
While caching doesn’t directly reduce the number of DOM nodes, it dramatically speeds up page load times, especially for returning visitors. This makes the DOM load and display much faster.
Caching stores a static version of your site. When a user revisits, their browser can load this saved version instead of rebuilding the page from scratch, which is much faster. This also reduces the load on your server, freeing it up to process the DOM more quickly.
Setting up caching is simple with a plugin like WP Rocket, which automatically enables optimal caching settings upon activation. You can learn more about its caching features in our WP Rocket installation guide.
10. Use a WordPress CDN
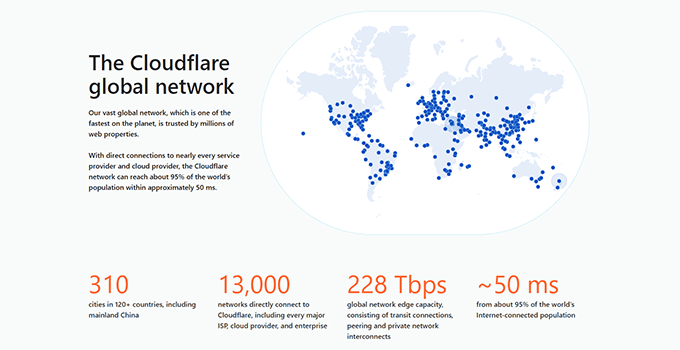
A CDN (Content Delivery Network) also helps mitigate the effects of a large DOM without directly changing it. A CDN is a global network of servers that stores copies of your website’s static files (images, CSS, JavaScript).
When a user visits your site, the CDN delivers these files from the server closest to their physical location. This drastically reduces download times and allows the browser to start processing the DOM much faster.
We use Cloudflare’s CDN on WPBeginner. You can learn why we chose it in our post about switching from Sucuri to Cloudflare.
For other options, check out our list of the best WordPress CDN services.
11. Optimize Your WordPress Database
This is another indirect optimization. While your database isn’t part of the DOM, a bloated database can slow down your server’s response time. This delay makes it take longer for your site to load, which can make a large DOM feel even slower.
Over time, your database can fill up with unnecessary data like post revisions, spam comments, and old plugin data. Cleaning this out helps your website run more efficiently.
Our guide on how to optimize your WordPress database shows you how to use a plugin to clean up your database safely and quickly.
Focus on Overall WordPress Performance, Not Just DOM Size
While addressing the ‘Avoid an excessive DOM size’ warning in WordPress is important for website speed, it’s not the only factor to consider.
A website with a lot of functionality or unique formatting may naturally have a bigger DOM, and that’s okay. The key is to find the right balance between site performance and features.
So, aside from DOM size, you may want to pay attention to other metrics like Core Web Vitals. These are specific metrics that Google uses to measure a website’s user experience.

Frequently Asked Questions About Excessive DOM Size
Here are answers to some of the most common questions we get about fixing DOM size issues in WordPress.
What is a good DOM size for a webpage?
According to Google’s guidelines, a good target is to keep your DOM size under 1,500 total nodes, with a maximum nesting depth of 32 levels, and no single element having more than 60 children.
Will using a page builder always increase the DOM size?
Not necessarily. Modern, performance-focused page builders like SeedProd are designed to generate clean and efficient code. However, some older or poorly-coded page builders can add many unnecessary wrapper elements that increase the DOM size.
How can I check my website’s DOM size for free?
You can use free online tools like Google PageSpeed Insights or GTmetrix. You can also check it directly in your browser. In Google Chrome, right-click on your page, choose ‘Inspect,’ go to the ‘Console’ tab, and type the command document.querySelectorAll('*').length then press Enter.
Additional Resources for WordPress Performance
We hope this tutorial helped you learn how to fix excessive DOM size in WordPress.
You may also want to check out these related guides on improving your website’s performance:
- The Ultimate Guide to Boost WordPress Speed & Performance
- How to Speed up WooCommerce Performance
- Proven Ways to Reduce Bounce Rate and Increase Conversions
If you liked this article, then please subscribe to our YouTube Channel for WordPress video tutorials. You can also find us on Twitter and Facebook.
")
 in 2024")


Moinuddin Waheed
i have realised that using the right plugin can save us from lots of hassles and can help reduce the excessive DOM size enough to boost website performance.
i am using wp rocket for caching but didn’t know that this plugin can be used to achieve so many things.
we can minify css and js files, can reduce render blocking in css and js just by enabling simple settings in wp rocket.
Thanks for clear steps regarding reducing excessive DOM size and boosting website performance.
Jiří Vaněk
Many times, PageSpeed Insights has alerted me to a large DOM, but I never really knew where to start or how to reduce it. This article has a lot of tips on how to handle this problem. This guide provides clear steps, and that’s great.
Moinuddin Waheed
Until recently I didn’t know what these metrics are that are shown in page speed insights.
But thanks to these kind of extra helpful articles, I have grown in understanding these details and it has helped me achieve good results.