Downloaded 59 times
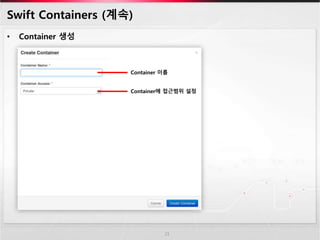
![Storage Node 설치
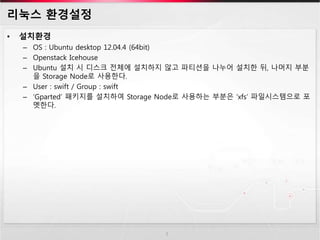
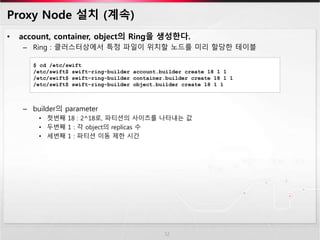
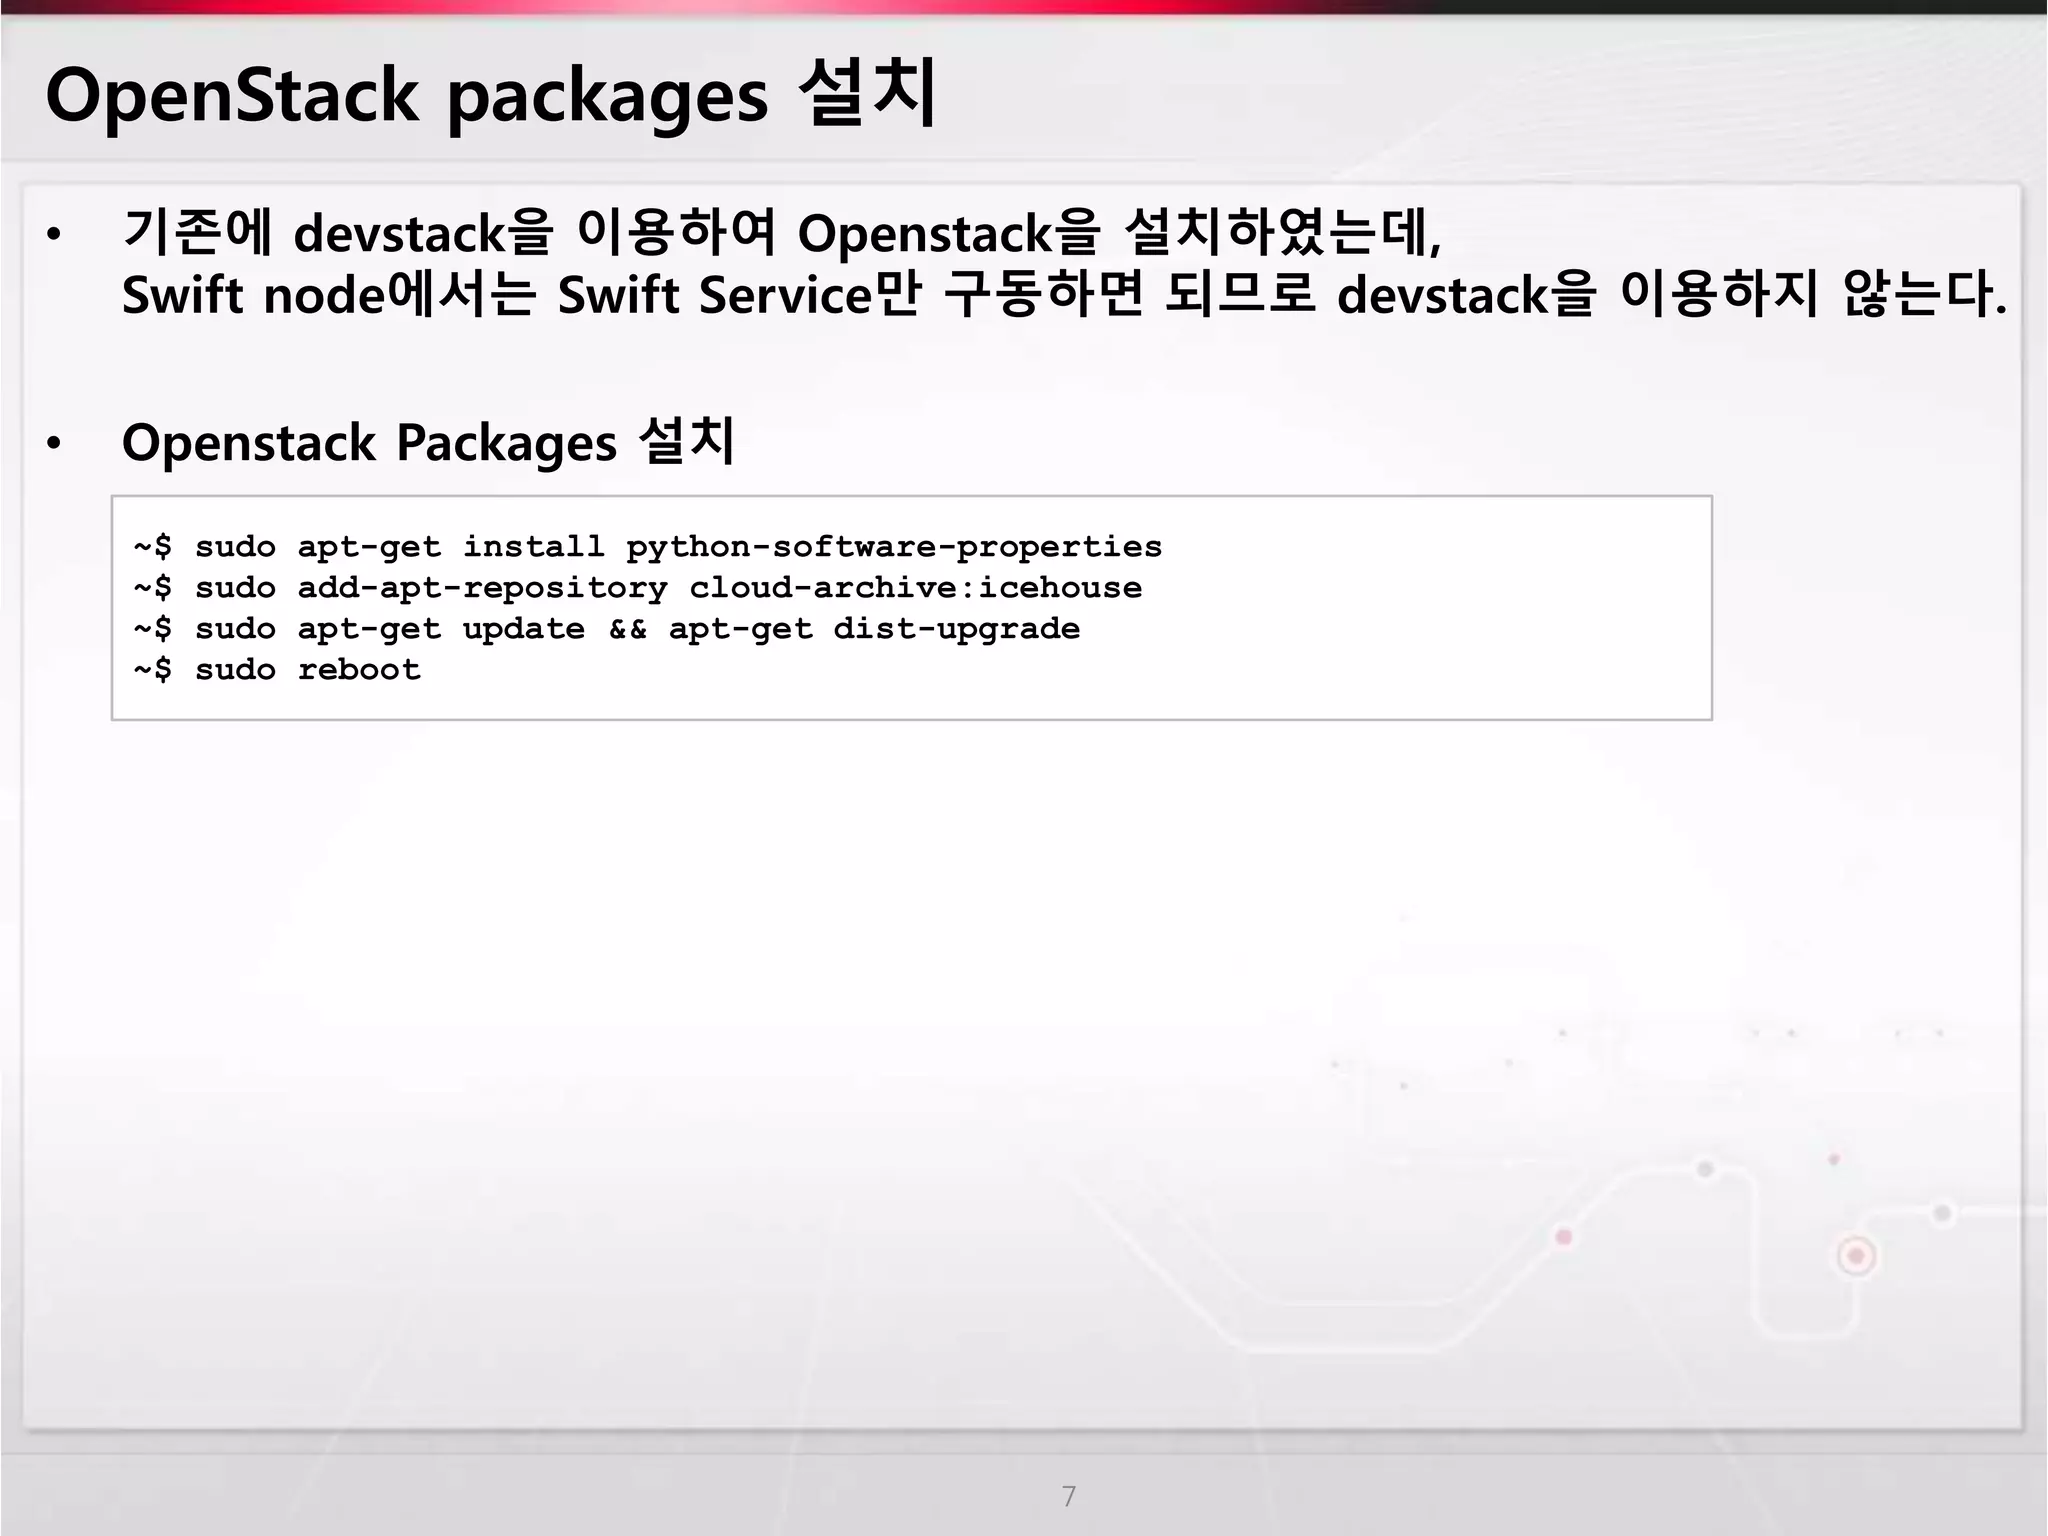
• Storage node packages 설치
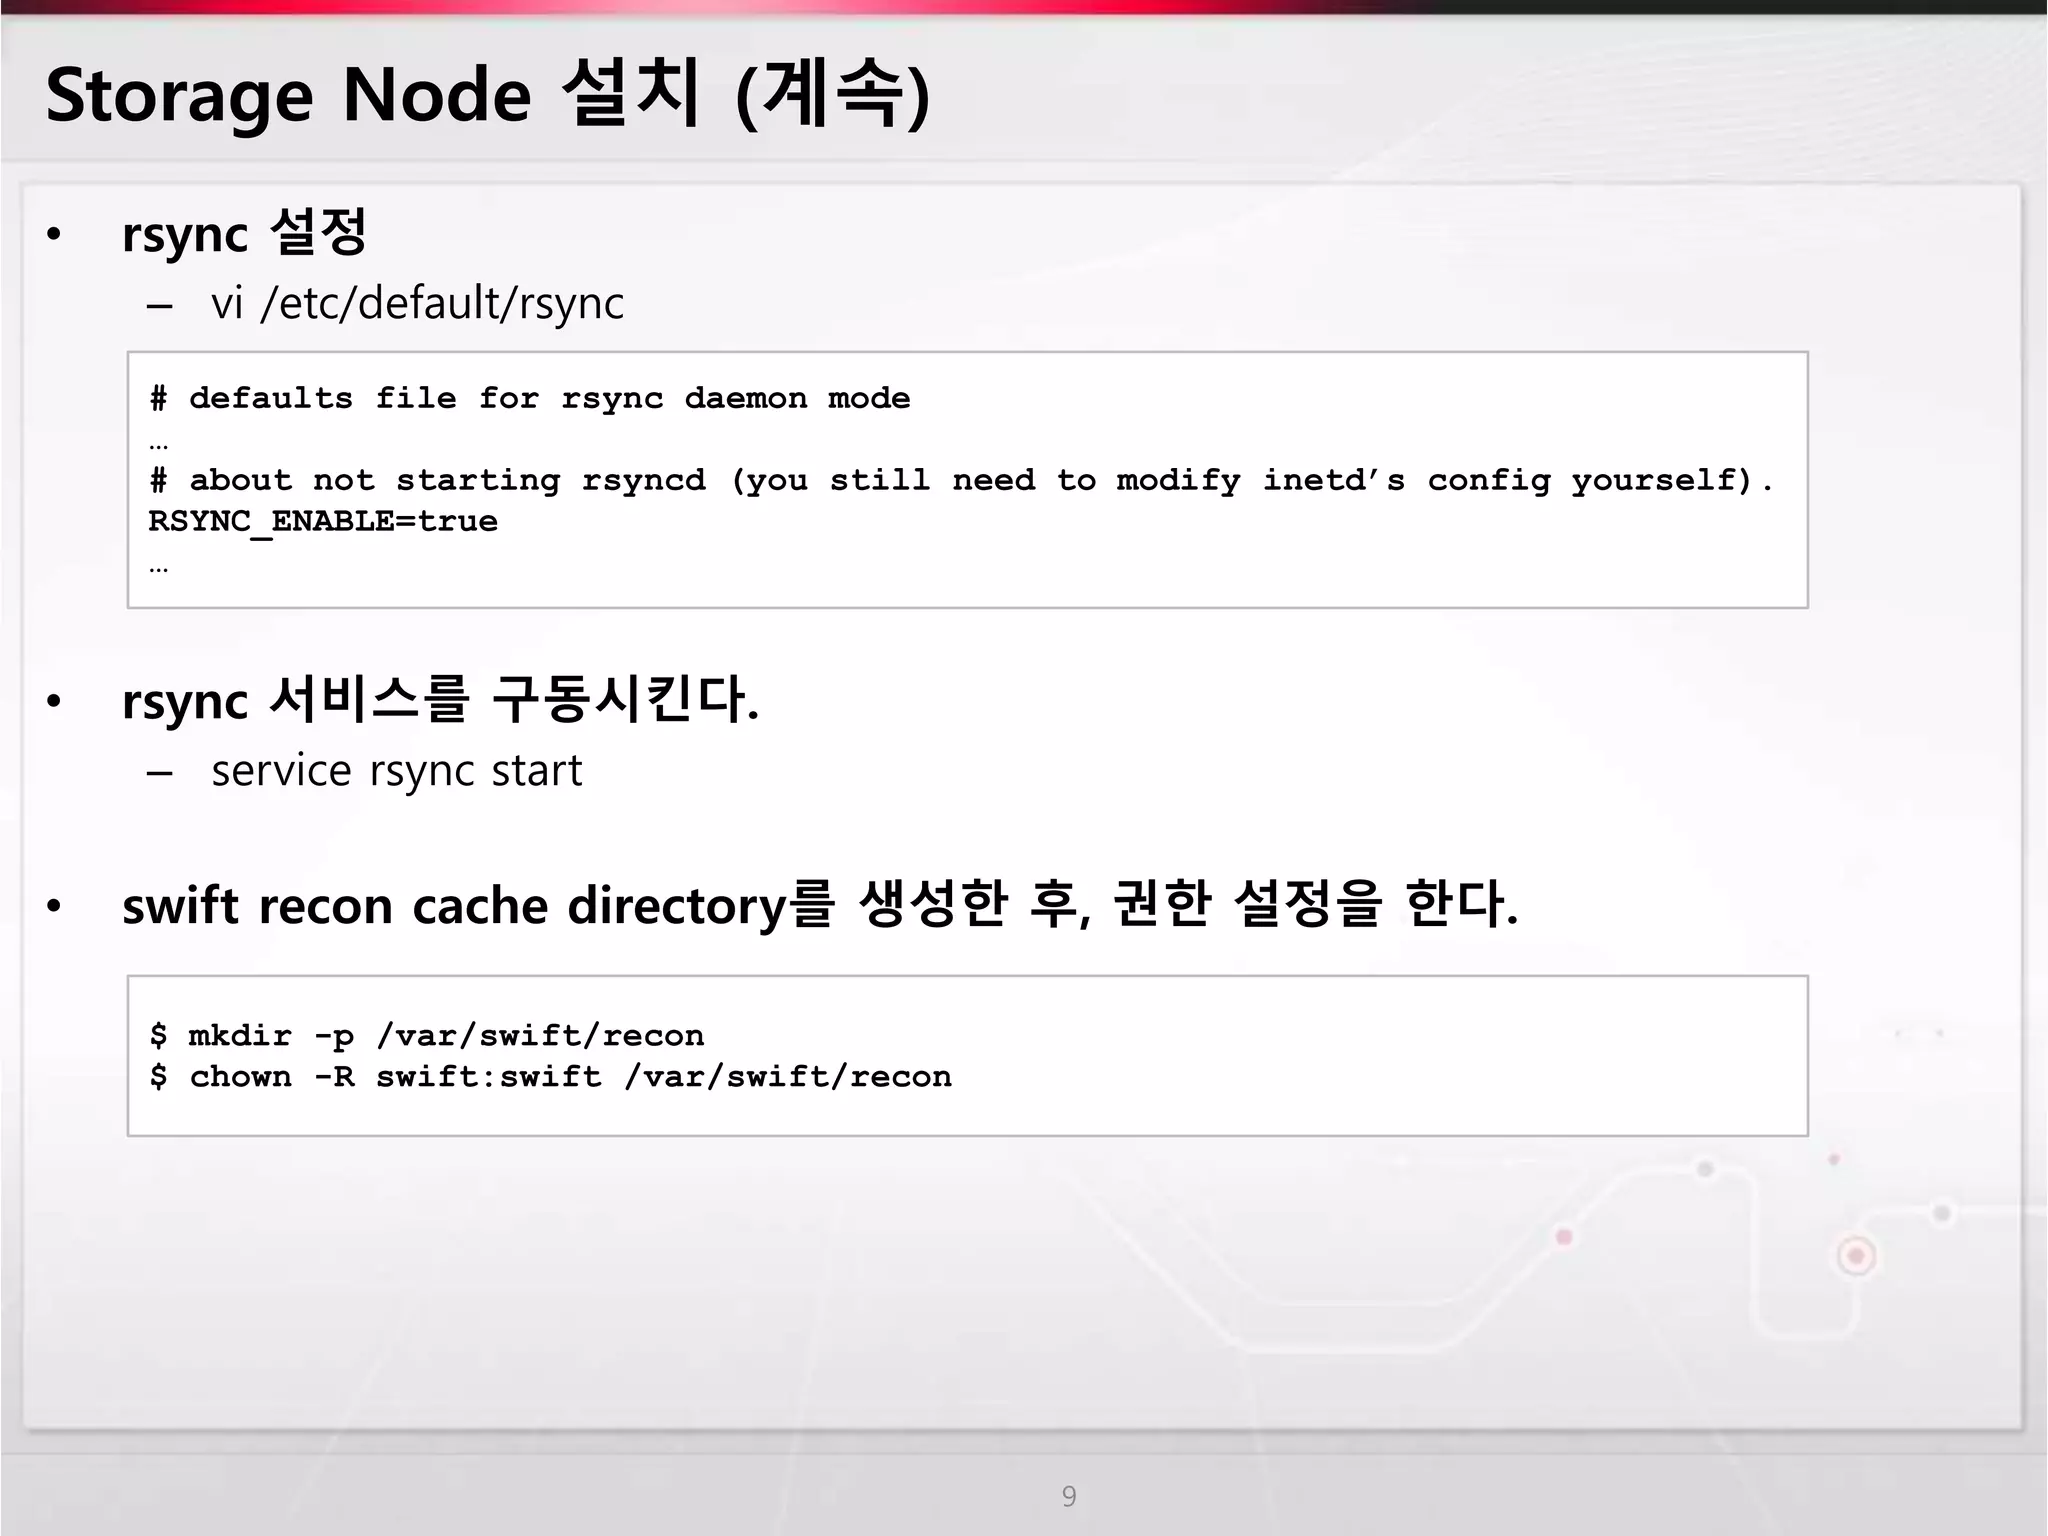
• rsyncd 환경설정
– vi /etc/rsyncd.conf
8
~$ sudo apt-get install swift-account swift-container swift-object xfsprogs
uid = swift
gid = swift
log file = /var/log/rsyncd.log
pid file = /var/run/rsyncd.pid
address = STORAGE_LOCAL_NET_IP
[account]
max connections = 2
path = /srv/node/
read only = false
lock file = /var/lock/account.lock
[container]
max connections = 2
path = /srv/node/
read only = false
lock file = /var/lock/container.lock
[object]
max connections = 2
path = /srv/node/
read only = false
lock file = /var/lock/object.lock](https://image.slidesharecdn.com/openstackswiftnodev1-141228091021-conversion-gate01/85/Installation-Openstack-Swift-8-320.jpg)

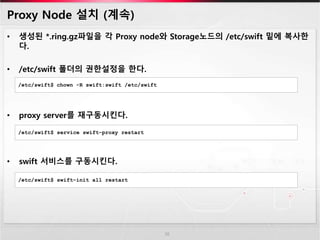
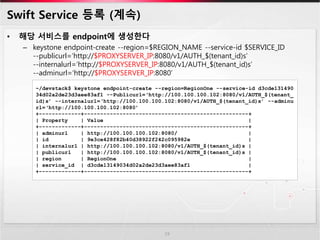
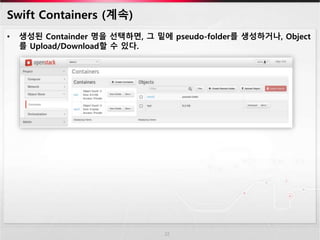
![Proxy Node 설치 (계속)
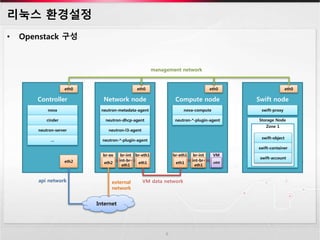
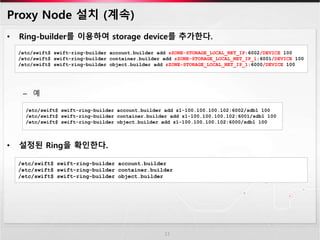
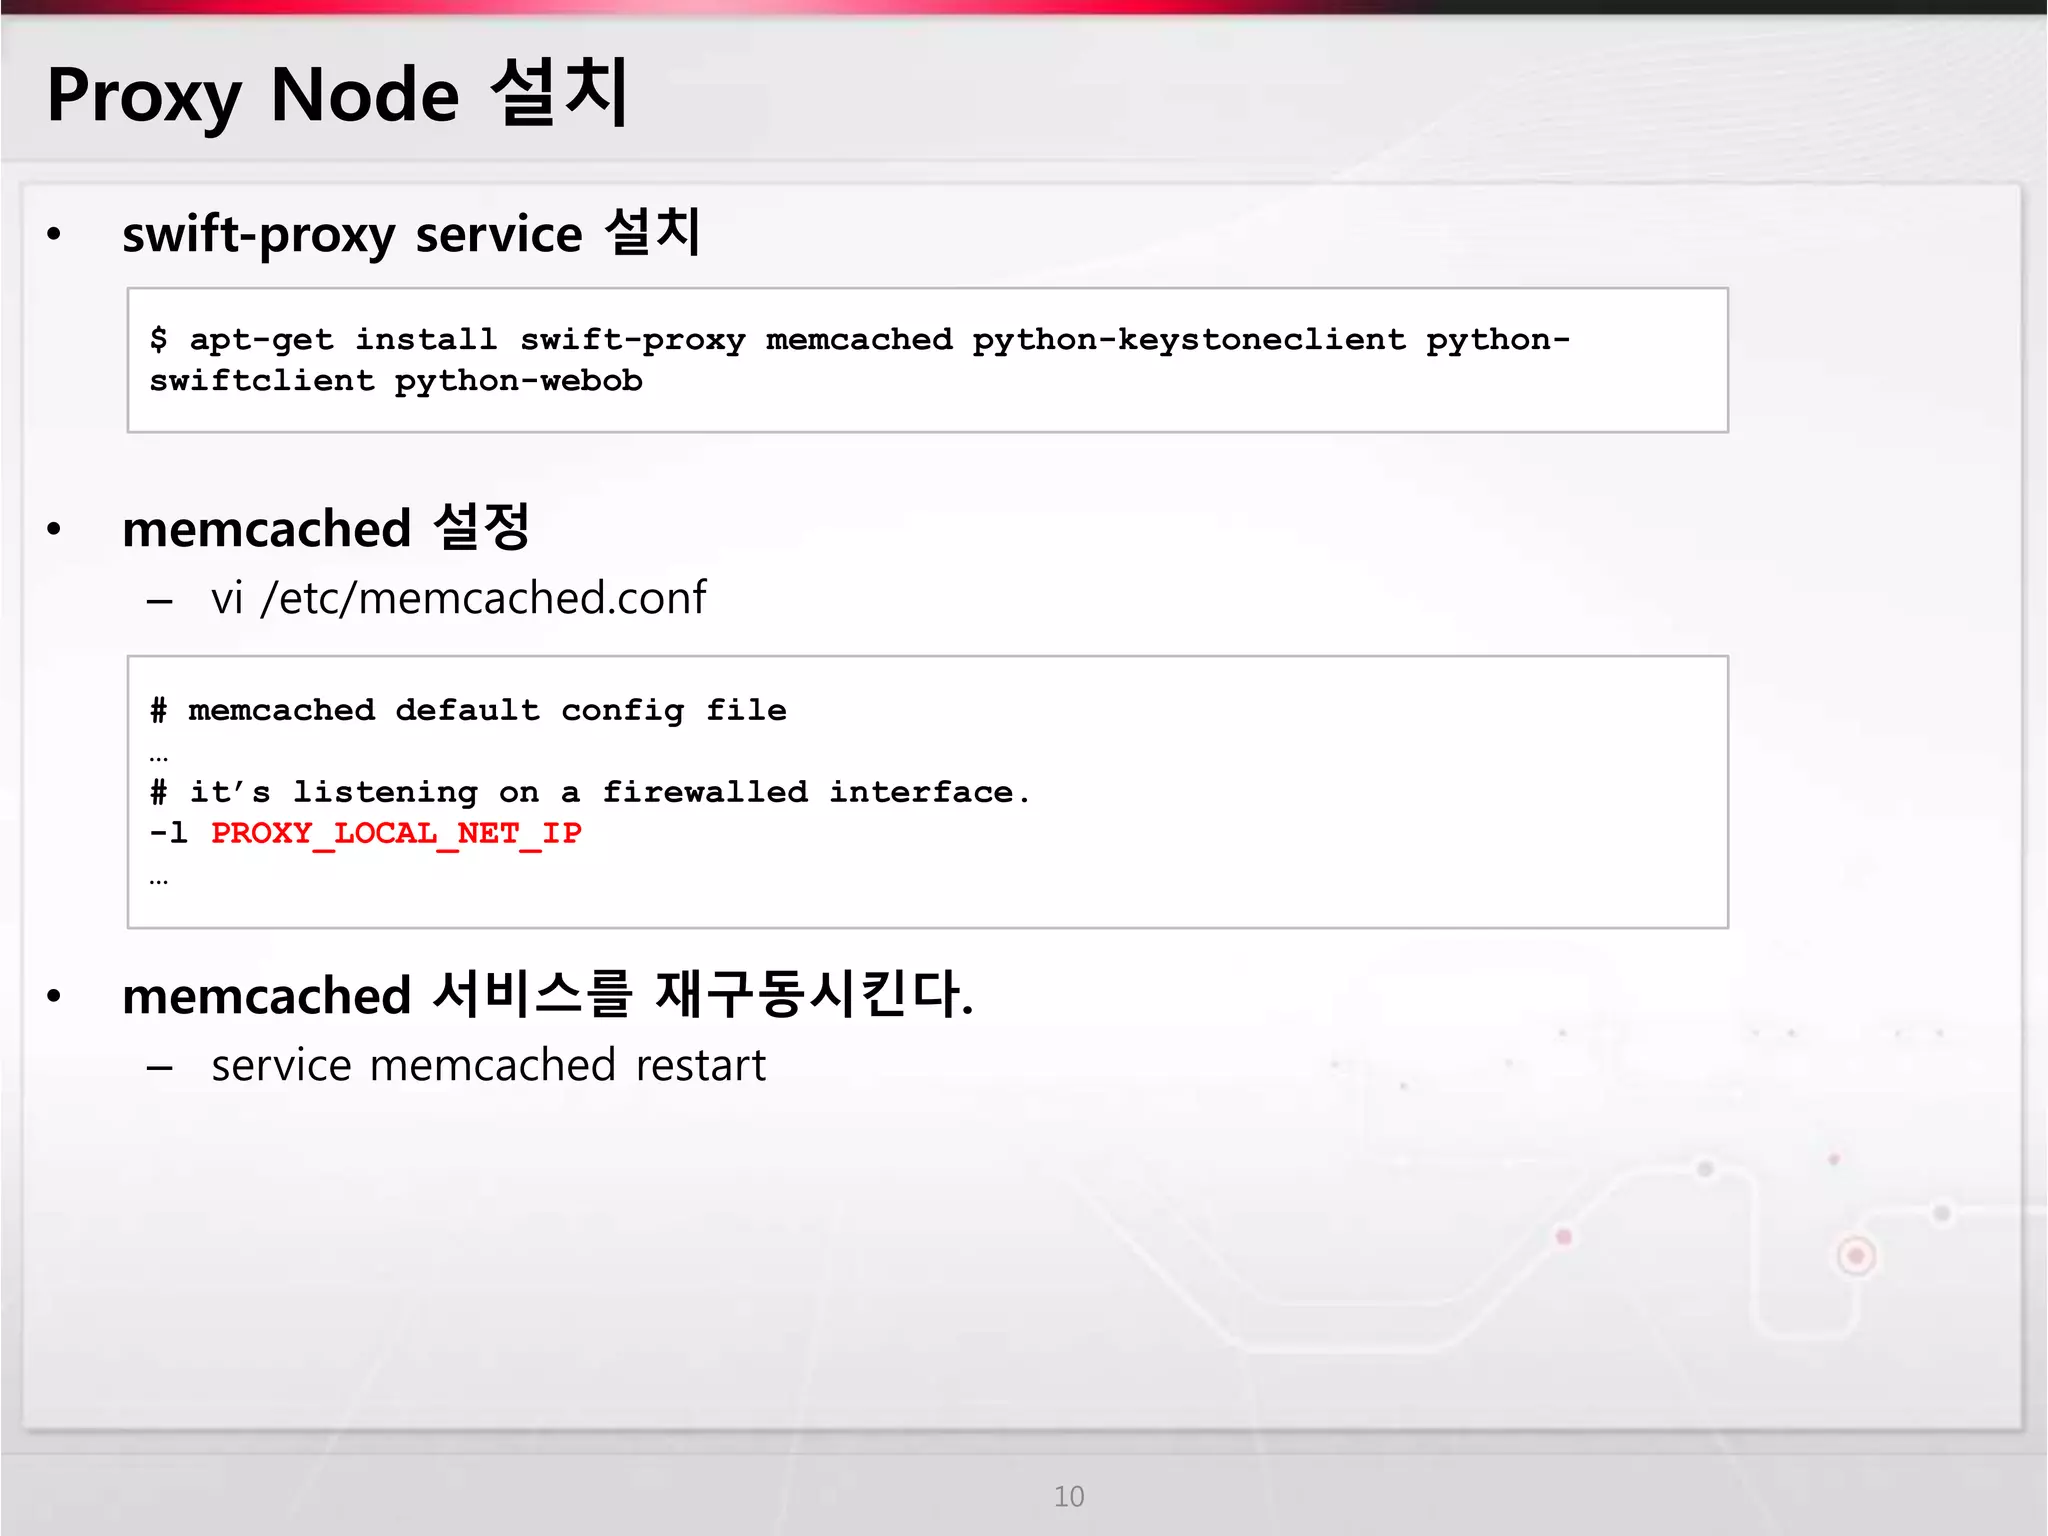
• Proxy server 설정
– vi /etc/swift/proxy-server.conf
11
[DEFAULT]
bind_port = 8080
user = swift
[pipeline:main]
pipeline = healthcheck cache authtoken keystoneauth proxy-server
[app:proxy-server]
use = egg:swift#proxy
allow_account_management = true
account_autocreate = true
[filter:keystoneauth]
use = egg:swift#keystoneauth
operator_roles = Member,admin,swiftoperator
[filter:authtoken]
paste.filter_factory = keystoneclient.middleware.auth_token:filter_factory
delay_auth_decision = true
signing_dir = /home/swift/keystone-signing
auth_protocol = http
auth_host = controller_IP
auth_port = 35357
admin_tenant_name = service
admin_user = swift
admin_password = SWIFT_PASSWORD
[filter:cache]
use = egg:swift#memcache
[filter:catch_errors]
use = egg:swift#catch_errors
[filter:healthcheck]
use = egg:swift#healthcheck](https://image.slidesharecdn.com/openstackswiftnodev1-141228091021-conversion-gate01/85/Installation-Openstack-Swift-11-320.jpg)
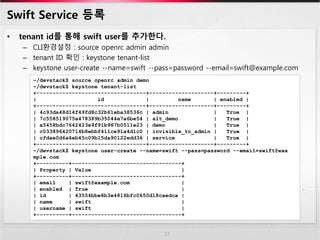


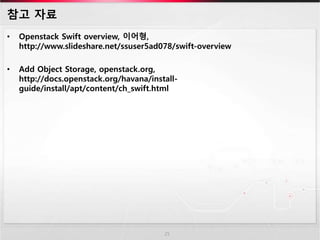
![Storage Node 설치
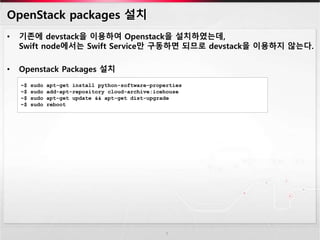
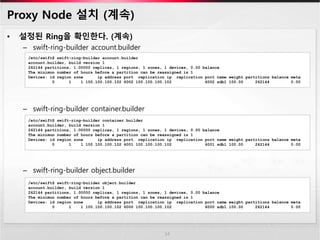
• Storage node packages 설치
• rsyncd 환경설정
– vi /etc/rsyncd.conf
8
~$ sudo apt-get install swift-account swift-container swift-object xfsprogs
uid = swift
gid = swift
log file = /var/log/rsyncd.log
pid file = /var/run/rsyncd.pid
address = STORAGE_LOCAL_NET_IP
[account]
max connections = 2
path = /srv/node/
read only = false
lock file = /var/lock/account.lock
[container]
max connections = 2
path = /srv/node/
read only = false
lock file = /var/lock/container.lock
[object]
max connections = 2
path = /srv/node/
read only = false
lock file = /var/lock/object.lock](https://image.slidesharecdn.com/openstackswiftnodev1-141228091021-conversion-gate01/75/Installation-Openstack-Swift-8-2048.jpg)
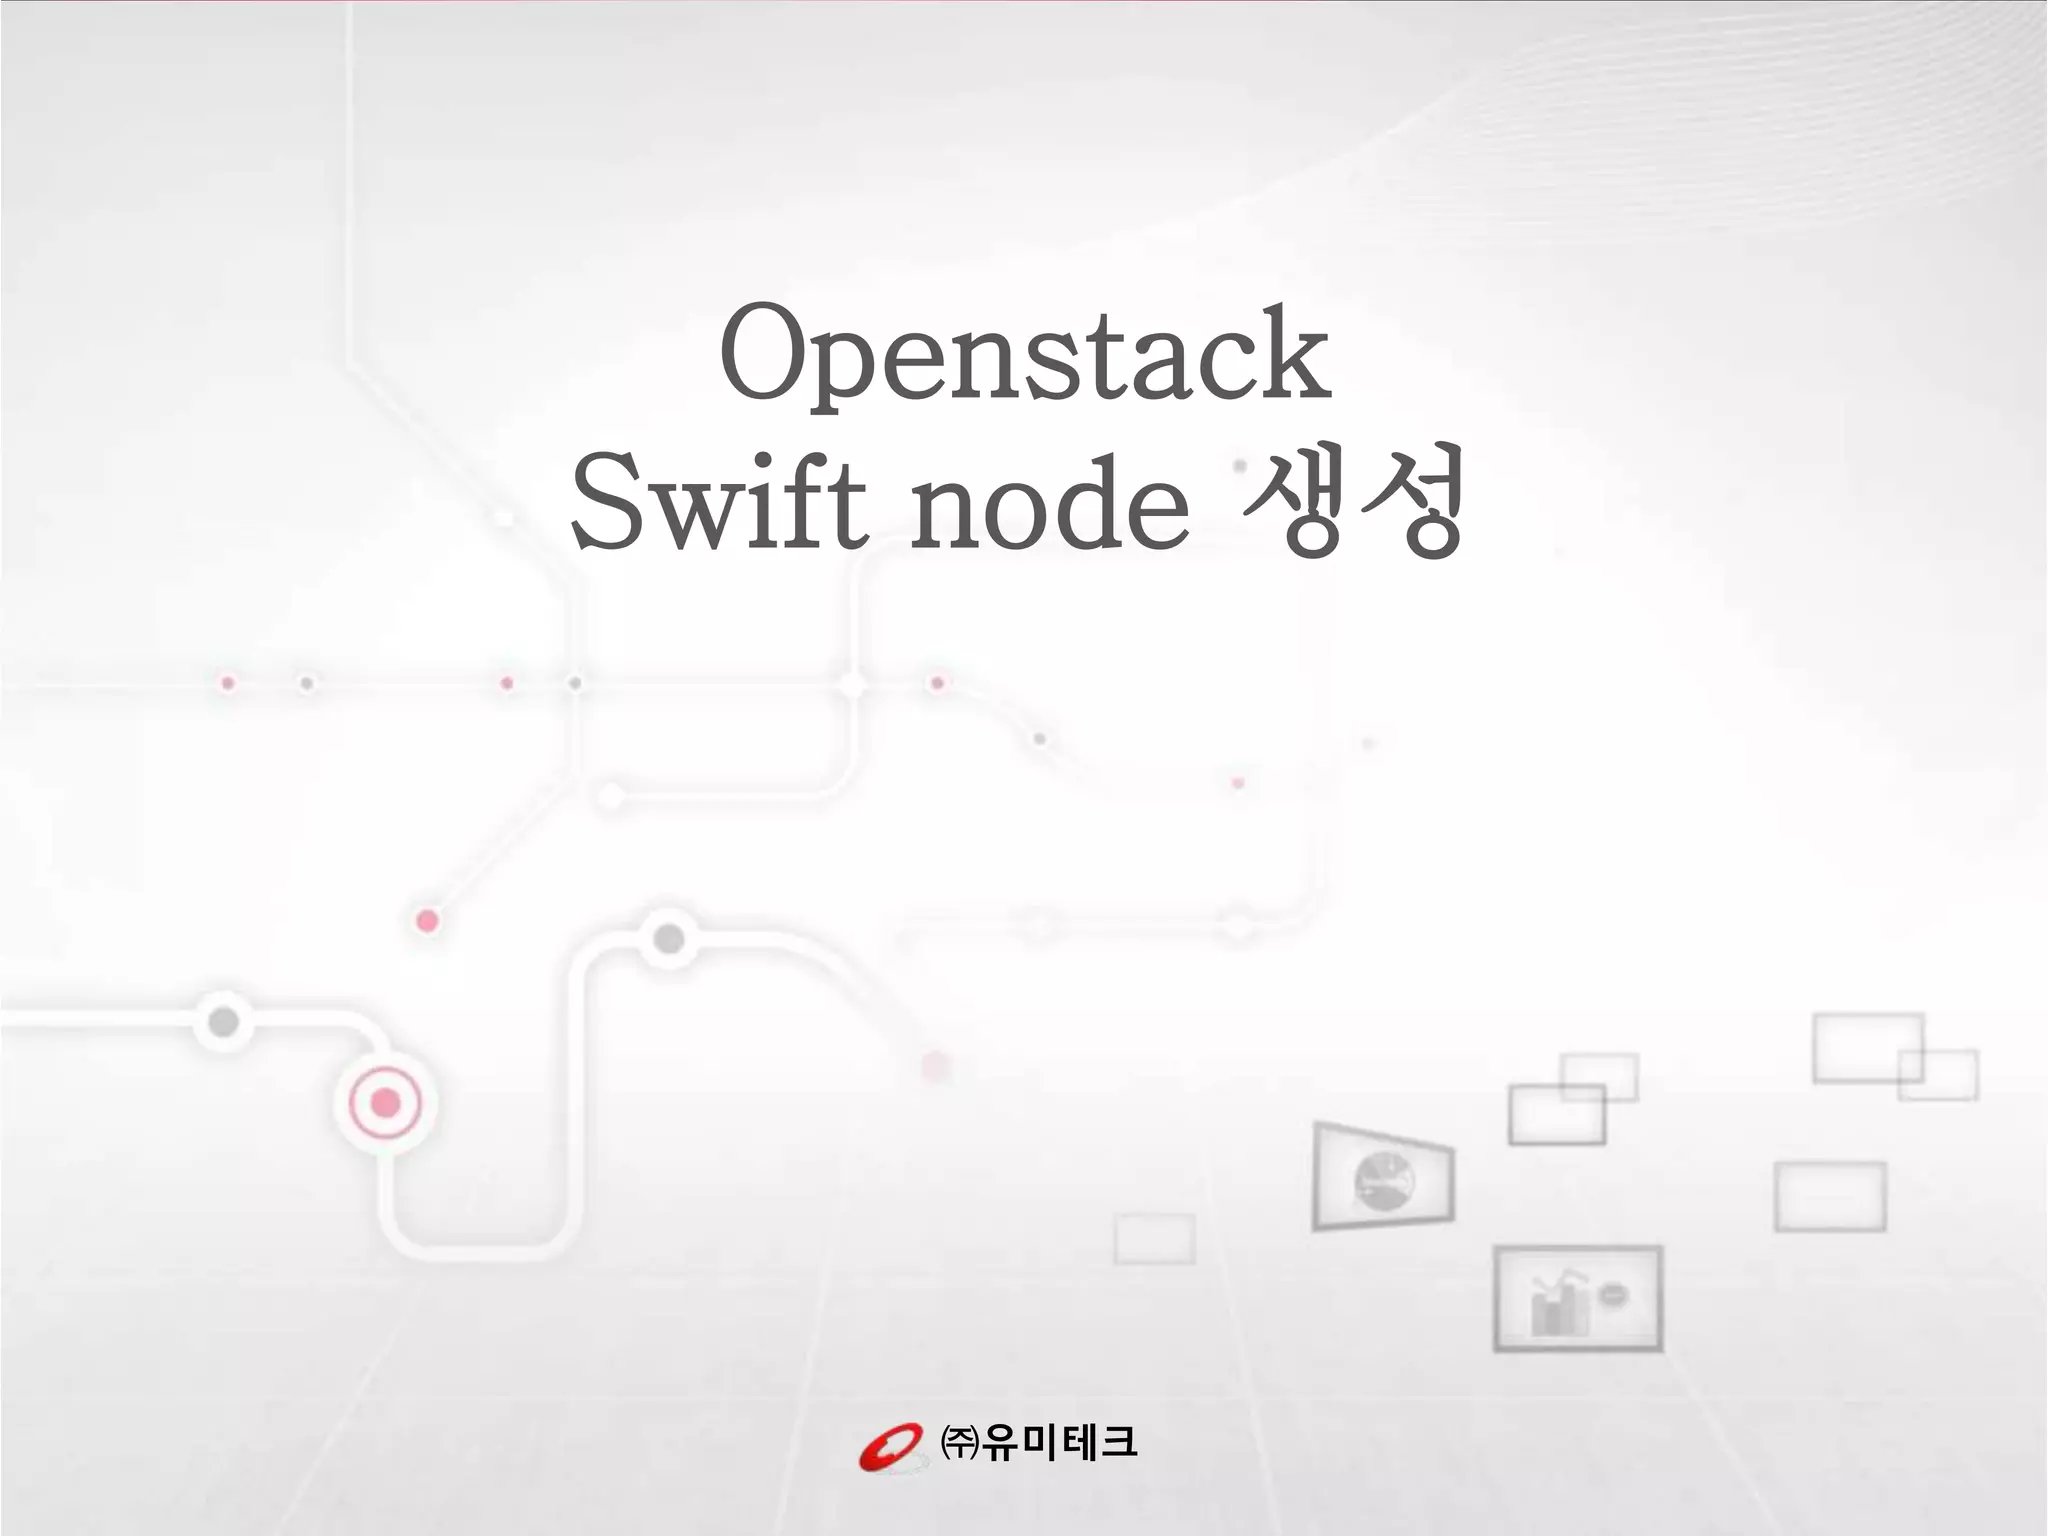
![Proxy Node 설치 (계속)
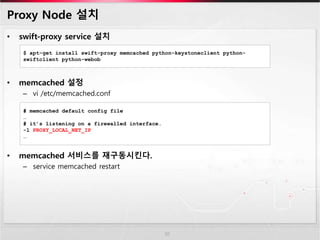
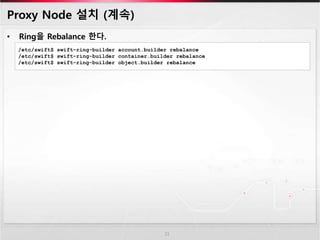
• Proxy server 설정
– vi /etc/swift/proxy-server.conf
11
[DEFAULT]
bind_port = 8080
user = swift
[pipeline:main]
pipeline = healthcheck cache authtoken keystoneauth proxy-server
[app:proxy-server]
use = egg:swift#proxy
allow_account_management = true
account_autocreate = true
[filter:keystoneauth]
use = egg:swift#keystoneauth
operator_roles = Member,admin,swiftoperator
[filter:authtoken]
paste.filter_factory = keystoneclient.middleware.auth_token:filter_factory
delay_auth_decision = true
signing_dir = /home/swift/keystone-signing
auth_protocol = http
auth_host = controller_IP
auth_port = 35357
admin_tenant_name = service
admin_user = swift
admin_password = SWIFT_PASSWORD
[filter:cache]
use = egg:swift#memcache
[filter:catch_errors]
use = egg:swift#catch_errors
[filter:healthcheck]
use = egg:swift#healthcheck](https://image.slidesharecdn.com/openstackswiftnodev1-141228091021-conversion-gate01/75/Installation-Openstack-Swift-11-2048.jpg)


The document describes the process of setting up OpenStack Swift object storage. It includes installing and configuring Swift packages on both storage and proxy nodes, generating ring files to map objects to storage devices, and registering the Swift service with Keystone for authentication. Key steps are installing Swift packages, adding storage devices to the ring, distributing ring files, and configuring the proxy server and authentication filter.


![[ 2015 SOSCON ]오픈스택 swift로 시작하는 오픈소스 분석 삽질기](https://cdn.slidesharecdn.com/ss_thumbnails/openstackkoreaswift-151028080003-lva1-app6891-thumbnail.jpg?width=600ounds&width=560&fit=bounds)
![[OpenStack Days Korea 2016] Track1 - Mellanox CloudX - Acceleration for Cloud...](https://cdn.slidesharecdn.com/ss_thumbnails/14mellanox-160226171740-thumbnail.jpg?width=600ounds&width=560&fit=bounds)

![[OpenStack Day in Korea 2015] Track 1 - Triple O를 이용한 빠르고 쉬운 OpenStack 설치](https://cdn.slidesharecdn.com/ss_thumbnails/11-150213041431-conversion-gate02-thumbnail.jpg?width=600ounds&width=560&fit=bounds)


![[오픈소스컨설팅] Open Stack Ceph, Neutron, HA, Multi-Region](https://cdn.slidesharecdn.com/ss_thumbnails/openstackoscv0-160718105826-thumbnail.jpg?width=600ounds&width=560&fit=bounds)


![[OpenInfra Days Korea 2018] Day 2 - E4 - 딥다이브: immutable Kubernetes architecture](https://cdn.slidesharecdn.com/ss_thumbnails/e41530linuxkit-k8s-180704110158-thumbnail.jpg?width=600ounds&width=560&fit=bounds)


