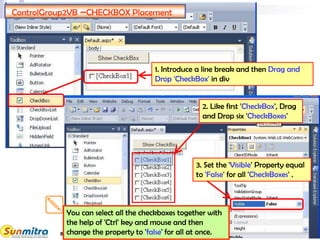
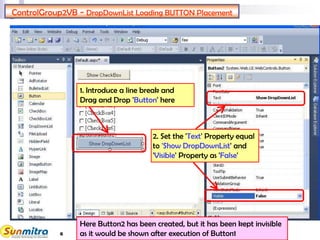
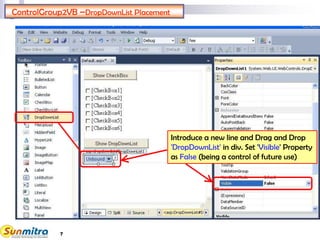
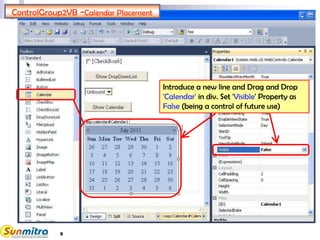
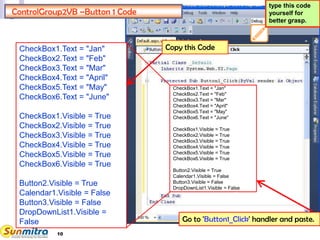
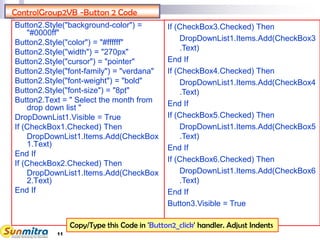
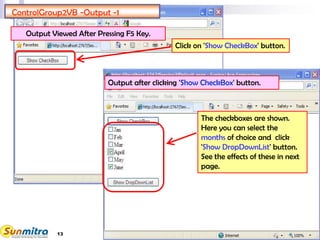
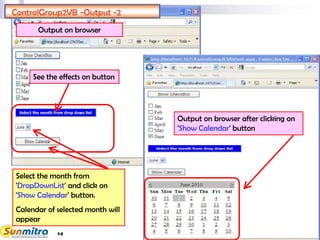
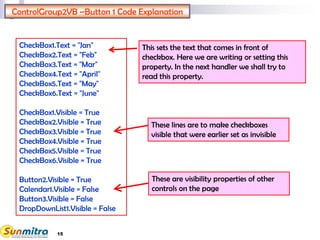
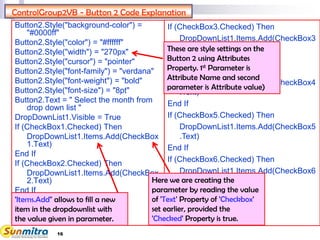
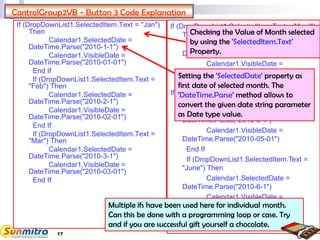
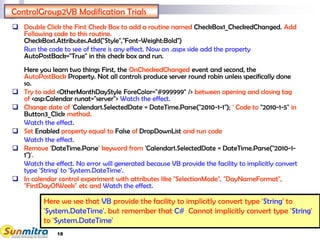
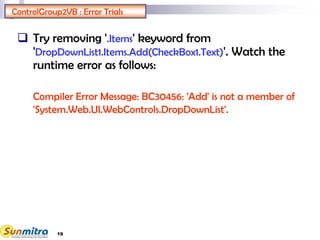
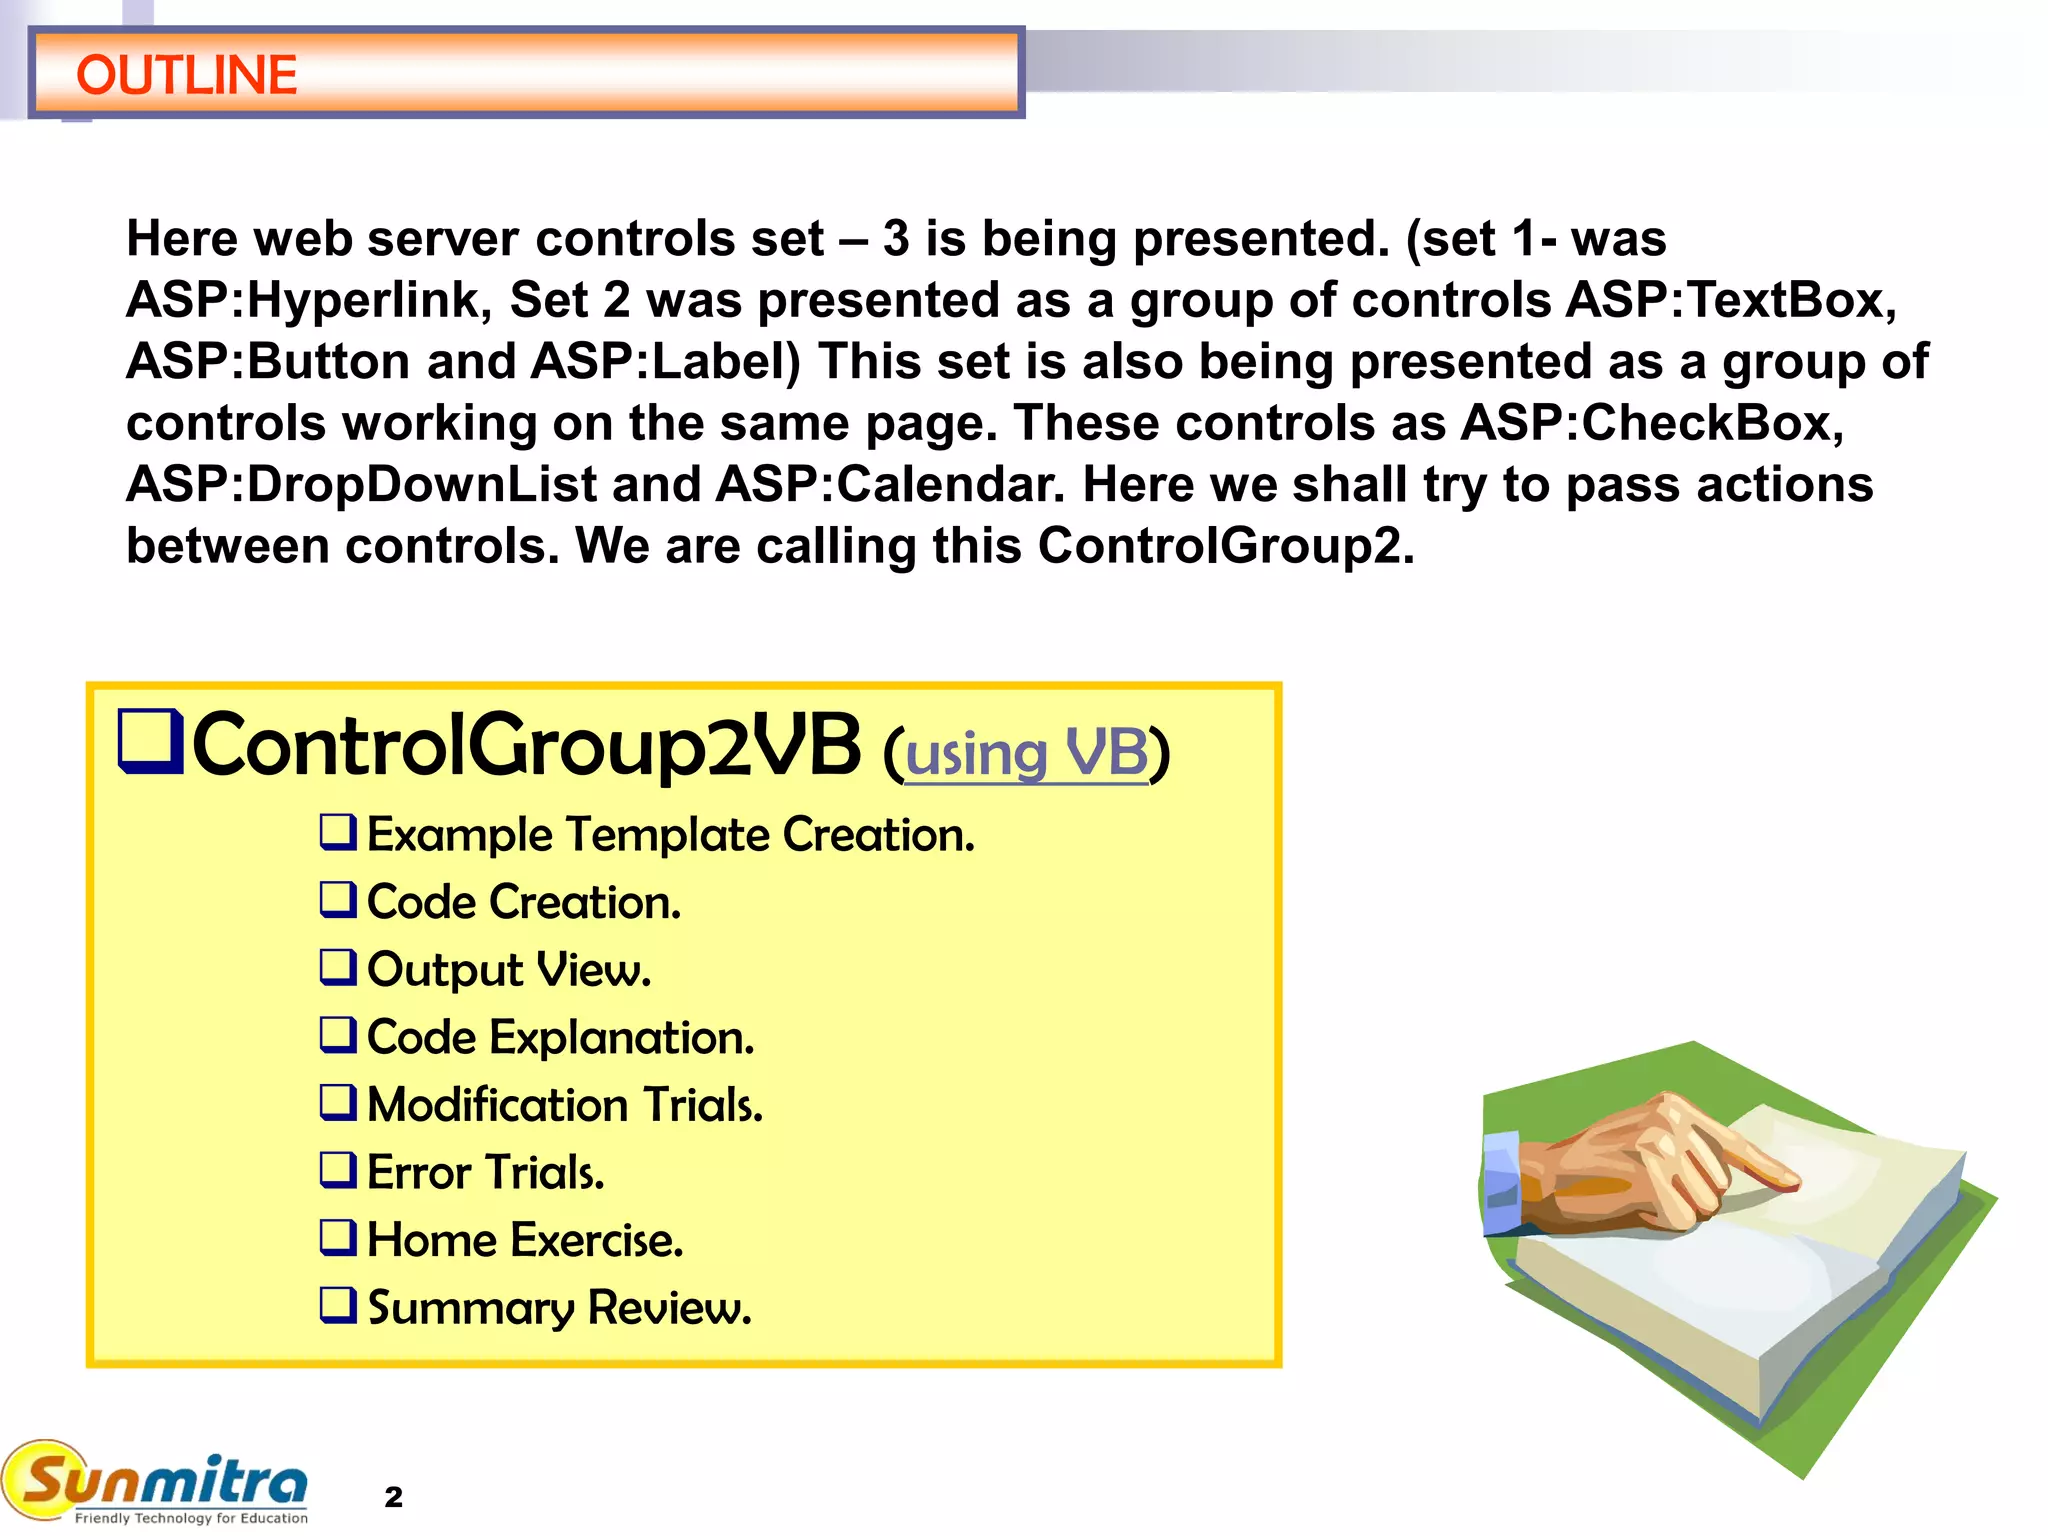
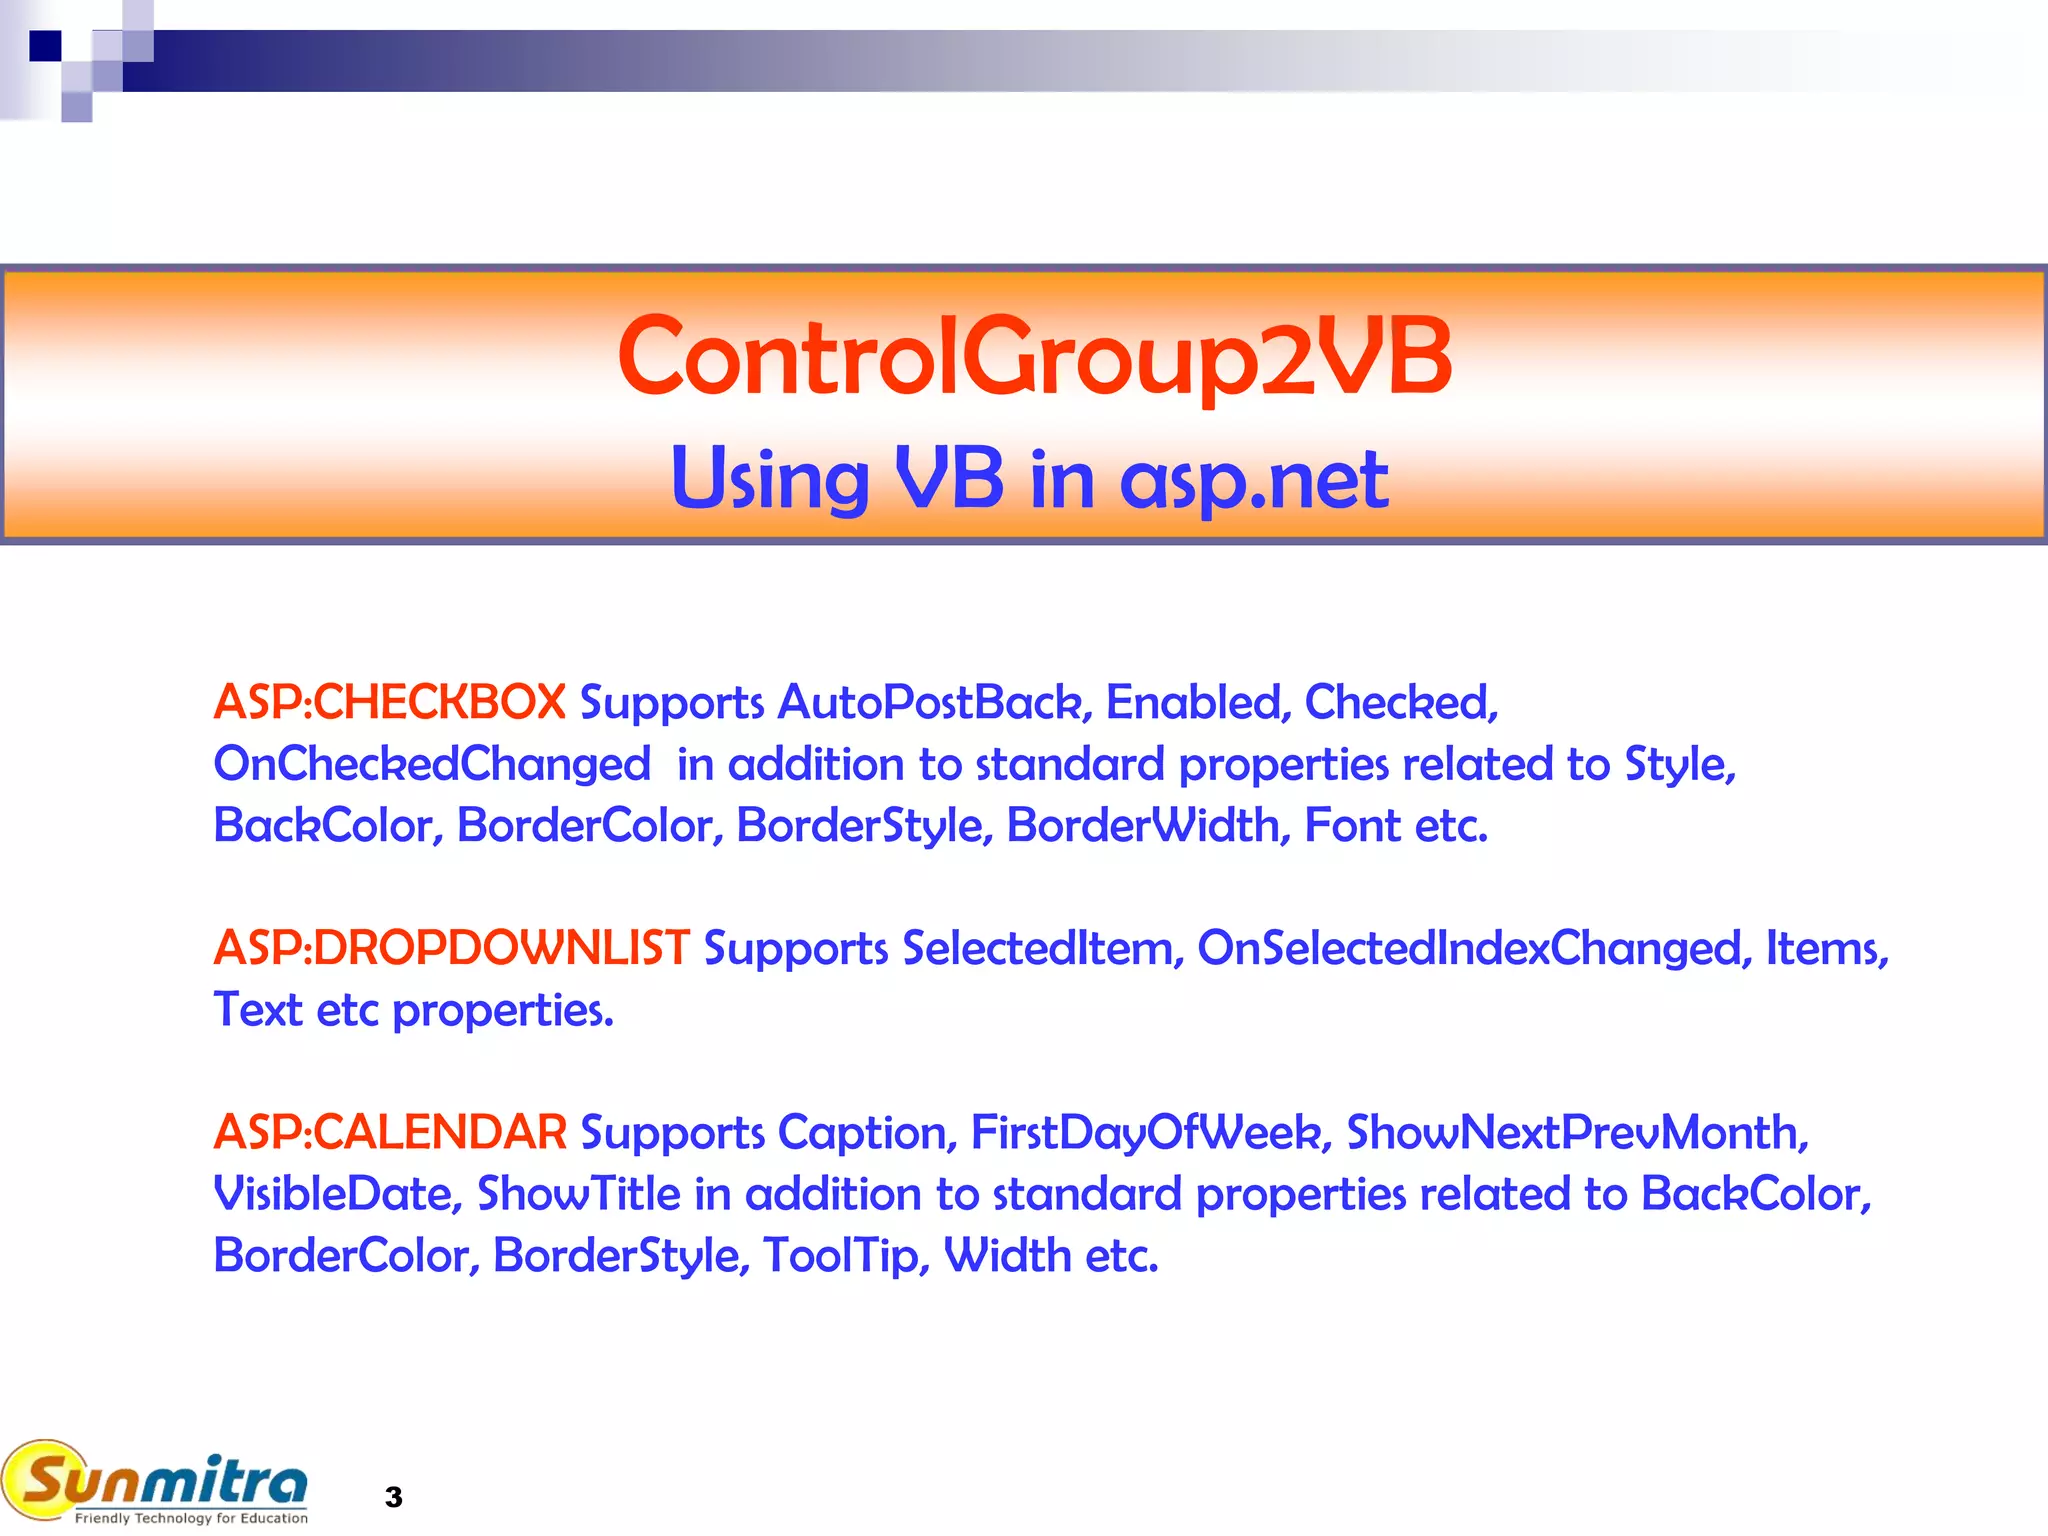
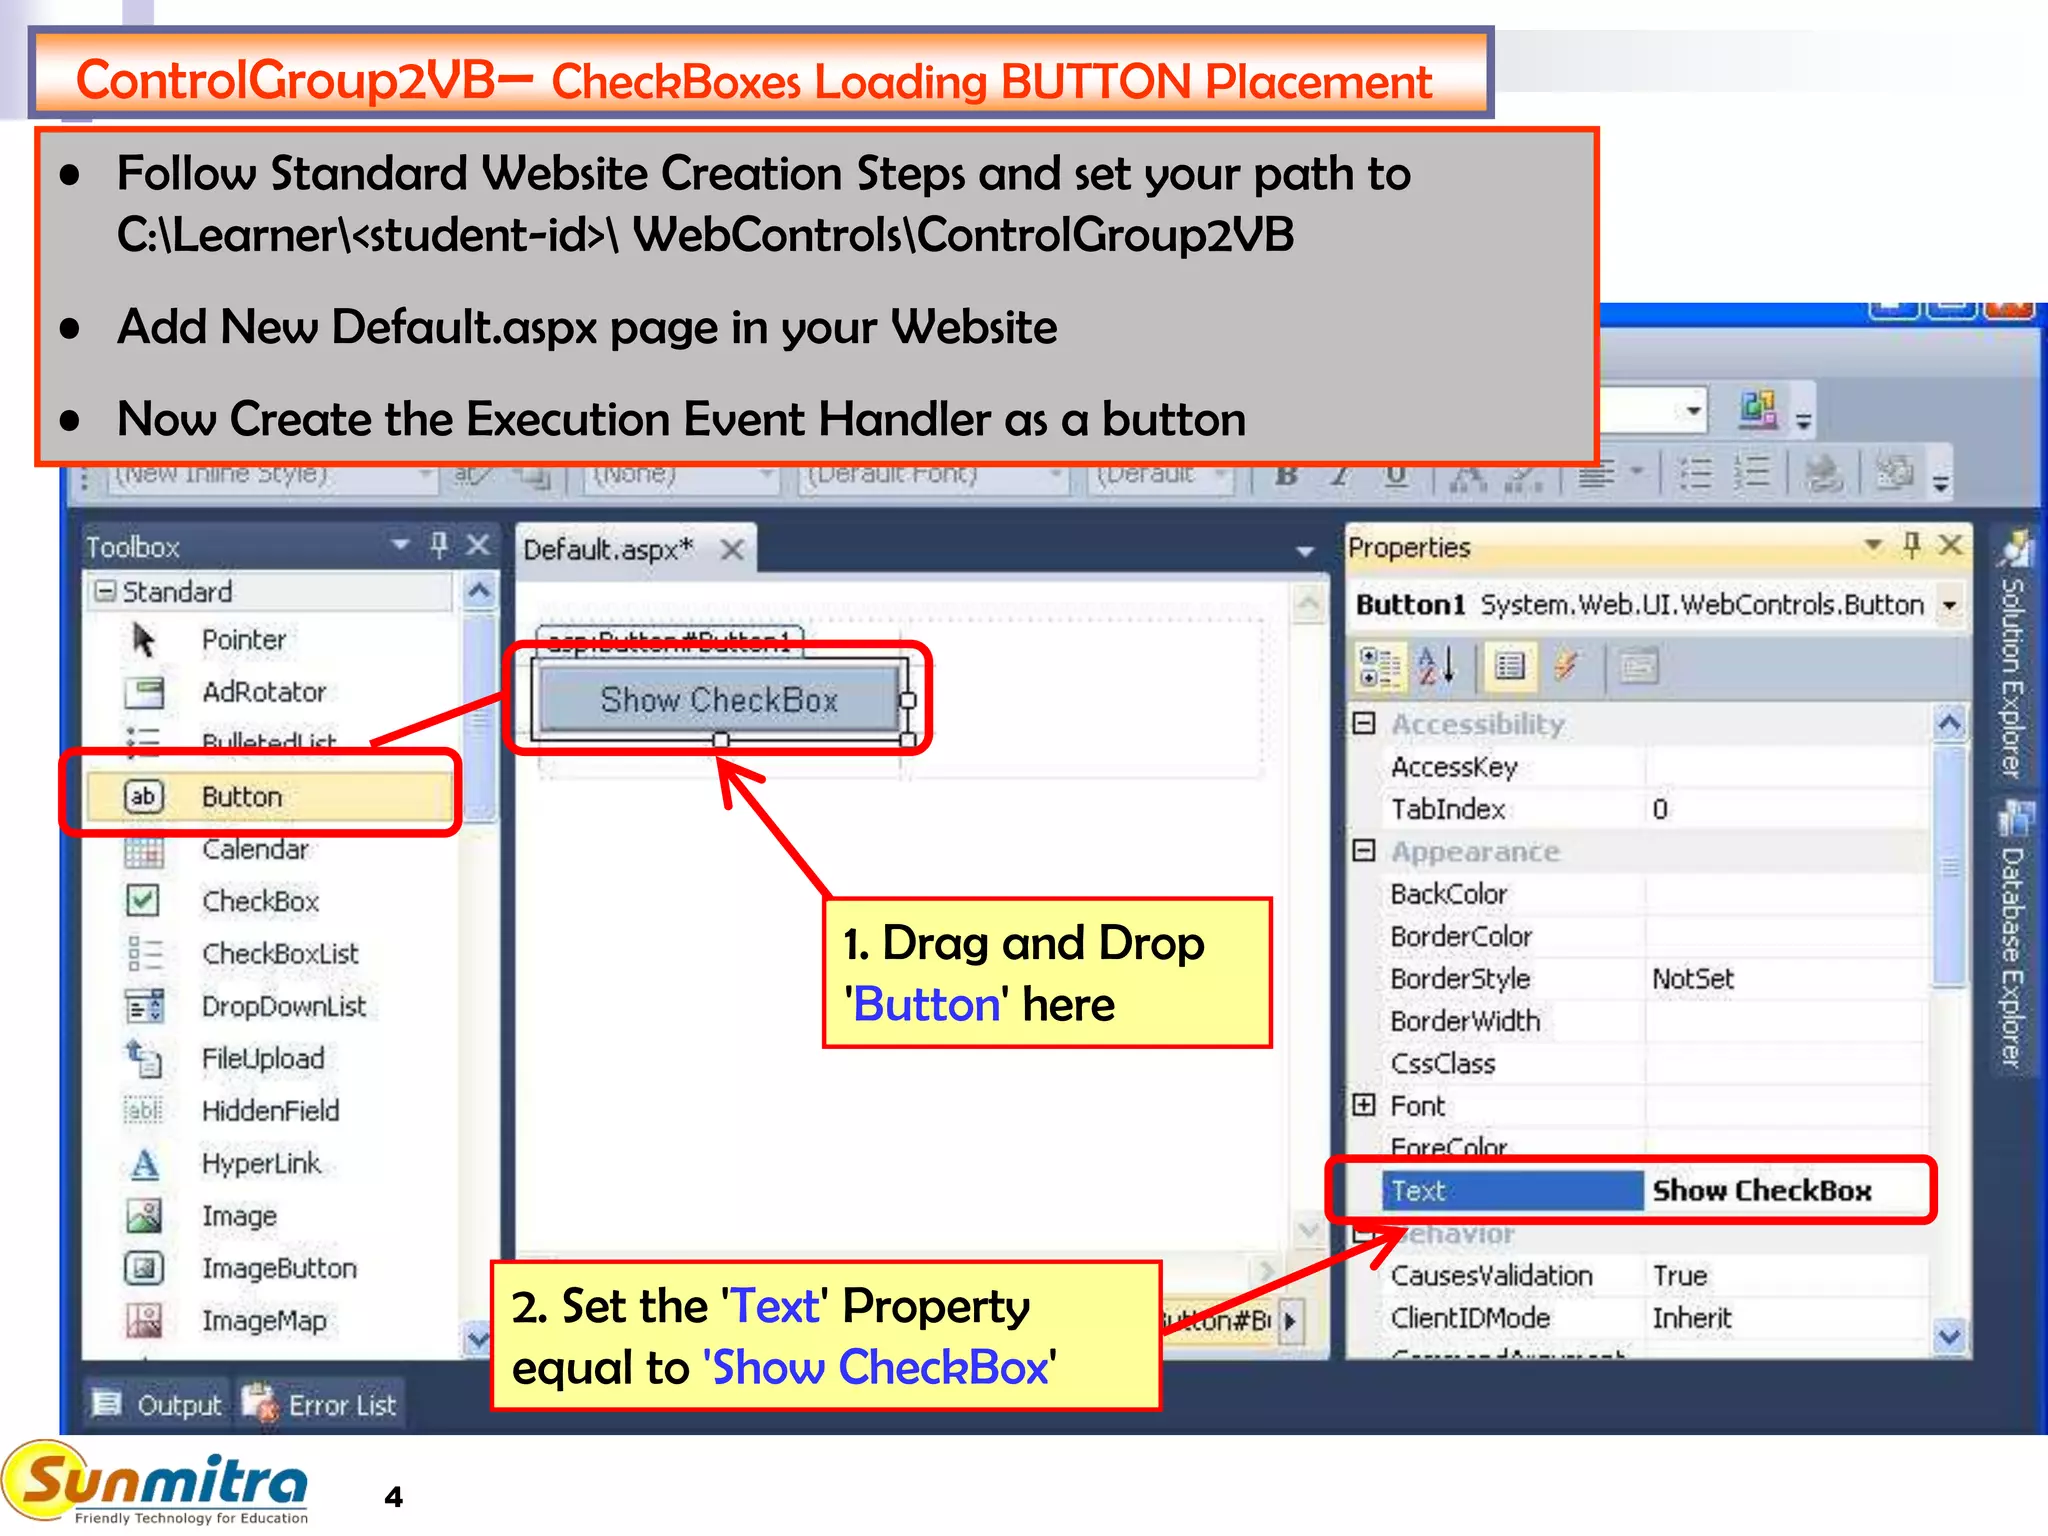
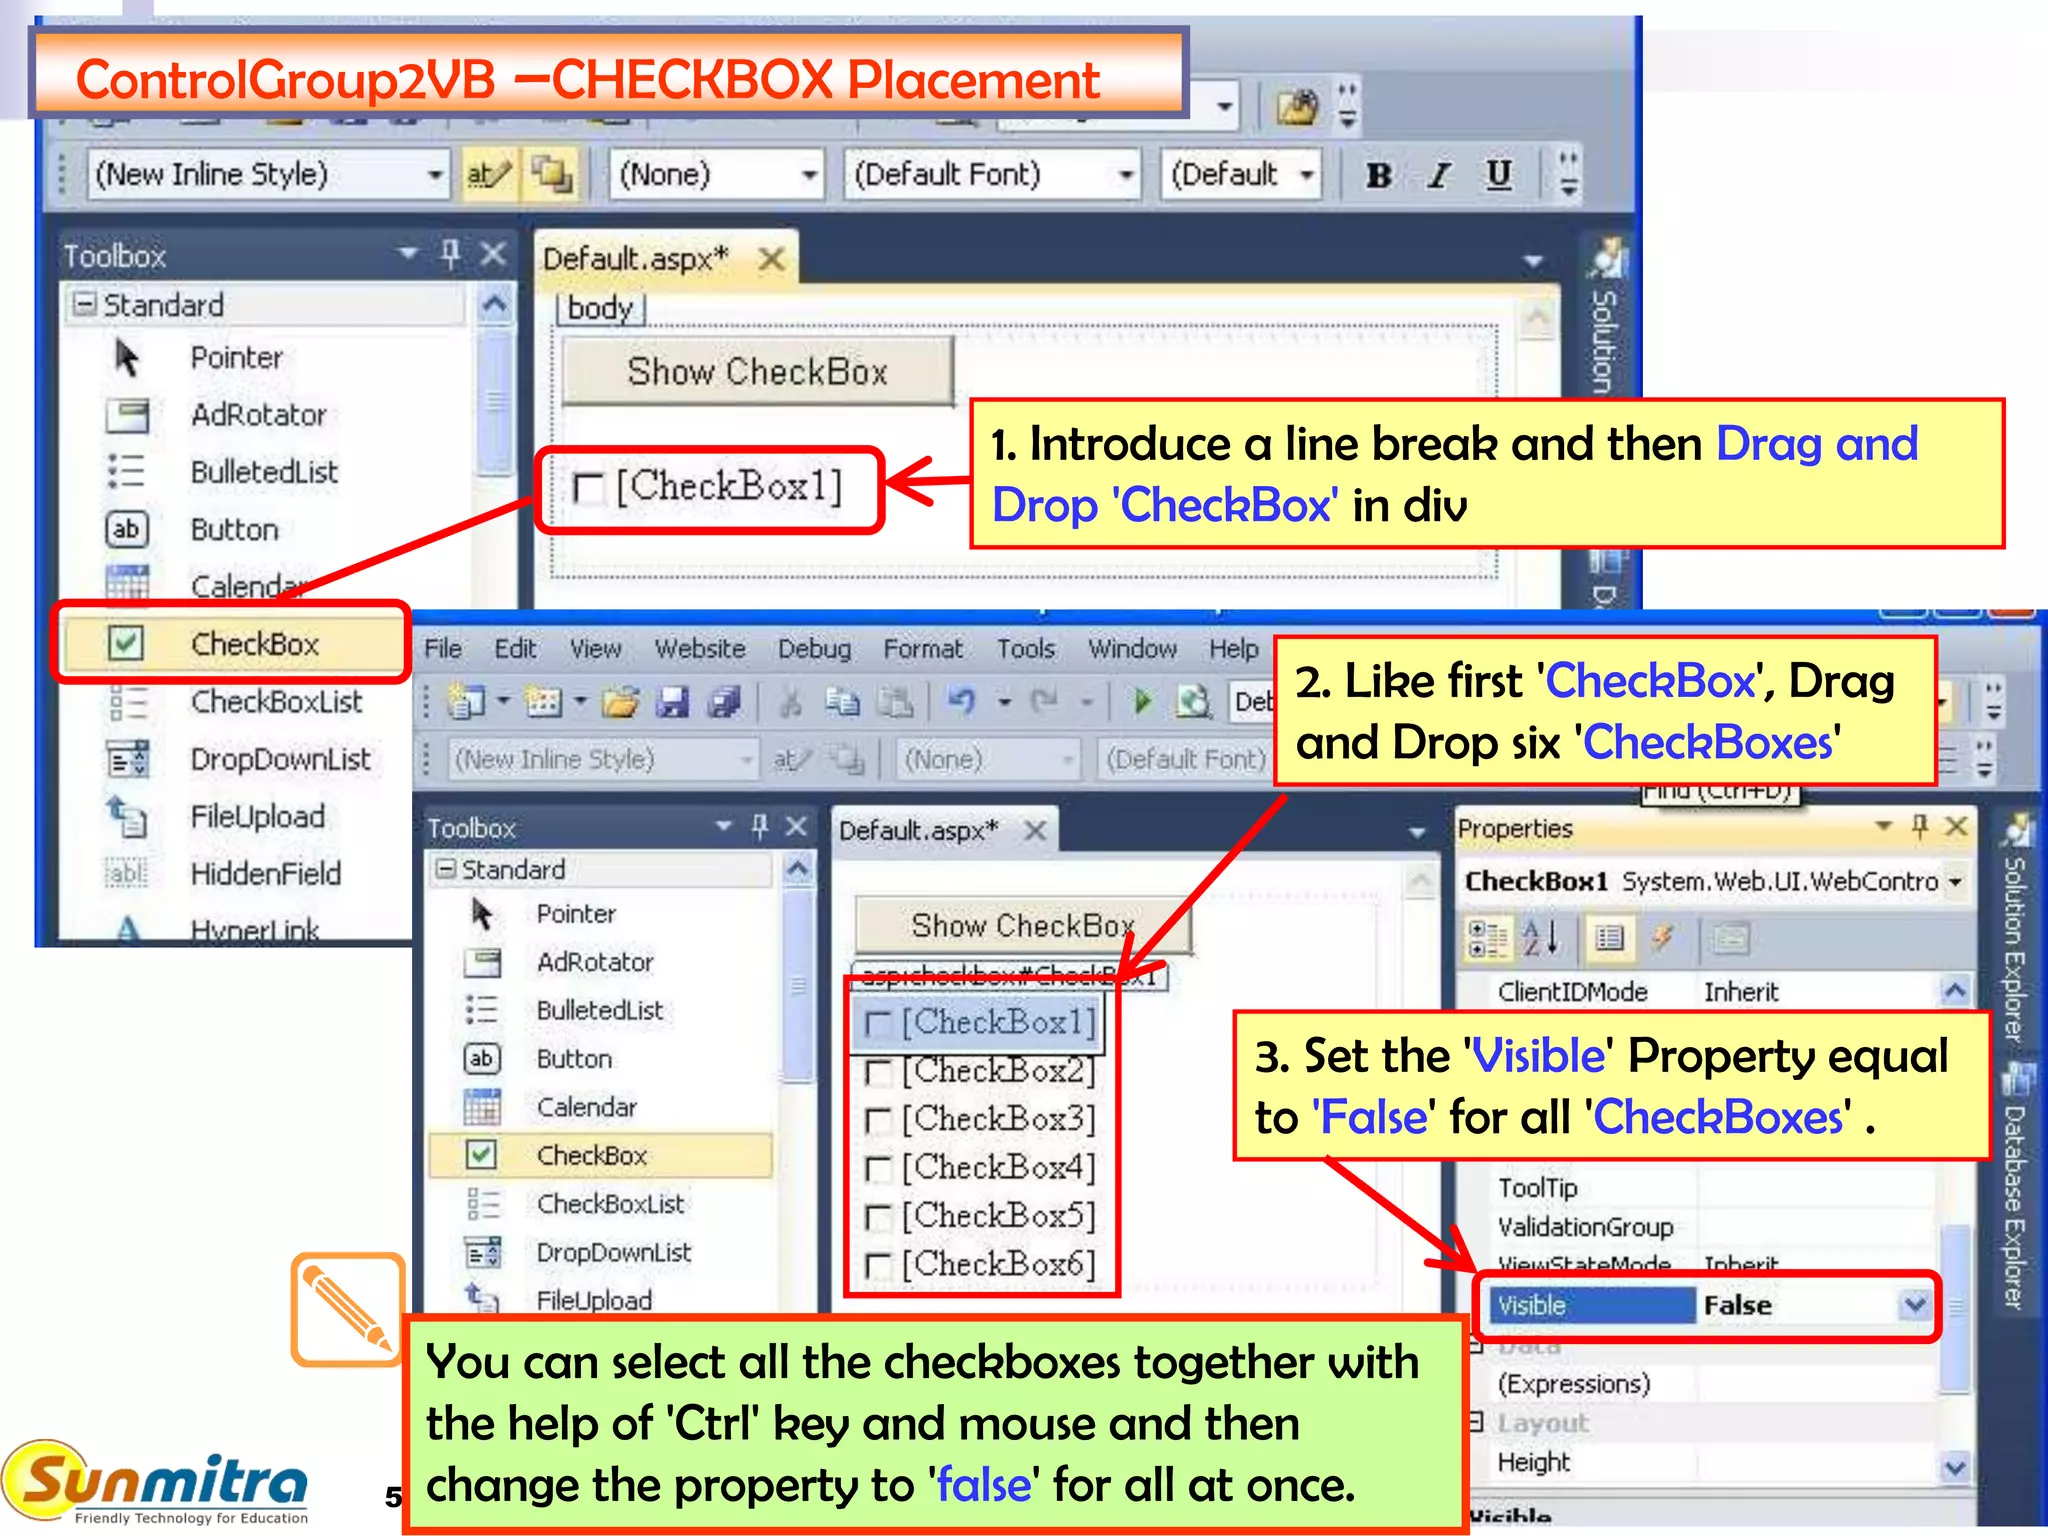
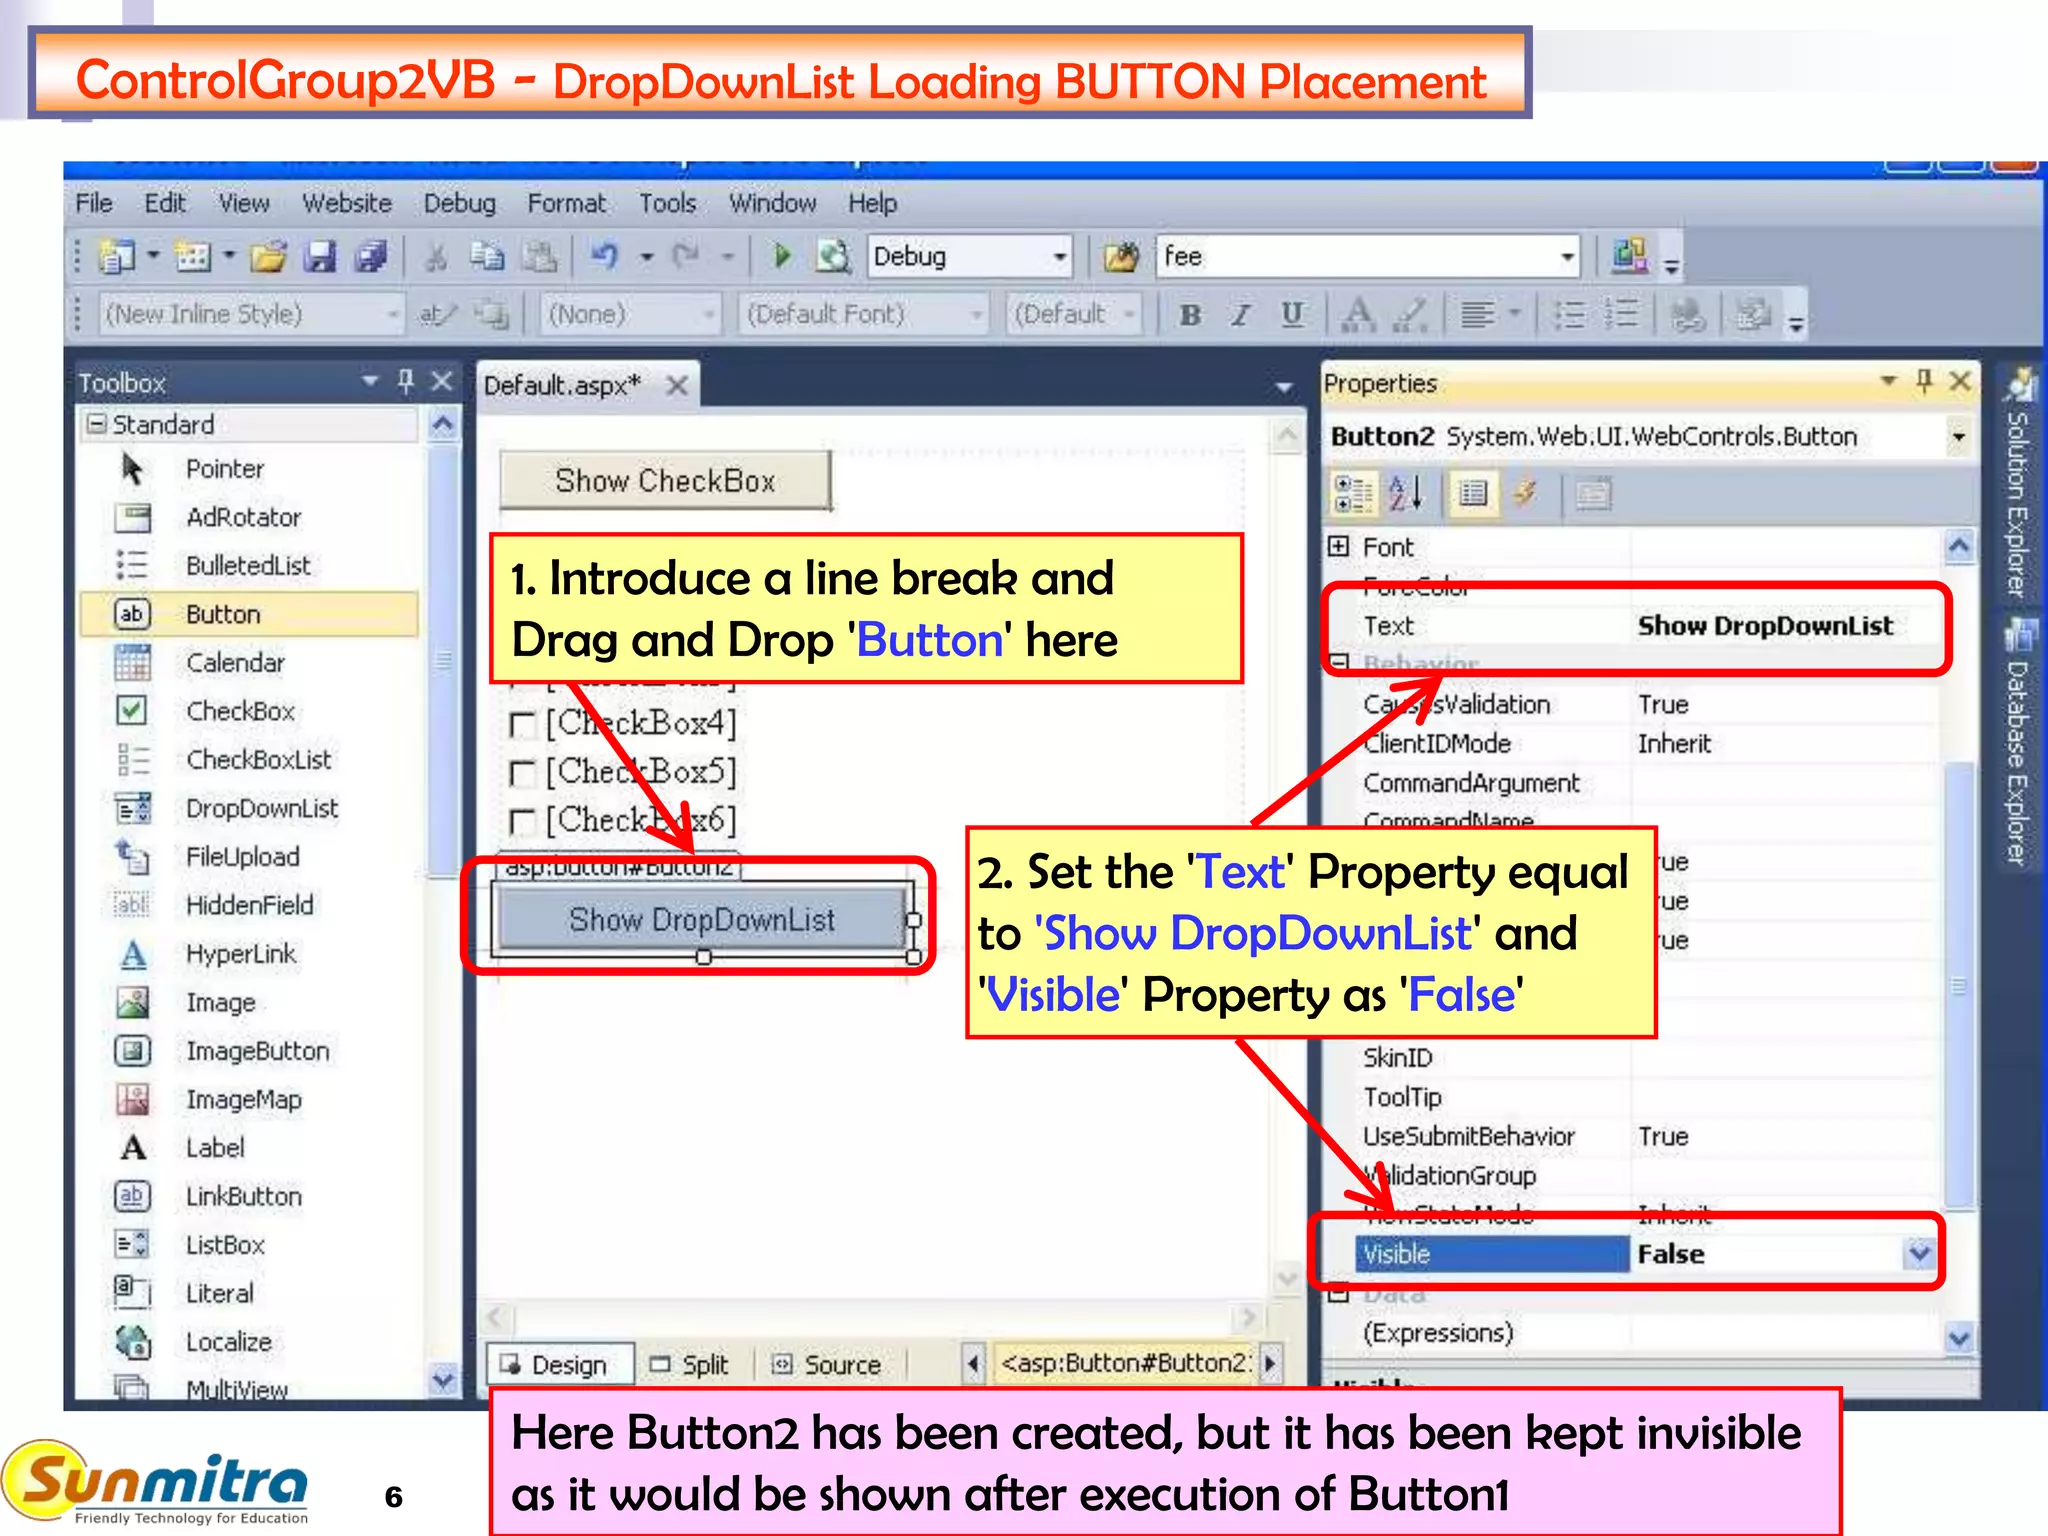
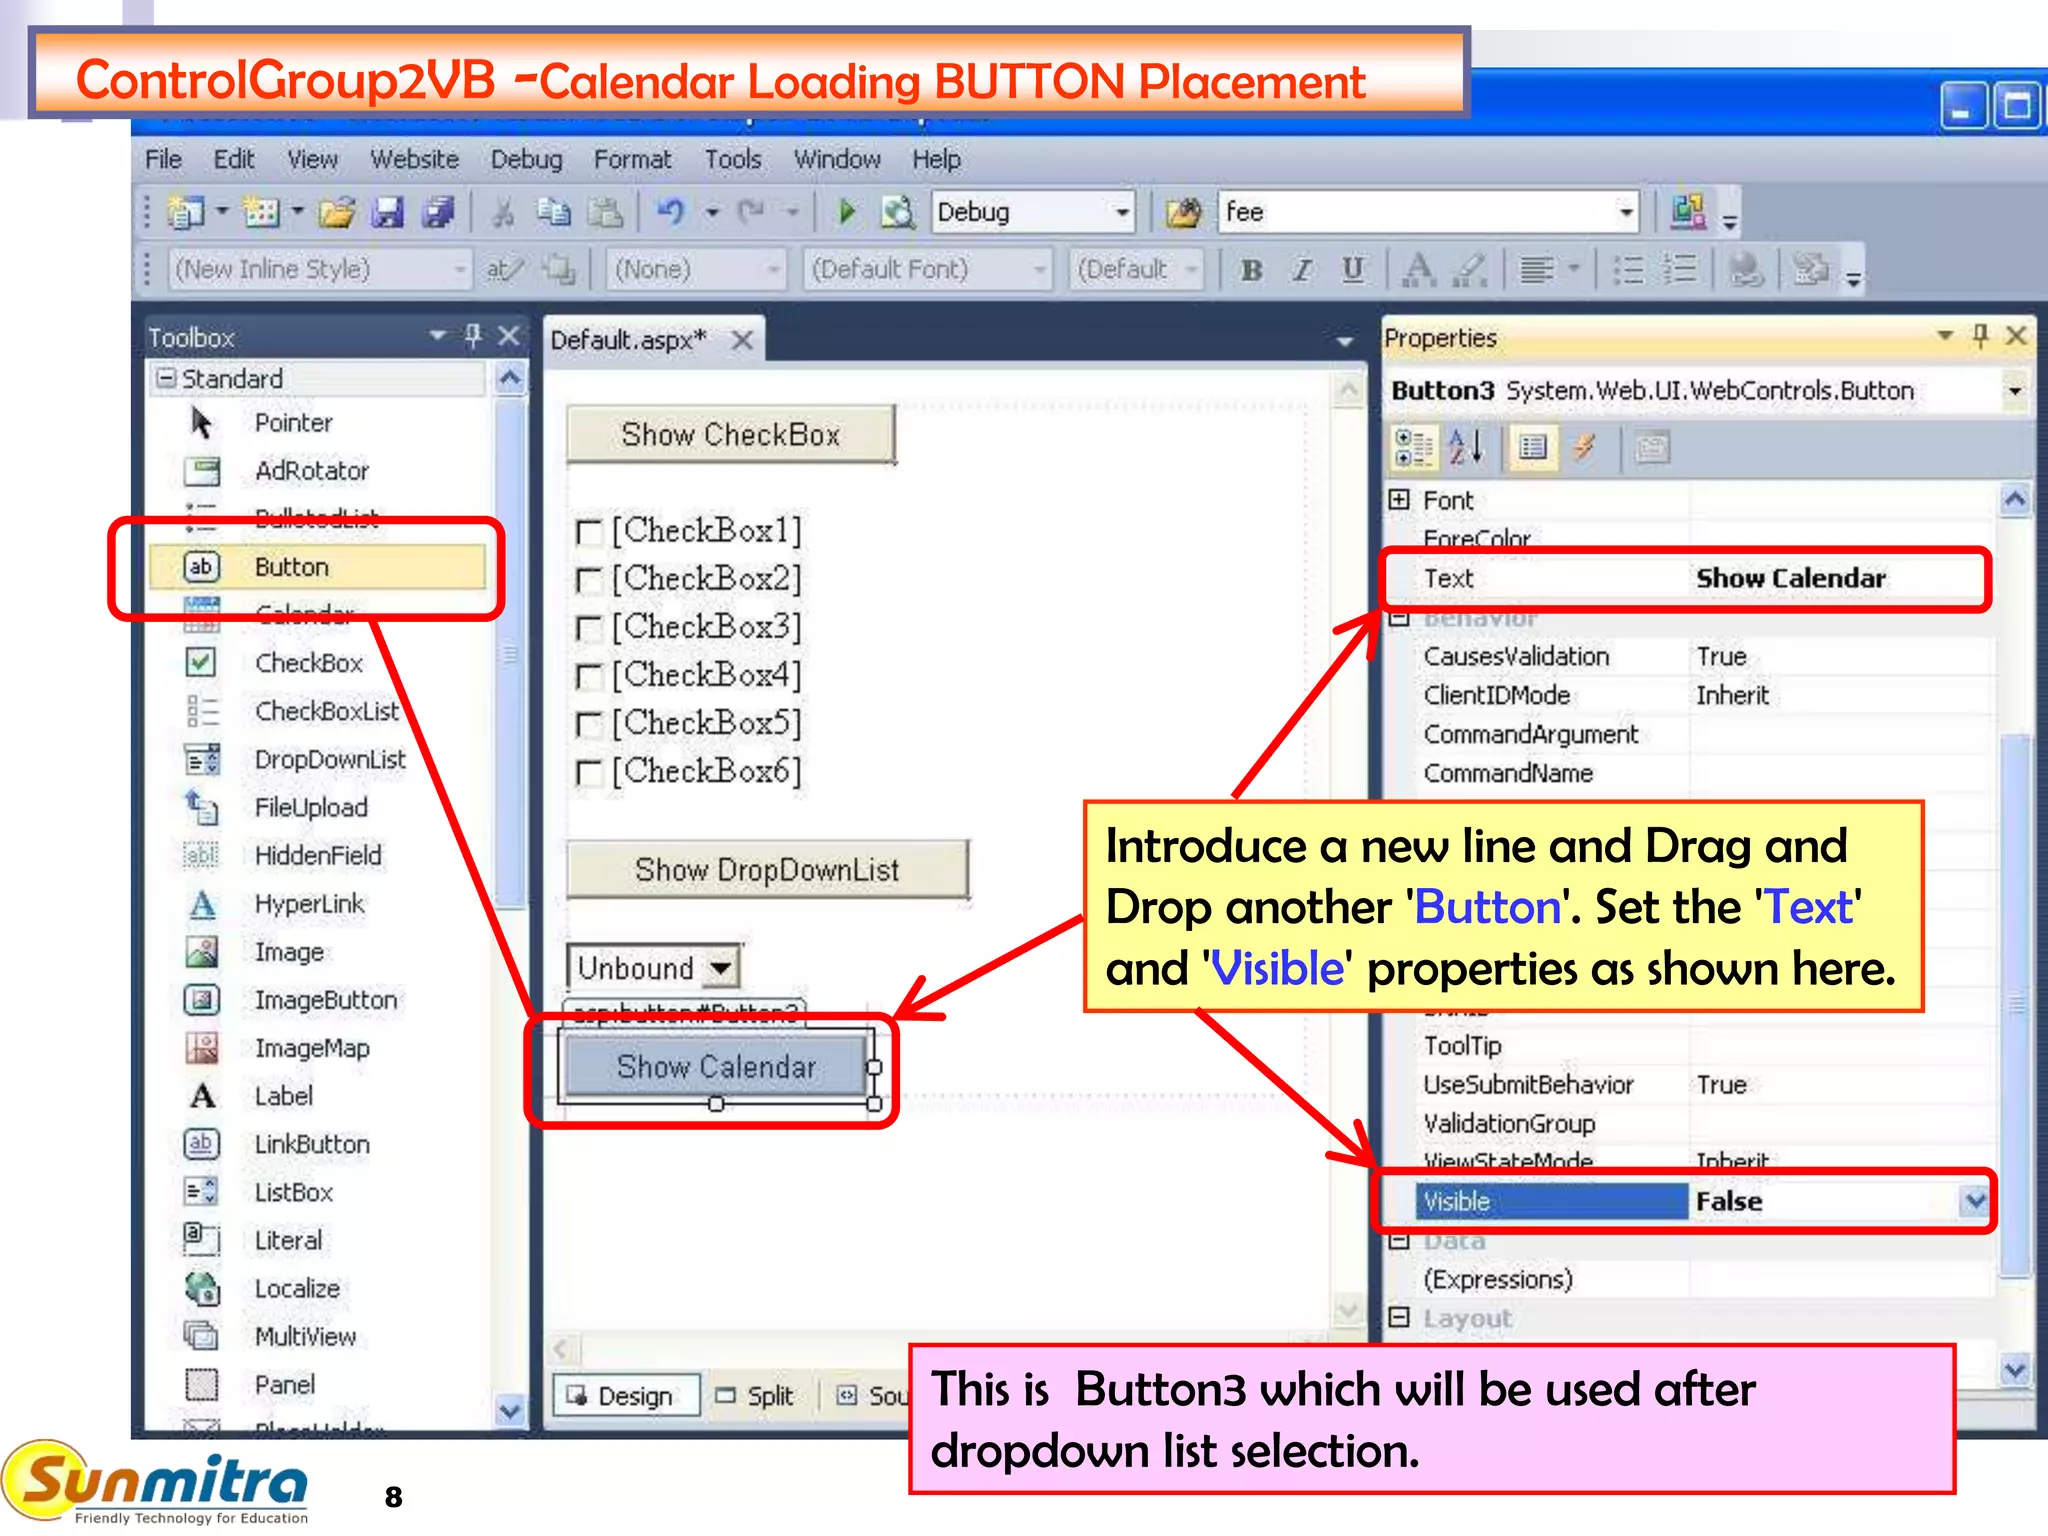
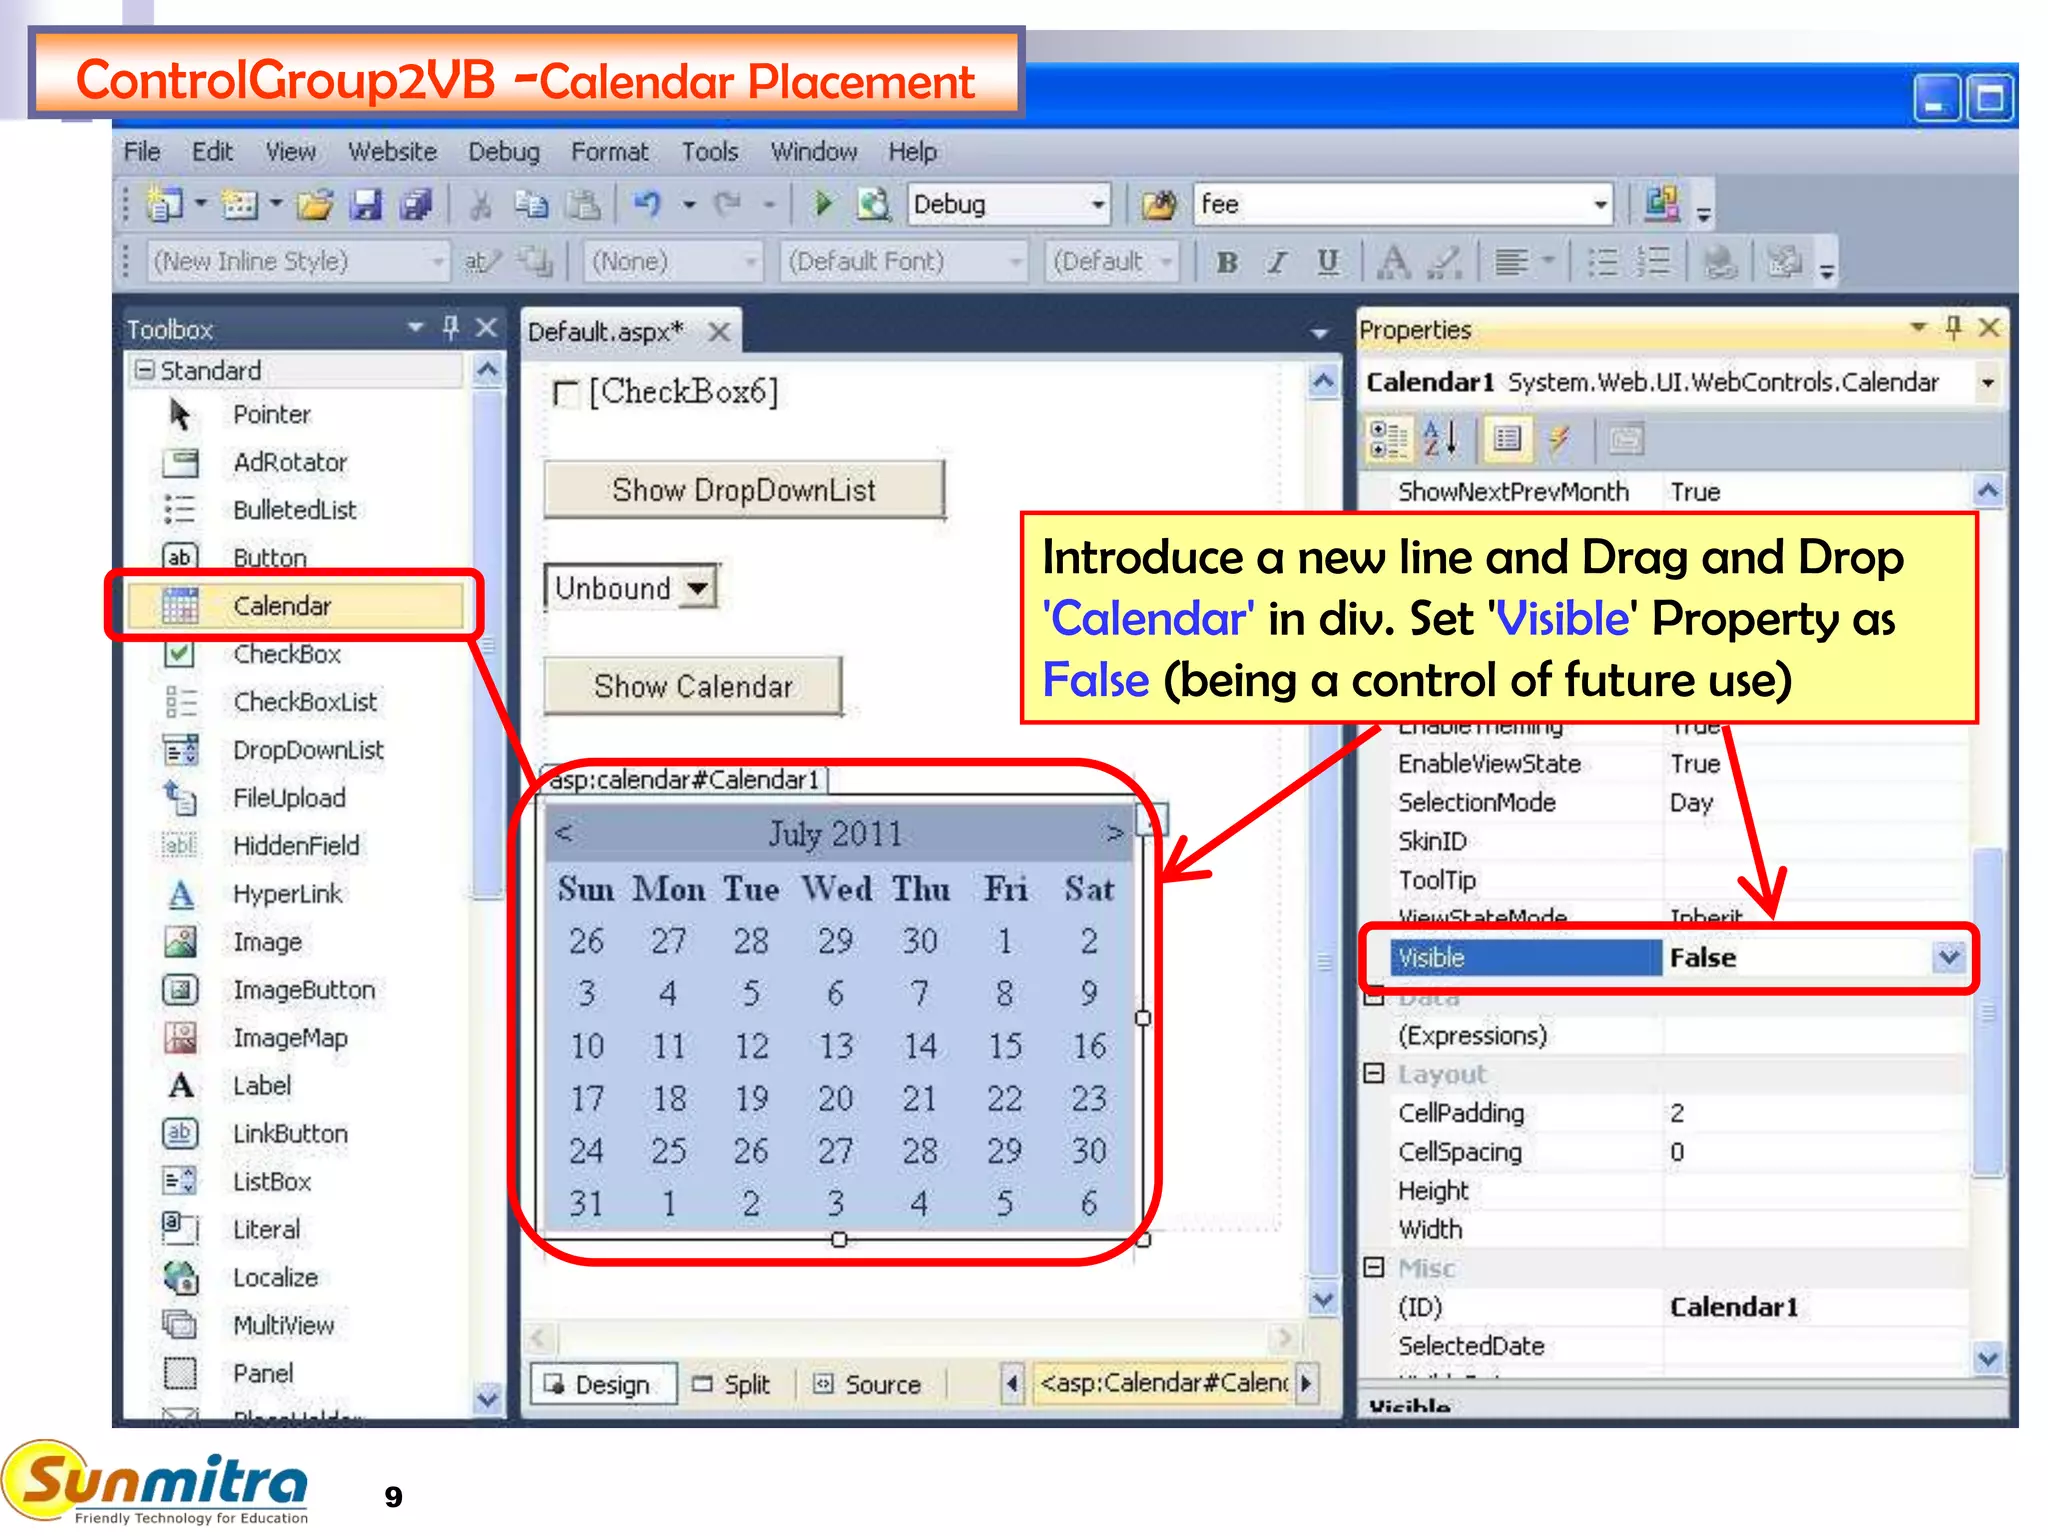
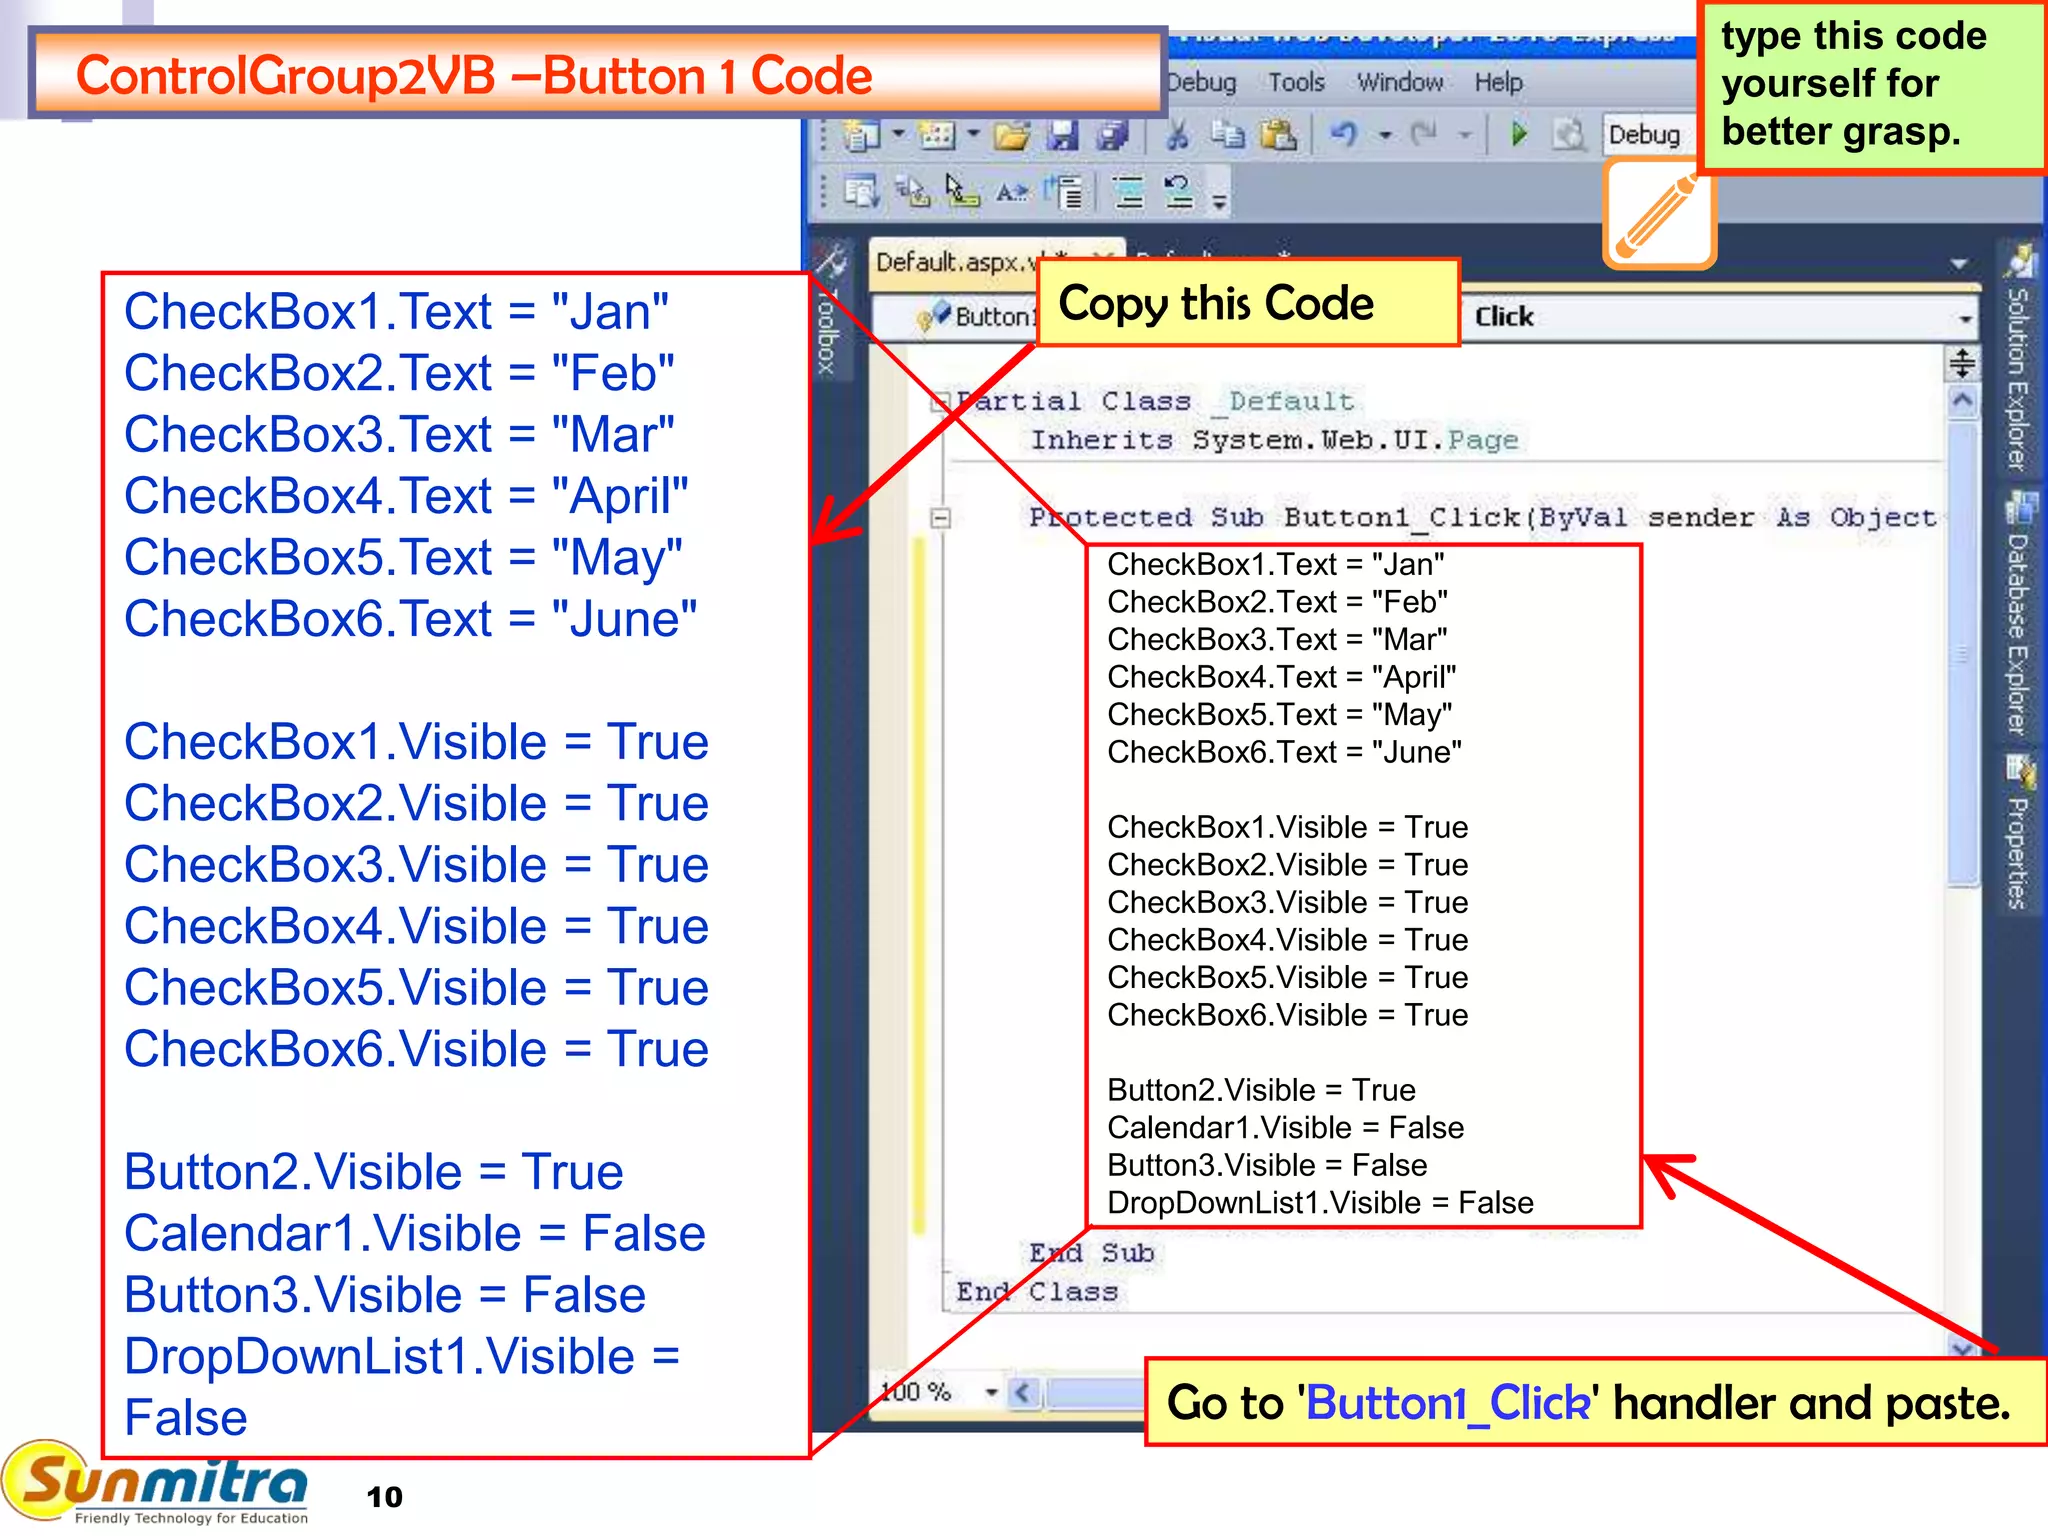
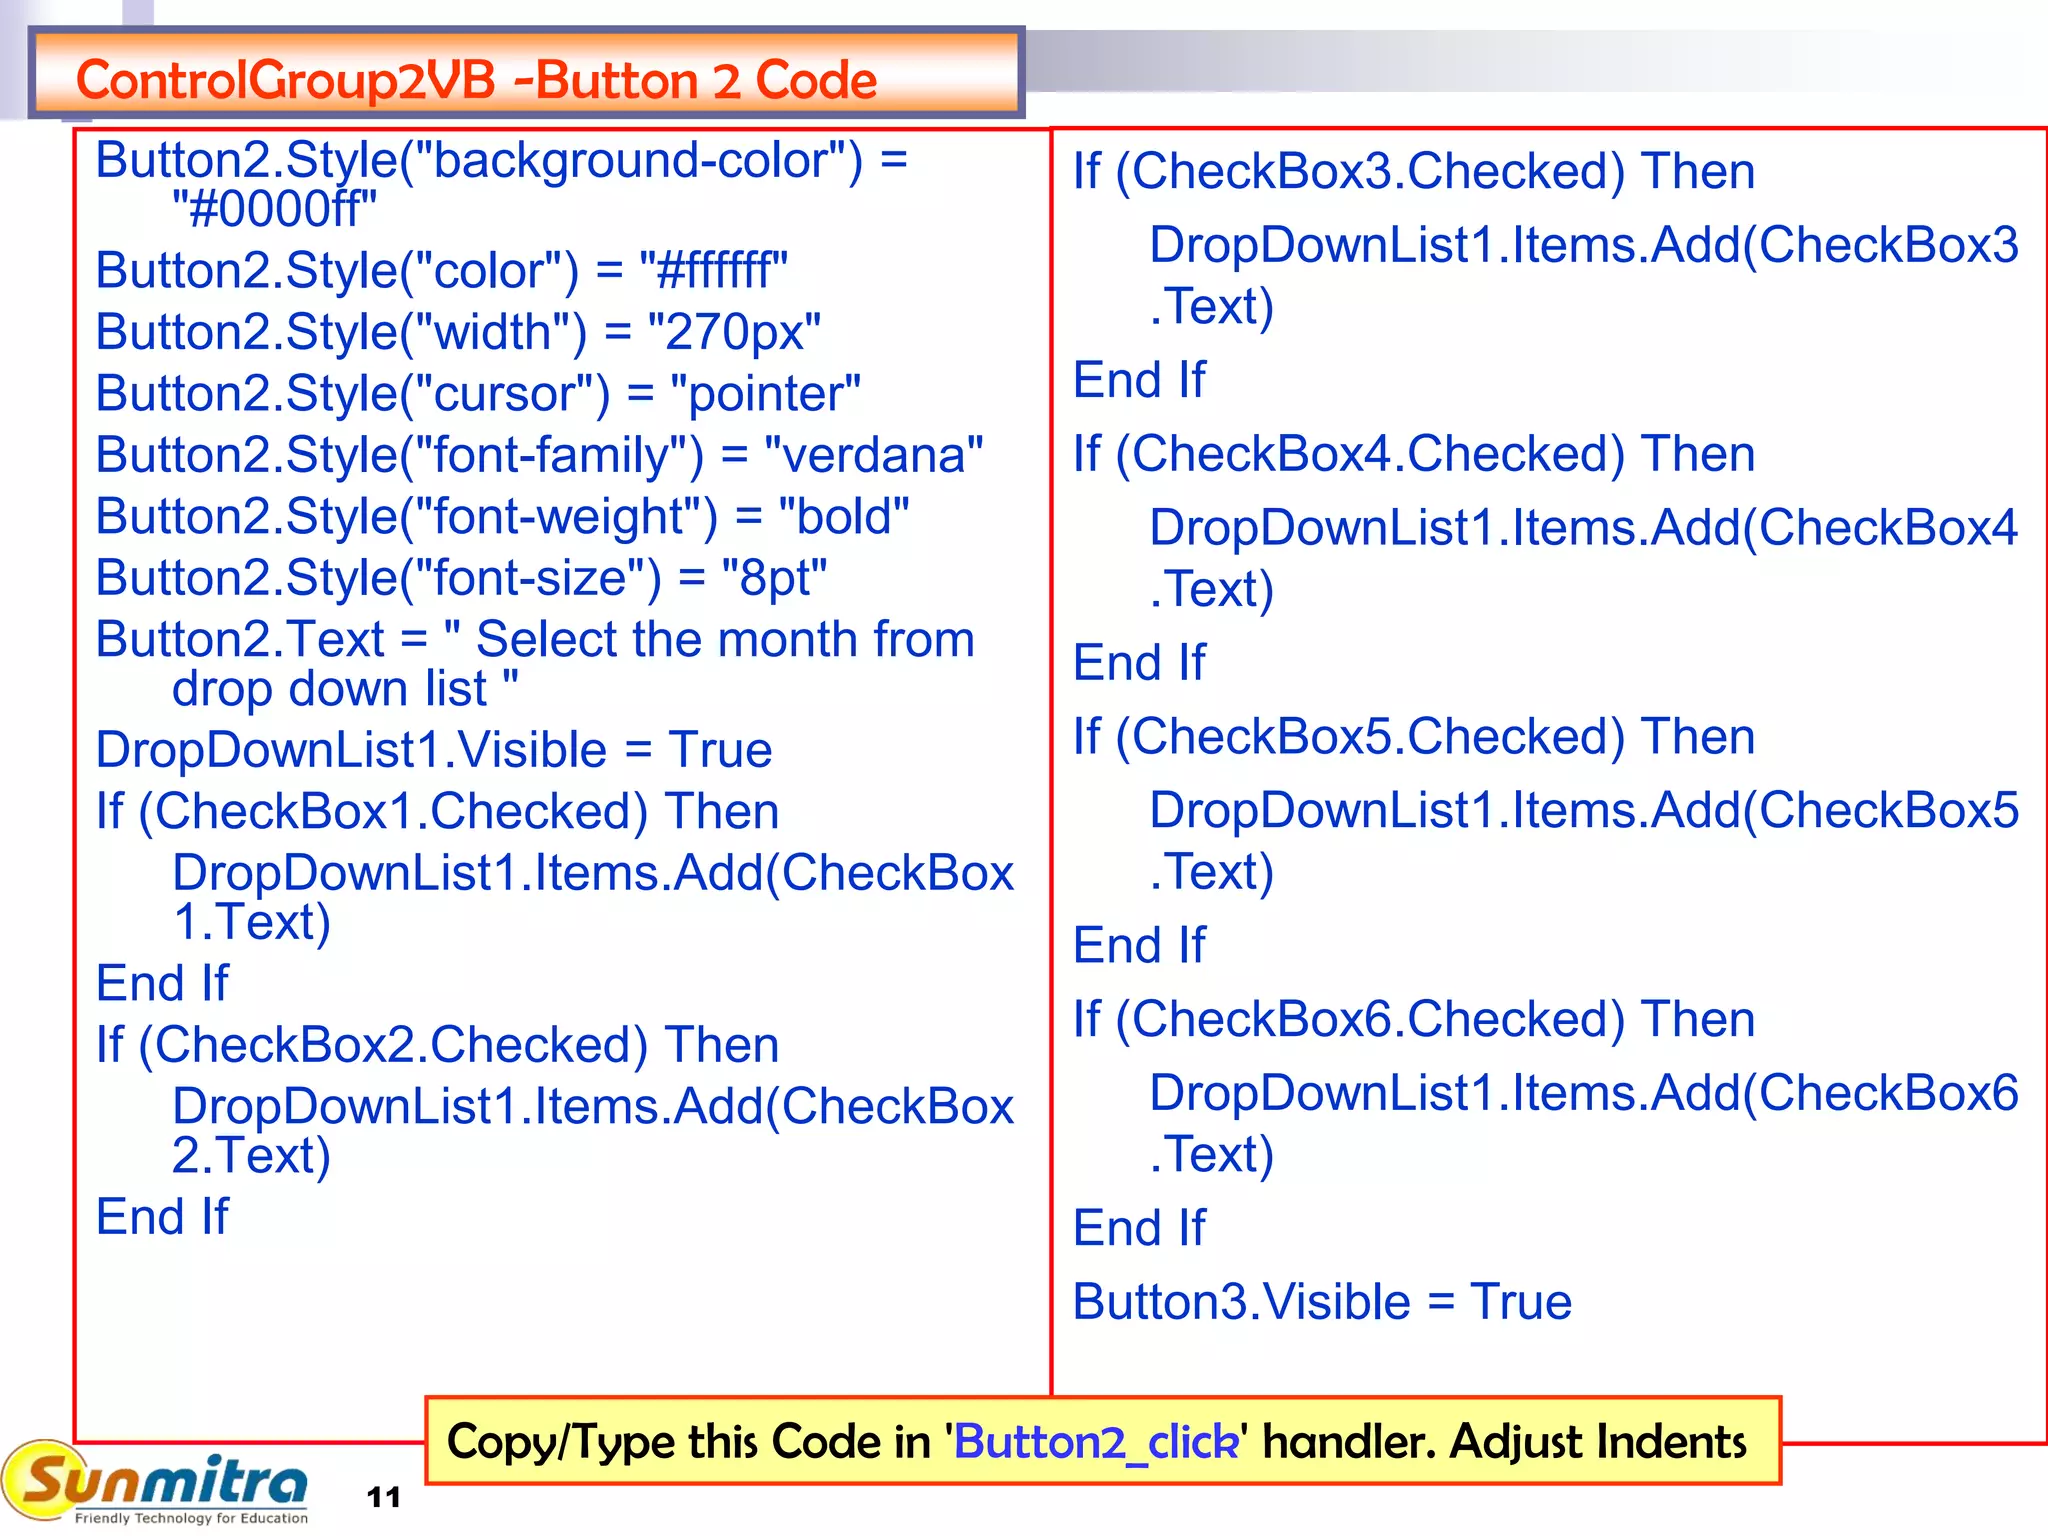
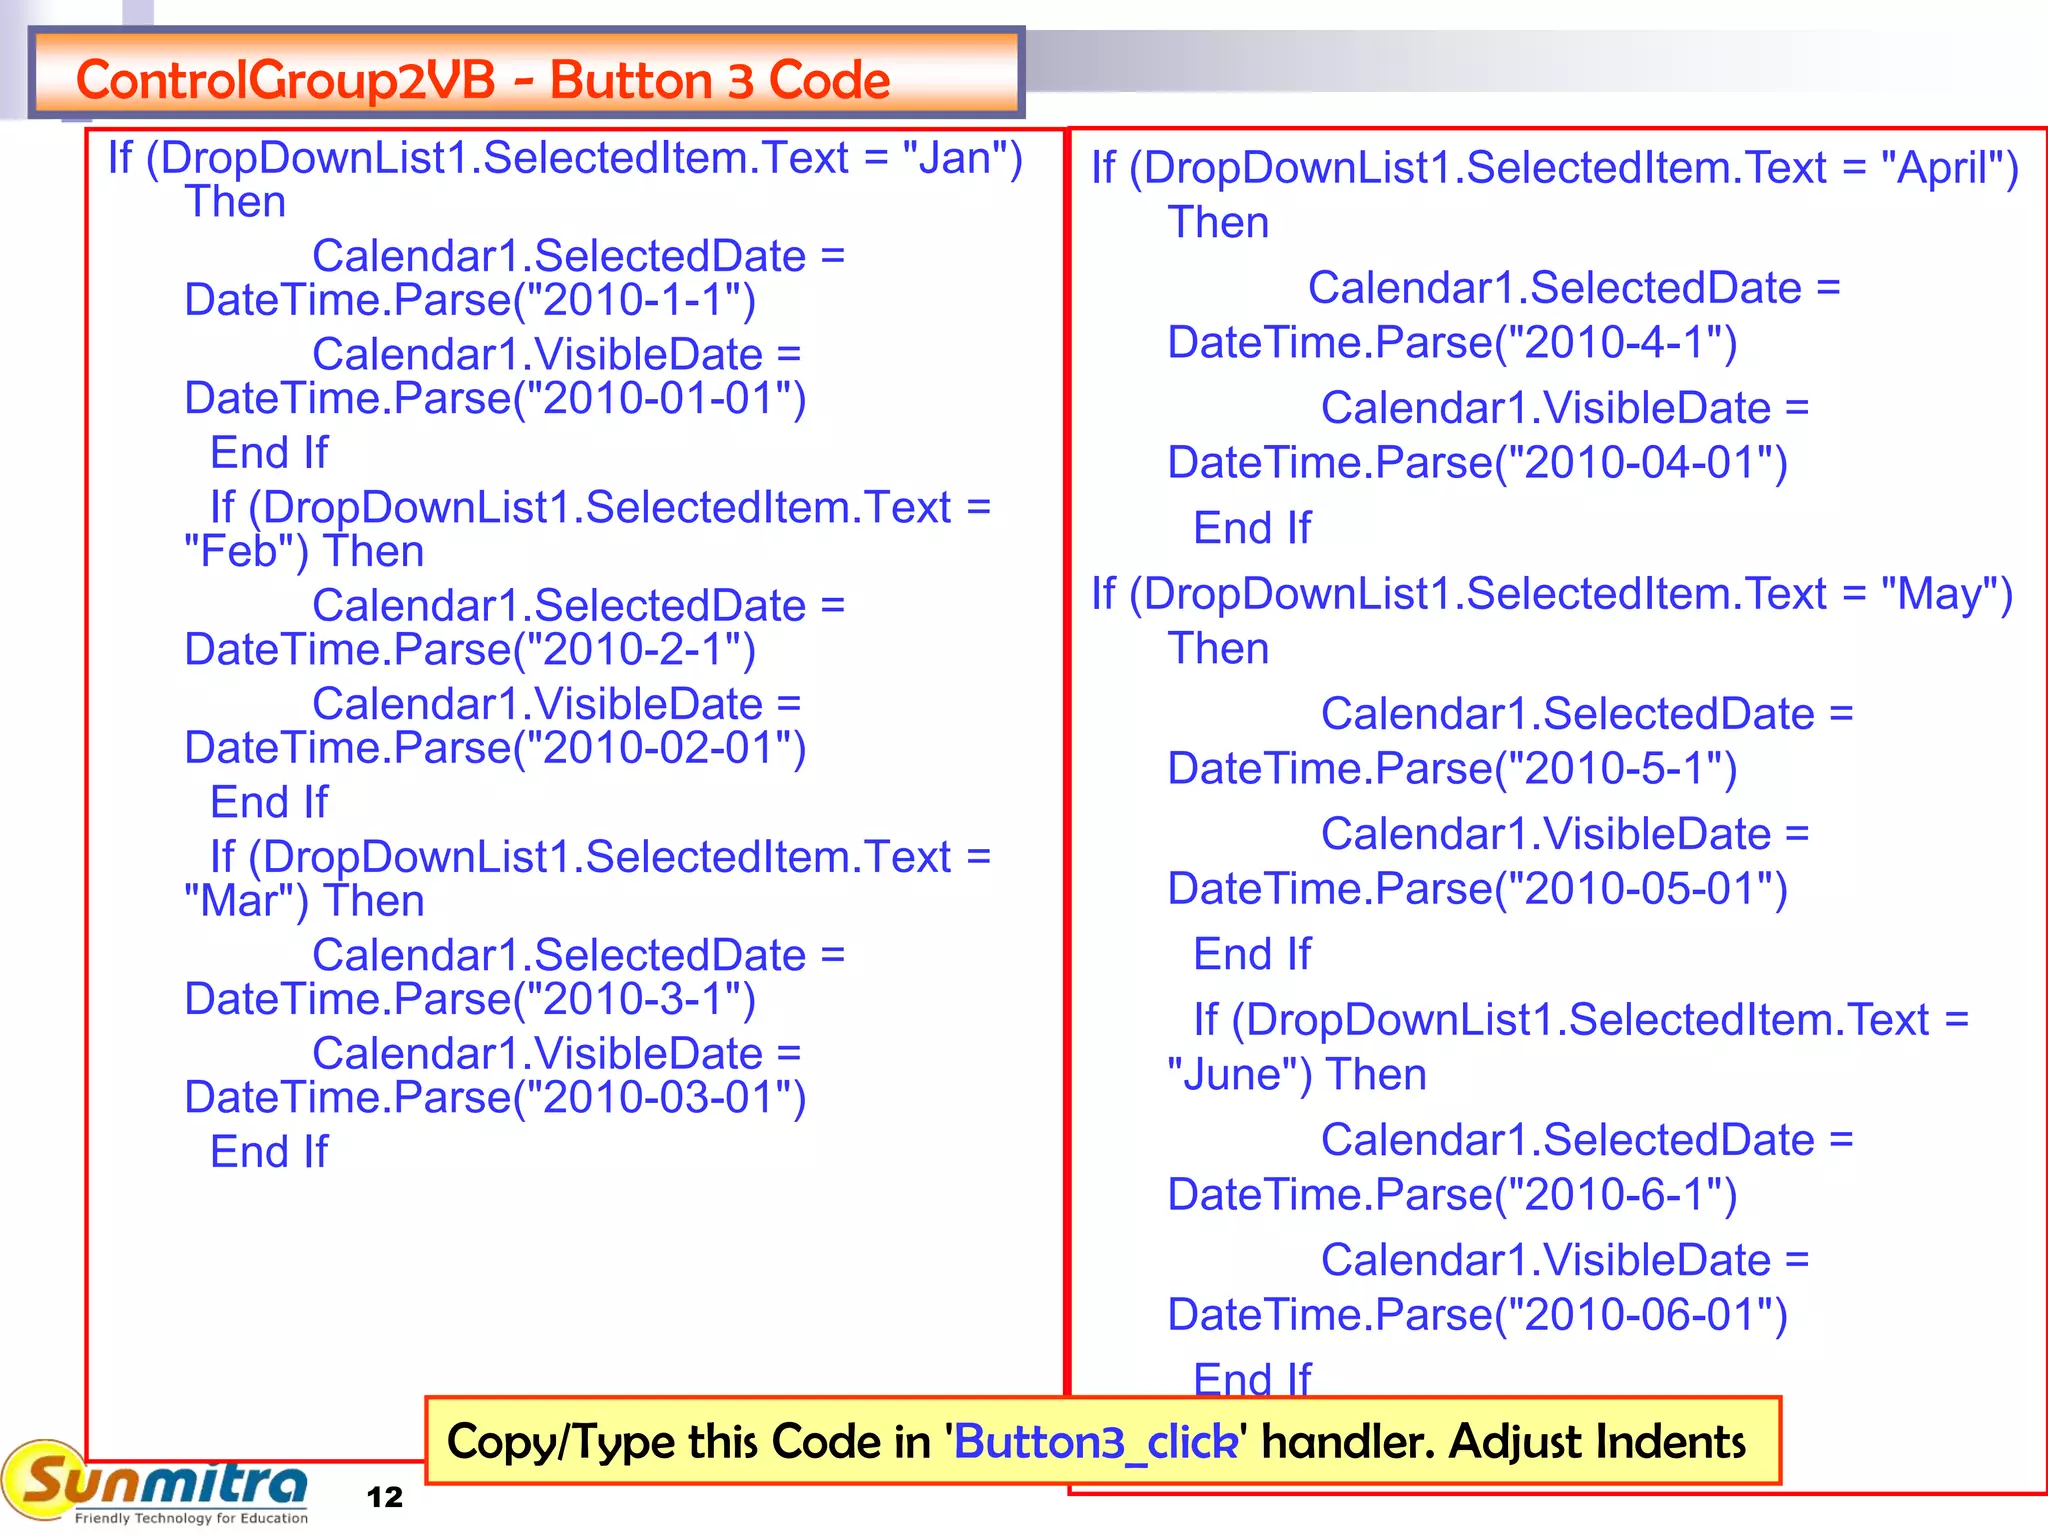
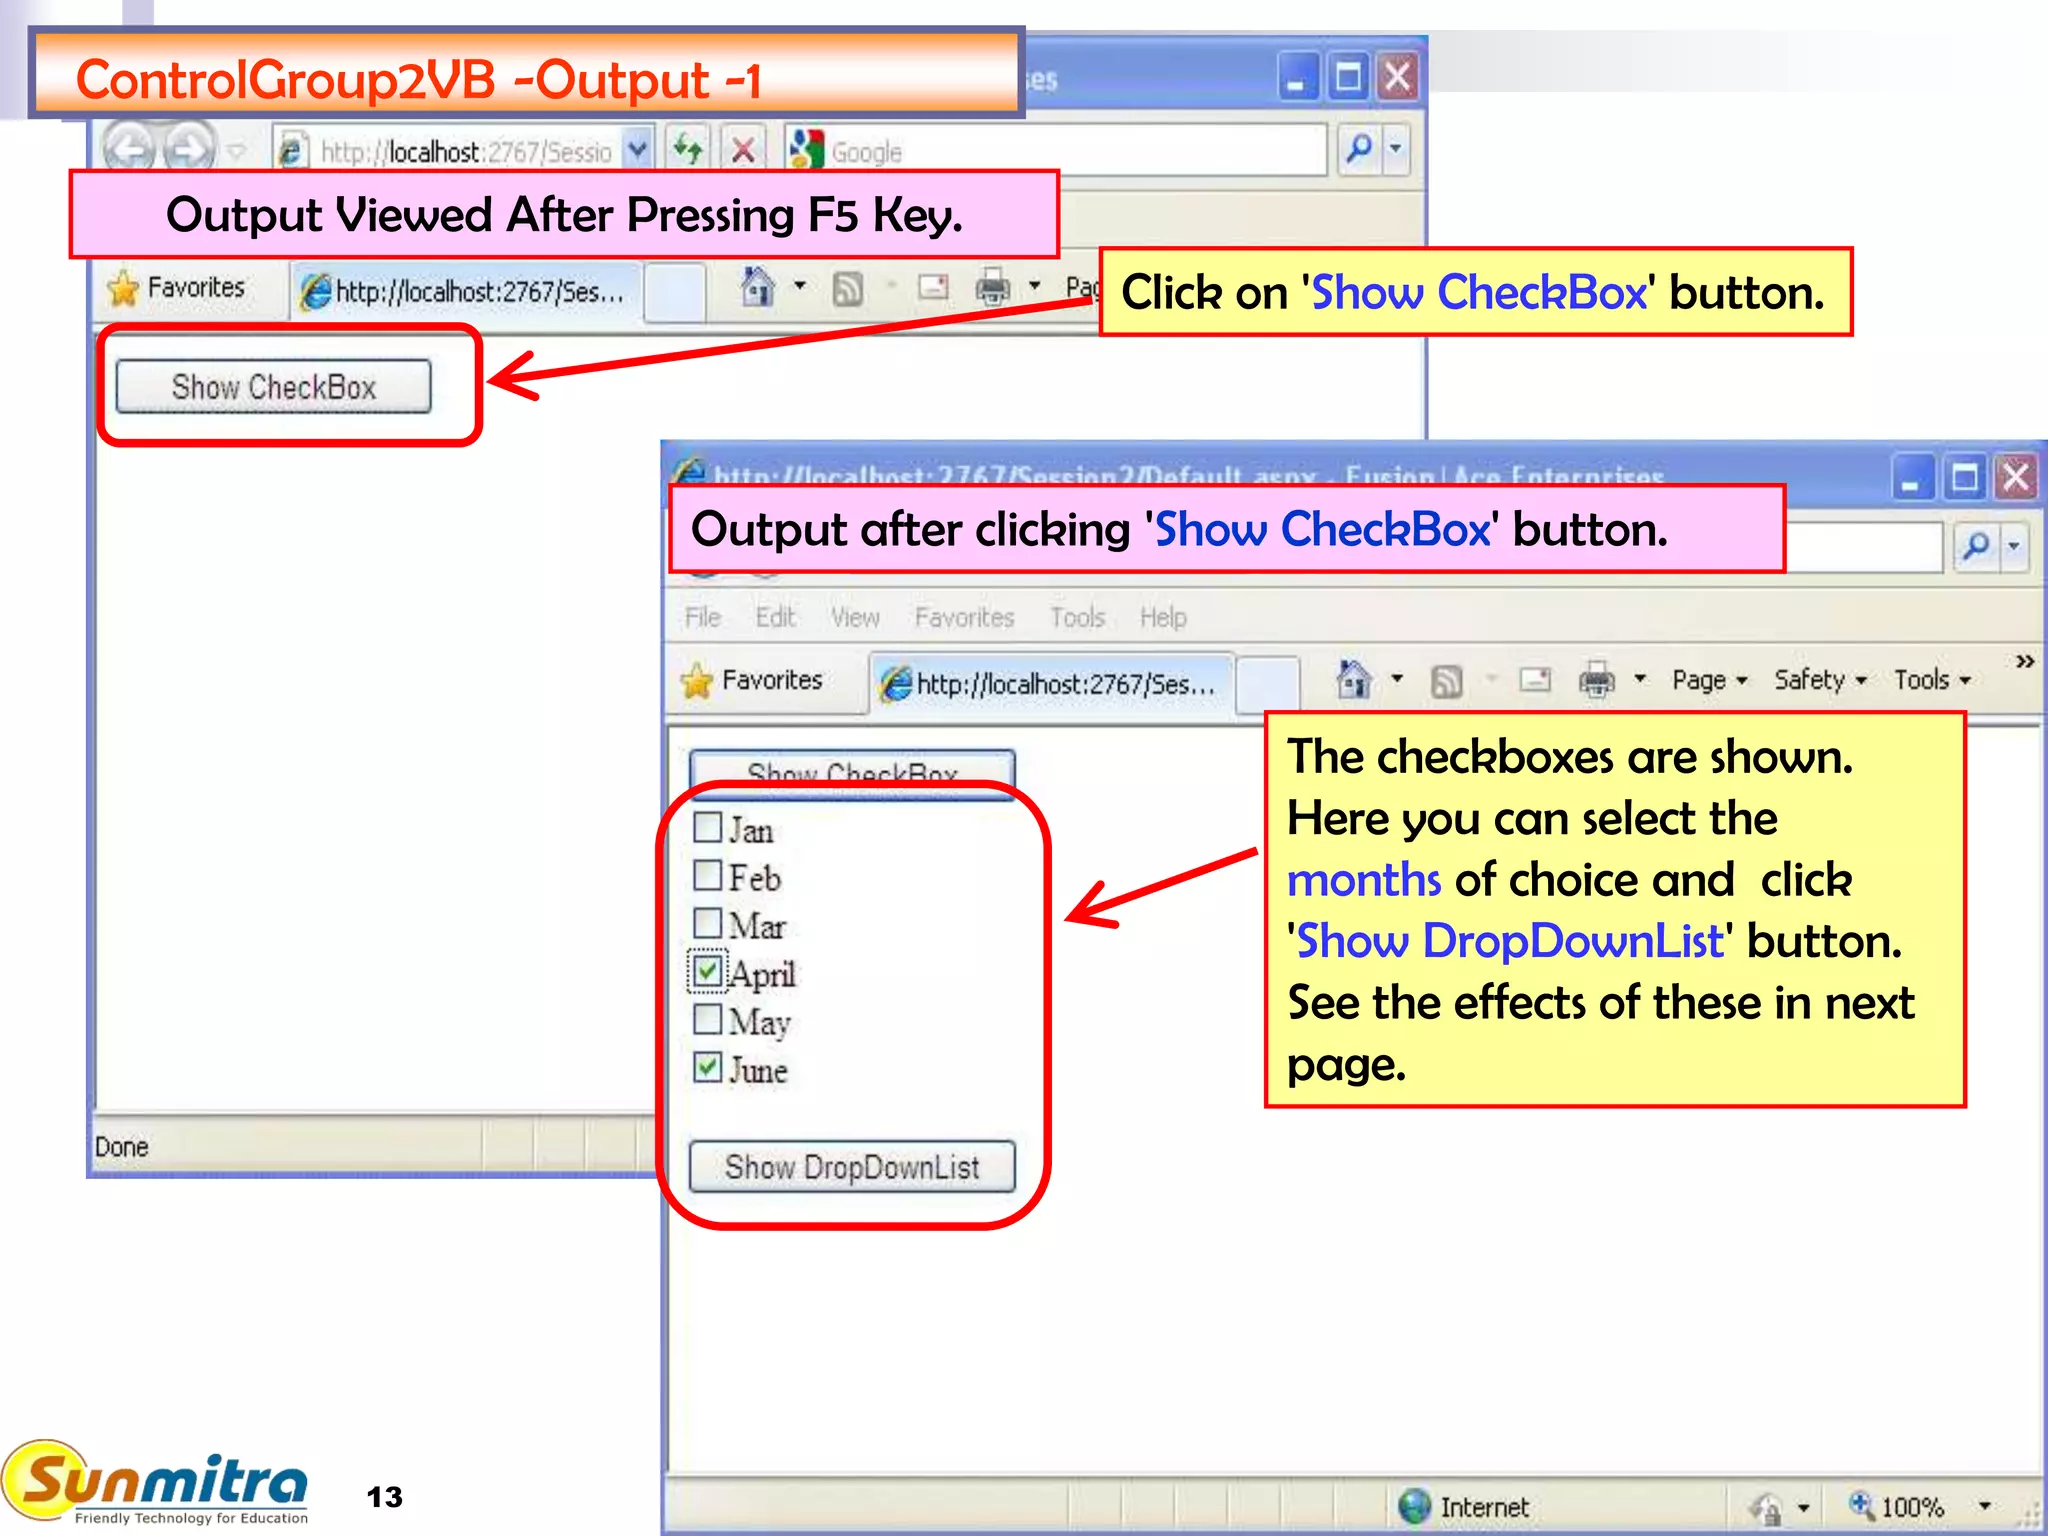
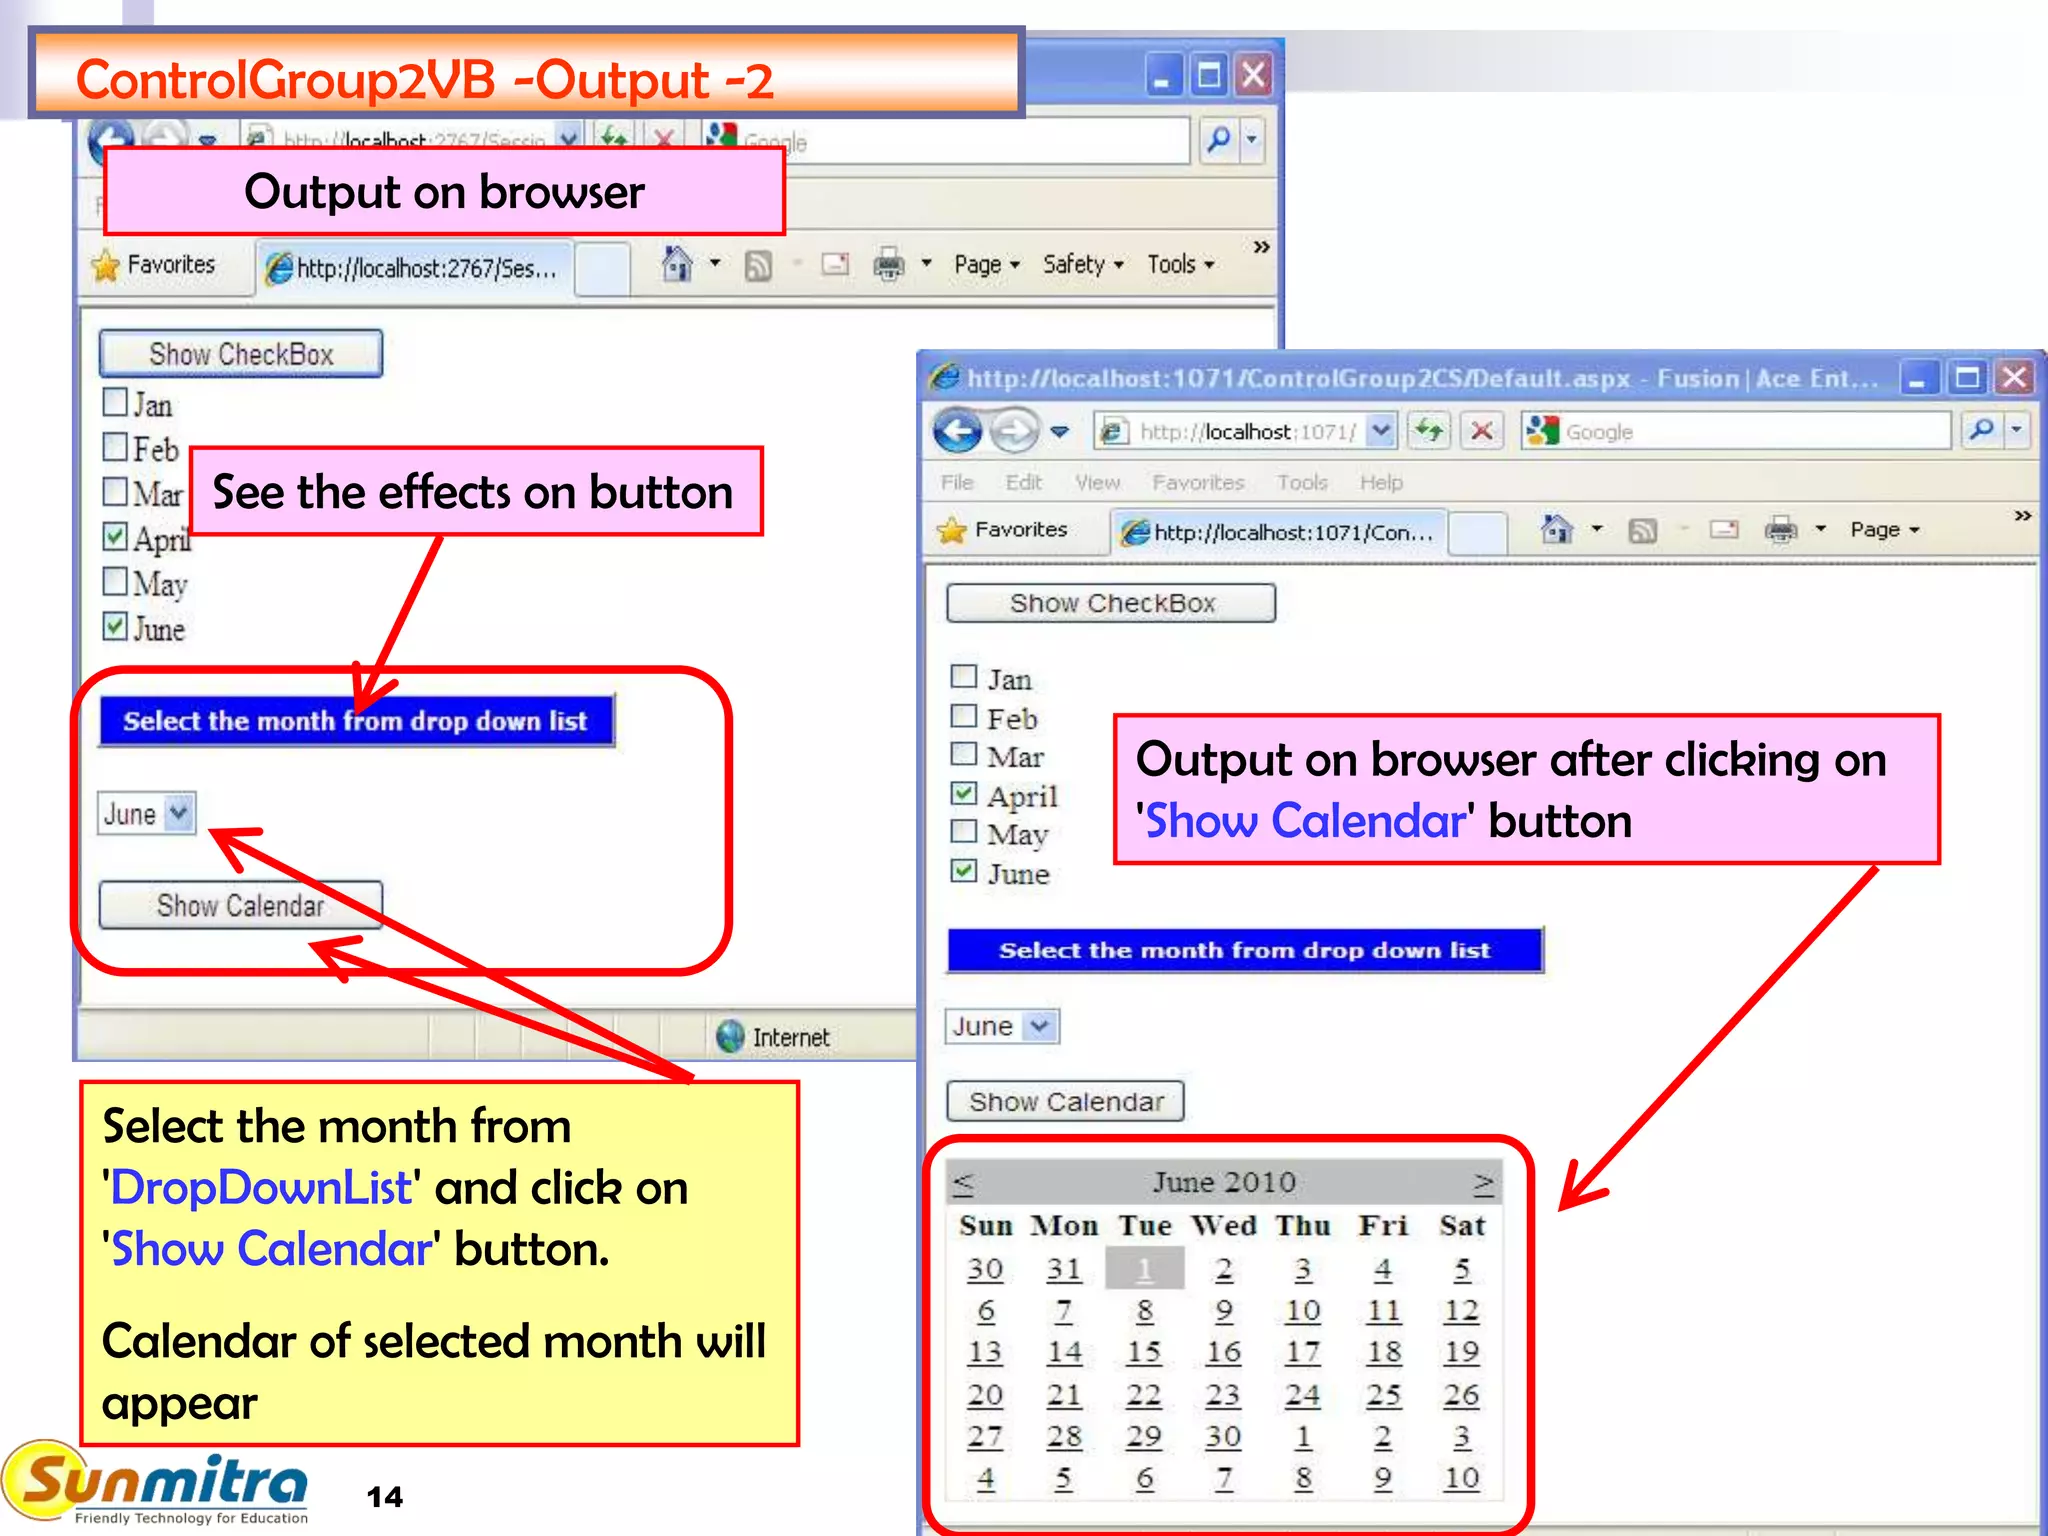
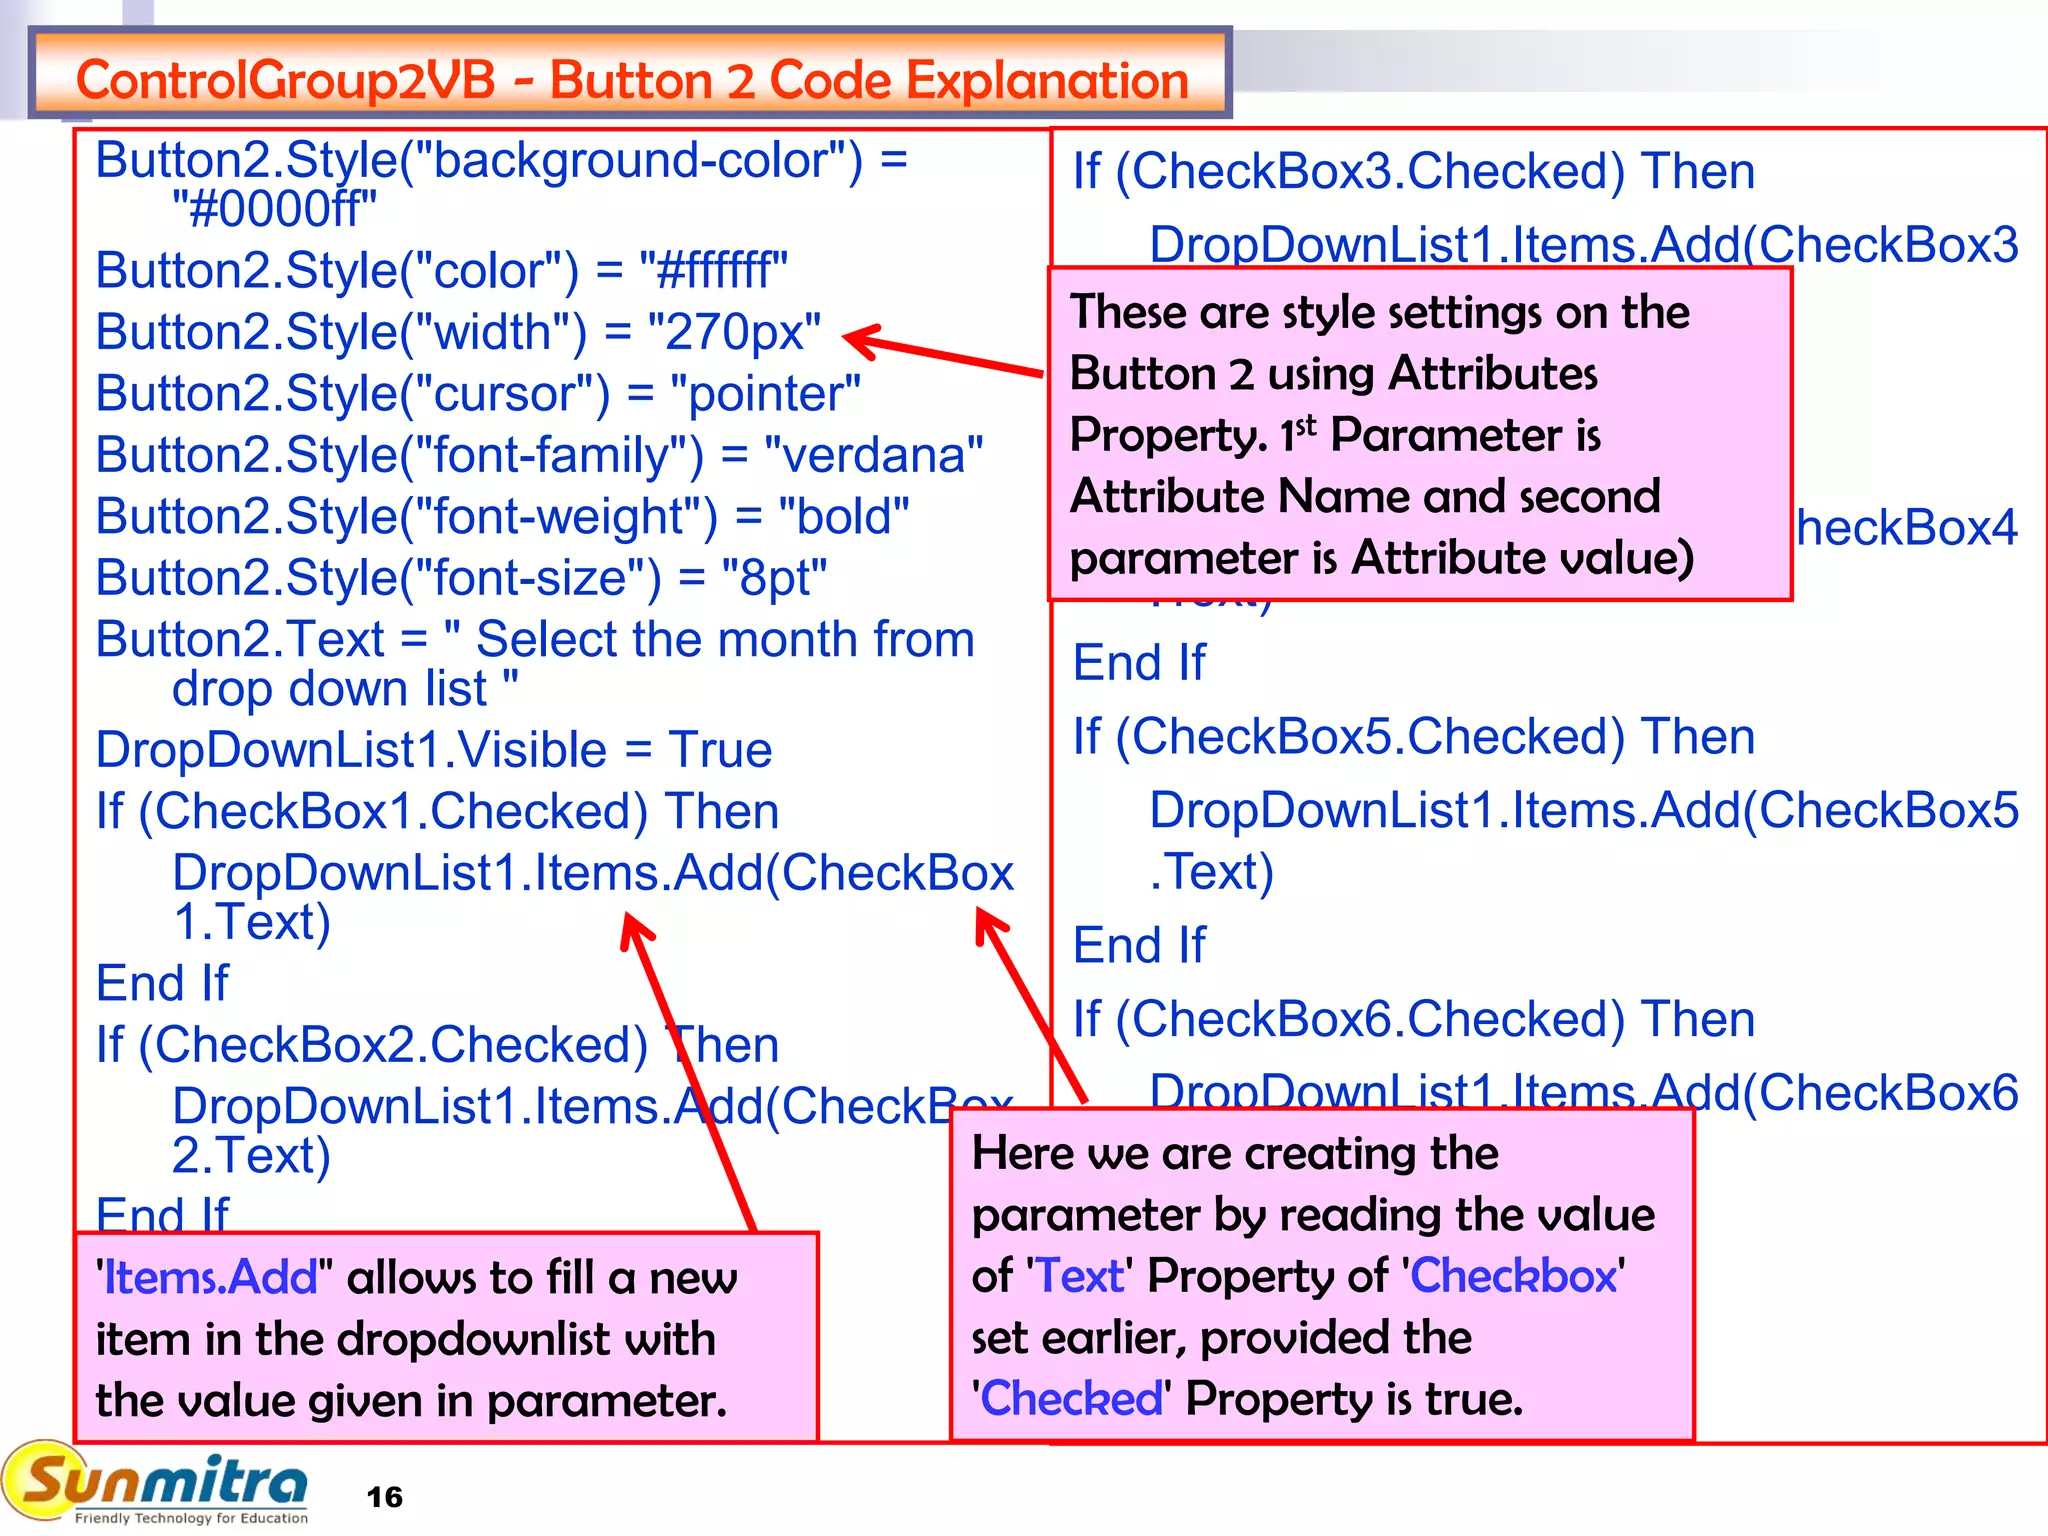
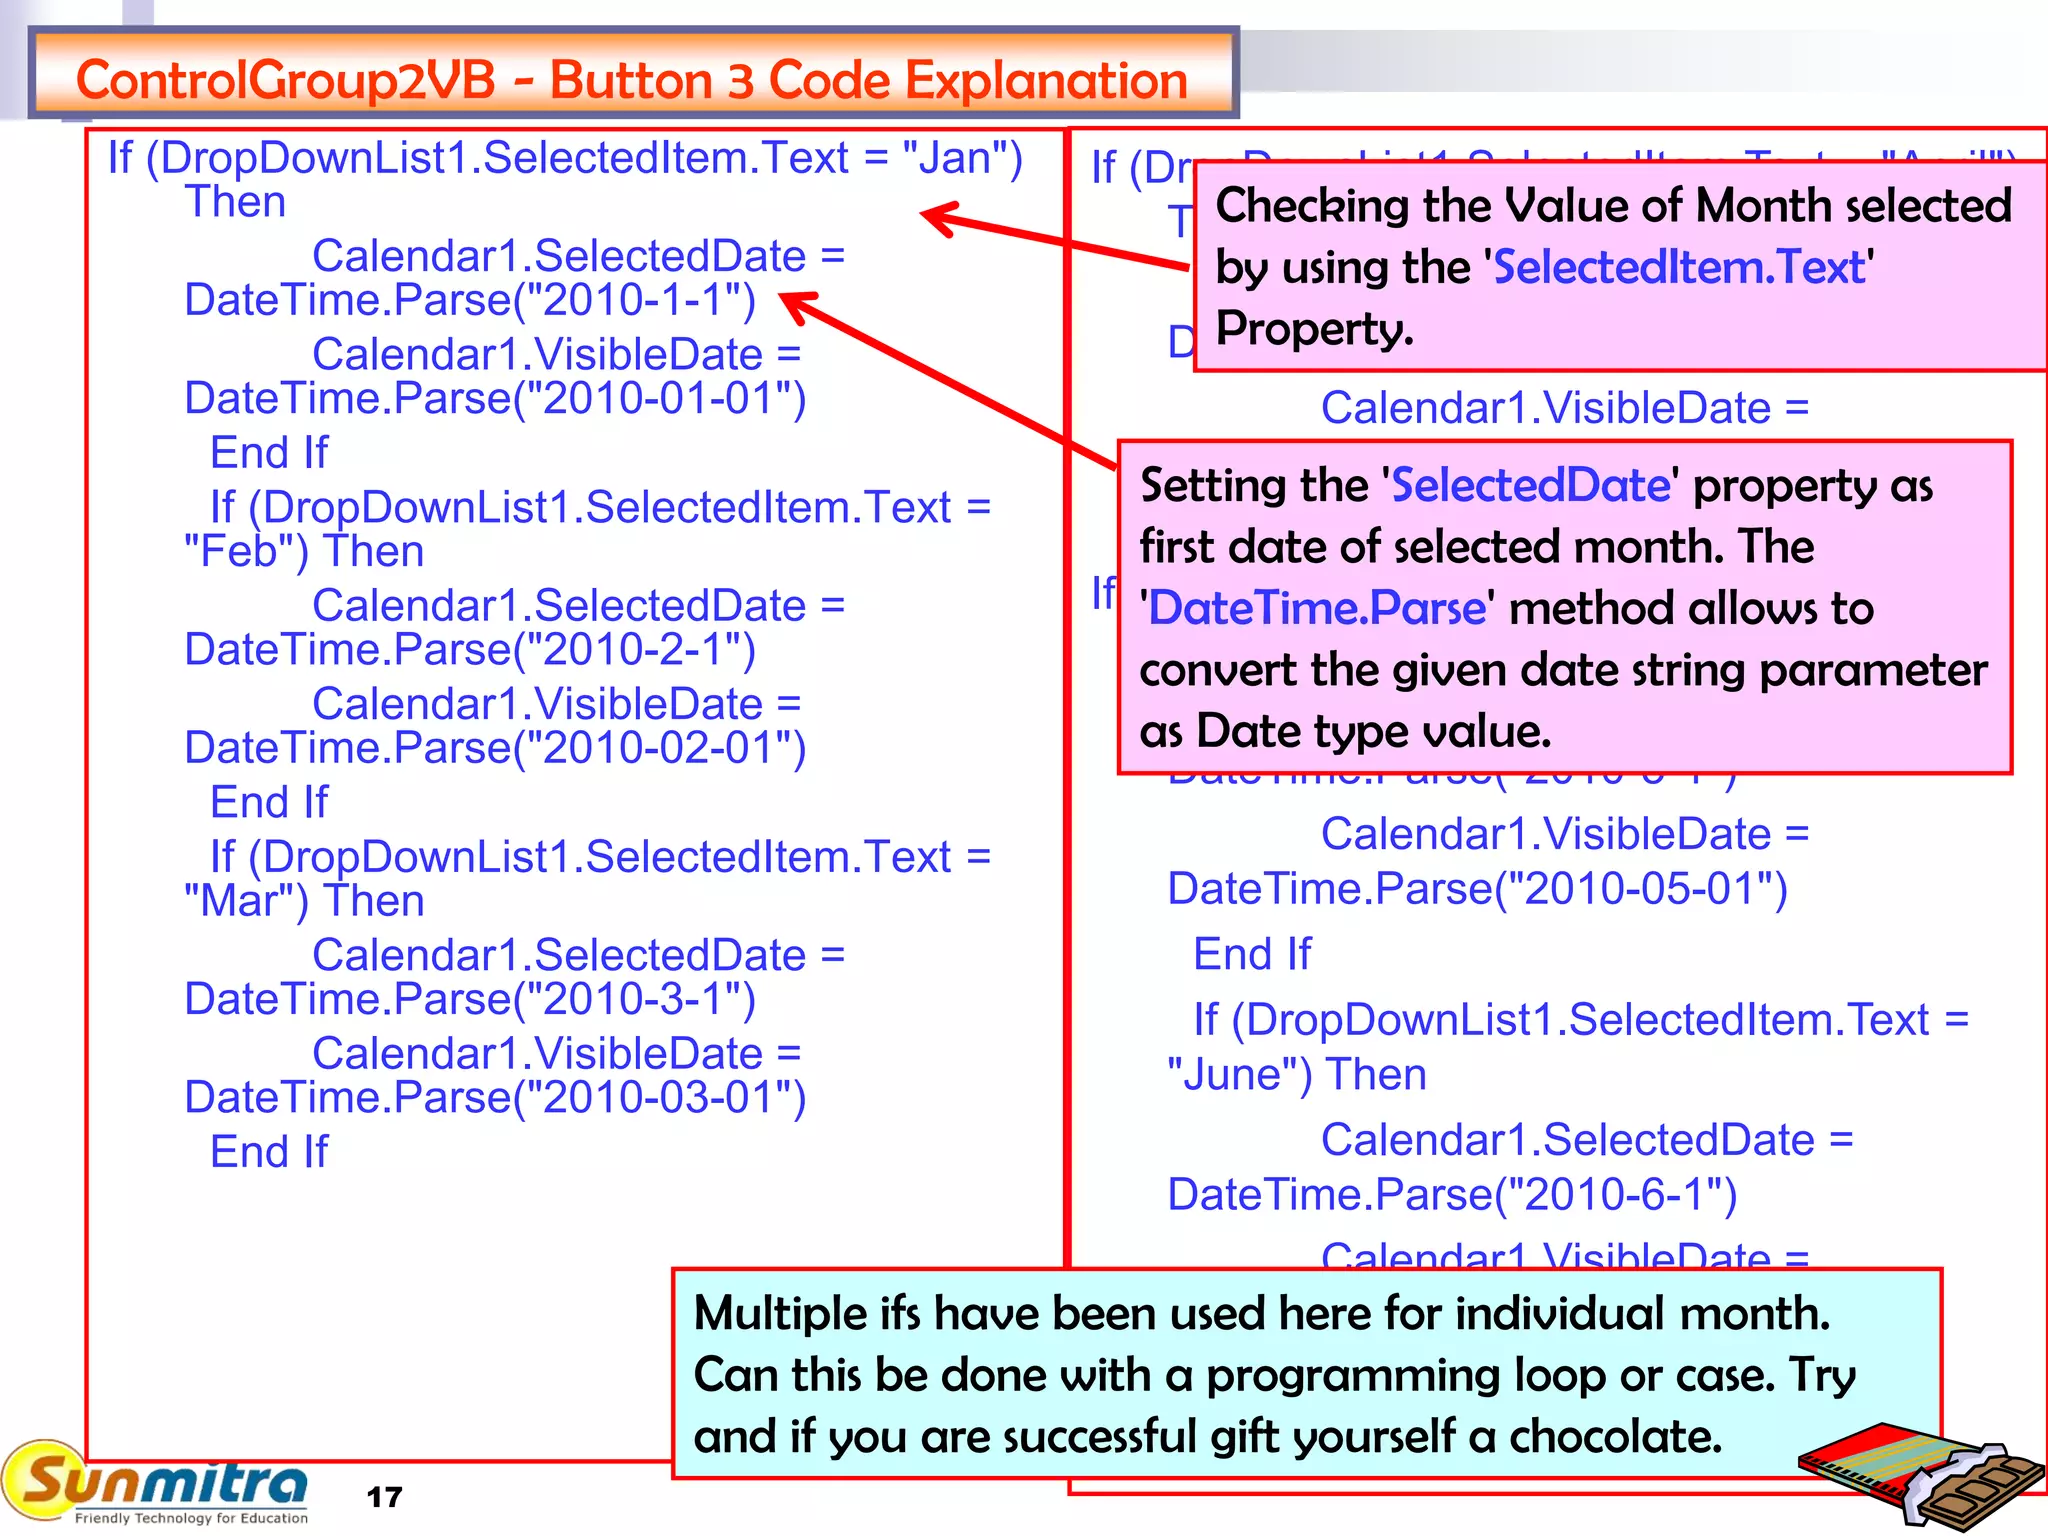
KEMBAR78
Visual Web Developer and Web Controls VB set 3 | PPTX
1
A Programme Under the compumitra Series
WEB SERVER CONTROLS SET – 3
LAB WORK GUIDE
2
OUTLINE
Here web server controls set – 3 is being presented. (set 1- was
ASP:Hyperlink, Set 2 was presented as a group of controls ASP:TextBox,
ASP:Button and ASP:Label) This set is also being presented as a group of
controls working on the same page. These controls as ASP:CheckBox,
ASP:DropDownList and ASP:Calendar. Here we shall try to pass actions
between controls. We are calling this ControlGroup2.
ControlGroup2VB (using VB)
Example Template Creation.
Code Creation.
Output View.
Code Explanation.
Modification Trials.
Error Trials.
Home Exercise.
Summary Review.
3
ControlGroup2VB
Using VB in asp.net
ASP:CHECKBOX Supports AutoPostBack, Enabled, Checked,
OnCheckedChanged in addition to standard properties related to Style,
BackColor, BorderColor, BorderStyle, BorderWidth, Font etc.
ASP:DROPDOWNLIST Supports SelectedItem, OnSelectedIndexChanged, Items,
Text etc properties.
ASP:CALENDAR Supports Caption, FirstDayOfWeek, ShowNextPrevMonth,
VisibleDate, ShowTitle in addition to standard properties related to BackColor,
BorderColor, BorderStyle, ToolTip, Width etc.
4
ControlGroup2VB– CheckBoxes Loading BUTTON Placement
1. Drag and Drop
'Button' here
2. Set the 'Text' Property
equal to 'Show CheckBox'
• Follow Standard Website Creation Steps and set your path to
C:Learner<student-id> WebControlsControlGroup2VB
• Add New Default.aspx page in your Website
• Now Create the Execution Event Handler as a button
5
1. Introduce a line break and then Drag and
Drop 'CheckBox' in div
ControlGroup2VB –CHECKBOX Placement
2. Like first 'CheckBox', Drag
and Drop six 'CheckBoxes'
3. Set the 'Visible' Property equal
to 'False' for all 'CheckBoxes' .
You can select all the checkboxes together with
the help of 'Ctrl' key and mouse and then
change the property to 'false' for all at once.
6
ControlGroup2VB - DropDownList Loading BUTTON Placement
1. Introduce a line break and
Drag and Drop 'Button' here
2. Set the 'Text' Property equal
to 'Show DropDownList' and
'Visible' Property as 'False'
Here Button2 has been created, but it has been kept invisible
as it would be shown after execution of Button1
7
ControlGroup2VB –DropDownList Placement
Introduce a new line and Drag and Drop
'DropDownList' in div. Set 'Visible' Property
as False (being a control of future use)
8
ControlGroup2VB -Calendar Loading BUTTON Placement
Introduce a new line and Drag and
Drop another 'Button'. Set the 'Text'
and 'Visible' properties as shown here.
This is Button3 which will be used after
dropdown list selection.
9
ControlGroup2VB -Calendar Placement
Introduce a new line and Drag and Drop
'Calendar' in div. Set 'Visible' Property as
False (being a control of future use)
10
ControlGroup2VB –Button 1 Code
CheckBox1.Text = "Jan"
CheckBox2.Text = "Feb"
CheckBox3.Text = "Mar"
CheckBox4.Text = "April"
CheckBox5.Text = "May"
CheckBox6.Text = "June"
CheckBox1.Visible = True
CheckBox2.Visible = True
CheckBox3.Visible = True
CheckBox4.Visible = True
CheckBox5.Visible = True
CheckBox6.Visible = True
Button2.Visible = True
Calendar1.Visible = False
Button3.Visible = False
DropDownList1.Visible = False
CheckBox1.Text = "Jan"
CheckBox2.Text = "Feb"
CheckBox3.Text = "Mar"
CheckBox4.Text = "April"
CheckBox5.Text = "May"
CheckBox6.Text = "June"
CheckBox1.Visible = True
CheckBox2.Visible = True
CheckBox3.Visible = True
CheckBox4.Visible = True
CheckBox5.Visible = True
CheckBox6.Visible = True
Button2.Visible = True
Calendar1.Visible = False
Button3.Visible = False
DropDownList1.Visible =
False
Copy this Code
Go to 'Button1_Click' handler and paste.
type this code
yourself for
better grasp.
11
ControlGroup2VB -Button 2 Code
Button2.Style("background-color") =
"#0000ff"
Button2.Style("color") = "#ffffff"
Button2.Style("width") = "270px"
Button2.Style("cursor") = "pointer"
Button2.Style("font-family") = "verdana"
Button2.Style("font-weight") = "bold"
Button2.Style("font-size") = "8pt"
Button2.Text = " Select the month from
drop down list "
DropDownList1.Visible = True
If (CheckBox1.Checked) Then
DropDownList1.Items.Add(CheckBox
1.Text)
End If
If (CheckBox2.Checked) Then
DropDownList1.Items.Add(CheckBox
2.Text)
End If
If (CheckBox3.Checked) Then
DropDownList1.Items.Add(CheckBox3
.Text)
End If
If (CheckBox4.Checked) Then
DropDownList1.Items.Add(CheckBox4
.Text)
End If
If (CheckBox5.Checked) Then
DropDownList1.Items.Add(CheckBox5
.Text)
End If
If (CheckBox6.Checked) Then
DropDownList1.Items.Add(CheckBox6
.Text)
End If
Button3.Visible = True
Copy/Type this Code in 'Button2_click' handler. Adjust Indents
12
ControlGroup2VB - Button 3 Code
If (DropDownList1.SelectedItem.Text = "Jan")
Then
Calendar1.SelectedDate =
DateTime.Parse("2010-1-1")
Calendar1.VisibleDate =
DateTime.Parse("2010-01-01")
End If
If (DropDownList1.SelectedItem.Text =
"Feb") Then
Calendar1.SelectedDate =
DateTime.Parse("2010-2-1")
Calendar1.VisibleDate =
DateTime.Parse("2010-02-01")
End If
If (DropDownList1.SelectedItem.Text =
"Mar") Then
Calendar1.SelectedDate =
DateTime.Parse("2010-3-1")
Calendar1.VisibleDate =
DateTime.Parse("2010-03-01")
End If
If (DropDownList1.SelectedItem.Text = "April")
Then
Calendar1.SelectedDate =
DateTime.Parse("2010-4-1")
Calendar1.VisibleDate =
DateTime.Parse("2010-04-01")
End If
If (DropDownList1.SelectedItem.Text = "May")
Then
Calendar1.SelectedDate =
DateTime.Parse("2010-5-1")
Calendar1.VisibleDate =
DateTime.Parse("2010-05-01")
End If
If (DropDownList1.SelectedItem.Text =
"June") Then
Calendar1.SelectedDate =
DateTime.Parse("2010-6-1")
Calendar1.VisibleDate =
DateTime.Parse("2010-06-01")
End If
Calendar1.Visible = TrueCopy/Type this Code in 'Button3_click' handler. Adjust Indents
13
ControlGroup2VB -Output -1
Click on 'Show CheckBox' button.
The checkboxes are shown.
Here you can select the
months of choice and click
'Show DropDownList' button.
See the effects of these in next
page.
Output after clicking 'Show CheckBox' button.
Output Viewed After Pressing F5 Key.
14
ControlGroup2VB -Output -2
Select the month from
'DropDownList' and click on
'Show Calendar' button.
Calendar of selected month will
appear
See the effects on button
Output on browser after clicking on
'Show Calendar' button
Output on browser
15
ControlGroup2VB –Button 1 Code Explanation
CheckBox1.Text = "Jan"
CheckBox2.Text = "Feb"
CheckBox3.Text = "Mar"
CheckBox4.Text = "April"
CheckBox5.Text = "May"
CheckBox6.Text = "June"
CheckBox1.Visible = True
CheckBox2.Visible = True
CheckBox3.Visible = True
CheckBox4.Visible = True
CheckBox5.Visible = True
CheckBox6.Visible = True
Button2.Visible = True
Calendar1.Visible = False
Button3.Visible = False
DropDownList1.Visible = False
These are visibility properties of other
controls on the page
These lines are to make checkboxes
visible that were earlier set as invisible
This sets the text that comes in front of
checkbox. Here we are writing or setting this
property. In the next handler we shall try to
read this property.
16
ControlGroup2VB - Button 2 Code Explanation
Button2.Style("background-color") =
"#0000ff"
Button2.Style("color") = "#ffffff"
Button2.Style("width") = "270px"
Button2.Style("cursor") = "pointer"
Button2.Style("font-family") = "verdana"
Button2.Style("font-weight") = "bold"
Button2.Style("font-size") = "8pt"
Button2.Text = " Select the month from
drop down list "
DropDownList1.Visible = True
If (CheckBox1.Checked) Then
DropDownList1.Items.Add(CheckBox
1.Text)
End If
If (CheckBox2.Checked) Then
DropDownList1.Items.Add(CheckBox
2.Text)
End If
If (CheckBox3.Checked) Then
DropDownList1.Items.Add(CheckBox3
.Text)
End If
If (CheckBox4.Checked) Then
DropDownList1.Items.Add(CheckBox4
.Text)
End If
If (CheckBox5.Checked) Then
DropDownList1.Items.Add(CheckBox5
.Text)
End If
If (CheckBox6.Checked) Then
DropDownList1.Items.Add(CheckBox6
.Text)
End If
Button3.Visible = True
These are style settings on the
Button 2 using Attributes
Property. 1st Parameter is
Attribute Name and second
parameter is Attribute value)
'Items.Add" allows to fill a new
item in the dropdownlist with
the value given in parameter.
Here we are creating the
parameter by reading the value
of 'Text' Property of 'Checkbox'
set earlier, provided the
'Checked' Property is true.
17
ControlGroup2VB - Button 3 Code Explanation
If (DropDownList1.SelectedItem.Text = "Jan")
Then
Calendar1.SelectedDate =
DateTime.Parse("2010-1-1")
Calendar1.VisibleDate =
DateTime.Parse("2010-01-01")
End If
If (DropDownList1.SelectedItem.Text =
"Feb") Then
Calendar1.SelectedDate =
DateTime.Parse("2010-2-1")
Calendar1.VisibleDate =
DateTime.Parse("2010-02-01")
End If
If (DropDownList1.SelectedItem.Text =
"Mar") Then
Calendar1.SelectedDate =
DateTime.Parse("2010-3-1")
Calendar1.VisibleDate =
DateTime.Parse("2010-03-01")
End If
If (DropDownList1.SelectedItem.Text = "April")
Then
Calendar1.SelectedDate =
DateTime.Parse("2010-4-1")
Calendar1.VisibleDate =
DateTime.Parse("2010-04-01")
End If
If (DropDownList1.SelectedItem.Text = "May")
Then
Calendar1.SelectedDate =
DateTime.Parse("2010-5-1")
Calendar1.VisibleDate =
DateTime.Parse("2010-05-01")
End If
If (DropDownList1.SelectedItem.Text =
"June") Then
Calendar1.SelectedDate =
DateTime.Parse("2010-6-1")
Calendar1.VisibleDate =
DateTime.Parse("2010-06-01")
End If
Calendar1.Visible = True
Checking the Value of Month selected
by using the 'SelectedItem.Text'
Property.
Setting the 'SelectedDate' property as
first date of selected month. The
'DateTime.Parse' method allows to
convert the given date string parameter
as Date type value.
Multiple ifs have been used here for individual month.
Can this be done with a programming loop or case. Try
and if you are successful gift yourself a chocolate.
18
ControlGroup2VB Modification Trials
 Double Click the First Check Box to add a routine named CheckBox1_CheckedChanged. Add
Following code to this routine.
CheckBox1.Attributes.Add("Style","Font-Weight:Bold")
Run the code to see of there is any effect. Now on .aspx side add the property
AutoPostBack="True" in this check box and run.
Here you learn two things First, the OnCheckedChanged event and second, the
AutoPostBack Property. Not all controls produce server round robin unless specifically done
so.
 Try to add <OtherMonthDayStyle ForeColor="#999999" /> between opening and closing tag
of <asp:Calendar runat="server"> Watch the effect.
 Change date of 'Calendar1.SelectedDate = DateTime.Parse("2010-1-1"); ' Code to "2010-1-5" in
Button3_Click method.
Watch the effect.
 Set Enabled property equal to False of DropDownList and run code
Watch the effect.
 Remove 'DateTime.Parse' keyword from 'Calendar1.SelectedDate = DateTime.Parse("2010-1-
1")'.
Watch the effect. No error will generated because VB provide the facility to implicitly convert
type 'String' to 'System.DateTime'.
 In calendar control experiment with attributes like "SelectionMode", "DayNameFormat",
"FirstDayOfWeek" etc and Watch the effect.
Here we see that VB provide the facility to implicitly convert type 'String' to
'System.DateTime'. but remember that C# Cannot implicitly convert type 'String'
to 'System.DateTime'
19
ControlGroup2VB : Error Trials
 Try removing '.Items' keyword from
'DropDownList1.Items.Add(CheckBox1.Text)'. Watch the
runtime error as follows:
Compiler Error Message: BC30456: 'Add' is not a member of
'System.Web.UI.WebControls.DropDownList'.
20
ControlGroup2VB : Home Exercise
Improve the code with a freshly written Reset( )
function so that the same page can be retested/re-
used again and again.
Write a program similar to the example given which
can use 12 CheckBoxes for 12 months (January to
December).
In the button3 code handler try to use a case or
some kind of loop instead of multiple ifs for each
month.
Voila! It seems to be an easy sitter. This may however eat-up your dinner if you are
not so familiar with case constructs or loops. Surf the net and find out examples.
21
ControlGroup2VB : Learning Summary Review
 Use of Asp:CheckBox with following attributes
 Visible, Text, Style, OnCheckedChanged, AutoPostBack
 Use of DropDownList with Functionality of
 Visible, Items.Add, SelectedItem.Text
 Use of calendar with Functionality of
 SelectedDate, VisibleDate, OtherMonthDayStyle, SelectionMode,
DayNameFormat, FirstDayofWeek etc.
 Using Properties of One Handler into another handler.
 Understanding why some controls don't directly pass the
postback event to server.
 Property setting of Button by Server side coding
22
ControlGroup2CS : Bibliography
CheckBox: http://msdn.microsoft.com/en-
us/library/4s78d0k1(VS.71).aspx
DropDownList:
http://msdn.microsoft.com/en-
us/library/0dzka5sf(v=VS.71).aspx .
Calendar: http://msdn.microsoft.com/en-
us/library/dxf9k8sh(v=VS.71).aspx .
www.asp101.com
www.dotnetfunda.com
http://www.w3schools.com/aspnet
23
Ask and guide me at
sunmitraeducation@gmail.com
Share this information with as
many people as possible.
Keep visiting www.sunmitra.com
for programme updates.

Visual Web Developer and Web Controls VB set 3

  • 1.
    1 A Programme Underthe compumitra Series WEB SERVER CONTROLS SET – 3 LAB WORK GUIDE
  • 2.
    2 OUTLINE Here web servercontrols set – 3 is being presented. (set 1- was ASP:Hyperlink, Set 2 was presented as a group of controls ASP:TextBox, ASP:Button and ASP:Label) This set is also being presented as a group of controls working on the same page. These controls as ASP:CheckBox, ASP:DropDownList and ASP:Calendar. Here we shall try to pass actions between controls. We are calling this ControlGroup2. ControlGroup2VB (using VB) Example Template Creation. Code Creation. Output View. Code Explanation. Modification Trials. Error Trials. Home Exercise. Summary Review.
  • 3.
    3 ControlGroup2VB Using VB inasp.net ASP:CHECKBOX Supports AutoPostBack, Enabled, Checked, OnCheckedChanged in addition to standard properties related to Style, BackColor, BorderColor, BorderStyle, BorderWidth, Font etc. ASP:DROPDOWNLIST Supports SelectedItem, OnSelectedIndexChanged, Items, Text etc properties. ASP:CALENDAR Supports Caption, FirstDayOfWeek, ShowNextPrevMonth, VisibleDate, ShowTitle in addition to standard properties related to BackColor, BorderColor, BorderStyle, ToolTip, Width etc.
  • 4.
    4 ControlGroup2VB– CheckBoxes LoadingBUTTON Placement 1. Drag and Drop 'Button' here 2. Set the 'Text' Property equal to 'Show CheckBox' • Follow Standard Website Creation Steps and set your path to C:Learner<student-id> WebControlsControlGroup2VB • Add New Default.aspx page in your Website • Now Create the Execution Event Handler as a button
  • 5.
    5 1. Introduce aline break and then Drag and Drop 'CheckBox' in div ControlGroup2VB –CHECKBOX Placement 2. Like first 'CheckBox', Drag and Drop six 'CheckBoxes' 3. Set the 'Visible' Property equal to 'False' for all 'CheckBoxes' . You can select all the checkboxes together with the help of 'Ctrl' key and mouse and then change the property to 'false' for all at once.
  • 6.
    6 ControlGroup2VB - DropDownListLoading BUTTON Placement 1. Introduce a line break and Drag and Drop 'Button' here 2. Set the 'Text' Property equal to 'Show DropDownList' and 'Visible' Property as 'False' Here Button2 has been created, but it has been kept invisible as it would be shown after execution of Button1
  • 7.
    7 ControlGroup2VB –DropDownList Placement Introducea new line and Drag and Drop 'DropDownList' in div. Set 'Visible' Property as False (being a control of future use)
  • 8.
    8 ControlGroup2VB -Calendar LoadingBUTTON Placement Introduce a new line and Drag and Drop another 'Button'. Set the 'Text' and 'Visible' properties as shown here. This is Button3 which will be used after dropdown list selection.
  • 9.
    9 ControlGroup2VB -Calendar Placement Introducea new line and Drag and Drop 'Calendar' in div. Set 'Visible' Property as False (being a control of future use)
  • 10.
    10 ControlGroup2VB –Button 1Code CheckBox1.Text = "Jan" CheckBox2.Text = "Feb" CheckBox3.Text = "Mar" CheckBox4.Text = "April" CheckBox5.Text = "May" CheckBox6.Text = "June" CheckBox1.Visible = True CheckBox2.Visible = True CheckBox3.Visible = True CheckBox4.Visible = True CheckBox5.Visible = True CheckBox6.Visible = True Button2.Visible = True Calendar1.Visible = False Button3.Visible = False DropDownList1.Visible = False CheckBox1.Text = "Jan" CheckBox2.Text = "Feb" CheckBox3.Text = "Mar" CheckBox4.Text = "April" CheckBox5.Text = "May" CheckBox6.Text = "June" CheckBox1.Visible = True CheckBox2.Visible = True CheckBox3.Visible = True CheckBox4.Visible = True CheckBox5.Visible = True CheckBox6.Visible = True Button2.Visible = True Calendar1.Visible = False Button3.Visible = False DropDownList1.Visible = False Copy this Code Go to 'Button1_Click' handler and paste. type this code yourself for better grasp.
  • 11.
    11 ControlGroup2VB -Button 2Code Button2.Style("background-color") = "#0000ff" Button2.Style("color") = "#ffffff" Button2.Style("width") = "270px" Button2.Style("cursor") = "pointer" Button2.Style("font-family") = "verdana" Button2.Style("font-weight") = "bold" Button2.Style("font-size") = "8pt" Button2.Text = " Select the month from drop down list " DropDownList1.Visible = True If (CheckBox1.Checked) Then DropDownList1.Items.Add(CheckBox 1.Text) End If If (CheckBox2.Checked) Then DropDownList1.Items.Add(CheckBox 2.Text) End If If (CheckBox3.Checked) Then DropDownList1.Items.Add(CheckBox3 .Text) End If If (CheckBox4.Checked) Then DropDownList1.Items.Add(CheckBox4 .Text) End If If (CheckBox5.Checked) Then DropDownList1.Items.Add(CheckBox5 .Text) End If If (CheckBox6.Checked) Then DropDownList1.Items.Add(CheckBox6 .Text) End If Button3.Visible = True Copy/Type this Code in 'Button2_click' handler. Adjust Indents
  • 12.
    12 ControlGroup2VB - Button3 Code If (DropDownList1.SelectedItem.Text = "Jan") Then Calendar1.SelectedDate = DateTime.Parse("2010-1-1") Calendar1.VisibleDate = DateTime.Parse("2010-01-01") End If If (DropDownList1.SelectedItem.Text = "Feb") Then Calendar1.SelectedDate = DateTime.Parse("2010-2-1") Calendar1.VisibleDate = DateTime.Parse("2010-02-01") End If If (DropDownList1.SelectedItem.Text = "Mar") Then Calendar1.SelectedDate = DateTime.Parse("2010-3-1") Calendar1.VisibleDate = DateTime.Parse("2010-03-01") End If If (DropDownList1.SelectedItem.Text = "April") Then Calendar1.SelectedDate = DateTime.Parse("2010-4-1") Calendar1.VisibleDate = DateTime.Parse("2010-04-01") End If If (DropDownList1.SelectedItem.Text = "May") Then Calendar1.SelectedDate = DateTime.Parse("2010-5-1") Calendar1.VisibleDate = DateTime.Parse("2010-05-01") End If If (DropDownList1.SelectedItem.Text = "June") Then Calendar1.SelectedDate = DateTime.Parse("2010-6-1") Calendar1.VisibleDate = DateTime.Parse("2010-06-01") End If Calendar1.Visible = TrueCopy/Type this Code in 'Button3_click' handler. Adjust Indents
  • 13.
    13 ControlGroup2VB -Output -1 Clickon 'Show CheckBox' button. The checkboxes are shown. Here you can select the months of choice and click 'Show DropDownList' button. See the effects of these in next page. Output after clicking 'Show CheckBox' button. Output Viewed After Pressing F5 Key.
  • 14.
    14 ControlGroup2VB -Output -2 Selectthe month from 'DropDownList' and click on 'Show Calendar' button. Calendar of selected month will appear See the effects on button Output on browser after clicking on 'Show Calendar' button Output on browser
  • 15.
    15 ControlGroup2VB –Button 1Code Explanation CheckBox1.Text = "Jan" CheckBox2.Text = "Feb" CheckBox3.Text = "Mar" CheckBox4.Text = "April" CheckBox5.Text = "May" CheckBox6.Text = "June" CheckBox1.Visible = True CheckBox2.Visible = True CheckBox3.Visible = True CheckBox4.Visible = True CheckBox5.Visible = True CheckBox6.Visible = True Button2.Visible = True Calendar1.Visible = False Button3.Visible = False DropDownList1.Visible = False These are visibility properties of other controls on the page These lines are to make checkboxes visible that were earlier set as invisible This sets the text that comes in front of checkbox. Here we are writing or setting this property. In the next handler we shall try to read this property.
  • 16.
    16 ControlGroup2VB - Button2 Code Explanation Button2.Style("background-color") = "#0000ff" Button2.Style("color") = "#ffffff" Button2.Style("width") = "270px" Button2.Style("cursor") = "pointer" Button2.Style("font-family") = "verdana" Button2.Style("font-weight") = "bold" Button2.Style("font-size") = "8pt" Button2.Text = " Select the month from drop down list " DropDownList1.Visible = True If (CheckBox1.Checked) Then DropDownList1.Items.Add(CheckBox 1.Text) End If If (CheckBox2.Checked) Then DropDownList1.Items.Add(CheckBox 2.Text) End If If (CheckBox3.Checked) Then DropDownList1.Items.Add(CheckBox3 .Text) End If If (CheckBox4.Checked) Then DropDownList1.Items.Add(CheckBox4 .Text) End If If (CheckBox5.Checked) Then DropDownList1.Items.Add(CheckBox5 .Text) End If If (CheckBox6.Checked) Then DropDownList1.Items.Add(CheckBox6 .Text) End If Button3.Visible = True These are style settings on the Button 2 using Attributes Property. 1st Parameter is Attribute Name and second parameter is Attribute value) 'Items.Add" allows to fill a new item in the dropdownlist with the value given in parameter. Here we are creating the parameter by reading the value of 'Text' Property of 'Checkbox' set earlier, provided the 'Checked' Property is true.
  • 17.
    17 ControlGroup2VB - Button3 Code Explanation If (DropDownList1.SelectedItem.Text = "Jan") Then Calendar1.SelectedDate = DateTime.Parse("2010-1-1") Calendar1.VisibleDate = DateTime.Parse("2010-01-01") End If If (DropDownList1.SelectedItem.Text = "Feb") Then Calendar1.SelectedDate = DateTime.Parse("2010-2-1") Calendar1.VisibleDate = DateTime.Parse("2010-02-01") End If If (DropDownList1.SelectedItem.Text = "Mar") Then Calendar1.SelectedDate = DateTime.Parse("2010-3-1") Calendar1.VisibleDate = DateTime.Parse("2010-03-01") End If If (DropDownList1.SelectedItem.Text = "April") Then Calendar1.SelectedDate = DateTime.Parse("2010-4-1") Calendar1.VisibleDate = DateTime.Parse("2010-04-01") End If If (DropDownList1.SelectedItem.Text = "May") Then Calendar1.SelectedDate = DateTime.Parse("2010-5-1") Calendar1.VisibleDate = DateTime.Parse("2010-05-01") End If If (DropDownList1.SelectedItem.Text = "June") Then Calendar1.SelectedDate = DateTime.Parse("2010-6-1") Calendar1.VisibleDate = DateTime.Parse("2010-06-01") End If Calendar1.Visible = True Checking the Value of Month selected by using the 'SelectedItem.Text' Property. Setting the 'SelectedDate' property as first date of selected month. The 'DateTime.Parse' method allows to convert the given date string parameter as Date type value. Multiple ifs have been used here for individual month. Can this be done with a programming loop or case. Try and if you are successful gift yourself a chocolate.
  • 18.
    18 ControlGroup2VB Modification Trials Double Click the First Check Box to add a routine named CheckBox1_CheckedChanged. Add Following code to this routine. CheckBox1.Attributes.Add("Style","Font-Weight:Bold") Run the code to see of there is any effect. Now on .aspx side add the property AutoPostBack="True" in this check box and run. Here you learn two things First, the OnCheckedChanged event and second, the AutoPostBack Property. Not all controls produce server round robin unless specifically done so.  Try to add <OtherMonthDayStyle ForeColor="#999999" /> between opening and closing tag of <asp:Calendar runat="server"> Watch the effect.  Change date of 'Calendar1.SelectedDate = DateTime.Parse("2010-1-1"); ' Code to "2010-1-5" in Button3_Click method. Watch the effect.  Set Enabled property equal to False of DropDownList and run code Watch the effect.  Remove 'DateTime.Parse' keyword from 'Calendar1.SelectedDate = DateTime.Parse("2010-1- 1")'. Watch the effect. No error will generated because VB provide the facility to implicitly convert type 'String' to 'System.DateTime'.  In calendar control experiment with attributes like "SelectionMode", "DayNameFormat", "FirstDayOfWeek" etc and Watch the effect. Here we see that VB provide the facility to implicitly convert type 'String' to 'System.DateTime'. but remember that C# Cannot implicitly convert type 'String' to 'System.DateTime'
  • 19.
    19 ControlGroup2VB : ErrorTrials  Try removing '.Items' keyword from 'DropDownList1.Items.Add(CheckBox1.Text)'. Watch the runtime error as follows: Compiler Error Message: BC30456: 'Add' is not a member of 'System.Web.UI.WebControls.DropDownList'.
  • 20.
    20 ControlGroup2VB : HomeExercise Improve the code with a freshly written Reset( ) function so that the same page can be retested/re- used again and again. Write a program similar to the example given which can use 12 CheckBoxes for 12 months (January to December). In the button3 code handler try to use a case or some kind of loop instead of multiple ifs for each month. Voila! It seems to be an easy sitter. This may however eat-up your dinner if you are not so familiar with case constructs or loops. Surf the net and find out examples.
  • 21.
    21 ControlGroup2VB : LearningSummary Review  Use of Asp:CheckBox with following attributes  Visible, Text, Style, OnCheckedChanged, AutoPostBack  Use of DropDownList with Functionality of  Visible, Items.Add, SelectedItem.Text  Use of calendar with Functionality of  SelectedDate, VisibleDate, OtherMonthDayStyle, SelectionMode, DayNameFormat, FirstDayofWeek etc.  Using Properties of One Handler into another handler.  Understanding why some controls don't directly pass the postback event to server.  Property setting of Button by Server side coding
  • 22.
    22 ControlGroup2CS : Bibliography CheckBox:http://msdn.microsoft.com/en- us/library/4s78d0k1(VS.71).aspx DropDownList: http://msdn.microsoft.com/en- us/library/0dzka5sf(v=VS.71).aspx . Calendar: http://msdn.microsoft.com/en- us/library/dxf9k8sh(v=VS.71).aspx . www.asp101.com www.dotnetfunda.com http://www.w3schools.com/aspnet
  • 23.
    23 Ask and guideme at sunmitraeducation@gmail.com Share this information with as many people as possible. Keep visiting www.sunmitra.com for programme updates.