If you’ve ever opened your inbox to find dozens of spam form submissions, then you know how frustrating it is.
Fake inquiries, gibberish messages, and suspicious links can bury the real customer requests you actually care about. Worse, this flood of spam can block your real emails from getting through and waste hours of your time each week.
At WPBeginner, we recently had to deal with over 18,000 spam entries trying to flood our contact form overnight. That’s why we know contact form spam isn’t just annoying. It’s a serious problem that can cost you leads and even slow down your site.
The good news is you don’t have to live with it.
After years of testing anti-spam methods, we’ve identified 9 proven strategies that stop spam without blocking real visitors. With these solutions, you can focus on what matters most: connecting with genuine customers. ✅

Why You Need to Block Contact Form Spam in WordPress
Spambots crawl websites and look for non-secure forms so that they can email you spammy links. These links often send you to revenue-generating ad websites or phishing sites.
They may also try to break into your website’s login form using brute force attacks. If a bot does manage to log in to your WordPress account, then it could take control of your website. This is one reason why WordPress security is so important.
Sometimes, they can even look for vulnerabilities in your site’s forms and hijack them to send malware or spam to other people. Spammers can install malware, leaving your visitors and website at risk. They can even steal personal information, which is very dangerous for online stores with sensitive customer data.
On top of that, if spammers use your contact forms to send spam messages via email, they could also send spam to your email list. They often look like an email you sent.
Unaware that it could be spam, users can open these emails and click on the links inside. This would increase traffic and engagement on that site and reward the spammer in the process. Plus, it could hurt your relationship with your readers.
This means that spam isn’t just a nuisance. Those spambots can be dangerous to your website, your visitors, and your reputation.
🔗 Related: We’ve even had to stop over 18,000 spam lead attacks on our own WordPress form — here’s exactly how we blocked it.
With that in mind, let’s take a look at some proven methods for preventing contact form spam on your WordPress site.
Simply use the quick links below to jump straight to the method you want to learn about first:
- Choosing the Right WordPress Form Plugin to Combat Spam
- Use ReCAPTCHA Checkbox to Block Contact Form Spam
- Using Google Invisible reCAPTCHA to Block Contact Form Spam
- Using Custom CAPTCHA to Block Contact Form Spam
- Prevent Spam Bots From Seeing Your Form
- Block Spam IP Addresses
- Restrict Entries By Country
- Block Specific Email Addresses on Your Form
- Filter Out Spammy Keywords and Profanity in Your Contact Form Submissions
- Frequently Asked Questions (FAQ) About Contact Form Spam
- Further Reading to Improve Your WordPress Security and Performance
Ready? Here are 9 proven ways to reduce and block contact form spam in WordPress.
1. Choosing the Right WordPress Form Plugin to Combat Spam
Many WordPress contact form plugins don’t come with built-in spam protection. Even if a plugin has basic spam protection features, these are often unreliable and difficult to use.
The most effective way to block contact form spam is by choosing the best WordPress contact form plugin.
We recommend using WPForms because it has a built-in spam protection token that protects your forms without affecting the user experience. Plus, it’s the same tool we use for all contact, survey, and opt-in forms here at WPBeginner.
You can read our complete WPForms review for more details about what it can do!
WPForms has built-in reCAPTCHA and custom CAPTCHA features that help you fight contact form spam. We will be going through the different options you can use.
So first, let’s install and activate the WPForms plugin. If you are not sure how to do that, then take a look at our step-by-step guide on how to install a WordPress plugin.
📝 Note: Some of the tips in this article also work on the free WPForms Lite version.
Once the WPForms plugin is activated, you’ll need to create a contact form.
To get started, simply head to WPForms » Add New, where you’ll be taken to the drag-and-drop editor. Then, you can type a name for your contact form into the ‘Form Name’ field.
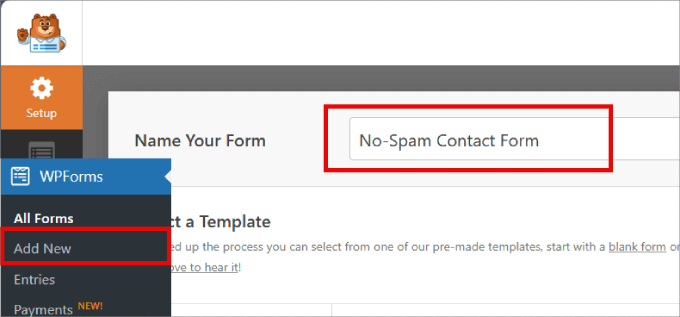
WPForms comes with 2000+ ready-made templates that you can use to create all kinds of forms. You can use these form templates to collect registrations, create an email newsletter, and even accept credit card payments on your WordPress website.
What’s more, you can use the AI-powered form builder to create forms in just seconds. You just need to give the AI a short description, and then it will generate the form for you!
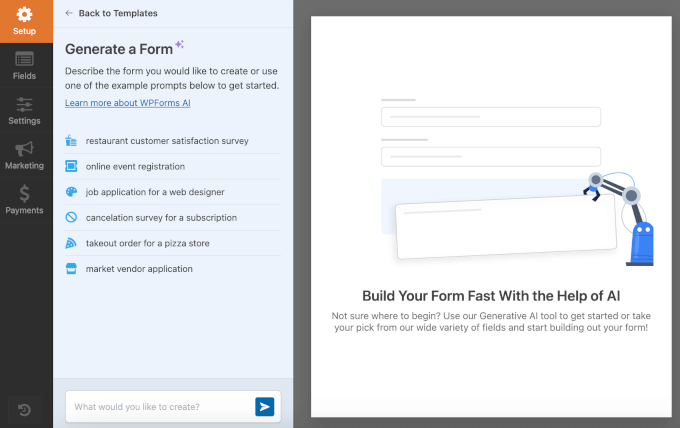
And if you want to use a pre-made template, then you can go ahead and explore the library.
Since we are creating a contact form, you can go ahead and select ‘Use Template’ under the ‘Simple Contact Form’ template.
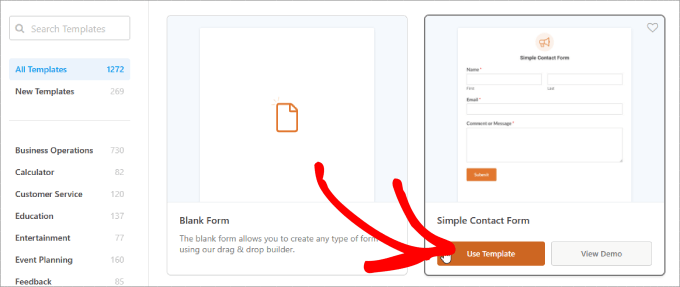
WPForms will now automatically create a basic contact form for your WordPress website.
This form template already has fields where visitors can type in their name, email address, and message.
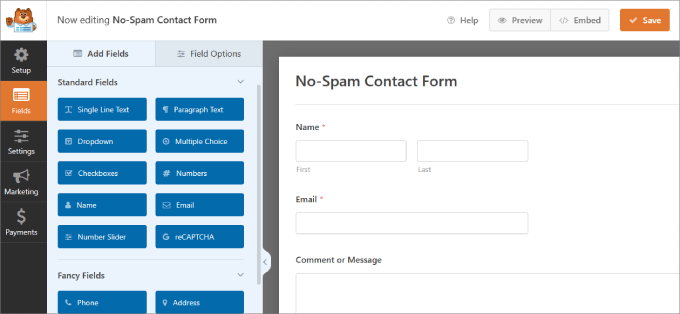
By default, WPForms will automatically protect your forms with a secret anti-spam token. This token is unique to each form submission and invisible to both spambots and visitors.
In the past, WPForms used to use a honeypot, a hidden field that only spambots see and fill out.
But this new anti-spam token is a far more advanced and effective solution. Because spambots cannot see or interact with this secret token, they get stuck and are unable to submit the form.
This method doesn’t require any action from your visitors, which can help prevent form abandonment.
The WPForms anti-spam token is automatically enabled on each new form that you create. You can verify this by going to Settings » Spam Protection and Security inside the form builder.
On this screen, you can also enable Akismet anti-spam protection. This will automatically check submissions against Akismet’s global spam database.
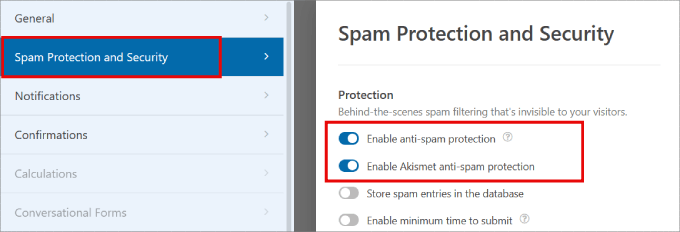
🚨 Important: You’ll need the Akismet anti-spam plugin to enable this feature in WPForms. To learn more, you can check out our blog post on what Akismet is and why you should start using it right away.
Even with these powerful protections, some determined spammers might still get through. If that happens, you can use the other methods in this guide to stop them for good.
2. Use reCAPTCHA Checkbox to Block Contact Form Spam
One straightforward way to stop the spambots from getting through is to use reCAPTCHA. This popular method is available on both the free and pro versions of WPForms.
reCAPTCHA is a free tool available from Google, and we use it in combination with WPForm’s built-in anti-spam token system.
To add a reCAPTCHA checkbox to your contact form, you can head over to WPForms » Settings in your WordPress dashboard.
Then, go ahead and click on the ‘CAPTCHA’ tab. Next, you need to select ‘reCAPTCHA’ by clicking on it.
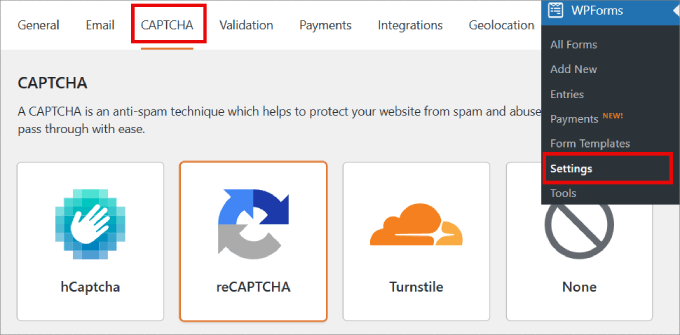
Once you’ve done that, let’s scroll down to the ‘Type’ section.
Then, you can click to select the ‘Checkbox reCAPTCHA v2’ radio button.
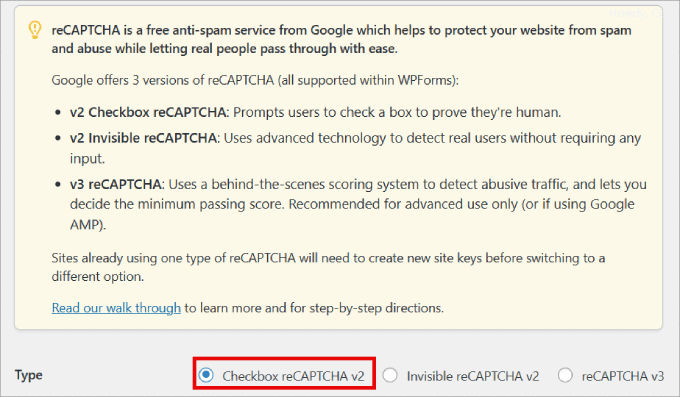
WPForms will now ask you for a Site Key and Secret Key.
To get this information, go to Google’s reCAPTCHA website and click the ‘v3 Admin Console’ button in the top menu.
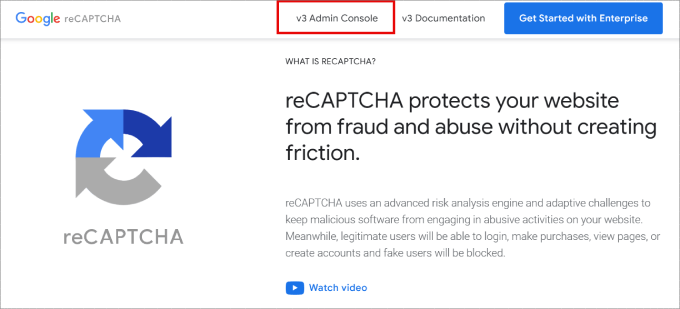
After signing in, click the ‘Create’ icon (a plus sign) to register a new site. If you’re not already logged into your Google account, then you’ll need to type in your username and password or create a new Google account.
Next, you’ll see a screen where you can register your WordPress website.
First, you can enter a name for your site in the ‘Label’ field. This is just for your own reference, but we recommend using a clear, descriptive name to help you identify your site easily.
Next, under ‘reCAPTCHA type,’ select the ‘Challenge (v2)’ option. Then, from the choices that appear below, select the “I’m not a robot” Checkbox option.
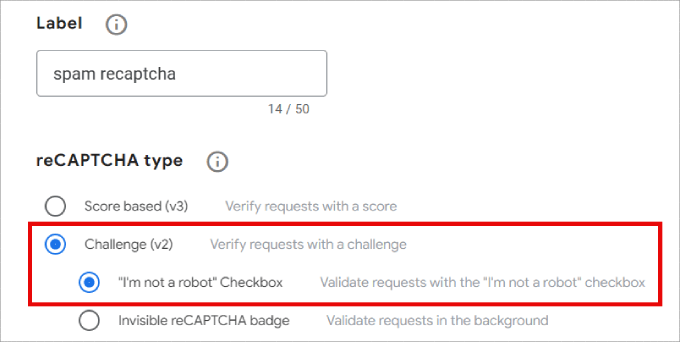
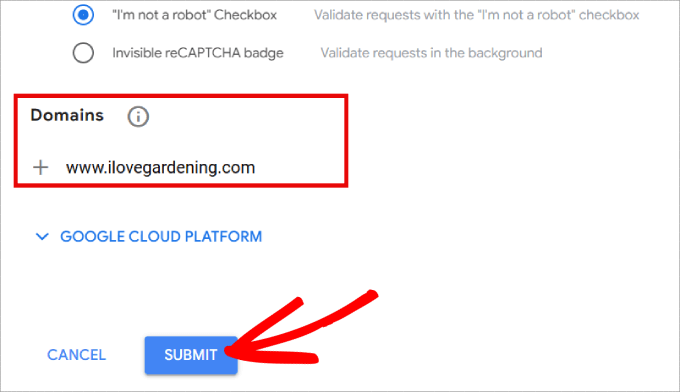
Next, let’s type your website’s domain name into the ‘Domain’ field.
Once you’ve done that, just click the ‘Submit’ button at the bottom of the page.
Next, you’ll see a page containing your website’s site key and secret key.
To start using reCAPTCHA, you simply need to copy this information into your WPForms settings page.
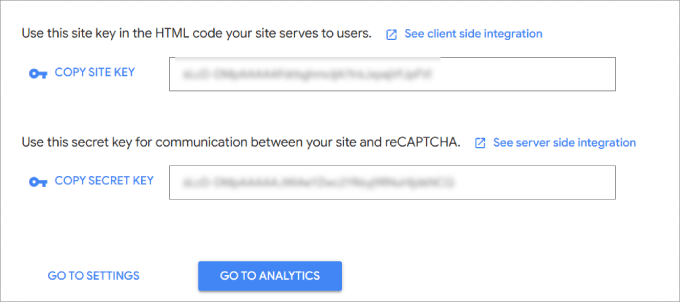
So, let’s copy each key separately and then paste it into the ‘Site Key’ and ‘Secret Key’ fields in your WordPress dashboard.
Once you’ve done that, don’t forget to click on the ‘Save Settings’ button at the bottom of the screen.
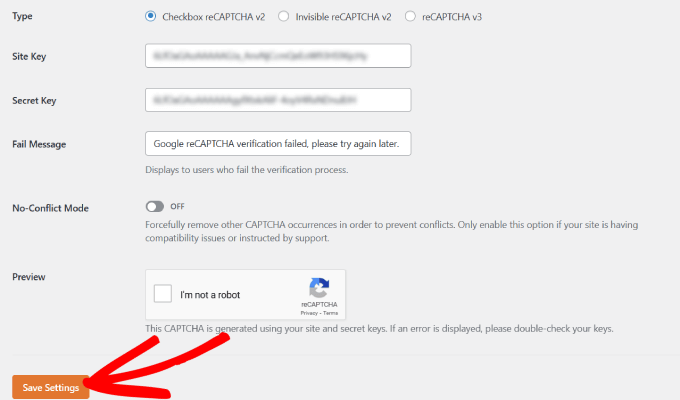
After that, you are ready to add the reCAPTCHA checkbox to your contact form.
To start, you can head over to WPForms » All Forms and click on the ‘Edit’ link for the form that you want to protect with reCAPTCHA.
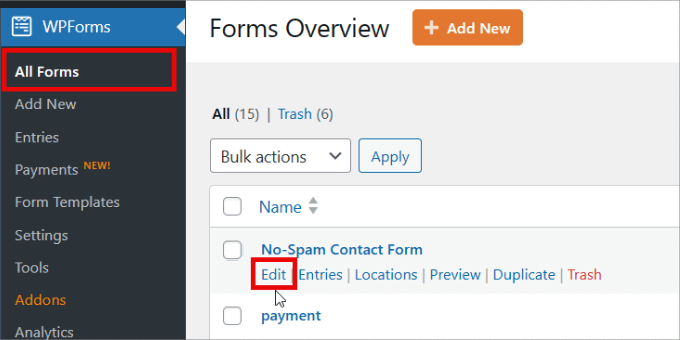
This will open your form in the drag-and-drop form builder. In the left-hand menu, find the ‘reCAPTCHA’ field and give it a click.
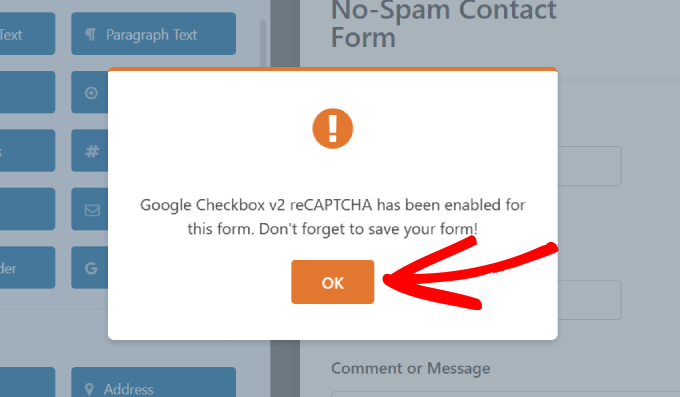
You’ll now see a message that reCAPTCHA has been enabled for the form. To continue, simply click the ‘OK’ button.
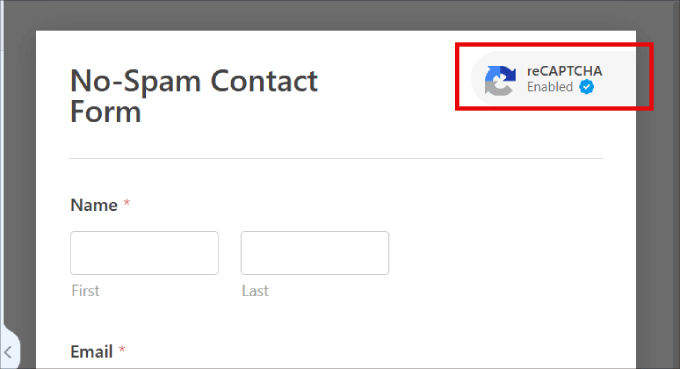
Now, you’ll see the reCAPTCHA logo at the top of your form.
This means that you’ve successfully added reCAPTCHA protection to your contact form.
📝 Note: If you decide to remove reCAPTCHA from the form at any point, then you simply need to click on the ‘reCAPTCHA’ field in WPForms’ left-hand menu. You’ll then see a message asking you to confirm that you want to remove reCAPTCHA.
When you are done, remember to save your changes by clicking on the orange ‘Save’ button.
Adding Your Contact Form to Your Website
After all that, you are ready to add the contact form to your website.
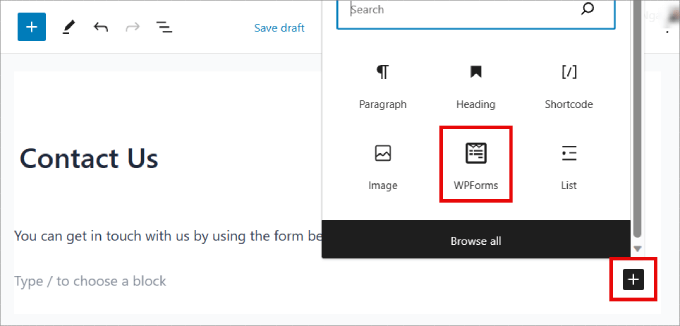
To do this, simply open the page or post where you want to show your form and click the ‘+’ button to add a new block.
In the content editor, you can then type ‘WPForms’ to find the right block. Once you click on the WPForms block, the block will be added to your page.
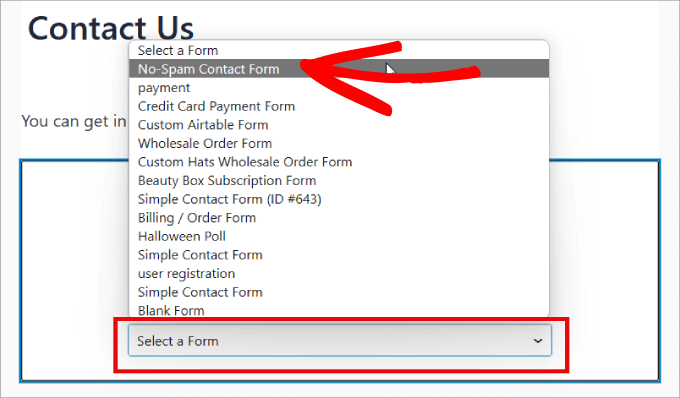
From here, you can click the ‘Select a Form’ dropdown to open it.
You can now choose the contact form that you just created.
WPForms will show a preview of how this form will look directly inside the WordPress block editor.
You can also preview this page by clicking on the ‘Preview’ button at the top of the page. No matter how you choose to preview the form, you’ll see a reCAPTCHA field.
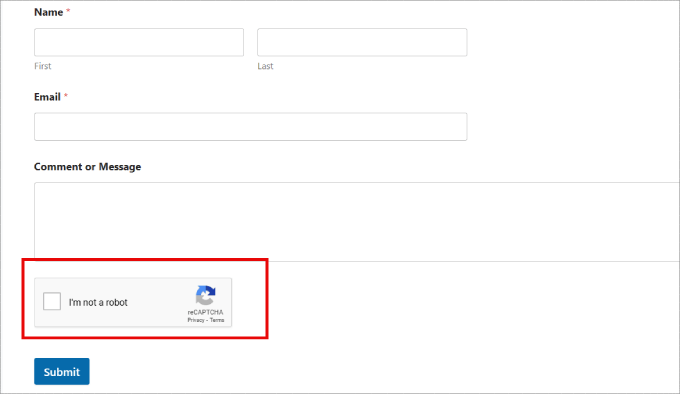
This field will block all automated spam submissions, drastically reducing the amount of contact form spam you get on your website.
3. Using Google Invisible reCAPTCHA to Block Contact Form Spam
Some website owners don’t want their users to have to check a box to submit the contact form. This is where invisible reCAPTCHA comes in.
Invisible reCAPTCHA works like the regular reCAPTCHA, except there’s no checkbox.
Instead, when the form is submitted, Google will determine whether it might be a bot submitting it. If so, Google will pop up the extra reCAPTCHA verification. If you want to see how it works, Google has a demo here.
You can use invisible reCAPTCHA on your WPForms contact forms. In fact, the process is very similar to adding a reCAPTCHA checkbox, as described above.
The first difference is that you need to select a different option when setting up reCAPTCHA on the Google website.
Rather than pick the ‘I’m not a robot’ checkbox, you must select ‘Invisible reCAPTCHA badge’ instead.
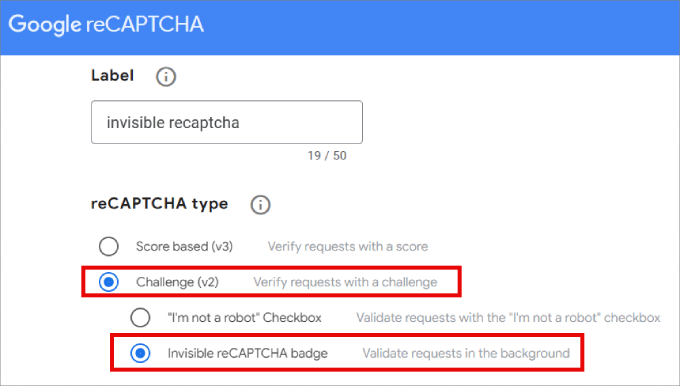
You can then create the site and secret keys following the same process above.
Once you’ve done that, you can head over to WPForms » Settings in your WordPress dashboard and click the ‘CAPTCHA’ tab.
However, this time, you’ll need to select ‘Invisible reCAPTCHA v2.’
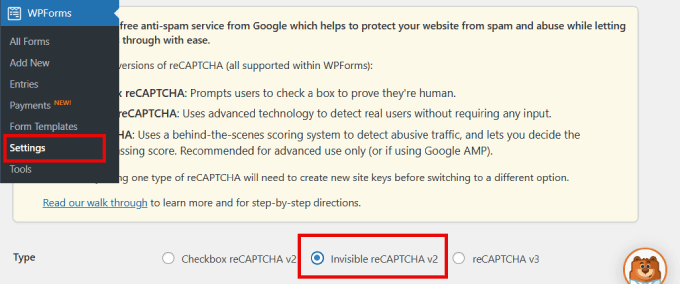
Make sure to hit the ‘Save Settings’ button at the bottom of the page.
You can then add a reCAPTCHA field to your contact form, following the same process described above.
Every time someone submits a contact form, your WordPress site will use the invisible reCAPTCHA automatically.
Visitors will see the reCAPTCHA logo in the bottom corner of your form, as shown in the following image. This logo lets them know that your contact form is protected from spambots.
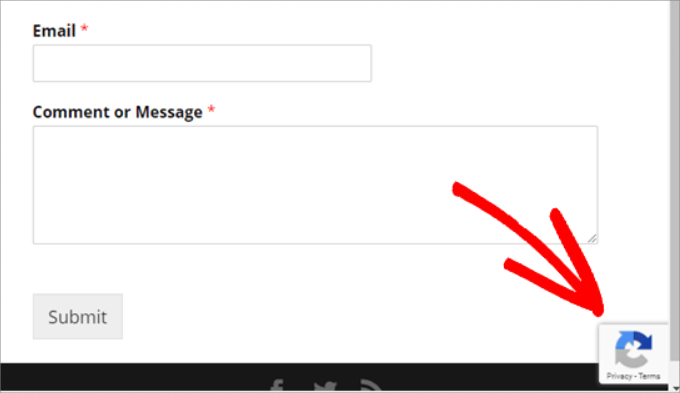
If the user wants to learn more about reCAPTCHA, then they simply need to click that logo. The logo will then expand to show links to Google’s privacy policy and terms of service.
It’s also a good idea to update your own site’s privacy policy with some information about how you use reCAPTCHA.
4. Using Custom CAPTCHA to Block Contact Form Spam
Some website owners don’t want to use Google’s reCAPTCHA on their sites due to privacy concerns or simply want something not branded.
The good news is that WPForms Pro comes with a custom CAPTCHA addon. This lets you create your own question-based CAPTCHA to block contact form spam without relying on Google.
To activate this addon, simply go to WPForms » Addons in your WordPress dashboard. Then, you’ll want to find the ‘Custom Captcha Addon’ box and click its ‘Install Addon’ button.
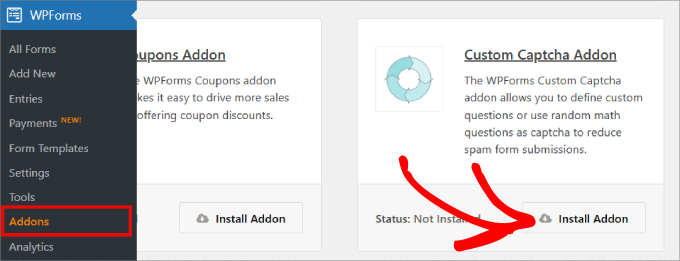
Once it’s installed, you can go to WPForms » All Forms then find your contact form and click on its ‘Edit’ link to open it in the WPForms editor.
In the left-hand menu, let’s scroll to ‘Fancy fields’ and drag the ‘Custom Captcha’ field onto your form.
We recommend placing this field just above the ‘Submit’ button. This means that visitors will have already completed the rest of the form before they realize they must complete a CAPTCHA field.
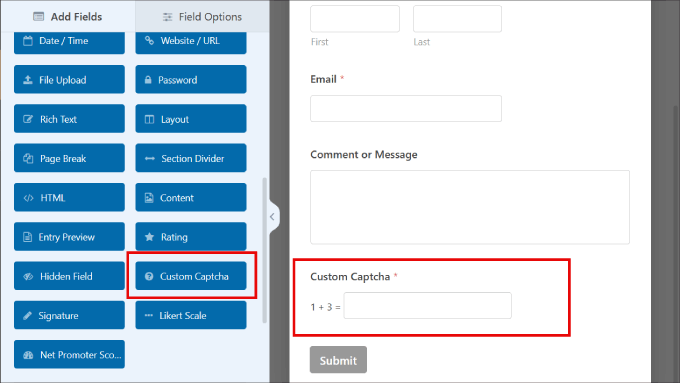
By default, this field shows a random math question. Another option is to type in a few different questions and then challenge visitors to enter the correct answers.
If you want to switch to a question-and-answer CAPTCHA, then click on the ‘CAPTCHA’ field to select it.
In the left-hand menu, simply open the ‘Type’ dropdown and select ‘Question and Answer.’
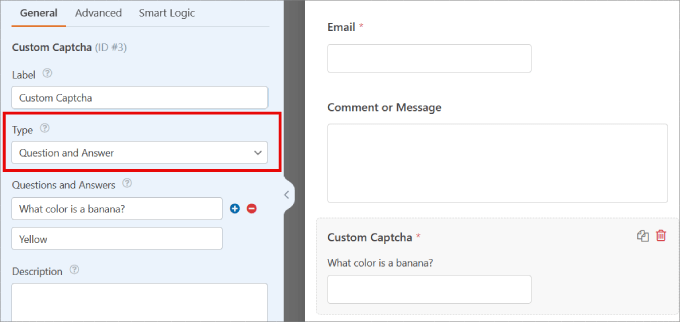
If you choose ‘Question and Answer,’ then we recommend creating a few different questions. WPForms will then rotate these questions randomly so they are harder for spambots to predict.
If you choose the ‘Math’ option, then WPForms will generate random math questions, so it’s much less predictable.
5. Prevent Spam Bots From Seeing Your Form
Another way to block contact form spam in WordPress is by stopping bots from even seeing your form. You could do this by password-protecting your contact form or by only showing it to people who have registered with your WordPress membership site.
These methods might be overkill for a standard contact form, but they could work well in other situations.
For example, if you run a monthly Q&A for your email subscribers, then you might create a private form where they can send you questions.
Password Protecting Your Form Using WordPress’ Visibility Options
You can password-protect your entire ‘Contact Us’ page using WordPress’ built-in tools.
To get started, simply open your ‘Contact Us’ page in the WordPress block editor. Then, in the left-hand menu, next to ‘Visibility,’ you can click on ‘Public.’
In the popup that appears, let’s click on ‘Password protected.’
You can now type your password into the field that shows ‘Use a secure password’ by default. All visitors will use the same password to access your Contact Us page.
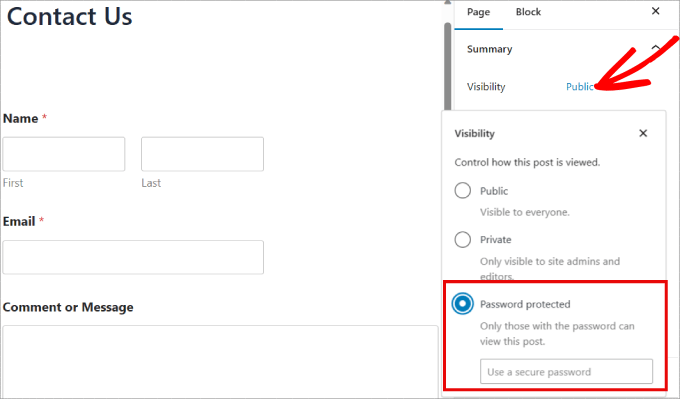
Once you’ve done that, you can either update or publish your page as normal.
Now, whenever someone visits your ‘Contact Us’ page, they’ll be asked to type in the password.
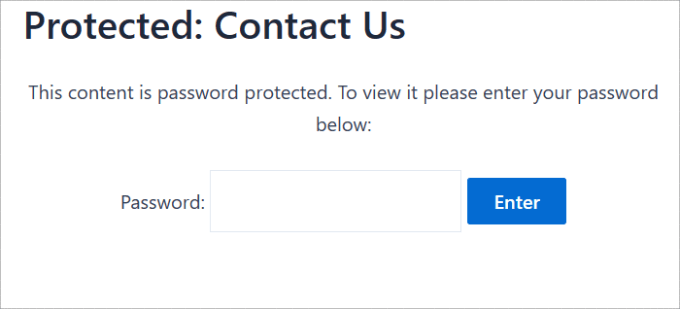
Once they’ve entered the password, the visitor can click on the ‘Submit’ button and use your contact form as normal.
There are a couple of drawbacks to this method.
First, your contact page will display a default message that isn’t easily customizable.
Second, this method will password-protect your entire Contact Us page and not just your form. This could be a problem if this page has some content that should be visible to all users, such as FAQs, your postal address, or your business phone number.
Password Protecting Your Form Using a WPForms Addon
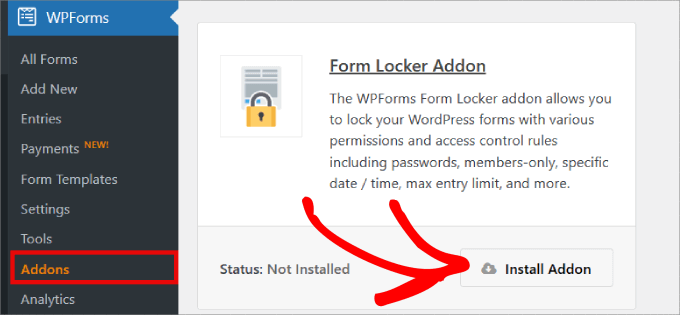
If you are using the Pro version of WPForms, the Form Locker add-on lets you password-protect the form itself, not your entire ‘Contact Us’ page.
To install Form Locker, simply go to WPForms » Addons. You can then find the Form Locker Addon and click its ‘Install Addon’ button.
WPForms should install and activate this addon automatically.
Next, you can head over to WPForms » All Forms and find the form you want password-protected, and click on its ‘Edit’ link.
In the left-hand menu, you’ll want to select Settings » Form Locker. You can then turn on the ‘Enable verification’ toggle.
WPForms will now show some fields where you can type in the password you want to use and the message you’ll show visitors.
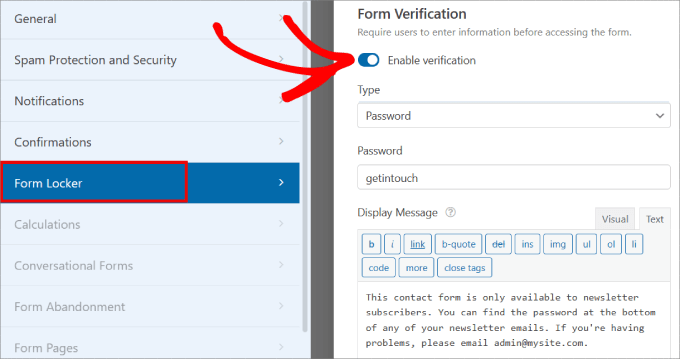
Your ‘Contact Us’ page will now be visible to all users, with just the contact form hidden.
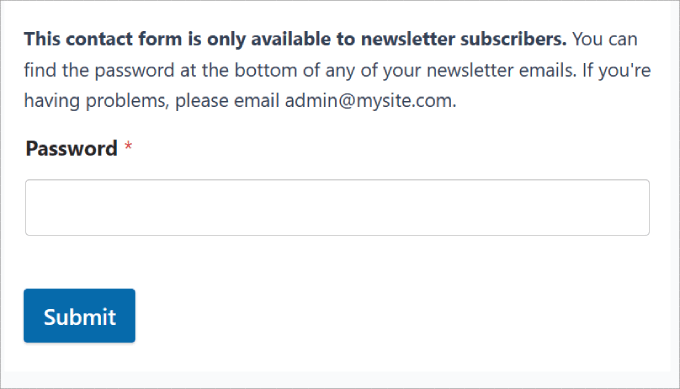
In the following image, you can see an example of how your form will look before the visitor enters the password.
Showing Your Contact Page Only to Registered Users
You can also only let users access your contact form if they’ve registered on your site.
In the ‘Form Locker’ tab in WPForms, you can enable the ‘Logged in users only’ toggle under Form Restrictions. That way, the form can only be viewed by logged-in members.

This is a great option if you want to offer a specific service to members only. There are several great membership site plugins that you could use to do this.
6. Block Spam IP Addresses
If you notice that spam is repeatedly coming from the same IP address, you can block it from your site. This is a powerful way to stop known spammers who may have found a way to bypass your other security measures.
However, it’s important to use the right tool for the job. Many users try to block IPs by going to Settings » Discussion, and adding them to the ‘Disallowed Comment Keys’ box.
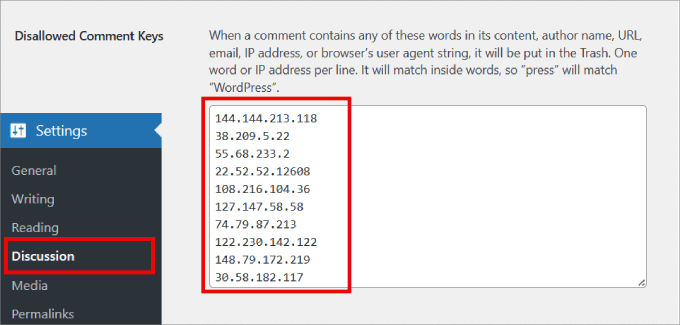
This method will not work for contact form spam. That setting only blocks users from posting comments on your blog posts.
The correct way to block IP addresses from your entire site is by using a Web Application Firewall (WAF). A WAF acts as a protective barrier, filtering malicious traffic before it can even reach your WordPress site.
At WPBeginner, we use Cloudflare for our website firewall. Another popular and reliable option is Sucuri.
Both of these services allow you to easily block specific IP addresses in their dashboard. Once an IP is blocked at the firewall level, that user will no longer be able to visit your site or submit your WordPress forms.
For more details on setting this up, you can see our guides on how to block IP addresses in WordPress.
7. Restrict Entries By Country
If you consistently receive spam submissions from specific countries, then you can block entries from those countries. If your website operates in a specific region, restricting access from other countries will ensure you only receive relevant inquiries.
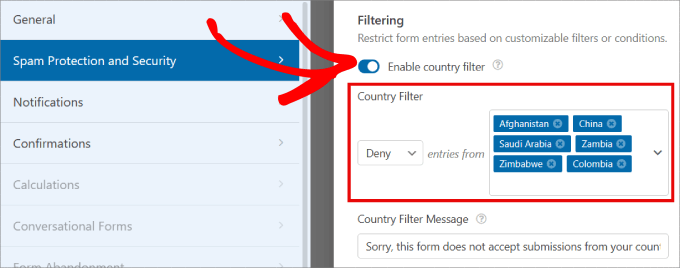
The good news is that WPForms has a country filtering feature in its advanced spam-blocking methods. Under Settings » Spam Protection and Security, you can toggle on the ‘Enable country filter.’ From there, you can choose to allow or deny specific countries.
Once you have added those countries to the denylist, you can customize the message those users will receive.
8. Block Specific Email Addresses on Your Form
Blocking spam from human visitors can be tricky. Unlike automated bots, real people can easily solve CAPTCHA and bypass other security checks, which means you need different strategies to stop them.
One effective method is to block repeat offenders. If you notice that you’re repeatedly receiving spam from the same email addresses, you can prevent them from submitting your form again.
In the WPForms builder, you can click on the ‘Email’ field to open its settings. In the left-hand panel, expand the ‘Advanced Options’ tab.
Here, you’ll find a box labeled ‘Allowlist / Denylist.’ In the text box, just type in the email addresses from which you’d like to stop submissions. You can type in the complete email or use an asterisk (*) to allow for a partial match.
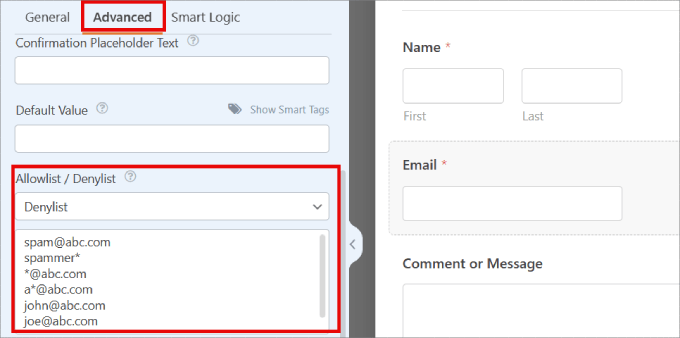
The feature is incredibly powerful since you can create partial matches in various formats.
For example, here are several examples you can experiment with:
spammer@spamcompany.com– This is where you block the exact match of the specified email address.spammer*– Using this filter will prevent submissions from emails that start with that name.*@spamcompany.com– This blocks all email addresses from that domain.a*spamcompany.com– You can block email addresses that begin with a specific letter for that given domain.spammer@spamcompany.com,spammer2@spamcompany.com– If you know all of the names for that email address, you can add them with a comma between each or add a new line for each email.
If you are also looking to block temporary and spammy email addresses, then see our guide on how to block disposable email addresses in WordPress.
9. Filter Out Spammy Keywords and Profanity in Your Contact Form Submissions
Human visitors may enter all kinds of keywords or phrases to promote their products or links when submitting spam through your contact form.
To deal with this, you can block spammy keywords in your contact form. All you have to do is toggle on the ‘Enable keyword filter’ setting, which is located on the Settings » Spam Protection and Security page.
Then go ahead and click on ‘Edit keyword list.’
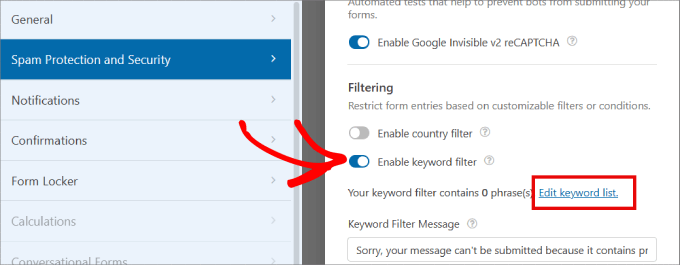
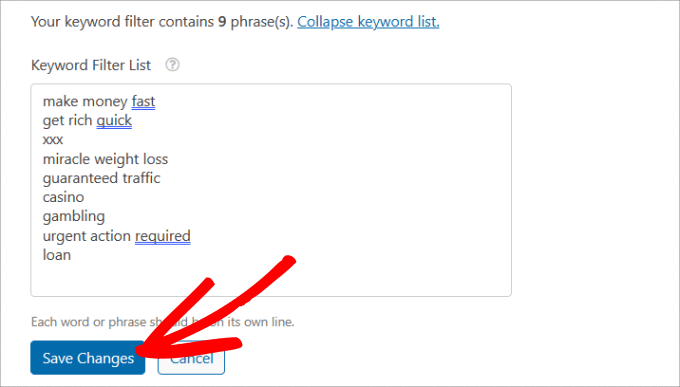
Go ahead and enter the list of keywords that you want to be blocked from contact form entries.
You may want to consider keywords related to financial scams, adult content, or health-related scams.
Once you’ve entered your banned keywords, just click ‘Save Changes.’
Frequently Asked Questions (FAQ) About Contact Form Spam
What is the best plugin to stop contact form spam?
We recommend WPForms because it comes with several built-in tools to fight spam from both bots and real people. You’ll get a smart anti-spam token, Google reCAPTCHA, custom CAPTCHA options, country filters, and keyword filtering.
Is Google reCAPTCHA free to use?
Yes! Google reCAPTCHA is completely free for most websites. The free limit is more than enough to cover small business sites, WordPress blogs, and personal projects.
Why do I still get spam even with a CAPTCHA on my form?
CAPTCHA is great at stopping bots, but it can’t stop a real person from filling out your form. Some spammers even pay people to solve CAPTCHA. That’s why it’s best to use a layered approach with tools like keyword filters, email deny lists, and a firewall.
Can Akismet block contact form spam?
Yes. If your form plugin supports it, Akismet can block spam submissions. For example, WPForms lets you enable Akismet protection, which automatically checks every form entry against Akismet’s global spam database.
Further Reading to Improve Your WordPress Security and Performance
We hope this article has helped you learn how to block contact form spam in WordPress.
Now that you’ve secured your contact forms, you can take your website security and performance even further.
Here are some extra guides to help you out:
- How to Track and Reduce Form Abandonment in WordPress
- How to Add NoCAPTCHA to Block Comment Spam in WordPress
- How to Stop Registration Spam on Your WordPress Membership Site
- How to Increase Your Blog Traffic – The Easy Way
- How to Improve User Experience in WordPress
- Best WordPress Security Plugins to Protect Your Site
- The Ultimate WordPress Security Guide
- The Ultimate WordPress Performance Guide
If you liked this article, then please subscribe to our YouTube Channel for WordPress video tutorials. You can also find us on Twitter and Facebook.


Dennis Muthomi
A goldmine of information in this guide!
The tip about using WPForms’ built-in anti-spam token is particularly interesting – I hadn’t heard of that before.
I’ve been using reCAPTCHA, but I’m now considering trying out the custom CAPTCHA option for a more personalized approach.
Jiří Vaněk
Thank you for a very informative article. I have been using the WP Armour plugin on my website to block spam. Unfortunately, after the latest update, it began letting spam through onto the discussion forum. Therefore, I started looking for a better solution. I would like to ask about implementing Google reCAPTCHA. I have read on various forums that it may not be the best anti-spam solution. What is your opinion on reCAPTCHA from the perspective of WordPress professionals?
Does it make sense to use multiple spam solutions simultaneously, such as WP Armour along with reCAPTCHA? Or is that not advisable?
WPBeginner Support
You would want to check with WP Armor for if there is any issue with using reCAPTCHA with their plugin. For reCAPCHA in general it will not catch everything but if you’re having trouble with spam at the moment then it is a good option to have available to you to try and see what your users think.
Admin
Hajjalah
I really found this guide very useful because it enabled me stop all bad bots from using my contact forms. I just used the Google reCAPTCHA method and this fixed the entire problem. Your guides are really very useful for addressing different WordPress issues. Thanks Indeed.
Mrteesurez
By implementing all these, atleast couples of it, It will really helpful in combating spams but I have a question on that password protected page. Can those password protected pages show on search engines ?
WPBeginner Comments
The content of the form itself is not visible to search engines if the page is password-protected.
Lizzie W
Thanks!! Hopefully this will stop the bots which started targeting my new site! Step by step instructions were a god send – much appreciated!!
WPBeginner Support
Glad our guide was helpful!
Admin
Laurence Marks
The tip on the honeypot for contact forms was helpful. We were getting one or two spams per day.
I’ve created websites in raw HTML since 1995 but jumping into current Wordpress has been quite an experience for me.
WPBeginner Support
Glad our recommendation was helpful
Admin
Steve Biese
Can your form block messages by not allowing certain content. I simply want a form that will NOT go through if let’s say they enter “Joe Miller”. I’m going nuts trying to find a simple contact form that can do that.
WPBeginner Support
There are tools for blocking certain submissions. If you reach out to the support for the plugin directly they can help set up certain blocking.
Admin
Amanda
I am using WPForms lite. I do not see honeypot anywhere. What am I missing. Do I need to upgrade?
Last question, if we select, GDPR, do we still receive the form data, or is it deleted after a specific time? Or are we obligated to delete it? Would we include on our website’s privacy page how long the data will exist in our hands before it is deleted?
WPBeginner Support
You would want to check in the general settings for the form for honeypot in the lite version.
For GDPR, we would recommend starting by taking a look at our GDPR recommendations below:
https://www.wpbeginner.com/beginners-guide/the-ultimate-guide-to-wordpress-and-gdpr-compliance-everything-you-need-to-know/
Admin
Ayo
Thank you, this was helpful
WPBeginner Support
You’re welcome
Admin
Veronika Veale
Amazing! I don’t know what I would do without your tutorials
WPBeginner Support
Glad our tutorials could be helpful
Admin
Raj R Agrawal
Excellent tutorial, really helping me a lot. Special thanks to you all from the bottom of the heart . Thanks.
WPBeginner Support
You’re welcome, glad our content can be helpful
Admin