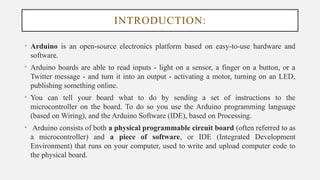
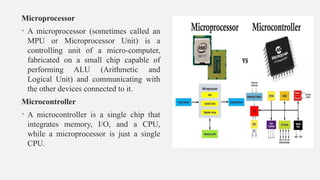
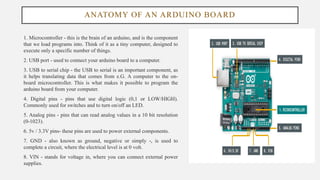
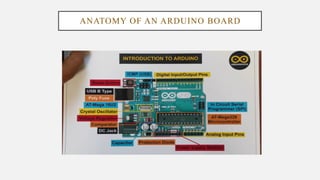
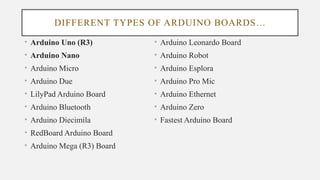
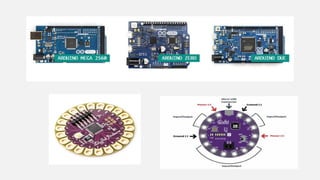
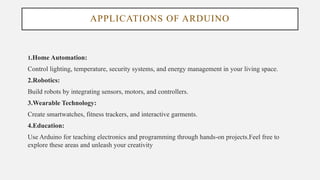
KEMBAR78
arduino and its introduction deep dive ppt.pptx
National Education Society®
JNN College of Engineering, Shivamogga
Dept. Electronics andTelecommunication Engineering
Workshop On ARDUINO BASICS
TOPICS WHICH WILL BE COVERED….
Introduction to ARDUINO.
Anatomy of Arduino.
Programming environment.
Applications of Arduino.
Some useful sensors.
Hands-on session..
Line follower bot.
INTRODUCTION:
• Arduino is an open-source electronics platform based on easy-to-use hardware and
software.
• Arduino boards are able to read inputs - light on a sensor, a finger on a button, or a
Twitter message - and turn it into an output - activating a motor, turning on an LED,
publishing something online.
• You can tell your board what to do by sending a set of instructions to the
microcontroller on the board. To do so you use the Arduino programming language
(based on Wiring), and the Arduino Software (IDE), based on Processing.
• Arduino consists of both a physical programmable circuit board (often referred to as
a microcontroller) and a piece of software, or IDE (Integrated Development
Environment) that runs on your computer, used to write and upload computer code to
the physical board.
Microprocessor
• A microprocessor (sometimes called an
MPU or Microprocessor Unit) is a
controlling unit of a micro-computer,
fabricated on a small chip capable of
performing ALU (Arithmetic and
Logical Unit) and communicating with
the other devices connected to it.
Microcontroller
• A microcontroller is a single chip that
integrates memory, I/O, and a CPU,
while a microprocessor is just a single
CPU.
ANATOMY OF AN ARDUINO BOARD
1. Microcontroller - this is the brain of an arduino, and is the component
that we load programs into. Think of it as a tiny computer, designed to
execute only a specific number of things.
2. USB port - used to connect your arduino board to a computer.
3. USB to serial chip - the USB to serial is an important component, as
it helps translating data that comes from e.G. A computer to the on-
board microcontroller. This is what makes it possible to program the
arduino board from your computer.
4. Digital pins - pins that use digital logic (0,1 or LOW/HIGH).
Commonly used for switches and to turn on/off an LED.
5. Analog pins - pins that can read analog values in a 10 bit resolution
(0-1023).
6. 5v / 3.3V pins- these pins are used to power external components.
7. GND - also known as ground, negative or simply -, is used to
complete a circuit, where the electrical level is at 0 volt.
8. VIN - stands for voltage in, where you can connect external power
supplies.
ANATOMY OF AN ARDUINO BOARD
DIFFERENT TYPES OF ARDUINO BOARDS…
• Arduino Uno (R3)
• Arduino Nano
• Arduino Micro
• Arduino Due
• LilyPad Arduino Board
• Arduino Bluetooth
• Arduino Diecimila
• RedBoard Arduino Board
• Arduino Mega (R3) Board
• Arduino Leonardo Board
• Arduino Robot
• Arduino Esplora
• Arduino Pro Mic
• Arduino Ethernet
• Arduino Zero
• Fastest Arduino Board
DifferentVarieties of Arduino
A R D U I N O U N O
• The Uno is a huge option for your initial Arduino.
This Arduino board depends on an ATmega328P
based microcontroller.
• As compared with other types of arduino boards, it
is very simple to use like the Arduino Mega type
board.
• It consists of 14-digital I/O pins, where 6-pins can
be used as PWM(pulse width modulation outputs),
6-analog inputs, a reset button, a power jack, a
USB connection, an In-Circuit Serial
Programming header (ICSP), etc.
• It includes everything required to hold up the
microcontroller; simply attach it to a PC with the
help of a USB cable and give the supply to get
started with an AC-to-DC adapter or battery.
ARDUINO NANO
• This is a small board based on the
microcontrollers like ATmega328P
otherwise ATmega628 but the
connection of this board is the same as
to the Arduino UNO board. This kind of
microcontroller board is very small in
size, sustainable, flexible, and reliable.
• The devices like mini USB and Arduino
IDE are necessary to build the projects.
• This board mainly includes analog pins-
8, digital pins-14 with the set of an I/O
pin, power pins-6 & RST (reset) pins-2.
HOW TO CODE IN ARDUINO
• You need to download Arduino IDE (Integrated Development Environment).
• Arduino IDE is available for all Mac, Windows.and Linux.
Arduino Coding Basics:
Coding Screen
• The coding screen is divided into two blocks. The setup is considered as the preparation block,
while the loop is considered as the execution block. The set of statements in the setup and loop
blocks are enclosed with the curly brackets. We can write multiple statements depending on the
coding requirements for a particular project.
F O R E X A M P L E :
What is Setup? What type of code is written in the setup block?
It contains an initial part of the code to be executed. The pin modes, libraries,
variables, etc., are initialized in the setup section. It is executed only once during the
uploading of the program and after reset or power up of the Arduino board.
Zero setup () resides at the top of each sketch. As soon as the program starts
running, the code inside the curly bracket is executed in the setup and it executes
only once.
What is Loop? What type of code is written in the Loop block?
The loop contains statements that are executed repeatedly. The section of code
inside the curly brackets is repeated depending on the value of variables.
Time in Arduino
• The time in Arduino programming is measured in a millisecond.
• Where, 1 sec = 1000 milliseconds
pinMode ( )
• The specific pin number is set as the INPUT or OUTPUT in the pinMode () function.
• The Syntax is: pinMode (pin, mode)
• pin: It is the pin number. We can select the pin number according to the requirements.
• mode: We can set the mode as INPUT or OUTPUT according to the corresponding pin number.
• Example: We want to set the 12 pin number as the output pin.
• Code:pinMode (12, OUTPUT);
digitalWrite( )
• The digitalWrite ( ) function is used to set the value of a pin as HIGH or LOW.
• HIGH: It sets the value of the voltage. For the 5V board, it will set the value of 5V, while for 3.3V, it will set
the value of 3.3V.
• LOW: It sets the value = 0 (GND).
• If we do not set the pinMode as OUTPUT, the LED may light dim.
• The syntax is: digitalWrite( pin, value HIGH/LOW)
• pin: We can specify the pin number or the declared variable.
• Let's understand with an example.
• Example:
1. digitalWrite (13, HIGH);
2. digitalWrite (13, LOW);
• The HIGH will ON the LED and LOW will OFF the LED connected to pin number 13.
What is the difference between digitalRead () and digitalWrite ()?
• The digitalRead () function will read the HIGH/LOW value from the digital pin, and the digitalWrite ()
function is used to set the HIGH/LOW value of the digital pin.
Serial.begin ( )
• The serial.begin( ) sets the baud rate for serial data
communication. The baud rate signifies the data rate in
bits per second.
• The default baud rate in Arduino is 9600 bps (bits per
second). We can specify other baud rates as well, such as
4800, 14400, 38400, 28800, etc.
• The Serial.begin( ) is declared in two formats, which are
shown below:
• begin( speed )
• begin( speed, config)
• Where,
• serial: It signifies the serial port object.
• speed: It signifies the baud rate or bps (bits per second)
rate. It allows long data types.
• config: It sets the stop, parity, and data bits.
• Example :
void setup ( )
{
Serial.begin(4800);
}
void loop ( )
{
}
• The serial.begin (4800 ) open the
serial port and set the bits per rate to
4800. The messages in Arduino are
interchanged with the serial monitor at
a rate of 4800 bits per second.
LI B R AR IES
• The Arduino environment can be extended through the use of libraries, just like most programming
platforms. Libraries provide extra functionality for use in sketches, e.g. working with hardware or
manipulating data.
• To use a library in a sketch, select it from Sketch > Import Library.
Official Arduino Libraries
Robotics:
Libraries for controlling servo and stepper motors.
i. Servo - for controlling servo motors.
ii. Stepper - for controlling stepper motors.
Communication
Libraries for using the SPI, I2C and UART protocols.
i. SPI - for communicating with devices using the Serial Peripheral Interface (SPI) Bus.
ii. Wire - Two Wire Interface (TWI/I2C) for sending and receiving data over a net of devices or sensors.
iii. SoftwareSerial - for serial communication on any digital pins.
B U I LT- I N F U N C T I O N S
EXAMPLE CODE: BLINK LED
WHAT IS A SENSOR?
• A Sensor is an input device which provides an output (signal) with respect to a
specific physical quantity (input).
• A Sensor is a device that converts signals from one energy domain to electrical
domain. The definition of the Sensor can be better understood if we take an
example in to consideration.
1. Infrared Sensor (IR Sensor)
IR Sensors or Infrared Sensor are light based sensor that are used in various
applications like Proximity and Object Detection. IR Sensors are used as proximity
sensors in almost all mobile phones.
(2)ULTRA SONIC SENSOR AND (3)LDR SENSOR
• The Ultrasonic Sensor is a
Transceiver Module (Transmitter +
Receiver).
• It transmits High Frequency
Ultrasonic Waves of frequency greater
than 20 KHz.Intercepts the waves
reflected by an obstacle.
• An LDR or light dependent resistor is
also known as photo resistor, photocell,
photoconductor. It is a one type of
resistor whose resistance varies
depending on the amount of light falling
on its surface. When the light falls on the
resistor, then the resistance changes.
4 . DHT 11 SE NSOR
• DHT11 sensor consists of a capacitive
humidity sensing element and a thermistor for
sensing temperature. The humidity sensing
capacitor has two electrodes with a moisture
holding substrate as a dielectric between them.
Change in the capacitance value occurs with
the change in humidity levels. The IC
measure, process this changed resistance
values and change them into digital form.
• For measuring temperature this sensor uses a
temperature coefficient thermistor, which
causes a decrease in its resistance value with
increase in temperature, this sensor is usually
made up of semiconductor ceramics or
polymers.
RELAY MODULE
• Relay modules are simply circuit boards that house one or
more relays. They come in a variety of shapes and sizes
but are most commonly rectangular with 2, 4, or 8 relays
mounted on them, sometimes even up to 16 relays.
• Relay modules contain other components than the relay
unit. These include indicator LEDs, protection diodes,
transistors, resistors, and other parts.
• The relay module’s function is mainly to switch electrical
devices and systems on or off. It also serves to isolate the
control circuit from the device or system being controlled.
• This is important because it allows you the use a
microcontroller or other low-power device to control
devices with much higher voltages and currents.
• Another relay module’s purpose is to amplify the control
signal so that it can switch the higher currents using only a
small out of power from a microcontroller.
B L U E T O O T H M O D U L E
• Bluetooth serves as a technological
interface that facilitates the establishment
of a protocol for data transmission
between devices and helps any two
devices connect wirelessly using
Bluetooth Low Energy. The range of
mediated data transfer for Bluetooth Low
Energy modules is typically tens of
meters, and data is conveyed within
designated frequency bands.
OLED-ORGANIC LIGHT EMITTING
DIODE
• Organic Light Emitting
Diode popularly known as OLED
is a solid-state device that
consists of thin films of organic
molecules that generate a
bright light on the application of
electric current. They are made
by a series of organic thin films
placed between two conductors.
LCD-LIQUID CRYSTAL DISPLAY
• LCD stands for Liquid Crystal
Display. It is a flat panel display
technology, mainly used in TVs
and computer monitors,
nowadays it is used for mobile
phones also. These LCDs are
completely different from that
old CRT displays, it uses liquid
crystals instead of cathode ray in
its primary form of operation.
APPLICATIONS OF ARDUINO
1.Home Automation:
Control lighting, temperature, security systems, and energy management in your living space.
2.Robotics:
Build robots by integrating sensors, motors, and controllers.
3.Wearable Technology:
Create smartwatches, fitness trackers, and interactive garments.
4.Education:
Use Arduino for teaching electronics and programming through hands-on projects.Feel free to
explore these areas and unleash your creativity
THANK
YOU….

arduino and its introduction deep dive ppt.pptx

  • 1.
    National Education Society® JNNCollege of Engineering, Shivamogga Dept. Electronics andTelecommunication Engineering Workshop On ARDUINO BASICS
  • 2.
    TOPICS WHICH WILLBE COVERED…. Introduction to ARDUINO. Anatomy of Arduino. Programming environment. Applications of Arduino. Some useful sensors. Hands-on session.. Line follower bot.
  • 3.
    INTRODUCTION: • Arduino isan open-source electronics platform based on easy-to-use hardware and software. • Arduino boards are able to read inputs - light on a sensor, a finger on a button, or a Twitter message - and turn it into an output - activating a motor, turning on an LED, publishing something online. • You can tell your board what to do by sending a set of instructions to the microcontroller on the board. To do so you use the Arduino programming language (based on Wiring), and the Arduino Software (IDE), based on Processing. • Arduino consists of both a physical programmable circuit board (often referred to as a microcontroller) and a piece of software, or IDE (Integrated Development Environment) that runs on your computer, used to write and upload computer code to the physical board.
  • 4.
    Microprocessor • A microprocessor(sometimes called an MPU or Microprocessor Unit) is a controlling unit of a micro-computer, fabricated on a small chip capable of performing ALU (Arithmetic and Logical Unit) and communicating with the other devices connected to it. Microcontroller • A microcontroller is a single chip that integrates memory, I/O, and a CPU, while a microprocessor is just a single CPU.
  • 5.
    ANATOMY OF ANARDUINO BOARD 1. Microcontroller - this is the brain of an arduino, and is the component that we load programs into. Think of it as a tiny computer, designed to execute only a specific number of things. 2. USB port - used to connect your arduino board to a computer. 3. USB to serial chip - the USB to serial is an important component, as it helps translating data that comes from e.G. A computer to the on- board microcontroller. This is what makes it possible to program the arduino board from your computer. 4. Digital pins - pins that use digital logic (0,1 or LOW/HIGH). Commonly used for switches and to turn on/off an LED. 5. Analog pins - pins that can read analog values in a 10 bit resolution (0-1023). 6. 5v / 3.3V pins- these pins are used to power external components. 7. GND - also known as ground, negative or simply -, is used to complete a circuit, where the electrical level is at 0 volt. 8. VIN - stands for voltage in, where you can connect external power supplies.
  • 6.
    ANATOMY OF ANARDUINO BOARD
  • 7.
    DIFFERENT TYPES OFARDUINO BOARDS… • Arduino Uno (R3) • Arduino Nano • Arduino Micro • Arduino Due • LilyPad Arduino Board • Arduino Bluetooth • Arduino Diecimila • RedBoard Arduino Board • Arduino Mega (R3) Board • Arduino Leonardo Board • Arduino Robot • Arduino Esplora • Arduino Pro Mic • Arduino Ethernet • Arduino Zero • Fastest Arduino Board
  • 8.
  • 10.
    A R DU I N O U N O • The Uno is a huge option for your initial Arduino. This Arduino board depends on an ATmega328P based microcontroller. • As compared with other types of arduino boards, it is very simple to use like the Arduino Mega type board. • It consists of 14-digital I/O pins, where 6-pins can be used as PWM(pulse width modulation outputs), 6-analog inputs, a reset button, a power jack, a USB connection, an In-Circuit Serial Programming header (ICSP), etc. • It includes everything required to hold up the microcontroller; simply attach it to a PC with the help of a USB cable and give the supply to get started with an AC-to-DC adapter or battery.
  • 12.
    ARDUINO NANO • Thisis a small board based on the microcontrollers like ATmega328P otherwise ATmega628 but the connection of this board is the same as to the Arduino UNO board. This kind of microcontroller board is very small in size, sustainable, flexible, and reliable. • The devices like mini USB and Arduino IDE are necessary to build the projects. • This board mainly includes analog pins- 8, digital pins-14 with the set of an I/O pin, power pins-6 & RST (reset) pins-2.
  • 13.
    HOW TO CODEIN ARDUINO • You need to download Arduino IDE (Integrated Development Environment). • Arduino IDE is available for all Mac, Windows.and Linux.
  • 14.
    Arduino Coding Basics: CodingScreen • The coding screen is divided into two blocks. The setup is considered as the preparation block, while the loop is considered as the execution block. The set of statements in the setup and loop blocks are enclosed with the curly brackets. We can write multiple statements depending on the coding requirements for a particular project.
  • 15.
    F O RE X A M P L E :
  • 16.
    What is Setup?What type of code is written in the setup block? It contains an initial part of the code to be executed. The pin modes, libraries, variables, etc., are initialized in the setup section. It is executed only once during the uploading of the program and after reset or power up of the Arduino board. Zero setup () resides at the top of each sketch. As soon as the program starts running, the code inside the curly bracket is executed in the setup and it executes only once. What is Loop? What type of code is written in the Loop block? The loop contains statements that are executed repeatedly. The section of code inside the curly brackets is repeated depending on the value of variables. Time in Arduino • The time in Arduino programming is measured in a millisecond. • Where, 1 sec = 1000 milliseconds
  • 17.
    pinMode ( ) •The specific pin number is set as the INPUT or OUTPUT in the pinMode () function. • The Syntax is: pinMode (pin, mode) • pin: It is the pin number. We can select the pin number according to the requirements. • mode: We can set the mode as INPUT or OUTPUT according to the corresponding pin number. • Example: We want to set the 12 pin number as the output pin. • Code:pinMode (12, OUTPUT);
  • 18.
    digitalWrite( ) • ThedigitalWrite ( ) function is used to set the value of a pin as HIGH or LOW. • HIGH: It sets the value of the voltage. For the 5V board, it will set the value of 5V, while for 3.3V, it will set the value of 3.3V. • LOW: It sets the value = 0 (GND). • If we do not set the pinMode as OUTPUT, the LED may light dim. • The syntax is: digitalWrite( pin, value HIGH/LOW) • pin: We can specify the pin number or the declared variable. • Let's understand with an example. • Example: 1. digitalWrite (13, HIGH); 2. digitalWrite (13, LOW); • The HIGH will ON the LED and LOW will OFF the LED connected to pin number 13. What is the difference between digitalRead () and digitalWrite ()? • The digitalRead () function will read the HIGH/LOW value from the digital pin, and the digitalWrite () function is used to set the HIGH/LOW value of the digital pin.
  • 19.
    Serial.begin ( ) •The serial.begin( ) sets the baud rate for serial data communication. The baud rate signifies the data rate in bits per second. • The default baud rate in Arduino is 9600 bps (bits per second). We can specify other baud rates as well, such as 4800, 14400, 38400, 28800, etc. • The Serial.begin( ) is declared in two formats, which are shown below: • begin( speed ) • begin( speed, config) • Where, • serial: It signifies the serial port object. • speed: It signifies the baud rate or bps (bits per second) rate. It allows long data types. • config: It sets the stop, parity, and data bits. • Example : void setup ( ) { Serial.begin(4800); } void loop ( ) { } • The serial.begin (4800 ) open the serial port and set the bits per rate to 4800. The messages in Arduino are interchanged with the serial monitor at a rate of 4800 bits per second.
  • 20.
    LI B RAR IES • The Arduino environment can be extended through the use of libraries, just like most programming platforms. Libraries provide extra functionality for use in sketches, e.g. working with hardware or manipulating data. • To use a library in a sketch, select it from Sketch > Import Library. Official Arduino Libraries Robotics: Libraries for controlling servo and stepper motors. i. Servo - for controlling servo motors. ii. Stepper - for controlling stepper motors. Communication Libraries for using the SPI, I2C and UART protocols. i. SPI - for communicating with devices using the Serial Peripheral Interface (SPI) Bus. ii. Wire - Two Wire Interface (TWI/I2C) for sending and receiving data over a net of devices or sensors. iii. SoftwareSerial - for serial communication on any digital pins.
  • 21.
    B U ILT- I N F U N C T I O N S
  • 22.
  • 23.
    WHAT IS ASENSOR? • A Sensor is an input device which provides an output (signal) with respect to a specific physical quantity (input). • A Sensor is a device that converts signals from one energy domain to electrical domain. The definition of the Sensor can be better understood if we take an example in to consideration. 1. Infrared Sensor (IR Sensor) IR Sensors or Infrared Sensor are light based sensor that are used in various applications like Proximity and Object Detection. IR Sensors are used as proximity sensors in almost all mobile phones.
  • 24.
    (2)ULTRA SONIC SENSORAND (3)LDR SENSOR • The Ultrasonic Sensor is a Transceiver Module (Transmitter + Receiver). • It transmits High Frequency Ultrasonic Waves of frequency greater than 20 KHz.Intercepts the waves reflected by an obstacle. • An LDR or light dependent resistor is also known as photo resistor, photocell, photoconductor. It is a one type of resistor whose resistance varies depending on the amount of light falling on its surface. When the light falls on the resistor, then the resistance changes.
  • 25.
    4 . DHT11 SE NSOR • DHT11 sensor consists of a capacitive humidity sensing element and a thermistor for sensing temperature. The humidity sensing capacitor has two electrodes with a moisture holding substrate as a dielectric between them. Change in the capacitance value occurs with the change in humidity levels. The IC measure, process this changed resistance values and change them into digital form. • For measuring temperature this sensor uses a temperature coefficient thermistor, which causes a decrease in its resistance value with increase in temperature, this sensor is usually made up of semiconductor ceramics or polymers.
  • 26.
    RELAY MODULE • Relaymodules are simply circuit boards that house one or more relays. They come in a variety of shapes and sizes but are most commonly rectangular with 2, 4, or 8 relays mounted on them, sometimes even up to 16 relays. • Relay modules contain other components than the relay unit. These include indicator LEDs, protection diodes, transistors, resistors, and other parts. • The relay module’s function is mainly to switch electrical devices and systems on or off. It also serves to isolate the control circuit from the device or system being controlled. • This is important because it allows you the use a microcontroller or other low-power device to control devices with much higher voltages and currents. • Another relay module’s purpose is to amplify the control signal so that it can switch the higher currents using only a small out of power from a microcontroller.
  • 27.
    B L UE T O O T H M O D U L E • Bluetooth serves as a technological interface that facilitates the establishment of a protocol for data transmission between devices and helps any two devices connect wirelessly using Bluetooth Low Energy. The range of mediated data transfer for Bluetooth Low Energy modules is typically tens of meters, and data is conveyed within designated frequency bands.
  • 28.
    OLED-ORGANIC LIGHT EMITTING DIODE •Organic Light Emitting Diode popularly known as OLED is a solid-state device that consists of thin films of organic molecules that generate a bright light on the application of electric current. They are made by a series of organic thin films placed between two conductors.
  • 29.
    LCD-LIQUID CRYSTAL DISPLAY •LCD stands for Liquid Crystal Display. It is a flat panel display technology, mainly used in TVs and computer monitors, nowadays it is used for mobile phones also. These LCDs are completely different from that old CRT displays, it uses liquid crystals instead of cathode ray in its primary form of operation.
  • 30.
    APPLICATIONS OF ARDUINO 1.HomeAutomation: Control lighting, temperature, security systems, and energy management in your living space. 2.Robotics: Build robots by integrating sensors, motors, and controllers. 3.Wearable Technology: Create smartwatches, fitness trackers, and interactive garments. 4.Education: Use Arduino for teaching electronics and programming through hands-on projects.Feel free to explore these areas and unleash your creativity
  • 31.