KEMBAR78
How to Create an Event in Odoo 18 - Odoo 18 Slides | PPTX
How to Create an Event in
Odoo 18
Enterprise
Enterprise
Introduction
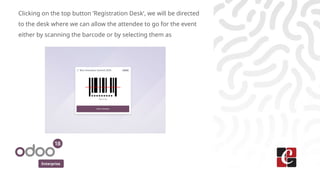
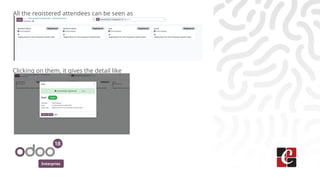
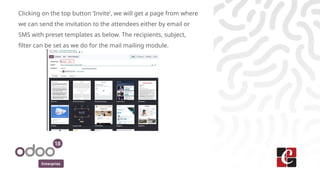
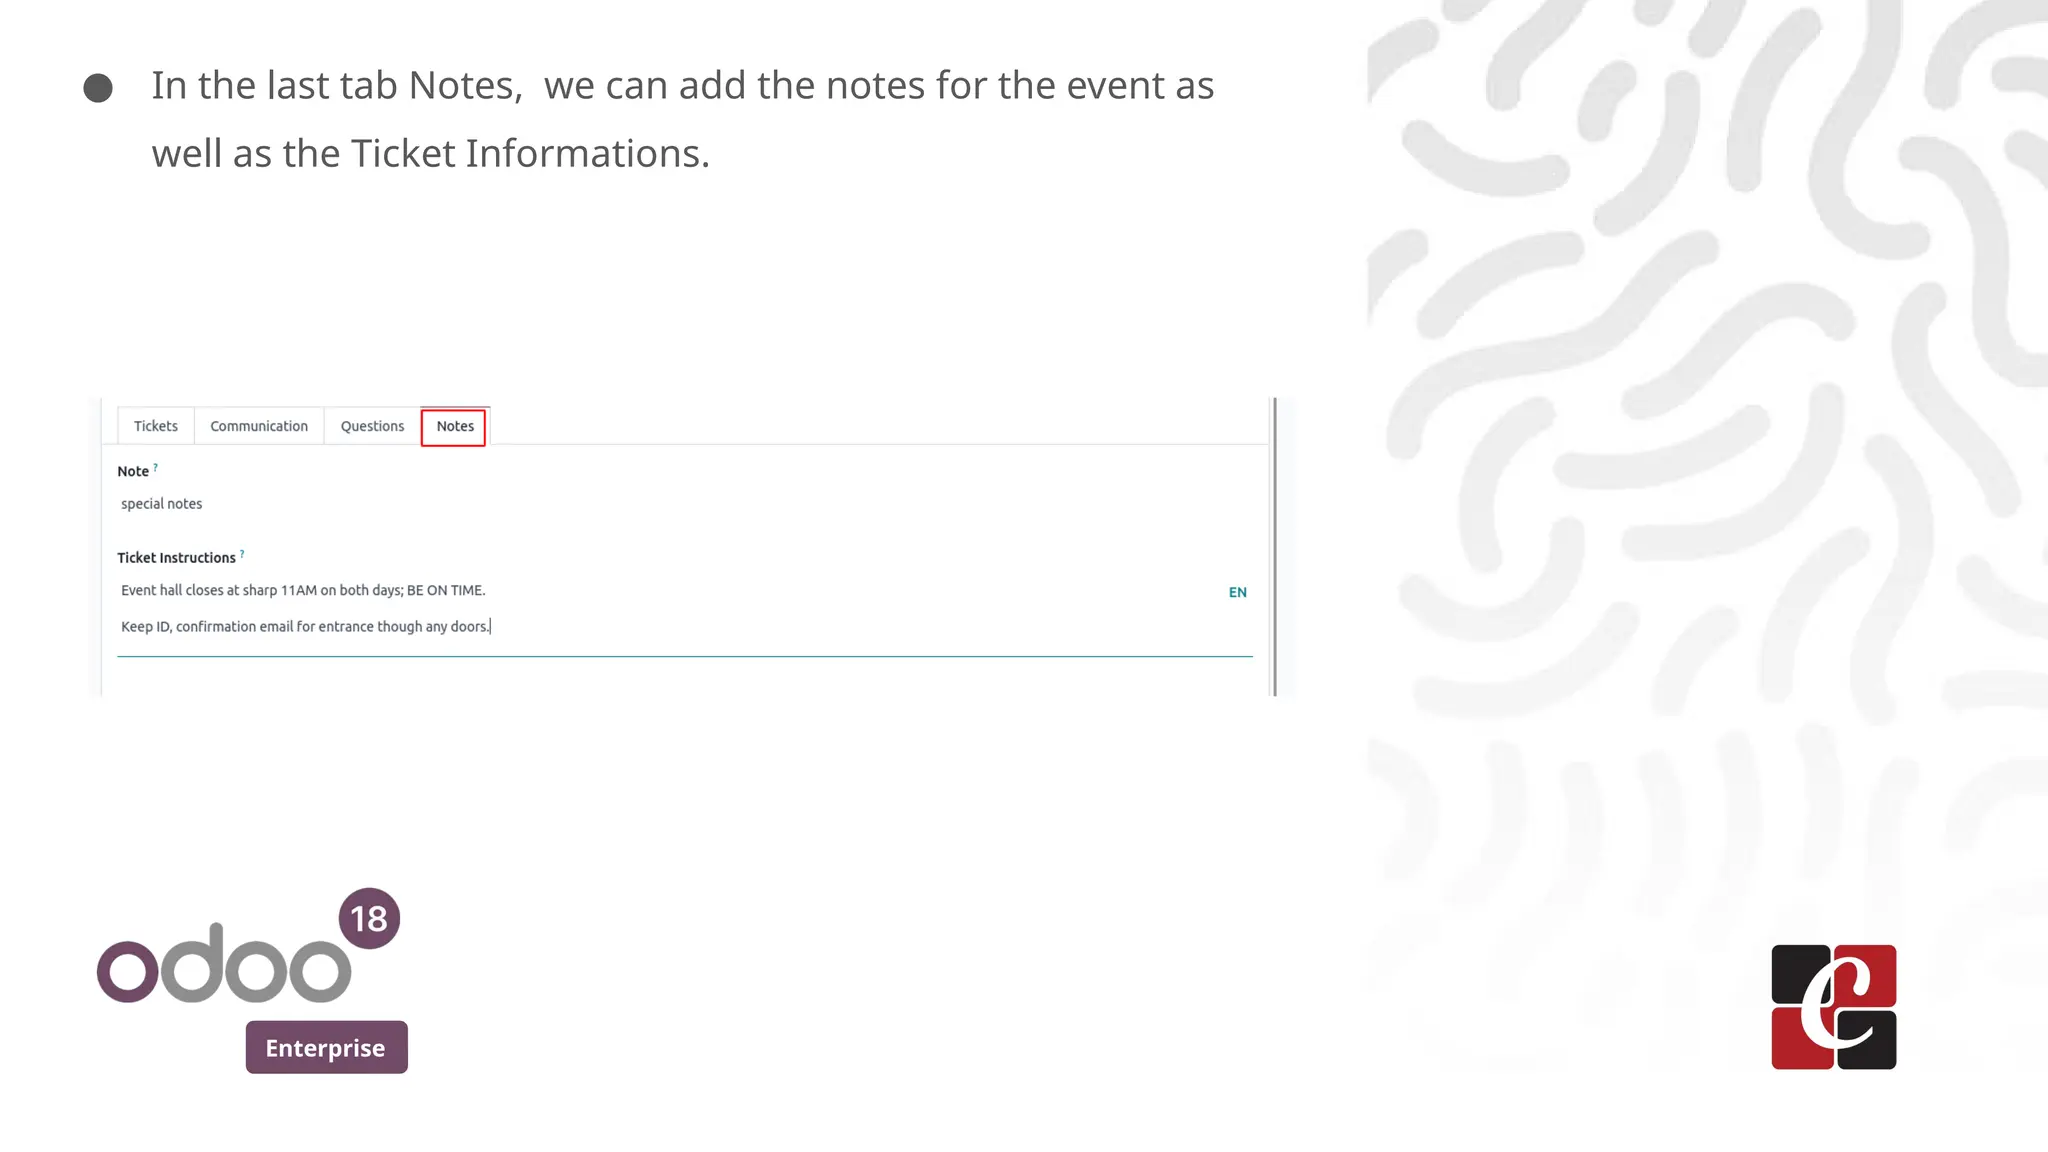
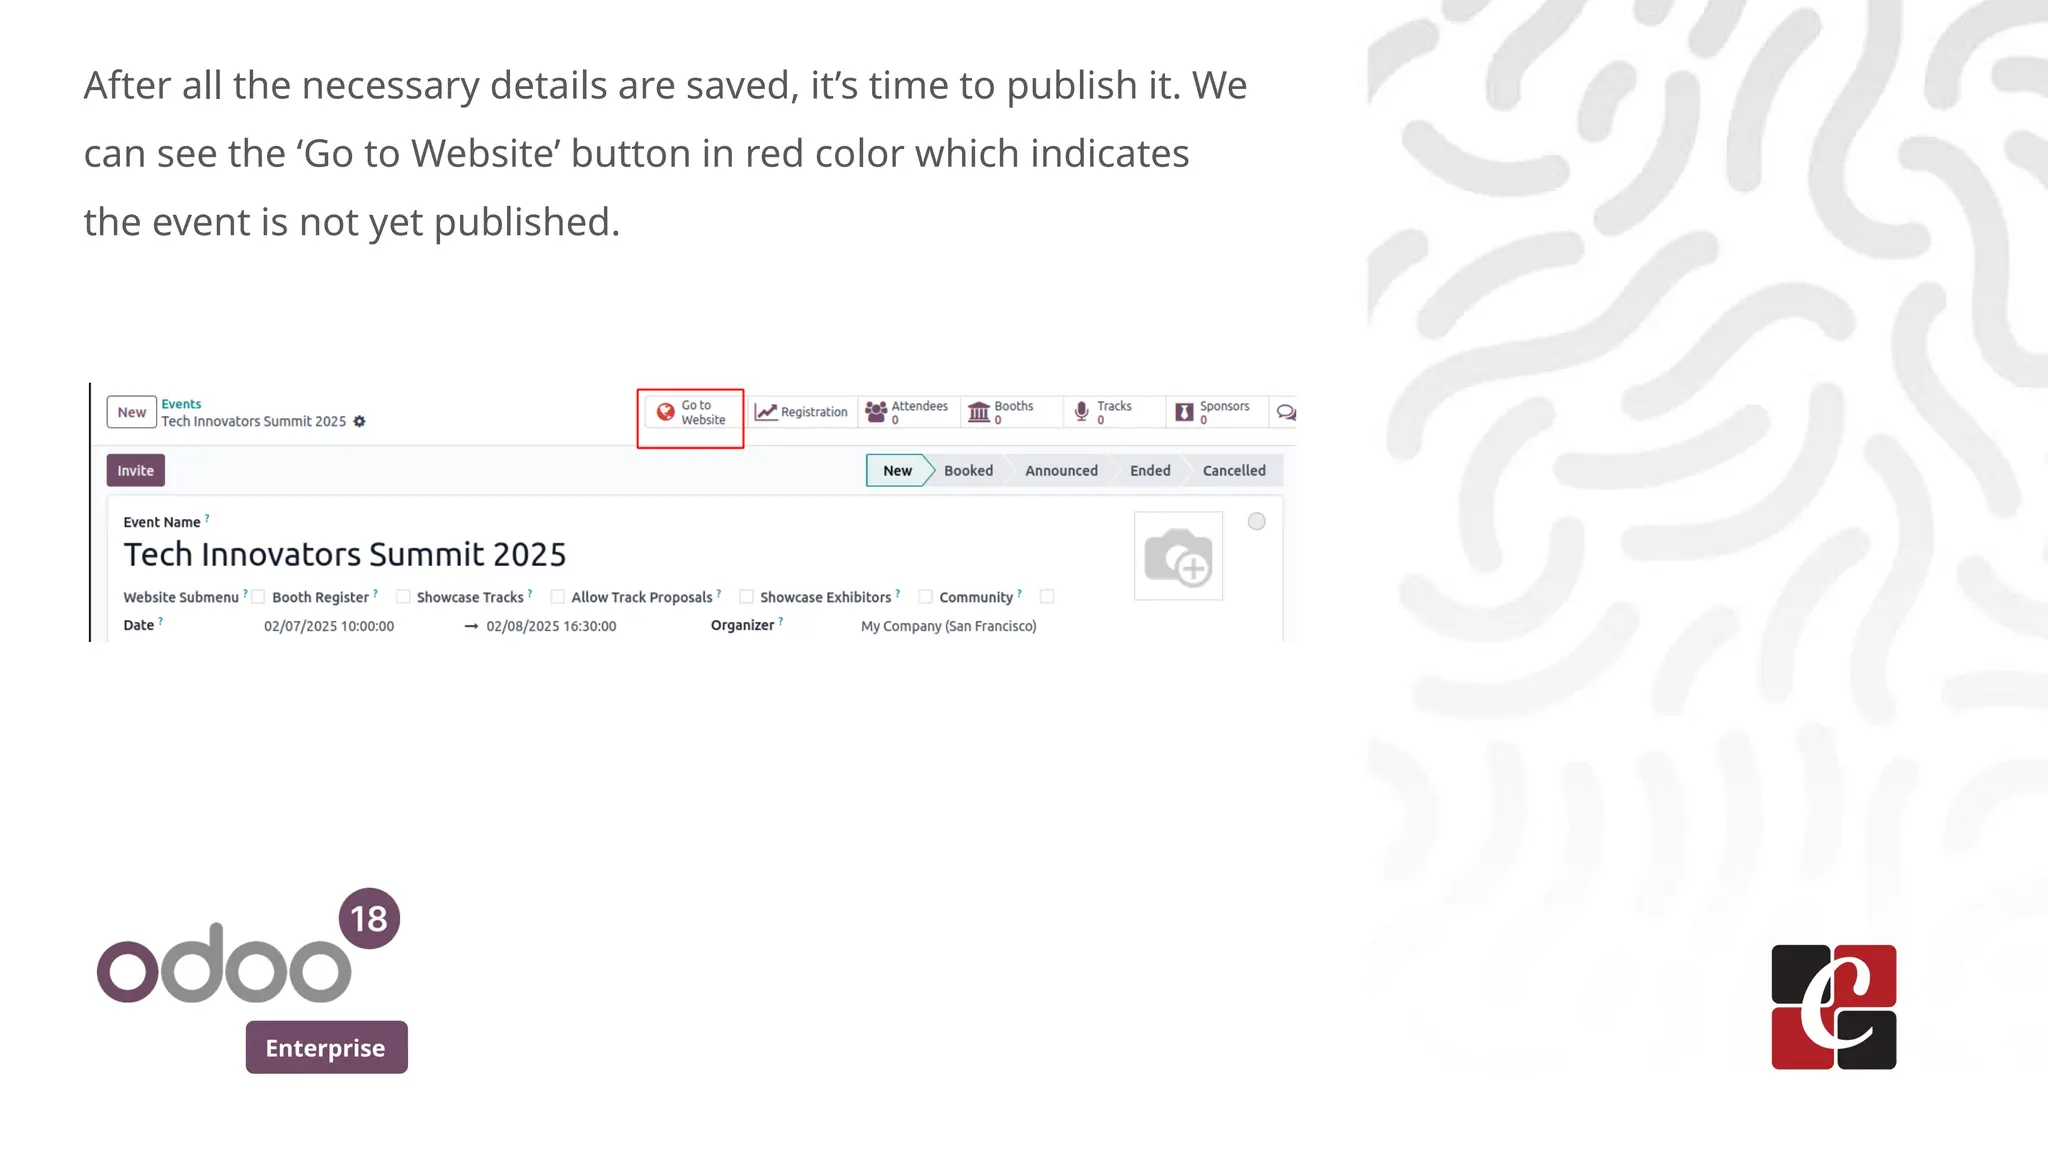
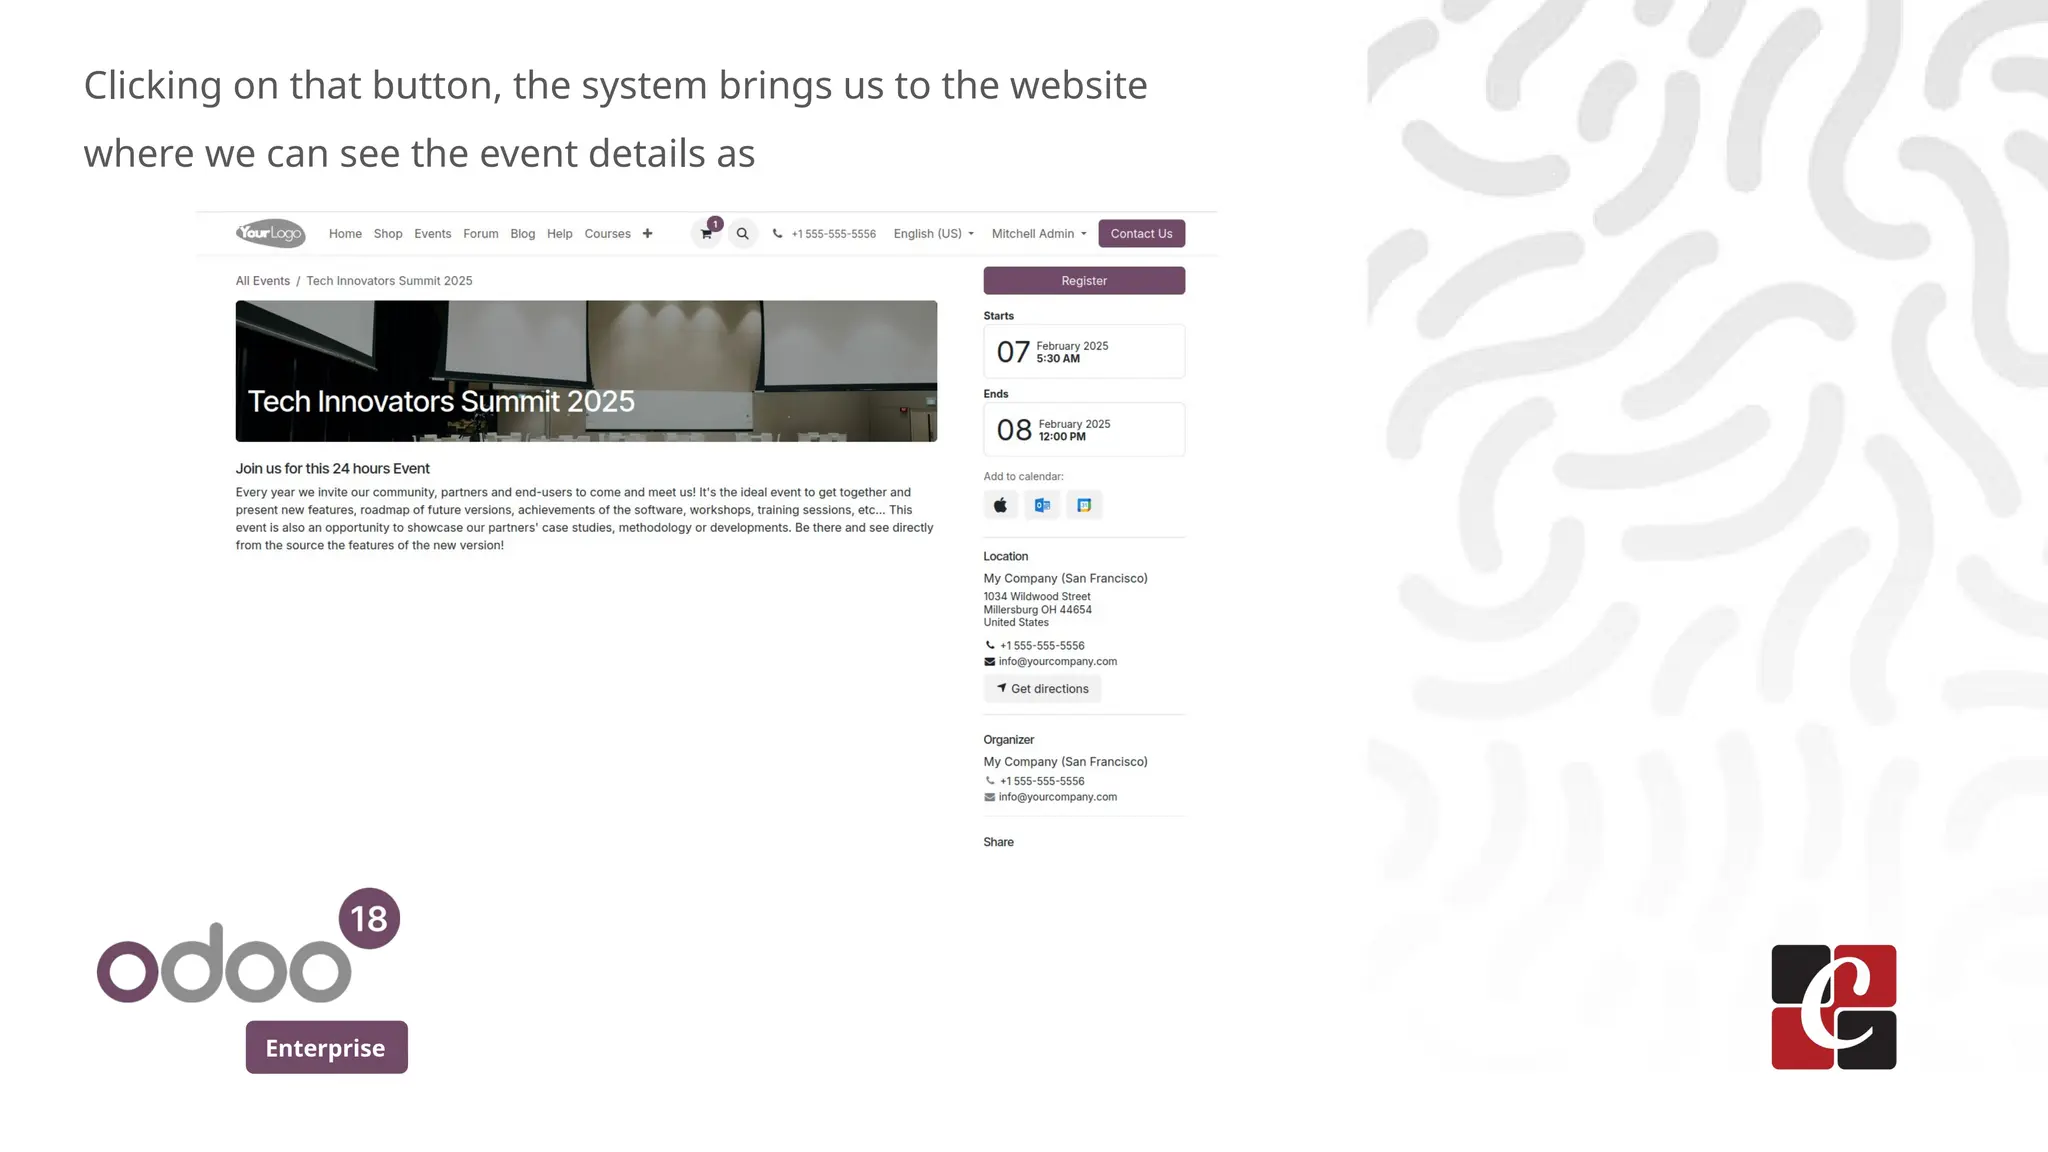
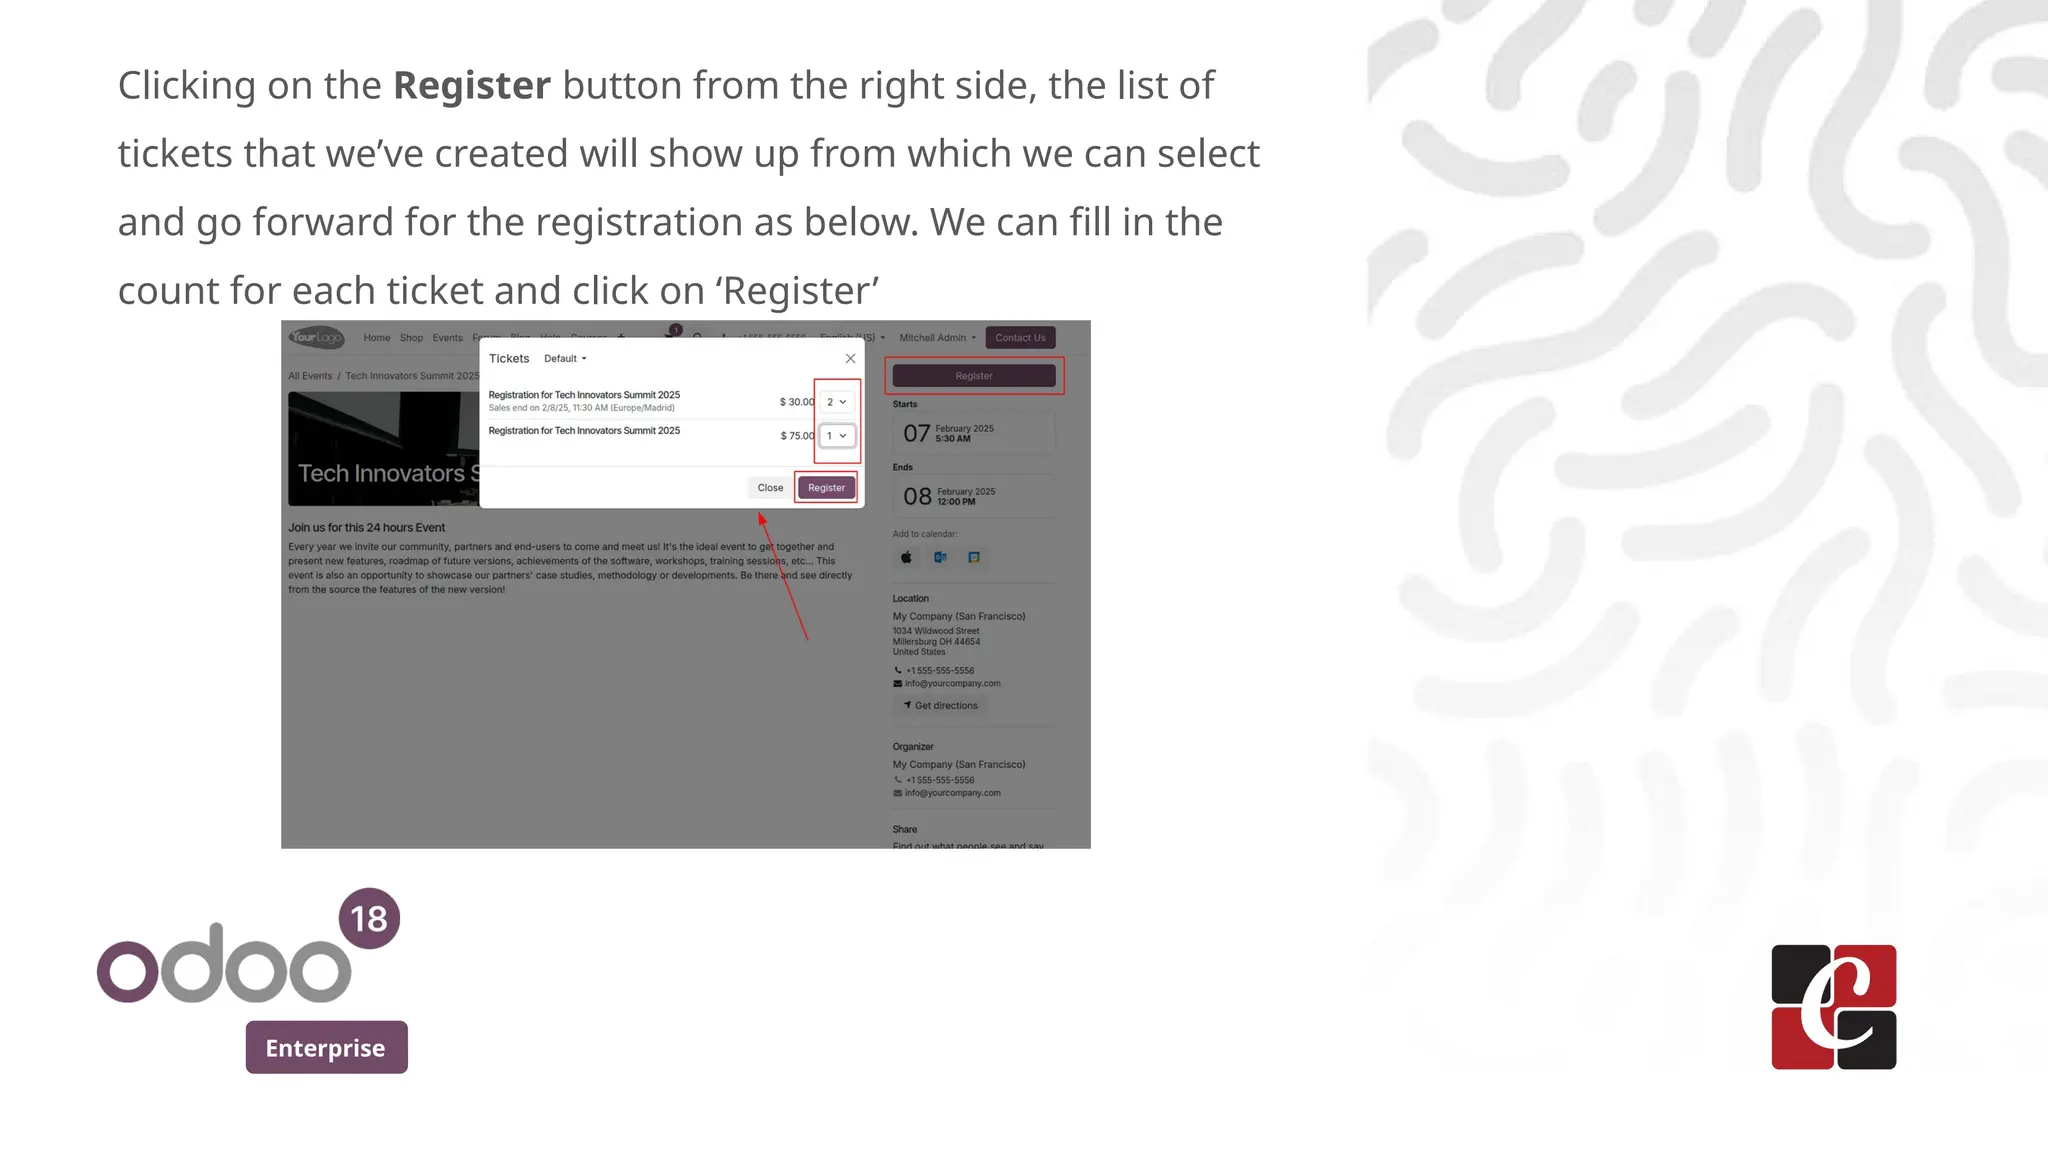
Creating an event in Odoo 18 is a straightforward process that allows
you to manage various aspects of your event efficiently.
Odoo 18 Events Module is a powerful tool for organizing and
managing events of all sizes, from conferences and workshops to
webinars and meetups. It streamlines event creation, ticketing,
attendee tracking, and promotions, integrating seamlessly with
Odoo’s CRM, marketing, and website modules. With automation and
real-time analytics, it simplifies event management, ensuring a
smooth and professional experience.
Enterprise
Let’s move to the Events module and we get the view like this which
shows all the events created so far.
Enterprise
To create a fresh event, click on New. Then, we can fill in with some
example data for the event
Enterprise
● Give a meaningful Name for the event, here it is ‘Tech Innovators Summit 2025’
● Date range be added with a start and end date and time
● Display Time zone indicates the time zone in which the event is to be displayed on the website.
● We can fill in the language if the communication emails of the attendees are to be translated to a
particular language.
● A pre configured event template can be selected for the event and saved in the Template field.
These templates can be created from the ‘Events>Configuration>Event Templates’ menu.
● For the short description, tags can be added for the event.
● Organizer and Responsible will be auto filled with the current company and user respectively. They
are editable also.
● We can add the Venue and Exhibition map for the visitors as any file from our system.
● The visibility can be Public, Via Link, Logged Users.
Enterprise
● The checkbox Limit Registrations can be enabled to set limit for
the number of attendees for the event. An integer field to enter
the count will be visible then.
● The Badge Dimension and Badge Background can be added so
that it will be visible for the badges.
● On the top, there are some boolean fields which allows us to add
the event as a website menu, booth register, etc like
Enterprise
● Under the Tickets tab, click on ‘Add a line’ to add tickets and set
some configurations like the Ticket product, it’s name, price, start
and end dates if any, maximum number of available tickets. The
seats taken will be auto updated there. Here we keep two types
of tickets; one is normal of price 50 and VIP ticket of price 75 of
maximum 100 count.
Enterprise
To send the communication mails/SMS for the event, they can be
configured under the Communication tab with needed templates
as
Enterprise
● From the Questions tab, multiple queries, their details like
mandatory, type, answer, etc can be set
Enterprise
Upon clicking the ‘Add a line’, a window comes where we can set
the details about the questions like
Enterprise
● In the last tab Notes, we can add the notes for the event as
well as the Ticket Informations.
Enterprise
After all the necessary details are saved, it’s time to publish it. We
can see the ‘Go to Website’ button in red color which indicates
the event is not yet published.
Enterprise
Clicking on that button, the system brings us to the website
where we can see the event details as
Enterprise
Clicking on the Register button from the right side, the list of
tickets that we’ve created will show up from which we can select
and go forward for the registration as below. We can fill in the
count for each ticket and click on ‘Register’
Enterprise
Then, we can fill in the details of each attendee like this. On the
top, the ticket number and type will be displayed as below. Fill in
the form and click on ‘Go to Payment’
Enterprise
Then, the user can confirm the payment to get the success page as
Enterprise
After the authorization, the page will get updated as below. We
can download the tickets and see the event details and the
payment information that we have completed.
Enterprise
The downloaded sample ticket can be seen as
Enterprise
Now, going back to the backend to see the events, take the menu
Events > Events again
Enterprise
Open the event and we can see that the smart button ‘Attendees’
and ‘Sales’ have updated with the values as below. Also, for the
tickets, the updation can be seen
Enterprise
Clicking on the Attendees button, their detail included with the
admin can be seen as
Using the last two buttons in the tree view, the attendees can be
marked as attending or it can be cancelled also.
Enterprise
Clicking on the top button ‘Registration Desk’, we will be directed
to the desk where we can allow the attendee to go for the event
either by scanning the barcode or by selecting them as
Enterprise
All the registered attendees can be seen as
Clicking on them, it gives the detail like
Enterprise
Clicking on the top button ‘Invite’, we will get a page from where
we can send the invitation to the attendees either by email or
SMS with preset templates as below. The recipients, subject,
filter can be set as we do for the mail mailing module.
For More Info.
Check our company website for related blogs
and Odoo book.
Check our YouTube channel for
functional and technical videos in Odoo.
Enterprise
www.cybrosys.com

How to Create an Event in Odoo 18 - Odoo 18 Slides

  • 1.
    How to Createan Event in Odoo 18 Enterprise
  • 2.
    Enterprise Introduction Creating an eventin Odoo 18 is a straightforward process that allows you to manage various aspects of your event efficiently. Odoo 18 Events Module is a powerful tool for organizing and managing events of all sizes, from conferences and workshops to webinars and meetups. It streamlines event creation, ticketing, attendee tracking, and promotions, integrating seamlessly with Odoo’s CRM, marketing, and website modules. With automation and real-time analytics, it simplifies event management, ensuring a smooth and professional experience.
  • 3.
    Enterprise Let’s move tothe Events module and we get the view like this which shows all the events created so far.
  • 4.
    Enterprise To create afresh event, click on New. Then, we can fill in with some example data for the event
  • 5.
    Enterprise ● Give ameaningful Name for the event, here it is ‘Tech Innovators Summit 2025’ ● Date range be added with a start and end date and time ● Display Time zone indicates the time zone in which the event is to be displayed on the website. ● We can fill in the language if the communication emails of the attendees are to be translated to a particular language. ● A pre configured event template can be selected for the event and saved in the Template field. These templates can be created from the ‘Events>Configuration>Event Templates’ menu. ● For the short description, tags can be added for the event. ● Organizer and Responsible will be auto filled with the current company and user respectively. They are editable also. ● We can add the Venue and Exhibition map for the visitors as any file from our system. ● The visibility can be Public, Via Link, Logged Users.
  • 6.
    Enterprise ● The checkboxLimit Registrations can be enabled to set limit for the number of attendees for the event. An integer field to enter the count will be visible then. ● The Badge Dimension and Badge Background can be added so that it will be visible for the badges. ● On the top, there are some boolean fields which allows us to add the event as a website menu, booth register, etc like
  • 7.
    Enterprise ● Under theTickets tab, click on ‘Add a line’ to add tickets and set some configurations like the Ticket product, it’s name, price, start and end dates if any, maximum number of available tickets. The seats taken will be auto updated there. Here we keep two types of tickets; one is normal of price 50 and VIP ticket of price 75 of maximum 100 count.
  • 8.
    Enterprise To send thecommunication mails/SMS for the event, they can be configured under the Communication tab with needed templates as
  • 9.
    Enterprise ● From theQuestions tab, multiple queries, their details like mandatory, type, answer, etc can be set
  • 10.
    Enterprise Upon clicking the‘Add a line’, a window comes where we can set the details about the questions like
  • 11.
    Enterprise ● In thelast tab Notes, we can add the notes for the event as well as the Ticket Informations.
  • 12.
    Enterprise After all thenecessary details are saved, it’s time to publish it. We can see the ‘Go to Website’ button in red color which indicates the event is not yet published.
  • 13.
    Enterprise Clicking on thatbutton, the system brings us to the website where we can see the event details as
  • 14.
    Enterprise Clicking on theRegister button from the right side, the list of tickets that we’ve created will show up from which we can select and go forward for the registration as below. We can fill in the count for each ticket and click on ‘Register’
  • 15.
    Enterprise Then, we canfill in the details of each attendee like this. On the top, the ticket number and type will be displayed as below. Fill in the form and click on ‘Go to Payment’
  • 16.
    Enterprise Then, the usercan confirm the payment to get the success page as
  • 17.
    Enterprise After the authorization,the page will get updated as below. We can download the tickets and see the event details and the payment information that we have completed.
  • 18.
    Enterprise The downloaded sampleticket can be seen as
  • 19.
    Enterprise Now, going backto the backend to see the events, take the menu Events > Events again
  • 20.
    Enterprise Open the eventand we can see that the smart button ‘Attendees’ and ‘Sales’ have updated with the values as below. Also, for the tickets, the updation can be seen
  • 21.
    Enterprise Clicking on theAttendees button, their detail included with the admin can be seen as Using the last two buttons in the tree view, the attendees can be marked as attending or it can be cancelled also.
  • 22.
    Enterprise Clicking on thetop button ‘Registration Desk’, we will be directed to the desk where we can allow the attendee to go for the event either by scanning the barcode or by selecting them as
  • 23.
    Enterprise All the registeredattendees can be seen as Clicking on them, it gives the detail like
  • 24.
    Enterprise Clicking on thetop button ‘Invite’, we will get a page from where we can send the invitation to the attendees either by email or SMS with preset templates as below. The recipients, subject, filter can be set as we do for the mail mailing module.
  • 25.
    For More Info. Checkour company website for related blogs and Odoo book. Check our YouTube channel for functional and technical videos in Odoo. Enterprise www.cybrosys.com