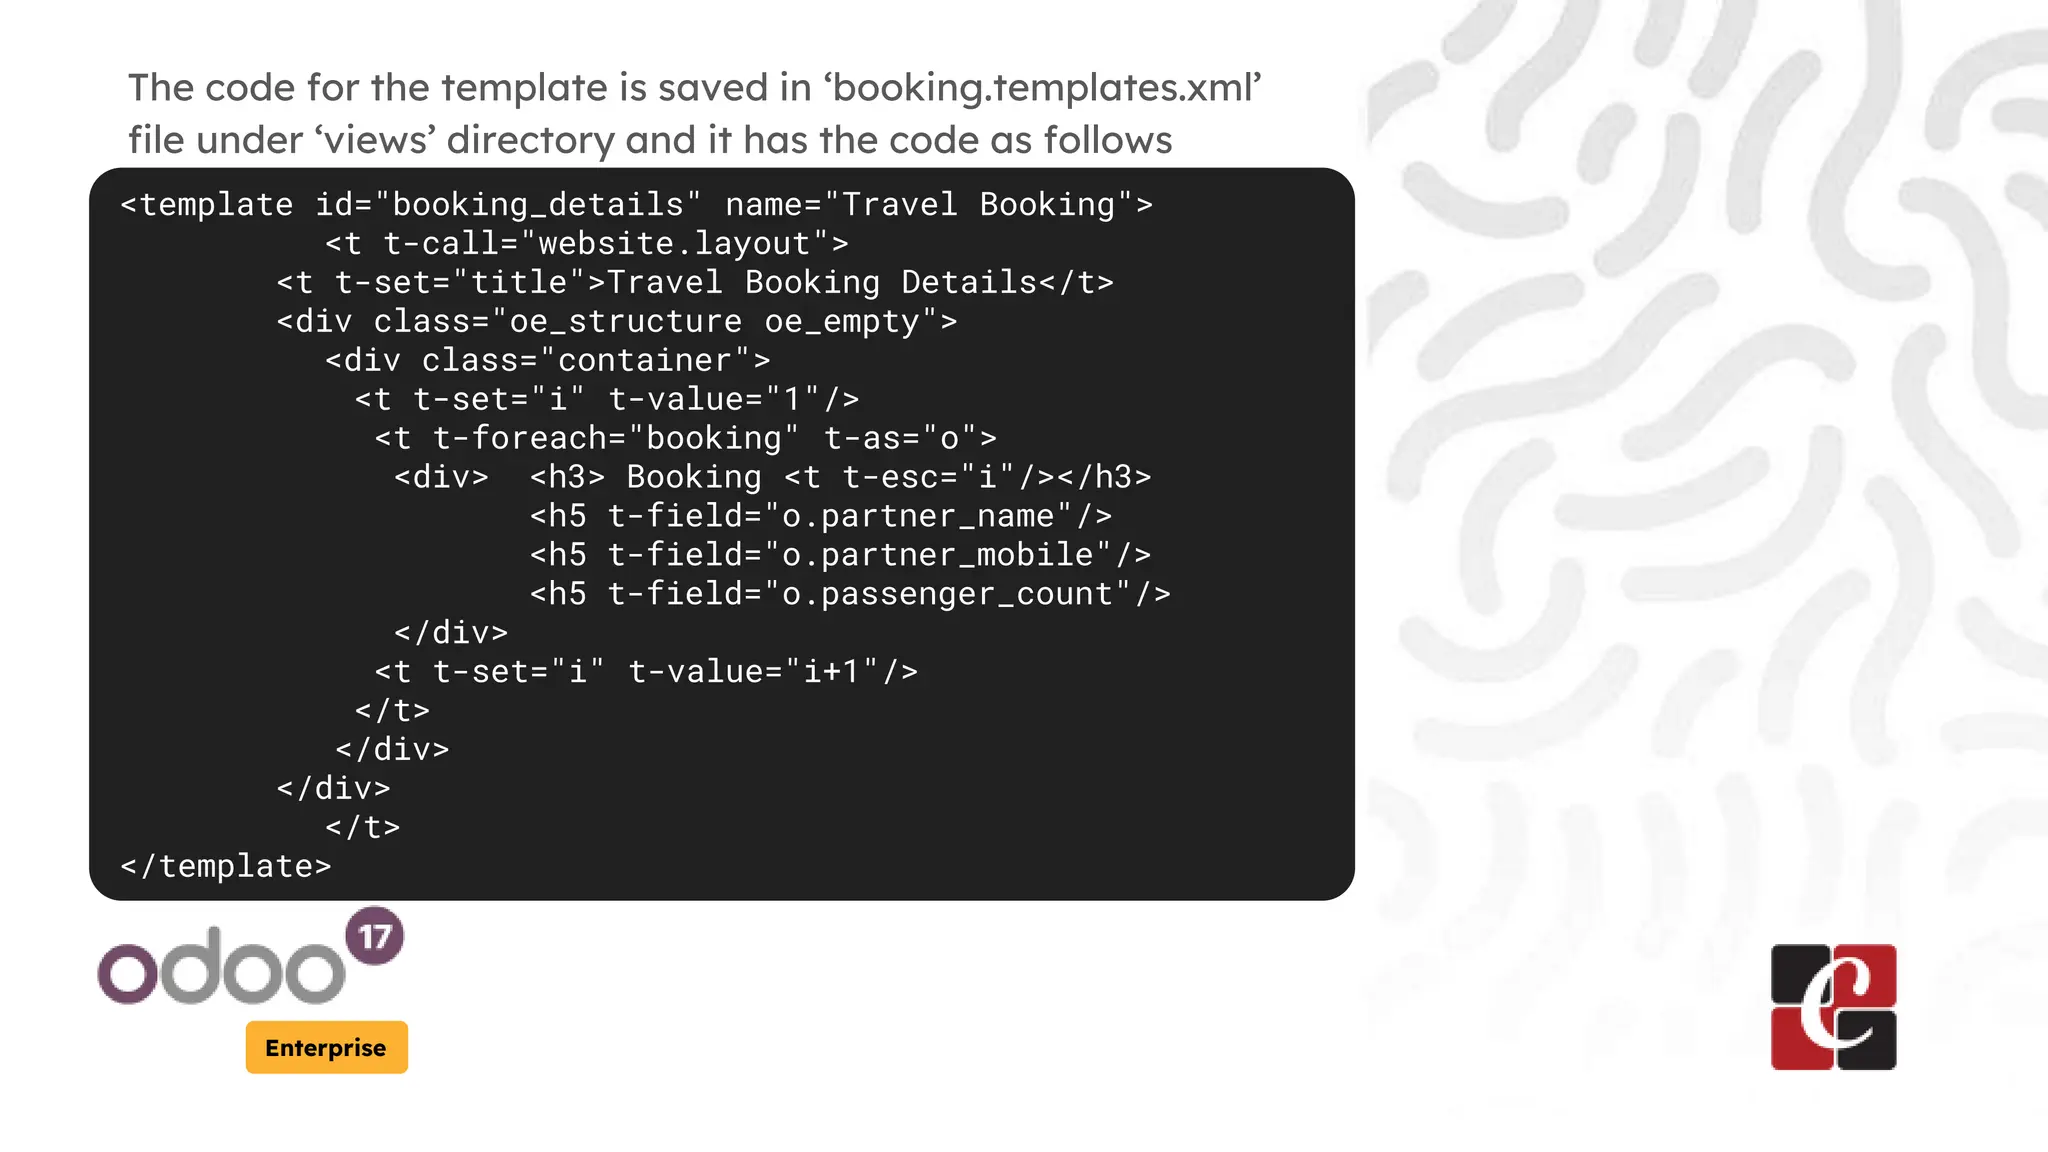
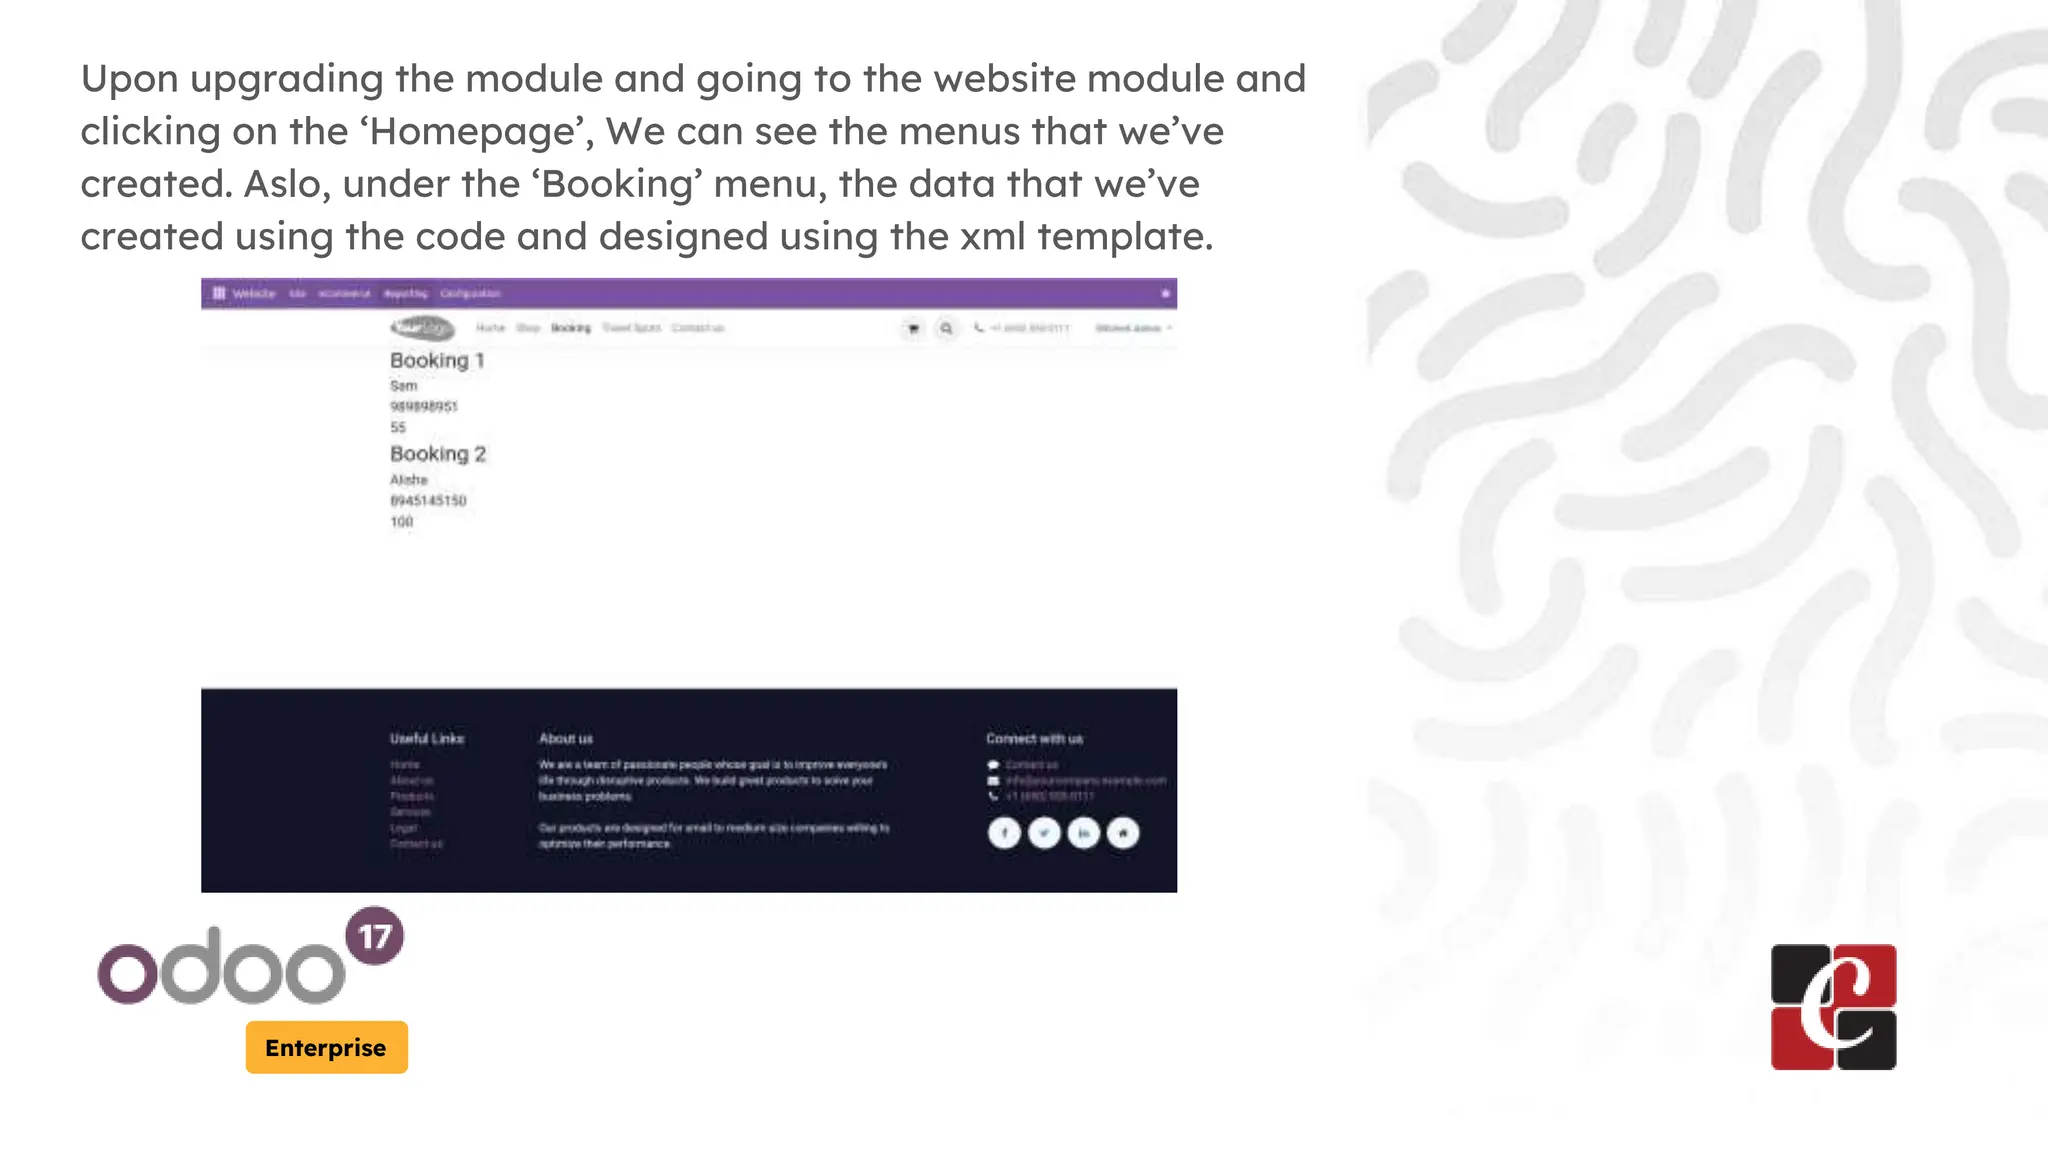
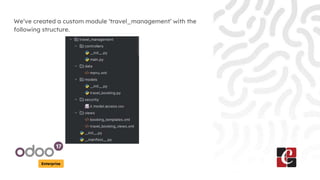
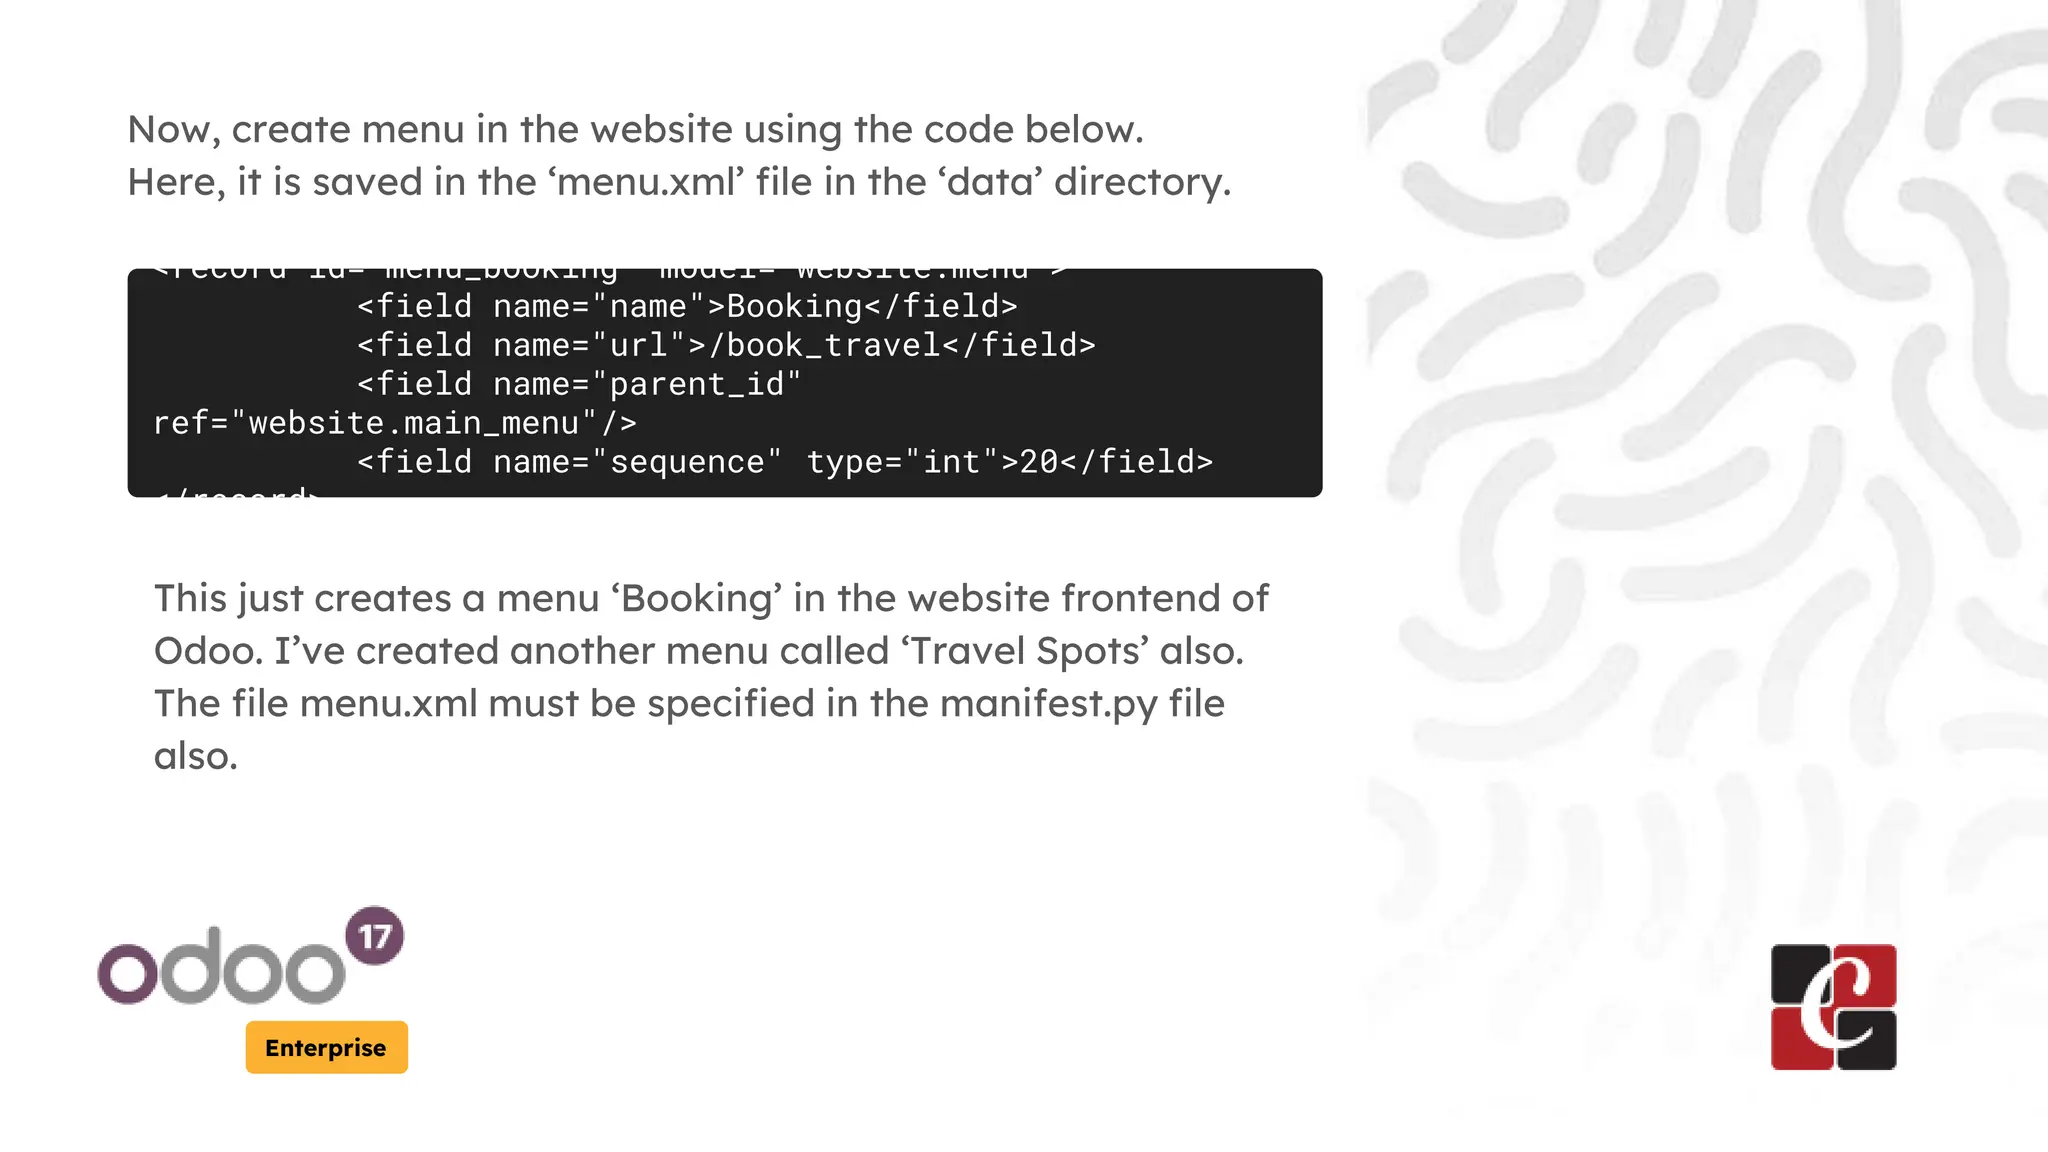
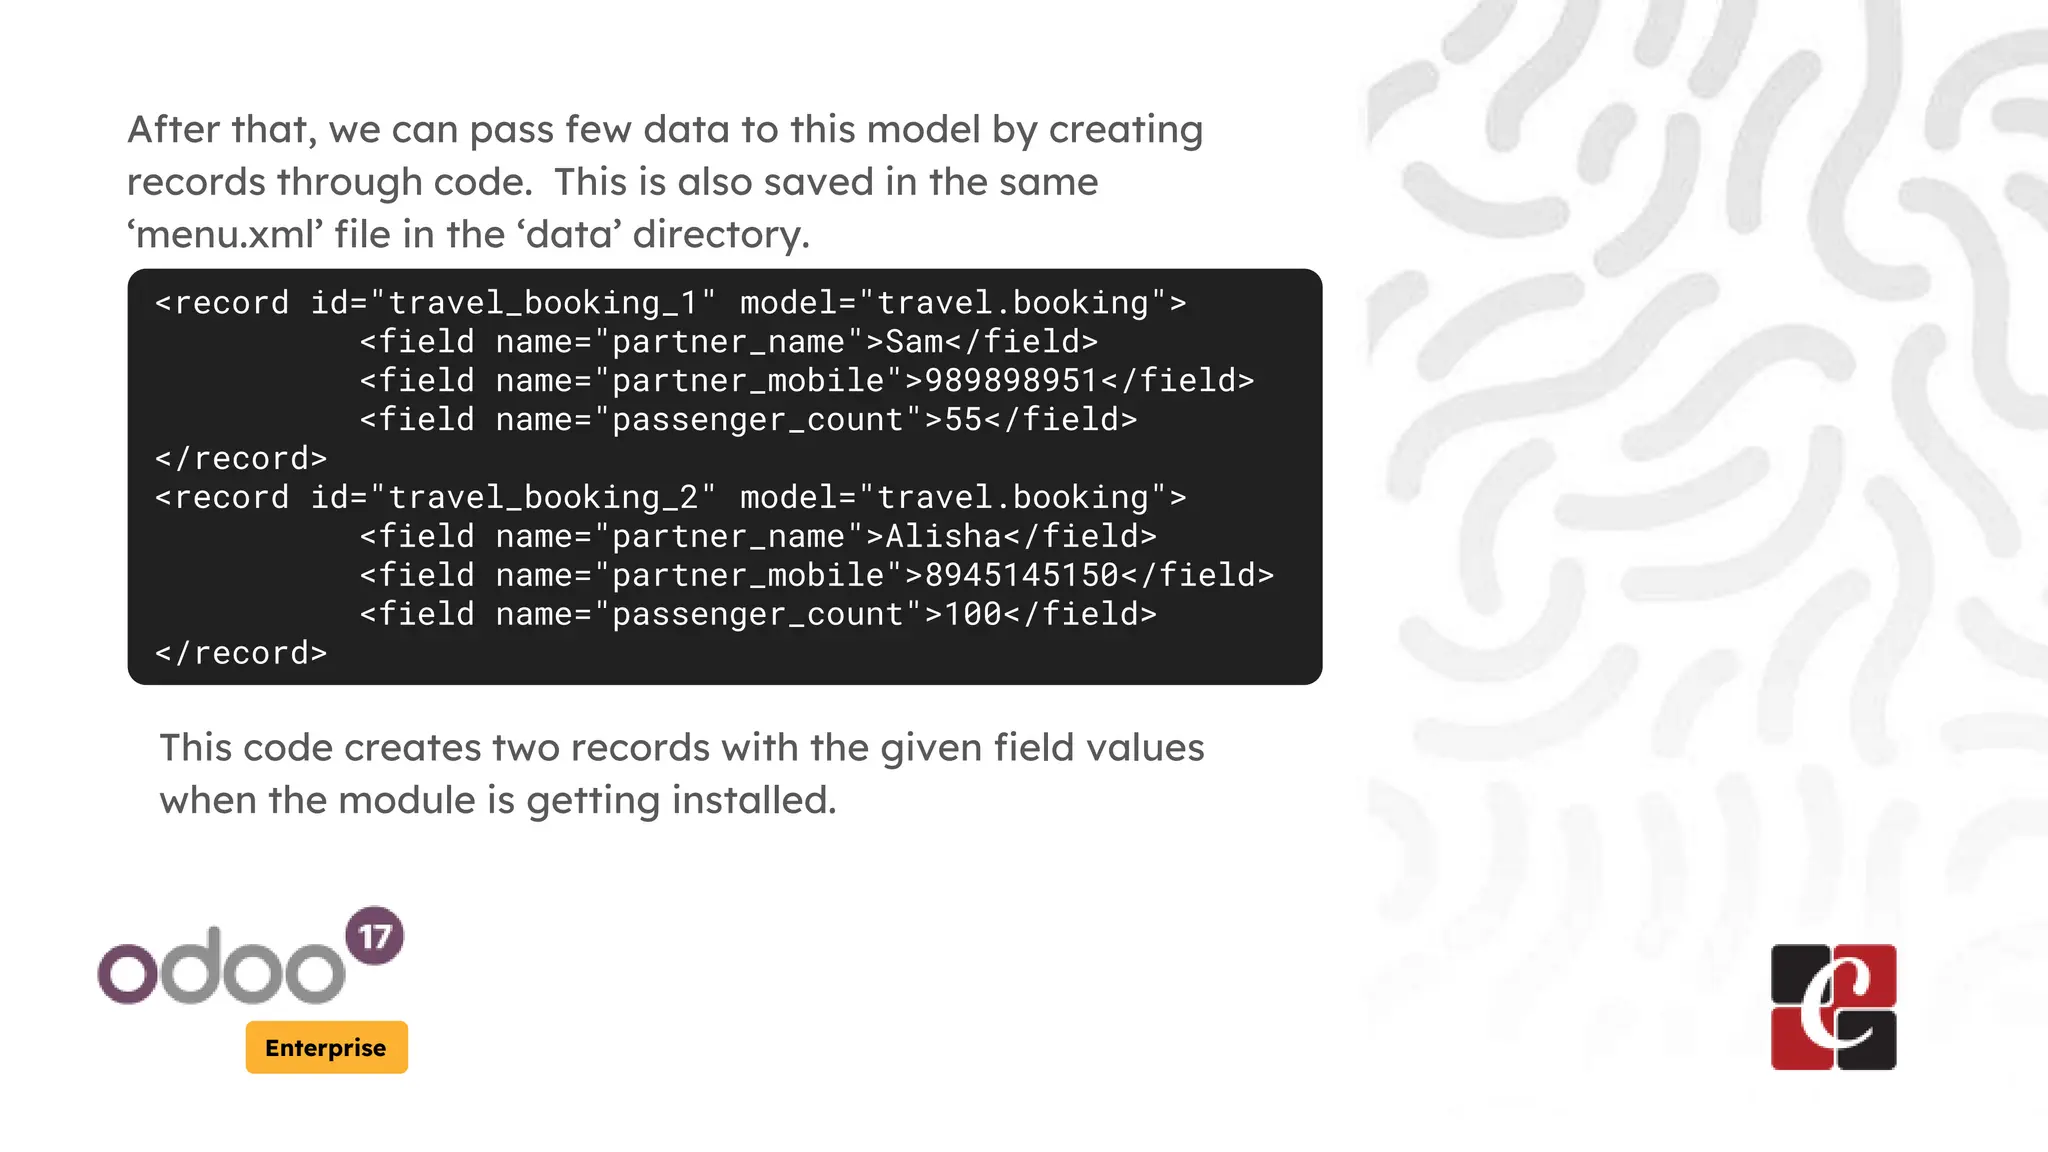
KEMBAR78
How to Store Data on the Odoo 17 Website | PPTX
Storing Data on Odoo
17 Website
Enterprise
Introduction
Enterprise
Here we are going to discuss how to store data in Odoo 17 Website.
It includes defining a model with few fields in it. Add demo data into
the model using data directory. Also using a controller, pass the values
into the template while rendering it and display the values in the
website.
Enterprise
We’ve created a custom module ‘travel_management’ with the
following structure.
Enterprise
First, in the module, we have to created ‘models’ directory in
which the custom model is defined. Here, for the travel booking,
we have the class and attributes as
class TravelBooking(models.Model):
_name = 'travel.booking'
_description = 'Travel Card'
_check_company_auto = True
partner_name = fields.Char(string="Partner
Name",
required=True)
partner_mobile = fields.Char(string="Mobile")
passenger_count = fields.Integer(string="No of
Passengers")
Enterprise
Now, create menu in the website using the code below.
Here, it is saved in the ‘menu.xml’ file in the ‘data’ directory.
<record id="menu_booking" model="website.menu">
<field name="name">Booking</field>
<field name="url">/book_travel</field>
<field name="parent_id"
ref="website.main_menu"/>
<field name="sequence" type="int">20</field>
</record>
This just creates a menu ‘Booking’ in the website frontend of
Odoo. I’ve created another menu called ‘Travel Spots’ also.
The file menu.xml must be specified in the manifest.py file
also.
Enterprise
After that, we can pass few data to this model by creating
records through code. This is also saved in the same
‘menu.xml’ file in the ‘data’ directory.
<record id="travel_booking_1" model="travel.booking">
<field name="partner_name">Sam</field>
<field name="partner_mobile">989898951</field>
<field name="passenger_count">55</field>
</record>
<record id="travel_booking_2" model="travel.booking">
<field name="partner_name">Alisha</field>
<field name="partner_mobile">8945145150</field>
<field name="passenger_count">100</field>
</record>
This code creates two records with the given field values
when the module is getting installed.
Enterprise
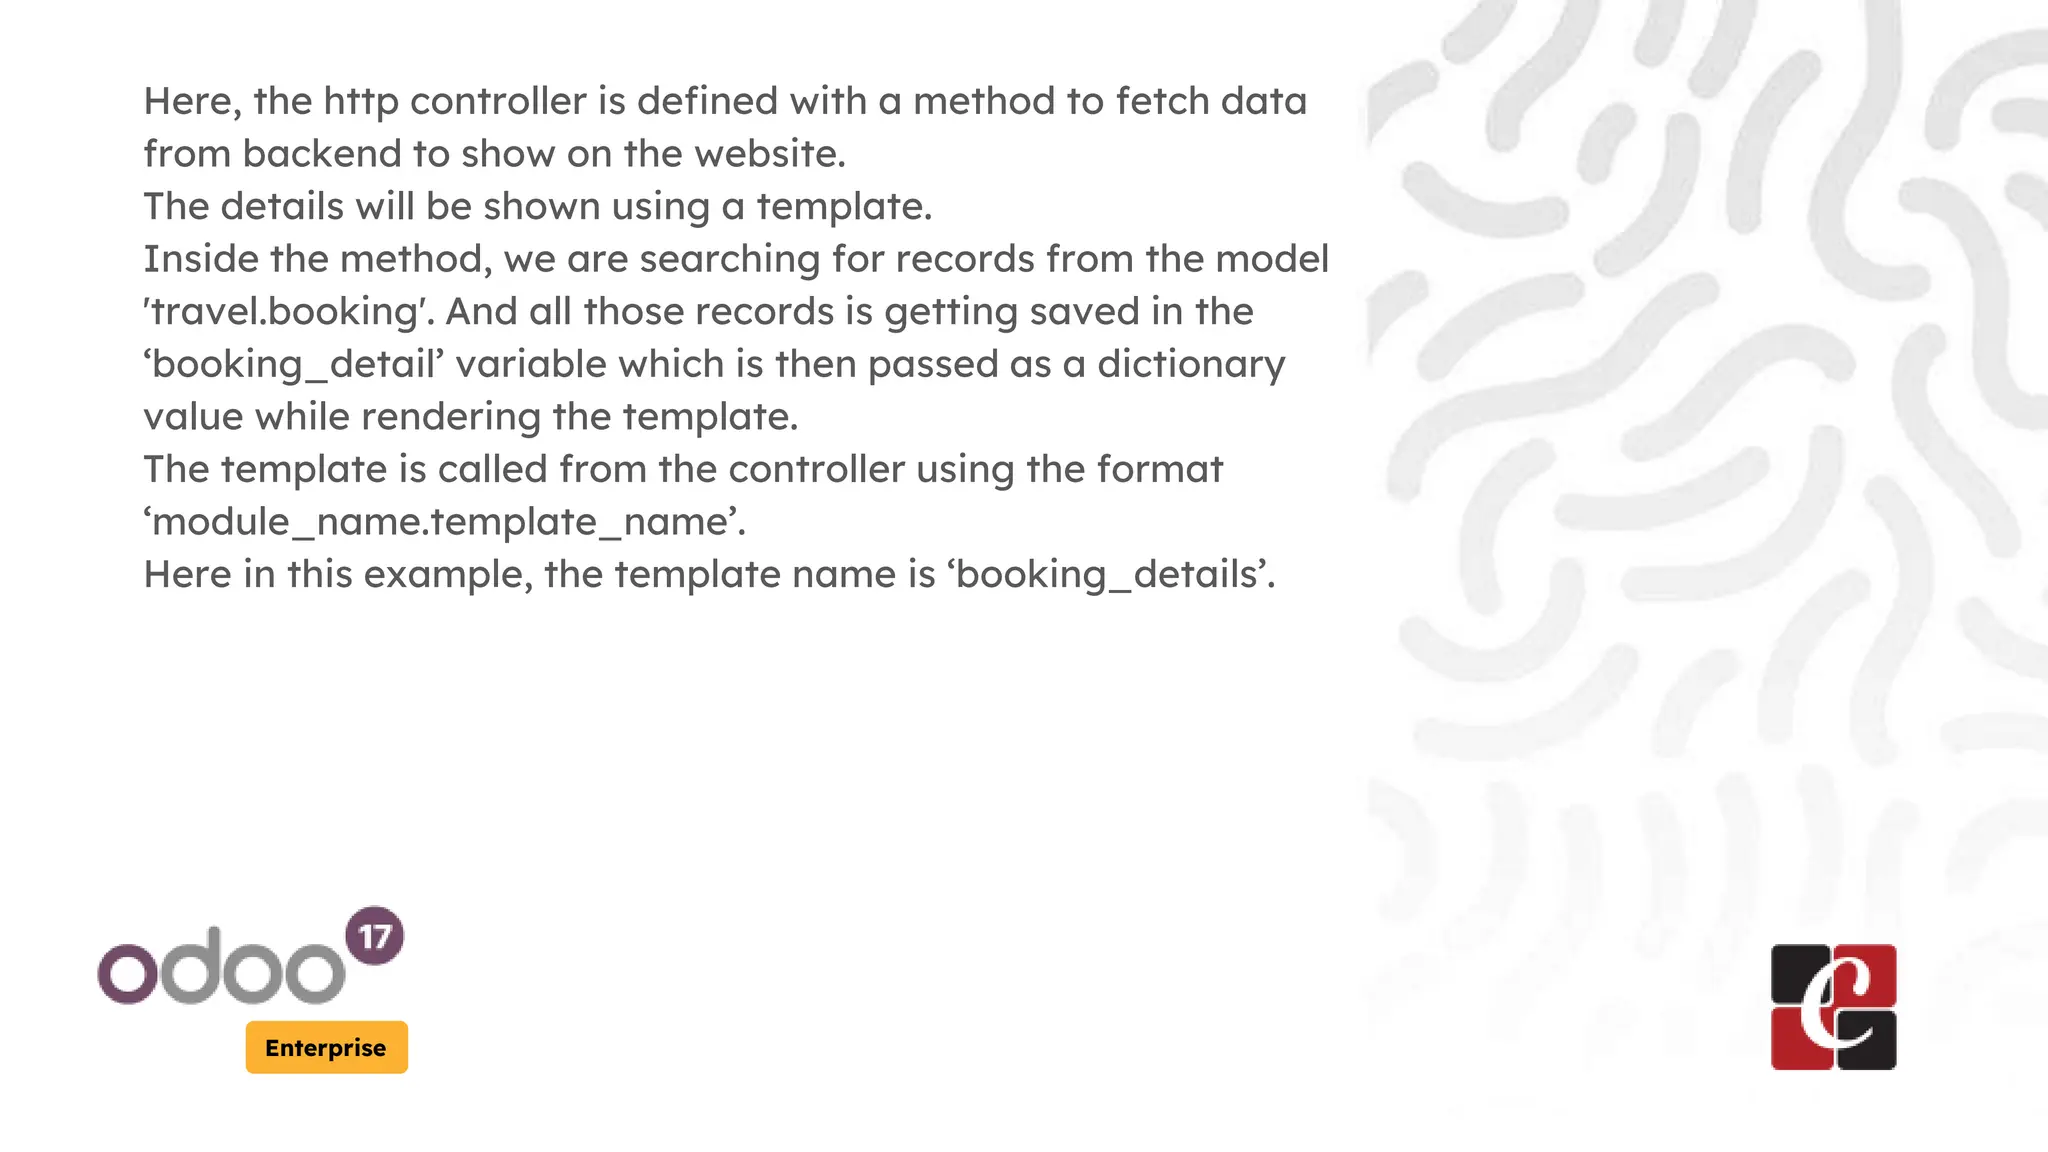
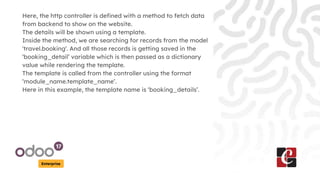
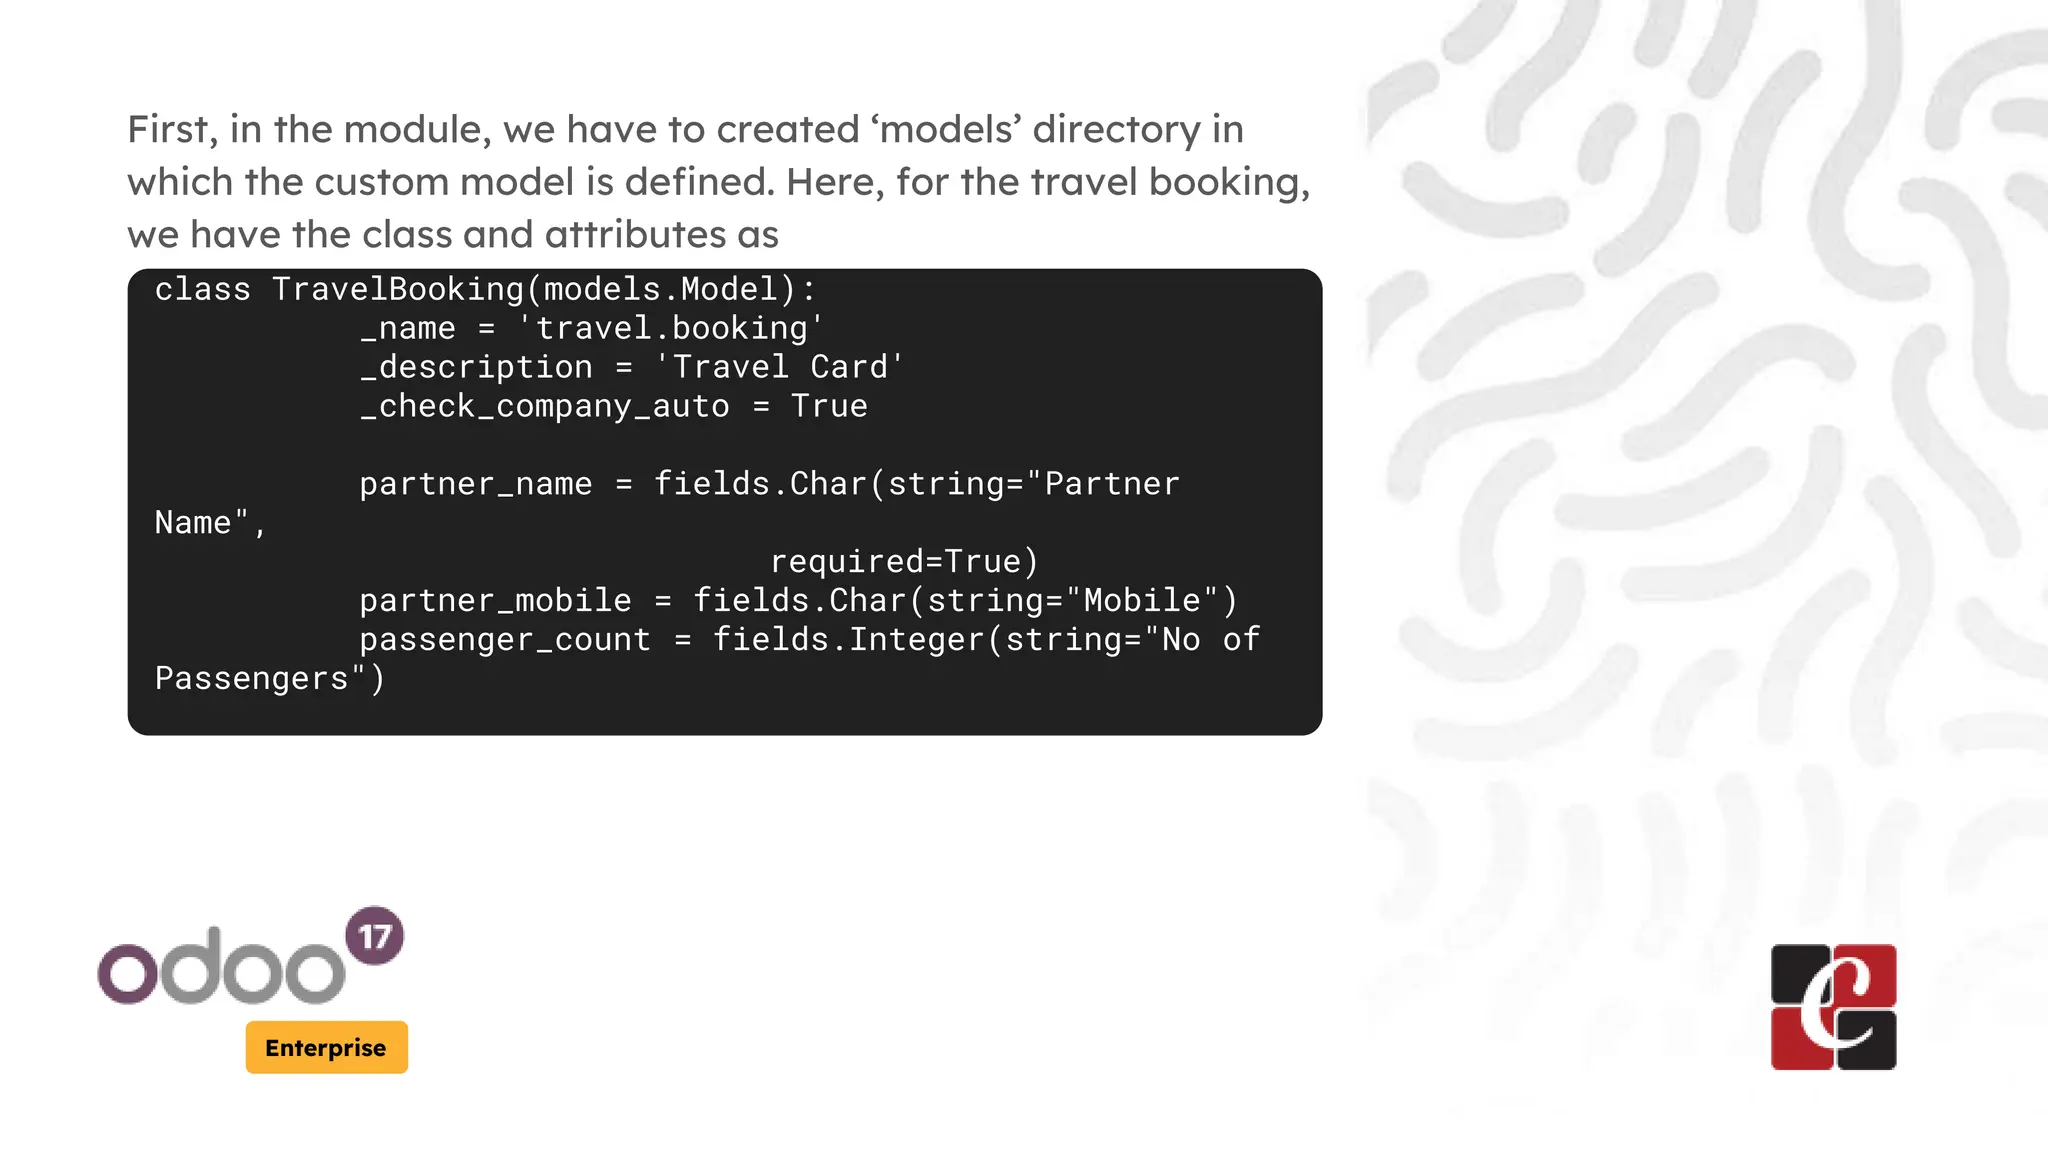
Now, from the controllers, we can pass these values using the
template that we design. The controller ‘main.py’ file
from odoo import http
from odoo.http import request
class TravelData(http.Controller):
@http.route('/book_travel', type='http', auth="public",
website=True)
def travel_booking_info(self, **arg):
booking_detail=request.env['travel.booking'].sudo().search([]
)
values = {'booking': booking_detail}
return request.render(
'travel_management.booking_details', values)
Enterprise
Here, the http controller is defined with a method to fetch data
from backend to show on the website.
The details will be shown using a template.
Inside the method, we are searching for records from the model
'travel.booking'. And all those records is getting saved in the
‘booking_detail’ variable which is then passed as a dictionary
value while rendering the template.
The template is called from the controller using the format
‘module_name.template_name’.
Here in this example, the template name is ‘booking_details’.
Enterprise
The code for the template is saved in ‘booking.templates.xml’
file under ‘views’ directory and it has the code as follows
<template id="booking_details" name="Travel Booking">
<t t-call="website.layout">
<t t-set="title">Travel Booking Details</t>
<div class="oe_structure oe_empty">
<div class="container">
<t t-set="i" t-value="1"/>
<t t-foreach="booking" t-as="o">
<div> <h3> Booking <t t-esc="i"/></h3>
<h5 t-field="o.partner_name"/>
<h5 t-field="o.partner_mobile"/>
<h5 t-field="o.passenger_count"/>
</div>
<t t-set="i" t-value="i+1"/>
</t>
</div>
</div>
</t>
</template>
Enterprise
Upon upgrading the module and going to the website module and
clicking on the ‘Homepage’, We can see the menus that we’ve
created. Aslo, under the ‘Booking’ menu, the data that we’ve
created using the code and designed using the xml template.
For More Info.
Check our company website for related
blogs and Odoo book.
Check our YouTube channel for
functional and technical videos in Odoo.
Enterprise
www.cybrosys.com

How to Store Data on the Odoo 17 Website

  • 1.
    Storing Data onOdoo 17 Website Enterprise
  • 2.
    Introduction Enterprise Here we aregoing to discuss how to store data in Odoo 17 Website. It includes defining a model with few fields in it. Add demo data into the model using data directory. Also using a controller, pass the values into the template while rendering it and display the values in the website.
  • 3.
    Enterprise We’ve created acustom module ‘travel_management’ with the following structure.
  • 4.
    Enterprise First, in themodule, we have to created ‘models’ directory in which the custom model is defined. Here, for the travel booking, we have the class and attributes as class TravelBooking(models.Model): _name = 'travel.booking' _description = 'Travel Card' _check_company_auto = True partner_name = fields.Char(string="Partner Name", required=True) partner_mobile = fields.Char(string="Mobile") passenger_count = fields.Integer(string="No of Passengers")
  • 5.
    Enterprise Now, create menuin the website using the code below. Here, it is saved in the ‘menu.xml’ file in the ‘data’ directory. <record id="menu_booking" model="website.menu"> <field name="name">Booking</field> <field name="url">/book_travel</field> <field name="parent_id" ref="website.main_menu"/> <field name="sequence" type="int">20</field> </record> This just creates a menu ‘Booking’ in the website frontend of Odoo. I’ve created another menu called ‘Travel Spots’ also. The file menu.xml must be specified in the manifest.py file also.
  • 6.
    Enterprise After that, wecan pass few data to this model by creating records through code. This is also saved in the same ‘menu.xml’ file in the ‘data’ directory. <record id="travel_booking_1" model="travel.booking"> <field name="partner_name">Sam</field> <field name="partner_mobile">989898951</field> <field name="passenger_count">55</field> </record> <record id="travel_booking_2" model="travel.booking"> <field name="partner_name">Alisha</field> <field name="partner_mobile">8945145150</field> <field name="passenger_count">100</field> </record> This code creates two records with the given field values when the module is getting installed.
  • 7.
    Enterprise Now, from thecontrollers, we can pass these values using the template that we design. The controller ‘main.py’ file from odoo import http from odoo.http import request class TravelData(http.Controller): @http.route('/book_travel', type='http', auth="public", website=True) def travel_booking_info(self, **arg): booking_detail=request.env['travel.booking'].sudo().search([] ) values = {'booking': booking_detail} return request.render( 'travel_management.booking_details', values)
  • 8.
    Enterprise Here, the httpcontroller is defined with a method to fetch data from backend to show on the website. The details will be shown using a template. Inside the method, we are searching for records from the model 'travel.booking'. And all those records is getting saved in the ‘booking_detail’ variable which is then passed as a dictionary value while rendering the template. The template is called from the controller using the format ‘module_name.template_name’. Here in this example, the template name is ‘booking_details’.
  • 9.
    Enterprise The code forthe template is saved in ‘booking.templates.xml’ file under ‘views’ directory and it has the code as follows <template id="booking_details" name="Travel Booking"> <t t-call="website.layout"> <t t-set="title">Travel Booking Details</t> <div class="oe_structure oe_empty"> <div class="container"> <t t-set="i" t-value="1"/> <t t-foreach="booking" t-as="o"> <div> <h3> Booking <t t-esc="i"/></h3> <h5 t-field="o.partner_name"/> <h5 t-field="o.partner_mobile"/> <h5 t-field="o.passenger_count"/> </div> <t t-set="i" t-value="i+1"/> </t> </div> </div> </t> </template>
  • 10.
    Enterprise Upon upgrading themodule and going to the website module and clicking on the ‘Homepage’, We can see the menus that we’ve created. Aslo, under the ‘Booking’ menu, the data that we’ve created using the code and designed using the xml template.
  • 11.
    For More Info. Checkour company website for related blogs and Odoo book. Check our YouTube channel for functional and technical videos in Odoo. Enterprise www.cybrosys.com