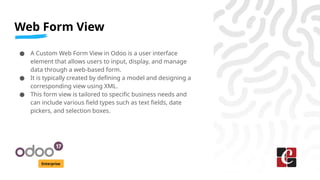
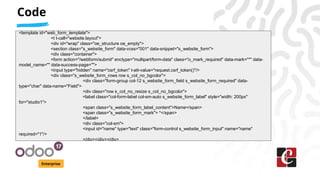
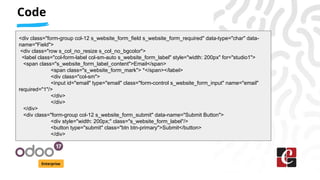
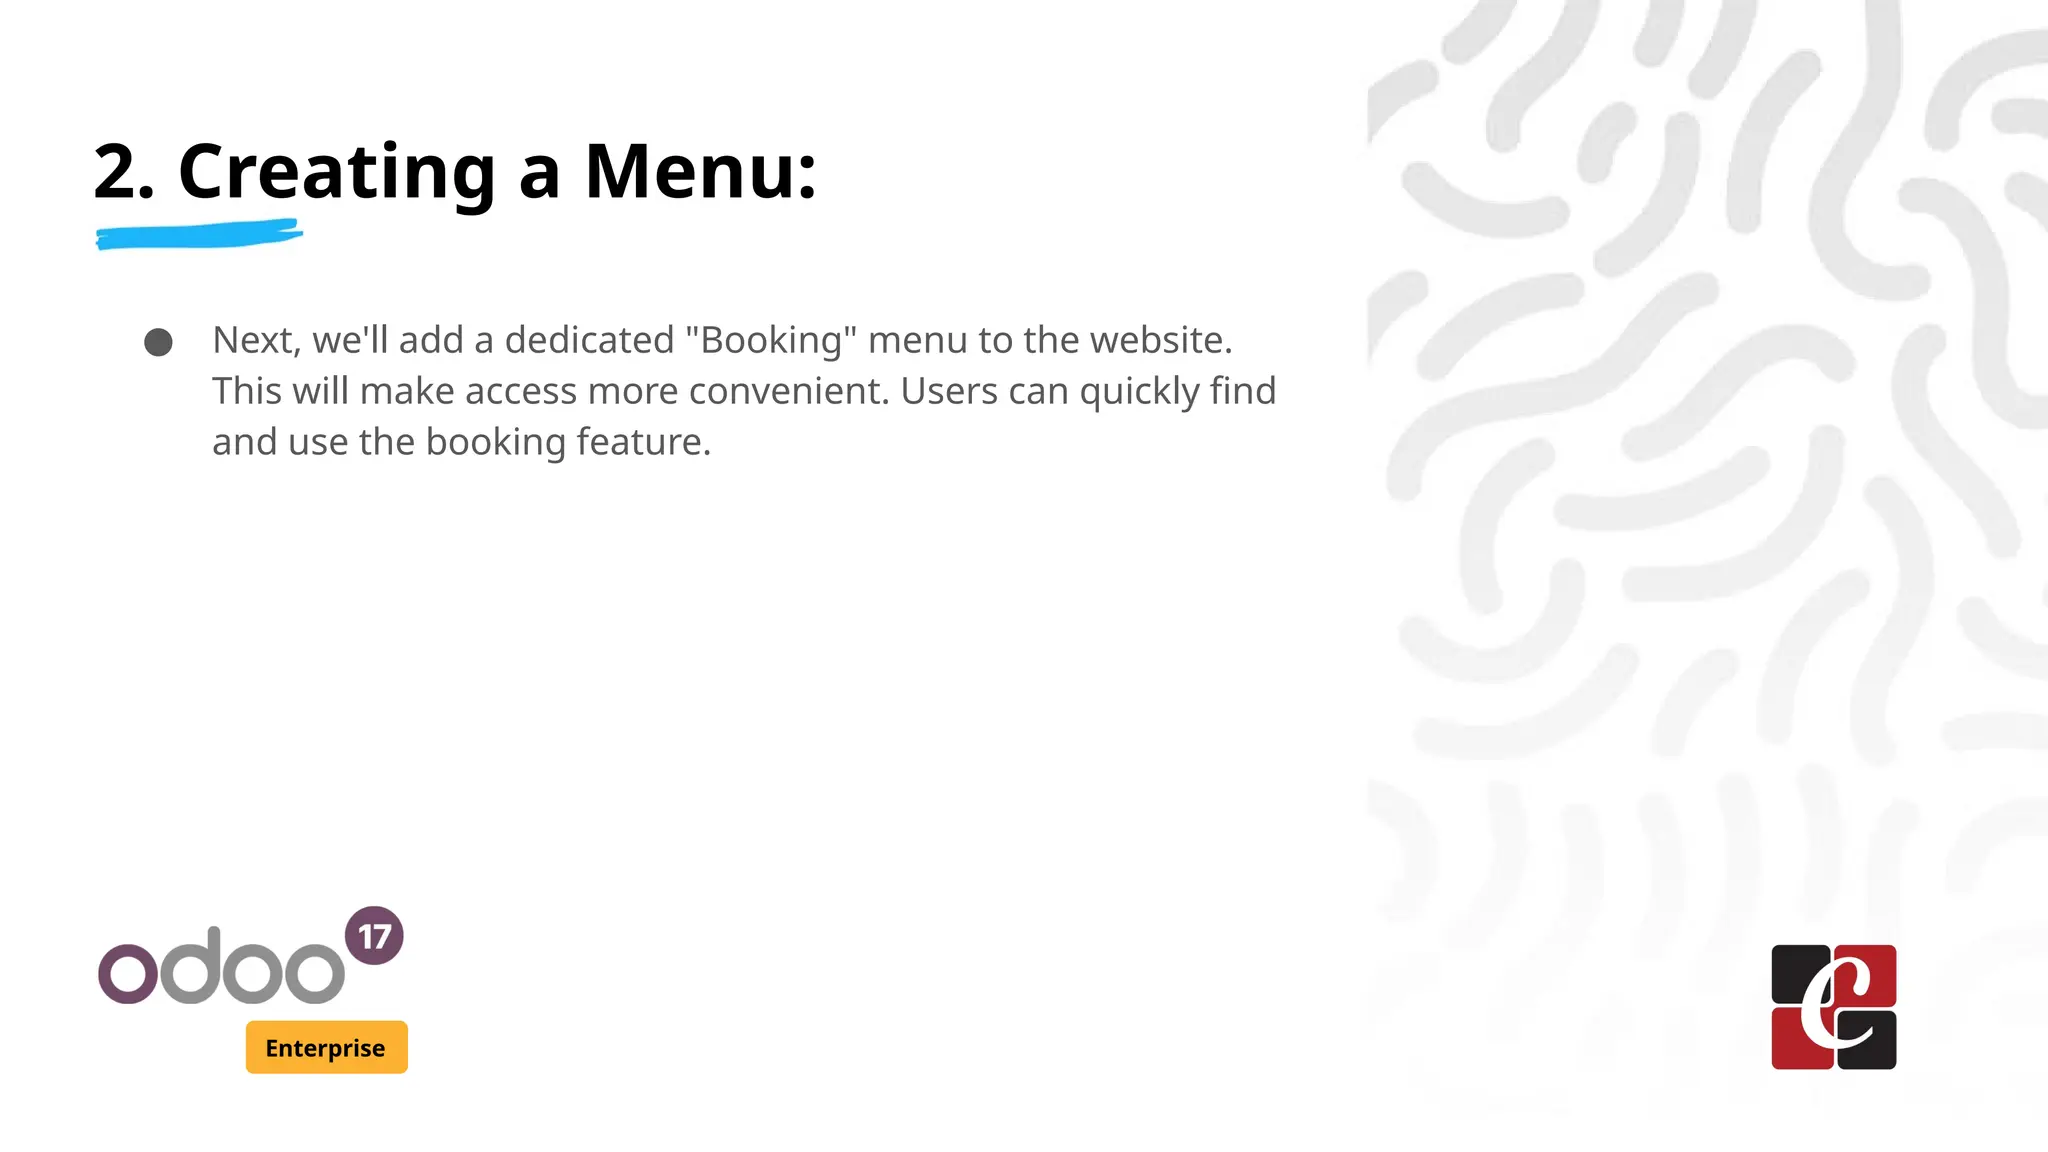
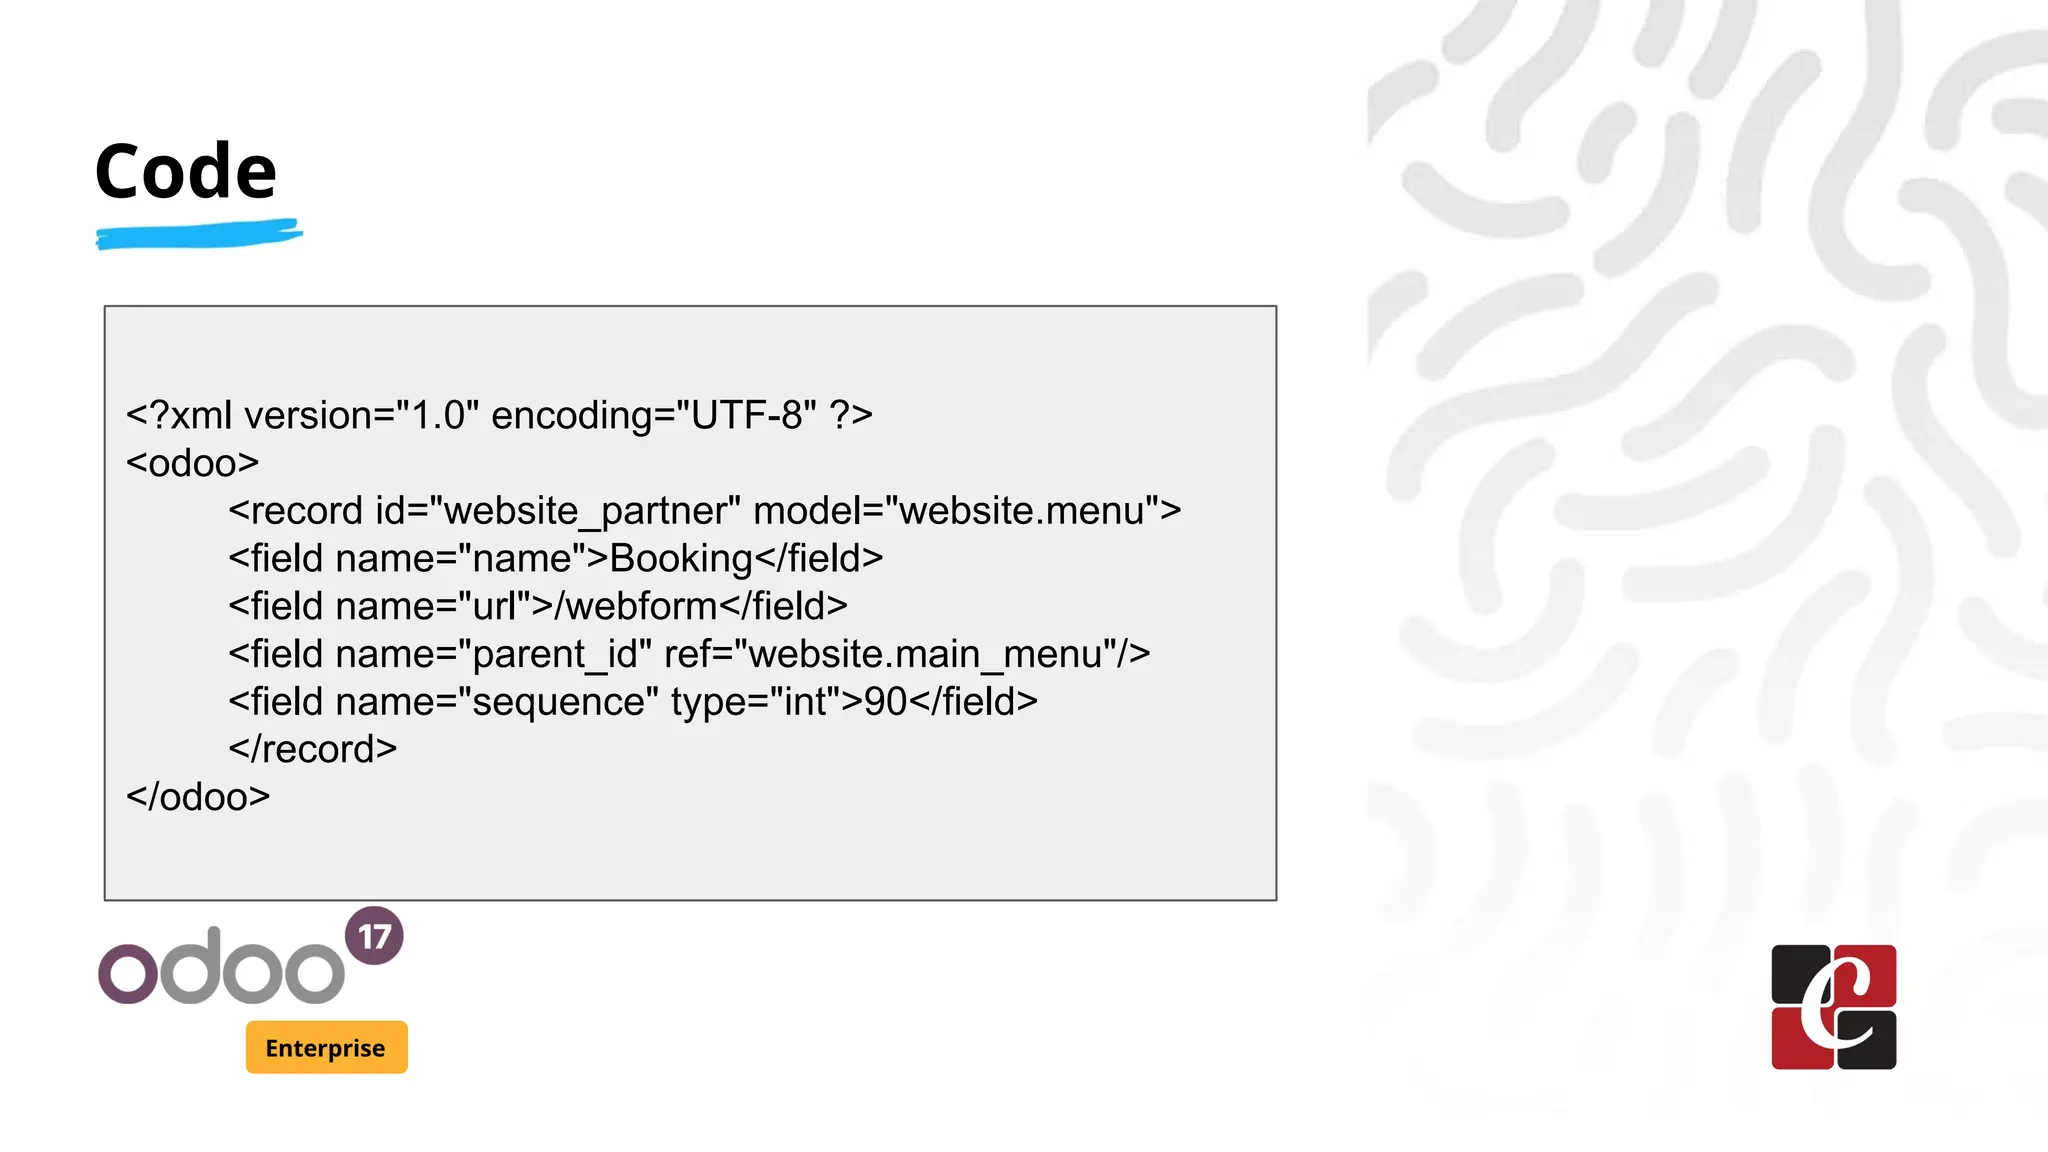
KEMBAR78
How to Create a Custom Web Form View in Odoo 17 | PPTX
How to Create a Custom
Web Form View in Odoo 17
Enterprise
Introduction
Enterprise
Creating a custom web form view in Odoo 17 involves several key
steps: defining the model, creating the view, setting up actions
and menus, and defining the template and controller. Here’s a
structured overview to guide you through the process:
Web Form View
Enterprise
● A Custom Web Form View in Odoo is a user interface
element that allows users to input, display, and manage
data through a web-based form.
● It is typically created by defining a model and designing a
corresponding view using XML.
● This form view is tailored to specific business needs and
can include various field types such as text fields, date
pickers, and selection boxes.
Steps
Enterprise
● Define the Model
● Create the menu
● Build the controller
● Design the template
1. Defining the Model
Enterprise
● Define the model in Odoo, they are referring to the process of
creating or specifying the structure, attributes, relationships,
and behavior of a business entity within the Odoo framework
using Python classes and associated XML files for views and
security configurations.
Code
Enterprise
2. Creating a Menu:
Enterprise
● Next, we'll add a dedicated "Booking" menu to the website.
This will make access more convenient. Users can quickly find
and use the booking feature.
Code
Enterprise
<?xml version="1.0" encoding="UTF-8" ?>
<odoo>
<record id="website_partner" model="website.menu">
<field name="name">Booking</field>
<field name="url">/webform</field>
<field name="parent_id" ref="website.main_menu"/>
<field name="sequence" type="int">90</field>
</record>
</odoo>
3. Building the Controller:
Enterprise
● Develop a controller to manage HTTP requests for our
custom web form.
● This controller will have functions to display the form.
● Additionally, it will process form submissions efficiently
Code
Enterprise
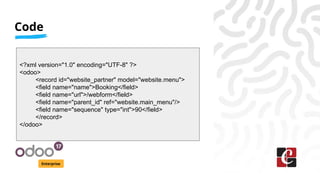
from odoo.http import request, Controller, route
class WebFormController(Controller):
@route('/webform', auth='public', website=True)
def web_form(self, **kwargs):
return request.render('custom_web_form.web_form_template')
@route('/webform/submit', type='http', auth='public',
website=True, methods=['POST'])
def web_form_submit(self, **post):
request.env['custom.web.form.booking'].sudo().create({
'name': post.get('name'),
'email': post.get('email'),
})
return request.redirect('/thank-you-page')
4. Designing the Template:
Enterprise
● Design an XML template file to the structure and layout of
our web form.
● This template look exactly as form appears
Code
Enterprise
<template id="web_form_template">
<t t-call="website.layout">
<div id="wrap" class="oe_structure oe_empty">
<section class="s_website_form" data-vcss="001" data-snippet="s_website_form">
<div class="container">
<form action="/webform/submit" enctype="multipart/form-data" class="o_mark_required" data-mark="*" data-
model_name="" data-success-page="">
<input type="hidden" name="csrf_token" t-att-value="request.csrf_token()"/>
<div class="s_website_form_rows row s_col_no_bgcolor">
<div class="form-group col-12 s_website_form_field s_website_form_required" data-
type="char" data-name="Field">
<div class="row s_col_no_resize s_col_no_bgcolor">
<label class="col-form-label col-sm-auto s_website_form_label" style="width: 200px"
for="studio1">
<span class="s_website_form_label_content">Name</span>
<span class="s_website_form_mark"> *</span>
</label>
<div class="col-sm">
<input id="name" type="text" class="form-control s_website_form_input" name="name"
required="1"/>
</div></div></div>
Code Explanation
Enterprise
● This code defines a web form template using XML.
● First of all declare a template and incorporating the site's base
layout.
● Within this layout, a container div wraps the form elements,
ensuring they are displayed correctly.
Code
Enterprise
<div class="form-group col-12 s_website_form_field s_website_form_required" data-type="char" data-
name="Field">
<div class="row s_col_no_resize s_col_no_bgcolor">
<label class="col-form-label col-sm-auto s_website_form_label" style="width: 200px" for="studio1">
<span class="s_website_form_label_content">Email</span>
<span class="s_website_form_mark"> *</span></label>
<div class="col-sm">
<input id="email" type="email" class="form-control s_website_form_input" name="email"
required="1"/>
</div>
</div>
</div>
<div class="form-group col-12 s_website_form_submit" data-name="Submit Button">
<div style="width: 200px;" class="s_website_form_label"/>
<button type="submit" class="btn btn-primary">Submit</button>
</div>
Code Explanation
Enterprise
● The form itself is designed to handle user submissions and
includes a CSRF token for security.
● It features input fields for "Name" and "Email," each with labels
and required attributes, and ends with a submit button styled
with Bootstrap classes.
● The layout and structure of the form are managed through
various CSS classes and custom attributes to ensure proper
styling and functionality.
Enterprise
Conclusion
Hence this is how one can create a custom web form view in Odoo
17 .
For More Info.
Check our company website for related blogs
and Odoo book.
Check our YouTube channel for
functional and technical videos in Odoo.
Enterprise
www.cybrosys.com

How to Create a Custom Web Form View in Odoo 17

  • 1.
    How to Createa Custom Web Form View in Odoo 17 Enterprise
  • 2.
    Introduction Enterprise Creating a customweb form view in Odoo 17 involves several key steps: defining the model, creating the view, setting up actions and menus, and defining the template and controller. Here’s a structured overview to guide you through the process:
  • 3.
    Web Form View Enterprise ●A Custom Web Form View in Odoo is a user interface element that allows users to input, display, and manage data through a web-based form. ● It is typically created by defining a model and designing a corresponding view using XML. ● This form view is tailored to specific business needs and can include various field types such as text fields, date pickers, and selection boxes.
  • 4.
    Steps Enterprise ● Define theModel ● Create the menu ● Build the controller ● Design the template
  • 5.
    1. Defining theModel Enterprise ● Define the model in Odoo, they are referring to the process of creating or specifying the structure, attributes, relationships, and behavior of a business entity within the Odoo framework using Python classes and associated XML files for views and security configurations.
  • 6.
  • 7.
    2. Creating aMenu: Enterprise ● Next, we'll add a dedicated "Booking" menu to the website. This will make access more convenient. Users can quickly find and use the booking feature.
  • 8.
    Code Enterprise <?xml version="1.0" encoding="UTF-8"?> <odoo> <record id="website_partner" model="website.menu"> <field name="name">Booking</field> <field name="url">/webform</field> <field name="parent_id" ref="website.main_menu"/> <field name="sequence" type="int">90</field> </record> </odoo>
  • 9.
    3. Building theController: Enterprise ● Develop a controller to manage HTTP requests for our custom web form. ● This controller will have functions to display the form. ● Additionally, it will process form submissions efficiently
  • 10.
    Code Enterprise from odoo.http importrequest, Controller, route class WebFormController(Controller): @route('/webform', auth='public', website=True) def web_form(self, **kwargs): return request.render('custom_web_form.web_form_template') @route('/webform/submit', type='http', auth='public', website=True, methods=['POST']) def web_form_submit(self, **post): request.env['custom.web.form.booking'].sudo().create({ 'name': post.get('name'), 'email': post.get('email'), }) return request.redirect('/thank-you-page')
  • 11.
    4. Designing theTemplate: Enterprise ● Design an XML template file to the structure and layout of our web form. ● This template look exactly as form appears
  • 12.
    Code Enterprise <template id="web_form_template"> <t t-call="website.layout"> <divid="wrap" class="oe_structure oe_empty"> <section class="s_website_form" data-vcss="001" data-snippet="s_website_form"> <div class="container"> <form action="/webform/submit" enctype="multipart/form-data" class="o_mark_required" data-mark="*" data- model_name="" data-success-page=""> <input type="hidden" name="csrf_token" t-att-value="request.csrf_token()"/> <div class="s_website_form_rows row s_col_no_bgcolor"> <div class="form-group col-12 s_website_form_field s_website_form_required" data- type="char" data-name="Field"> <div class="row s_col_no_resize s_col_no_bgcolor"> <label class="col-form-label col-sm-auto s_website_form_label" style="width: 200px" for="studio1"> <span class="s_website_form_label_content">Name</span> <span class="s_website_form_mark"> *</span> </label> <div class="col-sm"> <input id="name" type="text" class="form-control s_website_form_input" name="name" required="1"/> </div></div></div>
  • 13.
    Code Explanation Enterprise ● Thiscode defines a web form template using XML. ● First of all declare a template and incorporating the site's base layout. ● Within this layout, a container div wraps the form elements, ensuring they are displayed correctly.
  • 14.
    Code Enterprise <div class="form-group col-12s_website_form_field s_website_form_required" data-type="char" data- name="Field"> <div class="row s_col_no_resize s_col_no_bgcolor"> <label class="col-form-label col-sm-auto s_website_form_label" style="width: 200px" for="studio1"> <span class="s_website_form_label_content">Email</span> <span class="s_website_form_mark"> *</span></label> <div class="col-sm"> <input id="email" type="email" class="form-control s_website_form_input" name="email" required="1"/> </div> </div> </div> <div class="form-group col-12 s_website_form_submit" data-name="Submit Button"> <div style="width: 200px;" class="s_website_form_label"/> <button type="submit" class="btn btn-primary">Submit</button> </div>
  • 15.
    Code Explanation Enterprise ● Theform itself is designed to handle user submissions and includes a CSRF token for security. ● It features input fields for "Name" and "Email," each with labels and required attributes, and ends with a submit button styled with Bootstrap classes. ● The layout and structure of the form are managed through various CSS classes and custom attributes to ensure proper styling and functionality.
  • 16.
    Enterprise Conclusion Hence this ishow one can create a custom web form view in Odoo 17 .
  • 17.
    For More Info. Checkour company website for related blogs and Odoo book. Check our YouTube channel for functional and technical videos in Odoo. Enterprise www.cybrosys.com