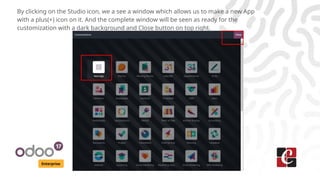
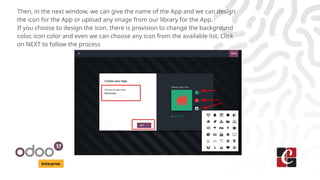
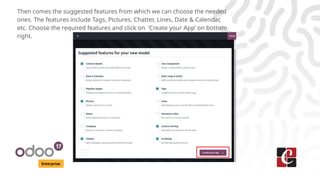
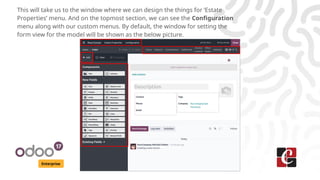
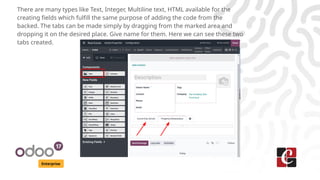
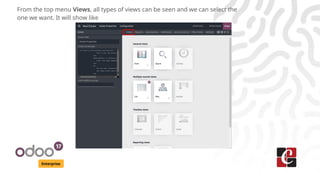
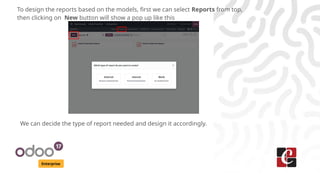
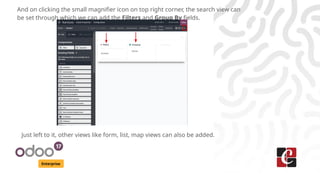
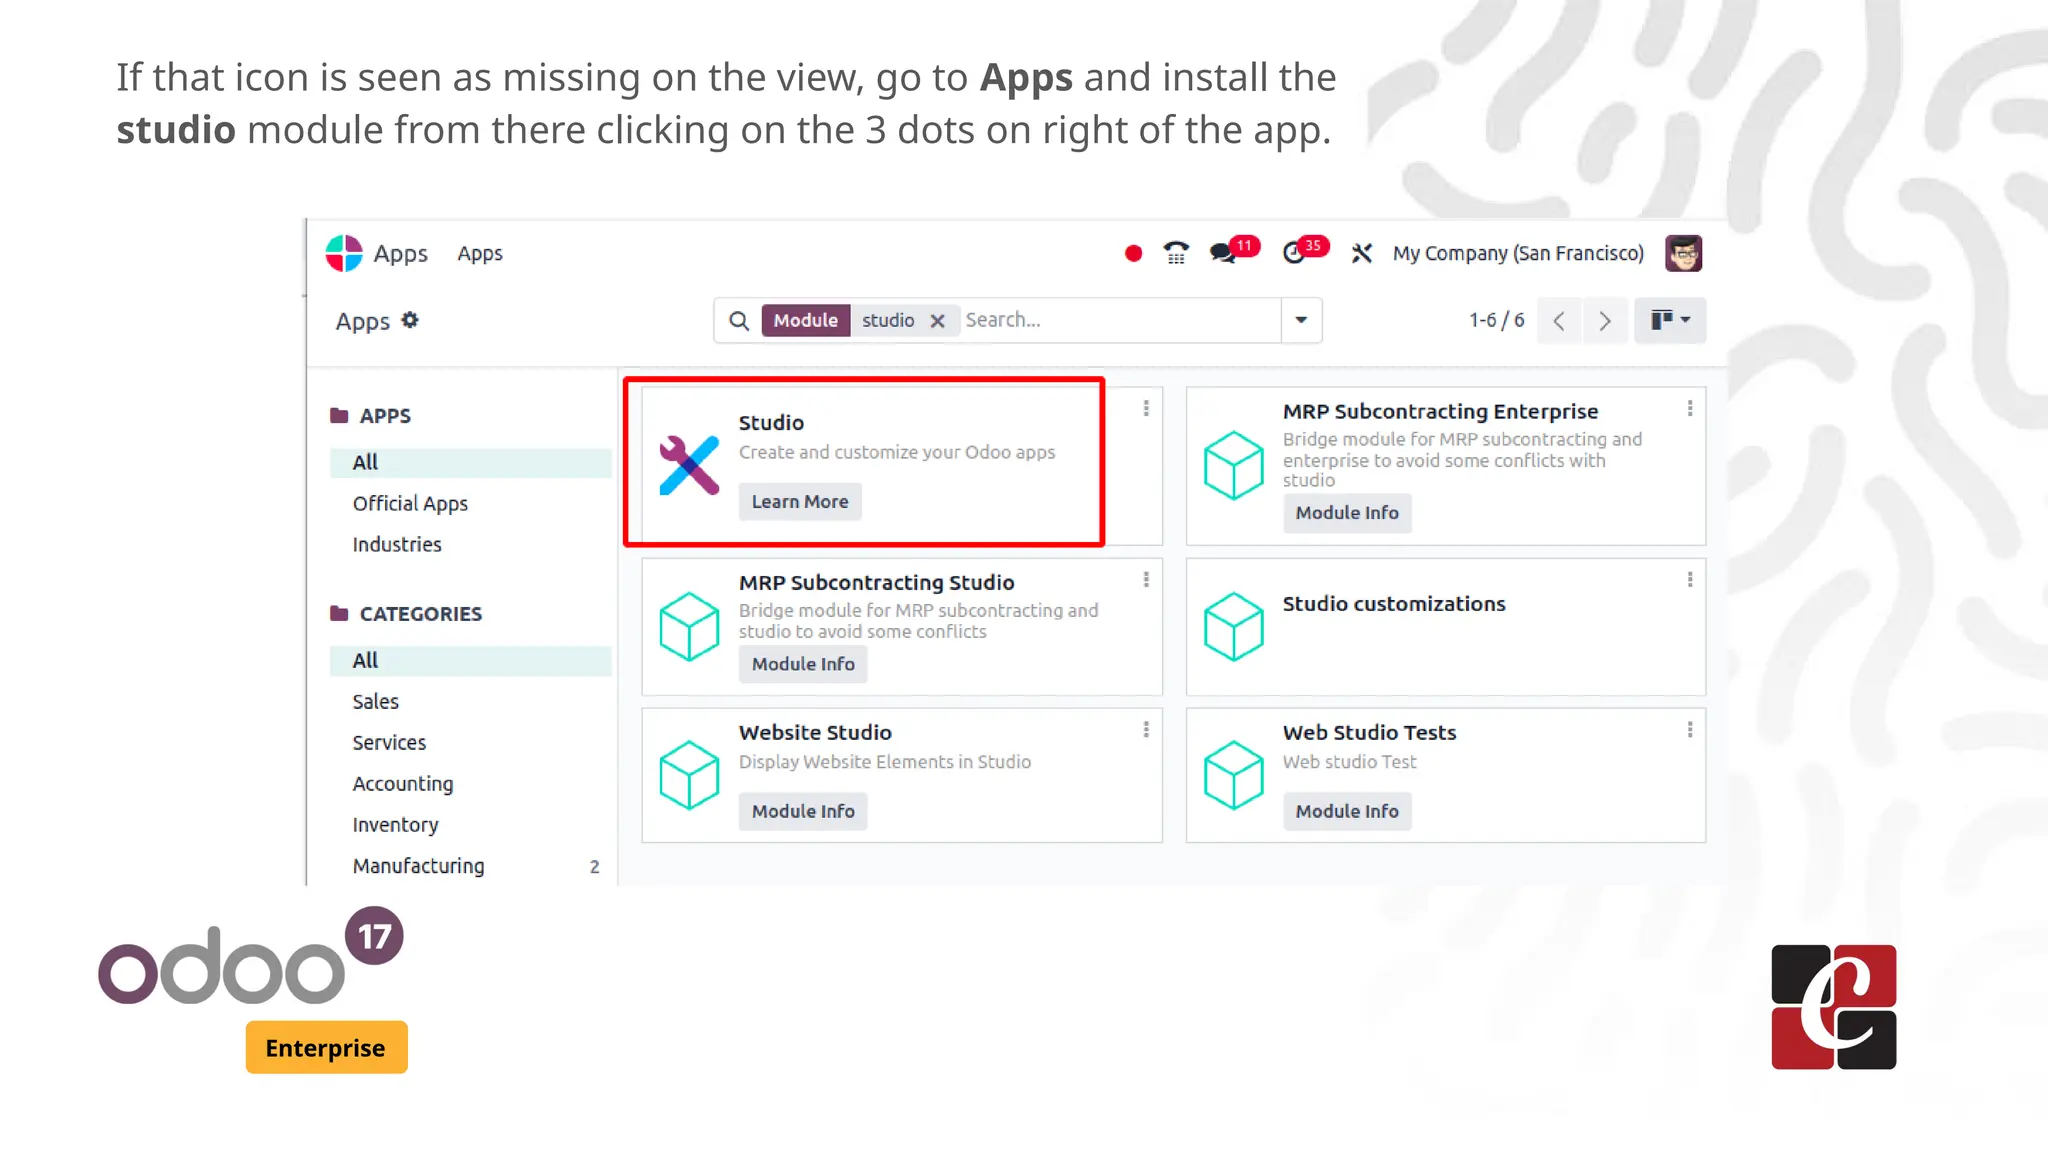
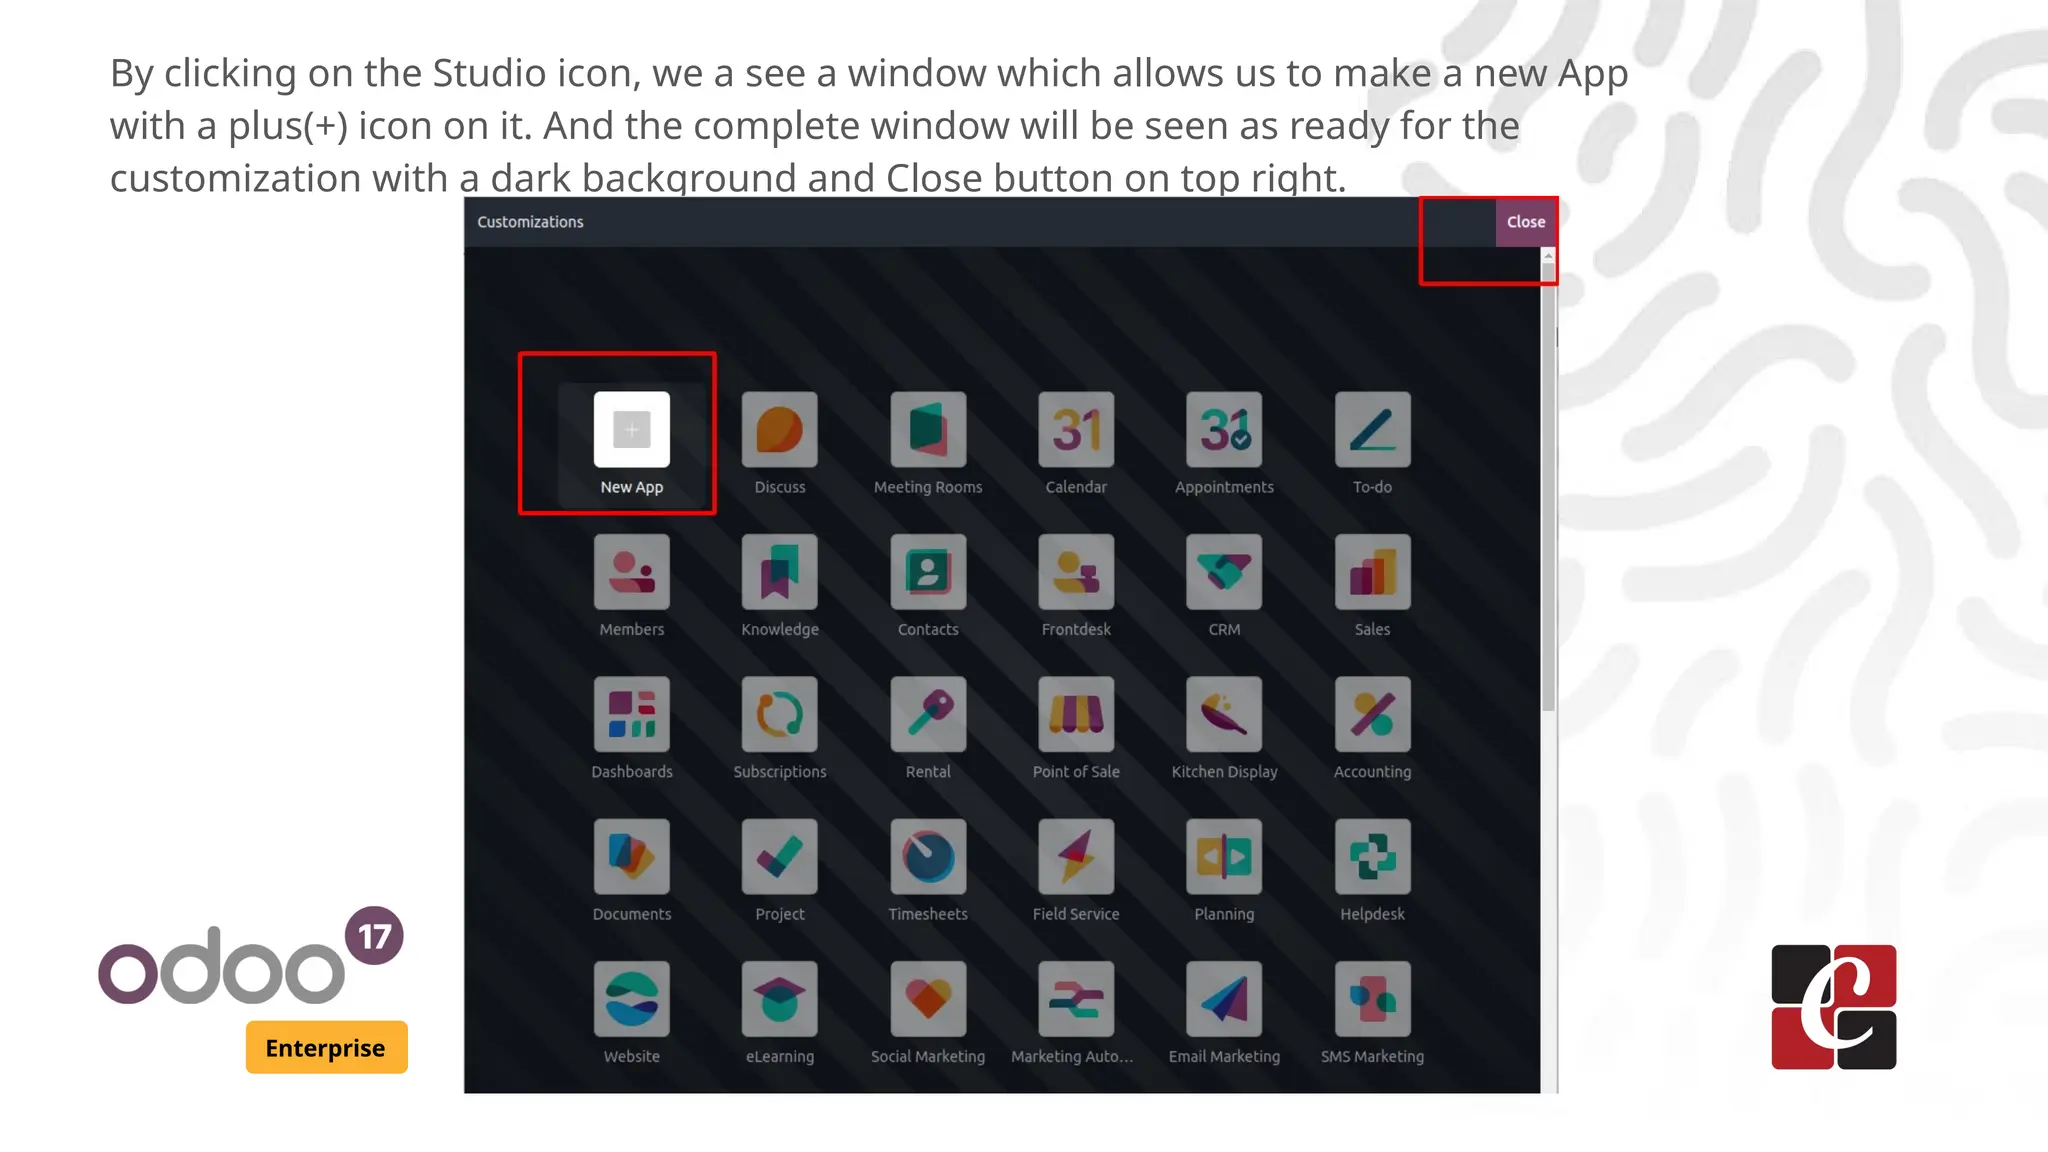
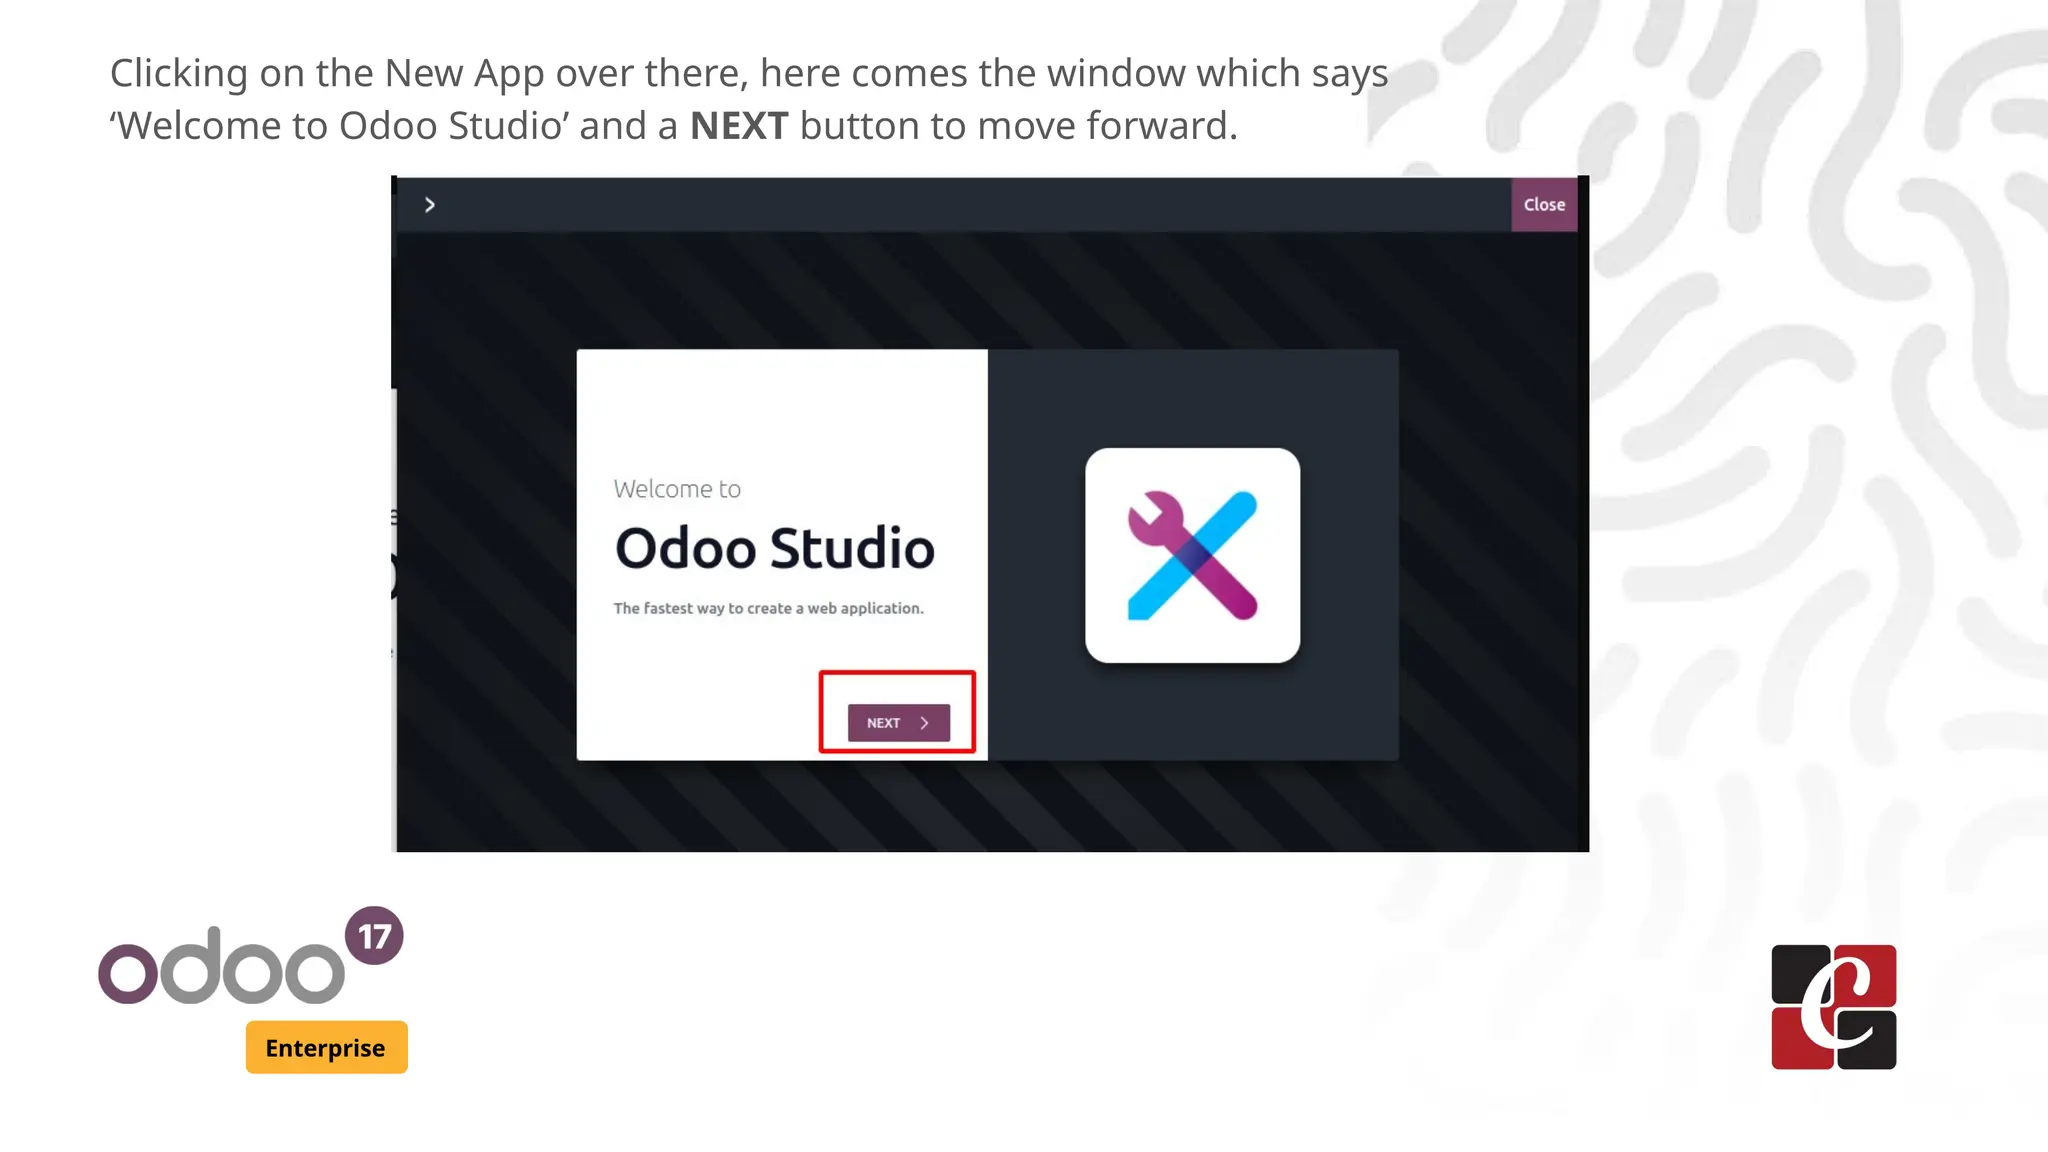
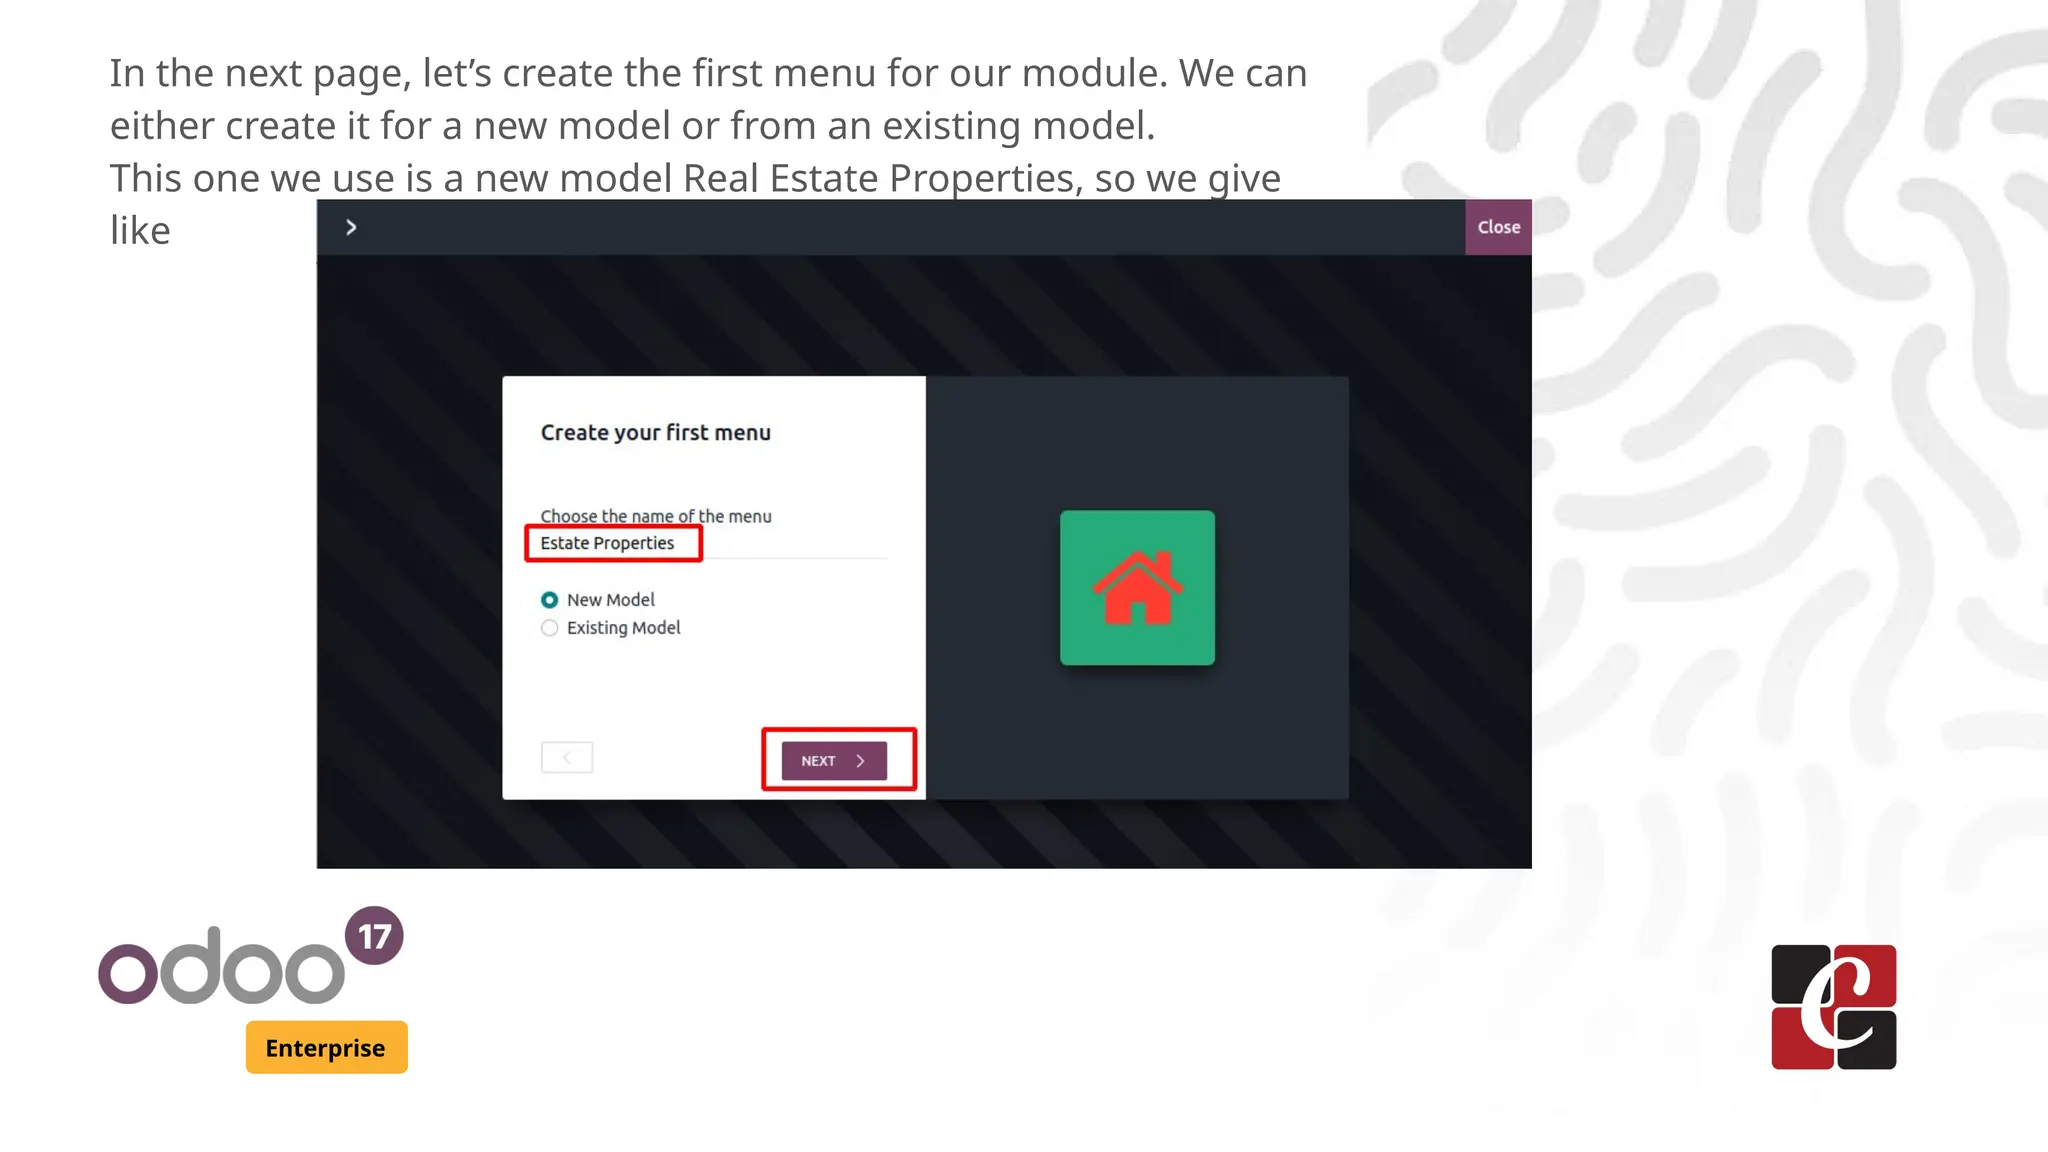
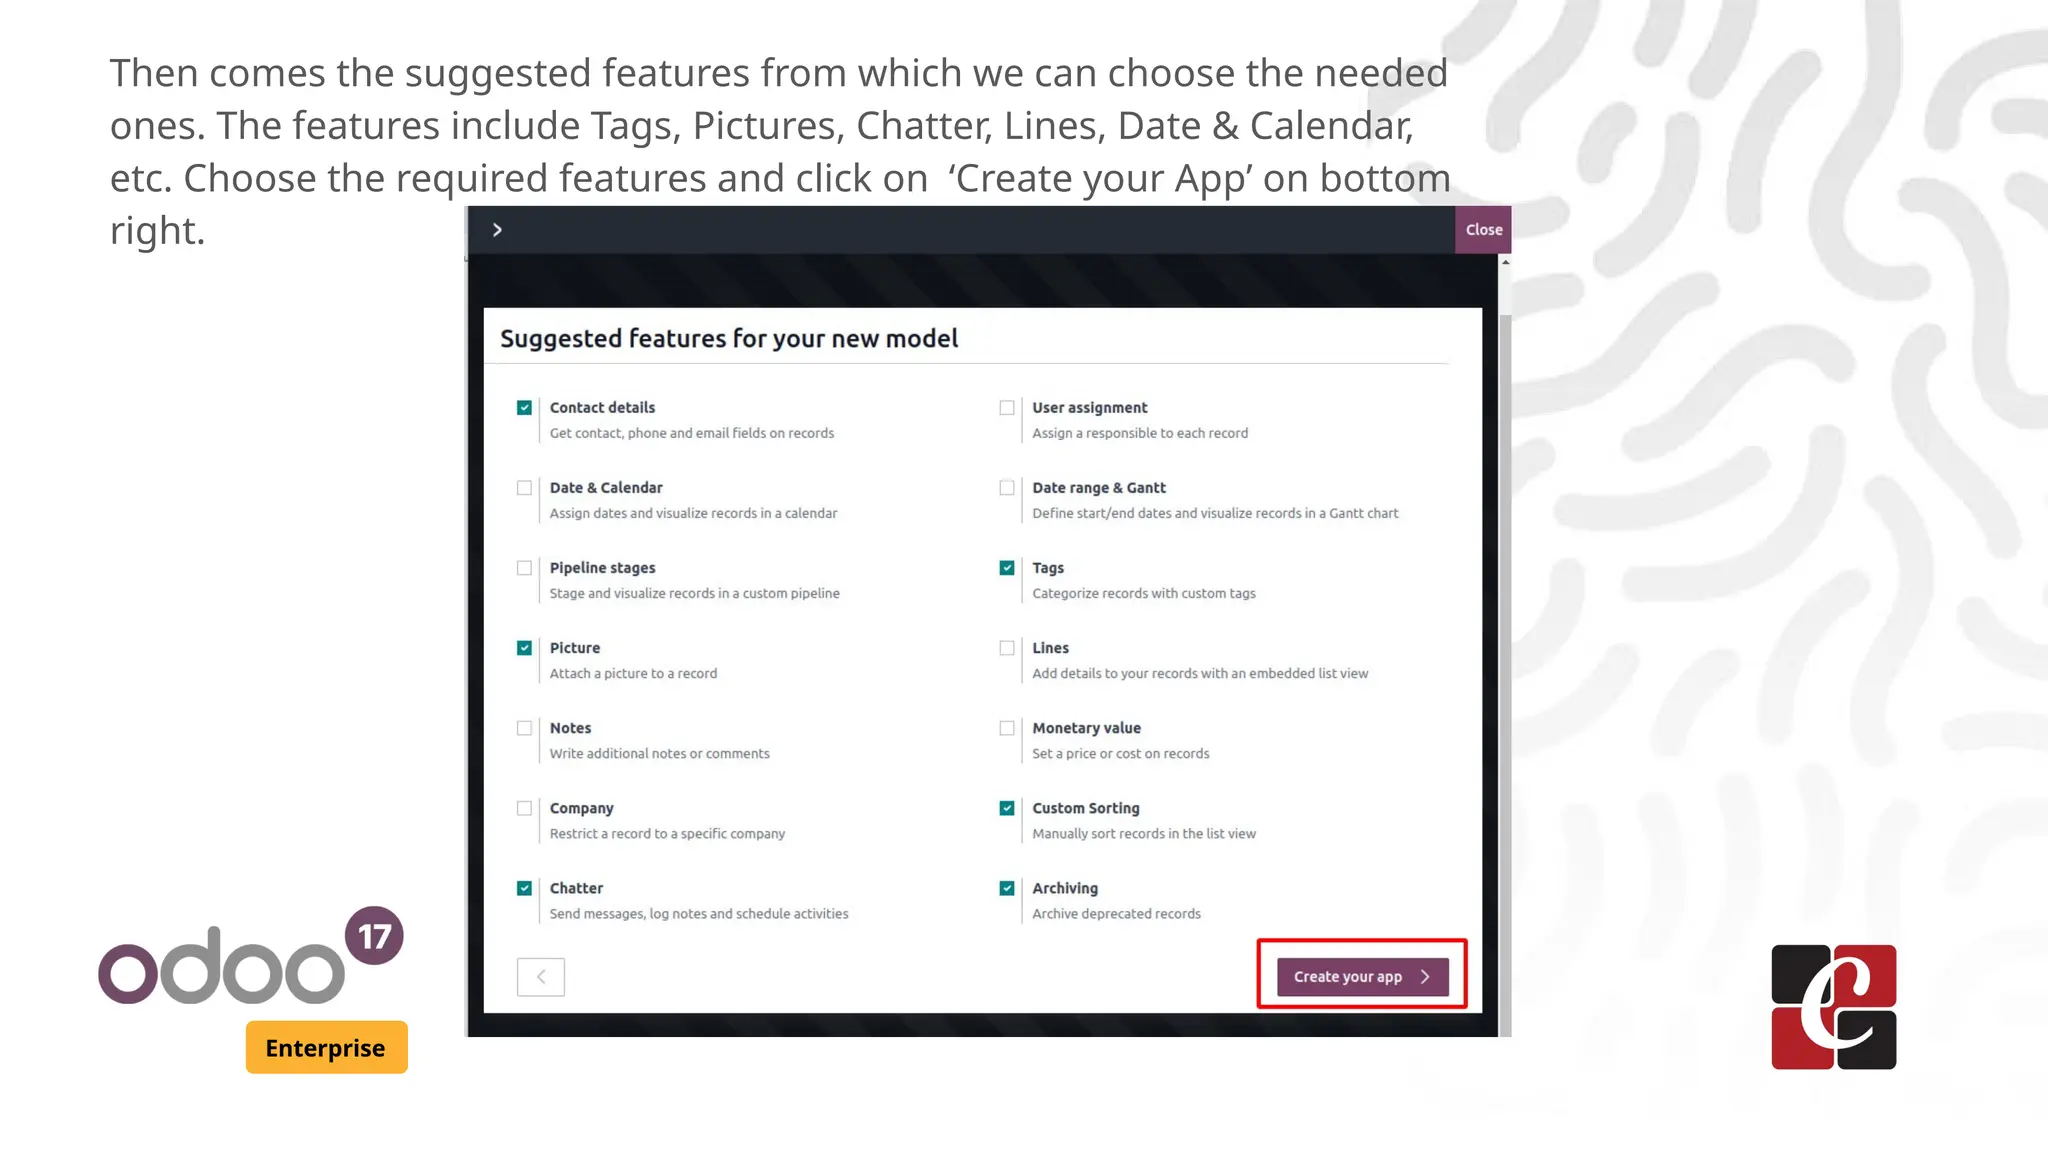
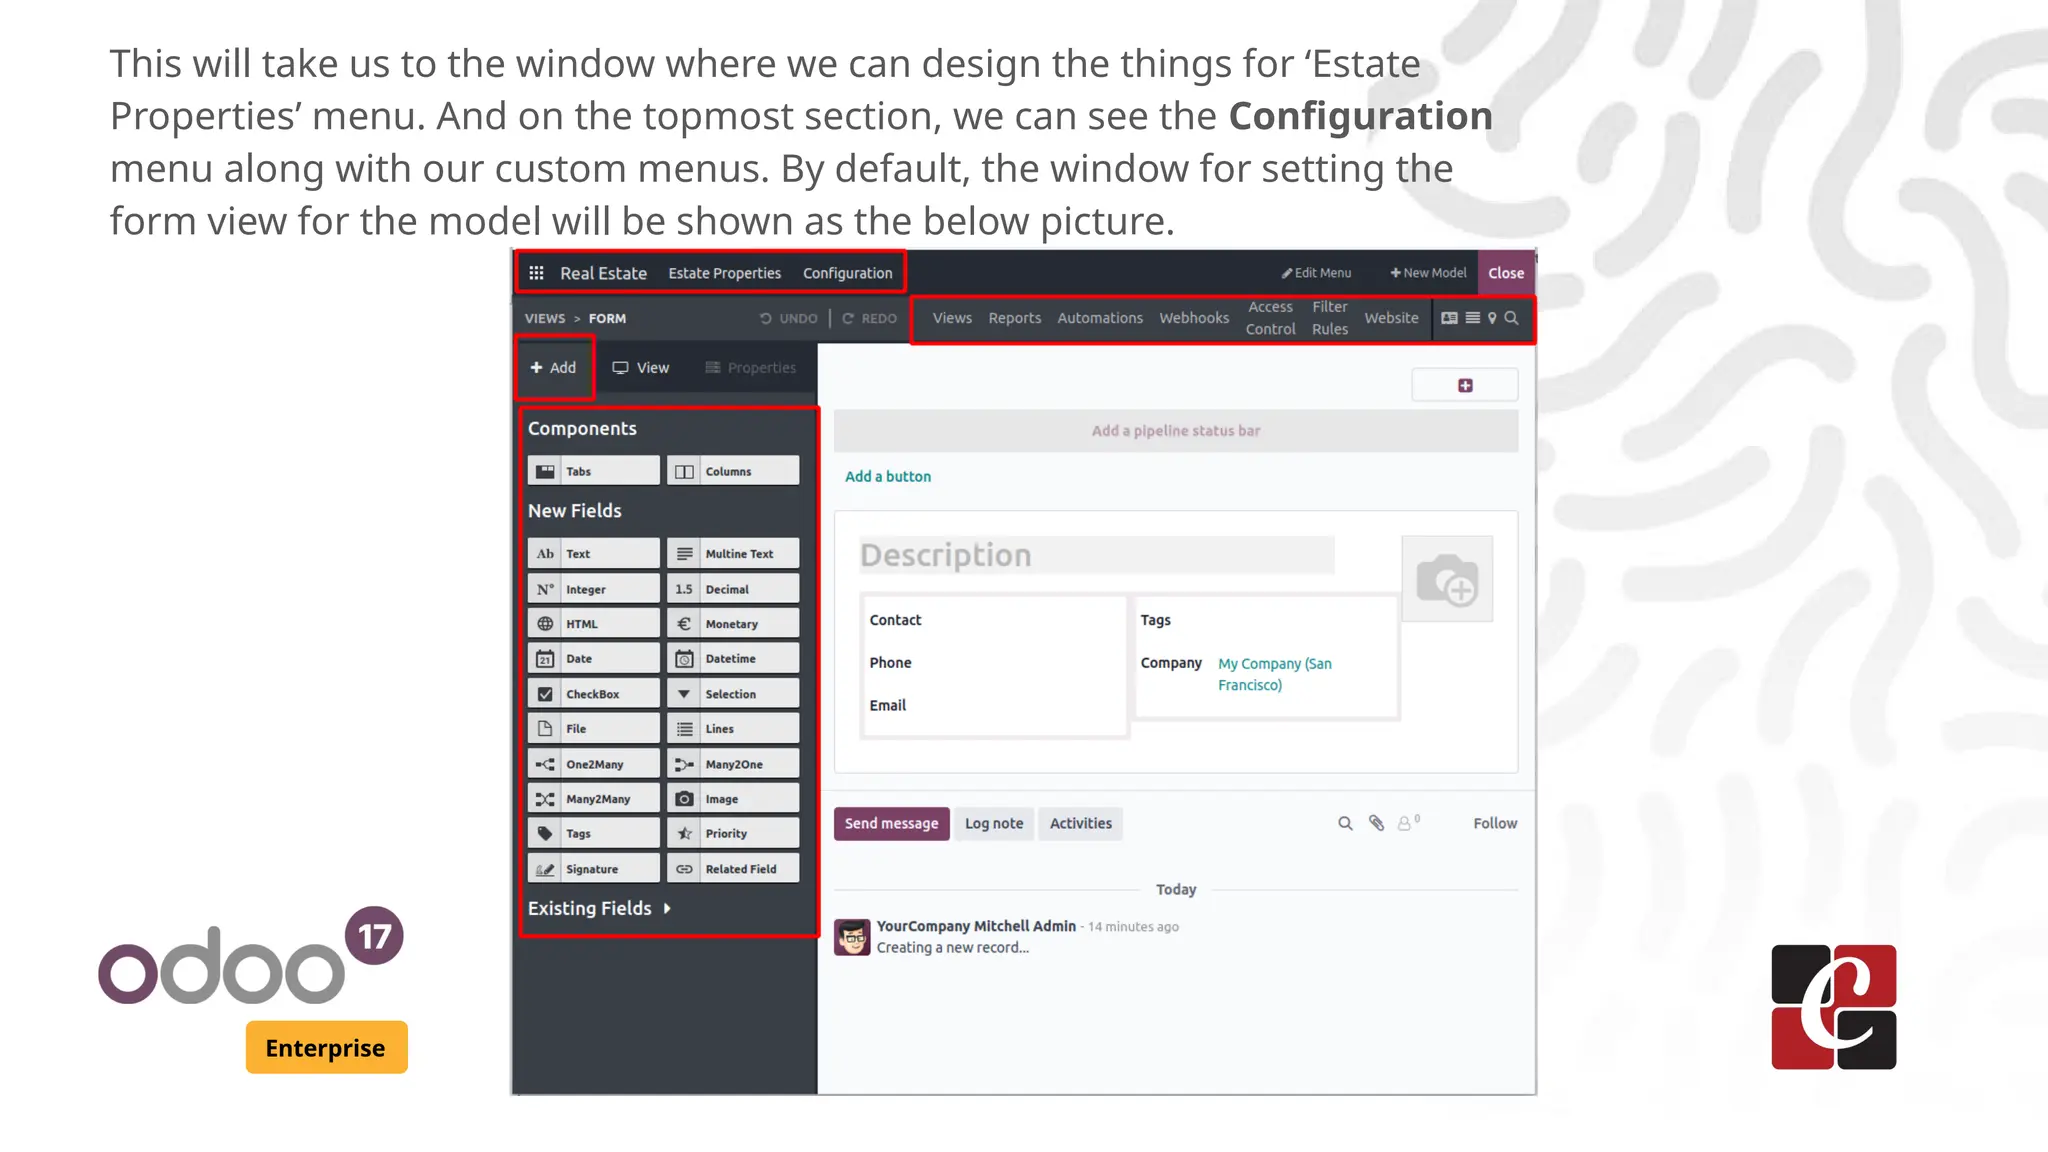
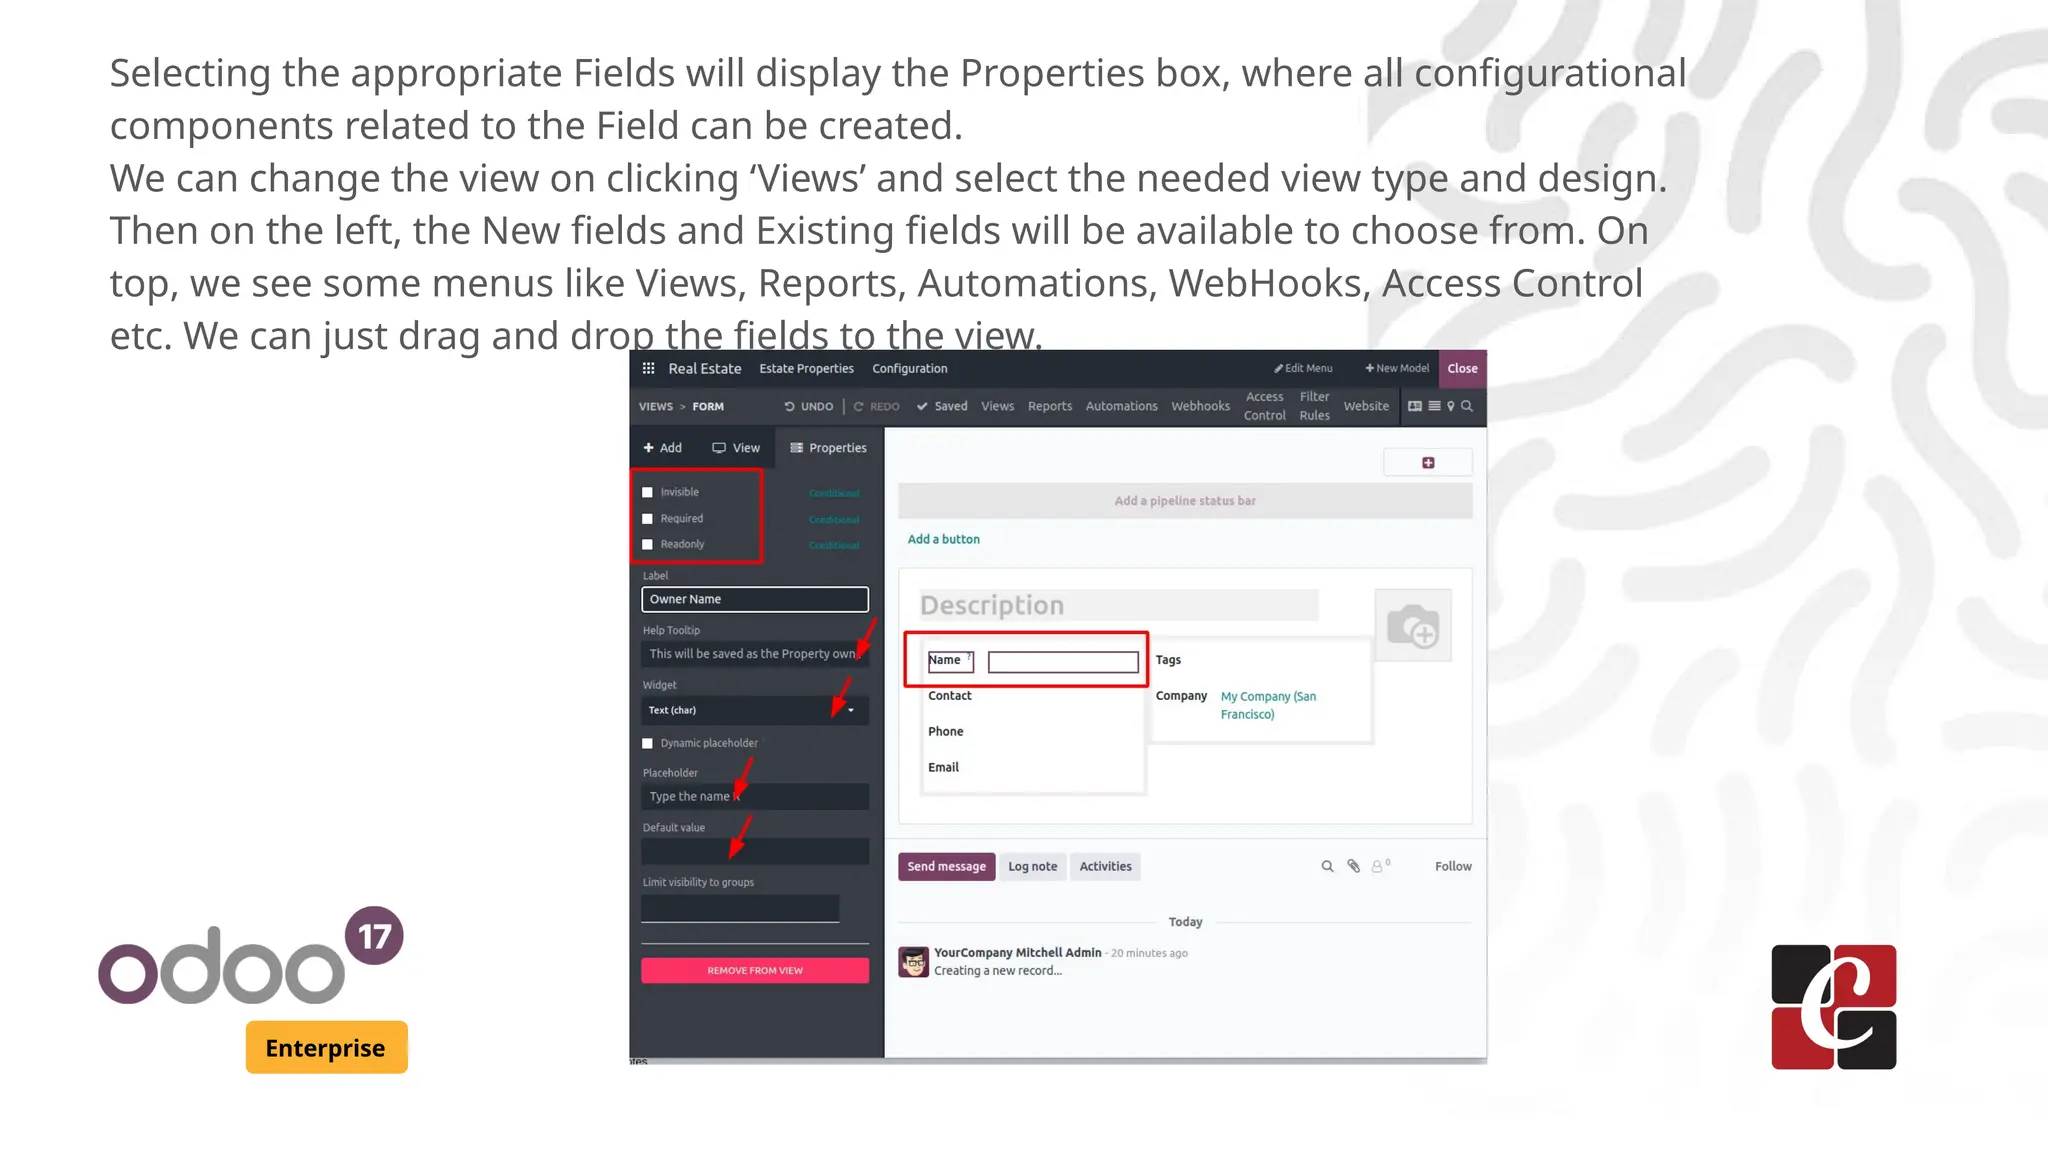
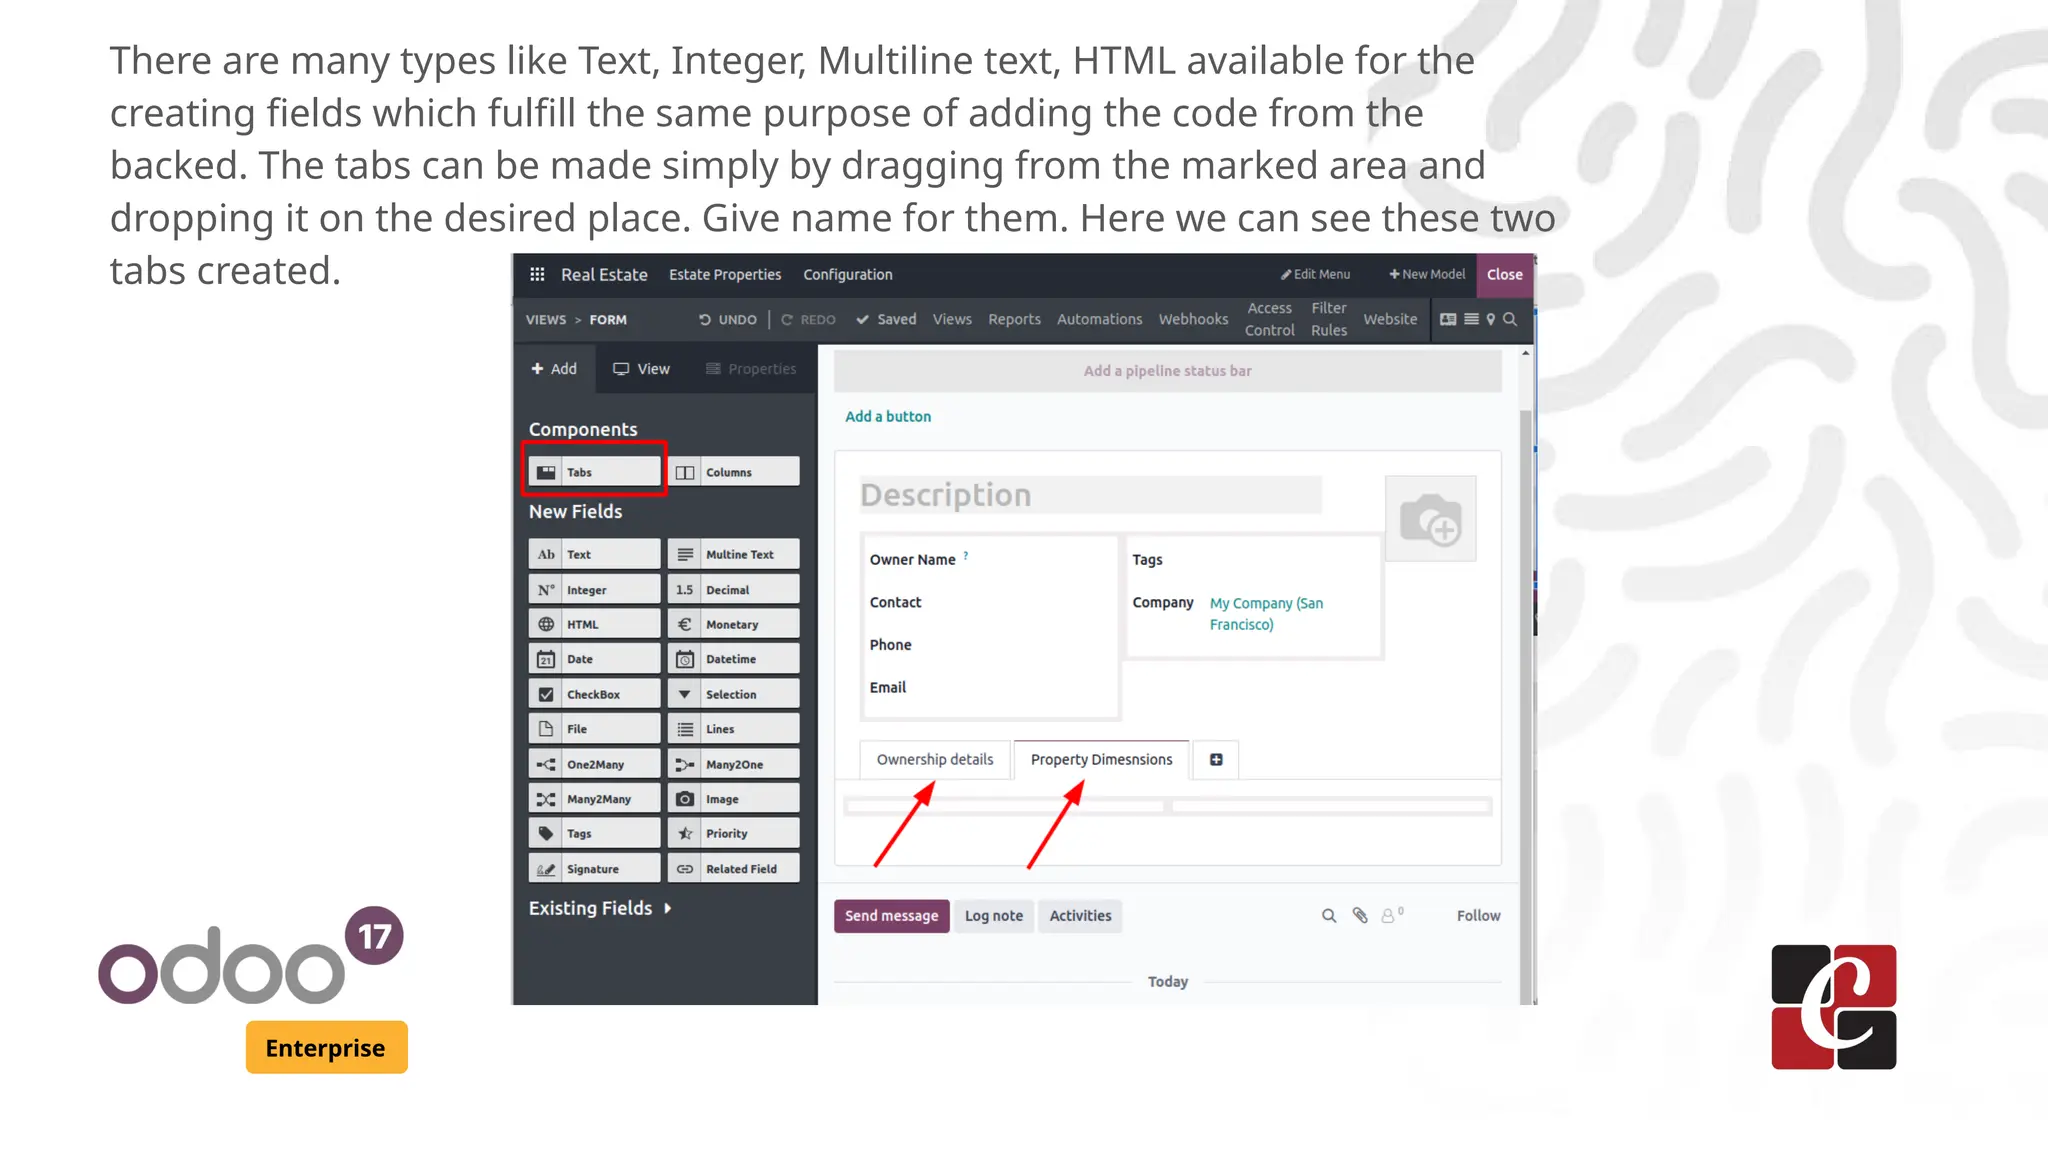
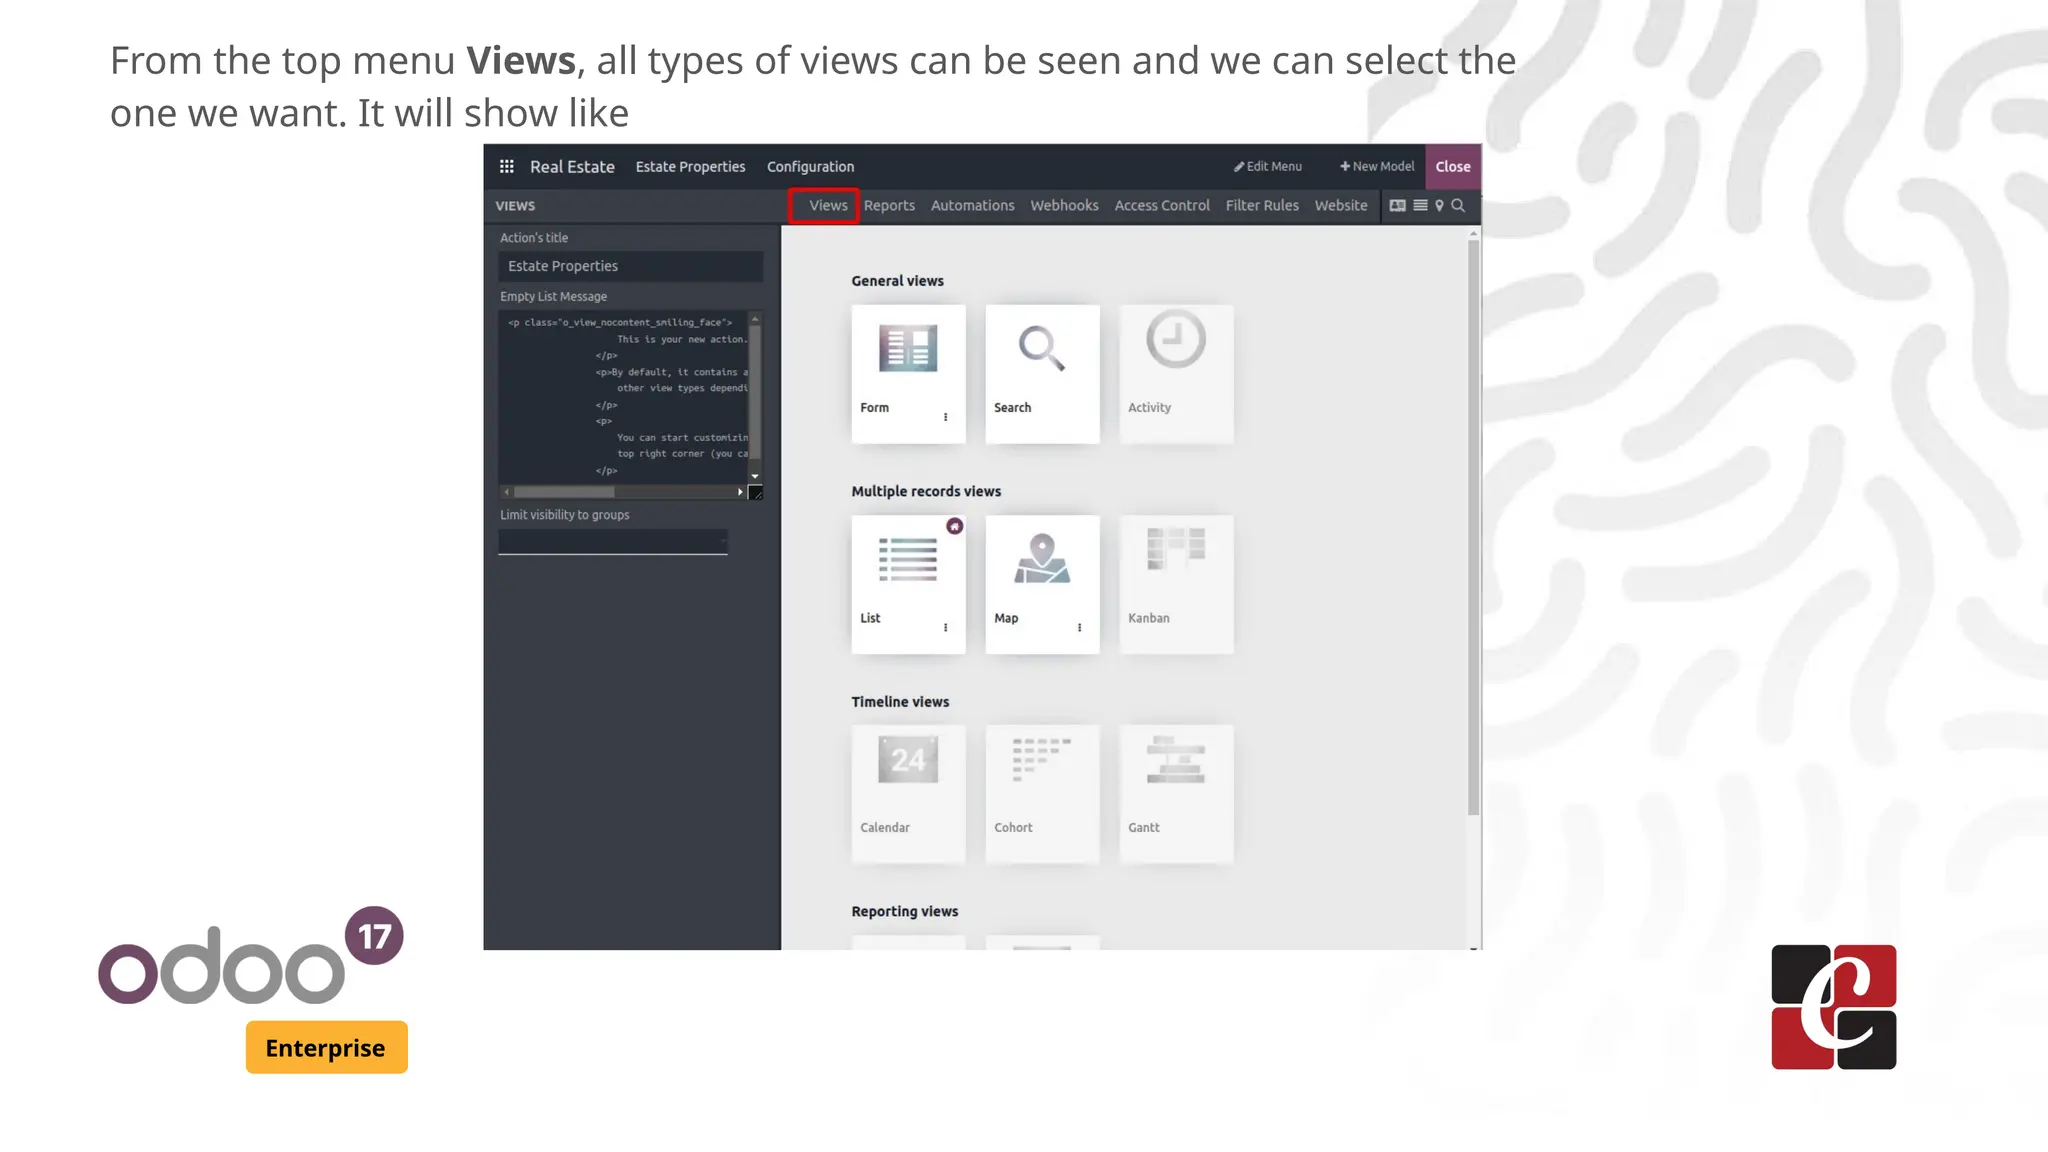
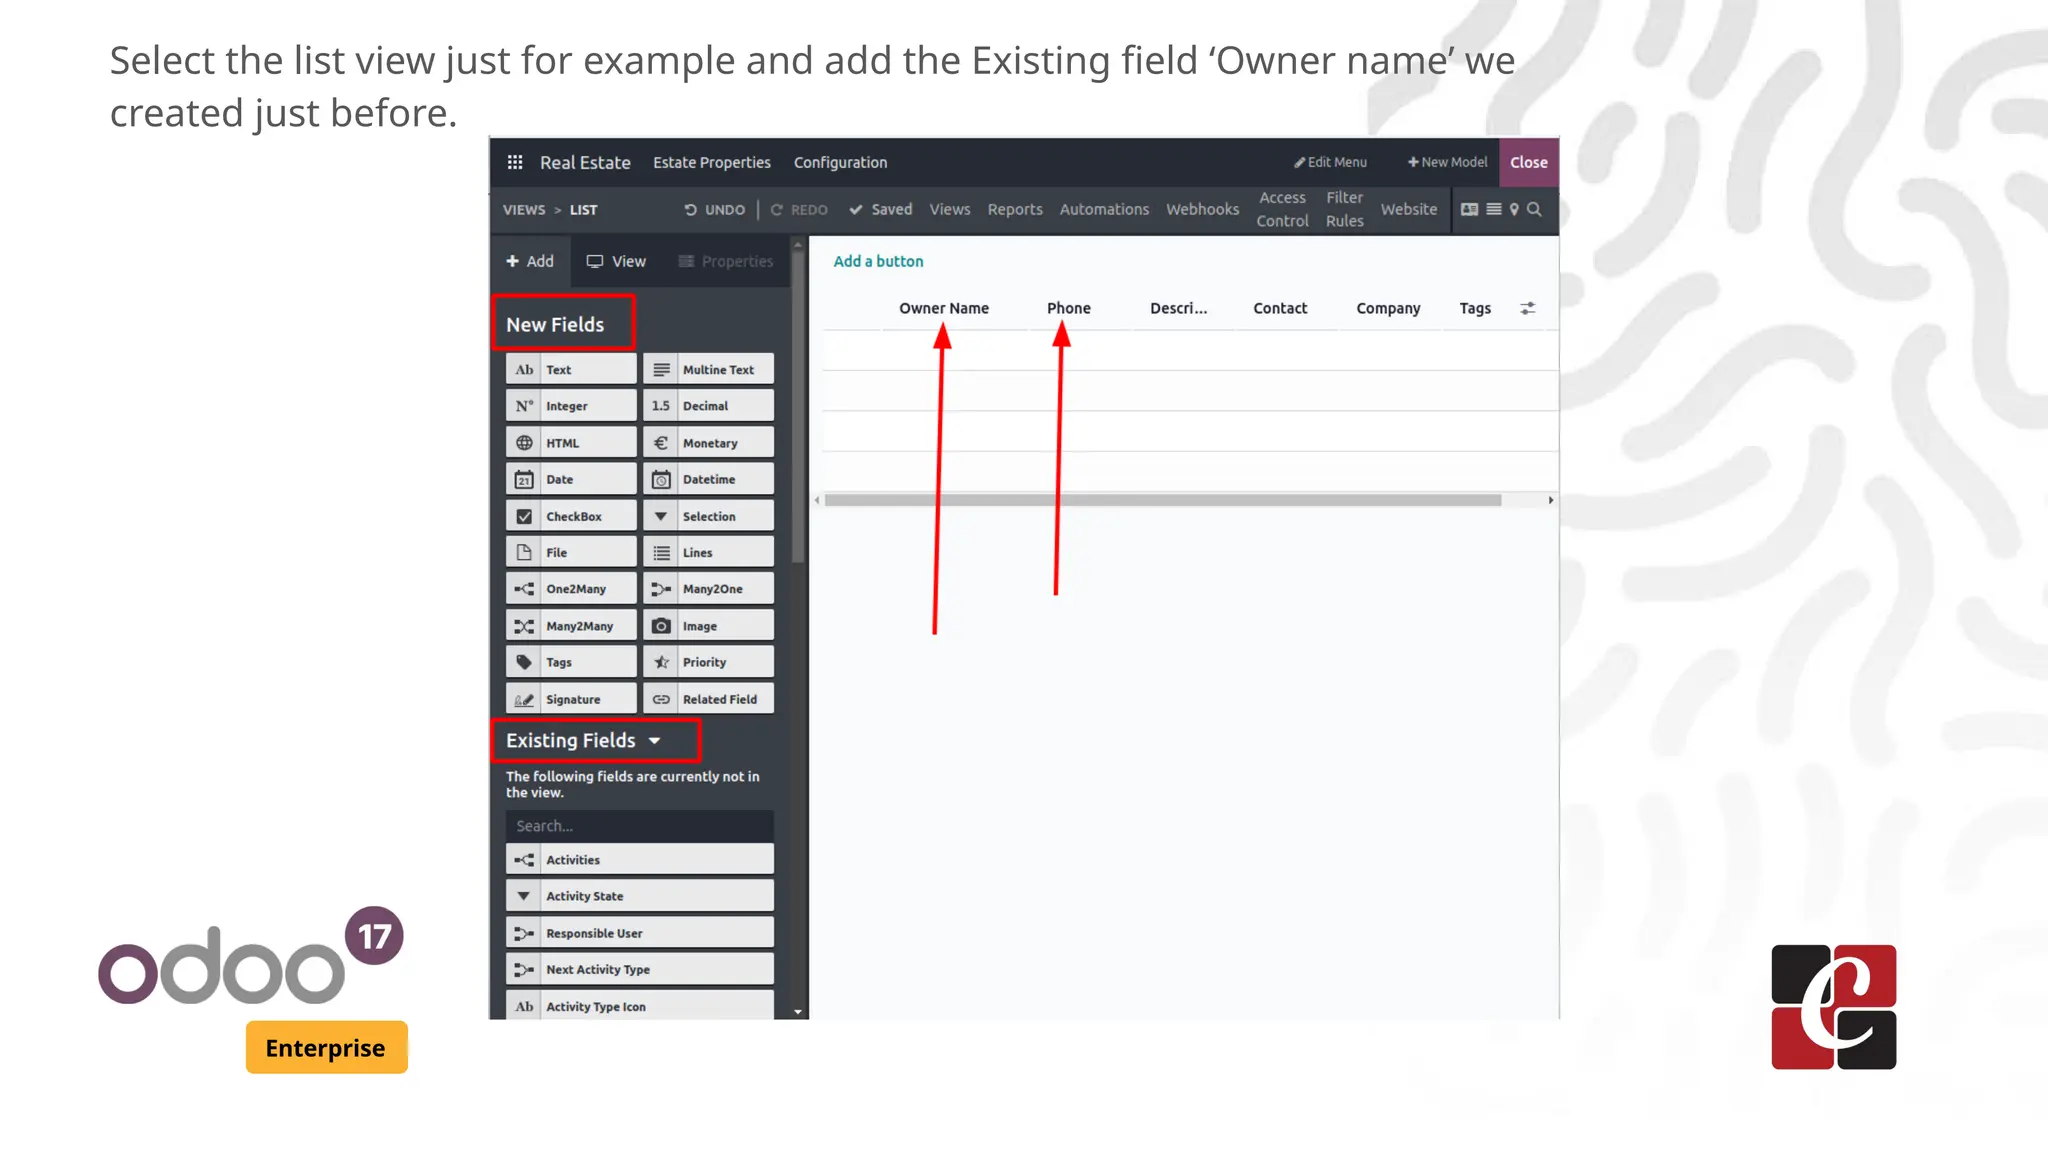
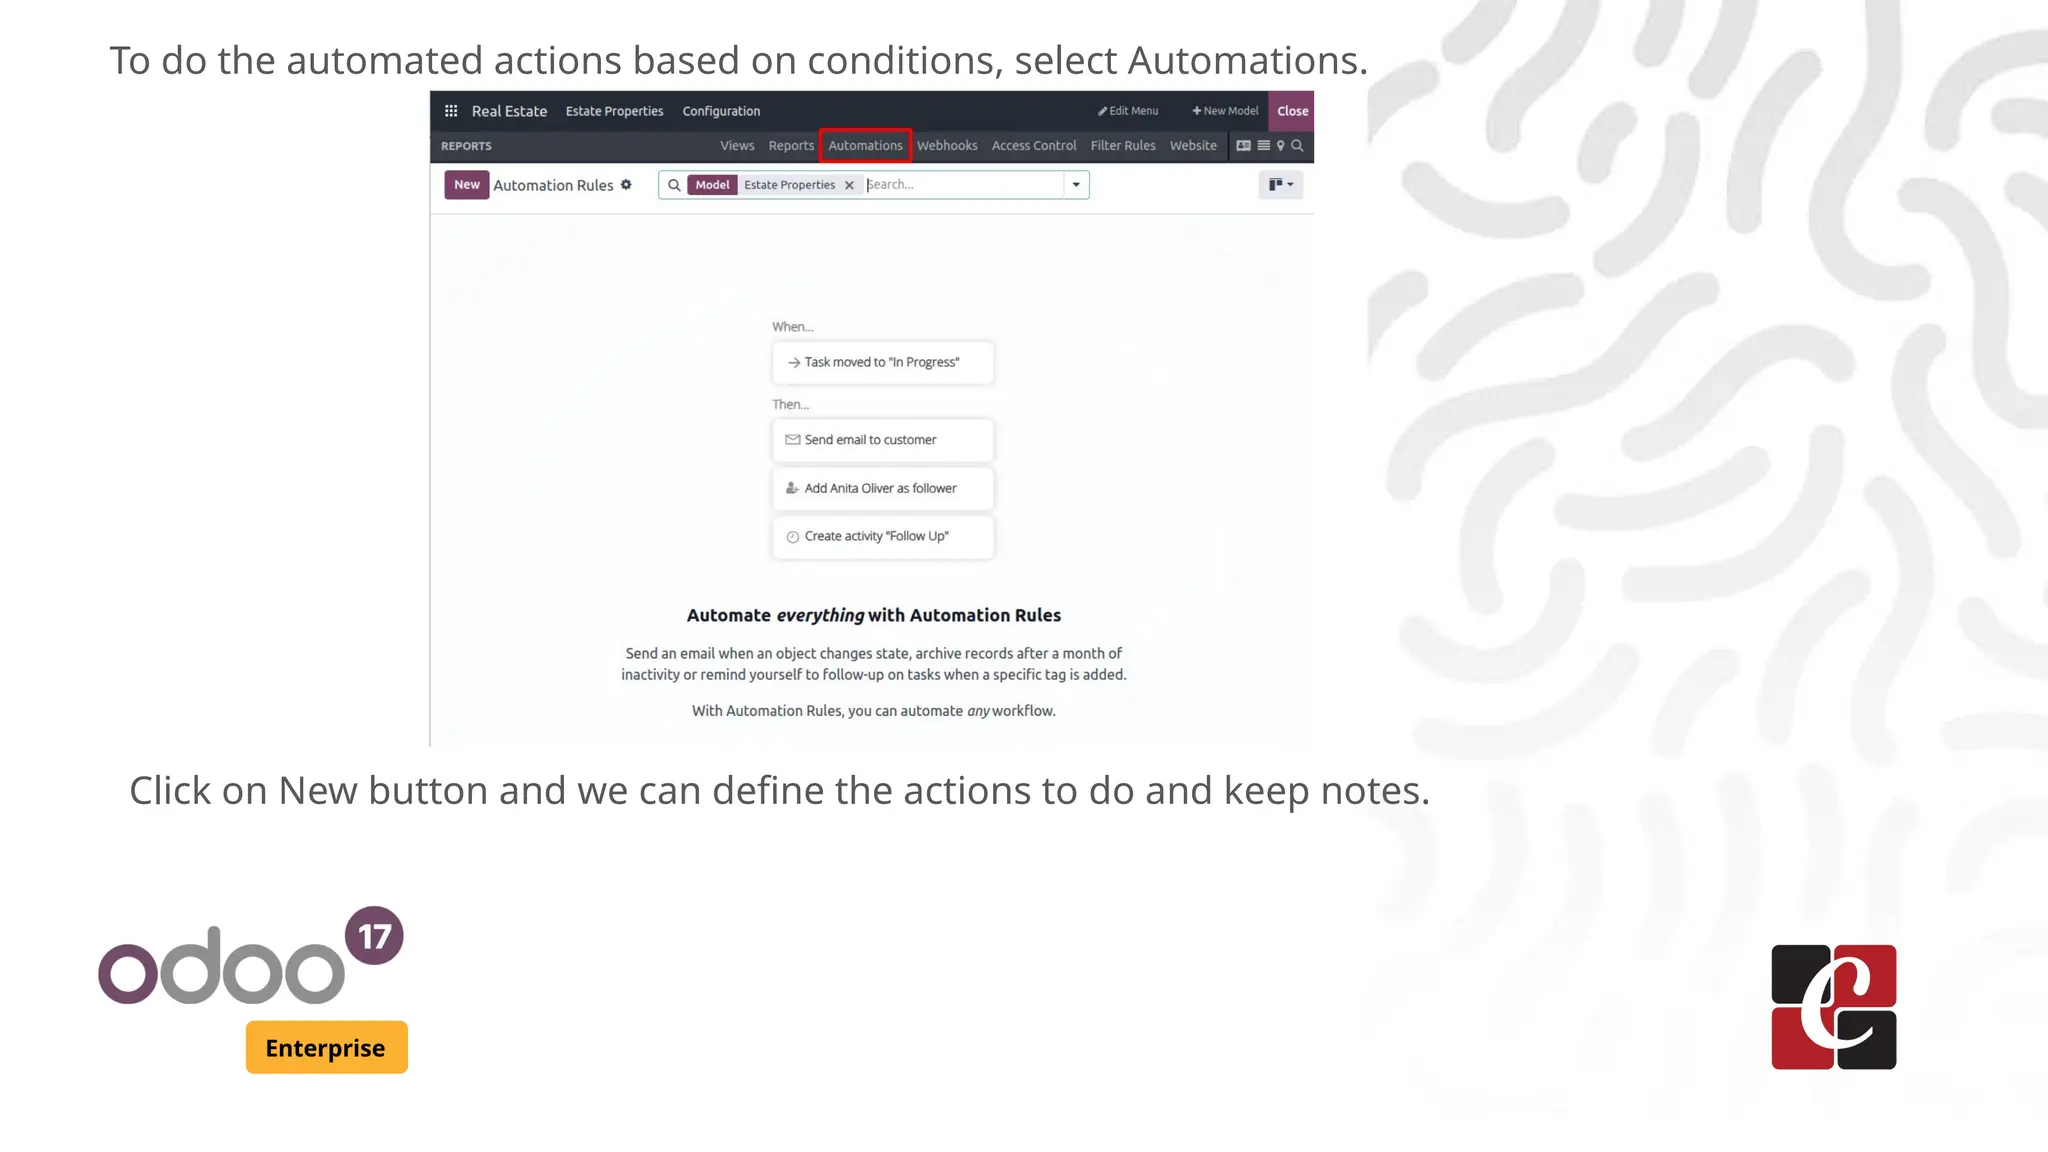
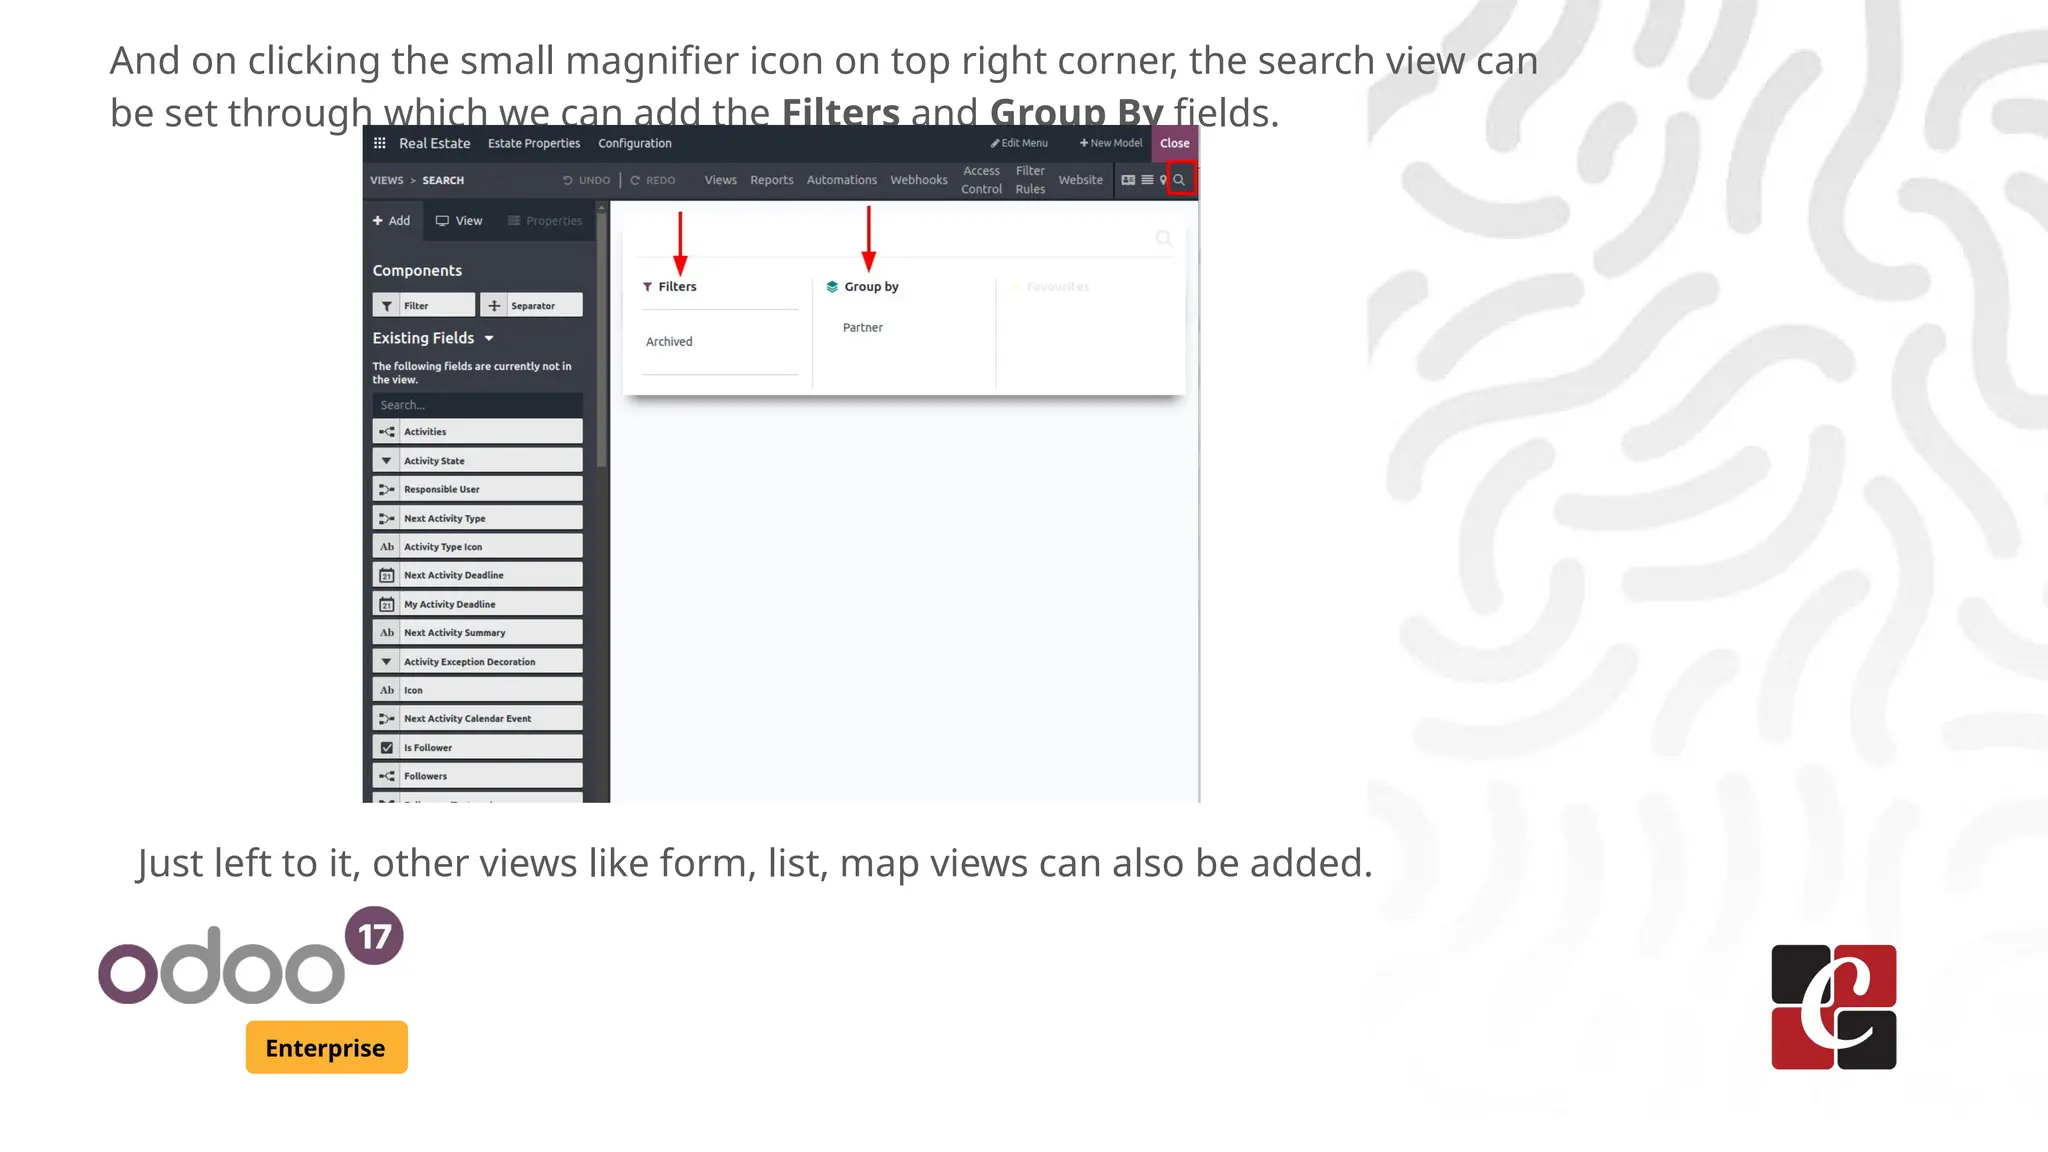
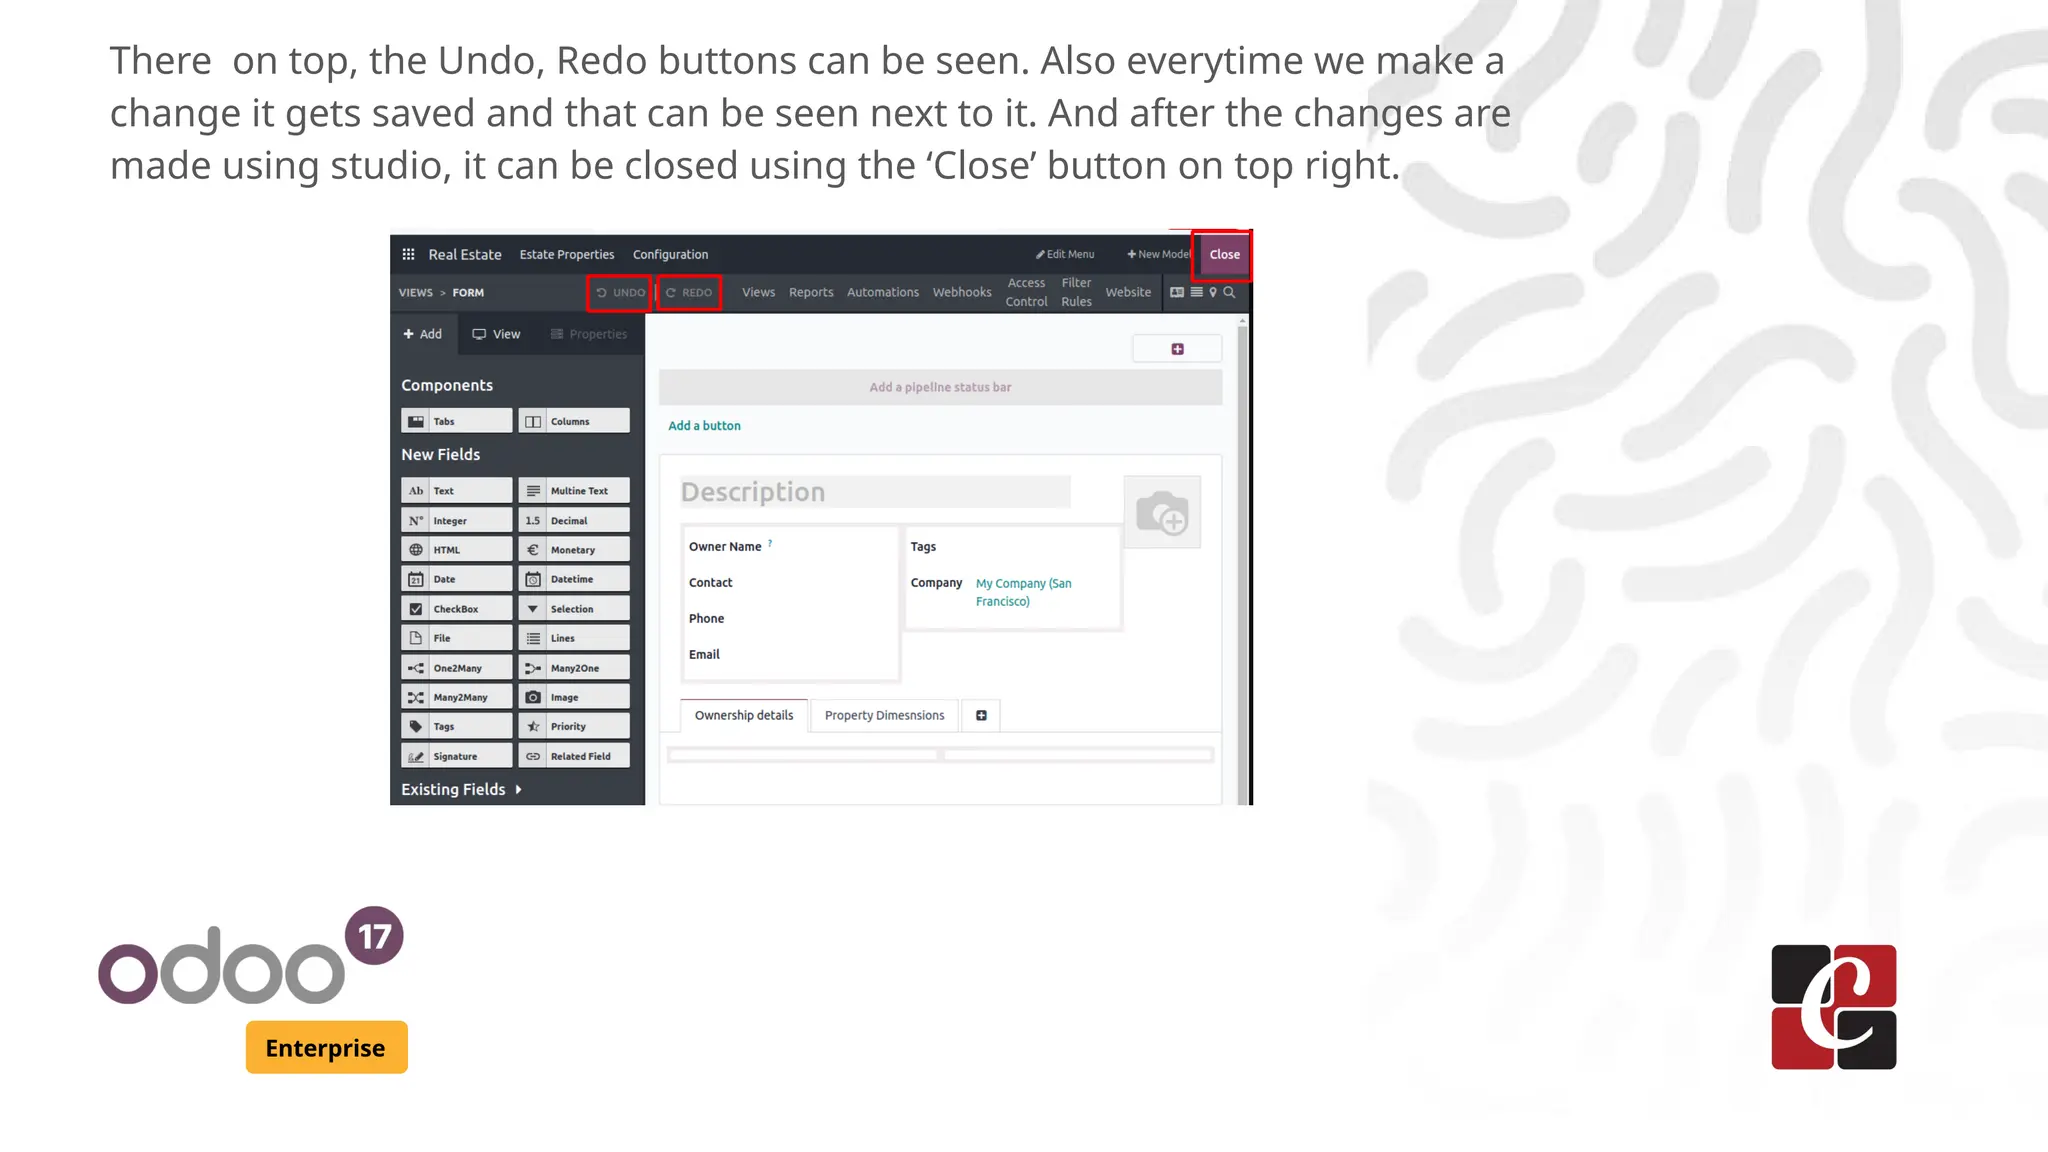
KEMBAR78
How to Create an App Using Odoo 17 Studio | PPTX
How to Create an App
Using Odoo 17 Studio
Enterprise
Introduction
Enterprise
Odoo Studio is a powerful tool that allows us to build custom
applications without needing to write code.
Creating an app with Odoo 17 Studio can greatly enhance our
business processes by tailoring the software to fit our specific needs.
Let’s explore this interesting feature of Odoo in detail.
Enterprise
Studio module cannot be seen with a UI icon in the main view of the
module list as we see for Sales, Purchase, etc. Instead, we can see an
icon of Toggle Studio on top just left to the company name is shown.
Enterprise
If that icon is seen as missing on the view, go to Apps and install the
studio module from there clicking on the 3 dots on right of the app.
Enterprise
By clicking on the Studio icon, we a see a window which allows us to make a new App
with a plus(+) icon on it. And the complete window will be seen as ready for the
customization with a dark background and Close button on top right.
Enterprise
Clicking on the New App over there, here comes the window which says
‘Welcome to Odoo Studio’ and a NEXT button to move forward.
Enterprise
Then, in the next window, we can give the name of the App and we can design
the icon for the App or upload any image from our library for the App.
If you choose to design the icon, there is provision to change the background
color, icon color and even we can choose any icon from the available list. Click
on NEXT to follow the process
Enterprise
In the next page, let’s create the first menu for our module. We can
either create it for a new model or from an existing model.
This one we use is a new model Real Estate Properties, so we give
like
Enterprise
Then comes the suggested features from which we can choose the needed
ones. The features include Tags, Pictures, Chatter, Lines, Date & Calendar,
etc. Choose the required features and click on ‘Create your App’ on bottom
right.
Enterprise
This will take us to the window where we can design the things for ‘Estate
Properties’ menu. And on the topmost section, we can see the Configuration
menu along with our custom menus. By default, the window for setting the
form view for the model will be shown as the below picture.
Enterprise
Selecting the appropriate Fields will display the Properties box, where all configurational
components related to the Field can be created.
We can change the view on clicking ‘Views’ and select the needed view type and design.
Then on the left, the New fields and Existing fields will be available to choose from. On
top, we see some menus like Views, Reports, Automations, WebHooks, Access Control
etc. We can just drag and drop the fields to the view.
Enterprise
Here, I’ve just added the field ‘Owner Name’. For that we can set the properties
like invisible, readonly, required and conditions can also be set for them. This will
do the function of the code that we add in xml code from the backend.
Also the features like Label, Help tooltip, widget, Placeholder, Default value can
be set directly by giving or selecting values from there.
Click on Add button on top to make it available in the view.
Enterprise
There are many types like Text, Integer, Multiline text, HTML available for the
creating fields which fulfill the same purpose of adding the code from the
backed. The tabs can be made simply by dragging from the marked area and
dropping it on the desired place. Give name for them. Here we can see these two
tabs created.
Enterprise
From the top menu Views, all types of views can be seen and we can select the
one we want. It will show like
Enterprise
Select the list view just for example and add the Existing field ‘Owner name’ we
created just before.
Enterprise
To design the reports based on the models, first we can select Reports from top,
then clicking on New button will show a pop up like this
We can decide the type of report needed and design it accordingly.
Enterprise
To do the automated actions based on conditions, select Automations.
Click on New button and we can define the actions to do and keep notes.
Enterprise
And on clicking the small magnifier icon on top right corner, the search view can
be set through which we can add the Filters and Group By fields.
Just left to it, other views like form, list, map views can also be added.
Enterprise
There on top, the Undo, Redo buttons can be seen. Also everytime we make a
change it gets saved and that can be seen next to it. And after the changes are
made using studio, it can be closed using the ‘Close’ button on top right.
Enterprise
In this way, we basically create a module and create its views and other
properties in Odoo using the Studio module.
The Studio module in Odoo offers numerous benefits, making it an
invaluable tool for businesses looking to tailor Odoo to their specific
needs. It offers User-Friendly Customization, Increased Flexibility and
Productivity and Cost-Effective Solution.
For More Info.
Check our company website for related blogs
and Odoo book.
Check our YouTube channel for
functional and technical videos in Odoo.
Enterprise
www.cybrosys.com

How to Create an App Using Odoo 17 Studio

  • 1.
    How to Createan App Using Odoo 17 Studio Enterprise
  • 2.
    Introduction Enterprise Odoo Studio isa powerful tool that allows us to build custom applications without needing to write code. Creating an app with Odoo 17 Studio can greatly enhance our business processes by tailoring the software to fit our specific needs. Let’s explore this interesting feature of Odoo in detail.
  • 3.
    Enterprise Studio module cannotbe seen with a UI icon in the main view of the module list as we see for Sales, Purchase, etc. Instead, we can see an icon of Toggle Studio on top just left to the company name is shown.
  • 4.
    Enterprise If that iconis seen as missing on the view, go to Apps and install the studio module from there clicking on the 3 dots on right of the app.
  • 5.
    Enterprise By clicking onthe Studio icon, we a see a window which allows us to make a new App with a plus(+) icon on it. And the complete window will be seen as ready for the customization with a dark background and Close button on top right.
  • 6.
    Enterprise Clicking on theNew App over there, here comes the window which says ‘Welcome to Odoo Studio’ and a NEXT button to move forward.
  • 7.
    Enterprise Then, in thenext window, we can give the name of the App and we can design the icon for the App or upload any image from our library for the App. If you choose to design the icon, there is provision to change the background color, icon color and even we can choose any icon from the available list. Click on NEXT to follow the process
  • 8.
    Enterprise In the nextpage, let’s create the first menu for our module. We can either create it for a new model or from an existing model. This one we use is a new model Real Estate Properties, so we give like
  • 9.
    Enterprise Then comes thesuggested features from which we can choose the needed ones. The features include Tags, Pictures, Chatter, Lines, Date & Calendar, etc. Choose the required features and click on ‘Create your App’ on bottom right.
  • 10.
    Enterprise This will takeus to the window where we can design the things for ‘Estate Properties’ menu. And on the topmost section, we can see the Configuration menu along with our custom menus. By default, the window for setting the form view for the model will be shown as the below picture.
  • 11.
    Enterprise Selecting the appropriateFields will display the Properties box, where all configurational components related to the Field can be created. We can change the view on clicking ‘Views’ and select the needed view type and design. Then on the left, the New fields and Existing fields will be available to choose from. On top, we see some menus like Views, Reports, Automations, WebHooks, Access Control etc. We can just drag and drop the fields to the view.
  • 12.
    Enterprise Here, I’ve justadded the field ‘Owner Name’. For that we can set the properties like invisible, readonly, required and conditions can also be set for them. This will do the function of the code that we add in xml code from the backend. Also the features like Label, Help tooltip, widget, Placeholder, Default value can be set directly by giving or selecting values from there. Click on Add button on top to make it available in the view.
  • 13.
    Enterprise There are manytypes like Text, Integer, Multiline text, HTML available for the creating fields which fulfill the same purpose of adding the code from the backed. The tabs can be made simply by dragging from the marked area and dropping it on the desired place. Give name for them. Here we can see these two tabs created.
  • 14.
    Enterprise From the topmenu Views, all types of views can be seen and we can select the one we want. It will show like
  • 15.
    Enterprise Select the listview just for example and add the Existing field ‘Owner name’ we created just before.
  • 16.
    Enterprise To design thereports based on the models, first we can select Reports from top, then clicking on New button will show a pop up like this We can decide the type of report needed and design it accordingly.
  • 17.
    Enterprise To do theautomated actions based on conditions, select Automations. Click on New button and we can define the actions to do and keep notes.
  • 18.
    Enterprise And on clickingthe small magnifier icon on top right corner, the search view can be set through which we can add the Filters and Group By fields. Just left to it, other views like form, list, map views can also be added.
  • 19.
    Enterprise There on top,the Undo, Redo buttons can be seen. Also everytime we make a change it gets saved and that can be seen next to it. And after the changes are made using studio, it can be closed using the ‘Close’ button on top right.
  • 20.
    Enterprise In this way,we basically create a module and create its views and other properties in Odoo using the Studio module. The Studio module in Odoo offers numerous benefits, making it an invaluable tool for businesses looking to tailor Odoo to their specific needs. It offers User-Friendly Customization, Increased Flexibility and Productivity and Cost-Effective Solution.
  • 21.
    For More Info. Checkour company website for related blogs and Odoo book. Check our YouTube channel for functional and technical videos in Odoo. Enterprise www.cybrosys.com