Download to read offline


![Sample
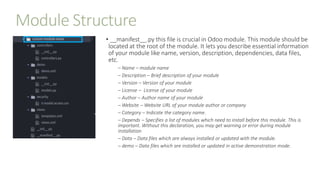
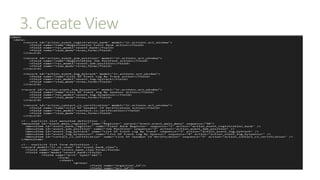
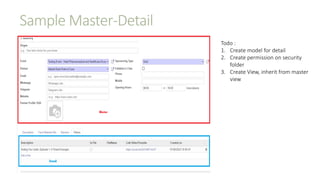
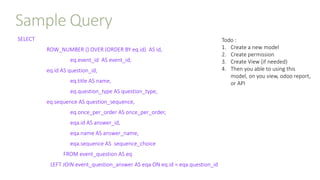
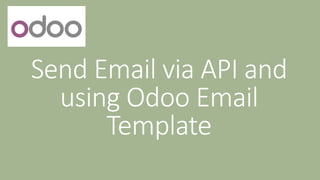
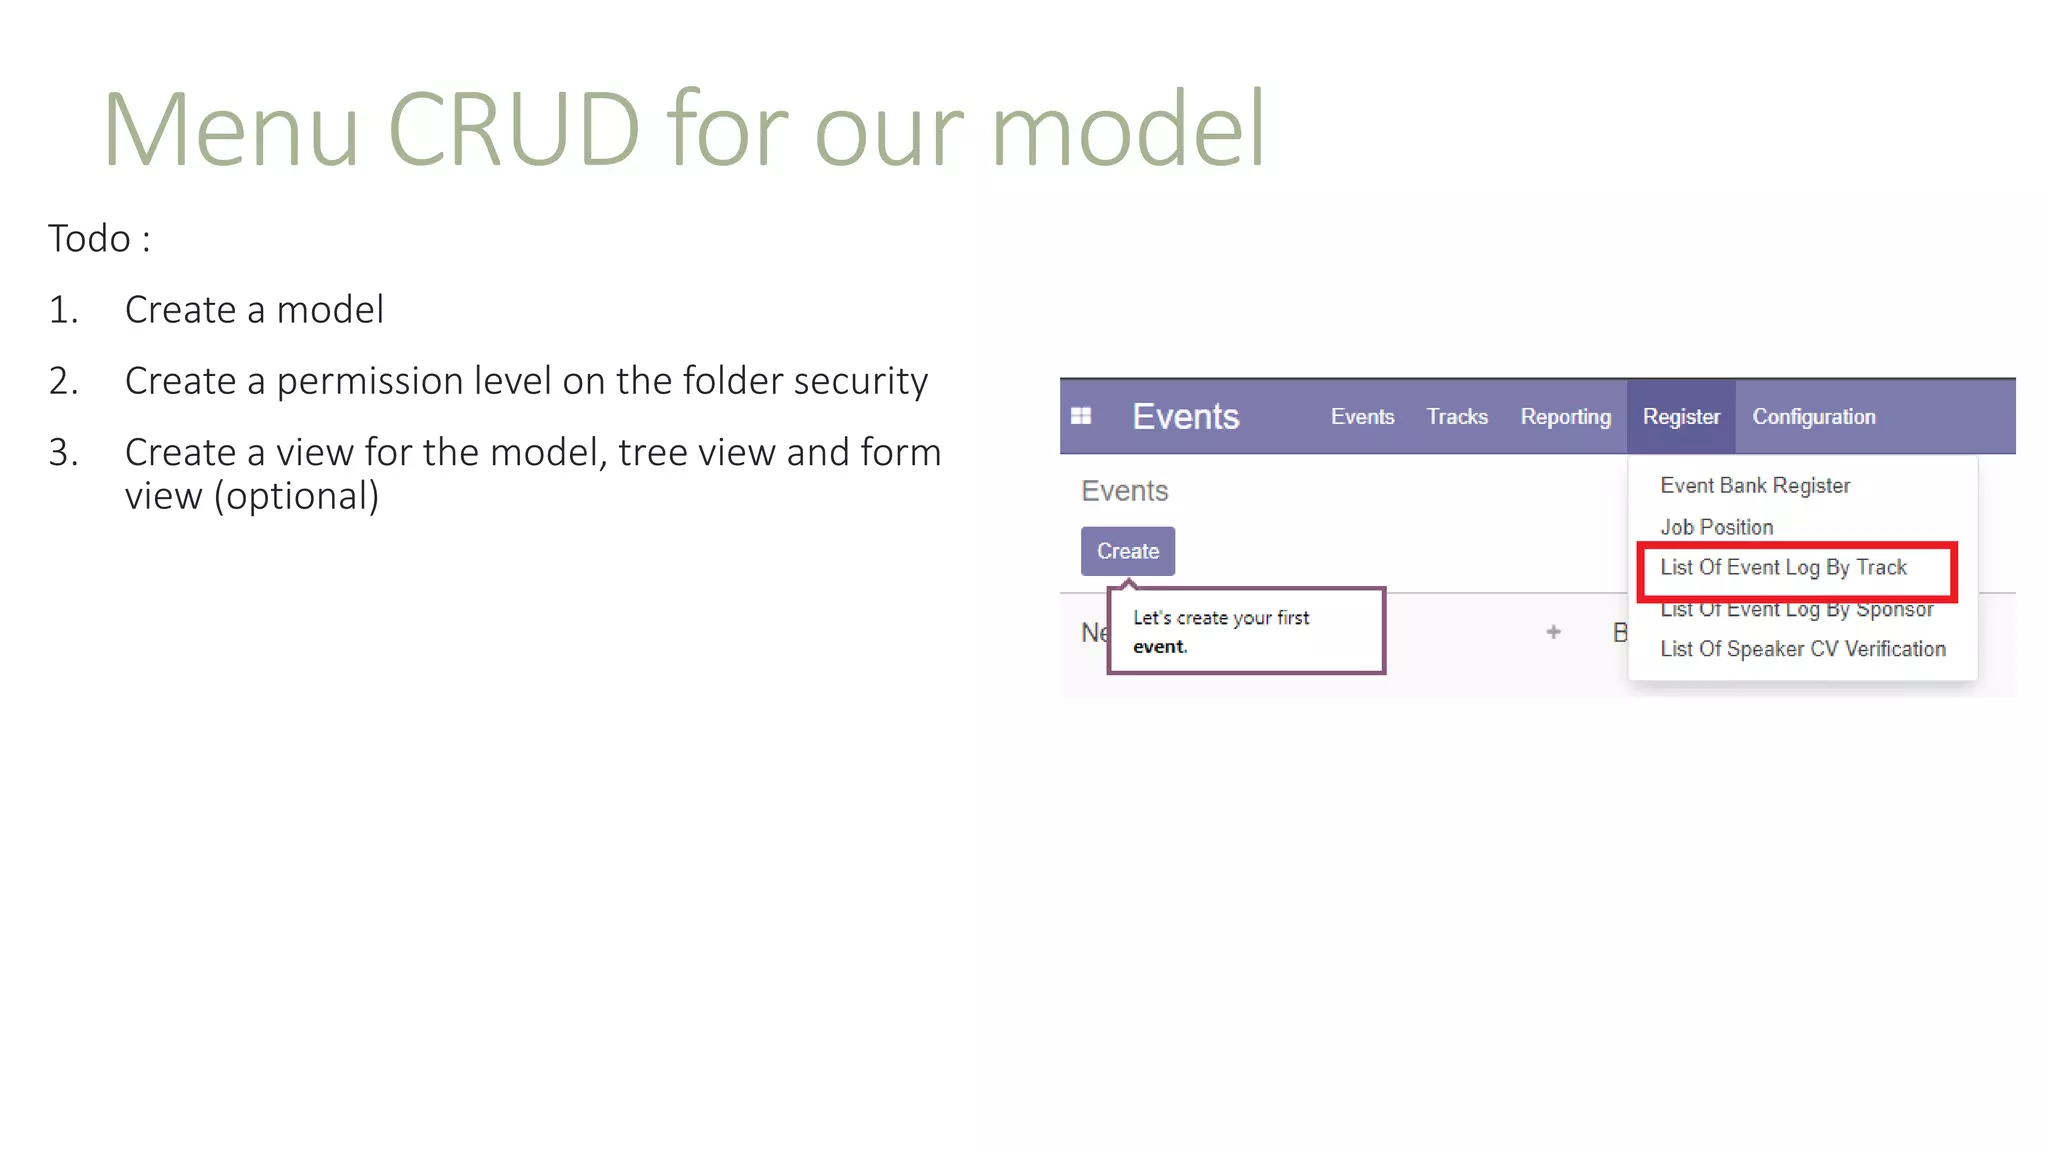
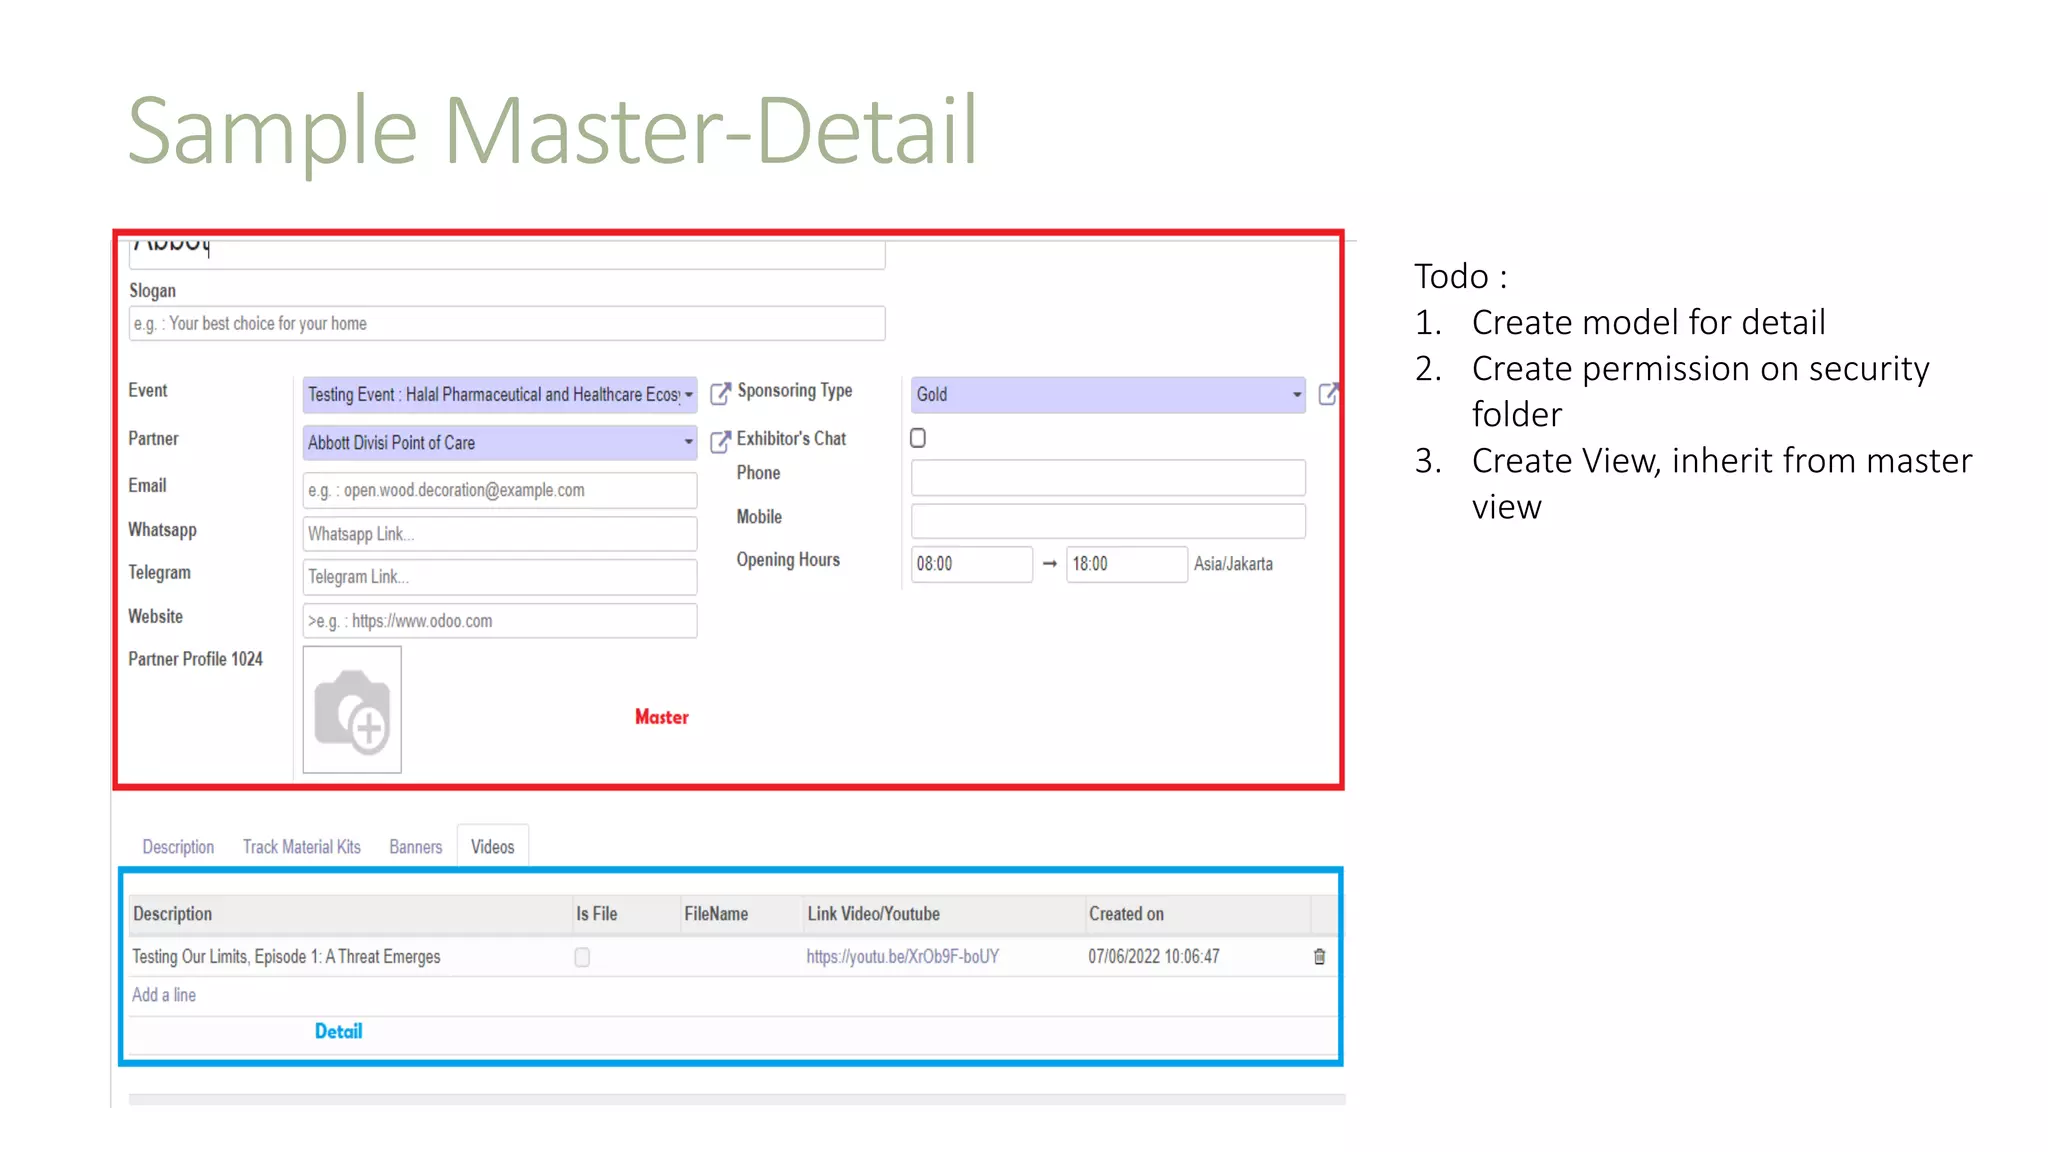
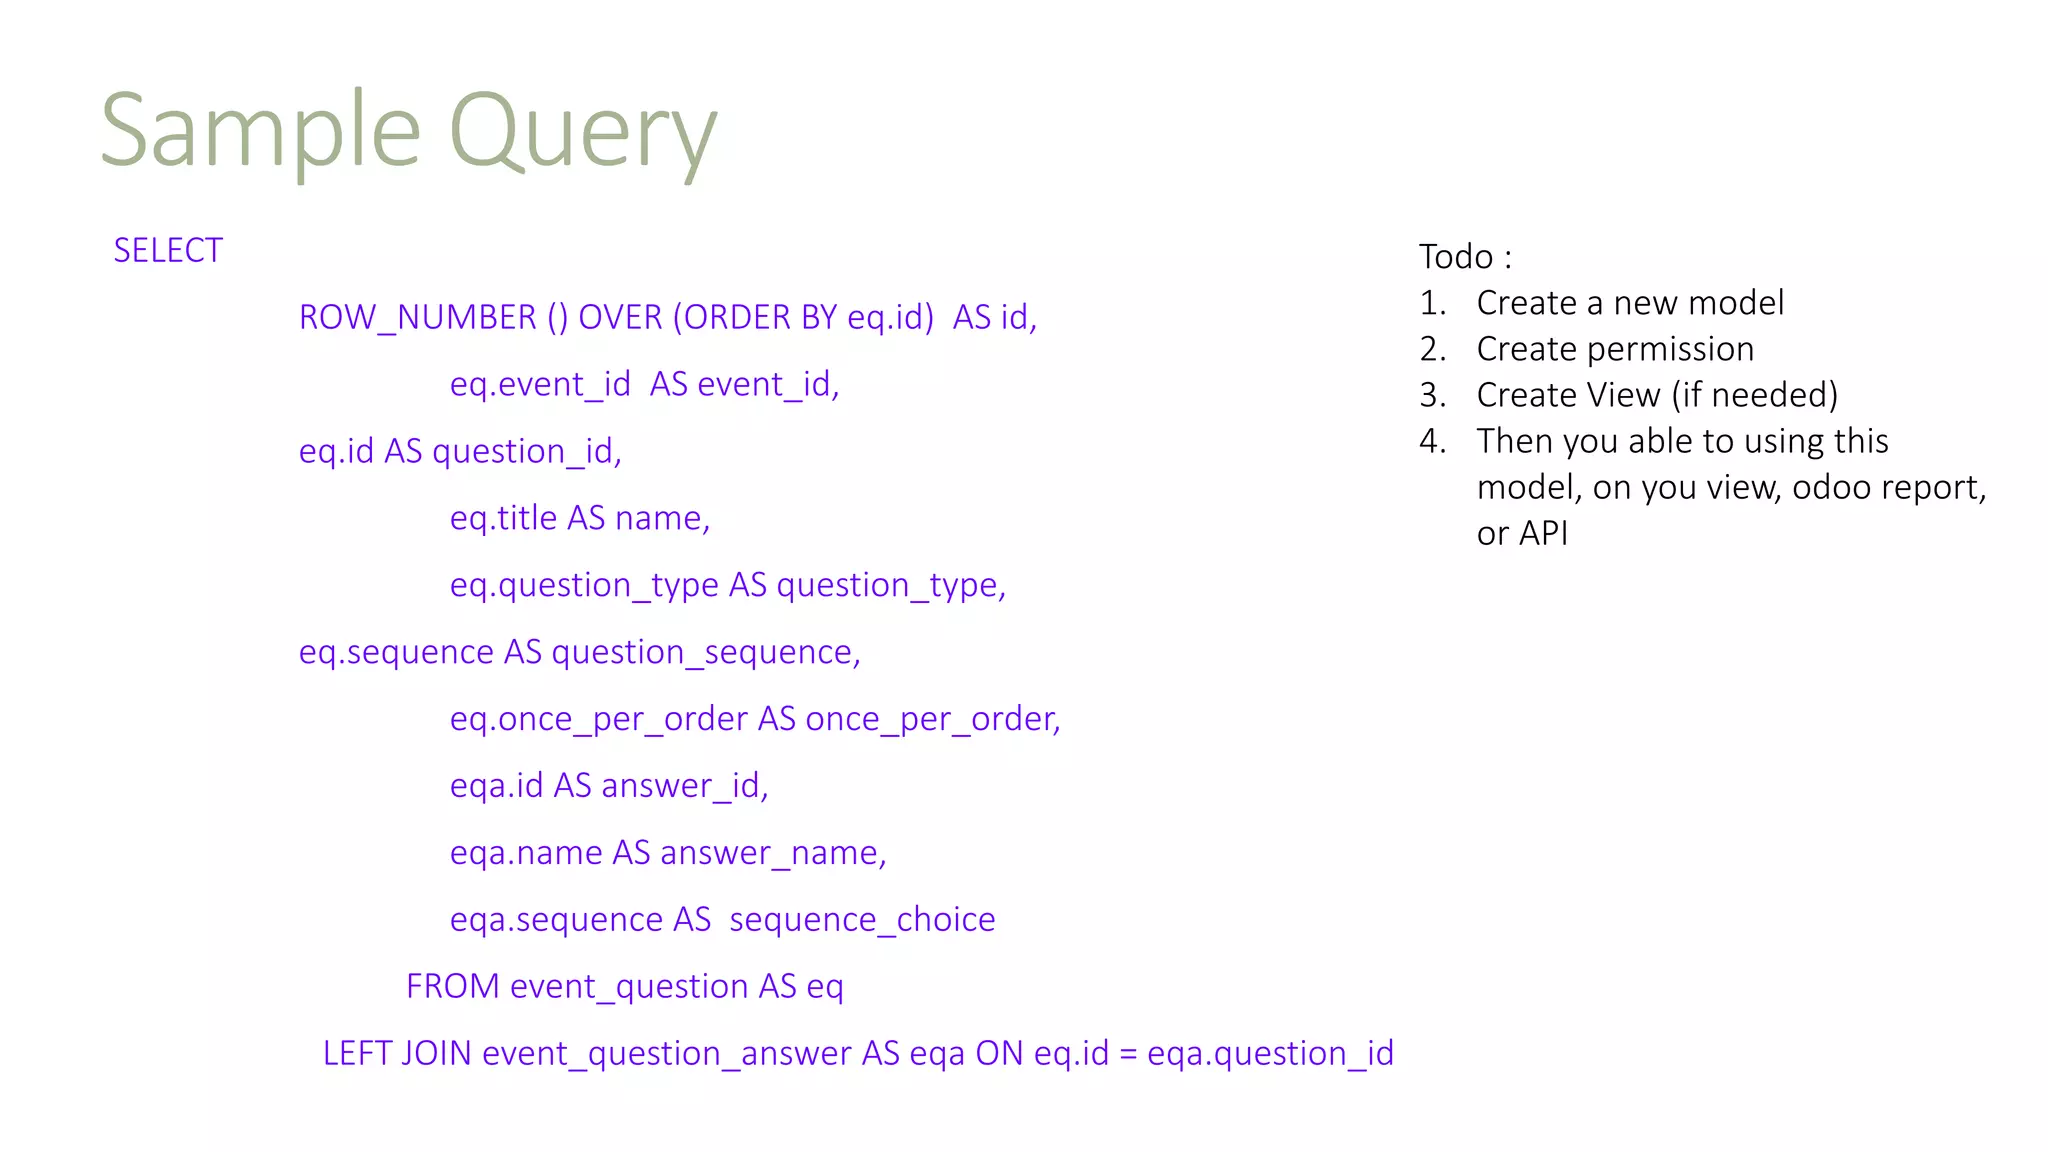
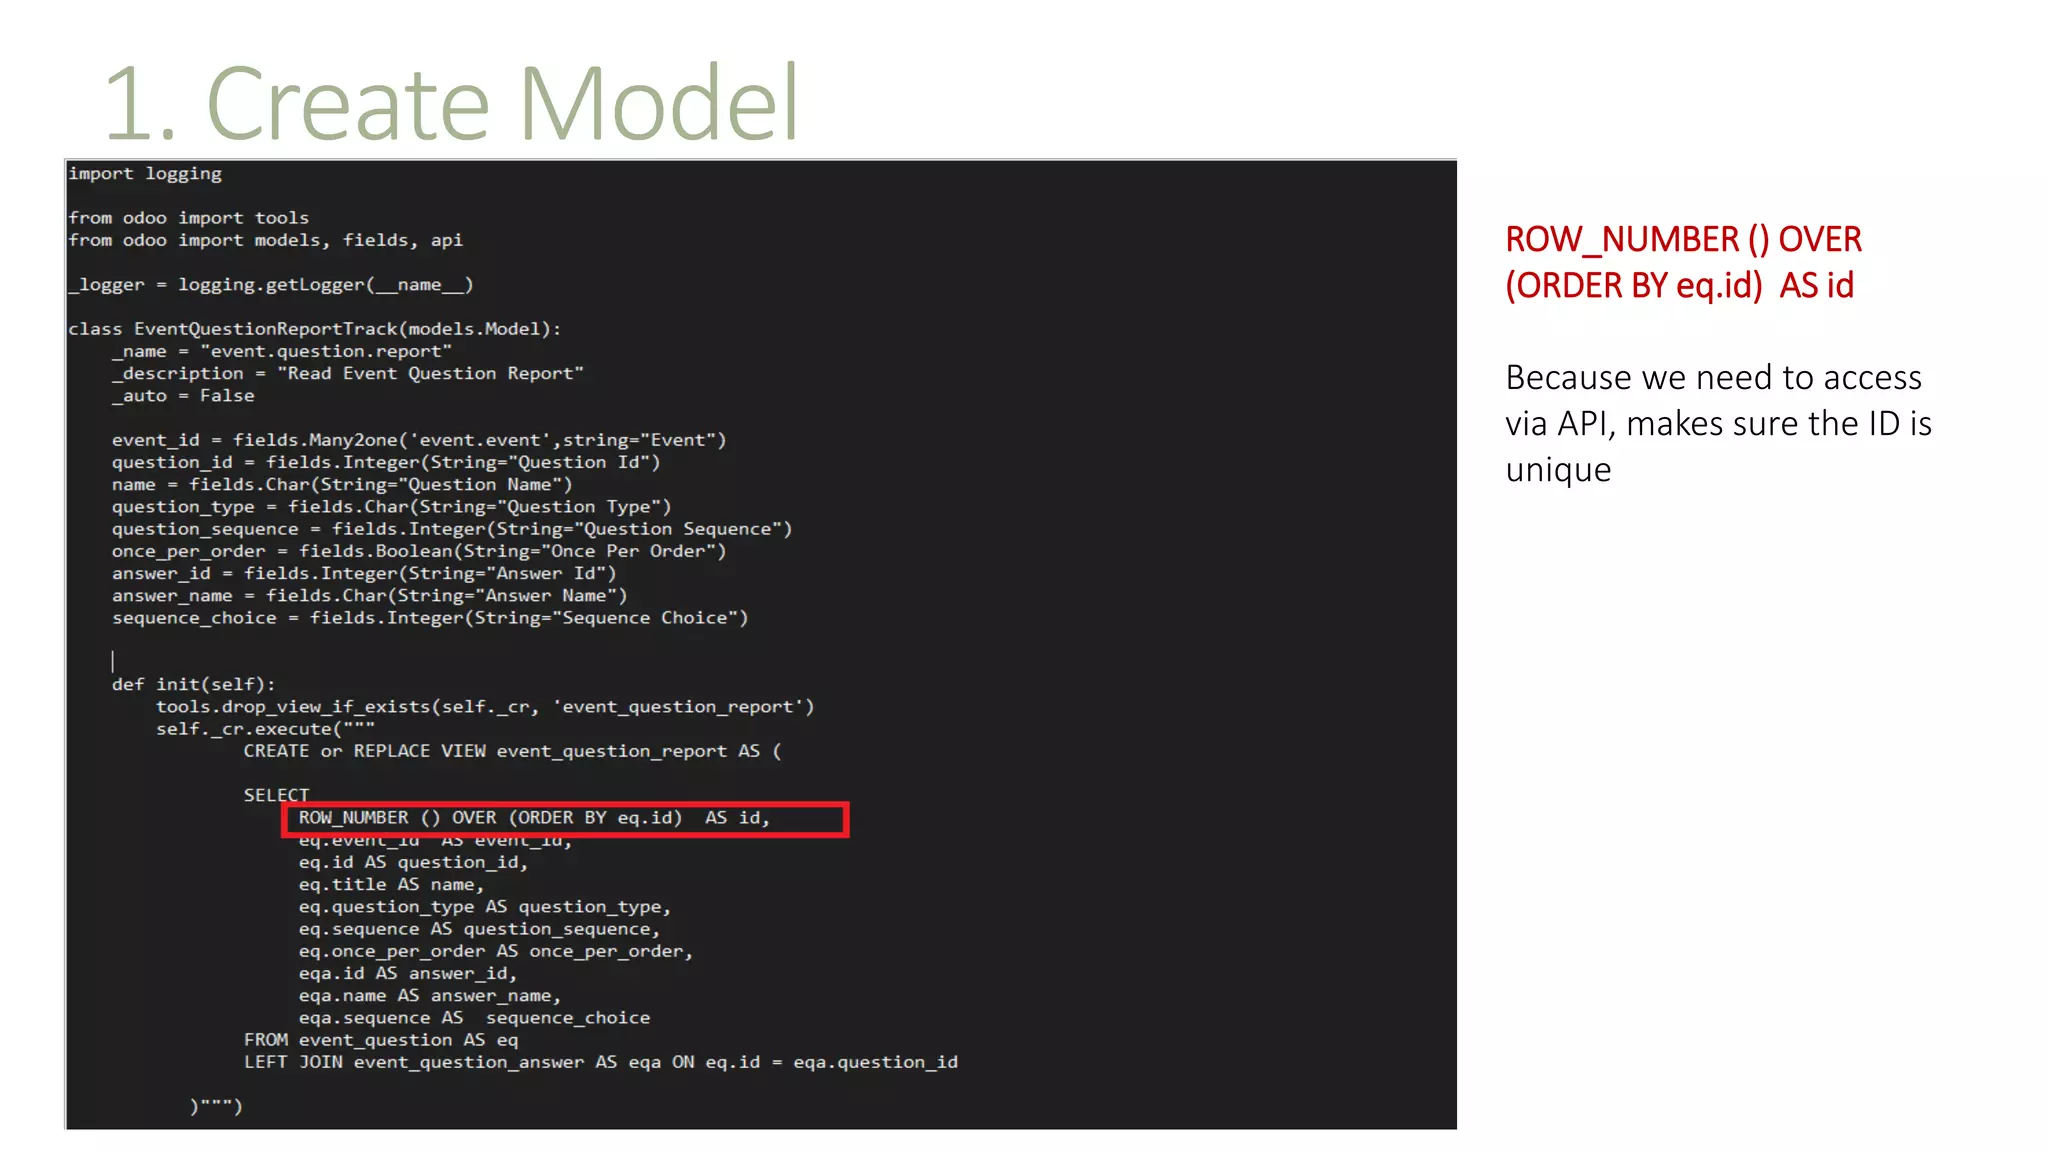
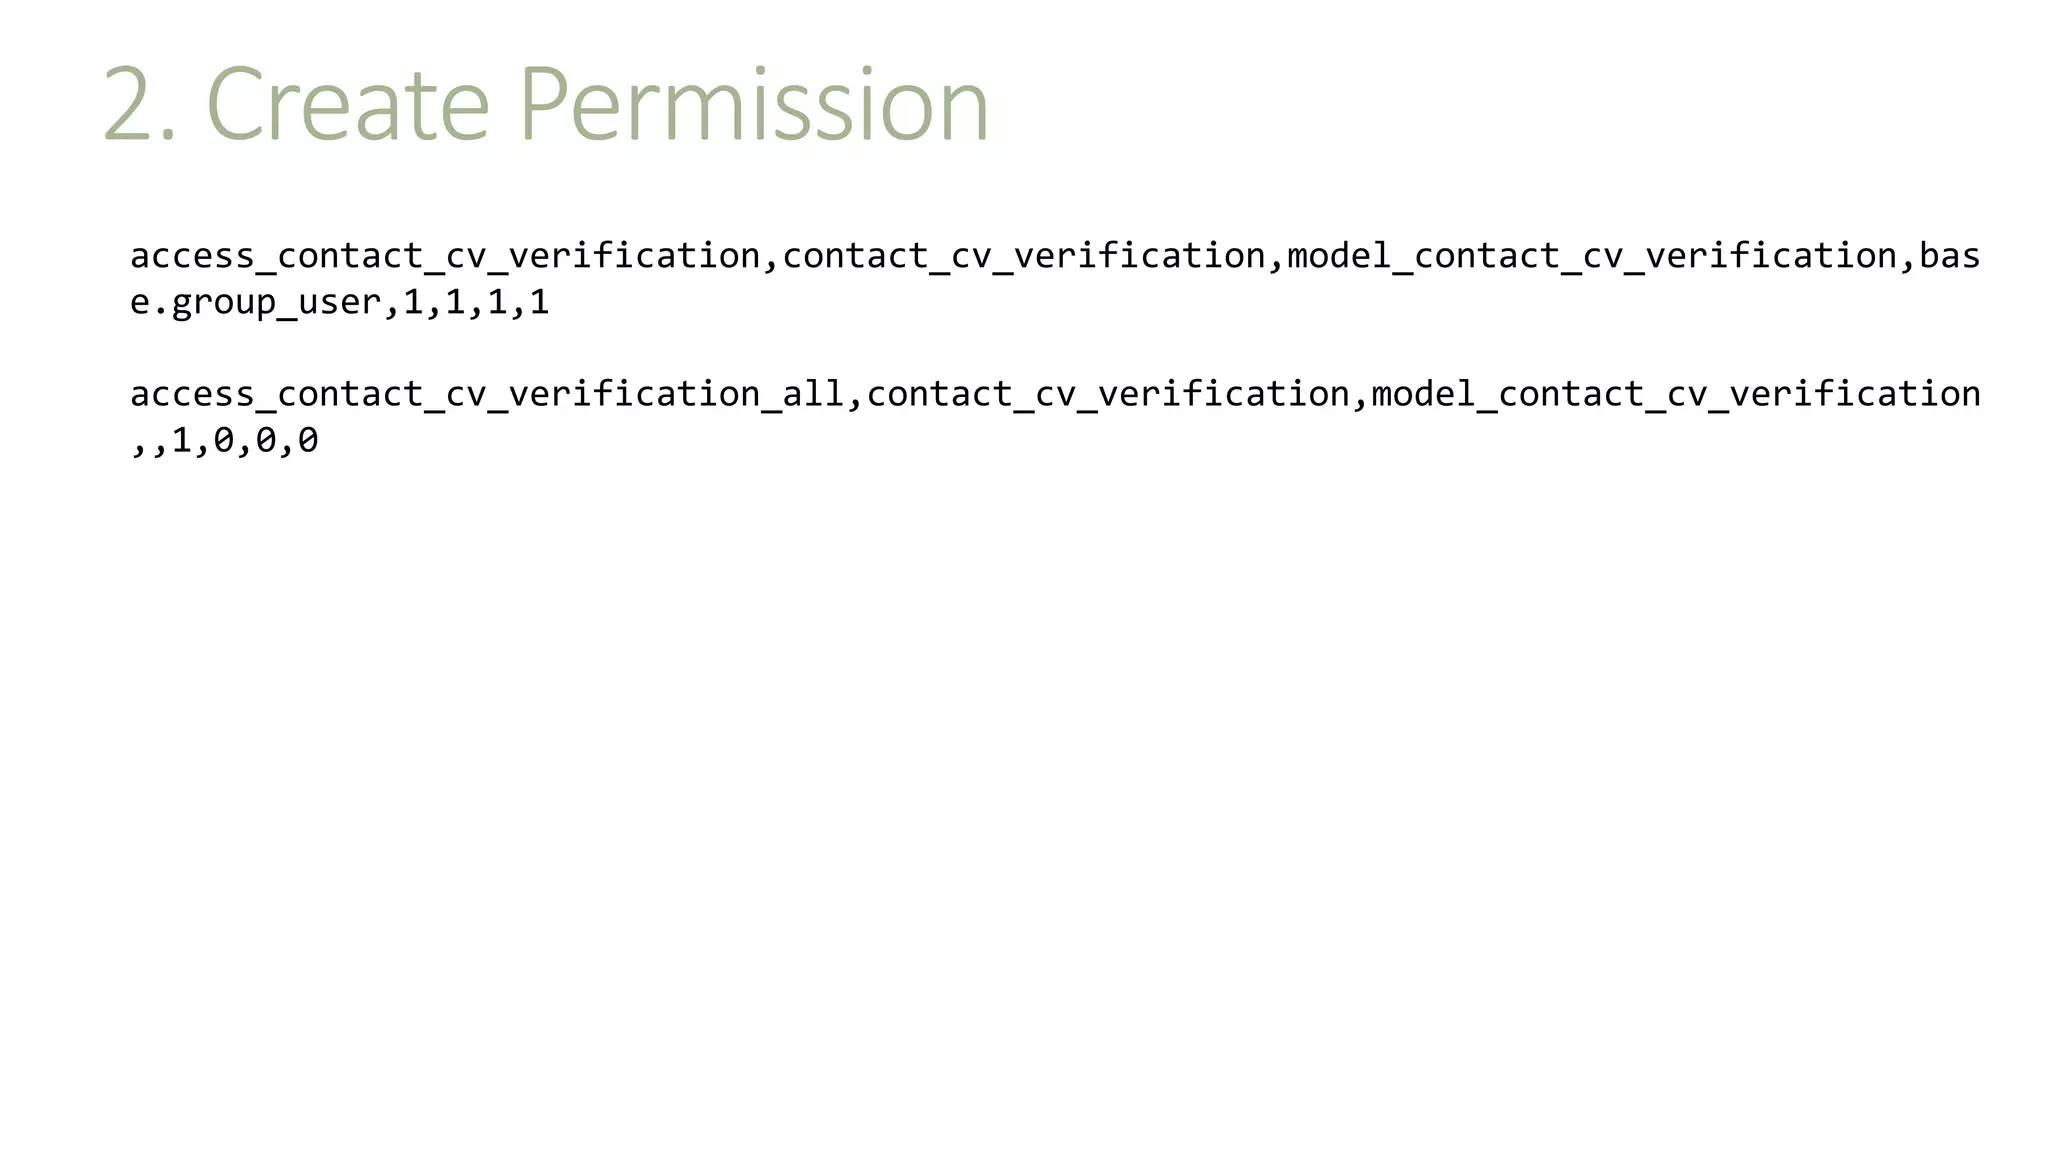
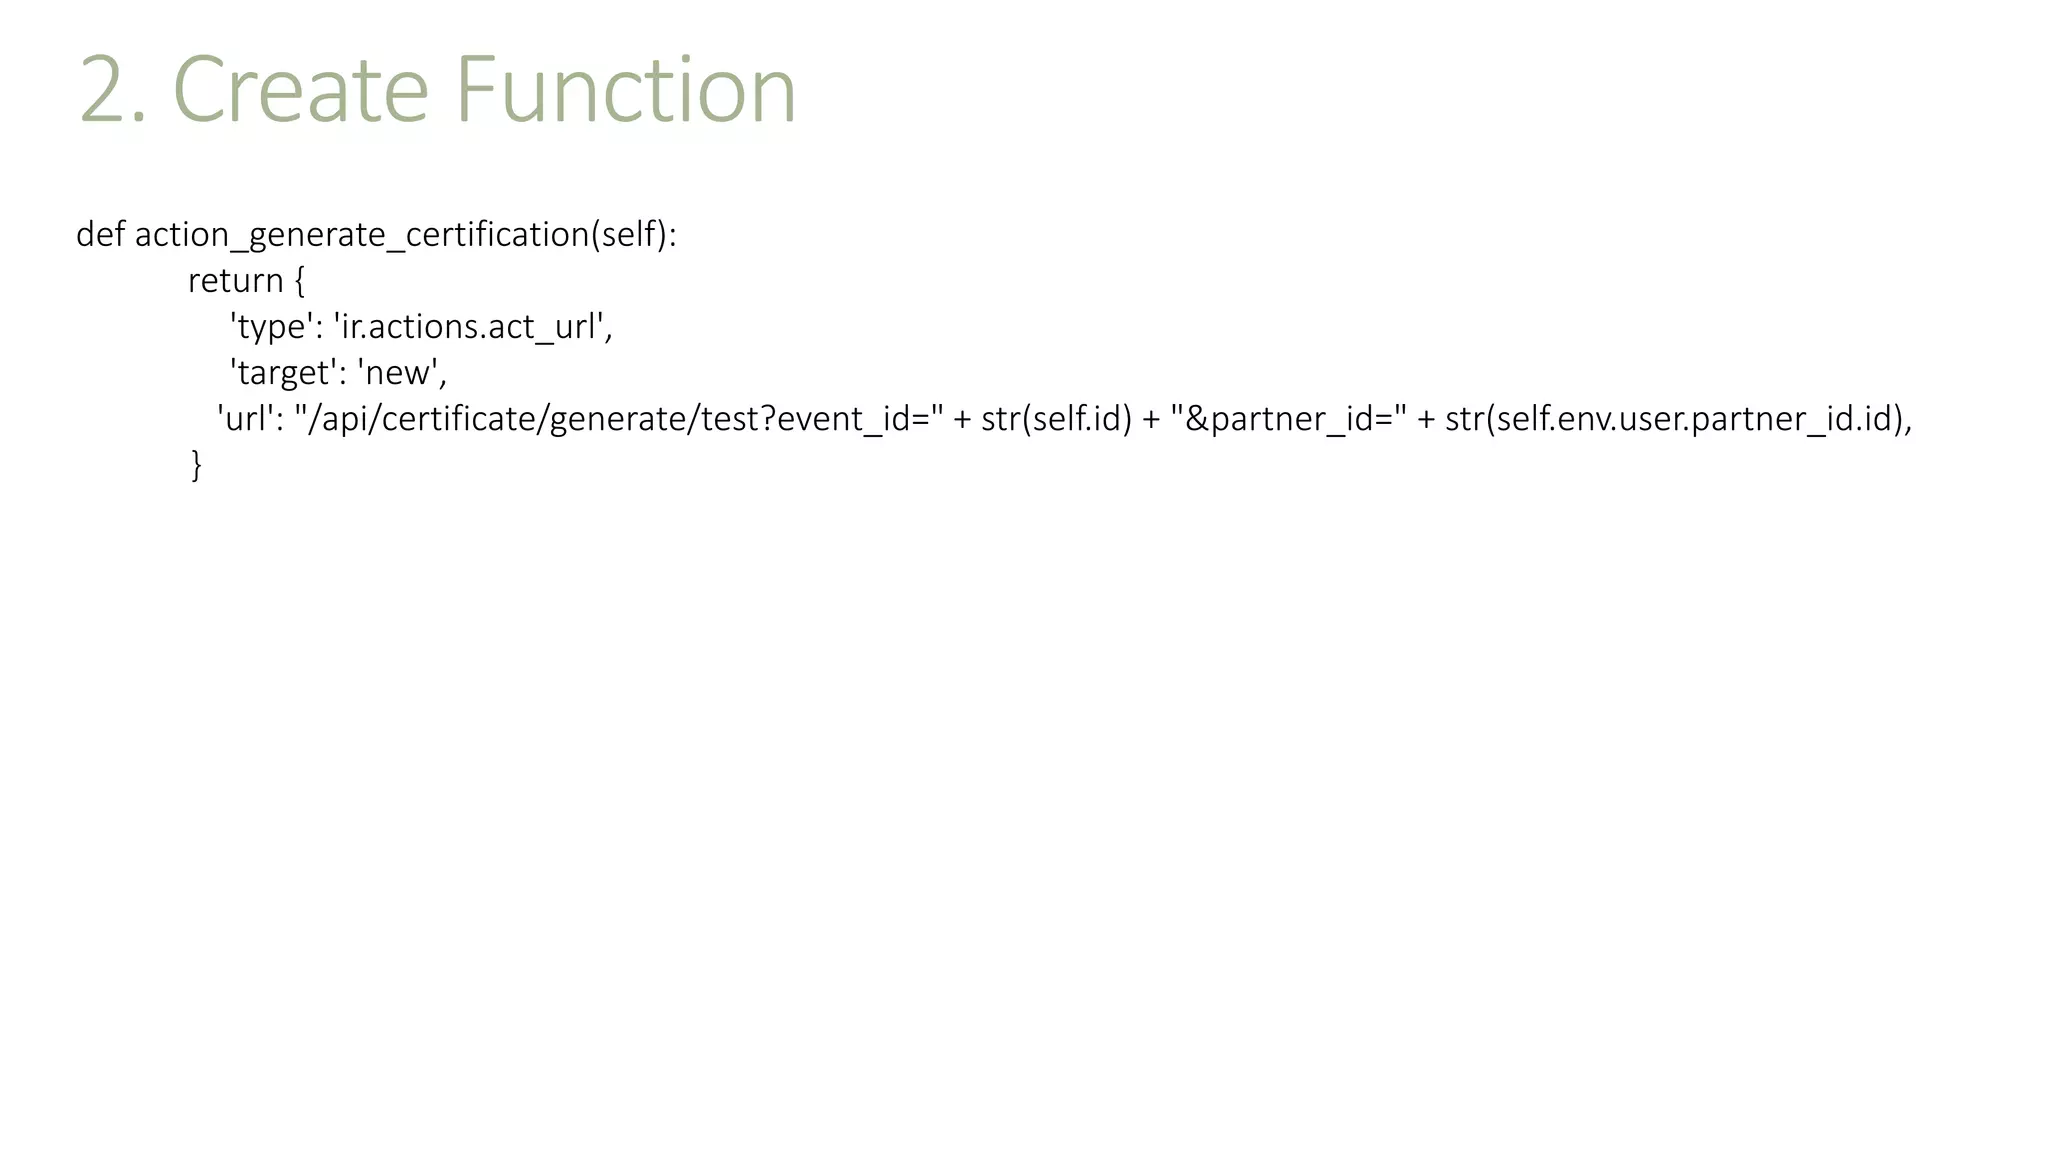
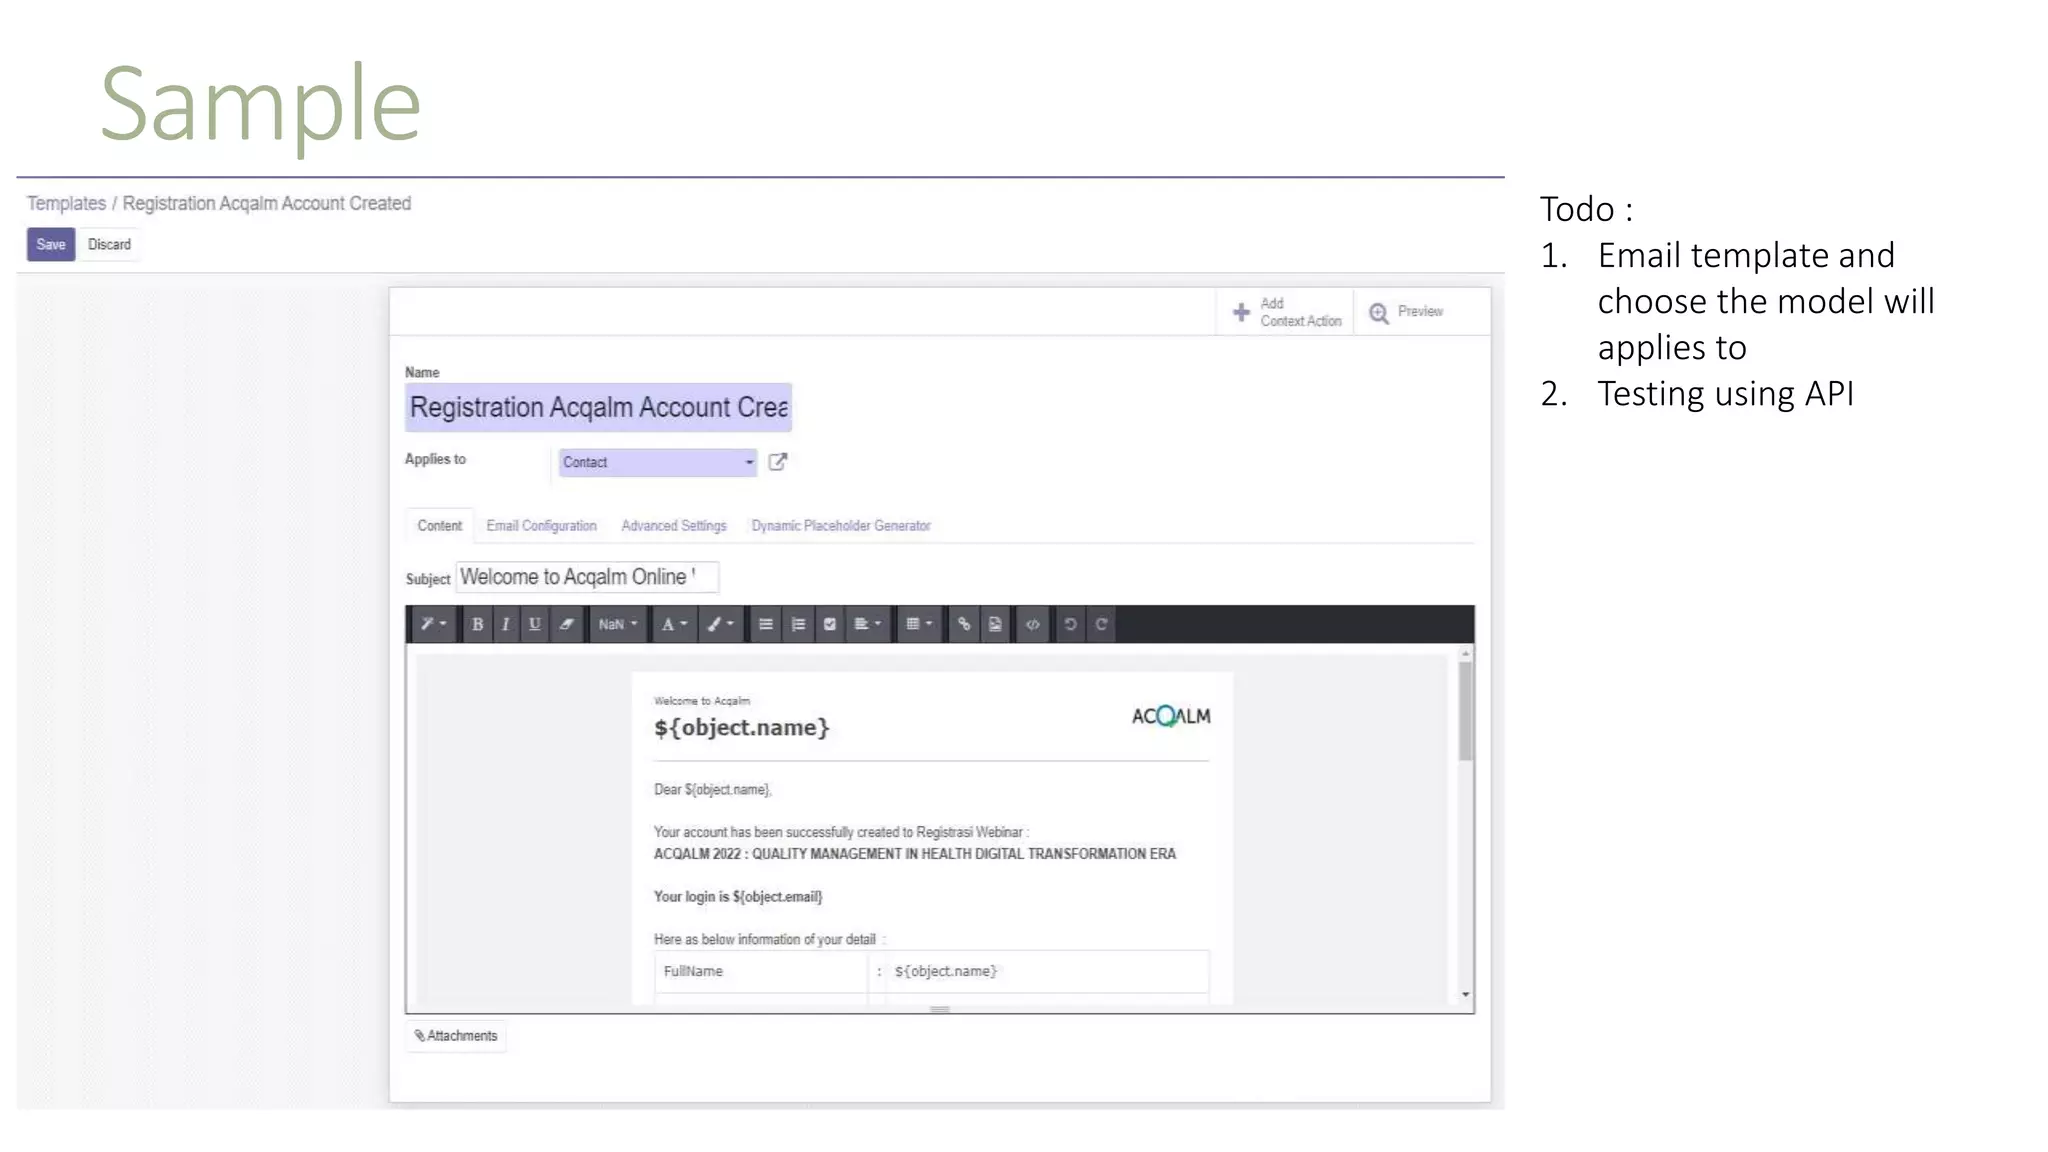
Todo :
1. Create button on the view
2. Create function on the model, since the
button type using object
1. Create button on view
<xpath expr="//field[@name='stage_id']" position="before">
<button type="object" name="action_generate_certification" string="Test Certification" class="btn btn-secondary"
attrs="{'invisible': [('is_certificate', '=', False)]}"/>
</xpath>](https://image.slidesharecdn.com/tipsontrickodooadd-on-220713145647-5021c79c/85/Tips-On-Trick-Odoo-Add-On-pptx-31-320.jpg)

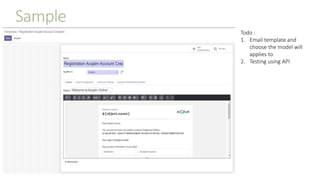
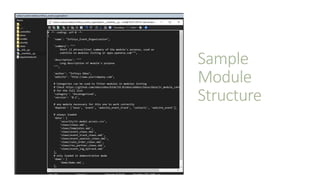
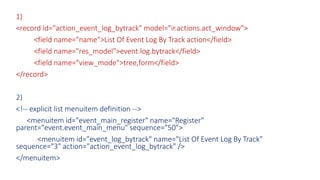
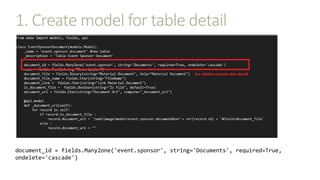
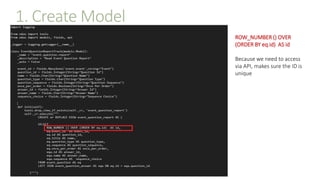
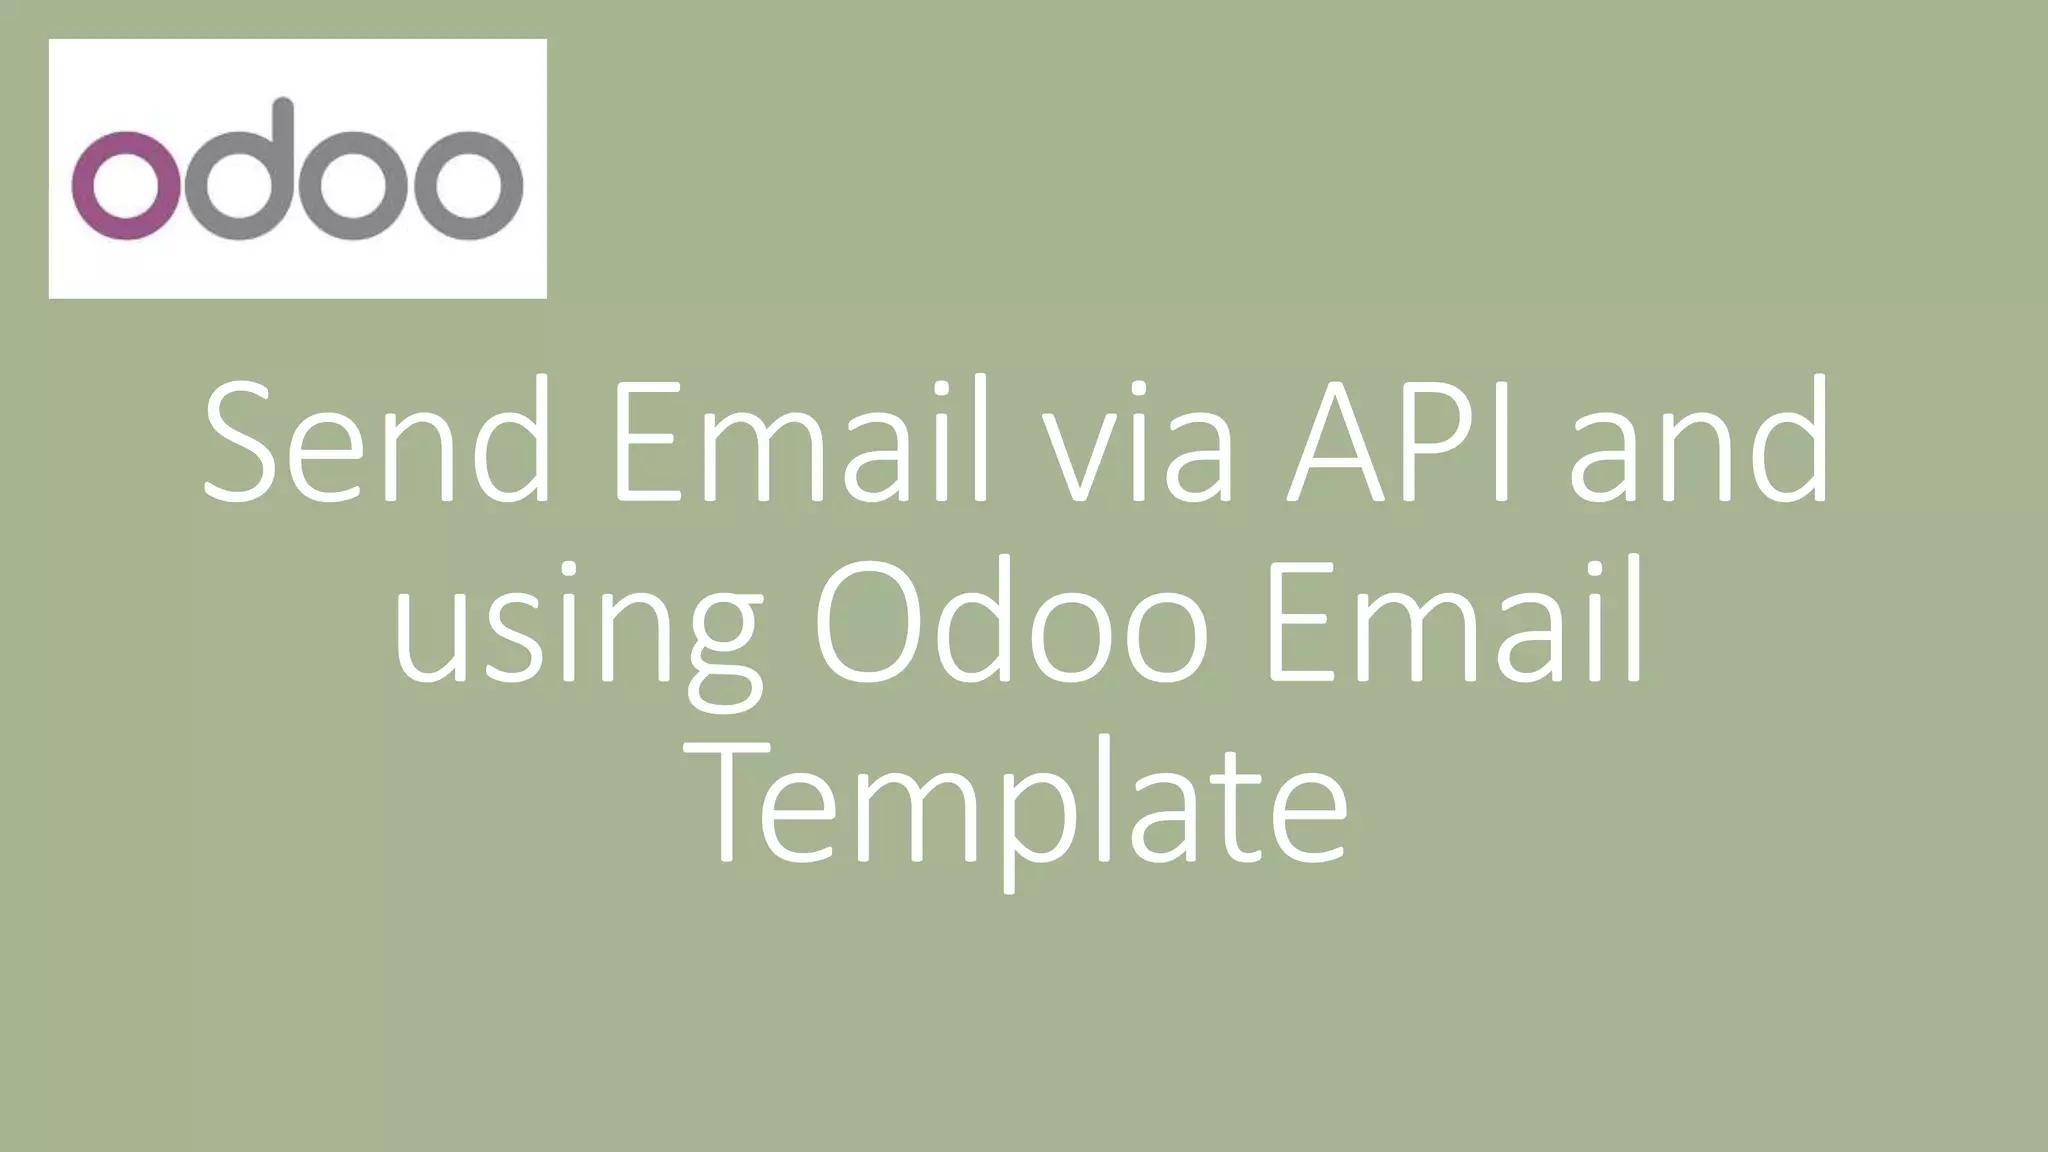
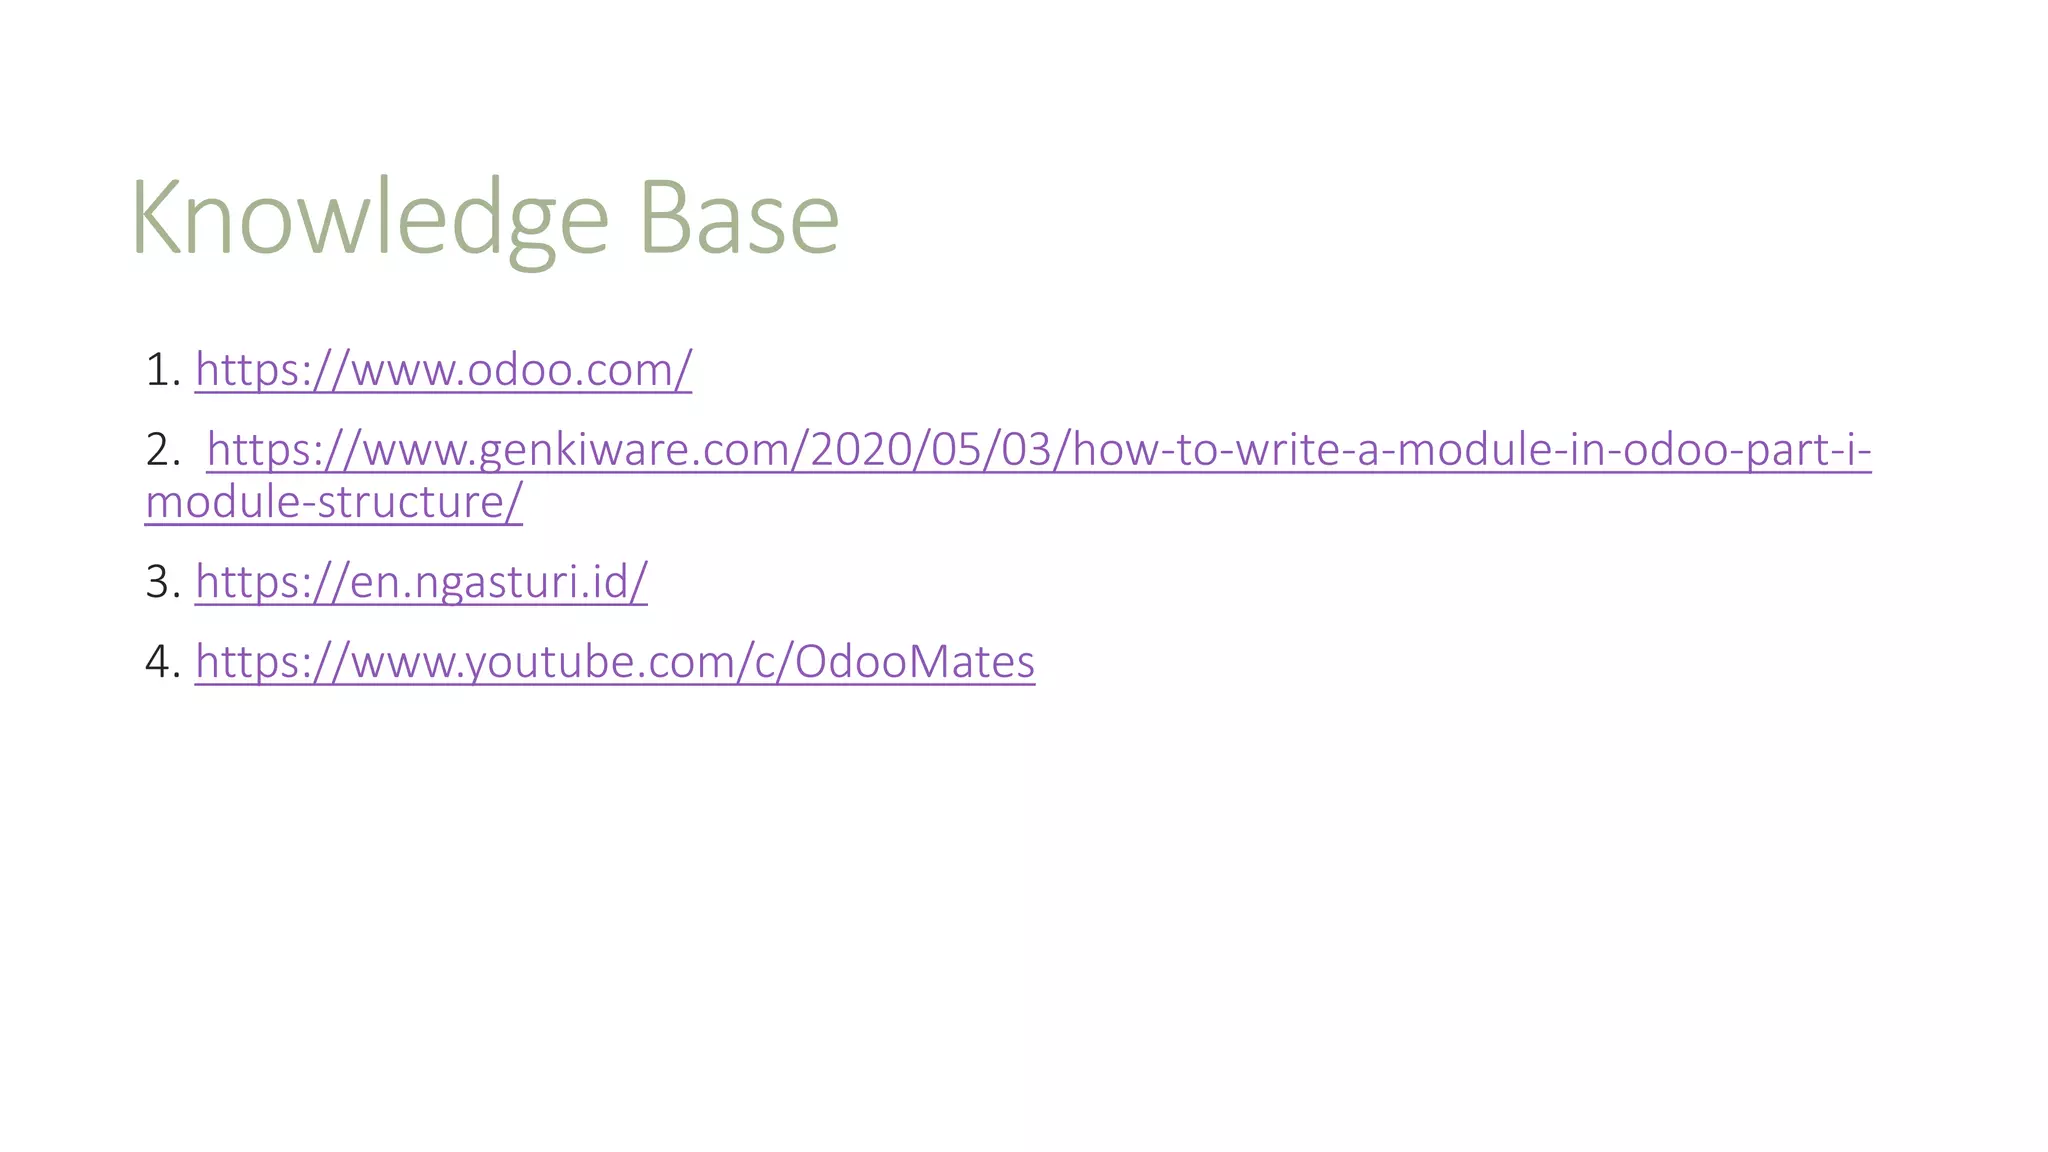
![Access template email using API
#Send Email Registration
email_template_obj = request.env['mail.template']
template_id = email_template_obj.sudo().search([('name','=','Registration Acqalm Account Created'),('model_id.model',
'=', 'res.partner')])
template_id.send_mail(_partner_id, force_send=True)
_logger.info("send Email Succeed")](https://image.slidesharecdn.com/tipsontrickodooadd-on-220713145647-5021c79c/85/Tips-On-Trick-Odoo-Add-On-pptx-35-320.jpg)

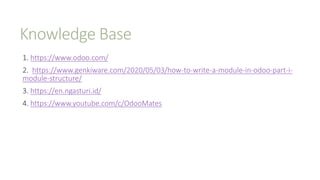


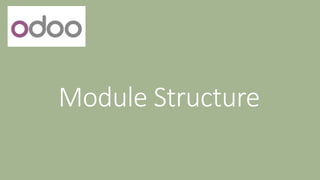
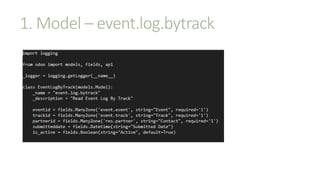
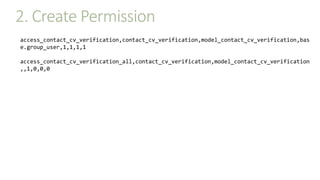
![Sample
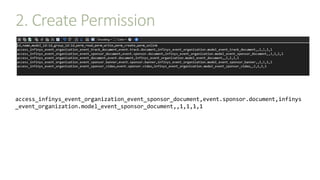
Todo :
1. Create button on the view
2. Create function on the model, since the
button type using object
1. Create button on view
<xpath expr="//field[@name='stage_id']" position="before">
<button type="object" name="action_generate_certification" string="Test Certification" class="btn btn-secondary"
attrs="{'invisible': [('is_certificate', '=', False)]}"/>
</xpath>](https://image.slidesharecdn.com/tipsontrickodooadd-on-220713145647-5021c79c/75/Tips-On-Trick-Odoo-Add-On-pptx-31-2048.jpg)
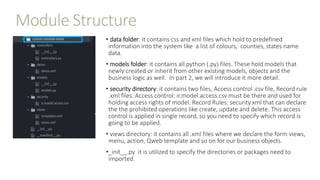
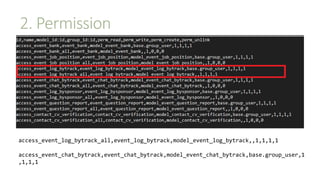
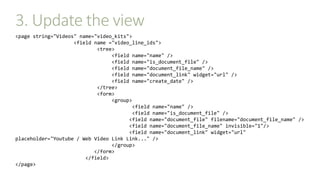
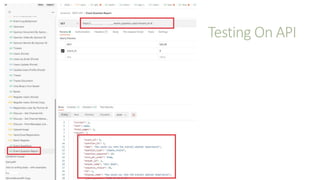
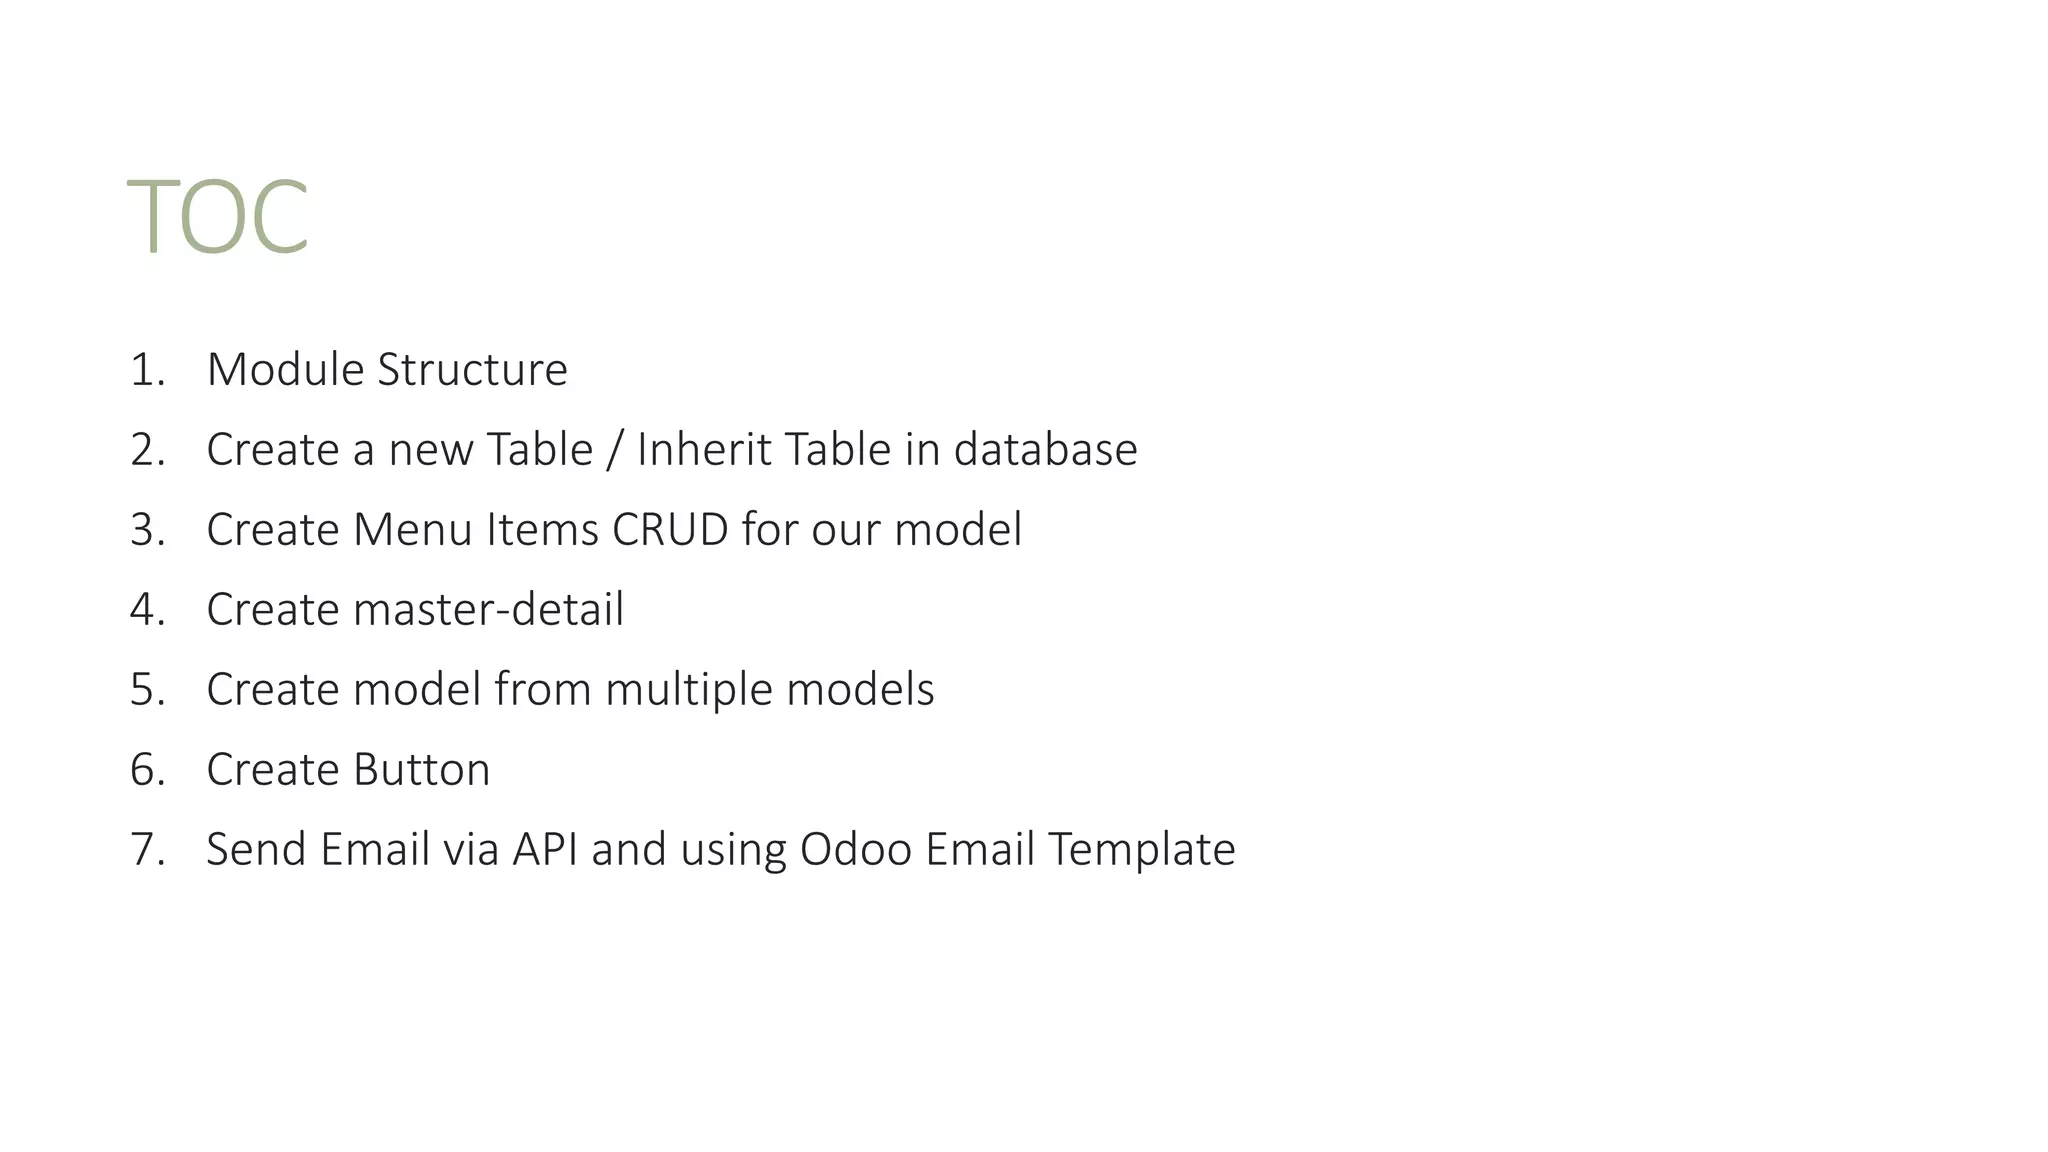
![Access template email using API
#Send Email Registration
email_template_obj = request.env['mail.template']
template_id = email_template_obj.sudo().search([('name','=','Registration Acqalm Account Created'),('model_id.model',
'=', 'res.partner')])
template_id.send_mail(_partner_id, force_send=True)
_logger.info("send Email Succeed")](https://image.slidesharecdn.com/tipsontrickodooadd-on-220713145647-5021c79c/75/Tips-On-Trick-Odoo-Add-On-pptx-35-2048.jpg)


The document provides a comprehensive guide on developing with Odoo ERP, covering module creation, database interactions, and functionalities using Python. It outlines module structures, including data files, models, security access, and view definitions, while also detailing CRUD operations and common development tasks. Additionally, tips on utilizing Odoo's API for sending emails and generating reports are discussed, along with resources for further learning.


![[Slides] how to integrated managed service dengan it department](https://cdn.slidesharecdn.com/ss_thumbnails/slideshowtointegratedmanagedservicedenganitdepartment-211129072021-thumbnail.jpg?width=600ounds&width=560&fit=bounds)

![[Slides] key considerations to look for in managed services](https://cdn.slidesharecdn.com/ss_thumbnails/slideskeyconsiderationstolookforinmanagedservices-211014111824-thumbnail.jpg?width=600ounds&width=560&fit=bounds)
![[Slides] Infinys Cloud Manage Service](https://cdn.slidesharecdn.com/ss_thumbnails/slidesinfinyscloudmanageservice-210923095806-thumbnail.jpg?width=600ounds&width=560&fit=bounds)


![UiPath Automation Suite Installation (Hands-On) [2/3]](https://cdn.slidesharecdn.com/ss_thumbnails/automationsuitecommunitysession2-251015095633-a6d862f1-thumbnail.jpg?width=600ounds&width=560&fit=bounds)


